Transcripts
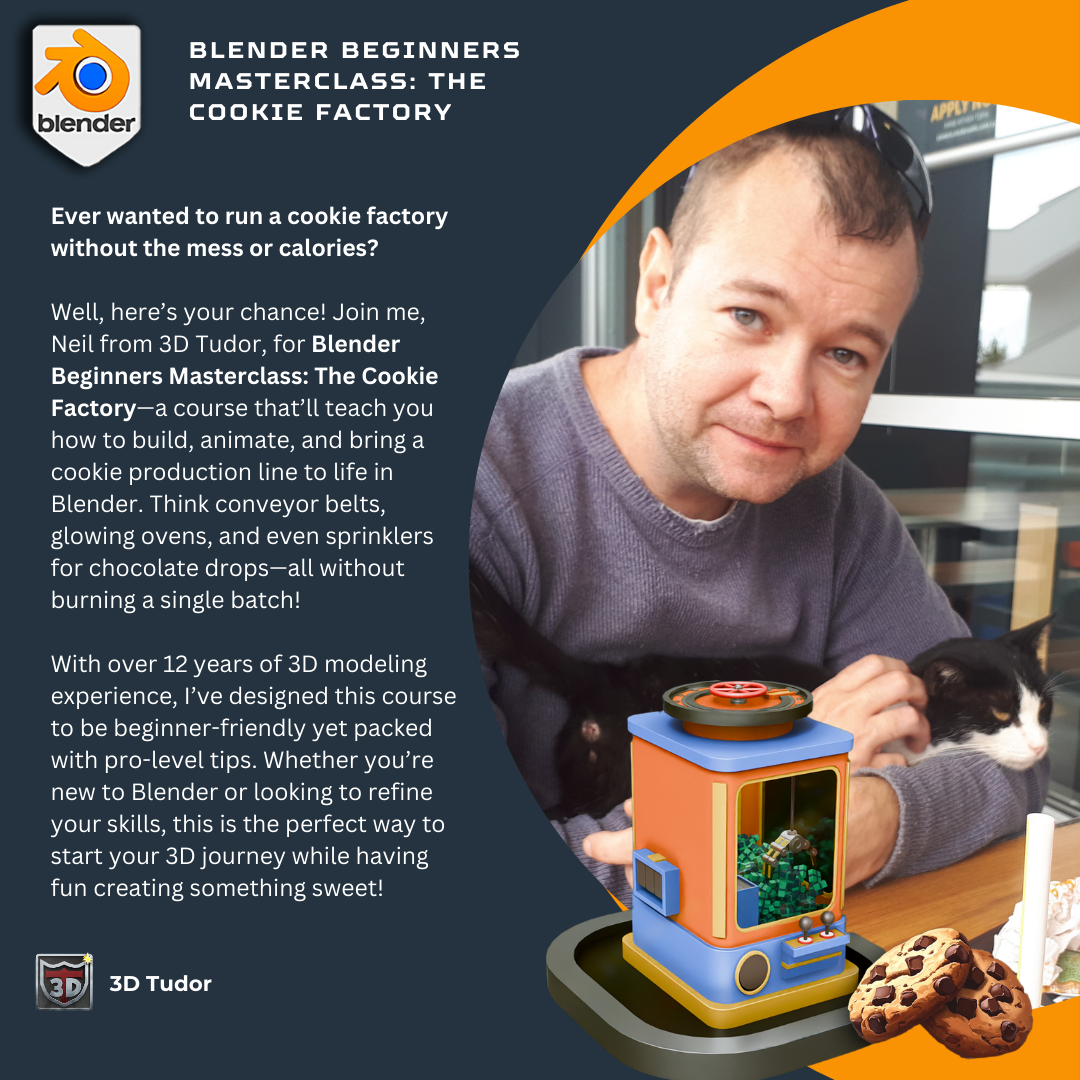
1. Blender Beginners Masterclass the Cookie Factory Introduction: Welcome everyone. It's Neil
here from The D Tudor. And I've got a question for you. Have you ever wanted to dive
into three D modeling and animation but felt overwhelmed
by where to store? Or maybe you've tried
before only to get stuck on complicated tools
or boring tutorials that just didn't click. While you're not alone,
I've worked with thousands of students who've had
the exact same struggles, and that's exactly
why we've created this course to make learning blender not just approachable, but also fun and rewarding. Let me introduce you to the Blender beginners
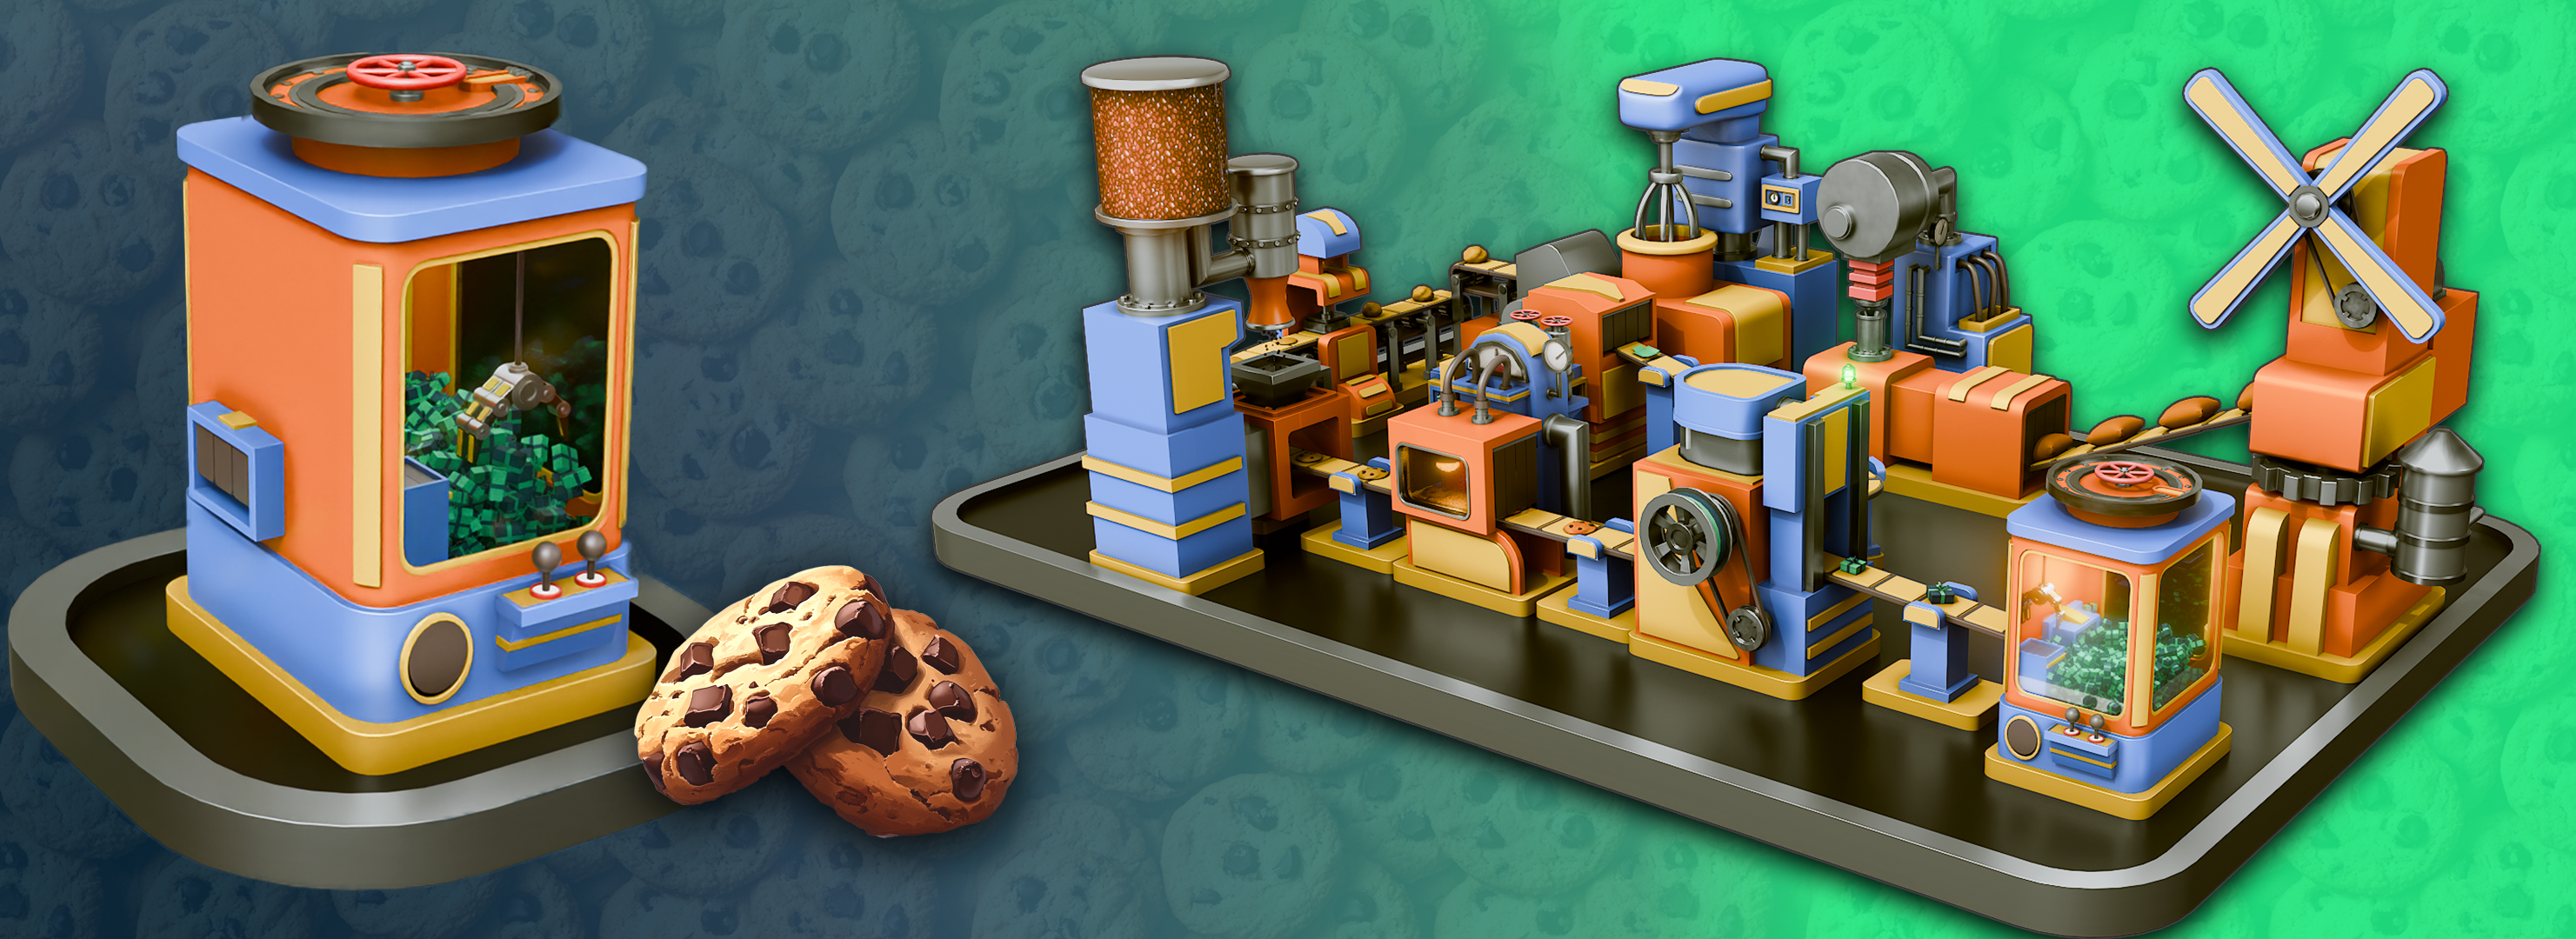
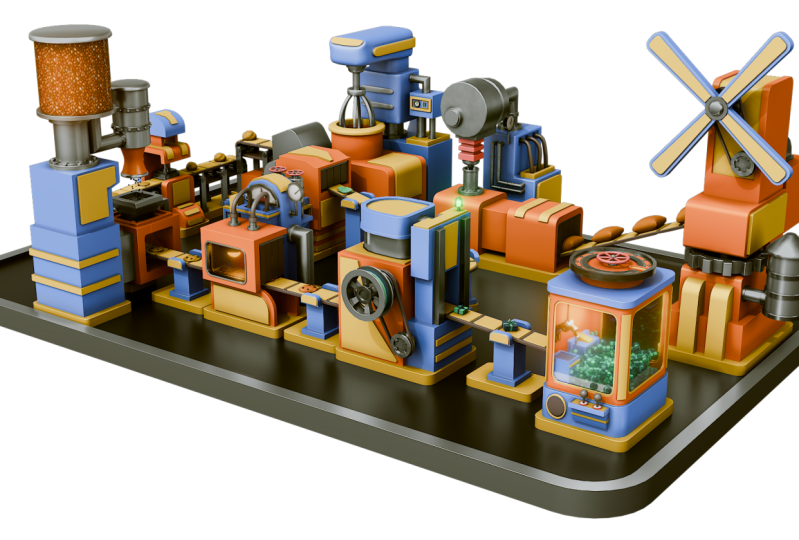
master class, the cookie factory.
Isn't just a course. It's a full journey into
Blenders stylized three D world. Where you'll create, animate and render an entire cookie
factory from scratch. If you like many beginners, you've probably faced one or
more of these challenges. You're unsure where
to start with Blenders tools and interface. You find it difficult to stay motivated with generic,
uninspiring tutorials. Or maybe, despite
your best efforts, your models just don't
love the way you imagined. Seen it time and time again, and it's really frustrating. You want to create
something amazing, but there's road
blocks get in the way. That's where this
course comes in. It's designed to solve
those exact problems. I giving you a clear, step
by step path to success. So saying all that, what
makes this course different? Here's how it works. We start
with the absolute basics, even if you've never
opened blending before. I'll walk you through
everything from navigating the interface to creating your
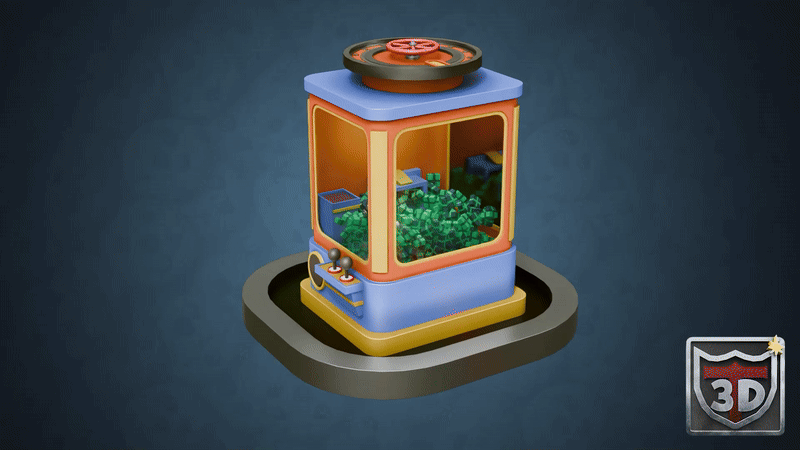
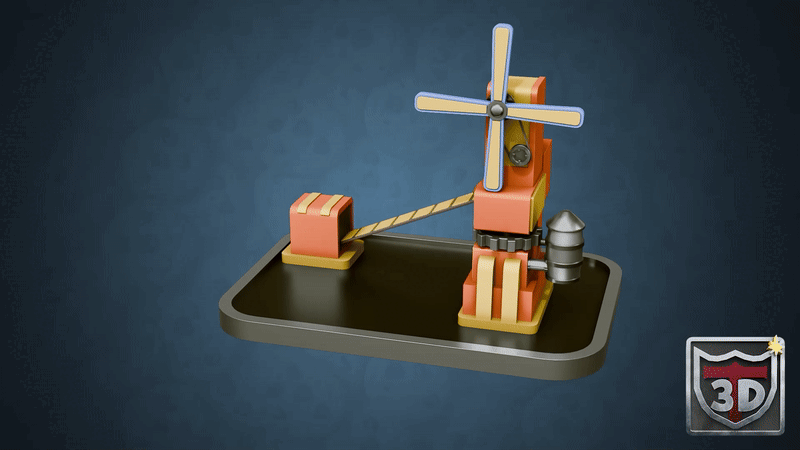
very first three D model. We'll start building
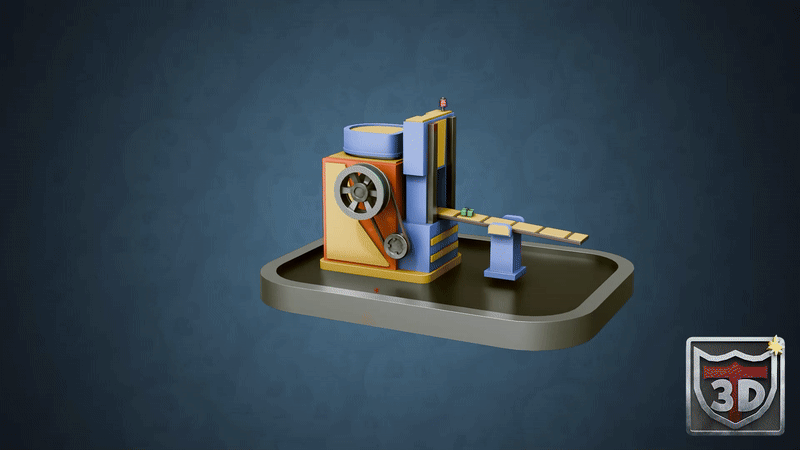
the flour mill, the first machine in
your cookie factory. You'll animate its
rotating parts, add in shaders, and set the foundation for the
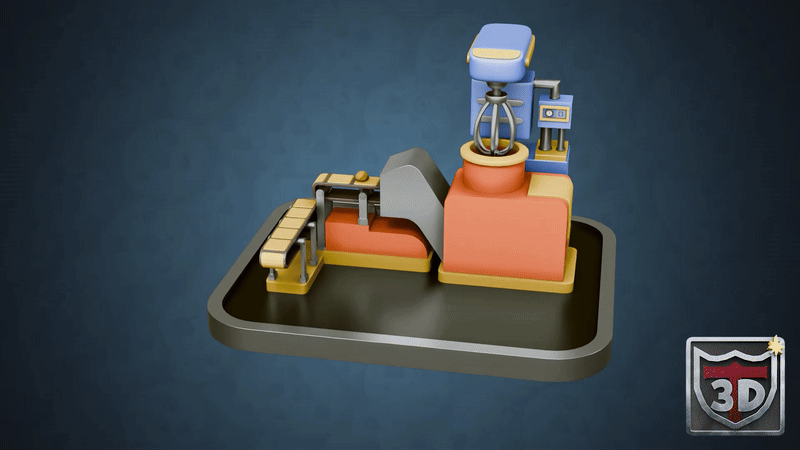
rest of your project. With every new machine, you'll learn new skills. For example, in the
mixing machine, you'll master animation
cycles and noise to simulate flowing batter while also learning how to avoid
repetitive texture. The sprinkler machine,
you'll dive into Blender'sPicle system to create dynamic
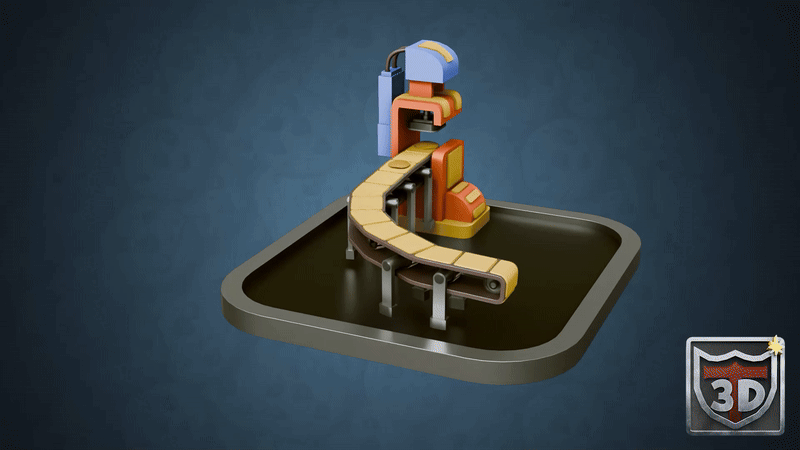
chocolate sprinkles. By the time we reach the box
maker and grab a machine, you'll be working with
advanced animations, complex keyframes, and even custom geometry notes to tie
everything together. Each lesson builds on the last, so you're constantly
growing your skills while working on an
amazing project. But this course isn't just
about building machines. It's about giving you
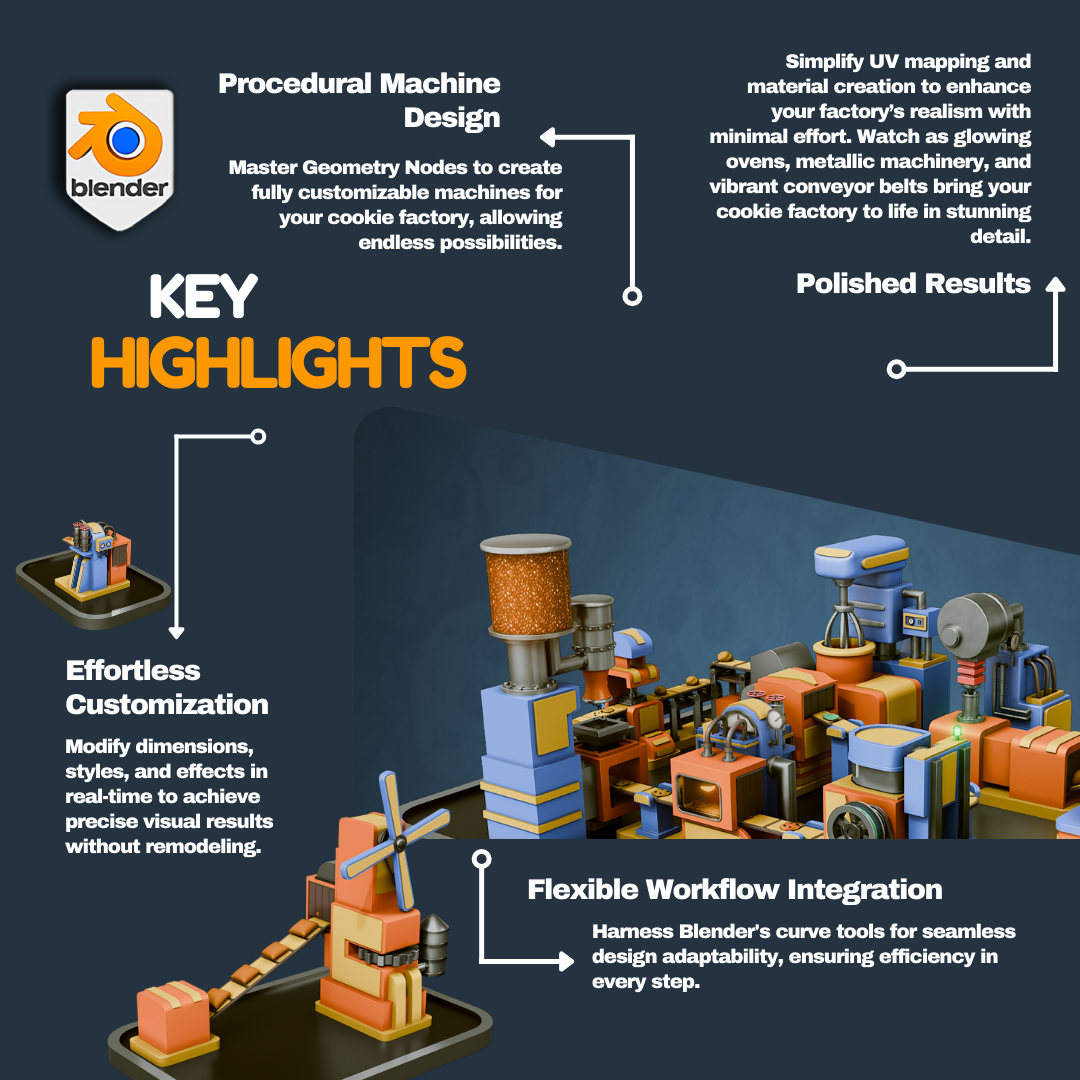
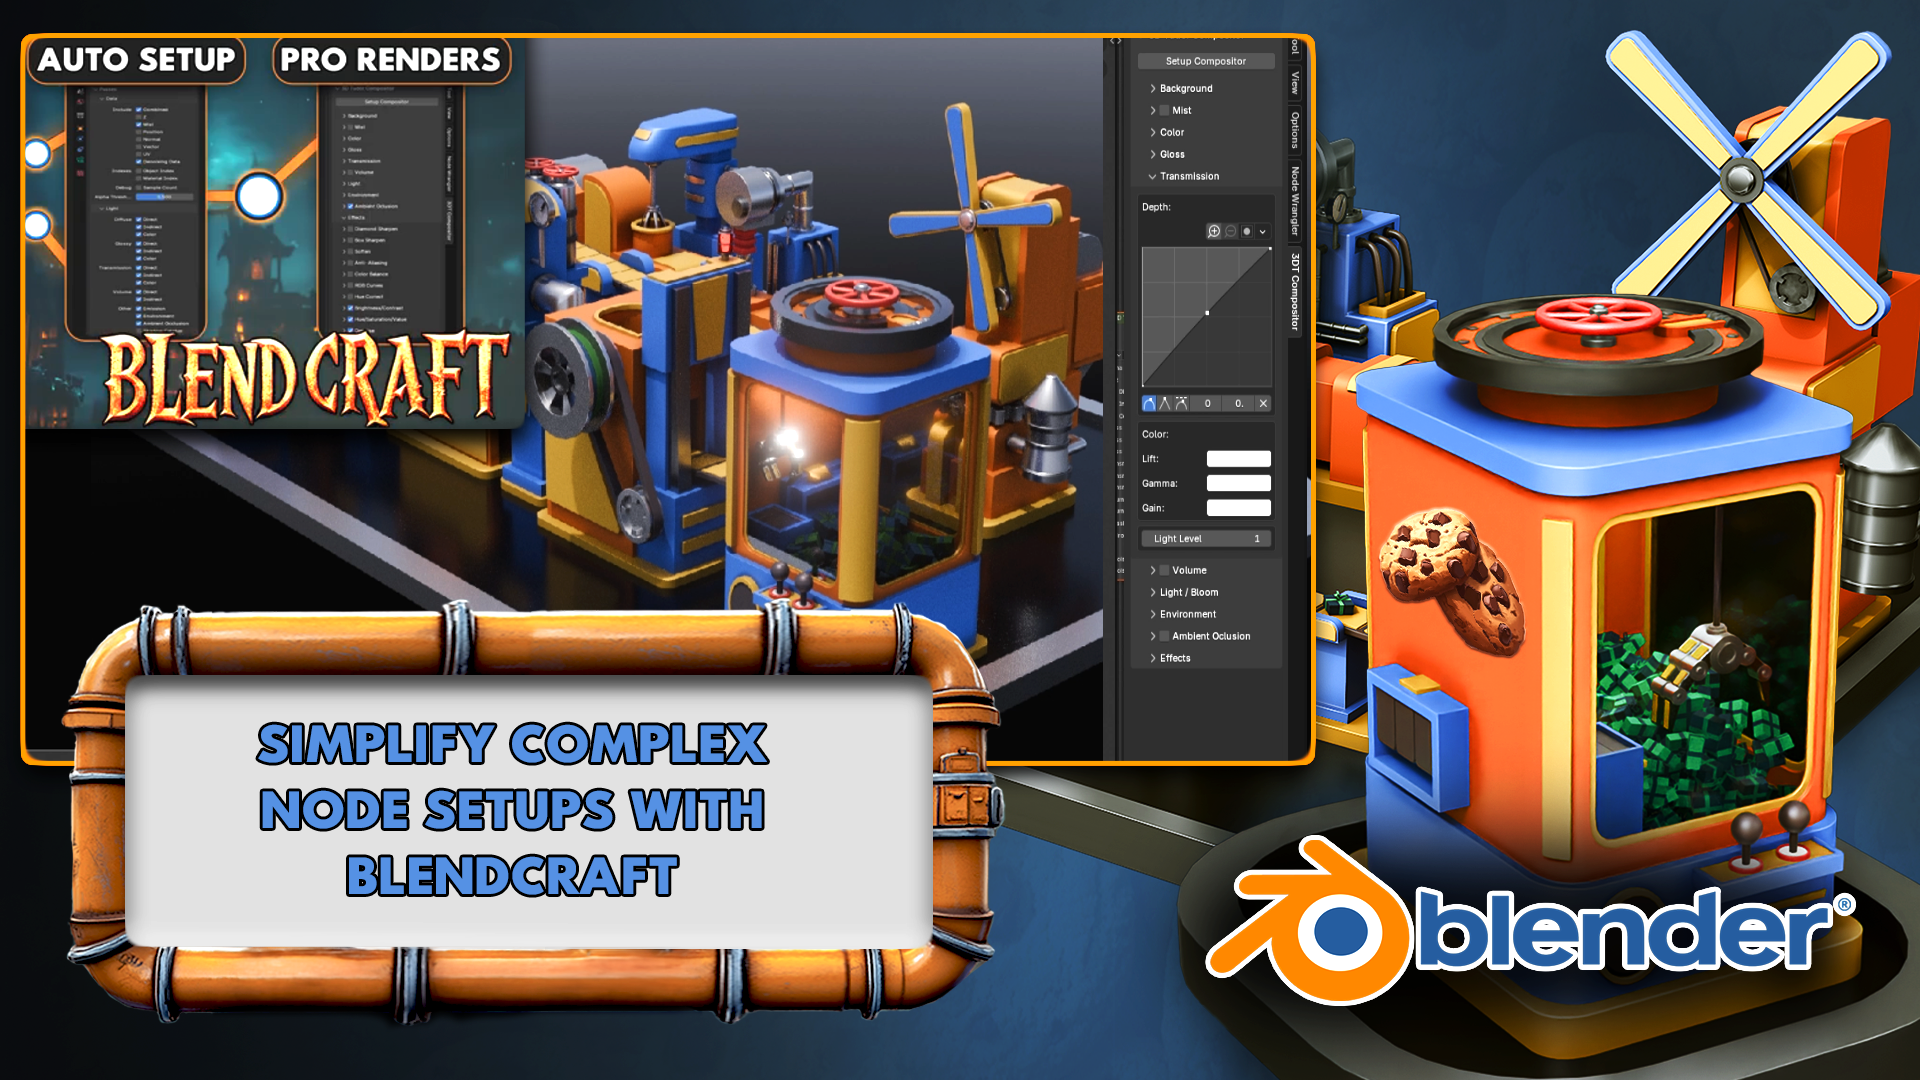
the tools to succeed. Included in your resource pack is something truly special. The three D Tudor
Glen Craft compositor add this is one of the most powerful compositor
tools in blender, designed to make
your renders look polished and professional
with minimum effort. With blend craft, you'll
add depth, color grading, and special effects
to your animations, taking them from
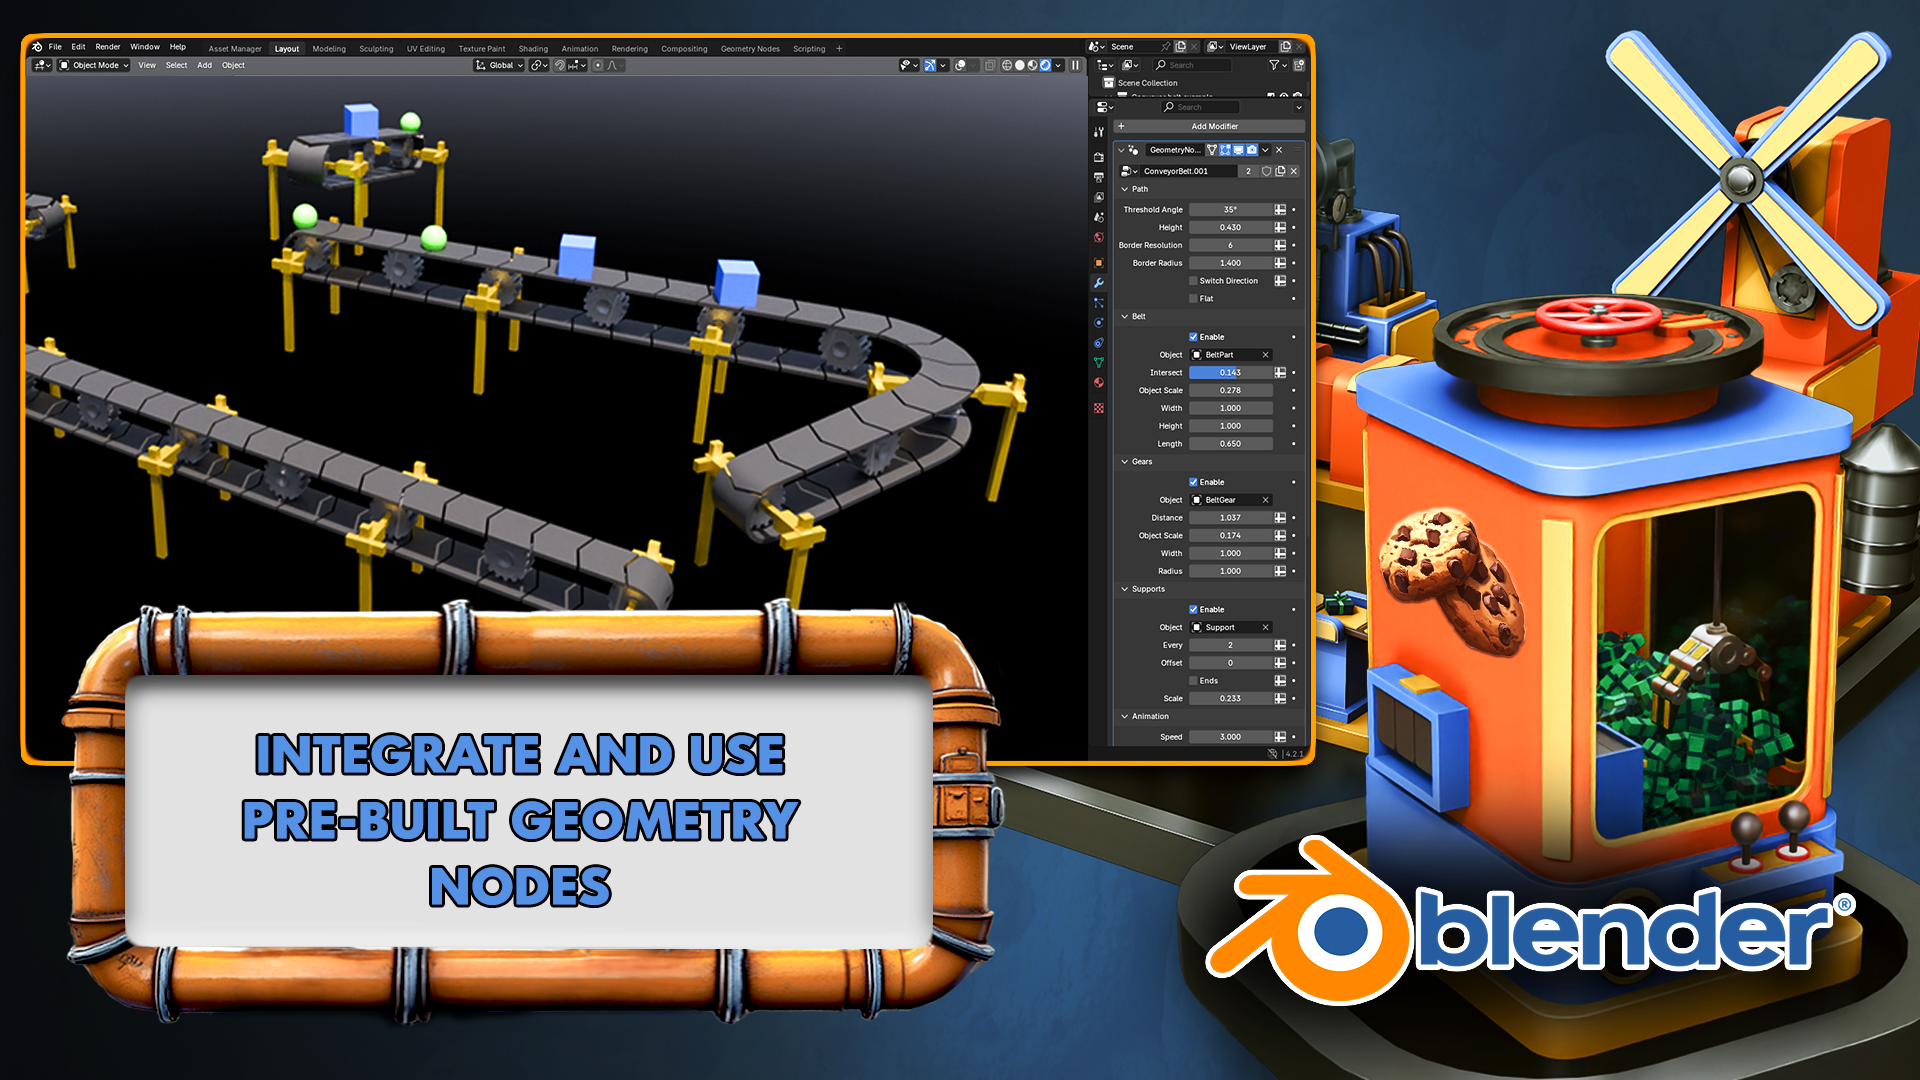
good to stunning. The resource pack also includes custom Jumpton nodes like
the conveyor Jumcon node, which simplifies the process of creating dynamic
conveyor belts. You won't just learn
how to use these tools, you'll understand
how to customize them and apply them
into your own project. I love most about this course is how fun and practical it is. Instead of following
abstract exercises, you're working on something
tangible and stylized, only animated
cookie factory that looks like it came straight
out of a Pixaw movie. And because everything you learn is tied to a real project, the skills you gain are
immediately applicable to other three D modeling
and animation challenges. Whether you want to create
stylized game assets, animated films or just
expand your blend portfolio, this course is the
perfect starting point. You've been waiting for
the right time to start your three D
journey. This is it. The blender beginner's
master class, the cookie factory is here to
help you build confidence, master blenders tools, and have a blast creating
something truly unique. Join me today, and let's bring your cookie factory to life.
2. Blender Introduction and Resource Pack Overview: Welcome everyone to the Blender
beginners master class, the cookie factory. And this course is
aimed at beginners. But saying that, if you
are a blender Jedi, there's going to
be tons of stuff packed into this course
that you will learn, and you'll absolutely learn
something new along the way. Now, we have designed
this course in a way that makes it approachable for absolute
beginners to blender. It will be difficult for sure, as all new things are, including three D modeling, which is one of
the hardest things you're ever going to
attempt to learn. But along the way,
you're going to grab a load of knowledge to go away and create your own models and environments in the future. In other words,
it's going to set you off on the right way. You're going to learn the proper pipeline for how things are actually created and how it's done in a professional capacity. Now, everything
you're going to need comes from an actual
download pack, so we call it the
course download pack, and that's a folder that you can download that comes
with this course. And that's the first
thing we're going to do. We're going to go through
this download pack. Now I'm going to try my
best not to overload you in the beginning and we're going to go through a
lot of different things, but I'm going to
try and spread it out a little bit
so you don't get overloaded and you can follow
along as easy as possible. It will still be
difficult, though, and we'll be covering most of the things that are in blender. So in other words, we will
be covering the modeling, the basics of modeling, the
higher up levels of modeling. We'll also be
covering animation, particle systems, shape
keys, shaders, rendering, the holster bang, basically
from start to finish, but we're going to break it down just to make
it a little bit easier for those of
you that are new. So saying all that, the first thing then
that we're going to discuss is the actual
blender version. And you can see here that
I've opened this up, and I'm on Blender 4.2 0.3 LTS. And this is, at the time the
newest version of Blender. Now I recommend that you get the newest version of blender. That will work on your
machine as you know, if you go too far back, so if you go past Blender three and you're running
2.8 or something, there's a lot of things
that are not going to be in there that
we will be using. One of them is the
asset manager, the way that shaders work
and things like this. So get the newest
version that you can, and I recommend anything
from kind of blender three, 3.1 onwards should be
okay to actually use. But if you get something
like blend of four plus, that will be a lot better. Now, the first thing we
want to discuss then is the resource pack before
doing actually anything. So make sure you've
downloaded the resource pack, and then we'll go
through that right now. So once you've downloaded it, this is what you're
going to get. So you're going to
get animations, you're going to get omg node, human reference,
references and textures. So just make sure all
of those are there. Now, the first one
I'm going to show you then is references. And I'm going to show
you this one, basically, it's all of the
images of the object. So if I double click
this and let it load up, and inside there, you're going to
see that we've got the batter maker, the box maker, and these are basically still images of the assets that
we're going to create. This then is going to make
it much, much easier. If I say to you, Right, let's work on the flour mill guys, and then we can
open up that image, and we can work from that. The other great thing that I've actually put in here, as well, is going to be the animations, which are these
under animations. So you will see if I come over, let's say, to the flour
mill, open this up, and you will see that you've got a full working version of the flour mill to
actually use the reference, and it has a turntable. You see, you can see every
single part in detail, how it's actually created and
how it's supposed to work, which is really, really
handy when you're starting out to get an idea of how
things are supposed to work. Okay, so moving on, let's close that down. So
you've got that. Let's go back to the course pack and next in the list
is the geometry node. This is one of our
geometrire nodes that we've made in house here
at three D Tudor, and this then is going to speed up how you can make
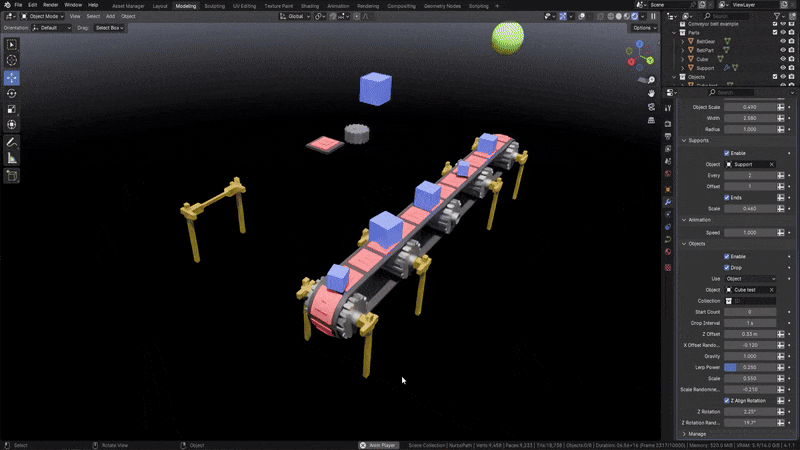
conveyor belts. So it's going to make
it really, really easy. And geometry nodes is one of the biggest things
to hit Blender. It's, you know, just
really, really taking off, and it's basically
something you can use to procedural model things or get smoke done really easily or fire or make some planks
of wood really easily. So we're going to go into
Geometri nodes as well. You're not going to
have to build any jump nodes or
anything like that. I'm just going to be showing you how they work and
how it can really, really speed up your workflow. Next of all, then, we've
got the human reference, and the Uvm reference,
once you've got this, you'll be using it every single
time you open up blender, because basically it
gives you a scale, and scales really important, and we're going to discuss
that a little bit. Well, actually, next, we're probably going to be
discussing it next. Okay. Finally, then, we've got the textures
in there as well. Now, in this course, most of the modeling has
been done with shaders. I'm going to explain
to you a difference between shaders and textures. There's only a couple of
textures in this course, and I'm also going
to show you how you can animate those
textures as well. Something really exciting
to look forward to. Alright, so that is the
actual course pick. Now, what I'm going to do is
I'm going to put this down. And first of all, I'm
just going to click anywhere off of that
kind of splash screen. And then what I'm
going to do is just left click on my camera. Now, you'll notice
when I left click, you'll notice that
we've also got screencast keys down here. So if you ever lost, you
can follow these down here. They are pretty good. It
doesn't show everything. So in other words, zooming
now, it doesn't really show, but it will show all of the keystrokes and things
like that, making it really, really easy if I'm moving
too fast, talking too fast, you don't understand
me, properly, you'll be able to
follow along with that. Alright, so, with the camera,
let's delete the camera. Let's come to this point light, so we're going to left
click on it and delete it. And let's finally
come to the cube. And yes, we're going to delete the cube and
bring in a new one. We're going to do that,
but that's first of all, let's delete it out
the way like so. Now what we want to
do is we want to bring in our human reference. So all I'm going to
do is go to file. I'm going to go to
Import, go down to OBJ. And then I'm going
to find the file where all of my
download pack is, which is in my factory course. So double click your
factory course, course pack, and here
it is Human reference. Let's double click him. You will notice there's two
files in there. One is the OBJ and one is the
MTL. We only want the OBJ. The MTL is basically the
material that's supposed to come with this human reference. But in actuality, you don't need that all. All
you need is this. So let's come in double
click it, and here we are. Here is our guy in there. Now, the thing is,
why do we use him? If I press one on
the number pad, you'll get a front and you can see that each one of
these represents a meter. So this guy is between
1.7 and 1.8 meters tall, making him the average
height for a human being, especially where I'm from. I don't know where you're from. You might be much taller or much smaller
where you're from. But for us, 1.8 meters about the average height, so that's why we use him. So anything then we're
creating can use him, stand him next to it, and
have a really good idea of what is actually the size
of whatever we're creating. And this is really
important, guys, because if you're doing
anything like particle systems, if you're doing animations, if you're sending it through on a pipeline to someone
else who is either texturing or taking it through to a game engine like unreal, you really need to make sure, first of all, that you've
got the right skill. So that's why we do
that. Next of all, then what we're going
to do is we're going to save out this actual file. So I'm going to go to File, I'm going to go to
Savas let it open up, and you can see, I've
already got one in here. I'm just going to override
this because at the moment, you can see cookie
factory course. Let's just delete
that out the way, so we've got a fresh save. We'll save it as
this then Cookie factory course, blend foil, and then I'll go to save as Lo, and that is now saved out. Now, at the end of every lesson, I recommend that you
save out your file. So file and you can
just save now. Like so. And you can also see
that you can just Controls and save it
out that way as well. Now, what we're going to
do on the next lesson is, I'm going to be
introducing you to the Blender blender
basic navigation, just so you understand how to get around the viewport
a little bit easier. And from there, we'll be
moving on to referencing. So we need to start
kind of small, not even muddling yet. We need to start at
the very beginning, how to get around blender, then move on to references, and then move on to a bit of
basic muddling and blender, just to keep it nice and easy
for you to follow along. Alright, everyone. So I hope you enjoyed
that introduction, and I'll see you
on the next one. Thanks, everyone. Bye bye.
3. Blender basics navigation for Blender Beginners Masterclass: Welcome back, everyone
to Blender Beginner's Master Class, the
Cookie factory. And this is where
we left it off. Absolutely, nowhere
because we didn't really do any modeling
or anything like that. And now, what I'm
going to play for you is Blender basic navigation. For those of you that are brand new, make sure
you watch this. Lots and lots of useful
information of how to fly around the
Blender viewport. And for all of you out
there already know this, move on to the next lesson,
and I'll see you over there. Thanks, everyone. See you
on the next one. Bye bye. Welcome everyone to the
basics of blender navigation. Now before we begin, it's
important to understand how the axises work within blender. So we can see at the
moment, we've got a green line going this way and a red line
going this way. This is called the Y axis, and this one is
called the X axis. We also have one
that is the Z axis, which we can't see right now. It doesn't actually come in with blender viewport as default. But if you want to
actually set it on, you just come up to the
top right hand side, where these two interlocking
balls are and just click the Z axis, and
now we can actually see. So how do we actually move
around the blend of viewport? There's a number of
ways of doing this. One of them is over on
the right hand side here. You can see if are over here, it's the zoom in and Zoom out. I can actually left
click and move these up and down then to
zoom in and Zoom out, or I can use the actual
mouse to actually zoom in and Zoom out using
the actual scroll wheel. There's also another thing
you can do with Zoom, which is holding control shift and pressing the middle mouse, and you'll see you have
a lot more control over zooming in and zooming out. Now the next thing we
want to discuss is actually rotating
around an object. So how to do that? First of all, we'll bring in a
cube with Shift A, bring in a cube. Now, if I press the
middle mouse button and move my mouse left to right, you can see we can
actually rotate around. Unfortunately, though, we're not actually rotating
around this cube. So to actually fix that, we need to center our view
onto the actual cube. We basically want to focus our view onto this actual cube. So to do that, we're
just going to press the little dot button on
the actual number pad, and then you'll see that we
actually zoom in to the cube. If I scroll my mouse wheel out, you will see now if I hold the middle mouse button
and turn left and right, we're actually rotating
then around the cube. And this is important because if I actually bring
in another cube, so if I duplicate this
cube with Shift D, move it over, so bring
in my move Gizmo. And now you'll see if I
rotate around this cube, I'm not rotating
around this one. So it's fix that, press
the dot button again, zoom out, and now
it can actually rotate around this
cube, as well. Now let's look at
something called panning, which means that we're actually going to move left and right. And we do this by holding the shift button, holding
the middle mouse, and then we can actually
scroll left and right around our
actual viewport. So now we've actually discovered how to zoom in and the
different ways we can actually do how to rotate around an object and
how to actually pant. We can also come up to
the top right hand side here and use these buttons here. So again, remember we're
looking at the Yaxis, the X axis, and the Z axis. If we come to our Yaxis
and click that on, you will see now that you've got a front view of the Y axis. If you click the X axis, then we can change it
to that red X axis, and finally, the
Z axis, as well. Now, there are
other ways as well that we can actually look
around the viewport, and these involve using
the actual number. If I press one on my number pad, it's going to te me into that
white axis or front view. If I press two, it's going to actually rotate
that slightly. And if I press two again, it's going to rotate
it slightly more. Now, if I press the eight, it will rotate it the
other way, as well. Now, to go into the side
view or the X axis, we can also press three
on the number pad, and that will give
us that effect. We can also press seven to
go over the top, as well. Now, what about if we actually want to go
to the opposite? So instead of going from
the bird's eye view, we want to come to the
underside of our model. Well, that's actually
quite easy as well. All you need to do is
press Control seven, and that then will take you to the bottom view of
our actual model. We can also do the
same inside view and on the X axis and YXs. So, for instance,
if I press one, I'm going to be going into YXis. If I press Control one, I'm going to be going into the opposite side on
the actual Y axis. Can also find these
options just in case you forget at the top left
hand side here under view. So if I go down to view and
go across the viewport, you can see here that this actually tells me exactly what I need to press to
get the viewpoint that I've just
actually explained. Now, we also have the button on the number pad, which
is number five, a number five button
in blender toggles between perspective
and autographic views. Perspective view offers a more natural and
realistic viewpoint with objects appearing smaller
as they get further away. Mimicking human vision. Orthographic view removes
perspective distortion, making all objects appear at their true size,
regardless of distance. Useful for precision
modeling and technical work. The other thing that number
five does, for instance, if I come to my
cube, at the moment, I am able to actually
zoom into the cube. However, if I press number five, I will not be able to
actually zoom into this cube no matter
how far I zoom in. I'll still be able
to move around it by pressing the little
dot button, like so. But if I actually
want to actually work on the inside of an object, I can quickly press number five, and then I can
actually go in and work around the inside as well. You're working on a laptop
or something like that or a tablet and it doesn't
actually have a number pad, you can also use,
if a press five, the actual squiggle key, which is under the escape board on the left hand side
of your keyboard, and that then will
give you pretty much the same options
as we had before. So we can click the right view. We can actually
click the back view. And we can click the left view, for instance, the opposite
to what we had before. So instead of pressing
one and three, we just press the
little squggle line, and then we can actually view
whichever side we need to. Now, nearly at the end of
this short introduction, there are a couple more things
that you can actually do. If you come over to
the right hand side and you see here where we've actually got the name of the actual parts
within our scene, we can also grab them from here and then press the
little dot B to zoom in. So I can grab this one,
press the little dot B, and that then will zoom us in. The other great thing about
this is we can also come in, shift select them press
the little dot button, and then we're able
to actually rotate around both of these
cubes. Alright, everyone. So I hope you enjoyed this short introduction to the
navigation within blender, and I hope from now on, it won't be a struggle
navigating around the viewport. Thanks, lo, everyone. Cheers.
4. Blender referencing guide for Blender Beginners Masterclass: Welcome back, everyone
to Blend of Beginners master class, the
Cookie factory. Now what I want to do is
I want to, first of all, introducing you to our
referencing guide. And from there on
the next lesson, then what we're
going to be doing is we're actually going to be bringing in our own references. And I think that's a good
place to start because you need references when you're going to be
building anything. Whether that's environments, whether it's just a simple prop, you will need references. And within that
guide, it's going to show you how to get references, how to arrange them, what
kind of software you should be using to collect
your references and all that sort of good stuff. Alright, everyone. I'm going
to play that for you now, and I'll see you on
the back end of there. Thanks a lot. Bye bye. Welcome, everyone to our in
depth referencing guide. And it's very important that we actually use
references in pretty much any kind of modeling or environments that we're
actually going to be work on. So before we actually
do anything, before we put any cubes
down or anything like that, it's really important
that we have some really, really decent references
to actually work with. So the first thing I want to recommend is that you can use something to actually
put all your references on like Photoshop or even word. But what I'm going
to recommend is that you use something
called Pure ref. If you go to the site
that's called purerev.com, you will actually open
this, and from there, you can actually
click Get Pure Rv, and that then will take you
to this download screen. And you will see at the moment, you've got 157 or custom amount, you can actually put this on zero and actually
get this for free. So it's completely free, and you can come back and
make a donation if you like. And then all you need to
do is click Download. So the only things
we're going to talk about pretty much for
reference in here, are going to be free, except our mid journey part. But there are other alternatives
like Dolly and a load of others out there that you can use instead of mid journey. Once you open up pura, then, this is what you will be
greeted by this screen. And if you want to right click, you can actually drag
this around to any of your screens or you can
actually make it smaller, O. And it's a really,
really good program. This really, really handy,
highly recommend getting. Now, let's actually think
about getting our references. And there are a few
sources that we use to actually grab
references from. But generally, what you
want to do is you want to build up a kind of
reference pack if you're going to be a hobbyist or a professional in three D modeling or environments where
you're going to see things perhaps on
Pinterest or sketch up, and actually, you want
to save them in a file. So I know people with
thousands and thousands of images that they've
saved over the years. And whenever they're
coming to a project, they'll then dive in
and actually find all of the images that they've got on that particular thing. This could be a Samurai
warrior or a Chinese bell. Also, a lot of people
I know as well, who are working
professionally at this will go around museums. They will take their
own actual images, and then they'll also upload
those to the file as well. So the first point of call
if you're not actually got your own database yet is probably going to
be actually Google. So let's open up Google, and you can see here
that at the moment, I'm looking for a
Victorian delivery truck. I'm going to do is I'm
just going to go through these and get some nice
references like this one, for instance, and then
I'm simply going to right click and I'm
going to copy image. Then what I'm going to do
is I'm going to go over to PureRv so I'm just
going to open it back up, press Control V,
and you'll see now that I've got my
nice image in here. What we're also able
to do with PUR RVs, we're able to also pull it out and make it bigger if needed, which is really, really
handy when we're putting in lots and lots
of actual images. Now, the next thing
I recommend you do once you've actually
got an image in there, is what you can do
is you can left click and drag it
over somewhere. And then what you can
do is you can press Control N and you can
actually make a note. So let's call this Victorian
Trucks. Let's put it Trucks. Now, within my scene,
I might actually want a Victorian lamppost as well as part of the scene
or something like that. So let's actually
look at the next one. So the next point of call is actually going
to be Pinterest, and let's actually put in Victorian lamppost.
So let's try that. Like, so let's see what we get, and we can see we've got many, many styles,
especially this one. This one's actually really nice. This one's also really nice. So what I'm going to do is I'm going to actually take this one, I'm going to right
click Copy Image, go back to my PUREv and then
drop the images in there, like so, and maybe make this
one a little bit bigger. What I tend to do is I gather a load of images for
each of these things. When we're actually
building a scene or even just a model, you want to grab as many
images as possible. I'm talking hundreds
of images here. And especially if
you're doing a scene, you want all of
the little parts. You want everything
down to the lighting, the environment, the trees. You want to grab references for absolutely everything because it will make your
scenes just really, really look so much better if you've got some
really good references. So now let me show
you this is one that I'm actually working
on at the moment. So if I come over and load reason and I'm just going
to load this one here, and you'll see at the moment,
I have all of my props. I have all of my main
buildings that I'm going to be looking out
to use as references. I have a ton of doors. I even have a load of foliage. I have all my windows. I have my lights over here, and I also have, more
importantly, all of the lighting. In other words, it's a scene. So what time of day
is it going to be? Is it going to be, you know, early in the morning, or
is it going to be at dusk? Is it going to be a night scene, or is it going to be midday with that sun beating
down on my scene? Just make sure it actually
matches the scene. There's no point having a
scene like this, for instance. So this one here, if you've got a log cabin out in the snow, you really want it to
match your actual scene. Now, before moving on,
there are a couple of other places that we do go
to use for referencing, especially something like
sketch up, which is really, really great because you can actually come into
an actual scene. And then what you
can do is you can actually rotate
around it and really, really check out how a model is put together like
something like this, which is one of our actual own. But you can see here how
easy it is then to get a good idea of what actually
incorporated in this scene. You can actually
do from there then is we can actually
come down and we can actually get some
screenshots of this or even right click
and copy image. There's also, let's
say, if we wanted to do a Victorian truck, for instance, to keep the same theme as
what we've been doing, you can see that
there's no end of actual Victorian or vintage
type vehicles on here. Not as many as what
there is on ArtStation, but still a very, very good place to start looking
for reference in. That leads me on to my next one, which of course is ArtStation. This simply is one of
the biggest resources for referencing or for looking
up artists in the world. Let's put in a
reference of Victorian, for instance, and let's
see what we actually get. Let's search artwork,
so we're going to search artwork and let's see what it
actually comes up with. Should be lots and lots of
things to work with here, especially good if you're
looking for actual lighting. So you're looking for lighting effects
like this one here. And again, we can
take these actual, um use them for references. And the best thing is about
ArtStation is we can also come down and look at things
that may be concept art, so two D or actual three D, and we can also come down as well and look at what
subject matter it is. So it could be automotives, so Victorian automotives, or it could be architecture
or something like that. So the possibilities with ArtStation are
pretty much endless, and you're able to grab
tons and tons of really, really high quality references. There are, of course,
hundreds and hundreds of other places you could probably
go to grab references, but I'm showing
you these because as far as references go, these are some of the
best places to go. Let's move on then to one of the things that we
really use a lot of now, which you want to thought
actually would come into it as far as
referencing goes, but it actually is
really, really handy. So let me introduce
to you now Chat GPT. So here is Chat GPT. You can see that we
have Chat GPT four, but we also have 3.5. 3.5 is actually free, and it is actually good enough
to do whatever you want. You really don't need to pay
for this. It's also free. So what I'm going to do
is I'm going to go to message, and I'm
going to type in, give me ten different buildings for a Victorian town scene. Something like that. Let's click Enter and let's see
what it gives me. So you can see now it's given me a lot of things to
actually work with here. And the best thing about
this is you can also say, give me ten more. And it will just then go
ahead and give you ten more. Now, these things
are really handy to use because then I can simply take these ideas and it'll
also bounce other ideas to me, and I can then go
into Pinterest. Or Google search and actually look them up or try and find
something like this. And I can kind of get
ideas and design my scene around there using all of those things and
especially Pure Rv. We can also take them in
to our actual Mid journey. Now, again, our mid
journey is paid for. I think the lowest amount is
$20 or something like that, but there are many, many
free things out there, but I will still show you
what we actually do with our AI based image generator. So you can see at
the moment, this is the image that we've
actually generated. I know we've called
it is Victorian era, delivery van, and this
is what we actually get. If we go to my images, you will see that
we've generated a ton of images about
all of the things. Especially, we use this as
well to generate textures. It's not just there to actually generate images and ideas
and things like that. You can actually use it to generate transfers
that are going to go on Windows or adverts,
or actual textures. And we do use this, especially
for things like curtains, because it's really,
really easy to get that look that you're
actually looking. You can see here,
we've got a lot of ideas for living rooms, we've got a lot of ideas for bedrooms and
things like that. What we can also do
with mid journeys, we can also go and explore. And what you could do is
you could look up with a search prom Victorian. Let's put in carriage. And then we can also
get ideas from this. So if I put in
Victorian carriage, you can see this
as what comes up. Now, if we come over to here, we can also see if
we click on here, this is the actual prompt
that somebody put in, so you can actually
take that prompt, maybe change it around a bit, and then get your own
images rather than just simply copying
other people's images. It's a great place to start to actually gather
your own images. The other thing is
about mid journeys, I can come in for instance,
let's just go back. And then what I can do is I
can hold the shift but down. I can grab all of
these, for instance, and then what I can do is click the download button and
download all of those images. And the best thing is
about PUREv is you can bring in multiple images
at the same time. So you can just drag, drop them, and then they'll all appear
actually next to each other. So really, really
handy things to have. So lastly then to sum up, don't do what I did
a few years ago, where I just dive straight into blend and not even think about references and just
find references if I had to while I'm
actually building something. Don't do it that way. It leads directly into building
a beautiful gray box, as well, all this,
because first of all, you grab all of your references. You make sure
everything's set out. You can go and find some more
references if you need to. If you suddenly have a
spark of inspiration, you want to make
something on the fly, then grab some more
references for it. But to start with, grab all of your references,
have them really, really nicely laid out,
and spend, you know, even half a day to a day
grabbing all those references. You can then save the
pura that, as well. Into individual files,
and then you'll have all the other references around that particular build in there, ready to use maybe on another
project in the future. Or, everyone, so I hope
you found this useful, and I'll hope you'll take
my advice going forward. Thanks everyone. See you
on the next one. Cheers.
5. Bringing our first reference and talking about the creative process for Blender Beginn: Welcome back, everyone to Blender beginner's master class, the cookie factory, and
this is where we left off. Nowhere again, but we are going to be doing something now. So first of all,
what we're going to do is we're going to move
our guide to the side. Now, at the moment, you
can see, I can't move him. He's got no arrows or
anything like that. So what I'm going to do is
just press Shift and Spacebar. Come down to where
it says, Move. And then, hey, I've got a
Gizmo. Now I can move him. Now, over on the left hand side, you will see we've
also got these. These also allow
me to rotate him, but this is the one that
you want to click on if you don't want to
press Shift and Spacebar. What I want to do is I just want to move him over to the side. Now, if this tab
is bothering you, you can also press T
to close that out of the way or T to have it
open completely up to you. Now, let's bring
in our reference. So what I want to
do is, first of all, I want to press Shift D, and this will bring me
to the primitives menu where most of the actual
primitives will be found. I want to then come down and
the one I want is image, and I want to have
a reference image. The reason I don't
want to background is because when you bring
a background image in, it will disappear if you're
not straight on view. So when I tend to
bring references in, I'm always using
the reference one. So let's click it. And what we're going
to do then is go to where our actual download is. So factory Course, and then we're going
to go to Cours Pack. And the one we want
is our references, which is this one here.
And here they all are. Now, if you don't
see yours like this, just move over to
here so you can see now you might
see yours like this. Click on these four icons here, and then you'll
be able to see them. And the other great thing
you can do as well, is you can actually make
them bigger or smaller, giving you a much better
view of what's in there. Now, the first one we want to
bring in is the flour mill, but I'm going to
bring it in a way which you shouldn't really do. So let's just double click it. And you'll see now it's come in. It looks nice and
that, but you will see it's been a weird angle. We don't really want that. We
want things to be straight. So what I'm going to do is
I'm going to delete it. I'm going to press one
on the number pad. I'm going to press Shift A, image, reference, and now
I'm going to bring it in. And the reason is now
because I was straight on, blender brings it in in the angle that you're
actually looking at. So now you can see
I brought it in. It's nice and straight, and now it's really, really easy to use. Now, let's move it over here because we are going to
use this as a reference. Now, some people prefer to have references on their
other screen. Sometimes I use references
in the viewport like this. Sometimes I have them
on my other screen. It all depends if
you've got another screen and how you want to work. But also, some people in Blender like to use a
reference down here. Now, I don't like to do
this because I find it clutters up my actual viewport, but I'm going to show you nonetheless how to
do that anyway. So let's open this up. So first of all, I want
to bring in a new tab. Going to come down right
to the bottom of here, what I'm going to do then
is just pull this up. I'm going to pull
this up like so, and then I'm going to
come to my outliner, click on this button
here, and the one on one isimageEditor, like so. Now, the image then is going to be this and to bring this in, I just want to click on
this little box here, and then I'm going to go to
again, my factory course. I'm going to go to
my course pack, I'm going to go to references, and I'm going to bring in my
flour mill, and here it is. Now you've got it on
the right hand side. Now, it's not in the
viewport, as you can see, it might work better for
some people over there, but for me, honestly, it feels too cluttered, so I'm not going
to have it there. I'm going to have
it in the viewport, and I'm going to
have a reference on my other screen as well. Now, what I'm going to do
to get rid of that if you don't want that
there is just again, come over to the bottom
left hand side here, left click and drag it down, you'll end up with
an arrow there, and then it means you can actually take that
out of the way. Now, there is one more way you can actually
do this, as well. You can also come up to Window, and you're going to
click New Window. And then what you're
going to do is you're going to come over
to left hand side, going down to Image Editor, and then we're going
to go to Image open, and we're going to again,
open up that reference. So if I come to factory, course pack references for
building, and there we go. Now with this now, you can grab and put this
over your other screen. That might be also
what you want to do. Now, again, you might
want to just open it up, open the file up so you've
got the image there, so you might not even
need to do this. I do find it's a little bit heavier on blender, not by much, but a little bit, and it
generally clutters it up again. So that's the reason
why I'm actually putting it in my actual viewpod I just find it the
easiest way to actually work from. So
now we've done that. Let's actually discuss
our reference or my references that are put together for this actual course. So before building anything, I always get tons of references, as I've showed you in the
actual referencing guide. So I'm going to head to
my course pack again. I'm going to go to references. I'm going to let that load up. And within there, then,
you're actually going to see once this
loads up in here, you're going to see that I
actually also have a PUF file, but this one's a little bit
different because I wanted to actually work on creating
these things myself. So if I open up PUF, so let's actually open
that you will see, close that off, that this
is all I basically got. What I was focusing
on mainly with the references for
this course is shapes, how pipes might go together. Basically, I didn't
want fully built actual models of,
you know, a factory. Not only that, they're
also hard to find because this sort of thing hasn't
been done that much. And we have to remember
that references, you need to get things that
have already been built. Or even if you use an AI, it uses references that have already been built really and
kind of puts them together. So let's say if
you're looking for a fairy on top of a
butterfly flying along, it's going to be really hard to find references like that. Why? Because generally fairies
don't fly on butterflies, and in actual fact, fairies
fly, butterflies fly. So it's incredibly hard to find references on things like this. So when I'm doing
this, sometimes I go just to the basics. So just to look for, like, kind of shapes, kind of how
gear kind of how pipes are. And that's what I did basically
for this actual course. Now, with my other courses, you will see I've
got whole towns. I've got environment lighting. I've got all kinds of things, but this is just to
show you that you can actually take it
down to the basics, get references, and
let your imagination fly and be really creative in what you
actually want to create. Okay, so let's close that down. So we're just going
to close that down. I'm not going to need that. I'm also going to
close this down. And what I'm going
to do now is just save out my work, like so. Now on the next lesson, what
I'm going to do then is, I'm going to introduce you to the basics of
modeling in blender. It is something that you're
going to need to know. So if you don't know the basics, please watch that.
Pay attention. It's just go to show you the
very basics, and from there, then we can actually
come back and actually start building something,
which is what we're here for. Alright, everyone, so I'll
see you on the next one. Thanks a lot. Bye bye.
6. Blender basics modeling for Blender Beginners Masterclass: Welcome back, everyone to Blender Beginner's master class, the Cookie factory, and this is where we left
off with our reference. And now I'm going to
do is, as I said, I'm going to play a basic video on basic modeling in Blender. It is going to give
you the very basics. So, together with the blend the basic navigation
and the muddling, you should be set to actually
start muddling something. Alright, everyone, so I'll
see you on the next lesson. Again, if you know all this,
move on to the next one, and I'll see you
after. Thanks a lot. Bye bye. Welcome everyone to the basics of
modeling in blender. And this is a short
introduction just to get you started on a few of the
basics in modeling. So the first thing I want to
do is bring in a primitive. So the way that we're
going to bring into primitive is press Shift and A, and then what we're going
to do is open up a menu, and you can see that
we've got all of these things along this
actual primitives menu. But the one we want to focus
on is the actual mesh. And from here, you can
see we can bring in many, many things like cylinders, cubes, planes, and the
one we want to bring in just now is going
to be our cube. That we brought our cube in
the next thing I want to discuss is object and edit mode. And you can see at the moment
over on the left hand side, we're actually in something
called object mode, and this means basically we can manipulate this whole object. So if I press G, I can actually move it around
my viewport like so. If I press S to scale, I can actually scale the
whole of the object in. But the thing is, we
don't really want to work in object mode necessarily, and a lot of the
time, we're actually going to be working
in edit mode. So we can come up to
the top left hand side and put this in Edit mode, or we can actually press the tab button and jump
into Edit mode that way. You will notice once we've actually gone into Edding mode, we have a lot more
options to use, and more importantly,
we have a lot of the topology now to
play around with. So the first thing you'll notice the difference being is that we have now these three options
up at the top and side. And if you hover over them, it will say vertex,
edges, and faces. Now, vertex is going to be
these little points here. The edges is going to be these edges of my cubes
or any of the edges. And finally, we've
got the faces, which is actually the
whole polygon face. Now, you can also, instead
of clicking on these, press one on the keyboard, and that then will jump
you into vertex select. If you press two, you
can go into edges, and three is going to
take you into faces. From here, we can actually
manipulate any of these parts. So you will notice
at the moment, I've got gizmo here. Now, if you don't have
the Gizmo available, coming over to the
left hand side, and you'll have this little
button here that says Move, or you can press Shift Spacebar and bring in your
move tool like so. So now because I'm on faces, I can actually pull
out this face like so, if I go to edges, I can
actually grab one of the edges and pull
this out like so. And if we're on vertexes, I can grab this vertex or grab the second vertex with Shift Select and then
pull this out like so. Really, really easy to actually
manipulate things once you know how to select
each of these parts. Before we go too much
in the weeds with actually modeling in
this actual Edit mode, let's just jump back into
object mode for now. What I want to show
you is how we can actually move this
actual cube around. So as well as moving it
with the actual gizmo here, we can also press G
and actually free move this object around or we
can press G and Y, too. Let's put it along the Y axis, move it around or the X axis, for instance, and move
it this way or even the z axis and move
it up and down. To drop it back
where we started, let's just right click like so. So that's actually moving the location of it's
not a cube anymore, but let's just say it's a cube. We can also scale this in
as well with the S but so we can scale it in or
scale it out like so. Now we can also press the S but, hold the shift button,
and then we have a lot more Finesse
on actual scale. We can also scale this
up by, let's say, a factor of two, so S, two, enter, and there we go. And of course, we can scale
it down pretty small as well. Now the next thing I want
to discuss is rotating, because if we rotate it with
R and just rotate it around, we haven't got a lot of
control over how this rotates. So what I want to do instead is, I always want to press R, then attach it to an axis,
which might be the Y, so the green one, and
then rotate it either by free hand or by actually inputting the
value under our number pad. So if I want to rotate it, let's say, by 90 degrees, press the end button,
and I've rotated this round by 90 degrees. Now, if I want to
rotate it back, I can press O Y, the little minus button
on the number pad, 90, and then we can
rotate it back. There is something else
that you need to know. We also want to reset
our transformations, and this is one of the most important things within Blender, because if you don't reset
your transformations, Blender still
considers this a cube, even though it's not
really a cube anymore. So what we want to do to reset our transformations
is press control. A all transforms, and
then you'll notice that the orientation has
moved over here because it will always move
to the center of the world. From there, then we
want to actually reset our orientation, as well. So we want to right click
set origin to geometry, and then it's going to
put the origin right back in the center
of this object. Now, it's also important
to know resetting the transformations will also impact things like UV mapping,
things like modifiers. Basically, if you ever
have a problem in blender, always make sure that you
reset your transformations, and then most of those problems
will definitely go away. Alright, the next thing about resetting our
transformations, it makes it really
easy then to get something back to how
we had it before. In other words, if I press
S and scale this down, and then let's press R and Z and rotate it round this way, because before this, I
actually reset my rotations. What I can now do is press AlnS and put it back
to the scale that it was before I did anything
and then ln R and actually reset
that rotation as well. So really, really handy, once you've actually reset your transformations in
what you can actually. Moving on, we're
actually going to be looking now at duplication. So if I come round here, I'm able to actually
duplicate this. If I press Shift D and
then press the Enterbn, it's now a duplication, and I can move this over
to the right hand side. So now we have
actually two objects. Now, what if you want these two objects actually combined, and you didn't mean to actually duplicate it in object mode, for instance? Well, that's easy. We can just shift,
select the other one and press Control J, and now they're both actually join together,
as you can see. So if I press tab now, we're able to come in and actually work on them
both at the same time. What happens if we want to
actually split them up, so we don't want the
objects to actually be together. That's also easy. Just make sure that you
select one of them first, and then all you're
going to do is press L, just to select everything. So all of these faces, then you're going
to press P. Come down to where it says selection, and now if I press tab, they're both actually split off. Now, of course, using
the same command, if I press tab, I can
actually come in, grab a face, for instance, press Shift D. I
can actually also duplicate things with
inside Edit mode as well. So we might want to duplicate
all three of these. Shift D. I can actually come in then and actually
duplicate them like so. It also means, though,
is that these, when you duplicate them in edit mode will be part
of the same object, of course, because in edit mode, they're not actually
classed as an object. They're clustered as
the same actual part. Now, for the next
part, I'm going to bring in a brand new cube, and I'm just going
to show you some of the basic modeling
techniques within blender and go through
a few of the options. So here we have a
brand new cube, and the first one I'm
going to show you is, if we come into Edit mode, we'll always be working
in edit mode to show you these things, make
sure you're in Edit mode. I'm going to grab the top face. And what I'm going
to do is press E, and that then is going
to extrude this out. Now, sometimes you will need
to extrude something out, and it will need to be
along A axis, for instance. So all I'm going to do is go to Edge sect, grab this edge, and then what I'm going
to do is press E, and you can see, because it's not
tied to an axis, it's floating around everywhere. However, if I press the Xpon, you can see now it extrudes out, following along
that actual axis, which then makes it
really, really easy to manipulate it where I
actually need it to go. Next one we're going to look at is something called beveling, and then all I need to do is come in and I'm going
to grab my edge. So I'm going to press
two on the keyboard, grab an edge like so,
and then I'm just going to press
Control B like so. And you'll notice now it's actually bevelled off that side. You'll also notice down on
the left hand side here, we have something called
an operator panel. It will be closed. Just open it up, and from here then with the actual bevel, we're able then to
turn the bevels down, for instance, turn them
up, move how the shape of the actual bevel is going to be and all that
other good stuff. Pretty much anything you do in blender is going to give you
an operator panel like this. We're not going to go too much
into this, but basically, the moment that you press Tab button to come
out of Edit mode, this is going to disappear, and then you're locked in
with the actual shape that you've chosen or the
insert or the extrusion. So just bear that in mind. So the moment I press tab,
that actually disappears. What about if we want to bevel off vertices and not edges? So, for instance, if I come to a vertice like this
and vertice like this, press Control B, you'll see
that it bevels off like this. But if I come to one that are the
opposites of each other, press Control B, you'll see
nothing actually happens. However, if I press
control shift and B, then we're actually
able to bevel off the actual vertices like so. So that's another handy
tip for actually bevel. Now the next modeling
technique we want to discuss is
actually edge loops. So how do we get more
geometry onto this? So, for instance, I want to
bring some edges on here, I can press Control, and that then will bring me
one edge in here. If I left click then, you can see that I can put this either this side or this side. But let's say I want it
right in the center. I'm just going to right
click on the mouse, and that then is going to
put it right in the center. Now, the other
thing I can do with the operator panel
again is then come in and turn all of these up to give me more
actual edge loops, and I can even move them
to the on the right. Now, I can also, if
I press Control Zed, come in, press control law. I can actually scroll up on the mouse wheel to give me as many edge loops
as I actually want. Or if I want a little
bit more fins, I can actually type it out
on the actual number pad, so I can type out 120, for instance, and
have 120 edge loops. To cancel it at any time,
just press the escape board, and then that will
cancel it out. Now the next modeling
technique I want to show you requires two actual blocks
or two cubes like this. And all I'm going to do is I'm going to come in and I'm going to select opposing
faces like so. And then I want to actually join these together,
for instance. So all I'm going to do,
I've selected them both. I'm going to right
click and come down to it says bridge faces. And now you can see I can
actually join those together. Now, if I press Controls head
and just go back a minute, you can also do this
by coming in and let's say grabbing
this and this edge, and what I'm going
to do instead is, I'm going to press the F bone like so and come
down to the bottom, as well, and then
grab both of these and press the FBne like so. Sometimes bridge will
not work because bridge has to work with two edges
and nothing in between. In other words, nothing
selected there. If I come into this one now and try right click and come
down to where it says, Bridge edge loops, you will see select at least
two edge loops. So we can't actually
join up from there, and that is when
it's a good idea to use the FBne instead. Now the final modeling
technique that I actually want to show you is
something called insert. What I'm going to do is I'm
going to grab this face here. I'm going to press the
ebon and then you can see you can actually
insert this face in. And from there, you can actually extrude it out if you want to. You can also then
press Control B and bevel it off if you want to. And you can see now
it's really easy to use all of those techniques
that I've actually showed. Now, lastly, the
last thing I want to show you is the insert again. But this time we're
going to grab this base and this base, and if I press I,
it's true you can actually insert them
both at the same time. Now, the best thing
though about insert is, if I press the I and
then press I again, we can actually insert them separately from
each other like so. Now, I see a lot of
renders on Facebook and other social media that kind of look really,
really blocky. For instance, if I press tab
now and go into object mode, you will see this actually
looks pretty blocky. But there's a real
easy fix for this, so it doesn't actually
have to look like that. All you need to
do is once you've actually finished, right click, come up and where it
says, shade auto smooth, and that then will shade it off based on the actual angle. So really, really easy
to either shade flat, shade completely smooth like so, or shade auto smooth like so. If you actually are struggling
and you actually want it to shady a little bit
smoother than what it is, you can come over to
the right hand side where this little triangle is, go down and open up the normal, and from there, you can
actually increase this and shade it even more smooth
based on a higher angle. The default is always set to 30. So make sure you set it to 30 in case you
actually overdo it. The last thing I
want to show you in this introduction is
the actual cursor, because I think it's very, very important to actually modeling. So what I'm going to
do at the mono is I'm going to make another
cube with Shift D, and then I want this cube on top of this
cube, for instance. Now, if I move my
cursor over here, so shift right click. And then what I can do is
I can press Shift desk, and I'm going to go selection
to cursor, keep offset. And that then is going to move the exact center of this cube, all the orientation
to my actual cursor. Now, how would I get this
then on top of this cube? I would literally
grab this cube. I would first of all, right
click and set the origin to geometry just to make sure that origin is right
in the center like. So I would then press Shift
Desk cursor to selected, and that then is going to put my cursor right in the center. And then I would grab this
cube, and from there, I'm able to go Shift Desk
selection cursor, keep offset. And now that cube is right
next to this actual cube here. From here then, I can
actually bring this up, and let's actually
just have a quick play around of everything
that we've learned. So you can see now if I pull this going to join them both together
then with Control J. And then the first thing
I'm going to do is come in, grab this face and this face, and we're going to
right click then, and we're gonna come
down to bridge faces. And then I'm going to
bring in some edge loops. So let's bring in two
or three edge loops. Left click, right, click. And then what I'm going to
do is I'm going to press Alt Shift and click
just to select all of this edge going
around here and press the S but and pull
it out like so. There, then what I'm
going to do is I'm going to bevel off both of these tops, so I'm going to grab this
top, shift select this top. I'm going to press Control B and actually bevel them off like so. From there, then I'm going
to bring in an insert, so I'm going to grab
the front top here. I'm going to insert this
with the eye button like so. And then from there, I'm
actually going to extrude out. So I'm going to extrude
this out like so. Now, let's say I want a
bigger piece on the next bit, I'm going to press
Shift D. Pull it out, so this is a duplicate
of this face. I'm going to press the S but to make it a little bit bigger, and then I'm going to press E and pull that out
along the axis. Finally, then what
I'm going to do is grab this one and
this one and going to right click then and
bridge faces like so. And you can see just
how easy this really is now to actually start
building out some really, really complex models with everything that
you've just learned. Alright, everyone, so I
hope you enjoyed that, and I'll see on the
next one Cheers.
7. Starting modeling our factory parts, starting with winmill machinery, creating base and first gear p: But Welcome back,
everyone to blend it, begin as master class,
the cookie factory. Now, what we're going
to do is, first of all, before we even start
modeling, at the moment, we're in object mode, as
you can see over here. So we have wireframe,
object mode, material mode, and render mode. Now, within Object mode, if we come over to this
little dropdown now, we can see we've got
all of these things. Now, some people like
working with Mac Cap. Some people like working flat, and some people like
working studio. I'm definitely one of those guys that likes working
in the studio. I find it really easy
to see what I'm doing. However, there is one
thing I do like doing. That is, if I come down here, I like putting cavity on. I really find it handy when I'm creating cubes
and things like that. Let's actually create
our first cube. Now, with your cursor in the center, it's
not in the center. So if I shift right,
click anywhere around here, move
my cursor away, I can then press Shift S, cursor to world origin, and there it is
right in the center. Now, if I press Shift A, we can bring in that cube
that we actually deleted. Shift A come down,
bring in a cube. Now, you'll notice at the moment that my cube looks like this, but the moment I turn cavities
on, so if I come down, turn the cavities on,
now we can just get a clear distinction
of those edges. And that's why I actually
like working with cavity on. As I said, some people mess around with all of these things, but for me, you know, working as basic as possible, but with cavities on gives me a really good idea of what
I'm actually creating. Alright, so what
we'll do then is we'll start with our windmill. So what we'll do, we've
got our cube here. We're going to press S and Z, and that's going to squish
it in on the Z axis. So we know the Z
axis is this way. The Y axis is the green and
the red axis is the sorry, the X axis is the red. Now, you can also see
not only by colors, but you can also see up here. Generally, this is going to show you which way it's pointing. I find this really handy to use when I'm mirroring
something and things like that. So don't forget to look there. Look here for the axis, as well. Alright, so let's pull
this out a little bit. So what I'm going
to do is I'm gonna pull it along the Y axis. So S and Y, let's pull it
out a little bit like so. Now, the thing is when we're creating
something like this, we have to think of the art
style we're going with. Now, in this one, I wanted
something very cartoony, very nice and pleasing on
the eye, very colorful. And in actual fact, when I think of hound
going to build it, I always have something in mind, an art style in mind. So with this, it was more going along the lines of cocoa melon. Which is the famous kids
TV show off of YouTube. I wanted it very colorful and
very rounded kind of edges. And that's where I actually got, you know, thought of the art
style that I'm going with. Of course, you're not going to directly copy an art style. It's not going, you
know, looking exactly like something in
that actual show, but it is kind of
that art style. And this art style has been
done a lot of times before. But with me seeing that, you now know where I'm
actually leading to. Now, again, when I'm picking
something that's stylized, I will pick games like, you know, Ano 1,800 is
a favorite of mine. Settlers is another favorite and that's what I'm
actually doing when I'm thinking of the hot style. It keeps me on that hot style, and that's why I have this
image in my mind of that. Alright, so saying that, when we've actually now we've
actually brought this in, we obviously have a lot of hard edges on here
and something about, you know, creating something that's really
pleasing on the eye. You don't really want
a lot of hard edges. You want a lot of
roundness on there. So what I'm going to do now
is I'm going to come in, and I'm going to grab
each of these edges here. So I'm going to grab
this one, this one, this one, and this one. And what I'm going to do is
I'm going to press Control B, and what that's going to do is enabled me to bevel it out. Now, if I scroll up
the mouse wheel, you can see that I can bring
more or less bevels in. Now, one thing I forgot
to say before doing this, so I'm just going to right
click to take that off. Is that before
bedling anything or before inserting or extruding
or anything like that, always always, once you've
got the shape that you actually want, reset
your transformations. And this is because in blender, Blender still sees this as the cube that we
actually created. So that, you know, one
by 1 meter or two by two meter cube that, you
know, we brought in. That's what Blender
still sees you as. So when it comes to bevel it, you might not get the
results that you're expecting unless you reset
your transformation. So we're going to be resetting
our transformations a lot, and we're also going to
be moving the orientation back to the center
a lot as well. So try and get used to that. So first of all, let's
press Control A, all transforms, and then we'll reset all of
the transforms. Now let's right click and
set the origin to geometry. So we're going to set the origin to geometry. It should
already be there. Then we're going to press
tab to go into Edit mode. Now in the blender
basics of modeling, you should now understand
the difference between object mode
and edit mode. So what we're going to
do now we've got all of these edges is
press Control B, and now you can see they're actually beveling
off the right way. From there, I'm going to
scroll my mouse wheel up and get some nice
rounded edges like so I'm going to left
click and there we go there or now now
nicely beveled off. Bypress tab now you can see what they're
going to look like. Now, the other thing
is now I've showed you that I wouldn't
bevel anything off, and I mean anything off until you've built out
the actual model. And the reason is because now if I want to
actually come in, and let's say I want to
pull it out this way, it's much harder
to pull this out. Now it's beveled off,
much harder because you've got a lot of geometry
to actually work with. So what I'm going to do
is I'm going to press Control E. I'm going to go back. And I'm going to leave this as is until I've built
the whole thing out. So I'm just going to build
the whole thing out. I'm going to build
a little windmill on top, as you can see here, basically all of this, including up to this
kind of back bit on here as well,
even this part here. And once I've done
that, then we're going to make it
nice and round and, you know, round all those edges. First of all, though,
we want to make sure everything is to scale. So let's carry on
working on this. So we need this bit along here. So all I'm going to do
is press Shift D again. I'm going to bring
in another cube. I'm going to press the S bone. And then what I'm
going to do is I'm going to pull it up like so, and then I'm going to press tab. I'm going to grab the face. So at the moment you can
see, I can only grab edges because it's
on Edge select. If I select the face over here, then I can grab this top face. Now, you will also
notice in edit mode, there is no movement tool. Now, when you first of all, go into Edit mode
or object mode, the movement tool or the
Gizmo will not be there. So what I tend to
do is every time when you open up blender, you bring in the move tool,
then it'll be like that until you move to another tab or until you re open Blender. So if I press shift spacebar
bringing my move tool. There it is. If I press tab, I've got a move tool
as you can see. If I go to modeling, move toll disappears, as you can see. So let's go back to layout,
press the tab button. And what we're going to
do is pull this down, and I'm then going to pull
this further over to here. I'm going to grab the
back one, pull it further over to here, like so. Alright, so that's looking
pretty nice so far. Now we need this part on here, and we also need a big gear
that's going to go in there. So I think what we'll do is we'll bring in the gear first, and then we can kind
of build around it. So if I press Shift,
at the moment, you will see that
I don't actually have a gear or
anything like that. And this is because
the gears are part of the inbuilt add
ons within blender, and these things you
actually need to turn on. So what I'm going to do is
I'm going to go over to edit, and then I'm going to
go down to preferences. And then what we're
going to do is we're going to go to add ons. And now what I want
to do is I want to bring in the extras. So if I come in, I'm
going to go to search, I'm going to put
in extra, like so, and we will see that we've
got extra mesh objects. We want to just tick this on, like so. And let it tick on. And then we can close this down. And now what we want
to do is we want to bring in the gear. So what I'm going to do
is I'm going to press Shift A, I'm going
to come on over, and I'm going to go down
to where it says gears, like so. So come to gears. And then what I'm going to do is that I'm going to move it up. Now, I've got all
of these presets over on the left hand side, and you can see, though, the moment I move it up,
all of those disappear. So what I want to do instead is, I want to even if press control's E, it's
not going to come back. So what I want to do is
delete that out of the way. And instead, I want to press
shift day coming over, bring in a gear again.
So bring in the gear. And then what I'm
going to do is you can see we've got a location here. I'm going to move it
up on the z axis, and now you can
see I can actually get that into the
place where I want it. So we can see that we actually want this a little
bit smaller, as well. So what we can do is now we
can turn this down and then I can also move it along this
screen, which is the Y axis. So let's move it
along this Y axis. So it's just sticking out
there, and there we go. And now you can see that I
can drop it down, as well. And the reason I'm doing
this is I want to drop it down just so it's
nearly sat on here. But I also want to do this
because I want to make sure that I've also got
another pot in here. So, in other words, I
forgot I need another pot like kind of C shape in here. So what I'm going to do is I'm
going to move this up now, so I'm going to move
it up a little bit, like so to where I
want it, so I want it. Let's think somewhere somewhere around there and make sure
that it's sticking out. And what we can do now is
we've moved it around. We've got it into
the right place. Are we happy with
the size of it? Do we want it a
little bit thinner, for instance? So we can come in. We can turn the thinness down. We can turn the base up. We can even turn how many gears
there are on here. You can see a number of
teeth on here, for instance. But we're going to keep
this pretty simple. We're going to keep it
something like this. Now, the other thing is
that when you're moving it, so let's say the radius, you want to bring out the radius. You can also hold
the shift board, and what that'll do
is make it really, really slow, whichever
way you're going. It's really, really handy to actually make things
bigger or smaller. Alright, so we're going to
leave our gear there for now. And then what we're gonna
do is on the next lesson, we're actually going
to create this sport, put our gear in, and then we should have this
part built up here. Alright, everyone, so I
hope you enjoyed that, and I'll see you on the
next one. Thanks a lot. Bye bye.
8. Attaching gear to the windmill of our machine, creating aditional detail to the gear surface for Ble: Welcome back if you want
to begin as master class, the cookie factory, and
this is where we left off. Alright, so now let's
bring in that C section. So what I'm gonna do is
I'm gonna press Shift A. We're going to bring
in another cube. So Shift A mesh, let's
bring in a cube. Let's bring that cube up then. So we definitely gonna want
it a little bit smaller. So I'm just gonna fit
it just on top of that, just so it's just in there. I'm gonna press the S button
then to bring it down. I'm gonna pull it down then, like so, making
sure it's fitting. Now, I definitely want it to fit a little bit easier in here. I don't want it right
up to this edge. So I'm going to press S&X
and pull it in, like so. And now I want to focus
just on the bottom. So what I'm going to do is
I'm going to press tab. I'm going to come in
Facelck is this one. You can also, by the way, you've got vertices, edges,
and faces here. You can press one, two, or three to select each one of
those on the keyboard. And what I want to
do then is bring it down to where I want it. So I want it somewhere
around here. And then what I want
to do is I want to bring this out
just a little bit. So roundab there, and obviously, I want to bring this
to the back like so. Now, I'm happy with how
chunky this part is now, but what I want to do now
is I want to pull it up. All the way. So, in other words, I want to bring up
this first of all. So let's bring up our gear. So we're going to bring
up our gear a little bit. Now, I think my gears a
little bit too thick. So instead of trying to, you
know, create a new gear, all I'm going to do
is press EM's head and bring it in like so. And now I think
I'm happy with how that gear is, you
know, put there. Now, one thing I can see is
if I go over the top of it, I can see this part of my gear is slightly
sticking past here, so I'm just going to
pull it back just into place just so it's
still stuck out like so, and then bring it up
just a little bit. Alright, that's looking good. Now, as I said, we've got
it in the right place. What we want to do now, though, is we want this part to
be all the way up here. So what I'm going to do is I'm going to come
into this part, press the tab, grab this top face, pull
it all the way up. Like so. And this is
roughly where I want to. Now, the other thing is, I want to now put
a break in here, which is quite easy but hard if you don't
know how to do it. So what I'm going to do is I'm going to press Control off. That then we bring
in an edge loop, and you can see when I
bring the edge loop in, wherever I move it along here, it moves to the top
or to the side. I can also scroll
my mouse wheel up. That will bring more of them in. But for now, we only want
one in let's keep it simple. And what I'm going
to do is left click. And from there, you
can see that I can move it around like so. What I want to do, just click right click. So I can
even put it here. Left click it or
you can just press right click and
what they'll do is drop it right in the center. Now, luckily for me, if I press three on the number pad
and go to sideview, it's basically in
the middle of here now anyway. Yours might not be. So just press the tab but, go to this part here. And what you want to
do, you gear basically, is you want to put this
right in the center of that actual edge loop is. So I can't see at the moment. So what you need to
do is you need to just go to wireframe and then you'll be able to see this
now this actual you know, where this sectual edge loop is. And from there, you can move this gear up or down
wherever you want. From there, what I'm
going to do is I'm going to go back to object mode. I'm going to come then
to this cube here. And then what I'm going
to do is go back in. Now, the thing is, you might
have not selected this now. So we want to make sure
that we're selecting this. So Alt Shift and click we'll select it
going all the way around, and then we want to
press Control B. And what we're going
to do is we're going to bevel it out. Now, you can see
at the moment I've got all these lines in there, I want to scroll my
mouse wheel down, and I'm going to bevel it to
round about here. Like so. And now you can see we've
got a gap each side. Now, if you're not happy with, you know, you want a little
bit more gap, which I do. I'm going to press Control's
E. Control B again, pull it out and make it a
little bit bigger like so. Now what I want to do
is I want to make sure that this has a gap. So the gear, you know, it's
stuck out a little bit. Is it stuck out a little bit
too much? I think it is. So I'm going to come
back to my gear now. I'm going to press the S
bone jaws to pull it back in and just get it to the
right size that I want. So and's head, pull it out
a little bit. Like so. So scaling in n's head
to squish it down. Wherever you want to. Okay, from here
then, let's come in, and we'll make one
more edge loop because we obviously
want it to fit in here. So what I'm going to do is
I'm going to press Control, left click and right click. And now we can see that this
is not in the right place. But before moving
this left or right, what I'm going to do is I'm
going to come to my facelet, grab this face, shifts
like this face, shifts like this face, and then what I'm going to do
is press delete and faces. Now you can see that
we've got a gap there, but we've got loads
of holes in our mesh. So we need to fix that. So what I'm going to do is
I'm going to come in. I'm going to grab this edge here so you can see I'm
on Edge select here, grab this edge with Shift
select, press the F button, and then I'm going to come
up to this one and this one, press the F button. And unfortunately, you
can't do them all together because you'll end up
with a mess of a mesh, and then grab this
one and this one, press the Fb, and there we go. Now, we do have a new problem. In that, our gear is stuck in this mesh here. We
don't really want that. So let's come to Face select. Make sure you've
grabbed this face then, and all you're going
to do is pull it back. Like so, just so that actual
gear is fitting in there. If you press three, you
can go to side view, and then you can see
just how much room you've actually got on this now, it's pulling back just
a tiny bit, like so. Now, what we're
looking for here, basically when we're
doing this, we don't want to make
this bit too thin. If it's too thin, obviously, this would collapse, so we
don't really want that. The other thing is, as
well with this gear, we want to make it actually
animate and moving around. So when we're
thinking about that, it can't just be just
stuck in the air. Spinning around. I
actually needs to look as though it's actually
attached to this mesh here. So the way we're going
to do that is we're going to come to our gear now. And what I'm going to do is
sometimes it's really easy to work on something if you're
isolating everything out. So in other words, if you're
isolating this gear out, you will then it make it much easier to
actually work with. So there's two ways
of doing that. I'll first of all, show
you the question mark. So if you press question
mark on your keyboard, you'll see it zooms in
and it isolates it out, which makes it really,
really easy to work with. As we go later on in the course, I'll show you more and
more ways of doing things and why you might
want to do it that way. Because isolation works for, you know, it basically
turns off all the lighting. So you've got once you
isolate something out, later on in the course, you might want the
lighting there, so there are other
ways to do things. Anyway, let's actually
isolate it out for now. And then what I'm going to do is I'm going to come in now. I'm going to go to Edge lick. And what I'm going to do is I'm going to grab this edge here. So Alt Shift, and click, make sure it's grabbed
all the way around there. I'm going to grab
this edge here, Alt, shift, and click, make sure it's grabbed all the
way around there. And what I want to do is
I want to fill this in. So I'm going to right
click, come down to bridge edge loops
and fill it in. Now I want to do is
I want to make sure that I've got two edges in here, so I'm going to press
Control R. So what I'm going to do is I'm going to left click and then I
move it up and down, right click to put
it in the center, and then I'm going
to press Control B, and now I've got full control how much I want
to pull that out, which is much, much
easier, like so. From there, then, what I want to do now is I want
to fill these in, so both of these faces. What I'm going to do is I'm
going to grab this bomb, Al shift and click press
the F but for face, and then grab this one,
Alt Shift and click, F button, face like so. And now we've filled
that in. We've gave you a little bit of relief
going around there, front and bottom, and now
this is easier to work with. So now what I want to do is I basically want to
create a kind of column going up and one going down just so it's attached
to the actual machine. So what I'm going to do is
I'm going to go to face select again, make sure, select the top face, shift, select the bottom face, and
then I'm going to use I. And this is basically
going to insert. So if I press I now, I can basically insert
this and bring it in. Like so, and there we go. Now what we want
to do is we want to basically bring it out, so it's got, you know, kind
of a rod going through there. So I'm going to
press the E button. And when you press
E, what you're going to be doing
is extruding now. You need to be very careful
when you're pressing E, because what you
don't want to do is press E a few times
because then you'll end up mesh with mesh over the top of each other, and
we really don't want that. So what we're going to do is
we're going to press E once, and you'll see we get this line. Don't move your
mouse or anything. Just press the end button. And now it looks as though
nothing's happened. But the moment I press S and
Z now and pull this out, you will see that now we can actually pull that out into
the column that we need. Now, the other thing is,
if yours didn't pull out, so let's press
Control Z to go back. Let's come up to these two
interlocking links here. You will see that we've
got one median point and one individual origins. Make sure this is on medium
point when you pull it out. So S and Z, pull it out, and there we go, like so. Now, if I press tab now, press AltaH or if Altage doesn't work
because we didn't hide it, press the question
mark, and there we go. Now we've got this
gear into place. Now, the moment it
looks a bit messy, there's lots of
kind of, you know, edges on here and in here. We're going to talk
about that in a bit. That's to do with
how we're gonna shades move and all that
sort of good stuff. But the first thing, as
I said, we need to do is we need to make sure
that we've built this out. So that's the first
thing that we're doing. So on the next lesson,
we're going to carry on building this up. We're going to get these
two little points in here. We're going to, you know,
kind of fit everything together on this one,
make it really nice, and then we can start, you know, kind of smoothing everything,
beveling everything, and making it look
really, really nice. Now, at the end of every lesson, make sure you save your work, so file and save, and I'll see you on the
next one every one. Thanks a lot. Bye bye.
9. Adding a cylindrical tank to the side of a windmill, creating pipes using blender built in mesh addo: Welcome back everyone to Blend
Beginner's master class, the cookie factory. So now, if we take a
look at our reference, let's make it a little
bit bigger with this. We can see that we've got
these two bits on here. We've built this bit up here. We've still got a
windmill to build, and we've got this
little part over here. So I think what we'll start on is this little part over here.
So let's start on there. We want it right next
to this part here. I'm going to do is, first
of all, I'm going to bring in a cylinder this time. So Shift A, mesh. Let's come down to
where it says cylinder, and let's bring in a cylinder. Now, you can see at the moment, we've got all of these
vertices on here. Now, I don't recommend
ever leaving it on 32. I think 32 is way too high. The difference is, so I will show you, we
bring this over. So I'm going to
put this one here. I'm going to bring in a new one. So Shift A, I'm going
to bring in a cylinder, and we'll put this cylinder
down on something like eight. And then what we'll do is we'll bring in one more cylinder. Shift A, bring in
one more cylinder, and we'll put this cylinder
on something like 24. Now you can see the
difference between them. You can see if I
come to this one, right click and I'm going
to shade auto smooth, you can see it shades off
really, really smooth. If I come to this one, right, click and shade auto smooth, we can't actually get
any smoothness on there unless we turn
this all the way up, but we're still going to
end up with the top of it looking like this
kind of jagged, and we don't really want that. This is very, very low things, you know, where
you've got a mobile game or something like this. Now, this is the happy medium. So if I come to here, right
click, shade auto smooth. You can see we've got
a little tiny bit of blockiness along there,
unlike this one. You know, you can see the
difference between them. And I think to use a cylinder, we should be aiming 16-24, any lower than that,
and you end up with this kind of real blockiness
that we just don't want. Alright, so now I'm
going to do is I'm going to delete each of these. So let's delete them. I'm
going to grab this part here. I'm going to press shifts, cursor to selected, and then I'm going to
bring in a cylinder. So Shift A, let's
bring in a cylinder. I'm going to make sure
that my vertzs are on 24. Okay, so let's come in then. And what we want to do now
is pull this to the side. We're going to make it
a little bit smaller. And then what we're going to
do is we're going to press n's just to pull it
out a little bit. And we can see from
this that it's going to be in this
bottom part here. So you can see it's this part here where
it's going to be in, so it needs to be at the
side of here, like so. And we can see
that it's probably dropping not all
the way down here. So this is a little bit
low as you can see. So instead of squishing it down, let's press tab,
come to the bottom. And what we'll do is
we'll pull that up then to the bottom
of there like so. Now, as far as the
top part goes, I would say that it needs
to start just after here. So this top part in here, which is this part here, we'll start it just after there. And the way we'll
do the top part is we'll press E for extrude, enter again, and then
press the S borne, and then we should be able
to pull it out, like so. And then what we'll
do is we'll press E for extrude again, but we'll just pull
it straight up. Now, if it's not following
the z line straight up, press Z, and you'll see
that it freezes it. Press z again, and
you'll see now that it pulls it up
along that z axis. And we're going to pull it
up to round about here. And then what we're going to
do is press the S bone and bring it in to get that nice
top that we're looking for. Now, however, we do have
one problem in this, and that is the fact that, as you can see, this bit here kind of needs coming
down a little bit. You can see that when
I brought that up, I didn't equate for the
fact of it's too hard edge. Now, you can see it's too
sharp along this edge, and we don't want
to go for that. So all we want to do
is press Control Z. And instead of doing
that, we'll pull it down to here, like so. And then what we'll do
is we'll press E and then bring it up and
then press the S board. And now you can see
that's looking much, much nicer on the top there, and let's bring it down like so. Now, I can also see
that from here, this is near enough, a little bit off the top of it, and you can see mine's right at the top of this edge here. So what I'm going to do is
I'm going to press tab, go to this part, grab the top. So bowl for these parts here, and I'm going to pull
them up, like so, making it a little bit bigger. And now I think that this
is fitting in place. Now I'm going to do is
just going to grab it all. I'm going to press the sponge to make it tiny bit smaller, like so, pull it out this way. So we've got room or two
pipes that go to go in there. So we're going to have one
large pipe coming through here and one smaller pipe
kind of coming round here. Now, there are ways of shrinking things down. Along the width. So in other words,
if I want to make it so that this is a little
bit thinner along here, I can come in, press
Alt Shift click to grab it going all the
way around the outside. And instead of
pressing the S bone, which is just going to
bring it in like this, I can actually press alters, and then I can bring it in like so and make it a
little bit thinner. And then on here, I can
also do the same thing. So lns, bring it in like so, and that is a much better
way of trying to bring it in rather than actually
using just S for scale. Alright, so now we've got this. What we want, first of all, is an outside on this part here. So what I'm going to do
is I'm going to come in, press the tab but, control on, left click, bring it down. And then what I'm
going to do is Alt Shift click, going along here. So Alt Shift click, E, Enter. And then instead of pressing S, I normally press AlterS
and bring it out. So holding the shift but then, you can hold it out and
bring it wherever you want. So I think I'm going
to be happy with something like this. All right. So finally, then, probably want a little bit of a
relief on the bottom. So in other words,
I just want to pull this down
just a little bit, like so, and there we go. Now, when we get to
things like this, it's always a good idea to shade things off smooth
because then you're going to have a great idea what everything's
going to look like. So what I'm going to do
is I'm going to right click shade auto smooth
and there we go. Now, you can see,
you'll always get this. In the top of here, you've got kind of these little
ridges going in. You will get that all
the time when we're using quite low polygons. So when we brought in that
actual cylinder, I showed you, we brought it down to 24, and you can see now it's
looking a little bit jagged. Now, luckily for us, when
we bring in our Shader, when we bring in the lighting, you won't really be able to see this because it's metal anyway. Okay, so now let's put a couple of bands
going around here. So I'm going to
press the tab but, I'm going to press
Control, and this time, I'm going to move my scroll, my mouse wheel up once, left click, right click, and then the bars are right in the center of where
I want them to be. From there, then I'm
going to press Control B, and then I can pull
them out, like so, and then I'm going
to press E, enter, lanes, and then I should be
able to bring those out. Like so, and there we go. Now, right, click
again, shade Auto. Move just to make sure
it's smoothed off. Now, let's put a little
top on here as well. So what I'm going to
do with the top is, I'm going to grab
the face, like here, I'm going to press E
to S, pull it out, and then E, pull it up, and then S, pull it together,
like so, and there you go. That is what you end up
with. And I think, actually, that looks a little
bit better than how that top is on there. Alright. From there, then
what we want to do now is want to bring in or pipe. Now, there's many, many
ways of bringing in pipe, but I always find, one of the easiest ways is
using the extra. So if I press, let's just put it or cursor, we'll actually put it over here. So I'll put it over here. I'm going to press Shift A then. Come over to mesh,
and you will see that you've got one
that's called pipe joint. So I'm going to bring
in my first pipe, which will be a pipe elbow. Now, these are really important because what it
actually helps you do the joints where
this joint is, if I come down, first of all, and you can see the angle here, as I turn this up or down, we can actually move this
to let's say 90 degrees. So let's put it in 90 degrees. Now, this actually
just to create mesh is actually
quite hard to do. So doing it this way with the pipe joints makes
things much easier. The other thing is, as
well, I'm freely able now to bring my actual
pipe joint down, and now I can actually just use that and put
that in there now. So what I'm going to
do now is I'm going to move it with this over here. So with this control
panel over here, I'm going to move it
into place because then I can make it smaller and
bigger and anything I need. So first of all, we'll
move it on the Y, so you can see the Y locations. Let's move it over. Let's press either three or one,
so press three. Let's rotate it round.
So we can rotate it. This is the Y, which means
the X is running down there, which means I want to
rotate it by 90 degrees. Now we can see it's
the wrong way around. So let's put -90 instead. Like so, and now we can see
it's actually getting there. Now I can see it
needs to be much, much smaller, so let's
bring the radius down. Let's bring it back
then, so we're going to follow
along that X axis. So move it along the X. Let's put it into place. Now, the next problem with guys, obviously, this
pipe is too long. So what we can also do
is turn down the start, and we can also
turn down the end. And now we can start
fitting this into place. So again, with the X, I'm
going to move it down. I'm going to move it along
on the Y, so along the Y. And then we're going
to move it on the z and put it into place. And what I want it doing is drop in riding this bomb
part down here. Now, what I've got to take into account when I put
the end to this bomp, I'm also going to have an edge on here, so coming out here. I'm also going to
edit an edge on here. You can see I'm
not going to have a lot of room if I make that. So what I'm going to do is
just turn down the radius, holding the shift bone
just a little bit. And then I've got all
of this wasted mesh in the inside of
there, as you can see. If you want to see it
bet, just click on this, and then you'll be able to
see exactly how that looks. And then what I can do is now pull this back. So
it's the start. Let's pull it back all
the way to around there. And then we can see that's
only slightly in there. And now that's looking much, much easier to manage. Alright, so let's turn this off and have a good look
at what we've done. And, yeah, I think that's
looking about right. Now, what I want to do is
before doing the thing is, once I press Shift,
as you can see, I bring this out, and you can see now that the
problem I've got, is that I can't actually
move that round anymore. So that's the problem that we have. So we
don't really want that. So what I'm going
to do is instead, I'm going to leave out the way. I'm going to leave
this as it is. And for this part that's
gonna come out here, I'm going to create that myself, so we'll do that ourselves. But we'll do that
on the next one. As always, let's
save out our work. So file, save out our work, and I'll see you on the next
one, everyone. Thanks a lot. Bye bye.
10. Creating windmill machine vertical extention, starting to model the windmill blades for Blender Begi: Welcome back on to blend the
beginner's master class, the cookie factory, and this
is where we left it off. Alright, so let's deal
with this pipe first. So what I'm going to do is,
first of all, I'll come in. And basically, I want to bring in an edge loop at
the end of here. Now, if I bring an edge loop, so if I press Control R, you can see that it's
going along that way, and I can't really
straighten this up. So the easiest way I've found is just to bring
in your edge loop, and then what you want to
do is to straighten up, you just press S,
followed by the axis, which is the X axis, press zero. And then what they'll
do is straighten it up nicely for you. And I tend to use
that a lot because it makes things really,
really easy, actually. Now straighten up and
move there along here. I'm going to do the same
thing with this one. So I'm going to press Control.
Left click, right click. And this time, S, Y, zero, Enter, and then
I'm going to move this along here, like so. Now I'm going to do
both of these together, so I'm going to grab all
of this, Alt Shift click. Come around to this
one, Alt Shift, click, press the E button, Enter, Alter s, and then we're going to pull
them out. Like so. And now you can see we've got those actual pipe joints
that we actually wanted. Now, the other thing
that you might want to do as well is you might want to bevel off
this because it might be a little bit too sharp. So this edge going in here. So let's come in, all shifting, click, grab it going
all the way round. Just make sure that you've got it actually grabbing
all the way round. And then what I'm going
to do is press Control B, and then I should be
able to bevel this off. Now, once I press Control B, I can then scroll my mouse wheel up and get some nice
bevel on there. Left click, tab,
and there we go. Now, if I press, right
click and shade at smooth, you can see now that's
how the pipe joint looks. Now, there is another
way, as well. If I come back and I press Control B and
pull this out like so, I can also then go
over to this side, and what I can
actually do is either increase my segments,
I can drop them down. I can change the width of
this however I want it, so I might want it more rounded. I can also change, you know, whether it's an arc or not or whether it's sharp. Or I can also change how
it's actually beveled off. We're going to talk a
little bit more about this, you know, as we move forward, we can also change
the shape as well, so you can change it in or out, like so, and make it
however you want it. So I think something like
that looks pretty nice. I'm actually going to
put this on 0.5 again. Just get it back to our had. Alright, so that's looking good. Now let's press tab, and what we're going to do
now is we're going to right click and
shade At smooth, and that then is
going to make sure it's all shaded off smooth. Now, the reason I
did that is because we're trying to keep this to
that particular art style. And, you know, if we have
a really hard edge on, like, pipe there,
it's not going to look fitting for the
rest of the model. Okay, so now we've
done that, let's sort out this pipe here. Now, the thing is, I've
already got a pipe there, but I do want it a
little bit thicker so you need to decide
I'm going to take this pipe and kind of reuse it onto this bit or I'm just
going to make a new pipe. I think for me, I'm just
going to make a new pipe. Now, first of all, I want it to be level with this one here. So what I'm going to do
is I'm just looking, can I make it level
with that one? I think I can. So
what I'll do is I'll just grab this one here, so I'm going to press Alt
Shift and click Shift D. And then I can bring
it over into place. And then what I can do now is, so I've duplicated it, I can come to this edge, Alt Shift and click,
and then pull it out like so and
put that in place. Now what I can actually do
is make this a little bit thicker with Alt
shift and click, and then I can just press ts and bring it out a little bit, so it's a little bit
thicker than the other one. And then finally, I can press Control R, and
let's move it over. So I'm going to press left
and move it over to here, and then I'm going
to press Control R again and move it over to here. And then I'm going
to press Alt Shift click on each one of these. And then I'm going to press E, enter lanes, and then I should
be able to bring them out. Now, you can see what I want to avoid is it overlapping these. Now, I can see that you know,
on this particular one, I think I should move
these bars up a little bit and make them a
little bit uneven because I think it's
going to look much, much nicer if it
fits in properly. So let's actually sell that out. So I'm going
to come to this part. I'm going to grab
this one, Alt Shift, click, this one, Alt
Shift, click Control plus. And what that's going to
do is it's going to save me the time I than
select all of these. So Control Plus is going to grab kind of the next faces on. So now you can see it's
grab this one and this one. And now I can simply pull
those up a little bit like so. Now, let's get this now more
into where it should be. So what I can do is I can come and you can see these
are joined together as well. Do I really want
that? No, not really. So what I'm going to do
is I'm going to press L, and I'm going to separate it off now from this mesh over here. So I'm going to press P,
selection, separate it off. Now, this is the point
where if I grab this, you can see the orientation
is still over there. That's not very handy for me. So what I'm going to do is
I'm going to press Control A, set all of the transforms, right click Set origin to geometry, and now
it's back there. From there, the I can actually
isolate both of these out. So if I grab this one, shift select this one, press
the question mark. Now they're isolated out, and now I can actually move this more into the center
where I want it. So you can see I can
move it up there, and now that's actually
fitting really, really nicely. Now I can press
the question mark, bring everything back.
Double tap the A. And what that's going
to do is it's going to make sure if I've
got things selected, if I double tap the A, it will deselect
everything like so. And there we go. Well,
that is that bit. Actually done, that is
looking pretty nice now. Now we've done that part.
What we can actually do now is focus more on
getting that block. So this block up here for our actual windmill. So
let's focus on that. So first of all, though, I
want to make sure anything I'm bringing in is right
in the center of here, not over here where
my cursor is. So I'm going to come
to this block first. I've already got
these two selected. If not, just select them both. Press shifts and
cursor selected, and it's just going
to put them where we've got these two
selected, like so. From there, then I can press
Shift A and bring in a cube. I can make it a little
bit smaller then. And then what I can start
to do is pull this up. And put it into place
over here, like so. And then I'm going
to pull this up now. So I'm going to edit mode, grab the top face, and pull it up to where
I want it, like so. Alright, this is
looking so far so good. The only thing I'm worried
about at the moment I'm just wondering whether I need to pull this out
further over here. You know what? I think, because I've got a gear here,
as you can see. So the question is, how far
out do you want to pull it? So let's actually
go to that now, and we'll actually fix that because the good
thing is about this, I'm going to show you how to fix problems as you come over them. I can see that this is
a little bit thinner. Now, of course, I
could come in and press SNC and pull
the whole thing out, but then I've got
to also take into account I've got to move
all of the other stuff. So there's many ways to do this. I also come in and grab
these faces like so, and I can pull
them out this way, like so. That's another
way I can do it. I think with this
one, the easiest way to do it is to
grab all of these. So all of these,
except the gear, we don't want to grab the
gear or anything like that. And what we want to
do then is press S and X and pull them out like so. And then of course, we've
got the problem of the gear. Now, the gear is,
you can see here, we want to keep we want
to bring this out. So all of this gear
we want to bring out, but we don't want to make this any bigger or
anything like that. We just want to bring this out. So we're going to
come to our gear. We're going to press Alt Shift and click going all
the way around, and then we're going
to press Alterns and I should be able
to bring it out. Now, you can see, it's kind of not coming out the
way that I want it. So instead, W'llds
I'll press the Sp, and I'll pull it out, so
we've got gear on the sides. And then Wilds, I'll press EnsEd and do it that way again. Whichever way is going
to make things easier, whichever way is
going to work best, do it that way
because it's going to be much easier, you know, once you learn how to do all of these different ways of
doing things. Alright. That's looking so far so good. Now, this has pulled out enough. I'm a lot happier
with how this looks. Now, before we actually put our, you know, big windmill on there, we've got to take into account that we've got
this part in here. So this part in
here looks really, really nice, and we really,
really want to get that in. Now, the thing is when we're
doing something like that, it honestly is easier if we
put this bevel on first, go to make it much easier, which means before
I actually do that, I really want to
create this windmill. I want to create these
gears in there, you know, and forward planning thinking how I'm going to
actually do this. So let's actually start
with this part here, so you can see a windmill here. And to create my windmill, I'm going to create
in separate parts. In other words, I'm
not going to create this all in one mesh. You don't need to do that.
Create in separate parts. It's going to be much,
much easier for you. So the way I'm going
to do it is I'm going to I've already got my cursor. It should have been
in the center, but it has been moved out
around a bit because, obviously, I've
stretched this out. So I'm just going to make
sure it's in the center by grabbing this part
here, press in shifts, cursor center, press
in the tab bottom, Shift A then, and
bring in a cube. From there, then I'm
going to make my cube a little bit smaller, like so. I'm going to pull
it out. And then I'm going to make it
a little bit thinner. So S and Y. And then finally, I
want to it's going to be roughly around here. So this is going
to be the center where the first gear is. The other gear then is
going to be down here. Now, the thing is
with the windmill, it's not directly in the center, but we can still use it to kind of realize how big
this is going to be. So wherever we put one windmill, the tops
going to be up there. So I want to make
sure if it's here, it's going to be all
the way down here. In other words, do
the bot part first. It's going to make
your life easier. So what I'll do is
I'll grab the bon pot, I'm going to pull it all
the way down here, like so. We've got a good idea of how big this windmill
is going to be. From there, then I
want to make sure, as you can see here, it gets thinner as it
goes to the center and thicker as it goes
to the outside of it. So what I'm going to do
is I'm going to press S and X. I'm going
to pull that out, like so, and now we've got the first part of
our actual windmill. Now, I'm just going to
pull this out just a little bit more just so I
can see what I'm doing. And on the next
lesson, then we'll start beveling these edges. We'll start bringing
out then this end here, as you can see, and
we'll actually start finishing this windmill off. Alright, everyone, so
I hope you enjoyed it. Again, as always, make sure
you save how you work, and I'll see you on the next
one. Thanks a lot. Bye bye.
11. Adding detail to windmill blades, creating decorative roundness for stylized effect f: Welcome, M, everyone to Blend
Beginner's master class, the Cookie factory, and this
is where we left it off. Alright, so let's now
come to this part here. So I'm going to press the question mark
to isolate it out. I'm going to press tab
to go into Edit mode. I'm going to come
to my edge ect. I'm going to grab this
edge and this edge. Now, as I've said
before, we need to bevel off these edges, but
before you do that, always make sure Control A or transforms set
origin to geometry, and now go in and
bevel these off. So Control B, let's bevel them. Like so, and you can see, I'm fairly happy with these. You can really mess around
with these and create whatever type of windmill
you actually want. But for me, I think I'm
happy with how these look. Now, finally, before
I actually finish, I want to bring this top
pot in a little bit, so I'm going to
grab this one here. I'm going to press S and X and pull it in a
little bit like so. Now the thing is,
if I press tab now, press the question mark, if I come in now, I can see that. This is going to
come down to here, which means that this
has to be lifted up a little bit because we will
have a center point in here. So we're going to have
a center point in here, and I need to take
account for that. So what I'm going to do
is I'm just going to lift this up a little
bit more like so, and there we go, now I think I can get my center point in here, and that's what I really want to do before actually finishing. And so I'm going to come in now, grab the top of here,
press shifts to selected. And then what I'm
going to do is press tab because I don't want to bring in a new mesh that's
joined to this already. I want to keep them separate. So if I press Shift D
and bring in, let's say, a cylinder now, you can see that it's part
of the same mesh, and we don't want to do that. We want to save ourselves
a little bit of time. So what I'm going to
do is press shift I'm going to press tab
first, press Shift. And then I'm going to
bring in a cylinder like so, and we now it on 24. I'm going to spin
this cylinder round. So RX 90, so 90 degrees. I want to make it smaller, and then this is going
to be where my windmill, hopefully, is going to fit, so you can see it's going
to fit just in there. Now, let's see, first of all, if this is big enough, I don't think this
is big enough. So how am I going to
determine if it's big enough? First of all, I want to
pull this up a little bit. So we can see if I put this on, you can see if I grab this, let me just
try and grab this. There we go. Let's
press one again. You can see that
it's up into them. We don't really want
that, so we want to pull this up, like, so just so these are just in there because we've
got one going this side, one going top, and one
going this side as well. So now it's feeling
a little bit better. The other thing is, I think this is a little bit too small, so I'm going to make it
a little bit bigger, and now we can see they're
fitting in much better, and then I'm going
to move it up. On the z, just a
little bit like soap. Now, I think that's
gonna fit in much, much better. I'm going
to turn this off. And then what I'm going to do is squish it in a little bit, so S and Y, pull it in. Like so. And now I want to do is
I want to make sure that this windmill is going
to fit going around. So first of all, I
want to grab it. I want to come in and grab
this face and this face, and I want to give it a
relief on there just to make it look a little bit
nicer than what it did. Now the problem
I'm going to have, if I press the Ibn, you can see that it's
going to be a long way in before it goes
past this part here. So if I press I, you can
see if I put it there. Now we can actually
got that relief, and it's starting from there. I don't really want
that. So instead of what I'm going to
do is press Control R, and I want to bring
in an edge loop. Now, the problem I've got with bringing in an edge loop now, because I've beveled
this off already, we have got a problem, and
this is the things that you need to work on knowing
how to solve problems. So instead of that, what I'm going to
do is press one. I'm going to press
A just to make sure that all of this is
selected. Press one again. And then we come to mesh, we're going to go to bisect, and I'm going to
bisect this through. Now, when you bisect now, you'll get a line going all the way through, as you can see. Now, what you can do is with the bisec tool is you
need to set this to zero. So you can see here the X axis is set to not point non five. It will always be one that's a little bit higher
when you do it. If I set this to zero, you'll see that that
got straightened up. You're also able with a bisec
to move this up and down, which is really, really handy. And the other thing
is you're able to clear the inner or the outer. Now, we won't be using this
right now clearing that is. You can also fill in as well
once you've cleared it. We're just using it to actually
bring in an edge loop, even though we've got, you know, the problem with the bevel. So this is how you can fix. From there, then I just want
to bring it up a little bit. So just to there. And
now let's come in. We should be able
to grab the front. And the back. And now we
should be able to press the e button and bring it
in really nicely like so. So now you can see
we've got that really, really nice relief
there that we wanted. Okay, so that's looking nice. And before we finish,
the other thing is, we can also bring
this up a little bit, if you want it a little
bit higher, like so. And I think, yeah, that's
looking very nice, except the fact that I
need to grab both of them, bring them up a little
bit. There we go. Now, let's come in and grab
this one and this one. And now we actually want
to make that relief. So all we're going
to do is press E, enter, alter Ns,
and pull it out. Like so, press the tab button, and there you go. That
is the relief on there. Now, if I press right click
and shade auto smooth, then it's going to smooth
off those bottom parts, and that is what
I'm looking for. Now, let's work on
this center part. So what I want to do is
basically, I want this part. Yeah, I think it's
actually close enough. We just want the
front and the back. So let's do the front first. So first of all, right,
click shade auto smooth. Let's come in then to Edit
mode, grab the front, and all I'm going to do is press the Ibar and then I'm
going to pull it out, so E, pull it out. And then finally,
I want to bevel this off to make sure
it's nice and smooth. Again, before
beveling, control A or transforms, set
origin geometry. And now let's come
in, press Control B, and let's bevel that off, like so, and there you
go. Looking pretty nice. Now let's come to
the back because we will need a back that's going to come out into some
kind of gearing system. So what I'm going
to do is come in. I'm going to press I for insert, and then I'm going
to extrude that out into this part here. So we've got a back on
there now, as well. Alright, that's
looking pretty good. We want to keep it
simple as well, guys. We don't want to go over
the top with these things. So we're not looking at really, really intricate,
you know, robots. We're not looking at intricate factory parts that
are going to make, you know, Henry Ford Proud or anything like that.
Nothing like that. What we're going
to do is focus on simplicity and brightness
and things like this. Alright, so now we've got that. What we need to do is we
need to make sure that this windmill is going
four so it's got four, you know, what they called
now four fans to it. Okay, so how we're going to do that is
we're going to come to the center of here for a
shift desk, cust or selected. And then what we're gonna
do is we're going to come to the first kind of bleed. And then all I'm going to
do is I'm going to press, um, I'm thinking the
easiest way to do this. There's many ways
of doing anything. I'll show you the
first way of doing it. So the easiest way, basically. I'm going to write cliques
Origin three D cursor. And now, when I move
this around, so R Y, you can see it completely
goes around this point here. Now, what that means is,
I can press Shift D, and then I can press R Y, 90, and there we go. Now it's perfectly in line. And it's moved from this point, which makes it
really, really easy. It's also handy
to understand how orientations work for when we're actually animating
this, as well. So this is kind of the
basic introduction to it. Now I'm going to do is, I'm
going to press Shift D R Y, 90, shift D, R Y and
90. And there we go. Now they're all on there, and we can see we've near enough. Got our windmill set. Now, what I'm going
to do is I'm going to join all of these together. I'm gonna press Control J. Join them all together, like so. And that is looking pretty nice. Now what we want to do is we know where this is
going to go in now. So we know like this part here is where we're going
to have our pulley, so our pulley system. And once we've got
our pulley on there, then we can actually round
this off because we can see exactly where it's
going to be rounded off. Now, for our pulley system, let's make a new
part then for that. So what I'm going to
do is I'm going to use this orientation
where my cursor is. I want to press Shift D. I'm going to bring in
then a cylinder. I'm going to leave it on 24, rotate it round. So RX 90. Let's make it a little
bit smaller because we will need it bigger
than this at the back, so you can see it needs
to be bigger than this, and I want it a fair bit bigger. So what I'm going
to do is S and Y, pull it in, first of
all, pull it into place. So round about here. So we've got a
little bit of a gap. And then what I'm
also going to do is I'm going to press S and Y, pull it out a little
bit more, like so, and then I'm going to
make it bigger Again, so let's press tab, Alt, shift and click, going
all the way around, alter ness, and let's
pull it out like so. I also want to make this
a little bit thinner. So going to come in,
Alt shift and click. So going all the way
around this part, alter ness, bring
it down, like so. Now, let's make this pulley then so it actually
looks like pulley. So I'm going to come
back to this part, right click, shade Auto smooth. Tab Control R to bring
in an edge loop, left click, right click to
make sure it's in the center. Control B, scroll down, so we've just got one on there, like so and then I want to either bring this in
or bring these out. On this occasion, I'm
going to bring these in. When we bring in
something in or out, we can also use extrude. There are exceptions when
it might make things difficult and we'll come across those further
on in the course. But for now, we're going
to press E, Enter, and then alternS and
bring these in like so. And now you can see we've
got a pulley system where we can actually put
our cable going on there. Now the thing is
now we want to also make sure that we have another pulley down here
on the next lesson, so we'll create another pulley, and we're also going to
move this to the side. So on the next lesson, we'll move this all over to the side. We'll pour another
pulley system in here, and then we'll actually
be able to animate that eventually once we've
got everything running. Alright, everyone, so again, save about your work and I'll
see you on the next one. Thanks a lot. Bye bye.
12. Creating gears and belts to attach the windmill to for Blender Beginners Masterclass: Welcome back, everyone to
Blend Beginner's master class, the cookie factory, and this
is where we left you off. Now, what I want to do is I
want to grab all of this, including the sensor so make
sure you've grabbed it all, press one to go
into the side view, and I'm just going
to pull them over then to this side like so. So something like
that. And then I want my next pulley system
to be roundabout here. So it's actually on show with the actual fans going past it. So the way I'm going
to do that is, I'm probably actually
going to use, I'm going to use this pulley here. I'm going to press one. I'm going to press Shift
D to duplicate it. Pull it down, and let's put
it round about here like so. And the other thing is,
this one is quite big. So let's make this one a
little bit smaller, like so. A difference in scale always makes things look
more realistic. This, I would say, also needs
to be a little bit bigger. I think at the moment, it's
still a little bit too small. So what I'm going to do
is I'm just going to press S, pull it out, and then I'm going to press S and Y and pull it in, like so. And what I want to
make sure is that the belt can still go on there. So instead of now grabbing I want to make sure
that the bell is going to be the same
scale for them both. Now, that is going
to be a problem at the moment
because of the fact of this one in here is going to be much thinner than this
one in here, as you can see. So instead of doing that, what I'm going to do
now is I'm going to re grab this. I want
to press Shift D. I want to bring it down. Pull
it to the side, like so. So we're going to have
it round about there. And now we want to
make it smaller, but without altering this scale. So if I scale, you can
see this gets much, much thinner. We don't
want to do that. So what I'm going to
do is I'm going to grab the center with Alt Shift, and click in face leg. So Alt Shift click Alt Shift
click, Alt Shift click. So now you can see the
only ones we've not got selected are the backs and
the inner parts of them. And now what I can do
is I can press alters, and I can bring it in that way and make it smaller in that way, so I can press tes, like I say, tes and now it's
going to be smaller, and yet we've still
kept the same gap. The other thing is,
we should have also, as you can see,
the gaps the same. We've also kept them
at the same level, and that is what I wanted. Now, let's come in, and what we'll do is
we'll pull this out, and then I'm going to
press the eye button and bring this in like so. And then I'm going
to press the ebone once more and bring it in. And what I want to do now is, I want to if I press one, I want to keep some
of these here. So in other words, if I
grab this one and this one, I want to keep those as gears, like, kind of at the front. So I think with this,
I'm explaining it wrong. So what I'm going to do is
the two center ones in here, if I grab them going one, two, three, four, and then miss
these two, and then one, two, three, four,
miss these two, one, two, three, four, miss these two, and one, two, three, four, and
then miss those two. So you should end up with
something like this. Grab the center part then, and then what you want to
do is you want to press E and pull that back like so. So you're extruding
it back, holding the shift boon
wherever you want it, and then we're going to get
that nice relief on there that makes it a little bit
different from this pulley. Okay, that's that part done. Now we're on to probably
the hardest part of getting the actual bell onto here and making
it look quite nice. So what I'm going to
do, first of all, is I'm going to hide
this out of the way. I'm going to also hide
this part of the way, and then it'll leave
me just these pulleys on here that I can see now. Now, what I want
to do is I want to grab both of these pulleys. I want to press Control J, join them together,
it's going to make things much, much easier. And what I want to
do now is I want to grab this as it's just
going around the corner. So just coming round here. We're going to grab this, and we want to go to this part here, let's say, where the actual, you know, bell would be going. If I press F now, we can see now that the bell is going to be
going round like that. And actually, if we
look from all angles, that actually looks
pretty realistic. Now, don't worry.
We're going to make it look even more realistic. We're going to
grab this one now, and let's try grabbing. Let's try this one here. Press the F button
again, like so. And you can see the
problem is on that one. Is it's actually going through there, and we don't want that. So what we're going
to do is we're going to take this one off, and we're going to join it
on let's say this one here. So let's try that. F, and let's have a look. Is
that going to look good? I think it needs to
be the next one, so we'll take that one off, put this one on, press the
F button, and there we go. So now we can see,
is this one right? The belt is going to go round here all the way around. And
actually, you know what? That's looking pretty nice. Maybe we could get away with putting it on
the next one here. So, again, we're
going to have a look. So if it's this one here,
and then this one here. So what I tend to do
is I grab this one, and I'm going to grab
this one because this is the one that
I want to put on. I'm going to right click and
I'm going to mark a scene. And now you can
see, when I come in and delete that off,
so delete bases. Now I can come in and grab exactly the
ones that I wanted. So this one here, this one here, press the FB, and there we go, now I think that's looking
much, much better. Now, once you've got
it, come in, Press A, controlle and then we'll clear the seams,
and there you go. And then right click
and shade Ato smooth. And there we are. We've
got our belt on there. Now, of course, if you
wanted this belt to move, you want to be able
to actually have some control over this belt. So what I'm going to
do now is I'm going to duplicate this belt, make it so it's actually
its own object, not so it's attached to this, because, you know, we
need it to actually look a little bit, you
know, different from this. So the easiest way to
do that is to come in. What we're going to do
is lt, shift and click. If you can't lt shift, click, you're going to control,
click, Control click, going all the way
around, control, click going up to here, and
then come in. Control click. So you just holding control, clicking, going all the
way around, like so. Now, of course, we don't
want to delete this, and we don't want
to just separate it off because that
means that we're going to have holes
in our pulleys. So instead of doing that, let's just press Shift D. And then what we'll do is we'll pull this out, and there we go. Now we can get rid of these two, so we can press bleat and faces. And this is what
we're left with. That's exactly what we wanted. Alright, so now we need to
give this some thickness. So first of all, though, let's grab the whole
thing with L. So L basically selects all of
the islands that you want. And then what we're gonna
do is we're gonna press S and Y and bring
it in a little bit. And now I'm going
to separate it off. So P, selection, separate it
off. So now we've got these. We've got our belt before we do anything because we're going
to add a modifier in here. We're going to press Control A, all transforms right, click
Set origin to geometry. Now, let's bring
in our modifier. So one window is over
the right hand side, where this little
spanner is, click on it. Add modifier, come
down to generate, go down to where
it says, solidify. You can see it solidified
going inwards. We want to solidify
it going outwards. Now, it's a good job it
did this because you can see, Hey, what's
going on here? This doesn't look
right. The reason it doesn't look
right is the fact that wherever the normals are facing is where the solidifier is going to push it in or out. So what does that mean?
Generally, on a piece of mesh, you will always have
if you come over here, you'll see face orientation, you will always have
a front and a back. And this works to
make sure that when you send something
through to a game engine, for instance, you don't be rendering out the front
and back at the same time. So to optimize,
we basically say, right, this is the front,
we only render this. Or when we're using modifiers, it only takes in the front
or the back into account. So how do we change that round? There is an easy way
to change that round. All you're going to
do is just press tab A to select everything, and then shift N. And
what they'll do is recalculate the normals
for you as you can see. If I put it the
other way around, you can see it goes that
way, or it goes that way. But now you can see that
belt is looking pretty nice. From there, then,
we can go back, turn off face orientation. And then what we can
actually do is drag this over and put it into place, like so, and you can see
now if I put that in there, just how nice, if I hold shift. But if I pull it over and
hold the shift bone down, just how nice that
actually looks. I can easily make it a little
bit thinner if I need to. But actually, I
think that's right. Now, from there, then
I can actually change the thickness of this
so I can bring it down, holding the shift bone,
bring it down slightly, like so, making it
look even better. You might want to make it stick out a little bit on there. So I'll think a little bit
more, so I'm going to grab it. And what I'm going to
do is just pull it out just a little
bit, and there we go. It looks a nice thick belt that's really going
to turn this thing. From here, then I can press TH, bring back everything,
and double tap the A. Now, I would say when
using a solidify, I'm happy with this. I generally leave modifiers
on right until the end. So right until the end when I've actually finished the
whole of the model, I recommend you do the same. You might move something around. You might not be
happy with something, and that's why you
want to leave these. Now, the other thing
is at the moment, as you can see, these pulleys aren't actually into something. So what we need to do
is we need to grab the back and make
sure these are in. So all I'm going to do is, I'm just going to hide
this part of the way. I'm going to come
to the back here, I'm going to press the Ib. I'm going to do this one first. I want to press E, like so, and put it back in, and then I'm going to do the
same thing with this. And I did them
separate because I want them to be different sizes. I'm going to press I,
bring this one in, press the E but,
and pull it out. Now I'm going to press TH, bring back this part and just make sure that
these are in now, you can see here, this one's in and this one's in,
and there we go. That's looking quite nice. Okay, so on the next one, then what I want to do is I want to make sure that we've got
that band going over there. I think we can actually
put that in there. And what I can do now before
doing the back part of this is I can get away with
tidying all of this up, beveling them all off just before we do the
back part of this. So in other words,
this back part which is this p on here. Just before we do that part, we might as well tidy this up
because we know pretty much now that we've got the kind
of write scale that we want. We might want to before
finishing, pull these out. So if I grab all of these, I'm going to just
come in and grab each one of these grab
each one of these, each one of these and just
pull them out a little bit, just making it a little bit
more chunky than what it was. And I think now that's
looking pretty cool. Alright, so let's save our work, and on the next one,
we're going to start at, you know, tidying all this up, rounding off these edges, all that sort of good stuff. Alright, everyone.
Hope you enjoyed that, and I'll see you
in the next one. Thanks a lot. Bye bye.
13. Adding smaller decorative detail to the stylized windmill machinery using extrucion a: Welcome back, everyone to
Blend Beginners master class, the cookie Bac tree, and this is where we left off. Now, I think this
is a good time, first of all, just make
sure everything's okay. I think this actual ply here, I think, needs to be
a little bit thicker. Now, you've got to make
sure when you're doing this that we haven't got
this part selected here. So, what am I going to is, I'm just going to press
Shift H this time. So Shift H will dd everything
else out of the way, except this, and then I'm going to come into
here and press. Now, you can see
we have a problem there that we're selecting
the whole thing. Now, there is a
real good technique to actually stop that happening. All you can do is you can press Alt Shift and click on this one, Alt shifting, click on this
one, right click, Mcasin. And now, if you come in, and you select this with L, it will only go up to the seam. It's important, though, you
select it in face select, but it will only
go up to the seam, which means now I
can press S and E, and I can actually
make this much, much thicker, like so. Now, if I press old age
to bring everything back, you will see now that
is fitting in place, much, much nicer
than what it was. Alright, so that's looking good. Now what I want to
do is I want to bring in these parts here. So let's come in, and I'll
grab the front of here. So I'm going to press
Tab, grab the front, Shift S, cuss to selected. Tab, Shift A, and
then we're going to press Shift A and
bring in a cube. Let's press S. Like, so we'll bring it out.
Round about here. Pull it down to the floor. And then what I'm going to
do is I'm going to pull it up and I want to round
it so it's on there. Now, the other thing
is, I've got a lot of wasted mesh in there,
as you can see. Don't really want that, so
I'm going to press tab. I'm going to basically put this on so I can see on the inside, and then I'm going to pull it forward to where
I actually wants. So Ja stuck in there like so and then turn it off and it just makes it really,
really easy to work. Now, the other thing is, you'll see that I'm going to
have to pull it all out. But first of all, I'm going
to pull it up all the way. Up to round about here, and then I'm going to grab
the whole thing and press L, and then just pull it
back holding this if burn into place like so, and then just make sure
I'm happy with that. First of all, I think I need to make it a little bit thinner. So Sax, let's make it a
little bit thinner, like so. And then what I'll do is
I'll come to this edge here. And before we bevel, we need to make sure
reset all the transforms. But this time, I've
got my cursor here, and this tells me
it's in the center. So I'm going to right click
and set Origin 23 Dcursor. And the reason I want to do that is because I'm going
to mirror it over this side once I'm actually happy with it. So I'm
going to come in now. Grab the top of here,
press Control B, and then round it off,
like so, left click. And there we go, and I think
that's looking pretty nice. Alright, let's press tab. Let's right click,
shade Auto smooth. And then what I'm going
to do is now add in a modifier generate and we're
going to add in a mirror. And because the
mirror is based on the orientation of
the actual object, it will move it over
perfectly over this side. Now, with the mirror, you can also whenever you alter apart. So for instance, if I come in, I grab, let's say, this side. I can pull that in. It will pull it in on
this side as well. And the other thing
about the mirror is, if I want to move this, so let's say I want to
move the whole thing. Let's say I want to
move this to the left. If I'm moving object mode,
it'll move the whole thing. But if I come in, grab the whole thing in edit
mode and then move it, you can see now we can
actually control how we're moving it based on
that center orientation. Alright, so that's
looking pretty cool. Now let's come in and think
about now tiding all of this up before we move
on to the other parts. So first of all, let's come
in and round these edges off. So again, come in, Control A or transforms right
clicks origin to geometry. And then what I'm going
to do is grab this one, this one, this
one, and this one, I'm going to press Control
B and round them off, like so, press the tab button, right click, shade or to smooth. Alright, so that's
looking pretty nice. Now we need to make sure that
everything is rounded off. So First of all, we want to make sure
this is rounded off, this part here, this part here, and this part here round off. Now, let's do them
separate just to make sure we've got
control over them. So first of all, we'll
come to this one. Again, reset all the
transforms Origin, geometry, press Control
B, round it off. Just around about there.
I think that looks good, and then we'll
come to these two. And I'll do I think I'll
do all of these together. So one, two, and three. Press Control B, and
let's round them off. Like, so, right click, shade Atos move, and now you can see that's looking pretty nice. Now, one other thing I want
to do on this part here is, I want to bring this in to make a relief system because you want to make things interesting. You want to make sure that it's colorful and things like that. You can't really do
that if you've not got any reliefs on it. So
what do I mean by that? If I come in and I grab, let's say, this one,
this one, this one, and this one, I can now
come in and actually press the IBU and
bring those in. And what they'll enable
me to do, as you can see, it's enabling me now to actually bring this in and pull it out. Now, the thing is make sure
that when you bring this in, you have got offset even on. Just make sure that's on
when you're bringing it in with the eye button
like I just did. The other thing is don't
bring it in so far, where you're going to actually
start breaking the mesh. So be very careful
on parts like this. You really don't
want to bring it in, it starts breaking it. In other words, if I press
Control's, press the eyeb. If I bring it in too far, you can see it starts
breaking that mesh. We don't want that, so we
want to bring it far enough so that it looks nice and it's nice and even going
all the way around. Now, once we've
done that, what we can do now is we can press E, pull it out, and there we go. Now, what I'm going to do now is I'm also going to put
a relief on this side, but I'm only going
to put it in the top because we've got
already things there. So I'm just going to grab this. I'm going to press the Ib. I'm going to bring
that in like so, and then I'm going to
press E and pull that out like so, and there we go. Now, you can see this one stuck out a lot further than this one. You could have done them
both at the same time. I think, though, having a little bit of difference
in them is better. I'm going to pull it
out a little bit, so it's not so obvious, but a little bit of difference,
I think, is better. And as you can see, that's
why I've made them. You know, this one's
all the way down here, this one's down to
here, and I think that just makes it look
much, much better. Alright, so what about this
bo bit you might be asking? Well, the thing is, once we've
actually done all these, we're actually going
to be beveling them. So at the moment, I'm going
to leave that as it is because I don't want it that rounded like the other parts, and I'm going to come up
to this part here now. Now, the first thing is on this, I want to make sure I bevel
kind of the top of it. So I need to bring it up a little bit more
than what it is, so I'm going to bring
it up. Like so. And then what I'm going to do
is I'm going to press tab, Control A or transforms, set origin to geometry, and now let's come
in and grab the top. So we're going to grab
this one and this one, we're going to press Control B, and you can see now why I did that because then it
gives us more room. So like this, that's
looking pretty nice. Right click. And, you know, the one thing I
forgot before that, I really need to put kind of
a bottom in here, I think. Because if I try now
and press Control R, you can see we've not got that, which means that we'd have to go in and use the
bisect tool again. So, you know what? We'll make
this easy for ourselves. So we'll just press Control Z. We'll press Control R, bring in a new edge
loop, and this time, we'll just bring it down
to round about there. And now what I'll
do is I'll come in, grab both of these, press
Control B, bevel them off. Like, so, press the tab but, right click and shade Auto
smooth, and there we go. Now, let's finish this off. So what I want to do now is, I want to bring this in like kind of from here and
all the way around there. So what I'm going to
do is press Control. Left click, right click. You
can see on here how it is. Press Control B, as
we've done many times, scroll the mousewheel
all the way down, then get it to
where you want it. Now, we do want it quite chunky. So something like
this, and just make sure that this is still
fitting in there, which it is. Alright, also, make sure that this one is still fit
in there, which it is. Now, let's come down to this. So this one here. Control click going all the way
around to this one. And then what you're going
to do is press E, Enter, and then I'm going
to press Alter Ns and bring it in holding
the Shift but, like so. There we go, now, the thing is, you can see that these
are they stuck in? Let's see if they're stuck in. That one's stuck in there, and that one's just stuck
in. So you know what? They look pretty nice, so I'm going to turn this
off. And there we go. That is looking pretty cool. Alright. So now the one
thing we've got that I didn't do is I didn't put a
part of the pipe on here. So I'm just Yeah, it's
because I moved them out. That's why. So if I click
on this, you can see. So what I really want to do because I've pulled
it out a little bit, I think I want to move
all of these out. So I'm going to move
all out. A little bit. And I can also see that this, this here, and this
one here, I need them. I don't want this thing
hanging out too far. Or it would just bend over. So what I'm going to do is I'm going to grab this
one and this one. I'm going to press
the tab button and I can't see in
there at the moment, but if I put this on,
then I can see in there. And what I'm going to do
is I'm going to press Alt Shift and clip going
around each one of these. I'm going to press Control plus because I want to grab this bit, because if I don't
grab that bit, you'll see if I bend
them. It bends like this. We don't really want that.
So let's press Control Plus. And then what I'm going to
do is now I've grabbed them, I can actually turn this off, and then I can pull these out. So now you can see
they pull out really, really nicely, really easy
for me to actually do that. Alright, so that is
that bay as well. Now, that is all looking nice. Now before we move
around to the back bit, it's time to actually do
discuss our bevel modifier. But we're going to
do that in the next lesson because we're
running out of time. And the reason is
we always like to keep these lessons
around the ten, 12 minute mark, and that is
just to keep you engaged. Any longer than
that, you might want to go and grab a coffee
or something like that. It's better to actually keep them around the ten
or 12 minute mark. Alright, everyone,
hope you enjoyed that. I'll see you on the next one. Thanks a lot. Be bye.
14. Working on windmill attachments for Blender Beginners Masterclass: Welcome back, everyone to Blend the Beginner's
master class, the cookie factory, and
this is where we left off. Alright, so now we've got this. Now what we want to do is our
bevels that we spoke about. So the thing is, you don't really want to be
joining all of this together. And the reason is because
we're going to be having parts that are
actually animated. So when it's
something like this, we need to bevel
them off separately. So let's come to
this part first. Adding a modifier
generate a bevel. And you'll notice
when we bring in this bevel it comes
in like this. Now, I always tend to
have either not point, note, note three or not
point note, note five. Now what I also tend to do is, you will see on certain parts you will have problems
with the bevel. So for instance, if you come to something that's
a lot more complicated, like this gear, like
these parts here, you might have problems
with the bevel not working. So what I always
do is I come in, I'll go to geometry, and I'll turn the
clamp overlap off. And what that means is it will
basically cross them over. It will stop blender bevel in something if the actual
edges cross over. So what it means is
that you can get away with doing it
as long as you're very careful and you
keep this very low. So if I put this to note
point note note three, you will see now we've still got a bit of a bevel on there. And let's put it to note, point, not not five, like so. Oops. No point, not not five. There we go. Now we've got a nice bevel on there,
as you can see. The clamp overlap is off, and now what I should be able to do is I
should be able to apply this to the rest of
the model with no problem. So how do I do that? You
always grab the first one, which is the one that you
want the modifier to go onto. You're going to grab
the second one, which is the one with
the modifier on. You're going to press Control L, and what you're going to
do is you're going to copy modifiers,
and there you go. Now you've got that beautiful bevel on that part, as well. Now we need to do the
same. Now, when I do this, I tend to work in chunks. You can see this one's got a mirror if you copy modifiers, you will basically remove that mirror and just
add on the bevel. So if you've got
something with a mirror on, just apply it first. So Control A, apply the mirror. You can also, instead of hovering over and
pressing Control A, you can also come down
and we can actually hit the apply button
there as well. Like so. And now I can do is I can grab this one. Grab this 1 second. Press Control L, copy modifiers. And whoops, that was
the wrong way ran. Grab this one, grab this one, con troll L, copy
modifiers, and there we go. Now, let's work our way up. So as well, this obviously
needs to be shaded and smooth. So right click
shade Auto smooth. And then what I'll do is I'll
grab this one, grab this, C troll L, and copy
modifiers, and there we go. Let's see. Yeah, it's
actually working on that. We'll try it again on the
clamp overlap just so I can see that actually I can show
you that's actually working. So that's beveled off now. Now let's come to this one, and we'll do same thing again. So Control L, copy
modifiers, and there we go. Let's try turning. Now, I've not got anything I can show you. I wish I would have showed
you with the clamp overlap, but not at the moment, maybe I'll be on this one. We'll see. Alright, so now you
can see, they're all beveled off really
nice and beautifully, and now we'll just
work our way up, so I'm gonna come to these. Now, you can also
come to all of this. Just make sure you've got
no other modifiers on. So I can basically
grab all of these. I can grab the bell, and you can see I've got a
modifier on there. So I'm just going to click Down arrow, apply that modifier. And then what I can
do is I can grab this last press Control
L and copy modifiers. And what will
happen is I'll copy the modifiers to
all of these parts. So all of these now have
the bevel modifier on, as you can see, even on these. Now, the other thing is sometimes
when you're doing this, you'll see something
like this where it doesn't look like it's
not going on properly, and the reason is because we haven't reset the
transformations. I would say, once you've
actually got the bevels on, let's go back, grab
all of these parts. You know what? We'll
do that again. We'll do that again before applying it onto
all of these parts, so you can see no bevel on. I'm going to grab all of these. Including these, I want to press G just to make sure
I've grabbed it all, as you can see, and then right click to drop
it back in place. I want to press Control
A, all transforms, right click Set
origin to geometry. And now from here, I'm going
to grab this part last, and then I'm going
to press Control L, copy modifiers, and there we go, everything is beveled off. Now, let's see on this one. I I turn clamp overlap off. Nope, still contrary. I
will find one where I can show you that we're
actually working on, you know, properly. Alright. Let's double tap the A, Let's have a good
look round here. That's all looking
really, really nice now, and we've just got
these parts to do. So again, let's make sure we've got no modifiers on or
anything like that. Let's grab all of
these, press Control A, all transforms,
right clicks origin to geometry, grab this one last. Let's press Control L, and we're going to
copy modifiers. And then, we've got loads of beautiful bevels on there now. And this is looking really, really nice, and you can see exactly what
we're going for. It's got that
really, really soft look that's exactly
what we're going for. We don't want any hard edges. We want it to look really soft, and you're really
going to see this pop out once we've actually
finished this model. And I know this model,
it's taking, you know, a fairly long time to create, but we want to make sure
with the first model, we do everything as we're
going to be going forward, and I'll show you the right
way and the right pipeline to do things so that when you come to create
your own models, you can actually do
that in the future. Alright, so let's pull
this out a little bit. And what we're going to
do now is we're going to create the back of this. So this is where the kind of
flour is going to come out, and then it's going
to be going down. So first of all, I want
to create where the actual the conveyor
belt is coming out. So we're not going to
bring the conveyor belt in yet because that will
overcomplicate everything, but we're certainly
going to create the base where everything's
going to be coming out. I'm going to do is, I'm going to come to
the back of here. I've got my cursor
here. That will do because we know it's in the
center, so that's good. Let's press Shift day.
Let's bring in a cube. I'm gonna pull the cube over. I'm going to pull it up
into this part here, I want to press S and X, squish it in a little bit, and this is where I want my
actual flour to come out. Now, the thing is I want it probably down a little bit more. So something like
this, and then I'm going to pull it
into place, like so. Doesn't mid if you're overlapping
a little bit on any of these parts 'cause I'm gonna
put another pot in anyway. And this is basically going to be where my flower is
going to come out. So once I've actually
got this leveled up now, so the size that I
actually want it, I'm going to want another
block in here as well. So I want another block,
kind of be, you know, supporting it,
giving you relief, making the model interesting
all of that stuff. So shifts cursed to selected, Shift A, let's bring
in another cube. I'm also going to
save a work just in case you didn't save
yours on the last one. And then what I'm going
to do is I'm going to pull this back into place. Now, of course, we need
this much thinner. So S and X, let's pull it back
into place like so. And then what I'm
going to do is I'm going to I think this, this is going to be round
about the right size. This part here, I
mean, it just needs to be pulled back a little bit. So let's pull this back
a little bit into there. And then it looks like it's
actually slotting into there. This bit's on here where
I can put another piece, then that'll be supported there. And then I want this
bit going up here. Like so, and then
I can have a kind of n coming into here. So we'll do the vent next. So we'll now press Shift A, and we'll bring in another cube. We'll press S, and
we'll bring it up. And then what we'll do
is along the X axis. So S and X, let's
pull it in. Like so. Let's pull it over, like so, and now let's start to have a little bit
of fun with this. So let's pull it down. Now the thing is
when I'm beveling something, if I come in now, press Control A, all transforms, set origin geometry, do
what we normally do. So if we come in and
bevel it with Control B, we can see that it bevels
all the way back to there. Sometimes you don't want that. Sometimes you really want to control how that bevels working. The easiest way to do it
is bring in an edge loop. So control our left
click, tells Blender, I don't want it to be beveled
any further back than this, or if I bring it forward
any further back than this. What it means now is
if I press Control B, you'll see it goes up to
that point and you've actually got control of
how this is working. So if I bevel it off now, you can see exactly the control that I've got, that's
looking pretty nice. Albeit, I think I need to
press Essen'sEa and just bring it down a little bit into
there, and there we go. Now, let's think about
this bomb section. So I think we'll have
another box under here. So a box under here, coming down to just just
above this edge here. And then what we'll do
is we'll put kind of a strut going along
here to support it. So shifty let's bring
in another cube. Let's bring it down
to round about there. So it's just underneath. Then let's grab this face
and let's pull it back. So let's make sure that this, first of all, is all the
way back into there. And then let's also
make sure that it's not sticking past there.
We really don't want that. So all I'm going to
do is press S and X and bring it in to
round about there. Then what I'm going to do is, I'm going to come to the bottom, I'm going to pull it up
to round about here. And there you go. It's
fitting in nicely. Let's also make sure that this
is sat on there, like so. So it's sat on there
perfectly nicely. And then I think on
the next lesson, we'll add in a stroke
coming from there to there and then we'll kind
of do this part here, which is, you know, those parts where the conveyor
belt is going to come out. Now, the first thing
I want to do before doing that is I'm going to
introduce you to collections. So we're going to do
that on the next lesson, and I'm going to introduce you to collections because then
you'll understand, like, how we can put these things
in collections and keep everything nice and neatly organized as we
move on from here. Alright, everyone, I'll play
that for on the next one, and I'll see you
on the next one. Thanks a lot. Bye bye. Thank
15. Blender collections and layers basics for Blender Beginners Masterclass: Welcome back,
everyone to Blend and Beginner's master class,
the cookie factory. And what I'm going to do
now is I'm going to play a short introduction to
collections, and from there, then you'll understand when we come back on the next lesson, we'll start putting
these into some sort of order to make sure we
know what has been done. Alright, everyone. So I hope you enjoy this, and I'll
see you on the next one. Thanks a lot. Bye bye. Welcome everyone to
our collections guide. And you'll notice over the
right hand side in Blender, you will have something that's called them
collections over here, and this is basically how the old blender used to
actually handle layering. So with different layers, you would have different scenes or different objects in place. It's changed a little bit now, and in the new
blender 2.8 onwards, we're now dealing with
scenes and collections. First thing you'll
notice is over here that we've got one
that says collection. Let's call this
collection plane. And then what we'll
do is we'll actually put our plane into
that collection. Now, at the moment, you can
see within this collection, our plane is actually here, and we don't actually
want the other three. We want them basically into
a different collection. So what I'm going to do is
I'm going to right click. I'm going to go and
click New collection. And then what I can do is I
can call this cube. Like so. And then what I can do is I
can left click and drag and drop my u into the
new collection. And then what you can actually
do is you can actually close these up and you
can see how neat that is. Now, what we're going
to do is I'm going to show you the other
way of doing this now. So if we come to
our actual sphere, what I'm going to do is I'm
going to press the button. I'm going to then
click New collection, and I'm going to
click Sphere like so, press Enter or hit the Okay
button, and there we go. Now we've actually
got a new collection with our sphere in there. The other thing is
you can also come, you can press the end button, and then what you
can do from there is you can actually
click on one of these. So let's say we wanted
this cylinder in the cube, and it will automatically put
this cylinder in the cube. Now, if you don't want
that, you can press the end button again.
New collection. And let's put cylinder like
so, and then click Okay. And then we go. Now
we've actually got a really nice collection
sorted out really fast. Now, what about the
objects in there, then? Well, what you can do as
well is let's say we want to change the name of this
cube. We come on over to it. And instead of actually going
in here and renaming it, what we can actually do
then is press F two, and there you go, the
object name comes up. And if we change
this to cube 33, press en you will see now if we go to
the right hand side, this cube is called 33. Now, it's important
in large scenes to actually put things
into collections because that way
you can actually increase the performance of blender or you can hide
certain things out of the way. Because what you
can also do is you can grab multiple objects, press the M button again, drop them in a new scene. So a press new collection. And let's call this one objects
like so, and there we go. We have our new one with all of the objects
actually in there. Now, you can see, as well that because nothing
is left in there, we've not got this
little arrow there, so all of these are now empty, but it's quickly and
easily able to just press M and put them in their
own collections once more. The other reason why
this is actually important is because many of the displacements
or particle systems and lots of other things within blender or even geometry nodes, you can actually use
collections to do certain things to a certain
bunch of collections. Okay, so the next thing
we're going to look at is over on the
right hand side, we're also able then to hide
any of the collections. So if we click the
little on here, that will mean that this
collection has been hidden away from
the viewport view. Now, it's important
to distinguish between viewport
and came review. So the cam review basically means that if I click this off, when I actually to
render this scene, everything within
this collection will be hidden out of the way. It won't cast any shadows
or anything like that. I will all be hidden
out of the way. Now, the other one we've got
is this little tick Bon. If I select this, you will see that it just
turns both of them off, so it won't be visible in the
viewpot nor in the render. Now, the other thing to look at is if we click this
little down arrow, we also have a few
interesting ones here. So we have one that
says indirect only. We have one that says hold out. But the ones we're
most interested in is actually this one here. So if I click this little arrow here you can see now
we get a new option, and if I come and
click it on here, you will see now that
if I come across, these will still be
rendered in the viewpot, still rendered in the render, but I'm not able to
actually click on them, which makes this really
handy if you're trying to grab a load of actual assets or objects that you
won't actually be actually selecting this
collection on top of that. The other thing is,
if I turn this on, I can also do a search
here for let's say cube, so if I type in cube, so I'm able now to
quickly and easily find it within my actual scene. The other thing is over on
the right hand side as well, the double tap, the abon to deselect everything
also actually works. So let's turn this off now. So now let's have a
quick look at this in actual action in a real scene. So you can see here we have
a scene here with many, many, many parts,
which aren't named, and we need to basically put these into their own
collection because you can imagine a scene like this with
thousands of parts all in the same collection
is obviously having an impact on the
blender performance. So what I'm going to do is I'm just going to hide the floor, hide this part of the
floor, hide maybe this car. And then what I'm
going to do is I'm going to go over the top. And all I want to do now is just make sure that I'm
not going to select anything else apart from
this actual building here. And then all I'm going
to do is I'm just going to press B and just try and select everything on that
actual building like so. Just make sure I've not got my camera selected or
anything like that. And then what I'm going to
do is I'm going to press the N bourne new collection, and let's call it butchers Shop, and then press Enter
and click Okay. And now what I'm able
to do is I'm able to now come all the way
to the top of here, so if I go all the
way to the top and then start closing up, these collections like so. So we've got square
building there. We've got bookshop and butchers, and now we've got
the butcher shop, which is the one that
we've just made. And now you can see just how quickly I can actually
clean all that. I have come along and
I double tap the A, so I've not got
anything selected. I bring back my floor like so, I double tap the A again. And then what we're
going to do is just close hide the butcher
shop out of the way. And you can see this is the parts that I've actually missed. And then all I can
do is I can select these three parts or
four parts like so, press M, and let's drop them
into our butchers shop. And then they'll be
hidden out of the way, leaving the other
parts that are left, which I actually missed. So butcher shop again,
and there we go. So now we're able to hide the butcher's shop or we're able to bring it
back into the scene. So from there, going a little
bit more advanced now, what we're also able to do is hide all of our
collections in one go. We just need our mouse
in the viewport, and then all you need
to press is number one, and what that'll do is hide
all of these collections. From there, what
you can actually do is you can press number two, and what that'll do
is actually bring in the gray box or the second
collection on there. Number three, then brings in the third actual collection and so on and so on and so on. As you can see, up to a maximum, I think, either nine or zero. So you can see very, very
easy once you put them in collection to rename them to actually increase the
performance within blender, to hide them in the actual viewport or
hide them in the render. And then also once you've
done that, to select them. It'd have to be a
very, very big scene to have more than
ten collections. Within the collections as well, you can also add
inner collections. So if I put new here, and you'll see if
I open that now, we've actually got a
new butcher shop one. So within the collections, you can also have collections
within themselves, and you can build a really, really large
hierarchy from there. Alright, everyone, so I
hope you enjoyed that. I hope you found it useful. Thanks, every one. Cheers.
16. Creating exit box for flour to come out for Blender Beginners Masterclass: Welcome back, everyone to
Blend Beginner's master class, the Cookie factory, and
this is where we left off. Okay, so now we've learned
about collections. Let's put that into practice. Now, you can rename things. So if you press F two, you will see that you actually come up with an object name. Now, in this particular one, it's not so important to
be naming everything. It really doesn't help because we're not going to be joining everything together. We're gonna be animating
a lot of things. It's way more important to
put things in collections. So, in other words,
if we press M, we can then make
a new collection. As you've seen on the introduction to collections,
you can now come in, make a new collection,
and we'll call it the flour mill. Like so. And then we're going to
drop that into there. Now, you'll see if
I click this up, we've got the flour mill
with this cube in here. What I tend to do
then is I come to the flour mill, hide
it out the way. Then what I'll do is
I'll go to this bit. So, put it in the flour mill,
hide it out of the way. And the reason I'm doing
all this, by the way, is to make sure that
whatever I've bevelled off and already finished,
I'm not redoing it. That's why I'm doing this. So now I'm going to
come to this part, flour mill, M, flour mill, and just basically
put everything in. You can also grab many
things at the same time, so you can grab all of these, like so and flour mill. Grab both of these, flour
mill, and there you go. They're all in there.
I also tend to put my little guy 'cause
you will end up losing him. Trust me, putting him his own. So I just put him in
a human reference. Like, so enter Enter again. And now I'm never gonna lose him because
he's always there. You can also do a
search from him as well just in case
you do lose him, cause trust me, guys, you are gonna lose him
at some point. Alright, so now let's think
about these parts here. So I think we want a nice. I think we'll have a relief on the back of here. So
let's do that first. So what I'm going to do is
I'm going to grab the bag, I'm going to press
I, bring it in. And then what I'm going
to do is just pull it out just a
little bit like so. And then we'll put a
strut going from here to here just to kind
of hold this part up. So what I'm going to do is
I'm going to first of all, make sure my cust
is in the center, press shift a bring in a
cube, make the cube much, much smaller, and then let's put it into place where it's
going to be holding this up. So S and Y, like so, and then we'll
put it into there. Like so, and I think I'll also drop this
down a little bit, and, I think that's
about the right side. So something like
that, pull it down a little bit, and there we go. And then we'll do
is, I'll press Shift D. And I'll make sure it's
following along this line. I'll spin it round,
so R and X, 90, and then we'll put
this bit up into place along here, like so. And then what I'll do is I'll join these two parts together. So I'll press Control
J, join them together. And then what I'll
do is I'll come in, I'll grab the front or the bottom of this and
the front of this. I'm going to press the Ibn
to bring them in. Like so. And then what I want to do
is join these together. So you will see though, when I brought this eye in,
you can see it's messed up. And the reason is, I need
to reset all my transforms. So let's resell the transforms. Now press the I, and now
they're going in perfectly. Now, with these two
faces still selected, we can right click and
we can come down and we can go to bridge
faces like so, making that really,
really easy and a really nice strut that's holding
that all into place. Now on the original,
my strut was much, much thinner, but I think you can't
actually see it there. It was much, much thinner, but I think this one looks much nicer, and, yeah, it's
done a lot better. Alright, so we've got pretty
much all of that finished. Now we need to think
about the inside up here. So what I'm going to do is I'm going to come to this part. I want to press the Ibonn
first of all, to insert it. Now, the one thing I
didn't check again, I need to reset
all my transforms. So set origin to geometry, press the Ibon to
bring it in, like so. And then what I want to do is now I want to bring that back. So I'm going to press
E. And this is where obviously I need to bring it back right back now into there. I want to just hide
that out of the way. Now, from here, what I want
to do is I want to now use this bottom part to create, you know, the kind
of flaps where the flowers going to
come through and things. And I also want to make sure that my conveyor belt is going
to come from here as well. So I need the flaps coming quite low down to round about here. So what I'm going to
do is to do that. I'm going to grab this
edge here because this is the perfect
length of this anyway. I'm going to press Shift D. And then what I'm going
to do is I'm going to press E and then Z
and pull it down, so it's going to
be down to there. And then what I'm going
to do is I'm going to press E and Z and pull it all down
to here. Like so. All right, so now
I've done that, what I can do is I
can grab it all. I can pull it this way, and
then I want to press P, separate it off, tab, grab it again, C troll
A, all transons right. It's a origin to geometry. Now I want to do is I want to separate these two parts off. So this part here, I basically
want to extrude this out. So E extrude it out like so. Now, what tends to
happen as you can see, it's extruded it out and it's
actually took the back off. Now, luckily for
us, on this part, we don't really need
the back on it, but just take that into account. If you ever extrude
something that way, it might remove
the back on there. So just take that into account. Alright, now what I want to do is I want to pull this forward, and you can see, it's
still attached to there. So all I want to do is press Y, and then it's just going to
separate that out, like so. Alright, then what I'm going
to do is bring this in. So S and Y, bring it in very slightly, and then we're going to press P selection and
separate that off. So now I've got these
two separate pieces. Now what we want to
do is we want to create this kind of
rounded part on here. So the easiest way to do
that, it, first of all, to come in, press ControlR and bring in a number
of edge loops. So let's say this many,
left click, right click. And then this is
going to dictate how wide these actual flaps are. The other thing,
of course, is we need to separate these off. So what I'm going to do
is I'm going to come in. I'm going to grab this one,
this one, and this one, press the Y but, and now all
of these are separated off. Now, what I want to
do is I want to make sure that they're not
actually touching each other, so I'm going to press
A to grab everything, and now they're
all separated off, I can actually come up, put
this on individual origins. Press S and Y, and you'll see I can bring them all in as far as I want now. Now, of course, I don't want
to bring them in that far. I just want to bring them in
a little bit just so they're not touching like sos and
I've got a little gap down. And what I want to do
also is I want to make sure that I've got a beveled
edge on this bottom here. So what I'm going to do is
I'm going to press Control A, A transforms, resettle
the transforms. Put the origin to the center. And then what we'll do is
we'll grab all of these. Now, instead of just
going and grabbing amle, you can see there
if I press three, I'm going to the wrong side,
let's press Control three, and then we go to this side. Press the B button, and what you can do
is you can actually drag and grab them
all at the same time. So just these vertices down
the bottom, and from there, then what I can do is
I can press Control B, and nothing happens because
when it's a vertice, we need to press
Control, Shift and B. And there we go. Now we can
round all of those off. And there you go. You can see
that's looking pretty nice. Now, of course, these
need some actual limb depth to them. Now, if I come in and
press A and press E, you're going to see that
it's gonna probably. No, it didn't. I actually
didn't, so he did it right. So actually, that's
going to work. So I was going to use
the solidifier modifier if they didn't come out and
if it deleted all the bags, but in actual fact, it's worked. So again, it's always about knowing what you can use
to get away with things. Let's right click then and
shade Auto smooth like so. And let's then drop
these into place. So I'm going to pull
all of these back. Now remember, one thing we
said is that we need a gap on the bott for our conveyor belt. Now, I would say at the moment, this is looking a
little bit small gap, but I really don't want to. I need to pull these up here
and give a gap like this, not, shrink them down. If I shrink them down as well, I'll lose some of
that bevel on there, and I don't really want
to do that, either. So what I'm going to do is I'm just going to
pull them up there, and then going to
press Control three. I'm going to press
tab. I'm going to make sure I can
see through there. And then what I'm
going to do is I'm going to grab all of these. So B, grab all of these, and then just pull them
all down a little bit just to make sure they're
more in line, like so. Alright, that's looking pretty
good. Double tap the A. And I'm just looking if I'm
happy with how those are. I think we've got a little bit of a gap
down there and there. You know what? I think
that's looking pretty nice. Now, let's come in and just bring the rest of
our flour mill back. And again, what we'll do now
is we'll grab this part. We'll grab this part, this part, this part, this
part and this part, and finally, this part. And we'll go Control A, A transforms, right
click, Sarogin geometry. Right click, then,
shade at smooth. And then finally, we'll make
sure we grab this one here. And we want to copy this bevel, so Control L, copy modifiers, and there we go. We're done. That's looking pretty nice. Now, we have got, as
you can see, on here, a bit of unevenness on
this actual bevel here. So let's try first
of all, Control A, right click, Shade Auto Smooth. That's not really
working. So sometimes I tend to just turn this
down, and there we go. Now that's actually working. So you can see that's
looking much, much better. If you've got an
edge here like this, what I also tend to do is
I will bring this part in, so I bring it in
just a little bit. Press the E born just to make a little
bit of relief on there. And it makes sense why that actual edge is
there rather than, you know, trying to
get rid of this edge. We could get rid of this edge. We're not going to
do that right now, but you can see now all of
this is looking pretty nice. Alright, so now all I want to
do is I want to put all of these into this one
here, so flour mill. So if I grab all of these,
press the bn, flour mill. I can see what I've got left. Press, flour mill,
and there we go. Now bring them all
back. Double tap the A. And basically, that
is the flour mill, pretty much done guards. So now what we'll do
on the next lesson is we'll actually start
looking at bringing, you know, being able
to turn our render on, being able to put our
lighting on things like this, which are really important. So what I think I'll do
is on the next lesson, I'll give you an introduction to rendering in Blender
cycles and EV. And from there, then we
can actually start messing around with the cycles
engine, turn it on. It's a bit in depth for
this point in the course, but I think it's really
important to know. And as we go further
on into the course, I will show you more tips and tricks about rendering
in cycles and EV. I also think that cycles is still best render engine
out of EV and cycles, although I know some of you will struggle using
cycles all the time. So you'll have both
options there, really. But when you come to render out, make sure we're using
Blender cycles. Alright, everyone, so I
hope you enjoyed that. I'm going to save out my work. And on the next one, as I said, I'll introduce you to that. Thanks, everyone. Bye bye.
17. Blender rendering cycles and eevee basics for Blender Beginners Masterclass: Welcome back, everyone to
Blend Beginnings master class to the Cookie factory, and this is where
we left it off. And now we want to be able to do is we want to actually be able to bring in our
Cycles render engine. And if you can see,
at the moment when I bring my lighting in,
nothing is happening. We have no lighting in here. We have no real EV
or cycles on here. We're going to set all that up. But first of all, I'm
going to introduce you to rendering
in cycles and EV. And then when you
come back, we'll get some lighting set up. Alright, everyone. So I hope you enjoy this next one, and
I'll see you after it. Bye bye. Welcome everyone to the IV and cycles
part of the course, and this is a full guide on both the EV and the
cycles renderer. So the first one we're going to approach is the actual EV. And you can see the moment I have a scene setup like this, and I'll be using this to go
through the various options, and after which, you can
give it a try yourself. So the first thing at
the moment is we're on actual shading object mode, and we want to be
on the EV renderer, so I'm going to click that on. Now, you will notice
at the moment I have a sun and I have a hero l over here as well
for the other demonstration. So first of all, let's come
to this actual object here. And what I want to
do is I want to, first of all, go over
to the right hand side, where the render options are, and you'll see this
is actually on EV. Now, the first thing I want to discuss is not the sampling. We'll come back to
that in a minute. It's actually the
ambient occlusion. If we turn our
ambient occlusion on, you will see that able then
to actually make much, much better shadows
within our actual scene. So, for instance,
this actual cube here, if I turn it off, you'll see that all of
those shadows disappear, and if I turn it on,
enhances the shadows. We're also able to
go in, as well, and we're able to
come over to where the distance is and
turn that down to zero, and you'll see that makes
them all disappear. And as we turn it
up, we end up with more and more actual shadows on there up to a certain
point, as you can see. But you can see now turn
it off and on makes a real difference to how your scene's actually
going to look. Basically, what I'm discussing
here is the setup of V, and then we're
actually going to go over and actually
render that out. Now, let's move on to the next part of
this demonstration. And what we're going
to talk about now is the actual samples. So if I come up and
open this menu up, you can see at the moment
that we have render on 64 samples and
the viewport on 16. Now, not only does this give you a better
quality of image, but also the main reason is
that we can actually get a lot more definition on
these actual shadows. You can see if I zoom in here, these shadows are
kind of pixelated. But if I come in and let's say, put this to 300, you will see now it makes a real difference in
how the shadows look. It makes them much more
realistic and much better when you actually
come to render this. Now we're actually
going to discuss the other powerful
thing with EV, which is screen
space reflections. So at the moment, if I turn that on and I come to my
ground plane here, let's actually mess around
with the actual roughness. If I turn this down, you can see we end up with
loads of reflection on here. If I come then over and turn off screen
space reflections, you can see that all
of those reflections don't actually reflect on
this ground plane anymore. So this is why this
is so powerful, especially if you're
doing things like really, really shiny objects or metal, you really want on screen
space reflections. Let's just go back to my
ground plane now and just turn it back down on the
actual roughness. So let's turn it up a
little bit, like so. And then we've got
some reflections, and let's move over
to the next part. So we can see at the
moment we have this light, but it doesn't look very
good at the moment. We can see it has got a bluish
tinge reflection to it. But if we come back
over to Eve now, and what we can do is we
can actually turn on bloom. And now you can see that
we've got some really, really nice light and also
reflections enhanced, as well. We can also open up the bloom, and the best thing about the
bloom is we can actually control how much this is
going to actually bloom, how much fogginess it's
going to have to it. You can see the range that
we can put on there as well, and you can also see
that we can turn up this intensity all from
within the actual EV option. There are a load of
options within EV, and to go through all of them, honestly, would be like
doing another course. But what I want to show you is just one more thing within EV, which is where we have shadows. If we open this up,
we will see that these shadows actually come with their own resolution map. And at the moment,
they're on 512. The higher I turn this the better the actual
shadows are going to be. So if I put both
of these on 4,096, you will see now that when I actually come to
render this out, these shadows are going
to look even better. They even look better
in the actual view pot. So now all of Deans, I brought an actual
camera in place, and I just want to show
you one more thing before we hit that render but. If we come back to our monkey
and we click on our light, so let's click on
our light here. You can also come over
to the right hand side, and you'll have something
that says shadows. Just open that up and
click on Contact Shadows. And you will see now
just how much nicer, especially around these eyelids, how that looks, so you can see the difference and
how that looks. So all these things together, including the ambient
occlusion, the bloom, and the screen
space reflections, can make for a really,
really nice render. Now, it's important to remember, that EV is designed as
a real time renderer. So something like in a game
like real engine or unity, that is where a real time
renderer will be used. Whereas cycle, on
the other hand, is not actually meant for that. It's meant for getting really, really high quality
images or animations. It's not meant for
actual real time. So now what we can do
is we can actually go over and hit
that render button. So it's just render
image with EV, it's not like cycles where
it builds up and up and up, and then you actually
get your final render. It actually is just there. So 1 minute it's not
the next minute it is. Now, depending on how many
samples you actually ask EV to actually render out is how long it's actually
going to take. So you can see at
the moment, this has took around 3 seconds, and this is another
reason why you might want to use EV
because it's very, very fast at
rendering things out. So let's close this down now, and let's move on over to
our cycles render engine. The first thing to note is, when I actually turn
this over to cycles, it's going to be
much higher demand on your actual system, especially when we're
in the viewport view. You'll also notice, as well, that it's pretty
grainy at the moment, and this is because
we just need to turn on the viewport denoising, although this requires a lot of performance
from your machine. But you can see
straight off the bat that this is looking really,
really nice already. The only thing is,
whenever we turn around, because it's not a
real time renderer, it's going to take a little
bit of work to get to a certain level of samples
that you might be happy with. Now, the other thing
is at the moment, you can see under cycles, we also have a
device, and this is basically telling Blender
what device to use. So it can be your
CPU or your GPU. I do recommend that you use
your GPU rather than CPU if available because your GPU is much better at
handling rendering. So now, before we go into any of the options in the
cycles render engine, what we first need to do
is come over to edit, go down to preferences, and what we first need to do is go up to where
it says system, and from there, we can actually change the options for cycles. So what I'm going to do is I'm going to come over
to where it says optics you might not be able
to actually click this on. I might be down to Coder. This Optics X is the
CyclesXRnder engine, so we do have a new version of cycles in Blender
four onwards, and it's called CyclesX as well as come in with a host
of different features, which will increase the
quality of your renders. It's also, much faster
than the old cycles. If these options are
actually great out for you, that means that you
just haven't got a graphics card that
actually supports it. I do know that QDa, I think, is anything from Nvidia's
second series and the Optic sex is anything from the high end of
the second series, and certainly on the
third series of Nvidia. I'm not sure about the
other graphics cards. So you just have to pick whichever one you can,
the highest one you can. And unfortunately, if
you can't pick any, then you'll just have to
have the basic cycle. All you need to do to
enable that is, again, just put it on Optics ex
and take both of these on. So I like to tick both
of these on just in case blender can use both of them together to
speed up performance. So once you've got
those ticked on, or you've got your
Kubia ticked on, then what you can do
is close that down, and then you can come
over to where it say CPU and put it onto GPU compute, and you'll see just how much
faster that actually is. If I now move around, you can see how fast
this actually speeds up, and that is because
we're now using our GPU. Alright, so now let's go
through a few of the options. So you will see
under light paths. We've got a lot of options here. Now, all of these options will change the way that you're
seen actually looks like. We won't go through these, but these are where all of the light options will actually be from the transparency to the glossiness of
the actual scene. So you're free to mess
around with these. Just be aware. The
higher you put these, the more performance is
actually going to take. The other thing you
need to know is that sometimes when we're dealing with certain
shaders within blender, they won't be able to
be rendered out in EV, and it's normally down
to the ray tracing power of cycles that will actually be able
to render them out. A lot of the times
when we're dealing with something that has
a transparency in it, for instance, or something
that has displacement, and it's built through
the actual shader. So it's a material built
through the shader, you will have to actually
use blender cycles. Now what we're going to
do is I'm going to come down and just go through the performance options because performance on actual
cycles is very important. Now, depending on if
you're using your CPU or your GPU is how important it is to get
the right tile size. The higher the tile size, it is, the better it is
for your graphics card. The lower the tile size, the better it is for your CPU
or your computer processor. So whichever one you're
using to render out, whether it be your CPU or GPU, just take these into account. So again, CPU, lower tile size. So something like 64 and GPU, higher tile size,
something like 2048. The next thing we
want to look at is this use spatial splits, and you can see what it says longer build times
faster render. So just make sure that
you tick this on because what we're also going to
tick on is persistent data. Once we've ticked these two on, what it basically means is, it's going to take longer
to actually build out the scene than it
is to render it. If you don't tick this
on, it's going to take a certain
length for each one. Finally, the next thing
we want to discuss now, we've gone through that is
the actual color management, and you will have this
within EV, as well. I've just saved two cycles. Now, if you're
using Blender four, you will have a view
transform that says AGx and this is the new
actual view transform. This one is supposed to
be the most realistic. If you're using older
versions of blender, we'll have something
called filmic, but I recommend with
a new one using AGX. Now, you've also got a look which you can actually change, which is really
handy, especially if you're doing stylized scenes. And you can change this look to something like very
high contrast, or you can change it
anything in between. So you can have base contrast or let's actually let's
put it back on AGX. Let's put it on something like
a medium, where's medium. So medium high contrast. And you can see now this scene is looking really, really nice. Now, you can also see
a few other problems with blender cycles. One of them being, we don't actually have any
ambient clusion. We don't actually
have any bloom. So although everything looks
better in blender cycles, not only are you going to lose all that
straight off the bat, but also, you have to then come in and set it up
in the compositor. So this is why you
really need to think when you're
rendering out a scene, whether you want to render
it out in EV or cycles, EV is much, much faster and everything is there
straight off the get go. Cycles is much, much slower, needs a lot more performance
from your machine. And on the back end, we
also have to go into the compositor to get a
really, really nice image. Before we finish and
actually render this out, it's also very important with lender cycles how many samples you're actually
going to work with. So you can see here
where it says render, not the viewpoint on
where the render one is. You want to set this
pretty low to start with. It is set as default of 4,096. I recommend setting this at 200. Lapping is then, it's got a
noise threshold on there. I'll hit near that 200, and then the noise
threshold will kick in and basically denoise
your actual image. In other words, get rid of all those fly flies
and things like that. Now, if we come up and
what we're going to do before hitting the render bun, I also recommend if you're
working in cycles that you put this onto wireframe because then it's going to
save on performance, and it's not going to be rendering it out
in the viewport, as well as trying to render
it in the actual render. So let's put this on wireframe. What we're going to
do then is come over to render, Render image. And here we go. Now,
you can see it's very, very different from
how actual IV works. You can see it builds up,
builds up, builds up. You can see on here
the samples going up, and then you'll see
it actually finishes, and we can see it
took 12 seconds, which is around six times
longer than what IV took, but you can see it's a really,
really beautiful image. There's just no
ambient occlusion or contact shadows and
things like that on here. So that's the
difference, everyone. Now, the final thing
before I finish is, I want to show you just one
more thing that's important that you can do with both
EV or blender cycles. And if I come to my camera, and all I want to do is
just hit camera to view, and I just want to put my actual camera in this position just so I can
see the background here. And then all I'm going
to do is I'm just going to come down
to where it says, film, open that up, and you will see one that you've got here that says transparent this is how you create an image with a
transparent background. If I know go to
render out my image, you can see now it comes with
a transparent background. You can also see because we've got that persistent data on now, it's a little bit faster
than what it was before, and it's just under 8 seconds
instead of 12.5 seconds. Alright, everyone, so I
hope you enjoyed that. I hope you learned
a lot from it. We will go into a
lot more detail about this as we're working
through the course, whether we're working in
EV or Blender cycles, and we will be
discussing, as well, of course, the compositor
in Blender cycles. Thanks everyone. Choose. Okay.
18. Setting up lighting and first material for windmill for Blender Beginners Masterclass: Welcome back everyone to
Blend Beginners master class, the Cookie factory. And so you've already seen then how we go about
doing cycles in EV. So what we're going to
do now is we're going to go to edit preferences, and we're going to
go down to system. And I want to make sure that
these are set to Optics x. If you have it, if not cued it. And unfortunately, if you
don't have any of those, it's going to be none. Make sure you've got
the right graphics card and the right CPU. And then what you need to
do is close that down. Go over then to the
right hand side. You've got IV or cycles. Let's put this on cycles. So I'm going to put it on
the cycles render engine. What I always tend to do, is I put denoise on. This is pretty heavy
on performance guides. So if you're ever struggling
with performance, make sure to turn this off. It's one of the easiest
things you can do. And also, I always put
maximum samples up to around 200 just
in the beginning. You might want to reduce that, you know, if you've got
a lower end machine. Alright, so now you can see that it's looking
nice and all that, but we've got no
lighting in here. Now, everyone talks
about bringing suns in, bringing point lights in, or even bringing HDRIs in. Honestly, when I
work, the easiest one I tend to bring in
is a sky texture. I think it's the best thing in blender, actually, for lighting. So I'll show you
how that works now. So first of all, let's go
over to our shading panel. Now, when you first click
on your shading panel, it's going to take a little
bit of time to load up, and now we've got it on here. So what I'm going to do is
I'm going to go first of all. Now, this is the objects
where normally we're putting shaders and
textures onto our model. But what we want to do is
we want to first of all, come and put this on world. Now, the world, as you'll see, is this. So this is the world. So what I want to do is
I want to first of all, come into my background, put it onto render, and then
you'll see the difference. And if I delete
this, so delete this out of the way,
everything goes black. From there, then I
want to search and I want to look for sky texture. Bring in your sky
texture and add that in. And straightaway now, you'll see even straight off the bat, it looks really, really nice. You can see it's well
late. You've got some nice shadows in there
and things like that. And the other reason
why I want it while I like using this I
put this on render, is because of the fact,
if I go back to wild, you can see it's really, really
easy to rotate your sun. So if I bring this round, you can see I can rotate
it as easy as anything. I can also lift
up the elevation, drop down the elevation, and that is why I
like it so much. So from here then, let's
put some settings in. So Sunsize is basically,
if we look over here, we should be able to see a sun somewhere have a
look, let's drop this down. Then I got a good idea. Where is our sun.
There's our su there. Let's bring it up a
little bit, a little bit. Now, the sun size, you can see, if I now go over here, I can increase this
to massive amounts. I tend to turn this
down right down to 1.5, so I can barely, barely see it. The sun intensity, I tend to turn this all the
way down to something like note point note five or something like
that, or even lower. Actually, you can go
even lower with this. And now you can see this is
like a sunset or a sunrise. Now there is a sun elevation. Let's put this on something like 75 to give us more
of a daytime scene. Let's set the sun rotation. Let's put it on 45 or
something like this. And there we go. Now, let's
come to the altitude. The altitude, basically,
the higher you go up. So if I put this on 20,000, for instance, you'll see it's really blue because
it's really high up. As though you're in, you know, top of Mount Everest
or something. I tend to leave this alone. Unless I want a certain field. So if it's an icy continent
or something like this, then I'll mess around
with the altitude. And then finally,
we've got these. These do a lot of
different things. As you can see, I
can change the sky. I can change the dust,
how it's going to look, and I can change
the ozone, as well. So if you put in no
point note five, you put in 1.769, and finally, you put in 6.923. These are typically what I
have on in the beginning, and then I'll go and
play around with these once I've actually
finishing the bill. But for me, you know,
getting these things in, rotating it round, so I've got a good view of everything,
these are kind of what I have. You know, there's not too
many horse shadows in there. You've got a good
view of the model. And once you start bringing in materials and
things like that, which we're going
to be doing soon, then you'll really get an idea of how the models going to look, and that is the most
important thing. I also find with
the sky texture, it is quite low on performance. You know, it's lower than HDRIs. It's much lower than
bringing in, you know, light sauces, suns, you know, point lights and
all these things. So I find it incredibly
useful to work with this. Alright, so now we've
actually built this. We've actually got
all of our bevels in, everything's done
basically for it. I think it's now time to actually come in and just
make sure, first of all, let's put this up because I moved from layout to modeling, and I forgot to actually
tell you that layout is when you actually want to use
the timeline for animation, and modeling is when
you want to get rid of that timeline
and have nothing there. That's basically the
difference between the two. So now you can see I've
got my flour mill. If I hide all of that,
everything is hidden, which means that everything because we know we put them in those collections
because they're all beveled off and
things like this. Alright, so now we're going
to do is we're going to bring in our first actual material. So let's head on over
to our shading panel. Now, typically, in my courses, I tend to use a lot
of ambient occlusion. I think it really,
really helps you in the beginning because
it really helps your model stand now, you know, and it really adds
a lot of shadows in there. And it really gives
you a good feel of what your actual
model is going to look like when it's actually
composited and rendered. So what I'm going to do
is instead of world, I'm going to put this to object. So what I'm going to do then
is I'm going to hit New, and we want it to be
actually on this one, so I don't know where
I put the one on. Let me just go back
and take that off. Alright, let's click
on the bomb one. We're going to click
No. And basically, we want this to be a
beautiful orange color. We want it bright. We want it saturated,
things like that. So what I'm gonna
do, first of all, I've got a principle in here. At the moment, this is the thing that
controls everything. So you can see, if I
change the color of this, it will change the color
of this part here. So I'm just going
to put it back, though onto white because
I'm going to show you another way of
doing all this. So first of all, then,
let's bring in our color. So I'm going to go Shift D, I'm going to search and
I'm going to go to color, and the one on one is
mixed color like so. Now we don't actually
want this as a mix. What we want to do is we
want it as a multiply. And the reason we want
it as a multiply is because we're going to bring some ambient occlusion in there. So what I'm going to do
is I'm going to press Shift A, search
ambient occlusion. And basically ambient occlusion is how dark the crevices are, how light the edges are
and things like this. It gives a lot more
depth to actual models, even on simple
shaders like this. So let's bring that in. And then what I'm
going to do now, I'm going to bring
in a color ramp, so shift a color ramp. Like so. And then this is
going to say to Blender, how much darkness do you want in these little crevices
and things like this. So I'll show you
quickly what that does. So if I plug in my color into
the fact of the color ramp, and then I plug in the color into the bottom
of this one here, and then finally, I plug
this into my base color. There you go. Now you've got
a little bit of difference, you can see I bring this up now, you'll see now we're
starting to get some real variation
in those crevices. I can bring this
back as well and drop that back or, you
know, whichever I like. So what I'm going to do
is I'm going to bring this just to the end of
where it says linear, and I'm going to bring
this blacku just to the start of where it
says linear, like so. And you can see already now we've got some actual
depth in there. Looks much better than
what it did before. Okay. So now we want to
actually give this a color. Now, on here, we've
also got this factor. So we can turn this
down all the way up, and you'll see this controls how much of this is actually
being put onto the model. I want to put this
a 0.450, like so. And then what I'm going to do now is I'm going to
bring in my color. So we're going to
have a nice, kind of orangy type, red
color, something. Something like this for now. And what I'm also
going to do, as well, is I'm going to mess around
with the roughness over here. So you'll see that if I come
in and turn the metallic up, you'll see now it goes much, much darker and it looks
much more metallic. Now, what I'm going to do
is I'm going to put this on no 0.44, five, like so. And we've also got
roughness which we can turn all the way down
or all the way up. And, of course,
this is the shine that we're getting
off the model, so you can see all the way down. All the way up, we've got no Shine
basically coming off there. So I'm going to
put this on naught 0.427, something around there. And then the rest of it, I'm
going to leave the same. Now, all I need to do now is basically decide
on the color. So luckily for me, over the other side,
I've actually got a hex, which is a hex number. And if I come in now,
grab this one here, I can actually come
in, go to my hex. And if you put this
number in this BB 942f, press the enterbun,
there you go. That is the color.
I have actually got my own model that I actually created for
this actual course. So now we've got
the first color. What we want to do now
is create another color. So if you come over to
the right hand side, where our materials is, you can see that it's just called material Ooh one.
We don't want that. So let's call it yellow or factory yellow,
something like that. So we'll call it factory
yellow, like so. Now I want to do
is I want to click the down arrow, copy material. Come to the next part,
which is this one. I'm going to have it orange,
and I'm going to click new Down arrow and over here, down arrow and paste material. And then we're going to
call this factory orange. Like so. And then, again, I'm
going to give you the hex value of that one. And it's up to you
if you want to change this, there's no problem. Press Control V, Enter,
and there you go. Now we have orange and yellow, and they're looking
pretty, pretty nice. Now, again, it's up to
you whether once you've actually got all of these
materials on this one, we're going to have
most of the materials then for the rest of the build. So that's basically done there. So once we've done
that, you can then come in and change them if you
want them a different colour, if you want them a red
or if you want them a lot more metallic or
anything that you want. But just bear with it.
Let's paint this one first. So let's get the
shaders on this one. And then after that,
we can come in and actually change
them if you want to. Alright, everyone. So I hope you enjoyed that, and I'll
see you on the next one. Thanks a lot. Bye bye.
19. Working on metal parts of the shader for Blender Beginners Masterclass: Welcome back, everyone to
Blend Beginner's master class, the cookie factory, and this
is where we left it off. Alright, so one thing I
want to do before carrying on then is just
change the specular. So the specular is basically how the light interacts with things, especially if they're metallic
or if they're glossy. And all I want to do,
as you can see on this orange e is just bring
it down a little bit. You can see just a slight variation there if
I bring that down. So I'm just going to bring
it down to not 0.1, like so, and I'm also going to do the same thing on
this yellow, as well. So let's open up the specular
not 0.1, and there we go. I just think it adds a little
bit more to that yellow. All right. So now
let's carry on. So what I'm going to do I
can grab both of these, grab this one with Shift selegPress Control
L link materials. And generally, speaking, when you're actually
creating things, you will have to unwrap things, but because we're using a shade in this way within blender, it means we don't have
to unwrap anything. But don't worry further
on in the course. I am going to show
you how you can mark seams and unwrap
things properly. You will need to
know how to do that, and there is a whole section in the course about
doing things like that. Alright, so carrying on, let's come to this part here now. Now, this, as you can see,
has two materials on. So one will be orange, you can see here, and one
is going to be this yellow. So let's actually
put those on now. So I'm going to come in
click this little down how, we've got factory orange, and I'm also going to come in, click this little downhu, so click Plus first,
click the little down out and factory Yellow. Now, obviously, I want this
to be the factory yellow. Now, the easiest way to select all of these,
there's a couple of ways. We can either come in, press Alt Shift and click going
all the way around, and then right click and what you're going to do
is mark a seam. And the reason we're
going to do that then is because then I can
actually come in, press L, and it'll
just grab the island. I come over then to
the factory yellow, click a sign, and
it makes it really, really simple to do
that, as you can see. Now, let's come to
the other side then, so I'm going to do
the same thing here. So Alt Shift and click,
right click Mcasin. And because we've
got such clean lines in here, which we really have, it does mean that
making, you know, selecting these edges and things like that
is a lot easier. Generally, you'll find
the worse the mesh is, the harder it is to actually
select them in that way. Now, let's click
on factory Yellow, click Assign, and there we go. Now, let's move on to
the actual metal, then. So with the metal, I want it to look like metal, but I want it to
have a little bit of noise in there as well. So let's click New. And what I'll do is
I'll call it let's call it metal light because I
do want a couple of these. So metal light, and
the other one will be dark. So metal light. And then what we're gonna
do is we're going to bring in we'll actually make
a new one, actually. So what I'll do is
I'll press Shift day. We'll bring in the
ambient occlusion, like we did with the others.
So ambient occlusion. Let's drop that in. Don't
need to do anything on that. Then we'll bring
in the color Am. So color Ramp. Let's
bring that in. Let's, of course, plug
in the color to the FAC, and let's bring in,
as well, a multiply. So shift day, let's
bring in a multiply, which will be mixed colors. So a mixed color node. Basically, then you
can change that to all of these
different things. So instead of it being on mix, we're going to multiply that
ramp with our actual noise. Now there is a formula of
what it actually does. So basically, it
takes color one, multiplies it by color two, and then you end
up with something that's a lot more than what it was before rather than
just adding or overlaying it. Alright, so let's
serve, first of all, what we'll do is we'll plug our color ramp into
the bottom of here. And what I'm going to
do is I'm going to set the white just to the L on here, and then I'm going to bring
the blacku and I'm going to set it just to the L on here. Alright, so far so good. Now, if we plug this in,
not a lot should happen. And now what we're going to
do is we're going to set this again down to
nought 0.45 oh. And now I'm going to
bring in a noise. So if I zoom in a
little bit on here, you will be able to see if
I bring in a noise texture. So all of your noise textures
are going to be under here. You can see all of
these noise textures here, ways, Veroni. Let's pick the noise
texture for now, so we're going to pick
the noise texture. And then what I'm going to
do is bring in a color ramp. So let's press Shift A, and we'll bring in another
color ramp, so color ramp, like so And then what we'll
do is we'll plug the fact of the noise into
the color ramp and finally the color
into here, like so. And that's what I'm
talking about. There is that noise that we
actually wanted. Now, the thing is we don't want it so obvious,
but before that, we want to actually
make sure that all metallic is on because
this is after all metallic, we want to see what we're
actually doing with this. So what I'm going to do
is I'm going to turn the metallic up all the way up. And then what I'm going
to do is the roughness, I'm going to put on
note 0.3, like so. And I'm also going
to make sure yeah, the specular on this, I'm
going to keep the same. So everything like this, you can see now we've
got this color on there. Now, let's come in to the noise, and you can mess around
with all of these, so you will see if you
move the scale up, so you can see just what
that actually does. If you increase the detail, really have a play
around with this. And then once you've done, just actually bring in another one. So just bring in a new noise
texture and plug it in, and then you'll have a good
idea of what this does. Now, what we're going
to do is we're going to put this up to roundabout here. We're also going to then
change the color of this. So if I come in, grab this. I'm going to change the color up to a kind of grayish
color, like so. And now you can see
when this loads up, we've got a little bit of noise. It's very, very slight, as you can see on here, a bit of noise, and that
is what I'm looking for. So that is looking
pretty good now, and I'm happy with that metal. It's got that kind of, you know, that theme that I'm
actually going for. It doesn't look too realistic
or anything like that. It looks toy like, and that's
exactly what I'm going for. Okay, so now let's come
to this part here. So this part here we have. So let me just get it. This
part here. We'll have two on. So what I'm going to do is I'm going to first of all, come in. I'm going to give
you the metal light. And then what I'm also
going to do is come in, and I'm going to make a new one, and we'll call it metal dark. Like so. And then what
I'm going to do is come to the top one.
I'm going to copy it. So copy material, come
to the bottom one, paste material like so. Okay, so what I want
is the top off here, this band, this
band, and this band all to be a different color. So first of all, what I'll do is I'll come into this top here. And what I'm going
to do is grab it and you can see it
grabs the whole thing. That's not something I
want. So instead of that, I'm going to actually
mark some seams in. So let's come in.
And what I'll do is Alt Shift and click going
all the way around there. And I tend to do
the bottoms first. So if I move this up, you
can see I can grab it here. And if you're struggling,
by the way, doing this, just put it onto object mode, your wheels, be able to
see much, much better. And then I'll grab
the top of this one, bottom of this one
like this, like this. And now, right click, Moxin, there we go. Now I should be able to come
in and grab just the top. Just this band, just this band, and finally, just
this band, like so. And then all I'm going to do
is Metal doc, click a sign. Now, it is Metal doc, so we will need to change
this a little bit over. So what I'm going to
do now is go back to rendered view just so
I can see what I'm doing. And the only thing
really I want to do is change the darkness of
this, so I'm on Metal doc. So let's coming over, and what I'm going to do is just turn this down a little bit like
so, and there we go. It's slightly slightly darker. And what I'm also going to do, I'm just looking if I need
to change anything else. I'm going to bring down the
roughness just a little bit to not 0.241,
something like that. And now you can see we've got a clear distinction
between these, and I think that's
looking better. The one thing, I think, though, is that the top of
here might want to be dark as well, so
I'll also do that. Now, you know, put
in a seam in there. There's an easy
way of doing this. At the moment, you
see, I'm struggling, zooming in to where
exactly it is. So what I tend to do with
something like that is I'll just use my face
select, click on any face, press the little dot but, and then that will zoom me in, and then I'm able to come
in now and add in a seam. Now, of course, I can't
see this seam again. So what I'm also going to do is if I come over to
my little span it, I can turn off the
bevel just for now, turn on the object mode, and now I can actually
see what I'm doing. So Alt shifting click, right click, Mark a seam, turn the bevel back on. Come to face select,
grab just the top of it, and then we're
going to go over to materials and select the
metal doc, click a sign. And, Hey, press dough, press the tab button,
and there we go, That is looking pretty nice. I'm just wondering,
is that metal doc? I think the top was dark, so I need to thought I need to put it on
metal. There we go. Alright, that's looking better. That's exactly what I want. Now, let's do the pipes, then. So the pipes, I would
say just have them dark. I wouldn't go, maybe, maybe. Let's have a look first of all. Okay, so let's come in. We'll grab both of these pipes. We'll grab this one last. Always the one last that you
want the materials to be. Link materials like so. And then I'm wondering if so let's have a look
what it looks like. So what I'm going
to do is Alt Shift and click going all
the way around, conto plus, just
to move it up one. Metal dark, click a sign, press tab, and let's have a look. Do we
want it like that? Do you think that's looking
better than what we had before? Yeah, I think it does. I think it does. I think
we should do that. So all I'm gonna do
Alt Shift click. Grab it. Control plus. Metal dog, click a sign. Now, let's come
to the other one, so I'm going to grab this one. I'm going to grab
this edge here, press a little dot button, so I can actually come
around and work on this. And then Alt Shift
click, grab them both. So can come round here as well. Alt Shift, click, Control plus, metal dog, click a
sign, and there we go. Double tap the A and then
see what it looks like. That's looking
fantastic, really, really happy with how that is. And now on the next lesson, what we're going to do is
we're just going to carry on. We're going to get this
fully textured up. We've basically nearly you know, we've got the base of all of our materials now, so it's
going to be really easy. Should just make sure you
save it out of the way. The other thing is, as well, we really don't need these on
the left hand side here. I do find it much, much
harder to work with these. So all I'm going to do is
I'm just going to pull this over and I'm going to
pull this over as well. And then we've got just more
room to actually work with, as you can see, and I think
that's much, much easier. And again, now I'm
just going to save it out and it will
save out like that. Everyone. I hope
you enjoyed that. I'll see you on the next
one. Thanks a lot. Bye bye.
20. Tweaking shader coloring to add decorative touch to the design for Blender Beginners : Welcome back, everyone to blended beginner's master class, the cookie factory, and this
is where we left it off. Alright, so let's carry
on working our way up. Now, let's put it
on material mode. You can also put it
on there because now we have a good idea what
things are going to look like, Anyway, so let's come in, and what we'll do is we'll grab this one. We'll go to this. We'll press Control L, and we'll link materials. And what I want to do is
I want this part orange. So this part going around here. And this inner part on here,
I want to have it in yellow. So what I'm gonna do, you can
see, it's already grabbed, actually, for me,
which is really handy. So I'm just gonna click a sign on the yellow, and there we go. And now let's come
to these part here. So I'm just going to
hide these parts out of the way with H so
just grab them, press the H board, hide
them out of the way. And then, of course, we've
got these two pots here. Now, on these two pots, I want them to be
the light metal. Same for this one. So all of
this to be the light metal. I don't want the different
colors, I don't think. So all I'm going
to do then is just grab this and this
press Control L, and I'm going to link materials, and there we go. That's
the light metal on there. And then what we'll
do is we'll come to the actual rubber now. So this will be black
plastic stroke rubber. So let's actually bring that in. So all I'm going to
do is I'll click New. I'll name it on here and
we'll call it Black. In fact, you know what?
Yeah, we'll call it rubber. I think then we'll have a
good idea which one this is. And then what we'll
do is we'll come in, and first of all, we'll bring
in our ambient occlusion. So shift day ambient occlusion. If you want, you can just copy it straight from the other one. I'm just going to make it a little bit different.
So color ramp. Sometimes it's just quicker
just to plug it in, so let's bring in
that multiply then, so mix, color, like so, drop the color into the bottom, drop the result into the color, and then let's move these up. On this one, I'm going
to put it right where the is somewhere around here, and then bring this down to the the A somewhere
around there. I'm also going to
make sure then that the color is going to be
kind of you know what? I'll grab the color
from the hex. So my color will be this. So come to your X, Control V. There is going
to be my color. Press the enterbn. That's not looking
right at the moment, so it's because we
need to bring in the metallic a little bit.
So let's do that now. So I'm going to put the metallic
on not 0.445, not 0.427. 1.5, and let's go down to
the speculate as well, and we'll put that on
not 0.155, like so. Alright, let's put
it onto Render view, and let's have a
look. Now, I can see. It's not quite the color I'm
looking for. Definitely not. So I do want it a little bit
brownish, darker than that. And I'm just wondering
because I need to put this down to not 0.45 oh, like so. And that is still not
the color that I want. And the reason, of course, is because I've
still got it on mix. So let's put it on to multiply. There we go. That's
the color I want. That's looking very nice now. Alright, so let's press TH, bring back the parts
that I've not done yet. And now what we'll do is
we'll come to these parts. Now, we need a blue
and we need a yellow. So first of all, what I'll do is I'll bring in the yellow first. So I'm just going to click the down arrow and
I'm going to look for one that is factory yellow. So this one here. And then
what I'm going to do now, you can see, if you
haven't gone grab, by the way, just come in,
grab all three of these, like so, press Control plus. Click the little plus but new, and then we'll call
this factory blue. So factory blue, like so, and then we'll click Copy. So copy material, paste
material, and there we go. And now all we're going
to do is change this yellow Sorry, this blue. So we want the blue, and
I'm just going to come in and grab the color now for
you guys. Let's copy this. And let's come
over to my yellow. Click V, press the Enter, so it's this number here. And then all I'm going to do is click Assign, and there we go. Alright, so you can see now
that's looking really nice. That's exactly what we want. And now we can just work
our way around to the side. So first of all, we'll
come to this part here. This part is just
going to be orange. So all I'll do is
just grab this part, press Control L, and
we'll link materials. Then we'll grab this
part, grab this metal, press Control L, link materials. And now we're going to
come to this part here, and I'll grab the orange again, control LL and link materials. And then the bottom part we'll make you can make this yellow
orange totally up to you. I'll grab this part, press
Control L link materials. I'm going to grab this part now. I'm going to come
round to my pipes. Press Control L and
link materials. Now, on this part here, I want these edges to be you can see at the
moment, metal light. I want these parts
to be metal dark. So I'm going to
press Alt Shift and click Alt Shift click, CachowPlus Metal dot, click
a sign, and there we go. And now we're onto our rubber, and we're also onto
our back room, as well, which I'm
going to also discuss. So first of all, though,
let's put this on rubber. So we're going to grab
this part, grab this part, press Control L, and we're going to link
materials, and there we go. We're going to then
grab this part, hide it out of the way. And we're going to
grab this part then. And I want it to be
on the metal doc, so metal doc. And there we go. And now I'm just going to
hide this out of the way because we want to do
this back part here. So I'm going to grab
this pot again. I want to click plus new, and I'm going to call this hole. I always bring in a hole, and all I want it to be is
extremely, extremely dark. So what I'm going to do is
I'm going to grab this pot. I'm going to go to my hole
and click a sign, like so. And then all I'm
going to do is make this as dark as I possibly can. So if I grab this now, come to the white, bring this down, and then all I'm going to
do bring the metallic up, bring the roughness up or down, whichever let's put
it on ground there. And now you can see that's
extremely, extremely dark. Now, I'd probably bring this
all the way up, actually, because that means then
it hasn't actually got any shine on there
or anything like that. Now, if I press saltH, you can see now in there. That's looking pretty
nice, actually. Now, you can see,
though, the metal on this part here
isn't looking right. So this metal dark, it's looking a little bit
stretched and things like that. Now, generally, the
reason for that is that it's stretching along this. That could be that we've not
reset the transformation. So let's try Control A.
So I'm going to grab it. Control A all transforms
and set origin to geometry. Now for ones where it's
not working like this, you can see on the metal
like this one here, I would say that this noise
probably not correct. So what do I mean
by that? I mean, it's probably a little bit dark. So what I'm going to do is I'm just going to
come to this one, and we can see this
is the light metal. I'm going to bring
this down slightly. So what I'm going to do is
I'm going to bring it down, so bring it down, bring it
down, so it's just there. Now you can see it's just there. And if I double tap the A, it's looking a
little bit better. I'm just wondering, I don't
actually want to do that. I'm just wondering if I want to make this a
little bit darker. So let's make it a
little bit darker. So that is bringing through
this noise a little bit. Let's come in and bring this
a little bit darker then. Not too dark, like so, and let's see if now we
can bring this noise back a little bit while still
keeping that metallic look. Now, let's have a look at this. You can see it's looking
a little bit better. It's not looking 100% better. I'm just wondering now
if I can pull this back. Alright, so we did have a
little bit of a crash there. So not to worry. Let's come in now and let's see
if we can fix this. So we're trying to do
the actual color ramp. So I think let's, first of all, bring this
back a little bit like so. And then we go, we've
still got the same color. I think though it's
not dark enough. So what I'm going to do is I'm
going to come to this one. And I'm going to increase
the darkness of it. Is it going to do that?
Let me have a metal light. That's increased the
darkness on this, as well. There we go. And now let's
have a look at that. Alright, so that's looking much, much better now and we can see now it's looking better here. Now, on this one, is it metal
light or is it metal dark? So, this one is metal
dark, as we can see. So what I'm going to
do, first of all, I'm just going to make sure. You can see it's a little
bit darker on here, but the problem is the noise
is a little bit too high. So what I'm going to do,
I'm going to first of all, see if I can bring
that noise down. So for instance, if I
put the noise to zero, you will see it completely
clears all of that off. So what I'll do is I'll just
bring it up very slightly. Like so, double tap
the A. Let it load up. And now we can see we've got noise on those little
bits, but it's much, much smaller, and I think
that's looking much, much better actually
than what it was. I'm just going to look
at this metal part here. And yeah, that's looking
much, much better. Alright, the only thing is, is it looking metallic
enough, look. I still think it needs
to be a little bit darker on this metal. So let's go back to metal
Light, and what I'll do is. I'll do instead of doing that is I'll
just drag these over. Instead, I'll bring
in a master control. That then we'll show you how to actually do that. So
let's go to search. The one we want is
called RGB curves. So if you come to RGB curves, now you can drop that in here, and what that'll be now
is a master control. So if I bring this up here, much lighter or much, much darker, depending
on what you want. So let's have it somewhere just a little bit darker
than what we had it. Like so maybe, maybe a little bit lighter.
Let's have a look. Maybe something like
that, and there you go. It's looking much, much
better now, as you can see. Alright, this is looking good. Now, we've got one bit
that we need to replace, so I'm going to click down,
and we're going to go to metal Light, and there we go. And that is, basically, the windmill or flour
mill actually finished. Alright, everyone. So
on the next lesson, then what we'll do is we'll
move on to our next one. So our next one be we'll
have this part here. I'm not sure if I need this one. I'll bring in
another one as well. I'll show you how
to do that, and then we can make a start. On the next part, which is going to be I think it's the
batter machine, actually. I think it's the batter. So that one's an
interesting one. And when we've done that,
then what we can do is we can start getting our first
conveyor in there. Alright, everyone, so I hope you enjoyed that. I'll see
you on the next one. Thanks a lot. Bye bye.
21. Creating another device for factory, batter maker for Blender Beginners Masterclass: Welcome back everyone to Blend and Beginner's
master class, the cookie factory, and
this is where we left off. Now, let's go over to modeling because we don't really
want to be in shading. Make sure you've saved
out your work as well. Now, the first thing I want
to do is just move this over. So at the moment, I've
got no move tool, so shift space, Bob,
bringing my move tool. Let's actually leave
this one here. I'll press Shift D, just to duplicate it and bring it over. And then what I
want to do now is I want to go to the
right hand side, and I want to reopen a new one. So at the moment, you can
see the images flour mill. Let's close that and
let's open a new one up, and let's find where
these images are. So we've got our
references here. And let's click this on so we can see what
we're looking for. And the one we're looking
for is going to be. Let's find it. Where is it? This one here. So this one here is the one that we've got. Now, again, you can't
see too much on here, so make sure to bring in your or have a look
at your animation. And then you'll have
a clear understanding of what you're actually
going to be creating here. So we'll create this in
three stages, really. We'll create this
part here first. Then we'll create
this part, and then we'll create this part
going on top of there. So three stages, that's
how we'll do it. Alright, so now, first of all, what we'll do is we
need to make sure that the flour
that's coming along this conveyor belt
is going to be roughly the same size here to make sure everything's
fitting nicely. So that's the first
thing we'll do. So what we'll do is we'll
come to this part here. We'll press Control
A all transforms, and then set origin to geometry. And then what I'll
do is, I'll press shifts and cursor to selected. So cursor to selected. And then what I can do is I can
bring in a cube now. So Shift A, let's
bring in a cube. And you'll notice my cube has come under
collections as well, so you can see my cube here. We don't really want that, but we'll sort that out in a minute. So the first thing I want to
do is bring it up and make sure it's roughly the right size of these, as you can see. Now, the other thing is, when I need to bend this
round a little bit, so we want these
kind of tops of it, bent round a little
bit, and then I want to put in this part here. So I'm going to do that now. So I'm going to do it though
in two stages because I might not want this part in
the inner part bent as much. Let's see, actually. Let's
see. So let's come on. Let's go and grab this
edge and this edge. Let's press Control B, and let's bend them round, so left click and let's have a look
where that looks like. Let's press Tab, right,
click, Shade Auto smooth. And you know what? I think
that's actually going to look. Okay. Let's pull it over here. And what I want to do now is
make the inner part of this. So what I'm going to do is I'm going to grab the inner part. So this part here, I'm going to press the I for insert
and bring that in. And you know what?
I think that's actually going to
look pretty nice. So let's bring that
in a little bit. And then what I'm going to do is pull this back with extrude. So if I press E, I should be
able to pull it all the way. To here, given the illusion
that my conveyor belt, which will come from here is actually going into somewhere. Now, the only thing
I'm not happy with is the fact that, and
this is what I said. If you understand how to
fix things on the flight, it's going to be
much easier for you. I don't think this part is thick enough,
so this part here. So what I'm going to
do is I'm just going to come in, alt shift and click, and then alt S and
just bring it in, holding the shift button, and we should then
just be able to bring it in a little bit more. And I think now that's
looking much, much nicer. Alright, so far so good. Now what we need to
do is we need to bring this down to the floor. And the other thing
we need to make sure is that we're using
this part here. So you can see this part here, we can actually
sit that on here. So we've got it in
the right level. If we press seven
to go over the top, we can see that if I move this, we've got it in the right level. It's just how far do
we want it to come, you know, from here to
here with a conveyor belt? And also, where do
we want it to place? So what I'm going
to do to do that is I'll grab this bomb
part so shift D. And I want to put this right
level where I want it. So if I press seven,
I can go over the top then and put it
roughly where I want it to be, which will be
somewhere around here. Now, again, the
problem we have is we now want to sit
this on top of here. So let's put this on top, and then I'll tell you
what the problem is. The problem we're going to have is we need to bring this in. Now, bringing them in on here, you really don't want to just
press S and Y and squish it in because what'll happen is it will squish in that bend, as well, and you really
don't want that. So what I recommend
you do First of all, you get this level with it. So we move this now
to be more level. We make sure that this then is sat right on top of
there, which it is. And then from there, now we
can bring it in and move them around because we want it to be the same length coming
all of this way. You can see one,
two, three blocks, the same length all of the way. Alright, so let's do that now. So what I'm going to do
is I'm going to come in I'm going to go and grab this coming from here,
all the way around from here. So Control click all the
way around from here. Shift Spacebar, bring in
my move tool, like so. And then all I can do
now is pull it out and you can see we've got
the right length. Now what we need is
the same distance. So I'm going to grab
this one around here. This one round here,
and then I'm going to drag them over into
place like so, and you can see it's
much, much neater now. We still keeping that actual
shape that we wanted, and we can bring
them over like so. Alright, so far so good. Now what we want is these
parts here into here. The other thing is, how long is the conveyor
belt going to be? I think, actually,
if we look at this, the conveyor belt coming
from here to here, you might need a
little bit more. So all I'm going to
do is just pull it back a little bit like so, and then I'm going to grab
this part and this part. And you can see that this
part here, is separated, so I'm going to
grab this part and this part and press Shift D, drag them over, and then we're going to
rotate them round. So R, Z 180, rotate them round, and then let's put them now
where I want them. So if I bring them
down into place, so drag them down into
place where I want them, and they should fit in
there rather nicely, which they actually do. So double tap the
A. And there we go. That's looking pretty nice. Alright, so that's looking good. Now, the next thing
then we want to do is we want to make sure that we've got this part over here. So all I'm going to
do with this part, it's basically this we'll basically just have a
couple of holes in. So this part here, a
couple of holes in here, and then we've got this
part running down here. So let's do that
next. So what I'm gonna do is I'm gonna
press Shift D on this one. I'm gonna drag it over
to where I want it. So let's say somewhere
around here. We'll have a box
then in the center, and we also need
to make sure that we've got rid of this part here. So what I'm gonna do to do that is I'm going to
come first of all, and I'll probably just split
it straight down the middle. It's going to be so much
easier if I do that. So all I'm going to do
is press Control lot. Left click, split it straight
down here, right click, Mark Sam, come in, press the L on this part, press delete bass,
and there we go. And then what I can do
is I can come in now, Alt Shift click, and I just
want to fill in the face. F. And there you go,
as simple as that. Now we need to do is just
drag this out a little bit. We want it. So
somewhere like this, that's looking pretty nice. We've got enough
room then to put this pipe on that's
going to go up there. So what we'll do now
is, first of all, we'll drag this bit out a little bit just to where we want it. So Control click going
all the way around. Now I want it about the same
gap as what we've got here. So if I pull this out, that's then going to be
around the same gap. And now we need a cube
in this part here. So let's come in, grab
all of this face, shifts, cursor
selected, Shift A, and bring in a cube. Now, I don't want to bring in a cube while I'm in edit mode, so I want to press Tab,
Shift A, bring in a cube. Press the S born, bring it down, pull it up into place. Like so making sure that
it's in both of the sides. So S and X, pull it out, double tap
the A, and there we go. It's as simple as
that, and now you can see we've got all those
things that we actually need. Alright, so now what we
want to do is we want to actually focus on
this part here. So these are kind of this ramp that's going
to go down there. So how do we do that? This looks quite complicated
to get these parts in, but actually it's really not. So what I'm going to do
is I'm gonna press Shift A. Bring in another cube. It should come in right where that cursor was.
Press the S bon. And then let's bring it
up and put it into plate. So instead of, you know, having it from this
view, what I'll do is press Control and three. Let's see. Yeah, Control three. And there we go.
Let's bring it down a little bit, and
let's pull it over. And all we're going to do is
just focus on the first one. So I'm going to bring
it up, pull it over. And that looks about right
where I've got that. And then I'm just going
to put it into place. So now I basically want two. So I want one, this side, and one, the other side. So to do that, we'll bring
in a mirror modifier. First of all, though, we
need to tell Blender where we actually want this
to be mirrored from. So come to this big space here, press shift desk,
cursor selected, and then come back to your cue. So here's your cue. Press
Control A, all transforms. Right click Set origin, two, three D cursor. So now the origin is right
in the center of here, which means that when
I bring in a mirror, so generate a mirror, it's going to put it
over the other side, once a pot on the Y, turn
off the X, and there we go. Now, from here, we can actually make these things quite easily. So all I can do now
is I can come in, grab the tops off here, and we want to have them
slightly rounded off on the top, so Control B, round them off. Like so. And then
we'll also round them off just on the bottom
just a little bit, as well. So Control B, round them off just a slight
bit on the bottom, like so, and they look perfect. Now what I want to do is
I want to actually come in and what do I want to do? I want to actually boolean. So I want to boolean
these out of this. So, in other words,
making a big gap in these parts so that my
batter can flow down. Now, first of all, let's
pull them in a little bit further, like so. Alright, that looks quite nice. Okay, so let's say about our
work, and on the next one, then we'll get used in that
booleon and we'll create these parts and
then we'll actually motor on to create
this part here, which we can't see too well, but I will talk you through
that, so don't worry. And then from there, then we
can create the top of this, and then we'll have two
parts of this actually done, and then we can make a start
on the actual conveyor belt. Alright, everyone, so I hope you enjoyed that, and I'll
see you on the next one. Thanks a lot. Bye bye. An
22. Creating conveyor locations for batter maker for Blender Beginners Masterclass: Welcome back, everyone to
Blend Beginner's master class, the cookie factory, and this
is where we left you off. Alright, so there's a few
ways of using Boolean. I'm going to show you
the most simple ways so you can get your
head around with it. Later on, I'll show you a
more complex way of doing it. So the first thing is
that at the moment, we've got the mirror on these. Let's come to this part then. And what I want to
first of all, do, as always, before
adding the modifier, make sure you reset all your
transformed set origins, geometry, adding a modifier. And this time we're
looking for Boolean. Now, what is the Boolean? So this will be the part that
cuts the whole into here. So I'm going to come first of
all, where it says object. I'm going to click
on this one here. Just click it on like so. Now, nothing's happening
at the moment. You can't even see anything,
but if we put it on fast, hopefully, if I put it on,
let me just make sure. Cube oh nine let's just
hide these out of the way. And then we go,
There is Boolean. So let's come back to this. I'll just go through that again. I just had to make
sure that they're run. So first of all, we'll
come back to this. So we've got it on difference. We put it on fast. I normally use fast because exact doesn't always
work so well. So if I come into these
hide them out of the way, you can see here it's worked. If it doesn't work, if it's, like, you know, you've got
a piece of face over there. Sometimes that will happen. Just make sure you
put it on fast. Generally, you always put
it on fast for that reason. Alright, so let's press altage. Bring back these
pots. And now you can see that what I really want
to do now is apply this. So if I come in, press
Control A and apply that, now, basically,
we've got this part, and we've got this boolean now. But why I want to apply it
and not delete these is because of the fact I
actually want to use these to make kind of an
outline along here. Now, the other thing is,
you might want to keep your boolean on to make sure it's the right size
and things like that. So what I'll do is first come back to here, press Control Z, and let's just make sure
we bring back our boolean, so there's boolean now. And before I apply that, it's always worth, first of
all, measuring everything up. So what I'm going to
do, first of all, is I'm going to press Shift D, I'm going to bring these out. This is like forward thinking. This is how you
should be thinking. I'm going to press S and
X and bring these in now. Now, these are not the
boolean, of course. These are the boolean. And now I can hide these out the way. We've still got boolean
there. It's just not applied. And then what I can do now is I can come to these parts and create this kind of metal outline that's
going to go on these. So how am I going to
do that? I'm going to come to the front of
this one and the back. Remember, this one's
mirrored, so that's fine. Press the eye button
and bring it in. Now, as I said, with these, sometimes you will end
up with this happening. So you can see here, all of these have actually
tried to crossover, and we really don't want that. So there's two ways
of fixing this. The first way is of merging
all of these vertices. And the second way,
which sometimes works, if I press Sir Controls Ed, if I press E, enter S, it actually brings them in much, much nicer, as you can see. And this sometimes is
much, much easier. Now, we can delete
this so we can delete these faces then come
and bridge all of this. But I will show you a
better way of doing it. If you go up to Edit and
you go to preferences, you go to add ons, and the one you're looking
for is called Loop Tools. Loop tools. Here it
is, click it on, close this down, and
this is going to be one of your best friends
because this is so useful. Now I've got these
faces selected, I can right click Loop tools, bridge, and there you go. It's as simple as that to
bridge anything like that. Now I can right click
and shade Auto Smoove, and then I can press, no, I don't want to press. It's
still a mirror on there. So let's bring it in and
pull them back into place. Like so, and there we go, now we've got what we wanted, and I'm just wondering if I want to pull them
in a little bit further. If I go into here, you can see we've
got a big gap there. So actually, you know what? That's looking pretty nice. Yeah, and I think I'm
actually happy with that. Alright, so now let's
move on to our batter. So what I'm going to do is I'm
going to bring in shifted. Let's bring in a
cube, first of all, press the S button, and
let's bring this into place. Now I want this right
in the center of here. So I'm going to pull it down
into the center somewhere. And then what I'm going
to do is I'm going to press S and Z. Like so, and sometimes, sometimes it's really
worth actually working probably with a plane rather than a cube on
something like this. So let's change this then
into an actual plane. So to do that, all I'm
going to do is just grab the top, press Control plus, delete faces, and then I can pull this
back into place like so. Then what I can do is
then come with edge lit, grab this edge, I'm going to pull it out
to where I want it. So somewhere like here. And then what I'm going
to do is pull this down to where I want it, which will be round about here, and then what I can do is
I can pull this up into place just above there, like so. And I'm also wondering, yeah, I think I'll be able
to hide that in there. And then what I'll do
is I'll press E and X to extrude this out
along there, like so. Now, most of this is going
to be into the mixer anyway, so we can hide it in there. We just need to make
sure that first of all, this is level, and we've got
it the way that we want it. So I think first of all, the size of this needs
to come in this way. I'm going to expand
it a little bit. So S and Y, pull it out. Make sure that you're pulling it out on individual origins. And then what I'm going
to do now, I've got it level with everything,
so that's looking good. So finally, then let's turn
it into a three D object. So first of all,
though, let's come in, press Control R. Left click, right, click to add an
edge loop along there. Press Control B, and
then we're going to scroll it down just
so we've got two. And then what this will do is that'll make the edges for me. Finally, then I can
press L. I can press E. I can pull it up like so. Now, you can see that it's pulling up in a weird direction. So let's press z and z again, and then it'll pull up
nice and straight for you. So you want it relatively
thick, like so. And then finally, then
let's do these parts here. So let's come into face let, grab this face, this face,
this face, and this face. And again, we're
going to press E, and we're going to
press Z, Z again, and then we're going
to pull it up like so. And there we go, that's
looking pretty nice. Now, I'm wondering whether these are a little
bit too thick, so you can see these or maybe a little bit too thick.
So I think they are. So what I'm going to
do is I'm just going to pull these down a little bit. We have got a mirror
on. And again, it comes down to the same thing. Once we've done something,
can we actually fix it? And yes, we actually
certainly can. So Alt Shift and
click Control plus, keep pressing it
till we get all the way around to this side. And then what I'm going to do
is pull this down like so. Now, you will be asking, Hey, what about though the
boolean that we've put in? No problem. We can do the
same thing on there as well, because we actually
kept that boolean on. So tab Alt H, bring back everything.
Here's my boolean. And now I can do
exactly the same thing. But this time I'll go from here, going all the way
around to here. So control selecting
all the way around, and now I can actually
bring that boolean down to be just
in place like so. Now, you can also see
that my boolean on this is actually a little bit
into the side here as well, and I don't really want that. So what I'm going to
do as well is I'll grab the whole thing I want to press S and Y and just squeeze it in a
little bit like so. And also, the bottom of this boolean is poking through here, and I'm not so sure that
I want that either. So all I'm going to do is
I'm going to grab this. I'm going to go Control click, Control click, and
then we're just going to move it up a
little bit into place. And there we go. Now
we've got boolean done. We can hide that out the
way, and there you go. Now, you can see it's
fitting much, much better, albeit it's, you know, squeezed in a little bit of
the sides, but you know what? I don't think anyone's really gonna notice that, actually. So we're gonna leave
that like that. If you want to move it
around a little bit more, I've showed you how to do that now, so you should
be able to do that. Alright, so far so good. Now, obviously, we need
this on this side, as well. So all I'm going to do,
then is select this one. Control A, or transforms right, click Set origin, two, three D cursor,
add in a modifier, and we're going to bring in
a mirror, so another mirror. Put it on the Y, turn off the X, and there we go. We've
got on both sides. And finally, finally, we're
going to need actual texture. Now, we don't want to put the texture straight
onto the metal. We want it raised above it. So all I'm going to
do to do that is I'm going to grab this
one and this one. I'm going to press Shift D to duplicate it and just
pull it up a little bit, and then that will be my batter, so you can see we've
got just a simple plane for our batter on each side. Alright, so this is pretty
much this done. Of course. We've not got bevels on
or anything like that, but we will be doing that on
the next lesson, I think. And we'll get a bevel on these parts because I
think that's important. You know that already
there's a bevel on this part and this part is just these
parts where there's none on. Same for this part, and this one already has one on.
Alright, everyone. I hope you enjoyed that.
Make sure you save about your work, and I'll
see you on the next one. Thanks a lot. Bye bye.
23. Creating upper tank for batter maker for Blender Beginners Masterclass: Welcome back if you want to blend the beginners
master class, the cookie factory, and
this is where we left off. Alright, so first of all, then, let's put all of these in their own group cause at the moment, they're
in collection. We want them to be in the
we'll call it water adder. So all I'm going to
do is just shift, select all of these,
press the button. New collection, let's call
it water adder right. So enter Enter, and there we go, now we can actually
close that up. We can also move these around, so it can also put this
above human reference. So now you've got flour mill and water added,
and there we go. Now, the next thing we
want to do is we want to actually add in a bevel. Now, sometimes because
we've got, you know, things on here, we want to
make sure we do this right. So in other words, we've got
the Boolean still on here. So let's do it one at
a time. So we can come to this one. We
can grab this one. We can press Control L, and what we're going to
do is copy modifiers, and there we go,
now you can see, is there a modifier
been added on there? Let's have a look. It's
been added, for sure. The clamp overlap is off. So all I'm doing is
just checking if it is. And if you really want to check, just turn it up, and then
you'll be able to see. And that has been added
on there, so that's fine. Let's now do this one. So we'll grab this
one, this one, Control L, and we'll copy
modifiers, and there we go. And finally, this one, let's
see if it actually works. So control L, copy modifiers, and yeah it's actually
worked as well. And then we've got
these two parts. So this part here,
this part here, grab this part, Control L, copy modifiers, and there we go. Now you can see what happened. The mirror actually disappeared because we actually
copied the modifier. So what we want to do
is apply that mirror. No reason why we shouldn't
apply that Control A. Now let's see on
this one as well. This one also has
a mirror on there, so let's press Control A, then what we can do now
is grab both of these. Grab. I'm just looking
as well, as you can see. When I did that, it actually
took off the the Boolean. So I'm gonna have to go
back. Sorry about that. So let's go back a little bit before we do
that. There we go. Now, let's apply or
we'll come to this. We'll apply the Boleiu. We'll
come to the mirrors then. We'll apply the mirrors, and we'll come to these parts here, and we'll apply the
mirror on these. Now we can grab all
three of these. Grab this one here, press Control L and copy
modifiers, and there we go. Now we've got the
bevels on all of those. Finally, then we need to get
rid of these booleans here. So let's just grab them both, press delete, and there we go. That part is now done. Alright, so now we're
on to the next part, which will be this
part over here. So it's a bit hard to see. And now I'm just going to
pull these back a little bit, J so you can just sew. We have a little bit more room so we can actually
see what we're doing. Okay, so the main part, actually, is this
part going up here. So I'm just wondering
whether it'll be easier to actually create probably be
easier to create this part, this part first, actually, because it's gonna be right
in the center of here. So let's do it that way. It's
gonna be easier, I think. So we'll come into
this part, and what I'll do is I'll just
grab the top of here, press shift desk,
cursor to selected. And then what I'll
do is now I want a simple pipe with just a
few bolts going around it. So how am I going to do that? First of all, I'm
gonna press tab. I'm gonna press Shift A.
I'm going to bring in a mesh and a
cylinder, not a cone. Let's press Shift A again. Bring in a mesh. Cylinder.
And you'll notice my cylinder again because the re open up blender comes in at 32. We want this on 24, so
let's turn it down. And then what I want to
do is I want to put this right down to round about here. I'm going to squish it down,
so S and, squish it down. Put it on top of that,
and I'm thinking probably make it a little bit bigger because there is a
machine going in there, but make it a little
bit bigger, like so, and that looks kind of
bulky like this one here. And then what I'm going
to do is I'm going to write clay and
shade Auto smooth. And from there, what I'm
going to do is I'm going to jaws going to create
just this pipe here. So first of all, I'm
going to come in, face select, grab this top face, press the eyebone like so, holding the shift, and then E and pulling it up into place. Like so. Now, I just want
to make sure that I've got enough room for bolts that are going to go round here. So let's get those
bolts in first. We've got already
our cursor in here. So what I'm going to do is
I'm going to come to the top. I'm going to grab the top,
shifts, cursed or selected. And the reason I've done that is just so I can actually
see what I'm doing. Then what I'm going
to do is press Shift, I'm going to bring
in then a cylinder. And for this cylinder, I'm just going to put it on
something like six. So if you put it on
something like six or seven, you will have then the bolt kind of It looks like a
bolt, basically. That is what I want. So what
I'm going to do then is I'm just going to press
the S but, bring it down. I'm going to press seven
to go over the top, and where do I
actually want this? At the moment, I can't
actually see where it is. I can't even see if
it go through there, but if I put on wireframe, I should be able to see now
where it's going to go. So you can see if I
move this up here, I can see now that they're going to be going into there, like so. Alright, so that looks
about the right size. Now, if I put this back on, I should be able to press
Essen'sad and bring this down. And this I want looking
like an actual bolt, but a very, very simple bolt. It's up to you whether
you put a top on here. I think sometimes it's
worth doing that, actually. So all I'm going to
do just grab the top. So the top of here, press
the I button and then press E and just give it
a top on there, like so. I think that looks a little
bit of a better bolt. Now I want to do is I want to actually distribute
this round here. So at the moment, we know
we've got our cursor in here. Let's press Control
A or transforms. Right click Set origin, two, three D cursor. Now, it's up to you how
many bolts you need. So all you need to do is just a little bit of calculation. If you want six bolts
going around there, it's 360/6, equals 60 degrees. If you want more,
then you can do that. So what I'm going to do then
is I'll go over the top, so seven to go over the top. I'll put it back on wireframes and I can
see what I'm doing. I want to press Shift
D and then RZ 60, shift D, or Z 60. And there are other ways
you can do that, this, but trust me, this
is the fastest. And there we go nice
and evenly out. Now we can see if we
put this back on. They look nice and even. And what I tend to do now
is I'll grab all of these, and before joining
them together, I'm going to put them like that. So control, sorry, Control A, all transforms right click. Set origin to
geometry of them all, and then all I tend
to do is just come in Z and just spin them
around just a little bit. So and z, spin them round, and then and z. Spin them round and finally, and z, spin them round just so they're not all
facing the same way. They look a little
bit different. Okay, so far so good. Now, let's think
about this top pipe. So I think we've gone a little bit too high
with this top pipe, so I'm just going to pull
it down just a little bit, like so, and then I want to make a little edge
going around here. So let's press Control to bring in a edge loop, bring it up. Like so. And then
let's bring it out. So Alt, shift, and
click, E, enter, lanes, pull it out, holding the shift
button, like so. And then we need this inner
part here because you can see we do have this kind
of pipe going in there. So let's bring this in. So
what I'm going to do is press the Ibn and bring it in. Like so. And then what
I'm going to do then, I also want to bring
it down a little bit, like so, and then bring it in. So now I'm going to
bring it down, like so, and you can see
now that's looking actually a lot better
than what it was before. Okay, so now we've still got
our cursor in the center, which means now we can actually
create this part here. So this part here,
we're just going to be pumping supposedly the
water into this part. So what I'll do, first of all, is I'll press Shift A. I'll press my I'll bring
in another cylinder. I'll put it on 24. The good thing is
about working with either 24 or you're
working with seven for, you know, for the little
bolts and things, you're always aware like what
you actually need it on. So I only tend to work on, as I said, seven for bolts, 24 for, you know, round things and 16 if
I want it low poly. That's the way I
actually go with it. So if you remember those, you can actually do that every time. And not only that,
if you work with, um except the bolts, of course, if you're working
with even numbers, it's really easy then to, you know, create
things like we have done for this because we
work with even numbers. Alright, so now let's make it a little bit
smaller than this. And what I want to do is I want this to actually be
in there because I can pump this then up and down
and put in water in there. So what I'm going
to do, I want to select the bottom of here, so I'm just going to
pull it up a little bit. I'm going to pull
it in then. So S, pull it in, like so. And then what I'll
do is I'll press L, and I'll be able
to pull this down now into where I want it. So somewhere around here, and then what I
can do with this, maybe maybe a little bit more or maybe it needs to be a little
bit bigger, let's just see. So I'll pull it down
a little bit more. Grab this part, pull
it up, like so. Okay, so let's actually
create this bit. So this bit here, I'll just simply press D, enter, S, and bring
this out, like so. And then what I'll
do is, I'll press E again to pull it up, like so. E again, S, to pull it out, and then E to pull
it up like so. Alright, that's
looking pretty good. And now what I want
to do is I want to have a band in
the center of it. So control, left click, right click, Control
B, pull it out, like so, and then E, enter ln S, and then we
can pull it out like so. Now, the thing is
I want this to be slightly bevelled out like so. How would I go about doing
that? That's a good question. I also want this one to
be slightly beveled in. So I want it to kind
of go like this. So the way that I'm going to
do that is, first of all, bring in some edge
loops so Control, left click, right click. And then I'll grab
this one here. So Alt Shift and click, like so, and I'll come up to
something called proportional editing, click it on, and then just
pick whichever one you want. So we want to kind of spherical
look. So we'll grab this. We'll press the S button, we'll scroll our
mouse wheel back in, and then we should be
able to just bring it out a little bit, like so. Now I want to do the same
thing along here as well. So I'm going to press Control. Left click, right
click, because it is dependent on how many edge
loops you've go there. Control. Two, left
click, right, click. Control ar, two, left
click, right click. Grab the center one,
Al shift click, and then S, and then
you can s, pull it out. And make it a little bit
more rounded, like so. Right, click, Shade Auto
smooth. And there you go. You can see now that's looking, fitting the style that we want. You can see it's coming
in, sloping down, and now it actually
looks pretty nice. Now, we've got the next part, which is this part here, and we basically want this
to be I forgot the name. It's the musical instrument where you push them in and out. We basically want it to be
like that because we're actually going to be
adding on that animation. So on the next lesson, we'll
actually get that done. Let's come up to file
and save that out. And yeah, we're really
motoring along now, guys. Alright, everyone, so I
hope you enjoyed that, and I'll see you on the
next one. Thanks a lot. Bye bye.
24. Continuing with upper tank modeling for Blender Beginners Masterclass: Welcome back everyone to
Blending Beginners master class, the cookie factory, and this
is where we left you off. Alright, so let's create now this I still can't remember the name of
that musical item, but you basically
push them together. It's some kind of
organ or something. Anyway, let's put it on here. So what I'm gonna do
is press Shift Desk. Cust selected. Shift A, let's bring in a cube. Let's make the cube a
bit smaller just so it fits on there so you
can see if I pull this up, we want to have a little bit
of a space around there, maybe a little bit
bigger, around there. And then what I'm going to
do is just grab the top of it. I'm going to pull it down. So I just want to make sure without
proportion editing on. So make sure that's turned off, pull it down, and this is
kind of where we want it. So I'm just checking out,
making sure everything's right. Now, for the rest of it,
I'm going to pull it back up now because this is where
I actually want to go. And then what I'm
going to do now is I want these two
little gaps in here. So the easiest way to
do that is control law. I'll have a bigger
gap at the bottom. So kind of a bigger
gap around here, let's say, and then
what I'll do is I'll press Control
R. Left click, I want to gap here,
and then Control R, bring it down to a gap here, and then Control R, a
gap, maybe around here. So you can see I've got a big, we've got a smaller,
and we've got a big. So a little bit of
variation in there, and then all I'm going
to do is I'm going to press Alt Shift and click, like so I want to actually
bend bring these in now. I'm going to press E,
Enter for extrude, and then Alter holding
the Shift bon. And bring them in, like so. Now, with these, I think that
it needs a little bit of help with the actual bevels
on these parts here. So I'm actually going to
give it a hand with those. You can bevel it off once
you've done that, as well. So all I'm going to do
is I'm going to come in. I'm going to go Alt Shift click. And try and go all
the way around. For some reason, blend doesn't like when you do Alt Shift,
click on the bottom. So you'll have to go
around there. Alt Shift, click, l shift, click,
Alt Shift, click. And I'm going to
leave the top one. I don't want to do that. And then before we do anything, we always always reset
all our transformations. So in object mode, reset all your transformations,
reset the origin, press the tab bon,
press Control B, and then you're just
going to bring them in a little bit like so. So something like this,
press the tab on, and that is what it
should look like. And I think now, it's looking
a little bit more flimsy, and that's what we want to do because there's a
lot of bending here. So, yeah, that's what
we're going for with this. Alright, so now we've
got this part here. So first of all, let's
make this big drum, and then we can
decide, you know, where the kind of cube is going to come in that's going
to hold everything here. Alright, so let's bring in, first of all, A, cylinder. So bring in a cylinder
24. Rotate it round. So RX 90. Let's get that rotated round. Let's pull it up into the
place where I want it. So first of all, I'm going
to want it round about here. So round about here.
And you know what? This actually might be it
might be a little bit too big, so let's make it a
little bit smaller, like so, and let's pull it down. Now what I want to do is I want to bring in a cube because then that's going to give me
an idea of scale on this. So what I'll do is I'll bring in a cube and pull it up there. So Shift D, let's
bring in a cube, and let's pull it up into place. Let's press S and Z like so, and let's pull it into place. So it wants to be
in front of there, and it wants to be up. And then what I want to
do is bring it in now. So S and X, bring it in. So it's just just on
the sides of there, and then I'm going to move
this part forward. Like so. And now I think that is
looking pretty good. And I also think it's looking round about the right
size for this bit here. So for this bit, I think that's round
about the right size. It looks as though
it's, you know, usable. I think what I'll do
is I'll just bring it forward a little bit like so. And I think I'll
just make a tiny, tiny bit bigger,
and there we go. Alright, so now we need to think about bringing this back. How far back does it go? We definitely know
that it needs to come back past this point
here. That's for sure. So what I'll do is I'll come I'll grab the back of
it in face select, and I'm going to
pull it over here to be a fairly big drum. And then what I'm going to
do now is I'm going to press the IB and bring it in, and then I'm going to
press the E button. I'm going to go over
the top and now I can see how far past
I need to do it. E, bring it round about to the edge of this part
here, something like this. And then what we'll do
is we'll press Control. Left click, right, click
Control B, pull this out. Like so, and then enter Alness and then we'll pull
this out to where we want it. So maybe I've gone
a little bit far, so Alts, bring it
back if you want to. And I always think when you
press Alts and bring it back, it looks better anyway, because
it actually bends it in. If I press S Control's Ed
and press just the S but, you can see I can pull
it in properly now. But if I press Alts, I can actually pull it in
and bend those a little bit, and I think that's
actually looking better. All right, so so far so good, let's right click and
shade Ato smooth. Let's also then pull
this back a little bit, so I'm going to grab
this on the face, like so, and pull it back
just past this point here, so round about here. And then obviously I need it
to go into the drum so I'm going to pull it up
into place like so. Alright, that's
looking pretty nice. Now, we obviously want
a front on this drum. Now, you can use, you know, you could kind
of put a circle in here. So what I could do, I could
actually make my circle. So if I press I, I
can bring in then the circle and then put it
where I want it, like so. That's an easy way of doing it. You could also just
make another cylinder. But I think for us, I think I'm actually going to
just do it that way. Sometimes it does cause problems with bevels
and things like this. But I think on this occasion, actually, it's not going to do. Also, what you could
do is, as well, you can press E
and pull this out. So now we've got that actual
drum pot that we wanted. And then what you could do
is you could press Control plus and then press Y or
P and separate it off, and then re add a face on here. You can also do it that
way if you really, really want your
topology to look nice. For me, I'm not
going to do that. All I'm going to do now is
press I to bring it in again, press the E bun to pull it out, press the tab but, and there we go, it's
as simple as that. Now, that's looking
pretty nice like so. Okay, so working
our way back now. So we need to come now
to this point here. So you can see now
we need to think about how we actually
going to do this. So the first thing I would
say is bring in a new pipe. So if I come to this part here, what I'm going to do is
I'm going to press Shifts, cursor selected, and then
I'm going to press Shift A, and I'm going to
bring in a new pipe. So let's come down too. It looks like my extras
are not on there. So all I'll do is
edit preferences. Let's put in extra again. So extra Extra mesh. Click that on. Let it load up. Save out more work so we
don't have a crash shift day. And then we've got now our
pipe joints, so pipe elbow. Let's spin this
round, first of all, so we'll go to Z, put it
on 90, spin it round, put the angle on to
90 instead of 45, turn the divisions down
to 24, and there we go. That's looking
pretty good. And now what I need to do is
obviously make it smaller. So make it smaller.
And then what I'm also going to do is I'm
going to pull this out now. So if I pull this along, you can see here
we've got the Y axis. So let's pull it along
the Y axis like so. And now we just need to recognize where it's
actually going to go. We also need to drop this
back so it's into place, and we also need to
think about the scale. I think it's still
a little bit big, so I'll make it a
little bit smaller. And then the end
and the start lens. So I'm going to pull it up to round about halfway on there.
So something around there. And then the other angle, I'm going to pull, not that one. This one here, I'm
going to pull this back into place
round about here. Now, again, the moment I click off this is going to disappear. So just make sure you're
relatively happy with it. We can do a lot of work
on there from this, but I think for now, I'm going to be relatively
happy with that. So what I'm going to do now is start the actual box down here. So I'm going to press
shift, bring in a cube. And then what I'm going
to do is bring that down to let's say round
about here, like so. I'm going to make it
a little bit thinner. So S and X, bring it in. Like so. And I'm also
going to make it. Yeah, it's probably about
wide enough now, I think. Yeah, I think it's actually
make it a little bit wider, so S and why let's pull
it out a little bit. Like so. And then what
I want to do is now I want to bring it down to nearly nearly the same
point as here and then pull it out and then go down. So what
do I mean by that? So I'm going to
come in. I'm going to delete this face
out of the way. So delete faces, and
then I'm going to come in and grab this edge here. I'm going to press E and X and
pull this out along there. So I want some pipes
coming out of here. And then what I'm
going to do now, I want to extrude this down. So should I could
have really got away with leaving that face in
there. But you know what? I'll just go Alt
Shift and click now, and then I'll press E and Z. Pull this down straight
down, like so. Now you can see if I come to the side of you I've
gone way, way too far, so let's pull it up into place, like so. And there we go. And I also think at the moment, this is a little bit too low. So you know what I'm going
to do? I'm going to grab this face and just pull it
up a little bit like so. Alright, that's
looking pretty good. Now, before we finish,
let's just grab this part, press Shift D, enter, move it over into place. So we can get away, I think
with pudding it like that. I'm going to move it
over then into place. So this bit here is there. And then finally, I'm
just going to come round. Grab this and this
with Control click and then pull this into
place. Like so. Now, we'll want a front on this, which I'll do on
the next lesson. But I think this is really, really starting
to come together. Obviously, we still
need a long way to go before we finish this, but I think you're
getting a lot more skills now to actually create things, but more importantly, fix things if they
actually go wrong. That's a big part of
this actual course. Alright, everyone. So I hope you enjoyed that, and I'll
see you on the next one. Thanks a lot. Bye bye.
25. Creating extention for batter maker tank, modeling, modeling liquid creator tank for : Welcome, Mike, everyone to Blend the Beginner's master
class, the cookie factory. And I did say, as we move
on and on, by the way, I am going to show you more
ways to actually do things, easier ways to do things and basically up that complexity. So first of all,
with the complexity, let's grab one of these bolts. And what I want to
do is, first of all, I want to press Shift
D to duplicate it. I'm just going to drop
it there for now. I'm going to comb to the
center of my pipe then, I want to make sure
that I'm going to put the cursor
right in the sense. What I want to do is
just hide this out the come to the bomb part. You know what? We
won't do it that way. We'll press Control R. Left click, right
click and then S Z zero just to even that out, so, press Tab Altage and you
can bring back this now. Now what I want to do is I want to come back to this part, so I've got my
cursor in the sense so Alt Shift and click, shifts, cursed to selected. That then is going to put it right in the center of there. Next of all, then what I
want to do is I want to bring my bolt and drop
it right in the center. Now, first of all, make sure all the transforms are
recep set origins, geometry, press shifts,
and selections cursor. Now, we can't see our
bolt at the moment. So let's hide our pipe out the
way, and here is our bowl. Now we want to do is
bring in a circle. So shift A, curve, bring in a circle, like so, make the circle a little
bit smaller, like so. And then what we're going to do now is we're going to attach this bowl to this circle
to stop us having to, you know, kind of shift
D and rotate it around. So the way I'm going
to do that is now, I'm going to go to my
I'm going to press Add modifier, generate an array. Now, generally, when you're adding just
a simple modifier on, it will be under generate. And when you're deforming
anything like mesh, like where you're using
curves or simple deform, it will be under deform. And the other thing is, we can also use something that's
called modifier stacking, which is adding not one
but two, three, four, five modifiers on top of things to actually get amazing results. And this is one way. So this
is a simple modifier stack. So what I'm going to do is
go to generate add an array. I'm going to put it on something
like five just for now, so five, and let's change the X factor to something
like three, like so. And then what we're going
to do now is we're going to also add in a curve modifier. Add modifier, deform this
time and go to curve, and the curve is going
to be this curve here, and you will end up with
something like this now. And now it's really,
really easy to just increase this
amount, as you can see. And also the best thing is, if I bring this curve in, we can actually
bring these bolts in like so to wherever
we want them. So you can see really,
really handy to actually do now what I tend to do is I'll press AltH,
bring back my pipe. Let's go to our pipe now. And what I'm going to do
now is bring this out. So I'm going to press
Alt Shift and click, eat, enter Alterns and bring
this out a little bit. And then what I'll do is I'll
come back to my curve now, press the Ebone bring these bolts in so
they actually fit in. Let's also lift them up, so we're going to lift
everything up onto there, like so, and you can see
they're a little bit in. We can also come in as
well and grab our bolt, so it can come in,
grab just my bolts. And you can see it's right
in the center there. I can press A and S and make
them a little bit smaller, press the tab born, and now you'll see they're fit
in much, much nicer. Now the thing is, you can see they're a little
bit out over here, so it's a little bit uneven. So let's decrease one of those and then just
increase this amount. Holding the shift button,
and then you can actually even them up as you
want them like so. Really, really easy
way to do that. Now, once I've done that,
I don't just finish there. What I do is I'll take this. I'll press Shift D.
I'll drag it over, and I'll save this out now
because then it'll save me having to do this
on other parts. If I need to do this. I've got my bolts there.
They're already set up. All I need to do is actually
just bring them in. So what I do once I've done that is I'll press
the end button, new collection, and we'll
call it pots, like so. In fact, you know what
we won't call it pots. We'll put a reuse pots. We'll call it parts
and then re use, and then we'll have
one just for parts, which will be things like the cookie and things like that. Alright, so that's
done. And what I can do now is just hide that out way. We're not going to need that. And now you can see that
we've got our bolts in there. And what I can do now
with these bolts, actually, is come over and
apply these modifiers. First of all, though, you know, when you're applying
modifiers normally, you're always coming in,
pressing Control A, Control A. When you grow a lot of
modifiers on though, you really just want to apply
them all in one fell swoop. So there is an easier way
if you come over to object, convert, and just convert
to mesh, and there you go. Now I can actually delete
this part out of the way. And there are your
bolts. Now, of course, I need to bring
them down a little bit to make sure
they're in there. And now we can actually start
work on the rest of this. So let's first of all, even this out a little bit. You can see this is not needs rounding off a little
bit, so we'll come in. We'll grab this part, Alt
Shift click Control B, and we'll just even it out
just a little bit, like so, right click, shade at smoove and there we go
thing that looks better. And then now we'll
work on this bit here, so we'll get this part in here. So what I'll do is I'll press Control R. Left
click, right click, and then S and X or Y, and zero. Now let's move that
over there, like so. And then what I'll do is, I'm thinking whether
to, you know what? I'll pull it out a little bit, like so, and then I'll
do something else. I'll go Alt, shift, click,
E, enter, alternes. We'll pull that out
just a little bit. Control R, left click, move it over a little bit
with the shift button, and then lt, shift, click. Like, so E, enter Altern. Pull it out like so, and that
looks much, much better. Now, let's bring in another
edge loop along here. So control. Left click, right, click, S X or Y and zero
just even it out. Control B then just to pull
it out and pull it back one. Like so, and then eat ter alters and pull
it out, like so. And then what we'll do
is we'll do what we did before with alterss
and we'll just bring it in just a little bit like so, and that
looks really nice. Let's have another
one then on here. So control. Left
click, right, click, S S zero, and then move
it wherever you want it. So something around there,
Control B, pull it out, and then eat to Alters
pull it out like so, and then finally alterna
and let's pull it in a little bit like
so, and there we go. You can see just
how easy that was. So now, we've done one part, you know, saved out
our part over here. We're also going to do
that with another part, but let's first of all,
get this in place. So what I'm gonna do,
I'll first of all, create something along here. I'm thinking that, do I actually want to bevel
off any of these parts? That's the question you
have to ask yourself, or are you going to be happy
with just a bevel on there? So, in other words,
if I come in and I resettle the
transforms on this, like so, grab this one, press Control L,
and copy modifiers. Am I going to be happy with it just beveled off like this, or do I want to actually bevel
it off a little bit more? I think actually on this one, I probably want to bevel
it off a little bit more. Let's give that a try.
What I'm going to do is I'm going to grab
all of these edges. I'm going to press
Control B then and just pull it out and increase
it up, like so. And then press tab,
and there you go, now you can see
that's round off, right, click, shade Auto Smooth, and that looks to me
much, much nicer. Now the problem is when
you're working like this, is that this is going to cause issues when you come to
bevel off the next pot. So if you see here, Control B, it's going to cause a few
issues and points like this. Do we really want that? So there are a few ways around this. And what I'm going
to do now is just go back and show you
how to do this. So basically, if I come
in and go to select, and what we want to do is, where is it mesh,
select sharp edges. So I want to select.
Where is the sharp edges? There we go. Sharp
edges, like so. And now what I should
be able to do is press Control B and bevel
them all off in one go, like so, press the tab button, right, click Shade to smooth. And there you go.
Now you can see, they're all bethered
off really nicely, and that then is
looking a lot smoother. And I think, actually, it's
looking better like that. Alright, so now what
we want to do is we want to we want to
make a gap in here. We want to make a part
that's going to go round here as well. So
we'll do that part first. So what I'm going to do is I'm going to come to this face here. I'm going to grab
this face then. So shift D. Let's grab
this face, like so. Now, at the moment,
you can see, we've got no bevels in each of these, which is really handy
because we didn't want any. So all I'm gonna do is just grab this point and this point. I'm going to press
Control, Shift and B, and pull that out and just make a little bit
of a bevel there. And then what I'm
going to do is press L E to pull it out, like so, to give us
that relief on there. And then L to grab it all, like so, let's pull
it back into place. And then what I'm going to do is make it a little bit smaller. So S, make it a
little bit smaller, pull it down into
place, drop it back, maybe a tad, like so, and there we go. We've
got that relief on there. Now we want another
bit on here as well. So what I'm going to do I need three pipes
on here, actually. So I'm going to grab
this part here. I'm going to press the
I boon to bring it in, like so. Not quite that far. I'm going to press
S and Y to bring it in a little bit more.
So something like this. And then what I'm going to
do is instead of using this, all I'll do is press Shift D. And then I'll press E
and then I'll pull it up. So basically, I duplicated it. And the reason I did that now
is because I can grab it, press P selection,
and there we go. That now is separated off and I now can just
pull that back in. So it's already got
the bevel on there. It's already got this
modifier on there, as you can see, which makes my life a little bit
easier, actually. Alright, so we'll
save out our work, and on the next one, we should
be able to get this in. We should be able to
get the pipes in, and probably probably we'll end up with most of
this actually done. But you can see it's coming
together quite nicely. I'm really happy with how this is turning
out on this part, and then we can
actually start with the conveyor belt once we've
got the materials everyone. Hope you enjoyed that. I'll
see you in the next one. Thanks a lot. Bye bye.
26. Creating pipes using curvature techniques as well as pipe joint mesh primitive for Bl: Welcome back, everyone to Bleed and Beginners
master class, the cookie factory, and this
is where we left it off. Alright, so we want some
pipes going from here. So you can't really
see around there, but you will be able to
see on that animation going from here up into here. So let's first of all,
create this part here. So what I'm going to do
is I'm going to come in. I'll actually isolate this out, so shift H, isolate it out. And then what I'll
do is I'll come in. I'll grab these sides over here. And then what I'll
do is I'll press Control B and just
bevel those off, like so, and then I'll come
into the center point. This just this
center point here, I'm going to press the I
button to bring it in, making sure that I don't
go past those points. And then what I'll
do is I'll press E and pull that down like so. Alright, so that's that part. Let's press Altag, bring
that part back then. Now, let's do a similar
thing to the inside of here. So all I'm going to
do is I'm going to press I. I'm going
to bring it in. So roughly, so it's around
about the same size here, so you can see it's not
far off, that'll do. S said, let's pull
it down like so. And then what we'll
do is we'll pig it up into place like so, and then we just press
E and pull that back, and that's where
my pipes can go. So something like this
looks pretty good. Now what we'll do is we'll
actually bring these pipes in. So I've got my
orientation already here. I recommend probably putting it around about here, actually. So shifts, cuss to
selected, and then shift A. And what we're going to
bring in now is a curve. So I always recommend
bringing in the paths. I find them much easier to
work with than Beziers, so bring in your path,
and here's our curve. Now the thing is you
can move curves around. You're not going to lose the curve functions or
anything like that. The curve function is over here. You can see here's
the data function for the curve. Click that on. Nothing's going to
happen, even if you make it smaller like now, first of all, let's get it
point in the right way. So if we spin this
round on the Y, so Y 90, let's spin it round. And curves are really, really easy to use.
The best thing ever. So let's come in now increase that geometry with
just a simple. Where is it? Depth. Let's
increase the depth. Like so. Can really now get
this curb how we want it. So if I go into Edi
mode, shift spacebar, you can see now I
can actually move this curve around
exactly where I want it. The other thing is I can make it a little bit thinner if I want, so I can bring this down. And the last of all the things, I can also turn down
the resolution of this. Now, I'll quickly show you
don't actually do this, but when I convert a curve, you can't press Control A. You have to go to object, convert, and mesh, and
then you'll convert it. Now, you will notice
that this curve now has all of these polygons in there really,
really not needed. So let's press Control's
E and go back, and let's put this on six, for instance, and then
we'll do that again. Convert, mesh, tab,
way less polygons, just enough, actually, I think, to make it
nice and round. So let's go back once
more, so control Ed. Let's put this on six. So make sure you've got on six, and now let me show you how
we get this curve in place. Now, generally, when you're
using curves, it is easier. If you're using
proportional editing, I find it easier anyway. Let's pull it into
place, though. And the main thing is we want this curve to
be in place here. And we also want to make sure that once it's
fitted into place, we can reuse this curve again. So what I'm going to do
is I'm going to actually pull this over with
proportional editing on, so it's smooth, move it over, pull it down, pull this out. And as you'll see,
now it starts to pull the whole thing down,
pull it into place. Like so. And the first
thing I tend to do is when I'm pulling it
over, I'll bring it in. I'll get it into the right
place before doing anything. So into that center
look on there, pull this one up, like so, and you can see already
just how easy it is to use. Like, so like so, and that's looking
around about right. And I'm just wondering if
it's a little bit too thick, but I don't actually think so
I think that's about right. Now, once you've got your curve, press Shift D, duplicate it, bring it over to the side. And what you're going
to do now is press M, and you're going to put
it in parts to reuse. This means that when we
need some more curves, you know, in anything, so some more cables, we've actually got this
ready and ready to go, like we have with
the actual bolts. So let's put parts to reuse and now we can come
back to this part. And what I'm going to
do is gonna have three. So shift D, bring it over, Shift D. Bring it over. Now, of course, we don't want
these to all look the same. So what I'm going to do is I'm just going to grab them all. I'm going to press
Control J because you can use curves together. I want to line them up then,
so I'll grab this one. I'll turn off propulse
editing just for now and move it over a little
bit, turn it back on. And one thing we want to do is make sure that
connected only is on. The reason is, if I grab this, press the GB and bring this out, you will see that it's messing around with
all the curves. We don't really
want that. So what we want to do is put
connected only on, and then it'll only mess
around with this curve. That's all connected.
So this one here. Now what we can do
because we've done that is I can actually
bring this down. And actually start moving
them into a different plate. So in other words, I can
grab it, pull it out, I can grab this one,
pull it down like so, and just make them look a little bit different
from each other, like so, and then I
can move this one out. Like so we can also move this one probably a little
bit more over to this side. And now you can see
they're looking a little bit different
from each other. Alright, so I'm happy with
how those curves look. Now what I want to do
is I want to convert them and actually make
them look like pipes. So what I'm going to do is
I'm going to go to object, convert to mesh, and there we
go. They're all converted. And now I want to
do is I want to make these little parts here, as you can see,
into some sort of, you know, bolts or
something like that. So what I'll do is I'll first of all, come to this part here. I'm going to press
Alt Shift and click. I'm then going to press
let's press E, Enter. Alter nest, but make sure that you've got
portion leading off, so alter ness and
pull these out, like so, and then you've
got that part on there. Now we just need to do
the rest for the same. So before doing that,
now I've got that, what I'm going to
do is just go back. I'm going to press Alt
Shift click to grab the mold around
where I want them. So let's say around here, around here and around here, and then eat and alter ness, pull them out to
where I want them. And then just press. Right
click, Shade Auto smooth. You can see it's a
little bit too high on these because
we had it on six. So let's just turn
this up a little bit. And there you go. There is
your pipes all done for you. Alright, you might
want to come in and move these pipes a little bit further in so you can see here, for instance, we might want
to come in and grab this one, for instance, put
proportional editing on, Concho plus just to
grab the whole thing, and then just pull
this in a little bit, just so it's in there
if you want to. Okay, looking good so far. Now, let's think
about our other pipes that are going to go down here. I think, I think this
is with this pipe, we're probably going to
have to do it in a few, you know, a few bends
is what I'm thinking. So what I'm going to do is I'm going to
come to this part, and I'm just going
to grab this part, shift desk, c selected. And then what I'm going
to do is I'm going to press Shift A. In fact, we'll do
it in object mode. So Shift A. Let's
bring in a mesh. And what I'm going to
do is I'll bring in another pipe joint
so pipe elbow. We'll get it. You can see at the moment it is down to
the right scale of this, which is really great because that's what
we actually need. So let's actually bring it down. Let's pull it all the way
back then, so length, start, and length end. Let's pull that
all the way back. Let's make it even
smaller at the moment. So something around there. Let's spin it round then, so we'll spin it round on the ad, but it'll turn it
wrong way round. So -90, and there we go. Let's move it out, then, so we want to change
the location. Now, the Y location is that way, so let's pull it back. To
where we actually want it. So we want it somewhere
around there, and then I'm going to pull
it all the way up to there. So if I move the
location now up to here, let's move it on the X, as well, across
to here, like so. And then what we'll do is we'll bring it
back a little bit. So length start, length end, so we'll pull it
into there like so. And now what we can do is we can actually join this together. So in other words,
I want to now use this to create the rest
of my actual pipe. So how exactly am I
going to do that? So you can see, I've
got a bend on there. I want another bend, kind of, you know, this coming round and going round
to the other side. So let's see if I can
actually do that. So I'm going to press Shift D. I'm going to bring it down. And then what I want to
do is, I want to press Z, and let's I'm just thinking
which way I want this, so I want it to go
down from here, and I want this one
to go round there. I'm just wondering
if I can actually move it around there, actually. So Rs 100 and not RS R Y, 180. And then that's
pointing up that way. And then I can press RS -90, and then that's pointing
round that way. That's what I want. So now those two can join up. And then what I can do
is now I can bring this and point it into
that one down there. So if I press Shift
D, bring it over, and then I can press R Z 180, and then it's pointing
towards there, and then I can press RX -90, RX -90, and then it's
pointing in towards there. Now, where exactly
do I want this? So let's grab both of these. Let's pull them down like so. And then what we'll
do is we can move this one now into there, so it's lining up
with these points. All right, that's looking good. Now, let's do the next one. So what I'll do is I'll
grab both of these, and I'll also grab
this one here. And then what I'll do
is I'll press Shift and I'll move these over two here. And then what I'll
do is grab both of these, and I'll pull them up, like so, and then finally, I'll grab this one, and I'll pull it into place over here. Now we know that these are pretty much
level with each other. So all of these are
level with each other. And now what we can do is we can join all of these together, like so, and then I
can press Control J, join them all together,
and there we go. Now, finally, the last
thing we want to do, I really don't want
them stuck in, you know, kind of this f,
especially on these ones. So I'm going to press tab, I'm going to put in this X ray, so I can actually
see it's on here. And then what I'm
going to do is now, I'm going to go and
then Alt Shift click, then Alt Shift click
on this, like so, and then let's pull
them back without proportional editing on into
place where we want them. And then we'll do the same
thing on these, as well. So l shift, click, oh, shift, click, and
pull them back. And then let's just
turn that off. And there we go, now we can see they're looking
much much better. And now let's join them all
up. So I'm going to come in. And then Alt Shift click, Alt, shift, click, right click. And what we're going to
do is bridge edge loops. So bridge edge loops,
and there we go. Now there is another
little trick, so shift, click,
Al, shift, click, and then just press Shift R, and then that'll repeat
the last operation. So o shift, click. Oh, shift, click, shift, and then O shift, click and oh shift click and
shift R, and there we go. Now you can see,
if I right, click, shade Auto smooth
there we've got our pipes in done,
really, really nicely. So now what we want to do on the next lesson is we want to obviously put some little
joints in here on things. I don't think on
these smaller pipes, I need to, you know, bend these. I think it's only
on the big ones, but we'll put some joints
in on the next ones, and then we've just got
this dial on here to do, and then we're pretty
much done with this. I think what I'll
do is I'll actually take a little piece of these actually and use it for my dial rather than creating
another one, as well. Alright, everyone, so I hope you enjoyed that. I'll
see you on the next one. Let's save out our work, and I'll see you
on the next one. Thanks a lot. Bye bye. Thank
27. Enhancing 3d detail of batter maker, adding ridges onto pipes, adding measure arrow f: Welcome back everyone to Blend
Beginner's master class, the cookie factory, and this
is where we left it off. Okay, so let's now make a little part that's going
to come up and out of here. So all I'll do to do that is I'll press Alt Shift
click going along here. So Alt Shift click
Control plus Shift D. And then what I'll do is
I'll bring this over here. I'm going to press the Spawn then just to shrink
it down like so, and then I'll rotate
it round on the Y. So R Y, 180. Let's
spin it round. Let's pull it up
then into place. So it's going to be stuck
just in here, like so. And then what I can do
is pull this up now. So we've got an
actual pipe joint that we managed to
make just from this. So lt shift and click, like so. And then I'll pull it
up. Like sew into place. Alright, that's looking cool. Let's press Shift desk
because it's selected. Let's press then Shift A. And what we'll do is
now we'll bring in a cylinder. We'll have it on 24. So 24, we'll spin it round. So R Y, 90, we're going to make it a lot lot smaller just so it's
going to fit on there. We're also going to
squish it in on the X, so S and X, pull it in, and there we go, and then
stick it right on top of here, like so, and that
looks about right. And then what I always
tend to do on things like this is I'll
pull the back in. So I'm basically
going to come press the ebonne Press the E bone, and then from there,
we'll bevel it off. But first of all, always
reset your transforms. So set origin to geometry, grab the back of it, Control B, and make it a
little bit rounded. Right, click, shade Auto smooth. And there we go. That's
looking pretty nice. And we also on this, we'll also need a little
bit of glass, as well. That's another thing that
we'll actually need. So we're also going to, first of all, bring it
in. So I'll come in. I'll press the Ibn
to bring it in. I'll press E to pull
it in, like so. And what I'm also
going to do then is I'm going to make a
little pointer on here, so I'm going to press shifts, cursor selected, and then we're going to press tab,
and then Shift A. Let's bring in a cube. So we'll bring in a
cube, make it smaller. The other thing is, every
time I bring in a cube, it's always going
to be this size. Now, you can make it smaller. If you turn down the
cube size over here, you are going to if
I put this to one, every time I bring in a cube, now, it's going to be
this size when I bring it in unless I reload blender
or something like that. So I'm going to press the S bum. I'm going to bring
it in right to there. We still want to see it. That's the main thing,
so they are going to be a little bit chunkier than
what you would actually think. Then what I'm going to
do is I'm going to press S and X. I'm going
to pull it in. Pull it onto here, and then I'm going to pull
the top of it up, so I'm going to pull
the top of it up, and then I'm going to press S and Y and pull that in to there. Now, with the
pointer, I'm going to round off the bottom of it. So what I'm going
to do is I'm going to round off this part here. So I'm going to press Control B. Just round it off a
little bit on there. And then what I'm also
going to do is just put a little point on the
front of here as well. So I'm going to press Shift
A. We'll bring in a cylinder. We'll put it first of
all, won't put it on 24. It's too high, so we'll
put it on 16, like so, and then I'll squish it down
and then rotate it round. So, Y, 90. Make it much, much smaller, like so, and then I'm
going to pull it out, and then I'm going
to press S and X and then pull it out
a little bit more. And then all I'm
going to do then is just bevel off
the top of this. So if I grab this now, I'm going to press Control B. You can see it's not
beveling off properly. That's because I need to
reset all my transforms. Press Control B.
And there we go, right, click, Shade Smooth. Alright. So now we've got a center point
for this as well, which makes it really handy. We can join this up
with the other part. So press Control
J to join it up. And then what I'm
also going to do because I actually
want this part, all of this part, basically,
especially the pointer. So I'm going to bring
the pointer over here. So shift D, bring it over here. And then what I'm going
to do is press M, and we'll put it in parts reuse. So I've got that now. And then what I'll do is
I'll come to this part. Now I want to actually
put this glass on here. Now, the glass part,
you're actually going to it's going to be
over the top of here. So what I'm going to do
is I'm going to come in. I'm going to press O lt Shift click and I'm going to press F. And then what I'm going
to do is I'm going to press P to separate it off. So now and that
are separated off. Control A or transforms right
clicks origin geometry. And now I want to do is I
want to basically make it like a kind of
bubble, so rounded. So the easiest way to
do that is just press I bring in an insert
near enough to the center and then
press Control R, and bring in some
edge loops like so. Left click, right click. Now, grab the center,
and all you want to do is proportional editing
on and put it on the sphere. And now you should be
able to bring this out. So if I bring this out,
you can see it comes out like that. Like that, like that. And there we go, right
click Shapes Move. And there is the glass
from on top of there. So you can see that's
looking pretty nice. That's exactly what we want. Alright, so now we've pretty
much got the glass on there. We've got everything on here.
I'm thinking, what else? Then we just need to finish, I think, just these parts here. So let's actually do that now. So what I'm going to do is I'm going to come into these parts. I'm going to press Control
R. Left click, right, click, Control R, left click, right, click, grab them both, and then S Y without portion on, actually, SY, zero, and then just pull
them back into place. So that's those ones.
And then we will do the same on the so
Control R. Left click, right, click, Control R,
left click, right, click. And then S Y, zero, pull these back
into place like so. Now, let's do them all together. So Alt Shift and click going
all the way around here. Same on these, and then E enter alters and pull them out to where we want them,
something like this. And then we'll come now, and we'll add in a few
along here as well. So all I'm going to do then, we've got obviously two here. We might as well I'm just wondering whether we
might as well use these. We'll have two in this one.
I'll move this one up. So we'll just move this one up, and then I'll add
in another one, controla left
click, right click. And I'll leave these two
here like this as well. So now I can come in and just
use the ones I've already got to actually come in
and just adding a bevel, so I'm just going to
zoom in just so I can see what I'm doing
a little bit easier. So I'm going to press
Control B then, drop it down, like so, press the EB, Enter, Alter Ness, pull
them out, like so. And it's up to you whether
you press Alts again to bring them in a
little bit. Like so. And, yeah, I think
they look really nice. Alright, this part now
is pretty much done. Now, all we need to do is make sure that everything
is beveled off, and then we need to make
sure that we've got all of the materials on there. So let's go one by one,
first of all, then. So we already know if we're coming over to
our little spanner, this is actually all beveled
off, so that's cool. This one's all beveled off. This one's all beveled off. Now, the thing is,
do we actually need these parts really beveled? Probably not. Probably not. We don't probably
need those pipes beveled or anything like that. We probably also don't need
these beveled off either. They're two small parts. Now, this one here I would say, yes, we probably need it. So all I'm going to
do is grab this one. Control A all transforms, set origin, two geometry,
grab this one then. And all we're going to
do is press Control L, copy modifiers, bevel
it off, like so. And I think, yeah, that's
going to look good. We'll just have to see once
we've got it in because I'll show you another trick
that you can use you know, to keep this smoothness on here. So we'll do that now, actually. So what I'm going to
do is I still want. I don't want this so smooth. So all I'm going to do
is Alt Shift click. Old shift click, right
click, Marker Sharp. And there you go. You
can see now you've got that hard edge back in there, really, really handy if
you want to keep something nice and sharp. Hi
this out of the way. We're on to here now, grab
this, grab this part, Control L. Copy modifiers, that is beveled off now. And let's work our way down. This we definitely want
beveled off a little bit. So grab this part troll. Copy modifiers. Let's
hide this out of the way. And then we've got
these two here. So definitely definitely want
all of these beveled off. So I'm going to grab all
three of these C troll. Copy modifiers and just looking at this part it
doesn't beveled off very well, so I'm just going
to hit Control A, all transforms set
origin to geometry. That's that one.
That's that one. This one, look, let's
press Control A. There we go. Set
origins geometry. And let's also look at this one, Control A, set origins
geometry, and there we go. And I think the rest
of them actually are beveled off. Let's
bring everything back. And daddy's looking
now pretty nice. Now what we'll do is we'll put
it onto our material view. Let everything load up. We'll actually save it out. And then on the next lesson, then we'll get all of
these materials in. And yeah, I think this is looking really,
really nice so far. Okay, so we'll do
that on the next one. Alright, everyone, so I
hope you enjoyed that. I'll see you on the next
one. Thanks a lot. Bye bye.
28. Working on batter maker materials and shaders, adding color to machinery, creating gl: Welcome back, everyone to
blend Beginner's master class, the Cookie factory, and this
is where we left you off. Alright, so now, let's
start adding in. We forgot actually
something on here, so let's actually
finish those off. So all I'm going to
do Control R two. You know what? We'll actually do that a little bit different. A I'll do is I'll go for one and then left click and right click drop you
around the center. Control B, and let's
pull them out. So I'm going to have them
somewhere around here, and then all I'm
going to do is re grab these Alt Shift
click Alt Shift click. And actually, we don't want to go all the
way down what we can. We'll do Control B, and we'll pull them out first. So we'll
pull them out to there. And then what we'll
do is we'll come now to the end of here, to the end of here, shift, click here, and then
Control click here. And then all we're
going to do is press E, enter AlternS and pull those
out a little bit like so. Now, I might have gone a
little bit big on those. So instead of pressing Alts, I'll just press S, and bring
them back a little bit. And the other thing I can see is they're shrinking a
little bit on this side, so I might just bring them down. Wave shift, holding shift just to bring them down to straighten
them up a little bit, like so, and there we go. They're looking
much, much better. Now, from here, let's
actually, first of all, before we do anything else, come in and just give
these an edge loop. So Alt Shift click. They're going all the
way around to there, as you can see, Alt Shift click. Alt Shift, click,
all, shift, click, round the other side
now Alt Shift click, Althif click, and then
finally down under here, right click and
then mark a seam. And then I'll make it easy
then to split this up. So what I'm going to do now
is I'm going to on here, we should have factory yellow. So let's first of
all, join this up. So I'm going to grab this one. I'm going to grab you know what? We'll do it the other way.
We'll just add in one. So let's come in,
factory orange, and then we'll come
in. We'll grab this. So L and L, and then we'll add
plus, down arrow, factory yellow, click a
sign, and there we go. Now, we want factory
orange on here, so I'm going to
grab both of these. Grab this one last, Control L, and we're going to link
materials like so. And now on these parts,
we want them to be metal. These will be dark, and
these will be light. So we'll come to
these first of all. Now, of course, we need a new material for a
batter. We'll add that in. Don't worry. So first of all, though, we'll click
on metal light. And then what I'll do is I'll
come to these parts here. So mine are already selected,
click the plus button. New and we'll call
it batter mix. Like so. And then what we'll do is now
we'll click Assign. So we know we've got a bar
mix ready to go on there. Now we'll come to
these parts here and we'll go for the
metal doc like so. Then we'll come to
this part here. It's going to be metal light. So metal light. Now, I'm wondering
with the bolts, do I want them dark or light? And I think actually on these, I'm going to join
them all together. Like so. Make sure I've got
them all, press Control J, and then what I can
do is I can put these on metal light, as well. Now, we'll come up and we'll have this obviously be metal, and I'm just wondering if the bottom of it I want on dark. So I think we what I'll
do is first of all, I'll put this on metal light, and then the bottom part of it. So what I'm going
to do is just press Old shift click going around, Control plus Control Plus and Control plus plus B, Down arrow. Now Doc, click Assign. And yeah, I think that
looks perfect like that. You might want to
put another one on there, completely up to you. Now, this one is a new one. So what I'm going to do
is click the Down arrow. We're going to go
with factory Blue. I'm going to click
Plus, New factory. Red, like so. Down arrow, cupping material, down arrow, paste material, minus this one off then, like so, and then coming
over to your shading panel, and all we want to do
put this on render view, dot to zoom into it. And then I just want to change
this now for a red color. Maybe, maybe that's a
little bit too red. So drop it back Js to tad
like so, and there we go. We've got a nice
red color in there. And now let's carry on
working our way up. So the rest of this machine, I would say, needs to be metal. So we can add this, this, this will all be metal. We'll grab this. Finally,
Control L, link materials. There we go. Yeah, I think that's actually looking
nice. Let's have a look. Yeah, that's looking
pretty nice. I'm just wondering whether
they now want to have these, you know, a little bit
darker. Let's see, actually. So what we'll do is Alt, shift, click Control plus, plus button, down arrow, metal dark, click a sign. And,
yeah, you know what? I think it's gonna look
better with, though. So Alt, shift, click Alt
Shift click, Control plus. Down arrow. Metal dark Ops, wrong way. We won't
do it that way. We'll go back. You can see it won't actually go back,
so we'll do that again. So Control plus, and
we'll go Metal light. And then plus down arrow, metal dark, click a
sign, and there we go. That looks easier
way of doing it. I think I think on these
parts, let's have a look. It looks a bit weird on this
part here, so you know what? I think I'll just put it I think I'll minus
that off, actually. So I'll minus it off in object mode. I'm just
going to leave that. I'll leave that band on there. That band on there
looks quite nice. I'm also wondering about
the front of this. I think I'll come to the
front and do the same thing. So Control plus, metal
dark, click a sign. Yeah, and I think
that looks better. Distinguishes it a
little bit better. Now, let's come to
the bolts on here. And let's go down, meet Light. And now we're on
to this part here. So these parts here, if I go down, we've got
one that says rubber. So let's put those on rubber
so let's do these ones now. Now all of these parts are
going to be metal light. So down arrow, metal light. This part here is
going to be blue. So if I click the down w, it's going to be factory blue, and this part on the front of here and this part here
are going to be yellow. So if I come to this part here, press Control plus just to
grab it all, plus button, down arrow, factory yellow, click a sign, and then this one here will also be
factory yellow. Like so. Alright, so that's
looking pretty nice. Now the last thing is,
let's have a look. I think it's just this one,
so we've got the bad to do. We've got this to do, as well. So let's come to this. Now, the first
thing is, I want it on I think we'll have
this on metal dark, actually, just to
distinguish it off. So I'll come to this part.
And what I'll do is I'll click the down arrow and
we'll have it on Metal dark. And I'm wondering if
I want, you know, I'll leave this as it is. Now, we've got the glass.
I'm just going to hide that other way because we want the back of here to
be a white color. So what I'm going to do
is I'm going to click, I'm going to, first of all, bring a new one in, and
I'll call it factory white. So factory white, like so. And then what I'll do is
click the down arrow, and I'll paste the
material in because it should still be that blue
that we had from before. And then what I'll do
is I'll click on this, click a sign, like so. And then what I'm going to
do is come to my factory white and just put
this so you can see, is it going to be Let's
click a sign. There we go. And then I'll change this now. To white. Like so. I'll also bring this
up, and there we go. And then I'll put this
on the kind of rubber. I think it was. Not like that. Let's minus that off. Down arrow. You can see
now that's come in there, and I'll show you how to get rid of those in a little while. But let's for now put it on
rubber, and there we go. And I'm just making sure this little spot then I'm
going to click Control plus, and we'll put that
plus down arrow, metal light, click a sign, and there we go, as
distinguish it off. Let's shift right, click to move our cursor
out of the way. And now, finally, we've
actually got our glass. So let's make some
simple, simple glass. So all I'm going to
do is press Altage. Bring back my glass. Let's click New and we'll
call this glass. Like so. And then what I'll do is now, first of all, to make
glass, it's very simple. You have a transparent and you have one that's
called glass, of course, and they are actually
like the principals, so they're actually shaders. So you can't plug them
into the principal. So what you need to do
is delete the principal. Bring in a glass. So
shift day, search glass. So it's glass BSDF. Bring in a transparency
because then you've got control over how
transparent the glass is. So bring in
transparent. Like so. And then what you'll
do is bring in a mixed shader because you need to mix these two together. So shift a search, mix. And because they're shady,
you can't use a mixed color. It has to be a shader. So then we're going to plug
this one into the top here, this one into the bottom here. And then what I'm going to do is instead of it being a color, I'm actually going to I'll plug this in first
just to show you. So you end up with
something like this. Now, you can see through
there, double tap the A. So you can see through
there already. That's looking pretty nice.
It's, you know, a little bit. It's not quite see through, but we're going
to sort that out. So the first thing
is the transparency. If you change this around, you can see you can change
what color it's going to be. And you can also change the color on here, as
well as you can see. Now, what we're
going to do is we're going to use one of
these to control, like, how see through this is. The other thing is,
if you've got an IOA, you can see the more I put this IOA you can see the more kind of distorted
it actually goes. So what I'm going to
do is for this one, I'm going to put it on 1.2, which means it's nearly
nearly seafood, not quite. We've got a little bit
of distortion there, as you can see. And then what I'm going to
do is now bring in a noise, so search noise, bring in a noise texture, and I'm going to
drop that there. And then I'm also
going to bring in a color ramp, so color. Ramp. I'm going to
drop that in there. And then what I'm
going to do is plug this into the color, and I'm going to drop my fat
into this color ramp here. Now, at the moment, you
can see if I move this up, we've got quite a bit
of distortion on there, as you can see, that's
looking quite nice. Now, let's come
over to our noise. Put this around 160. And now you can see we've got lots and lots of noise in there. That's looking quite nice. And then what I
would say is just leave everything else as is. Now, what I want to do now is I'm going to pull this
all the way down. And I'm going to make
this a little bit gray. So something gray like this, and let's move it
up a little bit, and I think I've gone
a little bit too far. Let's have a look. There we are. We've got a little bit
of noise in there. That is what I'm looking
for. So something like that, you can see you can definitely see that
it adds to the glass, and you can see that
definitely looks like glass, and I think that actually
is looking pretty nice. Alright, so that's that. Now, one last thing
I would put this up. You can see if I bring
this up or bring it down. We can have it
complete glass or not. I'll put this on
not 0.525 like so. And now we can see if
we move from this side, now we can see that glass. I don't think it's too much. I think it's just
about right and we can also see that noise on there
that we've put on there, and that for me is pretty nice. All right, so let's
save out the file. And on the next one then,
what we'll work on is we'll start working on this
actual batter and then I'll show you how
you can actually have animation within
an actual texture. All everyone, so hope you enjoyed that. I'll see
you on the next one. Thanks a lot. Bye bye. Thank
29. Adding a texture map to our shader for batter for Blender Beginners Masterclass: Welcome back, everyone to blend the beginner's master class, the cookie factory, and this
is where we left you off. Alright, so we're on to
our first animation. Albeit is textures, but
I think learning how to, you know, make textures
animated is really important. Now, if you only want
to just put the texture on there and you don't want
to bother with the animation, of course, you don't
have to do that, but I think it's
well worth learning. And honestly, it
doesn't take that long. So the first thing I
want to do, though, is go to edit preferences. And what I want to do
is I want to bring in add on called
the node Wrangler. This node Wrangler,
once you took it on, will make things really,
really easy for you. For instance, a
lot of the times, you haven't got to go
in and set up you know, certain node groups
and things like this, it makes things much easier. So we'll be using
the node wringer a little bit more as we go on. But for now, let's just tick it on and then
we can bring it in. Alright, so what I'm going
to do now is click on these. I've got one that's
already called batter mix, and now I want to do
is I actually want to bring in one of those textures. So if I pull my
screen over here, you will see that within
there, we have two textures. One of them is called batter. All I want to do is drag and drop this right into
blender, like so. So now it's dragged
and dropped in there. And then what I can
do is I can plug this now into my base of
my actual principle. So if I plug this in
here, and here we go. Now you can see this
batter doesn't look right. And the reason it doesn't
look right is because of the fact that these
are not UV unwrapped. So before we go anywhere, the main thing is that
you'll need to know how to actually add in seams and chops, and then we're also going
to go through textures and shaders and how to actually
put those onto things. So in other words, UV unwrap. So the first one
I'm gonna play you now is proper use
of seams and shops. We've done a bit
of seams already, but learning how
to mark seams on things so that we can
unwrap things is really, really vital for actually
working in blender, not on actual shaders, like we've been using, but when you bring in actual textures in. Now, these are two deep planes, so we're not going
to have to use the seams and shops in these, but it's important because in some other parts of the course, you're going to need to
know how to use that. Alright, everyone, so
I'll play that for you now, and I'll see
you on the next one. Thanks a lot. Bye bye.
30. Blender basics uv seams and sharps for Blender Beginners Masterclass: Welcome back, everyone to Blend Beginner's master class,
the cookie factory. And now we need to
actually unwrap these. So we need to unwrap these, and I'm going to show you
how UV mapping works, what's the difference between texture UV maps and, you know, UV maps that you creating
substance painter and how to put them
on the UV map space. Alright, I'm gonna
play that for you now, and I'll see you on the
next one, everyone. If you know that
already, of course, move on to the next
lesson. That's fine. But I'll see you on the next
one. Thanks a lot. Bye bye. Welcome everyone to the
shut introduction to marking seams and sharps
part of the course. So before I give you examples of what I'm
actually talking about, let me just briefly
explain what they are. Seams you can think of like
seams on a piece of clothing, like a shirt or
pair of trousers. The main job of seams
is to make sure the texture that
you're trying to place on your mesh
goes on correctly, but more importantly, gives you control of how that
texture will look. Sharps are mot like seams, but serve an entirely
different purpose. We use sharps to
give us control of how sharp and soft angles
are on or measures. This makes them look realistic. It is also important we do this not only for
rendering and blender, but also sharps carry on through to other software
or games engines we want to use like substance painter or unreal
engine as an example. So with all that said,
let's get started. So here we are in blender
with our starting Queue. Now, if I click on my cube
and go to my UV Editing, you'll see that the cue is basically unwrapped
in this actual way. So basically, it
unwraps like a present. Now, if I come across and I grab this circub and
I press Shift D, and then we press Shift
spacebar to bring in our Gizmo, and we
move it across. And now let's say I want to
alter this cube a little bit. So what I'm going to do is I'm going to press the tab button, and I'm going to go
into Face Select, click the top face Shift Spacebar to bring
in the move tool. Bring it up so. Now, let's say I
want to unwrap this. Now, if I grab this
with L just to grab everything and I press
the U button for unwrap, you'll see that it unwraps
exactly the same way. Even if I reset the
transformations of this, it will still unwrap
exactly the same way. Now, let's mark some
seams and see how that has an actual effect
on our actual unwrap. So let's grab the top, and
we'll come down to the bottom. And what we're going to do
is we're going to press Control then come down
to where it says, McMs. Now, it's important
to remember that it's Controlle to mark
Seams in facelect. But if, for instance,
we're in EdgeSlt. So if we come to this edge, if we press sir Controlle, you will get this option
up as well, MkMs. But you can also right
click in Edge Select, and you can also see we can
mark Sam this way as well. So for now though I'm not going to actually
mark this scene, what I'm going to
do is I'm going to grab the whole thing with L, like so, and now I'm
going to press unwrap. And you can see it unwraps
completely different. Now, let's bring
in some textures so you can see what
exactly I'm talking about. So if I press S tab, I'll come up to my
materials panel up here and I'm going
to give this material. So I'm going to come across
to the right hand side, click on my material button. So let's now bring the material
I've already prepared. So if I come across
this little down arrow, come on down, you
can see I've got one here called wood, and
let's click that. Now you can see what's happened. We've actually applied our
material to this object, where you can see, it's
pretty much a mess. The top of it looks fine, but the t going around the
side is all bent and skewed. So if I zoom out and
I press tab now, you can see that the
reason is that it's not actually UVunwrapped correctly.
So how do we fix that? If we come up to Edge set
and we grab this edge, and now I'm going to do is
I'm going to right click, come down to mark scenes, and now grab the
whole thing again. I'm going to press, unwrap, and now you'll see it
unwraps absolutely fine. You can see that
woods looking really, really nice actually
on this mesh now. So what this does, the seams do is actually gives you control of how this actual texture
is placed on this mesh. You also need to take
into account that this is basically
an infinite loop. So if I come around and I look at this pace and this face, you can see that
they're going round. If we have no seam, when I
talk about infinite loops, it's basically going
around and around and Blender doesn't actually
understand how to unwrap it. So you'll end up with
that mess we had before. Now, the other thing to
take into account is, if I turn this wood around, for instance, Swan going to do, I'm going to come over
to the left hand side, the viewpoint of my UV editing, press A to grab everything
90, spin it round. Now, the other thing
I want to show you is that where we join these
actual seams up is also really important because
you'll never ever get it perfect on here where
there's an actual seam. So let me exaggerate
this a little bit. So I'm going to do is
I'm going to press tab. I'm going to make this a lot
smaller and I'm going to move it into the
center of my UV map, and then I'm going to press tab. Now you can see that
these edges don't line up whatsoever against
this other side. So this texture here doesn't
line up with this texture. And the reason is because
we've got a seam down there, and that is the actual
break in the texture. Yet if we come
round to this side, and I spin this round. So if I grab it or Z 90 and now go to this
one where we can see, you can see that these
line up perfectly. The reason is because obviously, there's no seam there.
The seam is here. So you need to take that into account on your own measures and objects that when you're
playing textures and materials, try and put seams where
you're not going to see them. So if it's on a door
handle, for instance, try and put them on the inside where no one's actually
going to see them. So always bear that in mind when you're actually
marking your seams. So now let's discuss sharps. So if I bring in
a new primitive, so if I press shift A, I'm going to go across the mesh, I'm going to bring
in a cylinder. Now, you'll notice
that this cylinder has all these little
edges around there, and let's say you want to
make a cup or something, the last thing that you want is all these hard edged
faces in there. Now, there are things we
can do to sort this out. So the first one we can do is we'll bring in another cylinder. So I'm just going to move
this one out of the way. So shift base bar, bring in my gizmo, move it
out of the way. Shift A, bring in
another cylinder. And this time, we're going to
come down to where it says, add cylinder and turn
up the vertices to 100. And now you'll notice that
we do have a round edge. But the problem is
that we've brought in 100 vertices to
actually achieve that. And that's not
something we want. We want to use as
few polygons as possible while still getting
a really good looking mesh. So how do we achieve that? Well, there are a number
of things we can. First of all, we can come
across to this right hand side, and what we can do now
is come to where it says normals and
click on Auto smooth. Then we can right click on the viewport and
click Shade Smooth. Now you'll notice it's
actually been smoothed off. But the problem with this is, if I turn up by Auto smooth, you can see if I turn it up
all the way, it goes really, really funky, and that is
because at 107 degrees, Blender decides that these edges along here needs moving on. So it doesn't give
us a lot of control. If we do this on the other
one, so if I grab this one, right click, shapes
move, Atos move on, you can see again, even with
lower amounts of polygons, we're still able
to smooth it off. But if we turn this up, we're still going to end up
with the same problem as what we had before. So
how do we solve that? Well, if we come in now,
press the tab button, come to the top, grab the top, shifts
like the bottom. Press controle because we are in face leg and we'll come
in and marker shop. And now you'll notice
if I press tab that now it's got
hard edges on there. This gives us control. So this is why we
actually use shops. No matter what I turn
this up to 180 degrees, which is the highest it goes, it will not get rid of
those shops that we mark. We can also mark shops
around the edges as well, serve a grab this
one and this one. And now because we're in Edge
select, we can right click. Come down, mark a shop, press the tab button,
and now you'll see you've got hard
edges on there. So it's very important
that you mark sharps, where you're going to
actually want hard edges. It's also important that
you get into the habit of marking shops when you're
actually marking seams. And then what happens is,
when you join two objects together and you turn up
the auto smooth if needed, you're not going to end up
with some measures like this. Okay, one, so I hope you enjoyed that
introduction to marking scenes and shops and as
they say, on with the show.
31. Animating batter texture to create flow motion for Blender Beginners Masterclass: Welcome back, everyone to Blend and beginner's
master class, the cookie factory, and this
is where we left you off. Alright, so let's actually
unwrap these first then. So first of all, if you're
going to unwrap something, you might as well go
over to the UV space. And you can see here
it's already brought up these parts here for
me. This is the batter. And you can see that the battery is a very, very simple image. And it's very, very
large, actually. But the way we can do is we can actually make this
much, much bigger. So I'm going to do,
first of all, is zoom into these with
my little dot bon. I'm going to make sure I've
got everything selected. I'm going to press P selection, separate those parts out. It's going to make it
easier to work with. Press Control A, all transform, click the origin, geometry,
press the tab bon, press A, and then
I'm going to press U. Unwrap and you should end
up with something like this. Now, let's actually
bring this over. And what I want to
do is, I just want to see what the battery
is looking like. So you can see the battery
is looking like this. Now, I could come over to this side and pull these out
and make them much smaller, like so, or make them much
bigger or something like that. But rather than do that, let's actually do this in
the shader itself. So we're not going to
bother in the UV map. We've unwrapped it.
Everything is looking good. Now, let's make sure that
we can do it in the UV. Now, one thing I do want
to make sure, though, I can see here I'm just making sure that
the bars looking. You know what? It's going to
be fine. It's gonna be fine. Let's go to shading now. So what we'll do now
is, first of all, I need some way to actually
make these bigger, smaller, change direction,
and all that other stuff. So what I'm going to do is
I'm going to grab my bar, and now we've got that
node wrangle activator that I can just press Control T. And what that's going
to do is set me up a texture and coordinates. And because now I've got
texture and coordinates, what I can actually do is change the actual scale of these,
so I can come down. Grab one of these
and put it to five, and you will see straight
away, it stretches it out. And the reason it's
stretched is because we've only changed
the X value to five. We really need to change
all of these to five. Now, rather than going in
and clicking on one by one, just left click the top one, drag down to the bottom one, press five, Enter,
and there you go. Now you've got your
actual batter mix. And it's looking different
from each other, and you can see that
it's been repeated. And it's been repeated
because it says on here that is a
repeating texture. And also, we've made sure that this texture actually
is repeatable. So, in other words, it
is a seamless texture. Now, the next thing I
want to do is I want to actually make sure that
this when it's rolling, so when it's actually
being mixed, so to speak, we actually don't
want it to look like it's just a simple texture, you know, just moving along. We don't want it to be
like that. We wanted to have a bit of
variation in it. So the way to do
that is I'm going to actually pull my material
output over here. And what I'm going
to do then is I'm going to grab all of this and I'm going to press shifty and
just bring it up like so. And I'll show you the magic behind this once
we've got this in. Now, the other thing I
want to do is I want to bring in some noise
as well into here. So we're going to do that first. So first of all, though, we'll
bring in a mixed shader, so search, mix, shader. So mix shader this one here because we have got a principle, so it can't be a mixed color. And then what I'm going
to do is I'm going to plug this into the bottom. This one into the top, and then I'm going to plug this into here and
nothing will happen basically because
they are exactly the same going over each other. Now what I'm going to do is I'm going to move them
along a little bit. You will see a little bit
of difference in them. So if I come to
this top one here, and I put this let's say on two. So let's
put this on two. And there you go, you'll see
that it's moved slightly. Now, let's come
down to this one, and what we'll do is we'll put this on something like 1.2. So on the X, 1.2. And there we go, now
you can see that they've kind of gone
into each other. It's a little bit blurry, basically, and that's what
we're hoping to achieve, so that now, when we
actually set these rolling, they're not going
to look the same. And you can try this yourself, you can put this back to
zero on each of those. When I've showed
you how to bring in the driver because that's what we're going to
use to drive these, you will be able to see there is a definite difference in them. Now what I want to do before
that is I want to bring in some noise before bringing
in actual drivers. So the way I'm going to
do that, first of all, is I'm going to bring
in a noise texture. So Shift A, search, noise texture like we've used
already many times before. So let's bring in the
noise. Let's also bring in a color ramp. So shift a search. Let's bring in a color ramp, like so, and we'll
drop that on there. And then what I'm
going to do is plug the fat into the fac
of the color ramp and plug the colour into the fac
of my mix shader like so. Now, you will notice when I
actually bring this up now, I've got Darker
and lighter spots, and that is what
I want because I want to have control
over that part. So what I'm going
to do now is just drop that back a little bit, bring my white down all the way to the black and there we go. We've highlighted those
parts a little bit more. The other thing I'm going to
do then is I'm just going to change a few of these
just a little bit. So I'm going to put this on 6.6. I'm going to put this on 1.5. I'm going to put this on six, not six, so that's roughness,
isn't it? You know what? We'll actually change
this. We'll change this three D to be four D. So we'll change the way
that it sits on the actual on this plane here. And then what I'll do
is I'll put the W 6.6, this one to 1.5,
this one to six, and find them a roughness
back to 0.5, like so. Alright, now that looks
fair, as you can see, we can also see
I'm thinking that this is probably probably
the wrong way around, but we'll see we'll
see as we go on. Now, what I also want
to do is I want to actually I'm thinking whether I actually bring in a
texture and coordinates. Let's press Control T. We can bring in a texture
and coordinates. I think that will just
make it sit a bit better. You then have control over how you move these,
as you can see. So if you want to control
that, you can do. I'm going to leave
mine for now on there. And now, all that is left is
to make this texture move. So the way we make it move, if we come over here, and we go to. Where is it? This one here. So I'm looking out
here, so we've got principled here,
principle here. These are our textures, and these are the mapping
for each one. If we come over and we go to our Y value, so this Y value, you will see as I move this, everything starts to
move on this one. If I move the other one, you will see everything starts
to move on the other one. This is why we want
to separate them. We want some movement in the top and move them in the bott, and we want them to be
different from each other. So the thing is, we
could set this to zero, and then let's say at frame 100, set it to ten. And what'll happen is, as
it goes through the frame, it'll actually start moving. But we don't want to
do that. We want to do this as automatically
as possible. If you want to do
something automatically, you need to use drivers
because what it means is, no matter how long the timeline, no matter how long this
animation is playing, it will basically just
keep going through. On a driver, resetting and
it'll be very, very fluid, and you haven't
got to add in any, you know, keys or
anything like this. So this is a really,
really easy way of animating something
with textures. Now, as we get a little bit
further on into the course, we are going to be using keys to actually put in certain
animations from this point, so point A to point B. But for this, we're
just going to use a simple driver just to get
you started with animations. So what we're going
to do to do that is, we'll come into the Y. And what I'm going to
press is hashtag frame 40. So if I come in and I press
hashtag frame Dash, 40. Press the end but, and now you press Space Board to
start the animation. You will see now we've
got them animated. Now you can see one of them is going the
wrong way around, and the reason for
that is on the UV map, that one is actually
turn around. So let's actually see if we can see this on material view. Might be easier to see.
So let this load up. There we go. And now you can
see just how they're moving. Now, what we're going to do
now is go to the other one, and you can see this
will just keep going. It's infinite, no matter
how long you know, the timeline is or
anything like that. So now we're going to do is we're going to go
to the other one. And what I'm going
to do instead on the other one is put it to 50. So one of them's going to
be moving slightly faster, one of them slightly
slower because basically, frame 40 and frame 50
means that it completes the entire kind of
movement in 40 frames, and then the other one
completes the in 50 frames. So if I come over to you and I do the same
thing, so hash tag, frame, as 50, like
so, press the enbne. Now press Spacebar and now you can see
they're all moving. You can also see that they're actually disappearing
in and out on here. You can see them being mixed up, so they're not all the same. Now, finally, if we come over them and we go to
our UV editing, and it is this one here. So if I grab this one, spin it round in my UV maps, just make sure my cursor
is on there dead 180. Now press the spacebar, you'll see they're all
running the right way. But more importantly, if
I come back to modeling, Make sure I'm on shading view. More importantly, you can see that they look
entirely different. You can see that some
are flowing over the others and they're actually
changing, as you can see. Now, you might be wondering
what that flickering is. And the reason why that's happening, if we come to layout, we can see that our
timeline is ending at 250. So let's go back to it. Let's put it on material view. Now, you can see
the moment it's 66. The moment it gets to 250, it's going to flicker because it's going to go back to zero. So if we press Space
Bar, you can see everything's fine on
there. Everything's fine. We're going to 250 now, and there you go. You can see it
jump a little bit. Now, if we set this
to 1,000, like so, now you'll see that
I'll just keep going, and it'll only flicker once it gets to 1,000, as you can see. So this is looking
quite nice now. Now, one thing I just
wanted to make sure is if it looks nice on
my rendered view, and you can see, actually
that is looking really nice. Now, finally, you
might want to go in just before we finish, and you might want to set the roughness you know,
a little bit more. Let's put it on to roughness. Like, so you might want to set the roughness up a little bit, just to get a little bit more
glistening on those things. You might want to set the
metallic up a little bit. Just make sure if you're
doing it, though, you set it on both
because at the moment, you can see, these are both, you know, these are both
linked together in a way. Now, what you can also
do last of all then, to do them both together. All you need to do
is bring in a value. So search value, like so. Drop that in there.
And then what I can also do is drop
in the roughness, the roughness on here. Like so, so now I've
got plugged into both. And now when I turn
that up, I can actually turn them
up at the same way. Now, what I'm going to do
is just take that there. I'm going to plug it in to my metallic because you'll
be able to see that easier. So plug it into metallic, plug this one into
metallic, unplug this one. And now, if I bring this up, you can see it changes them
both at the same time. So that is what we're interested in. So I'm going to
leave that in there. You can mess around with that if you want, plug into
your roughness. Just make sure it's
plugged into both, but it will change them
both at the same time, which makes things really,
really easy, actually. Alright, so what I'm going
to do is save out my work. So I'm going to save it out.
I'm gonna go into modeling. And then what we're
going to do on the next one is
we're actually going to make a start on bringing
in our conveyor belt. So this means that
we're going to bring in our geometry node that's going
to be used through here. I explain a little bit about
what geometry nodes are. Alright, everyone, so
hope you enjoyed that. I'll see you on the next
one. Thanks a lot. Bye bye.
32. Blender basics asset manager guide for Blender Beginners Masterclass: Welcome back, everyone to blend the beginner's master
class, the cookie factory. And now we're going to do is
we're actually going to be looking at our geometry notes. Now, first of all, let's actually open up
the rummage note. So if we open this
up, let it load up, and you will see that this is what you're
actually greeted with. So all of this, it looks very, very complicated, but trust me, guys, we've made
this rummage note as simple to use as possible. So it might be complicated
in the beginning, but after a while, you're
gonna get the hang of it. Now, what are geometry notes? So what are they? In blended, the powerful
node based tool set that allows
you to create and manipulate three D
models procedurally. They're great for beginners, they're great for
advanced users alike, because they're extremely
flexible way to build complex designs without
having to go in there and fiddle around with things or create new mesh
and things like that. The best way to think of juncture nodes is like
ego for three D modeling. And instead of manually
sculpting or moving pieces around build
your three D objects by connecting blocks which are emetre nodes that each
perform a specific task. So if we, for instance, go to this geometry node and we click on one
of these parts, you can see what it looks like. Now, of course,
this is a highly, highly advanced geometry node, and we've got one of our
experts who actually put this together you can see this is
how far you can take them. You can also create very, very simple emetre nodes which
might just turn, you know, a cube into a sphere or
something like that. You can create ones for trees. You can create them
for roof tiles. And we have actually 40
plus geometry nodes, which we've actually
created in house as well. So now we've gone through
what geometry nodes are. If we go back to modeling, how do we actually get these into the blendfle that
we're actually using? So there are a number of ways. First of all, you can
just press Control C, go to the blendfle
that you've got open, so the factory
blendflePress Control V, and it will drop in this
Jumptre node in there. That is one way of doing it. What I'm going to
show you now, though, is the asset manager
and how to use that to bring in
your Jumptre node. So I'm going to show you that
now when we come back then, I will actually create this into its own asset manager and show you then the
easy way out to do that and also how
you can build up massive libraries of
geometon nodes or shaders or models that you
can bring into any of your projects in
real time instantly. Alright, everyone, so I'm going
to play that for you now, and I'll see you on the
next one. Thanks a lot. Bye bye. Welcome, everyone to the Blender Asset
Manager guide. And basically, what we're
going to do in this one is just go through the asset
manager, show you how it works. It does seem fairly complex
when you first start this, but actually it's quite simple once you get your
head around it. So here you can see, I've got a standard scene here and
I've actually brought in some actual assets,
and they're named. This is important, actually, that just make sure you
name the assets before you actually put them
into the asset manager. Now you will notice when you
first come into Blender, whether that be Blender
three or Blender four, at the top here, it doesn't
actually say asset manager. So that's the first
thing we want to do. So to do that, all we need to do is come to the
little plus but. We're going to come across
to where it says, general, and then we're
going to go down to where it says asset manager. And once you click that
on, you'll actually be taken into the asset manager, and this is the easiest way
to actually work with this. And the thing is now
you'll see at the moment, we have our asset manager down here with all other files
on the left hand side. And in this, we'll be
populating all of our assets. Let's actually just pick
this up a little bit, then. And then what we're going to do is you can see at the moment, we have current file
and we have essentials, and under essentials is
basically all of the assets that Blender has decided to put into the asset
manager as default. What we want to do is we want
it to be on current file. So now I'm going to
do is I'm going to come to my first asset, which is going to be my tree. And now what we're going to
do is we're going to add this into our current
file asset manager. With this selected, if you come over to the
right hand side, you can see here it says tree. If a right click,
you'll see here, it says one that says
mark as our asset. The moment we actually
mark as asset, you will see now that actually appears in this space down here. You will also see that if we
put this onto material mode, and now if I come in and
actually drag this out, you will see that it
actually comes out with materials
actually attached, which is really, really handy. Now let's delete this out away. And what I'm going
to show you is now, if we focus on our actual car, let's press Shift and Spacebar
just to move it over here. And then what I'm going to do
is I'm going to come over, right click and I'm
going to mark as asset, and you'll see now our
car appears there. Now, if I come up and
right click and put clear asset and then
spin this round Z -90, like so, right click
Mark as asset, you'll see it appears
exactly the same way. So to actually change the rotation in the
asset manager itself, what you need to
do is you need to now reset all of the transforms. So what I'm going to do is I'm just going to clear the asset, and then we have put
Control A, all transforms, right click, set
origin geometry, and then right click and we
come down, mark as asset. And now you'll see it's actually rotated that round for you. You'll also see, as well
now if I pull this out, it comes in with
all the material. Can actually do some
other things as well. We can actually also
save out materials. So what I'm going to do,
first of all, though, is I'm going to come down and click the little plus button. And what I'm going to do is I'm going to call this Assets. Like, so I'm going to call the next one materials. Like so. Now I'm going to do is I'm just going to save out my work, and then I'm going
to go to unassigned. And you'll see at
the moment we have these two assets that
we put in there. We can simply shift select them both or shift
select them all, if you've got a
lot and drop them then into our actual assets, and now they're going to
appear in our assets. Now let's move on. And if
we click on this bench, what we'll do is we'll
come over to our material. And we can see we've got
two materials in here. So let's right click this one, Mark as asset, the same thing. And then what we'll
also do is come to this one and we'll right
click and mark as asset. Now, you will see when
you've marked them as asset that we've got
this little book here, the same as we've got up here. And now you'll see
we haven't got any assets in there
at the moment. So these two materials
didn't go in there. And that's because they
will be in unassigned. Now, let's grab both
of these materials. Now drop them into
our materials, and there we go, we've got materials, and we've got assets. Now, the best thing
about asset manager, what you can also
do is you can also use this for things
like geometry nodes. The only thing that
you can't use it for at the moment is animations. But pretty much
everything else you can use it with
the asset manager. Now the next thing we
want to look at is actually doing that then with
an actual geometry node. So I'm going to do
is press Control V, and here is a geometry node
that I've actually created. You can see here that if I pull this up over on the
right hand side, you can see it's actually
a geometry node. And at the moment,
if I press tab, you'll see it has
actually no mesh or any kind of topology because it's obviously
a geometry node. Now, what I want to do
is, I want to come up, right click Marks asset and now you'll see that I've got
something that says unassigned. So let's make one more
now and what we'll call this is geometry or geo node. Like so, and then I'm
going to come to it on a sign and put it into
my geometry node there. So, you will see now
if I bring this in, it actually comes in as a
geometry node, which is really, really handy if
you've got loads of geometry nodes and
you want to bring them and drop them
in your scene. Now, let's first of all, come up to file and save because this is
all great in that. But actually, how do we
use this in other files? So the way that we
can do that is we can come up to a new blendfle. So let's open up a new blendfle so here is our new Blend file. And what I want to
do, first of all, I want to come up and
add in my asset manager. So plus asset manager. And at the moment, you'll see
there's nothing in there. And what I want to do now is, I want to go up to Edit. I want to come to preferences. And within preferences, you will have one that
says file path, and this is basically
going to tell Blender where it needs to go to look for asset manager. So let's actually come in, and what we'll do is
we'll click the plus, and then all I'm
going to do now is find where I've
actually saved out that previous file
and I saved it in something called Blender
Asset Manager, which is here. This is the one that
I'm going to add it to. You'll see here that
it doesn't show any blend files or
anything like that, and then all you need to do
is add asset library like so, and then we can actually
close that down. Now what I can do is I
can come down and you'll see that I've got one that
says Blender asset manager, and here are all of those actual files that
I actually put in there, as well as where it says
assets, geodes and materials. So now I can simply come in, drag and drop my
actual truck in there. I can actually turn
on the materials. And now you can see, once again, it actually comes in
with all the material. The best thing is,
if I actually bring in a cube now and
just drop that there, shift spacebar just to move it, and then what I can also do is I can come to where
my materials are, drag and drop straight
on to my actual cube, let the actual shader compile and load up, and there we go. Now we can actually drag
and drop materials as well. Let's come to our
geometry node then, and I'll show you
that that also works. So now we can see we've got a geometry node that
we can actually use, which is really, really handy. Now you can see just how useful the actual asset
manager really is. Now, the other thing,
if we go up to edit and go to preferences, you will see that we
are able, as well, to add many, many
asset libraries. Just make sure that you
save your blend file. So if I bring this over
here just to show you, just make sure you make a file, and then within there, you're going to actually save
your asset manager. Because the most important
thing actually is, when you're actually
saving it in here, you will see that what else comes in is an actual text file. This text file gives
Blender all of the data that it needs to
actually set up these groups. So very important if you're moving your asset manager
to a different file, make sure you move this
text file as well. All right, everyone. So
let's close that down. And lastly, before I finish, what I will show
you is if you come to current file where
we don't have anything, you can also select all of
the things in your scene. Right click, go down
and mark as asset, and then you'll see that the G put into the asset manager. Alright everyone, so I hope you enjoyed that and I'll
see you in the next one. Thanks a lot. Cheers.
33. Working and customising conveyor track geometry node for Blender Beginners Masterclas: Welcome back, everyone to Blend and Beginner's
master class, the Cookie factory,
and this is where we left it off with
our geometry notes. So what I'm going to
do now, first of all, going to press the
Little plus button. And when I go over to where
it says asset manager. Now, if you don't
have asset manager, you can just click on Animation, for instance, and I'll show you actually
how to set you up. So if I come and drag this
to the left hand side, and then what I want
to do is change this from dope sheet
to asset browser. Then I'll see that I've got
all of these assets in here, and these are from my
other projects, of course. Now, what I'm going to do is I'm going to put in current file, and within this current file, I won't have anything because I haven't actually put
anything in there yet. Then what I'm going to do
is I'm going to go over to the right hand side to
where it says conveyor belt. And I want to right
click Mark as asset. And what that's done is
that's actually marked down my conveyor bell as an asset
or a geometry node in there. Now you can see all of these are basically the
same geometry node. So basically now I've
got that in there, and now all I want to do
is save out the file. So file, save it
out, and that's it. I can basically close
this file down now. I can close it down like so. I can go back then
to my actual model, and now I can
actually set this up so I can bring that
geometry node in. Now, first of all, though, we need to set up
something else. So we need to go to Edit. We need to go to preferences, and we need to go to file path. So this one here, then
we need to go to plus. And what we need to do now is find that file
that we had it in. So if we come to
course Blender file, we've got one in there, which will be, let me
just have a look. Course Blender file,
geometry node. Here we are. This is the one, so Jomich
node, click Add Asset. Now, if we can't see it, let's actually click on Blend Files, and then we can see Blender conveyor Jomich node
by three D Tudor, and we can simply add this
in there, and there we go. Now, if we come in to
our asset manager, let's click the Plus button. Now we can't see asset
manager on here. So what we'll do
again is animation. And then what I'll do
is drag this over. And then I'll come
over to here where it says dope sheet and put
this on Asset browser. And finally, then I
just want to put it onto geometry node, this
one that we brought in. And here we are. Here
is our conveyor belt, and we can just drag this in. Now, before we use
this, of course, we need to actually
create a port for our actual conveyor belt. So I'm going to do that now. So we'll create that first, and then what we'll
do is we'll attach a geometry node to a curve, and then it'll actually all fit into place once
we've actually done that. So let's create that
first part first. So let's go to modeling.
And what I'll do is I'll come to where
my little guy is. And I want my jumge node or conveyor belt to
run from here to here. So it's the very simple
one to start with. So let's come to our guy. Let's press Shift S.
So cussed selected. Let's press Shift A. And
then what I'm going to do is bring in a cube. And then going to make the cube a little bit smaller on the z. So S and z, let's make
it a little bit smaller. And then what I'm going to
do is I'm going to just bring up a little
bit on the inside. So if I move this over,
I want to press tab. Grab the top in face
leg, press the Ib. And then what I'm going
to do is bring it up like so, and there we go. Something like that.
Very, very simple. That'll do for our first
kind of conveyor belt. Now what I'm also going to do is I'm just going to drop
it down a little bit. It's a little bit too
high, something like that. Press Control A, all transforms, right, click Set
origins, geometry. And now let's add in some
colors, first of all. So I'm going to
click Down arrow. We're going to put it on let's put it on rubber, first of all, so rubber on this part,
and then the top A, I'm going to grab the top
face, press Control plus. Plus down arrow, and we
want it on factory yellow. Click a sign, and there we go. Alright. That looks good. Now, what I'm also going to do is I'm going to
put this in my part, so I'm just going to
move this over here. I'm going to press M, and
I'm going to put in parts, reuse, like so, and that then
is hidden out of the way. Now, let's bring in a curve. So what I'm going to do is I'm
going to bring in a curve. I'm going to bring in a path. And then what I'm going to
do now, I actually want to put my geometry
node onto this. So I'm going to basically
come in to my animation. We'll actually
rename this as well. I'm going to double click it, and I'll call it asset
manager. Like so. And then what I'm going to
do is I'm going to drag and drop this onto here, like so. Now you can see when we first bring this in, it's
a bit of a mess. We've got all of these
parts that have come in. We don't really
want any of those. So what I'm going to do
is I'm going to come over now to my little spanner, and here you can
see this now has the actual Jome
node put on there. Now if I press space bar, you'll see actually
something's happening, you can see it looks
a bit of a mess, but we've got a conveyor belt in there. So now let's fix that. So first of all, because we've put the conveyor belt on there, we don't need to be in
asset manager anymore. So let's go over to modeling. And then what we can
do now is we can basically come over again
to the geometry node. We can turn off the gears.
We're not going to need those. We can turn off the supports if they're on.
Don't enable those. And then what you want
to do is you want to change basically this
conveyor node part. So what I'm going to do
is I'm going to come in, take this off, and then that
will take those parts off. And then what I'm going to do is I'm going to open up this, and you can see that
I've got a part in here. Now, if I turn all of these on, this is the part
that we want to use. So this one here, I'm going
to call this conveyor belt, so conveyor belt part. So and now I've got this there. I can actually close that
up, so close that up again. Come back then to
my geometry node, which should be
somewhere around here. Now, sometimes that actually happens. Let's go and find it. Where is it? NbsPath.
There it is. Sometimes that actually happens where you won't be able to see it because it will be hidden because you haven't
brought in the object. Now, I knew where mine was. It doesn't matter if, you know, if yours is in there, show you a different way anyway. So let's just take that off. There's the actual
nerves path back. So let's bring in
again. So shift there. Let's bring in a path
just so you can see. So it leads to the other way. And now I want to do
is I can come in, add geometry node,
click the down arrow, and click conveyor
belt, and there we go. Now, let's start there again. So what I'm going to do
is turn off the gears. I've got this belt here. I'm
going to turn off the belt, and I already know the
part that I need to use. So it's under parts reuse, and it's called conveyor belt. So if I turn off this belt, there we go. Click on this. And then what we going to
do is click on this one, and there we go. We've
actually got that in. Now, the thing is we don't
actually want it double, so we want it flat.
So there we go. And then what we need to
do now is start messing around with a few of these
parts because at the moment, if I press spacebar, you can see that these parts
aren't actually together. So what we want to do is now
we want to bring these up so you can see we can start intersecting them more, like so. Just so they just intersect. Like so. Now, are they close
enough? I don't think so. I think they need to be a little bit closer, so
let's click it up. Oops. One more
time. So not 0.25. Let's bring it up to
Let's try not 0.26. Let's try not 0.27. And there we go, but
a little bit less. So not 0.265. There we go. That looks perfect for me. Now, the one other
thing that I'd forgot to do on this belt. So if I bring this belt back in, so this one over here is I
forgot to add on a modifier. So if I zoom into it, I'll add on a bevel modifier, so generate a bevel. Let's turn that
down to note point, note three, something like that, and there we go, now
that's looking much, much better, and I can
close these down again. And what will happen is now
that now is translated there, so you can see it looks very, very nice and smooth. So now it's going well, it's going the wrong
way to start with. So I have a couple
of choices here. Either I can turn it round or I can just switch
directions like so. So now if I switch
directions, there we go. Now what we need to do is we
need to put this into place. So I'm going to bring this over. I'm going to pull it
up into place like so. And when I work with this
actual conveyor belt, it's much, much easier if we actually get rid
of these verses. So if we press delete,
verts, get rid of them, and then what we'll do
is we'll pull this into place down here, so
we'll pull it down. Into place, like so. And then what I'm going to
do is make sure that it's centered and also make
sure that it's big enough. So the moment you can see,
it's not actually that big. Now we can do everything from
this actual jamage node. So we can change the width
on here, as you can see. We can change the length
on here, like so, so we can increase that length and then change the
width a little bit more, put it more into place,
and there we go, that's looking a
little bit better. Now the thing is, I think, I'll change the length
a little bit less. So something like that, and I think that actually
looks pretty nice. Now what I'll do is,
I'll grab the top of it, and you'll see it's very, very easy to actually work with. Now what I'll do is,
I'll put it there, and then I'll press E to extrude so, pull it
back a little bit. I'll press E and Y or X
and then pull it out, and then I have that
going into there. Now what I'm going to do
is just pull this up. A little bit, just
so it's over there. Now you can see that this
one needs also pulling up. Like, so, and we don't
want it breaking, so I've actually broke it because I've turned
it the wrong way. So what I'm going to do is
I'm going to pull them, I think, both up
at the same time. So if I grab this
one and this one, I'll pull it up, so
they're going in there. Like, so let's press the
space bar. And there we go. And I also think that I need this pulling out a
little bit further. And this pulling out
a little bit further. And I just want to stop
that just breaking there, as you can see, so I'm
gonna pull it back. I'm going, so it's nice and straight without
any brakes on there. And we can see that I'm going to have to pull
this up a little bit. And there we go. So there is our conveyor belt
going into here. Looking really, really nice. Now, of course, the
other problem we've got is we don't have
any flour on here. We're pressing Space
Bar, by the way, that's just starting
the animation, stopping the animation. So I forgot to say, press the space bar, start the animation, I'll
stop the animation. But anyway, now you can see that the conveyor belts going
nice and neatly into here. What I can also do now as well, is I can get rid
of most of these. We're not gonna need
these because I actually want to change them
for something else, anyway. So I'm just going
to delete all of those out of the
way and get a nice, clean blend file again. Now what we need
is some flowers. So we need actually
a flour bag on here. So what I'm going to do on the next lesson is we'll create our flour bag and we'll get those on there going
down around here. Now, again, once
you've done those, we'll have to create other
things like, you know, cookies and flat cookies and burnt cookies and
things like that, as we work on through
the actual course. But what we're
going to do now is we're going to create the flour, and then what we're going
to do is we're going to start on the basic
animations for these parts just so
we don't get too stuck in the weeds of
just actually modeling. We've got a nice part now. Let's actually get it animated. Let's get the shape keys
on and things like that, and then we can actually
build animate as we go along. So basically, model
put the shaders on, get the animation on, get the geometry node in
with the conveyor belt. As we go along, it's going
to make things much easier, much, much more exciting. All right, so let's
save out our work, and I'll see you on the next
and everyone. Thanks a lot. Bye bye.
34. Creating conveyor track using provided geometry node, adding custom flour bags for th: Welcome back, everyone, to blend beginner's Masterclass
the Cookie factory. Now, just make sure that
you're on layout now, and that is because we want to have this timeline
for animation. What I'm also going to
do is on this timeline, this is actually set to zero. You can see at the moment we
put it on an end of 1,000, which means that when it
gets to 1,000 frames, it's actually going to
restart at one again. Now, the moment you can see that this is the conveyor
bell moving, let's just put it on Object mode so you can see
it a little bit. So you can see it a
little bit easier. And the other thing
is, if I come to this, I will just quickly
show you, as well, we'll go through these
options a little bit slower and as we work
through everything, because as you can see, there is a lot of options down here. But the one main one
that I actually want to show you is animation speed. So at the moment,
you can see that we're going fairly,
fairly nice pace, but I can actually speed that
up to something like ten, and you will see now
it's rocking along. And we don't actually
want it like that. So that's one thing you
can actually do as well. Now, we're on to the object. So we need to put
some actual objects on here to be going along. I also recommend that you put this on something
like 10,000, something like that because then you're not going
to run out of time. You're going to be able to
see everything moving along. So let's actually do the let's first of
all, grab our guy. Make sure that your
cursor is selected. Let's bring in then a plane. So we're just going to bring
in a simple plane like this, and we're going to use this
as our actual flower bag. What I'm going to do then
is I'm just going to press tab to go into Edit
mode, and when I right, click, subdivide, subdivide,
subdivide, and subdivide. A few times. And then what
I'm going to do is press E, while I've got it all selected, E to pull it down a little bit. And then finally, I'm
just going to give some edge loops on
the side, so one, two, maybe three edge loops, left click, right
click, like so. Once you've done that, you should end up with
something like this. And I want to press Control A or transforms right click
Set origin to geometry. Now we need to turn this
into a bag of flour. So the way we're going to
do that is we're going to come over to the
right hand side. And what we're going
to do, first of all, set this down to one. You're going to come over to the right hand side
where it says physics, and you're going to give
it a cloth physics. Then what you're going to do is you're going to scroll down, and you've got one
that says pressure, and we're going to
put this pressure on something like two and then I'm also going to turn off
field weights gravity. And the reason I'm
going to do that is you'll see now when
I press space bar, it turns into a bag of flour, but it drops straight
through the floor. We don't actually want that. So how do we stop
that happening? Put it back to one and turn
your gravity down to zero. Then you can press
spacebar and there you go. You bag of flour is there
looking very, very nice. Right click, shade Auto
smooth and there we go. Now, you can see it's got a lot of dimples in
and things like that. We don't really want that, but we're going to fix that next. So first of all, though
what we want to do is we want to
actually apply this. So all I'm going to
do is go to object, I'm going to go down to convert, and I'm going to
convert it to a mesh, and you'll now see that cloth simulator is actually applied. Now, from here, what we
want to do is we don't want all of these sharps in. You can see that's causing
a major problem for us. So what I want to do is I
want to press A, control E, and I want to clear
sharps off there, and now you'll see it's
much, much smoother. Still not perfect, though, so we want to make it even
smoother than what it is. So what I'm going to do
is I'm going to go in, grab it all, I'm going
to go to vertex. And what I'm going to
do is smooth vertices. And you'll see now it actually
starts to get smoother. Now, I can also turn this up
and smooth it out even more, and I can even turn you up the amount I actually
want to smooth it. And now you'll see that looks like a perfect bag of flour. Now, the other thing is, because it's going to be on this convey, the bottom part of
it wants to be a little bit flatter
than the top part. So what I'm going to
do is I'm going to come to the bottom part. So I'm going to grab maybe
something like this. And then what I'm
going to do is press Control plus Control plus. And what I want to
do is I want to flatten that bom pot out a bit, so I'm going to come and use my proportional editing.
I'm going to go on smooth. And then what I'm
going to do is press EsnsEd and just smooth this out. So I'm going to bring
this out ssn Z, bring it out and smooth it
off, and then bring it up. And then you'll see that now that's a lot smoother
than what it was. I'm going to even smooth
it out a little bit more, so essen smooth it out
a little bit more. Bring it up. And there we go. Now, it can actually
sit onto our conveyor, and it should look pretty nice. Now, you don't need to
worry about the size. All you need to make sure
you do all transforms rightly set origin to geometry. Now, with these parts here, I'm going to move over to
a special place over here, and I'm going to
give it a new name. So you can see at the moment
we've got parts reuse. We want to just call this part. So I'm going to press M, and I'm going to make
a new collection, I'm going to call
it parts. Like so. I'm also going to press F two, and I'm going to
call it flour bag. Like so. Not bad. Bag. There we go. Flour bag, and then
I can close that up. Now let's come back
to our conveyor. So we want to put our flower
bags onto our conveyor. So what I'm going to do is
I'm going to go come on down and you can see
where it says object. Now, we've got the
object into parts, or we can use our object. So what I'm going to do,
I'm going to open this up, click on this, click
on flower bag. And then what I
should be able to do is object. So click on Object. Press the space bar, and there you go, There
is your flower bag. You're going to get one
appearing every intervals. So let me explain the intervals. I'm just trying to find
where the intervals. Drop intervals, so they're coming over every
1 second or so. Now, you can also see that the size of these is
a little bit big. We want to make these
a little bit smaller, so I'm going to make them a
little bit smaller like so. You can also see that they sat too low down in the conveyor. So what I'm going to do is
I'm going to bring up the z. So the z offset, I'm
going to pull this up so they sat on
there nicely like so. And also the scale, I would like it if they're
not all the same scale. So I'm going to turn
this up very slightly. And what that's going to do,
if I turn the scale down a little bit is it's going to alternate now between
the scale of them. So you can see some are bigger, some are smaller, not all
of them are the same size. I didn't want them
all the same size. Now, they all look
the same, though, because they're not rotated. So what we're also going
to do is we're also going to have a rotation offset. So now I can actually have them coming over.
So are rotated. As you can see, not of
all of them are the same, different sizes, different
scales, all things like that. That is exactly what we want. Now, you can, if you want
to, use a collection. So we're not going to
do it on this one, but you can use a collection, which means that you can
have all different bags, all different sizes, all of them looking different and
things like that. So what we can do is we
can come over to here now. We first of all, we can
give it a material. So let's do that first. So what we'll do is we'll go
to our shading panel. And then what we'll
do is we'll press dot to zoom to our
little flower bag, which is over here. So
let's zoom to this. And what I'm going to do
now is I'm going to give you one of the factory blue
or something like that. I'm going to click the little
down our copy material. And then what I'm going
to do is minus this off. Click the new and I'll call
it flour bag. Like so. And then what we'll do is now
we'll actually paste it in, so paste material, and then I'll get you the color
that we actually want it. So the color we want it
is going to be this one, which is a nice brown color.
So I'll come to this here. I'll actually zoom in
so you can actually see what I'm doing.
Come to this here. Hex, contro the enter, and that is the color that
I want you to have it. Now, of course, the flour bags, the roughness doesn't
want to be set so high. And the metallic, we don't
want any metallic on there. So we'll set the roughness
to 786, something like that, something around
here, and that then looks a bit more
like a flour bag. Now, the other thing
is, let's make a few variations of
these flour bags. Now we've got this, so
we'll go back to modeling. I'll zoom into it. And then what I'll do
is I'll press shift deep and I'll press shift deep. Like so. And then what I'll do is now is move
these around a bit. So we'll come to this one
first. We'll grab one of them. We'll make sure
proportional editing is on, and then all I'm going
to do is just move it around just a little bit, like so, making this one a little bit different
from the others. We'll bring this
in a little bit. In fact, we won't
bring in too much. We'll make it a little bit
more generic. Okay, like so. And then with this one,
we'll actually pull it in, pull this part in,
pull this part out, pull this part out a little bit, just make them a little bit
different from the others, like so, and then I'll bring
that in a little bit more. Like so. And now you
can see we've got three different flour bags here. And now what we can do is we can put these all in the same one. So first of all, I'll
grab all three of them. We'll press the B and
we'll put them into parts. And you can see here I've
got a collection seven. Let me just get rid
of that. So you can see here they're
all in here. I'm gonna move them out
because we had them all in parts before.
So let's drop them in. And then what I'll do
is, I'll get rid of this collection seven,
so press delete. You won't have yours there, but you will have in the minute. And now I want to do is
I want a right click and I want to put new collection. And this new collection, you notice I right
clicked on the parts. We'll call it flour bags. Like so, and then I'll
grab all three of my flower bags and drop
those in there like so. Now what we can
do is we can come back to our conveyor belt. We can click on our conveyor, go to the jut node. And instead of now using object
and then the object here, what we'll do is we'll
put this on collection, and then we'll turn this off and we'll turn on
the collection. So the collection wants to be
flower bags, this one here. And now you'll see if
I press space bar, all of these flower bags,
they're different sizes. They're a different rotation. Everything is
different about them. You will see, however, though, this one is a little bit big. So let's see, first of all, if I need to resell
the transforms, so control it all transforms,
right click SiginTGeometry. And you can see it's still
a little bit too big, which means that
I can now go back to my objects and just make
them a little bit smaller, so you can see here,
I need to make them a little bit smaller, like so. And now let's have a look and make sure they're
all going in. So that one's a little
bit big, as well. And there we go. I think
I'm happy with that. So this is our first
conveyor belt. And this is the first part of the cookie factory where
they're making the flour. So what we'll do now
on the next one, I will show you then how to animate something
like this windmill. So that will be a very, very
simple animation to get this windmill just spinning
around really, really nicely. Alright, everyone, so I
hope you enjoyed that, and I'll see you on the next
one. Thanks a lot. Bye bye.
35. Animating windmill and its gear rotation for Blender Beginners Masterclass: Welcome Macon to Blend
Beginner's master class, the Cookie factory, and
this is where we left off. Now we're going to head
on into animation. Now, again, if you
don't want to animate, you can move on to the other
sections of the course. We are going to be
animating each of the parts so that they move and they come to life and
all of that stuff. Now, mainly the animation we're going to be using
is pretty simple. It's going to give you
the basics of animation, and I highly recommend
that you learn just these small basics just to animate
your own projects. We're not going to be using complex rigs or
anything like that, except maybe the claw, which is the end part of, you know, the course. So once you're more comfortable with animating all
of these things, you'll probably be well up
for actually animating that. Alright, first of all, though, let's come to our windmill. So what I'm going to do, I'm actually going to delete
this out of the way. I'm going to move this
one over as well. I'm going to move
this over to there. And then that gives
me loads of room. First of all, let's get
ourselves set up properly. So if we come over to
animation, let's get it set up. You're not going to
need your material view or anything like that on
when you're working in here. What I do recommend, though, is over on the left hand side, instead of having it both ways just kind of the same
thing coming over. And change this. And
what you want to put it on is you want to put it
on this graph editor. So put the graph editor on. It will make things much,
much easier for you. Then what I'm going to do is
just pull this out like so, and you can also pull
this one a little bit to the left side and
pull this one a little bit to the right as well. And now pretty much we set up. Let's set it then to one. Always start from frame one when you start in an animation. Don't start from frame 40
or anything like that. I also recommend that you turn on not
proportional editing. Where is the little channel. Let me have a look. So
let's put timeline. This is what we want on timeline instead
of the dope sheet. So coming over, let's put this
on our timeline, like so. And what the timeline
does, it'll give you a little icon here
which says Auto key. This is going to
make things really, really easy for you when you're actually
trying to key things. So what I'm going to do now is I'm going to come
to my windmill. I want to make sure
that this part and this part are joined
together, so control J. And the other thing
is, at the moment, when I rotate this, you'll see it's rotating
from the center. Now, make sure that yours is
rotating from the center. So what I'm going to do is to
rotate it from the center. I'm going to grab
the center here, Shift S, cursed or selected. Grab my windmill
then. Control A, all transforms right click, set origin to geometry or I clicks origin
to three D cursor. Now, when I rotate
this on the Y, you can see it's
rotating perfectly. Just right click to drop
that back in place. Now, what you need to do is now you need to start the rotation. So here is where the first
rotation will be at frame one. If I then press I, what will happen is it will add
in an actual keyframe. So now blender knows this
is the starting position. Now, what I want to do is
I'll show you both ways, so the easy way
and the hard way. Now, you need to decide how fast this rotation
is going to go. Now, I recommend basing it over something like 150 frames
or something like that. So what we'll do
is we'll move to frame 50, which is on here. You can either drag this over or you can actually
type it in here. And then what I
want you to do is rotate it by 90 degrees. So R Y, 90 degrees like so. And then what you need
to do is press I, and now you'll see if I go
back press the space bar. This windmill is rotating. Now, you'll see that it takes
a bit of time to start, and it takes a little
bit of time to stop. We're going to fix
that. But first of all, let me show
you the other way. So I'm going to put frame one, and going to come to
these left click them, you'll notice these are
not highlighted anymore. Delete and delete
those out the way. Now I'm going to do is put
this onto Auto key in. We're going to go to frame 50, so click on frame 50, so rotate it again. So Y, 90, and now you'll notice that it puts
those keyframes in for you. So now you can see, press the
spacebar all done for you, which is really, really easy. Now, let's go to frame 100. Now, because it is a
full 360 rotation, it means it's better
off that you're putting in four actual
lots of keyframes. If you try and skip those out, it's not going to
rotate properly. So just take that on board. Now what we want to do
is want to press R Y, 90, and there we go, our keyframes in again. Now let's go to 150, put it on 150, like so. And then what we're
going to do is R Y, 90, press the enter
button, and there we go. Now, we should have a full
now go off from here, all the way around, it keeps
going, as you can see. You can see it slowing
down and speeding up. And the reason for
that is at the moment, Blender doesn't know that it's supposed to
just keep going. So it keeps going
at the same pace. So what we're going to do
is we're going to press A while we're roving
over here so you can double tap the
A to D select, press the Ab and two select. We're going to right
click, and we're going to go down to
interpolation mode, and we're going to
go on to linear. And you'll notice it
moves very slightly. But now when you
put it back to one, you press the space bar. And now you'll see it's going at exactly the same speed all the way through, and
that is perfect. Apart from, once we
get to frame 150, it just stops, and we
don't actually want that. So what we need to
do now is we need to add in a modifier
to tell Blender, we just want to repeat
this over and over again because this frame one is
exactly the same as frame 150. So once it gets to here,
it can start going through the process and just keep
spinning indefinitely, no matter how many keyframes. Now, it used to be where
we had to copy this, paste it along the time frame, all the way along for
infinity. That's annoying. We don't want
anything like that. We want to add in
an actual modifier. So what I'm going to do is I'm going to come over to here. I'm going to open
this up. I'm going to make sure that the objects. So you can see the object, all of these are part of it. If I click on one of these, you can see we've got
a timeline in here. Click on this one. We've
got another timeline. And basically, this
is the graph editor where you can make
things fast, slow. You can really play around with this graph and
really go in depth, especially if you're
rigging a character and you want to walk like
a giant, let's say, the work much more solidly, much slower, and you can really refine your
animations here. But we, however, don't
really want it for that. What we want to do is
make sure that we've got our object or this
object here clicked on. So this one here, as you can see, and I want to actually
open up one of those. So what I want to do
is I want to grab all of these, so
grab all of these. Click on my modifier, and the modifier I
want is called cycles. So if I come down,
I've got one that says cycles, and there we go. Now, I want to press Space Bar. I'm going to put this
back. Press the space bar, and what will happen is
when it gets to the end of the actual animation, it
will just carry on going. So I'll just carry on
going indefinitely, and that is the best thing
about this actual modifier. Now, the other thing is, if let's say I want
to speed this up, I can bring if I leave
my timeline here, press the S but, you'll see it shrinks everything
down to there. However, if I put it down
at frame one, press the Sp. Let's say we want
to half the speed. So instead of 50, we'll have it over roughly 75. The best thing is now
it's spinning fast a lot, but the modifier will still keep it all together, so
it'll still keep going. So if you really want to
speed up your windmill, that is an easy way of doing it. I think for us, we'll
have it on 150, and I think that
is really, really that looks really, really great. Alright, so now I
want to do what I'm going to do now is I'm going to hide this part half the way, and I'm going to
grab this one here, and I want this turning, as well as this
turning, as well. So what I'm going to do is
I'm going to split this off, so you can see this one P
selection, split them off. And then what I'm going to do is I'm going to grab this one and this one Control A or transforms right clicks
origins geometry. Now, once you get
the hang of this, you can do this
really, really fast. So what I'm going to
do is I'm going to put this one this one will probably be spinning
quicker than this one, just to the fact of
the size of the gear. I'd say, these are
roughly half the size. So let's come to this one first. We've got automatic on, and what I'm going to
do is just press I, and then I'm going to go to 50, then we're going to press R Y, 90, and then it's already
put it in for me, as you can see, and then 100. And then R Y, 90, and then 150, and then
R Y and 90, like so. Remember, you need to press A to make sure this
is all grabbed, right to bring in the
interpolation mode and put it on linear. Next of all, we're
adding a cycle, so we're going to put
cycles on like so. Now we'll do it on
this one as well, and you can just see how quick this is. Put it to frame one. Press the Ib, come to frame 50, press R Y, 90. Come to frame 100, R Y, 90, and finally frame 150. And then R Y, 90. And then all we're
going to do is, again, right click
interpolation mode, linear modifiers, a modifier
cycles, and there we go. Now it actually will be working, and you can see this one's
also working, turning round. This one's turning round. Now, I did say I want this one
a little bit quicker. So what I'm going to
do with this one, I'm going to go to frame one
and what I'm going to do is bring this down to 100
or something like that, and now you'll see that this
one's moving around quicker. Now, let's press lt age, bring back everything,
double tap the A, press the space bar, and you can see now this one's moving much, much quicker than
these parts here. Alright, so far so good. Let's save out work. And that, guys, is the
basics of animation. Most of the things in here are going to be
animated in that way. So you've already learned about texture animation with drivers, and now you learned about
rotation animations. Now, what we're going to
do on the next lesson is we're going to do a
couple more animations. First of all, we're
going to have this gear turning round. And second of all,
we're going to discuss another simple form of
animation which is shape keys. It actually is really, really simple once you get
the hang of it. And then on this one, we're actually going
to be animating this as well with the skills
that we've already learned. Alright, everyone, so I
hope you enjoyed that. I'll see you on the
next one. Thanks a lot. Bye bye.
36. Continuing with animation for windmill adding horzinontal large gear motion as well as creation shap: Welcome back everyone to Blend and beginner's
master class, the Cookie Back tree, and this is where
we left O. Alright, so let's do now the gear. So we can see if I
move this with G, right, click and drop it back. I can see that I'm going to
press Shift H, actually, to isolate it out just to make sure that I've got
it right in the center. So I'm going to grab
this one and this one. I'm going to press shift
desk cuss to selected. And then what I'm going
to do is press Control A or transforms right plate, Saurigen to three D cursor. Then what I'm going to do
is put it back to one. So back to one, so, then we're going to press
I, and we're just going to do the same thing as
what we've done before. So 50 and then R Z 90, like so, and then 100. And then, Z, 90, and then 150. And then finally, 90. Like so. Now what we know is right,
click interpolation linear, and then add in the
modifier cycles. Let's drop it back and
make sure that's working. And then at this
point, again, if you want to speed it up,
then speed it up. Let's press AaltH bring
everything back now. Let's see how that's
looking altogether. And we can see I like the fact this has turned a
different way to this. I think it's quite eye catching. You might want it to say it the other way. You can
do that, as well. Let's double tap the A. And now let's come to this part here. So we're going to set
here one, First of all, and on this one, we're going to do something
a little bit different. What I want to do is
just have this expanding and contracting, expanding
and contracting. So the way we're going to do
this is through shape keys. So it's a little bit
different to how you use, you know, just keyframes
and things like that. So what I'm going to do is coming over to the
right hand side. We can see already we have
one called shape keys. And what I'm going to do
before I do anything, control A transom set
Origins geometry, and let's add in a shape key. So if I press plus, we can add in a shape key, and if I press plus again. Add in another one.
So this is the base, so blender stores the base. Once you add another one, you can see now you've got a value, and with this value, you can actually do
something with it. So what I'm going
to do is I want to press tab, I'm going
to come in then, and what I want to do is just grab it around
the base, like so, and I'm going to put
proportional editing on, so just make sure proportions
on and it's on smooth. And then what I can do
is I can pull this out, so I can actually pull
this out like so. When I press tab again, you'll notice it goes back to normal. However, now I can
actually pull this out and put it in and pull it
out and put it in. Now, what I also
want to do is I want to make it also a
little bit thinner. So what I want to
do is I can come in and bring it in a
little bit, as well. So instead of doing this, what I can do is I can add in another shape key
press the tab bun, press the S but, and
bring it in like so. And then I press
tab, and now you'll see that I can bring
this in or out. So what I can really
do now is I can use both of these to
bring it in or out. So what I'm going to do
is well, first of all, I'll put it onto one. And what I'll do is I'll
bring it in, first of all. So we'll have it all the way in. So I'll go to this one,
bring it in, like so. I'm going to press I
and then what I'll do is I'll go to frame
50. So frame 50. And then what I'll do is
I'll bring it back to zero, and then I'll bring this one out and bring it all the
way up, like so. And then what we're
going to do is press I. Now, I need to
press I over here. I forgot to say that, I
don't need to go back to one and instead bring
them all back to here. So I'll go to key frame two, bring that out, bring
this one down, like so. Come back to this one and just
make sure it's I on there, and then I on here,
go to frame 50. And make sure it's
keyframed on I on here. Now, what we should have
here is it going out, and then we want to
come in back in. Now, I've kind of made a mess of this, so you know
what I'm gonna do? I'm just going to
leave those off. I'm going to restart this.
And what I'm going to do is I'm going to make
sure that this is on zero. This is on zero, as well. So frame one, it's
going to be like this, but I want this to be inward. So I'm going to bring
this up inward, so I'm going to press I and then going to go
to key frame one, and I'm going to press I. Then what I'm going to
do is go to frame 50. Like so. And then I'm going to press this one all the way up, and we're going to press I. I'm going to
come to this one, I'm going to bring
it all the way down, and I'm going to press I. Now, what we should have
now is it coming from here, all the way out to here. Now what we want to do is
we want to go to frame 100, and we want to
grab all of these, press Shift D and drag them all the way over to frame 100. And now we should have
is going out and in. So out and in. And there we go. Now, inwards should be
the same as this one, which means now these
are exactly the same. Now, let's it's
slow at the moment. We've not got interpolation on, but I actually think
it's better if we don't. It looks like it's
actually breathing, so I think I'm actually
happy with that. What I'm going to what I'm
going to do now, though, is go to my key, and
I want to actually open these up and make sure I can pour modifier
on them both. So if I grab both of these, I should be able
to add a modifier and bring in a cycle like so. And now if I step this back, now I should be able
to press spacebar in and out as though it's
actually breathing like so. And I think, actually, that
is looking pretty nice. Alright, so that's done. Now, the one thing I just
want to make sure is that this is obviously
catching into here. So basically, I
want this to move backwards and forwards
as this thing is moving. So let's see this part, as well. You can see that
this is also moving. So let's make sure now
that this is okay. So what we're gonna do is we're
going to go to frame one. Frame one, like so. I want to make sure that
this is over to this. So what I'm going to
do is I'm going to, first of all, come on in. Let's add in a keyframe, the basic one. Let's
add in another one. And all we want to do then is move this backwards and forward. So at zero, I want this to
be all the way back here. So let's press space bar, bring it to move without
proportional editing on, so let's bring it
all the way back. And then what we'll
do is at frame one. What's going on with
that? Frame one. There we go. Wait a
minute. Yeah, there we go. So frame one is all
the way over here. And now we want to
push it forward, so we need another one, so plus. And then what we'll do is
move this forward like so. I don't think it'll actually
be that far forward, actually, something like that. And there we go, now we can
move it this way, as well. Now we need to do is match
it up so on frame one, we're going to have it,
so it's there. So I. And then this one will be I, and now we'll move to 50. So let's put it on 50. And then this one should
be all the way back. So let's bring this
all the way back. Let's come to this one all
the way back to there, and now that's fit in.
Much, much better. And now let's press I and let's
press I on there like so. Now, let's go to frame 100 and we should just
be able to copy this. So if I grab this one, shift D, let's bring it over, like so. And now let's see
what that looks like. Let's go from here, actually. And there you go. Now you can see it's all moving together. So now we want to do
is grab them all, coming up to this part here. And what we want to do
is add in or modify it. So adding the modifier, cycles come back to it. And now you can see it's breathing perfectly in
line with each other, and that's looking pretty nice. Now, we have got
this one, of course, that we need to do the
same thing too, as well. So this is quite easy. We'll put it back to one, like so, and you can see we need to move this
a little bit forward. So all I'm going to do is
just come in, face select. And as you can see,
the more you do this, the quicker you're
going to get with it. And then what we'll
do is press tab. I'm going to press plus, plus
again and plus once more. Then we'll go to this first one. And what I'll do is I'll
move this down like so. And then as I move this up,
you can see that moves in. Now let's go to frame 50. Like so. And then I want to
move this all the way back. I think with this, actually, it's just moving it back. So all I'm going to do now is I'm going to put
it on key frame two, and I'm going to move it
back to round about there. Okay. Now let's go to frame one. And then what we want to do
is move this a little bit in. So we'll come to this one, move it in a little bit, like so, press the I, press the I, and then we'll go to frame 50. Like so, and I'm going to
move this all the way back. So let's move this
one all the way back and move this
one all the way up, and then press I
and then press I. And then finally frame 100, we'll just get this shift D, put it to 100, like so. And then what I'll finally do
is come to vote for these, modifiers, cycle,
and there we go. And now it's press space bar. And now everything is moving
in sync with each other. And as you can see, this
cartoony looks really nice. And that is that
part done, like so. Alright, so now we're
moving on to the next part, which is our batter maker. So what we want with this one is we want
this rotating round. We want this coming up and down, then this little dial kind of moving backwards
and forwards. Alright, so let's do that now. We'll press the pause button
and we'll put it back at one. Like so. We'll save our work, and we'll actually start
that on the next one. Alright, everyone,
hope you enjoyed that. Hope you learn a lot, and
I'll see you on the next one. Thanks a lot. Bye bye.
37. Adding stylized animation using shape key for nozzle of batter maker for Blender Begi: Welcome back, everyone to Blend and Beginner's
master class, the cookie factory, and
this where we left off. Alright, so let's
come to this bit. We want this bit to
go around like that. We want this bit to go up and down like this,
and we want this, what you can't see in
here, that little, you know, kind of nod lever. The thing that shows how hot is, we want that to bounce
around something like that. Alright, so let's
do this one first. So what I'm going to
do, first of all, is split this off,
so I'm going to grab this piece selection, and then we're going to
grab all of this part, and I'm actually going to
delete it. So delete faces. And then what I'm going
to do is just come to this bit I'm going to grab all of this edge
going around here. So Alt Shift and click, press the F bone, and now these two are
completely separated. Now I want to do is I
want the center of here, so shift s, cursed selected,
and now come to this one. Control A, transforms
right click, Seragin to three D cursor. Now, this should be right
in the center of here. So let's press I to give
it the first keyframe. Let's then go to 50. And then let's press R Y, 90, and then let's go to
100 and then R Y 90, and let's go to 150. And then Y, 90, and then finally
200 and then Y, 90. Alright, so we know now this will go all the way
around like so. And then what I need
to do is right click interpolation mode.
We want it on linear. And finally, then let's
bring in our cycle. So grab all of these, modifiers, add, and cycles, and then we go. Now let's see if that works, and it should just follow this
going all the way around. And it should once it gets
to here, restart again. Alright, that's looking cool. That's that bit done. Now
we want this bit now, so we'll join both
of these together. So join both of these
with Control J. And now we want to do
is press Control A or transforms set
origin to geometry. And what I want to do now is I want to come over to
my shape keys again. So let's go over
plus and plus again. And what I want to do is
move this up and down. So I'm going to basically
grab all of this round here. So I'm going to grab
all of this with L, and I want this to move
up this part up as well. So what I'm going to do is
put on proportional editing. I'm also going to make sure
that it's connected only is off because then I can move all of this up,
as you can see here. So we can move this up
and we can move it down. So I want to move it all up to you to squish it
in as you can see. So what I want to
do, first of all, is put it all the way
down to there, like so. And then what I'm going
to do is press tab, and then I'm going to
press the plus button. And then instead now, I'm
going to go all the way up. But what I'm going
to do, as well, I'm going to grab
it through the top and pull that down, as well. So if I come in and put on this button here so I
can actually see through, grab the top of there,
turn it off a minute. And then what I want to do
is pull it down like so. Now, if I press tab, if I open this up
a little bit more, I should be able to pull it up, and I should be able to
put it down, like so. So now what I want to do is
I want to put it in there. So let's go to one, like so. And what I'm going
to do is move this second is move this all
the way down like so. I, come to this one, press I. And then what we'll do is
we'll go to 50 like so. And what I'm going to do now
is I will pull this back. I'm going to pull
this all the way up and pull this all the
way down like so. I'm going to press
I and I like so. Then finally, I'm going
to grab all of these. I'm going to press Shift D
and drop them at 100 like so. And now we should have,
if we put this down, it should come up
and down like so. Now I can come in, grab all
of these or both of these, add in a cycle, and there we go. And let's see now what
that actually looks like. So up and down. And there we go. Really, really beautiful.
We've got that bit going. Okay, so now we're on
to just this part here. So if I come in, hide my
glass out of the way, this is the part, you can see the orientation is
already in there. So what I want to do now is set this first vol all
the way over to here. So what I'm going to do is
I'm going to press R X, bring it all the way over here, like so. It's put in a keyframe. I don't really want that, so I'm going to delete
out of the way. I'm going to go
over to one then, and what I'm going to
do now is press I. And then what I want to
do is I want to come to kind of like 25 or something, and I'm going to spin
it all the way around. So R Y or RX, like so, bring it all the
way around to here, like so. And then what I'm going
to do is put it on frame 100 like so, and spin it all the way back
round to this one here. So I'm going to grab
this one, Shift D. Let's put it all the
way back like so. And now you'll see it goes pink and then slowly
back down like so. Now what we want to
do is we want to now bring in a
couple of modifiers. First of all, we want
to bring in our cycles. So let's bring in
cycles like so, and there we go, now, it should seek cycling
through them. Like so. That's perfect. And now what we want to bring
in is one more modifier, you can also modify and
stack these as well. So the modifier we're going to bring in is going to be noise. We're going to bring in
another modifier like so. And you'll see now
that when I press it, it's bouncing all
over the place. And the reason is I'm going to go back, and instead
of doing that, I only want it set
in on the actual Y. So well, whatever it is, let's have X, yeah, it's X. So the X X is so you
can see location, this one, if I pull this
out a little bit, rotation. So we want it on the
X only on rotation, and we're going to
add in a modifier, and it's going to be noise. And now you'll see
that we've got noise bouncing up
and down on there. Now I want a bit more
extreme than that, so I'm going to put
the noise on 1.4, like so, and now you'll see
that it's bouncing a lot. Alright, so simple as
that to actually have it. And the thing is
about the noise, it will be randomized,
so it'll look different near
enough every time. But you'll see now
I press Altage, bring back everything,
go back to muddling. And now what we're
going to do is have a good look at what this
is going to look like. So we're going to press
tab, double tap the A, and then we're going to
put it onto render view. We're also going to
hide out these parts. We really don't want
these parts in there. I'm going to put that
up, tidy everything up, make sure everything's
nice and tidy. I also want to make sure
that before we check this, that everything on here
should be in the water adder. So I'm going to press M, put it into the water
adder, and I'm looking. Why is there another
object in there? I don't know why that's
in there, so let's get rid of that. So
let's do that again. So everything should
be in water adder, like so. And there we go. Now, when I turn this off, this one should hide,
this one should hide. And this is the conveyor belt. So I want to move this into
one that says conveyor belt. So let's go to New
collection Cd. The belt, like so, enter again, and now I'll
move this as well up. So I'm going to
move this right to the top in there, like so. And now I can hide all of
these parts out of the way, flour mill, or I can
add my water adder, everything can be
hidden out of the way. Now, let's see what this
looks like. Press space bar. And there we go. So
let's look at this. You can see this
coming in and out. Now, sometimes, if you want to see this a
little bit better, save out your work,
first of all, and then put this on cycles. Now, you all gonna have
one problem Well, sorry, on IV, you all gonna
have one problem, and one of the problems
is going to be. You can't generally see
through there we've with IV, but I think, actually, we can. So let's have a look now, and now you'll have
it in real time. What it's actually
going to look like, so you can see the
pipes moving back. Everything is looking
really nice on that part. We can also see the flour mill. This is moving round.
This is coming back down. And then finally, this part
here is moving around, and everything is
looking beautiful. Alright. That's really cool. Now, let's go to File,
Save out our work. And let's go to
cycles once more. What we're going to do now is bring this over a little bit, and now we're on to one of the
more complicated machines. So the modeling here
is a little bit more than the other ones. So what we're going to
do is go to our image. Open it up, and the image we want is going to be references, and we're going to
put this on so we can actually see what we're
looking at. Let these load up. And the one we want is
going to be the mixer. So let me see where
the mixer is. This one's the mixer here. So, again, you can see, you're
going to need a little bit of help from the
actual animation, so you can see exactly
what this looks like. But this does give you
a general overview of what it's going to look like. Alright, so when we come back, we're going to start
on this main part here and then build it up, and eventually we'll
have this finished. We'll leave the conveyor
belt till, you know, after we've actually
finished it, what we'll do is we'll just
build it up alter here. We'll get the animation
in this thing, which is really simple because this is just, you
know, drop down, spin round, and go back up, and then we can actually
work on this conveyor as we work our way
round to the squasher. So we'll need, you know, a couple of different pieces of parts for the actual
dough on that part, as well. Alright, everyone. So I'm
gonna save out my work, and I'll see you
on the next one. Thanks a lot. Bye bye. Un
38. Modeling a mixer machine for Blender Beginners Masterclass: Welcome, Mik everyone to Blend and Beginner's
master class, the cookie factory, and this
is where we left it off. Alright, let's put
this on object mode. And what we want to do now
is we want to place where this buyer can actually
go into the next machine. So what I'm going to do is
I'm going to first of all, will I think I'll use this, so I'm just going
to press Shifts, Custer selected, Shift A, and then what I'll do is
I'll bring in a cube. I want to bring my cube over. I want to place it, you know, wherever this
is going to go in. So we're going to
place it into here, so it's going to go all the
way into there, like so. And what I'm also going
to do as well is this basically is roundabout the
same size as this machine, so it's around about
the same size, if not a little bit wider. So what I'll do
is, first of all, I want to make it a
little bit wider. So S and Y make it a
little bit wider, so. And then what I'm
going to do is I'm going to pull it back because I need to have some room
without portion editing on. I need to have some room to put on the bit that's actually
going to be mixing it. So that's the first part I
actually need to put in there before doing anything
else because that'll give me an idea of, you know, kind of size, scale, things like that. The other thing is, I do want it a little bit
higher than this one, so I'm going to put
it up a little bit, so as though all of this bars going around
then being mixed in. Okay. So now let's press
Shift S, cursor selected. Let's press tab to
go into object mode. Shift A then, and we're going
to bring in a cylinder, and the cylinder we're
going to put on 24 again, just in case yours has
done that as well, and then we're going to press S and bring it up to where
I actually want it. So it's going to be
quite large this thing, so I'm going to press
S. Something like this. And I think that's actually high enough around about there. I want to right click
and shade Auto smooth. And I'm also just going to come in, grab the bottom of it, so grab the bottom face here and just pull it up just so
it's in the right place. Turn this off, and
then you'll be able to see exactly where you need it. So something like that. And it's just going to come straight
out the machine here. I think on this, I'll give
it a little bit more room, so a little bit more
room on this side. So like so, and now we'll fix
the top part of it first. So I'm going to come
in, grab this top part, and what I want
to do is bring in an edge loop. So I'm
going to press Control. Bring in an edge loops can
be quite chunky on this end. And then I'm also going to press the I'm going to actually
bring it out first, so shift and click. I'm just wondering the best
way about going around this. Yeah, I think it'll be better
if I just bring out first. So eat, enter Altnes.
Let's bring it out. Like, so and then what I'll do is I'll bring this
in a little bit. So I bring it in and then
drop it down into place where the actual mix is going to go before we get
past that point. You can see it disappears
there just before that. And then I can put, you know, my what's it called? My dork on there. So
now I can come in, l shift and click, alter this and just bring it
in a little bit more. Like so. All right. Now, I want this part
fairly rounded on here. So what I'm going to do
is I'm going to come in, Alt Shift, and click, Alt Shift, click, Alt Shift, click, press tamp, Control A,
resell the transform. So set origins, geometry, now press Control B. And then what I'm
going to do is turn these up just to round it off, like so, and there you go, now you can see that's
looking pretty nice. Okay, so now let's focus on
the rest of the machine. So first of all, I
want to bevel off this edge and this
edge going down here, and I also want to make a gap in this bom part where all
of this is going to go on. So I think what we'll
do, first of all, is we'll make this gap down here where this actual
bat is going in, and also as well,
need another part. So I'll also fix this
onto here now and not actually I'm fairly sure this is going to be
the width of it. I'm just wondering if I need to pull it a little
bit further over. I think I do. So I'm going to pull it a
little bit further over. I'm going to pull this a little
bit further over as well, so giving myself plenty of room. Then I'm going to press Shift D. I'm going to bring this
over then into place. So I'm going to put
it round about here. I'm going to make
sure, as you can see, it's not quite wide enough. Now, if you only need to move
it a little bit, of course, you can press S and Y and
move it a little bit like. So when you need to move this all the way
down here, though, just come in and grab
it going from this end. All the way around
to this end and then pull this down
to round about there, giving yourself a
little bit of room. It just squishes it in
too much if I was to, you know, squish it in on
the X along all of this. So that's why I've
done it like that. Alright, so now,
let's first of all, come in and as I said,
make this bit first. Now, we could come in and
use a boolean on here, but I recommend
we don't do that. What we'll do instead is, we'll bring in an edge
loop, so control. We'll bring it down to
where I actually want it, so it will be something
around there. And then what I'll do is
I'll press Control B. Bring it back just so there's not so many edge loops in there. And something like this, let's bring it down a little bit more. Like so. Let's bring
in another edge loop. So control R, left click, right click, Control B. And then what we'll do is
pull that out into place, and that should be even on
both of those sides like so. Now, before we carry on, let's put all of
these into mixer. So M, new collection, mixer. Like so, and we'll also
come down and we'll drag the mixer up to under
the water adder. So they're all in a nice order. Everything is nice and neatly
done as we're moving along. Okay, so now let's come
to this part here. Now, what I want to do is I want to before going any further, I also want to add in
one more edge loop, so controller so control, left click and bring
it down to there. And then I can
actually got a place where I can actually
bring this up too. So, in other words, I
can bring this out. One more edge loop, then, Control R, just
in front of here. Like, Sosa just in front
of this part here, and then we're ready to go. Now, one last thing though is, I need to drop this down
a little bit further. As you can see, this is not all the way down to the ground. We really want it down there. So what I'm going to
do is I'm going to put on my X ray and then
going to come in, and hopefully I should be able to grab it going all
the way from there, all the way to there, from here, all the way over to this
one here, turn it off, and then I should be
able to pull these down into place like so. Now, this part here,
let's fix that then. So what I'm going to do is
I'm going to grab this one, this one, this
one, and this one. I'm going to press
Control Shift and B, and then I'm going to
bevel those out, like so, making it a nice
rounded type you know, part that's going
to be in there. And then I'm going
to press E and pull them all the way back. Now the thing is when
I press E, then, you can see that I've
pulled these back as well. Now, as I said, when you press E, this
E is still on there. So you can either
press Control Z, and then it'll take it back. Or if you don't want to do that, what you can do instead
is you can press A, and then you can
come up to mesh, clean up, merge by distance. And what they'll
do is it'll remove that extrusion I
actually created there. That's sometimes the
way to go in case you're not sure whether
you've done extrusion or not. Now I can come to this.
I can press the Ebn. I can pull it back
into place like so, and that's looking pretty nice. That's exactly how I wanted. Next of all, then, I want to put on a bevel on here and
on the back, as well. I think I'll do this one first. So I'm just going to
grab all of this. I want to press Control
B and just bevel it off, increase the amount of bevels, like so, and then I'm also going to come
round to the back here. Press Control B and bevel
this one off as well. And then finally, I
want to pull this out. So I'm going to grab
this one and this one. I want to press E, enter Altern, pull this out a
little bit, like so. Right click, Shade Auto Smooth, and there we go. I'm
just going to make sure. Yeah, cavity is not
on. There we go. I can see much, much better now. That is looking pretty nice. That's exactly how I wanted it. And now let's move
on to the next part. So we kind of want it near enough lining
up with this one. It doesn't have to be exact
or anything like that. But what we first
of all, want to do is we want to make part that's, you know, kind of gonna come
up to the sides of here. So what I'm going
to do is first, I will make a smaller
one over here. So I'm going to press Shift. I'm going to bring in a cube. And what I'm going to
do is I'm going to move this over and down
to where I want it. So first of all,
I press control, if I press one, I should be able to see
then bring it down, and now I can see
that stuck in there. If I bring it over, then I
can see also it's in there, and then I can make it
a little bit wider on the X like so. And now you can see that's kind of fitting where I
actually want it. It's level near
enough with here. I just probably want it
a little bit thinner. So I'm just gonna
grab the back of it, pull it in a little
bit, like so. And, yeah, I think that's
looking quite nice for a base. Now, let's grab this base. Shift D. Let's bring it
over to where I want it. So we can see here we want
it round about there. And what I also want to do is I don't want it quite
the same as this. So what I'm going to
do is press S and X and bring it in a
little bit like so. And as I always say,
if it's too much, so this is way, way too much, come in, grab them going
all the way around there, and then let's pull
them down like so. Alright, that's
looking fantastic. Now, the next thing
is, I want to make this slightly higher
than this part here. So what I'm going to do
is I'm going to pull it up, so it's slightly higher. It gives a little bit more depth to your builds when you're
making things different sizes, you're making it on
different levels. You're making things
different scales, more depth. It doesn't look so uniform
when you're doing it that way. Okay, so now we've done that. Let's add in a small
kind of gear on here. So what I'm going to do is
press Shift, cuss to selected. And then what I'm going to
do now is add in a cube. So I'll add in a cube, but I want my cube kind
of to be over here. So what I'll do is
I'll press Shift A, bring in a cube,
make it smaller. Like so, bring it over here now, like so, and then let's bring
it up. And there we go. Let's make it a
little bit longer. So S little bit longer. And the thing is about
this, I want it to be, you know, taller than
this machine here. So once we've got this top on, we can make it a
little bit taller than this, again, adding depth. So what I'm going to do is just pull this up a little bit, and then I've got something
I can put under there now. So shifts, Custer selected, shift, let's bring
in now a cylinder. Make sure it's on 24. Let's press the S born, bring it down into
place so we can see now it's going to fit in
there, a little bit smaller. We just want to make
sure that it's strong enough to hold this,
so a little bit more. S and Z and let's pull it down, so it's in place
in both of those. Right, click Shade Auto smooth. And then what we're going to
do now is press Control A, bring it down to here, and then Control A, bring it up to round about here,
something like that. And now let's fit
it all together. So Alt Shift and click
E, enter Alter Ns. Let's bring that out. Like, so, up to you if you want to
put your bolts in there, I don't think I'm
going to do with mine. And then Alt Shift click, and then E enter alones,
bring this one up. And I think I'll have one more bit on
coming down as well. So I'm going to bring
it in a little bit. So lns, bring it in. And then Control plus. And then what we're going to
do is just bring it down, and I'll add in another bit. So I'm going to grab
this top bit here, E, enter S, pull it out, and then E and Zed, you want to make sure it's
following the axis like so, and there we go,
something like that, I think looks pretty nice. Now, let's start with the top part of this sense so once we've got the top part, we can get it moving
all the way over to here because this is what
he needs to line up to. If you look at this
at the moment, it's kind of not lining
up to where this is, and we really, really
want that line up. So what I'm going to do is
I'm going to grab this. I'm going to make sure that
my cursor is in the sens. You can see everything
is in there. And what I want to
do now I want to do a little trick to get it
right in the center of here. So what I'm going to do is I'm going to grab all of these, and I'm going to
grab this one last. So shift select this one last, Control P, and what we're
going to set parent object. Now, if I move this anywhere, you will see the whole
thing moves around, which is great because
what it means is I can come now to here,
shift Des selection. Sorry, cursor to selected. So move the cursor
there, grab this one, shift Ds and
selection to cursor. And now you can see that's
right bang in the center, which means now I can
just come round with three and I can
lift this all up, so it's nice and level with the rest of it,
holding shift button. And now, you'll see that
is level now with that. So once I've put top on here, we know this then is going
to be level with it. Now, let's put the
actual top on here because we need to make it
quite rounded on this bit. So what I'm going to
do is I'm going to remove all of these of
the parents that are set. So oat P, and what we're
going to do is clear paren, but make sure you
keep the transform. If not, they'll move all over the place. We
don't want that. So now if I move this, you'll see nothing
moves with it. Everything now is set into
where it needs to be. Alright, so now let's put this big chunky bit that's
going to be over here. First of all, though, I think this needs to be a
little bit wider. So what I'm going to do is
I'm going to press S and X, pull it out a little bit,
like so, and there we go. I think it looks
better like that. Let's move this a
little bit more over. To give us a little
bit more room, so over like that and make sure he's a little
bit more depth on. And then what we're gonna
do is save that'll work. And on the next one then, we'll actually bring
you know what, before we finish, let's
just bring this out a little bit like so.
Yeah, let's bring you out. Ah that actually looks better,
a bit more depth to it, and then we'll get the
top bit on and a bit underneath and get
it all together. Let's save out all
work once more, and I'll see you on the
next one, everyone. Thanks a lot. Bye bye.
39. Continuing modeling for a mixer machine for Blender Beginners Masterclass: Welcome back, everyone to Blend the Beginnings master
class, the cookie factory. And the first thing I
think we'll do is add in the little box that's
going to be on here. I'm just wondering
if I've made this a little bit too wide this way. So all I'm going
to do is press S and X. I'm just going to
bring it in a little bit. And then what I'm also
going to do, as well, is I think I'll
round this part off. So I'll come in, I'll grab
this side and this side. And before I do that, I'll
just press Control A or transforms set
origin to geometry, and now press Control
B and round them off. Now, I don't want it rounded off so much like
this, as you can see. So what I'm going to do
is I'm just going to pull this around like so, and then I'm also going
to pull this two here, I think, and then just try and round it off a little
bit more like this. And then on the right, click
and shade Auto smooth. And yeah, I think that's
looking much better. And finally, what I'm
also going to do, I'm going to press S and Y and just squish it down a
little bit more like so, and I think that's looking much, much better than
what it was before. Alright, so let's put
this little box in. So all I'm going to do is press shift day,
bringing a cube. And the cube is going
to come over here, so let's bring it
over here somewhere. Let's press S. And we want to make sure that it's
stuck at the side of it. So something like this,
let's have a look. And then we've got a
pipe coming out of here, into here, and we've got
two pipes coming down. And lastly, we want to make sure that if I go over the top, you can see it's
not quite there, so I need to pull this out a little bit more, so
I'm going to come in. Grab this part, press seven, and then I'm going to pull
it just past there, like so. I can also see, as well, that maybe maybe this part here, I could probably do with moving it a little bit more like so. And there we go, now, that
looks ready to rock and roll. So now let's think
about this top on here. So for this top, all I'm going to do is I'm
going to come in. I want to press the
Ibn to bring this in. And then what I'm going
to do is just press E, and I'm going to
pull it up like so. And from there,
then I think I can actually put a top on here. So first of all, let me
grab the top of here, so shifts to selected. And basically, then
what I want to do is I probably want this part here. So if you know what, if I just press Shift
D, bring that up. And then what I can do is I
can bring this over to here, like so, press the S button. Bring it out, like so. And then what I should
be able to do is grab the back of
this, pull it over, like so, press L
on this and then press E and then just
bring it up like so. And I think that will give me relatively a good
starting point. So I'm just going to
separate it off with L, like so, and P just to
separate it. And there we go. Control A, transoms right
click, SiginsGeometry, and yeah, I think that's
actually going to do it. I think we just need to now
pull it down into place. I think it's gonna need
rounding off in certain parts. So let's see if it's over
the top, first of all. So I need it really pull
into here over the top. And I'm just wondering whether this whole thing needs pulling
up, and I think it does. So I'm going to do that now. So what we're gonna
do is just pull this a little bit closer to it. And then what I can do is now with this, I can move it over, and then I can
actually pull this back a little bit
because I feel like this has gone a little
bit too far forward. I'm going to go
over the top seven. I'm gonna pull it back
just there. Like so. Alright. That is looking
out. Won't it now. We need to pull this top
bit back a little bit. So what we'll do is
we'll pull this down. Like so. And then what
I'll do is I will bring it up so I'm
going to press E, bring it up a little bit. And I think what I'll
do is I think I'll drag this bit back a
little bit like so. Now, what I want to avoid is I want to avoid these
parts on here. So what I'm going to
do is l shift and click Control B,
drop it back a few. Like so. And yeah,
that's what I want. And then what I want
to do is I want to round this back bit off. So Althift click, Al
shift, click Control B, increase the amount
of subdivisions, like so. And there we go. This is something that
I'm actually looking for. And then what I'm going to do
now is I'll actually finish this bit off by rounding off these top parts and
these bottom parts. I think I want to a
little bit more round. And the other thing
is, I'm thinking I want this from bit to
go in a little bit. So if I can press Control law, you can see that I can't
really bring it in because of the fact we've
got this point on here. So what are we going
to do to fix that? We've all score points
on here as well. So what I'm going to
do to fix that is I'll press Shift H to hide
everything else out of the way. I'm going to grab this
one. And this one. I want to press the J button, and then we're going
to grab this one and this one, press the JB. And now we're going
to come underneath, grab this one and this one, press J, this one, and this one. Press the JB. And now I
should be able to press Control and bring in
an edge loop, like so. Now, why did I want to do that? Because I actually want
to bring in this part. At the moment, I kind
of want to bring it in. So if you go over the top, this pan here will
be squished in, so it just brings it
all in a little bit. So how I'm going to do that is I'm going to come to
this center part, grab it just here, press
seven to go over the top. And then what I'm going to do
is put portion editing on. I'm going to press S
and X, pull it out, and it should, bring it in a
little bit for me like so, and there we go, it's
looking much, much better. And now, finally, let's come in, and we'll go, Al Shi click
going all the way around. And I'm hoping that I
can bevel off this top. So Control B, let's
bevel it off. Slightly, like so. And this is the part
that I'm just going to shade move and see if it gets
rid of that. No, it hasn't. So what I'm going to do, I'm
going to press Control B, I'm going to increase
the amount of subdivisions, and there we go. That is what I want, and now we'll do the same thing on here. All shift, click, Al shift, click, Al, shift, click. Control B. And there we go.
That is exactly what I want. Press Altag yeah, and
that's looking good. Now, we'll do the sides now so we can see we've already
got some sides on here. So what I'll do
for the sides is I will come to this
one and this one, and I'll also come. I'm just looking where I want
it. Yeah, those two there. And now we know it's over here,
so this one and this one. So we've got now the
same two through there. And what we're going to press
is Control Shift and B, and we're just going
to bevel those off. Bring back the bevels. We don't want too many.
So something like this. And then we can use this now to create the
pot that we want. So if I come in now
and grab this one and this one, all
the way to here, now what I'll do is I'll grab this one going all the
way round to here, and then this one and control
clicking all the way round. Then I can press E to lns
without portion editing on. Press Control E. Alterns, bring it out, and there we go. That is how we got that pot
on there, shade or smooth, and that's looking pretty nice except this
little bit here. So I'm wondering
whether I need to just bevel off this one just
a little bit more. So let's just have a look
how it's going to look, Control B. Yeah, and I think
I'll do both of those. So we'll grab this
one and this one and then this one and this one. And all I'll do is Control B. Like so, and there we go. Now, the bevelled off, fine. Now, let's do this top part, so what we'll do is we'll
grab this one in face leg. So this one here, going all the way over
to this one here, we're going to press
the Ibn then, like so. And then all I'm
going to do is press the E button just
to extrude it out. I'm going to extrude
it out actually along there, like so. Now the problem we've got
here, as you can see, this is a bit hard edged.
We don't want that. So we can either come in and now we can actually bevel it,
so I can actually come in, grab these edges like so, and then press Control
B and bevel those off. Increase the amount of edges, pull it out, like so. And then we go, But what'll
happen is, as you can see, now we've got an
issue with that, let's see if we can
shade it smooth. No, that's not gonna work. So instead of that, what
are we going to do, we're just going
to go back instead before we actually
pulled it out. And instead of doing that,
I'm going to bring it in. And what I've got to be careful of now is that I don't do that. So instead of doing
what we just did, all I'm going to do is I'm
going to press Shift D, and then I'm going to
extrude it out, like so. And then I'm going
to bevel it off now. So hopefully, let's see
if that actually works. So we duplicated it over there. Then we brought it
out with extrude. So Control B, let's
bevel it off. And now let's see
what that looks like. And there you go, now you can see that's
actually working. Albeit we need a few
more edge loops. Let's go back once more. Control B, bring in a few more. Chef. And there we go. Alright, that'll do.
So we duplicated it, then we straightway
extrude it out. So if I come now, I can
actually go for this. I can hide it out
of the way, and you can see that's
underneath it, anyway. So right, that's that bit done. Now, so we've got
all of this done. And we need the front
of this. So let's do those first before
finishing this, so we're going to press Control R. We're going to press two. Left click, right, click. Corn, troll B, bring
it all the way down. And then we'll have
it just on the front, probably coming from here. So we're going to grab this one, this one, this
one, and this one, and then the same on this
side, this side, this side, this side, and then I'm going to press Control, Shift and B. And we're going to bevel it, increase the amount of bevels. We don't want all
those broken pots, as you can see, every time I do that I'm getting
more broken pots. I want to be very careful.
I don't get those. You can see if we
do it that many, we don't end up with
any broken parts. Now, let's see if we
can extrude this out. So I'm going to grab this one, this one, this
one, and this one. And I think when I
extrude them out, they're gonna be
quite hard edge. So you know what
we're going to do? Instead of doing that, we'll do the same thing as
what we did before. So we'll grab all these going all the way over
to this one here, and then the same on this one. And then what we'll
do is press Shift D. And then E pulled them out, and now we're all
bevel them off. So we're just going to
bevel them off now, that one, this one and this one, and then around the other side. And this will make
it much much easier. So control B, increase
those bevels, like so, and there you go. That's one way of actually
getting that done. Okay, so so far so good, we've worked ours way
all the way around. And the next thing,
I think it's nearly time to actually get
this mixer on there. So I think we'll do that
on the next lesson. Alright, everyone, Sobi enjoyed that, and I'll see
you on the next one. Thanks a lot. Bye bye.
40. Creating a mixer hand using radial symmetry for Blender Beginners Masterclass: Welcome back, if you want to blend Beginner's master class, the Coke factory, and this
is where we left it off. Alright, so let's make
a start on this mixer. So what I'm gonna
do, first of all, I'll actually come,
and I'm going to I'm going to grab this here. I'm going to grab just
this part in the center. So just this part here. Shifty. I'm going
to bring it up. And then I'm going
to use this as a base form actual mixer, so I'm going to press S,
make it a bit smaller, like, and I'm going to
pull it up into place. The next thing I'm going
to do is press P selection just to split it off from there. Control layer transforms and set the origin of
geometry like so. Then I'm going to press tab, A, E, pull it down, like so, and then I'm going to press L and pull
this into place. And that's looking pretty nice. And now what we'll do
is we'll bring this in, so I'm going to press
I, E, bring it in. And then I'm going to
bevel off the top of here. So Alt Shift and
click Control B, bevel that off, like so. And now what we'll do is
we'll bring in this mixer, so I'm going to press I Woops. I to bring it in, hold
in the shift but, and then I'm going to press
E, and then I to bring it in. And then finally E,
let's bring it down. And we can see it's a little
bit thick at the moment. So all I'm going to do is
I'm going to press I again. Like so, and then I'm
going to press E, bring it down into place. Now I'm going to press E to S, bring it out, and then
E. And now from here, we need the actual mixer. So I also want to
make sure that this is actually split
off because this is going to drop down and
actually spin round. So I need to make sure
that this part here, as you'll see, is split
off from the rest of it. So I'm going to grab all of
this and this part here, I'm going to press P
selection and split that off. I'm going to hide
this part the way. And I'm going to
fill this facing. So let's come in. Alt Shift
click F to fill it in. And then what I'm going to do is press tach and just
swap between them. So now I'm going to
grab this top part. And what I'm going to do
instead is not fill the facing. I'm just going to
extrude that face up because then I can use that
to actually bring it down, so I'm gonna pull it all the way up there, something like this. Utah, bring it back everything. Okay, so now we need to
bring in the next part, which will be the kind of these, you know, the parts of the mix there are going
to mix everything up. So what I'll do to do
that is, first of all, I'll come to the center so
shift desk, cursor selected. And then what I'm going
to do now is I'm going to bring in a curve. So I'm going to bring in a path. I'm going to spin
this path around, so R Y 90. I'm going to make it
more smaller for now. I will be actually making
it bigger as we go along. And then what I'm going to
do now I want it kind of, I don't want it
bevelled so much. So what do I mean by that? If I come in, and
the first of all, what I do is extrude it. So if I extrude it, you'll see now it's going to
this side like this. And then I'm just going
to put it this side. And what I'm going to
do now is I'm going to actually try and fit it so
it goes to another point. So first of all, let's bring
this bit down, so shift D, bring it down to where
you want it to go, like here, something like that. And then I'm going to press S, and then E, pull
that up, like so. And what we're going to
do is we're going to put it round about here. All right. So what we need to do now is we need to make this
curve fit in there. Now, of course, this is
just a plane of the moment. That's all we can see. So
what we want to do is we want to add in a
modifier to this curve. So let's go to our modifies tab, add in the modifier, and the
one we want is a solidify. And we're going
to pull this out, so pull it out like so. And then what we're also
going to do is we're going to right click
and shade flat. Now we can see we've got
something to work with. However, since we brought
the soldi fire in, you can see it's moved it off. So it was, if I
press Control three, you can see it was
in the center, but we can also offset this. So first of all, let's
put even thickness on. Set this to note
0.5, and it should. Let me just set this to
round about the center. We're going to be able to
set this to the center. No 0.442. Let's bring this down a little
bit. There we go. Let's put this on -0.5, and now I'm going
to work from there and try and center
this out a little bit. It isn't so important now we
get it perfectly centered, but for now it makes it so that it's easier
for us to work with. So now if I press one, now I can see what
I've got to work with. And now I can actually make
this into how I want it. So I can bring these parts
down as you can see, and I can bend them
round like so, and then let's bring it
out. And there you go. Now you can see it's
starting to look like a mixer. And there we go. Alright, that's looking
pretty cool now. Now, what else do
we need to do this? First of all, it's a
little bit too thick, so let's make it a
little bit thinner. Not that way. Let's
go to the extrusion. So turn this down,
and there we go. Let's also turn down the
resolution something like seven. If we turn it down too much, you will see it bends
too much like that. We don't really
want it like that. So what we want to do
is put it on round about seven, and there we go. And I'm also wondering
if I come in now apply my solidify,
which we can't do. So what we'll do is
we'll bevel this after. We'll actually give it a bevel, and then we'll get it
going around all of these. I think, though, generally,
we've got the right, you know, kind of
scale for this. The one thing I'm
thinking is maybe, maybe we'll bring it
out a little bit. So we'll make it a
little bit thicker. The other thing we
can do as well, is we can come to
the bottom of it, put proportional editing on, press Alter S, and what you can do is you can
actually bring it in. But you can see it's kind
of bringing it in thinner. We don't really want that. We actually needed
to go the other way. So what I'm going
to do instead is, I'll actually apply
this so object, and then we'll go to
convert and mesh. And now what I'll
do is I'll come in to the bomb because I want this bomb to
be a little bit thinner, Alt shift and click, and then what we'll do
is we'll press S and Y and bring it in that
way instead, like so. Alright, that's
looking pretty nice. Now the next thing we
need to do is right, click shade Auto smooth. Let's press Control A or transforms right
click Set origin, 23d cursor because my three
D cursor is in the center, add in a modifier and
generate a bevel, and we can see now we're
starting to get somewhere. So we can see it's starting
to look like a mixer. I'm going to bring
that down very, very slowly, like so, and there we go, That
is looking pretty nice. That's looking like a mixer now. And I think I'll also increase
the segments as well. So I'll increase the segments, bring this down a little bit. I'm just wondering if I
can actually do that. If I can do that, let's see. Let's see if I increase these. There. Okay. Yeah, that's
looking like a mixer. Alright, I'm happy
with that. Now what we'll do is we'll
actually duplicate this. And on the original lad, one, two, three, four, five, six, so six, which is
60 because it's 6/360. So what we'll do is
we'll press Shift D, and then RZ 60, shift, Rs, 60, shifty. And I'm hoping I
did that. And then, Z, 60, and then shift, RZ 60 and shifty, Z, 60. And there we go. Alright, that's looking
like a proper mixer now. Yeah, I'm happy with
how that looks. I think one other thing
I want to do contro la, bring this down a little bit. Alt Shift click, E, enter Alterns without
portion editing, so Alts, bring it out. Like so. And what I'm also going
to do is put an insert on the song to press I like so, I'm going to press E
and pull this down. Like, so just adding
a little bit to it, we'll also do the same thing on the bottom of here as well. So I'll go in, and I'll press I and then E, pull this down, and we'll also do
the same on here, I, and then E, will pull it down this way. Okay, that's looking
really, really nice. I think that's pretty much done. I will join now this and this. So first of all, though, if
we join all these together, we've got bevels on there, and we don't really want those on. Well, we do want them on, but we want them all done together. So control J, join
it all together. And then what we'll
do is we'll go and apply the bevel on here. So apply this bevel,
object, convert, and mesh. And why is it done that?
Let's have a look. There we go. There we go. Why is it doing that? That's
not how it should go. Let's come over there
and press Control A, all transoms Saige and geometry. Hover over the bevel, press
Control A, and there we go. Now, let's join all of
this together with this. So control J. And finally, we got it all joined together. I don't know what
happened there, actually. That was a little bit weird. Alright, so now we've got
all of this part done. It's all done, basically, except the little part that's
going to be over here. So the little part over here is where the other conveyor
belts going to be. I don't think I'm gonna
put this part on yet. I'm going to do that
as the next part. What I'm going to
do, first of all, is focus on getting this
part done. Over here. So what I'm going to do is I'm going to come to this part. First of all, I'll make a bit underneath this that can
actually support this. So all I'll do is I'll
come underneath Shift D. And then what I'll do is I'll bring it
down into place. I want to press E, pull it up, and then L. And then all
I'm going to do now is press S and Y and pull
it into place like so. Alright. Now, we need a bit
of a pipe on this part, so a big pipe and a small pipe. I want to lift this
up a little bit. So L, this one here. So L, let's pull it up
a little bit. Like so. And then maybe
that's a little bit too high, something like this. And I'll also press S and Y and just bring it
in a little bit, like so. Now on the next
lesson, then I'll make my little dw
that goes on there. I'll put in the pipe
that goes on here, the pipe that goes under there. And basically, at
that point, then we've fully finished
with this, I think. And the only thing
left to do really is I'll also need
a back on here. But then once we've
done that, yeah, we should have this modeled by the end of the next lesson. Alright, everyone,
hope you enjoyed that. I'll see you in the next
one. Thanks a lot. Bye bye.
41. Working on modeling mixer gadget panel for Blender Beginners Masterclass: Welcome everyone to Blend
the Beginners master class, the cookie factory, and this
is where we left you off. So what I'll do,
first of all, is I'll come I'm gonna split this off because it's kind of
annoying me by the two together. Then what I'll do is
I'll come to this part, and I think I will come, first of all, I'll just, um yeah, I'll grab I'll grab
justice. No, you know what? I'll grab all of this pot. So shift D. Let's
grab all the pot. And then what we can
do is just press delete and limit to dissolve. All they'll do is just
delete those edges for me. Now, I want it to come from this part all the way
down to that pot. So I'm going to put it there. Sa like so, and then S and X, pull it in, like so, and maybe maybe this part here has gone a little
bit too far down, so all I'll do is
I'll bring it up, bring it up a little
bit, like so control. Left click, right click, and I've got eight of them on. So make it a round eight. That should be fine.
And then what we'll do is we've got two together
here, as you can see. So I'll probably say there
needs to be an uneven number. So if I press Control
R, bring in a few, and then change this to nine, you'll see now I've got
one right in the center, and that's basically
what I'm looking for. And then what I'm going to
do proportional editing on, I want it to be nice and
round and spherical. So all I can do now is I
can use raise this out. I don't want it
touching anything else, so connect it only off, and
then I can bring this out. Like so, and there we go. That's kind of what
I'm looking for. Like so I might have gone
a little bit too much, so I'll bring it back in a
little bit, and there we go. Now, the other thing
I want to do as well, is while I've got this center, I might as well press S and X, and then I can bring
these in like so. And that's looking pretty nice. Alright, now we've got
that. I can solidify this, so I'm going to come in, L, P, selection, separate it out. Control A, or transforms, right click Surrogen geometry, and then let's add
in a solidify. So generate solidify let's
put even thickness on. Let's bring it out like so, and let's put it into place wherever we're
going to have it, which will be
somewhere around here. Now, let's think about
these parts over here. So I'm going to press
Shift S, cursor selected. Shift A, let's bring in a cube.
So we'll bring in a cube. Let's press S to
make it smaller, and let's bring it up
into place. Like so. So something like this, I need to make sure
it's all in here, of course, so we're going to pull it in a little bit more. And then what I'm
going to do is press S and head, pull it
down a little bit, and then S and X, like so, and then pull it down a little bit more just so
it's all fitting in there. So you can see now that's
fill in there pretty nicely. And then what I'm
going to do now is bevel off these edges. But before I do that, I don't like the wastedness in here, so what I'm going to
do is just press tab, grab this face and just pull it back without portion
leditonO course, pull it back, turn that off, and there we go, that's
looking much better now. Let's come in and
bevel off these edges. So control B, bevel them off. Like so. You can see they
beveled off quite weirdly. I don't really like
that. And the reason is, of course, I have not
reset my transformations. Now let's try beveling
those off much, much nicer now, as you can see. Right click, shade At smooth. And now let's go
into this pot here. So this pot on here, let's grab this one, and
let's grab this one. And what we're gonna do is
press the Ibn, like so. And then what we're also
going to do is press E, and let's pull them both out. Like so. Alright. And I don't think I want those
bits actually rounding off. Now, all I need to do
is bring this one down. So shift D. Let's bring
this part down into place, and I'm just looking
to make sure. What is wrong with that bit? I don't know what's
happened with this. Oh, I do. It's because of
the extrusion. Let's see. Let's see what happened
with that extrusion. There we are. That's
what happened. So because we had a slidy
thion which I forgot about, it means I need to apply that first in object
mode, so control A. Now we can go in and you can see both of
them are selected, so let's grab this
one and this one. And if I press G now, you'll see that they're
not joined, which is cool. So E, enter, alter Ns, bring them out, and there we go, now, it's fitting in properly. And now shift D, bring this
down, put it into place. There we go. Alright,
that's looking good. All of that bit then is done. Now, let's work on
this part here. So first of all, let's do the dialing that's probably going to take the
longest amount of time. So we want a little round dial in here, and we're
not gonna use this. You know, we're not gonna animate this or
anything like that. It's just a nice, sweet dial. So what I'm gonna do is I'm
just gonna press Shift S, 'cause it's selected. Shift A. Let's bring in a plane, RY or art x, 90. Press the Sp. And what I'm going to
do is I'm just going to grab this and this part here, press Shift H, and I'm going to line everything up. So I'm
going to bring this out. I'm going to put it to where
I want it, first of all. So I'm going to
press Ns, S and X. And this is something I want it. So a little bit more
probably ns like so. Alright, that's looking good. Now, let's come in and actually
bevel off these sides. So we'll grab each one of these. We'll press Tab first of all, reset all the transforms. And then we'll press
Control Shift and B, and bevel that off, like so. And then what I'll
do is I'll come in, grab the inner part,
press the e board. Don't go too far, remember
just far enough, like so. And then what we'll do
is delete and faces. So delete faces, and
then grab this part, and we're just going to press
E and pull it out like so, right clk shade auto
smooth, and there we go. Let's put this into place. Now, we need this
little dial here. So let's bring that one in. So shifts, cursed or selected. Shift A, let's bring
in a cylinder. Let's put the cylinder on 24. No. Let's also make it
smaller and rotate it round. So, X 90. Let's bring it into place. Make it a little bit smaller. So something around this size. S and Y, bring it in. Like so put it on there, and then all I'm going to
do is grab the inner part, press the ebonne, and then I'm going to press
E and pull that back. And then finally, I'm
going to round this off. So lt shift, click Alt Shift, clip, tab Control A, transforms right, clicks
origin two geometry, tab again, and Control B. Let's round that off,
maybe not so much. Maybe that may
something like this. Press the tab. Shade
or two smooth. And there we go.
That's that part. Now, let's put this
little dial in there. So simple dial, shift,
bring in a cylinder. I'm going to make my
cylinder marge much smaller. So I'm going to bring
it all the way down. You can see also the depth of it I'm going to make smaller. So when I bring a
new cylinder in now, it's going to come in like
this a little bit smaller for me or X 90. The other thing is,
as well, it's not coming in the center, so shifts, curse to selected,
grab this one, shifts selection to
cursor, and there we go. And let's bring that
little dial into there. So, and I think, maybe a little bit smaller. And then what we'll
do is we'll just grab the outside of it. First of all, though, control, bring this edge
loop up to there. And then what we'll do is
we'll grab this one, this one, and this one, making
sure that they're level. So maybe to there, press
the E bone, pull it up. Shade or to smooth,
and there we go, that's this little dial. Now, let's bring in a cube. So shift a, bring in a cube. Make it a lot, lot smaller, and then bring it
over this part. And this will be the little
switch that's on there. So I'm going to press S and Y, all the way down
into place like so. And then we're just going
to grab the outside. We're going to press the ib, and then what we're going
to do is bring it up. And then the I
again, bring it in. This where we want our
switch and then E, pull it back into place. Now all we want is
just the switch. Now, the switch to do that, we'll do it actually
together. Why not? We'll just press I, bring it in, and then S and X, bring it in like so, and maybe even make it a
little bit bigger. So something like this,
that looks about right. And then E and then I like so, and then finally E. Like so. Now, I'm just thinking
about my other switch. It's going to be a
little bit like this. So what I'll do is I'll press shift desk, cursed to selected. Bring in then
another a cylinder. I'll come in quite small,
because that's where it. Let's put it on 16 because
it's only a tiny switch this. So I'll bring it down to 16. I'm going to rotate this round, so R Y 90, rotate it round into place. And then all I'll
do is I'll grab both of these and just
press the E button, and making sure they're
going the right way. If I press let's press its
head and just take that off, you can see now that these are not kind of going the right way, and I don't really want that. So what I can do is
I can press R Sorry, and then Y and pull
it along there. And then what I can do is pull it up like so, and there we go. We've got the nice switch
that we want. Shades move. And that then looks pretty cool. I'm happy with that. Alright, so we've got our switch. We've
got everything on there. Now let's press Saltag, bring back everything.
And here we go. So this is looking quite good. Let's at the moment, hide our flour mill and
our water adder. We should have this now. Now on the next lesson, then we
didn't quite get there. It was close, but not quite. We'll point a pipe
on here and here. We'll also then put in
the main pipe which's going to go into this part here. And then from there, we can actually start shading this off. Alright, we'll add in our
shaders. Alright, everyone. So I hope you enjoyed that, and I'll see you
on the next one. Thanks a lot. Bye bye.
42. Refining detail of a mixer, making sure meshes fit nicely together, adding boolean de: Welcome back, everyone Blending
beginners master class, the cookie factory, and this
is where we left it off. Alright, so let's do
the simple parts first. So what I'm going to do is
shift a bring in a cylinder. Let's bring this
cylinder down then. I'm gonna press
the You know what? This one can be this
thick, actually. So what I'll do is I'll
just bring it into place. I'll bring it up a
little bit, like, so the one problem I've got is actually, I brought that in. I should have put it on to 24. So the moment of going 16, so let's put it on 24, and there we go, now
let's put it into place. So Jes down. Like, so
let's pull it over. And then what we'll do is we'll grab this and just pull it up, making sure it's just
into the top of that, like so, and then I'll
bring this one over. So shift D rather than
bringing another one in. And to make this small, I'm just going to grab it going
around the outside so the top and bottom aren't actually grabbed,
and then alter ness, and then I can
bring it in holding the shift bun, like so, and that's then go
to keep that length, but not the, you know, it's not going to destroy
the actual size of it. Alright, so that's
that. Now, let's come in and think
about our other pipe. So we'll bring in Shift A, mesh, pipe joint, pipe elbow. I'm going to bring
this down to 24. I'm going to bring
down the radius, like so, and I'm also going
to put this on 90 degrees. I'm going to bring in
the start and end. So the start and
end of it really, really doesn't matter because
we can expand those anyway. And then what I'm
going to do is now, I think that is roughly
the right size, so I want to bring it up
into where I want it. So something in the
middle of there, like so, that's looking good. And then what I'm going
to do now is control, left click, right, click, control, left
click, right click, and then I'll grab this one, and I'll press S X and zero
and then grab this one, and then S z zero. Then we'll pull these
down into place. We'll pull this one into place. And then what I'll
do is, I'll press Alt Shift and click
Alt Shift click, E, enter Alter ands, pull those out, like so. Then finally, just this
big this big part on here. I want to bevel it
off just a tiny bit. So this one on here, grab it all the way around. Control B. Just a tiny bit like so, right click and shade or smooth. Yeah, that'll do. I'm sure that'll be okay. And then what I'll do is
I'll grab both of these, Control J, join
them both together. Control, left click, right, click, control, left
click, right, click. And then what I'll do
is just grab them both. Press Control B, and I should be able to pull them
up to where I want them. So somewhere like here,
that looks about right. And then what I can do is Al
shift click, Al shift click, going all the way around, and
then eat enter alter ness, pull those out, and it's
as simple as that, guys. And once you've got
the hang of it, you can see once you've actually got the way of doing things and the way of
thinking through things, you can just see how quickly
you can actually work, how quickly you
can build things. And you will get it.
You will get there. I'm absolutely certain of it. Alright. So we've
done all that now. What we want to do is come
into our material mode. We want to bring now we've done that. We
want to bring back. You know what? We'll just leave it in
object mode just for now because I need to
check out the bevel. So what I'm going to do, I'm going to grab the
whole thing now and hopefully haven't
got any modifiers on, so I'm just going to hide
them out of the way as I go through and check to make sure
there is no modifiers on. You can also see that
a lot of these parts, once I've checked these
can be joined together, like these tiny
parts, especially. So you can see now I don't think I've got any
modifiers on even on this. So yeah, no modifiers, old age, bring back everything. And now we can do
is we can start, you know, adding parts together. So basically, I'm going to
hide this part of the way. None of this part, as you
can see, is going to be, um, is going to be animated
or anything like that. So what I'm going to do
is just press Control J. Control layer transforms, and then right click
shade to smooth. That's that part. Let's hide
that one out of the way. I can join all of this together. So even this part here, I can join together
with Control J, right click, Shade Smooth,
hide it out of the way. And then I can join all of
this coming down to here. I'm just going to join
it with this for now. So press Control J, right, click, shade to smooth,
hide it out of the way. And then finally, we've
got this one and this one. Let's press Control
J, and there we go. Now, is all this
joined together? Yes, it is. We can press stage then and bring
everything back. And now, finally, let's come in and just grab
all of these parts, press Control A, all transforms right clicks origin
to geometry like so. Now let's come in
with our devil, so I'm going to grab
this one and this one, I'm going to press Control L, and I'm going to copy modifiers that didn't
work too well, did it? So let's go back what's
going on here. There we go. So let's go on this one. Let's
try this one. Control L. Copy modifiers, and
the reason it's doing that is I don't actually know. I don't know why it's
moving that over there, so maybe that's a little
bit of a bug in blender. I'm not sure. What I'll do is I'll try and do it this way. So generate bevel. And then what we'll
do is we'll put the profile, sorry,
the geometry. We'll turn off lamp overlap, and we'll put this
on note point note three. And there we go. Now we've got our bevel on I'm
just looking at our bevel, making sure that's
okay. I think it is. And what I'll do now is I'll
grab this one and this one. I'll press Control
L. Copy modifiers. And yeah, there's
something definitely wrong with how that's working. It shouldn't work like
that. So let's see if I can go there we go. So, for some reason, what's actually happening
there is it's actually taking a scale for some reason and actually
scaling everything down. So what I'm going to do,
if that happens to you, grab whatever it
is and press LTS, first of all, because then
that'll scale it back. The thing is, if you press
Alts, even if I rotate it, so if I rotate it like this, because I've reset
my transformations, and if I scale it
up, for instance, I can now press Alt R. What they'll do is reset
that rotation back to when before we
set the transformations. If I press Alts, it will scale
it back to that, as well. So that's at least that's
one good thing about this. Now, what I'm
looking at, as well, I'm also looking
at If I pull this down here, is this big enough? I think we need to
make this a little bit smaller, so
we'll also do that. So what I'm going to do is
just going to grab this. I want to press the button just shrink it down a
little bit, like so. And then what I'm also going
to do is I'm going to grab this again and I'm going
to I think I'll bring it. I think I'll grab the bottom
of it and bring it down. So what I'm gonna
do old ship click, pull it down into place
like so. Alright. Now, what else I'm
going to do is I'm also going to put this on note
point note not three, and there we go, That's
looking better now. Yeah, and I think the whole
thing is just looking better. It's bevelled off now. Now
we'll come to this one. We'll do the same thing again. So add, generate
bevel, not point, nut, not three, geometry, turn off clamp overlap,
and there we go. We should have a bevel on there, which we have. Same
again on here. Let's see if I'm join
this one with this one. So I'm going to grab this
one and this one Control. Copy modifiers. No, it's not going to work,
so let's go back. Come on. Let's go
back. Alright. So we did have a bit of a
crash there, one. Sorry about that, but sometimes it happens to the best of us. So what I'm going to
do is I'm going to actually try and
fix this because actually it put me on a
different route to where I was. So what I'm going
to do is I'm going to pull this down a little bit. I'm also going to
show you, as well. Not that I helped this
time, but if you come to file and you go to
recover, auto save. What'll happen is you'll have
all of the auto saves in here and you can see that I pulled it back from this
factory course here. This is the time I'm working, and you can see now that when
I pulled it back, though, it didn't actually put
everything in the proper place, which was kind of annoying, but sometimes that happens. So what I'm going to
do now is I'm going to try and just put these back
into the place where it was. And hopefully, in a few minutes, I should get it all back, but it has put me back a little
bit. We'll say that. So what I'm going to do
is I'm going to grab this part. I'm going
to pull it up. Put this into place
where I want it. So I think it went
around about there. Okay? This bit looks like it's nearly into place,
so let's pull it over. Let's pull it up, like so. And I think let's pull it
over this weight, like so. Alright, so that's that bit. I'm wondering if, yeah,
this bit you can see, it's a little bit out still, so let's pull it
over a little bit, get it into place or
pull this one back, whichever is the
case, I think we'll pull this back a
little bit, like so. And then what we'll do now
is we'll pull this back. So this should be
fitting in there, you can see it's a mile out. So what we'll do
is we'll come to this part here. We'll
grab this part. Here, Shift desk, cuss, selected, grab this part. And then what I'll
do is I'll press shifts and selections cursor. And now I can see where
this is going to go. So if I pull this up, you can see this is where we want it, which means that this
one is a long way out. So I need to put this right
in the center of this. So what I'm going to do is
I'm going to grab this end. So just this part in here, shift desk, cuss to selected, and then we're going
to go to this one. And what I want to do is
I want to move this now. To this part here. The way I'm going to
do it is I'm going to grab this right click origin, 23d cursor, and then we're going to come to
this part here now. I'm going to press shifts
selection to cursor. So cursor selected, like so, grab this one again, and then
shifts selections cursor. Now I know that this one's
right in the center there, and from here now, I can actually work out where
everything's going to go. So we can see now I need to
pull this down a little bit. So let's pull it down
into place like so. There we go. Let's
now move this. You can see this is a
little bit out, as well. This part's a little bit,
this part's a little bi. Let's move them over
into place like so. And then I've just got Yeah, I think that's looking
about right now. I think we've got it
all back to what it was. And there we go. So that caused us a lot. So what I'm going to
do is save on my work. I don't want that happen again. And all from trying
to join a bevel. So I don't know why the
bevels reacting like that. No idea there. But
what I want to make sure now is I've got
the bevel on everything. So no bevel on here.
So add modifier. We'll go to generate bevel. And what I'll do instead is, I'll put this on not
point not not three. And then what I'll also do
is I'll come to my geometry, turn off the clamp overlap, which I always get
used to turn that off. Then we'll come to
this point here, add in a bevel, and hopefully on the next
one, it will work. But on this one,
for some reason, does a not point not not three. And then what I'll
do is turn off the clamp overlap,
and there we go. Now we've got the bevel
working on there. Now, we can see on
this that we do have a problem in this
part that's going round. So before we fix that, though,
let's come to this part, add in a bevel on this as well, so generate a bevel,
not point none three. And on this one, we don't
need to put the clamp overlap off because it's
just basically a box. So we don't need to
worry about that. Now, this part, however,
let's see what's going on. I think these are crossing
over in some way, so we can see these parts
here are crossing over. So what we'll do on the next lesson is we'll
get these parts fixed. As I say, it's good
we're coming across these problems because what it means is any problems I have, I can show you how to fix them. So I'm going to
grab all of these. I'm going to press P selection, select that off, press Shift H, and then we're ready
for the next lesson. Let's sit save so we
don't lose anything, and I'll see you on
the next and everyone. Thanks a lot. Bye bye.
43. Adding material and shader to mixer machinery for Blender Beginners Masterclass: Welcome back,
everyone to Blend of Beginners master class,
the cookie factory. And here's where
we left you off. It's a mess. So let's
actually fix this. So we're going to come
in, and what I want to do is I can see that
if I come to point, I've got this point.
Let's zoom in. So press the dot
bon, so you can zoom in this point, this
point and this point, and I need to press M. And what I need to do is
I need to at the center. So merge at the center. Let's see if that's
actually fixed it. And yes, it should
have fixed it. I'm just wondering if it has. You know what I'm going to do to make this easy for myself, even easier for myself because I made a bit
of a mess on this. I'm going to press
Alt Shift and click. And then what I'm
going to do is press Shift D. I'm going
to bring it over here and I'm going
to fix this on its own because it's going
to be so much easier. Now what we're going to do is we're going to come in again. Going to grab all of these four, one, two, three, and four. And what I want to do is I want to basically join.
You know what? We'll do it a different way. We'll join these
two together first. So I'm going to press M
and at cursor. Like so. Not a cursor. M.
Let's try that again, at center at the center. There we go. Now we'll
come over to this one. We do the same thing again. So just these two
inner ones here, as you can see, and
we're just going to press Shift R and
I'll join those. And we're going to do
it just a slow way, so we're going to grab
these two in here. Like this and this, and we're going
to press Shift R, and then I'm going to
zoom over to these ones. So I'm just going
to press the little dot to zoom into these, grab these two here, shift. Okay, now we're going to grab this one, this
one, and this one. Make sure you grab
the middle one last. You're going to press
M, and you're going to go at last, like so. Now we're going to
come round and we're going to come to these two here. So these two, one,
two, this one, last, shift. Let's
come to this one. And that's all because
I went too far. Word the bevel, so shift, or the insert, one or the other. And then shift like so.
Alright, there we go. Now what I can do is I can
finally bring this back now. So I'm going to grab all
of this. So all of this. I'm going to bring it
slightly in front, just very slightly in front, and then go to press E and
pull it back into place. And then what we're going
to do is press Control plus Control plus, hide
it out of the way, grab the other one with L, press delete and vertices, and then press ltage and
bring this one back. And we should have now a
really, really nice mesh. Let's bring the whole
thing back then. So oltage to bring
everything back, double tap the A,
and there we go. Alright, so that's all fixed. So finally, now let's
bring in our material. So what we'll do
is we'll come in, and let's first of all, bring in. So we have the yellow. So let's bring in the orange. So on here, we'll go
over to material. Click the little down
arrow, back to your orange. And then what I'll do is
I'll come to this bit, and I might as well bring
in a seen so alt shift click let's turn this
round, Alt Shift click. And then Alt Shift click. You know what I'm going to
put it on material mode just to make it a little
bit easier for myself. Then I'm going to
come underneath. I'm going to let the
five remaining shaders load up, as you
can see over here. And then what I'm going
to do now is right click and mark a seam. And from there, then
I should be able to grab this island now, pressing and plus and down and factor yellow and
click a sign, and there we go. Alright, now, now let's
work our way around. So what I'll do is I'll
do just the top of you. So Alt Shift, click
Alt Shift click, right click and mark a scene. Grab the island once more. So, back to yellow, click a sign, and there we go. And now I want the
dark hole in here. So I'm going to click
Plus down arrow. Hole, click a sign,
and there we go. And then we'll do also the hole in the back
of here as well. So if I come to
this part, I should be able to grab just
the back up there hole, click a sign, and there we go. And now let's come to this one. So I think what I'll
do is I'll grab this, and I will grab this one here, and I'm just going
to press Control L, and I'm going to link
materials like so. Alright, that's looking good. I don't think I need to do
anything else for that. And then I'll grab
this. I'll grab this. I'll press Control L, Link
materials, and there we go. Now, I only want some yellow and blue one here,
actually, so you know what? Let's not do that.
Let's come in. Make our own materials on here. So we'll go with the blue first. So the whole thing will be blue except these parts on here. I'm going to press Alt Shift
and click Control plus. Keep going all the
way up to there. Let's click Plus Down arrow. And let's go with metal. Let's go with metal dark. Let's see if that looks better. Yes, it does. And
then what we'll do is we'll come into
this yellow parts, so I'm going to
grab all of these. I'm going to grab all of these then going all the
way around here. And this one going
all the way around. Notice I'm not grabbing the side because I'm just going
to press Control Plus, go to make it
really, really easy. Click the down arrow, factory yellow, click a
sign, and there we go. That was easy enough. Now,
let's do these parts on here. So I'm going to grab
this one, this one, this one, and this
one, CtrolPlus again. And this time, we'll
give them a metal. So we'll click Plus, down arrow, Metalight, click
a sign, and there we go. Now, let's work our
way around the back. So what I'm going to do,
I'll come to this one here, and I'll grab both of these. You know where I'll
give it all won't it. So I'll just grab both of these. Click the down arrow. We'll
go with factory blue, and then I'll click Plus,
the little Down arrow, and we'll go with
factory yellow. I'll click Assign, and I'll
also put it on there as well. So Control plus.
And there we go. Alright, so far so good. We're making quick
progress on this. So now let's come
to this part here. So what I'll do, first of all, is factory blue again. So factory blue always that. This one here I
can join with it. So Control J. Let's
join it together. And now we'll do
the metal first, so metal, and we'll
go with metal light, and we'll grab this one,
this one, and this one, click a sign to the
metal light, like so. And then we'll come to this
one L, plus down arrow. Factory yellow, click a sign. And then we'll come
to this part. So L, first of all, we'll do
it all in one color. So we'll come down,
we'll look for rubber, click a sign. Then
we want the white. So plus down arrow, factory white, click a sign. And now we want one more,
which will be the green. And I think that's all of the factory colors done
after that, by the way. So we're going to
click new, and we'll call it factory green. Like so. And then we're
going to copy this one. Paste it. Now, over here, we might be able to
do this from here. So if I remember rightly, it was a multiply. So let's just see this
is the multiply here. So if I come in the base color, you can see this is
the factored green. And if I just come in and
actually put that on there, Come down to where it says
factory in, click a sign. And now I should be able
to do it's come in. And without going
into anything else, I can actually
change that over Lo. Really easy let's pull
it down a little bit, factory green, there we go. Now with this bit,
let's come in. And first of all, we'll
grab the whole thing, and we'll go up to factory
yellow, click a sign. And then what I'll do is
I'll grab this part here, CntrowPlus, CartowPlus
not so far. So all I'll do is grab
these ones in here. So shift clicking away. We'll put this on blue, I think, some blue, where is my blue. Let's pull this down. Can't really see anything. There we go. That's what I want. Pull this down. There's my blue. Click a sign. Okay?
We've got that on. Then what we'll do is
we'll grab this part here. So if I grab all of this,
you can see it doesn't work. So Alt, shift, and
click Control plus. And then what we'll do
is we'll have rubber, a sign, and then I'll grab
the inner bit, factory white, click a sign, and then
just this bit here, and we'll do factory green, click a sign, and there we go. Alright, as simple
as that, guys, to do that. That's
looking pretty good. Just wondering if I should
make that a little bit bigger. Let's have a look
from back here. Yeah, I think I should make this just a little bit bigger, so I'm just going to
grab the whole thing, and then all I'll do is press
the S button and just bring it out. Like so. And that is looking pretty nice. Okay, so this is all
looking good now, the only animation we need to do on this is
going to be the mixer, so the mixer will just
come down, spin around, and then go back up, and then we just rinse and
repeat that process. So we'll do the mixer first, and then on the next one then, we'll actually start
on the stamper because the stamper it needs to
line up with everything. So what I'm trying
to work out is if we put in the conveyor belt. I think, actually, yes, we'll do the conveyor belt next after
we've done this mixer. Alright, everyone, so I hope you enjoyed that, and I'll
see you on the next one. Thanks a lot. Bye bye.
44. Animating mixer, making the mixer lower down, sping and raise back up for Blender Beg: Welcome back, everyone to Blender Beginner's master class, the cookie factory, and this
is where we left you off. Alright. So now what we want to do is we want to
animate this whisk. Now, animating this whisk
isn't that easy, actually. It's not as easy as
what you would think. So it's a bit technical because Blender doesn't
understand it when you're trying to do too
many things and you're trying to use that
cycle's motion. So cycling and animation over and over again,
for instance. So what we need to
do is we need to do this in a careful way. So the way we're going to
do this, first of all, is we're going to actually
make this move up and down. Then we're gonna
bring an empty in, and we're gonna spin it
around with that empty. So I'll show you
exactly what I mean. First of all, though,
let's come in. And what I do find helpful is if we bring in
one more material. So click the down
arrow, factory red, and the more we're
going to do is grab this one here and we're
going to click a sign. And now we know
which one this is. We can take this material off once we've
finished with this. Next of all, then we're going
to go over to animation. Now, the first thing I want to do is I want to
bring in an empty. So I'm going to
bring in an empty like this, so plain axis. And basically all an
empty is is something can follow along to it without
it actually being rendered. So if I make this a little
bit bigger like so, and then what I'm going to
do is I'm going to pair in this to my actual empty. So I'm going to grab
this, grab this, press Control P and click Set pair and two
Object, like so. Now, wherever I move this, this is actually going
to move, as well. I can move this though
independently, like so. Alright, so far so good. Now, let's bring this
up to roundabout here. It will set a key
frame in place. And then what we're going to
do is we're going to go to 50 and I'm going to basically
put this onto material, so I can see that
red line there. And then, basically what I'm
going to do is I'm going to press the eye button again, so I'm going
to keep it there. And then what I'm going to
do is I'm going to go to, let's say, I'm wondering if
I should actually move this. You know what? I think I
should move this down. So I'm going to move this
down into place like so. And I'm also wondering whether I should have made this
a little bit longer. Probably so. Let's see
how long we need it. I'll bring it down to here. And then what I'll
do is I'll remove these keyframes and I'll come
round to this point here. And what I'm going to
do is I'm going to grab both of these
Alt Shift and click, and I'm just going to pull it
up to something like that. And I'm hoping that
doesn't go through there. So now I'm going to do
is I'm going to pull it all the way up and I can see, yes, it's just in place now. So let's just put it
back with Controls Head. And then what we're
going to do is I want this to be here on 50,
so I'm going to press I, and then on one, I want it
to be back up at the top, so I'm going to pull it
all the way back up, like so, making sure it's
not sticking out of there. And there we go. So
now if I press this, should come down right to there, and then I want this
to whisk round. So I want it to whisk round
once it's actually in there. Alright, so now when do we
want it to come back up? Well, I would say round about, let's say, we don't
want it too long, so 50 is enough
time to come down. Everything we need to do then. So 50-100 makes it
150, let's say. So if we bring it to 150, I can press the i button now. And then what I can do is I
can bring it back up to 200, all the way back up
to where it was, which means I can
grab this part here, press Shift D, and bring it all the way over
here, like so. Now what happens is
it should come down. We'll do our whisking
in between there. And then at frame
200, it should end. Alright, so far so good, which means now I
can grab all of this and basically I
can come to objects. And we want the z location. So just this one, add modifier, and we'll bring in a cycle. Now, let's see if
that actually works. So it should go down, come back up at 1:50 stay at 200 and then
go back down again. Now, I'm not so happy with that, because what I wanted to do is I wanted to stay up there as well. So I think without making
this too complicated, we've got a small window here where we don't
want it to do anything, and we need to remember
where that window is. So what I'm going to
do is I'm going to bring this up to 250. And then what I'm gonna
do, so 250 like that, and then I'm going
to press Shift D, bring it over, like so. So that now should be
on 250, which it is. And I'm hoping now that it will stay up there
and restart again. So let's go down. Stay up there, then it should come back
down, and there we go. All right, that is
working perfectly. So now what we want to do is we want to go back to frame one. And what I want to do is I
want to give this a keyframe, so I'm going to press I
to give it a keyframe. I want to go then to frame 50. I want to press I to give
it another keyframe. And now we know if
we click on this that our window is 50-150. So what we need to do now
is come back to this. We're going to go to frame 60. And then we're going
to press the 90, and then frame 70. R z, 90, and then frame 80, and then R, 90, and then frame 90, and then R z 90. And now we know,
'cause this red mark, we've gone all the
way around and we're back round at the start again. Now, we already know that we
need to get to frame 150. So we're going to
go back to this, and we're going to carry on. So we're going to go to
100 and then R z 90, and then we're
going to go to 110. And then R z 90, and then we're
going to go to 120, and then R z 90, and then we're going
to go finally to 130, and then R z 90, spin it round. And now we know that from here, it's going to start spinning, but we need to make
sure this is up to 150. So I need to grab all of these. So all of these here, and I want to move it
to here to frame 60, and then I want to
press the S button and bring them up all the way to frame 60 150, like so. Now, you can see
when I start off, so it's going to come
all the way round. All the way around,
and there it is. Now, what I want to do
from this point here, so this point as
it starts turning, I want to grab all of these. And what I want to do is right
click interpolation mode to be on linear because I
don't want to actually, you know, I want it to
start spinning, spin spin, spin spin, as you
can see, like so. Now let's try that again,
so it's going to come down. And there we go, it
starts spinning. And then what we
wanted to do now, we wanted to stop spinning
on frame 150 so you can see we don't want any spinning
all the way up to 250. So all the way up to 250,
we don't want any spinning. So what I'm going to do is now, I'm going to come now, and
this has stopped spinning, so we don't want it
to spin anymore, so I'm going to drag this
shifty all the way up to 250. And now there should not
be any spinning now. Alright, so now the moment of truth, let's grab everything. And what we want to do
now is the empty object, and we want the z
rotation to be on cycles. Now, let's see if that
actually works. So here we go. So no spinning. Start spinning. Should stop, move up. Now it should wait, go
down, and there we go. Starts spinning
again. Alright, so that is done properly now. Now you can see why that was a little bit more
complicated than normal. The other thing is you
want to make sure that both of these animations
line up with each other. If not, one is going to be
going in front of the other, and it's gonna be much,
much harder to control. So I'm actually happy with this. The one thing you might
want to do is just speed up that mixing or
something like this. So what I'm going to
do now is I'm going to go over back to modeling. I'm going to then
leave that as is, apart from this bit here, I'm
gonna come grab this part. I'm going to put it on
metal light, click a sign, like so, double tap the A, and now you can see
this is what we've got. Now, if you want to see the
whole thing moving now, so if we put on the
flower machine, and what we want
to do is put this, let's first of all, save out our work. Save out your work. You can now put it on
the rendered view, and now what you can actually do is you can actually
turn off this. These two interlocking links, turn them off, and now
there'll be no empty there. You'll see everything moving. Now, if you do want
a better view of it, of course, put it on EV. Let it load up, and now you'll see everything
moving in real time, all of that hard work
that you've done, all of the things like this, which we can't see
at the moment. Let's see if we can
see that in EV. Thought we could see it before. I just want to make sure that's working. Yes, it
is. It's working. It's just not the glass is not working on IV,
unfortunately. Sometimes that happens,
but you can get a real idea now of what
this is going to look like. So let's put it back on EV. Make sure everything's working. All of that is flowing. This is going up and
down and spinning, and you can see already this is really starting to
come together now. Now, what we're going to do on the next one is
something a little bit harder because we
need to actually get in our conveyor belt. So from here, the
conveyor belt wants to go down, drop something down. And then from there,
it's going to go along to our actual stamper. So let's press Space Bar. Let's put it back on cycles. Let's go to object mode. Let's turn on these two
interlocking links, and then let's save out our
work. So let's save it out. And on the next one, as I said, we'll start with a
conveyor belt coming from here going
towards our stamper. Now, the good thing
is, we've already got many of the
materials in place. We've already learned how to do many of the conveyor belts, the animations,
all of that stuff. So from here on out, it's about repeating a lot of what we've actually done,
but this will, of course, sharpen
up your skills and definitely make the way that you approach things
much, much quicker. So that's what it's
about at this point. Alright, so I'm happy with that. I hope you're
enjoying this so far, and I'll see you on
the next and everyone. Thanks a lot. Bye bye.
45. Creating custom conveyor belt: Welcome back everyone to Blend
Beginner's master class, the cookie factory, and this
is where we left you off. Alright, so now what we're going to do is we're
going to actually create a conveyor that's
going to go this way, and then a conveyor
that's going to go this way and then
to the next part. So this is a little bit of step up from the last
conveyor we created. So first of all, rather
than create a, you know, new conveyor, we want it to be the same
width as this one. So all I'm going to
do is press Shift D, duplicate this one,
bring it over. And then what I'm going to do
is because this is really, really bent, as you can see,
we want it kind of straight. What I'm going to do is
I'm going to come in, grab this and this point, press delete and vertices. From here, then
I'm going to grab this little point that's left. I'm going to press
Efra extrude and extrude along the
white axis like so. Now, there will be a
problem with this conveyor, and the main problem will be in that when we come to bend it, it won't bend very well, and
I'll show you why that is. So first of all, let's
come to our little spanner and let's turn off flat so that we want it
actually round. Then what we want to do is just bring up this
height a little bit, jaws to have a little bit
of a gap between there. Now, you can see already this is what's happening. This
doesn't look right. And there is a reason for that. And the main reason is that this actual conveyor part here doesn't have
any topology on it. In other words, it doesn't
have any room to bend. If we go to it, so
if I go to my parts, I'm jaws going to
pull down this, go to my parts here,
not this part. Let's open. Let's open this up. That's not it, so it's
under parts reuse. Yes, this is the parts reuse. So what I'm going to do is
just turn that one off. Turn this one on.
Here is my part here. I'm going to move these
over now as well, being as I've got them out, I will be needing
them at some point. I'm going to press seven
to go over the top and G and just put them in
a nice line like so. Alright, so we can see here that this part has no topology, so it has no way to
bend in the middle. Now, if I come in and just put my camera here
so you can see it, if a breast controller, bring in something
like left click, right click, six edge loops. Do the same on the other side, so one, two, three, four, five, six, let's put that to six, so now you can see
what's happened. Now you can see it's
beautiful and flat. Now, what else I need to
do is shade this move to make sure that we haven't got all of these little points, you know, these little
edges on there. So right click, shade
or to smooth Bangle. And now the last thing I need to do if I come
back to this now, you can see it's
beautifully smooth now. What I need to do, though, is increase the actual
insection or decrease it. So let's bring it down to
something like there you go. Now you can see it's actually
going the right way. Now, you can see because
we use this one over here, it's already got the
flowers on there. We don't want that. So
what we're going to do is we want to
change the objects. So if I turn this object
off, not that one. Let's bring it back. The belt object. Not the belt object. Let's bring it back. So let's put this back on. There we go. So this is what we
want. This is it, where is it? Objects. There we go. Let's turn
the flour bag off, and then we won't
have that on there. Now, the next thing I
want to do is I actually want a gear in here because you can see, I
think it's on here. Let's spin this around, so
RX RX -90 wrong way round. So RX 90. Let's spin it around. Let's make it a
little bit bigger. You can see here that it has
little gears in this part. It has some dough going
over, comes along, drops down to the next section, and we also have these
little struts here. So we need to basically
create all of this part. Now, it sounds odd, but actually, with this belt,
it's not actually that hot. So first of all, then we
want some gears that are going to go on the
inside of here. And from there, then we can create our actual cookie dough. So let's do the gears first. So what I'm going to
do is I'm going to come over here now. I'm going to move this
back a little bit. And I'm going to put my cursor here with
shift right click. I'm going to press Shift A. I'm going to bring in a cylinder. I'm going to make sure the
cylinder then is on 24. And then what I'm going
to do is I'm going to pull pull my cylinder down. So let's make it a
little bit smaller. Let's press Esn'sE just to
squish it in a little bit. And don't worry because on
the actual conveyor belt, we're able to make this bigger, smaller, change the width and
all that other good stuff. Alright, so we want this
looking like a gear. So what I'm going to do
is I'm going to grab the top and bottom. And then what I'm going
to do is I'm going to press the I button
to bring it in. And then what I'm going to
do is I'm going to press E enter S and Z to
bring it in even more. If it isn't going in, I'm just wondering if we need to
put it on medium point, S and Z, and there
we go, like so. Alright, now we'll
bring it in once more. So I like so, and then E, enter S Z, bring it out a little bit. And now find the last one in, so I like so, and then E, enter
Stead bring it in. Now I want to do is I want to put something around
the outside of it, so control R. Left click, right, click Control B, pull these out. And then what I'm going
to do is every two. So if I grab one, two, what we'll do is grab
every other two. So one, two, and then
just work your way round. And we're just going
to grab two, like so, like so, going all
the way around, and it should because
we've got it on 24, end up like this. Then what we're going
to do is press E enter lns and bring this
out. And there we go. There is Angie. Now,
if I smooth this off, it's a right click
shade smooth by angle. And if I also press Control A O transforms set arigens geometry, adding a modifier, and we're
going to generate a bevel. And I'm going to put this
on nut point not not three. I'm not going to
change the geometry because I can see it's
already beveled off. And now let's see if that
actually goes into place. So if I come back to my belt and I come down
to where it says gears, I'm going to enab it, I'm going to turn off
this gear, and instead, I'm going to go to this
gear here, and there we go. That's looking beautiful. Now what I need to do now is
bring down the object scale. So I'm going to bring
down the object scale. Then I'm going to
bring down the radius. So we can also bring
down the radius, as you can see,
and then finally, do I want it wider?
You know what? I'm actually happy
with my width, and you can see now it
moves along the right way. Now, the next thing we need to do is make sure it's
running the other way. So what we're going to
do is just come up, switch direction
and there we go. You can see now just
how nice that looks. Now, this is basically
near enough done, but I am going to need
something to support it. So I actually will
create the support. We have got an option down here to put in supports,
as you can see, but the only problem
with the support is that you're scaling
them all at the same time, and especially on this one, I don't want them
all the same scale. So what I'm going to
do is first volt. We'll create the supports, and then we can use those just in case we need them anyway. So what I'll do is I'll press Shift and S, cursed or selected, Shift A, and then
what we'll do is we'll actually come in,
bring in a cylinder. We're going to move it
then to the outside, and I'll put it right
in this center. So right in the center of here. So, X, 90. Let's make it a
little bit smaller. And then what we're going to
do is pull it up into place. I'm going to make it
obviously a little bit smaller so it fits
right into there. So if I can slot it in to
where I need it to go, you can see here, it's going
to slot in right into there. I'm going to make it
a little bit smaller. Like so. And then
what I'm going to do. So now it's in
there. I'll make it a little bit bigger
on this edge. So I'm going to come in,
press the E button, S, pull it out, and then E, pull it out this way, like so, so we've got a bit
of a gap down there. Just make sure that
you've got that guys. Then what I'm going
to do is press the I button and then the
E button to pull it out, like so, and then I and then E and pull it
in, and there we go. Right, click,
shade, auto smooth. And now, obviously, we
need the struts down here. So what I'm going
to do, I'm going to come bring in 1 "
loop control on. Left click, right, click.
Control B, then, pull that out. And then what I want
to do is I want to grab some of these
down at the bottom. So let's say the bottom four, is that going to be enough? If I pull this down,
now ease, pull it down. Right, click Shade Auto smooth. That looks to me like it's strong enough to
hold up this thing, and that is exactly
what I'm looking for. So I'm going to then say,
This is about right. I just want to put
a bottom on here. So what I'm gonna do now, while I've got the bottom grabbed, I'm going to press S z
zero to zero that out. And then what I'm going
to do now, I just need the final bit of the strut, so I'm going to press E,
enter S, pull it out. And then E, pull it down, like so, right, click,
shade or to smooth. And finally, I'm going
to reset the transforms, at origin to geometry. And then I'm also going to come in and just bevel
these parts off. So I'm just going to come
in, bevel these edges off. Control B, bevel them off, turn up the amount of bevels, like so, right click,
shade or too smooth. Did we shade or too
smooth? There we go. We might need a bit more of a bevel there, so I
think we'll go back. Control B, increase
the amount of bevels. Right click. Shade or too
smooth, and there we go. Now, this is ready now for my actual for my actual conveyor
belt when I need them. So we've got it all set up. Now, everything is set up. Now, what I'm going to
do, I'm going to come in and I've got
parts reuse here, so you can see all these parts. This is actually
the conveyor belt. I think what I'll do
is I'll put these now into one that's
called conveyor belt. So we can see it's
called conveyor belt. We should really
drop these in there. So what I'm going to do is I'm going to grab all of these, press the end button,
and I'm going to put them into convey bell like so. Alright, so they're all done. I can close the hop now, and then basically when I
come back to my next one, I can actually get this in
the place that I want it. You will see that with these
gears, we've got gears here. The gears will go as
far as to support it. In other words, you can see that we've got a distance
between them. If I bring that down, I may be able to bring
more gears in. If a breast controls,
I can bring it back. So even if I come in
and pull this down, you'll see it actually works
on how far the gears are. Now, the next part of
this is actually really interesting because we're going
to be creating the dough. We've got to get it to drop off onto the next actual part. So coming along gear
to the next part. And I'll show you,
of course, how to do that as we move along. Alright, everyone, so
let's save out our work. I hope you enjoyed that getting into the thick of it now, and I'll see you
on the next one. Thanks a lot. Bye bye.
46. Working with Mixer Exit: Welcome back, everyone to Blend and beginner's
master class, the cookie factory and
this where we left it off. So what I want to do is
just pull this over now, and then I want to
go to this part. I'm going to grab this part
here, so this part here. And basically, I want to grab it all the way
down to this part, so all the way down to there. And then what I'm going to do
is I want to press Shift D, and I'm going to pull it
out a little bit like so. Then what I want to do is press P selection and split it off. Control A, all transforms right click Set origin to geometry. Then what I'm going
to do is pull this back near
enough into place, so it's going to
come from there. I think we'll pull, I've gone a little bit too
far, as you can see. So I think we'll pull this
part down just a tad, so like so, and then this
part up just a tad like so. And finally, what I'm going
to do then is press L, delete, and limit to dissolve
just to get rid of those. And now I'm going
to start actually pulling this out and
bending this in place. So I'm going to, I think, pull it out like so, and then I'll bring
in some edge loops. So control. Let's bring
in some edge loops. I'm just wondering,
actually the best way to do this. Like so. And then I'm going
to try and see if I can just bring up
this part here. So if I bring this up, is that going to be what
I want? There we go. That's more what
I actually want. Something like this. Yeah, and I think that's gonna actually
work for me very well. The one thing is, I'm wondering, I might actually have this
bent over, but you know what? On this, I actually
think it looks better. So what I'm going to do
then is just pull this into place because obviously I want it going around
there, like so. And then what I can
do from there is create this gap in the center, and it looks as though that cookie dough
is going out there. Now, the one thing
I would say is that this maybe needs
going a little bit. It needs kind of a box on here. I would say, I didn't
put that in mind, but I think it would
look better like that. So what I'm going to
do is shift desk, cursed to selected. Shift Day. Let's bring in a cube then. So we'll bring in
a cube. We'll make this cube a little bit smaller. We'll pull it up
into place, like so. And then what I'll do
is I'll press S and Y, bring it down a
little bit, and then I'll bring back this backbit. So if I bring back this backbit just a little bit like so, without portion hitting on. And then what I'll
do finally is just bevel this top of
this part here. So if I come in, grab this edge, press Control B, bevel it round. Right click, shade Auto
smooth, and there we go. Now, let's think
about this part here. So what I'm going to do
is I'm going to come, I'm going to press the
Ibon to bring it in. Like so. And then what I'm
going to do is pull it back. Now, this shows me straightaway, I need this to be a bit
bigger because I need this part to actually
fit perfectly, and I still want to have a
decent rim going around it. So what do I mean by
that? What I mean is, I want to make this
a little bit bigger. So if I press the S born, make it a little bit bigger, like so. And there we go. And then if I press tab, you can see now it's near
enough fitting, so that'll do. And then what I can do
now is I can come in, grab this face, and
then pull it back. So press E, pull it all the
way back into there, like so. And then it's going
to look as though this part is going in as well. So in other words, something's
dropping out here. So what I want to
do now is press the I want to actually hide it a little bit
better, I think. At the moment, it's
not hid very well. So what I'm going to do is just pull this out a little bit more. So I'm going to press E, pull
it out a little bit more. And now I think that's
perfectly done. Yeah, that's looking nice. Now I can actually get my actual dough coming
out of there. Maybe maybe we still want to
lift this up a little bit, so I'm just going to come in and grab all of these
and grab this one, and then I'm just
going to lift it up just a little bit,
and there we go. Okay, that's looking good. So from here now, what I can do is I can pull this
back a little bit. So let's pull this back
just a little bit. I'm going to try and
keep this one here. And then what I want
to do is I want to duplicate this and put
it going that way. So if I press, in
fact, you know what? We can't probably better
off not duplicating it because of the fact that
this should go along there, it needs to keep
together so that the dough balls can drop
down to the next one. In other words, if we
put this as flour, so let me just show
you what I mean. So the animation. So the object, let's
put it as flour. So let's find flour.
Here we are, flour bag. You will see once that flour bag starts. Let's put it on object. Here we go. They just
drop off the end, like so and disappear.
We don't want that. What we want to do is have it
where it drops off the end, and I'll show you
how we do that. So what we'll do is
we'll grab this part. We'll press the tab
on, we'll press E and Z, drop it down. To here. And then what we'll do is now we'll pull
it along this way. So if I press E and Y and
pull it along this way, now what should happen
is it should come to the end and drop
on there like so. That is exactly what we want. Now we still want to keep this kind of roundness on there. So what we also
need to do is come up to where it
says, where is it? Resolution, and we should be able to increase
that a little bit. Let's increase the border
radius, have a look at that. Yeah, like that. There we go. And I'm just wondering if I should pull this out a
little bit or pull it back. Let's see. And if I pull
this this way Oops. Can see it's bending that and
I don't really want that. Alright, let's give it a try like this because this
is looking pretty good. The only thing I
would say, I have a l actually is the lp. In other words, how
this drops off of there is not right, and
we need to fix that. And the other thing is, I need to probably pull
this back a little bit so that you can see here it's restarting here
because these curves, they have to start somewhere, so we need to bring
this down a bit. So what I'm going to do, I'm just going to
pull that back. And instead of that,
I'm going to increase my insection so
let's bring it down. You can see there that's
where it's starting. Now, if I increase this, is
that going to change that? To where it actually starts
somewhere else. Let's see. It's still gonna
be starting there, so I've just got to
be careful where this is actually
starting and ending. And what I want to
do then is change the insection now
to bring it up, holding this shift bun, to get it all nice and
neatly into place. Like so, and there we go. Now we can hardly see anything. That is basically what
we're looking for. Alright, so now we need to
just go through the loop. So what is the loop? The lob is basically, if I come down here, you will see you've
got drop in viles. That's correct.
We've got something called gravity and
we've got the lb power. So it's on no 0.25
at the moment. If I turn this all
the way up to one, you'll see it goes a
little jump, like so. If I turn this gravity down to zero, you'll
see what happens. It's just going
to stick there or float up in the air like so. We definitely don't
want any of that. So what I want to do is I
want to put my gravity up to 1.75. Let's try that. Then you can see
them dropping off. We want them to drop off
as realistic as possible. So let's turn the larp down. Let's turn it down even further. Let's turn it up a little bit, so we're going to go all
the way up. There you go. There you go. Now,
it's looking better. And let's turn this gravity
up a little bit more. And now it's probably dropping
a little bit too heavy, as you can see, they are dough
balls, but not that heavy. Here we go. And I think that's
looking pretty good now. So we've got our
flour coming along. Now, of course, on this,
these aren't flour. They're actually dough bulls. And the other thing
is, we have to make sure you can see at the
moment this is way, way too low, so I'm going to have to pick
this up a little bit. So let's actually
press Space Bar. Let's pick these up a
little bit, like so. Let's see how they going now. Now it's going underneath
it, which we don't want. So what I want to do is
I want to pull this out. I want to press Space Bar. I'm going to pull
this out, like so. And there we go. I think
we've got it right now. Now, let's see how far
off the floor it is. And what I'm going
to do now is lift the whole thing up
to round about here. And then what that tells me is now I need to lift this up. So this part here,
let's lift it all up. And that is roundabout the place that we're
going to want it, which means that I'm
gonna fit it in here. So we've got a little bit
of a gap under there. Now, what I'm going to do now is I'm going to fit everything together with the support just to see how this
works over here. So what I'm going to do is
I'm going to grab my support. Yeah, this is the support. I'm going to move it over here, so I'm going to press
Shift D, like so. And then what I'm going to
do is spin it round, so R X, 90 or X -90, let's spin it round and then
z 90, spin it into place. Seven on the number
pad. Let's press the S but to bring it out. G, then, let's bring it in. And then we need to look now where is the floor going to go? So I'm going to put this
right in the center of here. I don't mind if they're a little bit small these supports. Let's put it in. Let's make
it a little bit bigger. Like so. Like so. And then what I'm going
to do is just grab this part, Shift D, and then I can see how much room I'm actually
going to have, and this is where they
should come up to. Now I would say that this is
pretty low on the ground. So what I'm going
to do, I'm going to change the height,
just a little bit, bring it back, like so, and then I'll
change these gears. So I'm going to bring
these gears down as well. So if we see the gears, we
can bring down the scale. We can bring down the radius. So let's bring them
down a little bit, just so they're
fitting into place. So let's bring in this now. Let's put it right in the
place where we want it. If I press, let's say, Control three, we can then see where this is actually
going to fit in place. That's roughly where
it needs to go, and then we can see how
big this needs to be. I think it needs to be
a little bit smaller, just so it fits in there,
pull it up. And there we go. Once we've got
these in, actually, it's going to be much, much
easier as we work along. Alright, so now we've
just got the bomb to do. So I'm going to
do with the bomb, I'm going to grab all of these, press Control plus
Control plus again. Pull it up into place,
and there we go. Now, I think this
looks about right now. The only thing is,
as you can see, I'm going to have
to bring this down. So we'll do that before ending. So Alt Shift and click
Alt Shift click, and then Es and's, pull it down. And let's see if we
can actually get this into place looking right because you can
see at the moment, as I've stretched that out,
I need another edge loop, control, left
click, right click. And what I tend to do
now is I'll come in and shape it just on my own. So if I bring this
one and this one up, so we want a nice bend on there. Like so, and there we go. And then we want
another one in here. So I want to bring
this up just so the bend is not
actually so steep. So if I bring this up, you can see now I bring this one up. That end is not going
to be so steep, so that's looking pretty
nice, and there we go. Now we need some more support. So on the next one, I
just want to make sure this is working properly
now just before finishing. And, yeah, that's
looking perfect. Now, in the next one, then
what we'll do is we'll actually get these
actual supports in. We'll get this
part finished off. And then what we'll
do is we'll start our little stamper that's
going to be over here, which is going to stamp
the cookie dough. So basically out of here
is going to be dough. So that's another thing
that we need to do as well, we need to create
the actual dough. Alright, lots and lots
to do, as you can see. Alright, everyone, so I
hope you enjoyed that, and I'll see you in the
next one. Thanks a lot. Bye bye.
47. Adding detail to exit conveyor for Blender Beginners Masterclass: Welcome back, everyone to Blend the Beginner's master
class to Cookie factory. And I'm not happy
about, like, how, um, I want this a little
bit higher, I think. So what I'm going to do is I'm
going to grab all of this. I'm going to grab all
of this. And what I'm going to do is
just move it along. And then what I'm going
to do is pick it up. So I'm going to pick it
up somewhere like that, and I think then that is about the right
height I want it. If I make it so low, it's going to make
it really difficult as we move down here as we move through different parts of it to actually get it, you
know, how we want it. What that means is, though, I need to put a
new part in here. So what I'm going to
do is press shift day, bring in a cube. I want to make
sure, first of all, that this cube sits
on top of there, and then what I want to
do is I want to shape it so it actually fits into the rest of what I'm
going to do is I'm going to grab the
top of the cube, I'm going to pull it up then
into something like here. And then what I want to do
is bevel this edge off. So I'm going to come in, bevel this edge off, so control B. Let's bevel it off, like so, and then bevel this part
off as well, just a tad. Like so. Bring him
back my bevels a little bit till
I've got it right, like so, and I think that
then he's going to look much, much nicer and much
more reasonable. And then what I'm going to do is I'm going to bring this out now. So I'm going to come in, I don't want to stretch
it all that way, of course. We spoke about that. So if I come in and just come round and grab it going
all the way around there, and then I can actually pull
it out into place like so. Now, that to me is looking
much, much more reasonable. If I shade this move, you can see that's
looking much better. And the one thing I wanted to do just to make this stand out a little bit is I'm going to come to this
side and this side. I'm going to press the eye
button then and bring it in. Now, again, just make sure
that we don't go over these, you know, where the
interlock like we did before. We definitely
don't want that. We want it just just in
front of here, like so. So if I pull it for like so. And then what I can
do is press E enter lne and then just pull
them out a little bit, like so, leaving a little bit of a sliver of gap down there. Alright, that's
looking now much, much better, much
happier with that. Now, let's think
about our supports and all of these parts as well. So what I want to do is I want to make sure that
I'm naming these. At the moment these
aren't named, and are they all in
the correct place? So these are all for
the conveyor belt. So let's make sure these
are all in conveyor belt. And then what we'll also do, we've got a flour bag here, so let's find our flour bag. Here is it under parts,
let's have a look. So I'm going to just
put my parts here. There they are. These are
the three flour bags. So you can see, if
I open this up, we've got flower bags, flower
bags one, two, and three. So they're in the right parts. And then we've got
these other parts, which are these parts here. So you can see all
of these parts one, two, three, they're not
in the right place. You can see we've
got empty there. All of these want to be in water adder. So they
all want to be in there. So let's press M, and then
we'll go to water adder, drop those in there, like so. And now I should be able to actually close
certain parts off. So you can see the conveyor belt or closes down like this. Now, one problem we've got
is these conveyor belts, I don't actually want them. And these need to be
in mixer, not adder. So let's go in and put
them into the mixer. And now let's
actually check that. So we've got the flour mill. We've got the water adder. We've got the mixer. Okay, so that's everything
except this part down here. So we want this. Yeah, this
will be on a separate pot. We'll put this in the
stomper or squasher. So let's make a new one.
We'll make a new collection, and we'll call it stomper. Not Stimper Stomper like
so. And there we go. So now we've got a
new one called stomp, and we need to move
that one up because we're just tidying everything up before we're carrying on. And we're gonna drop
it below mixer. So then we've got the
stomper there like so, and then we've got the mixer,
which is this one here. Now, you can see that this part here is also not in there, so we need to put that
in, so I'm going to put that in the mixer like so. Lastly, I want to make sure that this mixers still working, so I want to make sure the
animations still going, which it is,
everything's fine there. So now, lastly, we need to sort out now our conveyor belt because
at the moment, we've got all of these things in the conveyor belt, and
we don't want those. What we want is
these separated out. So what I'm going to do is I'm going to grab each of these, I'm going to press
M, and I'm going to call them conveyor belt
pots or something like that. So conveyor belt parts. And we're doing all this
because in the future, we'll get lost in
all of these parts. So let's drop this now into conveyor belt,
and there we go. So we've got conveyor belt
and conveyor belt parts. So this is the conveyor belt. This is the conveyor belt parts. Now we should be
able to just hide the parts and keep
the conveyor belt. Now, I'm just wondering if I want this part to be
in conveyor belt. So what I'll do is I'll
grab all three of these. I'll do the same thing. So
we'll just call it conveyor. Conveyor belt, like so. And there we go, now,
what we'll do is we'll drop this now into there. So we've got conveyor belt, conveyor belt parts and
conveyor belt. Alright, great. So now we can hide this
conveyor belt parts, and now we have these. So these are basically parts
reuse we've called them. Is that a good name?
Let's first of all, open up what our parts are. So our parts are flour bags. We're going to call these we'll call them conveyor belt objects. So I'll call this conveyor
belt, belt objects. So because we're going to
have a few objects in here. So now if I close that up,
I should be able to put that just below my conveyor
belt, close that up. So we've got conveyor belt. You know what? I've
put it in there. I don't really want it
in there. Let's bring it out. There we go. So we've got conveyor belt, conveyor belt parts,
which are all of these. Let's bring them on. So
conveyor belt objects. Okay, where are they?
There they are. So conveyor belt objects. Let's close those off, like so. And then we've got conveyor
belt, and that's all done. And now we've got these
parts that we can reuse. So these parts here, we've got in there quite a few parts, actually, let's see. So we've got a cube in there. What is that part?
Let's have a look? Oh, that is the little part
for this part over here. So, let's make sure, first of all, that is still in there. Let it load up.
Yeah, there we go. So we've kept this little part just so we don't have
to make it again. I mean, we might have been better off keeping
the whole thing here, probably with the
animation as well. Yeah, you know what? I think we'll keep the whole
thing instead. So, what we'll do is we'll
grab I'm going to try. If I hide that out of the way, is it going to hide
the whole thing? Yeah, you've got the
glass there as well. So what I'm going to do
is I'm going to grab the glass, grab the whole thing. I'm going to press
Shift D, drag it over. And let's just see if I've not you can see that I've
still not got that pot. So what I'm gonna do I
want to come back to it, hide my glass, grab
my little pointer. Grab the whole
thing, press Alt H, and now Shift D, and now I should have the whole
thing, and there we go. Alright, so that's
the whole thing. Now, what I want to also
do is I want to make sure that this is all together. So, in other words,
if I grab them all to here, so all to this one, press Control P. And
what we'll do is we'll set parent objects
and keep transform. Now, this should still
work. No, it doesn't. So that's the problem we've got. You know, probably because of the location that it's
actually happening. Let's see if it actually
works. No, it's not working. It's dropping right back
there. You know what? We'll delete that, and we'll
come to that another time. So let's move this over here.
So, what else have we got? We've got a cylinder,
which is these. We've got this. So we're
going to call this pipe. We're going to call this bolts. And we're going to call
this one bolts array. And then finally, we're
going to call this needle. So it's this one here.
And there we go. Alright, took a long time to
actually get that sorted, but now you can see it's
actually sorted out, and what I can now do is
hide that out way, as well. And the reason I want to get all of that sorted, by the way, is because when I come
to actually, you know, create more and more parts, we got to be careful
that we don't lose track of where
everything is. Now we're going to do is
put this on object mode, and now what I
should be able to do is get these supports in. So I want a bit of a
support coming along here. So what I'll do, first of all, is I'll bring in a cube. So shift date. Let's
bring in a cube. And what we'll do then
is the supports will be I'm thinking coming
from under here, and they're going to supporting it all
the way over there. So what I'll do is I'll move this up a little
bit on top of here, and then I'll move it
over to here, like so. And then what I'll
do is, I'll bring it down to there like so, and then I'll bring
it over here to here. And then what I'll do is
I'll bevel off this edge. So bevel off this edge. Like so. All right, so far so good. Now what we can do is we
can bring this support, so I'm going to press
Shift D, bring it over. I'm going to press R s -90, and then I'm going to press Control one to go
into the side view. I'm going to move this
actually out the way, so I can actually
see what I'm doing. And then what I'm going to do
is I'm going to grab this, press G to move it into
place or wherever I want it. So this is going to be
right in the center there. And then next of
all, I'm going to now pull this into place. So once I've pulled
it into place, like so, you can
see there we go. And then what I'm going
to do is pull this down. So I can pull this down into
place now and you can see that I'm going to
have to make this a little bit wider,
which is no problem. So S and Y, pull it out a little
bit, and there we go, that is exactly what I'm
actually looking for. And then what I can do is I can press Shift D on this one. Control one again just to
go into the side view, and then I can move
that and put it right into place like so. All right, that's looking good. Now we'll grab this part
and move it just over here. We'll press Shift D then. And bring this part
over here, like so, and then I'm going to
move it all the way up to there just to give it
something to sit on. And then finally let's
come to this part here. So grab it with face
select this face, going all the way
around to this face, and then we're going to
pull it out into place. Now, I want to make sure that
I've got enough room here so you can see that
the supports on here, they're going to be interlocked
into this part here. So, in other words, we're going to have
not a support here, but we're definitely
going to have to support this side going down. I've got to be careful that
I've got enough room in here. In other words, let's
bring in one more piece. So shift D. And then we can
put them over the other side. So R, Z, 180, spin it round. And then what I'm going
to do is I'm going to see how this part fits in there. So I want it close as I can, and I want to whoops,
fit it into place. Like so, and that
actually looks as though it's fitting in quite
nicely. And you know what? This might work out
perfectly for us. So let's pull this up a little
bit onto there, like so. And then let's just pull this
out a little bit to there. And yeah, that's
exactly what I want. Now that's actually fitting in. It means we can fit
these in going this way. That's going to make it
much, much easier for us. Alright, so I'm happy with that. On the next lesson, then
before we continue, what we'll do is we'll get
the bevel in on these parts. We'll get this part
also bevelled. We'll get this other part in. So these other supports in
going towards the stumper, so the stumper is going
to be round here, and then finally,
we can actually make our little dough balls. Alright, everyone. I
hope you enjoyed that, and I'll see you
in the next one. Thanks a lot. Bye bye. Thank
48. Modeling dough mix for conveyor detail for Blender Beginners Masterclass: Welcome back, everyone to blend the beginner's
master class, the cookie factory, and this
is where we left it off. Alright, so first of all, then, let's actually bring this down to the point where
we actually need it. So what I'm going to do is
I'm going to grab this, I'm going to pull it down then to where we
actually need it, which will be, if I
press Control one, let's see where that's
going to come down to. So roundabout to
there is about right. And then what I
should be able to do now is move this out. So first of all, I'm going
to move it this way along. So I'm going to grab it.
Corn chow select it. And I know I'm going
to intersect in there, so I'm not really worried
about that right now. What I want to do is
just bring it up to the point where it's going
to be something like this. And then what I'm
going to do then is move it along once I've
got this part in here. So you can see I need
this part in here, this part in this side.
So let's do that now. So Shift D. Let's move it over. Let's drop it into
place, like so. Let's move this one over then. So Shift D. Let's drop
this one into place. Like so, you can see
how I'm lining up and basically just line them up in there where I can
actually see them. And you can also see that maybe, maybe these are a
touch too high. So what I'm going to do is
just grab all three of them, and I'm just going to
pull them down very, very slightly, like so. Alright, so now we've got
those in what we can do now is we can bring this
a little bit further, so I'll grab this one. And grab this one here, bring it a little bit further
to where I need it to go. So it'll be something like that while still
keeping it in there. You can see I
probably need to move it a little bit
further out of here. So let's move it out
as well, like so. And then what we'll do is we'll
bring now these two over. So what I'm going to
do I want to press Shift D, drag them over. I want to make sure
that this is on individual origins because I don't want to turn
them from this point. I just want to turn
on themselves. So art Z, 180, spin them round, like so, and then
let's drop those into place like so
wherever we want them. I want them just a
little bit further out, I guess, something like this. Alright, so now we've
got all of these fixed. Now, all I want to do now is bring this to
the right place. So you can see this part here. Let's put on our Xray, and we'll grab this
one and this one, and then all I'll do is
drag them over to there, and then finally turn that off, and I just want to drop this bit down because I don't want
them insecting like that, so I'm just going
to drop it down, like so, and maybe I've gone
a little bit too much there. Or maybe I need to
bring these down. Let's see whichever is the case. Let's bring it up, bring it up. Like so, and there we go. Alright, that's looking
pretty nice, happy with that. So now we've got all
of these parts here. So let's now come
in and actually make sure that all
of these are, like, shaded, smooth, or they have bevels on them and all
that other good stuff. So we already know that these
have bevels on them now. I'm going to try it with
just this part here. So what I'm gonna
do is I'm going to grab this one, grab this one, press Control L, and I'm going to copy modifiers,
and there we go. Now, for some
reason on this one, if you remember, it
wasn't working correctly. Now it seems to be. So let's just try one more, grab this. Control L, copy modifiers. Yeah, it's actually working. So let's grab this
one and this one, Control L, copy modifiers,
and there we go. And then we've got
these parts here. Now, these parts, yeah, I should really go into all
of them. Grab them all. Like, so grab this one
last, press Control LL, and we're going to copy
modifiers, and there we go, now this should all
be beveled off, which looking very, very nice. I'm just making sure now
everything's working correctly. And finally, now what I
want to do is I want to come in now and give
these a material. So let's think about the material we're
going to give them. So if I put this onto
or rendered view. What I'll do is I'll
make this part here. This part will be all silver. So if I come in and I'll go down and the one I want will
be several metal light. Let's bring a metal
light in like so. I also want the hole in here. So this hole in this
part here, a sign. Like so, and there we go. Now, these parts here
should be orange. So I think this
should be orange. Let's click down, and we're
looking for factory orange. We're also looking for this one to be factory orange, as well. And then what we'll do
is come to this part. And these parts here,
we've got both of them grab L. If I press
Control plus then, I can click the plus
but down arrow, and we can have factory yellow, click a sign, and there we go. That's looking perfect. Now we've got these gears. Now, these gears are
controlled from, if I save at my work
before moving on. So save at my work. If I come to the conveyor belt, we can open that up, and we've
got conveyor belt parts. These gears and everything are all in here, as you can see. Even this support is here. What I'm going to do then
is I'm going to come in. I'll add in my metal light, and you'll see now all of those inside there have
actually been done. If I press the little dot B, what I also want to do is select all of these,
press Control plus. And what I'm going to
do is plus down arrow, and I'm going to
look for metal doc. So metal doc, click a
sign, and there we go. That is what we want
something like this. And now that has
translated into if I press the little dot B
into all of these in there, as you can see.
Alright, fantastic. Now what we want to do is
we want to give these. I'm just wondering
if the bottom of these we want to give
a different color to. So in other words, give
them a rubber end to them. Probably so, probably so. So what we'll do is
we'll grab this one. We'll click the down arrow
and we'll click metal Light, like so. And then
this part here. So if I press tab, you can see all of this is
already selected, click the plus but, Down arrow, and we're going to want
the one that says rubber, click a sign, and there we go, That is what we want
them looking like. Now I want to do is
do the rest of them. So I'm going to grab
all of these now. Like so. I'm going to
grab even this one here, this one here, this one here. I also need to put these
the other side as well, but I'll do that in a moment. I'll grab this one,
press Control L, and this time, we're going
to link materials like so. Now, I want to come
into this one first. So we'll just do
rubber, click a sign. And then what we'll do is
we'll just work our way round. So this one here, rubber, click a sign, and then this one. And we've already done that
one there, and then this one. And then these two now, these might not be grabbed Let's look, that's made it easy for us. Okay. Now, did I do that one, let's have a look? Yes, I did. Alright, so now we can put it
back content material mode, and now we know what we're
doing. We can grab this one. We can press Shift D. And then what I can do is
spin them around again. As, 180, spin them
round seven to the top, and then I can see how far
I need to pull them out. So these are being pulled
out this fall, so. Alright. Cool. That's all good. Now we need to think about
this bottom part here. So I think we'll
have this orange. So I'm just going to
click the down arrow, back to orange, and there we go. Alright, that bit's
now mainly done. Now we need our dough balls, and we want a few dough balls. So the easiest way to do
this is I'm thinking, Yeah, I'll bring in my cursor. I'll bring it right around here. And what I'm going to
do is I'm going to press Shift mesh, and the one on one is it's going to be called
the rock generator. So you can see this
rock generator here. The moment I bring
it in and press dot, you can see this is
what we actually get. Now, I don't want actually the default the preset
here, you can see a preset. We actually want
the one that says river rocks, as you can see. Now, if I increase this, you will see that these look remarkably like
doblls not really, but I'm imagining they do. So we'll bring them
over, like so, and I'm just going to pick three or four of them to
actually work with. So, like so. There we go. So the three that I want to work with are going
to be this one, this one, and I think we'll also we want one that's a little bit more
rounded. So you know what? We'll just pick these, so I'm just going to
move them back. I'll get rid of the
others. Like so. And then what I'm
going to do now is just I'll use four, actually. Shift D. Let's bring
another one and then Shift D and bring
another one, like so. And then what we'll do is
we'll grab this one first, and you can see this is
basically what it is. So at the moment,
we have no mesh. If we come over to here, you can see it's got all
of these subsurfaces on, all of these displacements on, you can turn up a displacement and turn it into a
little bit different. You can come to this one
then and we can go down to the other displacement and turn this one up a little
bit different, like so. So you can kind of come
in and make them all look a little bit
different from each other. Like so, and let's do
the same with this one. And there we go. Now, I think they look pretty
good as dough balls. I think actually they
look about right. And now what I'll do is I'll
grab each of these, like so, object, convert, mesh,
and there we go, now you can see if I press tab. This is actually what we've got. So now all I want to do is I want to mix them up
a little bit more. So all I'm going to
do to do that is I'll grab them all, press Control J, press the tab button, I'm
going to press Control E, and I'm going to clear
those seams off, first of all, so
clear the seams off. You can see here they've got kind of some seams
running along here. Let's have a look now. I'm just wondering what those
seams are. Save a luck? Oh, there we go. Now they're
off. Oh, they're not seams. They're actually I
think they're shot, what they called
creases. There we go. Controllee. Let's, uh, I'm looking if we
have actually creases that we can take off edge
crease. There we go. We've got edge crease
and edge slide on there. I don't know why
those are on there, but they're not going to affect what we're
actually doing. Anyway, let's come over to mesh, transform, and then
we'll go to randomize. We'll turn this
down a little bit, like so, and there we go. And then what I'm going
to do is come on over it, add modify it, generate. And I want one that's
gonna deform it slightly. So it's going to be a smooth. So let's smooth them off. Let's turn that up, like so. Let's increase the amount. And let's get them nice
and smooth. Like so. And then all I'll do is press
Control A, and there we go. Finally, then, these look a bit high poly for what we need. So all we're going to do
now is generate a decimate, and what the decimate
is going to do is it's going to reduce
the amount of polygons. You can see at the
moment, I've got 6,144. If I turn this all the way down, you'll see now I've got a
polygon count of eight. You can see if I turn
this up to not 0.1, we now have a polygon count just over 1,000, and that is
what we're looking for. We might even turn it down
to not point and not five, like so, because after all, these are supposed
to be doubles. Now, lastly, now I've done that, what I want to do before doing
that, I want to grab them, and I want to press ssnsEd and shrink them down a little
bit because at the moment, as you can see, they need to be a little bit flatter
than what they are. Then what I'm going to do is I'm just going to
come to the bottom, grab the bottom of
each one like so, and then coming over,
put on smooth shading. And then what I'm going to
do is press Es and's Ed and just shrink them down. Like so. So we've still got that
kind of round top, but they look a lot more
now like actual doubles. Alright, so they're
looking good. Now, the other thing is we
don't want them too flat, so what I'm going to do is
grab the tops of them now, like so, and then I'm
going to lift these up, so I'm going to bring it in and lift them up to make sure
they're rounded on the top. And there we go because
they're going to be squashed into actual cookies.
So there we go. They're looking pretty good now, and now I can actually apply
that decime and there we go. You can see just how far
down these have dropped. Now, finally, we
actually want to have some actual
material on these. So what I'm going to
do is I will go and bring in just a simple material. So I'm just checking
on my other screen what material I
actually want on these. So we've got dough. It's pretty much the same actually as
what we've used before. So what I'm going to do is I'm going to bring
all of these up now. And I'm going to put them over here because they're going to
go with the conveyor belt, so I'm just trying to
keep everything together. And then what I'm going
to do is split them up. So you can basically come up and you can split
them this way. So if you want to, for
instance, go to select, and we want to not select mesh, and we want to separate
by loose pots, now you'll see these
are actually split off. So easy way of doing that. Now, let's grab them
all, press Control A or transs right click Set
origin to geometry. And then what I'm
going to do now is I'm going to grab this one, and I'm going to see flour bag. If I go to shading. You can see this is
a flower bag set up. I'm going to actually copy this Control C. I'm going to
come then to this one, I'm going to call it
Doug Balls. Like so. And then what I'm going to do, I'm going to delete this off, and then I'm going to just press ControlV and then bring that in. Now, finally, let's put
it on rendered view, and I'll just get
you the hex value. So I'm going to get you
the hex value, which, if I zoom in now, to here hex. Control v. Press the enterbne. There's the hex
value. And then I'm also going to make sure
that first of all, we have no metallic on, and
the roughness is going to be down because you want them
slightly, slightly shinier. Like so. Much shinier than
the flour bags, for instance. And finally, now we can
grab all three of these. Grab this one last,
press Control L, and we're going to link
materials, and there we go. Now, let's save out our work, and we'll actually put these in the right column and put them into the conveyor
belt on the next one. Alright, everyone, so I
hope you enjoyed that. I'll see you on the next
one. Thanks a lot. Bye bye.
49. Animating dough to be stomped on by stomping machine for Blender Beginners Masterclas: Welcome back, everyone to blend of Beginner's
master class, the cookie factory, and
this is where we left off. I think I'm actually
going to get rid of this one. I
don't want this one. So I'm just gonna
have the three balls here because it looked a
little bit off, actually. So now what I'm going to do
is press Shift Space bar, bring in my move tool. I'm just gonna move
this one over. And now I've got these
three, and what I want to do is put them in
their own collection. So at the moment, you can see, if I go back to modeling that I've got the collections
here, conveyor belts. I'm looking for
conveyor belt objects. And what I want to
do is I want to make a new one and
drop them in there. So what I'll do is I'll
grab all three of these M, new collection, and
let's call them dough. Bowls Ls. We'll also put on
there actually round, just so we know one's
around and some are flat. Click Okay, and there we go. Now what we're going to do
is we're going to drag this up into our conveyor
belt objects, so I'm going to drop
that right in there, like so, and there we
go. Now they're done. Now, what is this cube here?
Let's find out what that is. So I'm going to press dot and we can see this cube
is part of these. So what I'm going to do is
put that into our mixer. Yeah, our mixer like so. Alright, so everything
now is tidied up. Now what we want to do is swap these for the actual dough ball. So what I'm going to do is
I'm going to come down. This is split off
now from this so you can see these are two
separate objects. And what I'm going to do
now is come back to here. I want to come down to
where it says, objects. So these objects here, we definitely don't want
them in flower bags. What we want. You can see
it's an object as well. We don't want that. What
we want is a collection. We want to remove this, and then the collection wants to be conflaer belts and
we want it to be, where is it dough balls, dough balls round. There we go. Now, let's see how
these are looking. So we can see these are
looking pretty nice. We just want to make
sure they drop. And the other thing
is, we can see your looking at my object and
making sure I think, you know, they're the
right size and everything. I'm just wondering if
we need a few more of these coming off the
thing at the same time, which means that we can
do drop intervals of, let's say, not 0.5,
something like this. So now it actually speeds
up, as you can see. Now, maybe that's a little
bit too high, as you can see, so let's put it on not 0.75. Let's try that. And
it will slow down. It'll just take a
little bit of time. I think that is looking
much better now. Alright, and you can see
the balls are different. The scale is random.
The rotation is random, all of that other stuff. We can actually
probably get away. You know what we'll
leave them like that. I think that's
actually good enough. I'm making sure the
loop's okay now. Let's mess around with this
loop just a little bit more, just to make sure
this part is okay. Let's pull it all the way down. That's not working, so
let's bring it up a little bit. There you go. Now it's working, but it's
just getting stuck on the end, so let's turn the gravity
down a little bit. Still getting stuck on
the end a little bit, so I'm going to turn
this gravity up, tiny bit, and then turn
the lurp up a tiny bit. Let's see now. Still too much. Let's turn it up. There we go. Now you can see that is
looking much, much better. Alright, so we've got that now. Everything is looking
cool with that, and the dough balls are done. Now we're moving on then
to the actual stamper. So let's start with the stamper first of all,
of getting the imaging. So what we'll do is
we'll bring this over. I'm going to spin it round, so I had 90, let's spin it round. And then what we'll
do is we'll move this over here, pull it over. Let's pull it over this way.
And then using the red. Let's pull it over this way. And then what we'll do is we'll come now and change that out. So let's click Open. And the one we want,
let's put this on is going to be our stamper, which is which one
is the stamper. Let's find it. I think
it's this one here. Yes, this is our stamper. So we can see we've got
a big machine here. And basically, we've got this conveyor bell that
runs through there, and then we've got this big
stamper that's going to go up and down stamping
the dough balls, you know, into
something that's flat. Then finally going
to be sprinkled with chocolates, and
that's the idea of this. Alright, so let's actually
work on the stamper. So first of all,
with the stamper, you should know that we need to actually hide this in some way. So if we put our
stamper around here, we need to make sure
that it's hid inside here because it's actually going to be two of these parts. So in other words, if I grab this part and this part
and I press Shiftee, I'm going to then
move these over, like so, without portion editing on. Let's
move them over. And I want these to kind of be interlocking into here like so. What that means is then I also want to make sure that
these are split off. So P selection, split them off, and then press space bar. And now you'll see
that near enough, near enough, they're joining. Now, they're not quite, so that is the first thing
that I want to do. So I'm just going to
press right play, set origin two geometry. I'm going to move it
over just a tiny bit like so, and there we go. Now, you can see that
is what we want. We're actually joining them, near enough at the right part. And what that means is then that the stamper will come down and it'll give the illusion of the actually being
stamped in that way. Now the next thing
we need to do is we need to make room
for this damper. So let's first of
all, make the base. So you can see all of
these, have a base on them. What I'm going to do then is I'm going to press
the space bar. I'm going to come
in, I'm going to grab this base
first, so grab this. I'm also going to get rid
of these supports, as well. So I'm going to pull
these back. And then what I'm going to do is
I'm going to press L, shift and D, duplicate this. I'm going to press P selections, separate it Control A or
transonsR plaq origin of geometry and spin this round. So head 90. Let's spin
this round into place. So this is where my stamp is going to be
somewhere around here. I'm going to get rid of
this one and this one. So delete those out the way, and this is where
I want to put it. So right where Bang, you can see right around there
is where I want to put it, which means that this might need put in a little
bit over here, so I'm going to move
it just a little bit over there, right
into the center. As you can see,
this is the center, and now I know where my
stamper machine can go. And from here then, let's
actually build this out. So the stamper wants to come
down right around here, so we'll actually
start on that part. So what I'm going to do
is we're going to press Shift S, cursor selected, Shift A, and then what we'll
do is we'll bring in a cube. First of all, we'll bring up the cube. We'll make it smaller. So it's the right size. We'll press En'sEad like so, and there we go,
now, you can imagine this, stamping it there. That is what we want.
Okay, so from here, then, let's actually make it look like an actual
stamping machine. And the other thing
is, let's make it so it's actually
the right size. So around here, right
around that size. And then what we'll do now is we'll bevel these edges off. So I'm going to come
in. I'm going to put it on object mode, actually. And the other thing is, as well. I'm going to hide
these out of the way because it will cause performance and
optimization issues if you've got everything
showing on here. So let's hide the flour mill, the water adder, the mixer, and let's just hide
those out of the way, and it'll be much, much
easier to work with. We can also see now
popping in like so. Alright, perfect.
Now, let's come in, and what we'll do is we'll
grab all of these parts. And we'll press Control B
and bevel them off, like so. And then what we'll do now is we'll come to
the bottom part, and we'll press E, enter S, pull these out, and then E, pull it down, like
so, and there we go. And then what we'll do
now is we need to think about the actual
stamping part of it. So I'm going to come
in, bring this bit in. So I'm going to press
I and then press E, make sure you don't
go past those again. Press the E bone, like so, shifts, cursed to selected, and then tab, and then shift A, and we're going to
bring in a cylinder, make sure it's on 24. S to bring it in. And then we need to decide how high this part is going to go. So we know it's going to
come down to this part here, all the way down to
here to squish them. So now what I'm going
to do is pull it up, like so, and then I'm going
to grab both of these. And actually, you know what? I want to make another
edge on there. So control. Let's
bring this down. And then let's come around
Alt Shift and click E, to lns and pull this out. Like, so, right click, shade or to smooth.
And there we go. Alright, that's looking good. So now we can see it's
going to come down. Let's see now if this goes
underneath. And there we go. See. Yeah, it's a
little bit out. So you can see, I
need to move it over. I press three. It's
a little bit out. It's changing a little
bit over this side. So let's try that
again. There. Okay, so that's gonna work roundabout, fine. That should look okay. Now, we've got this part, so
we've moved everything over. Now we need to actually put this into something that's going
to make it look good. So what I'm going
to do is I'm gonna, again, save out my work, and we'll start this
on the next one. But what we'll do, first
of all, is build this bit around so that it looks
as though something's there, and we'll also kind
of hide this a little bit and make it look like it's
actually being supported, you know, by the actual
stamp of this conveyor belt. Alright, everyone, so I
hope you enjoyed that, and I'll see you in the
next one. Thanks, lot. Bye bye.
50. Creating support for the stomper machine, to hold the stomper for Blender Beginners M: Welcome back, we want to blend the beginners
master class, the cookie factory, and this
is where we left it off. Alright, so now let's come in. Let's bring in another cube, so we're gonna bring in a
cube right around here. And then what I'm going to
do is squish this down, so S and Z, pull it down like
so and we want this cube. Basically have a hole in here. This is going to move up
and down into the machine. So we definitely want
to make this longer. Now, how high do we want this? I don't think we want
it quite so high. So round about this height, I think it is going to be fine. And then what I'm going to do
now is I want to just make sure that there's enough room either side to
actually support this. So if I now press tab, I can press Control R.
Left click, right click, Control B, bring that back down, and I can bring it just
past this part here. So just past the
actual conveyor belt, leaving a little bit of a gap. From there, then what I can
do is I can come now to this side and I can
extrude this down. So if I extrude this down, like so, and then what I can do I can
come to the back now. I can extrude it down
all the way down. So it's just there,
as you can see, all the way down to round
about just the bottom of here because we want to look as though this is actually
supporting it. And from there, then
what I want to do is then this will be
set on another part. So from here, I want to
bring in another cue. So shift day, let's
bring in a cue. Let's bring this all the
way down to the bottom. So right into here, like so. And then what we'll
do is we'll come underneath, grab the top of it, pull it all the way down,
so it's just underneath, so it's j touching that
part that we actually made. And then what we're
going to do is make it a little
bit further back, so we're going to pull it
a little bit further back, and then we're going to
grab both of these sides, press S and Y and pull
them out a little bit. Now, if they're not
pulling out, make sure you're on medium point. So S and Y, pull them
out a little bit, like so, and then we go, that's looking pretty
cool right now. And then what we want
is the front now. So we want a front bit on here. So what I'm going to do is
pull this out a little bit. I want to press Control R, left click and bring
it along like so. And then what I'm going to do
now is lift up this front. I'm going to press E
and I want to lift up this front just in
front of those like so. And I'm not quite sure, I think, how far
do I wan that up. I think something like that, so we've got a range of motion. We can just see it like so, and I think that will be fine. Alright, so now we need the
front and back on this. So again, we'll bring in a cube, so shift day, bring in a cube. Let's bring it down into place. Let's make it a little
bit smaller then. So this will be the
front part of this. We'll pull it into
place. Like so. And then what I'll do is
I'll press Control A, I'll transform set
origin to geometry. I'll then come to the
front of my cube, grab just this edge, control B, and then all I want to do is
bring in some edge loops, like so, I'm going to round
it off, and there we go. Now what I want to do is I want kind of three bands on here. So I might as well do that now. Now I'm thinking,
do I want one here, one here and one here? I think actually that'll
look about right. Again, before we do anything, let's press Control A, I'll transom set origin,
two geometry. Let's also shade it
smooth so we have a good idea once we're inserting
how it's going to look. So we're going to
press the insert, holding the shift
button, like so. And then what I'm
going to do now, I want to bevel these parts off. So I'm going to come to my vertex select
Control Shift and B. Let's bevel these off, like so. And then what we'll
do now is we'll grab just these parts here. Like so, and what I'm
going to do is press E, Enter Alternat and let's
bring them out, like so. Now, we can see we've got
some issues with all of this. Let's right click
and Shade Smooth. You can see we've still
got some issues in here. Generally, this is caused by, you know, this part in here, this bending part in here. And as I said, sometimes, if you press Control Plus, you can just split this off. So why split it off, and then you can
actually get rid of most of those shading issues. On this occasion, though, for whatever reason,
it hasn't done that. So what we'll need to do now is just get rid of
these parts in here. So what I'll do is I'll come I'll grab each of these like so. And then what we'll
do is we'll press Alt Shift click
on each of these, like so, and on
this and on this, right click and macacine. And then all we're going to
do is we're going to come in. We're going to press
L on this island. So L, L and L. We're going to press
delete and faces. And then what we're going to
do is fill these faces in. Now, there is an easy
way of filling in faces. All you need to do is mesh, come down to clean up, and what you're going to
do is fill holes, and there you go. You
can fill them in. Now, if they're not filling in because there's too many faces, just come up and increase this. I always tend to put this
on something like 12 and then every time I build something, it makes
things really easy. Now, you can see that smoothness
now is perfectly done, so that's looking really nice. And now what I can do
is now I can press Shift D and bring this over to the back end
up here as well, Z 180 and just give it support on the back as
well as the front like so. Alright, so far so good. Now, let's think about
this part on here. So what I want to do
is I want to bevel this side and this side. So
we'll come to this part. Again, before we do that,
we'll press Control A or transforms right click
Set origin to geometry. And then what I'll do is I'll
grab this one and this one, I'll press Control B and just bevel that off
where we want it, which will be
something like this. Right click, Shade
Smooth by angle. And then what I'm going to do
now is the inside of here. I'm going to also bevel this
off, but just a little bit. So if I press Control B, I should be able to bevel
it off just a tiny bit. Like so, and then I
come right click. Shapes move biangle
and there we go. That is slightly beveled off. And now I think it looks
much, much better like that. Now, let's put some
angles on here. So this will be coming through here up into
the main machine. So what we'll do is
we'll press Control R. Let's go with two. Left click, right click, and then let's press Control
B and bevel O's off, but drop it all the way down. And we can see here that this
now is a little bit out. And I'm not sure why that happened or why it's
a little bit out, but my stamper is
definitely not my stamper, but my machine is definitely
a little bit out, and I don't really like that. So what I want to do is I want to move this all
into the correct place. So I'm going to grab
all of these, like so. And I guess, first of
all, before we do that, let's move our cursor
to where we need it. So if I grab the top of here, press shift desk,
cursor selected, and then what I want to
do is I want to grab, let's say this one
last so I want to basically grab all of
these parts like so. And then grab this
part last and press Control P. And what
we'll do is object. So we'll set part object
and keep transform. And then this one here,
I want to move to there. So I'm going to press Shift
desk and selection to cursor, and there we go, now it's
right in the center. Everything has moved
along with it, which makes it really,
really handy now for us. If I press three now, I can
basically drop this back down now to where we actually
want to holding the Shift but and drop
it back down to there. And now you can
see that this now, if I come back to this part, press the tab but, now
this actually lines up. Albeit, these want to be pushed
out a little bit further, but we'll deal with
that in just 1 second. First of all, we
want to do, right click shades move Bangle. And what we next
want to do is remove all of those parents now. So if I press O
P, we're going to clear and keep transformation
on the parents. And now when I move
this, nothing else should move with it, and
that is what we want. Okay, so now let's deal with these parts
that we had before. So what I want to do is I
want to pull these out. So I've got them all selected. Let's actually pull them
out. So if I press S, and let's have a look. Oops. Let's go back, S and Y, let's pull them out, and you can see it makes
them a little bit bigger. On this occasion, I don't actually mind if they're
a little bit bigger, but what I don't want is, I don't want to bring them all the way out.
So all of these. What I want to do is from here, going all the way
around to here, and then from here, going
all the way around to here. And then what I want
to do is press Eat, enter lns, and then
pull them out, like so. Now I want to right click
Sheets move bi angle, and there we go.
That is what I want. Now, I know I'm aware I've
got some hard edges on here. So if I increase this
jaws to slide bit, let's see if we can
actually get rid of those. No, I don't think we can. So let's right click
Shats Move Bangle. Let's put that back on 30. And let's see. Yeah, we've got some odd edges in there,
and that's the reason. So what I'll do is Alt Shift
click Alt Shift click, right click, and what we'll
do is clear the shops. Let's see if that
actually helped. And no, it didn't
because for some reason, we've also got shops in here. Let's right click
and clear Shops. Alright, that's looking
a little bit better, albeit, though, we've got
now issues with this part. So how do we fix that? Well, we're going to go in, and we'll grab we'll grab
these two first, and then we'll grab
just this one here, and we'll actually right
click and we'll shade flat. And there we go. Is
that looking okay? Is that gonna cause us issues? I think it's gonna
cause us a few issues. We've also got some
issues in this part here, which I'm not very happy with. I'm just wondering whether I want to bring in
another bevel on there. It can fix things, but sometimes it can
also cause issues. If I go over here, for instance, press Control B, you will see we can actually
fix a lot of it, but you will also see
that it also causes some other issues like here when we pull this out,
which we don't really want. So we've definitely
got issues there. So what I would say,
instead of doing that, we'll actually come in, so we'll go back before we actually brought
these out, if we can. So let's see if we can. If not, we'll do it another
way. You know what? We'll just do it the other
way. So what I'm gonna do, I'll show you as
a way to actually fix this. So we're
gonna press one. We're gonna press
eight. We're going to come in with a bisec, so we're going to press mesh. Bisect, and then
we're going to cut it across here,
right across here. Make sure that
this X is on zero, like so, and then what
we're going to do is either clear the inner
or clear the outer. So we're going to clear
the outer on this one. The thing is, though,
let's have a look, first of all, we'll
take that outer off. So we're going to
have it around there. What I'm going to do
instead is actually, I'm going to right click
and I'm going to mark as. So we'll come in. If it
doesn't work, by the way, right click in press
Control E to mark a sm. It just means that we're
in face select instead. So controle, Mark asm like so. All right, so now what we should be able to
do is grab this. We should be able to press L, and we should be able to
separate this out like so. Now I can come
back to this part. I can bring this up now. So what I'm going to do
is I'm going to come in hold Shift click. And then what I'm going to do is bring it to roundabout here. So I'm going to press one. I'm going to pull it
up to roundabout here. And then what I'm going to do is I'm going to pull it up now. So E Z, pull it up to
round about here, like so. And then now I'm going
to grab all of this. So I'm going to grab all
of this going across here. I'm going to press one again. And then what I want to
do is press E and pull it all the way over to here. And then what I want to do
now is press Control R, bring it all the
way over to here, and then I'm going to grab
the bottom of this now. So if I come in, I should
be able to grab the bottom. Of this going all the way
over with Control click. And then finally,
I'm going to press E and pull it down to here. Now, finally, I need
to drop this back. As you can see
this is not right. So what I want to
do is I want to press Alt Shift click going all the way around minus off these two because
we want to bridge it. So right click and we're
going to bridge edge loops. And now we should be
able to get this into the state where we can actually near enough,
work on this again. So we're just going to grab
all of this going to here, and now I'm going
to pull it down, pull it down, pull it down,
all the way down to there. Now, what I should
be able to do now is grab this, delete
it out the way. Grab this, right click, Shade Atos move,
and there we go. Now, let's make sure then
when I do my bevels, I'm going to do them properly on this beam as I've actually
had to fix all of this. So you can see now
all of this is fixed. Let's press A control Lee, and we're clear all of
those seems like so. Okay, so on the next one, then, we should be able to
get this surf fixed. Everything is looking
in place now. I think actually
on the next one, we should actually get this completely finished
with the model, and then we can move all of these parts down and into
place and things like that. Alright, everyone, so let's save our work, and I'll see
you on the next one. Thanks a lot. Bye bye.
51. Adding additional decorative detail to stomper for Blender Beginners Masterclass: Welcome back and run to blend the beginner's
master class, the cookie factory, and this
is where we left it off. Alright, so what I'm going
to do, first of all, is I'm going to then devel these off and get it back to
the position I had it. So what I'm going to do
is I'm going to come in. I'm going to press Alt Shift and click, just to
go around there, Alt shifting click
to go around here, and then I'm going to
press Control and B. And hopefully, I should be
able to increase this enough. So let's give it a lot more
than what we gave her before. And then left click and drop
ins place now. That's right. Click and Shade
Smooth. Now, we've still got a little bit
of a band on there. I'm not sure if I
increase it even more. Will it actually
get rid of that? So I'm actually
going to test that, so I'm going to come back, I'm going to press Control
B. I'm going to bring it all the way up to that
part just in front of it, so not quite in front.
So round about there. I'm going to increase
them then and then left click and tab
and there we go, I think that's actually as smooth as we're going to get it. So we're going to
have it that smooth. Alright, so now what we want
to do is want to come in, grab this edge and this edge, and then shifts like this one, going all the way around to
this one, and then press E, enter Alterns and bring it out, like so tab, right,
click, Shade Smooth. And you know what? It's a little bit better
than what it was. It's still not perfect
to what we need. But once I got my materials on, I think it's going to I think it's going to
be okay, actually. Alright, so now let's
come to the inside. The other thing is you
learned actually how to rebuild something if you
make a mess of something. I think that actually is
the most important thing. Now, let's shift select
on each of these. Let's press Control B.
And what we're going to do is just bring
these out like so. Okay, so now let's
actually right click Shade Smooth,
and there we go. And finally, now, finally, we're back to where
we actually started. So what we want to do
now, first of all, we want to put a hole in here. So what I'm going
to do to do that is I'll grab just this part. I'll press Shift D.
I'll bring it up. I'll pull it out, like so. I'll press the E button like so. And then what I want to do
is just split this off. So L, P, selection, like so, press Control A, all
transforms right, click, set origin to geometry. And now I'm going to do
is just put that like, so making short, pressing Essen'sE and pull it all
the way through, like so. Now the next thing is
I'm going to show you another way because we're actually going to Boley in this, but I'll show you a
better way of doing it. Edit preferences, go to add ons, and the one you want is
called the ball tool. So ball tool, make
sure this is turned. Close that down, and then what you want to do is grab
the Boolean first, grab the item you
want to boolean next and press
Control and minus, and then you'll end up
with something like this. Now what I want to do is right,
click Shade Auto Smooth. Well, I can't do that actually until I've actually
applied this. But the good thing about this is I can now still work with my boolean while I'm
actually seeing in real time how this
is actually looking. So you can see it. This is
actually looking pretty nice. Now I've got it very
close to where I need it. It's going all the
way through there. And once you've done that,
what you can actually do now is come over and
come over to the ball, press Control A,
and there we go. Now we should be able to
shades move, and there we go. You can see just
how easy that is. Now, for those of you
wondering about the ball tool, it's still like this,
as you can see. A lot of people just delete it, but if you really want
to actually get it back, you can come over to
the right hand side, and you can go down to
where, I think, let's say, edit boll tool and let's
put it on to remove Bush. This one here, remove the brush, and there we go. You can
actually get it back. Alright, just in case
you want to do that. Let's delete that
out the way then. And what we're going to do now
is work on the actual top. So first of all, I'm going
to grab the top off here. I'm going to bring it
up a little bit higher. So I'm going to
bring it up to here. And then what I'm
going to do now. So this is going to be stamping
all the way down like so. So what I'm going to do now, I need an actual top on here. So I'm going to press shift A. I'm going to bring in a cube. I'm going to bring my cube up, make it a little bit smaller,
so something like this. And what I also
want to do then is put it into place like so. I'm going to pull it
down a little bit. And then what I'm going to
do is bevel this part here. So press Control
B, bevel it off. Maybe not that far.
Something like that. And I think now that's
looking pretty good. Right, click Shade Smooth. And then we just want a
couple of parts in here. So a couple of
blocks, basically. So what I'm going to do shift
A again, bring in a cube, press the S button,
bring the cube over, make it a little bit smaller, just so it's fitting
along there. S and X, pull it out, like so, grab the top. And then let's pull it up into place like so, and there we go. Alright, that's looking
pretty good now. I think also it's
looking pretty strong. I think it's a little bit
too far forward, like so. Now, we have got our
cursor in the center here. If a right click and set
the origin 23d cursor, I should be able to
come over now and just generate a simple mirror, put it on the Y, turn off
the X, and there we go. Now we can see that's
going in there. It's supported really well. And now I think all we
need on here really is the back of this leading to
some actual pipes on here. Let's actually though
put a front on here just to make it
a little bit nicer. So control, left
click, right click. Control B, bring it down, and we'll just put
it right from. Let's put another
one in, so control, bring it around to here. And then all we'll do is
we'll bring it around to here, here, enter lns, and just put a front in it
because I'm always thinking of how we can actually
put things on there to, you know, make it look a little bit different and
things like this. Okay, so now let's deal
with the back pit. So I'm going to press Shift A. I'm going to bring in a cube. I'm going to bring my cube
down to roundabout here. So, roundabout, let's
pull it up a little bit. Let's press S and X, bring it in a little
bit, like so, and let's pull it
down, tiny bit. And then what we'll do
is press Shift D to duplicate that and then
we'll just pull it up. We'll make it a little
bit smaller, like so. I'm going to pull it
back, jaws to tad, and then I'm going to
press the tad button, grab the front of it, and
then just pull it up like so. And then what I'm going
to do is pull this up. Now, what I want is some cables coming from this
part to this part. But first of all, let's make the part where the
cables are going to go in. So if I press the eye button
and then pull it out, there's where my cables
can go in and then they'll just plug into some
part on the back of here. So I'll make a part on
the back of here as well. So what I'll do is I'll
press Control, bring it up. And then Control R, bring
it up to roundabout here, and then I'll just
grab all three of these, press the I button. So I, bring it in, and then pull these
out just a little bit, like so right click
and shade Auto smooth. Now, the part I want is going to be it's hidden at the moment. We already know though that
the parts to reuse are here. So what I can do is
I can grab my pipe, Shift D, and this is why we
actually kept this pipe. And then what we'll do is we'll just hide those
out the way again. And you can see,
because I hid him out the way, it's
actually got in there. So what do I need
to do is press M and put this in my stumper, and then I can hide my
pipes out of the way. And finally, then I've
still got my cursor here, so I can press Shifts
selections cursor, press the little dot
born to zoom in. And then what I can do now
is put this into place. So, 180 or 80 As 180, spin it all the way around, and let's get this into place. So where do we want it? We're wanting it
starting from there, and we want it going to here. So I'm going to now press
one to go in side view. And then I'm just going to press G and just get this fan in. And just remember if
you've got too many parts, like, sometimes you might end
up just delete one of them. There's no issue
with doing that. So now you can level
it all up, like so. And let's pull it back. And on this one, I think I'm
going to need two. So I'm going to put one here
and one over here, like so. And then all I'm
going to do is move this one over with
proportional editing on. So let's move it over a
little bit. And there we go. Let's come to this one now. Same sort of thing. So
we're going to move this one over a little bit. We're also going to move
this in the middle of a little bit just so it looks a little bit different
from that one. And then finally all I'll do
is I'll bring both of these. So I'll bring both
of these up just a little bit just to
make it a little bit easier for me to deal with them. Like so. And finally, then let's go to object and convert and mesh,
and there we go. Let's join them together
with Control J, and this is what we end up with. Now, let's come in,
Alt Shift click, Alt Shift, click, Alt, shift, click, and
finally, Alt Shift click. Press the EB, Alterns without
proportional dting on. So alterns, bring them out, holding the shift but if needed. Right, click, shade
or to smooth and just turn it up a
little bit like so. You can see how fast we
actually put this together. Now, one thing is, I need to
make sure that this stamper, so all of this damper, where is it going to come up to? We've got loads of room
there, as you can see, I can come all the
way up to here even without actually
going through there, and that is exactly what I want. So what I'm going to do
is I'm going to put it, you know, not quite so high. I'm going to put it around
there. So we've got a good, clear idea of what
this machines doing. And then what I'm
going to do is press ControlJ and join it together. Now, with the stamper,
what we need to do now is we need to actually
bevel everything off, go through all the shaders, put all the shaders
on things like this. We'll also, in fact,
before we finish, quickly, put on a bevel on here. So just round this
off a little bit, so I'm going to grab
these two here, press Control B, round them off a little bit to make them
look a little bit nicer. And then what I'm also going to do is put a front on here. So I'm going to press
the Ibn to bring it in and then E to bring it out, like so, and then right, click Shade Atos move, and there we go, That is
looking very nice now. I think that's
basically finished. So what we'll do now
is save that or work. And on the next one, we'll actually one last thing I think we need to do
is move this back. You know what? We'll do
that while we're here. So all I'm going to do
is put on my X ray, and then I can pull
this back just to here. Let's turn it off. Double
tap the A, and there you go. You can see just how nice
that actually looks now. All right, so that's
looking perfect. Really happy with
how that looks. And now we should just
make sure that these change once they've
actually been stamped. Okay. Alright, everyone. So I hope you enjoyed that and I'll see
you on the next one. Thanks a lot. Bye bye.
52. Working on timing to switch dough when it gets stomped and adding material to machine: Welcome back if we want to Blend Beginner's master class,
the cookie factory. And one of the things that
I have actually found is that when you're actually
moving these round, sometimes you'll end up creating a like a insert in a keyframe, and you
might not want that. So just make sure when we're not using this that we turn that off just in case that happens to you because it
has been happening to me, but now I actually figured
out what the actual issue is. Alright, so now, then, now we've got our cookie
dough on there. Let's just make sure
they're actually spinning changing
over which they are. Okay, so now let's come in. Put this onto material view. And what we want to
do now, we've pretty much got all of the
materials that we needed. We just need to make sure
that they're beveled. At the moment, you can
see that this is beveled. And then, you know, the other thing where
I'm going to do, I'm going to just grab each
of these, and I come down, press delete on the time frame just in case I've got
anything in there because I think that's what happened
actually when I was trying to copy the
modifiers over, it was actually creating
some key frames, and that's what
actually happened, so I've just deleted all those now. Now what I should be able to
do is grab both of these. Let's just put it on object mode just for now, grab this one, press Control L, and
what we're going to do is copy modifiers like
so. And there we go. Now we can see they're done. Let's come up then
to all of these. Let's press Control L, and what we're going to
do is copy modifiers, and there we go. And finally, then
we've got this. We've got these parts, this part, this part. We've
got a mirror on there. So just make sure you press
Control A and apply it. Then grab this, press Control L, copy modifiers, and there we go. Now, if these are, you know, beveling a little bit much
again, sometimes that happens. Right click, shades move, and just turn it up
a little bit more. If that's not working, we might want to let's
try Let's come in, actually. I'll do that again. And then what I'll do is
I'll turn it up all the way. Let's see if it's
actually going to do it. And you know what?
If it's doing that, just take off the modifier. Put this on 30. Take
off the modifier. Right, click, Shade Smooth,
turn it up a little bit. And I think now I've got
edges in there. There we go. I've got sharps in
there, so right click or Control play sharp. Now let's right
click, Shade Smooth, take off those edges. And sometimes this also happens. I'm going to take this off,
actually. There we go. All right, so that's
looking good. Now what I want to do is
I'm just going to come in and instead of doing
the automatic bevel, I'm just going to
bevel them myself. So I'm just going to give
them a slight bevel. So Control B pull them out. Hold the bevel up, so so very, very slight bevel, like
so, and there we go. Alright, so let's come in now. Put it on material view. Let's come to these parts, then. We'll go to material. And then what we're going to do
is put them on rubber. So these are going
to be on rubber. This is going to be blue
with a bit of yellow on, so blue, factory blue. And then the yellow part
is going to be here. So what I'm going to
do is I'm going to grab all of this, controls this. Control plus plus
down arrow, yellow. Click a sign. And then we're going to come
to the back of it. I think this should
still be blue, so all of this should be blue. So let's come to this part. We'll grab this
one and this one, press Control LL, and
this time link materials. We'll do the same thing
on this one and this one, Control LL, link materials. And now we're going
to go to this part. Now This parts
going to be orange, so down arrow. Factory orange. Except these parts which
are going to be yellow. So these parts are
near. Control select going all the way along. Shift
select the one in there. Control select, Control plus, and then all we're
going to do plus down arrow and battery yellow, click a sign, and there we go. Alright, working our
way forward then. These parts here, these are
going to be the same as this, so Control L link materials. This part here is
going to be metal. Lots of metal on this, so I
want to click the down arrow. Come down to where
it says metal light. Click that on. Now,
the bomb part of this, I want to be dog. So this part here,
this stamper part. I'm going to Alt, shift,
click, Alt Shift click. I want to click
Plus, Down arrow. Metal, dark, click a
sign, and there we go. So I just want a bit of a
distinction on that part. And now we're working our
way down to this part. So this part's
going to be orange and yellow, same as this. So Control L link materials. And what I'm going to do is put a yellow part on this,
so Control Plus. Assign, and there we go. And now finally
just these parts. So this part and this part,
we can join together. No problem there. And
then what we'll do is we'll grab this
one and this one, Control L link materials. And now let's come in
and grab all of these. So I think actually, we can just press
L on these because they're not actually
joined with anything else. Click the down arrow and
assign, and there we go. Alright, looking so far so good. Now, let's have a quick look at what that looks like
in rendered view. Before we do that, let's
save out our work. So let it load up in rendered
view. And there we go. It's looking very, very nice. And now what we need to do is create this stumper to go down. So but the first thing
we want to do is now animate this stamper. Now, the other thing is, is that if we've been
moving things around, because I forgot to say that if you've got this automatic on, sometimes it can cause issues. So sometimes when you're
pressing Spacebar, you'll end up with
things jumping around, or sometimes you'll
move things there, and when you press Spacebar,
they'll jump around again. So just make sure you grab all of these parts
at the moment, and all you're
going to do is just come down to the
timeline and press Delete and just make sure the timeline is
completely clear. Next of all, then,
we want to come to our actual conveyor,
I want to come down, and what I want to
do is I want to set the drop intervals to not 0.8, and I also want to
set them to not 0.8 on the other side
as well, like so. Now, what we need to do now is make sure that they line up, so we can see as
these come along, let's make sure they line up. If not, we're just going to have to move
things over slightly, so you can see here, boom, and is it going to line up? You can see it's a
little tiny bit out, so lays line it up a
little bit, like so. Then you can see it's a
little bit out the other way. So let's see if
they line up there. So before this, let's come
back. Where's our timeline. Let's come back so
we can see that this here wants to line
up perfectly with this. So if I bring this this way, that is where they
want to line up. Let's see. There we
go. There we go. They're nearly lining
up now as you can see. So I'm going to pull
this now a little bit more this way.
Now let's see. And now they're
lining up perfectly. Now, the one problem we've
got now is the fact that this stomper is a little
bit. As you can see. So what we want to do is
we want to actually move it slightly slightly so
it's over this part here. So all I'm going to do
is just grab all of the stomper, all of the pots. And once you've
grabbed them all, just press G just to make sure
you've grabbed them on. You can see I've got
these two pots missing. And then what I want to
do is I want to place it so that it's right
in the center of this. Now, let's even go
into Y frame and see. Do I have a center there? Do I have a reference or something that I
can actually use? At the moment, you can
see, no, I've not. I've still got a reference even here, so you
know what I'll do? I'll turn that off, and I'll basically put it to
round about here. That looks to be right in
the center of the express. And there we go.
And there we go. And there we go.
And I think that is a roundabout close enough. Alright, so now we've got this. Now what we need to do is make
sure the stump is actually going to be working
in the correct way. So what I'm going to
do is I'm going to go over to frame, 340. So let's go to frame 340. And what I'm going
to do, actually, is I'm going to be using
what I've already done previously to actually
get this right because it took a fair
amount of time to get this. So what I'm going to do is
I'm going to pull this up. And then what I'm going to
do is I'm going to press I just to make sure we've
got a keyframe in there. Then what I'm going
to do now is I'm going to go to frame 35, six, so 35, six. Let's zoom in a little bit. You can put it on here
as well. Three, five, six, and I'm going
to press I again. Then what I'm going to
do is now I'm going to go to frame three, 72. So three, seven, two. And then I'm going to
actually bring this down now all the way down as though
it's stamping on there. So like this, stamping on there, press the Ibn over
here, like so. And then what we're going
to do is go to frame 384. So 384. And then what we're going to do is
we're going to leave it here, so we're going to press
the ebon once more. And then finally,
we've got last frame, which is 388, so
three, eight, eight. And then what I'm
going to do now is I'm going to
bring it back up. Now to bring it back up,
I'm going to grab this one, I'm going to press Shift
D and drop that on 388. Now, let's see if
we've got this right. So I'm really, really hoping
we've got this right. The other thing
is, of course, we need to make it a cycle. So let's drop this down. And what we want is
the z location and we want to add a modifier
and we want to cycle. Now, let's see if this
is actually working. And yes, it looks like it is. So let's make sure
these come through. It's a little bit
short, as you can see. I would say it's a little bit too so what I'm going to do then is actually
before it drops down here, you can see I need to hold it off a little bit longer on here. So what I'm going to do
is I'm just going to go to my timeline. So we can see if
we go back to 300, this is where it's
actually holding off. So it's holding off from here, which means I need to increase this perhaps by two
frames or something. So let's try that. So all I'm going to do
is just grab these, increase it one, two frames,
and then it'll drop down. Now, let's see if we've
got this right now. I think we've got
the timing right. Yes, this looks. Let's see. Okay, we're a little
bit out still. So let's see if we
increase this a little bit more to
here. Let's try this. We can see we're getting
right on the cusp of it now. So let's try it a
little bit more there. Nearly there now. So let's pull this up a little bit more. Another couple of frames. And now I'll do is I'll
move this one up as well. So, G, move this up, like so, and then
G, move this up. And we're very close now. So let's move this up a
little bit more like so. And let's see. Now what happens. And there we go, everyone. Let's just make sure
they keep in time. I don't want them
to go out of time. Even over a very, very
long space of time, we want it to
actually keep right. And you know what? I
think we've done it. Alright, so that
is how we actually get into that bit of
a long one, I know. But what we'll do then
on the next one is we'll actually get these
changed over to a cookie. So it's all about messing
around with these two. As long as you've
got these two kind of set perfectly right. Then you can actually
play around with it and get it moving perfect. It's going to take
time. This wasn't the same as what I had
on the previous one, you know, the drafter that
I had actually built. So it is going to
take some time. Alright, everyone, so
let's save our work. I'm going to press
the spacebar now. I'm going to save our work, and I'm really glad that
part's over because it is probably one of the
hardest animations to get right, but
I'm glad it's over. Alright, everyone.
Speak to the next one. Thanks a lot. Bye bye. T
53. Creating stomped dought for machine conveyor, and using shape keys to extend and lowe: Welcome back, everyone to Blend the beginner's
master class, the cookie factory, and this
is where we left you off. Now, there is one thing
that we did forget. So, as well as these cookies that need to change
into cookies, we also forgot that we've got the top of this end
sticking out of here. So what I'm going to do
is, I'm first of all, gonna put this round about 3:40. You can see this is really
sticking out of there. You'll also have
the same problem, I'm sure, and we need
to actually fix that. So what we're gonna
do is we're gonna go over to the right hand side. Now, I was messing around
with my shape keys, but I'm just gonna be
minusing those off, so it should be roundabout
where you've got here. Once you've got that press
plus get the basic shape key, plus again and plus again because we're going to want
two shape keys on here. Now, the first shape key,
we want to bring this down. So all I'm going to do then
is I'm going to press tab. I'm going to come
to this shape key. And then, basically what I'm
going to do is bring it all the way down to here like so. Then, as I come up or down
to roundabout this bit, I want to come to my shape key, so to my second shape key, I want to press the tab button, and I want to pull it all
the way up to here like so. Alright, so now we've got
the shape keys in place. Now let's come over to 340. Let's come to the
first shape key, and we'll rename this down. And then we'll come to
the other shape key and we'll really name this up. Something like that makes
a little bit more sense. Now, let's go to the down one, and what I'm going to
do is pull this down. So that now is in
place, as you can see. Doesn't have to be
all the way down. It can be somewhere around here. And then what you're going to
do is press the eye button, and you're also going
to come to the up, and you're gonna press
the eye button on there, as well, just to save
yourself a bit of work. Then what we're going to do
then is we're going to pull this over to roundabout here. And again, I'm going
to do the same thing. So I'm going to press
the eye button. I'm going to go to
the down, press the eye button, like so. Then I'm going to
come to the next one. And now, what I want
to do is the down one, I want to pull all the way up, and the up one, I want to pull all the way up
to there like so. And then what we're going to
do is press the I button, come to the down, press the
eye bone, and there we go. Now I want to do is
come over to here, and I want to do the
same thing again. So I'm just pressing
I, coming to the up, pressing I, and there we go. And finally, finally, we
want to come back to here. And the first thing we
want to do is the up, we want to pull that
all the way down, and then we want to
go to the down key, and I want to pull
that all the way up or near enough all the way
up halfway in between. It doesn't really
matter on that one. Press I, press the
up one, and press I. And now, if I cycle
through these, you should see that
that works perfectly. Now what we need to do is
add them to our cycle. So if I come over to
the left hand side, we've got a down,
and we've got an up. So let's click on
the down first. Click on cycle. Let's go to the up,
click on cycle. And now if I start it from here, you should see that
this works perfectly. You can see this
thing stretching and contracting, and
that is what we want. Now, the next thing we
want to make sure is just that it is actually
stamping them, as you can see, stamp, stamp, and it's just
perfectly balanced and right. Okay, so the next
thing we need to do then is we need to make sure that these, as you can see, are disappearing so
in this bit here, you can see it comes down,
so it comes down to there, and it's just not lasting long enough at the moment,
because when it lifts up, you will see so it's
lifting up from here, you will see that we've still got a little bit of clipping. So if I go on, you'll
see what I mean. Then we'll see when
it changed this one. We wanted to stay just
that slightly bit longer because a fraction
of the second later, you can see that
actually switches. So what I'm going to do, I'm
going to grab all of these, and I'm going to move them over too, and now it should see. Bang. And there you go. You cannot see that switchover, or, you can see the switchover,
but it's so slight. Let's move them up one more. So we'll move them up to one
more frame just to there. And now let's see.
And there we go. Like so. Like, so. Like so. And like so. And the only thing I'm
worried about now is the flick up is a
little bit too extreme. But the problem we have is
if we make it less extreme, in other words, if
we move these out. So moving this over there, we can see we've
only kind of got one frame to actually work with before
the change over it. So I'm going to
leave it at that. I think that looks
actually okay, so let's have looked at it. Yeah, and I think that's okay. I know it's flicking
up really fast, but it is an industrial machine, so possibly will do that. Alright, let's go back
over to modeling. And what I want to
do now is change these to be actually cookies. So what I'm going
to do, I'm going to come to these parts here. These are the parts
that I want to use. And what I'm going to do, I'm just going to check
out this one. So I'm just going to move
it into place like so. And what I'm going to do is make a cookie out of all of these. So I'm going to
press Shift desk, cursed or selected shifty and then what I want to do
is I want to make it, you know, kind of actually
so it looks like a cookie. So what I'm going to do is
I'm going to go to mesh. I'm going to come to cylinder. I'm going to make this
a little bit smaller, a little bit thinner, like so, like something like this. And then what I'm
going to show you is another technique you can do. So I'm just going
to put that there. I'm going to make it
a little bit bigger, a little bit flatter, because we've got
a lot of dough in there, something
like this, I think. And what I'm going to do with
then is press Control A, right click, set
origin to geometry. And now what we're going to do is we're going
to head on over. Well, first of all, we're
gonna save our work, head on over then
to sculpt mode. So heading over to sculpt mode, and what we're going to do is we're going to
press the R boorne. And what that enables
me to do is enables me to actually bring in and
give this more topology. So the more I bring
it in with my mouse, the more topology I'm
going to give it. So I'm going to
give here a lot of topology right now, like so, and then I'm going
to press Control and you'll see now
that it's actually looking completely different. If I press Tab now,
you'll see that we've got all that topology
actually based on there. And from there, then I can come in and smooth it off like so. Now, I don't actually want
to smooth it off yet, and the reason is because I want to make the cookies
look different, of course. So what I'm going to do is
go back then to object mode. So back to object mode. And what I'm going to do
is shift D and then shift D and then join them
together with Control J, like so, and now back
into sculpt mode. So back in sculpt
mode and then shift, holding Shift, going around
them to smooth those off, doing the same thing, and then
on this one, going around, smoothing them off, and making them look a little
bit different. And now what we're going
to do is we're going to make them a little
bit more lumpy. And the way to do that
is, first of all, you want to make sure that
one of these buttons, let me just have a
look brush on here, front face is only on. And the reason you
want that is if I press T and open
up all of these, you will see when I come
in and bring lumps in, it actually comes
underneath and takes the lumps away from underneath,
and we don't want that. So what we actually want to
do is we want to come in, go to our brush,
front face only. And now when I do this, you'll see it doesn't alter
the bottom of it, and that is exactly
what we want. So now let's make our brush
a little bit smaller. And instead of using that brush, what we'll use is this one here, the clay strips brush, and now you'll see
that I can actually go in and put in some lumps, like so, and go in, put in some lumps on this one, and we're going to make it so it actually looks a
little bit different from each other and looks a lot more like an actual cookie. Once we've done that,
we can press Control R, and then what they'll do
is they'll neighbors. Two, let's have a look, why? Did I actually put
that on? Nope, I clicked I clicked
accumulate by accident. Let's go back. So
let's keep going back. And if we can't go back to this one, don't worry about it. What I'll do is I'll just make another
one. So go to Object. Again, all of these
mistakes, easy to fix. So all do is we'll press L, Shift D, bring this
one over. Like so. Alright, let's go
back to sculpting. And then what we'll
do is now brush, not accumulate front face only, and then let's go over the top. And now let's start actually
adding in some depth to it, like so, so I just want you to add some different scope to it. Like, so I'm going to check it. Don't write once I've
actually brought it in. So now you can see
nothing's happening. They're looking a lot
more like cookies. And the other thing
is you can also use the move tool
or the grab tool. Now, what you want to
do is just make it a little bit bigger
with a little too, um, sideways facing
brackets on your keyboard. And then what you can do
is you can just pull this out a little bit and
make them, you know, a little bit more cookie, like, not so not so, you know, all the same
or anything like this. So let's make them a little
bit bigger, like so. And then what we'll do
is we'll press Control to actual retpologize
them, so control. And then finally, what we'll
do is we'll just smooth them off a little bit, like so, and you'll see now
that we've got different cookies, like so. So three different cookies. Now, finally, let's go
back to object mode. These are a little
bit high poly. So what we can do is now
we can go to object, generate, decimate,
and then turn it down. The moment, you can see 13,000 polygons for some
cookies is pretty high. So let's bring this down. Keep going down, keep
going down till we get it round about 2000.
That should be okay. And then what we'll do
is we'll apply that, right click, Shade
Smooth, and there we go. You could bring it
down even further if you want to
completely up to you. Now, these cookies, then, we first of all, want
to split them up. So what I'm going to do
is just grab them all, like so go down to mesh and separate by loose
parts, and there we go. Grab them all again,
controle A or transforms, right plug, origin to geometry. And then what I'm going to do is put them in their own one. So it's under it
will be let's just make it cookie, dough. Like so. Alright. Like okay. Cookie dough. Is
that the right one? Let's have a look what
we've already got here. So we've got where
are all our parts. Let's look where
these parts are. So they're all
inconvey belt objects. So we've got dough balls. So yeah, cookie dough
makes kind of sense. So let's actually pull this up, and we're going to drop this
into this here, like so. Alright, they're
dropped in there. So now we're ready to go,
and let's bring those in. So let's see what they
actually look like. So what we're gonna
do is come to this conveyor and we're
going to go down. To where it says, collection, dough bulls. We want
to change that out. And what we want to put it on is cookie dough. There we go. Now, let's see what
that actually looks like. Double tap the eh. And there we go.
We have cookies. They're looking pretty
cool. And there you go. That's looking cool.
And you can see now we're really, really
getting somewhere. I'm really happy
actually with our those. Look, really, really big
cookies. I'm not sure, though. Do I want to bring the scale down jaws to Tad? I think I do. Yeah, something like this,
I think, is much better. Alright, so let's
save everything out. That was a long lesson, but
we got a lot done in it. On the next one, then
we'll do, first of all, we'll bring we'll actually I'm just wondering if I
need to straighten this up. I don't actually think anything
needs straightening up. So what we can do
is we can start working our way around here. To the sprinkler machine. And the sprinkler machine is basically where the chocolate drops drop down onto
our actual cookies. So we'll work on that part next. And before we actually do that, you can see here is how
it's going to go around. So we have to actually bend this going round to the
sprinkler machine. Alright, everyone. Thanks a lot. Bye bye.
54. Modelign chocolate chip machine, creating the base, for conveyor belt to go in for Bl: Welcome back, everyone to
Blend beginner's master class, the cookie factory. So we've got everything
working out. The stampers are working,
and now we need to do is bring it round to
our sprinkling machine. Now, with this conveyor belt, the easiest way to probably do that is just to grab
the end off here. And what we're
gonna do is press E and X and just pull
it out this way. Now just bear in mind,
where you pull it out, there will be a slight bit of flashing as you can see here. Now, you can limit this.
There is a sweet spot. So what I want to do is grab
this end and grab this end, right click and subdivide, and you'll see once I
bring that subdivision in, it does actually change how
that is. Now I can pull this. Or bring it down to try and reduce that as
much as possible. And you can get it in a
really, really sweet spot. So the sweetest spot is
basically where you're going to get the least
amount of flashing. Let's see. I've still
got a lot there. Let's see if I bring it
down a little bit more. And what I'm also going
to do is put it on material view and
what I'm looking for, because it looks like
flashing because of the mesh. Now, what I'm looking for now is getting rid of some of that. So it actually comes as though it's coming round.
So let's see now. No we've got too
much there still. Let's try it now.
I still too much. Let's bring it all the way up. To here, and there we go, that's probably going to be the best I can get it
going around there, but I actually think that
is looking pretty good. Now, the one thing we
didn't do on this dough, as you can see, is we didn't
give it an actual material. So that's what we're
going to do next. We're just going to
grab each of these, and we're gonna grab this and we're going
to press Control, link material, and there we go. Now we've got our
cookies in there. Okay, so from here, what I
first of all want to do is, first of all, just want to build out the actual sprinkler. So where is the
sprinkler machine going to go round about here? Can we get away with pushing
this back any further? That's the thing. I want to
see if we can get away with pushing it back just
a little bit further. And there you go,
now you can see, Is that looking a
little bit better? Let's see if we can get
away with a little bit more. And there we go. I think that is the best
we're going to get yeah, I think that's gonna
look good like that. Alright, so now we can put our sprinkler machine
right around here. So let's work on that first. So first of all, I want to make an actual box that's going
to go round everything. So what I'm going to do is
I'm going to go over the top, shift, select the button here, shift A, and I'm going
to bring in a cube. And then what I want to
do is make this inside. So basically, I want to bring
an inside part to this. I'm going to make it big
enough, first of all, like so. And then what I'm going
to do, I want them going through this part here. So I'm going to come
in. I'm going to grab this side and this side. I'm going to press the eye
button and bring it in. To run about where I want it, and I can see I need this cube, much, much bigger, as well. So Eins Ed, let's pull it
out where it needs to go, so I'm going to
pull it up to here. And you know what,
before I do that, I'll actually go back before I actually use that
insert. There we go. Let's get into place first. So we're going to
have it down here. But remember, we're
going to have, you know, the insert on here, so it needs to support
it along here, and then it also needs
to be high enough. The other thing is
with these cookies, now I can see them, I need to drop them
down a little bit. So what I'm going to do is go to my objects and the z offset. Let's bring them down and
drop them right down. Into where they need to
go, and there we go. Now they're just
not floating there, so now they're looking much, much better, and there we go. Alright, so moving
back onto this. So let's grab the top of here. And what we'll do
is we'll just move it up just a little
bit, like so. And then from there now, what I'll do is I'll create
the insert here. So I'm going to grab
this one and this one. I'm going to press the
ibn and bring it in. And where I want to bring it in is to the bottom off here. So now I can press the
S bone, bring it in, bring it in, bring it
in. Something like this. You can see though
it started to bend, so I'm going to do it
again from this side, so I can actually see what
I'm doing from there, all the way in to
something like there. Now what I'm going to do
is I'm going to right click Loop tools and bridge, and there we go, they
can go into this now where the chocolate drops are going to come down
straight through there. Okay, so now let's build this out a little
bit more, though. First of all, I want to put some bevels on the
inside of here, make it nice and round, as the art style that
we're going for dictates. So let's make it nice and round, so let's press Control
B and bring those out. Nice and round, like,
so and there we go, and then we can right click and Shade Smooth
not shade smooth. Shade auto smooth, there we go. Now, last of all, I want to make sure then this is
in the right place. So you can see here,
it's a little bit out. If I put on my wireframe, I can see where this
starts, where this ends. Now let's move it over. So it's round about in the
same as both of them, and now you can see
that it actually is, making sure that this is
supported on each side, like so. Alright, so now let's think
about the top of this. I definitely want
a hole in here. But the first thing I'm going
to do is I'm going to come in I'm going to bring this in. So I'm going to press the
e button to bring it in, like so, and then we're
going to press the ie button again to bring it in. Like so. And then what I'm going to
do is Alt Shift and click. I'm going to press E and
pull that up a little bit. And from there now, I'm
going to make my hole, so I'm going to press the Ibn. And then I want to basically bring that all the way through. So, so it's probably not
so easy just to do that. So what I'm going to do is
I'm going to press Shift D, and then I'm going
to bring this up. I'm going to press E, so it goes all the
way through there, and then I'm going
to press L and P and selection and
split that off. Now I'm going to
do is I'm going to come back to this part. And before I do
anything, I want to actually bevel off
this part here. So I'm going to come in and bevel off
each of these edges. I can hide this
out of the way, as well, so let's come in to you, and let's come in
and grab this edge, this edge, this edge, this edge, and the
inner edges, as well. Like so. And then what I'm
going to do is control and B and just bevel those
off a little bit. Like so, right click Shade
auto smooth, and there we go. That's perfectly well wanted. Now the next thing I want to do is I want to actually
put this hole in here. So all I'm going to do is
press Atg, bring back this. This is going to be my boolean. So I'm going to grab
my actual boolean, grab this part, press Control and minus, and just
minus that off. Now, again, if it's not working, put it on fast,
and there you go. You'll see it's
actually working. Now, you can see that
we've got some problems with shading and
things like that. We can fix all I'm going
to do at the moment is press Control A and
fix that out of the way. I'm going to hide my Boolean
just out of the way for now. I'm going to come back
to here, right click, Shade auto smooth,
and there we go. Hopefully now, that is looking pretty nice,
as you can see. Alright, let's bring
back our Boolean. We'll delete that
out of the way. We don't need that anymore. And then what we can do
now is we can actually put in our dropper. So our dropper is
going to go into here slightly just into
the bottom of here, and then the big cylinder with the actual chocolate drops, is going to start
sprinkling them in. So let's do that now.
So what I want to do, first of all, grab this, press Shift S selected. Shift A then, and I'm
going to bring in a cube. And this will be what
actually catches all of those kind of little drops that are
going to go in there. So we're going to put
it in round about here. And it's going to be don't worry because it's going to be
carried by something else. So what we're going
to do now I'll bring it up a little
bit, actually. I'll bring this part in. So face select, bring
this part in with S, and let's bring it down
a little bit, like so, and then let's press L,
and just make sure that it's just over the top so we
can actually see like so. And then what I'll do
is press the S but, bring it out a little bit, bring it down a little bit,
and there we go. Now, let's pull it down
just a little bit more. Press the EB to bring it up. Alt Shift and click,
and then we'll press E to alter S, bring it out. Like so, and there we go. Then what I'm going to do now is I'm going to grab the top and the bottom and press
the Ibn to bring it in. And then I'm going
to right click bridge edge loops like so, and there we go, There
is our actual dropper. Now if you're a
bit unhappy like I am about how far this is in, all I'm going to do
then is Alt Shift click lns and bring it
back a little bit. Then I think that is looking the way that I actually
wanted it. And there we go. Alright, so you know what? I'm going to just move up
this part a little bit. So Alt Shift click, not
quite as bent down as that. Perfect. That is
looking when I wanted. Now, then let's think about
the actual dropper then. So once we've got the dropper
in it's basic going to have little chocolate sprinkles that are going to
drop down here, fumbling down to here and basically going on
to our cookies. And then the cookies
basically are going to be changing over. We basically want this
to be the halfway point. So if I bring this over, I can bring this over
to the halfway point, which is if I go over the
top, I can actually see them. So where does it swap over? It's going to swap
over around here, as you can see, and
we'll check that once we've actually got
the next part in. Alright, so for now, though, let's actually come in then
and make this top part. So this top pot, we're
on a beautiful cylinder with these chocolate
drops coming out. So what I'm going to do is
I'm going to press shift day. I'm going to bring
in a cylinder, I'm going to bring it up. Make sure it's on 24, if you've reloaded your
blender or anything like that. So let's put it
around about here. And then what I'm going
to do is, I think, actually this is round
about the right size, maybe a tad smaller. And the other thing I forgot to do is I should have
really bring this. So we'll bring this
in just so you've got an image to work from. So we'll bring it in.
We'll come to this. I'll come to the image.
I'll go to open. And the image we want is
going to be this one here. And actually, this
is quite a nice view of what we're actually
creating here. Alright, so that's
that. Let's also pull it over here so we can actually see
what we're doing. A dead 90, like so. And let's pull it
over to the side. So you can see on this,
the main thing is this beautiful cylinder
that's going to allow all of these kind of
chocolate drops to come in. You can see we've got a big pipe that we
need to put in it, an even bigger
cylinder over here, and then the machine coming
down here to this little bit. So I think, first of all, the one thing we
do need to do is probably pull this
out a little bit. So I would say, let's grab
just this going around here. So Alt Shift and click. If you can't actually grab
it going all the way around, just press C. And what
you can do then is you can make this bigger and smaller with your middle mouse button. What you can also do, though, is left click and select thel. You can also press middle
mouse to deselect, as well. If you want to get
it off, just right, click the mouse button. But for me, I want to bring
this all around here. Right click to take it off, and now you can see
that I can just pull that out a little
bit further because I want it just to hang out a little bit more on this
side than the other side. Okay, so on the next
one, then what we'll do is we'll actually
create this cylinder. So this cylinder
going around here, we'll actually
bring in the bolts and we'll put those
around there. We've already got the bolts
set up, that's great. Let's go to file then
save everything out, and I'll see you on the
next one, everyone. Thanks a lot. Bye bye.
55. Focusing on chocolote chip tank located at the top of the machine, adding bolts ussin: Welcome back to Blended
beginner's master class, the cookie factory. And what I'm going
to do now is I'm actually going to make
this a little bit bigger, so a little bit bigger, like so. I'm actually going to
pull it up, as well. And then what I'm going
to do from here is I'll create this actual beautiful
sun that we've gone there. So it's looking
something like this. So the way I'm going to do that, first of all, I'll come to
the top of it, E, enter, S, pull it out, and then E, pull that up, and then let's
create this beautiful top. So what I'm gonna do
to create the top, Control B, bring it back
a little bit. Like so. And again, we can control this completely
through here as well. Don't forget, so we
can actually really bring it back or make
it more rounded, whatever you want to do, like, so let's right click
and shade Auto smooth. And that is the nice top
that I actually wanted. Alright, so now what we want is these 2
bars going around. So let's do Control. Left click, right, click. Control B, drop it back down, so we've got the bevel where we actually want it. So
roundabout there. And then what we can
do Alt Shift click, Alt Shift click, Control
B and pull that out, like so, and then E enter Alas, bring that out to where
we actually want it. And then what we're
going to do is bevel off these edges, as well. Alt Shift click,
Alt shift, click, because we want a little bit more bevel than what you know, our modifier is
going to give us. So Control B, let's
increase them, make it nice and rounded, like so, and there we go. Let's right click Shade Auto
smooth and there we go. Okay, so this is
looking good so far. I think all we
need to do is just bring up this top
just a little bit. So what do I mean by
that? I'm going to press the eye board just to
insert it in a little bit, and then just bring it up very, very slightly, like so, and it's just
adding a little bit more roundness on the top of it. Now, I want to go over
to my parts here. So we've got some bolts,
which will be in. If I put this up, we've
got some parts to reuse. This one here. We've
also got a load of cubes and things that
should be in the stumper. So that's something else I need to make sure
that they're in. So I'm going to grab
all of these parts. Let's see if it is all of these. Let's have a look, all of these. G, I've also got
this part in there. For now, though, literally, I'm just going to press M. I'm going to put them
in the stomper. I'm going to grab
these, as well. I'm going to press M,
put them in the stomper. And then these ones here,
I'm going to press M, make a new collection, and we'll call this
the sprinkler. Like, so and then what
I'm going to do with the sprinkler is
I'm going to put it underneath my stumper, like so. Now, if I turn off my stumper, all of that should disappear. If I turn off my sprinkler, all of this should disappear. Now what we can do is we come to these parts that
I want to reuse. If I grab them, press
the little dot but, I can see they're all here. And what I'm gonna do, first
of all, is duplicate them, so shift D. Let's
duplicate them over here. Now, of course, I want
these to go sideways. So what I want to do
is come to my bolt. I want to press the
tab but and I want to rotate them on the X value. So X -90, let's rotate them, and there we go. That is
what we're looking for. Now what we can do because we've actually fixed those
is we can bring them back over to my
sprinkler machine. So I'm going to press Shift
desk, selections cursor. And then what I'm going to do
now is I want to pull these out based on the actual curve. So if I press the Sp, I can pull them out look like so and get them
where I want them. So if I grab them both, I
can bring them up then. And then what I can do is I
can bring my curve down now. So press the S bun,
bring the curve down, and you can see I want my
bolts something like this. Now all I need to do is
just increase the amount. So if I go to my bolts now, come to my array, I can increase the amount
how they're going around. I can also let
them more or less. So let's get them all
the way around first, and you can see now
they're not quite there. So what I'm going to do now is bring this down
holding the shift bun. I'm actually going
to bring it up. And then what I'm going
to do is reduce them down one more up, like so, and let's have a
look what they look like. So tab, double tap the A. Yeah, I think they're looking right. I just think they probably need to be a little bit bigger. So if we go to bolt, which is inside here now, let's put on this Xray so we
can see what we're doing. Let's increase the size
just a little bit, like so, and let's also make
them a little bit thinner. So all I'm going to do S and Y, make them a little bit thinner, like so, press the tab button. Turn this off, and there we go. You've got
your bolts in there. Really nice. But you can see we've overlapped here because
we've made them bigger, so let's turn it down to
there, and there we go. Now what you can do is
you can increase this just to make that
gap here to here, the same, so I can
actually increase it just a little bit,
and there we go. Now I want to do is
a one to just apply. So object, convert to mesh.
And that didn't work. Why didn't that work?
Let's have a look. I think it could be something
to do with our animation. So when we did this before, we saw that it had a
problem with the animation. So I'm going to grab
them. You can see there's some animation on there. This is one of the problems
I'm talking about. You can come over here
now and press Delete, and now I go up to object
and convert to mesh, we shouldn't have any problems. So yeah, that using the auto key and does
cause some issues, but now we've actually
managed to fix that, and all I want to do is just
delete this out the way. And then finally,
what I'm going to do is just press Shift D and bring this up to this
point here, like so. Okay, so far so good. Now, let's make now this part that's going
to come down here. So what I'm going to do is I'm going to come to this part here, I'm going to press the ibt. And then what I'm
going to do is press the E button to bring
this down to here. And then we're going
to press the I button. And then what I'm
going to do now is press it going
all the way down. So I'm going to press E going all the way down to
where I want it, which will be, I think, round about round about here because we're going to
have an end on it, as well. Now, let's bring in some
edge loop, so control. Left click, right, click. Make sure it's an
uneven edge loop amount because then it'll make it
easier to bring this in. So if I come in now,
let's try it on sharp, first of all, so we'll press
the S. We'll bring it out. You can see that's not quite right. So let's try another one. We'll try an inverse square. There we go. Now you can see that is exactly
what we want. That is looking very nice. Okay, so now let's come in. And, first of all,
we want to make a hole in the bomb without
proportional editing on. Let's grab the bomb. Let's
press the I button like so, and then let's press E and pull that up there, just
out of the way. And then control law left
click, right, click. And then Alt Shift and click, E, enter Alter ness and let's
pull that out like so now. You can see on this time, it's
not pulling out properly, and it's because we're right
near the edge of here. When it's in the center,
it's much, much better. A we're going to
do is just press the S button to pull
it out in that way. Okay, now what I want to do
is bevel off these edges. So Alt Shift click, shift, click, and then Control
B, bevel those off. And there we go, right
click, shade Ato smooth. And that is looking pretty nice. That is exactly what I wanted. Mine is a little bit
longer on the image, as you can see, but I'm fairly
happy with how this looks. Okay, so now what
we want is we just want something that's
going to be in this part, which is going to hold
it kind of on there. So this part is kind of floating at the moment. We don't
really want that. So what I'm going to do is
bring in a cube, so mesh. Bring in a cube,
let's bring it up. We'll press the bon, and then we'll pull it just into the side where we want it. So I want it just
under here, like so, and then just out, pull
it out a little bit, making sure it's not
poking through there. And then finally, I
want to bring it out. So I'm going to bring
it out. You know what? I'll make it a little
bit thinner as well, so I'm just going to
go underneath it. I'm going to pull
it up to there. And then all I'm going
to do is pull it out to here, like so. And then I think what
I'm going to do is I'm just going to bring it down, so control, bring
in an edge loop, and we'll make it kind
of the same thickness. And then bring it down to here, like so, and then I'll stick it in this part here, so
I'll press E again. Like so. And then what
I'll do is I'll pull it into place with E again,
right into place there. Control, left click,
right, click. Well, not left
click, right, click. Left click, drag along. Left click. There we go. Alt Shift click, E, enter Alterns, pull it out. And there we go.
We've got something now that's holding it in place, and that can be just
made out of metal. Alright, so now what we want to do is we want the big
massive cylinder up here. We'll bring that
in, first of all, so we'll press shift D, and
we'll bring in a cylinder. We'll also make sure it's
on 24, save out our work. And then what we'll do is
we'll bring this up and just put this into place
where it's going to go. So this cylinder is pretty big. It's full of chocolate drops, so it needs to be
fairly, fairly big. We're talking something around kind of maybe even this size, maybe a little tad smaller,
but something around here. And then it's going to start
from all the way up here, and it needs to be quite tall, one of the tallest things
in the factory, actually. So something like this
is quite dominating. You can see it from miles
away, and there we go. Now, what I want to do now is just bring him a flour mill, and just to show you the
difference in height, it's fairly big part
of the machine. I'm just wondering if, though, I've got it a little
bit too high, so let's bring it
down a little bit, what I'm trying to
do is measure if I'm taking an image or a render, it's a little bit too high. So what I'm going to
do is just bring it down a little bit round here, and I think that actually
is looking a bit better. Now, what I'll do is I'll
do the top and the bomb, so I'm going to grab the
top and the bomb, E, enter, S, bring it out, and you can see it's coming
out in a not very nice way, which means I can put it
on individual origins, now press the S bone,
and there we go. And then E, enter, and then S and Z. And it's not going to
work because I have to swap it back then
to medium points. So S and Z, let's swap it back. Like so. And then what I want to do is I kind of want
it to look like this. So to make it look like that, all I want to do is Alt Shift
click Alt Shift, click. And then I'm going to press
Control B and bevel it off, even give a few more
bevels in, like so. And then finally, I'm going to do the same thing as I did with this one where I'm
just going to press I just to bring it
in just slightly, and then just lift it up very, very slightly just
to give it that rounded edge off,
and there we go. And then what we'll do is on the next one is we'll
bring in some glass, we'll bring in not
on the next one, but we'll finally,
when we finish this, we'll actually bring
in some glass, and then the chocolate drops
can be underneath there. So it actually has
that little shine on before seeing the
chocolate drops, and that's exactly what we want. But before doing any
of that, of course, we're always going to
finish building this out and basically getting all the shaders on
and things like that. Then we'll do the
chocolate drops and glass, and finally, then then we'll do an actual particle system. And a particle system, we'll be here to, you know, have the chocolate
drops dropping down. Alright, everyone, so I
hope you enjoyed that. I'll see you on the next
one. Thanks a lot. Bye bye.
56. Creating additional decorative detail on chocolate chip machine, adding gouge measurement system, ad: Welcome back,
everyone to Blend and Beginner's master class,
the cookie factory. So now let's actually press Let's grab this
cylinder, first of all. Let's press Shift desk
and Custer selected. And what we're gonna
do now is bringing a pipe, so pipe joint, as we've done many times
before. So pipe elbow. Let's put it on 24 as normal. Let's put it to 90 degrees. We shouldn't have any problem at all dealing with this now. So first of all, let's make
it a little bit smaller. So what I'm going to do is turn the radius down to
something like here. And I want to bring this
down into place so I can actually see where
it needs to go. Don't press Control Z because
if you press Control Z, it might not work out correctly. So what I want to do
is rotate this round. So you can see, I want to rotate this by 90 degrees, I think. Then let's rotate it the other way. I think
it's this way. Yes, it is. So 90 degrees. And then finally, I want
to bring this down now. So the location of the
z, let's bring it down. And now you can see we've got a good idea of the
scale of this thing. Now, first of all, I want to
push it more to the front because I actually
want another big piece actually over here. So you can see, as well, now I've moved this like
that is not we wanted. So first of all,
delete, shift a. Let's bring in another
pipe joint pipe elbow. And there we go, now what
I'm going to do is I'm going to bring down the
radius even more, and then I'm going to
bring it down once again. Like, so I'm going to rotate
it round by 90 degrees. I'm also going to rotate this
one round by 90 degrees, and I'm not going to forget
this time that I cannot move it with the little arrow. So what I'm going to do
then is bring down the z. So bring it into place and
then move it over with the Y. So let's move it over. And this is exactly
where I want it. So from here, we can put
a big cylinder in here. Now, this is still too big, so let's bring it down
a little bit smaller, and let's bring it over
on the Y down to here. Now, this is near enough
in the right place. I think I have to move
it up a tiny little bit. So let's move it
up a little bit, like so, and then we'll
drop these down now. So let's start. Let's bring it all the way
back to something like there. Let's bring the length in, then all the way down to
something just under there, like so, and I think this
now looks about right. Now, clearly we can see that these are now
in the right place, so we'll move those next. So what I'm going to
do is come to this, and I'm going to
grab all of these. So Alt Shift click Control plus Control
plus, Control plus, Control plus, and then
I should be able to now move those up
into place like so. And finally, then I'll grab these little bars bolts here and put those
into place, like so. And then I can come
to this part here, press Control R.
Left click, right, click, control, left, click, right, click, grab
this one first. S said zero, pull it
up to where I want it, which'll be somewhere
around there. And then Alt Shift click
and then S and Y and zero, and then move this into
place where I want it, which'll be something
around there. Now, what I want to do
now is make this joint. So, shiv, click, eat,
enter alter ness. Let's bring it out
to where I want it. So something like
this looks good. Right, click, Shade auto smooth. And now let's do the
same thing on here. So l shif click, eat enter, alter ness, and pull it out, like so, right, click,
shade, auto smooth. Now, let's get rid of this
horrible bend on here. So what I'm going to do
is, again, I'll come in. Grab this and then Control B, pull this out a little bit, making it just a
better bend like so, and I'll also while I'm here, clear the sharps off like so. Now what we should be able to do is we should be able to write click and
shades move by angle, and then it should look better
than what it did before, although shades move
by angle. There we go. I'm just wondering if I can
move that up a little bit. I'm going to take off the sharp, so keep sharp edges.
Let's take those off. And I'm just wondering if I've actually not gone far enough on that or if I'm
worrying about too much, which I might be. You know what? I'm going to leave it at
that. It's gonna be okay. All right, so last of all, then, do I want a little
ridge under here? I think I do. Just a tiny ridge. So I'll press control law. And I'll bring it
just below there. And then what I'll
do is I'll grab this Alt Shift plate,
heat, enter Alter, and bring that out a
little bit just to create a little bit of a ridge under there. I think
that looks better. And now we're on to the big the big kind of
cylinder on here. So shift day, let's
bring in a cylinder. Let's make sure it's on 24. Let's bring it down,
then, and what we're going to do
is move it over. So I need it to be a
little bit smaller. And this is the thing
that's actually powering this thing so we
need it quite big, quite hefty, quite chunky. So something like this, I think. And then it's gonna
come down to, you know, it's also
held up with this. We have to remember that.
So we don't want it toppling over or
anything like that. And more so wondering if I
make this a little bit bigger, so like this, can I actually
move this over then? I think I'll move this
over just a little bit, and that means that
I'll have to come into this Alt Shift and
click Control plus, and then I'll just pull
this back into place. And then I've got a
little bit more room. Now, why did I want more room? Because I actually want to have this bolted onto the top here. So let's do the top first. So control, bring it up. And then Alt Shift and click, E, enter Alterns and bring it out, and then I'll do the bottom bit. This is where the bolts
are going to go on. So control R, bring it down. We want this fairly chunky, so it's holding a lot
of weight on there. So Alt shift, and click, E, enter lns and bring this out, so right click, shade smooth. Now, let's bring in
those bolts again. So I'm going to come
to these bolts. I'm going to grab
them with shift seleglight. Shift D then. And then what I'm
going to do is I want them right in the
center of here. So I'm going to come
to this shifts, curse to select come to
both of these parts, so make sure you've
grabbed them both. Shift desk and selections. Cursir. And then what
you're going to do now is you want to grab just
the actual ring. So if I come in and
grab the ring here, as you can see, I can then
pull this out like so. I can turn this off now, and now I can really
see what I'm doing. Now, first of all, as you
can see, these bolts, they're way way too small, at the moment, we need a much,
much chunkier than that. So what I'm going to do
now is grab the bolts, press tab, and then I'm going to press A, just to grab that bolt. I know it's in there somewhere. And then what I can
do is I can really, really start to bring these out, as you can see, making
them much, much chunkier. Press the tab button,
and there we go. Now you can see, they're
looking much, much chunkier. Now all I need to do is think, how many of these
are going to be. I'll increase the amount. Round to there, and the distance needs to be slightly
slightly more, so let's bring them back and put them to roundabout there. All right, perfect. Now, again, let's see if I press
if I go to object, come down to convert and mesh, it's going to mess them up. So we know what's causing that. We know that we need to
go over to our animation, press delete back to modeling, press the Tabb object,
convert to mesh. Like so, and then get rid of
this ring, and there we go. That is that part done. Now, let's think about
this part going down here. So I'm happy with
all the rest of it. Let's press your day then, and what we're going
to bring in is a cube. And I want this to
sit on this cube. So again, this cubes
going to be quite chunky. In other words, it's quite big. Gonna have to sit right on
there somewhere around there. And then what I want to do is I want to bring this bit in. So this bit here I
want to bring in. So all I'm going to
do is press Control. I'm going to bring
in an edge loop. Why is the edge
loop not coming on? Control. There we go. Let's bring in the edge loop, so we're going to
pull it to there. And then what we're going to do is we're going to pull this back underneath
this part of here. Now, the thing is,
I don't want to pull it back so that
it bends all this, so I'm going to bring
in another edge loop and put it around there, and then it'll enable
me to pull this back, so you can see now
I can actually pull this back without any issues. And inside here, we can
have all of the you know, the what they call the little I'm going to
actually show you. I'll go over to
the mixer machine, bring it on. These parts here. This is what I want. Let's
press the little dot on. So I'm going to steal,
I think, all of this. So I'm going to steal this part. I'm going to steal all
of this part here. I'm going to just use
these two icons here. And then what I'm going
to do, press Shift D. And I'm going
to bring it over. And I'm going to press
P selection like so, and that is what
I want, I think. So now I can grab it. Press Control A
or transoms right click Set origin to geometry. Now, let's bring this over here. It's always handy when we've got things that
we've already built. Let's press Z 180
to spin it round. And then what we're going to
do is put this into place. Now, first of all, we can see that we need this
much, much bigger, so let's make it
much, much bigger, like so, and let's
put it into place. Round about there.
And you know what? We'll hide all of
this out of the way, just so we can see
what we're doing. So I'll put it in
something like here. I'm going to bring it
down a little bit. I'm just wondering if I need to stretch it out or
anything like that. I think, you know
what I will do. So what I'll do to
stretch that out. Is all press Alt Shift
click going around here, Control plus going
all the way around, and then we can actually
stretch that out. And from there, then what we can do is we can grab
the whole thing, put it back to the middle, and then we can come in
now and grab this here. So grab all of this,
Shift D, bring it over, and then shift D,
and bring it over, like so, and you can see we're a little tiny bit out on this. So let's bring it over
a little bit more. And then Alt Shift click again, Control plus all the way up. And then we can actually
move it out like so. Now we want to do is
move each of these. So I want to rotate
this, so R Y. You can see it's not
rotating through the middle. So all I'm going to do
shifts, curse to selected. Now, you want to press
your little sideways V next to the question mark, and you'll see three D cursor and now grab the whole thing, and then press R and Y, and now it will rotate
directly on there. Let's do the same thing
on this one then. Shift desk cursed selected, L, and then and Y and
rotate it this way. Not that way, actually,
we'll move it even further. We'll put it down to here,
something like that. It'll sideways be again back to individual origin
so you don't forget. Alright, so that's
that part done. And the next one then,
we should actually get this finished, ready to go. And then what we'll do is
we can actually put in some more supports
because we're definitely going to need some supports
going around here. We haven't actually
put in any supports. We definitely want them. So we'll put in some
supports going around here. We'll actually create
the supports that we'll I'm just wondering if
we create those supports. I'm just wondering yeah, I think we'll create some different supports
coming forward. So round here, we'll still have the supports
that we've got here. But as we get further
on into here, we'll use some
different supports. Alright, everyone. So let's say that'll work, and I'll
see you on the next one. Thanks a lot. Bye bye.
57. Manually addign detail to conveyor belt, creating supports in custom places for a mor: I can run to blend the
beginner's master class, the cookie factory, and this
is where we left it off. Now, what I'm going
to do is I'm going to actually grab this part here, press Shift D, and I'm going to bring this then around to here. Now, I want this
to be kind of in the center of this part
once I've built it, so I'm just going to leave
it there just for now. And what I'm going
to do, first of all, is come to the bottom of here. I'm going to press E to S and
pull this out a little bit, like so, and then
we're going to press E and bring it down to
pretty much to the floor. So if I bring it down
to roundabout here, you can see then it's pretty much in there once
I've brought it down. Alright, that is what we're looking for,
something like this. And now what we can do is we can bring the
rest of it back, so press t H, bring
the rest of it back. This is what we're
looking for now. It's all kind of supported. We just want to make
sure that this part on here is also kind of
supported this part here. It's supported here,
but at the moment, it's just going
to be floating in the air, and we don't
really want that. So we want it to be
supported from this bit here and another bit
coming from underneath. So what I'm going to
do, first of all, is I'll come to this part here and we'll
do this part first. So I'm going to
press the i button to bring this and
then I'm going to press the E button to bring it out and put it into
place like so. You can see at the
moment, it's not really working because it needs to be much, much thinner than this. So S and X, let's bring it in. If it's not coming in,
just use medium point. So S and X, bring it in. And then also what we'll do
is we'll bring this part up. So we're going to bring
this part up like so. And then I want something similar to this part
here that I'll be going and kind of holding
it underneath here as well. So what I'll do is I'll come
to this part here first. I'm going to press the Ibn and then what I'll do is
I'll press E, like so. I'll press I'll make it a
little bit thicker, actually. Then I'll press the Ibn
to bring it in, like so. And then what I'm going to
do is I'm going to press E to bring it down to here. And then just I
want a little bit of an edge loop in there, bring it down, and then I want to pull it
across into place. So E, pull it across into place, like so, another edge
loop control la. And then what we'll
do is we'll make another part on here, Alt Shift and click, heat, enter Alter Ness, and
bring it out like so. Now what we'll do
is right, click, Shade moove and there we go. That is that part done. That all looks now like
it's fitting together well. Lastly, then, I want to
put an edge loop going, you know, kind of
around this part here. So if I press control law, we should still be able to put an edge loop going round there. And then what I can do
is I can move this then down to where I want it.
So something like this. And then I might be
able to get away with putting an edge loop
round here as well. So what I'm going to
do is I'm going to have one edge loop.
You know what? We'll just bring two
edge loops like so, and then I'll press Control B and just bevel that
out a little bit. And from there, then
I can actually put a ridge going round here.
So what do I mean by that? So I can come in going all the way around to this side,
grabbing this one, all the way around to this side, pressing E and Alter ness and
pulling them out like so. Now, you can see that
they're not even. You can see definitely
definitely not even. Just put offset even
on, and there we go. Now, you can also see
they're too far out now, so I'm just going to
press the S button. I don't like that. So what I'm going to do is I'm
going to do it again. Alter ness because I've
still got that there. And now you'll see
when I bring them out, offset even has already
tipped, that is what I want. Finally, then, let's
come to this part here. And what I want to do is I
want to bring this part here, so like this, and I
want to bring it in. Now, unfortunately, I will
have a problem in that. If I bring this in, it's going to have some
crossovers if I'm using extrude or if I'm using insert. So I
don't really want that. So what I'm going
to do instead is, I want to press Shift D, I'm going to pull it
out, press delete, and limit to dissolve, and then I'm going to
press the i button and bring it in that
way, and there we go. Now we can actually bring it. Now I'm going to do it, I'm
just going to pressure D. I'm going to pull this
out. Get rid of this one. So L and delete vertices. No, that's not
working like that. L, let's try that again. Delete vertices, and now we've
just got this part left, which means I can extrude
this out like so, press the born and put
that into place now. And hopefully, if
I lift this up, I should be able
to put that into place so it actually fits in there nicely like
so, and there we go. Now, let's pull it at
the other side as well. So Shift D, we'll bring it over to the other
side, and there we go. Alright, so this part is, I think, looking
at my reference. Pretty much done.
Now, let's pull this over we forgot about this part to where
I actually want it, so it's going to be quite small, and it's going to be sat. Let's have a look.
Round about here, maybe even a little
bit in, like so. So let's deal with
this side of it first. So all I'm going to do is
I'm going to grab this one. I grab this one, and then
I'm going to pull it back to this point here. And then what I'm
going to do is grab this one going all
the way around to here and I'm
going to pull this out into place like so. Alright, that is looking good. Okay, so now while we're here, before moving on and putting
all of the other things on, what we might as well do
is put on these parts. So I'm going to
grab all of these. So all of these parts, not that one because
that one's a bit small. What I'm going to do
basically is press shift D, and I'm going to bring this over then to where I
actually want it. So we can see if I
start round about here, let's try and get this one at
least into a decent place. So we'll put it
into place like so. And then we need one on
the other side, of course. So what I'm going to
do I'm thinking that, yeah, I can move this one into
place and rotate it round. So let's rotate this.
So z, rotate round. Let's put this on normal. And then what they'll
enable me to do now is move it along the axis that
have rotated it round two. And there you go.
Now you can see, it's nearly fin in place, just a little bit this way. Maybe I've gone a
little bit too far. And then we go, that
looks about right. Now, let's do the same
thing with this then. So we're going to press R
and Z and rotate it round. Then let's push it into place. Like so, and there we go. Now we've got that coming round, and now I think we just
want a couple more on this. But I think these ones here. I think what we'll do is we'll actually bring this out to here. So I'm just wondering
whether they have it in two or whether
we have it in one. And I'm also wondering
whether we've got enough rollers actually
going around there. Let me see if I can increase
the amount of rollers. So we've got gears here. We can change the distance. And what we could do instead
is we could have it like that and then miss one
out and then put one in. I think that might be
the best thing to do. So what we'll do is we've
made a mess of these ones, so but we can fix that. No problem. So we'll
pull this over here. We'll grab this one, we'll press Altar, then we'll reset it. We'll actually delete
this one out the way. And then what I'll do is I'll
pull this round and then Z, 90, spin it round
to the right way, and then just drop that
into place where I want it. So even though this is
rotating a little bit, as you can see, we might actually rotate it just a little bit just to
match it. Like so. And then what I'll
do is I'll press Shift D on both of these. So Shift D, I'll drag them over, and then I'll put the
first one in place. So this one here, Rs 180, let's pull it into place. So we want it just under there, as you can see, like this
one. So there we go. That one's in place.
And now we'll do the same thing with
this one, Rsad 180. Like so, and you can see now because we actually
spun it round, we've actually got it at the
same angle as the other one, and that's looking pretty good. Now, let's come
with this so we can pull this back into
place like so. And then what I can do is I can press Control A or transforms, set origins, geometry,
shift D, drag this out. And then rotate it round. So I 97 to go over the top, and let's just get it in
the right place first. So we was the one to even on both this side and this side. So I'm going to put it
round about to here. And then what I'll do
is I'll grab this one. I'll press Shift
D, bring it over, and then z 90, and then let's put
this one into plate. So I'm going to
drag it to there. And then pull it out into place, and then just make sure that
I also do the other one. So I just want to
make sure it's a little bit further this way, so I'm just going to
pull it over there, and then shift D,
drag it over here and put this one into
place. Like so. And then I can pull this
back a little bit like so, and then grab both
of these, Shift D, bring them over,
and then R Z 180, spin them round,
and then just make sure that they are
in place as well. Like so. And there we go, making sure that this
fits, double tap the A. And there we go, I think
that is looking pretty nice. And yeah, we can have
now the next one. So the next conveyor
coming from this part, and this will basically be
sprinkled cookies after that. So let's put it on
to material view. And on the next one then,
what we're going to do is we're going to basically get all of the
materials on here, including this glass
and underneath it, what they called the
chocolate drops. And I'll show you how
to do that, as well. Alright, everyone, so I hope you enjoyed that, I'll see
you on the next one. Thanks a lot. Bye bye.
58. Adding shader material to the chocolate chip machine and uv unwrapping chocolate tank to add chocola: Welcome back if you want to blend a beginner's master class, the cookie factory, and
this where we left it off. So what I'm going
to do now is I'm going to come to this part here. I'm going to grab this
part going around here. And what I'm going to
do is press Shift D, and then I'm going
to press the Spun and just pull it
out a little bit. This then will be
my actual glass. That's why I want to do this. I want to actually
add glass onto here. Now, first of all,
before we do that, this part here is definitely
going to need metal on it. So what we'll do is we'll come over and the other thing is, we haven't actually
added on our bevels yet. So let's do those first. So we'll start on
this part first, and all I'll do is I'll come in. Add a modifier,
generate a bevel. And when I go down to geometry, turn off my clamp overlap, put this down to note point
note three as normal. And then what I'll do now
is that's done so I can actually come round
the other parts and do it on all of them. So I can grab all
of these parts. I can grab this part here
as well, this part here, this part here,
press the G button, and then look which parts
I've not got it on. Now, this one here, I'm fairly sure already has it
on, as you can see. These bolts don't, so I
can grab the bolts and press the G. Grab the
bolt. There we go. Press the G. And from here, we've nearly got everything,
so I'm going to grab this, grab this last, press Control L, and then I'm going to
copy modifiers like so. Now, all of these now should
have a nice bevel on, so let's actually have a
look, and there we go. We've got a nice bevel on there. Back then to material view. And then what we're going
to do with this one is we'll go to material. We'll put on the
metal light like so. And obviously, this
doesn't want to be metal light this part here. So now we want to do is I want to actually create a new
glass, so new glass, and we'll call it
main or we'll call it sprinkler glass. Like so. And then what we'll do
is we'll press tab, and we'll grab that one
that we already made, and then what we'll
do is click a sign. Now I want to do is we want to head on over to my shading. I'm going to save my workout, head on over to
my shading panel, and let's press
dot to Zoom to it. Let's put it onto our rendered
view. And here we are. Now, what I want to
do is then I want to create a new type of glass, and what we want to do is we
want to use something called fresnl and the fresnll basically what is
fresnF of all, fresnel, it's supposedly pronounced
frenl and it refers to the way light interacts with the
surface depending on the angle of view or
the angle of incidence, and it's used to create kind of a bit more
realism in your glass. So when you're
looking at things, you want that little
bit of shine, you want to see
something's behind glass. This is a perfect
thing for you to use. So let's then, first of all, come in, and what
we're going to do, we'll say up kind of
the same way as what we did with with our other glass, except instead of using glass, we're going to use a glossy. So Shift A, search, gloss. So glossy BSDF. And then what we're going
to do is we're going to set the roughness down to zero. And then what I'm going to
bring in is a refraction. So shift A, refraction, like so, again, a BSDF. And what I'm going to do is
I'm going to set the yeah, I think I'll put a
value in with the IOR. I'll just set the roughness, make sure it's down to zero. Alright, so now what
we're going to do is mix those two
shaders together. So mix shader like so. And then what I'll do
is drop that there, and then I'm going to
plug in this glossy into the bottom and this
refraction into the top. And then go to
plug both of these into the surface, and
that is what we get. Not what we're looking
for. Looks kind of weird, but let's go one step further. So what we'll do now is
bring in the fresnel. So shift day, search
fresnel like so, and then what we'll do
is we'll bring the Iowa. Both of these Iowa want
to be on 1.5, like so. And then what I'm going to
do is bring in a value. Shift day, search,
bring in a value. And if you remember the value, you can alter things
at the same time. So if I put this
to 1.450, like so, and then plug it into
Marawa on this one, and then plug it into
Marawa on this one, and finally plug that into
the fact of this one, we should end up with
something like that. Now, the moment we can't
really see anything, and that's because
this on the inside of here hasn't got any chocolate drops on
or anything like that. So let's first of all,
hide that out of the way. And now what we'll do is
we'll make a new one, and we'll call it
chocolate drops, so new chocolate drops. Like so, and there we go. And let's click Assign. So now that'll go white. And then what we'll do
now is we'll come back to our course data. So our course download
pad that we had, so let this load up again. And then I'll go to my
course download pack. So here we are. Here
is our chocolate drop. So let's drop down
there, and there we go. Now, as soon as we plug this in, let's plug it in, press
the tab, and there we go. We can see we've got glass over the top of our
chocolate drops. Now, of course, we do
have a problem in that these chocolate
drops look gigantic, and we don't want
chocolate drops like that. So what I'm going to do is
just press Control T. As long as you've installed the no
wrangler, this should work. And what now I want to do is obviously make these
much, much smaller. So I'm going to come down scale, drag all the way down, press eight, and then we can change the scale
of those like so. Now, some of you keen eyed out there might be wondering oh, this is plugged in
via the UV map. And the reason why
the UV map works, and we haven't got to unwrap
anything is because when we bring in a cylinder or a cube or even a cone
for that matter, blender has already
actually unwrapped it. Simple primitives are
already unwrapped. It's only when you start
doing complex things to them like this where they're not
going to unwrap correctly. But when you first bring it in, you can get away with it
already being unwrapped. Now, as you can see,
this is looking pretty nice. All the way round. It is a seamless texture, so it should fit
absolutely perfectly. If you don't bring in
a seamless texture, you are going to have like lines down here where it's
actually joining. So just take that into account. You can barely see where
any lines are joining us, as I said, it's a
seamless texture, and it looks very, very nice. Alright, so that is
the chocolate drops. That is the glass dum.
And now what we can do is head on over
back to modeling. I can press the tab button now, and you will notice, as well, that because we're
in material view, you won't be able
to see that glass. Glass only works basically
in the view of cycles, the way we've set it
up is for cycles, so just take that into account. Alright, so now let's
come to this part here. And what I'm going to do is
I'm going to click down. I'm going to go to my
metal light, like so. I'm going to also put
metal light on here. So metal, where is
it? Metal light. And then what I'm going
to do is I'll come to, we'll come to this part here, again, metal light.
And you know what? For me, to make it a
little bit easier for you, I'm just going to say I work, and I'm also just gonna
put it on Render view because I know you guys
will be able to see better. Now I've got it on there.
So double tap the eye. Also, I'm going to change this from normal to global as well. Okay, so now let's
actually do the next part, which will be this part here. So what I'm going to do
is I'm going to bring in metal light, so metal light. And then what I'm
going to do is I'm going to also put metal
light on these parts. I'm going to join them
together, actually, Control J, and then we're
going to click down arrow. We're gonna put it
on metal light. And then these parts here
now, I'm going to come in. Alt, shift, click Alt Shift click Control plus all
the way up to that, then sharp plus bun, down arrow. And metal dark, like
so, and click a sign. And then I'm also thinking the bottom and the top of here, you can see this is
what it looks like. I think I'll
actually leave that. I think the only
thing then I need to change is this
part around here. So what I'm going to do
is I'm going to come in, Alt Shift click Control plus, Control plus, grab this one
here, Alt Shift, click. And then what I'm going to
do is click the plus button, the down arrow, and
I want the orange. So orange, click a sign, and there we go, that
is that part done. Alright, so let's move on. Let's bring in this next part, which will be this part here. So this part is all going to be meal going all the
way around to here. This part is also
going to be met, so we'll just go
metal light, like so. I'll grab this one, and
I can't grab that one, so I'll just grab this
one and this one, press Control L, and we're
just going to link material. Then we'll come to
this part here, and all of this part, apart from the part underneath
will be orange. So I'll just grab this one, press Control L, link materials. Now I'll grab this
plus down arrow, factory orange, tab,
grab all of this. We don't want this
part down here. So this part down here we
definitely don't want. So I'm going to actually make
some alterations to this. So what I'm going
to do is I'm going to grab factory
orange, click a sign. And then what I'll do is
I'll grab this one on here, and I'll grab this underneath. So I'm going to grab
this underneath. Click Control plus, like
so, minus this off, grab this one on here then, and also going around here, and then I'll click
Plus down arrow. And then what I'm
going to do is go to Metal Dark click a sign, and then we're going to
press Alt Shift click, and I want to basically grab it going all the way
around here as well. So I'm going to grab it going
all the way around here, like so, and then metal
light, click a sign. And there we go. That
is that part done now. And then I'll do the same
thing on here as well. So this one on here,
as you can see, it's got a little
bit round here, poncho plus, plus down
arrow and metal dark, and click a sign. Alright, looking good. Now,
let's come to this part here. So this part here
needs to be blue, first of all, factory blue.
And then these parts. So these parts on here
we'll put as yellow. So yellow plus down arrow, factory yellow, click a sign. And then we'll also
do the same on here. So I'm just going
to grab this one going all the way
around to here, and then shift let's select this one going all the
way around to here. Control plus, factory
yellow, click a sign. And then finally on
this Alt Shift and click plus down arrow, and we want the metal light, click a sign and double
tap the A there we go. I'm just wondering
about these on here. I'm sure these green on the
other one. You know what? I think I might make
these green or red. So what I'm gonna do, I'll
make two of them green. And then one of them red. So plus down arrow, red, click a sign, and there we go, double tap the A,
and we forgot one. Did we forget that
pot? No, we've not. Alright. There we go, guys. That looks really, really nice. And yeah, I think I'm
happy with how that looks. Alright, so on the
next lesson, then, we first of all, need to make our sprinkles come out of here. That's one thing we need
to make sure happens. And then we need
to make sure that our next platform is going to be moving along into the oven. So we'll make that happen as well. I'll show
you how to do that. And we also need to make sure
that these cookies that are coming out of here actually
have sprinkles on them. So I'm going to go to file.
I'm going to save on my work. I'm going to put
it on object mode, and I'll see on the
next one, everyone. So I hope you're
enjoying everything. Hope you're enjoying the course. I hope you learn tons and tons. That's what it's all
about. I'll see you on the next one.
Thanks a lot. Bye bye.
59. Lesson 58 Creating chocolate chip detail for cookies using rock generator in blender, adding it o: Welcome back if we want to blend the beginner's
master class, the cookie factory, and this
is where we left it off. Now, what I want to
do now is come over here and I want to actually
make some more parts. So basically, we've got, where are the conveyor
belt objects, cookie dough, dough
balls, and flour bags. We want to make three
more of these ones. So we want three of these. So we're gonna press
Shift D, bring them over. And then what I want to put
these in is cookies with chocolate chip cookies
or raw Cookies. Let's put them in that, like so. And then what we can do
is now we can drag these. So whereabouts have
these gone, I think. They're not in
there, not in there, not in there. Are they in here? I'm actually trying
to find them. Press a little dot on.
That will find them. There we go. Raw cookies. Alright, so raw cookies, we can drop up here, and we can put it in conveyor
belt objects right there. Okay, so that's those. Now
we need the chocolate drop. So again, shift right click, we'll put your cursor
there, Shift day, and then we're going to do mesh, and we're going to go again to Rock generator and
the Rock generator. We want it on River Rocks, because I think River
Rocks is the best one. Let's have a look if
it is River Rocks. I'm sure it's river rocks. Let me just create a few more. Yeah, river rocks, they look
like chocolate drops to me. So what we'll do is we'll
have ten chocolate drops. Let's see if they're all like, Okay, so once I move
one out of the way, you can see now we can
move them into place. So what I'll do is I'll
just put them all together. Now the thing is about the
chocolate drops, obviously, these are, first of
all, way too big. And second of all, probably got way too much topology on just
for little chocolate drops. So we'll actually sort
those out, as well. I'm going to press G just to put it over here, and this one. I don't know what
happened to that one. I think it's usable, so I'll
make it a little bit bigger, just the same as the
others like, so. Alright, so let's
go over the top. And what we'll do is
we'll grab them all, go to object,
convert to mesh, so. We don't want to join them together or anything like that. But what we want to do if we come over to one of them now, go to our little span and add
modifier, go to decimate. You'll see it has 2000 polygons. We really don't
want 2000 polygons. We want to bring it
all the way down. These are tiny, tiny
chocolate drops, so we really, really
don't want that. Then what we want to
do is we basically want to grab all of them. So let's grab all of them. Make sure you've
grabbed this one last, press Control L, and we're going to copy modifiers like so. And there we go. There we've
got our chocolate drops really low on the topology now. So let's press Object because
if we press Control A here, it will only actually apply
this decimate to this one. So we're going to go to object, convert to mesh,
and there we go. Hopefully, these will be
our little chocolate drops. So let's put them over. And what we're going to do is we're
going to put them there. We want them in their
own collection. So we're going to press
M, new collection, chocolate. Drops, like so. And there we go. Now,
let's come and find it. So here is our chocolate drops. Let's drag them up and put them into they're not really
part of the conveyor belt. Actually, they're not
really part of that. So what I'm going to do,
we've got a conveyor belt. I'm going to actually put
them right at the top there because I want to actually put them into a particle system. Now, the other thing
is, I want to also sprinkle these round on
these actual cookies. So what I'm going to do is I'm going to drag
these over, like so. And then I'm going to press
seven to go over the top. And then I'm just going
to grab a few of them. So I want to make these a
little bit smaller as well. So I'm going to
grab them as well. I'm going to press the S bun. I'm going to make them
much, much smaller like so. And then what I'm going to
do is press Control A all transforms right clicks
origin to geometry of each. Then what I'm going
to do is press Shift D. I'm going to drag them over. And now, all I want to do is just press Shift D,
grabbing different ones. Shift D, and then Shift D, grab some really random ones, like so and then
Shift D. Like so, and all we're trying
to do here is just turn them into
basically cookies. And that's why I
want them looking a little bit different
from each other. And it's just a little bit of short time just to get them
the way that you want them, shifty like so, and then
we'll grab this one. And then this one over
here, and then this one. Lots and lots of
chocolate chips in them. Grab this one over here, and finally this one
over here, like so. Now, one thing I
did forget to do. You can see they look beautiful. They look like
cookies. That's great. One thing I did
forget to do, though, is actually make them
look like chocolate. So what I'm gonna do, first of all, is I'll come to this one. I'll go to new and I'll go
to chocolate chips. Like so. And then what I'll do
is I'll go to my dough, and I'll click the down arrow, copy material, and then
we'll come to this one. Which one was it? There
it is. That one there. And then we'll go to shading. We'll press a little dot
bun on our chocolate chip. And then what I'll
do is I'll click the down arrow and paste
material, and there we go. And then what we'll
do is we'll turn them into much, much
darker chocolate. So let's bring it
down, and there we go, now they look like
actual chocolate, with a little bit
of a glisten on. And now we can go back
to modeling let's put it on to material mode so we can make sure we're
doing the right thing. Let's grab all of
these, all of these. And then what we're
going to do is just grab each one of these because I forgot I needed a material on, like so, like so. And then grab this
one last, Control L, and then copy modifiers, so not copy modifiers. Copy link materials.
There we go. Now, we can get rid of
these because these are in not the
right place anyway. And then what we can do is
we can grab all of these, grab this cookie,
press Control J, and then grab all of these, grab this cookie,
press Control J, and then grab all
of these and grab this cookie and press
Control J, and there we go. So these are the raw ones, and these are the
chocolate drops. So now these chocolate
drops should be, if I grab one of them should be in something called
chocolate drops. They're all in there. They're called rocks,
but that'll be okay. And then these cookies now, if I press the dot
but, should be under raw cookies,
which they are. So now we've got
all of that set up. Now we can actually think
about a porticle system. So what we want to do, first
of all, is come over here. So I'm going to come
over to this one. And what I want to do is just
bring in a simple plane. So shift D, bring in a plane. Now the thing is,
I didn't actually attach my cursor there. So shifts, cursor selected, shift a and bring in a plane. And what I'm going to do
is make the plane smaller, and I'm also gonna
bring it down. You know what? First of all, I'll put it over here,
and then you'll be able to see exactly
what I'm doing. So now we've got a plane, let's press Control A and
resell the transforms because we did make it
a little bit smaller. And what we're
going to do now is we're going to go over
to the right hand side, click on particle systems, click No, and I'm
going to call this. You need to call it the same in both of these, by the way. If not, you're not going
to be able to find it. It's going to be very hard
to find because generally, you can use these particle systems again in something else, but you need to know
what it's called. Now, I find if I don't
rename it in both, it doesn't actually
come up properly. So what I'm going to do
is call it chocolate. Drops, like so, and I'm
going to copy that. So Control C. Come to this now. Control V, press the enterbar. And then what we're gonna do
is we've got those in there. Alright, so now we
want it as an emitter. Now, if I press Space Bar, you'll see at the moment, nothing actually
happens with this. Now, those of you keen
I mind wondering, well, it's not playing anything. And the reason it's
not playing anything, of course, is because our
frame start is on one. Frame end is on 200. Now, if we go to our
layout or our animation, but we'll see on
our layout, we've got up to frames 10,000. So we've gone past there
already run 8,600. So if we put this down to
one and then press play, you will see that things start happening. So
that's looking good. Now, let's go back to modeling now we understand what
is going on there, and let's put this onto 10,000. Like, so that then noll give us enough room to go
through you know, the whole animation and
everything like that. Now, the next thing we want to do is we want to give ourselves more actual balls or
more chocolate drops. So let's put this on 2000, like so, and then we'll end
up with a lot lot more. Now, the next thing
is that they're popping up before popping down, what we need to do is we need
to make sure, first of all, that the field weights, the gravity is on not 0.16 oh. So not 0.16 oh, like so. And then you'll see
that they start popping up before they
actually drop down. Alright, so the next thing
we need to do is we need to think about what it is
that's actually in here. The moment, you will see
that if we go to render, it's on Where Is it Render? It's not on anything
except halo. So we want this to be on a
collection because we have a whole collection of chocolate drops in here that
we actually need to use. So let's go then to collection. And the one we want
is going to be W is it right the
top Chocolate drops. And here we are. Now we've
got chocolate drops. But there's not many of them. First of all, we
need to make sure that the scale is
there, and also, we need to make sure we're using the whole of
the collection. Now, sometimes this
happens where, you know, it's using the whole
of a collection like this. We don't want that. We don't
want to use them altogether. So we want different
chocolate drops. Let's make them
much, much bigger. And now you'll see we've
got chocolate drops. They're all different, like so. Again, though, I'm still not happy with everything on here, but I think for this
point, we'll save it out. And then when we come
back, we'll work a little bit more on
our chocolate drops, get them right so
they look right. At the moment you can see
they're not looking right. And then from there,
we can actually make the next
conveyor bell and put in our cookies with the chocolate drops actually
on going into the oven. Alright, every once, so
let's save our work, and I'll see you
on the next one. Thanks a lot. Bye bye. Thanks.
60. Continuing to implement particle of chocolote chips falling down onto cookies for Ble: Welcome back if we want to
blend beginner's master class, the cookie factory, and this
is where we left it off. Alright, so we need
these chocolate drops, obviously, to be a little bit
smaller than what they are. So let's bring the scale of them down just a little bit, like so. And then what we'll do is we'll
talk through all of this. So you can see at
the moment they're jumping up and then
they're dropping down. You can see as well
that the lifetime of these actual drops
isn't what it should be. So in other words, if
I bring this to here. So I'm just going to
put it into here. They should be, I'm going to make this a little bit
smaller, by the way. They should be
dropping out of there, you can see the drop down, drop down, and then they
actually disappear. And the reason for that
is because the lifetime, so the lifetime of the drops
is actually ending on 50. So if we change this to 100, you will see now that they'll drop down further and further. So let's turn you can
see now there they are. They're dropping
all the way through the floor now. We
don't want that heave. So what we want is
a happy medium. So let's try 70, and let's
see what happens after a bit. Where are they going
to die, Let's see. So here they are right
on the conveyor belt. So you want to set this exactly where
they're going to die, you know, disappear
basically is what it is. Alright, so next thing
we've got is velocity. Now, this alters the way that they're, you
know, coming down. They can be going to the side. Let's say, you've got some wind. You can mess around with these, turn this up, turn
the object velocity. If I turn this up,
you'll see that they start to get faster
or get slower, and you just have to
turn them up now by, you know, something like
this to get them sped up. Now I'm going to put that
back to where I had it in. You can also rotate
these things as well, so you can make sure they're rotating as they actually
drop down, as well. We're not going to mess around with that either.
We don't want that. We want to keep this
basic as possible. The only thing I want to show you is just the basics of it, so you have a good idea
of using, you know, how you can use this physics
engine within blender, especially for
something like this. Now, the other most
important thing, though, is where is it? Show emitter. So it can
actually hide the emitter. So once we hide the emitter, you will see if I hide
this out of the way. We won't be able to see
that emitter. 1 second. Where is it? Show
emitter, hide emitter. We won't be able to
see this emitter once it's actually rendered. So I'm going to hide that way because I definitely
don't want to see that. Now what I want to do is make
sure that there's enough of these chocolate drops dropping down into the place
that I'll want them. At the moment, there's
not that many. There's two ways of doing this. One is very, very
well optimized, and the other one is
not so optimized. So the first way of
doing it is children. We can now come to simple and have a lot more
drops drop in, but you will see that
when they drop down, they drop down in big clumps or we can have it interpolated. And yeah, for some reason.
That is not working. I don't know why. And I think interpolated isn't working because we've actually
got it using collections. What I'm going to do is
put it on non on this, and I'm going to actually
come up here and turn them up to
something like 8,000, and then you'll see
a huge difference as these things
start to drop down, like so, and I think that's about the right amount that
should be dropping down. So that's the way
we're going to do it. So that's the basic setup. Of course, come in and mess around with
these if you want to. Definitely mess around with the wind and things like this, get a good idea of what they're actually doing. Now
we've got that. What we want to do
is press Altag, bring back our tube, and just make sure that they're dropping out of there correctly. And now you can see that's
exactly how it's looking. You can see them
dropping through. Now we want to do is we
want to actually make another conveyor belt going
along here. From this point. So I want it basically
to come from here where these are
actually changing over. So they're going into
here and changing over. So what I'm going to do is
I'm going to grab this one. I'm going to press Shift
D just on this point. So Shift D. Let's grab it. Let's pull it over here. And then what I'm going
to do is I'm going to press P selection, separate it off, and you can see now's actually disappeared. So you know what?
We won't do that. We'll actually press
E and X and pull it. So we'll pull it out first.
Then we'll grab them both. Then we'll press pea selection
and separate it off. Now, we should have both
of them running like so. All right, call so far. Now, what I want to
do is come around. To my conveyor belt, and I want to put it flat. So I want to start
getting flat again. And what I also want to
do is then bring down the intersection to
make sure that they're much more together. So like so. And then what I want to do
now is take off the gears. We don't want any
gears under this. And what I want to do now
is make sure that I'm pressing Control A or transform
set origin to geometry, and now I'm able
to move it over. There we go. Now,
what I want to do is move it over, so it's in line. With this one here, and
then I basically want to have these swapping over so you can see chocolate
drops going on. We want these kind of other
cookies to come over. So when it starts, they're
going to be coming round. Here they come. Let's see if they swap over
at the right time. Nearly. You can see
just in front of it. So let's put it back a
little bit around there. And there we go. Now
they're swapping over. And they said, what
we want to do now is change these over for the
actual chocolate drops. Now, you can see that
I might be better off lowering this
down a little bit. So if I lower it
down just a tad, double tap the A, and let's
see what happens now. And then we go Okay. I'm just looking where
they're changing, making sure they're changing
in the right place. And I think that's fine
where they're changing. Alright, so far so good. Now what we want to
do is change these to be the object to be
not cookie dough, but where is it? Convey Objects. We want them raw cookies. That's the one we want,
so we're going to change this over to be raw. I'll be down here
somewhere, raw cookies. Alright, so now what
should happen is, there we go. That
is what we want. So changing let's have a look from here so we
can see them going in. Chocolate drops going on
them, and there you go. And that is exactly
what we want, and then out of the end come the actual chocolate
chip cookies. Alright, so now what
we're doing is, we actually going to start
work on the actual oven. This is quite a big part, and we also want to make sure that they're going
into the oven. Through some flaps, and then when they come
out the other side, they're actually going
to be cupped inside. So let's actually
create that now. So first of all,
let's come in then, making sure that we've
cleaned everything up. So we have got one that's
called conveyor belt, and you can see if I hide
this out of the way, it is hiding all the conveyor
belt out of the way, which is really, really handy. Next of all, then, again, the tidying up process begins. So we've got conveyor belt, which we know is
this one over here. So where is the conveyor belt? Let's have a look
what is under there. Have? Oh, conveyor belt objects. Okay, that's cool. These
are not objects, look, so they're just the
chocolate chips, conveyor belt objects. Then we've got the flour mill. Then we've got the mixer, which is this part here. Now, I think with this mixer, I'm going to have
this bit in as well. So M, I'll put it into mixer. So M, let's put it into where
is it? Where's my mixer? So flour mill, water
adder, mixer, there we go. Now let's hide that
out of the way. Then we've got our stomper so basically, let's
see what's in there. All of that is hidden
out of the way. I don't want these parts hidden
out of the way, as well. I want to put those into, not the stumper
into the sprinkler. So now let's hide the stumper. And finally, now we're left
with just the sprinkler. So if I hide the sprinkler, you can see we've got all of these things that
aren't in there. So what I'm going to do is I'm going to grab all of these. I'm going to press M. I'm going to put them
in the sprinkler, and then I should be able to
now hide the out of the way. And now we've got just
the human reference, and we've also got the
parts, and there we go, everything now is
nice and clean. We've also got this empty, which is this here. Alright, so now let's bring
back our sprinkler, like so. And then what I
want to do is also bring back my conveyor belt. So let's bring back
the conveyor belt. And I'm also going
to move this right up to the top on here, like so. So it's right up at the top, so I know I can bring that
forwards and backwards. Okay, so let's move
on to the oven. So first of all, then what we'll do is
we'll create a cube, a little bit like we
did with this one. And then from the cube, we'll actually get
everything going in. We'll actually cut it away at
the back, I think, as well. So I'm just kind of figuring out how I'm
going to do this. So first of all, then, let's make this
a little bit longer. Even though we're going
to need it longer, let's make it a
little bit longer and decide where we're
going to have this. So let's now grab this, and we'll press shifts,
Custer selected. And then what I'm
going to do is I'm going to bring in a plane. So I'll bring in a plane first. We'll also put this
in object mode just to make it a
little bit easier. And by the way, on
my rendered view, it was running
much, much slower. And the reason is because
I had it on CPU, not GPU. So now you can see much, much cleaner, much, much faster, even though everything's moving, you can see much better.
That was the reason why. Okay, so now let's pull this up a little bit and
decide where we want this, how big we want this. First of all, we're going to
need it much, much wider. So S and X, we're
also going to put an object mode so I can
actually get something done. And then what I'm
going to do now is I basically want it come
in right over the top of here so you can see here I want this edge right around
the edge of this. So I want to be able
to see these cookies before they actually
come into the oven. So maybe maybe I want to have it round about here
somewhere around there. And then what I'm
going to do now is I'm going to pull this down. So I'm going to grab this edge. I'm going to press E and Z, pull it down into place. So just pass this conveyor. Like so, so it looks as though something is
actually holding it up. So that's looking
pretty nice there. Alright, so now we can actually
create the rest of it. I want this to go to the
back of the conveyor, but not too far because we've
got an actual, you know, a big machine that's going to be doing things
with there as well. Now we've done that,
what we want to do is reset all the transforms, right, clicks Origins Geometry,
and let's save our work. And as normal, I'll see
you on the next one, guys. Alright, everyone.
Thanks a lot. Bye bye.
61. Starting the modeling process for baking machine, modeling in the passway for cookies: Welcome back everyone to blend and beginner's
master class, the cookie factory, and this
is where we left it off. Alright, let's bring in an insert then in
the front of here. So in the front of our oven, let's bring in an
insert like so. Now, do I want it
exactly in the middle? No, I don't think
so I think I'll put it to this
side a little bit, just to make it a
little bit different. And then what I'll
do is I'll grab this one, this one, this one, and this one Control
Shift and B, and we're just going to
bevel those off just to create that beautiful
round window that we want. And then what I'm
going to do also is I'm just going to press the ebonne and insert
it again like so. And then this will
be the actual window showing into the oven. From here, then,
I'm going to again resell the transforms. I'm going to come over
then add in a modifier, and we're going to
generate a solidify. Then what I'm going to do is I'm just going to come round. I'm going to make sure then
that I pull these out, pull them out, pull them
out, even thickness on. And obviously, you can see that I've probably gone
the wrong way there. So let's come out this way. Now the problem is when
you go the other way, I'm going to pull it
this way a little bit. I do need this to
be quite chunky. At the moment, it's
not very chunky, so let's make it even
chunkier, like so. I mean, it is an
oven, after all, so it needs to have
some depth to it. The problem is, though, that
you might have actually come in and changed the
face location round. So first of all, I'm
going to go hit solidify, like so, and then you can
see it's the right way. So just make sure it's
the right way, guys. Now I'm going to do is
I'm going to come in, and now you can see that I've
got both of these selected, and what I'm going
to do now is I'm going to right click
loop tools and bridge. And there we go,
because we did that, we've already got
that in place now, which means now I can
press Control law, left click, right, click
F, and fill that in. And that then will
be my actual glass. Okay, so now I can also, because I did that,
go Alt, shift, click, and press E, and pull this out, and then it's got that kind of ridge going around
there, as well. Right click and Shade
Smooth by angle. Now, this wants to
go in our oven. So what I'm going to do
is I'm going to make a new collection called oven. Like so, and I'm also
going to bring my oven up and put it just
under my sprinkler, so I'm going to drop it
just under there, like so. Now, I'm going to bring back
a minute my flour mill, because what I want
is this part here, so I'm going to zoom into it. I want this because I don't actually want to
create something new. So I'm going to press Shift
D, duplicate that round. And then what I'm
going to do now is put that where my oven is. So over here, let's
put it over here, make sure that it actually fits, and it's going to
have to be probably a little bit bigger and
certainly a little bit longer. So let's see how this
is going to fit. So I'm going to
pull this up into place going into the
oven round about here. And it's actually
fitting in very nicely. So that's one good thing. And I think also we'll
have a back from this oven that's going to come down and
create a back off here because I think not
hving a back on there is not going
to work for us, but I think we should make
it a little bit smaller. So we'll bring the back in now. So what I'll do is press shifts, cuss the selected, Shift
A, bring in a cube. And I'm just wondering, actually, is that
the easiest way? Probably not, but we'll
go ahead with it anyway. So S Y, let's bring it in. Let's put it into place. So we're going to put it up into place in there, look like that. And then what we're going
to do is press S&X. And we definitely don't want
it to be the same length. We want it to fit, so it's actually fitting this
in place like so. And I also want to make
sure that it's coming down to here,
something like this. And then from this part
then I can actually create the rest of it that
I actually want to create. So these are kind of going to be coming out and under here. So I'll show you what
I mean, as I go along. It's a bit hard to
explain at the moment, trying to actually
put this in place. So what I'm going to do
is I'm going to pull this out a little bit, like so. And then what I'm going to do is I'm going to grab both of these, and I'm going to pull
these into place, like so, and you can see it's
not quite fitting in, so all I'm going to
do is move this over. To the sorting this
part out first. And then what I'm going
to do with this part is I'm going to
press the tab on. I'm going to grab
all of this one, press delete and vertices, and then I'm going to come to this now and put it into place. And now you can see, it's
like, nothing happened to it. So it's fitting into place now. Now I want to do is
I want to bring it down because I want my
cookies going under there, like so, and then
all I'm going to do is grab the tops
of each of these. And pull them up into place. And now we've got that
into place there. That is looking pretty nice. Okay, so now we can grab these. And what I can do is
I can press Shift D. I can bring it over here. I can press R z, 180, spin it round, and then drop that into
place on there, like so. And you can see with this
one, because I span it round, it's not really fitting
in place properly, so I'm just going
to play around with it and get it fitting
into place like so. Alright, now, the
other thing is we also have an inside of the oven. So we just have to take
that into account, as well. So we do have an inside of the oven but what I'm first of all going to do is I'm going
to fix this back bit here. So what I'm going to do is I'm going to come to this back bit, I'm going to grab
the bottom of it. Now, what I need to
be careful of is that I don't go too far
down past this point. So if I press three, let's say, I need to bring this down now, all the way down to
this point here. So if I press E, I'm going
to bring it down from there, all the way down
to there, like so. And then what I want
to do is I want to bring this out now
to this point. So I'm going to press E again. I'm going to bring it
out to this point here. Make sure that it's not
touching it, like so. So let's bring it out
to there, like so. And then what I'm going to do now is I'm going
to press Control. Left click and bring it
over another one, like so. And I think with this, I'm going to make this one
a little bit thicker. Then what I'm going to
do now is I'm going to grab this and this one, and I'm going to bring them out. So E, bring them out, like so. And then I'm going to bevel
the tops of them off. So if I grab the top here
and I grab the top here, not this one, this one here, I'm going to press Control
B and bevel it off like so. Now I'm not happy
with that bevel, so what I'm going to
do is press Control A, reset all the
transforms, like so, origins geometry, try it again and see if I'm
happier with it. And I think, yeah, I'm
happier with how that looks. Not quite that far,
something like here, right click shade auto Smooth. And there we go, I think what
I'll do before I do that, actually, I'll just come back
to it before I bevel it. I'm going to hit Control B. And then I'm going to
increase the bevel, actually, so make it a
little bit more rounded. Like, so, and now right
clicking Sheets move. And yeah, I think that's
looking a little bit better. Alright, so the rest
of the oven now. So let's come round to this
side. So that's all done. It's got a solid pot in there. And yeah, I think
I'm happy with that. Now, what I think we
need is some really, really big bulbs in there. So what I'm going
to do is I'm going to start with my bulbs. I'll press Shift D. And what I'll do is I'll
bring a cylinder. Make sure it's on 24
again. We'll bring it up. And what we'll do
then is we'll have the end of the bulbs going out a little bit. So
what do I mean by that? Let's first of all, bring it up. Let's press the Sp what I want to do then
is bring out this bit. So I'm going to press Control R, bring in a few edge
loops, like so, and then go to grab
the bottom of it, like so, bring in
proportional editing, and then let's
just bring it out. You can see, maybe, actually, maybe we could do them that way, or maybe we could have
them slanted more out. So if it come to
root, we can have them not root. Let's go to shop. Maybe we can have them
going out like this. Completely up to you, of
course, what you want to do. I think mine looking like this looks to be a little bit better. I think then I'll put
in another edge loop, left click, right click. And then Alt Shift click E, enter Alt and S without
proportional editing on, so alt and S. And if it's not working again,
just press the S button. Like so, right, click,
shade auto smooth. Now, let's think about the top of these bulbs because they're
going to be coming out. The top of here,
let's make them all, so a little bit smaller. And let's put let's
make the top first. So what I'm going
to do with the top is I'm going to pull
it up first of all, and then I'm going to press
E to S, bring it out, and then E, like so, and then I should be able
to drop that into plate. So if I drop this int plate, it should just sit
on top of there, like so, and then we can see where the actual
bulb is coming down to. So if I hide this
out of the way, we can see there's the bulb
in there because don't forget we want to be able to
see it through the window. So we want to be able
to see what this thing looks like because you're not going to be able to
see it through here. So you want to see
that kind of bend on there and you want
to see it coming down, you want to see the bulbing
and things like that. Okay, so we've got
that bit there. Let's make sure then it's just sat on top of there,
which is great. Now, let's make the
power part of this. So all I'm going to
do is press the I but I'm going to press E and
pull it straight up. And then from there, what I'm going to do is
I'm going to bring in, let's say three edge loops. So three edge loops, left
click, right, click, C troll B, pull them out,
drop it all the way back, like so, and then E enter ln, holding the shift
but, right click. And there you go. There's the actual
PowerPoint for the bulbs. And now we need is, you know, a big pipe going on those
or something like this. Now, let's make the actual
ball part in there. So what I'm going to
do is press shift H, and I'm going to come in. And what I think I'll do is, first of all, I'll
bring this part in. So if I come into this part, I'm going to press the I
button to bring it in, like so, and then
E, bring it up, and then S, bring it
in again, like so. Now we'll bring in the bulbs, so I'm going to press shift
desk Custer selected, and we'll use actually a
primitive we've not used before, which'll be UVsphee. Now, when you first bring
in these UV spheres, Make sure you turn
down the segment. So on UV spheres, I tend to just put it on 16. So like this, right
click, Shade Smooth, and you can see you can get
away with a lot like that, and that's how I tend to do it. Now, what I want to do is I want this to
obviously be a bulb. And at the moment, you can see now that's
looking pretty nice. We can see that we need
to bevel this edge off. But I'm also thinking
that I would like the bulb to be shaped a
little bit different. So what I'm going to do
is I'm going to come in, grab the top of
here because we're never going to use the
top of here anyway. So just grab one of
them, press the C, and just grab them all,
press delete and faces. We'll just delete that
off, like so and then what I'm going to do is I'm going
to come in, Alt Shift click. Let's put on
proportional editing, press the Sb, bring it in. Let's bring it out a little bit, and how do we want our bulbs. Let's change that to root. Let's try the root, and there we go. That's
looking better. And that's looking a
lot more like a bulb. And then I can just slot
that into place like so, and it's as though it's
actually burning away there. Alright, so last of all before we finish, let's
come into this one. Oh, shift click Corn troll B, not too far, increase
it. Left click. And there we go, There
is our bulb in place. Now, we might as well
join these together, so I'll press ControlJ
join them together. I'll press Altag to
bring back my oven. And finally, finally, let's think where we actually want
them. So we want one here. And one over here, like so, and I think they
look really cool now. Alright, so on the
next one then, we'll carry on with
the actual oven. I think we'll put something along here just to give it a little bit of a
relief on there. And then what we
can do is we can start with the back of the oven, which actually
looks a little bit different It's little bit
fun to make on that one, so we'll have fun on it. Alright, everyone, so I
hope you enjoyed that. I'll see you on the next
one. Thanks a lot. Bye bye.
62. Adding additional decorative detail to baker, creating a side machine to measure the baking process,: Well, welcome back everyone to blend the beginners
master class, the cookie factory, and
this is where we left off. Alright, so what I want to
do now is I want to bring in a let's think.
Let's bring in a cube. So what we'll do is we'll
start the back of you and we'll put this
rounda I think. In the middle, first of all,
then what we'll do is we'll pull it out a little bit
on the S and X, like so. And you know what? I
always keep against it. Let's move this over, and let's actually
open up our image. So let's open up our image. And the one we want is going to be the oven, which
is this one here. So this is the bit that
we're actually creating. Then we're going to
create this bit round, and then we're kind
of going to add on all of these other parts. So let's actually, first of all, pull this up to
where we want it. So I'm thinking, something like this looks to be round
about the right height. And then what we'll do is we'll bring it down a little bit. So let's bring it down. With face electn,
so bring it down to roundabout without
proportional editing on as well. So I'll bring it down
to roundabout there. So what I want to
do is I want to basically lay it
out, first of all, so that everything
looks, you know, right before adding in all of these different parts
and things like that. So what I'm going to do now
is I'm going to press E, enter, S, pull it
out a little bit. And then what I'm going
to do is press E, pull it down to the floor. The other thing I
want to do is I want to bring one of these over. So shift D. Let's bring it over. Like so. And then let's put it into place
where we want it. So we know roughly now there's going to
be a pipe on here, and we know it's roughly going to come back to this point here. So what we'll do is we'll put it round about here
to start with, and then grab it going all
the way around here, like so. Pull it out, and there we go. And now let's bring
this part out, so all the way around to here, and then pull it back
to there, like so. Alright, that's looking
so far so good. Now, let's think about this big pipe before we
do anything else. So it's basically like this
pipe here, as you can see. And what I'm going
to do is I'll grab this point here, press shifts, Custer selected, Shift A, and let's bring in,
let's first of all, go to mesh and bring in a
pipe joint and an elbow, and we want this one
to be a bit thicker, but luckily for us now
because we've brought it in, not loaded up blender,
anything like that, we've actually got it
pretty much in place. What I'm going to do is
move it along the X. And then what I'm going to
do is move it along the z, and I basically want
to go in there. And I also want to make
sure that the radius of this is quite thick. So
something like this. And then what I'll
do is I'll move it back just a little bit, and then I'll have
the start and length. So let's pull that
down to the floor. And let's pull this one
into where we want it. And there we go, that's
looking about right. And what we can do is right
click and shade or smooth. We can also then do
what we always do. So we'll add in these parts. Now, there is another way
of doing this, of course. Which might be an easy way. And that's basically
just grabbing this end, extruding it out and
doing it that way. But honestly, I find
this way so easy. So, X zero, and
then do this one. So control R. Left click
right, click S zero. And then all we have to
do is just pull it down. It takes no time at all, really. So it's up to you which
way you want to do it. Let's pull this in, like so. And then, because
it's quite thick, let's put another
one in here as well. Control R, S, z,
zero, control B. Like so. And then I'll do we'll do them all
together, actually. Oops. Let's come in
with face select. So Alt Shift and click. Alt, shift, click, E, enter AlterS. Let's
bring them out. Like, so, tab, right
click, shade or smooth. And then finally, let's come in and just bevel off this one. Grab them all, C troll, we'll clear the
sharps, first of all. We'll press Control B, and we'll increase the bevels. Like so. And there we go.
Perfect. Alright, so now let's think about this top. So on the top, I want to actually bevel it off. So all I'm going to do,
I'm going to come in, have this edge and this edge, press Control B and
bevel it off, like so. And the main reason I
want to do, you know, this front is because
I actually want to basically put
these parts in here. So these are going to be little tubes that are going
to go in there. They're going to go into
a box on the front. So I've just got to make sure at the moment that I've got
enough room to pull this back. So I'm going to
grab all of these, I'm going to pull them
back a little bit. And then on the front of here, I'm actually going
to put a front on, so I'm going to grab
this one, shifts, cursed to selected, Shift
A, bring in a cube. Let's bring it forward. So bring it forward, like so. And then what I'm
going to do then is pull this across into there, and then pull it down
and I want it rest in just under here. So just under here, like so. And then these pipes then can go into something that's
going to be on here. And what I can do is
I can press Control, bring it up to there, control B, pull it out, like so, then eat enter
lns and pull it out, like so, making sure offset
even is on, which it is. Alright, finally, then, let's
come into the top of it. Press the ebon and then what
we'll do is pull that down. I'm just wondering
whether I want to move it all that way first. I think I do. Then
what I'll do is pull it down from here, like so. And I'm also wondering whether I want to pull this
out a little bit. Can see here might
want to pull this out just so it's
in front of there. So now, let's think
about this top bit here. Do I want it a
little bit higher? I think I might. So what I'll
do is I'll grab all of this going round and just pull it up just a little
bit, like so. And then what I'll do is now
I want to actually create, you know, kind of
something in here, which is going to be one of the little knobs
that goes backwards and forwards. So I'll
want that on there. I'm also wondering
whether I've actually brought in enough bevels on
here, so you can see it is. It is okay. It should be okay. What we'll do then
is we'll come in. We'll grab this and this, we'll press J to join them up. We'll grab this
one and this one, we'll press J to join them up. And then what we'll do
is we'll press ControR, bring in an edge loop
and just bring it up, like so, just under there. And then finally, what
I can do with this is I can bring this out of here, so I can press Shift D.
And I'm going to do it that way because
it's going to be a little bit easier to wit with. And we're going to press
S, like so, delete. So delete and limited dissolve. And then let's put this
back in here like so. Let's shove it all the way
back in and then press E, and then we can pull
it out like so. And then what we can do is
create the glass on here. So if I press I then, I can bring it in, so
I can bring it back. So basically, I want
to pull it in now, so I'm going to press E. And that is this bid done
now, as you can see. So right, click, Shades move. Now we just want this
glass part on here. So how do we do that? Easiest way to do it.
Oh shifting, click. We're going to
press the F but, P, selection, split that off. And then what I'm going
to do is press tab. And then bring it in.
So if I press the bone, I should be able to bring
it in relatively fast. So something
something like there. And then what I'm going to
do is join these backup. So if I come in, I should be
able to come into this one, press the bone, and what we'll do is we'll
join it at the last. Same for this one, press
the bone and at the last. Alright, there we go. Now
I can press Control R, bring in a few more edge loops, and I'm hoping this works. I should be able to then pull this out with
proportional editing on. So let's put it on
let's put it on sphere, and let's see what we get with this let's pull it
out, pull it out. Maybe, maybe it's not quite not working as
well as I'd hope, so let's bring this out.
Let's have a look at that. We want this to be glass, so just wondering, is
that going to work? I think the main problem is, is this part obviously here. And I definitely want it glass
and I do want it shaped. So I'm going to delete that, and I'm going to give
this a try again. And instead, I'm just going to think of a different
way to do it. So if I press F, like so, and then go to press
P, split it off, like so, and then pull it out. Is it going to be too
difficult to do this? That's the question.
So what I'm going to do is I'm going
to press Control O. It's gonna be one, actually. So I'm going in front
of it a save up. Press tab, hide this out of the way. There
we go. It is one. Okay, what I'll do is, I'll
try one more way of doing it. So what we can do is instead, we can get on knife and
join it over here, like so. We can press K again
and join it over here. Press Enter, and then K again and join over
here and press Enter. And then what we can do is
we want to go down now, but we want to make sure
it's going down perfectly. So if we grab this, we can pull it down to then
kind of line it up. But if you just press A, it will make sure it lines up perfectly, and then you can press K again, A, drop it down here, press the enter bone,
and then K from here, A, drop it down here, press the enterbn and
just basically work your way along until
you get to the end. And this might give
me enough to actually be able to pull it out because it's got a lot more
topology on there now, so I'm hoping it
does, but we'll see. Like so, bring it to the end. And now I should be
able to just come in, grab the center of this. And now let's see
if I can pull it out but bring this out. Like so. You know what? It's much, much better
than where it was. I think I can actually
work with it. So what I'll do now is I'll
pull this back into place. Like so. And then I'll come in and I'll
do the same thing. But what I'm gonna do now is I'm going to grab the top
ones, for instance, and I'm going to pull them back in and see if I can
bring them back in. And no, I don't think
it's still gonna work. Let's try it sharp on there. Like so. Let's try these two
now, bring them back in. Let's try this one and this
one and bring them in, like so, and then these two, and these two, bring them in. Can I actually go away with it? Then let's try these two
first, bring them in. Like so, and then these
two, bring them in. And then finally this
one and this one. And then let's see if
we can smooth it off, and then we go, right,
click Shade Smooth. Now let's try just smoothing it and see if it actually
fits in place. So what I'm going to do
is going to come over, add modifier, deform. And what we want is the smooth. And let's see if we can get
enough smoothing on there. To make it worthwhile,
or we might need to just subdivide
it. So you know what? We'll try that
instead, add modifier, generate a subdivision surface. And then we go, That is
going to work, I think. So now what we can
do is we can pull it out a little bit, like so. We can shove it in a little bit, like so, and then
just drop it down. And then S and z, let's see if that's
going to fit in there. Let's press tab,
double tap the A. And there we go, I actually think we're going to
get away with that. Let's pull it out
a little bit more. Have the eh? It's not
quite not quite there. You know what? On the next one, we'll delete that the way. On the next one, we'll try
one more thing to do this, 'cause I don't want to waste
too much time on this. And then what we'll do is we'll actually, we'll bevel it off. We'll try beveling
off after this. That'll be the one
last way we'll do it. Alright, everyone, let's save our work, and I'll see
you on the next one. Thanks a lot. Bye bye. Thank
63. Using curve to create cable attachments to bakery system, fixing animation issue caus: Welcome back, everyone to blend the Beginner's master
class, the cookie factory. Now, let's try
what we said then. So the attempt last
chance saloon at this, let's press the F button, and then what we'll do is we'll separate it off. And
then I'll grab this. I'll press Control
A or transform, set origin to geometry. I'll bring it out to just here. And then what I'm going
to do is press A, E, and then pull it out like so. Now what I want to
do is come to Bevel, Alt Shift and click Control B, bevel it into place, and bring those right there. Like so, right, click, Shade smooth Bangle.
You know what? That might work. Now,
let's see if we can actually get away with
a subdivision surface. Is that gonna make you better? Now, the reason why it's bending so much is because it's simple. If I put this onto it's
on Cat Null Catmull, clock, if I put this on simple, press Control A, you'll see now if a right click
and shapes move. It's basically added a
load of geometry here, but it's added in all
the wrong places. So I don't think we'll
be actually doing that. I think we'll leave
it like that. I think this is good
enough, to be honest. So let's not mess
around with anymore. It's good enough, and
now let's move on. So what I'm going to do now
is a definitely want my pipe. So one of the pipes I've got
here, let's have a look, so it's going to be under
let's have a look parts. Re use parts. Here's my pipe. Let's press shift D.
And then what I'm going to do is bring
this into place. Like so and I want to
put it around here, so I'm going to go over the top. I'm going to press the S born, making it much, much bigger, Rs 90, and then Rs
180, spin it round. And let's drop this into place. Like so. And then
what we need to do now is we need to
plug it into here. So let's see if we
can actually do that. So I want to leave that there. Then what I want to do
is plug this into here. Like so. We've got sharp on. We don't want that. So
let's plug it in. To there. Let's make sure it's
going the right way. Like so. And I think. Okay, I think that's actually
looking pretty good. Now, let's grab the next one. So to do that, we'll just press shift deep, bring it over. And then this time, I'm
going to rotate it. So Z's rotate it round, let's move this one
over a little bit, like so, and let's move
this one over a little bit. Like so. Alright. Looking good. Now,
we've done that. Let's actually join
these both together, so Control J, object, convert, mesh, and now I'll do is I'll bring these parts out. So what I'm going to do is I'll grab both of these endpoints. I'll press Control B
and pull these out. I'll drop back my
bevels a little bit. I'll press Enter lns and
bring those out, like so. And then I'll come
to this point here. All shift, click,
Al, shift, click. And then what I'm
going to do is E, enter lns and bring these
out a little bit further. And this time, what I'm
going to do is I'm going to bring just this
top part back in. So if I press the S on
individual origins, I should end up with
something like that. That is what I'm looking for. Alright, so that's
looking pretty good. Now, let's do these
parts in here. So all we'll do with
these is very simple. Oh shift, click, E enter lns. Oops. Let's bring it
back. Where is it gone? Let's press Altag. Sorry, we managed to bring them back. Not sure what
happened to them. But anyway, I just pressed Control's Ed a
few times, got them back. So here we go. Let's press
Enter Altns and bring it out. Like so right, click, Shades Move. And there we go. Alright, so we've
got this part in. Now, let's bring back a minute
or I think it's the mixer. Nope, it's not the mixer, so it must be the water adder. Yes, it's this one here.
This is what I want. Now, one problem I've got
with this is I need to make sure that this part here, for instance, if I press Dot, I want to definitely
take this off of there. So P selection. I also want to make sure that
I'm grabbing all of this. So inside here, there
is this that I want. This has the animation on, so I need to be really careful
where I'm pouring that. So if I duplicate this
and press Shift D, like so, if I now
press space bar, you can see, it drops
right back there. So I have to be careful with it. So what I'm going to do
is instead, if I press G, I'm going to press Shift
D. Put it over here. And then so I can
move this round. I'm going to press shifts,
cause the selected. Shift A, we're going to bring
in an empty, so plane axis. And all the plane axis is, as we know, it just allows something to follow
it and it won't be rendered. So what I'm going to do now is join this to the plane axis. So Control P. Object
keep transform. And now if I press Space
Bar, will it actually do it? No, I don't think so. So
it's still over there. So can I actually
make it stay there? I don't think so.
So you know what I'm going to do?
I'm going to come. I'm going to grab this I'm going to press ltH
to bring back the front. I'm going to grab this
part and this part. I'm going to move
them over here. So shift D, shift
Spacebar to move. Let's move them over here. And then what I'm
going to do now is I'm going to go
to the animation, so the animation for this. Which is in here, and
I'm just going to hover over it and press delete. Then what's going to happen
is if I press dot now, I should be able to
press Space Bar, and that will stay there. Albeit, we lost the animation. So now let's press altage, bring back everything.
Let's grab all this. And then what we're going
to do is move it over to our oven because even though
we can't use it that way, it's still better than
building it again. What I'm also going
to do is make sure moving these
around on medium point, z 90. We'll put it
that way for now. I know I have to turn
it around, but I'm just trying to get the right
scale for it at the moment. So we'll put it over here, and then we'll press the
S bone, and there we go. And what I'll do is,
I'll turn them round. So Rz 180. And then what I'll do is I'll put them into place
where I want them. So just about that. Like so. And then what I'll do
with this is z 180, like so, and you can see it span all the way around there. So let's put it on
individual origins, z 180, and we're still spinning around there. Why are we spinning
around there? Because the orientation is here. So all transforms right
click at origin to geometry, Z 180, and there we go.
Now it's actually better. Now what I need to do is
just move this into there. So Alt Shift and click, pull it into place,
and there we go. Alright, that's looking good. Now we've got everything
done, all we need now. Is the back and the actual side. So let's work on
the sides first. So this side has a
little box on there. This side has a box on there. So all I'm going
to do is, I think, I'll put a box on this part, and then I'll steal a couple
of other parts as well. Now, I've noticed that
these things over here, for some reason, let's
see if they're animated. They're actually animated. I don't really like
I don't know why they got animator, that's
prone back to one. So yeah, they've moved
all the way over there. So all I want to do, I've not
got my actual animation on. Maybe I pressed I by mistake. I'm going to press
delete. And then what I'm going to do is
just put them back now. So I'm going to go
back to modeling. And again, these problems
pop up from time to time. We all have them, and it's
knowing how to fix things and why things happened or
what is actually going on, which are the most
important things. So I'm going to put
these back into place, press space part and now
everything's working correctly. Control A or transforms rightly. Set origins geometry. Just put them into
place, pull them down. And maybe even down a
little bit further, like so, and there we go. Alright, they're back now. Now, everything's
cool with this. We just need that box on now
what we're talking about. So let's bring in
where's my cursor. It's over there at the moment. Let's bring our cursor here. So cursor selected, shift day, mesh, cube, and
let's pull it out. Like so. Let's press the pun. So we'll put it
round about here. So sticking out that much, I guess. I'll round about here. And what I'll also
do is I'll pull it out maybe past
this part as well. So maybe something like this. Let's pull it out
back a little bit, so it's jaws level with it. Like so. Or we can
pull it further out, so it's actually
under there slightly. Yeah, actually, you know
what? I think that's better. Just looking to make
sure everything's right. Okay, I'm happy
with that. Now what I'll do is I'll
press the I button, and then I'll press the E button to pull that out, like so. And then what I'll do is
I'll look towards now, we also should have
something on here. Let's press lth, bring
back everything. I'm just looking where
that part is on there, because I've also got
another part missing. And it's this part on here. So I'm looking to
where it's gone. I've turned on everything, and this part seems
to have gone missing, and we've also got two of these. So let's delete one of these. Now, what happened
with this part is, it actually jumped over
here because again, because of our animation. So when we put on
this auto anime, I forgot to turn it off, which means that you probably
forgot to turn it off, which means that all
these parts over here generally have animation
on them, as you can see. And it's really annoying,
actually, that it's done that. So what I'm going to do is
just come to these parts. I'm going to hide
this out of the way, and there are those parts
that I actually wanted. So what I'm going to do is
just pull it over there. I'm going to make sure
that I check that now from every time just to make sure
that doesn't happen again. So now let's come back to
modeling, press the dot bun, to zoom to these parts, and then while
there is, I'll fit these onto the place
where they are. The other thing, of course,
is, as you can see, is that we've also lost the kind of scale
of them as well. So we don't really
want that to happen. So what I'm going to do is
pull them into place like so, and let's level them
up just a little bit. They're a little bit
more level, like so. And then what I'm going
to do is press Shift D, and I'm going to
bring these over press S 90 and move
them over to here. So this one here. And of course, I don't want them to be as big, so I'm just going to
press the S bone. I'm thinking that
they're probably going to be around
the right scale. So let's just put them on
like so. And there we go. That's looking
pretty nice, anyway. Alright, so on the
next one, then, what we'll do is we'll get
these pipes coming down here. And then what we'll
do is we'll end up with a couple of
canisters on the back, which will be out here, and
then finally the supports. I'm hoping we'll get finished by the end of next
lesson, this actual one. I'm not 100% sure,
but we'll see. We'll try our best, so hopefully we should
get it finished. Alright, everyone, so I
hope you enjoyed that. I'll see you on the next
one. Thanks a lot. Bye bye.
64. Creating gastanks for the backside of a bakery to enhance the stylized look even furt: Welcome everyone to blend the beginners master
class, the cookie factory. Now, I'm going to come to
this part of the moment, and what I want
to do is I'm just looking at the width
of this part here. And what I think I'm going
to do with this, actually, is just bring these in a
little bit because you can see this one's here and this one here, and I want
to bring this out. Now if I bring this out, it's going to move
the whole thing. So instead of doing
that, all I'm going to do is bring
it out like so, and just make it a little bit
more in line with this one. Right, click, Shades
move, and there we go. Now, I think that looks
a little bit better. I looks a little bit flimsy. Okay, so now let's come and think about these
pipes around here. The other thing, of course,
is I really want to make sure that all of this part, so I'm going to
hide the sideway. All of this part is in oven. So let's come down, put it
all in oven, and there we go. Alright, so now
why did I do that? It just gives me a little bit more room to actually work with. At the moment, I'm
really struggling to see what I'm actually doing. So I'm just going to
hide all of these parts, and now I can see what I'm
doing much, much better. Now, let's think about the two pipes that we're
going to bring in. So we've got our cursor here, I'm going to put my cursor
over here, actually. So cursor selected,
and then shift day, let's bring in a
couple of pipes. Now the thing is, can we use
these pipes around here? Probably we could probably get away with using
these instead. So, you know what?
We will do that. Shift D, we'll bring it over instead of
creating new ones, Z 180, let's bring it down to where we want it then. So I'm
going to pull it down. And one I'll have up
and one I'll have down. So we'll plug it in. And you can see we need to pull
it out a little bit. Let's plug it in, like so. We'll bring it over
here, and we'll have this one go a little
bit further down. So something like
that. I'll bring in my Xray so I can
see what I'm doing. And then go to pull these
back like so roundabout here. You can also see
that I brought these in but didn't actually
do anything with them. So hopefully, have I actually brought
them in? You know what? I think they're just the faces at the angle. So you know what? We'll think we'll leave
those like there is. And then what we'll
do is we'll come in now, and I'll grab this one. And what we'll do
is we'll go Alt, shift, and click
and bring it up. And then finally, am I
happy with the thickness? Let's see if I can
grab it and press Alt. Can I actually bring
it out? Yes, I can. Yes, I can. That looks
shade smooth biangle. I'm just wondering, yeah, I've got some shops on there. Maybe I want to
get rid of those. So let's see if we can
get rid of these sharps, controle, clear sharps,
and there we go. Alright, I'm happy
with that one now. Let's press Shift D and
bring this one over. It is an oven, after all, so
that's what I'm thinking. I'll pull this one
up, so we'll have it, you know, something
like this instead. And then what I'll
do is I'll put on Xray again, grab
the top of it. So I kind of grab
the top. Let's see. No, let's try it again. Come on. Let's zoom in then if you want,
let me do it that way. I'll shift click. There we go. Now, let's pull it
down into place. Like so, turn this off. And then what we'll do is
join these both together. So Control J, and
then I'll press Control R. Left click,
bring it up a little bit. Control R. Left click, bring it up a little bit,
and then grab them both. And then S, Z and zero,
just to level them out, bring them up a little bit, like so, and then we'll do
the same thing on here then. So Control R, left click and then S X and zero.
Same thing on here. Control R, left click SX zero. And now I'll do is just
move these into place. So this one here
and this one here. And then we'll go to face
Lt. Alt Shift click, Al, shift, click,
Alt Shift click, and Alt Shift click. Eat, ter Alter
Ness, bring it out. Like, so right click and shade, Ato smooth, and there we go. Okay, so that's
that bit done now. Let's think about
the next bit then. So next bit will be kind
of a bit on the back. So I'm going to come
to this part again. Shift desk c to selected. Shift date, let's bring
in, first of all, a cube, and I'm going to
want them on the back here, so I'm going to press
EnsEd bring this down to round about here so it can fit along
here and then S and X, pull it out a
little bit like so. And then what we'll
do is we'll pull it out just so it's level with that and then pull this
back a little bit like so. Now, let's get these
canisters on here first. So I'll set my
canisters on here. Before doing anything else. So what I'll do is I'll
come to this part now, Shift desk, Custer selected. Shift, let's bring
in then a cylinder. Let's make it 24. Let's bring it down, and let's put it into place where
we're going to have it. So if we have one canister here, we should then be
able to have another canister next to it. And I want to get
an idea of scale. So what I'm going to do
is I'm going to right click and set the origin
to three D cursor, add in a modifier, and I'm
going to bring in a mirror, and now I've got a good idea what these
are going to look like. Now, let's come on underneath. And then what I'm going
to do is press Control B. And round those off,
so they actually look like a canister,
so like that. And then what I'm
going to do is grab the whole thing
and just bring it down so it's actually
on the floor, like so. And then I'll bring them up. So we'll bring them up to the top so we can
actually see them. So just up to here and a little bit further
even, and then Control B. And bevel these off on the
top, as well, like so. Right, click, shade Auto
smooth, and there we go. Now, let's think about the top. So all I'm going to do is press I, I'm going to bring it in. And then going to bring
it up to this point. I'm going to press I again
and bring it in and then E, putting it up to
the top, like so. And then what I'm going to do is I'm going to bevel off this top. So Control B, let's bevel it off a little bit,
and there we go. And now let's press
Control R two, left click, right, click. Control B, pull it down all the way down to
one, left, click, and then E enter lns and
bring that out. Like so. Alright, right, click
Shades Move Bangle. That's it. So far so good. Now what we want to do, though, is we want to actually create, you know, some roundness
actually on top of you. So some turning
handles or something. So what we'll do to do
that is we'll come in. We'll grab this. And what we'll do is we'll press Shift D, and then we'll pull
it out with S, and then I'll press S and Z
and bring that in like so. Now, the first thing I want
to do is I want to actually give this, you know, some depth. And the easiest way to give it depth is actually to come in. Select it all P selection,
just to split it off, and then Control
A, all transforms, but put set the origin back to the three D cuss so
we've got that mirror on. And then add in modifier and
we'll do a bit of modifier stacking with a solidify.
So let's bring that out. Like so make it around
about that thick. Press Control A, and then right click and
shades move biangle. Now what we want to do
is we want to bring these in to this point here. So we want some little
round points on here. So what we'll do is we'll
miss three and then come in, miss three and see if
can get away with it, actually. So miss three. Miss three and miss three, and then miss three, and we can. So then what we'll do is
we'll press E to lns, and we should be
able to bring those into the center, like so. Now, let's see if
we can actually bring in a subdivision on these. So generate subdivision surface. You can see we've nearly
got it there, actually. It's not quite right.
If we turn this up, it's not really going to
help, as you can see. But what we can do from this is see what we need,
where we're going wrong. So what we're going to do
now is press the tab button, and I'm going to
press Control R, bring in an edge loop,
and you can see, as I bring that out, you
can see what that does. It actually leaves us with
a nice round part on there. Control R, then, we bring it
this way, and there we go. And then we want to do
Control R on these parts. So Control R, left,
click, right, click. Control R, left,
click, right, click, control, and just keep
going round, like so. And there we go. Okay,
now we've got the mole. Now what we can do
is bevel these off. So if I grab all of
these, press Control B, I can actually then bevel them off and make them
nice and beautiful. And that looks pretty good. Now, let's come
down to the bombt. So what I'm going to do is I'm
going to press Control of. Bring it out, like
so, and then control. And that's the final one.
Bring it into the middle, like so, and there you go, D is how you make the tops. For your cylinders. Alright, so we've done that.
They're looking cool. Now the one is some straps
to hold everything on. The way I'll do my
straps is I'll basically probably I'm thinking I'll
probably use my cylinders. So what I'll do is
I'll press ControllT, left click, right click
Control B, like so. And then what I'll do
is I'll use these. So what I'll do, I'll come
from this part here, I think. So if I come from this
part, and this part. And then what I can do is I
can go round the other side, or I can press three, actually. So if I press, I'm just wondering
can I actually do that? Let's have a look. A little
bit hard to see on there. I'm going to go from
there, actually. I think that's about level. So just right next to there, I think it's going to
be round about level. So I think they're the
same on both sides. And what I'm going to
do then is press E and Y and pull those out. And you can see they are straight, and these
are straight. So just pull them out like that, and then what you're
going to do is you're going to go
to face select, come all the way around to here. Same for this one all
the way around to here, and then basically
you're going to press Shift D. Duplicate those. And then what we're going
to do is press P selection, and I'm going to press tab, and I'm going to grab
those I've just done. So these all the canisters, whichever one you want, get, you know, hide the canisters
out of the way if you want. And then what we're going to
do now is press Control A, all transforms, right click, set origin, three D cursor, add in a modifier, and we're going to bring in
A, where is it? Let's have. We want
to generate solidify. There we go. Let's
pull the solidify out, not inwards, so that's
inwards. Let's bring it out. You can see we've got
some problems on there, and all we know what that is. We just press tab, A, it is the normals,
press shift n, and there we go the fixed. And then what we can do
is just press saltge, bring back everything,
and now we can just line this up with the
thickness that we want it. So if I bring this down
to something like that, I think that's about
the right thickness. Alright, let's say
if that'll work. We didn't get there. We didn't
manage to get it finished, but we will definitely get
this finished on the next one. So I'll see you then.
Thanks, everyone. Bye bye. Thanks.
65. Creating gas shader for the oven, creating glass bulb shader for heat lamps, adding t: I'll come back around to blend the beginner's
master class, the cookie factory, and
this where we left it off. Okay, before I go any
further, let me grab this. I just want to press
A and grab it all. Let's go to individual origins, and all I'm going to do is
make it a little bit bigger. Like so. I think they looked a little bit too small on there. We could go ahead
and make them much, much bigger than that,
but you know what? Let's look from here. Oops,
double tap the A. Yeah, I think they look
absolutely fine, like that. Let's have a look
actually what would happen if we did
make them bigger. So let's press the S bon. Let's pull it out, something
like this. You know what? They do so much look better. So all I'm going to
do is I'm going to grab all of these going round. I want to make it a little bit chunkier because
they do look better, and then I'm just going
to press the S Born on medium point
and bring them in. Like so. And then
I'm just going to go back to individual origins, press the S born again, and then bring them
out so they're right size. And there we go. Alright, they look much
better. Much, much better. Okay, so now let's
go back to here. So what I'm going to do
is apply that solidify. Then we're going to hide
these out of the way. Come back to my cylinder then, and then all I'm going to do now is I'm going to delete
these out of the way. I don't need them. So
I'm going to delete those delete faces, like so. And I might as well delete these edge loops as well.
I don't really need them. So when you're
deleting edge loops, just press delete, and what you're going to do
is dissolve edges. That makes it really
easy. I'll th them. Come back to these, right click, Shade Smooth by angle. And now we need is we've shoved them in a little bit too
far, as you can see, but not to worry because what
we can do is we can grab the whole thing and I can put an edge loop down
like round about here. So how we'll do that
is we'll come to bisect and we'll drop in
an edge loop along there. Make sure this is zeroed out. So zero. And there we go, now we can actually come in and just grab each one of these. So Alt Shift click, like so. Same on this side, Alt
Shift click, like so. And then you're just
going to press E to Alter NS and then pull those out a little
bit. Now, I can see. I press the Alts. Let's try S. So S, pull them out, like
so, and I'm looking. You can see they're
slightly bent out, so I'm going to pull them
back, pull in shift button. Like, so right click, Shades move Bangle,
and there we go. Alright, so far so good. Now, I think we've got just
the bottom part to go now. So I'm going to press Shift A. I'm going to bring in a cube. And then what I'm
going to do is I'm just going to make it a simple simple kind of
support along here. So something very simple. So let's press
EnsEd, bring it up. Like, so. Let's
bring this part in. So we'll bring this
part in like so, and then I'm just going to bring it down a little bit more. I'm going to make sure
I'm touching that back, so I'm going to be touching
that back like so, and then all I'm going to
do is just pull this up. So pull this up to here. And finally, I'm going
to join it to this. So I'm going to press Control J. Join to that, and it's going to put that
on the other side. Now, all I want is just
one more simple part, which is going to come
from here and down. So again, I'm going to press
Shift D, bring in a cube. I'm going to press the S
bone and bring it over. So I'm going to bring it
over to round about here. And then what I'm going to do is just put it into
place along here. And then I'm going
to bring this down. So I'm going to bring this down all the way down to
where I need it. And I'm just wondering.
Yeah, this pot here, you can see, as well that
also needs to come down. So let's pull that down first, we'll pull it all the way down to the floor, like so. And then we'll pull this
one all the way down into the floor. Like so. Alright, so now
we'll do is we'll pull this pot out, so
we'll pull it out. Like so. We'll make it
a little bit thinner. I think it's a little
bit too chunky. So S and X, a
little bit thinner. And then what we'll do
is we'll bevel this off. So if I come to this
part, I should be able to bevel it off like that
and pull it back in. You can see that it's
not quite how I want it, so I'm going to do Control A, all transforms, and I'm
also going to bring in an edge loop just
round about here. And the reason I'm bringing
that in, of course, is because then when
I bevel control B, it's only going to
go to that point, and that's what I want. So now I can actually
bevel it coming down to here right click
Sheets move biangle. And finally, I can
actually bring in an edge loop. Actually,
I don't need to. What I'll do is I'll
bring it from here, so I'll grab this one, and then I'll grab these going
all the way up. You know what,
though? I do actually want one edge loop in
there, so control. Left click, right, click. Control B, bring it
down up to there. And then we can grab this
bottom and then let's say from here all the way
up to, let's say here, and then enter lns
and bring it out, like so, hab, Shakes Mo
Bangle, and there we go. Now what I can do is fine
I can add it to this. So control J, and there we go. And then what we can do is now
we can pull this part out. So we've already got
this part grabbed. Let's pull it out into place. And that is looking
really, really cool. Alright, I'm happy
with my actual oven. Now, let's come to materials, and let's get some
materials on this. So first of all, let's actually bring in I'm just wondering if I
bring in the glass. So this glass on the oven
is going to be it's going to be a little bit
different again because I want to add
some noise in there. So we've got kind of
three types of glass now. So let's do this first. So what we'll do with
this part is we'll add in our first color,
which will be orange. So I'll bring in the orange. Then I'll bring in some metal. So what I'll do is I'll grab this going all the
way around here, like so, plus again. Now, I just want to be careful
because at the moment, I don't want all of these grabs, so I'm going to do this
a bed time, actually. So I'm going to grab these
going all the way around here. I'm going to grab it
then going all the way around here and here.
And you know what? I'm going to click the plus
button, the down arrow, and I want on the metal light, and let's click Assign. And what I'm going to do now is just hide this part
out of the way because I want the inner part of this also to be metal, as well. So metal light, click a sign. Now, if I press Salt H, I'll bring in my glass now, so we'll click Plus New. And we'll call this oven glass. And then what we'll
do is we'll hop it over then to our shader. So we'll hop it
over to our shader. We'll zoom out, press the dot
bon to Zoom to this part. We'll come to this
part, click assign. We're already in actual cycles. Just make sure your GPU is on. And then what we'll do
now is build this shader. So we'll just delete
the principled. We'll bring in again, we'll bring in the
glass this time because it's a little
bit different you know, from the chocolate drop one. So we'll bring in the glass. So glass, BSDF.
Drop that in there, and then I'll bring
in a transparent, so shift transparent
because then I'm going to have some actual control over how dark or
how light it is. And what I also want to
do is bring in a noise. So I'm going to bring
in a noise texture, so search noise. So I'll drop that in there, and then I'll bring
in a color ramp so I can control that noise, as well. So color ramp. And hopefully, at this
point, you're starting to actually understand what
I'm actually doing, why I'm doing it, and how these things are
actually working. So let's first of all, bring in a mixed shader because we can't mix it with the
color, as we know, so mixed shader we'll drop
this one into the top, this one into the bottom, and
we'll drop this into here. There we go. Perfectly
see through. Now what we want to do
is put this on 0.525. We want to make sure
that the IOR on here is going to be set
a little bit lower. So 1.050, something like that. And now you can see, we can
near enough see in there. And then what we want to do is make it a little bit darker. So what I'm going to do is
bring this down a little bit, and you can see now how much control
we've got over there. And then what I also
want to do now is plug in my color ramp into here, and then I'm also going to plug the fact of the noise into here. And now let's bring
that noise actually in. So what I'm going to
do is put this on 160 160 something like that. We're going to leave all
the others at the same, and now you can
already see that now it's actually looking
pretty much like an oven. And the only thing
left to do is we can actually turn
this up now so we can really start ramping this
up to round about here. Let's bring this
one back to bring, you know, some of
that noise back in. And finally, then let's
come to this black and just turn it down a little bit. Like, so so we can still
kind of see in the oven, and there we go, now that's looking like an
actual oven window. Now, next of all, then,
let's actually come in, and what we'll do is we'll
actually come to the bulbs. So what I'm going
to do is I'm going to come I'm just going to hide this out of the
way at the moment, and I'm going to
come to my bulbs. And these are going
to be really, really easy, these bulbs. So first of all, most of it is going to be the metal light. And then just these parts. So this part here, this part
is going to be my bulb. So if I click New and I'll
call it bulb, like so. And then what I'll do is I'll
just bring an emission in. So instead of it
being the principal, you should be able
to click on it. Go on down. You will have
one that says emission. And what I'm going to do is
I'm going to grab my bull, press the bn, and click
a sign on this, like so. Now, let's put the strength
of the emission on ten, and let's turn the color to, you know, something
like an orange color. So a deep orange
color like this. And there we go,
double tap the A, and that's looking about right. Now I'm thinking I'll do
the same on this one then. So we'll copy, copy this. So Control L link materials, and then we'll
come to this part, and we'll just put it
onto bowl like a sign. And then what we'll do is we'll press, we're going to do it. I'll tach and bring them
back. And there we go. There is our bulbs in
our oven coming in and actually heating up
the actual cookies. Alright, so that's that. Now, you might want it
a little bit darker. If you do want it a bit dark, all you need to do
is obviously come to this one here and then
just turn it down. A little bit darker, like so. And you can also come and
turn the transparency down a little bit darker as well
if you want to, like so. And you can also this white, you can also if you
turn this down, you're near enough, go to get it going and kind
of see through like that. But don't really
want it like that. I'm going to put it
there. Yeah, and I think that's looking okay. And if I want to then mess
around with this as well, just to get it the color
that I want. Like so. And, yeah, I think
that's looking good. Alright, we've finished this, so you might want to
leave yours here. I'm going to move mine just
a little bit over, like so. And then what I'll do
on the next lesson is we'll get the bevels in. I'm absolutely I'm certain that we actually
bevelled these off, so I wouldn't just hop over to modeling just for a second
because I don't remember. So let's go to modeling. And let's go to my sprinkler. And what I want to look
is if it has on a bevel. Yeah, all these things have
bevels on. That's great. So I need to do the same
thing with my oven, as well, and not
actually forget that. So I can hide the where is
it the sprinkler once more. I can put it then
onto Reno view, and that's where we're
at at the moment. So let's come in on
the next lesson. That'll be the first thing
that we do then is fix that. And I can also see that
I might need to looking, do I need to move these
over a little bit? I think also I'll
fix these as well. I'll bevel it, and then
we can get animating it. We've already got a glass
on here, as you can see. Alright, everyone, so
hope you enjoyed that. I'll see you on the next
one. Thanks a lot. Bye bye.
66. Modeling heat measurement arrow on our baker, continuing shading our bakery machine f: Welcome back if you want to blend the beginner's
master class, the cookie factory, and
this is where we left off. Now, let's fix these
before we do anything. So all I'm going to
do is press tab. I'm going to grab this one,
I'm going to put it on to smooth proportional editing. And then all I'm going to
do is press the G born, bring it out a lot more and just move it over
there a little bit. Same for this one, old shifting clique move this one back. A little bit, just so it's fad in place, a
little bit better. Alright, from there,
then, let's make sure then we've got
all of our bevels on. So we see we've
got bevel on here. Let's grab this part. This one's already got bevel on, so we'll hide that
one out of the way. So we'll grab this
and we'll grab this. We'll press Control L. And what we're gonna do is
copy modifiers, like so, hide it out of the way. Now we want, in
fact, you know what? We'll keep this one. We'll
just hide this one out. Now we'll do the rest of it. So all of these should
have a bevel on there. They should have
a bevel on there. This won't, of course, so we'll grab this again, Control L, and copy modifiers, like so, hide it out of the way. This here should
have a bevel on it, which it has, so we can
hide that out of the way. These here, we don't really want to bevel on those
they're too small. So what I'm going to
do now is grab this, this and this corn troll
and copy modifiers, and then hide them out of the way, hide them
out of the way. This one has also got one on. I'm just looking to make
sure. Yes, it does. Hide it out of the way. This
doesn't need a bevel on it. It's just a piece of glass, so it can hide out of the way. These do. So I'm going to
grab all of these, like so. I'm going to press G just to make sure I've
grabbed them all. Grab this one last Control L.
We're gonna copy modifiers. And we can see with the pipes, that's what always happens. So let's come to the pipes, and what I'll do
is shade smooth, and then I'll bring
it up a little bit and see if I can
actually do that. No, I can't, so you
know what I'm going to do. I'm not going to do that. I'm going to just grab these, these and these control
and copy modifiers, and then I can hide these
out of the way, like so. And I think on these
things like this, do I really need
a bevel on them? The other thing is you
can actually do it limit it by weight and
things like this. So you can actually, you know, use other ways to actually, add a bevel on, as well as you
can also change the angle. So what I'm going
to do with these is I'll add on a bevel, so we'll generate a bevel and then what we'll do is we'll put a note point note not three, like so we can change the
angle, as you can see. So then what'll happen is, if I turn that up slightly, you'll see now we've just got
a bevel on each of these. And the idea of this course
is the further we go along, the more little tips and tricks I'm going
to be showing you. The more new things
I'm trying to show you and all that
other good stuff. So you're learning all
the time, hopefully. Let's hide this out of the
way. Let's do the same thing. You know what? We'll
actually just press Control because we'll do the
same thing now with this. So grab this one, grab
this one, Control LL, copy modifiers, and there we go with bevel
doze off as well. Now, let's hide all of
this out of the way, like so, and now we're going
to come to these parts here. First of all, we've got a
mirror on all of these, so let's take that
off with Control A. And then what we're going
to do is grab this one. It's got a bevel
on, as you can see, Control LL, and we're going to copy modifiers, and there we go. Now we can hide these
out of the way. So all of these, hide them out of the way. Let's
come to this one. Then this one's a simple one. This one's already been done. Don't need to worry
about this one. So we'll just grab
this Control L, and copy modifiers,
and there we go. Now, the rest of these, we don't really need
any bevels on them. We've already rounded a
lot of that off anyway. You might want to put a
bevel on this or something, but for me, I'm not really
bothered about that. I'm going to leave it as it is. What I'm going to do now
then is come to RenodVe. So we've got so far now, you can see, we
have all this done. We have these parts done,
so that's looking good. So what I want to do now
is come to the rest of it. So this part down here,
I'm also, I think, go to put a front on here and a back on here maybe,
which I did forget about. So all I'll do is I'll
come to this part. I'll also come
down to this part. And then what I'm
going to do is press the Ibn and bring that down, and then E Enter. And then I'm just going to
move to the side loness without proportionality on less, and let's bring them out,
like so, and there we go. Alright, while we've
got them there, let's just select them both. We'll come then to material. We'll drop it down to the
orange, so factory orange. And then what I'll
also do is add in another one, which
will be the yellow. So factory, not
factory orange again. Factory yellow, and click
a sign, and there we go. Alright, so that bit
is looking good. That is done out the way. Let's these. These
are also done. Like so. And now what we're
going to work on is these. These will be rubber, of course. So let's come down,
put on rubber, like so, and then we can
hide those out of the way. This one is going to be glass. Now, what sort of
glass it's going to be the normal glass. I think we can get away with
just having this glass, so you can see it's just
glass. So let's come down. Put it on as glass, and let's have a look where
that looks like. So glass. And there we go. And then on the inside
of this, though, we want to make sure that
we've got a big dial on there, which I also forgot about. So what I'm going to do is I'm just going to hide
this out of the way. I'm going to then
come into this part here and I'm going to first
of all, give it the blue. I also forgot to put a
top on there as well. So let's actually do
that now. So control. Left click, right click. Control B, let's pull this out. And then what I'll do is I'll put a top on there going from here all the way around to here. Let's have a look, so it's
going from there to there. E, enter alterna, bring it out, like so Control plus, and then we'll
bring the blue in. So let's bring factory blue, and then we'll press
the plus button, bring in the yellow. So let's go for the
factory yellow. Click a sign, like so. Okay, now this part here, we're going to press Alt
Shift click Poncho plus, click the plus B, and we're
going to go with metal. So where is it metal light
and then click Assign. This part in here, we're
going to go with the white. So click the down arrow
and we're going to go with factory white,
click Assign. And now let's make this
big kind of pointer on here because this is the
one that's going to be also animated along
with this one. One thing is, I'm just making sure we're
not too close there. I think we'll be okay. So what I want to do is come
to the center here. You know what? We'll
come down to here, actually, Shift desk,
cussed or selected. And then what I'm going
to do is press Shift A, and we'll bring in a cylinder. We'll spin this cylinder around. So all X and 90 will make it a little
bit smaller, like so. And because I brought
it in like that, you can see that I've actually kept it so I can actually put it
kind of halfway in, which is exactly what
I'm looking for. Now, what I want to do now is delete this bottom part off. So the way I'm going to do it is I'm going to split this
off, first of all, so pe selection, and then
I'm going to split it off, and now I just want to
delete it from here. So the easiest way is to
show is from here to here, right click and marker scene. Alright, now what I
can do is I can just press the little question
mark to hide it all off, right click to Shadesoth Bangle. Coming in now, and now you
can see I can delete it from there to there, and I can press. No, that's not worked.
So let's come again. So here, Control
click, Control click, Control click, Shifts elect, shifts let, delete basis. Alright, so now
let's fill that in. So Alt Shift click, F, Alt Shift click, F, and then from this
one to this one, press the F button,
and there we go. Now, let's have a little
point that comes out. So all I'm going
to do is grab it. I'll press the I to
bring it in, insert, and then E, pull it out
like so, and there we go. And the next thing
I'm going to do, you can see I've got a little
bit of a problem on there. And I think I think that's to
do with the actual beverly. Bring it out a
little bit further. Yeah, that's not
looking too bad. And then what I'll
do is I'll just I'll come in and I'll change
this to the red. So if I change this
to factory red, it should change it
to red, like so. Now, let's put the
little lever in. Now, the little lever we
want moving from this point, so we want it to kind of move we want it to basically
go round from here. So what I'm going to do
is press shift day, mesh, cube, making much,
much smaller, like so. And then let's bring
it up into place. Like so, let's press the
S but, bring it down. So when I move it now, I should be able to
move it from here. Then what I'm going to do
is I'm going to go in. I can actually see it,
grab it, pull it out, like so, and then put it back
onto you. So there we go. And then what I want to do is make it a little bit thinner. So I'm going to press
E and then S and X, and then E and then
S and X, like so. Alright. And I should
be able to now move it. If I press R and Y, as you can see, that is kind of the movement I
want. So that's perfect. Now, let's press altagO the little question mark,
bring back everything. Let's hide this mirror out
of the way. And there we go. And last of all, what I want to do is want this sepa, of course. So let's come in. And
let's give this the, uh, let's give it the metal. So we'll go down metal
light. There we go. And that's that bit done. So we're going to hide
this out of the way, hide this one out of the way,
hide these out of the way. Hide this part because I think, have a look, we near enough
done with that part? Yes, we are. Hide this out of the way. Now,
let's come to this. This, of course, is
going to be the metal. It's a huge piece of metal, though, so we'll
go metal, light. And then what we'll do is
we'll come in to these parts. So all shiv, click, Alif click, O Shiv, click, 'cause on the bigger meal parts, normally I make sure
that it has a bit of, you know, it looks a
little bit different. On different pots like that. In other words, let's
hide that out of the way. And then we've got all of this. This has already done, so we can hide all of this
out of the way, all of this, all of
this, all of these, all of these, like
so, and all of these, and there we go, and we're left with just these parts here. Not sure. Metal
light. There we go. Let's hide those, as well. Let's also hide this. But we're left with just this. Let's go up and save. And we'll definitely get this
finished on the next one, and we'll definitely
be moving on to some of the
animation on there. And also, we have the
conveyor belt to go through, which you'll be changing
from, you know, cookies in cookie dough to nice golden cookies before they move on to
actually go into, you know, be boxed
and things like that. Alright, everyone, so I
hope you enjoyed that. I'll see you on the next
one. Thanks a lot. Bye bye.
67. Animating heat gouge monitor arrows to give us motion randomly fluctuating back and fort: Welcome back and to Blender
Beginner's master class, the Cookie factory, and
this is where we left off. So let's come to
this part first. Down arrow. Let's go to
yellow first on this one. So we're going to go
to factory yellow. Then what I'm going to do
is grab the front of it. Control plus plus
button, down arrow, factory blue, click a sign,
hide that one out of the way. That one's done. Now, let's come we'll actually
come to these ones. What we're gonna
do, we'll actually grab these first,
and we'll click. So we're going to go down
to Metal light, like so. I'm wondering whether I want
to metal light or metal doc. Let's try the metal
doc on there. So metal doc. And which
one do I like the most? You know, the other stuff
is always really light. So maybe these should be darker metal. I
think they should. So what I'll do is, I'm just wondering if
the tops of them, I should have them light
instead. I'll try that. Salt, shift, click,
Holt shift, click, control plus arrow,
down and metal light. Click a sign, and there we go, probably going to be
better like that. Let us click the down
arrow, factor red. Let's come to here, and
we'll pick on the rubber. All the way down,
rubber, and there we go. Now, because all these
are joined together, it's obviously meant that these two as well
have done that. Doesn't mat, we'll just
change it over to the blue, factory blue plus, and
factory factory yellow. There we go. Now,
let's come to these. We're going to
grab all of these. We'll do the factory
blue first, lick a sine, and then I'll grab this
one and grab this one, Control plus and factory
yellow, and there we go. Then we've got just
this one here, which will be just factory blue. L sine, and then finally this
one. See this one, as well? Why is that? Oh, these are two separate. Thought
they were mirrored. Okay, they're not mirrored. So yeah, let's come
over, factory blue. Click a sign, L, factory blue, click a sign. I really thought
they were mirrored, but I think it's cause
these two are mirrored, so Control plus, factory
yellow. There we go. And then finally, this one, we'll put it on to factory blue. And then we've got
Justice, this part left. So this will be factory blue. Then we'll go in
and click Control plus and the little plus
down arrow and on factory, yellow, and click Sign. And there we go. Alright, I'll take you bring back everything. Let's have a look
what we've got here. Alright, this is looking cool. Now, on this one, we've got you could have some more
animations in there. You could really
make these pipes be going and all kinds of
crazy things on this. But we're gonna keep
it relatively simple. I mean, we don't want
to make this course, you know, 100 hours
long or something. So let's do this simply. So first of all, I'm going
to hide this out of the way. I'm going to hide this
one out of the way. And all we're gonna be having
on the oven is we've got already you know,
the lights in there. So let's now fix these. So, first of all, let's
go over to animation. Let's press the dot board on one of these if
I can grab one. So let's go to this one. We'll grab this inside, like, so we'll make sure
we're on frame one. So frame one, let's go to that. Let's zoom out and
move down, like so. And then what I'm going to do is I'm just going to
press the eye button. I'm going to then go over to, let's say 30, so, Y, bring it over, like so, press the I button, and then what we'll do
is we'll go back to the start on frame
40 or something. So let's just grab these, Shift D, bring them over. And now it should just go round, and then back, like so,
and then back round. Okay, so let's
grab all of these. And the first one
we want to put on, we're going to be
on the rotation, so it's going to be
on the Y rotation. Let's add in then a
cycles, first of all, so a cycle, then
bring it round back. And that's not done it, so
why has that not done it? I'm going to grab them
all. There we go. So it's on a different
one, let's have a look. Put it on the Y. I'm
sure it was Y, Y. Here, it is the
Y. Let's come in. Grab the mole cycle. And let's see now. Now it's working. No idea why it wasn't working
before, but now it is. Now, the other thing is we
want to put a noise on here. So let's come in and I'm just checking my other one just
to see how the noise is. Okay, got the noise. Alright, so let's put a noise on here. So we'll go for modifier,
add in a noise. And then what we'll do
is we'll put this on 2.7 and one, zero and one, and we can see that
for some reason, it's moved it all
the way over there, and that is because we
put it on all of this. So what I'm going to do
is just take that off. I'm going to go to the Y, and I'm just going
to add in a noise on here and see if
that actually works. So let's add in the noise, 2.7. And now let's see.
Now, for some reason, it's actually put it I
shouldn't be on the Y. It should be on the X. Let's try the X. Let's oh,
that's what's happened. I've got a noise on
all of these now. All right, let's press
Control's head and let's go back before
we add any noise. There we are. We
should be on that. Now, let's go to
the Y and see if the noise actually
works just on this one. So we'll go to noise, 2.7. No, it's bouncing
around like that. We definitely don't
want that, so we're not going to
put it on the Y. We're going to try it on the X. So let's see that is working. We're going to go to frame one, and we're going to add in
now our noise. There we go. That's what we want, 2.7. There we go. There's
the noise that we want. Alright, that's perfect. Now, let's do the same
thing for this one. So we want this going from frame one, all the way around here. Now the thing is about
this, is this tall enough? I think it should
be actually taller. So let's press n's and pull it up a little bit just so we
can actually see something. And then what we'll do
is we'll press R and Y, and we'll pull it all
the way round to here. And then we'll do is press I, and then I'll bring it
all the way round to here on 30 frames. So R and Y all the way
back round to here, and then I, and then
we'll go to 40. So we'll bring it all the way
back round to here again, like so, and then I. And you can really have
some fun with this, and then we'll go
to 50 and then R Y, and then I, and then all
the way back round again. So R Y, back round
to here, so I. And then finally frame
70. Let's pull this. So the start frame is going
to be same as the end frame, so shift D, drag them
over and drop them in. Okay, let's grab them, and what we'll do
is open up this. And now what we're going
to do is grab the mall and we're going to go
through a cycle like so. So let's see if it works. So we're going to go all the way around there we go,
that's looking perfect. And then what we'll
do is on the X, so it should be on the X. Let's see. So we're
going to add in noise. I'm not sure if it's bouncing the right
way, actually, on that one. So what I'm going to
do is take it off. I'm going to go to the
Y and add in noise. There we go. I think
that's bouncing Is that bouncing
the right way now? Yeah, I think that's
bouncing the right way. Let's put it on 2.7, and then we'll get a clear
understanding of it. Yeah, that's definitely
bouncing the right way now. So now we've got the
noise on both of those. We can close those
up, double tap the A, go back to modeling. And now let's see if I press spacebar and there we go.
That's looking pretty cool. And now what we need
to do we need to come round to our
actual cookies. So what we want to do is
we want cooked cookies. So I can grab one of these. You can see the
cookies are attached, so I can press I can
move them up there. And then what I can
do is press Shift D. I can bring them over there. And then what I want to do now is change just this
material here. So you can see where it
says cookie doubles. I basically want to copy that. So I'm going to copy material, and then we're going
to click Plus, and I'm going to click new. And I'm going to call
them cut cookies. Like so. And then
what I'm going to do is paste that onto there. And finally, then what
I'm going to do is I'm going to come in now
just to these parts. So, I'm going to go
with, you know what? I should just change that from cookie bolt to cook cookies. So if I come in, minus
this off and change this to cook cookies, it
should be the same. Yes. So now I'm going to
do the same thing on here. Cooked. Cookies. Same
thing on here. Cooked. Cookies, like so. And what
we'll do on the next one then is we will change
this material here. And then what'll happen is these will look like
they've been cooked. And then what we'll
do is we'll bring in another conveyor
going down here. And then what will happen with
that is those cookies then will go in here like this and they will come out
completely cooked. So let's see if
that'll work, like so, and I'll see you on the
next one, everyone. Thanks a lot. Bye bye.
68. Texturing our chocolate chip cookies and creating variations for Blender Beginners Ma: Welcome back, everyone
to blend of beginners, master class, the
cookie factory, and that's where we left off. Alright, so at the
moment, we've got these, and if I press little Db bun, you will see that these
are in raw cookies, and we don't really want
them in raw cookies. What we want them in
is cooked cookies. So I'm going to press M.
I'm going to put them in the new collection,
cooked cookies. Like soap, and there we go. And then what I'm going to
do now is move these up. So we've got all
of these in here, and we're go to my
cooked cookies, and I'm going to
move them up into this one here, like soap. Alright, so they're
done. Now, let's come over then to our shading. These are our cooked cookies, so we definitely
gonna need these a little bit of a
different color. So what I'm gonna do, I'm
going to zoom over to here, making sure I'm in
there cycles render. And then what I'm
going to do now is mess around with
these a little bit. First of all, I want them
a little bit redder. So a little bit redder, like so. And then what I
want to do is add some noise to these
things as well. So I'm going to first of all, bring in a mix. You know what? We've already got a mixed color. I'm thinking, yeah, I'll add in another mixed color
so we can add that in. So search, mix color. Drop down there. I'll put
this down at the bottom. And then what I'll do is
I'll put this on multiply, and then I'll leave
this on not 0.5. Now, what I'm going to do is I'm going to bring in a noise now. So let's bring in
a noise texture. So shift day, search, noise texture, like so. And then what I'm going to
bring in is color ramp, so search, holler
ramp, bring that in. And then what we'll do is we will keep all of these
basically the same. We'll drop the fat
into the color ramp, and then we'll drop the
color into the top of here, and then we'll end up
with something like this. Not quite what I'm looking for. So what I'm going to
do now is I'm going to grab this and I'm going
to make it a orange. So an orangey color, like so. I'm then going to bring this up over here. And you know what? I think I'm even going to
make it even more orange. So even more orange. Like so. And then with this one, I'm
going to make it a kind of yellowish color so I'm
going to come down, put it a nice, yellowish colour, and now you can see they're actually starting
to get somewhere. So let's now bring that
down a little bit, like so, and now you can see
these look like they've actually been cooked, and they look very nice. Now, we could also change
the chocolate on these, but I don't think I'm
going to go that far. I think I'm happy
with how these look. Okay, so let's now
go over to muddling. And then what we need
to do now, of course, we need to now end
these cookies and have them changing over right at
the end into the other one. So what I'm going to do is I'm going to come to this part, I'm going to pull it
back over to here. And then I'm going to
do what we normally do, which is we're going
to press Shift D, like so, and then I'm going
to press E and Y, not Y, X. Let's pull it out, like so. And then what we're
going to do is we're going to grab just this part, so L, grab this part. P, selection, like so. Now, the cookies should
start from here. You can see them
starting just in there. Let's hide this out of the way so we can see
what we're doing. And let's as well come in. And what we'll do
is we'll come to our where is it or
object and collection. Instead of raw cookies, we want this to be
cooked cookies, this one here.
That's what we want. And we want it now
to change over, which it's nearly changing over, as you can see, very close
to changing over already. So let's now move this
a little bit this way, and let's see now what happens. Oh, it's very close, a little bit more this
way. There you go. You can hardly see the difference
and a little bit more. There you go. It actually
looks like they're actually cooking. Some
are getting smaller. I'm not gonna change
that, actually. Some are growing with the heat. But anyway, that's looking good. Alright, so last of all, then, we can't really
see in there anyway. So we won't be able to see
that kind of band there. Let's press Altag and see
what we can see there. What I'm going to do is
I'm gonna press Space Bar. And we definitely can't
see them changing. And what's coming
out is cook cookies. And yeah, I'm happy with that. These are just got sprinkles on the middle of
nowhere. That's okay. All right, so last of all, then, before finishing
this whole thing, what we want is a couple
of major supports now. We already put this
in the right place. What I'm going to do
is press space bar, I'm gonna go into object mode. And what I want to do is
put a support in here. If I bring back at the moment, my sprinkler I've got space to put an actual support in here to kind of
hold everything up. So I'm actually
going to use that. And I can use it as well for the other parts that
I actually create. So let's come in,
and what we'll do is we'll I want it right
in the center of here. So if I press shifts, cursor selected, and I
can bring it here then. So what I'm going to do
Shift A, bring in a Q. So that's right in the center. This is kind of the
size that we want it. So what I'm going to do is just put it right under the belt. So E and E, put it right under. Like so. Let's have a look. If we go over the top now, let's make it a
little bit wider. So S and Y, let's pull it out a little bit. Let's then press Tab one, press Control R, bring
in one edge loop, left click, right, click Control B because we know we've already got the edge loop, and then what we'll do
is we'll bring it in two right in the
center so the moment, you can see this
is not coming in, so I'm just going to hold
the shift around to there. Alright, now I'm going to do is I'm going to grab
each one of these. I'm going to press the dot bon so I can
see what I'm doing. And then I want this
right right under here. So it actually wants
to be supporting it. So I'm going to first
of all, bring these up. So I'm going to bring
these up, like so. So E, bring them up just
over the top of there. And then what I'm
going to do with this is I'm going to
press the I button, and then I'm going to
bring this up now. So I'm going to press
E and bring it up, so it's actually supporting it. So like so, it's actually
running along there like so. Okay, so now we want to
just bevel off these edges, so I'm going to press Control A, all transforms,
right click origin, two geometry, tab but, and then let's grab each one of these like so, press Control B. And then what we're
going to do is bevel that off, like so. And there we go right, click, Shade move biangle
and then what we're going to do is this has maybe
gone a little bit too far. So I'm just going to pull
this up a little bit now, so pull it up to
something like here. And then what I'll do
is I'll pull this down, so I want this coming
down into place like so, and then right, click
Shades Move Bangle. And then what I'm going to do
now is grab each of these. You know what? I'll
just grab the top one. I think, Will I grab the top and bob one? You
know what, we will. Top and bom, we're going to
press the eye boon then. Like so don't go too far. Eat to alter nest,
to pull them out. Like so, and there we go. And then we just
want to bom on here, and we also want to
put a stand on here. So what I'm going to do is
I'll grab a smaller stand. So let's grab this one,
shift D. Let's move it over. And what I'll do is I'll grab where this is press Shift desk, cursor selected, grab this one, shift desk, selections cursor. Press in one now, and
all I need to do is bring it down to the same
level as all of the rest. So bring it down
to there, like so. And then what I can do now
is I can make it into place. Now, first of all, I
want to come into here. Grab the bottom of
this, press E to S, and pull it out, like so. And then what I want
to do is press E and pull it down into place like so. Now, does that fit? It actually fits, so that's pretty cool. Now what I can do is
I can grab I can, first of all, grab all of this. We know that there's
already a bevel on here, so we can
actually use that. So I can do is grab all of this, grab this, press Control J, and there's our bevel on there. Now, let's come over, and what we'll do is we'll
grab the whole thing. So we'll grab the whole thing. At the moment, it's all yellow. Let's actually
change that to blue. And then it'll be
easier to change it back to the yellow
or the parts we want. So change it all to blue. Let's come into these
two parts then. Like so. And I'm going
to put those as yellow. So down arrow, factory
yellow. Like so. Let's click a sign. And then what I'm going to do
is the bottom part. I'm also going to do
the same thing there. So factory yellow, click a sign. And then this part in
here that we can't see. I'm going to press
the question mark just to hide everything
else out of the way. Just this part
here, contour plus, factory yellow, click
a sign. There we go. OldtH, bring back everything
all the question mark. And there we go, that now is being poured really,
really nicely. Let's go to file and save. And what I want to do now is bring this over to
this side as well. So shifty, bring it over, and then we'll put it
in there, like so. And then now this is ready to
go into our other machine, which will be our kind of packer that packs
them in the boxes. So I'm going to put this
into here, like so. And then on the next lesson, I'm just going to
check everything before we finish. So flour mill. Mixer, stumper, double tap
the A, and there we go. What a lot of stuff
that is, guys. How nice does that look? Alright, so I think
now we've saved enough room here to
put in the boxer, and then it's going to come round all the way round to here. So we might have
gone a little bit far this way, but I think
we'll get away with it. It doesn't matter how long
this is anyway, to our packer. And then finally, at the end, we're going to have our grab it. So our grabbing machine to
grab our box of cookies. Alright, but everything there
looks really, really nice. Let's save out our
work, so file and save and I'll see you on
the next one, everyone. Thanks a lot. Bye bye.
69. Blender basics, performance and optimisation for Blender Beginners Masterclass: Welcome back, if you want to Blender beginner's master class, the Cookie factory. And I think it's time to
do a couple of things. Now. We've got a lot of
things actually in the scene. So what I think we
should do is go through performance and
optimization of how we can increase the performance
within the Blender viewport and also how we can make it so that we can actually render
things out because sometimes, if you've got too
much in the screen and you're using VRAM, it actually will hinder
your ability to render, especially in Pyco'sRder engine. Alright, so I'm going
to play that for you now and I'll see you on
the next one, everyone. Thanks a lot. Bye bye. Welcome everyone to our
performance optimization guide. And a lot of times, when you're dealing with really, really complex scenes
or even simple scenes, if you've got a low end machine, you will come across
things like da out of memory or blender
actually crashing. And there is lots and lots of ways we can actually
deal with that. And I think it's important for all of you guys to actually know what things we can actually do to stop
this happening. We probably won't be able to
get rid of it altogether. There'll still be times
when blender crashes, but we can do a lot
to actually increase that performance
to get our scenes where we want them to be
and more importantly, render out beautiful images. So the first thing we're
going to discuss is RAM. And now, if you look down at the bottom right hand side here, you will see one
that says memory, and you will see
one that says RAM. Now, the most important
thing is that, first of all, you understand
now to bring these on. So what we're going
to do is we're going to go up to preferences. We're going to go down then to interface, and under interface, you'll have a status par and you can actually click
all of these on. So we've got system
memory and video memory. And these are some of the
most important things. So let's just close that down a minute and let's
actually go through these. So basically, you can see
here that down the we've got how many triangles we've got in the scene and how many objects. These directly correlate
most of the time to how much performance
your computer will need to actually
run this blender scene. So the more faces, which are polygons you have in your scene, the more performance
you're going to need. Same thing goes for
the amount of objects. If you've got a ton of
objects in your scene, then it's going to
come at the cost of actual performance. Now let's move on
to the actual RAM, which is how much RAM your
actual computer actually has. And I recommend a
minimum bare minimum, you need 8 gigabytes
of RAM to run blender, and it comes down to the more, the better the performance
from your machine. So I would say aim
for 16 gigabytes. Now, also, we have something
that's also very important, which is called V RAM, and this is normally
the RAM that comes with your
actual graphics card. And basically, the higher
this is on the graphics card, the much smoother time
you're going to have. So I tend to see problems myself is with the actual
memory on your computer. If it's too low, you have
problems in the viewport, and where I see the problems
arise with the VRAM is normally when
you actually come to render out complex scenes. The next thing we
can do to actually limit the amount of
performance needed is actually put everything in a nice neat order in collections and make sure everything's just
named correctly. What we can do from
there, then we can close certain parts
of our scene down. Which means that we can either render them out a
little bit at a time and then lay them on top of each other or especially
in the viewport, what we can actually
do is close parts that we're not working
on at the time, especially in large scenes. And then this then again, will limit the
actual performance. Also, it comes down
to your CPU, as well. You CPU, the better
it is you know, the better time you're going
to have with all of this. But let's now say
we've got all of that sorted and we're still
having some problems. Let's now go into a few of the options that we can
actually mess around with. So what we're going to do is we're going to go up to edit, go down to preferences. And the first thing I
want you to look at is system and on the system, just make sure that you've got this set to whichever you can. So it can be QDa, optics
X, or one of these. Just make sure it's not unknown. And then once you've got the one selected which you want to use, just make sure both
of these are ticked on and blend of them will
take advantage of those. Also make sure that
you haven't got undue steps set at
250 or something. This has a huge actual
impact on performance. So if you're really,
really struggling, I recommend turning these undo
steps down to five or ten. But the problem obviously is that you're not going
to be able to press Controls Ed and go back very
far if it's set too low. So I recommend all of these things I'm
actually showing you. Try and play aranda a bit
till you've got, you know, that kind of perfect setup, and then you shouldn't
have or you should have less problems
in the future. All of these other things we can mess around with as well. I don't recommend these unless you're absolutely
really struggling. I think you should keep
these what they're set to. This is the only one,
and this Tikton is the only one as far as I would go on here, messing
around with those. Alright, so let's
close that down and let's now come over to
the right hand side. And you can see here at the
moment, if I scroll up, I'm on blender render
engine cycles. And it's important to know that to have an easier
time, it's much, much easier to put this onto EV, which is basically a
real time render engine like unreal or unity or
something like that. That then makes it
much easier if I come to render this
or click on my Render view to actually move around the scene while it's
actually being rendered. So the thing is, if
you're on IV as well, there also are some
things that you can actually turn off to
increase performance again. But normally with IV, unless you've got a
very low end machine, you shouldn't have any problems. If you are having
problems, however, just make sure that viewport denoising is
actually turned off. This is one of the
heaviest things, actually, denoising both on blender and cycles that actually really increase that
performance needed. So you can turn the
viewport denoising off. You can also turn the ambient
occlusion and you can also turn the bloom off and especially screen
space reflections. Make sure that is
also turned off. Now, pretty much everything in EV you shouldn't need to mess
around with anything else. Once you've turned these off, you should have a
much easier time. Now, let's move on
over then to cycles, which is a little bit different. So if we come over to cycles, you will see even my machine, it's quite a high end machine, or it was maybe two years ago or something,
sometimes struggle, especially with large
scenes like this with a lot of textures and a lot of
sand and things like that. So if you look over
here at the moment, I actually have, in my
view port denoids on. The first thing I recommend
doing is turning this off. This then will increase
performance no end. So once you've turned that off, it's going to take
a little bit of time to actually apply
that, as you can see here. And then you can also turn the denoise off in
the rendezvous, but I don't recommend
that because then you're going to end up
with a very grainy render, and that's maybe something
that you don't want. Now, you can see already that I'm really, really
struggling here, even with the
denoise turned off, because this is
quite a large scene. It's got a lot of
displacement on there. So I'm just showing you
just how pixelated that is and just how long
we need to wait. I'm going to do now while I
actually fix a few things. I'm just going to put
this onto material mode, and that leads me on
to my next point. So when you're working in
blender, it's important, even though it looks really, really nice to be working
in blender cycles, it actually comes
at a huge cost. You can see already working in material mode over here
is actually really, really helping me
navigate around my scene. Now, if you're
struggling even more, what you can do is
you can come and put this just on object mode, and then you shouldn't actually have any problems whatsoever. It's also important to know before you click
this render Bn, so the render image board, make sure that
you're on wireframe. And the reason is because
you don't want to be rendering out the
scene, you know, in cycles on viewport shaded and then
render it out again, that is more than likely
going to lead to a crash. So what I always do before
I actually hit that render bone is put
it on wireframe. This is the lowest
amount that blender needs to use in the
actual viewport. It's also important to remember that everything comes at a cost that you
put into blender. This could be things
like geometry nodes, porticle systems, simulations. Some of them have larger
costs than others, but everything down to the smallest object
has some kind of cost. So when you've got a scene that's just crashing
all the time, it's generally down to something that's quite a large
cost on performance. Now, the other thing to note
is when you're actually bringing in textures to your scene, it's
important to know. So if we go to this
one, for instance, and we go to our shading panel, this is quite a complex shader. The more complex
the shaders are, the much higher performance
it's going to need. The other thing is, when you're actually bringing in textures, be very careful that
you're not bringing in really, really
large textures. So I recommend four
K be the maximum. But honestly, if
you can stick to two K textures or one K
textures or much better, it's going to make a
much easier time for you making large scenes. This is why a lot of game
companies, especially mobile, use only like 512
or one K texture so they can handle the
performance and keep that optimization pretty high. The other thing is
about textures. If you're using
seamless textures, that is better than
using something that you've gone out and you've painted in substance painter. So it's just much easier to use seamless textures
because they can be used over and over again and limit
that performance. Also make sure on
the right hand side here if you come up
to this let arrow, you can see that light
in our scene lights and scene will make sure they
are turned off as well, because they will also
cost you performance. And last of all, before we move on to the
cycles part of it, if you come over to
your actual world, If you're using a HGRI within, we're not on this one,
we're using a sky texture. If you're using a HGRI, that's also going to come
at a cost of performance, and it's quite a large
cost in comparison, something like the sky texture. So if you can, make sure that you're using something
like the sky texture. As you can see, it's
just one node here, and I know it's very
nice to use HGRI. But if you need to
control optimization, try and learn how to use
the sky texture instead. Alright, so,
finally, then moving over then to our cycles, we can see, first of all, that device I'm using is my GPU. It's always better to use
your GPU over your CPU. It will make it much, much faster because
it's relying on a lot of VRAM from your
actual graphics card. And as we discussed moving down, we can also turn
off the denoise. This is one of the
best things you can do to actually
increase performance. Next thing you can do is you can come down to where
it says light paths, and all of these come
at a cost as well. The lower you set these, the better it's going to be. I recommend messing
around with these last. So last of all, after you've done
everything else, this is what I would be clicking off or turning down,
especially caustics. They're also quite high
on the performance. Last of all, let me show you one of the best things
you can also do, which is if we've got
it on rendom mode, we're on actually cycles. We've turned on denoise again. You can see how nice
this actual sand looks, but it comes a huge cost. So just remember this
comes a huge cost. Now, if I come over and down
and just scroll down here, we have one that says simplify. Click that on, and
then what you'll have access to is all of
these options here. Now, one of the main
things we can do is the texture limit and the
maximum subdivisions. The maximum subdivisions, if you go over that subdivisions
in your modifiers, you can actually reduce
that or override that over here and simplify and turn them down
to one or something. That then will reduce the polygon count right
across you seen wherever it's over six or five or whatever you set this to increase
in performance. And one of the
last things we can do is we can turn
down this text limit. If I turn down the text
limit to something like 256, you'll see after a while, what it'll do is it'll
turn down all of those textures right across
you seen down to 256. So even if they're four k or eight K, if you turn this on, you can turn them all
down and then you'll see, look how grainy now
this actual sand looks, look how blurry these looks. And the reason is because
we've turned down our text limits all the
way down to 256. The other thing is,
if you're having problems renting out your seam, you can also come
in and turn them down in the actual
render as well, which really significantly
helps with crashes, cuda out of memory
and things like that. The last thing then we can
do is especially when we come to actually rendering now, is you can see here that
if you hover over here, it says, use compact
VH structures. It uses less RAM,
but renders slower. So if you're having
problems with crashing, I recommend turning this one on. And if you go to the next one, you'll see for hover over this, it says, use special type
VH optimized for curves. It uses more RAM, but renders
faster. Turn that one off. Also, turn persistent data
off if you need to, as well, because what it means is that
blender is caching all of that data of the scene to save on basically
having to redo it all. So if you turn this
off, what it's going to do is a fresh start every time, and it's not saving so
much in the memory. I don't actually know whether this one is bed to
turn on and off. Again, I would have a
play around with it. Something that is a little
bit more sophisticated, so we're not going
to go into it here, but you do have the option
that you might want to look into of baking out your scene. So in other words,
you can actually bake all of your scene out onto a UV map for all the lighting and all the textures
and things like that, but mainly for lighting, to make sure when you
come to render it, everything is already
rendered out, and then all it's going to do
is render out the objects, all the textures, and
without the lighting. So that then makes it much, much easier on your machine to have a fast render
without crash. So last of all, what
I want to say is, if you're building large
scenes within blender, try and use the shader
panel more than actually bringing
in actual textures. That also is going
to save you a lot of performance and optimize
things really nicely. The only problem you're
going to have, obviously, is if you're sending things into Unreal or Unity or
another game engine, you obviously won't be able
to use those materials, so you will need
textures for those. So this primarily is based on rendering and
building large scenes within blender.
Alright, everyone. So I hope you found that handy. I know if I was
just starting out, I'd really want to know
this stuff because it would have made my life so much
easier in the beginning. Alright, everyone,
thanks a lot, Cheers.
70. Setting up camera and our composition for the scene, starting box maker machinery for: Welcome back, everyone to Blend Beginner's master class,
the cookie factory. And I hope you
learned a lot from the actual optimization and performance tutorial
I just showed you. And if you didn't watch that,
I suggest that you actually go and watch that because it is really, really handy to know. Now what I'm going to do is, I'm just going to
show you how you can take a quick render because
we haven't gone through that, and you might want to just
render one of your pieces out. So don't forget because we've
set this up in such a way, it's really, really easy
to hide everything. So all you want to do
really at the moment, you can see that
we've got our cursor. So wherever your cursor, that is where the camera will come. But when I bring a camera, I don't even worry
where it's going to come because I'll show
you why in just 1 second. So what I'm going to do, first of all, is just
press Shift day, go to my primitives menu, and right down near the bottom, you'll have one that says
camera, bring that in. You'll see my cameras
around here somewhere. What I'm going to do is just set myself up somewhere around here, and then we're going to
press Control Alt and zero. And now what I can do
is I can zoom in and zoom out and you can
see my camera is here. Now, don't worry if you actually click off your camera
like I've just done here, just press zero again, and then that will put you in. Now what you want
to do is just zoom in until your camera. It's around the
outside like this, so we've got this little
kind of gap in here. Then what you want to
do is press N to open up this control panel over here. And finally, we
just want to go to view and you want to
go to camera to view. Then what you can
do is just press N again, close that down. And now, wherever
I move my mouse, that is where my camera
is going to actually be. So if I Zoom in and
zoom out, you can see, I can put it around here
using the shift middle mouse, and you can also press
Control Shift, Middle mouse. And that then will
actually allow you to zoom out slow if needed. Alright, so I'm going to set my camera up
something like this. And then what I'm going to do is just press the end button, come to camera to view, and just turn that off,
and now I should be able to move around and leave
my camera actually there. Alright, next of all, then what you want to do is
we went through already the EV and
cycles render options. What you want to make sure
you do then is coming over, make sure you're on cycles, make sure it's on GPU, and then come down to
where it says performance. And just make sure
persistent data is on. Now, on mine, we're using Blender 4.1 or 4.2,
something around there. Now on earlier versions, there might be a few
more options here. One of them is to
speed up rendering, which uses more RAM, or you can slow it
down and use less RAM. So don't forget you
can also use that. Next of all, the next
click on persistent data. This basically makes sure that when we re
render something, it's already got
some of the data in there to render it again. Now, the other thing I would say is when you come up here, Make sure that if we go
to the maximum samples, make sure to put this
on something very low. For you, I would cause I'm not sure what machine
you'll be running, make sure to put this
on something like 20 just to give you an idea of how long that is going to take. And lastly, the last
thing I would say is, if you're coming over
to this output here, you can actually click
on Render Region. So if I come back to my render, if I click this
on Render Region, you will see now it
cuts all of that away. Basically, what
blender is doing there is it's not trying to
render the whole scene out. This really does help
increase render times. And finally, now
before hitting that render button, I
recommend always, always saving out your work
just so you don't lose anything and making sure that you're at least
on object mode. So if you put shade
in object mode, and also turn off these two interlocking links because I feel
personally that this actually speeds it what
we're going to do now is that we're just
going to go over and render, so you can come here. You can render image.
You can either click here or you
can play SF 12. So I'm just going to
click Render Image. And the first time
you render out, it's going to be slower than, you know, when you
next render out. It's slows the first
time. It might have to load up kernels
and things like that. And there you go, guys, you can see that is how you
can get a render. Now, of course, this
scene is not finished. It's in no way, you know, composited or
anything like that. We're going to go into all of that stuff and make
this lots, lots better, but at the moment, you can
see this is what we've got, and it is looking pretty nice. So once you've done that and you've figured
out how to do that, you can take a few of your
renders. Let's close it down. And a few more lessons in
we'll actually talk about the compositor and how we can lay things and all
of that good stuff. Alright, so now I've done that. Let me just move my camera away. Let's put on our
rendered view once more. Let's turn on these two
interlocking links, and there we go, Let's now
think about carrying on. So the next one we're
going to build is going to be the actual packer. And from the packer,
there's going to be some boxes that are
going to come down here. So I'm thinking probably
better off actually building the box maker
before we do anything else. It's a little bit
simpler, I think. And then from there we can put
a conveyor into, you know, the packer and our cookies can go in there as well.
So let's do it that way. What we want to do
is we want to put our box maker around here, and then it can go
at the side of here, and then it's gonna
come round on the conveyor belt around here to the actual squasherO
the thing that squashes the box together and
puts the cookies in there. So what I'm going to
do is, first of all, if I bring this part back so you have an idea of
what I'm talking about, let's actually change this over. So we'll go over here and
we'll change this over to which one is the box creator? Not this one. This
is the squash. So the box creator, where is it? Is it this one? No, that's the oven.
Mix this stamper. That's not it. Box
packer, box maker. There we go. That's the one. So this is the one that we're
actually going to create. It's got a small animation on with this thing going
backwards and forwards, you know, as though it's
cutting out boxes and things. So let's start making that now. So the first thing is then let's see where we actually
want to create this. So I think in around
here and not only that, I also want to make sure that we this a little bit higher. So this conveyor belt will
be a little bit higher, a little bit like
this one where it's raised a little bit higher just to give a little bit more
depth to the actual scene. So what I'm going to
do, first of all, is I'm going to grab
this part here, I'm going to press Shift D, and I'm going to
duplicate this out. And then what I'm
going to do is I'm going to put this in its own. So what I'm going to
do is I'm going to press let's press M, and let's make a new collection, and we'll call it box maker. Like so, click Okay,
and there we go. Now what I'm going to
do is press shifts. In fact, you know what the
orientation isn't right to it. So control A or transforms
that origins geometry, shifts because
selected, Shift A, and let's bring in a cube. Okay. Let's pull that in.
Let's press the dot but. And what we'll also is, we'll just put it an
object mode for now. This will make it much
easier to work with. So I'm going to
do is pull it up. And then what I want to do
is decide the sides of it. So I'm going to pull
it back to here. I'm going to press the S button. I don't want to hide
too much of it, so you will see that I want to put it somewhere where I
can still see everything. So if you put it somewhere
around here, as you can see, from this view here,
if I move around, we've still got a very, very
good view of everything. And then what we
need to decide is where is the conveyor
going to come from? So what I'm going to do
is grab this conveyor. I'm going to right
click Origins geometry, I'm going to press Shift D, and then what I'm going to
do is just move it over. Then what I'm going to
do is move this up, so we want it up a little
bit to give us some depth, and then we're going
to pull it back into the place where
it's going to go, so you can see it's going
to go round about here. And now we can see we
need to definitely make this a little bit
higher than what it is, because obviously, we've
got some boxes out there. So how high up do we want? Do we want it this high or do we want it a
little bit lower? So let's say a little bit lower, like so and then we can
decide with our box, we've got boxes coming out here. We need one of these in here. So what I'll do is I'll
grab this part here. Let me just grab this part
here to set this out, and then I'll press Shift D, and I'm going to
bring this over, and I'm going to put
this into place. Now, because these are boxes, they don't actually need
to be as high up as that. So what do I mean by that? In other words, I
can put it around here around this bit like this. And then what I can do
is reduce these down. So I'm going to grab
this part first. I'm going to press L
and bring that down. And then what I'm going to
do is grab each of these, and I'm also going to bring
those down then as well. So just shift click
each of these. Let's bring them down to place. Now we're going to fix this
because we want them to be a little bit bigger than
what they are, anyway. Joe's going to pull
it over to the side. So something like this, let's try and level it up
a little bit more. So we'll level it up a
little bit more to that. And now you can see that we
can have them coming down and going around here and have a
little bit more variation. Now, what I'm going to do now is I'm also going to come in. You can see these are on here. Let's press spasebll
just to get those. What I'm also going
to do then is I'm going to put the actual machine, the box machine, wherever these things are going
to go over here as well. What I'll do is I'll
make another cube, so I'll press Shift day, and we'll bring in another cube, and we'll bring this over here. And we're going to
call this the squash. We'll call it something
like the squash, Let's pick it up. Let's press the button. And then this gives me a
good idea if I put this here because we want this
one going straight in, and then this one. So I can probably get away
with it being there, like so. And then this one is going to
come down and go into here. So that's the first thing
I want to do just see if I can actually feed
it down into this. So if I bring it down to here, and then if I press seven to
go over the top and I press E and X and pull that
out a little bit, then what I'll do is
bring it down here. So E and Y, pull it round
into here, like so. And then finally, I want to make sure that I've dropped
this down as well, so into here, like so. And now you can
see, I will have to do some work on these bits here. I will have to make sure that
it's going round enough, for instance, we'll
have to make sure that this has pulled back
enough, as you can see. We need to do a little
bit of work on that. Let's pull it up a little bit. But for now, we're just
going to leave it there, and you'll see that the
cookies come down there, and then they're going
to be going in there. So we can see from this angle here, we can still see a lot. Now, what I need to do, though, is probably pick this
up a little bit. So I'm going to
just grab the top, press space bar, move
it up a little bit. It's jaws on the top of there. And then I'm just going
to have a look round now to see if I can
actually see anything. Alright, this is
looking pretty nice. I'm going to press
the tab button now, tach, bring back everything. I'm just wondering
where that part's gone? Did I delete that part, by
any chance? Maybe I did. Anyway, this is looking
how I wanted it. Okay, so now let's come over. Let's just hide this
box out of the way. I'm just wondering
where that part's gone. You know what I think happened? It's in there.
Look, you can see. Same thing happened as what's happened with the other stuff. So I need to move this out. And take off the animation. So let's come over, animation, let's delete that out the way. Let's go back to modeling, and then we'll actually
press Tab and move this out, press ultage and there we go. Now we've got it back in place. Alright, so let's
put that there. Alright, I know that took a long time to actually
get that sword, but I think planning it
out like that is really, really important to actually, you know, get the look that
we're actually looking for. Also, we have to think, as well, this stumper, it's going
to be really high. It's gonna be like
this sort of height. And we still want to make
sure we can see the oven, we can see everything
and make it really, really interesting as we
turn everything around. And not only that,
we also want to make sure that
whatever we're doing, you know, is created
in a way where actually it fits.
So everything fits. So on this part, for instance, we're going
to have it coming out, and then we're going to
have the claw machine here, you know, and it all wants to
fit in a nice kind of area. The other thing is, I'm
thinking, you know, this might be a little
bit too far this way. So I think on the next one,
the first thing we'll do. I'm just wondering
if I can actually move it over we've actually got all of these parts
that are actually animating and things.
So you know what? I'm not going to touch that, but what we'll do is
on the next one, then we'll start actually on
this, you know, box machine. Alright, everyone, so I hope you enjoyed that and I'll
see you on the next one. Thanks a lot. Bye bye.
71. Continuing modeling process for box maker for Blender Beginners Masterclass: Welcome back eon. Blend the
beginner's master class, the cookie factory, and
this where we left it off. Alright, so let's
now fix this part. So what I'm going to
do, first of all, is I'll pull this side up. So I'm gonna press Control R. I'm going to bring this
over here, like so. And then what I'm going to do is I'll grab the top of here, and I'm just going
to lift it up very, very slightly and
then bend it in. I'm just wondering,
actually, yeah, I'll just pull it up, I think, so E, let's pull it up. Like so let's bring in
another edge loop along here. And then let's pull
these two down. So what I'm going to
do is I'm going to actually pull these
down to here. So I'm going to
press M at the last, and I'm going to do the
same thing on here, but shift R, like so.
So something like this. Then what I want to do
now is I want to put a top on this before
going any further. And I also want to
make sure that this is fitting in much, much
better than what it is. It's a little bit too
big at the moment. So what I'm going to
do is press S and Y. Let's bring it in like so, just so it fits
much, much better. You can see as well that these aren't fitting too
well on there. So what I'm going
to do is press S and Y and pull them out. So that there's four instead. So if I put this on here, you can see now
there's four instead, and then I can get
rid of this one. So L, delete vertices. Now, I need a hole
in there, of course. So let's actually
put that in there. So what I'm going to do
is I'm going to press Control R. Bring one up
so that this is in there, like so, I'm going
to press Control R again and bring it up,
so it's in here as well. So underneath here, like so, and then I'm going
to press Control R. Left click, right, click, drop it right in the
center, Control B, bring back the amount
of bevels on there, and then just drop it into here. Now, we can see now now
because we've got this centered that we can actually center all of these
things as well. So what I'm going to
do is I'm going to come to the center part so
this center part behind you. I'm going to press Shift
S, cursed or selected. And then what I'm
going to do now is grab this one and this one. I'm going to join them
together with Control J. Control layer transms right
clicks at origin to geometry, shifts then. In
fact, is that right? It's in the center,
so that'll do. So shifts selections cursor. That then is right
in the center now. Let's do the same thing on here. The orientation is right
here, so that's helpful. Shift desk selections cursor. Now, I knew it would pull it
out, but what it's going to do is it's going to
actually center it for me, and that's the main thing
that I want from this. So there we go now. Everything is centered off. Now one thing is, it's
a little bit too high. So what I'm going to
do is just pull it down a little bit to there, and then I'm also
going to pull this down now to round about there. If we come back to this part, we will see this is what
we've actually got. So from here now, I
can extrude this back. So all I'm going to
do is I'm going to press E and extrude
it in, like so, all the way back just so we
can get something in there, and then press tab,
bring this down again. And then we want this
all the way at the top, and let's pull it back
into place like so, and there we go, This
is looking pretty nice. And now, finally,
what I want to do is bring this down below here. So we're just going to
come to my conveyor belt, I'm going to pull this down. Do here, so maybe down to
here, just so it's underneath. And then what I'll do is I'll
come back to this part now. So this part here,
grab this bomb part, and then I'm just going
to pull that down under this convey be like so. Alright, that's
looking pretty nice. Now I want to do I want to bring this up,
so this on here. You know what I'm
also going to do? I'm also going to hide
my chocolate drops. Let's have a look conveyor belt, flour mill, water adder, mixer, stomper
sprinkler, and my oven. Now, you can see that gets hidden on my oven. I
don't really want that. So what I'm going to
do is I'm going to put this in my box maker. I'm also, as well, go
to move my box maker up to be under my oven, like so. And if I hide the box maker,
all of that gets hid. Let's also put this in
the box maker, as well. So M, box maker,
and there we go. Alright, so now we've got a really good view
of everything. Now let's hide or oven, out of the way, and there we go. Now, let's pull this up. So I'm just wondering, have I got this wide
enough at the moment? I might want it a little
bit wider on each side. So we can still do that
because all we need to do is just grab all
of these sides then, like so, and then come to here. Like so. And then all
I'm going to do is press S and Y and pull
those out a little bit. If they're not pulling out,
just go to medium points. So S and Y, let's pull them out and make it a little
bit wider like so. And then what we'll do now
is put a bottom on here. So first of all,
though, I'll come in. I'll grab all of these. I'll pull them up a
little bit like so. And then what I'm going to
do is, I think I'll press the shifts cursor selected. First of all, let's put
it right in the middle. And then let's just put a
bottom on there with cubes. So shift day bring
in a cube like that, and then I'm going
to put it down. To where I actually
want it. Now, let's pull this out to
where I want it. So this is right in the center, so I can grab the front of
it, pull it out like so. And then what I can
also do is grab the back of it and pull that
out to where I want it. And finally, Control two. Left click, right click, and then Control B and
pull these out like so, and then E ter alterns and pull those out and make
sure offset is even is on. Okay, so that's looking
so far so good. Now I can move this
over a little bit because this is where the
edge of it is going to be. And what I also need is
I want a top on here, and then I want a big,
big vent on the back. Let's put the big vent
on the back first. I'm going to press shift a mesh, cube, bring it over, put it to the back
wherever I want it. I want it come in probably
to run about there. What I'll do is I'll
pull it this way. And then what I'll do is I'll grab the back of it like so, pull it back to run about there, and then pull this
one up to there. Then what I'll do is
I'll come in then, grab the back of it,
press Control B, and I going to bevel it off. From there, I think.
So like that. Right click Shade Smooth. Now, let's just make the vent actually in here,
so make it work. So all I'm going to do press
the I button, like so, and then we're going to press
E and pull it up like so, and again, Shade Smooth. Alright, so now
just this top then. So what I'm going
to do with the top, I'm thinking that I'll bring
and I'll bring this part in. So this part in here.
That's the first thing. I'll also add in an edge loop. So let's do that
first, actually. Control ar, left
click, right click. Grab this part here,
and then we'll do S and Y, and
we'll bring that in. And then we'll grab
this one S and Y and bring that in, like so. And then I'll have one
more edge loop at the back, control, left click. To there, and then we'll just
grab this one and this one, and we'll press E
and to alternS, pull it up, like so. Right click, Shade Smooth. Okay, so first bit down. That's looking pretty nice. Now we need to work
on the next bit, which is a little bit more
complicated, actually. So what we'll do is
we'll get it into place. I think, first of all,
we'll bring in a cube. So we'll bring in a cube.
We'll pull this over. And what we'll do is
we'll put it next to this because obviously it's
got feeding into this, so we want to put it
next to it, like so. And then from there, we want to make this kind of interesting. That's what we're
trying to do, really. So what we'll do is we'll
pull this out a little bit. And from here, then we'll have some more machines on here. Now what I need to just
check is where my oven is. So my oven's here, and
where is my sprinkler, my sprinkler, if I work around. I've got plenty
of room in there, as you can see,
and not only that, we're kind of fitting
in everything into a really nice kind of space.
So that's the main thing. So what it means is
it means I can pull this out a little
bit further like so, and it means that I can
actually work on this now. So what I can do is now I can actually bring in from here, shifts cursed or
selected, and then shift. And what we'll do is we'll
bring in another cube. I'm going to make this
cube a little bit smaller. But what I am going
to do is just pull it out two here a little bit. So pull it out past
here, pull it out. And here we can have some
controls on this part here. But then what I can
do is I can pull it down into place so I can see roughly if I hide my sprinkler
oven out of the way, and if I press one, I can see
where I actually need it. So down here is
where I'm going to need this tab, grab
the top of it. And then we're going to pull
it up to here, like so. I'll press I then, bring it in, and then E, and let's put
a top on there like so. Alright, so far so good. Now, let's save out our work, so we're going to save it out. And then on the next one, we can actually make a start
on this part here. You know, build this round for that actual machine that's going to do all of the printing
and things like that. Okay, everyone, so I hope you enjoyed that, and I'll
see you on the next one. Thanks a lot. Bye bye. An
72. Adding smaller detail to box maker, such as hinges and considering where the motion w: Welcome back, everyone to blend the beginners
master class. The Cocky factory. Alright, so now we've got how much room we
need to put in here. So what I'm going to do
is I'm going to grab this control A or transoms, set the origin to
geometry, Shift S then, Custer selected, shift A, bring in a cube. Let's make the
cube much smaller. Let's then bring
it up into place. I want one part of
the back of here, which is going to come
nearly to the end up here. So I'm going to put
it round about here. And then what I'm
going to do is drag it over to here,
something like this. And then what I'm
going to do is, I think, actually,
that'll be okay. So I can put a kind of arm
going down here into the pot. So what I'm going to do
is press Control A again, right clicks at Origins
Geometry, grab this part, press the eye button, and then what I'm going
to do is pull this back into place like so,
and there we go. Let's pull it out just a little bit so it's nice and even. And now let's think
about actually creating this part around here. So what I'll do is I'll
again bring in, in fact, you know what, we'll bring
in a plane this time, and we'll put it around here. We'll make it a lot
smaller, like so. And then what I'll do
is I'll press S and Y and pull it out, like so. And I want it roughly to be round about the
same size as here. So S and Y, pull it a
little bit further out. Like so and then S and X. And there we go. Now, I do
want to have another one, a little bit further down here, but I want to give a
difference in them, so I want this one to
be kind of bigger. So I'm thinking, probably the easiest
way of doing this is doing them
both together. So what I'll do
is I'll pull this down just nearly into place. I'm not quite through
there, as you can see. And then I'll do
this one. I'll press Shift D. I'll press R, Y, 90, bring it out into place. Put this around
here and then and, and we'll make this one a
little bit bigger, like so. And then what I'm
going to do is just I'm going to move them
both at the same time. Actually, I'm going to move them over here into place like so. All right, so let's
reset both of the transforms because we
can do them both together. And then what we'll do is we'll
come to each of the ends, so we'll grab this one
first, then this one. And then what we're going to
do is control shift and B, and what we'll do is
bevel those out like so. And you can see here
that this one has a little bit of a problem because it's a
little bit smaller, so I'll just come back
control shift and B. Let's see if I can
actually do them together. So we'll get that far like so. And you know what? I don't
think I actually want that. I think I want it
something like this, so this one's quite more, a little bit more less rounded. Alright, so far so good. Now, let's pull this
one up and this one. So what I'll do is
I'll press eat, enter lns and pull
them both out. Like so. And then what I'm going to do is press
the i button and bring them in to where I want them or something like this, and then I can
press Enter lns and bring them back into the place
where I want them like so. Alright, so now let's grab
this one and put it down, and then let's grab this
one and pull it over. And then let's grab
them both and right click and Shade Smooth biangle. Okay, that's looking
pretty nice. I'm wondering if this one's
a little bit too big, if this one's also a
little bit too big, I can make them smaller now, so I can press S and X, for instance, and bring them in. I can also do the same
on this one, as well. So S and Ed make it a little
bit smaller, like so. Okay, that's looking good. Now, let's make
the actual machine that's going to go on here then. So first of all, we'll
bring in another cube. So Shift, let's bring in a cube. Let's bring it up.
Press the S button. Press S and and pull it into place along here, just
at the edge of there. Then what I'll do is
I'm thinking if I need it a little bit
bigger, maybe I do. S and Y, let's pull it out. And then what we'll
do is we'll pull it down to let's press tab, pull it down to here, like so. Now we need a little
bit that's going to feed from this part, so it's going to
move left and right, going into this part here. We'll make that next actually. What I'll do is I'll just
press Control A again, I'll transform right click
set origin to geometry, and then what I'll
do is press Shift A, bring in a cube and
then I'll pull it up. You know what? I need
to actually bring it into here. So I'll
press Shift desk. Custer selected Shift D.
Let's bring in a cube. Let's make our cube a little
bit smaller, actually, just so I have, you know, it makes it a little bit
easier to work with. So every time I bring it in now, it's going to be like this size. And then what I want
to do now is I want to feed this down and
into this part here. So what I'm going to
do is I'm going to pull it down all the
way down to here, and then go to grab the
bottom of it and pull it up, like so and then what I'm going to do is press the I button
and then bring this down, and then press the button
to bring it in, like so, and then the I to bring
it in a little bit more, and then we'll check
the scale after that. So now if I bring this down, it looks like it's kind
of feeding into that. Now, you can see, it's
a little bit out, so I'll just pull
it down to that. Then I'll pull it over, making sure it fits going along there. And we can see that
we can probably get away with making it a little bit bigger on these pots. What I'll do is Alt
Shift, click Alt, shift, click, Alt Shift click, lns, then we can bring it
out a little bit more. So it fits a little
bit better in there. Alright, so that's looking good. Now we'll just put a marker
on here or something, so control R. Left click, right, click Control B,
pull this out a little bit, turn them all the way
down, and then Control R. To here and then
control up to here, making it a little
bit different. Then grab each one of these
parts and then press E and to alter and pull those
parts out a little bit. So, just making it a little
bit more machine like. And then what we'll do is
we'll now put a top on here. So I'm going to grab the top. We'll press I and then
pull it up, like so. And now we need just
this handle and it's going to come down to here. So what I'll do is I'll press
the I button and bring this in and then I'll press S and Y and pull it in a little bit further
to make that arm. And then what I'll
do is pull this out. So if I pull this
out now you can see we've got this arm now. And then we need to know where we need to
pull this out too. A little bit hard to
see at the moment. So what we'll do instead is
we'll just press Control R, and we'll bring it back, so
we've got an arm on there, and then we can
move the arm back. So first of all, we're just
going to bring it out. We're going to press
E then to move it down into place. And
this is what I'm saying. You can't really see what's actually happening or
where it's going to be. So what I'm going
to do is just grab now these parts here, and then I can just pull that back like so,
and there we go. Now we can see that's
looking much, much better. Alright, so we can see now this thing will move
across, left and right. And what I want to do now is think about the bottom
section of this. So I'm just wondering whether this bit's a little
bit too thick. I think it is. So Jaws, pull it in, like so. And then what I'll also do is this bottom section now,
I need to put that in. So we'll do that now. We'll actually come
to this part here. So this is this bottom
shifts, cursed or selected. And then what I'll do is
I'll press tab, shift A, and we'll bring in we'll
bring in a cube again, so we'll bring the cube in,
and we'll just shape it. So what I'll do is I'll
put back into there. So just into there.
And then I'll press tab and I'll
pull it in, like so. And then what I'll
do is I'll round this bottom part of it off. So I'll press Control A or transforms origins
geometry, and then tab. This one and this one, I'll press Control B
and round them off. Like so, making sure
that when a right click and shade or move, it's
still going to look good. And there we go, now
I want to actually think about this
part going up here. Yeah, everything
seems nice on there. It does look nice. So I think I'll have one more
metal part in here, actually. So what I'll do is
I'll just grab each of these sides and I'll press the eye button
and bring them in, and then I'll press E to AlternS and this time
we'll bring them in, like, so, right click, then, Shade mooth biangle
and there we go. Alright, now, let's think
about this part, like I said. So shift day, let's
bring in a cube. Let's make it a
little bit smaller. Let's press S and X, bring it in to here and then what we'll do
is round these edges off. I'm going to pull it out a
little bit further. Like so. And then I'll grab
both of these edges, and I'll press Control B and
round them off of there. And then what we'll do
is we'll grab this top. And we'll pull it up a little bit, so we're going
to pull it up. Probably it around about there. And then what I'll do is
I'll press the I button to bring it in, like so, and then we're going
to press E and bring it up again to there. Okay, that's looking. Now I wanted it. And now we can think about bringing
this out and in. So first of all,
let's bring it to this part of here
because we know this is going to be
the furvist point out. So what I'll do
is I'll grab this going all the way around
here because we don't want to stretch this be too much, but we'll pull it to here. And then what we'll do is we'll do the same with this side. So we'll grab this
one. And this one and then pull it over to here. And then finally we now we
want this one and this one, and we'll pull this all the
way over to roundabout here, something like that, making sure everything is set on
where it should be. And finally, then we'll actually
bring the bomb part in. So what I'm going to do
with the bottom part is? First of all, I'll press Control A O transforms, set
origin geometry. I'll grab this bomb part
and I'll bring it in. So I'm going to bring
it in that far. And then what I'm going
to do is press E and bring it down into the
space where I want it. And what I'm also checking
is this part here. I'm probably going
to have to stretch it because I really want this part actually
fitting in there. So this part here wants to
be part of the whole thing. So I'm going to grab
just this part. I'm going to press S and Y
and pull it out a little bit, and then just pull it
into place, hiding that, as you can see, making sure that this gap is hid in there. Like so, and then I
think from there, I can actually build
out the rest of this. So I'll put a fan on here. I'll put some other
little things in here. And I'll also I'm
just wondering, yeah, I'll put something
on the back in here. I'll put a little switch on here, and all things like that. Alright, so that's
looking pretty nice. Alright, everyone, so hope you enjoyed that one, and I'll
see you on the next one. Thanks a lot. Bye bye.
73. Creating leavers and continuing details onto box maker modeling for Blender Beginners: Welcome back everyone to Blending Beginner's
master class, the cookie factory, and this
is where we left it off. Now, I think I want
a little bit of a lever on here, so
I'm going to go. I'm just wondering if
it's on the water added. Is that where we put that
little bit of a clip? Or did we put it on the mixer, and it's there on the
mixer. This is what I want. So I want this part here. So I'm just going to come in, and I'm hoping if
I steal this part, so if I come into
here, I press Shift D. Like so, and I bring it over. And then what I'm going to
do is press P selection, contro A, all transforms, right clicks to
Origins Jump tree, and I'm just going to make sure that it's got no animation on, which it hasn't, so that's good. So let's come back
now, and now we can actually bring this into
the place where I want it. So I want it much, much bigger than
what it was before. And I'm going to put
it right in the center of here on its own
little kind of box. So, let's pull it down. Let's press the S button and
make it much, much bigger, as I said, and then we can kind of put it in there
on its own little box. I'm also going to
pull this part back. So if I come in and
grab this part, I can pull this part back then. And then what I can do now
is create a box for it. So first of all, let's
put it where we want it. So if we want it
round about here, maybe just to the side, a
little bit further down. And then what we'll
do is pull it out. We'll press shift this,
cursed to selected. We'll press shift A then,
and we'll bring in a cube. And then what we'll
do is pull this cube back M it a little bit bigger, and then S and Y, bring it in. And now just look, see how
big you actually want that. So we know it's
right in the middle. I think, actually, that will do. So let's pull it
into place, like so. Let's pull this into
place, like so. And there we go, that's
looking pretty nice. Now, last of all, I actually want a pipe
going down there. Now, we have a lot of pipes, especially on I think we
have some in our oven. Let's have a look. Yes,
we have some pipes here. So let's grab this one here. So I'm going to grab this
one, Shift D, bring it over. P, selection, re grab it. Control A, all transforms, set origin to geometry, and then Rs 90 to spin it round. And then what we're
going to do is pull it into place where I want it. So it'll be something
going to the side. I'm also going to make
it a little bit smaller. And then I'm just going to
plug this in just under there. Now, you can see that I do want it probably a little bit longer, and I also want this part
to be out a little bit. So all I'm going to do is I'm going to put this
part into place, and then I'm going to come
in and then Alt Shift, and click, lt, shift,
click, Alter Ns. So bring that in, hold
in the shift button, so bring it in, bring it in. And you'll see how it fits near enough perfectly in place. So I'm going to press
Alt Shift click, Corn chow plus, and I'm going to bring
this out a little bit. Like so. And then what I'm going to do is now
move this all in. So if I move this all in, I'm
going to move it to there, and then what I'm going to
do is pull this part and this part out a
little bit, like so, and I'm also going to come
in Alt Shift click Control plus and then just move
it up into place like so. And finally, then I'm
going to move this out. Then I'm going to grab this
part, move this part out. Like so and just get it all fitting in into the right place. Like so. And there we go. Alright, that's
that bit done now. Let's think about our fan. So for our fan, I'm going to hide our oven
out the way again. For our fan, let's bring
it in round about here. So let's press Shift D, first
of all, bring in a cube. Let's work out how big
the fan needs to be. So we'll actually
create the fan. So S and Z, we'll
pull it up to here, S and Y, and we'll pull it
out to round about here. Or something like this will be where the actual
fan is going to be. So what do I mean
by just a vent, I mean, not our actual fan. Then what we'll
do is we'll press Control L or transforms. Origins geometry,
grab the center, press the i button
to bring it in. And then what I'm going
to do is drop it back. E to drop it back. Now what I'm going to do is actually,
I'm going to grab this. I've already got pull it
back a little bit further, press Shift D. And then all you're going to do is you're
going to press Control Law, bring in however many
events you actually want, left click, right click and
then just split them off. Grab all of these.
Splitting them off with Y, and then you can re
grab all of these. And all you want
to do now is just put it on individual origins. So make sure it's on
individual and then R and Y, and you should be able to
turn them all like so. Now, we could come in and also add in a solidify, but honestly, all you can do is just press E, and you can pull them out
now and they are simple fan. And basically, now I want
to put these into place, so I should have really split them up. It
would be easier. So L, P, selection, split them off, and
then Control A, all transforms set
origin to geometry, and then it's just pull them
back into place like so, and you can see just how easy that was to
actually create. Now, let's come down
to this bottom part. So we'll grab this part. We'll press the Ibn
to bring it in. So I don't want it
coming in so far. So basically, I want
it coming in there, but I want it back to the wall, so I'm going to just pull it
back to the wall like so, and then I'm going to
press the E button, bring it down to here,
and then Control R, bring it down to here, like so. And then we'll press three on the keyboard to
grab this part, and then we're going
to press E and pull it out into place like so. Alright, so far so good. All of that is looking nice now. I just want a couple
more parts in there. Now, you can see, as well that
this part actually moved, and it's because it's
part of the oven. So let's just put it
into the box maker, like so, and let's
hide that other way. 'cause I was wondering
where is that gone? Alright, so let's now
come to this part here. And what I'll do is I'll
just press the i button. I'll bring that all
the way in like so. And then I'm just
going to pull it out just to give it some
variation on there. And then we'll also do the same, I think, with this
part here as well. So I'm just going to
press the I button, I'm going to bring it in and then just pop it out
a little bit like so. And then with this
part here now, this part can all stay okay. That part is looking good. What I want now though,
is these parts in here. So what I'm going to
do is I'm just going to grab this part here, I'm going to press Shift
D. I'm going to press the S button and then S and Z, and then S and Y and just
pull it out to here, like so. We're just going to put a
couple of things on here. I'm going to pull it
out a little bit. And then we're going to come in, grab each of these points. You can just press L on here because there are
four points on here. So we can just press
Control Shift and B now and just increase the amount
we have left click, and then we go,
let's press L on it again and let's press E and
pull it back into place. E, pull it back
into place like so. And then what we'll do is just grab the whole thing with L, shift D, and bring it down. Okay, there we go. That then, I think,
is just about done. So let's have a quick look
at what this looks like. So the main thing we need to do now is we've got our bevels in so the first thing we want to do is put it
onto object mode, like so, and then
what I want to do is grab this part, this part. You know what? I
can pretty much get away with grabbing
all of these parts, all of these, all of
these, all of these. Press the G but just to move it to see what
parts we miss. We can see we've
missed quite a few, so we can grab all of these. We can grab this one
here, and we can grab this vent here. And then what I'm hoping I
can do is I can grab this. Then that's press Control L, and what we're going to
do is copy modifiers, and hopefully everything
should be okay. If not, just press Control
A or transforms right click Setagen to geometry of
the and in actual fact, the thing is, we can't
join all of these up, but we can join a lot of
these parts up already. So if I grab this one, did I actually add the
modifier on there, that's up? No, I think I missed
that. So what I'll do is I'll grab this one, grab this one last press
Control L, copy modifiers. And then what I'm going
to do is just slowly go around and add all the things
that I can add together. So I can add all of these
together, all of these, all of these, anything that's basically not
going to be moving. So you can see all of these parts are not
going to be moving. And let's have a look
what I've got here. So I can grab this part and
press G, let's have a look. So the thing is this is
all going to be moving so now I can press Control
J and join it together. Now, let's go over
then to our material. And the other thing
is, let's right click and shade Auto move, as well, just to shade
those parts off. Let's go over to material view, and it's all coming as metal.
That's absolutely fine. So what we can do now we can
come to this part first. We can grab the whole thing. Let's come in, grab
the whole thing. And then what we'll do is
we'll put this as a orange. So we'll have it
as factory orange. Let's go to material,
click the plus, click the down arrow,
and factory orange. And the other thing is
when we're doing this, you can see that because
we join them all together, sometimes it does
cause problems. So let's now click a
sign on that. So a sign. And then what we'll do is
we'll come to the bottom part, and we'll click a sign, and then we'll go for
plus, down arrow. Let's go to the yellow,
factory yellow. And then what I'm going
to do is make sure I'm on Face leg, and then
Alt Shift click, O shift click Control plus
factory yellow, click a sign. Alright, that's looking good. Now, let's come to
these two parts. So this one, this one,
this one, and this one, and what we're going to do
factory yellow, click a sign. Then we'll come to
this big part here. Also this part here, click
the little plus button. Down arrow, factory
blue, click a sign. Okay, now we need the
little dark points in here, so grab this one and
this Plus button, you know what we'll also
do it on there as well. So plus button down arrow,
and we're going for the hole. So hole, there we go. Click sign. There we go. Alright, so now we've got the vent and all of this.
So let's come to this part. So L, factory blue,
click a sign, and then L, and we'll click a
sign on factory blue again. And this part will be yellow. So yellow, factory yellow, click a sign, and there we go. Okay. So all of that
part then is done. We've just got this part to do. And then what we'll
do is the animation. You know what? Before I
finish? This is bugging me. So grab both of these, ControPlus back to yellow. Click a sign, and there we go. So what we'll do
then is we'll bring in I don't know if actually
this is metal or not. Is this metal? Yes, it is. Okay, so that's okay. So what we'll do then is we'll bring in the metal on this one, and then we'll get
this one animated go in forwards and backwards. Alright, everyone, so I
hope you enjoyed that. I'll see you on the
next one. Thanks a lot. Bye bye.
74. Adding animation to box maker, of parts going back and forth, starting to positioning o: Welcome back everyone to Benn
Beginner's master class, the cookie factory, and
this is where we left off. Alright, so let's come in. We can pretty much get
away actually with this in joining it all together because it's only going to
be moving left and right. So let's join all of
this together, like so. And what I'll do is I'll
press Control J. I'll press the G but just to make sure, and I need
to join this one. So Control J. We can see, as well, we've not
grown modifier on this. So what I'll do is I'll grab this one last. I'll
press Control L. And what I'm going to do
is link. No, we won't. We'll copy modifiers like so. And then I'll grab this part
here. And you know what? We won't do that. We'll
just add in our material. So we'll come in and
we'll add in metal light, like so, and now we can
actually see what we're doing. And then what we'll
do is we'll put a darker part on this part here. So Alt Shift click, let's go round, and we'll also put it
underneath here as well. So Alt Shift, click. No there, going around, not there either, going around this part of here. There we go. And then we'll do his plus, and we'll hit the dark. So metal dark. Let's click a sign. And then I'm just wondering
if we want any of the others. I think we'll have
this part here. So we'll go for this
part, this part here, and we'll put it on
metal dock just to give it a little
bit of variation. Alright, so so far so good. Now, we need to make sure then that this is
going left and right. So first of all, I'm
going to move this over to here. Like so. And then I've got to make sure, though, that as you can see, we don't want that
stuck in there, so it's only going to go right up to the edge and then
back over to here. So let's go over
to our animation. Let's put it onto one. Let's press the little
dot bon to zoom in. And then what we'll do is
we'll just press I on here, and then we'll move it over to, let's say, 20 frames,
something like that. And in those 20 frames, then we'll move it over to here. So we'll move it over to here, like so, making sure it's not going through
all of those parts. So it's going to
move over to there like so, and then we're
going to press I. And then we want it to.
So let's have a look. It's going to come from
here to there pretty fast. And then we'll go right
left and then right again. So we'll go back to here. So all I'm going to do is
grab this one, Shift D, bring it to 25, and then
I'll grab this one, Shift D, bring it to 30. And now let's have a look
what that looks like. So maybe too fast, as you can see, so
what we'll do is we'll just split them
up a little bit. So all I'm going to do, I'll grab them all with box select. I'll press the S button, and I'll bring them
to maybe 40 frames. That looks better. And now we want to drop it right
back to the start. So all I'm going to do
now is put it on to shift D. Let's say 60 frames
or let's say 55. Let's try that. Oh, here we go. Okay, there we go.
That's what I want. Something like that, something a little bit more interesting. Alright, so now what we'll
do is we'll come over. We'll go to the object data. We can see it's being
pulled on the Y. So hopefully, if I come
in then to Y location, I should be able to just add
it in a cycles on the Y. Let's bring it back then
let's see if that works. And there we go. Now, I'm just wondering about
this last part. If I actually want it to
stop, and I think I do, I'm going to instead of that, grab this part, shift D,
and I'll put that there. And now let's see
what that looks like. Yeah, that looks better. Okay, much, much
happier with that. Now, let's go back
to modeling them. And now we've got
this. Let's have a look what this looks
like on Render view. Double tap the A.
And there we go. The one thing I think is
this blackness in here. Let's put it back to
the factory blue. So let's click a sign. Yeah,
I think that looks better. And then round here as well, we'll also grab both of these. I'm on factory
yellow. There we go. Yeah, I think that
looks pretty good. Alright, so now what we need
to do is we need to think about our actual boxes that
are going to come down here, and we also need to think
about how we can actually stop this looking a
little bit stretched out. So what I'm going to do is
I will come to this part. I'll put it on Object
mode because I can actually see
much, much better. And what I want to do is you
can see it's probably caused by the fact that we've got this kind of bending down here. So let's see what happens
if we bend it down. Will that make it any better? You can see you've probably
bend it too far down there. So let's see if I delete
this out of the way, so delete vertices is that
going to make it any better? Now, if I bring in another one, so I'll bring in
another subdivision, I'll bring it over
this one over. Let's see what
happens with this. Is that going to
make any better? So if we bend it out, let's say, let's bring
both of them out. And sometimes it is
a little bit fiddly. Let's have a look
at that. You know what that actually might
be might be better. Let's just bring in our oven, and this is where
it's going to be. So now I'll move
all of these up. So let's see if I
can pull all of these into place, like so. And you can see
we've got a little bit of a problem on these. The little bit of flickering, you can see, we do have a little bit of
flickering on here. It's not so bad, but what
we need to check is on rendered view what
that's actually going to look like because we don't want too much
flickering on there, especially when
we're rendering it. So the more we can
actually reduce that, the better
it's going to be. Let's just put it up. I
actually think, You know what? That is going to look okay. All right, I'm
going to leave that you can see, not too much there, not too much there, and it's going into a place
that will want it. Now, the one thing I also want to check is the flour mill. At the moment, we can see our
flour mill looks like this. What I'm thinking
is if I'm going to have the other machine here, so the grabber is going
to be right next to here and might be better off in grabbing everything
in the flour mill. So if I come in and grab
everything in here, I should be able to
pull them to the side. Now what I need to check though. And then what we'll do is
we'll actually pull this over, so over here, and then hopefully this new part in here then should look
a little bit better. Now, let's see if we can
actually move this over as well, because we want to move both
of these over into place, like so, and that's
how they into place. Let's have a look.
I think they are. And let's now see if my flower
bows come out properly. So double tap the e.
And we can see that these parts here have
all moved over there. That is not something we want. So I'm wondering if I can move these with instead of
moving them like that, can I actually pin them to something and then
move them all together. So what I'm going to do is
just press Control's head. I will move them back. All
of this in place. Like so. And I need to pin
them to something. So all I'm going to
do just to pin them to something is I will
bring in an empty. So I'm just going
to press Shift, bring in a plain Axes empty, press the S button, and then what I'm going to
do is grab all of these. I grab them all again, re grab my empty still
there, as you can see it, and then just press Control P, set parent object
to keep transform. And then what I
should be able to do now is move all of these over, press the space bar, and everything should stay
the same as you can see. Alright, so that's
that problem fix. Let's just move it a
little bit further over. And then what I'm going to
do is grab each of these, pull them over into
place like so, and now press the space
bar. And there we go. Now we should have
everything that we actually need running properly as we don. Now, we can move this again once we've actually got
everything in here. This might not be so big. This, you know, the kind of
box that's going to go here, the grabber is going to
go around here somewhere, and maybe we'll actually
move it over to here. So a little bit different. I'm not actually sure yet. I just want to make sure that
it's all fitting in place. The other thing
is, as well, let's actually bring everything in. So we can actually move
pretty much everything. I just want to see how everything's fitting together
because at the moment, I think we should be able to move some other parts of it up. I'm just wondering whether
it's worth moving, you know, kind of this up a
little bit over here just to give us a little
bit more room on this side. Sometimes this
happens where you've just got to move
things a little bit. I think I think I will because I can grab both
of these at the same time. So what we'll do
is we'll just move this over a little bit. Making sure that
we're not, you know, kind of interfering
in this part. I think what we'll do
on the next lesson, actually, we'll do this
on the next lesson, we'll just do a little
bit of cleanup, where we just tied it all up, move things closer
together, work out, you know, where our kind
of grabbing machines are going to be and all
that other good stuff, and then, you know, kind of tie it all in together, because
I think, at the moment, this is a little
bit a little bit, um, It's not packed enough. It needs something else
here. That's what I think. And I'm just wondering
whether I move this here instead to just combine it and
pack it a little bit more. Because when we're actually
taking a render of this, we also want to tell a story. And if we're telling
a story, it's a little bit harder if
we can't see everything. So we really want to make
sure that how is everything, you know, kind of
packed together? Can I, you know, move
this further up? Is that going to pack anything like that?
So, you know what? I'll just press Control's head. Move that back to where it was. We'll leave this here for now. The other thing that
looks pretty good. The other thing I'm
wondering, as well, is if I want this to
be a bit bigger now. Luckily, for us, because
we've actually got this now, we can actually scale it up and still everything is going to work the same way
as you can see. So we might want to scale
this part up a little bit make this a
little bit higher, and I think, actually, that is going to look a
little bit better. So now you know how to put your your animations
to and actual empty, I think that might
make you better. So if I move this
over there now, this to me is kind
of the perfect place where I actually want
this, you can see. We've got a little
bit of room there. We're going to have these
parts going down there. And then if we can have the actual grabbing machine
somewhere around here, I think this might
actually work. So at the moment, I'm not
going to fix this part here. I'm going to wait because I need to bring this
over, as you can see. So I'm going to wait a minute
until I finish this part. I come to the grabbing machine, and then I'll try and get
it all into place from. Alright, everyone. So I
hope you enjoyed that one. A little bit now
fiddling around, trying to get
everything in there. But you can see that
we've finished this now. So this part here now,
we've finished these. What we need to do
on the next one then is bringing the boxes. So we'll create some boxes, two different types of boxers, two different types of colors, and they then will lead
in to the box machine. Alright, everyone, so I
hope you enjoyed that. I'll see you on the next
one. Thanks a lot. Bye bye.
75. Creating boxes and packages for our cookies, creating variations of finished boxes an: Welcome back,
everyone to Blend and Beginner's master class,
the cookie factory. Now, the first thing I'm
going to do before doing anything is I'm just going
to grab both of these. I'm going to press S and X, and I'm going to
squeeze them in because those are definitely too big. So they didn't look
right like that. So that's the first thing. Next of all, then, let's
think about our actual boxes. So if you come over to
object mode and then let's come over here
and one other thing, I just want to make sure
that my box maker yeah, if I hide all of this, none of these parts
are in the box maker. Where is this part? Let's
see where this part is. This part should be
in the conveyor belt. Yes, it is. So that's
one good thing. So let's close that up. Let's hide this out of the way. Just bring it back a
minute. There we go. And then what I can do is
I can grab all of this, like so, press the end button, and we're gonna put
it in the box make. Like so, and now press Alt H, bring it back or
turn it back on. And now let's see if my box
maker hides, there we go. Alright, that's the main
thing that I wanted. Okay, so now we
need boxes, then. So first of all, I'm going
to grab this cookie, press Shift E,
cursed to selected. Shift A then, let's
bring in a plane. So let's bring a plane.
Let's bring it over here. We'll make it roughly around the size it is when
we brought it in. So something like this,
and then we can make them smaller or bigger when
we actually finish. So something like
this, the boxes need to be all the same size. So that's one thing
to take into account. So let's now actually
create these boxes. So what I'm going to do
is I'm going to come. I'm thinking if I bring
them out individually, I'm just wondering the
best way to do this. Okay, I know the
best way to do this. Let's make this a
little bit bigger. And then what we'll
do is we'll press Control A, left click, right, click, Control,
left click, right, click. And then what we'll do is
Alt Shift click Control B, and then all we're going
to do is pull them out to make them kind
of square like so. So something like this, and
then we can actually come in and delete these three here, so delete and bases. And then what we can do is
now we can lift these up. So if we come and
grab each of these, and then we can pick them
up like so, and then we go, that is the first
box, and I can go Control A or transform
set origin to geometry. Adding a modifier,
we'll bring in, first of all, A solidify. So let's bring that
in. Let's make these boxes a little bit
thicker going this way. Like so, and then
we'll press Control A. We'll add another modifier
no, which will be a bevel, and we'll put it down
to 0.3, like so. Alright, so far so good
that is our first box. Let's press Shift D and
create another box. So these then will be
two different colors. And now what we want to
do is we want to actually create this from
here, the actual box. So what I'm going to
do, I'll grab this one. And I'll grab this part, and then what I'm going to
do is just press Shift D. Bring it over. And then what
I'm going to do is I'll press E to bring it up, like so. And now we know
it's the same size, but it is the same bulk, so we'll make it a little bit bigger look something like this. And then what we'll do is
now we need a top on here. So all I'm going to
do is press Enter S, bring it out, and
then E to pull it up. So, so it looks
like an actual box. Now, I'm just wondering I made it a little bit
too thick on here, so I'm going to press alters and just drop it back in like so, and that's looking pretty nice. And then I'm thinking
that I'm going to need a ribbon kind of
going around here. So we'll do the ribbon going this way and the
ribbon going this way. Let's come in, control,
left click, right, click, and then control, left click, right, click. And then what we'll do is
grab them both and Control B. Like so. And from here, then we can use this to
kind of go around there. So, should I do
this as part of it, probably thinking
that I should press Shift D and bring it out
and work from it on here because we can see
that maybe maybe we should probably join
these together. So join, you know, this one together to
make it come out, so it's not kind of
in and then out, so it looks a little
bit more realistic. So let's grab this
one and this one. And what we'll do is press
M, and we'll click at last, and then this one
and this one shift, just to do the same thing, and we'll just work our way around. You can't unfortunately
do them all together. Because it will just join them all at
the last one that you did, and we don't
really want that. So we'll just do this one and this one, shift,
and then this one, this one, shift, this one, and this one shift R, like so. Now, if I put that park in, you'll see they look
absolutely fine now. So right click, Shade
Smooth. So now I can come. I can grab this part, and I want to put it
right back on there. So seven to go over the top, making sure that's on
roughly which it is. And now, if I come in
and press P selection, I should now be able
to grab this bit. Control A all
transforms, set origin, two geometry, and then we'll
go into add a solidify. So let's add a solidify. Let's pull it out a little
bit. So not inwards. Let's pull it out. Like so. And then what we'll do
is apply the solidify, right click Set smooth angle, and there is the box with
nearly a ribbon round it. So now let's put the actual
ribbon on the center of here. So I'm thinking, let's first
of all, bring this up. So I'll bring it in a
little bit, like so, and then what I'll do is
I'll bring it up, like so, and then I think I'll bevel off these edges. So
let's do that now. I'll bevel off these edges, making this a
little bit rounded. So Control B. So and then right click
Sheets move by angle. And now we want a
few ribbons in here. So the easiest way to do the
ribbons is first of all, make sure you've got
the center of it, like so and then shifts,
curse to selected. And then what we'll do is
we'll bring in a circle. Let's bring in a
circle. Let's make it a little bit smaller. Let her rotate it round. So RY 90. Let's bring it up. Let's press S and Y and
squish it in like so. And then what we're going to do now is make this a ribbon. So the way we'll do that is
basically coming over to Oh, we brought in a circle.
To bring in a curve. Let's bring in a curve circle, curve circle, not
the mesh circle. So press the S button, press R Y, 90.
Let's bring it up. And then S and Y, squish it in. Now we've got the
option over here. Okay, so let's go to extrude, so now I can see we can
actually extrude it out. We can also, as well,
come in and press Alterns and extrude
this bit out, so it makes it a little bit bigger and then grab
the bottom alterns, make it a little bit smaller, like so, and then it's starting
to look like a ribbon. And then what we'll
do is we'll come in and add in solidify, add in a generate and
come down to solidify. Let's turn this up a
little bit, like so. Let's also right click
and what we're going to do is shade flat because
that then gives me a much, much better idea of what
this is going to look like. I'm thinking that's probably
a little bit too thick. So let's drop it back
a little bit like so. And then what we'll do is
we'll just rotate it, so, Y. Rotate it round. Then what we'll
do is press Shift D and we'll bring
in another one, and we'll rotate
it the other way. Y, let's rotate it this way, like so, and there we go. Now we just want a I'm just wondering if we want
a bow going over the top. I'm just looking how big
that actually looks. I'm thinking maybe we could get away with
one more on there. So let's pull these up
first. So we'll grab this. We'll press G, pull it up, and then we'll grab
this one, press G, and pull it up like so. Then we'll have I'm
just wondering if we just need a couple of bows
or if we want one more. You know what? I think
we'll leave it like that. We'll just have a couple of
parts going over the top, and then two maybe hanging down. I think we'll do that. How we'll do that is we'll press shift A. We'll bring in another curve, but this time we're
bringing a path. We'll make it much, much smaller and bring it into place like so. And then we'll come in and
we'll use the same extrusion, so we can see on here,
we've got extrusion at not 0.16, so we'll
do the same here. So extrusion, not 0.16, like so. And then what we'll do is
we'll copy the modifiers, so Control L, copy modifiers. And we'll also press Control A, all transforms the
origin to geometry, right click and shade. Where is it shade
flat? There we go. And now that should
be roughly the same. Although you can see, it's a little bit too thick,
so let's drop it back. It's going the other
way, that's why. So what we'll do is
we'll drop it back here. We'll come back
to this, and then we'll increase the extrusion, like so, and then
we'll rotate it round. So RX 90, rotate it round. And then what I'll do is,
I'll bring this into there, bring this one into
there, and bring these kind of down
and over it, like so. And then we go, and let's
now bring them back. And just play around with it
to get it how you want it. You can see I'm just
playing around with this, getting them to go both ways, and then shift D O Z, 90. And then all I'm going
to do is pick this up. So G, pick it up. Like so, and there
we go. All right. And I don't actually
think we need any kind of things
coming off these. What I do think we need, though, is to set this on seven. So what I'll do is I'll
just go in each of these, set it to seven because
it's a little bit too high on the 12. Go to this one. Let's set this. Maybe
this one because it is a loop needs to be
probably a little bit higher. So let's set it
to you know what? We'll leave that on 12 just so we don't lose too
much out of it. Now I'm going to do is
just grab each of these, and I'm going to go to object, convert, and convert to mesh, and then I'm going
to press Control J, join them all together. Control AO transforms,
and then right click and what we're going to
do is shades move biangle, and there we go, There
is the actual box. Now we can actually join
all of this together, but we might have a
modifier on or two. So let's just make sure it's only got a bevel modifier
on, so that's okay. So Control J, join it together. Control A or transforms rightly. Set origin, two geometry, and there we go, that
is the actual box done. Now we will need another box. So if I press Shift D, I
can bring not this one. Oh, they all join together? Okay. Well, just delete that. I'll come to this one
first, L, P, selection. And then I've got this one here. Shift D, bring it over. And then all I want to do
then is just grab them all, then once more, Control A or transform set
origin, two geometry. Alright, so on the
next one, then what we'll do is we'll bring
in some material. And then we can
actually get those onto our actual conveyor belt. So we've got the boxes now. We've pretty much got everything done that we need
for these cookies, you know, finish
boxes, open boxes. And now we need to do is get these on this
conveyor belt and then we'll start on the
actual boxing machine. Alright, everyone. I
hope you enjoyed that. I'll see you on next one.
Thanks a lot. Bye bye.
76. Modeling cookie packing machine for Blender Beginners Masterclass: Welcome back, everyone to blend of beginner's
master class, the cookie factory, and
this is where we left off. Alright, so what we want
to do is we want to swap these cookies over now
for the actual boxes. So all I'm going to do is I'm going to come down
to where it says, Objects, collect cooked cookies. Let's change those. And you
know what I need to do? First of all, I need to
put these into boxes. So we want open boxes. So these will be these, and
we'll call them open Boxes. Like so. Click Okay. And then we'll put closed boxes. So, New collection,
closed boxes. L so, Enter, Enter. So now we have open
and closed boxes, as you can see here. So what I want to do
now is drop these into my conveyor belt objects, so you can see we've got
all of these in here. So let's close this down,
close this one down, grab this one, this
one, drag them up, and drop them into
there, like so. Next of all, then what we
also haven't done is we haven't gave these any
kind of materials. So all I'm going to do is grab this one, grab this one last, press Control LL, and we'll
link materials like so. And then what I'm going to
do is I'm going to go over, click the plus button new
and call it box blue. Like so, and then
I'll click Plus, New and block Box Green. Green, not green. Okay, like so, and then I'll just copy this. So copy material, and then we're going to paste
material onto this, and we're also going
to paste the material onto this and then
minus this one off. Alright, so we've got
box blue and green. So let's come in now,
and what we'll do is we'll go to our shading option. And what we'll do
is open this up, and we should have
pretty much everything set up here as we want
it, except the color. So all I'm going to
do now is just come, change the color to a nice greenish color, a bit brighter. Like so let's zoom into that. Maybe a little bit darker.
Let's have a look. We want something bright
but not too bright. So what I'm going to do is
just change a little bit more. So we want it more
of a pastor color, you know, not a bright green or anything like that,
something like this. And then what we'll
do is we'll come to the This is actually box blue. So let's actually, you know, what we'll do, we'll
copy material. Paste material, and there we go, and now we'll come to this one. And then what we'll do
is we'll change this to a nice blue color, something like
let's have a look. Something like this. This sort of blue, I think, is very nice. And then with this one, what
we'll do is drop it down, and we'll go with box green. And then what we'll do is
we'll come to this one, and we'll go with box blue. And then I'll come
to the ribbon, and all I'm going
to do is just grab. You know what? We'll
just grab all of this. So we'll grab all of
this one instead, and I'll basically
put it as box green. So down arrow, box green, like so, and let's click a sign. Press tab bone, and there we go. That's that one. And now
we'll come to this one, and we'll do it the
other way around. So first of all, box green, and then grab all of
this and then just click Plus Down
arrow and box blue. Click a sign. And there we
go. There is our boxes. They look very nice. Now finally, we can
come over to here. Come back to our conveyor. Let's go to modeling, actually. It's going to make
it much easier. Domo is going to
come to my conveyor, press the little dot
but and zoom round. And then what I want to
do now is coming over. Come down to where
the objects are, and I'm going to
turn this one off. I'm going to open
it up and I want to close boxes. Where is it box? We want open boxes.
Let's have a look. Where is open boxes box make, chocolate drops, clothes boxes? Where are my open boxes? There we are. Is there anything
in there? Yes, there is. Why can't I actually do that? Where's my open boxes? There they are. Open boxes. Alright. Now you can
see that we need to obviously pull these
up a little bit on the z. So also, I'm just wondering
why they're all green. Let's see, first of all, so where is the z offset? Let's bring that
up. There we go. Let's press the spacebar. Hopefully, some blue
boxes will come in there. There we go. Alright, so let's now you can see
they're looking pretty nice. We just need to
make sure. That all of them are the right scale. So we don't want any
scale randomness. So I'm going to do is
just set this to zero, and then we're going to
have more the same size, like so, and there you go. That's looking pretty nice. Alright, so we've got
our box on there. The one thing I would say is
that they come too often. So one I'm going to do is change the drop intervals to every 1 second,
something around there. And then what I'll do is
if I reset the animation. So let's go to animation.
Let's just put it on one. Let's go back to
modeling, let it load up, press the tab button,
double tap the eight, and now let's see
those boxes come out. So every 1 second, they
should be coming out. And I think that's
going to be better. I think we had too many before. So they're roughly in line with the cookies coming out now. And I think also, I'm just looking at
the size of these. You know what? I think
they actually look okay. I think they should be
big like this, anyway. Yeah, they're
looking pretty nice. Alright, so now we've done that. What we can do is we
can save out our work, and then now we can come to the actual machine that puts these boxes together
and things like this. So I'm going to come
to this part here. And this needs to
be quite chunky. What I first going to
do is just press M. I'll make a new collection. We'll call this one box packer. Like so, and there we go. And what we also want to do, I would say that
this is probably a little bit too
high at the moment. So let's bring it down slightly. Now, what I'm going to do
is I'm going to steal, I think. Let's have a look. We want one of these. This
one's a little bit smaller. I think, actually, we can get away with using one of these. So what I'll do is
I'll come in and I'll grab the top and
the bottom of here. So top and the bottom
of this one here. And then what I'll do is
I'll pull these out I know. I'll press Shift D and
then pull them out. And then what I'll do
is spin these rounds. So R's head, 180, spin these round,
and they want to be the same size as
this one in here. I'm going to just put them on
the front of here for now, and you can see,
for some reason, they're not in line, so
let's pull them out, get them roughly in
line where I want them. Pull them down into
here, like so. I'm going to pull this over the side then a
little bit like so. And now I want to actually do the same thing over this side. So Shift D. This one,
though, of course, wants to be a little bit bigger because these are bigger boxes. So RSEd -90. And then let's pull
them back into line. Where they need to go. So we're going to pull them into here. And then what I'm going to
do is pull them down here. So I'm going to pull
them down into place. I'm going to make this
a little bit wider. So S and X, pull them
out a little bit. And then what I'm
also going to do is pull these down because
we don't want it to be, you know, quite as big. So we don't want it to be
quite as big going in there. So I've got all these grabbed. I can pull them down
into place like so, and then I can come to this part now and pull it forward
and into place. So if I grab this, I can
pull it forward like so. And then what I can do
is I can grab them all. Hold them back to where
I want them, roughly. Alright, so far so good. Now, I think what
we should do now is actually work
on this bit here. So we should work
on these parts. I'm gonna put in an object mode so I can actually
see what I'm doing. And you know what
else I'm going to do. I'm also going to just
close these up and just clean everything
up so I can actually see what I'm
doing at the moment. I'm struggling to
see so I'm just going to hide all
of these parts. Like, so we know these
are in the right place. Now, you can see
once I hit my oven, these parts disappeared,
so I'm going to grab both of these. And these. I'm going to press
the end button, and I'm going to put
them in the box maker. Yeah, box maker.
Where's the other one? Water add a mixer, stumper, sprinkler, box
maker, box packer. That's what I want
to put them in. Put them in the box packer. I'm also then going to move the box packer up and
under the box maker. So I've got box maker
and box packer. Alright, so there we go. Now if I come to my box packer, I should be able to hide that
out of the way, like so. Now, let's come and also
hide my conveyor belt. So conveyor belt, let's
hide those out of the way. Let's also hide the
oven out of the way. And now pretty much everything
is hidden out of the way, giving me lots and lots of room to actually work
on this machine. So this is the one coming. Now I've lost which
way I'm going. Yeah, this is the one where the actual cookies are
going to come from. So let's work on
this part first. So I'm going to first of all, press Control R.
I'm going to bring this down to roundabout there, and then go to press
ControlR I'm going to bring this across so that it's got a gap in just
the side of that, and then control law, bring it over this way, and
then control law, let's bring it over just to
the top of there like so. And then what I'm going
to do is grab this part, I'm going to press E and
pull that back into there. And then I'm going to grab
this one and this one and pull them back into
place. There we go. And then we'll do the
same thing with here now. So I've already got one in here. Can I lower this
down a little bit? Will that make sense?
I think it will. So all I'll do is grab this one. I'll pull it down a little bit, like so, and then
Control R, left click, bring it over, and
then Control R, left click, bring it over, and then Control A, bring it up. Into place. Now I want it a
little bit lower than there. I think I might have to
drop these down as well. I'm going to put it
like that for now. And all I'm going to
do is just grab this. I'm going to press E
to push it back bed, like so, and then
I'm going to grab both of these and
pull those back. The other thing is,
have I actually got on, cavity is on, so that's okay. Now, let's bring back the
conveyor just for now, and we can see this
one I'm talking about. We do need to bring this down. So all I'm going to do
is come back to this, grab this point and
just bring it under, like so, and then I'm going to do the same thing on this side, so I'm going to grab this point here and just bring it down. But it's just under
there. Like so. And then I can see now that this probably has to
go up a little bit, so I'm just going
to pull it up a little bit into there,
and there we go. Now, let's make sure
that one's okay. Okay, so now let's make
if I bring back my oven, so let's just bring back
the oven just for now, I want this part here because
this machine basically, it's going to have
a bit on the back. So what I want to do
is I want to copy this so shifty bring it over then because
I want to make sure that it's going to be
sat on the right place. So if I bring it to
roundabout here. And then what I'll
do is I'll bring this back because the bit on the actual bag is going
to be covering this anyway, so I can bring this part in. So what I mean by that
is I can just bring that part in like soap. Alright, so far so good. Let's press M and put
it in our box Packer. And then what we want
to do is we want to now make this a little bit more interesting than
what it is at the moment. But before we do that,
we'll save out our work, and we'll actually start
that on the next lesson. Alright, everyone, hope you enjoyed that and I'll
see you on the next one. Thanks a lot. Bye bye.
77. Adding packining stomper for the top of the machine, thinking of the exit hole for pa: Welcome back if you want to blend the beginner's
master class. The cookie factory, and
this where we left you off. Okay, so what I'm going to do
is just grab all of these. I'm going to press the Ibn
just to bring them in, and then all I'm
going to do is press the Y just to bring
them out a little bit. Now, on this one, I want to make it a
little bit different. So I'm going to grab
all three of these, press the I bone, bring it in. And then what I'm
going to do is just bring those out as well, like so just making it look
a little bit different. And then what I'm
also going to do is I'm going to put one in the bom. So I'm just going to
grab all three of these. Shift D, drag it out, and then press delete
and limited dissolve. Let's make it a
little bit smaller and a little bit
thinner, like so, and just done what
we've done before on the other parts
where we're just bringing little parts of it just out and in just to make it a
little bit more interesting. So control shift and B. Like, so increase
it if you needed, like so and then press
L on one of these. Press the E bunch
and bring it back, and then L to grab
everything and then just put it into place
wherever you want it. Pull it out a little
bit, and then shift D, and let's bring it
up like let's make sure those they're perfectly
in the center there, like so, and that's
looking pretty good. Alright, so now we're going
to work our way round. And on the top bit, we are going to need a
big pot that's going to kind of be going in and
out and things like that. So let's actually
make that part now. So to do that, what I'm going
to do is I'm just going to now come and grab all
of these, like so. And then we go to press shifts, curs is selected, it should
put it right in the middle. And then what I can do
is I can press Shift A and bring in a cube, like so. And I basically
want this to have kind of come back a little bit. So kind of here, have a
cylinder on the end of it. And you know well, I forgot. Let's actually see if I
bring everything back, where is where is my empty. There it is. It's over here. Always forget, let's
pull this out, just so you can see
what I'm doing. And then let's come
round, open this up. And the one we want
now is this one here. So now you can see can't
really see this under there, but you can see at
least the back of it. So you've got a good
idea of the back inside of what that's
going to look like. Okay, so now we've got that. Let's hide everything
else out the way. So pots we use hide all these, all of them, except
the box packer. There we go. Okay.
And of course, the where's it gone now? Where did I put it? This
empty should be showing now. Let's have a look where
it is. Just move. There it is. So this is in my collections.
There's the empty. Alright. Okay. Alright,
let's get to work then. So we can grab this,
and then what we're going to do is we're going
to pull it out a little bit. So S and Y, pull it
out a little bit, and then we'll pull it out this way a little bit, like so. And then what we'll do is we'll squish it down a little bit. So E ands, let's push it
down a little bit like so. So that looks round about the right size for
the time being. I'm going to pull it out a
little bit more like so. And then what I'm going to do now is round these edges off. Now before I do that, let's
reset the transforms. Let's come in then Ted
grab these two edges. Let's press Control B. Like so and round that off, like so. Now, the other thing is,
I'm going to pull it up. And I'm going to
put it into here. So if I grab this center
part, press the eye boom, and then I'll press the E
button, and there you go, now it looks like it's actually going to be squashing
something in there. I'm going to put it all the
way down to there, like so. And what I want to do
now is pull it down, and I want to right click
shade smooth Bangle. And what I want to do
before doing anything else, I want to put a hole
in this part here. So in this actual box here, I want to actually put a hole. So what I'm going to do is I'm going to grab this part here, I want to compress Control minus and then it's going to put
that hole in there for me. And from there, then
I think I'm happy with coming down like that. So I think that's
actually deep enough. So what I'm going
to do then is just click on this coming over, Control A, come back to this, and then we'll go and
open up that end panel. And then what I want
to do is go down to where is it the item or edit. There we go. Remove
brush, and there we go. We're back where we started. Alright, so now this can
move up and down, like so. That's what we
actually wanted to do. The only thing is, it's a
little bit too tight on there. We don't actually
want it that tight. So what we're going to
do is just grab this, Alt and S and just bring it
in a little bit like so. So it's got a little bit of
room there so you can see. And the other thing
is we want to kind of band around here. So I'm going to come
to this part next. And what I want to do then is grab this part going all
the way around here. Now, sometimes when you've
actually boolean things, it does make a mess up things. It does that a lot. That's
an entirely different course on fixing booleans.
They are a problem. But for now, what we're going to do is we're going to come in and just make sure we've grabbed these going
all the way around. And then what I'm
going to do is shift D. I'm going to bring it
up to where I want it, and then E and Z bring it down. And then what I'm
going to do now is just separate this off. So L P selection
separated Control A, you'll transform set
origin to geometry, add in a modifier, and we're
going to add in a solidify. Now, let's pull this out. It doesn't look right to me,
so all I'm going to do tab, A to grow everything, shift in, spit it round, and there we go, now it's looking much better, except the fact we've got
uneven bends on here. Even things on,
we'll sort that out, and then what we
can do is just pull it out a little bit like so. And there you go. You've
got that on there. Now, let's pull it out
a little bit more. And there we go,
it's got a nice Form there now. That's
exactly what we want. Now, moving back then,
let's come first of all, we'll just shade or smooth. Move biangle. Why is
that not working? Because we didn't
apply the solidify. Apply that Shade smooth Bangle. There we go. Alright,
this part here then. Let's come in, first
of all, control. We'll bring in a
big edge on here. So, shift click, E, enter, lns. Let's bring that out, like so. And then we're also going
to bring an edge in here. So I, and then E, drop it down, and there we go, right click sheets,
move by angle. And there we go.
That's that part done. Now, let's bring a big
chunky part on this part. Ready for, you know,
this backport. And then I think we can actually start creating this
backport here. So let's first of all,
though, bring in a cylinder. So shift A, mesh, bring in a cylinder,
spin it round, so R Y 90. And then what we'll do is
we'll press the S bone. I'm going to put this right
on top of here like so. So right on there, let's
pull it up a little bit on there like so. And you know what?
I think I'll add in another cube on here. I'm going to press Shift desk, Custer selected shift just to give you a little
bit more strength. And then we'll add this in here, like so, pull it forward. And as you can see, I think that is going to make
it look if I press EssnsEd pull it down past there Essn'sEad and then
just pull this out. Here. Like so. I think it's going to make
it look a little bit better. Now we can actually
pull this out a little bit, all the way out. So it's just past there, and there we go, right,
click Shade Smooth Bangle. Alright, now we can join all of this part together.
So Control J. Join it together,
and there we go. And now let's think about
this part at the back of you. Because then we can
have these kind of circle bits that are
going to be on here. If you look at the
image, you can see these two bits here. This is what we're creating now. So we want to create a base,
first of all, down here, and then we need
another opening there, so we'll use one of these,
and then working our way up. And finally, we've
got a light on here, which by the way,
is also animated. I'm going to show you how to
animate that light, as well. But first of all, let's come in, and we're adding a box down
at the bottom of here. So if I press shift day,
I'll bring in a cube. I'll drop my cube down here. We want something
that's fairly chunky. So I think this sort of
scale something like this. And then what I'll do is
I'll bring the back in. So if I come in, X ray on. We can bring that back
all the way forward, turn it off, and
then drop it into the place where I want it.
So somewhere like that. And then what we'll do is
we'll come underneath, bring it up and put
that into place. And then finally, finally, we want to press L,
grab the whole thing, and then SNY and just pull
it out into where I want it, which will be
somewhere around here. Now, the only thing
is I can see on here already is
that it's not even. This is not in the even place. So I just need to put
this back a minute, so controls head.
Let's put it back. Let's press S and Y
and just pull it in a little bit like and from here, then we'll create it going up. So if I now, first of
all, come to this part, grab this one and this one, I can pull it out there
into place, like so. And from here, then
I can actually build up these struts now which
are going to go up there. Now, is this tall
enough, first of all? I think it needs to go
up a little bit more. This gap here then
is going to be where my box finished boxes are
going to be coming out of. So if I grab this now, as well, if I grab both of
these, just press Control J, join them together, and
then I'll press Shift D. And what I'm going to do
is I'll spin them round, first of all, so z -90. And I want to make sure
that the center of origin is right in the
center of here, so come in, grab this center one, shifts, cursor to selected, right click, set origin, 23d cursor. Now what I can do is
I can come in and drop this right in
the center of here. So if I come in, I
can grab this one, you can see, Control
A, all transform, set origin to geometry, shifts, cursor to selected,
grab this one, shifts, selection to cursor. That then is going to put it
right in the center for me. And now I can see that
I want it to come Round about here and down. And the other thing is, these are actually finished boxes. So let's just grab. I'm just wondering how
big these boxes are. So what I'm going to do
is I'm going to go to my conveyor belt objects, and I'm just going
to grab a box. I'm going to press Shift
D, and it's going to give me a good idea of
how big these boxes are. So you can see the fairly,
fairly big these boxes, like so, like so. And I'm also wondering
yeah, are they too big? That is the question. Are
they a little bit too big. I'm wondering if I want to make them a
little bit smaller. Let me bring my
conveyor belts back. And if I make these smaller. So if I make them
all smaller, so S, make them a little bit smaller, then Control A, or transform
set origin to geometry. Yeah, I'm thinking
that then is going to be a little bit better than
the size that they were. So we're going to have
them this size, I think. I think that looks
better. And then what I'll do is just delete
that out of the way. I'll press Shift D
on one of these. And then what I'll
do is I'll press shifts selection cursor, bring my box up, and now I have a good idea of how big
that box is going to be. So we definitely definitely going to need it to
be this to be bigger. Not wider, but
definitely taller. So I can pick this up now and we'll have it
roundabout there. And then what I'll do is
I'll grab each of these. So L, L, L and L, drop them down to there. My conveyor then
can come up here. So this is the thing
my conveyor belt needs to come along here. And I think what I'll do for that is grab this conveyor belt, so shift D. We'll
put it here roughly, and I'll bring it down, so it'll come over
this, as you can see. Now the thing is it's
not right in the center, so let's drop it into the center around
about round there. And then what we'll do is we'll
add in another edge loop, so I'm going to not another
edge loop, another vertice. So grab them both, subdivide, move this one over here. And then what we can
do is we can bring this one down, like so. Ready to go into
the claw machine. Now, we might need to just
bring it back a minute because I don't
know where the claw machine is going to
be at the moment, but we can definitely
bring it like that. And now you can see this is roughly the size that
we're going to have them. Now, if I bring my box up, how my box laying
on there means I'm probably going to need to bring this up a little
bit more like here. And then what I can do is I
can grab each end of here. Like so and bring those
up into place. Like so. And then finally just bring this out Just a little bit more. It's a little bit too
close to that edge. Like so. Alright, that is
looking how I want it. And on the next lesson,
then, you know what? I need to bring up
a little bit more. And on the next
lesson, then what I need to do is now I need to actually put this
kind of box in here, this edge and then start
building around it. I think, also, I'll
squeeze them in a little. So S and Y, bring them
in just a little bit, like so. Alright, everyone. So now what we'll
do is we'll save that'll work, and I'll
see you on the next one. Thanks a lot. Bye bye.
78. Working on attaching stomper with extra detail for Blender Beginners Masterclass: Welcome back if we one to
blend Beginner's master class, the cookie factory, and
this is where we left off. Alright, so let's
come into this part. And what I want to do
really is grab this part, and I should be able to move
this to the side, like so. I should also be able to press SNY and pull it out to
the size that I needed, so it wants to be just a
little bit wider than those. And then what I want
to do is pull it down into place like so. So this is going to be
sat on top of that, and then it should
go back into place. Now, I also want
to make sure that this bit is also pulled
down into place, and then it should be able
to come to the back of press the E button and pull it right
back into place like so. Now, because this
is going so far back in and might make these a little bit smaller so
you can actually see the boxes or
whatever coming out. So let's actually have
a look at that now. So if I pull this all
into place, like so. And then what I can
do is then I think I think I'll grab I think
I'll grab all of these. So L, L, L and L, and I'll pull them up
a little bit so you can actually see them, you
know, kind of in there. And then I'll grab
the back up here, and I'm going to pull it
back even further then. So pull it back, pull
it back, pull it back. And then what I'm
also going to do with the conveyor is I'm also going to pull this
part back as well. So pull it all the way back
into the machine like so, and then you'll see them
actually pop out of there. Alright, that's
looking pretty nice. Now, I'm not sure about the
box size at the moment. I think they need to be
still a little bit smaller. I think they will be smaller, so let's actually
come into this one. And what we'll do is
we'll go down to objects. We'll close that off, and
what we'll do is we'll open we want open closed boxes. These closed boxes. Let's press space bar, double tap the A. And what are these things? Oh, yes. We'll press the bring
them up on the z, offset. There we go. Now they
look good. Alright. But now you can see that's
how they're coming out. We'll have a black
part in there. Has this gone far enough back? As you can see, this here doesn't look like it's
gone near enough back, so I'm going to
put it all the way back into that part into there. Like so. And let's
press Space Bar. Yeah. And you know
what? This might be. Yeah, you know what? That looks that looks good. Alright, so that's looking good. Now, make sure you're happy with everything
before carrying on. I think the one
thing I want to do is bring in these
walls a little bit. I think they're a little bit
too wide for the conveyor. So I'm going to
press S and Y and bring them in with
medium point on. So S and Y. Let's bring them in. So let's bring them in a
little bit more. So S and Y. And let's also while we're doing that, bring this part in. So S and Y, let's bring
them in a little bit, so double tap the
A, and there we go. Now, let's come in and think
about this top bit then. So going up to the top. So we want a machine. That's where this part here
is going to move up and down. So what I'm going to do
is I'm going to press Shift A. I'm going
to bring in a cube. And I'm hoping that cube is level with that.
It should be. If we'll go over the
top, we can see, yes, it looks actually
like it's level with that. And where we want it
come in OS and X, roundabout this point here so that this can move
up and down on this. And then we need an
inner bit, as well. So I'm just wondering how
wide they actually want that. If I go to the top, I can see
probably going to want it, so it comes near
enough out to here. So S and X. Let's
try that again. But S and Y. There we go. Pull it out
to round about here. And then what I'm going to
do is now I want it to drop in just below here,
so round about here, and then I'm going to press
Control R. Left click, right click, making sure
it's in the middle, which is Control B, drop it back, and we'll have it come in to
round about here. And then what I want to do now is I want to pull this back. Now, as I told you, when you use extrude and
you want to pull this in, you will see when
I pull this in, I'm going to end up with
a whole heap of problems. So rather than doing that, it's better actually
to either make a boolean or just
press Control R and drop it to where
you actually want. Instead of doing that, then all you want to do is come in, grab all three of
these, press let faces, and then you want
to fill these in. So you want to fill
in these faces. If you fill in this one, so
just grab this top and bom, press the F bun, press A, mesh, clean up, fill holes. I'll fill it in for you like so. Alright, that's looking good. Now, the one thing
I do want to do, it's probably, if
I go over the top, a little bit too far out this. So all I'm going to do is
just grab these bags and pull it in a little bit like so because we want some
other parts on here, and this is looking a little
bit too thick, to be honest. Alright, so now what
we want to do is we want the parts that are
going to be underneath here. So the pillars basically
supporting all of this. So all I'm going to do is I'm going to grab both of these, and I'm going to
press the eye button, like so, and have they
come in correctly. Let's do that again.
So Control A, all transforms, right,
clicks the origins geometry. Then press the eye button. And you know what? I'm wondering if I should grab these as well. You know what? I am. I'm
going to grab them all, press the bond like so. And then what I'm going to
do is pull these down now. So pull these down into place. And there we go, that's
looking pretty solid. Now, the one thing
you can see is that these need probably pull
in this way a little bit, so I'm going to
grab both of them. I'm going to press S and Y, pull them over this way just to give us a
little bit of room. You can also see that this is probably a little bit
out at the moment, so I'm also going to just move it over very
slightly over here, like so just making sure
everything fits in place. Alright, so that's good. Now we need some extra
supports on here. So again, I'll press
shifts on this. Shift A, bring in a cube. And let's pull this over. So I'm going to make
it much, much smaller. Then what I'm going
to do is pull it over to where I want it, make it smaller still,
and then S and Y or X. So, and then I'm going to put
it all the way up to here. I'm going to use my X ray
to go in all the way back. And there we go, and
then let's pull it out into place like so. Now, let's grab
the bottom of it. And what we're gonna do
is press E, like so, and now you can see, we
just need to pull it back in a little bit like so. And we also need to make
it a little bit thin. It's a little bit too
chunky at the moment. So S and Y, pull it in. There we go. I would also say that if
you can press Control R, bring it up to round about here, and then just pull
out this part. So pull it out, and I think
that will look better. Now, rather than
actually doing that over the other side, let's
press Control A. All transform origin
to three D cursor. Adding a modifier, and we'll
bring in a mirror on the Y, turn off the X, and there we go. Now, let's come
to the top of it, and what we're
going to do is grab each of these parts here. I'm going to press
the e born then. And then what I'm going
to do is press E and pull this sub like so.
Alright, that's that bit. Now, with this part on here,
I'm just going to come in, grab the top of this, S
and Y, and pull it out. And then what I'm going
to do is press this face, press the eyebarn and then
pull this out, like so. And there we go.
That's that bit done. And then what I'm going to
do is just the bomb bit. We'll have a couple of
bars going along here. I also save out my work. So a couple of bars going
along here, so control. Two, left click, right,
click. Control B. So Control. Left click, right, click, Control B, pull it out nearly to the end. And then grab this one and this one and press E
and pull those out. And there we go. Alright,
so that's that bit done. Now what we need is
a light on here, and we also need a belt
pulley system going along here a little
bit like what we had with the windmill. I would actually probably you could take it
from the windmill. But honestly, for this, let
me just see if this comes up and down, up and down. We could take it from
there, but honestly, I would actually just rebuild it just to make sure
that you've got a hang of everything. Yeah,
that's what I would do. Anyway, this is
looking really nice. On the next one, then
we'll actually get that done one I'm gonna
do for now is file, save it out, and I'll see you
on the next one, everyone. Thanks a lot. Bye bye. Thanks
79. Modeling gears and additional systems for pulley system of our packaging machine for : Welcome back if
you want to lay in the beginner's master
class, the cookie factory. Now, let's do this bit. So shift day, let's
bring in a cylinder. Let's have it on 24. So 24. Let's bring it over, and let's first of
all, spin it round. So X 90, spin it round, and then S and Y. And what we're going
to do is just set this out first, how
we actually want it. So you have a good idea. You can see already on here how it is, but I'm going to show
you how I set this out. So first of all, I want
to go in into here. So I want it just
above the top there. This one here, I want
it to be quite big. S and Y because this has maybe have gone a little
bit too much with that, because this has
the rolls on there. So it's going to
be like into here. So it's going to be stuck out
here, something like that. And then what we're
going to do now is we're going to press Shift D, and we're going to
bring in another one. And then what I'm going
to do is grab this going all the way just
around the outside, press lnss and bring
that in, like so, and then S and Y and
bring it in, like so, still leaving room
for an actual, you know, a part to go in here. So now you can see
everything lines up. You buy come in now,
grab the front off here, press the Ibn to bring it in, and then press E to pull it out. You can see it nearly fits in. So now we have a good judgment of where this is going to be, and that's why I'm doing this. So if I grab both of these now, I can pull them
down a little bit, and now they're
all gonna fit in. Now, this saying that is
a little bit too thick, so I'm just going
to grab it again, Alters, bring it down, like so. Now what I want to do is
I want to grab this one, and I want to bring it down to here and make a smaller one because I want to
make this one a little bit thicker
than what it is. So ternss bring it out, like so, and then we're going to have another pulley, which
is going to be down here. So what I'm going to do is
just grab this one, Shift D, and I want to make sure it
stays along the same line. But what I want to do is I want to pull it
down here because this then is going to
have the belt on there. So I'm just going to
pull it to there. And then from there, what I'm
going to do is I'm going to now press lns and bring it down, making it much, much
smaller, like so. And then from here,
I can grab this back one if I can see in
there. There we go. So grab this back one. Like so, and put that into place like so. And let's also make it. So Alt Shift and click,
and then Alterns. Let's make it a
little bit smaller, as well, like so. Alright, that's looking good. This is how I want it laid out. My belt then we'll come
from here to here. This will be the main part of the machine, which will be here. Wondering if I've gave enough
room there or do I want, you know, more or
less room there? You know what? I think
that looks good. I'll pull it back
just a little bit. Like so. Okay, so let's make a start then
on this part here. So first of all, what we'll do with this is
we'll have an Ipt in this. So I'm going to press
Control R. Left click, right, click Control B. And what we're going
to do is just pull it out to get that gap. And then what I'm
going to do is, while I've got this E, enter, lanes, and just
bring that back into there. So something like this, then we want to do is do
the inner part now. So we want this coming in. So what I'm going to do is
grab both the front and back. Press the Ib, bring it
all the way back in. And then what we're
going to do now is press right click loop tools, bridge faces, and then you should end up with
something like this. Alright, so that's exactly what I
want for the start of it. Let's right click
and Shade Smooth. Let's also save out our
work, so we'll save it out. Now we need to do is we need
to make it look as though it's actually got
some ribbon on there. So I need to pull them out and pull them in and all
that sort of good stuff. So really, really
easy way to do that. All we do, first of all, is we'll bring in some edge loop. So let's bring in five, left click, right click. And then what we'll do now is we'll grab each of
these individually. So if I grab this one,
press E, enter Altnz. I should be able to
bring it out like so. Then I'll grab this one.
Bring it out as well. So eat enter Alterns. So bring it out just
slightly above that one. Alt Shift, click, eat, enter lnss, bring this one
out, and then this one, Alt Shift click, et enter lnss, bring this one out
a little bit more, and then Alt Shift, click. So Alt Shift. What
am I doing here? Alt Shift, click.
Eat enter Alternss. And let's bring that
one out as well. Now right, click, Shade move biangle and that is what
you should be left with. And then what we can
do is just color each one of these independently. Let's come to the
actual gear itself. So we're going to
want a cent point in here and we're going to want, you know, some quite
chunky gears in here. So what I'm going to do
is come to the inside. Control R, left click, right, click Control B, and how
chunky do we want them? Perhaps perhaps something
around this chunkiness. And because we
brought this on 24, we can also come in now and
grab each one of these. Miss two, grab the next two, miss two, grab the next two, and just keep going
around like so. And there we go. Now what I can do is I can actually
bring these in. So if I press E, Enter, S, I can bring them
in together like so. Then what you can do because you've brought
them in like that, I might want to
bring them in much straighter than that. So you
know what I'm going to do? I'm going to press Control's
E. Instead of doing that, I've already extruded lns, and let's bring them in
this way to the center. And then what we'll do is we'll come in now and make them a little bit smaller
just in the middle. So what I'm going to do now is put this onto
individual origins, press the S but, and you can actually bring
them in that way, and I think that way looks actually better
than the other way. Let's we click and Shade Smooth
Bangle, and there we go. I'm just wondering if these
are a little bit too thick. So I'm going to go
Alt, hit, click, lt, chip, click.
Just go around them. And then we're going
to press Altnes and bring them in a little bit. And I think that actually
looks better now. Now I'm going to do is
just press Shift S. Curse selected Shift A. We'll bring in another cylinder. We'll spin that
cylinder around then. So X 90. I'll make it a
little bit smaller, so the outfit in there, like so, and then I'm going
to press S and Y. Just get it into where
they're all gonna fit in. And then I'm just
going to do the same thing with both sides of it. We'll make it easier.
So what I'll do is I'll grab the
front and the back, press the I, bring it in, and then E enter lns
and pull it out. Did I actually press E, E, enter Alts, pull it back. There we go. Alright, right, click, shade or smooth.
And there we go. That is that part done then. So yeah, I'm happy
with how that looks. Now obviously, I need this part going into now this
pulley system. So what I'm going to
do with this part is, I'll press the I button. I'm going to pull it back then, E into this pulley system, like so and then with
these pulley systems now, I need them to be
exactly the same, pretty much. So what
I'm going to do? These are smaller just on
the end, but they should be. If we go over the top, it should be exactly
the same width. So I can grab both of them at the same time, press Control R, left click, right,
click, Control R, left click, right,
click, grab them both. Control B, and I should be able to pull them out
at the same time, like so, which
makes it very easy for me now to make that
actual pulley system. I think with this one,
we'll have it nice and smooth or maybe just
a ridge on there. But first of all, let's press E, enter, Alternt and
let's pull those back. Into place for that big kind of bell that's going to
be on there, like so. Let's right click
and Shade Smooth. And now let's come to this one. So what I'm going to do is I'm just going to hide this
one out of the way, just so you can see
what I'm doing. I'll come to this one
then to this face. I'm going to press
I and bring it in, and then I'm going to press
I again and bring it in. And I'm just going to grab
this Alt Shift and click E, enter Alter Ns, and just bring it out
like so, and there we go. Now, this one here is a little bit more a little bit different. So what I'll do with
this one is well, first of all, grab the front. I'll press the ibn
to bring it in. And then what I'll
do is I'll press the ebone again to bring it in. And then all I'm going to do
now is I'll grab let's say, we'll grab two, and then
we'll miss Can we miss four? Let's see. So, one,
two, three, four, one, two, and then one, two, three, four, one, two. Yes, we can. So we can
grab all of those now. And the only thing is, these
are the wrong way round. The wrong way round,
so I need them the other way round. You
know what I'm gonna do? I'm going to go t
shift and click, grab this, and then go to
pull it back just a tad. And then what I'm going to
do is where my two are. So one, two, three, four, two, one, two, three,
four, two, one, two, three, four,
two, and one, two, three, four, Middle one, and then pull them back. And there we go. Right,
click, Shade to Smoove. That is the look that
I'm actually going for. Okay, so now we need this
actual pulley system on here. So we need these
spinning independently. But first of all,
let's join them together because it will
make our life easier. And then what we'll do is
we'll save out our work, and on the next one, then we'll create that belt that's
going to go down here. And then pretty much we've done with this except the light. We just need to create a light, and then we can actually get everything on here looking the way that we want
to. Alright, everyone. So I hope you enjoyed that, and I'll see you
on the next one. Thanks a lot. Bye bye.
80. Modeling gear belts and bulbs and additional support for our machine for Blender Begi: Welcome back, everyone to Blend the beginner's
master class, the cookie factory, and this
is where we left it off. Okay, so let's deal
with our belt first. So what I'm going to do is I'm looking for the
downward trajectory, which is there two
roundabout here. Now when I first do this,
I always click on one. So this one here, let's say, and then I'll click on the
next one, press the F button. And then what I'm looking
for is, how does that look? Does that look realistic? And I think, yes, it does. So then I come
around to the back and I'll do exactly
the same thing. So let's say from
here all the way down to let's say this one
here, press the F button. There we go. Now, you can see, the problem with this one is, it's actually cutting
through there. But that's fine as long as it's looking right when it's
going around there. You know what? I think that's it's going to make sense
going through there. I'm just going to try
it instead of this one. I'll minus this off and put it on this one, press the F bone. And that's looking better. Alright, so that's
looking right. Now I want to do is I
want to come round. I want to go Alt
Shift and click, Alt Shift click,
grab both of these. And you'll see if I do
Alt Shift click on this, now I can do is I can press
Shift D and pull it out. Delete both of these,
so delete faces. And now we've just
got this left, and this is what we
want, apart from. No, we don't, because
that's not what we want. We want it going all
the way around here, and now we can press Shift D.
Now we've got what we want. All right, so let's leave these out of the way. So delete faces. And then all I'm going
to do now is I want to delete these going from
all the way around here, all the way up to
there, delete faces, and then you end up with
your pulley system, and the pulley system on
this one is already correct. So let's come in now, grab this LP selection. And then what we'll do now
is we can press Control A or transform set
origin to geometry. Let's drag this
then back in place. Let's bring in a solidify. So we're going to
bring in a generate, solidify. Let's bring it out. I'll bring it out like so, and we want it quite a
thick belt this one. So quite thick,
something like that. And we can see this is
not working correctly. So A, shift N, spin it round. Let's put it on flat, so it's shade flat so
it can actually see, you can see this is quite thick. Let's bring it
back a little bit, so not quite so thick, just so it's over
the top of there. And there we go.
This is, you know, a really powerful thing
spinning this around. So I think now that
looks absolutely fine. Let's apply that and
let's press right, click Shade Smooth by angle. Ot H, bring back this part. And there we go. Alright,
that is the pul system. So now we can have all
of this part spinning. We can have this
part spinning at the same time, and then
this part spinning. So what I'll do is I'll
join these two together, and you can see these
on need spitting up. So let's come in, first
of all, LP selection. Join these two together
with Control J, and there we go, now we've
got everything split up. And now we can actually
work on those. Now, for this side,
what I want to do is I want to bring
it in so that, you know, it's kind of
coming cutting across here. I'm just wondering if I
bring in another edge loop, so control let's put
that one down there, then, and then I want it
kind of cut in up to here. So maybe from here to here. So let's come in,
knife this time, down to here, like so, press the end to bottom. Okay, so from there, then, we can actually grab it going
all the way over to here, all the way over
to here, like so. Then I can press the eye button. And then what I can do
is I can pull this out, like so, and add just a little
bit of relief on there, and I think that's
looking quite nice. The only thing is, I
always like to, if I can, bevel this edge because it
looks a little bit too sharp and the actual bevel is
not going to do any good. So bevel this edge a little bit, like so, and there we go, and then right click
and shade smooth. And now it's looking much,
much smoother, as you can see. And that's looking pretty nice. Okay, so we're moving on
now to the actual light. So with the light, we want
a simple light on here. We want it to go from red to
green and just keep cycling. So we just have to remember
when we animate this, how many frames is this over, and then we can actually
set that light up. So what I'm going to do, I'm going to put my light on here. So I'll press Shift
day festival, and I'll bring in a cylinder, and I'm going to bring
it over to here. I'm going to make it a little
bit smaller this part here. I'm going to put my light in around about this point here. Now, also, I can come
in and I can grab, you know, kind of all
these pots and put in. You know what? That looks.
It looks good enough. I'm not going to mess
around with it, actually. Gonna put my light then there. We want it big enough so
you can actually see it. So we'll have that
as the bottom. And then what I'll
do is I'll press E, enter S bring it out, like so. And then what we'll do is
we'll press E and pull it up, and this will be the
basis for our light. And then what we'll do is
I'll bevel off the top now. So Control A transforms
the origins geometry. Grab the top, press Control B, bevel it off, like so, and then we'll put a
little top on there. So I'll press E, and then S, bring it in, like so. And then what I want to
do is put in a few bands. So first of all, though
we'll have a big band on the bottom, and I'll come round. And grab this one.
Eat, enter Altern, pull that out, like so, and
then we'll right, click, shade moove biangle and now want a few more bands one, one, two, maybe two at the top, and maybe one halfway
down, press Control on. Left click, right, click. Control B, pull it back. Like so, E enter ln. And this is going to
be glass, by the way. So this round here that we're
creating here is metal. Right, click, Shot,
move biangle. And then these bits
are going to be metal. This part in the inside
is going to be glass. So I'm going to do then is
Alt Shift and click with face late there and there, and then eat into alternss and pull those
out a little bit, press tab, some shades
smooth there we go. And I think that's going
to look pretty nice. Now, the only thing
we need in here then is the actual bulb that's
going to fit in here. So we're going to just
hide these out the way. So hide these out of the way. Come to this center
point, then Alt Shift click Shift desk,
curse to selected. And then what we need is just a bulb in here of some kind. So I'll just press Shift A.
I'll bring in a cylinder. I'll make it a little
bit smaller, like so. And then we'll just
create a bulb in here. So we want a nice bulb maybe up to here, something like that. Grab the top of it. Control B. And then just bevel it off, so we've got a nice bulb, and then we'll bring
it down. Like so. I'm going to make it
a little bit bigger, so I'll press L, press
the S but, like so. And then what I'll do
is I'll press ControlR, bring in a few edge loops,
left click, right click. And then I just want
to grab this bottom. So if I can see
through there now, I should be able
to go on face leg, grab, is this the bottom of it? Yes, it is. Let's turn that off. Then what I can do
is come to here, make sure connected only is on. And let's put inverse square. Let's try that one. Let's
bring it in. And there we go. And then what I can just
pull it up a little bit. Press the F button,
press I to bring it in, and then E, and there we go. It should be stuck in there now. As the bulb. Then all
I'll do is bring this. You know what? We'll make a
face on here. So Shift click. Press the F button because you will be able
to see inside there. And then what we'll do
is press I, bring it in, and then E, drop it down, and then we go, There is
the bulb inside there. Alright, so now, we've
got all of that in. Let me just take a look round, making sure I've actually rebuilt this thing as I wanted
it, and I think I have. I think everything's got
what I wanted in there. So now what we should
do is now we should bevel everything off before
we do anything else. We've already got
a bevel on here. So, let's grab both of these. Let's press Control
L. And what we'll do is copy modifiers like so, and then I'm just going to
hide those out of the way, like so, and then go to
grab both of these parts. Now, this part, as you can see, should have been attached to it. So this definitely should be
attached to this part here. So some reason this is not,
let's attach it to it. Control J. There we go. And now we can hide
that out of the way, hide this one out of the way, and then we'll just
grab all of these. We'll grab this part
here, this part here, grab this part last, Control L, and we're going to
copy modifiers. We're going to hide
those out of the way. Except this one. We don't want to hide
this one out of the way. So hide. And then we've
got just these parts here. So these parts here, this part here, grab
this part last, press Control L and
copy modifiers. And we can see, we
have a problem in there because we didn't
account for the mirror. So Control A, that's
account for that mirror. Grab these. Grab this
one last, Control L, copy modifiers, oltch, bring back everything,
and there we go. Alright, so on the next lesson, then what we'll do is
we'll actually start getting the materials into here, but you can see already
that is looking pretty nice. Yours wondering. What is that? Is
that another box? Yes, it is. It's just
another box forming. It looks a bit like a shadow
or something in there, just making sure nothing's
coming out here. Yeah, so on the next one, we'll actually get the material in. We'll do the light last
because then we can actually come and
animate animate that. I'll show you a way
to put in red glass so it's see through
red glass and a bulb. Alright, everyone.
Sobi enjoyed that. I'll see you in the next one. Thanks a lot. Bye bye. T
81. Working on applying shaders, creating shader for our light bulb located at the top, to i: Welcome back everyone
to blending beginning the master class,
the Cookie factory. So let's go over now
to our shading panel. And I'm going to
come to this light here. So I'm just
going to click on it. I'll come to the light. And the first one I'll give it is new, and we'll give it
the dark metal. So let's give it the dark metal. And then, of course, we
want to have a new one. So we'll call it red
glass, so red glass. And then we also
want the emitters. So we'll call it
what shall we call it now hazard hazard light. Like, so, there we go. Now, let's do the
red glass first. So what I'm going to
do with the glass is we'll do a simple
salve like we did before. So we'll just make it a
little bit more transparent. First of all, though,
let's come in. And what I want to do is
I want to press Altag and I want to grab all of these
except these metal rings. So all of these going up here, all of them down to
roundabout here, I think. And then what we'll
do is we'll put red glass and we'll assign that. Alright, so now we've
got all of that done. Just want to make
sure, right, click Shade Smooth Bangle,
and there we go. Okay, so let's come
in, and what we'll do first of all is get
rid of this principle. We'll then bring in a
glass BSDF so glass, BSDF and we'll also
bring in a transparency, like we've done
many times before. So transparent.
Like, so bring in a mixed shader, so mix shader. And then we'll also
bring in a noise. So shift day bring in a noise. And then we'll also
bring in a color ramp. So shift day, bring
in a color ramp. Alright, let's go to
our noise first then. So we'll set the noise. All we'll do with the noise
is just put this round 160 like we normally do. We'll then plug the fat
into the color ramp. We'll bring we'll actually do that in a minute, actually,
with the color ramp. We'll plug this first of
volo in to my actual color. So it's not that this one
here, plug it into the color. And actually, before I do that, yeah, we will do that.
Let's plug it in. Sorry. 1.050 and then what we'll do is we'll
plug this into the shader, plug the transparency
into the shader, and then let's plug it all in. And there we go, now
you can see inside. Let's change this then
to a red color like so. Let's press tab, and there we go. We've got
that red color on. And then what we want to do now is we want to come in
and bring these up. So we can make it more or
less transparent using this. So what I'm going
to do, I'm going to bring this down to the B, so you can see what
we're doing here. Bring this one up then
or bring this up. You can see now
we've got some noise in there. That is what we want. And then I'm also
going to turn down the noise a little bit,
so I'll grab this. I'll put it more on gray. Yours to drop it back
a little bit like so. Alright, that's looking good. Now, let's come in and just hide those out of
the way. Come to my bulb. And what I'm going
to do with the bulb, I don't want this part on it. Hold shift, click,
take that off. And what I want is hazard light. So let's click a sign on that. And then we go, that's
what we've got so far. Now, let's actually
come in with our bulb, and all we're going to do is
bring in a simple emission. So delete your princlled. Let's press Shift A,
search. We'll do emission. Like so, and then I'm going to drop my emission
into the surface, and I'm going to put it on 2.7. And for now, I'm just going
to put it on a red color. So we're just gonna
have it on red, but this is where we're
actually going to be changing this as this gets animated
at the same time. Now we've got that there,
that's the light then. So now what we want
to do is we want to so basically the
green and the red. So both the red glass and the hazard light will
actually change color. So we'll actually
come in now, though, and actually give
the rest of it. Some actual color as well. So let's come to this part here. Down arrow. This part will
be blue, so factory blue. Let's come to this
top part then. So we'll just grab all of these. Control plus, plus
down arrow and yellow. So we'll go with factory yellow. This will be most of the colors. So basically all of this
then can actually have, you know, colors from here. We'll also grab
this Control plus, factory yellow, click a sign, and then we'll grab,
you know what? We'll just grab the whole thing. So we'll grab all
of these like, so, grab this, and then
I'm just going to grab this one last and Control L, and we'll link
materials like so. Okay, so let's
come to this part. We've done this part.
Hi it out of the way. Let's come to this part,
and we'll make these metal. So plus down arrow. And we're going to go let's go with the dark
and metal, I think. So metal, dark Tab, A, click a sign,
and there we go. Hide that other way.
Let's come to this part. And on this part,
all I want to do is just press Control
plus factory yellow, click a sign, and there we go. Hide that other way.
Let's come to this one. And on this one, all I
want is the metal dark. And I do want the met
dark. I do want it light. I'm wondering if it might contrast too much with the
belt. So you know what? I'll just try the
metal light instead. Yeah, and I think that
looks actually better. So I'm going to leave it
like that and hide that way. This one is going
to be the rubber, so plus down arrow, rubber, tab, A, and then
a sign, and there we go. And then we're
working our way up. So this one here we'll do most
of it the um Metal light. Let's click tab A,
assigned metal Light. This part on the center will actually make it the dark one. So this part here and maybe this part here
will make it the dark, so plus down arrow Metal dog, click a sign, and there we go. Now, of course,
this is not looking right because we need
these bands on here. So I'm going to just minus these off because we don't
need these on here. I'm going to click Plus,
and we want the box blue, plus again and the box green. And then what I'll do
is I'll go to this one. So Alt Shift click Alt Shift
click Alt Shift click, and we'll have it
on the box blue, click a sign, and then Alt Shift click Alt Shift click and have it on the box green, click a sign, and there we go. There is those bands then that you're going
to create those. That is looking fine now. Now, let's hide that
part out of the way. And let's come to
this part here. Now, instead of it being blue, let's put it on the orange. So let's go down factory
orange, like so. And then we'll come
into these parts here. Like so. And I just want to make sure I've
got all of those. Control plus, factory yellow. Click a sign, there we go. And then we'll come
to this part here. So grab this, grab
this, grab this, Control plus, factory yellow, click a sign. Come
round here then. Same thing again. Let's click
Control plus, actually. Click a sign. Alright,
that's that part. Now, if I hide this
part of the way, I should just be left
with this part here. Now, we've got it on blue at the moment, so let's come in. Grab this part, factor
yellow. Click a sign. Let's also come in, and
this bit down here, for instance, this is definitely
going to be on metal. We'll put it on the metal light, and let's click a
sign, and there we go. And then let's come
to this part here. We'll have this part yellow and this part the metal light. And then we'll go to
this part, press the, and we'll have it
on factory yellow, click a sign, and there we go. Alright, one bit we've
missed is this part on here. So, let's press ultage,
bring back everything. So this part should
definitely be yellow. So all I'll do is go to factory where is
it factory yellow. And then I'm just going
to hide this part of the way because the
bottom underneath here, I just want to create
with the hole, so click Down arrow. And the whole and then click
Assign, and there we go. Now, let's press all teach,
bring back everything, and let's have a good
look round there, making sure all of
that looks nice, making sure I've not
missed anything. And yeah, I think that
looks really, really nice. I'm happy with it. And
now what we need to do on the next lesson, we're
going to save this out. So on the next
lesson, what we're going to do is
going to have this, first of all,
moving up and down, and then this actually
changing color. Alright, everyone, so I hope you enjoyed that, and I'll
see you on the next one. Thanks a lot. Bye bye.
82. Creating animation motion for boxing machine, adding rotation motion for gears and ve: Welcome back on to Blend
Beginner's master class, the cookie factory. So something a little bit
more complicated now. But once we've done this kind of stamper thing that's
gonna go up and down, and we've done these wheels,
is the actual light? I'm going to show you, yes, you can actually animate textures, shaders, bulbs,
things like this. And I'm going to show you
exactly how to do that. First of all though, let's
deal with this thing. So, this one's to come down. So we're going to go to
animation, first of all. We're gonna pres
the little dot but, and then later, we want
to put this onto one. So this is where it's going
to be what we're going to do is we're going to remember how many frames we've
done this over. So we're going to press the I button just to set it there. And then what I'm going
to do is I want it to stay there for 20
seconds or something, then I'm going to press I maybe maybe too much that,
but we'll see. Then what I want to
do is I want to pull it all the way down over, let's say 50 frames,
something like that. So bring it all the way down
to where it needs to go. So all the way down to there. And then what I'm going
to do is press I, and let's see how
that actually looks. So stay stay stay. There we go. Now, we want to have it kind
of juttering a little bit, so we want it kind
of squashing down. So what I'm going to do
to actually achieve that is I'll bring it to here. And what I'll do is I'll push
it further down, like so, press the ebon, and now what'll happen is it'll go
faster here, so faster. And then squash, as you can see. So now if I drag this
out a little bit, so grab just this one, press G, drag it out to 70, you will see now that
it'll go so far down and then look as
though it's actually squashing it in, as you can see. And then what we'll do is
we'll flip it back up now. So let's go to 90 frames, grab this one, Shift D, bring it all the way
over to 90, like so, and then we'll see
and there we go. That is exactly what we want. So now what I'm going to do is, I'm going to grab all of these. I'm going to come over, and we're going to go
to the transform, and we know the transform
is just on the z. So location, z, modifier, cycle, and there we go. Now let's give that try. So we should end up
with it going down, up, down, squushing
down. And there you go. That is exactly what we wanted, and that is the kind of
animation we wanted, as well. Okay. So now let's deal
with this bit here. We already know really, really easy to deal with this bit. We also know that the
bottom wheel will spin faster than the top wheel because this is a huge wheel. So let's deal with
the top one first. So what I want to make
sure, first of all, though, is I've got my cursor
in the sensor. So cursor to center. And then what I'm going to
do is I'm going to press Control A or transforms
right click Set origin, two, three D cursor.
Put it back to one. And then what we're
going to do is press I, and then we're going to
come over to let's say 50. Let's say 30, actually, and then we can do
this 120 or something. And then what we'll
press is this on. Now let's just make sure that we don't mess
around and this time, leave it on or
anything like that. So, Y, 90, and then go to 60. And then R Y, 90, and then let's go to 90, and then R Y, 90, and finally 120,
and then R Y 90. Now, let's milk so make sure
we remember interpolation. So we're going to
have it on linear, and then let's finally come in, put in a cycles modifier. Let's put it back, and
let's make sure that works. And there we go. That's
working perfectly. So now we know that this
one should be on 20. So let's come into
this one, bring one. And then again, we'll make sure we've got our cursor
in the center. Grab the center, shift
desk, curs selected, right clicks origin, 23d
cursor, and let's press I. And then what we'll
do is 20 this time. So 20, and then we'll press R Y, 90, and then we'll go
to 40 and then R Y 90, and then 60, and then R Y, 90, and then finally 80, and then R Y 90.
Let's turn that off. Make sure all of
these are grabbed, right click interpolation
mod linear. And let's come up
now, adding a cycle, and there we go, and
let's come over, and there we go.
Double tap the A. This one's spinning much
faster than the other one, as you can see, that is
exactly what we want. Okay, so now we're
on to the lights. So we know that this is
based over 90 frames. So we know when it comes up, so we can see here that when it comes up,
then it goes down. So we can have it on
green for the first 20, and then we can have it on red, up to 70, and then green again. So that's what
we're going to do. So we've got I would
make a note of this, so we've got 120,
it will be green. So let's put that
down. So 120 green. And then 20-70, it will be red. And then 70-90, it
will be green again. Okay, got that written down. Now we're going to do is we'll
come into this part here. So we'll come into this.
Well, first of all, go to our shader. And what I'm going to
have to do with my shader is I'm actually going
to bring this up. So I'm going to bring this up, and what I'm going to put on
here now in this one here, I'm going to put
on the dope sheet. So let's bring that up to
the dope sheet, like so. And you'll see that when
I've clicked on this, got all of these
transforms on, actually, just wondering why those all on there? Let me
just have a look. But that is everything on
here. So you know what? Let's not put it
on the dope sheet. Let's put it on the timeline. Let's see if we can
do on the timeline. So what I'm going to
do now is I'm going to come to this part here
where it says omission. We're going to put
it on frame one. So let's put it on frame one. So frame one. And then what I'm going
to do is going to press I on here. So hovering over here, just press the I. I
just want to make sure, actually, on the dope
sheet that's appeared on, let's just go to animation
for just 1 second. And what I want to make sure is that this is actually on here. What I'm going to do
is press I on here, and there we go, now it's on. Now what I want to do is
just go back to shading. And I'm going to
go to frame one, and I'm going to
press I hovering over this red. So
press the eye button. And now you can see hazard
Light is actually on there. Now, if we go to animation, hazard light is
actually on here, and now you'll see
I've got a no tree with all of these
different colors in. Okay, so far so good. Now let's go back to shading. And at the moment, we
have got this on red, and we know we need to keep
this on red until frame 20, as we've got written down here. So let's come in,
frame 20, like so. And we're doing this on the
hazard light, by the way. So frame 20, let's
press the eye button. And then what we'll
do is now from frame 20 to 70, we need it green. So let's put this
on 70, like so. Make this a green color. And then what we're going to
do is press the I like so, and then from frame 70 to 90,
we want it back on the red. So what I'm going to do
is I'm going to bring it over Look here. You know what? I'll bring
it over to here, actually. And what we'll do is
we'll click on this. We'll go to the hex value,
and we'll copy that. I'll make it easier for us. Now let's go to frame
90. There we go. And then what we're
going to do now is click on this hex value, contro V, Enter, and then
just press I again, like so. Now, let's go over now to our
animation. And here we are. Here is all our default values. Let's put this on. And we should now have it if we
go through there. So as it's going down
red and then green. Now, the only problem
is at the moment, you can see it's very slow. Going over. Now, do I
actually want that? So as I go through this, you can see now it
starts to slowly swap over to the green, and
I don't think that's right. So what I'm going
to do instead is, I'm going to right click
interpolation mode, and this time, I'm going
to put on constant. And what that should
do is it should mean that it actually
flicks over, so you can see now
it's going down red, click to green, and
then it should go back to red again
now. Let's see now. There we go. Now, let's
see now if I come in, grab all of these and put this onto cycles, it
should actually work. So let's press it. Here we go. Red, green, red. Now,
the only thing is, I would say that this green needs moving
down a little bit. So what I'm going to
do is just grab all of these, all of these green. I'm going to press G and just
move it down a little bit. Now, let's see what
that looks like. Green, and there we go
and back to red again. I'm wondering, it's on green, on green, back to red. And it's on red here, I think we can get away
with probably on frame ten still
actually being green. So what does that
mean? It means I can bring these over again. So shift D. Let's
bring them over. And let's also bring
them over to here, like so. And now let's see. So green, green, red, green, and now it's popping
off on red and green. So we don't really want that. So why is that
actually happening? So red. Yeah, I think
this should be red. So we'll just shift D, bring those over to red. Now let's see what
that looks like. The red I think I've
made a mess of this, so let's try that again. Alright, so all we'll
do is we'll press A. We'll delete those out the way. Let's start that again.
We'll start that again. First of all, though
before we end this, let's press I just
to get that in. And then we'll go
over to shading. Alright, so we know
it's over 90 frames. Let's do that again.
First of all, I'm gonna save this out 'cause I had too many frames in probably in the wrong places
and stuff like that. Alright, we'll do that in
the next one anyway, guys. Thanks a lot. Bye bye.
83. Creating animation for green to red changes for light bulb for Blender Beginners Mas: Microphone to blend the
beginner's master class, the cookie factory, and this
is where we left it off. So we've got red, and we've got green on this
one, for some reason. Let's put it back to red. So we'll start out
as we mean to go on. Alright, so it's all red. That's what we want. Now, let's come to our hazard lights. First of all, let's press I, and what they'll give
everything in here. And then if I'm on my
shader which I am now, you can see that when
this thing is at the top, so on frame one, this
should be green. So let's come in and put it
to a green color like so. Then we're going
to do is press I, and now you'll notice that
these values appear down here. Now we want to do is
we want it to change over when it gets to
starting to go down. So let's say frame 18, let's say it's going
to change over there. So what we'll do is we'll
change it over to the red, like so, and then
what we'll do is press the eye button like so. Now, we should have a
change now, so you can see, bam bam, and then it goes down. Two frame 70. Once it gets to frame 70, then it should start to change
over to the green color. So what I'm going to
do is on frame 60, I'm going to basically
put it at red still, and then on frame 70, I'm going to put
it at the green. Now, the green value I
want to grab from here. So if I go here and grab this green value with
the hex, Control C, go to frame 70, and then change this
over now with the hex, Control V, enter, and then just make sure you
press the eye button. So now we should have
going from green to red. To green again, all the
way up to frame 90, where it should still be green. So I'm going to press again. Now, we should end up now. We're not going to
cycle this yet, but it goes from green to
red, all the way down. And cycles back to green again. That is
exactly what we want. Now the problem is
now we haven't got anything cycling in here
yet, but that's okay. We need to now know so one, 18, 60, 70, and 90. Let's go now to the red glass, and we're going to
do the same thing. So in the beginning
on this one here, we can see it's on green. So let's make sure
on the red glass, this is also on green. So we're going to put
this to green like so, and you notice it
accentuates it a lot. Then what we'll do
is we'll go to 20, and we're going
to put sorry, 18. And we're going to
put this now on red. To match the other
one and then we're going to press the eye button. Then on frame 60, we still want it to be on red. So what we're going to do
is press the eye button, and then on frame 70, we're
going to match the green. So we're going to go back,
grab this green hex. Control C, come back
then to frame 70. So frame 70, change
this over to the green, control V, and then you're going to press the I button on here. And then what you're
going to do is you're going to come over to frame 90 and just make
sure it's done green, pressing the eye button like so. Now, we should have all of
these changing over in one go. So red green, and then
it should cycle over. Now, one thing you might want to do if you grab all of these, you might want to right
click interpolation mode and put it on constant. And then what that'll
mean is it'll flick. Bam. Bam and there we go. Now, let's come over
then to the animation, and what we want to do now is we want to grab all of these, and we want to add
it in a cycles. So cycles, like so. Now, you can see when I've added in that cycles, it doesn't. It's not working right.
Let's have a look. Bam Bam. And you can see what's
happening because I've not added a cycle in
to this red glass. So the no tree here, grab all three of these and put it on cycles as
well. And now let's see. So red, green, red, Green. Red, Green. There we go. Finally, guys. We got there. Okay, now we want to
do one more thing. So what we want to do, we also want to add in a light here. So shifts, Custer
selected, shift, let's bring in then a light, and we'll bring
in a point light. And what we'll do is we'll
increase the radius of it. So if increase the radius of it, and then we'll increase the
power because the thing is, when we've got a light
here, it is an emission. It is behind glass, and so it's not going to
shine on any of these things. So you can see these
surfaces here. If I put this then
on, let's say, red, you can see at the
moment, we've got no shine. But now, if I come
in and turn this up, let's say to 200, now you'll see we've
got actually shine. So light shining on there, which is another part
of the illusion of everything because we definitely want some light shining on here. The only thing is, we need
to swap those over as well. So what we're gonna do is we're going to go to our point light. Frame one. And what
I'm going to do is, I'm just going to press
I, and there we go. Now what I'm also
going to do is I want this on green on frame one, so I'm going to
put this on green, like so, and I'm
going to press I. And there we go. We've got
our point light in there. We've got the color
channels in there, and that is exactly
what we want. Now what we're going
to do is we're going to go to frame 18, and it's turned to red. So what I'm going to do is
I'm going to put this on red, like so, and then I'm
going to press I. Then what I'm going
to do is I'm going to go now to frame 60, and we already know
let's just have a look, making sure this is changing, so green to red. So you can see now
on the light green here, changing over to red. And then what I want to do
now is bring it to frame 60, and I still want it on the
red, so I'm going to press I, and then I'm going
to go to frame 70, and I know it swaps
over on frame 70. So what I need to
do now is change this over to the green, so
I'm going to go to the green. I'm going to copy
the hex value again. So Control C. I'm going
to go then to frame 70. I'll bring this over frame 70, change this to green like so, and then press I,
and there we go. And then it should stay
the same now until we get back to frame 90. I just want to check yeah, I think it should stay
the same. Now, let's see. Did I put anything on frame 90? That's the thing
that I want to know. Let me come to
this. Yes, we have. So we've got it on frame
90 still green, I think. So we'll actually
do that as well. So frame 90, let's
go to our light. Press the i button,
and there we go. Now, let's grab
everything on here. Right click
interpolation constant. And then let's see what happens. So we can see the
green light on here, flicks to red, goes down. Ls to green, goes up. Perfect. Now we want
to do is point like, grab all three of these,
modify it, bring in cycles. And then let's see
if this works. Looks to red, down, green, back up, red, back down. There we go, guys. That is it. Okay, so let's go
to modeling now. Let's save out our work. So file, save. What we'll do is we'll put this in with the actual machine. So I'm going to press
M. I want to put it into the box packer, like so. And now what I want
to do is I just want to make sure
everything is running correctly before looking at what I'm going to be doing next. So all of these parts, so these cubes, what
are these cubes? We can see here we've got a
lot of parts on here that I'm going to grab pretty
much all of these. I think it's all of
these parts. Like so. I'm going to press N. I'm going to put them
in the box packer. And now if I add that box
packer, let's have a look. Yeah, you should
have hide all of that stuff out of the
way, which is great. So that's the box packer. Box maker, all of that is
hid and out of the way. The oven, all of that is
in and out of the way. The sprinkler, all of that
is in and out of the way. Now, the sprinkler, we've
got these two pots on here. I'm going to call
these supports. So I'm just going to make
a new one, new collection, and just call them supports we will need a few more
supports, as well. Let's bring those in like so, and I'm also going to put my supports below the
box packer like so. Now, if I hide
those, that's that. Then we've got the
sprinkler like so. Now you can see here, we've got a part here, which
we don't want there. So what I'm going
to do is put that in with my sprinkler, like so. Then we've got the stumper. So the stumper is all here. Now you can see these supports. Aren't really in anything. So what I'm going to do, I'm
going to grab all of these. So these here, like so, and then these here,
I'm going to put them into the one
that says supports. So M, let's put them in to supports this
one here, like so. Then we've got the squasher
or the stumper. There we go. Then we've got the mixer. So let's hide the
mixer, and there we go. Now, the other thing is these should be supports, as well. So what I'm going to do
is grab all of these. And I'm going to put
these into the supports, this one here, like so. Then I've got the mixer, so I can hide the mixer now. And then I've got
the water adder. And then finally, I've got
the flour mill, like so. And you can see here that this empty also wants to
go in the flour mill. So let's put it into flour
mill, and there we go. And finally, then we've got the conveyor belt,
which is all these. Now, you can see with
my conveyor belt, these shouldn't be in here. These should be somewhere else. T and this, what is this
even? This is the support. This is the conveyor belt. These should be in
these reused pots. So let's put them in
there. So parts reuse. There we go. Nothing's changed
on there. That's good. So now if I hide this, there's those parts,
we should also, as well, put this
in Ports reuse. So what I'll do is I'll press M, go to ports reuse, put that in. Then I can hide those
out of the way. And Joe looking now, this one here wants
to be in supports. So M supports, and there we go. And then we've got all
of these parts now, got the human, and we've got
the convey bell objects. So convey bell objects, we've got our chocolate drops, and we've got collection, which is just that and
then conveyor belt. So now everything
is as it should be. And what I'm going to
do is these parts here, and the conveyor belt objects. I'm just going to
move that down and drop it just above
there, like so. And now what I'm going to do is just hide these two
out of the way, hide my collection
out of the way. And this is what we
should be left with and hide the chocolate
drops out of the way. And let's just have
a good look at what we've got right now
because then we can decide if we need to
move anything around. Because the thing
is at the moment, you can see if I press Space but let's hide our human
out of the way, as well. Human reference, let's
game out of the way. Let's hide this out of the way, and this is what
we've got right now. So you can see our
actual grabber is going to go round
about here at the moment. You know what? I think, actually, it's
going to look nice. If I put some supports in here, if I put some
supports around here, I think having the
grabber here still gives it still will make it look
really nice, actually. So, yeah, I don't
think, actually, I really I don't think actually, I need to move anything around. Now, if you do want to
move things around, do what we did with
windmill where you actually attach, you know,
an empty to it, so everything moves along with but if you've
got this four guys, you should be really proud
of what you've done here. It is quite a complex thing to actually put this together. So what we'll do now on
the next one is then we'll bring these supports in first of all, before
doing anything else. So these supports from here. I think I'll make them a
little bit thinner as well. And then once we've
done that, we can actually make a start
on the last machine. We'll also put this windmill back, so we'll do the supports, put the windmill back, and then make a start on the
actual grabber. So let's save out our work, and I'll see you on the next
one, everyone. Thanks a lot. Bye bye. Thanks so much.
84. Modeling machinery supports, starting modeling process for claw machine at the end of: Welcome back if we want to Blend the beginner's master
class, the Cookie factory. And here we go. Now, I
have seen a mistake, so I'm just going to show you
how to fix that, as well. First of all, let's
press the space bar, and you will see here. Hey, we have dough coming
out of nowhere over here. Let's actually go
in and fix that. So first of all,
we'll grab this part. We're going over to animation
if this happens to you, make sure it's because we had this on the
automatic thing. So what I'll do is I'll
come over to this site. And I'm just going to
pull the animation forward just till
it pops back in. And then what I'm going to do on this bit down here,
just press delete. And then what will happen is, if you go back to modeling now, you should end up with
everything working as intended. So let's see if it
actually, as you can see, we've got double boxes here. But yeah, now you can see,
we've got double on here, double on cookies and
things like that, but it will write itself around. Don't worry about
that. Alright, so all that bit looks
really, really cool. Everything hopefully
should be working now. Now what we want to
do is just make sure this flour mill is in the
right place because obviously, we want to have a grabbing
machine over here. So what I'm going to
do is I'm going to lift this part up, so I'm
going to press space part. I'm going to come in and
lift both of these parts up. So I'm going to lift
them up into place. I'm also going to pull
them back and just make sure the flowers you know, the flour bags are actually coming out
of the right place. I also I've made this a little bit bigger as
well, don't forget. So now I need to
put it back into place like so, and there we go. And I'm also going
to make sure it's just on the ground
plane, which it is. Alright, so that's
all looking good. Now, let's pres spacebar, make
sure everything's working. All the sprinklers working. The spinning machine, everything
is in the right place. And, yeah, that's looking good. Alright, so now
let's first of all, before we do
anything else, then, we'll save our work
now we fix that. And then what we'll do is
we'll come to each of these, and I just want to squish
them in a little bit. So S&X, pull them in
just a little bit, and then just level them up into the place where
they're going to go. And what I'm going to
do now is just make sure that these are
in the conveyor. So you can see these
are in the supports. So supports, that's
where we want them. So what I'm going to do
now is press Shift D, and I want to bring those to actually support this, as well. So all I'm going to do is
I'm going to put round here, so I'm going to press
seven to go over the top, make sure
that it's in there. And then I'm going to
actually have a support here and maybe another support,
and then one support here. So Shift D bring in
another support, and then Shift D,
another support. And then we'll have another
support going around here. So Shift D Z 90, spin it round seven,
to go over the top, and then G just to get it
into where you want it. So around there, I
think it is perfect. Now, of course, these
are way, way too high. So what we're going to do is
we want to bring these down. The easiest way to do it is
probably just to bring in a edge loop like so, and
then you can come in, right click, mark a seam, grab the whole thing with L, and then you can just pull it down to where you
actually want it. So something like
this Looks good. And I probably should
have gone away with doing that to start
with, but never mind. That one looks good. This one needs probably pulling
up a little bit. So we'll do the
same thing anyway. We'll come to this one. Control A, bring it up, and then right click,
Mocasm, come in, press the button and pull it down to where
you actually want it, and then we'll do the same
thing on this one, as well. So we'll press ControR, bring it up, right click, Mark asm, and then
L and bring it up. Now, you can see
here, L didn't work because I grabbed the
whole thing. There we go. Let's pull it up. Keep
going, keep going. T double tap the A.
And there we go. Now you can see what a
difference it makes. It actually looks like it's
filled out a lot more now, and that's exactly what
we're looking for. So now we're up to
the final stage, which is going to
be our grabber. This is the hardest
part, for sure. And also, now we've got
everything else done. The only thing probably
we need is the floor. So we'll bring in
our grabber first. Then we'll bring in our floor, and then you'll be able to see how it's all going to look. So all we'll do then is
we'll press Shifteight. We'll bring in a cube. And what I'm going to do is
I want to keep this to be, you know, kind of
the right size. I want to get one of these. I want to put it on
the ground plane, as well, but what
size do I want it? And what height do I want it? So I'm probably going to
want it around you know, this sort of size, something
like that, and the height, so you got to
remember on this one, most of this and most of this
here is going to be glass, and then the bottom bit
is going to be, you know, where the actual levers
are and things like this. So something like this
looks about right. Now, when I created
this, I am creating it. You know, this is going to be you can either have it
from this way if you want, or you can have
it from this way. I think it looks
better from this way, so a little bit
towards this end. And then what we'll do is now
we've got the size of it, and what I can do now
is just grab this bit, pressure D, and I can bring it over into place where I want it. So just sit it on kind
of the final a final one let's bring it into
place. Pull it over. And then what I'll do
is I'll come round now, and we'll pull it down, and then I'll come round
to this one here. So I'm going to grab this
one going all the way around to here and
pull it out like so. Alright, so now we can just
see these boxes creeping in, which is exactly what we want. And when we look from
here, now we've got a good view of what everything's
going to look like. And yeah, I think I'm actually
happy with how that looks. The only thing I'm
wondering is if I need to push that back a little
bit, but you know what? I think we'll be okay with this. It's telling a nice
story if I turn around. We've got everything in view,
so that's looking good. Okay. Now what we
want to do is we want to like I did
with the windmill, by the way, if you want to move any of
these parts around, I'll show you just on this one. So the easiest way to do that, we'll do it with
this water adder. So I'm going to press pause, and what I'm going to do is
I'm going to come to my water adder
because we've sorted them out in such a good way, if you come in and grab
all of these cubes, all of them, you can see
that's the water adder. Press shifts,
cursed or selected. Then you're going
to press Shift A, and you're going to
bring in a empty. So plain Ax is empty,
press the S button. And now all you're
going to do is re grab all of these again. Grab this empty last, and you're going
to press Control P and Object Keat transform, and you're going to do
that to make sure that whatever the animation is on there, it's still
going to work. Now, I've done that.
Everything is here now. If I press Spacebar, you will see everything carries
on moving around. Even if I go to
RenderVew you will see that batter still
keeps moving round. You'll also see that
this little dial in here still keeps
moving round. Now, it's important,
as well, to put this. So now you've grabbed this empty into the whichever one it
was so the water adder, put it into there,
and then it'll go right to the top because it's
the parent of everything, and that way, you'll be able to move around whatever
you need to. So now if you need to
move these round or put them into somewhere else,
you can actually do that. You'll just have
to fiddle around with the actual conveyor belt. Okay, so now all
that's bits done. Let's come in, and what we'll do is we'll bring in now a plane. So I'm going to
bring in a plane. I want my plane to be
roughly around here. It's going to have to be
quite big this plane because this is going to be my
actual ground plane. So what I'm going to
do is I'm going to bring it down to the ground. So if I bring it
up a little bit, so it fits just on there. So all these things are actually on there, and
then what I can do, I can go over the top, put it on top jet mode so I can really,
really see what I'm doing. And then what I'm going to
do now is pull this out. So I'm going to pull this
out round about to here, and then I'm going to pull
this out round about to here, and then I'm going to pull
this out round about to here and just set in the stage for
how this is going to look. Now, I think that rounded edges do look a lot lot nicer, so
that's what I'm going to do. I'm going to come in, grab
each of these, like so, control shift and B, and just bevel them out and
round, like so. And because these are the
edges of the actual factory, I'm going to give them a few
more edge loops, like so. And then what I want to do
is I want to bring this in so I want to bring it
in, wave the eye button. Don't go too far. So
something like this. And now you can see I just have to make it a little bit bigger because of the fact it's cutting into the edges of these pots. So what I'm going
to do, I'll come in and do what we did
before and the other one. If I come over, you can see
we can't do it that way. So I'll come this way, like so, and then I can pull it
into where I want it. I can also do the
same with here, so it's a little bit cutting through that little
bit over there. So I'll do the same thing here. And then I'll also come round
and grab all of these here. So same thing here, like
so, and then the final bit, which'll be this bit around here and just pull it
this way a little bit. Now what I can do is I can grab it going all
the way around. So all shift and click. And then what I'm
going to do is press E and just pull that
up a little bit. So maybe I've gone a little
bit too far, so pull it down. Like so. ContoA all
transforms, right. Clicks that origins geometry. And finally, what
I want to do is I just then want to
pull the sides down. So I'm going to grab this side, Alt Shift and click
and just pull them down like so,
and there we go. Now we've got our floor. So now what we want
to do is just go into our rendered
view and the floor. Is going to be kind of the
same with the rest of it. So first of all, we'll
bring in the metal. So we'll bring in a metal, where is it, metal
light, like so. And then this floor, then we'll actually come in and
give this color, a different color,
and we'll actually call it plus down arrow. And what we'll do is we'll bring in the
factory blue first, and then we'll plus
plus down arrow. And you know what won plus plus down arrow, actually,
we'll click new, and we'll call it a
ground factory floor. Like so. And then what
we'll do is copy the blue. So copy material,
paste material, minus off the factory. You'll have to do
that in object mode, so minus it off, and
then factory floor, what I'll do is now, I'll press tab and I'll actually assign
that to the bottom of here. And then I'm just going to hop on over to my shading panel. We can see we've still
got this on there. So let's move that out.
We don't need that. We'll put it onto rendered view. And then what I'm going
to do is just come round. And what I want is
to have this black. So I'm going to put it
on to black, like so. And what I also want to
make sure is that it has a little bit more
roughness on there. So I'm going to turn
the metallic up to not 0.8 something like that. I'm also going to turn down that roughness and now
you can see, look, that we can get some real
nice shine on there, and that is what
we're looking for. So it looks really,
really shiny, really, really clean, and that
is exactly what we want. Now, let's go back
to modeling then. And on the next one, what we're going to be doing is
we're going to be creating this actual grabber. It is a more complex
animation on this thing, so we'll be working
on that as well. And the other thing is, I want
to keep the conveyor belt. So before I do all that,
all I'm going to do is just close all
of these parts off. You can see that this part here, ended up hiding, as well. So let's press M, and we'll
make a new collection, and we'll call it
grabber, like so. And then we'll also put this
into the grabber as well. So we'll put it grabber, and then I'll also move up my grabber to be
under my box packer, so under there, like so. And now I should be able to
hide this out of the way. And that's what I
should be left with making it much, much
easier to work. And, of course, we'll be
working in object mode. Let's say that all work, and I'll see you on the Next
one everyone. Thanks a lot. Bye bye.
85. Creating frame for claw machine, keeping holes for preview of whats inside machine fo: Welcome back on to Blend
beginnings master class, the cookie factory, and
this is where we left off. Now, let's bring in, first
of all, our collection. Let's change this over, and let's just discuss this because this one is actually the
hardest one to create, not only in terms of modeling, but also in terms of animation. What I'm going to
do is come over, I'm going to swap this over
then for this one here. So we're going to build
this in three stages. So the first part is this part. The second part is the top, and the third part is
then this part down here, and then we're going to
pull them all together. Alright, so wave the first
part. Now you've got this. I'm going to hide mine
out the way because I do actually have a
reference on my screen, but you can keep yours
there just in case. So what we're going to
do is, first of all, we've seen that this is going
to be roughly the height. We also want to make sure
that the bottom of this. So if I press Control law,
bring this down then, this can be the bottom where
the actual levers are, and this then will be the top
where the actual window is. So what I think I need to do then is just pull this up, then. So if I grab this part, I
can then pull this part up like and then what I can do is I can
split this off now. Now I've got the size in right. Now, it's up to you whether
you want to, you know, make this kind of a little bit higher if you want, it's
completely up to you. So what I'll do is I'll
press Control plus. I'll press P selection,
separate that off. And then what I'm going
to do is Alt Shift click P selection and
separate this part off, and now it's all separated
into three parts. So now I'm going to do and we're going to hide
this part out of the way and then going to
hide this part of the way, and this will be the
part I actually work on. Now, first of all, let's
actually make the glass window. So the way I'm going to
do this, first of all, let's press Control A, all
transforms, set origins, geometry, and let's make this inner window before
we do anything else. I'm just wondering if I should do the bevel first.
You know what? We'll do the bevel first.
So all I'm going to do is I'll grab each of these. So each of these corners, and then what we'll
do is we'll press Control B and just
bevel that out. I'm going to pull it
down a little bit. I don't want to be
bevelled quite so much. So something like this, I think, will look pretty good. What we'll do is we'll
come to the inner part. So we're going to come to
these parts here, like so. And then what I'm going to do
is press the eye button and bring those in to where I actually want
this actual glass. So a little bit further out, something like that, I think,
will be absolutely fine. Next of all, then, let's
bevel off these edges. So while we've got
more selected, you'll notice I haven't
done the back run as well. I've left that completely plain. And what I'm going to
do is press Control B and just bevel
these off like so. And there we go, now we've got a nice rounded kind of glass that we're
going to have in there. Next of all, then,
what we want to do is we want to actually
delete these out of the way. So delete these three out of
the way, delete and faces. Once we've done that, then
we can press Control A, transforms, right click
Set origins geometry. And finally, then we're going
to be adding in A solidify, generate, solidify, and let's then bring it in.
Let's bring it in. Like so, making it a little bit thicker like something we should end up with
something like this. And inside here, then
we're going to be putting an inner part
and then the glass. So maybe even a bit thicker, maybe that thick,
something like this. Alright, so far so good. Now, let's actually apply that. So Control A, right click, set origin to geometry, and then that's shade smooth
tangle. You know what? I don't think I actually
applied all the transforms. Then set origin. To geometry. Alright, that's looking good. Now, what we need to do now is think about this bottom bit because not only does
this bottom bit come out, but this part here is
also going to be in here, filled with actual boxes
of cookies like this. So let's think about
the bottom bit first. So what I'm going to
do is press altage. I'll bring back this part. And I also want to make
this a little bit thicker, so not only do I want
to kind of round this, to make it a little bit thicker, and then I can actually create
this inner part into here. I'm also going to hide
this out of the way because at the moment
that's not very useful. So what I'm going to do
then is come to this part. I'm going to press Shift H, hide everything else
out of the way. And for now, I'm going to delete the bottom out of the
way, so delete faces. Then I'm going to press Tab, bring back the other parts. And then what I want to
do now is bevel this off. So, again, we're going to
come to these four parts. Like so, and then
we're going to hit. Once we've got this, we're
going to hit that bevel. So Control B, let's bevel it off to be round about the
same as the other part. Now, once we've done that, then what I want to do
with this is, again, control A or transform
set origins geometry, and you will notice I've beveled it all the way round like so. And now what we want to do is we actually want
to bring that out, so we're going to
add in a solidify. And I'm going to bring bring it in there. Let's bring it out. Then that one's going in, as you can see, so bring it in first. And then what you
want to do is change the offset to bring it out like so and then bring it
in a little bit more. And there you go. Now you've
got the bottom of this. That is looking pretty good. Press Control A, all transforms, right click and set origins geometry and right
click and shades moove. Now, I just want to give
this an actual bottom. So all I'm going to do is shift H just to hide
everything out the way. And then I'll come in
now, press Control R, left click and just
drop that down. To somewhere like here, and then I can just press the
F button and fill that in. So that is the bottom of that. If I press TH now, this is what we
should be left with. Now what we want to
do is we want to put some edges on these
parts going around here. So let's come in,
and you can see here that I don't actually
want to grab the whole thing, so I'll show you what I mean
by that, but first of all, I'm just wondering if
it'll be easier if I just add in a shop.
I think it will be. So let's come in. And all we're going to do is
add in a shop there. So right click, not a
shop sorry Sam Let's add in a seam and then come
in. Can I grab this now? So, you'll see it's still grabbing it all the way
through, which we don't want. So let's press Shift H again. And what we'll do now is come in, and instead
of doing that, all we're going to
do edge select, and then Alt Shift and click Alt Shift click and just go
all the way around like so. You can also use Control
Click as well if you need to. And we'll also go all the
way around the bottom. So I'm going to Control
click, Control click, and Control click, and
finally Control click, right click and Mc Sm. Not that. No claros. Markosm. Alright, so now I
should be able to come in, press the elbow just on
this, and there we go. So now we need to do is just replicate that to
the other parts. So this one, this one, this one, this one, and this
one and this one, right click and Mc Sm. Now finally, we've
got a mole in. So what we want to do
now is just come in. Like so, like so. And then all I'm
going to do then is, I think I'll press Shift and D. So Shift D, S and Z, bring them down, like so. And then what I'll do is I think we can pull
them out from there. So E Enter, AlternS. Let's pull them
out a little bit. Like so, let's press
the Tabb right, click Shade Auto smooth Bangle. And there we go, There is our
machine near enough done. And yeah, it's
looking very rounded. I'm happy with how that looks. Now, of course, we also
have the inner parts to do. Now we've done we need some glass in there and things like that and other
parts in there. But I think for now, let's actually start on
the actual top. So we'll get the top onto here. And then once we've
done that, then we can start, you know, working on the outside of
here down at the bottom, because I think we should
build all of this before we actually start working on the inner part because that's
the most complicated part. What I'm going to do is
then I'm going to press TH, bring back everything, so let it come back, lth, there we go. Then what we want to do,
we also want to round this part off and we also
want to make this piggot. All I'm going to do is
we're going to press S first. In fact, you know what? Control AHL transforms,
set origins, geometry, then press
the S button like so. Then what we'll
do is we'll round these edges off like so. Control B, round them off. And there we go. And
then what we can do now you can see that's
looking pretty nice. Let's put a bottom on here because I don't
think it has one on. So Alt Shift and click. Press the F bone, press L then. And what I want to do is just make this a little bit thinner. So S and E, make it a little bit thinner and then pull
it down into place. Now, under here, you won't
be able to see under here, but we have actually got
some lights under here. So I actually want
to bring those in. So what I'm going to do is
I'm going to press Shift H. I'm going to come to
the underside of here. I'm going to grab
this underside. I'm going to press
I to bring it in. And then what I'm going to do
is press E and pull it up, and this will be where my actual light sauce
is going to come from. We're also going to have
some metal bars in here to basically move the grabber
along and things like this. Alright, so now we've done that. Let's actually shave
this off smooth. So shade smooth biangle. Now, I was thinking when I
was doing the top of here, I could actually put, you know, a huge cookie on here
or something like this. But for me, I just
wanted it to look more like a vault where
they came in and, you know, emptied the machine
and things like that. I thought it was a
little bit more fun, you know, than creating
just a big cookie on here. So you can create a
big cookie on here. I think that would look
good, but I myself, I'm just going to press
cussed to selected shift Day, and then what we're going
to bring in is a cylinder. We're going to put it on 24. And then what we're
going to do is pull this out into place where
we're going to have it. I'm going to press SnsEad
and then just drop it in, not to there to this point here. And then from there,
what we'll do is we'll pull it up a little bit. So I'm going to press tab, tab, pull it up a little bit. And then what I'll do is
just before we end then, I'll press E enter S, pull it out a little
bit, and then E, pull it up like
this, and then I, pull it in, like so, and then E and then
leave it like this. Right, click Shade
Smooth Bangle. Alright, that's looking
pretty good so far. So once we come back then, we'll actually get
this finished off, and then we'll work on the
bottom part over here. Alright, everyone, so I
hope you enjoyed that. I'll see you on the next
one. Thanks a lot. Bye bye.
86. Adding vault door to the top of our claw machine, modelling all parts for it for Blen: Welcome back if we want to blend and beginner's
master class, the cookie factory, and this
is where we left it off. Alright, so let's make
then some parts on here. So what I'm going to
do is, first of all, I'll bring this in,
so I'm going to press the I button just
to bring it in. And then what I'm
going to do is drop that bike a little bit more. And then I'm gonna
press the I button again and round this part, then we'll have some
bolts going around there. And then what I'll do is press
E to pull it up. Like so. And then we're gonna
press the I button. And then E, and then the I just to make it
a little bit interesting, as you can see, and finally,
then E to pull it back. Alright, so we've
got this so far. Now, let's bring in our
where are the parts reuse. And what we'll do is
we'll grab this one here. So these bolts, I'm going
to press Shift D. And then what I'll do is I'll bring them to the
center of here. So I'm going to press shifts
and selections Cursor. I'm going to press seven
just to go over the top, making sure they're
in the right place. And then finally, what I'm
going to do is bring them up. What I want to do is bring these out and make
the bolts bigger. So first of all,
let's bring out this, and we're going to
put them right on, we can see right on this
part here going around here. I also then want to
come to my bolts. I want to make them
much, much bigger. So S, let's make them
bigger, like so, press the tab button,
and now we can see are they going to fit in there. So let's
bring them down. I'm going to bring all
of them down into place. Like so, and there we go. Double tap the A. Yeah, I think that's
looking pretty good. And you can see they're
fitting in there very nicely. And then what I'm going
to do is increase this. So if I come to my bolts, I can increase the
amount of them. I want to bring them back
one, bring them out more. So holding the shift
boon, there we go. And that's looking pretty good. And now we'll think
about this centerpoint. What I'm going to do
is bring back my oven, and I'm going to
steal this part here. So I'm just making sure
there's a mirror on there. Let's actually just
press Shift D. Like so, and then I'll just remove
the mirror from this one, and I should just be
left with this control A transform set
origin to geometry. And then what we're
going to do is shift S and selections cursor. Drop that in the center then and then let's pull it up
to where we want it, so it's going to be up here. Let's make it a little
bit bigger than that, so we're going to press the
S button to pull it out. And then what I want to do
now is bring up the center of here just to hide these
kind of inner spokes. I'm going to come to the center, and we're going to
press the I button, and we're going to press
E and then I again, and then E and pull it
up into place like so. Maybe, maybe that's a
little bit too big, Alt Shift and click
Alns, bring it in, and then let's have
the centerpoint I and then E. And then finally, Control B, just to
round that off now. If it's not rounding off,
control A will transform, set origin to geometry, and then Control B, and you
should be able to round that off nice and neatly, like so. Alright, so that is the top bit. Now, let's think about I definitely want a
hinge on here as well. So what I'm going to do is
I'm going to press Shift A, and I'll bring in a cube. I'll make my cube a
little bit smaller, and I want the hinge going
basically into here. So it looks as though it's
actually able to open. And then what I'm going
to do is press S and, like so drop that into place. Something around there.
I think, you know what? I'll bring it up a little
bit more, like so. Then I'll bevel off
these edges now. Let's grab this
edge and this edge, press Control B and
just bevel those off. Now, this might be a little
bit too thick, I think, what I'll do is I'll press L, S, and Y, bring it in. And yeah, something like this. I think that looks pretty nice. Right click, shade
smooth biangle, tad button, grab the top of
here, press the I button. And I'm going to hide this part here with an actual hinge. So what I'm going
to do is press E, pull it down, so make sure you don't
pop through this part. So it just wants
pulling down, so maybe I've gone a
little bit too far, so I'll pull it up
to Tad. There we go. And then shifts,
cursor selected, Shift A, and let's
bring in another cube. Let's press the S button then. And then what I'll
do is I'll bring it right to this edge. I think I'll have to lift up
this edge a little bit more, so I'm just going to press
Alt Shift and click. Just going to pull it
up a little bit more. And from there then I
should be able to get my hinging that's going
to be over this side. I'm also thinking that I will also pull up this one
Alt Shift and click. Let's pull up this one
a little bit more. Because the way that
we construct it, you can see it's quite
easy to pull it all up. Now, let's press S and Y
and pull it out, like so, and then let's finally
bring it down, so bring it down
just below there. L, just to pull it into place,
so it's actually in there, and then let's bring
this part back to let's create those
actual hinges on here. So what I'm going to
do is control R three, left click, right click. And then what I'm going to
do is I'll press Control B, pull it all the
way down like so, and we're just creating
that hinge there and then E enter Alterns and
bring those back. Let's keep bringing them back. Is it going to fit in there and actually look like we want? And what I'm also going to do, I'm just going to give it a try, but I'm going to see if
subdivision surface. We'll bring that
into what I wanted. Let's have a look, so
generate subdivision surface. Let's put it on
let's bring it up, first of all, as you can
see. It's nearly there. It just needs some actual work. So we'll try, first of all, bringing the front in, so control, left
click, right, click. Control, left click,
right, click, grab them both, and let's
now pull them up across. So S and Y on medium
point and then S and Y, pull them over, like so. And then what we want to do is control left click,
right, click. And just in the center
of each of these. And you'll see eventually, once you've actually done that, if we press Control
B and pull them out, now we're actually starting to get somewhere as you can see. And then finally, then we need them also on this part here. So I'm going to press Control
LA, left, click, right, click, control, left
click, right, click. And I'm going to
bring these parts in. So S and Y, bring them in. And then I'm thinking this part here then. So
this is the last part. So control art, left,
click, right click. Control art, left
click, right click. And then what I'm going
to do is I'm going to press Control B, pull those out, and there you go, There
is the actual hinge, and you can see that's
looking pretty nice. It's a little bit, you know,
what's the word for it? I'm just thinking, press
S. Let's pull it down, make it a little bit smaller. Let's pull it up. It's a
little bit chunky fied, and that's what we
want because I think I can actually move
this now from here. So if I press control that,
left click, right click. And then what I want
to do is put this on smooth or the rounded one, and then a shod, be
able to pull it back, like so, double tap the A. And there we go. I think that's fitting in really,
really nicely. I'm happy with that. Okay, let's make a start then on what
we'll do is first of all, we'll apply our curve
to these bolts. So object convert to mesh,
so apply both for those. That didn't work,
so let's come back. Where's my bolts gone? Where are my bolts gone? That's
a bit strange. Let's bring them back.
Let's go forward, then. And I don't know
why it did that. They put them over
there, I think, probably because there's
an animation on there. So let's go back to animation.
And there's the culprit. Let's move it back into place,
see if it actually moves. No, it doesn't. So that is
annoying when that happens. So let's just come down
here, press delete. And then what we'll
do is we'll grab the whole thing shifts
and selections cursor, and the cursors
not in the center. So let's put it in the center. So shifts cursor selected, grab both of these, shifts
and selections cursor. And there we go.
We've got them back. Now, it keeps putting this on so you can see it's on again. A I'm going to do
is go down here, make sure that's deleted so you can see now
nothing is on there. Now if we grab our
bolts, hopefully, object, convert to
mesh, and there we go. All right. So we've
got those in. Let's delete this ring
now that's going around, and let's just make sure that
these are in the ground, so make sure that
they're in there. We go. I might also just press S and E and just squish
them up a little bit, make them a little bit
different from the other bolts. And there we go. Now,
we've got a bolt in there, but I'm not going
to worry about it. What I'm going to
do though is just rotate these round a little bit, so Rs, rotate them round just so they're more in
line with this part here. Press the tab but come
to this part and press, delete and verts, and that gets rid of that bolt
that we can see in there. Okay, let's now go
back to modeling. And what we're going to
work on the next lesson, if I press LTH, bring back all of this stuff
is this part here. So what I want here is
I want it going into, you know, a part, let's
say, a part on here. So I think instead of it, you know, coming
down to this part, it should realistically
be going into here because then it looks
as though I can shove some, you know, kind of presents
into this part here. Alright, everyone, so we'll
do that on the next one. We'll put it into something
like here about here. And then we'll have a room for the actual presents or boxes to actually put
them in here as well. Everyone. Hope you enjoyed that. Let's say about our work, and I'll see her
on the next one. Thanks a lot. Bye bye.
87. Working on the entrance for the claw machine and thinking how boxes come into it for : Welcome, Macon to the
beginner's master class the cookie factory. Now, what I want to
do is I want to, first of all, bring in a cube. So I'm going to press Shift
Day. Let's bring in a cube. And what we'll do then is
we'll pull this over here. Now, what I want to make
sure is wherever I put this, it's got enough room for
mysual boxes to go in place. You can see if I bring this up, so if I bring it up
round about to here, you can see that I need to
make this a little bit wider. I'm also wondering if this
should be straight up as well. So if I pull this
up without this on, and then it should go
straight to there, and then I can
actually make it a little bit flatter
once it gets to here, and I think that looks
a little bit better. All right, so what I'm
going to do now is I'm going to come
to my square again. I'm going to press S and Y
and pull it out a little bit. Then what I want to
do now is see where my actual box has come to. So if I press space bar,
let's actually see. Is anything actually going
to be running? No, it's not. So let's come up. And let's
bring back everything. Conveyor belt objects. There we go. Let's put that on. Let's put all of these parts on. And then what we'll
do is we'll actually start it from the beginning. So we'll go to animation. Let's put it in one, and
let's go back to modeling. And hopefully now Things should start running,
which they are. All right. So now we can see if
I pause it there, this is roughly how much room we've got to actually make that, so not a lot, which is great
because we want it to be kind of small on this end. So all I'm going to do then is I'm going to grab
the whole thing, and I'm going to press
Sn E, pull it down. And then what I'm going to do
is put it just under there. So it looks as though this
is actually on there, and I'm also wondering
whether I can get away with pulling it a
little bit further down. I'm going to press
S and, like so. And I want enough room
to make sure wherever I'm pulling this that we've got an edge
going around there. So what I'm going
to do from here is, I'll pull it up a
slight bit, like so, and then I'll press the I
button and bring it in, like so, and there we go. And I think that's going
to fit it pretty nicely. So now I can do is I can
press the E button and pull this back like so.
All the way back. And I can make sure, as well, that this part on here, I don't want it
actually being there, so I want to pull it all
the way back like so. I also want to make sure that this part is not stuck in there. We don't want to go back that
far, so just into there, because on the inside, it's actually going to look as though there's
another part on here. So we'll do that in a minute. First of all, though,
let's finish this part. So something like
this, we're also then going to steal
these parts here, so we're going to come
in and I'm going to steal this part.
You can also see. Yeah, that's okay, actually. We're going to press Shift D. And I'm going
to bring it over. And the other thing is, I'm
gonna bring it over, like so. And the other thing is,
if I spin this round, I want this to go
then into there, onto there, but I think this is still a little bit
too far forward. So all I'm going to
do old shift click, pull it back a
little bit like so, and then let's get this part in. So if I bring this,
let's have a look, we can actually hide probably the box maker
and all this stuff away. So let's hide it all the way, not the grabber. There we go. Now we can actually work
a little bit easier. Let's also You know what? I need my box
packer back because I need to put this
in with the grabber. So, drop it into the grabber, hide the box packer out
the way, and there we go. Let's drop this down. So
we'll grab this part here. Let's drop it down into
where it's going to go, so it's going to go
round about there, and then I'm going to press tab, L, bring this up into place. I'm going to drop
it back as well. And then I'm going to
just line it up like so, and then S and Y,
pull it into place. And then what I'll do is
I'll grab these parts now. So I'm going to grab
all of these parts, pull them over into place like so, and
then pull them back. There we go, and then
we'll grab the bottom. Now, there is another way
of grabbing the bomb. I don't want to go through
and just grab all of these. So what I want to do
is face the forward, which is Control three. We can see that we've got our conveyor belt in
the way at the moment. So let's just hide that
conveyor belt out of the way. Let's also what is this? This is the supports, I think it is. Yes, supports. Let's hide those out of the way. And there you go, now you
can see we've got this. And then what you can do is
you can go onto wireframe, double tap the A, and
then just press B for box select and just grab
them all like sewn you. See now it's grabbed
them more like that, put it back on the object mode, and then we should
be able to lift them up into place like so. Okay, so now let's bring
back our conveyor belt. So conveyor belt objects, conveyor belt, there we go. And now you can see that's looking pretty nice
and they should, let's see, disappear into there. So we want to make
sure they'll go all the way through
before disappearing. So there you go, and now they're
disappearing into there. Now, the other thing is, these are coming really,
really thick and fast. Do we want them so fast? Decide if you do because if not, you can just come in and turn down where is it this one
here, the drop intervals. Also make sure they sat flat on there, and
I think they are. And now from there, let's actually work on
the inside of here. So if I just grab
this at the moment, we should, if I put it on Xray, have just this back here. I can press Shift D then
and bring this forward. Through there, turn it off, and there we go, we have
something to work with. Let's also split this off, so split off selection. And let's now come
back to this part. Control A or transforms
set origins geometry, and let's put a little
bit of a top on there. So all I'm going to
do is I'm going to press Control LA left
click, right click, Control B, and just pull it
out a little bit like so, and then Control A and
pull this one forward. And finally, let's pull
this up with E like so. Alright, so that's
that part. Now, let's think about the inner part. So let me just create here. So we need a box
that's going to go this side where the actual presents are going to drop into. We can see the size of the presents are going
to be like this. So what I'm going to
do, first of all, I want to press Shift
desk c to selected. I want to press Shift
date bring in a cube, and I'm going to make it much, much smaller, like so. Let's get it to be
the right size first. So we're going to pull it
down basically to the floor. And what we want to do is the
boxes to drop into there. So it wants to be probably a
little bit bigger than that. So lt, shift, and click lns, pull it out just a little
bit, something like this. And then what I want to do
now is grab the top of it, press the i button, like so. And then what I want to do
is bring it down into there, and that is where my box
is going to drop down. Now, while I've got
it, I might as well grab this part. So shift D. Spin it around, so's 90,
spin it round again. So X -90 just so it's
facing the right way. And then what I want to
do now is grab this one. Control A, or transforms right,
clicks origins geometry, grab this one then Control A or transforms origins geometry, and then shifts
selections cursor. No, we don't. Grab this one, shifts cursor selected, shifts selections
cursor, and there we go. Now it's actually in place. Now we want to do is just
make this kind of drop. So let's put this in here. So when it drops in there,
it actually looks as though, you know, it's dropping
through something. Like this, and then all I'll do is delete a couple of these. So L and L, delete vertices, and then grab this one, L, and then press S and X and
bring that in like so. And then finally, I'll
just grab each of these, and I'll pull them
into place first. So pull them into
place, like so, and then I'll press S and X, pull them out, holding
the shift board. And then what we'll
do is just grab the back of them
and pull them up, and then this part
is pretty much done. So let's pull them
into place like so. Now, I'll grab my box, and I'll join it to these parts because all we've got on
there is a bevel, so control. J, join them together. And then finally, one
thing I forgot is this is probably a
little bit too high. So let's come in L, L, L and L, and drop it down just a little bit
so something looks. So you can just
basically see it. Then what we'll do is we'll
drag this over over to here. So if I pull this all over now, we should be able
to put this into place onto here
and then the box. So grab it or grab the boxes, pull it up into the air, and then drop it
through into here. So probably want it, you know, near the actual glass. Like so. Alright,
so far so good. So we've got the place
the boxes go into. We've got the place the actual gripper will drop them into. And now what we want is
the place where the boxes, once they go through here
are going to come out, you know, into the
actual machine. So let's press
let's first of all, press Control A or transforms, set origins geometry,
press the S button. And what I'm going
to do is just pull that back then just into there. So just so it goes through, I'm going to press tab
then, A to grab it, and then E, let's pull it
out into place. Like so. And then I'm going to
press the I button. And then I'm going to press
the E button to pull it out. Still want to make
sure that these boxes are the right size, so you can still see it's
going to go through there. And then finally, I just
want to press I and bring it down and then press E and
bring it all the way back. Like so. Keep going, keep going, keep going all the way
back just before we get there because we can
have that hole in there. All right. That's looking good. I'm thinking maybe maybe I want to pull this
out a little bit more. So all I'm going to do
is l shift and click. And I'm thinking that if I pull you know what? I'll
just do it like this. So control, left click, right click Moken and then
we can actually you know, what can we actually grab it
going all the way around? Yes, we can. So now I should be able to pull that all
out, as you can see, and then the hole can go back
a little bit further just before there. And there we go. All right, so let's just put a top on here, and
then we finish this. So what I'm going to do is
press Control R. Left click, right, click, press Control
B to pull that out. I'm going to move
then this line over. So Control, Shift, and click, move it over, like so. And then finally, I think I want to bring just this one in. So S and Y, let's
bring it in, like so. And then what we'll do is
we want it to come up. But what I'm going to do, I'm going to press Control
R, bring in another one. And then we're going to
press E, bring it up, so I'm going to grab
this part then, press the F button, and then I just want
to fill these in. So if I grab this
one and this one, and press F, and grab this
one and this one, press F, and we end up with
something like this, controle or transom
set origins, geometry, which I think is
looking pretty nice. Everyone. So I hope
you enjoyed that one. Let's say that all
work as always. And what I think we'll do on the next one then
is we'll get to work on these levers
and things like that. And then finally, I think we'll actually get some boxes in here. So I have actually added a new geometry node
to the download pack. It's called our stacker node, and you'll see once you
actually go in there when we come to that part
that it's in there now. By magic, it's
actually in there. But, yeah, it will be there
for you to use as well. Alright, everyone,
Sope you enjoyed that. See you on the next one. Thanks a lot. Bye bye. Thank
88. Modeling claw controls for the front, using crate stacker geometry node to stack pile: Welcome back, everyone to Blend and begin as master class, the cookie factory, and
this where we left it off. Okay, so now, let's think
about this part here where the actual presents
or boxes come out. So what I'm going to do is
I'm going to press Shift A, and I'll bring in a cylinder, make sure it's on 24. As always, we're going to
rotate it round on the X. So RX 90, let's rotate it round. Let's
pull it into place. And then what I'm going to
do is press the X button, press S and Y, and then
I'm going to pull it out. And this is all this bit's about really is having
a little bit of fun. I'm going to press sen's
E and pull it up like so. And you have a lot of fun once you know
what you're doing. It's a lot more fun. And what I'm going to do then
is pull this bit back because basically
you can create whatever you want, like so. And then what I'm going
to do is press I. You know what? I'll
press I on both of them. So I just want to
see through there. So I'll just press I on
this one and this one. I'll press I like so. And there we go, and then
I'll bridge edge loop. So bridge edge loops like so. Now, let's turn that off, and then what I can do is
I can press Control R, bring in an edge
loop just to there, press the F button,
and there we go. And now I just want one bit
that's going to be here. So what I'm going to do
is I'm going to press Alt Shift and click F, and then Y just to
split that off. And then what I should be
able to do is make a tiny bit smaller and pull
this up like so. I also want to bend
it a little bit. So I'm going to
press E to pull it out and then L, pull it back. And then I'm just going
to bend it on the X. X, just bend it a little bit, like so, and then pull it back, and there we go, right,
click, shade Auto smooth. All right, that's that bit done. Now, let's think about
our actual gears stick. I'm going to press Shift desk, c to select it just to
put it there. Shift date. Let's bring in a cube.
Let's pull it over. This will be kind of
the right height, actually, so that's
looking good. So what I'll do
is I'll just come to the underneath of here. If you can't grab it,
just go put X ray on, and then you should be able
to grab it in face leg and then just pull it up to where you want it and turn that off. And then going to pull it out. So I'll want it all the way out, jaws to here just before
it gets there, like so. And then what I'll
do is pull it back. Into this part here. So it needs to be a gear
stick on here, so now I can grab the
underneath, as you can see. And then what I can do
now is I'll make you a bit chunkier and then I'll press the I but
to bring this in. And then what I'm going
to do is I'm going to pull it back into that place, press E to bring it down. And then what I'll do
is bring this back. So if I bring this
back a little bit, like so, and there we go. Now, let's set up it for the couple of
gear sticks on there. I'm also thinking, maybe maybe I want to pull it
out a little bit more, but we'll actually
see that in a minute. So S and X, let's pull it in a little bit. Let's come in now. And we'll press I
to bring it in. Like so. And I'm just thinking I will also pull this
back, so grab this one. Like this, pull it back
into place. Like so. And then what I'll do is I'll
press E and pull this down. Js to there, like so. And then finally
what I'll do is, I'll bring in an
edge loop on here. So control, left click, right, click Control B,
pull that out, E, then alterns, pull this out, holding the shift bone, like so make sure offset even is on. And you can see that
didn't come out properly. You can see there it's bending on here. We don't
really want that. So what we're going
to do is press the S button to pull it out. And I can also see that
it's probably to do with the fact that I've not
reset my transformations. So I'm just going to press Tab, reset all the transforms, set origins geometry, and then let's try that
again with old S, and you can see
it's still bending. Let's press the S button. And yeah, it's still
bending a little bit. So what that means is
I'll pull it out there, press S and Y, and then we'll pull it
out this way instead. And we'll get it
done regardless. And now you can see
that's what we've got. Okay, that's looking good.
Now, these actual gear sticks. So first of all, let's press
Shift desk Custer selected. Let's then press Shift D, and what we'll bring
in is a UV sphere. And as always on UV spheres, just set this to 16. Let's right click Shade Smooth, and let's have a look at that. Okay, I'm happy with
how that looks. Then what I can do is I can
bring this up and into place. Now, these things want
to be quite chunky, so you can see here, if they look like this,
this is quite good. And what we'll do
is we'll come in. We'll get rid of this
centter bit again. So just grab one of them, C, bring it down, and then you should be
able to select them and then delete faces. Before I do that, they'll think, actually, I'll bring it to here. So I'll just press Control
plus, delete and faces. Then what I'll do is
now I'll come in. I'll press Alt Shift and
click and press the F button. And then what I'll
do is I'll press the I button. Bring it in. So E, bring it in a little bit. I, bring it out, and then
now make your stick. So if I come down, E and Z, make my stick going
into place like so. Now, I do need to put
this now into position. So if I put it around
here, like so, then what I can do
is I can create the round part that's going
to be underneath for you. So if I press shifts
cursor are selected. So shifts. Like so Shift D. Let's bring
in then a cylinder, press the S button, S
and z and then S again, and bring it down
to where I want it. So something like this. Make
it a little bit bigger, like so S said, and there we go. Let's now grab the top of this. So we're going to press I and then bring it in two places. Right click, Shade Smooth
Bangle. And there we go. Alright, so they're
looking quite chunky, as you can see, and that's
exactly what we want. What I'm going to do now is
grab the center of here, so shift desk,
cursed or selected, grab both of these then, right click and set
origin to three D cursor, and now finally, let's
add in a mirror. So add in a mirror. And let's just now copy
this one onto the mirror. So control. Copy modifiers,
double tap the A. Finally, let's actually
shades smooth. There we go. Alright. There is our two little knobs in there, and I'm thinking, let's
actually grab them both. Press the tab, press A, and just move them
this way a little bit. And, yeah, that's
looking pretty nice. Okay, so now now, we need the actual
boxes in here. So we have our boxes
in a collection. We've got them. Let's have
a look where they are. So we've got them
under chocolate drops, let's go down to belt Objects. So we can see here we've got
open boxes and closed boxes. And, of course, the one
we want is closed boxes. So what I'm going to
do now is I'm going to create a cube that's going to go right
in the center of here. So if I come in, just
grab the center, shifts, curse to selected. Shift A then. So tab first, though, Shift A, create a cube. I'm going to pull this cube up to where I actually want it, and then I'm going to make
it bigger with the button, going out to maybe I'll
pull it up to there. Now, we can reduce this in real time, so don't
worry about that. Let's just get it where we want it first. So
something like this. Then we're going to do is
press Control A or transforms, set origin to geometry. Next of all, then
what I want to do is. And now I want to bring in
that new geometry node. So let's head on over
to our resource pack. So now you'll see in
our resource pipe, there's one that's called
blender stacker node. Let's double click
that, let it load up. And then you'll
see within there, there'll be just
a cube in there. So you can see this
cube in there, and it's got a create
stacker on there. Now, I've already
showed you how to use it with Asset Manager, and you can also append things. So that's what I'm
going to show you now. So you can see it's there.
Let's close that down. So don't save, and let's go now to the other way
of bringing things in. So file, append. And what we want to do now is find the actual geomete
node. So here we are. Blender stacker,
double click it, and the one we want is under
node and then under there, you're going to find
all of these nodes, and you can see crate
stacker oh one is here. Bring that in. And
then what'll happen is if I now go and
press Dot over here, let's see if I've actually
brought it in. Where is it? Should be brought in somewhere. And I'm just trying to see
where it's actually come in. Should actually
be in the center. Let's just see now
if I come to this, add geometry node,
click the down arrow. We've got the crate
stacker in here. So we have got it in
here. I'm just wondering. I think it's just brought in
the geometry node, actually. So it's not brought
in that cube, just the emture node,
which is really handy. Alright, so now, how
do we use this then? First of all, we'll
turn off hide box. And then what we're going to do now is we need a collection, and the collection is
going to be closed boxes, and let's bring that
in. And there we go. We've got a load of
closed boxes in here. Now, you can see that the size and scale of these is not right, so let's bring them
down all the way down. In fact, you know
we'll put this on something like we've got
a big gap between them, as well, and loads and
loads of problems. Let's first of all,
put it on 200. 200 particles instead of 1,000 because it doesn't make sense to have
them that big. What I'll also do then
is turn down the scale. So let's put the scale on
let's put it on note 0.1, something like that, see if that actually brings
them down in scale. Let it load up. There we go. If I press dot now, we can
see these are the boxes. Now, still, they're
way way too big. They want to be
more of this size, and we can also
see the particles are actually creating it, so it's very, very
hard to work with. So on the next
lesson, what we'll do is we'll save out our work now, so let's go to File and Save. And on the next lesson,
I'm going to show you exactly how to
work with this. Alright, everyone, so I
hope you enjoyed that, and I'll see you
on the next one. Thanks a lot. Bye bye. Thanks so much.
89. Modeling claw hand with all the little gears for Blender Beginners Masterclass: Welcome back, everyone to
Blend Beginner's master class, the cookie factory. Now what I'm going to do is
rather than do it like that, I'm going to do is just
take this off a minute, come to my boxes, and just make sure we
reset the transforms, set origin, to
geometry on them both. Now, let's press Spacebar, and hopefully we can get
the size of our boxes. Here, this is the size that
we actually want them. Now I'm going to
do is I'm going to come back to this box then, add in a geometry node, and what we're going to do
is go two geometry nodes, and the one we want
is going to be called the crate
stacker like so. And there we go. Now,
what I want to do now is put this
on something like 200 let's then put this on
gap between on naught 0.67. Oh, let's put the
scale on naught 0.41. Oh, and let's put
the overflow on minus not 0.28 oh,
something like this. And then what we'll do
is we'll come in now, and what we're looking
for is the closed boxes. So these closed boxes here, and there we go, now we can see we've got all of these in. Now, what we can also do
now is change the seed, so you can actually
change the seed, like, so you can see we've
got all these boxes in. Now the thing is, you can
see they're a little bit um, smaller or bigger some
occasions than these. So what I want to do is
just change the scale, make them a little bit bigger. Like, so just to match that, and there we go, and then we can actually change the seed. Now, the good thing about this is I can actually
come in to my box. And what I can do is
I can come to my box, grab the top of it,
and pull it down, and you'll see that it actually starts to
bring them all down, hide the box out the
way, and there you go. You've got a load
of boxes in there. Now what I just want to
make sure is none of these are actually
on the outside. I also want to make sure that if we come in and just
unhide that box again, we can make this box
a little bit bigger, so make it a little bit bigger, like so hide the box again, and then they're gonna come
up to the glass and look as though they're actually
leaning on the glass. Now I can also see that
the bottom of these is actually through the floor.
I don't really want them. I want to make it nice and tidy, so I'm just going
to put them up, so none of them are
through on the floor. And then what I'm
going to do now is pull this down a little bit and bring them just
below there like soap. Now, what we definitely
don't want is a box sticking out of
there. So let's hide. Let's see now what
they look like. And that is looking really nice. Now, you can see all that
work was done for us. We can also change the overflow so it can actually
bring them up like so. We don't want any boxes
sticking in any awkward places. So that's what I'm trying
to actually avoid. And then once you've
done this now, you can actually change this into a mesh and
get rid of any of these boxes that are causing you issues like this one down here, for instance, the stuck in or you can actually
change the seed. What I'm also going to do is I'm going to unhide my box once more to cause just so I don't cause myself
extra problems, I'm going to come in and
grab the bottom of here. And then what I want
to do is pull this up, so I can pull it up all the
way up here if I want to, but I'm not going to pull
it up all the way up there. I'm just going to put it around there, hide the box again, and there we go, now, we can see the floor in there. We
don't really want that. So what I want to
do now is pull it down maybe a little bit
or change the seat. So you can see now I can
pull it down and hide everything out the way.
And that is looking good. I can also come in to
this edge here as well, so I can come into this one. That off and move them
over just so they're not sticking in any
other places where I don't want them, so I
think, You know what? I think I've solved most of
my problems that I've got. Now, as I said, you
can come in now and make sure you've
got it grabbed, go to object, convert to mesh, and now they're all
converted to mesh. Now, you will see
when a press tab has 214,000 polygons in
here, so quite high. Now what we can do is though
we can come in and grab, let's say, all of this
one with Edge leg. So just make sure
you're grabbing it. We don't want to do too
much of this, of course, because this actually
causes its own problems. So what I want to
do is just press G, and we don't want to
actually grab all of that. We want to. I'm hoping that I should
be able to just grab this, and there we go,
and let's pull it into place where we
actually want it. And now any others that
are causing us problems, this one in here, for instance, this one in here,
they are causing us a little bit of problems
as well. Let's come in. Let's actually separate this
out first, so shift age, and then we can come in and
grab all of these parts. Like so, and you know what? With these, I'll either move
them or simply delete them. So I'm just going
to move them over. Like so. Let's press tab, oltge, bring back
the other part. And there we go, I think that's
going to be good enough. We do want it obviously random. Last one, actually, we'll
move this one as well. It's going a little bit
too close in there. So I'm going to come in L. Pull it over a little bit or
we can even rotate it round. So let's rotate. What is
going on with that one? Press Let's move it over. I don't know why
there's two in there, but they've actually duplicated it over. Let's delete that one. So delete verses.
Okay, you know what? That looks good enough.
Yeah, that's enough, actually presence in there. So I think I'm actually
happy with that. Okay, so now what
do we need to do? We need to actually work
on our actual gripper. So our gripper is going
to be coming down here. It's going to be
grabbing something. It's going to come and
it has to move around, and it also has to open up. So we want it to be chunkified and still actually serve a
function at the same time. So that's what we need
to do. So what I'm going to do now is I'm
going to come in. I'm going to first of all, save my work, so I'll
let's save it out. And then what I'm going to
do is I'm going to come in and I'll bring it in here
actually. So shift day. Let's bring in a cylinder, make sure it's on 24. And then what we'll do is we'll
come and rotate it round. Now, at the moment,
we're not going to worry about scale or
anything like that. We can scale this all down
once we've actually finished. So we're going to press R X 90, scale this down then
to where we want it. And then what we'll do is we'll keep it actually
this size for now. And what I'm going to
do is I'm going to come to the inner and outer. But this one in here and here. And then what I'm going
to do is press I, and then I again, like so, and then I'm going to
press Alt Shift and click Alt Shift click, enter lns, and just bring
that out a little bit. Like so. Okay, so now I can press Shift S,
cursed to selected. I can also write click
and Shade Smooth Bangle. And what I'm also going
to do is I'll just add in generate a bevel. So we'll put it on North
point north three. Like so. So we've already got a bevel in there
and got it going, bevel off all these parts. Alright, next of all, then
let's put the top on here. So mesh, cylinder, make
it a little bit smaller, bring it up into place, and then sen's head,
bring it down, like so, and then what I'm going
to do is grab the top, press the I button,
press E, like so. And then I'm also going to press I and then E and bring that in. And then finally I, bring
it in a little bit, and then E, I'm going to pull this up wherever I
need it into place. And then I'm also going to
come in press Control plus, and I'm going to press
P, separate that off. And now I'm going to
press right, click Shade Auto Smooth. And finally, we'll just grab
this bit, press Control L, and we'll copy
modifiers. There we go. Alright, all that done so far. So now, we need the
other side up here. So coming down to here, we want a big, large gripper. So what I'll do, first of all, is if I press one, I can
now bring in a cylinder. So Shift A, let's
bring in a cylinder. Let's spin it round on the X. So X 90. Let's make it smaller, like so. Let's bring it into place
roughly where I want it. So somewhere like here, and then I can put you know,
the bar going across there. And then what I'll
do is I'll press Shift D, and I'll bring it in. To here. So we can see now we've got it this kind
of scale at the moment. And you know what? I think that's going to be
the right size. I want the bottom one though
to be a little bit smaller. So just grab it going all the way around there, alter this, and then it'll just
mean that you keep the actual width. That's
what we actually want. And then what we
want to do is bring in these parts now going across here once
we've done these. So what I'm going to do is
I'll grab both of these. I'll press Control J. I'll grab this one
and this one then. And then what I'll
do is, I'll press I and then E enter Alness. Let's bring them
out a little bit. And then I and then
E enter Alness. And this time, we're
going to bring them in. Like so. Alright. You know what? I don't like
them like that. I'm going to do
it the other way. I think I will bring
them in instead. So let's go the
other way, actually. So all we'll do is we'll
bring them in now. So E enter loness. Let's bring them in, like so, and then I and then
let's bring them out, E to lns, bring them out. And then finally, what
we'll do is we'll press Control B and bevel them off. Like so. Right click
shade or too smooth. Yeah, and they look
much, much better now. Now, let's press Control L on here and we'll copy modifiers. And then what we'll
do is we'll start creating these parts that
are going to be in here. And what we need
to do is, as well, I need to make sure that these are thin enough where they can actually have two ones. So if I go over the top now, you can see this one's
right in the middle. I'm just going to bring
it over, so shifty. I'm going to bring
it over to here. I'm going to put
it in place here. And then what I'm
going to do is press shifty and bring
it over to here. Now you can see,
look, they don't actually fit in place, so
I'm going to bring it there. I'm going to grab
all of them now. So all of these. Devens
go over the top. I'm going to make sure they're
on individual origins, and I'm going to press S and Y and start shrinking
them down like so. And then that now is going to give me a really,
really good idea. Of where I can
actually put them. So now you can see that these are going to
fit into place. And now we know we've got
the right scale on those. All right, so so far so good, as I said, on the next one then, we'll start bringing in
the metal pots on here, and then we should
have these finished by the end of the next lesson. Alright, everyone, so I
hope you enjoyed that, and I'll see you on the
next one. Thanks a lot. Bye bye. Thank
90. Modeling shape to better fit the claw to pick up present boxes for Blender Beginners : Welcome back everyone to blend the beginner's master
class. The cookie factory. Now, before I go
on, you know what? I forgot a bit on here. So
let's actually come in. Let's put this up. We'll
put this up. Parts reuse. I think most of these parts actually have gone into there, but anyway, we'll
put on our oven in a minute. And there we go. That's the part that I
want. Let's press it, and we'll put that
into our grabber. There we go. I'm
looking at this, thinking there's something
actually missing. Alright, so now we've done that. Let's actually make
this grab a pot. So what I'm going to do is
I'm going to bring in a cube. So shift date, let's
bring in a cube. Let's make it a
little bit smaller. And what we'll do
is we'll pull that then into this part here. So I'll make it a little
bit smaller still. I'll bring it out a little bit, like so, and then
what I'll do is, I'll grab it and
pull it into place into this part here, like so. And I think I'll also
pull it up a little bit. And then we go,
grab the top of it, press the e button. And I think I'll do this all
at the same time, actually, because I want to make some
little parts on there. So what I'm going to do now is press Shift D, duplicate that. And I should be able to press. Let's change the scale back. That's the one thing, actually. So what I'll do is I'll
rotate it round first. So R Y 90. Let's put it over here. And then this can be used
for the bottom bit. So if I press one, I can bring this then
into the bomb bit, make it a little bit smaller, of course, and then
pull it up into place. And then what I can do is now I can actually bring this Oops, one, into the place
where I want it. So here will be the gripper. And then what I want
to do now is come in, grab this edge, press one again, and then bring it down like so. And there we go. We've got
a nice gripper on there. We can make an inside
on here as well. And now let's use it again. So all I'm going to do
shift D. Spin it round. So RY 90. Let's bring it down into place. And we just want to
straighten this up now. So if I put it into here, I can then come underneath, press three on the
keyboard, one, and let's put it
into place where we want to something like this, let's bring it down,
and let's come round to this side
and bring it up. And there we go.
There is our gripper. So now I should be able to grab my box in the
in part of here. If I grab one of these boxes, so what I want to do, you can
see the size of this box. So if I bring this over Shift D, we're just going to duplicate
and just measure it up to make sure that
this is close enough. And then what I'm going
to do is press the S but just to make it the
right size as this one. You can see now
it's the right size as this box here,
roughly, that is. And then what I want to
do is bring it round. I want to spin it on its side, so RY 90, press one. And then what I want to do now is make sure that when I've grip this that it's
actually gripping it, so you can see at the
moment this is not right. So shifts selection cursor. Let's put it right
in the center, then where it's
going to be gripped. So here's where it's
going to be gripped. So I need to now move
this a little bit over. So I would say that I'll
move this whole thing, so I can join all of these together now because I've
got them done, basically, so I can go Control J,
join them all together, and I'm not going to do
it that way, actually, because First of all,
want the modifier on. So Control A, copy modifiers. Control A or transforms. There we go. Now they're done. Right click at origin, two, three D cursor, grab
both of these then. All of these press Control
J, join them together. And then what I want
to do now is just rotate them from
here as you can see. So R, Y, rotate them,
and there you go. Now it will be gripping from
the right actual place. Now what I want to do is
I want to finish this off by putting some
things on the outside. So what I'm going to
do is I'm going to come I'm going to grab each of these then and I'm going to press the e button
to bring them in, like so. Keep going, keep going. And then what I want to do is press Enter alters
to pull them out, like so, and there we go.
That's looking quite nice. Now, because these are going
to be moving outwards, I just want to be
careful and I want to pull this down this
way a little bit. I'm just going to
put this on normal, and then you'll
see I can actually pull this down this way. And then I've got this
one which is fine, and I've got this one which
definitely is not fine. I want to pull this
one down to here. Like so, and then I'm looking, that's the little bow in there. That's no problem. Now let's
do the inside of this one. So we're going to do
basically the same thing, so I and then E, and I'm going to pull
it back this way, so into there, like so. The inner parts of these I'm not actually going
to do anything with. So now then we just need to
put it over the other side. So if I delete these out of the way, this is all joined up, so I can just press
Shift D. Tab, A, move it over, and that's not going to work, so let's put it onto Global. Move it over, and then
R z 180 spin it round. Now you can see that's
not spinning I want it. So what I'm going
to do is just put this onto medium point and then RZ 180 spin it round. And let's now pull that
into place. Like sewing. You can see we've
got even gap there. Now, let's go over the top, and what we're going to do
is we're going to move it over here, like so. So let's grab it again. So now I'm going to move
it over here, like so, and then we're going to
press Shift D. I'm going to move it over this way. Like so. And now you can see
that's grabbing it very, very nicely, and that is
exactly what we want. Okay, so now we've
done all of that. We can basically save this box. I am going to save this box. I am going to be using
it for something. And what I'm going to do is just put it in with a gripper. So, put it in with the grabber, sorry, not the gripper,
and there we go. And I'm just going to move
that to the side. For now. Now what I want to do is
then I want to get this to be kind of the right
scale in the right place, all of that other good stuff. And what we can
actually do is now we can join all of this together. So I can come in,
join all of this together with these pressing
Control J, and there we go. Press Control A, or transform
set origin to geometry. Now, let's get it to be
then the right size. Because I was being
silly, I actually got that we need to actually get it to
the right size first. So anyway, let's come in, and what we'll do is we'll get it to be the right size first, and then I'll just have to move these around just a little bit. Never mind, not to
worry about that. So let's bring it in. We'll
make it a little bit smaller. It's still way, way too small. And that, to me, looks
about the right size, and we want it to be
roughly in the middle. So we want it to move along like this so you can actually
see it from here. If you put it further up, you're not going to
be able to see it. And what that means is now, if I bring my box here, let's make sure, first
of all, that this is, you know, one of the around
about the same size. Can I get away with
making it a little bit smaller cause that
is going to help me? So, something like this,
I think will help me. And then what I'll do now is
I'll put it back into place, and we'll just
measure it up again. As you can see, we'll measure it up what we'll do is now
pull these out again. So all I'm going to do, I'm
sorry about that everyone. It's my mess up. What I'm going to do is I'm going to
grab all of these. I want them right
in the center here. So first of all, actually,
let's grab this. So shift desk, cursor selected,
then grab all of these. What I'm going to
do now is I'm going to press the little sideways V, I'm going to go to
three D cursor. And now I should be able
to just press R and Y and just move it out to
the side of this box, so it's gripping it properly now, like something like this. And then I'll do the same
thing on all of these. I'll grab all of these.
I'll grab all of these. And the inner parts,
like so, I'll press one, and then I should be
able to press R and Y and move those out,
as well, like so. So it didn't take long
to actually fix it. Alright, so now let's
put that over there. And what I want to do now is I want to make the end on here. So the top part up here. Now, no one's really
going to see this. So what I want is kind of, you can see here this is
let's go to the roof again. You can see here that
the inner part on here, where it actually goes
in, is not really right. So let's come in,
Alt Shift click. Let's see if we can grab it
going all the way around. Alters, let's bring it in, so it actually goes over there. And now I've got a
little bit of a problem. In the top bit doesn't
want to go in properly. So let's actually see
what's going on there. First of all,
though, let's press Control's and just go back. Let's isolate this out, and let's see why it's
gripped over there. There we go. That's the issue. So Alt shifting
and click, Alters. Let's bring it in this
way, first of all. Let's now press tab, AltH, bring back everything. And we definitely
want to bring it in a little bit more than what
it is at the moment. You can see. It's
not far enough in, so I'm going to bring it
in just a little bit more, like so, and there we go, because I'm going to
have a light in there, but I'm also going to be having some parts in here as well. So now, what I'm going to do is, first of all, I'll
make the top of here. So what I'll do, I'll come to the top and I'll
grab this top here. And then what I'm going
to do is press E to S. We don't want the little
sideways V there anymore. We want it to be on
individual origins. Press the S button, and then I'm going to pull it up like so, and we want it
going far enough up that it's going to be
into this part here. So I think first of all, what I'll do is we'll press
shifts cuss or selected, tab Shift A, bringing a cube, and we're going to make
this cube smaller. And where is this
going to fit in? So it's going into
the roof here. That's what we're looking for. It's going to go
into the roof here. And then what I'm going
to do is press SNY and pull this out
as you can see. So you can see now that this
wants to be up a little bit. I'm going to pull this up. Like so, so it's
actually in there. You can also see that
I need to pull it over a little bit more
just so it fits in. So S and X, let's pull it out, like so. And then what I also want to do is press the I button on here. So I'm going to press Control A, all transform, set
origin to geometry. And then what I'm going to
do is press the I button, and then S and X
and bring it in. Like so, and then finally, what I'm going to
do is Alt Shift and click, and I'm now
going to pull it out. So E, pull it out,
and there you go. That's what you should be left
with something like this. And from there, then
what we can do is we can actually hook
this into there. And from there, I can
actually move this along and move this
along at the same time. So that's what the idea is. So on the next lesson,
then what we'll do is we'll actually
duplicate this, get it turned the other way. And then from there,
what we can do is we can bring this part, this little arm up right into the center of what we're
actually working with. Alright, everyone, so I
hope you enjoyed that. I'll see you on the next
one. Thanks a lot. Bye bye.
91. Making the boxes and its placement seem more believable for Blender Beginners Masterc: Welcome back, everyone, to blend of beginner's master class, the cookie factory, and this
is where we left it off. So what I'm going to do now
is I'm going to come in. And by the way, on the last one, I actually selected everything. And when I brought this in, I actually brought
everything in, so I actually made
everything really, really big and everything,
so I had to go back and get an actual site another file
and actually reload it. Now, I can see
that I've also got some problems in some of
the buildings like this, so you can see here I've got
some problems in parts here, which I might have to fix again because I made
a mess of those. I think I've grabbed
two things at once, and I think that's
what happened. But I'm going to fix these parts and get those
into the right places. Let's also bring
back at the moment. So before we do that,
let's do a little bit of damage control just in case
you've done the same thing. So you can see all
of these parts. Let's just make sure
all of our parts are actually running correctly
before I do anything. So I'm just going to turn
them all on, like so. And because we've
organized everything, we can see now that everything
is running correctly. It's just, some of these parts here. So
this looks correct. It's this part in here
that's not correct anymore, and definitely
definitely these parts here that are messed up
for whatever reason. So what I'll do
is, first of all, I'll come in and I'll
grab these things. I'm not sure if it's a bevel
or what I did to this, but anyway, let's come in and delete vertices on this one. I'm also just going to grab the whole thing and
hide it out of the way. And there we go, I've got
that part in there as well. So let's come in,
hel delete vertices. Let's come in then
to the next part. So what I'll do is this here, you can see it has
been completely bent, and I really
don't want that. So let's come in and delete
and faces this time. You can see that it's
a real mess on here. So delete faces. And we can also see
that this part on here looks to have all been bent, and we
really don't want that. So what we're going to do is Alt Shift and click
going all the way around S and X and zero,
straighten all that up. Same on this one.
Alt Shift click S X, zero, straighten
all that one up. And there we go, that's
all nice and straight now. Now we can actually start
rejoining all this together. So F join this up and
F join this one up. You know, not from there.
Actually, what we'll do is we'll grab it from
here, press the Ebn. And I do think, like, making mistakes like this is
good that we leave them in. I think we should be
doing that, actually. And I also think
that we need to, was this going outside before? What? We'll actually
have it like that. So I'll grab it here, grab
it here, and there we go. Yeah, I think, actually, that
looks a little bit better. So there's a silver
lining to everything. And yeah, the problem is, though, as you can see, how far is these parts out? So let's just go back because the problem is that they're
completely different, you know, different
from each other. So what I'll do is I need
to straighten this one up. And if press S Y zero, I can straighten it
up going that way. And then this one S Y zero. It's not actually going
to straighten it up. Is it going to straighten
it up in the right way? I think it's actually moved it over to this side,
so we can see here. Let's actually straighten. This one's straight,
as you can see. Let's straighten this
one, which means. Let's just pull that
into side like that. Let's not mess around with this. Alright, no one's gonna
notice that little part. And if you want to rebuild it, you can go ahead and rebuild it, but it's been a long course, so we'll leave it like that. Alright, now we'll come
to this part here, and I'll simply just
get rid of these. And then finally, let's come in, grab this once more, shift D, and then
we'll bring it over. Then R Z 180, and I'll just actually get this into place actually
quite quickly. So all I'm going to do is I'm going to pull it into
place where I want it. I'm going to drop
it down into there, and then I'm going to
pull it back like so. And then we're going
to grab this part, L, S, and Y, bring it in, bring it in, bring it in
all the way up to there, and then we'll grab
these top parts now. So what I'm going
to do with these is I'm going to press L, L, L and L. I'm going to then
pull them up just under there, like so, and then grab the tops. Just the tops on here,
and then pull it down. Like so. And then finally, this part here, do I
need to bring anymore? I think that actually
looks quite nice, so all I'll do now
shift D, bring it over, and then I'm going to
spin it round art Z 90, and then art Y or X -90 and
lay it down over here now. I'm hoping I didn't
make any more mistakes. Like that because that was a
bit of a big blunder there. And what I'll also do on this one is just get
rid of these two. So delete erzs tab. Let's bring it into
place where I want it. So something like this,
S and X, pull it out. And there we go,
and then S and X, pull it back in, like so. And then all they'll
do now is L, pull this into place just
along here, S and X. Let's get it right
into that SNX. And then let's also
drop these down. So drop these down in
a minute. There we go. And then finally then
just bring these back. And we should be back
where we started. Took 6 minutes to
actually fix those parts, and I'm really
hoping I didn't make any more mistakes. But
anyway, here we go. So now let's grab this part, Shiftes cursed to
selected. Grab this part. Alt Shift and click shifts
selection cursor you know, we should have done it
the other way around. Right click Set
origin, 23d cursor. Okay, now we can grab this part. So we've got this part,
shifts, selections cursor. And finally, this part,
shifts, selections cursor. And now I can actually
drop that down into place. Alright, so just
again, make sure that you're happy with where
it is before doing this. And then what we'll do
is now we'll come in, we'll grab the top of here. So control, bring it up. Alt Shift and click, E, enter Alons, bring that out. Control R two. Left click, right,
click Control B, and bring those out, E, enter Alts, like so, and then finally this inner bit, I'm going to come
grab this in a bit, press the I button
to bring it in, and then E and I want to
pull it through into there. And I want to make sure
it's actually fit in. So Alterns, bring
it in, like so. Now, finally, let's right click Shade Auto smooth and
that is that bit done. And now what you want to
do is grab this part, press Shift D. And OSE, 180 hundred 80, OSEd 90. So it's going this
way this time. And because it's square,
it should fit in very, very nicely, and there we go. Now, these are going to
be moving along here, and this is actually
going to be moving along as well and all
that other good stuff. So at the moment, that
is looking pretty nice. Now, we need one more thing, I think, to finish this off. I think before we do that, what we'll do is we'll actually
grab everything on here. So I'm just going to hide
these parts out of the way, seven to go over the top, B to grab all of these, including this box here, and then press M, and we want to put them in the grabber like so. And then what I'm going to do is I'm going to double tap the A, OTH, bring back everything. And I'm just making sure, as you can see on
here, for some reason, we've got a duplication of this, so I'm just going
to drop that there, press delete and delete
that out of the way. And then finally,
what I want to do now is just make sure when
I turn this off and on, everything is working correctly. So we can see boxes
going in there. Into here. And then
what we want now is this grabber to work
once we've actually got all of our materials on
and things like that. So let's put it on material
mode at the moment. We've already got
a yellow in here. We can also see that I want to bring this in a little bit. So what I'm going to do
is I'm going to press S and X and bring
it in a little bit. And the other thing
is, I can also see and I need to bring it
back this way a little bit. I can also see that this box, whatever reason, isn't looking
like the box that I had, so I'm just going to go grab a new box like this one
and make sure it fits in. So shift D, pull it over. Right, so and then we're
going to press Control A or transforms set
Origin to geometry. Press the EM button because
we want it in the grabber. And then what we're
going to do is bring it out now and making sure once again that
this fits into here. So, Y, 90. Let's press one, G, and just make sure
it fits in there. It's the same size as these
parts. So let's bring it in. Does it fit in there? It does fit in there, relatively nice. So let's make it a
little bit smaller. And there we go, maybe
even a little bit smaller. I think, yep, that's gonna
be just about right. Okay, it doesn't
need to be perfect. I just needs to look like
something like that. Alright, we'll move
that out into place because we're going to put
that down here in a minute. It's gonna be completely separate from all
of these parts. Okay, so what we're gonna do
now is we're going to save out our work, so file, save. And then what I'm
going to do now, I can pretty much join
most of this together, that's not going to
actually be moving. So what I can do is I can grab, for instance, this,
this, this part, this part, I can
join all of those together even down to the bottom part, I can
join that together. So Control J. Let's join
it together, like so. And then I'll just speed up the process of adding
in all of my textures. Let's also do it to
this part as well. Control J. And then
we should have. If we grab it now, let's
grab our bolts, as well. So we'll join these to
these parts, so Control J. You can see we've
got no modifiers on the moment so what we're going to do is hide
that out of the way. We've got this part
that we forgot, so we've got Vo for these. And you can see that this has already got a subdivision on, so I'm actually
going to apply that, so Control A. I'm
going to grab all of these then press Control
J and join them together. I've missed this
part, so I'm going to press Control J,
join that together. You can also see that
because I did that, as well, this also has
a subdivision on it, so let's apply that first. Let's move it into
place just so it sat in there very
nicely, like so. And then now we can join it altogether with Control
J, and there we go. Now, I'm looking
at the rest of it. Now I'm happy with
the rest of it. So I'm just looking down here. So we've got this should be
split off from this part, and then we've got this part, which should be joined to
this part here, Control J. There we go. And I'm just
looking now at F press Altag. Let's bring back all that stuff. Let's hide these out of the way. So we've got the two bolts, the two little knobs
that are going to move it round. We
need those separated. So these parts here, they're
not going to be moving. So if I press Altag, I can join these two parts
to this, so Control J. You can see I've got
mirror on though, so I'll come in, Control A, then join them with Control J, hide them out the way.
Then I've got the bottom. Then I've got my presence, and then I've got
this part here, which needs to join it, as well. So Altag again, let's grab this part and join it to
this part with Control J. Right, click Shade Ato Smooth,
hide it out of the way. We've got this part that's
all joined together. That's cool. We've got these two parts
which are separated. We need them separated.
We've got this one here, which is joined,
and then finally this one and the two
knobs, and there we go. Alright, so everything
is arranged now. So what we need to do
on the next lesson is we'll bring in the bevels. First of all, that will be easy because we've got
them all sorted out, and then we'll actually
start texturing them. Alright, everyone, so I
hope you enjoyed that. We're on the final hurdle now. Once we've done this, we
can start animating it, and then finally we can
start taking some renders. Thanks, everyone. Bye bye.
92. Adding shaders to the claw for Blender Beginners Masterclass: Welcome back everyone to blend of Beginner's
master class, the Cookie factory, and
this is where we left off. So let's start with
this part first. Let's see what materials have
gone here. Metal, rubber. We don't want rubber
metal and rubber on. We just want you know what? We'll just take them all off. And then what we'll
do, first of all, is bring in the first one, which will be let's have a look. It'll be factory blue.
Let's bring that in first. And then what we can
do is we can bring in now a factory yellow. So let's go down.
Factory yellow, and then we'll click a sign. What we can also do, as well
as we'll bring in a bevel. But what I'll do is I'll
just grab this, grab this, press Control LL, and I will copy modifiers, and
there's that bevel on. Then what I can do now
is come into this again, and when I come round
and this part here, you can see, I Ama happy with how that part
looks? I don't think so. So you know what I'm
going to do Alt Shift and click Control plus,
delete that out the way. So delete faces like so. And then what I'm
going to do is I'm going to press Alt Shift click, Alt Shift click and bridge
edge loops like so. Press the E button
and then press lns, you can see it doesn't
come out properly. I'm going to press the S button. I'm happy with how
that's coming out. I'm going to press S and Y. Let's see if that's come out now any better than what it did. Yes, it is. That looks
much, much better. Control plus, and then we'll
go over to our materials. Sign, and then we'll do
yellow on this part here, so I'll grab all
of this part here. Now, I can see that this part also needs to be made a little
bit bigger, as well. But first of all, let's
just grab this part, click a sign, and then
we'll go to the inner part. So the inner part in here. Plus down arrow and we're
looking for the hole. So the hole we
made, click a sign, and then we're going to go
to this part now, press L, S, and bring it up into place, like so, and then we'll turn
this color into rubber. So little down arrow. Let's look for our rubber. Here it is. Click a
sign, and there we go. Now it's starting
to come together. So now we'll come to
these parts here, and we'll have all of these
red, except the inner part. So we'll go for factory, red, click a sign, and
then the inner parts now plus down arrow. And we'll look for the factory. Should have one that
says factory white. Let's have a look. There we are. Factory white. Click a sign. Alright, now, some of you
more eagle eyed might notice that we've got a lot
of extra materials in here, like factory red Ooh one. This is normally
happens when you duplicate something or you
bring another part in, and you'll end up with two
of the same materials. We can actually come
in and fix these. We'll do those right at the end. But basically, you
can come up and file, and you've got one
here that says, clean up and you clean up everything that you're
not actually using. Now remember, if you're not using something,
so, for instance, on here, we've got a
geometry node on here, but we've actually applied it. So what that means is if I bring in and you'll see at the moment, if I come in and bring
in just another cube. So let me just show you what I mean. Bring in another cube. Go over to modifiers, add in a geometry node, click the little down
arrow and you've got create stacker here. Apply that. Now, if I come in and
click on this shield, it means that even if I
delete this cube out the way. So even if I come in now and
delete that out of the way, I will still have that
geometry node on there. In other words, then if I come
in and clean this up now, so clean up unused data blocks, it'll say look, 39 unused
data blocks to the actions. And then what you want
to do is come in and clean up the second one,
which is this one here, clean all those up,
and then you'll have most of those materials will
have actually gone away. Now, I'm not going
to do that right now because I just want
to finish this off. So what we're going to do
now is come to this part. We've already got the
right materials on this. I'm going to come then to this, so press Control plus, and we're going
to go over factor yellow, and there we go. Then we're going to come
to the inner side now, so we can see this
part should be rubber. So let's go in and add
where is it rubber? There it is. L a sign. This part then should be
metal, so light metal. And I'm just
wondering, actually, let's click Down arrow first, and we'll look for the
light metal light, and then just click a sign. And what I'm wondering is
if there's metal on there. Yeah, this has been separated. That's the reason why.
Alright, so let's come in. And what we'll do is we'll
bring in this yellow on here. So I'll grab both of these
and this one and this one, and then the same this
side and this side, factory yellow, click a sign. And there we go. And then what I want to do now
is work my way up. So welcome to this part,
and I'll also grab this one last and I'll press
Control L. And what I'm going to do is copy
modifiers like so, and I want to make sure that
that modifier has gone in and you can see it is beveled
on there, so that's great. I also want to see, have I
got anything else on there? No, I've not. Let's come
back to material then. And once we've done this, we're actually going
to put the window in, but we're going to put
the window in right at the end once we've done the
animation because honestly, it's much easier
to work with this without the actual
window being there. I also want to come
in, first of all, and actually add in
the whole in here. So let's come in.
Material whole, click a sign, like
so, and there we go. And now let's do this part here. So this part is
going to be orange, so we're going to look
for factory orange, this part here, and
then these outer parts. So all of these parts in here. So I already have them
grabbed but if not, just press L on each of them, Cresp Control plus,
and then you can go in and press Plus down arrow, and we're looking
for factory yellow. And click a sign. Now, we also want
to put in this bit, but again, we're going to do that once we've actually
done these animations. It's just that it
just makes it much, much easier to work with, much easier to see
what we're doing. Now, let's come into
these parts now, and these are basically
just going to be rubber, so I'm just
going to grab one. You can see, as well,
I've got them mir on. I don't want that, so
I'm going to apply that. And then what I'm going to
do is split these off now. So I'm just going to
grab one of them. He selection, split them off, and then all I'm going to
do is press Control A, I transform set origin
to geometry for now, even though we're going to have the orientation down
here in the end, and let's then add
in now a material. So we'll come in and rubber is what we're
going to add here, so rubber and then
I'll just press Control L and ink
materials, and there we go. Alright, now let's move on up
then let's do our grabber. So our grabber I I come in, this will be many different
colors, actually. So first of all, let's add
the proper metal in first. So if we come down, we'll add metal light. So this one here. Then I'll click the plus button, and I'll add in metal doc So
metal dk plus button again, and I'll add in let's
have a look. Metal. We've got metal
light, metal doc. Let's add in the factory yellow. So factory yellow, this
one here. Like so. Alright, so now what we'll
do is we've got this. We'll have a rubber
part on here. So I'm just going to
grab all of this. So I'll need to add in
another rubber part. I'll come down.
Rubber click a sign. And then this can
all stay the same. What we'll do is on
these hinge parts, first of all, we'll
grab them all, like so, and we'll add those metal doc so metal
doc on each of these. I'm just looking if I'm
happy with these parts here. So I think I've changed
this part here, as you can see,
these I'm not happy with because they don't look the same as this, so you know
what I'm going to do? I'm going to grab all of these, and we're going to re
put them back over. You can see at the top of here, we've actually squished
them for some reason. So delete vertices.'s
grab this one, and we're going to put them
over to be the same size. I'm also going to isolate this out with a
little question mark. Press tab. Over the top, we've already got a cursor
right in the center. So shift D, duplicate them over, or 180, spin it round, and then just make sure
that it's going in roughly around this
same space as it is. Like so Shift D, bring
in the next one. And then let's put
it. So it's going round about the same,
and there we go. Now that's actually
fixed, as well. I'm just looking to make sure you can see the line going here, you can see the
line going there, and that looks fine now. Okay, so now we can
come back to it. And what we'll do now is
grab each of these like so, and we'll click a sign
on the dark metal, and then I'll come into
each of these points here. So all of these
on here, like so, like so, like so, like so, and also the inner
part on each of these. Click Control plus, and
then factory yellow, click a sign, and there we go, that's what you
should be left with. And you know what? I think
that looks pretty good. Up to you whether you want to
change your bolts, as well. Completely up to you. Let's go up here then and you know what? I think I'm going to leave
everything on there. So now let's press the
little question mark again, bring back everything. And now, finally, do we
have a bevel on there? Let's have a look. Yes, we do. So now we're on to
this part here. I think we'll do this on the next one because we need to also bring
in some light on here. But while we're
there, we'll actually just come into both
of these parts. We'll grab this part
last, press Control L, and then we'll link
or copy modifiers. And then we're going to
come in, do this one, and we'll add metal light into here or metal dot
which you have one. Let's add metal Doc and
we'll also grab this one and this one then Control
L and ink materials. Double tap the A,
and there we go. So the only bit now we've
got is the light on here, all of this bit on top. And then finally we can actually start with the animations. Alright, so let's
save out our work, and I'll see her on the
next one, everyone. Thanks a lot. Bye bye.
93. Working with lighting sources for claw machine to light up the machine inside from th: Welcome back, everyone to Blend and Beginner's
master class, the cookie factory, and
this where we left it off. Alright, so let's come
in and change this. Let's add plus, actually. And let's go to factory orange. So we're going to go
to factory orange. This then can come down and
just be on factory red. And what I'll also
do is I'm just going to hide this
part out of the way. So I'm just going to hide this
part of the way. Like so. Press A on everything else, and I'm just going to
then go to you know what? It might be easy. You know what? I'll just do it a sign, rather
than thinking about it. Let's just do that. Now,
I also need the top. Now, the top of here, I'm
not going to have on that. So what I'm going
to do is grab this separately plus down arrow. Bactuyblue. Click
assign, like so. And then now we'll come
to the outside of here. So I'm going to click
Control plus Control plus. I don't want it to
go that far, though. So all I'm going to do now is come to the inner part of here, and then the inner
part and inner part. And I'm going to go with metal, and we'll go with
metal dark, I think. So metal this one here, click a sign, and now
we've got the inner side. So this one here, so Alt Shift, and click Alt Shift
click Control plus, and we'll also do
this metal Doc, click a sign, and then we've
got the inner part now. So this inner part, all of it, if I select it all, I don't
really want to do that. So all I'm going
to do is go down, keep puntro plus all the
way down just to there, and then we'll go
with metal light. Plus down arrow. Metal, and
where is it metal light? This one here, like a sign. And then finally each of these
bolts, let's come in now. Just grab each one of
these with L. Like so, and then we'll go with
metal light, as well. And now I'm going to this bit. So this bit and the inner
part will be plus down arrow. We're looking for
yellow. So factory, yellow, click a sign. And then this part here
will be my metal part, and we'll go with metal
light on this part here, like so, and there we go. Okay, nearly done. Now, let's put a
light source in here. So we've already got the
cursor in the center. Let's bring in then a light, and we'll bring
in an area light. I'm going to make it much, much bigger so it just goes
to the outside of there, and then I'm also going to
pull it down through there. And now we need to actually
give it some light. So I'm going to first of all, put this on around 300 like so, and I'll put the
size is 1 meter. We don't want to mess
around with that. And then what I'll do is
put the rendezvous on. And I want to make sure
that it's actually coming through here
now at the moment, as you can see, there we go. Now it's lighting
the whole thing. I just want to make sure
that it's actually lighting. If I put this on a point light, I'm just wondering what
it'll actually light. Let's just press G, move that
on the side. There we go. So I'm actually going
to, you know what? I'll just change this. I'll
bring in another light. I just want to bring
another light and see if we can actually light that at the moment because
of the moment. This is not lit up, and
I'm expecting this as an area light to be lit up. I'm just wondering if
it's the wrong way round. What I'm going to
do is I'm actually going to delete the way, press shift day, and I'm going
to bring in a point light. I'm going to bring it
down, put it on 300, like so, change it to area
light, and there we go. And then what I'll do is I'll increase the size of this now. Let's increase the size of it. And let's put it up into place, like so, and let's press
the S but, and there we go. It's lining up the
machine perfectly, but I do want some
light on here as well. And so what we want to do is we also want to
spin this round. So R Y, 180, spin it round, and then you're
going to end up with that light sauce on there, and you can see now that is
looking really, really nice. Alright, so now we've done that, what we want to do
is we want to make sure that this light source
is actually point in the right direction because if I press Shift Space bar
and bring this down, which I can't do at the moment, let me just try and bring
this down. So I want this. I want to bring it
down, not this. I want my actual light. So let's come into. Let's just hide
this out the way. It'll be easier, and then we'll grab our light,
and there we go. Now you can see, Look, it's the wrong way round.
So you know what? I think we actually want to
press R Y 180, spin it round. And I actually want this
to be double sided, but I don't think there's
actually a way to do that. So what I'm going to do is I'm going to pull
it up to there. And then I'm also
going to press shifty, bring in another one,
but spin this one round. So Y, 180 Ws, Y, 180, spin it round. And then I should be able
to I I press TH now, bring back everything, this
is what it should look like. And now it's pointing it there. So yeah, I'm still
not happy with that. It's still not looking
the way I wanted it to. What I'm actually going to do is I'm going to come
back to this now, and I've got two lights
here, as you can see. I'm going to delete one
of them out the way. I'm going to come to
this one then RY, 180, spin it round. Now, that light sauce
is looking pretty nice. And all I'm going to
do at the moment, I'm going to leave
that there for now. So Altag leave that
there for now. I'm going to hide it out
of the way. Not that. I want to hide my light
sauce out of the way, and then we're going to
come to this part now. And what I want to do is change this to an
actual light sauce. So I'm just going to press Plus, and we'll call it grab a light. So grab a Light, like so. And then what we'll do
is change this from a principle to an admission. We're going to also click
then assign on this, so make sure it's
assigned on this, and there we go, that
is looking better. Now we've got a
complete light source of vi press voltage now, bring the light in, and that
is what I'm looking for. Now with the grab a
light, I can still grab it and I can still
turn up that light, and you can see now that is
looking how it should do. Alright. So finally,
we've got that. Now, let's think about
now the hardest, as I said, the hardest
animation in the whole thing. And to do that, what
I'm also going to is, I want to make sure that
all of this in here, again, including the light is actually put in
to the right place, first of all, before
I do anything. So M, let's put everything in the grabber and let's
come to our grabber then. Let's close that up. And hide everything out of the
way, and there we go. Now what I can do is I can just hide everything else
out of the way. I don't want any interference
from anything else, even the supports everything
like that inside our guy, inside the conveyor belts, and let's hide our parts reuse. And there we go, that's what
we should be left with. Alright, so how are
we going to do this? Well, we're going
to use a mixture of moving this
backwards and forwards. Let's put it on object mode. This backwards and forwards, and we're going to use a
couple of shape keys, as well. One of the shape keys,
we'll be able to move this up and down into
where we're going to have it, and the other shape key is going to move these out and in. From there, then
we're going to move it backwards and forwards. So we'll start all the way
over here in the beginning. So I'm going to move this and
this in the beginning now. I'm going to move it all
the way over here, like so, and I'm also going to then move it all the way across here, not so it's going in the glass, but just so it's
across here, like so. And then you know what?
We'll move it all at the same time. That
will make it easier. So move this all
the way over there. So whenever this
moves, this part. So whenever this moves,
it'll move along this track, and then it can move
along this track, and that then will
make things easier. And we want to make it,
so it moves this way, moves towards here,
picks up a box, and then from there, moves sideways and drops
the box into there, and then just moves back and
repeats the whole process. Then what we'll do is we'll
also come in and make these knobs also move in the direction that we're
actually moving this in. Okay, so we've got everything
ready and laid out. And what we're going to do
now is save out our work, and we'll make a fresh start
on this on the next lesson. Alright, everyone, so I
hope you enjoyed that. I'll see you in the next one. Thanks a lot. Bye bye. Thanks.
94. Working on animating claw machine for Blender Beginners Masterclass: Welcome back, everyone to
Blend Beginners master class, the E cookie factory. And before we begin, let's
go over to our animation. Let's put this animation on one. Make sure that this
is turned off. And then what we
want to do now is, first of all, sort
out the shape keys. So the shape keys,
basically, one of them, we want to have it, so it's fully extended out this thing. And then when it comes
in to grab something, it will be grabbing it in here. So what I'm going to do is
I'm going to click on this. And then what I'm going to do is I'm going to click plus for the base plus one more and
plus one more like so. So the first shape key, I want to bring it down
into these actual parcels. So we'll do that now.
So what I'm going to do with that is I'm going
to grab all of these. So let's grab all
of these parts, and this will be the
first shape key like so. Then we'll go round, just make sure we've got
everything grabbed. Like, so including this, and then what we want to do
is pull them down into place. You can see I've
not got everything grabbed there for
whatever reason. Make sure I'm on edge select. It does make it easier, like so, and now I should be able to pull everything down into place. Like so something around there. And then what I also want to
do is extend this down now. So I want to extend this down at the same time back
into that place. Now, I've got full
control of this now, and I should be able to use this shape key to bring
it down and bring it up. Perfect. Alright, the next shape key, this
is shape key too. So I'll call this extender. Like so, and now we'll
go to shape key one. Now, shape key one is going to be one that pulls
these in and out. So the way we're
going to do that is we'll work it on a
angle, for instance. So what I'm going
to do is, first of all, I'm going to come in. I'm going to put my cursor
right in the center. So shifts, cursor to selected. Then what we'll do
is now we'll come to these parts, we'll come
to this part first. Like, making sure we've
grabbed everything. And then what you're going
to do is just going to press G just to move
it out of the way. Now, what I want to
do now is press one, and I'm going to
extend these out. So I'm going to extend them
out, though from the cursor. So the little sideways
V, three D cursor, and then R and Y, and we should be able
to move them out. So it should start like this. And when we come now
down to the rotation, we should get a rotation
of 19.9 degrees. Let's put it on 20 just to make it a little bit
easier to understand. And then what we'll do now
is we'll come to this side, and we know it's on 20 degrees, so we'll do the
same thing again. And what I want to do
is one, and then we're going to press R Y, bend it up a little bit, and
then just put it on -20. Now, these are now the same. So if I come in, if
I bring this down, you can see now we've got that grabbing action to grab our box. So what I'm going to
do now is I'm going to start with this
over here, like so. So this is how the
grabber should start. It's then going to
move a little bit to the side and down here. Okay, so far so good. So what I want to do now is basically make a key
for all of this, including these
parts here as well. So we'll come in and we'll
basically go in and press I. We'll come to this
one. We'll press I, and then we'll come
to this one up here. So this part here,
this one here, and we're going to press I. So inside here, I. And then this one here,
we're also going to press I. Okay, so far so good. Now, let's go to frame
20, something like that. And then what I'm going
to do is I'm going to move this one and
this one this way. Now, for this, now
I'm going to put on my auto king because I'm
moving multiple parts. So what I'm going to do now
is move it all this way, like so because it's
moving sideways. And then what I want to do
now, I've got it to there. So I want to come
in now to frame 40, and I want to move
them all forward. So not this part here, this part and this part now. This is why we put this on. The other thing is before
we do that, actually. So if I comeback I've got to
make sure that on frame 20, this one is also keyed in. So I'm going to press I like so, and we're going to have
a little bit of a leg, as you'll see. So you'll
see what happens. If I put it on frame 40 now, you'll see when I
move this forward, I really want to nothing
to move even at frame 39. So I'm just going to
put it on frame 39, I'm going to press the I button. I'm going to come
to this as well, I'm going to press the I button. So on frame 39,
nothing is moving. I'm also going to key
frame these in as well. So I'm going to
press I on this one and I on this one, so
nothing's happened. So all what's happened at
the moment you can see here that this hasn't moved as
well. So let's put that back. Let's put it back on frame one. And then what I need
to do now is pull this back into place on here. I need to pull it
back into place because I forgot to
press I on this as well, and that's why we're
checking it as we go. So you can see here
now this is in roughly the center,
and let's press I. Now, it should all move
now at the same time. Perfect. So far, so good. Now, in frame 40, we want it to start moving from here to here. So what we're going to do from here now, so put it on frame. Let's put it on frame
50, you know what? And then what we'll
do is we'll move this one from here all the way over through here so you can see it's
moving along there. Like so. Perfect. Let's press the I should have already
key framing everything in. So now we're going
to check that again. So here we go, moving that way, moving that way,
and there we go. Now, we can see it's a
little bit too fast, so we don't want it that fast. We want it a little bit slower. So what we're going to
do is just press L. No, we're not. We're
going to press B. Grab all of these and move
them over to frame 60. Now, let's try that again.
So we move this way. We move this way.
That is perfect. That is what I want. Okay, so now we want this to move down. So at this point, we
want it to stay till, let's say, here, and
now on frame 80, now it can start extending down. The first one we want to
do is extend it down. But before that, let's make sure we keep frame all
of these parts in. So we're going to
keep frame this part, this part with I,
this part with I. And now on frame 80, we come back to
this, and we want this now to start extending now. Now the problem is,
we don't want it to extend before frame 80. So we're going to put it on 79, and we're going to key frame
both of these parts in, so I and I. And then what we're going to
do now is go to frame 90. Can move these
backwards and forwards, as you know, and we're going to bring down the extender first. Bring down the extender
into here like so, and then we're going to press I and then come to this
one and press I. Then what we're
going to do now is press I on each of these, so I and then I on this one. And there we go. Now, let's
see what we've got so far. So we've got it coming over, down to here, going down, and there we go,
everything perfect so far. Okay, so now on frame 100, we actually want it
gripping something or let's have a look
frame, grip now. We can actually get
away with frame 100. We'll have it on here.
Again, we're going to go, I, I grab this part, I, and then this part and I, and then frame 110, now we can have it gripping. So now we'll go back
to this, same thing, but this time, we're going
to be moving this one down. So it's going to grip I, and then I, and then I, and then I and inside as well, don't forget to grab this
inside and press the I button. Okay, so now what have we got? We should have it moving
to the side, moving down. Coming down, gripping, and now that's perfect.
That is what we want. And now from here, we want
120 to stay exactly the same. So again, on everything, I, I, I, and then on these, we're going to have
it on I and then I, and then on 130, we'll
have it bringing up now. So the extender we
want now to come up. And then what we're
going to do is press I on everything again, especially on the
inside of here. And then I like so. Okay, again, make sure when you're
doing this, you're always. Sorry, I had a bit of a croque
voice, all that talking. Make sure that you're
always checking your work. So, again, we're going to go all the way back to the start. We're going to press space bar. It's going to move forward,
go down, grip, go up. And then we should have
a present in our hand. And from there, then we're
now going to move across. So we're going to save work. And on the next
lesson, we're going to move this across,
and from there then, we should be able to drop
this present into there, and then all we have to do is repeat the process
over and over again. So I'll show you how that
works on the next lesson. Alright, everyone.
Thanks a lot. Bye bye.
95. Continuing with the animation motion of a claw, making it move back and forth to pick: Welcome back if we want to blend the beginner's
master class, the cookie factory, and this
is where we left it off. Alright, so the home street, let's see if we can get
this finished in this time. First of all, though, I
think when I move this over, you can see I'm not
going to have a lot of room here on this box here, so we're going to extend
that out a little bit. But let's first
vulgate over there. So at the moment you can see, we've brought it
all the way over, we've come down,
we've grabbed it, and now we want to do
is just hang there. So I'm going to come in
again on all of these. We're gonna press the i button. On the eye, going over,
eye in the screen, I on this, and again, I on this part. Now on frame 150, we're going to actually
move it then to the side. So what I'm going to do
is I'm going to grab this and this and I'm going to
move them over to the side, like so, and I have to give
myself a fair amount of room. You can see I'm also moving
from this point here. We don't really want that, so let's press the
little sideways, V individual origins, and now
we'll move them over here. So what I want to do is
I want to move it near that wall and open
up round about here. So we're going to go to here.
And I'm hoping if I come, let me just turn
this off a minute. Come to this. This is
the open and close. Let's name that as well,
open and close, like so. And then what we'll do
now is if I open it up, you can see it's not quite going in the wall
there. That's what we want. So let's put this
back in a minute. And then what I'm going to
do now is just click I, I, and then in the screen,
I on both of these. I'm hoping it does them
all at the same time, and then I on this one, as well. Now, let's see what we've got. So we should come over go over, come down, grab, pull it over. Then what we want to do
now is open this up. So we want to come in to frame, so it's stuck there. And then from this frame to this frame, let's
open it up now. What we'll do is
we'll come to this. We'll go to open and close,
and we'll open that up, press the Ib and the same
thing on all of these, rinse and repeat, not on this. Let's just hide this light out of the way so it's
not interfering with it, and then I and then I on here. Okay. So now let's see
what we've got it comes over grab like so, and then opens up,
which is nice, so the parcel will
drop in there. I'm just wondering if
if it moves over here, and then straightaway,
it opens up. I don't think that
should be how it is. So what I'm going to do is I'm going to come to this part here. I'm going to grab these parts. I'm going to press G to
move them over to 170. And then what I'm
going to do with these parts is I'm going
to grab all of these, move them over to 170, this one, grab all of these, move them over to 170. And now what we should
do is we should come over and there you go, but it's still too fast. So what we do we want
to print on 160. And again, we want to print
some more keyframes now, so I'm going to pro
I drop this down. I like so, and then
grab this one. I, I, and I. Okay. Let's see what we've
got now. Let's pull this out. It looks complicated, but
you can see the way that we've been doing it makes
it actually pretty simple. Going over. And there
we go, now it opens. Perfect. Now, let's make this box a little bit
bigger like we spoke about. So what I'm going to do is I'm going to come
into the inside, with face select, like so, grab this part and this part. And then what I'm going to do
is pull them out over here. Then what I'm going to do
is grab this part here. So just this inner
part, pull it over, grab this part in here, Shift D, drag it over, pull
that into place, and then just make these
a little bit smaller, making sure I've got
medium point on. So SNX just pull them in. Like, so making sure
everything fits, and let's pull them
this way a little bit. There we go. Alright, perfect. Okay, so from here
now, let's go back. So we've dropped them off at
170, presents dropped in. Let's go to 180. We'll keep
it everything like this. So I and I on here. And then in the center, I and I. Okay, so we drop off. Like so. And then 190, we're
going to close them up. So first volt, we'll
close this one up, like so, and then come to here, and then come to here, like so. And then what we'll do
is we'll move it back, and then we'll open
it up finally. So I'm going to press I
in the center, I and I. And now we can actually start making our way back to
where we actually came. So what I want to do now, I want to get it back to
exactly the same point as what I had when
I first started. Now, this is
obviously round here, so everything will be around but we want to make
our way back slowly. First of all, it's easier if we just go straight back now, so you can see now closed. And if we go straight back,
so let's go from here, we'll hold on here. So we'll grab all of
these. Grab this. Same point here because we
want to open it up as well. So same point here.
We'll grab this, press in I, pressing I. And then on 210, now we can
actually bring it back. So all I'm going to do
is grab this and this. I'm going to put this on, and I'm going to pull
it back into place. Now, I've got to be careful because I
really want to put it back into the same place that
it was. So where was that? Let's first of all, turn
this off just 1 second. So this was where
everything was. So I've got both of these. I've also got this as well. So what I'm going
to do instead is, I'm going to grab this
here and I'm going to put it on 220 I'll move it to. So Shift D, let's put it on 220. We'll come to this one as well. We'll grab this
one, Shift D, 220. And then finally, this
one here, as you can see, it's moved all the
way back here, and I don't really
You know what? Yeah, we will. We will do that. So we'll grab this one here. We'll press Shift D, 220. And let's see what
we've done there because sometimes this is
not going to work out right. So we've come over
here, bring it over. Pick up our present, drop it in. And now the moments of
truth. There you go. It sets back over to the
place where we had it. And now we need to do is, is it over the place
where we had it? No, our place where we
had it is over there, so that can be the final part. So from here, then,
we're going to grab this now and we'll do it to 240. So Shift D, 240. We'll drop this in
there. We'll also make sure that the hand, so the hand is actually closed. So I and I pull
both of those on. And then we also want
to make sure now, so this is 220, that this
part here is also there. So 220, what was this part? Have a look, 240.
Sorry. So let's put this part one shifty, 240, and then this one, shifty, 240, and now
it should all line up. So let's see the moments are to let's see if it all lines up. So we come out, we go down, we grab, we pull up, we go, we drop. And then we start moving back into place with it
open perfectly. Now what we should
do is we should be able to press A on this part, and we should be able
to bring in a modifier. So if we open this,
we'll grab all of these. We'll put in a modifier
with the cycles. And then what we'll
do is we'll come to, this one's, that's right. Okay. I'm wondering
what's happening there. Then we'll grab all
of this, open it up, grab all of these,
modifier cycles. And then we'll grab this one. We've got all the keyframes
and the transforms. So let's open up all
the transforms first. Grab all of these,
modifier cycles, and then we'll open
up the keyframes. Grab both of them,
modifier cycles. Now, let's see. Let's see if this all works. Does
it all come together? All of that bit is good. Except this bit with a flicking. And the reason the flicking is happening is because
it went from here to here and then flicked back again
because it should be open. So here, it shouldn't be
open, as you can see. This part should be closed. So let's come close that off, like so, press the eye
button, and now let's see. There we go. And I
think that's okay, but the one thing I'm thinking
is if I come to here, so as it comes, it
should be opening. You can see it takes a
long time to open this. So what I'm going to
do on here on the 20, I'm actually going to
fully open it and press I, and now let's see
what that looks like. There we go. Now it's better. Here, grab our box, drop it in, pull it back. And there we go. Now it's working perfectly.
Alright, everyone. So that is the
hardest animation. What we need to do now is
we need to save our work. And on the next one,
all we need to do then is put this
present into place, drop in or whatever
it needs to do. And then we just
need these little knobs to move left and right. And then, basically,
we've got this finished. From there, then
all we need to do after that is just
render it out, show you how to
render things out, bring in the composite, and that then is the end of the long journey of
this master class. Alright, everyone. So I'll
speak to you on the next one. Thanks a lot. Bye bye.
96. Working on glass for claw machine and its window frame for Blender Beginners Mastercl: Welcome back, everyone to blender beginner's master class, the cookie factory. Okay, so all we've got now is this present to
actually bring in here. So what I'm going to do
is just hide out the top. I'm going to go over the top. And what I want to do is see where this comes
down, first of all. So where is this
point coming down? So I think it's around 120. So it comes down
ran about 1:20 90. So 90 by 90 has dropped down. So it's now come in, and
what we'll do is we'll drop this over the top where it's actually
going to be grabbed. So it'll be something
down there, and we'll stick it
round about here. You can see now if this comes in and grabs, that
is what I'm looking for. And I'm looking to put it on round about
the halfway point, as you can see,
something like this. Alright, so now let's
go back to 100. Or, yeah, 100, we'll
have it there. And let's press I on this part. So we're going to have I
it's going to be there. And then from here,
we'll let it grab it. So one, what is it one? So 116 or something, 120, it's still there. I don't think it
started to lift up, so let's press I, and we're actually going to move
this there like so. Now, what I want to do is I want to follow this all the way up. So as you can see,
if I come to 122, I then want to bring
this up to make sure that this is in the same
place as what it was. So 124, ring it up. Same place, 126. Bring it up into the same
place like so, and then 128, bring it up into the
same place, 130, bring it up into the same place, like so, and there we go 130. Now, let's see if that
actually picks it up. And there we go,
it's picked it up. Now we need to do the same thing going this way as
well, unfortunately. So what we want to
do is now from 130, we want it coming in, opening, and then dropping down
and restarting again. Okay, so 132, it's still
there. So we're okay on that. So we might as well just
press the I button, and then from 134,
we're still there. So I, 136, still there, I, 137 or 38 I. And 140 I, we're still there, 142, now we need to
start moving it over. So we're going to put it here, like so making sure
then it's in there, like so, press the Ib, 144. And we need to do this
on such little frames because it's moving
pretty fast this thing. Put it on there,
I, and then 146. I'm going to put it on here. Press the I button,
148, bring it over. Press the I bone,
and then 140 or 150, I think it stops there. Press the ebon and then 150 onwards, it's
going to release. So from here, we can see it
starts to release in here. Now, there will be
a slight delay. So if you put it on 162, we can press I, and
then from there, we know it can start
dropping down now. I can start dropping
down all the way down to here,
round about here. So let's put it in 170 and see. That's probably going
to be too fast. So what we'll do is we'll
just put it through there, like so and press. We don't need to
press, actually. Now, let's have a look what
that actually looks like. So we grab it, we pull it up, we move across, and we drop in. And now you can see that's
actually dropping in maybe, maybe a little bit too fast. So what I'll do is I'll
just move this over to 175, and now we'll try that. And there we go. Now that
looks more realistic. Now what we need to do
is we need to now bring it back round to the
actual start point. So what we'll do
is, first of all, we'll bring it down
inside the machine. So what I'm going
to do is from 185, let's say, let's bring it
down inside the machine. Let's then bring
it across on 195, so let's bring it across. Like so, and now I want it back in exactly
the same position. So we'll do it on let's say two oh five while the rest
of the things moving. And then what we'll do
is we'll press Shift D and bring it over to here for two oh five, and
there we can go. Now, let's see if actually how that comes so you can see here. We don't want it actually
coming up so fast. We want it nice and slow. So what I'm going
to do is I'm going to move this out a little bit, and I'm going to bring
this out all the way over. So let's put it on 225. And then what I'm
going to do so you can see nice and slow now. Now, we want to move
it more to the side. So I'm going to put
it I'm going to put it down and move it more
to the side like so. Then we'll have a
nice linear fashion, and it's still too fast, so I want it under
here, this last bit. So this last bit,
as it rises up, where is it to actually go? So it actually has to go here. So now, what I'll do is, I'm thinking the best way to do this is I'll press Shift D
and I'll bring that over, then what I'll do is I'll pull
it down into here like so. Now we should ring
this part now. So this part where it started out all the way over to two, two, five, like so. And then this part here
just put down, like so. And now we should
have it. Let's see. Yeah, you can see here it's dropping in, moving all
the way over there. Now we definitely
don't want that. So we want it to
come down from here. The moment we release it, it wants to be dropping
straight through. So this bit we've kind of messed up on, so let's pull it over. And let's see what
that looks like now. And then we go, now
it's coming back round. Now, we're kind
of messed up here because it's kind of going,
you can't see actually that. It's going a bit to this side. Now all I want to do is
then I want to move this G, put it at 2:50,
something like that. And then we go nice and
slowly back into there. Now the thing is, what
does this end on? It ends on 240, so
we need to make sure that this is ending on 240, like so, and it's
starting where it is now. So all the way this, so shift D, start it on one. Alright, so far so good. And now what we
should be able to do is just press Space Bar. So we're going to start
it on one, grabs it, picks it up, drops it, and then we go, and then
it'll go all the way back, and then it starts
all over again. Perfect. So now we need to do is just grab all of
the object data, like so modifier cycles. Let's put this then
on modeling now. So we'll go back to
modeling, double tap the A, t H, bring back the
rest of the part, and then all I'm going to
do is put on render view. I'm also going to
turn off this bit, so I've not seen any
of those other parts, and let's have a good look
what that looks like. So come down, get up. Drop it in place. And there we go, perfect, perfect. So hopefully, yours has turned
out something like that. Now the next thing
we need to do then is actually work
on our glass now. So let's do that now. What I'm first of all going to do is I'm going to come in. I'm going to put it on
Object mode just for now. I'm going to come
to this part now, so not this part, this part. Let's click this song, and
we can see what we're doing. And then what I'm going to do is press Control, left click, right click, and then
we're going to just do Control, left click,
right, click. Come round to here, Control, left click, right, click, and now just grab them all again. And then I'm going
to press Control B, pull them out, so pull
them out like so, and then we're going
to press E enter Alterns just to bring those
in a little bit like so. Then finally, we want
the glass onto here. So another one. So control, left click, right, click, Control R, left click, right, click, and then finally Control R,
left click, right, click. Re grab them. And then what
we're going to do then is press Control B and pull
them out very slightly. And then what I'm
going to do now is I'm going to fill these in. So I'm going you know, before I do that, actually,
before I do that, what I want to do really get the right color on
so you can see here, these will be orange. I think this will be orange. I want to make the
inside of here yellow. So let's go in Control plus. Altshift and click, I mean, so Alt Shift and click,
then Control plus. So Control plus Control plus, factory yellow, click assign,
and now for the glass. So what I'll do is I'll
come to this one here. So Alt Shift and click F, and then Alt Shift and click. You know what, before we do
that, let's just come in, grab this part plus down arrow, and we're looking for glass. So what glass do we have?
We have oven glass, sprinkler glass, and we
have this main glass here. So let me just check
that out, first of all, I'm going to go over
to the shading panel. Is this the glass I
want? No, it's not. I want the one with the fresnel. So I want let's have a look. Sprinkler glass. Let's have a look. This is the one I want. So this is the exact one I want, 1.450, so it's called
the sprinkler glass. Let's go back to modeling now. And let's click a sign like so. And now what we'll
do is we'll put it on to, you know what,
we won't do that. What we'll do, first of all,
is adding all our glass. Then wait and see
what this looks like. So F, let's do the same thing
now on the outside of this. So Alt Shift and click, F, Alt Shift and click, F, and then Alt Shift
click, F. And finally, Alt Shift click, F. And now let's just add in all
of those glass pots. So what am I going to do?
Did I do it on this one? Let's press teach. Yes, I have. So all I'm going to
do now is grab this, sprinkle the glass,
click a sign, hide it out of the way, hide
this one out of the way. This one, a sign, hide it out of the
way, this one, a sign, hide it out of the way, this one, a sign,
hide it out way, and this one, a sign,
hide it out the way. Ol tate, bring back everything. And the moment of truth,
let's have a look. And there we go. And I would say that
we definitely need to turn down the IOA on this. So I think on the next one, I'll actually come
in and have a look. It might be the fact that I've got double glass on
there or something. But anyway, I'll
have a look and see. It's not right.
It's way too far. I'll have a look and turn
that down a little bit. Alright, everyone, so I hope you enjoyed that and I'll
see you on the next one. Thanks a lot. Bye bye.
97. Final placements of our cookie factory, making sure everything is connected, and anit: Welcome back everyone to
Blending Beginners master class, the cookie factory. And now we need to do is
just go to the shading. And I don't forget I've got
these little knobs to do, and then once I've done that, everything else is animated. These are really easy, though, in comparison to what
we've been doing. First of all, though,
let's come over, pull out this one and this one. Let's set these to zero. Let's set this to zero. Let's set the yo war
to zero on this. Let's set it to zero on this,
and let's plug them in. And this way, you'll be able to get exactly what
you're looking for. So if I come in now to this,
start turning this up, now you can see if I turn it up to something
like not 0.4, we actually have a
nice view on and it looks exactly like it
should be with the glass. We're getting a nice
glint over there, and it actually looks like a
real nice grab in machine. Okay, so now, finally, then, let's come over you know what? We'll go to our animation. So I just need to keep an
eye on what this is doing, so let's come over
to our animation. I thought I'd
finished, actually, but no, I haven't. So what I'll do is I'll
actually put it on Render View. I think I can actually
get away with that. If not, just hide this out of the way. You
don't need to see this. All you need to see is it
actually moving across. So first of all, we've
got this one that we need pulling back or going
forward, and then this one. So let's come to this one first. So what I'm going to
do is I want to put the orientation right down
at the bottom of here, so it looks as though
it's bending from there. So all I'm going Hi
this out of the way. We'll come to this
one first, press a little but dot but so
we can zoom around it. Come to this part, Shift Desk, cursor selected, grab
this little knob, then, Control A, and then
right click Set origin, two, three D cursor. Come to this one then,
exactly the same thing. Shift desk, cursed selected. Grab this then, right click. Set origin, two, three D cursor. Now we've got both of these
level and ready to go. So first of all, we haven't
got any bonds on here. I should have put some bonds
on there to press the bon, but never mind, we
didn't do that, so we're not going
to worry about that. So let's first of all, come, and we've got this
on at the moment. So just remember
you've got this on. And what we're going
to do in frame one, we're going to
press I, and we're going to come to this
one and press I. And then what I'm going
to do now is coming over. So it's going to start moving
near enough straightaway, so we want this one to
start moving all the way over to frame 40
because on frame 40, then it starts to go forward. So let's just make
sure it's just moving sideways up to frame 40, so you can see, as
we get to frame 40, then it starts moving. So from frame 40, really,
it starts moving, but for now, I'm going to then
put it going to the left. So let's have a
look, so we want it going to the left from here. So I'm going to start
bending it from here. So R and Y, let's start bending it, like so. So we're going to start bending it all the
way over there. And then what we
want to do frame 20, want to copy this one, Shift D. Like so, let's have a look
what that looks like. There we go. If you want, you can just grab this and make it last a
little bit longer, like so now you'll
see. There we go. That looks good. Now it's going to start coming towards
us from frame 40. So what I'm going
to do is grab this. Then from there, I'm going
to pull it back now, frame like so and then R and X. We'll pull it back like so. And then we're going to
pull it all the way over to frame 60 like so, then I'm going to press Shift D, bring that up to frame 60, bring this up a
little bit, like so. Okay, so let's see
what that looks like. So first of all, let back. Perfect. Down. That's the bun press. And then we'll move it to the right now. So we'll do from
here, we'll press I. And then what we'll do
is it'll start moving. So from frame 142, we
will start moving it, so Y moving it like so, and then it'll go to over here. So we'll go to frame
one, five, 15. Moves very fast over
here to 150 maybe. So let's go and
grab this one here. So Shift D. There, and then shift D, bring
that over to there. Now, let's see. And there
we go, Is that too fast? It does move fast. So, yeah, I think that'll
actually be okay. We've got it down. We forward. Moving to the left,
and there we go. Now, we need to know
this is on 240 frames. So what we need to do is
we need to go to 240 now, and we need to put it on 240, like so, and then press I and then press I on
this one, like so. And then what we can
do is we can come to this one, go to Object, all the locations, cycles, and then we'll go
to this one here, all the locations, and
then cycles, like so, and now every time should move
over back Grab over again. And then we go, we've
dropped our present in, and then it all goes back. Alright, that's perfect. Now, let's go back to modeling. I told you that one
would be easier and compared to what you did before. OT H, bring back everything. So now I want to do is I
want to save out my work, first of all, and we should have everything
available now. We should be able to clean
up pretty much everything. So let's just make sure
everything's completed and clean. So we've got a plane
here. What is this plane? Oh, that's my ground space. So let's press M, and we'll
call it factory floor. Like so, and then what we'll
do is we'll close that up. I want to also bring that up to where the grabber
is. We'll put it there. Got human reference,
conveyor belt objects. Now let's see if we
bring everything in. This is our conveyor belt. We've got then our collection. So our collection is this, we're not going to
need this anymore. So let's just press Delete on that and delete our collection. Delete it over here like so. Then we've got our
chocolate drops. We're not going to
need to see those. We've got our flour mill. Now, the other thing is that
I need to tell you about. Also on the right
hand side here, you will see that we've
also got a little renderbw. We have also this
little down arrow, and that then you
can actually use to change a few of these things. I don't recommend using any of these, especially
for this course. But what I would certainly
say is the chocolate drops, anything you're not
seeing actually in the viewport, turn it off. Then we'll come to flour mill. That's all lined up now,
so we sorted all that out, so we need that on
the water adder. That's all looking good now. Make sure everything's okay with that. Then we've got the mixer. Okay? That's looking good. Then we have the stumper. That's all looking good. And then we've got
the sprinkler. Then we've got the oven. And I just want to
make sure, actually, on this one now, you can see that is definitely
not looking right. That is because we changed
the glass for this. You can see it's
sprinkler glass. So this is why we're
checking everything. Now, let's click the little
down now, copy material. And then what I'm going
to do click Plus, and I'll change the name
of this to grab a glass. Like so. And then I'll come
down and paste material, so new, and this will
be sprinkler glass. Like so and then I'm going
to paste it in there. So paste material in there. And then what I'll do is
now, I'll minus that off. I'll minus that
off, and then what I'll do is I'll come
grab just this part, change it to sprinkler glass, click a sine, and there we go. Hopefully that's gonna be right. Click a sign. And if I hide that out of the
way, what's behind there? Let's have a look. Okay,
let's have a look. Have we still got our chocolate drops on? Let's press Altag. I'm just looking. Where
are our chocolate drops. There's where our
chocolate drops should be. So Alt Shift and click
Chocolate drops, click a sign. And now put this
on rendered view. Yeah, we still
can't see in there because the sprinkle
glass is on there, which means then let's go into our shading and let's comb
to our sprinkle glass. And what we're going to do is just remove this, remove this, put this on 1.5, like so, put this one on 1.5. Like so. And can we
actually see anything now? So this here should be
assigned our sprinkler glass. And I'm just wondering
why can't see anything? And I think it's because
we've got the wrong one. Sprinker glass, click a sign.
Hide it out of the way. You know what? Let's come in. Okay, Old ship, click
sprinkle glass. Click a sign, hide
it out of the way. Chocolate drops, click a sign. Hide it out of the way or
ltatee, bring back everything. Render view one, tab,
and there we go. Now they're looking. Or
they're looking right. Can't really see through them. So sprinkle glass is not right, so let's get this
right first of all. And it's because I'm just looking now which
way I want this set up, and it's because
yeah, put it on 150. Alright, 1.5. That all to do it. Alright, there we
go. That looks be. Now what we can do is
we can plug this in. So we can plug this in now to whatever it wants, so
let's plug it back in. Let's put this in on 1.5
instead. And there we go. We've got our glass bag.
Right, then, back to muddling. Let's just make
sure before we do anything else that everything
is working properly. So we've got our oven in. Everything's working
on the oven. We've got our box mixer in. Box maker, sorry. Then
we've got the box packer. Then we've got
finally the supports, and then we've got the grabber. So the grabbers already done. Now, let's see if we
turn this off now, let's see this
working in action. And there we go, guys.
That is looking. Really, really nice. Alright, so on the next lesson, what I'm going to
do is I'm going to play you a short video, which is camera and turntables. And from that one then once you've learnt how
to do a turntable, we've already got
a camera set up, and we're going to go
in then how to take a decent render and how
to set up the compositor. Alright, everyone, so I
hope you enjoyed that. I'll see you on the
next one. Thanks a lot. Bye bye. T
98. Camera turntable basics for Blender Beginners Masterclass: Welcome back, everyone to
Blend beginner's master class, the Cookie factory. And now, as I said,
I'm just going to play a short video about
cameras and turntables. And once you've
learned that, you can actually set up your
own turntables. And then what we're
going to do on the next lesson is dive straight in to the compositor to show you how you
can get a really, really amazing render
of this factory. Alright, everyone, so I hope you enjoyed that, and I'll
see you on the next one. Thanks a lot. Bye bye. Welcome everyone to our
camera setup, Complete guide. And as you can see here,
we've got a fairly, fairly large scene,
and we actually need to bring a camera in
to actually render it. So what I'm first of all, going to do to
bring a camera in, I'm going to press Shift A, and within our primitives menu, you will see one
that says camera. Now, normally, the camera
will always come in. Whereabouts you've
actually got your cursor. So if I delete that
camera out the way now, shift right click and
put my cursor over here, press Shift A,
bring in my camera, and you'll see there it is. Now, rather than
go into my camera, so to go to our camera, we're going to press
zero on the number pad. That then is going to
zoom into our camera, and from there, then
we're able to actually come over and open this
little panel here. To do that, we just press
the end button to open it. And then what we
can do is we can click this camera to view, and you'll notice
that it goes fairly red around the outside
of the camera. And from there, then we're
able to scroll our mouse wheel out and put our camera
where we actually want it. We can also hold Control
shift middle mouse, and what you can actually
do then is really, really get a nice, smooth zoom in and zoom out
of our actual camera as well. So all of the basic functions of moving around the
actual viewport work exactly the same way
with the camera as long as we've got camera
to view turned on. Now, what if I told you, though, there's an easier way of
actually doing this, as well. So all I'm going
to do is I'm just going to delete my
camera out the way. And then what I'm
going to do is I'm going to press Shift A, and I'm going to bring
in another camera. I'm going to position myself in the viewport of where I want
my camera roughly to be. And instead of zoom in
to the camera with zero, what I'm going to do
is I'm going to press Control Alt and zero. And then what it's going
to do is it's going to put the camera in the middle
of the viewport for me. And from there, I normally
zoom in two, three times. And then why there is, I
click camera to view on. And now I'm able to position my camera where I
actually want it, which is a little bit
easier than actually going to the camera and
moving it into place. Now from here, I want
to discuss a few of the camera options that you can actually do with the
camera, as well. So what we need to do
with the camera selected, so just make sure that your
actual camera is selected, so you can see mine
is selected there. Print there on the
number pad to zoom back into your camera and get the view that
you're looking for. Let's press camera to view, although you don't
need to take this on to do these options. And if we come down to
the right hand side now, we have one that is
the actual camera. Now if you're going over to
the right hand side here, we'll see we have a type
called perspective. And if I click this little
downo you'll see that I also have orthographic on here
as well and panoramic. Now, we're not really
going to discuss panoramic because that is really taking it up a notch when it
comes to actually rendering. So we're going to keep this
pretty simple for now. So we do have perspective
and orthographic. And basically, perspective is basically as though you're
viewing this yourself, orthographic to keep it simple, basically it means
it has no depth to the actual scene that you're
actually trying to render. Now, as well as that, we can actually at
the moment, zoom in and zoom out with
our actual mouse. But I recommend
instead of doing that, just change the
focal lens slightly, and then that will
be able to zoom you in and zoom you out and get probably a
better perspective on what you're
actually rendering. We also want to talk
about the shift X and Y. If you want to move your
camera left and right, what you can do is you
can come up to item. And instead of moving this around left and right
with your actual mouse, what we can actually
do now is move the location of our
camera like so, and I find this sometimes a
little bit easier to use, especially when we're
going on the z axis rather than moving my mouse
with shift and middle mouse. I find it a little bit easier because it will be more exact. In other words, if I actually
take off camera to view, you will see if I
come to my camera now and I go to the item
and I'm moving this up, you'll see it moves
out perfectly. Alright, so going back now, let's go back to the camera, and let's now discuss our
clip Store and the clip end. Basically, if you want
to have a lot of things outside of the scene and you don't want to actually
have those rendered, what you can do is you can
actually change the clip end. This is the most important one, and let's put it to
something like 20. And what you'll see is
everything disappears. Now, if I start turning that up, you will see that the camera clipping actually
starts to increase, which then shows you the
actual buildings of our scene. And if I turn it up, so
far what I can do is I can actually start
rendering the entire scene. But anything in the background here won't be actually rendered. So it's extremely handy when you've got a load of
assets over here. You've got a scene,
and you don't actually want to
render those parts. Okay, so the next
thing we want to discuss is actually
coming in and naming our cameras because if we have multiple
cameras in the scene, and we want to take
different renders of them. Let's say we're doing
shots and we want one shot to be coming out
of this corridor somewhere, want another shot going around the roof or something like that. It's important to know
how to actually change the view to render these pots. So what I'm first
of all going to do is I'm going to
come to my camera, make sure it's selected, go
over to the right hand side, where all my collections are, press the little dot button, which is on your number pad, and that then will
take me to my camera. Now, let's add in another
camera after this. But the first thing I
want to do is just rename this camera to camera long shot. And then what we're
going to do now is bring in another camera. So I'm going to press Shift A, bring in a camera. It's
going to come over there. And let's say I want the
shot to be down here, so going down through
this alleyway like so. I want to press Control Alt and zero to bring
my camera there. And then going to Ja
Zoom in a little bit, go to View and going
a camera to view. And then what I'm going
to do is just set my camera up where
I actually want it. Next of all, I'm going
to put it close up, so camera close up shots. Like so. And now I'm
going to turn this off. So now we have two
cameras in the scene, one short range and
one long range. And at the moment you can see
the local camera over here, it's set, if I click on
this, too long range. The moment I click on
this and press zero, you will see it takes me
to my long range camera. Now, if I click on it again
and click to short range, it will take me to my short range camera
or any other cameras, you can have as many cameras
as you want in the scene. Now, what about rendering? If I set this to
camera short range, and I've got my camera here, the moment I go to
render out image, you will see that it won't be rendering out the camera
short range image. What it will be doing
is rendering out the camera long range
image. Why is that? That's because we also need to change the camera in
the actual scene. So you can see here we
have camera at long range. And if we click this, we also
have camera at short range. And now, basically,
I can render out this actual short range like so so I've come up to
render, render image. Let it start up,
and there we go. Now it starts rendering out this actual
part of the scene. Now, the thing is, you've got to remember that when you've got loads of cameras
in your scene, this part here
controls the viewport. So where you're looking
in the viewport, which camera you're
actually looking through. And this part here controls
the actual render. So just be sure to switch
them over and just be sure also to rename your cameras when you've got lots of
cameras in your scene. Now, finally, the next
thing we want to discuss is how to actually make
a quick turn table. And the reason we're doing
that is because many, many times people want a
turn table of where they're actually going to
be going around their scene or their
actual assets. So the way we're going to
do that is, first of all, make sure your asset or your scene is in the
center of the viewport, so you can see where
these crossing lines are. And then all you want to
do is press Shift desk and you want to put
cursor to world origin. That then we'll say
cursor to the center. And what I'm going to do from
there is I'm going to press Shift Day and I'm going to
bring in an actual curve, and the one I'm going to
bring in is a circle. From there, then I'm going
to press the S button and just pull the circle out
where I actually want it. And now what I want to do is
I want to tie my camera to my actual circle because
I'm going to use my circle to actually
animate the camera. So the way I'm going to
do that is I'm going to grab my camera, grab my circle, cross Control P, and
then I'm going to go down to where it
says, follow path. And you will notice
now you've got a little bit of a line where the actual camera is
to the actual circle. Now, it's important wherever you want your camera to start, so you can see at the moment
this is on actual zero. So we want our camera probably to start somewhere around here. So the first thing
I'm going to is grab my circle and
rotate it round, so's rotate it round, and then my camera is going
to start roughly over here. But what I need to
do, first of all, is move the camera
to this point here rather than it rotating away
from the actual circle. So the way I'm going to
do that is just press tab on my circle to go
into Edit mode. And then I'm going to
grab this little point here because this is where
the camera is attached to. It will always be attached
to a point on here, and then I'm going
to press shifts, and then cursor to selected. Next one I'm going
to do is press tab, and then we're going
to go to my camera. And what I'm going to
do is press shifts and selection to
cursor keep offset. That then is going to
put my camera there. Now, you will see if I press the spaceboard now because
it is following this path, my camera actually
shoots around there, like so before it
begins again at frame 200 or 800 or
whatever you set it to. Let's now set this back at zero, and the camera should be
exactly where they'll put it. And now what we need to do is we need to if we press zero, you can see, it's not actually looking at the building
or anything like that. So the next thing we
need to do is make sure this camera is looking
at our actual scene. So the way we're going to
do that is press shift day, and you're going to bring
in an empty and plain axis. And at the moment, you can see, I've put this in the wrong place because it came
where my cursor was. So what I want to
do is delete that. And then what I want
to do is press shifts and cursor to world origin. Shift A, bring in an
empty plain axis like so. And the reason we're using a plain axis is because it won't be rendered out at all
within the render, but it is something which our
camera can actually follow. So now I've got my
plain axis in there. I recommend that
you pull it out, so keep pulling out it's
pretty big, like so. And then what we're
going to do is we're going to come to our camera, come down to where it says constraints just above
the camera image. Add constrain, and the one
you want is Track two. And then all you want to do is click this little pipette here. Click on your actual empty, and now you'll see
that your camera is pointing at the actual empty. Still, this isn't very
good because we have a problem in the cameras looking completely in
the wrong direction. But if you zoom out enough, what you can actually
do is you can select your empty and you can
pull it up like so. You can select your circle then, and you can also
lift it up like so. So you can actually really start to mess around
with this and get that perfect
viewpoint what you're looking for. So
something like this. And then all I'm going to do is I'm just going to press the S bod to expand the circle, pull it out, and now you'll see, we've got the perfect
place where we need it, need to pull it up a
little bit more, maybe. Let's pull up the empty a
little bit. And there we go. And now if we press Space Bar, you can see that we've
got a term table. So one more thing before
we actually finish this, we obviously need to
control how fast the actual how fast
the actual camera is going around the circle. So all we need to do to do that is we will select our circle. So if I come out and
select my circle, over then to the right hand side where you've got
your circle options. And then what you want
to do is come down to where it says path animation, and then you can turn this down or up to whatever you like. So let's put this on 800. Let's put the
evaluation time on 800. And then if I go
to my camera now, press the zero button,
press Space pot. You can see now that
we have a render, which is going to
last 0-800 frames, or we can change this to 600, so let's say 600, 600, like so. There we go. Now it's
gone to 600 frames. Then when it gets to 600 here, it'll just carry on over the 800 because we obviously
have 800 frames here. So last of all, just
change the amount of frames to match the amount of frames in your
path animation. And what will happen
is, it will get to 600, and that then should
restart the camera. So you can see there's
no break in it. It just actually
carries on in a circle or a turntable around
your scene or asset. All everyone, so I hope that's a lot of
information for you. I hope it made sense, and I hope it gave
you a good rundown of how cameras actually work. Thanks a lot. See you on
the next one. Cheers.
99. Working with compositor addor to adjust our render for Blender Beginners Masterclass: Welcome back everyone to blend the beginners master
class, the cookie factory. So now you've got
your camera sorted. You know how to do turn tables. Now, we mad about this, but we actually decided
to include into this course the actual I
built compositor add on, which is going to revolutionize the way not only
you do this course, but all of your
projects in the future. So you'll find that
within the resource pack, and let me show you
how that works. So first of all, let's go in
and go to Edit preferences. And what we want to do is
we want to go to add ons, and we want to go to
Install From Disk. The one we want is going
to be under compositor. So here it is, double click it. You don't need to, you know, unzip it or anything like
that, and there we go. Now, at the moment over on the right hand side,
you will see over here. So we've got it on cycles. We've got it on 200
frames of the moment. Over here, you will
see all of these. Now, all of these are
basically layers. These layers do
different things, so you can make, for instance, the gloss shine more, the actual light glow more, the actual colors of all of
these things can be changed. So let me show you
just how good this is. So first of all, we're going to go over then to
our compositor, and we're going to
go to use nodes, and at the moment,
you're going to end up, this is basically the default. This is basically the
default for blender. What I'm going to do then
is drag and drop this down, and then we're going to
drag and pull this over, and I'm going to go and put
this onto Image Editor. Now at the moment, we won't
have anything in there. So what we'll do now is coming over to the
right hand side, and you can see one that says
three D Tudor, compositor. And what we're going to
do is click that on, and then we're going to
set up the compositor. This guys is going to do
all of the work for you, setting up every single
node that you could ever want when you're actually
rendering something out. So let's go to setup
compositor, and here we are. So this now has set all
of this up for you, and you can see all on the right hand side here
is all the options. Now, before I go ahead, let me just show
you, first of all, it's also turned on all of the actual layers
that you're going to need unless you're
doing something really, really crazy, these are all the layers that you'll
actually ever need. And it's also come in. And if I scroll down,
you can see under film, it's also put transparency on. Now, I don't want
transparency on. I'm actually going
to turn that off, so just make sure
you turn that off, and then what we're
going to do then is go back to modeling. So we're going to go
back to modeling, and we're going to set
up our camera now. So you can see at the
moment, we've got our view. We need to camera to view, press the end bunch,
close that down. And all I'm going to do
then is just zoom out a little bit just to get
everything in the frame like so. There, then what I'm
going to do is I'm going to put it onto Object mode. I'm going to make sure my
interlocking links are actually turned on or off sorry, so we've got nothing
in the background, and this then is going
to speed up the render. Now, before always
clicking render, just make sure you go to save, and then all you're going to do is hit that render button. So now it's going to
take a little bit of time to think
through everything, load everything up, and
let's see what happens. So at the moment,
the compositor, so the three d tudor compositor, you won't do anything at all
because nothing's turned on. Now, you can also see that I've got all of these things
in the background. So what I'm going to do, I'm going to wait
till this finishes, and you can see it's
already finished. I'm going to come in
then and just hide all of these things in the background because I
really don't want them on, so you can see all of these
things have turned off. So all of these parts here, I actually need to turn
these off like so, making sure they're all off, and then sit at that
render button once more. And now you'll see that nothing should be
in the background, and we should get a really,
really beautiful render. Once this is done, we're going to go through all
of the options, and we're going to show
you how everything works. And from there, you're
going to end up with a beautiful render every
single time going forward, not only in this project, but
as I say, in every project, going forward, you're
going to end up with a very, very nice render. Okay, so let's close that down. We'll come over to
our compositor. We'll come up to
the left hand side, and what we want to put it
on now is render result, and this is what
we'll be left with. Now what I want to do is I can pull this all the way over. I'm not even going to need to
go into my rendered screen. I can do everything from here. So, first of all,
let's go into color. We can actually
change the color. You will see actually changes
on the fly in real time, as you can see,
it's updating it. Let's change the
color. Then let's put it a little bit brighter. Just make it old. Maybe that's a little bit too much,
a little bit less. Something like
this. Alright, next of all, then, we're
going to come down. We're going to
close that one up. We're going to go to the gloss. So the gloss basically
is the layer that controls all of this
metal and things like that. We can actually turn that
up now and make these much, much shinier, as you can see. Now, to get real kind
of looking really nice, we've also added on
there a metal glint. And what that's going to
do is just going to add some glints on there if needed. Now, I recommend that you actually turn this down
if needed, as well. You might not want
that on there. Not that far, by the
way. Turn that down. This is only in case you've
got some sun shining onto the meal and wanting the actual glint to
come into effect. So what I'm going to do,
though, is I'm going to turn that off for this one. And what I'm going to do is mess around with the brightness. So let me turn up the
brightness of the metal. Let's turn it up to, like,
not 0.5 or something, and then you'll see a bit
of a difference there, and there we go. All right, so that
metals looking nice. Let's turn it up a slight bit. Just like that, just to get that metal shine really, really good. Let's close up our gloss. Next of all, then we've
got transmission. Transmission is
glass, basically, anything like water or glass. And you will see that if I
come in now and turn this up, the glass on here and on
here will actually change. So you can really fiddle
around with this now and change what that actual
glass is going to look like. So for me, I'm going to put it a little bit lighter, like so. And then what I'm
going to do is I'm also can change the light level, so I can actually change it
so that we actually have a little bit of light in
there as well if needed. From there, then I can actually pull it
down a little bit, change it a little bit
more, and you can end up with a real glow
on things like that. What else am I going to do?
I'm going to turn this off. I'm going to come
then to my colors. And what I can also do is add in a little bit of
blue if I need it, or even some yellow. So let's add in a little
tiny bit of yellow like so, and now you can see it's really starting to bring
that glass out. Let's add this a
little bit of blue. And there we go,
and we can really play around with
this, as you can see. That is the transmission then. Next of all, then, we have got volume and miss
controls in here. Now, the thing is with
the volume and mist, we're not actually using those. They are way, way more advanced than what we're
trying to do here. So at the moment, we're not
going to be using those, but when it comes to the future and you will be using those, you will see these are a Godsend to you because
if everything is set up, you'll bring in your volume, and then you'll be
able to play around with it or you're mist. Now let's come to the light blu. A light bloom, what
we can actually do is you can see our
little light here. We can actually turn on our
bloom, and there you go. And now we can also increase
the light, like so. We can also change the
color of the light. We can increase the
range of the light, as you can see,
and we can really, really turn this up
to make it much, much brighter than
what it was before. And then we can turn
this all the way up. Like so, and then you get a completely different look from that actual light source. It's looking really,
really nice, as well. We've also got streaks in
here that we can add in, lens flare we can also add in, and all kinds of
things that we can actually do with this light. We can also come in if you want to and change the
color of your light, like so, whatever
you want, really. Alright, so that is
the light bloom. Next of all, then, we've
got the environment. Now, of course, this is an
environment what's behind you. So if I come in then and
change this up, for instance, I can actually come in and change how bright this
is, for instance. I can also come in and
change the colors of it. So if I want it a more
green color, there you go. You can actually change
the color of the light. We can change that
darkness as well. And already now, you can see that's looking much, much nicer. But it gets better, guys, because finally on just
the limited options, we can also change the
ambient occlusion, bring in more ambient
occlusion if needed, bring in less if needed. And we've also got a color here. So if I drop this
back, for instance, I can bring it all
back, as you can see, and now we've got
a lot more dark, and what we can also do is
turn this up a little bit. To bring back that
light, and I can also come in and change
the color of those. So if I come in and
put it on, let's say, a yellowish color,
you can see now that actually changes everything
to that yellowish tinge. I can even come down then and bring it down a
little bit like so. And then I can come in and
make this a little bit darker. So let's make it a little bit darker, maybe too much there. So let's pull it up a
little bit, pull it. Let it load up,
and there you go. You can see you can get exactly the look that you're
actually looking for. Now, for me, what I'm going to do is I'm going to
turn off the color and just have a little
bit of ambient occlusion. I don't want actually
too much because I still want it to be really
nice and kind of bright. Now, don't worry,
though. This is just the ambient occlusion. We can come in and
make it all brighter, and I'm going to
show you that on the next lesson
because guess what? We've got a ton more options here that we can actually
play around with. So I'll show you how to fiddle around with
these, as well. And in the end, you'll have an amazing render.
Alright, everyone. So that's it for this one. On the next one, then, it is probably going to
be the final lesson. And from there,
you're able to go forward and create
some amazing stuff. Alright, everyone.
Hope you enjoyed that. See you on the next one.
Thanks a lot. Bye bye.
100. Color correction in blender compositor, setting up denoiser and sharpening up our render for Blender: Welcome back, everyone to
Blenenbgin as master class, the cookie factory, and
this is where we left off. Now, the other thing
we can do before moving on to these then
is also the background. At the moment, I've got none. Now, this always works better when we're actually bringing in something like a
transpant background. So, in other words,
we need to actually have this as a transpant
background to start with. And then what we can do is
bring in any of our images. If I open up this, you
can see I can actually bring in a background
image straight from here. So we'll actually do that
first, so we're gonna come in. We're going to re render
it out with transparency. So if a come down, put it
on transparent, like so. And then what I'm going to do is render it out, so render image. You can see now it's got
a transparent background. And then from there, what
I'll do is I'll show you actually how we can
actually bring in an image. And then from there, what we'll
do is we'll actually come in and finish this
off. So there you go. You can see our image
is already in there. And now if I close this up
and go back to my compositor, you will see now that I can
actually put this on Alpha, if I want to, let it load up, or I can put it on my image, or I can have it on non, which will be the actual alpha. So so many things you can
actually do with this. Now what I'm going to do is I'm going to come in and
show you the last thing. So first of all, we've
got box shopping. So you'll see that
as I bring this in, it's going to sharpen
everything up. Of course, you've got things you can change here to
actually really, really make it
sharper, as you can see Everything is
much, much sharper. Now, you've got box
and diamond hoping. One of them works
better on some things, the other one works
better than others, but I'm going to sharpen
it up just a little bit, like, so I'm going
to close that up. Next of all, then
you've got soften. Sometimes when I'm
actually working, I will use the box shopping, and then I'll re soften
everything and back off. So you can see here
that I can actually soften everything back
off once that loads up, and you can see now
it's kind of softer and looking really good
because we've made it crisp, and then we've softened
it on top of that. Next of all, then
we've got antilicin which is basically these
lines running down here. You can have a play
around with it's quite hard to actually get this to be the look that you're
actually wanting, but you will see if you mess
around with this enough, you'll get that look
that you're looking for. Let's close that off. Next of all, then we've
got the color balance. Now, the color
balance is basically how much warmth or cold. So let's say you're
dealing with something like the itch King out
of World of Warcraft, you might want to bring
in a little bit more blue and make it a
little bit more cooler. I recommend when you do this, play around with it by coming, setting it
all the way over. So if I set this all the way
over to red, let it load up. You can see exactly what that's going to do and from there, then really drop it
back and only very, very slightly increase it. This is a slight yellow
look, and then we've just brought that in and brought a
little bit of warmth to it. We can also come to
this one, bring a tiny, tiny bit of warmth to this, or a little bit of
blue, and there you go. You can see exactly
what's happened. Let's bring a little bit
of blue in this one. Let's see how that looks. And there we go, I think
that looks pretty nice. Then let's close
that up, and then we've got the RGB curves, which, of course,
if I open this up, this is what controls
the lighting. So if I bring this
up, you will see it brightens up this whole
thing much much more. Let's bring it up,
just a tiny bit, just to make it a little bit lighter. Let's close that up. Next of all, we've got correct. Now, this is where
you can really accentuate those colors. So if I bring this
all the way up, what will happen is it'll
bring that yellow all the way I'll completely saturate
that yellow as you can see. So you can actually break it down into the colors
that you want actually saturated or desaturated
because I can also bring this down as well and completely get rid of that
yellow if I want to. So this is a little
bit more on the, you know, professional use case, but it's there just
in case you need it. I'm going to turn that
off for this one. And what I'm going to do now is come to my brightness
and contrast. Yes, we can play around with the brightness and
contrast a little bit. I recommend when you're
doing this, turn it up very, very slowly, you'll get a kind
of grainy effect on there. And finally, before denoise, we've also got hue
and saturation, and this is the one
where I'll turn it up for this one
just a little bit. So then what we'll
do is we'll turn up this saturation just a little bit to 1.2, something like that. You can see everything
now gets saturated. Maybe I've gone a little
bit too overkill on that, maybe 1.3, something like that. Still, maybe a
little bit too much. Let's try 1.060.
And there we go, I think that's
looking really nice. And finally, the best one in the whole of the
composite is the denise. You can see at the
moment, we've got a load of noise on
here, especially. You can see this noise, click
this on, wait a little bit. Let it load up,
and there you go. Everything is
cleaned up for you. Thank you so much,
everyone for joining me in the Blender beginners master
class, the Cookie factory. It's been an incredible journey, and I truly hope you've
enjoyed building and animating your cookie factory as much as I've enjoyed guiding
you through it. Over the course
of these lessons, we've covered so much together. You started with
the fundamentals, learning blenders interface, navigation and essential tools. From there, you modeled and
animated ten unique machines, mastering skills like
stylized modeling for vibrant and creative design. Texture creation and UV mapping, and avoiding
repetitive patterns, lighting techniques
including emission shaders and blender sky texture, particle systems for realistic, dynamic effects like
chocolate sprinkles and advanced animations
using keyframes, cycles and timing techniques. And of course, not to be
listed out compositing with the three Tudor blind
Craft add on to bring your renders to life with
professional grade effects. If you enjoyed this course
and found it helpful, I'd love to hear your feedback. Leaving a review not
only helps me improve, but also helps other
students find the course. It makes a huge difference, and I'd be so grateful. Now that you've built
your own cookie factory, I hope you're
feeling inspired to take on new challenges
in blender. Whether it's your next
stylized project, creating game assets or tackling
more complex animations, the skills you've
gained here will serve as a strong foundation. Once again, everyone, thank you for taking this
journey with me. Your creativity and dedication
have been amazing to see. I can't wait to see what
you'll create next until then. Happy Modeling and I'll see you in the next course. Cheers.
 3D Tudor, The 3D Tutor