Transcripts
1. Blender Essentials for Beginners: Stop Getting Lost in the Viewport: Welcome to Blender
Essentials for beginners. Stop Getting lost
in the Viewboard. I'm Luke from Pretty Tutor, and if Blenders Viewboard feels like a maze where you
keep losing your model, you are in a right place. In this short essentials course, you will learn the
navigation moves you will use every single day, orbit, fan, Zoom, and
how to snap clean, front, right, and top used
without fighting the camera. Will cover the Viewport Gizmo offer graphic versus
perspective and mouse keyboard shortcuts that make you proficient
in the viewport. Then we will jump into fly and walk mode so you can
explore any scene like a game with gravity when you want a proper
sense of scale. You will also learn how to
tune navigation preferences, plus the framing and
isolated shortcuts that instantly bring your
work back onto screen. So let's get into Lesson one.
2. Mastering Blender Viewport Gizmo and Projections: Hello and welcome everyone to Blender Navigation Essentials, viewport controls,
and shortcuts. Before we get started,
I would just like to let you know that every shortcut that I'm using is going to be seen on the bottom
left hand corner. So everything is going
to be seen here. In case you miss
it when I say it, you're free to check that out. Now, as for the setup, I am going to be using a resource pack that
includes a scene. Feel free to follow along and familiarize yourself with
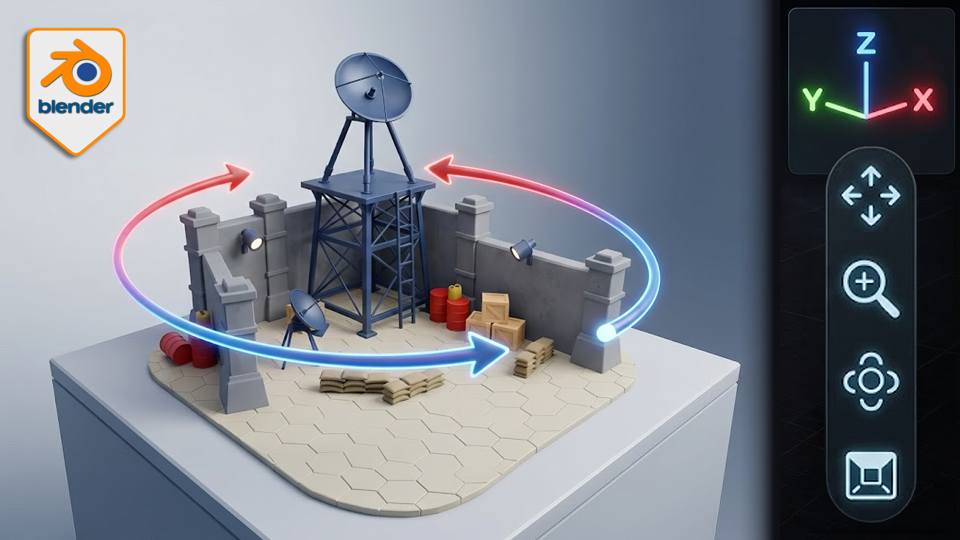
the Blender viewports. Alright, so to start off,
we're going to make use out of the gizmo found
at the very top. So this sort of a gizmo
will allow you to move around your scene by clicking and holding
the love mouse button, we're able to move it around. All you have to do is
just simply make sure that you are within this
highlighted circle. And just to emphasize on
this highlighted circle, Ihanct a little bit. You can see this is the type of highlighted circle you're
going to see around it. Once you go over
with your mouse, essentially, you'll
be able to see it. And once you are
within the circle, you're able to click and hold your left mouse button and
move around your scene. Next up, you'll
notice that we have some highlights of
the gizmo as well. We have Z X and Y. So these are the
three dimensions for, well, three D viewport. By clicking on it,
you'll be able to realign your setup
to show the scene, either from the top down view, from the side view or
from the front view. We can see the naming and
which side of the viewport we are by just seeing it on
the top left hand side. Right now we are
on the right side. If I was to click on Z
will be on the top side. And we can leave this by simply clicking
again and holding our leftmuse button
to just move it out of that perspective. Next up, you'll notice
that you also have these free little blobs that are matching colors
with the axis. So Z, positive axis
would be at the top, and at the bottom, we'll have
a matching empty circle, that will be the
negative Z axis. If I was to highlight
it with my mouse, you'll see that it even
says minus Z axis. What this means is that
if you click on it, it'll give you the Z axis
but from the bottom. So that's quite
important because we can do it for
all of these axes. So for example, we can go onto negative Y axis onto
negative X axis. And every time you can
see that it is changing the name of which
view we are at. So we can even go on the left, and we can even go
on the backside. So right underneath it, we have some additional
controls for the viewport, as well, which is pretty
good if you're using a touch support or
a drawing tablet. So firstly, we have ourselves
a magnifying glass. By clicking and holding, we can go up and down to Zoom
in and out of the scene. Next up, we have
ourselves a panning hand. This little button will allow you to move around your objects. So just like that,
we're able to, for example, locate
the satellite dish. So using this button and clicking and holding
left mouse button, we're able to do it and
move around the scene. This works in any
type of a view. So whenever you are
having a setup like this where it's more diagonal or if you're going
for a top down view, all of these shots
will be able to use the panning shot
just like the Zoom. Alright. Next up, we
have a camera button, which we're not going to
be touching it just yet, as we don't have a
camera in our scene, let's go ahead and move
on to the next part, which is going to be the
orthographic projection view. This button over here
will allow you to essentially change from
perspective to orthographic view. In case you don't
know what this is, essentially, perspective
will give you depth. So items that are
closer to your scene, will allow you to
be shown as bigger. So for example, this
lantern over here is way bigger than the lantern
on the left hand side. If I was to turn on the
orthographic projection view, we'll see that now these
are essentially identical. So it's never going to change
the scale of an object. You can see, for example, these barrels over here would be the same size if we're
looking from this angle. But again, if we turn
it back to perspective, we'll be able to see that
they have different size now. If you're struggling to select on an object
throughout the scene, feel free to disable the
lighting collection. You can click on this button on the upper right hand corner. That way, we're able to play
around more with the scene. And that's everything for viewport navigation
in the first lesson. Hope it was helpful. If you enjoyed it
and found it clear. A quick review would mean a lot. Thank you so much
for watching, and I will be seeing you in a bit.
3. Essential Mouse Shortcuts for Viewport Navigation: Hello and welcome back around to blended navigation
essentials, viewport controls,
and shortcuts. In the previous lesson, we
talked everything there is to know about on screen
viewport controls, which is especially good for touchscreen and drawing tablets. But now let's go
ahead and make use out of keyboard and
mouse controls. So by default, everything that is necessary when it
comes to such controls, all that you need to
know is that it is going to be attached to the
middle mouse button. Firstly, middle mouse button
by itself will allow you to rotate the camera around just
like we had with the Gizmo. Next up, we can use Alt
and middle mouse button, which will snap to the right
or the nearest type of view, similar to as if we were clicking on these
buttons on the Gizmo. I would highly recommend instead
of holding Alt first and then using middle mouse
button to rotate, which is completely
viable, as you can see, I would highly recommend to just firstly use the middle
mouse button instead, and then whilst using
it, you can then hold Alt and then it will snap. That way you can get
your view closer to the desired angle and then hold Alt and
then it's going to snap. And then afterwards, just release the middle mouse button, release the Alt and then it's going to give
you this view. Next up, you have Shift
and Middle Mouse button. So shift and Middle Mouse
button will allow you to make use out of
the panning mode. So this is especially great or when we want to just pan around
the scene just like that. And again, you're able
to just pan around and move it to the
desired directions. Next up is going
to be the zooming. Zooming can be either done using a mouse wheel by
scrolling in and out. So scrolling up will zoom in, scrolling out will zoom out. Alternatively, you can use Control and middle mouse button. And that will also allow
you to zoom in and out. So by using Control and
middle mouse button, you can move it
upwards to zoom in or move it downwards to
zoom out just like that. And using all of these options, you can play around get everything that you want
out of the controls. What a basic, well, navigation. You can preview it
from this angle, for example, we can
get it a bit closer. Then we can go, for example, to the top down view if we
want to, and move it around. The outlooks from
the top this scene, locate some Amocraes
for example, in a corner and just preview it how they
look from different angles. So yeah, that's going to
be it from this lesson. Thank you so much for watching, and I will be
seeing you in a bit
4. Explore Scenes with Fly Mode Navigation Controls: Hello and welcome back everyone to Blended navigation
Essentials, viewport controls,
and shortcuts. In the last lesson, we went over how we can preview our scene using mouse and keyboard to just zoom in and out
and pan it around. Next up, we're going
to continue on with a preview and how else
we can visualize the scene. So this time, what I'd
like you to let you know is that we have an
alternative way for this, and that way is using shift and the symbol that's above tab. So next to escape,
there is a little dot, which if you shift
and click on it, you can see at the
bottom left hand corner, it will enable you to have
a crosshair in the middle. So right away, you'll
notice that we can just move it around
and we have no mouse. So first things
first, what I'd like you to let you know
is that we can just click our mouse button and it escapes that type of viewport. We go back on it, we can
again click the Shift and apostrophes and it goes
back into this viewport. Now, what's nice about this
viewport is that we can use WAS D to move around just
like in a video game. So that is pretty nice. We can also use Q and E to
fly up and down in this mode, which is also
really, really nice. And all the settings,
by the way, can be seen at the bottom of the viewport
when we are in that mode. So we're going to go for
every single one of them, but just letting you know,
again, at the bottom, you will see the items like so, and they will remind you of
the shortcuts that we have. But just to make sure that
it's fully understood, we're going to go every single
one of them one by one. So again, going onto the mode, we can move back and forth using WSD Q and E to
move it up and down. Then we have options for R and F. So this is
going to be based on how you're looking at
the well, at the scene. If you're looking
downwards, for example, you can use R to essentially pan it through the
scene like so, whilst using Q and E would still keep you going up
and down in the world. R will just let you have
this nice diagonal shot. F, again, will be based on the local rotation of
this playable mode. Now, next up, we have jump, jump by itself will
not do anything. We need to enable gravity,
which we'll get to it. But before doing that,
space. Space is your friend. It will help you just teleport
to where you're looking. So it's not going to work if it's outside
of the viewport, but it will work when you are looking at a
specific mesh part. So we can, for example,
go to the top of the satellite and see
how it looks like. Maybe we want to have a
little stealthy for example, character, just looking
from the top of the setup. Then we can use just right click to go back
to the viewport. And reset the location
of where we were. Next step is using shift
will allow you to use fast, which will speed up this setup. And using t will allow
you to slow it down, which is also very, very good. Then we also have, well, the controls for some
of these settings. Using plus and minus
on your keyboard, you can see the acceleration at the bottom is being
increased or lowered, and we can increase it to
just go back and forth really fast or really slow. And again, with
this acceleration, we can use fast using shift or using Alt to slow it down
to nearly crawling speed. Jump is going to be
for gravity mode, so we're not going to
touch it just yet, but I would like to mention
about the Z axis correction. So Z axis correction, right now, if I was to move my well, mouse, there is
this smooth motion. By clicking Z, you will
enable a mode where it lets you just go back and
forth, much, much faster. You can see that it
is just straight, snappy, literally
based on your wrist. But Z cannot be turned off, so you have to just
go out of that mode, go into it again,
and you'll be able to make use out of the
Z correction again. One final thing that I would
like to mention is that you can also use acceleration
using our mouse wheel. So by scrolling up, you can
increase the acceleration. By scrolling down,
you can decrease it. But that's something that's
quite interesting and it kind of works actually,
same as unrengine. So I'm very happy about this motion because you have full control over
the acceleration. And yeah, we're going to come back to the gravity
mode in a bit. But now, though, thank
you so much for watching, and I will be seeing
you in a bit.
5. Walk Mode with Gravity for Real Scale Preview: Hello and welcome back over to Blandon Navigation Essentials, Vbart controls, and shortcuts. In the last lesson, we learned a little bit about
this flying mode, which is great to
preview the scene from different angles and
have a nicer range of motion. Next up, what I'd
like you to let you know is that by clicking Tab, we're going to drop
our character, and that's going to make it fall all the way to the bottom. But by using it, this fly mode on above the mesh, if I were to hit Tab,
you'll notice that we now land on this mesh as
a playable character. This is great because you don't really need to use any
sorts of collisions. You can just simply
walk on any mesh. The downside of it, though, is that it's not
exactly like a game, meaning that you can technically
just walk over anything. You see how it firstly tries
to well, go into the wall. There are no collisions, so it technically
goes into the wall then it realizes that the
character that's being played, the playable character,
it's not above a mesh. So always just checks whether
it's above a mesh or not, and there is a small
little point collision to see where the mesh as is. And if it's not touching a face, it just puts it above the mesh, and that's how
essentially it works. But we can see that
we have some issues with the player
just being able to, well, jump and essentially walk over anything
that it touches. But it's still pretty nice. Anyways, moving on, we have some additional player controls. We have V that
allows us to jump, which is very, very nice. Something worth
noting is that we can play around with
the jump height. You can use a dot or to
increase it or decrease it. So right now I'm clicking on the dot to
increase it to a ten, and if I click V, I'll
be able to jump higher. Something worth noting, though, is if you click and hold the V, you'll be able to
jump much higher. So there is a difference between just tapping V or
clicking and holding V. So yeah, you're able
to also control the jump height with
certain bit of precision. Let me just go ahead and lower down the jump height
because I don't want to be jumping so
much all the time. And yeah, you can
still use teleport, by the way. So
that's quite nice. Just make sure to not overdo it because now we are
underneath the map. So that's one more
thing worth noting. Teleportation doesn't
work quite as nice with this playable character when you're not flying
because gravity is on, and that means that
when you click space and it's in some
sort of a collision, it might go outside
of the bounds. But all in all, it is
a really nice setup. It gives you ability to
preview scale of the scene, see how the entire setup looks like and what can be added. And, yeah, that's
pretty much it. Thank you so much for watching, and I will be seeing
you in a bit.
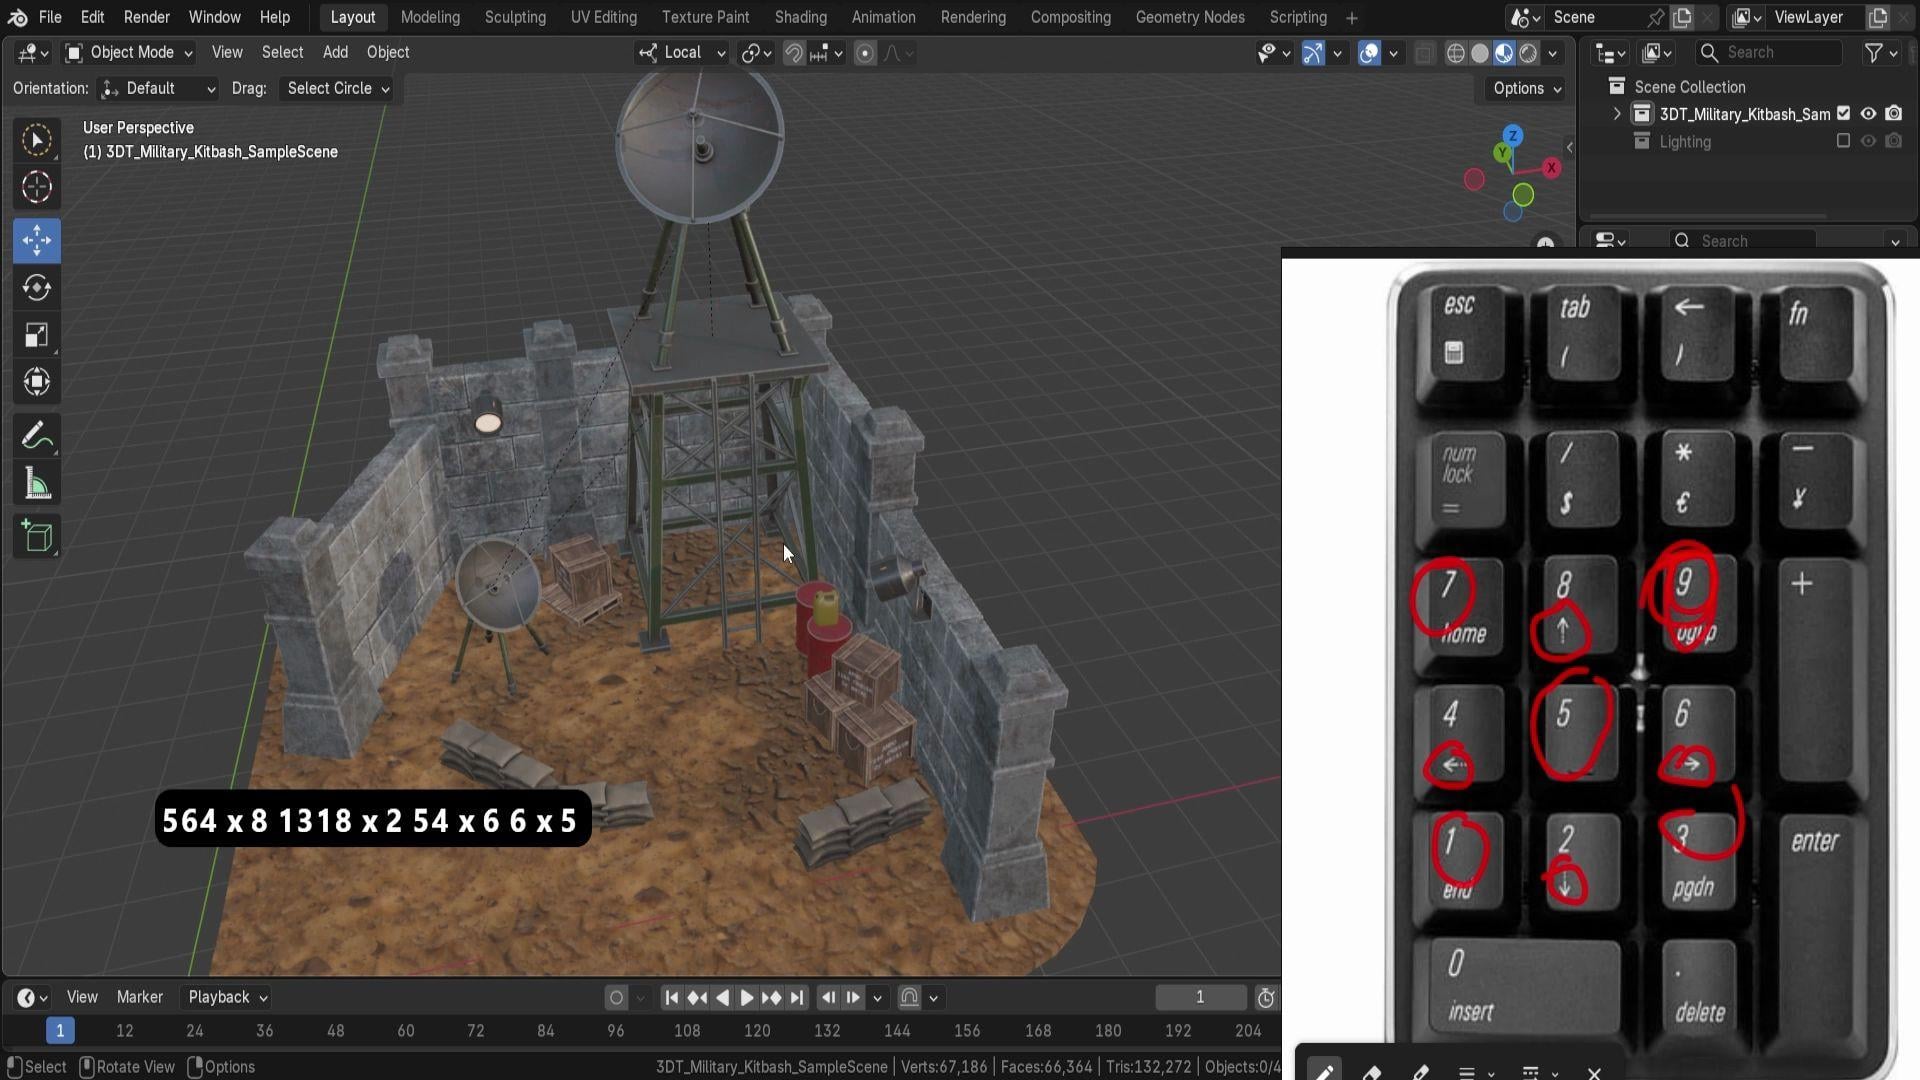
6. Master Numpad Views, Isometric Angles and Quad View: Hello and welcome back everyone to Plant Navigation Essentials, VPOt controls, and shortcuts. Now that we're back with
the usual controls, and we're not playing
around the map. Let's go ahead and go over
certain additional controls, certain additional
shortcuts that we can use. This time, we're going
to be exploring Numpad, and on the Numpad
have a bunch of different numbers
that we can use essentially to help
us with the Gizmo. So for starters, we're just
going to focus on one, three, seven and nine. So by using one, three, seven, we're able to go between, well, front view, as you
can see over here. Front view, and clicking three will allow us to
go to the right view. Seven will give us the top view. Nine, however, is a little
bit more interesting. This number over here will allow us to invert the position. So by clicking nine, whilst we are on the
top orpographic view, we can just go to the
bottom orthographic view. And similar to that, if we are at the front view,
we can click nine. That goes to the back view. If we are at the right view, we can click nine to
go onto the left view. So all of that is lovely stuff. Now, what happens when you
want to rotate specific angle? Let's say we are at
this angle over here, but we don't want to just do it manually using
middle mouse button. We want to have some
more refinement. Well, in this case, we can use
eight, four, six, and two. But notice how on the numpad, you'll have arrows for each
one of the directions. So these are the
arrows that represent which direction it's going
to go for on the setup. And click eight, for example, to go up, down or
left and right. Each time you click by default, it's going to go 15 degrees, but that's quite
something important. The next thing I'd like
to mention is that if we are in a front view, which automatically changes to orthographic view, by the way, we are going to
then rotate it and then it's going to keep
us in orthographic view. This is quite nice
because if we want to have an isometric view, we can do so by clicking four. Three times and then
clicking 83 times as well. That's going to give
us this sort of perfect orthographic type
of isometric style of view. For certain games,
for certain renders, it is perfect of what
you're trying to get. So that's worth noting. But again, I hope that
we move it outside, you can see it, we are still in that same orthographic view. Well, in this case,
clicking number five as right in the center will help us
because by doing that, essentially changes
from the perspective to orthographic or vice versa. You can see it being
changed just like that. So that is quite nice. Using these
navigations, I highly recommend to just playing
around by clicking one, for example, rotating it, so if you want to see it around, maybe pulling it
up, clicking five, and just kind of
seeing how you can preview the environment
just using the numpad keys. If you're having a
laptop, don't fret, we are going to come back to the alternatives of how to
make use out of numpad. But for now, though, for
those of you who do have it, play around with the settings, see how well you're
able to move around. Let's say you want to well, rotate around the satellite, you can just go ahead and do that in an isometric
view nonetheless, and you can preview it from certain different angles in
a sort of an engineered way. And then once you're
done, click five, make sure you are in
perspective mode, and you are back to normal. The final thing that
I'd like to mention in this lesson is going to be how you can have multiple
windows all at once. And this is quite useful because we can click Control Alt and Q, and that breaks us
with multiple views. So you can see, by default, top right is going to be the same view that
we were using. And then on the left
hand side, top left, we're going to get the
top orthographic view. Then we also have a bottom left, front orthographic view and
right orthographic view. All of them are quite useful, and if we want to flip
them around, again, we can just use nine to just go from right to left if needed. So for example, this one
has more detail over here. We can, for example,
select an object, maybe move it up and
down or like so. And it helps us to preview how it looks like
from different angles. Maybe this one right now is, you know, overlapping
a little bit. We can just fix that up, like so, and there we go. Having all four
viewports at once helps us with this
type of an issue. Keep in mind that if you have a camera outside
for one of them, use the dot on the numpad. So this little option over
here to refocus where you are. Dot is especially useful
now if we were to go back to the perspective view
using Control T and Q, the dot is especially
useful because by default, if you're trying to
zoom in too much, you're not going to be able to. So, for example,
let's say, I want to zoom in closer
to this ladder, but I cannot. So what can we do? Well, by clicking on
that dot on the numpad, we are essentially
not only going with the viewport to have it
centered of an object, but we're also making
sure that we're now able to zoom into its
centerpiece, as well. You can see us zooming into the very center
of this piece. So essentially, when
we are rotating, we have this invisible
focal point, which we're able to then
use as a sort of rotation. So right now, for
example, if I want to rotate around
the satellite dish, I can click the dot, and now we are able to rotate
around it just like that. It's a pretty useful
little tool to use. All of the tools can be found by the way on the view
option over here, then viewpoint, and you
can see that we have top, bottom, front, back,
right and left. And next to it, you'll
see all the shortcuts. So in case you forget,
make sure to just go onto this section and you
can see what is what. Alright, so that is
going to be it for me. Thank you so much
for watching, and I will be seeing you in a bit.
7. Customize Orbit, Auto Perspective and Rotation: Hello and welcome back everyone to Blended navigation
essentials, Pep controls, and shortcuts. In the last lesson, we went
over the shortcut settings. Now we're going to go into depth in regards to
its customizations. So for us to do that,
we're going to go onto Edits tab on a top
left hand corner. We're going to
select preferences, and we are going to access a
navigation preferences tab. And here we will
find all the beauty that we want for
controlling the viewpoard. I'm just going to lower it
down a little bit so we'd be able to see what we're
doing with the setup. First things first,
we have ourselves the orbit orbit
and t. Over here, we have orbitting method. So by default, it should
be set to a turntable, which essentially locks z axis, meaning that when
we are rotating, it's not going to tilt
the z axis itself. If we were to use trackball, which allows us to have full
control over the rotation, we'll notice that we are
now able to rotate it in all sorts of ways and essentially tilting
this camera like so. If during this motion, if you'd like to
reset the rotation, the easiest way to do
is just simply clicking one or one of the shortcuts
for going to well, the front or the top you, and then you'll have that
same type of rotation. But again, if you feel like doing something like
sculpting, let's say, using something
like a truck ball might be quite useful to have the right type of gesture and motion or all that sort
of organic shapes. So it's quite helpful. But if you go back
to turn table, you'll notice that
now we are locked with this sort of rotation. So again, we would
just simply need to reset it by going into either
side view or top view, and now it's back to normal. Afterwards, we have
ourselves orbit sensitivity. So this is going
to be dependent on whether you're using
trackball or turntable. If you're using
turntable, sensitivity will be based on angles. If I was to increase this, we'll see that we are
super super finicky. So keep that in mind, we
can also revert back by clicking backspace
on our keyboard, and that goes us back to the
fault value, which was 0.4. Track ball will have
just a normal value, but this is also to
control the sensitivity. Oh, next up is something
called orbit around selection. This is pretty useful if we have let me just go ahead
and reset this rotation. It is pretty useful when we need to rotate it around
specific objects. So let's say we want to rotate
around radar previously, we talked a little bit about
how we can use the dot on the numpad to just make
sure it's centered. Well, we don't really
have to do that with this option on if
we have it selected. Everything that
we have selected, then will become the rotation. So right now, we're rotating it like was to put it on the side, this radar and with
the selection on, we'll see that we are rotating
it around this section, even if it's to the side of us. It's not turned to that anymore. It's based on a selection. If we have something
at the very corner, we'll have that selection
rotation, just like that. And you can see how useful that would by just simply making
different selections, we're able to have full control
of how we are selecting. This will not
affect, by the way, the option for zooming in. You can see that
we cannot zoom in now too much to this spotlight. I only affects the rotation type of that invisible focus point. But if we want to, we
can also just click the dot button that will again zoom into the
object of selection, and now we can rotate
it around and zoom in as close or as far
as we want from it. Next step is we have an option for auto perspective depth. So this one is essentially
what allows us to change from perspective to orthographic view whenever
we use those shortcuts. If I was to click on
Y button over here, we will notice that
we automatically go onto orthographic view. Same thing goes when
we move it outside, just rotating it using
Middle Mouse button. We see that it changes
now to perspective mode. If this disabled,
what will happen is if we go to this front view, we'll see that we are
still in perspective mode. So that way, we can use number five or this button on the side, which will allow us to go between perspective
and pro graphic views, and it's not going to change regardless of what motion we're
doing within a viewpoard. So you can see me
turning around, going between front and top, and it's still orthographic. Next up is going to be depth. So automatic depth
will allow you to mix up that issue with the Zoom that we
were just talking about. So if we have this enable, we'll be able to zoom in as close as we want to
this, for example, lantern, and it's not
going to be limited as we had before to that
invisible focal point. Instead, what it's going
to do is it's going to estimate the center point where we're trying to zoom into. We can go past it,
but you can see it slowing down just like that. Super useful thing to
have this depth option, especially when we're
previewing environments. But I wouldn't
recommend you if you're doing a single object modeling because that will give you no control over how far
or close the object is. If there's nothing
behind an object, the depth sensitivity
might start glitching out. You can see without the depth, if I was to just select
this radar dish, I can just use the dot to
have it as a focal point. Finally, we have smooth
view and rotation angle, so smooth view will
allow you to change how fast it goes between those traditional shots
of a click seven, and it goes to the top view. You notice how it doesn't snap. It just has that slight motion. Well, if I was to
change this to zero, it will just snap completely. So we can go between
front view, top view, side view, all of that good
stuff in a nap moment. There is no motion between it. This determines how many
milliseconds it is. If I was to change it to 1,000, which I believe is
the maximum amount, let me just go ahead and
add zero. No, that is it. Hundred, so 1 second. It will basically
allow us to go between those motions in a
much slower rate, which is very nice. Finally, we have
the rotation angle. So this is for that numpad
control when we had four, six and eight and two
to rotate it around. I by default, does
it in 15 degrees. If I want to set this to five, it's going to be doing
it in five degrees. So that's quite nice
alternative control for that extra bit of Vaness when we want to make sure that
everything is proper. Alternatively, we can set it
up to a higher angle, so 45. So if I click one, I can
just then afterwards, click eight and four, and that's going to
give me that perfect isometric type of a view. And yeah, that is going to
be it from this lesson. Thank you so much for watching, and I will be seeing
you in a bed.
8. Control Zoom Methods and Zoom to Mouse Position: Hello, and welcome back e one to Blender navigation
essentials, viewport controls,
and shortcuts. In the last lesson, we went
over orbit and Pan tab. We're now going to continue
on with the Zoom tab. In this section, you have
option for Zoom method. By default, it will
be set to dolly. This means when we use control
and middle mouse button, it's going to allow us to go
in and out just like that. Next up, we have an
option for scale. Scale option will
allow you to zoom in and out more like
a two the setup, so you can just really zoom in to those areas
where you want them to be. The reason it's more
for precision like is because it feels
more like pinching onto a canvas instead of a zoom in dolly motion that
goes towards the view. You can see how just making
go in and out almost like, well, pinching on Canvas. Uh, next up, we have more
of an interesting one. This is going to be a
continue type of motion. But this is great for large environments
and scenes because it has that load motion, and you're able to go
in and out based on the speed of how close it is
from proximity of the mouse. So when we start using Control
a middle mouse button and then have that location right
in this area over here, we can then drag
down to zoom out, drag in to zoom in. And just with this motion you can see how fast
we're able to do it. The downside is that
because it's so floaty, it might not always give you that perfect accuracy and precision as you'd have with 02. So next up, we have option. I'm going to go ahead
and just go onto Dolly for now or a Zoom method. Next up, we have
option for Zoom axis. So this essentially means that using Control and
middle mouse button, by default, we're using
up and down motion. If you want to change that, feel free to change it to horizontal, which will let you do left
and right, just like that. But that's quite handy. Right underneath it, we have an option called Zoom
to mouse position. This option will be for all
three of the Zoom methods. So that is nice. And essentially what it does is that it will allow
you to zoom in to position of
where the mouse is. If I was to quickly
show you what I mean, is that right now
when we're zooming, we are always going to be zooming towards the
center of the viewport. By having this option on, we can zoom in to
where the mouse is. So you notice how my mouse right now is towards the lantern. If I was to right
now use the zoom, we'll start zooming
in towards it. So that is very, very handy. So now if I was to zooming
in towards satellite, all I'd have to do is just
move my mouse towards it, and that will allow
me to zoom in. That's quite nice.
But sometimes, especially when zooming out, can be a little
bit more finicky, I would so next up, we have option four
mouse and wheel. So this is for
inversion options. So firstly, it means that the
zoom direction for a mouse, it's going to use Control
and middle mouse button. So if we were to have this on, it will allow us to move
upwards and zoom out, whereas before moving upwards, motion will zoom us in. So that's something that's worth knowing both for continue
shot and dolly shot. And afterwards, we
have mouse wheel, so this will be the
mouse scroll wheel. Using up and down motion just
to kind of go in and out. It inverses this option. And then for scale, well, we don't have
these two options. We just simply have invert
wheel Zoom direction. So that will allow
us to just go in and out because this is
based on pinching. What it means is
that it essentially goes with control
and mouse wheel and we are able
to just pinch it. So there are no controls
for inverting that. And yeah, finally, we have some controls for fly and walk, which we can cover
in the next lesson. So thank you so
much for watching, and I will be seeing
you in a bit.
9. Walk and Fly Navigation with Gravity Controls: Hello and welcome
back everyone to Blender of navigation
essentials, VPort controls and shortcuts. In the last lesson, we
went over the Zoom tab. Now we're going to go
over lie and walk tab. This tab is very interesting
because it has two options for UPort navigation,
walk, and fly. So the difference in here is
that simply by using, again, the option for shift and Omaki we're able to
go into the fly mode. If we hit tab, we
enable gravity, and this is called walk mode. Before we talk about fly mode, we're going to walk
over the walk viewport. So this is the one that uses
shift and that apostrophe, which allows us to move around. And in here, we'll find
additional settings for it. And the settings that we
have firstly is, well, if we have an option
to reverse a mouse, in case some of you
want to do that, feel free to reverse the mouse. Then we have mouse sensitivity. Which is essentially
just an option to allow us to have
more sensitive mouse. If I was to change it to ten, we have really, really
sensitive mouse. So feel free to play around with that to have the right controls. Teleport duration is for the
use of when we use spacebar, teleport, you see that
slight bit of transition. That is the teleport duration. If you set this to zero, we can have an instant change, which might be good
if you're not trying to get additional visuals out of it or if you don't
feel as nauseous. Or if you want something
super cinematic, feel free to change
this to a higher value. And then we can have these really nice shots where it just moves from
one area to another. You can even imagine how you can just set up Ie protation. You can click, and then you
can just look at an angle, and that gives us some
interesting cinematics. Uh, luckily for us, this is a bit different
than a smooth view, so we can increase it to
something more ridiculous. Ten actually is
the maximum value, but it's still very good because you can then make some really slow
motion just like that. And you can imagine
that just by having some recording on the viewboard can create some interesting
shots using it. Uh, next up, we have walk
speed and speed factor. So walk speed is the default
walk speed if we were to go and enable
gravity over here, by default, this is
the walk in speed. But if I was to
change it to ten, we'll have, well, much
faster walking speed. And walking speed factor, is going to be using it
for slowing or sprinting. So shift or the other button, which is Alt will control that. So if I was to say the 200
or ten is the maximum value, sorry, we can just sprint. You see me holding
Shift, it just like sprints so fast in comparison. So also Alt will be super, super slow, but that's
quite nice as well. Next up, we have gravity. So gravity will allow us to control how the jump height is, which is, by the
way, also controlled by the multiplier
value at the bottom. So previously we
talked about using dots and commas to
increase the jump value. So this will allow us to
use V to jump like so. But by increasing the
jump height over here, we are essentially multiplying that value with this value. So if I was to set this ten, oh the ten, like so, and then use the jump. E is going to jump
us very, very high. So the jump value
will just simply change the jump
height, default value. So whenever we are going
back into the option, when we go into the walk mode, the default jump height
will be affected by this. Notice that's quite
interesting is that if you change
the jump height, you see me changing
it at the bottom. I change the jump height.
Now it's very, very small. And if I was to go back off
the view and go back into it, now it's again that same option. So now it's again that
very small option of 0.59, even though the jump height over here is still set as ten. So it is interlinked with the parameter that
we can use at the bottom. Honestly, leaving
this as default will be best and just changing it at the bottom
will give you the same value. Next up, we have the
option for view height. So this is the default
view height, 1.6 meters. If we change it
to something like 10 meters and we go
into the view mode, we'll see that we
are now like giants walking on the scene. So that's quite nice. I'm just going to go ahead and change
this height back to normal. And finally, view navigation. So we had option for walk, which includes not
only walking but also well flying using a tab
by disabling the gravity. We can fly around
just like that. But the fly navigation is way different than
the walk Danimation. Now, in the next lesson, we
are going to talk a little bit about the view
navigation for fly. So thank you so
much for watching, and I will be seeing
you in a bit.
10. Mastering Fly Navigation for Precision Viewport Control: Hell o and welcome
back, everyone to Blendt Navigation essentials, viewport controls,
and shortcuts. Now that we have
ourselves the setting for fly and walk fly view
navigation turned on, we're going to be able to have a completely
different setup when we click Shift and
the apostrophe key. This time, you'll see that the crosshair is actually
into a small square. And when we move
our mouse around, it feels more hovery. And the reason for
that is it's set up as a fly sort of a drone motion. We click D, for example, we'll see that we
start hovering. So if we click D you more times, we'll start flying
in that direction, though. So that's pretty nice. And then we can just use our
mouse to control the flight. So by just playing
around with, you know, WASD, we're able to fly around
our scene just like that. That's pretty nice. Another
thing that is worth knowing is that it also has Q and
E to fly up and down, but this is going to
be more equivalent towards the local motion. So if I was to look down, it's going to,
well, fly forwards. So it behaves or it should
behave like more of a drone. Right. Next step is we
have an Alt precision. So this will allow us to, well not fly as fast. So by holding Alt, I'm
able to just click D, and you can see it's going to be flying much, much, more slowly. And also click W to move forward and just kind of use S to kind of start
slowing down as you can see, much more final controls. Then we have acceleration. We can use either a numpad, minus or plus, you increase or decrease
the acceleration that we already inherit. So let's say we are
moving forward, you can see the
acceleration at the bottom is saying that we are at one, but if we start clicking plus, it's going to
increase the speed. If we start clicking minus, it's going to go
negative acceleration. And with that in mind, you can also use mouse wheel. So just going up and down, you're able to control the speed of how
fast you want to be. Finally, we have an option that says free look that
basically allows us to move in a setting that will not affect the motion
of the camera. So right now, if I was
to move like this, just by clicking a couple of
times, we'll move sideways, and if we start rotating our
camera, the viewport camera, we are going to be able to
hover around this environment. But if I was to hold control, we can essentially look around and it's going to
keep that same momentum, and you can see that
we're flying off even though we're rotating
or camera and whatnot, it's going to be moving
in that same direction. Once we release it,
it's going to start behaving with that same local
acceleration that we had. So you can see we're all
again going sideways. Omo final thing that
I'd like to mention is how easy it is to control, not only by using WASD Q and E to move back
and forth and such. You can also use a
middle mouse button. By clicking and holding, you can drag it around
essentially padding the view so you can just have some really,
really stable shots. And, yeah, that's
pretty much it. Unfortunately, there's no other settings
for the flight mode, just like we had for walk mode. All of the settings are
done with the bottom app. If we want to cancel it
just like we did with walk, we can hit Escape or hit
our let Mouse button, and we're going to get back to the usual viewpoard controls. But that's going
to be it for me. Thank you so much for watching, and I will be seeing
you in a bit.
11. Customizing Blender Viewport Controls and Input Settings: Hello and welcome back everyone to Blender Ogation essentials, viewport controls,
and shortcuts. In the last lesson, we went over everything that you
need to know in terms of light preferences
and how to make use out of alternative
controls for the viewport. We're now going to go back
onto the edit preferences tab. And this time, we're going
to go onto the input stab. So here you'll find some alternative options that will help you with your
viewport controls. And the first option
that we have is going to be for emulate numpad. This option is great for
when you're using a laptop because if you don't have this numpad over here on
your side of the keyboard, the option to emulate it, the option to emulate
the numpad will allow you to use the keys
in the same matter. So using one, three, seven will allow you to go between front side
and top views. You don't really need to use numpad if you have disenabled. If I have this
disabled, however, won't be able to use those
same keys as you can see. So right now, I'm clicking
just upper numbers on my keyboard and it's
not doing anything. Next up, we have option for default to advance
numeric input. This is more for when
we're moving objects and we want to use more
in depth setup. It doesn't really
affect the viewport, so we're going to
move on from here. Afterwards, we have
options for Mouse tab. But this option will allow you to emulate middle mouse button. Having this emulate free
button or a mouse enabled, we'll be able to use Alt
as a middle mouse button. So for example, beforehand, we were able to use
middle mouse button to move around like soap. But let's say you're on a
laptop and you have a touchpad. So alternatively,
what you can do is have this enabled
and then use Alt, and then it will allow you to use the same options
we had previously. So before we had middle
mouse button to move around, now we can use Alt plus left
mouse button to move around, and that will work
in the same way. Alternatively, we can
also use Alt and Shift pan around just like we had Shift and Middle
Mouse button, so they would work in
the same exact way. So essentially, all the options that you had with
Middle Mouse button, it will work over here. So Alt and Left click
will allow you to rotate. Alt Shift and left click
will allow you to pan, and Alt Control will allow
you to zoom in and out. Next up, we have an option
for continuous grab. This is more for
manipulating objects. We don't really need
to worry about it. It just allows us to go past
the norm of the screen, doesn't limit that, and it
wraps around the screen. Afterwards, we have option
for release confirms. It is also more for operations. But what we are interested is in these options over
here right underneath. We have mouse drag thresholds. They would allow us
to move to an action. So right now, if I was to use middle mouse button
and start dragging, we'll see that, well,
we start rotating. By clicking, we
don't have anything, but mouse drag threshold, if we were to increase it
a maximum amount of 255, you're going to have more
perhaps of a resistance. Afterwards, we have tablet API. So this will help
us in case we have some issues with the
automatic setup. By default, it should be good. It would either use
Windows Inc or Win tab or if you're on OS, it would have an alternative. But if you have the
right drives installed, this will work quite well, but if it doesn't, you'd be able to choose
the alternative. Then we also have Max
threshold and softness, which is more for
tablet scouting. And here is an interesting
one multi touch gestures. So if you have a tablet
or a touchscreen, using multitouch will
allow you to zoom in, pinch in, using two fingers,
you can pan around, things like that, using multitouch gestures will
allow you to do that. This should be on by default, so feel free to play around if you have the touch support. And finally, we have
something called NDOF, which is for a free D mouse. So by default, mostly
everyone uses two D mouse. But in case you have one
of those free D mouses, which allows you to
move in free D space, you'd be able to make use out of these settings to control well specific parameters
of the set mouse, giving you full control
in free D space. Options include things like ability to change between
object and flight mode. You can also choose
a lock horizon, so it wouldn't have
that same issue as we had with the tilting or
our navigation track ball. And then we have
some fine tuning of where we want this to be
centered around for rotation, how we can show the axis or if we want to show the
orbit center as well, and small tuning such as
sensitivity controls, as well as how you
want it to be zooming in and of course, the
inversion controls. So that's quite nice as well. And yeah, that's pretty much it when it comes to the inputs. So thank you so
much for watching, and I will be seeing
you in a bit.
12. Frame, Isolate, and Zoom with Essential Viewport Shortcuts: Hello and welcome back everyone to Blended Obligation
Essentials, viewport controls,
and shortcuts. Now we're going to
go over some of those more specialized uses
of shortcuts in the viewport. And the first one that
we're going to touch up is the dot on the numpad. We previously talked a
little bit about it, but let's go into full
depth about this option. And what it does is essentially
by selecting an object, it grabs the object, and when you click on the dot, it zooms into the viewport, fully object being
centered to the viewpoint. Way it works is it grabs a
bounding box around an object. So every object has a certain
type of you can imagine, like an invisible square, which has an entire
object inside of it, and the size of that box is just right for every
single object, meaning that when we select
the wall, for example, if I was to click on
this dot on the numpad, we'll be able to have this
same object even though it's bigger to be in generally the same area where this box would have
been in the viewpoint. It's going to try to have used that same spacing of an object of the bounding
box for the set viewpoint. If you were in edit
mode whilst editing meshes and had certain
little dot selected, you would move into just these specific selections like vertices or edges
depending on what you have. So that's something
worth knowing. This item is great for when you are outside of the
boundaries, for example, and you need to find
yourself the object, you can go and select one of
the objects that you have, for example, this Jerry can
on the top right hand corner. And with the selected,
I will now move my mouse to the middle
of the viewpoint, click the dot and it goes on to the selected
object just like that. So we're able to locate
it where the scene is, where the object is
directly right away. If you don't want to locate the scene as is with the selection, there
is an alternative. That alternative is, if we
were to click Home key, it goes on to the entire
selection of our environment. So what it does is it creates
a sort of a bounding box, similar to what we had
with individual items, but this time it
creates a bounding box of an entire scene. This means that everything
that is visible is going to well be put in the center of the frame
when we hit Home button. Because we have an entire scene when we click Hope button, it's going to
position our camera, not the camera position
or location of the camera itself in that area. If we had everything
else hidden and maybe just a couple
of boxes selected, only this area over here, as an example, I will just
show you hide everything away. So if we have a lot of items hidden and only some
pieces are missing, it only goes onto
the set pieces. So it only grabs everything
that is visible. And that means that the things that are
not visible are not going to impact
this home key. The alternative
for using home key is going to be something called centering
and framing it all. So we center the cursor
and framing it all using shift and C. It does the same operation
as using home button by framing the entire
scene except this time, it also moves this predecursor. We're not going to go too much in depth in
regards to that, but essentially what this is is this free decursor allows us to, well, position various
things like we can relocate origin points or we can spawn objects when
we spawn new objects. It's going to be based
on this free decursor. But when we use shift and C, it reframes the entire position of our viewport as well as
resets this predecursor. So it allows us to easier
start off on a new object. Uh, next up, we have
something called Zoom region. This is very handy if we want to zoom into
specific region without needing tediously
zooming in to where we want it. The way it works is
if we click Shift B, it gives us a square selection, which we can use Leftmuse
button to drag it across. And everything that's
been dragged across, it'll try to put it into
this sort of a bounding box, then move the viewport
onto the bounding box to make sure that everything is within that set selection. This is not going to work if you're going to have
selection outside. I will say depth too large, meaning that it tries to
grab anything outside, but there's nothing outside, so it's going to give us an error. It needs to have
even a slight bit of depth or slight bit of selection
for it to work properly. So you can see me selecting
just a tiny bit over here, it's going to move
straight to it. That's quite nice, especially
when we want to, well, move on to parts directly and just kind of visualize
how they look like. Maybe from this
angle, you can see, we can just go onto the
lamp, like so straight away. It gives us perfect control. Next step is we have an
option for isolating view, which will allow us to create a localized viewpoort
space for selection. If we have a
selection like this, we can click the slash
key on our keyboard, and that's going to isolate
the entire selection. By clicking it back,
we're going to go out of this selection. If you're wondering when you
are inside of the selection, all you have to do
is just look at the top left hand corner
where it says Local. And if we are in a
localized space, it's going to have
that local word next to the scene name. But yeah, you can see we're going between
local and non local. This is going to be based on
a selection that we have. So if we just have these
boxes and the sandbag, we're going to
have a local space of just those selections. And it's quite useful and
helpful to preview to help with the modeling and whatnot to kind of help isolate
some specific parts. It's not the same
as hiding objects because they're going to
be treated differently. Even so, using something
like a home key will allow us to frame all the
localized assets in one spot. So when it comes to that matter, hiding or localizing
items will work the same for both of the
home button uses. Next up is if you want to hide some of the parts or sorry, take the parts out
of localized space. So for example, this terrain,
if we want to take it out, what we can do is we can
use Alt and Slash key, and that selection that we had will be taken out
of the local space. So in case you don't want to make re selection every time, what you can do is just select
the parts you don't want. You can click Alt and Slash k, and that's going
to give you just the right type of assets. And then we can reframe
it using Shift and B. But there we go. Quick note when we are in localized space, it's going to essentially not
include any of the items. So if we want to select
this Gerrican and try to move using the dot to focus on the jycans not
going to do anything. The reason being is that we
are in a local space which is outside of the normal
environment spacing. Now, that is something
worth knowing. But now that we go out
of the localized space, we see that selection is there. We can even see it
highlighted in the back. We can click on a
dot and it's going to bring us to this Jerycan. And that's it, happy
modeling, everyone.
 3D Tudor, Bestselling Blender Author & 3D Educator