Transcripts
1. Why Blender Snapping Feels Wrong: Grid, Snap Base and 3D Cursor Fixes for Beginners: If Blender snapping feels wrong, it is usually not because
Blender is broken. It is because Grid, snap base, and the precursor are doing
exactly what they're told, which might not always
be what you meant. Hi, I'm Luke from Pretty Tudor, and in this blenders
essentials class, we fix that properly. There's also a resource
pack included, so you can follow along without setting the whole
thing up from scratch. You'll learn how snapping
actually works by breaking it into three
simple decisions. What moves, what it snaps do, and which transform it affects. Once that clicks, Grid and Increment stops feeling random. Snap base starts making sense, and your object placement
gets a lot cleaner. You will know exactly why
something lands where it lands. We also dig into the
precursor properly, using it for
placement, rotation, surface alignment,
module builds, and fixing awkward offsets that keep prowing
your scene off. So if you're tired of
fighting too, join me, and let's get it
working the way it should until next time,
happy modeling, everyone.
2. Mastering Snapping, Grid and Transform Precision: Hi. Hello. Hello, and welcome, everyone to Blender
Essential for beginners, snapping and alignment Basics. And with these lessons, you will have a resource Pack
provided for you to help you familiarize with
all the snapping tools that are within Blender. It's not mandatory to
follow along these lessons, but I do highly recommend
you to grab the project, as it will give you a good hands on experience with the software. By the end of this course, you will know what part
of an object moves, what it snaps to,
which transform effects and how to fix
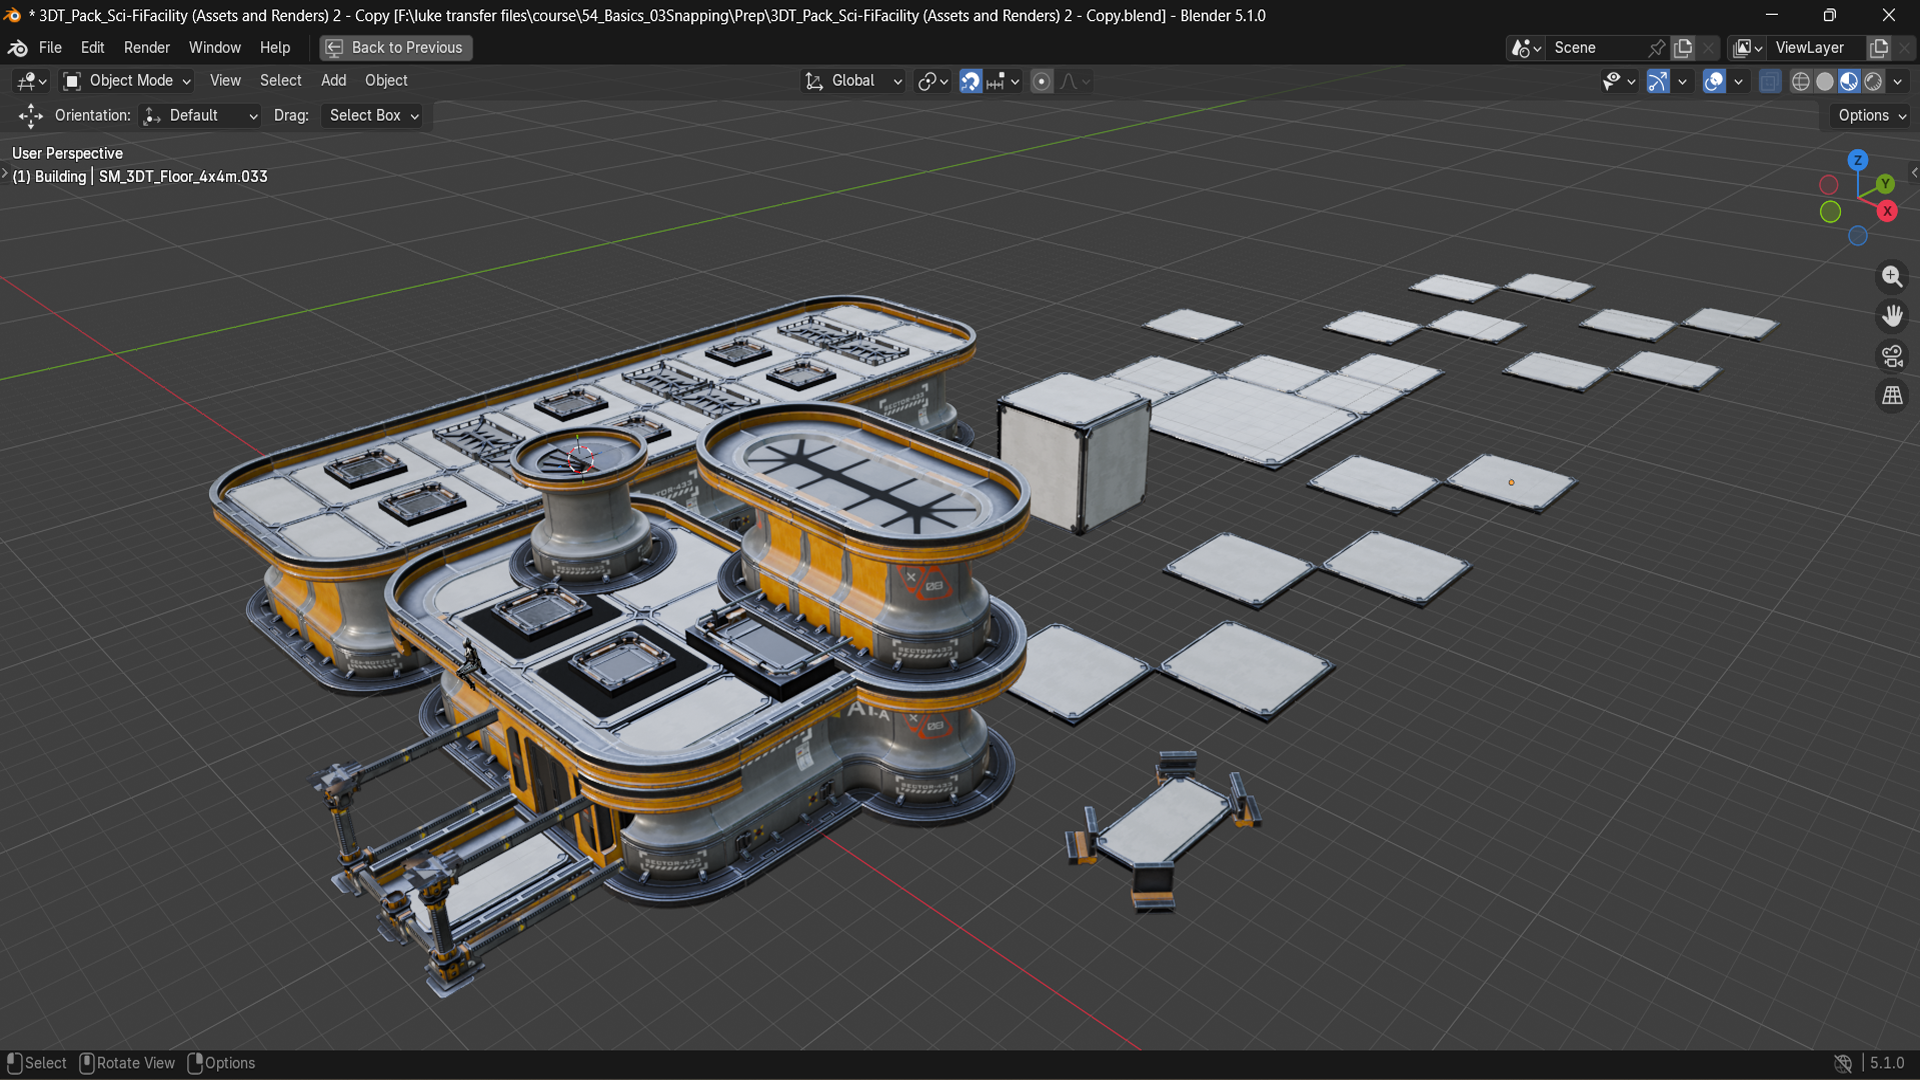
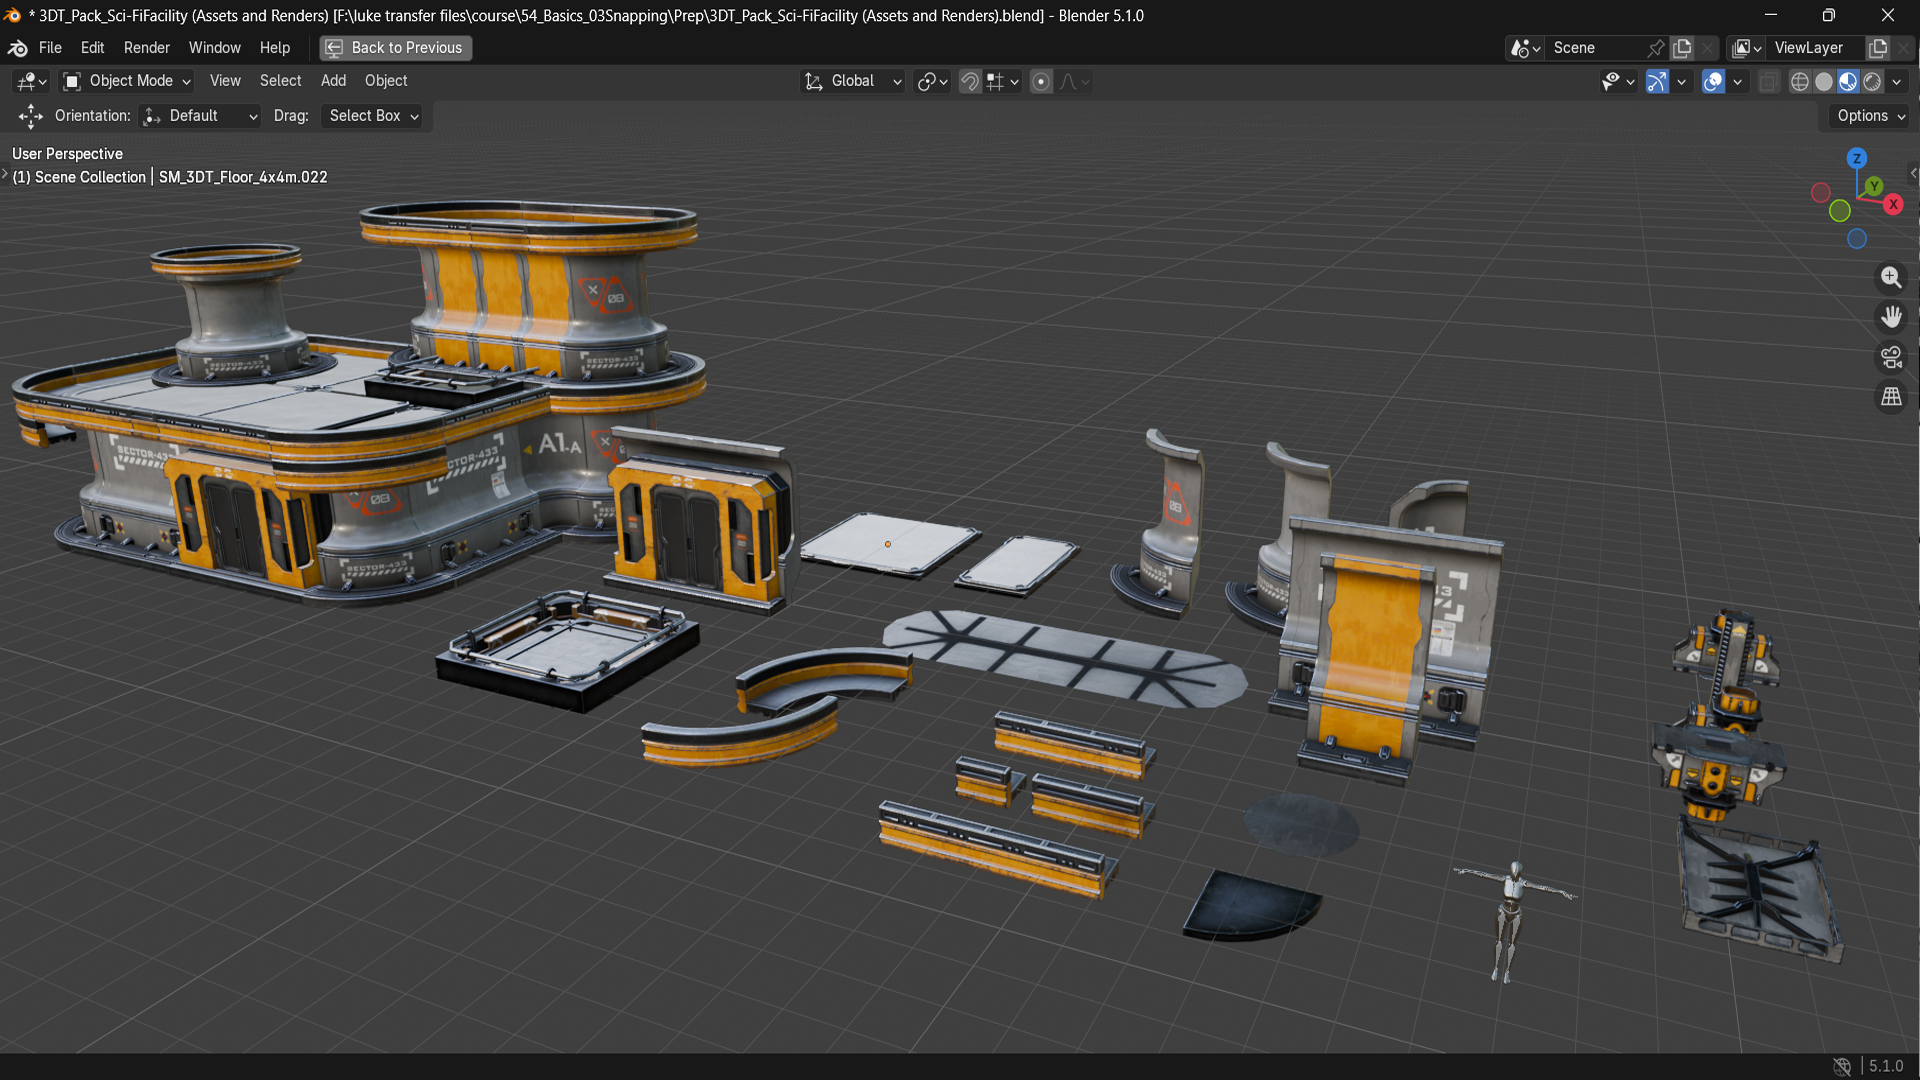
snapping when it goes wrong. So when you open yourself
up with the project, you will have this setup. And before we get into it, I would like to mention that on the bottom left hand corner, all the buttons that I'm
going to be clicking, you are going to
be seeing all of these shortcuts and
just in general, the combination of
keys that we're using throughout the setup. Alright, so what
is snapping tool? Well, at the top tection
of your viewport, you will see snapping
option over here. If this is on, it will be
highlighted with blue. And if it is off, it
will be grade out. Next to it, there are snapping
options button over here, which if you were
to click on it, you'll have a bunch of options, which might be a
little bit different depending whether you
are in object mode, edit mode, or any other mode. By default, though, the snapping should
be set as Increment. Which is the basic
snapping option. And to show you what it does, I'm going to quickly spawn a simple cube on the scene,
and without snapping, we can click G and move the
cube around using it like so, and you can see that the motion itself is going to
be very smooth. But with the snapping
option turned on, we will notice that now
our cube is jittered or actually is snapping
two sections of a grid. It is not just a simple
lock and snap to the grid. It is a placement system. It tells Blender what point on your selection
you should move and what kind of thing it
is allowed to snap to. The snapping tool allows you to have a great precision
and placement. Instead of just moving something freely and judging by the eye, you can use a snapping
option to have specific points for
your selection, for your motion, and for your general adjustments within
your free D environment. A great example would be
for these couple of assets. This is a great example of a modular part because it's
set up in a nice uniform way, and you are able to
essentially snap one piece to another using the
set snapping method. So not only does it
give you precision, it can also speed
up your workflow, and you wouldn't have any
of the overlaps it will snap in perfectly
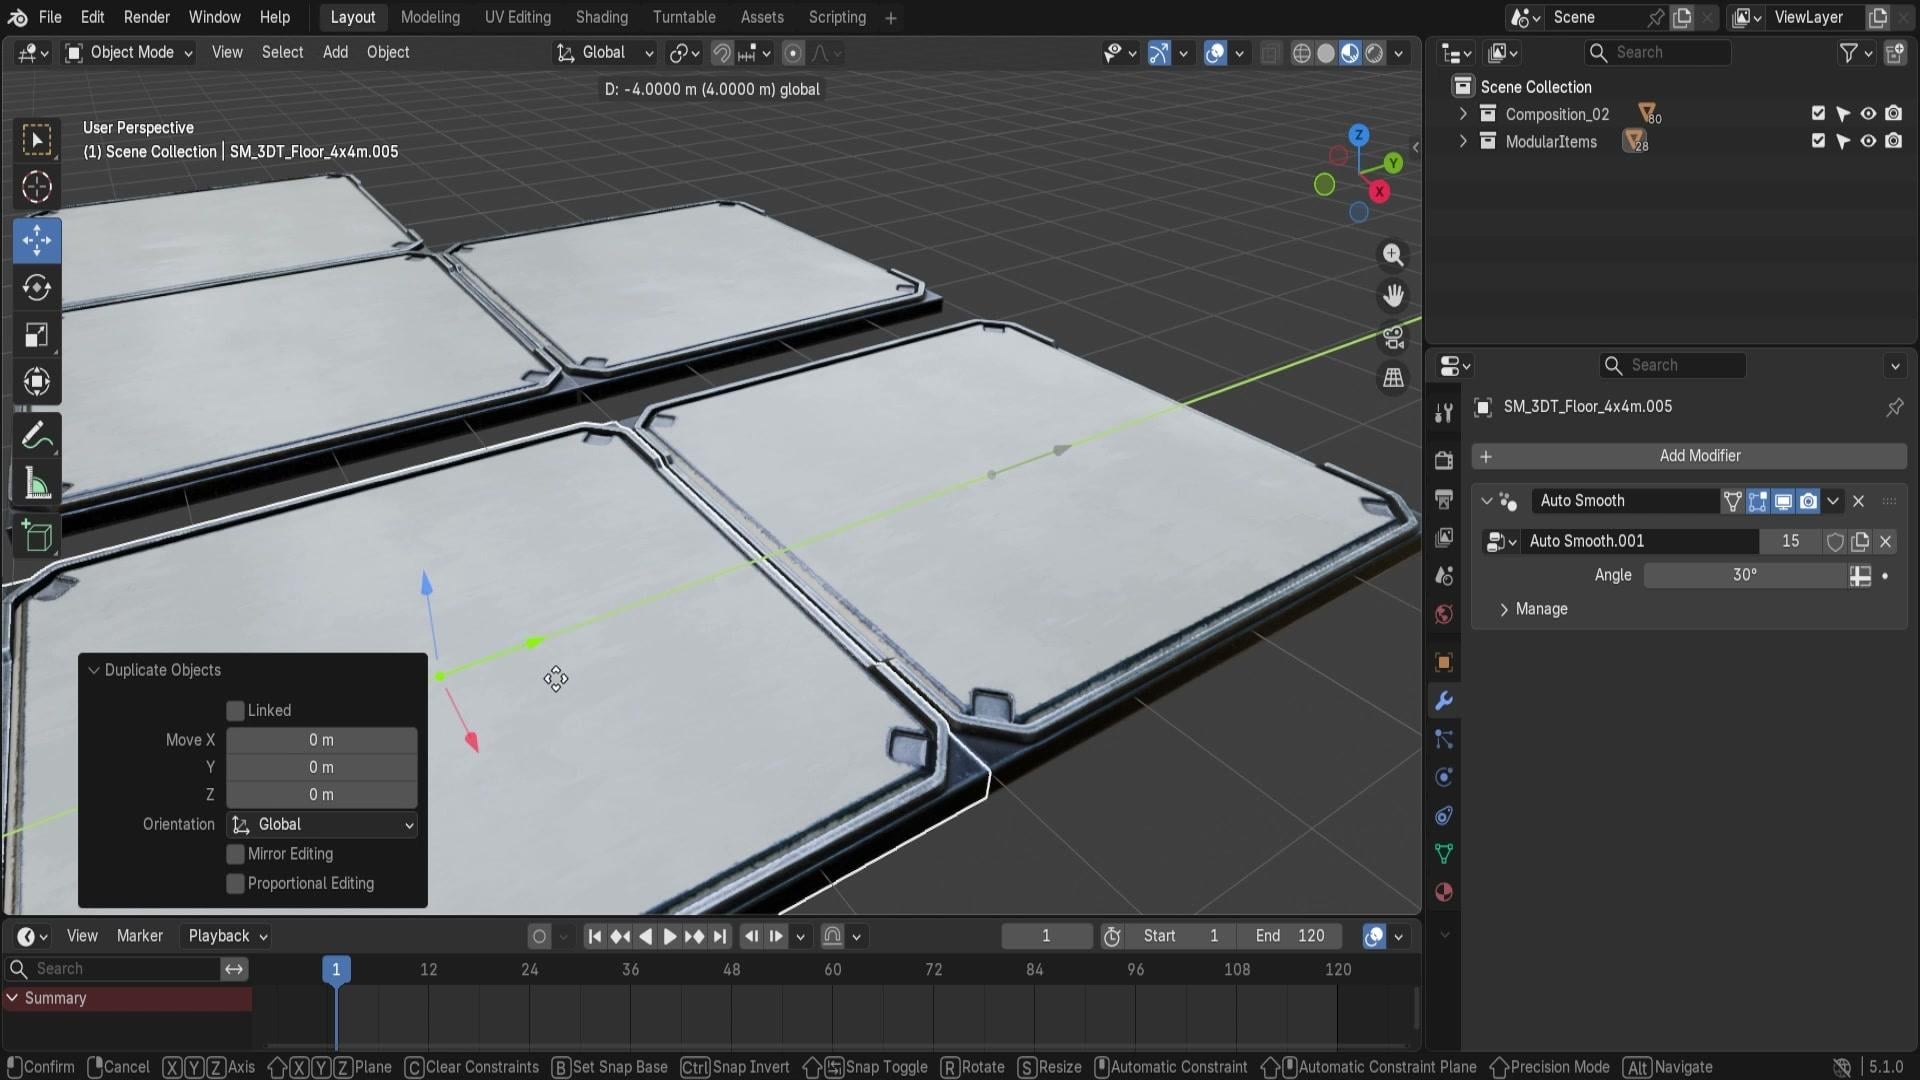
with another object. So as a quick example, we can even go to
our module pieces. Duplicate one of
the grid sample. So this platform over here is going to be very nice for us. Let's go ahead and
click Shift D Escape to make a duplicate
and move this off to the outside of that
set duplicated block. Now, if we were to have
the snapping turned off, we would be able to move
this around quite easily, and it wouldn't lock anything
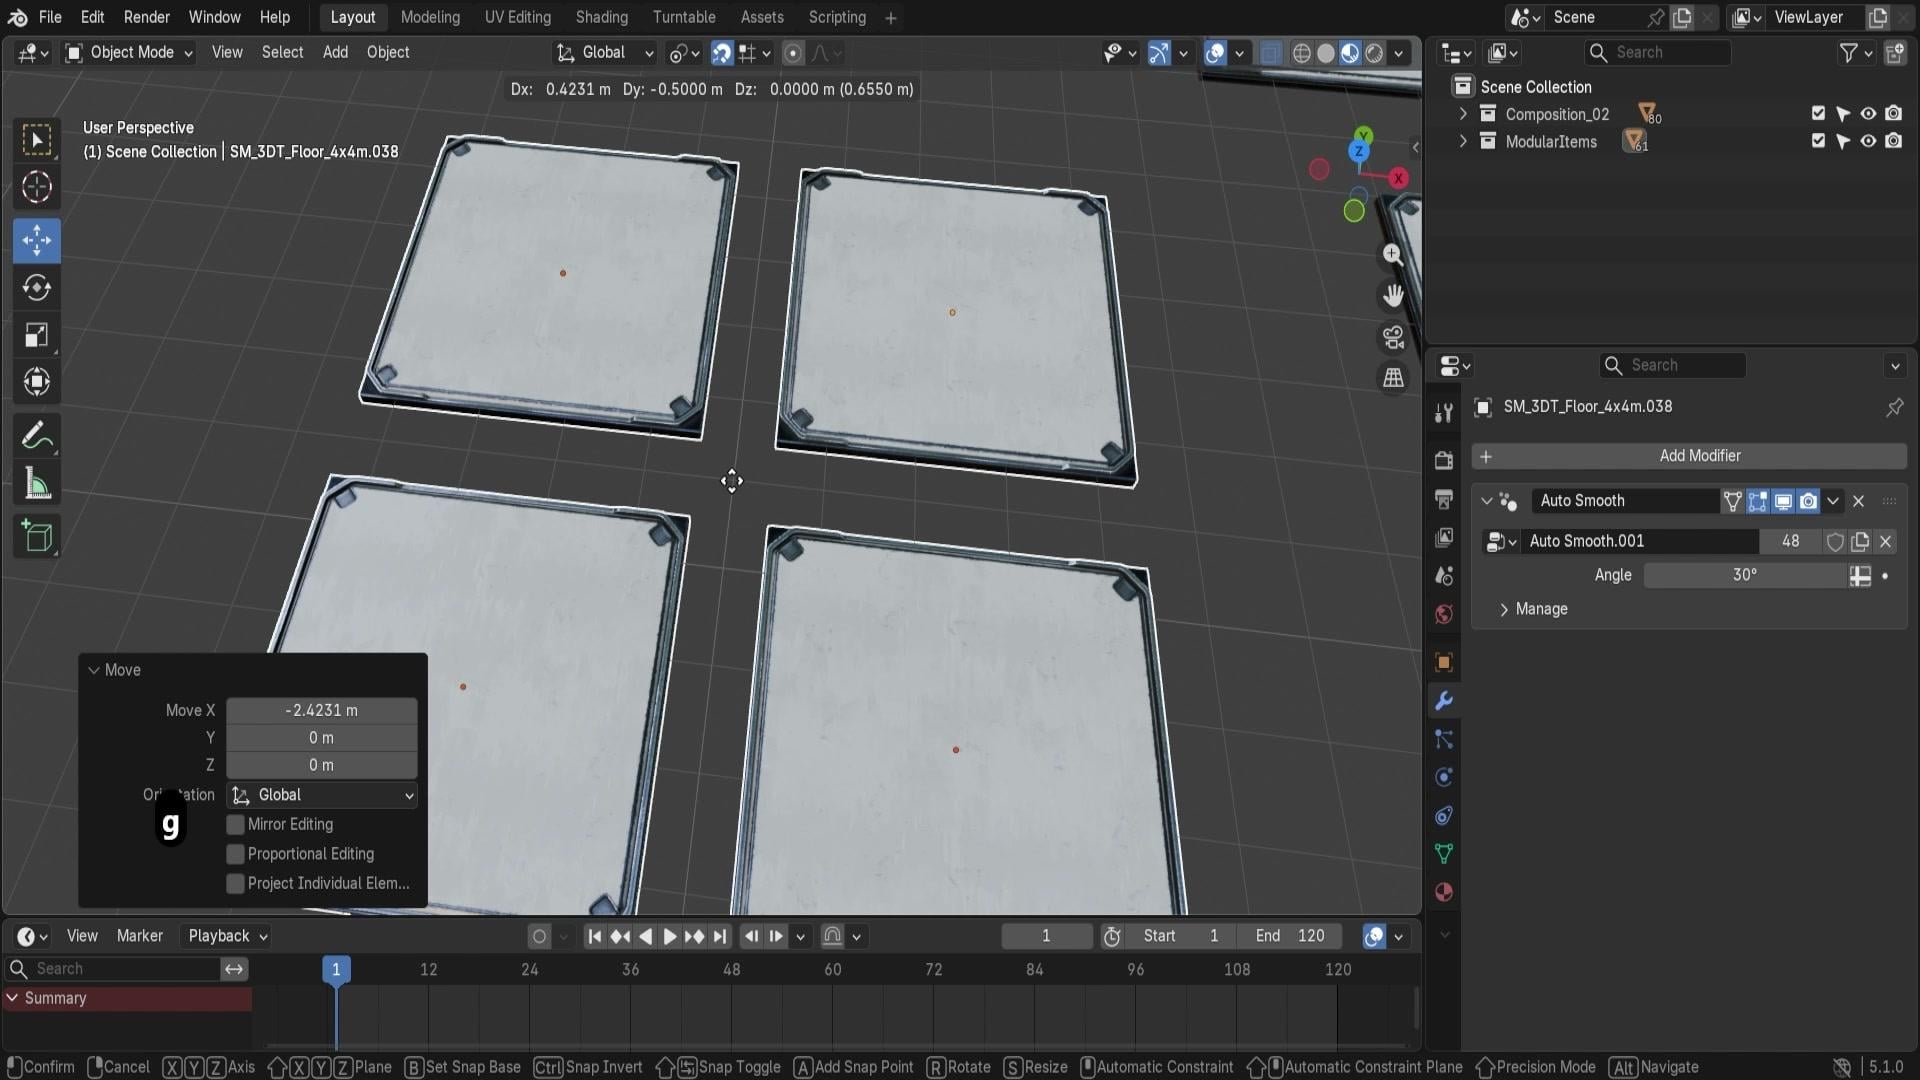
in terms of row placement. But when we have another
duplicate using shift and D, we can simply move this off
to the side, and there we go. It's going to snap it
perfectly to one another. The other thing that I'd like
to mention here is that you can turn it off and
on using a shortcut, and that shortcut is going
to be shift and tab. Using shift and tab, you're going to be
able to quickly switch between on and
off of the snapping. Just make sure you
do it all at once. If you were to hit just the tab, it's going to go
on to edit mode. So just make sure
to use shift and tab and that will enable
and disable the snapping, which is pretty good, as
it will allow you then to move your objects
around like so. The thing that I'd
like to mention is that if you want
to, for example, have a specific gap whilst
you have the object moving, you can hold control, and that's going
to turn on or off the snapping depending on
what you have in what state. So right now, because I
have the snapping turned on and I am moving the object, if I were to hold control, it's going to turn
that off just for this particular function.
So that's quite nice. And if we have this
turned off and now we duplicate this for
example, and now we want to, for example, snap it
to this cover block, we can hold control, and then it's going to turn
on the snapping. So it's essentially going to do a live flip whilst we're doing
the transform operation, which is very, very convenient when working
with multiple items. So for example,
over here, I want this specific gap to be
quite a bit smaller, so I was able to do
it like so I can then make another
duplicate like so, and using Control, I can snap it like this to the section. And maybe here I want it
to be more in the middle. And if I was to click G and X, I might want to hold Control
and maybe snap it or maybe just manually
place it like so. That way, working with snapping can be a seamless process. You can work with and without the snapping options throughout your placement of blocks to make the best
out of your items. This control option
doesn't just turn on the default setting for
what we have over here. If I have the
snapping turned on, you can see that I
can, for example, use rotation, using our Z to
rotate it around the object. By default, it's going to
just rotate it naturally. Even though we have
snapping turned on, we don't have the option
set to be using rotation. We're going to come
back to that in a bit. But what we need to
know now is that if we're using our Z
and hold control, we can start using
full snapping. So because the rotation by default doesn't have
the snapping turned on, having it using control, it will allow you to turn on snapping and you
can rotate this, for example, 90 degrees
just like that. The other thing
is, it's going to work the same way
for scaling as well. By default, it's not going
to have any snapping setup, but if we were to hold control, it's going to start
snapping increments. So you can see that we can
just upscale it to one but one or the exact value
of two. So there we go. And then afterwards, we
can use our mouse click to just make sure that it's
scaled up by a value of two. Thank you so much for watching, and I will be seeing
you in a bit.
3. Understanding Snap Base, Target and Transform Control: Hello, and welcome back ed to Blender Essential for beginners, snapping and Alignment Basics. Now, before we start learning each snapping option in depth, I want to show you
the whole system as a connected set of controls. Snapping works best when
you stop thinking of it as a single button
and start thinking more of a set of decisions. And Blender needs to know
essentially three things, and those three things would be what point from your
selection should move? By default, you can see that when we have an
object selected, for example, it will move an object or rotate an object from the center point for
this specific platform. So that's the point
right now that it uses for all
of these options. The second thing that
it needs to know is what kind of thing
you want to snap too. Right now, by default, it's set to increment snapping, and that allows us to basically
move it in increments to make sure the objects
snap together nicely. And the final thing is what kind of transforms snapping
should affect. So we already slightly
touched on that, and that would be whether you want it to only
affect the motion, the movement or rotation
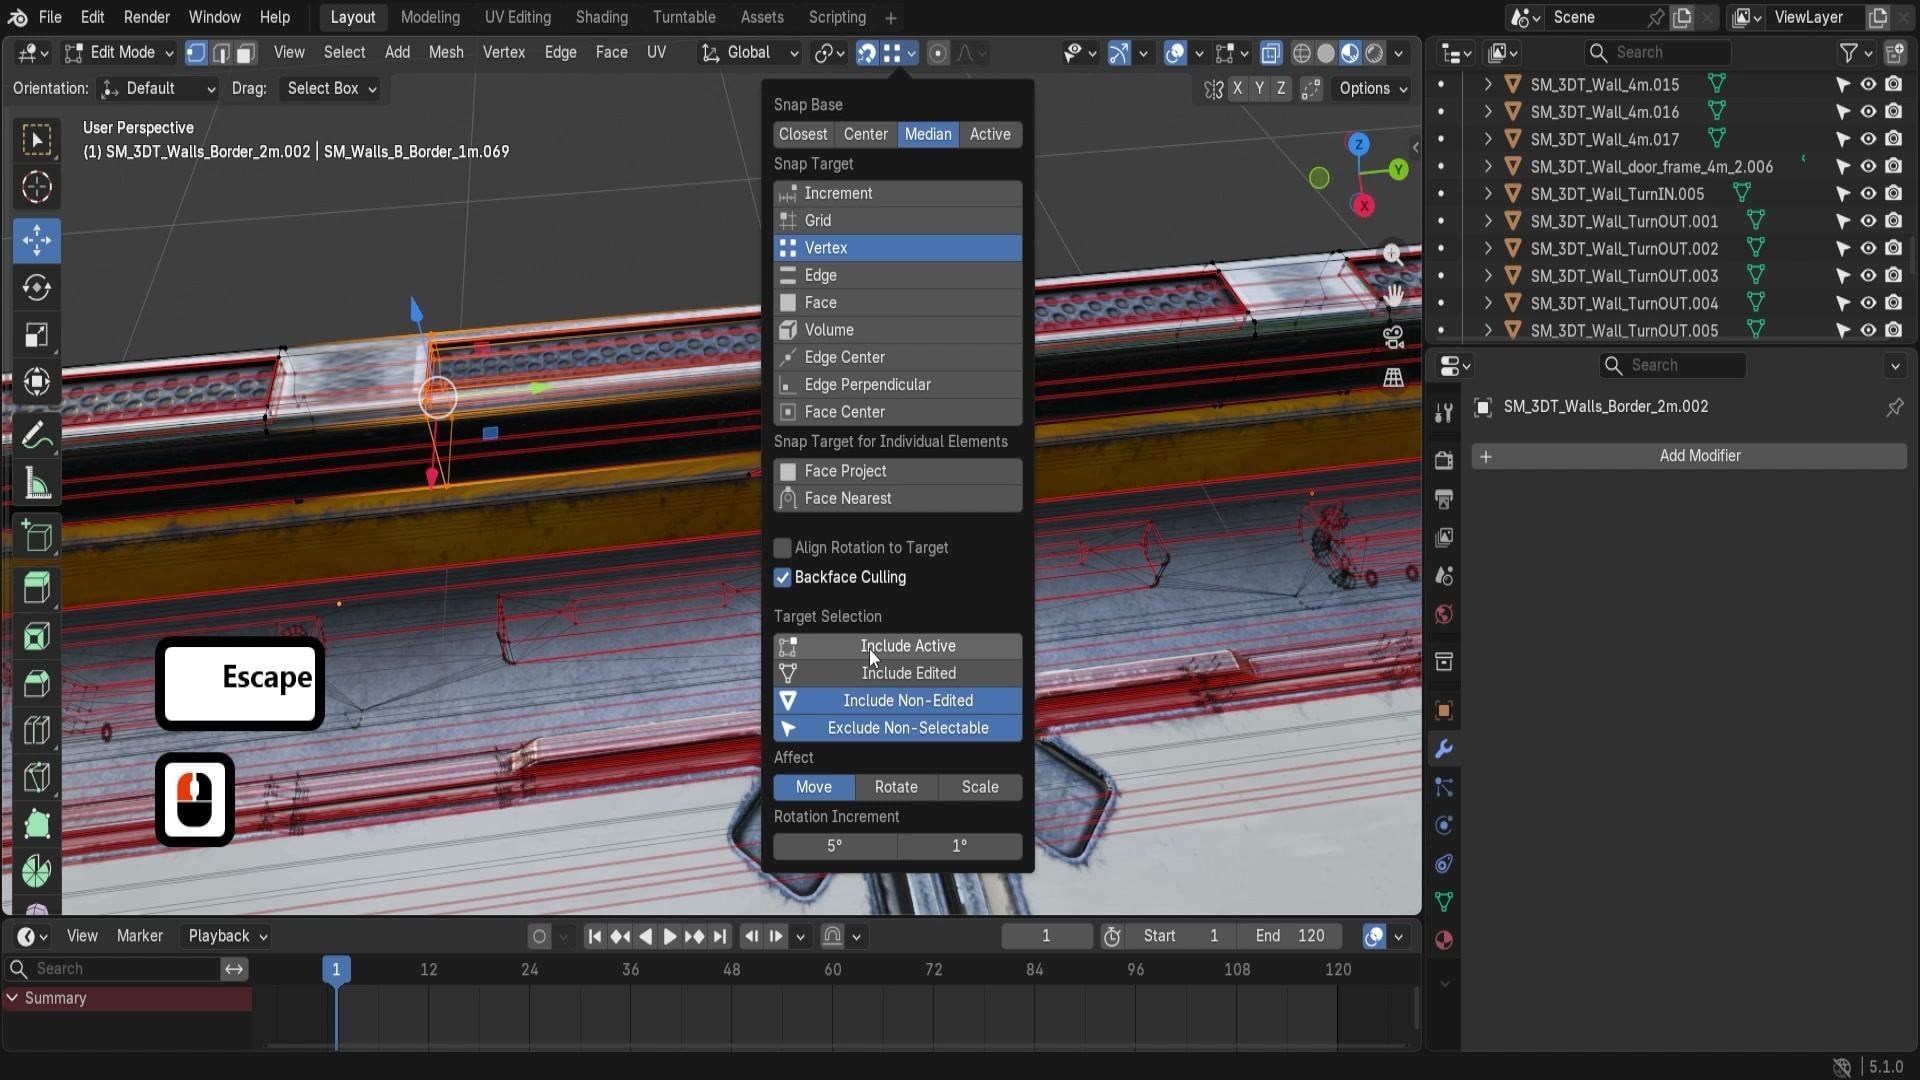
or maybe scale. And all of these options can be essentially controlled through the snapping tool over here. And so start off, let's go ahead and
open it up and just quickly get ourselves
an overview on what these parts are. So at the top, we
have snapping base. This is going to allow us to tell what point from
the selection it moves. By default, we have it set
to center, then target. So where do we want to snap
the snapping to occur? And this has a bunch of options, including Increment,
grid, vertex, and more. Then there's a couple
of additional ones called face to project
phase nearest. This is going to be part
of the snapping target. And underneath,
we're going to have a selection of
filters and rules. These are going to be changing a little bit depending
on what we have chosen. So for example, if I
have selected to volume, you'll notice that we
have snap to peel object, but if I have it
set to Increment, this will going
to have an option for absolute increment snap. So depending on an option
that we have selected, these selections might
vary a little bit. Then we have the target
selection and effect, these options will
essentially determine what is able to be used with
the snapping option. And finally, we have
rotation increment. So this is basically to control how big of a
rotation snapping it is. It is essentially a snap
target, but for rotation. Just changing a
couple of options, we can get ourselves a
completely different result. So if I was to select these, I can just put them over here and make a duplicate
and move it like so, and you can see that
here is going to look like a completely
different type of snapping method to what
we had previously. So it's not only just
simple snap to increments. There is a whole other way
of using the snapping tool. Which we're going to
go through in a bit. Look, let's now
make sure we have the default setup and we're going to end
this lesson here. Thank you so much
for watching and I'll be seeing you in a bit.
5. Snap Base, Pivot Points and Active Element Control: Hello and welcome
back everyone to Blender essentials
for beginners, snapping and alignment basics. And now we're going to
talk a little bit about the next part of our
snapping options. Previously, we talked a
little bit about snap target, which was Increment and grid. But before we move on
to the other options, let's go back a little bit and talk a little about snap base. So by default, you should have the option turned on for center. And what this means
is essentially it's going to grab the
center of the object. And it's going to use
this as a base to snap it to the grid because well, right now we have the
grid option turned on. So if I was to click
G, I can move it, and you can see it
snaps directly to this part of the setup. And the reason right
now it's called center is because it uses
the center of an object, not the center of
the mesh as is, but the center of
the origin point. And the origin point, if I was to show you real quick, zoom in a little bit
to one of the objects. It's going to be
this orange circle right in the object over here. It doesn't mean that it's always going to
be in the center. So, for example, this
little piece over here will have the center of
origin in the quarter, meaning that because we have the object selected
just by itself. If I was to click G, it will
snap this origin point. So it's not exactly going to
be the center of an object, but rather the center
of the origin point. So that's a quick
distinguishment. And the other thing
that I'd like to mention is that by default, if we're just using one object, it might not look like much, but if I was to duplicate it, move it off to the
side a little bit, just to show it as
a separate piece. If I was to position this
in the center of the grid, and I want to make a duplicate
with another object. If I was to hold shift
and select both of them, now it's going to be centered
in between those objects. So if I click G, it's
going to allow me to reposition these
items like soap. But let's say one of these duplicates is a
little bit off center. Let's say we want to make
a little bit of a gap. So if I have both
of these selected, the object for the
centerpiece because of these both selections origins are in a center is now going to
be centered up like so. So if I click G, it's
going to now want to center it with this
being in the middle. So you can see it's essentially
going to move it like so, and now we have a little bit
of an offset just like that, where the item is positioned a little
bit offset to the grid because it wants to have
both of these panels to be snapping with, again, the centerpiece
being right in the middle. The other thing that's
worth noting is that not only is
affected by snap base, but because we have
the center selected, it tries to use the middle point of whatever the origin point is, and it's important to know a little bit about
origin points because prior to the transformation
of the snapping function, we're also using the current
transformation center, which can also be changed. So not only does
snap base affect it, but we can also use a
pivot point adjustment. So at the top, we have another
option over here, which allows us to use
a transform pivot point if I was to change this to, for example, active element, it will change it to the
basically last selected item. If I was to select
this panel over here and hold Shift
select O panel over here, we can now hold G
or sorry, click G, and you can see that now it uses this origin point as the base. Before it determines
the snapping base. It firstly determines what exactly this pivot
point is going to be. And if we select active
element, for example, it's going to try using
the last origin point. So essentially, the center
point is going to be considered as this origin point over here for the last object. If I was to select
something like individual origins,
for example, again, you'll notice that it goes back to the middle
ground because it now can view that there's multiple origin points
for multiple objects, and now that again
tries to re center or combine all of the
origin points to an average where it would
be in the center over here. So that is how
essentially it works. We'll just go back to
the median point for transform point because that's what it should be by default. But yeah, if you're
having a little bit of an issue with your snapping, make sure that you also
check this option over here. Going back to the snap base, we already talked
about the center, which essentially grabs the
selection from its center. Now, the closest will allow
you to grab an object and try to snap it to the
nearest point of an object. It's not a bad example to use Increment or grid
for this one because it's going to try to just
snap the object to your grid, essentially, so it's not
going to really work. But if I was to select an object and just use snapping
target face, which we're going to
cover it in a bit, you'll see that when I click G, it's going to then try to snap it to the
edge of an object. You'll notice that my
Cursor now gets to the closest point of what it is going to be in contact
with another object. And that allows us to
nicely position our object. So for example, I
can use GX over here and then position
it nicely like so, and that would give us
this kind of a control. So for example, I don't want
the bevel to be visible. I can click Gx and then kind of reposition
it a little bit. We perfectly snap
out that bevel. On the centerpiece,
which would be a nice little
workaround to make sure that these panels maybe look
a little bit more welded. If I click G and move
it to the upper panel, you'll see that now our
position is going to be switched to the location with the upper of this panel
that we're trying to move. So again, it's going to
basically try to snap it with the closest part of
what the panel is. If I was to move, for example, another panel a little to
the left and click G again, you'll see that
now the left part is going to try to make
the contact first. So instead of having
the centerpiece, it's going to attempt to get the closest part
to this up object. Now, next up, we have
an option for median. Real quick, I'm just
going to go from face to back to grid to show
this as an example. And now, essentially, the
snap base median is going to work similarly to
what center would work like with median point
transform pi with point. Except that if we have another
option, like for example, active element selected,
you'll notice that we're able to still snap
to the center points. So this will basically grab this snap base at
the median will grab all of the
selected options, and it will ignore the
transform pivot point menu and center it with
its selection. So let's say we now
have four panels. So if I were to grab all four of them and if I was
to have snap base, set as center with
the active element, it will have this
base to be used for snapping as
an active element because it considers it to
be the center point because, again, of the transform
pivot points, but if I was to use
it as a median, it will now grab all of
these points and put all of these origin points in the median in the
middle. So there we go. We can now have this
part as the centerpiece. Whereas before it was just using this point over here because
it's the active element. So mediant helps us to
keep it consistent, and it's going to ignore the
transform pivot position. Next up, we have an active
active essentially will work like an active element
for transform pivot position. It will allow us to, well, have the last selected object to be used as an active element. So now you can see that we are using this panel at the top, right, as an active
piece for snapping. And there we go. We
pretty much covered all of the options
for snap base. Let's go back on
to the center one and so with such controls, we can select all of these
panels and quickly position them as a two by
two type of a grid. We can grab this other
ceiling frame, like so, make a duplicate,
put it on the top, and I'm going to turn off
the snapping a little bit. That way, I can move
this a little bit above like sew above this
other ceiling setup. We can position
one of them to be a little bit higher
up in this section, like so, so it's closer
to the end of the panel. Once we have this
position set up, like so, we can then turn
on back the snapping. We can use Shift D GX and move it to identical spot basically on another
side of the panel. And now with the option for snap base to be set as median, or actually active in this case, because I think it
will work better because we're going to be snapping in the same exact spot. We can select both of these
items, both of these panels, click Shift D to
make a duplicate, and now I'm going to use G Y and move it downwards like so. So now it's going to be
right underneath the setup, except that it doesn't want to go in the
same kind of gap. So I'm going to click seven
to go to offer Graphic View. And because of that, we're able to zoom in a
little bit and use GY and just kind of snap it a little
bit with a smaller grid. And just like that,
we got ourselves a very nice pattern of
this entire rooftop. And if we want to make
it longer, let's say, into the sideway, we can
grab this entire setup. We can hit Shift D, GX, and then move it up
to the side like so. And because it's using
active element right now, it should setting it up
with a perfect snap. The reason I'm using
the active element and not the centerpiece is because if I was to
make a duplicate, click GNX, it's
going to not let us move this panel to attach it quite as
easily as we had before. So what we're doing here is
selecting this entire setup, holding Shift, selecting
this panel over here. So now you can see
the orange highlight. You can then use the active element and use Shift D Gx and move
it off to the side, and now it's going to move
all of these parts just like so based on this
one single panel. And just like that,
we got ourselves a nice little pattern of
something like a rooftop. All right, so that's going
to be it from this lesson. Thank you so much
for watching, and I will be seeing you in a bit.
6. Vertex, Edge and Face Snapping for Complex Builds: Hello, and welcome
back everyone to Blender essentials
for beginners, snapping and alignment basics. Now we learned all
about the snap base. Let's go back on to
the snap target. So we already talked a
little bit about Increment, how it basically can
be used as a grid, but with its own local
offset from an object, then the grid itself is
basically the gridded lines. And next up we have vertex. So vertices are object
points in a mesh. If we were to go onto Edit mode, we'll be able to see
these little dots, and these are the vertices
in the set object, and these can be used in
combination with snap target vertices to essentially
snapping object parts. Even in edit mode, I can click G and I can
move it and you can see directly snapping into the vertice to this
dot over here, or I can move it over here, and it's going to
snap it like so. And what's nice about it in object mode is that you can use it to snap it to basically
any part of an object. If I was to select another item, something like this disc, for example, I want it
to be half a circle. I can make this
into a duplicate, so just move it a little
bit off to the side to make it a little bit
easier to work with. And then I can make a duplicate, and you'll see that it now snaps to these dots that we
were just talking about. So these dots can
be used now for snapping whether I wanted to be snapping for top
section or the lower. It's always going to be
based on the mouse position. So if I have my mouse position lower to the lower vertice, it's going to snap
to the lower part. If I have it to
the high vertice, it's going to snap
to the higher part. And that's quite important because we can make
use out of it to essentially give us
some real nice type of stairs, let's say. Right now, I'm just going
to rotate this 90 degrees, like so, and I'm
going to click G and move it up to this part. So you can see this is like a
nice oval or half a circle. Then next up, I would grab
this little piece over here. I could hit Shift
D and then escape, se RZ 15, like so. So it would rotate it
just a little bit, and then use GZ and move it
down just by little bit like. Use the duplication again. So Shift D, escape, GZ, move it down, and then again, I would use RZ 15. And basically, I'm snapping the vertices to the one that's
like right underneath it. Because the origin point of this item is having the
origin point at the top, we're able to essentially
do steps like this, and you can see what's
happening right now. We are able to make some really nice type of
steps, just like that. We can continue doing it
until we get 90 degrees, and then we can just make
a duplicate out of this. So let me just go ahead
and keep on doing it, like so and one more.
Just like that. And I believe if we look
from top there we go, we have perfect 90 degrees. Now we can go ahead and select this entire piece like
so, and hold shift, select the top
section, hit Shift D, escape, and then use G
Z and move it like so. Then we can do R Z 180. And just like that. We got this setup,
except this is not 180, it needs to be 90,
something like that. And I just realized a little bit of a mistake that this step didn't need
to be duplicated. So I'm going to just quickly fix that up by deleting
the upper section, grab it in this upper piece
as an active element, and then snapping
it, and there we go. You can see perfect
type of setup. And just like that, we are able to create ourselves a staircase. Going to move this
down, actually. If we are moving it down when it's not detecting
any of the vertices, it's not going to snap to
anything. So that's quite nice. Quite a nice way of getting around the issue.
And there we go. I'm just using then 80 degrees, sorry, 180 degrees to rotate it. And just like that, we
got ourselves a really, really nice and simplistic
type of spiral, and I'm just going
to hold shift, select these upper parts. And again, hold shift, select the upper part
as an active element, hit Shift D, escape GZ, and move it down a
little more like so, snap it again to the bottom
piece, just like that. And you can see got ourselves
a nice little staircase. I wouldn't say it's quite
little at this point because we a lot of
steps within it. But anyways, that's
how you would use this type of an option. Then next up, we have
an option for edge. Edge is going to work
similarly to Vertex except instead of using
the dots on a mesh. Instead of using these dots, it's going to use edges. So if we were to
go into Edit mode, change the option to edge mode, we'll see that these are the options that
we have over here. These are the lines which
we can use for snapping. They are great when we have long straight
lines, especially. So let's say I want to snap this closer to the edge of
this base over here. What we can do is we can
select this object over here. We can change the snap
target to be an edge. And then when I click G, it's going to try to
snap to the set edge. So if I were to turn
on the wireframe, you can see the type of snapping that is happening
just like that. And I will also just
going to use GY, so I would lock the position. It wouldn't snap to the Z axis, but just to the Y axis. And like that, I can snap
it to the edge like so, and maybe every outer one, I want this to be snapping to this outer edge
just like that. And maybe you see now that the roof has
some offset parts. Maybe that would
be pretty cool way of changing it and
offsetting these parts. The up side of the mesh of this rooftop panel
would be a little bit more of an issue with an active snap base because the origin
point is at the edge. So if I was to try to snap
it to this upper part, you can see that it snaps it and moves the entire object to the up side. We don't
want this to happen. We want to make sure that the closest snapping point
is, well, the closest part, so let's go ahead and change
it to the snap base to be closest with the snap
target to the edge, and we can use now G, Y, and there we go. Once we have our
mouse over this edge, it's going to put it with the closest point of the object. Which is pretty nice way of
working around the issue of having the origin points a little bit
more off to the side. And just like that, we
are able to, for example, fix up this roof to have panels, you know, in more of a variance. So some panels are
more off to the side, O panels are getting
closer to the centerpiece, and it's just nice overall. Next up, we have a face. Again, face is going to be from the edit mode if we go
onto an object edit mode, so faces are essentially
going to be the face parts, the panels that are on the mesh. So all of these selected parts, they are going to be the faces, and each one of them can be used as a snapping point,
which is very, very nice because we can do some nice and quick ways
for attaching objects. So let's say we have
these frames over here, I believe they're
called support base. We have one that's for a quarter. Let's
make use out of it. We can just make a
duplicate outside, like so, and now we have
this builder over, like so. By duplicating it and using
snap base set to face, we can move it directly onto
an object except right now, it's not going to work
because you can see that it snaps with the closest option. And the closest option
was being the top, so it doesn't have that
right snapping option. If we were to change snap base to center or active or median, these cases, it
will work the same. We can just snap the bottom of the origin point over this
one over here to the part. And just like that, we are able to snap it properly
to this section, which is very nice for us. And then next up, let's
say we want this to be on the side as well.
We can also do that. In this case, however,
we would need to rotate this by 90
degrees like so, and then just move
it up like that. We're going to learn
for an alternative way, though in a bit, but that is one way for
making use out of it. It is not perfect, as you
can see over here because it essentially snaps you to
everything on a face. But if you already
have a placement nicely set like this
vertical beam over here, you can use Shift
D to duplicate it, GZ and just move it basically until you snap
it onto the upper face. And that will give you perfect
placement, just like that. A quick little thing to
mention is that if you want to move your object in
just one direction, you can still make
use of something like a vertex snapping or just
snapping in general, but only for a single X. So, for example,
right now, if I want to click G and
move this to be at the point where it's in the same section as
this bottom panel, I can use G and X and then
snap it to the X value, but then move my mouse lower, so it would snap it down to where I'm
pointing, basically. So if I hover over this
vertice over here, I can just click my left mouse button and then
snap it off to the side. I can do the same thing over here to snap it to the vertices. Right now, by just simply using Vertex point and
closest snap base, I'm able to essentially
align these three panels in the same row whilst keeping
the Y axis as it was before. All right, so that's going
to be it from this video. Thank you so much
for watching, and I will be seeing you in a bit. O.
7. Volume, Edge Center and Face Center Snapping: Hello and welcome back
prone to Blender essentials for beginners snapping
and alignment basics. In the last lesson, we
went over the basics of Vertex edge, phase snapping. Now we're going to move
on to volume snap target. This is a lovely one. At first glance, you might
consider that it works very similarly to a phase snap
target, but it is not. If you hover over the
top of this column, for example, with the object. Transform, you'll notice that it tries to snap to the top, but it works very different when we go to the side of an object that we're
trying to snap to. If I was to move my selected object closer with the volume
selection snapping, you'll notice that at first, it tries to snap to the edge, but then as we get
closer to the center, it gets closer and
closer to the middle. The way it works is very, very interesting as it firstly grabs the first
point of contact. And then the second point as
it comes out of the object, and then it uses that as a sort of a way to
estimate the volume of an object and where
to place it in between for the snapping mode. So as we get closer
to the centerpiece, it's going to essentially put it right between this
point and this point. So it's going to
be in the center. And this type of an option
is quite useful for when we want to attach certain objects inside of the form of an object. So for example, let's
grab this edge over here. And let's say we want to kind of duplicate it to go outwards. Going to make another
duplicate actually beforehand. And if I was to click Duplicate, it's going to then try to go in between this
contact over here. The issue right now is that the origin point is a
little bit too high up. So real quick, I'm just
going to go ahead and fix this for this
particular example. So I'm just going to make sure that I transform
the origin point right to where the
bottom line is, which by the way, brings me to a quick upper point is that when we have
snapping point on, we can use this with adjusting
the origin point as well. So when we have this transform origin points effect only on, we can have snapping mode and
we can have it set to face. And then we can just go to the
bottom and just snap it to the very base of this
little edge, like so. So now we can turn off the
snapping off and use shifty. And now you can
see that it snaps right inside of the object. So you might be
wondering, how is it different to the
face, in this case. Well, if I were to
turn off the volume, you'll notice that
it actually goes more into the object itself. So attaching something
like screws or bolts or some other attachments
onto the building might be more beneficial using
this kind of way because it puts the item directly
into the object, into the volume of the object. So you can see now
it has this kind of nice attachment
going into the item. So that's quite
nice, I would say. And just like that, we got ourselves an interesting
looking even like a staircase. So when it comes to snapping, we can make use out of various ways with the
volume for attachments. Next up, we have ourselves
an option for edge center. This is going to be more of a unique variation for edge snapping except it's going to put it to the
center of the edge. So it's great for when we
are working with more, again, flat surfaces perhaps. So if we go back to this
one quarter of a circle, we can make a
duplicate out of it, and you'll see that it snaps to the middle part of the edge. If we were to turn
on the Y frame, this entire edge if I was
to just select this object, this entire edge goes
from one side to another, and in the middle part is where the snapping
point is going to be. And using that, we can make various of different
alterations. So right now, I
can, for example, quickly make this sort of a
sideways staircase like this, which kind of looks interesting, but perhaps it's not your forte. So let's say we grab this
panel over on the side, and using the edge snapping, we can just simply put
it off on the side. I'm going to make sure we
use snap base closest, like so, and I'm just going to firstly move it off to the side,
just like that. And just like that, we can snap it to the
center of this panel, and it's going to be right
in the middle because this center part
is going to align with the side of the
panel on the right side, and just because of that, we're going to be snapping
it to the centerpiece. So alternatively, over
here, we can do the same. That way we can align the panels to be more
offset to the side, but at the same time, snapped to the middle part
of these panels. Next up, we have ourselves
option for edge perpendicular. This one is an interesting
one because it essentially grabs two edges or three points and sees where there is
a 90 degrees angle. So this quarter of
a circle is going to work very well for us because if we make a
duplicate out of it, you can see that the moment
we go over 90 degrees, it's going to snap to that part, and should also
snap or actually, it might be a little bit
harder to see because we are using snap based clotes. I'm going to change
it back to median just to make sure that we have more of a constant
result when snapping. And you can see, right now, it might look like
snapping at random, but because there is a 90 degree angle between those lines and
this part over here, it tries to kind of
snap it here as well. So because we have so
many lines over here, it might be a little
bit difficult to always distinguish the setup. But in terms of, like, finding the right panels
or something of that sort, when we have corners like this, it might be quite useful because
it will just simply grab the snapping point of
right angle point, and it should be over here, yep. It's a little bit hard to
snap it, but there you go. Once we snap it, you
can see it gives us this nice little
corner at the side. And just like that,
we are able to make some real nice type of
snapping decisions. Finally, we have ourselves a lovely face center
snapping target. This one is a lovely one because this one is going to
work similar to edge center. But instead of finding
the center of an edge, it's going to find
the center of a face. So let's say I want to well, we can use the same frame as we had over here or
support pillars. If I I duplicate and hit escape, I can then essentially
snap it right in the center of this
face over here. This part over here, and it
should snap it quite well, although I just realized now that there is a little
bit of an issue, and that issue is, well, we have a trangulated face
on the top over here. So in order to fix that,
we can just select these edges like so and
do a bit of a cleanup. But instead of selecting
all of these edges, what I would highly
recommend you is just to select this edge over, like so and dissolve the
edge just in the middle. So we get ourselves
this lovely square. And because of this square, we should be able to
perfectly snap it to the top of this corner,
just like that. And this should also
have a nice top. Yep, it does, and we're
able to snap it. Like so. The reason I don't always like removing all the edges
from this part is because end goons sometimes give
me some bit of an issue in terms of finding it the
center point of a phase. So if I were to delete these parts and just have
this one phase at the top, we can then try to snap it and let's see
if it worked this time. So in this case, I think snapping snapping
was quite right. But again, sometimes it
doesn't always work. I highly recommend
you to just keep the Face as a four
sided, like so. Simply because even though
engons will always work, the centerpiece might not be perfectly centered
for that set phase. It really depends on how
the vertices are laid out. And as a final quick little tip for snap target section is that you can enable multiple parts or
multiple options to be using for snapping. So let's say we want to use
Face center and edge center. By holding Shift and tapping
on snap target option, we can enable multiple
ones like so. If we want to revert it, we can just simply click with our left mouse button
and it's going to just go to the single option. But by holding
Shift, we can select as many as we want, like so, and at the top, it'll
start saying mix, which means that
multiple are selected. And that is very, very good for us because
it allows us to essentially make
snapping decisions based on multiple of data. So over here, for example, we can snap this option to
the center of the face, like so, or we can snap it
to the edge, just like that. And both options would
be valid for this setup, and that way, we can even have a little bit of a
platform underneath, perhaps. Just to kind of help us maybe stabilize with the thickness. And yeah, a lot
of unique ways of setting it up and
we can even make a platform that
goes up, like so. And then, let's say, once we are finished with this
platform going up, we can then even include
an option for Increment. So once we include Increment, we can then just
use quick snapping, like so for these platforms, and then we can continue
going 90 degrees, although increment
and other options might not always
work quite as well. Oh, sorry, I forgot to
hold shift in this case. That's why it wasn't
working, but there we go. Once we do hold it, you can see that we are able to use it. And you should
notice that when we get to the snapping
selection or option, it turns our
centerpiece or motion. Into a triangle. We have a little triangle where
the snapping occurs. So if we are just
snapping to a grid, we don't see that
triangle, but once we get it to the side,
we do see that triangle. It actually depends on what
kind of snapping it is. If we have volume, for example, it's not going to show that. I believe it's going to
show more like an X. Then we have an option
for edge perpendicular, which is going to
be more like A. Well, the sine for 90
degrees, there we go. A little sign of Alexo. All of these symbols show what kind of snapping
we are doing. If we're having Face, it's
just going to be the same X. So it's mainly for the
ones that are lower on the snapping target to help you identify what exact type
of snapping we are getting. All right, so that's going
to be it from this lesson. Thank you so much
for watching, and I will be seeing you in a bit.
8. Align Rotation to Target and Advanced Face Snapping: Hello, welcome back everyone
to Blender Essentials for beginners snapping
and alignment basics. Now, let's go ahead
and talk a little bit about the options
found underneath. So if I was to have the
default settings for snap base to be median and snap targets selected
as Increment, with the Increment selection, you'll see that we have
absolute increment snap. So this is not going to be visible in another
one of the options. As it will allow you to essentially snap closer to the
grid as previously talked. But the other options such as align rotation to
the target is going to work very nice with snapping when you wanted to
snap it onto the object. So if I was to have
something like a snap phase target selected for the face and
use a line rotation target, we can essentially use
this snapping option too, just snap it to the
face of the surface. So see over here, because the face is
facing sideways, we are able to essentially
snap it to the side. Works really well if we're
also combining it with something like the
closest snap base. The reason being is if we
have this a little bit lower, we can essentially snap the
shoe panel side by side, like so, and if we want, we can just duplicate
it another panel, snap it to the outside, like so, and just like that, we are able to create a quick little room. I'm just going to move this
panel off to the side, so the closest point will be on the outside and duplicate it. Again, move this a little
bit off to the side, just like that, we're able
to create a sort of a cube. So as you can see, just
by having combination of snap base closes and set
it to snap target face, we're able to do
things like that because essentially align
rotation to target allows you to align it to the normals of each one of those attachments
that we're having. Uh, if I was to have it set
to something like a vertex, that would work a little
bit more interestingly because if I was to get my snap base back to median to show the align
rotation to target, we can see that if we
have it now selected, we're going to get more
diagonal type of setup. So this is going to work a little better for
something like attaching corners or angles or
something of that sort because we can get the normals. From the vertices, if you want to preview
those set normals, nice little visualization
that I would recommend is going
onto edit mode. Let's go ahead and just
select one of the objects, go onto Edit mode, and then within the
viewport overlays or mesh edit mode overlays. Can find ourselves option
for display Vertex normal. If we were to click this
on and turn up the size, we'll be able to see
these blue lines. Each one of those represent the normals for
individual vertices. So it shows that if the vertice is on more
of a flat surface, we are going to get a line
that goes directly upwards. But if it's in a corner, going to get a line that
goes diagonally across, so. So it sort of gives us a 45 degree of an angle,
especially in corners. So this little dot over here, you can see that we have a
line going in 45 degrees. As for the faces, if you want to see
that, visually we can also use this button over
here, display normal. If we were to have it selected, we can see that we
have a bunch of outlines and we can see that
this face, for example, in the middle, has
the normal facing upwards straight upwards, so that's pretty nifty. If we want to make sure that it doesn't change
the rotation for the object when we are placing it on top of another object, we will be able to Oh, hold on. Let me just make sure that we have the faces on there we go. We will be able to just
position like so and so we can, for example, stack some objects on top of one another,
just like that. That is pretty viable
way of doing things. Going back to the options
that we had previously, Face project and
as nearest really works well with the align
rotation to target. The reason being is
that face project by using Face project, we are able to
essentially stick it to the surface projecting from the viewpoint from
what we're seeing. So it kind of works the same way at first
glance to face snap target, but Face project will work
a little bit differently, and I will show you
what I mean by that. Right now, with basic
type of surfaces, going to work, in my opinion, a little bit better when
we're trying to snap it with a line rotation target because we get results
straight away, and it's going to be more easier to control because it projects it directly
from the camera. But the difference
between face project and normal phase snap is that if
I was to create, let's say, a UV sphere, make it very large, like so as a preview, use Shade Smooth, of course, so we don't have to see all
those individual faces. And let's say we want to have multiple panels placed
alongside this sphere. If I were to have a
normal face snap target selected and have
multiple of these panels, let's just go ahead
and quickly create those panels, like so. Doing it in a random order, so you could have it seen at
multiple variances, like so. Let's have them all selected. And now, if I have those
faces selected and put it onto the sphere, you can see that it snaps
it to the closest part, so again, because we have the align rotation to target
setup, it's going to, well, align this one object
or one median, which we're using the
snap base one median, it's going to snap it all
of these objects as one. But with the base
project selected, it's going to work completely
differently because once we start putting it
onto this sphere, all of these are going to be snapping and projecting
themselves onto the sphere. So you can see that each one of those little panels end up being projected nicely onto the set
sphere. That's quite nice. Starts misbehaving
once you start moving it more than once,
as you can see over here. But the initial projection works quite well because we're able to maybe
position it like so, and then we have these lovely
panels wrapping around. The other option is going
to be face nearest. So that works
similar to project, but instead of just
using the camera to project all of the items, it's going to detect the nearest surface and
try to project it on it. So as you can see, it even tries to wrap more
around this object over here, and I think I forgot to a
light rotation target is on. So by just using it, you can see that it helps us to wrap around
it a little bit better, but it doesn't quite use the align rotation
to target quite as well. The option for face nearest snapping would definitely work better with align rotation
to target turned on. So if we have this turned
off and then just push it, we'll see that those
individual points end up wrapping around the sphere
quite nicely, just like that. The other option. And this setup is that when we have
phase nearest selected, we have option to have
snap to the same object. So let's say have two spheres, and I'm just going to move
this outwards a little bit. Let's say we have two spheres. We can grab back the panels and without the option for snap
to the same target turned on, when we try to snap
these onto an object, it will try to maybe
go onto one sphere, and then you can see to
over one as well over here. But this option right here,
9. Exclude Non Selectable Targets for Precise Snapping: Hello and welcome
back everyone to Blender essentials for beginners snapping and align basics. Now we have ourselves
the custom menu explain. Let's go to the next object, and that's going to be to
exclude non selectble targets. So this tab called
target selection, allows us to essentially
exclude everything outside. And the best way to
show you this would be if I was to make a duplicate
out of one object, and let's say we want to
attach it to multiple items. Let's say we have multiple
objects over here, and we're only trying to attach it to this panel on
the left hand side, but maybe this upper one is getting on our way
of our attachment. So what can we do about it? Well, we can select this object. We can locate it on the upper right at corner
where the outliner is, and we can just select
this option over here, which allows us to have this
panel to be deselected. That means that we can now
not select this panel. You can see me trying
to drag it across, and we are not able
to select this panel. If you're not having this icon to have disable the selection, just go onto the filter
restriction toggles and have this option tied toll. And that way, you can
have this deselected. The only way to select
it basically is if we have this selected in outliner, that way, we can have
it just selected. So going back to this, because we have
this di selected, we are not going to be able
to snap it. Snap to it. If we had this option, exclude non select
non selectibturn off, we would naturally be
able to still snap to it, which could be very annoying. But in this case,
with this turned on, we are able to go straight through it and
maybe just focus on snapping it with our
little object over here. So if we have something
like, let's say, close to snap base, we could just snap it
directly like so, and it's not going to get
in the way of the up one, which is pretty good. Like so. Now, what's useful about it is, let's say we have this
entire roof already set up. We can grab it. We can make
it into a new collection. So clicking M, turning it into a new collection,
calling it roof. Like so, creating it. And now we have
this entire section in a new collection called Roof. Now, this option, this
collection or a folder, also has that same button which allows us to disable
the selection. So now we cannot select it. And because of it, we could, for example, grab
this wall over here. We could build it up, like, se and just move all the
items into the position. Let's use the grid
for starting point to just kind of quickly
place it in the grid. Let's maybe lower
this a little bit. Like sew to get
something of this sort. And then next up, we're going to be able to
maybe use vertex snapping and make a duplicate out of this because we still
have closed snap base, we can just snap it
to the side, like so. And just like that, we're able to work with this
snapping option. And you can see that we're able to select this
alternative option. And then afterwards,
we could even place in the borders, so
this is 4 meters. Let's go ahead and just
grab it, so because, again, we have these deselected, we can simply snap it
to the base of this. Actually, I'm just going
to check. This is right. Yep, this looks right. So there we go, perfect little snap. So after we get
it nicely set up, we could either use, again the vertex snapping
or use increments, all of which would work. And then, you know, just
quick motion like so, give us a nice little wall
or base, just like that. And we got ourselves
a nice little front. Then afterwards, we would need to use a corner, of course. So we probably use
this corner over here, make a duplicate, put it
up to the side, like so. And there we go.
Then the other side, rotate it 180 degrees or sorry, 90 degrees and move it up to
the side. Just like that. So in this case, I can use snapping two for
thesis closest base, and I can just
snap it perfectly. Next up, we could put the
upper corners as well. So maybe something like
this would work well. I'm just going to
grab it, put it up to the top, see
how this would work. Something of this sort, perhaps. There we go. Nice little fit. Once we have the
corner, let's go ahead and scrap a smaller wall, put it up to the side, use a rotation by 90 degrees, and let's snap it to
the corner over here. I'm going to click G, click B, so I could actually grab
this little edge and then snap it hopefully to its side. Actually might have
been the wrong option. I need to grab this
little corner. So let me just go
ahead and do that. There we go. Perfect fit. And we are going to actually make sure that
it goes halfway in. We don't have any
issues afterwards. I'm going to use Increment,
going to click GY, and then no Increment grid, GY, and move it to where
it would be at the top of the grid
then extend it a little bit because I really
like this little piece. I want to make use out of this. And now we have ourselves
a little setup. But, of course, just
extending it all like this will not give you a proper
connection to this. We would either have
ourselves a gap or we would overlap with
the entire base section. I will show you how to make an editing setup in the next lesson and how
to make use out of that, snapping all of the
snapping options to get yourself
some quick results. Thank you so much
for watching and I will be seeing you in a bit.
10. Mastering Vertex Snapping in Edit and Object Mode: Okay. Hello, and welcome back everyone to
Blender essentials for beginners snapping
and aligning basics. In the last lesson, we
went over and started continuing on building
with this base section. We made sure that the
upper section is made non selectb and we already
started building sidewalls, but we have an issue where
there are some gaps over here. So what's nice about snapping is that not only does
it work in object mode, but it also works in edit mode. If we were to have an
edit mode selected, we can grab all of these
vertices over here, and we could essentially push it to the side of
the upper wall. For starters, we want to make sure that we have
Vertex selection, and we want to just
make sure that we are using active way, we can select this entire
part right down the middle. I'm also using a
transparency X ray, so you can just enable
this at the top over here. That way, we can select
all of this object, and it would go through
the entire setup. So right now, I
have it disabled, but if I have selected, the X ray will allow
me to select all of the items going
across, like so. And then whilst holding Shift, I'm going to select one of the vertices over
here, just like that. Link shift to deselect
first and then clicking on it again to get
a white vertice over here. And then afterwards
with the active set, I can click GY and I can move it not in increments
onto vertices. Like so, and it's going
to snap perfectly. The reason we're using
active is because we want to make sure that it snaps
only this one part. If we were to have it a
little bit differently, where we were to have
like, let's say, median, it would not work because we have
more vertices selected. The reason we're
selecting all of these vertices is because we want to stretch out the
largest portion of the wall. And that would be, well, this middle section over here. We could have stretched
out just this part, like so, maybe have it like so, but then it's such a small part. And then the symmetry of this entire wall would
be a little bit off. But by stretching
it from the middle, we are able to prevent
all of these issues. Let's go ahead and
just simply do that. Just like that. Nice
little operation to make sure that it perfectly
sits together on the side. And we can actually do the same, I believe, for it
as well as well. Although we do have
a three meter wall or even two meter over here, we can most likely
use this one instead. So a two meter wall. I'm just going to make sure we put it nicely
connected over here. Make sure we drag it up, and I'm going to use
snap to close that way. We can potentially have it
where it snaps normally. Or alternatively,
we can click G, B, just hit on a corner
and there we go. Nice little way to
snap these two. Although, looking
at this, it seems like the issue is that it's
not covering the full way. So let's go ahead
and just fix that. We are going to go
to the top section, grab all of these, select one of the vertices, just
like we did previously. If we can select
it, there we go. Gin GY, move it to
the side like this. Perfect little
setup, just like so. Alright. Afterwards, we can essentially duplicate
this to the our side. I think we don't
even have we don't even really need
this part over here. We can just go ahead
and delete it. And then we can just
grab this entire corner. We can just move it like
so GX with the duplicate, and we can right click and
use mirror, then global X. There we go. That way, we're going to get ourselves
a real nice setup. Then we can use GX, B, snap it to the point. And just like that, we're going to snap it
perfectly to the point. Like so. All right. Afterwards, we're going to
need some walls at the top. So what can we do
about these walls? Well, we can grab a smaller wall, like
this one over here. Now, we just need to set
up the quarters so we can do so using smaller tiles. Let's just go ahead and use
it using a median and grid snapping that way and place it right with the other
tiles, like so. Make a duplicate to outside, and we can select them
both and use duplicate, then Gx and move it up to
the side just like that. And then all we need
to do is actually grab these styles over like so
and by selecting them, moving it onto the roof, we're going to make sure
that nothing else gets selected other than these walls. We can select the walls. We can make a duplicate, escape GY, move it up a little
bit, like so, and then we can right
click mirror Global Y. And then place it back
into where it belongs. Now we're going to just
simply use a vertex snapping. We are going to then click GY, and we're
going to click B, then we are able to
select this edge and use this edge for snapping,
just like that. Nice and simple setup.
So there we go. We got ourselves
a full warehouse with just quick
snapping methods. So going back to the edit mode, we can make use out of
snapping tool. Yes, we can. But let's talk a little bit about more on what's
possible with it. So when we are in edit mode, we have more target selections. We have include active, include edited,
include non edited, and exclude non selectable. So firstly, exclude
non selectable. This will basically
mean the same thing as we tried with the object mode, which means that we can't snap onto anything that is
set as non selectib. So all of these roof tiles, they're not going to be able to be used for non selectible. Then next up, we have an
option for include active. So basically, if we
have the selected, we're not going to
be able to snap onto if we have this
include active turned off, we will not be able to snap it onto a measure
that's being edited. So let's say we have a
vertices selected over here, we will not be able
to snap to any of the other vertices that
we are able to edit. And that's quite
handy because let's say we have an object nearby and we maybe have it too close
to snapping targets, we can technically select
both of them like this, go into edit mode, and now we can, let's say, just edit one object. We can select parts of
one object like so, and we're not going to be able to snap onto
the object itself, and it's only going
to be snapping to other items, which is very nice. If you want to, let's say, have multiple objects, editing, and you want to make sure that this option for movement does not snap to the alternatives, to the other parts that you're editing with
an upper object. What you can do is instead
of using Include active, which is basically saying that, here's the main selection of your editor as well
as your other items. So for example, this object on the right can snap to itself, but it cannot snap to
the object on the left. But let's say we want
both the objects to not be snapping
to each other, we can use this item
called Include edited. We have this deselected, it will now not allow you to
snap to either one of those, no matter which
one you're using, because we are having these
both objects in edit mode, we can essentially
ignore them both. And if we have this turned off and then we have
include active turned on, that means that this active on the left is now going to
be the snapping option. But the item that's
not active but is in edit mode is not going
to be the edit mode. And let's say we have three
items selected, like so, and we have the middle
one as an active element. So it's selected
last holding shift. We can, click on it, and now it has orange outliner. If you go onto Edit mode and we try to snap to it,
it's going to snap. But if we include
active turned off, it's not going to snap anymore. So you can play around
with include active, include edited to have perfect control over your
items over your snapping. I personally love to
have multiple objects, include active turned on. And that way, we can have
just one object to be able to be used as snapping
a type of an anchor, whilst the other ones,
the one on the right, the one on left is not
going to be used like that, which is very, very nice. And then we also have an
option for include non edited. So let's say you are
working on just modeling these items that are in
edit mode and you don't want the other items to
be part of the snapping. So you can simply use include
non edited turned off, this option turned off,
which is on by default. And then it's not
going to register any other items outside of
the mesh you're editing with, which is very, very handy. Finally, we have an option
four, exclude non selectable. This is that option
we talked about, so we're going to
basically leave it as is. All of this give you a great
control over the setup, as you can move your
objects in edit mode, in object mode and just
snap the vertices, snap the faces to
the right setups. So yeah, that's going
to be it for me. Thank you so much
for watching, and I will be seeing you in a bit.
11. Precise Move, Rotate and Scale with Snap Controls: Okay. Hello and welcome back e one to blender
Essentials for beginners, snapping and alignment basics. Now we're going to talk a
little bit about effect tab. So effect allows us to
change whereever we want the snapping to work between
move, rotate, and scale. We can have multiple
of them turned on, and when it comes to snapping, it will work well for movement. Snapping motion is what the
setup is made for, basically. The tool itself will be
great with all of them. But when it comes to
rotate and scale, however, it's a
little bit different. And what I mean by that is if I have a panel, for example, set, we can see that it
snaps nicely to the vertices right now because
we have the movement set. But if we want to use
something like rotate, it's going to start acting
a little bit weird. So, for example, once
it starts snapping, you'll notice that it changes to a different bit of alignment. So it does try to
snap to the setup, but it's not going to
work quite as well. You might think that
the rotation alignment might be because of something
like align rotation target. But that's not the case,
if we have this turned on, we can see a preview
on the mouse itself changing depending
on the vertice, but the alignment of the object itself is not going
to be changing. What I would recommend to use the rotate affection with is,
well, firstly, increment. Increment is going to be
great with all of them, move, rotate and scale because you can just essentially rotate
it in increments. By default is going to be
set to five increments, so you can rotate it by five. If you hold shift, it's going to be much lower. You can see the rotation
goes up by one, like so, and that's the type of
fine tuning you can achieve with the increment
rotation snapping. The other option would
be great is a grid. Grid would be great
with orthographic view, something like orographic
rotation snapping is great because you can just set your mouse to be on top, like so and then when
you start moving you'll be snapping
it to those angles. Just keep in mind
that if you are putting your snap rotation
off a little bit to the side, it's not going to quite work
as well because let's say we have this mouse right in
the middle of the grid, it's going to firstly try to snap to this point over here. So it's not going to
be quite as good. But that being said,
it's quite nice to allow you to realign
to certain angles. Then we also have the option
to have a face center. So this one I would highly recommend with the
rotation effect. You can just well, select
this, for example, and just rotate it to let's
say this phase or this phase, like the faces of meshes.
They're quite nice. And then finally, volume is
going to be also pretty good because you can essentially get it to the center of an object. So let's say we want it to be rotating to the center
over here, this pillar, we can just kind of
make it a rotation, and now it's going to be
rotated in that direction. So just a couple
of variants over here that are quite like with
the affection of rotate. Going back to the
increment rotation, a quick nifty trick is that we also have at the bottom
rotation increments. By default, it's set to five
degrees and one degrees. If we try using R z with
the rotation at the top, you'll notice that we're
moving it by five degrees, that is going to be
the first value. If we were to change this to
something like 15 degrees, now this is going to be changing every 15 degrees just like that. The second value is going to be for when we are holding
the shift, essentially. So by default is going to
be changing by one degrees. And if I was to change this to something like five
degrees at this point, we are going to have five
degrees just like that. So a quite nifty
little tool to use. My recommendation for these
two values is basically just start off by rotating it
to a reasonable amount. So if you have it
set to 30, sorry, or 15 or just like a
high value like that, you can set it up to, like, something like 30 over here. And then after you have the rotation set
at the top to 30, like so, you can then hold
Shift and then add 35. So it's going to be adding that five extra to added to 35. So having a bit of initial rotation
with the first value and then using shift to add a bit additional of
those degrees really helps here to get
the right result. Next up, we have scaling. So scaling is an interesting
one because, well, you can scale it by default with increments by value of 0.1. Unfortunately, you do not have the same options
as rotation increments. You can only scale it
in a value of 0.1, and whilst holding shift, you can use it a value of 0.01. So it's quite a nice
little feature. If you want finer controls, whenever you're done scaling, you will have a resize tab, just like what you saw
with rotation and motion. You can just simply
change it over here to get a more nicer result. If you really need to fine
tune something like that. But what's nice about
snapping using incrementation with snapping is that
you can essentially get the right proportions
right off the bat. So for example, you
want this to be twice as big as in comparison
to the tile, you can just scale it upwards, and you can see at the
top, it's going to be twice as big, just like that. And then it's going
to be real nice and easy to block out your setup. So you can see
already, I can put in a couple of tiles
over on the side, and it's going to the right type of proportions to what we want. And alternatively,
if we want to, for example, scale this down
because this is too thick, we can scale it in Z value, and now it's going to scale
it up to a value of 0.5, just for Z value,
just like that. So it's going to give
you that same type of height, as you
can see over here. So we upscale it by two and
then scale it down in Z to 0.5 to get that same exact
type of thickness for a tile. Quite nice and simple
to set that stuff up. Now, what I really
like about this is how we can use it with the combination of snapping
two objects or even a grid. So this pillar over here is going to be a
great example because let's say we have a
pillar set like this, and let's say we want this to
reach to a certain amount. Let's say this one is a
little bit too high up, but we can grab the
bottom frame over here. I'm just going to quickly
make it move upwards, mirror it in global z axis, so we have it reversed. And then let's say we want
to fill out this gap. What can we do about? What's
the perfect solution? Well, we can't just duplicate this to be going upwards like this because
it's a little bit too big. We could just squish it inwards this original pipe to be attaching it
directly to the frame. And the way we can
do it is by using the scale with the
increment selected, we can just click one
and go to the side view, then use SS and just
push it upwards like so. So it's going to give you
just the right amount of attachment, just like that.
And even lower it. Maybe something like this.
Yeah, that looks great. Unfortunately, the
scaling does not work with other items, actually. If I was to select this pillar and try using
something like vertex, you can see that it
snaps to the scale, but it's not actually affecting. We're scaling it up smoothly. Like nothing's happening. So the only scale
affection is going to be increment as all the other ones are just simply not
going to affect it. Honestly, just having scale turned on is going to mess you up because if we have anything other than increment
with the scale turned on, it's not going to
affect a single thing. And the other thing is that now when I'm using
scale with control, whilst using control, it is
not going to be affecting it. So my recommendation
is to simply have effect scale turned off. And now when we are using scale, we can hold control, and now it's going to
start snapping. The reason being that it
starts using snapping is because that it considers
the scale effect turned off, and when it turns it
on, the default setup is going to be increments. In other words, in order
for it to be properly used, I highly recommend to just use snapping throughout
the setup with either, you know, vertex, face or
any of the other ones. And then when you need
to use it with scale, just simply use control instead. And yeah, that's pretty
much it with the setup. Thank you so much for watching, and I will be seeing
you in a bit.
12. Complete Guide to the 3D Cursor and Snap Menu: Okay. Hello and welcome back everyone to Blender
essentials for beginners, snapping and alignment basics. Now we're going to
talk a little bit about something
called freed cursor. Fred cursor essentially is
this little fellow over here. If we zoom in, it's going
to be right in our setup, so we can move it around by simply clicking Shift
and right click, and that's going to allow us to move it around
just like that. What's nice about this is that this is basically a manual
placement point in the scene. If normal snapping
finds a target for me, freed cursor lets me
place the target myself. And the first example
I could show you is by just simply placing
a normal primitive. If we were to grab
ourselves a cube, you'll notice that now
it gets placed and snaps directly to
this free D cursor. If I was to hold
shift and tap it elsewhere and then
spawn another cube, it's going to spawn
on that cursor again. So the way it works essentially, is it grabs the origin point of the mesh and puts it
over the freed cursor. Not only do we have an option to move it manually using
Shift and right click, we also have an entire
option dedicated to it. By clicking Shift and S, we get ourselves
a snapping menu. And in here, we have
a bunch of options. So let's start with the basics. Cursor to origin world origin. So let's start with the basics. Cursor to world origin. If I was to click on it,
Free cursor disappears and ends up being at the
center of our world, which is very far off. Now we can spawn our items and move them to the
center of the world. Next up, we have a
motion photo cursor. But before moving on to them, I'd like to point out
a couple of things. And firstly, at the left side of each of those buttons,
you'll notice an icon. It is either a mouse icon
or a precursor icon. When it is a precursor icon, we know that it's going to
move the cursor itself. When it is the mouse icon, it will essentially move our object to precursor
or another alternative. Now, going back to the setup, cursor to grid is
an interesting one. This will allow you to basically snap this cursor
back onto the grid. If, let's say we were to
go to the top down view and place our cursor in
between the grid section, we can use shifting S
and use cursor to grid. And that's going to snap
to the closest point. So if we want to make
sure that we have a cursor in a nicer position, we can use ShiftinS
and just make sure that it reorientates the
setup just like that. Now, the other way to snap it, the precursor is if
we want to move it, we can use the cursor icon
on the left hand side. If we were to just select
this, we can use this, as you notice now with
the snapping tool itself. So this will work just
in the same way as any other snapping item. We can use either
grid or vertex, like so and now with this tool selected,
I can, for example, snap the precursor to
a corner of the cube, which is very, very
convenient for us. Then we also have option
for cursor to select it. That will allow you
to basically grab an item and ShiftinS and
use cursor to select it. And it's going to
place your precursor right in the center
point of your item. This option also works with
multiple items selected. So let's say we have
these two items selected, and if we were to click
Shift cursor to selected, we are going to get ourselves the cursor right in
between those objects. And you might be
wondering why it is in the edge of
this two by two. A type of panel and
the reason for that is because the origin point
is at the center of one piece and then
at the center of another piece of one by
two type of a panel, meaning that it's going to be right in the middle over here. So if I was to
grab, for example, these smaller panels,
just place them off, so we can select them both, and you can see already
the movement type of o gizmo is showing
where the middle part is. The reason being is that we have transformed pivot point
set as median point. So yeah, essentially,
using cursor to select it, we'll put the item
in the median point. And not only are we
able to place the item, the free dcursor like that, we are also able to use
it in an editor mode. So if I was to go to
editor mode like that, we can select a vertice, and then we can
use shiftiness and then cursor to select
it just like that. So it's quite nice and
we can also do that for faces, cursor to select it. So if we want to place an item on top of this
surface, we can do so. And again, the same
goes for an edge. So it's going to place it in the middle of the edge if
we have one edge selected. You know, we can have
two edges selected, and then it's going to place it right in between those edges. So the versatility
for the placement of the free decursor is pretty much endless
when it comes to that. Finally, going back
to the object mode, we can have an option
for cursor to active. Cursor to active will
essentially place it on your main active item. I have two items selected, the one that's glowing
in orange instead of the darker orange or reddish color
is going to be the active, so you can see that
it snaps to this. So we have, let's say,
multiple items selected, the last selection that we have is going to be, of course, the active one, quite
nice and simple type of design and setup. Yeah, in the next lesson,
we'll be able to talk a little bit about how to
actually make use out of these. Thank you so much
for watching and we'll be seeing you in a bit.
13. Powerful Selection Snapping with the 3D Cursor: Okay. Hello and welcome back, everyone to Blender
essentials for beginners Snapping
and iman basics. Now that we went over all of the freed mouse
snapping options, we can go ahead and
make use out of it. But before that,
let's go ahead and quickly talk about
ShiftinS menu, the items that I don't think are quite with
the fredcursor. So the options for
selection to active is going to be an option to snap it to your
selection, essentially. So if I have a cube, and I have another
item selected. I can use Shift Ness
selection to active and it's going to snap
it onto the item. The reason it's snapping
to the corner is because this item had its origin
point on the side. But let's say I have my
trusty grid selected. I select the cube, and actually, I'll go ahead and
hold Shift select the grid item panel again
to make sure it's active, hold shiftless,
selection to active, and now it's going to move
it directly in the center. So that's quite nice. One of the ways you could
make use out of this is, let's say you want to replace this upper roof section over
here. It's a flat surface. It doesn't look quite as nice. But if we want to
change it, well, we can make a duplicate out of our lovely corner over
here, corner piece. Let's make a duplicate,
and then I'm going to hold Shift and select this item
over here on the side, hold control shift and S, and use selection to active. That way, it puts it directly
where this circle is. I can now go ahead and
delete this circle, make this one maybe a
little bit smaller as well, and just use Shift D, escape, Z, and then
holding Control, I can snap it like
so to another angle. Z, control, and just so then
click Left Mouse button, and then again,
duplicate Z control. So Shift, duplicate RZ
control, and there we go. Holding control,
let's you snap it, set it up to exactly 90 degrees, and we got ourselves this
lovely little pattern at the top now of
this preset roof. The next thing that we
could potentially grab is, let's say we have multiple panels that
are scattered around. Let's say we don't
have a snapping option and we just kind of
scatter it around like so and we want to
make sure that we are aligning all of them
to a nice little grid. So what we can do is we can use shiftiness and use
selection to grid. Selection to grid will
snap it directly to the closest little what's
it called grid item, L S. And keep in mind that
as we talked previously, when using orthographic view by clicking seven to
going to the top view, we can zoom out a little bit to get ourselves grid
that's larger, and then we can use
shiftiness cursor to grid. Maybe a little bit
smaller. There we go. And now it's going to
be snapping perfectly. So we get ourselves this
little setup over, like so. All of the items being
perfectly placed. Next up, we have options
for selection to cursor and selection to
curse or keep offset. Both of them are actually the same option,
if you believe it. Let's say we have a cursor over on the side and we have a
couple of items selected. We can use Shift ness to
select selection to cursor, and now it's going to
snap our item like so. It's actually going
to be like this. We're going to get
to it in a bit. But right now, say we want to move an
item onto the cursor, we can use shifting S and
use selection to cursor, and that's going to snap it directly onto the
cursor, just like that. So one of the nicest ways
of using it, for example, let's say we want to replace this panel with something nicer. It's a little bit too repetitive with all of the
colors and whatnot. And one way to do it is if we make a duplicate out
of this orange panel, which is a lot shorter, can just move it somewhere and go
back to the wall over here. We can select this wall. We can use ShiftinS and
use cursor to select it, which is going to
place our cursor right where the origin
point of this wall is. Then we can just delete
this set of wall, and the cursor is
still going to be kept the same in this area. Then we can select that item that we want to
use it for duplication, ShiftinS and use
selection to cursor. And just like that, we are
able to replace the wall, and we can even move it a
little bit off to the side. I could use a previous setup where I can just move
it using increment. We can be a little bit
more smart about this. We can select this orange
wall that we just played, see that the corner
is on the right side, but we want this to
be on the left side. And we know that this
corner over here also has the origin
point on the right side. So I can select both
this corner and the orange wall and have our
gizmo now in the center, exactly where the wall
needs to be placed. And I can use Shiftins
cursor to select it, and that's going to place
the cursor right in the center where it needs to be. Then we can just duplicate this orange wall and
move it off to the side, use selection cursor
and place it like that. So just an alternative
way of setting it up. Then, what was that other
option? You might be wondering? Let's say you have this entire
factory wanting to move it back onto the world origin
or something of that sort. You can use Shift en use
cursor to world origin, and then use selection
to cursor, keep offset. Instead of using
selection to cursor, by using selection to cursor, all of the items will be snapped individually to the precursor, making them overlap one another. But if I have this
entire selection, I want them to be keeping
that little bit of an offset in contrast to one another and treating
it as one object. But by using shiftiness
and using heap offset, we are able to move our
entire building just like that onto the
center of the world. And that's quite
nice. And the reason I said previously that shifting keep offset and cursor are the same things is essentially because at the bottom
left hand corner, we'll see snap selection
to cursor options. I just simply taking
this on or off, we'll basically have
that same option. So shifting as,
selection cursor, and selection cursor Kip
offset are the same options. But without tick on or off. Now, the other thing
that I'd like to mention is this little option
over here, rotation. Rotation is an interesting one. It is for a free decursor, but precursor itself is a little bit of an
interesting one. You can see if I zoom in, we do have a bit of a
direction going in and out. So the blue slightly shifts, the green and X and Y xs basically show up
in different selections. That indicates the rotation
of a free decursor that is going to be based on the placement of
the free decursor. So if I hold shift and just click on this surface over here, you'll notice that it's going to be basing it upwards because, well, it's going to be based on the viewport
snapping to the face. So the position is
snapping onto the face, but the rotation is basically
based on the viewpoint. And if I was to click seven to go to the top down
view for a numpad, I can just use Shift and tap and then we're going to have
it to facing the top way. Meaning that if I was to use shifts and selection to cursor, it's going to place it
at this platform again. And if I was to use
the rotation on, you're going to see that
it's actually rotating around if we want to inherit
the rotation of our object, let's say this same panel, what we can do is we can select an object to shiftiness
and cursor to active. That way, even if our
rotation is different, it's going to inherit
the objects value. Now, if I was to use
selection to cursor, it's going to still rotate it. Actually, I will explain you
the reason why for that. But let's save it
for ano lesson. Thank you so much for watching
and I will be seeing you in a bit. And
14. 3D Cursor Rotation Precise Snapping Alignment: Hello, welcome back everyone to Blender essentials for beginners snapping and alignment basics. In the last lesson, we
left ourselves off with this snap to object
rotation dilemma. So now let's go ahead and go over why that's
happening exactly. The reason for that is because this original object does
have a preset rotation. So it doesn't grab the
rotation of how it looks, is it grabs the rotation of the original item pre rotation. So right now it's set as -90 degrees as you can see over
here in an item option. If I was to click AltnR, you'll see that this is the
actual rotation of an object. Now, if I was to
make a duplicate and just use a cursor to active, I can set this
selection cursor and the rotation is going
to be exactly the same. Even if I was to rotate
this differently now, if I was to use
ShiftingST item is going to snap back
to the free cursor with the same rotation. As the original rotation of this snapped
items orientation. One way to fix it, let's say we have this
again, 90 degrees, one way to fix it,
so it wouldn't go onto its rotation like that, but use another rotation is if we open up panel on view action, we have free decursor
location and rotation. These items will allow you to control exactly how you want
to move the free decursor. So for example, we can move it over here using transition, like so XYZ coordinates and
rotation, we'll have XYZ. I'm not sure why it's
set to quanarim. Feel free to change it
to the usual XYZ Euler. That way you just
have XYZ coordinates, and you can see
this is zero, zero. And if I was to
do as previously, cursor to active, we can see that rotation is
set to zero, zero. If I was to move this object
to selection to cursor, like so with rotation active, it's going to snap it like so. But let's say we
have the rotation of this precursor set to 90
degrees in the view and panel. We can now snap the object
with the rotation on, and it's going to
snap it perfectly. So let's say we have a
bunch of items that are, you know, differently
shaped, snapped and whatnot. And select all of them,
so use selection cursor, and it's going to snap it directly on to object
with the right rotation. And if we keep offset on, we're not only going
to be snapping it and rotating the objects, we can also keep the overall
shape of the set objects. That's quite interesting because if we have multiple pieces, let's say, the top
of the stairs, which has a bunch of different
spirals and rotations, and we want to put it into
where this object is, we can use shiftiness
selection to cursor, and now you can see that we're going to place it like this with the offset turned on. It's going to stack it nicely
on top of one another. The top one had multiple pieces because we had these
two duplicate. But you can see that
it piles them up on top of one another and resets
the rotation, essentially, which is, I think, very, very lovely for a quick wrabbing of multiple objects and
just restacking them. Like so. One final thing is that I wanted to mention,
that would be if, let's say we want to attach these corners as
corners for well, some sort of reinforcement
for this panel, let's say. Easy to do. We can then go onto an object, go into edit mode, and then if you want to truly make use out of the
rotation option, going back onto the predecursor, changing the orientation to geometry will allow
you to make sure that we change the rotation
based on where we click. So you can see that
here 90 degrees, here would be zero degrees. And if we use that together with snapping tool
for, let's say, edge, we can just put this
onto an edge like so, or even better actually
onto face edge center. L so we can then snap it onto
this edge center, like so, and then we can go
back onto object mode. We can select this item. We can use Shift ness and selection to cursor with rotation offset,
and there we go. We go to sell us perfect
rotation for this edge. And of course, we
could do that for all the other items
or alternatively, we can just duplicate it, move it off to this
uper edge like so and then use R z
and using Control, we can just rotate
in 90 degrees. We can just select
both these items now, change the snapping
to increment. And then just move it up, so the news R is Z 180,
and there we go. We got to sell some interesting
corners for this piece. That's going to be
it from this lesson. Thank you so much
for watching and I will be seeing you in a bit.
15. Pose Mode Snapping for Perfect Seated Characters: Allon, we'll come back over
on to blender essentials for beginner snapping and
alignment basics. Now we're going to
move a little bit more onto the animation basics. And right here, I
have an armature set up with this character, this mesh over here. So we can select either
the armature or the mesh. And we're going to make it sit on the side of this
building because why not? So for Srters we're
just going to grab both the mesh and this armature, move it a bit closer
to our end, like so. Just get it a bit
closer into the scene. And the next step is we can just simply use the a posing mode. So if we were to select
this armature over here, we can go on to pose
mode, and right away, we can try to sit down
on this ledge over here. So what we're going to
do is we're going to firstly grab both of the legs, like so, both on the sides, and we can click G, you
can see it move it around. But we can also click R X, and then it allows us
to just rotate them, like so, so we can make it sit. We want it to be
closer to 90 degrees. So vals holding control, we're
going to just set it up. You can see the top
number -90 degrees. But we don't want to be
completely at 90 degrees, so we can just lower it to 75. Or alternatively, we can
hold Shift and then kind of get ourselves that nice
five degree extra snapping. So maybe set it up to 80 or 85. No, 80 would be better. Let's go ahead and go with that. And then afterwards, we can
just left mouse button, click the left Mouse button, and we got ourselves this
nice little rotation at 85 degrees or
sorry, 80 degrees. And then afterwards, we
can work on the placement for it being placed
basically sit on the sledge. So what we're going
to do is we're going to grab this middle
piece over here, which allows us to
essentially use it as a root for this entire mesh. And if you click G, we can see this entire meth moving around. We're going to try
making use out of a snapping tool
for face snapping. If we were to enable snapping option and
use face snap like so, it's going to give
us some bit of an issue because
when we move this, it's going to grab
us to the camera. The reason that's happening is because when we are
moving this armature, it's going to well, snapping onto the mesh itself. Every time we move it,
it snaps and snaps and snaps until it gets
close to the camera. The way to avoid that
is if we were to go back onto object mode
and select the mesh, we can hover over
in our outliner, click the dot, and then we're going to see the dummy
over here on the side. And this dummy can just be chosen to be
disabled selection. That way, we're not going to be selecting this mesh anymore, and we can go back onto the
armature and go on to pose. And now, if we were to
select this root bone, we'll see that we're now able
to move it into position. It's not doing it,
just make sure that target selection exclude
non selectible is enabled. And with the face selection
and this option on, we're going to be able
to essentially select this bone and click G to
move it into position. Now you'll notice that this is, well, going into the world itself. So what can
we do about it? Well, we can just move
our mouse a little bit to the side where there
is no mesh and click GZ, move it upwards, like so. Until we get to something more reasonable
or alternatively, we can just go into menu and use the item option and then just manually moving the Y panel. So in case you don't
have an option to move it without snapping
it, or alternatively, you can use Control and then
clicks first, hold Control, and then you're going to
whilst holding Control, temporarily disable
the snapping. So the reason we're doing
this is because after we get a reasonable position, like so, we can
then use it again. But this time, when we click G, instead of just clicking G, we're going to click B and
then just tap on this section. That way, we can move it anywhere we'd like on
the face of the surface. So essentially, what
B does is it creates a nice little offset from
already existing points. So if I click G, you can
see that it does like so, but then if I click
B and then tap my left mouse button
on this same surface, it's going to have that same offset that we had previously, now I can put it
maybe over here. I can even place it
maybe over here, just sitting it nicely
on the flat surface, Ivo way would work quite nicely. But the issue is that every time you'd have to
do the same thing, so just make sure you tap
B and then afterwards, you move it and you'd have
yourself a nice little offset. So maybe we can put our
character over here like so, and then we can just
bend legs a little bit. So select both of
these mature parts. Click RX, bend it inwards. Would look kind of cool,
something like this, perhaps. Select these parts.
Then click RX. RX, maybe even hold
control if you'd like to have a little bit more
control over the snapping. Maybe I did it a
little bit too much. Way, I think this
will look quite nice. Like so. Yeah,
something like that. And then afterwards, we
can even lower the arms a little bit because
we don't want them to be going upwards a
little bit too much. We're just going to
lower them a little bit. Something like so, and palms can just stretch
out a little bit. Now we're making it sit
nicely on the ledge. We can even tilt the
head a little bit because I think it looks
quite nice. There we go. Something like this
will be quite nice. Sitting on the side of this
lovely little factory. That's going to be it.
Thank you so much for watching and I will be
seeing you in a bit.
16. Fixing Snapping Errors Origins, Faces Volume: Hello, and welcome back over to Blender essentials for blenders, snapping and alignment basics. Now we're going to
go a little bit over some troubleshooting
scenarios. First form being, let's say, we want to drag an object onto
a part or the environment, and it snaps onto
the wrong setup. The setup itself might be
snapping to the right way, but it doesn't just simply
have the right functionality. So in this case, for example, you saw it jumping
around jittery, and the reason for that
is because right now we have closest snap base selected. And that basically got the
object to the closest part. But if we end up using
face projection, it essentially projects
from one side, and then if the object has
a face to another side, it will jump between those two. So you always need
to check whether you have the right
snap base for that. The second thing would
be to making sure that the snapping target is
actually set proper. So right now, let's say
we have phase selection. But, oh, it's not exactly working as intended and
why that is the case? Well, the reason for
that is right now, it's not actually a
phase projection. It is phase project. So it's not phase target, the normal one, but
phase projection. Are two different items, but you can see that the
icons are very close. So you might also want to make sure that you have
the right setup. So in this case, if I want to, for example, place an
object on top of the roof, I might consider to
just use snap base set to median and then use just
a normal face snap target. That way, it's going to
give me some nice results, and you can see it snapping it nicely on top of this building, maybe we can just
place it like so. That's going to give us
a nice little result. Next up is the origin. So let's say we want to move this piece to be centered
with the door over here. Right now, this door is
a separate object piece. I want to make use out of maybe the edge over here be
used as a center point. The way we could
potentially work with it is if I have this object
at the top selected, we can just use edge or vertex. I think edge is
okay in this case. We can select edge and
then whilst dragon, if we move our mouse
to the bottom, we can snap it to the base. But center now is
going to be offset. The reason being is
that this piece now has the origin point
on the corner instead. So to fix that, what we're
going to do is real quick, I'm just going to click
Isolation button, which is a slash key. That way we can see the bottom. We can go into Edit mode, select the face like so, and we can use shiftiness to actually use Cursor to active. Sorry Cursor to selected. Then go out of our edit
mode to object mode, right click and set origin
to free the Cursor, and that way it's going
to be nicely centered. Then when we go out
of isolation mode, we can move this object
based to its center. So I can use this X coordinates to just snap it to the
center of the door, and now it's going to be right in the middle where
this door is. So that's going
to be quite nice. Next up, let's say we
have another object, and I'm just going to
move it off to the side. Let's say we wanted to
snap it onto the grid, but we have the
increment selected. So absolute grid will
work quite well, but you can see it
snapping a little bit off, and the way the math works sometimes might make it
difficult to actually snap it because we have
the mouse not exactly on the grid dots, but it just snaps
it well, wagely. But I recommend you just to sometimes switch
it to grid option. And that way, you'd have a
little bit more control. You can see how nicely it
now snaps to the set grid. So because the way the increment works with absolute
increment snap, sometimes when you have a
mouse right in the middle, it just doesn't know
how to behave as it tries to offset the
object onto the grid. So for faster, clearer results, switching again to grid
might be the option. Next up, let's say we
want to snap this object onto our lovely item. And it gives us some really bizarre angles,
as you can see over here. I'm trying to right now snap
it to the vertice and it's not going to give me that good right angle that
we would love to see. So with vertex snapping, it's always going to be
if it's in a corner, it's always going to
be a 90 degree type of a normal offset, like so, especially
if it has bevels, so you might have more
problems with that. I would highly recommend
if you're using the align rotation to target to use Face
instead because it has high surface and it's not
going to be as just jittery, like so, or even better
to use face center. That way, it'll give
you a true snap to the middle of the desired face so you
can see over here. I'm going to real quick, click AltnR to make sure I
reset the original rotation. That we did before. So
that's an hour thing. If you have slight bit of an offset to
rotation or something, it's going to try to keep that rotation when it tries
to snap it onto an object, so it's not going to give you quite as good of a
result, for example. But if we have AltnR selected, which clays the rotation detail, then we can snap an
object, like so, and it's going to give you like perfect right angle type
of a setup just like that. That's something worth knowing. If you're having some
issues with rotation, just make sure to check whether you have a align
rotation of target turned on. Or also you might want
to check if you have effect rotation turned on as well because that
sometimes gives you an issue, especially when you're trying
to rotate it manually. So if I have this turned off,
now it's going to be fine. But with this on and I have
some items on the side, it's going to well, we see start flipping
out and freaking out because sometimes it
tries to snap to one angle, another angle and whatnot. If it doesn't find it, then it's going to look completely
different. You can see like so. So make sure that if you are
using effect rotate option, just to be wary of the
surroundings and which snapping you are using in case you want to get
the desired results. Next step is going to be
ignore backface culling. This one is great for
when you want to make sure that it only faces the
frontal parts of an object, but sometimes the Blender itself might be occluding
some of those smaller, let's say, vertices or items that you could otherwise
potentially snap onto. So sometimes, you might
not be able to get the right type of snapping that you want out of your setup. In which case, I would
highly recommend you to just turn on or sorry, turn off the backface culling. So that way, you'd have more control over
your snapping in case you're finding
hard to find that right vertice or face or
edge to snap onto an object. Now, I'd like to talk a little
bit about the snap base, sorry, snap target volume. That is going to be quite
an interesting one. And if you have an object, let's say, like
this one over here, where the walls are set
up with module pieces, but on the inside,
it's completely empty. Let's say you want
to make use out of this snapping for volume two, grab an entire volume
of these walls. Best way that you could
do it is actually, if you were to grab both the walls on the front and the back, you could join them together. That way, it creates
a certain volume, but by default, it's not
going to find that volume. You can see over, so
it's going to put the volume more in the middle of just
one part of the wall. So the way you can do it is if you use the snap
peel object option, it's going to peel
it as one part, essentially creating a volume in between these two hollow parts. So that way you can
now, as you can see, snap the object
right in the middle, center of this set volume
between those two walls. So if you have a room, let's say, something
like over here, you could potentially
join all of these parts together and then use snap feel object to allow object to snap to the center of this entire room,
which is quite handy. Let's continue on with
this in the next lesson. Thank you so much for watching, and I will be seeing
you in a bit. A. And
17. Solving Armature Snapping Issues with Collections: Hi. Hello, welcome
back around to Blender essentials for beginners snapping and alignment basics. Now, let's go ahead and
continue on with the section. Now, the final part that
I'd like to mention would be actually going back to this character would
be in regards to this. So sometimes when
using snapping, let's say we go real quick
back to object positioning, sometimes when using snapping
with something like Face, we were having the issue
of the object getting closer and closer and
closer because it was snapping onto the item
itself like that. So the reason this is
happening is because, well, we don't have right now the object
selection turned on. But the thing is sometimes
when we are creating objects or when we're setting them
up to make them nicer, we attach one into another. So right now, as you can
see the object is attached. This dummy of a mesh is attached to the
armature directly. So it's going to be
like one object. So if I was to make this
disabled selection for the armature and if I was to go back onto the object pose, then you'll see that we
still have the same problem. The reason being is that
this attached object is inside of another
attached item. So sometimes when using
exclude non selectbs, you might encounter
a problem where even though the object
has that deselection, there is an item inside of it, which will not have
that deselection. So make sure you have
it properly set up. Although when all of the items are inside of a collection, then this shouldn't
be a problem. So you can either
check and expand the options to see
whether there's additional items that
need to be deselected, or we can create a quick
collection by clicking, New collection with
the armature selected. In this case, New collection, we can call it
character, so create. And now, this object
is going to be inside, although if you have
just armature selected, you see that it's going to be now dummy outside of
this module item. So just make sure
to have both of these selected or multiple
items selected in object mode. So now when we
create a collection, we can call it character, and it's going to place it as is with its proper attachment. And if we have this d selection, we can now go back
onto the armature, set it to pose, and now we're not going to have that same of an issue anymore. Oh, yeah, those are some
quick problem solving parts for more of
niche problems, and hope you liked it. And yeah, I'll see you in a bit.
18. UV Snapping, UDIM Workflow Pixel Grid Precision: Hi. Hello, welcome back everyone to Blender
essentials for beginners snapping
and alignment basics. And now we're going
to talk a little bit about UV editing. So if we go onto UV Editing
tab, this one over here, we'll have some
nice little setups for our viewport on
the right hand side, and our UD space, which is used for UV editing. So if, let's say, select the object and go
into Edit mode, will now be able to see
this entire object, so. And if you're not seeing it, just make sure to click on
UV sync button over here. This will make sure
that the entire object that is within the Edit mode, at the top, we have ourselves the option for snapping,
just like that. And we have options
for Snap target. Although once you open the tab, you'll notice that it's way less to what you'd
have in your viewport. We only have options
for increment, grid, and vertex to be used
as snap targets. And then we have Snap base, which is only for the vertex. So if we have grid or
increment enabled, these are going to be disabled. Then we have options for effect for move rotate and scale wherever we want
to turn them on, and of course,
rotation increments. Again, by default is going
to be five degrees and one degree for smaller edits. First thing that I
want to mention is moving UVs using snap to grid. This one is pretty good when we want to use our objects for, let's say, something like UDMs. UDMs would require
us to set ourselves up UV spaces not only
0-1 coordinates, but in multiple quadrants. This means that if one object
has set up for Eudims, we'd have to move them around. So let's say you
would want to move this upper section
to be one object, this little tower at the top. What could we do about it? Well, in order to make
sure that we have the same amount of spacing and the same amount of texture
density, we don't change that. We could select one object. We could go onto Edit mode,
entire setup selected. What we can do is we can make sure that the snap
target is actually increment. That way, when we are moving it, we can see that it
snaps to bits, like so. And that way, we
can just click X as well to make sure that
it moves along the side. Move it all the
way to the right, like so to make sure
that this square is an imaginary square that's
next to our up UV section. And by doing that, we can see
that it's going to give us those exact same coordinate
outcomes because UVs end up wrapping the
texture coordinates. They end up going on a loop. So we can see it with
just normal textures. But this would allow
us to, for example, make it so that one
part is on one end, then this part could
be even mortar right. At this point, we
wouldn't be able to see more of the quadrants. So to help us out a little bit, if you go to overlays
on the right hand side, if you're not seeing it,
just make sure to scroll down using your mouse wheel by hovering over this section. And within the overlay, you can turn on X
tiles for X and Y. So if we set something
like ten by ten, you'll have all these quadrants
to be set by ten by ten. And this will help us out to
kind of manually move this. So again, we still
have the option for snapping two increments. We can then move these tiles
easily to other parts. And just like that, we
can move them around. Like so up to you for the positioning but once
we are done with this, we would have all
of these pillars, as you can see in different
quadrants and they'd still be using that same amount of layout, which is pretty good. So now if we were to
use this entire tower, if we were to join up
as an object and then put it maybe through something
like substance painter, we would have all of these
UVs nicely already laid out and repurposed from a
normal UV setup to UDM setup. So we could have
additional details, for example, for graffiti
or something of that sort. Next up, we have options for if I was to go back
to the usual tile set. So next up, we have
options for grid. This grid option is
actually very handy, especially when we're using
with overlay options. So right now, our overlay for the UVs is going to be
a little bit different. We have a grid guideline, and we have options for
dynamic fixed and pixel. So dynamic will allow us to basically zoom in
and get more of those little squares so we can position them in tinier
bits, just like that. And if we zoom out, that's not going to be
the case anymore, we're going to be working
with larger grids. But changing this to fixed will keep our grid always
the same size. So now, even if we
are zooming in, we're always going to
have that same grid. The other option
is to use pixel. Pixel is very interesting
one because it allows us to basically treat grid
as individual pixels. So as you can see,
we have a tiny, tiny amount just like that. This pixel setup is actually
tied to your image, the texture that you're
using currently. So right now because we're
using 2048 resolution, the pixels are going
to look like that, and we are able
essentially to snap it onto our setup quite easily using the snapping
the grid, just like that. So we're able to nap it
like so, as you can see. If you would have a
lower resolution, you would have a
different snapping grid. But I would also like to let
you know that if you have a resolution that's not set
in the square for texture, something like let's
say I have right now an option for a background,
this one over here. If I have this on or
an image background, you'll see that based on that, we're going to have
ourselves a grid that's going to be
wider just like that. So ideally you'd want
to have a resolution of an image to use that that would match the usual
texture square, which is either a 1024
or 2048 resolution, or if you're working
with Pixel art, 25, six or 512 would also work, or even going smaller
64 example or one, 28 would also be an option. Then you would have
yourself a way bigger grid, and it would be snapping
perfectly to your texture size. All right, so now
I'm just going to go and revert the setup. And let's say I want
this to be placed where option over here is
where the black panel is. So the bottom of
this would be black, and let's say we
want to reuse it. So the top would also
be a set as black. Well, what can we do about it? Well, we could simply
grab the panel over here. We could put it more in
the middle, like so, and then we could
use vertex snapping. So vertex snapping would
allow us to go and use basically snapping
to vertices option. And if we use it
individually on each vertex, we can just snap it directly to other UV endpoints, basically. That way, we'll get ourselves a perfect overlay of what the
previous panel looked like, and you can see that
we're getting ourselves all nice type of
detail over here. So this is going to give us
this chunky block, let's say. And just because
I like this one, I'm going to go ahead and
just make a duplicate onto this upper part
with increment snapping. Make a duplicate GX, and then just move to the side. There we go, I think, black
panels look quite nice. Now looking at this
panel over here might not be the best location for it. So maybe we can even just put it right in the middle
of these panels, like so Alright, so we're
going to end our lesson here. Thank you so much for watching, and I will be seeing
you in a bit.
19. Modular Entrance Design with Precision Snapping: Hi. Hello, welcome back every on to Blender
Essentials for beginners Snapping
and alignment basics. Now that we covered
everything about UVs, let's go ahead and
actually make use of it in real life applications. So for us to do that, we are going to
start off perhaps by just upgrading this
already set up base. And let's say we want to maybe create ourselves an
entrance platform over here. We can grab ourselves one
of the platform setups. So maybe something
like this yeah, this wide small one over here, and I'm just going to make
a duplicate right away. Just using snapping increment, we can place it
where the door is, and it's going to be perfectly centered because
we're using the grid. Most of the cases, if a
modular item has a grid setup, so if like a panel
has a full grid use, you can see that right
now it's just using two sections of the grid
and it's two by four. Make full use out of
it if it's possible. And then afterwards, we can grab this wider
part over here. We can put it, duplicate
it over to the side, rotate around using control
while holding control, so we get 90 degrees,
nice quick snap, and then we can
just try to align it to this section and
see if it would work. Maybe it's not as well. There we go,
something like that. I think that will
look quite nice. And then we can just move
it to the outer section. To move it to the
outer side, all we can do is just simply duplicate it, maybe even mirror
it, mirror global X. So and just kind of
reposition it real quick. There we go. Nice
little walkway. And let's say we
want to now kind of reinforce it
with smaller parts, small pieces, so we can
use these items over here. I'm just going to
grab these ones, like so, these free items, and then we can just
move it off to the side. So these parts are not perfectly to the
grid, as you can see. So we're going to
work around that. We're going to make sure
that they're set nicely by snapping items directly onto the basis, but
at the same time, we want to have some
visual aesthetics over the grid so we can position some symmetry
from one end to another and just
make sure that we just make it look a
little bit nicer. Actually, these parts
can be a little bit too big. We can
make them smaller. And for that, we can scale
it down and using control, we can just scale it
down to a value of 0.7, like so, you can see perfect 0.7 because we were
holding control. So again, usually, when
I'm working with snapping, most of the cases like
70% of it or more even, would be set up with Snap base, set to median increment
and affect move only. And then when I'm
holding control, we can affect rotate and scale, and just switching
between that using just control will
be, so much better. Next up, we can just place
some items over here. And let's say we want this
to be a little bit lower. So in this case, I'm
going to hold control, just manually reposition
this first item, so making sure that the face is generally
somewhere in the middle, just like that, and we got
ourselves a first setup. We can a little bit
move it a little bit to the front because there's going to be a pipe
at the front leg. So at this point, I'm just playing around with the
shapes with the form. Snapping doesn't only allow
you to keep it rigid, but also allows us to well, play around with the
forms and shapes, making sure that it's
conformal yet flexible for us, so we don't have to
manually readjust parts. So right now, for
example, we want to snap it to the
center of this part. We would need to
enable a face center, like so, and we can just move this item right to the
top, and there we go. We got ourselves a nice
little setup like so. And then I'm going
to make a duplicate, going to also enable the aligned rotation
to target, like so, and we can just snap it
directly into this object, and I am going to what's up with that doesn't seem
to want to work yet, because these are
set as strangles. So we can either dissolve this triangle over soap or if we don't have
an option like that, we can always just change up ourselves to be using
edge center instead. So when an object
is strangulated, we'll be able to do that. As you can see,
though, now, we don't have a good option
with the rotation. It's giving us a little
bit of a messy setup. So in this case, we can
firstly use something like face center with a
line rotation to target to make sure it aligns
to that angle, like so, then we can move it
off to the side a little making sure that there's no items
in the background, so it wouldn't just re snap it, or we can also use control to make sure that we just move it off to the side. And then we can just turn off
a line rotation to target, turn back to edge center, move this to the centerpiece,
and there we go. We're going to get ourselves
lovely little setup. This time, I'm just going to
make it much, much thinner, just like that, and
we're going to sell a real nice type of a fit. In this case, I'm not
using snapping scale. I think it's going
to be quite right. Yep, looks reasonable,
because I'm not planning to use this multiple
times. I think it's okay. Then afterwards, we
can just snap this, duplicate it off to the side, snap this to the upper side, rotate this R Z and use control to snap at 90
degrees like that. And I think next up, we can just use face
project. Base center. Sorry. There we go. And it's going to
snap it perfectly. So I'm just duplicating
it and snapping it perfectly to the
face just like that. And you can see how nice
and simple this is. Super easy to use. And
we can afterwards, maybe just grab
something like this, put it maybe in the
middle over here, we attach it to the sides. Although, in this case, we have an issue of them not aligning properly or
if I try to use it, it's going to use
the origin points, so it's not going to snap
to my desired location. So what I'm going
to do instead is, I am going to this case, I'm going to use G, click B, and snap to the center
of this. But let me see. Yeah, it's a triangle again, so I'm going to go ahead and check real quick if
there's a triangle over here. So no, in this case,
it might be just easier to make to
dissolve this triangle. But let's say we don't
have an option for that. Would basically, in this case, want to use an option
for where it snaps to the center of the
face and an option two, where we have an
edge center edge of the snapping.
So what can we do? We can't just tell it normally, so we can use face center and holding shift, use edge center. If we want to snap this
object to the pipe, and let's say we don't see
both of the faces at once, what we can do is
we can click G, B, snap it over here. And now at the bottom, you see that we have saying
that we can use all navigate. So whilst holding old, we can use our middle mouse
button to rotate this around and now snap it perfectly to where we want it to
be, just like so. Although I'm worried
that this might not be perfectly centered, I think that's okay for now. But let's just
keep that in mind. Because then afterwards,
we can just go ahead and close this up a little bit to
make sure they look nicer. So this upper section,
we can just duplicate. We can then actually,
what am I doing? We can just go ahead and
duplicate it, click Escape GZ, and move it upwards like so, and then mirror it in
global Z, just like that. I'm going to raise it GZ holding control is
going to raise it above, and I can use this pace. So
that's going to be nice. So GB, snap it to the middle Oldt snap it
to the middle over here. And there we got
ourselves this up part. And I'm not too keen
about moving all of these at once or one by one, so I'm going to do
it all together. So I'm going to grab all of these frames, going
to this time, make sure that we are snapping
it to the active one, and we're going to make sure that the last one selected is going to be the one that's
needed to be snapped to. So now we can use
Shift D and just snap it directly with
the face over here. And just like that, we got
ourselves a nice little setup. Just to make it symmetrical
and nice and pretty, I'm going to make it quick
and simple solution. Going to just grab these parts, going to grab this one as well, and just duplicate
it to the upside. Click X to make sure
we're locking it, and then mirroring it
on X just like that. Now I want to snap to this part. I think that's going
to be quite right. Let's go ahead and
do that. So G, B, snap over here. So now we're moving all of these structures
together as one, snapping it to this
up section, like so, and we got to sell this
part that snap nicely. So, something like
that might be alright. And let's say we can
just keep it as it is. I'm considering about putting
our frame on the top, but I just want the door
to be more visible. But yeah, adding detail like
that is quite reasonable. And let's say this part is not quite as centered
as I hoped for. So we can use snapping just
like we did previously. And I'm just selecting
all of these frame parts, like so so it turns out that the entire section
was a little bit offset. This door is not
exactly right where the grid is centered to make sure that we are
having it more symmetrical. I'm just going to grab this
entire section like so. And once we have it selected, because this is placed
with asymmetry, mind for the grid, I know that the center point is going to be
right in the middle because one side is
going to be the same as the other side because we're
using the grid increments. And then afterwards, we
can just use Snap base. With the vertex. Target, use GX and just
kind of reposition to the center of
where this door is. And just like that,
we got ourselves now these parts perfectly
aligning to the entrance. And Nice, unique little setup. All right, so that's
going to be it. Thank you so much
for watching and I will be seeing you in a bit. A quick couple of things. This one over here, I think
is a little bit too big, so I'm just going to make it smaller more reasonable amount. Go to use snapping face center to make a duplicate onto
this panel over here. That way, it's nice in the
middle of these panels. Let's send it here and continue on with it in the next lesson. Thank you so much for watching and I will be seeing
you in a bit.
20. Centering and Aligning Stairs with 3D Cursor Snapping: Hello and welcome back ever
on to Blender Essentials for beginners Snapping
and Alignment basics. So let's continue on
where we left off. And this part over here is, well, we can replace it with
stairs since we have them. Let's go ahead and do
that. We can click L to select Linked, limit
is set to normal. We can just go ahead and select the stop and actually
just delete it, so that way, we can
replace it with these lovely stairs
if we choose to. Let's go ahead and make
a duplicate out of them. Hold shift to select
the upper part, click Control J and make
this into one piece. And now let's see how we can, well, put it in the center. So for this case, I think
we can use the precursor. So let's go ahead and just select dots on one
end and then another. We can use shifting S.
Cursors to selected, so now it's going to
be perfectly centered. Then select the
staircase and now use shiftinS selection to cursor and no rotation. There we go. And this is looking quite nice. We can use scale with control to scale it down to a perfect
size, and there we go. We got to selves a nice looking staircase
going downwards. So that's quite interesting. And this part over here, I'm just going to go
ahead and make sure that roof is selected. We can just call
this Wanda building. Like, so I'm just going
to make sure that the entire section is
set into building. And now we can move this building B next to the upper building that
we already had on the scene. So before I had individual
origins, just playing around. But now median point, we rotate this
building 90 degrees, moving it somewhere closer, maybe something like
so, saving a look. Of course, we need to
raise it up a little bit, and I'm going to go ahead
and do that by using the snapping mode to make sure it's placed normally
on the ground. So to do that, we're going
to just use grid snap. We can use G and then B to
snap it to the vertice, which is not allowing
us because we need to select Snap target
also to be vertex. So hold shift,
select the vertex. Now grid and vertex are enabled. So we can click G, B, snap it to the bottom, like so, and then move it
upwards, just like that. And now it's going to be facing and sitting perfectly
on the ground. And maybe I'll just move
it a little bit to side, just like that, something like so. I think that's quite right. And the next part
is actually just to make it a little bit nicer. We are going to replace
this pattern a little bit. I really, really do not like how these on the end turned out, so we can just go
ahead and delete them. And now the next step
would be just to well, position these little
ones over on the top. So I'm going to use this time
face center and position this at the center
of each one of those grids on top of the
rooftop. Just like that. Super nice, super simple. Maybe even consider
placing one in here, but no, I do not like it. And just like that, we
got ourselves a way, way nicer, visually
pleasing result. All right, so that's
going to be it. Thank you so much for watching. And I hope that this
information about snapping has been
informative for you. So yeah, that's pretty
much it for me. Happy modeling, everyone.
 3D Tudor, The 3D Tutor