Transcripts
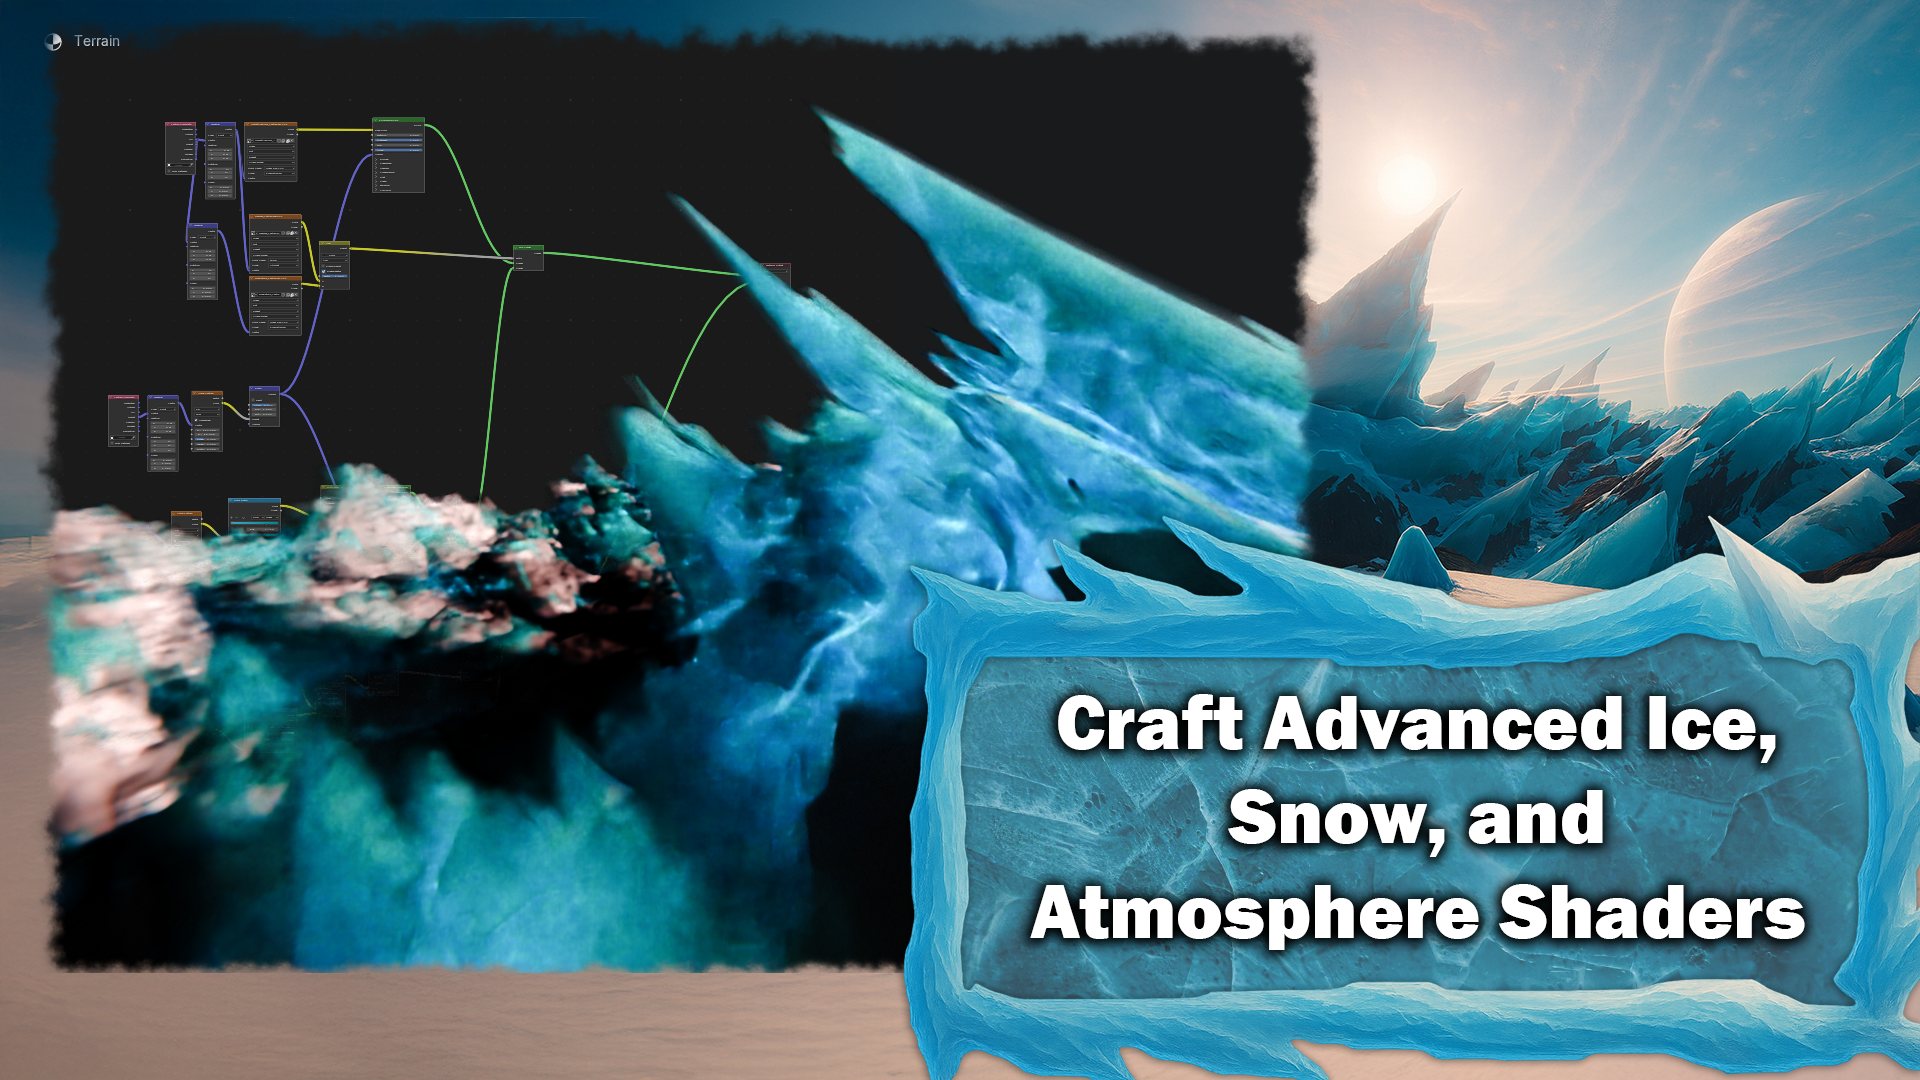
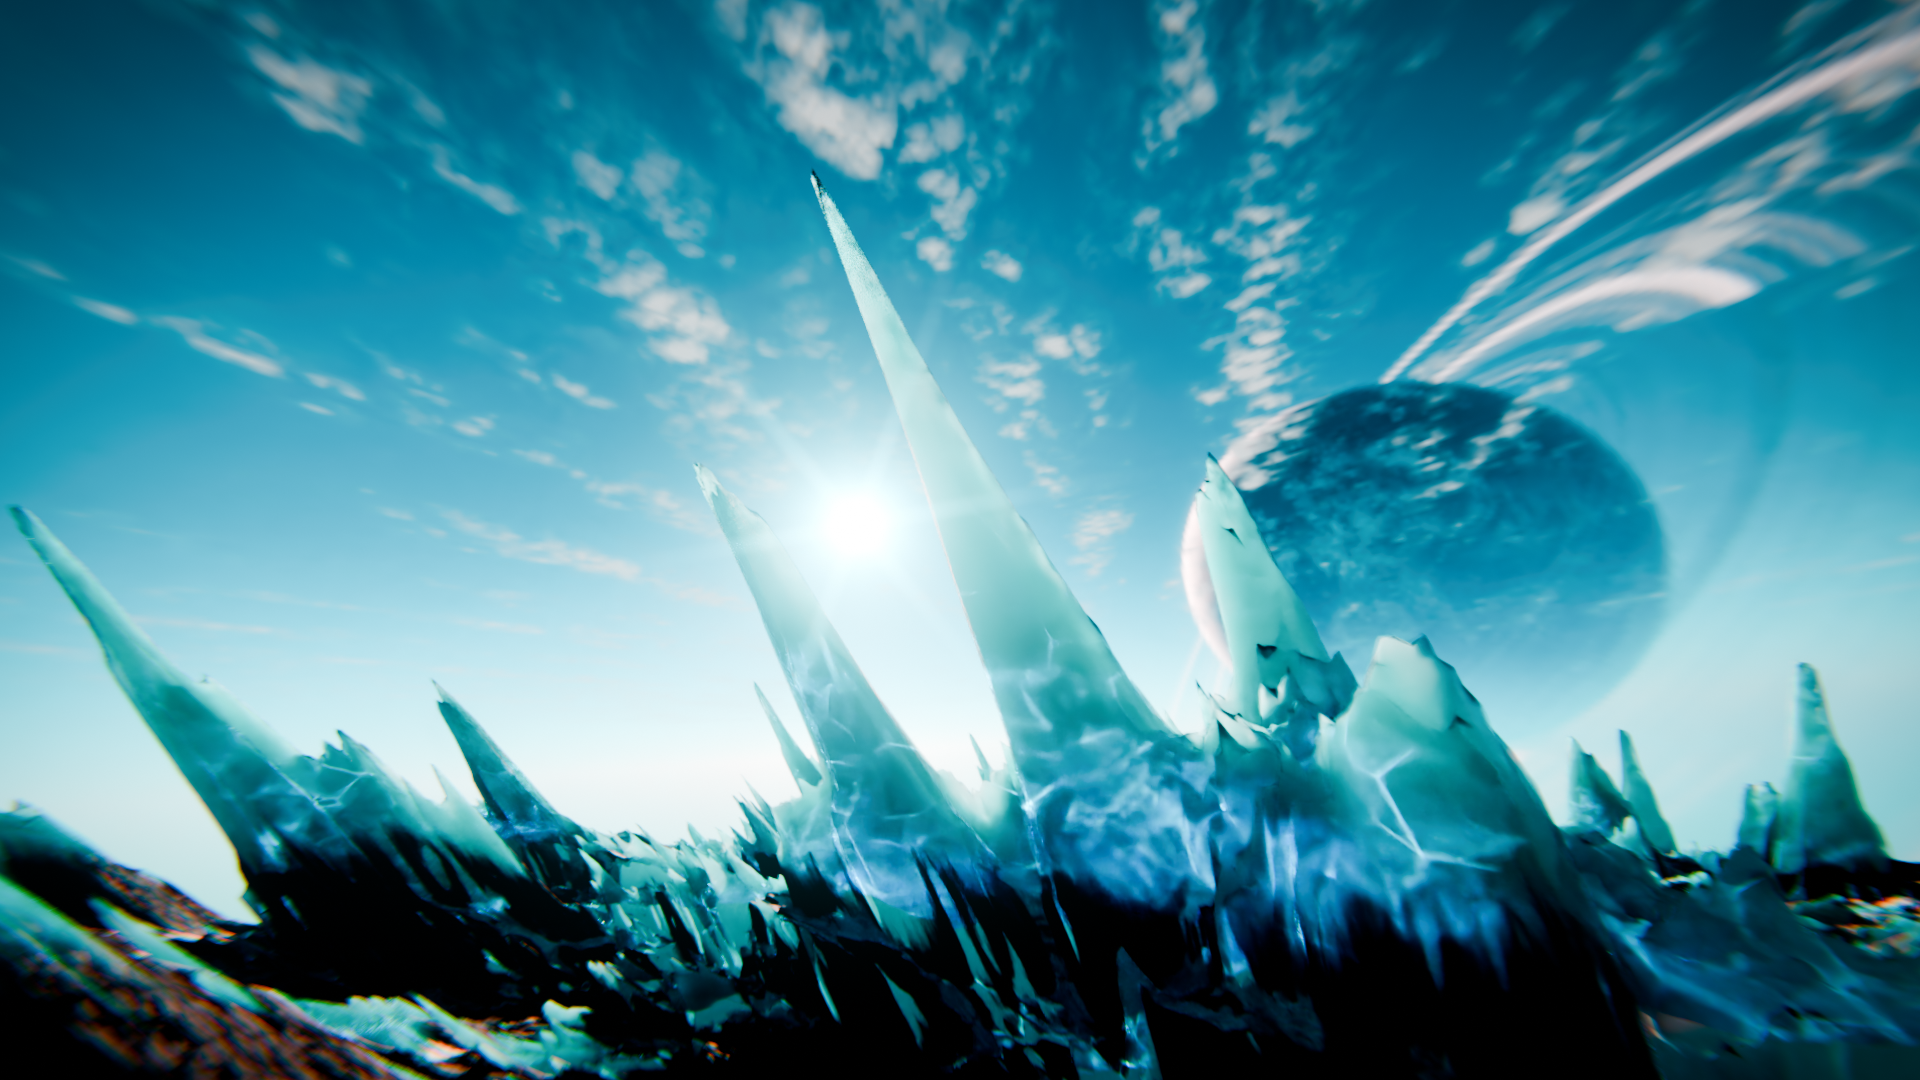
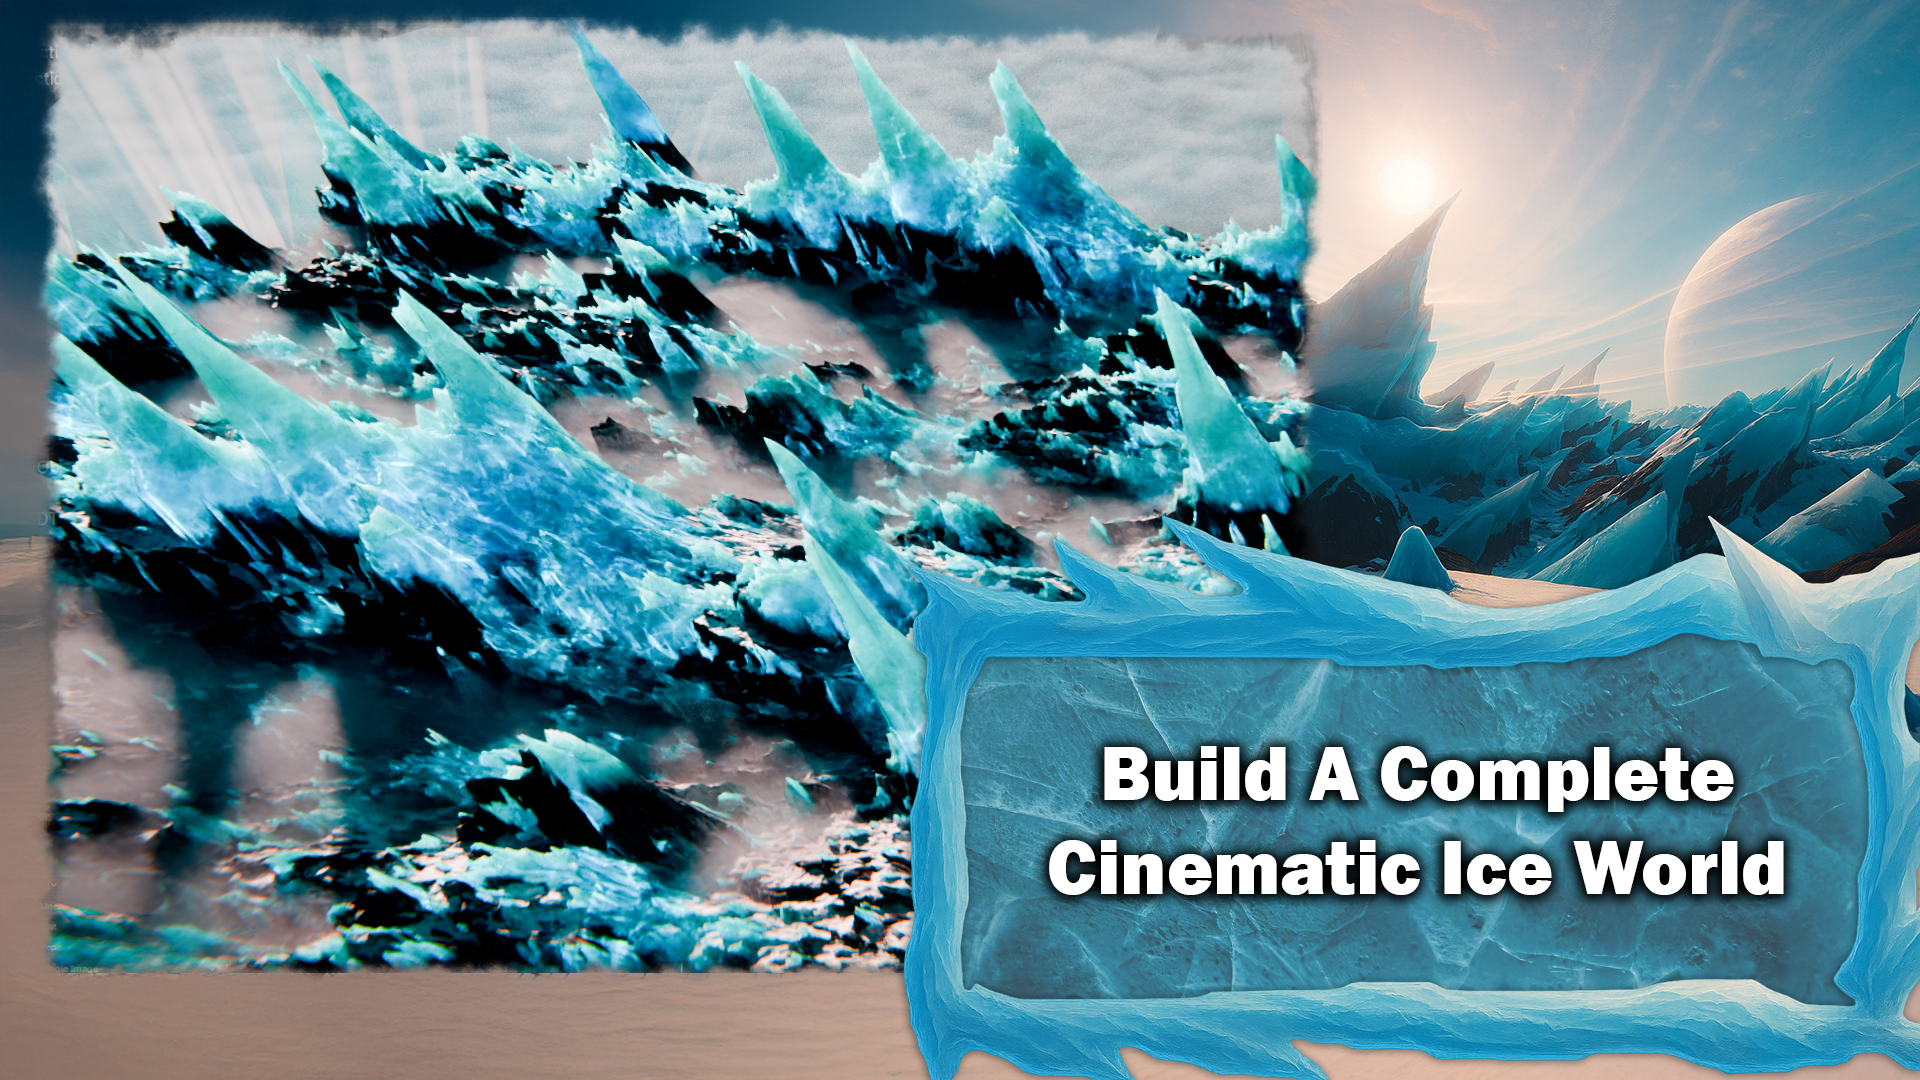
1. Introduction Blender and Gaea Masterclass - Procedural Ice World: In this mask class, you are going to build a complete cinematic ice
world from scratch, using both Gaya and blender, knowing that you built most of the world procedurally from the first noise Odin Gaya to the final composited
frame of black. My name is Josh. I
will take you through a full production style workflow from creating
icy environment. I will start by
walking you through the interface, node
graph, navigation, and central terrain nodes with cute introduction and
explanation of how nodes work so that
you know exactly where everything lives
and how it works. We begin to build a dramatic rocky based terrain using nodes like extendard
multifractial erosion, debris and snow
simulators and color our terrain so that we have
a texture to use later. Export high quality
height maps, color maps, and masks from Gaia in the
right formats and resolutions. Once we're in
blender, we will turn our flat plane into a landscape. We will subdivide
the drain and use multiple displaced
modifiers to add both large scale and
small scale detail, including an interesting
diagonal displacement pass to give the whole
world a dynamic tilt. We're then going to build a
layered material and blender, which blends rock, snow, ice, and is driven by the masks
that we exported from Gaia. We also cover a slightly
extensive section on bug fixing. If blender and Gaya
do not communicate correctly or if blender
has UV mapping issues, I'll show you how to track down the common issues and fix
displacement problems and cleanup seams so that your train actually matches what
you saw in Gaia. To sell the mood of
the scene, we build a custom HRI also in blender, using layered fog and a lightly modified
use of sky texture. We'll learn how to
create a planet, a full planet using
a simple texture, a sphere, rings and clouds. Then add it to our
scene as a HDRI. We'll then add multiple fog
volumes for distance fog and ground fog using gradients
noise and volume scatter to get that cold
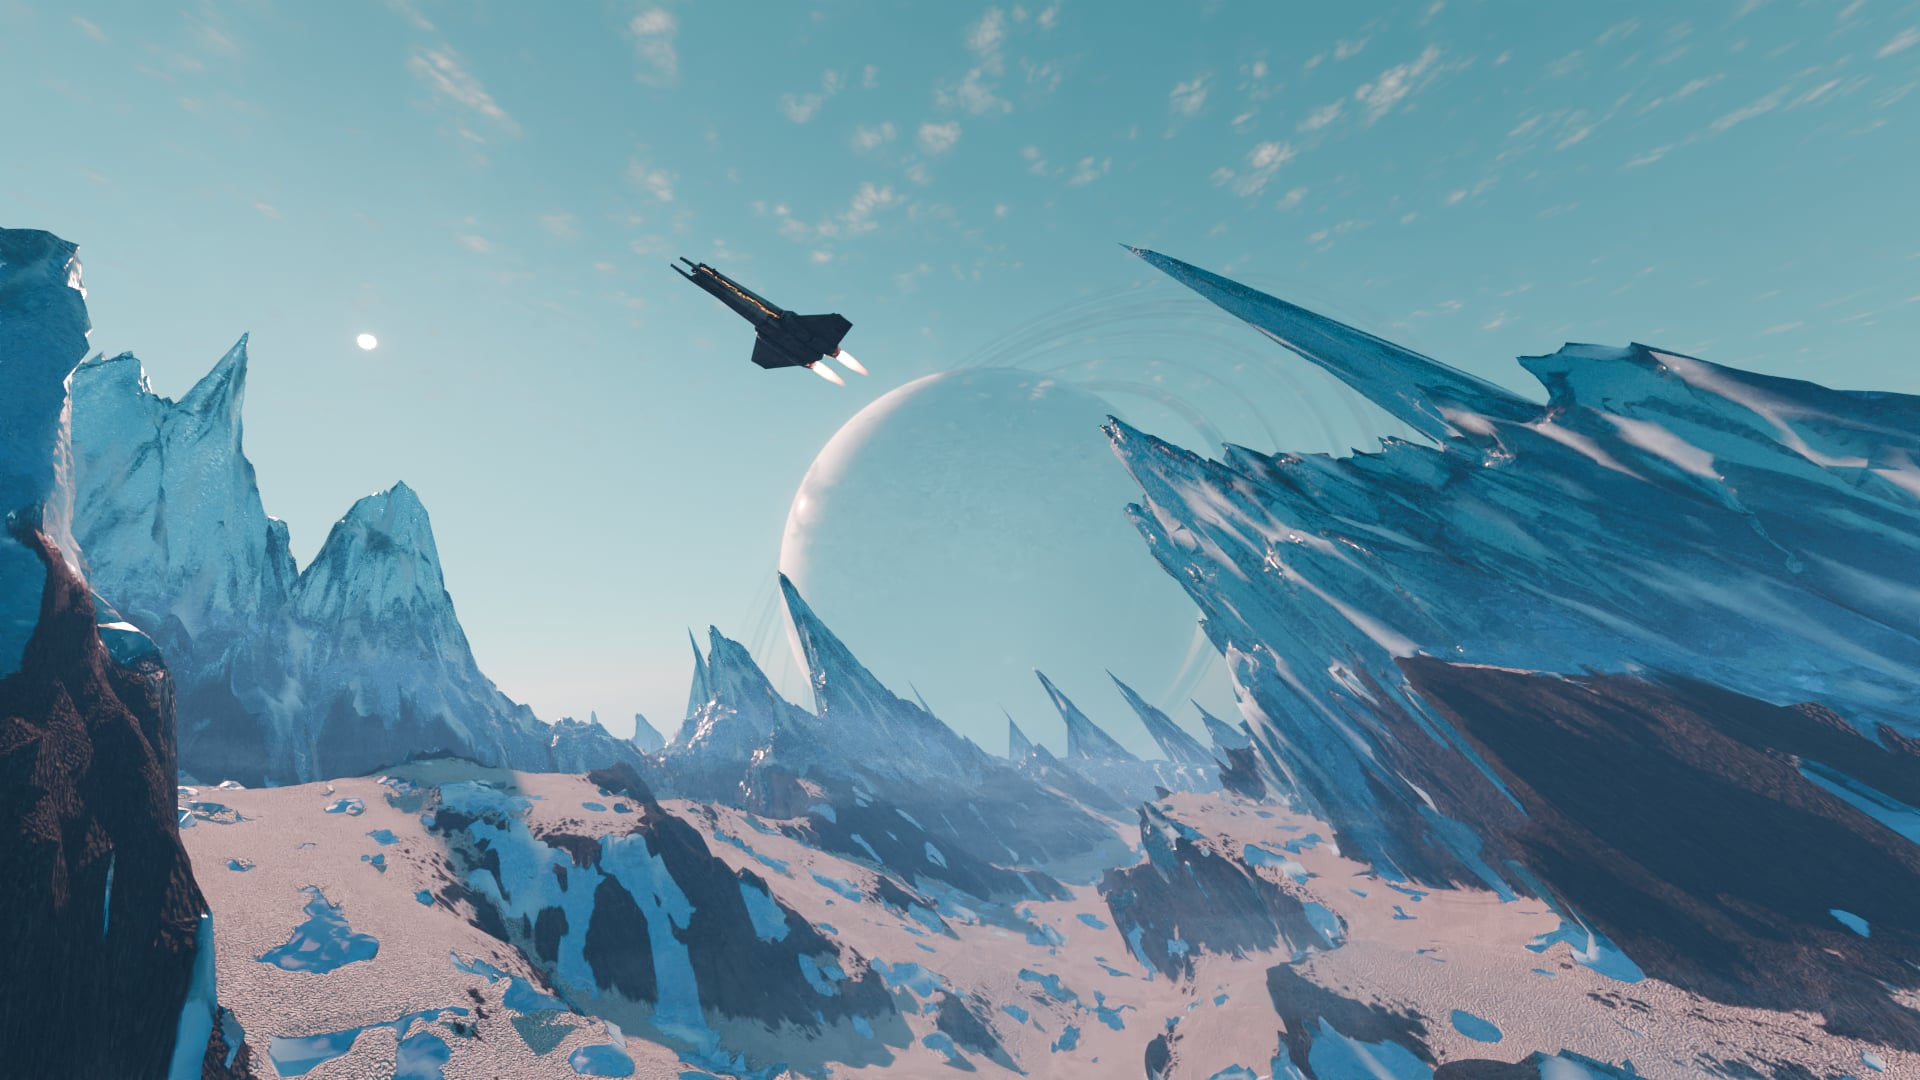
cinematic atmosphere. Down, of course, our scene is not complete
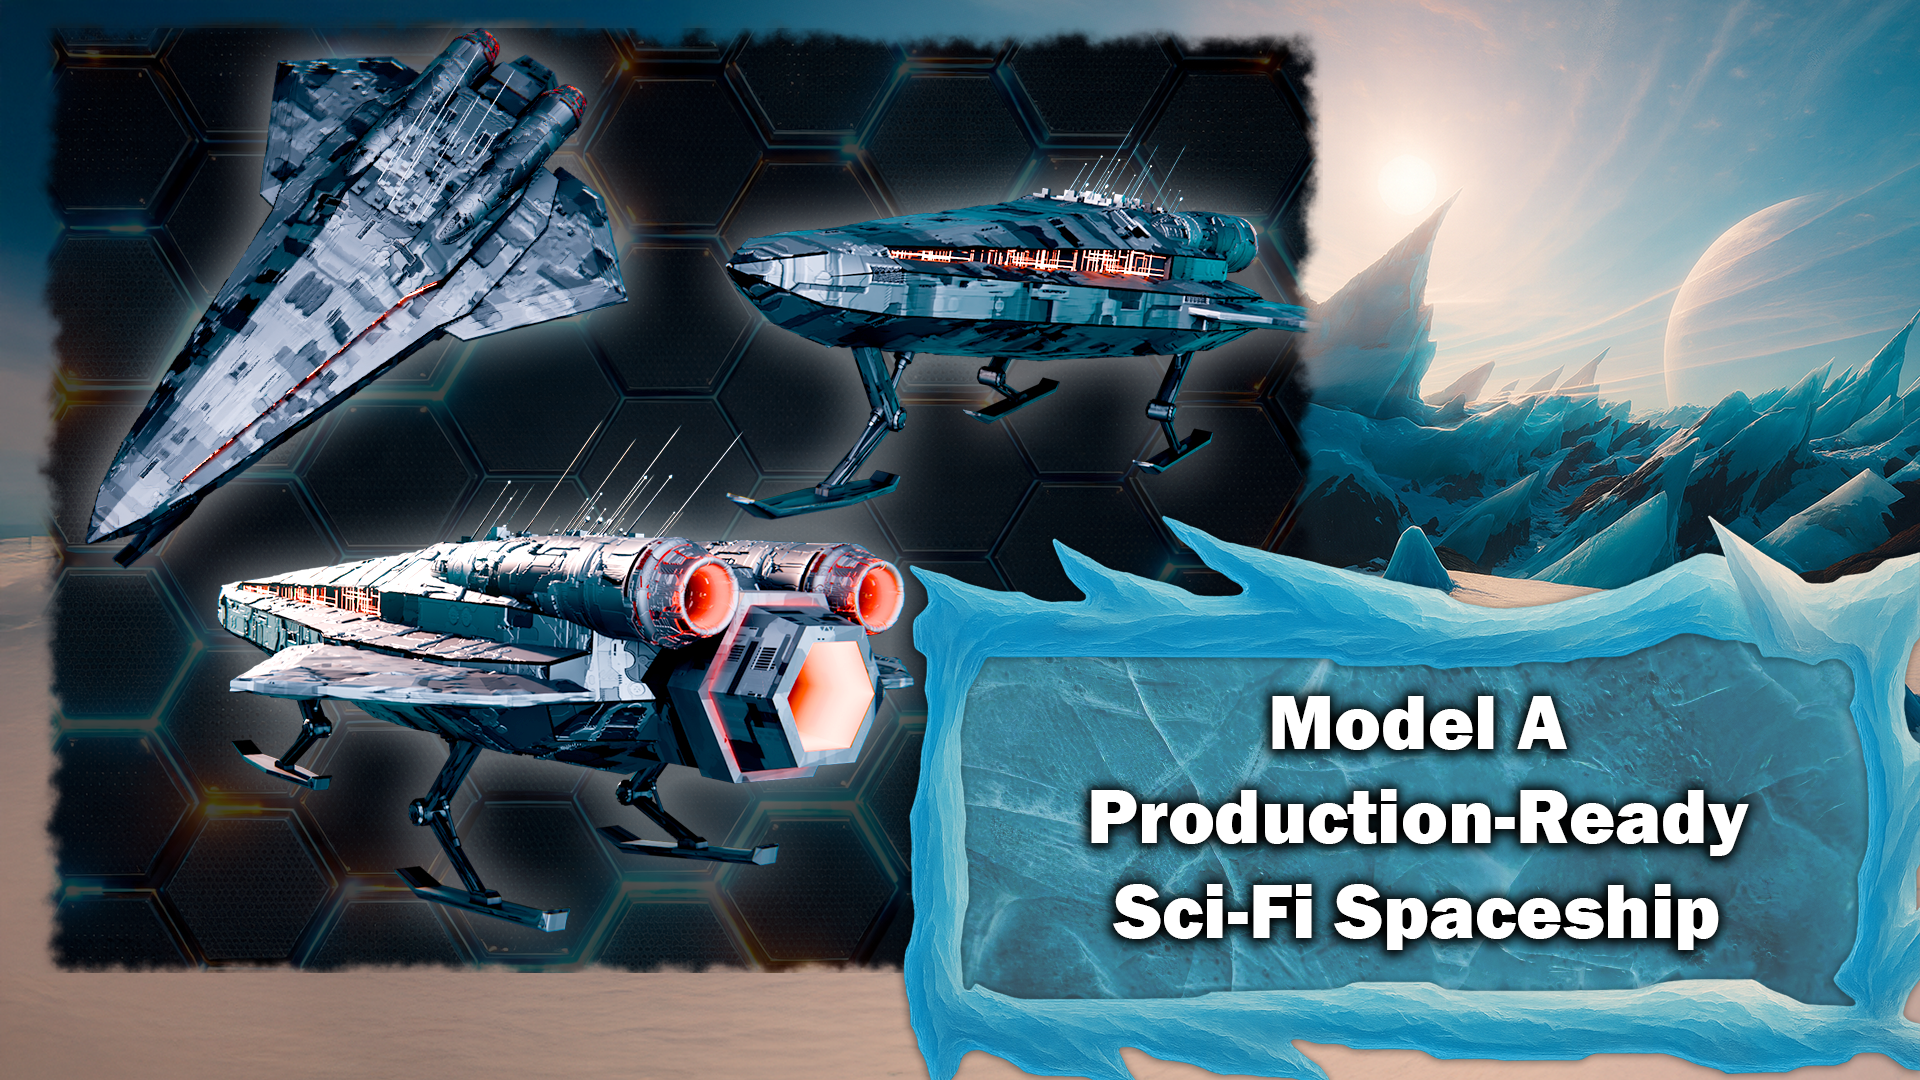
without a hero object, so we must model a custom spaceship right from
scratch, right in blender. We'll start from a
simple cube, of course, and use classic hard surface
modeling tools plus bit of mirror modifiers to block out the main body, wings, engines. Shading, we will create
a metal material and use displacement based textures
that will generate in another program
called JS placement, which procedurally generates
random si fide textures, and use that for
panel detail and emissive engine glows that will tie into your
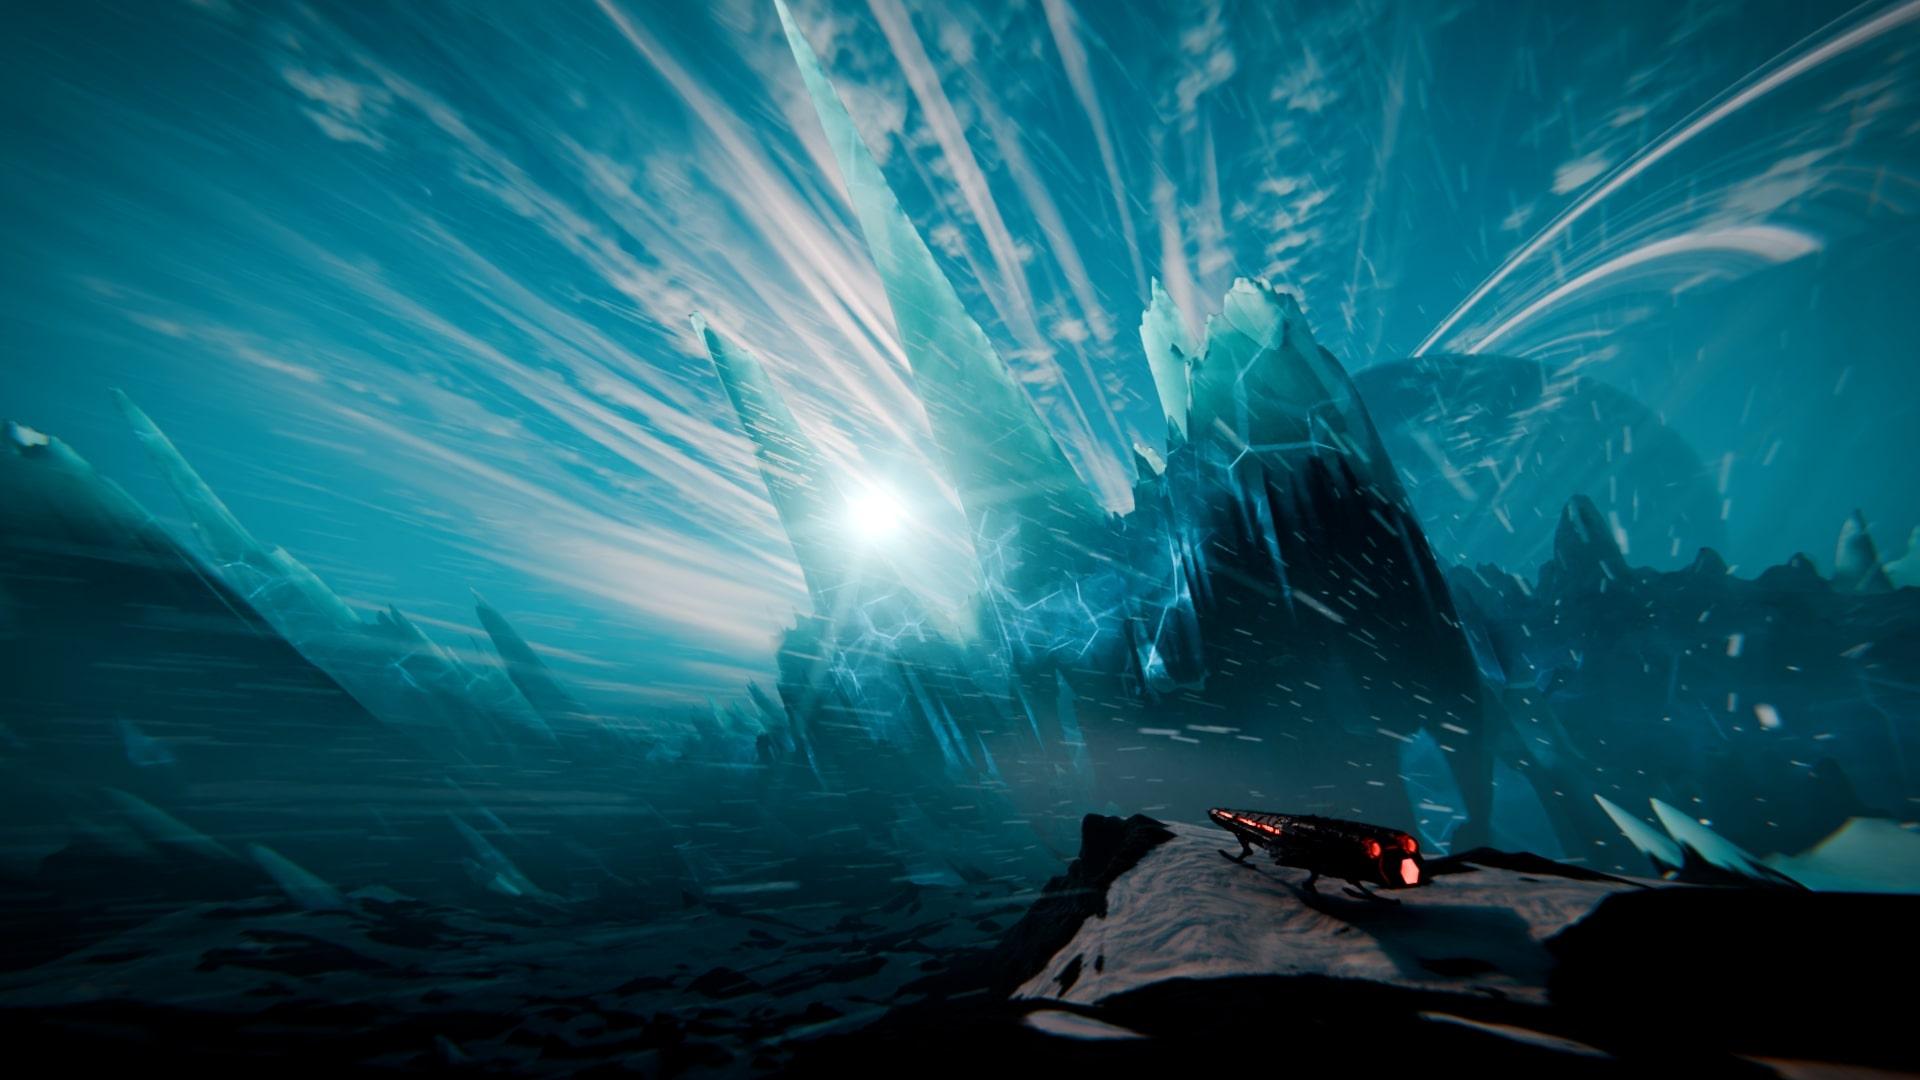
lighting nicely. To finish off the moon, we
add snow particle system that uses motion blur to create snow stringing
across your lens. You can learn how to
control the size, density, and motion of the particles and how to balance them with
your fog and lighting. Last step is
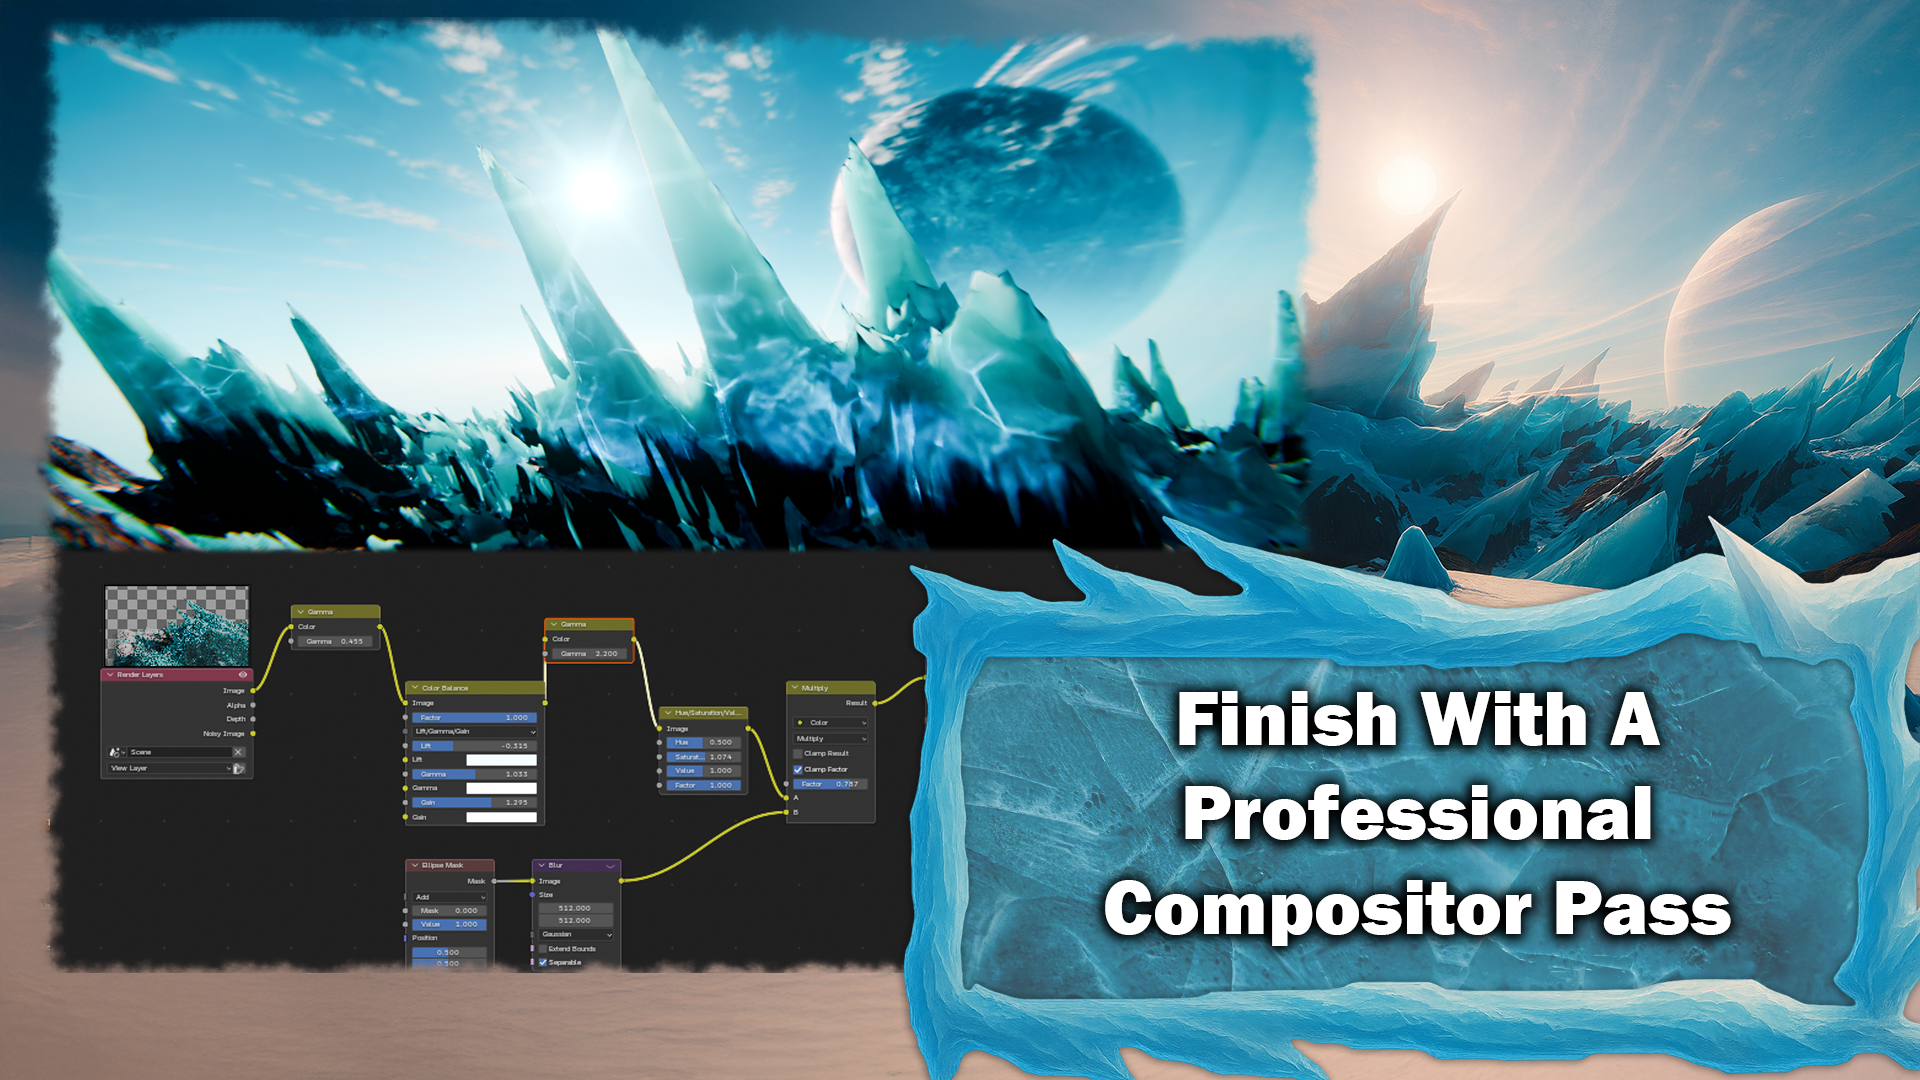
polishing the image. In the compositor, we add glare streaks and
saddle bloom and add a color balance to push the cold blues and
the white highlights, a vignette to draw your eye to the important parts
of your scene and gentle lens distortion. Give you that slight aberration
for a cinematic finish. By the end of this course, you will have a fully realized
procedural ice world, custom spaceship,
atmospheric effects, and a lovely final
rendered image that you can proudly
put in your portfolio.
2. Procedural Terrain Creation in Gaia for Blender Integration: Welcome to Blender and Gaia Mass class,
procedural Ice World. Now, as you can tell
from the title, we will actually be using another program along the
side of Blender called Gaia. Gaia is a very, very fun to use height
Map generation tool. It will procedurally
generate height maps with simulated erosion and rockfall and all kinds of terrain
modification for you. Output some very nice
looking height maps. Now, I'm going to give a
quick demonstration on the uses of Gaia's height maps
and what a height map is, how to create Wilding Gaia and how to implement
it in Blender. Right. Now, just so
you understand all of this lesson and
probably the next one will be dedicated to an example, should you wish to
skip immediately to the course material skip ahead. The lesson should be marked when we start the actual course. But if you're interested in understanding the
program, please continue. Righty. Now, on the
left hand side, we've got all of these categories,
a whole bunch of menu. It's a bit like the right click menu and Blender for nodes. And we are going to grab
ourselves a terrain primitive, sorry, a primitive extended
multifractal. Here we go. That looks like some
pretty cool terrain to me. Now, GAA is a mode
based program, so you'll come out here and you will type in something else
like this erosion two. And it links. It's nodes. So if you don't
understand nodes, um, I'll try to explain it. But yeah, I hope I hope for your sake that you understand
nodes before we start this. Anyway, so like Fudini
and unlike Blender, all of the parameters on the nodes are on the
right hand side in, like, sort of an outliner here. It outlines all of
the node parameters. So we've got our
graph view here. We've got our view
port here, which you can rotate with left click, pan with middle click
and Zoom with scroll. Up here, we've got our
save where we can save it and the preview resolution
that we want to preview at. I would suggest working
on it in one or 0.5 K and cranking up to two and
four once you're happy and you want to see the detail that you
can get out of it. Now, down here in our
little panel here, this is basically like the
actual outliner and Blender. This outlines all of the nodes that you
can click through. If you have a lot of them, you can scroll for quite a bit. Then we have the build menu. This is where we choose
to output our file. So here I can choose the resolution output
that I can output in. I'm going to output in one K because I have paid
for this program. This program is completely
free, by the way. Well, not completely. The
program is free to use. If you don't understand,
I'm going to go quickly over what
a height map is. So height map basically is
a two dimensional image, you know, it's
just a flat image. But once applied to a flat plane with enough subdivisions in
a three D software, it will displace all
of the vertices on the plane up and down based
on the grayscale image. So black is zero, white is one, and every shade of gray
in between is halfway. I will move all of the
points up and down. So it's quite a very efficient
way of creating terrain. Now, of course, if you want
more detailed terrain, you're going to need
higher resolutions. And Gaia can go to some truly
ridiculous resolutions. I can't even dream of what I
would need 256 K image for. What? Like, I legitimately have no clue what you would use. This would be like NASA. In case you were wondering,
NASA actually does use Gaia. It's on the Gaia quad spinner, which is the
publisher, their page. Kind of funny. But still, that's a little bit overkill. I'm going to run on one K
because the community version, which is the free for
everybody version, can only export up to one K. Now I have the
Indie version, so, of course, I can
use it commercially and go to eight K,
which is useful. But for the purposes
of this course, I'm going to use
one K so that you can follow along and
not feel left out. Now, we've got that. There's some more
settings over here. Most of them you
don't want to touch. The one relevant one
that used to be in here that I've just recently
updated two days ago. And this new build
destination is now not in a settings
menu somewhere else. It's right here, which
is really useful. Set this to a build destination. As you can see, it's already
going to somewhere specific. And then once we're
ready to export, you'll press F three on a node, and we'll market to export and export all of the images
that this node creates. And then there's all the file
formats that you can do. H. Quick tip, XR
for the height map, and for when we do colors PNG. Unless you specifically need
one of these other ones, which I've never used, yeah. I'm just going to unmark
that for a second. And then over here on the right, all of this panel, including these at the bottom only
pertains to each node. So here there's a whole
bunch of modifiers, and then here these
are basically these, but they're faster to access. Sweet. Now you
understand how it works. We've got our multifractal, which I'm going to click up
here on this little thing. It's going to, that's
going to clip off. Wish that would
flip the other way. Let me just Let me just
pull that over here. There you go. You
can see it now. There's a whole bunch
of things here, but if I'm going to close this back up
so you can see more. But if I ever click on this, I'm probably changing between mask and default
mask will let us see this as the Toti
grayscale image. And it will effect as a Toti
grayscale image, as well. Alright. Let's stick
that back over there. Wish that would flip
to the other side. Oh, well, kind over everything. Now, we've got our multifractal, and I will not be going over all of the parameters
because that will take probably about its own course's worth to go over, like one category's
worth of parameters. So, to be honest, just click through it
like this one does scale. That's pretty self explanatory. The relative feature scale, you click around on it, you get the idea
of what it does. Same with the
roughness, you know, Gaia is a lot of just clicking the parameters back and forth to find what you like the best. Now, I'm going to decrease
the regular feature scale. Now we've got some
nice terrain looking here. I'm not going
to use any of those. Then I'm going to come
over here to my erosion. Now, these ones produce self explanatory duration is how long it's been
eroding for Oh, geez. Okay. Down cutting is how much the water cuts
down, as you can see. Erosion scale is
the really fun one that goes from this kind of sort of very furrowed terrain to this sort of more
sediment based terrain, which is kind of nice. I'm going to set it
right about Now, there's a whole bunch
of sediment parameters, but to be honest, I don't really know much about these apart from the fact
that they make sediment, I know they're really
good to use, though. I just never find myself in a
situation where I use them. Then, of course,
there's the shape is, you know, let's look at this
mountain here specifically. This mountain has this
sort of pointy shape, and then I can put it up, so it has a more bulky
shape. Pretty good. I'm going to go back
for the pointy shape. I like that looks better for me. Y. I'm gonna increase it down cutting too. I just
want a little bit more. Sweet. Now we've got our train. We are now going to save, or at least I am going to,
because I like to do that. Um, save that Bush, also, in case you're wondering, I'm using Gaia
two, not Gaia one. Gaia one is good, and it is definitely a lot more
complete than Gaia two, but Gaia two has a lot more powerful and it works
a lot more faster. And more faster, yes,
correct English people. Anyway, um, I'm going to now use surface
terrace stratify. There we go. Actually, I don't think I'm gonna
use stratify today. Stratifi make some really cool
abstract terrain, though. I love that. We're
gonna use that later. Now, what we're going
to do is we are going to use simulate,
scatter, debris. Now, if you're wondering how all of these are
automatically connecting, when you click on a node and you add another node,
say this scatter here. It's debris scatter. It will automatically connect
it to the last one. So if I click on here
again, and I say, I want to modify blur this, it will actually
plug out of that. But if you don't have
anything selected, it will just place
it in the view. Another useful thing to know
to delete a connection. Click on it, press delete. Yeah, that's it. Righty.
Now we've got our debris. We're going to
increase the debris amount because
there's not enough. I'm going to increase and increase both sides of the scale parameter so
that we have bigger. I'm going to decrease
the friction, which means they'll
roll further. Oh, that's a little much. Oh, I actually want
a bit of friction. Yeah, I like that.
I actually want a bit more now. Pretty cool. Now, let's have a look
at this node real quick. So we have the in and out. The in and the outs height map. It always will be if it
modifies the height map. Unless it's a color node, this is going to
be the height map. Now, some nodes have these
in like this precipitation. Like say you only want
to erode a certain part. Let's say, let's grab a
radial gradient right here. And let's plug this
into the precipitation. If I decrease the scale here, you'll see it's only
this area here. Now, if you have a look, none
of this is getting eroding, but this is here because
as this is seeing it, the water is only falling in this area to erode,
which is pretty cool. You can also do this
using the mask, but see, this will dynamically, you know, if it was only
on top of the mountain, it would dynamically
go down the mountain. Whereas if it was
the mask, it would cut off completely
exactly where it was. But anyway, we want to
erode our whole thing. Same with here. The emitter, if say you wanted only the
rocks on this mountain, you could do something similar, and you could do it over here. Now we have our outputs.
So this is the flow. This flow output is basically going to be a grayscale image. Let me just grab an effect
not so you can see it. It is all of the lines. There's all of the
where the water went, basically. Pretty cool. If we do the wear, it's
pretty much the same thing. This is where all of the like, rock has been worn
down the most. And deposits is where
all the sediment went. Now, we don't have
a lot of sediment, so you can't really see it. If I go at water level
here, there you go. You can see a little more. So this is where all
the sediment is. Let's have a look
at the Sea. You can see where it's worn more. Right. Now, if we have a
look at the same thing with the debris because we're actually going to be using
these outputs from the debris. We've got the debris here if
I turn off the water level. This is going to be a
random color for each rock, which is really useful for
coloring the rocks later on. Then we've got the debris,
which is basically just a mask of where the rock is and
where the terrain is. Now, from here, we
are going to add in simulate water C. And we are
going to get some water. Now, of course, water
levels not high enough. And also, all of this just terrain has
moved way off the bottom. So we're going to go
over to the debris node, and we're going to click
this one right here, which is drop two surface. So it will drop the lowest point to z zero or vertical zero, depending on what
program you use. And there we go.
Now we've got C. I'm going to decrease
that actually. I like these. It's
going to look like a Y once we're done.
Increase the variation. I just like to do that
because it means it's varied. I'm going to do that. This is basically the mask.
The shoe size is the mask and the shore height is sorry, the shore size is a combination
between the mask and It's like it's where the terrain that borders the sea gets flattened
out, which is pretty cool. And it affects the mask as well. The shore height is how
vertically that can go. Like, for me, I
don't really want a lot of shore height here. There we go. That's much better. Feel that. That
looks pretty good. Right. Now, I was going to add trees. In fact,
I still might. Yeah, we might do
that just because. So let's add tree. Now, I'm going to click on this C node, and I'm
going to press G. What G does is it adds
this little icon here, and once we've done
all the coloring, what the coloring is
gonna do is it's going to say, this thing with G, in case you didn't know
is mark for underlay, which means that all of the color nodes are going to use that cause when we
open up the tree, you see, the trees actually
going to modify the train. It's going to add
in lots of trees. Wow. Who knew? Anyway. So what's
going to happen is if we plug the trees
into the color, we would be coloring
the trees as well, but we don't want to use
the trees as physical mesh. We're going to instance
the trees in Blender later using the mask this
tree node generates. So this pressing G will allow us to use
this as the terrain, and this is a mask
later and not have this effect all the coloring because it would
look really weird. Now, I'm going to set
these two big trees. Now, we have a problem here, the trees are growing in the
water, which is not good. But remember these masks here, we've got the water
musk that tells us where the water is
and the shore musk, which tells us
where the shore is. So if we combine these together
using a combined node, and we set this to 100
and we set it to add, so it adds both
of those together and stick this into
the inhibition. None of the trees
are on the shore anymore. That's pretty good. Now, I'm going to pause this here because that's
been 15 minutes. And yeah, you probably don't want to watch this
for more than 15 minutes, but we will come back to these
trees in our next lesson. So yeah, hopefully
you stick around, hopefully you enjoy it, and we'll see you in the next one.
3. Realistic Terrain Coloration and Exporting from Gaia: Alrighty. Welcome
back to Blender and Gaia Master Class,
procedural Ice World. Now, in our last lesson, we started the example
of how Gaia works. We used our multifractal
terrain. We eroded it. We scattered rocks all
over the place and dropped to the floor.
We added some water. We added some trees that are now no longer
grow in the water, which is kind of helpful. And in this lesson, we
are going to be finishing this terrain by making the
trees not look so uniform. And we are going to export
this into Blender and create a mini finished scene with it as an example of how to use
Blender and Gaia together. Yeah, where we left off,
we masked out the trees. Now, unfortunately, the trees are looking a little uniform, which if you ever know the joke about three D and nature,
nature's never uniform. It's perfection
and imperfection. So fortunately for us, Guy has this lovely
patches and spread. Yeah. That will reduce all
of the uniformity here, and now it looks way better. Also, nice and fun. We have a slope
inhibition so that the trees can't grow on cliffs. I'm going to decrease this
so that they only grow, you know, in a sufficient amount of Oh, that's a little much. No bad. You know, decrease the spread
a little too, so that they can
spread out a bit more. See that's kind of thinking
there. Going to hear my PC firing up background. Trying to achieve lift off. Alright, now you can increase
the health a little bit. Now, we're done with this. We're going to stick
this down here because this is not going
to be the end result, sort of. We're going
to come back to that. However, what we're going to
do now is we are going to output this into a chokepoint. Now, what a chokepoint is,
chokepoint is basically like a reroute node and Blender. If you want to know, you can
double click to close it up. Probably should be running
screencast keys, but oh, well. Um Now, I've done this before. I've colored an entire terrain with like 20 color nodes and then realized I needed to stick another terrain
modifier after that. And so I had to unplug
all 20 color nodes and stick them all
into the new node. So this thing here,
basically we reroute all of our color nodes
into this output socket. So if we decidere to add
another node after C, like, say, we want
to add I don't know. What is the rocky. Let's add outcrops. After this here. We can just plug that in and then all of our color
nodes are still connected, and it won't cause any problems. Now, let's get on to coloring, which is quite fun in
case you didn't know. Now, this drive basically creates grayscale
images based on, you know, curvature,
slope, peaks. There's flow, there's rock maps. But the one we're
going to be using is texture base to start off with, which is basically just a cheat sheet for all of them
at the same time. I'm going to crank
a few of these up. Probably not the flows, though. Definitely the soil going to go down so that
we get fun stuff. This is definitely
one of the click around and find out nodes. So please enjoy yourself here. This is. Alright. Now, if
you're wondering, this is a horrible
color for our terrain. You know, it's grayscale.
We're not making a 1950s film. So we're going to add in a colorized SAT map where I'm going to just drag
out and go SAT. Now, what the SAT Map is is basically it's a color
like in Blender, but there's a whole
bunch of presets. There's like nearly 2000 I
think they said there was. I'd love to see a day
when you can do your own, but yeah, for now, we are perfectly fine with the ridiculous amount
that we have currently. Now, I'm going to click around here until I find
one that I really like. I think I'm going to
go with that one. See, I'll like this one. So what this is doing is
it's taking this band here and coloring the
grayscale band that would be, if you could think
about, imagine that this texture base has a band like this that's the
gray on one side, the black on one side, and
the white on the other, and it's gray in between,
just like a default color am. And it's assigning all of
these colors to those. Pretty good. The bias, in case you wondered,
basically shifts. I picks up this line here and it will move it
along the other colorm. So if I move this along here, all of it will offset, but I like to leave it at zero. Also, useful thing to know. I probably should have
mentioned before. RClick will allow you
to do a whole bunch of parameters and will allow you to type in
individual values. Now, I know you're probably not going to
use that a whole lot. I don't really. Most I do is to type if I want a
really small value. Right now, also,
useful thing to note, there's a HS fig right here. That's the last thing I'm
going to say that's about it. Right, now we've got this. This does some
pretty cool terrain, but unfortunately, it's
a little bit pixelated. Now, that is, of course, because we're running on one K, and I'll crank it up to
two KCL see what I mean. So good time to control
this and save, please. Now, when you switch resolution, just so you know, it is going to rebuild your entire tree. So if you have 100
plus node tree, you're probably
going to want to go and have lunch
while it rebuilds. And as you can see, the train is now much higher resolution. If I crank this all
the way up to four K, which is going to be
way, way overkill. Just watch it. See,
this is what ten nodes, and it's taking forever if we watch this as
it goes through. L see the train will
get much higher detail. There we go. Look at that. That's some crunchy
terrain right there. Very nice and high rest. But remember, every
time you edit, it has to do that pretty much for at least two nodes
a head all over again. So every time you click on a new node, it has
to recalculate it. So I'm going to set it back
to one K so that we can actually do things at
a reasonable speed. Now, we're going to
grab our sat map, and then we're going
to drag this out, and we're going to
go color erosion because color erosion
is a really fun node. It basically does the erosion, just like the erosion
node back here. Well, that's bright. But it only does it to the
physical color. It doesn't actually
affect the mesh. N I can just connect this. This is just going to
Oh, dear. Never mind. Always connect it to
your choke point. That way if something
you want to mess with it later,
you can do that. Now what the color
erosion is gonna do, it's basically going to drag all the colors down the rain, as you can see here, by switch between these two, sort
of blurt them out. Probably don't want it
as strong as I have it. Blender is generally
the one that you can that's the blur. If you put it higher,
it blurs more. This is also another click
around and find something you like with Yeah. Now, I'm going to add one more. Now I'm going to
save again because last time I used this node, it crashed, which
is unfortunate. It's called the weathering
node. The weathering node. If I ops connecting the height. God damn it. I wish there was a thing like
Blender with the right click. This weathering
node is basically is just edge detection
and cavity detection. Makes the edges white. I'm going to decrease the amount because that's a little much. And the cavity is darker if
you click on the darker, you can see here, if
I turn this on and off, it makes it darker. I'm going to increase the
creep, increase the scale. I'm going to
increase the amount, and I'm going to
click washed out that sort of washes away. There we go. As you
can see, it sort of adds just a little bit of extra depth and almost
ao to the terrain. Okay, the grassy
rain's done now. If I really wanted to, I
could mask rocks and do, like, make the peaks all rocky, but that's a little bit of
overkill for right now. So we're just going to
roll with this for now and stick our fingers
in the air and go, La Di Da, this is how it works. Now, unfortunately, our
water is green right now. It's a very, very interesting
pattern of green, but it's still green,
which is, yeah. So what are we going
to do? I found the best is the depth, the depth output
of the C. We put the depth output into
a SAT map, I hope so. So pro typing there. We're going to switch it
to the blue one here. And I already know
this one specifically here is really nice
for tropical water. And I'm going to
clamp in this so that that white edge is right right at the
edge of the water. Now, if we look back here, Oh, yeah, that's okay. That's dokey. It's the white is not going
to the edge of the water. So we can change this
bias here to make it go all the way in
the edge of the water. I don't know why that's
not going, Bray. What? Does some
Unfortunate. Unfortunate. Oh, well, that's the way
it's gonna have to be. I know I probably could
scroll through all of these and find another one,
but I can't be bothered. But yeah, so we now have what it looks like some
pretty good aerial water. Now I could also add in, like, I think that's what
that pixel noise is for. Remember if we go
back to the basic, we go to the noise. Oh, dear. If I color this with
a sat maps in blue. Look at this. I add
these together. That went a whole lot
better in my mind. Oh, well, we'll
just use this for now that looks kind of good. Now, like before, we can just drag this output into
this output to combine. And set the blend ratio to one, and we are going to
set this to water. I forget that you
can't drag these. That's unfortunate. There it is. Water. And we stick
that into the mask. That's wrong way. Let's just swap those inputs real
quick, and there we go. Water. I like that. Now, I actually want
this water to be a little more green because we're going for a tropical here. So we're going to adjust the hue here to
something like that. And there's a slightly
greener water. Sweet. Now, in case you noticed, our beach is also green, which is not generally the
color you see beaches. So we're going to do
this all over again. Sort of. We are
going to drag out the shore and we are
going to go Satmap again. We are going to go
for the sandy one, and we're going to
pick a sandy color, and we are going to mix
it again with 100% blend, but we're going to
use the shore output this time, which
is the last one. And we're going to go, Oh, oops. Again, wrong way. Swap in buts. Hey, and our shore has been I don't know why
it's over here, though. What Did I make sure that I put the right questioning
my sanity right now? That's weird. That
is really weird. Anyway, I can live with that. Let me just have a look
at this shore real quick. Counting this is share. That's Alrighty. Okay, I'm going to introduce another thing like
we press G here. You can also press F on a node, and we'll lock the
preview to that. So I can go back here and
screw with the shoe size here while still
looking at that node, the FX node down here. I'm going to delete
that now, and I'm going to click over here. I'm going to press F twice to go out, and there's our share. Kind of. All things
are going wrong, but oh, well, I have everything. Oh, yeah, that's much better. There we go. And now
we've got our beach. We've got our terrain,
and we've got our water. I like that. Now what we're going to do is
we're going to plug on here and we're going
to press F three. F three is the
export like before. We're exporting the combine, and this is going
to be color, so we're going to set
this a PNG 16. We're going to come back
all the way over to here and we're going to
press F three on the C. The C is going to be a EXR, but we are only going to
export the primary output. Now, if you wanted to replace
this water with your own, like, a box, volumetrics
water shader and Blender, you would turn off
Render surface, and this would remove the part where it
flattens this out, and you could add in a box and raise it to
the same sea level. Now, for my demonstration, I'm not going to do that just because it's going to be faster, and you've probably been
bored enough watching this. Now. So we're going to do that, and we're going to only
export the primary output, which is going to be an EXR because this is
going to be the height map. We're going to come
over here. We're going to look at our trees real quick. We're also going
to press F three. This is going to be a JP
sorry not JPG A PNG 16 again. And we're going to mark none, and then we're going
to click on trees. This is going to
export basically a map of where all the trees are so that we can use it to scatter tree models
on the terrain later. Right. Now, I'm going to leave this here because
I've yapped for long enough. We're going to come back
in the next lesson, and we're going to export everything with all
our correct settings, and we're going to start
importing it into Blender. So yeah, hopefully,
stick around, enjoy it. I know I'm enjoying it,
which is pretty good. And I'll see you
in the next one.
4. Displacement Mapping and Color Texturing in Blender: Alrighty. Welcome back to Blender and Gaia Master
Class, procedural Ice World. Now, right now, we're
in our introduction. This is how the program works. In case you somehow missed the last few videos,
we built all of this, which builds a very nice
terrain with color and water, and we have simulated
trees as well over here. Now, I guess you missed, I've just cranked this
up to four K so that we can enjoy this terrain and
all of its crispy glory, about to compute all the trees, which is going to
take a little bit. But I actually figured
out what was wrong. I mixed the shore
after the water, and I need to do the shore on the grass and then the water. So yeah, in case you were wondering what happened
there, that's what happened. So yeah, also good time to save. Yeah, I'm going to
click back over here. And yeah, so now we're on
to the exporting part. So we're going to press F three on this one,
because of the output, I think I actually
did this before, but I have had to
make a new one, so I'm going to do it again. Set to PNG 16, and that's EXR. Sorry, PNG 16 straight. And that's a color.
And now to export. If you have a higher
version Gaia, you're probably not watching
this, but if you do, please take the time to enjoy one of the
higher resolutions, but for the purposes
of this course, I'm going to be using one
K like everybody else. Now, this is already set to a area that I know where
I'm going to build at. I have a folder full of Gaia builds that I've already
set it to go to. So this is ready to go. Please
set your file output here. Just know that there will be about four or five image files, so it won't just be one. Now, we've got all of these. We've got them all ready to go. And now we will click on
Build if you're ready. Let me just make sure I've
got the trees, too. Oh, dear. Oh, well, and now
we pick up Build, and it will pop up this
little thing I'll say we can close Gaia to save
REM and GPU memory, but I'm not in case
I want to come back to this and modify
it and then export again. And it will pop up
this terminal window, which will tell us a
whole bunch of fun stuff. It will go through
all of the nodes as they build, and they output. Now, if you didn't we go. Mine's finished. We're going
to press any key to exit. Now, if you didn't
disable thing, your file explorer just
probably popped up with all of the files in it. Now, we're done here, so I'm going to open up Blender, but we are going to have a
look at these images first. We come back over here to Gaia. Where's my Gaia output. There we go. We have
a look at Gaia here. I've got this Builds folder, and there will be one
called course Example 001. And there's our terrain
that we just exported. If we go over here, this
one is all the trees. You can see us as trees. I went the wrong way. Let's combined. Then, of course, we can't
see the XR and that thing, so which is unfortunate. But lucky for us,
Blender file explorer, we'll look at any image
file, which was really fun. Right. Now we're in Blender. We are going to add
ourselves a plane, and we're going to
scout through ten. Because the height map
will work on any object, mesh, but it works
on planes better. But the thing to
know is height maps only work with geometry. So we need to subdivide this. I'm going to subdivide this 100 times and then
subdivide it once more. Now, I would suggest not
going much higher than this and using a subdivision
surface modifier. Oops, that is not the right. Oops. Not bad. Subdivision surface. Now if you somehow don't know what a
subdivision surface does, a subdivision
surface, basically, it takes all of the
squares in our mesh, and it will cut them from
the top and the bottom. And it does that again
for every level. Also, a thing that's
useful to know, we're going to be using
the simple mode because simple mode does not make
our corners rounded. We are now going
immediately proceed to Vertex mode by pressing tab, and we are going
to go to select. Now yours might be
along the top here. I have an add on that compresses it into here for ease of use. We're going to select
by trait, non manifold. You can do this in
normal Blender. Don't worry, and we're going to presete and click on vertices. Right, now we've got
our subdivision. We are going to hide this for now just so that we can
work a little faster. And we're going to add
in a displaced modifier. Now what the
displaced modifier is it does exactly
what I said before. I'll move all of the points in the space up and down
based on grayscale image. I'm going to use this
to example. We see we have this image here of noise. And so the black
parts of the noise, like this bit here, that's going to be that bit
right down there. This bright part in the middle, that's probably that
bit right there. So it moves all of the points,
the vertices on the mesh. I can't quite see it until
I turn this on up and down, based on that image,
which is really useful. Right. Now, we
don't want clouds, which is good if you don't have a way of
making height maps. We're going to use
Image and movie, and we're going to open up that Gaia Builds folder with for me, it's called course Bors example because
that's what it is. And see here. Here we have Blender just instantly
reading the EXR file. And then we go,
There's our terrain. Now I'm going to
go Shade Smooth. There we go. That's our terrain from over here. Pretty cool. I like that. Now,
if you so desire, you can turn on your subdivision and get your detail back. I'm going to set
this up to four for my um Rs for the render
so that once it renders, as you can see, we can
get even more detail. Okay, word of warning, never, ever click and drag the
iterations on subdivision, because while it might take, I'm not going to
say this right now. While it might take, like, half a second for
two subdivisions, 3 seconds for three
subdivisions, 20 seconds for
four subdivisions, it might take 3 hours
for six subdivisions. So you definitely don't
want to try and drag it. Always type it or use
the little things here. Right. Now we've
done all of that. This is some really boring
white looking terrain. So let's color it off
to the shading tab. My shading tab will look a
little different to yours. That's just because I
like the way it's set up. We are going to enter
material preview by holding Z variety. Now we're going to
start coloring. Now, we're going to add
ourselves to new material. We're gonna call it
terrain. What it is. We're going to press Control and it'll open up this image texter. Now, if you for some reason, don't have the node
wrangler enabled, go to your preferences by
pressing Control comma, or you can go edit preferences here and search
for node Wrangler. Now, this will come pre
installed with Blender. It should if it's not, you can click Under
Get Extensions and search for it
here and install it. But it should become pre
installed in Burner. You always want to have this on. It just makes your
life so much easier. Anyway, now back to this. We've got this is coming from the UV, as well,
which is important. We're going to open
that exact file again with the Gaia builds. I'm going to decrease this
so I can actually see this now. Cross example. And I'm going to grab
the combine now. Hey, look at that. Now,
because it's terrain, no roughness and no specular. Useful to know. Alrighty. Now,
if you remember correctly, we actually did some
other things, too. We did the trees. Now I'm just realizing I want a roughness map so
that I can make the water shiny and the terrain, you know, not shiny. So let's click back on to Gaia. Let's turn off, click on these, and press F three to
turn them all off, except for the C. Now, the C here, we're going to go under this little icon here, we're going to click off out and we're going to click on water. This is going to give us a white map that only
outputs the water, and I'm going to click on Build, which I'm going to save first. I'm going to click on Build. And I'm going to set that
going, and I'm going to click back over to Blender because
by the time that's done, we are going to have it. I'm going to come back here and I'm going to go to number
two, and here's our water. PrutyGod. Let's add
in a color ramp. I have mine set to C
because like quite literally just set the node to a shortcut C because
I use it so much. So if I summon a color ramp out of thin air,
that's what I'm doing. But if you wanted to
do it, you can go It's color ramp right there.
Also, if you didn't know, this is this node
Pi is an add on, also like node wrangler
comes pre installed. It's called node Pi. I probably should have
mentioned this before. This one right here, development node pie, which
is really useful. Makes my life so much easier because I don't have
to, you know, Oh. Oh, I want a converter.
I want that converter. Wait, what about a
shader? Oh, no, shader. Sorry. Shader. Oh,
yeah, over here. It's like, No, I want this
shader. I want that shader. Anyway, we're going to
flip this color amp so that the water is black, which is going to be zero and the grain is white,
which is one. And I'm going to
do the opposite. I'm going to just plug this
one into the IOA level, which is going to do
the exact same thing, but the opposite direction,
and now it's all shining, but it's a little bit too shiny. So I'm going to
just breeze through a wave bump map setup so that because this is technically not part
of the course yet. Also, useful the Noe,
Control Shift Left click, we'll preview the node just like clicking on a node and Gaia. Yeah, you got to do it a bit
differently for Blender. There we go. Now
we got some water. And we got our train. All we need is some lights,
camera and action. And as a film student, I can tell you nobody ever says that, which
is really funny. I'm going to pull out from
my environments add on. So it's a free add on to Skylab. I'm just going to do
this just so that we can enjoy it real quick. I And here we go. We have ourselves and mountains. Now, you can add fog and stuff, but it's a little much for now. Maybe that's going to be on that's gonna be in the
coarse material, my guy. That's going to be in
the coarse material. That's where all that fun stuff
is going to be. So, yeah. So this is how you import
height maps from Gaia and you put them into
Blender, which is really fun. I stick this to real time
so that when I do this, it doesn't look so horrible. Yeah. Right. This is gonna be the
end of this lesson. Uh, yeah, that's the end of the introduction. I
hope you enjoyed. Um, yeah. I will see you next time to start the
actually relevant stuff. Took me long enough.
5. Modeling a Stylized Ice Terrain with Advanced Gaia Nodes: Hello, and welcome to Blender
and Gaia Master Class. Residual Ice World. Now, I made some previous
videos on how to integrate Gaia into Blender and how to understand Gaia
and how Gaia generally works. So if you are new, please
refer to those as those will make you understand things a little better if you're
coming straight in, or for some reason, you'll just want to skip this tutorial. Or you already know
how to use Gaia. I'm assuming you've
skipped here. Right? Let's talking more doing. Let's start off with a
primitive train landscape. We are going to do plates. Well, it's pretty
cool. So the idea is we're going to have, like, scraped rock, a bit like this that the ice is sort of
scraped over and broken. And, oh, that's interesting. And then we're
going to have these lovely ice spikes coming up out of the sort of
abstract rocky terrain. Rady. And then we're going
to have all of that colored, and we're gonna
have sort of a dark volcanic rock for the ground. And then we're
going to have some big giant spikes of Well, they're gonna look like
rock to start with, but we're going to use a mass to turn them into
ice and Blender. Rady. Now, let's add
an effect note after this plates and decrease the multiplier because I
don't want it that strong. Now we're going to add ourselves a primitive extended
multifractle. Multifractal is one
of my favorites. It's pretty good for a
lot of different things. Going to have a really spiky
multifractal real quick. I'm going to auto level
and drop to the ground. Oh, that is the wrong.
That is not it. I'm actually going
to turn that off, and I'm going to get an
actual auto level node. That way I can control
the influence of it using this thing. There we go. We got that. And now
I'm going to add in a primitive
extended dot noise. Oops. Plugged in. Oops, my bad. And we're going to have
quite a few iterations. The size is going to be set as basically the
exact same thing, and we're gonna have quite high. I actually Yeah, we'll
stick it right there. Right about there. Okay,
now what we're gonna do. Look at this. So we're
gonna affix them, put them together in thin shape. Now what we're going
to do is we are going to put these into
another effect node, and we are going to shape
them and multiply them, so they're a bit taller,
more interesting. Now we're going to
mix these together. Good old screen
style screen 100%. Now we're going to
stick all of this into another effects node and use
the shaper and the multiply. Oh, that's a bit much. Now, I'm thinking that roughness is probably a
little much right now. The relative feature scale
should be a bit bigger. Mm. So we're getting more
spikes with that. Decrease Oh, There's
some spikes. There's a lot of
spikes, actually, increase the iterations here. That way we get a
few more big spikes. The dot noise really
makes the large spikes, and the multifactal dust the
little ones, there we go. Now we got all of
those. We are going to combine all of this
with a terrain, landscape, mountain range, and we're just going to
combine this just before the effects node. The mountain range
gets. Should we do it before that
date Fixed node? Nah, let's do it
after the fixed node. Yeah, I know it's a lock node. What we're going to do is
we're going to go screen again and we're going to
screen these together. Now, I'm going to increase
the height on this, so it's actually
interesting to look at and make it basic. Decrease the scale. That way, we're going to get some
interesting terrain, probably a little much
probably a little high. Then we got that. So now
we've got the spikes and we've got this sort of
little rocky terrain here. I'm actually going to change the seed of this because
I don't like that seed. That looks much
better. Yeah. Wait. And then we're going to
combine it with our plates. Also screen. You can see the plates aren't
doing a whole lot. I mean, if I do that.
Oh, that looks cool. If I did that, that could
look pretty interesting. I think I technically
I want to drop this, and I want to drop
this, as well. I probably want to add
these on instead of. Yeah. That looks way better.
Um does it, though? Not really. Alright,
screen it is. Rady, now comes the fun part. We get to shape all
of this rock with our modifier nodes into something
that looks pretty cool. I'm going to start with
the sandstone node. You'll notice the modifier
nodes, they all have this sort of green, blue teal outline. Now this is Sandstone is quite literally smashed
out arrange to pieces. We're going to have to
mess with it a little bit. We're going to see
the iterations to 11 highs a bit more convexity, and we are going to
decrease the chipping. And we are going to click on
the seed until we get all of the big spikes from back here until we get
all of them back. I do want it to break. I just don't want it to
break that much. There we go. That
looks pretty good. It's not really affecting
up here as much, but it's definitely
affecting down here on the bulky parts. Now we're going to grab out
another one called distress, which is also a modifier, which does exactly what
you think it does. It basically just breaks apart the terrain like
it's being distressed. Though I will warn you
this takes up a lot of computing power to do. So if your builds
are taking too long, when you build it at the end, probably a good idea
to remove that one. This is one of the things
that always goes sideways. There we go. I like that. Now, let's drag this out again. And we got my favorite
one stratify. I love sttify. Strotofy
makes everything look cool. Increase the spacing,
increase the tensity, shape. There we go. Look at that. How
crunchy it looks. That's not really the
most interesting thing if you really don't like it. But still, I like stratify. Stratify makes it look like it's sort of been
bashed around a bit. Now, on top of that,
we're going to add the, yes. The D exists. Also, can't we just
name it, you know, break and crumble slightly
instead of Antostomosis? Yes. I love this if you've
ever used Anisystrope in volumetrics shading or
her toy hognous volumes. It's Oh, I love three D. That's the most unpronounceable
stuff you've ever heard. Anyway, and then we're
going to add crumble. Oh, finally, something
that actually makes sense. We are going to increase
the impact of the animus, and we're going to
do full quality. And we're going to crumble
a bit, duration, strength. And as you can see, this
is basically just making it more bashed up terrain. Then we're going to
go erosion, two. No down cutting. Down cutting is where it
cuts down into the rock, decrease the duration, and
we're going to decrease the erosion scale
because this will make it look really interesting. Also, no sediment. Absolutely, none
of the sediment. And we're going to make this
shape a little more shapy. So, yeah. So if I
give a recap on this, it kind of breeze past them. The sandstones basically
just mashed it's basically just taking a hammer
to everything, kind of. It's broken off pieces. It's cut cut pieces
out of the terrain. Then the distress basically just throws a whole bunch of little
rocks and chips it off, and the stratifier
is turning into a whole bunch of strata,
which are these lines. The animosis is
basically a distress but a different way and
stained with the crumble. And then the erosion is
turning it into, like, sort of weathered so that
it doesn't look too, you know, CGI, almost. Okay, important thing
to do now save. If you haven't
already, please do. Now, we are going to add another modifier. I
think it's the last one. We're going to add the
crowd texture modifier, which basically is
just going to texture all of these ever so
slightly, you know? It's just going to make them
ever so slightly more more, more bumpy, more detail. Now we're going to add one of my favorite nodes,
the debris node. The debris node does exactly
what you think it does. It scatters a whole bunch of little rocks all over the place based on flow and gravity
and yada yada, yada. So as you can see, we've
got a whole bunch of yea. Now, I'm going to increase
the maximum size and decrease the minimum size so that we get a little
bit more variation. They're not all like the
exact same, like, marbles. Wait for this to
finish computing. Debris is often one that takes a little while
there it goes. And I'm going to
set it to sharp as well, because we
want sharp rocks. If we think about this,
all of this is going to be sort of super wind swept
and, like, snowed on. So we're going to
assume that all of the rocks are being
pushed into the cracks. So if we decrease the
friction all the way down, all of these rocks
are sort of going to gravitate to almost, like, the lowest point wherever they'd hit and they'd stop. So they won't be
up here anymore. They'll all be in the
cracks and crevices. I'm going to decrease the amount because that's a
little bit much. And I'm going to increase the
scale because that's cool. The scale is gonna
allow us to see it. There we go. Ready, good. Now we've got these rocks
all over the place. It's like they've
broken off, kind of bounced around, fell down. I think actually we
even less than that. Yeah, let's go about 30 K. Alrighty. Now, we are
going to add in the snow, and it's going to
cover up all of our detail. Yeah, pretty much. You could increase the duration. I'm not particularly fast. I'll set it back to
whatever it was. But the important thing here is we want to see our
detail from all of this. So I'm going to grab out
of the erosion note. I'm going to grab
out a height mask. Now, what I'm going to do is I'm going after I decrease the
fullness and the range. You'll see it's masking
everything by height, right? You know? That's how it's going. Now, I would do a
warp after this, if what I was doing was going to be a hard line because the warp would
displace it up and down. We're going to do it later, though, in case
you're wondering. But what we're going to do
is we're going to stick this into the melt map here so that when we
crank up the melt, it's going to melt all
of the snow below, no, inside the mask. So if I do that. Yeah, but
there was also another thing. I want the rocks to be open. And so I've got
this debris output. I'm going to mix
it without height. Oops, mix, please. I'm going to add at 100. So as you can see, we've got the mask for
all of the debris now, and I'm going to stick
that into the melt, and that will break up
all of the snow because all of the debris will
now be free of snow. It'll be like the snow melted around it.
It's pretty cool. Now, now we've done that, we can move on to colorization. But that's next lesson. So you're going to enjoy
that in a little bit, and I'm going to be back soonish. All right.
See you then.
6. Colorizing Terrain with Texture Maps and Erosion Effects: And Alrighty. And welcome back to
Blender Gaia Master Class, procedural Ice world. Now, in our last lesson, we made all the
terrain, you know? We made the mesh
part of the terrain. All of the physical objects. We didn't do any
shading, as you can see, that's just the ice node
the snow node there. But, yeah, we made our
lovely ice spikes. We weathered it, we broke it up, we applied strata and
we put our snow on. Now, right now, because we're looking directly
at the snow node, it's coloring the snow white. But if I were to say
add in a choke point, that would all
disappear and I would just go back to
being default McCAp. Now, we're going to start the colorization now because
that's the next step, and it's going to give
us a much better color than anything we could
make in the shader Editor, because all of this color
will be simulated and derived directly from this mesh, so to speak, even though it
is technically a two D plane. Now, we are going to add a checkpoint for
the simple reason that when we plug in
all of our color nodes, they're all going to come from a mesh output
because we're going to drive all of the color from the actual physical geometry. If you say finish making your finish making
your coloring, all of your colorization. And then you want to
add in a node just like between the colorization and whatever your final
output used to be, you have to unplug all
the colorization nodes from that output and plug all of them into the new output. So if we add a chokepoint node, which is a bit like a
reroute node in Blender, we will not have that problem because
then we can just plug this into the new node. So I wanted to add in vegetation
shrubs for some reason. Oops, probably not shrubs. Shrubs is a bad example. Vegetation trees. I can just plug it in here
and then plug it into here, and then all of
those color nodes are still connected,
technically. As you can see it's thinking
quite a bit. There you go. And now we've got a whole
bunch of trees all over. I think. We don't want that. But
that's the general idea. So we're going to
add a choke point. And we are now going
to use derive texture. Texture base. Now, texture base. Oops, is good for turning like nothing into something like this
is the better one. You can use the texturizer and we will use that
for the snow later because but this gives
more varied inputs. Now, I'm going to go over exactly what's
going on here and when we turn the when we turn this into color,
what's going to happen. Now, the thing is,
if you've ever used a color ramp in Blender, you'll understand
that you can color, you can color a grayscale
image into color based off, like, its position
on the color ramp. So we're going to grab
ourselves a SAT map, which if you missed
the first bit is Guy's version
of a color ramp, as you can see, we've
got a whole bunch of preset color ramps, basically. Um so what's happening here is we've got this bar.
This is the color bar. You can clamp out how
many colors you have. You change the bias.
There's HSV down here. There's some other
processing things there. But as you can see,
what's happening is we've got this gray scale. If you imagine there's another imaginary bar like
this that's the gray scale. It's black on one side and white on the other and
gray in the middle. And what it's doing
is, you know, it's just going
along through here. And okay, that gray
value that was here, we're going to give it that
color because that lines up. And that's pretty much
what's happening, which is pretty good.
It's very convenient. And it lets us do really interesting colours
instead of just having, you know, solid color, which would be really dull. Anyway, onto what
we're actually doing, we're going to make
this into volcanic sort of blackish basalt rock. So we're going to grab rock.
And we're actually going to choose a really stripy one like this that has
a lot of detail, and we're just going to decrease the saturation
all the way. That way, and a bit
of the lightness. That way, we've got ourselves some very
nice volcanic rock. Now, this would be great,
but it can be better. We're going to add in
a color erosion note, which you missed if you
missed the earlier stuff, the color erosion does
the erosion thing, but it only does
it to the colors. It doesn't actually
affect the mesh. So if you have a look here. You can see it sort
of dragging out all the colors and
washing the way of it. Now, this is actually a
little bit much for me. I don't I actually quite
like the detail that that had previously. See what. I have to ask the color hold. Okay. Yeah, I think
that's pretty good. I'll probably go
a little higher. I'm running two K.
Okay. That's why. Okay, let's just
spread this build. Okay, another useful
thing to know while it builds is when you're
looking at a color, you are, Oh, dear. Okay. That is disappointing. Oh, well, anyway, when
you look at color, it's using the mesh
as well as the color, even though you're just
looking at the color output. But say you want to
use a different thing, like if you don't want
to use this snow output, you can click on this
node and press G. G will basically market
for color rendering. So as you can see
here, I'm looking at this, there's no snow, even though the snow node, if I look at it now, is in
between, and I turn that off. Now we have the snow back. Oh, you can bet, yeah,
it's soft there. So this is useful if you want to use
something like the trees, you want to get the trees mask, but not the actual like you saw before it makes the little
spikes on the terrain. If you don't want those spikes, you can use the previous
node before it. Have that as the color output, and then have this tree
node, that would be here. As a mask output, even though it does
modify the mesh, you won't use that modification.
It's kind of useful. So we're going to click
on this checkpoint and press G so that we make sure nothing goes
sideways. You can do that. And we are going to dial these back a little bit,
especially the blend. That's going to do unfun things. I might actually change this up. Yeah, it looks a bit better. Sweet. Now, what we want to do is we want to have a
look at this real quick, make sure it all works.
Yeah, that looks nice. Okay. Now, we are going
to use a different part. We're going to add
in another one. We are going to add in What are fun things can we do
here? We've got to flow. So as you can see, you can
derive things like the angle, the curvature, the height, the normals, we used
the height before. And the slope
slopes always good. Same with dirt or soil. We are going to use
another texture base. No, sorry, we are
going to output a SAT map directly from
this height output. Now, what this does is this makes sort of like
sedimentary layers almost, where it's all kind of
lining up on the terrain, which is great if you're using the color
erosion because then you can plug in the cool erosion
here, crank up all of this. And that really
yeah, look at that. It's displaced
them all, sort of. Just kind of fun. Gonna increase the flow
volume on this one. Now, we are going to go back here and we're
going to desaturate this. And I'm actually going to
pity that, there we go. I was going to say it looks like it should be a whole
lot closer together. To decrease it brightness, and we are going
to combine these together with a overlay, I believe this one
should be 100% overlay. Maybe a screen.
Now, it's overlay. Okay? Now I've got this really dark volcanic rock now. That's a little bit dark. So I'm going to press
F to lock the preview, and I'm going to increase the brightness on some
of these just a little. That way, we can still
see our terrain. Ironically, it probably
didn't need to do this one. So right clicking, if you've
missed before, reset. Useful. Now, this is done. We're going to press F again
to unlock the preview. We are going to add in snow. Now, like I said before, we are going to add
in a texture is up. Now, the text riser basically just comes with a whole
batch of presets. That's about it. I'm pretty sure C is the one we want to Oh, that is not. That is not it. I do wish there was,
like, more presets. I know you can, like,
screw with them here, which is kind of fun,
but, like, yeah. Two. See if we can find one. These ironically, actually
change every time you open it. So I guess it is infinite. There we go. That looks good. I actually don't want the slows. I want the slope and the soil. Yeah, look at all that
detail. Look at the detail. Anyway, we are now going
to add in another SAT map. And we're going to do the
exact same thing, though. We're going to use sand
this time, use the sand. Well, that's an
interesting color. That's an interesting preset. We're going to use a sand
one, something like this. We want something that
will basically give us a whole bunch of detail.
I like this one. This one looks detailed.
Yeah, I like that. We're going to decrease the
saturation just like before. Oops. That And we're going to
increase the lightness. Now we are also going to
add in a different node. We're going to add a clamp node. This is so we're basically
going too. We're going to. And you can't see this because of how my
monitor is set up, which is really
unfortunate, but I'm clicking on mask here
just so you know. Um, this is going to make it so we don't have
those horrible black bits, but this doesn't get too
ridiculously overexposed. Now what we're gonna do is we're gonna combine this again. We're going to do a blend
at one because we're going to mix it based off the
snow output over here. I bet you it's going
to be the wrong way. Yep, it's the wrong way.
Then we go swap inputs, and there's our
snow. Pretty good. Ah, I really wish we could do this in a little
higher resolution, but I will provide a four K
map of this once it's done. That way, if you want
the high resolution at the expense of
your own creation, you're more than welcome to. But anyway, as you can
see, lots of detail. I'm actually going
to preview this, and I'm going to drag these up and down to see
if there we go. A little bit of variation there. I went a little too
high. And there's all our snow, ready to go. Pretty good. Now, this is technically the
terrain texture done. Now we just need to make the
mask for the ice spikes. Now, I actually did it using
the height aspect before. Whoops. But I'm going to really quickly check if
picks does better. I probably should have
checked this before. G to unlock this. Oh, yes, we need to connect these two Au output.
Et me just check. Yeah, I don't think I don't
think that's going to work. Oh, well, height
it is old style. Okay, now for the height, we only want the
tops of the peak, so we're going to set the
range to the maximum, then the minimum, close it in, and we're going to
decrease the fall off so that it is
slightly harsher. That way we can just
see it a little better. I'm going to mess with this ramp until I get some of the
peaks, but not all of them. So you can see this
entire mountain here is turning into ice. Oh, well, there we go. Anyway. Now, this
would be great, but it is really
uniform and flat. Now, that's because it's
based on the height, but we can actually add in
warp using the warp node, just to spice it up
a little, let's say. So I'm going to
decrease the strength. A little bit. I'm going to
decrease the size a little. And as you can see,
it's messing with it. It's like plugging the
normal into the vector on a gradient a noise map into the vector on a
gradient in Blender. You mess with the z axis
slightly. Just kind of good. That's a little bit that's a
little bit like, nah, okay. Let's go with a
slightly smaller value. Now, this value, these
values here will differ depending on
the seed that you use. Oh, that was not good. Oh, well. And both your personal terrain and the height you set this at. So basically want to make
sure that there's no black. Now, that's the other side. We can't deal with
that. Like this, you got no black on the peaks. That's good. But we also
have the variation. Right. Now, due to how we're going to import this into Blender,
we want this to repeat. Now, we could use an array, but that's going to cause issues later when we build geometry
nodes set up for this. So we're actually going to sort of array it
using the textures. We're going to
repeat the texture. Now, if you've ever used
textures before ever, you'll know that repeating
them never looks great. And fortunately for us, I'm just going to
save here real quick. You sure probably should,
too. Repeating textures doesn't really work
unless they're seamless. Now, quad spinner, who has made Guy they are
the people who make this. They've already thought
ahead and made us a seamless note that allows us to convert
our stuff into seamless. Now, unfortunately, I've plugged the color into the height. So you're going to need to plug in your
height here first. There you go. And
as you can see, it's modifying the edges. And it is making it seamless. That's all
you need to know, really. So as you can see this bits
getting cut off there, well, it's over here now.
Which is really good. I'm very, very, very happy with this because this
is a very fun node. Allows you to do more things, which is really nice, which
I very much appreciate. Now I'm going to
duplicate this node with Control D. It does
take a few times sometimes. And I'm going to do
the same in here, but I'm also going to have to
plug in the height because the seamless needs the
height to work correctly. And technically,
this is a image. So there we go. There's all
of our outputs ready to go. Now we're going
to press F three, which is the output
button on both of these. And we're going to switch
over down here into the build tab, set
your build output. I'm going to use I'm actually
going to name the first, something I never do
usually. Press F two. This is going to be height. Oops, some premium spelling.
More premium spelling. Height and color. Now, useful to note, also, this will just
rename it over here. No, no, it's 26 characters,
letters of the alphabet. You cannot do other things. Otherwise, it will
cause problems. So, you know, I
tried to do H C for height and color.
That did not work. And I'm going to name
this to Ice mask. And yes, I'm going to
rename it over here. The ice mask is going
to be a PNG 16. I wish you could set the color
from this to be a PNG 16, as well, but we're just going to have to deal with it as EXR. Technically, EXR is
way better as well, so, you know, they're
just much larger files. Rady, we are ready to go. We are going to save
because that is important. And we are going to quickly check that we
have done everything. We have our ice.
We have our color. We have our spikes
that look pretty good. And we have our ice
mask so that we can turn it into ice and Blender later with
the Blender shader. Okay, we are now going to hit Build and we are
going to start build. Now, because we have
this loaded in at one K, everything's exactly
as it should be. So instead of building all
of this all over again, Gaia is just going to, you know, build it's just going to save
the current height maps, which is really good.
Okay, we've done that. We are going to add in right
click here and go New Tab, and now we have another graph, which we're going to go
back. We can do over here. And this is going to
be the next lesson because we've probably
gone far enough as it is. What we're going
to do now is we're going to add in another sort of detail map that's not going
to be terrain, so to speak. It's going to be
a whole bunch of little spikes that we're
going to overlay with another displacement modifier
and Blender so that we can add just a little bit
more detail to our scene. Anyway, here ends this lesson. I will see you in the next one.
7. Detailing Terrain with Fine Displacement and Height Masks: Welcome back to Blender
and Gaia Master Class. Procedural ice world. In our last lesson. Yeah, we finished out terrain.
It's looking pretty good. We did our coloring.
We made it seamless. We added our mask
in for the ice, and we exported our colors. Now, we are going to add in
a new scene where we are going to basically make another little height map
that just does details. This is going to be useful for, like, a little just a
little bit of extra detail. We're going to add another displacement modifier
and Blender, add a little bit more
interesting detail. That way we don't have to
screw with this directly, as we wouldn't be able
to make this kind of detail on top of here, which is unfortunate.
Anyway, start off. We're going to go
primitive extended mollifractal. Not this again. Okay, if this happens, this is basically this
trying to combine with this, which is really
unfortunate, yeah, pretty much just added in twice, and it will just I don't know. It's a bit interesting. Anyway,
we're going to drop this down so that it does
not cause problems. We're going to keep
a fairly high scale and a very low relative
feature scale. And we're going to lower the
roughness just a little bit. Now we're going
to add in, again, the dot noise,
extended dot noise. Oops. That's afterwards my bad. And we are going to effex this. We are going to actually,
first, we're going to add in a whole bunch more,
a whole bunch more. We're going to make
them much, much smaller because we are doing, like, little bits this time
and make them really high. Now, we're going
to multiply these up so that they are
quite high and use the shaper to sort
of combine them down into little spiky bits instead
of having them before. This is probably could
use more of these, like a lot more. There we go. Anyway, we're
going to combine this now. With a screen at 100%. And we are now going to
add in an effect node, which we are going
to shape actually. Yeah, no, we're going to add in actual shaper node because we
want to do this beforehand. We're going to shape these down. I kind of want like these
have random high spikes. That's unfortunate. Oh, well, I kind of have everything.
It's much better. Okay. Now we've got this. I always want this to
be more pronounced. Let's add ourselves in an
effect note here. Before. Oh, dear. That's not good. Okay, guys being special. Let's add in
ourselves ffex note. And plug it in
here. Ignore that. We're going to shape
this ever so slightly, but we're also going
to multiply it, so it's a lot taller. It's easier now all
the way up here. I'm going to lock
the preview here and increase this multiply
until it works. Same here. Other there we go. Now they're much
more interesting. I'm going to decrease
the scale on these. I'm going to decrease the
dot noise size a little more I want more like spread
detail as opposed to, you know, like physical there's big bits here and big bits there, small bits there. I want more even Um, that could do. Mm. Right. And now we're
gonna add ourselves an effet node and decrease on the multiplier so
that they're more, you know, not so
ridiculously high. Okay, here's our detail map. Now, we are going
to add an erosion and decrease the scale. And here we go. Here's
where it gets interesting. We're going to
increase the shape, sorry, decrease the
shape all the way down. So it gives us those
spicy bits back. We're going to decrease the
down cutting and no sediment. No sediment on this one, either. You know, feel free to play
around with this erosion. It may help. It may not. For me, I don't think it's gonna add a lot of problems if I do that. And then this even adds extra
little details over here. Adds in little bits of sediment. Okay, now we're going to add. We're actually going
to add the sediments. Oops. Sediments. No. This is just going to sort of it's a
little bit much right now. I want to be fine
fine sediments. This is just gonna
make it so it's not excessively over the top. I'm gonna go a little less
scale, a little less angle. It's basically just
go to smooth out the little bits in between
the small details. Just gonna be nice. It
looked like it did nothing, but oh, well. Oh, yeah. By the way, when we come back here to this shape and node, maintain fine details, please. This will allow us to have more detail
in our final option. Just remember that one. And now we're going to output
this into a height mask. 'cause we are done with
this one, at least. We are going to Okay, this is being funny. Why is that Okay. Now, I have a feeling
this is all happening because I left this as having the marked the
marked for rendering on it, did something strange,
but oh, well. Anyway, we're going
to decrease the fall off all the way and increase the range so that
it doesn't do everything. Here we go. So now you can see we're getting our
little ice spikes here. We just want a little bit. I'm going to say, probably
a little more than that you really kind of only
want the ice spikes. You don't want anything else. I wonder if we can turn
this on I was going to say maybe there's a maintain finer details back
here, but there isn't. That's what allows us to
get all the little spikes. Okay, this is done now. We are now going to press
F three on this one, because we only want
the height Oh, sorry, we're going to press
f three on these two, because we want the
height from this one and like the height map from this one and the
height mask from this one. And I'm actually
going to undo that. I'm going to put
these both through a seamless node just in case
it causes issues later. That's our in and
that's our color. And I'm leaving it as
the exact same settings. That way it matches up
with this one over here. So we got that. We got that.
Going to press three here. This is going to
have to be XR again. This is going to
be fine details. Sweet. Oops, and I'm going
to click back on here. Okay, sweet. Now we
can out Expot again. And also, good idea to
save before you do this. We go to build, and
we're going to start. As you can see, it's starting. This is how you build old style if you don't want to just save
off exactly what you have. For some reason, it's
doing it this time, but not the other one. I don't know. It's
being a bit funny now. Oh, it's trying to build
all of this, as well. Okay. Anyway, we are done now
with Gaia, pretty much. This is our detail. Then we've got our
actual t goodness. Got to be careful
when pressing G, 'cause it can
sometimes be crazy. Oh, well, you know the drill. It looks like that. It's here. Sweet. We're done. Time to work, move on to Blender.
8. Importing and Displacing Terrain Height Maps in Blender: Welcome back to Blender
Gaia Masterclass, procedural Ice World. Alright. Now, in
our last lesson, we finished up we
finished up our terrain. We finished up this side, and we finished up this side,
which is really good. Now, what we want to do is we want to put all
of this into Blender. Now, I'm going to hope that you watch the
introductionary videos. If you did Please do if you don't already
know how to do this. Now, let's switch
over to Blender. As you can see, I've got my
Blender scene right here. Not much you can do to set
up the scene to start with. Probably a good thing
would be to write, click down here and turn on
scene statistics or go up here and turn on scene
statistics up here. This will just make
sure that your subdivisions don't go too high. Now, we're going to add in E mesh plane. Or
you could use grid. Grid probably be good as well, because then you can change
the subdivisions here to say 100 and then you can right
click and subdivide again. So now we have technically a 200 times subdivision
or 400, sorry. We're going to add in
a subsurface modifier, set it to simple, and I'm going to crank it up
to three for viewpot. So this is basically
going to make our plane super,
super high details. If I turn off this,
this is going to be really, really
crunchy detail. Also, we set it to
simple so that oh, my God, scroll, it
doesn't round the edges. I'm actually going to set
this to two, let's say. Not adaptive, optimal. So you can see this is a
really high res plane. Now we're going to just hide
this for now, just for now, while we add in a displaced
modifier. Pretty good. Now, I'm going to decrease
the mid level all the way, and I'm going to add a
new one and click on these sliders over here
that says texture tab. Now, we're using an image. So we're going to
open from here. Please find your Gaia
folder, which is down here, your builds, your ictern cores. And here we have
all of our outputs. So we have our height
and color out XR. Now, this out is the
color. Sorry, the height. This is going to be
your height map. See how this one says texture, that's going to be the
color. That's the mask. Okay, well, that's
something different there. So, yes, we want to use this. Oh. Oh, my bad, this is the detail. Oops. This is here is our terrain. My bad. It's odd. It renamed itself. Anyway, we are going to
crank up the strength of this so that we get our
lovely terrain back. As you can see we've
got some quite nice, large ice spikes there. Now, I'm going to
turn our subdiv back on so that we
can see our lovely, highly detailed
terrain here. Yeah. Pretty good. Now, we are
going to scale this by ten. And in my file, Oh, my goodness. Just ignore this, please,
so I can organize it all. If I click on item here, I can see this is 20
meters by 20 meters, which is, you know, one
scale by ten is 20 somehow. Anyway, the relevant thing is we need to scale this
up until it hits about 80. This is what I had in
the original file. This is what all the
settings will work at. Stick it right there. Now, a thing if you
looked at the old file is it had sort of
like an angle on it, which is kind of interesting. It was actually quite fun
to use the first time. Because if you use a displaced
modifier, generally, they always go off the
normal direction, which is, you know, if we add
in a sphere here. And we subdivide it real quick. If you add in a
displaced modifier, and we could probably just
add in our ice mask out. You'll see it's going
out of the directional. This is a horrible example. Yeah, it's going out from
the directional, you know, if you have a look at the
physical the physical mesh, and then you have the turn on, oh, I can think you have
to do this in edit mode. The mesh normals. That's very you'll see all of the mesh normals
are pointing outwards, and that's the
direction that the displace pushes outwards. Now, this is useful for if you're making like
multi sided things, but we're making terrain,
it only goes upwards. Mostly because our plains
mesh goes upwards. Mesh almost go upwards. So we set this to Z. It does nothing because
it's also going upwards because it's still going
the same direction. But if we now duplicate this
and we change this to y, we can bend our terrain and do fun things now we actually want to go in
the other direction. Yep, 'cause that's how
our terrains built. That's pretty good.
I really like that. I'm going to have
it all lined up. I'm actually going to
increase my thing here. Some reason these look
like they're turning out quite a lot higher
than this over here. It's discerning slightly. Anyway, I guess that's
the way it will be. Now, we've done this. We
want to do this again. We're going to add
displacement modify. This is going to turn into
absolute broccoli right now. We are going to add
in another one. We are going to duplicate this
using that little number. That basically number
will basically tell you that I don't want to change all of the displaced modifies
textures at the same time, which can be useful if
you want synced textures. But we want a different texture. We want the fine
details out EXR. What the hell is the
difference between those. We are going to decrease the
strength of this a long way. And we are going to set this to the Z axis so that
when we do this again, and you'll probably
want to decrease that. So now you can see we've got all of our little fine details. Now we're going to do the
exact same thing again. We are going to duplicate this, or you can press Shift D. And
we're going to set this to the Yxs and we are going to make this going
the other direction. So it all lines up. And so, see, now you can see if
I turn off these, you just add in just a
little bit extra detail, which is really nice. Now, big problem. This is not enough
terrain to look at, you know, if you put
the thing in here, crank up sub div to like three so that we can
see all of our detail. Oh, that's spicy there. Okay, that displace might be
a little strong right there. Ah, I guess we'll just have to position our
camera so we don't see that. Unfortunate. Anyway, if we stick our camera in
somewhere like here, you'll notice that it's not really enough to
look at, you know? If you look out
past the horizon. You'll see, you know,
the world ends, which is not generally a
good thing to look at. So if we go back to
our texture tab, we can actually change and
repeat on the mapping, which is going to array
our terrain, basically. This is what the
seamless is for. So as you can see, there's no seam in the middle,
which is really nice. Now, you're gonna have to
decrease your display strength. I'm going to change the whoops. Okay, turn off my
subdiv sub dip. Sub dibs going to
make it run really slow. We're going
to come back here. We're going to decrease
our display strength so that we don't have to look at that horrible
probably stretched terrain. And we're going to do the
exact same thing with our little terrain here
to turn these back on. There we go. Yeah. So now, I'm going to set this to two and turn this back on so that we
can see our terrain. Yeah, we're pretty much
done with the setup. We are now going
to proceed to make a HDRI in another
Blender file and then import it into this one so that we have a custom world. Because otherwise, we'd
basically be stuck using the Nish Da sky, which is, yeah. I mean, it's good.
But, like, really? You want to I don't
want to use that, man. So, we are actually going to
build ourselves our own HRI. Next lesson, because that is
gonna take quite a while. Alrighty. Yeah, so that's
gonna be the end for now. I know this is probably gonna
be a really short lesson. We're gonna delete this
camera real quick, too, because we're gonna
come back in later. We are going to probably
go and have a look. See what went wrong with
these giant ice spikes, 'cause they're getting
very, very tall for no reason whatsoever. So we will do a little bit of troubleshooting in
our next video. Actually, we might
do that right now, 'cause the next video is
gonna be the HDRI one. Let's have a look, say. So I Gaia, it looks fine, okay? Hmm. If we look at
our height and color, I said this to be G, please let me look at that. Ah, for some reason,
has unplugged itself. Maybe that's why it went wrong. I wonder. Shouldn't really make a
difference, but oh, well. Anyway, uh, so let's go have a look at those EXR files and
blenders File Explorer. Shall we? Let's just make sure this is,
this is the terrain. Let's make the
size really large. Okay, so I wonder
wonder if we used this. I accidentally used that. It doesn't look like
it. Wonder what the difference between
these two are. Hmm. Questions, questions. See. This is why it's always good to make sure you're
doing everything right. See, it seems fine details. Huh. That's odd. That is odd. Did not happen
last time or the time before. Hmm.
9. Terrain Displacement Cleanup and Artifact Fixes: Welcome back to Blender and Gaia Master Class,
procedural Ice World. Anyway, let's try and
export this again. Hopefully, that way,
nothing goes wrong. We don't really want
the fine details, so we're going to disenable
this, so it turns off. And we're going to
turn off the ice mask. So we just have the
height and color. So this one right here is the
only one that's exporting. We're going to build this. Yep. And we're going to
save the cached file. That might be it. It might be something wrong
with that saving method. So we may just have to
rebuild it manually. We're going to open
up at number three, pull out this ice mask here. That did absolutely
nothing, okay? Let's turn off both of
these displacements here. Turn off our sub div. Make sure we're opening
the correct file open, BG again, builds. Make sure you find the
ones that you are doing. Oh, that's interesting. Ah, my bad. Number three here. It is number three.
This is the third one. Somehow, this is all
built all over again, even though I disabled it. Huh. And as you can see, these
are really tall again. Okay, let's try this again, but we're gonna force it to build. We're gonna go no, and
we're gonna force to build. Hopefully, that's not going
to do anything over here. Okay, let's pull up this
again and watch it. We can watch the
exceedingly amusing thing of watching Gaia build. Okay, let's get
rid of this again. Let's actually turn
on Blender file. Go into the images here,
and we're going to remove the height and color out. Got EXR. Going to delete these? We're going to delete,
whatever that is. Yeah, okay, so that's
the small fine details. Sorry, that's not
the fine details. That's something else. Okay? You know what? Let's
reimport everything. That way we make sure
everything's completely clean. Gonna go back to our view
layers. I go on our grid. We're going to do Gaia,
builds train cores. Now this is number four, for some reason has built
everything anyway. And we're going to look at this. Okay. That is perturbing. Let us off this one. Ah. No, that shouldn't that
shouldn't go too high. Okay, let's have a look at see exactly which ones these are. So it's this one here,
which is right beside see. That one's the right
height. But is it this one? Is it just that one? I
set these back to one. Ooh. That's interesting. This disappeared now. Mm. I still feel like
these are a little high. It's that one right
there. I can see it being really bright. If we
look back at Gaia. It's this one right in
the middle. But see that should only be like
twice as high as the mountains definitely
way higher than twice. Mm. That is interesting. Okay Ah, what are
we going to do? What are we going to do? You know what I think
we're going to do? I think we're gonna
change the seat. We're going to press F on this
so that it locks the view. We're going to come back
to our multifractal, and we are going to press C. No, I think that's probably
a little bit far. We can probably, we can look at it back
here at Sandstone. We click on the multifractal. That way, it doesn't have
too many to look at. Okay? Let's try
the dot noise now. This is going to
change the big ones. To do I like one. Oh, there, that's really
good. That's really good because they're right
on top of that. That's gonna be nice and fun. Okay, I like this now. Let's press F twice on this so that we
can unlock the view, the preview lock, sorry. Wait for this to all build out. Make sure that our ice mask still works, looks like it does. And now we are going to I wonder why this is Let's
just unmark these for export. Actually, no, we're going to do the ice mask because that's
what we're gonna do. We're not going to do
the seamless. We can press F three and unmark that. We're just going
to do these now. So we've got ice mask, heightened color, and
heightened color, both as XRs. Why have we got this as an E X? This should be a PNG 16. Odd. Anyway, let's
build this again. And we are not going
to do that anymore. For some reason that
is not working. Right. Let's try this again. This is not supposed
to happen, but okay. And over here is number five, which is gonna be filled
up with our stuff. Soon, there we go. If we
refresh this, there we go. Okay, so we've got our
height and color out EXR. That looks way
better. There we go. There we go. So there's
something wrong with the export. I guess that's what you get for using the new
version of Gaia. It's currently, I think
it's still in Beta. Anyway, now that's
solved, we can go back and we can turn
on all of these again. Is this well now, there
we go. That's way better. This is also a little bit much. But remember, we're
going to go back in here and we're going to
crank these both up to two. Oh, that is way too strong. Spin off our sub
div so that we can modify this all in real time. Now, all of this angle, this is up to you, okay? This is artistic preference. I'm going at about 45 slightly more than 45 less
than 45 degrees, just because I feel
like I'm going for more like the idea that the
wind's blown really, really fast across all of this, and it's sort of blown these up into ice
spikes like that. We're going to actually add
some clouds in later that make it look like those
clouds themselves there. I'm going to now turn back on my small displacement back on this so that I can actually
see my small displacement. My small displacement
didn't work because we removed the
texts. That's right. We are going to
open this up again. We're going to grow to our
Gaia folder with builds. And this one here, I don't think we have our
fine details in here, just so you know, but we are going to have our
fine details in this one. We have a look at the
fine details at xi dot. There we go. As you can see, that adds in a little bit of extra, extra interesting thing. Let's turn this off
just so that we can get a little bit of
idea what's happening. This is gonna be a long
video, I tell you. There we go. And there's
our small detail, and then we can turn
both of these back on. Sweet. So it's looking very
crunchy terrain. Don't worry. It will
look much better later. Especially if we crank
up this to, like, three, you'll start seeing
some of the smooth parts. You definitely can't
see it from this angle. Well, that's the thing
for another day. Now our terrain is fixed because nothing went wrong
technically and okay. It's improvisation.
Adapt, expand, improvise. Something like that. Anyway, that's
gonna be the end of this lesson that you've probably worked for way too
long right now. Hopefully, this problem
did not occur to you. In case it did, this
is how you fix it. Yeah, onto the HDRI. I'll see you next
one in the next one.
10. Designing a Custom HDRI Sky for Procedural Scene Lighting: Welcome back to Blender Gaia Mr. Class, procedural Ice world. In our last lesson, we imported the train into
Blender. We made it angled. We did all the fun
stuff. Then it broke and we spent like 20
minutes trying to fix it. So it's now fixed, thankfully. Hopefully this didn't
happen to you. But I'm going to leave
this in here in case it did so that at this
point in the course, you will understand
how to fix it. Now, we are going to completely ditch this
Blender file right now. We're going to save if
you didn't we are going to go Control end and
we're going to click New. We are now going to open up ourselves a new
version of Blender, and we are going to
make ourselves some pretty cool as your y. So we can't open a new
version of Blender. Now, in this new file, we're going to have a planet. We're going to have a
planet in the background because that's going to
look cool, you know. So we're going to add
ourselves UV sphere, and we're going to press
Control two to subdivide it. Right. And now we are
going to add in a circle. We're going to go down here
under Mike Mouse thing, and we're going to set this do 64. We're going to
scale it out a bit. We're going to go
into Vertex mode, and we're going to
scale quite a bit. Pretty nice. And we're going to deal with
this a little later. We're going to come back to the shading of that
a little later. We are first going to do the
fog and the like background. Okay, to start this, we're going to go to the shading tab. Now I'm going to expand this a little so that we can
see it a bit better, and I'm going to open up cycles. Now, we're going to
add change this, sorry to the world setting. So this is how we do all
of our world shaders. Now as you can see,
it's pitch black. That's because this
is set to zero. So if I set this to
one, it's white. We are going to add
in now a sun texture. I saw texture, my bad. And we are going to set this
to have a lot of ozone. As you can see, this
is very bright. We're going to have to crank
this down a little later, increase the sun
elevation a bit. We're going to add in HSV. And we're going to decrease
that a little bit. So we get this sort
of greenish tinge? I know it's red over here,
but that's just the sun. What we're gonna do? So we're going to plug
this into the color here. We're going to
decrease the strength. We have this sort
of why is that red? That should not be red. Okay. Decrease the air a little.
That'll take away the red. Anyway, what we want to do now is we want to add
in ourselves a volume. Now, there's some very specific
values for this volume, and we're going to do them later because what
we want to do is we want to build
this planet first, and then we're going to have we're gonna have
three levels of the plane. We can actually can have
a whole planet here. That's like a full res planet. And then we're going
to have a big sort of plane up in the sky that has, like, a cloud texture on
it that's, like, you know, looks pretty cool, my
abysmal drawing skills. And then we're going
to have a fog volume, which will basically act as
sort of like a distance fog. But anyway, it's going to make everything look much cooler. So to start with, we're
going to set this back to object so that we
can actually do our stuff. I'm going to add
in a new material. And this is going
to be the ground. Now, I am going
to use a texture. I'd love to say I know
where to find one, but I really actually don't. Textures are quite
planet textures, not everywhere, but they're
not too hard to find. I remember where mine
went. Remember I probably there was a great you can actually Oh,
yeah, blue marble. NASA has a whole bunch of Earth textures that you can use. So I'm going to use this, and, yeah, there's one in here. Okay, so I'm going
to grab the Oh, I do not want an 86 K map, bro. I'm going to grab this
world image here. Now, I know this is Earth, but if we rotate it
to the sideways, you're never gonna
really notice. No, are you? It's not gonna matter that much. Okay, what we're gonna do now is we're going to add in a colom. We're going to clamp
these together so that we can basically just
mask out the oceans. I would suggest setting
this to constant. This is just gonna make your
life a little bit easier. There we go. Now we have a
oceans mask. We look at this. It's probably a little bit far. Right. Oh, God damn it. You know, let's just
do this procedurally. A, noise texture. Object coordinates with control
We're gonna look at this. We're going to add
in a color ramp. We are going to
clamp these together so that they form
interesting shapes. We're going to
increase the detail, decrease the scale
so that we get more continent esque things. Gonna set this to
constant so that we can see much better.
There we go. Yeah, I don't know why I didn't even just do this to start. A a bit of roughness, just
to make it look cooler. Okay, so now we have our sort of this is going to be the
mask between both of them. So we're going to have two
principal BSDFs actually. This is not going to be
there. And we're going to mix them using this. Oops. Please. Now, we are going to put in I've got a whoops, my bad. We are going to put
in a deep blue value here, quite deep blue. Feel free to copy the hex code that you see once this is done. Something like that, I think. So this is that hex code
or these parameters here. This is going to be your ocean. So this is going to be
a 0.1 roughness yeah, that should probably
be pretty good. And we are going to now. We are going to duplicate
this Control Shift D, which will retain its
original link, sorry. My bad. We are going to control
shift left click on this, and we're going to look at it, and we are going to color it. So we're going to
have white up here, add in a few extra nodes. We are going to have sort of, I want to say, gray,
probably darkish gray. And then we're going
to have green, sort of desaturate probably
a little bit too much. You know, do we want
this to be an ice well? I think we want this to
be another ice well. So we're gonna make
this blue, actually, just for a little bit of spicy. And then we're going
to make this sort of a different kind of blue. This is going to be
like a less green blue. Then that's gonna be black. Then if we plug this
into the color here, increase the roughness
all the way and decrease the specular
IR wet level, so it does not reflect.
And we look at this. Mm. Interesting. My bad. Flip color mp. See, we were coloring
it the wrong way. That's much better. And now if you mess with these, might actually
increase the value on this one a little bit. Sometimes you got to
get quite careful with these parameters they will
cause issues, as you can see. This white one isn't even
showing through. That's why. You got to clamp them
in. There we go. And there's our
mountains, sort of. Now, if you look back
here, that's pretty good. I'm going to add a little
bit of distortion to this. Oh, that's a little bit
much okay. Never mind. No distortions. That
did not work well. Okay, bump map. Color into the height,
set the distance to one. Joshi left click. If we
increase the filter width, that will do horrible things. I hate this new filter
width. It's so annoying. I'll break things. Really unfortunate. We're going to control shift
D and duplicate this again. We're going to clamp
this in using Bpline. We're going to add another stop. That way, it doesn't go to gray. It goes all the way to black. Going to make these
a little more. And we're going
to plug this into the distance so as you can see, it's only really
like it gets sort of I'll That's the
wrong way again. Flip color amp. Please,
that is unfortunate. Oh, well, if we look at this, you'll see it's like
it's only bumpy in the middle and it sort of
gets thinner on the edges. So you want to decrease
this so it's not really predominant.
That's much better now. Now, if we look at this again, we have a pretty good planet. It's only missing two
thirds of everything, so let's duplicate this sphere and scale it up
ever so slightly. Let's name this to terrain. Sorry, no, no, not
terrain, ground. This 'cause this is the
ground level, basically. And we're going to do
the same here. Ground. We're going to name this
two rings and this sphere here too at Moss. I think I technically. Okay, so we got to Atmos. We're going to remove
this material, and we're going to
add a new one called you guessed it at Moss. And this quite literally just going to be
a volume scatter. Yeah, that's it. Have a little bit of ist
Anisotropy. I get slightly blue. You know what I'm gonna
make this slightly green, actually, just for
something interesting. Gonna increase the density
and decrease the size. So it's just enough to see. Or isotropy. There we go. See, there's quite a
bit of difference. Anyway, for the last bit, we are actually going
to use a texture. You can do this. Oh, God. You can do this on your own with a noise texture
like I did the ground. But trust me, it doesn't look as good as
if you do it with a texture. So we're going to make
clouds. Those two. We're going to remove
this. We're going to add a diffuse BSDF and a transparent BSDF
which is basically just white and alpha, basically. And we are going to add in ourselves a mixed
texture to mix it, and we're going to
plug generate it in. We're going to open
ourselves text up. And as you saw here,
I have blue marble. I have this cloud combined. If we wait for this to load in, we are going to then proceed. Probably a good idea before they do this is to save your project. So I'm going to save
this over here as the like that. So
we've saved our file. We're going to preview this. And as you can see,
it's quite a stretch for press to slash key,
we can just look at it. That's probably because we
have not set this to sphere. That looks way
better, at least in my opinion. So we now have this. We're gonna look back
at our mix shader, realize that these are
in the wrong inputs, and we're going to
switch them around and lo and behold, clouds. Let's press this again,
and we've got our clouds. That's pretty good. I don't
like this atmosphere anymore. You know what? Let's
change this to MI. MI is MI is actually
what real atmosphere is. This is meant to mimic real
life atmosphere there. We go that looks way
better. Look at that. Ooh. Spicy. And anyway,
now for the rings. Now, the rings are gonna
operate a little differently. We're going to use
UV editing for these. We have a look over here. We are going to select
one of these edges here. Now, this only works if you're
in edge mode, by the way. You're going to right
click and go, Mark Sam. We are now going
to then press A, select everything, and
unwrap angle based. Now, unfortunately, so there's a cut just exactly where I
thought it would be. Unfortunately, this isn't
really going to work. So I'm going to
scale I'm actually, I'm going to rotate
this, holding control so that it snaps,
doesn't really snap. Rotate it enough, so it's
sort of that way, vertical. And then we're going to
scale on the Y axis, which is up and down by zero, which is going to make
it completely flat. We're going to do the
exact same thing here. We're going to
scale on the y axis zero. Move these underneath. We're going to grab
this edge we're going to scale on the X axis to
zero, same with this one. So now we have this
perfectly flat quad. So we're going to
go right click and we're going to go
flow active quads. Oops, we have to
select everything. Okay. Now it's all
in a straight line. This is going to save
us so much trouble. If you had some U V
square add on, use that. You can do all of this.
Everything I just did, you can do by just
clicking that button. Now we're going to go
back to the shading, and we're going to add
ourselves to new material, and we're going to call it rings because that's
what we're doing. And we're going to
add ourselves in a Oops, diffuse Transparent. Not transparent,
yeah, transparent. You got to be careful not to
use the trans oh goodness. You got to be careful not to use the translucent BSDF as that does not do what you
think it does, pretty much. Okay. Now we're going to add
ourselves a noise texture. Gonna press Control T to add ourselves the mapping, and
we're going to use the UV. Now we're gonna Josh left click on this. Looks
pretty good, right? You know, pretty,
pretty average. It's got a seam over
on the top side, but you don't really see it.
11. World Shader Tweaks for Better HDRI Lighting Control: Mm come back to Blender and Gaia Master
Class, procedural Ice world. Okay, here's where
the magic happens. We're going to decrease the
scale on the Y to zero. And then increase the scale. Look at that.
That's pretty cool. That's pretty cool. Now, I'm going to go over here. I'm going to grab this,
and I'm going to make this clamp it in a bit. Now, this is basically
This color ramp will dictate how much of
the rings you have. So I'm going to increase
the detail all the way too, by the way. Here's the roughs. So if we have a look we
have all of these rings. If I increase the black value, it gets rid of if I
decrease it and say, increase one of the others,
these will get way stronger. So I'm going to actually make this Oops, that's the wrong way. I'm going to make this
quite dark, actually, so that we get sort
of bright rings, and then we get
the little rings. Now I'm going to plug
this into this mixed Jada and bet that this is the
wrong way around. Yes, it is. And there's our rings.
Now, you'll notice there's a bit of lack of
geometry, press control, too. This will smooth it
all out by adding in a subdivision surface
modifier over here. Sweet. Now we have our planet. We have our rings.
We're cooking with gas. Now, depending on
whether you end up looking at this from the
bottom side or the top side, mess with this black parameter here and these white ones, and they'll come back and forth. I'm going to leave
mine for there for now and get back to the middle. So we're going to add
ourselves in a plane, move it up, and we're going
to scale it up really big. This is going to be
the world Clouds. Now, I have a cloud texture. We're going to use
the same diffuse translucent again
for the clouds. I have a cloud texture. From Samuel Krug, who
is a very good Zuber. I followed his planet
tutorial a while back, and I built some
really, really, really, really stupidly high, high
quality cloud textures. Like, this one here is, like, I think that's 30,000 pixels on. At 7,000. Okay. My bad. Some of the Okay,
these comp ones will be much bigger though. As you can see, that's 109. It's a 200 megabyte image. So if you didn't know, you can go to LandSAT and LanSAT will let you download images of Clouds,
which is really nice. These are all real world
clouds taken by satellites. So I'm going to end up
using this one right here. But if you want to
see how to get these, you go to this website
here, USGS, Earth Explorer. We're going to go down under
the LanSAt LansAT collection one Level two, and
the Lance at 89. And then we're going
to go back here. We're going to Zoom out. I'm going to take here. Alaska has some
very nice clouds. So I'm going to take a
picture of stuff over here. We're going to add a polygon, so I'm going to go Oh, whoops. Actually, I'm going
to use the circle. I like using the circle
much better. There we go. Right here. And then
I'm going to apply. And what this is going
to do is after we set, let's say date that
date to that date, doesn't really matter that much. Yeah. So we're going to apply that and we're going to
look at the results. Now this is currently going
to search for Landsat. And then up over here,
we're going to get a whole load of those
images which have, you know, fully, if you takes a while to load,
these are very large images. As you can see this is actually taking a
picture of the train. Let's perhaps go down down
over here on the sea. Let's go back to the search
criteria, clear circle. Here, here, it's apply
to show results. It's going to search through
all of the images again. And here we go. Here's a nice big Bank of
Clouds. That looks pretty nice. If you remember this
websites a little outdated. Got them over here. There's more clouds.
So you get the idea. So you'd go and download those. Or you could just
use noise texture, but that's not really
going to look that great. So I'm going to go I'm going
to open up my Clouds folder, and I'm going to go
grab that Cloud file. This is going to open up this. Pretty good. It's going to plug into here.
This is the wrong way. Yet and I'm going to use a
color ramp just to press E, switch it to E's,
and there we go. We've got some clouds. Now, I'm actually going to add in a math multiply and
multiply these quite a bit. I think because
we're viewing this from the Boment it's not
going to look very great, so I'm going to actually
switch these out for emission. There we go. That
looks way better. Look at that. Look
at that. Look at it. I'm actually going to add a
power node in front of here. This is just going
to make it Oh, that's a little bit much. This is basically going to
make the high values really strong and the low
values like less strong, depending on which way you go. Power node is very fun to use. I think I'm going
to put it like that and rotate it a
little bit. Okay. I'm going to grab
all the planet, including the rings,
and I'm going to go, New collection, planet. That way, I can just instantly right click and go select
objects to get it. I'm going to move
this all the way over here and make
it really big. Oh, that's a little too big. Suspension. And I'm going to rotate this ring so
that it looks interesting. Pretty good. Pretty good. Now comes the fun
part, the volumetrics. Okay, to do this, we are going to add
ourselves in a cube. And as you scale
it up quite a bit, seeing Shift S to only scale
without scaling the Zaxs. Now we're going to add
this. We're going to call this distance bog. Okay, now comes the fun part, the really hard part
because this will actually change depending
on what happens. We are going to set
this to Raleigh. Raleigh is actually
something that will simulate light scattering in the atmosphere,
which is what we want. We're going to plug
this into the volume. We are now going to add in a gradient texture
control T object, and we're going
to rotate this 90 degrees -90 degrees, my bad, so that we have much softer fall off. But the best pline
you scale it on the zaaxis slowly downwards so that we get more
of a smooth gradient. Whoops. And then we are going
to add in a math multiply. Let's say this to 0.01. Let's this into the density. And here we have.
It's very nice. Distance fg. Right. Now the fun part. Now, you've probably been wondering
this whole time, how are we going
to turn this into a HDRI This is never
going to work. Okay, well, no, and
yes at the same time. We're going to add in
a camera at Origin. We're gonna press
old R, which will completely remove all rotations. We're going to press RX 90 so that it is pointing
exactly 90 degrees upwards. Then we're going to go down
here into the cameras. And under perspective, we're
going to go to panoramic. Now, if you've ever
used panoramic before, you'll notice it's,
it's a panorama. It could be a 360, but it's just, you know,
field of view is 180. But if we go on to here and
set this to equirectangular, you might notice this looks very familiar if you've
ever used HDRI before. Pretty good. So let's
have a look at this. I think I'm going to increase
the density on this. Oh, that's a little bit much. I'm gonna make this
light blue as well. There we are. I think I'm gonna make my planet
a little bigger too. Also, unfortunate thing is
solid view does not work. So yeah, solid
view does not show the equirectangular,
only the rendered view. So yeah, I'm going to do that. That looks actually
pretty good right now. I think I might scale up
this a whole lot bigger. Let's pull out a new
window real quick, set this to the camera view. I'm just going to make
sure this is big enough that we won't see
the edges like that. Move this back so it
does not intersect. Rotate this a little bit more. It's like that. I like that planet. That
planet looks good. Mm might increase the
density on this just so that it sort of blends those
clouds out a little more. Let's go back to
the shading tab. Helps increase the height. Oh, my. Okay. Oh, yeah, that's good.
That's good. Right there. This is the outcome
you want, generally. Here's the current
setup from that. The clouds are really big. Oh. Okay, if you encounter this kind of clipping,
please press N, find your view panel, which is somewhere here and increase the end to
something really large. That will just allow you to
see as far as you want to. Okay, so we've got the really big plane, we've
got the really big square. We've got the really big planet. Yeah. Okay. Sweet. Now, a useful thing to know when rendering HDRIs is this is going
to be a 12 ratio. So we want 180 times
two instead of 290. So we can go up here.
We can press this and we can go times two. This is now an echo
rectangular map. This will go This will fit perfectly
with everything else. Also, because this is a HDRI,
and we will be seeing it, we want this to be quite a
high resolution, like 400. So we're going to add in 400%. This will basically just
increase the resolution. So this will end up
being like a 16 K image. So if you can't render it this higher resolution,
that's unfortunate. I will include this one
in the course files, but I encourage you
to make your own. Now, we're going to set
this to be a radiance HDR, which is how you store like the light
information in a HDRI. You could also do an EXR, but that's don't bother. I'm pretty sure radiance
is better for this. So we are now going
to press render. Well, I'd love to give
you some updates on like, these are the settings
I use. I'm using GPU. I know, I'd love to say I could give you
the answer to these, but these values
differ depending on your PC and your
graphics card. So generally, 0.5 from
the noise threshold, a fairly lowish number
for the Max samples to start off with and a denise
using whatever you have, use the GPU always. And now we're going
to press F two. Now, this is going to holy. This is going to be
a humongous image. Oh, that just absolutely flash
banged me with that image. So yeah, we're going to
render this out now. As you can see, it's
very, very large. Each of those squares is
256 pixels, by the way. You might render the whole image slowly as it goes through. That's fine, too. It's
the output that matters. And once we're
finished with this, we are going to save it into a file where we can bring
it back as HRI later. Yeah, I'm going to soon as this is finished,
I'm going to save it, and that is going to be the
end of the lesson because I've probably gone just a
little bit too long this time. Uh, but I wanted to make sure
the HRI was, like, done. It was, you know,
no more problems. Yada yada yada. Mm, it's still making
a bit of a line. Oh, well, hopefully I
doubt you'll see it. You shouldn't see
it. If we do see it, we'll come back later
and mess with it. Now, don't delete this project. Always save this project
because you may want to come back later and modify your HDRI, you might
want to, you know, change the place of the
sun or how many clouds there are or how big or
where the planet is. So always, always save this one, and you'll come
back to it later. This is going to
denoise real quick. This is going to take a truly monumental effort to denoise. But once it does, we're going
to get this lovely HDRI. Now, I'm going to press Alt S, which is the key for Save. This is where you can see this
is the one I already made. I'm going to call
this Ice course HDRI. And I'm going to make
sure that this is saving as a radiance HDR. I'm gonna save that image, and we are done. That is it. This is
the final output. This is the scene, if you
wanted to have a look. I'm going to leave it here, and I will see you on the next one.
12. Ice Shader Creation with Subsurface Scattering and Volumetrics: Welcome back to Blender and Gaia Master Class,
procedural Ice World. In our last lesson, we
made ourselves an HDRI Oh, dear, which was very convenient. It means we don't have
to search the Internet for HDRI and might
have to buy it, download it. Who
knows what goes on. So we made ourselves in
Blender, which is really nice. Now we are going through colorless terrain using
the color outputs that we made during
our creation in Gaia, and then we are going
to add in our HDRI and add some fog to our scene to make it look a little
bit interesting. So we're going to go
to the shading tab. We're going to view
this right here, and we are going to go
into the render view. I'm going to go
under these three, the viewport options, I'm going to turn off both of these. That way we can see cycles,
but in like a preview. We're going to set
this back to Object and I'm going to
add a new material, and I'm going to
call it for rain. Okay. Now what we're going
to do is we're gonna press Control T to
open up our textures. We're going to go find in Gaia, again, it builds
ice rain course. This one right here, the
height and color texture. Now, this is set to linear, whatever that was
color space SRGB, SRGB people. That's the go. Now, because we did the array of this terrain
using the mapping, we need to set the scale to two on everything that way
everything lines up. I have a feeling something
might have gone wrong here because we've
displaced it twice. So if we go back over here and we turn off these
displacement real quick. There we go. Okay.
There's our terrain. It looks pretty good. Unfortunately, it's kind of
shiny, which we don't like. So we're gonna turn
these back on again. This will basically make it
so it doesn't reflect light. I want to make
this a bit bigger. This is hard to look at. Okay, so there's our ice. Well, it's not our
ice. There's our rock. It does look a little
weird, though. I feel like there's something, apparently,
that's working. Okay, now we're going to
turn both of these back on. Just be warned this may
make things look slightly strange in certain locations,
something to be aware of. Okay, so now we have this.
This is working fine. But now we have to
build our ice texture, sorry, not our ice
texture, our ice material. So we're going to basically
have this all on its own. And then we're going to have an entire ice material
built down here, and we're going to mix it
with this one right here. Based on that
actually we're going to control shift D because
we want to maintain that array, the double. We're going to use
this ice mask texture, which we have a look now. We'll mask out all
of our ice bikes. So we're going to stick
that right into here, and then that's going to be
our output. That's the plan. Right. Now, let's get started
with this ice material. Okay. Now to start off
on our ice texture, we're going to be using
subsurface scattering. Now this is going to be quite
heavy on lower end PCs, so I do apologize, but this is how you
make good looking ice. So we're going to add ourselves
to subsurface scattering, and we're going to use these parameters because these are the ones that
I've made sure work. We are going to have
an IOR of 1.309, which is ice, I do believe. We're going to have a scale
of zero to start with. Just gonna cause problems
later, but I will. And we're going to
have a transparent BSD of. Okay, there it is. We're gonna mix these
together. And we're going to mix these based
off a layer weight. Right here, add in a color ramp. In case you're wondering
how I'm summoning color ramps out of thin
air, I've literally like, set my but the C key to just instantly
summon color ramps because I use it so many times. So you'd probably
just have to go A and find your color ramp. So if you're wondering
how I have this node Pie, it is an add on comes in
Blenders extension Library. You just sech it up here. It is node Pie. So if I miss that,
yeah, it's that. Okay, so we're going
to use the facing. And we're going to have a
look at this real quick. We are going to make
this sort of like mid gray, almost like that. We're going to clamp this in quite a bit, so it's
only on the edges. That way, it's going to only
be transparent at, like, the very edges, as
you can see here, it's slightly transparent
on the edges, and then the rest is the
subset for scattering. Righty. Now, we want to add
ourselves in a noise texture. Press Control T object. And we are going to go
with another color ramp. We are going to plug the color in here. Gonna have
a look at this. We're going to have a
light blue, almost, sort of, like, almost actually,
I want to, like that. So under how I'd say this, almost like a dark
teal blue almost. And we're going to
have this over here. And on this side, we're going to have basically the same thing, but it's going to be
slightly lighter, and it's going to
be like light blue, blue blue instead of green blue. And we're going to put this
immediately through a HSV. This is going to allow us to modify the color later
if we so choose, stick that into here, and
we have a look over here. There we go. Pretty good. I'm going to set this to
like 0.45. There we go. It's a bit more green our ice is going to be nice
looking transparent later. Righty. Now for
this noise texture, we're going to go
for a scale like 25 not much detail,
no lacerenity. Yeah, it's pretty much just
going to be like that. Yeah. Just like that. Just a little bit
of variation in the color so it's not boring. Okay. And now we are going to add in the fun part,
the volumetrics. To start this, we're going
to add in a voronoi texture. We are going to set
it to distance to edge from F one to
distance to edge. We're going to add a color ramp. We're going to plug
it in here and we're going to switch the sides, and we're going to clamp
this in so, so very tight. But it is important to
set this to object first, too, with our control T. Oh,
my God, my things over here. Okay. Never mind. I'm
gonna stick that there. That way you can see my little
cursor thing a bit better. Alrighty. Now we are going to set the scale on
this to, like, 45. This is, it's a little
much. Oh, that's 450. Okay, 45. My bad. There we go. That's much better. Holy. Details is gonna
be about ten, let's say, 0.6 on the roughness This is basically gonna give
us these nice jagged, sort of looking stuff. Pretty good. We're
going to control shift D and duplicate
this again, but instead, it's going
to be back to F one. This is going to give us
you can't quite see that. You're gonna have to remove
the detail to see that. It's going to give
us these things again, which are really good. Oh, yeah, and you probably
want to set this back to 0.5. Add in another color. We are going to have
a black one there, another black one here, and white one all
the way heavier. But we're going to set
this up Bast bline. We're actually going
to increase the dark. Now we're going to
control shift right click and multiply them together
using a color mix node, multiply. There we go. So this is basically going
to mask out some that are, like, sort of in
certain locations. Now, because this is the exact same it's the exact same pattern because we've got
the scale the same. They're going to do this kind
of strange thing where they like leave some and not. So we're going to
decrease this scale back to, like, 25 again. That way, get some cracks are going to be
dark, some are not. Some are going to be
completely black. And anyway, you get
the drill, okay? So we've made ourselves some nice procedural sort
of cracks and stuff. Now, it does look like cracks, sort of, I don't know, it's kind of like lines and doesn't really
look that good, but trust me, it will now
we get to the fun pit. We're going to use
the math multiply. We're gonna multiply this
by 175. That's a lot. I know what you're thinking. That's a lot to multiply. And by the way, we're
gonna plug this into the strength of an
emission shader. I'm gonna make
this a light blue. Now, just so you know, you want this Oh,
dear. Updating lights. Okay. Now it would
be a good time to save just in case
something go sideways. Okay, there we go. Did
a little bit of funny. So yeah, so we've got our
nice emission shader here. And that's great, but it
doesn't really do much for ice. So we're going to add
in a volume scatter. We're going to set this
to foia fernia for end, which is used for underwater,
if you didn't know. We're going to set the
IOR to the same thing, 1.309, which is
ice, I do believe. Set the back scattering to 0.038 I'm going to set this color to a red so that when the absorption comes in,
it's going to look green. We're going to mix. We're actually not
going to mix these. We're going to add
these together. We're going to be special. Can we Blender is being
special right now. Okay. Okay. Is not liking
that because I'm trying to look at a volume scatter
with the surface. So what we're going to do now
is we're going to plug this into the volume right here. As you can see, it's doing
exactly what we want. It's creating a whole bunch
of fractures inside the ice. And if we plug
this over the top, we're going to get
this really cool. We do need a little bit of
scale here. Really cool. Ice texture. Looks like it's
refracting around inside. Now, I think, if
we look over here, there's a little
bit too much black. So I'm going to
increase this color here until I can sort of
see more of the white, more of the light light texture. There we go. So now it's
a bit more predominant. Yeah. Okay. So that's our ice texture.
We've done all this. Now what we're going to do is we are going to mix
these together. We remove that. I think we
can just leave the volume in. Oops. That's probably anyway, we're going to mix
these two together, control shift click, which
will mix our shaders. And we want to do this based on the ice mask like that,
exactly like that. And then we're going to
plug this into the volume, and we're going to have
these gorgeous ice spikes with our lovely black
volcanic terrain. And that's going to be
the end of this lesson because that looks
pretty cool to me. Hey, look, even though the snow's even piling
up on the ice. That shouldn't happen, but that's actually
pretty cool, anyway. Right. That's the end of this
lesson. I hope you enjoyed. I will see you in the
next one where we will start adding
volumetric fog. We'll start positioning
all our camera and stuff. We'll add sort of effects. We're going to add into here. We're going to add in a bit
of these little spiky bits. We're gonna make
them the ice, too, using our mask from before.
And, yeah, that's it. That's it for now.
See you later. Oo.
13. Atmospheric Fog and Cinematic HDRI Lighting Setup: Welcome back to Blender
Angya mask class, procedural Ice World. Now, in our last lesson, we built this texture, and we made this truly wonderful ice. Well, at least in my opinion, I very much enjoy
looking at this ice. We have built that and
use the masks to mask it out to be only effective on top of the correct piece of ice. Now, we need to add in all the little ice spikes that we added with the fine details. So what we're going to do is
we're going to go over here, we're going to turn off both of the big displacement and
only have the little ones. So now it's only all
the little spiky bits. So let's control Chef D this
because this is our mask. This is our ice mask.
We go back up one, go back, we can find
out fine details. So if you can see here,
something is ever so slightly wrong because
none of this lines up. Oh, do we actually
I don't think we. We did not array
this, I believe. We go into our displays
here and we open up this. Did we? No, we did not. That is where we went
wrong. We forgot to repeat our mini ice spikes. See, as you can see now,
they look much better. I'm going to add these together. And plug this into the
output right there. Now if we bring back
everything else, this is going to
look really cool because now we've got all of these little bits of ice that are peaking
up out of the ground. I'm also going to just set
all of these coordinates to UV because I remember that something went wrong
and that was the fix to it. We're going to do it now just in case to make sure
it's all done anyway. Yeah, we go. There we go. Now we've got a whole bunch more ice,
which looks really cool. I felt it was a little
bit odd if we just, you know, just had these
giant bikes of ce, you know? Got to have, you know, variation between just the
boring bit and the big bit. Okay, that's done now. Now we get to move on to
the volumetrics. But before we do that, we are
going to place our camera. This is a fairly important part, but definitely one of the
most fun, I would believe. So I'm going to add
in myself a camera. I'm going to go Control
Alt number pad zero, which will allow me to snap
the camera to my view. And I like looking backwards
at the ice spikes, you know, looking at as opposed to, like, looking
at them this way. So I'm going to come
over here. I think I'm going to look at right here. Let's crank up this sub div to, like, let's save real quick. I'm going to set
this to four real quick just so I can
see all of the detail. Oh, this is gonna suck. Oh. There we go. Now we've got our
really crunchy terrain. I think I'm going to look
up at this right here. Settle somewhere around
here, to look up like that. I'm going to come over to
here, decrease my Well, decrease my focal
length for like 15, add this make that little
zoom in a little bit. And now we get to move around
and position our camera. Now, there's a really
fun thing you can do. If you've ever used Unreal
Engine, you can go to view, view and Where is it? Is the view Where is
it? I be right here. Navigation, my bad.
Navigation and you can choose fly walk navigation, which allow you to
use the WISD keys, like in Unreal to navigate
through your scene, which is quite useful
for situations like, Oh, I like that. I
like that very much. And Q and E are up and down, by the way, just so you know. We're going to stick
this right here. And right there. And once you left click,
that will place it. I'm going to turn on
Viewport display. I'm going to increase
my pass part out nearly all the way, and I'm going to turn on the
thirds composition guides. So as you can see, I've lined
up my can't probably can't really can't really see it, which is really unfortunate. But like my Oh,
that does not work. That's sad. You can
see my line lined up here and my line
lined up here. So we've got the big
open space over here, and then we've got the
main spike over here. If you rotate this slightly, I could probably line
it up a little better. But, yeah. Also, useful to know, double tapping will
engage a gimble mode, which will allow
you basically to just look around,
which is really fun. Okay, now we've got our
camera temporary setup. We are going to add in our HDRI and our fog. Now,
start this off. We're going to do the HDRI
first because this creates light. We are going
to go over here. We are going to scroll
along the top here. If yours is closed like mine and turn back on scene
world and scene lights, you can see this actually
glows, which is really fun. Now I'm going to sect world. I'm going to press Control T, which is going to add ourselves
an environment texture. And I'm going to go
open that exact file. I rent it out right here.
I'm going to load that in. It's going to take a little sec because this is
quite a large image, and it's creating
light, so it's going to have to update
images and lights. What's this again, body. This
is going to take a while. Okay, this is taking a
while at work. There we go. And there's our host Shari. Now, unfortunately, this
is at the wrong spot, as you can see the sun is like, all the way over this side, and then over here is
our giant planet, and then there's our
clouds up above. I love that. I really love that. So let's rotate along the Zaxs until our sun shows
up in our viewport, which is where we want it. There's our planet There we go. Nearly got the sun. There we go. I'm going to increase I
think it's the X rotation. This will change depending
on your scene, by the way, the X rotation so that we can basically bring the
horizon up a little bit. There we go. Now we have that. That's a little bit bright. This is why you want to
make sure that you save your HDRI and come back to it. So I'm going to go
back and remove that horrible white
glare from my HDRI. But for now, that's
going to have to do. So we're going to go
back to our layout. We're going to go
Shift A, and we're going to add a mesh cube. And we're going to scale
it up quite a lot. Make sure it's up here,
and then we're going to go scale shifts so that
we don't scale on Z axis and just scale it on Z
axis a little bit manually. Now, we're going to switch
back to the shading tab, and we are going to
switch this back to the object tab so that we can actually modify our object. We're going to add
new, we're going to go fog one because this is
going to be one of two fogs. We are going to remove this completely because
that's useless. We are going to add in a volume scatter and a volume absorption
and an add shader. And we're going to add
these both together and stick them out into the volume. And that all went blank because the volume
density is really high. What we want to do now is we want to add in ourselves
a gradient texture. So basically the
smoke Oh, smoke. The fog is going to get clearer and less dense the
closer it is to the camera. And no, I'm not going to
do this with a miss pass. That didn't work, unfortunately. So we are going to use
the object cordon, and here we're going to
look at this, seeing that. And we are going to o
decrease the scale, the X axis to quite low, and we're going to
move this across. So it's quite a
convincing gradient or quite a stable gradient.
Okay, there we go. All right. Now what we want
to do is we want to add in a colmspe to Baseline. Is going to allow us to
make it even smoother. We can actually bring this
back a little bit too. And we're going to add
in a multiply node or multiply math multiply. I'm going to set this to 0.3. I'm going to stick this
into both densities. All right. Now that is done. We have this sort of
further you get away, the more dense it gets folk. I'm going to set these
both to a light blue, very, very carefully light blue. Otherwise it will go very
saturated by the way. And as you can see, that's
doing what we want, but it's just a little bit
much. That's a little dense. Let's make this a little
let's make this 0.1. See what that looks like. Yeah. Now, just so you know, this
is going to end up being a drain and the nisostropi
is going to be -0.25. I probably could actually crank that back up a little bit now. This is gonna make us a very nice sort of once we get that sunlight and
we make it a bit brighter, this is going to
look way better. But for now, we have that lovely sort of distance
fog that sort of gets, you know, more opaque the
further it gets away. Now, I also would
suggest rotating this object to fit
your camera's angle. So it does that a little bit more accurately, just like that. We bring it down a little bit. Hmm. Fog is something
you can play with all day and get nowhere or play with for 3 seconds
and finish the scene. It is so finicky. Definitely screw around
with this to your liking. Um Yeah. Okay, hold up. Have I not set Oh, that's why. Our world strength
is set to like 0.3. That's not good. Let's
set this to like 0.6. That way, it's not too
bright. There we go. Righty. This is going to
be the end of this lesson. In the next lesson,
we are going to finish the environment setup, and then we're going to start. Then the next course after that, we're going to do modeling. I know you didn't think
you're gonna do it, but we're going to. We're going to go through
some very interesting things of how to model a spaceship. So yes, save, please, and I will see you
in the next one.
14. Refining Fog Layers and Rebuilding Custom HDRI Lighting: Welcome back to Blender
Angya Master Class, procedural Ice world. Now, in our last lesson, we finally imported
all the stuff. We made our scene
look like a scene. It looks like
something like now. It's definitely not
a finished product, but that's what we're gonna do. We're going to
finish all the fog. We're going to
fine tune the fog. We might go back and mess
with the HDRI a little bit. As you can see, it's quite bright on the left
hand side over here. I definitely want
to remove that, and our planet
isn't very visible, so we are going to fix that. But right now,
something we can do just off the bat
is we're going to fix this distance fog
because it's it's working, but it's also not working,
if you know what I mean. So I'm going to decrease
the size of this. Now, this distance fog is
definitely you're going to have to you could follow
what I do exactly, but because you'll have made your scene ever so slightly
different from me, everything's going to be
a little bit different. So I would suggest trying to find a way to do
it on your own. Here we go. Scaling it up seems
to have given us much smoother gradient to
fall off into the background. Let me let me switch
this to object. Yeah, this looks pretty solid. I feel like I probably
could increase the saturation to
it so slightly on these just to make it a
little bit more poppy. Okay. Now we've done that. We're
going to duplicate this with Shift D. We are going
to scale it down, hide the previous fog for a fit. Okay, now we're going to take a moment to name everything. So this grid here,
this is our terrain. So we're going to
name it terrain. This cube here, this is
the second cube, sorry. This is going to be
our distance fog, so we're going to
call Distance fog. So I can't talk while I'm
typing. Kind of interesting. And this one here, we're
going to call ground fog. Oops. Case in point. Okay, now we've
named everything. We're going to hide
our distance fog. Now, if you see in my Atlana, I've got this cursor icon. I've got an eye, a
TV, and a camera. Now, if you want one of these, they all
do different things. But if you want these,
you just click on this little option here and you can turn them on
and off right here. The I is hide. This simply hides
objects in the viewport, same as pressing H, and you can bring them
back with AltH. However, if you click on the
TV icon or Monitor icon, this is stable in viewport. This will not come back
if you press ALTH. So this is like going down into your object properties and ignoring that and changing
the visibility here. And the selection means
that you cannot select, if I click on this distance object I
turn off the selection. I can't select that anymore. It's kind of useful,
but for now, we're just going to disable
that in the viewport. Okay, now we're going
to grab distance our ground fog,
sorry, this time. Wait for all of this to update. I'm going to go
onto my Oh, like. I'm going to go over here
and I'm going to turn off this subdiv in viewport
so that we can see it. Now we're going to grab this fog and we're going to
get rid of it and we're going to add
a new fog material. H that's dog. None of
those in our scene. Okay, now we're going to add
in a volume scatter again, and we are going to
set this to -0.4, which is going to look a little
interesting, definitely. But it'll look better in
the long run, trust me. Now, we're going
to open up this. We're going to grab ourselves
a gradient texture, control T to open
the mapping nodes. And I'm going to add
in a noise texture, plug this into the vector, plug the object into
the vector that way our gradient is aligned to the middle of the
middle of the object. The object coordinates is based off the origin
of the object, as you can see right
there, that origin. That's where the center
of our coordinates are. Now, what we're going to
do now is we're going to rotate this along the
y axis, 90 degrees. We're actually going to
do -90 because we want the white on the bottom,
because the white is yes. We're going to that
I'm going to say this quid dratic real quick. It's going to give us
a nice easy fall off. In case you didn't know if
there's one of these menus, you can hold Control and scroll, scroll through all
of the options. I'm going to go
back to quadratic, and I'm going to go
control Chef right click, and I'm going to drag
to mix these together. And I'm going to have a
look at this real quick. Okay, I'm going to
now apply Control A, and I'm going to apply scale. This is going to apply the
scale of the object so that our noise texture doesn't
look horrible and stretched. G to decrease the scale so that the size of the noise texture
gets a little bigger. You don't want it too small, and we're going to increase
the detail all the way. Now, if we look back here, you'll notice that
this has started displacing our our gradient, which is what we want, because we don't
want a uniform flat. We don't want uniform
and flat ground folk. That's not going to work.
Anyway, now we've done that, we're going to duplicate
our noise texture. We're going to plug
the object coordinate into here because we don't need any of the mapping
that this does. If you ever look back
here, this is this. You're going to increase
the scale slightly. I'm going to summon a color
ramp out of thin air, and I'm going to
clam this together slightly while setting
this new beast line, which will allow me to have a much nicer fall
off on the noise, allow me to have
the dark bits and the light bits
without having it, you know, really, really
black and really white. Okay, now I'm going
to control right click again and drag this
with our gradient texture, and I am going to
color burn this one. Is going to add
something interesting. This is going to add
in just a little bit of detail, as you can see. Kind of fun. Okay, this is
going to go into our density. But first, we are going to stick a math node in here,
math, multiply. Right, I'm going to now enter my camera view with
number pad zero. I'm going to drag down by pressing G and then
Z. I'm going to drag down our fog volume till it only covers parts of the ground
that I want to see. I'm going to set
my render preview to real time real quick. Now, I've made these
render presets. This one's for real time. This is basically just
automatic fast using GPU denoising with the
really low samples just so that everything I can, like, look at it fairly fast
and it's nice and smooth. I'm actually going to decrease. I'm going to set
this to like 0.1. There we go. Actually,
You know what? I think we might we might
increase the scale. We might scale with some
of the za axis real quick just to make it a little bit more a
little bit more deep. I have to bring it
back up, though. Let's go even lower.
Let's go 0.0. Oh, that's not 03. It's gonna be like almost
like condensation, I want to say, sort of forming in the low parts of the scene. Might crank that back up
just a little bit more, 0.05. There we go. Alright. Well, that's that. And now if we turn our distance fog back on,
don't forget to save. And we're going to turn
this back on here. Don't worry. If
this looks really like gray, we're going
to fix out later. But the important thing to
look at now is the actual fog and how sort of it's making
the distance look faded out, which is really, really
important if you want the depth. Okay. Now we're going to
go back to our HDRI scene, and we are going to hopefully improve it ever so slightly because it's great as this is, it's a giant white light there, and our planet's a
little not there. Alrighty. We're
back, and we've got our very own custom made HDRI. Now I'm going to
cris the pass part. It's useful thing to know if you increase the pass
part out all the way, it only renders what's in the viewport instead of
all of this outside. Okay, which makes it render
faster, which is good. I think our density on
this is a little too high. I think that's our
current problem. The density on this leg
scatter is too high. We bring that back down.
Perhaps perhaps I think it'd probably be wise to also rotate
the So that for a second. I would be wise
to rotate this so that that open part
is beside the planet. That way, we can see the
planet more clearly. No, I still don't like this
giant white light in the sky, so we're going to go back
to the world settings here. I'm going to mess with
my sky texture here. I'm going to decrease
the amount of dust this is what adds in
that questionable table. Oh, that's nice. I like
that. It's kind of cool. It's what adds in that
questionable light in the sky, all of that dust the
sun's bouncing off. It's almost like
the volume scatter. Um, I'm going to increase
the sun size, too. I think I want a
little larger sun. That could be interesting. Decrease this dust a little bit. Now, alternatively, you
could use a sky add on, like I could pull up here
from my Environments one. I've got Skylab, a nice
free sky option. Um, You could use Skylab. You could use I think this is actually one that comes built in with Blender. There's a true sky.
Oh, sorry, not. No. It's some kind
of sky add on. Then there was the true
sky that came out in the Blenders launch bundle, which is really good,
but it doesn't work into 4.5, which is unfortunate. So I'm trying to do
this in main Blender. But if you have an option that you have that
would be better, I would encourage
you to use that. Anyway, we're back here. Let's press TH and
bring back our scatter. That looks way better. Now our planet's a little
bit more there. Yeah. Alrighty. I I think back over here
our icebkes of course, we have a look at the sun
positioning here without either of the fog so that
this renders really fast. I think we probably want
to move the planet a little bit closer to the sun and make it a
little bit smaller. So if we switch back over here, let's go back to our layout. Let's grab this and let's
make it just a bit smaller. And let's move it
closer to the sun. Now, I'm pretty
sure I also rotated the HDRI upwards so that we
could see the planet more, so I'm going to move
the planet just a little bit past the horizon. Alright. Let's try this now. Also, I know I said that you'd want to render out in super high resolution
with the 400%. But until you've
perfected the HDRI, I would suggest rendering out at half normal resolution, 50%. That way you can
just render faster. I mean, if you want
to render a full resolution the whole
time, that's fine. But I'm aware that some
people have limited PCs, and if you either have one of those or you
just don't want to spend the time rendering while you're fixing it
and only want to render the 400% quality
once it's finished, it probably would be a good
idea to start out using that. Okay, I'm going to render
this out now, real quick. I'm going to S, to save
this, save it here again. And I'm going to save
over this previous one, we're using radiance
HGR save image. Uh, it probably isn't a great idea to save
over the image, but I know I can just change
everything if I want to. This is quite bright
here, I have to say. That's perturbing because that's not how it looks like
in the viewport. Hey, we might decrease
the shading on this. We might decrease the strength of this pato even
more down to 0.02. This scatter is basically just to give us this nice effect on the planet so it doesn't look like the planets, you
know, it's just there. Plus, it also it removes all this dark gray black
stuff down the bottom, which is kind of dokey. Okay. Let's try this again. Save. Always save, always save. It's better to save
than to not save. Alrighty. I'm going
to save this again. I'm gonna save it over the top because I know
it's exactly there. Okay, back to our previous. Alright. So if we go back
to our world settings, pull up the nope again, I'm going to remove the rotation
because I've fixed that. Oh, it's already loaded it in, too, which is extra nice. There you go. So
let's rotate this. You know what? I'm going
to change this again, cause I want that sun to be
right there in between those. So I'm going to move the
planet a little bit more, just a little bit
more. Let's hide that. I'm gonna probably do this in this viewport.
Describe the planet. I can just right click
and select objects. What's this cube. Why is this in the
planet collection? This should not be in
the planet collection. Yeah, I'm gonna write
click, select objects. Ist to go into the top view, and I'm just gonna
move it. A little Ooh. Why is this camera in
this collection as well? Okay, that's funny. And I'm going to just move my
planet a little bit closer. That's going to also give
us a really nice sort of highlight on the
edge of the planet. I'm going to rotate my rings
again so that they show up. Actually, I'm going to go
for something interesting. I'm going to rotate my rings
this way by pressing twice. This can be quite hard
to use the orbit mode. And I'm going to get it
so that the planet casts a shadow across the rings
because I think that's cool. Okay, now we've done that, you guessed it. We're
going to render it again. Is that Saves F 12, render out. Great, Save, back to
the other version of Blender, open this IcecreshI. Okay, that did not work.
Did we save it correctly. Maybe you have to refresh this. That is still not the same. Maybe we didn't
save it properly. Okay, let's S again. Save it over Ice course HDRI. Let's call it Ask course HDRI plus and use the
plus to give it a one. That way we know
which one we have. Let's go back into Blender,
open up these again. Ice course one. There we go. Yeah, I like that. Because then we have something on this side. Probably could do a bit
better framing for this, but, you know, let's actually let's use the rotate and
rotate this up a bit. I know I said I wasn't
going to, but there we go. There's a little bit
of better framing. To be honest, I could probably decrease the size of this again, but
I don't want to. That's enough for me. I don't like that ice spike
being right there. Just gonna reframe it ever
so slightly. Move across. Sweet. That's it
for this lesson. Um, To recap, we made
ourselves the distance, and we we tweak
the distance fog, made ourselves to ground
fog, and fix your HDRI. So now it looks like this, which is starting to look a
little bit white, I know. It's starting to get a bit
washed out, but don't worry. That's what compositing is for. Anyway, I will see you
in the next one, where, if you remember, last
time, I promised we are going to start
modeling a spaceship. See you then. And
don't forget to say.
15. Modeling a Sci Fi Spaceship Using Mirror Modifier Techniques: Welcome back to Blender and Gaia Master Class,
procedural Ice World. In our last lesson, we finished our i, we've tweaked it, we
placed everything. We got all our framing right. We did all the fogs
and volumetrics. We're done with sort of
the base scene setup. Now we're going to move on to modeling a little spaceship to give our scene a little bit of something interesting
to look at. So we are going to
do a little bit of basic modeling, and we're
going to do some fun. Probably going to
be a bit overkill. I'm going to show you how
to use displacement maps and like hada displacement
and stuff like that. But yeah, I'm I'm thinking we probably
won't end up using it, but I'll show you just in case. I'm going to put all of this
into a thing called scene. I'm going to move my mouse over so that it's
not in the middle. And I'm going to hide
this real quick. You know, shift S and pull my
cursor back to the origin. Now, you could model a
spaceship out of nothing, you know, you can go and get a cube, that's about say square. Go get your default cube, and you could, you
know, Spaceship. You ever watched the Lego
movie? Yeah. Spaceship. It's actually a bit fairly
similar to what he does. You know, you mash
pieces together until, you know, it looks cool. But we're not going to
do that because we want, I want to say continuity. It's almost like we
want a plan, okay? We want a plan. And we could get that just
from thinking about it, but, like, yeah, I vote
for something else. And, I'm going to
use hard ops real quick just to illustrate
my point, but, you know, if you would make a
spaceship like that, you could just I forget what
the name is for doing this. Like, I don't remember. Anyway, so we're going to grab
ourselves some reference. Now, you could get reference
from anywhere you want. But for me, definitely
the best, easiest, and most accurate
reference is AI images. Now, I know it's AI, but if you get
multiple AI images, you can take the parts
that you like and then sort of mash them together and then
put your own spin on it. Like, I made this, and if I pull up the original
project file, this is what my spaceship looks
like in the original one. So it's sort of similar. It shares the same
sort of features, but it is actually, in fact, different in
some aspects because, you know, copying is
not that interesting. It has, you know, I extended the jets. I didn't include these guns
because we don't need it. I did actually like
these protruding parts. And yeah, there's a lot of
there's some things different, something's less,
something's more. But, you know, it's
open to interpretation. This is an idea that we're going to turn into a spaceship. Now, I think I did actually
copy this pretty accurately, but I would say not
to do that because I know some people are
really on it about AI. It's like, Okay, it's basically the same
thing as reference images, but it's just one image instead. But okay, I'm not going
to get into that debate. But I know for the
purpose of this course, we're going to be using
an AI image generator. Now, you might be thinking, Oh, yeah, but we've got to pay, way too much money to
get like five images, and probably only one of them is going to be
good, maybe half good. Well, I've discovered that I'm
pretty sure this is Google has very helpfully given us something called image
effects, image effects. Yeah, Google Labs image effect. And it goes infinitely.
There's no limit. There's no models. There's
just aspect ratio. It's power by image
en three, apparently. There's aspect ratios, there's, you know, prompts,
there's extra prompts. And you can just make spaceships or whatever you
choose to type in. And it goes forever.
You know, it's free. It's 100% free, which
is really, really nice. Yeah. So we're gonna
just I don't know. You could choose to type
something specific. Say maybe you wanted
a round spaceship. You go, you know,
round spicy spaceship, yada, yada, yada, type
in what you want. Probably I'm gonna probably
going to cut here until I've managed to make something that this makes
something that I like. So, yeah, I will see you in a bit once I've found
a suitable lima. That one right there. A, is it? Alright. I finally found
something that I like. I've got this one
right here. I'm going to download this
image real quick. C, they're all
called image offXs. Annoying, but oh, well, so
we've got this image now. We are going to pull
it into Blender. To do that, we are
going to go Shift A image as reference. G to find downloads. We're going to find that image that I just downloaded
right there. I'm going to go Old art, clear the rotation on RX 90. Ooh. Boney. Hey, that's odd. Usually, it's not that way. Okay, now we've got it upright. We are going to flip this on the Z 180 degrees, so
it's facing that way. Gonna push it out, scale it up. And we're going to add ourselves a cube because
that's how we start. Just pushing this off
to the side of it, too. Now, I'm just going to I
hope you know how to model, not particularly
well, but just know, like, you know, tab
goes into Edit mode. Es to extrude, S is to scale. You can press Z to make
it go up and down. I'm going to, I'm going
to try and I've got my little screencast
things over here so that you can see
what I'm pressing, but, you know,
petrol B is bevel. Right. Now, I'm going
to basically just make this. I have some ideas. I don't want these parts here. I don't like those
fins, these fins. I'm going to make them
more Ah, let's see. I don't know. We might
experiment with them later. I probably I want some more
antennas up on top here, and I don't think
I'm going to have these spikes out the front. And it's going to be a
whole lot more symmetrical. That's the plane, but I'm
going to follow the same, the same lines here where it's
got that little bit down. As you can see, there's
not much back here. There's a lot of just, you know, nothing back here as the AIs trying to figure
out what's behind, but it can't we're going to
have to improvise back here, but, you know, that's
how modeling works. So let's get cracking. Now, we're going to start
with this top part. I feel like we grab this
and we bring it back, and we bring this top
edge up a little and scale it this face
outwards along the y axis. We're going to start
getting this part here. And now, I'm going to bring
this down ever so slightly. Oops. I'm going to grab this top edge, bring it
down ever so slight. Okay, I want to wait to see
this much better. I might. I'm going to just go change my viewport settings
a bit so that oh, I forgot to turn on cavity. My bad. And why is
the normals on? Okay, we don't need those.
These little blue lines. I'm going to go change
my viewport settings because for some reason, they've changed so that you can see everything
a little bit clearer. Alright, I'm back. I've
changed my viewport settings. I've now put on a
different Mccap up here. I've chosen this. Oh,
yeah, that's better. Don't mind. There's
our nice dark gray. You can actually see what
I have selected now, which is much better. Yeah, yeah, that's way better. I should have done
this before. My bad. Anyway, we're gonna
grab this edge up here. We're actually going to
grab this whole face, and we're gonna drag it forward. 'cause this is a long spaceship. We're gonna grab this, and
we're gonna move this down. So it's starting to
starting to go back. I'm going to turn
off the grid real quick just so that we
can mess with this. And then from what
it looks like, we're going to go forward
again, but this is going to go down fairly sharply. Right. Now we've just done
this whole part here. We need to expand it outwards. Just so you know what I'm doing. We're going to expand all
of this outwards here. We're going to move
it up a little. Might have to fix this later. Here we go. Okay,
now we've got that Hmm. That kind of, like, goes forward, doesn't it? Like that. And inwards, too. Right, real quick,
we're going to add ourselves a mirror modifier. Gonna go along the
whoops, y axis. I want to go the other way. At least, let me
go the other way. Oh, dear. I do hate this. I want to flip it, bro. Flip the sides that
I'm doing this on. Oh, there we go. I
forgot it was that one. I'm just so used
to using hard ops. It's been a while. But yeah, so we're
going to do that. This will allow us to only
need to model on one side, and everything
will be updated on the other side, which
is really convenient. Came cause issues
later, but we're gonna stick our fingers in our ears and pretend that doesn't exist. So, to start here, we want to mm, I think I'm gonna
roll with that. I wonder what we can do. We can probably just merge
this up, can't we? Go click on that one. Merge at last. And I'm going to do the same
over here. Merge at last. Sweet. Alrighty. Now
we have all of this. This is basically the top
side of the spacecraft. Now, if you notice, it
gets wider at the back. So we do want to
grab this interface, probably the t that
verticee as well. And we're going to
scale these inwards. Just like that. Yeah, I
like that. I do like that. But now I'm going to come back here. I'm
gonna extrude again. E. And we're gonna leave that
for interpretation later. We're now going to
grab all of the faces. You want a quick,
interesting tip. First, I'm going
to go to use Oh, this is Xray view,
by the way, Alts. I'm going to scale along
the X axis to zero. It's just go to line
up that nice and flat. Um, Okay, I'm going to show you something
really cool, real quick. I'm going to click on
this and I'm going to go Shift G, and I'm going
to choose normal. What this will do
is it will select, add to the selection
every single face that has the same
normal as that face. Now, of course, this one didn't do it because it
is slightly off, so we can open up the select similar and increase
the threshold. I'll just do it. And now we're going
to do a scale Z zero, which is going to make
everything completely flat along the z axis. As you see before, we
just flatten that out. Now we're going to
extrude this all down. If we see here, we need to
immediately go outwards, which is going to be a
little bit of a pain to do. Also, this doesn't appear to be it gets wider at this point, like here, as opposed to, like, it's coming in really short
here, my horrible drawing. Oh, well, so we want to have this line here sort of
pitched downwards, as well. I mean, it's got to rotate it. So we're going to grab that I'm going to grab this side
as well, just in case. I'm gonna pitch these down. I'm going to grab this top pi
up part and do it as well. Okay, now we've got that. We
want to extrude outwards. So I'm going to try something real quick and
extrude all of this, and then I'm going to
scale it outwards. You have to fix
up here in a sec. But like. What else we could do? I'm going to use edge mode, and I'm going to Alt
click on both sides here. This will select
all of the loop. So we'll select all
of the ones along here really fast, which
is nice and easy. I'm going to ignore the
other side real quick. I'm going to go Alt click
here and I'm going to extrude straight out. Maybe
not that much. I'm going to go
down a little bit, if we have a look over
here, it does go down. We're going to grab this part,
we're going to move it up, and we're going to
move it back in, too, because everything sort of gets smaller as it gets towards the front
of the spacecraft. We're gonna do something
like that. Now, remember, you do want to Improide bit
here. Like, I'm going to go. I want to say, okay. I want this to
continue all the way past it 'cause I'm going to
mess with the wings later. So I'm going to go and I'm
going to grab all of this. I'm gonna go down. I'm going to go down again, but I'm
going to move it inwards. I'm also going to
turn on clipping. This will just allow us to lock the vertices at the center, which is going to
be very useful. Yeah, I like that.
And then I'm going to go that one, that one, that one, that one, and I'm going
to go extrude again, and I'm just going to move it
all the way in the middle. Now, there are technically two vertices on top of
each other here, so I'm going to press A
to select everything, M, to choose to merge
and merge by distance. And you'll see it
removes that one vertex. This also good for
cleaning up mesh if you have mesh with trouble. You move this up a bit, this up a bit to lt select this and the top.
I'm going to press. F to create a face. Wait. Now, we do have some
of these funny things there. I think we'll fix that
in shading later. Alright, so we're starting
to get a spacecraft. And I know it doesn't look.
Is that a normal flip? I think this normal has flipped. Old N for the normal panel?
Yeah, it was flipped. And you can choose
the flip option. There's a lot of
fun things in here. Be careful. These
will most likely break your normals if you
don't know what you're doing. Alrighty. Now let's just check inside, make
sure nothing's wrong. Okay, so this here, there's this giant these faces down here. We don't
want these anymore. So we're gonna press Delete
and press F for faces, or you can click
on Faces Option. Sweet. Okay. Now, I think what I'm going
to do is I'm going to sort of come back in here. The spaceship, the end of
the spaceship is going to like the angle back in, and then we're going
to have our booster jets out the back like that. I'm not sure what the configuration for
those are going to be yet, and I do I do kind of want, like, some fins, but they might be very
small, almost like that. Anyway, that's my that's my
limit for today. Apparently. Uh oh, don't forget. Okay, these apparently
a flipped as well. You know what? Let's
recalculate everything. We press A, select
all the faces, Alt N, and we're gonna choose
to recalculate outside, which is just going to
basically go to fix everything. So I just thought
it was those two, but apparently, there's more. If you have a look all fine. Except for these. I'm gonna Alt select. Oh, that does not look good. Okay. Gonna Oh, okay. Yeah, I'm going to manually select that. I'm going
to click on this one. I'm going to hold Control
and click on this one, which is basically
going to select the shortest path to that,
which is what we want. I'm going to press F to create
a face, and there we go. Now, if we have a
look on the Okay, so it does and it links up, which is nice because
we have the turned on the clipping. I
forgot we did that. Anyway, that's to start. We're going to come
back later, and we're going to go through a
little bit more modeling, and then we're going to go
over the shading and how to use shaded displacement
with adaptive subdivision, which is gonna be
absolute overkill, but I'm gonna show
you how to do it anyway it's really cool. Even though we're
probably going to end up turning it off for
the final render. Anyway, that's it for now, and I will see you
in the next one.
16. Engine and Wing Modeling with Mirror Modifier Techniques: Welcome back to Blender Gaia Master Class,
procedural Ice World. In our last lesson, we started
modeling our spaceship, using this AI image
as reference. And as I illustrated, literally at the end of last lesson, we're going to start
working on the back to, you know, give it some engines. We might give it
some little wings. I'm thinking probably
not as big as these. They're at they're
a bit too long for me and definitely some engines so that our spaceship
can go forward. So, yeah, let's jump
right into that. Also, I should feel like
I should mention right now as I press tab, I
get this radio menu. This is an add on that I have that yeah. It's just helpful. Unfortunately, it's not free. It's not that important, though. You can access all of these
by just pressing one, two, and three up
here respectively, and cycling through the modes. So, yeah, don't
worry about this. This is not necessary
for anything I do. Anyway, let's get
on to the point. Right now, we need to pull
these backwards a bit, 'cause I feel like the rear of our ship should
be a little longer. Perhaps extrude it and scale. And to be honest, because there's gonna be a whole
bunch of engines back here, we don't really need to do
anything much back here. I'm probably going to
make it a little longer, though, a little longer. Oh, you've got some
room for engines. Alright. Now, we are going
to add some engines, and following Oops, shift
day and add a cylinder. And over here, behind
all of my cursor, we're going to set these 26. Now, as you might have noticed, there's currently nothing
in my scene collection. This is due to the fact
that for some reason, the episode the lesson that
I recorded disappeared. And so I'm having
to return and do this in the post
production stage. So there may be minor
in discrepancies, but I am going to
replicate what I did as precisely as possible. So don't worry if all
of this disappeared. And you should end up with 90%, the same ship. So do not worry. That's why my outliner
is currently empty. Anyway, now we're going to
use this cylinder to make ourselves jet engines
because that's pretty cool. I'm going to come
in here. I'm going to move this over here. I'm going to scale it up a bit. I'm gonna press T so
that my tools go away. I'm gonna extrude forward,
scale it down a bit. Maybe a bit forward, as well. I'm gonna extrude, and I'm
just going to move it inside. I think I'm actually going to
scale all this down a bit. And I'm making sure I've got
that last face selected, I'm going to move it down a bit, so it feels a bit more natural going in there,
maybe a bit bigger. And then we want that to all
look like it's right there. Now I'm going to
grab this. This is a bit long right now.
I'm going to grab this. I'm going to go ES, and this is going to just
scale it outwards. E again, ES again so that we have that
little ridge there. Actually, I'm going
to alt select this real quick and scale Shift x so that I can
just scale in a bit. If you didn't know, scaling on shift will scale on
every axis butt. So if I just press S, it'll
get bigger and smaller. As you can see, here's the
X axis going this way. If I scale Shift X, I will scale on everything but that axis scale on
the Z and YO axis. If I did it what Shift Z, I would scale on anything but the Z axis. It's just helpful. And then I'm going to scale this one down ever so slightly. ES, inset it. I'm going to go in, in again. I'm just going to make
a little bit of detail. Sweet. You can move this
back as far as you want, but it's going to end up
clipping with the main chip. Now, unfortunately, this
is only on one side. So like our spaceship, we are going to mirror it. So what I'm going to do
is I'm going to go right click and I'm going to go set
origin to three D cursor, because the cursor is in the
center of our spaceship. Now when we go here, and we can go and we can
add a mirror modifier, we can mirror it on the
Y axis, problem solved. Problem solved. Alrighty. Now, we are
going to come back, and we're going to
add another cylinder, another hexagonal cylinder, rotate it on the y
axis 90 degrees. Bring it down. This is going
to be like the main engine. So we're going to
compress it a bit. We're going to scale
it on the shift X, so it does not scale on the X. We're going to
make sure it fits. We might scale it out a bit. And what we're gonna
do is we're just going to this is going
to be really simple. We're actually just
going to bring this out. And then we are
going to go here. We're going to control
out of loop cut. And as a different way of making these little ring things, we're going to go Control
B, open up this bevel, and then I'm going to go Alt E, and I'm going to
extrude faces along normals and just
extrude out slightly. Then I'm going to go into face mode and scale
this back down, ES, scale in, ding
it all the way back. I might actually do this
again for this one. That way, we've got a
little bit of detail. And now we've got
this. They've all got these kind of rings around
them, which is interesting. Sweet. Problem solved.
Now, as of knowing this after it occurs because
I'm recording this in post, we did end up using
a booling to, like, make this go further
back inside the spaceship. Knowing now that that does not work and causes
more problems later, I'm going to emit that now, and you can forget to do this
step conveniently later. Um yeah. Okay. So what I'm gonna do now is I'm going to what
are we gonna do next? Oh, that's right. Wings.
See, our spaceship isn't really gonna
go anywhere without wings, which is a problem. So, let's fix that. We're gonna grab
ourselves a mesh cube. Don't have to modify
anything for this one. We're going to scale on Z axis. It's going down scale Shift Z, so it does not scale on Z axis. We're going to move
it on the z axis. And then we are going
to go scale this axis, that axis, we're going to add
a loop cut in the middle, and we're going to grab this edge right here,
that specific one. Go into the top view, and we're going to move this
out like that. Then I'm going to go into Alt Z, so into X ray view. Box select, you
can't quite see it, but when you box select it, you box select that singular
vertice edge there. We're going to move
it in, I think. I think I'm actually going
to move this whole wing in. I don't want it to be that wide. And then I'm going to
go Control R, actually. I'm going to go Control
B to extend it out. I'm going to go, I
think it's Alt S. Yeah, Alt S is expand or shrink
and fatten, sorry. Um, yeah, that's helpful. And I'm gonna move all of this forward slightly, so it
looks more like a wing. Um, yeah, and I'm gonna scale this on this axis,
so it's a little thicker. There we go. Uh, I'm going to. Actually, while I'm at
it, I'm gonna grab this, and I'm gonna move
this back slightly. That way, it's just a little
bit, a little bit fancy. A little bit fancy. Yeah, feel free to play around with the
proportions on this, all of the locations
and the vertices. I'm going to move
these so they're back in line right there. Wait. And then, exact
same as the jets. I'm going to set origin
to three cursor, and I'm going to add
a mirror modifier and set it to the Y axis. And now we have our
spaceship, our two wings. Hm. I think these
wings are a bit big. Let's make them a bit smaller. Oh, this is also useful to
note. That's up there now. So I'm going to go
into Edit mode. I'm going to grab everything. I'm going to press one to
go onto the side view. I'm gonna move it up, so
it's nearly at the middle. Then I'm going to
bring it back down. This way, our origin
is at the right level. So when I go in
here and I can go scale down and
bring these backs. These are a bit big
right now for me. Yeah, that's better. Yeah. Okay. Sweet. Um hm. Also, just to note, you can't move this
around on its own. If you want to move
it and mirror it, you have to move
it and edit mode. It's just a quick tip. Go to position these wings
in a interesting form. Oh, quick. There we go.
And there's our wings. Uh, yeah, actually, I
probably could make these a bit bigger. Think
this bit here. This section here and
this section here, I'm going to scale Shift X, so they're just a little
wider. There we go. Sweet. Disaster averted, these
bloody shading artifacts. Doing it the second time.
They still got them. Ah. Okay. Now, I'm going
to ask you to once again, do the most important part
of any three D, anything. Control less and safe. Right? I'm pretty sure
that's all for now. I know it was a super, super
short lesson, but yeah. Unfortunately, unless you
wanted to magically make all of this rear section and wings
materialize, we had to do it. But next step is a lesson. We're going to get
onto the fun stuff. We're actually going
to do a bit of geometry nodes to scatter greebles which we're going
to make across our ship, which is pretty good. You actually end up using
this greeble setup anyway. It's just a scatter. But yeah, kind of fun.
Alright. That's it for now. We'll see you later.
17. Scattering Greebles Using Geometry Nodes and Voronoi Textures: Welcome back to Blender An Gaia Master Class,
procedural Ice World. In our last two lessons, we modeled this spaceship, based on our reference
image over here. And I'm thinking that it's probably the ships
a little too tall, if I wanted to
copy this exactly. And I do enjoy the fact
that this looks flat, so I'm going to grab all
of these faces up here. I'm going to move them down. Yeah, I like that. That
looks much sleeker. We're gonna have to
modify this now. Okay. Anyway, as I was saying before I got
ridiculously distracted, we are now going to
we are now going to do the final gribbling
some slight adjustments. And hopefully, hopefully,
we're going to get onto that lovely texturing I was talking about
for way too long. Anyway, start off
right into the action. Let's grab the
front of the ship. Now, what do we want
for the front of ship? Because this does
not help at all. So we're gonna have
to improvise here. I almost want to,
like, an ice breaker, you know, something like this. This could be interesting. I got to fix that zoom, bro. Yeah, if you don't know,
you can hold Control and drag middle mouse
button to Zoom smoothly. I should probably be
doing that. Anyway, I'm going to select these two,
and I'm going to press J. This is going to add in an edge so that it doesn't
look horrible. Yeah, the icebreaker
isn't doing it for me. Let's just move
that back up here. Same here, I'm going to
grab those two vertices and press J to add an edge. And, you know, let's do it
for the final one as well. Gonna look a little strange, but kind of looks
like a bird now. No, let's move this down.
Some of these down. That's the wrong. Hmm. Interesting. I'm gonna
use the top view. I'm gonna enter Xray, so I select everything and
scale them out on the way. That's a little better. You know, let's just
leave it there. This is going to become a moot. Whoa. That does not look good. Okay, let's undo that. Sorry. That did not. That did not cook. You
know what I'm going to do? I'm going to merge
these down. I'm going to merge both of
these down here. I'm going to press A, M,
and merge by distance. In case you're wondering
what pressing G twice does, it allows you to slide vertices along the
edges as opposed to going G and then pressing
X to slide along X. We can press G twice and slide
along all of these edges. That way you can
basically merge you can stick the vertices
on top of each other so you can merge
them really easily. Alrighty. Now we've got the
front of our spacecraft. We are going to add in these
little grebs up the top, though we're going to have
a few more than that. Okay, so we're going
to go over here. We're going to add in
ourselves a cylinder. Now this is still Sector six. I suggest you set this to 16. This is a good sort of low raised but still
circular option. Gonna scale shifts a so it
gets thinner but not shorter. We're going to think,
What do we want? We want kind of like multiple antennas. We want maybe a radar
dish or something. I might actually we might
not do the radar dish. That's going to look
a little bit weird. Anyway, we're going
to tap inoEoe. We're going to grab this top
face, and we're going to extrude it out and scale it in. And for the top, I'm actually going to extrude it
out just a little bit, scale it up, extrude
it, and do that. That way, it's just got a little bit of something
interesting on the top. Right click, shade Auto smooth. We are now going
to duplicate this, scale it down on the z axis. We are going to grab this
top set and move it up. We are going to do the same
thing for the middle set, and we're going to scale
it up, and we're going to pre Control B, which
is going to bevel. We're just going to make
it a little bit bigger. So this is going to be a little
bit shorter and stouter. Now we're going to do the
same thing, but we're going to add another cylinder. Cannot talk today, and we are going to make it
thick, really thick. We're going to
grab the top face, move it down, extrude out. It's going to go much thinner, and then we're going to
go extrude up again. This is going to be a
really tall one, actually. And then we're going to
extrude oh, that's sideways. We're going to
extrude all the way up and then scale into a point. Just a little bit of difference. Okay. Now we've got that. We're going to do
a few little bits at the bottom. Oh,
that's a circle. We're going to grab a cube.
To bring it over here, scale it down on the Z axis. We are going to go
into Edit mode. We're going to click the top. We're going to right
click and subdivide that where we get these squares. I'm going to extrude
this one up and this one also up but
just not as high. Creating this sort
of Grebel effect. We are now going to erratically
and subdivide this again. We're going to grab
this piece, and we're extra it's going to just
add a little bit agreeable, a little bit of detail. I'm going to do this
again with another cube. But this time, we are going to do something
a little interesting. We are going to shiftS and
drag the closer to selected, so it's onto this face. Going to go Shift A
and add a cube again. We go to scale it down and out, so it creates this sort
of long rectangle. And we're going to
move it over here. We're going to go Control R, which is going to
add a loop cup. I'm going to right click to place it exactly
in the middle. I'm going to go Control B, which is going to expand this out because we are
beveling that edge. I'm going to orbit under
and grab on face mode, both of these faces, and I'm
going to extrude them down. I'm now going to press L to select all of this
link geometry. Z to move it down, and I'm
going to do Shift D and then middle click and drag it so
that it locks on the X axis, and then I'm going
to left click. Now, because we
did the duplicate and move all on the same action, I can press the hot key Shift R, which is repeat. Oh, what? That should be repeat. Oh, dear. Okay. Never mind. We're just going to press
Shift D repeatedly. That should be repeat. Anyway, and we're going
to add this sort of grid. Nice. I'm going to turn on cavity cavity seems to have
disappeared yet again. Now you can see
everything a bit better. Ooh, this is not smooth
Shade Smooth. My bad. Okay, we're going to grab
all of these real quick, and we're going to
go hit Control A and apply rotation and scale. This is gonna make sure
nothing goes sideways. Now we're going to
have a fun bit. We're going to do some geo nodes because I can't be bothered placing all
of these manually. So we're going to
select these top faces. This is where all of our
Gribbls going to come out of. We're going to go Shifty
to duplicate the faces, right click to place them
back exactly where they were and hit P and
choose selection. This is going to
separate those faces out as their own object. Now, I'm going to click
on my geometry nodes tab. I'm going to open
this up so that you can see it a
whole lot better. I'm going to press making
sure that I haven't clicked off and that faces that we duplicate it
out are still selected. I'm going to press
the slash key. This is going to isolate
just this section, and we're going to add ourselves a new geometry node setup. Okay, we're going to move
this all the way over here. Now, this is where I enjoyed
the node Pie add on. Now, if you missed it before, in your preferences,
you can see, I was changing my
viewpoint before. Under add ons, I have
one called node Pi. You want this one, by the
way, not the old one. If you don't have
this, you'll be able to find it in extensions. Yeah. It has, I haven't
updated it yet. I should. Anyway, this allows you
to do press Control A, and pull up all of the nodes. Instead of having to manually search through all of
these, like, you know, there's that one,
that one, that one, one of the ones
with nothing in it. I say to go geometry, I
want to Oh, I want to read. Wait, I set position that
would be a write, right? Oh, there it is. What What
about extruding geometry? Maybe I extrude Do
I sample extrude? Do I write extrude? Or
maybe our operations. Nope, Extrude isn't in here. Well, with Control A, you
can just see everything, and I know that extrude faces is up here somewhere.
Extrude mesh. Anyway, so I'm going to be
using this. Don't worry. Everything is color coded, and I know it's going to take a while to figure
out where everything is. But I'm going to be using it. You could also just, you know, 'cause I'm telling you
what the node's called, you can just search for
distribute points on faces. Ooh. Okay. That's
obviously an asset I have. And then get the distribute
points on faces note. But for me, I know
it's right down here. Distribute points on faces. Anyway, this does help speed up your
workflow quite a lot. Anyway, so now we've got all these points.
That's pretty good. I'm almost tempted to not use this and to just
subdivide this. This could be really good. That's subdivision
surface, my bad. I want to subdivide
mesh. I'm going to increase the amount here. I'm going to just
turn off the grid real quick so that you can see. I have wireframe enabled, so it's really helpful. I'm going to add a
loop cut in here. That way, everything's square. This is going to help
us make a grid to do it because they distribute points on faces, if
you have a look here. They do it randomly. There's
no it's random option. Whereas if we go here and
we go measure to points, this is a grid,
which is helpful. I think we're going to
go with this for now. I'm going to increase, I'm going to leave it on three
right now, actually. Okay, now we are going
to delete geometry. This is going to remove
everything because we're currently just deleting
everything right now. We're going to add in
a Voronoid texture. We are going to control shift left click on the
mesh to points. Actually, we're going to do
it on the subdivided mesh. We're going to crank this
up to six right now. So we've got really, really high resolution
mesh right now. This is just so that
when we Control shift left click on the color, we can see our Voronoi
texture really well. I'm going to change this
from Euclidean to ebutev. I'm going to decrease the
scale so that they get bigger. To add in a color ramp, like I said, I can just
summ it out of thin air. And we are now going to
plug this color into the selection and
clamp in both value. So as you can see,
it's kind of it's only deleting certain
parts of the mesh. Appears to be the ones.
The white section just so you know the white section is the
one that gets deleted. I'm actually going to
increase the scale on here, so it's a little more random. And I'm going to set
this back to three. I'm actually going
to set this to two. I don't want that many things. Okay, so now we have these
sort of it's in a grid, but it's also like some
of it's not there. Now, useful to know if you want a different different
Voronoi pattern, you can set this to 40
and change this W value, and it will change I
was like a random. It's like the seed,
just so you know.
18. Refining Greeble Scatter Patterns and Variation: O. Welcome back to Blender and Gaia Master
Class, procedural Ice World. Roddy. So yeah, so you can see
I can change my seat here. Roddy, now that's set up, I'm going to add Instance on points, and I'm going to Okay. I'm going to add in a
collection info node and turn on separate
and reset children and stick that into
the instances. Now things happened
because we haven't got a collection yet. That's bad. We're going to switch
back to our view. We're going to grab
all of the antenna. There's only three right
now. We're going to go to add them to
a new collection. New collection, and I'm
gonna call them Antenna. And I'm going to grab these two, and I'm going to add them to a new collection called greeble. That's not how you spell
greeble. There we go. Greeble. Okay, let's go
back to geometry nodes. Unfortunately, we've
deselected out object here. This is why you name
things, people. You know, click through
one of these until I find. There we go. Okay, this is a
great point to name this to antenna system. That way we know what it is. And we don't we don't, that's where you
name things, people. Anyway, we are going
to go in here, and we're gonna
choose the antenna. As you can see.
Unfortunately, it's spawning all of the
antennas on each point. So we're going to
choose pick instance, which is basically
going to choose randomly between them. Great. It looks crazy bad, though. So what we're going to
do is we're going to add in ourselves a random value, stick that into the
scale, and here we go. They're all random scale. That looks much
better, in my opinion. Now what we're going to
do is we are going to add in a rotate instances node
after our instance on point, and we are going to
rotate along with the Yaxis so they are
pointing backwards. That way, they're more
like, you know, streamline. Feel free to go as
far back as you want. I'm going to set
mine about there. Now, unfortunately,
that would look kind of bad because well, not the rotation, but
this is going to look kind of bad because
there's no base to it, which is what we're going to do. We're going to
duplicate all of this. In fact, we're
going to make this we're going to make
this into a note group. So I'm going to pull this collection instance
all the way out here. I'm going to, I'm going
to grab all of this. And I'm going to go Catrog. This is going to add
everything into a note group. We're going to call this
node group scatter. I'm going to press tab again. I'm going to plug the level the random value max and the rotation input and both the
oops that's the vector, the W and scale input into here. So now we have this nice
little scatter node with all of our
parameters on it, and we've got this
instance option here. Okay, I'm going to
Control Shift D this. This will allow us to maintain
our previous connections. I'm going to shift
D this antenna and replace this with
the instance here, and I'm going to set
this to be the Greables. If I control shift,
let click on this, we're doing the exact
same thing here. Of course, we don't
want the rotation, so we're going to
set that to zero. We are going to increase the level so that there's
more of them, and we're going to decrease
the max scale so that, you know, they don't
overlap infinitely. We're going to do
a little bit of interesting rotation fun to rotate these so they're not
all pointing the same way, as you can see, all of these are going the
same direction, which is, it could
be better, you know? Oh, that's the scale. These W and scale for the noise
just soon though. Okay, we are going to
add in a random value. Going to set it to vector. We're going to add in
a vector math node and set it to Snap. We are now going to plug
our random value into the top snap vector and the vector from the
snap into the rotation. Oh, that's the wrong
one. The rotation. Now, what you can see is, if I increase these,
these should rotate. Actually, I'm going
to switch this. I'm going to add in
another rotation below that's the one
for the instance on points because that seems to
not work with the rotation. We're going to plug
this one into here. That should be working.
Oh, there we go. Okay, so it was
snapping it to nothing. That's why. My bad. Let's undo that real quick. I forgot I forgot that the
snap does that at zero. Okay, so as you can see, all of our things are
rotated randomly. Now, if I set this to zero on both X and Y so
they don't rotate, they're still going
to rotate randomly, and we want this to stay
in sort of a grid pattern. Now, to do that, we're
going to use the snap node. We are going to set the snap to a certain value like this. And as you can
see, it's snapping everything to this angle. Now, unfortunately,
because this is Pi, this is 3.14 15, if I do that, real quick. You'll see they've all
snapped to 90 degrees. Unfortunately, it's
the exact same as if you hadn't,
you know, done it. Actually, no, Pi has
done 180 degrees. So Pi has rotated. Some of these, as you can
see this one over here is rotated 180 degrees. But we want them to only
rotate 90 degrees randomly. So we are going to do Pi. We can actually type
it in Pi divided by two, which is 01.571. And this is now
going to rotate all of our things
exactly 90 degrees. And it's only ever 90 degrees, you're not going to
get any random things. As you can see here, this
one's rotated 90 degrees. That one's not Gaia yada.
It was very useful. And we are using Pi instead
of typing in like 90 degrees, so 45 degrees or 90 degrees
or 180 degrees because this is this is radiance, I
believe, it's called. These are radians, which is there's like 100
radians or something. No, there's I don't know, man. It's, it's vector math, my guy. It's vector math. It's
just It's painful. And I know. It's the ones
when you get the degrees. Like if I do the angle, one of these angles
axes to rotation, one of these will
be used Rotate. I remember there's
a vector rotates, the vector rotate has angle. As you can see here, this
has the degree symbol. This will be 90 degrees. So but all of these, that number there and
Pi divided by two, here, these both equal 90 degrees because this is a
radiant and this is degrees. It's special like that.
Please don't ask. Anyway, I'm now going to control shift right
click and drag, join these together
and plug this into the output so that we have a little bit of greeble
to stick on our output. Now we're going to go
all the way back here and scale down a little bit,
because that's a bit big. Okay, these these antenna
are really large. Okay. We're going to decrease the MAX scale on the
antenna, like that. Come back here. And we've got our antenna poking
out the top of our spaceship. I move these up. You'll be to see the
rest of the greebles. Alright. Now, what you can do is I'm going to finish
the lesson here, but should you desire to,
you can do the same thing. You can control R and take out these faces here and
do the same thing, but minus the antenna using
the same scatter system here, that convenient little
scatter node that we just built to add on things like this bit here or maybe you want a bit
of extra detail on here. I'm just quickly going to go in, and I'm going to go I want
there, there, there and there. These are all going to
be the windows, sort of. I'm going to go I'm going
to use the Alt E again. Ooh, that's, old E, and I'm going to
extrude manifold. This is basically it's
going to do funny things. Trust me, it's better than
just in this situation. It's going to basically
it's going to basically cut inwards into the
mesh, which is helpful. But anyway, I'm going
to do that real quick. I hate the shading artifacts. Oh, well, we'll fix them
later. Anyway, that's the end of this lesson, and my mouse is now
right in the middle. That's very unhelpful. Anyway, that's the
end of this lesson. And our next lesson, we will be getting definitely be
getting onto the shading, even though I've
promised it to you for the last five lessons
or something. Yeah, next one is shading. Don't worry. Anyway,
I'll see you next time.
19. Adaptive Subdivision Shading with Displacement and Emission: Welcome back to Blender
and Gaia Master Class. In our last few lessons, we modeled this little
spaceship here. Pretty cool. We
used our reference. We made ourselves a spaceship. It's got some problems,
but we'll fix them later. Actually, we might
fix these right now. If we just press J, we can fix that. Alrighty. Now. We're going to start shading, which is why I am
in my shading tab. I'm going to do all of
my shading in cycles, but for some unknown reason, IV is really slow for me right
now, which is unfortunate. But, oh, well, I guess
you'll just have to keep up with the
cycles or do it in EV. Some of these will only
work in cycles, by the way, so just be aware you might want to switch
two cycles occasionally to check that all of
the things work out. Alright, first off,
I'm going to use this drop down to turn off
scene lights and scene world. That way, I've got
a preview setup. And right now, I'm going
to completely ditch Blender for something
called JS placement. Now, JS placement is
a very, very cool, sort of old greeble texture
generating program. So what JS placement will do if I look at
the classic here, JS placement will take all
of these different sprites, and it will scatter them
at different, like, brightnesses all over
a four k square image. So I go here and
I click Generate. There you go. Look at that. It's random randomly scattered
all of these sprites over 104 k. So 48 4096, I believe it is 4096 by four oh 96 image might be getting that
wrong, but oh, well. And if we go, have a look at J's placement two, and we say, Have a look at this
particular one, let's generate this.
That looks pretty cool. That's a pretty cool
extra right there. And the best part is,
it's infinite variations. You can change the
background brightness, so you can see the
background's a bit darker now. You can change the amount
of sprites there I go. I can see this is going to
take way longer because there's now 390
sprites sticking on. You can change it so
the sprites are really small. You get the idea. It's really cool. And there's different variations
you can do too. Okay, I'm going to
increase that and decrease that that way this
just works a little faster. Give it a nicer
output. But, yeah. So these are this
program is so cool. But there is a big
but in this one. The butt is it's no
longer available. Well, sort of. Okay, so
basically, it was open. I want to say it
was free to use, free for commercial, free for
everything, like Blender. But, if you go to the website,
the connections failed. You used to be able
to click on this and go to the JS placement website, a feeling it's down now. But it said there was basically the entire
website was gone, there was just a little
bit of text that said, I'm not on this anymore. Please don't bother me,
which was unfortunate. It was a pity because this
was a really cool program. However, because it
was so widely used, there is quite a
few instances of the program floating around
on file sharing sites. Feel free to grab at
your own discretion. However, the most
cool thing that I've seen is there is now a
web based version of it. So if I go up here, I can do all of this
in the web browser. So I will be including
quite a few. Well, this has taken a
while, bro. What is this? Hey, this appears to be down. Unfortunate. Um,
that's a problem. Could just be my really
slow Internet, though. I miss that. I'm gonna
include There you go. I just need to be
less impatient. Um, so I'm going to include a whole bunch of
images that I've generated with Jazz placement in the
course files so that you can pick and choose should
you not want to do this or, you know, you don't want
to download Jazz placement or you don't want to use the web browser because
for some reason, it's not working very well. It was working fine
the other day. But anyway, you can
just use those. But, yeah, I'm going to I'm going to use
this one, I think. Am I going to use I
think I'm going to use Agro Mac. A little
bit more. Okay. This is going to be my image. And also, you can turn on
the colorizer and you can. This is cool, trust me. Anyway, if I toggle
off the colorizer, I'm just going to
generate another one. So it's in the gray scale, 'cause the grayscale is
kind of what we want. I need more sprite spray. You got to fill up
the background. There we go. So I'm
going to save height. I'm going to save this file to the rest of my JS height
maps I'm going to use. I'm going to save that. And I'm now also going to go up here, and I'm going to grab wire, which does something really
cool. It makes these. I'm not going to go I'm going
to do cardinal directions, and width color,
I'm going to Oh, the max origin spread
all the way up. This is basically in
a mean. It doesn't all come out of the middle. Like if you decrease the
max wire wire splay, I decrease this, you'll see they should all come out of
the middle, like that. Oh, there you go. That one.
That one's pretty cool. I love that. But anyway, so we're going to increase
the max origin spread. We're going to set
it to cardinal. We're going to increase
the layer count. We're going to decrease
the max wire width. And we're going to
increase the step length so that they
can go further. That looks good. I'm gonna
save this hides again. Ah, I have a feeling I
didn't save those PNG files. Yeah, the unfortunate thing is, when you use Jazz placement, you have to type dot PNG, which is really
annoying, oh, well. I'm going to do this again.
So I forgot to do that. I was Oops, that's
the wrong button. I'm going to go. Yes,
and I'm gonna go. Okay. Save them as PNG files, and now I'm going
to click on here. I'm going to add
myself a new material. I'm going to call this ship
base that's what it is. Click on the principal
BSDF Control T, and I'm going to do the
principal texture setup. Now, I actually I just
discovered the screen caskes has this option to tell you exactly
what I'm doing. Like, as you can see,
I'm selecting here, I can box select, or I can, you know,
move and attach. Pretty cool. I
thought that was fun. So it's actually
telling you what Blender does as a
result of my thing. So I'm going to open this image. I'm going to go to
my Blender stuff where I saved all of
those height maps. I'm going to grab
the ice course Agro, and we're going to look
at this and think that looks really bad
because right now, we're using UV map
that doesn't exist. So we're going to switch
the UV editing tab. Actually, before we do this,
we're going to go back here. We're going to
remove this texture. We're going to go
new. We're going to type and call this UV. And we're going to change
this from generated blank to UV grid, and we are going
to go new image. And then we're going to go
back to the UV at end tab, and we're going to go into face mode and material preview. You'll see this image, that's the one we just
made, which is pretty cool. Now, I'm going to
cheat real quick, and I'm just going to press A, I'm going to U and then
choose Q projection. It's just going to
work. This occasionally won't work depending on your specific the
way you've modeled, but for most things,
this will work. So I'm going to do the
exact same thing here, AQ projection. I'm going to link all
of the objects to have this material real quick. That way I can just use it for everything to make sure that everything is UV
Nwrapped correctly. I'm going to grab all
of my objects here, tab into all of them at once, press A, choose this UV option, and I'm going to
average island scale, which is going to make all of
the squares the same size. Sweet. Now we're going to
go back to the shading tab, and we are going to Jesus
little drop down here, and in here, we should be
out to find out somewhere. I'm going to type in Agro that's what I called my texture. I calls agro. There we go. See how texture
works now. Great. Los kind of bad, though,
because it's kind of white, and we want the dark sort of
sort of base metal plating. Now I'm going to increase
my metallic to 0.5, and I'm going to drop a
color ramp over the top, and I'm going to click on the white, and I'm going
to decrease the color. So it's really
dark. There we go. So sort of I haven't increased the roughness or
decrease the roughness at all. I've only increased the
metallic to 0.5 so that we get the sort of almost like
a plastic metal look, which you can see a
lot of in the sci fi sort of things these
days. Kind of cool. Alright. Now that's done. We are going to go over here, and we are going to
add in a displacement. No, data is not
the displacement. And we're going to plug
this into the lazy connect. Is that really what
this is called? Lazy Connect. Oh, man. And I'm going to plug the
displacement the ice course Oh, my God, the texture, sorry, bad the texture into
the height option. This is going to do nothing
right now because we need to set we need
to do two things. One, we need to scroll down to our material settings down here. And under the settings option, we are going to change
displacement from bump only to displacement only. This means that when we change our scale, our displacement
is going to work. Sweet. However, if you
increase the scale, you'll notice that this
is really not the image. We're not displacing
the image at all. So we're going to go
back to our layout. We are going to do the most important thing
we're ever going to do. We're going to save there we go. And we are going to we're going to isolate this in our viewport real quick
with the slash key. And we're going to
come back here. We're going to go
over to modifiers. We're going to close all that, and we're going to add the
subdivision surface modifier. This is going to
look really stupid. But if we turn this back
to viewport level zero, along with this one, we
choose adaptive subdivision. Now, do not go into
Reno view right now if you have a slow PC, because this basically
uses your GPU to subdivide on a pixel level. This is like the equivalent of 12 somewhere 6-12 subdivisions on if you had the
normal subdivisions. So this is truly ridiculous
level of subdivision, and it only occurs
in the rendezvous. It doesn't actually
occur on the mesh level. So I'm going to increase my
dicing scale to like three. This is basically going to
make less subdivisions. I'm going to go back
to my shading view. There we go. As you can see, we now have that subdivision. Now, of course, that
three was a little high. That was just so that
we could load in well. We're going to change
this back to one, as you can see,
slowly getting there. I decrease my scale to 0.1. And, okay, this is try it.
If I said this to simple. There we go. If we
set it to simple, simple Catw clk will
smooth your edges. Now, you could want that if
you want a smooth spaceship. It looks a bit like
the Queen's ship from Star Wars one, you know. That could be a vibe.
You could go with that. I want my angular ship, so
I'm gonna set this to simple. Simple doesn't smooth the edges. I'm going to increase
my scale to like 0.3 and look at all that detail. Look at all that free detail that we didn't have to model.
20. Material Polish Emission, Micro Detail, and Adaptive Subdivision: Welcome back to Blender and Gaia Master Class,
procedural Ice World. So what we're gonna do
is we're gonna mess with the mid level until that problem
doesn't show up anymore. Okay, that's the problem. It's these faces didn't
UV unwrap correctly. Let's go back to
our UV Editing tab. Um That's odd. This is displaying
differently from EVD cycles. Well, that's that's something
I've never seen before. I'll have to admit. Okay. Perhaps I UV unwrap all
of these separately, if I go U and just
use angle based. Ah. That is very interesting. I've never seen this before. Something spicy
is going on here. Hopefully, this
didn't occur to you. I'd love to know what this is. It's very interesting. Wonder if it's got to do
with one of my modifiers. Oh it's got to do with
the subdiv. Okay. Interesting. Perhaps it would be wise to control
B to bevel and then press V to use vertex bevel and to just bevel off
that nose just slightly. And then if I turn this back
on does that, there we go. Apparently, the
adaptive subdiff does not work with triangles.
That's news to me. Okay, that's big news to me. Okay, that's news to me. Okay, so you got to be careful
with this, apparently. Well, that's a problem. Well, I sincerely
hope you didn't. See if I could just
do that and that. What this to, like, not
affect the UV? Can I do that? Be a thing? I insert a vertice here. Oh. This is how to
troubleshoot people? What? Okay, I caught Bull. This is some random stuff. This did not happen last time. Okay. It's because I no. Okay, that's concerning.
Any of those work? No. I haven't messed
with this enough. I need to really need
to look into this more. That's really odd
because this Mm Hmm. Okay. Abe cube it again. Okay, so now we've only
got this as a problem. Yes. That does it everything now. Well, that's dookie. I wonder what bet I'm
gonna have to do. Oops, that's the wrong button. Okay. That's weird. Hopefully
that didn't happen to you. I've just linked this
up to the front. That's a triangle now. Oh,
it's a quad, though. Ah. Okay. Note to self. Adaptive
adaptive subdivision is more times not useful
than it actually is. Oh, look, it's doing
it down here as well. Why? You know what I can do. I can do this. Oh, now
it's doing it here. God damn. That's even worse. Yep, adaptive
subdivision is way, way more pain than it's worth. Okay. And we don't care about that because that's all the
way on the bottom. Okay. Ah. Man, why does it
have to be this difficult? What? What? Okay, let's apply this bullying
modifier real quick. Let's just isolate this
so that we can see. Not the bullying the
Oh, it's a booling. Let's apply the booling way we know what
we're dealing with. You want to what
we might just do. We might just drag this below. There we go. Problem solved. Ah, that took long? Geez. Alright, now we've
quantified everything. We can finally get back
to what we were doing, which is we can look at this, and we can stick our
displacement back. Oh, please tell me
it doesn't. Oh, no. Alright, no more
bowling. This is just gonna cause
too many issues. Oh. Oh. Well, I sure as hell wish I'd discovered this before I started recording. Oh, my goodness. Yeah, okay. I'm gonna cut here
and fix all of this. I'd love to say I can
tell you how to fix it, but your your measure
is gonna be different. So I'm just gonna Alright, I fixed it. It all looks like it works now. That was painful,
to say the least. Okay, we're gonna
have to do something about the inside of that later. I guess it doesn't
really matter. We're not going to
see it that much. To the mid level. I'm going to increase my subdiv. I'm going to set it to one. Oh. Yep. There we go.
Look at all that detail. That's why we want the
adaptive subdivision. It allows us to do all
of that fun stuff. Now we're going to do the same thing for
all the rest of this. We're going to Oh, that's gonna cause
more problems. Oh. Control, two. Both the zeroed to simple
adaptive subdivision. Excuse me. And I'm going
to apply scale for these. I'm gonna do the same thing
again. Adaptive subdivision. The last one over here.
Adaptive subdivision. Maybe the round is better. Yeah, I'm feeling
the round right now. Yeah, that looks way better. It's a little bit
chunky, though. So reason. I like
that real quick. I'm going to, I'm going to decrease the amount of strength on the scale
on this displacement. Is a little bit much.
Let's say, 0.23. There we go. So we got our
really cool, high detail. These are really low detail now. I'm going to set this I'm
probably going to regret this, but I'm gonna set this to 0.5. Okay, now that's
much higher quality. I'm going to set it back to one because we're not actually going to even use this
displacement, to be honest. I'm just showing this because
it's really useful to know. Actually, we might we
might we might include. Yeah, we might actually this is
going to make it look cool. Anyway, now we've done that, we need to move on to
the important parts. We're going to grab
the inside here where the lights are gonna be, and we're going to add
a new material sign, call it ship Lights. And we're going to do
the same thing again. We're gonna go control
P to add that in. And we're going to open up
from that file that we had. Open the wire folder. We go back out of it mode
now you've done that, increase the scale, which
will make more detail. And I'm going to put a color ramp into the
emission with this one. What color do we want our
spaceship lights to be? I'm I'm gonna go for orange, I think, could be fun. Also gonna make the base
color black and rough. I'm going to increase
the strength of this so we have our
spaceship lights. Now, in one of the Blender versions
that introduced EV next, it removed the option
to have bloom in EV. So if we go back to
the compositing tab and we set this glare to bloom, this will only you can
do fog glow if you're on an earlier version than
like 4.4, I think it was. And I'm going to set
the quality to high. And if we go back now and we scroll all the
way over here and turn on Viewpot
compositing, there we go. We've got our bloom back. Wait. Why is it
not on this side? You should have a mirror
modifier on here. Oh, we don't it's my bad. Yeah, if you don't right now, now it would be a
good idea to add a mirror modifier on
the YXS flipping. And now we have lights on both
sides. Oh, that's bright. Let's come back here.
There we go. Here we go. Alrighty. Now, for some
reason, this is ing. Ah, I got to do it before. The adaptive subdivision only works if it's the last modifier. Yeah, it's pin to last. Let's do that just in case. Sweet. Now we are going to leave it here because we're going to
do the second part. We're gonna do the engines and the greebles and all of that in the next lesson. I'm
going to leave it here. I will see you guys
in the next one. I know this one's been
a bit of a pain to do. But yeah, we're going to
get there. Don't worry. M
21. Realistic Engine Glow with Gradient Emission and Ambient Occlusion: Welcome back to Blender Angyams class, procedural Ice World. In our last lesson, we kind of got screwed over by
adaptive subdivision. Yeah, if you were
there, you were there. You weren't don't
need to know it was a truly horrible experience. But don't worry,
we push through. Now we are going to. I'm going to just increase
the adaptive subdivision on these cause I want
it to look nice. 0.5. Just don't do that. This is just for your
benefit so that you can enjoy the detail. Okay, now we're going to add in gloat these engines
like they're hot. Now, this looks really cool. I very much enjoy this. First off, though, we are
going to go Shift test, and we're going to add
our cursor to selected. That's the cursor
to the main engine. We're going to add ourselves
an empty plain axis and we're going to
bring it back out here. What we're going to
do now is we are going to add in ourselves
a gradient texture. We're going to add
the texture setup, use object, and we are going to click and choose the empty. So what this does now, if we look at this is
if we move the empty, you will see it brings
the gradient with it. I'm going to put
that just there. And save. Save is the
most important part. Now we've done
that. We are going to click on here so that we
can get our material back. We are going to
organize everything. And we are now going
to work some magic with the AO, or
ambient occlusion. This is going to create a delightful effect with
our Ooh, there you can go. So you can see, when we've got our shaded displacement
with the displacement map, it actually counts
towards the AO. So we can do some
really fun things with this got in a
color ramp here, increase the sample,
so it's accurate. Increase the distance
just a little bit. I might Uh, I might set these to one for now so that we don't spend four years
looking at updating mesh, which is not very interesting. There we go. If I flip this color ramp around,
I clamp this in. I think you can see
where we're getting. Whoa, your time is insane. I might I might just isolate these out
with the slash key. Um, Oh. That way, they just
render up a bit faster. I'm going to decrease the
distance a little bit. So it's just the You know what, we might set both of
these to, like, 2.5. That way, it won't take forever. I thought I thought I
thought one was gonna work. Apparently, no. I might
say this to Besle yes. It's bespline. Gonna
bring this out here. I'm going to click on this one. I'm going to set this to, like, a really slightly desaturated
sort of orange white, and I'm going to set
another one in here. It's going to be Oh, that's the hue. My bad. No, I want to go back. I want to increase the
saturation quite a bit. Move it down probably
more over here. Then I want one more
all the way over here. It's like this sort of deep red. But it should be easing
a little bitter. Should be. Whoa,
that's a bit much. Should be just say just like that. That
looks pretty good. Now, what I'm going to do is
I'm going to mix that with our gradient mask that we
just made using the empty. I'm gonna contrive right click, and I'm going to
mix these together. I'm going to choose multiply, crank it all the way up so
that it's only at the back that's a little
bit too red a red. There we go. Let's try.
That's a bit better. Then I'm going to plug
this into the emission. And I'm gonna crack
this up to light. Let's say, 12, maybe. Our gradient texture
needs a bit of tweaking. Alright, we're going to
drop a color ramp in here, and we are going to
set this best line, and we are going to
soften it all out. Oh, we're not previewing
it, that's why. We're also going to
decrease the scale on the x axis just
so that this can, like, show up better. A little bit much. Maybe something like
that. That way, it's more of a gradual fall off. Alright. Now if I click back on here, we have some
superheated engines. That's I love this effect. This effect is so cool. And if you want,
vaguely remember one of these modes will do better. I just don't quite
remember which one it was. I think it's that one. Overlay. Yeah, that
sounds about right. Let's show this one. But we're
going to copy this color. Yeah, I've got a
frog on my throat today and paste it here. That way, they
yeah, look at that. Look at that. Look at that. Look at that. Oh, that's
a bit bright. Never mind. If I switch the
inputs on this, no. Pity. Oh, well, I think we're gonna just
have to stick to multiply. Well, that might be it. Subtract. Yeah, no,
absolutely not. Hit? Well, it will just
have to be ultiply. I can live with that. Let's set this back to saturation of zero. I actually don't mind
that that color. Look at that color. And originally, I actually
did have this as, like, a light blue so that when
you sort of cranked it in, it would get really, really
hot in, like, the gaps. But to be honest, I tried that, and it just I just wasn't it. Like, I just didn't
look that great. And probably increase the value on all of these, so
they're not dark. Just go to make this like
a light. There we go. Okay, now we've got all that. We've got our gorgeous engines. We are going to add
in a point light. We're going to grab
this color here again. Probably already have it copied, but just in case, we're
going to paste it over here. We're going to
increase the exposure all the way set
this to like 100. And we can't see
anything right now because we don't have the
scene lights option ticked on. There we go. I probably
was a little bit much. Let's try ten, five. Basically, you want
to make it not bright and then just go
a little bit above that. Like that. Okay, there we go. So one
and 8.8 for exposure. Now I'm going to do the
exact same z over here. Going to select
this inside face, though, these interfaces here. That way, I can do
ShiftS in selected and duplicate this
light directly inside. That way, it's easy. And I'm going to come back here, shifts because it's selected, I'm going to put
my three Dcursor down here, duplicate this. I'm going to go Control
M, which is mirror, and I'm going to press X.
Oh, X is the wrong way. Why? Sorry. And Y is going to
mirror it directly over. And using the center point as the curse since we
set this over here. If we look at this again, we've got our engines raring to go. Yeah. Sweet. I'm now going
to for scientific purposes, I'm going to set
all of these to 0.9 so that we can enjoy our
super hierus engines, maybe they're working? Post it. Okay. Quite known, both. Gonna save the most
important thing ever? Oops. That's space bar. My bad. Gonna wait for the
geometry to build. Downside of adaptive
subdivision. There we go. And look at that. We got
a really, really nice. Wish the gradient was a
bit smoother, though. P. Oh, well, to be honest, you're not going to see the difference in the
gradient that much. You're just going
to see the fact that it looks like that. Oh, that's the
wrong camera view. Anyway, I'm going to set
these back to, like, two. Now we've enjoyed our
high resolution version. And I'm going to
unhide the rest of the spaceship by pressing slash. And our next lesson, we're going to go over
how to color these, how to color them randomly. And yeah, I think our
spaceships nearly done. Got that. Pretty cool
spaceship. Righty. Here ends this lesson. I will
see you in the next one.
22. Geometry Nodes, we randomize antenna and greeble colors by storing a named insta: Welcome back to Blender
and Gaia Mass class. Procedural Ice world. In our last lesson, we finished texturing all of the main
parts of the spaceship. Added in our displacement. We did our probably
not in the last one, but before we did
our displacement, we modeled, we did
our displacement. We did our texturing
with jazz placement. Then we did our
interesting engine effect with the AO, which
was pretty cool. And now we are
going to dive into randomizing the colors
of these right here, these antenna agreeable things. Now, I know I said I
was going to stick like greebles on the front
here, but, like, the spaceships probably
going to be too far away to see the difference. So maybe. I don't know. We'll
have to think about it later. That's it. Okay. We're now going to press slash to isolate our selection. And now we're gonna
add a new material, and we're gonna call
it antena greebles. Alrighty. Now, you'll
notice that putting in geometry and clicking through
and saying random island W, well, first off, we need
to assign our material. So we're going to have to
go back to geometry nodes. We're going to I've already
isolated this, I think. We're going to go in here. We're going to caress Control A, and I've updated this. All of the set material used to be over here, but
now it's over here. So just beware if you're using earlier
version of node pie. Yeah. Anyway, we're going
to set our material here. Oh, God. And we're
going to set it through antenna greebles and we're
going to click back so I don't have to look at my
horrible mouse placement. We're ready. Now,
if you look over here, this doesn't work. None of that random
per island works. It's questionable at best. You can see it's kind of
trying to do it here, but it's just it's failing. So this is where we introduce geometry nodes asset attributes
into the shading editor. So we're going to go
back to geometry nodes. You have to deal with
my mouse for a second. Hello. Let me just Yo.
Okay, there we go. And we're going to store some attributes
that basically tell us give every single attribute every single instance here, and different numbers so that we can color
them all later. So what we're going to
do is going to compress control A and open up our choose store named attribute
or you can search it up. I'm now going to add
in an index node, which is going to if we press Ktroshef leftClick on this and Ktroshef left click on this, it's going to give us a
whole bunch of numbers. You can get these numbers by choosing the circle
icon dropdown. Now, before you click
on attribute text, be aware that if you
have a lot of vertices. You'll see there's a
lot of numbers here. But if you have
too many numbers, it will actually crash
Blender training to display every single
vertices numbers. So you can go over
here and you can switch the viewer from
auto to instance, which will only
display one number per instance instead of one
number per vertice, which is kind of helpful. Okay, now we've done that. As you can see, we've got
different numbers per instance, as you can see, some are overlaid right
on top of each other. So there's some
multi numbers here. But, yes, as you can see, there's a different number
for every instance, that's what we want. So we want to get
rid of this viewer, and we're going to
plug this index into the value on the
store named attribute. Now we're going to
switch this also from point to instance. That way, it does exactly
what we did before. I'm going to call this. What
am I going to call this? Let's call it's going to be IDX, so it's going to be
the ID of the index. All right. Let's try this
now, just real quick. Let's go back to a shading. We're going to press
Control A attribute, and we're going to look
at it, and we call it the ID index. As you can see,
nothing's happened. This is because we need to
set this also to instancer. Now, this has become
very bright because, remember, there's a
lot of instances here. So if you have a look
at this real quick, you'll see that some
of these numbers, they got the hundreds, 200 maybe even somewhere. So that's why I think we
have nearly that many. So when we're looking at this, this is assigning
numbers to your thing. So you have an emission value
of 200 in here somewhere, which is why this
one here is black because that's the 01, so it's giving off an
emission value of zero. If you didn't know when
you prove you a color, it's basically like plugging
it into emission value, an emission shader, sorry. But yeah, so we're getting
quite bright here. Now, we don't want that. We want basically a gray scale 0-1. Now, to do that, we're going
to do something really funny. We are going
to delete that. We are going to discover
the attribute statistic. I'm going to plug the
attribute statistic in. It's one of the
biggest nodes, too. And what this is
going to do is it's basically going to measure our attribute here that we're making. It's
going to measure it. So if we plug this index in
here into the attribute, set this two instance again, you'll see there's a whole
bunch of outputs here, but the relevant ones that I
like to use are min and max. This is basically
going to tell us the minimum amount of them or
the maximum amount of them. Now, so how do I put this? So let's say you
have 100 objects, or let's say, actually,
let's say you have 105. That way it's not perfect. You have 105 objects. And you want to come
back here and you want to put in a map range, and you want to set your from because if you don't know
how MAP range works, map range is really fun. The from minu from Max are
basically your inputs. So your input is going to say it's going to be, say,
if we have a gray scale, exactly what we want this
to be, if we want, like, a noise texture, let's
say, that's color. We want a noise texture
here, we plug this in. We're going to
have an input 0-1. That's how the noise
texture works. Now, here, it says from min, zero to from max one. So that's indicating that we
know that the noise texture, it starts at zero
and it ends at one. And then we want to say the
two min and two max I say we want that zero to one to
be put into zero to two. So, you know, or maybe
it's minus one to one. So the numbers on this, even though you can't
actually see less than black, which is zero, you have now a gradient between negative one and one on the
noise texture. So that's how map range
works. It's really good. But basically, what we
want to do is we want to input our attribute, and we want to its maximum
amount of the indexes, all the way to the zero to
one, which is already here. So if we go over here
and we grab this max and we stick it into another
store named attribute, but call it max. This is going to
tell us exactly how many like how high
the index value goes. So when we come back here and we duplicate this and
we set this to max, we can plug this factor
into the two max, and it will tell the
map range exactly how high to go to encompass
everything perfectly. Pretty good. Anyway, that's how you do random instance
shading that isn't dokey. I know you can do it with
a white noise texture. It's one of the few uses for
the white noise texture, but it really doesn't
look that great. I'll show you real quick
if you want to know. If we didn't just mute this
and say this didn't happen. So we've got this don't
exist. Neither does this. We're going to grab ourselves
a white noise texture. We're going to plug the
color into the vector, and then we're going to add
in a math snap node. Nap go. And if you screw with this, you'll see it
randomly colors it. But at some point, you'll
realize that like, there'll be two colors
per instance sometimes. Like it will be half
of the instance will be gray one dark gray and
the half will be light gray, and it's it's just not
it's just not great. Anyway, this is the way I prefer to do it for
obvious reasons. Since it just works, oh, I forgot to turn
on my max again. Well, if you miss that,
press M to mute nodes. Basically, it bypasses
them, which is helpful. Alright, now we've got this. We're gonna add in a color ramp. We don't want perfect black, and we don't want perfect white. So let's put this back down. This is going to go
into the base color. Go increase the metallic. We're gonna decrease
the roughness slightly. And I'm going to add in a noise texture and
another noise texture, plug the color into the vector, press Control T on the
first noise texture to open up the
mapping coordinates and plug in the object, so it doesn't look wonky when we map it on because if we don't
looks weird and stretched. Now, I'm going to add another
color ramp behind that, but before I do, I'm going
to decrease the scale. Just so you understand,
the first noise texture is the scale and primary detail. Like if I crank up
the detail on this, see, it's primary detail. If I look at the
second noise texture, that's basically the detail, the secondary detail,
kind of helpful. Um, I wouldn't suggest touching
anything else on that. I mean, you could, but,
like, you know, yeah. Anyway, we're gonna decrease this gray value a little bit, and we're going to plug
this into the roughness. Oh, that decreased
a little bit much. We're gonna increase
this value black value cause we don't want to be
perfectly reflective, either. Sweet. There's our metal. As you can see, it's
different colors. I've probably decrease it. Mm. No, actually,
let's leave that. Anyway, now we've done that. So reason this isn't working on our antenna. Not entirely sure. I wonder if this index
doesn't apply to it. Hey, that's interesting.
Let me, no, it is. It's just that they're
at the bottom. Okay. Sweet. Okay. Well, there's our random texture. I like that.
23. Geometry Nodes ID Based Colour Randomisation: Welcome back to Blender and Gaia Master Class,
procedural Ice World. Righty. Now if we go back to PresSlash to reveal the
rest of the spaceship, wait for all the Jeetib to build because we've got the
adaptive subdivision on. And there we go. We have
ourselves a spaceship people. Now, I'm going to
improvise a little bit. I was actually, I'm going to
put up the image on screen. I was actually going to put
the spaceship up in the sky, but that would mean that all our hard work in making this spaceship look
good would go to waste. So I'm going to
improvise by making. We're going to
start a little bit of modeling, just to finish off. I'm going to add in a cube. I'm going to scale Chefs. I'm actually going to bring this out here so I can look at it. Press that too,
that's in the way. Alright. Now what we're gonna do is we're gonna
model landing gear. So this spaceship is going to be landed in
front of our camera. That's the plan. I probably should have gotten
reference for this, but I'm going to
wing it real quick. There's a good
chance you probably won't see much of it since it's under the spaceship. I'm gonna bevel real quick. How are we going to make this? Just thinking real
quick. I'm picturing in my mind what I want to make. Okay, Shifts, we're
gonna drag it over here. So when we add in a cylinder, it's going to be
over here ready. Rotate along the Y
axis 90. Is that Y? No, X, sorry. My axes decided they want to look
exactly at the same time. Oh, I'm not going to use
the hard ups real quick. I'm gonna shade auto smooth. Oh, that actually
work that time. Usually, I have to
use hards, otherwise, cause for some reason,
the default Blender is one broken for me. I'm
gonna apply scale. Then I'm going to bevel
these edges edge end edges. You've got that gonna
go into the side view. We're going to duplicate this we are going to scale it
down on shift instead, so it doesn't scale
on the Z axis. I'm going to now move this
ever so slightly to the side, and I'm going to duplicate it also to the other side.
So now we have a two. I'm now going to add in
a cube, move it down. Scale. This is going to be
our landing year piece. We're going to have,
like, a skis, I think. I know there's, like,
spaceships with, like, wheels and stuff, but for ease of use
and also law accuracy, since I don't think
a spaceship would be out of land on snow with wheels, we're going to make these skis. I'm going to grab this. And
I'm going to shear this. I'm gonna press open up
all of my Oh, my God. I'm going to open up this. I'm going to grab my
shear option here. Shear is a really fun tool. It's also fiddly sometimes. It will basically, like, cut. Oh, God. We undo that. Basically, like when
you rotate this face, usually, you'll, like, stretch
these faces up and down. Like that one will
go out that way, and that one will
probably go out that way. But when you shear,
oh, that's small. When you shear, it
will basically just rotate the face perfectly so that it lines up
with everything, which is really helpful. I'm
going to grab the shear. Sometimes it doesn't
work, though. A good idea is to
apply scale, though. I'm going to grab
my shear to for the 15th time. There we go. And now I'm going
to press E, and I'm going to extrude upwards. I'm going to do scale on
what I'm going to take. I'm going to go back to
press W to go back to my box I'm going to
press this button here, which is the left carrot, if you know what that is, or it's the omic key for typing. And I'm going to choose
the normal option. Now I'm going to go scale on I'm going to use my
middle click and drag so that I can make
sure I get it right. I'm going to scale on the
X axis in this instance. Yep. Alright. Now I'm going to do
the same thing over here, I have to lt so that
I can select that face easily, grab my shear. Actually Oh, whoops,
that's the wrong one. I'm going to grab this one here. I'm going to E extrude, then go W to just go back to the selectant I'm going to scale on whatever this
axis is also the X axis. And now we have
that. I'm going to grab Alt select both of
these edge loops down here. I'm going to control
B and bevel them until they look
satisfactory. Okay. We've got some landing gear. Please don't make me rig this. I might have to do some some constraint rigging real quick. Uh Okay. First off, we're going
to add another cube, and we're going to bring
it down here so that we've got some kind of way to connect, this landing gear to the ski. Gonna go into the
side view again. I'm going to grab
this bottom place. I'm going to move it up,
and I'm going to scale it on this axis, the Y axis, Gaea, extrude it down, just nearly all the way,
and then I'm going to extrude it down
again and scale up. This one is not going
to be on one axis. So we're going to get
this sort of little thing that's connecting our skiing. Sweet. Now I'm going
to get all of this. I'm going to go, New
collection, Landing. It's going to be
extremely helpful. We're now going to
move this over. I'm going to say, I want three. I think this is not
a big spacecraft, so we're going to do that. We're going to stick one here. We're gonna stick
one up the front. Then, of course, we're
going to duplicate one onto the other side, but we're going to
do that in a second. For now, we're going to
pose the landing gear. Now we have all the pieces.
I'm not going to do all the constraint
rigging, so don't worry. We are going to go rotate this board We're
going to place it up. Oh. Oh, yeah. Probably a good idea
to set this back to global with that oma key. I'm going to place this
back up under here. We don't worry, we're
going to add in another one of these
things up here later. Gah not duplicate this. I'm gonna just move this up, and eyeball it into position there. I'm going to do the
same thing with this, but I'm gonna make sure I select both of these at the same time. Also, if these are
rotating funny, make sure your pivot
point is set to median and not individual
oranges or three Dcursor. You can achieve this by pressing this full
stop key right here. We're going to do that a
little bit of rotation. We might actually do a
fair bit of rotation here this spaceship is
going to be quite low. Now we're gonna
grab both of these, and we're going to
drag these up until they link up like that. Sweet. Uh, right. We are going to now add in
some interesting things. Oh, yes, we have to move all of this over to lineup, by the way. Wait. Now, unfortunately, this landing gear is
looking very flimsy. So let's add in a cylinder. Now, it's going to
be back over here. We are going to Auto Smooth. Oh, God. We are going
to go into Edibode. We're going to scale
it down and to go E and then press S
immediately to scale in, which is basically inset, but it does slightly
difference just so you know, we are going to E to extrude
upwards, E to extrude again. We're going to scale
down slightly. We're going to use
the inset now with I. We're going to extrude back
down just in a little bit, inset a bit more, and
then extrude back out. We're going to make this
sort of piston effect. Okay, now we've got
this at the end. We're going to do
this again, extrude, scale back up, and
then extrude again, just as a little end cap. Also, as you can see, unfortunately, our auto smooth. It's sharpening this edge, but it isn't sharpening these edges. So I'm going to introduce you
to something called sharps. So if we go into Edge mode, this is only available
in Edge mode, please press two if you didn't, just press two because that
was an add on that I have. And Alt left click to
loop select this edge. We're going to go right
click and mark up. Now, there's a hot key here. This is a custom
hot key that I have set because I use sharps a lot. You can you can add a hot key by clicking
this here though for you, I'll say add hot key
instead of change it, and then you can
press in a hot key because I like to use
this a whole lot. For me, it's Control ls. I don't say press
B as well. My bad. And as you can see now, it
has sharpened that edge. So we're going to
go back up here. And we're going to
do this as well. Now we're going to
grab this. We're going to move it all the
way over here. In fact, we're going to use
shifts in our cursor object and cursor to selection and object to cursor options
to put them together. We're going to scale
this down so it fits add this in here, and we might grab the edge
here and that one face right on the end and just drag
it down a little bit more, trying to keep it
straight, just like that. Then, of course, we're going to do the absolutely same thing. We're going to duplicate
this with Shift D. We're going to press Alt R to clear the
rotation real quick. And we're going to
scale on the z axis, and we're going to scale
on the shift z axis, so everything but the
z axis so that we get a much thicker and
stouter piston. We're going to do
the same thing, but it's going to come out of
the spaceship this time. You may want to after
doing this, extend this. Now, if you want to
extend this perfectly, go back into that normal
mode and press Z, and it will go along the
way the face is facing, which is exceedingly helpful. I'm going to use this again.
I'm going to go to Z, and it's going to do that. Sweet. And there's
our landing gear. Probably could look
a little better. And now I'm thinking about it, that piston would
probably be on this side. No, it wouldn't be. But still, we're going to
leave it there for now. I might actually make this. This normal is very useful
because now I can go Shift Z again and it will do
it based on the Ooh. Okay, now we want to
actually set it to local. The local will basically
be the local XYZ x. How do I display this?
If I go to Origins. You'll see how there's a
option here that's like all of the separate Zaxs that's different to the actual
physical world Zaxis. So now when I scale and go, Ooh, I turn that off. I scale on Z axis, it's going to be on the Z axis
of the object. So I'm going to go back in
here and I'm going to go Scale Shifts using
the local transform. It's going to get bigger. So Alrighty. Um, I'm gonna come back next time for the rest of these because I have taken
way too long as it is. So, yeah, I will be back
in the next lesson, depending on how long
you take to watch it to get to watching it. But, yeah, we're gonna continue
with our Lanning year, and we are going to
start positioning. But yeah, we're we're gonna have to do a little bit
of lockout first. Right? We'll see you
on the next one.
24. Landing Gear Detailing and Scene Readability Checks: Welcome back to Blender Gaia Master Class,
procedural Ice worlds. And I know you're
looking at my screen, and you're thinking,
that's a hot lot of ice world right
there. That there? That's some premium terrain. Well, I know it's a spaceship, but don't worry. We will
be getting on with it. In our last lesson, we finished off the texting
and we did some landing gear. Now, what we're going
to do is we're going to grab all of these objects that comprise of
our landing gear. We're actually going
to not do that yet. We're going to go Shift S
on this spaceship first. I forgot. And now we're going
to select everything else. We are going to choose
the three D cursor opting G. Just like with the
lights and the thing, we're going to press Shift D. Yep. And then we're
going to right click. That way we have our duplication selected, and it's
exactly where it was. And then we're going
to go Control M, and we're going to choose Y. And then we're going to
press Enter or left click. This will allow us to
place both of our things. Now I'm thinking right here. I actually want all of this
to be further out, I think. He could do all of
this with a mirror, and I could because hard
Ops is special like that, I could just click here, and I could actually modify all
of these in real time. Oops, that's not
based on the global. But because you
don't have hard ops, I'm assuming, we're going
to do this manually. So for now, we are going
to grab all of that. We're going to go at
the back, and I'm going to place these
out here, I think. Yeah. Remember, it's
not going to be that important since you're probably
going to look at it like that. So we're
going to grab that. We're going to grab all of this. We're going to grab
all of this again, and we're going to do
it all over again. Make sure we're on
three D cursor. Shift D, right
click Control M Y. And there we go. We
have our spaceships landing here at
the back at least. Now, we're going to do the
same thing at the front. But well, we're going to do the posing at
least at the front. Now for the front one, I'm
actually going to modify this. This is going to have a
loop cut in the middle. Unfortunately, for me,
this loop cut is not even. So I'm going to scale. Oh, I'm going to select the medium mode first
with the full stop. I'm going to scale
along the X axis zero. That's just going to
make it nice flat. And then I'm going
to scale along the Y axis to make
this a little bigger. Just for a little bit of
something interesting. We also might make this wider, and we're going to make
these wider this way. Just a little bit,
though. Not too much. We might make this
circle a bit thinner. We want it to be just ever so slightly different
from the back ones. Alright. Now, what
we're going to do. Since we have our
origin at the center, and it's perfectly, I hate that shading artifact.
Don't worry. That's not going
to show up later. The adaptive
subdivision fixes that. I'm going to shift S and
drag this all the way up. That way, it's perfectly
in the center. Bring it back down.
Now I'm going to do the Shift S cursor to selected because this is
now in the center. Now I'm going to look at
this from the side again. We're going to rotate s. I think we're, we're
going to do it this way. I'm gonna place this
here. Place that there. It's almost a bit like kit bashing. Gonna place
this one here. Yeah, before we continue, something useful that we
want to do is we want to can't remember if
you can annotate line. You're probably going to
want to do this with me. You're going to draw
a straight line that's going to indicate
where the ground level is. That way, both landing gear is going to Can I
control and snap this? Or I can't press A,
that's unfortunate. You can also use a plane. That looks pretty
straight to me. Never mid it doesn't use
this grid real quick. I'm going to turn off
screen cast keys for a second just so that
I can see this. Okay, so that's basically
the second one up like that. So I'm using this
line right here, and then it's two squares up. So that's pretty straight. Okay, I'm gonna pres
W to go back again. Turn on screen cast key so that you can see
what I'm doing. Rotate it and put
it into position. I'm going to grab both of these. I'm going to stick these
on the line lining up. Now, like before, we're
going to grab all of these, and we're going, Oh,
God. That's right. Don't forget to set
this stew global. Otherwise, things
will go sideways, quite literally,
if you just saw. And we're gonna sip
it around the middle. Now, I know you want to be like, Oh, but, you know, we got to be careful with making sure it's
exactly the same. You're never gonna see it. You're never going
to see it. I've seen too many people get stuck making their model like
perfectly mirredOly for you to not see
half of the model. So just be aware that
perfection is great, but usually I only use the perfect if we're going
to mirror it and I want it to be exactly
on the other side. We're going to duplicate
our pit again. We're going to go
back into local mode, scale on the Z axis,
and we're going to position it with the
shifts back on the inside. That way, it's in the
middle. And we're going to position it there. And we're going to do the
same thing with this one. And we're going to
place it over here. I'm going to actually
place this one. It's going to be
right down here. G scale on the Z
axis quite a lot. This places all the
way down there. Okay, now would be
a really good time to make use of the
shear tool again. So we're going to
go into thing here. We're going to grab this,
and we're going to share. Let's see which way is the
correct arts this one here. And we're going to share it
until it all disappears. Oh, God. There we go. Sweet. You're free to position the pistons as you want. Like, I'm
looking at these. I'm thinking they're probably
a little sketch, but, like, like I said before,
you're never gonna see it. Really? You're
gonna see a glimpse of it. Nobody's gonna be going. Oh, so that shouldn't be there. That's illegal, you know, no Nobody's policing your
stuff, just so you're aware. I'm going to delete this line now since
we don't need that. Alrighty. That's
all of that done. Now we're going to get
to do some blocking out. But the first thing
we want to do is, though even though we have
all this landing gear, what we're gonna do is we're going to select everything here, including this piece here. Gonna move it all to make sure we have all of it selected. We're going to
press M, and we're gonna call this spaceship. Alright, and then
we're just going to delete the landing gear. Sweet. And these over here, they're all we're actually
going to go in here. We're gonna go right
click and we're gonna go New collection. Even though it's greeble. Okay, that's unfortunate.
We're gonna call this Grill. And we're going to drag this
all the way out, please. We're going to drag this
into the scene collection. So it's going to show up all the way down
the bottom here. We go to close out spaceship. We're going to grab
the antenna and hot control and click
the greeble as well, so we both select it, and then we're going to just
drag them into greebles. That way, they're
both, you know, inside the greebles thing. So we can just like, you know, clean up a little bit. Sweet. We're going to
bring back the scene now and hide the spaceship. Now, unfortunately, this is
a rather large opaque box, which we can't see through. And this is going
to be a problem. So we're going to
go down here, and under Viewpoart display, we're going to set this
displays from texted to bounds and we're going to do same with
this thing in here. This is just going to
make our fog objects, you know, we can
select through them. They're all going to
display perfectly fine. Don't worry. This does
not affect anything else. It just affects your way of
seeing it in the viewport. Now, if we press zero
on your number pad, which is how we look
at through our camera, you'll notice there
probably isn't a whole lot of space to land
a spaceship here, you know? It's all a bed turn
the sub div back on. You'll see, it's just
a little bit rocky, just a little bit. Um, yeah. So we're going to add in a little a little we're going to go back
into Gaia, actually. We're gonna go in
and we're going to add a little bit of, like, terrain right here that's
going to be sort of like this as a foreground.
Maybe like that. It's gonna be more like that.
And my horrible shading. It's going to be
a bit like that. Anyway, it might have some
rocks over here on the side. But this is going to be
like our depth scaling. So we're going to have
the small scale here, and then we have the big
scale in the background. And if you look it
through the render view, you'll see that fog is creating some nice depth once this
defined sides to load. You'll see you have
that depth with the fog and the super
bright background. Okay, I'm gonna have to we're gonna have to go and
modify that in a bit, but that's a That's my favorite
word. That's for later. Anyway, I know it's a
short episode or lesson, but I'm going to end this one
here since we're basically going to be going and doing something completely
different now. You're gonna turn this back off. I might say this
to four as well. And this to two. That way, it doesn't take so
much to boot up. Yeah, I'm going to go and
we're going to go back into Gaia and we're going to make a small scale terrain
that fits right there. Alrighty. That's the
end of this lesson. I will see you in
the next month.
25. Realistic Foreground Terrain with Snow and Debris in Gaia: He Welcome back to Blender and Gaia Master
Class, procedural Ice world. And in today's lesson,
we're going to be adding a little bit more
procedural ice world. Back in Gaia. As I said
in our last lesson, we finished our learning gear. It was quite short. We are
going to make ourselves some foreground for the scene so that we can place
our spaceship. Alrighty. Start off,
primitive extended dot noise. Again, we're going to
be making ice spikes. They're just going to be a
little different this time. We're going to make
them very small, very small dots that
are quite high. We probably actually
don't want that many. All right. Now, what we want is we want sort of
like what do we want? We want like a hill almost. Let's go with primitive
gradient radial gradient. And if you have a
look at this, this, Wa that's too big.
We want less height. And we're going to click
on Oh, this thing here, Toggle Gizmo, which
will allow us to move move the
gradient places. Personally, I want it over here. Decrease the height
a little bit, too. It's just gonna be
convenient like that. And I might add an effect node where you're going
to use this to clip t in the tops flat. Don't worry, we'll
fix this later. We are now going to fix it by combining it with
an extended multifractal. Combine these together.
For the multifractor, we want to drop it all
the way to the floor. We want to decrease
the scale a bit. Holy, that's tall. Relative feature scale down and the roughness down
just a little bit. We're now going to
stick this into an effect node because
we want to mess with. We are going to lower
the multiply so that when we stick this on
screen, it's not too much. As you can see, it's too much. So we want to go
back, as you can see. What's happening is
on the multifractal, it's low on this side, but
it's high on this side, which is canceling
out our thing. So we're going to click
on this one here, we're going to press F.
Then we're going to go, and we're going to click
through the noise seeds until we get that. So it's high up here and
it's low over there. So I'm going to press F
again to unlock that. We are now going to
drop this to the floor. I already was. Never mind. Now, we get on. We are going to I think we're going to decrease the
effects of this noise. Oh, God. That's a
little little bit much. There we go. 'Cause
it's small scale, we don't want it too crazy. But remember, we are
going to do want it a little bit more cause we
are going to erode it, so it's gonna to get rid
of that line over here. So you do want it to be just a little bit more
than what you think. Now we're going to combine
it with the dot noise. We're going to add
this one. We're gonna add 100% dot noise. Oops. Add at 100% dot noise. We Where do my dots go? Oh, that's blend. Sorry,
add. There we go. I wondered where they
went. But because I forgot effects
a node over here. Another effector node, as
you can see I like them. And we're going to shape of
this so that they're spiky. We might actually I'm gonna
press F to lock the preview, I'm going to increase
the iteration, so we get a few
more. There we go. Alright. Now we have these. We are going to
add in a Come on. There we go. We are going
to add in an erosion too. Now, remember this is supposed
to be fairly small scale. This is going to be measured in meters as opposed to kilometers. Like, from this
side over here to this side over here
might be 80 meters. So it's not going to be
super, super high scale. So we're going to increase
the erosion scale. If we go really low, we
get all of the lines. We don't want that. We
want kind of like that. We don't really we want the
lines, but only slightly. That's like that, that'll do. And we can increase the shape
because snow does that. There we go. As you can
see, it's eroded them away. Right, what are we going to do? Now, why is that?
Line still there. Yeah, you're not going
to see it. You're not going to see it from this angle. It doesn't matter, because
we're going to basically going to be looking
at our terrain, probably from right
that lump right there. We're gonna probably be
looking at it like that. Right. Now, it's windy in
our theoretical world, we need to make the
snow pile up on one side and not on the other. So we are going to
add a snow load. This is going to be
just good in general. And yes, the melt
directional can work. No, it doesn't work
in my opinion. At least not for
what we want to do. We want a low model scale, and we want to Do you
want to melt it slightly. Oh, that's a little
much. Just want to just a little bit. Let's
put it right there. All right. Now, this is great, but it's not exactly what we want because it's
on all the sides. I'm assuming in our
theoretical world, the wind's blowing
across really fast, which is why the ice
spikes are all sideways. So we're basically going to
make it so that the side on the wind has been
blown clean of ice, but behind in the wind shadow, there's, like, little bits of
snow that's been piled up. So we're going to
grab out of here, we're going to get a angle. Angle is exactly what you think. It basically does one side. It's like a points and
arrow at the mesh and all of the sides of the mesh
that are close to the arrow, the direction the arrows
facing, they get shaded. White. I'm going to
decrease to fall off a bit. Yep. Now I'm going
to bring this out. I'm actually going to put
this into a color erosion. Gonna be a bit
interesting. But I do want to decrease this
range to quite a bit. That way we don't.
That's a bit bar. Oh, that's the wrong
end of the range. Put them into a color
erosion. This is a bit much. I don't want to
transport that far, but I do want to colour
hold all the way. And I'm going to plug this into the snow map. Plug that
into the snow map. Yes, I did. And if I increase the intensity and all of this jazz here, you'll see it's basically
like the snows piling up on one side, which
is really helpful. I might increase the
fall off on this. Let's preview the snow node
real quick so that we can modify this to
increase the fall off. So as you can see, it's like
the winds blown this side clean and over here is
kind of, you know, not. Now, I might control D, just duplicate this,
plug it in again. I'm going to also do
Control D on this one. Plug it in again. My bat. I was supposed to plug
it into this one. And I'm going to preview unlock the preview,
click on this one. I'm going to change the As Mth to 180, just go to flip sides. We're going to do all
of this all over again. And we're going to plug
this into the melt map. This is basically
just going to smooth out these sort of harsh
edges here, hopefully. We're going to melt this a bit. You might want to decrease
the color hold on this and the sediment density.
Was the blend. Sweet. That did nothing.
It's unfortunate. I should be doing something. Might stick it there. Freeze a slip off angle. That way, it will pile up
on side here. There you go. Now we're looking a little
bit more real scale. Here we go. Alrighty. So there's our snow
all pile up on the side. Feel free to screw around
with all of these. Oh, that's much better. Okay. We're going to
leave it right there. Feel free to screw around with all these values and
on the color erosion, too. They're going to be useful. Anyway, we are going to
go back to this again. We are now going to
do a debris node. But this time, we're going to have probably about
three times the debris. It's going to be quite
a bit. We're going to have quite a lot of friction. And we're going to make
the scale the size, sorry, the size 1-18. So basically quite big. We go to increase the debris amount because
I'm not seeing any. Oh, too much friction. Sorry. My bad. Kind of want this to be
everywhere. I was thinking. Decrease the debris
amount like 10,000 1,000. And I'm going to increase
the scale quite a bit. The size because we
have bigger rocks now. I'm going to increase
the amount multiplier so that we get a few
more. There we go. Now, thinking about it, we would probably put this
debris before all of this. This here is why
we use checkpoint because now I'm going to
have to select all of this. I'm going to have
to put this in here and stick this into
all of these outputs. Imagine doing this
with, like, 20 nodes. That's why we do the
checkpoint for the outputs. At least on the God, now this is doing
something funny here. Et's maybe do that. Alright. We're gonna end
up doing that like that. I'm gonna just remove this melt. I don't think it's
doing anything. Just unfortunate. I think the transport distance
is a little too high. Oh, there we go. Apparently, that's the only
thing that's making out scene have snow on it. Huh.
26. Foreground Terrain Pass Snow Masking and Debris Detail: Welcome back to Blender and Gaia Master Class,
procedural Ice world. Now we have our windswept rock. We are now going to
go back to the debris and change it to sharp
because I want sharp rocks. Okay. Now that's all done, we are going to output
this into a checkpoint. I'm going to double click
this to make it smaller, now we're going to
do the colorization. So we are going to go
and we are going to grab ourselves a texture base. Yep, I'm going to
decrease the slope a bit. No flows for me. Soil and patches. I'm gonna decrease
the soil a bit. This is going to be the rock,
by the way, just here away. I'm gonna output this into
it. Whoops, right there. Sat map. I'm going to
choose a nice looking, banded one that showcases all of the detail without
changing for that one. That one looks
really good. Okay? Let's decrease the saturation. So it's gray, decrease the lightness because we're
going to crank it up later. Wait, so there's
our rock for now. We might actually
want a different one. We want a lot of
detail right here. That's like our outcome. That could be good.
Yeah, I like that. And see, that's
supposed to be green. Anyway, out of here.
Another texted base. All of this jazz, no
flows on this one. Definitely gonna have some chaos and a little bit of peaks. And we're going to output
this into another set map. And we're going to choose
one that look good on snow, so we want that
detail everywhere. All that yellow one
looks really nice. Yeah, that's going to be
good. We're going to clamp this, the clamp Ah. Choose the mask option, please. Since for some
reason, you can't see that guys being funny. Going to increase that. And then I'm going to mix these together. Oh. Don't forget, press
G over here on this one. That way, we don't
get any funny things. We're going to blend
using the snow output. And we're going to blend 100%. Sweet. That clamp went a
little bit bright, okay? Yeah, that's it. Okay. So
now we've got our snow. We want our little ice peaks
to be, you know, peaky. We want them to be ice.
And we're going to grab. Let's see if we can
do it with this. I know it didn't work before. But let's see if we
can derive peaks. Yeah, I don't think
so. I don't think so. We can try. We can
try and clamp it. I'll clip my bad. Get this. Okay. Gonna have to do it
the old fashioned way. We're going to come
back to the snow. We're actually going
to I think we're going to drive it from
all the way back here. Once we do this, we're
going to go height, which I spelt correctly. 100% correctly. We're going to. We're gonna have to
do this separately. I'm going to unlock
this real quick. I'm going to do the height range based off this real quick. Really quick. Don't forget
that method we use. We're gonna use
the warp, as well. Gonna do not a lot of strength
and a little less size. Oh, a little bit
more size, actually. I want the complexity.
Roughness. That's it. Increase the roughness.
Sweet. We're gonna export. And we're
gonna export that. And we are going to export that. F three, in case you forgot. All right. Now we're going
to go back to the builds. Gonna build this back at one K. I'm going to build
snails and XR because I'm going to click on this
and choose primary only. This is only going to
output the height map. And now I'm going to
go back over here. I'm going to go F two,
and I'm going to call this color. Yes, I'm
going to rename it. I'm going to go back
over to the warp. Gonna press F two, and
we're going to output Ice. Yes, I want to rename
it. Now we've got that, and the color and the ice
are going to be PNG 16. Got to look into PNG
64. Sound pretty good. Okay, save time. Make sure
you're in the viewport. Sometimes it's funny like that. All righty. So I'm just going to
preview this real quick, really quick, just to
make sure it works. I'm going to output
this into a SAT map. 90% sure it will work.
We're gonna go blue. I'm gonna choose
this blue color. We're gonna mix these with that. I'm actually just go to output a straight sat map
from the snow. And I'm going to
mix it with this. Pop inputs. Yeah. Okay. That's good. As you can see, okay. So you might want to
decrease the height, the lower height because it seems to be it's bleeding
onto the ground a bit, so I'm going to press
F to lock that. I'm going to come
back to the height. I'm going to increase
the bottom range, just so it doesn't do
strange things like that. I'm going to have to
mess with this now, increase the roughness,
decrease the strength a bit. There we go. Oh, I
never figure out. So many programs like the size, the lower you get,
the bigger it gets or higher you get,
the bigger it gets. It's so annoying, but oh, well. I guess hire is more detailed. Alright, I'm going to
set it right there. Yeah, we've got our
little ice pieces, so we can delete this
now and that as well. Se export time. You
know, the drill. We're going to save again, and we're gonna click Export. We're gonna build it at one K. We're gonna Okay. Oh, yeah, Color erosion hasn't had the
height connected my bad. I forgot I forgot about that. And we are going to click
on the end one, do, do, build, start build, and we're going to save the cash built because it's already done. Sweet. Now we're going to
hop back into Blender. We're going to turn off this
gray mat cap because it's hurting my eyes, at
least on this one. We're going to go back
and do our camera view. We're going to shift right click and place the cursor right here. Then we're going to go
Shift A, mesh plane, and then push the
full stop button on your number pad to zoom in. Go up, you know, the drill, right click, subdivide, type in 100. You can't drag it,
unfortunately. But yeah, I'm going to actually subdivide this one more time. Now I'm going to go
and I'm going to go displace new and this button, open D. We're going to open
up our file from Gaia. Builds Ice bikes. Ice
course, foreground. And I'm going to
grab the snow R. Okay. First order of business, back into Edit mode, vertices, deselect everything.
Choose under select. You can go select by trait, non manifold, Brest delete, and then choose vertices. We're now going to go
back out of Edit Mode. We're going to right
click and Shade Smooth. And that's actually
looking quite good. I'm going to on the modifier, I'm going to decrease the
mid level all the way. And I'm now going to split
my screen by holding up here in any of these top corners or actually in any of the
corners anywhere in Blender, you'll see it forms
this crosshair. You want to when that happens, you want to click and drag into the window
you want to split. I'm going to lock
it to the middle there and we now
have two windows. This window on the right is
going to be our viewport, and the one on the left is
going to be our camera, which case, I'm going to press Shift Alt Z to disable
all of the overlays. I'm also going to move
screencast keys over. So that it's not in our weight. And actually I'm actually going to squish that over a bit. Alright. This is going
to let us like I said, this is going to let us, do our positioning if
I find my camera. Here's my camera there
it is right there. Okay, we're going to grab this, slap it over, move it down. Do you remember? Where
is the high point? Is the high points
on this side, so we need to rotate at 90 degrees. Negative 90 degrees, sorry, -90. We're going to Z. I would advise against moving things on the Zadax only on the Zeaxs
while on the top view, as it will usually move them very fast, which is unfortunate. I prefer doing it in the
camera view, actually. Okay, this is a bit in the way. Let's have a look. Where do
we want that spaceship lane? I want the spaceship to
be, like, right here. So remember, we don't
actually need this to be perfectly yeah, that looks good. It's a bit too all encompassing. It's all of the bottom.
Want it to like. Yeah. Anyway, important
thing to note, we haven't made it angle.
So let's go back in. We're going to set
the coordinates to UV and the direction to Z, and we are going
to hover over and press Shift D to duplicate it. We are going to set
this direction to Y. That is going to do our angle, and we are going to mess
with it by rotating it until we find it correctly. Okay. There we go. Our
spaceship is going to be right here on
that little platform. A little bit. Okay,
we might need to decrease the clip start on
this, decrease the clip start. This will just allow us to
get closer to the Oops, closer to the camera
with our terrain. Don't really want it
that close. Okay. Imagine how hard this would
be with only one view. You'd be constantly flicking
back and forth between them. There we go. You're gonna
have that right there. Now I'm going to quickly
let this back on. So we have our rule
of Thirds here. I want the spaceship to be
right on the rule of thirds. So it's going to
end up right there. Wait. Alright, now time
to work the magic. We're gonna go back
into our shading tab. We're going to look
at our lovely scene. Click and drag over
both of these, hide both the fog objects. And I'm going to say, we're probably going to
come back to this because I've probably talked
for long enough again. Next time we're gonna come
back. We're basically just going to recreate
this ice material. We could probably
copy most of it, so don't worry. It's
not gonna be too hard. But, yeah, that's it for now. I will be back in the next one.
27. Snow Shading, Subsurface Scattering, and Ship Grounding: Alrighty. Welcome back to Linda and Gay mask class.
Procedural I well. Now, in our last lesson, we went over and created
Guy stuffing Guy. We created our four
grand terrain. Yeah, so that's pretty good. It doesn't It actually
turned out really well 'cause we have this
lovely well, at least I did. I have this lovely
little platform here to stick my spaceship on. And you can't even see that line that ended up in the
train at the end. But, yeah, that's
super satisfactory. That's really good. Now,
what we're going to do? Now we're going to recreate
our train material over here. So what we're going to do,
we're going to go new. We don't really need to
do too much for this one. We just need to
go control add in that builds foreground
the color out. As you can see, that's
made our color out. Oh, let me just
zoom in real quick. Yep. Hey, look at that.
The colors even line up. The angle even lines up, all of the snows on the right side since the winds blowing from
this direction over here, bring across that
way. That's nice. I wasn't sure whether that
would line up properly, but it does. That's pretty good. Alright. Now what we want
to do is we want to add in our ice mask, which we're going to
do by control shift D. This way we duplicate it with
all of its other things, and we're going to
choose the ice out, which as you can see, will
shade all of our little peaks. White. We're gonna go over here. We're going to grab
the ice shader from somewhere on
the right material? Yes, I am. Where's
my ice shader? Oh, it's down here. Okay.
Oh, it's all of this. Okay. Why is that? Not together. Okay, we're going
to select all this. We're going to go control seat. Grab it all. Gonna
come down here and we're going to press
Control V, paste it all. We are going to immediately
stick this shader, this add shader into the volume, and we are going to control
shift right click and mix principle and our mix
shader from the ice down here, and we are going to mix
it based on that mask. As you can see, we now have ice. Oh, that's a lot of volume. We now have ice over
here as well. Sweet. That is super good,
even though you can't really see any of it. Oh, well. Anyway, we are going to grab ourselves and
Ise dexter real. No and a bump node. We're going to poke the bump in the color to the height
distance to one, drop with left click
so we can preview it. We're going to
increase the detail. And we're going to plug this
into the principal BSDF. Now, we might want to make
a nice snow material. Since this is up and close, just a diffuse white.
Probably won't work. I'm thank you. So I'm going to just finish
this bump real quick. I'm gonna look at
the bump. Now we're going to mask out on the snow, so it's only look at the rock. That actually doesn't
look too bad to me. I'm gonna decrease
it just slightly, though, just so that we don't have any
shading errors later. Okay. We're going to go back into Guy because
we never closed it. You should never don't you should know you shot
shouldn't never close Guy. We're going to press F three on these again to unexport them. We're going to come back to
the snow and we're going to choose the snow option as well. So this is and not the out. We're now going to
set this to a PNG 16 because we're only
exporting the snow mask. This will allow us to mask
out basically like the ice. We're going to mask out the rock we're going to mask
out the snow from the rock and the
ice so that we can give the snow a different material just like
we did with the ice. So I'm going to save this
again, and I'm going to build. Save cash build, and we're done. Alright, now we're going
to go tov D again. We are going to
move this up here. We're going to open
up that, go back up on wearing a new one and
choose our snow mask. And as you can see,
we've got our snow mask. Okay, we're going to ditch
the snow mask right now. We're going to make
ourselves an ice texture. I'm going to remove the volume as well, so it speaks up a bit. Now, ice is made using
subsurface scattering or SSS. You can use, like, other things to
do it, but, like, really, I would suggest using subsurface, it
just looks the best. I'm going to Okay, now might be a good time to
turn on your scene world. Holy. Very bright. Okay, now's a great time to go to our world settings
and set the strength to, like, 0.5, because
that's really bright. Yeah, why was that
not like that before? I'm gonna run with
0.6. Okay. Let's set this back to object.
It's a bit odd. Um, are we sure we haven't got, like, another light now seem? Because that is
very, very bright. You know what we
might do. We might go back to the world settings. We're gonna do one of
my favorite things. We're gonna control shift D
and we're gonna look at this. We're gonna mix it. We're
gonna add in the light path. No, the most interesting
node you'll ever see. I promise you, this is
so much fun to use. Okay, what we're going to
do now is we're going to chuck the I camera rate into the mix factor. Now,
nothing changes. So basically what the ICamera
rate is is as you can see, sort of it's actually this is one of the few times
you can actually see it. The ICamera array
basically tells Solink whether you're looking at it or not, whether you
can see it in the camera. So let's say I had Let's
actually demonstrate this. Let's say, Okay, so I've got
two white backgrounds here. I'm going to set the strength
of these both to one. I'm going to set the color
of one to be brilliant red, hue, zero, red, and the other
to be quite bright blue. And as you can see,
because we got the 50%, you know, it's
purple, but anyway. Oh, if we look at
this, you can see that this is coloring all
of our ice here white. And if we do it this
way, red, sorry. And then if we do it all
the way, this is blue. If I put the I camera
ray in here to the mix, what's happening is
we're seeing the sky, so it's shading it blue. But the bounce light
is seeing the effects, all of the all you can
see all the train is red tinge because the train is seeing the sky as being red. It's really fun.
So the easiest way I can say is the camera array, basically, you can switch
between what you see and what all of the light bouncers
sees, which is really helpful. If I go all the
way back here and reverse all of this back
to where they're both 0.6, I stick this back into both. What I can do here is I
can mess with this one. Okay. So as you can see, this is the one that
controls the lighting. And this one here is
the one that we see. So I want my sky
to look like that. But I want my lighting
to be a little bit darker. Just a little bit. As you can see, we still have quite a bit of
lighting over here, especially if I crank
up the subdivisions so we see it all. Yeah. Okay, I'm going
to now go back to my object properties
and wonder why my subset for scanning
is not working properly. This is just pure
white right now. Oh, you can see it's
starting to work now. Now it's not blinding white. So I'm going to tinge
this slightly blue. I'm going to add in this
bump map into the normal. Actually, you can
actually do this. We might actually do this
on the subsurface in here. Do we have a look
at this real quick. Oh. Okay, don't forget to
turn the roughness up. I forgot about that. In here, we want to turn up
the subsurface. But first, we're we're gonna we're going to do
the subsurface for some, so we're just going to
turn it all the way up for now. As you see, here we go. It's instantly looking like ice if I set all
of these to one, so it's not red. In fact, I might set both of
these first ones down a bit. This is RGB, by the way,
I know it's a vector, but it's technically RGB, so this is red, green, and blue. So we're going to
just decrease these slightly until we get
that blue tinge in there. I'm actually going to increase
the green a little bit, too, so it's more
of a cien tinge. Okay, so we've got our ice
now. It doesn't look too bad. I'm going to increase the scale, so it's oh, got to be careful
here. That looks good. But as you can see, it's
screwing with our rock. So what we're going to
do is we're going to choose the snow out. So we've got the white is
one and the black is zero, so it's going to turn on and off the subsurface based on it. We can plug that
into the weight. If we look back here, we've
now got that subsurface without the rock
looking weird. Sweet. There's our snow and
our ice. We're cooking. I'm going to grab that slug
slap that back in there. Now I've got realistic
snow. Pretty good. And even better. I actually decreased the normal because
we increased the scale. It decreased the normal
strength on it, basically. Subsurface is own thing. I could yap about it all day and probably tell you nothing, but, you know, I touch on it. It's useful in some situations
for me, but not enough. But yeah, Okay, that's our done. Sweet. Now we can go back here, and we can position
our spaceship now. That's the last thing
we're going to do today. But yes. So we're gonna go here. We're gonna right
click this, and we're gonna go select Objects. As you can see, under here
somewhere is our spaceship. There it is. And we
selected it all. We're going to bring
it all Wa Okay. My bad global transform. We're going to bring it
all the way over here. I'm going to click on the
main body, Shift desk, selected, to move this over
so you can see all my things. I'm going to go Shift
A and go empty cube. Now I'm going to
scale this up so it encompasses the whole spaceship. I'm going to select
everything on the spaceship and
make sure that this is the empty is the
last thing selected and press Control P and
to keep transform. This is basically going to lock everything to this object. So when I move it,
everything else moves, but I can actually
move everything individually inside of that,
which is really useful. Alright, now I'm going to shift right click
and click on where I want my spaceship to B. I'm going to scale this
down quite a bit, and then I'm going to go Shift S and do selection to cursor, which is going to
snap that over there. Unfortunately, I didn't
scale it down enough, as you can see, quite
a big spaceship. I'm going to scale it
down quite like that. Now I get a position. I'm
going to just look it here. Scale it down a little more. I'm going to bring it
over here. I'm going to hide the camera for
a sec, rotate it. This is the fun part. I know I've got an add on
that does this really well. It's called Drop it, I believe. I'm not sure whether I
could use that, though. I don't think that
would actually work for this, which is unfortunate. Yeah, I'm going to position
my spaceship down here. Actually, I'm going to
be smart about this. I want the lines
of the spaceship to point towards these things. So I'm gonna rotate my
spaceship like that, and then rotate it upwards. I'm going to end up modifying the landing gear to
fit on this better. I'm actually going to rotate
this a little bit like that. But now, I'm not going
to include a person, but you could in
theory, right here, you could like if you
have the add on enabled, I'm pretty sure this one
actually comes with blender, and if it's not, it's in the it's in
in the extension, sorry, lost my thoughts there. You can add in a human form. And you could, you know,
go over here and you could add in a dude
right at the end. You could be looking
out, you know. Hey, what's that over
there? You know, You know, you can do that. But I'm not. I don't like that. I actually don't like
people in my renders. But yeah, we're going to
have our spaceship here. Now, the important thing
is our spaceships. Landing gear isn't
landing properly. So we're going to go down here. We're going to switch this
to medium point and local. And now we are going to adjust. Actually, we're going
to switch these to this to Act development, which is the one over here. I'm going to rotate on the Xxis. This should be on Act
Development, my guy. That is not working. My bad. Okay, we're gonna basically
just position these. Yeah, we're gonna
we're gonna use local. It's gonna Let's
place this first. Let's see if we can
stick this down. Want it to be slightly
in on both sides. And I'm going to
grab both of these, and rotate them along
the y axis. These in. This one is way too far down. So I'm going to
bring this back up, fit it to the surface. Now it would probably be
a really great time to add a subdivision
here, by the way. So let's press Control, too. Just go to add it
down here and we're just going to drag it all
the way up to the top. Sweet. Adonis is going
to be a bit fiddly, I know, but unfortunately, that's the way the
cookie crumbles. Also, if you didn't
know, while you're in both global and local
mode, you can press, if I press G Z twice, because I'm in local mode, it's going to use
the local axis, but I press it again, it's
going to use the Ooh. If I press Z again, it's gonna use the global axis. If I'm in global mode,
if I press G and Z, it's going to use global
access, but I press Z again, it's going to use
the local axis, which is kind of useful. Useful to know. As you can see, that's
there, that's there. And this one here is
way far off the ground. Oh, no, it's actually
nearly perfect. Damn. But and that one we
don't need to modify at all. There we go. Our spaceships
on the ground now, even if it looks a
little weird sometimes, you'll be able to see it
with the shadows later. Alrighty. And there's
our spaceship, well, it's cool stuff,
and it's sitting there. Yeah. This is nearly
the scene set up, done. Yeah, nearly done people.
We're nearly We are a few lessons away
from ready to render. We've got a little bit
of polishing to do and maybe some effects, and
that's going to be about it. But yeah, Alrighty
here ends this lesson, and I will see you
in the next one.
28. Optimizing Subdivision and Atmospheric Fog Integration: Welcome back to Blender
Angya mask class. Procedural ice well. Well, like I said, we're nearly done. Just some minor adjustments. And I remember from last time, we didn't actually texture or make a material for
the landing gear. So we're gonna be doing that,
if you have a look here. This loads in? Oh, yes, we're using a high
subdivision version of this. Okay. For now, let's turn off the subdivision
on the foreground. They'll just let us load
in a little faster, maybe. Go. Anyway, so we're going
to make a little bit of texture for the foreground,
the landing gear. And then we're going to do some slight fog adjustments
because right now, this little piece of even though this little piece
of land is quite big, technically, it doesn't it
doesn't get any of the fog, the atmospheric fog,
which is really ee. Phone 3 minutes earlier. Oh. Oh. Oh. Okay. Oh, that's another good point. Since our spaceship
is no longer flying, we don't need these
lights in the engines to make it look like it's. Where are the lights
in the engines? Yeah. Hey. Oh, useful to know. You can I'll click on something, select everything through it. So I'm just going to
click Delete that one, delete that one. That one. That spaceship isn't
really flying anymore. It doesn't need like Okay. I'm going to hide
this for a bit. And these fogs hoops. That way, it's just a spaceship. Okay, am I going fast now? Oh. A sub tips back now. Okay. Let's go back in the shading 'cause this is Oh, my goodness. There we go. We probably want to
crank up the scale of this displacement now so it
displays on here a bit more. We can crank this
up to like 0.4. So it's all easily
visible from the camera. Lights. The base. I am going to
duplicate this, by the way. If you didn't know that
little number there. This little number I'm going to duplicate this using
this little number here. Well, basically, I'll duplicate the material and give it a new name so that you
can mess with it again. Like here, I'm going to
increase the scale to one because this is the base
part of the ship right here. That's what's taking
for enter end. It's this adaptive subdivision. What sub div do we have it on? One. Okay. To. Adaptive is really annoying
to work with. Oh, that's why. That one's really high. It was the wings. There we go. Now you can see you can Oh, God. You can move the I'm sure you can see
what's going on here. What we did is basically
we made it so they're separate so that
the ships can have higher scale than
these because for some reason, they're better. I don't know. It's something
special like that. Also, let's Let's
not touch that. Let's increase the
scale on this. Let's remove the displacement
temporarily and look at this increase this scale till we get a bit
more detail like that and connect the
displacement again. There we go. Now we can
maybe drop it down to 0.5. There we go. Now it
looks more uniform. The important thing is,
this isn't quite working. Let's make sure there's
only one of these is there. Alrighty. Well, what we're going to do now is we're going to mess with the AO so that it does only in the cracks instead
of the whole thing. Okay, we want the
distance to be low. Do the only local for now. Low, sometimes it gets better. Okay. Anyway, we zoom in here. We can modify. If
we go over here, the outside starts
to get emissive. Also, probably a
good idea to add another black stop over
on this side that way. Basblin has a tendency to leak its color all the way
to the end of the ramp, which is not good if you
need it for emission because emission will boost up even
those really low levels of value all the way up. Oh, there right there. That's
really good right there. Come back over here. And There we go. Now it looks like, oh, goodness. Okay, let's decrease
this strength real quick. That's better. The intention was for this
to end up like be flying. So all of this would be really bright and
you wouldn't really see it that much.
But now it's here. It's very close by. Red. Much red. Anyway, I think I
can live with that. Would like the inside to be
a little bit more varied, but I can't always
have everything. Let's try increasing
the distance again. Alright. I'm gonna roll
with that for now. I really would like
to improve that, that might come a little later. Right now we need to give
these some material. Now, of course, we're
probably just gonna use this material here because
that's we want the ship base. Yep. Okay, now I'm going
to go to layout. I'm going to un rendev that. I'm going to zoom in right here. I'm going to select all of the
individual parts for this. Well, in fact, we can
probably if I press this here. Go like that. We can just hold
Control and deselect, D box select that, move
those to make sure they're all the ones that
I've got selected. And if I check here,
that's got the ship base. We're going to go
Control Link L to Link and M to link materials. Now if we go back to the
shading They all have it. Sit. Let's go. Hey, that's a pretty cool shot. Anyway, yeah, so now we need
to do a little bit of work, making sure that this
Oh, that's right. I hit everything instead of where is the
rest of my scene? If you have a look here like
this, do it in the layout. If you ever look at the layout, you'll see that all this is this nice fog covering
it, but this doesn't here. And we could adjust this by
making we might adjust it, I think we're going
to end up adjusting it by making both of these bigger because the fog
works based on size. Let's do that for a second. Now remember how we linked
all of these together. Splender stop scratching. We can now scale all of these up uniformly without
having troubles, so we can just grab
those and scale up. We're going to have to find
that spot again, though. We're like there
gonna move it over. Down, I've got it. This is a good time to make sure that you aren't using local, as I've just noticed. But if any of your
transforms are not working, make sure that they're on global and it will probably fix it. But Alright, useful thing to know that
you probably already know. If you press G and
then shifts Z, it won't move it on the z axis, but it will move it
on the X and Y axis. So when you press Shift
before K or an axis, it will exclude that axis
instead of doing that axis. I go over here. So you want this to be a bit
bigger. Yeah, like that. Now, I'm kind of making this
a moot point because it will automatically happen
in orthographic top view. Okay, now we're back here. But all of this is now
much larger scale. So hopefully, when we come over back over here and
we render this, we'll open up the
rendee. There we go. Now you can see that
fog is starting to become it's starting to
integrate part of here. Ah, okay. So we've got to
go back and work on that. Joy. I just fix it. Oh, well But yeah, this looks much more
integrated, at least to me. Like, before it
was really sharp, the foreground terrain
was really sharp, oops. And the background terrain had all of this lovely
depth fog on it. But now it looks like, you know, it feels more integrated. Right along this edge, you can see it's starting to
get some of the fog. Even up the top here, it's much darker than it was
before, I'm pretty sure. Yeah. Right. We might add in
some slight details to this. Yeah, we might we might
add some details in here, but I think I'm
going to do that. That's going to be next lesson. Excuse me. Yeah, that's gonna be
the end of this lesson. We're gonna come back
in the next one. We are going to make sure all the materials are
absolutely perfect. We're going to add in
a particle effect. This might be the
next lesson after. We go to add in a
particle effect. And I think we're going to do some compositing and render then in the next one after that. There's only three
more to go, at least by my calculations. But, yeah. Alright.
I will see you on the next one. M
29. Creating Realistic Snowfall with Particles and Volume Fog: And Welcome back to
Blender and go mask class. S your ice well. In our last lesson, we
did some polishing. We fixed the terrain
scaling issue, and we added materials
to the legs. In this lesson, we are going
to hop over the shading tab, and we are going to fix
some things in the shading. If I come back here and have
a look through our camera, this ground here, it's
looking a bit dull. So we're going to click on
it, make sure that we've got the actual grounds the
foreground selected. We're going to press
the slash key to isolate. We're going to zoom in. We're going to use the camera
view, and we're going to go over to this bumper
node right here. This bump node, we're going
to increase the strength and the distance until it doesn't. I was going to say
two. Now we've just got a little
bit more detail in our terrain and
our snow and rock, and it just looks
better, in my opinion. It looks more like rock. Yeah. I'm going to heft this and plug
this into the vector. Review this, and I'm going
to increase the detail and the scale on this right
here. I'm going to oops. Gonna go back into
the camera view. Then I'm going to
plug in the shader. Whoa. Okay, this is a bad idea. All right, that's a bad idea. That usually makes a
really nice rock texture, but okay. All right. Okay. All right, we're going
to come back out with slash. We are going to then
proceed to click on both of the engines and press slash against
so we isolate them. We come back and we
are going to fix this. Come down here. We're going
to select both of these, and we're going to go 0.7 Alt, hold Alt, and then press Enter. Sort link that between
both of these, so they both get 0.7. There we go. Okay, that seemed to
be the only problem. Sweet. That's done. I'm actually going to set
these back up to 1.5, hold Alt and press Enter. Oh, I guess you can see I
didn't have this one selected. Oh. Never mind,
apparently, I did. Anyway, that will just speed up our viewpoard a little bit. And I'm going to click
on this train back here. The big terrain.
We're gonna zoom in. We're going to look
at it quite close up. Now is a good time
to turn back on the subdivision so that we can see our nice and
high detailed terrain. Oh, I love that. So crunchy. A look at our ice. Our ice
is very smooth right now. I know it's a logical outcome
for being wind blown, but it's just a little bit much. So we're going to add in a bump. We're going to
press Control T so that we can add in an image. We're going to delete
the image and replace it with noise because
noise is way better. And we're going to
get it from object, increase the size,
so it's everywhere. G used to detail. And we're going to stick the
color into the height, set the distance to
one. I preview this. Okay, I'm going to increase
the roughness slightly. Oh, that looks so trippy. Um, so it's a little more uniform, and
I'm going to decrease the. I'm going to try
and leave it there. Now I'm going and I'm
going to connect that in here and look at
the principle of BSDF. Great. Now I'm going to grab all of this,
move it down here. I'm going to plug this
into the normal on the subsurface and
hope that this, this shows up like that. See that all of that looking like ice actually does
kind of look pretty good. As you can see, it is
there ever so slightly. I set this back to point like four, where
it's really prominent. Have a look here. Yeah, I
actually like that better. Let's leave it there. That
looks really nice now. It's got, like all
the little bit of imperfections where
if I didn't have this new thing you can do that you probably
didn't know before, hold control, lt and
right click and drag, we'll basically just
disable a node connection. It's called mute
Links, apparently. It's like pressing
M on something. As you can see, we've
gone from this kind of super smooth to having, like, the little imperfections. I really like that. Sweet. Now we're gonna come
back here and wonder why we did that because it's completely irrelevant nearly. Oh, actually, it does
make quite a difference. Okay. Usually, you
don't see that. Okay, we're going to disable
subdivision again so that we don't lag
everything out. We are now going to What did
I say we're going to do? Oh, effects. That's
right. We're going to add in a snow particle effect. Okay, we're going to
completely ditch all of our terrain for a second. And
we're gonna come over here. We're gonna go mash do I
want to do this? Yes, I do. I'm gonna go mesh circle. We're gonna set it
from nothing to endgon and then we're gonna drag it all the
way out over here. And then we are going to do
something really interesting. We are going to open up our we're going to open
up our add ons menu. And you're going to search
for one called Copy. It's called Copy
Attributes Menu. Now, this is also very useful. I would suggest just having
this on all the time. It's just helpful like that. Is what we're gonna do.
This is going to allow us to select our circle. Make
sure you've done that. We might actually modify
the circle first. Okay, we're gonna put
this back in camera view, and we're going
to you Like that. Okay. We're gonna have a look
at our circle real quick. We're going to make it
ever so slightly oblong. And we are going to we're
going to apply scale. Okay. Now, make sure you've
got that selected, and we're gonna zoom in. We're gonna find a claimer
and we're going to shift, click our camera so
that's still selected. And we are going to
press Control C, which is the copy
attributes menu, and we're going
to copy rotation. What this is going to
do is it's going to copy the rotation of the camera onto the
rotation of the flat thing. So this is now facing the
exact same way as the camera. That's relevant in a
bit. Anyway, we're going to switch back
to the shading tab. Now, since we have our
circle selected still, we're going to press
slash to isolate it. Well, okay, we're going to
have to press it twice. My bad. We're going
to go into Reneve. We're going to add new material. This is going to be
called Snow Particle. This quite literally is
just going to be actually, we might use the transparent
the principle, are. We're going to decrease the
Alpha just a little bit. And we are going to add
a gradient texture. He put the color into the
Alpha. Have a look at it. We're going to switch
it to spherical, Breast control T to get
our mapping slept object, and we're going to do
scale on the YXspes. Yours might be different
just so you're aware. We're going to put a
color ramp in here and clamp out the white
ever so slightly. And we're going to
stick this into the Alpha and then
have a look at it. Okay. So what I need to do is
I need to set this to ease. Actually, let's set it to
best Blaine, my favorite. I love best plane.
We're going to do that. So now we have this
sort of white particle. I'm going to give it a
little bit of transmission. This is going to
make it so that it can, like, reflect through. It won't be, like, really
dark on this side. And yeah, you don't want you
want it to have we might actually just give it
100% roughnes that way, that's much better. And we're gonna leave
it as perfect white. Right, that's our snow. We are now going to
come back over here. We're gonna go Shift
A, mesh, cube. Excuse me. A, and it's
perfectly on the camera. Let's scale it up. We
probably want it to be pretty much the
exact same size as the maybe not the exact same, but like it fits inside
the foreground terrain. Alright, particle system time, we're
going to go over here. We're going to click on
the particle properties. We're going to p plus to add
ourselves a particle system. We are going to
immediately go down to the viewport and render options, and we are going to uncheck
show emitter and both. Now, just so you're aware,
you can't see it anymore, but if you click
on it, it is still there. So you're aware of that. If you ever end up
selecting the wrong thing, you may want to
end up just hiding the particle system because
it will cause issues. Anyway, if we play
now, you'll see there's lots of little
particles falling out, and they balling
through the train, but we can fix that. What we're going to do
is we are going to go under field weights and decrease gravity
all the way down. This basically means when
they get emitted out, they're just gonna keep going. Right, while we're
here up to velocity, decrease normal all
the way to zero. That way when they spawn
in, they're just there. Lifetime we're going
to set this to 500, so whatever something above your something above
your maximum scene time. That way, they just stay there. Now, the one problem here is that they're all
spawning on the surface. So we're going to go
over to the source and switch it emit from
faces from volume. We're going to go right back to the start and you'll see they're all emitting from
volume now, insight. Sweet. That is
exactly what we want. However, they're all coming
in at a different frame. So we're going to
set the start and end frame both to one. Now if we go back to the
start, they all there already. Sweet. We actually might set this to frame 20,
the end frame to 20. This is basically
going to you'll see, and we're going to set the
number to 2000 for now. We may tweak these later. Okay, we are now going
to go and shift right click here to put
our cursor over here so it's somewhere we
can see really easily. And we are going to
go shift A and add a force field turbulence. We're gonna move it up slightly.
And it looks like an ED. The position of this
does not really matter. Only thing that happens by changing the
position, rotation, and scale of this is that
you change the position, rotation and scale of
the noise it creates. What I mean by that is
if you have a look here, you can see it's emitting
a noise force on this. If you ever use something
like Houdini or Ambigen, this is a noise force. Now, we're going to
increase the flow. Flow is basically airdrag. We're going to increase
this to like five, I think. Actually, no. We don't
want it to five. We want it to one, actually. And we're going to increase
the strength to maybe six. This is definitely a lot
of speculation here. We're also going to add wind, and we're going to
rotate it along the Y axis 90 degrees that way. This way, it's going
to, like, blow out particles across our screen. And we want it to be quite
strong, actually, yeah. And now I'm thinking about it, we probably actually
want the wind blowing the direction of the ice spike since that's how they form. Yeah, that looks pretty good. So we may want to end up
moving our cube over here. Like that might make mine
a little taller, as well. Alrighty. That's looking
pretty good for me. As you can see, it's
kind of blowing. It's like a blizzard
almost, a mini blizzard. And once we get to about 40
where they've all spawned in, which is where
we're gonna render, they'll all have motion
blare all be great. Yeah. Okay, so we're going to switch back to
the particle settings. And we're going to go from render to halo as
render to object, we're going to go all
the way over here to wherever our sphere circle is. We're going to click
on the object, and we're gonna click on Circle. Now, they're all
facing up right now. Remember how we rotated ours correctly to face the camera? Well, we can just
go over here and click on this object rotation, and now they're all
facing the camera. Also, scale randomness.
Always, always, always do this. Okay. Now, as you can see,
they're blowing by. We might want to make them a
little bit smaller, though. I'm going to decrease my end
frame to, like, here, 120. That way, it just
loops back faster. I'm going to decrease
the overall size so that they're more like smaller. Now I'm going to go and
increase the amount to, like, 6,000 maybe. Yeah. Get behind that. I think I have a feeling
frame 50 is going to be it. Alright, let's have a look at
this in the rendered view. See, we've got that lovely thing we might
actually add in. We might sneakily turn
this back on real quick. I'm just going to show this in the viewport just to
check if this will work. We might sneakily add in. On this object, I'm going
to add in material. I'm going to add in
a volume scatter, very, very sneakily
add in an MI scatter. See if this works and
make it slightly blue. I'm gonna have a huge diameter. Actually, no, we're not.
So basically give us a little halo around
the sun, almost. We're gonna call
this MIE scatter. Because MIE scattering
is actually a thing that happens
in real life. Well, yeah, we're gonna
leave that we might leave. We're gonna leave that
at 0.007 for now. Anyway, we're gonna
leave that for now. That's our ice. Hopefully, we're just
going to leave that there.
30. Snowfall and Fog Polish Motion, Density, and Final Shading: Welcome back to Blender
and Gaia Master Class. Procedural Ice World. Yeah, we're just going
to leave that there. And now, I believe that is
Let's do a preview render. I can tell this already this is already at
15 minutes now. So we're going to spend the next probably going to
go to 20 minutes, and we're going to
spend that last five. Rendering. Okay. Start
off. Render preview. We're going to set the
noise threshold 0.5, set excuse me, M samples to 128, the time limit to 30 seconds with the denoise of open image, accurate, albedo and
normal high and use GPU, which for some
reason, should be on. Okay, so this is going
to basically render out a low quality
preview. Of our image. All of these settings
are relevant to your computer's
computing power or GPU processing power.
This works for me. I have a 30 70, so I have a decently
high end computer. It's not definitely need
an upgrade sometime soon, but still it can handle itself. So if you have a lower spec PC, feel free to decrease
both the samples and increase the
noise threshold. The higher the noise threshold, so the closer to one it gets, the lower the quality, the
lower the sample MX samples is, the lower the quality. So I'm gonna press F 12
now and open up my render. This is gonna go. Do do
do. It's gonna compute in. Oh, I probably should
have decreased the subdivision on some of these 'cause this is gonna take a little
while to bake in now. Ono. There we go. Oh, that looks suspiciously
smooth over there. What is that? Oh, dear. Check what that is. I'm not entirely sure what this is here. As you can see, that's
looking quite nice. I'm a big fan of
that. As you can see, our ice in the middle
is kind of taking it. Yeah, what is this? I wonder if we've intersected
with the terrain, and I've just been
too stupid to see it. We might have to crank up
our volume fog Mometric fog. Ah, I think we have.
Yeah, we have. Okay, we're going to grab
the spaceship spaceship box, the little terrain and the
snow, we're gonna move it up. Oh, and the camera. We need to select the camera as
well. Don't forget. Let's just make
sure that we've got that camera selected that we do. And we're gonna
move everything up. Out of the train. I'm going
to come back to the train, and I'm going to turn
on the subdivision. It's just going to make sure
that everything is in place. I'm going to crank
this back down to two so that it
doesn't go too high. And we press F 11 and
look at this again. Okay, so we want the density
on the volumetrics fog to go a bit up on all
accounts. All right. Oh, that's the wrong
one. This one here. We're going to look
at this. We are going to leave that there, and we're going to go
into the shading menu. So that's a little far. Now, we are going to click
on our distance fog, and we are going to increase the density by increasing
this multiplier value. So we're going to go to 0.5. And I'm going to
grab the ground fog, come over here to the density
here and set the tubes, you know, go back up to 0.1. And then at some point, I'm going to dear, what it out. Where did all of
our new objects go? What is this? It's still
on the scene. That's nice. Let's just name this
snow system. Yeah. Sweet. And now we
can click on that. We can come back here and
we can make this 0.001. And, now we've got all of
that. Let's press F 11. Let's press number two, and
let's press F 12 again. So basically, what this is
going to do is this gonna let us compare if we
press one and two now, it's going to compare our current render to
our previous render. See that has a lot
more fog in it now. That's much better. I mean, if you like this lack
of fog over here, feel free to not
change anything. But, for me, yeah, it's gonna gonna
have some changes. As you can see the height, there's a bit of
height difference. But, yeah, I like
that fog way better. Damn it. I wish 'cause now we can see past the horizon,
it's really annoying. To high up. Okay. So we need to select this, this, our camera and our box. And we need to Let's try
having this scale down again. Move it forward and put it
down in this divot here. Let's use the Y frame that way, we're looking at it. Erect. Rotate everything up. I'm pressing RR
twice here that way. I can tilt everything at once. It's going to look a
little weird later, but hopefully if I look at this now. That's how it renders. Renders properly. At that Ah, but now it's in the
way of the sun. Okay, we might go over to our shading and
switch this to world, and we might rotate
our world slightly. Let's turn off the fog,
though. Turn off the fog. That's going to speed
up the render time considerably. There we go. Okay, let's give this a
crack. Let's go F 11. Oh, I accidentally
press F 12. My bad. Anyway, same principle, we're just gonna let that render out. It's slightly better. Or if this didn't take up as much of the
foreground as it does. Y. Oh. I guess that's
just the way it is. Um, I do really wish that perhaps perhaps we can
tilt down and have that. I don't really like
the fact that that's gonna end up out at
the top of the screen, but feeling that's the snow go. Oh, the snow system
has been hidden. That's why. We're
gonna grab that. We're gonna grab
all of these again, and we're gonna try
and tilt them down. You know what? We might go for the Hail Mary. We're going to move this
really close into the divot. I'm actually going
to come out of here. I'm going to look at it from a three D perspective real quick. We're gonna come out
of here. We're gonna go right into the divot. Scale down. Move
all the way down. We're going to come
back in the camera for this to make sure that
we don't clip in. Do. We are going to move to the side. Rotate slightly. Now we're going to
look at it in Y frame. That's all there. Let's grab our
camera and decrease the focal length and pan it
up a little bit, like that. Et's see how this looks. A. That works. Now, if we pull our fog back, A, and it even
integrates, that's nice. This is really nice.
We're gonna go back, and we're gonna rotate our piece re just a little bit more
that's intersecting, and that's not a great idea. I'm told I like it.
We're gonna have it. I like it sort of leeching
into that piece of ce. Okay, now we're going to
go back to the object. We're going to click until
we get out of terrain. I get to see, what happens if I increase
the strength on this? Okay, it starts to look weird. Except this back to one. And
I'm going to come over here. I'm going to disconnect both of these just so that
we have our volume. I'm going to increase the
density of the volume slightly and increase the power on the noise texture
to like 200. Sorry, the emission,
the emission volume. I'm going to link this back in. I go to say it's an improvement. Alright. Now, I've gone probably about 5 minutes over schedule here, so we're going
to leave it here, and we're going to be back in a little bit to
start pretty sure. We're nearly about to start compositing, which
is pretty good. Anyway, I will see
you in the next m
31. Compositing Snow Scenes with Motion Blur and Glare Effects: He Welcome back to Blender Angyamss class,
procedural ice world. In our last lesson, we
finished polishing. We reframed slightly, and, yeah, we tweak the
materials bit. But now we've got to
get onto our snow. Right now, it looks
a little bit goofy. So yeah, I'm going to
grab our snow object. I'm going to decrease the
scale of this down 2.005. It's going to make it really,
really, really small. Okay. Now I am going to go up
in my particle settings. I'm going to go up
to the cache option. I'm going to click Bake. Now, be aware this could take a while. It is going to completely
lock blender while you do it. And you'll get a little
progress bar down the bottom here saying baking point cache. Now, mine goes very fast, but yours might not go so
fast, just so you're aware. What this will do is
this will basically write down to memory where all of the particles go so that if you've ever
used a simulation, you know you can't
scrub backwards, unless you have it baked. So we now have it baked, so we've got it. Okay, sweet. Now, the important thing to make all this snow look really
good is we're going to scroll down in our let just
close all this up real quick. Scroll down in our render
properties to motion blurt. We're going to check it, and we're gonna leave
it on one for now. Going to make our snow go past. Right. I think we are about
to start compositing. That's the go right now. So I'm going to press F 11. I'm going to switch
over to here. I'm going to press F 12.
I'm going to render. Alright. Now you can see the
snow is a little bit better. However, it's only centering
around the camera. Now, I know this does
actually occur in real life, but we probably want ours to show up a little
more predominantly. I've got a Okay, we're
going to have to tweak that material,
that rock texture. It's looking a little weird. I'm going to come over here.
I'm going to go to this. I'm going to delete my bake. Going to increase the
number to 10,000. I'm actually going
to go 12 13,000. I'm going to increase
the scale to 0.08 008. I'm going to go to
the shading table and I'm gonna look and I'm going to click on my circle. I go roughness, bit down. I'm going to decrease the transmission weight
just a little bit. But we can see it, but hopefully this means
that we will be able to see the rest
of it as well. Yeah. I might just add a little
bit of emission to these just so that we can
see them as being white. Right. We're going to hide
this for a sec. We're going to go back to
our foreground terrain. Now I want better
rock right now. I'm going to turn on the
subdivision for this object. So we got nice high resolution. And I'm going to
attempt to build. I've tried to do this before, but hopefully it's going
to work this time. I'm going to stick
this into here. I'm going to increase
the detail here. Increase the distortion
slightly and the scale. Now I'm going to look
at the principal BSDF. Decrease the roughness
on some of these. Really? Really? Sort of volcanic rock. Othing I've got to get
better at is building noise textures,
things like this. Yeah, let's try that.
Let's leave it there. I like that sort of rock
sort of twisted like lava. That is, like, the idea of
what this planet is made of. Anyway, stop thinking about what it could be This should be named for four TMAsh today. Or grand Terrain.
Oh, my goodness. Okay, we're going to save
the most important step. You should be doing this
without me even telling you. And we are going to
look at this again. And I think, yeah, I think we're ready
to start depositing. I might actually
decrease the strength on the big terrains bump because it is quite
quite messing with that. If you like this sort of
really detached actually, that looks fine once I'm going
to decrease it slightly. That's just going
to make sort of the inflections in it a
little bit more prominent. Right, we're going
to do compositing now because I'm not
doing this anymore. We are going to press F 12, and we're going to
render four the last time before we
render full quality, and we're going to switch
over to the compositing tab. Now, check use nodes
if you haven't already and create
this setup right here. Yeah, what we want to do is
we want to add in a glenode. We're also going to add
in a color balance, a lens extortion, which we're going to
end right at the end. And we are going
to add a Oh, yes. A ellipse mask. A blur node. Do this all while we
wait for our render. Blur node, what else do we need? We probably do There we go. There's our render.
Why is it not? Why do we not bake the cache? Am I just special like that? I think I forgot to bake it. Oh, yeah. My dad baked the
cache. Frame 50. Make sure you have that
motion blur enabled, and the things quite high. I should have
done that before. Damn it. We're going
to render out. Again. Well, that means we can get back our
compositing tab. We are going to add in a mix multiplayer We're going to build this
real quick because we can probably look
at this without it. Okay, so we see the circle, make the cir called
nice and big. You want it to basically be
from the edge of the screen, the edge of the screen, and then grab both of them
at the same time and make it a bit bigger. It should be a bit
bigger. Anyway, we're going to plug this
into the image, and we're going to
look at this image. We're going to make the
size something like 256. We're going to plug
this into the multiply, and we're going to plug the
multiply in the top here. Yeah, I think we might do it. We might actually place
it after the glare. But yeah. So what this is going to do
is this is going to add us. Actually, let's put this to 512 and decrease the
size a bit like that. Now we're going to come up
here and as you can see, this is a vignette efect now. We don't want it
all the way, but I have to focus our image, our attention in the middle. We are going to
increase it a bit more because I want it
only on the edges. That way we can
increase it here. Okay, so we've got
about to Gaich. We've got a color beans,
and we've got all of that nice snow seems to
be absent down here. I might have to
move it slightly. We are going to just open this up so that you
can see really easy. Make sure it's on
lift gamma gain. We're going to
decrease the lift a bit. Lift is the shadows. We're going to make these
a little bit more blue. We are going to
decrease the gamma slightly and increase
the gain a bit. Definitely, you want to play
around with these until, you know, it looks interesting. I generally don't mess
with the colors that much. That's just personal preference. Anyway, we're going to do that. We're going to add in a
hue saturation value node. I wish I had their
vibrance built into this. We're going to increase
the saturation slightly, just slightly. As you can see, it's
not a big difference. We're going to have that.
Then we've got our image. We're going to preview the
glare the highlight, sorry. Make sure this is set
to bloom and high. You open up all of these. We are going to increase
the highlights decrease the threshold until like a
good portion of the scene. You don't want a lot,
but you want the engine, you want the sun, and
you want the edges. And we are going to
toggle off clamp, and we're going
to increase we're going to click back to the glare to increase the size and
decrease the strength. That's very bright. Gonna
look back over here. We might tint this blue. Look at that. M
32. Final Compositor Pass Motion Blur, Glare, and Output: Welcome back to Blender and Gaia Master Class,
procedural Ice World. All right. We don't really need that much bloom
on this image, to be honest. Like, if I remove that we have a look at our highlights, we'd
probably get more. But anyway, we are going to now, we're going to actually
add another one of these just because
it's in the ice. There's something interesting
that occurs in the ice. I'm going to disable this real quick. Go back
to the highlights. I'm going to increase the
threshold so it's just the sun. Probably go quite high here. And I'm going to switch
this from bloom to streaks. I'm going to preview the glare. We're going to make six streaks. We're going to expand this out. We're going to
increase the fade, or, sorry, decrease
the fade a bit. No color modulation and increase iterations
to like seven, maybe. And we're going to
set this to medium. We're going to change the angle of the streaks
ever so slightly, and we are going to
decrease the strength. Just like that. Now if we ever
look at this again, oops. I'd have to increase the strength now because
we can't see it. You'll get this effect that
you've sometimes seen, if I put this back on, we need we might set
this to low now. Some reason the glare
length changes depending on the the quality, which is really annoying, I'm
going to set my to medium, see if I can get this
fade all the way up. Now if we look at the
image again, there we go. Now if we decrease the strength, even more. Let's set it to it. Let's type it in, actually. Let's go zero, zero, 01. Nope. Okay, let's go. Up now, zero, one. There we go. I want halfway, so I'm going to go zero,
five, just like that. Sweet. Now we're going to
go to the lens distortion, and we're going to click fit, and we're going to click
on dispersion and go 0.01. That's not enough.
Let's go 0.05. As you can see, Oh, that's a
little bit much now, my bad. Let's do two. Two is enough. Okay. So as you can see,
we've got this at the edge. So funny things going on with
the snow up here, per se. Anyway, and there's
our final composite. As you can see, we
definitely upgraded it. Well, at least in
my opinion, we did. I'm going to come back
here and we're going to What's going on
with that snow. I think we might need
to increase the amount of time the snow is emitted for, so we might actually delete
this bake crank this up to 25,000 and change this to 50. What this is gonna do now? Actually, I don't want
it to be that high. I'm gonna go 15,000. This is just gonna. And then on frame 50,
we're going to bake it. The bake doesn't really matter. I'm going to go on frame 50, and we're gonna
render this again. Because for some
reason, these are going sideways. Oh, yeah, also. I'm gonna B there's
nothing over here. It's concerning. Anyway, I'm
now going to press F 11. I'm going to switch
to number two, and I'm going to press
F two and render again. Also, save. Always good to save. A, and there we go.
As you can see, the snow is still drping
out. What the hell? Okay, we might I shouldn't
be doing funny things. Try rolling back here. Okay, pro tip, if
you press Control B, you'll get the box select. Now, this box select works
in the camera view only. Oops, Alt B. Lb my bat
works in the camera view. Later select part of your
image to only render. So I'm only rendering this
top section right now. So I was really
good for checking if this is happening again. I wonder if it's
just because that's the direction that
it's coming from. Let's increase the
wind speed and decrease the turbulence
effectiveness. Increase this to three and
increase the wind to six. Okay, now let's go
grab our particles, delete bake and bake again. You can see this is
more linear flow now. De. Let's try it again. There we go. As you can
see, it's now more linear. Must have been
what was happening is that the turbulence was
pushing it back and forth, and it was just not happy. All right. Now if we go control
Alt B. Oops. Roll S two. Troll Alt B. Josh ******* it. Alt, Alt B. Okay, that used to be
Control O B. Ot B, we can now get the sort back, and we can press F
12 and render again. Hey, and now we're done.
That looks way better. Um, yeah. I think we are done. I'm thinking we're
done. Okay, so now is a good time to go
through and crank up all of the settings on all of
these and press render. This is it. That's it. We're done, I think. Um, I'm happy with this.
This looks quite nice. Definitely a little different
from my previous render, but I like it. We might decrease the amount of the strength on that that's
looking very dark there. So we might hop over to
here, back out of that. Here, find this and decrease
the scale like point. Two. And do it
over here as well. Two. Right. Yeah, I'm going to go crank up all of the subdivision levels on this. Four. Well, probably should not have done that in
the viewport, though. As you can see, it's
slowed down a whole lot. Let's set this back to
two. Okay, that's better. And we're going to set
this back up to four, two. Feel free to set this
as high as you want. I not suggest going past five, especially with
only one K image. I'm going to crank that up. I'm going to go
in, and I'm going to crank up these
sub dip on here. I'm going to set these to one
for now because they're not really I think none of these
are really very close. I'm going to set this to one, hold Alt so that we
can multi do it. Oh, I forgot to turn on. Anyway, and I'm going
to press render. I'll get back to you. I'll leave the recording on so that you
can watch the render go. I'm actually going to Okay,
final render settings. This since this is
the final lesson, here's the final
render settings. We are going to I'm going
to open up my perfect one. We are going to roll
with open image D noise, accurate, high, GPU,
albedo and normal. I'm going to run 0.03. I've discovered it's
actually better 0.03 with two k samples
and no time limit. Now, to make all of
this work much better, I'm going to go down to volumes, and I'm going to decrease
the max steps to 64, and I'm going to decrease the step rate for
both of these 0.01. This is going to make
the volumes look better, and this is going
to make the volumes render like about
20 times faster. I'm going to keep scrolling down now to where I get
to the performance. Compositor already said GPU. I've using tiling, 256, curves and persistent data. Persistent data only matters if you've animated something. I'm probably going to animate this ever so
slightly, just a pen, maybe something really basic, so it looks amusing. And, yeah. So yeah. We're done. That's everything. Um, feel free to
set this to film. Filmic basically makes
it look different. It makes the colors. It makes the computer interpret
the colors differently. So if I look at all
this real quick, and I set this from AJXTFlmic. You'll notice they
get a little bit brighter and a bit
more saturated, where AGX is a little less, and as you can see
stand, it's even worse. I like AGX. I'm
going to go punchy. That's grayscale. Or
very high contrast. Let's try punchy for now. Idiom. No, I'm gonna
leave it right there. I'm going to leave
it right there. And that is my scene, minus the fog, of course,
unfortunately. Um, I'm going to
turn those back on. As you can see, it's
taking forever to render out because I've cranked
all of the settings up. Thank you for sticking with
me all the way to the end of Blender and Gaia master
class, procedural Ice World. I hope you have enjoyed building
this frozen environment, and now you feel much
more confident using both Gaia and Blender together
in your own projects. If you have a moment, please consider leaving a
review or some feedback, and it would help me make
better future content, which would be good, too. Also love to see
what you create. So please please do share your renders and
experiments and thoughts. Uh, and thanks again for joining me on this, slightly
long journey. Um, yeah. Thanks. And
happy boat building.
 3D Tudor, The 3D Tutor