Transcripts
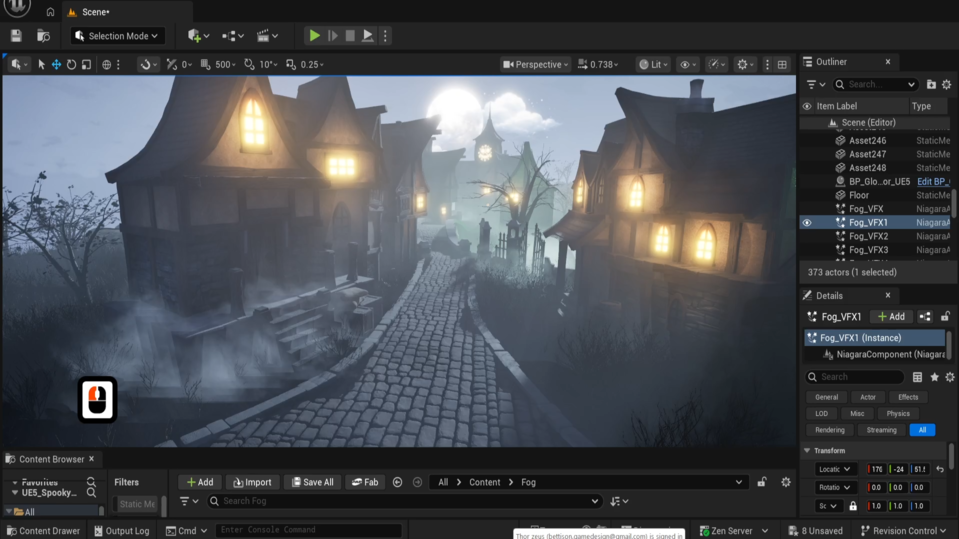
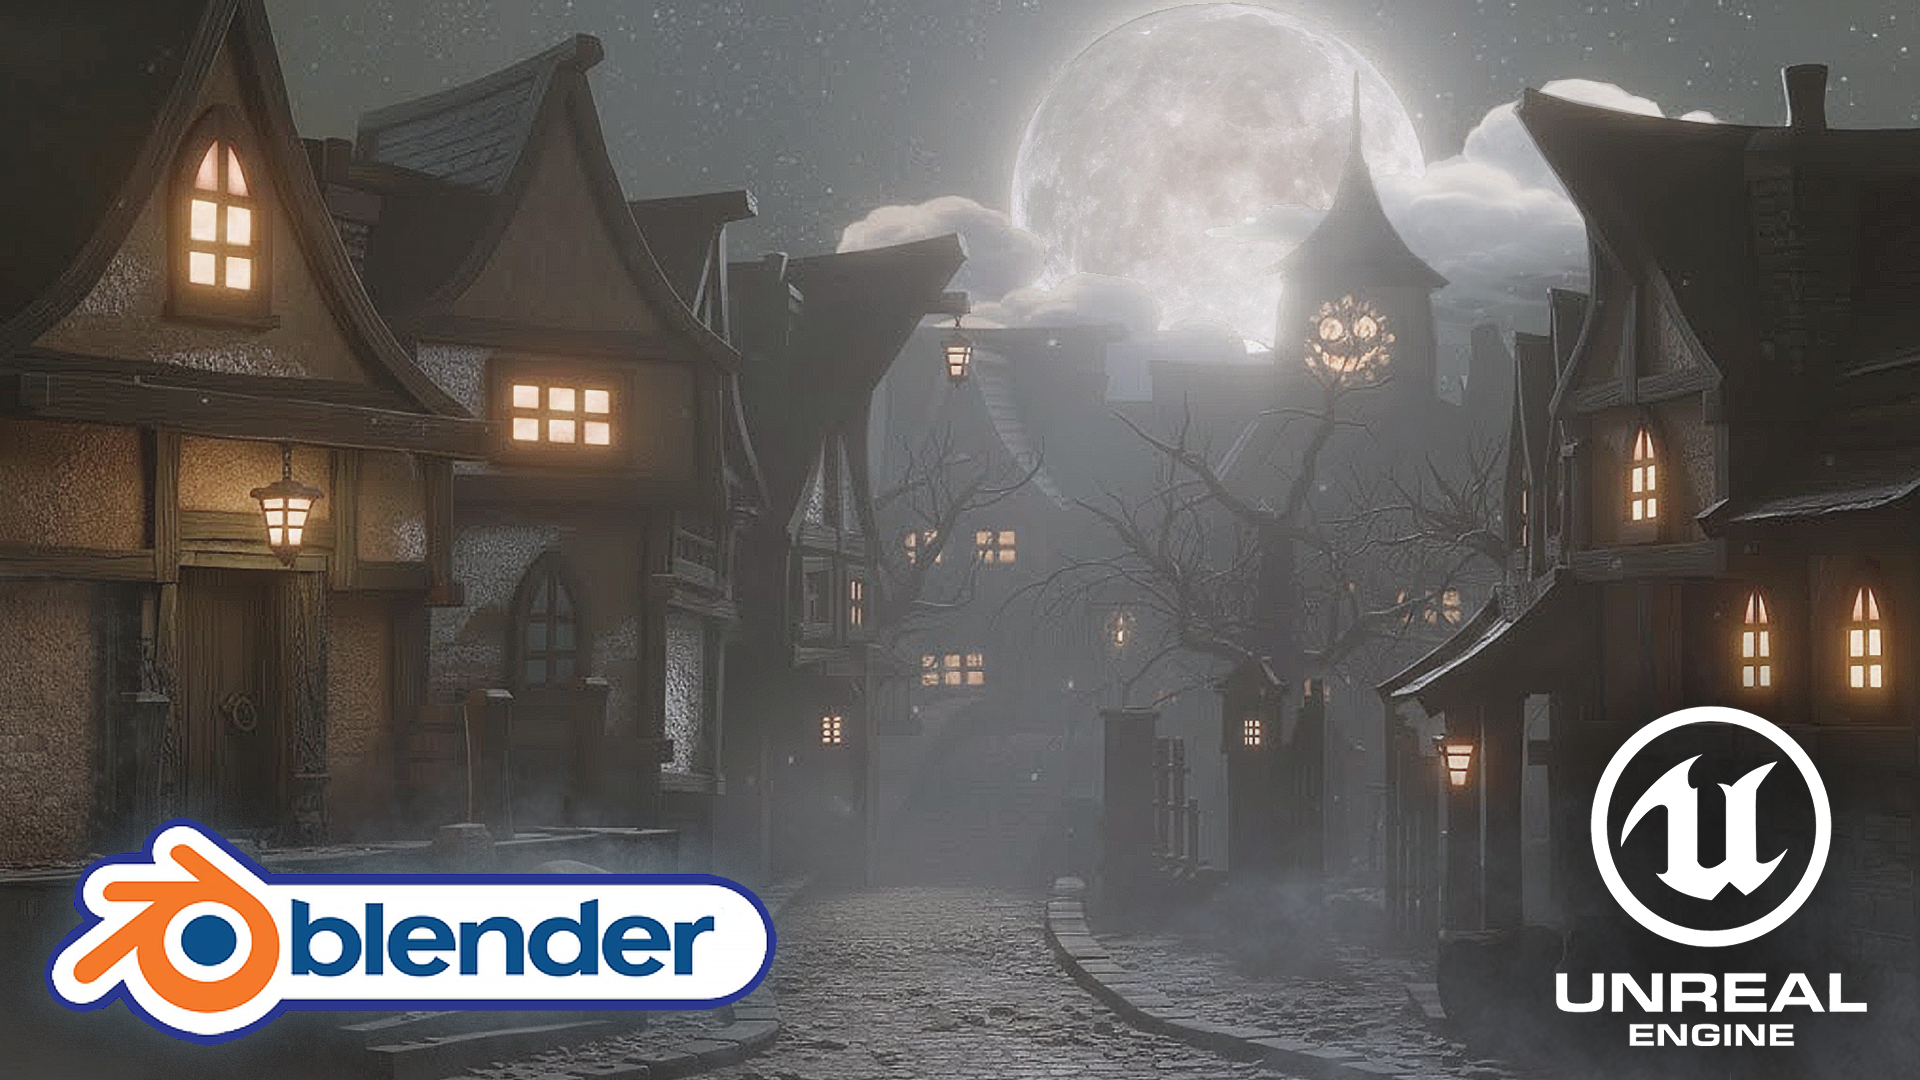
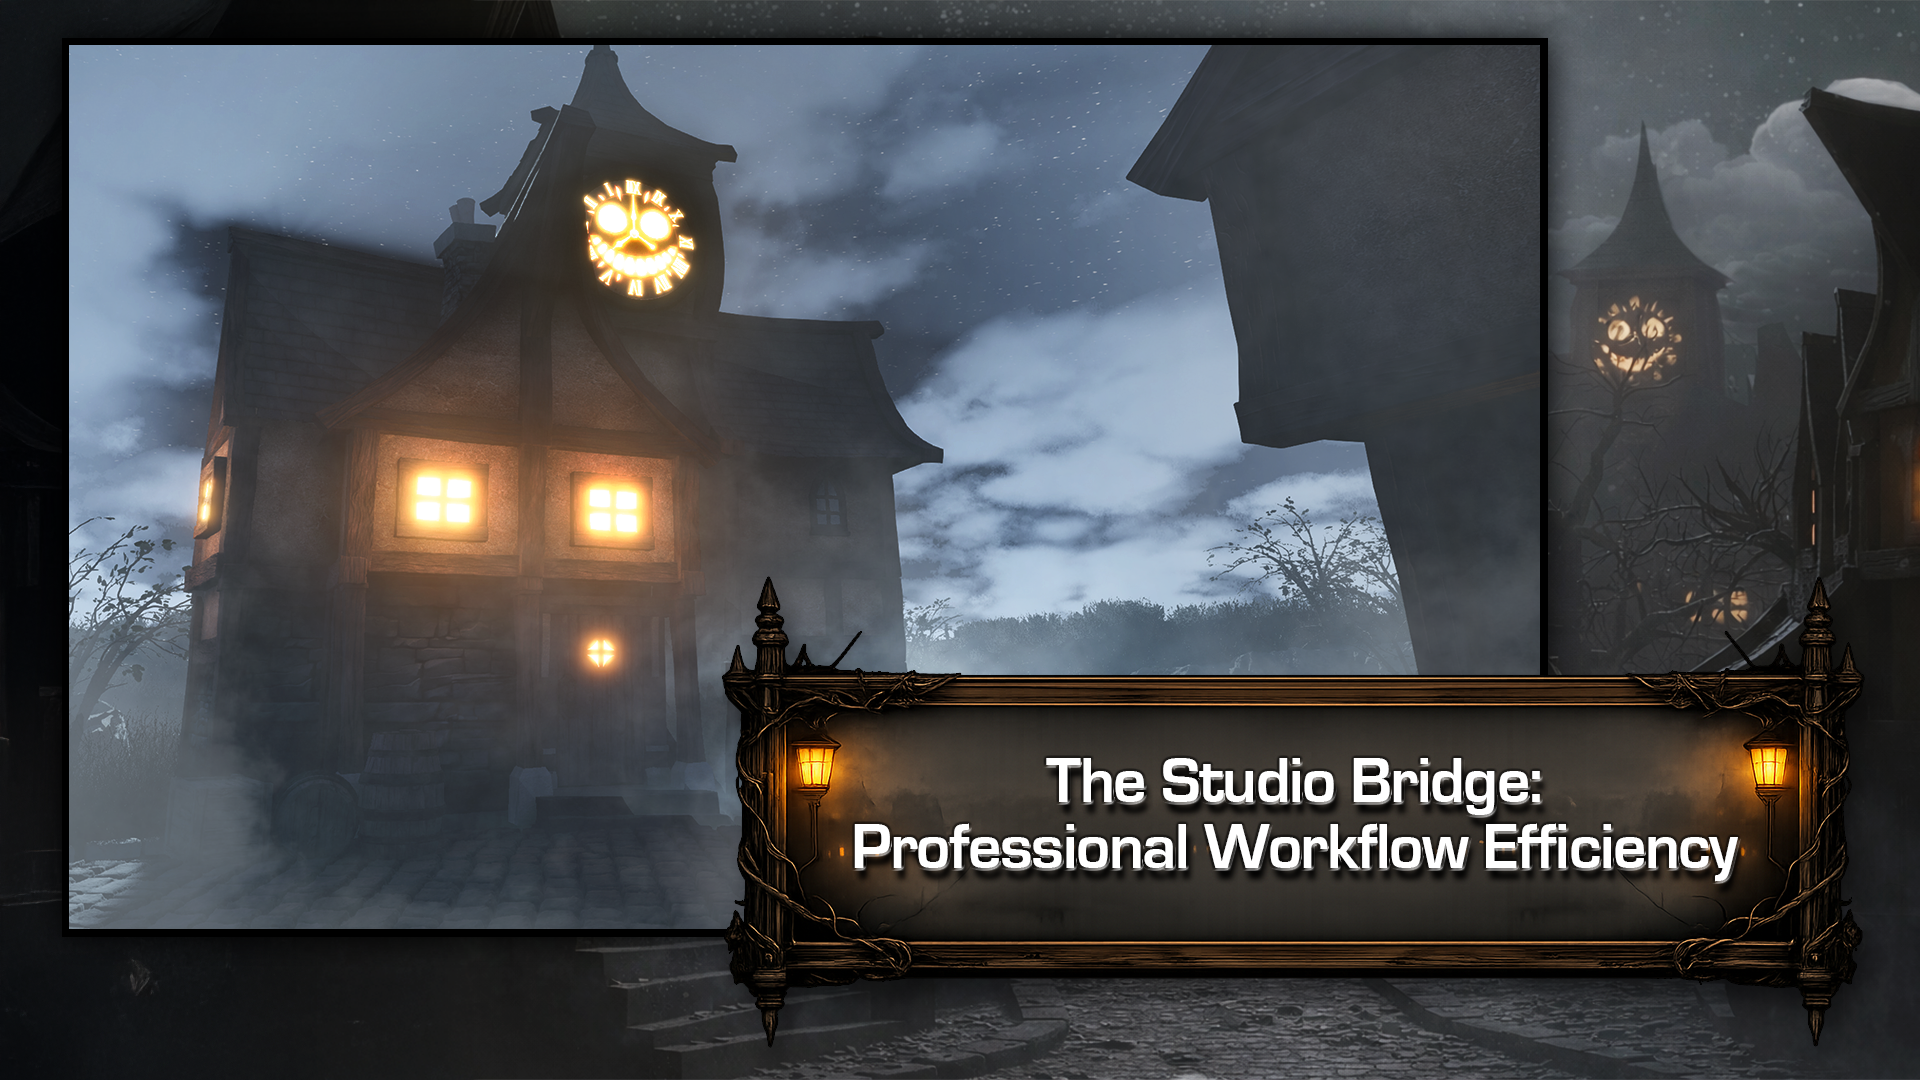
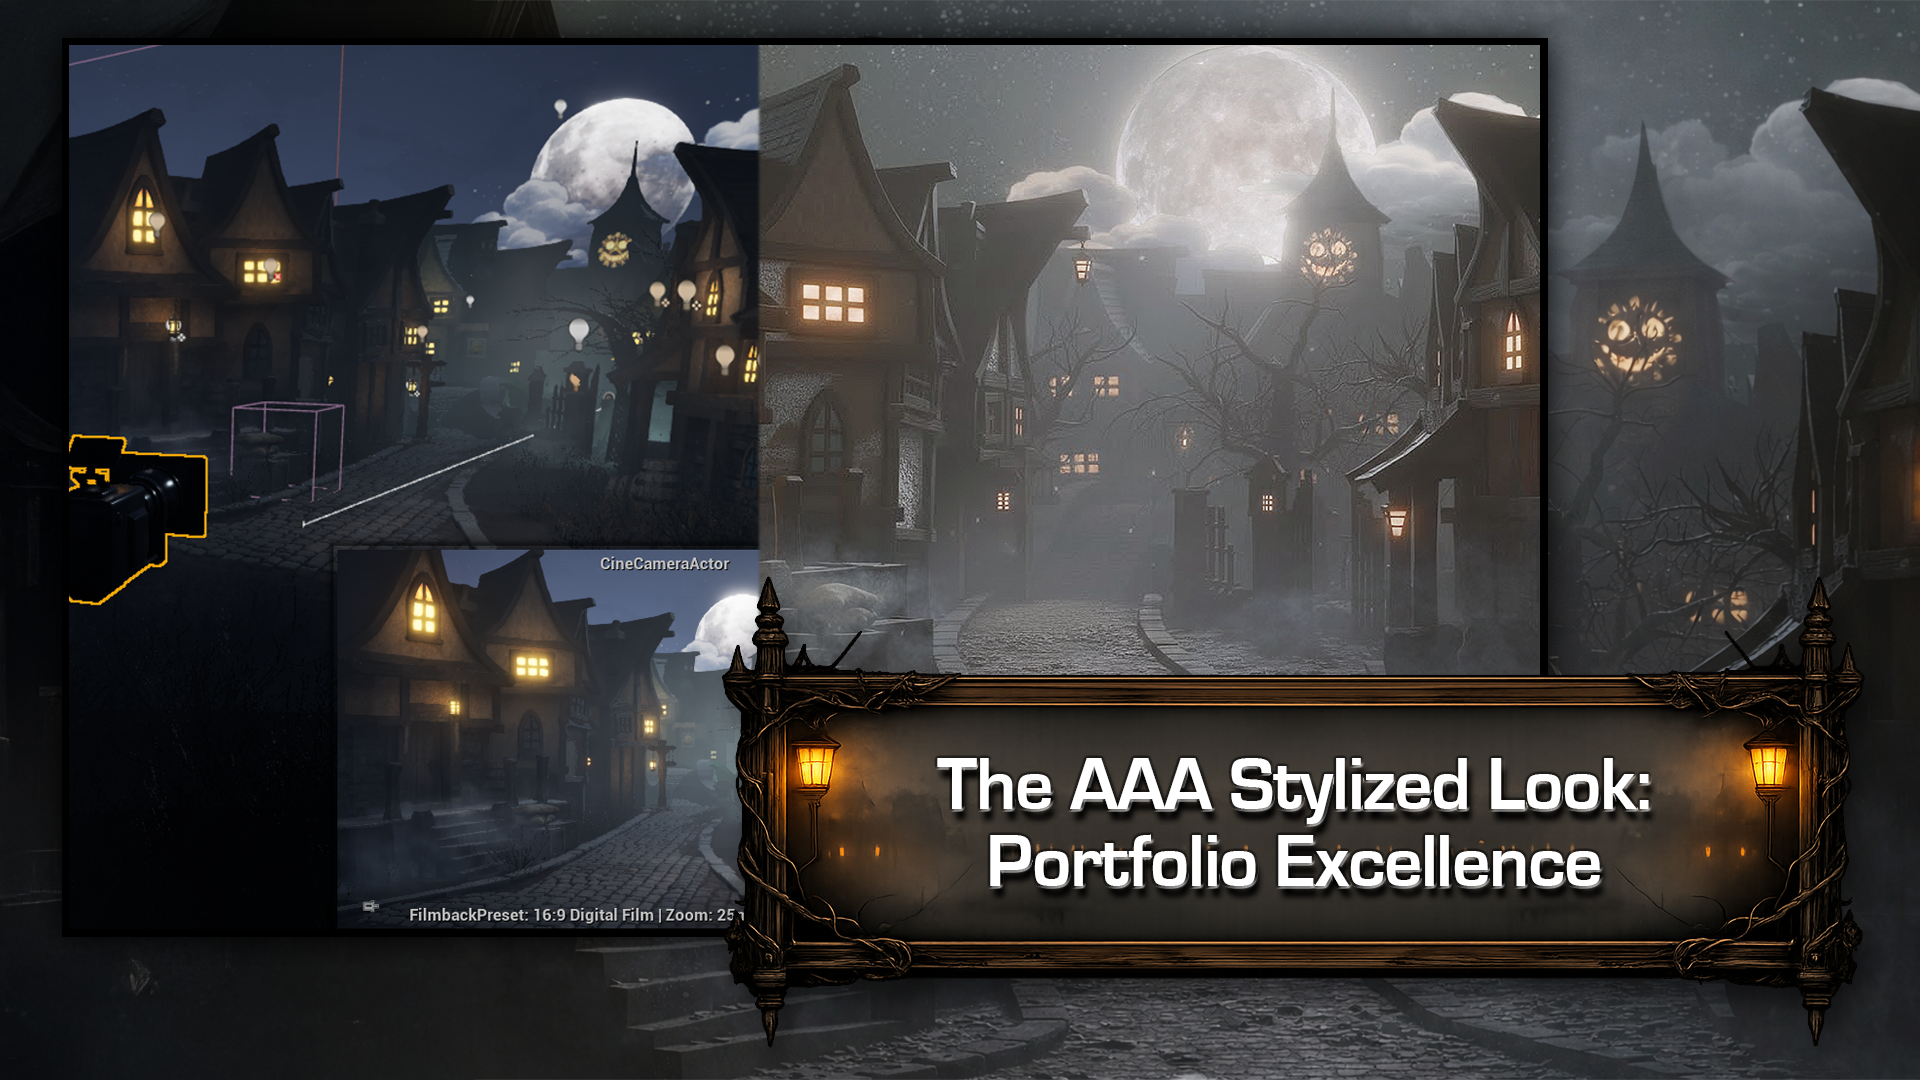
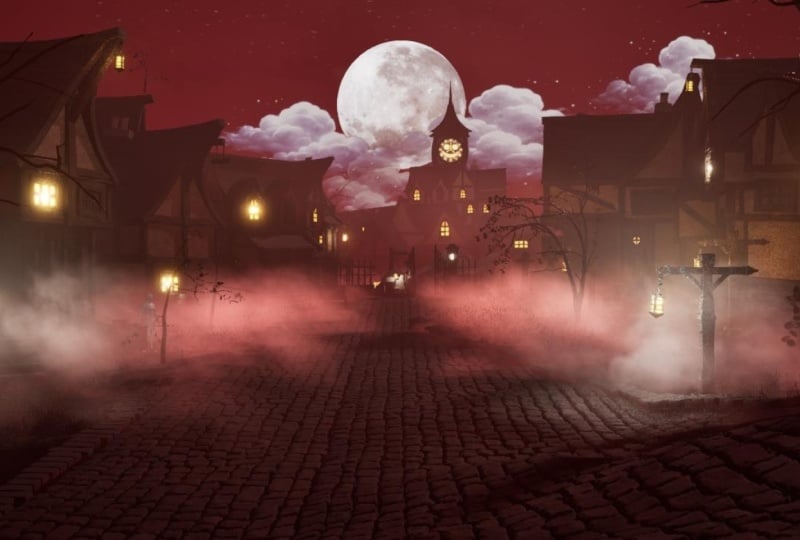
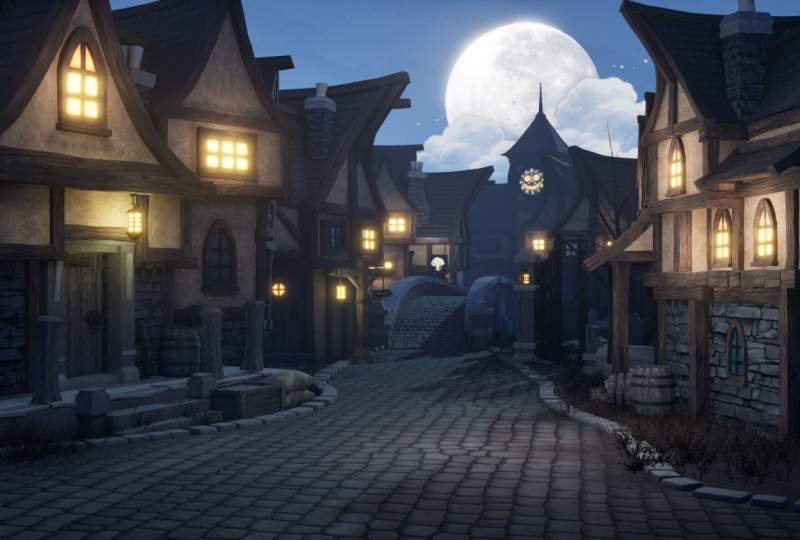
1. Haunted Street Environment – Blender to Unreal Engine 5: Welcome everyone to the stylized Haunted Street Environment, Blender to Unreal Engine five. If you've ever built
assets in Blender, open unreal and
immediately felt like you're teleported into
a different universe, this course is that bridge. We will build a stylized Haunted Street environment properly from modular kit to finished
cinematic scene. Hi, everyone. I'm Neil from TD Tudor. And in this course,
you're not getting random tricks or
a highlight reel. You're getting a workflow you can repeat for the
rest of your career. We will be building a stylized haunted Street modular
kit in Blender. That actually fits
together cleanly, stays consistent and scales into a full environment
without falling apart. Then we take that exact kit
into Unreal Engine five and turn it into a finish scene with mood, depth, and that. I really want to walk down
this living breathing street, but I absolutely do not want
to go there atmosphere. The real win here is you won't just finish
one haunted street. You'll own a reusable blender to Unreal Engine five pipeline. You can apply to any world
you want in the future. This course is brought
to you by two of the best instructors
in the industry. I'll be handling the
blender section, and Luke will be handling the
Unreal Engine five section. Three D Tudor is trusted by more than 250,000 artists worldwide. We also have one of
the largest catalog of courses in stylized environments
in the world because we obsess over the exact
friction points that stop most modular kids from working
seamlessly in a pipeline. Three D Tudor spent
years solving this exact problem.
Most artists here. In the blender
portion, we focus only on what actually matters
a modular environment. Planning a modular set so every piece connects
cleanly and stays flexible. Modeling with consistent
stylized shaped language that feels like one world, practical modeling workflow
for speed and control, Uvu wrapping and textil density, so textures behave perfectly, and a simple
repeatable checklist so you can sanity check
the kit before export. Yes, we cover the real world
friction points, too, scale, origins, shading weirdness, and the exact habits that
stop things looking off. We will be showing
you the exact process that AA studios use
time and time again. Then it's time for
Luke to take over as we bring the kit to life
in Unreal Engine five. We start with a
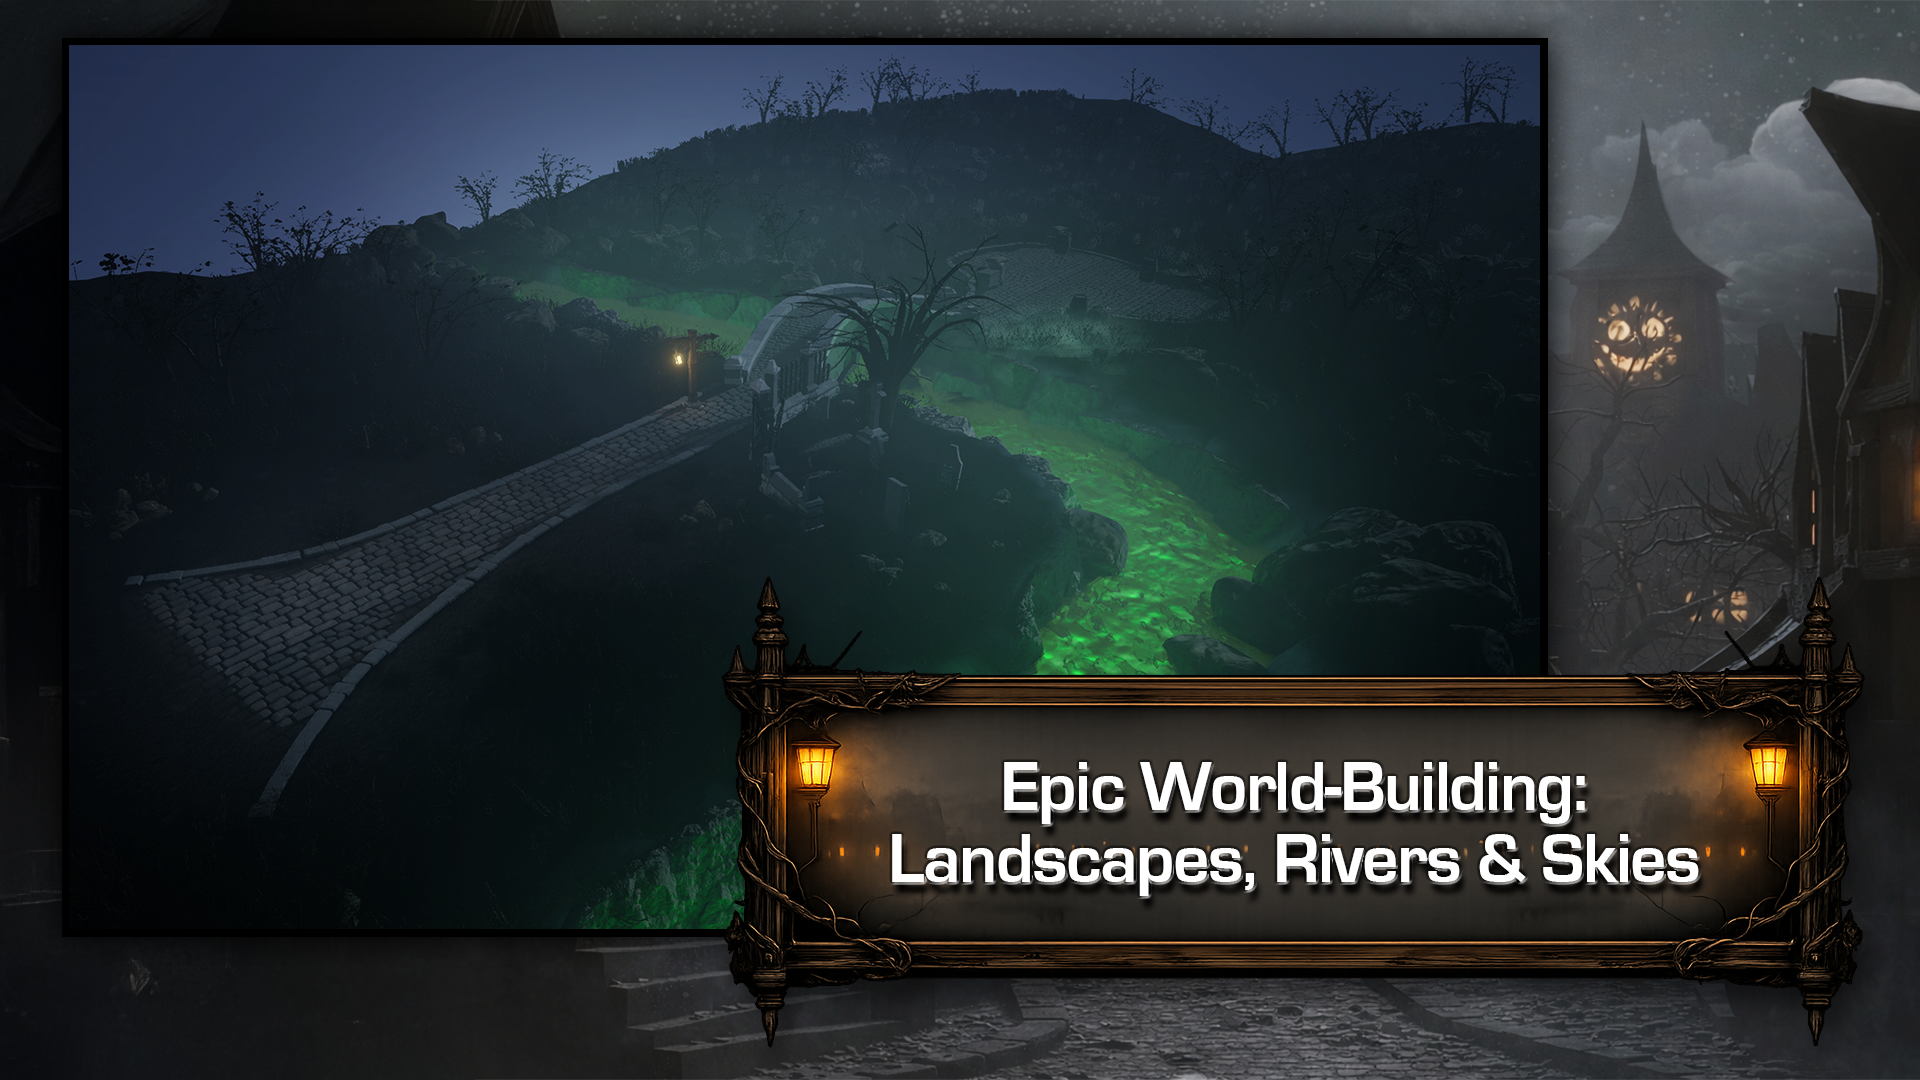
clean GOB handoff then build the world around it. Landmsterrain, river
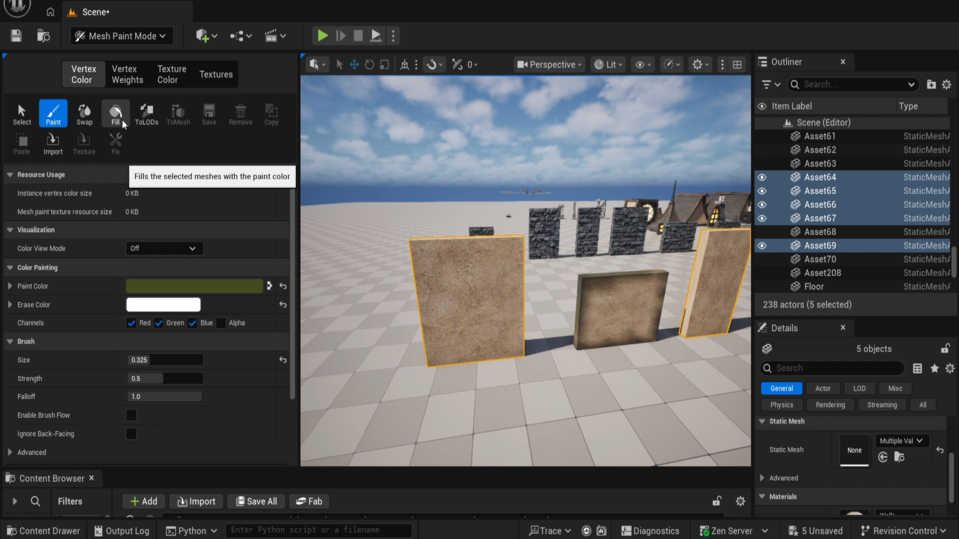
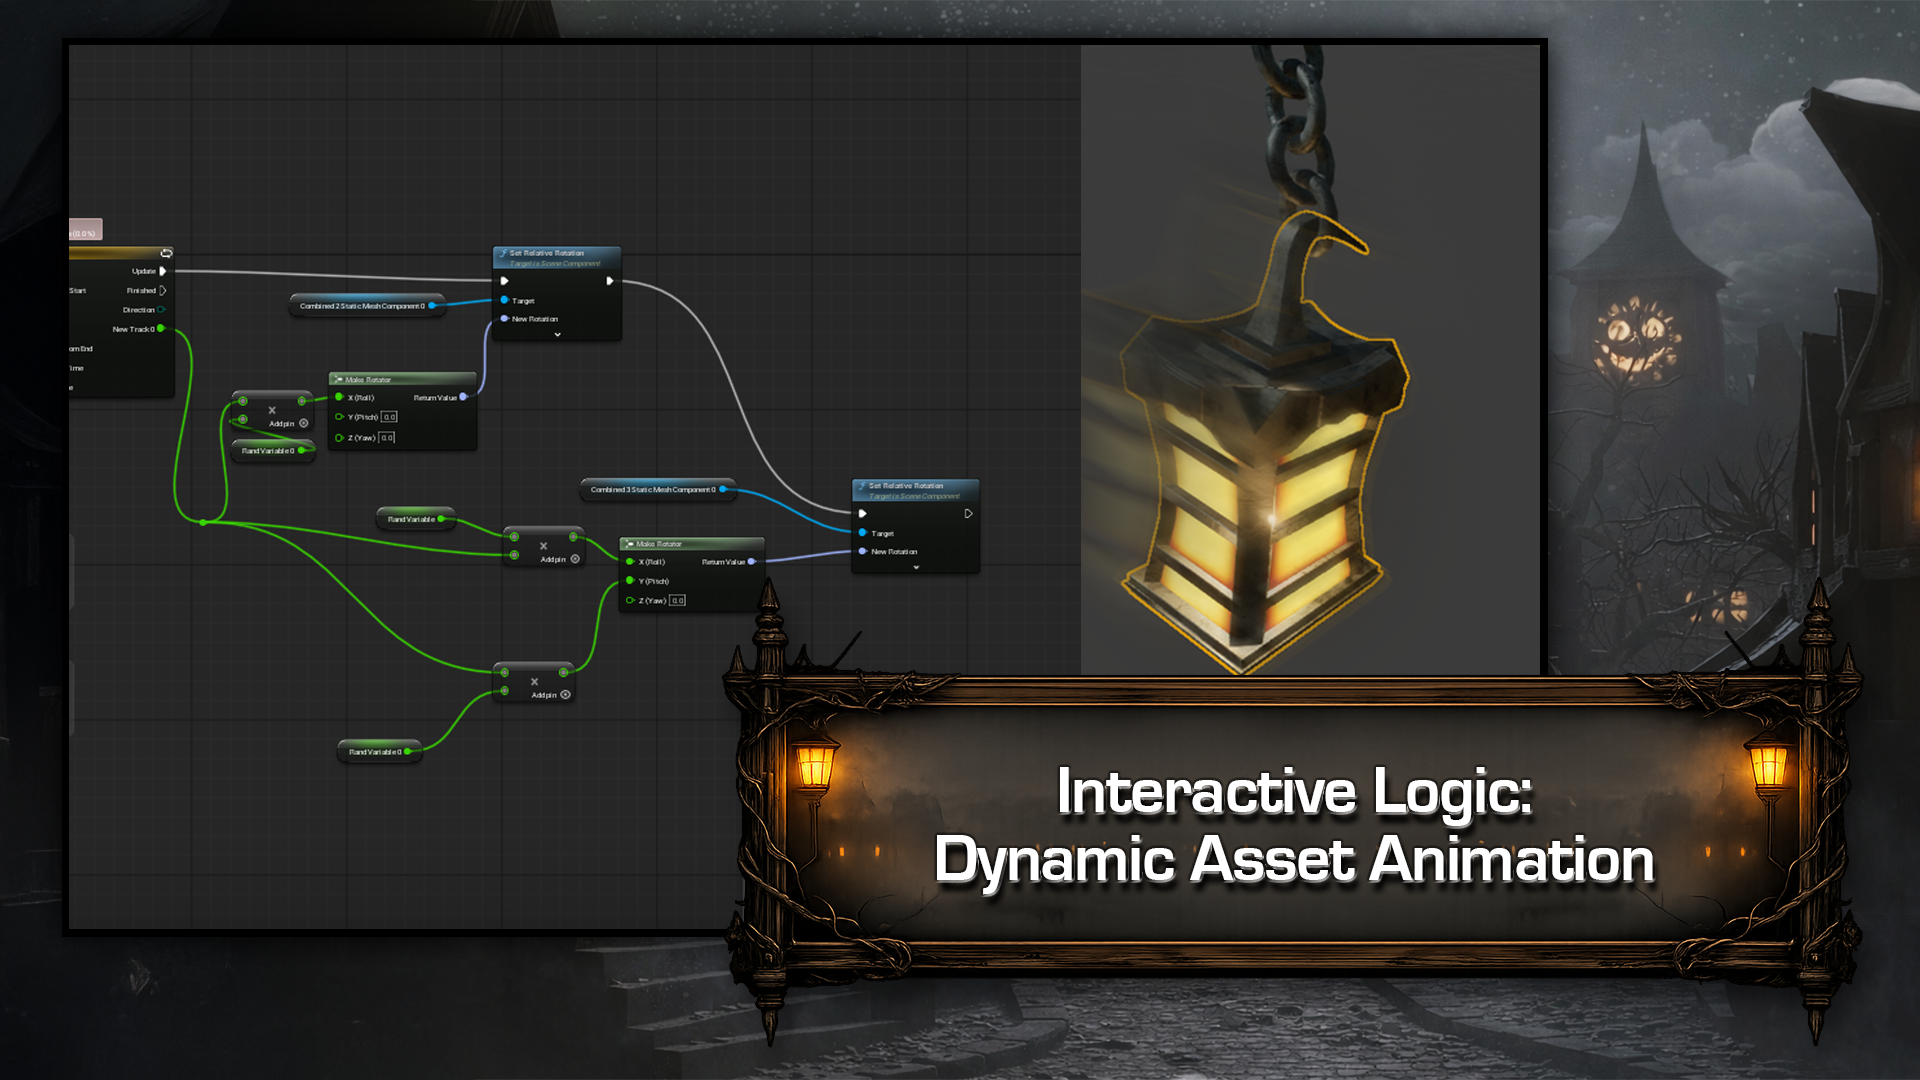
layouts, and cameras. From there we add the magic. Vertex painted grime and variation so nothing
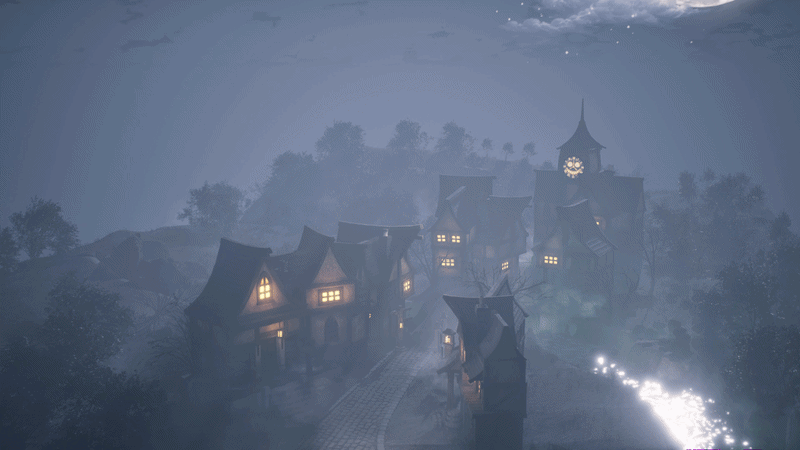
feels duplicated, volumetric fog and lumen night lighting that match the
blender, money shot exactly. Procedural foliage and PCG
details that feel hand placed and a short
cinematic camera move ready for your portfolio. It's the difference
between I imported some assets and I built a living, breathing,
haunted street. And because this
is three D Tudor you're never going
to be starting from just a blank slate. You'll get a full resource pi. That includes a
curated reference set, shaders and seam materials, human scale reference,
geometry note tools. This includes stairs and
stone walkway generators, sample prebuilt buildings
to jump start your scene, and extra thumbnails and
compositing references. If you want that clear AA pipeline that's
going to take you from a beginner to a
professional workflow for building any
stylized environments, you're in the right place. Everything is included. The
workflow is repeatable, and the goal is a
finished cinematic scene. So let's get into Lesson one. Don't just dream about
creating environments. Let's actually build them. Happy modeling, everyone.
2. Building a Modular Haunted Street from Blender to Unreal Engine 5: Welcome everyone to
the Haunted Street Environment Blender to Unreal. And in this course,
we're going to recreate a fully modular, stylized haunted Street
stroke village environment, starting with clean,
reusable assets built right here in
Blender 5.0 0.1. Then what we'll be doing
is assembling and bringing the full scene to life
inside Unreal Engine five. The end goal is not just
a nice looking render. The end goal is actually
a production ready workflow you can only use
for your own environments, haunted streets, medieval
towns, fantasy villages. In the stylized game world, where you want modular parts that actually behave properly. This course is split
cleanly into two parts. So the first part
will be in blender, building the modular
asset kit properly, and the second part is
unreal engine assembling, lighting, and presenting
the environment. Luke will be handling the unreal engine side
of the course. Here's our Unreal
engine specialist, and he'll walk you through
the environment setup, layout and presentation, all right inside
Unreal Engine five. He will be doing
this in a clear, practical way so
you'll be able to follow along very, very easily. I've made this course
extremely flexible, so that means you can
start wherever you want. If you want to do
the full pipeline, perfect, we have
you covered there. And if you'll start in blender, where we build the modular
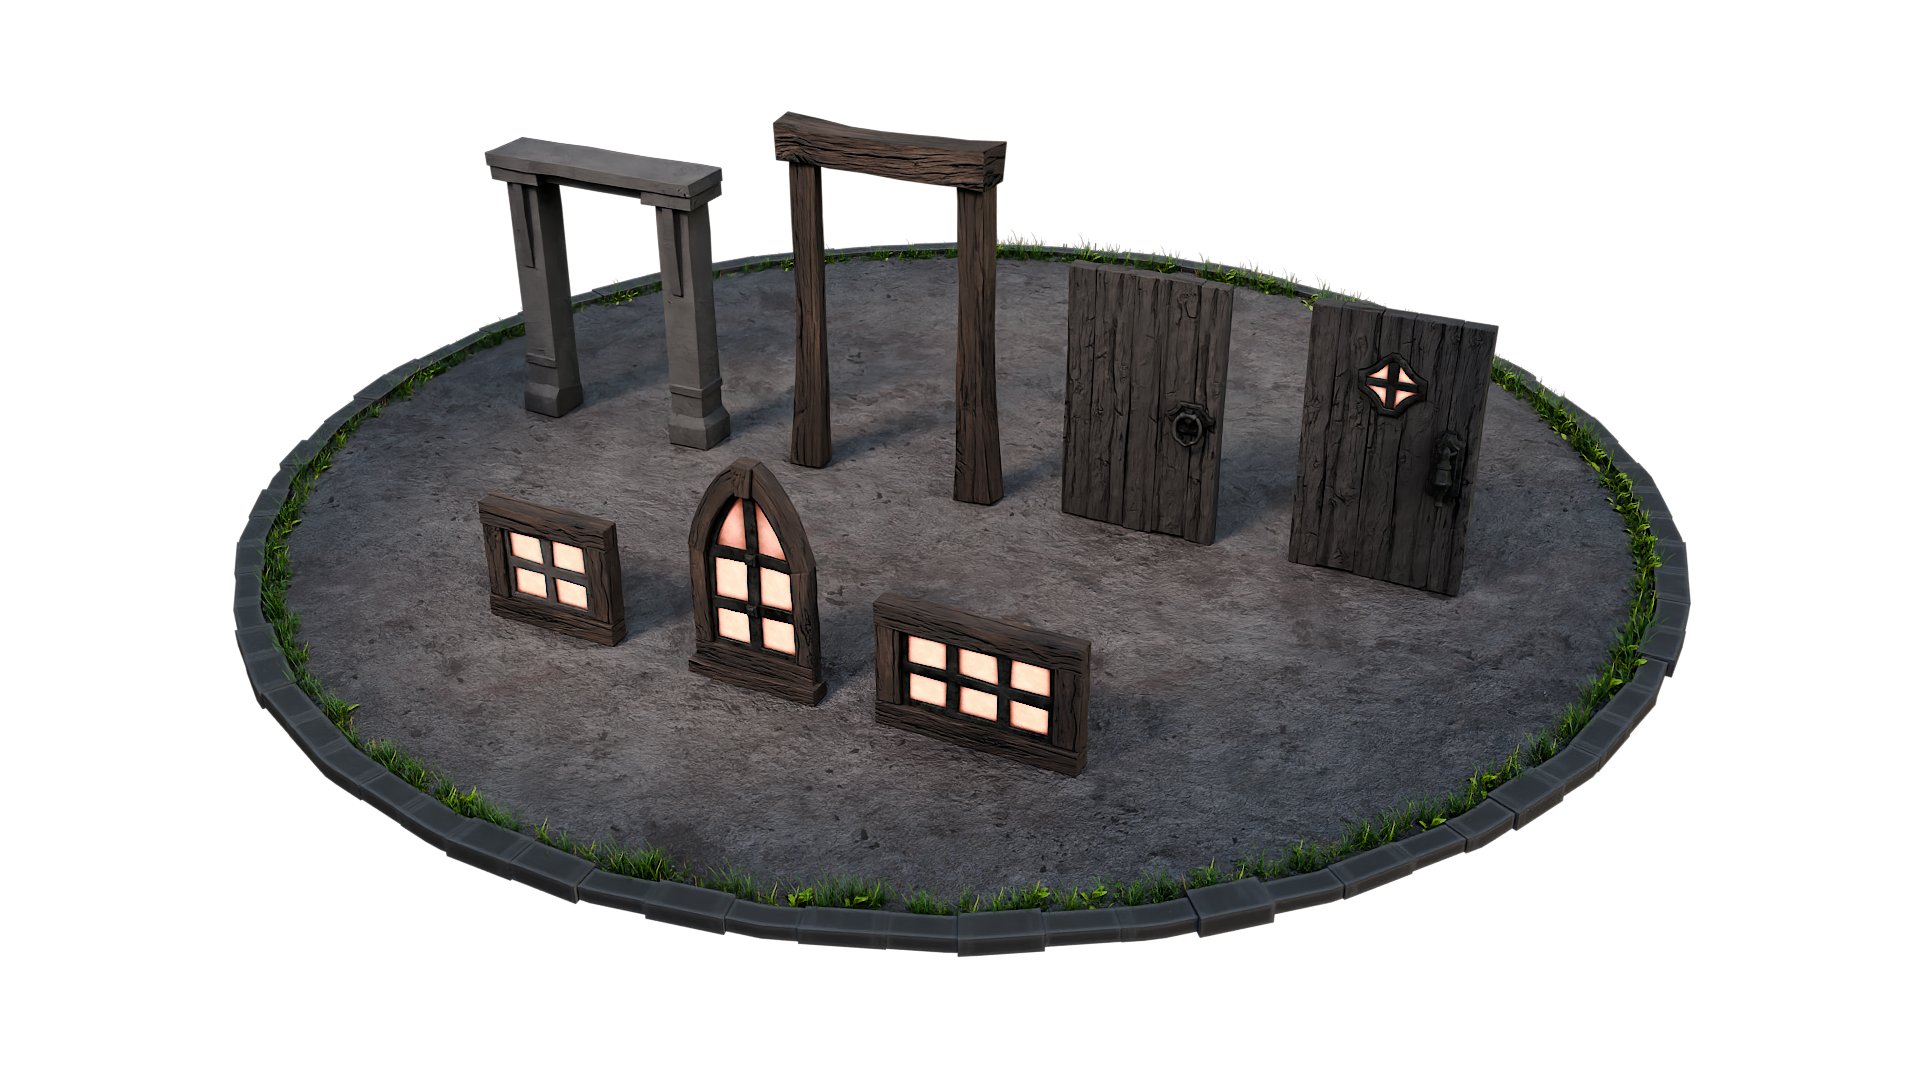
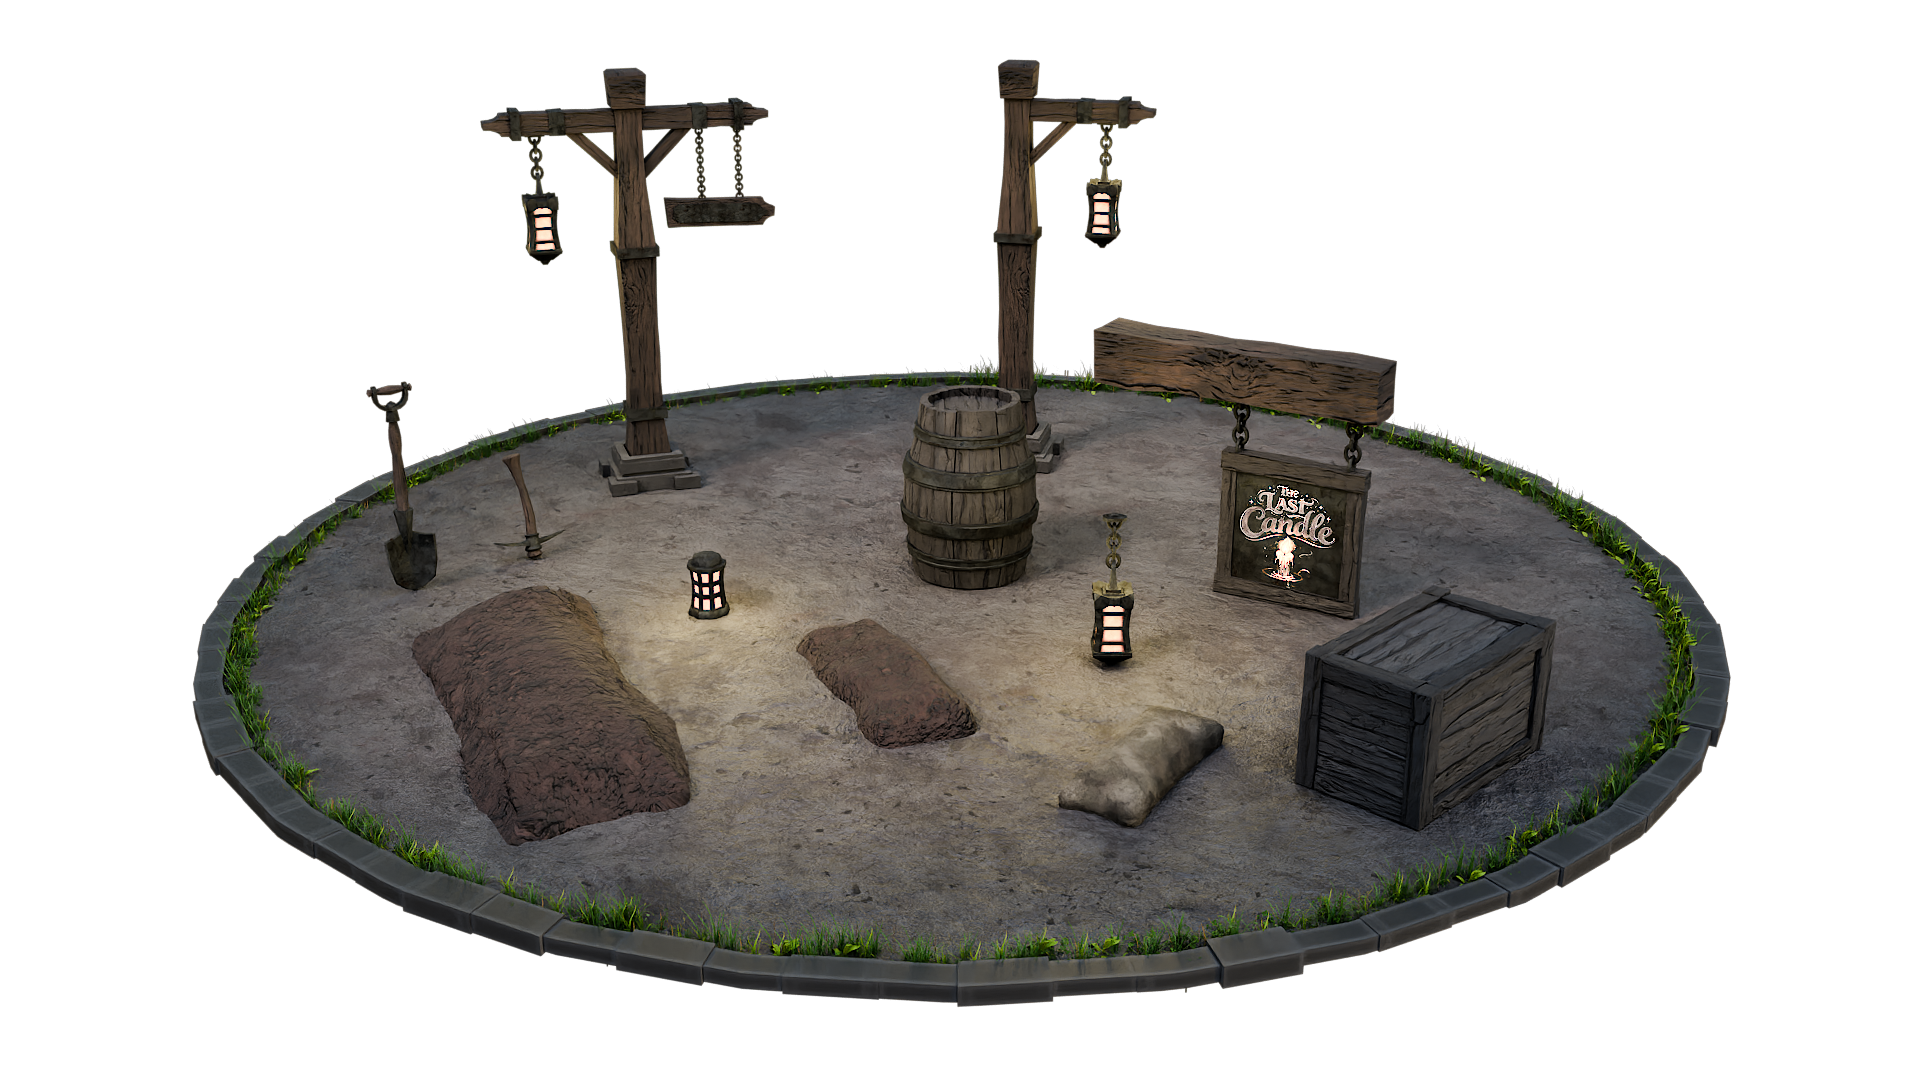
kit from scratch using a large production
ready resource pack, including walls, supports, roofs, stairs, windows,
props, trees, shaders, and everything you need to construct a haunted
street properly, we also have you covered there. And more importantly, you will learn how these parts
are designed to work together cleanly and predictably once they're inside
Unreal Engine. Now, if you want to skip
the blender and jump straight into Unreal,
that's absolutely fine. So you can close the
blender default and open the blender UE
five resource pack. You'll then need to
jump to the lesson. Welcome to Unreal Engine. Let's prepare our blender foil. Lesson becomes your
starting point. Everything is already created, imported, and ready to use. No punishment for skipping
steps and no gaps in learning. So what actually comes
with this course? So, as I said, this
course comes with two blender resource packs. And the first one is the
blender part specific. So this is for those people
that want to start creating the kickbash or the assets
entirely in blender. And then perhaps moving over to the Unreal Engine five
further down the line. But for now, this will be the resource pack
we'll be using, and this is the section
that I will be teaching. Now inside the resource pack, you can see we've got
a number of shaders, so you can see all of these
shaders and I'll show you how to bring these into
your own blender file. We also have a human
OBJ reference here. This is for scaling because
we absolutely want to make sure that everything
is scaled correctly, which we'll talk about
later on in the course. We also have two
separate geometry nodes. These are going to make it very easy to create things like stairs and the actual stone paths that are
in there as well. And then we have a
few tree variations. Now the trees are
there if you want to create your own
blender environment. When it comes to the
unreal engine part, we'll be creating our own trees right inside Unreal Engine five. Now, I want to be clear here
that in the blender section, what we'll be doing is creating
all of the modular parts. We won't be doing
the things like advanced lighting or
compositing or rendering. It's basically there to create
all of the modular parts that are then going to go
on to Unreal Engine five. Now, if you're only doing
the Unreal Engine five part, this is the resource pack
that you'll be able to open, and again, it includes
all the shaders, includes our human reference, and includes all of the parts
already pre built for you. It also includes
things like trees. And again, as I said before, it does include all
of the prefabs. So it's up to you whether
you want to create your own trees in
Unreal Engine five, which we will go through, or you want to use these trees
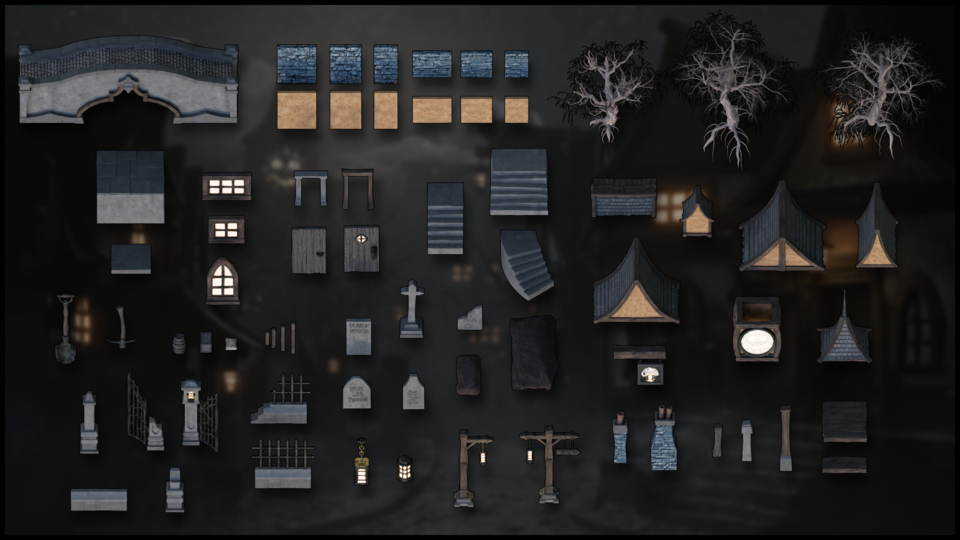
that we've also supplied. Now, also in the resource pack, you will find the
complete thumbnail so you'll know exactly what we're actually creating here and exactly what we're
working towards. As well as that,
we've also included to make things really,
really easy for you. All of the resource images. So when you've downloaded
your resource pack, if you open up the
resource image file, you will see in there everything that we're
going to build. You'll also see in there all of the materials that
we've actually got included with the course, and you'll see things like
the complete contact sheet where we've got everything that we're going to be building. We also then have close
ups of all of the parts. So, for instance, on the Roos, you can see exactly how
we need to build this, and it's a really great way
to reference everything and to follow along and see exactly what we're
going to be creating. This way, you can actually make your own variations on things, or you can make it exactly
as you see in the reference. Now also throughout
the entire course, you will notice on the
left hand side that we've actually got keystrokes
turned on using Karnak, so you'll be able to see
every single keystroke, every little shortcut, and it'll be easy for
you to follow along, even if English isn't
your first language, or my accent is too heavy. So as well as building
all the parts, a quick timeline of what
we're going to be doing, I will definitely be
showing you how to save and recover your work properly
and using the modeling tab. It's cleaner and it
keeps you more focused. So we'll also discuss about. We'll also look at
turning cavities on. This means that it's much
easier to read your scenes. We will bring in
some basic lighting using the skybox setup. We'll also be using
the AO Shader for clarity while modeling, and I'll be covering
the core blend skills, blending navigations, essentials, blending
modeling tools, and habits, and
we'll be starting the kit right from the get go. Well, of course, be
starting very easily, so we'll be starting
with the walls, moving on to the supports, and then getting more and more
in depth as it goes along. And this gives you
a gradual skill and muscle memory increase as
we work through the course. Now, I'm using Blender 5.0 0.1, but anything from Blender three
onwards is going to work. There's only a few exceptions
that you might come across, but earlier versions
as far back as that will be absolutely
fine to follow along. There are new updates to Blender 51 of them
being the lattice. It's been made just a lot easier to actually
put a lattice on, let's say, a roof or
something like that. But I'll also be showing
you both ways of doing it. So the old lattice
and the new lattice, and you'll see the
difference between them. It does dramatically
speed things up. But as far as real changes go between Blender three
and Blender five, what we'll be actually doing, there isn't that many changes, so you should be able to
follow along absolutely fine. So to reiterate,
if you're here for the full pipeline, this is
where you need to start. In a few minutes
we'll be starting. This is where we'll
be building the kit properly and blended with
other little modular parts, and then loop will
take you through to the unreal engine part and turn those parts into a complete,
haunted environment. And if you're just here for
the unreal engine part, you can jump straight
to that lesson that I told you earlier and start
building immediately. Either way, you're finished
with a modular workflow. You can reuse again and again. And as I said earlier, we won't actually
be cover you know, the complete blender render. So the end render, we're not actually
covering in this course. We're actually only covering no to build the modular parts, set them up and
things like this. But you will get a very, very nice end render
in Unreal Engine five. Now, we do cover final renders
in most of our courses. We've got some amazing
courses out there. We also cover the full lighting, advanced lighting, and full
compositing guide as well. So you'll be able to find
those in Alia courses. And for those people that
have to Alia courses, there's a lot of
people out you will be able to absolutely go ahead and just build
out your scene, render it out, and
then we'll be able to see exactly what you
guys came up with. I'm sure they're
gonna look amazing. All right, everyone, so I hope you enjoyed the introduction, and I'll see you
on the next one. Thanks a lot. Bye bye.
3. Mastering Blender Viewport Navigation and File Safety: Welcome, everyone to
the Haunted Street Environment Blender to Unreal. And what I want to do
now is actually play you a short video on how
to get around blender, because that's the first thing that you're going to need to do. Now, before we do that, what I want to quickly do, though, is just delete this that's
in the actual viewport. Now, if I mentioned viewport, it is this big part of the screening here where you
can see all of the models, all of the actual Y and X axis. And we'll talk about that more specifically a little bit later. But for now, all
we want to do is just left click
dragon our camera, press delete, and then left
click dragging our point. No cube, and of course, we need to delete the
cube, so press delete. The next thing I want to
do then is just put it onto the modeling tab
rather than the layout. You can see on the
layout we have this timeline on here, and
I don't really want that. So let's just put it onto
the modeling tab like so. So finally, before moving on, I just want to cover
saving out your work, so you can see at
the moment, it says unsaved at the top of here. And then all we want to do is
come down to where it says, File, go to Flesavs and we want to save
this out somewhere. So I'm going to save it out in my course so you can see I've got my course here with all the course layouts and
everything like that. This is where I'm
going to save it. So I'm going to call it blender
two unreal haunted house. And you can, of course, call it whatever you hunted village, sorry, not a house,
not just a house. Hunted village, so press
enter twice, and there we go. You can see now this
file path has changed. It tells us the name of the
Blenfle that's being saved, and you can also see
there's no star there. Ifever you can see,
like a little star, so let me just bring in a cube. If ever you see a
little star like this, all it means is that the
file hasn't been saved out. What you can also
do, as well as you can come down now
and just click Save, you don't need to click Save As. Once it's been saved as, then it's always save. Now, finally, if you ever
want to recover your work, you have got a
number of options. First of all, you can
recover the last session. Now, this always ends up a
problem if you've got many, many blender, you know, files open at the same time. Last session could
be any one of those. It seems to me
completely random. So it's not a very
good thing to rely on. Now, you also have a button
that says auto save. Generally AutoSave will
be a few minutes apart. So you'll definitely
be able to catch work if you made a mistake, if you don't know
how to get back. But catching work, you know, from an hour ago or 2 hours ago, 3 hours ago is actually
quite hard to do. So just make sure that you're always saving
out your work. And the other thing is, as well, you can actually
recover things from yesterday or three days ago, things like that. They
will get saved out. But unfortunately, it is
much harder to recover work, you know, from, like, 2
hours ago or something. So just be very careful when
you're saving out your work. Make sure you're
saving out constantly. That's one of the things
you need to learn if you're new to blend it,
save out all the time. Because, you know,
crashes happen. Now, with blender, honestly, it's one of the
best softwares out there where crashes
don't happen that often, but just in case something
like that happens. And now I'm going to play you is a quick video on
Blender navigation. So how to get around blenders, zoom into things, you know, do a top view, all
of that good stuff, and I'll play that now and
see you on the next one. Alright, everyone. Thanks a lot. Welcome everyone to the
basics of blender navigation. Now before we begin, it's
important to understand how the axises work within blender. So we can see at the
moment, we've got a green line going this way and a red line
going this way. This is called the Y axis, and this one is
called the X axis. We also have one
that is the Z axis, which we can't see right now. It doesn't actually come in with blender viewport as default. But if you want to
actually set it on, you just come up to the
top right hand side, where these two interlocking
balls are and just click the Z axis, and
now we can actually see. So how do we actually move
around the blend of viewport? There's a number of
ways of doing this. One of them is over on
the right hand side here. You can see if are over here, it's the zoom in and Zoom out. I can actually left
click and move these up and down then to
zoom in and Zoom out, or I can use the actual
mouse to actually zoom in and zoom out using
the actual scroll wheel. There's also another thing
you can do with Zoom, which is holding control shift and pressing the middle mouse, and you'll see you have
a lot more control over zooming in and zooming out. Now the next thing we
want to discuss is actually rotating
around an object. So how to do First of all, we'll bring in a
cube with Shift A, bring in a cube. Now, if I press the
middle mouse button and move my mouse left or right, you can see we can
actually rotate around. Unfortunately, though, we're not actually rotating
around this cube. So to actually fix that, we need to center our view
onto the actual cube. We basically want to focus our view onto this actual cube. So to do that, we're
just going to press the little dot button on
the actual number pad, and then you'll see that we
actually zoom in to the cube. Now if I scroll my
mouse wheel out, you will see now if I hold the middle mouse button
and turn left and right, we're actually rotating
then around the cube. And this is important because if I actually bring
in another cube, so if I duplicate this
cube with Shift D, move it over, so bring
in my move Gizmo. And now you'll see if I
rotate around this cube, I'm not rotating
around this one. So to fix that just
press the dog but again, zoom out, and now I can actually rotate around this
cube, as well. Now let's look at
something called panning, which means that we're actually going to move left and right. And we do this by holding the shift button, holding
the middle mouse, and then we can actually
scroll left and right around our
actual viewport. So now we've actually
discovered how to zoom in and the different
ways we can actually do. How to rotate around an object
and how to actually pan. We can also come up to
the top right hand side here and use these buttons here. So again, remember we're
looking at the Yaxs, the X axis, and the Z axis. If we come to our Yaxis
and click that on, you will see now that you've got a front view of the Y axis. If you click the X axis, then we can change it
to that red X axis, and finally, the
Z axis, as well. Now, there are other
ways as well that we can actually look
around the viewport, and these involve using
the actual number. If I press one on my number pad, it's going to take me into
that white axis or front view. If I press two, it's going to actually rotate
that slightly. And if I press two again, it's going to rotate
it slightly more. Now, if I press
the eight, it will rotate it the other
way, as well. Now, to go into the side
view or the X axis, we can also press three
on the number pad, and that will give
us that effect. We can also press seven to
go over the top, as well. Now, what about if we actually want to go
to the opposite? So instead of going from
the bird's eye view, we want to come to the
underside of our model. Well, that's actually
quite easy, as well. All you need to do is
press Control seven, and that then will take you to the bottom view of
our actual model. We can also do the
same inside view and on the x axis and YXs. So, for instance,
if I press one, I'm going to be
going into Yaxis. If I press Control one, I'm going to be going into the opposite side on
the actual Y axis. Can also find these
options just in case you forget the top left hand
side here under view. So if I go down to view and
go across the viewport, you can see here that this actually tells me exactly what I need to press to
get the viewpoint that I've just
actually explained. Now, we also have the button on the number pad,
which is number five, a number five button
in blender toggles between perspective and
orthographic views. Perspective view offers a more natural and
realistic viewpoint with objects appearing
small as they get further away, mimicking
human vision. Orthographic view removes
perspective distortion, making all objects appear at their true size,
regardless of distance. Useful for precision
modeling and technical work. The other thing that number
five does, for instance, if I come to my cube, at the moment, I am able to
actually zoom into the cube. However, if I press number five, I will not be able to
actually zoom into this cube no matter
how far I zoom in. I'll still be able
to move around it by pressing the little
dot button, like so. But if I actually
want to actually work on the inside of an object, I can quickly press number five, and then I can
actually go in and work around the inside as well. Now, if you're working on a
laptop or something like that or a tablet and it doesn't
actually have a number pad, you can also use,
if I press five, the actual squiggle key, which is under the escape board on the left hand side
of your keyboard, and that then will
give you pretty much the same options
as we had before. So we can click the right view, we can actually click the back and we can
click the left view, for instance, the opposite
to what we had before. So instead of pressing
one and three, we just press the
little squggle line, and then we can actually view
whichever side we need to. Now, nearly at the end of
this short introduction, there are a couple more things
that you can actually do. If you come over to
the right hand side and you see here where we've actually got the name of the actual parts
within our scene, we can also grab them from here and then press the
little dot B to zoom in. So I can grab this one,
press the little dot B, and that then will zoom us in. The other great thing about
this is we can also come in, shift select them press
the little dot button, and then we're able
to actually rotate around both of these
cubes. Alright, everyone. So I hope you enjoyed
the short introduction to the navigation
within Blender, and I hope from now on, it won't be a struggle
navigating around the viewport. Thanks, lo, everyone. Cheers.
4. Core Modeling Tools Extrude, Bevel, Bridge and More: Welcome back, if you want to the Haunted Street environment, a Blender to Unreal, and this is where
we left it off. Absolutely nowhere
because we haven't done anything yet apart
from delete the cube. So let's carry on. So what
we want to do, first of all, is open up our images, because that is the thing
that you're going to be referencing most of the time. So once you've downloaded
the resource pack, you will have one that says
in the resource images. And again, this has got
everything that you'll need. So you'll really be able
to check out all of the resources like the
materials or the contact sheet. Now, what we want to do, though, is we want to get
this inside Blender. And, you know, I'm
using a second screen. So generally with me,
I actually open one of these and then just put
it over to my second screen, and that's way, way easier,
and that is how I work. Not everyone works
the same, of course, so I'm going to show
you the couple of ways that you can
actually do this. So first of all, I'm
going to close that down. I'm going to put this down here. And what I'm going to
do is I'm first of all, going to go into front view. So I'm going to press
one number pad. I'm going to press Shift A then, and then I'm going to come down and all these options here, just ignore the rest
of them for now, and the one you want is
under image and reference. So click on Image
and then reference. And then what we want to
do is we want to actually look for those images. Now, of course, for me,
they're going to be under the course resource pack. The thumbnail is here, as you can see, but what
we want is the images. So the resource images
is this one here. Now at the moment, they're
really, really hard to see, hard to read, all of that stuff. So what you want to do
is you want to come up and put it onto images like so. You can also, as well,
increase the size, so it can increase the size, so it can really, really see
what we're actually doing. Then what we're going
to do is just select this bridge at random,
double click it, and there we go now we've got
image actually in Blender, and we can work with it in that. Now, this image will stay here no matter what
you put it on. Whether you put it
on a wireframe, whether you put
it on object mode or rendered mode,
it doesn't matter. This image will stay
there permanently. So that's one good thing
about that if you haven't got a second screen or if you just
like working in this way. Now, what I'm going
to do, though, I'm going to let out way
and show you one other way. So let's go to deed. And what I'm going
to do now is come in and add in another part here. So if I come in now I can actually come down to
the bomb left hand side, and I can drag this up. Now, you will notice
at the moment, I've got it selected
on this tab here. It doesn't matter which tab
of all of these you select, you can still drag and pull up. But if you want to
follow me exactly along, then make sure you
select this one. What I'm going to
do then is just pull this up now so we can pull this up rather than
making a new tab, I'm going to put
this onto image. Image editor, let's open that. Then what I'm going to do
is I'm going to come to Image and we're
going to click Open. And of course, I want, again, the same thing as wired before. Course resource pack,
resource images, and let's select
the bridge again. And there we go now. You can
see that bridge is in here. You can hover over
here as well and use the Zoom tool to zoom in and
out, which is really handy. And you can also,
if you're careful, come over to the left hand side, and you can also pull
it out like that so that the bridge
reference is always in, you know, in the
actual blend file, making it really, really
easy for you to work. If you've not got
a second monitor or if you like
working in this way. To actually change that, all
we do then is just go to Image and open a different one so we can open all
of our shaders, for instance, and it's just a real easy way
to actually work. Now, if you don't like that and you want
to get rid of it, all you're going
to do is come to the tab above or
the window above, look for the little
corset, left click, drag it down until you've got an arrow moving down,
and there you go. You can actually move that and get rid of
that if you want to. So now I'm going to do is I'm just going to pull this across, so I sure I'd be
able to hopefully. Grab this. Yeah, there we go. Grab it on here. Pull
it across a little bit, so Akan got more
in the viewport. And what we're going to do now
is we're going to play you a short introduction into the
basic modeling of Blender. Highly recommend
that you watch this. I'll give you the
very, very basics. We're going to cover
all of that anyway, but it'll just be there
just to get you started. So I'm going to play that now, and I'll see you on the next
and everyone. Thanks a lot. Bye bye. Welcome everyone to the basics of
modeling in Blender, and this is a short
introduction just to get you started on a few of the
basics in modeling. So the first thing I want to
do is bring in A primitive. So the way that we're
going to bring into primitive is press Shift and A, and then what we're going
to do is open up a menu, and you can see that
we've got all of these things along this
actual primitives menu. But the one we want to focus
on is the actual mesh. And from here, you can
see we can bring in many, many things like cylinders, cubes, planes, and the
one we want to bring in just now is going
to be our cube. That we brought our cube in
the next thing I want to discuss is object and edit mode. And you can see at the moment, over the left hand side, we're actually in something
called object mode, and this means basically we can manipulate this whole object. So if I press G, I can actually move it around
my viewport like so. If I press S to scale, I can actually scale the
whole of the object in. But the thing is, we
don't really want to work in object mode necessarily, and a lot of the
time, we're actually going to be working
in edit mode. So we can come up to
the top left hand side and put this in edit mode, or we can actually press the tab button and jump
into Edit mode that way. You will notice once we've
actually gone into Eddy mode, we have a lot more
options to use, and more importantly,
we have a lot of the topology now to
play around with. The first thing you'll notice the difference being is that we have now these three options
up at the top and side. If you have over them, it will say vertex, edges, and faces. Now, vertex is going to be
these little points here. The edges is going to be these edges of my cubes
or any of the edges. And finally, we've
got the faces, which is actually the
whole polygon face. Now, you can also, instead
of clicking on these, press one on the keyboard, and that then will jump
you into vertex select. If you press two, you
can go into edges, and three is going to
take you into faces. From here, we can actually
manipulate any of these parts. So you will notice
at the moment, I've got a gizmo here. Now, if you don't have
the Gizmo available, coming over to the
left hand side, and you'll have this little
button here that says Move, or you can press Shift spacebar and bring in your
move tool like so. Now because I'm on faces, I can actually pull
out this face like so, if I go to edges, I
can actually grab one of the edges and pull
this out like so. And if we're on vertexes, I can grab this vertex or grab the second vertex with Shift Select and then
pull this out like so. Really, really easy to actually
manipulate things once you know how to select
each of these parts. Before we go too much
in the weeds with actually modeling in
this actual Edit mode, let's just jump back into
Object mode for now. What I want to show
you is how we can actually move this
actual cube around. So as well as moving it
with the actual gizmo here, we can also press G
and actually free move this object around or we
can press G and Y, too. Let's put it along the Y axis, move it around or the X axis, for instance, and
move it this way, or even the z axis and
move it up and down. To drop it back
where we started, let's just right click like so. So that's actually moving the location of it's
not a cube anymore, but let's just say it's a cube. We can also scale this in
as well with the S but so we can scale it in or
scale it out like so. Now we can also press the S but, hold the shift button,
and then we have a lot more finesse
on actual scale. You can also scale
this up by, let's say, a factor of two, S, two, enter, and there we go. And of course, we can scale
it down pretty small as well. Now the next thing I want
to discuss is rotating, because if we rotate it with
R and just rotate it around, we haven't got a lot of
control over how this rotates. So what I want to do instead is, I always want to press R, then attach it to an axis,
which might be the Y, so the green one and then
rotate it either by freehand. Or by actually inputting the
value under our number pad. So if I want to rotate it, let's say, by 90 degrees, press the end button,
and I've rotated this round by 90 degrees. Now, if I want to rotate
it back, I can press O Y, the little minus button
on the number pad, 90, and then we can
rotate it back. There is something else
that you need to know. We also want to reset
our transformations, and this is one of the most important things within Blender, because if you don't reset
your transformations, Blender still
considers this a cube, even though it's not
really a cube anymore. So what we want to do to reset the transformations
is press control. A all transforms, and
then you'll notice that the orientation has
moved over here because it will always move
to the center of the world. From there, then we
want to actually reset our orientation as well. So we want to right click,
set origin to geometry, and then it's going to
put the origin right back in the center
of this object. Now, it's also important to know resetting the
transformations will also impact things like UV mapping, things
like modifiers. Basically, if you ever
have a problem in Blender, always make sure that you
reset your transformations, and then most of those problems
will definitely go away. Alright, the next thing about resetting our
transformations, it makes it really
easy then to get something back to how
we had it before. In other words, if I press
S and scale this down, and then let's press R and Z and rotate it round this way, because before this, I
actually reset my rotations. What I can now do is press AlnS and put it back
to the scale that it was before I did anything
and then ln R and actually reset
that rotation as well. So really, really handy, once you've actually reset your transformations in
what you can actually. Moving on, we're
actually going to be looking now at duplication. So if I come round here, I'm able to actually
duplicate this. If I press Shift D and
then press the Enterborn, it's now a duplication, and I can move this over
to the right hand side. So now we have
actually two objects. Now, what if you want these two objects actually combined, and you didn't mean to actually duplicate it in object mode, for instance? Well, that's easy. We can just shift,
select the other one and press Control J, and now they're both actually join together,
as you can see. So if I press tab now, we're able to come
in and actually work on them both
at the same time. What happens if we want to
actually split them up, so we don't want the
objects to actually be together. That's also easy. Just make sure that you
select one of them first, and then all you're
going to do is press L just to select everything. So all of these faces, then you're going to press P.
Come down to say selection, and now if I press Tab, they're both actually split off. Now, of course, using
the same command, if I press tab, I can
actually come in, grab a face, for instance, press Shift D. I
can actually also duplicate things with
inside Edit mode as well. So we might want to duplicate
all three of these. Shift D, I can actually come in then and actually
duplicate them like so. It also means, though,
is that these, when you duplicate them in edit mode will be part
of the same object, of course, because in edit mode, they're not actually
classed as an object. They're clustered as
the same actual part. Now, for the next
part, I'm going to bring in a brand new cube, and I'm just going
to show you some of the basic modeling
techniques within Blender and go through
a few of the options. So here we have a
brand new cube, and the first one I'm
going to show you is, if we come into Edit mode, we'll always be working
in edit mode to show you these things, make
sure you're in edit mode. I'm going to grab the top face. And what I'm going
to do is press E, and that then is going
to extrude this out. Sometimes you will need
to extrude something out, and it will need to be
along A axis, for instance. So all I'm going to do is go to Edge Select, grab this edge, and then what I'm going
to do is press E, and you can see because
it's not tied to an axis, it's floating around everywhere. However, if I press the Xb, you can see now it extrudes out, following along
that actual axis, which then makes it
really, really easy to manipulate it where I
actually need it to go. Next one we're going to look at is something called beveling, and then all I need to do is come in and I'm going
to grab my edge, so I'm going to press
two on the keyboard, grab an edge like so,
and then I'm just going to press
Control B like so. And you'll notice now it's actually bevelled off that side. You'll also notice down on
the left hand side here, we have something called
an operator panel. It will be closed. Just open it up, and from here then with the actual bevel, we're able then to
turn the bevels down, for instance, turn them
up, move how the shape of the actual bevel is going to be and all that
other good stuff. Pretty much anything you do in Blender is going to give you
an operator panel like this. We're not going to go too much
into this, but basically, the moment that you press Tab button to come
out of Edit mode, this is going to disappear, and then you're locked in
with the actual shape that you've chosen or the
insert or the extrusion. So just bear that in mind. So the moment I press tab,
that actually disappears. What about if we want to bevel off vertices and not edges? So, for instance, if I come to a vertice like this
and vertice like this, press Control B, you'll see
that it bevels off like this. But if I come to one that are the
opposites of each other, press Control B, you'll see
nothing actually happens. However, if I press
control shift and B, then we're actually
able to bevel off the actual verts like so. So that's another handy
tip for actually bevel. Now the next modeling
technique we want to discuss is
actually edge loops. So how do we get more
geometry onto this? So, for instance, I want to
bring some edges on here, I can press Control, and that then will bring me
one edge in here. If I left click then, you can see that I can put this either this side or this side. But let's say I want it
right in the center. I'm just going to right
click on the mouse, and that then is going to
put it right in the center. Now, the other
thing I can do with the operator panel
again is then come in and turn all of these up to give me more
actual edge loops, and I can even move them
to the on the right. Now, I can also, if
I press Control E, come in, press control law. I can actually scroll up on the mouse wheel to give me as many edge loops
as I actually want. Or if I want a little
bit more fins, I can actually type it out
on the actual number pad, so I can type out 120, for instance, and
have 120 edge loops. To cancel it at any time,
just press the escape board, and then that will
cancel it out. Now the next modeling
technique I want to show you requires two actual blocks
or two cubes like this. And all I'm going to do
is I'm going to come in, and I'm going to select
opposing faces like so. And then I want to actually join these together,
for instance. So all I'm going to do,
I've selected them both. I'm going to right
click and come down to where it
says bridge faces. And now you can see I can
actually join those together. Now, if I press Controls dead
and just go back a minute, you can also do this
by coming in and let's say grabbing this
edge and this edge, and what I'm going
to do instead is, I'm going to press the F bone like so and come
down to the bottom, as well, and then
grab both of these and press the FBne like so. Sometimes bridge will
not work because bridge has to work with two edges
and nothing in between. In other words, nothing
selected there. If I come into this
one now and try right click and come
down to where it says, Bridge edge loops, you will see select at least
two edge loops. So we can't actually
join up from there, and that is when
it's a good idea to use the FBne instead. Now the final modeling
technique that I actually want to show you is
something called insert. What I'm going to do is I'm
going to grab this face here. I'm going to press the
ebon and then you can see you can actually
insert this face in, and from there, you can actually extrude it out if you want to. You can also then
press Control B and bevel it off if you want to. And you can see now
it's really easy to use all of those techniques
that I've actually showed. Now, lastly, the
last thing I want to show you is the insert again, but this time we're
going to grab this base and this base, and if I press I,
it's true you can actually insert them
both at the same time. Now, the best thing
though about insert is, if I press the I and
then press I again, we can actually insert them separately from
each other like so. Now, I see a lot of
renders on Facebook and other social media that kind of look really,
really blocky. For instance, if I press tab
now and go into object mode, you will see this actually
looks pretty blocky. But there's a really
easy fix for this, so it doesn't actually
have to look like that. All you need to do is once you've actually
finished, right click, come up and where it
says shade auto, smooth, and that then will shade it off based on the actual angle. So really, really easy
to either shade flat, shade completely
smooth, like so, or shade auto smooth like so. If you actually are struggling
and you actually want it to shady a little bit
smoother than what it is, you can come over
to the right side where this little triangle is, go down and open up the normal, and from there, you can
actually increase this and shade it even more smooth
based on a higher angle. The default is always set to 30, just make sure you set it to 30 in case you actually overdo it. The last thing I
want to show you in this introduction is
the actual cursor, because I think it's very, very important to actually modeling. So what I'm going to do
at the morning is I'm going to make another
cube with Shift D, and then I want this cube on top of this
cube, for instance. Now, if I move my
cursor over here, so shift right click. And then what I can do is
I can press Shift desk, and I'm going to go selection
to cursor, keep offset. And that then is going to move the exact center of this cube, all the orientation
to my actual cursor. Now, how would I get this
then on top of this cube? I would literally
grab this cube. I would first of all, right
click and set the origin to geometry just to make sure that origin is right
in the center like. So I would then press Shift
Desk cursor to selected, and that then is going to put my cursor right in the center. And then I would grab this
cube, and from there, I'm able to go Shift
Desk selection to cursor, keep offset. And now that cube is right
next to this actual cube here. From here then, I can
actually bring this up, and let's actually
just have a quick play around of everything
that we've learned. So you can see now if I pull this going to join them both together then
with Control J. And then the first thing
I'm going to do is come in, grab this face and this face, and we're going to
right click then, and we're going to come
down to bridge faces. And then going to bring
in some edge loops. So let's bring in two
or three edge loops. Left click, right, click. And then what I'm going to
do is I'm going to press Alt Shift and click
just to select all of this edge going
around here and press the S but and pull
it out like so. There, then what I'm
going to do is I'm going to bevel off both of these tops, so I'm going to grab this
top, Shift select this top. I'm going to press Control B and actually bevel
them off like so. From there, then I'm going
to bring in an insert, so I'm going to grab
the front top here. I'm going to insert this
with the eye button like so. And then from there, I'm
actually going to extrude out. So I'm going to extrude
this out like so. Now, let's say I want a
bigger piece on the next bit, I'm going to press
Shift D. Pull it out. So this is a duplicate
of this face. I want to press the S but to
make it a little bit bigger, and then I'm going to press E and pull that out
along the axis. Finally, then what I'm
going to do is grab this one and this one and going to right click then and
bridge faces like so. And you can see just
how easy this really is now to actually start
building out some really, really complex models with everything that
you've just learned. Alright, everyone, so I
hope you enjoyed that, and I'll see on the
next one Cheers.
5. Creating Modular Wall Variations with Real World Scale: Welcome back, if you want to the Haunted Street environment in Blender and Unreal Engine 5. And this is where we left
it off, nowhere again, but I promise you now we
are going to get started. Alright, so what we want
to do, first of all, then, is open up
our resource pack. So if I come down
here to my bom, you will see I've got my
resource pack already open here. I recommend that if
you have this open, you absolutely make sure
that you're on object mode, which we'll talk about
in just 1 second. Now, the one that we want
is the human reference, so we want to grab our human
reference and bring him in. Now, there's two
ways of doing this. First of all, we
can actually just select and I'm telling
you this because sometimes there are issues with opening it up and pressing
Control C and Control V, and sometimes there are problems with appending
straight from my file. So I'm going to show you both ways just so you've got those. So what we're going to
do is press Control C. We're going to
close that. So just put it down to
actually close it. And then what you're
going to do is you're going to press Control V, and your little guy
is already in here. Now, you can see
he's come in here. But where is he? Now, let's just make sure we've
got him selected. And what we're going to do
is press the little dot, and that will zoom
me then to him. You can see if I Zoom out has been placed all
the way over here, and that is because
he's placed in exactly the same space and
time as our resource pack. Now, we don't really want
that. We're going to place him right in
the center over here. So what we're going
to do is press shifts and selection to cursor. Now, the problem is
you might have come in and put your cursor
somewhere else. You might have accidentally
press Shift right click and move that
cursor around like that. Then if you press shifts, selection to cursor, you will see moves exactly
where the cursor is. That's not what we want. So what we want to
do, first of all, is just press shifts, cursor to world origin, shifts, and selection to cursor. Now, you will notice, as well. No, if I press the dot but, our guys kind of he's not really stood
on the ground plane. So in other words, this
is the ground plane, this flat area here. If we bring in, which we should do, let's
bring in a plane, so shift day, bring
in a plane like so, make the plane a
little bit bigger. So we're going to
scale it up now, press the S button,
scale it up, like so. And then what we're
going to do is we're going to grab
our little guy, press one on the number pad, and let's bring him
up so he's actually stood on something and
not floating in the air. Now, you will notice
at the moment, we can't bring him up because and we haven't gone to Gizmo. Now, there's two
ways of doing this. We can either come over to the left hand side and
click this bone here, or with Blender,
everything is a shortcut, pretty much, except
the bisect tool. They've not fixed that yet. It's still you have to
go into a menu and, you know, grab it that way,
which is kind of annoying. But everything else
seems to be a shortcut. So what I want you to
do is put shift space. Come down and click
on the move tool, and then we have
our little gizmo. And from here, what we can
do is we can just drag him up and put him on the
ground plane, like so. And there he is. We've
got our little guy there, and he's on the ground plane, and that is exactly
what we want. And we've also got
our plane in there, which means it's
going to be a little bit easier to build everything. Now we're going to do
is grab our little guy, pull him over to
the left hand side, and now we can actually look at starting to create something. So now what we want
to start doing is actually creating our walls. So just first of
all, make sure that you've got your
cursor in the center, and then all we're going
to do is press Shift day, and we're going to
bring in a cube. Now, you might be
wondering why we're bringing in a cube
to create the walls? Can't we create them
actually flat, for instance. But I'll show you why when
you're creating modular packs, that's not the best idea. So first of all,
what we're going to do is just open up this, and the one that we're creating
is going to be our walls, which is, let me just find
our walls, this one here. So, you will see if I open this up that we've got all
of our walls here. Now, there are two
types of walls. One is the concrete one.
One is the brick one. And you can also see on here we've got all
of the supports. We've got a post support, a post on concrete
or stone support as fully stone support, and then we've got
these little parts. And these little
parts are really, really handy when you're creating roof supports
or you're creating, you know, rafts where
people are walking out onto and all of that stuff. So now we've got that open. Either bring that in
as a reference with inside Blender or put it on
your second screen like me. I'm just going to move that
over to the right hand side. Okay, so it doesn't
tell us though on the reference the
actual dimensions, but I will be giving you those. Now, most of the things in here don't actually have
a set dimension. It's more like, Let's
put our guy next to it. How big do we want it? When you're working with
things that are stylized, generally, you're keeping
to a certain scale, but things are out of scale, and you need to work
out how to match that out of scale right
across the modular pack, which is not so easy to do. You know, for instance,
in World of Warcraft, the human reference in there is like seven
or eight feet tall. Is a giant, but everything in World of Warcraft is
scaled appropriately. Things are huge in there
because they have huge weapons, huge barrels, things like that. But we're going to keep to
our human reference scale, and all we're going
to do is try and accentuate what
things look like. So that could be the
railings on the graveyard, for instance. It
could be this bridge. They look very kind of chunky. They don't look like
they would in real life. They're much much
chunkier than that. They're not quite minecraft, but they're also not
something like ESO. They're a little
bit more stylized. Now, ASO is a stylized
game, of course, but a lot of that is done
through the texture work, not actually the models. The models, if you
took them out, actually look quite realistic. And if you put realistic
textures on there, you know, you could absolutely
have them in something like
GTA, for instance. Alright, seeing all that,
let's put that down then, and then we'll make a
start on our actual walls. So here's our first wall. Now, first of all, let's sort out the depth of
the actual wall. So I'm going to work
across the Y axis. And what I'm going to
do is I'm going to put the end panel
open with end button. So we're going to
open up this panel. This is then going to be really, really easy for
creating our walls. Cause all we have to do is
just come to where the Y axis is and put it on
not 0.25 like so. And then we, we've got the
thickness of our walls. Let's look at the height. The height is going to
be the Z axis going up. Let's put this on 3 meters, and then of course,
we'll come to the X, which is this one going
across here and we'll put this on 2.5 meters. There we've got, if
I press one now, we've got a three meter height, 2.5 meters wide, and
0.25 meter depth wall. And that's exactly what we
want for our start in block. Now the thing is, as well,
we've got two types of walls, as I said, one is
concrete, one is brick. So all we need to do is
basically take this, duplicate it, to
create the next one. Before we do that, however, let's create
the rest of them. So what I'm going to do is
I'm going to comb to Mex one. I'm going to duplicate
this so I don't have to rebuild everything
again. So press shift D. And then what I'm going
to do is drag it across. Now, we still want this the same depth and the same height, but we just want the whip
to be a little bit less. So the moment it's 2.5, let's put it on two, and
that's it as simple as that. Let's press Shift D,
then, bring it across. And then what we'll do
on the next one is we'll put this onto 1.5. And there we go, three walls. Now, the one thing I said is, why are we not using planes? And the reason is because
if you look at here, we now can have a variation
of the texture on this side, a variation on this side. So instead of having
three different walls, we've actually here got six, but it gets better than that
because we can also mirror them on either the vertically
or the horizontally. So in actual fact, we can have near enough 12 24 variations
all from these three walls, which is really, really great. For when we're building
out our prefab buildings, really great for when you're actually
creating modular packs. So always remember that
in the back of your head, do you want to have
a single plane, you know, for your walls, or
do you want more variations? Now, of course, when
you double them up, the draw calls are going to
be higher, but it's very, very small because
we haven't got, you know, two shaders on
here or anything like that. It's exactly the same shader, and it's only rendering
out one side at a time. So it's actually quite low. We need to think about
these things when we're building out really,
really big scenes. Now, if we come to the next one, what I want to do is then I want to grab all three of these. So what I'm going to do is
I'm going to press Shift D. I'm going to drag them over. And what I want to do now is instead of it being
3 meters tall, I only want it to be
2 meters in height. So what I'm going to do is
I'm going to grab this one. I'm going to put it on two, and then I'm going
to grab this one, put it on two, and then we're going to grab this one
and put it on two. Next of all, what
I'm going to do is I'm going to grab
all three of these. I'm going to press one, so
I'm looking straight on, drag them down, and there we go. They're
now set on there. Now, this is a little bit small, so I'm going to press the S
bone once I've slipped it. Double tap the A just
to deselect everything, and there we go,
there are our walls. Now, as I said, we
actually want to have, you know, another six
walls for the bricks. But for now, this is
looking pretty good. Now, the one thing we need to look at before carrying on is, if I come to this wall, you will see at the moment
that the scale is this. This doesn't really
make any sense. And what has happened
here is we took a cube and we've basically
changed the scale of the cube. Now when we come to put
a modifier on or we come to UV wrap it
and put textures on, this can actually get messed up. And the reason it can get messed up is that Blender still thinks we're dealing with that cube that we started with originally. So what we want to
do is with this, we want to reset
the transform so it doesn't cause us problems
later down the line. You're going to
be doing a lot of this resetting
transforms all the time. So what I want to do is press
controle all transforms. And you'll notice
when I've done that, this actual orientation gets
set to the world origin. We don't want that. So what
we want to do is right click and set origin to geometry. And now what it's going
to do is going to set it to the center
of the geometry, and it's going to also reset
all of the transforms. So now when we use a
modifier or we, you know, start to wrap something, everything will be reset. Now what I can do is I
can select this wall, Shift select the rest of them. So I'm holding Shift,
left clicking, not my actual plane. I don't
want to select the plane. I just want these
walls selected. I can do them all
at the same time. So that's handy because
back in the day, we could only select
one at a time. If we press Control
A or transforms, right click, set origin to
geometry, and there we go. We've got all of them reset now. So if you click on any of these, you can see that
they're all reset and all to the right scale. Now the next thing we need to do is we need to rename them. So what we're going to do
on the next lesson is, I'm going to show
you a short tutorial about collections and
renaming things and the easiest way to do
that because keeping your Blender of file tidy is one of the most important
things you can do. It's going to save you a ton
of headache down the line, because once you start
building prefabs or you have a massive environment with loads of modular parts, you absolutely want to make
sure everything's named. You don't want to be
dealing with cube 01, or cube.oo5 and not
knowing what that is. Everything kind of gets renamed. So if it's like a plane, every plane will be
plain plain Ooh. You know, if it's a
curve, it will be called a curve or
a nerves curve. You'll not know what
you're actually looking at within the collections here. So I'm going to pull this down. And what I'm going to do is, as I said, after every lesson, make sure you save
your work, and I'll see you on the
next one, everyone. Thanks a lot. Bye bye.
6. Mastering Collections for Clean Scene Organization: Welcome back, everyone to the
Haunted Street environment, Blender to Unreal, and this
is where we left you off. Now what I'm gonna do is
I'm going to show you a short tutorial on how
to deal with collections, naming, lays, things like that, so you absolutely have a good understanding of what we're going to be doing
on the next lesson. Alright, I have
one song. Going to play that now. Please watch it. Even if you're familiar with it, it might be worth
watching you might gain some extra things
like some shortcuts, things like that, and I'll
see you on the next one. Thanks a lot. Bye bye. Welcome everyone to
our collections guide. And you'll notice over the
right hand side in Blender, you will have something that's called them
collections over here, and this is basally how the old Blender used to
actually handle layering. So with different layers, you would have different scenes or different objects in place. It's changed a little bit now, and in the new
Blender 2.8 onwards, we're now dealing with
scenes and collections. First thing you'll
notice is over here that we've got one
that says collection. Let's call this
collection plane. And then what we'll
do is we'll actually put our plane into
that collection. Now, at the moment, you can
see within this collection, our plane is actually here, and we don't actually
want the other three. We want them basically into
a different collection. So what I'm going to do is
I'm going to right click. I'm going to go and
click New collection. And then what I can do
is I can call this cube. Like so. And then what I can
do is I can left click and drag and drop my cube
into the new collection. And then what you can actually
do is you can actually close these up and you
can see how neat that is. Now, what we're going
to do is I'm going to show you the other
way of doing this now. So if we come to
our actual sphere, what I'm going to do is I'm
going to press the button. I'm going to then
click New collection, and I'm going to
click sphere like so, press Enter or hit the Okay
button, and there we go. Now we've actually
got a new collection with our sphere in there. The other thing is,
you can also come, you can press the end button, and then what you
can do from there is you can actually
click on one of these. So let's say we wanted
this cylinder in the cube, and it will automatically put
this cylinder in the cube. Now, if you don't want that, you can press the end button again. New collection. And let's put cylinder like so and then
click Okay. And then we go. Now we've actually got a
really nice collection sorted out really fast. Now, what about the
objects in there, then? Well, what you can
do as well is, let's say we want to change
the name of this cube. We can come on over
to it. And instead of actually going in
here and renaming it, what we can actually do
then is press F two, and there you go, the
object name comes up. And if we change
this to cube 33, press Enter you will see now if we go to
the right hand side, this cube is called 33. Now, it's important
in large scenes to actually put things
into collections because that way
you can actually increase the performance of Blender or you can hide
certain things out of the way. Because what you
can also do is you can grab multiple objects, press the button again, drop them in a new scene. So press new collection. And let's call this one objects. Like so, and there we go. We have our new one with all of the objects
actually in there. Now, you can see as well that because nothing
is left in there, we've not got this
little arrow there, so all of these are now empty, but it's quickly and
easily able to just press M and put them in their
own collections once more. The other reason why
this is actually important is because many of the displacements
or particle systems and lots of other things within Blender or even geometry nodes, you can actually use
collections to do certain things to a certain
bunch of collections. Okay, so the next thing
we're going to look at is over on the
right hand side, we're also able then to hide
any of the collections. So if we click the
little on here, that will mean that this
collection has been hidden away from
the viewport view. Now, it's important
to distinguish between viewport
and came review. So the Cam review basically means that if I click this off, when I actually am to
render this scene, everything within
this collection will be hidden out of the way. It won't cast any shadows
or anything like that. I will all be hidden
out of the way. Now, the other one we've
got is this little Tik B. If I select this, you will see that it just
turns both of them off, so it won't be visible in the
viewport nor in the render. Now, the other thing to look at is if we click this
little down arrow, we also have a few
interesting ones here. So we have one that
says indirect only. We have one that says hold out. But the ones we're most interested in is
actually this one here. So if I click this little arrow you can see now we
get a new option, and if I come and
click it on here, you will see now that
if I come across, these will still be
rendered in the viewport, still rendered in the render, but I'm not able to
actually click on them, which makes this really
handy if you're trying to grab a load of actual assets or objects that you
won't actually be actually selecting this
collection on top of that. The other thing is,
if I turn this on, I can also do a search
here for let's say cube, so if I type in cube. So I'm able now to
quickly and easily find it within my actual scene. The other thing is over on
the right hand side as well, the double tap, the a button to deselect everything
also actually works. So let's turn this off now. So now let's have a
quick look at this in actual action in a real scene. So you can see here
we have a scene here with many,
many, many parts, which aren't named,
and we need to basically put these into
their own collection. Because you can
imagine a scene like this with thousands
of parts all in the same collection
is obviously having an impact on the
Blender performance. So what I'm going to do is I'm just going to hide the floor, hide this part of the
floor, hide maybe this car. And then what I'm
going to do is I'm going to go over the top. And all I want to do now is just make sure that I'm
not going to select anything else apart from
this actual building here. And then all I'm going
to do is I'm just going to press B and just try and select everything on that
actual building like so. Just make sure I've not got my camera selected or
anything like that. And then what I'm going to
do is I'm going to press the N bourne new collection, and let's call it butchers Shop, and then press Enter
and click Okay. And now what I'm able
to do is I'm able to now come all the way
to the top of here, so if I go all the
way to the top and then start closing up, these collections like so. So we've got square
building there. We've got bookshop and butchers, and now we've got
the butcher shop, which is the one that
we've just made. And now you can see just how quickly I can actually
clean all that. I have come along and
I double tap the A, so I've not got
anything selected. I bring back my floor like so, I double tap the A again. And then what we're
going to do is just close hide the butcher
shop out of the way. And you can see this is the parts that I've actually missed. And then all I can
do is I can select these three parts or
four parts like so, press M, and let's drop them
into our butchers shop. And then they'll be
hidden out of the way, leaving the other
parts that are left, which I actually missed. So butcher shop again,
and there we go. So now we're able to hide the butcher's shop or we're able to bring it
back into the scene. So from there, going a little
bit more advanced now, what we're also able to do is hide all of our
collections in one go. We just need our mouse
in the viewport, and then all you need
to press is number one, and what that'll do is hide
all of these collections. From there, what
you can actually do is you can press number two, and what that'll do
is actually bring in the gray box or the second
collection on there. Number three then brings in the third actual collection and so on and so on and so on. As you can see, up to a maximum, I think, either nine or zero. You can see very, very
easy once you've put them in collections um,
to rename them, to actually increase the
performance within Blender, to hide them in the actual viewport or
hide them in the render. And then also once you've
done that, to select them. I'd have to be a
very, very big scene to have more than
ten collections. Within the collections as well, you can also add
inner collections. So if I put new here, and you'll see if
I open that now, we've actually got a
new butcher shop one. So within the collections, you can also have collections
within themselves, and you can build a really, really large
hierarchy from there. Alright, everyone, so I
hope you enjoyed that. I hope you found it useful. Thanks, everyone. Cheers.
7. Professional Asset Naming and Modular Wall Setup: Welcome back, everyone to the
Haunted Street environment, Blender it to Unreal. This is where we left you off. Now, what I'm going to do is I'm going to quickly close this up, so the end panel and
press just to close that. You can also close this panel over here with T if you want to. So you can open it and close it. We're gonna close that as well. And now we're going to focus
on is just naming these. So I'm going to call
my first collection. I'm gonna come in
here, double click it, and let's call it walls like so. And then what we're
going to do is come to our first wall. Now, instead of coming
over here and renaming it, which I absolutely can, I'll
do that first, actually. So what I'll do is, I'll
call it concrete wall. And I did forget something. Concrete wall,
let's press enter. Let's press the end
panel to open that up. I did forget my dimensions. So 3 meters by 2.5. So what we'll do
is we'll come in, and we'll go three
by 2.5, like so. Then what I'll do is I'll
come to my next one. And instead of going over
here and double clicking, what I'll do is
I'll press F two, and then I can press Control V if I copied it, but
I didn't copy it. So let's come in.
Control C, copy that. Come to this one, press F two. Press Control V. And
then what we want to do is 3 meters by two. So I'm just going
to delete that out, and then it's there, and you'll see that
updates on there. Really, really nice. Next of all, then we'll come
to the next one. This is 1.5. So if I come here, press have two, Control V, and then we'll go three, by
1.5 meters, and there we go. Now, you might be
wondering, as well, why we have three variations. And the simple answer to
that is you can actually make a lot of variations
with your prefabs. You can get away with scaling. So you can scale, you know, on the z axis, you can
scale on the X axis. But the thing is you don't
want to stretch them too far. If you double, you know, the width of this wall here, especially on Unreal
Engine, you're going to get a lot of stretching
on your UV maps. So it's much much beer to put a support in here or
to use two of these, you know, if you want
to have 3 meters, for instance, rather than
trying to stretch these out. That's why we're
doing it this way. Now, of course, you could
go in and make, you know, another five of these with
all the different sizes, but then you'll end
up with a lot of blow within your modular pack. So
you don't really want that. Now let's come to
this one. And what we'll do is we've
already done this one. So now we'll come to this
one. We'll press F two, we'll press Control V. And
this one isn't 3 meters. This one is 2 meters by 2.5. So all I'm going to
do is put two by 2.5. I'm going to left click
drag along press Control C, and then that's ready for me. If I now come into this
one, press Control V, and now it's 2
meters, B 2 meters. Like so, and then we'll do
the last one Rsive two, Corn chov and then
two by 1.5 meters. So 1.5 meters. Like so. Alright, so now you can see
all of those are named. Now you can see we've
also got a plane in here. And we also have our
human OBJ in here. Now, we don't particularly want those to be in our wall section. So what I'm going
to do is just come to my human reference, press the M button, and then what we can do
is put a new collection, and we'll call this human
reference, like so. And there we go. We've
created a new collection, which is really, really nice. Now, let's do the
same with the plane. So we'll go and we'll
call this new collection, and we'll call it ground plane. Like so, once or twice,
and there we go. Now, the best thing
is with collections as well as you can
actually hide them, so you can actually
close them all up, making it much, much
easier to work with. Now, the other thing that you
can do with collections is, if you come up and come to
this little filter button, you come over and click
on this selectable. Now, what they'll do is they'll add another button on here, which means that now, if I turn this off, so the human here, this
one here, sorry. I I turn this off, it means
now, no matter what I do, I can't actually
select my human, which is really great
if you want things in your scene that you absolutely
don't want to delete, absolutely don't want to move, you know, things like that, you don't want to touch also when you're trying to
grab a load of things, my humen doesn't get selected, so it's really, really
handy for that. So let's actually
turn that back on. And what we can also do,
as well as now we've got the main collections is hide certain things that
we don't want to see, which is also really, really handy when you've got
a whole building, and all you want
to do is work on the supports and the walls are getting the
way, for instance. Because you sorted out all of your collections and
everything's nice and neat, you should do this
from the get go. It's really easy to do that. And finally, the last
thing you can do with collections
is you can hide, let's say, ground plane. You'll notice it
doesn't disappear, but when we come to
render something, it won't actually show
up in the render. That's another
reason it's really, really handy to sort out your collections because
a lot of the time, you might have shaders
that you actually want to see in the viewport
for working with, but when it comes to rendering, you might not want to be
rendering out those spheres. So really, really
handy to have that. Alright, so now we've done that, let's just put those all on. And what I'm going to do now is I'm going to grab all of these. So I'm going to
grab all of these. And what I'm going
to do is just press Shifty drag them back, and then we go, these are
going to be our second wall. So instead of it being
a concrete wall, this is going to
be a brick wall. So I'm going to do
is press F two, and I'm going to come in and I'm going to delete
this out of the way. So I'm going to call it brick. Wall like so. And then what I'm going to do is now,
I'm going to copy that. So I'm going to come
in, copy that just so I haven't got to type
out every single time. We already know that these
are exactly the same skill. So all I can do is
just come in now, come to this one,
press Control V, and now you'll see that's it. You'll notice as well that I actually copied when
I did this space. I always copy the
space because it makes it a little bit
easier to work with, and then we'll just
come in, Pressf two, and you'll see that
within no time, we've actually got
them all renamed correctly and all of them
in the right collections. So really, really
easy to do of course, we are working on the
most simple parts here, but it's the same process with the more complex
parts as well. So let's rename it
Brick wall, like so. Alright, so we've got
everything in here, and now we can close
up that end panel. We don't need that anymore. So this will be a shorter lesson because on the next lesson, what I'm going to show you
is these tabs up here. So these are really interesting
object mode, edit mode. We've got material mode,
we've got render mode, and I'm also going to show you ambient occlusion,
which is a really, really great way of actually visualizing how things
are going to look. I'm going to show
you about cavities. We're going to talk about that. And I'm also perhaps
on that lesson, also going to get into
some basic lighting, just so you can
actually see what you're creating
within your scene. This then makes it really great. If you like me and
you create a model, you want to get some textures
on it straight away, and then you want to be able
to see what it looks like. It just keeps you really, really invested within the scene. Alright, so again, what I'm going to do is I'm
going to come up. I'm going to save out my work, and I'll see you on the
next one, everyone. Thanks a lot. Bye bye.
8. Eevee vs Cycles Shading, Lighting and Render Settings: Welcome back, everyone
to the Hunted Street Environment Blender to Unreal. And this is where
we left you off. First of all, before
we go any further, then let's discuss these
four options up here. We can see that at the moment. We've got one that says
viewpoint shading solid. I call this object mode, but solid mode, object mode. I know that there's a difference between objects and edit mode, and we'll discuss that as well. So first of all, let's discuss
the objects and edit mode. But if you hear me say
object mode or solid mode, it is referring to this
little tab up here. So what I'm going to do is I'm going to come first of all, to this wall here. I'm going to press
the tab button, and this is where you do
all of your modeling. Now, of course, in
the object mode, we can still scale, we can
still rotate if we want to. We can still do all
of that good stuff. What we can't do, though, is actually do things like this. So if we come up here and we grab one of these
little verts here, I'm going to press Shift space
bar to bring in my gizmo, and then I can pull
this out like so. So we can actually alter the actual mesh
within the edit mode. Now, up on here, you
have got three options. One of them is the vertices. One of them is the edges, and one of them is the face. Now, you can actually change
these on your numbers. So on your numbers on your
keyboard, one, two, and three. Separate each one of these. And you can see now if I press three, I can click my face, press two, I can
click them my edges, and if I press one, I can
click them a little dirt. Now, we are going
to go a lot more in depth when it comes to
actually creating things, you know, modeling
wise, of course, we are because we have to
create this whole modular pack. But for now, that's all
you need to really know. Now, the next thing you need
to know, here is over here. On the right hand side,
we have these four here. Now, the moments on solid mode. We can put it on
wireframe Y wireframe because it means you can see
through the whole scene. You can also see the whole
mesh of our guy here, which means it's really,
really easy to select things. For instance, sometimes when
we've got it on solid mode, you might want to see through
this to select a face. In other words, if I put
it on wireframe again, press the tabs going
to eight mode. You can see if I
put it on three, which is face select over
here, you can see that now. I can see the back face
off here and select it, or I can select the front face, or I can select this face
here. How am I doing that? Yeah, there's a
little dot there, and it took me a long time to realize that little
dot was there. I never used to see it, but
now I know. So there we go. That's how you can
select things in frame. So what are the other buttons? Well, as we know, this one is solid. This one is material. So all this is going to show on your blender is the
actual material on these. They're not going
to be truly lit. You have got a few options
when you click this look. You can see viewport
shading is on here. So you can also put in
your scene lights and you seem W. We will go
into that a lot more, once we actually
get to that stage. But for now, all
you need to know is this is material mode. Once we've got some
materials in here, I'll show you what
they look like. Okay, and the final one
is the render view. And as you can see, when
we click this on at the moment, it's
pretty underrating. Because we've got no
lighting in here, so we really, really can't
see anything at the moment. Now, the next thing
we want to do then before moving on is I want to play you a short video
just about Blender cycles. Now the quick tutorial
will tell you, as well, about Evie, but I definitely want to
show you about cycles, since that's what
we will be using. And then when we come
back, I can actually show you the difference
between them and why we're actually using this
one over the other one and why Miami a good
idea to go back to Evie. But we'll do that
after. First of all, though, let's save our work, so I'm going to
go to File, Save, and I'll play that for you now, and I'll see you in
the next one at one. Thanks a lot. Bye bye. Welcome everyone to the IV and
cycles part of the course, and this is a full guide on both the EV and the
cycles renderer. So the first one we're
going to approach is the actual EV, and you can see the moment I have a scene setup like this, and I'll be using this to go
through the various options, and after which you can
give it a try yourself. So the first thing at
the moment is we're on actual shading object mode, and we want to be
on the EV renderer, so I'm going to click that on. Now, you will notice
at the moment, I have a sun and I have a Herio over here as well
for the other demonstration. So first of all, let's come
to this actual object here. And what I want to do is
I want to, first of all, go over to the right hand side where the render options are, and you'll see this
is actually on EV. Now, the first thing I want to discuss is not the sampling. We'll come back to
that in a minute. It's actually the
ambient occlusion. If we turn our
ambient occlusion on, you will see that able then
to actually make much, much better shadows
within our actual scene. So, for instance,
this actual cube here, if I turn it off, you'll see that all of
those shadows disappear, and if I turn it on,
enhances the shadows. We're also able to
go in, as well, and we're able to
come over to where the distance is and
turn that down to zero, and you'll see that makes
them all disappear. And as we turn it
up, we end up with more and more actual shadows on there up to a certain
point, as you can see. But you can see now turn
it off and on makes a real difference to how your scenes actually
going to look. So what I'm discussing
here is the setup of V, and then we're
actually going to go over and actually
render that out. Now, let's move on to the next part of
this demonstration. And what we're going
to talk about now is the actual samples. So if I come up and
open this menu up, you can see at the moment
that we have render on 64 samples and
the viewport on 16. Now, not only does this give you a better
quality of image, but also the main reason is
that we can actually get a lot more definition on
these actual shadows. You can see if I zoom in here, these shadows are
kind of pixelated but if I come in and let's say, put this to 300, you will see now it makes a real difference in
how the shadows look. It makes them much
more realistic and much better when you actually
come to render this. Now we're actually
going to discuss the other powerful
thing with EV, which is screen
space reflections. So at the moment, if I turn that on and I come to my
ground plane here, let's actually mess around
with the actual roughness. If I turn this down, you can see we end up with
loads of reflection on here. If I come then over and turn off screen
space reflections, you can see that all
of those reflections don't actually reflect on
this ground plane anymore. So this is why this
is so powerful, especially if you're
doing things like really, really shiny objects or metal, you really want on screen
space reflections. Let's just go back to my
ground plane now and just turn it back down on the
actual roughness. So let's turn it up a
little bit, like so. And then we've got
some reflections, and let's move over
to the next part. So we can see at the
moment we have this light, but it doesn't look very
good at the moment. We can see it has got a bluish
tinge reflection to it. But if we come back
over to EV now, and what we can do is we
can actually turn on bloom. And now you can see that
we've got some really, really nice light and also
reflections enhanced, as well. We can also open up the bloom, and the best thing about the
bloom is we can actually control how much this is
going to actually bloom, how much fogginess it's
going to have to it. You can see the range that
we can put on there as well, and you can also see
that we can turn up this intensity all from
within the actual EV option. Now there are a load
of options within EV, and to go through all of them honestly would be
doing another course. But what I want to show you is just one more thing within EV, which is where we have shadows. If we open this up,
we will see that these shadows actually come with their own resolution map. And at the moment,
they're on 512. The higher I turn this the better the actual
shadows are going to be. So if I put both
of these on 4,096, you will see now that when I actually come to
render this out, these shadows are going
to look even better. They even look better
in the actual viewport. So now all of Deans, I brought an actual
camera in place, and I just want to show
you one more thing before we hit that
render button. If we come back to our monkey
and we click on our light, so let's click on
our light here. You can also come over
to the right hand side, and you'll have something
that says shadows. Just open that up and
click on Contact Shadows. And you will see now
just how much nicer, especially around these eyelids, how that looks, so you can see the difference and
how that looks. So all these things together, including the ambient
occlusion, the bloom, and the screen
space reflections, can make for a really,
really nice render. Now, it's important
to remember that EV is designed as a
real time renderer. So something like in a game
like real engine or unity, that is where a real time
renderer will be used. Whereas cycle, on
the other hand, is not actually meant for that. It's meant for getting really, really high quality
images or animations. It's not meant for
actual real time. So now what we can do
is we can actually go over and hit
that render button. So it's just render image with EV it's not like cycles where
it builds up and up and up, and then actually actually
get your final render. It actually is just there. So 1 minute, it's not.
The next minute it is. Now, depending on how many
samples you actually ask EV to actually render out is how long it's actually
going to take. So you can see at
the moment, this has took around 3 seconds, and this is another
reason why you might want to use EV
because it's very, very fast at
rendering things out. So let's close this
down now and let's move on over to our
cycles render engine. The first thing to note is, when I actually turn
this over to cycles, it's going to be
much higher demand on your actual system, especially when we're
in the viewport view. You'll also notice, as well, that it's pretty
grainy at the moment, and this is because
we just need to turn on the viewport denoising, although this requires a lot of performance
from your machine. But you can see
straight off the bat that this is looking really,
really nice already. The only thing is,
whenever we turn around, because it's not a
real time renderer, it's going to take a little
bit of work to get to a certain level of samples
that you might be happy with. Now, the other thing
is at the moment, you can see the cycles, we also have a
device, and this is basically telling Blender
what device to use. So it can be your
CPU or your GPU. I do recommend that you use
your GPU rather than CPU, if available because your GPU is much better at
handling rendering. So now, before we go into any of the in the cycles render engine. What we first need to do
is come over to Edit, go down to preferences. And what we first need to do is go up to where
it says system, and from there, we can actually change the options for cycles. So what I'm going to do
is I'm going to come over to where it says OpticsX. You might not be able to
actually click this on. It might be down to QDa. This Optics x is the
CyclesXRnder engine, so we do have a new version of cycles in Blender
four onwards, and it's called Cycles x. Well as come in with a
host of different features which will increase the
quality of your renders. It's also much, much faster
than the old cycles. Now, if these options are
actually great out for you, that means that you
just haven't got a graphics card that
actually supports it. I do know that QDa, I think, is anything from Nvidia's
second series and the Optic sex is anything from the high end of
the second series, and certainly on the
third series of Nvidia. I'm not sure about the
other graphics cards. So you just have to pick whichever one you can,
the highest one you can. And unfortunately, if
you can't pick any, then you'll just have to
have the basic cycle. All you need to do to
enable that is, again, just put it on Optics ex
and take both of these on. So I like to take both
of these on just in case Blender can use both of them together to
speed up performance. So once you've got
those ticked on, or you've got your
Cubia ticked on, then what you can do
is close that down, and then you can come
over to where it say CPU and put it onto GPU compute, and you'll see just how much
faster that actually is. If I now move around, you can see how fast
this actually speeds up, and that is because
we're now using our GPU. Alright, so now let's go
through a few of the options. So you will see
under light paths. We've got a lot of options here. Now, all of these options will change the way that you're
seen actually looks like. We won't go through these, but these are where all of the light options will actually be from the transparency to the glossiness of
the actual scene. So you're free to mess around
with these. Just be aware. The higher you put these, the more performance
is actually going to. The other thing you
need to know is that sometimes when we're dealing with certain
shaders within blender, they won't be able to
be rendered out in EV, and it's normally down
to the ray tracing power of cycles that will actually be able
to render them out. A lot of the times
when we're dealing with something that has
a transparency in it, for instance, or something
that has displacement, and it's built through
the actual shader. So it's a material built
through the shader, you will have to actually
use blender cycles. What we're going to do
is I'm going to come down and just go through the performance options because performance on actual
cycles is very important. Now, depending on if
you're using your CPU or your GPU is how important it is to get
the right tile size. The higher the tile size, it is, the better it is
for your graphics card. The lower the tile size, the better it is for your CPU
or your computer processor. So, whichever one you're
using to render out, whether it be your CPU or GPU, just take these into account. So again, CPU, lower tile size. So something like 64. And GPU, higher tile size,
something like 2048. The next thing we
want to look at is this use spatial splits, and you can see what it says, longer build times
faster render. So just make sure that you
tick this on because what we're also going to tick
on is persistent data. Once we've ticked these two on, what it basically means is, it's going to take longer
to actually build out the scene than it
is to render it. If you don't tick this
on, it's going to take a certain
length for each one. Finally, the next thing
we want to discuss now, we've gone through that is
the actual color management, and you will have this
within EV as well. I've just saved two cycles. Now, if you're
using Blender four, you will have a view
transform that says AGx and this is the new
actual view transform. This one is supposed to
be the most realistic. If you're using older
versions of Blender, we'll have something
called filmic, but I recommend with
the new one using AGX. Now, you've also got a look which you can actually change, which is really
handy, especially if you're doing stylized scenes. And you can change this look to something like very
high contrast, or you can change
anything in between. So you can have base contrast or let's actually let's
put it back on AGX. Let's put it on something like
a medium. Where's medium. So medium high contrast. And you can see now this scene is looking really, really nice. Now, you can also see
a few other problems with blender cycles. One of them being, we don't actually have any
ambient occlusion. We don't actually
have any bloom. So although everything looks
better in blender cycles, not only are you going to lose all that
straight off the bat, but also, you have to then come in and set it up
in the compositor. So this is why you really need to think when you're
rendering out a scene, whether you want to render
it out in EV or cycles, EV is much, much faster and everything is there
straight off the get go. Cycles is much, much slower, needs a lot more performance
from your machine. And on the back end, we
also have to go into the compositor to get a
really, really nice image. Before we finish and
actually render this out, it's also very important with lender cycles how many samples you're actually
going to work with. So you can see here
where it says render, not the viewpoint on
where the render one is. You want to set this
pretty low to start with. It is set as default of 40096. I recommend setting this at 200. Lapping is then it's got a
noise threshold on there. I'll hit near that 200, and then the noise
threshold will kick in and basically denoise
your actual image. In other words, get rid of all those fireflies
and things like that. Now, if we come up and
what we're going to do before hitting the render bun, I also recommend if you're
working in cycles that you put this onto wireframe because then it's going to
save on performance, and it's not going to be rendering it out
in the viewport, as well as trying to render
it in the actual render. So let's put this on wireframe. What we're going to
do then is come over to render, Render image. And here we go. Now,
you can see it's very, very different from
how actual IV works. You can see it builds up,
builds up, builds up. You can see on here
the samples going up, and then you'll see
it actually finishes, and we can see it
took 12 seconds, which is around six times
longer than what EV took, but you can see it's a really,
really beautiful image. There's just no
ambient occlusion or contact shadows and
things like that on here. So that's the
difference, everyone. Now, the final thing
before I finish is, I want to show you just one
more thing that's important that you can do with both
EV or blender cycles. And if I come to my camera, and all I want to do is
just hit camera to view, and I just want to put my actual camera in this position just so I can
see the background here. And then all I'm going
to do is I'm just going to come down
to where it says, film, open that up, and you will see one that you've got here that says transparent. This is how you create an image with a
transparent background. If I know go to
render out my image, you can see now it comes with
a transparent background. You can also see because we've got that persistent data on now, it's a little bit faster
than what it was before, and it's just under 8 seconds
instead of 12.5 seconds. Alright, everyone, so I
hope you enjoyed that. I hope you learned
a lot from it. We will go into a
lot more detail about this as we're working
through the course, whether we're working in
EV or Blender cycles, and we will be
discussing, as well, of course, the compositor
in Blender cycles. Thanks, everyone. Cheers.
9. Gray Box Materials with Ambient Occlusion Setup: Welcome back, everyone to the Hunt Street environment
blended to Unreal, and this is where
we left it off. And what we want
to do now is just quickly put this on
object mode for now. And we just want to go in
once this is loaded up, and we just want to go in
to the right hand side, and you will see at the
moment, we have this on EV, which means that it renders
really, really fast. But I'm going to
show you in a minute why we don't want
to be using EV, why it's better to use
cycles if you can. If you have a potato machine
like I used to have, EV is absolutely essential
rendering out, you know, even in the view porting cycles is much more taxing on your GPU. Now, first of all, though, let me show you cavity. So at the moment, we
have these walls. They're readable, but we can make them a
lot more readable. And I recommend setting this up when you first open
your blender file, even saving it as
a default file. So, in other words,
I will quickly open the blend file and show you
how you can set that up. So let's do that in another blender file and then we'll come back and repeat the process
in this actual file. So here we are in a brand
new blend of files and you will notice if you come up
to the top right hand side, you will see that
you've got default. So you can save startup file. This is where I would
save these options out. They're very easy to You know, a lot of things you could save. You could save a custom, Yo. You could save the
fact that you're opening up in modeling
instead of layout. You could even change the layout and then save it as
the default file. What I'm going to show you is, I'm going to show you cavits. So what I want to
do, first of all, is I'm going to take my cube I'm going to shift
D to duplicate it, press shift space
bar to bring in my move tool, and then
I've got it there. What I'm going to do is
then I'm going to come in, I'm going to shift D again and I'm going to drop
that there like so. Now what I want to do is I
want to take this one here. Left click it. Press the
tab on, press Control. Left click, right click, and this then we bring
in an edge loop. Now, edge loops we'll
absolutely be talking more about as the course progresses. But for now, don't copy what I'm doing. Watch what I'm doing. And then you'll see exactly
why I'm doing this. Now, what I'm going to
do is I'm going to come in now and extrude
this out with E. So I'm going to press
E to extrude it out, and we have something like this. Finally, then I'll just reset all my transforms because it's just a habit at this point. So set origins geometry. And now I'm going to show you, if I double tap the A, up here, if you're in solid mode, click the little down arrow and come down to where it says
cavity and turn that on. You'll notice instantly
it's more readable, and this is why I
recommend having this on. The other thing you can
do is you can change the ridge so that it's even
more readable if you want. And you can also
change the valley. So the valley is this one here. The ridge is the
one on the outside. You can change the
valley like so. Now the thing is why did
I put that like that? It's because to show you that if objects are intersecting
in between each other, it's not going to show you the
valley here, for instance. So don't expect it to do that. This is more based on
ambient occlusion. This is to read
the actual model. You can also come in
and change it to world, which sometimes I like doing, then turn up the ridge, then turn up the valley. And now you can see that we've actually got
that on there. Why? Because it's based on world now and not just
the actual model. So more like ambient
occlusion, this is working. So really, really easy way to actually read
your model now, even though you're
still in solid mode. I'm going to do is now, if you want to save this like this, so these options,
what I would do is I would come in and just
delete these out of the way. So delete them out of the way
because they will stay on. If I bring another cube in now, you will see that it comes
in exactly the same as that. If I duplicate with Shift D,
now you can see it's there. So I'm going to
delete those both out of the way, come up to file, and then go down to defaults and save this as the startup file, and that's already
set up for you. Again, as we move along, you might think that, Hey, I want to save that
as the default file. Hey, I want to save this
add on add ons as well get saved to the default
file if you want them to so, for instance, you could bring in your node wrangler and
then save it as a default, as well as everything else. So really, really handy to think what you actually
want in your default file. I guarantee you'll end up with thousands of
things in there, half the things you
won't ever need, and you'll end up coming back and starting a new default file. That's exactly what I did. Now, let's close that
down and actually go back to our scene, so we're
not going to save that. And what we're
going to do now is do exactly the same thing here. So I'm going to come
down, put it onto cavity, turn up the ridge a little bit, just so it's a little
bit easier to read. Let's put it on to world so
we can actually see things, turn it up a little
bit more like so. And there we go. That's
looking quite nice. And we'll also turn up
the valley a little bit, like so, and now we can
actually see everything. Alright, now, the only
problem here is you know, I'm just going to turn off my wild I actually
don't like that. I'm going to turn off
my w there we go. Now, the only problem here
is that we still don't know, if we go into material mode, for instance, we still got this. It's just going to show
this all the time. So what I tend to do is when
I'm building a gray box, for instance, I like to see what the lighting's
going to look like. I can't do both. I can't see
the cavities, the ridges, when I'm in, you know, when I'm in material mode, so I can't see them and also, I've got nice lighting in here. It'd be nice to
read the gray box before actually getting, you know, materials and textures
on and things like that. So what we've done is and
how I always work is, I will create a special
material that I put onto these before I
actually start texturing. So let's open up
our resource pack. So if you come down here, open up our Which resource pack
is it? Let me have a look. Yes, it's this
resource pack here. And what I want to do
is now I want to come down and select one
of these shaders. Now, you will notice
if you select this shader on the
right hand side, now, rather than go
in and open this up, all you've got to do
is just hover over it, press a little dog but
on the number pad, and it will open you up straight
to where it needs to be. So this is the fog volume
shader. We don't want that. What we want is the
ambient occlusion. Now, you can see on here
ambient Occlusion is here. You'll see it's named on here, and it's also named in
the material panel. So you can see in
the material panel, it's also named there as well. This is the
one that we want. So what I'm going to do
is just press Control C. I'm going to close that down, and then going to press
Control V and bring it in. And of course, it's
going to come over here like our human
reference did. I'm going to press seven
to go over the top. And the best thing is, if
I'm going over the top, it means that I
can actually press G and just drag it out like so. Now, if you know over the
top, so if I pull that back, and now press G,
you'll notice it could end up anywhere in world space. So I don't recommend that. Always press seven,
press the G key, and then we'll drag it
over to where we want it. Now, we want to put
this ambien occlusion, so this ambien occlusion
on here onto these walls. So the easiest way to do that, rather than going over
to, you know, your wall, coming over to the
materials panel, clicking the down arrow, you will see that we've
got Ami inclusion, am inclusion 01, and I'll tell you why
that is in a minute. And we've also got
material on there. These, we don't need
all of these things. And again, it's a nice idea
to keep things really, really tidy, so we'll discuss
that in just 1 second. First of all, though, we want to get this material onto here. So what I'm going to
do is grab this one, shifts like this one, press Control L, and what we want to do is link materials. Now you'll notice if I come to my wall now, straight away now, it's much, much easier to read because of the fact that it's
got a material on there. Which is our ambient occlusion. Now, what I want to do is I want to put down all of these, so I'm going to select
this one, this one, this one, this one,
this one, this one, this one, this one, and
this one and this one. And then finally, select the one we want to take
the material from, which is this one,
press Control L. I've also selected E
in my ground plane. That's absolutely
fine. Press Control L, and then link materials,
and there we go now. Did I actually link materials? No, because I took it off. So let's press Control L, ink materials, and double
tap the A, and then we go. Now they've got ambient
occlusion on here. You can see now with a gray box, really, really easy to read. Now, there is another
thing you can do with this if we actually go over
to our shading panel. So I know it's getting a little bit more technical right now. But trust me, it's quite easy
to see what I'm doing here. If we go over then to
our shading panel, you will see in here that this is a simple material setup. We've got the ambient occlusion,
we've got a color ram, we've got a mixed shader, and then we've got
our actual color, which is this principle, and they're all leading
into this surface. All materials end in a surface unless it's a
volume or displacement. Pretty much for you,
during this course, all of the materials are
going to end in the surface. The color ramp is there
because then that gives us control of the depth of
the ambient occlusion. If I turn this down or up, you can see we've got a lot
more or less depth on there. The ambient occlusion
is the distance, so it can turn this up or down
depending on the distance. Now, the good thing is you press Control's head if
you make a mistake. Now, the color, what's
the color there for? Well, it's to make it
a different color. So it can make a nice, gray color if we want
to while still keeping Or lighting in there. So now you can see much, much
easier to read, especially when you're creating things like, you
know, gray boxing. So for here, when I'm
doing a gray box, I would have a little bit
under there, you know, that contact shadow that's
always under everything, and then it's really
easy to build it out. Now, one thing before we carry
on on this shader panel, I do recommend that we
don't have this here. Generally, you're never
going to need this. You will need the UV map at some point, so
keep that on there. But anything I don't
need, I tend to just pull across and then take that out so I can
actually see more of what I'm doing because
it gets cluttered. You know, when you're
working in your viewport and you're working
with the shader, sometimes it's really hard
to see what you're doing, and you just want a bigger
view in the viewport. Alright, so all of
that is explained. Now, let's just
quickly explain them. Why if I come over here, I've got three
materials on here, and I've only got, you know, I've only put one material
in the entire scene. That's because our human came in with ambien
occlusion on. Now we need to get rid of
this ambien occlusion. So what I'm going to do is
I'm going to grab my human, grab my wool, press Control L, and I'm going to link materials. That then is going to make sure that he has ambient
occlusion on him. Now, if you notice
if I click on here, Amien occlusion 01,
I'm in occlusion 01, Ami occlusions on everything. What that means is now I
can purge everything else. So I'm going to come
over, I'm going to come down to where
it says cleanup, purge unused data, and it's going to purge
out of the scene. Out of blender memory, one, two meshes, three
materials, and two images. So that, you know, camera deleted, that
light I deleted, those materials that
we're not using anymore, those images that we brought in, so going to be purged, which
means it's going to be a smaller blender file. So let's go to delete
delete that out of the way. And now what you'll see
is if I come over here, I've only got one material. Now, if I come in
double tap this, I'm going to change it
to ambien occlusion, like so, and now we only have one material which
is ambien occlusion. So again, really
nice and cleaned up. And finally, before ending this, because I didn't get
to show you, you know, the render part, let's actually put this in
its own collection. So I'm going to grab this,
I'm going to press the M. I'm going to put it in a new
collection called shaders. Like, so I'm going
to click Create. And then what I'm
going to do, it's already named, and
it's already in there, and I can close that, hide it anytime I want.
Let's save our work. And on the next one,
what we'll do is then we'll be discussing
the lighting. So we'll be discussing
the EV and the cycles, which you've already known
something about now, and I'll see you on the
next one, everyone. Thanks a lot. Bye bye.
10. Cycles vs Eevee GPU Setup and Sky Texture Lighting: Welcome back everyone to the
Haunted Street environment, Blender to Unreal, and this
is where we left you off. Alright, so what we
want to do now is go through the EV and cycles. There's a huge
difference between them. But first of all, I
want you to go to Edit, go to preferences. And what you want to do is
set this up on your system. So make sure your
systems selected. And what you want to do
is, if you run the potato, you're probably gonna
have to select none. If you run in a mid
range computer, you can probably
select da and if you run in something a little
bit more higher end with a, um graphics card like I have, then you can use the Optics X. What does this do? It means
that your computer can then use your graphics card to not only render things out, but also use cycles in viewport,
render extremely well. So there's also an option
here, which is OpenGL. You can put it on Vulcan, if
you like, and test that out. But for now, I would just have it on one of these too,
if you possibly can, and make sure that your
Nvidia graphics card or whatever graphics card you're using is actually ticked on. Now, you can also see that you
can also tick on your CPU. I don't recommend this. I think it actually slows things down. So you just have
your GPU selected. Once you've done
that, then, close it down and come over to
the right hand side. And you'll see at the
moment, because it's on EV, it isn't actually using
the graphics card anyway. So what we want to
do is we want to come and want to
put this on cycles, and now you can see
I've got an option. Now at the moment, you'll
see when I turn round, if I put this on the rendered
view, when I turn around, you can see it's very grainy, takes a long time for
the samples to load, and that is because
it's using my CPU. Let me switch this
to GPU wherever, and now you'll see
this is like a rocket. So you can see now turning
round makes things really, really easy to work with
things in the viewport. Now, the other thing
is that at the moment, you can see it's very grainy. Now, to get rid of that, what
you want to do is open up this sampling and
turn on denoise. And you will notice
now when I turn, it's really, really nice. There is a slight bit of lag, but as long as you've
got a decent GPU, it should be absolutely fine in the things we're doing now. Now, if you're
struggling with this, again, put it back onto EV. It's not going to look as good as cycles. That's for sure. The other thing is, no matter
what GPU you're using, even if you've got
a large scene, denoising actually uses
a lot of that GPU up. So make sure if
you're struggling with a large scene,
turn this off. For now, we're going to
leave you on because we've only got a
few parts in here. Now, what I want to do
now is actually get some basic lighting
in here so we can really see what
we're actually building, because I find that when
I'm building something, especially for
courses, you know, keeping engagement with you guys high means that we're
creating things, and then we put in materials
and textures on them. That's not something that we actually do in the real world. Normally, we'll grey
box things out. Then we'll create
the parts like this, and then we'll put
on the materials and textures and start
slotting them into place. That's normally how
we work on things. But here, we're actually
going to start bringing in the basic lighting
and then unwrapping, putting textures, materials
on things like that. Alright, so what
we're going to do is go over to the shading panel. Now, you would think
that the shading panel is just materials, but it's also where
you'll find the world. So you can see here
we've got the world. Let's just turn this
to basic lighting. And again, once
you've set this up, you can actually save this
out as a depot, as well. Now, you can also append things, which I'll show you in just
1 second because I didn't show you about the human
appendinym either, but you can also append things like lighting, for instance, or like any of the
objects in the scene, or the HDRI or anything
else for that matter. So what we want to do then is we want to come down
and put this to world. Now, once I've put
this to world, you'll see now if I put
this on Rendered view, I've actually got in
my scene now this. So if I turn this up, you will see it actually alters how it looks
within Blender. Now, what we want to do, instead of having a basic background is we want to bring in one of
the best nodes in Blender, which is called the sky texture. So if I press shift day, do a search and look
for sky texture. I can drop that in. Now, I honestly use this
more than HGRIs. I really like the lighting, especially when it comes
to stylized things. I love the fact that
you can really, really tailor this wherever you want, as long
as you're careful. And yeah, so I use
this all the time. So what I'm going
to do is then I'm going to plug in my color into my background and
hey Presto. There we are. We've actually got lighting
in straight off the bat. Now, the best thing is
we've got it on cycle. So let's see if I
can see my sun disk. Sometimes you can't see it. It's very hard to see sometimes. So what I'm going to do is
I'll turn down the size. Let's turn down the size. You know, I often struggle
finding this sun disc. I'm always looking
in the wrong place. Let's put it really big. Let's see if I can
see it. There we go. Now we can see the actual sun. Now, let's turn it
down a little bit. So turn it down, turn it down. Let's also turn down
the sun intensity. In fact, we'll turn this
down to no 0.5 first. Now we can see our sun
disc, and there you go. So that's how you
can make your sun exactly right size
as what you need. Now, be warned that if
you put this onto EV, you will no longer be
able to see the sun disc, and it will say
sundisc not available. So just be warned
if you can't see your sun disc on EV,
that is the reason why. Alright, so we've
got our sun disc in. Now, let's zoom to one of these. So let's select one of them. Press the little dot on. And then what we're
going to do now is, I'll show you
how these work. Now, the moment you can see that these shadows are
looking a bit pointed, and that's because
we need to raise up or down the sun
actual elevation. We can also turn
this sun, you know, intensity down a little bit because it is a
little bit bright, so I'll be a little
bit more natural. And then if we come round
this side, you can see, it's quite a nice sunny day. We can also, as well, turn
up this and you'll see it slightly rounds
off the shadows, which I think look a little
bit more natural than really, really hard shadows, especially
when you're dealing with, you know, stylized things. We can also, as well,
again, as I said, turn up the sun elevation
so that it's more midday. We can also turn
the rotation round, as well, which is really handy. Now, another thing
I forgot to say is when you're doing this,
always say about your work. Because the chance of Blender crashing is always here when you're using
the sky texture. Maybe they fixed it in, you know, Blender 5. I'm running a
pretty good machine here probably better than
what I was doing before. So maybe that's what's done here as well. So
just be careful. So I'm just going to
rotate these a little bit, so get a little bit
of rotation this way. And then what I'm going to
do is look at the altitude. Now, I wouldn't change
a lot of these. Honestly, I would leave it
like this. This is perfect. You don't need to
change anything else. But of course, if you want to mess around with the altitude, so let's turn up the altitude. So, in other words, we're
right at the top of, you know, Mount Kilimanjoro right now, or you can have it at sea level. Right, the sea, like so. So it's up to you
where you want it. I'm going to leave it on 100. I think that's why
it was on, like so. We can also change
the air as well, so you can see you've got
a really nice rich color. Now, the reason why I don't recommend messing
around with these too much is because once
you start changing things, the texture that you have
will look a bit different. And then that causes issues
later down the line, especially when you bring in
things like Unreal Engine. You know, you're looking
at things in a viewport of something that's not
going to be the same in Unreal Engine 5 because the
lighting is not the same. So I tend to keep this as
close to default as I can. Now, this for me, on these settings, looks
absolutely fine. Now, what I will show you is, if we go and put this back on modeling, so I'm going to
leave it like this. I'm going to press
tab, double tap the eight, and
leave it like that. You'll see that we've got our ambient occlusion on
there, so that's still good. And now you can see just how
readable that actually is. Now we've got the
lighting in there. It really, really is
really nice and readable. You get a really clear idea of what your models are
going to look like. So before we end this lesson, what I'm going to do is
I'm just going to open up a new Glendople and I'm going to show you that if we're
coming over here, and let me just actually save that out first before
doing anything. So let's save this out. So save come back to that Blender
power I just opened up. Here it is. What I can do now is I can come
down to our pend. I can go over there
to my course. So blend it on village,
this one here. And you will see that
if I double click it and go into Wild, you will see basic
lighting is there. And if I bring that in now, you will see that here we are. We've got our basic lighting. Let's just set this two cycles. There is our basic lighting, what we had in our other scene. We can also go and append. And if I come up and
go to materials, I can also bring in
ambien occlusion. So let's bring that in.
Let's grab our cube. Let's put the ambient occlusion on there, and there we go. And we could also bring
in, so file, append, can also bring in if we
come to our objects, where is the human reference. And here he is. He's
in there as well. Let's double tap
the e. So you can append things from one
file to another file. Now, later in the course, I'm
also going to show you how you can actually set it
up with Asset Manager, which is a whole different
subject on its own, and it's an amazing
thing to have. And, trust me, once
you've got Asset Manager, you'll be building the
Blender files left right and center because it's such an
amazing feature and Blender. Now, for now, let's
close that down. And what I'm going to do
is I'm going to save out my work and on the next one, what we're going to
discuss is seams and shop. So that's where we're
going to go next. For now, I would always say, if you've got Blender
open, always, always, just make sure you
put it on object mode because it is eating
up a lot of GPU, you know, having it
on rendered view. Alright, everyone, so you enjoyed that. I'll see
you on the next one. Thanks a lot. Bye bye.
11. Mastering Seams and Sharp Edges for Clean Shading: Welcome back, everyone to the
Haunted Street environment, Blender to Unreal, and this
is where we left it off. Now, what we need to
do next is we need to actually add in some seams, not so much shops, but it's
best to learn about seams and shops at the same time because they actually do
relate to each other. So I'm gonna play a quick
tutorial on seams and shops. Now, even if you think you know all about
seams and shops, please watch it because you find out something new on there. So watch it, and if you do already know when
you're some Jedi, you unwrapping, then just
move on to the next lesson. Alright, everyone. So again, I'm going to save out my work. As always, and I'll see
you on the next one. Thanks a lot. Bye bye. Welcome, everyone to the
shut introduction to marking seams and Sharps,
part of the course. So before I give you examples of what I'm
actually talking about, let me just briefly
explain what they are. Seams you can think of like
seams on a piece of clothing, like a shirt or
pair of trousers. The main job of seams
is to make sure the texture that
you're trying to place on your mesh
goes on correctly, but more importantly, gives you control of how that
texture will look. Sharps are more like seams, but serve an entirely
different purpose. We use sharps to
give us control of how sharp and soft angles
are on our measures. This makes them look realistic. It is also important we do this not only for
rendering and Blender, but also sharps carry on through to other software
or games engines we want to use like Substance Painter or Unreal
Engine as an example. So with all that said,
let's get started. So here we are in Blender
with our starting cube. Now, if I click on my cube
and go to my UV Editing, you'll see that the cube is basically unwrapping
in this actual way. So basically, it
unwraps like a present. Now, if I come across and I grab this circub and
I press Shift D, and then we press Shift
spacebar to bring in our Gizmo, and we
move it across. And now let's say I want to
alter this cube a little bit. So what I'm going to do is I'm going to press the tab button, and I'm going to go
into Face select, click the top face Shift Spacebar to bring
in the move tool. Bring it up like so. Now, let's say I
want to unwrap this. Now, if I grab this
with L just to grab everything and I press
the U button for unwrap, you'll see that it unwraps
exactly the same way. Even if I reset the
transformations of this, it will still unwrap
exactly the same way. Now, let's mark some
seams and see how that has an actual effect
on our actual unwrap. So let's grab the top, and
we'll come down to the bottom. And what we're going to do
is we're going to press Controlle then come down
to where it says, seams. Now, it's important
to remember that it's Control lee to mark
seams in Facect. But if, for instance,
we're in Edge Set. So if we come to this edge, if we press Controlle, you will get this option
up as well, seams. But you can also right
click in Edge Select, and you can also see we can
mark a seam this way as well. So for now, though I'm not going to actually
mark this scene. What I'm going to
do is I'm going to grab the whole thing with L, like so, and now I'm
going to press unwrap. And you can see it unwraps
completely different. Now, let's bring
in some textures so you can see what
exactly I'm talking about. So if I press say tab, I'll come up to my
materials panel up here and I'm going
to give this material. So I'm going to come across
to the right hand side, click on my material button. So let's now bring the material
I've already prepared. So if I come across
this little down arrow, come on down, you
can see I've got one here called wood, and
let's click that. Now you can see what's happened. We've actually applied our
material to this object, where you can see, it's
pretty much a mess. The top of it looks fine, but the bit going around the
side is all bent and skewed. So if I zoom out and
I press Tab now, you can see that the reason is that it's not actually
UV unwrapped correctly. So how do we fix
that? If we come up to Edge set and
we grab this edge, and now I'm going to do is
I'm going to right click. Come down to mark seams and now grab the
whole thing again. I'm going to press, unwrap, and now you'll see it
unwraps absolutely fine. You can see that
woods looking really, really nice actually
on this mesh now. So what this does, the seams do is actually gives you control of how this actual texture
is placed on this mesh. You also need to take
into account that this is basically
an infinite loop. So if I come round and I look
at this face and this face, you can see that
they're going round. If we have no seam, when I
talk about infinite loops, it's basically going
around and around and Blender doesn't actually
understand how to unwrap it. So you'll end up with
that mess we had before. Now, the other thing to
take into account is, if I turn this wood around, for instance, Swan going to do, I'm going to come over
to the left hand side, the viewport of my UV editing, press A to grab everything, R 90, spin it round. Now, the other thing
I want to show you is that where we join these
actual seams up is also really important because
you'll never ever get it perfect on here where
there's an actual seam. So let me exaggerate
this a little bit. So I'm going to do is
I'm going to press tab. I'm going to make
this a lot smaller and I'm going to move it into the center of my UV map and
then going to press tab. Now you can see that
these edges don't line up whatsoever against
this other side. So this texture here doesn't
line up with this texture. And the reason is because
we've got a seam down there, and that is the actual
break in the texture. Yet if we come
round to this side, and I spin this round. So if I grab it or Z 90 and now go to this
one where we can see, you can see that these
line up perfectly. And the reason is
because obviously, there's no seam there.
The seam is here. So you need to take that into account on your own measures and objects that when you're
applying textures and materials, try and put seams where
you're not going to see them. So if it's on a door
handle, for instance, try and put them on the inside where no one's actually
going to see them. So always bear that in mind when you're actually
marking your seams. So now let's discuss sharps. So if I bring in
a new primitive, so if I press Shift A, I'm going to go across the mesh, I'm going to bring
in a cylinder. Now, you'll notice
that this cylinder has all these little
edges around there, and let's say you want to
make a cup or something, the last thing that you want is all these hard edged
faces in there. Now, there are things we
can do to sort this out. So the first one we can do is we'll bring in another cylinder. So I'm just going to move
this one out of the way. So shift spas bar, bring in my gizmo, move
it out of the way. Shift A, bring in
another cylinder. And this time, I'm going to
come down to where it says, add cylinder and turn
up the vertices to 100. And now, you'll notice that
we do have a round edge. But the problem is
that we've brought in 100 vertices to
actually achieve that. And that's not
something we want. We want to use as
few hologons as possible while still getting
a really good looking mesh. So how do we achieve that? Well, there are a number
of things we can do. First of all, we can come
across to this right hand side. And what we can do now
is come to where it says normals and
click on Auto Smooth. Then we can right click on the viewport and
click Shades Smoove. And now you'll notice it's
actually been smoothed off. But the problem with this is, if I turn up by Autosmooth, you can see if I turn
it up all the way, it goes really, really funky. And that is because
at 107 degrees, Blender decides that these edges along here needs moving on. So it doesn't give
us a lot of control. If we do this on the other
one, so grab this one, right click, Sheets
move, Atos, move on. You can see again, even with
lower amounts of polygons, we're still able
to smooth it off. But if we turn this up, we're still going to end up
with the same problem as what we had before. So
how do we solve that? Well, if we come in now,
press the tab button, come to the top, grab the top, shifts
like the bottom. Press Control E
because we are in face leg and we'll come
in and marker shop. And now you'll notice
if I press tab that now it's got
Hard edges on there. This gives us control. So this is why we
actually use shops. No matter what I turn
this up to 180 degrees, which is the highest it goes, it will not get rid of
those shops that we mark. We can also mark shops
around the edges as well, Server grab this
one and this one. And now because we're in Edge
select, we can right click. Come down, mark a shop, press the tab button,
and now you'll see you've got hard
edges on there. So it's very important
that you mark sharps, where you're going to
actually want hard edges. It's also important that
you get into the habit of marking shops when you're
actually marking seams. And then what happens is,
when you join two objects together and you turn up
the auto smooth if needed, you're not going to end up
with some measures like this. Okay, everyone, so I hope you enjoyed that
introduction to marking scenes and shops and as
they say, on with the show.
12. Unwrapping Modular Walls and Applying Brick Textures: Welcome back, everyone to the Haunted Street environment
Blender that's Unreal. And hopefully, you found
that really, really useful. Now what we're gonna do is we're going to come
in and we're going to select all of our walls. So I'm going to select
every single wall. And then what I'm going to
do is press the tab button. Now, what I want to do is
select all the faces now. So I'm going to make
sure I'm on Face select, and I'm going to
come in and just select all of these faces, shift and left
clicking on each one to make sure that I
select them all, like so. I'm going to move around
then to the front. I'm going to shift select
all of these, like so. All the way along, and
then I'm going to press Controlli and I'm going to come down to where it
says, Mark seam. This is the one you want.
Once you mark a seam, you will see now that we've got seams going all the
way around the faces. Now, as you learned in
the previous lesson, these won't unwrap properly. If I try and unwrap these, they won't unwrap because
this is an infinite loop. You can see it goes all the way around. There is no break to it. So the faces will
unwrap correctly, but these parts in here
won't unwrap correctly. So what I'm going to do
is I'm going to come to edge select and I'm going
to select the bottom. Why the bottom when
you've actually been working in the industry or you've been doing
this a long time, you'll quickly realize
that where you set your seams is
very important. And generally, you want to
select them at the bottom, because that is a place
where these walls are generally going to
be going into something. In other words, no one will
be able to see the seams. If in these walls, even if let's say we missed
a support or something, it would still look okay
because you won't be able to see that seam because it probably would be in the floor. Now, when you're dealing with
something like potatoes, you know, it's very,
very hard to hide seams. But there is no
real way of getting around the fact that
seams need to be hidden. And the way that, you know, three D software works today, games work today, generally, you're going to see some seams. You'll even see in some of the games that you
play, you know, where I remember in
World of Warcraft, there's a dungeon in there. You can absolutely see a
lot of seams in there. You know, it's one of
the older dungeons. You can see the seams in there. So look around next time
you're playing games, and you'll see a lot of seams. Now what I'm going to
do is I'm going to right click Mark Sam. And then what that
means is now I've got a seam on all of these. Now, again, before
doing anything, once you've actually
marked your seams, always reset all
your transforms. Reset all your transforms
origin to geometry like so. Now, the other thing is, when
we move on in the course, we're going to be doing a lot
of beveling but for walls, we actually don't need any sort of bevels on them
because they're either going to be hidden or they need to go
next to each other. And if they're going
next to each other, last thing you want
is a bevel because it all cause an artifact within, you know, these edges
joining each other. So we absolutely don't
want to do that. But you'll see later
in the course, you know, how we're
bevel in and things. Now, what I'm going to do
is now I deselect to them, so I just need to
select them all again. I could come up to
here and come to my walls and just shift
select them all this way. Again, it makes it really easy. Let's head on over
then to UV Editing. Now, first of all,
with the editor, you're not really going
to need this side. So what I tend to
do is move it over a little bit and then move
over this a little bit, and then it gives
me room so that I can actually see
my rendering view, my object, solid mode, you know, and everything
else that I'm going to need. So what I want to do now
is I want to unwrap these. So what I'm going to do is I'm
going to press the tab on. I'm going to press A
to select everything. I'm going to unwrap them
all at the same time. I'm going to do that
because on the walls, it makes it easier
to make everything the same texture
size texture density is absolutely a thing that
we need to talk about. What I'm then going
to do is press you and I'm going to
unwrap angle bats. Now, later in the course,
we're going to be using a lot of smart UV
project and wrapping. That's something that we'll talk about later down the line. But for now, we're
going to unwrap with angle bats because we've
marked all of our seams. So let's select that,
and there we go. Hey Presto. Everything
is unwrapping. Everything looks nice and tidy. All of these, as you can see, they're not infinite loops
or anything like that. Everything is working correctly. Now we want to do is
want to head on over to our resource pack and grab
our bricks and our concrete. So let's open that up. So here we are in
our resource pack. Now, again, we can see on here
we have our brick shader. Now, if you can't see them,
just put it on material mode, and you can see straightaway, this is our concrete,
this is our bricks. So let's just grab these two, press Control C, put that down, head on back over to here. And then what you
want to do is just press Control V. Now, again, they're going
to come over there. So all I'm going to do
is grab both of those, press seven to go over the top. Come over here,
press the G board, and I'm going to put them
next to my ambient occlusion, press the dub, zoom
in, and there we go. And then I'm just going
to press the button, and I'm going to put
them in my shaders. So click on your shaders and
there we go there in there. Now, next of all what we
want to do is we've got these our cement walls, and these are our brick walls. So let's first of
all, come in and we'll do the cement walls first. I'll put it on material so
you can see what I'm doing. So if I grab all of these, like so, and then I'm going
to grab this one last. I'm going to press Control, and I'm going to link
materials, and there we go. They're looking great
already, apart from the fact, you can see the texture density on these looks like
something out of minecraft, and we don't actually want that. So what we want to do is
grab all these like so, press the tabon to take
us into the UV map, and here is the UV map. I'll put it over here so
you can see it properly. And what we want to do
is we want to make these bigger because that then will
squish down the texture, and we'll end up with something like this or pressed
S in the UV map. And now we can see they are
looking much, much better. Now, you don't
want to go too big because these are
seamless textures. If you're not using
seams textures, you'll end up with lines down
here and things like that. So it's important that if
you're doing this yourself, make sure that you're either
converting a texture to seamless or you're grabbing
seamless textures. You don't want big lines down the center or
anything like that. If I make them too big, so if I press tab and
make them too big, you will see that we
actually start to get a lot of repeating. So we don't want to go
too big with these. We want to bring it
down just enough where we're not getting any
kind of repeating but where they
actually look good. So just be aware of
that actual fact. Alright, so now we've done that, what we want to do
these cement blocks, as you can see, all around
the sides, they look perfect. They look different
from one side to the other because when we
unwrap them as well, this, if I come to
this face is here, and this face is over here. It's a completely different
part of the UV texture, which means that they're
going to look different, and that is why we've got two faces on here because we knew that
would be happening. Now, let's come to the back
ones, do the same thing. Now, the difference here
is, these are bricks. They're not metal,
they're not concrete, so you'll see that
we might end up with some issues. So
I'm going to press tab. I'm going to press
A to make sure I select everything because
if I don't press A, I might end up not
unwrapping something, I'm going to press U and
unwrap on angle based. And then what I'm
going to do is now, I'm going to grab these. Grab my brick, press Control L, and I'm going to link
materials like so. And now if I come in, we
can see that one of them, two of them are the
wrong way around. This always always happens. So you just have to come
in, grab both of these two, press tab A again to make
sure you selected something, and just in your UV viewport, press R, 90 and spin
them round like so. And there we go. Now,
you can see that the bricks here they actually
look pretty good. Now, are they, you know, a little bit too chunky, I would say a little
bit too chunky. So what I'm going
to do is, again, I'm going to grab all of these, and now they're facing
the right way round. I'm going to press tab A. And what I'm going to do
is come over to my UV map, and I'm going to press
the Sban to scale them up and make them a little bit smaller on the actual
size of the walls. If you press tab now, you can see exactly what they look like. So they to me, look
absolutely right. Now, the other thing
is, you will notice that this is going
round the wrong way. So this top one looks
absolutely fine. This one looks absolutely fine because the bricks are
going the right way round. But on something like this, they're actually
going the wrong way. Now, again, when we're dealing with modular parts,
this doesn't matter. This will be covered
up either by a support or if we
join another brick. So if we join, you know, that's press shift spacebar, this to it, like so, you will see that you're never
going to see those anyway. So it doesn't really matter about these outsides
or anything like that. But if you want to be,
you know, perfection. Just make sure the
bricks are going the right way round
front and top. But it's really,
really not needed. Alright, so, finally, then, let's come back to modeling. Let's save out our work. And then what we're going
to do is now just go to the render button
and here you go. This is what you've created
already. Half of the pack. Not really, but we've created the main bulk of the pad that we're going to
create things with. So now on the next lessons, what we can actually
start doing is working on more sophisticated
models, you know, having a little bit more, um, skill based things
going forward, such as edge loops, you know, beveling,
things like that. But this is the basics of Blender and the basics
of Blender modeling. To get you up to a level
where you can actually see exactly what you're
producing and you can see already it's looking
really, really nice. Now, if you look back, all we did was we took a cube, we squished it in,
we unwrapping it. All of these things
are quite simple, and then we grabbed a shader or texture and just
slapped it on there. Now, you can grab shaders, seamless textures from Blender
and put them on there. And I think just before I go, what I will do is, I'll show
you in the shading panel, if we take, you know, this wall, for instance, and I just
show you under object mod. So we're going to object
M. This is the shader. Generally, shaders will
come with a base color, a metallic, a roughness. But you can actually just get
away if I unplug all these. We just a shader
straight off of Google. In other words, all
we want to do is just bring in the base color, so the texture, and then
just plug it into here. So let's just plug it into here. And now, all we've got in here,
if I unplug this as well, is just basically
a Google texture, a seamless Google
texture of that, and you can see that it
looks pretty good already. It's only when we start
adding in the other things. So getting real actual shaders
in there that it really, really starts
bringing it to life. You've got some normal in there, for instance, you know, and we can really start ramping that up
and making it, you know, if I turn this up, for instance, making it more three
D, for instance, now you can see what that's
doing, things like that. You know, but as a basics, you just need an actual
texture of Google. Alright, so in the next
ones, we'll cover shaders. We'll cover how to set them
up a lot more in depth. But for now, all you need
to know is you've got the skills now to
make basic models and put on a basic
texture and create basic lighting and actually get something that's pretty
readable out of all this. So you should be very happy
with yourself so far. Alright, then, let's finally
go back to modeling. I'm going to save my work. And on the next one,
we actually will be creating the first
support for our building. I'm going to put
it on object mode, and I'll see you on the
next one, everyone. Thanks a lot. Bye bye.
13. Modeling Wooden Struts with Bevel Modifier: Welcome back, everyone
to the Haunted Street environment,
Blender to Unreal. And this is where
we left you off. Now, what I want
to do, as well as putting them in collections
is just to keep it tidy, create something where
it's just going to show, you know,
where the parts are. It does make it easier
visually, as well, whenever you're
looking at a contact sheet or you're seeing all of these things to actually sort them out and put them
in the right place. So all I'm gonna do is just grab these because we're
working in the center. Of the viewport. So I just
want to grab these now. They're actually
finished, so I can move them over here, like so. And you can see
that I moved them down a little bit, so
let's not do that. So all I'll do is
just press G over the top with this number
pad seven, like so. And finally, what
else I'm going to do is I'm just going
to press Shift A, and what we're going
to bring in is text. So let's just bring
in some text. We'll just drag it over here. And then all I'll do is I'll
press a little dot button. So I'm zoomed into my text, and I'll make it a
little bitters bigger, a little bit bigger.
Can't get my words out. So press the s button
just to scale it up, and then all you're
going to do is press and X just to rotate
it on that X axis. Finally, then you can
come over to your text. You'll see here that
we can actually come in and where is it? We can change the
font, for instance, so you can change the font. I'm just going to
leave mine as this, but you're welcome to
go and change yours. And the other thing is, if
you come under geometry, you will see as well that
we can also extrude it. If you go onto Render view, you'll see it's just
white at the moment. I'm okay with that. I think I
want to leave it like that. I don't want to spend
too much time on it. But if you want to, of
course, add in a new color, just click New and
then just pick your color from down here, you
should be able to do that. Alright, then, now
we've done that. Let's finally, then
move on to our struts. So it's something a little bit more exciting than just walls, and it's something
that absolutely is needed in modular packs, you would find that the actual struts are the
main bulk of any build. So it's very important
that we get those in. So what we're going to
do is we're going to first of all, come in. And what I'm going to do
is make the first one. So I'm going to give you some dimensions that he can
actually work with. So if I come back and just
put it on Object Mode, just so he can see what we're
doing, press shift day. I'm going to bring in aQ and then what we're going
to do with this cube, we're not actually going to
alter it, you know, on here. What we're going
to do is open up the end panel and the
height of the cube, we want it on 2.52 meters. So I always make them a little bit bigger than
let's say this wall. This wall is where is it? This walls 3 meters. This one is 2.5, as you can see. So I'm putting it on 2.52, just to make it a
little bit bigger, just so it goes over
the tops of those. I find things fit
a lot lot there. Next of all, then I want
to make the X and the Y. It's up to you whether
you want it squared, but I'm going to put
it on not 0.268, and then not 0.259. Like so. And there we go, This is
our first five zoom in, now you can see that's exactly what it's
going to look like. Now, rather than, you know, altering this one, we might as well do them all
at the same time. So all I'm going to do then
is comb to the next one. So I'm just going
to press Shift D. I'm going to drag it over here. And then on the Z axis, all I want to do is put 2.02, like so, and then we'll
press Shift D again. Come to the next one. And
the next one is going to be, I think, 1.53. So 1.53. And then Shift D and we're going to come to
the next one, like so, and this one, I think, looking at my other
screen is 1.04, so 1.04. Now, before going any
further, of course, when you're following along, just make sure you
have got this out. These are the struts
that we're creating. We will be creating
the post after. So we're creating both
of these posts and the um, Stone post as well. We'll be doing those after, but for now, we're just
working on these, and then I think we'll actually get this whole part of it done. So we'll also work on
these planks, as well. So let's put that over
on the right hand side. Now I want to do
then, now we've got that is we want to
actually make these, so they're a little bit jagged, a little bit uneven and all
of that sort of good stuff. So what I'm going to do is, first of all, is grab them all. Press Control A, all transforms, right click Set
origin to geometry, right click, set
origin to geometry. And now I'm going to do is,
I'm going to come into them. I've pressed tab to
go into Eddie mode. I'm going to press
Control R, left click, right click and Control R
and left click, right click. Now, don't worry about pausing
it or anything like that. As long as it looks
round about right, you will see that it will
work what we're trying to do. You could have in 15
edge loops in this. Now, let's go back to edge loop then because I should really explain that
a little bit more. When you press Control R, that then brings you
in an edge loop. When you click it, it means that you can
move it up and down. When you click it again,
it puts it in place. However, there is another
way you can do it. So Control, left click, you can actually right click and it'll put it right
in the center for you. So very important to actually
know that distinction. So Control A, bring in a few
edge loops, right click. And you'll also see down here, there's a little
option that opens up this little sub menu. And from here, we
can actually turn up the amount of edge
loops if we want to. So that's also really handy. And this bottom
menu, by the way, is very handy with a lot
of things we'll be doing. All right, so let's
move to the next one. I've got that open
now so you will be able to see if you
want to copy along. So five, this one will be four, and this one will be probably
three, something like this. Okay, so what we want to
do now is then we want to actually make these a little bit warped and things
like this, okay? Because we don't want them
all looking the same. We want to keep pretty
much the tops of them, you know, relatively flat. We don't want them
bend, you know, at 45 degrees or
anything like that. So what I'm going to
do is I'm going to, first of all, show
you on this one. So Alt Shift and click to grab all of this
edge going up there. There's a number of
ways of grabbing edges. You can click on an edge and then shift, click, shift, click, and do it the old
way, or you can click on an edge
and press Control. And then will fill in
all of these for you. If I click on this edge, click Control on this one, you can see that's
exactly what happens. Or you can do what
I'm doing here, which is Alt Shift, and click, and then
we'll grab them all. Now, we're just going to
work on this one for now. So you can see we've
got our edges selected. And then what we're going to do is now we're going
to go to mesh, we're going to go to transform. And what we want to do
is click on Randomize. Now, you'll see that
that's a bit of a mess. But if we open up this sub menu, you'll see that the
randomize is on, and then all we do
is just bring them down just a slight bit
to note point note one, and now you'll see that's
what we've ended up with with no actual real work. Now, some of you out
there might be asking, well, why don't you just
grab the whole thing? If we grab the whole thing
though and do the same thing, you will see that we end up
with a lot more distortion. So I typically like just
to have it on the edges. You can see now it's
kind of bending it in. I don't actually
want that. I want them to be relatively straight, but with the edges, you know, of course, a bit more random. So what I'm going to do is
just press Control's head. I'm going to come
back in now and grab all of these because
you can do them all at the same time, like so. So just grab all of the edges. There is a way to select all of the edges from
one of these menus, but the problem is that
these are also edges, and I don't want to grab
these, so this top part here. All right, then what we're
going to do is go to mesh, transform, and we're
going to go to randomize. And then what I'm going
to do is just turn this down to note
point note one. Like so, and there we go. Now they're looking pretty nice. Now, some of your eagle
eye out there might notice that we've got a few kind
of artifacts on here, and all this has to
do is just shading. So all you need to do
to get rid of those is right click and
shade auto smooth, and now you'll see they're
really nice and smooth. Now, to finish these off, what we want to do is then we
want to add in a modifier. Now, when you're
adding in modifiers, unlike the randomized, it's
called non destructive. What does that mean exactly? It means that
basically we are doing something that we can take off in the future if we want to. This randomized,
we can't do that. It's like setting stone. If we want to go back and take this off, we can't
actually do that. So when we're adding modifiers, it's really great because it's
non destructive workflow. And it means that when
we come to unwrap them, which I'll show you, you're not going to have it where you're
unwrapping the bevels. So let's first go in then and
add in our first modifier. So we're going to come over to this spanner, add modifier, and we're going to
go to generate, and the one we want is
going to be a bevel. So the bevel is going
to come in like so. Now you'll notice, even though
we have the all selected. It's only actually
attached it to, one of the objects. That's fine. There's
a really easy way to attach it to
everything, anyway. At the moment, though,
let's just work on this one and get it
right at the moment, you can see that this is really, really bevelled and we
don't want to post. So let's come in and put this on note point, not note three, and now you'll see if
I zoom into this one, that we've got a slight
slight bevel on there. Now, sometimes bevels
will cause you problems, and in the future, throughout the course, we will see that. But on these, they've worked
out absolutely perfect. Now with this one selected, so you can see this
one is in yellow, the others are in
an orange color. We can press Control L, and what we can do is then is we can copy modifiers like so, and now you'll see they
get modifiers on them. It's important if
you're doing this that you always select
the ones you want the modifier on and select
the ones with the modifier on it already last because then these three
will copy that one. Alright, so that's that part. Now, what I want to
do before, you know, moving on to the stone
or anything like that is actually get
the materials on here. So we've got that
wooden shade in place, and then we can
actually carry on cause these are just the struts. So as I said, we're
going to work on the posts and things
like that after. But for now, let's just get
the struts out of the way. So one step at a time,
is what I'm saying. Alright, everyone, so I hope you really enjoyed that, and I'll
see you on the next one. Thanks a lot. Bye bye.
14. Appending Materials and Clean UVs for Stone Post: Welcome everyone to the Haunted Street environment
Blender the Unreal. This is where we left they. Now, at the moment, if we
put this on material, again, if I was building a gray
box or something like that, I would attach on the
ambient occlusion. I am going to
attach on, I think, the ambient occlusion
just to this text, so I'll just come down
ambient occlusion like so. And what I'm going to do is instead of bringing
in another shader, rather than having
all my shaders here, I don't see
the point in that. You can either bring them all in or you can just go to up end. The thing is, if you
bring them all in, it's going to be
costly on the GPU. So just make sure if you're
bringing them all in, then you can hide
them out of the way. Now, what I'm going to do is
I'm going to actually come in and I'll append.
So I'll go to file. I'll go to append.
So this one here. I'm going to find my file now. So resource course. And I think, let's have a little
course resource pack. And it's the Blender
resource pack. Here it is. This is the one, and the one we want is going to
be the materials, and these are all the
materials that we have. Now, we can absolutely come
in and just grab them all, like so, click a Pen,
and there we go. Now if we come to
the right hand side, you will see that we've got all of our materials already in. So really, really
quick way to do. Problem is, of
course, that when you save out and you send
this to someone else, because they're
not being used on anything and because they've
not got this shield on, that means that they
will be lost probably. So two ways to fix this. You either go in and you
click on the shield, because then what
it will is it will defend it no matter what. So even if nothing's
using that actual shader, it will still be there if
you send it to someone else. And the other thing
you can do is you can come down external data, automatically pack resources,
save out your work, and then what's
happened is it's packed all of those into the
actual blend falle. If you send this someone, and you've not packed it or
you've not got the shield on, they're going to end up
with a load of, you know, walls and things, and they're
just going to be pink. There's going to be
no textures there. So you must make sure
you do one or the other. Do it early because
you will forget, I guarantee you and
do it that way. It's much, much easier. Now I'm going to do is
because I've done that, I can actually come in and delete these shaders
out of the way. I'm not going to
need them anymore, and I can also delete
this out of the way. So delete that out
of the way like so. Now, let's come into our struts. So what I'm going to do then is grab all of them
at the same time. And I'm going to actually unwrap them. So I'm
going to come in. I'm going to press the
tab, press the A button, U, and you might be asking, Hey, there's no seams on there. Yes, there's no seams on there, because what we're
going to do on this one is smart UV project. Click Okay. Now, we
can't see anything yet, so what we're going to do
is now adding the material. So if I come in and
looking for wood, so we can see we've got
a number of woods here, and it's the old wood. I'll just check that just to make sure I'm absolutely right. But I think it's the old
wood. It's a wood red. So let's just see
if it's wood red. So where is it wood? Let's go and do a search again. So wood red there we go. Alright, so now we can see we've got our material on here. Now, again, we've got only
material on one of them, so let's come in and press
Control, Link materials. And we can see also this wood grain is going
the wrong way. Now, you'll really, really find that when you're
creating scenes, wood grain is
absolutely something that you should be
paying attention to. Most people don't, but it's very important that the wood grain
is going the right way. If not, the eye picks it up. The eye picks up this wood
grain looks a bit weird. You might not pick it up, but other people will in the scene, maybe subconsciously, as well. So just make sure it's
going the right way. What do I mean by that? This wood grain, if I press a little dot B needs
to turn him round. So what I'm going
to do is press Tab. Again, on my over here, I'm going to press A just to make sure everything's selected. On the UV map, I'm
going to press A, and then what I'm going to do
is I'm going to press R and 90 just to spin it round
on that 90 degrees. And now you can see what
that's actually looking like. Now, we want to make sure straight off the
bat that we have something to actually work
what I'm going to do is, I'm just going to press
tab on here again. So I'm just going to
grab all four of these. I'm going to press
tab on here again, and what I'm going
to do is just mess around and see how I like it. That is probably a
little bit too much. In other words, it's
a bit too realistic. So what I'm going to do
is bring it down a little bit instead and have a look
at what that looks like. And that, to me, looks much, much better for the build that
we're actually going for. Now, again, I'm going to save that more word because I want
to show you something else. Now, we have a modifier on here, so you can see we've got still this bevel modifier on here. You can see, however,
all of these have unwrapped really,
really nicely. And for the most part, you know, I'm wrapping with
automatic unwrapping. So this smart UV project, so it's basically automatic unwrapping, works
extremely well. There might be times
though where it doesn't. Now, the other thing
is, if I come in just to this one and I
press Control A, or I apply my bevel, when I come in now and press it, you will see now that we've got these little kind of
artifacts in there, and you can also see on the UV map, we also
have them on there. Very important that you
don't apply your bevel. I keep your bevels,
no matter what. I made the mistake early
on of always applying my bevels and you absolutely
don't want to do that. So I'm going to get back now, get it back to where we are. You want to leave
them like that. These bevels will get applied when you send them
through Unreal Engine, but what it will do
is it will make sure that you're not unwrapping
with a bevel on there, because if I come
in, once again, I know it's taking
a bit of time, but it's very important. If I apply this and then
press UV smart UV unwrap, you can see now that we've actually unwrapping them
with the actual bevels on. Now, if you do this
with a more complex, you know, object, it's going to absolutely
cause you some problems. So what I'm going to do now is press Controls Ed, go back, get my bevel back on, get my
wood all in place like this. Now, for now, I'm just
going to move these to the side. Like so. And what we're also
going to do is come out and go back to our modeling tab. And then what I'm going to do is now start with a new one. Now, I need three items, so I need, you know, a wooden support that's
actually going to hold up, you know, roofs and
things like this. I need then two posts. One of them is going to be wood. The other one is
going to be stone. So let's work on the stone one first because that one's
a little bit different. And what we're going
to do is we're just going to press Shift A, and we're going to
bring in a cube. Now, I actually want
some dimensions, so I'm actually going
to take some dimensions from the previous one I did. So on the Z axis, we're going to make this 1.70. So 1.70 on the Z axis. Now, you'll find
that what happens now is that if I
shrink this down, the z axis already
also gets shrunk. So I don't really want
to do it like that. So what I'm going
to do instead is, I'm going to come
to Face Select, I'm going to press
Alt Shift and click. And instead of pressing
the S buttom like so, I'm going to press Alts, and that then is going
to shrink it down to be roundabout the right size that I wanted, as
you can see now. Now, this post he's already included because it's
quite big, as you can see. So I'm going to come over to my little guy and I'm
going to measure it up. So you can see this
is supposed to be, you know, a stone post, albeit it's quite big. What I'm going to do
is I'm going to press less and just make it a
little bit thinner like so. Now, the top of here is also going to be
like a top on you, and we've measured it out the
z axis, including the top. So what I'm going to do now is I'm going to press Control R, and I'm going to drag that up to where I actually
want the top. So somewhere like here,
I think I want the top. Next of all, then
what I'm going to do is I'm going to mark a scene. If I come in and mark a scene, you might be wondering why is
he marking a seam so early? The thing is because
seams don't just have to be used to
UVon wrap things, they can also be used, which I use them a lot to
actually select things. If you come to Facleg now and
you select the top of here, it only goes to the scene. If you come to this side and
you select this side with, it only comes to the scene. Now, if you come in with Edge
select and you select it, you will see that if
I just grab this, it actually goes
through the scene. I tend to use it with Face select just to select the
part I actually want. I'm going to do is
I'm going to press Alt Shift and click. So going around all here, not the top, I'm going
to press E, Enter. And again, I'm
going to press Alas and just bring that
out a little bit. Now, one of the other things
that you should be aware of is when you use an extrude, which we've just
done, so we extruded. Now, let me go back
and actually do that because it doesn't
make a lot of sense. If I press E now, there's an extrusion on there. If you press E again, there's another
extrusion on there, but you can't actually see it. So you've got to be
very careful about that that you're not actually creating loads
and loads of seams, loads and loads of extrusion. So what I'm going to do is if that happens and you're unsure, so we'll get out of the
way troubleshooting first. I select, and what we
want to do is go to No, sorry, mesh, come to clean up. And what we want to do is
just merge by distance. And you can see 16
vertices have been merged. That's because now it's
took off that extrusion. Again, Alt Shift click, E, Enter, and then Alt and S. Now, the other thing is a lot of the time when
you're doing this, you will find that it
will come out uneven. And that is because before
actually doing that, so I'm going to go back again. I need to reset all
of my transforms. Again, Blender still
thinks this is a cube. So let's go to set
origin two geometry, and let's also
shade Auto smooth. And now let's come in.
Alt Shift and click E, Enter, Alt, and S. And there we go. Now it
should come out really, really nice and even. Okay, so what I want to do now is I want to bring in
this top a little bit. So what I'm going to do is
I'm going to select the top. And rather than going around and pressing Alt Shift
click, which I can do, I can simply just
press Control plus and then we'll select
the next lot along. Then what I want to do is I just want to bring these in now. So I'm going to
press the E S but, sorry, just to bring it in. And then I'm going to
pull this down like so, and then I'm going to grab this top and I'm
just going to press E just to give it a little
bit of a variation. Alright, so far so good. So on the next lesson, we'll
get this post finished. We'll probably get the
other two posts finished. Now I've explained a lot of
the background on, you know, doing things right
or troubleshooting, so we'll be able to move
swiftly along on the next one. Alright, everyone, so I
hope you enjoyed that. I'll see you in the next
one. Thanks a lot. Bye bye.
15. Bending Stylized Brick Post with Proportional Editing: Well, welcome back everyone to the Haunted Street environment.
Blender it to Unreal. And this is where
we left it off. Okay, so what we're
going to do now is we're going to create
the stone pi here. But before we do that, it's always best to
actually bend this in. To give you that
really creepy look, what we want to do is
we want to come in, press the tab on so you're
in edit mode, press Control. And what we're gonna do is
we're going to bring in probably five edge
loops. So left click. Right click to drop them
right in the center. Then what I'm going to do is I'm going to grab this center one. A shift and click,
grab the center one, and then you're going to come
up to this layer icon here. This is proportional editing. Now you'll notice
when I scale in, we have a little circle here
now, and this is really, really handy for making
bent mesh like this. You can even come in
and do it that way. Now, the one problem
we've got is that this on the top is going to be coming in as well, and
we don't really want that. So what we're going to
do is a little trick is you can grab the
top of it with L, come underneath it, press L, and then press H, hide
them out of the way. Now what you can do is
you can come in and you'll see if I press
the S bone on here, press ltH, none of that
is actually affected. Let's go back a
minute. Let's press the S bone again, bring
it all the way out. Press tab, and there you go. You can see it's actually
brought it in for us. Albeit, it's pulled this
bit down a little bit, but it actually hasn't
brought those in. So really, really easy
to do it that way. What I'm going to do now
though, is just go back. And I want you to press one,
so you're facing forward, press the S bone, scroll
the mouse wheel up, and then you should be able
to bring it in as you like. Now the thing is, as well, we have a number of options here. So we have sharp, we have root. Now, a lot of the time,
it's either root or sharp. So if I press the S born, you can see now just
how that works. We can bring it in just a tad, like so press the tad button, and that's what it's
actually going to look like. Now, what we want to do
now we've done that, so once you're happy with yours, is you're going to press tag, and you're going to come
in and you're going to press Alt Shift click, Alt Shift, click Alt Shift,
click, Alt Shift, click, Alt Shift, click, right click, and you're going
to mark a scene. From here, then what we're
going to do is we're going to press L to select this one. We're going to
miss this one out, and we're going to press
L to select this one, this one out, press L to select that one. Why
are we doing that? We want to actually split
these off from each other. So all of these
want to be split. Now, if I grab them
all at the same time, it's not going to
split them off. If I press Y now and then G, without portional editing on, you will see now
they're all split off, which means that all of these, as well every other one
is also all split off. Why have we done
that? Because that means now when we
bring our beveling, so we'll show you at the moment, if I bring my beveling
so I'm going to press A or transforms set
origin to geometry, bring in my bevel, so I'd
modifier generate a bevel. Let's put the bevel on note
point, not note three. Again, something like that. You can see that we don't
have any bricks there. Rather than building every brick individually, that's hard work. We don't want to do
that. It's way way easier to get your
bricks there first. So to put them in, to make sure they're even all of
that good stuff, and then to actually
put the faces on them. It's much, much quicker. So what we're going to do
now is we've got all this. All of it is selected with the. We're going to go to mesh.
We're going to go to cleanup. But this time, we're going
to click Fill Holes. And you will see that all of these now shall be filled in. So if I come to this one,
come to edge select, grab this edge,
cross the G born. You can see it's got
a face on there. Now, sometimes you will need
to when you fill holes, turn up the fill holes.
I'll show you that a bit. But for now, you can also see that they have all the
bevels on as well. So that's really, really cool. Now, the other thing is now, we want to also bend these. So what I'm going to do,
I'm going to just go back and I would like you to
also go back if we can. So before we put our bevel on, we've got no bevel on now, before we split them up, so none of them are split up, we want to actually
bend these bricks, so old shift click
going all the way down. Now, I just want to
make sure that these, Phi press, yeah, you can see that they're all still split. So if I grab this one, you
can see it's still split. If they're like
that, just press A, go to mesh, and
then come down to where it says cleanup
merge by distance. 24 verts have been selected, which means now if I grab this, press the G born, it
all comes together. That is what we
want because we're going to randomize it
before doing that. So Alt, shift,
click, Alt, shift, click. Oh, shift, click. Like so going all the way up. Now, the bits we don't
want are these ones here, so we're just going
to shift select all of those, like so. And we also don't
want these ones. So anything that's
the flat part, we actually don't want those on. Like so, and the rest of
it can stay the same. Now we're going to
do is go to mesh, and we're going to come
down to transform. We're going to go to randomize, and we're going
to turn this down to naught point naught one, like so, and now we're
going to get a bit of variation in our
bricks, as you can see. Now we can come in and we
can grab each of these. L, L, L. So, Y, G, just to make
sure they split. A, and then what you can do
is you can come to mesh, cleanup and then fill holes. And there is where you can
turn it up if you need to. Now, let's come
in and add modify and we'll generate a bevel, and we'll put it on
note point note, note three, like so. And there we go, now
we've gore bricks. They're all uneven.
They're still following that kind of line
that we put out there, but they're looking
very, very nice. Very much in the
style of the scene. Now, let's do the same
then for the next post. So what I'm going to do is
just I'll move this over here. We'll come to our next post. So what I'm going to do is
I'm going to make sure, first of all, my cursor
is in the center. So Shift S, cursor
to world origin. Shift A, let's bring in a cue, so another cue.
Let's bring it in. Pull it over here. And
what I want to do is 1.34 is going to be the height, so 1.34 is going
to be the height. And then, again, what I'm going
to do is Alt Shift click, and then alterna and bring it down to the size. I
actually want it. This is going to
be made of wood, so we want it
probably a little bit thinner than, you know,
what we've got here. Now, remember, we're creating these to be actually
stylized so you can see, they're quite chunky, you know? This is a chunky piece of wood. That's exactly
what we want. You don't want anything
where, you know, you're going so thin like
this, like realistic. We don't want that.
We want chunkiness. Now what we want to do is
then we want to pull this up. And what I also want to do
now is I need a top on here, so I'm going to have
it this height, I'm going to put a top on here, exactly the same thing
as I did with this. What I'm going to do then is
press Control of Left click, bring it up to where
I actually want it. So maybe maybe
somewhere around here. And then what I'm
going to do again is, I'm just wondering now to actually I'm going
to do this bit. What I'm going to do
is I'm going to come in I'm going to pull this down to round about here to
give us a top on our post. And then what I'm going
to do is press the Ib, and what that's going to
do is going to insert it. Now, before doing that, let's just reset all of our transform. So Control A, right
click SgensGeometry, now press the Ibn like so. And then what I'm
going to do is, I think I'll extrude this bit out first because I
want to pull this up. So I'm just wondering, actually, if I do it this way, it'll
give me a nice top on it. So it'll give me, for instance, don't do this, but if
I do it like this, you can see there's a nice
top on there like that, or I can do it the other way where I'm not
going to pull this up. So these thought
process are always going through my head
when I'm doing this. I can do it this way, where I'm going to extrude
it out first, so eat, enter lns. So let's extrude it out, like so, and then
let's pull it up. And now we can see we've
got a little bit of a difference there of
how it's going to look. I think, personally, I'm
going to go with this one. I also think, you know, compared to the top, maybe this is a little bit too thick, so Alt Shift and click Altes. Let's bring it in a little bit. We can also do the same here. Alt Shift, click, Alts. You can bring that in a
little bit, and then you can, of course, bring in the top
as well with just the Sbn. And I think, yeah, that's
something I'm happy with. And now we'll do is
I'll press Control law. And I'll bring in
another five edge loops. Now, this time, I'm going to do it a little bit different. I'm going to come down
to the bottom of here. So what I'm going to do is
I'm going to come under here. And what I'm going to do is I'm going to put it on object mode. And when we put on object mode, you'll see a new
button opens up, and this is kind of like
an X ray or a ghost. And now we can see
if I press tab, I can actually select
this one underneath here, turn it off, and
then it disappears. And what we're going to
do is if I press one now, I'm going to press the S
button just to pull it out. And then I'm going to
press Alt Shift click on these edges and pull
them out a little bit. And then what I'm going
to do is grab this one and press the S bone and
pull it in a little bit. Grab this one up,
Alt Shift click, press the S bone, like
so, and finally this one. Press the S bone, like so. And we can see it's a
little bit out on here. So I'm just going to
bring it in a little bit, but now you can
see we can also do it in the way that
I've just showed you. Now what we want to do
is we want to right click and shade auto smooth, so we get rid of
those artifacts. And finally, then
we're going to do the same thing as
what we did before. So Alt Shift click. Like so. And if you
want to be fast, you know, try it without
taking those off. See what it actually looks like, so we come up to mesh,
come down to transform, randomize note point note one.
Let's have a look at that. You know what? I
think that's going to be pretty good, as is. Alright, so what I'm going to do now is I'm going
to save Ama work. So I'm going to save Ama work. And on the next one, we'll
build that final post. And I think, as well as
that, what we'll also do is we'll build out the big
post and the plank. So we'll do the all at
the same time, basically. Alright, everyone, so I
hope you enjoyed that. I'll see you in the
next one. Thanks a lot. Bye bye.
16. Large Support Post and Stylized Plank Modeling: Welcome back, everyone
to the Haunted Street environment
Blender two Unreal, and this is where
we left you off. Okay, so what we're going to do now is the next post then, so I'm going to just move
this over to the side. I forgot my bevel on here, so I'm just going to grab this, grab this one, press Control L, and we're going to
copy modifiers. That then we'll add a bevel on. You can see now
we've got an issue with the shading on here. You can actually see
that because we put on the cavity and the wild. I think we put it on. No,
it's still got it on screen, but it'll probably show up even more if you've got
yours on wild. Let's grab it and let's right, click on Autosmooth.
Doesn't fix anything. Now, if this happens, there's always a way of
actually fixing it. What you can do is
you can come in. You can grab this round here, grab this one on the top. And then what we can
do is right click, and what we're going to do
is mark a sharp instead. And there we go, that's actually
fix that shading issue. Then the one thing I like I don't like so much about
Blender is shading. You get a lot of shading issues. I feel like other softwares have a little bit bet when it
comes to shading smooth. So I will say that. So sometimes you have to go in and
add shops like that. Alright, next of all, then,
we're going to press Shift A. We're going to bring in a cube. And this cube, we're going
to make 2.8 meters tall, so 2.8 meters tall. We want it round
about the thickness of this, of this one. So again, what I'm going to
do is I'm going to come in. I'm going to press Alt Shift and click Alterns, bring it in. Let's scale it to this. So if I come in, press the
little dot bon to zoom in. I'll press Alts. So
something like this. And then what I'm going to do is I'm just going to pull it up because this is what I know
that I have to work with. So this will be my actual post. And then what I'll do is I'll
do the bottom part first. So I'm going to bring
in an edge loop, so I'm going to press tab,
make sure I'm in Egit mode. Control, left click,
drag it down. This will be probably the
star of my post then. And then what I'm going to do
now is I will pull it out. So Alt Shift and click, EF extrude and enter, and then Alterns let's
pull it out like so, and then let's finally
grab this edge, lt shifting click, and
pull it down like so, and that's the start of my post. Now we want the top of the post. What I'm going to do is
again control, left click. Bring it up to here
because we want something to be holding it up. Al shift click, E, Enter, AlnS and bring
that out, like so. And there we go. That's
looking pretty good. And now I just want
to bring this in. Now, it's up to you
whether you use proportional editing, hide
these out of the way. But I think for
this, I'm just going to bring in five edge loops, and I bring in five, by the way, because it's got center one. Then I'm going to
press Al Shift click. Press, press one to
go into front view. Grab the next one down, press S. Next one up, press S, just to get the shape that
I'm actually looking for. And then this final
one, press the S bon. Then I can see this
one's a little bit out. Press the S bon. Like so, this one's
maybe a tad out as well. And then we go, that
will do for me. Right, click, Shade Auto
Smooth, and there we go. Control A or transforms
because we're going to be adding on a modifier. Now we can see that we do have a problem with this
part here. It's fine. Let's bring in our bevel
thirst, select this one, press Control L, copy
modifiers, and there we go. Now, let's sort this part out. So I'm going to come in,
Edge select, Oh ****, click, right click, and we will mark a sharp. That's
that bit sword. Let's also mark a sharp on
here as well. And there we go. All done. Okay, so
that's that part. Now, again, we didn't
reset. Oh, did we? Oh, we've got two selected. That's all it is. Let's
move that one over there. Now we're on to
our actual planks. So again, you've got your
reference for the planks. So what I'm going to
do is, first of all, let's bring in I think this
time we'll bring in a plane. That will make it a
little bit easier. So shift A, bring in a plane. Let's pull it over here, like, so and what we'll do
is we'll make sure that the Y is going
to stay on two, and the X will be
on let's try 1.55. Something like this,
we'll pull that up. And then what we'll
also do, I'm thinking, I'll probably just
take two planks out of this and have
it for my other plane. So I'm going to keep it
like that, actually. So we want 66 planks in this. So I'm going to press tab, I'm going to press Control, and I'm going to make
enough, so I've got six. So if I look there, it's got six there. Left click, right click. Now, actually, I'm not
going to do it that way. What I'm going to do is
show you another way. Control, left click. Let's put it here, Control R, left click, let's put another one here. Control r, left click, another one here,
Control R, left click, another one here, and Control
R. Another one in here. So now we've got one, two,
three, four, five, six, and they're all uneven because I didn't
even space them out, which I think is going
to be much, much better. Now, one thing I did
forget on this one, so I'm just going
to quickly go back to it is I did forget, of course, to add
in the randomize, and we absolutely
want it on this. So what I'm going to do is Alt Shift click Alt Shift click. You will see that the workflow, I'm actually showing you is
extremely, extremely quick. So you can see once you
get the hang of this, you can just start
building along. Everything will be on easy mode because you already have all the techniques already in there, and you have a certain kind of checklist that you go down. Alright, so I'm going
to grab all these, I'm going to take off these
ones that I've took off. So you take yours off. And then what we're going
to do is we're going to come over mesh, transform, randomize, naught
point naught one, like so, and there
we go, that will do. That will do. That's
looking pretty nice. Now, back to our planks, then. So the first thing
I want to do is I want to randomize this. So I need some more
edge loops in here. So if I press ControlR bring
in a few edge loops like so, left click, right click,
then come back to these. And while I've got
these selected, I might as well right click and marcasm because I'm
actually thinking ahead. And now while I've got
them all selected, so I select this edge and
this edge and come in, mesh, and I want to
randomize my edges. So let's put it down, though, to naught point
naught one, like so. And there we go, now we've got a lot of randomization in there. You can see if I
go over the top, that these are
slightly out as well, which is what I
want because it's making the planks uneven, and you can even come
in and just make sure that they're
quite uniform down. You can mess around with
this. In other words, you can turn this up and down, you can turn this up and down
and mess around with them. Now, I haven't done that because that's the question.
Did I take that off? Did I not actually do that in the end?
Sometimes that happens. So what I'm going to do is, I'm just going to
go over the top. Yeah, it looks like I've
not actually done them. So I'm going to do
is I'm going to come again mesh transform. Randomize, and
then put no point, note one, and there we go. Okay, so now, what do we do with the next pit? We're
just going to split them up. L, L, L, every other one, Y, G, just to split them up. A, and then what
we want to do now is make them a
little bit uneven. But first of all, let's
pull them down. Like so. So we want them probably
around that thickness. If I open up my end panel and
come, let's put it on tab. Come to my item. We can see
at the moment it's no 0.177. Let's put it on
naught 0.22. Like so. Make them a tiny,
tiny bit thicker. And what we'll also do is right click and shade or to smooth. And we'll also bring in a bevel to see what they
actually look like, and we'll put this
on point, not three. And there we go. There
is our planks of wood. Now, they're a little bit, you know, too close together. So leads actually come in now
with de slc because if not, we'll end up just selecting this seam if it goes
all the way around. And what I'm going to
do is just pull them apart a little bit, like so, because
they are planks, and we don't want them, you
know, so close together. And I'm doing all this work in the beginning because I
know I'm going to have two other planks that I
need to actually work on, so I can use those as well. So let's pull them out. Like so, and there we go. We've
got a few planks. Now, one other thing
we haven't got is we haven't pulled them
out enough over this side. So what I tend to do with
this is I will come in, grab one of them, put
proportional editing on, and I want to put
it onto random. So random on this side. And then what I can do is then I can pull them out like so. Now, you'll see that they
all come out together. But what I want to
do is I'm going to put connected only on. And what that means is
then when I pull them out, like so, you can see now not all of them are
being pulled out. But basically go down
all of the sides and just make sure that
they're all slightly random. What you can also do as well, is press R and Z, and we can rotate them or
some of them very slightly. It's very, very subtle guys, not anything big, so
it's RZ very slightly. I will catch this, so it's
important that we do it, especially if we're here
building it anyway. Doesn't make any difference because we're
already doing this. Let's pull them down. Like so. Now the next thing I
want to do to really, really do this is grab this one and pull it
down below that one, grab this one, and
maybe pull it up just above and grab this one and
pull it down a little bit. Now, it will seem like this is a lot of work for
just some planks, but you can see
just how nice they look now, from a
little bit of work. The other thing is
what we can also do now is I can take two of them. Let's take these two
here, for instance. These two here, L and L, press Shift D, bring them over. Without portion editing on, let's turn it off.
Bring them over. And then what I'm going to do
is I'm going to press R z, 180, and then we press R Y, 180, spin them round, and now we've got two
variations of our planks. Finally, then, I just want
to split them up, like so. So I'm going to press L and L, making sure they're
all selected. Press P and selection, and now vote for
these are split up. Now I'm going to select vote for them, pressing Control A, all transforms, right click, set origin to geometry. Then finally, guys,
let's save out our work because we haven't
saved it for a bit. There we go. There is
all of our post done. There's our supports done, and there is our planks done. And you can see it was a lot
of fun actually making that. And you can also see that the
things that I showed you, the techniques that
I showed you can absolutely be used
in going forward, you know, in everything
that you do and how easy it is once
you've got that workflow. Alright, everyone. I'll
see you on the next one. Thanks a lot. Bye bye.
17. Smart UV Project and Material Setup for Assets: Welcome back, everyone
to the Hunter Street environment
Blender to Unreal. And this is where
we left it off. Okay, so let's now start
getting some textures on there. Now, what I'm going to
do is just put it on material mode just so I
can see what I'm doing. I get a good idea then of what my wood is going to look like, and that's how I actually do it. And then what I'll do
is I'll grab this one, this one, this
one, and this one. I'm going to press
the tab, press A, and then I'm going to press
U and Smart UV project. Click Unwrap. Now,
the first thing is that we're going
to comb to these. And what we're going to
do is put on the wood, so we want the same
wood as this one. So I'm going to
grab both of these, and I'm going to press
Control L. Link materials. You can see we've got a problem
with them straightaway. So let's come into these
now, press the tab button, and we've got to
go, unfortunately, two UV, so we have to
go to the UV space. And what I'm going to
do is zoom to them. And then going to
come to my UV map. I'm going to rotate them round. So R 90, like so. And then what I'm going
to do is just make sure that they're looking
the same as this wood here. I can see that they are, they're looking round
about the same. How am I doing that?
I'm looking at this part here, looking
at this part here, looking how indented that is, and they look round
about the same. So if I came to this
and I press tab, you can see they're round
about the same size. Now, let's do the same
thing then on these. So all I need to do now
is come into these, and the main part on these two, at least, is going to be wood. So what I'll do is
I'll come down. Click on this one, down arrow, and then we're going to go
wood or we actually select these press Control
L in the viewport. So control L and link materials. Now, this one here is a
little bit different. It's stone dark and stone light. So I will do that
at the same time. So I'm going to go for
stone dark, like so. And then I'm also going
to click the plus one and click Stone Light. There we go. Now, you'll see and nothing
else gets added to this one. And the reason for
that is because it always puts the
first one on there. The second one doesn't go on, you know, till we
actually apply it. So now I'm just looking at
stone light, stone light. And I'm looking on my reference. And actually, it's all stone light. So you know
what I'm going to do? I'm going to actually come
in take off the stone dog, so make sure you're
in object mode, take it off, and there we go. Now, of course, these are way, way, you know, it's too blurry.
It looks like minecraft. We don't want that. So
what we're going to do is we're going to make sure
it's all selected with A. Come on to the left hand side, make sure it's all selected, UV, and what we're going to
do is just pack islands. Now, at the moment,
I want to take off rotation because rotations kind of annoying
when you've, like, you know, put all of these
woods going the right way, and then you come and
you pack islands, and it just rotates everything. So just take that
off. Click Pack, and then it'll pack
them out for you. Now, the other thing we
just need to be careful of is that the stone
looks actually good. And the other thing is, at a
minute, let's have a look. Here's my bevel. Here's
my bevel on there? Let me just pull this
out and have a look. Yeah, my bevels on there. It's
just a fact that I forgot. I think to create
this stonework. So not sure why that happened, but what I'm going to
do is quickly fix that. If yours are the
same, I don't know. Right, click, Mp seams. I think I forgot after I
split them up, actually. So all I'm going to do come into the inside
hole shift click. If you can't see it,
just hide your bevel, like so, and now you can see
exactly what you're doing. Right, click Mop scene. And then what we're
going to do is just grab this top one, L, L and L. Press Y. Well, first of all, let's press G. Yeah, they're all
actually connected. Let's press Y, split them up. Press A to grab everything, and then we'll go to mesh, and we'll go to cleanup and
we'll go to fill holes. And now we should have
filled all those holes in. And now I'll press Control A or transforms Sig in geometry, turn my bevel back
on, and there we go. Now we've got our stonework. Now, the thing is, these
stones they look a little bit they might need the bevel
just turning up a touch. So let's put it one point
note not five instead. I think now they're
looking much, much better. Also, the stonework is
probably a little bit too big, and you can also see
that it's not wrapped correctly over here, so
we're going to press U. Smart UVP jet, click on wrap. And now there you go. Now it's looking much better. One of the reasons was is that
because it was all joined, when we went to unwrap it, he actually unwrapping
it together, and so it made it
look all the same. Now you can see that it's all
looking kind of different. The other thing that
you might want to do is just come in and press AlternS and bring one
of them in, like, so, or do the same on
this one, so alternS, bring it in just a very, very small amount, just to
make it a little bit uneven. It doesn't take 2 seconds to do, and it is adding a little
to this actual structure. So I think, you
know, now it looks like it's partially
collapsing or something. So yeah, that looks
much, much better. Now, let's come to
our big post here. And what I'm going
to do, first of all, is rotate this around because the stone doesn't
matter if it's rotated around, but the wood absolutely does. So I'm going to rotate
it round first, like so. And then what I'm
going to do is, do I need to pack islands on this? If I look at this
and I look at this, they look round about the same. So I'm not going to mess
around with the actual wood. What I'm going to do
then is just the stone. So to do that, I'll make it a little bit
easier for myself. Oh, shift click. Then
Alt Shift click in here, right click and we're
going to mark a seam. Then all I'm going
to do is come in and grab just this part with
L and Face selecton. Grab this part with
L and Face selecton. Now we can see we've
got these parts. And then what I'm going
to do is UV and I'm going to pack just the
islands of those parts. Pack islands, click
pack, and there we go. Now let's put it
onto this material. The material on these, let me just check
that because I think, yes, it's going
to be stone dark, this one's stone dark, so let's come in and we'll also click Plus and Stone dark, like so. Come back, so press tab, click a sign, and there we go. We've got our stone
on. Now, of course, the stone here looks a
little bit too realistic. So let's press tab,
press the S pawn, bring it down a little
bit, maybe too much, a little bit less.
Something like that. Looks absolutely fine. Okay, so that's the
actual post done. Now we want to come
to our wooden post. So this one here. Yes,
that's what I've done. I actually came in, and that was the The wooden one and this
one was the stone one. So that's why that
didn't look right. Okay, let me fix this. So what I want to do is I'm just wondering how I go
and fix this now. This might be one where I'll just have to
rebuild it off screen. So I think I'll be back in just 1 second. In
fact, you know what? This is actually looking good for I'm just wondering which
one we're going to keep. That's a silly
mistake that I made. But anyway, let's come in
and fix this one first. So we'll go we'll actually
we'll make this one again. We'll do it again,
guys. If you've not made the same mistake as me, then good for you, but I did. Alright, so let's
come in First of all, we'll smart U V
project, click on wrap. Like so. We can see
this is the stone one. So let's put it on the stone. So we're going to have on stone
I think it's stone light. Yes, stone light. Like so. Yeah, that's looking
pretty good. You know, one thing
I did find, though, if I bring this in now is that this stone actually
doing what I did. So if I grab this round
here, press Alterns. Grab this one round
here, press Alonss. Like, so making it like this, let's bring a let's bring
this one in a little bit. Doing this actually
adds quite a bit to it. So I think, you know, it was a happy mistake
to have like that. That looks a lot lot better now. It's just that this one is, of course, messed
up a little bit. Now, how do we fix this? So we don't really
want to go in and do all this again,
so we'll come in, and all we'll do is come
into with edge select, and we're going to just
grab all of these, like so, and then I'm just
going to press P and selection and
take those away. Now I'm going to do is,
I'm just going to come and I'm going to grab the
inside of this part here, so hold shift, and
click, grab the inside. If it doesn't click
all the way around, it doesn't do that generally if you've got a
hole in the mesh. Just grab them, you know, with shift select instead, press one on your number pad, and what you want to
do then is press E and Z to pull it
down that z axis. If it's not coming
straight down, just press the z bone again, and it will come down
to where we want it. So we want it just on the
bottom up there, like so. Next of all, then, I'm going
to bring in some edge loops. So again, I'm going to put this. Still wiring the UV,
we can do it in there. I'm going to put my
little ghost thing on. I'm going to press
the tab button then. And then what I'm going
to do is press Control, and I should be able to bring
in some edge loops like so. Now, I've just got to make sure that I'm dealing
with the right one. You can see I'm dealing
with the right one there. And then what we'll do is now
we'll come underneath it. We'll grab this part
underneath here, so you can see this
little part here. We're going to press one. We're going to
press the S button, and then we're just going
to pull it out like so. Then I'm going to come
to the next part. So in edge select, grab this
part, press the S bone. Grab this part here, press the S bone to bring
it in. This part here. Al shifting,
clicking, of course, press the S bone to bring
it in. Work my way up. So grab this one here, press
the S bone to bring it in. And then this one here. Press the S button
to bring it in. Okay, so we've so far so good. Now, let's come in, take off our see through part.
Let's turn that off. Like so. Let's come in and also hide it out of the way with
grab this one, press delete. We're not going to need that.
Alton bring back this part. And finally, then
Alt Shift and click. Now, Old Shift click is
not going to work really because we've already
done this top part. So I'm just going
to select this one. Control select, this one, Shift select, control select, Shift Select, control select, shifts contour slick,
just like that. And then what I'm
going to do now is I'm going to make
you uneven again. So mesh, transform. We're going to come
down to randomize, and we're going to
open this up and put it on note point note one. Like so sometimes it'll
go a little bit too far. And I think on this
occasion, it has. So all I'm going
to do is put it on noteoinn note five,
something like that. I think that's looking
much, much better. And there we go. Alright,
so we're back to where we started, which is pretty good. So what we'll do on
the next one is, then we'll get this finished off. I'm going to
save out my work. We'll get the material on
it because at the moment, you can see that we've done
pretty much all of these, except not that
post, this one here. So this just needs a wood on it. Everything else is
looking really good. And once we've done that,
we can get them named, get them in, you know, the correct collection, and
move on to the next thing. So really sorry about my mess
up there, guys. It happens. Sometimes you don't see through the trees properly, as they say. I'll see you on next one.
Thanks a lot. Bye bye.
18. Building Procedural Stone Stairs with Geometry Nodes: Welcome back, everyone to the
Hunter Street Environments, Blender to Unreal, and this
is where we left it off. Alright, let's pull
this out first. Let's come in then to this actual wood that
we messed up on. And all I'm going
to do is press L, and I'm also going
to make sure that I've got this
selected underneath. Just make sure that I selected. Also make sure that
in the UV map, you've also got
everything select Sorry. Not in the UV map. Don't
select everything. Then what we're going to do
is click plus Down arrow, and we want the wood that
we had on the other one, which is the wood red, and then we're just
going to click Assign. Now, we can see at the moment this is looking
very, very blocky, so all I'm going
to do is press U, smart UV project, click
on RAB and there we go. Now what we want to do
is turn them round. So just with the
select to press R 90, spin them round and just
make sure that it's looking like this one over here. So I think that
looks pretty good. I'm just going to
make sure, as well, if I go into this one here, maybe, maybe with
these two top parts, I've got a little bit
too low on the stone. I mean, they're not close up hero shots or
anything like that, but always pay
attention to that. So what I want to do now
is just make sure in object mode that I've
got all of my bevels on. So I'm just going
to come in and you can see my bevels on here. This is with it on
and off, like so. And what I'm also going to do
is I'm going to put a shop, I think on all these, so I'm going to
grab the top of it. Press Control plus Control
plus Control plus, and then I'm going
to press Controlle and I'm going to mark a sharp, so that goes all over there, and that's looking
much, much better. Now, I think everything else, I'm happy with so now we
can actually move on. So let's go back to modeling, and then what we'll do is
we'll put our support. So these are the struts. These are the supports,
and these are our planks. So first of all,
let's do our support. So what I'm going to do is
press M. New collection, let's call it supports. Like so, click Create. Let's move these over here then. So I'm just going to press
seven to go over the top, like so I'm going
to put these here. I'm going to grab my
text, I'm going to press Shift D, and I'm
going to put that there. I'm going to make it
a little bit smaller because it's a little
bit too big for these. Put that there, like so.
Then I'll grab my planks. I'm going to press G, move
them over there, grab my text, Shift D, drop that there, and then finally, I'm going
to get my actual struds. I'm going to press G
s to move them over. Grab my text, Shift
D, drop that there. Now, what I want to do
is put these in planks. So if I grab these, press the
NbnNw collection. Planks. Like so. Click the enter bone. Same with the struts now, so I'm going to grab all
four of these struds. Press the N bon. New collection. Let's call it struts. Like so. And now we're going
to go to our text. So these are our support, so let's actually put that in. So capitals SUPPORTS. Can see that's way way too big, so let's make it smaller. Still over the top, so I can just move it into place like so. This one says text, it should say wall, so I'm
just going to delete that off, but walls like so, make it a little bit smaller, and then G, put it in place. This one's going to be planks. So planks. Like so, and make it a
little bit smaller. And then finally, this one
is the struts. So struts. And you can see just how fast it is if you do this
in the beginning. If you do it in the
beginning, don't wait till you've
got tons of stuff. Now, finally, what I want to do is just move all of these up. So I'm going to just
grab my ground plane, press H to hide it,
grab all of these. And then all I'm gonna do is just move them up a little bit. So we've got a
little bit more room to actually work with,
move all these up, like so old bring
back my ground plane, double tap the A, and there we go, that's
what we've got so far. Let's say that or
work. And let's now begin with our steps. Now, the thing is about steps. You know, there's many,
many ways of doing steps, but with a geometry
nodes to create steps, it definitely definitely
makes it easier. So that's what we're
going to actually do. So what I'm going to do is
I'm going to go to file, I'm going to go to a pen. You can copy and
paste if you want to. I'm going to click the Lob. And what I'm going to do then
is come down to hopefully, there should be one
undernare called. Let's have a look, compositor. Emission, environment, gloss. I was hoping stairs
geometry node. There we go. So there's the stairs geometry node
and the stone path. These are the two that I want, so I'm going to
select these two, I'm going to pen them, and
now they should be in. Now, to test that, what I'm
going to do is, first of all, I'm going to press Shift A, and we're going to bring in a curve. And the curve I'm
going to bring in is a path because it's way easier
to work with than bezier. What's the difference
you might ask? If I bring in a Bezier, you can see it comes in
automatically curved. You've got these handles that you can actually move around, but we really don't need that. What we want to do is
bring in a straight curve. So if I bring in a path, you can see now
when I press tab, it hasn't got those handles on, and it's very easy then
to manipulate it round. We're not like bending, as we will be doing
a little bit later. We're not bending mesh or anything like that or
trying to get curves. We're just trying to
make flight of stairs. So what I'm going to do then
is I'm going to press tab, and I'm going to bring in now the Jumptonode which
should already be there. So let's come over to
our modifiers tab. This is where the
Jumptonodes live. Add modifier, and
you'll see if we go to where is it down the
bottom? Jumptonode is there. Click the down arrow,
and we should have in Stairs Jumptre node,
as you can see here. So stairs, jomegre node, bring it in, and that
is what we've got. Why use a Jumpton node instead of just creating
a flight of stairs? You know, it's easy to create
a flight of stairs, right? Not so much, not
so easy, actually. So, you know, also with Jumption node,
it's non destructive. I can change these stairs on the fly and all that
sort of good stuff, and that's one of the main
points of doing this. Now, before we begin, let's actually just bring in a cube. So I'm going to
press shift A. I'm going to bring in a cube, and the reason I
want to bring in a cube because it's going to give me an idea of how big
these stairs need to be. It's very hard sometimes
to look at the reference. Speaking of reference,
let's actually bring that over so you can actually see
what we're building here. Let's go over. To the stairs. This is what we're
actually craning, so just make sure
you've got this open. And you can see that
we've got this plinth, three lots of stairs, and
then we've got this kind of tiny plinth that's
going to go under the steps leading into the door. So that's where we put in that. That's why we've got that
there, because if not, you end up with a piece missing where the door is and you ain't got anything really
to fill that in with. So always make sure that
you're making this part. When you come to the
Unreal Engine part, you will see exactly
how this works. So bring this into Blender so you know exactly
what you're doing. And then what we're going
to do is we're going to, you know, carry
on creating this. Now, these stairs, so let's
come to the first stairs. I'm going to give you some
dimensions here, put them in. So what we want is
2.45 we want 2.83, and we want 1.33, like so. Now, this is the right
scale for my stairs. I just need to spin it
round. So odds head and 90, spin it round. This is the size that I want it. So if I bring this up
to the ground plane, this is how wide
I want my stairs, and this is the actual
height of the stairs. Now, you can see, at the moment, these
stairs are pretty big. All I'm going to do
then is put it on object mode so everyone
can see what I'm doing. Now, what I want to
do, first of all, I do want a base on here, but I don't really
want this banister. I don't want these top parts
on this particular stairs, and I'm just not
going to use them. So what I'm going to do
is take the handrail off, and I'm going to
take the poles off, and we'll be left with
something like this. So what I want to
do, first of all, is we can increase the
length of the base, as you can see, so
we can make as many, many steps as we actually want. We can also increase the
width of these actual steps, so we can bring them out and
put them wherever we want. Now, what we want to
do, first of all, is make sure that this
is the correct height. So what I'm going to do is
just press the airborne. Bring it down, so I'm going
to press one and just making sure that fits
within the actual cube. So you can see there I've pretty much got it
perfectly right. Then what I'm going
to do is then I want to increase the actual width. So rather than increasing
it with the S and scale, let's do it through
the geometry nodes, so I should be able
to bring this up. I'm also going to
increase the width of the actual stairs,
bring those up. If it doesn't come over,
just put it on four, and it should actually increase. It's got a limiter on there, where you can bypass
that quite easily. And then we've got
something like that. Now, we already know that these
then are the right scale, so we can delete
our little cube. You know what? We'll
leave our little cube there because we'll use
it for other steps. So these already are
looking pretty nice. Now, how many steps do we have? So we have a big flat
bit though on the top, and that's something that we actually have to
be careful with. So you know what
I'm going to do? I'm actually going to come in. Pull it back a little bit. So I've got that nice
flat bit on the top, and, you know, we'll actually see how far we want to
pull that back. So what we're going to do is delete these three
actual nodes here, so press delete, delete
them out of the way. And then we've got
full control now if press shift space bar to move this backwards
and forwards, like so. And there you go. Now, on my actual
reference, I've got one, two, three, four,
five, six steps. So I've got one, two, three, four, five, and then
the 61 is over here. So if you look at the reference, you can
see we've got one, two, three, four,
five, and then six. So this is how many
steps you actually need. So just make sure you've got the same or you might want
to go more or less. Now, how do we measure stairs? What I'm looking for,
when I bring my guy here, I'm looking that it comes
up to his shin bone. I don't want it coming up to his knees or anything like that. You know, these are
steep steps as they are, but remember, they've
actually got top on them. So when we come to convert
them, we will say, these actually have, you know, a top on them, which we
can actually get rid of. But these at the moment, are pretty steep stairs as it is. If you go and try and step up some stairs where
it's, you know, actually just under your
car here, you know, near your shin, which
is your shin here, you'll see it's pretty steep. So we've got to take that into consideration when we're
doing these stairs. Now we've got these. What
I want to do then is. I'm also going to
make a copy of that. So shifty let's bring it over. Let's pull it back over here. And then what I
want to do now is I can see if I bring
this here again, I can see that this is how much room I've got to
play with on the back end. So what I'm going to
do is I'm going to pull this up to make
sure that the level. I can see that they're
still a little bit high. So what I'm going to
do is just press S and Z and just squish them
down a little bit. And then going to press one
making it into side view, and I'm going to
make sure that I get this round about the
right height of this. So S and Z, a little tab. Now, a little trick, as well, is if you hold the shift button
down, it will slow down. You're actually pulling it
out, which is always handy. So now you can see I've
got the bottom lined up. Forget about this step on here. I've got this top lined up, and they are looking
pretty good. Now, the other thing
is, then I want to pull these out once I've
actually converted them. So what I'm going to
do now is just move this to the side.
Here are my steps. And yeah, I'm happy with that. Let's save out our work, and on the next one, we should actually get
these steps finished. Alright, everyone, so I
hope you enjoyed that, and I'll see you on the
next one. Thanks a lot. Bye bye.
19. Converting Geometry Nodes Stairs into Worn Stone: Welcome back, everyone
to the Haunted Street environment
Blender to Unreal. This is where we
left off. So now what I want to do is I
actually want to convert this. So I'm just looking,
though, before I do that. And I'm just making I've got
enough room on this top, and I still don't think I have. So all I'm going to do,
if I pull this back, it will increase or decrease
the amount of steps. So what I'm going to do is I'm
going to put it like that, and then I'm going to come to the length of my actual base. Now, if I turn this up, you will see that we can
either put it up or down, and now we've got five, six steps or whatever we had
again, exactly the same. And now I've got a
bit more room to actually play with
for the top on here. Alright, now I'm looking at it, and I'm still thinking maybe, maybe a little bit more, maybe a little bit more,
something like this. Let's turn it up again. And then we've got
one, two, three, four, five, and the six. We've got one, two, three, four, five, and the six. There we go, that's
looking good. Okay. Now, time to convert. We're going to convert this from the geometry node because we've already got a geometry nodes
over here with our steps on. We're going to convert this
then to our actual steps. What I'm going to
do is I'm going to come up to where it says, where is the object here. And we're going to go
to convert over here, convert the mesh,
and we should end up with some really,
really nice mesh. So what I'm going to
do now is come in, get rid of these, first of all. I'm going to delete
them, so delete. When you're deleting anything, if you can always delete by vertices because it
won't leave any empties, they're called, empty,
you know, space. You'll have a lot of
those probably left over, like I thousands
of them the first time I was using Blender.
Let's come in then. And what we'll also do is
press Oh Shift click on this center because
we really actually don't want it there, and I'll show you why
that is in a minute. And then we're going
to press delete. And this time, instead of that, we're going to dissolve edges, and then we'll take
that offer us. Now the next thing we want to do then is we want
to pull this out. So I'm going to
grab this top one, control, select this bone one. And then what I'm going to
do is just go over the top. I'm going to press
extrude and just pull it out to line up
with this part here. And now we've got pretty
much all steps nearly done. Now the last thing we want
to do is we want to make sure that the mesh doesn't
have too many verts in. You know, vertices
are not needed. Edges, sorry that
are not needed. This edge here, you can see
really isn't doing anything. So what we're going to
do is Alt Shift click, I'm going to press delete
and dissolve edges, get that out of the way. Now finally, we want to
bring in some edge loops, so some more edge loops that are actually
going to do something. So what I'm going to do is press Control and I'm
going to bring some in. So if I press five or
even yeah, let's do five. Left click, right click. We've got five on
there, and there we go. Now why do I do that? Because obviously,
we want to make sure that this is randomized. So what I'm going to
do is I'm going to come in, Althit, click, Al shift, click,
oh, shift, click, oh, shift, click,
Al, shift, click. And probably even now, we
don't need to do the bomb. We'll leave it like so,
and then we'll go to mesh, and we'll come down to
transform, randomize, and then let's turn this down till it's something that
we actually happen with. Now, with steps, we can get
away with a lot lot more. As you can see, than with, you know, the wood,
for instance. Let's write click and
shade auto smooth. So they're already
looking pretty good. You can see the bent
a little bit on the front and the sides
and things like this, and that is exactly
what I'm looking for. It's as simple as that, guys. Now, the other thing is I like to do, especially
with steps, is I like to, you know, go in and pull this
down a little bit. Pull this one down a little bit, raise this one up a little bit, like so, and you might notice that it's very uneven
at the moment. Don't worry about that because we're going
to pull it down. Then what I'm going to
do is I'm going to come in and pull this down just to make it a
little bit more even. Let's move our guy
out of the way. And then I'm looking
for any parts where I've pulled it too much. So like this part here, sinking in a little
bit too much, let's have a look
again. This one here. Like so, and maybe, maybe this one here, just a tad holding the
shift bone down again. And there we go. I think
that's looking good. Now, finally, finally. Let's do the edges as well.
Let's bring these down. Let's pull this
down a little bit. Let's come to this one and pull it down a little bit more. Let's bring this down
a little bit. Like so. Let's pull this one down. Let's pull this up a little bit. And then what we'll
do is pull this one up a little bit as well, and just taking our time till
we're happy with our steps. I'm not really focused
on the top of it. I don't really want
to alter, you know, too much of this because it
should be relatively flat. And yeah, I think
I'm happy with that. What I'm going to do then
is press Control law, bring in three edge loops, and I'll probably come
in then with the top. Face leg, click on
your portional ity, make sure it's on random, and
I'll grab the back of here, pull it out a little bit,
and just pull this down, grab this one, pull it down
a little bit, like so, and now it's very uneven, and we can see that's
looking pretty nice except probably this bit here. Pull it down a
little bit. Like so. Alright. I think I'm
happy with that. They're looking pretty good. Let's reset the transformations. Let's also add in then
a bevel, so a bevel. Let's put it on note
point, not note three. And there we go. There is
our steps, pretty much done. Okay, so now we're
working on the next part. So I'm going to move
this to the side. I'm going to save out my work. And then what I'm
going to do now, if we look on our reference, we can see what we're going to do now is work on this part, or we could just work
on this top part. I think this is the plinth. Might be a easier to do
this part first, I think. Yeah, I think we'll do
that because I'm just wondering if I can use some of those parts then on
the top of there. That could be a possibility. That's what I'm
thinking of here. So I think we'll do the PI. So I'm going to just find
my plinth on my reference, so I've got an actual
scale to work with. And then what I'm going to do is I'm going to come to this, and I'm going to put it on 2.57. Now, of course,
when we're building these out in the beginning, we are actually working out
the size of everything. It's just easier at
this point to tell you, this is the size it should be. But of course, you can make
them any size you want to be. It's just easier
to follow along at the moment till
you get the idea. So let's put this on 2.51. Like so, let's put the Z
value on 1.5, like so. Now, let's press one, and I want to pull this up
then to the ground plane. Now we've made it a bit bigger. Now, I don't want
to get rid of this. But instead, what I want
to do is just press Shift D. Always be aware to save things like I'm doing here
because it does speed up your workflow rather than
creating a new cube every time. And now we've got the size
of our actual plinth, so this is the size of the PIT. Now, what we want to make
sure we're doing here is we want to put some
stone slabs on here. So what I'm going to do is I'm going to grab the top of it. I'm going to press
Shift D. Like so, just to duplicate
that part there. And then I'm going to
press P selection, like so, just split it off. And then what I'm just going
to do before I do anything is reset all the
transforms on this plane. Now I'm going to
do is I'm going to bring in some subdivisions. So I'm going to grab this,
right click, subdivide. You can also come down and subdivide it down here as well. So I'll give it a third
few subdivisions. And the reason we're doing
that is we want to now create spaces for stone slabs. So now I'll come in and
I'll select this one, like so, and then
I'm going to come in and I'll select this one. We don't want them too big, so don't make them too big. We'll have this one,
I think, in half, and then we'll have it
coming up to this part here. I don't want any shapes
in here as well, so I'm not looking for
shapes. Not in the slightest. So I want to make sure
that'll do it like this. And then maybe this one we can get away with
doing it like this. And then this one we can bring probably to here. This
one we can bring. Again, we've just
got to make sure we don't make any shape. So something like this. And
then this one here we could. We've got an L shape here, so I just need to be a little
bit careful with that, and we'll bring it out to here, and then we'll bring this part
to here, and there we go. Alright, so we created
something like this. Now I can go ahead
and mark a seam. And from there, then what I
can do now is split these up. So what I tend to do if it's
loads of things like this, I'll press L on any that are
completely separately apart. So you can see here they're
completely separated, completely separated, press Y, press H. Then we'll
do the same thing. So it's just rinse
and repeat now. We can see we have
got L shape on here. I'm just wondering if
I actually want that. Or if I can actually
let's just go back a minute because I
don't actually want an L shape on these,
that's for sure. So before I do this,
let's look at getting rid of this shape on here. So if I put this here,
that has got rid of that. I've got no more
shapes in there. At least I don't
see any right now, right click and mark a scene. And now we're back to this part. So now I'm going to go
L. I'm going to go L, L, L, Y, and hide
them out of the way. Then we'll go L, L, L Y, hide out of the way. We'll go to the center one. We'll go to this one, Y,
hide them out of the way. And then finally,
it's just this one. So L and press ATH,
and there we go. We've got everything
in there now. Now what I tend to do now is, this is the point where I'll make them a little bit uneven. So I'll grab all of them. I'll go to mesh,
and then I'll go to transform and I'll
go to randomize, and then I'll put it down
to naught point naught one, like so, and now we can see
that these are pretty uneven. If I write, click now and shade at smooth, we can
see they're really, really uneven, they're broken
apart from each other, and that's exactly what
we're looking for. Now, what we'll do on
the next lesson, then, is we'll actually give
these some depth. And then what we'll do is we'll actually make sure
that we're happy, you know, with all the
unevenness and things like that. We'll get them into place
then on top of our plinth, and then we'll move on to the I think it's the
final stairs, actually. Alright, so let's save our work, and I'll see you on the next
one, everyone. Thanks a lot. Bye bye.
20. Solidify Modifier Depth and Secondary Stair Set: Welcome back everyone to the Haunted Street environment
Blender to Unreal, and this is where
we left it off. Okay, so what we want to do
now is give this some depth. Now, let's go in there and rather than
extrude them all out, that's actually a
bad way sometimes of doing things better to
be non destructive. What I'll do is I'll
going to add modifier and we'll generate this
time, a solidify. Now, I'm going to add this solidify on and
then going to press A all transforms and set origins geometry
because they have got, obviously a modifier on there. And then what I'm going to do is increase the thickness
of these slabs. And because we're
not using extrude, it means that we can actually put these on top of where
they're going to go, so they're going to go
right on top of there, and then going to
come into this one, select that top face, and drag it down to where
I actually want it. And now we can see exactly
what they look like. Now, the other thing is, we can also do something
that's called modifier stacking where not only can we add a solidify on, we can also come in and add
a bevel on at the same time. So let's add the bevel on. Let's put it on Not
point note three, like so or Not point
not note three, sorry. And there we go. This is what the slabs are actually
going to look like. Now, at this point, I tend
to come in and I'll grab, let's say, this one, the
solidify on, so that's fine. What it means is I can
actually bring it up, pull it up a little
bit, maybe, maybe. It's a little bit too much. So what I'll do is
I'll put it on smooth, connected only as on, and then we'll drag it
down just on this bit, so it's not too high up. Like so, and you
notice I'll probably leave the ones on the
outside, at least for now, if I'm pulling them up because
it's got a solidify on, which means it won't go level
to the plinth underneath. You can see we've
got a bit of a gap. So that's something
I need to think about once I've
actually finished. Is there too much
of a gap? Can I get away with it, all of that stuff? I can press on this one now. I can bring it up a little bit. And there we go, That's
looking pretty good. I would say, that
looking at this, maybe this one here wants to just be dropped
down just a tad, like so, but that's looking
pretty nice already. All right, so I'm
happy with that. Now I want to do is we want
to make sure because we have to join this and this that we're not applying our solidify. So before you actually
apply solidify, just make sure you're happy with the thickness
of these slabs. Once we've done that,
then we can actually probably think about, you know, extruding these out or
something not extrude, changing the depth of these to make them a
little bit thicker. The ones where we've got
issues with them, you know, maybe I think it's just one, actually, which
is this one here. So what I'll do is I'll
hover over my solidify and press Control A,
then we'll apply it. And then what I want to do
is just come into this one. Press, ssn without the
smoothing on ssn, pull it. And then I'm just going
to drop it into place while it's still
lifted up there. And I think now that's
looking pretty nice. Now I want to do is finally I want to join do I
want to join them yet? Probably not, actually. I'm
not going to join them yet. I'm just going to
grab them both. I'm going to pull it
over this section here. All right, so that's the
plint Now let's move back then to the actual stairs. So I'm just looking
at my stairs, and here is the stairs. So let's come in now and get a good idea of
the scale of the stairs. So I'm going to
bring my cube again, and the scale wants to be 1.52. 2.84, 1.58, like so. So these are a lot
thinner, as you can see. So now we're going to do
is bring my stairs in. They have got a top on them,
so just remember that. And what I'm going to do is I'm going to bring this in now. I'm going to bring the
width of my base in. So I'm going to bring that in. We've still got
the tops on them. Now, that can actually
be really handy if we keep that on them as long as we mess around with the
thickness of them. So what I'm going to
do, first of all, I've got let me just make sure that these are
the right scale. I'm going to press three.
On the number pad. I'm going to pull them across, and I can see now
that the scales are a little tiny bit out. So las bring in that width
a little bit more, like so. And then what we'll do is
we'll bring in the width of this like so. So the jaws pop in
out underneath. And now I've got that I can actually move this
out of the way, and I'm probably done
with this at this point. So there we go. That's where
we've got at the moment. We can see we've got a little
ledge going over there. Now, these stairs, one, two, three, four, five,
and six again. So, one, two, three, four, five and six. So what I'll do now is I'll just make sure that
I'm very happy with these parts
because I don't think they're quite
overhanging enough. So what I'll do is I'll come to my stairs and I'll
change the depth, jaws to tad like so, and there we go,
I think I've got something that I can
actually work with on here. All right, so now it's
time to convert them. Now, the reason I convert over here is because when
you press Control A, it says you've got an error, so you have to always
come and convert geometry nodes into
mesh in this way. Okay, so we've got this now. Now let's first of all,
separate them out. So I'm going to grab
the stairs, like so, P selection, grab the stairs again, hide them out of the way. Then I'm going to
grab the backup here. Now, I did forget
that I just need to measure out the actual length. So I need to pull
it out to here. So what I'm going to do now
is come back to my stairs. Like so, Control select
and rather than extrude, I can simply just pull it
out like so. All right. The the stairs pretty much done. Actual scaling of them. Now I want to do is make sure if I press ultage
I can bring those back, come back to my steps. I'm going to press L, delete, and delete vertices now I'm looking if I can
use these on here. What I'm going to
do is I'm going to steal this bit for shift D. I drag it over. I'm going to press seven
to go over the top. I'm going to make
them on this one, at least because I'm looking at the plinth compared to this. I'm just going to see on
my own reference yeah, they're much, much
smaller, it seems. Well, not much smaller, but they're a little bit
smaller on these stairs. So what I'm going
to do is make them slightly slightly smaller. So if I come in,
I'm going to make them slightly, slightly smaller, like so, and then I'm going to try and fit them onto here because they
have a bevel on them. Let's drop these,
what we'll put them. We'll put them
there. And then what I'll do is I'll
press three again. I'm going to grab my
stairs, press S and z, and just squish them all down and pull them down
into place like so. There we go, that is
looking pretty good. Now I want to make sure that
these are fitting on here. So we can see some of them are not really
fitting on there. So I'm wondering if I should
actually redo these rather than trying to do
it in this way. And the other thing is I need
to bring my stairs down, the other thing is they're
probably not thick enough. So what I'm going to do
is press tab A and Z, and I want to, you can see the
pull them from the middle. I don't want that. I'm going to put it on individual origins. Up here is where
you can actually, alter your transformed
pivot point. I'm going to put it on
individual origins. And what that means is
then I can pull them out. All against each other,
getting them to be the same thickness as pretty
much these ones here. Now, what I'm going
to do is I'm going to actually delete this
out of the way, and then going to
come to this part. I'm going to come in,
l shift, and click, delete, dissolve Dissolve edge. It's not miss click there. And then what I'm going
to do now is I'm going to bring this so this part here, press shift D, bring it up, and then we'll do exactly the same thing as what
we did before. Now, what I'll do, though
with the stairs is, I'm going to bring
in some edge loops, control R, control R. Bring in some edge
loops, contro la. I'll put one there as well. Control. Now, when
I'm doing this, I like to make sure that they're kind of split from each other. So what do I mean by that?
If I'm putting one here, they don't line up at all.
That's how I like to do it. So I'm going to put
maybe another one here. And then the next one,
I'll do the same thing. So control and then Control R. Some of them are
going to be much, much bigger than the
others, as you can see, like so, and then we'll have
Control law on this one. Control R. And then
maybe maybe we'll leave, I think we'll have one more in, like so, and then control. And then finally,
maybe one more. Like so. And then we go,
that's that part done. Now if we come to this top part now, we've got it split off. Let's right click and subdivide, turn up the subdivisions like we did before, something like this. And then what we're
going to do now is come in again with edge
select and just select the ones that we want again
like this and just get a few slabs on this like so can also
breast control select, and then we'll go
to this one, and I think we'll bring it
here, so like this. And then this one,
maybe like this. And I don't want an L shape, so I have to be careful here because I definitely don't
want an L shape in there, as I've said, so I'll
have it like this. And then I'm wondering if, yeah, I'm not going to make
that actually bigger, so I'll put it here. And then that's a
huge step there. So I think we'll do
it here like this. All right. That looks
good. Right, click. Moccasine. Okay, so
all that is good. So the last thing you want to do then is just split these off. So again, L, L, L and Y and and then L, L, Y and then YN And finally, this one, Y and Oh, tech, bring back everything. Okay, so far so good,
let's save our work. And on the next one, guys, Oh, we should have
these stairs finished. I'm sure we'll have
them finished, but you have got here a really, really good workflow for
actually working out stairs. As you can see, I think these stairs look
really, really nice. We've still got a fair
amount of work to do, you know, on these parts here, pulling them down,
all of that stuff. I mind, at this point, come in and just create
these again because, you know, it's easy
enough to create them. I know we came in and
already put these things in. I just depends if I can pull it all down
at the same time. Sometimes we can do that,
sometimes we can't. So always thinking ahead. Alright, everyone. I
hope you enjoyed that. I'll see you in the next
one. Thanks a lot. Bye bye.
21. Final Stair Wear with Solidify and Bevel: Welcome back, everyone,
to the Haunted Street Environment
Blender to Unreal. And I think, You know what? I'm actually going
to delete these. So sorry about that,
guys, but I think I'm going to delete those
because I think I can actually do a better
job if I come in and set, not like that
controller, my own up. So left click, right,
click, and there we go. Now I want to do is I want
to come in, split this off. So I want the stairs
split off for now. So P selection, split it off, hide this part out of the way, come back to my stairs, and then I've just got the stairs
to actually work on. So what I'm going to do now is Alt Shift click on
all of these edges. Like so, and you know exactly
what I'm going to do now. I'm going to go to mesh,
transform, randomize, turn this down till I'm
happy with something where it's not too bumpy,
something like this. And that's looking pretty nice. And then what I'll do is
I'll just come in then, and I'll pull these down a little bit, the
ones I want down. I'll pull one of them up. So one of them up. I'll pull
this one down a little bit, maybe this one, also
down a little bit. Maybe these two down
a little bit like so, and I want the plum
to stay around about the same or the top part. And then I want this one
to probably come down to something like
that, and there we go. Now, if I come in now and just, you know, press
three, is it three? Is it Control three
on the number pad? Yes, it is. I want to straighten these up a little bit now because we don't want them, you know, like that. So all I'm going to do is
come round, grab this one, control three, and then I'm able to pull it down a
little bit, like so. You can see here that this one needs coming down
as well. This one. And then this one, this one down as well. Like so. And then let's make
this one a little bit more of a difference. Like so. All right. Right click Shade Auto Smooth. And that's pretty
much what we've got. That's looking good. And
now what we can do is we can actually figure out
these actual stair parts. So what I'm going to do
is shift select this one, Control select, shift,
control, same thing. And if it doesn't go across,
just be careful of that. Just select them and
then Control select. And again, you can
see now it's actually coming over, and there we go. All right, so there
are four steps four steps, five steps. There we go, so we
can press Shift D. And we can pull them up. And
we know that these are in pretty much bent like
our other ones are. Now the problem here is that we do need a few
more edge loops, and I'll show you
why in a minute. If I press right,
click and subdivide, you will see that we actually get a line going
down the center. We don't want that. So what
we're going to do is l shift click and get rid of
that middle line. We really don't
want it, so delete, dissolve edges, and we're left
with something like this. Now, from here, we can
actually make steps. So you can see here
we're going to make some steps like this. Like this and like this, and then we'll do
the same over here, trying not to copy
the same ones. I don't want them
lining up at all, so you can see here not
having them lined up, not too small, not too big, happy medium, happy medium
is what we're going for. So something like this,
I think, right click, and then what we'll do
is we'll mark a seam. And then finally,
now what we'll do is so now what we'll do is
we'll actually split them up. So we're going to go L, L, L, and all the other ones, like so, and like so, press Y. That's them split up then. So finally, then what
we want to do is I want to just make sure if I'm on my stairs
now, as you can see, if I shade move, these are still got
some ridges in here, as you can see, you know, we've got no except these. Let's actually just
select these parts. Let's see what they
look like, actually, because at the moment,
we've got these, we can actually smooth those
out, but let's see what they look like with
these parts on here. Now, I'm going to just
for now, split off this. So P selection, split it off. Come back to my stairs,
Control A or transforms, set origin to geometry, add in a solidify. So let's bring in a solidify, pull it out to make sure
it's the right thickness. So we're going to
pull it down like so. I'm also going to check on here. So I'm going to press altage,
bring back this part. And actually, you know what? I didn't actually get
any thickness off there, so I'm going to
drag this one over. I'm going to shift D. Always get into habit guys off shift, not actually just dragging it across because when
you come to delete, you'll find, like I do, many times, I've deleted it and they have to
do the work again. So always get into
habit of that. Okay, so now we have some thickness to actually work with. You can see this is
how thick they are. So let's bring down our
thickness. A little bit more. Let's pull them up into place, and let's also also make
them wider on the Y. So S and Y, pull them out, so they're just
hanging over there, and, of course, S and X, pull them out, and
then pull them back in place because
we absolutely want them hanging over like this. Alright, so far so good. So we've got our solidify
on now we want to do is want to make sure that
we apply our solidify. So control A. Let's apply that. And then what we're going
to do is bring in a bevel. So we're going to
bring in a bevel we're going to put
it on not point, nut three, like so,
and there we go. Now, the one thing
that we need to do is make these a
little bit uneven. So I'm just going
to grab, you know, some of them I'm
going to work on, first of all, the
tops of the steps. So I'm just going to grab
this one, for instance. I'm going to grab this one,
make it a little bit smaller. And then this one. Like so. And we'll see at the
moment that we've got a little bit too
much bending them, but I'll show you how to
fix that in a minute. So let's come just keep
working on the tops of them. Don't worry too much
about that yet. Like so, let's pull it up, working our way down,
making them uneven. Like, so like so. Okay, there we go. Now, the one thing
we've got left to do is to pull them out, but
I'm not going to do that. First of all, I'm
going to select my steps now. I'm
going to press A. And what I'm going to
do now is press delete, and hopefully this will
work with dissolve edges, and that didn't work,
so let's come in, and let's put Limited dissolve. And hopefully that now
will have left you with some decent decent ones.
I'm looking at the steps. I can see there's still two or three maybe that
aren't working, so I'm going to press Control Z. And the reason is
once you get rid of these edge loops like this one. So if I come in, press delete, dissolve edges, you'll see that that bend should disappear. So if I press delete,
dissolve edges, you can see now
that's disappeared, but something else
is happening with that because it's still actually bent, and it shouldn't be bent. So I'm going to
just hide my steps. I'm going to come
round then and see what's actually going
on here because that actually shouldn't be the
case because we've actually got we haven't actually
got anything on there, and I'm wondering why
that is the case. So let me just go back just to make sure we're
doing this correctly. So we've got that on there.
I'm going to actually, you know what, I'm
going to pull that up. Any of that are really bent, I'm going to pull
them up a little bit, so they're not quite as
bent because that then is going to make it probably
a little bit easier for me. So here we can have a
little bit of bending, but we don't want
it to be you know, too bent out of place. So something like this
looks much better. We don't want them to look
like bananas or anything. And I know we're taking
our time on these, but honestly, it's worth it. If it's going in a piece, and it's going to be
used multiple times, absolutely worth doing this. Yeah, and I think now except
this one maybe pull it down. And I think now they're looking actually much, much better. Alright, so lastly, then, we want to come in now and we will pull out some of these. So if I grab some of these,
I can then pull them out. I can grab some of these, for instance, and
pull them back. I can also press Z and rotate
them a little bit like so. I can do the same
then with this, so I'm just going
to pull it out. I'm going to rotate
this one round, so Z, and we're then going to pull
this one out a little bit, like so, making them
very, very uneven again. And this one here,
I'll pull out. Like, so this one
here, I'll rotate. So I'll z I'm also
rotating both ways. So, for instance, you
know, on this one, I won't actually
rotate that one, but I will rotate this one. So I'll spin it around
the other way this time. And then I'll pull this one
maybe back a little bit, like so, and then
pull this one out. And let's have a look
at what I've got. There we go. They're looking. They're looking
really, really nice. I'm happy with those.
They're very bent, all of that great stuff that
we're actually looking for. And what we're going to do now is we're going
to come to these. Now, these should
already be split up. Yes, they are, which means I can just simply come in,
press Control A, resell my transforms, copy
the actual thickness of them, so I'm going to grab
this one, grab this one. I'm going to press Control L. Copy modifiers, and I'm also going to go back to
this because I actually applied that solidify and
add in another solidify. And then what I'm going
to do is just make sure. I'm going to delete
this out of the way, as I said, that's
why we do that. We can just delete it out
of the way now, no problem. Come back to this,
press the little do on. And then we're
going to increase, not that one, increase
the thickness. So increase the thickness, sit them on top,
and there we go. Now we're going to do is now we should because these are split, once I actually apply the
solidify, there we go. We've got exactly
what we needed. Now, I'm just
looking now to make sure that they bend
where they need to be because you can
see at the front of you it's a little bit out, so I'm just going
to pull this down. With old shifting clicks, I've grabbed the
entire edge loop. So I'll pull this
down a little bit, pull this one down a little bit, and just making sure
that the front of these is lined up a little
bit better before I finish. So I'm going to pull this
down All shift click, pull this one down, and then I'll do the
same on this one. So I'll pull it
down a little bit. Like so, right, click
shade Ato smooth. And finally, finally,
I think what we'll do is we'll just grab
the top of this one, pull it up a little bit,
grab the top of this one. So I'm control selecting, pull it down a little bit. Do the same on this one. Like so, pull it
up a little bit. And then on this one,
we'll also pull this up a little bit
as well, like so. And finally, finally, let's finish with these
parts here, as well. So we'll pull this one out. We'll pull this one out
a little bit as well, and we'll also go
round the sides. We don't need to do the
back. No one's ever going to see that. We're
going to pull these out. A little bit, and
I'm also going to pull this back a little bit. And then finally, I'm
going to just grab this, I'm going to press
S and Y and just pull it out just a slight bit just so it's over
the top of there. Now, let's have a look
what we've got there, and you can see that it's
looking really, really nice. I'm just wondering about
just this one here. I think I'm just going to, I think, let's try
pulling it up. And let's try pulling it down and seeing which
one fits better. Probably down. And there we go. Alright, so that's
those steps done. Now, pretty much then
we've got the plenth. We've got the main
steps, and we've got the step the steps with
the steps on them. So pretty much we are
done with our stairs. Now we can get rid of this
cube. We can save our work. And on the next one,
we can actually get some textures, materials, get some UVM wrapping going,
making sure, you know, all the solidify are applied,
all of that good stuff. Alright, everyone. So I
hope you enjoyed that. I'll see you in the next
one. Thanks, love. Bye bye.
22. Modeling and Bending Detailed Stone Staircases: Welcome back, everyone
to the Haunted Street environment
Blender to Unreal, and this is where
we left you off. Now, I think the one
we'll start with first will definitely
be these stairs. They're the easiest to
do. So what we'll do is definitely on these,
let's give it a try. Sometimes you can actually get away with automatic
UVN wrapping, and other times you need
to mark some seams, but I always tend to test it out first and see how it goes. So what we'll do, first
of all, is we'll come in. We'll bring in the material. So we definitely want the stone, and the one we're going to
use is the stone light. And then what I'm
going to do is now, I'm going to press tab A U,
SmartUVPject, click Unwrap. Then what we're going to do is just put it on the
rendered view. Let's have a look
what that looks like. Doub tab, double tap the A. And there we go. That
actually looks pretty good. And I'm actually
thinking I don't think I need to even worry. Apart from the back
end, I think the back, for some reason, is definitely a little bit
more blocky than the front. So what I'll do is
we'll actually will. We'll go into UV Editing and we're looking at
the size scale here. Actually, it looks about right. So what I'm going to do is, I'm just going to
press Control A or transoms set the
origin of geometry, press the tab and then
U and smart UV project, click Okay, there we go. It's unwrap the same, so
it should be good to go. Let's have a look. And
it actually looks good. I'm just wondering whether whether I need to pull
these out a little bit. I'm gonna pull them
out just a tad. Yeah, and I think that looks
much, much better now. Alright, that's looking good. Now let's move on
to the Plymph then. So this is in two parts
on here, as you can see. We've not got a bevel on the bone because
these are joined up. Now, one of the things you
will find when enjoying things like Plymsups
that the bottom, if I just put this nob jet mode, you kind of don't want
to bevel on there, because if you snap them
next to each other, you're going to have
a gap down there. So what I tend to do
with things like this is I will grab this top part. Grab the bomb part,
press Control A, resell the transforms, just
to make sure that's working. Set origins geometry. And instead of joining
these together, I'm just going to grab the bomb, press Control P, so
the bombs grab last, and we're going to set the
pairing to the object. What that means is now that this can still move on its own. If we grab the bomb, though, you'll see everything
moves with it. And so it just gets out
of the fact that we need to poll beveln cause
if we join them together, we're going to have
to pour Bvlon. There's no way around
that unless we go in and bevel every
one of these by hand, which I actually want to
avoid. So now we've got that. What we want to do is
with this part here, we want to make sure that
we're using the stone, but we're going to
use the stone dark. And then with this one here, we're going to use the stone
light, so stone light. Now, let's come in now,
put this on material, so we can actually
see what we're doing. And then what we're
going to do now is this one here, first
of all, we'll do this. We're going to press
Smart UV project. Here wrap. Let's see what that looks like. And that's looking
the same as this one. Now let's do this. So tab, A, smart UV project, click on wrap, let's look at what
that looks like. Let's make these a little
bit bigger. Like so. Let's put it on Render
view just to get a good idea how those
slabs are gonna look. And yeah, they double tap the A. Think they're
looking pretty nice. So that's looking good. You
can see how easy that was. Now, let's come to our final one where we've got slabs,
and we've got stairs. Now, because of these stairs, they're not going
to be, you know, slaughtered next to each other. There's no chance
that's going to happen. So on the stairs,
we can actually use a bevel. No problem there. So what we're going to do
is we're going to come in, I'm going to copy. So I'm going to press Control L. I'm going to copy modifiers. In fact, you know what,
before we do that, let's actually check what
modifiers are on there. So we've got a solidify on here. Is it solidify or is it
just, it's a smooth. So we've got a smooth on
there, so that's okay. Got a move on there,
so that one's okay. So what I'm going to
do is, first of all, I'm going to wrap
these separately, and then I'm going to
join them together. But first, let's add
in that modifier. So I'm just going to grab
this one, grab this one, press Control L, I'm
going to copy modifiers, so I'm going to grab
everything then, press Control A, all transforms, right click, set
origin to geometry. I'm going to put it
on object mode just so I can make sure that
bevel is on there, which it is, put it
back on material mode, and then what I'm going to
do is come to these first. Now, these are
going to be stone. So they're going to
be the stone doc. This is also going
to be stone doc, so I can just grab this one, grab this one, press control. Link materials, and then
finally grab this one, and we'll put this
on the stone light. So stone light, there we go. Now, let's unwrap
this one first. So tab A, smart UV project. Click Okay. Let's make
sure that's looking good. It's a little bit too chunky, as you can see, let's
bring it out a little bit. Let's now come to this one. So A, smart UV project,
click on Wrap. Let's have a look at those.
And what I'm looking for, first of all, is to make
sure it looks like this. And also, I grab
this bottom plinth, but press Dot, making sure that my slabs look like
those, which they do. So everything's looking
kind of similar. Let's now come to these steps, tab, A, U, smart UV project. Click Okay. Let's
have a look at those. And they're all looking
very different, which I'm happy about. Final thing before
finishing then. Let's look on Render view. And yeah, they're
looking pretty nice. The sun, by the way on here might be a little
bit too bright. Just wondering if I
can turn that down. And not have it quite so bright. So I went to world, and I'm just turning down the strength
of the sky texture, and I think that looks a
lot more reasonable now. Okay, so now we've got all that. We've
actually got them done. So let's while we're here, put it back on to material mode, and let's join both of
these with this one, pressing Control J,
join them all together. Control AAA then all transforms to origin to
geometry, and there we go. Now, another reason why we
actually added a lot of vertzs into this one is because we've also got a
curve stairs, as well. So if we open this up, you
can see that we actually have a curved stairs on here.
So let's actually do that. I nearly forgot about
the little step as well, so we need to do that after. So what I'm going to do is I'm going to first of
all, bring it over. So shift, just be
a duplicate of it. And then what we're going
to do is we're going to bring in a modifier. So if I come in, I'm going
to add in a modifier, and the modifier
we're going to bring in is going to be under deform, and it's going to be simple
simple deform, like soap. And now you can see it's bent in a very weird way.
We don't want that. What we want to do is make
sure that it's on bend, and we also want
to make sure that it's on the z if we can. Now, there is a chance that this is not bending
correctly for you, and I've been
there. Don't worry. What you need to do
is first of all, you need to put this
on medium point. Then what you need to do
is you need to press tab. You need to press A
to select everything, and X, let's turn it that way. 90. Press the tab
button or X -90, and now you'll see it's
still under z axis, but it's bending
in this other way. Now, you might end up with
it looking like this. If that happens, again,
I'll do it again. All you need to do is press tab, select everything or X -90, tab to go into Object mode, or X minus X 90. And there you go.
You can see I've got it back now to
what I want to do. Okay, so now what
I want to do is I just want to turn it this way, making sure that
it's looking good. And now you can see if I go over the top and I press spin, or RSE, you can see
now we line that up, and there we go, we've
got curved actual steps. So simple as that, again, I'm going to
leave that modifier on. There's no reason to apply that at the moment. I
just want to leave it on. And then when Luke comes to it, you will probably apply it before sending it
through to Unreal. There is an option as
well when you export out to apply all
modifiers anyway, so it makes things
really, really easily. Now, let's think about
that little Plymph now because I did nearly
forget about that. I'm going to save out my work. And then all I'm going to do
now is bring in a new cube, so shift a bringing a cube, and I'll give you the
dimensions for it. So if we come over to
the right hand side, we'll go 1.48, 1.5 0.21. Let's have a look at that. There we go. That is
our little plenth. That is all we need, guys. And then all you want to do
is grab it smart UV project. I also want to make sure
that I manning a modifier. So generate a bevel. We'll put it on note
point, not note three, and we'll also then just reset the transformations
again because I forgot. And then we'll unwrap it. So now, smart UV
project. Click Okay. Now I'm betting that this is going to look a
little bit different. I'm also going to grab this, grab this one, press Control L, and we're going to
link materials, and then we're just
going to make sure it looks absolutely fine.
And you know what? It looks absolutely fine. So what we're going to do now is we're just going to come up, save our work, and
then the next lesson, what we'll do is we'll actually get these
steps, you know, turn around, put in
the right place where we want to, you
know, create them. And then what we're going
to do is we're going to actually think what we're actually going to
be creating next. So if we go through
here, you can see we've got all these
props and things, and these are quite
complex because, you know, we have a
lot of lights in here. Lights are quite
complex to create, so we're going to leave those
for a little bit later. Roofs are something that's easy once you get the hang of
it to start with again, they're going to
be quite complex. So we're looking for
something that's relatively easy just to keep, you know, that kind of
gradual learning in place. So I'm just going through. We've got our graveyards. We've got a dozen windows, and then we've got a
contact sheet here. So we've pretty much will
probably come in and work, I would say, on the doors
and the supports here. They're probably going to
be the next place we go, so doors and supports. And then from there, just
to give you a timeline, I would say that we're
probably going to work because we're
trying to work on things that are
going to give you the skills to be able to
complete the other things. So, for instance, once we've
done the doors and supports, you'll have a lot of the key
skills to create, you know, these railings or these lights
here that you see already. We could move on from creating these doors and support
straight to the roofs. We could also do that. But I think maybe the
lights after that. So I think the doors
and the supports after. And yeah, that's what we'll do. We'll do the
supports, the doors, then the windows.
We'll do it that way. I think that'll be a
good way to do it. Alright, everyone, so I
hope you enjoyed that, and I'll see you
on the next one. Thanks a lot. Bye bye.
23. Building Stylized Wooden Windows with Clean Topology: Welcome back, everyone
to the Haunted Street environment
Blender to Unreal, and this is where
we left you off. Now, what I would
quickly want to do before moving on is
'cause I forgot, is that this part
here, as we can see, if I put it on Rendered view, you will see that as a
stone on the top of it. We don't actually
want that. What we want to do is put that on wood. So what I'm gonna do is
I'm just going to come in and come to where it
says stone light, and I'll minus that off. And hopefully we should
get something like this. Now, yeah, something like that. You might want to put your wood grain going the
other way, I think. So let me just grab this. So all I'm going to do,
I'll select the top face. In fact, you know what? I
want to select the top face. I'll select these
faces going around. Shift, click, shift, click. Come to UV map, so UV editing, and let's just 90,
spin them round. Press a little Db bu so I can see what we're doing.
And there we go. I think that looks much,
much better, like so. Alright, so that's all done. Now what we want to do is
go back to modeling then. And then all I'm going to do
now is double tap the A and put these into their own plate. So this is the base. I'll also put this in a base
and then put these in step. Let's do it that way.
First of all, though, let's close these up so I can actually see
what I'm doing. I'll grab all three of these. Now remember, one of them like
this, has two parts to it. So you need to grab both.
So we'll grab these, these, and these. We'll
press the end button. New collection, and let's put
them into stairs, like so. Let's then grab this
one and this one, put it in something
that's called base. Or bases. Let's do it that way. And then finally, this one, we'll call this I'm just wondering if I'd
just call this a plinth. I'll put this actually
in bases, I think. So we'll just put it in
bases. It'll be easier. And then what we'll
do is call this with two small stone slab, like so. And then we'll come to this and we'll call it main plinth. So it's up to you, of course, what you want to call
yours. Main plinth. And then we'll
call this No heft. He too. And we'll call
this plins slabs. Put that right? Yep, I did. Slabs like so. And then we'll call
this large stairs I wouldn't be too inventive of what you're trying to
call things, honestly. You'll really get fed
up of doing that. So we'll call this small stairs. I used to be so inventive
with what I was doing. I ended up so long, but it's really not worth it. So small stairs,
and then we'll call this small round
stairs. Like so. Okay, so they're all done. So now what we need to do is we just need to put
these in place. So what I'm going to do, I'm
going to grab where it says, planks go over the top, and then I'll just press Shift D. And I'll press
Shift D. And finally, then we'll grab all of these, making sure we're
grabbing them all, like so, making sure
as well because we want to turn them
on medium point. So make sure medium points on. And then from there,
just press's head 90, seven to go over the top again. Let's put the stairs
in place first. So we're going to put those
probably around here, like so, nice and neat. Then we'll put the bases in
place. I'll grab this one. Then I'll come round,
grab this one, press seven to go over the top, press the G board, and here,
press dough there we go. Then we just need to name this, we'll call it bases. Like so, and then we'll press tab, and
then finally this one, and we'll call it
tab stairs. Like so. And there we go. There
we go, guys. All done. Now, let's come in,
put it on Object mode. Let's go to File,
Save that'll work. And now we want to do is bring
over our reference guide. We're going to now
create the windows, so we said the supports
and doors and windows. So let's do pretty
much together. I think we'll start
with the windows. They're a bit more in depth than just the support, so
it's something new. And what we'll do then is
get the actual reference up, so here it is, so you can see they're all
together anyway. Now, the main thing is, when
you're looking at these, when people create windows, normally what they do is
they won't put any gaps, so there won't be no
gaps in the wood. Very important that you
put gaps and also very important that this window, you can see, has a gap
going horizontally. Most people just
put it you know, kind of going in this
direction diagonally. Now, the thing was,
in this time period, let's say it was based on
a medieval time period, there's no way that
they're going to cut out the corner and join them
together like we have today. It's not going to
happen. All they would do is get a piece of wood, bang it on the bottom of it and put another piece
of wood on there. So take that into account
when you're actually building things because you absolutely
will get, you know, more it's not really realism because it's
a stylized build, but you'll definitely
get it looking right, if you know what I mean. Alright, so with that
said, let's put that down. So put that to the
right hand side. Bring it in if you want to,
that's how you're working. And what I'll do is
I'll start simply. So what we're going to do is
we'll just bring in a plane. So just make sure curse us
to the center of the world. Shift A, mesh, bring in a plane. Let's spin our plane over
so it's the right way. So X -90, and let's bring
it over to our little guy, so we have a good reference
point to actually work with. And then what I'm
going to do now is I'm going to open
up the end panel. I'm going to give you
the scales again, so we'll put this
on 1.14. Not 0.21. Well, actually,
that's the width, so we don't need to
actually do that, so we'll just leave that
on one, and we'll put the z axis on not 0.983. And the reason yeah not 0.983. Let's have a look at that.
Still on naught. Why is that? Maybe because it's
got no depth to it is why it's doing that. Let me just reset
all the transforms. Set origin to geometry, and there we go, I
turn this down now. So there we go. No 0.983. There we go. Now it's
actually wicking, so it's just a case of
resetting our transformations. As is any problems in Blender, honestly, resetting
transformations, you won't go far
wrong with that. Alright, for now then, let's actually do the next one then. So what I'm going to do is I'm going to just duplicate this. So Shift D, let's duplicate it. And then what we'll do
is we'll put in 1.14. Same for that one, not 0.83, and I'm looking
actually at the width. So the width will be 1.54, 1.54, and everything else
will be round about the same. Now, there is a case when we
stop putting it together, it's going to look a
little bit different. But for now, this is great. Okay, so now what we want to
do is we want to actually do if I press one to
go into front view, we want to actually do these
parts that are going to go over here and these parts
then going to go down. So what I'm going to do
is I'm, first of all, going to press Control,
left click, right, click, bringing in one edge loop, Control, left click, right, click, bring in
another edge loop. Now, you might be
wondering, you know, what's happened to
the outside of this? Now, the good thing
doing it this way is what you can do is you can
press Alt Shift click. So now I've got both
of these, you know, edge loops selected, and then what we're going to
press is Control B. Now, Control B is
to bevel something. So if I quickly just show
you bring in a cube. So if I bring in a cube, don't bring this
in it's just so I can actually show
you what I mean. If you go to the
edge of here and instead of using the
modifier press Control B, you will see that you can
actually bevel that off. You'll also see that down
on the left hand side here, you get a load of options, so you can use those as
well to actually work with. We are absolutely going to
be using this in the future, but being as this
is the first time, I'm just going to explain it, you can also, as well, come grab your vertices, press Control Shift B, and you can actually
bevel that off as well. So it makes it
really, really easy. As well as that, you can
actually grab multiple vertices, Control Shift B, and bevel
them all off at the same time. Now, you will notice, as well, if we go too far, we end
up with these problems. I will discuss that in a bit, how to get rid of those, how
to not have that happening. But for now, that's all
you really need to know. Okay, so now we've done that, let's delete that
out of the way. Now, there is a
little trick here. What you can do is you
can actually do this as well on edges like this. So if I come in now
and I grab this one, I'm going to do exactly
the same thing. So I'm going to press
Control, left click, right, click, control law, left
click, right click. And now I'm going to do is
grab them both together, and I'm going to come in, make sure I've got
edge sipped on, select these edges like s
and then press Control B, and I'm able then to bring these out like
so, as you can see. That's really, really great because what that means is then I can bring up this one and I can bring up this
one. So what do I mean? If I come in now,
press Control B, you can see I can pull those across to the height that
I actually want them. So if we look at this now, you can imagine that these are the bits of wood where
they're sitting on, and these are the bits of wood where these are sitting on, and they're kind
of the same depth. Now, we'll say
that if I go back, I've made them probably
a little bit too thin. So let's make them a
little bit thicker like so. Let's come to these now. Control Shift and
click press Control B, and then I can
bring these out and get exactly these
parts of wood that I actually want while
still leaving the center leaving the center is actually quite important. Now we've done that, let's
actually split them up. So what we can do here is we can split
them up along here. So, shift, click, shift, click, right click, and
we're going to mark a scene. And then we can also
split them up along here. So like so, let's
remove that panel, right click and marcasm and now you'll see this
is what we've got. Now, you can see because this has a different width on it, that these are probably a little bit too
thin on this side. So what I'm going
to do is lt shift, click, lt shift, click. I've got medium point on. So what I'll do then is press S and X and just bring
them in a little bit, just to make them a little bit thicker because the way
looking a little bit thin. Now what this enabled me
to do as well is now, I can come in and
grab both of these, for instance, press
the Y button, and now these are all split up. And I can also do the
same with these as well. Y, G, all split up. And let's actually split
these ones up as well, all at the same time,
and there we go. Now, what we should have now, if I move this is all
of these split up, which makes it really,
really easy, actually, to create windows you know, kind of in this style
and put the center of the window in
because you haven't actually got anything else
messing around with that. Now, the only thing is that once we start messing
around with, you know, these pieces of wood and stuff, that we might need to
make the actual inside of the window just a tad bigger. But apart from that, I have
found after, you know, doing these windows hundreds
if not thousands of times, this is the easiest way. Alright, so we're going to
save out our work as always, and I hope you
learn a lot there, and I'll see you on the
next and every one. Thanks a lot. Bye bye.
24. Adding Window Panes, Solidify Thickness and Depth: Welcome back, everyone to the
Haunted Street environment Blender to Unreal. And what I want to
do now is then I want to create these
actual windows. Now, the way to do this is we need a center point on these, and we need an inside on these. So what I'm going to do is I'm going to grab both of these. I'm going to press the i button. That then gives us that kind of outline that's
going around there. And then what I'm going to
do is press Control law. Left click, right, click. Control law left
click, right, click. So one going the vertical,
one on the horizontal. Now on this one, it
actually has two. So control on the vertical. Score your mouse wheel up once,
left click, right, click. And then on this one, Control
left click, right click. Finally, then we can do
all of these together. So Alt Shift click Alt shift, click, Alt shift,
click, Al shift, click, press Control B, and
then you should end up with those little panes
in there for your window. So now you can see this is what they're
going to look like. Now, the thing is, I probably want to
put a little bit of variations on these parts here. So what I'm going to do
is I'm just going to I'm looking as well that these aren't the same
size as these ones. So what I'm going to do is
just press Control's Ed again. Press tab, press Control A, all transforms right click, set origin to geometry. Now go back in and let's
see if that's fixed it. So Control B, pull them out, and now you can see
they're exactly the same width as each other. Now, you will see that this part here is maybe a little bit
smaller than this part. I'm going to see if it
can actually come in. So this is if you make mistakes, Alt Shift click Alt Shift click. And what I can do is
then hopefully press S, and I should be able
to pull that in based on if I come
here to where it says, where is it individual origins, and I should be able
to press the s button and bring that in a
tiny bit like so. Now, you know what?
Instead of doing that, I'm going to go Alt Shift click and grab it going around there. Alt Shift click going
around this one, and then I'm going to
press the S bone and then I can bring it
in like I need it. Now I can add a little bit
more thickness on here. I can also add a little bit more thickness
on this bit as well, just to get it so they're
looking round about right. If I press S and
Z, for instance, I should be able to pull it down get to be the right
scale that I want. Now, the other
thing is that these parts here they
definitely want to be, you know, a little
bit randomized. They don't want to be
so flat like this. So what I'm going to
do is I'm going to add in a few more edge loops, but before I do that,
I definitely want to keep all of this
kind of together. So, in other words, I
don't want my windows. To be part of all this. So what I'm going
to do is come in. I'm going to press
Controlle and Mark asm. Now I've got all of
our windows marked. Now I can do is I can actually come in and bend
these a little bit. But before I do that, let's
add in a few more edge loops. So Control law,
left click, right, click, control, left
click, right, click. Control. And you
might be thinking, this is a lot of messing around, but honestly, the result is
going to speak for itself. So all we're going
to do is just add in one more edge loop going
across each of these, like so like so. Now what we can do
is we can come in. We can grab each of these, so this is grabbing them,
grab each of these like so. Come over to mesh, transform, go to where it says randomize, turn this down to
Not point note one. Like so. And let's turn it
down a little bit more. So naught point, not not five. Let's try that. And let's see what they're
going to look like. Now, the thing is the windows
themselves want to be flat. So we just need to take
that into account, and we're going to
flatten them up, and you'll see that in a minute. But for now, these are, you know, poking
out a long here. They're poking out a long here, and they look very uneven, and that's exactly
what we're going for. So now I want to do is I want to make sure though that they're actually the windows
are actually flat. So at this point
now, I can come in, grab my windows because they're going to line up now with these, like so. So grab my windows. Like so, and then
I'm going to press P selection just to
separate those off. Come back to my windows, then, so grab both my windows,
press tab button, A to grab them all, and then S, and look where
your direction is, so it should be Y and zero. And what that's going
to do is just going to flatten them all out for me. So all these windows now
exactly flat because I've zeroed them
out under Y axis. So you can see now
they're made flat. All right, so now
I can press tab and I can hide
those out the way. Now let's talk about the main structures of the actual window. So if I come to this one first, what I can do now is not only
can I randomize it as well, so I can split these
off, split these off. I've got total control
over these windows now, which is exactly what I want. So what I'm going to do now
is I'm going to actually do that first. So I'm
going to come in. I'm going to split this
part off with edge select, so it makes sure
it selects it all, and then I'm going to
press Pt selection, split that off, like so, and then do the
same on this one. So, P, selection, split
that off as well, like so, and now we've
just end up with these. Now, these, as we know,
they're already split up. That's great. Let's add a few more edge
loops to these then. So just a few edge loops. And don't worry if
you're thinking that this is a lot of
polygons for a window. Trust me, when I say like
in a lot of games nowadays, the polygon amount, it doesn't
really matter so much. What matters is the
shade of setup, the UV space that you're using, because the draw calls
on the materials used is by far more
important nowadays. So if you've got a load of
four K textures, for instance, instead of two k, you're
absolutely going to blow the um, the environment or the gain. If you've got 100, you know, shaders with five
textures in each, that's really, really
going to blow Blender. So you'll find that if you're
using the environment, even if it's got 1 million
polygons in there, if you drop down, the amount of textures
and shaders in there, absolutely will
increase performance. That's not to say that polygon
count doesn't, you know, do anything, but
when we're talking here a few more polygons,
it's negligible. It really is. So let's
come now to this one. We'll do the same thing on this. So three, three, and then two. And then two on
this one, as well. Okay, so now we've
got both of these. Now, what I want to
do is grab them both, press A, and then what we're going to do
again is come in, transform, randomize,
and turn this down stop with naught
point note one, like so. And there we go, now we
should have our windows. Now I want to do
is solidify these. So what I'm going to do
is I'm going to come over to my little span, I generate and bring
in a solidify, like so, you'll notice it's
only actually done it on one. Let's turn it back a little bit, so we've got a round
about the thickness. Now, when you're
dealing with windows, always make them
thicker than what you actually think
it's going to be. And the reason is
because this part here will be going in the wall, and you still want
to see your windows. So what I tend to do is
just go a little bit thicker than what I think
it's actually going to be. And then the bulk of my actual windows is going
to be on the frontier. Now, we'll do the
same for this one. So all I need to do now
is just press Control L, and what I'm going to
do is copy modifiers, and there we go. Right click, Shade Auto smooth, and these are the
start of your windows. Now, the one thing
I would say here is the fact that we need to
pull these out a little bit. And again, I know
it's a lot of work, but if you want it to
look really, really good, and that's what we want to
do, this is the way to do it. So what I'm going to
do now is I'm going to apply this modifier and
then we're going to come in. We've already got all
that randomness on, and then all we're going to do is just pull this one out a little bit and do the same
with this one because windows, when they were
building them, they actually had a little gap
in between all these. And you can see just how nice
these windows look already. So let's pull them all
out together, like so. And then finally, what
we'll do is we'll add some more
randomness on these. So let me just go in. I need
to add the slidy pi on here, so contole and there we go. And that's because I
messed up a little bit, come to the back of this, and just pull them back so
they're the same space. And finally, then what we'll do is we'll just come in now. I'll grab each of these. So each of these, like so I'll do the same on this,
I'll grab this one as well. So I've got them
both grabbed now. I'm going to double
tap the A actually just to make sure I
clear everything. Shift select each of these. Like, so come around to
this one, Shift select it. And then what I'm going to do is just pull them out a little bit. Now, just make sure this
is on individual origins. Let's see if that works
or individual origins. And then all we're
going to do is press SNC and see if
we can pull them out. Now, if they won't pull out, what's happening there is
it's because they're planes. So instead of doing it that way, let's do it the other way. So we'll just pull
these ones out. We'll come around to this side. We'll pull these ones
out a little bit, and then I should be able
to now grab each of these. Like so, put it on
medium point this time, so it's pulling from the
center, not individually. Press the S and X
and pull them in, and it should pull them out,
like so. And there we go. We've got our windows
actually in place. All right, all good so far. Now, let's press ultage, bring back our
actual main windows. And then what we're
going to do now is basically pull these
back a little bit. So you can see if I grab
this one, this one, and my windows, let's pull them back into
place a little bit. So they're going to be
starting round about there. And then what we're
going to do now is we're going to grab
these two pots. And we're going to use
the solidify again. We haven't got to break any of these up, so that's
one good thing. Before we begin, let's reset
all of our transforms. Adding a modifier generate
and bring in a solidify. And again, it will
be the other way. So let's pull it
back a little bit, and you can see how far
you're going in there. So you can see how
far this is going. You can then understand where
your glass is going to be. And if you've got
see through windows, you really want to make sure that this is the
right thickness. So at the moment, this is
looking pretty nice, actually. I can also write click
and shade or smooth, and you can see just
how nice that looks. And then what we can also
do is grab odd glass now and pull it back into place to make sure
everything's looking good. Now, I would say on these, they want to be a little
bit further back. So if they go back that far, just make sure that
this part is also coming back a little bit thurther just in case you
want to see through glass, you want to be able to
see that ridge on there. Okay, so far so good now. Now, the last thing is, we
want to do the same on here. So all I'm going to do is
grab this one, grab this one, press Control L, and then all we're going to do
is copy modifiers, and finally, finally,
just bring our glass back the same as
the one over there, and there we go. And just look how nice
they look, guys, already. Now, let me just make sure, my cavity is on so I
can see everything. Let's just put it on material. And see if I can see because I often checked like
this, you know, before doing
anything, so all I'm going to do is just
grab all of these, and I'm going to come over to
my material. You know what? I don't even need to
do that. I'll just press Control on this guy. Link materials, double tap
the A, and there we go. Now we can see
exactly what they're going to look like, and
they look fantastic. So now we want to do
on the next one is we want to create now we
know how to create windows, we want to create
that other window. So the other window that's
going to come up here, you know, it's like a round it's not actually
a rounded window. It's actually a
triangular shaped window, so we want to create that one. Alright, everyone,
so, I hope you enjoyed that, and I'll
see you on the next one. Thanks a lot. Bye bye.
25. Modeling a Triangular Arched Window with Knife Tool: Welcome back, everyone
to the Haunted treat environment
Blender two Unreal. Now, just so you know, guys, I know it seems like it's taking a long time to
actually get anywhere, but absolutely
explaining things in depth when we first do
it is really important. As we go further
into the course, I haven't got to keep explaining the same things over
and over again. But you see what I'm trying to do here is build the
knowledge within you actual muscle memory and
the workflow on top of that. So all of these things
will enable you then to go ahead and create
your own environments, modular packs, things like that. I don't want it just
to be a course where, you know, you're just
copying what I do. I actually want you to learn
as you're going along. So that's why it's taking
a little bit longer. I know people
sometimes moan, Oh, it could have been
done in 5 hours less or something like that. And that's true. But then you'd miss
a lot of that. You know, it's not
just random talk here. It's actually telling you
why we're doing things. Alright, with that said, then let's actually come in
and create the next part. So what I'm going to do is
bring in another plane. So I'm going to bring in
a plane RX 90 spine Ram. And let's bring this up then, pull it up into place. Now, let's get the
right dimensions. So first of all,
we're going to come in to our dimensions, and we're going to
put this on 1.07. We're going to put this on 0.21, but that's the y, so we don't
need to worry about that. So the only one we need
to worry about then is the Z, so 1.78. And it's not actually
doing because I need to reset all my transforms. And then 1.78 on the
z, and there we go. Alright, so this is the height of actual, you know,
our other window. Now what we want to do is we
want to bring this bit in. And the way we do that is
we're going to come two of it, select both of these bits to Control Shift B, bring it down. Now, what you can do here is
you can add in a few more, like so. Bring it
something like that. I know it doesn't
look right, but we can do everything
now from down here. So if I come in now, I can actually turn
the whip down. You'll see we get
some crossover. I'm going to tell you
how to turn that off. If you come and put
clamp overlap on, then turn this down, you'll see now you can't actually
go any further. So that actually
stops that happening. If you turn it off, you
can see it's broken. Then what we want to
do is turn this down, and then we can actually get what we're
actually looking for. So we want it coming
round like that, but we don't want it
going out as far, so I'm going to bring
this back. Like so. And the other thing is,
I really want to bring them down a little bit to make, you know, this rounded
edge a little bit more. So what I'm going to do is I'm going to pull this out now. So if I press S and Z, I can actually pull
this out like so. And then what I can do is now I can open up my end panel again. So if I open up my panel, press the tab, I can
see now it's on 1.92. Let's put that back onto 1.78, like so, and there we go, we've actually got the window that we're actually looking for. Now what I want to do
is the bottom of this, so this is a little
bit of a different window actually comes out. So let's actually do that first. Now, you will find
when we go into this, because of the way it is,
because this is an end gun, in other words, it has
more than four sides, so it has a lot
of sides to this. It does cause issues when we're trying to add in an edge loop. So you will see that going across horizontally is an issue, going up is also an issue. The other thing is that we don't have a center
point in here. We only have parts
on here like this, and we absolutely
need a center point. So the easiest way to
get a center point first is just to grab the top up
here. So just grab the top. Grab the bottom, right click, and what you're going
to do is subdivide. Once you've subdivided,
you will see then that now we've got an
actual sense point in here, and now we can actually join these together to give us that part that
we actually need. Now, before I do
that, of course, I want to actually create the inner part and
the bottom part. So this bottom part is really important, that's
going to come out. So what I'm going to do is, I'm going to show you
another technique. Using the knife tool just
to create this part. So I'm going to press tab
to go into Edit mode. And then what I'm going
to do now is come in with K. So this is
the knife tool, and I want to draw a line going from this
part to this part. Now, of course, I
don't want to wing it or eyeball it to make
sure that it's straight. So all I'm going
to do is press A, and that then is going to keep it absolutely straight for me. Come over to this side,
press the enter button, and there we go. We've
got that part on there. From here then, I can actually split this off because
this is going to be that bottom section,
on our window. So I'm going to press
the wide button, and then all I'm
going to do is press SNX and just pull it
out a little bit. This is or give then the shelf that this
actual window sat on. And again, when you're working
with anything like this, working out how
you're going to do it is actually the hardest part. And once you've got
that worked out, then generally you can
actually go in and, you know, make
something look good. But always spend some
time working out. Okay, if you do it this way, that'll then I'll mess with,
you know, this inner part. If I do it this way,
then I won't have these, you know, proper square blocks. I will have something
at an angle. All of that stuff needs
working out first. Okay, so let's now
come in, press one. And what I want to do is press the eye button
now to bring this in. So I'm going to press
the eye button to bring it in to get the
thickness that I want. So it should be round about
the same thickness as here. It's maybe a little bit less, but you can see this is what
we've actually got here, and this is looking pretty nice. Now the thing is, as
well, is that these parts here maybe want rounding
off a little bit more. You can absolutely come in
if you want to do that. All you've got to do is
grab two of these edges, make sure you're
on medium point, press the SNX and you
should be able to then just round them off a
little bit more like so. Okay, so so far so good. Now we want is I want a
center point in here. So what I'm going to do is I'm going to grab this part here, I'm going to right click and
I'm going to mark a scene. And then what I'm going to
do is I'm going to work out. So this comes all the
way down to here. I can grab this one and this one and then right click
and mark a scene. Now, we do have the problem at the bottom, as you can see, because we've got those
actual corners on, and we don't
actually want those. So what we're going
to do instead is, we're going to come with
the knife tool again. So K, select this area
here, press the A button, go across, press
the enter button, K, select this corner. A, go across, press the enter
button, and there we go. Now what we can do is we
can mark these seams, and now this seam here as
well, so I'll mark a seam. And now we've got a flat bit. We've got these
two bits going up, and this, more
importantly, is split. Now what we want to do
is want to come in. Same thing as what we
did with the other one. So the first of all, we want to create our actual windows. So how many windows
are we going to have? First of all, let's
split this off. So I'm going to
press P selection to split it. I'm
going to select it. And instead of pressing
H to, you know, TH to hide everything or
bring everything back, I'm going to press the
little question mark. And what that does is that isolates it from everything
else in the scene, and this then makes it really, really easy to
actually work with. So now we've got that
what we want to do, if we look at our
window before going on, this is the part
that we're actually trying to create,
this part in here. So now we've got that,
let's put that down. And what I'm going to do
is then First of all, I want a length coming
from here to here. So let's come in with
our little verte seleg select this and
this one down here. And if it's not down here,
if you haven't got one, just come in again, select this, right click and subdivide. That then we'll give you one. So now you can select this one. And this one, and you can
press the J button like so. Now, don't press F
to fill in a face. It does work, but it
actually doesn't because it doesn't create an edge loop running through the actual mesh. It just creates it on
top. So don't do that. Next of all, then,
let's come in. And what we want to do then
is create one here, so J. And then from there, we just want one more, and from this, I can actually press Control
now left click, right click. Alright, so far so good. So now it's simply
a case of coming in with our insert
on face select, selecting all of
these faces like so, and then all I'm going to
press is the eye button. Press the i button again and you'll see that we
have some problems, and you will always always
get these problems when you're using Booleans or when
you're using the insert. And what it means is, we don't really want to click on a clamp overlap or anything like that because we absolutely
want it to look like this. What that means is
then we have to actually go in and fix the mesh. So how do we do that? So you can see these points
here two points here. So if we come over to
our little vertice, so can we join them
up to this one here? Will it let us join
them up to there? Is that where we
actually need it? You can see that if I come in
and just bring these down, it will actually
make it a little bit easier to see
what I'm doing. So you can see here, where
is the edge for here? So I'm just going to go
back before I do that just so I can show you a little
bit cleaner what I mean. So if I press the eye
button and bring them in, now you can see where
these two joins are. So you can see now
and bringing them in these two joins
are with each other. So if I grab this one
and join it to here, that should be absolutely fine. So let's do that. So
we'll grab this one. We'll grab this one, and I think we'll
grab maybe this one. And let's right click.
Come down to it. It says merge vertices and
we'll merge at the last. So we'll merge at the last. Now, you can see what's happened here is it's brought that in, and that's okay because we
could bring it out if needed, but it's brought it in
really, really harshly. Is that actually
something I want? So let's go back again
and let's think, right, let's join them up to this part here because
I think it'll be easier. So join them up to this one.
So click this one last. You can also press
the end button and go to last, and there we go. Now we have got a little bit of a problem where I need
to bring these down now. So I'm going to bring
them all down together. But you can see, if
I do it that way, this actually looks pretty good. So I'm going to do the same
thing now with this one. So I'm going to join them
up to this one last. So click, click, click click, right click, merge vertices, At last, and there we go. Now, if we grab
both of these now, we should be able to bring them down to where we
actually want them, which will be
something like that. And finally, while we've
got these two selected, let's press the J
button, and there we go. Now we've got exactly
what we want. I'm just looking to make sure that they come down far enough, or you're actually
happy with this, or you're happy with, you
know, how far they're in? Because the best
thing now is that we can come in to each of these. And what we can actually do
is press they button and we can bring them in to how we want them now,
as you can see. So we can bring
these in, like so, and that actually
looks pretty good. Now, at this point, it's always best if you want to round
these up a bit more, if you want them like that, to do that right at this point. Now, the next thing, of course, that we need to do is
randomize them a little bit. Now, you're going to have
a lot of problems with, especially, you know, a
lot of these in here. Luckily for us,
though, you know, we're not actually we're
splitting up our windows, so we don't need them to have all of these edge loops
going across them. We just want the edge loop. So if a left click,
right, click on there to actually do the job of
randomizing these little bits. So I'm going to do
the same on here. So two, left, click, right, click, two, left
click, right, click. And let's do the same on here. Two, left click, right, click. And two, left click,
right, click. Now, the other thing
is before finishing, then, we'll do that on the
next lesson, by the way. So before finishing, let's
just save out our work. And I'm going to
see you on the next one because we are
running out of time, and this has been a long lesson, and I'll see you
on the next one. Hopefully, you get back to this, and you'll be randomizing and
finishing this window off. Alright, everyone. So I hope you enjoyed that, and I'll
see you in the next one. Thanks a lot. Bye bye.
26. Solidify, Clean Topology and Bevel Haunted Windows: Welcome back, everyone
to the Haunted Street environment
Blender to Unreal, and this is where
we left it off. Alright, so now we
want to do is we want to come and we want
to randomize all of this. So all I'm going
to do is just grab the whole thing with A, and then what I'm
going to do is come to mesh, transform, and randomize. Let's put it on naught
point naught five, like so, and that's
not really anything. Let's try a note
point, not not five. And there we go,
that's looking better. Is it randomized nuh probably so I would say I'm looking at these little
edges or they're lining up. No, they're a little bit bent, and that's exactly what I want. And now I want to do is
split my windows off. I'm just going to come in
and split my windows off, so I'm going to control, click, control, click, control, click, Shift click, like so, shift, click, and
just go around making sure you've got them
all selected, like so. And there we go. Now we
can split these off, so I'm going to press
Y split them off, and now you'll see the split. I'm also at this point
going to press delete, and I want to do probably
limited dissolve on these. I'm wondering whether
to keep them. Like, you know what? I'm
going to keep them like that. And the reason is, if
I go limited dissolve, what tends to happen is it
will straighten them all up. You can see it's straightened
all these windows up. That makes it a little
bit harder when we come to put the UVs on and
sit them in place. So I'm just going
to press Control, and I'm going to actually
keep them like that. And all I'm going
to do instead is, I'm just going to press S
and Y and zero them out, like so just so they're nice
and flat and ready to use. Alright, so we're
pretty much then done with this inside
of the window. Let's then press Tab button, press the little question mark, so press the question mark
and bring everything back. Let's right click and
shade Auto smooth, and that is what
we've ended up with. Now I want to do is we
want to make sure that they looking something
like this part. So if I come to this part now, what I'll do is I will come and pull this
part out a little bit, like so, and then I'll
come to this part here. So now I've got this part here. Press Control A will transform
set origin to geometry. Now, the thickness of this
is not 0.237, as we can see. So what I want to do
is I want to come in, bring in a modifier will
be the solidify again. So solidify modifier and
pull it back. Like so. And we can see now
that on the Y, not 0.184, let's see, not 0.237. So can I do it from here? I don't actually, no,
not 0.237. Yes, I can. So now they're exactly
the same thickness that go over the top
as this one here. Let's see if they actually are, or if it's just messing with me. Even if it is, we
can sort this out. I press G just to make sure
I've grabbed everything. Let's have a look. I think I want the thickness
a little bit more, and I can see they're
not lined up. So what I'm going to do is I'm going to come
back to this one. I'm going to increase
my thickness to match this one here. So I'm just going to pull it
forward, and there we go. That's about the right
thickness of this. Now, the other thing
is, of course, I've not put a
split on here yet, and I really want
to split these up. So what I'm going to do is now, I'm going to come in and do Alt Shift click
Alt Shift click. And I also want it going
all the way around here. Now you can see at the moment, it's not going all
the way around there. And the reason for that is because we've still
got our solidify on. So all I'm going to
do is just make sure that I'm splitting these up,
so I'm going to come in. I'm going to grab this
one and this one. I'm going to press the Y button, and I'm going to grab
this one and this one, I'm going to press the Y button just to make sure
they're split off. So now you can see
this is split off. These are split off,
and now we should get that line in there once we've actually applied
this solidify. So let's actually do that, then. We're going to apply
this, so control A. In object mode, of course, Control A, right click, shade auto smooth
and there we go. And now we should
have these split off. Now, the way that we test
this is with the bevel. When we bring the
bevel in, we'll see if that actually works. I've never worried
like, if something doesn't work because we
can fix it down the road. Now, what I'm going to do is
just pull this out now just so it's lining up,
and there we go. And finally, with this,
I'm just going to add in a few edge loops. I'm just wondering
why can't add in a few edge loops, Sal control. It seems to have
something on there. So what I'm going
to do is press L, delete and limit to dissolve. Then I should be
able to bring in some edge loops like so. And then finally, I can grab the whole thing and
just go to mesh, transform and randomize that, and let's put it on
nut point naught one, like so, and there we go. That's that part done.
Now, the one thing is, we haven't done that
yet on these parts, and we're absolutely
going to do that. So again, control bring
in a few edge loops, control, bring in
a few edge loops, contoA bring in a
few edge loops. Like, so, press the A button. I'm not going to I
want to deselect this. So instead of L, I'm going to press Shift
L just to deselect that, and then I'm going
to come to mesh, transform, randomize,
nope, point, no one, like so,
and there we go. I'm also not going to worry too much about this part here. I can deal with that
in just a second, so we'll deal with
that in just a minute. Now, what I want to do now is focus on this part
here, of course. So again, I've not
got my, I have. I've stuck on my solidify
so that's really handy. So let's come to this part.
Control A, all transforms. Sargon geometry, grab this one, breast Control L, and we're
going to coffee modifiers. And then what we're
going to do is pull both of these back. So I'm going to grab just this
one. And this one inside. So this window, oh, they're all part of the
same thing, so that's good. That just means I need to
split them off, though. So let's pull them back to where we want them
to go so you can see here this is kind of the gap where
we're wanting to go. And then what we're
going to do now is we need to spit
off our windows. So if I come in here, where
are they? Here they are. So let's split these off, so I'm going to press P
selection, split those off, and I'm going to remove
the modifier off here, so I'm just going to press the
little X, and there we go. Now, let's pull our
windows forward. Like so, and we
should end up with something like this
that looks really, really nice, as you can see. Now, let's deal
with this top part. Our solidify is not on anymore, but we want to make
sure that this part is fitting in place. Now, I think it looks a
little bit out at the moment. If I press on here,
press the GB, I'm just looking to make sure
why it looks a little bit. I think it's because I just need to pull it
out a little bit. S and Y and then S and Z and
pull it out a little bit, like so, and I think now that's looking
much, much better. Now, the last thing
for the windows is we need this center part in. So all I'm going to do if I come to this window once more, apply my solidify
controllA and I should now be able to create the little square block
that's going in there. Now, I could, honestly, go in and just create
a square on here, but we might lose
the sizing of there. So I'm just wondering
whether to do that or whether to do it the easier way. Server press one. What
do I mean by that? I come in, grab this
one and this one, press the J button, and then
grab this one and this one. You can't, do them together. In other words, you can't grab loads of them and
do it like that. So I'm just going
to do it this way. So J, like so. And then what I'm going
to do is the same here. So J, same here, J, same here, J, and then the
same here with J. There we go. Now I can come in
and instead of, going and try and
selecting them all, I can press the C button and
just select them like so. You can also move the circle up and down, so
bigger and smaller. And to get it off, you
just right, click. So it's C, scroll
it up and down, select right click
to take it off. Alright now we've got
that. Let's press Shift D. Bring those out. And then what we're going
to do then is press Delete. Limit to dissolve,
and then press E to pull them out,
so simple extrude. Let's also make
them a little bit smaller so they're not so big. You can also see here we've got a little bit of a
mess on our mesh. We can fix that in a minute. In fact, do we want to
fix that in a minute, or do we want to fix it now?
Let's actually have a look. You can see the reason
why that happened. Is because it's still
bent a little bit, so it has got some bending
there, as you can see. So what you can do is you
can actually right click. Make sure you're in face
select, right click, and what you can see
is you can triangulate faces. That will fix that. And then what you can do is
you can triangles to quads, and then you'll only have
the parts that you need. Now, we don't want
to do that right now, so I'm just
going to go back. I'm going to leave that just for now because I want to
actually bring this in. Now, let's see if I
can actually bring that in because I've
got two to fix there. So I'm going to press
I, press the Ibn again, and I should be able to
bring it in like so, then all I'm going to do is
press E and pull them out. Like so. And then what I'm
going to do is just select all of these and then just
pull them back into place. I'm also going to come and make them a
little bit smaller. So individual origins,
press the Is bone, make them a little bit smaller, and then just make sure that
they are in the actual wood. And finally, then, like I said, we're going to right
clay Make sure you're on facelift, triangulate faces, tries to quads, and we should end up with a mesh
that's actually working where we're not
going to cause problems further down the line
in unreal engine. If you have guns and
things like that, sometimes an unreal engine, when you come to
triangulate things, it does cause issues. So make sure it's
done in blender, and then you shouldn't
have any issues. The only other issues you
might have is when too many of the points
come together. So let's say you've
got 20 points all coming verging together, that sometimes also
causes issues. Like it is now, this
should be absolutely fine. Alright. So we're pretty
much done with all of that. We've got our parts in here. You can see they're all
split up looking really, really nice, and
that's it, basically. Now what we need to do is
we need to bevel them. We need to get the materials
on, especially the windows. So for now, I'm going to keep the windows split because I don't need a bevel
on them anyway. So what I'm going to do is
just grab each of these now, I'm going to make
sure that there is no solidify on there. So all I'm going to do
is press Control A. I'm going to come to this
one, press Control A, I'm going to come to this one, and that's already on, making sure that there is
nothing on these. Then what I'm going to do is I'm going to come to each of these, press Control J,
join them together. Not the windows.
I'm going to leave the windows separate.
So Control J. Come to this one, making
sure my windows are split, grab this one, Control J. So now you should have
all of these joints together and you should have
your windows separated out. Let's come to each of these now, reset all the transforms, all transforms, set
origins, geometry. And then we're going to
do is add in a modifier, which would be a bevel, and we're going to set
that to note point, not not three, not point, not not three, like so, got a little bevel on
there looking very nice. There we go. Let's now do
the same in the other ones. Instead of going through all
that process, Control L, copy modifiers double tap
the A, and there we go. We've got our windows
looking fantastic. Finally, then, just
grab your windows. Press Control A, all transformed,
set origins, geometry, and these now are ready to
begin putting on our textures. So we're going to be
putting on our textures. Now, before we actually do that, let's go up and save
that I work, as always, and then the next lesson we'll
get the textures on here, and we should should
hopefully get these finished, but they're looking
fantastic, as you can see. And now you know the process, honestly, creating
windows in this way. You know, you can do that
all day long, honestly. It won't take you too
long to create windows. Alright, everyone, so I
hope you enjoyed that. I'll see you in the next
one. Thanks a lot. Bye bye.
27. Magic UV and UV Squares for Perfect Window Unwraps: Welcome back, everyone to the
Haunted Street environment in Blender To Unreal. And what I should say is
Blender, too Unreal, not in. Okay, so what we want to do now is we're going to be
unwrapping these. But the first thing
I want to show you is two actual add ons. Now, one of them you can
get from the Blender, so the Blender site, and I'll
show you how to do that, and the other one is a download. Now, the downloaded one, it's up to you whether you
pay for it or get it free. You can pay the person that
developed it if you want to, or you can just download it for free, completely up to you. And the other thing is that you don't actually need
to use that if you don't want to
because I'm going to show you the other way
of actually doing it. It just makes things
really, really easy. One that's from the Blender
foundation, though, you absolutely want
to get that one because it does make
things a lot lot easier. Okay, so the first thing we're going to do then is just open up a new file so I can show you exactly what
I'm going to do. And then what we're going
to do is go to edit, and we're going to
go to preferences. So edit preferences. We're going to go
to get extensions or add ons, whichever
one you want to do. And you can see here we've got all of these add ons in here. If we go to get extensions, what we need to do is
allow online access. And what we're going
to do then is do a search for magic UV. So you can see this
Magic UV here. We can click Install, or you can actually go and click
where it actually is. So you can actually go to the
site and find where it is. And once you've done that, what you're going to have is you're going to have this pop
up so you can see here, this is going to pop up. And then what you're
going to do is click Get add on drag and
drop into Blender. So all you need to
do is actually just drag and drop this like it says, into Blender, like so, and then it will
check for updates, and then you just click Okay. And now, when I
go to my add ons, you will see that if I do, search for magic UV, it's actually in there,
really, really easy. Now, the other one
you're going to want to install is going to
be the UV Squares, but you have to
install that one from the disc because obviously
that's not part of it. So if I show you
this one quickly, this is UV Squares. So you can see here,
it says UV Squares. If you click on here, you
should then be able to download the zip file and you don't
actually need to unwrap it. You don't need to
undo it to do that, and then all you want to
do is actually install it. Then what will happen is, if
I close that down a minute, you'll have everything that
you need to follow along. So if I just close
this down a minute, come to edit and preferences, you will see here
I've got UV Squares, I've got UV layout, which this has already built in, so you just
need to tick it on. So tick on UV layout, make sure Magic UV is on. Then you're ready to go. So
what does that do exactly? Well, UV magic helps us when
we're trying to copy UVs, and the UV Squares helps when we're trying to
straighten out UV. So I'll show you
what I mean by that. First of all, though,
let's come in, and we'll do this one
first, because this one, I'll be able to show you
exactly what they do. So let's come to this one, and what we're going
to do is just go over and change the material, and we're
going to unwrap it. So let's first of all,
grab the whole thing, press U and smart UV project. Let's see how that goes. And then what we'll do
is we'll come in now and add in our first
material, which, if I check, should be, let's just have a
look. Wood red. So we're going to add
in wood, red, like so. We're also going to
add in our metal, so I have a click Down arrow. But in metal, we
don't get anything. Let's have a look.
So metals not there. Let's just check on our append and make sure we're
bringing them in. So we're going to go
to file and append. Let me just pull
it out of there. Append. It's already should open up to the file that
you were in before. And all we want to do then is come down to where
we have materials, and let's see we actually have one called metal.
We should have one. Called metal, this one here. I'm going to double click that, and then I should be able
to click the down arrow, look for my metal,
and here it is. All right. And the last one
is going to be the glass. So let's just make
sure that's in. So you can see I've
swapped these over. I didn't mean to do that.
So what I'm going to do is just put it on red wood, and then I'm going to click
Plus, down arrow, metal. This one here plus down arrow, and the one we want is glass. We can see we've got no
glass in here or windows. Let's see if it's
on the windows. Windows, not under here. So what I'm going to
do, same thing again, go to file, append, and the one we're looking for is going to be
near the bottom because obviously it's
a W. We've got windows, lights unlit, and we should have the one where it's
actually lit as well. So let me just find that
one. You know what? I'll bring in the
unlit one first, so windows lights unlit. We'll click append, and now we'll search
for the other one. The other one is going to be let me just
make sure, actually, we'll just go to
the resource pack, and just under here, we've
got Windows lights unlit. So that's that one.
Let me just put this on to renerview
so I can see if the lit version is in there because it
should be, this is the one. So it's called window
lights it shader. I'm going to press Control C, seen as I've got that there. Close this, and then
let's just bring it in. And then it should be
in there like that. Now what I'm going to do is
I'm going to set on my glass. Or I'm going to
minus this one off, and I'm going to
come to my glass. So just this class,
click the down arrow, Windows lights lit, plus
Windows lights lit. So let's put in UN, and
there we go, unlit. There we go. We've
got both of them on. So I'm going to
say about my work. I'm also just going to make sure that external data is
clicked on which it is. Alright, so now we're
ready to rock and roll. So let's first of all,
see what this looks like. So this is a wood, complete
mess, as you can see. We don't want any of that. Basically, every single thing we could have going wrong
is going wrong on here. Now, let's come in. And what we'll do is we'll
go to the UV first. We'll spin all
these around so 90. Let's press the.in the viewport so we can actually
see what we're doing. Now, you can see, especially on these parts, it
doesn't look right. And the reason it
doesn't look right is because they're not actually
following the bend. This is where the UV
Squares comes in. It makes things a
lot lot easier. What I'm first of
all going to do then is I'm going to
turn this one round, so I'm going to come
in Edge select, press on this one
and then press R and 90 and spin that round just to make sure that's
looking really nice. Then what I'm going to
do is come into these. So I'm going to select
this one, like so, and you can see
here the issue is. Everything looks
right, apart from these parts here, just bent. Now, I'll show you
both ways of doing it. So let's come in, and what we'll do is we'll just
highlight this part first. I'm just going to grab
it going all the way to here, so that's this one here. I'm also going to turn this off, so it'll make it really, really easy to see
what you're doing. And then what we'll do
is we'll actually come in and grab one of these, and instead of that, I'm
going to press Unwrap. And you will also notice because
I've got UV magic on it, it actually gives you a
lot more options here. And what I'm going to do
is I'm going to go to follow Active quads, click Okay. Then what I'm going to do is I'm going to pressure you again, and instead of that,
I'm going to go to LitmaPPk click Okay. Then I'm going to go finally
to follow Active quads, click Okay, and there we go. Now you can see this, if I make it a little bit
smaller, it straighten out. So let's pull it over here. You can see now it follows
that along perfectly. And look at the difference
that it makes if it follows the wood and if it
doesn't follow the wood. This looks a lot more natural. It actually looks
like, you know, they've got the wood, and they bent it slightly because that's
how they actually do it. You know, they don't
cut it into that shape. It's actually bent slightly. You know, they generally
heat it up and bend it a little bit, and
that's how they do it. Same as to do with
pipes the same process. So we absolutely want
this flow to follow this. Now, one thing I did
forget to do before I do that is I did it a little bit of the wrong way round.
So let's start again. So what I'm going to do
is I'm going to come in, turn this off, grab
this from here to here. I'm going to press and I'm
going to follow active sorry. Light M pick, click Okay. Follow active quads, click
Okay, and there you go. Now you've got the same result. Now you might be asking. So
why do we need UV Squares? Because all I can do
is I can come in, grab it, press Alt, and it strains it out for me. Same with this one. Any
of them, grab this. Press L over here,
T straightened out. That's why we use UV
Squares because it's just that simple act of not having to repeat the process
over and over again. Generally, as well, you can
come in and grab them all, so you can press L and L, press and straighten them out all at the same
time, and there you go. So that's really, really easy, and that's why we
actually use it. Now, what I'm going to
do is with this part, I'm going to make it think
a little bit bigger. So I'm going to come in, UV, PAC Islands, no rotation. Click PAC. Let it do its thing. I should work it out,
and there we go. And now you can see, if I make
that a little bit smaller, it's actually looking
a lot lot there. It's kind of at the
wrong angle here, so I'm just going to rotate it, so I'll straighten it
up, and there we go. Now, everything now and
there looks pretty nice. Now, let's come now,
apart from this one. I'm not actually
happy with that one. I'm wondering if apart from
this with all of these, I should come in while
I've got them all here, let's not press the
windows buttonel. Let's come in, grab
all these, press A, UV, PAC Islands, click PAC, and let's see what
they look like now. And I think they look much, much better now, as you can see. Alright, so now let's
come to this part here. And what we're going to
do is grab all of this. And instead of it being on wood, we're going to
turn it to mel and click a sign, and there we go. Now let's look at what
that mel looks like. Still looks a little bit chunky. So let's come in,
A, grab everything, UV, and then we're
going to Pack Islands. So Pack Islands is
here. No rotation. Click Okay. And now you can see they're
looking fantastic. Alright, so that's
that big covered. We've covered the UV Squares, and now we want to
cover Magic UV. So we want to come in. What I want to do is grab
just one of my windows. I want to come to my window,
select your windows, come to this one,
press the button. And what I want to do is
I want to be straight on. I want to be straight
on the view sun pressing one on my number pad. And what I want to do is
I want to come in and press and Smart UV project. So if we come now to
Smart UV project, not Smart UV project, project from view, then we end up with
something like this. Now, you can see now
I can actually grab this and pull this into
place where I want it, exactly into place
where I want it. Now I can even, you know, make it smaller, make it bigger. I can press S and X, not on here in the
viewport S and X, pull it out, get it
exactly how I want it. So G and X, let's move it over. Press the tab but,
and there we go. If we put this then
on Rendered view, you will see double tap the A, that that now has got a lot of dirt on there and
things like that, and it's looking
really, really nice. However, the others
aren't looking so great. So what we want to do is we
want to come to this one, L, L and L, and then
select this one last, L, and then what
we're going to do is in fact, we're going
to select this one first. So L, and we're going
to go down to where it says copy, copy UV map. And then we're going
to go to this one, and we're going to hit L,
and we're going to go Paste. Where's paste, copy paste, paste, UV map, and there we go. Now we've got them look
in exactly the same. So I'm going to go
through that once more. First of all, grab this one. Copy, copy UV Map. Come to the YH ever
when you want. These two, for instance,
press in paste, UV map. And there we go.
That's not working. So let's try it again with one of them. It
is a bit finicky. I will say that. Paste, UV map. So it looks like we have
to do them one at a time. Paste, UV map. Yes,
and there we go. Alright, so there
you go. You can see exactly what's
happening there. Now, what we can do is we can come in and obviously
spin this around, so 180, spin it around, make them look a little bit
different for each other. But I'm not gonna
bother doing that. This is really,
really handy guys when you're doing
things with the lights, for instance, the lights are
such a pain to actually do. Now on the next one,
I'll show you how we do this one here.
We'll also talk. Now we've done that
a little bit about this shader and I'll
see on the next one. Let's save our work
done before we do that. So save. See her
on the next one, everyone. Thanks a lot. Bye bye.
28. Fix Distorted UVs and Control Window Emission: Welcome back, everyone
to the Haunted Street environment
Blender to Unreal, and this is where
we left you off. Alright, so let's now
deal with these pots, these still look a
little bit of a mess. So what we're gonna do is we're going to come into this part, so I'm going to grab this
part, and I'm going to press, again, one on the number pad. I'm going to press U,
and then we're going to press project from
view, this one here. And here we go. We've
got this here now. Now, what I want
to do is I want to make sure that this is
relatively straight. So all I'm going to do is
I'm going to grab this. I'm going to move it over
into this middle of this, press the S bone to scale it up, and then press G.
Put it into place. Press the S bone again, just scale it up a
little bit more. Press the G. Like so. And now what I want to make sure is that I've not really got, you know, any gaps or
anything like that. So I'm just going to
pull this into place. So I'm going to grab
this one as well. I'm going to pull
it over to here. I'm going to grab this
one, pull it over to here, pull this one over to here, and pull this one over
to here, like so. And then I just want
to make sure that these are in the right place. We need a little bit
more dirt on this. So if I press G and Y, I can actually bring in that
dirt and I can also then pull this one over
just making sure that the UV is set right. Like so. Let's move this. Like so, and that's
looking about. So that's looking
pretty good. We've got dirt on all of the parts. Now, of course, what
we want to do is we want to copy the UV again. So what I'm going
to do is face leg, make sure it's grabbed. Copy, copy UV map, come to this one, copy, paste, UV map, and there we go. Now, this one's looking
a little bit damaged. So what I'm going to do reset or transform, see if that works. We might have to actually
do this one on its own. It's no big deal because it's
just one origin, geometry. Let's try that again, so
I'll come to this one first, and I'll go to copy, copy, UV map, and then we'll come
to this one and see if we can do the same thing. So paste, UV map, and it's still doing
the same thing. So what I'm going to do
is I'm just going to unwrap this one again
and we'll go to, where is it? Project from view. There we go. And then
I'll just move it round. So instead of that, it could be because sometimes the
mirror causes a few issues. So it leads me on to
my next point anyway. With things like this, you might have to gohe and do it manually. Generally, square things
work absolutely fine. Come to UV, go to mirror, and we're going to mirror it on the Y axis just to
turn that round. We're then going to make
it a little bit bigger, like so and by the
time you finish this, you should actually be very good at doing these UVs anyway. And again, shouldn't
be a problem if you're just using the
ki just to move them out, and you haven't got too
many to actually deal with. Like so, like so, and there we go, and it's still looking a little bit stretched. Now, wondering why is it
looking a little bit stretched? Because it shouldn't look
stretched like that, and I'm wondering if it's better to bring in the other window because we are having a few
issues with this. I'm just looking if there is there a solidify on
No it's just that. So what I'm going to do instead is and delete that
out of the way. So delete verses. I'm
going to grab this one, shift D. I'm going
to bring it over. Shift spacebar to
bring in my moveTol. And then all I'm going
to do is spin it round. So Rs 180, spin it round. And I'm going to
put it in place. Like so. Double tap the A, making sure that it's thin. It's not quite thin,
as you can see. So what I'm going to
do is just come back to it, move it a
little bit more. If it's not thin in just
make it a tad bigger, so S, make it a little bit
bigger, and there we go. Now it's fin into place. Alright, easy as that. So, you know, we got
over that problem. Now, let's move on
then to our next one. Now, these after we've done all that should be
really, really easy. So let's come into
this part first. And what we're going to
do is we're going to copy the um, materials under here. We first of all, of course,
going to unwrap it. So U, smartUVPject,
click Unwrap, and then we're going
to go to here, press Control L, and we're
going to link materials. And then what we're going
to do is we're going to come in and spin
them all around. So we'll deal with
this part first. Make sure you're on edge select. So L, L, L and L. And then what we're going
to do is press A 90, spin them all around,
UV and pack islands. So pack islands, click Okay. And there we go,
that's that one, and then we'll come
again to the metal. So we're going to grab
all of the metal. A, UV, Paklans click Okay, and then of course, we need
to put this onto metal. So this bit here,
we click Metal, click assign, and there we go, that's our metal ones done. Now, let's do this
one at the same time. So we'll just do exactly the same thing as what
I've just done. So tab first, A,
smart UV project. So this one here. Smart UV project, click Okay. And then what we're
going to do is I'm going to turn them
around anyway. So R, 90, and then I'm
going to press tab, grab this one, press
Control, Link materials. Now they're going the
right way around. And then what I'm going
to do is I'm actually going to probably leave those as they are because
the wood looks kind of the same because
it's a smaller area. Now I'm going to come to this
part here, grab this one, and all I want to do now
is put it onto meal, click a sign, and finally, let's actually have
a look at the meal. And the meal looks fine
on that one, as well. Now, let's do our windows. So what I'm going to do
is with these windows, I'm going to come
into these ones, and I'm going to
grab one of them. So I'm going to press
Tab, grab this one here. And first of all, we've got
ambient occlusion on here, so I need to make
sure that all of these windows are
the same as this. I'm going to press
Control L. I'm going to link materials like so. Then I'll come to one
of these windows now. So this one here. And
what I'm going to do is I'm just going to unwrap it
again, project from view. So you project from view, which is this one
here, and there we go. And then I'm going to press
A, G, move it into place, and you know exactly what I'm going to be
doing now, I think, because we already did it
with the other ones, S and X. And these are more
square windows, so that's why I'm doing
them again. Like so. And then we go, once
you're happy with it, all you need to do if it's square, it
might actually work. Let's put this on Facegb
we'll grab this one first, actually, copy,
copy, copy UV map, and then let's see
if this works. LLL LL copy, paste, paste UV map, and it's not
working. Of course not. And also, I think, did it add in that? Yes, it did. So let's try it on just on one. So, copy, paste, UV map. Now, instead of doing
that, what I'm going to do now is I'm
going to try all. Let's see if you can actually
do it on all of them. So you paste. All. Nope, still not working, so we'll have to do
them individually, still saving a lot of time. So instead of doing this, what
we're going to do is copy paste, paste, UV map. I'll come to this one, and
I'll just try seeing if I can just press Shift DR. No, that's not also going to work. Of course. Shift DR
generally repeats the same process as
what you did before. And on this occasion, for some reason,
selection sequence. That might work.
Let's try that one. So L, L, and then U, copy selection sequence, UV map. And let's see if that works, so we'll grab both of these. Copy, paste, UV map. No, again, that
didn't do anything. So I'm going to go to U, copy, paste, UV map, and then the same on this one. And it should. Honestly,
I've done this before, and I'm not sure why.
It's not doing them all. And I want to see now if
it works on this one. So if I grab this one, I'm
going to go instead transfer. I'm going to try
that one instead. So let's see if we can
actually work this out because I'm not actually
sure which one I use. Let's do this. So you transfer, copy, and let's go to this one. L, U, transfer. We haven't got a paste
on here. So let's paste. And let's try pasting all
on this one, as well. So, copy paste, A. Still not working. I
don't know why that is. I'm just going to
press Control's Ed and just do them individually. It's a bit of a pain, especially because I'm going to
try default, as well. Let's try the default
on both of these. It could be that you know, they're all different
scales. Could be that. You know, they've
been pulled out a little bit different
from each other, but let's just see No,
it's still not working. So enough of that, then what we'll do is
just we'll do it the hard way UV map, and we'll do the same on here. We're finished now
anyway on this UV map. The lights should be easier because they will
all be the same. So I think it's
just these windows. Either way, I'm really, really happy with how
they've turned out. And what I'm going to do
now is go to File and Save. Now, before we
finish this lesson, what we really need to do
is discuss the lighting. So you will see if we go
over to our shading panel, this is the layout, if I
put it on rendered view. This is the layout
for should be. Let's just come to
this, the lights. So you can see here that the
lights have an emission. So you can see the only
difference between this and other shaders is they
actually have an emission. And this emission shows
it or shows Blender, where, if I click on this, the dark parts and the
low parts are so you can see these black areas
and these grayish areas, it shows exactly where
the emission should be. Now, the other
thing is, if I come over to the right hand side, under my materials here, we can see we've
got emission born. If I start turning that up, you'll see it affects all
of them within the scene. Now, the other thing is, we
have gave you two shaders. One of them is the lit, and one of them is unlit. If I just take this off, this is what they look like when they're unlit, as you can see. They've got no strength
on the emission, even though we can
turn that up if we want to, but we
don't want to do that. And now you can see you can have a choice between lit and unlit. The other thing is,
as well. You can create two windows
if you want to. So two lots of windows, some of them being
unlit, some of them being lit if
you really want to, or you can simply
come in and just remove one of these shaders. So in other words,
we can come in and just select, for instance, all of these, and then click
on this and click Assign, and that will do the same thing. Now, of course, I
don't want to do that. I want these actually lit. Now, what we're
going to do then on the next lesson is
we're going to do the doors now and the
supports as well. Now, the thing is
the doors, actually, now we've done all of this work should actually be quite easy. Now, the one thing, I
think before carrying on, I just want to make sure I haven't actually put
the bevel on these, and I haven't joined
them altogether, so we should do that
on the next lesson, then before carry
on with the doors. Alright, everyone, so I
hope you enjoyed that. We'll actually go over to modeling because we won't
need to be in here anymore. And you'll notice, as
well, when I do this, putting the bevel on,
even though we've unwrapping them is
absolutely fine. We'll go to pile and save
our work, press ends, close up that end panel, and on the next one, then we'll actually figure out
what we're doing. I do see there's a couple of errors in here as
well, which we'll fix. You generally get that
sometimes on these, so you can see there's
an error here. It's actually put it here even though we
don't have any seams, so we'll fix that on the next one, anyway.
Alright, everyone. I'll see you on the next
one. Thanks a lot. Bye bye.
29. Boolean Door Cutouts and Custom Panel Modeling: Welcome back, if you
want to the Haunted Street environment
Blender it to Unreal. This is where we left it off. So what we want to
do now before doing anything is just
fix these errors. So we can see here we've
got a few errors here. Let's see if we can
fix them together. It is basically just on these
parts here, as you can see. You know, sometimes it
actually just splits them off. So instead of doing
Smart UV project, all I'm going to hit
is unwrap angle base because we've got
no seams in there. And then what I'll do is
I'll go to the UV editing. I'll spin these rounds, so R 90. I'll zoom to it with
a little dot but, and then let's see if we've
actually fixed those issues. So there's that one there's
the inside of that one, and now you can see
they're absolutely fine. So simple to fix those. Next of all, then, what we
want to do is we want to bring in our bevel. Now,
let's start with this one. I like to work on object mode when I'm
bringing in a bevel. Oh, we've actually
put the bevels on. Let me just have a look at that. There's the bevel.
There's the bevel. Oh, we have got bevels
on. It's 'cause I was checking our
window. Okay, great. So all we want to do
then is grab the glass, put it on material mode, grab the glass, grab the window, press Control J,
join them all up, grab the window, grab the glass. Same thing again. Control
J, join them all up. Now, you might be wondering, how do we select these now? If we want to change the
glass, for instance, it's a little bit harder
now because we've got if we come
over to materials, we've got all of
these materials on. Well, my friends, it's
actually really easy. All you do is you come
in with face leg, select one of the faces. Come to where it says, select, and you've got one that
says, select similar, select all by material, and then we can
actually click it, click a sign or click
it, click a sign. Really, really easy
to change them over. So just in case you're
worried about that. Alright, so let's move
these then to the side. Like so. And then we'll start
work on our actual doors. Okay, so what we'll do is
we'll bring in a plane first. So mesh and plane, we'll spin this plane round. So Rx 90, let's get it spun round to the
size that we want it. I've got some
dimensions once more. So if we reset all
of our transforms, like so what we'll
do is on the X, put it on 1.37,
and then on the z, we'll put it on
2.25 meters tall. And if we press one and we
bring it up a little bit, you should always when I'm not giving you dimensions,
measure it against your guy. You don't want a door
that's smaller than him or you don't want a
door that's nine feet tall, so just be very careful of that when you're actually
doing this yourself. Now, the next thing
you want to do, we're going to want two doors, so we might as well
use the same one. So what I'm going to
do is press Shift D and bring it over. Now, don't add thickness if you intend to add in a hole
or anything like that, because the good
thing is when you're bringing in when you're
doing boolean operations, it's better to work with flat mesh rather than working with, you know, three D objects, real, real bad because
it's easier to fix things. Boolean operations,
just so you know, they look amazing, but they always cause you
problems with mesh. So the first thing
we're going to do is add in our planks. So I'm going to three
or four planks. Now, what we want to do, we don't just want to bring in some edge loops and do this. We don't want to do that.
What we want to do is just bring in an edge
loop one at a time, because even though it
takes a bit longer, it does make sure that our
door looks very different. Why? Because obviously,
we're not bringing them in you know, willy nilly. And I want, basically, yeah, five planks, one, two,
three, four, five. So they're not all even. You can see straight
off the get go, that is looking
much, much better. The other thing we
want to do, as well, is we want to add a few
edge loops going this way, like so, because what that means is then we can actually
randomize this. Now, the other thing is we don't need to worry about these being split up in a certain way because they're not
being split up. So what I'm going to
do now is, though, make my life easy is
actually come in, Alt, ****, click, Al ****,
click, Al, ****, click. I'm going to right click
then and Mark sin like so. Then what I'm going
to do is come to this one and do exactly
the same thing. So I'm going to
press Controller, bring it over, maybe make this one a little bit
thicker than that one. And again, I'm looking
to have five of these, so I'm going to put one here, and then one probably
over here, like so. Now, again, before I add in the other edge loops,
I'll just mark my seams. So right click Mark seams, add in then a few
edge loops, like so. Left click, right
click, and there we go. Now, before we split these up or do anything,
one of the doors, you'll notice if I open this up, you will see that if we come to our doors, it's got
this part on it, and it looks complicated how to do that, but
it absolutely is not, so I'm going to show you next how we actually
get over that using actual boolean and using the shape that
we already have there. So let's put that down.
And first of all, what you want to
do is we actually want to create that shape. So what I'm going to do is
I'm going to press tab. So press tab over here. And then what I'm going to
do is I want to bring in my cube right in
the center of here. When we're using
Boolean, of course, we need to make sure that
it is a three object. So I'm going to
press Shifts cursor to select at this time,
not world origin. So it should be in the
center of your door. Then what I'm going to do
is going to press Control. A, bring in a cube. I'm going to make
that then smaller to the size that I
actually want this. So something around about here. I always tend to go a little bit bigger than I think
just in case. I want to make it
smaller or just in case, it doesn't quite fit, and then I've got the option to make it a little bit smaller. And then what I'm going
to do is just bring it up into place of
where it's going. Now, again, using our guy, you should be able to
realistically see in this. It shouldn't be up here
where no one's being able to see no down here where
a hobbits looking in. So just remember that.
So let's come in now. Let's put it on Object mode so we can actually
see what we're doing. And now let's come to this cube. So let's first of all, make this bit that's going to go out. And the easiest
way to do that is, first of all, resell
your transforms. Then what you're going
to do is you're going to come in with Edge select, selecting all these. Like so. Pressing one on the
number of Patsy, you can actually see
what you're doing. Press in Control B, that will bring in your
bevel options. Increase it if you need
to, and then left click. Then what we want to do is
now we want to turn this up or down to bring in that
shape that we actually want. So that's roughly the
shape that we want. Now, what I'm going
to do is, though, I'm going to come
in and actually add another little
bit on top of you. So Control B like so, just a little one,
and we're also probably going to turn
down these a little bit. So we've only got three
there. And there we go. That's looking about right. Now at this stage, you can
absolutely do your boolean. So first of all,
though, just make sure you're happy with the size. Now, the one thing to take into account is he might be
looking through here, but this window is not
going to be that big. This window is going
to actually be this big because this is the
metal part going around it. So what I'm going to do
is I'm going to come in. I'm going to make it a
little bit taller to give you that kind of feel because I feel like doing that. So I'm going to press S and
X, bring it in a little bit, and I'm also going to make
it a little bit smaller because it absolutely is
a little bit too big. And there we go, I think I'm happy with how
that's laid out now. Now what I want to do
is I want to actually create that into this mesh here. So what I'm going
to do is I'm going to first of all, let's come in. And first of all,
coming over to my dit, I'm going to go to
my preferences. And what I want to make sure
is I've got my boll tool on. So I'm going to
come in, boll tool, make sure this is ticked on. If it's not, you can install it from Blender extensions again, and I'll show you
exactly how it is. So I've opened that up. Here it is, and all I want
to do is click Get done, drag it in, make sure it's
ticked on. Simple as that. This also is a lifesaver. It makes things really easy. What I'm going to do is I'm going to grab my boolean first, grab my mesh second, and press Control and plus. And you'll see that
we get an error. Don't worry, though.
It's actually worked. If I come in and hide the
boolean out of the way, you'll see nothing happens. If I come back, though, you
will see that if I click on my plane over on here, it's actually got boolean on. Now, if I come in
and apply this, so I'm quickly going to
apply it just to show you. So Control A, apply that. Come to this, then,
delete it out of the way. Come to this. In
fact, you know what? I did this actually wrong. I did it on Union. It needs to be on where is it? Fast difference. Is that it? Yeah, there we go. Difference. I did it on Union
instead of difference, so sorry about that, guys. Now you can see that we've
got that boolean in there. Now, the problem is, if
I press tab on here, you won't see any difference. So what we absolutely
need to do is apply that. So if I come in, press
Concho A, apply that. Now, you might be
wondering if I press tab, you can see now
all of this mesh, all of these problems that
we have with the mesh. That is what I'm talking
about that we need to fix before doing anything else because we don't want
to have it where, you know, this plank of wood has all of these
issues with the mesh. The other problem you'll
see is that this, for instance, we can't
no longer see this. You know, so we need to
be able to see that. So what I want to do is come to, I think it's Edit boolean and remove cutter and then
we go, we've got it back. Why do we want that
back? Because we want to use this to
create the window. We don't just want to
use it for our boolean. So I'm just going
to make it smaller like and then all
I'm going to do is press Control A or transform
set origin to geometry. Now, you can also see because of the fact that it's used
the boolean operation, it's joined it to this. You'll see when I move my door, this moves at the same time, select it P, and just
clear the parent off. So clear the parent, and now you'll see if
I move my door. There we go. No problems. You'll also see now it's sat in the middle of there,
which is what we want. The door has the
right orientation, and we are basically
ready now to go and fix our actual door before
doing anything else. So we'll come in on
the next lesson. We'll fix this. I'll actually move this just out
of the way for now. We'll come in on the
next lesson and we'll fix all of this mesh before
we do anything else. I'll show you really, really
easy ways of doing that. And then once we've done that, we should be able to carry
on and create this dog. Alright, everyone, so I hope you enjoyed that, and I'll
see you on the next one. Thanks a lot. Bye bye.
30. Clean Topology, Randomize and Bevel Door Panels: Welcome back, everyone
to the Haunted tree Environment Blender to Unreal. And this is where
we left it off. Now, you can see that we have
a lot of ing guns in here. In other words,
this is four sides. If it's a triangle, it'll
just be three sides. I'll come in from here to here, and you can see here if we
put this onto vertices, we've got one, two,
three guns, basically. If we come in and we
grab this and we go right click and we go
triangulate faces, we'll end up with
something like that. Tries to quads, we'll end up
with something like this. So you can see already much,
much cleaner topology. Now let's go and do the same thing here and see
what we end up with triangulate faces,
triangles to quads. There we go. Now, I think we
can actually work with this. It's not too bad. We've still got quads and things like that. Not too many verts are going into edges going
into these points. So this should work
out absolutely fine. The one thing that we
just have to be careful is we don't really
want to have it where, you know, we've got too much bumpiness
around these areas, so we have to be very careful. So what I'm going to do then is, I want to split these
up once I've done this. So all I'm going
to do then is just grab these parts here, right click, triangulate
triangles to quads, and we should end up with
something like this. Then what we can do
is we can come in now and we can split
each of these off. So I'm going to press Y and
split them off, like so. And then finally, what I can
do is now I can come in and, um, make these
edges more random. So what I'll do is, though, rather than working
on all of this, because I don't want to basically
break these parts here. What I'm going to do is
I'm just going to come in and I'll work
on just this one. So if I press, sorry, L on here, L on here, and then I'm very careful
about these ones, so what I'm going
to do is just come in and select them like this. And let's see if we can actually get some variations from that. So mesh, transform. Let's go to randomize, and let's put this
on note point, note one, and let's
see what we get. Have we got enough randomization there? They have been split up. And as you can see, that
is looking pretty good. Now, let's write click
and shade Auto Smooth. And I think that's something
we can actually work with. Now, of course, the
best test for this is actually bringing in a solidify. Control A, let's reset
all of the transforms. Let's bring in then our
solidify, generate solidify. Let's pull this, then
back, we'll go back. Now, the doors don't need
to be like the walls. They are going to
go against things, but we just need to
make sure you know, we're not looking
out the windows, but on this one,
we actually are. So maybe, maybe it might be worth just going back
a little bit further, making this then a little
bit wider on the Y, and then just putting that in
place and just seeing if it fits might want to be
a little bit more. Like so, something like this. Now we've got this.
What we want to do then is just make sure
we're happy with our doll. Now, when I'm
dealing with dolls, I want to make sure that
there's a difference at the top and the actual bone
which in here you can see there is. So
that's pretty nice. You can also see some of it
is back off, and we really, really didn't have to do a lot of work to
get to this point. And we also know now that if we come in and we apply this, the actual mesh should
be pretty clean. So let's press Control A. Let's apply that double tap
the A, and there we go. We can see we've actually got quite clean mesh going all the way around there, and
that is the main thing. Now, let's just press Control s E to go back before
actually applying that. And what we're
going to do now is exactly the same on this door. So what we're going to do
now is select all of these. So I'm going to
come in. I'm going to select each of these, like so, press the Y
bone, split them up. And then what I'm going to
do now is grab them all. I'm going to come to mesh, and I want to go down and randomize. And then I'm going to put it
on naught, point, not one. Like so. And then we go, now they're looking pretty nice. And then what I'm
going to do is add in the same solidify. So I'm going to come
in, right, click shade auto smooth Control A or transform set
origin to geometry. And then what I'm going
to do is grab this one, press Control L, copy
modifiers, and there we go. Now, finally, on this one, that's looking
really, really nice. We've got a lot of
different variations on the top on the bottom. And what I'm also going
to do is add in a bevel. So let's go in and
add in a bevel. And we want this set,
not on this one, on this one, let's
add in a bevel. Not point note note three, like so, and there's
our bevel done, and that dot is
pretty much done. We can see bevels looking nice. Now on this one, we also
had that bevel on there. Nothing happened. You can see there's a tiny,
tiny bevel on there. So let's see, actually,
if I can press Control A or transform
set origin into geometry. Let's see if I turn this bevel. You can see it only goes so far. And the reason for
that is because it's stopping it going any further because of this part in here. Bevels don't work very well when you've got
booleans on them, so just please take
them into account. However, if I come
into geometry, turn off the clamp overlap, you'll see we end
up with this mess. And that's because this bevel now is turned up way too high. Note point, not three, and we should end up
with a nice bevel. Even around these points here. But more importantly,
now we've got control over our actual bevel. So you can see, we've got
bevel in here, bevel in here, and that is exactly what
we want without crossing the line of, you
know, going too far. Alright, so that's
looking pretty nice. Now we want to do is then we want to pull this into place. So I'm gonna pull this into place to where it wants to go. And now we just need to on the next lesson,
work on this bit. In other words, putting
the glass in there, making it look
really, really nice. There's a window in our door. And then once we've
finished that before actually
texturing our doors, I think we'll make the supports
to make sure they fit. So I'm just going
to move this one a little bit over
the left hand side. I'm going to save a work, and I'll see you on the
next one, everyone. Thanks a lot. Bye bye.
31. Modeling Detailed Door Panels with Glass Inserts: Welcome back, everyone
to the Haunted Street environment
Blender to Unreal. This is where we left it off. Now, let's actually come in and make sure that
you've got your reference. So you want to have
your reference here. So make sure you've got your reference on your door. This is what you're going for. So it's going to be all metal and a little cross
in the center, and then you've got
these parts in there. And I forgot, as
well that we also need to work on the
little door handles. So that's going to be fun I
completely forgot about that. And then after that,
we're going to work on these two parts here, which are way, way less
technical than this part. Alright, so now we've got that. Let's put it down. Let's get
work in then on this one. Now, first of all, it's probably easier working on a plane rather than
this big thick thing. So what I'm going to
do is just come in, grab the face, press shift, and I'm going to pull that out. Next of all, what I'm
going to do is I'm going to press the eye
button to bring it in. So the eye boon, let's bring
it in however far we want. Now, we're always fine with, you know, doors like this. It is easier, actually, to bring it in first
by a tiny amount and then bring it
in again. Like so. And what that means is then
I can pull this part down. If I don't do it this way, it makes it much harder in the future to do that.
Now we've got that. We now actually need to have a line going across
these parts here. So what I'm going to do
is I'm going to come in you can see I've got
this part and this part. I've got this part, this part. And what I want to
do is make a line. I'm actually going to grab
the center one as well, and we're going to press
right click and there we go. We've made a
subdivision on there, which is going to make it easy
to make those glass parts. Now we're going to do the
same thing on this one. So we're going to go
all three of these, right click and subdivide. Now, this one's not
done that for us, so all we need to do is just
grab this one and this one, press the J button, and
there we go. We've got that. Now we want to do
is make the glass, so we're going to come
grab all four of these, press the I, press the I again, and then bring it to
where we want it. Now, the problem here is, I don't recommend, actually, probably this is a bad way. Why? Because although we've got this metal
part going across, we've also got another
indentation in there. So let's go back and figure
this out a better way. So I'm just going to
grab all of these. I'm going to press
Control B instead. And then get that
to where I want it. So something maybe something
like this because then what's going to happen
is it's not going to go over those levels up here. And I'm just wondering. I'm just wondering if I actually want them thicker,
how would I do that? So that's something
that I'm contemplating. If I grab this one and this one, can I actually make them any thicker without
damaging too much this? So if I press esenx, put it on medium point, Press the S and X. You can see that we've got
kind of some broken mesh, which means that we need to pull all those bits back into place. But does it look better?
That's the main question. Does it actually look better? Probably, it does, probably. So I could come in and
instead of doing that, make my life easier. And let's see if I grab
all of these. There we go. Look, I can pull them
all out like so. So that might be the best way. So what I'm going to do
is grab all of these. I'm going to press S and X and make them thicker in that way, and then I'll grab
both of these. I'll press S and Z and make them thicker in this
way, and there we go. Can't see much, but that's
what I actually want. Now I'm going to do is
come to my actual windows. I'm going to separate
them off first. So why? And then I'm going to pull
them back into place. Now what I want to do is grab this part going
all the way around, so lt shift and click and just
pull it back a little bit, and now we get that slight slight deviation
between the metal. Now, the other thing
is that this part is definitely set different
from the other metal. So I actually want
to also do that. So what I'm going to do
is I'm going to come in. I'm going to select
these edges here, so going all the way
down here, again, these ones here, and again,
this one up the top. Like so. Now, the one thing
I just got to be careful of with the top is that
it's not flat on there. So maybe maybe instead
of selecting these, I should go in and
select this like so. Then what I'm going to do
is right plague moccasine. And now it should enable me. Actually, yes, it should
enable me to come in face select and
just select this. And now I can actually press Y, separate that off, and pull
it back a little bit like so. Alright, so that's that part. Now, with this part, let's actually give its own thickness. So if I come in, I've
got an option here. I can extrude it or I
can use the solidify. Honestly, guys, if
you're extrude, you just got to be
really careful. You can obviously
extrude it like that, but I prefer using
solidify rather than that, if it actually will let me. So all I'm going to do is just come into this P selection, come into this LP
selection, and there we go. It gives me just a
lot more control. So I'm going to
do is grab all of these press control A or
transform, set origins geometry. Let's come to this
spot first, modify, generate a solidify, and now let's pull it back to
where we actually want it. You can see here it's
going a little bit weird. Let's put it even. And I think let's
try the other way. Yeah, it's definitely not
going to work like that. So as I said, if
it doesn't work, we have the other option
then of extruding. So I'll only use extrude
if ab, so I have to. On this occasion, I'm going
to pull it back to here. And then what I'm going
to do is press tab A and then extrude it back
to where this one is. So if I press E now, I can pull it all the
way back to here. Now, at this point,
we can get rid of this main block here
we don't need anymore. So all I'm going to do is
come in, select it first, so I'm not getting rid of
those windows, press the born. Making sure I've not got
anything else selected. You know, I don't want this center part
select or anything. Press delete, vertices,
delete the other way. Next of all, then now, let's
see what this looks like. I'm going to select this right
click, shade Ato smooth. And I can see
that's looking very nice except this
part around here. So what I'm going to do
is I'm going to come in Alt Shift click Alt Shift click
going all the way around, right click, and we're
going to mark a shot. Then we've got that actual
shot piece on there, and this now is looking
really, really nice. Now we need this glass part. So we're going to pull this
back to where we want it. So let's pull it back to there. I'm going to press tab A. I'm going to extrude
it back then, like so, and there we go. And again, I did that because, you know, we know this will
work on this particular one. The solidify clause
has some issues, so we might as well go with it, and it will show you after what you have to be careful
of when you use extrusion. But first of all, let's
get our glass in. So again, let's reset all the transforms,
origin to geometry. Let's put the glass in place
now, making sure it fits. And then we go, I might
want to pull this out a little bit and pull my
glass out just there, double tap the A. Yeah, and I think that looks
really, really cool. Now, the issue then with using extrude is also
things that you don't see. So if I come up here
to the top here, you'll see that we have got face orientation and
exactly what I said. All of the other meshes near enough don't have issues
with orientation. What does this mean exactly? This means that when we check take them into something
like Unreal Engine, Unreal Engine reads
the front of the mesh. It doesn't read the
back of the mesh. Why? Because then it
hasn't got to do so many draw calls because it's only looking at the
front of the mesh. If your face is the
wrong way round, when you take that
through to Unreal Engine, it will just be
invisible because it's basically inside out,
and we don't want that. So when we click that
on, it tells us, whichever one of these
he's in red, needs fixing. So if you come to these
first, these are easy. Press the tab on,
press Control N, and then what we're going
to do, not control N. Shift, we're going to
spin them round like so. You'll also notice
when I come to the next one, if I come in, so any of yours I read, go in and press Shift n. Now, you'll also be able to
if you're hv problems. So let's just come to this one. Press shift n, you'll see that it can recalculate
down here as well. So let's say you've got the odd one that's the wrong way round, select it, and then you
can turn it down here. For most of them, though, you should just be able
to grab everything, press Shift n, spin them round. Let's do the same on
this one, as well. So I'm just going to
come in. Like, so shift down, spin them around. So this is flip normals. This is what
flipping normals is. So if we come to this
one here, grab the face, press shift, N, inside,
and there we go. Now, finally, this here, then, which is a little bit of a mess, as you can see, let's grab both of these
at the same time. A, shift down and
spin them round, and there we go.
We're ready to go. Now, you will notice
that the glass on the inside is red
because it's a plane. So we can't actually turn it around on both ways unless
it's a ready object. But because our doors
going up against the wall, no one's going to
see that anyway. And there is an option
in Unreal Engine, where you can put a shader
on that reads both sides. For leaves, things like that, you don't want to see through
leaves from underneath it. You know, a tree
trunk just there, and you look up
and you don't see anything and then stood further back, you
see all the leaves. We don't want it
working like that. So there are ways
to get around that. But for this, what we're doing, we want to make sure they're
going the right way. Alright, so we've done all
that. That's looking good. Now, the next thing
then we need to do is work on our door handles. If we open up our
reference again, we can see we've got this
door handle on here, this door handle on here. But what I'm going to do
on the next lesson is actually do a tutorial
on the asset manager. Now, we're not going to use the asset manager
within this course, but you can absolutely
use it within your own courses to get your own blendfleset up
and things like that. Asset Manager is incredibly addictive, and
before you know it, you'll have 100 files with
all these different things in completely overblown and you really don't need half of it. But what it's great
for is if you took the time to create
these door handles, for instance, really nicely, and you want to use them in
another scene or environment, you absolutely can build
up a load of door handles. Now when you first
start, you'll probably end up with really
rubbish door handles. And then as you move on, they'll get better and
better and better, and then you'll
end up going back and deleting those rubbish ones. You know, you'll end up
with something like from minecraft to ERO type thing. I did the same thing
years and years ago, and don't worry about. All right, everyone. So
I hope you enjoyed that, and I'll see you in the
next one. Thanks a lot. Bye bye.
32. Creating a Classic Door Handle with Curves: Welcome back everyone
to the Haunted Street Environment
Blender To Unreal. And I said that a bit weirdly, but anyway, you get the point. I've said
it every single time. Alright, so let's create then
this door for handle first. So what we'll do is
we'll come down. I think we'll create the
actual outline of it. So again, I always prefer to
start with an actual plane. So X 90, let's spin it round. Let's get it in the right place, the right dimensions
that we want it. Let's pull it over here. Now I tend to put door handles
so they're fitting in. You know, both of
these planks here. So what I'll do is I'll
pull it out a little bit. I'll make it a little
bit wider, so S and X, a little bit thinner, S and z, and then we can pull
it out like so. Now what I want to do
is I want to create, you know, this kind of
look that we're going for. So what I'm going to do
is I'm going to come in. First of all, in object mode res you transforms as always. And then what we'll
do is now we'll come and select each
of these verts. I'll press Control Shift B
because they are vertices, and then I should be able to
bring it in just like that. Again, you can mess around
with these if you want to. I think actually, I'm quite
happy with how this looks. So what I'm going to do now
is come to Face select, select the face,
bring it in slightly, and then bring it in again. Like so, and this is
where I want my door. And then what I want to do
is now grab the old thing. We'll use the extrusion.
You can see it's gone red. Let's press, shift, spin it all around
while we've got it. All shift click to go
around all that edge then and then just
pull it back like so. Alright, so far so good. Now what we want to do is
we want this face inwards. So all I'm going to
do is extrude it in, like so, and there is
that bit already done. Now, I tend to put the
knocker of the door handle on first and then
I'll do the little bit that, you know, anchors
in place on after. Now, what I'm going to
do because I've got this here and I don't
want to, you know, bring something in over here, I'm just going to press shifts, Custer selected,
press the tab but, and I'm going to
press Control A or transforms right
click SargsGeometry, and right click Shade Auto
Smooth while I'm there. And then I'm going to finish
this off just with a shop. So l Shift and click both
of these edge loops, and then we're going to
mark a sharp like so. Okay. Now, let's
bring in handle. So we're going to start
perhaps with a circle. So let's bring a circle
in. Let's make it smaller. Let's rotate it. R Y 90 90, and let's bring it into where we want it. So it's
going to be on here. I'm going to make it a little
bit smaller and then just pull it up and get it into
place where we want it. The other thing is when
I'm working with a circle, I tend to, first of all, come over to where the curve
data is, which is over here. What I'm going to do then
is bring on the extrusion. So I'm going to
not the extrusion, sorry, where is it? The depth. Let's
bring up the depth. Then we have something
to work with. Now, before we move on, let me just tell you
something about the curves. So, bezier curves. The other thing you should
know is the resolution when you use it not on jump
nodes is really important. If I turn this down to one, you will see we end up
with something like that. If we keep turning
it up, you'll see we end up with it
somewhere more rounded. We absolutely want to
make sure that we've got, you know, a lot of edges, edge loops going around you. We don't want to end up
with something mind crafty. We don't want to end up
with something like this. Yes, stylized, but we're not
going for that look here. So be absolutely
aware and turn this up around about eight to
ten, something like that. That's the first thing. The other thing is
the resolution. We can also turn that up. What does the resolution do? So if you think of the
resolution on here, this is basically all of the edge loops
going around here, but we also want resolution
going around here as well. So we turn this up to five, press let's apply that. So we'll go to object for now. Don't apply your own,
but just for now, let's convert it to a
mesh so you can see. If I press tab now, you can
see that what it looks like. If I right click now
and shade at smooth, you can see it's still
relatively smooth. Now, if I go back
before doing that, turn down this resolution
to four and then go to object and
convert. To mesh. Now you'll see that we've
not got as many around here, so let's auto smooth, and
that's what we end up with. We end up with something
like this with some hard edges on there.
We don't want that. So we absolutely want
to make sure that we're turning this up to five and
not having those issues. Alright, now we've
done that, what we can do is we can come in and
shape this til I want it. You might want yours round. I just simply want to come
in and bring these in. Now, the other thing is you
can bring in more edge loops. But first of all, let's
just bring these in. So I'm going to press SNC and bring them in a
little bit, like so. Then what I'm going to do is
I'm going to grab these two. Shifts like this one,
right click and subdivide. And what that's going to
do then is it's going to give me a little bit of
a difference on here, and it also means that
now I can actually move these round and
create whatever I want. So if I press S and X, I can bring those in and just create a bit better of a handle. Now, you can copy the
one I created exactly, or you can make your own, we subdivide these C you'll see, it's a little bit
more rounded now, and you can actually do it exactly like I'm doing, or
you can create your own. I think for me, I'm going
to have a little bit more of a longer one on this. And then what I'm
going to do now once I'm happy with the shape
is I'm going to come in. I'm going to go to object. I'm going to come
down to convert, and I'm going to
convert it to mesh, and we should end up with
something like this. Now what I'm going
to do is I want to put the actual
knocker on here. So what I'm going to do is
if I come to the center, I should be able to see
that this is the center, one, two, three,
one, two, three. So I'm going to go, I think
I think I'll go to five. So something right here. Grab the center, make sure, one, two, three, four,
five, and there we go. Just make sure the gap
is exactly the same. Right click, and
then what you're going to do is mark a seam. Now, for me, I tend to just now have done that
remove this seam, so I'm going to
clear the seam off, and then you should
end up with something like that. Now, why
have we done that? What we want to do now is come
into this part and we want to extrude this out to make it look as though it's
an actual handle. So I'm going to press E Enter. I'm going to press
alterns and just pull that out like
so, and there we go. Now, again, you can put
the offset even on, and that'll just even
it out a little bit, but this is what
we've ended up with. If we press tab now, we can see that's
looking pretty nice. Albeit because
it's shade smooth, we haven't got those
sharp edges in, but we'll fix those
in just 1 second. First of all, though, I want to put some more seams on here. And once you get into the
flow of this, honestly, it's really, really
easy to actually do. So once we've got
this one there, I'm going to pick this one. I'm going to go, I
think I'll go in, two in here, right click, Mark asm, and I'll even do a little bit on
the bottom, as well. So right click, Marca sm. Now, let's grab these ones. So we're going to press L,
L. We're going to press E. To alternates and pull
them out a slight bit. So just just a
slight bit like so, and then the bottom will
do a little bit more. Just to add a little
bit of variation to this and to show you how easy it is once you've got the actual principle of this
to make things like this. Alright, now we've got that.
If ice sheets move now, you'll see it looks
something like this, looking really, really nice. We don't have to
add in any sharps, but that is kind of
beautiful, you know. Okay, so now let's finish off with the actual
holder of this. So all I'm going to do
is bring in a cube. I'm going to make my cube
a little bit smaller, bring it into place where
I actually want it, so I'm going to
press dot butter, and then I'm going to press
SNH and bring it up SN Z, and let's put it
somewhere behind here. So SNY like, so put
our handle in place. Now, I tend to when I put my
handle in place like this, I want it to come slightly through there so we
can actually see it. But this is looking
pretty nice already. I might want to actually
rotate my handle a little bit. Now, let's look at the handle
size before we carry on. I'm going to bring my guy over, and let's look how
big this handle is. At the moment this handles
absolutely massive, so we're going to make
it a little bit smaller. Like so, and now
we can see if we pull it up that now
is fitting in place, much, much better, like so. Now, let's deal with
this part, then. So first of all, we'll
come to these parts here. And what I'm going to
do is I'm just going to grab both of these
parts, press Control B, and I'm going to bevel that off, like so until I'm happy with it. And then I'm going to
come to the top part, press Control B again,
and bevel that off. But this time, I want to
turn up the width tiny bit, and I also want
to bring this up, so it's a little bit
more rounded, like so. And finally, to finish this off, I think I'll bring it in. So I'm going to press
the Ibn for insert, and then I'm going
to press E and pull it out a little
bit, like so. And then I want to make sure
that the back over here, pressing the question
mark is not so far back, so I'm just going
to come to the back of here, grab the face, pull it back, press the question mark
again in object mode. And now I've still got
that selected on the back, so now I can pull
it back to my door. Like so, and there we go. Let's right click
shade Ato Smooth. Alright, so that's
looking pretty good. Now, the one thing I always
do normally with doors is I normally make sure that this
is rotated a little bit. So R and X just rotate
it out just a tad. And I also make sure that I'm separating them out
because this has a bevelon. So this here, it's got a
bevelon as you can see, it's got the solidify on. So let's apply the solidify,
leave the bevel on. But I don't particularly
want to bevel on this because it's
just simply too small. You know, it's a bit
of a waste of having extra polygons and things like that because they're only going to be seen from back here. You'll never see that
there's a bevel on there. Here, you can see it's
a little bit rounded. But for really, really
tiny things like that, you don't want to
waste a bevel on it. Also, if you put a bevel
on as well on all of this, it's going to increase
this dramatically, and we don't really
want that either. What I'm going to do instead is just join all this together, Control J, press Control A or transform set
origin to geometry. And what I'm going
to do instead is I'm going to grab my handle, grab my door, press Control P, and what we're
going to do is set parent and keep the
transformation. Now I've done that.
If I grab my door, this will always move with it. I ask the label to grab all this and pull it
out a little bit more, which I think I'm
going to do, but it will always stay
attached to the door. So I'm going to come
isolate this out again. So question mark, come to the back of it,
grab the center, press Control plus Control plus, and then will enable me
to pull it all out at the same time and then
just pull it out like so. Press the tap button, press the question mark,
bring everything back. I've still got it grabbed there, so it means I can still pull
it back to where I want it. And now I need to think,
Is that too far out? Probably. So let's pull
it back in a little bit, double tap the eight, and then just make sure that
you're happy with it. Now, I know this lesson it was quite long just to
create a door handle, but I think all of those things that I've just showed
you are really, really important for
going forward to increasing your own skills when creating things like this. Alright, so all we need
to do then is save our w and I'll see her on
the next one, everyone. Thanks a lot. Bye bye.
33. Designing a Teardrop Door Handle with Cylinder: Welcome back, everyone to the
Haunted Street environment. Blender to Unreal. This
is where we left off. Now what we need to do is
exactly the same thing apart from the fact we're
doing a different handle. So what I want to do is I
want to come on over to here. I'm going to bring my cube
in and then move it to here. So I'm going to because
it's a bit harder to put, you know, my cursor around here. So what I'm going to do
is just press shift day, bring in a cube, make it smaller, and then just
bring it over into place. Working out first of all
the dimensions of it. This one we want a
little bit longer. So I pull it over here, want it a little bit longer,
you can see on this. It's a little bit
longer. This one, a little bit more, you know, accentuated down, more
like a tear drop. Which fits the
scene pretty well. Okay, so what I'm
going to do is press S and X and bring it in. I'm going to then bring it
around to this soft scale. Again, I'm going to
work on this bid first, so I'm going to press S and Y and bring it around to here. Now, because this one's
a little bit simpler, this part, anyway, I'm
going to not use a plane. I'll just try and
do it the other way where it's not
actually using a plane. It's just, you know, bringing it out with extrude and
things like that. So what I'm going to do
is I'm going to come in, grab my edges first, like so, Press tab, press Control A, all transforms just to make sure you've got
a nice base to work with. Press tab again.
Press Control B. And then what I'm going to
do is I'm going to increase the number and then
bring this in like so. Something like this I
think looks pretty nice. Now, one thing I'm
always aware of is that whenever I'm using the insert, I'm always wary of how
close these are together. So make sure that
when you're doing it, you don't bring them
too close together. In other words, what do I mean? When I come to Faceg now, press the ebon, I want to make sure I've got enough
room to work with. As you can see here, these
are getting quite close, but they're not
actually overlapping. So I just want to
make sure that, you know, I'm causing
myself issues. Then what I'm going to do is
I'm going to pull this out. And this will be where my
handle will actually start. Now, one thing we can see is
this is way way too wide. So if I press S and Y, I can actually drop
it back and put it into place where
I actually want it. And finally, I'll right click
and shade or too smooth. Now, one thing I didn't do
with this is I didn't know, pull this back like
this one here. So you can see this one here has pulled
back a little bit. If that happens to you,
easy to fix that really. All you want to do is control or left click, bring this up. And then come to this part
here, Alt Shift and click, and then you can just press AlnS and you can bring
it back like that, or you can press S and do it that way. So
you've got now that. Just be careful when
you do it, though, because what you
want to make sure is that it's coming out cleanly. So if you press Alts, you can see now it
comes out a little bit on all of these, so you can see now
it's come out. But if we go to
one, you will see that the sides maybe don't
come quie as far as that. So all I'm going to
do is just press SNC and just pull them out a
little bit more like so. That then is looking
much, much nicer. Again, though, we want
to make sure if I right click that actual
line isn't there. So what I'll do is I'll come in. I'll shift and click, right, click, and we'll mark a shop. And there we go.
Alright, so far so good. Now, let's begin
with our handle. Now for this one, I'm probably not going
to be using a curve. I think that would be
a little bit silly. However, I will be using a
curve for the insert bit. So in other words, where this actual
door handle hangs on. Now, what I'm going to do
then is I'm going to bring in for this a cylinder. So I'm going to press
shifts, cursed or selected, Shift A, and then we're going
to bring in a cylinder. Now, for some reason, Blender always brings in a
cylinder with 32 vertices, as we can see down here. We don't want 32 vertices. That's a lot of vertices. We really want to
bring this down. So I'm going to show you a
difference between them. So on here, we've got 32. Let's bring in another one. So Shift A, bring in a cylinder. On this one, we'll put it on let's put 16,
something like that. And then on the final one, I'll press Shift A,
bring in a cylinder. We'll put this on like so. Now, if we come
into each of these, right click, Shade Auto Smooth, you can see that on this one, we definitely don't want to go as low as eight as you can see. On this one, it looks
really, really nice, really rounded, but it's
using so many vertices, and we really don't
want to do that. So we want a happy medium. Now, you can see if we're
looking at the top of here, we have got, kind of some
of these ridges on here. So I recommend rather
than using 32, when you bring it in, use 18-24. So shift day, let's
bring in a mesh, and what we're going
to do is we'll put this round about 22. So round about in the
middle of what's said. And then what we're
going to do is right click, Shade auto Smooth, and now you can see
we've got the best of both worlds. That
is why I do that. The other reason I do that
is if we're shaping this, so if we press and pull it down, if we're shaping this
into what we want, then what we'll do
is just pull it out. We'll get it the
right size first. So we'll get it the
right size at the top, where the little handles
going to come in. So it's going to come in
round about along there. So like so. If we're shaping this, we need some vertices
to work with. At the moment, if
we brought in A, we'd hardly have
anything to work with. I'd look really, really blocky,
exactly like minecraft. We don't want no. So
what we want to do now it's come to the top
of it, grab the face, press Control B, and
now you'll see we can actually create a beautiful
top on there like so. Now, in the original, you will
see that this is rounded. You can see it round on the end, but however you want to
create it, is up to you. I actually like bringing this in now because I
did it by mistake, and it actually looks a little bit better than the
rounded top on there. Now, if you want to,
you can also come in, grab the top and make the top
just a little bit rounded. All we need to do is just come down and increase those round. So it looks something like this, and I think that
looks quite nice. Now, be aware that when we
come to the Unreal part, we're going to be using my old pack that I actually created. So some of the parts might
look a little bit different as your pack will look
a little bit different. So just bear that in mind
when we move on to that part. Now I'm going to
do is I'm going to come I'm going to
bring this part in, so I'm going to press S. I'm going to bring it in, like so. And then what I'm
going to do is just press one to go into
the front view. Now I want to do is I want to bring this down to where
it's going to drop down, which will be all the way down here pretty much right down
to something around here. So if I press E to extrude, I can bring it down to
where I actually want it. Then what I want to do now is I want to bring in
some edge loops, so control R. Left
click, right click. I brought in six edge loops. And what I want to do is, first of all, bring this part out. I'm going to press S, I'm
going to bring it out like so. Now, I don't particularly
want a hard edge on there. So what I'm going to
do is press Control B. Scroll my mouse wheel
up so it's just one. Like, so press E, enter, Alt, and S, and then I should
be able to bring that out. And when we've done
that, then you'll see that we've got
something like this. Alright, so far so good. Now we want to do
the bomb bit because the bomb bit is going
to be coming out much, much wider than
this top bit here. So what I'm going to do then is I'm going
to come in again, and I want to bring
out this bombit. So I'm going to
bring this part out, so I'm going to press the S
but to bring it out like so. Now, don't worry if, you know, at the moment,
it's not looking right. Just there with me and
just keep potting along. We're going to grab
this part now. We're going to bring
that out, as well. Jaws together. Nice kind
of round pot on there. And then what I'm going to
do is bring this part out a little bit more so it's not quite as what would be sharp as what
we had it before. Now with this bit,
we're going to grab it. We're going to press Control B. I'm going to bring
in a few of them, and now we can see we
can round that off. We're also going to do
the same thing with this, so Control B, round it
off a little bit more. Like so. And we're looking
at the silhouette. So what does the
silhouette look like? It looks fantastic right now. So we're happy with that. And
then finally the bomb bit. Now on the bomb on mine, I actually brought it in, and then I actually put
a round end on it. I think I'll do that
again. So what I'll do is I'll come
in, press control. Left click, right, click, press the Sb then
to bring it in. And then I'll round
the bomb off. So I'm going to
come to the bomb, press in one again,
press Control B. I'm just going to
round it off like so. Now, of course, you can see that this bomb bit doesn't
look so good now. So all we're going
to do is spend a little bit of time pressing the Sb I'm bringing
this in a little bit, press the S born. Like so. Press the S born, bring it
in to where we want it. So somewhere around there
and don't worry about going back if you need to
just to get that really, really nice shape that
we're actually looking for. Alright, so that shape
looks really good. I would say that we definitely
going to need a shot on maybe on this bit here or
I like to bring in extrude. So what do I mean by
that? On this bit here, let's press Control B. Bring it down. So we've
just got one band there. Press the E, enter and
lns and bring that out. So then that's giving
us that sort of look. And then on the bombing now, I think we can add either another band
like we've done here or we can just use a sharp. So let's see what
they look like. So let's put a sharp here, sharp here, mock shop. And then we go, I actually
think that looks good. And I think I'll add
one more in here. So control our left click, right click, Corn chow, B, and then E enter lns. Pull down there, and that then is looking very, very nice. Okay, so that's the door
handle for this one. You can see that it's
still fit in his hand even though it's a little bit
chunky on the chunky side. If it is too chunky, just let's go in, reset
all the transforms. Let's make it a
little bit smaller, and let's make it a
little bit longer on the S and Z, and there we go. Now it's really
fitting the scene. Now what we want to
do is we want to actually have something that's
going to hold in place. We also want it slightly
slightly rotated, as I said, so just pull
it out a little bit. And then what we're
going to do is shift this cursor selected, and then we're going
to press Shift A, and we're just going to bring
in a simple curve circle. We're going to make it much,
much smaller, of course. Like so we're going to fit it into place wherever
it's going to go. Come over to your
curve, and what you want to do is
turn up your depth. Now, again, remember,
resolution, turn up to five. Turn the resolution
preview down to nine, and there we go, make it
a little bit smaller. And the good thing
is about using curves is if I bring
this in place now, you can see it's
really, really thin. We don't want that, so let's
turn up the thickness of that and get it absolutely
at what we actually want. So something like this,
and we can even press S&X and just pull it out a little bit so
it fits in place. Now when I'm doing this, I always tend when I convert this. So if I go to object,
convert to mesh, I always tend then to
come in. Grab this part. Shift click, grab this part, Shift click, right
click, Mark Sm. What I want to do
then is come in and just press L on the side
that I want to get rid of. L, delete. And faces, not vertices, faces. And then you'll end up
with something like this. And I do that because
all of that mesh in there would be completely
wasted if I'm not doing it. You can then get
away with pressing Alt Shift click on both of these parts and
moving them back. So if I move them back into
place, no one can see that. It doesn't look like it's been bent or anything like that. And the main thing is now
we can join it together, so we can join all of
these parts together. Let me just look if
this is a Bezier curve. No, it's not because
I converted it. So let's join them all together. Let's press Control
A or transforms, and let's right click
and shade Auto Smooth. And there we go, that
is the best way I've found of creating door handles. So now you've got that
way. Finally, then we want to make sure that this, this, and this are all joined
together with Control J. You can see we've got some
problems there probably because we've got on
let me have a look. Why is that doing that? It
should be a modifier on there. There we go. The modifiers
on this. That's why. Okay, so let's apply
that modifier. We'll make sure we join
it up to the door last. So join it up to the door, press Control J,
and there we go. Now, one of the things
that you can see is we've lost a lot of the smoothing. Let's shade Auto smooth. And the reason this
happens is because we've got a bevel on this
one, and we don't want that. So I'm just going
to press Control Z. And what I'm going to do then
is I'm going to join this, this and this up, so Control J. There we go. That's looking. Let me just make sure it's
looking fine to where it was. Yeah, it's fine. It's looking
the same. So control J. Then we've got the
door handle, like so. So we've got to make sure
that's all joined up. And then what I'm going
to do is just grab both of these, grab this one last, press Control P, and set parent to object,
keep the transform. And there we go. But we do have a problem, as you can see. Now, we don't want
this because you can see this line
going over here. That is because one of this. So let's have a
look which one we. This one here, the
transform is over here. So we want to right
click SurrogenTGeometry, and now they're all
going to there. That tells us that we just
didn't set the origin point. Okay, so now when
I move my door, I move my door, everything
should come along with it. All right, so now
we're finally on. Let me think. So we've
got our windows. We've got our doors.
We've got our handles. So the next one
we're going to do will be the supports
around the door. Once we've done that, we can
get everything textured, materials on there, and
all of that good stuff. Let's save our work, and I'll
see you on the next one.
34. Mastering the Blender Asset Manager and Libraries: And Welcome back if you want to the Haunted Street environment Blender To Unreal, and this is where
we left you off. No, I completely forgot that I didn't share the video
on the Asset Manager. So really sorry
about that, guys. I'm going to share that now.
Make sure you watch it. It's really, really important. It'll open up the doorway to so many things
within Blender. So if you never come across the asset manager or you
think you know how to use it, I would still watch it anyway, 'cause there are tips
and tricks in there. It's also evolved
a lot, as well, so now it's much,
much easier to use. Alright, I'll play
that for you now, guys, and I'll see
you on the next one. Thanks a lot. Bye bye. Welcome, everyone to the
Blender Asset Manager guide. And basically, what we're
going to do in this one is just go through the asset
manager, show you how it works. It does seem fairly complex
when you first start this, but actually it's quite simple once you get your
head around it. So here you can see, I've got a standard scene here and
I've actually brought in some actual assets,
and they're named. This is important, actually, that just make sure you
name the assets before you actually put them
into the asset manager. Now you will notice when you
first come into Blender, whether that be Blender
three or Blender four, at the top here, it doesn't
actually say asset manager. So that's the first
thing we want to do. So to do all we need to do is
come to the little plus p. We're going to come across
to where it says general, and then we're
going to go down to where it says asset manager. And once you click that
on, you'll actually be taken into the asset manager, and this is the easiest way
to actually work with this. And the thing is now
you'll see at the moment, we have our asset manager down here with all other files
on the left hand side, and in this, this we'll be
populating all of our assets. Let's actually just pick
this up a little bit, then. And then what we're going to do is you can see at the moment, we have current file and we have essentials and under
essentials is basically all of the assets
that Blender has decided to put into the
asset manager as default. What we want to do is we want
it to be on current file. So now I'm going to
do is I'm going to come to my first asset, which is going to be my tree. And now what we're going to
do is we're going to add this into our current
file asset manager. With this selected, if you come over to the
right hand side, you can see here it says tree. If a right click,
you'll see here, it says one that
says mark as asset. The moment we actually
mark as asset, you will see now that actually appears in this space down here. You will also see that if we
put this onto material mode, and now if I come in and
actually drag this out, you will see that it
actually comes out with materials
actually attached, which is really, really handy. Now let's delete
this out of the way. And what I'm going to
show you is now if we focus on our actual car, let's press Shift and Spacebar
just to move it over here. And then what I'm going to do
is I'm going to come over, right click and a markers asset, and you'll see now our
car appears there. Now, if I come up and right
click and put clear Asset, and then spin this round Z -90, so right click Mark as asset, you'll see it appears
exactly the same way. So to actually change the rotation in the
asset manager itself, what you need to
do is you need to now reset all of the transforms. So what I'm going to do is I'm just going to clear the asset, and then we put Control
AAA all transformed, right click, set
origin geometry, and then right click and when it come down, mark as asset. And now you'll see it's actually rotated that round for you. You'll also see, as well, now if I pull this out, it comes in with all the materials. We can actually do some
other things as well. We can actually also
save out materials. So what I'm going to do,
first of all, though, is I'm going to come down and click the little Plus button. And what I'm going to do is I'm going to call this Assets. Like, so I'm going to call the next one materials. Like so. Now I'm going to do is I'm just going to save out my work, and then I'm going
to go to unassigned, and you'll see at
the moment we have these two assets that
we put in there. We can simply shift select them both or shift
select them all, if you've got a
lot and drop them then into our actual assets, and now they're going to
appear in our assets. Now let's move on and if
we click on this bench, what we'll do is we'll
come over to our material. And we can see we've got
two materials in here. So let's right click this one, Mark as asset, the same thing. And then what we'll
also do is come to this one and we'll right
click and mark as asset. Now, you will see when
you've marked them as asset that we've got
this little book here, the same as we've got up here. And now you'll see we haven't got any assets in
there at the moment, so these two materials
didn't go in there, and that is because they
will be unassigned. Now, let's grab both
of these materials. Now drop them into
our materials, and there we go, we've got materials, and we've got assets. Now, the best thing
about asset manager, what you can also
do is you can also use this for things
like geometry nodes. The only thing that
you can't use it for at the moment is animations. But pretty much
everything else you can use it with
the asset manager. The next thing we want
to look at is actually doing that then with an
actual geometry node. So I'm going to do
is press Control V, and here is a geometry node
that I've actually created. You can see here
that if I pull this up over on the right hand side, you can see it's actually
a geometry node, and at the moment, if I press tab, you'll
see it has actually no mesh or any kind of topology because it's
obviously a geometry node. Now what I want to do
is, I want to come up, right click Markers Asset, and now you'll see that I've got something that
says unassigned. So let's make one more
now and what we'll call this is geometry or geode. Like so, and then I'm
going to come to it on a sign and put it into
my geometry node there. So you will see now
if I bring this in, it actually comes in as a
geometry node, which is really, really handy if
you've got loads of geometry nodes and
you want to bring them and drop them
in your scene. Now, let's, first of all, come up to file and save because this is
all great in that, but actually, how do we
use this in other files. So the way that we
can do that is we can come up to a new blendfle. So let's open up a new blendfle. So here is our new blenfle. And what I want to
do, first of all, I want to come up and
add in my asset manager. So plus asset manager. And at the moment, you'll see
there's nothing in there. And what I want to do now
is I want to go up to Edit. I want to come to preferences. And within preferences, you will have one that
says file path. And this is basically going to tell Blender where it needs to go to look for asset manager. So let's actually come in, and what we'll do is
we'll click the plus, and then all I'm
going to do now is find where I've
actually saved out that previous file
and I saved it in something called Blender
Asset Manager, which is here. So this is the one that
I'm going to add it to. You'll see here that
it doesn't show any blend files or
anything like that, and then all you
need to do is add Asset library like So we can
actually close that down. Now what I can do is I
can come down and you'll see that I've got one that
says Blender Asset Manager, and here are all of those actual files that
I actually put in there, as well as where it says
assets, geodes and materials. So now I can simply come in, drag and drop my
actual truck in there. I can actually turn
on the materials. And now you can see, once again, it actually comes in
with all the material. The best thing is
if I actually bring in a cube now and
just drop that there, shift space bar just to move it, and then what I can also do is I can come to where
my materials are, drag and drop straight
on to my actual cube, let the actual shader compile and load up, and there we go. Now we can actually drag
and drop materials as well. Let's come to our
geometry node then, and I'll show you
that that also works. So now we can see we've got a geometry node that
we can actually use, which is really, really handy. And now you can see just how useful the actual asset
manager really is. The other thing, if we go up to edit and go to preferences, you will see that we
are able, as well, to add many, many
asset libraries. Just make sure that you
save your blend file. So if I bring this over
here just to show you, just make sure you make a file, and then within there, you're going to actually save
your asset manager. Because the most important
thing actually is, when you're actually
saving it in here, you will see that what else comes in is an actual text file. This text file gives
Blender all of the data that it needs to
actually set up these groups. So very important if you're moving your asset manager
to a different file, make sure you move this
text file as well. All right, everyone. So
let's close that down. And lastly, before I finish, what I will show
you is if you come to current file where
we don't have anything, you can also select all of
the things in your scene. Right click, go down
and mark as asset. And then you'll see
that the all get put into the asset manager. All right, everyone, so
I hope you enjoyed that, and I'll see you
in the next one. Thanks a lot. Cheers.
35. Modeling Wooden Door Supports with Mirror and Bevel: Welcome back, if
youon to the Hunter Street environment
Blender to Unreal, and this is where
we left it off, looking at this door handle. But now we're on to
actually these parts here. So you can see this part here looks a little bit
taller than these. I'm going to make that a
little bit smaller, of course. And these parts we
should absolutely whiz through at
this point because, you know, we've done so much
work to get to this point. Alright, so that's the parts that
we're going to create now. Let's first of all, then
we'll use our dolls, as a kind of base
to put them around. That's why we're doing
them at the same time. So what we'll do
then is, I'll just grab my own references. And now let's start
by, first of all, putting this on item so we
can see the dimensions. Let's move this
over to this side. Let's press shifts.
Custer selected. Let's press Shift A, and
what we'll do is we'll bring in I think we'll bring in a plain star with that'll
make it a little bit easier. Let's press S and Y, pull it in a little
bit, get it to the top of that door or
wherever we want it. And from there, then
we can actually work out where we're going
to place these points. Now, important, make sure that it's on the ground
plane, which it is. And then all you want to do is press Control A or transforms
set origins, geometry, press Control R, left
click, right click, Control B, and then we
want to bring these down to the sides of our doors. Now, if you're not sure where
that is, just put this on, and then you can
see, absolutely, these are the sides
of the doors. And from there,
then you can select your faces on each side. And what we're going to
do then is, first of all, we want to make sure that this before doing anything is
actually a full mesh. So I'm going to select
the whole thing, and I'm going to then press E, pull get it to the
thickness that I wanted. So we want something
really chunky, I mean, these things, actually, they are made of wood, but they are main supports. So because the wood
is going up this way, it means that it's
really, really strong. It's batter like a
tree supporting. When they built them, you
know, in medieval times, this would be the door support would have bricks
over the top of it. It would be a major support.
And it's supported. That's why you're getting
bowed in slightly. So you're getting actually
bowed in a little bit, and the reason for that is because it bends
under the weight. So just take that into account. Now, from that, then
what we want to do is we want to
grab both of these. I want to press Shift D because I don't want to just
extrude them down. I want to make life
easy for myself. I'm going to put them
just under there, then. And then what I'm
going to do is press E now Z just to make sure that it's coming down
there, and there we go. That is our first support. Now, when you know you
bring these into Unreal, you can actually make
these a little bit bigger, just to fit a bit
better if you want to. You can pull these
out a little bit. You've got a little bit
of leeway to work with. Now, the next thing
I want to do is come back then to this pot I'm going to press the S and X just to pull it out,
just so it's over there. And I also want
to make sure that it's coming out past
this door as well, past these supports, as well. So S&Y let's get it all set up so it looks pretty
good to start with. Now I want to do is want to
bring in some edge loops, so bring in some edge loops. Make sure one's in
the center, like so, and I want to now bend this
down just a slight bit. So if you come in
with proportion, let it in on the smoothing
one, that should do it. Bring it out a little bit, and we want to just bend it
down very slightly like so. Now, the eye picks
up on these things, even if you don't think so, and these little touches
mean all the difference. Now the next thing we
want to do is we want to come in and add some edge
loops along these as well. So Control R, left
click, right, click, so I brought in five edge loops, Control R, left click, right, click, five
edge loops again. And we want to now
pull these parts out. So I want to go in and press
S&X and pull them out. The only problem with that
is when I do it like that, again, we're going to
pull the whole thing out. We don't actually
want that. We don't want to split the mesh
or anything like that. So what I'm going to do
is I'm going to come in, grab these, grab these, press Control plus,
and then what I'm going to do is hide
the rest out the way, and then I'm going to
come in, grab this. Grab this one, press one, and I'm going to press S and
X and pull them out very, very slightly, so there's
something like this. And now if I press Altag, bring back everything, you will see that is what we've got. Now, at the moment, I'm
not too happy with, you know, the thickness
of each of these. I think they are a
little bit too thick. So what I'm going to do, grab both of them, and then
going to come in, and I'm going to make sure
they're on individual origins, I'm going to press S and X and just make them
a little bit thinner. Now, you might be wondering
that now we've got to pull them both over to each
side, and that's not great. However, we can just come in, press the L, delete this
one out of the way. Really, really easy. Select
this one, P, selection. Control A, all transforms. Make sure it's right
in the senses. So right click Set origin, three Dcursor,
adding a modifier, and we're going to
bring in just a mirror. And then we'll put it exactly on that side and look
exactly the same now. Now you can see, maybe there's a little bit more
of a gap on this side. So let's just see if
it is in the sense. This looks in the
center of here. But let's make it in the
center of this point instead. So shift desk, cursor
selected, grab this one. Right click. Just
move the origin, origin three D cursor. So it is in the
center. It's just this door is a little bit, you know, not wide
enough for it. So I'm going to come in S&X and just pull it
out very slightly, like so, just making sure it fits in there a little
bit better than that. The other thing is,
of course, the door it's a little bit
longer than this. Now, I don't want to mess
around with the door. What I want to do is I want to hide my plane
out of the way, come to the bottom of here, grab these two faces like so. And this is on the mirror,
so it doesn't matter, and then just pull them down
into the floor like so. Now, of course, that means that this part here
isn't quite right. So all I'm going to
do is just press one. I'm going to pull
it in a little bit. I'm going to do the
same with this, pull it in a little bit, tiny, tiny bit, and there we go, that's what we've ended up with. Now what I can do is I can
actually apply my mirror. And then what I can
do is now I'm coming over and do all the work
like we do all the time. So what I'm going to
do, first of all, is I'll come to this one here. Oh, shift, click, old shift, click, old shift, click. It is a thick piece of wood. So the chance of, you know, having little things coming out here not really going to happen. So just grab the edges
going round there. We're going to go to mesh,
transform, randomize, and then turn this down
to naught point not one, like so, and there we go, that's looking
much, much better. The other thing I
tend to do with these because of the shape
that we're actually going for, is just pull them up just very, very slightly, like so. Like so, and now that
thing that looks much, much better, right, click,
shade, Ato, smooth. Now we're going to do
the same things on here. So Alt, shift, click, Al, shift, click going all the way around, like so, and then all
we're going to do is mesh, transform, and we'll go to
randomize. No point note one. And there we go, right,
click, shade at smooth. Finally, then we can
join these two together. So Control J. We can
resell the transforms. We can actually come in
and generate then a bevel, put it on naught
point naught three, and there we go,
we've got our bevel, we've got our doorway, and
everything's looking great. Now we need to move
on to the next one. So let's again look
at our reference. This is the next one we're
going to be building. Before you start anything, you should always think like, right, how do I break this down? So with something like this, we can see we've got a top. We've got these two pillars here that can all be
modeled the same, and we've got this part here. Now, honestly, the amount
of people I see who say, you should be creating
models that are, you know, extruded and muddled together, so
not joined together. They're not separate models. They're actually the same model, part of the same structure.
You don't need to do that. Maybe in the old days, really old days, yes, okay, we might need to do that. But nowadays, we
can have them as, you know, separate
measures joined together. So don't worry about that.
Don't think you've got to model everything,
you know, together. That's just makes things really, really hard work, and we
really don't need to do that. So with that said,
let's actually come in. And what we'll do is just make a start on the top of here. So I'm going to put this down. And then what I'm going
to do is I'm going to, first of all, bring
in the top of here. I'm going to come
to my door, shift desk because it's selected, shift D, I'm going to bring in. I think on this one,
we'll bring in a cube. I'll make it much smaller. I'll put it to the
top of my door. I'll press S and Z just
to squish it down. Get it the right
size that I want. And then what I'm going
to do is pull this out. So if I go over the top now, I should be able
to press S and X, pull it out, and then
where do I want it? I can't actually see where I
want it right this moment. But what I definitely
want to do is I want one that's underneath it
a little bit smaller. So all I'm going to
do is press Shift and D, duplicate it, and then I'm going
to press S and X, pull that in roughly to the sides of the doors
just before this pillow. So maybe a little
bit more like so. And then what I'm
going to do is then pull back this front bit. I can leave the back bit
that bits going in the wall, but let's grab just
this front face. And then what we can do is pull that bag onto there like so. From here, then we can
make our actual pillars that are going to go down here. And the other thing is, is this wide enough
for the pillars? I'm not so sure at the moment, so I think what I'll do is. I'll make it a little bit, a little bit wider, like so. And then from there,
what I can do is I can come now under underneath, press Control R, left click, right click Control B, and I can pull that out then to where I
actually want them. So something around
here looks perfect. And then what I can do
now is grab both of these parts or even just one of them, probably
just one of them. Press Shift D.
Pull it down very, very slightly and then press E just to go down to where
we actually want it. Now, I can see that, yeah, that's looking quite nice. I'm just wondering about
the thickness of all this, if the thickness is a little
bit out, so in other words, the width on this way, I can press S and Y and just pull that out just so it looks right because this sake is
going to be in the wool. I think I've gone a
little bit too far, so I'm just going to press and Y, bring it back a little bit. Yeah, and I think that's
looking much, much better. Now the thing is it's a
bit deceptive because the top of these is actually a lot thicker than the
bottom of these, but I'm going to show
you that in a minute. At the moment, all we want
is something like this. Now, what I'm going to do
now is press LP selection. I'm going to grab
this part here. So this part no my stats, press Control A or transforms, set origin to geometry. Press shifts, cussed selected, grab this part then,
shifts and not shifts. Right clicks the origin
to three D Cursor. What that means is
then I can come in and generate a mirror
on the other side, which is exactly
what I want to do. Now, as well as that, I need to pull these
back a little bit, but we're going to do
that on the next lesson. So I'm going to click File, I'm going to save it out, and I'm going to see her on
the next one, everyone. Thanks a lot. Bye bye.
36. Shaping a Detailed Stone Doorway with Mirror: And Welcome back, everyone to the Haunted
Street environment Blender to Unreal. This is where we left it off. Okay, so what I want
to do now is we want to create these parts
where they're gonna go back. So let's actually
have a look at that. So first of all, what I'm
going to do is I'm going to grab I think I'll grab just this part now and I'll
pull this all the way back. Because we've got
that mirror on, it does make life
much, much easier. So something like that, maybe, maybe it's not
quite thick enough. So something like that, I think. And let's think now of pulling
this back a little bit. So we're gonna pull it back
maybe just pass the door. So something around
there. And then we also want to make sure that we've got this bit on here. I'm going to press Controller.
I'm going to bring it up. If you notice when I bring
you up, I've got a choice. I can either make it so that this bit comes
out just over there, and we've got that overhang, or I can hide the overhang like so. So that's the choice I've got. So if I come in now
and press Alt click, like so, press the E
born, press AlternS. So I've extruded it, I should be able to pull it back.
Now, you can see here. Definitely what's
happening here because the actual orientations
not been reset. So I'm just going to go
back before that extrude, I'm going to press Control A, all transforms, set origin, two, three D cursor. And now if I press E to AlternS, it should come out perfectly
I want here, as you can see. So alternS let's pull it out
a little bit more like so. And then what we'll do is we'll also pull this part
out a little bit. Now, because this is no mirror, we want to pull it all out. So SNX and if it's
not coming out, just make sure we're
on medium point. So SNX, pull that
out, cover that. And I'm also probably
going to make this a little bit tard,
thicker, like so. The other thing is, of course, that this needs coming down, so I'm just going to grab
the Press not the top, the sides with Alt Shift and
click, press Control plus, and then all I'm
going to do is just bring that down then into place, making sure that it's not
interacting with the door. And finally, I just want
to make sure that this, it looks like it's a
little bit bent in. If that ever happens,
Alt Shift click S, Z, zero, and then
we'll plan that out. I'm going to pull
it up a little bit just so it's above that door, and then you should end up
with something like this. Now we're working on
this part down here. So what I'm going to do
is I'm going to come in controller,
left click, right, click Control B, pull
that out like so, and now I want to make sure
that this bit is coming down. Now, for this, you can do
it in a number of ways. You can either pull
it down straight from here or you can do it with the way that
I'm going to do it, where if you press one,
we're going to bring in another edge loop and bring it to exactly
where I want it. Now, I am looking at the
bottom and just making sure that this bottom,
as you can see, actually looks like it's
bending a little bit on there, and I'm not sure what's
actually going on there. So let me just grab this bottom, I'm going to press S Z zero and flan that out because for some reason, it
was actually bend. So now we're going to
do is pull that down. Into the ground plane, and
now we'll come back to this. So how far do you
want these out? I think I want them to
come round about here. So I'm going to press Control R, bring it up a little
bit, like so, and then from here,
what I can do is I've got control
now to pull this out. So I'm going to pull it
out, just behind that. And then what I'll do is I'll
add in one more edge loop, so Control R, bring it down. Then all we'll do is pull this back a little bit,
like so. All right. That's that bit. Now we
want this bit down here, and we also want
another bit down here. I think I'll do the
bomb part first. So what I'm going to do is
I'm going to press tab. Control R, another edge loop. Now, where do we
want it to start? Probably somewhere around there. And I'll bring in
another edge loop, so control R. Looks. Control R. And we want
that to be there. So if we look on our
reference again, we can see we've got this part down here is what
we're looking at. So we've got this little bit of a gap then coming down to here. So if I now come in, what I want to be careful
of is when I pull this out, I don't know if I'm
pulling out like this. We'll have a look. We'll have a look if
it can go around, and what we'll do is
we'll press Altns. And yeah, it might
actually work like that. So that's how I want to pull it out because I don't want to pull this whole thing out where it's actually pulling
out of the door as well. Now, I am looking when I'm doing this to see if it's flat. You can see that I
do have some issues here where it's
not actually flat, so I'm just going
to grab this side, and I'm going to press S x, zero, just to flat that out. Now the problem is, if I press one on the
number pad again, is that flat now? I think so. I'm going to do the
same thing here, Alt Shift and click S Z, zero, just to level that out. And I'll also make sure. Yeah, you can see here this be here is not flat inst there. So what I want to
do is I want to grab all of this. In
fact, we'll do this. Let me have a look. Let's think. We can do this one like this. So S Y, zero, and then we'll do
the same on this. So I'm grabbing this one first, grabbing this one last because that's my point where
I want it to be, and then S Y and zero. And that then is
leveled all that out. Now, I just need to
make sure that again, this part here is the same. So if I go this time SX zero
and do the same on here, SX zero, now we know that that is perfectly shaped,
and that is what we want. Now, from here, then, let's
put the final part in. So if I press Control R,
I don't want it there. Otrol lot, bring it down
to roundabout here. And then what I'm
going to do is press Control B, pull it out, and then finally make
sure face select is on E, enter lns. And with this little
one, we can actually get away with bringing
that out like so. And there we go.
Now, you can see, 'cause we had our
mirror on, it's done exactly the same on the
other side, that is perfect. That's exactly what
we want. And then we go, that's it, guys. We did that pretty fast. Now, the one thing we do
need to make sure is that this part here is coming all
the way back past this part. And we want to make sure just
to keep it nice and tidy, that this bit is coming up to
there, something like that, and now just have another look round and pull your door back a little bit because it's
a little bit too far out and make sure it's
actually looking good. We can even pull it back all the way to here if we want yeah, I think that's looking
really, really nice now. I'm happy with that. Alright, so now on this,
same as we did with this, it is stone, but we
still want to add a little bit of variations
and things like that. So I think what we'll do is
we'll come to all of this. We'll press tab A, and I'll try and see if I
can just go to transform, go to where it says randomized, and just bring it down
something really, really low. So instead of Nautpointnau one, we'll go Naupointnught
five, like so. And let's see what that
looks like. And there we go. We've got a little bit of
variation there, tiny, tiny fraction
because it is stone, but I do think it looks better. Alright, let's join you
together with Control J. Control A as always reset
all of our transforms. And then what we want to
do now is copy the bevel. So on here, we've got a bevel. So all I'm going to do is
grab this one, grab this one, press Control L, copy
modifiers, and there we go. That's looking pretty nice. Now, I'm just looking
at this part here, so I just want to come into
this shade Auto smooth. That's got rid of that. We've got our bevel on
there, as you can see, and now we're going to
do Avogor bevel on here. Yes, we have. So now, both of these are
pretty much done. So what I can do is now I
can move this to the side. I can move this one to the side. And then what we're gonna do on the next one is we
have to get all of these textured with shaders
on and things like that. Now, looking back now, if we go two, I've put this out really
big to our contact sheet. Let me see if we've
got our contact sheet. It's gone the other way. Of course, it would
be the other way. Here we are. We've already
done all of our walls. We've done all of our stairs. We've done our supports,
we've done our planks, and we've also done our windows, doors, and the other supports. So you can see, we've
done our plinths as well. We've got our main
roofs and these parts, these chimneys, these lights. But we're really
getting down this now. You know, we're probably at
this point, halfway through. So halfway through. And
the other great thing is a lot of the stuff
now you already know, you'll be able to
follow along really, really quickly, so it should actually speed up
the process, no end. And at this point, you can certainly think about what you're going to start
creating in the future, you know, as in
your own mod packs. You're not going
to know quite how to put them together until
you get to that part, but you're certainly
going to know, you know, how to actually create
these little parts. Alright, everyone, so I'm
going to put that down. I'm going to save my
work, so save work. And I'll see you on the next
one. Thanks a lot. Bye bye.
37. Applying Stone and Wood Materials with Smart UV Project: Welcome back, everyone,
to the Haunted Street environment
Blender to Unreal, and this is where
we left it off. Now what we want to do is
then we want to come in. Let's first of all, come and
put it on material mode and see exactly what we've got left to actually put material on. And the first thing
I think we'll do is we'll do the supports. I think they will
be the easiest. So we have on those Stone Light and Stone Doc Now,
on my reference, I'm just looking
at which one has the stone dark and
which ones stone light. And it looks to me
like everything basically on here
is stone light, except these parts going around here and these parts
coming down here. So let's actually replicate. I'm going to do first is
grab my actual support, press tab A, and we should be very accustomed
now to what I'm doing. So what we're gonna
do is just smart UVPjec, click on Wrap. And I'm also looking, can
I actually grab this one? This one here has
both of them on. So I'll grab this
one, press Control L, and I'm going to link
materials like so. Now, the other thing
is, let's just make sure, yes,
everything's on there. I already check
that. So what I'm going to do now is come
over to my material. It should have stone
light on here. And what I'm going
to do is grab these. Now, when I come to grab these, you have to be careful
that you're not grabbing any of
the insides here. So what I'm going to do is
I'm going to come here grab this one and grab it going
all the way around to here, and then I'm going to do
the same on the next one. So Shift click, Control click. All the way around to
here, Control click. Then press Control plus. And then all you want
to do then is mine. In fact, you know
what? We've actually got a little pot that's
coming out there. So you know what we'll
leave that on there because I think it's this one
where it's not coming out. So I just have to
be careful with this one if I'm putting
Stone dark on there. I'm actually
wondering, you know, whether this should be
stone dark. Never mind. We'll do that in a minute.
So I'll go to Stone Dark, click Assign, and there we
go, that's my stone dark. And then I'll come
to these. So I'm going to grab this
one, this one. This one and this one,
press Control plus, and then assign Stone dark. And I know it looks the texture looks a little bit weird at
the moment, but don't worry. We're going to fix
that, of course. And then what I'm
going to do now, I'm thinking, Al, shift, click, Alt Shift click, Al,
shift, click, Al, shift, click and Stone dark, and let's see how that looks. And you know what?
I think that's going to be absolutely fine. The other thing
is, you could come in and break this off
really, really easy. In other words, you could
come in and just go Alt Shift click Alt
Shift, click on here. So Althift click, right
click and mark a sm. And then all you're
going to do is just grab these two parts. Press Y, and those
are split off. And then what you're
going to do is press A. You're going to go
to mesh, clean up, like we did before,
and fill holes. And hopefully,
hopefully, I'm looking now to see if that's
filled a hole. I'm going to write click
and Shade O to smooth. You can see we have some
shading issues on there. Let me just check this and
why that's filled hole. Let me just check this
one and see if this Yeah, this one doesn't have a hole
filled, and the reason is, as you can see, when
we went to fill holes, this didn't fill in correctly
because of the fact it's got more actual edges down
there, as you can see. So more edges on here. We don't actually we do
want those edges on there. So what I'm going to do is
steady. I'm just going to grab everything, mesh, clean up. Fill holes, and then
just turn it up. So if I turn this up
to something like ten, we should now have
those holes filled. So if I put this over there, you can see now those
holes are filled, and now we should end up
with this going around here. Now, the other thing
is, you will notice that this over this side, as you can see, is not
actually straight. So I'm wondering if
the bow fun straight. I'm going to straighten this up. I'm just wondering whether
it would be easier just to recreate these pots
because they have caused us a little bit of a
problem. And you know what? I think it will
be easier. I know it's a little bit of
messing around guys, but I think it's
going to be easier just to delete those
out of the way, press Shift D, and then bring it down very,
very slightly, like so. And then what I'll
do is I'll press E, and pull it down and then E again and pull it down to there. And then what I'm
going to do is I'm going to pull it out this way. So if I pull both of
these out this way. So if I pull it out this way, then get the scale
and that once. So if I go over now to my
in fact, you know what? It's on here. You can see we've pulled it out on here, so
I'm going to copy this. And then what I'll do is
I'll go on the Y this time, so I'm going to grab
all three of these, and I'll pull it out on the Y, and you can see it's minus. So all I need to
do is control, so, press the enterbne and that then we'll pull them out
exactly the same. Now, I am concerned that we've
still got as we can see, a little bit of a shading issue. And I'm wondering if I come in, right click and mark a sharp, is that going to fix that?
And the answer is no. And the reason that's
there, by the way, is because we need an
actual edge in here. So if I come in and I grab this one and this
one and I press J, is it going to actually fix it? I'm wondering still why? Yeah, it's because this
thing isn't straight. Oh, I know now. I know exactly where it is now. Okay, so I'll fix
this straightaway. It's a good job we
found this, actually. So L, delete versus. Then we're gonna
come up to this, and we're gonna
press Shift D. We're gonna bring it down. I'll
show you what the issue is. The issue is, this has already
been. That's the issue. That is exactly
the issue. So what we're going to do
is pull this up, like so, and then we're
gonna press Delete. And I should be able to go
limited dissolve like so. And now I should be
able to press E, pull it down to where
I actually want it. So let's pull it down
to the ground plane. So my ground plane is just
around there, as you can see. And then I should
be able to press Control R and bring up one. And now, finally, I should
be able to pull this out. So if I pull this out to here, and then what I'll do
is, I'll copy that. So Control C. And then what I'll do is I'll pull
this out to here, go back to my Y,
press Control V, Enter, and there we
go. Now that's better. Now I can add in a sharp, so I'll shift and click. Marker sharp, and there
we go. It's perfect. I was just looking a
little out before. Now, how do we put it over here? I'm just going to
press L, delete this out of the way, so
dissolve edges. So I'm really, really glad
I actually found that. I'm just making
sure, by the way, we deleted that I
deleted it, okay? And then what I'm
going to do is just press L P selection, just to separate it from
the rest of the mesh, so you can see now
we've got two parts. And then going to press
mirror modifier on, so let's come into
modifiers, add modifier, generate a mirror, and that
puts that on the other side. Now, while we're
here, we can actually make sure that we're happy with, you know, how far these are out. Are they big enough? You
know, does it look right? Is everything looking good now, you know, what I think it is? I would say I've probably gone
a little bit too far here, so I'm just going to grab both of these, I'm going
to bring them back. I'm going to grab
this then, Control C, and then all I'm going to
do is come to this one. So the middle and the
bomb, pull it back, and then just press
Control V on there, and that then should pull
it back to be the same. And you see that this
is the same as well. Now, let's come in in
our mirror, apply it, Control A, and then
all I'm going to do now is grab this and
this, press Control J, and then we should end
up should end up with, with the actual stone on there. So now what I need to
do is just press A U, smart UV project, like
so, and there we go. Now I'm going to do is
go over to my UV map. I'm going to press Tab sorry, dot, just to get into
where the support is. Press the tab button, A, and here we go, A again, and then let's make them
a little bit bigger. And now let's look at
what that looks like. And there we go. It
looks perfection, guys. Really, really nice
now. Really happy I actually went in
and fixed that. Okay, so now we're
on to the wood one. Wood one should be
really, really easy. Let's I'm just looking out. If I've got some
wood. Yes, I have. The wood on here, actually, let me just check
again on my reference. Just to make sure this is wood light and metal.
So let's actually do that. So first of all, what I'm
going to do is unwrap it AU, smart UV project, click Unwrap. Then I'm going to go
to woodlight so wood. Now, we haven't got
wood light on here. So again, I'll come in file. I'll go to we'll go to a pen, but because I'm in Edit
mode, I can't do that. So now I can file a pen. And then we're looking for wood. So if I put in a search
here, Wood light. Let's bring that in. And I haven't got old
wood doc as well, so I'm going to bring in
both of these just in case, and the other one
is I need metal. So let's see if I've got metal. And yes, we've got metal. And this is ready
then for the dust, so that's already there. So now what I want is
the wood that wood? Red, spring that in. And then what we're
going to do now is press A, sorry, tab, A, A over here, 90, spin it round,
and there we go. That is that part done. Alright, so that's
that part done. Now on the next one, then, what we'll do is we'll
save our old work first. And I'm really sorry that
we went in to fix that, but I think it's
really important to actually show mistakes
when they happen. I really, really
do believe that. I don't believe it teaches
people anything when there's never any mistakes,
completely flawless. And, you know,
even professionals make mistakes all
the time, actually. So we actually produce
this course first, so we create the entire
scene, all of the pots, and everything
like that, just to make sure it is from A to B. But there are still
mistakes along the way, because obviously it's a huge court and that is a good thing. So I'm not going to be editing those out or anything like that. I'm going to be keeping
them in just so you can see if you make this mistake,
this is how you fix it. Alright, everyone, so I hope you enjoyed that, and I'll
see you on the next one. Thanks a lot. Bye bye.
38. Smart UV Project and Mirror Modifier for Doors: Welcome back, everyone to the
Haunted Street environment Blender to Unreal, and this is where
we left it off. Okay, go to keep in the
UV Editing for now. And what are we going
to do now is this door. So I'm gonna come in. The door and the
handle are separated, which makes it really,
really easy for me. Just make sure you press A, so you select
everything, and then you're going to
smart UV project, like so going to go in and look for a search
for wood because we should have now the wood
dark and the wood light. We're going to pick the
wood light for this. We're going to,
of course, go in, press A 90, spin that round. And there we go, we've
got our door on there. You can see exactly what
it's going to look like, and that looks really,
really nice already. I don't actually think I need
to do anything with that. Okay, so let's come
into our metal. A, SmartUVPject, click wrap
down arrow. Look for metal. Like, so click that on. Press the tab button. And there we go. I think that's
done, as well. Okay, now the last door, and this bit is a little bit
more complicated, of course. So let's come in, first of all, press A smart UV project, click on wrap, and
then we'll come down and we'll copy the wood
that we had before, which was the wood light. We'll come in again,
spin it round. So R 90, spin that round. So now we're on to let's
do the handle first. It is at the easier one. Let's put metal. Here it is. A, smart UV project. Click Okay. That's that done. That's looking very
nice, as you can see. You can also turn, you know, your um light round if you open up the sky
texture over here, all of the options will be on. I highly recommend
before rotating. Always, always say
about your work rotating has a tendency
to crash blender. But now what we can
do is we can come and bring this around so we can actually see what
we're looking at. Like so I tend to put a little
bit of shadow on there. It does give me a better view. And now what I can do is I
can come in with my door, make it a little bit bigger or a little bit smaller and see
exactly where I want it. So something like that, I
think, maybe gone too big, something like that, I
think, looks pretty nice. Okay, so the other thing
is, I just want to check, see if I've got the bevel
on there. And yes, I have. So let's now come back to the last part of the door,
which is this part here. So all I'm going to
do is grab this part, press A, U, smart UV
project, click Okay. And the first material I
want to put on is going to be metal because that's what
it's mostly made out of. So metal, there we go. And now what we're
going to do is just grab these parts here. Hopefully, we won't have any problems with
this, let's see. So what I'm going to do is
I'm just going to press you, and we're going to
project from you like so. Now, we want to put on our
window on here, so our glass, so I'm going to put in glass, and we want the one that
is window light, it. So I'm always putting
the lit ones on for now because I think it's easier to take them
off if we need to. And now I'm going to do is I'll grab the one, which
is the easiest. So this one here will
be the easiest to use. I'll bring it over.
I'm going to press the Ebone jaws to make
it bigger. Like so. So I'm going to press G, and I'm going to zoom in just a little bit just to
see how that is. I'm going to grab
both of these for now and just press G,
move them out the way. That then is going to make
it a little bit easier. I'm going to grab
both of these then. I'm going to press G and X, and then I can move them
over to where I want. And now I'm going to do is
just put these into place. So I'm going to move these into place like so, like
we've done before. Like, so grab both of these, press G, and then
grab both of these, and I'm going to press G and Y and move them up into place. Now, that's what
we should end up with, and I think
that looks good. I'm just looking
at this bit here. If I'm happy with it, and
Jas going to come down, press G and Y, and Jas bring that up a little
bit till I'm happy. And then I'm Jos going
to pull this bit. Jost a little bit. If it comes, let's see over here. Like so. Okay, so now I want to do is I want to come into this one, press the UB, and again, we're going to go down
to where it says copy. So we're going to
copy UVs, so UV map, and then I'm going
to come to this one, and we're going to
press Paste UV map. So paste UV map. And again, this is not
going how I wanted it to. So I'm going to try that again. So I've got paste on here. Sometimes, when you've
got funny shapes, this seems to be
what's the problem. So instead of that, let's go to transfer copy, and
then we'll go to U. Transfer Let's go to transfer. Have we got one that's transfer? Yeah, that's not gonna work. With this one, I'm wondering, because this has not
been randomized, it might be easier rather than
trying to copy the UV map like that to actually come in and just delete
this out the way. So if I come in,
not print screen. Come in, delete faces, delete faces, delete faces. Make sure I'm in
the center then, so shift desk
cursor to selected. And then what I'm going
to do is come back to this face then I'm going
to press P selection, separate it off,
control AO transforms, set origin, then 23 Dcursor. Adding a modifier, then
the modifier we're going to bring in is going
to be a mirror. Mirror it on that side,
mirror it on the z as well. And there we go, that's
what we've got left with. Now, we can see we've got a
big difference down here. I'm not really going
to worry about that. I'm going to apply that mirror. And then all I'm going
to do now is come in. Edge select, and I'm
going to pull this down. So I'm going to, I think, put it onto I'm going to go out of here because we
know our windows are fine. We know they look fine. So
I'm going to go out of here. I'm going to go on object modes. I'm gonna press Dot
just to zoom into it because I don't want to
make too much of a mess here. And what I'm going to do is I'm going to grab both of these now and pull it down. And you can see that we've got a little bit of an issue here. And that's what I
want to avoid because I don't want this
stretching so much, which means that
I might have to. In the end, you can see here
that I think if I come in, actually, and I'll press
the litle question mark, so I'm in solid mode. Press the litle question mark. Let's see what's going off
with these because it could be that we've just got too
many vertics in there. So what I'm going to do
is I'm going to press M, and I'll merge it at the last, and I'll do the
same thing on here. So M Merge, where is
it merge at last. There we go. And then
let's pull these two down. And I think from here then, I'm also going to delete
this out of the way. I don't think I need
this one in as well, so I'll press delete,
and I'm going to dissolve versus like so. Now, let's press question Mark
to bring everything back. Let's make sure then we
actually put them in place. So I know it's a little thing, but I do want to make sure
that they're done right. Let's put it onto
there, and I think that looks absolutely fine now. Now, we could go in
and reunwrap those, but honestly, I don't think at this point, there's
any need to do that. It's such a tiny, tiny thing. And you wouldn't you
wouldn't notice it, even if you're up here anyway. So I think that's
absolutely fine. You can see the
difference between these. There's a little
bit of difference. If you really want to go in, project from view
again and set them up and then copy, you're
welcome to do that. Now, I just want to join
this with this now, so I'm going to press Control
J, join them both together, and we should still have
If we move our door now, everything moving
together like so. Double tap the A, and
there we go, guys. Okay, so now what I want to do is I want
to move my door here. I want to make a
new one. So if I close these up, this
is what I've got. If I grab both of these, then I'm just dragging
over the viewport, pressing the b, and I'm just checking to make sure
I've not created them already. Let's put one as doors, like so. Enter. Let's put these. We've already got
one that is support, so we'll put door archers. So let's come in, grab both
of these, door archers. And again, if you
really want to use your asset manager
to put these in, you're welcome to
do that, as well. I'm going to grab
all of these, press. New collection we'll call
this Windows. Like so. And then what I'm going
to do now, I need to probably name them
while they're in there. So we'll just come
into this one first. We'll call it small window. This will make it really, really easy as well when
we're and unreal. We'll call this large window. So F two, large window like so, and we'll call this
arched window. So F two, arched window. Like so. And then we'll call
this stone door support. So F two, stone, door, support. And then we'll come to this one, and we'll call it
wooden door support. So F two wooden door, support, like so, and then we on to
the doors and the handles. Now, what I'm going
to do is I'll just call this simple door. Let's put that in,
so simple door. Like this, and I'll
call it window door. So windowed door, like so. And then what we'll do is
we'll call this small handle. So small handle. And then we'll call
this large handle. So large handle. And then what we'll do is we'll call this one door window, so F two door window, like so. Okay, so we've done all that. Now, let's put
these into a place. So I'm going to pres
seven to go over the top. I'll grab, first of all, my door archers, so I'm going
to put those there. Like so. I'm going
to move this one a little bit, put it into place. Seven to go over the top again. I'm going to grab my
windows, press in G, and then I'm going to
grab all my doors and the handle so click
and drag and G, and then all I want to
do is grab my stairs. Shift D. We'll just put
Shift D there, Shift D, and Shift D. And then all I'll do is come
into here and we'll call this door Arches
not like that. Arches or door arch,
I'll call it that. And then we'll do is make
this a little bit smaller, come to this one,
call it windows. Like so, let's make this one a little
bit smaller as well. And finally, this one
is the actual does. So that one's easy doors. Okay, now let's have a look, make sure everything's
looking good. And yes, it is. And now the best thing is that we are ready to move
on to the next part. So we said after these, which one did we say we're
going to do after these? Let's have a look.
We've done all these. We've done all of the walls. We've done all of the windows. I think it's probably time to do maybe maybe something
a little bit different, which might be the I think
we'll go with these. So we'll go with the barrel. We'll go with the crates and what's this called
the linen bag. We'll go with those, I think. So we'll get these
out of the way. We might even as well
do these graves. They're very different creating them than the other stuff
that we've been doing. So, yeah, I think we'll go
with those. Alright, everyone. So again, make sure you
saved out your work. Press tab, double tap
the A, and there we go. We're ready to rock 'n
roll on the next one. Finally, let's put the
cursor to World origin. Alright, everyone, so I
hope you enjoyed that, and I'll see you
in the next one. Thanks a lot. Bye bye.
39. Modeling a Stylized Spade with Proportional Editing: Welcome back, everyone
to the Haunted Street environment
Blender to Unreal. And let's take a
look, first of all, at a reference just so we make sure we've
got the right one. This is the one that
we're actually creating. So how far can we zoom in here? We've not got a very
good view actually here, so what I'm going to
do is see if I can find them on yes, here we are. So it's a little bit
of a better view. You can see this has pretty
stylized this part here. I might make it less chunky
on the actual build. I hope you guys
agree, it might be a little bit too chunky or it
might be just about right. I think when I built
this, I built it with quite a low vertice
on my cylinder. So I'm going to probably
do the same thing again. Alright, so let's
make a start on that. So first of all,
let's grab our guy. We'll zoom into him because
then will make it easy. And what we'll do then
is bring in a cylinder. I'm not going to worry about
scaling at this point. All I'm gonna worry about at the moment is just
getting it looking right. So what we'll do is
we'll go to mesh. We'll go to cylinder. And what we'll do is we'll turn this once we're in solid mode down
to something like eight. And I think that is how
many are used on it. Let me just have a look.
I think it's eight. Let's try ten. Let's go for ten. That might be a
little bit better, actually. Let's make it smaller. And the first thing we'll
do is the actual I'm not sure the arm of the
of of the speed. So let's bring it
in a little bit. And what I'll do is I'll
pull this down then. I'm going to j grab this. I'm going to pull it down
to something like there. And then what I'm going
to do is I'm going to put one edge loop
in that's going to separate the bottom
of it from the top. Let's press Control R, bring it up like so. And then what I'm going to do is bring in an edge loop here, Control R, left
click, right click. I'm going to press Control B and just pull this
out a little bit. Then I'm going to
press the S bon. Like so, and it's
as easy as that. Now what I'm going to do is
just bring in this part here. So I'm going to grab this phase, bring it in a little bit, maybe move it up a little bit like so. Alright, let's do the
thicker part now. So I'm going to press
Control R again. Left click, right click, right. In the center, let's drop
it down a little bit, press Control B, and
then I'm going to press the S borne just to bring
it out a little bit. Now, at the moment, it
looks a little bit thick, you know, compared to the spade
and everything like that. So what I'm going to
do before I start is go into object mode. Shade auto smooth. Let's
have a look at that. Is it going to
shade auto smooth? That is the question here. Just wondering if I've gone a
little bit too high, I can, of course, turn this
up and get it to be smoothed a little
bit more smooth. And there's another
option we can do as well while we do that, where we can go in and
generate a subdivision. So if you come in
with subdivision, you'll end up with
something like this. But you know what? I don't think I'm too
happy with that, actually. So you know what
I'm going to do, I'm going to press shift day. I'm going to bring
in a cylinder, and I'm going to put it on 18. So let's put it on 18. Let's see what we
get from there. So if you right click and shade Auto smooth, you know what? I think I'm going
to go with that. I think I'm going to go with 18. I think it's going
to look a little bit better at least on this build. Doing it in that way.
So, easy to do this. All we need to do is just bring it up to the top of
there, come round. And I recommend you
do this, by the way, if you're not happy, it's
the easiest way to do it. Go into Xray if
you can't see it, and then just pull it
down to the bottom. So we're going to pull
it down to the bottom. And then what I'm going to
do is I'm going to leave Xray on just for a minute just so I can
see what I'm doing. You know what? I can't even
see what I'm doing with that. So instead of that, I'm
going to put on wireframe, and now I can see where
those edge loops are. So I'm going to
come in control R, bring it up, control R,
bring up another one. And then Control R,
bring up another one. And then what I'm going to
do is come in now contoR, bring it up to there, Concho ar, bring it down to here,
and there we go. Now I want to do is I want
to come to the top of here. So I want to come in with
face let comb to the top, grab the top, like
so, press one again. And then all we
have to do is press the S bone to bring
it where we want it, and now we're on
to the edge loop, so I can press Alt Shift click, and you can see here, Al, shift, click, press the S bone, Alt Shift click,
press the S born. And now move down,
Alt Shift click, so make sure you click it first, just so you're not
selecting the other one. Press the S button, and then
just work your way down. It's a really, really
easy way of doing this. Click it first, Al shift, click, press the S
button, bring it out. Come on down. Al Shiv, click, press the S bone. Come
down to the last one. Al Shiv, click, press the
S bone and drop it down. Okay, so now let's
go to object mode, and we should end up with
something like this. And what that means is now I can actually select
my other one, and if I press G, you'll see
the difference between them. And I think this actually
looks much, much better. So what I'm going
to do now is delete the other way. I'm
going to come in. Let me just see if I had a shop on here, it's
going to look better. So, right click, Mark a Shop. I know it doesn't, I think
I'll leave the shop off. So now we're on to the spade. So let's come down to the spade part. Which
will be down here. I'm also thinking, is this
a little bit too thick? This might be a case where now I'm going to get
the right scale. So what I'm going
to do is just press S just to scale it down. You know what? It might just need to be a little bit taller. So I'm just going
to press S and Z, scale it down a little bit. Yeah, and I think now that's
looking round about right. So let's put the spade on here, and then we'll actually see. So what I'm going to
do is I'm going to come to the bottom up
here while I've got it. I'm going to press E, enter S, pull that
out a little bit, like so, and then E, bring it down to where we
actually want the spade to be. So if we look, it's roughly about up here. I'll
press the S bod. And bring it in like so. I think also with
this part as well, I'm going to press S and Y and just squish it in a little
bit, as well on there. And there we go,
that's looking good. Now I want to do
while I've got this, I'll press Shifts,
cursor selected. That makes sure then when I
bring in my actual plane, I've actually got something
to put it against. So what I'm going to do
then is I'm going to press Shift and A and
bring in a plane. I'm going to spin
this plane round. So R, and we're going
along the X 90, press the S bone to bring it down and
where do we want to? Somewhere. Somewhere
around here, maybe maybe this wants to
both go up a little bit, so I'm going to pull
it up a little bit. And then what I'm going
to do is bring it down, so bring it down just to
make it more like a spade. And first of all, I'll make
the little point a bit. So all I'm going to
do is press Control R. Left click, right click. And then I'm going
to press Control B and pull it out to where
I actually want it. So I'm going to pull it
out, press the upbond one, so we've got that center one. And then what I'm going
to do now is come in, put on proportional editing, and I think we'll go with, let's try going with Ru. So let's try going with
Ru grab the center part, bring in your mouse, like so. And there we go. Now, is
that what we want it? Or do we want it?
Let's say on Shop, let's try Shop, bring
it out a little bit, or do you want it
more like this? I think for us, let's
try in the square. Yeah, and I think that is the one that we're
going to go for. I think that is the best one. Now, finally, we want one
more edge loop in here. Well, actually, we might
need another one in, but I'm going to put
this round about here. And then what I'm going to
do is bring in these two. So I'm going to take
off pulseds for now. I'm going to make sure
that I'm on medium point, and I'm going to press S and X and bring that
in a little bit, like so, and then I'm also going to see if I
need to bring them out, and then finally, I'll bring
this one down a little bit. And that's looking really cool. Now what I want to
do is just grab these edges, bring them down. Press S and X, pull
them out a little bit, like so, and now we want that bend that
we've got in there. So if I come in,
I should be able to bring these down and have that nice bend that
we're actually looking for. Finally, then, we want
to bring these out now because we actually want a little bit of curve on here. So what I'm going to do
you notice here as well that we haven't got a
point going up there. It might be easier if we
put that in because if not, we're going to end up with a
really, really weird mesh. So to fix that, what we'll
do is we'll just come in, we'll right click,
and what we'll do is we will subdivide. Then we'll come in
back to vertices and we'll grab this
one and this one, press J, and then we'll come to this one and this
one and press J. And now we know the topology is relatively clean for doing
what we're going to do next. So what we're going to
do is we're going to grab all of these. In fact, you know what,
we'll grab all of these going down here, like so. And then what we'll do is
we'll bend these out now. So if I pull this out, I should be able to bend them. Now, what I'm going to do
now is just grab these ones. So grabbing these
here and this side. Like so, we're going to
bend this one out now. And then finally,
what we're going to do now is the last part, which should just
be these two here. We should just be
able to bend those out like so. Then there we go. That is looking pretty nice. Now, we might not have gone far enough, and if
you feel like that, there is another way
of doing it where you can actually put
portion head on, put it on smooth, and then
what you can actually do is bring this out
and pull it like that. You can do it that way as well. You might not go let's have a look what it
was like before. Let's pull it out a
little bit more. Like so. You know what? I think that's
actually looking better. It's just the angle of it now. So let's come in, take
off proportional editing, and X, and rotate it. Let's move it out a little bit, so it's right in the center
there. And there we go. I think that's looking
perfect, guys. Finally, then, let's give it
a little bit of thickness. So if I just press E to extrude, and we should end up with
something like this. That is looking very nice. Now, I'm just looking
if I want to pull it back a little bit, so I'm going to grab
the whole thing, pull it back a tiny bit. Maybe we don't want to see
that little bump in there. So maybe I want to just pull it out just so that's not there. And I'm also wondering, would it have, you know, this par here? Maybe that's too fine a detail. Let's write Clip and
shade Auto Smooth, and this is what we've
ended up with so far. So on the next lesson then, what we should be doing is we should be finishing this off, getting actually the handle on, and moving on to the next prop. Alright, guys. I'll see
you on the next one. Thanks a lot. Bye bye.
40. Finishing the Spade Handle with Mirror and Solidify: Welcome back, everyone
to the Haunted Street environment,
blended to Unreal. This is where we left off. Now, let's focus now on
the scaling of this. So let's make sure it's
the right size first. So I'm going to bring
it down. I'm going to pull it over to make sure. So imagine if he was stepping on this and he was
holding the handle, this looks then round
about the right size. Now, I will say that the bottom, so this spade, it might
be a little bit too big. So let's just come in, press the S bun and bring
it down a little bit. Like so, and let's bring this down a
little bit just there. Let's have a look at
that. And I think that now looks perfect. So now let's focus
on our handle. First of all, we'll move it just across because we know
we've got the right skill. Let's then come to the handle. So what I'm going to do
is I'll grab the top. Like, so I'm going
to press E to S, pull it out a little
bit, like so, then press the E borne
just to bring it up. Like so, and then let's
bring it in like this. And finally, we'll
have a little bit of, like, a knobbly bit on the end. So all I'm going to
do is just press I to insert, and then E, pull it up, like so
just a little one, and then S, bring it in. Alright, perfect. Now,
let's make that handle. Now, we could make the handle. With a curve. But I think
for this, we won't do that. What we'll do is
we'll just create it probably with a plane. So we'll use a plane to do that. So what I'm going to do is just press I'll come to the top, first of all, shifts, Custer selected, Shift A, and then what we'll do is
just bring in a simple plane. We'll make this plane smaller. We've got it already
facing the right way. All we need to do then is get it to be the right sort of size. So I'm going to press S and
Y, bring it in a little bit. I'm also going to raise
it up a little bit, like so, and then S and Y. And there we go, This
should make a good handle. Now, I'm going to, first of all, come in, press
Control, left click, right, click, and I'm
going to do that, so I only have to work
on one side at a time. So what I'm going to do
now, if I press one, I should be able to see where
I'm actually putting this. So now I can actually come in. I know I've got the right width. So all I do is press E, E, E, E, and maybe E
again like this. And then what I can do is
now I can come in Again, this is looking a
little bit too thick, I would say, maybe
a tad too thick, which means that this is
probably a little bit too thick. So I'm going to press Control R, the ring in an edge loop, and then I'll press Alt shift
and click going round here, press the bone just to
bring it in a little bit, and then I'll also bring in this part as
well a little bit. Shift click, like so. And then finally, I can actually
come in to my plane now, press S, Y, and bring
that in a little bit, just so it's a little
bit easier to handle. Okay, is it still a
little bit too thick? Maybe it is. Maybe it is. I'll just move it
up a little bit. S and Y. I think, that's looking much better. Okay, so that's looking good. Now what we want to do
is want to come in, delete this face off
of here, delete face. Like, so we already know the position of the orientation is right
bang in the center. That's exactly where we want it. Adding a modifier, we're going
to generate first of all, we'll generate a mirror, so that's that side,
and then we'll also generate a solidify. So let's bring in a solidify. Let's turn it down, so we've actually got
something to work with. And from here now,
we can actually see how far down
we want to come. So maybe something like this
is looking pretty good. At this point as well, you can come in and add in
another edge loop, so we can come in
control, left click, right click and then bring
this up a little bit, just to make it a little bit
more rounded if you want to. And we'll also come in, I think, grab this edge loop. So this one on the outside, and let's bring it
in a little bit. Let's also bring this
in a little bit, like so, and there we go. That's looking pretty nice. Now, I'm not going
to apply that. First of all, I'm
going to come in and bring in this handle
that we have. So I'm going to
press Shift date, bring in a cylinder. And then what I'm
going to do is I'm going to keep it
on 18, of course. I'm going to bring it
down then, like so. I'm going to spin
it round, so RY 90. Then I'm going to make
this fit along here. First of all, let's pull it out. I'm going to press S and X, pull it out into the
place where we want it. From here now, you
can really see, have we gone far enough? Should it be up here? If we look at the whole handle, you will see that the
handle at the moment, is probably a little
bit too small. I'm just going to
press the S button. Now it's looking about
right, but the one thing we can see is that the height of the handle to the rest of the spade looks a
little bit out of place. So what we'll do
is we'll come in, we'll grab these two first, we'll pull them up into place
like so we'll pull them in. And then we might even add add in Controlr another edge loop, pull this out. And
you know what? I actually like that
better than the original. Okay, so now let's deal
with these parts here. So how we're going to do
though, first of all, let's bring in one edge loop
in the center. So controlar. Left click, right, click, press the button,
pull it out like so. Right click to Shades Smoove,
and this is what we've got. And now what we want
is we want to make sure that these parts
here are coming in. So I'm going to press Control
R, left click, right, click, ControlR, left
click, right, click. Alshif click to grab the
other one, press the S bone. Now, at the moment, these
are coming in the center. That's because we've
got median point on. Let's put on individual origins. And now you'll see that's
actually working better. Something like this. And then I want to bring this
one in as well. So control, left
click, right, click, Control R, left
click, right, click. And then you should just be able to grab this one in here, and then we should be able
to bring this in like so. And there we go, that's
looking pretty good. And now what we'll do is
we'll grab just these ends. We'll make sure on medium point instead because then it'll
come from the center. We'll press SNC and
bring those in like so. And then finally, I'm just going to bevel off these edges. So I'm going to press
Control B, bevel them off. Now, you see, they're not
beveling off properly. They're just going kind of flat. That's because we need to
reset all of our transforms, set origin to geometry, and then you can come in and you should be able to
press Control B, and now they bevel
off absolutely fine. And there we go.
Now, the last thing I would say is that these parts here might need lifting
up a little bit. So if I lift them up
or they need rotating. Now I'm just wondering
if I come to this, let's just try the rotation. So we'll come to here and
we'll just press R and Y and then lift it up and
see if that looks better, which I think I'm
looking at this, and I think it actually
does look bet like that. Now, whenever you're
doing anything like that, don't try and just replicate
it over the other side. It's just so easy
just to come in, press Control plus,
and then just delete. So delete these faces
out of the way. Now, you already
know that with this, we've got it in
the center anyway. So simply come in and
just generate a mirror. Makes life really, really easy just to put it
over the other side. So don't mess around trying to do exactly the same
on the other side. Alright, so I think our spade now is actually done.
I'm happy with that. Now what we want to do then
is come to this one first. Now, one of the problems
you will have with a mirror is basically
when you press Control A, even if it's a cylinder, it
will put in an edge on here. Now, sometimes,
when you come in, so press Alt Shift
click on here, press the Hb, it fills
in a face on here. So if you're ever having
problems with it not UVing properly or you've got extra parts on UV map that you
don't know where they are, it's often to do with the mirror putting in a face in here, and hopefully we'll
see that in action. Now we've got this.
That one's done. Let's hide it out of the
way. Let's come to this one. First of all, I want
to apply my mirror, so Control A, My solidify let's
put it on even thickness. Let's apply that with Control A. Now let's see if on this one, if I press H, has it added? No, it hasn't done that now, so we're okay with
this one as well. Let's right click
Shade Ato Smooth. And then we go, we've got that. Let's hide that out of the way. And I think the other
things we didn't put anything on them.
Let me have a look. No, we haven't we're basically
at this point, all done. So I'm going to grab this now, this, this and this. I'm going to press Control J. I'm going to press Control A or transforms set
origin to geometry. Then there we go, guys, there
is the spade. Ready to go. Now, of course, if
you want yours to be, a little bit smaller, squished up or something,
grab this center part. So just this part here, and you should be able to
squish that down quite easily. In fact, I will
show you actually Alt Shift click Control plus, Control minus, make sure
we've got just this on. Press and Z, pull it down
a little bit, like so. And then what I'm
going to do then is pull all of
this down as well. So I'm just going to come in. I'm going to press Alt Shift and click on here, Control plus. And then what I'm
going to do is I'm going to grab the top of here
Alt shave, click Alt Shiv, click, and then L
and L. And now I can pull this bit down as well to bring it to
where I want it. And now it's looking
a little bit more stylized than
what it was before. Looks kind of chunky now,
which is what we wanted. Alright, everyone, so
I hope you enjoy that. Let's save our work,
and on the next one, we'll start work on
our actual pickaxe. And believe it or
not, these actually are they're quite hard
to model like this. So, you know, if you've got this far and you've
done all that work, and now you're doing
this, you know, it's gonna put you in good stead for the rest of the course. Alright, everyone,
I'll see you on the next one. Thanks a lot. Bye bye.
41. Modeling a Pickaxe and Blocking Out Graves: Welcome back, everyone to the
Haunted Street environment, Blender to Unreal, and
this is where we left the. Alright, so the pickaxe,
let's go with that. So first of all, let's make the little pick that's
going to go on there. So I'll bring in a cylinder. Now, if you've restart Blender, you need to make sure
that it's set on 18 because it'll come in back on 32. Blender always does that. What we're going to do
then is scale it down. We're going to get it roughly going to press Control's
and pull it this way, roughly the same
size as our spade. So if I zoom in now, I can see that if I put this part here, so
I'm looking at this body. If I make the pig that sort
of size, that should be fine. Alright, so let's see how big we need to make
this first of all. So what I'm going
to do is then I'll bring in a couple of
edge loops, so control. Two, left click, right click. And then what we'll do is we'll
come to the bottom first. So we'll go in, grab the
bone, press the S bone, like so, press E to extrude, then the S bone again,
something like this. And then what we'll do is we'll
come into the center one. We'll give it a
little bit of bend. So I'm going to press
Alt Shift click, press the S bone,
and there we go. And then what we'll
do is now we'll bring this part down like so, and then we might just bring
it up a little bit. Like so. Alright, that looks a
decent part of our pick. Now what we'll do is we'll
come to this part here, so I'll make this bomb bit. First of all, I'll
get rid of my plane. I'll just hide the other
way. First of all, then we'll grab this
bomb space here. We'll press I because the piece
of wood is going to come, you know, it's not
this is the mouth part that goes around
the wood anyway. And then what we're
going to do is press E, bring this out, and I'm
going to rotate it. So I'm going to rotate it on the Y. I'm going to move
it slightly, like so. And then what I'm
going to do is press I and then E and then S, just to bring it in, like so. I'm going to write click,
shade or to smooth, and we should end up with
something like this. Now, let's deal with
the actual handle now. So again, we'll come
to the top of here. We're going to press the
i button, bring it in. And then what I'm going to
do is now if I press one, I should be able to just
bring it up like so. And then rotate it on the Y or the X, doesn't
really matter which one. And then, E, we
should be able to make it a little bit bend. Now, I'm going to make
sure that because this part is bending this way, I'm going to make sure
that I'm bending it, you know, kind of this way, and then all I'm going to do is bend it a little
bit more on the Y, like so, like so. And if I've gone too far, I can just kind of
bend it back on the Y a little bit and just
move it back. Like so. And then bring it up
a little bit more, and then and Y and then
move it across. Like so. Now at the moment, I
know it doesn't look too much like a pig, page. But, trust me, once we've got the pick actually on
here, you will see. So I'm going to bring it
up a little bit more. I'm going to press the S bone, like so, and then bring
it up a little bit more. Press the S born
to go in. Like so. Alright, that's
looking pretty good. Now, don't worry too much
about this at the moment. We're going to
deal with inamine. Let's first of all,
just move it over here. And now let's put the
one side of the pic on. So let's do this side first. So what I'm going to do is I'm going to come into
this part here. And I think I'm going to
grab all three of these. So I'm going to grab
all three of these. And the first thing we're
going to do is just press the Ibn just to bring
it in a little bit. Press I again, so it's the
whole, not individually. And then what we want to
do now is bring this out. So if I press, I should be able to bring it out like this, and then I should be
able to press the S born and bring it in like
that. And there we go. Now, let's add a few edge loops, so control, bring in
a few edge loops. Let's bring in five. Left
click, right, click. Let's grab this bomb then, put proportional editing on. Now I want it to pull
this kind of way. So let's see if I put
this on local or normal. Will it pull it better this
way? So let's pull this. Let's bring it in a little bit. And let's see if we
can get a little bit of bend on there. Maybe let's put it
back on Global. This really helps, and I'll show you later on why it helps. Let's bend it like that,
and that is looking. Yeah, that's looking
pretty nice. Now, let's come with
the back of it, then. So with the back, we'll
grab the three again. So we'll grab all
three of these. Maybe maybe on this
one, actually. We could get away with
grabbing a few more. So let's see. Let's grab these. So we've grabbed four instead, we're going to press
I to bring it in. And then what I'm
going to do now is press one on the number pad, and I'm going to bring it out. Now we can see that
the angle that these are coming out is
probably not right. So what I'm going to do is
turn off proportional editing, and I'm going to pull
this out a little bit. I'm going to press S and Z just to squish it
in, and then E, pull it down, S
and z and then E, pull it down, and then S and Z. Like so. Now, you will
notice it's very, very thick on this end, and
we don't really want that. We do want, though,
this kind of, you know, this jut
coming this way. So what we'll do now
is, first of all, we'll come in and go S
and Y and bring it in. And then we'll come to
this next edge loop on there. So S and Y. Bring it in, and
then the final one S and Y and bring it in. And now you'll see that
that actually looks really, really like an actual pig. So really, really nice, you can see the handle
looks really nice now, and I told you, once
you've got that on, you will see that it's starting to look much, much better. Now, the one thing
I would say is I would even make this bit a little bit smaller or this
bit a little bit longer. That's the only
thing I would do. And so the easiest
way to do that, I would say is probably by
maybe cutting this part off. So if I come in, Alt Shift
click, right, click, Mark Sam come on in and
then press L, delete faces. And then what we can do now
is come into this part, Alt Shift and click,
proportional editing on. Let's make sure it's on smooth, and then let's press the S bone just to make it a little
bit smaller like so. And then what we'll also
do is we'll come in. Starting here, we'll press the S bone without
proportional editing on, like so, like so. And, like so, and we'll
have it I think like that, but obviously with this end, either pulled out a little bit, might have gone a
little tattoo far. Let's just bring them
out a little bit. A little tiny bit. And then we'll make
this end smaller now. So let's come to the end
Alt Shift and click. Press the S bone.
And there we go. I think that's looking
much, much better now. Now, to fill this in, we can
just press F. But honestly, if you just press F, you're not going to
get your edge loops on there or your vertices
or anything like that. So what you can do
instead of doing that, just press Alt F and
then we'll fill it much, much better for you,
as you can see. Alright, so that's looking
much, much better now. Alright, so that's
that big bill. I'm just looking on the
end. Am I happy with it? I think I am. Okay, so
let's now, move on. So let me just
grab my reference. Let's move on then to
the actual graves. So I'm just going to come and look how I'm actually how I actually did this
that's quite important. Okay, so what we're gonna
do then is make the graves. Now, first of all,
let's make the grave the same size as the guy. So what we'll do is we'll
come in to the guy. We'll press Shiftsk,
cuss to selected, we'll press Shift A, and we'll bring in a plane. We'll spin this round then. So RX 90. And then what we want to do then is just pull it
out a little bit. Now, let's make it,
you know, human side. So S&X like this. Is he gonna fit in
there comfortably? Probably not, so let's make
it a little bit longer. Like, so then what we'll do
is we'll spin it around. So X -90, and there we go, There will be our first grave. Now, let's make another one for, you know, a little
person. So shift D. Let's make it a
little bit smaller, something like this,
and there we go. Now, let's come in,
and what we want to do is perhaps we'll
do one first, then the other one.
I'll do this one first. I'm just going to press E
and then I'll press E again. I'll also press A and shift
N just to spin that round. Then what I'll do is I'll come
in now and pull this out. I'm going to just come
to the bottom of here, grabbing all of these edges, press the S bone, pull it out, grab this one, press the S bone, and pull it out like so. Now, the moments of truth then, is, I'll just make it
a little bit thicker, pull it out a little bit more. The moment of truth then is once we've got the
other parts on. So the first thing
we're going to do is say about my work. And then on the next lesson, what we'll do is
then we'll get in a few modifiers on here and actually see what
we can do with this. Alright, everyone, so I hope you enjoyed that, and I'll
see you on the next one. Thanks a lot. Bye bye.
42. Sculpting Grave Forms with Multi Resolution and Displace: Welcome back, everyone
to the Hunter Street Environment Blender to Unreal. And now I'm going
to show you how to actually turn
this into a grave. So the first thing we're
going to pawn here is going to be a
multi resolution. So if I come in and
I bring this one in, multi resolution, and then
what I can do is subdivide. Now if I subdivide, you'll end up with
something like this. We really don't want that.
What it's actually doing is it's pulling all
of the vertices in, it's adding more edges, so more edge loops around and you can see that
if I subdivide again, we end up with
something like this. It's great to use, but
no it's the first one. So if our breast controls
d and I actually go to simple and then
I go to subdivide, now you can see we're actually going somewhere a
little bit more. Albeit it's kind of broken
the mesh a little bit. So what I'll do instead of that is I'll play around with it. I'll do simple again,
then subdivide, and now we can see that
if I bring that in, it's kind of a nice base
to actually work with. Yes, we do have some issues because there's an
actual edge loop here. If we take that off,
so if we come in, shift and click and press,
delete, dissolve edges. Now press tab, press Control
A or transforms right, click Set origin geometry. What we can do now
is get rid of these. So we can unsubdivide. So if I press tab, unsubdivide Now, we
need to take these off. There we go. Let's
take that off. Let's take these off.
Like so. And there we go. And let's try and subdivide
now. Let's try that again. Simple. And let's take this off. Let's take it off and see what's actually
going wrong there. Oh, it's a problem. Alright,
let's try that again. So multi resolution. Let's see if this works
now, and there we go. Now it's working. Alright,
so let's press simple twice, press it on here,
press it again. And there we go. The
one thing I'm wondering is why I going to face
select Let's have a look? Is why it actually has
that little lump there. I'm not going to worry
about it too much. Now, the other way
we can do this. So this is a multi resolution. Why do we use this,
first of all, without worrying about
what's going on here? We use it because we have a lot of control over what we do. If we come in and
instead of using that, we use a simple subdivision, which you might see
a lot of people use. So let's bring in subdivision. You don't have as
much control over this as what you have with
the multi resolution. So if I press simple on here, you can see press simple again. I can put it up. Like, so then I can go to this
and put it on that. So it's either on simple
or cat mill cloth. And, you know, you've
got to apply it as well. So there's not as much
control over there. I absolutely recommend if you're doing anything
with sculpting, you're using the
multi resolution. Now, the thing is, this is
actually not looking too bad. So I could come in and use that. So what I'll do
is I'll generate, first of all, a
subdivision surface. I'll actually put it
though on simple instead, and I'll click that up
a couple of levels. Then I'll come in and
generate a multi resolution, and we'll see if
I subdivide now, is that not that one. Sorry. Let's put it on simple. Let's subdivide now. I'm just looking to see if
we still get those problems. And yes, I think we do.
What I'm going to do is just press tab,
delete this face. Let's see if now we
end up with a problem. Let's take that off a
minute, add it in again, generate a multi resolution, subdivide, and it looks now. Now it's actually
working, and there we go. Okay, so we took the bob off. Now it's working
much, much nicer, as you can see, and now we have control over subdividing it. So now we can see that
because we've subdivided it, you can see all of these
little edge loops in there, and it seems
completely overkill, but actually, it
makes it really easy to make our grave now. So what I can do is I will
subdivide it once more, and now you can see they're
really, really tiny and it's ready to actually
create something with. Now, I'm just going to go and do the same
thing with this. I'm going to bring it out
bring it out like that with S, grab the face under
here, delete it faces. And we're going to reset then the first of all the normals. So A, shift down,
spin those round. And then what I'm going to do is reset all the transforms, right, clicks the
origin geometry. And now let's see
if we can transfer. So if I go to this one,
shifts like this one, press Control L,
and we're going to copy modifiers, and there we go. Now we've got something we
can actually work with. Now, again, we can still
alter this because we've got all of our subdivisions, multi resolution
already on here. So just make sure that
you rewind and, you know, play it again if you want to see exactly how it got to this
point because, you know, I did use subdivides
simple you know, and varied them up a little bit. So just see if we can
get to this point. Now, let's come to this
one, and what we want to do now is just close this
up, close this up, adding a modifier, and let's
generate a displacement, which should be under deform. So deform, displace. Let's put the strength
for now on not 0.1. Now, when we're dealing
with displacement, basically, you're
displace the mesh. So every single one of these
points can get displaced. But if you think
of it like this, you could either displace every single point or every other point or
every second point. This is how you can
control displacement. You can also think
of the strength as how far we pulled or
pull in the points. So if it's very high,
we're pulling them all the way out here, which
I'll show you in a minute. Now the thing is
with displacement, we need to tell Blender, what
are we displace it against? So where are the
points coming out? Where are they staying
in? A stuff like that. So if we come over now to
our texture, we click No. And then what we do is
we change this from image or movie down
something like clouds. You can see now we get
displacement like this. Now, like I said, this is
basically pulling out points, pushing in points, all
of that good stuff. Now, if we come in,
we can actually change how much
displacement we have. We can also then come back to the modifier and
change the strength. So you will end up with
something like this, which actually now
is starting to look a lot more
like what we want. Now, I always recommend
with the mid level, always leave it at no 0.5, only change down the strength to get it to where
you actually want it, so it's actually going to
look like, you know, a grave. So I'm going to say that this probably a little
bit too little. So 0.15. Let's try that. And that, to me,
looks about right. If I write click and shade
Auto, it's move now. You can see that's looking
pretty much like a grave. Now, the other thing is, can
I go any further with this? So, in other words, can I
make a little bit smaller, like so, and then can I come in and mess around then
with the strength? So if I put the strength up, let's put it up to two, not two, not 0.2. Let's try that again. No 0.2, like so,
and there we go. I think that's looking near enough perfect for
what we actually want. Now, if we come to this one,
can we do the same thing? Let's give it a try. So either grab this one, grab this one, Best Control L, go
to copy modifiers, and there we go as
simple as that. Now, as I said, when
you've got this, I would always take
one of these and save out if you intend to
make a lot more graves. You know, so you can always copy it from one to the other.
And now we've done that. We don't actually need to,
you know, apply these. I think I think we can still put the texture on without
actually applying them. So let's see if we
can actually do that. So I'm going to look for dirt, first of all, and if I have to put it on
there, then it will. But again, if you want to
save yours out, then do that. So I'll click the down arrow, and I'm going to look for dirt. And we've got no dirt, so we're going to go to file. I'm going to save
out while I'm here. And then what I'm going
to do is go to append, which isn't there because
I'm in edit mode, so file, append,
and the one we're looking for is dirt
or mud. There it is. Dirt. And then what I'm
going to do now is come to this and put on
dirt, which is here. Let's put on this, let's have
a look at that looks like. You can see it's
looking pretty good. Now, that means that we
haven't had to unwrap it. I'm going to unwrap
it all anyway, so smart UV project. Click on Wrap. There we go. You can see that's
looking pretty good. And the best thing
is now as well, is I can come to the UV map and actually go and mess
around still with the UV. So you can see here if I
come press Dot to zoom in, press the tab but, I can come
in now make that smaller. Or make it bigger,
press the tab butt, and that's what it's
going to look like. Now the thing is, I do recommend
you can do it this way, of course, but I do
recommend applying these. So I do recommend applying
these in some way. Now, the best way to apply
these isn't how you think. It's actually to come
in and go to objects, come down to where
it says convert. Now, again, make sure
you save one of these out just in case you want to
mess around with it further. Convert to mesh, and that's
going to be applied. Now, if I press tab,
you will see this is a lot of mesh that
we're messing with. But you'll also see that we've got some slight bending in here, and that's simply
because you know, Blender hasn't unwrapping it properly because it was based, you know, on something else. The other reason is, as well,
if I come in over the top, press, project from view, so you're going to get
a much, much nicer, should be, much, much nicer way that it's going to
look, except the side. So you just have to
be careful of that. But I think still, you know, for our scene, this is actually going to
look pretty nice. And the other way is,
let's see if we can actually just unwrap
on angle base. So let's see if we can unwrap
it. Is it going to let me? Let's hope Blender doesn't crash because it's a lot of UVs. I should actually show you here. The way to do this
without doing that. So what I'm going to
do, first of all? I'll show you the
other way, guys, so hopefully you didn't
do that, Blender. Please don't blame me.
Adding a modifier, and we're going to go
to let's have a look. We want to go to decimate. Now, at the moment this is one of the best things.
I love decimate. At the moment, we have 82,000 polygons, really, really high. But if we click and
drag this down, we can bring this all the way down to something
ridiculous like zero. But if we put this
on, let's say, not 0.1, you can see now that we've only
got 14,000 polygons. Let's put it on Not point note one, see what we end up with. And now we've still
got that lumpiness, but we're down to
1,600 polygons. You can even take this further. I myself, I'm going
to keep here that. I'm going to press
Control A to apply that and then look
what's happened guides. Now it's completely triangulated and now much easier
to deal with. So now you can see that's
how it's unwrapped. That's looking very nice. We've not got really any
stretching on there, and that is looking cold. Now, on the next lesson, then what we're
gonna do is we'll do the same thing with this one. We'll also decimate it down
something really small, and then we've got
our graves finished. So again, let's save our work, and I'll see you on the
next one, everyone. Thanks a lot. Bye bye.
43. Cloth Simulation Linen Sack with Sculpt and Decimate: Welcome back, everyone to the
Haunted Street environment Blender to Unreal. And let's carry on then. So we've got this part
here. Let's apply this. So we're going to go to objects. We're gonna go to convert
and mesh. That's that done. Then we're going to bring in or generate. You don't
have to do it this way. By the way, you can
unwrap it first, but I prefer bringing in because obviously it's
easier on the GPU. So then we're going
to go to generate, and we're going to
go to decimate, and I'm going to bring this
down, so it's 81,000 again. If we look at this when
we applied our decimate. So let's come in and put
it on not point n one. Let's try that.
1,615 that'll do. Let's unwrap it. So if, in fact, you know what, I might have to actually
apply it first. So we'll just do that. Press
Control A. Let's apply that. There we go. Now
we should be able to unwrap it really easily. So let's unwrap it. Let's also
then put it against here. So Control L, we'll
copy materials, and let's have a look
what that looks like. And now I think I'm going
to have to bring it out a little bit or bring it in
a little bit, not this one. Let's go to this
one. Where is it? Is it actually
unwrapping? Yep, I think it's all the
way around here. So let's go to where is my UV. Just put it on. Is this it? Let's see. Let's move
it over. There we go. So I just tick this on just
to make sure I can see it. And then what I'm
going to do now is make it a little bit smaller, and it's got a little
bit of stretching there. Let's go over the top and
try it the other way. So we'll unwrap and we'll
go to project from view. This one here. Et's look
what that looks like, and that to me is looking
much, much better. Is it matching up with this
one? Yes, I think it is. So we're really happy
with how that looks. Alright, so that's that done. Now let's go back to modeling
seeing as we've done that. We have unwramped these,
so they're already done. And let's look at
our other props. So we've got three other props. We've got a barrel.
We've got a crates, and we've got a linen sack. Now, let's do the probably, let's do the sack first because that's the
most interesting one. So what I'm going to
do is press shift, curse to world origin. Let's press shift A, and what we'll do is
bring in a plane. Let's get the size
that we want it. So S and X, bring it in. Like so, you might be wondering why are we making
a sack from a plane, but I'll show you, it's much,
much easier to do that. So what I'm gonna do,
first of all, though, is add in a few subdivisions.
So keep going up. We can bring it down
anyway with decimate, and then what we're
going to do is press E and bring it down. Now what we need
to do is just add in one edge loop for now, left click, right click. I also want you to press A, shift N, and just spin it
round if it needs that. And then finally, let's
reset all of our transforms, set origin to geometry. Now, the easiest
way to make a sack, in my opinion, is to do
this what I've just done. So we've got a lot of topology
on the top of the bom, and we've got one edge
loop going across. Now, we could add in
another edge loop, but let's see what
it looks like first. And then all we're going
to do then is coming over to where is it physics tab, and the one we want is
going to be on cloth. So let's put cloth now, this is where the timeline
is actually important. So if you come over to layout, you'll see Iva press dot, we've actually got our
timeline over here. Now, this is cloth
at the moment. If I go back now to my physics tab so you can
see it's got cloth on, you can take this off as well, just in case you tick on the wrong one
and then put it back on. And the one we want is going
to be if we scroll down, we've got one that
says pressure. Let's put the pressure
on one for now. And the other thing is,
as soon as IPressPlay, this is going to drop
through the floor. So just remember that play, drop through the floor, but you can see what
actually happened there. Now, what we can do is spacebar to press play, Spacebar to stop. Let's bring it back,
so you can bring it back along that timeline,
set it to zero. And what we want to do
is we want to go down to not property
weights, field weights. And we want to set
the gravity to zero. We don't actually want it
dropping through the floor. And now what happens
is, if I press play, it will stay there,
and it'll puff up like this, exactly
what we want. Now, it's not quite
exactly what we want because you can see it's a little bit jagged and
things like that, but we're going to sort
that out in a minute, and I'll show you
how to do that. But basically, what you want
to do with the moment is make sure that it's the
right pressure for you. Now, the other thing is,
if I bring this back, to zero, and I put in
another edge loop. So if I grab this and press Control B and instead
bring in two edge loops, let's say, like so, press the tap but,
press Control A or transform, seigeneometry, press the space bar,
and then you'll see now we've got a lot
more of a difference there. You can see why added actually just one in because I think it just gives
you the right amount. Now, let's go back
and just test that again because we
might as well test it while you're here
just so you know. Instead of doing that, I'm going to Delete both of
these out of the way. So all shift and click. And then what we'll
do is go with delete and dissolve edges, and then I'm going
to press Control, left click, right
click Control B, bring in then a few edge
loops with the bevel, like so press the tabun, Control A, all transforms,
Seigineometry. Let's press the space bar and see what happens with
that. And there you go. You can see now
you've got a sack, but we still got a
few lines on there. So again, I only like using one. Now, if I go back, I should be able to go
back before I did that. And I'm just going to put one in Control R. Left click, right, click, tab Control A or transform
set origin to geometry. Now let's press Spacebar and hopefully we end up
with something like this. Okay, so that's a good
start to what we have. Now I'm going to do is I'm
going to actually keep that. Now, wherever you want to
keep it on your timeline, you might want it like this, or you might want it
a bit further on. To set that in stone now, all you need to do is object, convert to mesh,
and there we go. Now it's set in stone. Now we want to do
is we need a way to actually, smooth
all of this out. So what I tend to do is
use a mixture of things. Add modifier, generate,
let's bring in, first of all, a subdivision. So subdivision surface, and you can see now that's
straighten all out. And the other one I tend to
use is to bring in a deform. And what I want to do is smooth. So you can bring in a smooth, and then you can see you can actually smooth out these parts. Now, don't go too
far. But you can actually see now that's
looking a little bit bet. You can also, as well, come in and mess around
with the mesh. So any of these parts that
you're not happy with, you can just grab one of them, put proportional editing on, and then you can actually
bring them out like so. So you can do this as well. And that's another way
that we do this, like so. And the other final bis I'll show you why
that is in mine. Because we have a lot of, you know, subdivisions on here, things like that, we
can also come in, right click Shade Ato Smooth. We can also come in
and use the sculpting. Again, I would always save that my work before going over there. And then what I'll do is
I'll come to my sculpting. So instead of object, we're
going to go to sculpt. And now we can come in. And I'm not really going to
go a lot into this, but you can use the
shift button just to kind of smooth those
out if you want. Now, you will have
a problem here where sometimes it doesn't quite smooth everything
out as you want. So what you can do is you
can press the R button. What they'll do is it'll
increase the amount, pulling this backwards
and forwards, the amount of subdivisions
within the actual topology. If I put this on this, for instance, and
then press ControlR, what will happen is it will actually add all of those
subdivisions on this, now you can see that's
what we end up with. Now, because we have a
subdivision on here, we are likely it's not
going to turn out too well. What I'm going to do
is I'm just going to go to object mode again. I'm going to apply that
subdivision with Control A, and now I'll just see if
I go back to sculp mode, press the R bone, press
Control R, and there we go, we end up with something
like that instead, which is probably down
to the smoothing. So I'm going to bring the
smoothing down a little bit. And now I should
be able to come in and smooth those
out a little bit, get it to what I want. Like so. So let's just smooth these out. Press ControlR again, and you should then be able
to smooth them out. If something isn't
really smoothing out, the best brush you can actually
use is the inflate brush. So coming over to
the right hand side, click on your brushes.
So it's this bone here. Click on your brushes, and the one you want to
use is the inflate. So let me just find the inflate. And we've got Elastic. We've
got the pole brush, pinch. Where's the inflate brush?
Inflate. Here we go. And then what we want
to do is to increase the size of this circle,
it's like Photoshop. It's the little
sideways brackets. And then what we can do is
slowly inflate that out, press Control R, and then you can smooth that off in that way. Now, you can see, from
what we've got now, we can do the same on this side. We can do the same on this side, like se inflate it out. I'm going to press Control R, and there we go,
before we know it. We've got a nice sack here. Maybe, maybe this one needs. Moving out a little bit more. And the other thing
we can do, as well, is one of my other
favorite brushes is to come in and use
the move tool. So we've got one that it's
like a pull or a thumb. One of these, anyway, like the grab tool, that's
also a good one. As long as you make, you know, your circle really big, and then you can just pull it in and flatten this bit out. Like so, like so, plan it out. And there we go.
We've got a really, really nice sack that
was done quite easily. Let's make these
bits a bit thinner. Like so. Let's also
come round here, make this a little bit thinner. And then that's
press control then let's make them a little bit smaller just to finish the job. Let's smooth these off.
Again, if they don't get smoothed off, use
the inflate bone. Again, we'll come back to
inflate it out a little bit, press control, smooth
it off a little bit, inflate it out a little bit, press control, and there you go. Absolutely done. Now the
thing is, you will notice. Let me just fix this bit. Inflate, control, smooth off. Now, we're going to fix that in a minute, that little one. Just make sure it looks
pretty nice before finishing. And then the thing is
you want to actually apply this smooth on. So I'm going to press
Control A, apply that. And now we going to go
back to object mode, it should stay exactly as it is. So that's looking pretty nice. Now, finally, finally,
to finish this off, you can see we've got a
lot of polygons on here. Let's come in and see how
far we can get this down. So I'm going to go to generate, decimate, and at the moment, we can see we've
got 9,000 polygons. Let's put this on, first of all, no 0.5, see what
happens. Nothing really. Let's put it on no 0.1. And there we go. We've got the overall structure
of everything we need. It's a 1,800 polygons, you could probably
go down even further and still keep what this
actually looks like. So I'm now going to apply that control A, and there we go. Now, on the next lesson, what I'm going to show you is how to actually unwrap
this because things like this are a little
bit more difficult, as you can imagine, you're going to end up with
seams everywhere. We're going to show
you really, really easy way to actually
deal with this, and let's save out work. And on the next one, as
well, it's then we'll be moving on. Two barrels. Everybody, when they
start three D modeling wants to create barrels. I'm going to show you the
best way of doing it, and then we'll create our
barrel and then onto our crate. Crates actually a lot
harder than what you think, especially if you want to
create them correctly. So I'm gonna be showing
you that as well. Alright, everyone, so I hope you enjoyed that. I'll see
you in the next one. Thanks a lot. Bye bye.
44. Precise Seam Unwrapping and Barrel Base Modeling: Welcome back at once the Haunted Street environment
Blender to Unreal. This is where we left it off. And what we're going to do
now then is unwrap this. Now, I'll show you then the
two ways of unwrapping it. First of all, let's put it
onto our material view. Let's come down to our material. And bear in mind
that what I just showed you in the
sculpting section, it wasn't too in depth because I don't want this course
to be about that. It's the sculpting tools within Blender are
absolutely amazing. If you want to go and check
those out, then please do. But for now, let's just
put this back to zero. Let's go back to modeling, and let's press Tab. Go to material mode,
close the end panel. We're not going to
need that, and now we have a fresh place
to actually start. Now, the one we're
looking for is linen. So let's see if we've
actually got that in here. I don't see any linen in here. So again, we'll come,
and we'll go to append. And then what we're going
to look for is linen. Let's see if we've got that.
Here it is linen fabric. Let's double click that, and
then we'll come to this one. If I drop the linen
on then, so linen, fabric, you will see we end
up with something like this, lots and lots of issues. Now, if I come in and I
press A and just unwrap. So if I go to unwrap Angle based, you will
see we end up with that. If we come and smart
UV projectuwrap, we'll end up with
this, which actually has turned out pretty nicely. We do have some seams here. You can see some
nasty seams here. And basically, on a sack, you can see really
bad seams here. It's going to go across
the sides of it. So let's press Control A or
transforms Surrogen geometry. Let's try unwrapping
it again then. So smart UV projects
that come wrap. You're still going to end
up with the same problem. So how do we deal with this? There's actually an easy
way to deal with this. First of all, get where
the halfway point is. So the halfway point is here. You're going to
make sure the whole of the mesh is selected, and then what you're
going to do is you're going to go to mesh, and you're going to come
down and use the bisecTol. Now, this tool, many people
don't even know about, but it's there mainly to cut mesh, but we're
not going to use it. That way, we're going to
use it in a different way. So we're going to left click and drag across, first of all. And then what we're going
to do is we're going to set the X because that's
where we've drawn across. So this X, we're going
to set this to zero. What that means is
then it's going to be nice and flat for us. Now we can still move around
and see what we're doing. And what we can also
do is move this up and down to where we
want it at the same time, as long as you're using
this and not the Gizmo. And that looks
about right to me. Now, what we're going to do
now with this is we're going to right click and we're going to come down
and mark a scam. And what does that mean?
That means now we can unwrap these independently
for each other. Now, if I go back and
just do that once more, just to show you the actual
bisect tool in action, if I press three, come
in, mesh, bisect. So bisect is here, drag it across. Set it to zero. So make sure the Y this time
is set to zero, like so. Move it to where I want
it. So let's put it here. What it's actually used for is to clear the bottom
or clear the top. And what you can also
do is fill it in. So it's really, really
handy for things like that. We, of course, don't
want to use it for that. We want to use it for this,
and what I'm going to do is right click and I'm
going to mark a scene. Now, what does that
enable me to do then? Of course, it enables me then
to come over to our UV map. And then what I'm
going to do is press the dot but on here. So I'm going to
select this, press the dog bone, press
the tab bone, select the top, press, and I should be able to unwrap
it now, as you can see. Ever come to the bottom
now and press L, press U, unwrap.
And there we go. We've got two separate pieces, and the line follows exactly
where I want it to go. Now, the last thing
is, I, of course, want both of these to be a
little bit bigger. Like so. And there you go. That
is the easiest way. And now you can see it's got a natural seam going
along the side, like what you would
have in a linear sack. So hopefully, that makes sense. Hopefully you found
something new there. And as you can see,
that's looking very nice. Now, let's save out our work, so we're going to save our work, and now we'll move
on to our sack. I'm going to move
that over there then. I'm going to move
these two as well over there just so I've got a little
bit of room to work with. And then what I'm going to do
now is bring in a cylinder. Now, again, how many parts do
you want your cylinder on? It's actually more
important when you're creating a barrel that we understand how many vertices a cylinder has because
you need to divide it up. In other words, plank sides
need to be divided up. I tend to when I make a barrel, always put it on 24. And now what that
means is then I can divide this
up pretty easily. Now, you'll see
that if I come in, and grab the sides of here, I can go every other one and create my sides of my planks. In other words, to
make the barrel up. So if I come in now, it
ends nice and neatly here. Now, if you want to go
with three instead, you need to work out
many that's going to be. But for me, we're
going to go with two. So we're going to right click and mark a seam straightaway because now I've got this set up basically for when I want to, you know, add
in those plants. So what I'm going to
do now, press tab, I'm going to get this
to be the right scale. So jaws gonna pull it up. I'm going to press
EnsEad just to make it a little bit bigger. So
how big do you want? Probably a little bit smaller. I always recommend with barrels. If you're a guy stood
against the barrel, you kind of be able to lean your arms and lean forward
on top of the barrel, like you would do a
balcony but slightly less. So just imagine yourself
leaning on top of the barrel and that's basically the right scale that
you're going to go for. Now once we've got the
skelt I'm going to make it tiny, tiny bit smaller. Then focus on the shape. So what I'm going to do is I'm going to bring in
some edge loops, maybe five, left click, right click, and
now we can actually start bringing this bol
how we actually want it. So first of all, let's
deal with the bomb. If I press one, then I can press the S bone and bring it in. I'm going to take off proportional
editing just for now. So let's bring it
in a little bit. Now let's deal with the top. So I'm going to
bring the top in. So if I press the S bone, I want it to go a bit
further in than the bomb. And now I can come with our
edge select old ship click, press the S bon and get the actual shape that I'm
actually looking for. Now, I'm wondering on here, I'll bring out this
part here first, bring it out, bring
out this part, like so, and now we've got that kind of shape that
we're actually going for. You might want to
bring in your bom a little bit more.
Let's press one. Let's bring in a little
bit more like so, and let's also
bring in this bit, a tiny bit more as well. Now, I can see you can
really play around with this so you can have something like this if you want, just bear in mind that we
actually need these parts here. Now, generally with a barrel, you will notice it does
come up to the top, but then if you want to
get that stylized look, bring it out a little bit. In other words, bring
this out a little bit, so a little bit more
than you think. And maybe maybe let's have a look to even
get the right size. It's just playing around with
it at this point, like so. Let's see if we can bring this in without doing too much work. Let's bring it out a little bit. Okay, like so, and I think that is the right shape that I'm actually
going for there. Alright, these edge loops
are important as well, because we want to create the bars that are going to go around the barrel
using these parts. So the next thing you need to decide is how many do you need? You absolutely want
one near the bottom. So at this point, you could
actually come in left click, right click and
imagine then this is the kind of metal part that's
going around the barrel. So if I say I want one here, one here, maybe one here
and one on the top. So you've got these
bars coming in, and then you can
press Control B, turn down the bevels and pull them out to the
side that you wanted. All of this, as you notice, is done before we actually
do absolutely anything. Now all I want to do
now I've got these in, is think about taking these away from the
rest of the mesh. All I'm going to do is
press Shift D, Enter, and now I'm going to press P selection while I've got them, and there we go. Now
we've got two parts. So if I move this away, you should end up with
something like that. Now the next thing then we
want to do is we want to actually turn these
then into planks. Now, we want to separate the
top and the bottom, as well. So if I come in to
the top, to this top, I'm going to press P selection and separate those either way. I'm going to deal with
those parts in a minute. So if I come in now just
these tops and bombs, press the hide board, you should have something like this. Now, the next thing
then we want to do is just we click and
shade Ato smooth, just to get an idea of what
it's going to look like. And on the next lesson,
then what we'll do is we'll actually separate these out, and I'll show you
how to, you know, randomize them all
of that good stuff because we have two
options to do that. Alright, everyone, so
let's save our work, and I'll see her as
always on the next one. Thanks a lot. Bye bye.
45. Randomized Barrel Planks with Solidify and Detail: Welcome back, everyone
to the Haunted Street Environment Blender to Unreal and this is where
we left it off. Okay, so let's
crack on with this. Now, what I want to do
then is see if I can come in and bring in my
transform randomized. So this is the first
way of doing it. If I bring this down
now to not 0.1, you can see now we've got a lot of variations in the mesh. That's the first
way of doing it. Of course, what we can
do instead of that, though, is come in and
just split these off. Because we had a
seam on everyone, really, really easy to separate. And then what we can do
is now separate them off. So why separate them off, and then we can grab the whole
thing and then go to mesh, transform, and then randomize. So now they're all split
off from each other. So now let's put this
on naught point note one, and there we go. Now we have a lot
more variations, especially in the top with very little work from ourselves. And from this point
then what we can also do now is bring them in. What I'm going to do is
I'm going to come in, add in a modifier, and
we'll bring in a solidify. And then what we'll do is
pull that out a little bit, like so, and there we go. We've got the makings
of our barrel. Now, let's come to these parts. And what I'm first of
all going to do is press Control A or
transforms,sigen geometry. I'm also going to put
it on solid motor. You can actually
see what I'm doing. I'm going to write, click
and shade Auto Smooth, and I'm going to add
in another modifier, and we're going to
bring in a solidify. Let's pull it out
the other way then. You don't want to
pull it out too much, something like that.
And there you go. You can see already, wow, this is looking actually
pretty good for a barrel. Straight off the bat. Double tap the A, and there's
what you're going to get. All right, so now we've got that. We've got
our main barrel. We're going to apply
this solidify. But before I do
that, I just want to make sure if I come to this, I probably I'm thinking
I'll probably be better if I add a seam just to
the tops of here. So before applying my
solidify, I will come in. I'll press, you
know what I'll do? I'll just select
my barrel, press the question mark,
just isolate it out. And then what I'll do is
before doing anything else, I'm going to come in,
double tap the A, make sure my wireframe is on. Press the B button
on Edge select, press B and grab just
the top of these, right click and mark a scene. And now we should have marked a seam going all the
way around there. Now I'm going to do the
same thing on the bottom. So I'm going to press
double tap the A, B, grab just the bottom once, and then right click
and mark a seam. And there we go. Now, what
does that enable me to do? That enables me when I come
in and apply this solidify, so Control A to apply it. That enables me now should be able to grab the
inside of these. So you can see now I can
just grab the inside, which is really, really handy. Because what that means is then, I can actually randomize
these a little bit more. So I can randomize just these
parts a little bit more. So if I come in now, go to mesh, transform and randomize, turn it down to note
point note one. Now they're a little more
random in this inside of you. Now, you're not going
to see all the inside, of course, but it just makes
it a little bit different. And what I can also do as well, it come to the tops. So come to these tops. And this is the place
where you really want to put it on normal
instead of global, so you can put it on normal. And now you'll notice that these faces point in the right direction of
where you want them. And what I tend to do now
is bring these up and down just to make them
a little bit different. And even on some
of them, I mean, we don't really need to rotate them because they've
already been done for us, but we definitely
don't want them being so flat on the
areas that they are. So like this one here, let's
bring it down a little bit. And there we go,
you've got a really, really nice barrel done
really, really easily. Now, the other thing is
you might want to come in and just make the tops of
them a little bit smaller, which absolutely can.
You can also do that. If you come to
individual origins, put it on normal, press Y. We should then be able
to go along that axis, and just bring in
any, which are, you know, a little bit too
touching of the others. So this one here, for instance, as some Y work our way around. This one here, as
some Y. There we go. Now you can see what that looks like. Really, really nice. Now let's just do the bottom. Now the thing is
about the bottom. We don't want them bent
like this, as you can see. So let's come in and
do the bottom first. So we're just going
to grab all these. Again, we can press one, and instead of doing that, we
can put it onto wireframe. And what we can do is if
we zoom in a little bit, we might be able to use the Sbarne just to
select all these. Now, can we get away? We
just selecting those? I'm just looking, can
I get away with that? It might sometimes take
longer to do it this way, but I'll have the
on object mode. Let's have a look. Like, so. And if I press and
Y, you can see, I can bring all of these in at the same
time now, as well. And what we also want to do, though, is flat them out. So if I press S Z, put it back onto global. So S, Z, zero, then is going to flatten those all out for
us, and there we go. Now, in my thing, this is a
lot of work for a barrel. But I'm telling you this is the best way of doing it to get the best results while it's
still looking like a barrel. Again, now, I'm taking my
time to show you this, so you can actually do
this in other builds. It's not just so you know, we
can build a barrel in this. So I'm going to go in. I'm
going to grab this one. I'm going to put
it back on normal, and then I'm just
going to press S and Y and just bring
it in slightly, so just so they're
not touching so much. You can also do that going all the way around.
Same with this one. You can even grab it
on just these areas, S and Y, as long
as you're careful. And bring it in,
and there we go. Now, it still looks more like
a lotus leaf than a barrel. Remember as well, we can flan these out if you really want to. Generally, I only
flan the bombs out. I don't bother
flaning these out. But let's now press ultagO question mark and
bring everything back. So here is what we have so far. Now, let's deal with
the top and bomb. Generally, with
the top and bomb, I tend to get rid of the bomb, first of all, so just hide
the plane out of the way, come back to my top and bomb, pull them down like
so, press the tab bon, delete this one out of the way, we're going to use
the top as the bomb, make it easy for ourselves. And then what I'll do
is just pull this up. I'm going to make it
a little bit smaller just so it fits on
the top of there. So it's just just
going into there. If I press the
button, you can see, there is where it's going in. So that's where
it's going to be. Then what we're going
to do is pull it up, press seven to go over the top. Now in this part,
what I tend to do is, I put it on verte select, and then I'm going to
make this into a mesh. Now, all we need to do
is select one of them, select the other, press J. And the reason I'm doing
all of them is because it's going to be then a decent topology to
actually work with. You know, if I'm just
filling this phase, it's not going to give
me something I need to work with particularly well. So I'm going to do all of these, especially to make sure one, two, three, four, five. We
definitely don't want that. So I'm even going to do this so that we've not got
any guns on there, like so, and like so. Alright, now I want to do is I'm going to come
in and I'm going to grab the ones where it's going to make it
look like a barrel. So right click and mock a seam. Then all we're going to
do is we're going to come to these and these, we're going to
press the Y button. And then before we do that,
I missed one thing out. So go back one stage because
I did miss something out. Let's come in and also give you a few edge
loops going this way. You don't need so
many going this way. So you can get away with
doing it like this because, you know, they're not
guns or anything. So just give you
a few going this way, pressing the JBorne. And what they'll do is, though, is give you a little
bit of room to actually work when you come to
putting on the randomize. Now we can do is we
can come in L and L Y and then grab the whole
thing and come to mesh, transform, randomize, turn this down to Nut point
note one, and there you go. That's what we've got so far. Now, let's write, click
Shade Auto Smooth. Let's add in then a
generate solidify. Let's pull this solidify out up, and let's now put this in place. I'm going to press Control A. Right clicks origins geometry, drop it down into place. And there you go. There is
your barrel near enough done. And you'll see, is that not the quickest best way of
making a barrel you've seen? I think so. Now, what we're going to do is we're
going to grab this now. We're going to press Shift D. We're going to bring
it down to the bottom. And I always pour bomb on my barrels just in case you
want to turn it around. So I know a lot of people
leave the bomb off, but for me, I'm going
to press Control seven, make it a little bit
smaller just so it's fitting and put it there because it was no
extra work to do that. Always make sure the bomb is nearer to the bottom
of here than the top, which is further in, and
then you're good to go. Okay, let's now come and apply that solidify.
Let's come to these then. We've already applied the
solidify and on the next one, we'll have this absolutely
finished off with these parts. All right, everyone, so I'm
going to say if I'm aw. Until next time, I'll
see you on the next one. Thanks a lot. Bye bye.
46. Modeling a Detailed Barrel and Wooden Crate: Come back everyone to the
Haunted Street environment, blend it to Unreal. This is where we left it off. So what we're going to do now is we need to sort those out. So let me just grab my reference so I can see what
I'm looking at. Okay, so online, I have
one that comes out, one that goes in, pretty
easy stuff to do. Press Control A, and we'll
add in that solidify. Let's deal with these
two first then. So if I press Control R, left click, right, click, and then let's do
the bottom one. Control R, left click, right, click, re grab the top one. So shift, and click, press Control B, pull it out, like so, and let's
now bring them in. So I'm going to press
E, enter AlternS. Let's bring it. So bring
it in very slightly, like so, and there we go.
That's that part done. And we might also want to bevel off just these tops
and bombs of them. Let's see what it
looks like first. So I'm going to come in,
grab the top of here. I'm going to press Control B and just bevel it off
slightly like so. And I think, yeah, that's
looking much much better. So I'll come back, make
sure they're all the same. So I'm going to come back,
grab the outside of these, come to this one, so I can
actually see what I'm doing. Press Control B, and then just bevel them off like so, and
let's have a look at that. That looks really nice. Now, let's deal with
the other ones then. So we're going to
press Control R. Same thing again. Like so. Also click, press
Control B, pull it out, like so, press E, enter AlternS, and then we can pull that
one out as well, like so. And then we'll just press tab, have a quick look at it.
That's looking good. And then we'll also come in. Also click on each of these. And we'll come in and
bevel those off as well. So bevel those off, holding the shift bone if you need to. And there we go,
double tap the A, and there is our barrel
pretty much done. Now, let's just join
it all together. And on the barrel, it's a little bit bigger
than other stuff. So I tend to with
these little things, not bother with the bevel. On the barrel, though, yeah, we're probably
going to need it. So what I'm going to do is
reset all the transforms. Come inside modifier
and generate, and we'll add in a bevel. We'll put it on not
point note three. So let's come over here, note, point note three.
Let's try that again. Note, point note
three, and there we go, and that is what we've got. And I think that's
looking pretty good for a barrel that we made in
quite a little bit of time. Now, you can see under
here, this is not right, so I'm going to grab
everything, shift in, spin it all around,
and there we go. That's all done. Now, let's
put that to the side. Let's move on then to the
next one, which is the crate. Again, I said, crates. Are a little bit harder
than what you think. It's not just like
building a cube and, you know, making
some ends on it. It's not that at all.
You need to have a structure when you're
actually going to do it. So the structure I
work with is this. So we bring in a
cube to start with. So shift day, bring in a cube, get the right dimensions for it. So S, S and X. So something like this is
probably a little bit too big. Let's bring it up, put it on the ground plane. This
looks about right. When I'm measuring a crate,
I'm always looking at, can he hold that in his hands? Maybe, maybe not. Maybe it's a little
bit too wide. Now that looks a lot
be for him to hold. So that's how I measure it
and let's put it down there. So this is what we
need to start with. So with the crate, what we want to do is
we want to create. First of all, if we
look on the reference, if we've got the crate on here, let's just have a quick look. Here is the crate. And you can see that we've got these
blocks on the side. You know, they're
actually doing the work. You can also see then we've got these parts
going down the side, so, you know, a little bit more complex than what
you think as a set. Okay, so what we want to
do then, first of all, let's first of all,
bring in an edge loop, left click, right
click Control B. Let's pull it out to the size
that we actually want them. Now I'm going to come in and copy where it
says the width here. So copy this width. And what I should be able to
do now is do the same thing. So if I press Control
R, going this way, press Control B and
just bring it out, come to where it
says the width and press Control B,
press the nerbne. And has that worked?
Probably not. And the reason might be that I didn't resell
my transform. So let's resell the transforms.
Let's try that again. So Control B, let's
put in the width. And definitely definitely
not gonna work. So let's bring back that width. And instead, we'll eyeball it. We'll bring it out and
make them square like so. So you can already see now we've got the parts that
are going to go off, but you can see that we do have a problem with the inner parts, and also we need the parts that are going to
go across here. So control R. Left click, right click Control B, and these are the inner
parts there, as you can see. Now, again, it's not so
simple as, you know, these parts, we can just, you know, do it the easy way. But because we've
actually built out, you know, these chunky parts, how we want them, what
enables us to do now is come in and grab
these parts here. Like so, like so, and like so. And then all we need
to do is press E, Enter, alter Ns, and bring them in to
wherever we want them. So if I bring them all into
here, that seems reasonable. And from there, then
what we can do now is we can actually take all
of these parts we've actually got and do them pretty much at the same time.
So what do I mean by that? I'm going to grab all
of the tops of these. So well, where do I want
them, first of all? Let's first of all, start with these ones actually because it's going to make you a bit easier. So I'm going to grab these pots. And then what I'm going to do is just press Shift D just
to duplicate them, and then I'm going to press
E to bring them all down. And I'm glad they
win red because that then means it's easier
to actually see them. Then what I'm going to do
is press Control plus, and now I've got
them all selected. I'm going to press P selection. And actually hide
those other way. So we know we've got
these supports now. Now what we need to do is do the tops and the bombs, and
then we're ready to go. So if I hide those out, so I need to select them. So if I press tab, I can select just these
parts, another box. So let's see if I select them. If no opera and X ray mode,
select them this way. Look, H, take it off, and then what we'll do is
come back to our crate now, and we only want to select
these ones on here. Like so. And then what we want to do is just press E to pull them down. And sometimes with extrude, that does happen where it actually doesn't
fill it in properly. So I'm not going to
worry about that. All I'm going to do though
is press Control plus, and we can see that I
didn't duplicate them. So let's go back. Let's go
back again and not do that. Before we brought
them down, come on. Here we go. Now,
let's duplicate them. Shift D, duplicate and then
press E, pull them down. Again, they've
gone red, which is really nice. I
absolutely want that. Press Control plus, press
the P borne, selection. And then what we're going to
do is we've got those now let's come to the bob
ones. Zachla same thing. These ones on here, and then all I'm going
to do is press Shift D, and then E, pull them up
to where I want them. And then I'm going
to press Control plus P, separate them out. So separate by selection. Now, let's go back then. Let's press Tab,
come back to this, and all I want to do now is, you see, I've got
these four here, hide them out the way, and then I'll come to this one on here. I've got these
four here, and all I'm going to do hide
them out the way. Now what I'm going to
do is come back to my actual crate
and take this off. And what I'm going to do now
is separate these parts. So I'm going to separate all of these parts like so and then what I'm going
to do is press P, selection and hide
those out of the way. Now let's press Tab, grab these, hide them out of the way. And we've just got
this skeleton left. But if I come in now and press delete, so I'll press delete. Altag, bring back everything. Let's come now. Hide
this out of the way. This is what you
should be left with. And the best thing
now is everything is split up exactly as you need it. Now, first of all, let's
come into these four. Let's press tab A, shift and, spin everything round, and
this is what you've got left. You can see already as
well, a lot of the times, it has made it
easy because these are slightly uneven,
things like this. But now what I tend to do is, first of all, before
doing anything, I'll come in and just pull
them up individually, so we're not getting
exactly the same, like so, like so. Then I'll do the
same on the bottom. So individually again, it only takes a few
more seconds longer, really nothing. To
write home about. So we're just going
to pull these down, like so, just so
they're a bit uneven. And then once we've
got that bit, now we can come to the main bit. So first of all, what I'm going to do is
I'm going to come in, adding a few edge loops to this, adding a few edge loops to this, like so, come to the same
here. Same round here. Like so, and then I'll just
grab these ones, like so, and then we'll go to mesh, and we'll go to transform, go to randomize, and then we'll put this on
nut point note one. Let's have a look at
that and there we go. You can see already now, we're really starting to get
somewhere with this. So that's it. Let's then
hide those out the way. Let's then come to
this part here. And this part, like so. And then this part, and let's come to where we
are these parts here, so three and three, like so. Now, let's come in. Grab. You can see here
as well, these are still joined together.
Now, we don't want that. So before I do anything, what I'm going to
do is, I'm going to make sure that these
are actually separated. So I'm going to go I'm thinking the easiest
way to do this if a press Control plus, that's not really going to
split them up properly. If I come in, though
to the center of these and grab them all, so hold shift, click,
all shift click, rather than clicking
all of them, I should then to
press Control Plus. I'll Control plus.
This not work, so I'm going to have to just
come in and grab the ends. And I'm just going to
separate them off just to make my life easier, like so. So let's press Y, and
now they're separated, and now I should be
able to come in, grabbing all of these, like so, and then I'm going
to come again, transform, randomize
note point note one. Like so, and there we go, and now we can hide
those either way. We shouldn't just be left
with this shell now. So on the next one then,
I'll show you how to, you know, it's same as
doing the barrel basically. It's really, really
quick and easy way. If you think about if
you were building, you know, this yourself, would
you have done it this way? I think it's way more
efficient, actually. And yeah, let's save our work, and I'll see her on the
next one, everyone. Thanks a lot. Bye bye.
47. Randomized Planks, Solidify Modifier and UV Mapping: Welcome back, everyone to the
Haunted Street environment, Blender to Unreal, and this
is where we left it off. So what we're going to
do now is we're going to bring in these plants. So I'm going you can see this
is what we've got so far, shade or smooth, looking really, really
fantastic already. Now, we just need to be careful
that some of the parts, you know, might be
poking through. If they are, all we need to do then is just move
them out of the way. Now, if you go
normal, it might be a little bit iffy on, you know, when you pull it out, so just say over there. Don't
worry too much. If there's a lot of insections just pull them out a little bit. So even on this
one, you can see, we've got a little bit of an insection let's
just pull it out because we want them to be
completely randomized anyway. Now, let's come to these parts. First of all, before
we do anything, what we want to do is this, so this and this can be
joined up with this, so Control J, join it all up. So you should just
have two parts now. I'm just looking now to make
sure I've got two parts. Let's go into these parts. And what I want to
do, not this one, this one here. There we go. What I want to do is
press Control law and bring in three planks
this side, control. Three planks this side,
and then Control R, three planks this side, and then Control R,
three planks this side. Now, what we want to do as well, is we want to mark our
seams just to make it again, easy for ourselves. Right click, Mark a seam. Then what we're
going to do is add now a few more edge loops. So let's come in, and let's put four that side to this
side for this side. And to this side, like so. And then what we want to do is now we want to randomize these, but before we do that, should we split them up?
So is the question. So let's come in and
split them up, like so. I'm going to press Y. And then what I'm going to
do is grab the whole thing. Come up to mesh, transform, randomize.
Let's click on that. There we go. No point note one, and that should be looking good. Let's have a look. Right
click Sheets move. And let's now add some solidify, so all transforms, set
origins, geometry. Add modify, generate a solidify and we don't need it going too deep in
there just a little bit. So let's increase it just to hide those
bits out of the way, double tap the A, and this is what you
should be left with. A beautiful crate done
really, really fast. Now, let's come in.
Apply our solidify. And then what we can do
is just grab all of these and press Control J,
join it all together. The one place I forgot
is the top and the bom. So I'll have to go
in and do those. Now, I want to split these up, make it easy for myself. I'm sorry, guys, I
actually forgot that bit. Control AO transforms. Set doing for geometry,
Control R two, come down to the
bomb, Control R. I have got this one selected. No, I've not, so let's
come in. P, selection. I'll join this one with
this one, Breast control J, and then I'll come to
these now control R two, left click, right, click. Again, mark our seams. And again, add in
some edge loops. So five because it's quite long, like so, and then we'll
just split them off. So L, come up to the top, L Y. And now what we can
do is randomize them. So A, mesh, transform, randomize no point note one. And maybe that's a little
bit too high for these, so put it on naught point
naught, naught eight. Let's try that. That might
be a little bit better. And then finally, we'll
bring in that solidify. I'd modify, generate a solidify. Let's pull it down a little bit because we can still
see the gap in there, so we'll bring it down,
d in the shift bun, and then we'll apply
that, and there we go. Now we can join it together. Control J, control
A or transforms, and finally, then we
can bring in our bevel. Let's bring in a
bevel, let's say, to naught point, naught, naught three, like so, and there we go, you can see
that is looking pretty nice. Now, the one thing I can see is we've got a lot
of red in there, and there shouldn't really
be any red in there, so I'm going to press tab
A to grab everything, shifting N. And let's see where these red
points are coming from. Maybe if I hide this out
of the way, let's see. Yes, it looks like I've
still got that in there, so you can see this in here. Let's delete it out of the way. So delete and faces. Tab. There we go. Let's press SaltH
tab, there we go. We just had our original
still in there. So I've just deleted out of
the way, and there you go. Now you can see that is looking. Actually, amazing. But the amount of time
that we spent on it. Okay, so what we want to do now then is we want to get
some materials on these. We can already see that
on our gravestones, on our linen, we've got
the materials on there. So let's now deal
with our crate. So the crate materials
is going to be. I'm just looking at my
reference just to make sure. So we've got an old
wood dock on these, and we've also got a wood light. So I want to make
sure, first of all, we've got the right
materials on. So what I'm going to
do is old wood dog is going to be these
parts going around here, and then we've got wood light, which will be these
ones going in here. Let's do the wood light first. So if I come in and
I'll look for wood, and we've got wood light there, plus down arrow, old wood, dark. There we go. Press the tab, A, U, smart UV project,
click on Wrap. Let's go over to our UV Editing. Let's press the
little dot button, and let's come in and rotate those round let's have a
look what they look like. Maybe maybe it needs
to be a bit smaller, like so, and there we go, now let's come in,
grab all of these. Making sure you're
grabbing your corners, your bottoms, your sides. Like so, and let's
go to material, click on this one,
and click a sign, and you should end up
with something like that, and that's looking really, really nice, as you can see. I think it took us all told, maybe ten or 15 minutes to create this crate, so
that's pretty good. I'm really happy with that. Now, let's come to our barrel. This has got maybe
this wood on there. So I'll just come in. I'll grab this one first, grab this. Grab your barrel, press Control
L. Let's link materials. Well the links Let's try
that again. That's why. I'll grab this one
first, then this one. Control L, L link
materials. There we go. We can see the barrels
already looking good. I think I'm going to go with I'm wondering
which one this is. If I minus this off,
yeah, it's wood light. Click the down arrow.
Let's put in metal. Okay. Now let's deal
with this then. These parts, first of
all, these mel parts are going to be unwrapping, so small UV project. It is mel, so we
ain't got to worry about infinit loops or
anything like that. And we've still got old wood doc on why have we
still got that on? I don't want that on. Let me just see if I've messed this up. I haven't messed this up.
It looks like I have. Yeah, so this has got Mel. Let me just go back because I really messed up there, and
I didn't want to do that. So let's actually have a look. I think I put the
other one on this. I've got mel on there now for some reason. I
don't want that. I want the old wood. It
can happen. It can happen. It's been a long day, guys. So let's come in, and let's put old wood on here. Li a sign. And then we go, I
would say, though, it needs to probably, probably the outside
is going to be that. So let's do the
same on this side. I'm thinking that the inner side is probably going to be a bit dirtier than the outside.
So let's assign. And there we go. Is
this one actually, I think I actually
assign the wrong ones, so let's assign them like that. There we go. Now
that's looking better. And now let's come
back to our barrel, and we want the wood light, and we want this changing
for the metal this time. So metal is here. And then what we want
to do now is come to these and we'll unwrap
them once more. So these here, on
melt like a sign, U smart UV project,
click on wrap. And there we go. Let's make them now, a little bit bigger, like so. And if you've got, you know, issues with the shading, I'll show you how to fix
that in just a second. So all I'm going to do
here at the moment, though, is hide those
out of the way. And then going to
grab the others. We're going to press you. Smart UV project Okay. Press the R bone, 90
and spin those round. Now on the barrel, I can see like there's lots of these where they're
slightly bent, but you should be able
to get away with it. I'm going to press the S
bone just to bring it up. You'll see that we pretty much can get away with that anyway. It's just because they're
only bending slightly in, so it's not like what we're dealing with
with the other one. I am looking though at
something like this. I'm wondering, why
is it the same? Let's actually move that around. So yeah, now that's
looking good. Let's move this one up. And yeah, that's looking pretty good and looking at
the top and the bob. Now, let's deal with
these parts here then. These parts, if I press voltage, I should be able to
come then to these. Let's just move
around, put it on object mode. We've
got these parts here. Let's press voltage, and
we'll just grab these. Because we have big seams in these and it shouldn't
really be like that. I'm going to press Shift H then just to hide everything
else out of the way. And the reason is
you can see, we've got a lot of seams on here, which is causing
us major issues. So what I'm going to do
is I'm going to press Controll and I'm going
to clear all the seams. And what I'm going to do
then is re unwrap them. So unwrap smart UV
project, unwrap. Now let's see what they
actually turn out like. So I'm going to pull this
over, put it on material view. Pull it back, pull
this one over. Press the tap button,
and then we go. It's looking much, much
better now as you can see. And now let's press the
S just to bring it up. And then we go, that's
looking perfect, guys. Absolutely perfect. Let's go back to muddling,
double tap the A. So now, we've only got our spade and pickaxe
to get the material on, but you can see from jaws a few minutes
work realistically, just how nice they look, we're going to pull it down
onto the ground plane. And yeah, they would go in
any game, as you can see. Alright, let's save our work. And I'll see you on the
next one, everyone. Thanks a lot. Bye bye.
48. UV Mapping Props and Building a Stylized Lantern: Oh, guys, we left it off
here, so let's come in now, and what we're gonna do is
just texture these parts. So we'll do wood
red and the metal. So let's come to this one first. We just simply, I
think on this one, if I just grab the
tip of it like that, press the little dot
button and then come in, first of all, I'll just get
rid, I think, of the seams. I think it's going to be easier if we don't have any seams. The other thing is the wood. If I just lift this up,
so just pull it up. The wood actually comes
through to this bit. So what I'm going to
do is press tab A, ControllE and what we're
going to do is clear seams. And then I'm going to
come in with edge select. I'm going to also take away my base just so I
can see what I'm doing. And then what I'll do is
I'll come into this one. Alshif click and Alshift click around here,
right click, Marcin. Now I'm going to do
is, I'm going to press A U, smartUVPject, and I'm really hoping that I've actually resell of my
transforms. Let's do that again. Okay. And now U and smart UV project, which
is this one here. And then what we'll
do is we'll click the down arrow and one red. So wood red, and we
also want metal. So metal, like so,
and there we go. Alright, so first of all, let's come in and
turn them all around. So I'll go to my shading, not my shading, my UV editing. And what I'll do is I'll press the little
dot button again. I'm going to press R, 90,
spin them all around. And this is what we
should end up with. And then what I'm
going to do because I mark those seams as well, I'm going to press L on the metal part and assign
that and there we go. Now you can see that we do
have a lot of issues here, especially with certain parts like this where you can see, it's kind of not
unwrapping properly. So let's try that again. Smart your view
project. Click Okay. We're still getting
issues with this. Doesn't actually look too great. So what I'll do is
I'll come in and press the S button, bring
it out a little bit. And you can see this line here. This is when you actually need to decide whether
you're actually going to go in and
fix those issues. Now, let's first
of all deal with the top because it's
such a small prop. You got to make decisions on whether it's worth it or not. So with this prop here, I'm going to pull this
out a little bit. And you can see here
that now with the wood, there's not really any issues. Now with this, you
can see you've got a slight slight gradient here. Now, what sometimes works
if you actually come in and grab this pot is if
you move it over, so if you move it
over a little bit, you can see now that we
kind of getting somewhere. We just want to make
sure like there now, you can see it's a
lot less, and that, if we look from here, you
wouldn't be able to see it. So it's up to you, though,
if you want to go in and completely mark all the
seams on this or not. But I think for this
on this occasion, because it's such a small prop, it's not a hero prop. And by the way, a hero prop
is basically a prop which is going to be very prominent
in a game or in a video, something like that, and you're
going to see it close up. If it's a hero prop, you absolutely
want to make sure, you know, all the
seams are hidden. The topology is amazing. You know, the
modeling is top tier, all of that sort of thing. Now, let's come to our speed. I'm going to do exactly
the same thing. So Smart UV project, click Okay. And then what I'm going
to do is I'm just going to press Shift click on my pickaxe,
press Control. And link materials. And then what I'm going
to do is press tab, A, just to make
sure I'm selected everything 90, spin it round. So, press the S but
and pull them out. And then what I want to do
now is come to this part. I'm going to come
to spade down here. Now, all of this
shouldn't be wood. This part should be metal. This part should be metal. So I'm going to come in, first of all, and grab the
bottom, Alt Shift click there. And then this one
here going around, right, click, Mark sin. And now what I should be
able to do is come in. This is also going
to be wood, as well. Now, I should be able to
come in and grab this one, this one, and this one. And finally, this
one, put it on Mel, click assign and let's have a look at what
that's looking like. I'm going to also pull them
out a little bit more. Like so. And now that's
looking pretty good. Alright, so let's go
back to modeling, then. Now, we've done pretty
much all of our props. If we just coming over, so we've got, you know,
a kind of roadmap. You can see our props here. I think the next things
that we'll start working on will probably be the lights because once
we've got the lights, we can actually create, you
know, the street lamps. I think that's going to
be the best way to go. And lights, you know, I
think we've got to a stage now where we should
be able to do the lights. So we're
going to do those next. So first of all, though, let's make sure everything's in order. So these are going to be props, and what I want to do is
make sure they're names. So if I press F two on this
one, we'll call it barrel. And then we'll come to this one. And it might seem like this
is a bit of a time sink. So great. But honestly, guys, it's so worth doing. So small, grave. Especially when you're taking
it through to unreel Large. So you can easily find
everything, and we'll have sack. And then spade. And then finally the
pickaxe. Like so. All right. So now what we can do is we can go over the top. I can pull all of these over. So I'm just going to press
G, put them over there, and then grab these
two, press in G, and then I'll make
one of these so shifty and I'll press
tab and call it props. Like so. And then
what I'll do is I'll grab all of these,
press the button. And we haven't got
one for props yet, as you can see, so let's
make a new one called props. Like so. Now, let's
close up these seen as we've actually done all
those, and there's our props. Now we can see we've got
this Windows over here. I always check, actually. Yeah, that's my windows, shader. So I think I deleted those. I don't think I'm actually
going to need it, so I'm just going
to delete that off. And now we should have everything
really nice and neatly. Alright, so let's move on then
to the actual lights now. And I think what we'll
do is we'll start with easy one, which
is this one here. So we can see this one is a lot more complex
than this one, so we'll start with Easy one, and we'll probably start
probably with a cylinder. I think that's going
to make it easier. Alright, so let's put that down. Let's come back then. And what we're gonna do is press Shift A, and we'll bring in a cylinder. So let's bring in a cylinder. And I'm going to try
it on one, two, three. I'm going to try it
on eight, actually. So let's put the
vertices on eight, like so. Let's zoom into it. And we're definitely
not right now worried about scale or
anything like that. The main thing is just to get it to be kind of
that shape that we want. So what I'm going to do
is press tab Controller, bring in a few edge
loops, like so. And then what I want to do the win a brother in
is put it on five, just make sure yours on five. And then what we're
going to do is grab this center edge loop. We'll put proportional
editing on, and then I'm going
to pull this out. And bring it in very slowly, like so. And there we go. Now, that might have gone a
little bit too far because we definitely don't want
this kind of band here. The other thing is, I need to think if I'm going
to have three, so I'm going to have one
window here, one window here, and one window here,
and we definitely want to be taking things
like that into account. So what I want to do is
I want to make sure that this is not quite fnted so much, so we don't want that hardline. If I right click now,
shade or smooth. You can see it's
not quite there, so I'm just going to pull it
out a little bit like so, and you should end up
with something like this. Now, let's make it a little bit smaller to the scale
that we're going to be. And when we're dealing
with lights, of course, This is a stylized build, so you can see something like this if he
was holding that. It's still quite chunky. It's quite a big lantern, but I think something like this is going to be about
the right size. So let me just open
up my end panel. So these are the kind of scale
that I've got with these. And what I'm also
going to do, I think, is press Essen's head and just pull it out a
little bit like so. Now, I'm not going to
put the top on you. I'm going to do that after. What I'm going to do, though, is actually grab this
one and this one. I'm going to press P selection
and just flip those off, and I can even hide them out of the way if
I don't want them. Alright, so let's put it on Object mode so you can
actually see what I'm doing. And then what we're
going to do now is, this is going to be one window, this is
going to be the other. So right click and MarkosmJ
so we've got them there. Now what we want
to do is want to create these parts here. So all I'm going to do
is old shift click on all of these edges going round, like so, and there we go. And then what I'm going
to do now is I'm going to press Control B and
pull those out. Like so to the thickness
that I actually want. And then we're going to press
what we also need, as well. We need a bar in each
of these, as well. So I'm just wondering
if I want to put those in now or if I
want to put them in after. In other words, if I, you know what, I should
split these off. I'm going to press
Pete's selection and split those off and then
hide them out of the way. And now we've got
these parts here. So these bars here now. So if I come in and just
select all of these, and yeah, I could have selected them
before or put them in a in a vertice group, but I didn't think
ahead that far. So we're going to just
select them like so. And then what I'm going
to do is press Control B. And pull them out,
like so and then I'm going to press Pete's selection and separate those off as well. So if I press AltaH
now, so press Tab, Altag, bring back everything, we should end up with
something like this. And this is basically now ready
to bring out those parts, which I'm going to show
you in just 1 second. Now you can see, of
course, that this bomb part you can see
the red on there. Well so that, guys, don't worry about that.
Alright, everyone. So I hope you enjoyed that, and I'll see you
on the next one. Thanks a lot. Bye bye.
49. Lantern Thickness, Materials and Clean UV Mapping: Welcome back, everyone to the Haunted Street environment
Blender to Unreal, and this is where
we left it off. Alright, so what
we're going to do now is we want to bring
these parts out. Let's do that first. So I'm going to grab all
of these parts, press controle all
transforms Setgent geometry, add in a modifier, and we'll add in a solidify. Let's pull it out, then.
So let's pull it out. The reason doing it
like this is way, way better is because when
I bring these out now, so if I come in and
generate A solidify. Like so. If I bring
these out now, you can see I've got actually
a lot of control over them. Now, the one thing is
that you can see that they're not quite going in the space that
I actually want. You can see they're a little bit thinner than the ones I had. But don't worry, we're going
to be able to fix that. For now, just make sure that, you know, they're
in the right space. In other words, they are up to where you
actually want them. So if I pull this out a
little bit more, like so. So something like that, start
with something like that. Then what you're going to do
is you're going to press A. You're going to come in
and put this on normal, and you're going
to make sure that this is on individual origins. And now when you press S and Y, you can see that I can
pull them all out at the same angle and get them into the right place.
And there we go. Alright, so let's now come to the top so I'm
going to press tab. And what I'm going to
do is, first of all, I'll deal with this top. So if I pull it out, press
in the S but, like so, I'm going to make
sure that the gap from here to here looks right. And then what I'm going
to do is I'm going to press E to pull it up, like so, and then I'm going
to press I and pull it in. And then E and then pull it in, like so, and there we go. That's the top of it done. Now, let's deal with the bomb, and the bottom is relatively
simple, actually. So let's come to the bomb. Again, we're going
to pull this out. So I'm going to press the S bun, pull it out, like so. I'm going to press the E button. Like so. I'm going to press one just so I can go
straight into front view. I'm going to press E
again, press the S button, press E again, press the S bone to get it jaws to shape
that one, like so. Now, you can see when
I did that it kind of flicked and the other one actually that we're
basing this off, it is actually the other way. So let me just check that. So we're just going
to come in and we'll pull it out instead. So if I press the S bon,
and then grab this one, press the S bon, and that's more the shape
that the other one is. You know what? I actually see why I'm just wondering if we have a bottom
on here as well. So let me just come
into the bottom, press the S bun and
let's look at that. Yeah, and you know
what? I think that's probably going to
be about right. Right, click Shade
Smooth, and there we go. All right, so I'm
happy with that. So now what we've
got is basically this split into many,
many multiple parts. So what I'm going
to do is press H, hide this all out of the way, and then I can just
drag and select it all. I can come to Object first, convert and go to mesh. Then we'll make sure that
all of those solidify that I had on there
also get converted. I'll grab one piece then I'm
going to press Control J, and we should end up
with this like this. Alright, so that's
looking really cool. I think with this
as well, what we'll do is we've basically
finished it. So let's actually
get some textures on because we'll
make sure then we've not got too many windows in one go because that
would be a real pain. So what we'll do now
is press Control A, or transform set
origin to geometry, press tab, A, U. And I think the other thing
is before we do that, because we have all
these separate, you can see if I press L on
here, they're all separated. I will show you a
little technique that you can actually use if
it's part of the same mesh. So if we come in, and it does open the doorway
up to a lot of different things
you can actually do within Blender
to split things up. So what we'll do is
we'll select all those. Come over to the
right hand side, and you've got one that
says vertex groups, click the plus pom
and we'll call it let's call it Windows, something simple and make
sure you click assign then. Now, if I double tap the
A to deselect everything, if I just want to come in
now and select my Windows, I can just hit select,
and there you go. They're already selected again. So this is really handy
if you want to split the mesh down into
multiple parts, for instance, and
you don't have to keep going in and
selecting them all. Alright, so now we've done that. Let's now come in, I'm just making sure I'm
happy with everything. Let's now come in, and what we'll do is we'll
grab the whole thing. We'll press U and smart
UV project. Click Okay. And what we'll do is we'll
just then select all of these, so I'm going to click Select. We're going to hide
them out of the way. I'm going to come in, and I'm going to click
the down arrow, and we're looking for metal. So let's bring in the metal.
Let's put it on that. And let's also then comes. I don't know why all
those are selected, but A, U, smart UV
project, click Okay. And then all I'm going to
do now is go over to my UV, pull them out, press
the little db on, so I can see what I'm
doing. And there we go. Now what I'm going to do is
I'm going to come in, lt H, bring back those windows, double tap the A, come to your vertex groups,
click Select. And then all we're
going to do now is come back to materials, click the plus,
and we want glass. So glass Well, we're putting it. Let's see if it's on the lit. So where is it?
Window lights lit, and there we go
and click a sign. All right, so now we can see
the difference between them. And now we want to do is
let's come to one of them. So if I come to this one, so this one here, turn this off, so we got pulled this over. So we've just got
this part here, then what I'm going
to do is just press and Unwrap like so. I'm going to press the
Sbn to bring it down. I'm going to pull
it over to here. I'm going to press the
Sbn to bring it out, and then I'm going
to press S and X and pull it out
hopefully to the edges. Like, so we've got
something then like this. Now, what I'm hoping now is that I can come
in with Face select. I'm really hoping this
works. I'm going to press. I'm going to go down to copy, copy, and UV map. And then I'll come to this one. I'm just going to
test it on one. Hopefully, it'll work. So paste, paste UV map, and there we go. It's actually worked. You can see now they're
exactly the same. Now the next thing that I'll
want to do now is again, come in, and we'll go
to selection select. So it's just selected all those, and let's give it a try. Hopefully, it works. So you paste and we're going to paste
the UV map. There we go. And that's not work
is as I wanted. So let's actually come in, and we'll do it
probably probably because these are it's either to do with the
fact that, you know, they've got a vertex
in them, sorry, an edge, or it's to
do with the fact that some of these might be
actually longer than others. So what I'm going to do
instead is, I'll come in. I'll grab all of these, and I'll just see if I can do
just the top ones for now. Sometimes this works best, so, and we'll go to paste. UV map. No, that's not worked. So let's just try it with one
and see what the issue is. So copy, copy, and
we'll copy the UV map, and then let's try
it on this one. So, copy, paste, UV Map. And then we go,
It's worked on that one. Let's try two of them. So U, paste, UV map. You can see here it's
not. Let's try just one, paste, UV map. Let's have a look at
this one. You can see we just have to do them one at a time for whatever reason. Okay, let's paste. UV map. And I'll try a
different way as well. And I know we've messed
around with this a lot. But if we can actually
work out, you know, what's actually going on here, so copy paste, UV map. Alright, that's
the top bit done. Now, let's come to this one. So we'll see if I
can just paste one. So paste, UV map. And yes, that's actually
worked on there. Now, let's even just copy this. So I'm I'm going to copy the UV, and let's see if I can
transfer the UV, paste. Now, I'll try it on these. So let's see if I can paste
all those UV maps in. And if not, we're just going
to do them one at a time. Now we go to you. Transfer, paste. Nope,
it's not going to work. Alright, let's try
just one again, paste, paste, UV map. That one for whatever reason, this is Oh, I see
what's happened here. For some reason, we've
got a seam on there. That doesn't make a
lot of sense, does it? So let's clear the seam out. And now let's give that a try. I'm gonna press Control
AO transom origin to geometry because I really don't want to actually
do just this one again. I mean, if I have to, I will, but then we'll go to
transfer paste UV map. And I think with this one, we're going to have to
just press Unwrap. And then what I'm going to
do is just put this in. So A G. And you can see there
that it's actually split. And again, I'm just looking at what's going on
here because for some reason, this seam, I think,
is still there. So controlly clear seam. Now we might actually
be able to do it. So you paste UV map. And nope, it's actually
marking a scene for us. So all I'm going to do now
is press you and unwrap. And then we're going
to press the S boon. G, drop that in place,
press the S board. And if we come across anywhere we've got
issues like that, maybe, maybe we could
use this one instead. Okay, so now let's
work on our way round, so I will try copying this one. So you Copy UV map, and then we'll go to this one, and let's hopefully
copy paste UV map. And we're having the
same problems on here. So what I'll do is I'll grab
this one that we just did. So copy UV map, and then this one
U paste UV map. And there we go. We're not having any
problems with that now. Let's do the same.
We'll try two again. Let's see. So paste UV map. No, same problem. So we'll
do it one at a time. So we're going to
go paste, UV map. Same problem again with these. So sometimes, as I said, better off pressing U and
unwrap and then pressing S. And it's not saved us
from all of the work, but it's saved us from a lot of the work, which is
better than nothing. Now let's try it on this one, see if we have the
same problems. And it is a little
bit finickier. We'll say that. So
you let's wrap. Let's press A S G. But
the way that we laid out this UV map does make it so that it's
made it easy for us. And if we come to this one now, you can see that we are
on the last one out here. Now, when we come back, we'll quickly get these finished
off because basically, you can see, we've just got
the bomb ones to do now, so we'll unwrap one, and
then we'll do the others. Alright, everyone. I
know it's a little bit frustrating that that
doesn't work so well. It never has to be honest, but it does save time in a lot of ways, so that's why I use it. Alright, everyone, so I'll
see you on the next one. Thanks a lot. Bye bye.
50. Modeling an Ornate Standing Lamp Base and Crown: Welcome back everyone
to the Haunted Street environment,
Blender to Unreal. And this is where we left off. Alright, so now let's
come to this one first. And what I'm going to do
is I'm going to press. I'm going to go to
transfer and paste. And I'm going to try a couple with the transfer and paste, because I was yours
trying that out. So let's go to
transfer and paste. And there we go, It seems to
be working on these ones. So I'm yours gonna come round, grab the rest of these. Like so. I'm going to press
U transfer, paste. And, of course, it stops
working. Let's try these two. UV transfer paste. That's worked. Let's
try these two. UV transfer, paste. And we've just got this one. Let's try it on its and transfer and paste. And there we go. Alright, so this
one's looking good, except I missed one here. So I'm just going to go UV, transfer paste, and there we go. Now, you can see this
one here is also wrong. So let's go there
UV transfer paste. Then just going round, making sure that
I've got them all. And I was going to
say that you can see, even though, you know, we have so many
problems with this, it actually in the end,
wasn't actually difficult. Now, the one other thing
is that this here, just looking at
the edge of there. You know what?
That's going to do. I'm going to go to file,
I'm going to save I work. And then what I'm going to
do is go back to modeling, and now we're going to do
is attempt the harder one. So we're going to
do the other one. So let's just pull that up so you know what
I'm dealing with. It's this one here. So we're
going to create this one. Pretty much the same way that
we've done the other one, except we're going to kind
of do this bit up here. It's got a lot of
intricacy in this part, so we'll do that one next. All right, so to start with, let's this time, move
this to the side. And what we'll do is
we'll bring in a cube. So shift, let's bring in a cube. And then what we're
going to do is going to press S. We're going to put it on object mode or solid mode so we can see what we're doing. And this time, I'm just
going to scale it down J to be round about the
same as this one here. So if I grab this one, I'm
going to scale it down. Something like this. And then what we're going to
do now is just bring it back down to
here just so it's a little bit out of the way and I can actually work with it. Alright, so let's bring
in some edge loops first. So I'm going to press Control R. I'm going to bring in three, I think, one, two, three, left click, right click. I'm
going to press one again. And what I'm going to do
is grab this center one, put proportional editing on. At the moment, I'm going to
turn off this off of normal. It does interfere
with a lot of things, so I always want to make sure
that I've not got that on. Bring it in then,
and let's see if I get the actual shape
that we're looking for. So something like this. Let's turn it off now, just to refine it
just that little bit, and let's come to this
one, press the S bone. Yeah, I think something
like that, that's right. Click Shad to move. Something like that I
think is a good start. Now we'll do is we'll
grab all three of these. And we can do this one pretty much the same way as what
we did the other one. Or we can do it all together. So in other words, if I come
in and grab all of these, so you can see all of
these and all of these. And what you can do then
is press Control B. And then you can
bring them all in. Now you can see they're all
coming in different sizes. I don't actually want that,
so I'm just going to press Control AO transforms
set origin, geometry, then I'm going
to press Control B, holding the Shift button down, and now you can see that's
how they're coming in. Now, you can do it this way, but I think it would actually be better if we did
these ones first. I'm going to come in.
I'm going to press Control B because
I want these to be a lot thicker than
these ones here. Now I'm going to do
is press Control, Shift and click Control
shift and click Control B. And pull these ones out like so. Now, with this one, again, now we can come in, and I definitely want to
separate these off. So what I'll do
is we've got one, two, three, four on each side. We'll do what we did
before. Like so. What we'll do is
press P selection and hide those out the
way, just for now. And then what we'll do is
we'll also grab the top like we did before because I think this is the best
way of doing it. So P selection, and
then we can press tab, hide them out of
the way, like so. Now at this stage,
it's up to you whether you want to
split these off or whether you want to
one complete mesh. If I come in, press
Control AAA or transforms, and then we'll add in a modifier and we'll generate a solidify, and then what we'll do is we'll
pull it out a little bit. Like so, and you
can see, we still get a really, really
good result with that. Just make sure even
thickness is on. It does make a little bit
of difference. Like so. So it's completely up to you if you want to do it this way. Or let's press altage,
bring back the stuff. Let's just hide our
floor out of the way. So you'd end up with
something like this, or if you want to
separate them and, you know, do it separate
from each other. So these bits here
will be separated. I think for me, it's looking
pretty good like this. I actually like the
fact it's brought these out a little bit
on the edges like that. I think it adds a
little bit more to it. So, yeah, I think
I'm okay with this. Now what we'll do is
then we'll carry on and create the other bits. So I'm going to
grab this one here. I'm going to press the
Sp and pull it out. And then what I'm
going to do is press the E button just
to pull it down. Now, I'm just going to go around and make sure I'm happy with
this because at the moment, I'm going to press
Alt Shift and click lns and just bring it in
a little bit, like so. And then what I'm
going to do as well is come to the bomb, press the S but just to give us that little
bit of a slope there. Then we're going
to do is press E, enter S, and pull
it out, like so. And then what we're
going to do is press E and pull it down, and then S and pull it in, like, so all good. Then finally, we're going
to press I, pull it in, and then E, pull it down, and then press the S
butts, pull it in. And we're going to
press one just to make sure you've got
the right length. This is looking
perfect at the moment. And then I and then E, be careful when you press,
by the way that you're not actually collapsing these edges, and then we're going to press E pull it down, and finally, the Span, just to
pull it in again, and there we go, that
is looking fantastic. Alright, so now on
to the hard part, which is the top pot. And what we're going to do is we'll come to this top part. And you can see that this and the top part are actually
joined together. I'm just going to
press P selection, grab this top part, press ControllAO transforms, right click Set
origin to geometry. And what I'm going
to do then is I think I'll pull this out first to get it
lined up with this. So if I press S, I can pull it out pretty much to where I want it, so
something like this. Then what I'll do is I'll bring in a couple of edge loops, so Control R. Now, you can see that bringing in edge loops on this is a
little bit of a problem. And of course, the reason
is if I press tab, you will see if we select
this and this and join them, then we shouldn't
have any problems. But at the moment, we have
got problems because this is an end gon or if it was a triangle, we'd
have the same problem. So we're just going to
select these two top ones. We're going to
press the J button, and then we should be able to now bring in an edge
loop going that way. And I think we'll
bring in one, two, three, four, five,
six, maybe six. I'll bring in two at the moment, so I'm just going to bring in two edge loops, right click. I'll press Control
log going this way. And then what I'll do is I'll
just grab both of these, and I'm going to press Control B to bring them out
where I want them to. So something like that. And then what I'll do is
I'll increase the amount, so I'm going to bring
one in the middle. So it's got one, two, three, and one in the middle. Left click, and there we go. Now, why have we
done all that work? You might be asking
because I want to actually start pulling
all of these up, making it a little
bit more intricate. Now, we can see we've grabbed
this one and this one. So this one on the inner, and we've not got as many I've not got as many
going the other side at the moment, so you know
what I'm going to do? If that ever happens to you, just press delete and faces
and not delete and faces. Delete and limited dissolve. If that ever happens to
you, just start it again. Now, why did that happen? Well, it's a square,
pretty much, and it happened because I only did joined up these
vertices on one direction. So J then J and then J, and now we shouldn't
have any issues like so. Now for press Control again, we're going to go one, two, three, or we can use the
bevel method, which we did. So left click and right click
Control Lt. Left click, right click, Edge select. Oh Shift click, Control B, and now you should be
able to pull them out. Again, making sure that it is on four because you've got
these other edges on here. We have Gross Center
one going down here, and now we should be
able to use that. All right, so now we've got this bit. Leads
actually come in. And what we'll first of
all do is bring these up. So I'm going to go
Alt Shift click. I'm going to come
around this side then, Alt shift, click. And what I'm going to do
is bring these up like so. And then I'm going
to work my way in. So Alt Shift click Alt Shift, click on
the inner ones now. And I'm going to bring
these up as well. Like this. Then finally,
I'll bring this one. So Alt Shift click
Alt Shift click, and we'll bring you up
very slightly, like so. Alright, so far so good. Now what we can
do is we can grab the whole thing up,
so pressed either. We can press A. Let's go to face Leg to make
it a bit easier. And then what we're
going to do is press E and pull it up like so. And what I'm also going
to do then is press S, Z, zero, just to zero that out, so then I can do the top
bit a little bit separate. Alright, so now let's
work on our top bit. So again, I kind of want
to pull some of these out. You know, I've got pretty
much all of this here, so I'm just looking whether
I'm happy with that. So let's first of all,
pull it down into place. Yeah, and it's really actually fitting the scene.
I can see that. So what I'm going to do then is I'll come to this top one. I actually I'm just
wondering with this top one, whether I want to like kind of start make
a new start on it. So what I'm going to
do is press Shift D. I'm going to bring it up. I'm going to press P and
selection, separate it out. And then I'm going to grab
the top one, press tab, A, and delete and
limited Dissolve. And then what we can
do from here is, we've got a new start to it, so you know what? I'm just going to go
back before doing that, and instead of doing
that, I'm going to just come in and grab all of these. Going around here because I think I want to square
one to start with. So I'm just going to
grab all of those. I'm going to press Y then. And then what I'll
do is grab all of these and delete and vertzs. And now we should end up
with something like this. And I think that will actually give me
something to work with. So if I put this on here
so press the E button, yes, and that's what I want. That is going to give me a lot more to work with
than what I had. Let's press Control AO
transform set Origins geometry. File, Save work, and I'll see you on the
next one, everyone. Thanks a lot. Bye bye.
51. Sculpting the Lamp Hook and Chain with Curves: Welcome back everyone to the
Hunt Street environment, Blender it to Unreal. This is where we left you off. Alright, so let's come in then, and what we'll do is we'll
grab these top four corners. So this one here, this
one here, this one here. Now, remember, it's bevel, so it's Control Shift and B when we're talking
about vertices. Let's drop them down so we have them going all the
way over to there. So then we've got
that nice flat edge that we're actually looking for. And then we want to
do is just make sure, then you can see that these two vertuses are touching, and we don't
really want that. So what we want to do
is we want to come in and mesh clean up and want to merge by distance and a
vertical is removed, which is these things here. So we've actually
removed those. So always bear to clean
up in the beginning. And now we want to
do is we want to bring this center part down. Now, if I come in and
just grab these four, so the center four, like so, put proportional editing on, I should be able to
If I bring this in, bring it down like
so, and there you go. And that's looking
pretty nice. All right. From there, then, what I can do is I can actually
bring this part up. So if I come in,
grab all of these, so I'm going to
control select this one and Control select, control select all
the way around, like so, and then I'm going
to press E and bring it up. Now, of course, I don't want
this to be bent as well. S said zero. Now you can see
that because they had proportional editing on, so S said zero, and there we go. Like so. And let's bring it in. So S, bring it in. Let's look at what
we've got here, and this is looking
really, really nice. The one thing I would say is that this probably
needs a bevel on it. So this going around
here needs a bevel, and then it should
look pretty nice. And what we'll do,
though before doing that is we'll bring this in now. Now, again, with this top bit, I don't really want
to deal with all of these polygons
because I'm going to have kind of a
hook on top of it. So all I'm going to
do is just press Shift D. Bring it up, press delete, limit to dissolve, and then I'm going to press E. And then what I can do
from there is I can press the S bone and just slot
that into where I want it. And now I haven't got
to deal with all those. Now, is it small enough?
I don't think so. So Ns, let's put it into place. Like so. All right. And from there then I can
actually create my O. Now, let's go back then to that bevel that we spoke about. So Alt Shift click Go
all the way around, you can control click as well. Like so. Let's press Control B and just
bevel that off a bit. And has it done what I actually wanted it to? Probably so. Probably so. I'm just
wondering if it's bet with it or without it. So let's press Control Shift
and Z Control Shift, z. It's not actually working,
so let's press Control B. And we'll bevel it off
a little bit. Like so. How's that looking better? I'm not actually a I'm
not actually convinced. Whether that looks bear or whether it looks bet like that. I think I'm going to leave
it like this, actually. I think it's just a little
bit too fat is what I think. Let me just try bringing
this down instead of up. And let's also try. I actually think it looks
better, like flat down. I'm going to press SS zero. And I think what
I'll do is actually, I'm going to mark a seam, so I'm going to come
in and mark a seam. And this is a good
thing. If you know all the tools that
are available to you, you can quickly come
in and, you know, fix things on the fly and get them to
exactly how you want. There are no, you know, happy mistakes or
anything like that. So let's come in. Right
click and we'll mark a seam, and then we'll come to this bit. I'm going to grab it and I'm
going to press SSD and zero. Flatten that down. And you know what it looks
better like that. No denying it. At least
we tested it out, though. That's the main thing.
Okay, so let's come back. Let me just go back put
that back in place. Let's come to this part now. Let's press S and X, and I just want to bring
it in because this will be there where that
loops coming off of. And then what we'll
do is I'm just wondering the easiest way to do the hook probably probably
going to be with mesh. So I'll probably
do this with mesh. What I want to do though before doing that is come to this bit. A I'm going to do is
select all of these. So going into this one,
select all of these. Same on this side. And I've got that selected. I
don't want that really. And that's Okay, let's select them like
that. Select this one. Control select that one. Alright. Let's press the
IB and bring them in. E, enter Altne, pull them out a little
bit. And there we go. All right. That looks good. Now, let's come
to our hook then. Now, because, you know, our hook is it's quite long, so that's why I've made
this a little bit thinner, which means then I
can come to this bit. I'm going to press the
ibn to bring it in. So let's come to this phase, press the ibne and bring it in. Now I want to do is I want
to press three so I can actually see you know, the
way I'm going to this. I'm going to press
question mark though first in solid mode, press the tab bone
and then I should be able to bring this up. Like so. And I actually
want to rotate it round. Now, first of all, let's
bring it in a little bit. Let's bring it up.
Let's bring it in. And now let's rotate it. So it's going to be
rotated on the eggs. Let's bring it out. Let's
rotate it on the X, X. Let's bring it up and then R
and X to where we want it, let's press E and then R and X. And now we can start putting
these into the place. I'm just going to
press it out like so. Now I'm going to
grab this end of it. I'm going to make sure that
proportional editing is on, and I'm going to press the Span just to get it how I want it. Now, any parts from here you're
not happy with, you can, of course, or X now
bring them into place. So in other words,
this part here, I can see No, not quite right. So if I come in, I
can bend it that way. And there we go, we've actually got what we're
actually looking for. And the other things a little bit too jagged
at the moment. But before we actually come in and smooth those off
or anything like that, just make sure that you're
actually happy with it. I think let's just move
these this way a little bit. So we'll come in and move
all of these this way. Now, when you come
to select this, it has a tendency not
to select them all, so just be wary of that.
Let's bring them in. And now this, apart from
this one here, he's looking. Perfect. All right. Now let's go and smooth
them out a little bit. So I'm going to press
Alt Shift, click, Al, shift, click, Al, shift,
click Alt Shift, click, press Control B, and let's round it off a
little bit like so. Now the next thing I want to do then is make this a
little bit thinner. So I'm going to come
to this part here. I'm going to press S and X
with proportional editing on. Let's also put it on something like let's try the
inverse square. Let's try that
first. So S and X. Let's bring it in a
little bit like so. And there we go. That is looking
really, really nice now. Now, the last thing for this is we are going to need a chain. So we're going to
need a chain on this. Now, it's probably better off using the curve when you're
bringing in a chain. So what I'm going to do is, I'm just going to press shifts cause Can't get my words out. Cursed is selected. Shift A, and what we'll do is
we'll bring in a curve, and we're going to
bring in a circle. Now, let's make
the circle bigger so the actual size that we want. Let's turn it round. So RX 90. Let's put it in place,
so something like this. And then what we'll
do is come over to the curves menu, and
we're first of all, going to go to the
depth. Like so. And what I want to do is, again, make it a little bit
smaller because it's still a little bit too big. And then what I'm
going to do is come into these two sides, press S and X or S and Y. Let's try Nx first. Let's
put it on medium point. So SNx and bring it in like so. Now, let's see if I
bring in some more edge, if I bring in a subdivision. So if I grab this
one and this one, right, click, subdivide, grab this one and this one, right click and subdivide. I actually think that's going to look a little bit better. So again, then I'll just
come onto these two, so subdivide, and
then this one and this one subdivide,
and there we go. Now, is that still a little bit kind of flimsy,
maybe, maybe. So what I'll do on
the next lesson is then I'm going to
save that my work. I will show you the other
way of making a chain. So rather than this way,
I'll show you the other way which you'll be using a Taurus, and I'll go through
it and show you how that works. Alright,
everyone, so
52. Non Destructive Chain Links with Curve Path and Array Modifier: Welcome back, everyone
to the Hunter Street Environment
Blender T Unreal. Alright, we're going to
put this to the side. What I'm going to do
is then I'm going to bring in something
called a Taurus, but we're not actually
going to use that. So a Taurus is this. We can use this
to create change. Now the problem is, you
can pretty much change most of the things in
this menu. As you like. But once you, let's say, rotate it, so RX 90, this entire menu then disappears and we can no
longer do anything with it. So I don't recommend
doing that either. I do recommend, rather than
bringing in a simple curve, bring in my favorite curve, which is a path,
make it smaller. And you'll be thinking, why
are we bringing in a path, but you will see what we
can actually do with this. So I'm just going to make
it a little bit smaller. I'm going to bring
up then the depth. So I'm going to
bring up the depth like this just for now. Then what I'm going
to do is I'm going to press one to go into front view. I'm going to grab both
of these edges and bring them up without
portion editing on, of course, bring them up. And then going to grab
these, bring them down. Like so, and I'm also then going to right click and subdivide. Now you might be thinking, Well, this doesn't look very good, but if we come in
and just bring down these three, bring
in these then. So I'm going to
grab both of these, press S&X and bring them in. And now you can see we've got already a pretty nice
half link of a chain. Now, let's first of
all, bring these down. And then what I'll do
is line these up now. So if I grab this
one and this one, press Sx and zero, zero them out, and then
the same on this side. So S x, zero, zero them out. And then what I can
do is I can grab these two top ones,
press shifts, cursed as selected,
bring in then a mirror, so adding the modifier,
generate a mirror. Of course, it's going to be on the z axis, so turn those off. And the other thing
is you can also see that this is
a little bit out. So all I'm going
to do is press A, and I'm going to pull it
down into place like so. Now, attend to when
I'm doing this, bring them quite
close to each other because I am aware that if I
bring them that close now, I will be able to
use my cleanup mesh. I'll be able to do that
with it. Now, lastly, before, you know, finishing this, then, just make sure that you're completely happy with how your links look. You can see you
you can get a lot of different kind of
links in these now. We can make it more like this if you want to.
And you know what? I think that link now
is looking pretty good. You can also come in and
let's say grab these two, press alter Ns, and you
can make them thin, let's say, on these parts
here, for instance, so now they look a little
bit more reasonable. Now, the other
thing is, as well, it's non destructive, so we
can always change it around, and we can also bring
down the amount of resolution on our chain. So we brought that
down. And now I'm going to do is I'm
going to come over. I'm going to make them
a little bit smaller. And I always do this just before I'm actually
satisfied with it. So I'm going to make it
a little bit smaller, like so, like so. And then what I'm going to
do is I'm going to press Shift D just to duplicate
the whole thing, bring it up, and then Z at 90. And now I just want to make
sure that I'm actually happy with this like
so. And I think I am. So now before carrying on, I will delete the other way
because I'm happy with it. I'll then come to this
one, delete the other way. That one's looking. In
fact, you know what? Let's just have a comparison. You can see this
one and this one. I think this one looks
just way, way better. Let's delete it out the way. And then what we'll do is
come to this, we'll convert. So object convert to mesh, and then I'll come now
press A, and hopefully, if I come to mesh and clean up and we'll
merge by distance, let's turn it up a little bit. Till those vertices, 24
vertices, there we go. Now they've all linked together. Perfect. And then what
I want to do now is press Shift D and bring
it up, rotate it round, so I'll 90, and just make sure, then that this is in the
place that I want it. Now, on the original, I think we had one, two, three, four, and a fifth link,
so we'll make sure. Let me just look at the
distance actually on my own. So I think maybe
one more and then going into one because these
are actually longer links, so I've got to take
that into account. So I can do this two ways. I can either grab both of
these, press Control J. And then what I can do
is I can press Control A or transform set
origin to geometry, and then we can add
in another modifier, which this time
will be in array. Let's turn this down to zero. Let's go to the z
and turn that up, so we can see now
we can put these. If we hold the shift button, we can put these in place
wherever we want them. Like so. Let's turn the count down. We only want two of
them. And I think, yeah, that's looking good. Let's hover over here, press
Control A, and finally, then we just want now and the little component
where these are going into. So I'm going to press Shift A, I'll bring in a cube, like so. I'm going to make it smaller. I'm going to pull
it up in place, and then I'm going to have
it going probably the opposite way from which
way my hook is going. So if I press NSE, and then I pull it out this way, so S and X, and then S and Y, like so, something like this. And now I want to do
is I want to press Control A or transform
set origin geometry. And now let's bevel
these parts inwards. So what I'm going to do
is I'm going to come in. Like so, and then we're
going to press Control B, bring up the amount of vertices, like so, and then we're going to go over here to the
left hand side. I want to turn down or up
the whip to where I want it. And the main one is this one here. I'm going to turn it down. And there we go, I don't want
anything too extravagant, you know, for this part here. I just want to make sure that it's actually going
to fit in there. That's looking quite nice. I'm just wondering
it's just kind of should be just around here. More scented, not quite
so much to the side. And finally, to finish this
off, I'll just come in, grab the bomp,
press the I button, bring it in, and then I'll just press
E and bring that out. Right click, Shade Smooth. Yeah, and I think
I'm happy with that. Now, let's press a
little question mark, bring back everything,
double tap the A. And there we go. So we
have now two lights. These are way harder, actually, I think, than the
actual street lamps. And so now what we need to
do is pretty much what we did for this one, this
one's already done. We already know we've got
materials and textures on here. So let's now do the
same thing for here. Now, I'm just wondering, do I have a material
for the chain links. And I just checked that, and if you press in just
to move the other way, pretty much it's all metal. So all of this is this metal, and then
we've got the light. So let's actually do that. Now, I just want to make
sure that no I haven't got array modifiers on or anything like that. We
don't want any of that. And then what I'm going to
do now is grab all of these, all of these, all of these, the bottom and the middle. You can see here,
I've got solidify on. That is what I'm checking for. And finally, then if I grab all of this now, go up to Object, and what we're going to
do is just convert mesh, like so, press Control J, join it all together,
like so, press tab, and then A, and then all
we're going to do is U and smart UV
project, click Unwrap. And you'll see Blender is
very good at unwrapping, you know, lots and lots
of mesh like this. Now, let's come over,
and what we'll do is we'll go back
into solid mode, select this object mode, sorry, we'll select this one, press Control L, and we're going to link materials like so. Then what we're
going to do is come on over to our UV map. Press little dot bun. I'm going to press
tab A over this side, S, just to make it bigger. And there we go, that's
looking very nice. Okay, so finally,
the windows again. So we're going to
grab all of these. And just so I don't have
to keep clicking on these. In other words, if
I click them all off and I want them
all opened together, I'm also going to just put them in to their own vertex group, and we'll just call
it Windows again. And it's also good because
if you want to change these, let's say, to lit, you don't have to go in and
select them all again. So let's click a sign, like so. Now, these are different sizes, so that might make a difference. So what I'm going
to do first is, again, I selected it off. I can just go to
select now, like so, go to materials, select this one and click a sign. Then
we'll come to this one. And the good thing is about actually when they're
square like this and facing straight on is you
can just press you and come down to
project from view. That for me, makes it
a little bit easier. So now if I bring this up, like, so drop it into place
where I actually want it. And then we're going to press
S and's head, not N's head. Y. Let's pull it up. And G again, let's just
get it into place, and then S and Y, keep
going, keep going. Just so we've got those
dark edges around there. Now we can see the top part
kind of hasn't got them. So let's just grab
these top pots and see where that is going to fall in because this might
actually be in here. So S, sorry, G and Y. So the G key just moves it up, and now we can see if I bring
this down a little bit. We can get some dirt in there. Alright, so now
we're going to do. Let's see if we can
actually get this to work. So if I select this, I'm
going to press U. I'm going to go to transfer copy. Let's see if we can
actually copy it. Let's so what I'll do is now, I will grab this
one and this one. So grab both of these, and I'll show you a
different way of doing this just in case
you come across things like this. So
we'll do this quickly. If I press one
number pad, press U, and what we're going to
do is we're going to come down to where it says
project from view. Those two now in our line. Now, if I press
three, so if I grab this one and this one and
I press three on the Pad, I can go to and
project from view. Now, if I come round, this should be near enough in the same
place as you can see. Now, if I grab these
two, just these two, press Control plus, I
should then be able to press G and X and move them. So they're all pretty
much in the same place. Grab them all and then put
them all in the same place, and then press the Sp and
now let's line them up. So S and Y, let's pull them up together. Let's have a look
at what we've got there a little bit
out, as you can see. So I'm going to come in,
grab all of these G and X, pull them all over. And
then the same with this. G and X, pull them all
over a little bit, and then grab both
of these G and Y, let's pull them up, like
so, and there we go. And that is another way
of actually doing it. Alright, so on the next lesson, then I'm just going to move this to the side a little bit. On the next lesson,
then we just have these ones to actually unwrap. And then once we've done
that, we can actually move on with our
actual street lights. Alright, everyone, so I hope you enjoyed that, and I'll
see you on the next one. Thanks a lot. Bye bye.
53. Bridge Blockout Planning with Boolean Arches: Well, come back if you want to the Haunted Street environment. Blender to Unreal. This
is where we left it off. Okay, I have noticed that one of these is not quite right, so I'll just come
round and I'll grab, where is it this one here? So I'm going to grab just this two and you might have
done this as well, or you might not have
done. So copy default. And let's try pasting this because I think we had
some problems on one of them. I'm not sure if it's
this one or not. So let's paste default, and there we go.
Now it's the same. Alright, I'm just looking around making sure every
other things the same. Let's come to this one. So
we did the top of these. I'm wondering if we want to do all these together
because we could do that, but then it means splitting
them up, probably not. Let's see with this one, I'm going to reset
all the transforms. And then what I'll do is
I'll see if I can copy this. I'm just going to do that
before doing anything else. So if I copy copy default, and then I'll come to this
one and I'll paste, default. And there we are. They do
seem to be able to be copied, which means then what I can
do is I can do it with one. So if I come around to this one, and I'll also, you know what? I'll also give it a try on here. So let's try copy paste, default. There we go. Let's try it with
this one, copy paste. Default. And yeah, actually
seems Th one, let's see. Let's give it a try. So all
I'll do is first of all. I'm going to press
Control three. No, is that the one.
Let's have a look. Let's first of all,
press question mark, and then I can make sure
I get the right one. So Control three, Control one. Alright, Control one
to go into viewer one, U, and then what we'll
do is project from you. And then I'll just simply
bring it into here. I'm going to press
the S but to make it bigger like we've done
many, many times before. G to move it into place, and then I'm going to zoom out, and I'm going to press S
and Y, Jas to pull it up. To where I want it. Check
what that looks like. And I think apart
from this side, it needs to come in
over a little tiny bit, so I'm going to press tab again. I'm going to press G and X s to move it to the side
to get it where I want it, and it's going to go that away, like so, and there
we go, perfect. Now, let's see if
we can actually copy that because
it worked before, so it should work now, right? So copy, copy, default, and then paste, paste, default. And then Paste, default. Alright, so far so good. Let's see if we do three at
a time. One, two, three. You just know this is
not going to work. Paste, paste, default. And you know what? They actually did work. So that's great. Paste, paste. And this is when you realize, Yeah, this actual add
on is pretty good. Paste, paste depot.
And there we go. That's our light done.
Alright, that's actually done. Now, let's look
at our references again once I've actually
come into modeling, so let's come into modeling. We've got both of our lights, and I want to kind of throw a bit of a spanner
in the works here. And the reason is because
a lot of the time, you might be building
something and all of a sudden, you have to switch, and you've got to switch from
one thing to another. I want to actually
play that out here. So what we're going to do is
I'm going to just grab this. I'm going to press seven
to go over the top. I'm going to press Shift
D, drop it in here. I'm going to grab both of
these then and just move them over because these are
all my lights, like so. And then what I'm going
to do is, I'll call them, this one hanging light, this one standing light,
something simple again. So hanging light. And standing light. There we go. And then we'll also put them in their
own collection. So new collection lights. Like so, and let's
actually put that up. And now we shouldn't have
anything else in there, and that's just what
I'm checking for. Alright. So what do I mean by this spanner in the works?
Let's actually go in. What we're going to do
next is this bridge. So before we do
these parts here, we're going to do this bridge. It is a lot more technical than what we've
actually done before, but I'm fairly certain
that we can pull this off. So let's first of all,
get a decent reference of our bridge if
hopefully we have one. I'm sure we have one
somewhere. There we go. There's the reference.
And here we can see exactly what we've got. So we can see here before
you take anything on, especially something like this, you've got to
really plan it out. You've got to plan it out to
perfection because if not, you're going to end
up with it, you know, halfway through not being
able to actually create it. So if we look at this, it looks to me like we
started with a cube, made it to a rectangle, and then we're going to pull these parts down. So
these parts see it. Then we're going
to take a boolean, and we're going to
boolean this part out, and then we're going to go in
and boolean this part out. From there, then I'll
probably build these posts. Then I'll build this platform. So this platform here, you know, you can see it's probably
just a cube squished in and then pulled up
on these parts here. We can also see
that these posts, they've got an inward bit here. So having a knife in
detail also helps. Once I've got these
posts in them, I'm probably going to come
along and do this pathway. Now I know I have a geomgn
node that can really, really help with this, so
I'm going to use that. And finally, then, I'm going
to put these parts in. Now, when I'm thinking of
these parts, I'm thinking, maybe I could take the
edges from this where we booleaned it and use those to create
these wooden planks. That's probably going
to be the best way. I'm also going to make sure that I'm going to put some
supports in there. Along here, which we
can't see in this shot, just to make it, you know, look as though it's
being supported, just to make sure that
if you take a shot from here and you have some water there and it's
glowing a little bit, you will be able to see
him there and if it's just stone, it's not
going to look right. And finally, then
just this bit here, which is probably one of the
most simplest parts of this. So when you see a reference, break it down in that way, and then you'll find it's very, very easy to construct. Now, the other thing is
when you do it like that, you might come up
against a road block. So it might be, I don't actually
know how to do that bit. Go and research that bit, test it out, and
then you do know, and you might come up against
the second road block, which is you're testing your
theory of how to do it, and it simply doesn't work. That can happen. It
happens all the time. Don't give up with it again. Keep the workflow idea and just go and try and figure
out how to do that part. And then you'll find,
like, literally, when you break it
down like that, you can basically build
pretty much anything. It's the details and
the small details that are the hardest thing and take the longest
amount of time to do. So if we were making this bridge look
realistic, you know, the texturing side
of it is going to be a lot harder because we have to make
sure that we've got, you know, maybe, you know, some moss growing up
here or something. And, you know, the stone here is going to have erosion
or something like that. So that's what
takes up the time. But building, you know, simple structures like this when you break it down like
that is much, much easier. Okay, so now with all that done, let's actually
make a start this. So now, I will be giving you some scaling, some dimensions. But if you was building this, always use your guy. And again, it's important to make sure that
things are to scale. Even if you don't
start out to scale, make sure you bring it to
scale as soon as you can. Shifts then to bring my
cursor to world origin. Shift A then to bring in a cube, so not a circle. Let's bring in a cube. So
shift A, bring in a cube. And then here are
the dimensions. So if I press N, I'm
going to put in 14.2, Let's put in 4.15, and let's put in 4.36. Now, these are the
dimensions that I have used. I'm going to pull this over now. I'm going to put
it on object mode. These are the
dimensions I have used. Now, remember, the bridge
comes in and down. So you have to take
that also into account. But for now, we'll
work with this, and then we'll see how, you know, how this
is panning out. And the other thing to remember is when you're
creating a bridge, you don't want it
like, you know, this, it would be a complete waste of resources based on this time
period that raining for. So they're not going
to be building like Brooklyn Bridge
or something. And the other thing that you've
got to take into account, if this guy had a
horse and cart, can he still get
over this bridge? That is something
that you need to take into account because if we're viewing this
as a period um, piece, there would be
horse and carts bringing, you know, goods and services to the various establishments. So we have to think
of things like that. I see a lot of builds where they've not
thought through that, and you'll have a bridge
literally going over a bridge like this where someone's just
going to walk over it. You know, that's
not thought out. If you think of something
like the film Lord of the Rings and you look at
the bridges in the Shire, for instance, they are big enough to take
over the wagons. Okay, they're very tight, but
they're big enough there. Those people thought out that. You know, they didn't
just make whatever fit the scene, which
would be better, like little tiny stepping
stones and little, you know, tiny bridges
that they can cross over. You know, that's how they
thought about these things. When you look at the ls, for instance, they have a completely different
system in place. These things are thought out. They're brought by water. So the bridges in Rivendale some of them are very grand
where the horses run out, but a lot of them are very, very tiny where people just
walk across them. And the reason for
that is because everything was sort
out beforehand. So whenever you're
building something, you need to think about
all of those things, and you'll end up with a much more realistic looking render, even if that's stylized. Alright, so we're going
to save out our work, and I'll see you on the
next one, everyone. Thanks a lot. Bye bye.
54. Sculpting a Realistic Bridge Arch with Boolean Cut: Welcome back, everyone
to the Haunted Street Environment
Blender n Reel, and this is where
we left it off. And now, what I'm going to
do is I'm actually going to make the dimensions a little
bit smaller before we begin, because what I gave you is the dimensions for the whole bridge. And I'm thinking that
rather than doing that, it's probably going
to be easier if I just give you the dimensions of the actual main
bulk of the bridge. So 13.6. Let's put this on 3.32, and let's put the last
one on 3.88, like so. What this is is then this
is the top of the bridge. This then needs to
be sloping down, and then pretty much we've
got our dimensions for this. So all we need to focus on if we come in here now
and press Control R, left click right click and
bring in an edge loop, press tab because
obviously we've changed it from AC all transforms. Let's reset all the
transformations. And then what we'll do is now we'll bring in
some edge loop. So control. Let's bring
in some edge loop. So maybe let's have a look. Let's bring in how
many of you got there? Six. Okay, let's bring in six. Water tends to do if I
want to bring in six. Left click, right, click, turn this to six,
and there we go. Alright, so now
what we want to do is want to start
bringing these down. Obviously, we don't want
to bring them down, you know, so far that
it's going to look silly. So I'm not going to use
proportional editing right now because, well, I could do by keeping
just this part here. So yeah, you know what?
I'll show you that. So if we come into the bottom, press Control plus, press H
to hide them out the way, and then grab our center. So where is our center? If I grab three here, one, two, three, four, five, one, two, three,
four, five, six. So centers here now,
five each side. Hi way for now. Then what we're going
to do is we're going to come two these parts here, and I want to bend these down. So if I press one now, I can see where
they're bending down, and I can put my
proportional editing on, and then I can bend them
down and bring this out and then get a nice bend,
as you can see on there. Now, how do we want
to bend them down? For me, I don't want
them bending like that. I want to see if I can bend them in a rounded way.
So let's try this. And that's still
not what I want. So I think the only way
to actually bend them in a rounded way is to actually do it manually,
but we'll give it a try. We'll give it a try. We'll try root next. So let's
try that one. And yeah, it's probably
going to bend them like this unless let's try grabbing
the third one in. Let's try that and
see if that works. Again, that's probably
not going to work. So what I'm going
to do is I'm going to turn proportional
editing off, grab these two, and I
want to bring these down. So bring these down to
maybe something like that. Then I'm going to
go to Edge select. I'm going to grab these edges then and take your
time with this. Don't worry if it's
taking, you know, a bit too long of a time, and I'll bring these down then. Like so. Like so. Let's now press saltage and
bring it back everything. You see, because we hid those, everything's looking good now. Albeit though, I think we need to pull all of
this down a little bit. So Jos going to come in, grabbing all of the
edges, like so, not this one, this one
here, and then going along. And I'll bring them all down. So press in one
again. Let's bring them all down, like so. And let's keep kind of
sculpting our bridge. And there we go. And then this bit here, I'm
probably going to one. So I've got a nice
flat bit there. I always like a flat bit because then it ends in
where the path is. I don't like it if it's
tilting down towards the path. Because it makes it
harder to put together. So if I bring this down now, we'll make the slope a little
tiny bit less because, you know, although really
big humps look good, I mean, are they going to realistically be able
to walk on those? And there we go. That now
is looking about right. I do like a flat bit. Of course, you can come in and put a nice hump on
there if you want. There's no problem there
if you want to do that. But the problem is that
you've just got to be aware. When I finish this, they
always go shade or too smooth. And now I can see where
that little lump is, and I just want to
smooth out a little bit. So what I'll do is
Alt Shift click. Corn trope, and just smooth
it out just a tiny bit, like so, and then we go. Alright, that is looking
very, very nice. Now what we need to think about. We'll save our work
because we're going to use a boolean is shift. Custer selected. Shift A. Let's bring in then a cylinder. Now, when we bring
in a cylinder, it's very important
that we think about the vertices because this
is going to be a boolean. So I'm going to
recommend that we put this on something like 24. And the reason I'm picking 24 is because it's half a cylinder. You know, if you use it, so that basically means
it's going to have 12 sides roughly on your bridge. So if I spin this round now, so X 90 and bring this out, so I'm going to press S and Y and pull it all the way out. You can see that it's not
going to be like that. It's going to be more like this. S and X and then S and
then bring it down, it's going to be more
like this as you can see. Now, the other thing is I don't particularly want it to be. I want this bit to be flat. So what I'm going
to do is press S and Z and bring it
up a little bit. Like so. And don't worry, we'll check this as we go along. So what do
I mean by that? If I now grab my bridge, so I've got my clindiselected, grab my bridge, I can
press Control minus. We always get this, and now we can see exactly what
that's going to look like. And you can see now
we've got a bit of room where we can put this bit. Now, the only thing I
don't like is these bits. I want them to be flat. Now, I'm not going to mess around, you know,
with this boolean. I'm going to apply this
boolean straightaway, fix these parts first
that I don't like, and then once I've done that, I can bring the next boolean in. So I'm going to
just go over here, press Control A,
come to my boolean. I'm not going to
need it anymore. I've already thought of that. And then what I want
to do is I want to come to remove cutter. And then what I'm going to do is delete that
out of the way. Now, you could have
changed the boolean. To make sure this
doesn't happen, but I think it's easier just to go in now,
so go into the mesh. Come to these parts.
So first of all, we'll press M, and we'll
do it at the last, and then we'll do
the same thing here. So M at last, and then we'll do the
same thing this side. So I'm grabbing the top one. The bottom one is the last one. And then we just press ShiftR because that can also
do the same thing. Now what I want to do is we
want to go to Edge Select, and we want to
flatten these out, so I'm going to grab this
one first, then this one. I'm going to press SX zero, and that then is going to
flatten those out for me. And there you go. You can
see what happened there. Now, the other thing
is, do I actually want to flatten it out,
you know, so much? So you could have it perfectly, or you can just grab
both of them, press one. Hopefully median point
is on. Yes, it is. So then I can just
press S and X, and I can pull
those out manually, like so, because you're really
not going to notice that. And the other thing is it's going to be covered up slightly. You know, with some
wood on there. So anyway, I'm happy
with how that looks. So that's the first
stage of the bridge. And yeah, hopefully
you've got to this stage. Now, what I'm going
to do next is I'm going to now bring
in the next part. So I'm going to I'm just
wondering the easiest way to do this probably with a
cube and a bevel on it. So what I'm going to do is
I'm going to press Shift A. I'm going to split
it up, actually. So press tab. Shift A. Let's bring in a cube first. And let's see, first of all, if we can make the
shape that we want. So all I'm going to do
keep my cube control. Bring this down
somewhere like there, and we'll go back to the
reference just for a minute. You can't really see in here, but it comes up in this round, so it comes up here,
round, and then flat. That is what we're
trying to replicate. So by putting this
edge in there, when I come and I
bevel this off, it only goes to that edge.
That is what I'm looking for. If I didn't have this in here, so if I just press Controls, get rid of it, come to it now, it will go all the
way down to there. So I'm just limiting
what it can do. So I'm going to press Control R. I'm going to bring it
down to where I want it, then, somewhere like that, I'm going to press
tab Control A or transforms and then I'm going to come to
each side up here, press Control B, like so. Now, again, I don't really
want it come into there, so I want to have a
lot of control here. So what I'm going to do is
I'm going to press Control. Left click, right, click Control B and put in where
I want this flat bit to be. From there, then
what I can do is I can come now to these
press Control B, and it'll only go
to that part there. And what I can do from now is
I can pull it all the way. And then I can turn up the
amount of segments like so, and then finally, I
can bring this down. So you can see now I
can bring it down. And make exactly
what I want to do. The other thing
is, as well, I can also control the width of
where I actually want this, so you can see now I can control that width of where I want it. And that now is
looking pretty nice. Now, one other thing is it's looking a little bit
tall on the tall side, so I can come in and
just press EN'sEd and just squish it down a little
bit, and there we go. Now, let's press SNY and bring it into the
place where I want it. So just make sure it's poking through both sides
of the bridge. And then what we're going
to do is then is pull it up to where we
actually want it. Now, I can see again, it's
probably a little bit too big, so I'm going to press S, and then I'm going to press S and Y, make sure it's poking
out the whole thing. And the other thing is make sure whatever you're doing
with the boolean, make sure it's always
always poking through your three D model or has a tendency not
to work correctly. Okay, so this is looking good. Now, at this point, you want to decide, is it wide enough? Should I make it a little bit
wider? And I think I will? We go, we're all set up
for the next lesson, and we're going to
actually booley in this. And then I think we'll actually start with
the posts on here because I think that then gives
a reference for this bit. So we'll pull these two bits
up, start with the post, and then we can start probably
with the flat bit on here, which makes it
really, really easy. When we look at a
lot of these models, sometimes they
look unattainable. You know, they look
too difficult. But when you break it down, it just makes it so much easier. Alright, everyone, so I
hope you enjoyed that. See you on the next one.
Thanks a lot. Bye bye.
55. Stone Lip Details, Clean Topology and Mirrored Posts: And welcome back everyone to the Haunted Street
environment Blender Unreal, and this is where
we left you off. Alright, let's come
now to this part here. Before we do this, and
we're going to press Control R. Left
click, right click, Control B, and we're
going to bring those down and just pull it
out then to here. Now, we're still looking, can a horse and cart get over there, and that's basically
what we want. So then what we're going
to do is we're going to grab this one, Control, select this one, Shift
select this one, and then Control
select this one. And then we're going
to pull it up now. So we're going to press E, and pull it up to where we want it, and we want just a little
bit of a lip where our actual stone wall
is going to be on now. Of course, in this period, there wasn't no
health and safety. No one cared if
you're gonna fall off a bridge or
anything like that, so we don't have that to
concern ourselves with. Alright, so next of all, then we're going to come back
to this part, then. We're going to come
to our bridge. Again, I always save out my work before
using the boolean. I'm going to press
Control minus, and then I'm going
to wait for this to disappear or click on
it, and there we go. That is what we've actually got. Now, I do think that
this looks pretty good. Probably probably this part here just needs to be
a little bit longer, so I can grab my boolean, press SN, and just pull it
out and up a little bit, making sure that we've
got no edges in there. So that's a little tiny
bit higher, like so. And I think now that is
looking really nice. Okay, once I've done that
then, I'm going to come, I'm going to apply my
boolean with Control A, and I'm going to
come to my boolean, and I can simply
just press delete. I don't have to worry
about going into here. Next of all, then, as always, I always come in and
shade oro smooth, and now I can have a good visual of what that's
going to look like. Now, before working on
these posts over here, I always like to come
in and just make sure my mesh is, you know, sound. We want to make sure
that when we take this into Unreal Engine, that there isn't going to
be any issues with it. One issue I can
see is if you look where this and this
one are interacting, we can see that we really need to actually have
an edge loop in there. So I'm going to come
in, grab this one. And this one, press
the J button, come to this one, and come
to this one down here, press J, and then
come to this one. And we can see that we do have a little bit
of a problem here. So when we have something like this, it's probably better. I'm just trying to
figure out if it's better to use the knife tool on here because the
problem we've got is I don't kind of have
a halfway point on here. So I'm going to try
that. I'm going to press one on my number pad. I'm going to press K
and come up to here, press A to make
sure it's straight, and then just drop it
in there, like so. And then I'm going to do
the same thing on here. So K Hey, bring it up, like so. And then I'll join. You can see these
two are joined up. You can see we have another one here that's not actually joined. I'm just wondering, actually,
yeah, we've got two. So let's come in, and
we'll do this one as well. So J, this one, as well. J, like so. Okay,
that's looking good. Now the problem
we've got here is, as you can see,
we've got one here, and we need to move
it over there. So, grab this one, and then A, all the
way over to this one. Press the end but. Don't worry if you've
got that missing. We're not concerned
about that right now. It's okay. A, all
the way over here. Press the end bun. And
now it wants to do is we want to go straight
down basically into those, and then I know it's a lot half and around, but the thing is, if you do this, right, you're not going to have any problems
when you come to Unreal. So A, go down, enter, and then same for
this, K go down. A Enter, and then the
same for this one then. So, a go down, enter, and then this one. A, go down, and this
one, Enter boon. Now what we can
do is we can come in and we can grab
this one and this one, press the JB, and then we
can do the same on this one. Press Jake, and there we go. Alright, that is quite
good. Now we're looking. The next problems
we've got, we can see we've got some problems
along here as well. So I'm going to come
in. To this one first. I'm going to press J. And again, you will always always end up with these
problems when using boolean. And the idea is you've really
got to clean these up. Now, something like this, we can probably get away with
I'm just wondering if I can get rid of this because I'm probably not going to need the
bottom of here. In other words, if I come in and I press Alt
Shift and click, you can see it goes all the
way up to this part here. Now, if I press delete
and dissolve edges, you can see I can
get rid of that, and then I haven't got that problem all
the way along here. If I do the same thing then, on these two sides, like so, so delete
and dissolve edges. What that means is
now when I come in and I use triangulate, I shouldn't have all of
those problems again. It's the same thing
on here as well. I would say on this one here, that's so close together that
I'm literally just going to press delete and
dissolve edges like so. And now you can see that
we've actually got apart from this part here yeah,
actually clean mesh. So if I come around here, it
should be exactly the same. Now, let's come
in, and what we'll do is we'll try in face select, right click in and
triangulate faces, right click in and
tries to quads, and then double tap the A and you should end up with
something like this. Now, you can see it might not be the cleanest
looking mesh in the world, but the idea here is
not perfect topology. The idea here is to make
sure that this goes into unreal and it's triangulated properly. That is the idea here. You can see when we look
at smoothing, generally, if you've got issues
within your topology, it will show up when you're
actually smoothing it out. So I can see now that although we have little triangles here, it's not that bad. So could we re
apologize this bear? Absolutely. I'm not saying that. But for us, you know, beginning, we want to make
sure that topology is good enough to
go into unreal. It doesn't need
to be perfection. The other thing I'm
looking at, as well, whenever I'm looking
at things like this is how many points are going
into one of the points. Now, if this is bending
out or something, you've got all these
points going in there, that's gonna cause an issue. If you've got all these points going in there and you're
animating something, that's also going
to cause an issue. So when you're dealing with
just a bridge like this, you could probably even get away with not having even
any edges on here, getting rid of them all, and Unreal will probably
fix all that for you, but it probably will is the key. It might not. You might end up with lots of broken
mesh in here. So when you come to
the Unreal though, Luke is going to go through that and show you what happens, you know, if you do have
broken mesh, things like that. Alright, so we've got this
now, so we've done that part. Now, let's come to our post. So I'm going to come
over to my side. So this side here and
I'm going to then bring up a tube from here. So what I'm going to do is
I'm going to grab this edge, I'm going to press Shift
desk, cursor selected. Shift A, let's bring in a cube. Let's make it smaller. I'm also going to split it off, so P selection, split it off. Control A will transform
set origin to geometry, just for now because
we will want to be changing that very soon. And then what I'm
going to do now is bring this to
where I want it. So how far out is
this going to come? Probably, it's probably a
little bit too far out there, and probably a little
bit too far out there. And then what I'm going
to do is press EssensEd and pull this up to where
I actually want it. So I definitely want
to make sure that it's just under this bridge. So, ssnsEadPull it
just under the bridge. And now I want to do is
actually shape this. So I want to pull it
out a little bit. So what I'm going to do
is I'm going to bring in some edge loops, Centro. Left click, right click, and then grab this phase, like so, portional editing on. Let's try out, see
what that does. Let's press one, and
let's pull it out. Now, of course, when
I'm pulling this out, I don't want everything
else selected. So you know what? I'm
going to come in. Control select, Control plus, H, hide everything else
out of the way, come back to it, press one, and then I should be
able to pull it out. Now, I definitely don't want
it pulling out like that. So let's try another one. And that's more like
it. There we go. We've got that nice,
beautiful rounded part there. So it's nice, sleek, rounded off. Come in
something like that. Now, let's press saltage, bring back everything, and
that is what we've got. And now what we'll
do is we'll come in. Now, these are stone blocks, but we're gonna fix
those in a bit. We don't really want
to do those yet. So I'll show you
how to do those. At the moment, we need to establish where it's
going to come up to, and I think somewhere around
here is absolutely perfect. And then what I'll
do is, I think, I'll create that block. So that block that's
going to come out, I'm going to press E s
just below this, like so. And then we're going
to go now above it. So E, E, above it. Somewhere there, and
then we'll go E, pull it up, like so. And now we'll come back
and create these pots. So Al click Enter Alterns without proportional editing on. So terns, pull that
out where you want it. And again, before doing this, I actually recommend we
resell the transforms, like so and then
come back to it. Should click E, Enter lns, pull that out where you want it, so something like
that looks good, and then we'll do this top one. So E, enter alterns, pull it out, and I'm going
to make it slightly, slightly bigger than
this bottom one. And then finally we can
deal with this part. So I'm going to press
E. And then because this one is going that way. You can see it's
more a rectangle. What I tend to do is bring it in and then make it
thinner on this angle. So if I press S and X, sorry, S and Y, then you can
see it's following the actual flow of
the actual rectangle. If you make this square, it might not actually look right, so that's what I'm thinking
about when I do that. Now at the moment, I
want to pour a mirror on this to mirror over the other
sides and things like that, but I don't want to take
the mirror off because I actually want to do a little
bit more work on here. This is basically here then
to get our next part on. Okay, so what we'll
do is we'll come to the center of our
bridge, shift desk, cursed or selected,
grab this one, and then what we're going
to do is right clicks Origin three D cursor. Adding a modifier, we're
going to bring in a mirror. So a mirror, It's going
to go over there. Let's also put it on
the Y, and there we go. Double tap the A, and that's what you
should be left with. Now we can see just looking maybe this is a
little bit too in there. So what we can do
is press tab, A, and we can actually just
move that out to the side, like so, and now you can see we've got a
bit of room there. Alright, everyone,
so let's say about a w and I'll see you on the
next one. Thanks a lot. Bye bye.
56. Mirrored Supports and Solidify Modifier Details: Welcome back, everyone to the Haunted Street environment,
Blender to Unreal. And this is where
we left it off. So now what you want to do is we want to put this
little piece on here. If I come back to my reference, this here, this
little piece on here, and then we can
create this bit here, and we can see it
goes around really nicely all the way around there, giving us a really,
really nice support. Okay, so let's put
that down a minute. And then what we'll do is
then bring the first bit in. So I'm going to come
to this corner. That will make the most sense. So to this corner,
shifts Custer selected. Shift A, let's bring in a cube. Let's make it smaller. Like, so we might change
the scale of this, so I'm not going
to mirror it yet. What I'm going to do first is just bring it into
place where I want it. So something around here. Now what we need to
account for is that we're actually going to be bringing in some wood on here as well. So we need to account for that. And the other thing we need
to account for is just making sure that we're
actually pulling this out because we want
that particular look. And if we pull anything
out like this, you can see it gives us
that look automatically. You know, very thin,
slanted sides. That's the kind of
look we're going for. Then if we just pull
it down a little bit and maybe pull it up
a little bit as well. Like so how I pulled that up. Have look, let's just go back and make sure that
I'm pulling it up. Like, so press one. And there we go. All right. That's a good start. Now I want to do is I want to
bring in another cube. I'm going to press Shift A, bring in a cube. Let's
pull it over here. Let's make it thin at this. We're not going to
worry about scale over here or anything
like that at the moment. All we want to do is get it into the place where
we actually want it. I'm going to press S
and X and pull it out. Now the thing is, it wants
to cover this part here, so it wants to cover
this part. Quite nicely. So if I come in, grab this face, pull it down, you can see
it's covering that part. But we have to think of whether. So whether it's going to cover this part. And I
think the answer is no. So what I'm going to do is
just come into this part, S and Y, and just pull this
part out a little bit. And I also going
to pull this part down just so it sits just
below there, like so. And, of course, it's up to
you how you want to do this. Next of all, then, I want
to come in, press Control. Let's bring in five edge loops. I always like one in the
middle, as you know. Left click, and let's
just drag them over. So they're a little bit more centralized towards
here and here. And then what I'll do is grab this one. I'm going
to pull it up. Like so. Grab these two. Pull these up, like
so, and there we go. Now, you might be wondering. Yeah, but we've not
great the other side. Yep, you're right. So what I'm going to do is pull this back all
the way to here. And then what I'm going to do
is I'm going to press Tab, Controll all transforms. I'm going to then come back
to my bridge, shift DS Oops. Let's press Control, Shift S and cursor to selected,
so that's selected there. Come back to this part,
then right click and set origin two, three D cursor. And then let's add in a mirror, so generate a mirror. Now, we don't want it that
side at the beginning, so we're going to
paw Y, turn off X. And then what I'm
going to do is you can actually with the mirror, there's a little trick. Now, you can see,
as well that we do have some issues here because I silily pull
this into place. Now, what I'm going
to do is just grab this one and grab this one. I'm not even going to worry
if these are level or not because you can actually put something on
called clipping. And if I grab all of these now, pull them together, you will
see the moment we get there, we can't drag it any further. Now, you won't even
be able to pull them apart if you've let
go of the Gizmo. But if you turn clipping off, you can then pull
them apart, and it makes it flat anyway. Now, you can come in pull clipping in and
leave it like that. And then what you'll have
to do is just delete the edge loop because
you really don't need it. But I don't
recommend that. What I recommend is
taking off clipping. Now it's straight, pulling it just to here and
leaving it like that. Now what I'm going to do
is just apply the mirror. So press tab, apply the mirror. And then what you're going to do is you're going to come in now, grab this face and this face, this face, and this
face, right click. And what we're going
to do is bridge faces. So bridge faces,
and there you go, and then all you want to
do is Alt Shift click. On the edge, Alt **** click on this edge, delete,
dissolve edges. And there we go, we've got a perfectly
nice piece of mesh now. It's the same both sides. And now we can actually mirror
it over the other side. Let's first of all,
shade or too smooth. Let's then come over, add in a modifier, generate a mirror. And this time it should go over there, and it's perfectly fine. Now, let's not mirror this yet because we want to actually build this part
going round first. So the easiest way
to build this pot. So this part going round,
this part, this part, all of these pots is to simply
come in with edge select, grab this edge here
coming all the way up. So keep just going round,
all the way up to here. Like so, all the way up
to where you actually want your wood to actually go. Now my wood probably ends because we've got
a slab on top of it, probably ends around
this point here. So right to here. And then what you're going to
do is you're going to press Shift D and pull this out. Like so. And then we go. Now, let's press P selection, separate it off, and
let's come back to it. Control A, I always
reset the transforms, as you know, and there we go. Now what we want to do is
we want to come in vertex, select and look for any vertices that don't really
need to be there. So we can see all of
these are really nice. This one here doesn't
need to be there, so we're going to go
dissolve vertices. This one here doesn't
need to be here. So again, dissolve vertices. And now we're
looking at this bit. Do we need all of these? Probably. But what we
don't probably need is just this one here or you can move it around
if you want to. But for me, you know what? I think we just move
it slightly down. So I'm just going to
press G in front view, line it back up, and
there we go now. We've got that perfectly
right. Now, the next thing you want to do is we want
to split these off. So I'm going to
come to this part, and I'm going to come
then to this part. So I'm going to shift
select this part, come all the way
down to this part, and then I'm simply
going to press Y. And the reason I'm going
to do that then is because now I want this part here to be separated from all these
other parts because if I grab these now and I press E and Y, you can see that I
can pull them out, but they're also separated. Now, the other thing is, I
do once put on a solidify, but I can't do that if I've got all of these
issues with the mesh. So let's just press Shift N
and spin them all around. Now they're all facing that way, which is fine because I can
pull them out on there. But this one here is
facing the wrong way, so I'm just going to grab here, top of here, shift in, and then manually switch
it inside like so. Alright, so now we've got that. Let's come in then,
add in a modifier, and we're going to
generate a solidify. Let's then pull it out
because we can see that we're kind of on
the halfway point here. Now, if I pull this back, to here, we have a good idea of what it's
going to look like. The problem is that
if I pull this out either way, we've
got this happening. Now the thing as well
that you can also do is if you come over to
where it says offset, this is the best
thing about solidify. You can actually bring
this down and offset, which means then we can get that half and half type thing, and that is what
we're looking for. From there, then we can
increase the thickness. Let's increase the thickness. Like so and make it look
like it's an actual support. And that is looking
really, really nice. Now, the one thing I
would say at this point, we can still, pull these
up and pull them out. So if I come in, let's
say to this one. So if I grab this
with Edge select, so grab just this one, I
can press P selection. And then what I can
do is I can press son's heads S, let's
just grab it first. There we go. And then press
Eons head and pull it up. Now, you'll see that it's
not quite in the center, so set ourigenoGeometry, EnsEad and pull it up to
where we actually want it. And I do recommend when
you've got it like this, actually pull it out a little
bit with the thickness, like so, and then press S and Y and just pull it out a little bit just so it's
going to fit in place there. Now, the other
thing is just make sure that it's
relatively straight. So if we look, that's
relatively straight, like so. Now with this one, we
can see that this here, this is definitely not straight. So what I'm going to do
is I'm going to come in. I'm going to grab this part
here. I'm going to press one. I'm going to press E
and Z and just pull it just to straighten it
out just a little bit. Now, at the moment, if
I pull it this way, it's going to bend again. So for now, all I'm
going to do is just leave it like that because I do like it nice and straight. Now, on this
particular occasion, we can actually apply
or solidify, like so, and there we go,
now it's applied, and now I can do is
pull it to the side, and it's still kept straight. And now I think I'm happy
with how this has worked out. And now I'm going to do is
just grab the whole thing. I'll apply this
solidify, as well. Always be careful when
you join together that you don't
solidify things twice. It's happened to me
many, many times, and then press Control
J. Join it altogether. Control A or transforms, right click and set origin
to the three D cursor, which should be in
the center, right click and shade auto smooth. And that then is that part done. Here, then what we can
do is we've got both of these in so we can
actually mirror this. So add modifier. Let's
bring in another mirror. So mirror there, and
mirror on the Y, double tap the e,
and there we go. Why did I do that? Because
it's then going to make it easy to put this support in
and maybe a support up here. And on the next
lesson, what we can do then is we can start
getting this part. And you can see, as
well, as I said, if you break things down like
this, it gives you many, many options because the way
that it's been built is, you know, it's been built
quite procedurally anyway. It means that we can come in
and maybe cut these away. So you can have wood here or
you could have stone here. You can see we've
got many options because we've still got
our mirrors on here. We can still mirror this round. Everything is non
destructive as well. And if you build
like this, you know, in a lot of things you build in, it makes things way, way easier in the future if you
want to change something. You just built this out of
one single piece of mesh, that's going to be
pretty hard work. So try not to build like that. You know, in a
three D Tudor here, we do call this the
three D T method, and it's because of this
is the way that we do it. And most people out there don't
really build in this way. Well, not every
way that we do it, we have certain ways that
we put courses together, certain ways that
we bring, you know, our textures in and
all of that stuff. So it's quite unique out there, actually, as courses go. Alright, everyone, so I hope you enjoyed that, and I'll
see you in the next one. Thanks a lot. Bye bye.
57. Center Stone Structure and Geometry Nodes Path: Welcome back, if you
want to the Haunted Street environment
Blender to Unreal, and this is where
we left you off. Alright, we've already got
this in the center then, so let's work on this
center structure here. So what I'm gonna
do, first of all, this is going to be
made out of stone. When I'm actually
building things, I'm always thinking of what
it's going to be made out of, and from there, I can iterate when I actually
bring them in. Shift day, then, let's bring
in a cube, so another cube. Let's first of all, think about the bottom
section of this, where it's going to
come, all of that stuff. Let's pull it out
then into place. And first of all, let's get
it actually into place. So where is it going
to go? I would say it's probably
going to go there. S and z and then pull
it down a little bit. And then what we'll do is
press S and X and just pull it out just so those wooden slats are
actually going in there. And honestly, it doesn't matter how far back it goes because you can't
really see in there. But if you're going to
be able to see in there, just press S and Y. And bring it back and make it a little bit more reasonable. They're not going to be
carting around one ton blocks and things like that for a
bridge because it could, you know, damage the
structure or something. All right, so next of all, let's put the top on this then. So shift D. Let's
use the same block. Let's press the S bon
to bring it down. You can see there
when I'm pressing S. It's just bringing
it in the sides. We already know why
that is because I didn't reset all
my transforms. So now IF I press
tab, press the Sb. Now it's showed Oh, yeah, it's coming better than before, if not perfect,
something like this. And then what we'll do is we'll pull this up to where we
actually want it touching. Now, we haven't put
our path on there yet. So what we'll do is
we'll pull it up to grab this top,
pull it up to there. And then what I'm
going to do is stop the bevel from
going too far down. I'm going to press Control R, bring it down to maybe here. I'm going to press Control
R then on the vertical, press Control B, and I don't want to come in
past this point here. And then what I'm going
to do is grab both of these, press Control B, bring them in, bring it up
to where I actually want it. Like so. If I do it like that, it's going to mean it's
much easier than just to you stop this from
breaking with this mesh. So what I need to do
now is face click, right click, triangulate faces, right click and tries to
quads, and there we go. That mesh now is nice. She'll be able to right
click and shade Auto smooth. Finally, then, just
this bit on here, then. So what I'm going to do, again, Shift S, cursor selected. Let's just put that
there a minute. Shift A cube, make it smaller, like so. Let's pull it out. Let's pull it down to here, let's press S and Z. Pull it into place like so. And then what I'm going
to do is I'm going to bend it in here. And then I'm also going to
bend it in here, like so. So for that, I'm going
to need it much, much longer because I want
it to drop down past here. And I want the bends to come
in right level with here. So what I'm going to
do is I'm going to press Control R. Left click, right, click Control B. Drop it back. So that's the maximum I want
the width of this, and then I want
to press Control, bring it down just to there, so then you can kind of get that slope up that
we actually want. And then we want this top bit. Where do we want this
to slant down to? Probably, probably below here. So just below here, and you
can see I'm thinking ahead, thinking right, where do
you want my bevels to come? Next of all, then I'm
going to press Control A, set origin to geometry. And then what I'm going to
do is come into here and I'm going to press Control B. I'm going to bevel
it up to there, bring it in as little as
I can. And there we go. And that is looking pretty nice. And the other thing is, I can if I want control, you know, how far this is,
I can always come in and maybe pull
this up a little bit. Like so. Now, if that happens where you pull it
up and it's kind of broken, the reason that
happened is if I go back before the bevel, is because I actually
touch these sides. So if I press Control B, I actually touch
those sides like so before pulling it up,
that will always happen. So what you want to
do is you want to actually fix that straightaway. So, A, let's fix that
and the way we'll do it, mesh, clean up, merge by
distance forwards is merged. And now when I come
in, pull my face up. I will pull up very,
very nicely for you. Alright, so far so good. Now let's do this top bit. So what I'm going to do I also forgot I don't want
it going past here. So I'm going to press Control R, bring over the edge loop
just in front of there, so grab these three here. So just make sure
they're all grabbed. Press Control B, and
then again, pull it up. Now, you can see that we do have a problem there in
there. It's going past there. Generally, that doesn't happen. And I think probably on
this occasion, you know, that's happened because the mesh as this kind of
edge loop on here. And what's happening is,
if you press F nine, by the way, you can
actually pull this out. I should have been
doing that earlier, so I can pull this out. What's happening is because
clamp overlap is unticked, if I tack that on, that's
going to fix that. It basically stops it from
going past these edges. So just tick that on, and that then should fix everything. And now what you can do
is you can come back now, press Control B, and you'll see now you've got the choice
whether to pull it further. I'm just wondering because
clamp overlap is on, as well. It does mean that it's
limited on this side. So you just got to
be careful of that. We can, of course, yeah, we can't even mess
around with the wit. So, you know what? I'm going to leave it like that because I don't
really want to mess around with my clamp overlap
or anything like this. Now, this is a little bit longer than the one
I created originally. So what I'm gonna do
is just press Ens Ed and pull it up, like so. I think I'm happy with
it. The only thing is, I think this part here should be going
inwards, not outwards. So I'm going to press
S and bring it in. And then I'm going
to pull it up to here just so it's going in. I'm going to sort the
other bit out in a minute, but I'm going to get this,
first of all, looking right. So S and Y, like so. And then what I'm
going to do is make this a little bit thinner, so S and Y and then
pull it out tiny bit. Maybe, maybe that's just not quite enough.
Something like this. And I'm also thinking then finally this bit,
grab both of these, and then press S and
X and pull them out. Definitely passed here. So S and X, pull them out
again, and there we go. Now, now that's looking right. Now it looks like a keystone. Now, the next thing we
want to do is we want to bring in some bars
going this way. And the other thing is,
when we're doing this, we got to be careful when we mirror something
because we still want to make it look different, so we have to take
that into account. So what I'm going to do and
we'll do that after I know. It seems a long process, but if you want this to look good, there time, you kind of got
to go through the process. Alright, so now let's put
in this part on here. So for this, to make
it easy for myself, I could just come in to this
one, so I can grab this. I think this will be easiest, and I'm just looking if I've got anything to grab over here. I don't think so, so I'll just I think I'll
just grab this one. And what I'll do is
I'll press Shift D, pull it out a
little bit, and you can see it's got a
mirror on there, so it's going to pull
out in all of them. I don't mind my mirror
being on there actually, because it'll make it a
little bit easier for me. S and Z, like so, and then S and Y or X just
to get it a bit thinner. And then let's pull it
into place like there. Let's press the E button, and then what we'll do is use clipping and I'll clip
it just there like so, and that is the first support. I also think we need
a support on here. Now, for this, what I'll do is I'll just come into this bit. I'll press L, shift and D, and then I'll just bring it up because I want to
save myself work. I don't want to do
all that work again. I'm going to press S and E, and this is where my
supports going to be. F here, I'll just put
it in the mesh like so. And again, this is only
there just in case you're looking
under the structure so you can see there's
something there. All right. All
that's looking good. I'm not going to
apply the mirror yet, as I said, and what I want to do now is join all
of this together. Now, there's still a long way to go on this one.
We've got a bevel. We've got to make
everything look random, but we're really getting
down it now, guys. Let's come back to our bridge shift desk,
cursor selected. Let's come to this part then. And what I want to
do, first of all, is join all this together. So making sure I've
got no modifiers on, then I'm going to join it
together with Control J. And then what I'm going
to do is press Control A, A transforms right, clicks
the Origin three D cursor. Add modifier, and we're going to bring in a mirror,
and of course, it wants to be on the Y, turn off the X, and there we go. Now, if I come round here, should look exactly the same. All of these should
look the same. Everything looks really nice. Now the next thing
you want to do is bring in our geometry node. So what I'm going to do
I'm going to go to file, I'm going to go to hap end. And of course, we want to
append the resource pack, which is here, Blender
resource file, and here it is. Now, when we're doing this,
we want to go to Noe tree, and then we'll have
all of these on here. Now, I'm looking for one that
hopefully says Stone Path. I'm really hoping that's there. So let me have a look upstairs. Stone Path geometry
node, here it is. So I'm going to double click
this, and now it's in. And I'll just show you how
this works for So shift day, let's bring in a path. So we'll bring in a
path, pull it over here. I didn't modify
it. Geometry node. Click the little down arrow, Stone path geometry
node, and there we go. Now, why is this
so revolutionary? A bit like our fence node, to be honest, I saves
you so much time. If I come in, seven, go over the top,
press G, press E, press E, press E, press E, you can see it
builds a path for you. Better than that, if
you come in as well, and mess around with these, so if I turn up the
subdivisions one, turn up the bevels, you can see we end up with
something like this. Better than that, even, we can even bring in the
noise a little bit, turn up the noise power, and we can get them a
little bit uneven like so. And better than that,
we can also come in and change the
length of them. Or we can have random length, or we can have width. Or we can have random
width. Just like that. Now, if it doesn't go
back, just put in -0.5, then it will. There you go. Then from there, you
can actually bring it forward, like so. And then of course, if we've got width and length,
we need thickness. Let's make them a
little bit thicker. Let's turn up the
thickness value or down, and there we go. And before you know it, you've got a really, really nice path. The only thing I think
you can't do is shades moov just until you've
actually applied it. Now, last of all, you've also
got the gap between them. And you've got the random gap. So I can turn this down and make them slightly random.
And there you go. You can see within 2
minutes or something, we actually got a
stone half going, which was really, really nice. So that's why we're
going to use it. Okay, so on the next lesson, what we're going to do is
we're going to use this, and we're going to go
across here like so. The other thing is, because you've enrolled
in this course, you are free to use this
in your own projects, as long as it's not
for commercial use. It's that valuable, I know, guys. So use it in there. Same with the stairs
one, as well. Let's save that work, and now we'll see you
on the next one. Thanks a lot, guys. Bye bye.
58. Stone Bridge Slabs with Geometry Nodes Path: Welcome back, everyone to the
Haunted Street environment, Blender to Unreal, and this
is where we left it off. Alright, so now we've got this. We don't really
need to use this. I'm going to show you
a better way as well of how we get those
actually on the bridge. So what I'm first
of all going to do then is just delete
it out of the way. Now you've had a bit
of a play with it. Next of all, let's actually
mirror this, as well. Let's right click and set
origin to three D Cursor. Adding a modifier, and the
one we're going to bring in, of course, is a mirror.
Let's mirror it over there. And now, if we look around here, we should basically
have this near enough finished to how we actually want it except this stone
wall going on there. And you should be very happy with what you've
actually got here. Okay, next of all,
then we're going to come and what we want to do is we want this to basically
have our slabs on there. So what I'm going
to do is just press Control R. Left click, right click, and I'm going to then just take the top up here. So I'm just going to hide
these out of the way. So if I come in, press H,
hide them out of the way, and then should be able
to come in and just select this from
this point here. So you can see how
great selected here. Control select all
the way over there. And then what I'm going to do
is I'm just going to press Shift D and just bring you up very,
very slightly like so. Next of all, then
what I'm going to do is I'm going to press Alt Shift and click on that one that we
just created, press delete. And then what we're going to
do is just dissolve edges because we don't actually
need those there. And finally, then what I'm
going to do is re grab then this edge that
I've actually created. I'm going to press P
selection, and there we go. Now it's actually separated out. And from here, what
I'm going to do is I'm going to
press, first of all, Control A or transforms
set origin to geometry. Instead of using a curve, which you can also do, you can actually use
the line that you've actually created here and
then go up to object. And what you want to do is
you want to go to where it says convert and
convert to a curve. Now, these curves, you can't do as much as what you can
with your other curves. You can, extrude it
and things like that, but they definitely
haven't got handles on them, so don't expect that. But the main thing is, that we want to do is we want to
come in add in a modifier, a geometry node, and the one we want is the stone path.
And there you go. You can see just how easy
that was to bring in place. From there, then you can just
pull it down into place. Press Altag to bring
back the other stuff. I'm going to hide
this out of the way. And you should be left
with something like this. Now what we want to do
is you want to create your stonewall exactly
as you like it. So if you come to
your stonewall now, you can double tap the A and turn that off so you
don't have to actually see and then what you can do
is you can also Auto Smooth, and you can see if I
click on Auto Smooth, you can see it gets rid
of any of those lines. Now, I want in quite short, but it's entirely up to
you how you want yours. What I'm also going to
do, as well is now, I'm going to come on down now, do I want more subdivisions on? On the original, I
didn't put a lot of subdivisions on because I
didn't want a lot of noise. I want it to be fairly
low polydis anyway, and so I left it as it is. The first thing I want to
do is increase the length. So I definitely
want them longer, you know, than what
they were originally. And then what I'm
going to do is, as well, is we've
also got a seed here. Now, when you click this,
nothing will happen, but this is great because when we go to put it on
the other side, we can make them
look different from each other with
very little work. Now I want to do is increase
the length, randomness. So let's increase that, and now you can see
they're quite random. Let's come down there and
increase the I want the whip, actually, to be
probably slightly more. There jaws just over here. And if we come under
here, you can see, look, this is a line here. So let's increase that
with just a little bit, and it does pull it
out from the middle, which means it gets
increased both sides. That is exactly what we want. Next of all, then, let's bring
down the width randomness. So let's bring it down
jaws a slight bit. Is that the width? No, it
wasn't the width, Rundss. Let's increase it a slight bit. It only wants to be very,
very slight on this. So even if we put it to let's
say something like this, then then we get a
bit of variation. And then, of course, we'll
come to the thickness. Now, I'm actually quite
happy with the thickness, maybe maybe a tiny bit
more, but relatively happy. So let's bring it up
just a tiny bit like so, and let's also bring up
the width randomness. Very, very slight, like so, and you can see now
exactly what we've got. Very, very random.
I don't think, want to bring down this
gap or bring it up. If you bring it up, you'll see
we've got a little bit of, you know, kind of gaps in there. I don't actually
think I want that, so I'm not going to
mess around with that. Today, on this field. Now I want to do then is,
I'm very happy with that. I want to bring this
over then to this side. So what I'm going to do
is just press Shift D, and I'm hoping that
I can bring it over. I'm wondering if I can
put a mirror on there, but then I won't be
able to convince. So you know why I'm going to
have to do it the hard way. So all I'm going to do is I'm
going to put it into place. I'm just wondering the
easiest way to do this. I'm wondering if I can actually bring it over and
put it in place. So let's just see. Let's
first of all, come in. And what I'll do instead is, I'll grab this edge loop and this ledger loop with
Alt Shift click, and then I'll press shifts and cussor selected. I'll
then grab this one. I'll press Shift
Des and selection to cursor, which
is this one here, and we can see if I press three, that they're in the right place, so you can see it's in
perfectly the right place. But you can also see that it's not quite as high as this one. And so I'm just going
to bring it up just so using this line here just so it's round
about the right height. So a little bit more holding the shift button round to
there, something like this. And then what I'm going to
do is press the seed button, and then it's going to
mix that up for me. You only need to press it
once. You don't need to go through the entire
list of seeds. Finally, then what
I'm going to do is I'm going to grab them both. I'm going to go to object
and then come down to convert and convert to mesh. And there we go. Now, let's
come into one of them, and we can see this
is what we've got. So we've got fairly, fairly high amount of
subdivisions on here, you know, on the straight ones. But the thing is, some of
these are actually bent. You can see they're
slightly bent there. So, you know, I can
deal with that. That's okay. I think
we'll be fine at that. The other thing I always check, especially with um you
know if they have a habit, of if you press L, as you can see here, these
are not joined. So you can see all of these. If I grab this, look, you
can see none of it's joined. So what I tend to do is see
if I can come in and just quickly do a cleanup
and merge by distance. 576 verts a line there. Remove, sorry. Now what I
can do is I can come in, press the tab on, right,
click Shade Auto, smooth. And now, if I come
into each of these, it means that they're
individually together. So just make sure you do that happens a lot with
jump nodes, actually. Now, let's come into this one,
do exactly the same thing. So mesh, clean up. Merged by distance,
right, click, shade or Smooth,
and there we go. And now we can
actually I think we can probably go where we're
joining these together now, and I think now we're
pretty much for our bridge, at least, I'm just looking
round my actual reference. So let's have a look
at the reference, as well. Here is the bridge. So I think what we'll do
on the next lesson then is we'll actually bring
in this stone path. We'll actually stop
ping the stone on. We can see these
variations in the stone. We can see the wood here and all of that good sort of stuff. Now, let's put that
down. And then what we'll do is we'll
come to fail and save, and I'll see you on the
next one, everyone. Thanks a lot. Bye bye.
59. Bevel Modifiers and Clean UVs for Bridge Textures: Welcome back, everyone,
to the Haunted Street environment,
Blender to Unreal. This is where we left it off. Alright, so what we're going
to do now then is bring in the textures and the shaders. First of all, though, let's
come to this part here, and we'll do this one
first being as it's here. And let's bring
in the stone dog. So if I put it in stone, and we're looking for
the one that says dog, let's bring that in. Let's put it on
our material mode so we can actually
see what we're doing. Then what we're going
to do is press Tab, A, grab everything, and we'll
go smart UV projects. That should be absolutely fine, and that's what
we're left with. Now, of course, this is looking a bit low on the resolution. So all I'm going to do
is go to UV Editing. I'm going to press
dot to zoom in, like we've done
many times before. If that's not working, that means in the UV map
it's not there, so let's press ALTH. Let's press dot then.
Still not working. So let's press the little
question mark, and there we go. Now we can come to this. We
can press the tab button. And let's scale this
up. So if I press, let's scale it up a little
bit, press the tab button. And yeah, that's looking
much, much nicer. Now, the one thing that
we haven't done yet, which we definitely should do before doing this is probably
going back to modeling, and I completely forgot. So all I'm going to do is
I'm going to come to these. I'm going to add in a modifier. And the one I want to
bring in is a bevel, and I want to turn it down
to not point note three. So we'll do this
every single time before adding in our materials. So now we can see that's
what it's looking like. It's looking very nice. We
can hide that out the way. Now, let's actually
come to our bridge. Now, the bridge is another story entirely because we're probably going to find it a
little bit hard. Let's, a little bit hard to add in a
bevel, but we'll see. So control A all transforms right click
Set origin geometry. When I'm creating
anything like this, I do have a bit of a checklist
going down in my head. You might want to write down a checklist, though,
as you're doing this. In other words, it
will be, you know, resetting all of the transforms. It will be, you know,
resetting the orientation. It will be putting on a bevel. It will be making sure
things are unwrapping, making sure they've
got no modifiers on. I do have a checklist
going down, and that's what you
know, put it in my head. Oh, we haven't done
the bevel yet. Now, next of all,
then let's bring a bevel into this one and see if we can
actually bring it in. And, you know what? Actually,
it's coming. Fairly nice. I'm going to press the question
mark to isolate it out of the way just to make sure
because we did all that work, fixing all of the Booleans, so the boolean operations
and things like that, we can actually see
that we're able to bevel pretty much all of the main parts that
we actually need. Now, if you think
about it, honestly, if you haven't got
your bevel working in here, I wouldn't
worry about it. Why? Because it's going
to be hidden anyway. You know, the bottoms of them, you're not going to see anyway. The main bit that you want to be bevelled off is this
and this side here. And for me, that's
actually worked. Even this, though,
is actually hidden, but the ones on the
inside not so much, so this is going to work
out absolutely fine. Let's just try dropping it down to not point, not not three. And see if that's a
little bit too much. Sometimes it is, but
you know what, on this, I think it's actually coming
out really, really nice. Alright, so on this, then, we definitely definitely
want to separate out this part going over
here from this top part. And we want to do
that straightaway. So all I'm going to do
is Alt Shift, click. Come round to this
side, Alt Shift, click, grab this
and grab this one. Like, so right click
and we're going to mark a seam and we should have it going all the
way around there. Next of all, then what I want to do is grab the whole thing. And I'm just wondering, sometimes it might split it up. It does do that sometimes, but let's see how it
actually deals with it first. Smart UVN wrap. Let's go to UV Editing
and let's see. You know what? It
might have actually come out really,
really nice for us. So what I'm going to do is
just put this on material. Now, if you can't see O, you have an option of
pulling it this way or just pulling it this way and then you're
about to have it on now. You can see material is on
there, so that's great. And what I'm going
to do now is just put on a material.
So let's come in. Now we've actually
brought Babylon, let's press Control A or
transforms origin geometry, isolate just this bit out, so let's press the
question mark as well. And then what we'll do is
come over to materials, and we want two
materials on here. One is going to be
the stone light, and the other one is going
to be the cobblestone. So let's go with a
stone light first. So stone light because
that's the biggest block. And then what we're going to
do is going to press tab. We're going to pull
this back over. So let's drag this back
over, zoom out a little bit, press the Abne,
press the S borne, making it much, much bigger till you've
got something right. Now, the main thing is, if I pull this back over that
you're looking for, you don't want
repeating textures. If you can see this and this,
it's definitely repeating. You can see, can we see this one as well?
This one not so bad. So on this side,
we've definitely got a repeating texture. The question is, can I move them enough to get
those out of the way? And it's only really
this side and this side because you're not really going to see any of that. This is going to be
a different texture. Anyway, you're not going
to see inside there, so it's just those ones
that I've just pointed out. So this one and this one
we can see is repeating. So what I'm going to do is
I'm just going to press tab and I'm just going to
move them over somewhere, and I want to see then
if it's still repeating. We can see it's still repeating a little bit here and here. So let's come in, and
then we'll press G, and X, let's see if we move them not that
way. Let's press G and Y. Move them that way a little bit, and now I'm looking
where that is. And you can see
now we don't have repeating texture
because kind of this bit is in this open space here, or it would be, so now it's
looking much, much better. So always pay attention to that, because I do see a lot of renders where repeating
textures is really, really obvious and people
don't pick up on it. But, you know, if
you've got a good eye and you start seeing this right from the get go, you're going to
actually pick it up. Alright, so the final bit
then is this bit here. Now, I don't think if I go
to cobblestone, let's see. If I type in cobblestone, there is no cobblestone in here, so we're going to go to file, and we're going to go to append. So my append is not here. And why is it I here?
Because I'm in eddied mode. So file, append and the one
we want is not in here, it's going to be
in our materials. And we want the one that says cobblestones, this one here. Now, let's press the
plus but down arrow, and let's put in cobble. And here it is cobblestones. And then what we're
going to do now is come in with face let grab this face, and then come to our
cobblestones and click a sign, and there we go. That's looking great already. Now the thing is
now we've got this, let's make it a
little bit bigger because those cobblestones
are a little bit too small. And what I tend to do
is when I'm pulling it out is this part here is probably going to be
going into the soil. So you can see here and here, this ends here, as you can see. Now, I think, personally, it's better ending like this
than half a cobblestone, but it's completely up to you how you want
to deal with that. And what you can do
now is come to this, press S and Y, hold in the shift but and just bring them
out a little bit, a tiny bit because obviously
it's moving the other side, so you have to take
that into ccs. Now you can see this is
what you've got this side. This side, it's still
a little bit out. So S and Y, let's bring it out. So S and Y, bring it out just a little bit. Like so, and now
that's looking better. This side, it's half, kind of, so all I'm going to do now is I'm just going to
move it slightly. So if I come in once
more over here, GMY and just move it very, very slightly, and let's
see what we've got now. Still a little bit out, so now I'm just going to
bring it back in. So SY, holding the ship on, bring it slightly
slightly back in, and we should end up with
something like this. And that, for me, is much, much better because
then even if, you know, the soil starts exactly
where we are right now, it still means that it's
still going to look good because it looks
like there's an actual, you know, cobblestone
actually there. And that is important. Alright, so that's
basically done, and you can just see how fast it is that we're moving
along now with this. Now, let's come in. And
what we're going to do then is we'll do
these parts here. So we're going to come
in. If I come over again, I can see that I have got a bevel on here, which is great. So we've got a bevel on here. No, we've not. That was the
other part I clicked on. We've got a mirror on here.
We don't really want that. I'm going to unwrap
them separately anyway because I don't want
them looking the same. So I'm going to press Control. Because of' seamless
textures as well, it means they can
take up basically the same amount of UV space. You know, they're not being
textured in substance, which means we can get away
with a little bit more. What I'm going to
do now I've applied that is reset all my transforms, set origin geometry,
add in a modifier, we'll bring in a bevel. We'll turn it down to
Nut point naught three, like so, and then
we go we've got that soft edge on there, which
is what we're looking for. Next of all, then,
let some rab them. So, smart UV
project, click Okay. And then what we're going
to do is just grab them, press the S bone,
and pull them out, and then I'm going to
now come over and add in my stone light. We'll do that one first,
because the majority of it, You know what? I
think we'll add in. I'm just wondering which way will be the easiest
because there is something else that I did
forget to do that I want to make these
stone as well. And I think we'll actually
do that on the next lesson. So let's just go to
modeling just for 1 second, and I am
sorry about that, guys, but I actually did forget to create
these to be stone. And the thing is, I've added my bevlon and now I would
need to do them individually. So what I'm going
to do is just press Control's Ed before
doing anything, and hopefully before
bringing that in, I should be able to
get back to my mirror. Now, if you've not got back
to your mirror, just go in, delete the three and just mirror that one over
the other sides, and then you should
be good to go. And I'm sure you
know how to do that. If not, then just go back
and bring it in like this. Now I'm going to do
is I'm going to save a work, and on the next lesson, we'll sort these
stones out that I forgot and make them look
really, really nice. Alright, everyone, so
see you on the next one. Thanks a lot. Bye bye. I.
60. UV Seams, Island Variation and Final Bridge Join: Welcome back if you want to the Haunted Street environment Blender to Unreal, and this is where
we left it off. Now what we're going to do
is exactly what I said. So we'll come in, first of all, and what we'll do is
we'll grab this one here. We want to press the
little Db one just so we can actually position
ourselves under here, and then we'll come
down Al, shift, click, Al, ****, click, ****, click, working our
way down here. Al shift, click, right
click and mark a seam. Now, while we're here,
we might as well isolate with a little
question mark again, and then we'll come back into
the work that we've done. Now, let's split these off then. So all I'm going to do is what we've done
many times before, so we're going to press L, L, L and L, press the Y button. I was in the habit of just
pressing G just to make sure that they are right
click to drop it in place. And now what we can
do is we can grab the whole thing, mesh, clean up. Fill holes. And there we go. We should now, if I
come in to this one, press L, G, you should see that all
those holes are filled. Now, I never had to
turn it up from, um, four, because all of these are
actually quads, as you can see. Now, from this part, before
we do anything else, let's go to add modifier
generate and a bevel. That will make it very, very obvious that we've got
all of these in here, and now we can turn this
down to Note note three, and there we go, you've
got your blocks in there. Now, sometimes with
things like this, I like to turn them
up a little bit, but the only problem
there is that when you come to join
everything together, if something's got a
different bevel on it, so different bevel size, and you join them all together, as you know, with the doors, where you don't want
to bevel on it, then you have to kind of
link them via parenting. I don't really want
to do that, so I'm going to leave them at this. All right, so I'm
very happy with that. Now, what I want to do
now is apply my mirror, so I apply that, and now
I can finally come in, press A U Smart U V project, click Okay, and now I can come
in and put my material on. Now I'm going to go back over to UV editing and here we are. Let's put then the
light stone on first. So I'm going to go stone, and then I'm going
to go light like so, and there we go,
that's what we've got. I'm going to press As, pull them out a little
bit, and there you go. Now that's looking pretty nice. Now, because we unwrap
them as well, like this, it means that the stones
should be a little bit different from
each other and not joined together, because
if you see here, they're all kind of
all over the place, which means that this stone looks different from this stone, looks different from this stone. And also, because
of the fact that, you know, we've split them up, but not on a mirror, they're also going to look different. Now, what I tend to
do, and I know it's a little bit more work is I'll just come to
two of them and press Alterns just to bring them out a little bit
and come to this one maybe, press ltess because you'll be surprised how much difference that actually makes
when you do that. So you can see now it's made
quite a bit of difference, and I'll do the
same thing on here, grabbing two entirely
different ones. And this, you know, might seem, well, that's a little
bit of a pain. You know, you might think that, but it's took 10 seconds worth of work to make a
little bit of difference. I'm also going to
do the same here. And what I'm going to do is
just put it on object mode. I'm going to come
to these three, I'm going to press Altnss bring these ones in a
little bit, like so, and then I'm going
to come to this one, and I'm going to grab this one and a random one over here, and maybe this one,
I'm going to press lnase and bring them
out a little bit. So you can see now we've got some nice variation in our blocks for very,
very little work. Now, let's put it back
on material mode. Now, what we need to do
now is we need to make sure that these are going
to be the stone doc. So first of all,
let's bring it in. So we'll print stone, and
we'll put in doc like so. And then what I'm going
to do is press Alt Shift, and click, Alt Shift, click on each of these. So Alt, shift click,
lt shift click. You can press your little
db on just to line them up. It does make it a little bit easier to actually grab those. At shift, click,
Alt, shift, click. And then Alt Shift
click, Al shift, click. Press the Control Plus button. Now don't press it
again yet because we only want to actually
put it on these for now. Stone doc, click a sign. And now you should end up
with something like this. Now, of course, we want
the tops doing as well, so all I'm going to do is just come into the tops of them. And then press Control plus and then stone dark
and click Assign. And there we go now. Now you can see that's exactly
what we've got. I'm hoping if we
put it on RenderVew you can see exactly how nice
that's actually looking. You can see now there's
a difference in those, and this now is looking
very, very nice. Now, let's press SultaH
to bring back everything. Let's just hide our
floor and there we go. You can see how far we've
come already with this, and now what we want to do is bring in the stone
for this part. So this part here, and
we also want to bring in then this part for the wood, these parts, you know, we've not really got that
much more to Alright, so what we're going to
do now is let's come in. Let's put it back
onto material mode. Okay, so let's
come now to these. So what I'm going
to do is press A. You can see here before I start. Again, I've got a
mirror modifier on. I've got no bevel on, so
control A. Let's do that first. Control A, then all
transforms, right, clicks origin to geometry, adding the modifier, generate,
and bring in a bevel. Let's put it on object mode just so we can see
what we're doing. And let's put it on not point, not three, same as
before, and there we go. Alright, so that's looking good. Now, let's put it
back on material, and you can see just how
quick this process is now. This is the way that we do
this here at three D Tudor, so we have this
process of, you know, from A to B, if you follow
these steps every single time, you'll never actually get lost. So now let's press this.
A to grab everything. U. Smart UV project,
click on wrap. And then what we'll do now
is we'll copy this one here. So we're going to copy
this. I'm going to press Control L. I'm going
to link materials, and then we're going
to come back to this one over to me materials, delete the light, stone light, make sure you're in object
mode when you do that. And there we go. Then press tab. A, make sure
everything selected, A over here, press the S
board and bring them out. And there you go. That's exactly what you
should end up with. Now, let's come to this part. All of this part, I
think, should be doc. So what we'll do again
is we'll come over to our modifier, apply our mirror. Press Control A, let's
resell the transforms, add in another modifier, bring in a bevel, set it to
note point, note note three. And if you want, of course,
you can copy this from this. You can do it that way as well, rather than doing
this every time. And then tab A Smart UV
project. Click Okay. And then all we're going to
do is press As, bring it out. And again, I'll grab this one. Grab this one, press Control L, and we're going to link materials, and that's
what we end up with. Now, because this
one's so small, you can see there is a
slight difference in these. So all I'm going to do is
just come back to this. I'm going to bring them
in. And there we go, you can see it's lining
up a little bit more. Let's bring them in
a little bit more. And I think that
looks much, much better now and is
in line with that. Okay, so we've just got
these blocks to do. First of all, let's supply
our mirror, Control A. Grab this. Let's press Control L. We're going
to link materials. We're also going to as
well link modifiers, and there we go, make sure that they've actually gone on if
you're doing it this way. Also, make sure that you're
going to press Control A or transforms set
origin and geometry. Now, as I did that, you saw
the bevel actually come in, so it wasn't reset, and
that's what brought it in. And then all we're
going to do is press A, A, and we're going
to unwrap them. So smart UV project. Like Okay. And looking good. Okay, so we've just got now
the wooden parts to do. So let's do these parts. Now, we know we have
problems with wood. So let's first of all, come into all of this structure here. Let's press Control
A, first of all. Let's then press Control A
and reset all the transforms. Let's then grab this one here, and what we're going
to do is press Control L. Only copy and
modifiers this time. Make sure they've
actually gone on, so you can see there we've
got that nice bevel on there. And finally, then let's
bring in the wood. And the wood on this one
is going to be wood red. So let's come in
now, grab this one. Click the down arrow, so wood, and the one we want is wood red. Let's put it onto material. We can see already it's looking really good guys. Let's press A. Let's press U. Smart UV
project, click on wrap. And what we're going to do
now is spin them all round. So, 90, let's spin
them all round. Now, again, we've got some
problems here that the wood isn't flowing very nicely
on these parts here, and we really, really
don't want that. So what we're going to do is
we'll come to each of these. Now, if I just move
the other way, I haven't even got to
see this because I can simply come
in, grab each one, press all and if
Alt is not working, just make sure under
my preferences, if I go to add ons, let's see which
ones so we've got. Let me see which one's missing
on here for some reason. My add on isn't there. And you can see here it says,
missing add on. This one here. Why is UV
Squares not actually coming up? So let's have a
look at UV Squares. Apparently, it's not there. So let's come in, and install
from disk once I find it, I can double click it, and
now it should be on there. Let's see if it
actually works, guys. I'm going to come to this
one, press O and there we go. Now, what I tend to
do because it's been spun all of that way
around is I'll go in, first of all, and do them
all at the same time. So Alt and then Altn because they won't
all get spun around. So will, some won't L O And then Lot E and
then finally L and OT, just on these ones, one
here as well, so LOT. Now, I can see that these
are the ones that got span around and I can just R 90, spin them all around like
so, and there we go, make sure you press L when you're doing that, so
you grab them all. Now, let's come in and do the
same thing with these then. OT. I do love this add on. It saves so much work. And there is ways of doing it, as you've seen earlier on, but this definitely
is a lifesaver. Okay, so now we've got all that. Now, let's pull it back and let's actually look what
we've got. And there we go. We can see that's looking
really, really nice. Now, you can see, actually, because I always check this
one here for some reason, let's go and have a
look at that one. Yes, I've missed one,
you can see here. So L, O T, and I'm also going to look round the other
side because I'm a little bit of a
stickler to make sure everything's looking
nice and neat. And what I'm also going
to do then is press A, just to grab itth A, and I'm going to
make it a little bit smaller by increasing
the size on the UV map, just so I'm actually
happy with it. And that is looking nice, except I don't really like
the look of this one. It's too broken in there. So what I'm going to do
is just grab this one, press G, and move it down
to something I like better. I'm going to come round this
side then just making sure. And again, I don't
really like this one. So L and G, let's move it up, and that's looking a little
bit better there. Let's put it on rendered view. Let's come round this side
now let's have a look. And, yeah, I think
that looks really, really nice. And
that is it, guys. We basically I don't
want to speak too soon, but I think we've
finished our bridge. All right, so let's
go back to modeling. Let's press the question
marks, bring everything back. Let's just put it on material so we make sure nothing changes. Let's move our guy over there. And then what we're gonna do is hopefully we should be
able to grab all of this. Like, so let's grab
this part last, Let's press Control J. Join it together, and we should
have on there our bevel. Everything should stay the same, nice and neat, and that
is the moment of truth. Just always go around
guys and check always. The times I've done
this where Oh, you know, this
didn't work hundreds of times, guys,
hundreds of times. So let's press Control A or
transform set origin dometry. And the last thing we're
going to check before doing anything is just going in and making sure we've got a nice bevel on everything,
which we seem to have. And yes, looking beautiful. Alright, so I'm going to say
I'm and on the next one, then what we'll do is
we'll get this name. We'll get it in its, you know, own collection, and we're also going to look at what we're
going to do now. So pretty much, we've done everything except the lampposts, the chimneys. We've
still got those to do. We've got the sign to do,
we've got these roofs to do, and then we've got
these graves do. I think probably next, we're going to be
doing these graves. It's something very simple. Once we've got that
out of the way then, we can actually move
on something else, and also it cuts down the amount of things that we
have left to do. So I think we'll do that next. We'll get rid of those things. I am thinking of leaving
the roofs till the last. They are one of the hardest
things to actually do, and they're probably going to
take the longest, as well. So I don't know yet
whether I'm going to leave them right till the
last moment or not, but we'll decide
that in the future. All right, guys, so I'll
see you on the next one. Thanks a lot. Bye bye.
61. Organize Scene and Model Stylized Gravestones: Welcome back, everyone to the
Haunted Street environment, Blender to Unreal, and this
is where we left you off. Now, I just want to
reiterate before going any further, very
important, guys, that when you're doing
anything like this, don't apply your bevels because it will cause a lot of
problems down the road. Don't apply them yet. When
you get to the next part, which is the bridge
from Blender to Unreal, Luke will show you how
to deal with those. But always keep in the
back of your head, you can apply mirrors,
you can, you know, apply them from geometry
nodes, but just the bevel, leave it as is, you know, and you'll deal with that later. Alright, so now what we
want to do is name this. So first of all, we're
going to grab this, and we're going to press F two, and we're going to
call it bridge. So bridge, something simple, and we're going to put
it in a collection called bridge, of course. So bridge like so,
and there we go. Alright, so we've also got one here that says boolean cutters. This often appears when
using the boolean add on. So you can just welcome to
go in unless you've got booleans in there
that you want to keep, delete it out of the way. Close that up, and then all you should have is
something like this. Now we're going to do is grab our bridge seven to
go over the top. I'm going to put it over here,
so it's all nice and neat. Grab my walls, press
Shift D, bring it over, and then all I'm going
to do is press the tab, then just put it
as bridge instead. And again, I will
reiterate this as well. It's very, very important that not only do you save
often after every lesson, but you also make sure
that everything is put nice and neatly because
it's going to save you a ton of work down the line. Okay, so now let's come
to our next one then. So as I said, I think now we're going to be
dealing with these. We have got some decals as well that we're
going to use here. So let's create, you know, these kind of gravestones
that we've got here. Now, on this one, again, when we look at these things, it's important to evaluate how are they all done.
That's the first thing I do. This one, I can see it's a cube. That one's easy.
This one I can see, it's a cube with a bevel on. This one I can see, it's a
cube with another bevel, but they're brought inwards
instead of outwards. This one I can see
is a few cubes, and, you know, we
can use insert. We can use extrude,
pretty easy stuff. We've got a slight
bending here, okay? Great stuff. And then
we've got this top bit. I can see that we've
left, you know, kind of a square here, and then we've
extruded them out, so and then we've
put a bevel on top. Whenever you're
looking at something, it's always a good idea to
look at it in this way. This one is a little
bit different because we haven't really
done anything like this. And when I'm looking at something like
this, I'm working out. Okay, so this is a cube. It's been probably used a
knife on, so we can do that. The only thing is,
are we going to have the front and the back the same. You know, is it going to
be cut away the same way? Because you could actually
have it where you cut the front a little
bit off to the back, and then it would
give you kind of a slope on there and
things like that. I think for us, we'll just
do it nice and clean. It's quite a stylized build. You know, we don't
want to go too overly realistic or anything like that. And also doing that is going to make your life a
little bit harder. You can still do it, but
it'll make it a little bit harder because
you've got to make sure everything kind of lines up, the topology is
right, the smoothing is right, all of
that sort of thing. Okay, so now we've got that. Now we know the direction
that we're going to go for. Let's make a start
on these then. So first of all, I'll
leave my cursor. I'll put it in the world origin. I do like working to
the world origin, curse to world origin, and let's now bring our
guy also over there. So shifters cursed
to world origin. Or let's put him over there. So selections cursor,
and then let's press one and bring him up and
just put him on the world. Now, I brought him here
because it will give me a good idea of how big gravestones actually
are going to be. So let's start with the most simple kind of rectangle one, let's press shift
day, bring in a cube, and from here, I'm going to make it smaller, first of all. I'm going to press S and
Y and make it thinner, still chunky comparison to, graves that you might
see in the real world. Let's then pull it
up onto just below the actual ground plane because obviously
they sink a little bit below and how big then and how thin do
we want this to be. Now, you can see
that in this field, we're actually going for
quite a spindly look to give you that haunted feel. And it's important to
understand if you want to make something happy. You make it more rounded. And if you want to make
something haunted, you're making more
spiny looking. You know, they're
quite simple concepts. It's very hard to do rounded and haunted. They're
quite hard to do. You'll end up with
something that's kind of haunted with the
textures and shaders, but still looks
cartoony in a way. You know, you'll see on
kids films when they have monsters in them,
they're very rounded. You know, they're
not really spin. If you think of something
which is animated from, like, the Harry Potter
and the defielyHalos, and you see those kind of
spindly figures in that story, you know, they kind
of are creepy. And the reason they're creepy is because they're very spindly. And the more spindly
something is, the more creepy it
actually tends to be. When you look at something
like monster ink, and you look at those monsters, they look nice, you know? They don't look creepy
in any sort of way. Why? Because they're
rounded off? You know, you've got
the main character. He's an eyeball, but
he's very, very rounded. You know, you've got the
other one, the hairy one, and he's also very rounded, and all the horns are
nice and rounded off. The eyes are rounded,
all of that stuff. So, important to think about that when you're choosing
an art direction. Alright, so let's come
to the first one, then. What I'm going to do
is, first of all, let's put it on object mode so we can actually see
what we're doing. And then what we're
going to do is press E&C and bring it in. I'm going to make
it a little bit thinner because it is a
little bit too thick. And then what I'm going to do is think out all this needs to be. So I'm going to go
into Edit mode, grab this face, and pull
it up a little bit. And you know what? I think
that's about the right size. I'm going to move
that to the side. Then what I'm going
to do is just press Shift D. I'm going to use the same one might as
well while we've got it, and then I'm going to come in, control, left
click, right click, Control B to bring in a bevel, drop it down, like so, and then that'll be
the top of there. Again, control A all the
time, set origin, geometry. Grab each of these
edges and then come in, and what we're going to
do is press Control B. And bring it down to where
we actually want it. Now, if we want to drop it
down a little bit more, we can actually do that, but I'm going to just put
them there for now. And then going to bring up the amount of
subdivisions, like so. And as I said, you can see
now that I kind of need to, you know, drop these
down a little bit. But what I'm going
to do, first of all, is I already know if I
grab my top bit because, you know, it's a bevel, you can see that they're not joined. I'm already aware of
that. So what I'm going to do instead is now I'm
going to come into mesh. I'm going to go down to cleanup and I'm going to
merge by distance. For this is done, so that's nice and easy. Grab the top of this then. What we'll do is we'll
pull it up a little bit. Let's pull it up with
it in a smooth fashion. So let's just pull it up, bring it down a little bit, and then we can
pull it up like so, and then we can get that more spiny look that we're
actually looking for. And finally, then we can
actually just come down and turn that off, grab
each of these. They select, press the wb and just pull them back up to where we
actually want them. So I think actually
on this occasion, I'm going to pull it up a
little bit more, press tab, and then just drop it down
just so it's actually slightly smaller than the one at the side of it slightly,
guys, slightly. So let's pull it
down a little bit. Like so, and then it's just slightly smaller
than the one at the side. I think that then
looks absolutely fine. Alright, let's pull
that to the other side. Let's grab this one again. So Shift D. We're
going to pull it over, and then we want
the next one now. I'm going to make sure you can see the edge that
we've gone there. I'm going to make
sure with this one, it's a little bit wider. It's all press tab,
Control, left click, right, click Control B, drop
them back down and make it just a slight bit widen that one just to give us a
little bit of variation. And then we'll come in,
grab both of these, press Control B, bring them out. And this time, we're going
to left click and we want to press pull it over so you can actually
see what I'm doing. And then all I'm going to
do is change the whip, so I'm going to
change not the wip. Sorry, the profile and
bring it out. Like so. And the moment I move around there, that's going
to disappear. That's kind of annoying,
but that's the way it is. So what I want to do is just
bring them out a little bit, maybe like this,
something like that. And again, if you want to make
them a little bit higher, you can It's the same thing as what we did before,
so grab the top. Shift select the top,
sorry, press one. Let's pull them up with
proportional editing on. And the other thing
is, I know, as well. Like, so let's bring it
in a little bit and see. Because we've grabbed
them all, you know, that's not actually working, so we're going to
press it again. I'm going to pull it out based
on all of them, like so. I also know that if I grab this, I'm fairly sure that they're not joined together,
which they're not. So I'm going to press A, mesh, clean up, merge by distance. And finally, then
I'm going to pull the whole thing down,
come to the bott now. Press one and pull
them up, like so. And again, we've got
a little tiny bit of variation in
the height there. It's not very noticeable,
but you know it's there. Sometimes our eye picks that up, even without you
saying something. Okay, so we've got that one now. Now let's move on on
the next lesson then. We've got a choice. We
either do the Smash one. That's something a
little bit different. Yeah, I think we'll do
the smash one next, and then I think we'll do the
kind of cross after that. So first of all, though,
let's go to File, Save Our work, and I'll see
you on the next and everyone. Thanks a lot. Bye bye.
62. Modeling and Beveling a Stylized Cross Gravestone: Welcome back, everyone to the
Haunted Street environment. Blend it to Unreal. This is where we left it off. Alright, so what
we're going to do now is we're going
to grab this one. I'm going to press Shift D.
I'm going to drag it over. And then all I'm
going to do then is just delete the
back and the side. So I'm just going to
press Control plus, delete them out of the
way, so delete and faces. Then what we're
going to do is press one, going into front view. I'm going to grab this one. I'm going to make it
probably a little bit wider. So S&X make it a
little bit wider. And then I'm going to press Kate come in with my knife tool. And then what I'm
going to do is try and get that broken type of look. Like, so make sure you
don't go too thin. I always like it where we leave kind of a little bit
of a top on there. Like so, because we're going
with a more stylized look, so keeping it a little bit more boxy actually works
better, I think. So let's come in there and delete this one out of the way. So delete and faces. Let's then come back to this, and then let's press
E and pull it out, like so to the width that
we actually want it. Let's press L. Let's press Shift N and just
rotate that around. And you should end up
with something like this. Now, if you feel like you've
gone a little bit too far, you know, with how
deep you've cut it, like I feel like I have here, I'm just going to pull it
up a little bit, like so, and then I'm going to grab the bot I'm going to press one, and I'm going to pull it
down a little bit more. That then gives me
a little bit more, you know, place to actually put the decal that we're going to
be using on there. Alright, so far so good,
that looks very nice. Let's pull that one to the side. And to be honest,
guys, we're nearly enough done with the
ser on the last one. So what we're going to
do this is the cross. So probably better off, starting with the base. We'll make a very,
very simple base. So what I'm going to do is
I'm going to press Shift A. We're going to bring in a cube. I'm going to make the
cube a little bit smaller. Something like this. I'm going to press Eons then. Like, so because, you know, it has to actually hold quite a lot of weight
on the top of it, even if we're talking stylized or even if we're
talking realism. These things are pretty
hefty pieces of stone. So let's take that into account. So don't make it too thin, too small on the bottom. We don't want something
dinky like this. It wouldn't look right.
So let's press tab. Face, leg, grab the face. Let's press the Ib, bring it in. Let's press the E button. And the other thing
I think of when I'm doing anything stylized, you can get away with a lot
more when you bring it in. In other words, if I
brought it in like this, you can actually
get away with that more when you're doing
things stylized. It doesn't have to be super
realistic or something. I always tend to, as well, when I'm looking at
something like this, just make sure that they've
got a bit of variation. This blocks a lot
bigger than this block, so I am thinking about
that when I'm doing this. Let's press I again. Let's press the E button and let's press the S bone
then to bring it in. Like so. Now, the
other thing is, we've got to think that, are we going to have a solid, you know, square
block on top of this? No, probably not because we're
going for a hunt to look. So let's make it a little
bit thinner on the Y, and that then gives us probably a good base to
actually start from. Alright, so far so good. Now, let's bring this in now. So we're going to press
I again to bring it in. And from there, then
let's bring it out and see if we're actually happy
with the kind of scale. So if I press one now, I'm going to press
E and bring it up to round about
something like here, and that's then
going to be the top. Now the thing is to remember, you don't want it super massively tall in
comparison to these. Yes, it's, you know, a
cross and things like that, but we really don't
want to make it super massive or anything. Now, what I want to do now is bring in my edge
loop. So control. Let's bring in left click, right click, seven edge
loops Sa brought in. And I want it to
really, really cut start coming in from
roundabout here. So I'm just going to
grab this edge loop, Alt Shift click,
proportional editing on. Let's go into short mode,
see how that looks. Press one, and then
what I'm going to do is press S and Y. No, SNX, sorry, and bring it in. Now, that, to me, is a
little bit too sharp. So let's go with the
root. Let's try that. So SNX bring it in, like so, and there we go. It's very, very subtle, but
you can see it's there. Now what we're going to
do is we're going to make sure that the top of here, these align, where we actually
want them to come out. So if you imagine these
things are going to come out here and then we've got
the top of it here, I think this is about
right, actually. So what I'm going to do then
is come into this pot here, and then I'm going
to press E, enter, turn off my
proportional editing, and press S and X, and pull those out a little
bit to where I want them. Like so. The good thing
actually with this is, you might want to
leave it like that because you've already
got a slant on here, and I actually think that
looks pretty nice, actually. So yeah. Now let me see
if I leave that on. So I'm going to press
Control off, first of all. Left click, right click Control B because we're
going to pro bevel on this, so we're going to put it to
about there. Come out of it. Control A or transform,
set origins geometry. And then what we'll do is we'll come now to each of
these edges here. We're going to press Control B and pull them back to
where we want them. So something like this, let's then bend them in a little bit. In fact, you know what? We need to turn up first of all, this. Let's then bend them in. Like so, and I'm happy with,
you know, how they are. Again, you're probably
going to have it because you brought
it all the way up there, that this is not
joined, which it's not. So let's deal with that first. So A, mesh, clean and let's
go to merge by distance. And now I want to
do is basically pull these back a
little bit because, you know, I'm kind of not happy with how these are, so
I'm going to come in. I'm going to grab each of these, each of these, each of these, and then I'm going
to press S and X. And pull them all back
to where I want them to start and then grab
this and this. Proportionally to non,
let's put it on smooth. Let's press one, and then
I'm going to press S and X, and I'm going to try
and pull those out a little bit to get that more of a look that I'm
actually going for, and that's kind of
what I'm looking for something like this. And the other thing is, am
happy with our thicknesses. I think not. So what I'm going
to do is just come round. Control selecting, ship select, control select, control
select, press one again. You're going to press S and Z then you should be able to bring it in to
how you actually want it. And there we go, that's
looking very, very nice. Now the next thing I'm going
to do then is the top now. So you can already
see it's coming out, and that's exactly the
look I'm looking for. And what I'm going to
do with the top is, I'm not going to put a bevel in there. I'm going to
grab both of these. First of all, press Control B, and just bevel it off, like so. You know what? I think I'm
really happy with that. Now, finally, what
I want to do I might want to just put an
insert coming out on this, and I can absolutely do that now because of the
way that we've built this. So let's grab this part. We'll grab all of these. So just shift select them, and where do I want
to coming down to probably roundabout here. Now, let's see if we
can actually do this. I'm going to press the
ibone and bring it in. Now, one of the
things when you're doing this, as you can see, as you're bringing it in,
you're going to end up with crossing on the
measures like this. You can see that they've
crossed over a little bit. Now, don't let that
make you be afraid. I know many people
where they're doing things like this,
they'll bring them in, and they're like, Oh, we've got to fix
all of this work, so I'm not going to do that. If it looks better, don't
be afraid of doing that, we'll come in and we'll see all of these edges here so
you can see them in here. If I press dot on here, we can see now we've got a
few problems with the edges. Let's first of all,
grab this one, this one, and this one. Now, very important that
we do it in the same way. So we'll try this again. We'll grab this one, this
one, this one, and this one. We'll press the
button for merge, and we'll merge at the
center. And there you go. Now the problem
here is this now is probably too shop. But
we can deal with that. So control shift and B, bring it all the way down, and now we can see that we can make it nowhere near a shop. And as well as doing that, we can also, can I
actually turn this up? No, I can only turn that up. Oh, that's the reason why let's turn them as subdivisions. I'm just wondering if
I can turn that up. Probably not. But I think I will be happy with
actually how that looks. So what I'm going to do
now is press Controls Ed, going back all the way so
you can see how I did that. Alright, so let's zoom
in. Let's fix this first. So what we're going to
do is we're going to grab this one, this one, grab this 1 second,
and then this one, press M, and then
merge at center. And then we'll come over to the same thing over this side. So we grabbed this one, this one, this one and
finally this one here, and then we're just going to
press M and merge at center, and then we're going
to grab this one, come over to here,
grab this one, and then what you're going
to do is press Control B. Control Shift B. Control Shift B, and
start pulling it out. And there you go. Now, there is another way of
doing this, of course. Instead of doing it that way, we can simply because we'll
have more control over this, come in and just grab
all of this like so. Coming all the way down to
where we actually want it. And then what we can do
is just press Shift D and then E and pull it out to
where we want it, like so. And you can see that's
actually looking nicer than what it was before, and I'm quite happy with that. What that means is then
now I've got nice edge now that I can simply just bevel off because it's not going
to interfere with this. So what I can do now is
just press Control B and bevel that off like
so, and there you go. That's another way of doing it. Now I'm hoping, I did them
both at the same time, which is cool, and there we go. Alright, I think now that
looks really, really good. So what I'm going
to do now is just grab all of my greaves. So I'm going to press Control A, all transform set
origins geometry, I'm going to right
click and I'm going to shade smooth so
shade Auto smooth. You should end up now
with something like this. And then finally, what I'm going to do is on this one here, adding a modifier,
generate a bevel, set it to note point
not note three. Check that it looks really
nice, which it does. And then I'm going
to press Control L, and I'm going to copy modifiers. Now, let's just see
if the vat worked before finishing so you
can see a beautiful bevel. And again, the reason why we've got a nice bevel on there, even though we've done a
lot of work on this is because the topology is
good, and there we go. All done, except the
actual materials. So really, really nice. Pretty happy with that. And
yeah, let's move on then. So let's go out and file. Let's save our work.
And then the next one, what we'll do is we'll bring
in all of the materials. We'll bring in the decals, and we'll get them
fixed on there, and you'll see exactly
how they work. Alright, everyone, so I hope you enjoyed that. I'll see
you on the next one. Thanks a lot. Bye bye.
63. Applying Materials and Decals to Gravestones: Welcome back, everyone to the
Haunted Street environment, Blender to Unreal, and
this is where we left. All right, so now we're going to do is we're
going to come in, and the first thing we need to do is bring in the stone light. So let's put it
on material mode. Let's grab probably do this
all together, actually. So let's grab them all together. Let's press tab A, U and
smart UV project. Click Okay. Let's go over to
the UV Editing now. And let's press the little
Db bone unless come in, first of all, we'll bring in stone light because that's
the majority of them. So you can see here
Stone light is on there. You can see as well
that this is very, very chunky. Don't
really want that. So all you can do is
press A on my UV map, just pull it over a little bit. Press the S button without
proportional editing on, so make sure you turn this off. Press the S bone. Like, so to get it to where
you actually want it. I think something
like that looks good. And once you've got
that, of course, you've got the other
selected anyway. So press Control L, and what you're going to
do is link materials, and then you should end up
with something like this, really simple, really
easy to actually do. Doesn't matter about
the actual cross. So you can see the crosses
have been put a little bit, you know, off kilter,
I think, it's called. Now what we want to do is
come into this part here. So I'm going to press old
Shift click Alt Shift click. Plus down arrow, and then stone, and we're going to
bring in stone dark, click a sign, and we're also going to do the
same on the bottom. On the bottom, we can get
away with more Al Shi click Control plus this time, and then click Stone Dark, click a sign, and there we go. Alright, slight slight
variation, as you can see. Now, let's also do that
with this part on here. So this part on
here, let's come in. And what we'll do is press
Control click down there, select each of these. Like, so, press control. In fact, you know what? This is not joined, so we
can just press. Just press, guys. It's easy. Click a sign and then we go. We've got a slight slight
variation now on there. Now, the other thing is
with this part here, I would say that they need bringing out a little bit more. They're a little
bit. They're not actually right. So you
know I'm going to do? I'm just going to
re unwrap those. Somewhere smart UV project. Click, unwrap and
then bring them out. And there we go. Now,
that's looking much better. I'm also going to look
at this cross now. I'm going to come up to UV. I'm going to pack islands first just so
they're all together because it does make it
easier to do everything. So again, I'm going to come to where's my pack islands
there. It is Pack Islands. Let's click Pack.
Let it work it out. Should pack them very nicely. Blender now our packing islands is actually very, very good. Press the Sbn, bring them
out, make sure we're happy. With how all that
is, you know what? That's looking very nice. I'm looking at the rest of them, weighing up if
they're looking good. And yes, they are, which means now we can move on
to the second part. So before we do that,
though, let's save out work. Now we're going to
do is we've got our cursor in the world Origin. Let's move our cross
over to this side, move this one over a little bit. So just make sure
it follows the X. Press shift day, and the
one you want is a plane. Let's first of all,
spin our plane round. So X 90, spin it round, press one just to
go into front view, press the but and let's
start off with a square. I don't want to change
the scale of this yet. I wanted to start with a square. And then what I'm
going to do is I want a new material on here. Click the down arrow,
and the one I want is going to be decals and it's probably not
going to be there. So what we're going
to do is go to file. We're going to append and the
one we want is the decals. So I'm looking for the decals they don't seem to be on here, which means that they
might be in collection. Let's see if we've
got any collections in there, text trees, base, and I'm just wondering
where is my decals. So let's see if there's
any decals in here, and I will go and
check where they are. Oh, here we are in
our resource pack. And the basically
reason why we couldn't find them is because
it wasn't in there. So basically, I've put
them in there, guys, so you should be able to
have them exactly there. I'm looking at this.
This is the fog shade. I definitely didn't have them in there. Now they're in there. So the one you get we definitely have the
decals in there. Alright, so from here, I might as well just copy my sphere. I'll put this down again. We'll close this down.
We'll go back to modeling just so we make sure that it's in
the right place. First of all, I'll press Control
V, and I'll bring it in. It's over here, as you can see. What I want to do is I
don't actually need this because you'll look
over here and you can see gravestone decals
are actually in there. So just press delete. Then
let's come to this one, and then what we're
going to do is go down. And we know we're looking
for gravestone decals. Let's bring that in.
And there we are. There they all are guys,
looking really cool. You can see already
through them. If we put our rendered view on, you'll see now that they're
perfectly transparent, so they're all working
out perfectly. Now, before moving
on, let's actually go in to the actual Shader
and we can see here. That on this one here, we actually have a color
ramp, and we have an Alpha. And basically this
color ramp here, because it is going to an alpha, if I click on the Alpha, you can see this
what it looks like. So anything basically in black is going to be
full transparency. Anything in white is
going to be completely, you know, you're able
to see the material. And anything which is gray
or something like that, because we have a color
ramp in there will mean it has a slight
transparency. So when you're dealing
with things like this, just take that into account. Whatever you want to be
perfectly seen it's pure white. Anything that you don't want
to be seen, pure black, anything in between,
you have a chance of it being slightly seen,
ghostly, if you like. All right, so now
that's explained. Let's go back to modeling first. Now we can see that this here, for instance, definitely isn't the size that we
actually want it. So what we'll do is we'll, first of all, come
in to this one here. So we'll come into
this one here. And what I'm going to do
then is pull it over, and I'm going to pull it
just in front of there, like so, and then I'm going
to go back to my UV editing. And what I'm going to
do is I want it to be here lies problem. Let's do that one first,
so I'm going to press A, S, bring it down, G, move it round. And if I press the
little dot button now, we should be able to
see here lies problem. Let's pull it forward a little bit to where we
actually want it. Now it's up to you
if you want to make it a little bit
bigger on there, if you want to drop it down,
whatever you want to do. I think something like
I think, actually, it's probably a
little bit too big, but it is stylized, so just take that into account. So now what we want
to do is, if you go over the top to the seven, you can see that we've got
a lot of room to pull this down against there without
pulling it too far back. If you pull it too
far back, guys, all you'll do is you'll actually see it
disappear into there. So I'm going to place
mine on top of here. That's looking pretty good,
and I'm happy with that. Now what we want to
do is you want to get it onto the next one. So I think I'm going to put
this one rest in pieces, and I'm going to
come to this one, press Shift D, bring it
over, shift spacebar. We've got to move tool in. And I'm going to also write click and set
Origin to geometry, and there we go, we've fixed. Bring it over. Here
lies problem like so. Now, you can see that we do have a little bit
of a problem here. In that, you know, we can kind of see oh, we
don't really want that. So what we're going
to do, first of all, is we'll isolate
both of these out. Little question mark, press one, and then come back to this part. Now on this, what we can do
is we can just press the bom. Let's press Tab first, press the keyboard, and
then what we can do. I always tend to go slightly
in to where this is, and I also tend to
do it like this. So very, very close all the
way following it round. The reason I go slightly in is because when
something breaks off, generally, the letters here will be a little bit
more broken off. Than the rest of
it. So if I come up to here then and
come over to here, press the shift and move. Do not rotate it round, I'll break it, press
the enter button. Come up to your face, select, select it, press
Delete and faces. And there you go,
here is problem. That looks pretty good.
And now let's come over. So if I press the question mark, the other ones are way
way easier because we haven't got any cutting or
anything like that to do. Let's come to the next one then. So let's put this one
here. All I'm going to do. They're in a line, hopefully, so if I press Shift D, let's
pull that here to this one. And let's just make sure I press seven and
go over the top, we can see that it's
flush against there. Let's come to this one then. And on this one, we'll
pull it daily departed. And again, it's up to you
which one of these you use. You're welcome to use any
of them that you like. And again, you're
also welcome to use these in your own
kind of builds, making sure, as I always said, that it's not commercial use. So SN Z or SNY. Let's pull it up a
little bit, like so, and let's move it into a little bit more of a space where
we actually want it. Let's pull it up here, like so, and there we go.
That one's looking good. And then we've got one more, I think, which is this one here. So we'll grab SaaginGeometry, shift D, bring it over to
here, press the little dot bu. And then what I'm going
to do is, of course, I'll make it a
little bit smaller, pull it down into place
before I do anything. And the one I'm going to
put in is rib no fun. We'll use that
one. So A, so tab. Make sure we've got it, G, and then S and X, make it a little bit thinner. Make it a little bit
bigger, so S and Y. And then over here, make it a little bit smaller. Like, so double tap the A, and there we go,
that's what we've got. Alright, cool stuff. Now, on the next one, then, what we'll do is we'll actually go
back to muddling now. Now, we've got a bevel on each of those, so
we'll just check that. We've got a bevel
on each of those. So now what we really want to do is join all of
these together. So if I grab this and grab this, press Control J, I should
be able to get away. We've joined it all
together with no issues. Same on this one. Same on this one, C, troll J, and then the same on this
one here, C, troll J. So all we need to do then on the next lesson is
we just need to make sure that these have
been put in a collection. They're named properly,
things like that, and then we can
actually move on. Now when we move on,
what have we got left to do. We've
got our chimneys. We've got these lamp posts here, and we've got these builds here. I think on the next one,
we'll do something simple. So we'll get these chimneys
out of the way, I think. I think we'll do that. And I'm looking at what else
we've got left to do. Not a lot now, guys.
And I think then we'll move on to these
parts here because, you know, there's quite a bulky
part of the actual build. I think we'll build these
out next after the chimneys. So chimneys, then
those, then lampposts. And then finally working up
to the sign and the roofs. Alright, everyone, so
hope you enjoyed that. I'm going to save out my
work as you should as well, and I'll see you
on the next one. Thanks a lot. Bye bye.
64. Organizing Gravestones and Modeling Stylized Chimneys: And Welcome back, everyone to the Haunted
Street environment, Blender to Unreal, and this
is where we left it off. Okay, so what we're
going to do now is we're going to come in and
just rename all these. All of them have been created. So all of them now
should look really nice. Should have when this
loads up, at least, should have all of
the decals on them. So here we are, make
sure they look good, of course, before naming them. So let's call them gravestone. I think that's the best
thing to do. So we'll call it grave stone. And then what I'm going to do is I'm just going to press space, and I'm going to copy
this, so Control C, and we'll call this cross. Like so. And then we'll call
this rectangle, I think. Let's look at this one. So F two, gravestone, rectangle, like so, and then we'll
come to this one, and we'll call it rounded. That makes a bit of sense. Rounded. And then sharp. And then we'll call this broken. Like so. Alright, now
we grab all of them. And then what we're going
to do is just press the M button and we'll
call it a new collection. We'll call it gravestones.
Not like that. Like this. And then we go, Let's move our little
guy out of the way, pull him over to this side. Let's grab both of these, pull them over, and
let's now grab them all. Press seven, press G. Let's put them over
here just for now. Grab this door, Shift D, and then all we're going
to do is press tab, and we'll call it gravestones. Like so, I'm going to
make that then tab a little bit smaller and drop
it into place with the G. Alright, so far so good. Okay, so we're moving
on to the chimneys. So let's just make sure you've got your
reference for you. Chimneys, this is what
they're gonna look like. You can see, especially
with this one. It's slightly
crooked to the side. It does give you a lot of
options if you do this. By the way, if you make
it kind of square and, you know, tilted to one side, it means that I can turn
it 90 degrees and have it tilted in another way or
another way or another way. You know, you've got four
different ways then to do that. Same with this one, you
know if it is a bit of a more thinner type. You can actually turn
it around and just get a little bit of a
different look on them. You can also in reel, as well, bring the scale
down on the z axis, as well, slightly, so you can make them look
a little bit different. Hence why I've only
created two chimneys. You don't need a pack, which has got hundreds of
chimneys in it to get all of those variations
to make it look different. You just need to
be smart about it, how many you're
actually going to need. How can you turn it around
and all of stuff like that? Okay, so we'll come, I think,
to the big chimney first. Now I'm going to give you then some dimensions just
for the chimney, and then we'll deal
with the chimney pipes. So what I'll do is, first
of all, bring in a cube. So I'm going to press Shift day, bring in a cube. And then what I'm going to
do is press end button. I'm going to also
go into object mode so you can see what I'm doing. And then what I want to
do is I want to come to my item at the moment,
two by two by two. We don't really need
that, so 1.10 0.84, 2.62, and there we go. That's the size then of the chimney that we're going to be working with for this one, and we'll also get the scaling
for the other chimney. I'm going to just
save out my work. I don't know when
I last saved it. So shift day, let's
bring the next one. Again, this is
without the chimney, um pipes on top of it. So what we're going
to do with this one is we'll go in and we'll go naught 0.636, nought 0.638 and 2.03. And there we go. And again, I'm going to lift
it up with the G born and put it onto
the ground plate. Alright, so now we've got
something to work with. Now we can actually create our chimney and we'll do I think we'll do
the big one first, I'm just going to
move this over here. I'm going to press
shifts, Custer selected. And I could use this one, but the thing is once you
start using this one, you'll find that you'll start shrinking it a little bit or, you know, making it a
little bit thinner. And I don't really
want to do that. So what I'm going to do is I'm just going to press Shift D. I'm going to bring in a cube. I'm going to make my
cube around about this side so you can see here,
I'm going to pull it out. It doesn't need
to be exact guys. So something like
that, you can see now I've got quite a good
scaling on there. It's a slightly
slightly bit bigger. I can bring it in a
little bit if I want to. Something like this, though,
looks about right to me. Now I'm going to do is I
just need to decide where is the point where we're going to start the actual chimney pot. And I think for me, I'm
going to grab the top of it, press one, and just bring it up slightly,
something like this. Then what I'm going
to do is I'm going to press E, and I'm
going to bring it up, and I'm going to
leave a little bit of a top because it has got a
little bit of top on it. If you look at your
reference again, you can see this top on there. So that's what we'll be doing. What I'm going to do is I'm
going to press Control, bring in a few edge loops. Again, I always
like to bring in, you know, five or
something like that. I always find it easier to work with odd numbers than even. And then what I'm going to
do now is come to the top. Now, I should be
able to then bring this in to where I
actually want it. So if I grab this, I'm
going to bring in, let's try the root, and
let's bring this in. So if I bring it in like
this, you'll see already. It's got some slopes. Let's try the shop instead.
That's going the other way. Let's try the inverse square. So I do try a few of them just to see what I'm happy
with. And you know what? I think that one
is going to be it. It's got a little
bit of bend on here. Yeah, and I think that
one looks pretty nice. Okay, so now we've got that. We can deal with this bit once we've actually
put this top on it. So what I'm going
to do is take off my upper proportional editing, and I'm going to then press E and bring it up
to this one here. So if I press E, then I should be able to bring it up
to round about there. And then what I'm going
to do is Alt Shift click, press the E button, alter NS, and bring
that out then to where I actually want
it. So something like this. And then what I want
to do is just grab the top with Alt shifting click, press the S button, and bring it out
just a slight bit. Just to get that kind of slanted look that we're
actually looking for. And then finally, what I want to do is I want to bring this in. So I'm going to press the Span to bring
it in a little bit, and then I'm going to
press E and pull it down. Now, when I'm doing this, I tend to pull it
down far enough where there's no way where you're
going to see down there. I tend to you know, make the pipes a little bit longer and go really into here, just in case you're
taking a shot like this, you know, but it's up
to you how you do it. You can also do it the other way we actually bring
it up and have, you know, the pipes
actually sat on there. So if you do it,
the trick here is, if you're doing a
chimney without pipes, bring it
all the way down. If you're doing a
chimney with pipes, then just leave it
around there and let the actual pipes do the actual let's come
to our pipes, then. So what I'm going to do
is create our first pipe. I'm then going to
come in and bend everything and do everything
that we need to do on this. Now, the other thing is, am
I happy with this part here? So just this part in
here. I think I am. I'm looking at
what the angle is, and the angle to me is
looking pretty nice. So I'm going to press shift
desk to selected shift date. Let's bring in a well, let's bring in a cylinder. I
think it's going to be easy. And again, as I said, don't put it on 30 to two
guys. It's way too many. Put it on 18 to 24. I think with this, we'll put
it on something like 22. And also, remember,
when we did the barrel, we had to consider the
fact that we needed, you know, a barrel plank,
every other one or something. So we don't have that,
um to deal with on this. So what I'm going to do
then is bring it down. Now, I do want two here, so I want to make sure that
whatever I'm putting in here, five press shift, you'll see that I can put
another one next to it. So I'm just taking
that into account. I'm going to delete this
one out of the way, come back to this one,
then press the button, and then let's just pull
it up, first of all, into the place where
it's going to be, which is going to be
round about there. Now for this one, I actually want it to come in a little bit, so I want it to come
let's say to here. And then let's say we're going
to press E and then press the S bone and just pull it
in a little bit and then E, so bring it up. Like so. And then what I want to do is decide now how tall I want it. Now because we're going
for that haunted feel, it's better if it's a little bit taller than it
actually would be. And then from here,
then what you can do is now shape
this a little bit. So I'm going to
press Controller, bring in five edge loops, grab my middle edge
loop, and again, I'm going to put
proportional editing in them, and then bring it in. So I'm going to pull
it in and bring it in like so, and there we go. That is what we're looking
at. If I now press right, click, shade Auto smooth,
that's looking pretty nice. Albeit, it might be a
little bit too small, but we'll check
that in a minute. So all transforms. Set origins geometry, and what I want to do is
actually split this off. So P selection, split it off, come back to it now, I
transform, set origins geometry. And why am I doing
that Because I want to check that I can make
this a little bit bigger. So if I press the button, and make it a tiny bit bigger, can I still get another
one right next to it? And the answer is yes, just fitting in there,
as you can see. So, that's great.
Now, what we need to do now is come back
to this part here. So let's actually
make the chimney. So first of all, I'm
going to come in to the top of it
with Face select, grab that top, press the eye
button, and bring it in. And then what I'm
going to do is come to the outside edge, Alt click, pull it down a little bit
without portional editing on, of course, pull
it down, like so. And then what I'm going to
do is pull this back now. So if I press E, I
should be able to pull it down into there like so. Alright, that's
looking pretty nice. Now, the other thing
is, of course, I do want to rotate these, maybe a little bit,
just make them a little bit crooked or
something like that. I also want to make the
tops a little bit crooked. So what I'm going to do is
press and we will press tab, and then what we're going
to do is just bend it very, very slightly to the side. If I grab this edge loop, Al shift click,
portional editing on. I'll grab it again,
Al shift click. I'm grabbing it on
the second one down, by the way, guys.
Put it on smooth. Press one on the number pad, then what we'll
do is press R and we'll look and it
looks like it's Y. So let's press R and Y and just bend it very slightly, like so. I'm going to come down
a little bit, and Y. Let's bend it this
way, a little bit. Like so, and there we go. Alright, let's save
out our work now, so we're gonna go to File, Save. And on the next one, then we'll absolutely get this
chimney finished. And thanks a lot, guys,
for taking the course, and I hope you're
really enjoying it. Okay, see you on the
next one. Bye bye.
65. Finishing Chimneys with Bevels and Clean UV Mapping: And Welcome back, everyone to the Haunted Street environment Blender to Unreal, and this is where
we left it off. So we're really getting
down here now, guys. Alright, so what I'm gonna do
then is just, first of all, we'll come in, and all I'm going to do is just grab
this one and this one. Alt Shift, click Alt
Shift, click, go to mesh, transform, and we'll
go to a randomize. Let's turn this
down all the way. Note point, note one, turn down. Even that's a little
bit too much. So note point, note,
note five, like so, and that is looking a
little bit there, like so. And, yeah, that's
looking about right. That's exactly what I expect. Now, what I'm going
to do is press Shift D. I'm going to pull
it over to this side. And then what I'm going to
do is press R and z just to rotate it round just to make it look a little bit different, and that is what
we're left with. Okay, so now let's think
now about these parts here. So what I'm going to
do, first of all, I'm going to just join these
together just for now. So join them all
together with Control J. And then what I'm
going to do now is Js grab the top up here. So Jas this edge loop here. Again, we've got
proportional editing on. I'm going to press and Y. Now, when I spin this round, you can see that these two
top pipes aren't spinning, and that's because
we just want to make sure connected only is off. Then what I'm going to do is
just go to the front now, pressing one on the
number pad, and Y, and bring these all out, making
sure that the whole thing is going to turn a little
bit together like so. Now the thing is with this,
you could use, for instance, something like lattice, which you're absolutely
going to be using, and it will bend things much,
much nicer than this will. But for something
quick like this, I tend to just use the
proportional editing. So I'm just going
to click on that. It's a little bit bent now, as you can see, so it's a
little bit tilted to the side. And the one thing I
do want to make sure, though, is that the
bottom is still flat. So I'm going to press
S, Z, and zero, just flatten that out, and then it's going to rise
up into the right way. Okay, so I'm happy with that. Now the next thing I want to
do then is grab all of this, Pee again, selection
just to separate it off. Control layer, transform,
set origin to geometry. Now I'm going to
do is I'm going to just randomize these parts. I'm going to press
Alt Shift and click on all of the edges like so. Then what I'm going
to do is mesh, transform and randomize, and then I'm going to drop this all the way
down just so we've got a little slight bit of variation there, as
you can see now. Then finally, I'm
going to join it all back up together. Control J. Adding a modifier, we're
going to generate a bevel, and we're going to set
this bevel to note, point, not three, like
so, and there we go. First, chimney Los done. One more thing. Al shifting, click, right click and one
marker sharp on there. And there we go. Okay, cool. Now, let's deal with
the next one then, so I'm going to drag this over delete this
one out of the way. I'm not going to
need it anymore. And then what I'm going
to do now is try and replicate what I've just
done with this one here. Now, instead of, you know,
creating a new cube, I'll just press Shift D and
use this cube to work with. I'm going to first
of all, drop it down because it's a little
bit different this one. So let's first of all, drop
this down for the top. So let's bring it down, so let's press control law, bring in five edge loops, grab the middle,
proportional editing on. Again, we'll use the I think
we use the inverse square. Did we use the root?
I'm not actually sure, but I'll give it a try,
so let's bring it in. And yeah, this root
actually looks pretty good. Now, what I'll do is I'll come
down to the next one now, drop this down a little bit. And just bring it
in a little bit, like so, right, click,
Shade Ato smooth. And yeah, that looks good, except the fact it doesn't look very
spindly at the moment, so I'm going to make it
a little bit more spiny. So I'm going to do is
I'm going to press S. I'm going to press one. I'm going to press
S and's Ed and just make it a little
bit spindler like that. Now, I have to remember when
I gave you these sizes, it were based on, you know, this out of bit on top of it. If you go to your reference, you'll see it's got an
out of bit on there. So it was based on that,
so just bear that in mind. Now I'm going to
do then is create the top off here. So
I'm going to come in. Turn proportional editing off. And then what we'll do
now is we'll bring it up all the way to where we want it. So
something like here. And now what we'll do is we'll
create this part on here. So I'm going to press
Alt shifting and click. Eat, Enter, alters and then bring it out to where
we actually want it. So something like with
this little ledge here. And then what we'll
do is we'll press ControlR on this part, like so, and then I'm going to press ControlR on the top part. Making it bigger than this
part here, as you can see. And then what I'll do is
press Alt Shift click. I'm going to press the S but
to bring that out, like so. And then finally, I'm
going to press Control R, bring in three edge
loops on here. Now I'm going to do this by e, not by proportional editing. Sometimes it's easier
for me to do that. So first of all, grab this one, Alt Shift click, bring
it in. Althift click. Bring it in. Oh, shift
click and bring it in. So we have that nice kind of rounded look that we're
actually going for. And now we want to do is
make sure that this part here is a little bit
more solid on here. So a little bit
more sharper edge. So if I pull this
out, pull this out, you end up with something
that looks like this. And that is looking yeah, exactly as I wanted it. Pretty much apart
from the top needs, probably going in
a little bit more. So all I'm going to
do is grab this top, press Control plus,
press the Sb, just bring it in a
little bit more. Now, let's focus
on the top then. So first of all, I'm going to bring this in a little bit more, and then I'm going to press E
and drop that down like so. Alright, so far so good. Now let's see how
far we are off. We're about absolutely
perfect there. Let's see the width.
About absolutely perfect. So hopefully, guys, you've
got the same result I did. No idea how I got it so close,
just straight off the bat. Let's make it a tiny,
tiny bit taller. So Essence, I'd pull it
out a little bit, like so. And then what we'll
do now is before we do this kind of chimney,
we'll grab one. You know what? We will do
it. So we'll grab one of these L because we've already
done all the work already. No point making
work for ourselves, so we're going to grab this
one, press P selection. This one already has a
bevel on it as well. What we're going
to do then we want to put it right in the center. I'm going to come
in, grab this face on here, press shift desk, cursor selected, grab this part, control A or transform, set origin to geometry, press the Sbrne
selections cursor, drop that right in the center, and now where do I
want it poking out? Probably around here. What
I'm going to do then is press SNsEd and make
it much shorter, making sure that it's actually
fitting on this face now. This face is already down here. I definitely want to look and see where is
this poking out. So I'm going to poke it
out probably around there, like so, and then come
to this face down here. So this one down here and
then just pull it up. So I'm going to pull it up
into place where I need it just so the pipes actually
sat on top of there. Like so. And there we go. Now, the other thing is,
of course, you know, when you're bringing in
when you're doing chimneys, you really got to be deciding where you want your
bricks to come up to. And the reason I also, you know, make the tops of them stone, as you can see in
the reference image, is then I can make this top
where the pipes sit on stone. If you try and make the
tops of your bricks, honestly, they're never
going to look right. So just take that into account. Alright, so we've got
this so far so good. Now, let's come in
now, and what we'll do is the same thing as
what we did on this one. Do we want to bend it at all? That's the question, or do we want this one to
be kind of straight? I think for a smaller
structure like this, it's probably going to be okay if it's relatively straight. So what we'll do
then is just come in to the edges, Alt Shift click, mesh, transform, randomize,
turn it down all the way, and let's see what we
can get away with. So note point, note, one, and we should have a
little bit of variation then on there, and
that is looking good. Let's right click
Shade Auto smooth. Now, have you got some
issues like I have on here, reset all your transforms
again, so origin geometry. That should fix it. And finally, now I can grab this and join
it with this with Control J, and what that's going to
do is bring in my bevels. But again, I'm going to
click shade Atomve Now, if that's not
working, of course, we need to bring in some shops. So I'm going to
come in, Alt shift and click Alt Shift click, right click and marker
shop, and there we go. And then we want this
inner part probably. Sometimes it's better to put a shop in and sometimes it's
just better to leave it. So marker shop like so. I think on this occasion, it's actually better to put
that shop in there. I think that's looking
way way better. At this point, let's get rid of this one because we're
basically done with these. They're looking really cool. And yeah, I think
that looks nice. I think one thing I'm going
to do just to make it a little bit different is
just to grab this part. No proportional editing on
and just lift it up slightly, like so, just to make it
off keel a little bit. Alright, that's all done. Now what I want to do then
is bring in our materials. So the materials we're going to need here are
going to be clay, bricks and stone dk. I think we should have
them all except the clay. So let's have a look.
So first of all, we'll go down search for clay. No results found, as we thought. We have got the bricks
because they're on our walls, so I can bring in my bricks. And we have got EverpressPlus. We have got stone dk. And the reason it's
stone dark, of course, is because all of
this chimney smoke is going to make it pretty dark. Now let's go to file. Save while we're here, file again, append. Let's go to clay. You can see here the
one that says clay plus Down arrow, let's bring in our clay, which
is this one here. All right, so we've pretty much got everything
now that we need. Let's put it on material
mode before we begin. And what we're going to do now is grab this one, grab this one, press Control L,
and we're going to link materials, and there we go. Now, let's start with
the big one first. So what I'm going
to do is press tab, AU, Smart UV
project, click Okay. Now, normally with things
like brick on here, sometimes you get a few
issues, but on here, actually, it's opened,
pretty nicely. Now, you can see
here down this side. The bricks don't meet properly. Some of them look
bigger than other ones. And so with things like this, I tend to use project from view more to see
if that actually works. So I will show you what that is. But first of all, though, let's deal with these pots
because at the moment, it's very hard to
tell what the wall looks like when we've got
these other pots there. So what I'm going to do
is I'm just going to come I'm going to
press Alt Shift click, right click and Mc seen. And then what I'm
going to do now is come to these parts as well. So I'm going to press L. Go to my clay and click a
sign, and there you go. Now you'll see, as well, that you have got
some seams in here. They look a little bit
of a mess, as well. But we're not caring
about that at the bowman. All we're trying to do right now is just get them split up. So stone dog, let's
click a sign. And on the stone Dk, of
course, it should look fine. Now, you need to look where
these actual seams are. So we've got a seam
coming down here. We've got a seam
coming down here, and that's not what
we really want. So first of all, let's
actually come in. Press Control E, and
let's mark seam right down on the bottom
just to split that up because we don't really
care about the bottom. I do want it there just so
it is a three D object, and it's not got gap in
there because I think you having gaps and things
is never a good idea. It's better off being
a solid object. You can go in and save
yourself, you know, quite a few polygons by
deleting all the faces. But honestly, for
the amount of work, probably not worth it
on something like this, because it is, after
all, just one quad. Okay, let's come in then and think about
then these parts here. So what I'm going to do is, I think I'll grab
this side, this side. This side and this side, and I'll just give it a try to see what it looks like if I unwrap with project from view. I'm going to go to
Project from view, and then I'm going to go to
this side and this side, and then this side
and this side, I'm going to press
three and I'm going to press and project
from view again. Let's project from view. Now, let's see what
we've got there. And you can see it looks
like they line up very, very nicely, as you can see. Now, the thing is you've got to understand when
you're doing this, wherever you put your camera. I've got my camera here.
When I'm going to this bit, I'm not zooming in at all. My camera is still the same distance away from my chimney. So when I press one and I press project from view,
as you can see, project from view,
and then I come to this side and I go to the
top, go to the bottom. I have not zoomed in at all. I've kept my camera exactly
in the same position, and then I press three, and I press you and I go to
project from view. And now you can see, again, if I double tap the A, they're kind of lining
up a lot of places. It looks much, much better
than what we had before. But I didn't move my camera. Now, you're always going to get something where they
have to come together. But even here, you can see that some
of them are lining up, so it looks a lot lot better than just simply unwrapping it. Now what we need to
do because we've done that is we need to
come in and sort out, of course, on the next lesson, the actual scale of the texture because it
should match these walls, so I'll grab these walls,
make sure everything matches, and we should end up with a
really, really nice piece. I'll, of course, make
sure these match as well. Unfortunately,
there's no way really to do these with
project from view. But because they're
made of clay, all we need to do is
just make sure we dictate where the
seams are not blender. Alright, let's
save out our work, and I'll see her on the
next one, everyone. Thanks a lot. Bye bye.
66. Advanced Chimney Unwrapping and UV Organization: Welcome back, everyone to the
Hunter Street environment, blended to reel, and this
is where we left off. Okay, guys, so let's now
grab one of our walls, press shift D, bring it over, and let's just look at the
resolution or textile density, texture density of these. And you can see they're
quite chunky on this wall. Now, I think on here, we've got it absolutely right on this one, so I think we're okay with that. Now, let's first of all, then, actually fix these parts
here and this part here. So we know we've got a wall
now. That's looking good. So let's come into
this part here. So all I'm going to
do is grab this part, and I'm going to go
over to UV Editing. And then what I'm first
of all going to do is press the dot just so I
can see what I'm doing. Press A, and I always come
in and just pack islands. I just find it much, much easier once they're bigger like that to actually work with, and they're all
actually together we unwrap these all separate. Now, this is probably
a little bit too big, so let's make it a
little bit smaller. And now what I'll do is
move to our chimneys. Now, you can see if I grab
one of these chimneys, you can see this is how
it's kind of unwrapped. Not really, you
know what I wanted. So what I'm going to do is I'm going to I'll do them
both at the same time. I actually find that easier. But first of all, let's come in and just grab both of these. Let's isolate them out
with the question mark. And if they're not isolated
out with the question mark, just press Shift H. Let's see if they can
isolate them out like that. No, again, and the reason is because we have got
this on rendered view, let's put it on material
view, and there we go. Now you can see it's
actually working. So what I'm going
to do now is, first of all, I'll come
to both of these, press controle and let's
mark that first Sam out. Then what we'll do is
we'll come to this top. So this top here,
right click Marcosin. Now, the thing is at the moment, this is an infinite loop,
and we don't want that. So what I'm going to
do is put the sorry, click the edge loop, run
about the same place. It doesn't need to be
perfect by any means, right click and marcasm. Now we're going to come
down to the bottom. Now, something like this absolutely isn't
going to be seen, so we can get away with just
deleting those out the way, so delete and faces. And now, wherever we put
the edge loop on the inner, People this is, you know, the way around where
people are looking. So they're looking
this way, so I'll put that edge loop with
the seam on the inner, and now I'm going to go to
the back because this is the last place
people will be able to see, especially if it's dark. So if I come in now and go, um, from the top of here. So from here, all the
way down to here. And then if I go, you can
see that's not quite right. So all the way down to not
that one, this one here. And then we'll go
from this one here, all the way down
to this one here, right click, and we'll
mark team roundabout here. And then what this is
doing is telling Blender, Look, this is how I
actually want it unwrap. So then we can click Unwrap, and there we go, much,
much nicer unwrap. Everything kind of
flows around now, and you can see it's
looking really nice. And around here, you can see that we have
those seams there, but I think it's looking
much, much better. Now, at the moment,
let's actually make them a little bit bigger just to
see what that looks like. And now we've got a
lot of repeating, so I don't really like that, so I'm going to try making
them smaller. And there we go. From here, if I put it
on Render view now, you can see you can't
really see the seams. You've got some damage on there, and it's looking pretty nice. Apart from this one,
because I don't really like that damage on
the inside of it. Let's move it a little
bit towards the outside. So what I'm going to do
is just grab this one, press G and Y, and let's move it up, holding the Shift button out to the out a bit if
it goes on there. But a little bit
of broken there. In here now, so
that's looking good. It's not on an actual edge. And yeah, I think
I'm happy with that. Now, let's come to the next one. We're going to do exactly
the same thing, then. So it's just rinse and repeat. Let's put it on object mode so we can
see what we're doing. This wall, I actually
duplicated it. Always get used to pressing Shift D when you're
bringing it over. Don't just bring it
over, just make a check, make sure you've not deleted it, and then delete it out the way. Now we've got something
to actually work on. Grab your chimney,
then you small one, press the dot button, and then what we're going
to do is press Ohi, click Alt Shift click
Go around here, first of all, right
click Marcos. Let's do the top bit then. So the bit inside here. So Controllee and Mark Assim. And now what we want to do is the same thing pretty much
as what we did before. So what I'm going to do is
just position myself here. And now I'm not going to actually zoom in the camera
or anything like that. I'm going to put this
on material mode. And what I'm first
of all going to do is grab all of this going up, Stone dark, click a sign, grab my chimney, click
clay, click a sign. Now I'm going to come in
and grab these ones here. This one here, this one here, press one on the
number pad, press you. And then what we're going
to do is project from view, and then I'm going to
come round to the side again without Zoom in my
cameron or anything like that. Grab this one, this
one, and this one, press three on the number pad, press you and project from
view, exactly the same thing. And it should give us
something like this where it pretty much lines up
going all the way around. It's not perfect, but you'd struggle seeing, you
know, that part. Also, because I kind of zoomed out near enough the same
as what I did on this one, you can see now to look
around about the same size. Okay, so now let's
come to this part. We're going to press you
and smart UV project. Click On Rap, and there we go, we're left with
something like this. Make sure it lines
up with there. You can see probably it means it needs making a
little bit smaller. So let's go in, make it
a little bit smaller. And now we're onto
this bit here. I'm also looking at this part. Do I need to add a shop
in here, probably. So old shift, click,
right, click, Mark a shop, and now it looks a little bit more
prominent on there. Now, let's come into
this part again. Again, I will grab this, I'll press Shift age just to hide the other
part out of the way. I'm going to then come
in, grab this part here. Press Controlle Mark a seam, grab the top part
then, Alt Shift click, right click and mark a seam. And then what I'm
going to do is come to this part because
this is the front. Mark my first seam along here, right, click, Mark a
seam. Come to the bottom. Again, we don't need
it, so grab the bomb, press delete and faces. And then what I'm going to
do is mark my next scene, Sam which will be round
about the back of here, so grab the back off here. Any of these, actually,
so grab the top, going all the way
down to the bott. Right, click, Mark a sem, grab the whole thing,
press you and unwrap. Now, let's see what
we've actually got here. And this is looking pretty nice and looking round the pike. Let's look on the rendered
view just to make sure chimneys look
round about the same. Then, yes, they do. They are
looking really, really nice. Alright, so so far so good. Now what we want to
do is name them. Chimneys are done now, guys, so we can grab both of these, just make sure that we've got a bevel on each of
these, which we have. So Control A will transform their origin to geometry.
And now let's name them. So we'll simply call
this large chimney. Ever invented with the names. So F to small chimney, like so. And then what we'll do
is grab both of those, and we're gonna
press the N bone, and we'll make a new collection called chimneys, of
course, chimneys. Like so. Enter twice. And then also I will put these up just to keep it
all nice and clean. And then what I'm
going to do is just move this one a little
bit next to it. And I'm going to grab
both of my chimneys. I'm gonna press G, and we'll put them
somewhere over here. Grab this door, Shift D, tab delete doors.
We call it chuk. Like so, press the tab button, make it a little bit smaller, and there we go, everything nice and neat, everything in place. Let's save our work. Alright, so what are
we working on next? So we're going to
on the next lesson, make a start on
these parts here. So all of these parts here is what we're going
to be creating next. And once we've got
those out of the way, as I said, I think then we'll
move on to these parts. We've basically done
everything else, then. So once we've got
these pots out, we've got these two kind of variables, and then
we've got our roofs. So very, very now nearing, you know, the more
difficult stuff. But these are quite
simple still. These are a little bit harder, and these two are,
they're getting up there, and then finally the roofs. So let's do it that way. So I will save out my
work as I have done, and I'm going to see her
on the next one, everyone. Thanks a lot. Bye bye.
67. Modeling Modular Cemetery Walls with Bevel Detail: Welcome back everyone
to the Haunted Street environment,
Blender to Unreal. This is where we left it off. Now, I have been
looking at these parts, so let me just grab these parts on our references,
these parts here. Actually, they're much
harder than I thought. Much harder than I thought. So actually, this is
going to take you up another level of, you
know, creating things. So I think let's start
with this part here. So this part is leading on to this part is leading
on to this part. And when we've created
these railings, then we can actually use
the same technique or pretty similar technique to
create these parts here. So let's make a start on
this one here as I set. All right, with that
out of the way then, let's come in and
get some dimensions. So what I'll do is,
first of all, shifts, cursor to world origin, not over there, shifts
curse to world origin. And then what we'll do
is bring in a cube. So Shifte let's bring in a cube, and the dimensions for this
cube are going to be two. We're going to have
it on not 0.537. We're going to have it on not
0.771, something like this. Alright, let's put
it on Object moti. You can actually see
what I'm doing as well. Now, don't forget on
this, especially, these bomb parts are
going to be blocks, and the top part is going to be that part that actually
goes in there. So let's first of
all, split this off. So I'm going to press Control R, realize where my
blocks want to go, probably a little bit
higher than the center. So probably something
around there, and then we're going to
right click and mark a seam. Now what we can do is we can
split both of these off. So if I press L, I can
split this off from here. Before I do that, though, I'm actually going to
bring it in a little bit. So if I press S and Y now, I should be able to bring
it in. If I split it off. Y, G, make sure it's split, and then S and Y and
bring it in a little bit, and these are going to be stone. Okay, so let's deal with
the next part then. Whatever we do here,
we basically keep the same flow throughout. So first of all, then,
let's bring this in. So I'm going to press Control R, bring down a edge
loop down to here. And then what I want to
do is bring this part in. So I'm going to bring this part in to where I actually
want it first, so I'm going to grab
the top off here. Press S and Y, bring it in to where I want it. So something around here. Now, the other thing
is, we definitely definitely want this
kind of sloping in. We don't want this
hard edge on there. So what I'm going to do is bring in maybe four edge loops. Now, I know I always go
with an even number. Sorry, an odd number, but on this occasion
I'm going to go with an even number because I'm
going to do it manually. So if I press three, I'm
going to actually press tab, I'm going to press
question mark, isolate everything
out of the way, and now I can actually
work away at this. So if I press three, then
I should be able to press S and Y and bring this
one in a little bit, and then S and Y, bring it in a little
bit, and then S and Y. And don't get to a stage where you're bringing it in so much that
you actually lost, you know, cohesion. It
doesn't look the same. So S&Y bring it in, get that nice slope, and then
work your way back up SNY. And then S and Y very
slightly, like so. And then we go, we've got
that nice slope on there. Sometimes it's just
easier to do it like that rather than using
proportional editing. And you'll find the
more you do it, you'll definitely
get an eye for this. When you first start. Trust me, guys, you're going to
be all over the place. It's not going to look like
that probably off the bat, and if it does, well, then you're born to do this. Okay, so looking good so far. Now I'm going to do is
these can join together. Now, we're not too
concerned about them being, you
know, two metres. We've made them two metres
just so they're easy to use, but we can slot them
next to each other. And not have really
any problems. But with something like
this, I'm always thinking of the post. I'm
thinking of a poster. It's not really going to be, you know, two of these
joined together like that. There's going to
be a poster here. At least that's the
way I designed it. I do want to, however, if you want to do that,
you can do that, but we're not concerned
about the length of these because we're not building on top of them or
anything like that. They're going to be
flat on the ground. There's even going to be a post on here or next to each other. So just take that into account. Now, the next thing
you need to establish is you want stone
blocks under here. Do you want this also broken up? On the one I've created, I didn't actually break that up. So, you know, that's
perfectly fine. The one thing is, though, if people are going to
join them together, we kind of need to keep these relatively flat
so they join together, but still have a little
bit of a break in there. And the way we do that is just by using a bevel
which will kind of, you know, make that a little
bit uneven, join them up. We can also use randomized, so we don't need to pull these top parts in or
anything like that. Now what we're going to do then is come to
this bottom part. I'm going to grab this
bottom part, press Shift H, just to get rid of the
other parts out of the way, and I'm simply just going
to then fill this in. So I'm going to
fill this in with F and then we're going to
give it some edge loop. So I want four blocks here. So left click, right, click, one, two, three, four. Now, as with everything,
I don't like it when it comes in where
they're all the same blocks, so I'm just going to move
one of these out of the way here and one of
them out of the way here just to give it a
little bit of randomness. Next of all, then, I want
to split these blocks up. So Alt Shift click, right click, and what we're
going to do is mark seams. I always find it
easier to mark seams. Rather than just
splitting them up because then I
just come in and I press L, L, like so. And then we'll press Y and G and make sure
they're all split up. A, and then all we're
going to do is mesh. We'll come down to clean
up and fill holes, and it should fill
in those four holes. And to check that for us, all we need to do is press add in a modifier, bring in a bevel. Let's reset everything.
All transform, set origin to
geometry, Noone three. Like so, and there you go. That's what you
should be left with. Now, let's come back
to our blocks then. Now, we don't want
them to be too uneven. So I think on this, because I don't want
them too uneven, bringing in more edge loops is actually going
to go against that. So what I'm going
to do instead is, I'm going to go to transform, but without any more edge loops. And what that should do is if
I start turning this down, it should bring it down
relatively to where I want it. You can see now
they're still uneven. And they actually look
really, really nice, and we haven't had to do
hardly any work on that. Now the next thing
is, of course, we want to do the top part now. And again, this is where you
can decide if you want to split this up and have it in blocks or if you want
it straight like this. Now, what I'm going
to do then is press Alt bring back that part. I'm going to press L, Shift hide everything else
out of the way. And then what I'm going
to do is just fill in this face on the
bottom of here, press in F, like so,
and there we go. Alright, so that looks good. Now if I press Shift
D, bring this over, rotate it round z 180, rotate it round and drop it right just where it's
actually going to be. They can see now where
it's going to look like, and they look kind of
different from each other, exactly what we
wanted it to be like. Okay, so far so good. Now we've got the harder part of this because another one of these needs to have the
fence going on top. So first of all, we
need to decide how high the fence is actually
going to be so to do that, what I'm going to do is bring in another cube, so shift a. Let's bring in a
cube. And this cube, I want it to be on the
z axis 2.13, 2.13. And what I'm going to
do is squish it in, so S and Y, let's push it all
the way in like so. And now what I
want to do is make sure that both of these
are on the ground plane. So I'm going to grab my wool. Put it on the ground
plane, grab the top off here now and pull it up
to the ground plane. And then this tells me this is how high I actually
want my fence. Now, what I can do now is
just move that to the side, and I know that I
need a fence on here. Now, before we do that, let's make sure because
we've got this part, I press Shift D,
bring it to the side, and that is the first part
of our cemetery build. And then what I want to do
is file, save on my work. And then what we'll
do on the next one, we'll come in and start
with these railings. Alright, everyone, so I
hope you enjoyed that. I hope you're following
along really, really easily, and
I'll see you on the next one. Thanks
a lot. Bye bye.
68. Gothic Railings with Curves, Array and Solidify: Welcome back, everyone
to the Haunted Street environment,
Blender to Unreal. This is where we left it off. Alright, actually, I really,
really enjoy creating, you know, this next
part, these kind of railings that we do. I actually really enjoy
it. Don't ask me why. I don't know, but
I really enjoy it. Okay, so what we're going to do, first of all, is we
will bring in a curve. Now, you might be asking, why
are we bringing in a curve? And the reason is because we
want to use for our gait. And if we're using
it for our gait, it means we'll have the
same style throughout. So that's why I'm
trying to make things easy for myself
from here on out. So what I'm going to
do, first of all, is I'm going to press shifts, cursor selected, Shift A, and I'm going to
bring in a curve. I'm going to bring in my
favorite the curve path, press the S born, Y, 90, and let's bring
it up into place. So I'm going to put
it first of all, around here, I'm going to press the S bone, just
to bring it down, and I want it to line up so it's in here going up
to the top of here, so that's S and a little bit. O S. Let's pull it up, like so, drop it in,
and there we go. It's about the right size
that we actually need it. So why are we using the curve? Because with the curve,
we can actually come in now and bring extrude it out, like so to get the right
dimensions that we actually need for the upper parts of our gait. So something like
this, for instance, you can see now because
we've got on a curve, it's non destructive, which means we can come in
and mess around with it. Now, the other thing
is, we need to come in and give it some depth. So we're going to add
in and modify it, and we're going to
generate a solidify. And then what I'm going
to do is pull that out. Now, the thing is here, you
can see it's out at a slope. I'm also going to right click and shade flat
because it's much, much easier to
look at like that, and I'm also going
to put the offset to zero just to put it
right in the middle. And then wherever I
pull this out now, that is where it's going to go. Now the best thing
is that because we've got it like this and
we pull it out, pull it out, pull it out where we
actually want it, we now have got something
already that we actually like. Now, let's make it more square, though, because it
is the upper part. So if we come over to
our curve, come down. Let's make it a little bit
more square and chunky, so something like
this, and there we go. Now, that's that part.
So now we remember, though, the top part here, because I did forget about
that needs to drop down a little bit because we do need that kind of spiral on there. We can't obviously do
that with a curve. This is just to get the
dimensions that we need. So what I'm going to do is I'm going to pull this
down to there, and then my spire or my top of this can
go on top of there. Alright, so far so good. Now what we need to
do is we need to actually put it over to here. So we've got one, two, three, four, five, six
on our reference. And instead of just, you know, duplicating them, I
don't want to do that. So what I'm going to do is
add in another modifier, pull up my solidify,
add a modifier, and we'll bring in an array. And you'll notice
there brought in the let me just delete that add modifier, generate an array. We've got an array
that's the legacy. We might as well use that one. There is a difference
in between them. You have a lot more options in this array here,
as you can see. I've got a little bone
here I can actually use, which is really, really handy. But with me, I always try and keep things as
simple as possible. I'm not a guy that oh, shiny new tools or
anything like that. If the tool does a better
job like the new lattice, which I'll show you later,
then I'll be using it. But if I can get away with using the old tool and it's doing
exactly what I wanted to do, the workflows fast, then I'll
absolutely be using that. So, let's actually
take this off. Let's come to the old array, so generate legacy array. And what I'm going to
do is set this to zero and move the sorry,
which one is it? Is it the Y? No,
it must be the z. Move the z over to here. Then what we're going to
do is increase the count. And what we want to do
now is look at this and this and make sure
they kind of line up. So I'm going to pull that. Little bit holding
the shift but, getting it right to
where I want it, which is going to line
up with somewhere. Doesn't need to be
perfect guys again. And the reason is
because obviously these are bent and
all of that stuff, so they don't need to line
up absolutely perfect. But as long as you make
sure they line up, you know, near enough
where they should. Now, you can come in
and do it this way, so I can come in, grab this one. Press Control R,
press left click, right click, right
in the center, press Control B, pull it out, and then you'll see if I put it in the center of here, where
they're actually lined up. From there, then I
can actually come in and pull if I grab
this 1 second, so tab, grab this
one, press the tab. You actually see if
you can do that, so I'm going to put
it on wireframe. Now I can actually come into this bit and line it up
right in the center. So what that means
is I can move it, move it, move it that
way, and there you go. Now you can see
the lineup better. Let's put this on ObjMO just in case you really want
to get them lined up. That's why I did
that for you guys. Okay, next of all, then what we want to do is we want the cross section
going this way. So what I'm going to do is then I'm going to grab this one. I'm going to press Shift D. I'm going to just
move it over here, take off my array,
and then I'm going to spin it round on
the Y. So, Oh, why? 90, of course. Let's press one, and where are we
going to put this? Well, it's going
to come probably just at the edge of here. So just at the edge, it can poke out probably a
little bit further. And again, when you're
joining these up, that's why I didn't intend for them to be
joined up like that. I will show you how if you really want to join
them up in that way. When we come to put these these little blocks
on let me find it. So you can see these little
blocks here that are made. You can, when you're
doing it like this, put a little block on
there and on one side. So then one side will
have a block and the other side won't when
you come to join them up, they'll actually slot
into that little block. So if you really want
to join them up, you can get away with
doing it that way, or you put another post
on one of the ends. Another reason why I
didn't want to do that, avoid that and just put a post there is
because it's much, much easier than trying to join little these little
parts together. All of that stuff
needs thinking out. When you're creating
something like this. All right, so far so good. Let's now come in. And what I'll do with this then, I will grab I'm thinking, you can come in and just grab this like so and pull it out. And then what you can do is
you can delete all of these. So delete vertices and
pull it out a little bit. Again, I'm just going
to press just to hide the other way, and
then going to press one, making sure I'm there and
then just pull it out to the right size of what this one is over here,
so something like that. And then what I'll
do is because when I come in to my curve
and the resolution, it's dictated by subdivision. So I want to make sure
that I subdivide it and I subdivide it again and put
those subdivisions back, but in the center, now I've pulled it out.
So now that's done. What we can do now is pull
this down to where I want it, and then I can press
Shift D and pull it up to where I want
it. And there you go. Now the thing is on these, you do want to make these
a little bit longer, and these ones have that spike they're always longer
so you can see it's a rectangle because
that then gives it that kind of creepy look that
we're actually going for. So something like this
is looking very nice. Now, the other thing is because we are going with this
kind of creepy look, if you have kind of
one on their own, I tend to come in and just make these a little bit uneven. Like so, so I'll come
in with this one, make it a little bit uneven to start with because
that then is going to make it a little bit easier for me when I actually come
to do the other part. Now, the other thing
is, of course, I do want these to be
a little bit thinner. So if we come back
to our solidify, open that up, we can actually
drop this back down. So we're going to drop that
back down a little bit. We're going to copy
that Control C, come down to this one, open it up, and then
just press Control V, and then we get them
exactly the same. And the other thing
is, do we want to make them a little bit
thinner? I think so. So we'll come back to
our curve this time, drop the extrusion down, and then we can make them
a little bit thinner. And again, copy that. And then come to this
one, same thing again, control V, and there we go. Now we've got our actual gate. Now, I don't want to
lose either of these. So what I'm going to do is I'm going to make a copy of these. So first of all, I'm
going to grab all of this and I'm going
to put it to the side. So shift D, put it to the side because that
then is going to give me the kind of springboard
to actually make the gate that we're
going to make without having to
start all over again. Okay, so now we've done this. What we need to do now is
create the look of our gait that we can have going forward
in the rest of this bill. So what I'm going to
do is First of all, I'm going to grab both of these. I'm going to go to object, and I'm going to go to convert, so convert to mesh, like so, and this is what you will be left with something like this. Lots and lots of
vertices going along, and that's actually okay. I don't mind that. You can, if you don't want
as many vertices, just come in before converting. So this should be. I'm hoping I didn't actually
convert that one, so it's good that I
went back and come into these and turn this down
to something like eight. Do the same on this
one, turn it down something like eight,
same on this one. And then grab all of them, and then object and convert.
So convert to mesh. Now you'll see when
you go in, you've got less erz or less edges
going across there. Alright, cool. Now what
I want to do then is create the tops on
here. Now, the thing is We've converted these, and
we've used an array on here. And the thing is with the
curve. You can't just, like, apply one modifier, so we
had to do it this way. But what we want
to do now is bring in one of these and
then kind of move it over to these ones here
once we put this top on and the bottom because we don't want to do that
for every single one. Makes life hard work, and we don't want to make hard
work for ourselves. So what we're going to do
is grab the top of here. So the top of you, I'm
going to press one then. And then what I'm going
to do is press E, enter, S, pull it out, like so. Sometimes when
you're doing this, it's actually easier
to work in it frame because you can
actually see what you're doing a little bit more, and then I'm going
to press E. And then what I'm going to
do is press the IBarn, so go in and then I'm
going to press one again, I'm going to press E and pull it up to where
I actually want it. And then finally, I'm going
to bring in some edge loops, control art, bring in some
edge loops, five, left click, right, click, grab my top, and hopefully I can come in now and bring this in like so. So if I press the
Sbn, pull it down. Bring it in, like so. Now, let's try the shot,
see if that's better. So bring the S born. Let's try inversu. There we go. That's the one I want, like so. You know what? I'm not
happy with any of those. So what I'm going to do is I'm just going to bring it in to where the point is and
then going to come in. And because I haven't got to
do this on every single one, I might as well spend a little bit of time
on getting this right. So I'm going to have it kind of coming up to here and then
Stein's come in here. So S. And then S and then S, getting it to where I want it, and then S, you could end up
with something like this. Also looks good, so bring it in. S. And then finally
this top one, we will have to press
the little dot on, and we will have to grab
that face, press one, come back a little
bit, press the S. And bring it in like that. Okay, so let's have a look what that looks like
in object mode. We may have gone a
little bit too thin, and I think we've probably gone a little
bit too thin there, even starting from
the beginning. So if that happens,
you know what? Start again. Alt Shift click, S, pull this out to where I
actually want it to start. I want this part here
to be zeroed out. So Alt Shift click, S said, zero, just zero out, so we're good to start with. And now we'll just go in
again and work on this. So now if I press one, I'm
going to pull this out. I want a slight
curve. So Al Shiv, click, S, bring it out. Oh Shiv, click, S, bring it out. Al Shiv, click, S.
Bring it out to there. And now I think that's
looking much, much better. Now, the one thing I can
see if a shade smooth, shade or smooth, sorry, is that I want them to
be a little bit spiky. At the moment, they're
not very spiky. So all I'm going to do to
actually do that is I will come in to this part
here, Al Shift click. Let's press Control
plus going all the way down to just under here, and then I'll press EssensE
pull that up like so. And if I go in now you
can see they're a lot lot higher than this, and
I can pull them down. But before I pull them down, let's actually
dissolve this edge. So delete, dissolve edges just
so they don't cross over. Alt Shift click, right
click, Marcosin. Coming in, grab it with
your face. Like so. And then what I want to do
is press one and just pull it down into the place that
I want it. And there we go. That is looking much,
much better now. I'm very happy with that.
Now, we did run over a little bit on Time guys.
So, I am sorry about that. It was a bit of a long one. But on the next one then, we should get these finished off in the way
that we want them, and you'll see exactly
why we spent all of that work doing exactly this. Alright, everyone. I hope you enjoyed that, and I'll
see you in the next one. Thanks a lot. Bye bye.
69. Creating a Broken Fence with Boolean Damage: Welcome back, everyone to the
Haunted Street environment, Blender to Unreal, and this
is where we left it off. Okay, so now let's come in
and do this botm section, which is much, much simpler. All we need to do is
grab this bomb part. We're gonna press E
to Alterns and just pull it out into making sure it's not
going over the wall, of course, something like this. Now, it's up to you
whether you want to have a slight slight you know, um, gradient on there. So let's come in, go to
wireframe, grab the bottom here, Alshif clip like so, put it back onto object, and then just pull
it out, making that slide gradient like so. And yeah, I think
that looks good. Now we're on to this bit here. Now, what we want to do on this bit here is, first of all, if these lineup, which
mine do near enough, you can see the lineup
really, really well. That's really great because
that means I can use this then to create this
block that I want to create. So I'm going to do
that. Just make sure if yours don't line up, Alt Shift click, and
make sure one's above, one's below, like so. We don't need this
center one in, so we're going to go
Alt Shift, click, Alt Shift, click, and
we're going to press delete and dissolve edges. Another reason we want
to dissolve that edge is because when we come
to actually bend these, if you've got an edge in
there, it's going to bend this kind of cube, we
don't actually want that. Now we're going to
do is just come in, Alt Shift click, going all the way around, Alt Shift click. Let's actually do
that Alt Shift click. There we go. And
Alt Shift click. And then we're going
to press Eat enter Altns and just pop those out, like so. And there we go. We can see we're really,
really getting somewhere. Now, at this stage, we want have probably these a
little bit slanted, just to make sure
they look a little bit more rounded than what
they are at the moment, they look a little bit blocky. And if we want to do
that, all we need to do is Alt Shift click, going all the way around
here, Al shift click, going all the way around here. Now, we're facing a
bit of conundrum here. If we want to do them
both at the same time, it's going to make it a little bit harder because
whether you're using medium point or individual origins, it's
going to make it harder. So I tend to do
with this is I'll press S and Z and
do the first one. So like that. And then
what I'll do is I'll go to the z and I'll
copy this like so. So this is resize
copy and then what we'll do is Alt Shift click
and then Alt Shift click, making sure we've
got those, and then EnsEd just pull it as
far as you want to. It doesn't really
matter, because all you're going to do is
go back into here, press Control V, and then these
will be exactly the same. Alright, so far so good. Now, the time has come when we don't actually
want all of these. So what I'm going to do is
just press L on each of these. Like so, press delete. And you know what? I'm
just going to press P, P selection. Don't
delete them, guys. And the reason is, I'm going to come
back to this one now. And what I'm going to
do is using a modifier. Of course, we're going
to use the legacy array. We know already it's on the z, so we'll turn the X down, and then we'll put it over here, lining it up near
enough where it was, and then just keep creating. Once you get to the
end, then it will be a little bit so all you need to do is just come in and increase that with
holding the Shift bun, because that's going to make
it a little bit easier and try and get it perfectly
where the other one was. From there, then you can
hide this out of the way and delete these ones,
and there we go. We're ready to rock and roll. Alright, so that's looking really good. We
did that bit then. Really, really nicely.
And then from here then we need to now randomize
and things like this. Now, it might be a better
off a better idea, sorry, waiting until we've got the gates in and then do
all of the randomizing. Or you can do it
here if you want to. I think on this one, actually, probably better off
because the gates are a little bit more
complex in that we, in that we probably do
it first beforehand. So let's come in, and what
we'll do is we'll apply array. And then the next thing
that I like to do this, I know this seems like a
lot of messing around, but honestly, it just makes so much difference if
you're doing this. What I like to do
next is just come in then and just move
these a little bit, make them a little tiny
bit, then out of way. So if I come in, let's say
to this one, press one, and just press the G
button, bring it out, and you can see
it's moving this, just this down. I
don't want that. What I want to do is make
sure it's connected, like so. And then if I press G, and I'm very careful, you know what? These aren't joined together. So let's join them all together. We need to make sure that array has been put
on which it has. So let's join all
of this together. Control J, right click
Share do to Smoove, and then we're back
to where we had it. There we go. And then what
we're going to do now, we'll grab just this, actually. Just these two, press one and then press G, and
now everything. I turn that off. Should.
Yay, move together, like so. Now what I'm gonna do is
I'm just going to use this. Like so, and then we're
going to come to this one, like so and this one, like so and then this one
like so, and there we go, and we can also come in and just move these
out a little bit, making it a little bit uneven, like so, and we'll do the
same on this one, as well. Like so and you can see,
it's very small movements, guys, very, very small.
We don't need a lot. You can see that it's come
out a little bit bent, and we'll also pull
this one over here. We'll also pull
this one over here. We'll pull this one
back a little bit. So we've got it on all of the angles that we
warm and there we go. Alright. Now what we want
to do then is randomize. So if I come in, what I want to be careful of here
is if I'm randomizing, do I randomize just the edges? We can go in, and sometimes
the select bond does work. It's not great, guys, honestly. So what I'll do is I'll see if we can actually
select so you can see, select face angle. Let's put it on edge. So I'm looking at sharp
edges. There we go. And you can see
now we've selected pretty much all of the
sharp edges on here. So this time it's actually
worked out pretty well. Doesn't always work out, though. So then what we can do is we
can come to mesh, transform. And then we can go to randomize. And then what I'm
going to do is turn this all the way down
to Npoint note one, like so, and we should end
up with something like that, which is looking pretty nice. Now, I do think that we've gone slightly slightly
overboard on that. So what I'm going to do is
just press Controls head. Go back to how it was,
where they're all nice and straight,
transform randomize, and we'll put it on not point
naught five, not point, note five, Nopointnn five. Like so. And now we've got a slight slight deviation on these without it
going too crazy. And I think that is
just about right. Now, I'm just
checking my reference just to make sure I've
covered everything. And, yeah, I think I have. The one thing that we
haven't done is the bevel, so I'm going to still
keep these separate. I'm going to bring in a bevel now, so I'll bring in a bevel. I can see what it looks like. And I'm going to put it
on Not point not three. Like so. And then we go, Oh bevels on there,
everything's on there. Double tap the eye. And,
yeah, that's looking good. Now, let's do the
same thing. This has also got the bevel
on, which is great. That means because they've
got the same bevel, we enjoy them together,
not have any problems. Okay, so now we're going to
move on to the next part, which will be
breaking the fence. So what I'm going to
do is grab these two, press Shift D. And what I want to do then is just
move them over here, like so, and I'm going to
break this part here first. So I want to break
this part here. Now, when we're
breaking something, sometimes the easiest
way to do it is, first of all, to decide how
you're going to break it. So what I tend to do on something a little
bit more complex is, I'll press Shift desk, first
of all, curse to selected. Shift aid, let's
bring in a plane. Let's spin the plane
round, so RX 90. And let's decide if I
pull this in front, so press one, pull it in front. We want it to look I know
it's still stylized, but we still want a little
bit of realism to our brake. So what I'm going to
do then is put it on wireframe and I can see
perfectly in there, and I'm going to move this to the side just to the
side of this wall. And then what I'm going to do is decide where I want it break. I'm going to press tab.
Okay, to bring him a knife, and I'm going to break
it from, let's say here. Let's have it
sloping up, like so. And then we want it to
be kind of realistic. So generally when
you get a break, you might end up with, you know, this part coming straight up just at the top and
then breaking again. So if I do that,
so if I break it, I could even go inwards. I think I'll go
this way, actually, and break it here, like so. Just above there. And then what I'll do
is bring it to there. Doesn't matter
about the angle or anything, press the enter bot. And then what you want to do is take the top bit,
so the top bit. Now, when I first started
out, guys, honestly, trying to find the face in
here was always bamboozle me. You know, but you can see, there is a little face in there, and I think there's a
little face in there never we expect them.
So just remember that. So all I'm going to do is I'm
going to come to this one. I'm going to delete
it out the way, so delete and faces don't delete it by vertical
or you'll lose this part. And then all you're
going to do is just make sure this parts in front of it, press the E borne, pull
it all the way back. And we should end up
if we put this on, we should end up with
something like this. Let's press A, shift N, spin it round just to make
sure it's the right way. Let's hide these
rails out of the way, so we're going to hide
them out of the way. And then what we're going to
do is simply use boolium. So I'm going to come in, I'm going to reset all
my transforms. Like, so I'm going to
resell my transforms on here just to make sure they
don't mess anything up, and then I'm going
to grab this one, this one, press Control minus. And hopefully, it's not
worked to the moment. So what I'm going to do is
put intersect or union. And, you know, generally,
when this happens, let's put it on difference,
but let's go to float. And there you go. You'll
see it actually works. So when I first did this, I was like, Oh, this is
never going to work. I'm going to have to
do it the harder way. Just change that over and
then it'll work for you. Now, let's apply the boolean. So control layer,
apply the boolean. So you'll see now we've got one still there and one
actually broken. And from here, let's delete this actual boolean
prayer saltage, and this is what we
should be left with. Now what we need to do he's
make this look realistic. So how do we make
it look realistic? First of all, let's
come to this part. I'm going to grab
this one, this one, this one, these tops. So make sure we grab these tops, and I'm going to press Delete and delete them out of the way, and now we're going to left
with something like this. Now, because it's
broken like that, let's break it here.
So we'll come in. And what we'll do
is we'll add in a edge loo, let's say here, Alt Shift click, and then
we'll also break it here, Alshif click, right
click and marksme. Then we'll come in
with face select, press L and L and just delete, and we'll delete
faces on this one. Okay, so we're left with these. And now we need to do is just
fill in these holes salt. Shift, click, press the F
button, and then, oh, shift, click, press the F button, and you should be left
with something like that. Looking not cool already. Now, the other thing is maybe
maybe I also should break, you know, part of this off down to here or
something like this. And you know what I think will. So what I'm going to do is I'm going to leave,
I'm the other one. I left three in. But I think on this one, I'm
just going to leave two in, so I'll just break
it round about here. So I'll shift click, right
click Mccine, face select, L and L, and delete, and and let's delete faces. There we go. Let's then come into this part
and fill it in. So fill this face in, like so, and we'll also rotate it
without portion leading on, we'll rotate it on the Y, like so, and there we go. Now, because it's
been broken off, this piece of mel here will
definitely have sag down. So I have a press
Alt Shift click, proportioned tin back on. Let's pull it down a little bit, like so, and let's also
pull this one down. I feel like with this one, it's way too long now.
So you know what? I'm just going to press Control plus going all the way down to this part here, press delete and faces. And then what I'll do
is I'll fill this in now with F. And then what I'll do is
I'll pull it down very, very slightly probably without a portion editing on,
so let's pull it down, and let's come in and pull
this one down a little bit, and let's come in and pull
this one down for Tad, like so. And here we go. Now you can see that's
looking, pretty realistic. Is this one out
too far, probably. So let's come in,
right click and mark a seam and let's come in, grab this part and this part, press delete and face and let's fill this part in
with F. And there you go. You should be left
with something like that. That's looking
pretty nice. I'm happy with that.
And there we go. We can move it over here. We can save out our work. And then what we're going
to do on the next one is, I think we will start with I think we'll start
with the post next because the actual gate
is much, much harder. So we'll start with the post. We've got all these parts
already, so we're doing well. So we'll start with, we'll
start with the post next, and then we'll break the post, and then we'll start
actually on that gate. Alright, everyone. I
hope you enjoyed that. I'll see you on the next
one. Thanks a lot. Bye bye.
70. Modeling a Detailed Stone Pillar with Tapered Blocks: Welcome back, everyone
to the Haunted Street environment,
Blender to Unreal. And this is where
we left it off. Okay, so what we're
gonna do now is, again, shifts, cursor to world origin. Shift A, let's bring in a cube. Let's pull it over to this side. And the first thing we'll do is, as we've always done
now, get our dimensions. So dimensions no
0.664 and not 0.664, and the height will be 2.57. Okay, something like
this, let's press one. Let's put it up into place. And you'll see now I picked those dimensions is
because of this. Now, when we're doing this, it's important to make sure that these parts here are going to be going into this part
here, as you can see. So what I tend to
do on this one is I'll make an edge loop on
here because it'll give me, near enough perfect dimensions of where these actual railing
pots are going to go into. So what I'll do is I'll come in, press Control R and bring it
up to something like that. I can't mess around
with this, but I'll get this laid out to
where I actually want it, and then I'll do
this bottom part, and it definitely
wants to come up to something around
here, let's say. We can get away with having, you know, this part out
and then this part in. Then what I'll do is
I'll come in now, and I want to make this smaller. So I want to make this part, you know, a little bit smaller. So what I'll do is to
make it easy for myself, I'm just going to delete
these faces out of the way. Then I'll fill in these parts. So oh, shift,
click, press the F, and then oh shift, click, press the F because
these two parts are actually the
same at the moment. Then what I'm going to do
is, I'm just going to resell my transforms and then going to come in with face select
and grab this face, making sure I've
grabbed this face, press the IB and this is the easiest way I think
of joining these up. And now you can right
click. And what you want to do is bridge faces. And there you go. Now you've got an idea of how this
is going to look. I also think now this part here is going to be way
chunkier than this part, but it leaves me
room now to start creating with this part, and
that's why I've done that. So what I'm going to do now,
these are still split off, so you can see if I grab this, no, they're not.
They're not split off. So what I want to
do is split them off with the Y button,
and there we go, now I can actually
make this a little bit thinner because it's still a
little bit on the fat side, like so, and that's kind
of the dimensions I want. And the other thing is, it's
probably at the moment, looking a little not
quite tall enough, so I'm going to grab this part. And I'm thinking that, you know, what we'll do is we'll create
this now in blocks and then we can actually
make them toll it if we need to and same as
the top part as well. So what I'm going to do
is I'm going to press Control, come to the top part, like so, and then now I can
actually right click Markasm. Okay, so far so good. This top part, I can see now is nowhere near the scale
that I actually want it. So what I'm going to
do is press L on this, and then I'm going to press
Y just to split it off. And then what I'm going to do is fill it in, first of all. So if I come in now,
fill in that face, F, if I come in and
hide this part now, so hide with H, I'll fill in this
face as well with F. Now I'll press AltH so ltH. Bring back the other
part. And now I should be able to come in with
just L, and there we go. Now I'm going to press delete
and limit to dissolve. And the reason I'm
going to do that is because it'll get rid of that
part that I've got there. I really don't want that. Finally, then, let's
bring this in. I don't want to shrink
it down too much, so I'm just going
to press Alness grabbing all of those out there. Like so. And now
this looks much, much better in terms of size. Now, let's do the same
thing with the top part. So Alchifplq, press
the F button. And then Shiv click going
around these sides, press Ales, and let's bring it up to
where we actually want it, which will be
something like this. And now you can see already this is really starting to
come together nicely. Now, let's come in
now, press Control. Bring in five edge
loops, like so. And again, now we need
to bring this in. So again, you get to experiment. Did it actually bring in
one, two, three, four, five? Yes, I did. So now
let's bring it in. So I'm going to bring it
into something like here, and then going to work
my way down again. And you will get good
at this guys I promise. So live click, bring it
in to where I want it. I can see I've got a big, big, drastic difference there. So I'm just going to
work my way down, first of all, to
where I want this. So I want it from the
bomb going up like this. So this one probably has to
come in a little bit more. Then this one, a little bit
more, and then this one, a little bit more, like so, and then the final
top one, let's go in, just grab the top,
press one again, press the S button. And there we go. Right
click Shade Auto Smooth. And yeah, that's
something I wanted. Now, the one thing I did
want is at the moment, this is too thick, I think, and this is not tall enough, and we want to keep the same
kind of height on here. So what I'm going to do is I'm going to press Alt Shift
click on this one, press S ands, squishy
down a little bit, which then gives me a bit
of room to pull this down, which then gives
me a little bit of room to kind of stretch,
you know, this part out. Now, it's up to you
how you want to do it. I can come in and pull
this down like so, and then come in and
pull it down like so. And if I do it that
way, it means they have a little bit more
control of how I actually want this to look.
So I'm going to pull it down. And there we go, now it's looking for me, at
least, about right. Hopefully, you've
got the same thing. Now, we're not going
to mess around with this yet, because this, to me, looks a little bit
on the short side. So I'm going to see what I
can get away with down here. So let's come in, first of all. And let's I think
on this bit now, we should start from the
bottom and work our way up, and I think that's
going to be way way easier than trying to, you know, insert extrude in
and all that sort of thing. So what I'm going to do
is just grab the top, press F, press L on
the whole thing. Press delete and
limited dissolve. That then gives us a fresh
block to actually work with. And then we can come
to the top of here, press one, and then we can put it exactly where we
actually want it. So something like there is
where we want it to start out. Let's press the S
but just to bring it in just very slightly, like so. And then we're going to put some blocks on the top of here, so I'm going to press
the IB, bring it in. Now, where do I
want these blocks to come probably to
the bottom of here. So I'm going to press
E to pull them out. Now, at this stage, you can see that we probably
with the blocks, going to have to move it all
to the side a little bit, and hopefully we'll
get away with that. Or we make it a little
bit chunkier on the bone. But I think for us, I
think this is going to be the best way of doing this,
so we'll do it like that. And then what we'll
do is now we want another block on top of here. So I'm going to press one,
I'm going to press E, and I'm going to go up to
round about this part on here. And then what I'm going
to do is press Control R. Left click, right click. And then I'm going
to press S and just pull that out
slight bit like so. Now, of course, I
want these blocks to be a little bit underneath this. So what I'm going
to do is come in, press Control plus Control plus, down to that second
type part, press E, then enter alters, and pull
these out a little bit. Now, make sure that
they come out even. Now, I can see because I
pulled them out a little bit. That this now, so this under
here, is not quite level. So what I'm going to do is
Alt Shift click SS zero, level them out. There we go. Now, let's make sure while
the top part is even, let's make sure we're
happy with that. And yes, I think I am. And now we're on to
this block here. Now, the blocks on the bottom and this part here
need to be the same. So what I'm going to
do is Alt Shift click, I'm going to press Shift D, and I'm going to
bring them up and put them into place here, what I'm going to do is make
them a little bit thinner. This also here, I think is a little bit
on the thick side, and the way that we've done
it gives us a lot of options. If we come in now and we press Alt Shift click
on this, press Y. We should now have it all split, which means if I grab this now, I can simply press this and z, and it gives me a lot
more options, as you see. So now I can do is
I can pull it up slightly to where I
actually want it, and then I can grab
these bricks here. So I'll shift click because
they're going to be bricks and pull them
into place like so. Alright, now let's pull
this one down a little bit, like so, and then we want
the top part on here. And the other thing
is I'm thinking that maybe the top part
on here so maybe, maybe we can pull
all of this down and then put the top part on here
once we've actually got it. Now, because we split them all in different
sections, as you can see, we then can work on
these independently and get exactly the look that we're going for,
which is what we want. But first of all,
one step at a time. Let's actually grab
this one here. So all I'm going to
do is adding a face. And then what I'm
going to do then is grab the top part here. I'm going to press Shift
D just to duplicate it, press the S button
just to pull it out, like so, and then what I'm going to do is press E, pull it up. Like so, and then we're going
to press E, pull it up, and then press the S pan into place like so,
and there we go. That is exactly what
we're looking for, but I think that this part here, if I grab it, should be more or less into or right at the
top of this part here. I think that looks just
a whole lot there, which means then and we need to line these up a little bit
better than what they are. So if I come in and I line this up down here, and I come in, grab my bricks and line
them up more like that, I think, then that's
looking much, much better. But I want a difference in the scale of these
bricks to these bricks, which means that I just come in, grab my bomb bricks, pull them down a little bit, grab this part then
Al shift click, pull that down a little bit. And there we go, I think that
looks much, much better. We've got a little
bit more height on this if we pull it down. So all shift, click.
Let's pull it down into place. Like so. Alright, and I think
now we're ready to go with these parts. I'm just wondering if I
want to stretch this out a little bit more before we end. So let me just have a look. If I pull this up to there, and then I pull this part
up to there, you know what? I think that looks a bit better than probably
the original. It looks looks a
little bit taller, so I think I'm going
to go with that. Alright, let's save our w, and I'll see you on
the next and everyone. Thanks a lot. Bye bye.
71. Bevel Modifier, Randomize Transform and Stone Details: Welcome back, everyone to the
Haunted Street environment, blend the two Unreal. This is where we left it
off. So now what we want to do is come in and make sure
we're happy with everything. First of all, I
think this needs to be maybe a little bit wider. So again, because we've done it the
way that we're doing it, Alt Shift, click,
Alt Shift, click, Alter Ns, and we can
actually make that a little bit wider if we want
to. And there we go. Now, we can see that
because I did that, again, we've got a problem with this. You know
what I'm gonna do? I'm going to make it
a little bit thinner because I think it's
a little bit too fat, like so, and then I
want to zero out these. And the reason this is
happening, by the way, is because we've left this in. I don't think I think if I hide this out
the way, actually, yeah, I've got a hole
in there, and that's why it's causing me
so many problems. So what I'm going to do is,
first of all, zero out this. I'm going to clean up
the mesh, basically. I want to delete faces, like so, and then
all I'm going to do is fill that in
now, so E fill it in. Let's make sure this top part is already done as well,
which I think it is. Okay. Let's also fill
this in while we're here, just to make sure it's a normal mesh, Alt
Shift and click, delete and faces,
and then edge leg, Alt Shift click, and
then F, like so. All right, so now all of this, if I hide this out the way, all of this now should
be same as this. L, H, hide that out of
the way, one block. So you can see I've not godly
any edge loops on there. That is exactly what I want. Now, what I want to do
now is, first of all, work on these parts here, so make them, you know, a little bit uneven and
things like that. So let's work on just these. And all I'm going to
do, first of all, is press Control A or transforms
set origin to geometry. I'm also going to
bring in a bevel, so let's bring in a bevel. Let's set it to not point
not not three, like so. And what we'll also
do now is come to these ones, and
we'll go to mesh, and we're going to
go to transform and just randomize them, and we'll set this
all the way down. I shouldn't interact much. What we already have.
And then we go, now they're a little bit uneven, right click, shade
or too smooth. Now, we have got an
issue with this part, as you can see here, but a simple actual sharp
should fix that. So Alt Shift click, right
click and Mark Shop. Let's try it on
the top, as well. Hopefully, we can
get away with that. Right click and mark a
sharp and there we go. Now, let's do the
same for these, so Alt Shift click. And if you can't
goal Shift click, you're just going to have
to go all the way around, I'm afraid, same
as on the bottom. Like so, right
click, Mark a Shop. Let's do the same on
this one, as well, going all the way around, grabbing that one on the inside, same again on the bottom. Right click and marker Shop. Now, the top part looks actually
good without doing that. This part we need
to still work on. We've just worked on these parts at the moment, so
they're all done. Now, let's do the top part now. So ltH, bring back everything, and let's isolate this out. So I'm going to press L ShiftH to hide everything
else out of the way. And then I should be able to
just come to this top part. And again, on these parts, you want to be very, very
slight, what we're doing here. So mesh, transform, randomize, turn it all the way down
to note point, note one. Maybe even that's a little
bit too much for this one. So no, point, knot
five, turn it down. And there we go. Let's
add in our shop. So right click and marker
shop and let's press OTH, bring back everything, press
the tab on, and there we go. Now, before moving
on to our bricks, let's actually create this
part on here that we want, so we want one on the
front and one on the back. So what I'm going to do
is I'm going to come in. I'm going to grab this face. So just this face, press shift, bring it out a
little bit, like so. And what I'm going
to do then is, first of all, make it
a little bit smaller. And then I'm going to
make it smaller on the X. And then what I'm going
to do now is come in and grab these edges or vertices, press Control Shift and B, and bring it in,
increase the number. And then what I'm going
to do is come over to here and increase the profile. So let's increase it in, like so, and there we go. And then all we need
to do is press E, pull it out a little
bit, like so, press L. Shift in spin it round and put them
in place, like so. And then from there, I need
to put it on the back. So for this, I'll just press
P, just to separate it off. I'll come to grab
this part here, and then all I'm
going to do then is just grab this part around here. So shift click Shift
desk selected, come back to this part now so
you can see just this part, right clicks at origin,
three D cursor. Adding a modifier,
and we're just going to bring in a quick mirror, mirror on the Y, take off the X, and there we go, now
they're exactly the same. Now, at this point, just
make sure that you're happy. Without four, this is in, so you can see if I shrink
this down on the Y, like so, pull it
back a little bit. We'll, of course, go on that one because we
have that mirror on. Now, let's come over,
press Control A, and finally, then we can join all this together
with Control J. And there we go. That's what
we're left with so far. Now we've not done yet
because we still want to make sure that these two
blocks are stone. And I think it adds a
little bit more to it. So what we're going
to do is we're going to come into these parts, press Shift H, and there we go. You can
see they're not filled. Great time to see, though,
when we go to clean up, fill holes, how easy it is to
fill in those holes for us. And now let's make
our stone brick. So I'm going to press
Control on the top one. Gonna move it
slightly to the side. Control on this one,
move it slightly to the side like so,
and then control on. This one, move it the other way, just so they're not
lining up or anything. And I think on this, it's up to you
whether you have four blocks or whether you have, you know, two blocks. I think on this one, I'll have two, on this
one, I'll have four. I think it gives a
bit of variation. And now I'll do his
that, click, hf, click. Right click, and we're
going to mark in a seam. And I'm hoping now if
I split these off, so if I come in with face left, grab this face and this face, press Y and and
then grab this one, Y and and then finally, grab this one, y and AlternH,
bring back everything. Now we should have all
these bricks split off. So what I'm going
to do is, again, just come in, select them all. Like so, shift H to hide
everything else out of the way. And what I'm really
hoping is here now is when I come in
and fill the holes, we should see the Bevel
mark go down there. So if we come to mesh, we go to cleanup and
we go to fill holes. Now it's not going to
happen on its own, because the gap
here is quite high. So if I start turning this up, now you can see that we have those blocks all created for us. Now finally, what we want to
do is now grab all of these, go to mesh, transform, randomize, and then
what we're going to do is turn this
all the way down, maybe even lower than that. So note point, not note five. Let's press the tab but,
and there you go, guys. Simple as that to do
something like this. Alright, finally,
then, Control A or transforms their
origin to geometry. And that to me, looks
done. Looks really good. So now if I pull
this to the side, pull this one to the side, and there we go, we've got
those two parts now in there. Now the next part is going to be a little bit harder
because the next part is, of course, the actual gate. Now, before we get carried away, the first thing we
want to do is create the posts where the actual
gates going to come into. So what I'm going
to do is just drag these all of these, pull
them over to the side. I'm going to make sure
save out my work. I really don't want to lose all that work
that I did there, and let's pull them to
the side over here. Now, you can see that, although this has took quite a long time, it's still been relatively fast. I mean, you can actually create all of this within an hour. I mean, I'm actually
showing you how to do it. If I was doing on my own,
you can literally get it down to an hour to create the gate and everything else. So not that actual long
to create things like this and then create
a world from this. Alright, so let's come
back to this part here. And what we're going to do is we'll create the dimensions now. So first of all, though, let me just
resell the transforms. So set origin, geometry. Let's come up then we'll
put this on not 0.711. We'll put this on not 0.466, and we'll put this on 2.84. And the thing is, it
needs to be quite tall, taller than this one, even because it is a gate, so it's like kind of the
opening of the structure. So generally, you'll find
they're taller, not smaller. And then what we'll
do is we'll pull this up into the place
that I need to go. Now, because this part here is, you know, it's quite
complex to build. It's easier, actually,
just to bring in a cube and make a star on the bottom and
work your way up, that will be the easiest way. You might also be asking why
we're building this first. And the thing is,
once we've got this, we can have hinges of where the actual
gates going to go in. Also, when we want to let
me show you line this up. So if I use, I think this
is my grease pencil, when we come in and we want our gate to kind
of slope up here, we have a good reference point if we build this
part here first. If we just go and
build the gate first, we have to then work out, is it too tall here? Is it too small here
and all that stuff. We can also then line up
these parts here as well. So where are they
going to line up? Well, when we've
got this post here, not only does it gives us from here to here,
we can work with. So from here to here, it also
gives us though the height we can work with
because we don't want our gate to finish up here, nor do we want our gate
to finish down here. So that's something to take into account when we
build in our gate. Alright, so now we've done that. We'll save our work once
more, and on the next one, then we'll start with
this main stone post. Alright, everyone, so I
hope you enjoyed that. I'll see you in the next
one. Thanks a lot. Bye bye.
72. Designing a Gate Post with Lamp Recess and Hinge: Welcome back, everyone to the
haunted tree environment, blend it to Unreel. This is where we left it off. Okay, so now we're going
to do is use this. So first of all,
let's press Shift D to start to cree or post. So first of all, I'm
going to come down. So you can see, it's
quite thin on there, and that's exactly what we want for this gate to come into it. Now what I'm going to
do is I'm going to pull this down then to
where I actually want it. And then what we want to
do is just make sure that this starting block
is the right scale. At the moment it looks a little bit on the
thick side there, so we'll bring it down to
something like this. All right. So with this one, I don't
want too many bricks on here. I maybe want a couple,
but that's about it. So actually, sorry,
can't get my words out. T should be a little bit
easier because it means we can just go inwards
with the insert. Now, before doing
that, of course, you can see it didn't
work properly, so let's resell
those transforms. Then what we'll
do is we'll press the ebone and now
it'll go in perfectly, and then what we'll
do is we'll bring it up. To something like this. And again, you know,
wherever you put it, you can always go
in and change it because you're going
to have a lot of edge loops to actually do that. I've already showed
you how to do, you know, that part as well. And then what we're going
to do now is go in again, a slight bit, though, this time. So going in again,
bringing it up, like so, and then we're going
to go Enter S, bring it out, and
then E, pull it up. Like, so and these
are going to be those stone bricks
that I talked about, and now we're onto this
kind of pillar here. So let's do that bit now. And the thing is, at the moment, I really feel like, you know, it's time to make it
a little bit thicker. I really feel like we're dealing here on the kind of thin scale. So what I'm going to do is
just grab the whole thing, press S and Y, and just make it a little bit thicker
before I go anywhere else. That then is going to give me a little bit more leeway
to do what I want to do. Press Control A or transform
set origins geometry. So even though he is a little
bit thicker than this, I think it's going to
look a little bit better. What I'm going to do now
is bring this part in. Now when I bring this part in, I want to bring it in
very slightly on here, but more on the X. S and X to bring it in. Now let's press one
and see where we are. Now let's think how far
this needs to come up. If I press E, let's
bring it up to start with to something like this because we actually are
going to need a top on here. Then what we're going to
do is press E, enter S, pull it out, like so, and then E, pull it up just to have that
little base where it's on. And now we need to
think about this base that's on the inside. So what I'm going to do
is I'm going to press I, bring it in, and then
I'm going to press E, bring it up, like so. And I want this bit
in actualality, to be a little bit tall. So this bit here is going
to be a little bit tall, and then we're going to have
the base in it because in here is going to be
one of our lights. We want to put our
light in there, we want it to fit nice
and snugly in here. If we come in before
we do that and just press the question mark just to bring
everything back. And bring our guy over. You can see now this is the scale
that we're looking at. If we also come in and
bring out our lights, I'm going to press Shift
again and never just move it, press one, and then come
and put our light in there, you can see this is the
room that I've got to play. Let's make it a
little bit smaller. And we'll use this then
to have a reference. Now I can see that if that
light's going in there, this needs to be
quite a bit taller. I can also see if my gait
is going to come down here, this bit here is probably
a little bit too thick, so I need to bring probably
a little bit down. So all I'm going to do is
shift click Control plus. I'm going to bring
this down to here, and then I'm going to
bring this down to here. And now this should fit on top of here, and we've
got, you know, a little bit of room to do
what we need to do on there, albeit maybe a
little bit too much, so I'm going to come back.
I'm going to press one. I'm going to bring
it down just a slight amount to
something like there. And then what I'm going to do is now I've got to think about, you know, kind of getting
this all in there. So what I'm going
to do, I'm going to hide my plane out of the way. I'm going to come
bring these parts. So we've put these all over here and they're kind of
getting in the way here. I'm going to put them
over here, like so. I think I moved
those the wrong way. So have a look. Did I
move them the wrong way? No, I didn't need
them altogether. That's the thing. Let's
put it over here, like so. Let's press seven
to go over the top. And then what I'm going to do
is just grab all of these. I'm going to move them
right over here just so they're not getting any way of the stuff that
I've already done. We can also put them in their own collection and then hide everything out
of the way that way. That might be a lot lot
easier to do it that way. But for now, I'm not
actually going to do that. Now, I've got something to work, so I'm going to leave
my little guy here, and what I'm going to do now,
I've got my lamp in there. I know that's about right, so I'm going to hide the other way, and I'm going to grab
this post, my little guy, press Shift H because it's very important that we get
this to be kind of, you know, the right size of where we actually want
everything to work. So having a gait, if we look at this now, this is
how we're measuring it. So if we come to annotation, if we have a hinge under here, and then we have a
hinge in about here. Is it going to look
right if our gate then is going to come
up to, you know, this kind of point here, and
then up to this point here, and then up to this point here, and then finally up
to this point here? Is that going to look
right? And to me, I actually think that's
going to look really good. You know, it's quite
a nice sized gate. It's actually going
to have, you know, a nice flow going up there. To something like this.
And this is then going to have a top on here as well. So let's put the top on there. I'll leave this on here. You will notice my
annotation keeps on there, which is really handy.
Let's put the top on. So I'm going to do is
press E, enter, S, pull it out, and
then I'm going to press E to pull up
that top bit then, and then I'm going
to press I, bring it in with insert, E, pull it up, and then S to pull it in, like so, and then spring
it down a little bit. And there we go. Now we can see this is how the
gates going to look. Am I happy with this? I'm looking where my gait is. It will have to come with
the hinge down here. The first post will
have to come up here, and I think that looks
right, apart from the fact, maybe, maybe this
is just a little bit too steep up this bit. So let's fix that.
So we'll come in, and what we'll do is we'll
grab just this part here, shift click, and
we'll pull this down. And then what we'll do is
we'll grab this part here. **** click press Control plus, and you should then be able
to pull all that bit down. I think if I put it
down a little bit more, that actually gives us a lot more room to actually work with. Alright, so that is
how we plan this out. Now, on my original, these parts here were
actually bricks. I don't actually like it, so I'm going to change
it a little bit. I'm not going to
have that. I'm just going to have them a
little bit uneven. Now, I would say that this
part here, though, definitely, because I actually
like it just sloping in a little bit like so, and I think that looks
way, way better. I would also say that
probably on this bit, if we come in,
press Control law, press Control B, drop it down, so it's just two
edge loops like so, and then press the S butt
and just pull those out. I actually think
that looks much, much better now, so
that's looking good. And the one thing I would
say though about this part maybe maybe I could get away with just
one instead of two. So you know what? I'll
just do it with one. I'll press the S but
and bring it out. Does that look better?
Yes, I think it does. The only thing is that I think that if I
come in, Alt Shift, click Alt Shift,
click Control plus, and Z, and just make it
a little bit thicker. I think now it looks
way way better. This hinge, then, will it still fit under there? That's
the key question. Now, I think on this one, we should start work
straightaway on this part because it will
dictate how our lamp is going to look in there
because I always pick a section to work off, and this section is like, this is what we want
to keep everything to, and that's how I work when I'm approaching
something like this. Because if not,
you can really get lost in the woods
really, really easily. So I'm picking this section. This is the one that we're
going to work on first, and then from there we
can build off of that. Alright, so now we've got that. What we want to do
now is, first of all, is we want to split this off, so it's going to be much
easier if we split this off. So Alt Shift click. Let's press the Y button. In fact, you know what?
We'll just press P, and we'll split it off that way. And then what I can
do is I can press Shift hide everything out. If I press lth now, it's going to bring
back everything. So what we want to do, you know, you've got the whole bridge
and everything like that. So we'll do it a little
bit of a different way. We'll press We'll go
over to all of these. We'll press the question mark. We'll come back to this part, press the little dot button. So this part here, and then what we'll do is press ShiftH. Now, if I press ltH, only that part will
come back because the other part is,
of course, isolated. Now, be careful, guys, because when I was starting out, we isolating and hiding, they meant the same thing to me. Sometimes I end up where I
just couldn't find anything. And there's no way over
here if you've isolated something to bring back these because they're
already there. So be very careful. You can't see what
you're looking for, press the little question mark, and guarantee it's
going to turn. Alright. Now we've got that. Let's come to this then,
shift age, hide everything. Now, this annotation,
I'm wondering, actually, if I can I hide it. Yes, I can. So we'll
hide that other way. So now you ain't
got to see that, which will make it
much, much easier. And now we need to do is
think about this part. Now, if we go here it is. So this is what it looks like. You can see it's quite
nice inside there. We need to actually create that. Probably better off creating this with a boolean,
to be honest. It's gonna be the
easiest way to do it. So what we'll do is now we'll save our work, and
on the next one, we'll get straight into
staring that boolean, and then we'll get this cut out, and then from there, we
can build off there. Alright, everyone. So I
hope you enjoyed that. I'll see you in the next
one. Thanks a lot. Bye bye.
73. Boolean Lamp Cutout and Clean Topology Workflow: Welcome back, everyone
to the Haunted Street environment,
blended to Unreal. This is where we left it off. Alright, so now let's come in then with our Boolean,
first of all. So what I'm going to
do is press Control A or transform set
origins, geometry, shifts and cust selected, Shift A, let's bring in a cube. Let's, of course,
make it smaller. Like so let's pull
it out a little bit, so SY and let's get this to
where we actually want to. So we know the top
of here you know, we need to leave quite
a bit of room on here. So what I'm going to do is
pull it down a little bit. I'm also going to pull it
all the way through here, so all the way through, and now I know exactly where
I've got to work with. And when I bring
this boolean in, it's going to leave this
much on each of the sides. Then what I'm going to
do now is I'm going to come to my bevel. So I'm going to
come to there now on this I want a slight edge loop actually
probably in the middle. So I'm not beveling all
the way to the center. That might be a bad idea. Let's see how it goes first.
We won't put that in. What we'll do now is press
Control B, bring it to here, and then bring in our bevel, bring in a few of the bevel
and then left click, like so. Now you might be wondering, this doesn't look like
the original and I know, but I'm going to show you exactly what else you
can do with your bevel. So here we are, we can
see our bevels here. Now, what we can do here is come in and we can go
to where it says. Let me just look.
Custom, this one here. Then what I can do is
I can pull these out and actually get the shape
of why I actually want. Now, don't ask me guys exactly how this
works because honestly, it still bamboozles me today
how this actually works. You can put in more
points like so. You can increase the
amount of them like so, and then you can get when you're playing around
with it a little bit, exactly what you're looking for. But honestly, trying to work with this, it ain't
the easiest thing. So don't worry you know, I'm doing this and
it looks amazing. Yeah, it's just most of the
time of what I actually want. You can see now I've got something that I
actually really like. Now, as well as that, maybe, maybe, maybe pull
these up a little bit. What we don't want is
anything too sharp. So we don't want
these too sharp. We just want them in a nice
and smooth way like this. Now, the moment I
turn this around, this is going to
disappear, of course. So now you can see that
is what we've got. Now, once I've done this, honestly, a lot of the time, I will come in and just grab the ones that I'm not
happy with you know, and just manually
smooth those off, like so, or being them
in or whatever you want. If you're going to
bring them in, I'll bring in some more edge loops. So control, left click, right, click, control, left
click, right, click. And then let's just grab
these two top ones. So I don't think this is Oh, he's just done it, you
know, with the bevel. No, I've actually
brought them in like so. So you can see here now. Is this something
that I'm looking for? Does it want to be
so sharp on there? Does it want to be
a bit more rounded? Let's see if you can round
it out a little bit. And now we're starting
to get something that I'm actually looking for. And I think apart
from this part here, so on this part here, definitely want to be more rounded
off, so control. And of course, we could mirror this as well, but, you know, I don't really want to
mirror it at this point, because I want to show
you that you can actually get away with it
without mirroring. So now I'm going to round these
bits off, as you can see. Let's grab this
one and this one. And let's round these parts off, like so, and now you can see they're rounded
off pretty nicely. Alright, that is the shape I'm going for. That is
what I'm happy with. And what I'm going to
do now, of course, is I need to make
this, first of all, always make a three D, you know, at the moment, it's just two
D. It's got no top, no bomb. So let's grab this. Fill in this pace, and
we'll fill in this pace. And the reason I do
that is, honestly, if you don't do that, it just causes problems
later down the line. So I'm going to press
Control A or transforms, right, clicks that
origins geometry. Same on this one just to make sure that it's
going to go right, and then I'm going
to grab this one, grab this one last, press
Control minus, and there we go. Now, let's see if that's
actually worked out for us. And yeah, that's
looking really nice. Now what I can do is I
can come into this part, first of all, apply my Boolean. Then I can come into this part. And what I'm going to
do, You know what? Before doing that, let's
just check something because at the moment, yeah, I think what we'll have to do is recreate just this plane when we've got it,
pull it out of there. The reason I want to do
that is at the moment, this hasn't got a lot
of geometry on it, and trying to do the
whole thing with geometry probably going
to make it harder. So let's just apply this. And then what we'll
do is we'll delete this cutter out of the way. So delete it out of the way. Come back now to
this, and then you'll see if I come in now and press A and right click on FaceLt and right click and
come down to trangulate faces, we end up with
something like this. It's a little bit
of a mess, guys. If I come down to
triangulate quads, you can see it does end
up a little bit better, but we have a lot of points
going into these corners, and I don't really like
to work like that. So what I'm going to do is
just press Control's g, just go back to where it was. And then going to take this. So Alt Shift and click
going all the way around, take the back part of it, and what I'm going
to do is press Y and H and hide it
out of the way. Then what I'm going
to do then is come to this top part first,
right click, subdivide. If I put it on there
to verte as you will see we've got one
right in the center. Let's subdivide again
and subdivide again. Now if I come to
the next part now, so come to this part
and do the same thing. So right, click, subdivide, that might not work.
I'll try one at a time. So let's just grab
this one right, click, subdivide, subdivide. So that's three, four. Do this one, right, click, subdivide one, two, three, four. Now, let's make sure
that we have the same. This one I've gone a
little bit too far on, as you can see. Let's see if we've
got the same now. Just press Control E to go back. And now that looks about right. Now, I'm not going
to bother with this one down here
because it's too small. But now when I come in, and put it on Face, right click and
triangulate faces. Right click, tries to quads. That looks much better. We've got those
points going in now. We've only got a few points
going into each one. This now is a better mesh. All right, so why did
I save this other bit? The reason I save
this other bit is because now I can come
just to my front, press seven to go over the top, and what I can do now is
press E and pull it back. Now, you will see it doesn't look like everything's
selected on there. Let me just pull this
out a little bit. And I'm wondering, Yeah, I'm going to pull
it. There we go. That's the problem
because for some reason, I didn't separate this off. So I'm going to just
delete those out the way. So delete and faces. And now I've got just this bit. I should be able
to work with it. I don't need this
anymore anyway, because I'm going to
pull it back two here. I'm going to go
seven over the top, and then all I'm going
to do is press E and pull it all the
way back like so. Then I'm going to press
Control plus a few times. I'm going to press Shift
N. And there we go, Let's press H, hide
the other way, grab this one, press delete
and vertices this time, press Altag and there we go, we should have
something like this. Right click, shade Auto smooth, and that is looking pretty nice. Now we can actually come down to the bottom as well
and sort those out. First of all, though,
let's press lth like this, and now we can see if I
bring this into here, where exactly is
it going to sit? You can see it's nearly
fitting in perfectly. So if I just make
it a little bit smaller, now it
should fit on there. Now, the other thing I need to do it's not forget
about this bomb bit. So I'm just going to hide
this part of the way. Come to the bott. You can
see the slightly tilted. We don't want that, so I'm
going to grab both of these. S said zero, just
to zero them out. And then what I'm going to do is just pull them up a little bit. I'm going to press E
to pull them down. And then what I'm
going to do is press Alt Shift and click going
around each one of these. Like so E, enter Altera
and pull them out. A little bit, like so, and then press Altag, bring back everything, and this is what we
should end up with. So you can see now
that first bit is looking really, really nice. The top bit is done, basically, and now we'll work our way
down to this bit here. I can also come in, bring back my annotation now, so let's show that. If I press one now on
here, you can see now. Yeah, that's fitting
in really nicely. This is going to look cool. Okay, so let's
work our way down. So what we'll do is now, we'll actually take off,
hide the annotation. We're going to keep
it on just for now. And then what we'll do is
now come to this part here. Now, this part, can I get
away High press shift. If I grab this press shift can I get away with just
having this part flat? I think I can, so all
I'm going to do Oc shift click control plus
Y, separate it out. And then what I can do is just hide this part out of the way, hide it out of the way, and
now I can just join these up. So F, and F. And then what
we can do is L and delete, limit to dissolve, like so, and then we've got
a nice flat base. Okay, tab, oltage, bring
back the other parts. Now let's work our way down. Now, these parts here don't
really need to be anything, but the thing is, when
we bring in a bevel, it's going to be obvious
if I use my what, I won't use the annotation,
but it's going to be obvious that this is one block. I don't really want that I
want them to be you know, one, two, and three blocks
maybe, and then this split. And the way we do that is by spliting it and using the bevel because the bevel
then we make it obvious that there's kind
of a little gap in there, so we can use that
to our advantage. So let's actually do that first. So what I'm going to
do is press tab, lth, bring back everything,
and I'm going to click on just this so we've not
got everything selected. And then what we're
going to do is then come in and we'll
split these off. So I'm thinking one, two, maybe this one's two, and then this one will be on its own. So we'll do it that way. So what I'm going to do is
Alt Shift click, going there. This one will be two, Alt Shift, click going all the
way around there, and then we've got this
one, Alt Shift click, right click, Marcosm. And from here then, we
can split these off. So now we'll come
in with Face elect, we'll grab this one, and
we'll grab this one. We'll press Y, and now
they're split off. And now, if I come back
to this, press Control A, all transform
origin to geometry, adding a modifier and
we'll bring in a bevel, we'll set it to naught
point not not three. Like so now you
can see that these are not split because I haven't
filled in the faces yet. So let's come into
this one first, ShiftH and let's
fill in these pass. So we'll fill in this phase. Base select, grab
the whole thing, delete and limit to dissolve. And then we'll go OTH
come to the next part, L, shiftH, fill in these phases. F, fill in the bottom, F, like so, and then TH, and finally, this one here. L, shiftH and then F. I could have come
in and just filled in all the faces manually, as you've seen, but I wanted to show you how this
actually works. So delete, limit to dissolve, Otag, bring back everything, press the tab on,
and there we go. We can see there's
a clear distinction between these blocks, and that's exactly what
we're looking for. Now, before we end this,
let's just go to this one, ShiftH I want to
fill these in first. So we're going to go
Oh Shift click F, and then do the same
on this one here, O Shift click and F. Then if I press tab now,
bring back everything. That is what we are left with, and I think that's really,
really coming along now. And then the next
lesson, what we'll do is we'll get this part put in, and then we'll get straight
on to our railings. Alright, everyone, so I
hope you enjoyed that, and I'll see you in the
next one. Thanks a lot. Bye bye.
74. Modeling an Ornate Gate Frame with Bevel and Array: Welcome back, everyone to the
Hunted Street environment, blend it to Unreal. This is where we left it off. And now, then let's
work on this part here. So we want to bring
these parts in. Now, the way we're going
to do that, then is, well, first of all, press Altag, bring back everything just so we can see what we're
actually working with. And what we'll do is we'll
bring in a couple of He loops, well, four he loops to be exact. So we're going to
press Control R, and we'll bring in
one because we always like to bring in one and
then press Control B. Drop it back all the way and bring it to where
we want this up to. Something like
that, this is going to be the bit that goes inwards. If we look on our
reference quickly, we can see that this is
what we're doing here. Then what we're going
to do is Control R. Left click, right click. And then what we're going
to do is Control B and pull it out to the height
that we actually want it, which will be
something like this. Now I'm hoping that I bring
this in now, not this, This one here, I'm going
to press E, Enter, alters, bring it in,
holding the shift but. Coming down to here
and now I'm hoping I buy bevel Ds off now, it's
going to be what I want. Now, the first thing
is, when I come in and bevel these, you will end up. I'm just going to turn off
my bevel just for a second. There we go. Okay, come
to this. Press Control B. Now you can see, that's
exactly what we want. Now, what happens is, when
I increase the amount, you can see that it's
still got this on, so I need to put it on
superlips like that. Okay. Now you can see
exactly how we're going to achieve that inward
look that we're looking for. Now, let's press Control's E, and let's come and do them
all at the same time. So we're going to come round
to all of the like so, just shift select in every single one and then
we're going to press Control B and bring
them in like so. Where do we want them?
Yeah, something like that, I think, looks very good. Now, before we end, remember, we've still got control on how
we want to bring these in. So I think having them to
round is no good idea, especially on the look
we're actually going for. And we can also change the actual scale of them
holding the shift bone again, like so, and I'm going to mess around
with them a little bit, just to get them how I want it. I think something
like that looks perfect. And there we go. Right, click Shade Auto smooth. Alright. So this is looking
really, really nice. I'm just wondering
if I need anything else on here at all,
but you know what? I'm going to save my work,
and I think that looks good. Now we're on to the actual gate. So what I'm going to do is
just move my guy over here. And first of all,
before starting, I'm going to bring in
I think I'll bring in a plane because I used to be a guy that just winged
everything, okay? But actually, that's not
the best way of working. It's better to have a plan and better to set out how you're actually going to
do this because you will get way better results. So let's do that first. So what do I want to
it's press shift day. I'm going to bring in a plane.
I'm going to press RX 90. I'm going to put this
where I actually want it. So it's going to be round
about here because remember, we actually have hinges. So we've got hinges that
are going to go in here. So that tells me how
far I want it away. Now, I'm going to
pull it down to here. So this will be kind
of where, you know, the main gate post
is going to be, and it'll be hinged around here. Now I'm going to do is I'm
going to pull this up. To the height that
I actually want it. So it'll be something
around here. So slightly probably higher than the tip of here, like so. And then what I'm going to
do is just pull it over a little bit because this gate will be way too thick like that. So then now we can
actually draw on this. Now, we have got already
our annotation on here, probably hidden
behind there, but we're just going to
actually minus that off. And then what I'm
going to do now is work out where I
actually want it. So the first, you
know, kind of post, so the top of it, so from here, the top of it is
going to be here. And then we're going to
have the second one, which is probably going to be just around the same
height, like so, and then we're
going to now start ramping it back up
and then ramping it, you know, back up a little bit, and then before we
reach the top of here. Now, what we want to do then
is come from here and go up, up, up, up and round,
something like this. And then we want
to also go down. So if I hold the shift but, I can actually draw
in a straight line, go down here, go down here. Like so, and go down here, like so, go down here, like so, and go down here. Now, the other thing
is you can also right, guys, I have to
actually investigate. I used to be the middle
mouse, but it's not anymore. So now it's D right click and then you can actually delete
things out of the way. So a little bit more complex nowadays than what
it used to be. All right, so now
we've got this, we've got this point of where
we want it roughly to go. Now we want another
bar that's going to come up and under
here like this maybe. And then what we want to do
now is work our way down. So the bottom of here is
going to go through here, so we're going to have you could either have
them poking through, or you can have a major bar
going down here, like so. I'm also going to
stabilize my stroke, so it should be. Yeah,
that's much better. And now what we're going
to do is work out where our actual supports
are going to be because if this gate doesn't
have any supports on there, it would just
literally fall apart. So what I'm going to do is
I'm going to bring one up, and then I'm going to bring
it from here to here, and then I'm going to
do the same thing. Probably I'm also wondering if maybe it's a
little bit thick. Maybe it's just me
thinking too much on it. And what I'll do is
now I'll bring it to the second one and
then bring it down, and then I'll bring
it to the third one, so all the way to the third
one and then bring it down, get in that kind of
cobweb feel in there. That's exactly what I'm
trying to achieve here. So it kind of has, you
know, that haunted look. But when you think about
this, you wouldn't actually maybe not
even understand, well, why does it have
that haunted look? How has it achieved that? And you can see, because
it's actually a cobweb, and I think this actually
looks pretty good. And we can of
course reiterate on this as we're actually
building this out. But I think for a start, this is really good. Now, from here, what we can do is start bringing in these bars. Now, again, we know that these ones over here
have the array on. I can take that off and
start with this one. So this can be kind
of my main supports, so I can actually come
in, bring it into here, press EnsEad and pull it out, and that's another
reason I kept those in, and then I can bring in the I think this is a major support. So if I come round here, you can see, it's pretty thick. This gait by the
way, is not simple. It's not simple at all. So just don't beat yourself up if
you don't get it first time. Then what we'll do
is we'll bring in the other major support and we just want to basically place things down right now. But that's all we want to
do. We don't want to worry about the thickness of things
or anything like that. Let's just get them.
Well, not the thickness, you know, if it
all goes together, we don't want to worry
about that right now. So what we're going to do is
pull this one up to here, and then I'm going to delete
just these out of the way. So delete and vertices and just leave it up there
for now, like so. And then we grab this one. And I'm going to
do the same thing. So shift and place it here, like so, and then we're
going to do the same thing. So shift and D. Place
it here, like so, and then shift in D. Now I can see that these are not going to line up properly, so you know what
I'm going to do. I'm just going to delete
those out of the way. I'm going to come in then,
add in an array again. So generate an array.
That's the wrong array. I'll use the legacy
one, so generate legacy array, set this to zero. Now we want four, but we want three, kind of.
So let's put it on three. Let's turn up this, and then we can kind of
fat you know what, we need to bring in one more. Like so press one and let's then get these
lined up properly. So we want the same
gap from here to here. I think actually that
this over here maybe a little bit too far
over the side and it's another reason why we're
building this like this way. Then what we'll do now is
we'll apply our array. So let's, we can't
apply our array. And the reason we can't
apply our array is because we are still
using a curve. So that's one of the drawbacks
of actually using that. Which means that I can make these taller because
I can use offset, for instance, but I don't
really want to do that. So on this occasion, I'm just
going to get them lined up, and then I'll pull
them out, you know, as we go along, getting them to the right scale
and things like this. So let's come in, and what we'll do is we'll
just go to object, and we'll convert
to mesh, like so. And you'll notice, as well, that this part over
here was kept here. We've still got
this one here look, was kept here just
to actually use. Now, before we actually do anything, bring
this to the side. So shift D, bring it to the
side, get used to doing this. And then what we've
got is a copy of it just in case
anything goes wrong. Now what we can do
is we can go to object, convert, and mesh. And now I can do is I
can bring these up. Now, first of all, when I'm
dealing with all these, I don't want all of
these subdivisions in, so I'm just going to
press L on all of them, press delete and
limited dissolve, like so, and then I'm going
to go to the top of this one. Pull it in's place, and
then the top of this one, pull in's place, and then
the top of this one, pulldn's place to where
I actually want to. So something like Bin
you can see already now, Hey, this is starting to
really come together. And I know we've got a lot
further to go on this, but you can already see now it's a great way of laying
everything out. Alright, so let's go to file, save our work, and I'll see you on the
next one, everyone. Thanks a lot. Bye bye.
75. Sculpting Elegant Scrollwork with Curve Subdivision: Welcome back, everyone to the
Haunted Street environment, Blender it to Unreal. This is where we left it off. Alright, so what
we want to do then is create these parts that
are gonna go out there. So let's come in and
bring this in first. This is our curve, of course. Let's press Shift D. And then what I'm going to
do is bring this, hopefully, over, like so. And we want to start
with something in here. I'm going to make it
a little bit smaller. So E&C, let's make
it a little bit smaller and get it into
place where we want it. Let's press one. Let's put it
right in those parts there. And then what we're going
to do is grab this part. Now the thing is, I'm going to try using propulse editing. I'm going to set it onto, let's try sphere
to start with and see if I can actually
bring just this one up. Let's see if I can bring this one up and get the kind of curve that I actually want. So if we bring it up to here, here and here, something
like this to start with, and that's not actually
working that well. So all I'm going to do
is just bring it in. But now where I
actually want it, so we can see here kind of
needs to bend on there, and I think we're going to need a lot more subdivisions in this. So we can see here we've got basically no sub
subdivisions in this, which is making it a little bit hard to create all those curves. So what I'm going
to do is press A, right click and subdivide. That's going to give me a
subdivision within each one. And then what I can kind
of do is come in now and get the actual
curve that I want. So you can see here now. I'm just actually
kind of sculpting this into the way that I actually want
it. And there you go. Now you can see that's actually looking much, much better. Now, the other thing is you can come in and grab this and this, and what you can do
is, I think it's under controls where you can
actually smooth them off. So you can see that
actually smooths it off, which means that we
can now right click subdivide and let's
just try if that works. So we're just going to come
in and smooth them off. And that actually, I think, smoothed it off enough to a
point where if I come in, I'm going to actually be happy with the
smoothness on here. That's actually pretty nice now. I'm going to pull this
up. Like so, like so. And yeah, that looks
actually pretty nice. So that's following this. If I just hide this out the way, you can see now that's
looking pretty good. I would say that on this part, maybe smooth it off
a little bit more, like so, maybe even pull this one down
and just wrestle this a little bit more just to get it what I'm actually
looking for. Like so. And there we go. Now, I think that's
looking pretty good. I think that this bit
just needs coming down just to kind of add
that little bit on there. And, yeah, that's
looking pretty good. Now, if I press one, I should be able to pretty
much follow these. So now if I press Shift D, I should be able to pull
this down into place. And again, it looks hard
what we're doing here, but if we make it
easy for ourselves. So if I come in, and grab this one and this
one, press delete, and I'm going to
dissolve delete verses, and then I'm going to
pull this into place, like so wherever I want it. And then what I'm going
to do is grab them all, subdivide, subdivide. So then what I can
do now is I can just work my way into getting the
shape that I want first, like so. So going up there. And then what I
can do is press A, right click and subdivide. And now we can work a
little bit more on this. Get it into the
shape that we want, like so, like so, like so, like so. And then what we can
do is, of course, A, again, subdivide once more. And now we'll just try see
if we can smooth it off. So control points and smooth. And let's see if that
actually smooths it off. Let's give
it another try. So control points and smooth again. And yeah, you know what? That's actually worked out
better than I thought. Apart from this bit here, we can see it's a
little bit jagged, and maybe we need
more points in here. I'm not sure, but let's
just smooth that out. And I think you did
such a good job. And actually smoothing this, that it's made our
job doing this much, much easier now to get what we actually
want, so you can see, I'm just working across, smoothing all this
off, double tap the A. And there we go. I think
I'm happy with that. So really, really easy
way of doing that. Now we come to, you
know, the harder parts. Let's see if we can do the
same thing on the next part. So what we'll do, first of
all, is we'll grab this. We'll press Shift D again. We'll bring it down into place. Now, you might want
to come in and just, you know, try and fit
this all in there. But honestly, for the amount
of work that it takes, it's just way easier for me just to come in and grab
this one and this one, press delete and
delete vertices. Move this down into place
wherever I want it, and now to work on this. So if I grab all of these, right click, subdivide,
subdivide, subdivide, and I think one
more subdivision, and then I'll use the sphere. Let's try that, see if
that actually works. I'm going to press one,
and I'm going to bring it up a little bit.
That's not going to work. So let's try the shop. Let's see if that
works any better. There we go. That's
exactly what I want. Bring the shop up. Let's
now bring this down. So I'm going to bring this down. Now you can see the
sharps not working there. So instead of that,
I'll use the sphere. Let's see if that's any better. There we go, guys. That's exactly how
we're going to do it. Now, of course, we do need to move a little bit of it out, but we can see that sharp
worked fantastically well. That's looking
really, really nice. That's exactly what I want. Okay, so let's do the next one. So I'm going to grab
this one again, Shift D. Pull it
down into place. Let's now come in. Again,
grab the mole, delete verses. Let's set it a little
bit straight to them. You know what? We'll leave it like that.
I think I'll just pull this one down a little
bit. Grab them both. Right plea subdivide,
subdivide, and subdivide. I don't even know was it more than that?
Let me have a look. Yes, it's just slightly more. So let's go in,
subdivide like so. Let's come then to this one. This is the one that
we need the shop on. So put it on to
Shop. Pull it up. Like so. And then
what we'll do is put it onto the sphere, and then we'll go to this one, and we're just going
to pull it down, and then we'll also do the
same pretty much on this one, we'll pull it out a little bit. There we go. That's
looking really cool. Now, let's come to the
last one then. So shift. Let's carry on. And then
what we'll do is again, grab all these, and you
should be in a nice flow now. You've got everything going
perfectly. So that's great. Let's go in, right click,
subdivide, subdivide, subdivide, subdivide, and
then we'll grab this one. So this is where the
shops going to be. Let's put it on shop. Let's press one, so we're
going into front of you and let's bring that up
to where we want it. So round about there. You can see that the whole thing probably needs lifting
up a little bit. And then what we'll do now
is come to the round a bit, so we'll go too severe, grab this one maybe,
and let's pull it down. To we want it, you can see
were a little bit out there. Let's pull this,
use this one down. Do we want it
something like this. And yeah, that's
looking pretty cool. Now, let's come in,
fix these pots. So if I come in and pull
that into place, like so, and I'm just going
to take Js to step back and have a look what that
looks like, you know what? It looks Fantastic. Now I want to do then is I'm
going to save our my work. I'm not going to
need these anymore. I've pretty much built
everything I need. I know we need a bottom
on there, but we can see we've got everything
in there that we need. So come to your annotation,
if you put it on, go to notes, click the minus, and we should end up with
something like this. And from here, then
what I want to do is before going any further, because the rest of it is basically not doing any of this, we've got everything
in that we need. What we want to do now is
come to our curves and make sure that these are set
to eight or we'll end up. Make sure as well that
it's smoothed off, so you can see here this one slightly slightly
a little bit out. Just make sure that
you're actually happy. With how these are just before finishing,
I always do that. Then put it on eight, like so. So that one's looking nice. Make sure it's nice and
smooth on this one. Let's put this on eight as well. Let's work our way up then. This one's the la
curve. Let's put it on eight because we really
don't want too many. And the other problem
is because of the fact that these have
got so many subdivisions, you can see that even if I
turn this down like to two, you can see it just flans off, but as I turn it up to, like, you know, five, it's actually
not really altering it. So let's put it on five
actually rather than eight. So you can see the correlation
between the amount of subdivisions you
go in your curve and the amount of
resolution over here. So even though this says, Hey, if I turn this down to five, let's look what that looks like. It's a bit more blocky, I think. Let's put it on
eight, and let's see. Slightly slightly, guys,
slightly. Either way. Okay, we've done all this now, and what I want to
do is I want to turn all this into mesh before finishing. So I'm
going to grab all of this. We're going to go to object, and we're going to go
to convert to mesh. Okay, if I press tab now, this is what we
should end up with. Now, some of these have got, you know, way more, as I said, because we put more
subdivisions in here, way more mesh than
something like this. You can also see that we kind of need to clean
up some of these, and I'll show you how to
do that on the next one. But for now, we'll
save out a work, and I'll see you on the
next one, everyone. Thanks a lot. Bye bye.
76. Refining Gate Details and Optimizing Topology: Welcome back, everyone to the
Haunted Street environment. Blender to Unreal. This is where we left it off. Okay, so what we want
to do now is smooth out any places what we
don't actually like. So if I'm coming along here, I can see there's a chunky
bit right around here. So all I'm going to do
is I'm going to come in, Alt Shift and click
and then delete, and what we want to
do is dissolve edges. Now, you can see
that starting to. Now, if it's still not
right, what you want, just try dissolve in
a few more edges. So delete and dissolve edges, and there you go. It's
kind of smoothed. If you get bits where
it's, you know, where you want it, not quite so much, you
can actually come in, press the G button and just
smooth it out then like so, you can press Control then and just kind of shape it to
where you actually want it. So really, really easy to smooth those parts off as long
as you follow this. Al should click, and
then what we're going to do is delete and dissolve edges. Most of the time, you
will find that you can just get away with just
deleting an edge loop. Let's come to this
one now you can see this is quite chunky
on this part. Quite chunky on this part, so let's press delete.
Dissolve edges. Let's have a That looks like, much, much better
now, as you can see. We've got a little bit
of one in here as well. So delete, dissolve edges. And then as I work my way
up, these two in here, probably too much,
probably too much on that one and delete
and dissolve edges. And there you go
nice and smooth. And it doesn't take long. It might seem like
it's a lot of work, but it really, guys, it
doesn't take too long. Okay, so I think I'm pretty
much happy with this. Now, one thing I'm
not happy with is this being kind of too wide. If you look at our guy here, this gait is massive. We don't want it that we kind of want it thin and spindle it. So what I'm going to do is
just grab it all again, press G just to make sure
you've grabbed it all, and then what we're
going to do is put this on medium point, and then you're going
to press S and X and just bring it in a little
because it's just too big, like so looks way way better, even thinner than that, even. So if I press S and X, and you'll find that
because we've done that, as well, these actual bits
start to look even better now. Now, that to me,
looks way way better. Than what we had it
because I'm looking, you know, from an
artistic point of view. And the other thing
I want to do is just smooth it off
just so I can, you know, not see
these bits here, so shade or smooth. And now I can actually
see what I'm looking at. Now I know this gates
taking a long time, but it's actually quite
a complex piece to do. We now we've done that,
what we want to do now is then make these parts, this part, especially
a little bit thicker. I actually want this part poking out and this part being behind, so I can actually, you know, kind of shape it out one. So what I'm going to do
is, I'm just going to press S and Y, and I want to bring that out kind of thicker than
this part here. So I'm going to bring
it out all the way here just to give
it some thickness, and then I'm going to come
in with these parts then, not these, only
these main parts. So that means then I can come
in, grab this one, press. P selection, and then
grab both of these now, press Control A, all transform, set origin to geometry, and then I'm going to
press S and X, sorry, S and Y and pull those
out past this one here. So now we've got a
nice chunky bit, you know, for the edge. Everything fits in there,
and this part is, of course, on the outer part of this, making it look a
little bit better. Okay, so the next thing is that this part here is definitely
not thick enough, so I definitely want it
a little bit thicker. So what I'm going to do
is I'm going to grab this here and make it a little bit thicker. Why
am I doing that? Because this is where
the hinges go in, so it needs some thickness. And we also want, as well, if I come in, I need
to grab this part. So before doing
that, they'll press. I'll press delete,
Lim it to dissolve. Then I can grab this
and pull it out, making it a little
bit thicker, like so. Okay, so now let's come in, grab this part, Shift D. I'm
going to pull it over here. I'm going to press R Y, 90, pull it down into place.
I'm hoping, yes, I did. I got rid of all
of the edge loops, press SNC, bring it into place. And then what I want to do
is put it in there like so. Now, of course, I don't
want to, you know, shadowing this or
anything like that, so I'm gonna press S and Y,
bring it back a little bit. The other thing is I want
it to come to there, but not these parts to here. So then I'm going to
come into these parts, grab each of the bomb like
so, and pull them up. Alright, so far so good. Now, let's create
the actual tops on these so we can do
these two together. So this one and this one.
I'll grab the top here. And then what I'm going
to do is press E, enter, S, pull it out. They need to be on
individual origins. So S to pull it out, E, to pull it up like so. And now let's make the
top spikes on here. So I'm going to do is press
the I board to bring them in, and then I'm going to
press E to pull them up and then S to pull them in. Now the thing is
I'm going to make them shaped a little
bit better than that, but I'm going to work
on these parts now, so I'm going to come down
grabbing each of these parts. Now, before we do
that, actually, before we do that, just make sure you're happier
where these are. So I'm going to pull these up a little bit just to be
more in line with this one. You can see that gap here, here, and here now lines up
a little bit better. And then what I'm going to do
is grab all three of these, so all three of these tubs. And then we're going
to press E, Enter. And then we're going to
press S, bring them out. And then what we're going
to do is pull them up, so pull them up a little bit. I would say a little bit
thinner than this one on these ones if you really
want to get it right, then press I to bring them in, then press E to pull them out, and then press S to
bring them in, like so. And there we go. We should be left with
something like this. Now, then, guys, let's come in, and I will put an
edge loop in here. So just to give you
some variation, so Control R, bring it
up to here. Control B. We should be very good
at doing this now, and then E, enter terns, and just pull it out a
little bit, like so, and then press ENS, Js to pull it in, like that. And there you go. That's
looking pretty nice. Now, I don't think we
need another one on I imagine this is where a big lock is going
to be or something. I know it's high up, but I imagine someone climbing
up there to do that. That's in my own head. Now what we want to do
then is these parts here. Now, these probably the hardest part because we
have to go along and put an edge loop on every
single one of these. So every single one of these. So what I'm going to do is press Control R. I'm going to pull
this up into place there. Control R, pull it
up into place there. Now, I'm going to do them
all at the same time. It is going to make it easier. So what I'm going to do
is control R. Just put an edge loop right in the
center, work your way up then. So put downwards, whichever way you want
to do this, Control R. And then Control R.
I think actually, this is the hardest build. I did forget how
difficult this part was. All right, so we've
got all of these. I think it's actually
harder than the roofs, to be honest. Let's go in. It's a lot more intricate. The roofs are just using tools, whereas this is a
lot more intricate, a lot more artistic. Press Control B,
as to pull it out. Make sure it goes
past all of these. So make sure none of them. You know, it's all past every
single one, as you can see. Then you're going to
press E, Enter, alters, pull them out a little bit, like so, and then going
to press Control Plus. And why am I pressing
Control plus? Because now I actually have control over each of these,
how long they're going to be. So now I can make
them like this. And there we go, Dad is
looking really, really good. Okay, so we've pretty much
got everything done on them, just looking at a reference. Yep, I'm really, really
happy with that. We've got that cobweb
look on there. Now, the next thing
we need to do is, of course, make them
a little bit warp. We have to be very careful here, because some of
these like these, have a lot of
subdivisions in them. Now, we could bring down the subdivisions
to them you know, make this a little bit easier. What I tend to do,
though, is just check them all before
doing anything. So I can see here I need to bring in some
subdivisions here. So left click, right, click,
hide it out of the way. Let's come to this one, then. So control. Left
click, right click. And I am just putting
them in, even the space. That's all I'm trying
to do. I'm even going to leave this one
here, as you can see. Let's press H hide
the other way. Let's come to these
then. Again, control or bring in some edge loops. And again, you might think that this is a complete
waste of time. But honestly, it's
the little touches that make the big difference. So you'll see many
people's work. They look very sterile. And the reason is because we're going in and
we just add in just these extra things
which really don't take that much work when
we're actually doing them. So that's why we're spending
all this time doing that. Okay, once we've
done these ones, then let's hide them
out of the way, and then we're on to this. This one here you
can see is just way, way too many subdivisions. So what I'm going
to do is just press A. I'm going to press delete, and I'm going to do
limited dissolve. And then what I'm going to do,
make sure I'm on face like right click and I'm going
to triangulate faces, and then I'm going to go
triangles to quads just to give it way, way less. Now the thing is there.
Have I lost some of this? Let's press Altage,
bring it back. Have I lost some of that? I think so. That was
a little bit weird. I wasn't expecting, yes, I wasn't expecting that
to actually happen. So instead of that,
another way you can do it, add modify it and we'll go to generate and
we'll use a decimate. At the moment, 490. Let's bring it down to something
what we're happy with. So we can see something like this is I'm a lot
more happy with that. Press Control A, and you will end up now with
something like that, much, much better,
as you can see. And then what we're going to do is make sure we're on face select and then just right
click, triangulate faces, and right click tries to
quads, and there we go, now we have something we can actually work with.
Hide it out of the way. Let's do it on
this one, as well. And I'm wondering you can see has lost some thickness as well. So we want to make sure
we're not losing anymore. So generate decimate, take
it all the way down first, start bringing it up till
you're happy with it. So I'm happy with T wave,
something like that. Press Control A, you'll end
up with something like this. Right click, triangulate faces, right click, triangles to quads. And there we go. Now
you can see we've got down those. Why
are we doing this? Well, on the next one,
what we're going to be doing is warping everything
using the randomize. If we've got too
many subdivisions, you're just going to end
up with a load of noise, and we don't actually want that. Alright, everyone, so I hope you enjoyed that, and I'll
see you in the next one. Thanks a lot. Bye bye.
77. Aging the Gate with Randomize and Bevel Modifiers: Welcome back, everyone to the
Haunted Street environment, Blender two Unreal. This is where we left it off. And now, guys, let's
just carry on. So this one here, we'll just
add in some subdivision. So left click right click,
hide it out of the way. That one's nice and easy. Let's come then to these now. Now, can I do them
all at the same time? That's the question. Let's see. Let's join them all together. Press the tab on. They're all pretty much the same.
And let's come in. First of all, let's
press Control A, resell the transforms, add in then a decimate, bring it all the way down, break that mesh, and then put it back together again
to where you want it. Something like this looks good. Um, 240. That
sounds about right. Press Control A.
And then, again, we're going to
come in, A, right, click triangulate faces. They always do trangulate
faces just in case we've, you know, missed some zs, and then I actually
joint anything. And then I go to triangulate
to quads like so. We should end up with
something like this now that's looking
very, very nice. Now, I'm going to now delete this here because I'm not going to need it anymore, so
delete it out of the way. Then you should
have something like this. Looks pretty good. But we're not quite
finished yet. Now what we want
to do is come in and just bend these
a little bit. So what I'm going to
do, first of all, just going to try grabbing
everything, going to mesh, transform and coming
down to randomize, and then turning this
all the way down to note point note one. Let's
have a look at that. Press the tab button,
double tap the A. And you can see it
stuck out a little bit. We'll deal with
dynamin. But the moment we're looking at how
this actually looks. Is it bent too much? Am I actually happy
with it? I think I am. So now I'll come in
and do this one, so I'm going to
grab all of this. I'm going to go to
mesh, transform, randomize, turn it down.
Note point note one. Tab. Let's have a look at that. And you can see now that
is looking pretty good. Again, we'll come in and sort
this out in just 1 second. Let's do these one at a time, because we don't want to do more together because they're
a little bit different. Some might need a lot less. So let's come in then
to these ones here. So we'll do both
of these together. We'll join these up because
they're kind of the same. So Control J, join them up, and then what we'll
do is we'll come to mesh, transform,
and randomize. Let's turn these down all the way down to note point note one. Let's have a look at that. And yeah, I think
I'm happy with that. And I think I'm only going to do these sections now. So just these sections. I'm going to grab them all,
mesh, transform, randomize. No, point note. Two, let's try that. There we go, Yes, I
think that's it. Okay. Now, let's deal with
this part here. The only thing we
really need to do is maybe pull these a
little bit thicker. S and Y. Let's pull them out. So they're in place,
double tap the A. Make sure this part here is
a little bit thicker again, S and Y, just so that bit
is not poking out there. Check round the
other side as well. You can see why I'm saying
check round the other side. This one's a little bit out. So I'm going to just press
S and Y and pull them. Back in a little bit,
double tap the eight. Really, really important that
we get this right, guys. You can see on this page as well that it's poking through
here. Don't want that. Really important,
though, that we make sure before sending this through to Unreal,
that this is right. And now we're looking
at this part here. And again, we've
got a little bit of a problem. In this part. Again, this is just about now fixing any issues
that we've come across. I'll try grabbing this one
and just pulling it back. And I'll have a log on here. You can see again
this is pulled out. Let me try grabbing
the whole thing, press S, and Y, pull it back into place, double tap the A,
and there we go. I'm going down I'm checking everything now just
to make sure before I finish all of
this it's correct. And there we go, I think
now that's pretty good. All right. So now we can
join all of this together. So if I come in, Joe's
checking on this part of her, yet it's looking good, let's come in and join all of this together with
this press control J, control A or transform
set origin to geometry. Now, finally, let's just see
if I can bring in a bevel. So if I bring in a bevel, I'm going to say to
no point non three. Then we can have a slight bevel
on there, as you can see, and that is me just
smoothing it off, that last little bit. All right. Now we want is the
actual hinges. So I'm just checking
my reference. Now, I know how I
did the hinges now. I just had to go in
quickly check that. So just to make
sure they're right. So now I want to do is let's just pull it to the
side a little bit. And then what we'll do is we'll create the first hinge on here. I'm going to come in, grab
this and this, shift this. Cursor to selected. And then what I'll do is I'll press Shift A, bring in a cube. Now, the moment I brought in that cube attached
to something else. I'm just going to
press P selection. Now I can deal with my cube on its own. So
let's bring it in. Like so. Now, this
is quite a big gate. Whenever I'm creating hinges,
I'm always thinking, right, how thick is, you know, the actual parts attached to? So I'm going to say
it's going to be pretty chunky and
we'll start with, you know, this sort of size. I think that is a
good size to start, maybe even a little
bit bigger, like so. Next of all, then I'm going to design what this is actually
going to look like. So we want it to fit in the same kind of style that
we've actually got going on. So again, let's reset all
of our transforms now. This has already got a bevel. We don't really want
that at the moment. So all we'll do
is we'll come in, grab these, press Control B. We don't want them
crossing over. We do want them
coming out like that, so I'm going to give
it a few more edges. And then what I'm going to
do is bring it back in. Now, I can see that this is, you know, way, way too thin. So I can press
Control's head now. Control bean, it should bring it back to how I
actually want it. So something like
this, you can see, looks much, much better. The one thing we can see is, this is probably a
little bit too thick. So let's click on our ghost. Let's come in with Face leg, grab this back face, and then we're just
going to pull it back, like, so, turn it off, and now just make sure you're happy with that,
which I think I am. So if I put this in here, I can imagine now
there's going to be another being here that's going to fit in coming out of there. So what I want to do is
press Control I want three, so left click right click. So two edge loops gives
me three panels like so, and then Control B
and bevel it out, but turn the bevels down so you'll end up with
something like this, just to give us some breaks
in between each of these. Then I'm going to press
E, enter, alter Ns, and I should then be
able to pull them in. Just like that. Right click Shade Auto smooth, and there's the first
part of the gate. Now, you can see it really
fits the actual scene. You can see it looks kind of spindly and things like that. That's exactly what
we're looking for. And we'll see how
thick is as we go on. So what I'm going to
do is I'm going to press Shift desk as selected. Let's bring the next parts in. So what I'm going
to do is shift D. Let's bring in another cube. So bring in a cube, making
it much, much smaller, like so. And there we go. I am losing my voice a
little bit here, guys, so just bear with
me a little bit. Might be a bit rough and
ready, but I will keep going. Let's pull it up
in place where we actually want it. Like so. And I'm thinking that it probably should be
rounded on this end, and then going
thinner to this end is what I really want for this. So I'm going to pull it out, so S and Y, and
then I'm going to press S and X and pull
it out into this place. Let's deal with the
front first then. So again, resort the
transform seigun to geometry. Let's grab both of these
PS control B, bring it up. I definitely don't I
want it more rounded, so I'm going to actually
bring it down to there. And then what I'm
going to do is just bring that up, like so. And now I'm going to do is I kind of need to make this little bit a little bit
thinner and kind of tape it in like this. So what I'm going to do is
I'm going to grab this one, Control B to there. And then what I'm going to do
is turn up or down my whip. Now, I can see that that's yeah, it's not quite right, so I'm going to press Controls, Control B, bring it back. That is how I want it
except I want this part, at least, much, much longer. So I'm going to grab this part. Baslect, I'm going
to go to smooth. Like so, and then I'm just
going to bring it in, and hopefully should just be able to pull
that out, like so. That is kind of the
look I'm going for, except the fact that this
front paw I need First of all, I think I need it a
little bit thinner, but let's actually
put it in place first before we do anything. That is what I'm going
for. Let's make it a little bit thinner on
the Y. So S and Y. Let's make it a
little bit thinner. Right, click, shade auto smooth. And you know what? I think
that's what I'm looking for. Finally, then what we'll
do is press E, enter, S, without fortunately
it's none, S, like so, and then S and Y. And then what we'll do is
press E. And then again, because it's a very heavy gait,
we have to remember that. So I'm going to
press E again, S, pull it out, S, and Y. And now here's the chunky bit, so it looks like two pieces of metal, actually joined onset. Now, let's bring our gait
over, seeing where it goes in. So now we can see if
this is like this, you can see that we do
have some problems. First of all, it's too far out, and it doesn't really
want to be like. Second or it does look a little bit spindy now we've
got the gate on there. So and Y, let's bring it in. And then E&C, let's make
it a little bit smaller. So let's put our
gate on there now. And we can see now
as we bring this in, this bit is still a
little bit too spindly. So before we finish, let's come in,
press Control plus. And then what I'm
going to do is just pull that into place like so. And now I think if I come in, put my gait against there, that is looking
much, much better, especially when we've got
three of those on there. It is going to look
a lot lot better. Now, the other thing
is that this part here needs to look as though it's actually
got a bolt in there. So before we finish, again, before we finish, let's just pull this out a little bit on there.
In fact, you know what? We'll press Control plus. I'm going to try and
then just take those off and pull those out like so. And now I think I
can near enough, put a bolt in there for
a movie a little bit. Anyway, we'll do that
in the next lesson because we're really running
out of time on this one. Alright, everyone, so
let's save our work. I hope you enjoyed that, and I'll see you
in the next one. Thanks a lot. Bye bye.
78. Refining the Cemetery Gate with Mirror and Array: Welcome back, everyone
to the Haunted Street environment,
Blender to Unreal. This is where we left you off. Okay, so now let's pull
this out a little bit more. So S and Y, let's pull it out. Let's pull it into place, a little bit more
and why am I doing that because I want a
nice bolt in this part. So what I'm going to do is
come to this part here. I'm going to grab
each one of these, and I'm going to press
E to pull them out, like so, and then S and
Y and pull them in. And there we go, now we've
got more to wit with, and now I can do is bring in I think I'll bring in a cube, actually, or should I bring in. I think I'll bring
in the UV sphere. I don't even think we've
used one of these yet. So let's bring in the UV sphere. Again, when you
bring in UV spheres, you'll see way way too
high. Let's put it on 22. And I wouldn't change
this one going down here because 16
is absolutely fine. The moment of
truth, all you need to do is shade or too smooth. If it looks good, you'll see there's a little bit
of jaggnss on there, but it's quite a small part, so we're not going
to worry about that. Next of all, then we just
want to split this spit into. So Alt click, right
click and Mogin. Come in then, delete the last
bit L, delete, and faces. And then we're
going to do is put this into place by
pressing the Sb. Let's bring it into place. Smaller. Let's
press the little Db so we can see what we're
doing. Let's bring it over. Pull it in, like so,
and there we go. Now, that should go all
the way through here. So if I come in now, and I press, first
of all, S and z, just squish it down a little bit more, grab the center of it. And what you want to do is you
want to bring this in now. So I'm going to press
E to S, bring it in. And then what we're
going to do is press E and go all the way down. So make sure it's going
along the z axis. So make sure it's
following along there and also make sure that this
bit is not too thick. If it is too thick, old shift click Ol test, bring it down. Like so, and there we go. Now, what I really want
to do is I want to make sure that this bit is
nowhere near the center. So I'm going to press Alt
Shift click and bring it up because what I want to do is from here, put this
at the bottom. So what I'm going to do
is I'm going to press contro or transforms, right, clicks Origin three dcursor, add in a modifier, and we're
going to bring in a mirror. And finally, we're going
to put this mirror on the z, turn off the X. Now we're going to
put clipping on, I'm going to press tab,
and I should be able to join those together like so. Lying mirror now,
so press Control A. Come back in there,
and you want to delete now this because
we don't need this. Delete and EDSS not
Verus Delete and edges. Dissolve edges. There we go. Now, let's go back
into solid mode, and this is what we
should end up with. And I think that
looks pretty good. I would say, maybe I was a little bit too hasty because I think I need to
bring these down. So I'm going to come
in, press L on here. I'm going to press L on here, and I'm going to pull this down into place around there just so we've got the
top there showing, and then I'll do the
same thing on this one. Not worried if, you know,
they're not exactly the same. Doesn't matter
bolt. There we go. And now that looks much, much better than
what it did before. Okay, so now we've got pretty much all of this
done except these hinges. So now I just need
to put these down, and then we're pretty much done. So let's serve, first of all, see if I can use A again, because these don't
need to be perfect, it doesn't need to be
perfect at all because it's going to be warped in
all kinds of things anyway. So we're going to use
the array legacy. I'm going to turn this to zero. I'm going to see it's not
the Y, so it will be the z. So let's bring it
up, put it in place. Let's bring the count up. Let's press one just to
make sure they're all fitting into place, which
it looks like they are. And let's apply that. Double tap the A,
and there we go. That is our gait. Done. Just looking at one part. You know what? We're gonna mess around with this too long, and I don't really
want to do that. Now what I'm going to do is
come to all these parts, make sure they haven't got any modifiers on, join
them all together, like so, Control A or transform set origins,
geometry, press one. And then what I
want to do now is put them into the place
where they're going to go. So I'm going to put
it there, shift D, and put it here, like
so, and there we go. That is our gate
actually finished. Now, the last thing that I want to do is I want
to make sure that, you know, we have
variations of this. So what I want to do is have
this gate slightly open. So I'm going to
come to this bolt. This is where I want to come to. I'm going to press L on here. Shift S, curse to selected. Then what I'm going to do
is come back to my gate. Now, if I rotate this on the Z, it's going to rotate from here. But if I press the
little sideways V, you can see we can rotate
it from three D cursor. Now, it is the one pointing
towards the right. Click on three D cursor, and then you can press R and Z, and you can rotate that
gate however you like. Now that's looking good
because this one isn't broken, and now we need is a broken one. So all I'm going to do is just
grab these out of the way, I'm going to pull
them over here. You will notice it always pops back to this point
here to take that off, press a little sideways V, and go down to
individual origins again, and then you'll be fine. Now at the moment, and see
we've still got this here. Now, I'm going to pull
these to the side a little bit because I know I'll delete
them out of the way, but I don't ever delete
anything until I've finished, you know, this kind of asset
pack and things like that. So let's have a look now. We need the next part. So what I'm going to do
is I want to kind of grab all of this together because I want these to
be, you know, as one mesh. The only thing I don't
want to be as mesh, I think, is this part here. So at the moment, I think
I'm just wondering, I'll grab all of this. You can see that some of it has got bevel and
for some reason, this one hasn't I'm just
going to join this up, press Control J, like
and there we go. I'm just wondering, has it messed around
with my mesh, sorry, my bevel, and I think it has, let's go to geometry, turn clamp overlap off. And I'm just wondering if that bevel is actually
going to work, I'm going to reset
all the transforms. And it should, give me
what I'm looking for. Let's just go back before
I actually did that. So before joining it altogether. And I'm wondering, first of all, why this isn't going up, so this doesn't seem to be
altered by the clamp overlap. Let's have a look. Let's
take that off a minute. Let's add in another modifier. I just want to see if there's
something wrong with this. I can't actually, it's
actually working on that, so let's bring in
the bevel again. There we go. It has
brought in the bevel now. In some ways. There we go. That's what I'm
actually looking for. Now, let's put it on not
point not note three. Now the bevels on there.
No idea where that was, but you saw how I fixed that. Let's join this to this and see if that actually works,
and there we go. Now we've got that
bevel on there. It's very nice and
neat because we fixed all this topology already
in there, like always. And now we can do is this
already has a bevel on. Let's join this, this. So click on this one first. Just making sure everything
is right because I can see that we do have some
issues in the mess here. So I'm not happy
about this mess here. And sometimes you will end
up with problems like this. I'm wondering, why
is it doing that? I'm going to press
A shift and N, first of all, see
if that fixes it. And then going to
come back to this. I'm going to press A.
I'm going to right click on face leg
triangulate faces, and then we're going to come
in and triangles to quads, and then we're going to see if that's fixed all those issues, which now it has, so that's looking
much much better. And I also want to see if I
turn off face orientation, what is it going to look like? So I can see I've still got a little bit of
broken mesh here, as you can see, and
that is something that, you know, I'm not happy about. What is actually causing
that? Let's have a look. Too many going into one, as you can see. So,
too many edges. So I think instead of
actually putting this on, we have a little bit
more work to do on this, so I'm just going
to press Control's because I'm not happy with
how that actually is. Go back to here, and you can
see now this is how it is, and, you know, to fix this, I think what I'll do is, I think it's just this bit
here that's the issue. Just this bit here is causing
this kind of down here, and this is going to happen
every now and again. Now, rather than ignoring it,
we're not going to do that. We're gonna actually fix it. So what I'm going to do
is I'm going to come in, I'm going to press Shift H, hide everything else
out of the way, and let's actually fix this. So first of all, let's come in. We've got our bevel
on, but we're not going to worry too
much about that. What we're first of all
going to do is come in, save all your work guys, by the way, make sure
it's saved out, so file and save save
it out just in case, you know, things come a cropper and it doesn't work
properly, so let's come in. And what we're gonna do we'll probably I'm wondering if we do this one first.
I think we will. So what we'll do is we'll press Delete and we'll go
to delete faces, and we should end
up with just that. Okay? Then what we'll do is now we'll come and
do the same thing on here. Like so. There's just too many
edges going into one, which is causing fractures
within the mesh, and that's something
that we don't want, delete and faces, and we should end up now
with something like this. Now the reason it's happening is because there's simply not enough subdivisions on
the bottom and the top. So what I'm going to do
is I'm going to come in, first of all, I'm
going to fix these. I'm going to grab each of these. Right click and I'm going
to bridge edge loops. And if that doesn't work,
why isn't that working? Probably because we've got
a bottom on there already. So we'll come into this one, L, hide out of the
way. There we go. Now we've got this. Let's
hide this one out of the way, L and and you should just left with just this shell
with a top and a bottom. Make sure you've got that, guys. Then what we're going to do is bring in some edge loops here. Control, bring in a few
more edge loops, like so. So I've brought in six, and then Control R on this side. Left click, right, click, set this for six, and then
we'll do the bomb now, and we'll bring in
three more edge loops on three more edge
loops on here. Alright, so far so good. Now, the moment of
truth, let's see if we can join you up
and it looks better. So Alt Shift click, going
all the way around, Alt Shift click, going
all the way around, right click, Bridge edge loops. And that's a mess.
That's a mess. Let's Let's try
that different way. So the other way we're gonna
do is instead of doing that, let's press the F button.
That's also a mess. Let's press Alt F and H we got somewhere? How
we got somewhere? Altevs for the win. Has it done the
work that we need? It's still got the bevel on. Let's try it on this side. So Alt, shift, click, Alt, shift, click, alterna. Press tab. And, yeah, that's looking
much, much better. Now let's look at the mesh. We've still got a lot of
points going into these parts. So a lot of points going
into these parts here, which I'm not happy with
still, and, you know, there are a few more parts
going into these that I've created those subdivisions,
but not enough for me. So, you know what? I'm
going to press Controls Ed. I'm going to go back.
Before we fill that in. This is the sticking points. So these points, these points, this point and this point, and we'll sort those
out on the next one. So file, save your workout, and I'll see you on
the next one, guys. Thanks a lot. Bye bye.
79. Clean Bevel Topology and Broken Gate with Boolean: Welcome back everyone
to the Haunted Street environment,
blended to Unreal. This is where we left it off. Now, of course, we're gonna
come across problems. You know, it's not
gonna be flawless. Things are going to
happen, and it's actually way way
better if, you know, we're doing this
together and fixing those issues, because, you know, if I did this flawlessly, if something went wrong, you'd have no clue how to fix it. So it might seem like, Oh, wow, we made another mistake. We're going backwards and
forwards and things like this. A lot of instructors don't
leave these things in, and of course, I could come in, cut it all out, and it would look flawless and
it would be like, This guy does things
flawless every single time. That's simply not true.
So let's come in. Let's come to this part and this part and this
part and this part. And what we're going to
do is press Control B, bring it out, like so. Left click, and now
we'll put it on to five. So this is set to five, and now we'll try the same thing and
see the result that we get. So Al shift, click Alt Shift, click, Alter and there we go. Now, it might look a
little bit like spaghetti, but it's actually worked much, much better than we
wanted because now we actually have not so many
points going into one, which is exactly what we wanted. I split it up a bit,
making this much, much smoother, as you can see. Now, let's come in, Alt, shift, click, Alt, shift,
click, Alter now. Join Altogether. And now we've got a beautiful
bevel on there, and we haven't got any
issues with the mesh. Exactly what we're looking for. So now you can see this
looking much, much better. Let's go in Altag
and there we go. Alright, now we need
to join. This part. So this part's already got
the bevel these parts. So let's grab all
of these parts. Let's press Control J, like so. And finally, then we
should be able to. But we did it the
wrong way round. So let's grab this one
because that's got the bevel Control
J. There we go. There you go the
nice bevel there, and then let's come and
join this together, apart from the actual lamb. I'm not actually sure why I don't want to join the lamb yet. I think it's because
the material. I don't want the material
to get mixed up right now. But anyway, let's join
this and this together. So let's press Control J. And there we go. We should still have all of those
beautiful bevels on there. Everything joined together now. If I put on now my
face orientation, you will see, ya, it looks so much better. Okay, control A or transform
set origin to geometry. Now, let's move our guy just
over here. Let's grab this. And what we're going
to do is press Shift D. Bring it over to the side, and I just want to
check something. So what I want to
check as well is just so you know that we haven't been worrying about polygons or anything like that as
we've been building this. And you can see that the
way that we build this, it's clean, it
looks really nice. And yet, the polygon
count is pretty low. The amount of times I've
gone to CG trader, you know, to look at models and things, and this model would be, you know, hundreds of
thousands of polygons. You can see you really don't need it to get something really, really nice, as
you can see here. So, just so you know, you don't really need
anything like that. Now what we're
going to do is then we're going to mirror this. So rather than using
a mirror you know, over here with our modifiers, what we're going to
do is go to object, and you'll see you actually
have a mirror on here. You can also see that over the right hand side,
we've got the X, so we ous mirror on the X, and we'll end up with
something like that. Now I want a mirror, as well, so this gate's going inwards,
you know, and not outwards. So I'm going to also come in object mirror on the
Y, and there we go. Now, you can see that now we've mirrored it,
it's a little bit out. So what I'm going
to do is just set it right next to the other one. I've done that, of
course, over the top, and then I can pull
it out, making sure that these kind of
line up, like so. And then what I want
to do now smash it up. So let's smash this up. So first of all, we'll come in. We'll come to this part,
and I'm going to make sure I'm on itch let, and
I'm going to come down, and you will see because, yeah, because I mirrored it, I need
to move those into place. I'll do that in a
minute because I can see I move my gait, but not my bolt, so I'll
start that in a minute. First of all, though, let's come in. Delete that other way. So delete vertices. And now I want to do is grab it and move these bolts
into place first. We'll do that first. So all of these, we want
to spin them round. Now we want to span
round based on this. So I'll press I'll first
of all, go to this bolt. I'll press L, shifts,
cursed or selected. Then we'll grab all
these bolts, L, L and L. Then we'll
press little sideways, V, three D, cursor, and then we'll spin these round. So and Z spin them round, get them into a nice place, like so, there we go. Now the next thing I want to do is I want to bend this over. I wanted to make it a lot more crooked or
something like that. So what I'm going to is
grab all of my gait. You know what? Before that, I'm going to pull it from here. So I'll just grab these two,
shift, cursed or selected. There we go. And then what I'll do is I'll
grab my whole gait. You can do this with
any part you want. So I'll grab my whole gait and then I'm going to
bend it a little bit. I'm going to press R, Y. Then it a little bit,
and there you go. Now you can see it's looking
a little bit crooked. Press a little sideways V again, individual origins,
grab the top off here. And now I want to do
is pull these out. So I'm going to come in,
grab just this one here, press the little dot,
then I'm gonna press Alt Shift and click
proportional editing on. And then I'm just going
to wing it, you know, wing it, but we want to make sure that we're only
pulling connected only on, like so, and we're just going to pull them into place
because they're bent, so it doesn't really
matter if it's, you know, a little bit crooked
or something like that. So if I grab this
one coming out here, press the G born,
pull it into place. And then we'll do this one here. Shift click, pull it into place. Like so. There we go. And now we can see.
It's a little bit bend. It's exactly what we
want. Next of all, then, we want to smash this up. So we want it come
in, probably broken, going, you know, maybe we'll do it the
other way on this one. So what we'll do is
press one. You can see now how bend that is. Looks really nice. And then
what we'll do is we'll bring in a plain x 90. And what I'm going to do is
come from the top this time. So I'm going to come from
the top Ess and's head, and where do I want it to go. So let's first of
all, we'll have it up here coming down to here. So what I'm going
to do is press K, come in, break it
down here. Like so. And all the way down to here
for us the enter bottom. And then what I'm going to
do is grab just the top. And I'm going to
press Pete selection, split that off, and then
go to grab this part, delete out of the
way, grab this part, pull it over here, tab A, E, pull it through. A shift and end just
to spin that round. And there we go. That is
going to be our boolean. As always, retail you transforms grab your
boolean or your cutter, grab this one, Control minus. You'll get this error, as we already know,
but there we go. That is what we're wanting,
something like that. Then what we'll do is apply our boolean, delete the cutter. There we go, guys. That is exactly what we're looking for. Now, the parts
that we need them, I think, are pretty much done. So if I move this over here, move my gait over to here. So we've got this
part. We've got this part in the center. We've got this broken
part. The last thing without we're going to need
is just the top of this. So we'll just have
a top of this. So what I'm going to
do is just press. I'm going to press Shift D just in case we want to lay
a piece on the ground. And then what I'll do
is put this in place. I'm going to press P
selection, and there we go. Now, that was a long part of the course,
creating all of these. And more so because
I moved over, I'm just going to
put this into place. I will join it in
there, eventually, but not right now because
I want to come in. And actually give
these some textures and things like that because
that's quite a long process. And for now, though, I can actually delete these
out of the way. So that was a long part of the course getting
all those ready, way, way more difficult
than what I remember, but at least now we've
got through that. It's done. It looks fantastic. And now we have our
cemetery ready to go. You can test these out, as
well, because you've got this. You can come in and, you know, test this against here
and all that other stuff. So now let's prep for materials
and things like that. So before we finish, let's make sure Everything is joined. So all this is one
part except this, of course, making sure it's
got a bevel which it has. Let's come to this
one. Is that the same? So let's right click
Shade Auto Smooth. Let's also come back to them, press Control A or transforms, set origin to geometry, like so. And what I want to make
sure is just a little sideways Vs and individual
origins, which it is. Now, let's come to the next one. This has got a Bevlon.
This has got a Bevlon, let's join them both together. So Control J, Control A, or
transforms, setiginGeometry. Let's close that up.
That's that one done. This one, Control
A, A transform, set origin to geometry, close that up. Now
run to this one. Let's join it both together. Control J, Control
A, A transform, set origin to geometry.
That's that one done. And finally, now this
one, let's close it up, resell the transforms
origins geometry. And there we go, guys, now we're ready for the next stage, we'll actually get
these painted, and then we can move
on to the next part. Alright, everyone, let's save our work, and I'll see
you on the next one. Thanks a lot. Bye bye.
80. Smart UV Project and Linked Materials Workflow: And Welcome back, everyone to the Haunted Street environment Blender to Unreal. This is where we left it off. Now, I'm going to
show you a little bit of an easier way once you've got everything in just to make sure everything looks
kind of the same. But first of all, we have to do the kind of monkey work
first. So let's do that. So what we want to do is we need a few materials on these.
We're going to need metal. We're gonna need
stone, light and dark. Basically, for the
whole of this, that's the only materials
we're going to need. So if we come to this one first, let's go over to materials. Let's click the down arrow and what we're going
to look for then. I think we'll do
probably metal first. And the reason is because
this is mostly metal, I don't want to click
on all these parts to do that. So I'm
going to click metal. I want to put it
on material mode, and you'll see that
the metals come in, plus arrow down, and then
we'll do the stone light. So stone light, and then plus down and
stone light stone doc. There we go. Stone doc. No one there. Okay, there we go. And now I want to do is I'm thinking that I
just at the moment, need to make sure that the parts have what I
actually want on them. So I'm going to come
to this one first. I'm going to press
L on the top of it. So I'm looking at my
reference and just seeing this part here
is all stone dock. So first of all, I'll go
to assign the stone dock. I'm not going to worry
about unwrapping it yet. The next one down there. So all of this part here is going to be stone like, so
I'm going to assign that. Then what I'm going to do
now is work my way down. So the next part here, this part is going to be stone dark. So let's assign that. The next part down is
going to, of course, be stone light, so
let's assign that. These two parts,
then, is going to be stone, dog, stone dark. And then this will be stone, just this part here actually, I'll just go back Stone
dark, click a sign. And only this part is
going to be stone. So this part here will
be stone, click a sign. And then this part, Alt
Shift click Control plus, is going to be
stone dark as well. So something like this
is how it's going to be. So the moment, you can see, it's looking yeah, it's
looking pretty nice. Now, we could do it another
way where we would bring in, you know, three different
materials, red, blue, and green or something, so we can really see, you know, what we're actually doing here. You can do it that way if you're getting a
little bit confused. Now, what we'll do now is this, exactly this on this one. I think it's going
to be better if we unwrap this a little bit just to make it a
little bit easier. So what I'll do is just press A. We'll do a basic unwrap for now, and all I'm going to do
is smart UV project, click Okay, and unwrap it. And then now we kind of a better idea of what things
are going to look like. I'm not going to worry about
wrapping it properly yet. What I'm going to do
now is grab this one, grab this one, press Control L, and I'm going to link materials. Now, because we have
that metal in first, that should make it
really easy for us. Now we basically need
to do is copy this. So if I come to this part here, I'm going to
click this part. And what I'm going to do is
set this to stone light. I'm also going to
just set this part to stone light. So click assign. Now I'm going to do
is press A and going quickly unwrap with Smart
UV project just like that. And we should end up with
something like this, which is not right
because, of course, I need to make sure that this and just this bit here
are the stone dot, but you can see
how it showed up. That's the main thing, so shift click Control plus Stone
Doc, click Assign. Alright, now we're
on to this part. Again, we'll come in, grab this and this Control, and we're going to
link materials. And then what we're
going to do now is on my own reference, if I come in, and
click on this one. Second, guys, Stone
dark, stone light. Okay, so the ones
underneath a stone light, and these ones are stone dark.
So I'm going to come in. I'm going to make sure
I'm on Edge Select, and I'm going to grab
each part of these, and we're going to put it on
Stone light, click a sign, and then grab this part here and put it on Stone
Dk, click a sign. And I think I already
unwrapped these. So did I unwrap them? Let's
just unwrap them quickly? Yes, there we go. Now
they're unwrapping. Alright, now this one here, pretty much follow in
the same as over here. Again, I'm going to First
of all, I'll wrap it up. So you smart UV project. Click Okay. There we go. And then what I'm going
to do now is I'm going to go to my reference again just to make sure
I'm getting this right. And the first part of it. So this part here is
going to be stone dark, and so is this part under here. So I'm going to come
in, baselect like so, I'm going to zoom into it. I'm going to press L on this part here and
this part here. I'm also going to grab this. Going to grab this one, pressing Control L link materials. Now, these two parts here
are going to be stone dark, so I'm going to click a sign. Like, so this one
here is going to be, of course, stone light. So I'm going to come in,
gelet, go round to the back. Stone light, click a sign, and now working my way down. So stone dog, stone
dock, stone dock. So let's come in with
these, not that one. This one here, Stone
dock, click a sign. And we're going to hide
those other way for just for now and then come
into each of these. And click on Stone
Light, click a sign. Lt H, bring back everything,
and there we go. We've got our transition there. Let's come to this
one. This one's easy. We'll just grab this and this, press Control L, link materials, save our work so we
don't lose anything. And then what we'll do
is we'll come in now, press tab, A, stone
dark, click a sign. Grab just this one. I've got both of these,
select to the moment, just grab this one and
then A, U SmartUVPject. Click Okay. Now,
that's that one. Now let's come to
the final one then. So I'll grab this. I'll grab this one, press
Control L, link materials. And then what I'll do
now is, this is ML. We definitely want
that. What we're going to do now then
is select this one. This one is, of course,
stone dot, click a sign, and then we're going to hide
the other way and then come in and select all
of these parts, and we're going to put it onto
stone light, click a sign. Now, finally, oltH Make sure
we've got this one grabbed, press tab A smart U V
project. Click Okay. Okay. Miss this one. I
missed this one. I don't know how we
ended up with that, but let's just grab
the whole thing. Metal, sign, come to this one, and then click this
Stone Dk, click a sign. Come to this one, L, L, L and L, and click Stone
Light, click a sign. Okay. We've got
everything, guys. All right, so we
can see we've got a problem with this.
So let's come in. And the reason is
because we've got some some seams on there? Don't like, like a
sign. There we go. Now we definitely don't
want seams on there, but we'll do these one step at a time. Now,
why do we do that? The reason we did
that is because now we can unwrap
everything together. Now, the way that
we're going to do that is we're going to select everything with
the same material. So if I come in and
grab all of these, like so, press the tab on, double tap the A, and
what we want to do is select select similar
buy materials. So let's have a look if
we've got actually select similar direction
seams. You know what? We might not be able
to do this because I thought I thought we could, but the thing is, I think,
let me just have a look. Oh, yes, I've not
growing material selected. That might be it. Let's grab one of
these and then select. By material. There we go. Okay, I did work. Okay, so now what we can do is we
can go over to UV editing, press a little dot bon just to bring back everything, press U, smart UV project, click on wrap, put this on material. And what we can do now
is move all of these at the same time because now we can really see what they're
going to look like. In other words,
if I get this one looking right, so
press the S but. Without proportional editing on. So press the S born because you don't want any bent seams. Get this one,
right, can see that the rest of them follow
exactly the same. So they're looking
exactly the same. Now, if I come in, press the S bone and bring
out even further, now I can see I can
get in something we want. And there we go. Now if we put some rendered view instead, make sure
it looks right. That is looking very, very nice. Now, let's come
into the next one. So now we'll do
all of the stone. So if I grab this
one, it is stone dk, which means now I
can come up to the select, select similar material. It will select when I've
grabbed them all, all of them, Bpress tab, double tap the A, come into this one,
select similar bimterial. It's going to select
every single piece. Now, I can see that this here
shouldn't be stone dark, so I'm going to quickly go in, change this to stone light, and I'm also going
to see if this, this is also stone
doc, and it should be. I thought we actually fix this, but anyway, I'll go in, hide them all out the way,
put it back onto object mode. And come in and put
these on stone Light. There's bound to be some
cups along the way. So let's click a sign, and now I'll press tech. And now I'll do is put it
back on material mode. I'll double tap the A. I'll
go back in now, select this. This should be everything
that's stone doc. So this should be these
tops so let's select. Select similar material,
and I'm just going to make sure everything I wanted
is selected, yes, it is. And now I can do is,
I can press you. Smart UV project.
Click on round. And because we actually made sure everything was done before, so we resell of our transforms. The only problem we
might have now is the fact that some of these
have got seams involve. We're going to have a look
at that and just make sure. So A, S, let's pull
it out like so, and get it to what
we actually want. That on the stone dark side, is looking really nice. Now, let's do the stone light. This is where we might
have some problems, and the only reason is is because this has a great
big scene going down there. So instead of, you know, waiting for the problem to
rise, I'm going to come in, L, I'm going to press Control A, and I'm going to
clear the scenes. Then what I'm going to do
now I've got this selected. It's on Stone Light.
So select select similar and we haven't got it bid material because
we need to be on FaceLg. So select similar by
material. There we go. Everything is selected
that I wanted. Let's see how this wraps then.
So I'm going to press you. Smart V Bj. Click Okay, A, S, bring it out. Let's have a look. And there
we go. There we go, guys. Now, you can see
that sun wrapped absolutely perfectly now. All of these are
unwrapping. All of them are matching the bridge. If you go over and you
measure these against these, you'll be able to see that
they all match, like so. And yeah, really,
really happy with that. Let's put it on Render view. Have a quick look now what
we've actually built. And yeah, that looks
fantastic, guys. Okay, we're pretty
much done here. So what I'm going
to do, you can see now why did it that way. You can see how it's sped up
the workflow drastically. So now we'll go to modeling. And what we'll do is
now we'll finally join this lamb well, put it in the middle first just to make sure
it's in the middle. I'm not happy with how that is. So shifts, cursed to selected, and then grab this one, shift
Des and selections cursor. Then what we're going
to do is pull it up into place like so,
and a mind even. If you press dot, make
it a little bit bigger, so it jaws fits a
little bit better on there without actually
breaking any of this. Like so. Okay, finally, then,
let's join this. It's already should have. It doesn't go any bevel on this. That's one of the
issues when I join it up to this, it will
put a bevel on it. Let's see what it
looks like. Control J. Can see here, it's started now to break
this little bit here, and that is why I'm saying,
sometimes that happens. Now, we don't want
that happening. So instead of doing that,
I'm going to grab my lamp, grab this, press Control
L. In fact, not control. I'll control P, and I'm going
to set parent to object. Now, wherever I move this, this lamp is going
to come with it, and that's exactly
what it wants. Sometimes you just don't
want to join them up. Like with the door handles, you just don't want
to join them up, but you still want
it to be part of it. So we've done it like that, and now it makes a lot more sense. Alright, guys, so
what I'm going to do is I'm going to save on a w, and I'm gonna see you on
the next one. Thanks a lot. Bye bye.
81. Organizing Assets and Creating Broken Variations: Welcome back, everyone to the
Hunter's tree environment, blend it to Unreal. This is where we left it off. Alright, so what we want
to do now is name them. So what we're gonna do
is grab this one here. First of all, I'll call
this so cemetery gate. I'm always going to I
think, call them cemetery. Rather than me, I
have to keep typing that out. I'm just
going to put it there. So Control C, Enter, and then I'll call
this one. You know me. Cemetery gate broken.
Always simple. Okay, now let's move
to the next one, and we'll call it
cemetery fence. So Oops. I actually copied
that. That's the shame. That's a shame. So
cemetery fence. And then I'm gonna
copy this again and hopefully not make the
same mistake again. So cemetery fence. Let's press Enter, and there we go. Now, let's
come to this one. We'll call it cemetery post. So cemetery post. Not like that, not pod, post. Here we go. And then we'll call this
cemetery fence broken. So cemetery fence Broken. Now, I would suggest
unless you like, you know, World of Warcraft with literally tens of thousands of assets, to name them just as
simply as possible. Don't be too extravagant
with your names. All right, so this one will be cemetery stone top,
maybe, something like that. So we'll call it that
cemetery stone top. Here we go. Like so. Now let's let's before we
actually put them in, you know, their own place,
let's just press little question
mark just to bring everything back just to make
sure what I've called it. So these are props,
chimneys, gravestone. So if I call it just cemetery,
that should be okay. So if I bring all of
these now to here, press the N boorn new
collection, call it cemetery, minus the space bar, space cemetery, and there we go, we've done that, click Create, close that up, get rid
of my boolean cutter. And now I should be
able to come in and just grab all of these, like so, press seven to go over the top, and let's drop these into place where they're going to go. Then what I'm going to do
is just grab this door, press Shift D, and then
just call it cemetery. So control V. There we
go. Minus the space. Press the tab but, I get
a little bit bigger. And there we go. All right. Finally, guys.
Let's save our way. And we finally done
with those parts. Now, let's go to our reference let's zoom out a little bit. So we've got that one.
We've got that one. So we should have
one, two, three, four, five, six, seven. I just want to check
that before finishing. One, two, three,
four, five, six. Why is there that one? I think I think I missed. Let me just have a check.
Not there. There we go. I think I missed one of these. And what else did I miss? So I've got this. I've
got a flat piece. I think on my flat piece, what I didn't do is I
didn't create one of these, and I haven't sure I created one of those.
Let's have a look. I created one of those, but
no broken one of these. So you know what I'm going
to do? I'm just going to. I'll grab just this
and then I'll give us a little bit more
actual pieces to plate with because what I'll do
is I'll grab this one, and I'll press Shift
D, bring it over then, and then I'll press P selection, split that off, reset the transformations just so
it's right in the center, set origin to geometry. Now, this is fence, and I'll call it symmetry fence hf like so, because
I did forget. And then finally, we just
want to break this part off. So I'm just going to press Shift D. And I'll bring it
I'll bring it to here. I'll pull this over here. I'm just going to
grab this, press the little isolation button. Shift desk, c to selected. Shift D. Let's bring in a plane, Rx 90. We want to cut this down. So I'm going to put it
where I want it cut. Let's look at our image
again so we can see here. It's kind of cut, and it's still got a
little bit of that on, as you can see, so a
little bit of this. So let's actually do that,
so I'll put that down. So we want it come in probably
from here coming down, broken like that. So
we'll do that now. So what I'm going to do
I'll pull it forward, like so, press one to
go into front view. Let's see if I can press the tab button. Press
the ghost button. That's not going see through it, so let's put the Y frame on, and then we'll press tab, press K, and I want to
bring it from here, we'll break it down
here going across here. Now, don't break at the corners. It's going to make
your life hard. So just bring it over here, like so, and there we go. Now what we'll do is just
delete the bottom part. So just the bottom section with base leg, there's
a little face. Delete. Bases. And now
let's pull it back. So E, pull it back into place, put it on object mode,
A, shift and then. And then all I'm going to do
now is grab this, grab this. In fact, before
we do that, let's just reset the transformations. And then what we'll do
is we'll grab this one, press control minus, and you can see we've got a little
bit of a problem there. So I just want to make sure
it's going to be on float. Now, that's worked, except the fact that you can see
because this was two meshes, let's put it on to
difference yeah, probably we probably
on this one, going to have to just fix that. Unfortunately. So let's press Control A. Let's apply that. Come to our bevel, press delete and then all we'll do is we'll just
fix these parts. So I'll come in, old Shift
click, old shift click. You can see that I've
grabbed the wrong one. So Control Z, old shift
click, right click. And what we're going to
do is bridge edge loops. And we should end up with
something like that. Should I should be very clean. We'll do the same
thing on this as well. Old shift click.
Alt Shift click, right, click, Bridge edge
loops, and there we go. And now let's try doing
the same thing on here. So Alt Shift click,
Alt shift click, right, click, Bridge edge
loops, and there we go. It should be relatively clean, look like something like that. Now the thing is, if I
put this on material, of course, it's going to be a bit of a mess,
and we don't want that. So all we're going to
do is grab this one, grab it from here
where we cut it, and grab this one and this one, and I'm going to control
select this one. I'm going to press you, and
I'm just going to unwrap. And there we go, now you can see there's
a huge difference there. So finally, I'm
going to zoom to it. I'm going to grab it.
I'm going to press S, bring it down to the same
scale as the rest of it. And there we go, guys,
that is done for us. Now, let's go back to modeling. Let's press the
little question mark. Let's bring everything back. And then we'll call this
one emetuPost broken, and it didn't take too long. To get that in place. And again, we'll get rid of this boolean cutter out of
the way and close that up. Now let's go to file and save. And now we should have one, two, three, four, five, six, 78. We've actually got an extra
one because we made this one, but hey ho, it's all good. Okay, so let's come
to our reference. Now, what we working on next? So if we come in, we'll have a quick look at
our contact sheet. We can see now we've done this. We've done all of
these, done this, done this, done
these, done these. We've done all of our
graves, all of our props, our lights, we've
done these really, really hard parts,
done these props. So what we got we've
even done our chimneys. So the next two things we've
got to build are these. And then this sign, I think we'll take something
easy now. You know what? I think we'll do that. I
think we'll create this sign. It's much it's a little
bit of a rest buy before moving on to something
a little bit harder. So we'll do that next.
Alright, let's put that down. And let's first of all,
then get ourselves set up. So well, first of all,
Start with a piece of wood. So if I come over here, I'm going to steal
this piece of wood. I'm going to press
Shift D. I'm going to bring it over rather
than do all that again. And then what I'm going to
do is rotate this round and press the dot bon,
rotate it round, so Y, 90, and I'm going to
go onto the item itself. And I'm looking
how long this is. So I need to resell the
transforms, and there we go. We can see on the X, it's around 2 meters, and that's going to fit
perfectly with what I want. Why is that going to fit
perfectly with y one? Because you always want to
make it a little bit longer, you know, than what you've
got going into the wall. In other words,
origins, geometry, you want to make sure
that if the signs over, you've got enough to put it into the wall and stick out
as far as you want. So you want to make
it a little bit tiny a tiny bit longer
than what it was. Okay, so now we've got
that. What else do we need? Well, we need our
chain, as well. So let's use this chain. So all I'm going to do
is grab this chain. Like so, and then I've got something to
work with on there. I'm going to press Shift
D. I'm going to bring this over then and put
this near this part. I'm going to press P
selection, separate that off. And now I've got these
two bits to work with, which means now I can just press the little question mark, isolate everything
out, and there we go. We've got something really,
really nice to work with. Now I'm going to
isolate it back because the one thing I forgot is
our little guy over here, we really need to
use him as a scale. We don't want to size like the Yankee stadium screen
or anything like that. I want to make it
nice, an ideal size. So I'm going to grab
all three of these now, press a little question mark, and now we can begin. So let's first of
all, put the sign up. You know, if it was up here, how far would it be hanging around? You can also see as well that this has been reset the
transformations, this one hasn't. So I'm going to reset all
the transforms like so, and then I'm going
to put this into place where I want to go. I'm going to put it in
the middle of here. So let's first of
all, grab the middle. So shift this because to
selected and grab this one here, Shift D, and selections cursor. Let's pull it over
where we want to begin. We can move those,
but the main thing is just making sure
it's in the center. We can also make
more chains as well. Just depends how you want it. You know, to make more
chains, it's pretty easy. We just press Shift
D. We bring it down. We put it there,
and there you go. More chains, easy as that. Now to start with, I'm going
to just delete these off. So we'll just have an extra
link, so it's going that way. Press delete and Virtss
and there we go. Finally, then let's
join these together. ConJ and now we can
save that'll work. And we're ready to start on
our sign on the next one. All right, everyone. I'll
see you in the next one. Thanks a lot. Bye bye.
82. Model a Detailed Hanging Wooden Sign with Bevel: Welcome back everyone to the
Haunted Street environment, Blender it to Unreal. Now, let's look
at our sign then. So first of all, our sign we
don't want to do, you know, what we've already
learned, where we insert we end up
with those very, very modern angles. We
definitely don't want that. So what we want is we want
some wood going this way, two pieces of wood going
down the wood on the bottom. That's the way that
we want to do it. So we will start with
an actual plane. So we're going to start
off with a plane X 90, and let's get it to the scale. Now, we do want this
sign to be square. I want it to be
relatively square, and we want to see where
it's going to fit in first. So relatively square. You can see if I
made it this big, it's quite a big
sign, but it isn't completely over the
top. Always move it in. You don't want to hanging
out over here that looks, unless you're going
for a particular look, and it's more rectangle. So if it's like this, you
can get away with that. If it's a square one, though, put it a little bit
behind where this is. If I press one, you can see it slightly behind
where that is. And then we can
pull it up because this part of the wood is
where it's going to be. Now I want to do Concho law. Left click, right
click, Concho B, drop it down, and then let's work out the
size of our wood. I'm thinking
something like that. Contola left click,
right, click Control B. Let's pull it out then to the size of the wood
on this part here. Now, these maybe maybe slightly out. It
doesn't really matter. What we want to do, though, is we want to use this part
as well. So this part here. So what I'm going to do I
have not as you can see, it's all two D at the moment. It's not three D, and that's the way that
we need to have this. So what I'm going to
do, first of all, is split this away from these,
so I'm going to press Y. I'm going to pull this forward. That's going to be my sign. Then I'm going to press Shift D. I'm going to pull this back, that's going to be
the back of my sign. Next of all, then,
he'll want to come in, control, and bring in some edge loops for
the wood behind. Now, I'm going to do this one at a time, as I've done before. So control control, like so, something like this that
look a little bit uneven. Let's bring that
up. Let's bring one more in. And there we go. That's looking. Yeah, I
think that looks good. Next of all, then, let's come in and mark a seam
on each of these. Right, click. Mark a seam. Let's bring in some
edge loops, then. So four, left click, right, click, and there we go. Now finally, then, before
we actually make our wood, let's come in, grab
each of these. Let's go up to mesh, and let's come
down to randomize. Let's then bring it down to something a little
bit more useful like that. That looks okay.
And there we go. Pretty much now, once
we split these off, so we're going to
split these off, and split. These off here. So press the Y button, split them off, and now we'll bring in some
more edge loops. So three, we'll bring
in two or three. Again, we'll bring in three, and then we'll bring in three. Like so, left click,
right, click. And now we do is grab all
of these. Same thing again. So we're going to go mesh,
transform, randomize, turn it down to there, and there we go. All right. So now if we bring these back, so if I press E, should be able to bring them back to
get the size I want. I'm going to then press A, shift N, just to
spin those round. And then what I'm
going to do is just line them up then with my chain. Like so. That's looking good. Now let's do similar
thing to here. But this time, we're
going to split them off. So I'm going to grab this one, this one, and this
one, press the YB. And then what I'm going to
do is I'm going to grab all of them with L.
I'm going to press E, pull them back into place. Okay, let's put that into place. So if I just grab
these ones here. So press Control
plus a few times. Put it into place
there, like so, grab your sign then, drop it into place wherever it's
going to go into there. And I think we're
pretty much done. One last thing I want to
do is pull these out, pull this out, pull this out, and leave that one as is. Let's rotate this a
little bit. Like so. Slightly, guys, very slightly. Not too much. There we go. Now let's grab that chain, Shift D, pull it
over, there we go. Now, the one thing I would
say, because this is a sign, I think these should be
a little bit bigger, so I'm going to make them
a little bit bigger, just to hold the sign
a little bit easier, like so, and I think that looks a little bit better
than this one here. Wha I'm going to do
is press delete. I'm going to bring this
one over. And there we go. Alright, double tap the A. Now, the other thing is, do
I want to drop this down? Because at the moment, we've
got a little bit of room where we can actually drop
it down a little bit more. I think that looks
really, really nice. Now, the other thing is,
don't forget about the tops. On the other one,
I did forget about the tops, but I
always recommend, you know, you put
something here, so the metal has
something to go into. And it's a very, very simple thing to put something there. You just need a cube basically. So ever grab this one,
press shifts, so shifts. Custer selected, Shift A, bring in a cube, make it smaller, and then
just bring it up into place. It's going the other way around, so S and Y, laid out. Like so S and Z. Make it a little bit chunky, like so bring now
everything down. Jaws to tad, including the sign and the
middle of the sign, hopefully, bring it down, so it fits in nice
and neatly there. And then I'll just pull
this down a little bit, and now I'll do
the outside of it. So all I'll do is
grab the top of here, E, S, pull it out,
E, pull it up. And you should have
something like this. And finally, we'll just
add because we can, and we've done all that work, so we really know what
we're doing now. We will just add
a bevel on here. So all I'm going to do, first of all, resell my transforms, make sure the bevel works, press the Dub on so I can
actually move around here. Press tab, Control B, increase it. There we go. Right, click, shade, to smooth. And that is that
part actually done. Now shift D, bring
it all over here. There we go, looking nice. And now let's come to our bevel. So what we'll do is
we'll grab all of this, press Control A,
resell the transforms. Adding a modifier,
we'll generate a bevel, set it to nought point
not naught three. Like so, right, click,
Shae so smooth. There's the back of the sign. And there's the
front of the sign, and now we're going
to do is grab this, this, and this, press Control J, then we'll put the bevel,
hopefully on there. If it hasn't put it on
there, press Control A. If that still doesn't work, come down to geometry,
clamp overlap off. Now you can see it's working. Make sure this bit's okay. And now what we'll do is
we'll join all of this up. So this is set to
point no three, which is great because
that's what we based it on. So what I can do is I
can grab all of this, this one, grab this one last, press Control J,
and there we go. Now, right, plate
shade or smooth. You can see we might
need to turn up the smoothing a little bit because we have got a
little bit of this. If we come down towards
a smooth and turn it up, can we turn it up, actually? Yeah, I don't think we'll get away with any
more than that, so you know what?
I'm gonna leave it. No want to worry about
that. Tiny, tiny detail. Sometimes if it's not gonna
work, it's not gonna work. Now, one thing I do see with this is these aren't
dropped down enough, so I'm going to
drop these down a little bit further in place. And then I'm just going to
make sure I'm happy with that. You might want to put another male part on here
if you want to. I'm not gonna bother doing that. All I'm going to do
then is control A or transforms the
origin to geometry. Now, the front of the sign, this is where the
transparency is. So we don't actually want we
need a decal on the front, so I'm just going to press
Shift D and bring it forward. To there. And then I
should have that decon. I'm going to just slip
that off just for now. I'll grab it then and just
hide it out of the way. Now, let's deal with
the rest of it first. So what I'm going to do is, you can see we've got this
woods already done for us. The mel here is already done. So let's come in,
and what we'll do is we'll come now to
these parts first. We'll do this. And what
we'll do is press U. Smart UV project. Where is it? There it is. That's okay. Let's come to our material. You see we've got this
odd material on here. Let's click on this one,
click a sign. There we go. Don't need to worry too
much about these, honestly. And then we'll come
to these parts here. Now, with the wood, let me just see on
my own reference. So I've got wood light. So these are going
to be wood light. So we've got wood red, windows light. We
don't want that. So let's let's press
tab, minus that. We definitely don't
want that. And we definitely actually
don't want this, so I'm gonna minus that off. Then what I'm going to
do we've got Wood red. Let's click the plus button, click the Lil Down arrow,
and we're going to go wood, and the one we want is
Woodlight and we're going to press tab and we're
gonna click Assign. Alright, that's the wood
light. Now, let's come over. We can see it's going
the wrong way round. So let's come over
to our UV map. Let's unwrap it. So U, smart UV project, click Unwrap. There we go. Press A, 90, let's get it looking
the way that I want it. That's looking pretty nice. I would say it's a little bit higher red than the one up here. So what we'll do is we'll
make it a little bit smaller, like so, and there we go. Now, the other part. So let me look. This part is the wood. So what we'll do is we'll come. You can see this part on the
frontier should be metal. So I'll just go in and
assign that like so. I'm not going to worry too
much about that right now, but the back. Let me
just have a look. So the front part is going to be metal and the back part
is going to be wood red. So this is already on
wood red, which is great. You can see it's already
going the right way as well, but I'm going to wrap it because it's still non wrapped properly. So I'm going to go smart
UV project unwrap. I'm going to spin it around
then 90 and there we go. Now I'm going to
make it a little bit smaller just so it
fits the scene. And now finally we
need our decal. So let's see, first of all, do we have our sine deco. So I'm going to click
plus Down arrow, look for sign. Not got it there. So let's go to file, save our work, Bile, append. And what we're
looking for, then, let's find and a resource pack. Let's go in here, materials, and we're looking for sign. So stone lights, rain, and we're looking for let
me see what it's called. So it's called the in sign. There it is. Bring that in. And then let's go down
and there's our insign. So we've got that in there now. Now, the one thing I did
forget is if I press ultage, it should be actually on here. So let's minus this off, minus this off, minus
this off, minus this off. Let's put it on
insign. There we go. Yeah, it's time
to come together. Okay, so that's our deco. You can see. You can see
straight through it. The one thing is, I need to actually measure
this properly. So if I press A,
you can see this is where it should be.
It's not quite there. So all we'll do is
we'll just pull it. Hold in the shift, pull
it to where we want it. Press GM Y. You want to drop it down a little bit. There we go. Double tap the A. And now you can see that's looking
really, really nice. Now, I would say it's
a little bit of here. So maybe Control A will transform
set origin to geometry, pull it back just so
stuck in front of there. And then I just want to
come to this part here. And what I want to do is just, I'm not going to actually minus off me inside. Do you know why? Because I'm going to
grab this, grab this, join it all together
with Control J, and then it will just
add it on anyway, so I don't need to do anything. Alright. There we go, guys. That is the insign done. So on the next one we'll do
then is we'll name this. We'll put it in its own group, and then we'll move on
to the actual lampost. I think lamppost are the last one before the
roofs, and then we're done. So we're nearly done,
guys. Alright, everyone. So hope you enjoyed
that. See you on the next one. Thanks
a lot. Bye bye.
83. Build a Stylized Lamppost with Chains and Supports: Welcome back, everyone to the
Haunted Street environment. Blender it to Unreal. This is where we left it off. Okay, so now let's
go over to modeling. And what we want to do
then is, first of all, make sure you grab
this, make sure all the transforms are reset. So it's a origins geometry. And then what we want to
do is call it the insign. So in sign and ever inventive, I'm going to put it in a
collection called Insign. It's like that. Okay. Alright, let's press question mark, bring back everything. Let it load up.
Okay, there we go. And then what we'll do is
we'll drag it over to here, grab this one, Shift D, and we'll also press tab. And in sign, like so, press the tab board.
There we go, guys. That's that. Alright,
so now I want to do is gramma light. Always shift. Don't ever
just bring it over. Don't forget that, guys,
'cause I'm telling you, I've done it so many times
where I've got to go and rebuild something because
I didn't press shift. I brought it over and
then I'm like, Oh, no, I used all my supports or
something. So don't do that. Get used to not doing that. Alright, now what we
need is a lamppost. Now, luckily for us,
with a lamppost, we only need to create one of them because they're
basically the same lamppost. Now, first of all, I want
to get the z axis going. So what I'm going
to do is just grab this shift desk Custer
selected, and then shift Day. And what we're going to do
is just bring in a cube. Now, I just want to
measure the height. So 3 meters press one, and let's bring it up to
where we actually want it, something like this.
So that's the height. Then what I'll do is I'll
grab all three of these, press the question mark,
put it into object mode, and now I've actually got
something to work with. All right, so let's first
set out our width of this. We now know the height.
Let's set out our width. So I'm going to press
Alt Shift and click Altern and bring it in to the thickness that
I actually want it. So you can see here
this is kind of thick. I mean, I know lampost
needs to be thick, but not quite that thick, so let's bring it
down a little bit. And I think that's a good
place to actually start. So now I've got a height we
can actually work on now, building now where we actually, you know, want the
parts to come. So first of all, what I'll
do is, I'll press Shift D, and I'll rotate this round, so I'll win 90, press
the S bone, bring it up. To where I want it, press
S and X and bring it out. How far is the sign post
going to stick out? This is way too far, so S and X, pull it in. This
is more like it. And then if we do it that way, then we can have a support
on this part as well. So we can have the top on here, support going here, and a little bit sticking
out on this end. And I think there
we've nearly got it. Now, they're both
pretty much the same. Apart from on one of the sides, we actually have
a direction sign, so we'll bring that in first. That's another reason why
I brought this lighting? Because on one side, it's
going to have a light, and on the other side, it's going to have a chain
with directions. So what I'm going to do
is I'm going to come in, first of all, I'm going to grab these parts here,
so just the chain. I'm going to press Shift D. And then what I'm going to
do is bring it over. I'm going to press P selection. And I'm going to come
back to this then, reset all the transforms. So set origin,
geometry, press one, and then put where I
want my actual sign to go and just kind of laying it out how I
want everything to go. Now, I'm also with
the sign going to make these chains
a little bit smaller, stick them into place like so. And now let's put
in our support. So I'm just going to grab
this part here, press L, shift D, bring it down.
I'm going to press one. And what I'm going to do now
is just make it smaller, first of all, Rotate it. So if I press R Y, I should be able to
rotate that into place and get that to
where I actually want it, which might be something like. Now, rather than trying to, you know, it looks a little
bit thick at the moment. I don't quite want
it that thick. So what I'll do is I'll
come into the face. Now, rather than
pulling it down, you know, on the
Gizmo with Global on. Always said this to
normal if you do near an angle, get used to that. It makes things much,
much easier to control. You can see now that's
looking much, much better. And then what we want
to do now is we want to dictate where kind of these parts are going to be and where the end's going to be. So I'll do the end first. So let's see what
the end looks like, and then we'll get our
sign in there and we can move the end
forwards and backwards. So what do I mean by that? Let's come in, first
of all, grab this end. And what I'll do is I'll press the Fb just to fill that in. I'll put this back
then on Global. And then what I'm going
to do now is I want this end to come out a little bit and kind of be beveled off. So what I'm going to do
is I'm going to press E, pull it out to
something like here. I'm going to press
Control R, left click, right click Control B, drop the bevel down to how
thick I want this end to be. And then I'm going
to come in, grab this one and this one. I'm going to press
Control B then and hopefully bevel it off to
where I actually want it. So now you can see
it's a nice sign pointing the way that
I actually want it. Now, we already know that
because we've done that, we'll have this part here, which we'll know if
IpressG is not connected. So let's just press
A, first of all, mesh, cleanup, merge by
distance, four verts move. So that's fixed straight
out of the bag. Then what we'll do now
is where do we want this change come down
to and off of here. So what I'm going to do is I'm
happy with it being there. So I'm going to press Control. Left click, drag it
around to there, and then grab both of these, press Control B, drop
your bevel back down, make them relatively thick. So something like this, press E, enter Alterns and
then pull them out, and these will be the mel parts. Now, you can see that when
I've pulled them out, they end up slightly rounded. Now you can put the
offset to evenon, but I think it's more
a case of if I go back before extrude,
press the tab button. Let's reset all of
the transforms. So set origins,
geometry. Not that one. Let's right click origin, two geometry, right, click, Shade Auto moove as well. And then what we'll do
is go back in, press E, enter AlnS let's see if
that makes it any better. They're still round, but
you can see, though, now they're actually
level offset even on, and there we go. Now, the other thing I
like to do is make sure that I've got it on
individual origins. Press S and X, and just bring them
in a little bit. And I think I've made him
a little bit too big, so I'm just going to drag them back in, holding
the shift but, and then SNXPud them
out a little bit, like so, and I think that
then looks much, much better. Now, let's come to our chain, put it right in the middle. I want this chain to
be much, much smaller, but before I actually mess
around with the chain, where do I actually
want the sign to be? You can see my guy still
on the ground plane. If I have my sign
round about here, I think that's going to
look, you know, about right. So we'll do that next. So let's now create that sign. So what I'm going to do
is I'll come to my chain, press shift desk
custom selected. I'm going to then come in, and I think I'll bring a plane
in actually to start with. So RX 90. And I think, yes, I've still got that on. So I'll just check my normals to make sure I've
still got it on. Always good to keep that
on guys because it really, really does show you if there's
any issues with the mesh. SN, bring it down. And then what I'll
do is press S and X and pull it out to
where I actually want it. Now, I want it either. I don't want it level with this. So just don't make
it level with that. Either have it before that or have it after that, whichever
way you want to do. I think on the original,
I basically had it, you know, kind of before we can get away with
having it after it. Then what I'm going to do now is I'm going to first of all, I think I'll make I'm
just wondering if I want to I want to uneven it first
and put the other bit. You know what? I'll
do it this way. So what I'll do is I'll
keep this part here. So I'm gonna press
shift D first. I'm going to duplicate that. I'm going to come
to this back one, add in a few edge loops. And then what I'm
going to do is just make them a little bit uneven. So grabbing this and this, mesh, transform, randomize,
turn it down, obviously. So that's turn it
down to 0.2 maybe. Grab the whole thing,
press the E but. Press L on the whole thing, shift N, just to spin it round
to make sure it's right. And there we go.
And then I'm going to make it even more uneven now, like so, like so. And then what I'm going to do
now is bevel off this part. Now, the thing is, I also
want to bevel off this, but I'm going to do them separately. So I'm going
to bevel off this. Before I do that, though, let's
reset all the transforms. Then let's grab this
and press Control B, increase it just to get
something that we actually want. And that's looking, as
you can see, pretty nice. Let's pull this
part down as well. So we'll pull this part down. We'll pull this part
up a little bit, making it a little
bit uneven, like so. Right, click shade or smooth. And now let's come
to this part here. So we'll come in. We'll
press the S button. I'm going to press one, and
I want to make sure that we line this up a little bit
more than what it is. And what I'm going to
do now is come in, grab The vertices here here and here, control, shift, and B, and bring them in, like so. And then what I want is also the back maybe a
little bit as well. So I'll come to here
and here, Control, Shift and B, tiny bit, like so. And I think when I
put this in place, I'll drag it out, but
we'll see how it goes. So we'll put this into place. We'll press the E
bone and pull it out, and that's way too far. So let's put it back,
back, back. Like so. And then what we'll do now
is grab just this part, portion editing on
connected only on. And let's pull that out to
where we actually want it, like so, and there we go. So you can see,
because, you know, this bit is is it metal? The bit that I had?
Let me have a look? No, it's wood, and the
actual front of it is met. So I've kind of made this bear a little bit bend like a
bent plank or something. And the other thing is, let's
just rotate it, as well. So we're going to
rotate it down like so. Now, let's come
back to our chain, make it a little bit
smaller, put it into place. Like, so let's press Shift
D then, bring this down. Make sure this time
that we're actually, you know, in the correct place. So let's bring it down, making sure it's sit flush in there. Shift D again, bring
it down again. And this time, then we can
work out where this sign is going to go and more
importantly, the halfway point. So you can see here,
I'm going to have to come in here, put your ghost on. Like, so halfway
point is this one. So I'm going to
press Delete and us. I'm going to join all these
together now on trolJ. And then what I'm going
to do is turn this off, and now I can see exactly
where this bit needs to go. So if I put this here and see now it's going to go in there, now bring it over to the
next one. So shift D. Bring it over to
here. You can see now I needed that little
bit of extra chain there. What I'm going to
do on this actually is I'm going to bend
it a little bit more, pull it down, and then hopefully I shall be
able to grab this chain, Shift D, Z 90. Without portting on actually, I'll just press Escape,
turn that off, RZ 90. And I'm going to pull this
down into place, like so. Now I can see I'm still
a little bit out. I'm okay with that, because what I'm going to do is
just move it here, and Z very slightly and
then pull it into there, just making it a
little bit off canter. And I think that's
looking pretty nice. Now, the one thing is, I have gone too
small with those. You know I might have gone
a little bit too small. When I look from back here, they look a little bit
dinky, you know? Let's press the Sbard
and bring them up. Let's put this into place. And let's delete that
one out of the way. Let's bring it over.
Shift D. Like so. And I think I actually like that more than what I
had with the other one. Now, let's grab both of these, press Control J, put in our little ghost so we can
actually see inside there. And then all we're going to do is delete this one, this one, and this one, delete
verses turn that off. And there we go.
Alright, so far so good. Now, we've got this
part of the, you know, of our what's it
called? O lamppost? I couldn't get my
words out there. So we've got this
part of the lamppost. We've got this main signing. So on the other side then, we're going to basically
copy the same, and we're then going to think about the top of here because this side
we have, you know, a lamp that we can hang from it, and then we'll have it
coming down here and, you know, why it's not gonna take as long
to finish this one. This one's pretty easy compared
to what we've been doing. Alright, everyone, so I
hope you enjoyed that. Let's save our work as normal, and I'll see
you on the next one. Thanks, a lot. Bye bye.
84. Sculpt a Curved Lamppost and Stone Pedestal Base: Welcome back, everyone to the
Haunted Street environment, blend it to Unreal. This is where we left it off. So what we're gonna do now is, let's sort this, maybe
this pot out first. So what we're gonna do is
just grab all of this, grab this, press P selection. And then what we're
going to do is come back to this post, grab the center of it, so shift
desk, cursed to selected. And then what we're
gonna do is just put our center of
origin right there. So set origin, two, three D, cursor, shift D, and then Z 180 and spin it
round to the other side. I mean, we should end up
with something like this. That enables us then
to decide then. This is the main post. We need it kind of
coming in like that, have a center point and
then coming in like that. So what I'm first of
all going to do it's probably build out the
bottom of this just to get, you know, the kind of
how we actually want it. Or we can actually come
in and first of all, you know, bend it here
and then bend it here. So what I'm going to do
I will actually come in, grab the bottom of here, so pull it up a little bit, and then work out where I
actually want it bent in. So I want it kind of bent
in a roundabout here. So roundabout here like this. So bring it down. Left
click, right, click. It is roundabout in
the center anyway. And then what we're going
to do is press Control A, bring in a few edge loops, five again, control law, five again, left click, right, click, grab the center, put proportional editing on, and then hopefully we can bring this in to where we want it. Now, I don't think
that's going to work, so what we'll do is try root. Let's try root. And we've
tried a few of these now, so we should know
how to do this. Now, the other thing is, I've got one, two, three, four, five, so let's set this
before we do anything else. We'll mark a seam, so now we can see that and then we can bring this in and get it to where
we actually want it like so, and let's do the same here. So S, like so, and there we go. That is
what we actually want. Now, of course, we can see that these parts here, especially, they're a little bit too thick, so I'm going to press S
and Y, bring them in. They're a little bit, like so. Yeah, and I think that's
looking really, really nice. Now, let's work I said that we're going
to work on a bomb bit. Maybe it's easier to work
on the top bit before that. So what I'll do is
come back to the top. I've got a nice, you know, edge loop here I
can actually use. So what I'm going
to do is come in, turn proportionality off, grab these going round
here, press E, Enter. Alternss, bring those
back and then I'll just grab this and
pull it up like so, and there we go.
That's that bit. Now, working our way down. We've got this
center point here. Let's come in, grab
this, press Control B, drop my bevels down, press E, enter, Altnss and
bring that out. Lns, bring it out to where we
actually want it. Like so. And yeah, that's
looking pretty good. It fits the scene
really, really well. And now let's make our way
down to near the bottom. So with the bomb, we'll
start afresh, I think, what we'll do is we'll come in, grab this face here, press
shifts, cursed or selected. And then what we'll
do is now we'll bring in I think we'll
start with a cube. I think that's going
to be the easiest way. So I'll go in and press
Shift. Let's bring in a cube. Let's make it
smaller. Let's press S and Z and bring it down. To the ground plane.
Now, of course, this needs to hold
up a whole lamppost, but you can get away with
not making it so big, you know, because it'd probably
be out here somewhere. So we can make it this
big to start with, but then put a few kind of
stones on the side of it. And I took this actually from World of Warcraft.
That's what they do. So they'll make a base, and then they'll put some nice
stones out there. I think it looks
really, really cool. So what I'll do is I'll press
the Ibn and bring it in. I and then E, and then I and then E and
bring it up, like so. And I think that actually
looks better than my original. And then what I'll do is now bring out these stones
that I'm talking about. So to do that, I will use
I'll use this part here, so shift D, and then I'm going
to go over the top of it. Now, I want this to be right
in the center of here. There is an easier
way to do this. All I need to do is
press P selection, grab this part, Control A, resell the transform, so
it's right in the center. Come to this part here then, and then just grab Yvets shifts, cursor selected, come
back to this part, shifts and selection to cursor. Make it smaller. Pull
it down slightly, and then just grab
the bottom of it. They select press
E, pull it down. I always like to pull a
little bit lower than there. Press L, shift D, spin
everything round. And you should end up
with something like this, which I think looks quite nice. Now, is it too far out? Maybe. Let's pull it back in. Let's pull it back in
this way. Like so. Then, yeah, I think
that looks good. Now, if you want it exactly, if you wanted it exactly, you know, somewhere along
here, just do this. So all you need to do press
Control, left click, right, click Control, left click, right, click, grab them
both, press Control B. And what that enables you to do is get this
little place here. Now, what that means
is you can come in, grab that one, shift
desk, cursor selected. Right, click SeigenTTD cursor. And now we can come in and grab this part game so
grab that part, shift desk cursed to selected, grab this part now and shift
desk and selections cursor. And there you go. You can get it perfectly as you
actually want it. And then once you've got it
in place, you can come in, press L, and then press
Delete and limited dissolve. There you go. Now, let's
bring it into the center. So we want one there
and one there. So what we're going
to do Edge select. Shift click, Shift
desk, cursor selected, back to this, right click
the origin three D cursor, add in a modifier, of course, we're going to
bring in a mirror, put it on the Y, press
Control A, and there we go. That is that bit Done,
simple as that goes. Now, let's put in one more, so I'm going to
come back to this. I'm going to press Control B. And then what I'm going
to do is press E, enter AlterS and bring
that out, like so. And before you know it,
you've got a near enough, perfect lamppost with the sign. Now, all we want now
is the same thing. So we'll drain it all together. But just with one kind of arm, where is where this
is going to go. So what we'll do is
now, we'll come in, first of all, and I think we'll grab this
part and this part, press Control J, and then what we'll do is grab this
part, press Control J, like so, and then I'll press Shift D and just bring it over, and there is our lamppost. Now this part here is
made to go under here. Now, of course,
it's going to have to be a little bit smaller, but you can see now
if I put this here. It fits in really, really nice in our scene, and that looks really, really cool. Now, the next thing we want
to do then is beveling. So we'll come to this part here. It's not go bevel on at the moment, but we
want to bevel it. And the other thing is we
need to be careful here because we want to
make sure that we don't make life hard for
us when it comes to, you know, putting in the
materials and things like this. So let's first of all, you know what we could just come in and add in some seams just to make our life easier while
we've got it all. This one's already
got seam on it. So I'm just gonna come in, mark a seam on. You can see this a spl anyway. Let's mark the seams on these,
and we'll see how we go. We'll see how we go, guys.
Now, let's come to this one. Same thing. All right,
click and Mark a Seam. And now we should be
ready to rock and roll. Okay, so now let's join
this altogether. Control J. Let's make sure this
one's all together. And yes, it is. Let's make sure that this is joined
with this just for now. And then what we'll do is
just reset the transforms both together. Like so. And then what I'm going
to do now is come to this one first,
add in a modifier. And the one thing
we haven't done. Thinking about it is we've not, kind of warped anything. I don't know if you
want to do that. It is a lamp post, so you know, these things are not going
to be so warped as before. So what we can do is we
can just try a little bit. So we'll bring in just
an edge loop or two, and then we'll bring in
some here, one here. And we'll just give it a try. If it doesn't work,
it doesn't work. And then all I'm going
to do is just lt shift click on just the wooden parts. Same on this. We have got
a bit of metal in there, but I think just grabbing the
edges might just be enough. So we'll just look what it looks like compared
to the other one. If we don't like it,
we can always go back, like so, and then we'll go mesh, transform, randomize, turn it all the way
down to not 0.1. Yeah. Unfortunately,
it does look better. So we're going to do
the same thing on here. So Control R three, left click, right,
click, Control R one, and then we'll grab all of these going all
the way around, same on here, like so. And there we go, and then
we're going to go to mesh, transform or randomize
and turn this down all the way down to
0.1. And there we go. Alright, and now they look
different from each other, as well, which is great for us. Okay, now let's
bring in the bevel, so generate a bevel. No point, no, no, three. And, yeah, that's
looking really cool. I'm happy with that. Now, let's do the same thing on here. All we'll do is grab
this one and this one, press Control L, copy
modifiers. There we go. Now, let's again, do what we did before where we actually
bring in our materials. We add them onto place
and then we want, then we unwrap
them all together. I think that's going
to be the best way. So what we'll do
is now we'll come in with our materials now. The first one we want
is going to be we want, I think, one, two, three, four materials on here. So we'll bring in metal first because I always
think it's the easiest one. You know, when we put
it onto material, you'll see it all goes to mel I always find that's just
easier to deal with. I'm just wondering, actually, on this occasion,
would it be that? Let's put it on wood, actually. You know what? Red. And I'll tell you why Because
I've got these parts here, and I don't want to go and
select all of my wood. I actually just want to
select the metal parts. Okay, so I've got wood red. Metal. Plus stone light, and then plus stone Stone
dark, and there we go. Alright, we're ready
for the next one then. So we're going to go to
file. We're going to save our work and we'll see you
on the next one, guys. Thanks, lot. Bye bye.
85. Assign Materials and UV Unwrap the Lamppost: Welcome back, everyone
to the Haunted Street environment,
Blender to Unreal. This is where we left it off. So what we're going
to do now is, first of all, come in. Now we've got all
of our materials. Now let's put the
main materials on, then we can unwrap
them all together. So I'm going to come
in with Fay select, and hopefully I should
be able to select all of these. This
part's going to be mel. This part is going to be mel. I'm going to also
select this part here. And I'm going to Alt
Shift click around here, like so making sure then I've
signed metal onto there. Now, this part, I'm unsure
whether I want it you know, whether I was happier
with it being wood or whether I was happier
with it being metal. It would be a fairly big chunk of metal if that was metal. So I think I'll
leave it as wood. And then I'm going to
come down to this part. This part I want to be wood. This part here, I want
to be Stone light. So stone light, click a sign, and then we're going to go onto here and we're going
to grab all of these, and we're going to put them
on Stone dark like so. Now I want to do is grab this one and this
one Press Control L, and we're going to
link materials. And then what I'm going to do
is exactly the same thing. Now on here, we didn't
add any edge loop, so I'm just going to add
those now just to make my life a little bit
easier, like so. I'm hoping it's going
all the way through. So right click Mark
Sen. And to know that, I can come in, press. And you can see
here I'm not great, all I'm going to do
is Alt Shift click, press the little db on just
so I can zoom around here. Alt Shift click,
Alt Shift click, come down, Alt Shift click. Not like that. Like that. And last one underneath, like so, click on
metal, like a sign. There we go. And now let's
come down to the bob part. So I think it starts from here. Stone light, like a sign, and then each one of
these will be stone dark. Like so, click a sign. There we go. Okay, so now we should be able to grab
both of these together. And what I should be
able to do now is, first of all, select my wood. So I'm going to go to select, and we're going to
select buy material, and then we're
going to press and smart UV project like so unwrap. We're going to go over to
UV Editing. Let it load up. And then what we're
going to do is press a 90, spin it around. And then what I'm going
to do is make these probably a little bit bigger. And there they go. They
look something like this. Maybe maybe even bigger. Let's have a look because
there's a lot of wood here. Yeah, I like that. I
think looks better. And then we'll go
to our metal now. So I'm going to grab
one metal, select, and we're going to go to
similar material, like so. And then what I'm
going to do is grab all of these. I'm
going to press. Smart you reproject,
click and wrap A, and I'm going to go in and look if I need to make these
bigger, and there we go. I think that looks fine.
This is included in there. Finally, then we'll
come to these two, which is select
Similar material. That's all of those.
Smart UV project. Click Okay. As. Let's
have a look actually, because these are quite small. Yeah, you know what?
They look good. And then I'll select
one of these, select and select similar. By material. Smart UV project, click Okay, and there we go. All right. Is that quick, guys, that quick. All done. Now, the only thing is do you want your wood
going this way? If you do, maybe maybe
turn around the top. If you want to go the other
way, grab all of these. Let's spin them round and have a look what that looks
like. And you know what? I think that's probably
going to look a little bit better going down like that. Let me just check. So or 90, let's spin this one round or 90. I actually think
that looks better. So I'm going to come over here. That one's going the right way. Yeah, I think that looks better. So I'll thing these now. You can see I've
missed one here. That's a bit of a pain.
Why did I miss that one? Didn't know. Let's see if I've missed anymore. You
know what I'll do? I'll come in, grab all of this. And all I'm going to do then
is just apply my metal, click a sign, and there we go. That's actually
looking. Pretty good. And that's why I always
do the final check guys, just to make sure everything
is looking right. Okay, all of that looks good. Let's now go back to modeling, and we can call this lamppost
sign and lamppost light. So that's what we'll do.
So now what you want to do is just join
this with this, but with Control P, so it's, you know, setting the parent. Grab all of this, and
then what we'll do is we'll first of all,
call it lamppost, light, and then we'll
come to this one, and we'll call it
lamp post sign. So lamp post. Oops. Lamp. I'm not even sure if it's spelled
like that or not. Sign. I am dyslexic, so I sometimes
struggle with that. Lamppost. See, I put it
in lamp posts there, but I'm not actually sure. I'm not sure if it is,
lamppost light, lamppost sign. Okay, now let's put them
in their own categories. So new collection lamp post. Like so. And there we go. Now, let's press a
little question mark, bring everything
back. Let it load up. And then what we
can do is seven, bring them into place,
grab this sign, shift D, and let's
call it lamppost. So lamp post, like so. Press the tab on. Double
tap the A, and there we go. Okay, now let's put these up. And then what we're going
to do now is just make sure we've got
everything in there, everything's nice
and neatly done, and I'm looking the chain. I did forget the chain, guys. So, press control.
You know what? I'll just put them over there. I'll sneak them over
there like this. Okay, let's put them in. We will want them to go.
Let's make sure it's level. There we go. No one would
ever know any difference. And all I need to do now, as
long as I grab these first, grab this second,
crest Control J, I should get away with
putting them in, like so. The only problem is,
I've got window light on here, go to minus this off. And now they should
be the same name. Yes, they are, the same name
and in the right place. There we go. Perfect. Okay. Locking up. Now, let's bring
up our reference. So on the next lesson, we have done all of this, guys. We're on the final hurdle now. All we've got left to do, let's make a check first
to see if we've got it. So I'm going to do a quick check just to make sure
we've done everything. So we've got our
bridge. Yep, done. We've got our walls all done. We've got our supports all done. We've got our rafts all done. We've got our major
supports all done. We've got our plums, bases, or other supports
our doors, our lights. We've got all of our cemetery. We've got our windows. We've got our props down
here, which are all done. We've got our insign. Chimneys are done,
gravestones are done, and then we've got all of
our cemetery pieces done, which means now we are finally finally onto
the last hurdle. Now, honestly, compared
to the cemetery gate, I think these are
actually easier to do. There are some intricate
parts within these, which you can't quite
see on this one. But if we move it forward, hopefully, yeah, you
can see on here. There are some intricate
parts in here. There is this bit here, but a lot of it
we've already built, and there's also this part here. So I think we'll probably
make I start on this part. So we'll start with this
part, build this part out. And the other thing is,
because these are roofs, we have to stick to some kind of certain size because we need to make sure that the walls kind of line up when they've
got the supports. Luckily, for us,
because, you know, these walls are exactly, you know, three
metres, 2 meters, then they'll have
the support in them, and then the roof can
be a little bit out because you can make your
roof a little bit smaller, a little bit wider and all
of that sort of good stuff. So let's save out our work. And on the final hurdle, and I'll see on the
next one, everyone, I hope you really enjoying it. I hope you've learned
so much along the way. We're nearly there now, guys. Alright, everyone, so
I'll see you in the next one. Thanks a lot. Bye bye.
86. Modeling Stylized Haunted Roofs with Solidify and Mirror: Welcome back everyone
to the Haunted Street environment
Blender to Unreal. This is where we left you off. And now I feel like we should be playing something from the
final countdown or something. We're actually here, guys, on the final stage. So what we want to do
then is create now the roofs that are gonna fit together with everything else. Now, honestly, some
people, you know, create the roofs first because
then they get an idea of, you know, how everything's
gonna fit together. But to be quite honest, for me, most of the time, it's a gray box for the roof, and I create those actually last because it's like the
pinnacle of the building. And once I've got the
building in place, it gives me a much better idea, you know, of how the
roofs need to look. Throughout this
design, we have been focusing on, you
know, that haunted, stylized, but still
soft type look, and that's what we've managed
to achieve throughout. Alright, so what we're
going to do then is, first of all, I've got
some dimensions for you. But when I give you
the dimensions, we have to consider
the fact that some of them like the roof. They're going to
have a little bit stuck out and things like that. So I'm going to give
you the dimensions, but they're not actually going
to be the complete size. So what do I mean by
that? First of all, I'll grab one of the
more simple roofs, so we'll start there. And I'll show you
exactly once you've got these principles in place and you've got this workflow in, just how easy it
is actually to do. So what we're going to do
is we're first of all, going to bring A cube. So we're going to press Shift A. Let's bring in a cube. And then what we're going
to do, let's put it on object mode so we can actually
see what we're doing. Let's grab our little Gui and then what
we're going to do is just press the question mark just to isolate
everything else out. So we've got our guy.
We've got our cube, and then we're going
to come over here. Now, the X dimension 2.76, the Y dimension 4.84, and then the Z dimension 3.27. So this is going to be
the size. Of our roof. Now, stood next to this guy, it does look pretty
big, but, you know, if you've ever seen any games
been out in the real world, you'll know roofs are
pretty substantial. Now, what we want to do first
is bring this section in. So we've got this part here
and kind of this part here. We want to bring
this section in. So what I'm going to do
is I'm going to come in, I'm going to press S
and X and bring it in, and that is going to be pretty much how our roof
is going to look. Now, the other thing
is, at the moment, the roof isn't know, bent in or anything like that. So what I tend to do from here is we will use the lattice, but I use the lattice to actually transform the
whole of the roof. I don't use it to transform
these bits down here. I find it easier
to just come in, bring in some edge loops,
left, click, right, click, and then bring
these parts in. So you can use proportional
editing if you want. I prefer myself, as you know, to use my eye to actually
get it to where I want. I'm going to press SNX and
then Alt Shift click SNC, and then just bring
these sloping in to give us that kind
of field that we're actually looking for
that haunted type field and then SNC, like so. Now you can see we've got
that nice haunted type field. Now the thing is I might bring
these in a little bit more because I don't want to alter the scale of these bottom parts. So SNC, bring them in. Like so. A shift, click SNC, bring them in just
a little bit more. And there we go, and I think, let's have
a look at this one. So here's the next. And I think now that's looking
really, really nice. Okay, the other thing is, when I'm, you know, creating a roof like this, we have to make a slight
adjustment because over here is going to be the wood and on the back is going
to be the wood. Now, how do I create these
bits then and the bottom bit? So let's deal with that next. So what I'm going to do, first
of all, is I'll come in. Like so, so Alt Shift click. I'm just going to
grab one of them, and then I'm going
to press Shift D and just pull that
out a little bit. Then what I'm going to
do is press the E and the Y and pull it back
a little bit, like so. And then what I'm going
to do is just pull that into place where I want it. Now, what I'm looking
for here is for a roof, the thickness of
the actual wood, is going to be
quite substantial. You don't want anything, you
know, really, really thin. It needs to be chunky. So even this, even on this part, might need to be
pulled out on the y just a little bit more to make it a little
bit more chunky. Now, when I'm done with this, what I'm going to
do is I'm going to pull this back into place, so it should be here. And then it should be
over the other side. But what I can do now is I
can pull this part back. So I can pull this part pack, still keep those dimensions, but now I can see how far this ward is
actually going to be forward in front of that wall. It's a great way to hide seams. It's a great way
to go from walls to roofs without even
anyone noticing. And you'll see what I mean
by that in a little while. Now, let's now come
back to this part. Let's press L P selection,
separate it out. Let's press Control A, all transforms,
Seigin to geometry. And now, finally, what
we want to do with this bit is before we
do anything else is, we really want to
pull it down a little bit and just make
sure we've got, you know, we've got
kind of the right way that this is going
to go at the moment. But what we want to
do now is just come in and pull this
down a little bit. Now, when you're
pulling this down, it's always better to
pull it down with normal. Or if normal doesn't work,
which sometimes it done, but you can see
in this occasion, it's probably works, so we
can pull it down like that. If that's not working,
try your local. That sometimes works as well. So for now, we're going
to try it like this. And what I'm also going to do is just bring in an edge loop. And then I'm going
to jaw slightly, bow it out like so. Now, once I've brought
my solidify in, I can see really what
it's going to look like. So let's press Control A, set origins geometry,
add in a new modify it. Let's bring in a solidify. Let's pull it up to get
the thickness right. Let's set this down to zero. And now you can see
that that is fitting in really, really nicely. And we've got that
kind of, you know, that bent look that
we're actually looking for on the end already. Now, when you're creating moves, the other thing is when you've
created this side of it, always then come in and
create the top of it. Why? Because then you'll make sure everything's
fitting in. You won't be trying
to squeeze these in once you've actually
got an oscildifon. You know, once it's destructible
and you put the top on, it makes things
much, much harder. Also, from here as well, because I've actually done this, I can actually come
in, grab this. So grab this edge, and I can see now where
the points are. So where the points are
where it's not quite right, I can bring it in then and follow it and make it a
beautiful curve like so. Now, let's do what I said, then, so we'll come
to the top now. Now, remember this is going
to go on this side as well. But for now, because this
roofs relatively easy, this one, it's the
most simple one. We're now going
to grab this one. And what we're going
to do is we're going to press Shift D, and then I'm going
to press S and Y, X, sorry, bring it out. So we'll bring it
out to here first, press S and Y and pull
it out past this point, so it wants to be past this
point, as you can see. And then what we want to
do now is bring this up. So I'm going to bring
it up, and then will give me a much better idea of
how this is going to look. So if I press E to pull
it up and then E again, and now I want to do is press S and X and pull it in like so. Now, I can see that this
is still not right. And it's not quite
out far enough, so we have a number of options here because we've
done it this way. But let's first of all, come in, Control A, all
transform set origins, geometry, split this off, so LP selection, come
back to it then. And then what you want to do is just bevel these ends off. So I'm going to press Control B, and I'm going to bevel
them off, like so. Now you can see that
we've got a much, much better shape and understand where this now can
actually go into there, so it all actually
fits into place. We can also understand once
we pour mirror on this, if this is actually too
thick with the solidify, we can actually fix that as well because we
definitely don't want them overlapping in
this center part here, and that's something that
you need to be aware of. What we'll do now is we'll
come back to this first. We'll go over and add in
a new generate and what we'll bring in is a mirror. We'll mirror it on
the center of here. So if I come to this one,
I'll press shift desk, cursor selected, come
back to this then, Set Origin three D
cursor, and there we go. So we can see now
they're not overlapping. That's the first great
thing. And we can also see that if we
then bring this up, so grab this point here. If you can't see it,
just hide your solidify, then press E and Z just for now. You might need to press it twice because we've
still got our normal on and bring it
up into place like so. So just bring it up to there, and all that is is just so we can see it. We're
going to pull it down. Don't worry about that, guys, but we want to make sure for now that we pull this into place. So you can see now it's
going in like that. It's going in
wonderfully on there, and then all we want
to do is pull it down into place like so. Now let's take a step back. Press the tab button,
double tap the A. So the things we're looking for, first of all, we don't want
any crossover on here. Second of all, we want to
make sure that these are going into this piece of wood very nicely,
which they are. Third of all, we want to
make sure that we've got a little tip, you know,
poking out there. And next of all,
what you're looking at is how far are these
roof tiles coming up? Is there enough of a gap here? You know, are they
crossing over? Have you got some flashing because the messures
are too close together? All of that good
stuff like that. Let's come in and
right click and shade Atomve this. We
have a better idea. Let's do the same
on here, as well. And finally, how far is this
sticking out of the wall? Because you know when
the build things, these pieces of wood are actually stuck out
away from the wall. They're not flush with the wall. And also, if we're
building like that, it makes things harder because
you'll get your flashing, you'll get your seams
showing and all stuff like that, and
we don't want that. So they are the things that
we're looking for when we go forward when we're
building all of these roofs. Alright, so I think
I'm happy with that. Now, what I can do now
is bring this over here. Now, rather than you know, this is the size of where I actually
wanted my wall to go. So if I bring these over, not with a mirror, if I just press Shift
D and bring them over and then sit them, flush, so flush with this
wall near enough, and then come in, grab my wall then and pull it back, like so. So if I pull this back, so. And then we go, now we can look, if we going into Eddy mode at the actual width
of both of these. So if I come into both of these, it should be around
let me have a look, 3.27, and we're around 3.16. I think though that's
because they're not joined together at
the moment because, you know, what, let's
join them together. So control, J, 3.16. Now,
let me just have a look. If I press S and Y.
Yeah, it's this Y. So let me look at the Y, 4.84. Yeah. This is the dimension. 4.84 on this. This is 4.85, which means I've pulled
them near enough into the exact place and got the exact size roof
that I actually need. Now, never worry if
this part's, you know, not stuck out as
far as that part, you don't need to
worry, you know, because you want it to be
a little bit more random. The one thing you want
to make sure, though, is that it looks as though
it's solid on there. If I pull it back to here, it doesn't look as solid as
if you pull it out of here. That's the difference.
So although you don't want it
pulled all the way out, you don't mind if it's pulled
out a little bit alike. So I think it adds a little
bit of character to it. Now, what we're going to do
then and the next lesson is, we're going to put
the bottoms in here, and then I'm going to show
you the actual tiles. So we're going to create this one. We're
going to texture it. And then what we're
going to do is we're going to put the
tiles in the bottom, and I'll show you
a little technique of how you can get away
with it looking like there's real tiles when in actual reality,
it's just a texture. Alright, guys. So from here,
we're going to go to file, save, and I'll see you on the next one, everyone.
Thanks a lot. Bye bye.
87. Non Destructive Roof Bottoms and Lattice Ready Topology: Welcome back, everyone to the
Haunted Street environment, Blender the two Unreal, and
this is where we left off. Alright, so now let's come
in. And what I want to do? I've got pretty much everything there apart from
these bottom parts. So what I'm going to do, again, I will always try and
work non destructively. I think it's way way
easier to work that way. And then what I'll do is
I'll take these parts. I'll just put them
over here and I'll save them out just
in case I need them for the rest
of the route to get the kind of scale in the
same and things like this. So what I'm gonna do,
first of all, then, is press Shift D
I'm going to put this back onto Global because this is relatively
straight anyway, and I'm going to pull
this out like so. Then I'm going to press E and
Y and pull it out, like so. Now what I want to do is I
want to copy this modifier, so the solidify,
but not the mirror. So what I'm going to do
is press L P selection, like so, and then I'm going
to come back to this. I've got this and then I'm
going to press Control and L, and I'm going to copy modifiers. Of course, it's going to add on a mirror, so just take that off. We don't want that on.
Now, make sure when you're doing that because
of the way that we did it, you'll end up with probably taking this
mirror off. Don't do that. Make sure you click
on this first, then remove the mirror,
and there we go. Now, let's press
Control A or transform set origin to geometry, and let's pull this into place
like so. And there you go. Now you can see exactly
how that's going to be. Now, the thing is you need
to check a couple of things. First of all, make
sure that it's brought back further
than these front ones. You don't want it in front. It's not going to
look right in front, so make sure that
it's pulled back. Into place, like so. So it looks as though
these beams are being supported
by this big beam. Next of all, then, we want to put this on
the back of here. Now, we really don't
need to use mirror or anything like that because we want a little bit of
randomness in there. So just pull it back into place, making sure that you've
got enough room, so it looks as though
the walls actually, you know, behind it. Alright, so far so good. Now at this point,
we really want to take these parts and copy them. But before copying them,
let's first of all come in. And add in some edge
loops along here. Now, there's a couple of
reasons that we're doing that. First of all, we're
going to be using randomize to make sure
it's a little bit wonky, as we've been doing throughout. But second of all, when
we use the lattice, which actually bends the mesh, it can't bend meshes
with no edge loops. I mean, you can't you
can't bend an edge in the center if there's
no edge loops in there. So take that into account. You'll come across as I have many times, using the lattice. Things aren't bending in
the center and you're like, why is that not bending? You go in, you add some edge
loops, bends straight away. So just take that into
account as we get further on. If yours is not working,
this is the reason why. Now, let's come in, press tab, press Control law bring
in a fair few edge loops. So I brought in six on this. On these, we've already
got we haven't got edge loops yet because we've
still got the solidify. So I'm going to
leave those as is. On these, they've
also got a solidify. But even with the solidify, we can still come in and
add in some edge loops. So left click, right click, because we're not bending them
yet or anything like that. Let's come to this one here. So I'm going to come to
this one, contro law, add in a few edge
loops, like so. Now, pretty much
everything on here has got edge loops,
including the roof. So this has also got edge loops. W is exactly what we need, and they're following all the
way around the front. That's exactly the
setup that we want. Now, from here, we can just
move our guide to the side, make a copy of this,
so just press Shift D, and this then will be
kind of our preset to use on our other roofs if we need it. Okay?
Something like that. Now, at this point, I can
actually hide just that out of the way so I can focus on
this bit here. All right. So now let's come in, and what we can do now
is apply or solidify. So let's apply that and then we'll apply or
solidify on this one. We'll apply or
solidify on this one. We'll make sure there's no
solidify on anything else, and we should be
fine and good to go. Now you might be
asking why there's not a piece of wood
going across here? And the reason for that is that the roof tiles will
come over here. Now, when I'm
building, you know, the actual building
out, I tend to put, you know, support beams
from my pack under these, but let the roof
tiles do the work. Now, the other
thing is, we really don't want this bottom on here. It's serving no real purpose. And actually, when you
come to put this on top, I find that it's actually
harder to keep this on there. I mean, what color are
we going to do this? Are we going to make it the
same color as this wool? So because I get rid of this, it makes me go and build this properly where I've
got to put you know, a support beam under here just so you can't
see this hole in there. So I'm going to press the let, I'm going to go to faces, and then you're going to end
up with something like this. All right, so now we're
on to the next part. Now let's come in, and what
we'll do now because we've, you know, put our modifiers on, let's apply the
mirror by the way. We shouldn't have
anything in here now, which means that we
should be able to come in and join all of this together. Now, I'm thinking
before doing that, do I on to randomize
this probably. Let's come in then and do that. So what I'm going to do, I'll
grab the whole thing here. I'm going to go to
mesh, transform. Let's put on a randomize.
Let's turn it down. To not 0.1. So it's a
little bit, as you can see, a little bit more randomized, like so, and it's, you know, kind of a
little bit jagged. Now, under the really
thick structures, you never want it to be really, really randomized, point
sticking out everywhere. This is a thick beam after all. So on the roof, it's important that we don't go
too over the top. Now, let's come to
these parts here, and join all of these
parts together, including this part,
press Control J, press tab, A to grab
everything, mesh, transform. Let's go to randomize. Let's turn it all the way down to maybe 0.1, and
there we go now. You can see it's got that slide, you know, edging and
things like this. It looks much, much better
than it did. So far so good. Let's join the all together.
Let's press Control J now. We don't need to randomize the roof or anything like that. Let's press Control
A or transform, set origin to geometry. And now what we can do is bring actually in our materials. And you might be
wondering why am I not building the rest
of the roof out? Why am I actually
doing it this way? And the reason is because we want to get these roof tiles in first so we can use those
on the rest of the roofs. So let's come in, and we're
going to go for material, and we're going to go with red, so the red wood here. Then we're going to
go with roof tiles. So hopefully it's
there. No roof tiles, which means I need to go append. So we'll save our work
while we're here, we'll go to file append, and the one we want
is going to be tiles. Let's see if we got those in. So Roof tiles. Here we are. So
let's bring them in. Click the plus button,
click the down arrow, and we're looking for roof
tiles. That's what we need. And we're also looking, I think it's called concrete. So let me just press little question Mark just to
bring everything back. You can see that one's
still hidden. That's great. And what I'm going to do is, first of all, I'm going to
grab this one and this one. I'm going to look over here. So if I come to this one,
it says concrete wool. That is exactly what I want. And what I'm going to do,
don't just move them, press Shift D. And the reason is because we want to
delete these parts, but keep all these
parts, of course. So what I'm going to do is
just pull that over there. I'm also going to press
the little dot on. Yeah, and it's gone 001. So what I'm also checking
here is that you can see on here brick wall, 001. And you can see that's
happened because of the fact of we've duplicated
some of these things, used them earlier
on, deleted them, and what it's left us
with is this Ooh one. We need to clean that up near the end. Hopefully,
I'll remember that. Alright, let's come
to our support. We'll put that around here. Now, why have I
brought these in then? So I'm going to just
isolate everything out. Again, I brought them in because when I put it
on material mode now, I actually got a real good idea of what I actually
wanted to look like based on the texture
density of these parts here. So what I want to do now
is come in and match this. So I'm going to come
into this first, I'm going to press
A on these parts. This is all the wooden parts
I'm actually going to need. I'm going to press
U, and I'm going to go to Smart UV project. Click Okay. Now, of course, let's go to our UV map. Let's press A 90, spin it all around, and
we should end up with something, something like this. Alright, so now at the moment, I'm not gonna worry
about, you know, if the woods going
the right way as in, you know, it needs to be bended, slightly here or anything. I'm gonna, first of all, get
on with the other parts. So I'm gonna come in,
grab these parts. Shifts like this, controls
like that, press U. Smart UV project. Click on Rap. Go to where it says my concrete,
which is not on there. So let's press Tab.
Down arrow, concrete. Why is that on there?
Let's have a look. Walls. Let's try that. Down arrow, Walls.
Click on there. Let's put it back
on Render view. Let's press a sign, and there
we go, there's the walls. Now, the other thing
is at this stage, I might also want to make
sure that these here. So the roof here is actually split from the walls,
probably make it easier. So all I'm going to do
shift slick, control slick. And then what I'm
going to do is just press wine, separate those off, come to Roof task, click a sign, press U, smart UV project. Click Okay, and there we go. Now, generally, when
I'm doing this, I will think about
whether I need to project from view because
it does make it much, much easier, and maybe on this occasion, it
will be like that. But for now, let's
save our work, and I'll see you on the
next one, everyone. Thanks a lot. Bye bye.
88. Precise Roof Tile Unwrapping and Custom Edge Tiles: Welcome back, everyone to the
Hunter Street environment. Blender to Unreal. This is where we left it.
Okay, so now what we'll do is we'll come
into this part here. So I'm gonna bring
this part over. And the first thing I
want to do is just make sure the wood looks
the same as this. So I can see not quite
looking the same. I can pick one of
these and then go to select Select similar bimterial. And then what I want to do
is just either bring this out to make it larger so it
actually fits or smaller, whichever is going
to be the way. I think with those, let's
get a happy medium there, which will be
something like that. And then we'll now
work on these parts. So if I grab all of these parts, let's fix those now. So here we are. Let's
pull this over. And again, let's
grab one of them. Let's press allolT, grab
the next one, hold T, and just work your
way down the just straightening these
up even at the about because you will be able to see the backs of them here. So L, l t, and L, Alt E.
Alright, there we go. Now you'll be able to see
that that flows really, really nicely, as it should do. This flows really
nicely as it should do. Now, next of all, then,
before finishing this, make sure that you're
happy with the top and make sure that you're happy with the way the wood
grain is going here. At the moment, you
can see this is the wood grain way
if I spin it round, so 90, or you're happy
with it going there, that way, for instance. I think, for me,
probably bear with it going this way rather
than the other way. And I also want to just bevel this without using
the bevel modifier. So let's give that a try. And I don't think I want to
bevelate all of it like so. So instead of doing
that, I'm just going to come in, Alt Shift and click, grab me all the way around, and then press Control
B and bevel it like so. And I think now that
looks much, much better. Now, even, you can see
that it's probably cost me a little bit of work because of the fact that now I've
got to unwrap that, and this is another reason
why we don't apply that, you know, the bevel modifier. Definitely not because
it does cost you work. So now I'm going to
bevel this one. Like so. Alright. Now what I want to
do is just unwrap this one again and see if I can make that look a little bit
better than what it does. It might be following it, as you can see. Could be. You know what? It
is following it. I'm gonna leave it, actually. I think it looks good
without messing with that, so I'm just going
to leave it, so you can see from back
here, it looks nice. Now, I think the wood
grain going that way also looks good. This one's not quite right. So all I'll do is
grab both of these. A, or rotate it round, so it's going the
way that I like. And there we go, that looks
much, much better now. Alright, so moving on, let's deal with the walls now. So if I come into this, I
should be able to grab it because we split our roof off from there, so I
can grab both of those. Like so. And then what I'm
going to do is just press A. Now, we have got a square
there, and I do see that. What is that coming from? Let's press your H, hide
everything out way. Here it is, this on here. So that told me
there's something in here that I'm not
actually happy about. It also tells me that these are wrapped in
a very weird way. This shouldn't look like this. So what I'm going to
do, first of all, is delete the other
way. So delete faces. And then I'm also going to
come in, grab both of these. Let's resell the transforms. Let's come in now. Let's
press you and unwrap them. Like so. All right. Now let's match them up
to our wall over here. So if I press the S board now, you can see now they
are matching up. Okay, so let's now
do the actual roofs. Now, first of all, as I
said, grab your roofs. So let's press
AltageGrab your roofs. So shift click Control
click, all the way down. Like so. Let's press three. So we're going into
the side view. We'll zoom in round about here. Don't worry, you know, if you are not the
same zoomed in range or zoomed out range as
I am, doesn't really matter. Let's press U, and
what we're gonna do is project from
view, like so. Now we're going to do is
grab this and pull it out and get the roofs to the
scale that we actually want. We've got them unwrapping
perfectly now. Now what we need to do is
just pull off this bit where the actual scale of
the roof tiles is correct. Now, I always bring my guy in here and look at the
size of the roof tiles. At the moment, we are
going for stylize, but these are probably still on the large size, and
we don't want that. So I'm going to come
back to my roofs. I'm going to make them
a little bit smaller. So it's something like that now, and you can see they're
looking just way, way better. If I came in and just pulled
them in like that, yes, they look stylized,
but they don't fit the whole scene because
the whole, you know, all of the asset pack is kind of thin and slanted and yet
stylized at the same time. So they're slightly, slightly oversized but still
thin like that. So if we come in and make
these really chunky, it's not really going
to fit the scene. Okay, so once I'm
happy with that now, the main thing is that because we have
projected from view, this and this side
are exactly the same. So it makes it really, really easy to work with because now, once I move this up to get
these tiles into place, it's really easy
to actually move the other side up
because they're following exactly the same. So what I'm going to
do is I'm just going to press G and Y, and I'm going to
move these tiles just to the bottom
of there like so. So now you can see that
we've got tiles in the bottom of here and
we've got tiles in the bottom of here with
this little black bit there that looked like
the tiles actually end. Now, finally, now I've got this. I have something to work
with. I can come in, delete this wool, like so. I can come in now, grab the
whole thing, grab my guy, press a little question mark, and now I've isolated
everything out, and now I can just
work on this part. Now, why did I want to do that? So let's have a look at
these tiles, actually. And why I did that
because I want to see exactly how far
these are coming down, so you can see, not quite there. So I'm going to come
in back to my roof. I'm going to press G
and Y and bring it up, holding the shift bone all
the way to make sure that that tile is now looking
like they actually end. Now, you might think that this is a very
sharp edge on here. Don't quite look,
right? And I agree. And that is why we're going
to now create these tiles. So what I'm going to do
is I'm going to come in and create some
tiles based on this. So what I'm going to
do is I'm going to grab my guy, press shift desk, curse the selected, and then
I'm going to press shift D, and I'm going to
bring a plane in. I'm going to bring
my plane down. We only need to
do this once guy, so take your time with
it. It's no problem. And then what we're
going to do is press S and X and bring these in, and we're hoping to match
the scale of these tiles. So you can see here, this
is the scale of the tiles. Or, these gonna be a little
bit too big, probably so. So I'm going to press
S and X, like so, and then I'm going
to bring it over, and then I'm going to put it into where I actually want it. Like so, like so. And then what I'm going to
do is pull this out now. So I'm going to pull this
out all the way to the end. I'm also going to put
it on material rather than rendered view because you probably hear my
band going crazy. So let's put it onto this. And then what we'll
do is now we'll come in and bring in some edge loop. So
I'm going to come in. I'm going to press Control R. It's going to come all
the way over there. And what I want to do is kind of match the scale of these. So I'm going to press Control R, bring in another edge loop. I'm going to press Control
R, bring in another one, and then press Control R.
And you can see now I've got a good kind of scale going
here for the actual root. So control R. Next one, and then let's move my
guy forward a little bit. There we go. Let's come back. Let's press Control R. Let's press Control R. We'll have a little bit
of a bigger one here, Control R. And then control R, like so, and maybe maybe
that one's a little bit. There. Let's do it
something like that. All right, so all randomized. Now we want to do is
split all of these off. So I'm just going to come in, split them all off,
and then I'm going to press Y, like so. Now, this stage,
you want to make sure how big are these tiles. So what I'm going to do is I'm
going to take one of them. I am going to put it
back so I don't worry. I'm going to pull
it out, press R Y, rotate it round, and just put it where they're
actually going to go. And you'll see that if they
were under there, so R Y, if they are under there, they're a little bit probably too big, a slight slight bit. So what that means
is now I'll put it back. I'll grab
the whole thing. I'll press S and X and
just bring them in very, very slightly because they'll
still be going under there. Okay, so the next thing
then that we want to do is we want to press A, we want to bring these down, so E, bring them down. And get some thickness
on these, like so. Alright, so far so good. Now what we want to
do because they split up is we're going to
go back to them, A. And what I want to do
now is come to mesh, and I want to go to
transform randomize, and let's now turn this down, so they're not too
broken, so no 0.2. And then the next
thing we want to do now is just as I said, take your time with
these, try and fix them. Now, the other thing is, I might have done this
actually the wrong way. So what I'm going to do
instead of, you know, doing it that way, I'm actually going to bring in some
edge loops first. So first of all, let's
come in. Let's clean up. And let's merge by distance,
20 vertices there. So let's press Control law. Two, left click, right click. I'm thinking on this direction, probably not going
to need anything. Now what we can do is now
we can actually randomize. So if I come in, mesh,
transform, randomize, it's going to keep everything
together, making it much, much easier for me to get that kind of randomized look
that I'm actually going for. So something like this now, and now you can see that I just need to come in and
split them off. Old Shift click on all of these. Like so. Let's add
in now a seam. So we'll add in a seam and now what we'll do
is split these off. L on each one, like so, press Y, and now they split
off, and now press E and then just pull
them out, like so. Now we can do is
they're all broken up. Let's first of all,
add in a modifier. So we'll add in a bevel. We're going to bring in a bevel. We're going to reset
the transformation, so Control A, let's put it
down to what we normally do. No coin, no, no
three. There we go. And now what we want to do
is make these look a little bit more uneven and
things like that. So first of all,
let's grab them all. Let's make sure we're
on individual origins. Let's press S and Y, and just bring them in
a little bit like so. Now, at the moment, they
still look pretty similar. But the reasons for
that is because now I just need to pull them out
a little bit, like so. So we'll pull these, we'll rotate them even
round some of them, make them very, very
different from each other. And again, you
might be wondering, we've spent a lot
of time on this, but as I said, this is going to be used for
all of the roofs. So it's basically like its
own little kind of pack here. And then what we want to do now is Grab one of these.
Let's say the top. Let's grab this one
and pull it up. Let's grab this one then. All of it. Let's pull it down. Let's also come
in, grab this one, pull it down a little bit, making them a little bit uneven. Let's grab this one or an X, let's rotate it a
little bit like so, and let's just
work our way down. Let's pull this one maybe to the right a little
bit. Let's pull it up. Let's pull this one down. And we just want as much
variation on these, even this one as possible. And now what I want to do
is I want to put it onto object mode just so I can see what I've actually
got. And there we go. Now, let's come in
now and just right click and Shade Auto Smooth. And I think, yes,
we've got these now exactly as we want them. I would say that these two here, they're looking, you know, probably a little
bit too jagged. And on the next lesson,
we will fix that because we don't want them
looking too jagged like that. We want them, you know, to still look like roof tiles. So wherever there's
too much jagginss, we will actually fix that. All right, everyone, so
I hope you enjoyed that, and I'll see you on the
next one. Thanks a lot. Bye bye. And
89. Refining Tile Meshes and Perfect Roof Edge Blending: And Welcome back, everyone to the Haunted
Street environment, blend it to Unreal. This
is where we left off. Now, let's come in then and make sure that we're
happy with our these. And the only thing, as we said, that
we're not happy with, is I'm going to just
go to modeling because it's gonna make it a
little bit easier for me. Where's my bricks.
They're not there. Let's press a little
question mark. Hopefully, they'll
all pop back in. Let's hide this out of the way
first. Here are my bricks. So I'm gonna put it on object
mode. I'm gonna work here. I'm gonna grab the
mo first of all, 'cause I can see that, you know, all the
normals are wrong, so shift ends, spin
them all around. And then what I'm
gonna do now is a fix any where the
edge is way too much. So if I come in to let's
say this one here, grab this edge, not this edge, but if I come in,
press the little dot so I can actually
work with something, pull it out, and just straighten
them up a little bit. You can see here that when we come to
something like this, it's always better off
grabbing the inside edge. So again, press the little
dobb, then you can zoom round, grab this one and this one, and just straighten
them up a little bit, because it's just too much. They don't honestly look like
roof tiles at that point. They look just too bent. Now, don't be afraid of pulling these in and leaving a
little bit of gap in there. Nothing wrong with
that whatsoever. On something like this one, come grab the inside
of these then. Let's grab the inside of
this one and just fix them a little bit like so because we don't
want them too wonky, and then I'm just
going to go down and just look at
where the issues are. I'm going to just
pull that one out and it just changes
the depth of this one. I'm also going to come in and pull this one a little
bit to the side. So, wa way along. I can see here,
there's probably one here where we can pull
it out a little bit. Let's grab them both together, pull them out just a
little bit, like so, pull this one out a little
bit more and you can see exactly what I'm trying to achieve here
again with this one. Let's do the same thing.
So this one and this one, pull it out a little bit and
just straighten up that. And then finally, this one,
which is a long way out, let's grab this one and this
one we'll do those first, straighten it out, like so, and let's pull this one
in a little bit, like so. Alright, there's our roof tiles. Now, why do we do that?
Because we want to cheat. So what we want to do is
if we come to material, we want to put these roof tiles
under here so it actually looks like this is mesh
and not actual texture. It's a little trick that a lot of game companies actually do. So what I'm going, first
of all going to do is, I'm just going to come
to this, press voltage. I just want to bring this roof. So what we want to
work on now is we want to first of all,
hide this out of the way. We want to work on this, this, our little guy here, and this making sure I've
grabbed all of this. So I'm going to press left
click and just select it all, and then I'm going to hold Shift left click
and select it all, press the question mark, then isolate everything out. Now let's move my
guy to my side. Let's grab the roofs
that we've selected now. And what I'm going to do
is unwrap these first. So I'm going to go over
the top, first of all, and then what I'm going to
do is hopefully unwrap these to actually map
these out over here. So let's first of all,
just grab the whole thing. So I'm going to press A,
I'm going to press U, and I'm going to
unwrap angle based, and let's see what they
actually look like. Now, let's make sure that
these have the roof tiles. So I'm going to
go to roof tiles. Like so, and there we go. An absolute mess. Now, why did they end up
an absolute mess? Because they haven't reset all my transforms, set
origins, geometry. Now let's grab them and
unwrap angle based, and let's see now if they
unwrap the right way. Still not unwrapping
the right way, and the reason is, is because we haven't got any
real seams on here. So let's just try
smart UV project, like so, and now they're
looking much, much better. Now we need to do is come
over to our UV editing panel, press a little Db Make sure that run material so we can actually
see what we're doing. Pull that back then, and then we're going to
go over the top. Now, I'm going to probably
instead of using that, I'll probably use
Project From View because what that means is the top and the bottom will look exactly the same. So I'm
going to do it that way. So I'm going to do is
unwrap and we're going to go to Project From
View, and there we go. So it's to show you how you can solve different
issues with these. Now, let's spin
them round. So 90, like so, and then we'll
grab the first one. And everything now
you know, about this, including the sides,
as you can see, should look like this. So you can see, it's a little
bit blurry on the sides. We will sort that out
in just 1 second. The main thing is we want the
top and the bob to line up. So if I put it like this, press the G but, and let's put it into
one of the actual tiles. My job now is to
make this line up. Now, you can see, if I
spin this round or 90, is it going to
line up like that? In other words, is that going to look like that
roof tile there? We do need a little bit
of darkness on the sides, and this is probably
going to be, if I come over here,
the hardest thing. So you can see here now it's got a little bit
of darkness on there. That's exactly what I want. Now if I come back into there, it's this part here,
as you can see. So if I grab this one
here, press the G born, I should be able to
line that up and get a little bit more
darkness on there. Now, this is the hardest part, honestly, to just line
these up to make sure. Oops I need to grab all
of those so. Like so. To make this whole line up
to make this look right because you've got to make
sure wherever this part is, for instance, where
is this part? You know, you've got
to find it on UV Map. Now, luckily, for us, that's one part that I actually
want to line up. Like so. And there we go. Now, that's looking,
I would say, if I double tap
the ANAL zoom out, that one's looking pretty good. And also the bottom
is looking pretty good because we already
know that's the lining up. Now, let's try this one. So
what I'm going to do is find a roof tile that's going to
relatively fit it. Like so. And there we go. They don't
need to be perfect guys because we are going to put the darkness around
these edges as well. So all I'm going
to do now is just come in, grab each of these, and just see if I can line
them up with roof tiles, so I'm going to come in, and I'm going to put
this one over here. I'm going to come into
this one. I'm going to pick roof tiles
kind of fit without, you know, kind of
going over the top, so I'm going to put
that one in there. I'm going to come
to this one, make them look a little
bit different. Again, this one, slip
that one in there. Now, if it's got too much on the bomb like this
one probably has, you can also press S and Y and just bring it down a little bit just to
make it look right. Just carry on working
your way across, guys. It won't honestly take long. It looks pretty
daunting when you first start like this one here, way way too much on the bomb, so we don't really want that, so I'll just move it
and try another tile, just to get what
I'm looking for. If I'm not happy with that tile, I'll move it again to try
another tile, like so. And then, G line
this one up like so, and then finally the
last two. Like so. And then this one here. And then, G. And also, if I'm making this
look easy, guys, trust me, it's not something
that's easy to do. Now, let's come in.
And what we want to do now is just select
the tops of these. So if I grab these
tops off here, I might be able to come in
and select similar by normal. Sometimes that works. So you can see it
kind of, kind of. Let's try another one.
So you can also select similar by polygonal sides. You can see it again, not really done well once.
So you know what? Sometimes it's not
worth bothering, try and select, you know, all the things that are going
to make it easier for you. So what I'm going to
do you just go in, Alt Shift click because there
isn't that many actually. And just select all of
these sides like so. Shift H, hide everything else out of the way so we can
actually see what we're doing. Press, and we're going to smart you Vbjegs
and click on Rap. And there we go, that's
what we're left with. That's not what we want, so we want to make them
nice and small now. So, grab everything, make
them nice and small now. Let's press tab.
And there you go. You can see they're
looking pretty good. Now, any you're not happy with. So it could be this one,
for instance, just press G, move it over and get it into something
that you're happier with. But I think they
look pretty good. We don't want really
these blocks, so you can see here this block here. There's none on the bag. So what I'm going to do
is just move it out of the way to get rid
of that block. If I want to as well, I can also spin it round. That will also probably move
that block out of the way. Let's press G, pull it into
place, and there we go. Let's do the same
with this or 90. And again, we spent a
whole lesson on this, but I think it's
absolutely worth it, so we'll grab this one or 90. And I think there,
they look about right. So why did we spend
all that time? Well, here's the
moments of true. First of all, though, we
want to bring these over. So Shift D, we're going
to put these over here because they will be
then our default tiles. Now, let's come to this one.
We're going to put this in. We're going to rotate it. So
R and Y, let's rotate it. Let's press the little dub. Let's put it just just then under our roof tiles
that we already have. So just under here, like so, and let's pull it out
so it fits, S and Y. Pull it out just so
it fits in there. Double tap the A, and that
is why we're doing this. So now if I put this
on rendered view, you will see that we end up with something like this. And that
is what we're looking for. Now, just make sure you're
actually happy with it, so pull it forward if
you need to just to make it blend in a little bit
more if you want to. So I tend to just
make it blending, just a little bit better,
like so, and there we go. Now, you can see that
now looking from here, we've got our roof
tiles, you can see here, a little bit of variation
now on the bottom, which makes it look if I make
it a little bit thinner, which makes it look
even a little bit more just so it's not going
into that wood so much. Like the roof tiles
actually carry on, as you can see, and that's what we're
actually looking for. Now, you can also come
into these roof tiles, come over to your material. And what you can also do is
we can darken them up just a tad so they kind of match in even more than what
we've actually got them. So what we'll do on
the next lesson is just to finish these off
is we'll have a look, see if we can make them
look a little bit more, you know, kind of like these. And then once we've done that,
we're ready to go and we can actually finish
all of our roofs, because we have
basically everything we need now to actually
get these roofs done. We've got the right
size of wood. We've got the textures in there. We've got the shapes in
there, and we've got these little roof tiles that we can use now for all of them. Alright, everyone, so I'll
see you in the next one. Thanks a lot. Bye bye.
90. Matching Roof Tile Materials and Modeling Variations: Welcome back, everyone to the
Haunted Street environment, Blender it to one reopen. And this is where we left off. So what we want to do
now is we want to come in and actually alter
these just a little bit, just make sure they
fit in properly. Now, why is this happening? Well, first of all,
this is a two D plane. This is three D mesh. So the way the shadows interact, the way the light interacts, is going to be a
little bit different. So what we want to do now is
do something which honestly, you'll be using throughout
Blender once you learn it because it makes
things way, way easier. So what we're going to do
is we're going to come over to Li plus
button over here. Just make sure you've
got your tiles actually selected, plus, and then we'll call it new, and we're going to
call it roof tile. Ends. Like so. And then what we're
going to do is going to go to the roof tiles. We're going to copy
this copy material, and then we're going to paste
the material onto here. Now we're going to do is just
minus off those roof tiles. And all I've got now
is roof tiles on here, roof tile ends on here. Now the reason I did that is because any kind of, you know, work I do inside the
shader is going to, of course, affect
the roof tiles. So we need to split them up. Having them two
different shaders, and then we're able to start from where these roof
tiles started from. Now, if I go to shade in now, you will see, first of all, if I go on selectnm,
press a little dou on. Let's put it on Render view. And what we're trying to do is get it if
we zoom out here, this to be as close
to this as possible. We're not looking for
it to be, you know, picture perfect
when we're actually zoomed in because you know, the Asset pick is designed not to be super
close up like that. You know, if we were
doing it super close up, we might have done
either left this as texture or we might have
done all of these as tiles. They're the decisions
that you need to make. Depending on how close up
you're actually going to be. Now, let's come in then
to our roof tiles. So if we select those,
it says roof tile lens. Just make sure you've
got this selected. And now what we can
do is we can mess around with the things in here. Now, the one you want to mess around with is the base color. And the roughness, as well. Now, if I come in and
just unplug this, you will see that they end
up pretty shiny on here, but we're able to
mess around with the roof tiles like so.
Same with the color. If I unplug this,
you'll see it goes white because it
has no data in it, telling it what it needs
to actually go to. I have a Bast control Z, bring in the roughness
and the base color. Now we have something
to work with. Now, rather than unplugging
them or anything like that, what we want to do is
bring in some more nodes. So shift day, let's do a search. Let's bring in Gamma, first of all, and you'll notice, play around with these guys. If I bring this up, it makes it dark and it makes it lighter. We want it very, very fine. So if we put this on 1.05 oh, like so, there is a
slight difference there. If I, um, just plug
this in instead. You can see a very, very
slight difference, okay? Now I want to do is
we want to bring in a hue and saturation. We can then have the ability to control how
saturated it looks, what the hue is on there,
if we want to do that, we're not really going
to mess around with you. I will show you what it
does. But if we go to search now and we put it in hue, we'll find one that says hue and saturation, and let's
drop that in there. Messing around with the hue is normally a really bad idea. You might want to mess
around with it just to bring out these
little bits of blue. Generally, I don't
mess around with that. Let's put the
saturation on two then. Really, really pump
up that amount. Let's put the U on not 0.5, set it back to what it was. And then what we'll
do is now you can see it's really
saturated in comparison. Don't worry, guys, because
we're going to bring back this factor to not 0.17, three, and there we go.
We've dropped it back in. So we've made those
kind of, you know, these little details
of the colored parts, pop just a little bit more because it was looking
a little bit flat. And then what we want to do now is drop back the roughness. So I'm going to come
where the roughness is, press shift day, do a search, and the one we want is going to be RGB curves. So bring in RGB curves, drop it on this roughness. And now what you
have is ability to bring this all the way back
or all the way forward. And I'm going to set it just
by something like that. Now, already, if I zoom out now, you can see that that is looking better than
what it was before. Now, the final thing I want
to do it's just come down. And if I set this down to zero, it means we've got
no normal on there. And if I zoom in,
you can see now the look pretty much the same. You know, if I put
this back to zero, pretty much the same as you can see. It's very hard to tell. Now, I am going to set
it up a little bit more than what it was
maybe to note 0.1, just to give you a little bit more three dimensions to there. But if we zoom out now, if I move this cursor
out of the way, you can't tell that that was, you know, another
ending on there. They look kind of the same. That is what we're going for.
So now we're going to do now we've done that,
we've got that way. We're going to make sure
that if I press Alt age, I need to bring back
my roof tiles now. So let's just press the
little question mark. And I'm going to hide this
plane out of the way. And I'm not sure where I put those roof tiles,
actually. Here they are. Let's bring those over here. These are what we
want to work with. So we want to make sure
it's the same as these, so I'm just going
to put this over to roof tiles ends,
and there you go. You can see them slightly,
slightly changed there. It wasn't anything too big. Now, the best thing is, when you're dealing
with things like this, we haven't got to worry about if this side and this
side look the same, because you can never see
both sides at the same time. So that also means
generally you can get away with putting the roof tiles on this side, as well. So what I'm going to do
is I'm going to come, place my little
cursor in the center. And then I'm going
to come to these. I'm going to right click and
set Origin three D cursor, add in a modifier, and I'm
going to bring in A mirror. Let's put them on that side. And they're not going to
work because I need to press Control A,
resell the transform, set origin three D cursor, and then turn off
whichever one this is, which this will be the X. And then we go, guys, that is our roof tiles all
done and dusted. Now, let me apply the
actual mirror like so, and now we should have
something that's many, many parts, but that
is our first roof. Now, you might think,
at this point to create our next roofs
is easy, right? We just grab this. We make it, we scale it, and we pull it out. It's not the case,
so unfortunately, we have to go in and create a few more roof variations
because if not, we're going to get
a lot of issues with stretching and
things like this. So let's come in. This
is why we created this, as well, because it gives us a really easy way to
create, you know, the other roofs because we've got a lot of modifiers on here, non destructive, and
it's going to kind of show us the way on how to
create the rest of it. And we've also done most
of the hard work by now. So let's first of all, shifts, cursor to world origin. So over here, let's
press Shift A, and I actually don't
want to work over there. I want to actually
work over here. So what I'm going
to do is just pull it over here. There we go. I'm going to also
put this object mode so I can actually
see what I'm doing. And what I'm also going to
do because I'm just now creating the roofs is I should be able to
grab all of these, press little question mark, isolate everything
out of the way. Alright, so now let's
work on our next roof. So the dimensions of
this roof are going to be 5.58, 4.449. And then we've got
3.98, so three. 0.98. And again, now, let's bring your first of
all, to the ground plane. So it's going to be like
this. You can see much, much larger roof than this one. And we also know that this is based on a little
point coming out. So what I'm first of all going
to do is I'm going to grab the fronto here and I'm going to pull it back a
little bit, like so. And now, you'll see
the new dimension. So it should be on 4.29
because then what happens is, it gives me a little
bit of leeway to put a little post that's actually
going to come out of there. Now, you might also be
wondering, you know, my roofs have a they're
kind of going in like this. We're going to do
that later down the line guide, so don't worry. Okay, so now let's come in. And first of all,
bring in our roof. So S and X, bring it in. This is kind of where we want it, then, something like this. And then what we're
going to do is bring in some edge loops. So left click, right, click. So control, scroll
it up, left click, right click, and
then I'm going to do exactly what I did before. Now, where do I want
my roof to start? If I press one,
press S and next, I can start bringing
it in then like so. And again, this kind of needs
some kind of trained eye. You are going to struggle to begin with, to
get this right. And even today, I
still struggle. Getting this right and you can, of course, use proportional editing if you've mastered that, which I'm not going to
say I've not mastered it, but it's not so easy just to use proportional
editing on this. I tend to just come in and do it this way because
I think it's much, much easier, at least for
me to do it like this. I tend to get a better form
of what I'm looking for. So now it's like a
witch's hat on top, and that is by design, that's exactly what we want. Now we're going to do them
is bring in this part here. We've already got
this part over here. This has the tops normally don't have a solidify on
or anything like that, but we have got a
solidify on the top. But I'm just going to
work on the top first, and I'm going to see if I
can use this same post. So what I'm going to do is just come into the center here. I'm going to grab
this part here, save myself a load of work. So shift S, cursed to selected, then come back to this one, press Shift D, control
A, all transform, set origin, two geometry, press shift and S, and then selections cursor, and I'm going to drop
that in like so. Alright, so far so good
that looks about right. Probably a little bit
too big on the edges. So I'll probably keep this,
but pull back this one. So I'm gonna come
in, grab this one, pull it back to where I actually want
it, something like that. Now, the other thing
is, when we come to unwrap these and
things like that, we just got to be careful
that we actually change this just so it doesn't look
the same as the other one. Now, what we want to do now then on the next lesson is we're
going to grab these parts. We're going to pretty
much do the same thing as what we did on this
other part here, we're going to put them
on the front and back, and then we're going
to do this actual roof pretty much the same
way as what we did. First of all, let's right click Shade Auto Smooth and
leave it like that. Let's go to file,
save everything out, and I'll see you on the
next one, everyone. Thanks a lot. Bye bye.
91. Roof Variations with Mirror and Proportional Editing: Welcome back, if you
want to the Haunted Street environment,
Blender to Unreal. This is where we left it off. And in hindsight, I
know I'm going to need another roof very similar to this one,
but slightly different. So what I'm going
to do now I've got this part on here is I'm going to press Shift D, Enter, and I'm going to
pull it out to there because this other roof is going to be slightly
different to this one, but we're going to try
and do pretty much to save ourselves a lot
of work by doing that. Okay, so let's now
come to this roof. And first of all, we need these bits that
are going to come out. So all I'm going to
do is l chip, click. I'm going to do always
the same one at a time. And then what I'm going to
do is just press Shift D, and then I'm going
to pull it back. I'm going to press E and Y and pull it to
where I want it. So this solve thickness, and
then I'm going to grab it. So grab this one here. I'm going to press P
selection, like so. Okay, so we've got
this part now. So now all I need to do is press Control A, all transforms. Let's put the origin
pointer in the center. So we say origin.
A three D cursor. And then what I'm going to
do is grab this and this. Now, you can see on here,
we've got a mirror. Perfect. But let's see
if they are actually mirors so I'm going to grab
this one and this one, press Control L, and I'm going
to copy modifiers like so. Now, you will notice that the Y or the z is going over here, and that's because I need
to select this first. So let's put the Y
on, and there we go. Okay, now I want to do is
pull this out a little bit. As always, let's move
our guy to the side. Let's come into this then. And then what we'll do is again, we put it onto the normal. Let's extrude, and
let's pull it out. So if I put E, I want to pull it out on let's see where we're
going to pull this out. You can see there that
it's not quite working. Sometimes that happens. So instead of doing that, you can see that if I
pull this out now, I just want to kind of level it up so it's going
in the right way, and you can see, it's
pretty much looking good that I'm going to
grab both of these. So let me just grab this one. Let me see if I can
actually pull it up first. Yeah, I think I need to
grab just this inside one. Just going to pull it up
just so it's not bent at the end too much, like so. And I'm also thinking
that on this one, I'm going to press Control
left click, right, click, pull it back
just to make that end. Just a little bit
smoother, like so. Alright, right, click,
Shade auto, smooth. Let's look round the other side. I would say that it might be
a little bit too far out, but we'll see once we've
got this piece of wood in. Now for this piece of wood, I've already got this part here. I might as well use it. So Shift D. Let's bring it to the
center first of all, so shift D selections cursor. Now we know we've got it bang in the center. And I'll
just bring it out. Press the little dot
bone, pull it into place. Now, the one thing I didn't do. Oh, yeah, it's solidify by on. So let's press S and
X and pull it out, making sure that you're not
going past these points. If you pull it too
far, you will see it goes past there and you don't want bits of wood hanging out, but you do want to make sure it comes to the edges of you. So holding the shift bone, making sure that top
part doesn't come out, but making sure this edge
is actually in there, and there we go, looking
really, really nice. Now, the bigger the
roof, normally, the bigger the
supports, and that's something that you need
to take into account. You will see on this one
that this support, kind of, doesn't actually line up, so these are a little bit over, and that's something that
you need to think about. Also, this support probably needs to be a little bit bigger. So I'm going to press S and Z and pull it out
a little bit more. Now, of course,
when you do that, you're going to have the issue of these top parts in there, and that's something that
you need to think about. So how we get around that? So before mirroring
over the other side, we're going to
actually apply this. And then what I'm going
to do is just come in to these ends on here. I'm going to press S
and take off normal. So global on. I'm going to
press SNX and pull them in. Now, if they're not coming in, needs to be on medium point, SNXPull them in, like so. Alright, so far so good. Now, this bit here needs
to be obviously thicker. So SNX let's pull it out, and let's see then if that's
going to fit in place. And I tend to because
I've done that, you know, got fin in place, I tend to as well come in, grab
the top of it. Like so, and then I'll pull
it up just a little bit more because I think
that actually helps the structure a little bit. I'm also then going to come in, pull this out a little bit,
so it's hanging over there. You will notice that
the front and the back, they are pulled out differently,
and that's by design. I do want them to be a little bit different on
the front and back. Now, finally, then, we've got our roof tiles,
let's bring them in. And what we're going to do is put them in place and
then rotate them round. Now, you can see on these, that we've got one
hanging over the edge. I'm going to fix that. So
don't worry about that. Let's press R and Y
and rotate them round. Now, the one thing
I did wrong here, as I've told you
not to do is press Shift D. I need to press Shift
D and not just use them. I just caught myself doing
that. That happens a lot. Don't worry. And let's
pull them up into place, first of all, and then R and Y, let's rotate them round
into where we want them. We want them following this
rule and then pull them under like so it doesn't matter if a few
of them are sticking out, and then last of
all, we've got one, but pull it to the side, where it's sticking
through here. Now, because we've used Shift D, it means that I can
come in, press Altag, bring back everything, make
sure you're on edge leg, grab this last tile, press L,
and delete it out the way. Delete verts. You'll end up
with a bit of a gap there. That's fine because what
we're going to do now is just press S and Y and just
pull them out a little bit. You will find that
you can get away with tiny incremental
changes in scale. When you're on the small. So when we're on the
macro, dealing with these little tiles
and things like that, but you'll also find that when you're dealing
with the large, so the whole of the roof, you know, scaling
them in unreal, you're going to see like you
can make them fit really, really well, even moving
them half a meter. You can get away with that much. And that's why we're not
so much concerned about getting these roofs to
be absolutely exact. And it's something really
important to think about when you actually
create a modular pack, it doesn't need to be
down to the millimeter. You need to make sure
that it's just there enough if you're scaling
out half a meter, will it still fit on
top of those walls? That's the idea. So I see a lot of people who
are really daunted by modular packs because they think it needs to be
mathematically perfect, and that's not the case at all. You will see in World Warcraft, a lot of things
used over and over again and some are
scaled up massively, you know, and yet they
still kind of go together. This is also because
of the design of the assets done to such a really good level that
everything kind of fits in, even if you're scaling up
very small or very large. So now let's work our way
around to the other side. So what I'm going to do is now I just want
to put this over, so I'm going to
right click and set the origin to three D cursor, add in a modifier, and we're
going to bring in a mirror. So mirror over to
the other side. If it's not working, you can see they're all
over the place. Control A, resell
your transforms, set origin to three D cursor, turn off the Y and
Z, and there we go. Now I'm going to
resell the transforms on here just so I don't
have to keep doing that. And there we go. That's what
we should be left with. Now, for this, we're pretty
much done with this. All we need to do now is
add in the roof tiles, and we need to add in the walls and wood and all of
that good stuff. But rather than just, you
know, leaving it here, let's actually move
our guy a little bit over and create our second roof. And what we're going to do
then is just grab all of this, and I'm going to press Shift D and move this over to here. So this will be our second roof. Now, we need to make
this then look very different to the other
ones that we're doing. So first of all, what
I'm going to do is, I'm going to delete
this out of the way. I'm going to let this out of the way, but
I'm going to come in. I'm going to leave
this part here, and I'm just going to apply
my mirror and then come in. And delete this and this, press delete and vertices, and then I'll come
in to this part, and I'm going to
I'm just looking around the back because
I didn't mirror it Run. I did forget about that. So
let me just fix that first. So we're going to set the
origin to three D cursor, add in a mirror, and then we just
mirror it over here. Like, so take off the X, always, press Control A, and there we go, that's
mirrored over there. Just make sure again,
it's all thinning nicely. Now let's come to this one. We're going to mirror
that over there, then. We haven't got a
center point in here, but I will make one, so I'm just going to grab
both of these. Shift desk, cursed selected,
come back to this then. And then what I'll do
is right clicks origin, three D cursor,
add in a modifier. It's going to be a mirror,
put it over the Y, turn off the X, and there
we go. Let's apply that. And then what we'll do is
now come into this part, L and delete vertices,
and there we go. So we've kind of got
half a build in here. Now why do we do all that work? Because what we want to
do now is bring this out. In medieval, in haunted looks, if you want to get
that haunted look, make a roof like
this, pull it out, and you will see
that it really is a game changer on how
everything looks. It just looks creepy. It's, you know, spiky, it's slender. It's pulled out, adding more
shadows over the street. Lots and lots of things are
good and why we do this. You know, in real
life, seeing these, it's very, very rare
that you'll see this. You know, it doesn't
really exist. Now, what we'll do is we'll come in and we'll use
proportional editing. I'm going to press three, and I'm going to
see, first of all, if I can bring this out with
my proportional editing. Can I get away with
that? You can see it's not really bringing it out
the way that I want it. So let's try a different one. Let's try the shop, and sometimes it works perfectly
just like that, guys. You can see now Dad is
looking really nice. And there we go. You can see
just how nice that looks. Alright, now, because we've
done all the hard work, we can actually make these
really, really easily, guys. So what we're gonna
do, we've kept the same actual scale on here, and now we need to
put in these parts. So what we'll do now is
just quickly come in. I'm going to pull this back a little bit just
before finishing, so I want to pull this in fact, you know, I'll pull
this part forward. I'll just take off my
proportional editing, and I'm just going
to pull it just to get a nicer smoother look. And then what I'm
also going to do, another thing you
can do, by the way, is come into these tiles. Grab, you know, these two, move them, come into
these tiles, then, grab all four of
these, move them, grab these two back, and just move them into
place like so. Grab the whole thing,
press S and Y, and then just pull
them out a little bit, just so they fit in
a little bit better. And finally, then what you want to do now is just mirror them. So we're going to
mirror them on the Y. So object mirror on the Y
and just swap them over. Now, you'll see they look different to these
very different. That's the idea of doing that. Okay, so we're going
to save our work. I'm going to see you
on the next one. Please understand that
creating these roofs is the higher end of dling
it's pretty complex work. And so if you've got this far and you're at this point
and you're thinking, This has taken a long time, yes, it will take a long
time because, you know, I'm having to explain everything and why are we doing everything, so you have a good
comprehension of when you go forward and
creating your own things. I don't want to
just be, you know, the end of the course where
we just bam, bam, bam, creating something, no idea
of why we're doing it. We need that in there as well. Alright, everyone. So I'll
see you on the next one. Thanks a lot. Bye bye.
92. Build Roof Support Beams and Inner Wall with Mirror Bevel and Auto Smooth: Welcome back, everyone to the
Hunters tree environment, blend it to Unreal, and this
is where we left it off. Okay, so now let's come in. We'll grab these parts here. So I'm just going to
grab one of them. I'm gonna press Shift
D. First of all, E and Y, pull it out. And then I'm going to
press L and pull it back into place like so. So that's the main
starting point of this. Now, when you're doing
this, you've got to think about structure. How's it all going
to come together? And I'm going to show you
exactly how to do that. But you don't just
want this on there. You've got to have some kind of structure that's kind of going
to hold it all together. So this is just a starting
point as you'll see. Now, what you want
to do to make sure, though, is that this
is having a nice flow, which it is this way,
having a nice flow, you know, kind of
going up this way. So what we're going to do now is I'm going to separate this off. So P selection, separate it off, press Control A, all transforms. Right click and set the
origin to the three D cursor, and then I'll grab this
one and grab this one. And what I'm going to do
is just press Control L, I'm going to copy modifier. And we should end up with
something like that. Let's grab this one now, make sure you've
got it selected. Right click Shade Auto smooth, and that is what you should end up with something like this. Now, what I tend to do
is make sure that these are a little bit further
in because at the moment, if they don't bring
them in any further, they're going to
be too far apart. And so what I'm
also checking is, as it comes up here, is
there enough room for my toils, make sure
you've got that in there. And then finally,
what I want to do is make sure I'm happy
with the thickness. You might want to turn
your thickness up very, very slightly on these. So if I turn it
up very slightly, like so, just to add a
little bit more depth there. Now, let's deal with the bottom. Now, when I'm, you know,
creating these ones, I tend to create
them separately. I'm also looking
at this part here. I'm going to see, actually, if I want to just pull that
back a little bit in like so, and then also come in and
pull this back a little bit, just making it kind of a little bit more
rounded on there. And the mirrors done its work
on the other side as well. Now, let's come in
there. Pressure day, bring in a cube, and
we'll bring it down. And then press the S bone like
so, and then pull it out. So S and X, pull
it out in place. You can see at the moment,
way, way too thick. Don't worry about that. But
you can see I'm not using solidify here because sometimes you just don't want to use that. Sometimes it's just easier to actually put it in like this. And what I want to
do is I want to make sure that
this looks really, really strong because
of the fact that we need a supporting
beam going up there, and we also need
a wall going back here because the wall
wouldn't follow this. This is just for
these parts here. The beam is going to
go straight up and another beam is going to come out. That is how it would work. So what I'm going to do
is I'm going to grab this point and this point, press S and X and bring them in. And I want to make sure that
this and this are in there, like so, but make sure as well that the back of it is
not poking through. So pull it back so. Now we're on to this part here, which is the actual wall. We don't want it to come, you know, all the way out here. We want our roof tiles
to come out here, but the wall, we don't actually
want to come out there. So that makes it kind of tricky. So what we want to do
now is come and grab, first of all, this all
the way up to there. We want to press the Y but just to make sure
it's separated, and we want to press S and
Y and zero it out like so. And now we want to
pull this back. So we want to pull this
back into place like so. Make it a tiny, tiny
bit smaller, like so. Just so it fits in there and
nothing is poking through. Now we have something
that we need to work on. Now, you can at this stage, really, really go
to town with this. You can make this
much, much better than the original by
adding a lot more support. And I think you know what? On this one, I think
we're going to do that. So let's do that now. What
I'm first of all going to do is I'm going to
grab this part here. I'm going to press Shift D.
I'm going to rotate it round, so R Y 90, rotate it round. I want to make sure that these two parts here are zeroed out. So what I'll do is
I'll come to this one. I'm going to press Z
zero, zero it out, and then S Z zero and
zero that one out. And you can see now
why I didn't use the solidify on these
because I want to mess around with them
a little bit more. What I'm then going to do is pull it up into place like so. I'm going to press the S but just to make it
a little bit bigger. Like, so I'm going
to press S and Y, just to pull it
out a little bit. And now we've got that
beautiful bit at the bottom. Let's pull it up a little bit just so it's not so prominent. And finally, then
let's pull this bit into place
just around there. Now we want to do is we want
the main structure on top because then it's going
to give us an idea of how to do the rest of it. So again, I'm going to
come to this part here. So press L, press Shift D, and then we're going
to bring it up. We're going to put it in place. So R X this time 90, and we're going to put it into place right on top of
those parts there. I'm going to pull
it over here to here just so it goes
past these points. And then what I'm going to do
is pull it into place here. Now, we can see
nowhere near is this, you know, big enough
to fit on these parts, so we are going to
have to first of all, bring it down, so
it fits in place, and then grab both of these, make sure you're on medium point and then SNX and pull it out, so it fits in place. Now, with structures like this, you do want it fairly chunky
to fit everything in there. So I'm going to press S and X, pull it out a little
bit more like so. The thing is, though,
you don't want just, you know, a massive,
massive block like this. And to get around that, we can actually just come
in to the edges, press Control B and
bevel them off. If they're not beveling off
properly, press control out. Control A, resell the
transforms right, click Set origin to geometry, control B, and just
bevel them off. And there you go, now it
doesn't look so chunky, kind of thin, the
seam well, like so. What I also tend to do as well is I'll grab this part here. And I also want to
grab this part here. So what I'm going
to do is just come in, press the J born. Now I have something,
some mesh to actually work with
and pull this back, like so, and pull this
one back and give it us a slight curve
on there, like so. Alright. Now, the other
thing is, of course, I want to do I want to
actually bevel this end, but I think I'll do
that when we come to put in our materials. Now, the other thing is
because this is the inside, so you can see the inside here. We have to also
be really careful because the inside of here, if you're looking up
from here in Unreal, you'll be able to
see through there. We don't actually want that. So we actually want
this part here, so the inside of
here to be a wall that's actually over the top of there. So we actually
need to do that. So what I'm going to do
is I'm going to come in, I'm going to grab this one and this one and then this
one and this one. And you can see, look,
it's gone all the way through that's not
kind of something we want, but we will
be fixing that. So what I'm going to do
is press Shift D, enter, S and X, and bring them
in very slightly like so. And then what I'm going to do is I'm just with these selected, press Shift N, and then I'll
turn them around like so. And now I know I've got
the outside of the roof, and I've got these
parts in here, and now it should all fit
together really nicely. Now, the other
thing is you know, do we actually want it
all the way up to there? I don't think so. So
what I think we need to do is if I come in
and look through, I can see exactly
what's going on here. These are the bits
I actually want. So for now, what I'm going to do is I'm just going to press S and Y and just pull it out further because
then it will make it easy for me to grab
these edges here, like so, and then just pull them all the way back to
where this is starting. So you can see all
the way into here. All the way back
to there because that's the main structure
part, as you can see. And then what we can do is Alt Shift click and Alt Shift click, and then bring these back into place to make sure
everything's fitting in. So you can see here, look,
it's a little bit out there, but it's a little bit
too high on this, so just pull it back and then
finally what I'll do is, I just want to come in to
these two stages here. This is one of the
hardest bits, by the way, so just make sure you press ShiftH just to hide
out everything else, and then you can
grab these two and then just pull
them into place so they're fitting in really
nicely into those parts there. Now, let's press ltH,
double tap the eight. Let's turn it off, and that is what you
should be left with. Now, you can see that I probably need to pull these
down, as well. So all I'm going to do is just grab this one and this one, pull it down into place, and then I'm going
to press S and X, pull them out, and there we go, completely hidden
out of the way. Nothing's poking
through, and now it leaves us to carry
on with the rest of it. So what is the rest of it, then? So the rest of it,
then, first of all, let's create these parts
going in in these parts here. So to do that Alt Shift click on this part
here so you can see, I'm just grabbing or come in those parts that
we've just created. And then what we're going
to do is press Shift D. So shift and
D, pull this out, and then we're going
to press the E button, so E and Y and pull it
back beyond that point. Now we should be able
to grab this part. And this part. And
we're going to press P selection like so. Let's turn off this so we can actually see
what we're doing. And we can't really see
anything of the mom, but we can see this
flashing here, and that's basically what
we want to see right now. Now, for now, let's
hide out our roof, and then we'll be able to see exactly what we've got here. Let's right click
Shade Auto smooth. And finally, let's bring in a solidify and
let's pull it out. So inwards, like so, and then we'll
press AlnH like so. And now we can see that's
what we've actually got left. Obviously, this is
poking waywat in front, so let's drop it back
just a little bit. Like so, and we now
want to pull these back and still have room to
actually put this into here. So that's what I'm
looking for right now. So let's see if I can
actually do that. So I'm going to grab
this one and this one. B, I'm going to grab
this one and this one, and then I'm going
to press S and X. And then we go, Let's pull them back into place.
Now, I am wondering. And one of them, I
only move one of them because I had this and this. Let's try that again. And
it's only moving one of them, and I'm unsure why. So why is that on there? What am I actually
pulling there? Let's hide this out of the way. Can see what I'm doing now. What is in there. I'm actually
pulling, there we go. Let's see if I can actually
pull this one now. So can I pull this
one? There we go. Let's grab this one.
And there we go. Let's press S and X and pull
them into place like so. You'll notice I'm
making sure that I'm not going past
this point here. So I'm not going past there.
I'm going to do it again. So S and X Ops, S and X. Like, so let's increase
the thickness. To make it look
relatively thick. Let's press voltage now, so tab voltage,
bring it back in. And then we might
need to pull them back a little bit
more, as you can see. A little bit of fiddling around. Let's see if I can
actually come in again, grab this one and
this one S and X. There we go. So. And then I'll Walder is on
the next lesson is, I'll just work my
way up a little bit, making sure this all fits. And last of all, as well, I can see that these are probably should be behind
there, not in front of the. So let's pull them on the Y. So on this one here on the Y, let's pull them back
into place like so. Again, I'm always checking to make sure that nothing's
sticking out of here. You can see they're kind of sticking out
there a little bit, so I will come in and drop
those down on the next lesson. Alright, let's save
all word guys. Let's press Save and I'll
see you on the next one. Thanks a lot. Bye bye.
93. Final Roof Alignment, Bevel, and Randomize Variation: Come back if you on to the
Hunter Street environment, blend it to Unreal. This is where we left it off. Now, you might be wondering, Yeah, but what if
I've got it wrong? You will know if you've got it wrong when you bring
the textures in, you'll really be able to see
if anything's going wrong. Let's first of all,
though, shrink this down. So I'm going to press SN E, make sure that it's not
going through there. If it is, I'm also
going to press S and X and bring it
in a little bit. Now, sometimes when you do it like that, doesn't always work. So what you want to do
is just grab these, press the tab button,
grab the tops of these. Again, you can use this so you
can see what you're doing. So I can grab this one and
this one look and then compress S and X and
bring those in like so. There we go. And then I'm also just going
to take that off. I'm looking at the
inside of here, and I want to bring
these in probably a little bit more because I don't like this little edge on there. Now, again, if we come in now, we can see we've not
got an edge on here, so let's press Control R, Control R on this side, grab both of those, and now I can see exactly
what I'm doing. Turn that off, and
then I can press S and X and bring them back
a little bit like so, and then just work
my way up just to smooth this off just
a little bit more. So if I now come in,
grab both of these, turn it off, and
then can come in, press S and X, and
smooth them off. Like so. Alright. Looking good. Looks easy, right,
to pull that off, but in actuality,
it's pretty hot. So don't worry if you've made
a mess because honestly, you know, doing that on your
first run is pretty hard. And if you have got it right, then you've done really well. Now, we can also see that this here is poking through
this part here, so we need to make sure
that's not happening, and that might just
be the case of just dropping this down a tiny, tiny fraction, so we're
just going to drop it down. And if it's still there, move
the offset a little bit. So let's try moving the offset. Let's put it on minus. Let's even put it on minus two. No, I don't think we can
put it on minus two. So what I'll do is I think I'm going to just
have to pull them. I'm just going to press
Control's Ed and just get it to where I had it
because at the moment, it's not where I
wanted it, so 0.32. Tis poking through
there a little bit. Let's work a little
bit longer on this. And at this point, is
painful sometimes. And like so. Now, the other thing is, we can pull it into
place like that, make sure this part's right, and I'm just going to
do a little bit more, so ENX, like so. Get it to how I want it. And I'm not going to worry about these parts right now because
what I'm going to do now, I've got them into the right
place, they're looking good. I'm going to come in,
apply my solidify, and now I can do is come in. Grab these with face
legs, let's press tab. Grab these on this
part here, hopefully. Has it got a face on
there? There it is. And then come up to
this one, not this one. Let's Control select,
whichever one it is. No, we're not going to do that. So all I'm going to do is
I'm going to try and grab just this one and then try
and grab just this one. And then what I'm going to do is shrink them in a little bit. So I'm going to press
and X and bring them in. And by doing that, we shouldn't actually affect
any of the other mesh. So you can see here, press
tab, double tab, the A. You can't see any difference in there, and that's
exactly what I want. Now, the one problem I've got is you can see here as well. These parts now need
pulling out into place. So, again, we're
kind of wrestling with this mesh a little bit. You know, sometimes
that's going to happen. And what I'll do is
now turn that off, come back to it, press S and X. Probably why I didn't do
this in the first place, but I'm going to pull
them all the way to there, making sure. And then I just want
these top parts. I'm actually on the
final hurdle here, guys, because now we
can just come in, grab this one and this one, make sure I've got
them, turn it off, and then just press S and X. I should be able to pull those out to where we
actually want them, which is right
around there, still norectin my roof on the front. Maybe, maybe ah, maybe a has. So let's have ups
at S and X. Yeah, these parts here, I think, are from another part. So let's have a look. Where are they coming
in? Let's see. Let's pull them up
into place like this. Let's turn that off. I actually think if I go back into it, yeah, that's not actually
That's not actually these. So let's go back, pull them
back. What is going on? This is this part here. Ah, that's what it is.
It's the other part. It's the main part. Let's turn
it off. That's what it is. This part here is too far out. Well, that's good to know because then I can just come in. Very easy fix for this, precessing X, bring
it in a little bit, just so it's not poking out. And there we go.
Let's fix that part. Alright. Now, the last
thing you want to do then, you're gonna need a
bit coming up here. And we also want to bring this
out a little bit, I think. So control, bring in some edge loops, left
click, right click. And then what I'm
going to do is just grab this part here, put proportional
editing on, S and X, and let's pull it out
a little bit, like so. And then finally the final
part, guys, the final part. So all we're going to
do is just come in, grab this part, turn
proportional editing off, shift and D. And then what we'll
do is we'll make it a little bit smaller, pull it out. And put it into going up there, so and X, and then just rotate
it to where you want it. So I think that looks
nearly perfect. Now, I'm going to just come in. I don't want to hold to
the scale or anything, and I just want to grab this, make sure that we're on normal, and then it will follow
the normal direction and just pull it out into place
and then pull it down, making sure that this
isn't shining through. So maybe, maybe, maybe, we'll just pull that
back a little bit, and that means we'll pull
this one back a little bit. But this one been getting
less and less as we go down, giving us a nice, gentle slope right click,
shade Ato, smooth. And there you go. That is
looking perfect, guys. Okay, so we're pretty much done with all of
these two roofs, sorry. And we've already
got one roof done. So now, we've got all that. We've got all of our tiles in. We've got these parts in here. And by the way, these
should be basic roofs, because if you want
anything else in there, you can do that in Unreal, you know, to make them look
a little bit different. But for now, we've got
everything that we need. So now we need to
do is replicate what we've done with this one. Now, the other thing is, I
might as well, at this point, come in and add in my bevels and all of
the other good stuff. You can see I've
got bevel on here. So let's grab this
one and this one. Let's press Control J and add in those bevels,
and there we go. We can see we've got those
bevels on there now. And now let's just have
a look all rendered view. And there we go. That's what we should
look like on there. That's now all joined together. Now, what we need to do now is join all of these together, just making sure
though that we've got no issues with mirrors
and things like that. We've also got this
one over here, which we don't
really need anymore, so we can delete
it out of the way. And now let's figure out what we're going
to do with these. So first of all,
what I tend to do is if I'm working on
something like this, I'll actually come
in, hide out way. I'll come in then, and I'll apply my solidify,
apply my mirror, hide them out of the
way, come to this part, hide it out of the way, come to these parts, hide
out of the way. So now I know they're done. This one's got a mirror
on, so let's apply that. Like so, hide them out the way. Then we come to this one then. Nothing on this, as you can see, so hide it out way. And this is all preparing everything so that we
can actually use it. So control A, Control
A, hide it out the way. And then let's come to this one, Control A, hide out of the way. And we're just working our
way down, as you can see. This one's fine. Let's
have a look at these. They're fine. Let's
have a look at this. That's fine. That's fine. And these have a
mirror on, Control A, and the bevel we're
going to leave on. Old bring back everything. This is what we should
be left with now. Now, at this point, we can join, let's say, can we join together? Probably not yet because we've got a little bit more
work to do first. So first of all,
we need to come in and copy what we
did with this one. So you can see on
this one, we've put some randomize on there, and we need to kind of do
the same thing on these. So what I'm going to
do is, first of all, I'll probably join all of
these planks together, and I'll do them all
at the same time. That might make her life
a little bit easier. So I'm going to grab
all the ones on this one, press Control J. Then I'm going to come
to this one, grab him all on this side, including these bomb
ones. Press Control J. And now if you press
G, you should end up with the shell
of the actual roof. Let's do the same on here, the shell of the roof. And now what we can do is
we can actually come in and make sure we've got
some edge loops in there. So left click, right click. Go down, make sure any planks that don't have edge loops are
going to have them in. These have enough edge loops,
anyway, as you can see. Now, did we miss these
ones in the inside? Let's press Control
R. Maybe we did. Let's have a look. Yes, we have. So let's join these
with these, ControJ. And then let's come
in. These have already got some
edge loops in there. Very nice. Everything's ready to go on that one. Now,
let's come to this one. Everything actually is ready
to go on that one, as well. Now, let's come to
the first one, then. And what we want to do
then is press tab, A, mesh, transform, and we're going to add
in some randomize. Let's turn it all the way
down to note point no one. And there we go.
Got some little bit of variations in there. Sometimes I will come in, and on something like
this, for instance, on this bit, I might come
in and add in a few more. So I've just grabbed, you know, the edge loops going around the outside and then
come into mesh. So you're also free to
do that if you want to add a little
bit more you know, to the bottom parts, and I can see it's a
little bit more. I wouldn't do too much for these because they do want to be, you know, a little bit jaggines in there, but not over the top. It's mainly on the bottom ones where I tend to do that because, you know, they're
supporting a lot of wheat, so I take that into account. Let's go to mesh, transform, randomize, and then
turn this down 2.1. Alright, that one's
done, ready to go. Now, let's come into this one. We'll press A, randomize. Turn it down. Let's try no 0.2. And I think that's right. Click shade or to smooth. You can see here it's broken
a little bit too much. That's what you want
to be careful of. You can come in and add, you know, A sharp on there. That will actually straighten
it back out a little bit. But sometimes,
sometimes it's better, you know, not to
go quite as far. So I think on this one, in particular, we
won't go quite as far. I'll be mesh, transform, randomize and turn it down
to 0.1, and there you go. Right click, shade at smooth. Now, the other
thing is on these, in particular, just looking, we have actually got
a nice quad there. So we have got one
missing though here. Can you see this and this one? Let's right click. Make
sure run face let. So right click,
trangulate faces, right click, triangles to quads. And now it's probably made
here a little bit there. Although sometimes it's
better off doing it yourself. And the reason is because
if I press J on here, and I press J on this
side as well, like so. What that means is now I can
come in and bevel these off. Like so. So Control B. You can see the beveling
off in that way. So what I want to do instead is grab like I did
on the first one. Going all the way around, like so, Concho B. Let's bevel them
off a little bit. Let's come to this one,
do the same thing. Now, this one, hasn't even
got anything filling that in. Let's press Control B. Like so. There we go. Now, does he need
anything in there? Yes, because that's an on. So let's join that and that. Like so. Now it's a
perfect piece of mesh. And now I think after
all that work, we can, first of all, add in the
bevel and we can also, I'm not going to join you
altogether quite yet. But I think what I'll do is I'll definitely add the bevel on. So all I'm going to do is grab these two, grab this one last, and I just want to
copy that bevel, so Control A, copy modifiers. Let's just make sure they're
right before finishing then. You can see now we've got a beautiful bevel
going on there. I'm looking at this part here, just making sure I can see
it's coming out a little bit. So all I'm going to do is
grab this in face leg, like so, press S and Y. If that's not working,
make sure run global. So S and Y or X, bring it in a little
bit, like so. There we go. That's actually
looking pretty nice. And the reasoning
that popped out is because we used our
randomize on there. So I just popped it
out a little bit. So I am checking those as well, and now we're just having
a final check round, and we're going
to save our work. And on the next lesson, guys, we're going to get the materials on everything's ready to go. And then after that, we have we do have
four more roofs, but honestly, they're kind of different to these
except the small one. So are they easier. In a lot of ways, yes, they're easier than the
ones we've just created. And, you know, after
the four roofs, basically, the pack's finished. So we can start
moving on then to the Unreal Engine part.
Alright, everyone. So I hope you enjoyed that.
I'll see you in the next one. Thanks a lot. Bye bye.
94. Precise Roof Tile Unwrapping and UV Alignment: Welcome back if you want to
the Hunters tree environment, Blender it to Unreal. This is where we left it off. Okay, so now let's come in. Let's put it on material mode, and we should when
these load up. So we should have this. So I'm going to press Shift D again, bring it over just so it's a side of it so I can
actually see what I'm doing. And we want to mimic
this wood and this wood. Now, we might as
well grab these two, grab this one, press Control L, and what we're going to do
is link materials like so. Now, with these, and this, we want to press tab, A, go over to our
materials, Wood red, and click Assign, like so.
Now we've got our Wood red. Now what we need to do is just make sure it's
looking the same as that. So let's unwrap and smart
UV project, click Unwrap. And then what we want to do
is go over to our UV Editing. Press a little dot bun. And if they're not selected,
let's press oltage. Bring back the stuff. And
if that doesn't work, press the little question
mark, and there we go. Now we've got these
on there. If you want to come in and just
isolate everything out, you know, because your machine's chugging along, that's fine. And if not, just put
it onto material. The other thing is, as
well, at this point, turn off the noise
on the render. So on the viewport, sorry, turn it go to make life much, much better because it's not
going to chug along so much. Then you'll find
you're able to put this onto material view, and it'll actually work
a little bit better because all we're viewing
here is this bit anyway. So now we want to do we've
got both of these grabbed, make sure they're all grabbed, and then you're going to press R 90 and spin them round. Now, what we want to do now
is just match this wood, so it's matching
to this wood here. This looks a little bit, I would say, compared to this, you know, on
the small side. Now there is another
way you can check. If you grab this one here, you will see that if I
grab this piece of wood, I can see exactly
how big it is there, which means now if
I grab these two, like so and grab this one, we can see that this
is this piece of wood. Now, what that means is I
can come in, press, like so. And I know exactly
where this is. I can also then move
it to the side, as long as I'm still
happy with it. So I'm still happy with that. And then what I can do
is now I can come and press A to grab everything. And I'm thinking, maybe that's actually the
wrong way of doing this. I can grab both of these now and get them to be
round about the same size. Bye coming back in and seeing, here's my piece of wood here. You know what? I'm just
going to grab this one here. Here's my piece of wood here. Let's just go out again. So now I should be able to
grab these two here, press A, and then come and grab
this one, press tab, and now we can see how big these pieces of wood
are compared to this. And I would say they're
probably a little bit small. Let's have a look. Nearly there. In fact,
you know what they are. It's just there's so
many parts on here, so I would say they're
about right now. So now we've done that, let's
come back to these two. Let's say press tab. And
what I'm looking for now is just to straighten
out any of the bend pieces. So I'm going to come
in and then press Alt and just strain
all these out. And yes, again, it's a little
bit of a bind to do this, but doing it the
other way and getting the right result of it looking nice is more important than, you know, a couple of
minutes work, to be honest. So that's why I do this,
and I want this course to be the best work that you
can possibly put out there. And so that is why I'm
spending the time doing these little things
that a lot of artists probably don't even bother
doing because they don't notice that the wood
grain here's a mess. And so that is why because
when they make planks, they don't just cut out,
you know, a piece of wood. They actually bend the wood. And when they bend the wood, the grain goes with that bend. You know, if you
just cut it out, you will see the grain goes against the cut, and
that is why I do this. So there we go. Now they're
all straightened out. I've missed one up
here, as you can see. So, or straighten that out. I haven't missed anymore. Doesn't look like it. Let's
pull this to the side. And now you should end up
with beautiful pieces of wood with a nice flow
going all the way around. Okay, perfect. Now let's come hide
down our floor, and let's come now
to these parts here. So what I want to do
next is the wall. So I'm going to come in and see if I've managed to get
some decent walls on here. So you can see here
this walls you know, it's the same as this, so
I'm going to split it off. So I'm going to grab this one
and this one, press the Yb. I'm also going to
come in and see if these are all
together, which they are. So I'll grab this
one and this one. And then this one and this
one, press the Y button, and now I should be
able to come in and just press L on each
of these parts, press U and smart UV
project, click on wrap. Go to our materials. You can see they're
not quite right. So what I'm going to do is just join the materials to
be the same as here, Cctrol L, link materials,
and there we go. Now let's go back
into these two parts. Let's assign our walls on there. Now let's make them
the same as these. A, S, same as these. So now you can see they're
looking exactly the same. Everything's looking
great. Now what we need to do is our roof tiles. So these now should
be relatively easy. So we'll grab this
one and this one, we're going to press
three to go inside view, and then we're going to
press, and we're going to project from view like so. Then we're going to press
A, S, pull these out. And all we're trying to do now, we can actually see is get these roof tiles to be the
same scale as these ones here. You can see these are
slightly slightly bigger. So we're going to make
them a little bit smaller. And then what I'm going to
do now is press G and Y, level up the top ones so
they go in nice and neat. Now, they might not
always fit perfectly. So that's something
that you just need to take into account. So what I'm going
to do now is grab this one, not that one, this one, and this one, press Shift H, and now I can see how they're
going to line up. Now you can see this part
here is actually in the wood, same as this one and this one. I need to get it so that
these parts here look right. So what I'm going to
do is press G and Y, pull it up to where it
actually starts again. So there's the roof tells
where it starts again, double tap the A and have a
look at what they look like, and I think they
look pretty nice. Let's press altage,
hide this floor again. And then just check to make sure that these
are looking good. Now, you will see on this side, we've actually got this
little part in here. Now, does that look
right? Probably not. You can also see it's
mirrored over the other side. So it looks to me
like what we did was we deleted one side
and not the other side, I think, have a look.
Or maybe we didn't. Let's first of all, come in, press S and Y and bring it in just a little bit and
then pull it back this way. The other thing
is, I can see Now, this part here is not right, you know, this part on here. It needs to come down further, so I'm going to fix that now. And again, when you
come to the final part, you will always
find certain things have not gone right, and
this is one of them. So we definitely want to pull it down like that one over there. So all I'm going
to do is press E, Enter, S and X, pull them out. Pull them down just to get
them into the nice slope. Don't go too far, so a
little bit too far here. So S and X, bring them back, pull them up, like so and then S&X like so,
and there we go. That is looking perfect now. Now, of course, the
one problem we've got is it's too great an angle
here, so let's come back. Pull them back. There we go. And now we've got that
nice, beautiful flow again. And now we're just
looking at this because we're probably going to need to pull this
back a little bit. So Eva, let's just try
pulling it back first. There we go. Everything's
fitting in now. And the last thing
problem we've got is this is now known
wrap properly. So what we're going to
do is just re unwrap it, so smart UV project. Look at the scale
of this. And then what we can do is now a 90, spin it round, make it
a little bit smaller. And then what we can do now
is fix all these once again. So L, l E, L, T, work your way down. Like, so spin any round. I've gone, you know,
kind of a bit haphazard. And we will check to make sure
everything's looking good. Okay. And then we'll
do the same thing on here, L like so. Now, let's have a look
at what we've got there. Now, I don't really particularly like this black part on here. So that's the first
thing I'll fix. So if I come in, what I
want to do is press A, G, and move that like so. And then I'm going to go around, looking at the rest of it, making sure I'm happy with it. And again, I'm going
to go around here. And I'm not happy with
this part on here. So I'm going to come in, L, A, G, move it round. There we go. Okay,
happy with those. Now, let's go back to modeling and make sure that
we're happy with it. And I think on this, I
can delete this now. Let me just make
sure my roof tiles Around about the same.
Now, you can see, one of the problems we had there is I can definitely see a
difference on the roof tiles. So you can see here the
roof tiles because we use project from view
have got stretched out, you might like that. I'm not so sure myself, so I'm actually
going to come in. I'm going to grab these again. I'm going to try going through the top from the top this time. And I know it's that little
bit of extra messing around, but let's project
from view on the top. Let's go to UV editing. And then what I
want to do is now is see if I go over
the top again, if I can get them looking the
same scale as these ones. So let's press the button. Let's spin them round. So 90. And let's get them even bigger. So pull them out, pull them out, pull them out, get them on
the same scale as these. Roof tiles which
are going in there. Let's have a look
what that looks like before doing anything else. Press the little
dog bun. I think maybe that's also not worked. So you know what? We'll have
to do it the other way. So let's do angle based. No, that's not going to work. So let's go. Let's first of all, resell of our transforms. And we want to get these
right because we don't want the roof tiles to
let down everything. So resell of our transforms, let's go U, and then what we do Smart UV project, click Okay. And yeah, there we go. That might actually work better. Now we can see I'm just
wondering if I've actually unwrapping something
else because we should only have
these parts in here. I'm wondering what else I've
actually unwrapped here. And yeah, it's the
bottom. The bottom is probably what's
causing us issues. You know what? Delete
the bombs out the way. Delete and faces. There we go. Now I should be able to
come in, grab this one. And you can see because
they're all probably joined, that's also the top. Like we had before, the top causing a little bit of issues, so let's delete faces. Let's do the same thing
with this one now. So we'll come to the
top let's hide the way. And there we go, the leaf faces. And now let's come in, and
we should grab this now, exactly what we wanted. Let's come into
this one, as well. So we're going to grab
this one, this one, this one, and this one. And let's press you and we should be able to actually
unwrap like that now. And there we go. We can
actually unwrap like that. Now the thing is, these are the wrong way
round, as you can see, so let's spin them
round. So R, 180. And let's also, this
one's probably. These are going the right way. These look upside down to me. Let's press R 180. Now they're the right way round. These are the right way round. Tap double tap the A, and now on the next lesson, these are the wrong way round. I'd say that on the next lesson. If I spin these
around, there we go. Now they're going
the right way round. This one is still the wrong way round, so
let's come to this one. So 180. Now they're going the right
way round. Let's make sure. Let's make sure. And now everything's going the right
way round. Alright, guys. So on the next lesson, then what we'll do is
we'll save our work. We will get these
roof tiles done. Absolutely will get them done. And then after that, we're
on to the last four roofs. And I think you know what? After these roofs, we'll do something a little
bit different just to give us a little
bit of respite so we don't get too
bud doing roofs. Roofs take a long time. Very
boring in a lot of ways. Alright, everyone, so I hope you enjoyed that, and I'll
see you on the next one. Thanks a lot. Bye bye.
95. Building the Clock Tower Base with Solidify and Mirror: And Welcome back, everyone to the Horne
Street environment, Blender it to Unreal. This is where we left it off. And hopefully, after this, we'll be leaving these roofs off because they're
becoming a bit of a pain, but that's the way
it is sometimes. So now we want to do is
grab all of our roofs. We've got them in
the right place. So let's just make sure
we've got them all. We might as well do them all
together, you can see here. Have we got them all selected? What I'm going to do
is just make sure I've got my roof selected like so. Now, what I want to do is make these either
smaller or bigger, probably bigger because then
we're going to match these. What we want to do is
match these down here. I'm just going to move
this to the side because I find that viewing on material mode is
actually sometimes way, way easier than
viewing like this. Now, the other thing
is, we can actually see this on here. What we want to do
is kind of hide this out way so it can
still work over here. So if you come over here
to this little box here, you will see that you've
got one that says faces. You can actually
hide the other way. And yeah, you should be
able to work with that. I'm just wondering if I can actually hide those
out of the way. Never mind. We can
hide the other way, so now we can actually
see what we're doing. What that means is then
if I come over here, make these bigger, now
I can actually get the perfect view what I'm
actually looking for. And now we can see
that these are pretty much lining up
right across the board. Really, really easy to do that. Once you actually know
that, double tap the A. And I think now,
apart from this one, which I don't seem
to have grabbed, so let's just go back. A, that's why I didn't do that. Let's press A, just to make sure
I've grabbed that. I didn't see it there. And then what we'll do is again, we'll bring them out and get them into the right
space. And there we go. That looks about right.
Now, lastly, as I said, we just want to make sure
that at the botms of here, we don't want halve
tiles on here. So now it's just a question
of going in, grabbing, let's say this one, G and Y, and moving them just into
place, making sure they're fit. Let's make sure this one
as well as you can see. So G and Y, making sure the jaws down there, coming round to
these ones, then, and then G Y, them in place, come into this one,
and then L G and Y, put them into place, like so. Alright, looking co. Now, let's go back to
our bounding box, turn on our faces so we
can actually use that, double tap the A,
and there we go. Let's press Saltag,
bring back everything, hide of floor once more, and there we go, that is
what we're looking at. Again, as I said,
in material mode, you can really actually see what the structure of the
building is like. Now, I can also see before finishing that these
on the inside up here. So this on the inside up here, these ones here, you
can see is in the wool. So what I'm going
to do is just grab this one, grab this one, and I want to make sure that
my wool is selected like so. They're also known wrapped, so let's unwrap on Smart
UV project, unwrap. And let's also bring
them out a little bit, just so now they
look like the wool. And if I double tap the ANAL, you should see that's
what it's actually done. So that's looking really nice. Now, sometimes on
things like this, I will instead of using
this, I will use the wood. And you will get
a different look, and you can see now that looks now like the planks of
wood going across there, holding all this structure up. And I think actually
that looks better. Now finally, before
finishing then, let me just come to
this part because I'm still happy with
how that looks. Let's move it over that way. And now I think
that actually looks better, and there we go. I'm pretty much done
with these roofs. So the final part then, we can go back to modeling now. We can get rid of this roof
here because, remember, we shift deed to bring that
over here so we can lee way. And we can now come in, and you can see now the roofs
are lining up perfectly. There's no stretching in there. If you look this way,
no stretching in there. They're looking really nice. And yeah, I'm happy with those. Alright, so what we want to do, then we can see that this
over here as our Bvlon. So what we'll do is we'll join
this roof with this last. We'll press Control
J, join it together, and then we'll come
to this one here, and we'll grab this one last, then we'll press Control J. And then we've got
the issue with these spinning round
for whatever reason. Shift, spin them back
around. There we go. And you know, your heart
probably dropped them thinking, Oh, you know, the normals
no they're going wrong. Well, don't worry about that. We can fix that. No problem. We come then into these parts, make sure these normals are
right, ready for unreal. Shift down, spin them round. If they're not going
to spin around, spin them round like
that. There we go. Another reason why we have on the face orientation always is because we pick up
on that straightaway. We haven't actually
got to go in, you know, and fix
everything in the end. Okay, those roofs then are done. Finally, then let's
reset the transforms. Make sure bevels on
them both, which it is, and just have one final look
around is what I tend to do, making sure everything is
looking neat and tidy. And then finally, we can pull them over here to
this roof here. Alright, that's done.
Now, let's come in, and I think we'll do something a little bit different
just to give us, as I said, a little
bit of respite. I think next we'll actually
work on this part here. So we can see if we zoom in, it's got a clock tower slightly
you know, round it off, giving it that creepy kind of look while still giving
it that softness, which makes it stylized, happy, haunted type look. Okay, so let's get on with that. So the dimensions for
this, let's first of all, shift S. So we don't
actually have to do shifts. We don't need in
the world origin. Shift A, bring in a cube, and the dimensions on here
are going to be 3.12. 2.86 and 3.12. So you can see it's square, pretty much apart
from on the Y axis, let's from now, press Control A or transforms set
origins, geometry. And then what we'll
do, first of all, is we'll lay out the foundation of how this is going to be. So we know it's only
the front and back, which are going to be then. So what I'm going to
do is press ControlR, bring in five edge loops, like so, and then
I'm going to grab this top and this
top, press one. So I'm going to go
into front view I'm going to press SNX
and bring them in, like so, and then I'm
going to work my way down on this one and this one. So S&X bring them in. And then I'll probably come to the next one S&X. Bring them in. Now, I'm wondering, I've got
already quite rounded there. I think I'm just
going to round it a little bit more like so. So I'm wanting
something like this. Even if you've got a little
few centimeters bigger than, you know, what we
had in the original, don't worry about it. It's a you know, it's going to happen where
it's a little bit out, so don't worry
about it too much. Okay, so let's now make
the actual base for this. So all we want is wood coming out of pretty
much all of these parts. So what we'll do is the technique which I've
already showed you. So if I press Shift D, and then what I'll do is
pull this out along the Y. I'm going to press E then
and follow along the Y. So E and Y like so. And then what I'm going
to do is split this off. So L P, selection,
resell the transform. So control A, reset
all the transforms, and then we'll come
in and generate a solidify let's
bring it this way, Let's set this to zero, and then it should put it
right in the center for us, and let's make sure you're happy with the thickness of the wood. I think actually, the thickness of this wood is about right. So what I'm next looking at is this obviously is too far out,
so I'm going to put it in. I'm going to put it
in object mode just so you can see a
little bit easier, right click shade Auto smooth, and you should, as well. Auto smooth that. And this
is what you should have. Now, I would say, that this
probably isn't thick enough, so I'm going to increase
the thickness, like so, because it's holding
up, you know, a clock tower at
the end of the day. I would also say, as well, that it's probably stuck
out a little bit too much, so I'm just going
to bring it in. To something like that, maybe we've gone a little bit too far. Something like this,
I think, looks great. Okay, now what we need to
do is put the top on here. So we've got this in here. We can mirror that over there. Now let's think about
the top of here. Now, with the top,
we might as well just press Shift D
bringing a cube. Let's press S, and
let's bring it out. Put it into place where
we actually want it, get the scale that we want. So S and X. And we want it to you got to make a
choice, an artistic choice. And the artistic choice is, do you want it, you know, after there or before there? I tend to always
go the other way. So I have it this way. I don't
kind of want it that way. I don't think it looks
right. But again, guys, it's entirely up to you. Now, what I'm going
to do then is pull this bag just so
it's in front of it, work on the top,
then, so I don't want my top to be so thick like that. So bring it down a little bit. Like so, and I think
that looks pretty good. Now, the moment of truth then, let's see how this
actually looks. So grab your cube, shifts, make sure cursors to selected
of your middle cube. And then what you want
to do is grab both of these and Control
A, all transforms. Right click Set origin
to three D cursor. Now, let's do this one first. So I'm hoping to put this
over here and down onto here. So I'd modify generate a mirror. Let's see if that
actually works on the z, turn off the X, and there we go. Let's do the same
on this one, then. So what I'll do is add in a
modifier, generate a mirror, and then generate
a mirror on the Y, like so, and that is
what you're left with. Now you want to
do is grab these. You're happy with these.
It's got a mirror on. All we're going to
do is press Shift D and then RZ and 90. And there we've got
we've got basically the main structure
now already done. Apart from obviously these bits are looking a little bit small. So what I'm going to
do is I'm going to actually grab these bits
that I've just done. I'm going to press A to find the one, which
is the mirrored one. And then what I'm
going to do is press the S but and bring that in like so and there we
go as simple as that. Okay, make sure you're happy
with the gap here and here. But I think for me, press EN'sEa and just pull
it up a little bit. I think for me, though,
pretty happy with that. Now, before mirroring, you know, applying your mirrors, just go in and add in a few edge loops. Let's we should have
them already on here once we actually
apply that solidify, which at this point, I might
as well actually apply that. So now we've got enough
edge loops on here. Let's come into
this one as well, add in a few edge
loops. Like so. And that then is ready, then, so we can actually add
some randomization later on down the line. Now, let's come in
and save our work. And then on the next one,
what we'll do is we'll get on with the actual clock
on the front of it. And, you know, compared to
what we've just been doing, this is actually a breeze. It's a walk in the park.
Alright, everyone, so I hope you enjoyed that, and I'll see you
on the next one. Thanks a lot. Bye bye.
96. Modeling a Detailed Clock Face with Bevel and Subdivision Surface: Welcome back everyone
to the Hunter Street environment,
Blender to Unreal. This is where we left it off. Alright, so we've
done that part now. Now, what we want to do
then is bring in the clock. So we'll bring that in first. We'll press Shift Day.
We'll bring in a cylinder. Now, because it's a clock, and it needs to be very,
very nicely rounded. We don't want really jagged
edges in this clock. I'm actually going
to leave it on 32. So you won't find me
doing that very often, but for this occasion, I'm
actually going to do that. So I'm going to press R
X 90 and spin this out. And then go to pull it out
to where I actually want it. I'm also going to shade smooth. And you can see now it's very rounded, which is what we want. Now, where do we put our clock? We don't actually
know at the moment, because what we need
to do is first of all, make the clock face,
then make the outer bit. So first of all, we'll
just pull it out for now. We'll go to the
back of the face. And what we're going to do
then is just pull this out, and this is going to be
the actual clock part of. We need to kind of get
rid of a lot of this. But for now, what we'll do is we'll work with
what we've got. So we're going to
press Alt Shift click going around
the outside of it. We're going to press E, Enter, alternate, and pull
that out like so. This then is going to give us that little rim that
we have on there. So what we're going to
do is shift and click, and then we're going
to pull out exactly where we need it like so. And there we go,
that's our clock. Now we want an inner
part on here as well, because I think it
actually looks better. So what I'm going to do is
I'm going to come in control our going down past here, and then Alt Shift
click on here, eat, enter alters, and bring it
out just a little bit more. So ltess, bring it in, like so. And then we go, now we've got a nice little bit
of a rim on there. Now, what we want to do before doing anything else
is actually adding a bevel just to see what it's going to look like
because as I said, we do want it nice
and smooth on here. So we're going to
generate a bevel. We're going to turn
down this bevel to notte point not three, like so, and then we go, Is that smooth
enough? I think so. I think so. You could go
even smoother with these. You could come in
and bring in a um, where is it a
subdivision surface. And you'll see
automatically then you do get a kind
of smoother look. And I think that might
look even better. So on this occasion,
I might actually use that I think
that's looking much, much smoother than
what we had it. And it's also as it go beveling. Sometimes, when you
bring in the second one, you just got to be
careful that they don't interact with each other,
as you can see here. And what you tend to do
is bring this above, drop it on the top,
and now you'll see where these issues are. So now, we can see we need to fix these issues if we
bringing in solidify. How do we fix these issues? Well, we need more
edge loops, basically. So we need edge
loops on this bit. So if you see here, press
Control and bring it up, you can still get that
rounded edge look, but you've just got
to support the edges. You've got to
actually come in and support those edges
to actually get that. Again, I'll do it on here
as well. So bring it in. And now you can see
it's looking very nice, and now it's also
come into the center, and we'll support
this as well by pressing the eye boon
and bringing that in, holding the shift
boon, and there we go. And we'll also support this. Now for now, I'm
just going to turn off my bevel so I
can actually see. I'm going to turn off my subdivision so I
can actually see. And I can see now that I'm going to need an
edge loop in here. An edge loop in here. No not there. That's the wrong place. An edge loop in here, like so, and an edge loop in here. And this is how people
actually make cars, and they make them look
so rounded by using the subdivision modifier or the multi red. And
supporting it. You can see now
that's what we've got. Now, let's
come to the back. We're going to need a couple
of edge loops in here. So Control R, an edge loop here, and an edge loop here. And now, if I turn
these back on, you will see not only have we
got a nice bevel on there, but it's also very
nicely rounded. Now, from this point as well, because of the fact we've done and we've got a subdivision on, it does mean that we
can bring this in, for instance, so bring
it all the way in, bring in some more edge loops. So left click, right click. And then what we
can actually do is grab just this edge.
You know what? I'll just come up,
so Control plus, press Shift ge to hide
everything else out of the way, grab just the center, put
proportional editing on. Let's keep on shop just for now, and slowly bring it in and
pull that out a little bit. Now, sharp on
something like this, it's probably not
going to work so well. So you can see it
slightly slightly bowed. I would say, if
you're doing this, bring it out on
smooth or the sphere. So if you bring it on sphere, it's perfect for
this because you can see it brings it out
really, really nicely. That is how you can create a really, really nice clockface. Now, let's pull this back now into place to where
we actually want it. And I'm not sure where we
actually want it at the moment. Whether we want it here or, you know, a little bit bigger. But what I'm going to
do now is bring in the square part to support this. So I'm going to come in. I'm
going to press Shift desk selected shift day and
let's bring in a cube. Let's bring the cube
out where we want it. So if I press one, I can see that I need it to come out
probably all the way to there. I'm then going to put
on my ghost and I can see here this is where
you can just see it. These parts are going in, which means then I can grab
the front of this. So just the front in face leg. So grab this from like
so, press the eye button. And then let's bring it
in to where we want it. So round about there, and
then let's bring it in again to where we want it because we want
it to support this clock. So if I bring it into there, that's going to be
a good support. Now, if I come in and just grab these parts around
here, this part here, I should be able to
press Shift D and bring that forward
with our portion, we really don't need
that on, like so, and then grab this and
delete out the way. So delete vertices. Now
let's turn this off. Let's grab this part, pull it back into place. Let's press the E bond to pull
it out, and there you go. You've got some actual supports. Now, why are we you
know, not bending this? Why have we bend this and not this? Because
this has made a mel. You know, this is
probably not going to bend the same way as that
wood is under the weight. It's going to be
actually quite strong. The wood around it
is probably going to bend and keep
the metal there. And I think actually, it
makes quite a nice look. Now, the one thing
I would say is, even though mel is
not going to bend, you might want to
come in and just add in a few edge
loops, like so. And a few edge loops
here, like so, and just bend it very, very slightly if you're
going to bend it. So bring this in just very, very slightly, like so. Same on this part because the metal is not indestructible. So you might get a tiny, tiny bit of a bend like so, and now you can see
it's slightly warped, but the wood on the
outside it's done. It needs to replace
them, you know? Okay, really, really
not happy with that. And pretty much if I
double tap the A now. And pretty much, I think,
finished with this. So now let's come in, and
what we'll do is we'll apply. We haven't got any
bevels on here, so you can see there's
no bevels on here. So what we can do with this
is just press G first, just to make sure you've
grabbed everything. And then what you can do
is come up to object, and you're going to convert
to mesh because then they'll just convert all of
those mirrors on there. Then we can join it
all together, like so. And then we already know that we went in and put all of
those edge loops in, which means now we can
actually bring in a bevel. So if I bring in a bevel, put it on note point, not note three, and there we go. That's what we're looking at. Everything looks good there. And then we can come in now
and actually come to mesh, transform, and we're
going to go to randomize, and let's turn that down. Like, so maybe even to no 0.2,
can we go away with that? Let's right click Shade Auto
Smooth and there we go. Now, I also think on this, I'm going to make it
a little bit more pronounced on certain areas. So these, especially
the outside parts. So this one and this
one, maybe this one. So I'm just randomly
picking some parts, and then I'm going to go to mesh and transform and
randomize those. I'm going to turn
them down. And then I'm going to look at what
I've got, and there we go. That's looking very, very nice. Now, this stage, let's have a look at what
we've got on our clock. So we've got our subdivision. We've got our bevel on there. So let's apply, first of
all, just our subdivision, because we know this is
already set to point no north three on
this part as well. Let's randomize it
just a little bit. So transform, randomize. Turn it down to 0.2. There we go. Tiny, tiny bit. Have we got a break
in there, or is it to do with shading smooth? It's a shading smooth
issue, so there we go. And finally, now we
should be able to join this with this and add
the betivl so Control J, and then join this with this
and join it altogether, Control J, and we should end up with a really,
really nice piece. Now, again, on the
top and the bomb, we're really not going to
need these parts here, so you can see this outer
part here also needs joining. Let's first of all, though, come in and delete
the top and the bomb, so delete faces. Like so. And now we can
actually join this with this altogether contro. And there we go. We've
got something like this. Now, what we're going to
do now is, first of all, we'll save out our work, and on the next lesson, then pretty much done
with this clock, which means then we can
come in, unwrap it, make sure the wood
and everything, the walls and
everything like that is aligning with what
we've done for the roofs. And then we're done. We're
done with this clock tower, which means then, I think,
let me just check that. I think then we've
just got two pieces. So let's pull up this up. So we've done this one, this one, this one, we've
nearly done this one. We have these kind of
three pieces left. Now, these pieces are, you know, pretty easy compared
to what we've done here. This one's a little
bit different, but I'll show you
how to do that. After that, the
only thing that's left to do is the lattice, where we're going
to bend these in. I've left those
for the last part because I think it's easier
to do them, you know, together, because then
you've got the, you know, you've got the way of
how the lattice works, so we're going to leave
that till that part. Alright, everyone, so I hope you enjoyed that, and I'll
see you in the next one. Thanks a lot. Bye bye.
97. UV Mapping and Materials for the Clock Tower: Welcome back, everyone to the
Hunter Street environment, Blender it to Unreal. And this is where
we left it off. Okay, so now let's come in
and add in some materials. So what we'll do is we'll
come and basically, the only difference is
we need metal on here, we need wood, and we
need the walls on here. This hasn't gone
in mel on there, so I'm probably better off. First of all, resetting
all my transforms. Let's do that as always. Let's put it on material. Let's bring in the
first material, bring in the wood because
that's probably the majority. So I'm going to
look for red, wood. I'm going to press plus.
I'm going to look for then. I'm going to look for metal. So metal, we'll
bring that one in. We'll click the plus,
and we'll look for wool. So we want wall in there. And then finally,
we need the clock. Now, I'm not sure if
that's actually in there, but I'll see soon. So let's just minus
that off the way. Let's actually look, see
if the clock's in there. So we'll go up to File
and we'll go to append, and the clock is here. So there we go. We'll
bring that clock in, and here it is. And there we go. Alright, so we'll
leave the clock till last because I know that's
the most exciting part. So what we'll do is
we'll grab it all. First of all, we'll press U and smart UV project just to
give us a starting point. And then what we'll do is
we'll come to this wood. So we want to grab just
each of these woods. Now, if you like me, rather than having to keep
re grabbing them all, let's just go over and make
it into a vertex group, so we'll click assign, and then we can always
grab them really easily if we want to
mess around with them. Let's go to UV editing
them, let that load up. Let's bring him. Again, I'll just grab this
Shift D when I bring it over. Bring it into place just so we can see how we
want the wood to look. So first of all, we need
to grab not both of these, this one, and then we
need to press a 90. Now at the moment,
I'm not worried about these going straight up
or anything like that. All I'm trying to
do is get these to be round about the same
wood as what this is, which is what they are now. Then what I can do is worry
about the bend on those. So ti and then Lot E, and then Lot E, like so. And then we'll come in
and do the same on these. So L, Alt, E. And
I think by now, you pretty much have a really, really good workflow of actually
putting these together. Right, there we go. Okay, so now we've got that hide
them out of the way. Let's then come to our walls. So we'll come to these, then
we'll put it onto walls. So a sign, and then
we'll press A, S, bring it out, making sure it's
looking like this, which now it does, and then
we can hide those out way. And we're down to
this piece of wood, which is something I missed. I'll come back to that,
and that's why we're selecting everything at
the same time, guys. Let's come back to this first. So we're going to go
L. We also need to press TH because this was, for some reason,
hidden out of the way, which means that I'm going
to grab this piece of wood, and then what I'm
going to do is grab this piece of so
you can see here, I've got this one and this one. Now, which one is
this piece of wood? Have I got any smaller
parts in here? Yes, I have. I've got these parts in here,
as you can see. So I'm going to
shifts like these. And what I'm going
to do is, first of all, I'm going to go to UV. I'm going to pack the
islands, click Pack. I'm going to spin
them round or 90, and then I'm going to
make them the same size as these ones
here, pretty much. You can see now they're
around about the same size, and there you go, Done. Easy as that guys. Now, let's
come to our metal, then. So we're going to
unwrap all of these. So, smart UV project, just unwrap them once more. Come to your mouth,
click a sign. And honestly, with these, you should just be able
to make them a little bit bigger and get under the
right way that you want. And now we're on to the clock. So let's come to our clock. Now, one thing we didn't
do when we did our clock, let's press dot
just to zoom into this part is we didn't
actually mark a seam on here. And you will see as well that once I've marked a
seam on here to mark seam, let me just show you one thing. If I come back to object mode, you can see what that
subdivision did. I added tons and tons
of edges on here and all things and this is why we only want to use this
very sparingly because, you know, polygon count can
really go through the roof. If I, you know,
press tab on here, you can see down here that
the amount of polygons, these are triangles down here, but you can work out. This is a lot. If you look on
here, it's 6,700 polygons. Now, if I come to this 1,196, you know, it's six times
more than this roof here. Why? Just for this clock alone. If I grab all of these, I think if I grab this,
let me have a look. So faces 3,352. I'm just seeing if I can
just isolate those out. So if I grab this
one, there we go. So you can see here,
26 faces on this. On this one, 22 faces. On this one, 3,000 faces. That's the difference, guys. You can really,
really tell, like, this is a lot of
extra mesh on there. Now, let's come in. Grab
the clock, click a sign. Let's also then put it on
material mode, and here we are. Now, on something like this, I tend to come into this. So you can see
we've got a lot of extra mesh on here. Where
is that coming from? If I press Shift D, just to test that, I
can come round then, if I press the little db on and see that round the back of here, I have got all of these parts
that I probably don't need. So I've got all of
these face on here that don't need to really be
joined up to the rest of it. So what I'm going to
do is just delete this out of the way
because I did copy it, and then I'll come in and I'll
look at the rest of this. So if I come in, take all
this away, press H for hd. I can see now where all that wasted meshes.
Now, is it wasted? Are we actually going to
be able to see in there? I'm not 100% sure, so what I'll do is I'll come in, and you can see it's kind of
clicking on everything here. So I'm going to just come in, press shift H to
isolate everything out. Where is all of this? If I click the front, you
can see that is there. So where is all of
this being wasted? Alt Shift and click,
press Control plus, and then let's press
Delete and faces. There we go. Now,
is all that being wasted all the way up
to here? I think so. Let's press Altag,
bring it all back. Are we going to notice
any difference now? You know, this is going
all the way up to here. So maybe I can come in now and just looking at
where this edge is going, Yeah, this edge is going
all the way up to there. So I should now, if I come in and grab this part, press shiftH, I
should be able to come in and pretty
much delete the back. So if I press Alt
Shift right click, Marksm, come to
the back of this. I should be able to come in and delete faces because I'm really
not going to need those. If I press Altag now
bring back everything, we should be left with
something like this, making it much, much
cleaner to work with because when
I grab this now, you can see this is
what we're looking at. And now I know exactly
where I want to put this. Albeit, I need to spin it round. So I'm going to press spin it round to where I
actually want it. Something like
this. I'm going to press the S button
then to bring it out. Like, so I can see
it's a little bit out, but it just means I can press G and Y and line all of that up. Now, I can also see that this texture isn't
perfectly round. Sometimes it happens,
but you know what? It actually might make
it better for us because we can just pull it out
like that. And there we go. We've got it fitting
in near enough, Pep We've got a little
bit of edging on here. I can get rid of that,
just by pulling it out a little bit more,
so let's pull it out. Now, again, if you are
working just in Blender, the controls here, the
emission is down here, so you can turn this
up to make it much, much brighter if you want to or set it to
what we set it out, which is around four. Now, that's pretty
much that done now. You can see it's looking
really, really nice. The one thing you
might want to do at this stage is just go in,
grab the whole thing. Press one and just
press the S but just to bring it out a little bit more against that metal there. And I think that looks
probably a little bit better. Looks like it's part
of the same thing. You might want to just do that. Now, let's press Control
A, A transforms, set origin to geometry, and let's pull that
over here, like so. Now at this stage, I'm not
going to delete this roof. I'm just going to
put it over here, so I've actually got it. And now we've got those four different things that we had. Now, let's go once
more back to this. So we've just got three
more parts to do, guys, three more parts. I think what we'll do now is we'll come back to
this one and this one. I think, you know, this is really just a smaller
version of these. You know, it's kind of a box, but still relatively easy to do. And this one, we've used some parts that we
already had in here, so we can create this one quite easily, leaving
us this one last. So I think that's the
way round, we'll do it. We'll go up and we'll
file and save our work. We'll also come
back to modeling. And then I think we'll
try and do these pretty much together because then we've got them
both out of the way, and I'll see you on the
next one, everyone. Thanks a lot. Bye bye.
98. Modeling a Modular Dormer Roof with Mirror Modifier: Welcome back, everyone
to the Haunted Street environment,
Blender to Unreal. This is where we left you off. Okay, so what we're
gonna do now is, first of all, we'll put
the cursor to the center. So cursor to world origin. We'll bring in a cube. We'll bring that over then. So we'll bring
that over to here, and then we'll duplicate it. So shift D. And some of
you might be wondering, why aren't we using Old D? You know, with all
of these parts, why are we using Shift
D and not Old D? So what is the difference? So Shift D is just basically
a duplicate of something, and Old D is basically an
instance of something, which means that
whenever you change, you know, the original, you're going to change the other parts. Now, it's great to use Old D and think you're saving, you know, a lot of computer
power and GPUs or, you know, you're saving a lot of draw calls, things like that. That's great to use
when you've got your massive scene and all of the components
are already built. I highly recommend do
not use old D when you create the modular pag what'll happen is you'll end
up altering something, not remembering, and then you'll be deleting something
else, you know, all the way back when
you build something, you have to go and
build it again, or you'll change the
structure slightly. You know, you'll
change this post, and you'll make it a
little bit thinner, not realizing that
down the line, all of the posts
have been changed. The amount of times I've come
using old D and, you know, changed the post, and every post in the scene has been changed. Then you've got to go back
and replace them all. It ends up a bit of a mess. So that's why we're using
Shift D and not Old D. Once you build everything
out, then use Old D for those huge scenes because
it will save a lot, a lot of issues where, you know, blenders crashing
and things like this just because there's
so much in the scene. So huge environments, Alt
D, building modular packs, Shift D. Alright, so now we've explained that just in
case anyone's wondering. Let's first of all, come
into this one here. So first of all, we're going
to give you the dimensions, 2.262 and 2.77. And
that's the wrong one. But anyway, we did
it on this one, so that's the size for the roof. So the new roof, I'm going to set that
to the ground plane, like so.'s pull it up. And then we'll come to this
one, and this one will be 4.253 meters and 1.29 like so. Alright, that's that one. There we go. Let's
pull that one out. Put it into place. So
what are these two pods? So this is a very small roof. You can think of this
as, like, you know, little roofs that pop out from a roof and they've
got a window on. That's what this one
is. And this one is we need some sort of shelter. So basically, whenever
you're building a modular pack, you really
have to think, like, you've got to have
somewhere where there's kind of a shelter bit in
front of a door or something, you know, or to really
give some variation. Having these shelters just
really makes, you know, being from a flat cube to basically being able
to pop out little pots. So that's what these two
parts are there for. Okay, so what we want to do then with this one
is we want to, first of all, lay out
how it's going to look. So if I press Controller, I'm going to bring
it down to here. And what I want
to do is lay out, like, where is the
roof gonna come? So if I say the
roof's gonna come, you know, around here,
so this part here, I can grab now and pull back to my heart's content
to get the actual, you know, rough size of
where this is going to be. Once I've actually got
this, I can actually work, you know, with this and
create these walls. I don't actually
need the bottom. So this bottom is going
to be the roof tiles. Now what I'm also going
to do is press Control, bring in a few edge
loops like so, up to you whether you
bring in four or five, and then we can start
now sloping this. So sloping it out, pressing three and
going side view. I can just see it there and
then coming round three again and just sloping it out to where we
actually want it, and then three, sloping it out. And there you go. Now we've
got a nice slope on there. The roof tiles are
going to come off, and that's looking really nice. Now, do we need a bomb of this? No, we don't need the bomb, so we can actually delete the
other way. So delete faces. Do we need this bit on here? No, we don't need this
bit on here either, because it's flat
and we don't really want that. So delete faces. Now we've got walls, and all we need to do now is put in
the rest of the stuff. So first of all, I'll
grab both of these. And I'm going to press when I've grabbed both of
these, not like that. I'm going to shift
select so you can see you might have gone around the back,
so I'll do that again. So select this one, Control
select, Shift select, and then Control select, and then just press Y, separate them out. Do
I need a back on this? Sometimes it's better
to keep a back on this. You don't know what people
are going to do with it. It's also the reason why
on this particular one, we will be pouring the underside in here to make it look
right to actually because, you know, if you're
gonna walk around here, you're going
to see this here, you're going to see
the underside of here, so you just want to make sure that you've got that in place. What we're doing is at the
moment is we're actually just laying it out to make sure we've got all of
the parts in place. This is what we're building too, and that's exactly
what we're doing here. Alright, so so far so good. Now, just because
something smaller doesn't mean that you need to
have a little piece of dinky wood in there, okay? So just remember that as well. So what I'm going to
do is I'm going to come to this piece of wood here, shift D, bring it over. Like so, I'm going to
press P selection, separate it out, and now I have a good scale of what
I actually want. Control A, resell
the transforms, like so, and now I can start
actually building this out. Now, of course, I
can't build these bits out because it's bad to
build them out separately. But for now, I can certainly put these parts in to
what I actually want. So what I'm going
to do is press RS 97 to go over the top. G, let's put it into place. Let's make it a
little bit longer. I'm not going to worry about UVs or anything like that right now. All I'm going to do is just see if I can get it
into the right scale. So if I bring this
down to here now, you'll see we've already made a start on what this
is going to look like. So if I pull this down
to here, like so, we'll build this side out first, then we'll build the other side. So now, though, I'm
just going to pull this over to here just to
get it out of the way. And now I've got my scale
on pretty much all of it. I need one more part.
So I'm going to press lag or the
w question mark. Bring back my other parts, and the pieces I need are
going to be the pieces here. Again, we're going to press
Shift D, bring those over. And then what I'm
going to do now is just hide out my grand
plane just for now, grab these pieces,
grab this, grab this, and then press Question mark, isolate everything
out of the way. Now, on the roof, we absolutely want to top on it. We might as well use
these. We've got them, so let's press Z 90. Let's press seven,
get these into place. Now, the other thing I'm
going to do because I don't really need to see
the textures on here, putting on object mode gives me a much better view of
what I want to do. And there we go. You can see it looks as though it's
been pre built. So let's pull these into place. We'll also get rid
of this top here. We don't need it anymore,
so delete faces. We'll also right click and shade auto smooth just so I can
see that nice smooth edge, and then I'll pull
this up to here, making sure it fits
into here and here. Now, on the back of here, is more important than the
front because the back, I want these little bits
stuck out on the front, we're going to have a
piece of wood in there. So for now, all I'm going to do is just put this in
place with Shift D, pull it over, like so. Now, I don't want them
looking the same as that. So what I'm going
to do is just go to object, go to mirror. We're going to, first of
all, mirror on the X, and then we're also
going to go to object. We're going to mirror on the Y. And there we go, now you can see looking very different
from each other. Okay. Now we've done that, then, what we want to do is put in
these other piece of wood. We've got this first
piece of wood here. We need a piece of wood going
across here, across here, and then a piece of wood down, and maybe one going across
the center of this. So what I'm going to do
first voice press shift D, I want to bring this
up then into place. Now, at the moment, we've got quite a few edge loops on there. So what I tend to do is rather
than squish them all down, I'll keep the edge loops
pretty much the same, and then I'll press
delete and faces. I'll come in, grab this one. Alt Shift and click,
press the F bone, and now I'll bring it out to
where I actually want it. Now, I'm going to bring it
just out to there for now, and then I'm going
to grab this again, Shift D, bring it up. We're going to press R, Z 90. And then what I
want to do is put this right in the
center of here. So I'm going to grab
this first, shifts cursed to selected,
grab this one, then, shifts and selections cursor, bring it up to where
we actually want it, and then I'm going
to pull it out now. So if I press S and X, I'm going to pull it out to
where we actually want it. And, of course, I want
to make sure that this is in front of
my actual roof panel. So you can see if I
pull it out of here, now I have some direction of
where to pull this up to. So if I pull this up to here and then make it
a little bit smaller. So Ess and's head a little
bit thinner, there we go. Now we've got something
to work with. Now, when we put
this on this side, we have even more to work with. So that's the idea
here. Now, I would say that we also need another
bit coming over here. So what I'm going to do is
I'm going to press Shift D. I'm going to pull this
over to here, like so. And this is for if people want to put it
back against the wall, rather than putting
them back, you know, this back against the wall, let's have it where they can put it back against the wall, and they've still got
a support on here. That is what I'm thinking
of when I'm doing this. So this is going to
be that little bit of support when it's actually
back against this wall. So half of this will be in the wall, half
of it sticking out, but it looks like it's supported without someone having going on every single one of these and putting, you know,
a piece of wood. So that's exactly why that is. What I'm going to do Is bring it in a little bit. So S and X, bring it in. And then I'm going to
grab this one again. I'm going to press Shift D.
I'm going to rotate it round, so RX a 90, rotate it round. And then what I'm going to
do is put this in here. Again, I don't want to destroy all of those
edge loops I've done. So instead of just squishing it down, I'm
not going to do that. I'm going to grab the
top. Control plus going all the way down to here, press delete and faces, and then come in,
grab the edge here. So, shift click,
press F. Like so. Then what I'm going to do
is grab the whole thing, press L, S&X or S
and Y, pull it out. Like so, and then press S
and X and pull it out here. And then we go, we've got
that piece of wood in there. And that's looking
really, really nice. Now, the final bit
then is this bit here. We already know pretty
much how to do this, so we're going to grab it going
all the way down to here. We're then going
to press Shift D, as we've done many,
many times before. We're going to move it
over to this part here. We're going to press E and X, pull it over then to where
we actually want it, and then we're going
to split it off. So L, P, selection,
split it off. We're then going to press
Control A or transforms, set origin, two, geometry, like so, and then we're going
to bring in the modifier, which by now you will
know will be a solidify. Let's bring that solidify out or in whichever
one you want to do. Let's put it into place then. And we definitely definitely, first of all, a few
things want to check. First of all, it wants to come over the actual roof tiles, that's shade or smooth, which means I can
probably get away with dropping this back a
little bit, like so. And second of all, we
want to make sure that this part here is coming
over this, as well. Now, we don't want to
make this too large, so it might be better just
to pull this forward. Get into the place
where we want it, make sure these are fitting and then come to these
parts and pull them, you know, kind of this way. So SY, pull them into place, double tap the A,
and then we go, That's looking really,
really nice now. Now, the only thing
is, if, you know, these roof tiles, if you
do see the back up here, we have to think about this
part here just in case. So we could lift them all
up and do it that way. I think we should lift them up a little bit, so
just a little bit, but we still don't want to
make this so huge this part here that it's
kind of dominating everything because it's
the right scale right now. So instead of that, what
we'll do is just copy this. So we'll press Shift D and bring that into
the back like so. Now, with me, I like
to make things, you know, a little
bit different. So what I'm going to do
is just press S. Like so. I'm going to bring it over and sit it on top
of that if I can do. So I'm going to
come in. I'm going to bring it over and see if I can get away we've just
sitting here on top of here. So let's have a look.
If I pull this back, like so, and I'm also thinking, This part here, can I
pull it out a little bit? Like, so, should
I pull it under, you know, instead of on top? Maybe, maybe. So let's try that. So sin's Ed, let's just
put this post into place. And let's pull this back now into place. And
let's look at that. And I think, actually, that
looks really, really cool. Alright, so we've done that bit. We've done the other bit,
pretty much done with this. So what we want to do now
is make sure curs is, first of all, in the center. And then, so shift desk
cursed is selected. And then what we
want to do now is mirror all of these things
over to the other side. Now, basically, we can
actually grab pretty much all of these because they can all be mirrored
over the same side. And we can also see that we've
got bevel on some of them. So I'm going to just
press Control, Jay, because I know the last
one I grabbed had a bevel. Now, the problem
there is, as you can see, that solidify disappeared. So that's me being lazy. I should have
checked that first. So what I'm going to do
is just check the rest of these just to make sure I've got no other problems with them. And then what I'm going
to do is join them all. Two, this one last because
that has the bevel on, press Control J,
and there we go. Okay, so now let's mirror
them over the other side. Right click Set Origin,
three D cursor. I probably need to reads
elma transform first, so I'll do that first, and then Setigin three D cursor, adding a modifier, bring in
a mirror, and there we go. That's those over
the other side. Now, this stage, this is
when you want to check to make sure everything
is looking ship shape. This part here, probably
coming out too much. So ENC, bring it
back a little bit, like so, and there we go, That's looking really cool. Now, again, we need
some underneath. So we need to think about
the underneath now. So what I'm going to do is
bring these parts down. So shift D, you're not going
to see the top and the bob, that's great for us because it means I can now bring
these into place. Now, the other thing is,
do I need a bomb on there? This part here will
be in the wall. This part here will need
some sort of support. So where do we bring them up to? You can see here we've
got enough clearance for this part and this part, maybe too much, so I'm going to just drop it
down a little bit, and then what I'm
going to do, rather than stretch all these out, I'm going to press Shift D. Pull them out here,
grab both of them. So grabbing all of these, press S and Y and pull them all back together and then drop them back a
little bit like so. My roof tiles should then
cover this part here. Now, you can see one problem
we have with our roof tiles here is that these are too
far out at the moment. How far back do we need to go? Let's first of all,
drop them down. We might need to press S's Ed and squish them in a
little bit like so. And now we can see
were nearly there. Let's bring our roof
tiles then out to here. Let's pull these down
just a little bit. Making sure then our roof
tiles can pop out there. There's enough room under here, and we're still going to
hide this bit in there. And more importantly,
if I just turn off my where is it my floor. Now I can see what I'm doing. You can see now we've got a
little bit of a gap there. Now, I do think we've gone
a little bit too low. Because we need a little
bit of a lip on here. So what I'm going to do is just pull them up very slightly, like so, and you
can see now we've got a little bit of a
problem with these. We have two options
either squish them in or we pull them
back, or we do both. I think on this occasion, we'll squish them in a little bit, and we'll pull them back
because the thing is, once the roof tiles are here, you're really not going
to see these parts here. We're really not going
to see, like, you know, the inner workings of how
thick this plank is really. So we're taking
that into account while making it still look nice. So now you can see that
is what we've got. That's looking really good now, and that's already then to go. Now, what I'm going to
do now is these roofs. So I'm going to
bring my floor back. So to bring your floor
back, as Bonnie, these parts here are
pretty much done. They've got a bevel on them.
They've all been unwrapping, so we can hide those either way. Then what we want to do is now
is work on the rest of it, and what I'm going to
do because this lesson is getting longer and longer. I'm going to save the other way, and I'll see you on the
next one, everyone. Sorry for the long
lesson. Alright, see you later, by. Bye bye.
99. UV Unwrapping and Mirroring a Windowed Roof Module: Welcome back, everyone to the
Hunters tree environment, blend it to Unreal, and this
is where we left it off. Okay, so we've got pretty
much all of that done. What we want to do now
is the rest of it. So all I'm going to
do, we've got verts on there, our bevel on there, everything's looking
good, so I can pretty much join all
of this together. So I'm gonna press Control J. No, I can't because I
have a mirror on there, which is something I missed. Let's apply our mirror. Let's then join it together. So hopefully, Control J,
join it all together. We've still got our bevel
on there, and there we go. Now, let's split our roof off. So if we come to this part
now, we're gonna split this. From this wall here. I'm also probably going
to split all of this off. If by, you know, I'll just split this. I'll make it easier. There we go. And then
what we'll do now is we'll bring in our materials. So First of all, let's then come
to this one here. We're going to press A U
smart UV project, click wrap. And then what we're going
to do is go over to our UV Editing, let it load up, press the little dot but, A, R 90, spin it around. These ones here, as you can see, they're not spun around
the correct way. So I'm going to come in and
spin those round separately. So R 90. You know what? It's
because they've got the wrong material on. So let's go to wood and red. There we go. That's better. And what we also need to do
is come in, Alt, come in. L, Al and the same on these. So Al and then L and
Alt E. And there we go. Alright, so far so good,
that's looking nice. Now, let's come. I'm just
wondering about wood, actually, because I
should have checked that. Let me just see. So I have to bring this over. Let's press dot to zoom in, making sure the wood is looking the same on all of
these. You know what? I pretty much is,
so that's cool. Now we'll come and we'll
do the walls first. So if I come to this part, I'm going to grab these parts,
this part and this part, I'm going to press
you Smart UV project, click on wrap, and I'm also
then go to tie it with this. So I'm going to press Control
and J, join this together. Remember, the wood, you grab last because that has the bevel. Now let's come back
to the material. And what I want to do
is come into this now. So I'm going to grab
this one. This one and this one here. I'm going to put it on
walls, click a sign. I'm also, as well,
at this point, just going to minus that
off because I don't know why that's there and
sometimes it will be. And then what we want to do now is grab the walls,
press the Span, bring them out, and make sure the same scale as what we've got over there,
which they are. Now, the final thing is, I need to make sure
now that this here is, first of all going to
have roof tiles on there. So roof tiles, click a sign. And we need to make sure now
they're going the right way, which I'm not 100% sure on, so I'm going to make them
a little bit bigger. Or they're going
the right way 180. Now they're going the right
way. You can just see the difference in there as well, I want to make sure
that they're this side. So I'm going to press Z
90, bring in my roof. And what I'm looking for is to make sure that these are going the same scale as these ones here, which
I think they are. Now the next thing I want to do is bring over these roof tiles. So shift D, bring them over. Let's pull them into
place, like so, Z 90, and then the little
Db on just to zoom down. And let's put them into place. Now, you can see, pretty much. Wasn't done on purpose, guys, but they pretty much fit in perfectly. So
let's bring them in. They might need bringing
in a little bit, but they're very
close, so I can just press S and X, bring them in, like so, and then
O and X this time, pull them out, making sure. I have a fitting in
to where I want them, so something like this. And then with these
roof tiles now, you can see I'm nearly there, actually, I'm nearly
there already. So I can just press the Xbar, make them a little bit smaller, and then G and Y, pull them down to
where I want them, where it ends, which is here, and then just make
sure because there's too many popping on here, just pull them down, double
tap the A, and there you go. Looking perfect. Okay, now, then what I want to do is
just move this to the side. I'm going to press altage,
bring back everything, hide my floor out of
the way once more, and we're pretty much done
with this, as you can see. And that is looking really nice. We can even turn off our floor, and now we can have a good look around looking at where
these tiles are coming out, and I think that'll just looking fantastic. Nothing
poking through. Everything looks as, you know, as though it should
be, and now we can actually turn
back on our floor. And from there, we can
join all this together. So we've got all of
this to join together. We'll join the wood last because that we'll already
have on our bevel. So Control J, join it together. G, just to make sure that it's all joined,
and there we go. Alright, another one down, guys. So put that over there.
Congratulate yourself, and we've got the final two. So this one here, it should
be pretty easy by now. We've got the dimensions. Now we need to create
the window in here, we're actually make
it new windows, but let's test it with a window because then we'll be able to
see how it's going to look. So what I'm going
to do on this one is I'm going to grab
one of my windows. Now the thing is, again, shift
D. When you bring it over, shift D, selections cursor, press a little dot on. Remember that we can make our
windows smaller and bigger. Also remember that when you've
got something like this, it's not it's near enough
always going to be smaller. And the other thing
to remember is, is it really gonna
have this window in? I don't think so. I don't think it's gonna
have this window in, so probably gonna have
the smaller windows in. So we'll delete that
one out of the way. And what we'll do is we'll
bring over the small window. Shift D, Shift S, selections cursor,
press the dog bone, bring it out, and there we go. Now we can see it's probably
where it's going to have, and we can also get away with making it a little bit bigger. Now, what we have to do now is decide how big is the
support bomb going to be, where is the roofs gonna be and all that sort of good stuff. So what I'm going to do is I'm going to bring in an
edge loop control law. I'm going to bring
it just above here. Like so, and then I'm
going to come in, grab the top of here, press
S and X and bring it in. Now, I'm happy with
that? Not really. I think it's too flat. It needs to be more spiky. I'm going to bring this
down, Alt Shift and click, bring it down to where
actually it would look good, bring this down,
make it smaller. Now, the other thing to remember is just because
the roof is here, there's not going to be a
piece of wood across here. So if we make the artistic
direction to not do that, we've got a lot more leeway with the taller windows and
the smaller windows. We can make the
window, for instance, if I press S ands E S and X, we can make the window like
this a little bit smaller, and it's still going to fit. Now, I know we're not
going to do that, but it does give us options, and that's what we're
looking for here. Also, at this point,
if we really want to make this a little bit
taller, we absolutely can. So if we want to make
it a little tiny bit taller, we
absolutely can do that. Alright, so I think
I'm happy with this. What I'm going to do
then is Controller five, left click, right, click, and then I'm going to come in
like we've done every time before and press S and X
and start bringing this in. So Al shift, click S
and X, and bring it in. Oh shift, click, S and X. And then Alt Shift
click, S and X. And then O shift click S and X. Now I've got the blow, but you can see this
is too straight. So we'll do the same thing. We'll start working
our way in now. Like so getting that
beautiful haunted blow that we're actually looking
for. And there we go. Okay, that's looking good. Now, we've done these things
many, many times now, so we should be actually very, very proficient
actually doing this. So again, we come
into this part. We're going to press Shift D. We're going to pull
it out a little bit. We're going to press E
and Y, pull it back. And then what we're going
to do is separate this off. So LP selection. We've got this bit now Control A or transforms, first of all, and then we'll bring
in our modifier, which is our solidify, turn it up, and
then pull it back into place if we can, which
is going to be like there. Then the next thing we want
to check is this part here, making sure that this is back far enough,
something like that. And we also know on these, we should be pulling
this out a little bit, so we'll also make
sure we do that. Okay, so how thick
does it need to be? Again, just because
it's a smaller window, doesn't mean the frame
needs to be much, much smaller than this one here. So you can see this
is the chunkiness. It's probably not
chunky enough this. So let's come out, increase the thickness
a little bit. The one drawback we have here is we just need to
make sure this is covered. So that's the bit
that we'll come to next. So I'm
going to come in. Grab this part, press Shift
D. I'll press S and X, pull it out, like so. I'll press E then and
pull it up like so, and then I'm going
to pull it out like so this bag bit is going
to be in the wall anyway. And what we need to make sure is that we're
covering all of this. So as you can see, this might be a little bit
too thick, but we'll see. We'll just press SNH
and bring you out to the largest that
we think we can. We'll then pull down. So we're going to
pull this bit down. And then what we'll do is
we'll press E, pull it up, and then press S and X
and pull it in like soap. Now I can see that we've got a little tiny bit of leeway
where we can bring this back. So what we're going to do
is just pull this back. Tiny, tiny fraction, just
so it sits under there. I can also see it kind
of needs to come up here and we'll deal with
that part in just 1 second. Now, let's put a mirror on this just so it's
going the other side. Before we do that, we need
to grab the center of here. Shift desk, cursed, selected, grab this part, right click
Set origin, three D cursor, adding a modifier, bringing
a mirror, and there we go, now we can actually see what
this is going to look like. And yeah, I think this is a good grounding if
I just move this to the side and I right click and Shade Oto smooth going forward. So you can see really, really fast now how it can
move along these, and you can see in no time we'll have this done and dusted. You know what? I'll also
shades move on there. Save our work again, and I'll see you on
the next one, guys. Thanks a lot. Bye bye.
100. Building Roof Supports and Underside Planks: Welcome back, everyone to the
Haunted Street environment Blender to Unreal. And this is where
we left it off. So what we want to do now is, first of all, go to modeling. It's going to make it a
little bit easier for us. Press the question mark. And sometimes I forget that I
mean, you know, UV editing. You might not be able to
see everything as clearly, and it's just a habit. So what I'm going to do
now is, first of all, I want to before carrying on, just bring these parts in. They are mirrored, so let me just bend them in a little bit. Let's put it on
Object mode, as well, so you can actually
see what I'm doing. There we go. We've got a
nice slant going on there. Alright, so far so good. Now, we know we're going to
have to pull these bits out, but before we do that,
let's think on this one, because it actually has
a box underneath it, we definitely going to want to put some sort of support there, which just makes it a little bit trickier when you're actually
putting your roof tiles in. So what I'm going to
do is, first of all, let's bring in those roof tiles. So Shift D. Let's bring them in where they're going
to go because it will make it a
little bit easier. Now, we already
know the roof tiles are this kind of scale. I don't really like to
change the scale of them, so I tend to always keep them the right scale across
the whole build. When was the last time
you went to, you know, a building, and
the roof tiles on one part are smaller than the roof tiles on the other part. Just bear thy mind whenever
you're doing this. Now, what I would say is probably pull this
over to here just to make life a little
bit easier because then we can just delete
these ones out of the way. So if I press Altag, bring back all these parts, make sure I'm going gelect I'm
going to delete all these. Now, you will notice, as well, I used Shift D. I didn't
just move those over, get into the habitage. Trust me. So delete. Versus delete those either way. Now, the other thing is on this, it's probably be as well if
you come in and separate your roof a little bit from the walls and everything else. So I'm going to press Y. And then what I'm going to do is just lift it up slightly. That then will make it
a little bit easier to distinguish these from things like this support underneath. So now we know clear direction. This is where it needs
to come down to. This is where the support
is going to go under. Now, you know, putting
supports under these things ain't that
easy. It really is not. So what we're going
to do now is I think I steel if I can, a little piece off of here. So I'm just going to come
in, grab this piece, press Shift D, and
then drag it over. And then what I'm going to
do is press P selection, grab this part, then. So just this part, Control A, all transforms
Seragen to geometry. And I'm also just
going to remove the bevel because I
can put that on later. Now, because I'm dealing
with just this parts, well, let me just grab all of
this and let's press the little question mark
to isolate everything else out so we've got a nice clean space we can
actually work with. Let's then pull this into here. I'm going to pull it under here. It's gonna be way way too big, so I'm going to press the abne. And like I said, putting under support ain't as
easy as it looks. So we're going to
put it under here, pull it up to here, and that then will be our
support, as you can see. Now we're going to
pull it back two here. And then what I'm
going to do now is just chop off the end of it. So I'm going to
grab just this end, Control plus, delete and faces. This makes sure I've
got a lot of support still with the
actual edge loops, and then all just
bunched together. So I'm going to put
that there like so. Alright, so far so good. Now we've got to think
about the next bit, which will be this pie. Once I've got this pie in, I can kind of plan
out the rest of it. So what I'm going to do
is I'm going to come to this part I'm going to
grab the center up here, I'm going to press one, and
what I'm going to do is press E and I should be able to pull down the
direction I want. If I press E, I
should be able to then pull in the
direction I want. Now, you will see, like I said, the supports now, we have to
really think about those. So what I'm going to do is
grab this support here, press shift D, and first of all, going to bring it down to here. Now, in the bottom
part, I tend to make them a little
bit wider because they haven't got the
same constraints as what I've got with the roof, and I think it always looks a
little bit better you know, when you've got a difference in size of blocks and
things like this. Now, the other thing is, how far can we get away with this? I always then tend to pull
it up and look at, you know, how far it's poking
out, pull it back then, so it's not poking out, and
then look at the difference. So now you can see that's
looking pretty nice. Now, the next thing is,
let's build up this then. So what I'm going to do First
of all, it pull this out. So S and Y, pull it out so that this has something
to actually sit on. So this part here, pre
shift D, rotate it round, so RX 90 and then pull this into place
wherever it's going to go. So it's going to go
right over here. It's going to go then into here, leaving a little
bit of a gap here, and another reason
I want to pull them out as far as possible. So now I got a little bit of room where I can pull
this out because if not, it's just going to look like a piece of wood that's not
really doing anything. The other thing is, I want
to pull this up to here, like so, and now I've got a
really, really good idea. If I set this on top of here of where all of these pieces are kind of going
to go together. So what it tells me is now I can come in, I can
get rid of this. So Control plus, Control
plus, delete faces, come to the top of
here, Alt should click, press the F button, and now I can pull that down a little
bit, and get it into place. Now, the thing is, you're
going to have this part here, just come in and drag
it up. And there we go. That's that bit sorted. Now, of course, we're going
to have this part here. Rather than moving
the whole lot, let's just grab the front of it. And we'll pull it back
then into place, like so. And now you can see
why we actually needed to get it out as far as
possible, and there we go. Okay, soap bao good. All of this now
is looking great. Now, I would say that
this on here probably wants pulling out a little bit more being made a
little bit more chunky. So I'm going to pull
that out, and I'm also going to pull it down
a little bit, as well. And there we are. And now,
what about the bottom? So, the bottom, what I'm going
to use is the same planks. I'm also going to make
sure before doing that, that I've pulled it
out so that it's covering that part
there, and there we go. And I'm not going
to put anything else in here. I've
pretty much done. I can put this on the back. I can put this over this side. Same with these roof tiles. I can put those over
that side as well. I just need the bomb
to worry about. So what I'm going to do is I'm going to come to the bomb now, I'm going to delete
this out of the way, so delete and faces out
of the way, like so. I'm going to come to my top now, make sure that when I hide
this out of the way that my roof tiles don't have this part on there. I
definitely don't want that. I don't need to join to
the walls or anything. I simply don't need it there, so I'll delete that
other way, as well. Then what I'm going to
do now is the bomb. So I'm going to press the little question
mark just again. And what I'm going
to do is grab these. Now you can see I
did make an error. In that, I used these over
here. Did I replace them? No, I didn't replace them. So I didn't press Shift D, which means I need
to go back now. Grab both of these just
to get the ones I need, per shift, and bring them over. You might wondering
why am I bringing them both over Because then I can test them and see which ones these might just spin
around and fit perfectly. Let's see if they
do, but if not, we've got the option then of putting these in there as well. So let's put them in place
where they're going to go. So you can see,
they're going to go. If I press Control seven, that means I'll
be underneath it. I'm going to put them in place then where
they're going to go, and you can see, I need
to make them longer. So S and Y, let's
make them longer, and let's put them into place roughly where
they're going to go. Now, at the moment, little bit hard to see if they're
all gonna fit there. So I'm just going to make
them a little bit bigger. And then what I'm going
to do is grab this one. I'm going to press Shift D.
I'm going to spin it around, so R the 90. My curse is in the center, so I can press shifts and
selection to curs it. So shift Des selections cursor. And then what I can
do is pull them out, and it should be not even
because for some reason, shift Des selection
Shift, curse to selected. I keep pressing the wrong one. It's been a long day, guys. Shifts and selections cursor
This one. There we go. We'll get there in the end. Alright, why is that
still not going? You know why? Because I didn't reset the transforms on that. Now let's try selections
cursor. Hey, we made it. Okay. Now, let's pull
it out into place. Let's pull it down where
we actually want it. Let's make it a
little bit thinner. So S and E. And let's
pull it out like so. And there we go, That
is feeling nice now. These planks are
up against there, and now I can simply go Shift
D and just give you a bag. In case people want to
put that into the wall. And it's the same
for this, as well. But when we've got
the rest of it, you'll see how it finally
all comes together. So now let's use this center
point for these, as well. So control A all
transforms set origin, three D cursor,
adding a modifier, bring in a mirror, put
those over the other side. Now, let's do these together because we need these and these, let's put them all together. Over the other side. So what
I'm going to do is press Control J. I'm going
to press Control A, or transform, set
origin to three D, cursor, add in a mirror. There we go. Okay,
pretty much all done, except this back bit now. So what we're going to do
is I'm going to come in, grab both of these,
which we already had. We've got a mirror on still, which means I can go Shift D, drag it back. Put it into place. And we definitely definitely
don't want, you know, this part showing through, which means then we can do the
same thing with here. We've got it in the middle here. We've got a mirror on here. If I just press Y, I should then be able to just drop
that back into place. Now, you will see that this now. So these what we've
moved just need moving out into place so that
they're still under there. You can see that these kind of poking through here. We
don't really want that. So what I'm going to do S and Y, bring them back, and now
they're not poking through. We're just having a final
check like things like this, press Altag and grab both of
these and the bottom of it. Is it the bottom or
is it just that? Maybe just that and pull
it back into place. And There we go, guys. Done. I think it was
a lesson or two. I can also get rid
of this, as well. And now on the next lesson, all we need to do is
add in the materials, put it over here, and then
we'll move on to then. I know we have one
more roof left, but we'll move on
then to the lattice. We'll get all of
those parts done, and then we're onto
our final roof. So not a lot. We're on the last hurdle, guys. Alright, let's save our work, and I'll see you
on the next one. Thanks a lot. Bye bye.
101. Final UV Mapping, Materials, and Clean Shading: And Welcome back, everyone to
Haunted Street environment, Blender to Unreal, and this
is where we left it off. So what we want to
do now is we want to come in onto let's go
straight to the UV. Now, we can still work
with things on here. Now, one thing I've noticed, because we shaded
smooth on here, we're actually
missing that shop. So, oh, shift and click
Marker Shop. There we go. That's looking
much, much better. And the other thing is, we also should come in really
and bevel this off. So just this front, like
we've done with the others. Now, we don't need to
bevel off this back one, the front because the back
one is I can't imagine maybe. Maybe there's a situation
where you've got, you know, something under here and
you built some walls out. It's a possibility.
You know what? We'll do it just in case. Just in case someone
decides, you know, to come in and put this high up as a lookout or
something. I don't know. If they decide to do that, it's done there for
them. So that's good. Now what we want to
do is we want to join pretty much all
of this together. Do I want to do that right now? I don't think so, actually.
What I think I need to do is come in and make sure that I've
got none of this on. So Control A, Control
A, hide it out way. This one's got nothing
on. Hide it out way. You can also see that the roofs. So if I just press Control Z, you can see that the roofs and this part are all kind
of joined together. I don't want that, so I'm just going to
separate them out, and now I'm going to hide
this out of the way. Then I'm going to come to
this one, hide it out way. Then what I'm going to come
to is these roof tiles. I'm going to apply my mirror, and then I'm going
to hide it out way. Then I'm going to
come to these, apply my mirror, hide it out way. Then I'm going to come
to these parts here, I'm going to join them together, ContoJ and then I'm going to
hide them out of the way. Finally, these parts, we
already know they're okay. Let's press Saltag, get rid of our ground
plane once more. And then all we're
gonna do now is join all these pieces
of wood together. So all of these like so, press Control J,
join them together, press the G born just to make
sure you've got them all. And then finally, what
we'll do is we'll unwrap these and then we'll
add the bevel on after. So let's grab them all. A, U, smart UV project, lio. Always going to have to
spin them round, A or 90. And at this point, you can preempt pretty
much everything. So now we come in,
OT, we come in. Straight to them all up. And I think honestly at this point, you could probably
go away and create a roof. Pretty easily. I don't even think you need me to show you how to do that. You should have got
so much muscle memory built in now. It's unbelievable. Now, let's come in, and what we want to do is put
it onto material, make sure that our wood
red is on all of these, so I'm going to press A, a sign. And then what I'm going
to do now is just make sure all of these are pointed in the right way,
which they are. I'm always going to look
to make sure that the wood looks the same as this wood
here, so we can see here. Does it look the
same? Some parts. Yes, other parts? No. So I'm going to make
it a little bit bigger. Or a little bit smaller. Now he looks the same. Okay,
now it looks the same. Now, I am wondering one last bit if they look, You know what? They don't look a
little bit dinky. It's just they would
be smaller than this. Are they too dinky
on this part here? If they are, we
can just come in. And grab these ones all
the way down to there. And I'm just going to press ENC and just bring them
in a little bit, just adding a little bit of chunkiness on them.
Now I've done that. I'm just going to
press Control's Ed, and then I'm just going to comb to these ones here and just do them all together just so we're not losing cohesion
for how to build. So then I'm going to press
ENC and bring them in, like, so and the other
thing I'm checking is just to make sure I've not stretched those UVs in any way, which I don't think I have. Now, let's come
to the wall then. So we've got this part here. We should be able
to come to this one going all the way around here, and we should be able to
then bring down our walls, so we'll put it on top of there. We're not worried
about that yet. We're going to as
well unwrap these, so smart UV Bj, click on rap. A, S, bring them down to the
same scale as this here. So we can see here
that's looking good, and now we're on
our actual roofs. Now, the last time we
did roofs like this, we just simply unwrap them
rather than project from view. So I'm going to do pretty
much the same thing. So I'm going to
press you unwrap. And there we go. Let's put
this on roofs this time, so roof tiles, there we go. Now, let's make sure we're pointing them in the
right direction. So R Y 90. Again, these are
going the right way. These ones, I think are
going the wrong way. So I'm just going to grab
just this one or 180, spin it round, and now they're going the right way, they're
going the right way. Now we can grab
both of these now, press the S bone to
make them bigger, get them to be the
right scale of these ones that we've got here because that's why
we've got them there, that's roughly the right size. And finally, then let's
come to each one. So we'll do this one first, G
and Y, bring it into place. Like so. Double tap the A just to make sure
that's looking good. And then we'll come to this one. You can see this one
is a long way out. So we'll grab this one L, G, Y. Pull them into
place, there we go, double tap the A,
and now you can never see hardly any difference. Okay, at this point now, you can see the only
problem is that I've got rid of my walls here. Now, that's because I
just changed the material over instead of adding
a new material. Now, if I put my walls
back on, luckily for us, it's no problem
because of the fact we already unwrapping them and got them in the right scale, which means now I can
just come down and sign, and then it's done and
dusted easy as that. Now I can do is I can actually delete this out of the way. I'm not going to need anymore. I can also pretty much
delete these out of the way. I'm not going to need them
anymore because I've pretty much you know what? I
will leave them there. And the only reason
I'm gonna leave them there is because we have
one more roof left, and, you know, without checking, let me just have a check. Yeah, this one here, we might just need them for this
part. You know what? Don't delete them out the
way, guys. Leave them on. Delete the one that deleted it out of the way,
though, that's fine. Everything else now,
you should have one, two, three, four, five, six. Yep, and that's about right. Now, the last thing, of course, we need to do is we've got
a bevel, I think on these. Yes, we have. So let's
join everything. To these last, if I press G, let's make sure
everything's moving. No, it's not. But these also have a bevelon, so that's good. Press Control J,
press Control A, all transforms, set
origins, geometry, and then let's just go in making sure we've got our
bevel on there, which looks like we have, and I'm just checking
the other parts. And then we go, we've
got our bevel on there. So everything is looking good. Let shade or too move. And I think we are
pretty much done. With these roofs, at least. Alright. Roofs done? Not quite. Not quite. They're
not quite done. We have to do
something else now. So I'm going to show you
the power of the lattice. And, trust me, once you see it, you're going to use
it all the time. I'm fairly sure of that. So what I'm going
to do is I'm just going to separate
them a little bit. This won't have a
lattice on it anyway. So I'm going to separate
them out just a little bit. Now I'm going to
show you both ways because some of
you have their mab using an older version
of Blender and before, I mean, the lattice
was still powerful, but today, it's even more powerful just for
the setup of it. So I'll show you both
ways of doing it. But I'll save that for the next lesson because I
don't want to store, you know, the lattice now and then warming it in. We're
cutting the lesson. I don't want to do that.
So on the next lesson, then be prepared because I
want to show you the letters. Alright, everyone. I
hope you enjoyed that. See you on the next one.
Thanks a lot. Bye bye.
102. Bending Stylized Roofs with Lattice Deform: Welcome back, everyone to
the HundustryE environment, BlentnRel and we're
nearly there, guys. We are nearly there.
Okay, so let me show you the old lattice way. I'll pick this one just because
it's easier to show you. First of all, you'd press
Shift DS, cursed to selected, Shift Day, and then
what you're going to do is bring in a lattice. You can see Lattice
deform selected. And I think, yes,
that's the new way. Let me show you the old way. So we're going to go
to just the lattice. And what we'd have
to do or what you're gonna have to do if you're using an older version of blender, is scale this out to make
it fit around your roof. So you're going to
bring it out, make it fit around your roof. Do not reset the
transformations on this because I have found if you
reset the transformations, honestly, it messes with it,
and I don't want to do that. So I'm gonna press Esn'sEa
move it into place. Roughly around it, like so. Now, this lattice,
what does he do? If I come over to the
right hand side now, I need to put in where I
actually wanted to bend. So if I'm bending this roof, where would he
realistically bend? We probably not, if he use my annotation
just to show you, we're probably not
gonna have um you know, a roof that's gonna be
bending up like this. It's not going to be like that.
It's probably going to be sagging a little bit in
the center of there. It's not going to be
sagging round here, okay? Because on this
structure, at least, why would it be sagging,
you know, in this bit? You know, this bit comes down, and then this bit comes down, as well. I don't think so. It'd be too much.
It'd look more like a Japanese roof than something
that's got a bit of, you know, lean on it. So let's minus this off, and what we're going to do is, if we want it
bending along here, we come to this part
and increase these. Now, the more you increase this, the more you're gonna
be able to bend it. But I know it's
really, you know, you really want to get
in there and bend it as much as possible,
but don't do that. Just keep this to something like what we
do when we use He loop. So don't overdo it.
The other thing is, it's easy to also
think that you're just going to need it bending,
you know, this way. I always tend to
though do the side. So you can see if I
bring this one in, I've got it going along here. I tend, though to just bring in this one here and just a
couple. Not many at all. Now I want to do is
if I come in now and press Tab and try
and bend this round, nothing's going to happen
because what we need to do now is come
back to our roof, go to our modifiers, and we're going to
add in on a deform, so add in modifier,
deform, lattice. And the lattice, of course, is going to be what
we've just set up. Select the lattice,
and now Press one. Come into your lattice,
press the tab bon, and now you'll see
if I grab just this, our roof actually bends. That's amazing, okay? Our roof bends,
really, really cool. Okay, but what I want to do is I want to bend
the whole thing. So what I tend to do is I will come and very, very slightly, press in the B
boon for box left, grab all of these that
I've actually got here. Press shift and space bar because we need to
bring them in the gizmo again and bend them
very, very slightly. Then come in grab all of these and bend them
a little bit more. And then come into the center one and bend that one
a little bit more. Now, can you see that we've got some issues here with this wall? Now, the reason for that,
can you see how it's actually stayed upon there, or even this bit here? I'm not sure which bit is,
but we're going to go in. I think it's the wall here, and the reason for that
is, like I said, it's because if I press tab, bring in my edge
loops on the wall, so I want to bring in
just to the wall here. So I'm going to do that. I'm going to come
in with Face Lg, first of all, I'm going
to grab this wall. I'm going to make sure
there's no other walls like this one and this one that also aren't going
to bend with them. And what I'm going to do
is just press Shift H, hide everything out
of the way, and give it some edge
loops. So control. Left click, right click, press the tab, and
hey, press it bends. That's the reason why I told you in the beginning that
you need to make sure that we've
got edge loops in there to make sure
everything bends. And the one thing I
forgot the roof is, you know, the little walls
on here. And there you go. That's the result. Now you
can see everything's bending. You can also see
the roof on here. So the roof on here hasn't
got any edge loops in either, so let's come in, bring
in some edge loops, left click, right click,
press the tab on. And what do you know?
It all bends together. That's the reason why. Now if
we put this onto RenderVew, now you'll see exactly
how that's going to look. If you see the difference now, so if I turn it on and off, look at the difference, guys, that is the power
of the lattice. Now, once you've got
this done, come to it. Come to your lattice,
press Control A, delete your lattice
out of the way. And there you go.
Simple as that. Really, really nice what
it's actually done there. Now, what we want to do
now is the same thing. So we're going to move this over here because this one's done. We're going to do the
same thing for these. And now I've showed you
the old way of doing it. There is a new way of
doing it in Blender five. So let's go into object mode. We'll save our work so
we don't lose anything. We'll check the time
on the recording. Okay, we've got plenty of time. And then what we'll do
now is, first of all, make sure you've got, you know, the
transformers are reset. Next of all, then, come in, shift day, lattice from deform. When you press that, it's automatically going to
bring it in for you, making it so much easier, guys, so much easier. Now, this time, we are
bending it this way. We're not going to
bend it this way, so we're going to
bend it sideways, which means that when
we come to lattice, we don't want to go in
that way this time, we want to go sideways like so. So let's put in
something like that. Again, we'll turn up
the cross sections, a very little amount like so. Now, let's see, because it's going sideways, if we're
going to get that bend? That's something we
should always check. Let's first of all, though, come to this part
on the modifiers. We've got our lattice modifier
already put in there, and also the lattice has also been added because
this is blender five, not blender 2.8 or something. Now, if I come into three, I come into my lattice
and I try and bend the, so I'm going to pray a B, box select, grabbing
all of these here. I should be able to
pull that down like so, and it should pull them
all the way through. Now the thing is, I tend
to start right over here. So right over here,
right up to here, and bring them down, as I said. Then I'll work my way
along to this part here, bring them down a
little bit more, work my way along
to this part here. Now, the problem
here is we don't want these bombts to be, you know, you might not
want them to be as much. So you can come in and grab
all of these, for instance, and bring them
down and just work them differently, you
know, from each other. Now, the other thing
is, we kind of don't want we don't want
this to be too jagged, so we just have to be careful
when we're doing this, that we are making a
nice slope because the last thing you want
to do is have this start in and this ending point be too far away from where
they actually began with. And that's another trap
that you can fall into. So if I come in now, I can make it nice,
nice slope down here. Now, you will see that we do
have some problems in that. These roofs, as you can see, aren't bending as far as
we actually need them to. So we need to make
sure that that's happening. Now, why
is it happening? Again, it's down to the fact that if I remove my
lattice out of the way, you will see it's down to the fact that we haven't got
any cross sections on here. So let's come in, bring in some cross sections,
left click, right click. Come to the other side, control, bring in some cross sections, press the tab but, and now
we're absolutely fine. So you just got
to remember that. When you've done the
lines, always have a look around just to make sure that it's bending
the correct way. So on the walls so much
you can see here on the walls, looks
pretty much fine. On this wall, it looks
pretty much fine. I'll always go in as well and check it on
the renvew just to make sure I'm happy with how everything's gone. That
looks really nice. Now you can see,
it's got that really nice bend there,
and there we go. Alright, so far so good. Now, let's come back, press Altag, bring
back our lattice. And then what I'll do
is I'll come in now and apply my lattice and
delete it out of the way. This is this one done now. So this one is done. You can go to the
side, wave the others. So we've done one
and two so far. You can see, though how
quick this is because now we can grab all
of these like so, and I tend to kind
of bulk lattice them all at the same time. So what I'll do is
I'll come to this one. I'll basically press Shift A, and I'm going to first of all, Control A F, you know what? We'll do them all together.
Control A all transforms. Right click Saigon to geometry. Second of all, let's
actually go in. So we'll go into these
add in some edge loops. Five, left click, right, click, control law, five, left
click, right click. Now, the good thing is, when we're adding edge loops in here, it's not going to
mess around with our UV because we're
not moving them. We're just adding
in some edge loops. So left click, right, click. If we came in, and we added an edge loop,
so let me show you. If you came in and you
had an edge loop here, and then you start moving it, sometimes on the old blender, it might actually mess
around with your material. So just remember that as well. Control law. Left click, right, click, and let's
come into this one. So let's come to this
one. Control law. Three, left click, right, click. Now, on these ones as well, because I'm preparing them, so left click, right, click, I must make sure that
I also do my walls. So I'm going to press L and
L, hide these other way, bring in some major
loops on here, bring in some major
loops on here. Left click, right, click, Altage, bring back
everything, and there we go. Now, just make sure that
we're bending these. If you really are bending this, make sure you've got some
je loops in here as well. Okay? Now, everything else
should be good to go. And I think on the next lesson, then we'll finish
letting these off. And then we're on
to the final roof. And then once that's
done, we name them. We put them in collection. We have one final check of all the things, and
then we're done. All right, guys,
Save how you work, and I'll see you
on the next one. Thanks a lot. Bye bye.
103. Shaping Roof Caps and Tiles with Lattice Deform: Welcome back everyone to the
Haunted Street environment, blend it to Unreal, and this is where
we left it off. Alright. So what we want
to do now is come in. Shift A, add in a lattice, deformed from selected,
same with this one. So Shift A, Lattice, deformed from selected,
same with this one. Shift A, Lattice, deformed from selected. Come to this one. Exactly the same setup, guys. So turn this up, not that way. Turn
it up that way. Maybe five on this one. Turn this up just a couple. Same on this one. Do we need
Can we do the same way? Let me have a look.
Here's the lattice. There. Let's go to this, turn this one up. Yes, it is. It's the same way. Turn this up too, and
then same on this one. Probably not as
many on this one. Turn this up maybe three, one and two. Alright,
there we go. Okay, so let's come
into this one first. Come to our lattice,
press three, and then what we'll
do is we'll come in again, same as always. We want to kind of
grab all of these. So box select, come
down, grab this. Let's put it. You know what? I've actually not
selected my lattice there. Let's select my roof. Let's put it on Object
mode so we can really, really see what
we're doing here. And then what we'll do
is box select with B. We're going to bring
this down to here, bring this next one down. Here and bring this
middle one down to here, like so not so far, and then bring up the
top of this one Jas up, a little touch, like so. Alright, that's that one done. Now with this one,
we can just come in, apply our lattice, press Control A, delete the
lattice out of the way. And then for now,
we can just delete the way delete it.
Hide it out the way. Don't delete it, guys. We did all that wig. Let's
not delete it. Okay, let's come to
this lattice here. Same thing again. Simple now. Should have a good hang of this. So bring it down, bring
the next big down. And bring the final
bit down, like so, and then bring
maybe on this one, just this one up. Like so. Okay, let's again come in, ply our lattice,
delete it out the way. Hide our work or our roof. Let's come into this one,
press the little db on, grab our lattice, three, and then what we'll do is
exactly the same thing. So we'll come in. And on this one, I'm
just going to go down to here because
I don't want slight I don't want it bending slightly so
much. Come down to here. Now, you can see the top of that roof isn't
actually bending. And the reason is because I
didn't add in any edge loops. Okay, there you go. Now
you've got the roof. Now, wouldn't pull
this one up on here, needs a slide bend because there's a much,
much smaller roof. Apply your lattice,
press Control A, delete this one out of the way, press ultage to bring back
everything, and there we go. Now, we should have all of
our roofs looking really, really nice now, as you can see. If you want to take that
next step and really, really bend them in,
that is up to you. For me, I'm very
happy with these. Now, what I'm going to do
is just move them over to, I'll move them over to here. I want to make sure then I've
got everything in place. I want this down to
the ground plane. Like so, pull it over
here just for now. I can move these into a
better place, you know, as I'm working,
and then I'm just gonna move these over to here. Now we're on the
actual last roof. So the last roof
is this one here. So let me just pull it
out. It's this one here. It's everything we've
learned together, basically. You shouldn't have
any problems with it. And I think now with,
this is the last one. So let's Zoom, let me zoom into my reference that I've got
here and let's make a start. Now, the thing is with
these types of roofs, they do come with its
own self problem. So I'm just going to
grab my guy here, press shift desk,
cursor selected, and then going to just
move him to the side, press shift day,
bring in a cube. And what problems do you imagine that I'm
talking about here. First of all, when
you're actually trying to do something
at an angle, it does make it kind of odd. Sometimes it's easier
just to rotate this cube by 45 degrees
and do it that way. That is easier for most people, but I'm going to show
you the other way just in case you can't do that. You might be putting this
on top of a building. It is the harder
way of doing it, but in actuality, if
you learn it this way, the other way is way easier. So you're learning the
hardest way of doing it to make things
easier in the future. So let me stop waffling
on and actually give you some dimensions. So let's put it 3.59, three, 0.59, and let's put
this at 2.67, like so. Alright, let's pull
it up in place. So we should be pretty
much with a cube. And then this is going
to be, you know, the tops of the buildings,
as I showed you. Now, what I want to do
then is bring this in, first of all, so I'm
going to come in. And I'm going to grab the top, bring it into where I want it so you can see
something like here. And then what we're
going to do is bring in some edge loops like
we've done many, many times before. Left
click, right, click. I'm going to press one
to go into front view, put it on solid mode so you can actually
see what I'm doing. Start with the top, press
the S bone, bring it in. And I want a very, very
nice slope on here. So I'm probably going to bring in even more than I normally do just to get that
nice, beautiful slope. Like so. I can see it's
still a little bit out. But I'm going to have
a slope like this. And now I'm looking.
Where is it out? First of all, it's probably
out a little bit on this. Now I can bring them in,
so let me do that again. Like so. Okay, so we're going
all the way down to here, and it looks like this one
here is a little bit out, and then this one here
is a fraction out, there we go. Alright. That is looking good.
Now, right click Shade A Smoove helps me actually see if
there's any issues. And then what we'll do now
is we'll come underneath, delete and faces,
just delete that way. And now, to get
these bits on here. So to get these going down here the way
that we want them, it's a good idea to make
a second version of this. So a second version just makes
life a little bit easier. Now, you don't have to, but I think it's
bet because then you can have the
roof actually go. It looks a little
bit better, I think. So what I'm going to
do is press shift. Duplicate, if I
press G now you can see I've got another
one, P selection. And then what I'm going to
do is grab one of them. So just click on one of them, press H, and hide
it out the way. Now, this first one now, I'm going to press Alt
Shift click on the edges. So Alt Shift, click
on the edges, press Control B together the
scale I actually want them. And then what I'm
going to do is just delete these tops
out of the way. So I'm going to come in, delete these tops out of the way. I'm not going to
need them for this. I'm going to press
Delete and Bass. And then I'm going
to also come in and probably actually use B, box select, delete and faces, and there we go, that is what
you should be left with. I in wondering, you know, this looks a little bit weird, but trust me, it's the
easiest way to do this. So now we're going to
grab each of these. And then what we're
going to do is going to press E enter S with this on medium point. And now we want to
do is bend these down to where we
actually want them, like so, and you will notice
that they've actually, you know, come out
on the ends of them. In other words, they've
got a little bit wider. What we're looking for
now is just to make sure the flow coming from up
here is really nice. Now, if you want to, you know, put them back, you can't just press S because
they'll pull them in. So what you need to do is
put individual origins on, and then you'll be able
to press them down. I actually like it, you know, a little bit laid
out on the end. So I'm going to just go in come into these
parts now and play those little bits
out just a fraction to add that little bit
of extra flair to them. Okay, now we've got those. What we can do is
now we can come in, grab each of these now, like so. So shift, control select,
shift, control select. And then what we're
going to do is going to press P selection, and then we can delete
this part out of the way. Delete this part out of the way. Now, come back to
these, press Control A, or transform set
origin to geometry, and just add in A, solidify. Like so. Now, let's press altage and bring back
the original roof. Let's come in then hide
these out of the way. And now we need our job is to do is to increase the
thickness on these. So if I come in now,
why this lidifi first? Because if not, sometimes, if you haven't got
these flay parts out, it's actually a bit
harder to find them. So what I'm going to do now
is increase the thickness. On these. I'm going to
drop back then this, so drop back this
just a little bit. And now we can see exactly
what we're looking for. We can also see that these need kind of pulling
up a little bit. So we're going to come in and we're going to grab the edges on the tops of these so you can see all of these, like so, and we're even going
to pull them up and then pull them
in with the S bun, or we're simply
going to press E and Z and pull them up that way just to get them
to where we want them, put this on to medium point, press the S but then, and you should be
able to get them in. Now, if you take this
off, you'll see, well, they've gone really, really, you know, funky,
they're the top. But that's no problem because
we already know that if we come in now on individual
origins and press the S bon, we can bring them back to kind
of the scale that we want. Now we do see another
issue in that this part here needs
beveling off a little bit. But the thing was, why did
I do it this way is because I got complete control
then over this part here. So now I can actually
come in to these parts. So these parts here, I can
bring up my thickness. I can drop them back to
wherever I want them to cover those roof tiles and
just get them back into place. And now from here, then I
can come back to my roof, Alt, shift click,
lt, shift click. Alt Shift click,
Alt Shift click. I can press Control
B and pull that back bend to wherever I
want it now, like so. And then what I can do is
I can press delete faces, and come to the top of them, delete the faces, bike so, and then I can make
sure then these are my roof tiles so I can
split these off as well. So you can see, Control click, Shift click, Control click. Y. And now all of those
are split off, ready to go, and they're in the perfect place that
I actually want them. And again, we've still got
control over these parts here. Alright, I'm going to say
if I'm a work and we'll get this hopefully nearly finished
on the next lesson guides. Alright, everyone.
Thanks a lot. Bye bye.
104. Modeling a Tapered Spire with Bevel and Mirror: Welcome back, everyone
to the Hunted tree environment, LenaTo Unreal. This is where we left you off, and you can really tell it's
near the end of the course, 'cause my voice is
actually nearly gone. You know, speaking for 20, 30 hours, you know, over the course of a week
and a half or something, it takes its toll on your voice. Alright, so let's now come in, and what we want
to do is shifts, first focused to
selected, shift A. And what we're first
of all going to do is just measure
everything el. We're going to bring
in a cube, and the cube dimensions are
going to be not 0.531, not 0.531 and 2.22. So there we go. That's
the scaling that we're actually looking for
something around this. Now, you can see
straightaway that these parts here are they're
going to fit in well. Yes, if I pull it
up a little bit, you can see that they'll just fit in actually quite nicely. Now I want to turn
this you know, into this bott bit. And I think it's easier to
do the bottom bit first, then do the top bit, but I
don't want to lose my skill. So I'm just going
to press Shift D, duplicate it, move over
to the other side. Then what I'm going
to do now I've got this in place is I
can bring this down, and then what I can do
is do the sides first. So we're trying to keep in with the character and the art style
of the rest of the build. So what I'm going to do
is just grab these parts, press Control A quickly, resell my transforms,
and then I'll press Control B and
bring these in. Increase the amount like so, and then I want to come to
the width and bring it in. Now, I don't want to
bring in too far that, you know, I've lost
that cohesion. I can also, as well, make this a little
bit bigger if needed. And that's exactly
what I'm going to do. I'm also going to
come to the top, bring it down a little bit. Not going to worry
about that bit, press the Sp and bring it in. And then what I'm
going to do is press the I button and bring that in, making sure that I'm not
crossing over these sections, so I've not got to
go and, you know, do a load of fixing and
merging or anything like that. And then what I'm going to do
is press E and pull it up, like so, press the S
bun and bring those in. And now we should be ready
for this actual top here. So what I'm going to do now
is bring in a cylinder, so shift a cursed selecu. Now, the last thing we
want to do if we write, click and shade Auto
Smooth on this one is to bring in a cylinder which
is not going to be right. In other words, we need
a lot of vertices on the cylinder because
we don't want the spire to look kind of, you know, chunky, blocky, anything like that, because, you know, if you're putting
this in front of a moon, it's the silhouette of it, and you need to think about that because many people
probably do that. It's like the pinnacle
of the actual village. So let's take that into account when we're doing
something like this. So what we're gonna
do is press shift a we're going to
bring in a cylinder. We're going to keep on 32. And what we're going to
do then is just get it into the scale where
we actually want it. So it's going to fit
right about there. And the top of it, of course, is going to be thinner
than the bott. Now, the thing is we now need to bring it up to where this is. So we're going to bring
it up to that point, W we set out, like so. And the other thing is,
we want to make it so that it still follows
the same art design, which means it's going
to look spindly, it's going to be very curvy in that haunted kind of way, and that's what
we're looking for. So control art, bring in some edge loops, left
click, right click, grab the top of and let's even, first of all, do it with
proportional editing. So we're going to go for shop. We're going to go for
one on number pad, and then we're going
to press the Sb and really try and bring it in. And that's not working,
so we're going to try root. Let's try that. And there we go.
That's working much, much better than what we had it. Now, again, for me, I'm normally better at
just bring it in. So I can normally bring
it in and make a kind of tapered edge on here to the way that I
actually want it. Now, you might not
be able to do that. It's much harder than it looks, and it just takes
a lot of practice, but I'm going to try and bring mine in to the way
that I want it. So you can notice I'm getting
a slight bend on here. So you might just want to use proportional editing
to get yours. To be how you want it, but I'm going to just
have it like this. Now, I'm still not
happy with this. So what I'm going to do is
I'm going to come back. I'm going to come
in again and bring it in and bring this part in, like so, like so. And then as we get
close to the top, I'm going to start bending
it out a little bit. Then S like so. And now you can see that's the kind of look I'm
actually going for. You might want something else. Let's right click, shade Atom, double tap the ages to see. Shift right, click to move that cursor out the
way, and there we go. I'm actually very
happy with that. Now, the one thing is, I
think it does need a base. Now, I didn't put a base on my original, but
looking at this now, I think it's going to be bet
if we put some kind of base, so I'm just going
to turn that off, and all I'm going
to do is press E, and then I'm just going
to pull this out. Now, mine look better if I pull this out a little bit
longer than you think. So Alts, and then let's
pull that down. Like so. Is that going to look better? Maybe, maybe. I think the thing is it does
look better, pulled down. So all I'm going to do is l tes, bring it back in and then
pull it down a little bit, like so, and then we'll also mark in a sharp
just on here and here. So let's mark a sharp.
And there we go. I think that then looks perfect to what I
actually wanted. Alright, so let's leave
this out of the way. Let's come to our roof tiles. So here's our roof tiles. Shift D. Now, if
you're looking at something at a 45 degree angle, you can actually see this side and this
side at the same time. So you've got to also
bear that in mind. You can't see something
that's, you know, completely the opposite side, but you can see something
looking at an angle like this. So when I'm bringing
these in now, first of all, I'm going to
get just the right angle. So I'm going to
rotate this round on my roof tiles, bring it in. Get it to be the right angle and under there, where
I actually want it. So something like this. And
what I'm going to do then is, I'm going to rotate here
around the other side. So we need to basically
mess around with these roof tiles and mix them up a little bit is what I'm saying. Now, there are ways to do this
because if you start here, you can see that you
want your roof tiles to be a little bit into the roof, so this slight here, but not so much. So what I'm going to do
is just put this on here, and then I'm going to Make sure the orientation
is in the center. So I'm going to grab this part, shifts, cursed or selected, grab my oftiles and then I'm
going to press Control A, all transforms, right click, eigen to three D cursor. Then I'm going to press Shift D, and I'm going to press Z and
90 and rotate those round. Then what I'm going
to do on this one, at least, is I'm
going to mirror it, so I'm going to go to object, and I will mirror it on the X. So mirror on the X,
and there we go. Now, I'm looking, see if they look the same,
and no they don't. They look actually
very different. You can see this one and
this one are the same here, and that's what I'm
actually trying to avoid. Now, if I come in, let's
try and mirror it on the z. And that's not going to work because it's going
to put it up there. So what we'll do is
try mirroring it on. I mirrored it on the X, so
let's mirror it on the Y. And that's just going
to put it over there. Now, I've just got
to be careful. This one and this one now
you can see is over here. Now, the other thing you can do to make these look a
little bit different, if you press ultage,
you can just grab some of the roof
tiles like these two. Pull them over here and
just replace them out. With a couple of the others, don't worry too
much because we can unwrap them again or
make them smaller. So what I tend to do is
I'll just grab a couple, and then I'll come in, press ENx and just pull them out
and make them tht again. Same with this, I'll
do the same thing, so NX because that means then I'm not going to go and
unwrap everything again. I can grab then all
three of these. I can pull them over,
as you can see, and then this one here
can make a little bit bigger without
stretching too much. I really don't want
to stretch it too much and then pull
this one over here, and then press ENx, pull it out. And there we go. And now you can see that's
what it looks like. Now, if we come in now and
do the same thing over here. So if we're looking at
this side to this side, you won't be able to
see the difference. If you're looking
here to here, though, you might be able to
see some difference, and that's what I'm
trying to avoid. So what I want to do is
put this one over here because you can't see that
and this one over here. Now, before we do
that, let's come in, Oldage, get rid of these. So L and L delete and erzs. And now you can
see I need to make this a little bit smaller. So S and why? Bring it in. Let's move them back
so they're over here. Maybe maybe actually
we'll use that. And the reason is because
I want to use this part. Let's come to this part and delete both of these
parts out then. So delete and Hertz's. And now we should be ready
to mirror this over. So I'm going to come
to this one first. I'm going to go to add modifier, bring in a mirror. Pull that over that
side, come to this one, add modifier, bring in a mirror. And there we go. Alright,
so that is that part done. Now on this part, we might need to think before
finishing it, of putting the base
in here like we did before cause this going
on the top of something, and we definitely don't
want to be messing around, putting little pieces of wood in here or anything like that. So that's something that we definitely need
to think about. And I think on the next lesson, we should have pretty much
this structure done and be well on our way to putting
in materials, hopefully. So that's a good thing. Alright, so let's save our work, and I'll see you on
the next and everyone. Thanks a lot. Bye bye.
105. Building Wooden Supports and Clean UV Unwraps: And Welcome back, everyone to the Haunted
tree environment, blend it to unreel. This is where we left off. And now let's actually put
in the bottom section then. So what I'm going to do,
while I've got this here, I'm going to bring in a cube. I'm going to bring it down, and I'm going to try and
fit this into place. So first of all, let's press S. Then what I'll do is I'll
grab the top of here. So I'm going to fit
this just below there, so you can see just
below these tiles. I don't want to
interacting with them. And then what I'm going
to do is bring this up, and that then will form
this part of my wood. Now, what I'm going to
do then is come in. Grab the top of this, which is already
grabbed. No, it's not. That's the bomb.
Let's grab the top. Let's see if I can grab the top. There we go. Grab those, press the eye boum
while I can see what I'm doing and
bring them in. Now, I did tell
you not to do this because of the fact that these parts here then are
not going to be straight, but you can get away with this as long as you're doing
it in the correct way. So I'm going to delete
these faces out now, and we should end up with
something like this. So only do this if you know
what you're doing, basically. Now what I'm going to
do is old shift click, which at this point, you absolutely do know
what you're doing. And what I want to
do is bridge these. So I want to go right
click and bridge edges. And then we've got
something like this. Now why did we do it that way? Because now we can come in, Alt Shift click, Alt Shift
click, separate them out. And now we want to
do is press Shift H just to grab both of these. And the reason we've
done here like that is now because we can add in
all the faces on here. Now, rather than go in and
try and add in all faces, let's go to mesh, first of all, clean up, and let's fill holes. That will make it easier. And then what we
can do now is grab both of these at the same time, press S, and I think it's Y
and zero to zero those out. Let's do the same thing on
this then. So this one here. And this one here,
S Y, zero them out. Let's bring the other
ones back then. Same thing again. We'll grab these L and L, and
then we'll come in, and we'll go to mesh, clean up, fill holes, and then we'll grab this one. And this one and then S x, zero to zero them out, and then the same thing
on this one, as well. So it's a different way
of doing it, like so, SX and zero, but it's only meant if you already know
kind of what you're doing. So let's come in, grab
both of these now, and then we'll bring
them out to this point. So if I press S and X, I should, if it's on medium point, be able to bring them
out to this point here. Now, just got to be careful that they're not
poking through there, which they're not, which means then I can grab both of these. I can press S and Y this time and bring them
back so they all fit. Now, the other thing
I like to do is I just like to come in
and move them back just a little bit from each
other so that we can really see there's a difference in these pieces of wood, like so. And the final thing
I want to do, of course, is control, bring in some edge
loops, corn troll, some edge loops, corn
troll, some edge loops. And then finally control
last edge loops. We'll grab each
of these then and we'll just make them a
little bit more randomized. So mesh, transform, randomize, turn it down to note
point note one. And then finally, finally, the last thing I like to do
is just bring this one and this one and this one and this one just down a
little bit like so, and we should end up with
something that looks like this. I'm not going to
fill in this form because that's going to be
going on top of something, but we're pretty much
done now with this, which means now we're not going to join everything
together right now, but we've got these
parts and these parts that we absolutely
can join together. So Control J, join
them together, adding a modifier,
let's generate a bevel. Let's press Control A or transforms just to make
sure it's going on right. Let's set in not
point note not three, like so, and there we go. Now, let's come
over to our UV map. Let's press the little dot
board if it's not available. So we're going to
press dot to zoom in. We're then going to press
A. We're going to press U and smart UV
project. Click Okay. Now, the thing is here,
if I zoom into this, I just want to make sure
now that's gonna look okay. So I'm gonna come in, bring in material. It's
gonna be metal. Like, so, bring it
in, and there we go. That's actually
looking pretty good. I don't think I have a lot
of work actually do on that, and now we'll move
on to the next part. So these parts here, I can join at this point.
Let's have a look. First of all, we've got
no modifier on there. We have got a solidifier on
here, so let's apply that. Let's come to these parts then. Let's press Control J. Join them all together. Right,
click, Shade auto smooth. And the other thing is, you know what I'm
going to do before finishing this is actually
randomize these parts as well. So I'm going to go to mesh,
transform, randomize. Let's turn it down then again. There we go. Okay. And now
we want to do is A U unwrap. So Smart UV unwrap,
and there we go. Let's bring in our
material then. So we're going to go
with red wood, like so. First of all, we're going to
spin all these around or 90. Then we're going to add
in a bevel modifier, add in the bevel,
nought point non three. And then we're going
to just quickly check just to make sure
that bevels on there. So I always just
check just to make sure tab, there's
the bevel on there. That's looking good.
Back to material mode. And now let's look at this wood. Again, compare it to
this wood over here. This looks good. Of course, we've got a few issues
with the bending. Now, these bending,
you could honestly, 'cause you really
can't see them. I'm not going to do that
because I'm a bit of a stickler for making sure every little
piece is done right, so L, Now, when I'm doing
this one, I can see. It's not quite
unwrapped correctly. Now, can I get away with that? You know, is it
too far in there? Let's have a look once
we've actually done this. So we'll just strain
them all out. Then we'll have a better idea. So L O spin it round or 90. Same for this one. Lot
E. And there we go. Now, is there any other parts? They're a little bit bent on
these parts, as you can see, but not bent enough that I need to actually move
them, I don't think. So what I'm going to do is,
these are the main parts. Here it is. Here is the problem. You can see the problem here. For some reason, it unwrapped and it's put a great big
seam right down here, and I'm actually
glad this came up. And the reason I'm
glad it came up is because every now and again, you'll end up with
something like this. I don't know why it is, but, you know, you will
end up with it. So what I'm going to
do is press Shift H, hide everything out way. We absolutely don't want that. Now, the thing is, is it
going all the way through, or is it just this part of it? For me, it looks a, on some of them, it's
going all the way through. So in times like this,
you've just got to go. And add in a seam. And the reason is it might
be because these top parts, they are an on, so it could be that that's
causing the issue. But what I'm going to do
is just select all these, come down to the bottom, select all the bomb parts because
it won't take that long. Press controllee and we're going to mark a seam. So mark a seam. And then what we're
going to do is now we're going to come in and mark a seam on the inside where no one's going to
see on each of these. Right, click Mark as. Now, just grab all of these now, and what you're going to
do is press and unwrap. And you should end up with
something like that or 90, spin it round, like so, and you'll see now that
they have come out. Absolutely perfect. Alright, so they look
really, really nice now. That is how we fix them. While we're here, let's
just come in, face, click, right click, triangulate faces, tries to quads, and there we go. Now I'm just looking
Are they a quad? I don't think they're a quad, but it's actually said it
as though they are a quad. But anyway, we can also leave
those out if we wanted to. We don't actually need those in. So the end of the day, this looks a nice,
clean mesh now. Let's press saltag, hide
out this last little bit, then, and now we're on to the final part,
which is the roofs. So what are we going
to do First of all, let's unwrap all of these, so we're going to grab them all. This should all be split off. If you pull them away, you can
see they're all split off. We can press you then
and we can unwrap on angle based and see if we can actually
get away with that. Well, as well, bring
in our material, which will be our roof, so our roof tiles, there we go. Now, let's go into
each one of them. First of all, make sure
they're facing the right way. So this one, let's make them, first of all, a little bit bigger so we can actually
see what we're doing. So now we can see that this one here is definitely
the wrong way. So 180, spin it round. Now, that's facing
the right way. This one here is
facing the right way, and this one here is also
facing the right way. Now, the other thing
is, what we're also looking for here is to
make sure these line up. So make sure when I press
tabin, you can see, because the way it's unwrapped
them for me, at least, it's made them all unwrap
really nicely and cleanly. And not only are these
all looking different, but they're all lining
up with each other, and that's really,
really important. What that means, as well, is that the bombs of here, I've got lucky in the bombs have also pretty much lined up to the bottom of where
I actually need them. Make sure, guys, if that
didn't happen for you, yeah, make sure that
you also lined up. Now, the other thing is, these are a little bit too
big at the moment, so let's make them a
little bit smaller just so they line
up with our parts. And the other thing is now I do need to bring them up
just a little bit, so G and Y, bring them up just a
little bit, like so. Now, you can see,
it's broken now. You know, it's not the same now. So now if I grab this one, I can press G, so G, and Y and line this one up
first holding the shift but, and there we go, that's
that one, moving round. This one here, let's
do the same thing, G and Y and put this into place. Like so. Alright, perfect. Now, they're done. So
let's go to modeling. Let's grab all of this. So
we're grabbing all of this. Grab our spire last, press Control J.
I know we're not going to do that because we need to apply our mirrors first. Control A, apply our mirrors. Now let's try grabbing it all, grabbing this bit last,
pressing Control J. Let's go to material mode, have a look at that looks
like. And there we go. Daddy's looking perfect, guys. Perfect. So now we can come in, delete this out of the way,
delete this out of the way. And on the next lesson, we
need to put these Well, we need to do the final check. We need to put these
into their groups. And then we're done,
guys. We're done. We're there. Alright,
so let's save our work. And I'll see her
on the next one. Thanks, over one. Bye bye.
106. Final Asset Cleanup, Naming and Production Handoff: Welcome back, everyone,
to the Last time for the Blender port to the aunt history Environment
Blender to Unreal. And I hope you've
had a blast eyes creating this. I know I have. What a, you know, final render this
is going to be. Honestly, it's going
to be amazing. I haven't seen anything
out there quite like this, and I'm hoping like
before we begin, that you'll learn
the whole process. So someone said to you, Hey, make me an
Aztec, modular pack. You're going to have
a good comprehension of what you actually need to do, what you need to
think about, and all of that sort of thing. You know, they give
you an R direction. You make sure you
stick to it, you know, the reasons of why things
need to be this way. And more importantly, you
know, I think at T D Tudor, we really have become
specialists in, you know, stylized,
three D environments. I don't think there's
anyone quite out there who has this size of catalog, all this level of
expertise going forward. Alright, so after all that,
let's finish this off. So what I want to do is, first of all, name them. So you know me. I always name things
very, very complex. So this one we'll
call small roof. We'll call it roof first.
Well, then even copy this, so I ain't got to do this
seven or eight times. So roof, small, like so. W all way down. So we've got a midsize roof, so we'll call it F two, Control V roof mid. Then what we'll do is we'll
call it clock or clock tower. That'll be the easiest.
So we'll go F two, clock tower, like so. Then we'll go to Roof large. So we'll go Roof
contro V, large. And we'll leave it like that. And then we'll call this
one Roof large, pointed. So roof large pointed, like so. And then we'll call this
tower top, I think, roof tower top, so
contro V tower top. And then this one, let's
think what we'll call this. So we'll call it
not Roof supports. So Roof Terrace, maybe.
Maybe we could call it that. I think that would be
probably the best name to distinguish
them Roof Terrace. Like so. Alright, you might figure out some way
better names than I do. Now we can finally get rid of our little guy. We're not
gonna need him in there. And then what we can do is
now we can grab all of these, press the NB New
collection, call it Roofs. Like so. Alright, there we go. Now, the one thing is, I do want to put our
capital there, actually. So roofs. Like so. All right, everything
then is nice and neat. Let's drag them into the place. So I'm going to press
seven to go over the top. And then what I'm
going to do is just place them going in from here. I'll grab my next biggest
roof, put it next to there. I'll grab my tower
then, put it here. And I'm hoping I've
not missed anything. Let's put this roof over here, and this roof over here. And finally, this little roof,
let's put it over there. Then what we'll do is just grab the cemetery, press Shift D, we'll press the tab
for the last time, let's call it roofs. Like, so, press the tap on. Okay, so at this point, you're pretty much done with, you know, everything on here. You can see if we put
in an object mode, that's the next thing
that I'm going to check. You can see anything that
is the wrong way round, so the wrong way round is in. Let's just press all um ltates just to bring back
that ground plane. Now, the thing is, I
want to make sure, as well that everything
is on the ground plane. So that's the next
thing that I do. I also want to make sure that, as you can see,
all of these some of them are sticking
slightly through. I don't mind them
slightly through, but I want most of them to
be on the ground plane. So you can see here
that both of these and especially this one here are definitely not
sticking on the ground plane, so I'm just going
to lift them up. And then what I
want to do finally is just grab this ground plane. I'm going to come
in, edge select. Move it to here, move this to here just to make
it a little bit cleaner. Now the next thing I want to
do is come to all this text, grab it all, press the Nb, new collection, call it text. Like so. And now everything in my collections
is nice and clean. Now, finally, the
last thing I want to do get rid of this
human reference. You can see there's
no arrow there. Delete it out of the way. And then what you can do
is open up each of these, and you can see there's an issue in these,
like we said before. So what I want to do is just
delete this out of the way. I want to come to this one,
delete it out the way, make sure that
everything is clean, ready for, you know, handing over to Luke in Unreal. So I want to make sure
it's as clean as possible, and I'm wondering why that's
actually not working. So two by two, three by two, and I'm just wondering so this is brick wall three by one. Yeah, that one's
worked. Brick wall, three by two, brick
wall, three by two. That one's not working
for some reason, so three by two. Oh, it's because we've got two. Why have we got two?
Let's have a look. So brick wall, three
by two, two by two. So there shouldn't be any reason two by two, let's have a look. It keeps going like that,
and I'm not actually sure. So what I'm going to do just in case we've got any
other problems in here, because you can see
this is also named. This is where we should come. Go to file, save it out
before doing anything. Go to file, then what you
want to do is clean up and purge any measures, purge any materials that you're not using,
anything like that, because what that
means is now that this will be a clean
Blender of file. In other words, anything
that's not being used in here, unless you put a shield on here will be deleted, got rid of. No geometry nodes, no
materials there on there. If I come to here now and come
to materials and go down, you can see that all of these materials now is
everything that we're using. We have ground ambient occlusion there because that's
being used for the flow, but apart from that,
everything is clean. All of the materials then got OO one after them or
anything like that. So it's all clean. So now let's see if I come in,
press the enter. It's still not working. Yeah, it's because, look,
you can see here brick wall, two by two, brick
wall, two by two. Now, why have we got two
brick walls, two by two? Let's just go over. Let's
put it on material, and let's see what these
two brick walls are. So we've got this one.
This is not a two by two, and this is why it's
important that we check it. It is a two by two.
What's the difference in this one? This one is 2.5. There we go. So
this is 2.5 by two. Let's put that in
there. So 2.5 by two. And now we can go to this one, two by two and
delete it. Like so. Now we can come to this one, which is brick
wall three by 2.5. So it's my error. I
didn't put it right, and I can delete that, and
that should. Yes, there we go. Okay, so that's that one.
Let's look at ground plane. That's done, supports. We haven't named them.
So that's another thing while we're going down
here to name our supports. Don't know why I forgot
to name them, but I did. So what we'll do is we'll
call this stone support. Then we'll call
this wood support. Like so, and then we'll come to this one and we'll
call it large support. Don't scrimp on this
guys because it's so important when you're taking
things through to anyone. You know, if you're in a team
and you're passing this on, you really want to make
sure you've got a nice, clean place to work. So now we've got planks.
I think those are these. So we'll call it large Planks. And then we'll go to this one. We'll call it small planks. And this is why I do this
going through because I know in the end you don't want to be doing
this all at the end. Now, I don't know why, but most of my things have been renamed. I'm sure I named most of
these. Maybe I forgot. So let's have a look at
this. This is 2.52, and one. So let's go to Strut. Space, copy, and then we'll
call this 2.5, like so. And then what we're
going to do is go to this one, which is two. So Control V two, and then
we'll go to this one, which is 1.5, so Control V 1.5, and then we'll go to
this one, which is one. So control V one,
and there we go. Close that up.
Stairs. Large stairs. Thank you. At least
something's named Bass main plinth, named doors, simple door door
arches, windows, props. Lights, bridge,
gravestones, chimneys, cemetery, Insign,
lamppost, roofs, and text, all done. Now, lastly, you
want to make sure that when someone opens this up, first of all, turn
off face orientation. We really don't need
that on anymore. So now they have a clean view of everything that's in here. Double tap the ages to make
sure the Gizmo is not there. Go to file and make sure
that everything is packed. So always make
sure this is Tick, and then go to file and
save out your work, and you're pretty
much done to hand this over whether
it's going to be, you know, a um an animator, whether it's going to be someone who's going to be
re texturing it, whether it's going
to be someone who is going to take this
through to Unreal Engine. There are things that
you're going to have to do, which Luke will go through to get it prepared
for Unreal Engine, but you have done your job here. If this was your job to make the modular pack and the other guys taking it
through to Unreal Engine, if you get it to this level, you've done your job perfectly. That's exactly what
you need to do. All of the topology is clean. All of the materials are clean. Everything in this
Blender and file I taught you the right
way of doing it, so everything is clean. You've left the bevels
on, everything's pretty much got the bevel
on. It's been left on. It's not been applied yet, which means whoever's
taking it folk can apply those as
they're taking them out. And what that also means is that the texturing
that you've already done will keep on there
and still look good. Alright, everyone, so
I hope you really, really enjoyed this section. I hope you really
managed to follow along. I hope you did a
really, really good job of getting you through
the whole process. And more importantly, now, I hope you've learned you know, the AA pipeline
is based on this. It really is. So it's
based on referencing. It's based on, you know,
a lot of the time, bringing in a cube
to get the scale in, using the Human OBJ, doing these things I've been
doing the whole process, the whole checks we've been
doing, the whole shebang. Or everyone. So it's
Neil from three D Tudor. Hope she had a great one.
Happy modeling, everyone. See you on the next one.
107. Preparing Clean Modular Meshes for Unreal Engine 5: Hello and welcome back around
to Hunt Street environment, blended to Unreal Engine five. My name is Luke, and
I'm going to take over the second part
of this course. And right now, what
you should have are these little
parts over here, all the nice little doorways, side supports and gravestones, all of the necessary
parts in order to create your very
own environment. The current file that I
have open right now is a file that includes
all of these parts, and you can also have these
houses over here on the side. So in case you want to just go straight into
Unreal Engine five, you can start off
from this section. We will have a part
where I will show you how to set a house
up from scratch. And I also made sure
to include all of these little parts over here
of different buildings. That way, you can include
these houses into your section or
the environment in case you don't feel like building everything
from scratch. One thing that you
would need to fix up is the material
duplication issue. Right now, all of these parts, all of the walls are
using the right material. But if you were to make a
duplicate out of these houses, the materials over here
would be duplicated. So instead of being
called bricks, it would be called bricks.001. In order to switch that,
you would simply have to go onto this material
icon over here, and you would have
to switch from 001 to the normal brick. So the easiest way
for that would be to simply go through every
single one of the houses, and if it was like duplicate, you could just click on
the slot over here and use your arrow on your keyboard
to go up and then hit Enter. So up with an arrow
on your keyboard, and hit Enter and basically, you would just have
to repeat that same step for over and over again. That's unfortunately how
it is in case you want to reuse these houses as they are. But if you want to
build it from scratch, don't worry, we'll show
you a method for that. Next step is making
sure that all of our items are properly
set up for the export. So we'd have nice and clean
items for real engine. So first things first, what we need to do is make
sure that all of the modifiers that are set aren't going to
impact our setup. So in GLB export, there is an option to include transformations for the
deformers, sorry, the modifiers. But in certain
cases, I find that it doesn't actually
get quite as well converted from one item to another from blender
ton reel engine. So, for example, for the
staircase over here, we should just
realistically apply this simple deformer
just to make our lives a little
bit easier, like so. And next step is if we
look at where would it be? We just find it real
quick. There we go. These labs over here, we do
want to make use out of them, but we don't realistically
need to use all of them. So what we're going
to do is we're going to make use out of just free variations and create our own geometry node
inside of unreal engine. It's not quite called
a geometry node. It's called PCG, so we're
going to make use out of that. But for now, all we
need to do is just grab these items and find the area or where
we can lower the amount. I think we can actually find it inside. We're going
to select it. We're going to hit
tab, and we're going to just simply hit
the endpoint over here and lower it down
until we get free slabs, free rocks, like so. And I think something
like this will be right. Let's just make sure we
have reasonable variation. Then we're going to change the
material to be stone slab, stone where is it? Stone dark. There
we go. Actually. Pink stone light, it was. There we go. We can always change it in a real engine as well, so that's not a problem. And because it's getting
everything in a way, we want to also break this
down into separate objects, we're going to go
onto Object app, and from here, we are going
to find ourselves mesh. So let's convert mesh, like so, so that way, it goes and
converts the Dmitri node. To a mesh or the
modifier that we had. And afterwards, we can go into Edit mode. We
can select it all. We're just going to click and we're going to merge
by distance because these little stone slabs were having separated edges
for the normals. But if we were to merge that, we should have it as just
one chunk, which we do. Afterwards, we can go
ahead and select them all. We can hit P and we can
separate by loose parts. That way, we have
three unique slabs. I'm also going to
select them all and just use shades mooth. So we have ourselves
nice shaded tabs. And then we can just
slightly clean up the rest because we're going
to make sure that we're using export
based on a selection. We are going to make sure
that we remove the text. So for this part, if you're using
the same project, I'm just going to make
everything smaller, like so and find a text. I'm just going to take this
off, like so that way, we just have the parts itself. Afterwards, in
terms of the trees, we are going to make
them in real engine as well using the new
foliage editor. So we're going to just take
them off if you want to. You can keep them,
but they will not have any animation or
anything of that sort. But we can just
go ahead and find the trees in the section
and take them off as well, since we're not going
to be exporting them. Then I'm going to
select the stairs. I'm going to click
the dot. I'm going to find the stairs over here. So this is the stairs. Since we're done with it, we might as well just delete it. Um, at this point, honestly,
you could make a copy, just like I did with
this resource pack item, you can see that it's called
free Dichter Modular Pack on the street environment
complete copy. It's because I made a
copy of this plan file. But yeah, we can just
go ahead and remove it. And we are left with all
the necessary parts. Next step is just
making sure that some parts that we
are going to be animating are not
just duplicated. So, for example, this part of the year is looking quite nice. I love the way it looks. Unfortunately, though, we
need to just delete it. Since we have the lantern
over here on the side, we're going to be able to
make it swing a little bit. But in order for us to do that, we're going to make
sure that this is like a separate blueprint. And for that to work, we need to make sure
that this is deleted, so we can attach it,
reattach it afterwards. Same goes for this part
and this part over here. And to remove this
sign part over here, we're going to go
into Edit mode, and we're going to
make it separate item. I'm just going to
go ahead and click on every single
part of the chain. Or I'm considering
whether or not we can make it a little bit easier,
which I think we can. We can use Old s to make
it transparent mode. We can click free to go
into face selection, and then holding Shift, we can just select it all like so. Just make sure that this is only edited editor mode object. So nothing else is
selected, just this item. And then afterwards, we can make a selection like
this, like this. And I'm going to go ahead and I think a little bit
of selection over here. Once we make a selection of just all of these chains,
just a little bit touching, we can go ahead and
use Control plus to kind of increase
the selection like so, and afterwards, we can just simply click P and separate
based on selection. That way, we have ourselves this separate sign
over here, like so. Next up is just making
sure that, well, these points of light, they're not going
to be used as is, we're going to make
sure that we replace with the custom lights in items, that's
going to be right. And there's one more
tiny lantern over here, which we're also
going to delete. So again, we're going to replace it with this lantern over here, firstly because it reuses
the same mesh, and secondly, because it's easier to have more control over the
missive texture map, as well as maybe
spotlight and whatnot. So yeah, let's go ahead
and remove it, like so. And I'm checking if that is all. So currently, in terms
of the mesh setups, that seems to be
like everything. We can now go ahead and start preparing it a little bit more
with placement of origins. We can make sure that the mesh integrity is
properly set up. So we're going to
be able to continue on with this in the next lesson. Thank you so much
for watching, and I will be seeing you in a bit.
108. Fixing Scale, Normals and Non Manifold Geometr: Hello and welcome back around to Haunted Street environment, blended to Reel Engine five. In the last lesson,
we left ourselves off with cleaning up
some of the meshes, making sure that non
duplicates are set up. And now we're going to continue
on with this entire mesh. And the next step I'd
like to do is making sure that the mesh integrity
is properly set up. And by that, what
I mean is firstly, we need to make sure that the scale is properly
set up on the meshes. And if we select one of
the meshes, for example, we can click N. And there
is a transform option, and you can see that
the scale might be one might not be set to one. What that means is
basically that some of the mesh items by default, can be a different scale, and then it afterwards
transformation is being applied. That changes their
overall scale. It is generally
recommended to have the scale before
exporting set to 111. So I'm going to go ahead
and quickly check. For example, this one over here. If we were to click Alton S, it resets it to 111, but now you can see that this is the default scale of an item. It is way bigger
than it should be. So what can we do about it? Well, luckily, there
is an easy fix. We can go ahead and select
all of the items like so. I'm just going to
double check if the houses are the
21, which they are. I'm always a little bit paranoid about that
sort of stuff. If we were to select all
of the items like so, we can go ahead and click
Control A, and apply scale. On top of that, it
would be nice if we were to apply the
rotation as well. So when we are inputing it, an object is not going to be rotated sideways by accident. But that's going
to be quite nice. Let's go ahead and do that. Go ahead and apply rotation
and scale, like so. And you can see now that
this item that we were checking before is now set
to Oh, it was this item. It's now set to 111. If we were to use AltnS, you can see that
nothing changes. This is the fault scale
for the item now. So we got ourselves that set up. Next up is going
to be making sure that the face orientation
is properly set up. And what I mean by
that is, if we look, for example, underneath
this roof, can see that. It looks like it's
a general wall. And the reason for that
is because by default, a Blender uses two sided shader, and that means that the faces at the front is also
the face at the back. It's going to be able to be
visible from both sides. But in unreal
engine, because it's a real time render engine, it by default is set
to a single side, meaning that if it's
visible from this side, the opposite side is not
going to be visible. And for that, we need to make sure that we know
which side it's facing. So in order for us to see visually which side
it's facing is we can go onto overlays and we
can select face orientation. This option will allow us to
preview this kind of a view. In all the versions, everything that was facing front was blue. Now it's being ignored
and everything that's facing back is
just being shown as red. So, for example, if I was to show the backside of
this on the inside, it's being red, meaning
that in a real engine, you wouldn't be able
to see these backside. It would go straight through, and it would look invisible just to kind of save
up the performance. When we are going to be
exporting real engine, the GLB shader, there's
going to be two options. One is going to be two sided, and the other one is
going to be one sided. So we'll be able to
work those options. But for now, it's generally just better to make sure that
everything is nicely set up. Quick way to do it is if we
were to select this object, we can go ahead and go onto Tab. We can click A, and then
we can use Shift and N, and that should fix
most of the issues. In case where the issues are not fixed, let's have a look. These parts over
here, they are red, but it's not because they're red because they are flipped. It's because the seams for UBN wrapping are also
colour coded as red. So when the edge is red, you don't need to
worry about it. So we are ignoring
that. I'm also seeing that there is a bit
of an issue over here. I'm going to go ahead and
just kind of zoom in. Oh, going to turn off proportional editing and just
push it in a little bit, not too much, not
going to affect the material too much,
but there we go. This also allows us
to see gaps very clearly if there are any gaps like over here and over here, so we can have an opportunity to fix those just like that. There we go. So very
good little tool to use. So I'm happy with that. Also, when we are zooming out, you might notice that
there's some red flickering, and the reason for
that is because for optimization purposes, they're simplifying the meshes
when we're zooming out, the way the approximation
works between the faces. So some of the pixels
end up showing through. I don't know if it's quite
visible in the video, but if you're looking from a distance, you
can see, for example, these houses are purely red, but once you start zooming in, you'll notice that,
Hey, it's not an issue, so that's something
worth knowing. Um, so yeah, let's go
ahead and continue on with this little
side project. Let's go ahead and
just select this. Electoral, click Shift N. And now there is an
issue over here. So we use Shift N
and it flipped up sides because it
assumes that this is the backface, not
the front phase. But the way to fix it is
go on to phase selection, select this phase
individually and use Shift N, but just use this
button over here. You use this button to basically invert the option of flipping, and now it's facing
the right way. So with these tools,
we're able to quickly fix whatever
is needed, honestly. But this option over here, and this option over here
also needs to be fixed. So, there we go. And whilst I'm doing that, I'd like to also mention that changing the scale of the items that we had could also
affect the bevel amount. So if I had a different
type of beveling over here, it would be affected
by the scale reset. That's something worth knowing,
it might be worth and I'm quickly checking over some
of those bevels over here. But in general, it
should be quite right unless you're using
it to some extreme values. But honestly, from what
I saw, all is okay. Anyways, let's
keep on moving on. Let's just reuse that. Oh, the windows here need
to be facing the right way. Let's go ahead and do
that. Quick little fixes. Nice little practice, making
sure that we are able to clean everything up
nicely. There we go. And that is one over here, entire mesh, and these are red. There we go. So now, yeah, the backsides are
going to be red because it's one sided window. All is okay. So it's checking this create over
here as well. We set. Seems to be some issues over
here. What's going on here. Let's have a look, it might have been an
issue with the way, with the connections, I believe. So what we're going to do here, if we have an issue like that, I believe it was because there were some
merging going on, maybe merged based on distance, and this ended up
being picked up by, well, these edges over here. So we can fix it, luckily, we can fix it. Don't worry. We can just go ahead and use Alt Shift and just
click on this side. So it selects an
entire edge loop. Make sure you click
on the very edge. Then use Control plus
a couple of times, and this is enough as
far as we get basically, and then try to select the bases that are
going on inside. You can also use Z, C frou and you can identify which
dot is being correct. And then afterwards,
you can click P, separate by selection or sorry, the alternative way,
make it easier for us. We can separate by selection
and then select it all, click Control J, and
that would be nice, but we don't have to do that. Once we have selection
like that, we can click Y, and then it's going to
separate entire piece, and now it's going to
be a separate item. It's also good. I'm
going to make sure that yeah, this
is also an issue. So just going to select both of these using old shift and
click and then select it so click Old Z move in
here and select it on edge, then another edge. And why? So these kind of processes
unfortunately are needed to make sure that when we bring it
into a real engine, which can sometimes be a
little bit more finicky, things like Guns ngns are
quite fine these days, but if it's more of an interesting shape
so something like that, this would be an endgon, that
would be more problematic. But end goons,
meaning that it has multiple vertice
is more than four, so more than squares, basically. So that would sometimes be problematic when the
shape is more unique. Another thing is
non manifold edges. So what we saw we here,
when it connects to the edge connects rather than
the two connecting faces, it connects to
different normals. It can create quite an
issue in a real engine. Let's make sure we
don't have that. And yeah, moving on, something like a bridge
over here. Nice fix. These spears, we are going to bring
them into real engine. The main reason
for that is simply because this ensures that everything that we use route
items gets also imported. Even if they're being
applied on an object, it's just nice to know
that everything that we have over here gets
properly imported. So nice little preview,
visualization. So that is good.
This part over here, I think we can just have a look. There are some parts that are
a little bit more visible. You know what? We are going to continue on with this
in the next lesson. Thank you so much
for watching, and I'll be seeing you in a bit.
109. Optimizing Topology for Unreal Engine Vertex Paintin: Hello and welcome back over to Haunted Street environment, blended to Unreal Engine five. In the last lesson, we
left ourselves off by cleaning up some of
the non manifolds, some of the face
orientation to make sure everything goes smoothly when
we get to Unreal Engine. In this case, we're
just going to continue on with the
process a little bit. So the red that we see over here, we can
go ahead and fix it. I'm just going to
go ahead and select it all based on normal. Just make sure it's properly
selected for these pieces. Hit shift and it should fix it. I don't want to touch
the entire piece, just the ones that needed. These parts over they look a little bit interesting
what's going on with them? Well, I'm going to go ahead
and select the hit shift N, and they do not want to, for some reason, be
properly flipped. So I'll have to do it
manually, unfortunately. That's the way it is.
Oh, for this part, I believe I know
what's going on, so this just needs to be
straightened up a little bit. So I think that's quite right. And this part over here, this is the bottom, which, honestly, not sure
what's going on. I'm going to hit Shift
and H or Alt and H to make sure that
it reveals a hidden. Sometimes when you are in object mode, you
might not notice, but when you go into Edit mode, parts that are hidden,
something like this, you'll notice that
it disappears. So sometimes it just some
parts are well hidden. So this part over here, I think I can keep it as it is. I'm just going to go
ahead and select it and just bring it back a little bit, just to make sure it's
not affecting anything. That looks good now. All right. And finally, this
last piece over here, it can be just quick
little selection by clicking L. That is fine. And yeah, these parts over here, I'm just going to
select them at once, select them, so it shift
N, and there we go. The redness over here, you
don't need to worry about that because we are going
to cover this up with, like, anova roof and parts
of not and parts like that. I'm just going to check from
both sides. There we go. Ah. We found some walls
that need mixing. I'm just going to go ahead and
select all of these walls. Going to be smart about it. To select the Leto,
hold control, and deselect the platform, go into Edit mode,
select it all, hit shift M, and there we go. No hassle, no
fluff, quick fixes. Final checkup on
everything that we have. It is looking quite right. So I'm happy with this now. And we can move
to the next part. This part is going to
be adding vertices. And you might be thinking, why would we need to add vertices? Would it not ruin topology? If we look at the
houses over here, we have a lot more mesh than
we have from normal parts. And the reason for
that is because we are going to use something
called vertex painting, which makes use of the vertices, and that gives the color
information to them, and you can use that to apply
it on top of the material. We're going to get to that once we get to unreal engine part. But what you need
to know is that in order for you to use that, you need to make
sure that you have reasonable allow of vertices. Over here, when we have
just a face like that, you wouldn't be able
to apply any of the additional information
using vertice painting. You would need to basically have some additional vertices here in the middle to be able to control that a
little bit better. So it's a it's not overly
expensive process to do, but there are alternatives. So at this point, if
you, for example, would want to try out
using something like decals, you are free to do so. Also, you could just
keep it clean as is aber clean with this
kind of noisy pattern. This would also be
reasonable for a scene. But yeah, using vertex painting is a process that just gives
you additional details. So in something like blender, cles, you'll be able to
use ambient inclusion, for example, masks
from recasting to get some additional
depth to items. You could even create some
Edgeware and whatnot, but here with unreal
engine projects because it's real
time rendering, you wouldn't be able to do that. So we're just using different
methods basically for that. With that said, let's go ahead
and go for every part that needs additional vertices
to make sure that well, we get some reasonable detail. So with this roof over here, all we need to do
is use Control R and just increase
it to this amount. Left click, right click, every number of cuts, you'll be able to
see it on the side. But honestly, I'll just do
it by visually seeing it. And every time I'll just rate some reasonable amount that I think would work quite well. So the way the blending will
work, you'll see that later. But basically, it
transitions from one to the other vertice, and if you have more,
you'd have more control, but we are going to have
something in the middle. Everything that you need to
know is that the downside of this is that it doesn't
exactly quite work as well. I've noticed with
vertex painting. I've seen somewhere in
documentation that they are thinking of implementing vertex painting with the nanite, but it doesn't seem to be
quite working, honestly. So yeah, we're going to basically be
turning off the nanite and that's why a reason for
manually adding these in now is that we can control where exactly
we want them to be. So edge loops over here, we're going to be able to
add it in here and here, but we don't need to add
it onto the clock itself. It can be left as it is. And I noticed that it part might need to be
going up a little bit. There we go. All it's good. All is good over here. Got a second part
of the roof done. Let's go ahead and just continue
on. This part needs it. This part needs it.
Oh, or that's it. Let me just go
ahead and check it. No, you know what? This part is perfect for us. We
don't need anymore. We're going to leave it as this. We just need to add it in here. Thing like that.
Lovely. Next up, this, do we need it here? Well, we could add
just a little bit. If if we think it's a
good idea, think it is. So let's go ahead and
make sure we have that. Next up is we added
here, added here. Is this part over here. We're going to go ahead and
just add some more over here. And this part is not going
to allow us to add it. Why not? Let's see. Be able to add it?
What's going on here? I'm going to hit Shift
H and see what's up, because the edges
were so high up, we weren't able to see it. But I'm able to do
this. Yeah, right. I'm also going to
just lower this because it was
reaching from the top. Sometimes when modeling,
it's not always as visible, but when adding
fixes and whatnot, there's going to be slight little bit of
gaps and whatnot. It's always is the case, even if you are a
perfectionist when you're trying to work
on a different angle, in this case, adding edge loops and check in face orientation, you're going to notice
certain bits of parts. So don't worry about
it. No one is perfect. If you miss some of those gaps, you can always just
slightly fix them up. So we are continuing to
add what is required, all of these lovely edge
loops, this part over here. Like so. And this
part over here. So the main parts on
the top, we add it. I just want to make sure
that the staircase also has a reasonable
amount every go, which, yeah, it seems like
it does. All is good. Next s are simply the walls. So we can select all of these
lovely walls of s, like so, so like so go to Edit
mode and just simply get ourselves some
nice edge loops. So in this case, we
are going to add like so. There we go. We could some of you might
consider to do a bit more of a smart way and use a sub divider modifier,
which is fair enough. But the thing is, you might not get away with
it as much because it would start adding
edge loops over here as well in the parts where realistically it's
not really needed. So this doing it manually just gives us a lot more control. And we've done some
horizontal ones. Let's do some vertical
ones as well. Let's not forget about
those. There we go. Almost done. We are almost done. After was, we are
left with the bridge, and I believe that will be
pretty much it, honestly. So edge loops, edge loops, edge loops, lovely edge
loops are always good. There we go. And then we are going to add some edge loops in
here on the bridge. So that way, we are able to add some vertex information
for us the walkway. So able to just zig. So that is good. For here, I don't think
we are going to need it, so let's go ahead and
leave it as it is. And have a look. We don't really need to
add it anywhere else, but we could make sure that some parts have it a
little bit of an extra. Just make sure that when we
are painting some variants, we're going to have all the necessary information
and where to put it. Here, over here, I'm not
really worried about it. We can still use the vertices in a corner to kind
of darken them up. A is good. And smaller props, honestly, I'm not
worried about it. Chimneys chimneys, though,
that would definitely be needed to be added because they're going to be
top of the roofs. I'm going to make
sure we have lots of chunky vertex detail. So we have plenty of that. Let's make sure we add it in because they're
going to be visible, you're going to be lit
up by moon and whatnot, they're going to be really needing some of
that extra detail. The rest is totally okay. I was considering to add it
for something like doors. Doors already have
it. Plenty of that. Windows, we are
using Atlas maps, so we're not using
ordexpainting for the corners. We don't need to
worry about that. And yeah, that is
pretty much it. So next lesson,
we're going to make sure that origin points
are properly set. So yeah, thank you so
much for watching, and I will be seeing
you in a bit.
110. Perfect Origin Points and Pivots for Unreal Engine : Hello and welcome back everyone to Haunted Street Environment, Blender two on Reel Engine five. In the last lesson, we went over all the necessary setup
for vertex painting, and that means we have
these lovely verticas now covering up our mesh. And I'm just going to
double check real quick, see if everything is right. Always paranoid with that stuff, but it seems like it's all
good, so I'm happy for that. Now, next step is going
to be making sure that the origin points
are properly placed. Right now, they are centered, so it's quite good. But when we're placing our
items into Unreal Engine, when we're dragging it
from the At browser, it's going to use that origin
point to place an object. And rotate it as well. So right now, for example, the
origin point is over here. When we're using R
Z and rotating it, it's going to be rotating
with the center point. But let's say we want to have an object like
this one, for example, over here, we'd want
to ideally have this origin point be placed
in the center of this pillar. So when we're using RZ, we could have it rotate where the pillar is so that would make our lives much, much easier. Most of the modular kit parts
would also benefit greatly, especially something
like windows over here. Right now, they're centered,
but if we look from the top, this ideally needs to be placed on the very edge of the setup. And so for us to do that, what we're going to do ideally is we're going to
go onto objects, and we're going to select
transform effects origins. Once we have the selected, we can go onto an object, so for example, and we can see that we have a bit of
a different Gizmo. Again, we are using
the usual move Gizmo, but you'll notice that
we have Z NX showing up, and that means that
we're going to be now moving just origin point. And looking at this, I don't
think actually we need it for the bridge, we're
going to move it. But for something like
a barrel, ideally, we'd want it to be placed
well, at the bottom. So what's nice about
this is that we can use this together with
Snap to surface. We're going to make use
out of the face nearest. That way it locks in
to the right axis. If we were to use face project, it would not give us
the right well, setup. And by that mean it would
slide off the origin point. What we want is when we have it selected with the face nearest, and we can just click
GST and move it down with the mouse hovering
over the plane like so. So that you see it snaps to the base of this
plane, basically. So we can do some
similar for crate. For crate, we can keep it
as the center because if we want to rotate it 90
degrees and objects, it's actually quite
nice to have it, so bag would
potentially be lower. I am going to lower
this down as well. If we want to have more control, we can just turn
off the snapping and we can just
move it manually. I'm going to make it just slightly inside of the
mesh just a little bit, so it would actually look like it's part of another mesh
when we're placing it, it just makes our lives
a little bit easier. This for sure, we need
to just move GST and oh, let's make sure the snapping
is then. There we go. And this as well. So all of these little parts, it's going to be so much
nicer once we move it down if we want to move it upwards in
terms of the location, just make sure to turn off
the affecting origins, then move it without
the snapping, a little bit above like so, and then we can turn this back on the snapping back on and GZ and GZ there we go. Just nap down nicely. It is attached with
light over here, but we're not
worried about light because it's a separate item, we're going to place a
light source individually. We don't really need to worry
about the location of this, since we're not going
to be importing them. This part over here,
we can move it down. So it's actually floating. So what I'm going to do is, I will show you an
alternative way of placing the origin points in case you want to
have more control. But it's a little bit slower, but if it so we can select, for example, two edges, like so. Once we have two edges selected, you'll notice that the
Gizmo now is centered because we are
using median point. And then we can use ShiftinS
and cursor to select it. There we go. It's
going to place it right underneath, right
where it's supposed to. Then we can go on
to object mode. We can use right click
and use set origin to re decursor and that
right away just places it nicely in
exactly perfect setup. But that's quite
nice. Next up is this little lantern,
which I just noticed, we missed out the
vases or these, so I'm just going to
quicklyelect it, invert it. And this part over here, is not right, so I'm going to
go ahead and just manually select these parts and
just fix it up manually. I believe it was giving
us issue because we still have the bevel option
turned on over here. So if we were to, for example, apply the bubble, we wouldn't
have that same issue, but we can just manually fix it. It's right. So going back to this,
transform enabled, I don't think we need
snapping for this one, so we can just move this nicely
upwards with this point. Lovely. All right. So this is done, this is done. This points we can
just move it as well, so with a very edge. Nice. Afterwards, these parts can be a little bit
tedious, but honestly, doing this gives you a lot of
practice with optimization, and I think it's a
nice little exercise. So this part can go into the ground if I have
the snapping th. There we go. Said, so it would snap right through the base. No. It's one. Well, they all good. So the main parts are
mainly the ones with pillars that I'm worried
about and walls as well. Well, and doors, actually. Doors are also quite important. I'm going to make sure that
this is off from the ground. I have a little bit of a
gap because when placing, we're going to have this nice floating gap above the door, which I think is
going to be quite right, quite nice, actually. If you want to make
the door openable, I would recommend
these doors to have it on the edge or these
origin points. On the edge over here. And I just realized
that these handles need to be now properly,
well, applied. So for this particular setup, because the beveling might be a little bit different as
you can see over here, it is ideal that we were to just simply combine
these meshes. So let's go ahead and
select these doors. We can actually select
all of the doors and use Object convert to mesh. When we're using
that, it's going to well apply all the
modifiers required. Reason we're doing this is to make sure that the modifiers, smooth modifiers over here and sharper modifiers over here
would be left as the same. If we were to join these
objects right away, those modifiers would just be one value, so we
don't want this. Anyways, we can go
ahead and select it, use Control J to make them join, and now we have it
as just one mesh. This part can be done
as well, like that. And yeah, putting it on
the side would allow us to make them rotate as
normal doors, which is nice. That's a good practice. We're not going
to make them open because we are not going
to work on the interior, but it's just a nice little practice,
and then afterwards, we can use the napping GSD, put them onto the ground. And just like that, we got
ourselves a nice little setup. So if I was to try it, you can see it like open
and close and yeah, nice little practice
for module kit, especially it's super good. Now, these parts, I'm always
compliced about them, whether or not I want them to be origin point on the
center or at the bottom. If we had origin
point at the bottom, scaling them using S
Z would allow us to, well, scale it in one direction. Sometimes it's
very, very useful. But on our side, rotating them around when their origin
point is not centered. Sometimes be conflicting. But honestly, I think
it's okay to leave demise is next up, Windows. Let's go ahead and have a look. All we need to do is
just click seven and go on to options, origins, and just move them
a little bit to the back. Like, so when we're placing it, you need to make sure the
snapping is turned off. There we go. Lovely.
And this one over here. You know, these lines, extruded lines from
the gizmo really help. So the red line that we're
seeing over here actually allows us to align it properly
to the edge of the window. So what we want is not
completely out of it. We don't want them
to be like this because those gaps
would be visible. If we put them just
a little bit inside, like so when we're attaching
the window to the wall, it's going to be looking
very, very nice. So these parts, again, snapping, go ahead and just Nup and snop. So the rest is fine. This, I'm going to
leave it as is because, well, firstly, we want them to be inside of the
terrain a little bit. And secondly, we're not sure if we want them
to go up and down, we'll have to
manually put them in. The tools, we're not
using them as tools. They're completely okay
with being centered. Then this, we put
it in the center. This, we can also
put it at the base. That's fine. That's
fine. Now, the roofs. Yeah, the roofs would be nicer if they would just have it. The grounded setup. This one over here,
I think I'll just keep it as is because, well, we can just put it as
attachments and whatnot. So it's quite nice. And just
finalizing couple of parts. Like, so now the walls are
going to be quite simple. These parts over here, let's not forget about
these little parts. And it doesn't seem like it's getting the UVs that we
want from the modifier. I'm just going to real quick use SmartUVPject, and there we go. Nice little setup. In terms of their origin points, we can just select them all, set origin point to geometry, perfectly centered for
every single slab. Very nice for us. And then
next s is these parts, but they are not going to
have it at the bottom. So what's the easiest
way for these? Well, we could make a
little bit different way. We could go and
isolate these objects. We could turn the what's it called the
snapping turned off, and we can just put
it at the base. Alternatively, we can select in edit mode one of the faces
in the center bottom. You shift ans cursor to active and then
origin 23d cursor, which is always, always nice. So these ways would work. I think I can also just select these front walls just to make my life a
little bit easier. Always looking for faster way. It's always good. Then we
can isolate everything. We can click one,
and then we can just manually do the work for them. So putting it in, like, so not looking for perfection,
but it's still quite nice. Also, we could maybe
use a grid snapping because I noticed that
the grid is quite nice. So maybe using a grid would
be pretty good for us. So let's go ahead
and snap the grid. You said, and there we go. You said, there we go. You said, and there we go. Oh, snapping does make
it super nice, actually. I'm going to click seven to
go to the top down view. Turn off the snapping at
this point or actually back on because I just
realize the grid is also white centered, so we can just move it like so, move it, like so, and like so. Nice and simple little bit of basically orientation
to be at the bottom, but centered, and there we
go. You can now click seven. Sorry, go out of isolation mode. Can now select these parts
over here and go back into isolation mode by hitting
that slash or dash key. And let's go ahead
and click one. Select these parts, again, grid. And you love when parts are set up with the grid makes our lives so much easier
with a lot of the stuff. As you can see, it's
just so much faster. Go between them bomb bom, and we are almost done. So these kind of things, again, a little bit
tedious perhaps, but once you have them set up, it's, so much nicer
to work with. I can actually select
all of them at once because they're
nicely positioned, and I can just nap
it all at once. Again, looking for faster
always good because it can be a little bit confusing
or chaotic at times, but I do enjoy the process, and that is pretty
much it, I believe. So there you have it. In the next lesson, we're
going to be able to start working with GLB exports. So thank you so
much for watching, and I will be seeing
you in a bit.
111. Exporting Blender Assets to Unreal with glTF 2: Hello and welcome back over to Haunted Street Environment, Blender on Reel Engine five. In the last lesson,
we went ahead and set ourselves up with some
lovely origin points. We still have a
couple of them left, so I'll just go ahead
and do them right away. We just select all
of them at once, just like we did with
the walls and click GZ, move them down until
we touch the base. But it seems like it's not going to work quite as
well as I hoped for. I'm going to turn off
the snapping tool, kind of manually
reposition them. But this one I can
just go throw top you and position so
click GST to move upwards and just play around with the positioning until we get it to a reasonable setup. Alright, now that we
are done with that, we can go ahead and
export everything out. So first things first, I'm going to locate
where these platforms are just going to make sure they're hidden out of the way. And we have everything
including the items. The lanterns are
separate. That's good. We also have a human
scale over here, these Shada bowls,
which are just going to help us import
all the materials. And I also have these huts. If you we're working
from the start. Don't worry about
them because we'll have a chance to rate
them in a real engine. Alright, let's go ahead and
make a selection like so. We're going to go
on to File, Export, and we are going to
export GLB GLTF. So first things first,
what's the difference? Well, on the right hand
side, we have format option. We have GLB, and then GLTF
plus Bin plus textures. If we were to select this, it
would basically allow us to export all the texture
items all at once. But GLB file, this
one over here, will allow us to export
everything including the textures materials
into just one file. So it makes it more
convenient but less not as easy to
adjust it or whatnot. So once we have that, we can go ahead
and go to include. We include only the selected
items, which is good. Then in Transform
panel, Y is up. Because it's the standard setup. And then the rest is going to be we're going to
include UVs normals. We're going to apply
the modifiers, so that's going to apply
the bevels that we have, and the rest will be right. Vertex color by default
should be just as is. So this is the default setup. Materials we're going
to export as is, image quality, you could
put it to I hundred. Honestly, 75 is going to give you the
right type of setup, so I usually don't touch that. And then shape keys. We're not really using shape
keys, we can turn that off, and we have rest
position, armature. Again, we're not really using that. We can leave it as it is. We don't even have
to turn it off because technically,
we don't have it. Skinning, we can just
turn that off as well. Lighting, we're not going
to be using lighting, compression, we don't
need to worry about that. Animation, we can turn off because we have no
animation in these ones. And once we're
done with that, we can go all the way to the top. We can click on a plus symbol
over here and we can call this Export GLB mesh only. So it's going to give us a
nice preset whenever we want. We can now click on
this and allow us to export these files
with the right setup. So afterwards, just make sure
you have the right naming. So me just having
it so will be good. I can go ahead and
click Export GLTF and then it'll take some time for
everything to be exported. After you're done, you
should have yourself a file that's called what
you named it dot GLB. You see that it has
300 megabytes in size, so that should work quite well. If by some reason it doesn't
attach the materials, you should be able to fix that up by just making sure
that this is ticked on. You can try taking
it off and back on, and this hopefully
should fix that. The other thing is
now that you have an entire file of all the items, whether it's just a
modular kit items or the houses as well. If you have all of
it, if you have an issue when in a real engine and you
need to fix something up. So let's say we want
to make sure that, well, this smo for some reason, might
be a little bit off. We can just slightly
readjust it maybe. And let's say there was well, shape that was not quite right
or something of that sort, we could go into it, edit, make some adjustments
out of that. And once we are happy
with the adjustments, we would simply have
to just select it all. We would have to
go to File Export, GLB again, reuse
that same preset, and we could save it over. I would recommend you, though. You perhaps make a
copy out of this. So if you just make a copy
paste out of this file, that could prevent you
some potential issues. But the reason we want to save this from here is because
in Unreal Engine, you can right click
on an asset or an item and you can
select a reimport option. And that would
give you basically reimport that specific
part from this GLB file. The other thing that
I'd like to mention is that once you are importing
it into Unreal Engine, you'll see that the
naming is a little bit off with Unreal
Engine, unfortunately. Because it's not using
the main item file name. So for example, this one
is free DT House, 0.002. But it's not actually
using this name. It's going to be using this
name, the mesh itself. So if you'd like, you
could rename it over here. But honestly, the
functionality for Unreal Engine shouldn't
work like that. It should realistically save the file name based on the
name of this hierarchy. If you, for example, tried to import this GLB file
into a new Blender file, you will see that
the naming would be exactly the same
as it should be. So I believe that it's something to do with the
Unreal Engine itself. I will show you how
to quickly set up the naming in a real
engine as well, though, so you don't have
to worry about that. And yeah, all in all,
that's pretty much it. If you have some
small minor issues, I would like to
point out that we will learn how to
make adjustments in real engine as well. There is an option for modeling
in the program itself, but it's just useful to know that you can reimport
some of those items. Make sure, for example, maybe the density of the
mesh is not there. You can fix that by just
reimporting it through the file. So, yeah, that's going
to be it for me. Thank you so much
for watching, and I will be seeing you in a bit.
112. Introducing Unreal Engine 5 Basic: Hello, and welcome, everyone to the Introductionary lesson
for Unreal Engine 5. In case you're wondering
what this project is, you don't have to
get it yourself, but we're going to quickly skim through it just to
familiarize yourself with it. Once you open yourself up with Unreal Engine 5.7 Launcher, 5.7 up, you can go on to getting started tab
on the left hand side, and you'll see yourself
introduction to Unreal Engine. Project. So this is
where we are at. On the left hand side, you
will see that you have a documentation of every one of those stages for the level. Feel free to go through it. It gives you a good familiarity
with the software itself. We're not going to go through
the entire level, though. We just need to make sure
that we have the basics down. So I'm going to move this off to the site because we
don't really need it. And the first things first is that controls for
the viewport itself. We have a window in the
middle of the real engine. We can use our right mouse, holding a right
mouse and moving it around will allow us to
move it in the viewport. Then we can use whilst holding the right mouse WASD
to move it around. We can use Q and E to
move it up and down. And then at the top,
you'll see that we also have control for
the camera speed. So here, if we were
to set this to ten, we'll have a much faster type
of motion for the camera. So you can also control
this by the way, whilst holding the
right mouse button using your mouse wheel. So if I was to scroll up, you can see it moving upwards. If I was to scroll down, while holding the
right mouse button, we'll see it going down. And that way, we can control how fast or how slow
we want it to go. Just like that, I recommend you practicing a
little bit with that. Step, we have Play
button at the top, so this will allow you to
simulate the level if you don't want to use the
game mode provided. So right now we are
in first person. If you don't want
this, what you can do alternatively to simulate the level and all of its like Blueprint
animations or whatnot, you can just click on these
free dots and click Simulate. That way, you'll get all
of the necessary items. So for example, over here,
these parts were moving. If we didn't have
that, simulated, you wouldn't see it only in play mode or simulation mode.
You'll be able to see it. But yeah, simulation
will allow you to keep that same viewport as you
have with the editor, but it will simulate all
of the items in the scene, which is pretty nifty to know. Next up, we have move
rotate and scale. So for these, we have W to move. You can see the gizmo over here. We have XY z axis for
each one of the arrows, so we can move it
up down forwards, backwards and left and right. And we can use these
triangles in between to kind of get it to be locked
up between the two axes. So for example, we're using
this square over here, we can move it so it
wouldn't go back. We can also use
this.in the middle, which is going to be based on
the angle of your camera to move the items around
so you can see if I was to move it from this position, we're going to move it to
the sides and whatnot. That is something worth noting. Next up, we have
rotation, so clicking E, we'll be able to switch
between those options like so, and we are able to rotate it. If you're struggling
with rotation or motion and it's snappy, just double check your
grid lock option. So over here at the top,
we have a grid lock. If I was to disable
both of them, we can rotate it without the
control of the snappiness. So that's sometimes
worth knowing. So right now, it's
snapping between ten. We can change it
between 45 and now it's going to snap only
between 45 degrees. Then for this grid
motion over here, if I was to change
it between 50, we can move it in
the grid of 50. Uh, the other thing is scale. Scale is going to be just button or this option over here, which will allow us to, well, scale the object up and down. And what I'd like to mention
in this section as well is that we also have option for
local space coordinates. This will change how
the orientation of the Gizmo is for
move and rotate. Scale by default, will
only have local space. So if I was to select
move, for example, you'll notice that the Gizmo,
being positioned like this. But if we want to move
this object or rotate it based on the axis
of the object itself, we could change this
to a different option and then move it like so, and now we're able
to move it based on the already setup rotation. The same for rotation
as well a movement. Next, what I'd like to mention
is about contact browser. If I was to click
Control and space, we're able to get a pop up. Using control and space
is pretty useful, but sometimes you want to dock
it into your view itself. You can use this button
over here to dock it onto the viewboard
and that way, you'll get yourself a tab
right in your settings. And then we can afterwards, use this closed button
over here to close it. And if we want to get it back, we can either use Control space
or this button over here. And again, we can dock it
back like we had before. On the left hand side,
we'll have folders. Make sure you click on
the content folder to have the user
content folder open. And if you're not
seeing the right setup, it might be because
filters are enabled. If one of the filters is
enabled, for example, it'll show everything that's
inside of the folder itself. So you can either make sure that you have it
disabled or you can just reset filters over here in the management tab and that'll
just turn everything off. So that's a little bit
of a useful information. And finally, what I'd
like to talk about is the details panel on
the right hand side. Details stab on a side, we can see it's going to be based on the
selection of an item. So make sure you
have the right item selected in order
to see some things. The other thing is that once
we have an item selected, it might be that you might not be able to see
an entire setup. So for example, over here,
this is set as a static item, but you can a collision items. So it might be that even
though the item is selected, you might need to select
onto the item that's attached to the item
in the world level. Above it, we also have outliner. You can play around with it
and select different items. For example, if something is getting in the
way of selection. So for example, we want to
select something that's behind this little ramp. We can click H to hide the item. You can see on the outliner, we have an eye closed. We can click this eye back on, or we can use Control at
H to unhide everything. So if something like
that happens to you, just make sure to click Control at H and unhide everything, so you'd be seeing
what's in your world. And that is pretty much it. We covered the basics,
so hopefully now you'll be able to be up to speed and be able to follow along with the
rest of the lessons. Thank you so much
for watching, and I will be seeing you in a bit.
113. Importing GLB Files into Unreal Engine : Hello. Welcome back around to
Haunted Street environment, Blender to Unreal Engine 5. In the last lesson,
we ended up going over some Unreal Engine basics. Now we're going to be opening ourselves up with the project. So within the Resource Pack, you'll find yourself Unreal
Engine 5 Spooky Village, and within it, you'll
find this file over here. Before opening it up,
just make sure that in Epic games Launcher
for Unreal Engine, you have the version
5.7 or higher. And once you have that, you'll be able to
double click on this within the Resource pack and open it up
with that version. So after you open it up, you'll have a couple
of folders which we're going to go through
within the course. We are going to start
off by just going to file and clicking on New
level, selecting Basic. So this will give you a level that has a default lighting,
a nice little platform, and this place will
allow us to check and test our imports
of GLB files. Previously, we exported
ourselves a GLB file over here. So we're going to
make use out of it. I'm going to open up
a content browser, and I'm going to dog this
in because it makes it a little bit easier
for me to show. So afterwards, we are going to import it
into our content. Now, with previous versions, so all I'm doing right
now is clicking and holding it and dragging it
into the content browser, this GLB file, so, and it's going to pop up with
an import content window. The first thing that we want
to do is make sure that we have use source name
for asset turned on. Though, for some reason,
with this version, it goes directly
into the mesh name, which shouldn't okay, we're going to rename
it afterwards. Next up is a scene
name subfolder. So this one will create a folder basically for the GLB file, so it won't be just
scattered all over our content folder and
afterwards, asset type subfolder. So this will create static
meshes, materials and whatnot. All of that good stuff
just kind of help us break down all of the types, what we're importing
into their own folders. And then we're going to keep the translation as
normal offset rotation. We don't need to do that
because we selected Y being up, which is the standard
for GLB format, that's going to be
nicely converted. Even though a Z value is being
upwards and unreal engine, that gets automatically sorted. So afterwards, we're going to keep auto detect mesh types, although we just have static
meshes, okay? Bake meshes. That is something that we
are going to tick off, and the reason for that
is because then it will allow us to use
bake pivot meshes. But this will basically use the pivot meshes
that we already have and make sure that every asset will
have their own pivots. That's quite nice. Vertex
color is going to be right, by default should be
black, so that's good. Then we open up build. We're going to
recompute to tangents, make sure that there's no
issues with the face normals, and we're going to use mixed
t space, which is okay. Then afterwards, the
rest should be okay. It should be no degenerates, meaning that sometimes there's
some issues with vertices, for example, floating
and whatnot. So edges or something
of that sort. If you are having an issue, turning this on might help. And afterwards, import static
meshes should be good. Collision for
collision, we are going to generate a simplified
version of collision. So this will basically just
create the most basic type. It's quite cheap to generate, but at the same time,
it's good for us. You have something like that. In terms of build, we are
going to turn off nanite, so this will allow us to use the vertex painting with
our meshes properly. Otherwise, there
might be some issues. We could turn on
generate light map UVs, but we're using Lumen lighting, so we don't really
need to use that, so that's okay, and have a look. The rest should be
quite all right. Let's just go all of
them together and Yeah, there's nothing else that we
realistically need to do. Well, the textures, let's make sure we have them imported. The text normals should be
on by default, as well. In terms of flipping
normal map green channel, we are using something
called direct X normals, so it should be quite right. And also, if there is an
issue with a normal map, we can always just flip it
within the texture itself, so that's quite okay, which we're going to be checking
through, basically. So all is good in that
regard. We can leave it off. And that is pretty much it. Once we have this setup, we can go ahead
and click Import. And then it's going
to take some time. You can see at the bottom right hand
corner being imported. Then there's some
issues with the Import. Let's have a look. It's
just some naming issue, but it seems like it's
going to be okay. So that is okay. And yeah, once we have that, we can just go ahead and
click on this button for the saved assets to make
sure we save everything. And that's going to
make sure that it saves all of the
imports, just like that. And then we can go ahead
and go onto our level. We can hit Control and S to save it since we created it just now and call this level
scene, that's right. There we go. We got
ourselves a level. And now whenever we
open up a project, we'll just need to
double click on this and get into our level. So next step is going to be checking whether or not the static measures are
going to be all right. So if you do find some issues, you can see we have houses, for example, we have
all the nice items. If you have some issues with the items I showed
you previously, you can basically re export your GLB file
with all the items and then right
click on an item in Unreal Engine and use a
reimport button over here. That will give you an update to the file if there
are some issues. Next up is going to be renaming. Unfortunately, ah,
they are using you see the names of the mesh as I previously
mentioned in Blender. So the easiest fix for Saras would be to just
click on a house, for example, and we
can call it house one. And then house two and
find other one free. And I'm just going
to firstly fix up the houses with the
rest will be a little bit easier since we can
do them all at once. But with the house, I'd
like to manually find them, so there wouldn't be any issues. And there should be
one more, there we go, House six. Alright. This next part will just simply require us to rename
them all at once. With the new Unreal Engine, you're able to rename
them quite easily. I'm just going to go
ahead and select them all and then go
back to the houses, hold control, and
deselect the houses. Like so. And I'm going to
deselect the human as well. Afterwards, we can click. We can go to Batch Rename and we can have an
option to rename. So we can remove the prefixes. We can add new prefixes over here, all of that good stuff. And we can also rename. So for example, we can
just call it asset. So. And if we do auto increment, we'll see that basically add number to every
single one of the assets, so we numbize them
all like that. And that is pretty much it. We don't really need
to do anything else. We can just click on Apply, and that will sort out our
assets with some naming. There we go. Next up, I'm just going
to go ahead and move all of the items just to see how
they look onto the platform. And this will also prepare us for the vertex
painting as well, in case if you want to build
the houses from scratch. So let me just go
ahead and firstly, move this platform
off to the side since that's going to be where
the landscape will be. I'm just going to move it
off to the side, though. And I'm going to make the scale a little bit larger than that. So let's make it, I think 30 by 30 will do. And I'm going to move
it even further. The location would be, let's put it at 60,000. Something like that. There
we go. So now it's going to be completely off the
side from artery, and we can place our items
just to see how they look. So yeah, let's go ahead
and just do it one by one. And also another
thing that we can do is we can make sure that we have a grid turned on, 30 to 100. That way, when we place items, we can just have
it nicely placed So one by one, I'm
just placing them and also checking how
they turned out to be checking if there's
no inverted pass that we went over
in case we missed, that there are no
non manifold meshes or anything of that sort that ended up breaking
some of those meshes. Just making sure that
everything is nicely set. And I'm also just trying to
put the items in one area. So, for example, the
roofs will be in one section and everything
else will be in another. The walls would also be in
their own section as well. This time, as you saw, it slightly froze
in unreal engine and duplicated the mesh because
I pulled it out too fast. In case that
happens, we can just delete it and move forward. And it just one by one. We didn't adjust the orchid
points of the chimneys, but I think that's
alright because in every single location of
the roof of the rooftop, we would have to adjust that. And just one by one. Are able to move it like so. And you know what
to make it easier, I'm going to drag this out, make this a little bit larger, and I can use control and
just move my mouse like so, and that will make it smaller. So just using control
and mouse wheel, we can make the smaller
and then drag it out. So anyways, this is
where we left off. So go ahead and just
continue on with this. Again, rag that out
too quick. Right? If you're trying to prevent
maybe those freezes, we could potentially
go to lit mode, and that would make sure
that performance is higher. So. And it's a little bit
tedious, but honestly, I think it's worth it
because we're able to tell which object requires what if it needs fixing or not, it's better to do those kind of steps now rather than later. The props over here. We have our graveyard places as well. These are the slabs that
we're going to use for the entrance or for the street. And here are the walls. So the walls, I'm going to
put it off on this side. No. I'm giving some space. So when we're doing
vertex painting, we're able to quickly
just paint them in. These are the outer walls. I think you can just
move them up like so. Again, for vertex painting,
leaving some gap. Although it's okay if we don't, we can always hide them
away using letter H. Clicking on an eyeball in the
outlier, move away, right? And I think that's
it. Actually, yeah, these are preview spheres. We don't need them. The houses, if you have imported, feel free to also plug
them in to check. I'll be right,
though. There we go. All of the lovely houses. Alright, so that's
going to be it for me. Thank you so much
for watching, and I will be seeing you in a bit.
114. Procedural Mountains with Landmass Blueprint Brushe: Hello and welcome back everyone to Haunted Street environment, blended to Real Engine five. Now that we have all
of the assets placed, and we're able to
have a look at it, we can see that all is okay in terms of
the mesh integrity. If you don't have that,
make sure to just reimport it once you
fix up the GLB file. And afterwards, we are going to now go ahead and start
with the landscape. So we're going to start
off by just creating ourselves a landscape
within a landscape mode. We are going to only
use a couple of blocks. We don't need any more than that, to be honest
for this case. Otherwise, it's a little bit too big for what
we're trying to do. So it's not really needed. So instead of eight by eight, we're just going to do one
by two or sorry, two by one. There we go. So it's going to go in a straight and nice align. Then afterwards,
we're just going to simply keep it as is. We're going to make sure
that it creates a new. And I'm going to double check if everything is right with
this seems to be okay. And yeah, let's go
ahead and create it. After we create, we
have some options. We have ability to use the
sculpting tab this time. We can also go back to manage which we are going to do because we
need to use Blueprint. In order for us to make
use out of a Blueprint, we are going to
go to the plugins and we're going to enable mass. So would that be
landmass? There we go. That's the one
we're looking for. We're going to make
sure we enable it, and then afterwards,
it's going to ask us to restart the project. Let's
go ahead and do that. There we go. And afterwards, we'll be able to go back
onto our on tenth scene. There we go. Get back to our landscape and
use the landscape mode. But now we're able to go
back on to manage Blueprint, and we're going to be
able to select the brush. The brush that we're
going to use is going to be called
custom Bush Landmass. This one will allow us
to if we select it. It will allow us to
create a curve point that will essentially help us create mountains
in the scene. If I was to just
tap on the scene, we're going to see
those free points, and it's going to give us this bizarre extreme
type of look. The reason being is that now that we created
ourselves this setup, it's going to be entirely
through the detail tap. I'm just going to make
it a little bit bigger, like so so we could
actually see what's going on just like that. And let's go through
the options. We're going to go ahead and go on to the fall off over here. We're going to change the
fall of angle to be ten. That way, the angle itself is not going to be as an extreme as
you can see over here. Now, it's going to give
us a slight nudge. If we were to start
increasing it, you'll see that angle of this slope will start
getting bigger and bigger. So keeping it at ten is
going to be quite right. Then for the angle width, we're going to keep the default settings, and then afterwards, we are going to go all
the way down until we find ourselves the effects. And underneath that, it
is going to be blurring, curl noise and curves, all of the magic that
we need to happen. We're going to start
off with the noise. I'm just going to make
sure that we are checking. But these options
should be right. Then afterwards, in
terms of the curves, going to check as well
that channel depth and ramp are set to 100,000. That should be the
default option. And then displacement. Displacement is an interesting one because it will allow us to get some additional
detailing out of this setup. What I mean by that
is if we were to make sure that the
displacement texture is set to texture five, so you can also just look for noise and maybe use
an alternative one, if you'd like, but tiling noise five will work quite well. Then we can play around
with the height. If we set it to 150, you'll see that
we're now getting, nice little detail out
of this little hill. That's quite nice. Then we can play around with the tiling. So the tiling, the larger it is, the smaller the detail
will be in this setup. We need to be at level
free or the tiling free. That's going to give us
a nice little setup. And then we need to basically play around
with the shape itself. If we were to move this a little bit more
to the side like this, you'll notice that the shape
itself is very triangle. It's very, very inorganic. So in order to fix that, we are going to go all the
way to the top, not to the top, but to where the effect stab is on the top. And we're going to
select blurring. So blurring will allow us to essentially change
that original shape. So if we were to
set this to two, it's going to blur that
out a little bit, like so. And if, for example, I was to show it a
little bit more, you can see ten gives us this
kind of smoothing out hum. But keeping it as two with
the blur shape turned on, it's going to give us a
reasonably nice result. So afterwards, once we
have this entire setup, we can now play around
with the shape itself. We're going to go out of the landscape mode selection mode just to kind of see a little
bit more with the viewport, like so, and now we have
ourselves this little curve. So with this curve, we can
double click on the points, and you can see that now we are able to essentially
move the points around. And so with that, we're
going to be able to play around with it and set ourselves up into nice shapes. So once we have something a
little bit more reasonable, I would say something like this, and we are going to actually click off of it
and then click back on it. So that way, it selects
an entire pivot point, and we're able to
move it as a whole instead of just a single point. We need to make sure we do that. Now, I'm not seeing my
Gizmo for some reason. Going to make sure
that there we go. Going to go back on
to translate objects, select this point, there we go. And now we're able
to move it down. Also, we're able to
use E to rotate it. There you go. And just
moving it like so, we're able to get some
more unique shapes. So what we're going to do now is we're going to make
a duplicate out of this and we're going to create ourselves a nice little setup. So we are going to yeah
have these selected. After you're done with one, you can go back onto the landscape, and underneath the management, you can get yourself this back Landmass C. I
believe that's the one. And you can make
a copy out of it. So selected, hit
Control C control V, make a copy, and then you can
move this to another side. So this is going to
be the backside. I'm just looking
where the default sun is, default sun is over there. I'm just going to
use it as a base. We set ourselves up
with nice setup. Though this backside, because
the sun is over there, this backside is going to be
a little bit more um lane. We're just going to keep it as a reasonably plain
type of a look. I think that's going
to be quite right. Something like so and then and just continue making
duplicates out of the first one. The backside can be a
little bit more mountainy. So I would say we can raise this up a
little bit. There we go. Something like this, perhaps. Move it in a little bit and
play with the settings. Something alike. So I
think will be quite nice. If a little bit
too much, I would ideally prefer to be
on the other side, this kind of hill,
the longer hill. Once we have it, like so,
hold alt, and there we go. We now duplicate it like so. And make some adjustments. And afterwards, once you
have something like this, we can just make
some basic ones. We also have some additional
noise in the area. So for example, this
one, I don't want to angle the slope
to be too much, but we can just put it
to something like free, and you can see that it gives us a nice basic overall setup. The reason we're not
seeing the full slopes anymore is because this
is doing both options. So if we look at the setup, we can do a if I was
to find the option, actually, we can just
put it in search mode. There we go. We can
see that there is blend mode for Alpha blend
minimum and maximum. If we just decide
to use additive, it's basically just
going to do it for our overall overlap. If you want to
change up the shape, you can do a maximum, and that will basically just affect the base levels, like so. Doing something like
that, I think would be better for us in
this particular case, just to make sure we're
getting additional noise. And then afterwards, we can just change up for this specific
spline in the middle. Be a little bit less aggressive. So with that, I mean, the height could be set
to 50, have a look. Yeah, a little bit of nice variation. I think
that's quite right. Actually, maybe 80. I like it a little bit more. Yeah, that looks quite nice. And we can even
increase this to 3.5, just kind of have more variation in comparison to
the mountains in the and I think that
is pretty much it. So we got ourselves a
nice, lovely landscape. So now in our next lesson, we're going to make sure
that we prepare some bit more of a customization for this landscape setup so we
have some working space. So yeah, thank you so
much for watching, and I will be seeing
you in a bit.
115. Sculpting Rivers and Terrain with Landscape Edit Layer: Hello, and welcome
back around to Haunted Street Environment
blended to Real Engine five. In the last lesson, we
went ahead and added some bit of extra detail
onto our landscape plane. We're now going to
make sure we sculpt in all the necessary custom
setup or our environment. So what we're going to
do is we're going to go onto the landscape back
onto the landscape, and now we're going to
go onto the sculpt tab. And the first thing that
we're going to do is we are going to make sure we
have multiple layers. Right now, what this layer is is basically all the blueprint
brushes that we have. If we were to change
this to zero, it's going to be of nothing. So that means that all of what we have over
here is blueprints. We can even rename this layer.
We can double click on it. Or sorry, we can only
right click and click Rename and call it
Blueprints. Like so. Now we know which one is
being used for this setup. Next up is we're going
to add a new layer, and we're going to add
a basic edit layer. Like, so we're going to select. And then with this layer, we're going to be
able to sculpt. So, the main brush that we're going to use is
going to be flattened. This one over here. If I was to start flattening this out, you'll see that it gives
us a flat surface. It's actually quite important that we are going to
do that in a bit. And the reason being
is that we need to have some flat surface
for the buildings to lay. Otherwise, it's not
going to look quite as nice if there is some
humps and whatnot, but I'm going to undo
this now for now. Because what we need
to do is firstly, we need to figure out where
our river is going to go. But the way we're
going to do it is we are going to grab ourselves, our lovely where is it? There we go. Our lovely bridge
that we have at the back. We're going to make sure
that we grab the bridge, put it off onto, like, a center of the Landscape. Going to turn off the grid, it's not really relevant for us. We're going to put it
to a reasonable amount, and I'm going to make
sure it's more or less to the center of scene. Maybe a little bit
more to the right. Just a little bit,
not too much, though. We actually have completely centered piece over
here so you can see where the center is in the world in terms of
the world position. So that's quite nice. All of these little icons helps us determine where
the center is. So yeah, once we have
something like this, we are able to then just
bring it back a little bit. Yeah, this will do
quite well for us. All right, once we have
something like this, we are able to then
determine what we can do about the river. So we're going to go
back onto the landscape. We're going to make sure
that the layer is selected, and then we are going to make a brush that's more reasonable. Something like 150 would
be a good starting point. And as a starting point, we're going to use a
scalp brush, actually. So the way we use it is
using left mouse click, we are able to bring this up. To make sure that the strength is maybe a little bit higher, so we're able to see
what we're doing. You can see it going up using
shift and bringing it down. It's going to go downwards. So what we're going to
do now is we're going to just kind of sculpt
it out a little bit to see where the base
is and where we can use as a base point of the river. So the lowest I want to go for the river is going to be
somewhere around here, just a little bit underneath that because
we're going to have a plane that's going to be
for the river and whatnot. So we're just going to go just a little
bit undneath that, and we're going to go back onto the flattened brush
that we now the height, we're going to use
flattened target. Flattened target will allow us to use this
pipette over here. And if we were to click
just underneath where this bridge is we're going
to have this type of grid. You can see the grid moving with the pipette, we can click. And once we click,
it's going to lock. And with this locking, it basically shows the target of where we are able to sculpt. Now, if we're to click and hold, it's going to put
everything into this landscape on this height. Quite nice to get
yourself a bridge setup. Keep in mind that this
bridge is now straight. We're going to curve it a
little bit. In the end. We're going to make sure
we deform it a little bit. So we're going to make it just a little bit smaller
than it should be. We can then readjust
it afterwards, but we want to
make sure that the overall shape is quite nice. I'm going to make the
brush a little bit bigger. And the form that
we want to have is basically this one is going
to go a little bit straight, and then it's going to curve around in a sort of an L
shape, something like that. And that's going to give
us a nice base setup. And then afterwards, we can just play around
with the upper values. I'm just going to
make sure that it goes a little bit
more to the back. So afterwards, we just
need to make sure that these parts are
not just straight, so we can go into our
flattened target, make sure that this flattened
target is set to this part, and we're just going to
slightly tap tap, tap, make sure it's varying
in width or this area. Going to up over here, like so, and that's
going to be quite right. Realize that this is a little bit too low in
comparison to the bridge, going to bring this up, something like
this. There we go. Now, there we go. This
is perfect for us. We're going to use this
height and we're just going to bring it around a little bit. Like so. Alright for me. Some variation, like that. And additionally on top of that, you can use spoof. Spoof will allow
you to essentially delete the variance
from what we have. So, for example, over here,
if I was to click and hold, you can see that the slope
basically disappears. So with a smaller amount
of strength with 0.1, you can have some variation and the slope will look
a lot more natural. So quick taps, tap tap, kind of even the south. We have these kind of edges
over here, unfortunately, with landscape not going
to completely avoid them. So if you have too
big of slopes, you can hide them
away afterwards with some rocks and whatnot,
which we're going to do. So don't worry
about it too much. If it's not perfect. We're still going to come back to
this entire setup. But all in all, I would say, we were just to tap a
couple of times in areas. I would say that
this is pretty good. Now we can go ahead and use
a flattened tool, again, back to making sure that this is the same height or
where the bridge was. Yep, seems to be right. We're going to flatten
the area over here for the buildings and some
part in the back as well, again, for the buildings. So just a little
bit, not too much. We can come back to
it if we want to. We have ourselves nice
plane to work with. And this places as well
in the back. There we go. Since we're going
to have ourselves a nice clock tower
for this area. I'm actually quite happy
with the way it turned out, and landscape is a very nice
and optimized mesh setup. It uses essentially height
values to go up and down. And based on the
distance of your camera, you're going to have
more or less detail. So that's why some
shadows, for example, you can see them whirling around a little bit because
the mesh is deforming. Also preview the
match, by the way, if you go to WY frame mode
and you can see how it works. So when you get close enough,
going to look like this, but once you get
further, it's going to look a lot junkier. Quite an interesting
little knowledge to know. All right, so that's
going to be it for me. Thank you so
much for watching. And in the next lesson, we're going to well, continue
on with the environment. So I'll be seeing in a bit.
116. Building the Clock Tower Base and Fixing Normal Map: Aon we'll come back everyone to Haunted Street environment, blend it to real Engine five. In the last lesson, we set ourselves up with
this lovely setup. Now we're going to make sure
we start building the place. So first things first, what we're going to
do is we are going to start by getting
ourselves a simple cube. And the reason for that
is because I want to make sure that the main
building that we're creating, which is the clock tower, going
to be in the same height. So let's just go ahead
and grab the cube and change the scale to 15. Then afterwards, we
can move this cube, which is not a cube anymore
off to the side and hit. This way, it just
positions it right at the base of our landscape. And then we're going to
move it off onto the side, like in this area over here. Reason for that
is simply because we want to make
sure that we have some general scale
relevance in terms of how long or how big
we're making this building. And this is our main MAX side. So we're not going to
have any issues or any differences in terms of the main silhouette
that we're going to have. So yeah, even though
we have a human scale, I think that's a little bit
better of a nice start. Next step is we are going to find ourselves
the modular kit, static meshes, and
we're going to start building so the
ones that we want, I'm just going to dock
this inside of a set up, like so we're going
to make a little bit of an extra space because we
don't need this on the side. We have plenty of
things to work with. And we're going to start off
by just creating some walls. Just notice that the shadow of this cube is going this way, meaning that the source of
light is in this direction. So we're going to
actually move it to the outside because
the clock tower, we'd like it to have
it on this side. So after we move it, we're
going to start building it up. We don't really care
about location at this particular point
because we'll be able to move the entire
building around. Don't worry about the
positioning too much. What we're going
to start is with we are going to start
with static meshes. Let's just go into the static
meshes that we imported. And we are going to
begin with this wall. Once we import this wall, we'll notice, well,
there is a slight issue. The direction of the normals
are not facing the light. So where we are having
some darker areas, it should be lighter
and vice versa. And the reason for
that is, well, as I said previously, there's sometimes an issue with direct X and
OpenGL compatibility. In Blender, it uses OpenGL in real engine,
it uses direct X, and I think this and bridge are the only two areas where it's needed to be fixed. The rest is going
to be quite right. Let's go ahead and do that.
So let's select this. Let's locate the bricks material by double clicking
on it, like so. And we are going to find in
this section for details. It's a pretty nice little setup. Once you import GLB, it basically creates
this type of material for you,
which is very nice. We're going to find
ourselves normals. We can double click
on it, and we can click on the normals as well. Then this is the texture
that was important. We can find flip
flip green channel, and we can just antique that. But that's going to give us
the right setup There you go. You can see like that. And next up is just
this bridge over here. We're going to
select this bridge. We're going to double
click on the cobblestone, and it should be the same one. So I think it's going
to be quite right, though, there we go. Now you can see
it's a bit better. So before, you can see the
light source coming this way and it doesn't look quite
as right and after much, much better, just like that. And there are some options
which we can go through later to adjust the intensity
of normals and whatnot, but let's not get
ahead of ourselves. Right now we have this wall. I'm going to change the
rotation back to original, and we are going to start by building ourselves
a simple cube. So let's go ahead and make a duplicate of the
upside, like so. At this point, we could
also have a grid. Actually, that would be better. This way, going to give us
more in uniform type of setup. That way, we're able to create something like this
straight off the bat. So that's already
looking quite nice. The next step that I want to do is to make sure
that the width is proper because the main
thing that's going to determine the width is going to be this clock
tower over here. Once we import it,
you can see that, A, maybe it needs some
slight bit of adjustment. So although it's better to start building
from the bottom up, this Art is going to be
definitely needed to be checked. So in this case, what we can do is we
can slightly adjust it. We can slightly move this
off to the side. Like so. And even though we're
going to have some gaps, don't worry about it
because we are going to fix that with our timber. But even so, I would say that we can select these
parts over here. We can just extend them just a little bit without snapping on. That way we are just making sure that no gap is
going to be there, even though we
slightly squished it, the material, the texture. This type of texture is not
going to be quite as visible. You're not going
to be able to tell apart this from the side. It's, I think, quite right. Next up is going to be
adding these timber parts. Let's go ahead and check
which ones we need. So this long one for sure, and there should be another
long one, actually. Nope, we just have
shorter and shorter one. So we're just going
to use this one. Alright, so we are going to now make them a
little bit bigger, just like that, and they're going to look
nice and sturdy. I'm also going to move
this clock tower out of the way for now because we
don't need it at the moment. So let's go ahead and just
simply rate something like so. This, I think, can be moved to this area over
here and this honestly, can be slightly repositioned
better fit the system. And then afterwards,
we can just select these lumber parts and
move it to the outside. Then we got ourselves
a basic little setup, which is going to
look lovely once we make sure that there's
no gaps on there we go. Nice little setup, like so. Okay. Afterwards,
the next section, the next stage is going to be made out of more of
a concrete type of setup instead of a stone
wall type stone slabs. Or bricks, we are going to find ourselves a type of walls. So let's see which one would fit better in terms of the size. I think this one
would be quite right, but we can get maybe this one. I'm checking which one
is the tallest one because I want the biggest
one, there you go. That's the one
we're looking for, and now we're going to be able to adjust it properly into
its size. There we go. Building it in. So another thing that we need to consider is how this is going to be
attached to the house, and this is realistically
going to be partially visible. So I think this side is
going to be less visible, so we don't need to
worry about it too much. And we can just make sure that the overall shape and
setup is nicely set up. Gaps are going to be not
visible basically on this part. So I'm not too worried
about it, actually. All right, so this
over here is going to be build with,
again, the lumber. We can go ahead and select
these lumbar parts, and we can just use old and move it
upwards, just like that. Make sure that they are unique. I'm going to rotate
them by 90 degrees, one to one side, and a
one to another side. And this one to
the side as well. And this one can stay.
I think that's right. Okay, so yeah, the backside
is the most important part. It's going to make sure
it looks quite right. We are going to get ourselves a nice little wooden section in the middle. I think
this one is right. We can just rotate it and think extending it instead of scaling it because we want to
keep the thinness. We want the horizontal beams
to be a little bit more fin than the ones
go in vertically. So I think this is
going to be quite nice. Just going to make sure that it goes a little bit more inwards. Like so. Then afterwards, just this go a little bit
more back. There we go. So the underneath is going to have a little bit
more breathing room, and just move this
to the up side. But this part is too far off. I'm going to bring
this in quite a bit. So we have a little
bit more of a set up. Not worried about
the gap over here. We can always fix
it because this is going to be inside
of a building, but even so I think
that's quite right. This part I am not
too worried about. So let's go ahead and
just make sure that we have nice beams, Jess case. So I think that's quite right. We can leave it as it is, and
then come back afterwards once we build out
the entire building. We don't need to
worry about that. Next step is, I'm
just going to make sure that the height
is properly set up. So this is the top
of the clock tower. We still have ourselves a
lovely cube in the back. So we can grab this with
the top of the building. So this is for a clock
tower going to work very nice and lovely
for this scene. Let's just position it properly. Once we have it centered, can raise it up a little bit. Bumping like that, and
there you have it. G to move it a little
bit to the side like. And I think well to the
oversight, a little bit as well. There we go. Nice little setup. We're keeping that
junkiness as well, so we don't have to be
perfectly centered, so we can be a little bit
more playful with that. All right. Afterwards, we can go ahead and hold shift,
select both of them, move it all the way to the top, and then we can determine
how high we want this to be. So we're just going to make
sure that this is basically just kind of touching
the tip of the cube, and then we're going
to position it off onto the side,
just like that. So we have a little bit
of a gap over here. We're going to fix
that in a bit, but we are running out of time, so I reckon we're going to
do that in the next lesson. Thank you so much
for watching, and I will be seeing you in a bit.
117. Scaling and Aligning Tower Structure with Local Axe: Hello and welcome back, everyone to Haunted Street Environment. Blended to Real engine five. In the last lesson, we
left ourselves off with this partially complete
type of a tower. We're going to make sure
we add enough detail, but firstly, let's think about what we can do about this gap. We could firstly
just think about it and connect some sort
of a shorter wall. Something like this,
perhaps you could add it in and make the gap very small. But I think for this
particular case, it would be a little
bit too small. So what we're going
to do instead is we are going
to at this point, attach this tower onto this section around the section. I think it's quite right. Then next up is we're going
to grab all of these parts, and we are going to
just drag them upwards. So that way, we're going to have ourselves this part
nicely connected. And the other part is that I'd really like
this bottom part to be a little bit short in comparison to these parts,
so we can have that. And we are also going to squish them down because they are in the same location as in the same rotation
with the Z axis, they're all going to be
nicely scaled downwards. That's key. If this
part, for example, was rotated 90 degrees to this side and we had multiple
walls selected, let's say, we could then scale it, but this part would not scale in the right direction
because the scaling is based on a local axis. So this is something
worth knowing because it can be a
little bit tedious. That's why when rotating
something like walls, it's easier to just rotate
them around on its own axis. And then it makes life
life a little bit easier. And yeah, let's go ahead and
move it all the way inside. I think that's quite alright. I just would like to maybe move this a little bit to
the side. There we go. And this part I
am worried about. So I am looking around because this part is going to be
more exposed in comparison. So now we have a part at the bottom.
What can we do about it? Well, we can wrap ourselves
one of the walls. I'm going to check
this type of wall, actually, going to
see if I like it. I don't really like this part. I'm going to grab
maybe this wall. Yeah, this wall it
will do. We can then squish it a little bit. Don't worry about squishing
it. It's all okay. This noisy type of
pattern is not going to lose any type of detail. I'm more worried about things
like wood, for example. So we can make sure
that all is right, and something like that will do. Make sure we are putting
it properly inside, like so, and then afterwards, we can just duplicate it
holding lt and rotating it 90 degrees then repositioning it properly inside of itself. Something like that,
we'll do the trick. The afterwards, we can
grab the wooden planks. So this part, I
think it's going to. This part is
definitely or the job. We just need to make it a
little bit thicker because it's going to hide the differences,
I think, quite nicely. This part we need to move
it inwards, actually. But that's going to be done afterwards because I'd like to ideally just grab these
entire parts like so, se so and move it
holding upwards. Now, what I mentioned
about, you know, scale could be
quite a bad thing, but in this case, if we were to scale it a
little bit like so we can have some difference in variation
for their width and whatnot. So by playing around, you can see that the scale
over here, for example, is quite nice because it kind of overlaps it a little bit. And I'm quite happy about
this kind of result. The only thing is
that these walls might need to go a little bit out or actually these parts over here will make them
go out a little bit. The rest is okay,
I think. And this needs now to be just
slightly adjusted. So yeah, I think this wall definitely
needs to go inwards. These walls, unfortunately need to go inwards a little bit, as I was checking how the
horizontal beam interacts, and they need to be
readjusted to make sure that they go nicely together. Like, so part is okay, and this part needs to
go inwards as well. And yeah, that's okay. We shut out a little
bit, like so. Quick, little adjustments,
quick little tweaks. A is well, all is nice. And then we can just move these beams to
where they need to be. Although before doing that,
it's really better to make sure that their
scale is nice. Those little seams that we see
at the top and the bottom, they're going to be
nice different breakups for the joint parts. And I think it's
going to give us more unique type of a
look. That's quite nice. This part needs to go inwards. A little bit meaning that this part also needs
to go inwards. I'm not too worried
about a wall. It's not going to
be quite as visible because we're going
to be covering it up. So the only part mainly that I care about is actually this
part in the back. I want to make sure
that it is extra nice with what we
have over here. There we go. Nice little tower
is complete at this point. Make this a little bit wider. There we go. One more part. Like so. And there
we have it. Okay. Now, we are done with our tower. We got ourselves a face clock that is facing the other way. Let's make sure we rotate that. And if needed,
slightly readjust it. Make sure that the
positioning is right. I think that is looking okay. I'm not sure about
these parts over here. Maybe we can just lower
them a little bit, so. And that's what I meant
before when I was talking about gizmos,
being on one side, if we were to have
them at the bottom, scaling them up and down
would be quite nice, but I don't think it's
needed over here. For such a small task,
so I think it's okay. There we go. Something
like that is very nice. Alright, so we got
ourselves a lovely tower. And I think we're going to end our lesson a little
bit short over here. We're going to continue on with the setup and add
some extra parts. We have some variants of roofs. We need to make
sure that the door is fitting for the
front section. All of those logistical parts
need to be going in first. And then afterwards,
we can just populate it around fill in the
walls and whatnot. So yeah, all of that is going
to be in the next lesson. Thank you so much for watching, and I'll be seeing you in a bit.
118. Creating Stylized Roof Silhouettes and Entranc: Hello and welcome back, everyone to Haunted Street Environment. Blender to on real Engine five. In the last lesson,
we left ourselves off with this lovely tower, and of course, we're
not quite done because we'd like to have some
additional attachments to it. So let's get straight into it. We're going to go back
onto the content browser. We're going to find
our lovely roofs. So these are the ones over here. And we are going to yeah. So these roofs, we are
going to start off by using this one over here. Going to put it
nicely in the setup, and at this point, we are going to determine the location. We want it to be
slightly lower with the setup and also a
little bit smaller. So we're going to lower this
down to a value of seven. We say, let's go ahead
and go ahead and let's go ahead and lock
the lock over here, put it to 0.70 0.75. It's
a little bit bigger. That way, we can
have a nice roof. And the reason we're doing
this roof, by the way, from the setup is because when
looking at the silhouette, when looking at the back, roof is going to be the
most visible parts. We just want to make
sure the height and the location of it is,
well, placed nicely. Then next up is we are going
to just slightly rotate it. We want to rotate
it, not 90 degrees. We're going to turn this off and just change it to ten degrees. We're going to rotate it
by ten degrees, like so. This way, we got ourselves
a nice little setup, and now it just needs
to be slightly tweaked. We're going to make sure it is a little bit closer as well. Going to look from
a distance, yep. But that's something that looks a little better,
just like that. Next up is we're going to make sure to use more
of a pointed roof. This roof over here, and we are going to put
it on the front. So the front is going to be
perfctly straight 90 degrees because we want
to make sure it's perpendicular to
the clock tower, and from a distance going
to like be sideways, it's going to be right.
It will look quite nice. This thing is going to go to a little bit more of a
side of the tower, like so, and we are going
to lower it going to be a little bit higher than
this tower than this roof, but not quite as high up. So this is quite good, I'd say. In terms of how close
the front is it is, I think we can push
it a little bit back to a reasonable amount. Something like this
will do quite nicely. The question is whether the back or not is a little
bit too flat looking. And I would say it is actually, we're going to push this roof there for a little
bit more back. So it kind of breaks
up this entire part. That's a little bit more,
like, so just going to double check now if the
front is going to be okay. I think the front is okay
with this kind of breakage. But distance is also
going to look quite okay. So that is looking lovely. Next up is the roof
on the outside. We're just going to make sure we duplicate this to the outside, and the reason we're doing
this is because there is no edge at the top that
we have over here. I think that's going to give
us a nice little breakage. And we're going to rotate this not by ten degrees, but by 20. But basically, if we
look at it from the top, this goes a little bit towards the camera or towards the front, and this edge is also
going towards the front. So they're all going to be lightly basically curving
towards the camera. So I think that's going
to be quite nice. Next up is going to be this
little roof over here. That's a little bit more
fin. We're going to place it just underneath the roof
that's facing in front of us. So it's going to look like this beam is
supporting double one. And we're going to place it a little bit
off to the center. Like, so that way, it's
going to look well, a little bit more chunky that of being centered
to the tower. And in terms of its length, we could push it all
the way back, actually. This way, we're not going
to have this odd gap, and it's going to have
more volume to it. I think that's going
to be quite right. We don't want, like, a random thin super
thin gap in this area, especially since
we're going to have a light source coming
from the back. We're going to have, like,
the moon and whatnot. So such a thing, I think, would be quite
distracting, honestly. So yeah. Once we have
the silhouette set, we can do the door. The reason we're moving on
to the door is because we want to make sure that there is enough space for the entrance. We don't need to make the door too small or anything like that. We can just keep it as
original size because the original size is
for a human reference, so it's going to be good. So let's go ahead and find
ourselves what we need, which is going to be
this section over here. We're going to make use out
of this for a door and we're going to make use out of
this as well for the door. Way, we can move this
into the section, so we're going to have
ourselves lovely little set up. And of course, we need
to make sure that the placement is thought off. So what we're going to
do is we're going to either use this staircase, which I don't I'm not quite
sure or the staircase. I think we're going
to use this staircase because it doesn't have
the slaps on the top. I think it's going to be quite a bit better for the setup. And now the thing is,
we would realistically want slabs to better We
don't need that many steps. What we can do is we can
simply put them in the ground. Instead of using a
complete new mesh and having multiple instances of that mesh in an environment, it's sometimes good to
just move them inside. And that way, I can just
rotate this 90 degrees, wrap the door set
and also rotate it, and now move it onto
this section over here. So this is how tall we need to make the first
foundational piece. So you can see
that already here, it's above the height,
which is good. We're just going to
make sure that the front section matches it. And then the offset, if we have any can
be kept as is. And it's going to
be quite junky, but the main thing, again, the entrance is going to look good. That's what
we're looking for. I'm just going to make sure
that this is centered. Even if it's janky, it doesn't need to be completely chunky, the door supposedly
to be working, you know, so you can
keep it close, though. So realistically, this
just needs some walls. We're going to grab ourselves
some windows for the front. We're going to make sure we use nice squarish locks like so
and rotate them 90 degrees, place them in the
area where needed. And is this going to be right? I think it's going to
be right, honestly. Slightly readjusted. And then using old
duplicated to the outside. And now this middle part is
going to be filled in by our lovely little Asset. So I'm going to make
it a little bit bigger, put it where
we need to be. Here we go. And this needs a little bit more
chunkier, honestly. Even more. Like so now nice and chunky
of a building block. These parts will need to touch
this a little bit closer, like so I don't think
that's quite alright. Don't worry about repetition. By the way, we are going to
use vertex painting in a bit. Well, now, though,
let's make sure that everything is nicely placed. No overlaps or anything
of the sort is visible. We can grab ourselves
this piece and move it to the outside and grab this piece and move
it to the outside. And this piece actually need to be going inwards
a little bit more. I don't want them to
be sticking out as much, something like that. That means that these parts also need to be going inwards, because we want them to look
chunky, and there we go. Now notice there is a
gap. We need to fix that. There we go. All right. Afterwards, we can
place in some windows. Lovely windows already
have emission, but we're going to adjust
them a little bit. There we go, or first
windows looking quite nice. Next up is going
to be a couple of other locks over
here at the bottom. I'm just going to place them in. Like, so I think this horizontal beam is going to be quite right. We can maybe make them
a little bit thicker, like, that's looking good. And it's our side as well. Now, this gap, I'm not quite
happy about it, honestly. I'm going to just grab
these and move upwards. Like so. Alright, this is
looking very, very nice. I'm quite happy with this
result. It's going inwards. These are going outwards, and the overlap that you have looks like properly
joined together. So we are running out of time. I think we can continue
on with this in the next lesson and
talk about how we can place this door right
underneath these windows. Though, yeah, that's going
to be it for this lesson. Thank you so much
for watching, and I will be seeing you in a bit.
119. Layered Facade Depth with Walls and Support Beam: Hello, welcome back everyone to Haunted Street Environment, blended to reel and G five. In the last lesson,
we left ourselves off with this lovely door and we're about to fit it inside
or underneath these windows. Let's go ahead and
do that right away. And what we'll notice is that it's not quite there
in regards to the height. I'm just going to
put it over here so we could see the
height difference. And next step is we're going to select these
couple of windows. We're going to grab
these rooftops. And because we know where the starting point
is for this door, we can slightly raise this up. And I just realized these parts also need to be selected, so
let's go ahead and do that. This way, we can have
a little bit of a gap. I'm not too worried about walls. We're going to fix
that in a bit. So I think something
like that will do. It's going to check out
looks like over here. I think the shutte
is quite right. So before it was like this, was raising it just a little bit, which will do us quite nicely. Then afterwards, we
can select these, bring them up a little bit. And there we go. Alright, so next up is making sure that this is
properly inside. So we're going to
go ahead and grab these parts and put them a
little bit more to the back. I would have this kind
of a gap like sew. Then afterwards, what we
can do is we can start, well, laying out the
setup, the bricks and all. Firstly, we're going to make
sure we fill in this gap. We're going to find
ourselves a lengthy, long brick wall.
This one over here. Going to put it like se something to block
it out a little bit, and then we can well fill
in the wall behind it. So we're going to find
the widest that we can. This is not quite right. Give you this one. The shorter. Which one is the tallest
but also whidest? I'm just checking through. Selecting which ones we can use for this particular case,
I think this one, yeah. The biggest one is
going to do us the best because we can just
rotate in nine degrees, place it in behind
the door, like so. And like this, we're going to move this a
little bit more to the back. Yep, this will do. And then afterwards, we can just make sure it fills in
the entire backside. So we are going to move it
up to the side like so. And the next thing is going to be just getting
this gap filled in, so we're just going to grab
these walls over here. We are also going to
grab these planks, so make our lives a
little bit easier. And this should check the selection. Yep,
this should be good. Afterwards, we're
going to hold Alt, duplicate it, and
just rotate it. 90 degrees, there we go. Then we can just fill in
this gap nice and easy. Like so. Then select these
parts, lower them down. And let's see how it looks
like from the bottom. I think it looks quite nice. This part maybe needs to be a little bit
inwards, like so. Actually, let's put it
a little bit outwards. I think it's going to
cover it up nicely, and it's going to look like
an extra support beam. I think that's going
to look quite nice. And part is okay. We have to do the same part
on the up side as well, where we are lightly
pushing it outwards. Like and there we go. And next up is
because we duplicate this wall, it's going
to look like this. But firstly, let's go ahead
and fix up this issue. And now this is a little
bit too wide of a wall, so I'm going to find
one that's actually just thin, this one over here. And we're going to select
back onto this wall, click on this fin wall, and now with that selected
in our asset browser. We're actually just going to show it visually like
this a bit easier. Whichever last control
browser you use, whether it's using
controlled space or the one that you
attached it over here, whichever you use at last, it's going to be
using that selection. And once you have
that selection, you can click on this
button over here, which is going to replace
the wall just like that. So this way, we can have
ourselves a nice little setup, and this, I think, is small enough of a gap for us to
kind of fill it in manually. I'm also going to be not
afraid to just, you know, widen it up a little bit
because that's all good for us. Then we are going to go
ahead and grab this wall, put it to the side 90 degrees and just fill in this gap
like so. Ready looking good. And of course, we're going to have a little bit of a wall
on the other side as well, so I'm going to grab this wall. Actually, you know
what? I'm going to grab this finer
wall over here. Move this, put it 90 degrees and fill in this
space over here. Of course, the space will
need its own supports. So we can do that.
We are going to find ourselves the lovely beams. I'm wondering, they're not
going to be tall enough. We are needing to use the
tallest ones, right here. That way, we can
make some support. Even so, these beams
aren't big enough. I'm going to just scale them
like so because they're going to give us
bigger variations. At the bottom,
it's quite alright to have bigger variations, and we are going to also move this to this
part over here. And yeah, something like
this will do the trick, going to rotate at nine degrees. And here is where, as you can see, this part
of the extension starts. So we are going to go
ahead and sort that out. So next step is this wold. We can move it into that so
and move it to the outside. Looking good. Yep. And now, of course,
the wall over here, I'm just going to
duplicate this part. Push it in nicely, though. Hopefully, it's not too wide. If it is, we can just
squish it down just a little bit. Going to be okay. And we can leave it as it is because we are going
to have the port, although I'm a little bit more back because the beam needs
to have some thickness. Alright, so it's looking
pretty good so far. The naturally, we are
going to fill the gaps. So let's start with the base. Go to make sure it has
some nice supports going across, like so. And also lower down
to make it seem like this part is
supporting this beam, but we might need to
actually, you know what? No, we can keep it
as it is because it nicely attaches to one another.
I think it looks good. And yeah, let's put it to the
other side. Just like that. This backside needs
to be filled in. We're going to do
that in a moment. But for this particular
environment, it's really important that the building that
we have over here, the front is going
to look great, so we can just put all
of our energy into this, and then afterwards, we can
just fill in the blanks. This part might need
another variant. I'm going to also instead of just clicking this button,
we can also do this. By the way, we just clicking on this box and maybe
selecting Hanova variants. So this one is a
little bit too much, but I think we can
make do with it. I think we're going to
just a I put it up higher, though, it's going to
look like it's hanging, where this part looked like
the bottom was hanging. This one is going to
look the opposite. And it adds to that junkiness. Looks very nice, personally,
I think that at least. Okay, so next up is going to
be well adding these parts. And I think I'll
just extend this. I think I'll just extend
it during this 90 degrees, so we'd have some variance and do the same
again this way this, this, and this would look
different when we're looking from this angle.
They're going to look unique. Good. And we do need to
I back a little bit. What would be underneath
the roof, like so, and then we can play
around with this a little bit, just like that. Oh, I think this looks quite interesting of a setup.
I'm not sure if I like it. This looks very chunky, but I think it
looks quite nicely. Let's go ahead and add a
window here as well. You can. Need to rotate a 180 degrees and like so and lower
it a little bit even, so it doesn't look like
it's the same level. It doesn't actually.
That's good. Very very nice and junky. All right. So next step is well filling in the bottom part. So let's go ahead and do that. We can grab this wall over here. Nice and chunky, and we
can put it up like so. Ah. Now I see the bit of an issue, so we can either move this wall forwards and this p appears, but we can just bring
this part back. I think that's quite
a reasonable choice. And we can just put this
on overside as well. So Then I think we are extending
it a little bit too far, so I'm just gonna bring it back. Then this part I think
should be enough, I hope to fill in
this side. It's not. Let's see if we can
I think squish it. I think it's going to be Yeah, I'm quite happy
with this result, although these parts can
be moved back even more. And the reason being
is that, of course, we need to get some of those
lovely beams placed in. So actually, I'm going
to use this, put it in, so it would be in the same
90 degrees angle corner, even closer in actually need to be perfect
with that stuff. And, yeah, we like doing junky type of buildings because we don't really need
to focus about perfection. It's all about just the flow. And doing something like
this is quite relaxing, in my opinion, as well.
So yeah, it's quite nice. The part over here
is looking nice, but I think it's
just too blocky. It's just it doesn't have, like, difference in extrusion. The entire part looks too flat. So what we can do here is we can find ourselves
a shorter wall, and we can use this, hold lt, duplicate this part. Which I now realized
that would be a little bit longer or actually, this just needs to
be a bit closer in. And we can just simply
find the world that's not us not as tall. Which wall would not be a stall? All of them are quite
tall, actually. So what can we do
about this, well? We can just rotate it actually. There we go, because
the noise is very non directional where
as comparison to the wall, if we rotate this, these rocks would be vertically placed. But this wall is just random
noise type of texture. So we don't need to
worry about it too much. We can even squish it down a little bit, and it's
going to look good. Towards, let's go ahead and
add this extra beam in here. Going to actually
make it what a bit thinner. So, and there we go. We got ourselves a nice
little way to break up this just plain looking wall. All right. But I think the front is going
to look quite nice. But oh, we missed
the spot over here. Let's go ahead and just make
a quick duplicate it upside. And yeah, the front is
going to look quite nice. We can also break
this up a little bit even more with more uniqueness, and that would be
these parts over here. We can just make some supports that would
hold this entire setup. So And now, let me think. Should we have addition we
can have it like this where the story is a little bit off centered and it
quite looks nice. Or alternatively, we can
move this part to be supporting this
section and then move the door off to the side, which would also
work quite nicely. So I think this also
looks quite nice. Yeah, so I'm quite happy
with this result, as well. Maybe this wall can
be going upwards a little bit by too much,
just a little bit. And this is also quite nice. Alright, so that is going
to be it from this lesson. We're going to continue
on with it in the next. Thank you so much
for watching, and I will be seeing you in a bit.
120. Local Space Duplication for Tower Variation: Hello and welcome back everyone to Haunted Street environment, blended to Real Engine five. In the last lesson, we left ourselves off with this
lovely little setup, which I now realized that it needs slightly bit
of an adjustment. And by that, I mean, it just
needs to be pulled back. So in this part, well, this part can be just push up. I think that looks quite right. We center it a little
bit. There we go. Yeah, looking lovely. So now, this part is going to be an interesting one because
it has a slight rotation. So this rotation is going to
be added in to the setup, we are going to go ahead and bind ourselves
a wall first use. Go ahead and just
drag and drop it. So we're going to
move it forward, and now you can see
that it's well tilted. So what we're going to do
is we're going to match the rotation like so, and we are going to
place it just like that. Next up, all of the items just double check if this is the
right rotation it is. Next up, all of the items can be just reusing this instance, which will have the
rotation of that inherit. So if I was to, for example, hold Alt and move
this off to the side, and also the next thing
is that we're going to use Worldspace coordinates,
not worldspas coordinates. We're going to click on this to change the local
space coordinates. So that way, when we are
holding Alt and moving this, it's going to move it, you
see exactly to the side. That's wakes alignment
properly set. Next we're going to get ourselves a lovely beam
that we have over here, if this is the one
we're looking for. I think it is. That's good. I'm going to put it
over on this section, and then going to make it
just a little bit bigger. Just a little bit. Faulting old move the outside. And we are now going to just stretch out this wall just
a little bit. Like, so. And when stretching out, as long as I don't go over
the scale of 1.3, honestly, in most
cases, white all right. Especially for a
noise like this. If it was maybe like wood, it would affect the visual look, maybe a brick pattern over
here would get a bit wider, so we need to be a
little bit more careful. But all in all, honestly, it is all Good. So now that we have
a setup like this, on the other side, we're
going to duplicate this. And then we're just
going to rotate this 90 degrees because we
already had this aligned. This 90 degrees would be also
aligned to this section. So there we go. A
nice little setup. The wall here doesn't need
to be so stretched out, so we're just going to squeeze
it in, make sure it goes. Amount. Like so. And
at the same time, I'm also going to
fill in this gap. By just make it a
duplicate over on our end. Like so. Why complicate things when we can
keep it simple, especially when it's
such a small gap. All right, so next
up is this part, which is going to
make a duplicate. Again, because of our lovely
local space coordinates, we don't really need to worry about we alignments or whatnot. All of that good stuff. Going to be nicely aligned. So we have this type of setup. We can now go ahead
and play around with the height a little bit. And by that, ideally, I would like this to be
going up higher, actually. So that way, it's not going
to align with the same level, and we're going to have some
slight different variation in terms of, well,
they're positioning. So what we're going to do here is we're going
to select these. We're going to shrink
these down a little bit and bring them up,
and there we go. Then afterwards, I'm going to go ahead and
fix these as well. Just like that. And the other side, we
can make a duplicate, but we're going to make a
duplicate for smaller parts. So just going to select this, not this, which walls we can use.This perhaps
I think so, yeah. We can make this smaller scale, and that way, we can have three sections of
the wall over here. A lot smaller, but it will work quite nicely because
we are going to use Vertex painting on
multiple walls. And when we do that, it's
going to look quite nice. So Southing like this,
we'll do the trick. Next up is just make a
duplicate route these parts. And this part, I don't
quite like this gap. So what we're going to do is we're just going to make sure we drag this in
backwards, actually. Yeah. This gap is not quite
as nice as I hoped for. We can either move the entire roof with
the entire extension. But honestly, I
really want to keep this roof roof as it is. So instead, what we're going
to do is we're just going to extend this part
a little more, like so, introduce
some imperfections, add in section like this, and we're going to have
something like so. And afterwards, we could
just fill in the gap by having lovely section
of the wall over here. Not going to be very visible, but it's going to
be quite nice to have And it looks quite nice. It looks like some bit of
an extension, so it's good. Next up is just making sure that these gaps have wall parts. And I'm also going to
I just realized that these are still too
big, unfortunately, so they create some parts that
are going out of the roof. I'm just going to make sure
we adjust that as well. And we've got this
lovely little setup. Now, I still don't like that
we have the same variation, even though we have a little bit change
in height over here. I would like to also have
some bit of change of height in terms of this
section and this section. So what we're going
to do is we're going to select all
of these parts. We're going to shrink
them down a little bit, put it up higher. And now we can, well place
another wall over here. Let's go ahead and
select this wall. Let's go ahead and
just move it down, rotate it 90 degrees and place it up onto the side
just like that. In this case, I'm
not even worried about Sushi because we can just move this entire
part into the tower. So, honestly, that's
quite alright. And in terms of the height, we can lower this a little bit. Like, so to this amount,
I think it's quite right. And then we can grab ourselves
one of the logs over here, hold Alt, rotated 90 degrees and make sure it's the tall one. No, I said the taller one. Where is the taller one? This
one? That's a shorter one. Okay, all of them, why
are they so short? Is it because of the scale I'm just going to
go ahead and grab this one and then
use this method. Yep, it seems like it's a scale, so I'm not going to be worried
about breaching it out, like so and placing it into
the setup, just like that. All right. Next step is
the part at the bottom. So just going to duplicate
this like so, make some. Versions just like
that. And here's just about making them click. And these parts can be shorter. So I'm going to go
ahead and select them. This time, we are going to
need shorter versions like so, and we can grab these parts now. We can move them down, and we can fill it in like so. Then afterwards, we can
grab this wall, hold Alt, move it down, select
the where is it? This kind of wall, like so, and there we go. Nice little bit of
filling. All right. And here we have a
little bit of an edge, so I'm just going to
move the upwards. Hopefully, it's not
going to overlap much. I think it's going
to be a quart, okay. And here's good. So we have ourselves a nice
little foundation which has variation in between,
so that's quite nice. We can grab this piece. We can make a duplicate
90 degrees and move this to its required position
going to be over here. This part is going to be a little bit lower,
which is quite nice. So, extend it a little
bit, just like that. I think this part of the wall
is going to be quite right. Make a duplicate out, but I do want it to be matching
this a little bit more. So let's just go ahead and
squish it up a little bit. Wish it up some more. I fix this level can be made the same, so it's
going to be right. So something like this,
going to look quite nice. We can make duplicates to
the upper part. Like so. And finally, the wall
part over here can be made like that.
Alright, there we go. We got ourselves
lovely little setup. It looks a little bit I'm worried it looks a little
bit too thick, to be honest. So because it's so wide, I am willing to just
grab all of these parts, wish them all so move it a
little bit off to the side. These parts are not
getting squished. What is happening is they're getting they have
our local axis, just manually squish
them like so, and we are going to just
slightly reposition them. So that way you have some nicer bit of
variation, and there we go. Be afraid to just,
play around with those kind of things.
It's always nice. And the top part, we can just cover it up with a
little bit of roofing. The roofing we could
use is going to B. I know we have some
planks over here. Let's just find it real quick. We those planks B? There we go. Planks. And just move them
in this part part over here. No. I'm going to make some
rotation, duplication. Um, you know what? We only
need one. I only need one. Reach it out a little bit. No, and it's going
to look quite nice. I think it looks
quite nice, actually. We just need, of course,
have some support. But we are running out
of time, so let's go ahead and continue on with
this in the next lesson. Thank you so much
for watching, and we'll be seeing you in a bit.
121. Glowing Windows and Structural Beam Adjustment: Hello, run. Welcome back to Haunted
Street Environment Blender two Reel Engine five. This
is where we left off. We got ourselves a
lovely little setup for the house for
the clock tower, which is not quite finished yet. We still have some
backside to do, and we have, well, some
bit of a front side to do. Let's go ahead and
finish this up. So, in here, we went ahead
and squished the part, but we're still not quite
done with just adjusting it. I'm going to make this smaller as well. Just push
it off in the back. Like, so and move this as well to the backside to make sure
that the support is there. Then next up, we
can grab this from the up side because it's already
nicely placed up for us, and we can just move
it even lower it down, so it's going to look like a nice crooked little
piece going inside. We're also going
to make sure that the scaling is a
little bit smaller, so it's not overlapping as much. And there we go. We got
ourselves a nice little setup, which I think would
be better if we were to move this even back and
then the wall back as well, just to make sure that app
is nicely set up for us. Okay. Afterwards, we need to consider what to do
about the bottom part. So this part over here, I think we can just have
it the same height as this back side
because it's nicely higher up than this part. So we can probably just
grab this entire section, holding old, just
move it to out side. And I'm not going to
even change the rotation because it's going to fit
so nicely as on our side. I'm also going to
go, as you noticed, inside of the
building just to make sure we are able to
grab this individually. If you're not able
to see it, you can always just go
from lit to unlit, and there you go, you'd be able to
see on the inside, really nice little
functionality. The flashes that you see
is because of lumen. They're using a screen what's on screen lighting and whatnot, and it works quite nice. But yeah, when you go
between unlit and lit, you'll notice that,
like, exposure just kind of shifts real quick. And that's why it looks a
little bit interesting. So continuing on with this, we are going to go ahead and
just move this to the side. These parts now, I'm
wondering whether or not we should try to expand them
all the way to the side, like so and then have
some additional support, or if we should have just removed and just moved a
little bit to this side. I think if a wave would work, we have a nice little
gap over here or we could just block this gap, put some supports over this side, extend
this a little bit. Over them are very
appealing to me, honestly. I think I like how they
look in both ways. But I think I'll just go with
just keeping this honestly, it's quite nice, making sure that the gaps are non existent. All is good. It seems like
all is good, at least. We are missing a bit of
a support over there, so let's go ahead and just move this support into its place. Like so. Nice and lovely. Just a little bit of
an extra, like so. And then we need
to consider, well, this empty wall, we need to make sure that there's not
just an empty wall. We have a little
bit more than that. By doing that, I'd like to make sure that there's no overlaps. So let's go ahead
and just squish this even further. There we go. Nice and simple. So in
terms of the windows, I'd like this window
to be over here. I'm just looking whether or
not we should have a variant. So right now, we only
have one window, but in this case, we want to make sure that
the window we're using is not going to be Wait to
make it as well, by the way. The window we're using
is not going to be. Let me just let me make sure that this gap
is also nicely filled. The window that we're using is not going to be
glowing in this case. So what can we do about it? Well, that's why we imported all of those material
bolts over here, and they are not updating. I'm not sure why it
should be updating. There we go. Some reason they just want
to not update themselves, but they are updating,
so that's good. So basically, we had
a mesh for windows that included lit
and unlit windows. And for all of the windows, by default, we had them lit. Neil very graciously made sure
that they are nicely lit. So with this one, we want to make sure
that they're not lit. But because we are importing
all of those materials, we're able to include
all the shaders, even if they weren't
with that mesh. So right now, the
GLB also included. If we go with the
window selected, if we go on the
right hand side to the details stab,
we'll see element. Element two is basically
a slot for material. If we were to just
click on this, we should have another window, and it's not showing here, so let's go ahead and
just search for window. There we go. Window
lights unlit. Let's go ahead and click
on it, and there we go. We're going to have
ourselves unlit window. So if you want, some of
them can be kept glowing, some of them can be turned off. And if you're thinking about making potentially
a night scene, you could set up a blueprint which replaces one
material to another, essentially making it seem like lights turn on in the area. So that's kind of neat. That's kind of a nice little
functionality to have. So, the other thing
to consider is, well, the size of the
window. I don't like it. Let's go ahead and make
it a little bit bigger, just a little bit, not too much. We don't want to make it seem
like it's gigantic window. The next thing is
considering the positioning, we want it to be a little bit off centered because, again, it's a junky type
of clock tower. And then we can think
about some logistics. For example, over
here, this wall might not be strong enough to
support this window. So what we can do is, well, we can add a little bit of
an extra support over here, and I'm going to
potentially make this smaller and put it inside, like, so nice and easy simple type of
setup, and there we go. This one, I would like it to be a little bit
more centered, so it would look
like it's supporting the weight of this window. Alright. Next up, you're just going to be
fixing up the backside, which is going to be
this lovely setup. Let's go ahead and make our
lives a little bit easier. I think we can just grab
the first initial walls from here with all the
lovely supports by the way. Like so. And this wall
over here as well. So now when we hold bolt, we're able to duplicate
something like this, I'm going to try to
rotate it though it's a little bit off centered now into reposition and there we go. We an easy, nice little setup. We got some walls
over here. Very nice. Next up is going to be making sure that
this is filled in. So we're going to grab
these walls over here, and we can just move them. So I'm wondering if we
should split them up in two. I think we should
let's go ahead and grab a wall that's a
little bit thinner, like so, putting it up in here and just stretching
it just a little bit, and the next one over so and I don't know
if this is enough, actually for the walls. I would like them
to be a little bit more differentiated
from this wall. So we'd have a little bit
more of an extension. But yeah, looking at this side, I think what we can
do is grab this wall instead and just
move it inwards. There we go. This is a
nice, lovely extension. Then we just need
to fix up these a little bit, unfortunately. Whoa. It's not that
same axis. Okay. Unfortunately, with
scaling, you're only able to have when
scaling just local access. So quite a bit of a shame,
but it is what it is. And yeah, then afterwards, once we have all the necessary
parts properly positioned. Like so. Then we can just make sure that we
have some lovely supports. This support can go in here. I think that's going
to be qua right. Maybe we can even put
two beams over though. I think that's going to
be that could be right. Alternatively, you
can grab this beam and make it a little bit wider. No one says we cannot. Feel free to play around
with the shapes and make yourselves something
that looks nice to you. Alright, so we got
ourselves lovely walls. This part needs to be filled in. Oh, that's for sure. Let's go ahead and just grab these parts. I'm going to duplicate
it and move them. 90 degrees, rotate them
around, and there we go. We got ourselves nice setup. Also going to make
these smaller, just playing around
with the shape, maybe even higher up legs this. That's going to look nice. And
because this is higher up, going to look more
supportive for these parts. I think looking quite nice. This I'm not too keen
about to be honest. I'm wondering if we
should take that off, but honestly, that
looks quite all right. I'm quite happy with
this design. Okay. So next up is just adding
a couple of windows, making sure that
we have ourselves a chimney and all of that stuff, and then repositioning it
into the right location. So that's going
to be it for now. In the next lesson, we're
going to continue on with it. Thank you so much
for watching, and I will be seeing you in a bit.
122. Organizing, Duplicating, and Repositioning Building: Hello and welcome back everyone to Haunted Street environment, Blender to Reel Engine five. In the last lesson, we went ahead and finished
up the backside, making sure that there's no
gaps or anything around. We can just fly around and kind of see how it looks like
from the upper angle, from lower angle, making sure that logistics all are fitting. And afterwards, we can
just make sure that, well, this part
is not too plain. Let's go ahead and grab a window from here
because I want to have, well, same kind of size. We don't have to. This
place is very junky, totally okay to have
a different size, but I would prefer
to have it the same. I think that's quite nice.
Mm. I changed my mind. I'm going to make use
out of a bigger size. That's going to look much
nicer, in my opinion. There we go. Look
how nice this looks. And let's just make sure
it's a little bit more centered to the seam. There we go. And a
couple of windows over here wouldn't do us too bad. Go ahead and add one over here. Make sure that the rotation
is properly set up. So that's a nice little window, maybe a little bit
smaller. Okay. And again, because it's
hand built and everything, it's going to look a
little bit more organic. Like, you don't really need to have everything perfectly
measured up in here. It's the joy of using
stylist environment setups. We can make use out
of various of shape. So here, we can also make
it smaller if you want to. Oh, wrong scale. There we go. Yeah, very nice. At
the human level. And by the way, we
can make use out of a human scale over here. Which I think we can
just look for human. There we go. Nice human. So from the outside, you can, like, peek in to the house. That's quite alright. Quite nice. And looking at this, I think, it's quite right. So now we can talk about how we can reposition everything. So in order to do that, what we need to essentially
do is use Alt and control, and that gives us an ability to make a selection like this. Unfortunately, though,
this is going to give us only one
sided selection. So Alt and control and left mouse button
gives us simple selection, but you see the backsides,
they're not really selected. So this side show you see, these selections,
they're not selected. So the only way that I
know that's efficient to do an around of that kind of an issue is to go onto
multiple viewpoards and find yourself usability
for one of those. So we can use the
top so up section. You can see at each
one of the viewport, we have this option which
tells you top front, right, and this is perspective. So we're going to
go to the top view. We're going to locate
our lovely tower, wherever it is, there we go. And we are going to
make a selection. So just click and hold in here. You don't really need to
use Control and hold. Click and hold, make
a selection like so, and then you need
to hold Control 20. Click Control a couple of times. You see the selection
because we're also selecting terrain as well as the guy box, actually. There we go. Once we
have it deselected, you'll see that the gizmo is mainly centered to the house. That's how we know that
it's the only thing selected except for
these little rascals, we're going to make
sure we deselect them as well. Like so. We're only kept with the house. And now, once we have just
an entire house asset, we can see that they are the only basically
static meshes selected, we can click on this
little icon over here, which is going to
create a folder. With this folder, we can call this house of one
or clock tower. There we go. Yes, very
creative of a name. I know. So now, because we
have this folder, we won't have to make the same selection over and over again. It's not going to be as TDus
because once we deselect it, we can simply go to the top, locate this folder, right click and use Select All descendants. And that way, it's going
to give us this selection. I am worried about why
the Gizmo is being there. I'm going to click
F in our way of checking to see
what is selected. And I think I know
what is selected. There we go, Sky atmosphere. Sky atmosphere
should not be here. Also landmass and these parts
should also not be here. Let's go ahead and just
drag them outside. Onto the scene, like
so, there we go. But now only the static
meshes should be here. And if you add other items, you can just drag it outside. And there we go.
Now, if I was the right click and go to
selection all descendants, you can click F, and
you'll see zooms in. That means that, yes, we are finally just having
this house selected. Afterwards, we can just
move this entire house a little bit off to the side and see where the
positioning would be. So the way we want
to position it is we're going to just
look up a little bit, and from this distance, we are going to drag it back until we get
some bit of spacing, just to fill some other
houses in this area. I think something
like this is right. We can also now click
E to rotate it, and it should rotate an
entire house like this. So make sure that
it's not local, it's world or rotation. That way we can just rotate
it just a little bit and position it something like this. I think this is a good
spot. Yes, it is. The other thing is, yeah, we're pretty much set
with this lock tower. And once you create one, feel free to create those lovely buildings that
we have over here to recreate them or create your
own unique versions of them because that's what
we're going to use next. And the other thing that
I'd like to mention, once you create one and
it's using modular parts, you can essentially let
this que, by the way. You can essentially just select this folder and right
click duplicate hierarchy, and you will create a new folder that's for clock
tower like the second one, and you might be thinking, why would you need a second one? Well, you can select
all descendants. You can move it to, for example, an alternative place or
something of that sort. And then you can adjust all
the parts that you want. So for example, you don't
want this tower to be there. You can just move it like this, and you might not like how
these parts are, for example, you can move them around
and maybe even delete them, move the door even to the side or something of that
sort and just like that, you are able to create many,
many different variations. You turn off the lights for this one or something
of that sort. You can have multiple
windows on this one, and at some point, it'll start looking like a completely different
type of building. Or, you know, you could just use the cheap way and just rotate the building around and you'd have just a unique type of look. Even so you can see that by just creating one
with modular acids, you can just have so
many variations by just quickly adjusting and
stylizing some parts. You can even, for example,
select some roof parts. You can find them in an acid, and you can just replace it with another rooftop and then
just maybe make it smaller, rotate around, and
the shape itself is going to look
completely unique. When you look from a distance. So that's quite quick way
of adjusting some parts. And the other way that I
like to mention about. So something like that
would be quite cool, maybe even like squish don't
be afraid a squish parts. But you can see, just like that, we're able to make
something look that's completely
unique looking. So I don't really
want to do that here. I just wanted to show
you something like that. Let's go ahead and just delete
this entire book tower. We don't need it. We are good with just one for this example. The other thing that
I like to show you is how quickly you can
modify this section. So for example, this part maybe it's just too
much 90 degrees. We want to make sure
that it's rotated. It's kind of similar
to what this is. So we can potentially do that. We can go ahead and
use Control and Alt and just make a
selection like this. And then Control Shift
and Alt should let you make selection that adds
on top of that selection, and you keep on doing it until you are satisfied
with your selection. And once you're happy, you can make sure that you're able to just move it
outside a little bit. You just see, oh, there we go. So holding control, I'm going to deselect the entire landscape. Then let's see. All the parts that I
want to move are moving. So we can go onto
rotation mode and just rotate it by ten degrees. And then we can just slightly weak and reattach this part. Like, so in here, the roof is a little bit
oaking. That's okay. We can just move it a
little bit off to the side and maybe turn off
the napping mode, the roof like this as we can. And there we have it. I just don't like
the way this is. So the other thing
that we could do is just push this a little bit, move this to the front. And it's still not there. So I'm going to also make sure that real quick,
back to the selection, we move it off to the side
until we are not seeing that little king ing,
something like this. There we go. Now we can just double check that
every fins are right. So this part need to he's
sticking out a little bit, making sure that it's sticking
out in the right places. Then a couple of adjustments. So for example, this
part over here could be a little bit thicker, doesn't need to be so thin, and it kind of just
fills in this space. And yeah, Let around
with the shapes. I do encourage you doing that. It's quite fun and
quite relaxing to do. Unless you get some parts where it starts
overlapping and whatnot, but once you get
grasp of things, it just becomes tweaking
and tuning and yeah, that is quite a fun
experience, I think. So yeah, you don't have
to rotate this but a way, the overall shape from a
distance for that bit of an angle for this
particular section is not going to be quite as
visible as the one on the left. The main reason is because
we're going to have a moon or main focal
point over here. So we definitely need to
have a rotation here. But this part, just wanted
to show you that you can adjust in larger
chunks if you need to. And just looking
around, making sure that there's nothing wrong, which you can see
this part over here. We can slightly tweak
it a little bit so this part is interesting. I'm not sure if I
like it or not. I think I'll leave it, actually. I think I'll leave it or I was going to extend
it a little bit, and Oop. There we go. We're going to make an issue
here? No, I don't think so. I think it's quite alright
to have it like so. And the rotation. There we go. But it's not overlapping. And yeah, okay, so that's
going to be it for me. For now, thank you so
much for watching. Sorry for taking up some of your time just tweaking
and adjustment. I really enjoy this kind of stuff, and I hope
you do as well. And yeah, I'll be seeing
you in the next lesson.
123. Modeling Mode Fixes, Warp Deform and Asset Mergin: Hello. Welcome back everyone to Haunted Street environment, Blender at Reel engine five. If in the last lesson,
we left ourselves off by finalizing this little setup. We're now going to continue on and add some
additional buildings. So right now we have these
little huts over here. We're going to make
use out of them. So we're going to go
back to our place. Like, so if you're struggling
with the camera motion, just know that using a mouse
wheel scrolling up and down whilst moving is going to allow you to
speed up the camera. And yeah, let's go ahead and find ourselves these
little houses. So first things first,
on the left hand side, we're going to have
this little one, which is going to be placed
around this position like so. I'm just going to place
the buildings first, and then we can play around
with the position for them. Next up is going to be
this one over here. I believe that's the one
that's going to be placed. So actually, this one is
going to be a bit to the end, since it has a nice entrance, which would like us
to have it visible. And then there is also
this one over here, which is also going to
have an attachment, but this one is without a door, so it's going to attach
nicely to this platform. We can place it
like this for now. And we're going to drag this inside so it would look like out of the
same attachment. This foundation can be sitting
on the platform, like so, and I'm just making sure that this roof over here is
nicely set up, which it is. And then we can just make sure that this over here
is sitting nicely, or we can just move
this down a little bit though and now we have a lumbar over here that's
sitting nicely on top of this a little bit
inwards like so. And in terms of the rotation, let me just have a look
from the top down view, and think the rotation is right. Maybe we can rotate
it a little bit, base it more towards us. Like, so that's going
to be quite nice. I think that's
going to be, that's going to be very nice, actually. Something like that. Next
up is this one over here, which is also going
to be connected. To this. But we can leave a little bit more of a gap can imagine a walkway
through here and whatnot. We can even use our human
scale that we have. Just kind of make
sure that there is enough space to walk
through this little gap. And maybe it can be a little
bit closer, actually. Just a little bit like so. And in terms of positioning, I would say we can
make sure that this is a little bit more parallel in terms
of this attachment. I am going to move it and
then bring it back so it wouldn't give us
too much of a problem. Seeing this, looks like this
is a little bit broken. I'm trying to figure
out why that is. Going to check if it's
nanite that's causing it. I'm just going to
double click on the mesh, search for nanite. No, nanite is disabled. For some reason, this part of the mesh is unfortunately
a little bit broken. I think it's going inside of
the house for some reason. I'm not sure why if it's
GLB export in this case, or if it's just a maybe the way the imported
Unreal Engine got set up. But either way, we
can fix it, actually. So the way we're going to fix it is going to be quite simple. We are going to make
use of a modeling mode. Modeling mode is going to be located in this
section over here. You should be able to
see this modeling mode. If you're not seeing it. What you can do is
you can go on to plugins and search for modeling. So in this modeling tools
editor mode should be enabled. Afterwards, once you restart it, you should see the same that up. So in here, you will find
a couple of options. We can play around
with them and whatnot, but the one that
we're looking for right now is polygroups. And right now, this entire
thing is one polygroup. As you can see here in error, it says this object has
only single pole group, and we can use
group generator who basically have more polygroups for each one of the mesh parts. For us to get that,
we're going to go onto this more option and we're
going to select attributes. Here we can select generate polygroups and that's going to allow us to well
generate polygroups. We can use one of the options, I believe, going to be
from connected triangles. There we go. You
get this result. And that's the one that
we're looking for, I believe. I'm just
going to check. Actually, this part over here is going to be another option. So why that is the case? Well, and try based
normal deviation. That's not going to
be Unfortunately, that's the best way that
we can get it out of it. The overvoy could
be, for example, phase normal
deviation and we can increase the angle tolerance. But even here, it doesn't
seem to work properly. So yeah, we're going to use
from connected triangles. We're going to hit Accept. Then we're going to go
back onto our lovely. Where would it be? There
you go. All the group edit. We can select now
this part over here, and we can just move
it back, basically. Holding Shift I'm going
to make sure that these parts are selected
the top of the bottom. And now we're just
going to slightly push it actually
outwards like so. And now there's not going
to be an issue like that. We're then going to go to
the outer side because I saw an issue like that
over here as well. Actually, it's right over here. I was worried about this one, but looking at it now,
it looks quite good. But yeah, if you have
an issue like that, so you don't have to go back to GLB files and whatnot,
adjust it every time, you can do some fine
adjustments in a real engine, although if there's more, I
would recommend you going back to Blender,
you fix that up. All right. And also, if you're talking about, you
know, modeling, modeling mode is
pretty good not only at adjusting and tweaking
that kind of setup, it's also good for
changing shape. So this bridge over here is pretty but we can
make it better. We can go to the former
and we can use warp. Op will allow us to well
bend this type of setup. We can see the visualization, the yellow line will show
which way it's going to bend, the white line will show the original bounding box of
which way it's going to go. If we were to, for example, change this, we'll see
the bending amount. And if we want to
rotate this bend, what we can do is we
can use this gizmo over here and we can
just rotate it legs. And actually, looking at this, you can see the number
that's being used, so we can just change
this to 90 over here, and that's going to give
us right type of a bend. In terms of the bend itself, I think this is a
little bit too much. Let's go ahead and just make
it a little bit smaller. Like, so maybe it's still
a little bit too much, we can go ahead and just
down to something like 40. I think 40 is the right amount, and then it's going to
look quite nice for us. So before hitting accept, we just need to make sure
that we make a duplicate. The reason for
that is basically, if we were to make
an alteration here, it's going to make
the alteration for the entire static mesh. So whenever we want
to, for example, drag in a new bridge or whatnot, it's going to make
an altercation. Same thing over
here, by the way, when we changed and altered
this little setup over here, it also means that the part
that we had all the way to the back over there
also changed at once because it's not for
individual instances. It is for mesh as
a whole that was imported into the
content browser. Something more knowing. And if you want to have
some variation and adjustments after you set
something up like that, you must go on to create, and there is an
option for duplicate. Oh, sorry, it's going to be
form, duplicate over here. And then it's going to
basically ask if you want to use the item, yes. And if you want to delete it
afterwards, it makes a copy. So once we hit Accept, it's going to basically create an alternative
version in here. So it's going to have
generated folder. User, and there you go.
That's the new bridge. And then afterwards, once we
start making warp option, like we did, just talk about
90 degrees, and this is 40. Yep. So we can hit Accept. Afterwards, we basically have a bridge that's also
going to be band. So this one is a band bridge, but the original one that we had is not going to be benda, so that's pretty good to know. So yeah, the other thing is, if you want buildings like
this instead of just having multiple pieces and it can
be quite ed sometimes, what you can do is
you could potentially select all of the assets
of this clock tower. Like, so I'm just
going to show you, but I'm not going to do it
because I prefer this piece to be kept as but once you
have this selected, you could potentially
go to form and you can click Merge and then
merge new object. It's going to delete
the inputs of the item. It's going to create
you that piece. That would be quite a
nice thing to have. It would combine
all of the items into a t, something like this. So it would be if you're making
a larger town or whatnot, it would be easier to
have them controlled. But that's something quite nice. And yeah, that is pretty much
it from the modeling mode. We don't really
need to overuse it. We still have this upper
part to set up and kind of adjust these buildings to
make sure they fit properly. But we are running
out of time, so we're going to continue on with
this in the next lesson. Thank you so much
for watching, and I'll be seeing you in a bit.
124. Scene Composition, Camera Bookmarks and Silhouette: Hello and welcome back everyone to Haunted Street Environment. Blender two Unreal Engine 5. In the last lesson
we got to sell us these lovely free houses,
these lovely huts. I'm going to reposition
it to be a little bit closer to the bridge, and we are going to make sure that they are
rotated properly, so a little bit more this way. So when we are seeing it
from around this section, we're going to be able to
well. Have a nicer view. We don't want this to be
falling into the river, but getting it a
little bit closer is, I think, it a bit
nicer, just like so. Then we should find
ourselves a bit of a longer house, a hut. I'm going to quickly click on one of the huts
over here at the end, click F, and we should be able to locate
this one over here. This one is going to
be used for the front. I'm going to go ahead and just check which one it
is. It's House four. Going to click this, so
we'll be able to locate it. Click back onto the scene and
click F. Oh, that's not it. I'm just going to make sure we click on one of the
huts over here. And then we are able to just drag and drop it just like
so, position it properly. And here we need to
leave some room for, well, like a bit of a graveyard section over here so you can see it
for the background. Let's just make sure
it's not floating, so we're going to push it down a little bit much as needed. There we go. And something like this, I think will work quite
nicely just going to check, maybe a little bit further, just like a little
bit. Not too much. There we go. We got plenty
of space now looking lovely. And we can actually lay some buildings
in the back as well. So the building on the left, we want to make
use out of the one that had an option
for one over here, I believe, we'll have an option to put a sign for
an in for the inn. This one is going
to look quite nice. Alright, so let's see.
This is house free, okay? Go back onto our setup. And we're going to
go ahead and place it out like, outside. We're going to
rotate it as well. I'm going to turn
on the snapping for rotation we can do
a full 180 degrees. And let's have a
look how this looks. We want it to be just by the
entrance, something like so. Just going to make sure that
the positioning is nice. I'm going to turn off the
snapping now and just kind of move it a little
bit where needed. Something like that, perhaps. A little bit little bit
Oh, so there we go. Quite like this
because we have now some space for the
entrance, which is good. Question is, if that's going to be quite as visible
as I'm hoping for. But from this distance
from this angle, we can see that we need to
rotate it just a little bit, so I think that's going
to be quite right. Yep, that is good. And next up on the other side, we're going to use
another hut this time. If we were to check it, we are going to make use out of this little hut over here. Nice little simple setup. So the house one, go
ahead and go back to the setup and place it
over on this section. Like, so let's make sure that the entrance is
visible from this side. We are going to make it very
close to the side over here, going to check out
it looks like from a distance and quick Ofing When we are testing
something like that, we can make a preset
of viewport location. If I was to position
my camera to a general area where we
want the camera to be. We can use Control one, and now it saves a bookmark. Afterwards, we can
click one and we can go back to that saved bookmark.
That's quite nice. And we can do that with
Control two, Control three, and then we would be
able to, for example, if I was to set up
a camera like this, we can click Control two. Then it would save
another bookmark. Then I can click one
and it would go between those two viewport locations,
which is pretty nice. So here, we're getting
it quite close. I'd want it to be a little
bit off onto the side. And the reason being
is that it would give us a nicer
silhouette over here. Then, looking at this distance, I realize that I am
missing I believe I'm missing a chimney. Well, let's go ahead and add it to this building over here. I'm just clicking on
one of the items, we'd be able to add a chimney. And now because we
clicked onto that folder, we'll be able to at the
chimney on top of it. If I was to find a said chimney, we have multiple multiple for them. There we go. This one. We can add it in
nice and simple, and then we can just rotate
attachment a little bit, make it a little bit
uneven, like so. I think this is going to
look very, very nice. Just a little bit, not too much, maybe a little bit
more to the left. Like so. And now
this should be in the same folder
because No, it's not. We're just going to
move it manually. That's fine. I'll
show you another way. We can just right click on item, and we can select
move to Clock Tower. That way, it's going to be now
in the clock tower folder. As you can see, so everything is getting hidden by clicking
this button over here. All right. And I believe we're going to
leave the setup as is just, again, make sure to check the silhouette when
you're finalized it. We have to draw the eye
towards the clock tower. There is going to be a nice moon in the
background as well. All of that good stuff will help us to get a really nice design. We're going to get back in touch with the
composition a little bit later once we start working
with the night lighting. But before doing that,
I'd really like us to go over vertex painting
whilst the scene is still lit up this bright
we will be able to see what exactly we're doing with our well,
additional detail. So that's going to be
it for me for now. Thank you so much
for watching, and I will be seeing you in a bit.
125. Vertex Painting Grime and Stylized Ambient Occlusio: Hello and welcome back everyone to Haunted Street environment, blended to real Engine five. Now, we are going to touch a little bit
about vertex painting. When we import GLB file formats, the materials that we use already come with the
setup for vertex painting. So this lovely masked
material that gets imported ends up giving us
this bunch of functionality. And inside of it, there is a
place for vertex painting, which allows us to get well
additional information. Without it, it wouldn't work. But essentially, the thing that we're looking for is if I
was to open it up again, the one that we're
looking for is basically when we're
mixing up the base color, we are mixing up
with vertex color. And this little node, if
we were to set up with either a multiply or or
overlay blend overlay, if one of those would work quite nicely with
the vertex color. You would end up getting
the ability to mask out the vertex data and use it as a color
information for the base color. You can also use that
for our mask purposes, but we only realistically
want just the color. Oh, what can we do about it? Well, I'll firstly show
you how to use it on the clock tower because these
are still individual items. I would like to show
you the versatility if you're keeping it
as individual pieces, and then I will show
you how to use it if the mesh is already combined or if you're using these
already existing hot assets. Oh, what can we do about it? Well, holding Alt just going to duplicate
this wall because I want to show you how the
beauty of the vertex painting. We can go onto the mesh paint, and we can select vertex color. So this option over here
will allow you to do that. And then with the
selection, we're going to make sure that
the wall is selected, then we can click paint, and it will give
us these options. So we have paint color
white and race color black. Default, white is
not going to do anything because of the setup, it's set up with multiplier. But if we were to change the
paint color to be black, and in order for us to do that, we can click X to switch
between those colors, essentially paint color and Aris color is primary
and secondary color. So we can click X,
you see switching. So once we set this
up to be black, we can then click and hold and you'll see it darkening it up. If we want additional color, we can go onto this button
over here onto this box, and then we can change
the color as well as the brightness or the
value of the option. So we can make it maybe
a little bit more mossy, not completely black,
but just a little bit more for more
interesting look. If it's still a
little bit too much, going to be like so, I
think that's quite allr. Maybe it's a little
bit too green, so I'm just going to
lower that as well. I pick like that. So afterwards, once we start painting,
not enough, actually. Go. Once you start painting, we're going to get more of
a greenish type of a look. Maybe I'll just make sure that this goes a
little bit properly. There we go, more
greenish type of a look. So we don't want this. We
want it to be more darker. And you will see that there
are green dots on the mash. These are vertices. The ones that we
added, the edge loops, if you would like to
see what it looks like, we can go onto the y frame, and you can see that each one of the vertex paint is being
used for vertex painting, which is very, very nice. If we want to delete
it, we're going to be able to use
the white color, which is now white. So using the erase color, in order for us to do that,
we can just hold shift, and we can just hold our mouse. And by doing that, it's
going to use this eraser. If we were to
switch it, however, we can hold Shift and use our
mouse button to paint it. So just be aware that
basically using shift and mouse button will just
do a secondary color. If you mess this color up, just bring this color back
to saturation zero and the value back to that's
going to give you pure white. So by default, it's not
going to look quite nice. And if we were to overdo it, it might not look
quite as nice, either. But what I like to do is I
like to darken around edges. And also, because
of the brush size, we're going to get the back
side as well for that. So that's something
worth knowing. But once we get
something like that, we can hold shift and kind of just lightly erase it,
erase it, erase it. Like, so we're going to
get this sort of a result, which you can see, like, sort of grime at the arts. I'm not quite happy
about this corner, so just tap it again. Going to check the upside. The upside seems to be doing a little worse
than I hoped for, but it's quite right because we can just make
this brush a little bit smallest to not
affect the overside and then tap tap
tap, tap tap, tap. So and we're going to get
ourselves nice little grime. And after we are done, we can go and apply this mesh information
vertex information to all of our assets that
are using this instance. So for us to do that,
we can click on this box over here,
applies per instant. Vertex, call it
two source meshes. So you can see this wall on the right hand
side being normal. But if I was to
click on this and click over right, there we go. We got ourselves the wall done basically for
the upper section, for the bottom section,
and that's quite nice. So by using this logic, what we can do is we
can go all the way back to our placed items
to our placed walls, all of these walls like so, and we can just do
some vertex painting. So the way we're going to do it is going to select these walls. We can even do it all at once. So we can select these walls, so we can go onto
the mesh paint, and to make our lives
a little easier, we can go click paint. There you go. All the
selected walls, you can see, are going to allow us to paint, except for this one because
we didn't select it. You can go back onto
selection if you missed it. Make sure to click on
it. You can also use Control card selects it. And there we go. Selecting it back,
back to paint. And you know what? Let's go ahead and
make our laps a little bit easier
using film mode. So we darken the entire part. Like, so we make sure that the brush that we
have is quite large. You can see that the back sides, the back vertices are also
selected. That's nice. And holding shift, we
can just tap, tap, tap, tap, tap tap,
and there we go. Maybe a little bit too much. I don't quite like
that. There we go. Up. And if you
want more control, you can do that, by the way. In the left hand side, where the size is, you also have strength. So strength can be put 2.3, and then you'll have
a lot more redom and control for these walls. Maybe I should add a little
bit more grunge on the top. I go or something like
that, the backside. Backside also looks right, and then we can just do it
for the rest of the walls. So nice and simple. A little bit of faking of that ambient occlusion
effect or a stylized scene. Very, very nice. There we go. Something like that gives us
a little bit more depth and this one as well, going
to check the oversight. Oversight also looks
quite all right. This one I don't like.
Owner, this corner as well. Yeah, that looks quite nice. And this wall over here, I think that looks quite nice. All right. So now that
we are done with it all, we can again click to MshOrit and I'm hoping it
works for all of them. So I'm going to go
back onto selection, go all the way to the back and check our clock tower. But pink. Yeah, you can see that being applied on
every single point. And if there is some issue
like this part over here, for example, it's
being overlaid, I believe, we can go
back on the selection, move it a little
bit where needed. That's why I wanted
to make sure we have the walls here
to be separate. But even if we finish
it up like this, we have control afterwards as well to add even more detail. So by just selecting the wall in mesh paint, with
the selection, go back to the paint, and you can add
individual detail even after you're done doing
it for all of those walls. But that's quite nice. And yeah, by doing that, you can customize a lot of detail like that. So, for example,
here, maybe we wanted the grunge to be mainly
at the bottom over here, kind of establish certain
bit of an extra detail. We can totally do
so. Also, roofs. We need to give some
love to roofs as well. So let's go ahead and do that.
Going to get some paint. Going to just do do do do,
click, click, click, kick. Old shift click. Click on click. It's some variety in grudges. Keep in mind that
it's also painting on these wood parts as well,
which is unfortunate. But by just having some control, a little bit of control with the size of the brush
and painting it in, so we'll be able
to get ourselves a reasonably nice detail Okay. Actually, we are going to add a lot more
detail in these parts. Let's go ahead and
do that. A little bit more towards a grudge. Oh, I selected F by accident,
let me deselect it. Go. And tap tap,
tap, tap, tap tap. Lovely little
tapping. There we go. Now we're having a
nice little setup. Here as well. Don't be afraid to add lots, lots of grudge. And just stop tap,
tap, tap tap tap. Here, we need to
add it more towards the corner because
the wall itself, the last word somewhere is over here instead of being
distant corner, so just tapping it away would give us a nice little grunge. There we go.
Something like that. So this roof is done. This roof is done, and we still have some extra
parts. So, you know what? We are going to continue on
with this in the next lesson. Thank you so much
for watching, and I will be seeing you in a bit.
126. Advanced Vertex Painting for Roofs and Base Grim: Hello and welcome back everyone to Haunted
Street environment, Blender two and
Reel Engine five. In the last lesson, we
left ourselves off with some lovely vertex painting
process that can be a little bit tedious but also quite interesting
and nice to do. Let's go ahead and work or continue on working
with the setup. I would also like to add some detail to the
roof tiles themselves. Let's go ahead and select it. Let's go ahead and
click on paint and add a little
bit on the roof. So I'm going to make
the brush quite a bit smaller and then just kind of add that bit of a
crunch around these areas. So we can do a little bit larger and just
tap tap, tap tap, a couple of sections
just to kind of make sure that we have
some bit of a variation. So everybody loves
some bit of variation. We have it every once in a
while just a little bit. From a distance, you can
see it looks quite nice. We add it to this section. We can just add it
over here as well, at tap, tap tap, tap, tap tap, maybe a little
bit more grunge over here. Since it's closer to the wall, we might need that bit
of an extra grunge. Like, so don't be afraid to just tap around and
if you see from a distance it kind of looks
a little bit too much, you can hold shift and
just kind of undo it. Like that. That's
quite right over here. If you also want to see more in terms of, well, the color, we can go on to UnlitVew
and that's going to allow you to see a little bit better on where
that grudge goes. That's quite nice. So just, you know, switching
around between those two modes might be
the best option, honestly. So a little bit too much. Nothing like that will do.
And a little bit over here. Don't forget next to
the chimney as well. That would be quite
a nice detail. And I think I'm quite
happy with this design. Now, let's go ahead and continue adding a little bit more of detail
throughout the section. This part of here, for example, I would really, really
like to add even more. But let's go ahead and do that. Just a little bit of tapping, playing around with the
colors every once in a while, just make sure to go onto it mode just to make sure
that with the lighting, we're going to be able
to see more detail, all of that good stuff. Also, our thing, we can right
click on an entire folder, select all descendants and then with the entire
selected house, we can go on to paint,
and we can do all of the beautiful type of
variation painting. So maybe this part over here, for example, could use
a little bit of grunge. We can just paint it in. Like, so we can
darken this part, since it's like in
the back the walls. I don't think we've done
the walls, actually. We're going to go ahead
and do the walls now. Let's go ahead and
find it back in our play testing area with
these walls over here, we have not done them,
so let's go ahead and definitely add some grime, some little bit of
darkness to them. Mesh paint, vertex color paint. And once we click on paint, then we're able to be clicking
on fill, and there we go. Then with a reasonably
large brush, we're just going to tap tap tap, tap tap tap, and there we go. Just kind of hiding some of that part. Maybe you know what? Maybe the green, the green is definitely not the right
Let's make it more yellowy, less saturated and darker. I think that's
going to be better. Yeah, default like this,
much, much better. Otherwise, it looked
a little bit too, I don't know, too
odd, put it this way. There we go. We're just adding
some lovely little detail. Yeah, the back looks quite nice, as well, maybe here
it's not quite as nice. But yeah, all in all,
looking good. Alright. So once we have
something like that, let's say we can finally do
two mesh option override. Let's go back to our lean area, and let's see how this looks
like, Oh, looking good. I think this is
looking very nice. This one might need
a little bit more. Let's go ahead and add
some bit of an extra. Just to make sure we have
lots and lots of detail. And speaking of detail, it would be good if we add some grime for the base as well. That always helps. So let's go ahead and make our
lives a little bit easier. We're going to grab all of
these parts folding shift, bom, bom, bom, like that. And this part, I think this
part was also here, yep. And we grabbed most of it. I think there might
be a wall over here, but no, going to oh. Going to click control that
do the selection. All right. So with this selection, we can go to the
vertex color paint and do some bottom painting. So over here, we can
just step to top dp pop maybe a little
bit larger brush, we tap it in and then holding
shift, we just tap it out. And that way, we can control
a little bit of gradient. The gradient is
working quite well because we have the
fall of one by the way. So we had that to
something less, maybe it wouldn't
work quite as well. But I think with one, it gives us a nice
ability to control the hardness with the
control of strength of 0.3. When tapping, we're
able to get nice a little bit of contrast
for those parts. So here we can just over it, like, so a little bit too much. You know what? These parts
look already pretty good, I'll be honest.
Already looking great. There we go. Nice little
bit of an extra detail. Then the staircase, of course, we can do that a
little bit as well. So with the staircase, we can just put in a
grime route the setup, and then we can just hold shift and kind
of tap tap, tap, tap, tap tip top tip top and untap some of that
unnecessary rime. If something like that
we do us quite nicely. Just like that. Maybe
a little bit too much. Maybe we can lower
this down because these are so much lighter, we can keep it as it is. And what I think it's a
little bit too much, still. There we go. Something like that is going to make it look
like a little bit dusty. And this dow this section has no no parts
that are darkened. Let's go ahead and fix that. We're just darkening it into part and then kind
of, like, undoing it. Doing the same for
our side as well. You know, we can just set
it up on multiple sides. And then holding shift just
kind of to take some off. So, there we go. Nice bit of grunge. I love
the way it turned out. Looking very good. This part
over here is not so good. Actually, select both of them. We to add some bit of
grunge in the corner, a little bit at the bottom, making sure we have some
lovely little setup. Okay, so now I am pretty
happy with this result. We can carry on and add some additional vertex painting onto the rest of the huts. So we're going to continue on
with this in a next lesson. Thank you so much
for watching, and I will be seeing you in a bit.
127. Efficient Vertex Painting for Stylized Hut: Hello, o and welcome
back, everyone to Haunted Street Environment. Blender to Real Engine
five in the last lesson. We left ourselves off with
some lovely vertex painting. We're now going to continue
on with that setup. And get ourselves some
additional detail for the other buildings. Let's go ahead and start
with this one over here. We're going to start off by having a larger brush this time. We're going to tap it
everywhere, like so. Actually, you know what? We're going to do the
same method as we did for the stonewalls. We're going to just
simply click on fill. We're going to fill
everything in, and then we're going to walk backwards because it's
just one entire mesh. It just makes it so
much easier to do that. Going to make the brush
a little bit smaller. And I am going to work
with fall off this time because it just helps us
to speed up the process. So we're just going
to tap tap tap in areas where we need them. I'll be brighter. I know that
previously for the walls, we used more of a
greenish tint over here. But I think for this, it's also completely acceptable
to just have it, like, so just having variation
over here is good, like so and not too not too
bad. Not too bad, I think. And also go into unlit
mode so we could have a perfect knowledge of where exactly this
needs to be going. Like, so a little bit over here as well, over here, over here. And just quick taps, quick and simple taps. Lots of clicks. I don't
know if you're able to hear my amount of clicks that
I do with the mouse, but it's a lot. And then afterwards,
let's go ahead and just try seeing what we can
do about this staircase. So we're going to darken this section a little more. We're going
to make it smaller. We're going to tap tap
tap, tap tap tap in areas. Then next to the
staircase over here, we can just make it to smaller and tap tap tap from
the top a little bit. So and it should give
us hope it should give us something that's a little bit closer to darkening
at the bottom. So in these crevices,
hopefully, if not, we can just tap it
manually like so, and we should get something
that is reasonable. Like, so you can see,
like it highlights a little bit those steps, which I think is quite nice. Taps, reasonably small brush. And something like that
we do white nicely. Alright, so this is, I think, white, reasonable, maybe
this going over here. I'm not quite happy. It
was this part over here. I need to make sure that you have some texture visibility. The rest is, A, okay, maybe this one as well.
Now that I look at it. All right, so this is good. We can now go ahead
and go on to it Mode. If you like, if you'd like, feel free to use
to mesh, as well. If you're going to reuse
this hut or multiple places, you'd have this already built in and this vertex painting
already built in. Actually, I want to make
sure that we also have some painting on the Oh, sorry, vertice
color there we go. On this chimney.
Chimney is important. We need to have lots, lots of nice variants
for it. There we go. And the upper section can
be a little bit darkened, then we can just kind
of brighten this up, so it's going to
look like the area at the top is going
to be darker, which I think is going
to be quite nice. All in all, it's looking
good. All right. Next up, this
building over here. Let's go ahead and continue
on with the process. We are going to grab
ourselves paint, fill, and then we'll be
able to start doing this lovely little process
that we just been doing. Tap tap, tap, tap, tap tap. And I would say it's quite nice. Just make sure to get
some grange at the base, make sure to have main texture visible in the
areas in the center area, and the rest kind of just gives a little bit
of an extra depth, I think, and just a
general variance. Over here, we can just
remove this part. Here, we need to just make sure we have something as well. Voice going to be
looking too dark. A little bit over here as well. And I think that is, let's let's not miss this part. I think it's quite important
to have something here. There we go. And that's looking I'd say that's
looking quite nice. I'm happy with this result. But let's move to
the second one. Let's just have a
quick look around. Yeah, it looks it
looks quite nice. So next up is going to be let's go for
this one, actually. Let's go ahead and select this. Go back on to paint. Fill and ten. We are going to tat
tap tap tap, tap it around it mode maybe a little bit easier
for this particular part. Top top, tap tap. A tap tap. Again, also, you know, feel free to play around
with the coloring textures. You might find a
nice little setup. Maybe if we were
to create paint, that's a little bit more
green. That's pretty good. And since we're
talking about paint, Unreal Engine 5 now has a nice little introduction
for color options. So these at the bottom. Will show the reasons. So over here, you
can see reasons. You can also create a theme. We don't really need to do that. But basically, this would
allow us to go between our older and newer
paint color picks. That's quite nice if
you choose to use that. But I don't think personally, I am going to spend
too much time with this because I think it's already shaping
up pretty nicely. Let's keep in mind
that we're also going to be having a dark scene, like, a very nightly
type of scene. It's going to hide a lot
of detail on texture, and there's going
to be some visible, but the light is going to be attracting the
attention to the eye. So something worth considering. But yeah, something like that
will be pretty good for us. Let's not forget the chimney. I think this chimney needs a
little bit of an extra work, something like that, perhaps. It's quite right.
Maybe dark in the top. And then Yeah, something
like that will do. Actually, this part over
here to darken it, very, very much there we go.
Yeah, looking nice. Alright, next part is going to be these
buildings over here, but we are running out of time, so let's go ahead
and continue on with this in the next
lesson and then just spend the whole lesson just finalizing these huts over here. Thank you so much for watching, and I will be seeing
you in a bit. Mm.
128. Refining Vertex Paint and Night Scene Contras: Hello. Welcome back and front to
Haunted Street Environment, blended on Reel Engine five. In the last lesson,
we got a self some lovely little lecturing
done for these huts. And in comparison, I'm
wondering if it's not too dark. I am a little bit worried.
Let's have a look in the mode. Honestly, I think it's okay. I think it's going
to be alright. Worst case, we can come
back to it and fix it. But all in all,
it's good. I'm just worried about this
window especially. So real quick, I am going
to go ahead and fix this, actually, mesh paint, paint,
and just holding shift. I'm just going to remove
the part because it wasn't giving off that
same glow. Now it's fine. Alright. Next sp is
these buildings. We can go ahead and select
all of them at once. I think it's going to
be right worst case, we can just select
them individually. Vertex color paint, and let's
go ahead and fill them in. Then we can select large brush and just tap
tap tap, tap, tap tap. Kind of untap it. Maybe it's a little bit too large of a brush. So nice little undoing part. There we go. And then some for
the hot as well. This part and this part. They are turning out why nicely. All right. A We're just going to make sure that
every single part has its own unique detailing, making sure that the windows
are not overlaid with color. That's good. Here we can add a little bit.
I think that looks good. I'm going to tap on
this roof, of course. You can go into NIT
mode just to make sure that the roof has
lovely texture. Tapping on a chimney as
well let's not forget that. The chimney needs to
have its own coloring. The windows need to be
clearer a little bit. There we go. Something
like though. Like that will do the trick. Though, these are a
little bit too much, I think we can just
tap on the coloring. I think that's good.
And all in all, I think that's I think
that's pretty good. Maybe this one over here
was needed for the wall. Yeah, we just went over all
of these buildings like so made sure that everything
is nicely painted. And now, and just make
sure that the entrances, for example, have some
bit of an extra depth. So just darken it
completely and just kind of slowly tap it out, you'll get this walkway effect. Here, we're just going to
remove these lines as well. And that way, these staircases
will have more depth, maybe a little bit too much. But you can see the effect
this has. Just like that. Don't forget to add some
on the door as well and do that into add a
bit of an extra detail. Here, perhaps is also needed
be darkened and the rest, I think, is looking good. We can now add a little bit of an extra taps at the base as
well. Let's not forget that. We can darken these parts, so it's going to look a little
bit nicer with the dirt, the ground, all of
that lovely stuff. Like, so and let's have a look. Do we need any extra detail? Well, we can. We can add that. This part, especially
because it's going to be so close
to the focal point, I'd like to ideally add
a bit of an extra over, like so, and I'm going to
make it smaller and just make sure I remove it from
this part itself. Now, I can't remove this, so I'm just going to go ahead
and just remove it like so. And the chimneys as well,
let's not forget about them. And just a little bit of an extra with a smaller
brush, looking good. Bit of an extra
over here as well. There we go. Looking
pretty good. Alright, so I think I think that's pretty
much it, actually. I just want to maybe
retouch this part over here again because I do think it
is a little bit too dark. I think it's a
little bit too much. Going to just tap
on with a shift. Make sure it's not
overly too much. So as I think it was looking a little
bit too dark some spots. And now, I think it's
looking very, very nice. Yeah, I comparison,
Looking back, it was, I think, a
little bit too dark. So now we are good to go. And let's go ahead
and click Shift and as to make sure
we save everything, and that's going to
save an entire project. And yeah, in the next lesson, we're going to continue
on with the project. Thank you so much
for watching, and I will be seeing you in a bit.
129. Cine Camera Setup and Atmospheric Night Lightin: Hello, and welcome back everyone to Haunted Street environment. Blender on Real Engine five. In the last lesson,
we left ourselves off with the lovely setup
with the vertex painting, and all of the buildings
are looking nice. I think at this
point, we can finally start just placing the camera, getting the lighting
properly set up, and then we can focus
on smaller detail. But let's go ahead and
do that right away. We're going to go ahead and grab ourselves cinematic camera. So if we click on this button, we can just look for camera, and it should be
cina camera actor. Let's drag and drop
it into our scene. And if you're not
seeing the camera, click G, you should be able
to see something like this. And you'll be able to then
rotate this 190 degrees. I'm going to click Control set actually and use
the snapping mode. There we go, and how we can
turn it properly 180 degrees. And you'll see on the
bottom right hand side, we'll have ourselves the
preview of this camera. This is going to be quite performance heavy if you're
having multiple objects. What I would recommend
you do is just click on it mode and select
unlit this way, even with the scene. Being unlit on camera, you'll still be able to properly visualize what it looks like
with the full lighting. So it's not going to make use of viewports with
multiple lighting, and it's just not going to be quite as costly for
the performance. Next up, with this selected, we're going to
reposition our camera, and you'll notice
that in comparison to what camera sees if I was to
position my camera like so, and what we see is a
whole lot different. And the reason for it is
because the focal length makes more of a zoom
in effect. By default. In a detailed step, there is
an option to change that up, so current focal
length over here. If we were to lower this down, you'll see that it
starts bringing the FOV onto our setup,
which is pretty nice. What we want to use
here is going to be 25, like so, and we want to
keep current aperture 2.8. This should give us a
nice result by default. You'll notice that this
option, by the way, is not able to go any other way. And the reason for that
is because we're set with universal Zoom that
gives us limiter, certain limiter,
but that's right. The default setting
is quite right, but just letting you know if you want to go to extreme values, change this to custom and
you'll have more control, more freedom to play
around with the values. Thing that we want, though, is we want to go on
to focus settings. We want to turn on draw
deep bug option over here, and this will allow us to see a plane if we were to make the
setting a little bit less, so you'll be able
to see this plane. This plane shows where
the focal distance is where it tries to
focus the camera on, and it's quite important
to get a nice scene. So before doing that,
let's go ahead and reposition our camera
a little bit more. We're going to
make sure we well, let's go ahead and
turn this off maybe before we position this. So what we want over
here is we want to make the camera look straight
into this view. So I'm just going to
slightly reposition it We want the clock to be
more on the right hand side. So we're going to just move the camera a little bit
like so. Let's have a look. We have something like this. There we go,
something like that. This would be much, much better. So an angle, little bit a
bit to the left will do. And something like this a
little bit more to the left. Just making sure
that the roof is not being cut off with an
angle here being seen. If, by the way, you want
to make some adjustments with the positioning
and whatnot, you can click on the camera. You can click on this
button over here. And then when you click
off on other objects, you'll be able to see that, A, we are still having
this camera preview. So it's very good to have that. That way we can maybe, you know, bring this out a little bit, bring this in, have a little bit tweaking, things like that. The scene. And all
in all, it's good. Then we can go back
onto the camera, turn on this debug mode, and make sure that our
focus is placed over here. So it's like in the
middle of this building, maybe a little bit
more to the back. Even though our focal point or main visual is the clock tower, it's important to
have these eyes being the focus in camera. Is going to give us a nice juxta position,
and just overall, I think it's going to make it like a nice scene as a whole. Um, so I think this kind
of a setup is quite right. Then we can make some
final adjustments. So, for example, this
bridge over here, I'd like it to be
slightly rotated. So I'm going to turn off this and just slightly rotate it. So that way, from the view, this path would be
more opened up. Something like so, making
sure that there is a path over here as well. A
little bit too much. There we go. I'm
quite happy with this result in terms of
this house over here. Is it a reasonable
amount? I think it is. I think we can leave it as is then maybe the clock tower and these parts might need to go a little bit
more to the right. This can be definitely
opened up a little bit. We can move it a little bit. That way we can see the door over here, which is quite nice. It's going to be
blocked off a little bit with additional
symmetry items, but it's still, I think, just opening it up. Is
going to be quite okay. Also, the silhouette kind
of brings it in a little more or the clock
tower, like so. And yeah, now I'm pretty
happy with this result. We can move on to the lighting. Now that we have ourselves
the basic camera, we're going to be good to go. We're going to for ease of use, move this camera
actually to lighting. So move to lighting. So when we're doing
all the editing, it's going to be found over
here. So that's quite nice. Then next up is we're going to play around
with the lighting itself, but before we do
anything like that, we're going to make
sure that we have ourselves a nice little
setup for the exposure. Right now, it's way too bright, way too much in
terms of the setup. We need to make sure we
make it a night scene. The night scene
needs to have some, well, different bit of control. If we were to go
back to it mode, I'm going to take off the camera so we don't really have to see
it at this moment. Uh, the first thing that
we need to consider is the light source of
the direction light. This light source can
be controlled with control and L and moved
around like this. So if you go up and down, we can see the sun is
being switched around. We can also go left and right
to control its direction. So we're going to position
this let's have a look. It's going to position
this with rotation of they're a little bit higher up around -23
in terms of Y axis, you can have a
look at the bottom right hand corner over here or my exact coordinates,
my exact rotation. And then in terms of rotation, I think something like this, maybe a little bit
more to the right. I'm going to go back
where this gizmo is inside of the part. So yeah, this is a
little bit too much. We're going to make
sure it's facing a little bit more towards us, so I'm just going to
rotate this until we get something more like this where the shadow is
hitting it off on the side. We're also going to
have a tree over here that's going to hit us with some very nice shadows on the pavement over here
once we are set with that. But overall, a shadow
like this is great. We are later going
to play around with additional light sources to make sure we're getting some
creative freedom for that. But now if we have the
position in this area, we are going to make sure we are in a
directional sunlight. We are going to search for sun, and there is an option
for atmosphere sunlight. We're going to turn this off which seems like it turned off the whole sky,
but that's okay. The reason this is happening is because we want to make sure that the sky light that we're
receiving it from here, it's not showing
the sun over here. So we really want to make sure
that the sun is disabled. By turning this off, we
are able to do that. We'll have more paradive
freedom over the entire setup. Of course, we want to have
some gradient in our scene. Go to search for
volumetric, volumetric fog. Once we enable this, you'll
see this type of result. The reason this is
looking like that is now it's giving us volume, volumetric type of fog, which reflects from
direction light and in turn gives us,
well, this kind of a look. So it's looking a
little bit better in comparison to the
black background, but we're still not quite there. Firstly, I'd like us to go on to the density and
change this value up. We can change it to
be completely foggy, but we're going to use the
value of 0.3 in this case, and we are going to change up these couple
of values over here. And scattering color
will allow us to well change how much of the coloring is or the
overall parameter color. We want to be somewhat
bluish and darkish as well. The darker we make it, the less of an effect
it's going to give us. But also, we're going to have some nice ambient lighting
coming from that volumetric. So we want to be
something like this, maybe less saturated. This value over here,
that's going to look good. Then afterwards, we have
sky atmosphere ambient. We have this option
which will allow us to. Well, it's some bit of an
extra or in the background. We're going to make sure that
this is quite saturated, something of that
amount, that's good. And then next up is the fact
that it's very, very foggy. The reason this is foggy is
because we're also going to be changing the lighting
itself as well. Right now we're using the
intensity of a sun skylight. The six Lux is quite a lot in regards to the entire setup
want to be much, much lower. The moonlight is actually
much lower of a skylight. So by putting it to 0.3, we're going to be able
to lower this down. Of course, it's still not
quite there with the setup. And the reason for that is because we don't have control
over how bright it is. Even though we're changing
the lighting over here, you can see, it goes from like super
bright to super dark. If I was to change it
to something like 0.1, darkens and then brightens. The reason this is
happening is because we need to set exposure
mode to be different. Right now, it's trying to fake an eye adjustment
for the exposure. But in order for us to fix that, we are going to go into here and search for
post processing. Post process volume will help us to grab the exposure manually. We're going to put this
box over here that way. When we want to, for example, make some adjustments
from the camera itself, we can simply click on this box, and then it will bring us
to the post process volume. We're also going to put
this post process volume to lighting folder to make our
lives a little bit easier. And then the next
part is going to be with this process volume. We're going to search for infinite Infinity,
extend, unbound. We're going to take this
on, so it's going to affect the entire scene,
not just this box. So technically, we
could make this box big enough, and then afterwards, it could only affect that area, but we won't affect
the entire scene. And then we are going
to search for exposure. Exposure will allow us to
change the exposure type. We can set it a manual. And we are going to use different option
because as you can see, it's now turned
completely pitch black. So by changing this
exposure compensation, you can see we're able to
brighten this scene up. So we can use a value of 11, and it's going to
give us this nice, moody type of a look, which is exactly what
we want with the setup. Now we have ourselves very, very atmospheric type of look. Of course, it's not quite
done with the setup because we still have a
bunch of things to do. So we are going to continue on with this in the next lesson. Thank you so much
for watching, and we'll be seeing you in a bit.
130. Moonlight Refinement and Custom Starry Sky Materia: Hello and welcome back everyone to Haunted Street Environment. Planet on Reel Engine five. In the last lesson, we played
around with volumetric, direction of the light, as well as turning
on the overall mood. We're still not quite done here. Default lighting is looking
nice for dark scene, but you need to consider the overall akenss
of night scene. Actually, when you are looking into a night
scene in real life, you're not going to see just a white light coming
from the moon, even though it's reflected
from the sunlight. It's going to be slightly
bit of a shift of bluish. It's going to look
like a cold night, the way our eyes end up shifting the light itself ends up
being giving off that blue, huish type of aceta. But the reason for
that is because we end our eyes end up getting
that different exposure, which shifts the overall
look and all in all, short story short, we end up getting more
of a bluish tint. By just shifting that
slightly towards the section, you'll be able to get a
much more nicer blue tint. The other thing that we need to consider is the source angle. Source angle will allow
us to in combination with source soft light will allow us to get much nicer shadows. Right now, if we look at
the shadows close up, we'll be able to, for
example, increase this, and you can see how
much it softens it up. We're going to use a
value of 2.6 over here, and in terms of the
source soft angle, think we can just
use a value of 0.8. That looks good. It just softens up those shadows
just a little bit, make them look well, nicer to the scene. The next thing that we
might consider is bloom. Bloom in the
directional light would allow us to get
light shaft bloom. Once we turn this on, we'll
be able to see more of those streaks coming
from our building, it emphasizes on the silhouettes
of all of the items. We could play around with these. I'm just checking I'm not seeing the
settings that I want. I'm going to turn this
off and just search for where would it
be Light chats? There we go. It's going to
double check the options. So with light chef occlusion, we also have light hafbloom. This is something that we
might want to lower it down to quite reasonable amount. So without this in combination
with light chef bloom, it will give us much nicer of
contrast for the buildings. I think that's quite nice. Then I would also like you to check these
options over here, indirect light intensity and volumetric scantering intensity. These options will allow us to play around with the way
the ambience is working. I think the default
here is fine. I'm just going to check
the extreme values. It's brightening them
up a little bit. We're going to play with
some additional lightings. That's right. This one would allow us to get more
intensity of the fog. It's essentially
a multiplier with the fog for each
individual lighting. The default is good, again, but if it's looking a
little bit too off, you might have a problem
with these two values. Next step is we're going to add some bit of stars
onto the scene. You can see the bit of
clouds that are helping us to break down the overall
gradient of the setup, which is working nice. I'm not going to go
and change that. But what we also need is stars. For stars, luckily, with the default level
comes SM sky sphere, which is going to give
us essentially a mesh, a circular mesh going all the
way around our buildings. And yeah, we're going to
make use out of that. It includes simple Skydome, which is by the way located
in Engine sky folder. If you're not seeing
this, by the way, feel free to just enable or
would it be? Options panel. There you go engine content
and plug in content. Enable engine content
for this one, but plug in content would also
be needed in other cases, make sure you have
both of them enabled. But make sure to never change
anything from those parts because it will affect all the projects that
uses these materials. What you need to do instead, I'm just going to
double click just to check. Yep, it's
the right one. What you need to do instead is basically make a
copy out of this. So let's go ahead and
select this hit Control C. Go back to your folder, which is called content
at the very top. It over here, hit
Control B or actually, let's go on to sky and Clouds. Hit Control in here just to make sure we are a little
bit more organized, and let's hit
Control Shift ins to make sure we save it so
there's no star over here. So now we have ourselves
a material that's not going to be affected
by the setup. And just to make sure that
we're differentiating it, I'm going to change
the name of it to custom custom There we go. So now we can have
that selected click on this button over here and it's going to have this
custom material. Afterwards, we can double
click on it and go into it, which is going to give us
this option over here, and the default setup is great, but we are going to
add something else. Holding A, we're going to
tap here onto the material. Yeah, holding A, click on this, attach the node, and attach
it to a missive color. So now we're able to add stars onto this already
existing setup, all the bright parts
at the very least. So next step is holding T. We're going to create
a texture sample, and for this texture sample, we are going to find
ourselves something called if we were to select it at the bottom left
hand corner for details, we can search for stars. Sky Stars is a lovely
little texture. I'm not sure if it would be visible if I was to attach it, maybe it would be a
little better visibly. There we go. That
is what we'd have, basically. Which is pretty nice. And we are going to
go ahead and use that firstly with a multiplier
because by default, this is not going
to look too good. It's going to be way too bright. We can hold Control and
detach this from Add so and hold M instead and just
multiply the value by 0.1, like so and attach it onto AD. Now, for a quick check, if we were to hit Apply on
the top left hand corner, applies the material,
and now check the stars. We have some blob
of lots of blobs. Obviously, this is not
the intended result because we still
have missing scale, essentially, it is way too much. So what we're going to do
here is we're going to create ourselves texture
coordinate. There we go. Coordinate. We're
going to multiply this by a value of 22 at sorry, 22, 12, and that
is going to give us if we attach it to
information UV part over here, a much smaller amount. We can now hit Apply,
and that is going to give us a nice starry sky. You can see it in the background.
So that's pretty good. It's also going to be
broken up a little bit with the with the volumetric fog. You can see that it might
look a little bit too repetitive without the clouds. But with the clouds, it's going to be perfect. It's
going to be great. It's going to work
very well for us. So now we have
ourselves nice stars, the stars for the background
just to make sure it's not too plain or too empty. And next step is going to
be making sure that we have some nice little
lighting in the background. So moon and some clouds, all of that stylized
lovely stuff. So we are running
out of time, though. Let's go ahead and continue on with this in the next lesson. Thank you so much
for watching, and I will be seeing you in a bit.
131. Bloom Lighting and Emissive Moon Setu: Hello, and welcome back e one to Haunted
Street Environment, Blender to Real Engine five. Now, we were going to work on the moon, but
before doing that, I'd like to sort out a bloom, a little bit of glow
on the windows because this is as good as
any time to do that. We can grab the main source of light, not the
main source of light, but the most use light
which are the windows and use as a base setup for the
glow and then afterwards, we can build
everything around it to make sure that
it looks right. So, for example, what I
mean by that is if we were to go onto our
post process volume, this little box
over on the side, we can find ourselves bloom. So within the post process, there is a bloom option. We're going to make
sure we enable these options like so, so
we can play around with it. If we were to set it to 100, we're going to get ourselves
a flash bang like so. But using a version of 100 is pretty good for starting
point because that way, we can play around
with the threshold, and we can control how
much of a glow we want. So you can see by
moving the threshold, it's going to start picking up only the brightest
light sources. Once we start going past
a certain threshold, it's going to take everything
off because there's not enough nothing strong enough of a glow to give us that bloom, no emission, no light sources,
nothing of that sort. So we need to basically set something up that
would be reasonable. So it would give us
the main source lights of the windows,
something like that. It'd be a little
bit lower, 1.49. There we go. And then
we can change up the intensity to something
more like normal. Let's go ahead and
use a value of eight. So just a little bit
tiny bit of glow. We're going to also add some additional light
sources afterwards. We're only looking
at the glow itself, so we'll make sure that there is a blurrness
on the edges. You can see over here, light kind of glow coming
from the bloom. So using a value of eight
is going to be pretty good. Then we can also
increase the Gaussian. So this is another
amplification. This is specifically
for Gaussian side, that's going to make
that blur effect. So using a value of
1.5 will do the trick. You can now see a little
bit of that glow, which is exactly what we want. But by doing that, with
getting nice windows and all, we are losing some
of the detail from our little fellow over here
from the smiling clock face. We're going to go double
click on the element itself, and we can play around with
the value for emissiveness. So right now the emissiveness
is set to a value of four, which is right. But when it's combined with
glow, from a distance, especially, you're able to
see it with the recording. It basically takes off a lot
of detail doing it this way. So we got to make sure that
we're not losing that detail. By lowering this down to 0.1, we can see that we
basically are turning off that glow with the preshold it's not going to be affected, but we still want to be
glowing it just a little bit, but it needs to be glowing
whilst keeping the detail. Using a value of z 0.5, it's going to give us a
little bit of that glow, but you can see from a distance the readability is
so, so much better. I think it's going to be much, much noticeable
for a focal point. So that's going to be
something that we're going to keep. Next up the moon. In terms of the moon, we
are going to go ahead and get ourselves
a lovely texture that we have over
here in textures. We are going to open it
up, and we're going to see file for the moon. We set a nice moon material. We're going to
create our own one. Let's go into material section. We're going to create
material for moon like so, and we are going to
just simply double click on it and open
ourselves with the graph. In this graph we're going to make some
nice little setups. I'm going to use
this preview plane you can actually see
what we're doing. Let's go ahead and select this option, this
material output, and we're also going
to change from opaque to where to see it. So not opaque. We're
going to change from getting the overlays of the buttons are
getting in a way. So I'm just going to
move it off to the side. There we go. We're looking for
shading model lit. We just want to make
sure that we're not getting any well, shadows, anything of that sort. We just want to make
sure we're getting the plane data of the moon. And we're going to hold T. We're going to tap on the screen, and we are going to find ourselves the texture
for the moon. Once we selected, let's go back and find ourselves
this texture input, liking this button, and we'll
have ourselves the moon. Afterwards, let's go ahead and attach it to emissive color. We also need to make sure, well, the mask is set up properly. So let's go back
onto the material. Let's click on instead of Opaqu, we're going to have a
masked option like so, and we're going to attach
this mask to Alpha. A is Alpha. We're attaching it essentially so RGB would
be the main color output. A is just an alpha, and this will give
us this setup. So lovely little moon. Of course, we are
not quite done just yet because we need to make
sure that this is glowing. It's just not quite the same without the
glow of the moon. So we are going to
go ahead and hold M, tap on the screen, and
attach this to the multiply. We're going to get a nice
little intensity for 20. So you might be thinking,
Hey, it's a little bit too much of a glow because
now it's glowing too much, and you are absolutely right. It is glowing too much, but once we increase the glowinss
of the moon itself, once we get a general setup of how much we wanted
the moon to glow, which was done by the way, with some testing in the
scene, I placed the plane. We're going to get we're
going to get to that point. But I placed the
plane, basically. I played around with
the intensity once I get a moon that was glowing in the right way with that bloom setup that we
have off the windows, I then went into getting a nicer detail
out of the moon itself. In order to get nicer detail, we need to basically double
click on the texture. We have a texture
sample selected, we go on to textures, and
we double click on this. This will give us well, the output for the moon. The moon itself will
have adjustment options. So this will control
well, the brightness. The brightness itself
here is not the same as a missive
multiplier, by the way. It would just end up amplifying
and clamping the value. So it's not the same but we
also have brightness curve. This curve option works very same if you use the
Blender, for example, there are curves
shade in shader mode, RGB curves, and essentially
you're able to use this as a sort of a contrast. If we start lowering this, it'll just basically make
its moving out. But if we start increasing it, you'll get darker spots,
much, much darker. You'll get much more
contrast as you can see. What we're going to do here
is we're going to use a value of 1.5 just to get
a nicer contrast, and you'll see that we're getting more detail
out of the moon. In this section. So
that is pretty good. Not sure if it's
quite as visible, but hopefully it is going to show the extreme there
we go before and after. So 1.5, it is though. There we go. So now
we're also getting that nice little
didle out of the moon whilst keeping that lovely glow. And that's exactly what we want. We're going to close this down, yes, to make sure we
do close it down. And then we're going to
create ourselves a plane, just a simple shape
plane like though and we are going to attach the moon onto our lovely plane. And just drag and
drop it, right? Yeah, we can. There we go. Lovely moon glow that
we have over here. Of course, it's not quite
done with the moon setup. We need to make
sure that firstly, shadow is turned
off cast shadow. We don't want
shadows of the moon. We want this to be just a
plane for the background. And we have now that said plane. The thing is to make sure it's not increasing performance
for no reason. We also need to
turn off collision. Collision is at large scales or background is
never a good sign. It's never good thing to have. Let's make sure
that basically has no collision or
collision preset. And now we have
ourselves a proper, proper real plane for the moon. And what do we do about it? Well, we're going to make
sure we have it selected. Going to actually turn off
the content browser for now. We're going to change
the scale to 1,400. Wow. We have ourselves
a very ominous glow. Lovely. So the reason we're
making this so big is because now we can rotate this with snapping
turned on, of course. We can rotate this and get
ourselves the moon, like so. And now we're able to place
this moon in the back. Spot. I'm just checking if yep, this is the direction
that we're going for. We want this moon. I'm
just going to check. Just making sure if
it's the right way. If it's not, just make sure
to rotate it. All is good. And then we can just
drag it all the way to the back until we get
to a reasonable amount. That reasonable
amount, by the way, should be based on the camera. So let's go ahead and
click on a camera first. We're going to pin this
down, and now we're going to adjust and play around
with the set moon. There we go. The lovely moon
is coming onto our scene. We're going to make sure that it is properly in the right spot. I'm not sure if it
needs to be bigger or smaller with the setup in
terms of the set axis. I think this is quite
the right setup. I just wanted to be
a little bit lower, so it wouldn't have a silhouette that's just barely
touching this roof. We want this gap basically
to be non existent. Of course, it's for the camera
only I'm talking about. So I guess my viewport
is not in the camera. Not going to be there, but
for the camera itself, I am seeing that it
highlights the clock tower, very nicely. So I'm
very happy about that. Maybe actually looking
at the camera itself, need to push it a little
bit more to the left. A little more. There we go. Something like that. I'm
very happy with this result. And, yeah, we got ourselves some lovely, what's it called? Glow bloom effect, as well as we added ourselves
to the moon that works very, very well with this bloom. So yeah, that looks good to me. Thank you so much for watching, and we're going to
continue on with this in the next lesson.
I'll see you in a bit.
132. Translucent Cloud Materials with Glow Contro: Hello and welcome back over on to Haunted
Street Environment, Blender to Reel Engine five. In the last lesson,
we add ourselves a lovely moon to the background. We're now going to
continue on with this setup and make sure we get ourselves some
clouds as well. So for us to do that,
we are going to make a duplicate of the moon
moon two point oh, because we are going to
replace this material. Right now we only
have a moon material. We're going to create
a new material for clouds underscore MM. This means it's master material. Basically just a
normal material. Then we can make a material
instance out of it, so we can put in multiple clouds just
to make it easier for ourselves and to make sure we optimize a little bit for
the performance as well. So in a texture stab, we're going to have two clouds. Both of them just like
the moon has an Alpha. This time, it's not a mask, meaning it's not one or zero. It is a translucency map. So we're able to see
partially through it. There is you can see
transitioning from white color to Black, meaning the black
will not be visible, but the white will
be more visible. We're going to play
around that a little bit. Anyways, let's go ahead and go straight into the material. So Cloud Clouds MM so we are going to hold
T tab on the screen, and we're going to get
ourselves texture sample. And by default, we can just
simply add in our cloud. So I believe we can just search for Cloud actually over here, and we should be able to see
Clouds 11 and Clouds 21. Basically, it's the
texture found in here. And then afterwards to make
sure we're able to reuse it, we're going to right click
and use Convert to parameter. This will make
sure that it opens it up in material instance, basically, sort
of a duplicate of the master material with
exposed parameters. We can call this texture, like so, and now it will be
open in a texture setup. And to show what it looks like, we can connect it to
base color for Sautus, click Control Shift and S.
Make sure we apply it as well. And then I'm just going to move this a little
bit off to the side. Actually, we can use
controlled space. We can simply go to
materials section over here, and now we can click and rate material instance
from it. There you go. We're going to be able to
create material instance. We can just delete
master materials, we just underscore inst, and we're going to create clouds one, underscore instance. Oh. That way, it creates
a material instance. If we double click on
it, we'll see that we have on the right hand side,
global texture parameters. Global texture
parameters will have now textures because we
expose that parameter. We converted it
into a parameter, but will now allow
us to change this from clouds 11 to clouds
21 in this section, and we'll be able to well, change the textures
just like that. If we have more clouds,
we're able to do that. All right, so I'm going to
click Control Shift and S. Go back on the
material incidence, and now we're able to play
around with the setup. First things first
is we need to make sure that this is
same as the moon, meaning that this needs
to be an unlit pattern. So it's just going to give
us pure color output, like so, using control,
we can just move it out. Next step is we are going to make sure that
it's not opaque, but we're not using mass ever. We're using translucency
gray transmittant, meaning that we now open
up opacity override. This opacity overly
will allow us to basically make this transparent
because as you saw, we already have Alpha over here. We can just attach Alpha to opacity override and
we'll get this result. So this is going to
look quite nice. We can quickly check how it looks like visually if I was to replace the material with
the material instance. I'm just selecting this
material over here. Like so, selecting it, replacing it with
Cloud instance, and we'll see that we have nothing because this is
not two sided texture. I'm going to rotate
it 180 degrees, and it's still nothing. So what's going on over here? Going to click F,
see what's going on. And it is not visible. Let's go ahead and
apply the setup. It's still not visible. So what's going on over
here? There we go. We're able to see it
from the other side. I'm not sure why it
wasn't visible before, and we also need to rotate
it 180 degrees like that. All right. So we got
ourselves a simple cloud. Of course, we're not quite
done with the cloud. We have multiple things
to sort out and fix. First things first is we are going to fix
up the visibility. If I was to click one to go
back to how it looked like. Let me just lower
the camera a little bit with the speed. There we go. If we were to have a look at
how the cloud looks like, it is, I think, way
too transparent. So we're going to make sure
we have some controls for the Alpha to bring out that mask a little bit back onto our
cloud to make sure it's, well, just not disappearing as much into this glowing
giant of ours. So how can we do it? Well, firstly, we are going to make use
out of a clamp option, and clamp is, if we were to rightly search for clamp
in a material graph, we're going to be able
to attach it, like so. Will essentially
allow us to clamp down the minimum
and maximum value. So we also want to make sure that this is controllable
through the instance as well. I'm going to hold S. I'm
going to tap on a screen, and that creates a float
parameter ready to go. We're going to call
this minimum, like so. Default value is zero,
zero, like that. Holding S, we're going to
create max value as well. This one, default
value needs to be one. So right now, by default, it's just going to be one, so it's not going to
give us any change. Pam basically brings
out the original setup, and it's going to be
great by default. So we can apply this and see in material instance
how it looks like. We're now going to have
max and minimum values. For minimum and maximum values, we're able to clamp
out the default value. So minimum, meaning the
black value of Alpha would essentially give
us ability to well, take the entire Alpha
out of invisibility. So if I was to put it to 0.5, we can see that this is
bringing back the entire plane. In this case, because the
plane is going to be visible, it might not be quite as good, although it might be
a reasonable choice. The upper value or one
is going to be able to clamp out the maximum
value to a certain amount, so it wouldn't give us these complete non
transparent parts. You can see over
here, there are parts that you're not able to see through the moon
entirely at all. If I was to set this 2.5, you'll see that now these
parts are transparent. So it's quite good.
Extra bit of control. I usually put this to 0.95. So we'd have everywhere a bit of that extra tiny
bit of transparency, just a little bit, not too much, we're able to see the
texture of the moon. Of course, this is not going to solve our problem
for the Alphas. We need to dive a
little bit deeper. So let's go back onto
the master material. And the next thing that I'd
like to add would be power. PowR would basically allow
us to amplify our Alpha. With an option, which is
going to be a parameter. We're going to call this power, like so and apply it so
default value of two. And now it's going to
basically allow us to, well, amplify the entire
setup of this Alpha. If I was to put this
to a value of ten, you can see it
basically amplifies this entire part into
exponential values, which is very good
control because we're able to get some
interesting and unique contrasts. Side of this is that once it
goes past the value of one, it's going to maybe give some artifacts that
aren't really required. So in order to fix that, we're going to use a
saturate value over here to make sure that we don't
have those issues. So right now, we can have a bit of control with,
well, the contrast. So let's make sure we apply
this on the master material, going to the control
shiftingS as well. And now we have power. And with this power, we
would be able to well, get ourselves some nice results where we want to
desaturate the value, lower the contrast of the Alpha, or maybe we should get a
bit closer to the moon. It would be right on our face. Like, so or basically we could put in the contrast a little bit extra to
get sharper results. For this case,
even though delis, we want to make sure we will lower it down to a value of 0.5, so it gives us a nice bit of
a bleeding in on that Alpha. And the rest is going to
be with the Alpha itself. And what I mean by that is if I was to go onto the texture, let's go ahead and click
Control Shift and Ash. If I was to go onto
the texture itself, we have some interesting
options over here. So the option I'm talking about If I was just to make it a
little bit off to the side, we have an option for Alpha. So over here, this
option over here, it's already set to 1.5, by default, it should
be set to one. But if you think about it, the way this works is basically, it checks the Alpha range of this mask, this
mask over here. It checks the Alpha range, and if we were to increase it, it brings that range
past the value of one. So the entire value ends up
being dragged outside of it. And when it's one, it's basically going to
be completely visible. And with that, a little
option over here, we're able to control how much
we want to see this cloud. Luckily, for us, it was
already set to a good value. Maybe we can increase
it to a value of 0.6, just a little bit,
just a little bit. But yeah, by default,
this should be, I believe, yeah, set to one. Now we're going to increase it. And next option will
be to simply add some bit of wave to make
the clouds low because, of course, we want to make sure that we have an option for that. So all we need to do here is just make sure
that the miss of color, just like we did with
moon has a multiplier. This time we're going to use a parameter, call it strength. So strength for the
emissive color, the fault value can
be one or actually two just to make sure that we have initial glow,
then connected. And now if I was to apply it, we can see that hey we have a nice little
glow in the back, and we can play around with
these values basically to get the right result exactly
how we want this to be. I think this cloud
initial strength of two will work
very well for us. Then next up is just going to be creating the same
variant of instance. I'm going to close this
down. It'd be right. Let's go ahead and
click Control **** in S to make sure
it's saved properly. And we're going to
do a right click. Great material instance
again out of this, make sure it's just called
underscore instance, Cloud two underscore instance. Like so. Then let's go
double click on it. Enable those, so we'd
have control where we need to enable the Cloud 21. That way we have a nice
little cloud set up, and we are going to bring this Cloud 21
to this part as well. I'm going to move this
original one to the left, hold alt, move this to
the right, like so. And now we just need to make sure that it is set
with this instance, which we can do it through here. Loud two instance. There we go. Then we'll need to adjust a couple
of extra things. First thing is in
the material tab, we just need to
make sure that this is Max Alpha is at 1.3. If you want more visibility, feel free to have more of that. And now we just
need to make sure that the rest of the settings
is going to be right. So maximum minimum value, we can keep it as is honestly, although the maximum 0.95 98, actually, in this
case, because it's a little bit
different of a cloud. Going to need that.
And in terms of the power, that's how a look. In terms of the power, it can be 0.46. Like so. There we go. It's bringing
out those nice little values. And strength can
also be the same. And I think that's pretty
much it for the clouds. We can turn these off, like so. And let's see how it looks
like from a distance. We can now play around
with them a little bit. So this one can be a
little bit bigger. Unfortunate thing is
when it's at a distance, you can see the scaling is
not really working as well, so we got to do it
manually, unfortunately. So 1,800 perhaps. Let's have a look. Are we
move it in a right position? We are going to grab this cloud and set it a
little bit higher up. We're going to put this
to 2,500, actually. There we go. That's
a good value. We're going to grab our
little camera that we had. Where is the little camera
that we had there we go. I'm going to pin this
down so it doesn't move. Going to grab this camera, going to grab this
cloud and then slightly reposition the clouds. This cloud can be a little
bit more to lower it. There we go, something like so. This cloud can be set to a value of 2000.
Yeah, there we go. 2000, and we can just lower it down till we get this type
of result. And there we go. We got ourselves a nice little composition,
nice little setup. And all in all,
it's looking great. The only thing now
that we need to sort out is if we click F and using our mouse
wheel to scroll up. I'm not sure why it's not
showing up on Hill Hot key. I'm just basically changing
this camera speed, by the way, so we
can go in and out. The thing that we need to do is we need to make sure
that in a detailed step, we search for priority
for the clouds, and we set these translucent
sort priority to one because even though this
moon is masked in the back, sometimes because of a distance, it might overlap and whatnot to try to
optimize the scene. But now we're making sure
that always this will be in the right spot right
in front of the moon. Like, the clouds will
be properly set now. Alright, so that's
going to be it for me. Thank you so much for watching, and I will be seeing
you in a bit.
133. Prop Placement and Collision Setup for Realis: Hello and welcome back everyone to Haunted Street Environment, Blended on Reel Engine five. Now we have ourselves
nice lighting with a beautiful moon. We're going to continue on
with some prop placement. We make sure that, well, we have everything
nicely set up. First things first, we have a barrel and couple of
crates to work with. In terms of the module items, static meshes, we can find
those smaller assets. So crate over here,
let's put it out. And if you are having issue
seeing the entire scene, what you can do is you can
either go to unlit mode, or you can go onto there we
go perspective game settings. If you were to turn this off, you'll be able to
manually say how bright or how dark
you want it to be. So this is just a quick bypass, and that's going to get you like the scene brighter
without actually changing. Then afterwards,
you can click back on this and it'll give you that same spooky lighting.
It's pretty nice. So with this in mind, let's go ahead and
just move some parts. We're going to place
a barrel over here. And a barrel that has
fallen off or rolled over. We're going to also this point, turn off any snapping modes because we're working
with smaller props. We don't really need
that, and it's going to look organic in
terms of the placement. So here, I'm just
going to place these. So that looks right. The next step is we have a crate couple of
crates on the outside. Go ahead and just place
them in here as well. So one could be over here, one can be here as well. Like so. That's
looking quite right. And then we have some great section over
here to work with. So let's find ourselves a
lovely create over here. Place it in this section. Make sure it's properly
on the ground. I believe we can just
raise it up and click or we want to work. There we go. I'm not sure
why it wasn't working. Once I raised it up higher, you can click, and that's
going to place the box lower. Maybe it was because
the collision is within a house a
little bit different. Let me just have a look,
actually, quite curious to see. So if we go ahead and
search for collision, in this section, we can enable
it and see, there we go. Be it was overlapping
with the collision, it was giving us that issue. If we want more
accurate collision like something closer to
what we have over here, what we could do is we could
go into the mesh itself. And we can just make a
different pollution out of it. So if we were to
click on collision, we could see that
we could firstly remove the original
collision because this crater collision
was imported with GLB, just a default type of setup. But if we were to use something called
autoconvex collision, we get this option, and
we could play around with values increasing Hulcunt
Max ul vertices precision. Just by clicking the
default version, you can see that it
changes the amount. We can increase the l vertices. We count. Precision will get
closer to the item itself. But once I hit Apply, now you'll see that
it's even better. And if I were to
increase it even more, we get even better. So yeah, just doing this
kind of a simple setup, give us completely
different type of a look and different outcome. If you're working more on FPS game or something of that sort, you might need to consider that. Anyways, let's go ahead and
turn off the collision here. Like so. And yeah, let's just place
some extra crates. So one crate will
be more like this. The other crate
will be like this, so it's going to give us
a nice triangular shape. Just like so, and then we can also place some
bags on top of it. So let's go ahead
and find some of those lovely bags of ours. I believe this We could
that be? Have a look. There we go. And back. We
can just place it on top. And just move it to the
side and make a duplicate, have a couple of
backs just like that. Maybe the top one can be also squished even to
have some variants. Like so. One is thicker,
one is smaller. I think it looks quite nice. And even just slightly adjust
both of these rotations. Like so. In a way, I
think it's looking good. All right, so now that
we have this setup, we can add a couple
of smaller tools. So, for example, Pix over here would work
quite well for us. Let's go ahead and
do that. Going to rotate it to place
it on the ground. Like, so, there we go. Nice little pickaxe in a
corner, looking lovely. Another thing that we
can do now that we have some quick
presets of the items, we could potentially
group them up and then reuse it in other
places real quick. So by selecting
this using Shift, we can click Control G
and that groups it up. So if I click G, again, you can see that we
have a gray box, meaning that this
is one item now, not one item, but
it's counted as one. So you can see
there is something called on the right
hand side group actor. This group actor
will help us to kind of deselect it and reselect it. And if we were to use Alt G or sorry, Shift
G, there we go. It helps us to
remove that group. So it's quite nice to make quick setups like that
over here as well, I'm going to select
these, Control G and make a group selection. And then afterwards
with the selection, we can hold Alt and we can make a duplicate
to the outer side. We can populate the area
that's over here as well. Doesn't have to be super nice, but you can see how
easy and how fast this entire that up is. Then we can just grab the
upper group that we just made. Move it to the upper side. Like, sew, put this maybe over
here, rotate this around. Get sell some nice little
crates in the corner. Like, sew, and it looks much,
much better in this part, also maybe having some
parts over here as well. I think that's going
to look quite nicely. And maybe one more
part over here. Important to not overdo
it with the duplicates. But if you place it right, I think it's going
to look quite okay. Then afterwards, you can place
the normal ones as well. So for example, this
one great over here, we can maybe place a box
on this side as well. Maybe over here instead. And that helps us to break down that
repetitiveness as well. And honestly, I think that's pretty
much it with the setup. We don't need to overdo it. We can have something maybe on our ends as well if we
wanted to have a turntable, maybe or something of that sort. But yeah, feel free to play around
with some of those props, and we are going to continue on with this environment
in the next lesson. Thank you so much
for watching, and I will be seeing you in a bit.
134. Building a Cinematic Cemetery Entranc: Hello and welcome back. Every on to Haunted Street Department, Blender two and
Reel Engine five. In the last lesson,
we place some of the lovely props
throughout the scene. We're now going to fill
in this lovely space with our cemetery. So let's get into it. We are going to firstly find all the necessary
assets that we need. So we're going to use
these parts over here. Let's just grab them all
at once, place them out, and gather these out so we can see what
we're working with, the type of scale and how it could potentially
look for our scene. Uh, then if we were
to scroll down, you see a couple of
graves over here, of course, we're going to
use a couple of graves. Going to look quite
nice, quite lovely. Go ahead and move
the spars around. Then we have some grave graves themselves properly dug up. This one is a little
bit small of a grave. I am not too comfortable
about having a child sized grave in my place, so I'll go ahead and make
it a little bit bigger. I think that's a
reasonable thing to do. We also have a shovel. Let's
not forget about the shovel. We all need a little tool to make use well
dig those graves. And I think. That's
all we need, honestly. So let's go ahead and start
working with this setup. Firsps first is going
to be the gate. Going to move these to the side. So gate is going to consist
of one healthy looking gate, and the other one that's
not so healthy looking. I don't think we have it here. I'll just go ahead
and try to find it somewhere a miss
all of these items. Oh, there we go. That's exactly
what we're looking for. Lovely gates that
we have over here. We're going to push
them in a little bit. This one needs to be lower down, actually. Go looking lovely. And now, if we want
them to be opened up, we can just position
them like this. We can also, you know, click on the camera and see how it looks like in
our little scene over here. So I'm just going to I know it's a little bit too
small for a video, but honestly, it is so good to have this because we can just move this a
little bit to the side. You can see the highlight over here going to look,
so much better. And I'm just checking how close and how far
we need them to be. I think we can just make
them a little bit further. I think this space, this amount of space will be just right. So let's go ahead and
continue on with the setup. Next up is going to be well, placing all the
little parts in here. We got this broken piece but we also should have a
non broken piece. Let's see where is it. I might have missed
it. There we go. That's the entire chunky block
that we were looking for. Firstly, I think we can use ourselves
this part over here. I'm going to move these parts
a little bit after this d. Don't worry about
them just yet. This part can be a little
bit place like so. We can also at this point,
figure out how it's going to interact with the bridge
over here as well. So I think at this
point, we can make a duplicate can make a duplicate out of this and just place it in the last position where we want it to be. And afterwards, we can
just organize our setup. So we want this to
be realistically no gap for people to go through. And also, let's make
sure to look at the camera actor because it will give us a nice
visualization. Okay, so something like this
will give us a nice set up. We can reckon we can make a duplicate and make
a gate out of this. But the question is whether
or not we want to have two gates or one in this area. I think the answer is, maybe we should
have a broken one. Because why not?
Because I think we're going to add a little
bit of an extra. So, there we go. It's going to be broken
in a little bit. Next to the water, you know, maybe some corrosion
from all the chemicals. The glow that we'll have later, it's going to make sense. All right, so something
like that is looking good. I'm just checking for gaps. I'm not worried about
whether or not, you know, it's too
straight or not. I think it actually works out
even better in this case. So I'm quite happy with that. And then if we want no fence
at all in this section, we can just have it
something like this, make it seem like it's completely broken
down in this section. Being like that will be
pretty cool to have. That's a nice looking
setup, looking pretty good. Now we can populate our entire setup of
the cemetery itself. Which is not going
to be too much. We're just going to
grab this large grave. We're going to put it
just a little bit off to the side over here, something like that, literally
next to the entrance, going to look quite nice if you look at the
camera over here and also we like to see the shovel being visible
through the gate. So again, I'm looking
at this angle. You can see it
through here, like it off at the visibility. Also, I'm not quite happy
with the way this is, actually, I'm going to
rotate it a little bit. It was facing straight
into the camera. So it looked I think it looked
not as good as it should. Going to rotate it just a
little more. There we go. And now we're just
going to make sure that this is properly adjusted. A little bit too much, actually. So I think what we can do is
slightly reshuffle these, make sure that they look
in part with the section. Bit to the back,
quick little shuffle. This one can be a little
bit closer because it's going to look like it's
part of this setup. And because of that, this can be rotated and fit into this. There we go. Nice
little adjustment. So it looks also rounded
off a little bit more. I think I'm more
happy about that. So going back to the shovel, let's make sure it's rotated nicely and a little bit
to the back as well. And it's going to look
like someone was trying to do something
interesting in here. So maybe a little bit
too much rotation. So I'm going to check from
the back how it looks like, and a little bit
more to the right. I'm going to also go to
the world transformation, and something like this
will do the trick. Alright, so next up is
just going to be placing a couple of gravestone items, so a little bit of this and a little bit of that
something like. So can be over here. We also have to make sure
we leave some bit of space for our lovely tree
and slightly rearrange some parts if needed
for that because having a good tree is definitely going to help us out later down line. But these parts are
really, really nice. So we don't need this,
actually. We can delete it. And I was looking for
this part over here, which can be placed
over like so, and I believe we are
still missing one grave, so I'm just going to check real quick where that would be. We had, like, a broken one. This one over here perhaps. Yep. And there is another
one, actually, this one. Yeah, that's the one
I'm looking for. That's the one I want it
to be at the very end, it's going to be broken off. Also, we are placing now
just general setups. And what I mean by that is we need to offset them
a little bit as well. So we're going to just
slightly rotate it, make sure they're not
perfectly centered. And here is going to be
the other ago grave. Other ones are going to be overgrown with
vegetation and whatnot. So I'm not too worried about it. I have it like
this a little bit. We're just playing with the
rotation at this point, making sure that they all look a little bit of
centered, offset. Something like that. And it's going to check from a distance without
having it in the corner. How does that look? Lo right? Think it looks reasonable, except we can have a couple of gravestones a little
bit closer to this part. So just a little bit
closer. No, maybe. I think I think that covers it. I think that's good.
Maybe a little closer, though. There you go. The entrance. Alright, so that's going
to be pretty much it. We again, still going to have
a tree section over here. We still have a lantern space, and we're going to work with all of that in future lessons. Now, though, thank you
so much for watching, and I'll be seeing you in a bit.
135. Fixing Landscape Materials with Nanite Displacemen: Hello and welcome back around to Haunted Street environment, Blender to Reel Engine five. In the last lesson, we left ourselves off with
this lovely symetry. We're now going to continue
on with the environment. And this time, we're
going to finally touch up on the landscape
material itself, because right now,
as you can see, we have all the checkerboards. We need to make
sure we fix that. In order for us to
do that, we are going to go on Torconda Browser. We have ourselves a folder
called a landscape material, and within it, we have
ourselves material Setup. The setup is relatively simple. We have ourselves basically
couple materials combined, and those materials will include just wanted to
show you cell bombing, which we're going to
touch up in a bit, as well as some controls
for height displacement. But that's just going to be
for one of the materials. So without further two, all
we need to do is just set up a material instance out of that. We're
going to right click. We're going to create ourselves material instance
just like that, and we got ourselves this setup. Now, if we were to
click on the landscape and find it in details out
of all of these items, I'm not going to look
through all of that. We're going to just
search for material. We're going to find ourselves a landscape material
section over here. Let's go ahead and just use
this material instance, replace it into this section. And by of all, this is
what you should get. You should get yourself
completely pitch black setup. The reason for that
is because, well, first of all, it
has no information. And secondly, we need to
make sure we have weighted information or well
painted material. We're going to get into
all of that in a bit, but right now we just need to double click on the
material instance, and we need to fill in
some of this setup. So for the base material, what we're going to use is we're going to use the
textures from here. Um, these textures are basically we're going to have it within the
Unreal Engine itself, within the project I gave you, but they are basically the
same ones that we had, except for stone block tile which has height
variation as well. We'll be able to make use out of nanite to make sure that
this is properly set up. So base material,
we're going to make sure that we have
a dirt selected, and we're going to just
enable this or dirt and change up this dirt
to have base color. Then we also have
normal and roughness. We're going to make
sure that normal and roughness is also set. So we can use this
one over here. The reason we can use this texture is because
when GLB was imported, it combines the
roughness metallic, and I think that's it. Roughness and metallic into one. So we have ourselves this type of panel
and green channel, and blue channel will
be black because this is the metallic doesn't
have any metallic. But it's quite a nice
little functionality. Next up, we have
an extra material, so we're going to go ahead
and add that in as well. So this is going to be or tiles. This will have displacement and normal and
roughness, as well. So let's go ahead and
opulate this that also displacement is the
height and then the roughness, as well as a normal bales. So and should be right. This will also be
dirt or the grass. We're going to use basically the same material we can play
around with the UV values a little bit afterwards and get ourselves a little bit
more variation out of it without needing to spend additional resources for
calling out a new texture. There we go. And then we have
ourselves slope material. So slope material will work
with the grass material. It will be the base color will be this one
over here chipped. Go ahead and use that. You
also have displacement, which honestly we
can make use out of the same option or
a stone texture. Going to give us a little
bit of an extra noise. I think will be quite right. And then we have normal roughness and
leave it rest as it is. So normal and roughness. So this should give
us the right setup. I'm just going to double check the master material just to make sure that the GLB
is properly attached. Always paranoid
about that stuff. Just want to make sure that we have ourselves the right setup. So roughness comes from this texture and it's going to be masked out only
for the green color. So the green color is this value we here, so
it seems to be correct. All right, so I'm
happy about that. And yeah, let's get
right into the setup. We now that we have this
pretty much set for us, we can hit Control Shift
and S to save it out. We can close this
down for now and we can go back onto
the landscape mode. The landscape mode
will allow us to have paint section over here. We're going to make
sure that we have a layer tab selected. And then we should have ability to create layers
from assigned materials. Once that's been clicked, you should be able to
see these three layers. So we have the grass
material, as we had before, the extra material real for the pavement and
the base material, which is another
version of the dirt. So we're going to
firstly make sure that we autofill target layer setups, and we can just click
assigned layers only, and this should give us
weighted information, which it doesn't seem
to do on layers? No. Okay, so we're going to
do it manually it's right. We're going to click on
this pattern over here. We're going to just use
the default given setup, which would create a new folder
for seeing shared assets, and it's going to
create layer info. So that's going to be the weight information for the setup. And then we're just going to do it for every
single one of those. Going to go back and click
Pleas and blow over here, save and one more. Just like that. And now you can see that we have a landscape, a layer information,
meaning that now we can use this to paint
in the information. So by default, it's
still going to be black because it
has no information. We can select the
grass material. We can right click and
we can use fill layer. This option over
here we'll paint in the entire setup and you
can see the way it looks. Now, one thing that you might need to be
concerned about is the height difference because this landscape will be
using displacement, it is essential that we see how it behaves with the setup. And for us to make use out of the displacement
with the nanite, we need to make sure
that firstly the material that we
have al settings, this has Tesslation enabled, so it should be
enabled, as is asation. There we go. Enable Tesslation. So this button
should be turned on. To make sure that
when we get closer, basically creates
that extra detail. Then next up, the landscape itself should have
nanite enabled as well. So once you search for that in the details
for the landscape, you should be able to have
this bottle over here, enable landscape, and then we can build and after we build, we can rebuild the data, but we'll get to that in a bit. So once we click Build data, it's going to give
us this result. So now, it's going to be
quite right with the setup, although it seems to be
giving us some odd shadows. What's going on
with that? I think it's just a little bit of a bug. We can probably click control. We can go back onto
selection mode, click Control L
and just slightly. Oh, if we were to have
direction lighting, so Control L doesn't
seem to want to work. I'm just going to check
why that's the case. So in lighting
direction lighting, and it doesn't want to
rotate. So what's going on? Going to adjust it a little
bit and there we go. So yeah, I'm not sure
why there were glitches, but just by adjusting
this is quite right now. And yeah, next up is
going to be, well, checking the material itself
in material instance. If we have any issues with the material itself
being offset too much, let's say the displacement, the default
displacement is gray, so it should be neutral value. You can see that the
displacement value is 4.5, it shouldn't affect
the landscape itself. But if you are deciding to use some sort of a
displacement or whatnot, that's custom to the material,
and you're using that. You might want to enable this
and just adjust this value. You can see that if I
was to click Set one, you can see that it
raises now the setup. If it's going to
zero, it goes down. Mind you, this does not
affect the collision. So if we were to have a player, the collision itself
would not be affected. It would be basically walking on a floating
area in this case. So this is something
that's worth knowing. Such nanite setup
for the landscape is best used on mid scale values, maybe to just highlight
some rocks and whatnot, which we're going to
do with the setup. Or stone block. But
before getting to that, let's adjust some
slope material itself. So the way slope works is basically it's
based on an angle. You can see it over here
being already created. So bits of variance, but it's not quite done because, well, we don't have
the right amount. So going back to the
material instance, we're going to adjust
this a little bit. We are going to make use out of blend bias and
blend sharpness. Though blend bias, if we
were to increase this, you can see that it starts, oh, that's a little
bit too much. You can see that
it starts giving us these values over here. We're going to set this
to a value of 3.47. And then in terms
of the sharpness, if we were to play
around with it, you can see that it
basically allows us to blur out the
mask and whatnot. So we can set this to a -6.28, and that's going to give
us a pretty good result. So and that is a nice little base setup
that we have over here. Maybe the displacement for the rock is a little bit too much because we're
just using a base color. We're going to lower this down. So for us to do that, we can enable these options over here, actually,
all of them. And we can set the displacement
multiplier value to 0.05. There we go, just a
little bit less of a value going to give
us a reasonable result. And I think the rest is okay. We can play around with these
values as well over here. If we want to so for example, this one will bring in
the value of the slope, giving us these sharp edges. Again, the lighting is
a little bit broken. We can just adjust it slightly and it's
going to be fixed. Or also, in this case, we might get away with search for nanite
and rebuild data. There we go. So maybe this would be right. 0.45, a little bit better. Nice little slopes for the section I think
it is quite fitting. Also, don't worry about
it too much in terms of these, which
we already built. We're going to be able to
add some additional rocks and whatnot and make sure that
it's not quite as visible. But so far so good. Let's go ahead and continue on with the landscape
in the next lesson. Thank you so much
for watching and I'll be seeing you in a bit.
136. Cell Bombing and Pavement Paths in Landscap: And lower welcome back around to Haunted
Street environment, Blender two reel Engine five. In the last lesson, we set ourselves up with
this lovely material. We're now going to continue
on with the set material. And again, it seems that the lighting is a
little bit of an issue. I'm just going to slightly
move this around. There we go to fix the shadows. And next step is I'll explain a little bit about
what cell bombing is, this little tool over
here, this function. If I was to search
for in my engine, we're looking for this here, this is what uses the so
called UV cell bombing. And essentially it has all the necessary just
different randomized noise of various colors. Each one of those
colors represent RGB, so RG and B. And based on those coordinates, you can basically move
the UV coordinates, use that information
for vector free to move the coordinates
around the texture. And once that gets moved, we then use the Alpha, which has those
edge blurred lines, who essentially tell
the setup to keep the texture in those areas as is otherwise in these areas, they would have
some stretch marks. So by just keeping those edges just in place,
you avoid doing that. And that's what cell bombing is. With that in mind, we're able
to get into our material. Let me just go back
onto the content, landscape material and
material instance, and we'll be able to
essentially tell how much of a value we want out of the
noise, scale, and strength. So what I like to do
initially is I like to change the strength
to something more of an extreme value,
something like that. Maybe 100 would show
a little bit more. I'm not sure if it's visible, quite as visible as
I'd like it to be. It's probably not the
best showcase for that because it's a
little bit hard to see, but if I was to change up this, you'll see that Aho, it makes those kind
of noise patterns. And with these noise patterns, we are able to what to show
you these little blobs. We're able to essentially offset entire textures a little bit
to get less randomization. So if I was to set
this to zero, zero, you can see that the
pattern in the back ends up being a little
bit repetitive, but once we start setting
this up to a value of the scale 0.1 and
this value to 1.7, we'll be able to
offset it just enough. So it wouldn't be
quite as noticeable. A nice little cheap setup, relatively cheap
for performance. Next up is going to
be the pavement. Let's go ahead and use
the landscape mode. We are going to make sure
that the layer is selected. Then we're going to use
this Lasso tool over here. This Lasso tool will allow us to make a
selection just like that. And the selection will
allow us to, well, create a mask where
we want it to be. We can either use
lamas button and we can use shift to kind
of deselect the setup. Now, in terms of
the shape itself, what we want is we want to make sure that it doesn't
have much of a blur. We're going to take off
the fall off to zero. So it has either one or zero, and then we'll have a hard mask. It's going to be coming
off the bridge like so. Going to continue off the path. And here, it's going to slightly
extend, just like that. To make it something like so. I want this block
also to be leaded. This block will be right to
keep, something like that. And on our side, we are going to make it more of a
circular design. Let's go ahead and
just write something of this shape, like so. That's going to give
us a nice little setup for the pavement. So with this selection, we can use it for the paint, and I just realized I was using the select
in sculpt mode. Luckily for us,
the same selection basically works in
both the sections, whether it's in sculpt or
paint, which is good for us. So what we can do is basically, now that we have this setup. We can click off
use region as mask, and then we'll be able to kind
of hide where the mask is. We can then go on
to paint section, delect the grass material
over here and holding Shift, we'll see that where
we are taking it off, where we are taking it off, we are removing the mask. So holding shift
basically lets us to delete this grass material, which is quite important
because what we want here is we want to make sure that where
we have the payment, no layer is being applied. Otherwise, the height for nanite can be a
little bit messed up. We just want to
make sure that this is not going to be here. I think we actually need to have the region mask turned on. So I'm just going to double
check real quick. Yep. So what we're going to do here is we are going to make sure
that everywhere is applied. We're going to then click
negative mask, B falls. There we go. And we're
going to hold Shift and just kind of click it away. With this negative
mask ticked off, we're going to just have
this area where we can hold shift and remove this entire
section just like that. I don't really like this
little lob over here. We're going to quickly
fix this selection. So we have it in here as well. And here we want this to
be something of that sort. Okay. So going
back to the paint, we're going to hold shift and
just make sure everywhere is removed. Like so. So now it's just going
to be this setup. I'm also going to
increase the strength because we really, really don't want to be having any other mask. I
would just miss click. That's why. We're going to make sure we basically
take everything off. So it has now this
type of setup. And if I was to just click this off to show
you how it looks like, we'll go ourselves just no
information for the area. And I'm going to
invert this real quick because I just realized I
missed this part of here. Now I'm going to click on
it. And yeah, this is good. Next up is just
making sure that, well, this negative
mask is back on, so we're able to edit it. We're going to go back
onto the extra material, and we are going to just
paint in this mask. So it takes a little bit
to prepare the shaders. You can see it on
the top section. But once it does, we can
just do this kind of setup, like so and over here as well. Just like that. And now we got ourselves a
nice little pavement. And we can, I believe, at this point, turn off this, and then we can see
how it looks like. We've got ourselves a
nice little pavement that goes to the section. And the rest is good. Afterwards, once
we have the setup, we can make some adjustments. So for example, we can
check if the material has the right displacement by going on to the landscape
landscape material instance. So we can find ourselves
this extra material. And the first thing that
I would recommend you do is check if the
height is proper. So by that, what I
mean is maybe the p. There you go. Displacement, you can
just turn it all on. We don't need the strength
for this one, for the noise. We can just keep it at zero to make sure it doesn't offset. You can see if I put it
as 0.5, it kind of, like, offsets all the bricks with that cell bombing I
was talking about previously. We don't
want this to happen. We want this to be at zero. That's the first thing
that we want to do. Next step is the noise scale. Well, once we have the noise strength at zero,
it doesn't matter. The displacement mid value. This would control how
high up or low it is. So we can see that
we can lower it. We can increase it to
a little bit, like so. But I think we can just
lower it just a tiny bit, and that's going to give us a little bit of indentation
into the dirt itself, making the brick seem
like it's going inwards. Though, I'm going to
set it up to value of 0.501, just a
little bit above. Then afterwards, we have a
displacement multiplier. This one is what's
going to control the bricks to see how much
of a displacement it has. So over here, if I
set this to 0.5, you can see that the bricks now go inwards and they
have lots of depth. If I set this to zero, we're going to have some flat bricks. I can know the shadows, again, we're going
to just kind of slightly rebuild
the data in a bit. But value of 0.1, I think, is just right. We don't need to do it
to an extreme value. I think it's going
to be just right. Oh, next step is each one of the materials
has a UV scale. I picked this
default one is good, but if you want to
change it, feel free. I'm just going to double check. Yeah. Like by default, it should be set to 0.1, for example, but this
is, well, not enough. It's too chunky. Setting it to a value
of 0.2 maybe 0.4. Yeah, 0.2 is right. That's going to be quite okay. And the other thing is that
by setting these values, you can see that
displacement UVs also need to be changed up. So displacement and UV scales, I just kept them as separate. But yeah, having it as 0.2. Going to be quite right. And yeah, the reason I
kept the displacement set differently is because if we were to go onto slope material, for example, it allows
using the same texture. What we can do is we can go into displacement UV and
change this to a value of 0.1. And just by offsetting this, it's going to look
like a unique type of texture, which I
think is kind of neat. But Eva way, I
think it's going to look quite right for
what we're trying to do. One more thing that I'd
like to mention is if you're changing
architecture and whatnot, sometimes on the top
right hand side, an exclamation mark would pop up essentially asking
to rebuild the data. So you can either click on
that or just use rebuild data, and that's going to
mix it up for you. And I'm not quite happy with how the
shadows are behaving. I think I'll just go ahead
and move the lighting again. Doesn't seem to want to update. There we go. Alright, so that's going to be
it for this lesson. Thank you so much
for watching, and I will be seeing you in a bit.
137. Creating a River with Water Body in Unreal Engine : Hello, and welcome back everyone to Haunted Street environment. Blend it to Reel Engine five. Now that we have ourselves
this nice little setup. Let's go ahead and add some
water onto our environment. And for us to do
that, we'll need to enable a plug in first. Let's go ahead and
search for water. We should find both water
and Water advanced, we can go ahead and enable
them both, like so. And then afterwards, we
can restart the engine. Once the water has been applied for the plug in and
we restarted the engine, we can go back onto the scene. And we fin the scene. Now, go ahead and we talked
previously, reapply this. Wein the scene now,
we'll just go ahead and find the river. Water body river. Let's go ahead and just drag and drop this into the scene, insert a new
landscape edit layer, so we can just insert
it, hit complete, and that's going to create
ourselves this little setup. The thing is, though, we have already created
ourselves the setup for water in a way that we don't really need to
affect the landscape. As you can see, this setup
affects the landscape. We don't need that.
We already have that. So first thing that we're going to do is within this water body, we're going to search
for landscape. That's going to be
Effec landscape. We're going to
turn that off, and now it's not going
to work anymore, so that's good for us
because we can now adjust the setup Otis. We're going to go ahead and
select this entire water. Where is the original part. So that's the
original part plea. We're going to just
move it off and reposition it so it would
work nicely with or set up. So the starting point
can be over here. At this point, I think we can just lower this
down a little bit. I'm going to turn
off the grid snap because we don't need
the grid snap here. Let's go ahead and lower it till we get to a reasonable amount. I think something like
that will do the trick. Nicely covered up. We also need to slightly adjust
this part over here. I notice that it's going into
the landscape, the bridge. We can do that in a bit,
though but basically, this spline is going to be working like any other spline in a setup in which we have
points to work with. So here's another
point, for example. We can just slightly
reposition it, and the position of these splines will allow us to control the water direction. So you can see now
that it goes that way. We're going to move
this spline over here, and this should give us a
nice flow of the water. Now, if your water is
not going all the way, it might be because the
water body that was created, it creates also the
volume as well, which should be up this box. Yeah, water zone.
So this water zone might be a little bit too small. So if we extend it, you can see now the water
gets increased as well. I'm just going to
make sure that we increase it so increase
this next chunk over, like so, and there we go. We got ourselves
nice little setup. Maybe we might need to lower down this plin now a little bit. I think it's quite all right. This is hidden underneath
the map. That's right. The other thing is we
might need to consider about the chunkiness,
the scale of the water. There might be some
yaps for example, in between the water itself. For that, at the detail stab, we could use static
mesh settings. And if we were to enable this, if I was just to show you
underneath what it looks like. So now it looks
like this, but if we enable the static mesh, it's going to basically create
the static mesh itself, which should, hopefully, help us if there's any gaps
around in these areas. So I think that is good for us. And now we have ourselves
the lovely water over here, which of course is going
to be the fault setting. We need to make
sure that we have some additional well
controls for it first. So the few controls
that we have in here in a detailed stab is
going to be width, as well as the speed at
which the water goes. So if I was to find
it in all of this, we are going to find
the water material. But that is going to be there's multiple ones for
more advanced usage, which allows us to, for example, transition from normal water to ocean or something
of that sort. But the one that
we're looking here is just water material. So that's the one
we're going to use. We're going to make sure that
we don't rate any issue. So to prepare the usage, we're going to grab
this water material. We're going to make a copy, hit Control C, move
back to the content, and let's hit Control
B in this area. Way, we can just rename it to be underscore custom, like so, and we can apply this to
be used as water material. Now we can just open this up, and we'll have a
bunch of options. Before going on
to those options, I'd like to a little bit
talk about, you know, the curve the curvature
of the setup. So what I mean by that is every single spline point has
some options for the water, and we have firstly, ability to rotate this around. We have some handles over here. If we want to do
some fine tuning, we can do so to make sure we have full control over the
individual spline points. The other thing is that this
will also have if I was to bind it There we go. Water tab. It also has some
options for river whip. If I was to set it to ten, you'll see it makes
it super thin. I'm going to click Control Z. Default is quite high, meaning that everything gets
hidden under the landscape. If you have some, for example, areas where the rain goes inwards, you
might need to adjust. Up part is velocity. This velocity is a sort
of a multiplicative of the material instance itself, which has some options in there. But if you want, you
can, for example, lower this part to something
like ten, for example. So it starts being very
slow and basically, you'd have some speed over here, then it slows down over here. And that might give you
some really nice controls. Playing around with these
values is quite nice, honestly. We can come back to
that after we get some nicer setups for, well, the material itself
right now, it's very blue. We want it to be green. We want them to be a little
bit more realistic. This is a little
bit too stylized, too transparent for our taste, what we're trying to do for
this spooky spooky climate. So all of that is going to be quite nice later
down the line. And those are basically the main controls for the
water source, for rivers. And we can use this little
bit of an extra time to fix this backside because I was not liking the way this
interacts with the bridge. Let's go ahead and
quickly fix that. Don't be afraid to
go back and use the flattened tool and
just kind of fix it. I'm going to go
underwater, actually, in this case, click on the
pipet, click on this button. Now I can just use
this to lower it down. Oh, let's make sure we have the right layer
selected as well. Here is just going to be
slightly bit extended. There we go. Something like so. That's quite nice, I think. You can extend it a little
bit over here as well. Now that we see the
slope a little bit. I think that's quite all right. So if you think the water
is a little bit too fast, we can add additional
spline point, so we can just right click
add spline point here, and now we have ourselves
a separate spline point. I'm going to just shrink
this down using scaling. So these points that use interpolation are
a little bit smaller. So they basically give
us a smoother curve. As before, the interpolation as you saw was a little bit jagged. But now basically that we
have the point over here, we can use the velocity of
something like 50 over here. So it slows down where the bridges and then speeds back up, which I think is quite nice. And yeah, we are going
to get to all of the juicy parts in terms of the material in
the next lesson. Thank you so much
for watching, and I will be seeing you in a bit.
138. Refining River Water Material for Murky Glo: Hello and welcome back over to Haunted
Street environment. Blended tone Reel engine five. In the last lesson, we
set ourselves up with this lovely river which
looks way too still laced. And we talked about
how to control those lovely points or points. We also went over and created a duplicate of
the material instance, which is good for
us because now we can open it up by
double clicking on it and play with some of those
lovely, lovely settings. There is a lot of options here, but don't be discouraged because the options that we're going to use are not going to be
whelming overwhelming. We are going to go into global vector or is it global vector parameters?
Oh, there we go. It has absorption
and scattering. This is the main color
palette options. If we were to enable,
both of them, we'll be able to
make use out of it. Like so and we can for
starters use absorption, for example, to play around with how the color
gets absorbed. So the deeper it goes, the more of a different
color it gets. For example, if
it was to set it, more of a greenish color, it gets you see absorbed. And at the top, it's not going to
look quite as much, but the bottom is going to give us more and
more of greenish value. Gets amplified, I believe with the value parameter
here as well. If we were to set this
to something like 1,000, it's going to get
barely anything. If we set it to ten, it's going to absorb very, very much, and you can see
that like the depth that we see is barely visible. So with that in mind, we're going to set the
absorption value to 2.03, which gives us some nice
and non transparent water, almost filthy, but
not quite not quite. Then for the color, we're just going to use RGB
values over here manually. So we'd have the same color. So 15.5 for red for green, we're going to use 30 like so, and 25 for blue. And that's going to
give us this nice, neutral kind of color a little bit towards
greenish, but not quite. Gathering is the
main color source. So it's going to give
us the ability to well control how the top looks like the top layer once the absorption
kind of fades out. And playing around with
this is also quite nice. You can see we can, for example, make it a little
bit dirty looking. We can have all of
that option as well. The Alpha value is sorry, the Alpha will allow us
to basically control how much that gets overlaid
with the absorption. So that being said, we're
going to use value for red or 0.36, green also 0.36. Blue is going to be 0.04. It's going to give
us this nice hue. But the thing that I just realized that we
don't have the option for is the value itself. If we were to click on it,
we need to make sure that the value here for the
darkness brightness is 0.36. So you should be able
to see that once the RGB values are
over here. The same. I think we don't really
need to change that. Once we have these values like so, I'm just
going to double check. Yeah, this is 30, as well, so they are getting
changed, double checking. Alpha is going to
be set as 0.36, and that's going to give
us this type of a look, and you might be thinking,
why isn't it green? Because the value that we're
looking for, should be 18. The final thing is
the alpha itself, which is going to be 18.3. That's going to give us
some nice greenish hue. Of course, that's
not something that we quite have right because, well, we want it to be well, mystical and glowing and it's not quite there
with that setup. I'm going to before
getting into that, we're going to basically
set up ourselves a plane underneath this
water to get nice glow. But before doing that,
let's go ahead and just quickly check the rest
of the parameters. They should look
something like this. It doesn't have to be two sided, so let's make sure we
are not using that. The other thing that
I'd like to touch upon would be water shading. Water shading has refraction, which I'd like to touch up, as well as water
roughness and specular. These values will control the
stylization of the water. So the refraction will basically amplify
those normal values, the flow and whatnot, you can see that we are
able to see the waves a lot more if we set it to zero. Going to be quite nice, especially next to the corners. So a value of 1.5, I find that it works
quite nicely here. Then roughness roughness, well, if we were to increase it, it's going to look like
there's no reflection, so it's going to look very, very moldy, dusty, perhaps even. So using a value that's a little bit higher
to a value of 0.1, I think it's going to work
quite Specular is going to, well, focus mainly
on the reflections. It's nicely working with the combination
of the roughness. If we were to increase this, you can see the
reflection quite a bit more coming from
the background. So we're going to use
a value of 0.4 here. And I think that is pretty much it for
what we need to do here. You can go ahead and close down. We can rebuild Nate, although we haven't touched
the landscape itself. Just go and do that.
And, I totally forgot. One thing to mention about
would be the flow itself. There are a couple
of options for that, and one that we
have is going to be for River flow maps. That is an option. There
we go River flow Maps. I'm going to expand
this in details, We have river flow Map speed. If we were to set this to, you know, something like that, it's going to just amplify
the entire flow like, Whoa, a little bit too much. So what we're going to do
here is we are going to have it as 0.001. That's just going to slow
everything down, like so. So it works with combination of those points we talked
about previously, curvature points, which allows you to control
them individually. And I think here is what the only thing that we needed
to realistically change. Then on the top, we also have something called
general where would it be? Global scalar parameter values. So that would be there we
go, this option over here. This option will allow
us to basically control the max amount where it set
us to something very low. I'm not going to show up
here, but there we go. Maximum value will show up. So sometimes you might want to if you're having
some issues or errors, you might want to look
into this option over here as it would help
you with the settings. Alright, so we can now
go ahead and close this down and Okay. All we're missing now is a plane that's going
to amplify this look. We're going to continue on
with it in the next lesson. Thank you so much for
watching and just kind of preview how it looks like
with the normal lighting, we can go ahead and just have
a look at game settings, and there we go are nice
and lovely glittery set up. I think it looks quite nice. Alright, that's going
to be it for me. Thank you so much
for watching, and I will be seeing you in a bit.
139. Adding Emissive Glow Beneath the Rive: Hello, and welcome back an
to Hunt Street environment, Blender two and
Reel Engine five. In the last lesson, we
set ourselves up with this lovely water going
through the stream. We're now going to continue
on with the setup, and this time,
we're going to add some bit of an extra glow to it. So what I mean by that is
we're going to go ahead and create ourselves a
basic shape lane. Over here, we're just going
to drop it onto the scene. We're going to make this
scale 50 to 50 by now. It'd be enough for us,
but we can always adjust. And just to kind of visualize it just to make sure
we're getting it right. Then afterwards,
we're going to go onto our landscape
material folder. We're going to
right click. We are going to create our Ls material. We can call this one the glow. Like, so we can
double click on it, and here we are simply going
to use the missive color. So we're going to find the default lit and
change it to unlit. So no lighting is
affecting our setup. Then we're going to hold free. We're going to tap
on a screen, and that's going to give
us vector free. With vector free, we
can have it selected. We can click on this
constant over here, and we can change it
to a green value. So to make sure that
we're getting it right, we're just going to go
ahead and use red zero, green as one, and we can
add a bit of a blue, so 0.05, just a touch. Just for the sake of it,
then we can hit and we are going to make sure we have some control over the
missiveness of this. For us to do that,
we're going to hold M. We're going
to tap on the screen. We're going to connect the
first socket to multiply, and the multiply itself can
be just a value of 0.3. So we're just
multiplying it with 0.3. We get this kind of a glow. Then we can hit Apply. And we can close this down. Now we're going to
hit Control Shift N S just to make sure
we're saving it. And we're going to drag and drop this material onto this plane. You can see that this is the type of glow that we're getting. But once we start dragging
it lower onto our river, we're going to get ourselves
a nice little glow. There are technically two ways of doing this type of
setup. Well, free. One would be to add the glow onto the
river shader itself. The other one would have been
to add just light source. That would have
been great as well. But the reason we're using
plane is because with lumen, we are getting that
bit of an extra glow. At the same time, we are having this transparency bit of
depth going into the river. So that's quite nice. Now we just need to figure out the depth that we're having. So we're going to go slightly underneath the water, like so, and I think honestly,
this kind of depth is right, maybe a
little bit lower. So let's go ahead and see. We can lower this value, so I'm just clicking on
the right hand side, just like that, and that's
going to affect the height. And something like this
will be quite right, maybe a little bit higher. No. And yeah, we got ourselves nice little
glow coming from underneath. Now, just to make sure
that we're not having a random glow coming from
underneath the buildings, even though this is blocked, you can see that
maybe some parts can be glowing a little bit. And the reason for that
is because the plane is so big and there is no great threshold
with the plane. So what we're going to do
is we're going to just manually position
them to make sure that they're just covering
the water areas and not too much going into
the landscape itself. Going to make planes like this. You can put one over here, then we can make a duplicate
and just move it like so put one over like this. I'm not too worried even about them overlapping
because underneath, you're not going to
see the difference, honestly, though I am
totally okay with that. But just making sure
that it's looking good. Then we're going to grab
the previous plane as well. We're going to hold
Alt and just rotate this until we get
something reasonable. I think that's quite right. There we go. Ovely little glow. Oh, I don't like this
ticking out this much, going to just slightly
squish it in. There we go. And we got to sell
a nice little setup for the water glow. If you are still
having some issues with certain bit of
glow, let's say, over here, maybe it glows
a little bit too much, although it shouldn't matter
in this particular case. But if you are having some
issues where that is the case, you can simply actually
just rate yourself a cube, like so and put this
cube underground. So we are having a little
bit of thickness over here. We can extend it afterwards and just place it underground. So for example,
over here, you see the glow is happening if what was to put
this underground. Glow should not be here. So if I was to hide it, you can see a bit of glow, for example, if I
was to turn this on, you can see the glow disappears. A bit of an extra control. And we can name
this as shadow box. So so now we know
what we're using. And we're going to make sure that it casts shadows,
which it does. And then afterwards, you can just make some
duplicates and just, you know, place it in areas
where you think it's needed. Under houses, under this one is a little bit
sticking out too much. Let's make sure we drop
this a little bit more. And in areas like here as well. Maybe under these houses
as well might be needed. Drop them in. So the rest of the area should
be quite alright. Okay, so we are pretty much
done with the lighting. It was quite simple, and it gives us this
nice little green glow. So in the next lesson,
we're going to continue on with
the extra lighting. This time, we're going
to focus on the windows. So that's going to be it for me. Thank you so much for watching, and I will be seeing
you in a bit.
140. Realistic Window Lighting with Point Light: Hello and welcome back very on to Haunta Street Environment. Blended to Reel Engine five. In the last lesson, we added
this lovely little glow that gives us mysterious
little vibes to the setup. We're going to work a little bit more with the glow and
make sure that this time we're adding some
glow for the windows. Although we are getting a
bit of glow from bloom, it's a little bit fake. Even if we are seeing
this glow over here, it's not going to
give us a nice light coming out of them because
it's just using lumen, meaning that if I was to hide
my camera in this section, you actually should be
seeing that this gets darkened down because there's
no actual light source. So for us to fix
that, we're just going to position our
camera like this, and then afterwards, holding L, we're going to tap on
each one of the windows. So by holding L and tapping, you can see that it creates a point light, which
is what we want. So we're going to continue
on doing this and just get ourselves all the light sources where we want them to be while the windows are
glowing, basically. That's going to give us
nice little actions. So, I don't think we
need it over here, honestly, but feel free
to add it if needed. We're just looking
for the big windows and not a clock tower. I don't think we need
it for a clock tower just to make sure we're not
losing any of the detail. So holding, tapping,
tapping, tapping. Don't worry about the light being too intense at the moment. We are just making sure that the overall setup
is looking nice. And you can even
check the outsides, making sure that everything
is consistent and then done. And I think there's a
window over here as well. Let's not miss that. And
that's really much it. We don't have any glowing
windows on our sides. So, right, now we
have the whole setup. We can go ahead and grab
all of those point lights. We can create ourselves
folder and we can call it window or
lighting slash window. Yep, underscore window. The reason we're
calling it so is because this setup is going
to be in alphabetical order. The outliner is set in
alphabetical order, meaning that this folder is going to be next to this
lighting folder over here, which is quite nice. Now, next up is going to be
grabbing all of these items. We can click G, we can
see the setup over. And the first thing
that we need to do is we need to make sure that we are using
smaller anation radius. Attenuation radius, you can see this blue setup over here, meaning that how much of
an environment it affects. And if too many lights overlap, we are going to get errors. So the first thing
that we can do is, well, we can lower this
attenuation radius. With all these lights selected, we can just select this atten radius
detail tab section and we can write 300. And then it's going to give
us this smaller radius. Next step is intensity. Intensity is going to be set
to 500 because otherwise, I think it's going
to be too big. And source radius, let's set this source radius to 120
as well to make sure that, well, you can see
before, hard shadows, after soft shadows,
very, very nice. And then we, of course, need to change the light, be a little bit more orange. So something of this amount, I think we do quite
well. There we go. Now we got ourselves a nice
little atmospheric lighting, which is very, very good for us. And afterwards, we are also going to turn on
something called mega lights, it should be all by default, but this option over
here will allow us to, well, make sure that we're able to use all of
the lighting at once. If you're not
seeing this option, just make sure that
within the plugins mode, you're able to turn
on mega lights if I find Lights that's not here. Oh, sorry about that.
We are in plugins mode. This is going to be within
the project settings. In project settings, if you
were to search for lights, you should find yourself mega lights. There
we go over here. Make sure you have this enabled, and there is also another
option for ray trace shadows. This will be a little bit
higher in performance, but it will help us get
a much nicer result. Feel free to turn this on to get a bit of a better
quality to the setup. And afterwards, I don't think you need to
restart your project. It doesn't say it to us, so we can just go ahead and
close this down and you can see this is the type of
result we are getting now. Next up is we are going to make some customizations based
on this scene main camera. So right now, it's
all looking nice, but the ones in the background, you ideally would want to darken down just to make
sure they're more in the background and
kind of allow you to highlight the lovely tower
that we have the clock tower. So what are we going to
do is we're going to select the light
source over here, and I think this is
the first light source that I created in this area. And just select all these ones. Oh. And there's actually
missing over here. I'm going to manually
select it like that, making sure that no other lights are selected, just
the ones that I want. And afterwards, we're going to change the intensity 500-300. This way, it's not going to be as glaring as the
ones over here, and it will allow
us to well make sure it doesn't bleed in
foreground with the background. We're able to kind of have
that bit of an extra control. Also from a distance
one to another. Not going to look too
different, but again, from this angle, I think it
makes a huge difference. And that is going to be
it from this lesson. Thank you so much for watching, and I will be seeing
you in a bit.
141. Setting Up Procedural Foliage Volume with Shrub: Hello and welcome back everyone to Haunted Street Environment, blended tone Re Engine five. In the last lesson, we left ourselves off with
some added lighting. We're now going to make
sure we don't have such lighting with
the game environment just to make sure we
see a little bit more, and we are going to get
ourselves some foliage. So for us to do that, we need to firstly turn on the plugin. There is something called foliage procedural
vegetation editor. This will give us an
ability to create a volume that spawns
in the foliage for us. Let's go ahead and select
that, reset the setup. And after we restart
the project, we should have the ability
to go back onto our scene. Go ahead and do that. Once the scene loads, we can wrap ourselves a volume. So the one that we're
going to use is going to be called procedural. We're still not going
to be able to see it. And the reason for that is
because we need to go to project or sorry,
editor preferences. Then here we are going to
search for procedural. Foliage. We need to
now take this on here. Then we can close this down. And now we should be able to
see if we search foliage. There we go. Procedural foliage volume. This is what we're
going to be using. So in order for us to
make use out of it, we need, of course,
some type of foliage. And for that, we are going
to make use out of fab. So fab allows us
to basically get some real nice content
that's provided for a real engine or
other type of setups. We are simply going
to search for shrub. If I was to type it
in properly, rub. There we go. And with fin here, we're going to find ourselves not the one we're looking for. So I'm also going to type in
Quicksa so, and there we go. We got ourselves dead shrubs. It is free on the fab, so let's go ahead
and just grab it. We're going to use either medium quality
or low quality is okay. High quality and
raw quality is for ultra close ups and hyperalism. We don't
really need that. I believe high quality is
already 2048 resolution, whereas high quality would be four K might even go to
eight K in some cases. But anyways, once we have
it, you would click Dolon. You'd make sure you
sign yourself up first, and, yeah, you can just
add it to your project. You can see on the bottom right
hand corner, it's Dlwing. It's adding to my setup, and we have ourselves
static messes. So all of these items will
be now set up for us. So that's pretty good. But what we're going to use is going to be if I just
close everything down. What we're going to use is
going to be foliage itself. So foliage types,
these ones over here. For us to make use out of it, we are going to go back onto the procedural volume over here. In a detailed step,
we are going to find a what be the go
foliage spawner. So by default it should
nothing be here. But if we click on this, we can create a new asset
that is for the setup. Just to make it easier for us, we are going to
create a new folder. We're going to call it
Pcjural vegetation. So we can double click on it and we can
save it over here. So we're going to
create ourselves a new procedural spawner. We can call it underscore shrub. Or grass, that sort of thing. And then we'll have this setup. We can double click on it. We're going to see this setup. So what is here that
we're looking at? Well, we are simply looking
at procedural basis setup. It includes a random seed, tile size, number
of unique tiles. So basically, it doesn't
create a random spans, but it creates a
randomly spawn points where the foliage can spawn, and it just creates ten
unique versions of that, which is more than enough for what we're
trying to achieve. That's right. And we also
have minimum quad size, which we don't really need
to touch, so all is good. So in order for us to make
use out of the shrubs, we're going to simply click
over here to create an array, and we're going to start
with the first one. So what we're going
to use is we're going to use this
first one over here, the variation A, like so. Now, I believe if I
was to just control, and as to save this, we
should be already seeing it. Oh, it's not big enough. We can just lower it
down on the ground. I'm also going to move this box to be a little bit
bigger, just a little bit, not too much because we want to visualize how it's
going to look like, actually, maybe 800
by 800. Like so. So in a brush
settings, you'll see the option for this volume. We're going to come back
to that in a bit, though. Now it's just purely
for visual aesthetic. So going back to this,
what can we do about it? Well, we can double click
on this foliage item, and we are going to start
off with placement. Placement, in case if some
of the items are floating, you can turn this down to a negative like minus
two minus three, and that will give
you an ability to make sure that it is completely in the ground and
it's not floating. That's the first
thing. Then next up, you also have Aligned to normal, average normal this for grass
might not be quite needed. So actually, we're
going to leave it. But basically, we can
see, for example, an angle or slope
on the landscape, and aligning to
normal will allow us to contain that angle
the same as the slope. Might be good for
some flatter objects, maybe like some flat rocks
or something of that sort. We don't need that here, though. So we're going to skip that. Random pitch angle. So this one is what's going to control just slight
offset rotation. We're going to make
sure that it is set to free in case yours
is not set to free, make sure that it is. And then we also have
ground slope angle. Ground slope angle is basically going to
control where it spawns. We're going to move this box actually more to the side so we could see that potentially
on the corner. If it spawns in the slope, we're going to make
sure that it doesn't just moving in here just
to kind of test it. I believe the value by
default should be quite good, so we don't really
need to touch it. But there we go. So afterwards, after
the placement, procedural section over
here is what's going to matter for us most for
our procedural grass. We're going to firstly check
procedural density fall off. It needs to be going. Yeah,
it is going in the right way. So it goes 0-1. Basically how dense it is
to the original point. Then we also have collision. So this will determine how close those points can
spawn to one another. Each every single point will have its own
collision radius. For something like grass,
it is very, very small. So collision radius would
be 0.01 for the radius, and also we have a shade radius. So this is, again, in terms of the
clustering other objects can get close to it if it
needs to get close to it. So we're going to just make
sure that this is set to ten, which is going to
be great for us. And then we have the
cluster options itself. So, number of steps. So this is or an aging option, we don't touch that
initial seed density. So this is going to be the first spawn point
that gets created, and that is going to be five. So we're going to have five
different spawn points. And afterwards, it's going to spread from that point,
additional points. So if you worked with
something like particles, there is like particles and then child particles that spawns based on that
original point, and that's essentially
what this is, but for spawning foliage. And here should be should
be also 50 actually. Then spread variance
can be much lower, so it doesn't spread
off too much. We'd have more
clusters of grass. I wouldn't just have
just random noise. That is good for us. Seeds per step. This
can be set to four. That's going to be quite right. So each one of those steps is going to have
its own seed basically. And distribution seeds so this is basically randomization. Of each and every single
one of those points. So the default is zero. We're going to be switching them around based on the variance. Afterwards, we can go ahead and click Control and S to save it. So this should be set, and now we can test it
how it looks like. Now with this setup, we should be able to scroll
down and click Resimulate. Resimulating should give us A nice little spawn
point route to setup. So you can see that
it's not actually going down onto the setup. Well, first of all,
the slope is working, it's not going onto the slope. And secondly, it is floating, unfortunately,
floating a little bit. So we're going to go
ahead and fix that. In order for us to fix
that, well, firstly, I'm going to make a little bit of a larger box
actually out of this. So I think thousand 200 by 1,200 going to be quite alright. And I'm going to
change the Z value to be 400 as well just to make sure that we're
getting all the slopes. So next up, what
can we do about it? Well, we can firstly re
simulate this section. So again, at the bottom of the foliage procedural foliage, we can hit resimulate
and there we go. It's going to now
switch all of that. Then next up back
in our settings, we got ourselves the set value. So what we talked
about previously, it's going to be where
would it be there we go placement. Z
offset, there we go. If we were to set this
two minus one minus two, perhaps that would
fix this setup. Going to double check with
the re simulate. There we go. I think that's okay. But we can also just
lower it down even more. So minus two. And actually, this
doesn't we go. So this wasn't
going minus three. We need to do the
opposite. Sorry about that. We need to
do the opposite. So this one is going
to be minus three, and this one is going
to be minus two. And it doesn't seem to want
to work for some reason. When I change one, it
changes the other. If I was to change this
to zero and this to one. So it seems to be
working like this, but once I change this to
minus free, this minus two. No, now it seems to be working. So I wasn't sure what's
happening with that. Let's go ahead and change
this to minus free and this one to minus
three as well, actually. Maybe this 12 minus fog
to have some variants. Okay, let's go ahead and
click Control S to save this control shift
in S. There we go. Now it's saving everything up. And I'm going to re simulate it. Kinda see. Yeah, I think
that's quite all right. Okay, so now that we
have this type of setup, we can go ahead and
play a little bit with the scaling a
little bit itself. So the scaling I believe
is little too small. Let's go ahead and change
the scaling to be Uniform? Actually. Yeah, uniform will do. And this would allow us to
change all of these at once. So for this, let's go
ahead and change it to two and 2.2 to have
some variance. Let's go ahead and
click Control S, and let's re simulate. Let's see how this looks
like. There we go. Nice and chunky grass blocks, which I think looking
quite reasonable. So now we're just left to make sure we spread
it across the level. We're going to continue on
with this in the next lesson. So thank you so
much for watching, and we'll be seeing
you in a bit.
142. Advanced Procedural Foliage Controls and Optimizatio: Hello and welcome back everyone to Hunt a treat environment, blended and real engine five. Now that we have ourselves a
lovely little shrub setup, we're going to continue
on with this design, and first frings first is one
more thing that I totally forgot was at the bottom, we have contact shadow. We need to make sure
that we turn that off. The reason being is it helps
to optimize the setup. And other thing I'd like to
say if we were to search for static would be Oh, it's actually going to
be in a volume itself. Let's go ahead and just hit
Control NS to save it Control shifting S. I'm going to close this down
actually for now. And here we want
to make sure that we allow it only for landscape. We're going to lead it for
BSP and static meshes. This way, it's not going to populate that up
onto our meshes. If this wasn't turned on, it would populate it onto
the houses as well. We're going to make sure that
we also create something that would not just populate
it on the street as well, but we're going to
do that in a bit. We now we're just making
sure that it works nicely. And then afterwards,
we're going to start off by making sure that this entire box is set
up for the entire scene. So let's go ahead and do that. I'm just going to firstly check the scale of what
we need to have. So I think the scale
is actually perfect. So 12,000 by 12,000. Now, this one would be 60,000. Yeah, that looks
quite all right. Doesn't have to be perfect, but something that would give
us a reasonable setup. And then Z value, we're also
changing to 8,000 perhaps. Let's see, yep. And
we're also going to move it up a little bit to make sure that it's
not going into the war. So where there is a slope, it's not going to do anything, but when it's, you know, the ground level over here, we don't want to have
any of the foliage. So afterwards, we
should be able to click Simulate and it's going to simulate
all of the grass. Let's go ahead and try that out. Might take some time,
but there we go. Afterwards, you should
have something like that. So that's pretty good, but we're not quite done with
this, by the way. We still have an entire setup. And the reason for
that is because we are missing additional
grass variations, right now, just a single butt. We need to have more of that. So we're going to go
back now into the setup. We are going to create
multiple arrays, three more to have
four arrays in total. We are going to
then double click on the one that we
created, the variant A. And then we are going to, well, select variant B, C, and D for these options. Now, next step is
we're going to locate these three foliage types
in our content browser. So B, D and D, hold the control. I'm
just going to select it. Then let's hit Enter,
and then it's going to open up all three of
them in this one section, which is very, very good for us because we can go
back to variance A. We can right click
on the placement. We can copy this entire
tab for the placement. We can go back to here, select placement and paste
it all in here. So now it's updated that. We're going to do the same
thing for the procedural tab, variant A procedural or
would that be? There we go. Procedural tab, let's
go ahead and copy and paste in the procedural
tab like, and there we go. Next up is just
simply going to be, well, having some more variants. So we're going to
close this down. It should have it saved.
We're going to hit Control Shift and S
because I'm paranoid, and I always try to
save it out like that. Next up is going to
be opening these up as separate instances of B, C, and D, so we'd have
even more variants, and then we can play around
with the set variance. I just realized one a
reasonable mistake, scale. We not fix that, which
is going to be okay. We're going to do that in a
bit manually because, well, size always is nice
to do it manually. But what we need to do here
is we need to make sure that the instancing
has a different seed. If we were to use the
same for all four arrays, it's not going to give
us enough density. It's not going to have
that nice of a setup. But in placement if we were to find the
seed, seeds per step. No, not see distribution
seed, there we go. And now if I was to change
this to one, then in C, I'm going to change this C
to two and this to three. Basically every single
one of them will have its own unique distribution, meaning that once we hit
Control Shift and S, we can hit re simulate, and that is going to give
us a lot more variances. There we go. Look at
this very, very nice. So we got ourselves some
lovely, lovely shrubs. So we also had the scaling. Let's go ahead and
go back to this. In terms of the
scaling, honestly, you can play around
with that a little bit. Now, the other thing
that we want to do in not placement in growth, there is an option
for procedural scale. We want to have it a little bit larger than
what we have over here. So A, B, C, and D can have well, the default size of
one and three is good, but for some can be even larger. So I think for B and C, I'm going to go ahead and just make it a little bit larger. If I was to find this set
up in here, there we go. So for procedural
scale over here, we can set it up to something
like three and five. There we go. That's
going to be nice. And for C, I think
we can also do the same actually three and five, and that's going to give
us a nice little setup. Let's hit Control shift in S
to save it as a hit escape, and let's hit resimulate this is going to give
us this kind of a look, so nice little shrubs throughout the scene and a thing that's
looking quite nice. The thing now though is
if we start zooming out, we'll see that they
start lightening it up. So we're going to now put
out the coloring for them. While everything is nice,
visible, and for that, I'd like to ideally go back to game settings
for the lighting. Even though it's harder to see, it's way better to see it like this because we get the
right type of lighting. And from this area, you can see that
it's actually well, more of a silhouette, but it's still better to change
the base color as well. We are going to go on to one
of the procedural items, just clicking on the
mesh, and there we go. It's going to use two materials. You'll notice that it's
using two materials. One is the main material, that's for the close up, and other one is for the billboards. That's lighter up. Basically, that's giving
us that light outcome. We're going to actually
double click on both of them, open up both of these slots. So we have this material
and this material. We're going to for
the first material, this one over here,
we're going to make sure that we use
basic color controls, and we can just
lower the darkness a little bit to make sure that you're darkening this
down to a value of 0.6. That's going to be quite
right. Contrast, we can also increase
it to a value of 1.2 just to make sure we have some sharpness inside,
and there we go. You can see the type of
result that we're getting. So from both sides, I
think, looking quite nice. Now, for the billboard, we just need to
make sure that it matches the outcome
that we have over here because we're only going to be seeing it from
one angle realistically, we can just zoom our camera out until we start seeing this. I'm not sure if it's quite as visible this part over here. We have to this kind
of setup where we can see both the lighter
and the brighter ones, the darker and the
brighter ones. We can make sure we
are on a billboard. We can go enter base
color base color options. I think here, well, actually no. Yeah, this is the place
base color controls, and we are going to lower the brightness until we
get the right results. So you can see us
brightening this down. Oh, sorry, that's
not brightness. That's saturation. That's why
it's like that there we go. I was wondering what's going on, but if we start
darkening this down, you can see that it
turns more and more into a darker version.
So that's quite nice. We're going to lower
this down until we get to a value of 0.4, I'd say, that's going to
give us a nice little setup. The contrast is going to be
same as the previous one just to make sure we
have the same outcome. And there is a roughness option. Which you can see is what causes us that extreme reflection,
that whiteness. So if we were to increase
this to a value of 0.8, we're going to get
ourselves nice result. Keep in mind that we also need to consider
the overside as well. So this was changed,
which is good, but you can see that
this overside might also Be quite a little bit different. But yeah, by just
changing these values, we're able to get it a little
bit closer to what we had. Even so I'm not sure. Maybe we can darken
this a little bit more so. There we go. Quite happy about this now. So yeah, just like that, we
were able to fix this up, and now the grass is
looking quite nice at s. The thing that we're missing now with the
grass is the control, because if we look back
onto non game settings, we have a bunch of
grass everywhere. So what do we do about it?
Well, worse things worse, we go on to the procedural. We're going to find ourselves
use exclusion zone. So we're going to go ahead and just click on this
button over here. We find all four variations. We're going to hit
Enter, select ital. And at the bottom, there is an option, which I'm never going to find. Just going to search
for it exclusion. Exclusion. There we go. So there is something called for placement exclusion,
landscape layers. If we hit Plus, we're
able to basically determine what
index we're using, and that is going
to be the names of if we go to landscape paint, it's going to be the names
of these layers over here. We want to use this extra mat. As an index. So if we type it
in extra mat, there we go. We're now going to
basically allow it to be excluded from this zone,
which is pretty good. We can hit, close it down. And now, if we
were to go back to selection and re
simulate this field, if we were to re simulate, this path now will not
have any of the shrubs, which is pretty good for us. The other part is going to be based on the
foliage item itself. So if we go to the foliage
setting over here, make sure that all of
these are selected. We can then essentially
control them to our desires. By holding shift, for example, we can tap and we
can remove them out of grass or alternatively, we can select individual
pieces by clicking on Select. We can select individual pieces where we think it's not fitting. But for example, over
here on the barrel, it's not going to
look quite as nice. We can go ahead
and delete these. So just like that, we
have so much control. So it doesn't have to be
completely procedural, although some parts as we might see are a
bit harder to select. Again, I'm going to go
back onto the paint and maybe just remove
some parts over here. Like, so and, you know, if you're not too happy
about some of the parts, for example, if you remember, B and C are the
tallest grass parts, we can just select
these two and just kind of de select these parts. So the rest will be just
tiny little shrubs. That's quite nice. So yeah, that is pretty much it
in terms of the setup. There is some floating parts don't think that I have
noticed that are out here, but we are going to be working
on the river enhancements, making sure that it's looking
nice and the next lesson. So that's going to be
it for me for now. Thank you so much for watching, and I will be seeing
you in a bit.
143. Enhancing Rivers with Rocks, Cliffs and Nanite Fixe: Hello and welcome back everyone to Haunted
Street environment, Blended Reel Engine five. In the last lesson, we set ourselves up with nice lighting. We're now going
to make sure that this river is also just not
as empty as it is right now. So what we're going
to do is we're going to go back onto Fab, and we are going to start off by searching for some rocks. Let's go ahead and do that. Then going to make sure that
we are using free content, so we're going to grab the price that only
shows free content. And there should be
some nice river rocks. There's also something
worth noting. Quixel has been a little nasty with their environment setup. So they have some lovely rocks, and it says free but
if you go onto it, the only license that
it is free is UEFN. So it's the unreal
engine like Ont engine, the creator setup, but it's not going to allow you to put it onto unreal engine,
unfortunately. So what we're going
to do is we are going to list out Quicksel items. We can go back onto filters, and we can go on to
publishers tag over here. And it says only
Show Products B, we're going to use
Hight products B. And then we're going to
search for Quicksil like, so we're going to select
both Quixel mega plants, mega scans, and there we go. Now, it's going to show
you truly free content. So that's only for, like, scans from mega scans. The foliage, all of it
seems to be still free. So that's something
worth knowing and what we're looking
for is river rocks. I'm just trying
to find the ones. Maybe I'll just put
it in the search bar. River Rocks. Like so. So there you go. That's the one we're
going to be looking for. Let's go ahead and add this
onto our project. Like so. And the other thing
that we're looking for, you can see at the bottom right
hand corner, downloading, the other thing we're
looking for is going to be a sandstone cliff
and stone cliff. There you go. And we are going to turn off mega
scans for this one. These are not scanned,
so they should be. They're treated as individual
assets, so they should be. Yeah, there we go. The
license is properly set up. So we're going to grab
a couple of those, so I'm going to grab this
one with medium quality. And there was another
one that I liked, huge Samsung Cliff, as well. Also medium quality. Let's
go ahead and grab that. And I think these
two will be enough. We don't need to overdo it. Let's go back now and
start setting it up. So what we have here is, well, make it, make
sure that it's lighter. What we have here is
a couple of items. Let's go onto the fab folder, and it's still
getting the rocks. So let's just wait
for a little bit. There we go. And now
we are going to go into this little bit of an issue when
importing some assets. This one over here
is just one block. We have three
variations of rocks, but it's just one block. So what do we do
about it? Well, we can go onto our modeling mode. Like, so there is an option in X form to split,
and there we go. We're going to
preview it basically going to split byte topology, which we are going to accept. Now we have three
individual rocks. But you'll also notice that the Gizmo is actually
off centered. So you can see that the
Gizmo is over here. We want to fix that as
well. We're going to go on to Edit pivot points, again, in X form, and we're
going to click centered. Let's go ahead and do that
for every single one of them. That way, we have it
properly centered. Now you might be wondering where has it created this mesh? Because it doesn't create it
in the setup that we have. If we click on Static mesh, going to go out of this mode. If you click on Static mesh
on the bottom, bottom right, we'll see that it creates
the generate content in where the bridge was, it has that unique setup. The original mesh, which was the river Blox in static meshes, over here, it's
still free meshes. You see that the original
mesh does not change, but we just generated three
unique meshes out of that. That's pretty good
for us. Next up is we're going to play around with the
values a little bit. We're going to go onto the
material settings over here. It's going to move it off
to the side, like so, and then we can play around with a little bit
of normal scale, for example, if we were to change this to
something like four, you can see it bit extreme. So changing it back
to a value of two, 1.5 even, I think that would
give us a nicer setup. Other thing that we might
need to look into would be the color setup. So base color. If
we click on it. This is a bit different
to GLB Import. You can see that the
options are not the same. It only has an overlay
of the color itself. If we were to lower this down, for example, for the value,
we'd be darkening it. So that might be something
that might be good. And we can also, for example, make it maybe a little
bit more greenish tint. So I think that's going to
give us a nice variance. And then the rest would
be the lips, actually. We're going to go
back on to finding the mega scans, read the clips. There we go. We have two
of them, static measures. We have this one, and
we have other one. So this one as well. So with these two,
we'll be able to get some nice variation
out of our rocks. They look a little
bit broken right now. I think it might be due
to the nanite setup. One fix could
potentially be without turning off the nanite
could be turning off the double sided mesh, so it wouldn't it
would be visible from the other side if we
go back onto material. We should be able to find that material override
properties and two sided. We should be able
to turn that on, and that would fix it, but in this case,
it's not fixing it. So let's try another option. The other way would be with the ray issue because this
is a planar type of a mesh. It could be easier to just fix by going on
to directional light. And in here, we can
search for ray, and we can find
ourselves an option, cast array ray shadows
to be disabled. So this will give
us lower quality, but it'll fix the sanite issue or in order to
keep this casting, what we can do is we can use an option in a console
bar at the very bottom. So if we make sure that
this is set to CMD, we can search for R dot
ray tracing dot shadow. And here, there
should be an option for enable two sided geometry. There you go, this is
the option over here, enable two sided geometry. So once we click on
it, we can then set the value to zero, and that would solve this issue. So a quick little
way of fixing it. In order to keep
the rate tracing, the performance might be a
little bit lower because it's now using two side geometry even though it's not
visible on the other side, the ninit the text,
so that's good. Then we are going to
go into this material. And we are going to change up the saturation a little bit, it's going to be
not as colorful, more grayish, kind of more
fitting towards the rocks. Then normal intensity,
we can do it 1.2, a little bit more intense. And we're going to do the
same thing over here as well. These materials, again, are
going to be a little bit different because this one
is from QuicksilFab store, and they have, again, different options. But yeah. Mixing it up, this
one would need a little bit more of a contrast in comparison to rubber rock. I'm going to set it up
a little bit value of 1.3 and normal a little
bit more as well 1.5. There we go. Now we can play around with these rocks and
get ourselves nice setting. Firstly, these three
rocks over here, we are going to move
them off to the side, and we are going to start
off with these cliffs. Just making sure that this
one is a little bit smaller. We don't need this
to be this large, and this one can be actually
a little bit larger. It's okay. Then we're going
to start placing it in areas where
we need them to be. Resample this part over here, going to give us a nice
little reflection or, like, so going to also make sure we put it in the ground a
little bit, just like that. Don't be afraid to
have it interact with the main landscape
part itself to look quite nice and then maybe
put another one over here. So this one can be a little bit, even stretched out if you want to have some nicer variants. I'm going to make sure now
rotate this into its place. There go a nice little
blending in of the rock. So. And also the reflections for the water are going to
be quite nice, as well. So yeah, we're just using
these to scatter it around. And actually, we can
continue on with this in the next lesson since
we are running out of time. So yeah, let's go
ahead and do that. Thank you so much
for watching, and I'll be seeing you in a bit.
144. Placing Cliffs and Sculpting Terrain for Seamless Blend: Hello and welcome back everyone to Haunted
treat Environment, Blended on Reel Engine five. In the last lesson, we
left ourselves off with these lovely cliffs
and some rocks. We're now going to make use
out of them and place them throughout our scene. Let's
go ahead and do that. I'm going to place one in
here, that looks quite nice, maybe even drop a little bit higher as we can.
Nicely blending in. Then another one
over here as well. And don't be afraid to
overlap them as well. So for example, this one can be quite a nice little setup. And we're just going to continue on doing
this, to be honest, making sure that we have some
more interesting variation in our sections, especially in areas where
the slope is not as much. We can go ahead and just make
sure we fill that part in and nice little setups. Don't be afraid to also
push them out every go. Nice bit of variance.
Looking lovely. This one is coming out. If that happens and
you like the position, don't be afraid to go
back into the landscape bulped and just use the
flatten tool on this section. So and you can then a
little bit higher Bing so. And with the brush
fall off set to zero, you can you kind of blend
this in a little bit nicer. Oh, let's make sure we are
using the right layer as well, because I had this restarted and the project wasn't coming up. And this one is definitely
not as it should be. Mix these parts and now love
the latin targin manually. And just it's not going to work. I'm going to just
select it. There we go. Laten it out. A
little bit better. Yep. Alright. Next step is just
making sure that error mixed once you do
the landscaping like that. And let's see what else
we can do about it. Position it like so manual
bit of work. Go out right. Quite okay. And the
overside as well. Make my life easier
for the outside. I'm just going to grab this. Like, so going to put it onto
the outside and just kind of manually moving them
inwards. Like that. Right, and then
afterwards, we can just push them where
they need to be. Change this Bismo to
the world setting, so I can just keep the
height where I want them. When working with such setups, the first pass that I do
is just with one object. I place them in areas
where I like them to be. I kind of fill
them in afterwards once I'm happy with the results. So right now, for
example, we have this. We can make more
duplicates out of it, but let's not
forget that we also have ourselves This
cliff over here. So, for example, this clip will work wonders in this section, so we can even duplicate
it, move it, like so, and you can see the
way it's looking, and it's pretty damn
good, I would say. And spend as much time as we
want, actually, with this. I think it's going to
look quite lovely. Ivoi. This leaf is a little bit more. Oh. Yep. And yeah, just moving
the cliffs around, getting ourselves
nice variation, making them seem a little
bit nicer overall. The main focus
point is over here. So once we have enough
practice with these, let's make sure we work our
way with the bridge section. We can even just rotate
it a little bit, get them nicer in areas. So move them even
overlapping if needed. You can see how nice
this looks, for example. We can totally do so. We
can totally overlap them. All of it will look
quite as nice. Next step is here.
We're putting it. So something of that sort
might look quite right. It back in. Forget that we can also just
scale it outwards, and this part is okay. This part can be even you can also rotate it if
you like, by the way. These rocks work well
from this side as well. See that this might
turn out quite nicely. So we have a bit of a more interesting
and unique type of a shape coming out of this, or, you know, we can just
lower this down a little bit, and we have something like that. The upside looks a little
bit pale in comparison. Going to do a cheeky way of rabbing at this, moving
into the outside. Let's see what we can get away with something like
that, perhaps. And then by just playing
around with these, we'll be able to get
exactly what we want. They're pretty damn cool. Forget that we
also are not using game settings lighting,
with lighting like this, you can see it's looking
very, very nicely. Don't be afraid to have more unique shapes and
variations out of these rocks. At the end of the day, we
are making a stylized scene. So if you want some parts to be sticking
out, feel free to do so. And you can see that they
turn out quite nicely. I'm worried about
the reflection, maybe it's okay.
Maybe it's okay. Again, on this outside, I'd like to have
some funky rocks to make a duplicate to
the outside, like so. Put this cluster in here. Raise it up even a little bit. There we go,
something like that. And we have ourselves
nice little setup. It. All right. Pink. We're getting
something that is nicer. But this part, definitely, we cannot let this be seen. So I think I'll just
move it inwards. And even lower these
parts, actually. We cannot let it be seen, especially from
that camera angle, need to be more
contained there we go. And that's pretty good for us. So we can also use these groups by the way for
something like in a back. I'm going to grab
this cliff over here, going to make sure that
the rotation is default, it's facing upwards, and we can rate ourselves a nice
little cliff off on the side. I so if we were to go
onto the landscape mode, use flatten, kind
of put it in here, we can just flatten it in, just like that and make ourselves a nice
little lift section. Of course, let's rebuild
these for the height. And you see that over here, it's going to be just
the right position. From a distance, it's going to be visible as well a little bit, so I'm quite happy about that. Just a little bit of an
extra variation for us. Even squish this
down a little bit. Lay them in. Just like that. We're going to have ourselves nice rocky surface in this area. Also, the other thing, in order to have some
more variance, we can right click on
an object and we can use transform flip
mirror X axis. It just flips the scale on the transform.
Basically, it's nothing. Nothing too modern. That up. But it gives us
some nice variations. And just like that, we got ourselves a lovely little
cliff on the side. Of course, feel free to even
make it higher off a cliff. We can go back onto
the landscape. We can use the flatten that's even lower end and just pop pop, make it even more noticeable. Like, so you can see
with the lighting, be a nice cliff in the back. It is pretty good. All right, so now we have ourselves
the river rocks to worry about to add some detail. Parts need to be going
inwards a little bit. So we're going to worry about these rocks in the next lesson. Thank you so much
for watching, and I'll be seeing you in a bit.
145. Natural River Rock Placement with Foliage Mod: Hello and welcome back up prone to Haunted
Street environment, blended on Reel Engine five. And now we are left with
these free, lovely rocks, which we're going to set up
so we'd be able to place it and position it
nicely for the river. So what can we do about it? Well, firstly, we
are going to go onto our foliage mode over here, and now we'll need
to create ourselves, well, the foliage actor. By default, you
saw in the bushes, we already had those
foliage actors. We're now going to set
them up ourselves. And for us to do
that, we are going to go onto River Rock folder, find the static meshes,
and that's not it. Actually, in generated folder, which we ended up
splitting the rocks. We're now going to
be able to just simply drag and drop
it into our scene. And next up is just going
to be making use out of it. Let's make sure that other
items are ticked off. You see that these items
do not have the tick. These three do have a tick,
so that's quite nice. Now, we're just going to tap on the screen just to
see how it looks like, and I'm going to go
on to unlit mode just to see how they look like. And whilst holding shift, we can remove it because the density arrays
density is set to zero. So it only affects the
ones having a mark on, meaning that the grace
itself will not be affected. We can have ourselves
nice little setups. And with that in mind, we just need to make sure
we have them free selected. Density should be around ten, so we'd have nice
variation, and there we go. We can just place
the rocks like so. Then in terms of scaling, we can also mix that up
from a value 0.5 to one. And we also would
like an offset. So an offset I
believe this would be minus five. Let's go
ahead and have a look. Yep, you can see the
rock going inwards, and the rest, random
yo, random pitch angle. This should also be 180. So that way, it rotates
our rocks nicely. And using this method, firstly, we'll just blockade the
entire setup over here, make sure that it looks
like there is ways for the river to go into,
kind of nice blockage. And then we can just play around with some of those
rocks over here, for example. We can have a couple over here, maybe some in this
section as well. And yeah, also, don't forget we can also put them next
to the river as well, so just placing it
like so will help us get a nicer river effect. The other thing is, I'm
just going to double check. Should be out by the fault. I'm trying to find right now the landscape only be affected. We can search it over
here actually and escape. Find there go filters. So static measures and BSP, we don't need that only
for the landscape. So that way, when we're
painting putting in some rocks, going to look quite nice, especially by the
corners over here. If we look into it mode, we can see that we're getting ourselves real nice variations. Maybe we here a
little bit too much. But we can do this methology for creating some
nice variations in some rocks over here, maybe some in the back as well. We just want to make sure we add in some clusters, basically. Not by too much,
just a little bit. And here, not skimp
out on rocks, make it look, very, very nice. And once we're done
with such clusters, we can even refine it
a little bit further. We can grab these rocks and we can make the
size, much smaller. Well, we can change
the density to be 50. We can go to scale and the scale is set to 0.1. We don't want that. We
want to be the scale of, let's say, 0.12 0.3. So it's going to give us
these kind of clusters, nice chunky bits, and put
them around our larger rocks, and that's going to help us
gather the entire part out, and also place it, you know, in water as well, and even the symmetry as well
needs some bit of rocks. Let's not skip out on it. Like so. That's quite right. Maybe even over
here a little bit. So it'd be a little bit on
this side, a bit over here. This part would also
need some rocks. And I think that is
going to be pretty good. We're just making sure
that the clusters don't look too isolated. Going to remove
that larger rock. I think here as well, we can just make use
out of some going to be a little bit visible with some isolation
from the lighting. Okay, next up is we're going to delete
these floating rocks. We don't need them. And I think have a look here
over here are needed, quite well lit up this area. So and see that would be
nice to have some in here. Maybe larger variations as well. Let's not skip out on that. So let's grab the scale of two and 2.5, we'll
have some Whoa. That is a little bit too much. Um, 0.8 and one. That should be E, this massive boulder go and just add a little bit with density being a little
bit more varied. So here we can put it to 13 also in order to make
additional placements. We can change up the minimum
or maximum angle to be closer to 70 and there
we go more on slopes. Always nice to see.
Over here as well. I think that looks quite nice. That will look in the lit
mode. I don't like this rock. I'm going to remove it.
Maybe something like this. Yep. I'm quite
happy with that and just a bit of an
extra over here on the side. So there we go. All right, so next
up is going to be we'll continue on
with the project. So that's going to be it for me. Thank you so much for watching, and I will be seeing
you in a bit.
146. Procedural Path Slabs with PCG Linear Grammar Too: Hello and welcome back
everyone to Hunta Street Environment blender two
on Real engine five. Now that we have ourselves
nice lit up setup with river flowing and it
has all the lovely rocks, we're going to
start placing some of the additional
detail for this path. Right now, this path is, well, blending in with the we need
to make sure it looks much, much better, especially under
such lighting conditions. We need to make
sure we are able to break this down.
How can we do that? Well, we are going to make use out of what
we call PCG mode. If you are not seeing
this BCG mode, make sure to go to
plugins, search for PCG, and you should find out yourself procedural
ontenGeneration, PCG set up over here. This one needs to be turned on. And I think that's
the only one, that's the only one that needs to be turned on in order
to get that mode. Then afterwards, you
might be asked on the bottom right hand side
to be restarting the engine. Then you'll get this mode. So what's inside?
Well, there are various ways to
basically spawn items. But what we're going to use
here is simply draw spline. Once you click on drawSplin, you'll also have
multiple options, whether spacing tool, spline mesh tool or
linear Grammar tool. I really like the
linear Grammar tool because once you go into it, you'll notice you
have few options. And the way it works is if I was to draw this out,
we'll be able to see it. The way it works is
it basically right now uses grammar lettering with some symbolism or symbols
to get some unique us. So right now, it
basically creates A, which is the mesh
that has that tag. It creates that mesh over
and over again repeatedly. If we go onto modules, we can see the array
for index zero. This is what's being created the static mesh,
ECG axis tripod. Basically, it's the gizmo
that we're seeing over here. And you can see underneath it, it has symbol attached to it. So you can basically
write it in yourself. If it has a wrong letter, it's not going to
spawn anything. But now that I have
this letter over here, just as a simple B and I
write in B with the star, you're going to see that
now B is reoccurring. So I'm going to keep this as
A for now and for starters, we are going to add
multiple meshes. So the meshes that
we're going to add are going to be if we go to content into our
modular street sets, going to find ourselves,
those little slabs over here. So these are the ones that we're going to be using,
going to bring them out. Second. Just want
to visualize it. Help us with the
visualization, there we go. Alright? So these sign these slab pieces are going to be used for our
grammar linear tool, and we need to set that up. So modules turned on, grammar turned on,
and then afterwards, we're going to click
on the plus symbol so we'll have three
array elements in total. And then index zero
is going to be A. Index one is going to be B. And index two is going to be symbol C. And then afterwards, we're going to replace
the static mesh with one of those little guys. So let's go ahead
and select this. Let's click on this
button over here and now it's changing it up like so. Then for the Index one, we're going to just
simply use the next one, this one, go ahead
and just replace it. And for Index two is
going to be but this one. So the final one, basically, the asset free,
we'll have this one. Now we can switch between them. You can see that
this is working, so we can switch between
them to B, A, B, or C. Keep in mind that it's
also capital sensitive, so I'm using shift
to make it capital, but you can see them
switching around. Now, next up is we are
going to make use out of In a search engine, if you were to search for
unreal engine PCG grammar, you'll come up with this page, and it's really nice to see what kind of
experimentation you can do. If you go into it, you basically want look into
this, how it works. And here is shown an example. The way that we're going
to use it is basically, we're just going to
make each one of the letters with
a certain weight, attach them, meaning
that probability for them spawning would
be greater or lower. And using that, we
can essentially control the spam rate between
those different amounts. We're going to go to the top
for the grammar section. Then we are going to
delete this entire part, and we're going to use
the starting point of that qiggly bracket, meaning
we're opening it up. Then we're going
to inside of it. Well, we can close up bracket
and then inside of it, we can write ourselves
square bracket. Um, A, and then we
can close bracket. So basically, this
will show that every randomization point
will have this A inside, and then we can tell
amount of weight. What I like to do here is
once you click double dot, the column, we can type
in amount of weight. And in the example you
saw on the website, it said one, but I personally prefer to have it
ten by default. That way, if I want
to be lowered, I can just go back down. So every now we have
ten as default. And then we can just
copy this and paste it. We can just copy this inside. If you are not seeing it well enough, don't
worry about it. We can just show it
to you at the end. I'll make sure to zoom in. But basically,
once we copy this, we're going to put ourselves
a comma, there we go. So the way we differentiate every randomized randomization
is by using comma, and we can then paste
in the previous one, come again, and
paste it in again. Then afterwards, we can just
use B and C, replace the A, and we can use the star at the end to say that we're going to repeat this
until the very end. So afterwards, you can see that this is the effect
that we're getting. I'm going to draw a longer line, so it would be a little
bit more visible. And I'm going to show you
how this looks as well. So we can't really
zoom in through the unreal engine, using PUF. Basically, this quigly line, then in squares, we can
put in multiple letters. In this case, we're
only using A, and then we're saying the probability of the
weight, which is N, it shows how likely it is to be spawning because every
single one of them has ten, it's going to have
the same amount of probability for
them spawning. And yeah, this comma will basically separate each one
of those probability points. Afterwards, wiggly line to wiggly closed brackets
to close it up and the star to show that we are repeating that
process until the very end. And that will give
us this result. Now, next up, you might notice that the gap is way too much. So we're going to open
up every single index, and we're going to change the
size underneath the symbol. This will represent basically
sort of a collision sizing between each point and when
the next one can spawn. In this case, I
think just using 48, you can see that now this part is a bit closer because
it spawns way closer. If we were to do 48 to
every single one of them, we'll get a much,
much nicer result. Now, next up is, you'll
notice that we don't have the bricks facing the right way. What
can we do about it? Well, we can rotate them. If we locate the right one, so I think it's C, and B
that need to be rotated. So we have local offset
and local rotation. Using local rotation, we
can put this at 90 degrees. That's not the right one. X Y Z, this one should
be the right one. There we go, and we'll
get this rotation. So let's go ahead
and rotate them all, like so, and this is what
we are going to get. Already looking pretty good. Next up is just making sure that they have the
right spacing. So in this case, 67 might be better. There we go. It's spawning
right where it needs to be. For both of them should
be 67. There we go. We have ourselves nice spans. If you want, you can lower
that a little bit less 60. There we go now
it's super close, and this one can be 63. And just like that, we got
ourselves lovely little setup. This one is having a little
bit too much of a gap, so lower this to 50,
let's see how this works. I think that's not
the right one, so I'm going to give
this a 62 63, that sort. Let's have a look. So right now, we're trying to figure out
which one is causing it. And it might be this one that's being a
little bit too close. We're going to go back to here and put it to maybe 40, 50. There we go. Now we're
getting this part out. But it's not giving us the
right sizing for this out one. So that's what I'm
worried about. If I was to set this
to 50, we're here. Now, the spacing I'm using right now is 46 for the first one, 63 for the second
one and 63 for the third one for B and C. And you'll notice that most
spacing is nicely set up except for some where
it's a little bit offset. Reason for that offset
might be because due to the origin
point, in which case, you might want to go to local offset and just kind of try
playing around with offset. And you can see this is being
dragged now to the side, and we are getting them offset. We're setting this
to a value of ten. We're able to offset
it a little bit, and we can even play around
with the up one here as well. Oh, make sure that gives
us reasonable spacing. So pin ten here as well. And this will give us
a nice little setup. Now, you can draw this around and see the type of
result that you're getting, and you should be having a
nice reasonable outcome. Now, we are running out of time, so we're going to continue on with this in the next lesson. Thank you so much for
watching, and I'll be seeing you in a bit.
147. Drawing and Refining Pavement Paths with Spline: Hello, and welcome back everyone to Haunted
Street environment, blended two on Real Engine five. Now that we have ourselves
to set up for draw spline, we can play around with it and get ourselves some
real nice results. We're going to start off by just moving our camera upwards, and we're going to
draw a line like this, which is going to give
us a reasonable outcome. Actually, it's not quite
reasonable because I believe that the amount
of points that we're getting right now is
a little too many. We can adjust the
amount of points we're drawing by minimum
points basing. If we were to change
this to 400 or actually, let's go ahead and show you
what it looks like with 40. You can see the amount
of points is much less, but 400 is going to give us
a spline or actually 4,000. Let's make it 4,000, so it
would go a little bit better. I'm just going to redraw
this line like so, and we're going to get
ourselves this sort of result. About that. It seemed to have crashed
my system for some reason. So sometimes it can happen. I'm just going to go ahead
and redraw the line, like, so get a reasonable up,
something like that. And once we have it, we're
going to hit Accept. This should create a that up
for us to adjust basically. And going to double check. It also created it
based on a selection. So make sure you
have a selection of the landscape firstly made. That way, it attaches the
spline onto a landscape. Although previously working with it had PCG and
attached it there, so I'm not sure if
that's a bug or not, but either way, it works. So basically, yeah, once
you are able to select it, if you click G, you should be able to
see the spline points, and then you can just adjust it manually a
little bit like this. If you have an issue where you have a look,
I have an issue, if you have an issue where you
have these points rotated, it might cause them to be,
well, rotated like this. Make sure you just readjust it so manually, and there we go. And then the other
thing is you can simply redefine these
points a little bit, so you can click on one of them, use this square over here, so it wouldn't
affect the Z axis, my recommendation, and then
slightly tweak these points. You'll get yourself a
nice little result. This part over here
actually might be a little bit too much upgrade to go ahead and
delete that point. If you have too many
points, feel free to delete them by clicking on it and then deleting it and you can click E rotation and then
kind of readjust it you have a nice little line going across, just like that. So now that we have a setup like this, you
might be wondering, how can we draw this spline
onto the up section as well? Well, there is a way to do that. Firstly, we're going to go
on to the object itself. So let's go ahead and select it, and then you should
be able to see in a detailed stab
spline component. Underneath, you'll find
additional asset placements. But the one we're looking
for is spline component. Once you make a copy of
this out of the spline, you can hit Control
C, Control B, you'll be able to make
a duplicate out of it. Then afterwards, you can move this entire
spline and you'll see that there is more
stuff on top of it. The reason we're
doing this is because when we go now back to PCG, we're able to redraw the spline with this
component selected. And if I was not made
a copy out of the 01 into out of underscore zero
into a underscore one, when we were to draw this, we'd have a replacement
of the slide. So make sure you make a copy. Now you see that the underscore
one is being kept the same whilst underscore
zero is getting replaced, which is something
worth knowing. So next up is going to be
adding this other side as well. Like, so I think
that's quite right. We can hit Accept. We can
go into selection mode and we can make some
final little twixs. I'm going to remove a lot of
these points because I want them to be nice or controllable. So this point I don't like either one can be
slightly ticked. Like that. Is it a little bit
too straight? I think so. Go ahead and move it and make sure that these points that we are touching and adjusting, if they are too much for you, you can just scale them down
so you can select the point itself and you can shrink
it using the scale, and you can see that it's going to lower it down
because otherwise, if these points,
little points, okay, they're very hard to see, but if they end up overlapping,
you might get, like, some sharp angles in these
parts, that's worth knowing. I think now it's
looking quite right. Now, we're going to basically
do the same thing again. We're going to make
a copy out of this. Go ahead and click
Control C control. The reason being
is that now we can go back onto the spline, go back to PCG and draw spline and do it for
this part over here. I think I'll just
make it easier for ourselves and just draw
it all the way around, like, so that way, and I made a mistake right away. Yep, the mistake is that we have some parts that
are climbing up. That's okay. We're
going to fix it. Let's go back on
to selection mode. Let's select this spline over and delete
the climbing ones. We don't have any issues
over here whatsoever. If you want to add extra points, you can just right
click on spline itself and add
spline point here. I think exactly is
what exactly I'll do. Then I can just move
this a little bit. Off side, rotate
this a little bit. You'd have nice follow up. I think it's going
past may be okay? I'm not sure if we want to
follow the house or not. I think we don't. We just want this brick
set up to go inwards. It'll be quite
right. And this can just go into the
section over here. I think so. Something like that, I think we do. Oh, okay. Here's another issue. Go ahead and delete
these points. There's no point of just
dragging them down because they might also have
rotation issues. We really want to make sure
that they are nicely set up. This one does have
a rotation issue. I'm just going to fix it. There we go and make
sure that it is sitting nicely on died like that. These bricks can be
moved a bit outwards. And this box can be placed a
little bit in here as well. Slight little tweaks,
given our newer setup. I think it's looking
quite gorgeous. I think it's looking quite nice. This part except, which needs
to be probably deleted, and we can send it
manually, like so. And this part should
we add it or not? We can leave it as a
gap honestly here. I quite like that idea. Let's have a look
on how this looks, and it's looking lovely. Now, the only thing
that we might need to do would be well to
change the color, make sure that it's looking nice and lovely.
How can we do that? Well, we can select
one of the assets, so we should be able
to bind material, so there we go stone light. And I think, honestly, the stone itself is
too light, too light. Let's go ahead and double
click on this and let's change the base
factor for the stone. I am just going to check if the game settings is on,
which it is. There we go. Now it is. And you can see in
comparison to the pavement, this lights stone is too light. Honestly, we can darken it by quite a little bit until we
get something like this. Also, preferably, let's go on to normal scale and change
it to something like two, just to kind of have more
grittiness. There we go. And now it's looking
nicely. So there we go. We got ourselves some nice
little pavement on the side, and we are going to continue on with this
in the next lesson. Thank you so much
for watching, and I'll be seeing you in a bit.
148. Sculpting Stylized Procedural Trees in Unreal Engin: And Hello and welcome back, everyone to Haunted
Street environment. Blended to nheel Engine five. Now that we have ourselves
and entire scene set up, we're going to work
some on the trees, and UnreelEngine 5.7
includes a nice little setup that allows us to create our own procedural
vegetation of the trees. In order for us to
start that off, we're going to go on to edit, plugins, and we're going
to search for vegetation. Procedural vegetation editor, make sure that this is enabled. Then afterwards, we'll
want to go on to project settings and enable NAA foliage. This one over here, make sure
that this is also enabled. Once you have both
of them set up, we're going to go onto
our content drawer. We're going to just dock
it into our layout, make it a little bit
easier for ourselves. And we're going to
create ourselves a new folder called trees. We can call it trees. Like, so we're going to open
it up, right click, and we're going to search
for vegetation. There we go. Procedural vegetation, make sure you hover over your mouse, not over one of these
categories right above, and you should be able to find
it. Procedural vegetation. Afterwards, you'll be asked
which one you want to set up. We're going to create
ourselves common Hazel. These two are basically the initial blueprints
of the tree setup, and this is the default provided that you can enable
basically from the scratch. Let's go ahead and
just use Common Hazel. Click Create and you'll
get yourself this setup. So once you have it, you'll be able to double click on it. And open yourself up with the blueprint for
the vegetation tree. Within it, you'll find
four different trees. In order to see
them, what we can do is we can simply click on the very end graph point and you'll see the outcomes
that you're having. So each one of those
will allow you to preview the outcomes
of these trees. And the way they start off is by just getting
the initial setup. So you'll have the Hazel 01 over here being
dragged out to the curve. Then you'll have Hazel 02, Hazel 03, and Hazel 004. Each one of them get taken through all of these
various steps, which creates a folie tree, and by the end, they will give you four unique
different outputs. If you want to preview all of these outputs during
your setup, for example, at this stage, if you want to preview how the
outcome would look, what you can do
is you can select the output and you
click Control L. Click and Control L, doesn't seem to want to do it. There
we go. Let's do it again. Control an L. Once you
click Control an L, you can go back to CRV, and you'll see that now it's
previewing output node. You can see at the top over
here on the left hand corner. Other thing that
I'd like to mention is you can click Control an M, and that's going to spawn
in a human preview, which is not showing up. For some reason, I'm
just going to click on the preview itself using
left Mouse button, then click Control,
and there we go. Now it spawns this on the side. In case if for some
reason it's not spawning on your side and
the shortcut doesn't work, you can use the custom control button over here to click on it, and then you'll see
the exact type of scale that this setup is using. So these two shortcuts, basically, one for
previewing the output, the other one for previewing the scale are quite
useful and worth knowing. So in order to create anything, we're just going to simply
start with Hazel 03 and 04. In order to keep
the default ones, we're going to make a
selection like this, selection box out
of both of them, and we're going to hit
Control C, then Control B. This way, it will
allow us to make a duplicate out of our
own setup like so, and we can reconnect the parts. Let's go ahead and just
use 03 for this part over here and 04 for this
part over here. And next up is we're going to start off with
the 03 duplicate. Let's go ahead and just call this underscore custom.
Under square A. So that way, we would
know that this is custom A and this one,
we can click F two. We name these
frames, by the way. We can call it custom B. So right, going back to
the R starting point. So again, this is going
from common hazel O free, which essentially
creates a skeletal mesh for the tree to a carve section. In order to preview
this a little better, I'm going to click Control and L to make sure we go out of that lock mode that we showed
before. And there we go. That's what we're going
to see with the carve. It's essentially
going to preview the skeletal mesh by default, and it's looking good so far, but there are some options. So, for example, carve basis, we can select from root. If we start increasing it, it's going to show you a little bit
repositioning the camera. It's going to start cutting
off the parts from the top, which is pretty good. This is unfortunately the
only control that you have with the original
skeletal mesh. There is no way to create a
skeletal mesh from scratch or tweak it in a way that
it has amount of branches. So we're going to go ahead and just put
this value of the 0.5, and that's going
to just cut off, trim off a little
bit off the top, which is going to give
us nice little setup. Next step is we have gravity. Gravity is very interesting one because once we
start playing with it, you'll notice that it'll start
not doing anything to us. Why is that? Because
it's pre viewing, I think I might have
misclick there we go, Control L, fixes it. Or actually, I'm
going to click off of the gravity and click
Control and L. There we go. We're now not
previewing anything. So whenever we
click on something, it's going to show us
this node. All right. So going back to gravity, now that we're able
to see what it does, you can see that me controlling the gravity essentially lowers these branches at the
top and then starts lowering everything down
as it goes downwards. The way it works is it grabs
the direction by default, it should be minus one,
so pointing downwards. So if you can imagine that X
Y Z being values over here. So X, the first one, and you can even hover over
them. Actually, it says. So if I was to set this to zero, nothing is
going to happen, but if I was to
set the Y to one, it's going to point sideways. It's quite nice and you can feel free to
play around with it. But the value that we're looking here for is going
to be minus one, the default value, and a
value of 0.9 over here. So it would go in one
direction in X direction. Then afterwards, in terms
of the gravity itself, we're not going to overdo it. We're going to go ahead
and use a value of 0.18. Like so, so it's going to point out in a bit of
an odd direction, and that's going to give us
that stylized bit of a vibe. Next up is scale. Scale is going to
allow us to well, change up the default scale
that we have over here. And I believe we
can change it up, so it would be
quite a bit larger, honestly, because
we want to make sure it's looking
more like a tree. So using a value 3.2
will do us quite well. You can see that the
default skeletal mesh is going to look quite nice. It's important to set up the
right type of scaling here because it's going to be
affected by wind and animation, and we need to make
sure the scale, the size of the
tree reflects that. So you can technically upscale that afterwards in the end, but it's not going to
look quite as nice with its motion and the wind movement and all of that nice stuff. So next up is remove branches. Remove branches is essentially going to work in the
same way as carve. In this time, it's going to
have additional options. Like, you can remove
it based on light. So where the light touches in terms of this directional
angle from the top, it's going to start removing
these lesser branches. So it's going to give
us these trunks. We realistically don't really
want to touch it here, but it's a nice thing worth knowing to get more
unique type of looks. But now, let's go
ahead and leave it. And then afterwards, we get
ourselves mesh Builder. Mesh Builder is
where it's going to create ourselves
actual mesh itself. You can see that
now it's giving us these lovely little branches. Of course, this is a
little bit too thin. We need to make sure we
thicken this up a little bit. The way we're going
to do it is we're going to go all the way down or until we get to the point
of plan profile settings. In here, we will find profile. We need to make sure we set
it to a profile of zero, and then we'll be able
to use profile scale. If we use it, so you'll see
it starts scaling it up, but it's going to scale it
in the wrong direction. In order to make
sure we're going in the right direction
and the bottom part is scaled up properly, we need to open up
the profile off. Profile fall off will allow
us to essentially create a well profile if we were
to switch these around, so the top is now value of zero, and the value is
the Y axis is one. We can change this to a
value of being zero instead. Once we select on a frame, we can just click on it and
set it up, so zero, zero, and then up one would be one, and this value would
be one, as well. So it gives us a
nice generation. And just like that,
we're going to get ourselves a lovely
little thickness. So it's already
looking pretty good. Maybe the profile scale
is delivered too much, so let's go ahead and
lower it to four. And then we're going to have ourselves
displacement settings. Displacement settings
will allow us to firstly grab ourselves a noise. We can search for
noise, and we should find ourselves noise zero, one. There we go. That's what we're looking for. That's what we're going to grab. And then we can play around with a couple of
options over here. So firstly, we can play
with displacement scale. If we were to set
to extreme value, you can see what it does to us, and it gives us
lots of bumpiness. Of course, this is too much,
but it's a great start. I recommend you doing
that because then we can play around with the
UV scale over here, and we can determine exactly
the type of setup we want. In which case, we're
going to use 0.5 and 0.5. So that way, we're getting
ourselves a little bit of, well, larger type of UVs. And then we can just
lower this down to 1.5, and it's going to give
us nice little bumpiness going across the tree, which is looking
very, very lovely. For the mesh, if
we were to go up, we have some control for minimum divisions and
maximum divisions. This will help us to control the overall density of the mesh. If we were to go onto a
wireframe, you might even see it. So, for example,
max subdivisions, if were to change it to six, we'll be able to see that
it changes the amount. So I would recommend to
put the maximum divisions to eight and keep the
minimum subdivisions to six. This way, we're going
to get ourselves a lovely little tree that's able to be used for
background scrubs and little pieces like so. So that's not our main
hero shot of a setup. It's going to be more
in the background. That's going to be good. And we have a couple of other options, but I reckon we're
running out of time, so let's go ahead and continue on with this in the next lesson. Thank you so much
for watching, and I will be seeing you in a bit.
149. Designing Unique Tree Variations with Foliage Control: Hello, and welcome back over to Hunter
Street environment, Blender two and
Real Engine five. In the last lesson, we
left ourselves off with this mesh Builder section
of Hazel 03 custom one. We now are going to move
on to the second part, which is going to
be bone reduction. This part essentially
allows us to allow more animation
intricacies if we want to. If we were to set this 21, we'll see that the
amount gets way less. But as we increase it, we get more and more bones. Which would be pretty
good if we wanted to have more unique animation
and close up shots or background trees
0.5 will do the trick. Next up is going to
be foliage palette. By default, we are going to use these lovely
leaves over here. But because we want
to make use out of our own creepy type of setup, we're going to replace this, and if we enable it,
we'll be able to do so. So every single one
of those indexes essentially are
these tree parts, foliage parts, which are
looking pretty nice. But again, we want
to make sure that they look a little
bit more spooky, a little bit more creepy. So the outcome is not
just a bunch of leaves. It's more of a
twiggy like setup. So going back to this, which I need to
open up again since I wanted to show you the
outcome that we currently have. Going back to this, we're going to change every single
one of them right now. If I was to go onto
the content drawer, we should be able to see doesn't want to
show up as right. Basically, every single
one of these are coming from the plug in section, which is going to
be for the foliage. And I think it's actually going to be important
to show you that right away. So let's
go ahead and do that. If we go onto content, procedural vegetation
Sorry, engine plugins, then find ourselves
procedural vegetation. Rolling past all of these, is an alphabetical
order. Here we go. We're going to go onto content. We're going to find
some sample assets, and we are going
to go onto Hazel. So if we go to hazel, we'll see that there are some
previews over here already. We have some
instances. These will be leaves as well as twigs. We can replace these parts
with twigs, essentially. If we go back on to
foliage over here, we can do so for custom free. So we can just
search up for twig and you should find
yourself, what's the name? BR twig, or we can just simply click on one of them and
replace it over here. So replace. You can see that it gets replaced
with this one. Then this can be replaced
with another twig version. We can change this with
the same twig as well. So let's go ahead and
just use this twig, and we can foliage palette, change it up like so and we
have some twigs, some leaves. And I think that will be
much better for the outcome. Then afterwards,
foliage distributor will allow us to basically tell how many relafs we
want and the scale of them, which is pretty good for us. If we want to have more control, we can click on
override distribution, and that's going to
give us the ability to control the instant spacing, so the amount that's going
to create in the leaves. Right now, I made it a
little bit too much, but you can see that
by changing this, we can get something like this, nice little spacing, and then we have base scale which
will allow us to well, scale it down or going to check it with our
human reference. Make sure it's not
too odd looking. Little bit more there we go. Something like that,
we'll do the trick. I think that's already
looking pretty good. Something else worth
noting is eflenethreshold, also is quite helpful
if we lower this down. It'll basically allow us to
you can see it over here, high threshold, more buds, lower threshold, fewer buds
and branches retained. And by playing around with this, we can get more
unique variations. Anyways, once we're done, we can click on this and
we can see the preview. This is how it's going to look
like for the common hazel. But that's looking
lovely for us. Next step is going to be the
common hazel four, custom B. This one is a much
smaller shrub, but it's going to
help us to kind of make some variations
for the scale. We're going to keep it as it is. For gravity, we are going to use it only slightly because it's such a small version
in comparison, we don't need to overdo
it because otherwise, well, it doesn't
have enough weight for it to be taken
lower by gravity. You can imagine it as that. For the scale, we can keep a value of 1.1. That's
a little bit taller. So afterwards in terms of removing branches, I
don't think we need it. This amount is already small enough as it is. We
definitely can keep it. Next up is a mesh
Builder, mesh Builder. Max subdivisions, we can lower it to eight,
like we did before. And then profile we're going to set it up to zero
profile fall off again, invert these values and
you have a nice result. And then for the profile scale, let me just double check. Yeah, we definitely can just use something more reasonable, 1.3. We'll do the trick. Next up, bone reduction, default 0.5. Might be a little bit too much. So 0.7 0.8 even every go. Just looking at it visually, that will do more than enough, honestly. Afterwards,
foliage palette. Foliage palette by itself
is just leaves over here. So, honestly, when
we're distributing it, we're only going to get leaves. We might want to replace
one or two with twigs. Feel free to do so. So twig. Again, I believe it's BR Twig. Yeah, we can just select this
one over here and replace Index 11 as well as x, ten. There we go. So now when we have
foliage distribution, it's going to have
some twigs spoken out, which is, I think, quite
nice, quite alright. So next step is, well, there we go. We got ourselves to the variant. We have now ourselves
two custom setups. Firstly, we want to make sure
that it's properly named. So when we click
on this last node, we can go ahead and just have that same naming
as we had over here. So that's going to be
underscore custom underscore A. If so, so Sk underscore, custom hazel, underscore
of a custom A. And then we want this to be
underscore custom B or sorry, custom A as well.
Nope, custom B. Okay. Then we have two
essential versions of nice little variations,
which is pretty good. And to make more
variations out of this, what I would recommend you to
do is simply select these, then hit Control C, Control B, and we got a couple more. And then afterwards,
we are going to double click on this
point over here, so that way we can reuse
it for this copy version. We can click double twice again over here
and reuse it over here. So Hazel four, where we
used it over here before, it's also going to be
able to use section. So this one is going
to be custom C, and this one is going
to be custom D. So at the end, we have ourselves A BCD. That's pretty nice. And then
because they are copies, we already have
nice, lovely setups. So we can play around with,
well, additional control. So for example, we can go on
to carve we can play around with let's have a look with the carve amounts
so 0.1 instead. So carves out a little
bit on this end. We can then play
around with gravity. We can make it go into our
directions, for example, -0.9. Going to go in the
other direction because they have
different skeletal mesh, it's going to look
completely more unique. We can even lower the value of the gravity itself to -0.5, it's not going to go
crashing down as much. The scale over here can
also be changed to 3.1. All of that little
setups playing around with and all
would be quite useful. Even over here, if you
feel like lowering amount of branches,
feel free to do so. No one is going to
be stopping you. But and maybe, you know what? Let's go ahead and
put it to 2.5, lowering some of those branches, which is quite right. Then we have ourselves this
little setup, which is nice. Bone reduction, we
can keep it as is. Foliage palette, let's go
ahead and see if we can, well, we don't need to
touch it here because we can just change up
foliage distribution. If we were to just change up instant spacing and play
around with the threshold, we already are getting
completely unique type of setup. So already, it's
looking pretty good. This one can be changed with
the name to be underscore C. So common hazel is using
O free pattern, custom C. And this other one, the custom D, we can again just play around with
some of those settings. Just, you know, feel free to give it more unique
type of a look. Now it's going this way. We can remove some of the
branches as well. I don't think it needs to here actually, it's already so thin. If that here, we can maybe put a value of profile scale to a little bit chunkier look. We can do that. Here, we can even lower
the amount of bone. Once we have with increasing
the boat reduction setup. The reason for
that is it's going to just vary some animation, the way it wiggles, the
branches and whatnot, as well. Going to give us more organic
look when it's combined with variety, foliage patterns. Again, we just need to
use foliage distribution, play around with
override distribution over here, but some spacing. Like so and honestly,
there we go. I'm quite happy
with this result. This leaf over here. What's
going on with this leaf? I am not happy about
this leaf at all, so I'm wondering if it's a
scale minimum maximum scale, so I think can be 0.6. So minimum scale zer
0.5 maximum scale 0.6. I think this was
literally getting the scale itself of just one. So it was giving us that leaf. If I was to put it to two,
you can see that there are some leaves that are
smaller, some larger. But here, because it's
such a small type of twig look, we don't
need to overdo it. We can leave it as it
is. And then afterwards, we can just simply
make sure that this is called custom D. Go, we got ourselves four
unique type of breeze. We're now going to
continue on with this setup in the next lesson. Thanks so much for watching, and I will be seeing you in a bit.
150. Exporting Nanite Trees and Scattering with PC: Hello. Welcome back. Every on to Haunted Street Environment
BlanetonReel Engine five. Now that we have ourselves
the four outputs, like, so we need to go ahead
and export it, basically. So in order for us
to export it all, we're going to go ahead
and select all four of these outputs that we had
created, holding Shift. Like, so way in the detail stab, you can see the content
browser folder, and this is going to be an option where it's
going to be exported out. We're going to make sure
we select the right one, which is going to be
back in our content. That's not it in our content, and we had trees folder, so then we are going
to make sure that we have the great Nani foliage turned on the skeletal mesh. That's what we want, and
we want to make sure that Nani shape preservation
method is set to vaxalize. So when we are in a distance, we're going to see a axel
replacements of the mesh, which is the new way of well, optimization for Nani trees. So we have that said and done, we just need to make
sure that the wind settings should be set up with default dappling wind settings,
which is good for us. There's also the
tree wind settings, but realistically, we don't
really need to change that. It's going to be more than
okay to keep it as is. Afterwards, we're going to
go ahead and click Export, then we're going to
select Batch Export, and we're going to
basically select the last four items because these are the
ones that we created. So oh four, oh, free,
oh, four, oh free. The only thing now that I just realized is that we haven't
changed the names of it. So sorry about
that. Let's just go ahead and cancel it real quick. We need to make
sure that each and every single of the output names at the top is called
the right way. It seems to be using
the right mesh name. So it would be
exported out properly. But just in case, though we are going to go
ahead and select this, we're going to hit
F two and just going to use A over here, B over here, then C. This is just to make sure that we're not confusing ourselves, we're exporting the
right items and D. A, B, C D, all of
these lovely settings. And now we can go ahead and export it out,
and there we go. We'll be able to see
these last four ABCD. So just to double check
that we are exporting them with the right selection, basically, let's go
ahead and click Export. There we go. We have
exported it out. We can now go ahead
and close this down and in our content, we are going to see the trees
folder and here you go. We're going to have ourselves
nice, lovely variants. Now, the thing is, we cannot exactly
use them as is. If we were to just simply
place it to drag and drop it, visually it's going
to look right, but you'll notice that there is no motion and the
reason for that is because just placing it in the scene is not going to
activate the skeletal mesh, not going to use the
animation presets. Of that. And instead, there are a couple of
ways of sorting that out. So first things first,
we're going to sort it out as background trees or
these background trees, and then we're going to work
on our main hero assets. So we're going to get
a little bit more in regards to placing a
single asset for that. So for us to play
multiple assets, we are going to go back onto our engine plugins and
where is the tree assets? There we go. No, that's not it. Let's go ahead and
find ourselves the Ag procedural
vegetation content. In here, we have sample
assets, and we have maps. There's something
called Asset Zoom. Honestly, I would
often go back and forth so much from normal
content browser to this that I would
recommend you to just find procedural vegetation,
which I just unclicked. I'm just going to
click back over here. Find it over here and then right click and
add to favorites. Once you add procedural vegetation editor
content to favorites, now in your favorites,
you'll have this folder. So when you're in your
own content folder, you can go to Presidial
Vegetation Editor folder over here and you'll be able to
access these items quickly. So that's something I would
personally recommend you do. But anyways, once we
go to sample assets, you'll be able to go
to Maps and asset Zoo. Let's double click on it, make
sure we say what we have. And the reason we're using it is because it has
already nicely set up way to scatter the assets. So we're just going to grab the already preset of what already is there and we're going to
make use for our own world. So there we go. We have a couple of items. One is for the trees,
one is for the bushes, but both of them, have a look. Both of them will do it
quite well, to be honest. Though, this zone
is going to give us more variance or the scaling. Let's go ahead and
make use out of that. And in order to
make use out of it, what we need to
do is just simply select this hit Control C, then go back onto our content level over here
onto our credit scene. Like so, and we're
going to hit Control V, and that's going to spawn
the required trees. Of course, what we
have over here is not going to give us the
right content because, well, this is going to
give us the wrong trees. Let's go ahead and make use
out of our own created trees, go to parameters overrides, select the trees, and we're going to replace
these four indexes. You can also make more trees, add in more, or you can even remove the elements
and just recreate it. But all in all, we're
just going to replace the skeletal meshes with
our own custom ones. So we're going to go back
to the tree section. We're going to just
locate skeletal meshes. The ones that have a
pink stripe underneath, and you can see it
says skeletal mesh. Go ahead and select the
first one. Let's replace it. Then let's find the
second one, replace it. A third one, replace it and
a fourth one replace it. And here you should have
yourselves something like this, which is quite unique
and interesting, but obviously it's not quite
there in terms of the setup. We are having right now
a couple of issues. One of which would be
just a general placement. Honestly, placing all the trees just in the scene
would be quite nice. We could separate it
from the main area, but I would personally
recommend you to just place it on its own basis, on its own merit, we just need
to make sure that this is, well, a little bit
of a larger box. Let's go ahead and do that. So the first box, if we were to find a bounding
box, there we go. The first one could be 500 by 400 going to give us a nice little chunky
box we make use out of, and we can place it on the
ground just like that, and it's going to spawn
us the right amount. If we don't want to be
on the top of the hills, we can just lower it just
underneath the top of the hill, and it's just going to
give us to the side, like so nice little
spawn set up. Like so and then we can
just make a duplicate. Put this over here as well. This time we can raise
it a little bit. And if you don't like
the way it spawns, and also we ever make the
change for the bounding box. On here, we can set it up
to something like 200, actually 300, and this one
can be 200. There we go. And then afterwards, we can set up a different seat as well. So in the parameters, you should be able to go
onto PCG content settings, and there is an
option for a seat. If I was to set it to
something like 40, 42, you can see it
changing around. So that's quite nice for us. And once you get
something that you like, free to just add some other
trees in other areas as well. So in here, for example, we can just go ahead and add some, some, maybe some extra
trees over here. Nice and simple type of bounding boxes makes it quite easy to play around
with them, I think. And it gives us some really, really great results, honestly. And we're going to go ahead and place this part on
a section as well. Let's make sure that
the camera doesn't get behind any of the trees. So if it does, just make sure to
change the seed, and yeah, we are pretty much
done with the placement, so we can continue on
with the next lesson. Thank you so much
for watching, and I'll be seeing you in a bit.
151. Custom Tree Materials and Dense Forest Setu: Hello and welcome back everyone to Hunter
Street environment, Blended ton Reel Engine five. Now we have ourselves
a lovely setup for, well, all the forestry areas. Let's go ahead and customize the trees a little bit
little shrubs that we have. In order for us to do
that, we're going to firstly just find
ourselves a skeletal mesh. Then afterwards, we are
going to just double click on it and
locate the setup. So we have a couple
of material slots, as you can see over
here that's being used. We're going to firstly change the what's it called the bark. Let's go ahead and
click on this button, and it doesn't want to show up on my content
drawer for some reason. So what I'm going to do is I'm
going to manually find it. So this is going to
be in sample assets, common hazel materials, Bark. Let's go ahead and use that favorite item that
we set up over here. Sample assets, common hazel
materials and bark over here. So we're going to
make sure we copy it. Control C, Control B. We can call it under
Spark custom just to make sure we are certain
we're using the right one. Again, this is a plugins folder. We really want to make
sure we avoid changing it. That's why we are
binding ourselves now the trees folder
we've created and moving this bark onto
the tree folder like so. There we go. Next up is
just going to be making sure that we are changing the bark or the one
that we're looking for. So we're going to
select this over here and we're going to
click this button like so, and it should work
just like that. Now we can go on to discuss the material and change
what we're looking for. I'm going to use the
cylindrical section like so so we can actually
see how it looks like, Well, the session and we are going to just turn
on the base controls, make sure the brightness
is a little bit lower, saturation a little
bit increased more, so and contrast, also, we want to increase it
quite a little bit, so we get ourselves a bit
of a darker type of a look. Next s is roughness strength. We want to make sure
it's not as not as glowy with the moonlight that's going to look like
a wet tree otherwise. We want to make sure we
lower the roughness or increase the roughness strength so it wouldn't be as shiny. And then for normal, we also want to increase
this by a value of 1.2 just to make sure we get a more bumpiness
out of this data. Next up, once we're
done with this, let's go on to the next
material that we had. So let's just close this down and update the
material. There we go. We're getting ourselves
quite a dark looking type of a setup. Actually, looking at it over here might be a
little bit too dark. I'm a little bit worried
on that, have a look. No, it looks quite fine. So I was worried that in the preview, it was looking quite off, but no, it's looking quite nice. So next up is going to
be this hazel foliage. Let's go ahead and make a
duplicate like we did before, change this name to custom. So we are going to again, move it onto our tree section. There we go. Move it
to the trees like so. We got to sell this lovely
tree setup for the leaves. In here, you'll have the
options for the base color. So this will control well
the color of the leaves. We also have some options to control these little
twigs over here. That's something worth noting. So we're going to
start off by just changing the base
control saturation. We're going to increase
it to a value of 1.4, just to have more color. We're going to lower the
brightness to a value of 0.15, like so. So it's going to give us
these dark Boudish leaves that we're going to
love in our scene. And then we have
base color seeds. We don't really need to
work too much with them, but just to make
sure we can lower it to something that's
quite dark, like so. It's already looking quite nice. And then we have base
colour tint leaves. So this part, I think we
can leave it as it is, actually, but it basically gives us a little bit
of a tint if needed. That's quite right, though. Then just to make sure we
have ourselves a nice setup, we're going to go
on to where is it? Normal section over here, and we're going to increase the normal to a value of 1.35. Just a little bit
of an increase. We have more extreme
type of setup. Then in roughness, we can increase the roughness
leaf strength. I believe by default,
it's a little bit, it's a little bit too little, so we're just going
to increase it from the default value
was, I believe four. Let's just go back up.
The default value was, which gives us a nice shide but it still looks a
little bit too wet, so we're going to
increase it to a value of six and maybe 5.5. There we go, just a little bit. I'm just using a
sphere over here just to make sure that we are seeing those extra bumps and details that we're looking
for out of the setup. And yeah, once we
get something like that, going to be totally okay. We can now go ahead and
close this down and we can replace it for every single one of the trees with our setup. It's going to take some time to update the textures, as you saw, but once you do going to
look really, really nice. So we're going to go onto
our trees, d over like so. We're going to open up all the skeletal meshes that
we're looking for. Going to move it off to
the side a little bit. So can just open up all four
if I'm missing one more. There we go. We open
up all four of them, and just to make our lives
a little bit easier, we are going to just
select the bark over here to click this button and just go through every single one of them and
click this button. That way, you got to sell
nice dark looking bark. Next up is, well, this hazel foliage item, let's go ahead and just apply it to every single one of them, get ourselves some nice
Boutish looking leaves. Just like that. And one more thing that
I'd like to check would be these twigs over
here on the side. I should be using the
bark itself as it is. But just to make
sure I'm going to go on the procedural
vegetation option over here, and where is the foliage palette I'm
going to check one of them, and this is using twigs
that we're looking for. So these type of twigs, let's
go into next, let's see. So over here, we see that
they're much, much brighter, but inside of our
skeleton meshes because they're only
using type materials, this is going to be using
the same type of bark. So yeah, that is good. And I think we are pretty
much done with the trees. If you want to have more
trees, feel free to do so. The easiest way to do it would be to just
duplicate this volume, for example, and simply
put another seed inside. That way you have yourself
more of a distribution. This is a bit more
of a cheeky way. If you want, you could make a duplicate out of the wind
example, PCG over here. Once you'd make a duplicate,
once you'd make a copy, you could go into it and increase density
filler over here, lower sorry, the starting point
would be surface sampler. Could make the points per
square meter smaller. Then afterwards,
the density filler, if you have lower bounds lower
and upper bounds higher, you'd have a more
sampling amount. And then self pruning, if
you'd have this small value, overall, you'd get
yourself more of a forest. But right now, we really
don't need to do that. We don't need to
overcomplicate it. Just letting you know in
case you want to, well, make it more performance
table that up, maybe for a game or something of that sort, you'd
want to do that. Right now we are pretty
much good to go. We just need to make sure we have ourselves a lovely
tree on the side. So we're going to continue on with this in the next lesson. Thank you so much
for watching, and I will be seeing you in a bit.
152. Sculpting a Twisted Hollow Tree with Gravit: Hello and welcome back everyone to Hunted
Street environment. Blended H Reel Engine five. In the last lesson,
we set ourselves up with some lovely trees
in the background. We're now going to continue
on with the setup and get ourselves a customized
tree for the graveyard. So for us to do that,
we are going to go back onto our
content browser, find ourselves this
lovely procedural vegetation that we
were using before, and we are going to copy
a custom a actually, let's go ahead and just use the original default
common hazlo free. Let's go ahead and hit
Control C, hit Control B, and we're going to start off
with what was before setup. Just going to make sure that we are reusing the hazel free. So again, this one over here, we are reusing it. And this hazel actually
will freeze over here. I am just going to make another
dot over here, like so, just so we could have it lit up into this part as
well. Simple enough. Now, in order for us to get
ourselves a lovely setup, we're going to straightaway
just go to Boman output, hit Control and L Lock the
view to get this setup. The reason we're picking
this tree is because the original values
have a lot of branches, which I now wanted to show
actually, there we go. We have lots and
lots of branches. So it's looking very, very nice. It's going to look
quite right for us. Unfortunately, though, again, we can't add additional branches. We can't add additional bones onto the setup that
it already has. So we're going to be
working around that. We're going to start off
with carve the carve itself. We want to keep it as zero. Honestly, we can't prune because we have already
such little amount. Then next up for gravity. For gravity, we'll want
to use a value of 0.25, so it's going to drag
these down quite nicely. And of course, the direction
itself needs to be adjusted. This time we're going to
use the value downwards, even more extreme because I was playing around
with it previously, that's how it was amplified. Not always needed,
but in this case, we're going to use -2.38. Or 39, actually. Yep, -2.39. There we go. So it's going to drag everything down even more. Then for X and Y, we're going to use
a value of 0.2, sorry, 0.8, three, so. Is going to push
it onto the side. Then next value is going to
be 0.54, just like that. We're already getting a
very unique type of a look. But we're not quite done
because what we can do is not only can we use
a single gravity option, we can create multiple versions, and that will help us to create
more distinguished shape. So right now, if I was to
click the Control C control B, we can make a copy
for the gravity, we can reattach
it, the input and output like onto the scale. And you'll see that
we now ourselves yet another amplification
of the gravity. Well, this is a
little bit too much. Let's go ahead and use
the gravity here 40.16. Like so, and then direction
can be set to zero over here. It can go the other
way over here, so -0.3, like so, and it can be way smaller
over here, -0.8 over here. Then what's nice about this modified gravity is that
it has angle correction. If I was to set this
all the way to one, it's basically not
going to do much, but once we start lowering it, it's basically going to start affecting the upper
sections more and more. Basically, we have control over which parts we are
trying to affect. Over here, we were
affecting the whole tree, though we can lower this
to a value of 0.25, for example, and
it's now going to just make sure that the
bottom parts aren't as bendy, so it's more straightened up or something like a tree
is actually important. And for here, we can
use a value of 0.26. So it's a slight variation, but it's going to give
us such a nice result. I would even go as
far as saying 0.27. Just a little bit
more of a difference. There we go. Looking lovely. And if we want even more crazy type of a
result, we can do that. We can make a copy again
out of a new gravity, and we can put this in like so, and now use even more values. So here, we can use
a value of 0.29. So the direction here can
go into -1.230 over here, and it can go as far as 6.26. So it's going to go upwards,
as you can see over here. And this will allow us to grab everything and just move upwards and a
little bit to the side. And if we were to set the angle correction to one, it's not going
to do anything, but if we were to set it to
just smaller value of 0.94, it's going to grab some of those branches at the very end and just pull them upwards. So it's going to
look so much nicer. You can see it before. And after it's so,
so much nicer. Next up for the scale, we can use a value of four. I've scaled this
part quite a bit. We have ourselves a
large junky tree, which is always lovely to see. We're going to keep the remove branches
as it is for a mesh Builder we're going to start off by increasing Max divisions to 14 just to make sure we have, well, more detail out of this. This is going to
be our main prop, a hero prop in the shot. Of course, we want to
make sure it looks nice. It's going to check advanced settings real quick, as well. We don't really need to
change them, though. Profile. Let's go
ahead and do that. To change the profile to zero,
just like we did before. Profile fall off, we're
going to again flip it. This time, we're going to do
it a little bit differently. So let's go ahead and firstly invert these frame
values over Z. Then once we change the profile scale to a
value that's more extreme, 5.65, it's going to
look quite nice, but it's just going to
look more triangulated. Like, as in it looks like a
pyramid just stretched out. So in order for us to fix that, we're going to right
click on the point on the graph and add
key frame fall off. So that way, we can just have this bit more of a fall off, and you can see that
it's going to be way more chunkier. Towards the end. So that is going
to be quite nice. We can have it
something like though, I think that's looking
quite a bit nicer. Yeah, that looks
much, much nicer. So let's go ahead and
continue on with the setup. Bone reduction,
bone reduction has to be a little bit more dense. For this case, I
am going to click Control and L so we can
see what's going on. Click Control L whilst the
selecting out of photograph. And then we can just
go back onto here. And lower the value to a value of something that would
give us more of an outcome. So 0.14 will give us a
very, very nice result. You can see the
amount of bones is giving us very, very nice. Let's go on to
foliage palette now. For this, we are
going to make sure that we are having
no leaves here. We're going to just get foliage infos and every single index is going to be
changed by BR twig. We have two options,
zero, zero or 01. Let's just have it varied. So that way, we'll have ourselves like a hollow
tree type of an effect. And over here as well. And I think the final
one is this one. And it be an ovarian, fine. There we go. Once
we have it sorted, we can go on to
foliage distribution. And for here, we're not
going to overdo it too much. Let me just have a
look from a distance. So over here, we're going
to have Epline threshold, quite a bit smaller
zero point f one. Like, so and the rest, honestly, might be okay. I am considering to
make some adjustments, whether or not we
should do that. I think we can do that being a little bit more
playful base scale, we can have minimum
and maximum scale, so we can set this to two. We can have minimum
scale of 0.3, like so and value of
maximum scale, 1.5. So we have some extreme branches in regards to the differences. A is good very, very nicely. And then in terms of Branch distribution,
we can lower the spacing a little
bit by too much. Just a little bit. You
can see the type of result we're getting
very, very nice looking. The only thing that I
seem to have forgotten is actually some bumpiness
on the tree trunk. Sorry about that.
Let's go back onto the mesh Builder real
quick. Displacement. We want to have
some displacement. We're going to use
noise underscore PNG should find this item. But this is going to give us real nice result and the scale, we're going to use
an extreme value of 0.0 007, something like that. You can see super duper thin. And then we just
need to make sure that the scale is
way, way, less. Even go as far as 0.5. If we go, something like that. Is a little too much
actually to change this. Something more reasonable
there. If we go, that's the value I
was looking for. 0.00, 03. Alright. So once we get
something like this, we can see that, we have
ourselves a nice hollow tree. It's not quite there yet. The reason being is that well, it's not using enough
branches, but that's okay. We're going to sort
that all out in a bit. But now though, let's go and
make sure that we are using the right folder for the exports or trees section over here. We can call it underscore
custom underscore. Hello. Hello. All right, so there we go. That's the only
setups that we need. And now that we are
exporting only this tree, we can go ahead and click
Export Selected output node, and it's going to just
export this part. I don't even need to
change this output name because I know that's
only one I selected. Let's go ahead and click Export, and we are going to have
ourselves a nice hollow tree. Let's go ahead and find
the one we're looking for, which is going to
where we have hollow. So again, we are going to have some bit of controls
needed to be done first. But before doing that, let's go ahead and make sure
that the textures are being used properly.
So let's open this up. Let's find ourselves a lovely folder that has our
custom material and just replace it real quick. The same goes for leaves even though we're not
using the leaves, those branches are using
that greenish texture, as you can see, make sure you
use the darkened variant. So Alright, now that we
have the setup like this, we are going to close this down. And in order for us to use it as a single item in real engine, we can't just simply
place it as an instance. We have to make sure we
are using a blueprint. So we're going to go onto
our content browser. We're going to right click, create ourselves a
blueprint class. We're going to
create an actor and we're going to call
this Hollow tree. So then afterwards, we're going to double
click to open it up. And once we do that, we're going to need to create
ourselves a little setup. Let's go ahead and select
the fault scene root from which we're
going to click Add, and we're going to
search for skinned mesh. Instant skin mesh, we're
going to select it. And here, we're going to set ourselves up with
a skeletal asset. So for us to do that, we're
going to open this up. We're going to find ourselves a hollow holo tree, custom hollow. There we go. Let's go
ahead and add it in. And then the next
thing is we need to make use out of a
transform provider to make sure that it
creates a Wind. So we're going to click on this section and there go
wind Transform provider. Go ahead and select it, and
we're going to hit Compile. Once we hit Compile, we
should have a setup here. Let's make sure we hit
Control Shift ins as well. Take some time to save. The thing that I forgot
was if we were to go a little bit down onto
the instances section, if we were to click on plus symbol over here, there we go. We basically create ourselves an index for the
skin animation mesh, and that's what we're
going to get our seta. Now we can go ahead
and hit Compile and hit Control on to save it. Then we're going to continue on with this in the next lesson. So thank you so
much for watching, and I will be seeing
you in a bit.
153. Placing Hollow Trees and Controlling Wind Effect: Hello, Lord, welcome back up to Hunter Street Environment. Plant and Reel June 5. Now that we have ourselves
this hollow tree, which we can place
it in the scene, we're going to see that we
have this lovely animation. Let's go ahead and move it onto the back side of our
lovely cemetery, like so, and now the thing is that we
need to know is that, well, though we can't change the overall initial
shape of the mesh, what we can do is we can add additional bones by simply
holding alt and duplicating, there we go, we have
ourselves a secondary tree. So if I was to
rotate this around a little bit and maybe twist it, tilt it, we're going
to have more branches. It's going to look a
lot more intimidating. We just need to make
sure we overlap them a little bit nicer. So also, we can raise
this even if you want, we can maybe scale this down a little bit to make sure that the default goes into
where it needs to go. And we got ourselves nice
looking hollow tree. Okay, just check what it
looks like from a distance. We need to move this a little bit more
actually to the side. Let's go ahead and grab this and just move
it off onto here. We to see what it looks like on this side, looking quite nice. Like, so I want now this grave actually
to move a little bit off onto the side like that, so we could actually
see this grave a little more a little more. Something like this, perhaps. And that gives us some
space for this lovely tree. There we go. Alright, let's go ahead and select
both these parts. Move it move it to the side. Though and now we also want
some roots as well for it. You can't just keep it as it is. Over here. Yeah,
that looks good. So for the roots, what
we're going to do is we're going to do it in a little
bit of a cheeky way. We're going to duplicate
the tree again, and we're going to rotate
it around. And there we go. From the three parts, we're going to get
ourselves root parts. We can also wish it in
that axis a little bit, and that's going to give us a certain bit
of a look for it. And yeah, we are pretty much
done with this follow tree. The next thing that you might
want to know is that you can control the wind
intensity for this. We're now going to go onto a little setting in
a content browser, back onto the
procedural materials. We're going to go onto
material section, and here is not the right place. Because we need to
go now onto content. We need to go onto
sample essens, yes. And then materials. There we go. Global foliage actor,
and we're going to have this little chunky
boy over here. We can put it right in front
of the scene over here, and I'm also going to
make sure that it's not visible whilst we are
seeing the screen. The reason we're doing
this, by the way, is just to make sure that
when we are in camera view, we can still play around
with the setting. So once we have this
little actor in, once we have it
placed in the scene, we can just move it off
onto the side somewhere, so it would be out of our way. And then we can see that once we have this selected,
in the scene. So with the selection,
you have wind speed, season, strength, health,
all of that lovely stuff. So wind speed, if we were
to increase it to 100, we'll have a strong stormy wind. If you're planning to do
that, feel free to do so. But for us, we just want something
that's more reasonable. So keeping it at ten will give us that nice little
animation result. So yeah, we just also need to make sure
that the hollow tree that we have in the back is
also looking quite nice. Maybe this part over here can be or it can be
rotated a little bit. So and just lightly
lightly adjusted. We can also just invert this
into negative scale as well, and that's going to
flip it entirely, and that might be a nice result. I'm just looking for
more unique type of an outcome over
here, to be honest. Feel free to play
around with the values. Something like this,
that would look. Something like so. Yeah,
that looks quite nice. I'm quite happy
with this result. Alright, so yeah, that's
going to be it for me. We're now left with just
setting up the fog plains, and we'll be able to see an entire environment
with our broody atmosphere. Let's go ahead and
leave our lesson here, even though it's a
little bit short. Thank you so much
for watching, and I will be seeing you in a bit.
154. Creating Atmospheric Fog with Niagara System: Hello and welcome back around to Haunted Street environment, Blended turn wheel engine five. In the last lesson, we
lapped ourselves off with this lovely
setup for the trees, and all of it is looking nice. Now to enhance the
environment and the mood, we're going to make use
out of our fog planes. So going onto our
content folder, we are going to find ourselves
fog folder over here. Within it, we're
going to right click. We're going to get
ourselves Niagara system. And here, there are a
bunch of templates. We're going to use hanging
particles, wherever that is. And if you are not
able to see it, just search it in here hanging
particles. There you go. Let's go ahead and create it, and by default, it's
going to keep you this. Let's call this bog
underscore VFX, like so now let's click on it, and we're going to get ourselves these hanging particles,
which is lovely. Oh, we can. One way of working with them is moving this setup
off to the side, and then we'll have this
entire parameter setup. And because I like doing this because the preview is not always going to show
us what we want. By that, I mean,
if I was to drag the particles onto our scene, can see that maybe
it's not going to look quite the same
because mainly it's well, a dark cuisine, it's going to
look completely different. In the template itself, it wasn't even glowing. But here, it looks like
it's glowing and stuff. So we got to put these
into our consideration. But before we get
ahead of ourselves, what we need to do
first is we need to create ourselves a bog plane. Instead of using
these dots over here, we need to make use out
of, well, actual fog. For now, we're going to close this down
and we're going to create ourselves bog material. So we're going to right click. We're going to create material, and we're going to call
this Og one underscore Mt. So we can double click on it and we can get
ourselves this. Next up is we're going to drag this first cloud into here. You get the material. Then we're going to get
ourselves part to call color, this little tool over here, which will allow us to work with the texture and change up, well, the color as
well as opacity. Then next up is we're going to change up this
material itself right now. If we were to use it by default, it would be quite
performance heavy. The reason being is that
right now it's just set up as a full PBR
setup. We don't want this. We want to make sure that it is the blend mode
to be additive, meaning that it adds in, like, the brighter and
when it's darker, it's just going to
be more transparent. It works very well because it doesn't use an
additional opacity mask, and it's very, very
lightweight in comparison. As long as you don't
want to create darker fog or something that's, yeah, more like blackish type of smoke, then it's
going to be okay. If you do, you might
want to use something like mask or translentc
create transmittens. But the way, for us, we do want more of a whitish fog to make sure
we separate the atmosphere, what's in the foreground, and
what's in the background. So once we have
this as additive, we're going to hold M, we're
going to tap on the screen, and we're going to
combine RGB with A and RGB with particle
color for B. Then on top of that, to
make sure that the items that were already placed in the system that
controls the opacity, we want to make sure that
it can be controlled here. So what we're going to
do is we're going to hit another multiply
tapping M on the graph. We're going to attach
this with the Alpha. So the already existing
system that has opacity will also
affect the setup. So then we can attach it
to the base color like so and we got ourselves
a basic material. We can hit Apply over here. We can click Control S, and that saves us
with a new material. Want to make sure we
create two more of these. So we'll have two more
additional clouds. Let's go ahead and do that. So hit Control C, Control B, Control V. And here, we're just going to
rename it using F two. We can rename it as
fog 02 material. So fog 02 underscore material. Here is going to be this one over here can
be O free material. So we have 02 and of free. Let's go ahead and
open the both. So. And then we're just going to simply
replace this cloud. So this cloud, once we select
the second cloud over here, we can just find
the texture input, we can hit this button and
it's going to replace it. The same thing over here. We can just select the cloud free. We can grab the the
texture itself, and hit this button,
and there we go. We got ourselves three
unique materials or our little fog. Lovely stuff. Alright, now, going back to the fog BFX. Let's go ahead and
double click onto it. We open ourselves up with it. We are going to now move this a little bit off
to the side so we can actually see what's going on with the particles
just like that. Way, we're able to see
what's going on with this. Now we can go ahead
and select it, and we're going to start
off with the sponrate. Sponrate we're going to
change it to ninth just to make sure that we're seeing
what the particles are. And once we have more of those, we can go on to sprite renderer. It's going to zoom in so
you could be seeing it a little more. Sprite renderer. So once we select
sprite renderer, we're just going to go ahead and find ourselves fog material. There we go fog or one material. Let's go ahead and select it. And now it's going
to look like this. The reason it's looking
like this is because, well, it's creating tiny little blobs. These tiny little blobs
are obviously too small. We need to make sure that
they look much, much bigger. So what we're going to do
here is we're going to go into initial particle,
initialized particle. It's going to control where the particle is and how
it's being affected. Here we have sprite attributes. A size minimum and maximum. We're going to the minimum, we're going to set it up to 300. For maximum, we're going
to set it up to 310. We just want slight
bit of variation, but overall, it should give
us something like this. So already, you can see
that it's creating us some very interesting
and unique type of fog, and it's already
looking quite unique. Thing that we need to sort out is we need to make sure that they stay a little bit longer. Right now, they appear
and straightaway disappear because
the lifetime minimum and maximum is very, very short or reasonably
short for such a particle. We need to make sure we change this minimum to ten and 13. So now they're
going to be staying there for a lot longer. Then next up is, if we look
at it from a different angle, they're going to look
a little bit odd. And the reason for
that is because right now rotation mode
is set to random. We want to make sure that
it's set to a specific setup, so we're going to use
direct normalized angle zero to one, like so. And we are going to
keep it as it is now. It's just going to be more
facing towards our camera. And when we are from the top, it's still going to
keep that positioning. It's going to also help
us when we are rotating our item a little bit to add that bit of
an extra animation. But let's not get
ahead of ourselves. What we're going
to do now is we're going to go to shape location. Shape location will
allow us to well control the size of the setup. Right now, it's set as
box plane as 40040256, and it creates, well,
this boxy outcome. Which is almost
good, but not quite. We want to make sure
that this is set to 450, so it would be a little
bit wider for us, and now we can just move it
into this area over here, and we will see that we're creating ourselves a
very, very nice fog. Just wait a bit until these
disappear, and there we go. A nice little fog. So already looking very nice. Next up is going to be an
option for scale sprite size. If you look at it,
you'll notice that they appear and
then get smaller, so they get bigger and smaller, which gives us some
interesting animation. But honestly, here,
for such a fog, it feels a little
bit too bouncy, like it needs to be
softer, smaller. So what we're going to do is
we're just going to simply remove this scale sprite size. It's going to keep spawning that same type of scale,
same type of size. So it's going to be quite nice. Instead, what we're going to do is we're going to animate
it in a different way. We're going to add
ourselves something called rotation rate, right
rotation rate. That's the one over here.
Go ahead and add it, and this should help
us rotate the object. So let's go ahead
and put it to 100. You can see, Whoa, it
rotates our items. It looks crazy. Yes, it does look crazy. And the reason for that
is because the amount we're using is a
little bit too much. Let's put it to three,
and now it's going to give us a slow bit of rotation. You'll see that it
just slightly moves. It makes it feel like
it's moving in, like, a certain direction
while staying the same, so it has a bit of an extra
animation, feeling of motion, but it's not moving out of this position,
which is great for us. Uh, next step is scale color. Let's go ahead and select it. And this part will
allow us to basically control the SRGB if we want to. But also, if you remember, we set ourselves up
with scale Alpha. Scale Alpha will allow us to basically appear slowly
and disappear slowly. Make sure that this
is set as that. It'll give us a
nice little setup. And this upper section
will control how the value is being placed
for the main opacity. If we were to lower this 0.1, it's going to barely appear
as a very slight bit of fog, which is quite nice. I think we can keep
it as is for now, just a value of 0.1
with scale Alpha. The reason for it is because
we're going to be adding more variation to this using
our created unique smoke. So let's go ahead and continue on with this
in the next lesson. Thank you so much for watching, and I will be seeing
you in a bit.
155. Layered Fog Effects with Niagara Sprite Contro: Hello, and welcome
back ever on to Haunted Street in Barban
blended on Real Engine five. In the last lesson,
we left ourselves off with this lovely
little setup, which controls, well, how much the fog
is visible and whatnot. It's going to be wrong with it. Yep, that's going
to be quite okay. Even that 0.1 is right. I just want to make sure
it recess to graph so we can see that
it's 0.1 over here. Anyways, going
back to the setup, we now have ourselves
lovely little fog, but it's not enough variation. So the first thing
that we should do is make sure that
the variation is there. And the way we're going
to do it is we're going to make sure that we firstly, lower the spawn rate
over here to 30 because we're going to do
basically 1/3 of 90. And the reason for that
is because now we're going to make
duplicate out of this. Sorry about that. We're
going to make duplicate out of this twice. Like so. This will basically give us two unique spawn
points over here, and this gives us a control to basically create two
unique walk planes. So for both of these,
we're going to simply change up to renders. The sprite renderer over here, we're going to change it
to 02 and for the 01, 03. In that way, we have full
control of, for example, if we want them to
be rotating more, if we want them to
be rotating less, we have full control over that. So for something like
this fog plane over here, fog 02, you might notice that
its shape is not as blob. Is shape is a little bit more squished and, like, elongated. And that looks great, except that I find it that
it's going to make it seem like the rotation is a
little bit more too obvious. It's not going to give
us that bit of motion. We're going to do here
is we're going to go on to sprite rotation rate, and we're going to change
this to a value of two. Something like this one
over here, the fog 03. I find it to be nice and blobby, but we can play around
with the size over here. So if we were to go to
initialized particle, we can change the
original to be 310, minimum uniform sprite size, and the maximum to be 350. And that gives us a
nice blobby type of a look which has
these jagged edges. And just like that,
we are able to get ourselves some nice fog. Now, it might be a little bit
too many too many of those. So we're going to
go to the spun rate for which one was it three? And we're going to
change this to 15. So for this one, it's
going to spawn way less because they're
going to be larger, they're going to be needed less. And there we go. We're going to get
this sort of result. Once we have that essentially,
we are pretty much done. We can just close
this down and we got ourselves particles
spawning in here. So then we can place these
particles in other areas. We can just go ahead and click
G. You should be able to see this icon over
here for the fog, you can on the right
side, you can see fog FX. We can just manually move
it to this edge over here, so it's going to give us some
unique fog in this section, maybe even move it
inside of the house. So that way, if we were
to wait a little bit, that way, it's
just going to give us more for the ground itself. And we can even lower it down
just this kind of value. So we don't need realistically
to create a new variant. We can just put the location a little bit lower to make sure that it looks
more grounded, maybe a little bit too
grounded, in fact, to raise this up and
bring this outwards, but it will be a
little bit covering up this section over, like so. And I just realized this
human is not really needed. We're going to move
it out of the way. Human. At this point, we honestly
don't need a human reference. Let's go ahead and just
completely remove it. And now in terms of
these fog particles, Did I I think by accident, I moved it without
duplicating it. So sorry about that.
Let me just hold Alt. There we go. Now, it
makes a duplicate. I don't know what was
the case over here. Just going to raise
it up a little bit, bring it to the front. And yeah, we're going
to make holding Alt, a duplicate onto the upside. Like, so just to kind of
get some nice fog in here. And then we also wanted to be having a little bit of
fog over here as well. Of course, this kind of fog
is looking nice and whatnot, but it's not covering anything in terms of
the environment itself. So what we're going
to do here Oh, This is way too much. We're
going to lower this down. So, let's have a look. Going to wait a little bit. There we go. Much nicer fog. So this
fog is quite nice, but we need to make sure that the other environment parts
also have a bit of fog. So what we're going to
do is we're going to make a duplicate out of
the fog that we have. Over here. So fog BFX. Let's hit Control C, ControlV. And let's go into it. But this way, we'll be able to see what it looks like for
the entire environment. I'm also going to place it, make sure we're getting
the right setup. We're going to place it
into the scene as well. And now we can play
around with the settings. So the way we're going
to do it is firstly, we're going to remove
the version free. This one over here,
last one that we created, we're
going to remove it. This type of blob is just
not going to look nice, quite as nice and large scale. Let's go ahead and delete it. Then next up is we're going
to switch around these parts. So right now, it's
spawn rate, it's 30, we're going to set it up to
ten to make sure that well, it's not quite as much. And then we're going to go
on to initialized particle. Let me just have a quick look. The lifetime is okay.
The size now is going to be 2003 thousand. 2003 thousand. So, and now it's
going to create a large plane of volumes, which is looking
very, very nice. Then sprite rotation angle. We're going to switch
that up a little bit. So if we were to
increase this to one, you'll see that I just
rotates them a little bit. We're going to make sure
that it's set to 0.8, just to make sure that it looks different from the
original soap. Then shape location. Shape location is going to
be set to 8,004 thousand. 8,000, 4,300 for value. And that way, it
should be covering most of the most of the scene. We're just going to
move it a little bit more to the
center to make sure it covers it nicely,
the whole bank. And already you
can see that we're getting some interesting
looking volumetric planes. Then for rotation,
let's make sure that we lower this to value of two
because they're so large, the rotation end parts, especially going to
be quite visible. And then I think,
honestly, that's it. We just need to
make sure we have enough variance with our parts. Maybe we can lower the
scale color a little bit. So from value of 0.1, we're going to lower
it to a value 0.07. Let's put it like that.
I just want it to be just barely visible, like so. And yeah, it's looking good. And because I am a little
bit how should I put it? Um, efficient one
to be, I suppose. I'd like to just
delete the second one and make a duplicate of
the first one then simply replace the fog 02 because that will make
our lives much easier. We already have the
settings that we need, and we're going to get ourselves lovely fog coming
through the settings. Just like that, we got
ourselves variance in fog. And I think, honestly, one
more, quick, tiny thing, we're going to firstly rename
this one fog large FX, we know that this is being
used for large fog that apps. And then the second part is, I like the second sprite
renderer a lot more. So I'm going to increase
the spawn rate to 12, and I'm going to use the
scale color over here from 0.07 to a value of 0.09. So these ones will be
a little bit stronger. And I think that
is basically it. We don't even need
to do much else. I was considering
upscaling wind force, which would lead us
to drag these out. But this kind of scene requires us to make it look
like it's almost stationary. It's like, very gloomy
and dead looking whilst even the village is lively with the buildings inside
being glowing. But yeah, just checking
the final parts. I think it's looking quite nice, so let's go ahead
and end it here. Thank you so much
for watching, and I will be seeing you in a bit.
156. Building a Hanging Lantern Blueprint with Dynamic Ligh: Hello and welcome back everyone to Haunted Street Environment, Blended tone heel Engine five. In the last lesson, we
left ourselves off with this lovely little
cinematic fog. I now realize that we are missing a slight bit
of lantern over here. So let me just
quickly add that in. It's going to be within modular environment,
static meshes, and a little little bit of
a lantern over where is it? We have a lantern over here. We're going to be working them. There we go. This
lantern over here. Let's go ahead and add it in. Let's make sure it
looks lovely for us. And, you know, we can click L to add in a beautiful light, which is now way, way,
way, way too much. Go ahead and lower this down. Something like 12 maybe. Let's go ahead and just
make it more orange, so a little bit more orangy because it's more coming off the lantern light. I
think it's alright. And then a soft attenation
radius can be set to 300. Source radius can
be set to 12 24. Sorry. There we go. And we're going
to have ourselves a lovely little glow
coming out of it. Alright. Next up, we got ourselves a lantern that's coming
swinging from the side. Let's go ahead and do
that. We are going to grab ourselves this
lantern over here. We're going to drag
it into our scene, and we want to make
sure it swings, but we don't want just to
swing it like this, whoo. It's going to look crazy.
It's going to look not as good as you might think, if
you're thinking about that. But you can go onto modeling mode now and we can split up some of these parts. No go onto modeling mode. I'm also going to just make
sure we drag this above everything because we don't want the fog planes to be
interfering with us. So this little
lantern over here, we are going to,
well, break it apart. We're going to split it
into multiple parts, and it should be by vertex
overlap. There we go. Now it's going to give us
these lovely that apps. Let's go ahead and hit Accept. And now we're going to make
sure this upper section if we didn't bring it high enough because it's
getting in our way, this fog. If you have an
issue with the fog itself, selecting onto mesh, just hit H, hide this
big fog out of the way, and now you can make
selections properly. Alright, so we're going
to make sure that this upper section
is being one item, so we're going to
select these two. So we're going to
merge and accept. Then we're going to select these parts over
here for the chain. We're going to hit Merge
and accept before merging, you should have these settings. If it's not working
in the same way, make sure it writes
to a new object, and output is from
input and handle inputs deletes the
previous input. So basically, when we merge, this original gets deleted
from these asset parts, and it creates a new chain. So let's go ahead and
just select that. There we go. And then the rest of the items
would be these over here. I think we can just
select it like so. There we go. It's
going to check it. This is just the bottom
part. We can go ahead and merge it and merge
it just like so. Alright, so now we got
essentially three parts. The upper section,
the middle part, and the bottom section. These are what we need. We now need to make sure that the pivot points are
properly set up. So let's go on to pivot points. We're going to start off
with the upper section. This part is where the item
is going to be placed. Let's make sure that it is when we're looking
from the side, just going to go into this hinge is going to go
into upper section of some wood or
something of that sort. Let's go ahead and hit
Accept. Going to be nicely. No, it's not nicely
placed in the center, so I'm just going to offset it. Like so. Now, was it it was the wrong origin
point. That's okay. Because we can just fix it. So this part, we can be a
little bit smart about. We can hit center. Now it's going to be perfectly centered, and we're going to hit
the origin point B where this contact is
between those two chains. So we're going to hit Accept. So then when we are rotating, it's going to rotate based on this specific point,
which is beautiful. Next step is this part is
going to be very similar. Again, we're going to
make sure we center it. We move this more to
where the contact is. And then afterwards,
that's right. Let's go ahead and accept. So we have ourselves
lovely little setup. What can we do now? Well, we're now going to turn
this into blueprint. Let's go ahead and select all of these little parts over
here on the lantern. We're going to hit
onto the blueprint. We're going to convert
selection to blueprint class, and we're going to
harvest components. Then the path should
should be right. Yep, let's go ahead
and just call this lantern on the
call blueprint. And hit Accept. That way, we got a self's
lantern over here, and it has all the necessary
parts for us to work with. Going to just make the
grids bit smaller. So. And this should be
at the centerpiece. Going to check the location, not at the center. But this part over here,
just going to reset it is going to put me right
in the center of origin, and then these two
parts would be moved down without
the red selection, and that's going to
reorientate our setup. The reason we want to do this is now because the blueprint, the way of the setup
is this world position over here in the center of our blueprint is going to be the placement when
we drag our blueprint out. So we just want to make
sure nicely set up. Next up is we want
to make sure that this upper section is,
that's quite right. This upper section is
going to be proper. It's going to hold
these outer items. So what we're going
to do is going to make sure that it's
holding the chain. We're going to drag this onto the chain so that
way, when we are, for example, rotating this, we can see that this outer
part is moving as well. So now we are going to do the same thing
with the lantern as well. We're going to drag it and
drop it into the setup. And now we can see that
these parts are connected, and you can see that if we're moving the chain now, the
lantern is also moving. Let's go ahead and hit Compile, and now next step is going to be to set up a light source. So we're going to
hit Add over here, we're going to find point
light. Point light. So we're going to add this
point light onto the lantern, so onto the last part. Then we're going to move
it where it needs to go, which is a bit lower. So we position it to be
right in the center. Or less. All right, so next step is intensity. The way I'd like to usually
do is when I'm working with this is just make sure that we have this
entire blueprint, which has been
converted to blueprint. You can see on the bottom right
on the right hand corner. You can move this down and
you can see the type of light that it gives
off to the selling. So right now, it's
giving off way, way too much of a light and
everything is just glowing. We don't want this.
We want to make sure that it glows
reasonable amount. So what I do is I just play
around with these values when I'm working on certain scenes to make sure we're getting
the right outcome. So the intensity for this
one is going to be 600. Then atonal radius
is going to be 300. It's going to make sure
that everything outside of the 300 meter radius is
not going to be affected. Then source radius is
what's going to be causing a lot of the mixes. And one of that would be, while making sure
that the light source penetrates the items
grid, these hand rails. But right now, if you go inside, we'll notice that there is a
tiny little bit of an issue, and that is this because it was converted through a blender is actually
double sided. If this happens, we just
need to make sure we fix it. Fix this, make sure that the light is
able to pass through these parts as well and to
get ourselves a nicer result. What I would like
us to do is I'd like us to go back onto
one of the mesh parts, especially for the lantern. So this part over here,
let's double click on it. And here we will find
material property overrides, we're going to take this on and we're going to click this off. And now, you'll see
that on the inside, you're not going to see. So with this on, you see that it's two sided
with this off, it's going to be one sided, which means that now the light will able to pass
through these items. So it's going to give
us a nicer result. And we don't need to use if we were to go
back on to point Light, we don't need to use as
much of the source light. What is move it a little
bit off to the side. Going back to the setting. So source radius over
here can be 368. That's going to give us a very
nice soft type of a light. We can soft source light. We can just change to ten. It's also going
to be quite nice. And, of course, the
color needs to be more orange towards yellow. Yep, something like that,
we'll do. So there we go. We got ourselves very, very nice type of result. The other thing that
we can do is we can enhance the glow itself. We can make it
loom a little bit. Using volumetric
scattering over here, if I was to set it to
something like 100, you'll see it gives us
this nice round shape. We don't need to
do it to extreme, but just setting it to a value
of two is going to give us a slight bit of glow
coming out of this, which is going to
be great for us. Especially if we look
at the game setting slight we'll see that it gives us a very
nice type of well, shading, lovely
look out of this. Now next step is we need to make sure that this is
being animated. We need to make sure that it's swinging back and forth nicely. So we're going to continue on with this
in the next lesson. I'm just making sure
I'm compiling this, clicking Control Shift ands, and we can continue on with
this in the next lesson. Thank you so much for watching, and I'll be seeing you in a bit.
157. Animating Natural Lantern Swing with Timelin: Hello, Lo and welcome
back everyone to Hunter Street Warman, blender to Unreal Engine five. In the last lesson,
we set ourselves up with a nice blueprint light, which is going to look
quite nice for the scene, but we need to make
sure that it also looks good in an animation, in a slight bit of motion, adding a bit of
touch up to that. We are going to go
onto the event graph, and the first thing that
we're going to do is we're going to create
ourselves a timeline. So if we right click
on the blueprint, we're not going to
make it too complex. We're going to make it simple enough yet get good results. Timeline helps us to create
a timeline component. That's not, right? Timeline we need to get ourselves at
timeline. There we go. So we're creating ourselves
a new timeline like soap, and this allows us to basically, once we play it, it gives us, well, a
graph for the time. If we double click on it, we'll see that this
is what we get. And if we add ourselves a track, float track, we'll get
ourselves this sort of graph. Now, first thing
that you might need to know is that you can
change up the length. Right now, it's valued at the time is horizontal
value over here, so it's valued 0-5. If you want to make it longer,
you can change this time. Luckily, for us, we don't
need to change this time because it's perfectly
set up just right. And then we need to
basically get ourselves a nice graph that gets
a value from zero, zero to one to zero again. So for us to do that,
we're going to just simply right click add
key to flow curve, add key to float curve, and one in the middle as well. There we go. Then afterwards,
we can select this. We can get time zero, value zero over here, then this time zero
and zero as well. Oh sorry, time five
and zero, there we go. And for this one, it
could be time 2.5. And value one. Afterwards, you can
see that it's trangle, meaning that it's
going to be linear, up and down in
terms of the value. We want to make sure we have
some bit of interpolation. So a bit of a transition. We're going to select
this entire graph, so we're going into
right click and use Oto. Now you can see it has
that smooth type of curve, which is going to be
looking way more organic. The next thing is,
once we create that, we're going to select this and we're going to just move it down to around this amount. So we want to make sure that some of it is
going to a negative value. You see around -0.5, and this one goes to
opposite the plus 0.5. The reason being is
that because we want this to be swinging
back and forth, if we were to just have it
from this value to this value, it would just go in
one direction and back to the normal angle. We want it to be
going back and forth. And that is going to give
us the right result. The final thing that you really, really need to make
sure you do is loop. You need to click
on this button, make sure you have this on. Without this, the timeline
will not loop itself. It's not going to give
you that right result. So once you have this turned
on, you'll be set to go. Now we can go ahead and hit the X button to close this and go back to the
blueprint and then graph. And right away, we're
going to try using it. So the way we can use it is we can just attach this
to then begin play. So when we hit Play, it's going to well, run this timeline loop. The next thing is
we need to well, tell it what to do with it, what the value is
being used for. And what we're using
it for is going to be for setting
relative rotation. Relative rotation. Then we're going
to grab ourselves a set relative rotation, set relative rotation, like so, and we are going to turn
off context sensitive so we can get ourselves just a normal relative rotation like. We're going to use this to
update it just like that, and we need to tell which one we're being used for the target. So the target B is going to be this
middle part over here, this chain that's going to allow us to basically
make it rotation. Going to grab this one, place it in a graph,
and we're going to connect it like
snow to the target. So this is what's going to tell us that this is going
to be rotating. So when this is being run, this is also going
to activate it here, and then we need to tell how much the rotation
is going to be. So for us to do that, we
are going to get ourselves make rotator make rotator. This one over here, it will
allow us to put the value in and gives us XY and
Z for rotation angles. So next up is we're going to
tell what's being rotated. So we can directly put in
this new track that we created that goes
from -0.5 to 0.5, essentially to that area. If we were to put it to
X roll and hit compile, we can see that in a viewport, it's going to give us a
slight bit of motion. So once we hit play, you can
see that not sure if it's visible maybe it's
not quite as visible, but the reason
being is that right now this amount is way, way too little or actually,
sorry about that. It's not going to be visible because we haven't
connected anything. We need to connect this timeline itself to event begin play. So essentially, when
we hit play is going to run timeline and then
activate the relative location, which is going to give us the new rotation
for combined item. Using make rotation. So now
if we were to hit play, you'll see a tiny bit of motion. The angle is so small that
it's not going to be visible, and that's why we
need to amplify this. So we're going to use multiply. Multiply, so we're
going to multiply this value by a value of, let's say, 15 for
this just a preview, we're going to make sure we
randomize it a little bit. And now when we connect it, we can hit Compile and
we can hit Play and this will give us
some bit of motion. It's not giving us motion
so what's going on? Well, we can check into
here and check it's going to increase this
to 100 and even so it's not going to
simulate what's going on. Well, I think it's just
not visible in blueprint. Unfortunately, so I'm
going to load this down. Going to go to the three
dots and simulate. That way, we can keep
the camera view, and we can see it
swinging back and forth. Lovely like that, of course, it's missing quite
a lot of things. So we're going to make
sure we sort that out. The first things first
is we are missing some bit of well randomization. And for that, we are going
to create variables. We're going to get
ourselves two variables, one called rand variable, so we're going to make
sure it's not bullying, it's set as float
value, just like that. So it's going to give
us one randomization, and we're going to make it
a little bit more unique, we're going to copy this, paste it, and we're
going to get ourselves a second variable
just like that. That way, can multiply
with a value from here. You create the set
randomization. So first things first
is we're going to randomize with random
variable zero. We're going to put it here and we're going to get
this variable. We're going to place it
with the multiplier, and now in order for us to
create this randomizer, this variable, to make sure that before we hit
this timeline, we actually randomize
this value. For us to do that, we're going
to grab this variable 01. We're going to put this and set the variable over here
before anything happens. That way, we can set
it before we hit play, and we're going
to randomize this using random float
range, just like that. Range can be 0-6. I think that's going to give
us a nice reasonable value. We're going to put it in here. So it's going to
set the value 0-6 for each one of the instances whenever we use a unique
instance of blueprint, and now we're going
to hit compile. We're going to check
how it looks like for the simulation,
and there you go. A slight bit of motion. We're not quite done
just yet, of course, because we are still missing
some additional rotation, and this rotation
is going to be well using then we're going to
copy this relative rotation. Let's hit Control C, Control. We're going to also
do the same thing for rotation to make
use out of it next. So this is going to
be for another part. So let's go ahead
and connect it. This part is going
to be combined free. So this is the part
that's bottom of well, the lantern itself, basically. That's what we're
going to be rotating. And for now, we're
going to rotate Ipich. The reason is it's
going to give us that rotational bit of swing, which is going to
look very, very nice. So let's go ahead
and hit multiply Like, so we're going
to add it to Y pitch. We're going to grab
the variable again. So random variable 01, and use the same one and add it to the multiply at the bottom. The top one is again
going to be the track 01. We can even just double click
on this point over here, make a new one, create
ourselves a new point, just like that, just to make it a little
bit nicer to read. And yeah, that's
looking quite right. So basically, we are
rotating it on a Y axis. Now if we hit compile, oh, no target. Of course. Let's make sure we connect
that lantern itself. Now, it should be
okay. There we go. Let's go ahead and
hit simulate and see how it looks like.
But there we go. It's going to rotate this
in multiple directions. So it's going to look a
little bit more lively, like it has more weight to it. Of course, we're not quite done just yet because we
need to make sure that we make use out of the
other randomized point. This randomized point will
be a random variable, the original random variable.
We're going to place it. We're going to set this
random variable just before the random variable zero is going to be over
here like this. And then we're
also going to use, again, random float range. This time, this random
float range is going to be between minus ten and
ten minus ten and ten. So And now, once we establish
this random variable, we're going to
take it and use it firstly for new time over here. It's important to use it in
new time because otherwise, every single lantern that we duplicate would have
that synchronized look, they're going to be swinging
in exactly the same way. We don't want this. We can
imagine like gust of wind, for example, the ones
that are further away would have different bit
of rotation and stuff. So by randomizing it, it's going to look much, much better. The upper thing is that
we're going to use it for is going to be
well for the X role. But that's going to allow us
to make a little bit more of a swinging randomization
in this direction. So let's go ahead and get
this random variable. So we're going to multiply it. Multiply, no, this multiply. With, well, this same track, like so, and we're going
to put it on the roll. This way, when we compile, we can see that we can assimilate and it's going
to rotate it nicely. The bottom part is going to be giving us that slight
bit of rotation, slight bit of motion, a little bit more than
the chain itself. But everything is
moving as it should. So this part might not be
moving quite as nicely. If we hit Simulate again, it might be giving us a different bit of motion because everything
is randomized. And if we have
multiple lanterns, just to show you
what it looks like, if we have multiple of
them, we hit Simulate. They're all going
to have a little bit different
swinging animation. You can see that here is
a bit swinging like this. The ones on the back
swinging differently. Of course, because they're
so close to one another, it's going to look
very, very unnatural. You can imagine if they
are a bit further off, which we're going to have,
it's going to look great. It's going to look
perfect. We're going to set all of that up
in the next lesson. I'm just going to
go ahead and remove the unneeded blueprints. So yeah, thank you so
much for watching, and I will be seeing
you in a bit.
158. Creating a Worn Inn Sign Blueprint with Subtle Swin: Hello and welcome back. We're going to Haunted
Street environment, blended on Wheel engine five. Now that we have ourselves
a nicely hanging lantern, we're going to go ahead and I'm going to hide this.
Walk out of the way. We're going to go
ahead and well, make some additional
motion for some parts. But let's go ahead
and just move it nicely into the area
where this needs to be. Going to place it like so, a little bit more to
the right of the door, something like this,
nice little offset. And then the next part is
going to be well creating the sign for our in over here. I'm going to turn
off game settings so we could actually see a
little bit better over here. Then let's go ahead and find
ourselves static meshes. And we are going to get the sign over like so. Just like that. If your fog is getting
in the way of, well, selecting something, just make sure you hide it out
of the way, just like that. Then we can go on
to modeling mode. We can select the
modeling section like so, and just like we
did before, we're going to split this up. This time we can,
this default is good. Go ahead and accept. And we are going to, of course, keep this
as a separate piece. These chains these
chains can be one piece, and that includes
this up side as well, because they're going to be
acting as just as one axis. We're going to be
swinging back and forth. We don't really need
them to be separate. So once we select
these chains like, we're going to merge it. We're keeping the upper chain as because that's going to be connected to the upper
section of our sign. So now we can go ahead
and click Merge. We can go ahead and click Accept and we got ourselves this setup. Then next up is going to be selecting
everything underneath. Making sure that
everything is selected, including all of these boards. In fact, I'm going to just try making a selection like this. Like so. So now we have ourselves almost
everything selected. There we go. Now
everything is selected. We double check. Oh, no, not everything, not entirely. This part and this part is also missing what's going on
here, going to select these. And there was something else
that was here, I believe. And that was this
metal plate behind it. So I think and just see which one that
is, and that would be 21. We need to click Control Z to undo the stage and
holding Control, going to select this as
additional part, and there we go. You now have this
entire piece selected. C then hit Merge, and it should be good
for us. There we go. We have this, this, and we need to combine
this chunk into here. This upper log with
these chains, actually. Go ahead and do
that. There we go. And of course, we need to make sure that the pivot
points are properly set. So over for this one,
this pivot point is actually going
to be quite right. The upper ones, or these chains, we need to be editing them. Firstly, let's go
ahead and center it. Actually, let's go ahead
and do to the left. The reason being is that
it helps us to kind of visualize where it is in terms of the height
a little better, but that's going
to be quite right. I think that's okay. L so. Let's hit Accept. And
then for the sign, of course, as well, let's
go ahead and a pivot point. Let's center it, and
let's just raise it until we get to the very top. Like so. Let's hit Accept, and we got all of
the needed parts. Next up is going to
be wing it across, and we're going to reuse the previous blueprint in a little bit of a different way. We're going to get
to that in a bit. Now let's go ahead and
select all of these parts. We can go ahead and
just simply turn this to a blueprint
class, RVs component. You can call this sign and sign, so and hit elect. And now we got
ourselves this sign. Alright, perfect. Next up is I'm going to
grab Lantern blueprint, going to elect
everything for now, hit Control C and
then Control B into the sign or the event graph. And now some things
are not going to be working, but that's okay. We're going to actually move for this sign variables because
this is the only sign. We don't really need to
randomize anything here. We can keep that
control extra nice. But for now, let's go ahead and just put the
hierarchy in order. So this is the upper section, and this is the next one,
so this can go in here. We have the main part,
we have the second part, and the third part is going
to be going in here as well. So that way, we have the swing
like that, which is good. Going to double
check real quick? Uh huh. So there is a
bit of an issue here. That issue being the fact
that when we're swinging, it's offsetting it, everything. Like so. The reason being is that
the axis is a little bit off centered offset. We need to fix that. And
just looking at this, looks like it's right, but Yeah, looking from the top angle, you can see that it's
a little bit offset. That's okay, though. We can
just select these chains. We can click on this
button over here to go into those chains. And then, you know what? Let's minimize it. Put
it on this section. And then we can just drag
and drop it in here. You see that, yes, they are a little bit offset. So going back on
the modeling mode, we can just offset this a little bit with added pivot point. And I'm just going to make sure that it matches a little bit. Once we zoom out, you
can see it a little bit better that by rotating
this a little bit, this green arrow now is
touching this chain over here, and that's going to
be way way better. So now we can hit Accept and now it's going to give
us a nice outcome. So we can even go back now to our blueprint that we had
that we had somewhere. We can click on the sign over
here actually and access it through clicking this
button, it Blueprint sign. Now, this should be
properly set up, so now we can move it around and you can see it's
going to look quite right. The rotation is going
to need to be reset, and it's going to
look off because, well, we ended up moving
some of those parts. So I'm going to quickly
take it off from the root, attach it here, and then attach
it, so, just a quick fix. So taking it off the root, just going to quickly fix it up, like, so manually,
just like that. Now, everything looks great, and we can just reattach
everything like we had before. So upper section, middle part, and bottom part, there
we go. Now it's fixed. So now if we were to move it, it's going to look
quite a lot nicer. And, yeah, it's
going to be right. Okay, so next up is going
into the blueprint. We're going to
firstly hit compile, it's going to be an error. The reason being is that it doesn't know what to
do with the variables. We're going to delete the
set variables for now, and this one will not need the variables because we're
only using a single sign. Next up is deleting a
variable over here, deleting these parts,
deleting this variable, this variable, and
this variable. Now if we were to hit compile, it's still not going to give us the proper setup
because we need to make sure that these components
are set properly. So what I'd like us
to do is firstly, make sure that we have
the proper components. For this, it's going
to be bin two. So the chain part. Now you'll notice that
it's a bad blueprint. The reason being is that, well, firstly, it's not
using any variables. Let's go ahead and delete all of those variables and
randomizations. Let's go ahead and
do that because this is only a single
sign in a scene. We don't really need
randomization like that. We'll have a lot more
control over the setup if we were to just remove all
of those variables like so. Then for the well components, we're going to delete
these as well. The first component needs
to be this one over here. And let me check real quick. Is going to be needed
to be recompiled. Yeah, let's go ahead
and set up the items. I'm actually going to take off from the
timeline completely, just hit compile like so, and it's still going
to give me error. That's okay. Give me error because
these are not attached. I just want to double
check the hierarchy. So go ahead and attach something there we
go. We're back to this. Yeah, I attached the hierarchy
a little bit wrongly. That's okay. So this has
to be attached to be here. So log is the top, then the chain, and this sign is at the
bottom of the hierarchy. All of them attached
to one another. So now, going back to this, when graph is going to go
ahead and fix this real quick because I did not
use the right targets. But now we are going to have ourselves lovely little setup, which we can combine, compile and get ourselves
a nice outcome. The other thing is that
here we don't need to have an outcome for roll. Actually, I'm going to
double check real quick. This might have a
different rotation. So here we are rotating a pitch, so Y axis, which
is what we want. So in here, we're
going to replace it, make sure that this
is using Y axis. Here, we only need Y axis, so we're going to
leave it as is. And now we essentially are
going to be rotating in Y axis and in Y axis for the
sine. So that's good for us. We now need to just
determine the angle. Here it's going to be minus ten, and here is going to be 12. The reason being
is that basically, when we are rotating
the angle of the chain, it's going to try
to rotate it back. And the reason why
this is good over here is because if I
was to rotate it, if I was to show
you in simulation, when the axis Oh, yeah. Sorry about that. Forgot to
connect this to the timeline. So there we go. Make
sure you connect it to the timeline and then have
this sort of a setup. All right, so now compile
and let's go on simulation, so I could explain it
a little bit to you. Basically, when we are
rotating it to the side, it's going to
rotate a sign back. So it's going to
make it look like this sign at the bottom
is quite a bit heavier, that's going to work
really well for us. And I just realized that I might need to fix the
axis as well over here. So here, the axis is okay. But if I was to, yeah, if I was to put this to, zero is going to give me
that. So you know what? A quick little fixed
alternative fix for instead of using the origin point like
we did with the chains. What we can do is we can
quickly just put it in here. The axis of minus ten, the exact same axis as we had. Oh, it's going to
put it in manually. There we go. Now if we were to compile
it and simulate it, we will have it the same
angle. There we go. It's going to look like it's trying to offset that swing
that's being created. So it's going to look
really, really nice for us, especially from this angle
over here because it's just going to wobble
back and forth for like a really nice looking sign. The only thing is right now, this angle, I noticed
is also offset. So what's going on over here? Well, this is using -22, which we can fix
it over here, -22. Like so. And now we're going
to have ourselves a nice d. No, that's going to make it worse. What's
happening over here? Well, I think you need to set rotation
here to zero, zero. Yeah, it looks. Yep we
need to offset it to N. So I made a bit of a mistake over
here needs to be ten. We're basically just
reusing the same z rotation for chain N for
this section over. And now we are going to have ourselves that little swing that
we're looking for. So yeah, if you're having issues with offset of the angle, just make sure to
reuse that same setup. So over here for the again, for the chains, we are using
the rotation of Z ten. We can just, um, use
an average of that. Ten is okay. And then
for the ten over here, and then for the sign itself,
we're using minus ten. So we're using minus
ten over here. We're basically making sure
that there is no offset. The reason this is
happening, by the way, is because when I
imported the mesh, it was a little bit offset. So you can see the
grid over here itself is slightly offset, and that's what's causing
it basically this issue. So a little bit of a quick fix, but it worked out in the end. We're now going to place this
sign in a proper direction. Something like so at the
very corner. I like that. And don't be afraid to add
additional bit of details. So for example, over
here, we can add, yeah, this little log.
Oh, no, not this log. We have our own unique
logs, actually. This one over here, maybe? Oh, let's go on to
where would it be? Or modulo kit, find ourselves a small little log at
and place it in here. And that way, we
can just rotate it. So make it a little bit smaller and have it as an extra support. So a little bit of an extra
detail, just like that. Think it'll look quite nice. We can even just tilt
it a little bit. Like so. Alright, so
next up is going to be, well, adding a street
lamp in the next lesson. We're going to
continue on with it, though in well, the next lesson. Thank you so much for
watching. And then we'll be seeing you in a bit.
159. Create a Swinging Sign Blueprint with Text Rende: Hello. Welcome back, everyone to Haunted Street environment,
BlendeonRel engine five. And last lesson,
we left ourselves off with this lovely sign, which can now be
swinging across, and it's going to look
very, very lovely. Next step is just making sure that we have ourselves
a street lamp over here. Let's firstly grab
ourselves a sign board. So we have two variations. One double sided and another
one as just a corner. But we're going to grab ourselves double sided,
so this one over here. We're going to just turn off the game settings
for a little bit. And place it nicely
in the scene, a little bit rotated
towards the camera angle. Something like that will
be working great for us. Next up is, well, first of all, we can just put the lantern on that we have from
the blueprints. We should have it created. We're going to place it
at one corner over here. We're going to rotate
it a little bit, so it would actually match
with its rotation. Like so. And, of course, we
need to make sure it looks properly placed. So something, a
little bit too low. Something like this will
do us quite nicely. All right. So, already, this is going to have animation. We to double check if
everything is okay. Yep. Nice little bit
of swinging. Lovely. Next up is going to be sign. We're going to create
ourselves a sign over here. It's going to be a very
similar to what we have with the lantern, including
the randomization. We're going to find ourselves this lovely lantern of ours. So this one over here, which is going to place in the scene, and we are going to start
like we did before by going into modeling,
form, and split. We're going to split
it. Just like that. Let's go ahead and click P Step. Then next up is going to be explaining these
two at the top. Let's go ahead and
merge these like so, and we are going to Oh, select all of these chains. I don't want to select
all of these chains. We're going to see if
there is Christian way. I'm just going to do it like so. And most of them are getting selected,
which I'm happy about. So holding Shift, I'm just
selecting them all Oh, going to hold control
to deselect it. And once we have
something like that, I'm pretty sure
that's all we need. We're going to hold control
to deselect this one. We're going to just move it
just to see that these are the chains that we're
looking for, which they are. And actually, holding Control, I'm going to deselect
these ones at the very end because they
need to be separate. Okay, now we can
go ahead and merge this accept we can have
this as a separate piece, and these parts over here can be its own merged
part, just like that. So we have ourselves this part. We have ourselves this part, and we have ourselves
this part at the top. So. Alright, so
first swings first, let's go ahead and
see the rotation. This looks great. That's good. We're going to go ahead and Add it pivot point, center it. It's going to be right.
You can see one is lower than our because it's
nicely stylized. I like it very much that much. That's set up. Let's
go ahead and accept. Next up is this part.
Let's go ahead and add a pivot point to be top. And then we can lower it.
Actually, you know what? Let's go put it on
the left hand side. Move it and position
it just like that. Oh, a little bit
a little bit off. And bit to the left, like that. All right, let's except. Just going to check if the Pivot point is
properly set up. So I can see that Aver
moon is moving a little bit more because they're
a little bit offset. So what can we do
in this situation? Well, this moving means that the word point realistically needs to be
a little bit lower down, which is fair enough by me. We can lower this word point
a little bit to where, like, underneath this
chain hit Accept. Now, when we are rotating, you can see that this is kind
of offsetting a little bit, but here it's also staying
in more of a correct place. So that's good for us. And here we also are
going to want to put Gizmo to the top, yeah, and put it lower. So and here's going to
be a good position. I said, accepte how
this looks like. But I'm liking this. Let's go ahead and just
turn this into a blueprint. Go ahead and select these parts. Let's go on to Selection mode. Let's change this to blueprint,
convert blueprint class, Harvard components,
and of course, we need to name this
into sin Blueprint. Now it's going to give us
this lovely sign over here. We want this to be a little
bit more center to the world. Let me check where the
world Center is over here, which is fair enough. Actually, you know what? You just select them all
like this holding Shift, or sorry, in blueprint,
we need to hold Control. Now we can just move
this to be a bit more reasonable with the origin
point, something like so. Alright. So next up is well, let's go ahead and hit Compile. Next up is going to be
grabbing the lantern, the entire setup that
we had over here, except for event items. So all of these are
going to be selected. Let's go ahead and
hit Control C, go back to the sign part, go to event graph, and
hit Control B over here. Then next up is going to be
needing to connect the event begin play to set. Yeah, we're going to set
the random variables. In terms of the
random variables, we're going to do
the same thing for making sure that they
have the same outcome. So we need to create
new variables. Again, tuni variables. Let's go ahead and
copy the name so we can select random
variable over here. We can just um we need to make sure
that these both are named the same way as random variable and
random variable zero. Let's go ahead and just
call this Rand variable. Make sure it's
capital where needed. And here it's going to be Rand variable 02, Rand variable. It doesn't show, but
there is a base here, and I think that's the way it
is here. I'm not mistaken. Yep, you can see by
clicking on this, you have random variable name over here on the detail stab. We just need to change
these to be loads. And I should have
changed that beforehand. That's okay. Just click on change variable
type, and there we go. Next up is going to
be making sure that only one axis is
moving because we want these axis will be moving
in X direction, like so. And because they
have two chains, it's not going to be
moving in this direction. There's no way that's
going to happen. We're going to make
sure that this is also properly in
hierarchy. So this is top. This needs to be going
on this hierarchy, and this needs to be
in this hierarchy. So there we go. Now, it's going to be nicely
set up for us. Yep. All right. So next up is going
to be going back to the setup, removing pitch Y. Only X needs to be here. So the random variable,
just double check. Random variable 01
needs to be used on both of these, like so. And we're only using random
variable for the new time. Random variable zero is going to be used for
multiplication in here and here. So we're just going to make
sure that we're setting this value between minus
five and minus seven. So these are the variable times. Her can honestly be 0-5 because we're only using
this value or the new time. And if you know from
previous talking, the main length time
is just 5 seconds. So by having extra time, we'll not do anything else. Essentially, we are creating
random floats 0-5 for one, that one between minus five
and minus seven for over. Then we get this same timeline
with random variable, and we are of course, we need to change
the targets there. We go, that's
something I forgot. This one is going
to be going here. And this one is going
to be a wind here. The other thing I'd like to
mention is we're going to do the same way that
we did previously where it's going to be swinging. The chain is going to
be swinging one way and the sign at the bottom is going to be swinging
the other way. The way we do it
is we simply get ourselves multiply again and we just multiply by minus one. So if we were to
do that over here, we simply invert the value, and that's going to give us
that same motion that we had previously for
that weighty sign, which I think will look
quite nice, and there we go. Now, once we hit
compile, hit Control, and as we can go ahead
and see how this looks like and
simulate, there we go. Nice little sign movement,
exactly what we want. And we're going to just
rotate this for this line. We're going to move it through
the direction over here, just like that and place
it something like so. And as a little bonus, once we place it
in the right way. As a little bonus, what
we can do is we can also write out our
own sign name. So if we were to go back onto Blueprint
onto the Viewport, you can have something
called text. So if we were to click Add
Text, we have text render. We can just click
on it. And here we have ourselves little text. We can change the text
to be Pooki Village. Or something of that
sort up to you. You can feel free
to customize it. There is options for that. Then afterwards, we can
just change the scale. The world size is going to give us just a different
scale overall, and we can attach
it to the setup. I'm going to make sure
that this rotation is 90. Move it over here. And just like that,
we got ourselves. Spooky sign. Except we also need to
make sure that this is a place in a hierarchy
at the very bottom. That way, if we properly
set it up, like, so we'll have ourselves a
very, very spooky sign. Maybe bring it out
a little bit more. A little bit of tweaking,
just like that. Right. And once we hit compile, we'll see that we have spooky
village, just like that. So, honestly, that's quite
a nice little option to have we can darken
here the color as well, so text rain the color and
just darken it if we want to. It's a little bit too
much. We can do so. And I think that's
pretty much it. Honestly, that's all
we need to have. Go ahead and compile, post
these down, and there we go. Bookie Village. Make sure to adjust that based on
the lighting settings. All right, so that's
going to be it for me. Thank you so much for watching, and I will be seeing
you in a bit.
160. Level Sequence Setup and Cinematic Lightin: Hello and welcome back around to Haunted Street Environment, Blender tone Real Engine five. Down there we have ourselves
in a tire setup with all the lovely
animations in the scene. We're now going to
make sure we light up our, well, set ups. So, let's go ahead and do that. First things first is
that I noticed that this sign over here is
glowing way, way too much. Go ahead and fix
that real quick. We're going to go
ahead and select the sign whilst not
simulating the setup. We are within this blueprint. We're going to find
ourselves the final item, which should include
this sign over here. So in here, we got sign.
Let's go ahead and select it. We're going to change
this missive strength to one and change the one and change this factor factor to
something a little bit darker. That way, we have ourselves something that
doesn't just glow, doesn't stand out too much, but it's still going
to look quite alright. We're going to use
some lighting like this a little bit of art. But before doing
that, let's start with the original
starting point over here. And for us to do that,
we'll at this point, really need to ideally look
into the camera itself. But just looking at the
camera from this angle, if I was just to find this
lovely camera over here, looking at this angle over here in the corner is not going
to be quite as nice. So let's go ahead and start
setting ourselves up with a level scene that
level sequence. So right click on Konta Browser, select Level sequence,
all this level sequence. One, double click on it and
drag your camera into it. Oh, drag and drop. Like so and you'll
have this setting. You'll see now that this is now going to be in a viewport. Make sure not to move it because we are going to affect
the motion of the camera. You'll see me moving it like
so, it's going to move it. We'll need to click Control
Z to undo the motion. Make sure to unclick
this button over here, which is going to take off from the camera and instead,
click on this button, which is going to lock the
viewport to camera cuts, meaning that you cannot move now the camera because it's actually locked onto
the camera movement. We're not possessing
the camera itself. We're previewing what the
outcome would look like. The camera is not going to be moving, so that's quite nice. If we want, we can just click of this and now
readjust some parts. Ways, in order to set ourselves up with
some nicer lighting, what we're going to
do is we're going to click on this
button over here. We're going to create
lights and rectangle light. So it's already going to give us a very nice type of outcome. You can see that we
can position this and create some ambient lighting. So this way, we're
able to control exactly what we're
trying to do with this. We're going to start
off with just having this default amount
or even higher, we can put it to 15
just to make sure we see the location
of the light source. We're going to move
it a little bit off to the side
alternation radius. We're going to increase it
to 3,000 instead of 1,000, so it's going to affect
more of these parts. Then source width can be
390 and height can be 410. Barn door angle is
an interesting one, so we change the parameters of this source lighting,
as you can see. But barn angle will allow us to basically make sure that
it doesn't spread as much. If we were to change it to zero, it's going to give us
this straight light, so it's going to
be more tunneled. We can change this to 45, and it's going to give
us a nice result, just to make sure that
it kind of comes out in a longer radius for the spread. We're going to change
this also to 60. You can see that now this
changes light source for this. To be a little bit wider. And now we can make sure, well, we reposition this
a little bit better. So we want this to be
lighting up the front. Of camera, camera shot, and we will have
something like this, which is going to
raise up a little bit. So. The other thing that we
now need to consider is, well, this random glow that
we need to get rid of, and for us to get rid of that, we're going to go on to
indirect volumetric lighting. We're going to change
this to point to five, so there we go, no more glow. And now we're going to play
around with the intensity. So right now the
intensity is 15. We can change this to five, and it's going to give us a
nice little bit of lighting. We're also going to move this
light to a lighting folder, since it's going to be more
creative type of setup. I think it's going to
be the second one. Nope, it's going to be the
first lighting. There we go. And now it's going to be
at the very top in here. You can see before and after, we can look at the camera
ourselves as well. So nice bit of
creative lighting. I already see that this
pops so much nicer. The upper thing is going to
be on the outside as well. So let's go ahead
and just grab this. Put it onto the upside as well, a little bit of an
extra lighting. To make sure that we are well lighted up this
out side as well, we might need to just rotate
it a little bit forwards. The reason being is
that so we wouldn't affect the bottom too much. But let's have a look. Yeah, we're just highlighting
the rooftops and whatnot, so that's pretty good for us. Alright. Next up is going to be making sure that there's
some lighting over here. We're going to rate ourselves a new
light source here by holding L tapping on the
screen, and there we go. The thing that I don't want
is, well, floating volume. We're going to make
sure that the volume over here is set to zero, so just lights up
this section like so, and then we can just keep it
with a nicer source radius, something of that sort. Now, in terms of
intensity, honestly, I think it's quite right, as is going to check out looks
like in our camera view. So we can click G to hide
all of those points, kind of visualize
how it looks like. One thing that we can
also do is turn off perhaps cast shadows over here. Might be a good idea, which I think, yeah, this will be a good idea. And intensity wise,
we can honestly, I think we can keep it as it is. Maybe we can move it
around a little bit. So location over here, you can see it when we around, and we can just kind of
reposition it a little bit. To make it seem like this. I'm mainly looking at
the barrel as well as some just overall lighting to make sure that we're
getting ourselves a nice way of popping
up this section. And I think that's
looking quite right. I'm not sure about
attenuation radius. Maybe you can lower it to 800, and that's going to be great. Next up is going to be
some parts in the back. But we are running out of
time, so I'll tell you what. Let's go ahead and continue on with this in the next lesson. Thank you so much
for watching, and I will be seeing you in a bit.
161. Precision Lighting with Lighting Channel: Hello, Lord, welcome
back everyone to Hunta Street environment, Blendotn Wheel engine five. Now we have ourselves
some basic lighting that's already
looking quite nice. We're going to continue
on with the setup. And this time, we're
going to make sure we have more customized
lighting options. So what I mean by
that is if we were to click L holding L and
tap on the screen, we can create ourselves light
source, which is very nice. To remove the volumetrics, we are going to go ahead and
go to volumetric scattering, set it to zero, and now it's going to give us a
nice little glow. Glow is great, but we want to make sure we only affecting
it certain parts. We don't want to be
affecting the ground. We just want to highlight
some of the rooftops. So for us to do
that, what we can do is we can within
this point light, we can search for channel. Channel. No, there we go. And we
can turn off channel zero. By default, every single one of the item has channel zero set. If we were to turn this off, it's going to turn off all of
the light coming from this. You can see that nothing now is affecting the light when
this is turned off. But if we were to turn
this to channel one, if we have this turned
on a channel one, then nothing will happen. The reason being is that
nothing has channel one. So we need to tell what objects will be
affected by this channel one. So if we go onto the building, we can select channel one
to be applied here as well. This way, as you can see, we're now applying Channel one directly onto the building. If we lower this light
source downwards, nothing else will be affected
by this light source, which is pretty good
because we can now move this light source to
be above our rooftop, something of that sort. And this will give us a
nice little highlight. So if we go onto the
well, camera view, we can see that we're getting some bit of extra
highlight on the chimney, which is very nice for us. We can play around with
the location a little bit, kind of get some
interesting shadows, a little bit highlighting
that extra part. But something like this will do. We're just getting some
nice soft shadows. So this is looking
pretty good for us. And we can also do it
on the upside as well. If I was to make a
duplicate out of this control Control
B on the outliner, we can then move this light
source a little bit more to the back and a little
bit more to the left. Of course, we need to go
onto the building over here, make sure that the channel
one is enabled or, like so, and now we're
going to be able to use this light source
to light it up. Maybe it's a little bit too
far back. Let's have a look. If it's a little
bit too far back, let's go ahead and just put
it in something like so. The reason being is that we want to highlight this corner. So when we are looking, you can see that it highlights nicely and also the
chimney, as well. So it kind of gives us a bit of a contrast
between these two parts. So just like that. You can see the chimney
is highlighted, the edge is highlighted, all of it looks very, very nice and lovely. All right. Then afterwards, we can play
around with the intensity. Maybe 5,000 is a
little bit too much. Putting it to 4,000 instead, kind of soften it a little bit. The slide would be
quite a good idea. And then next up is we can just highlight
this part a little bit, hold L, tap on the screen, and move this a little bit, like so, turn off the volumetric scattering
over here to zero. And get source radius
set to be 150. Like so. And then this should
be 2000 like that, a little bit of an extra
light source coming for our lovely little sign. So it wouldn't look like
it's glowing too much. It would be quite
nicely visible. You can see it in
the back click. So looking at this, we can now adjust
some of the parts. And we can do a lot of
wicking, basically. So, for example, this
tree on the side, we can move it a little bit
of both of these parts, we can move it a little bit
off with a side to kind of help us break up parts. Like so. Then this
building on the side, we can move it a little bit
forwards because right now we have quite a bit of a gap that's just glowing in the back. With this gap, I'm not
quite happy about. We can just go ahead and select these building parts and
just move it forwards. I'm going to go back onto
the cinematic camera and just move it until we
lose that bit of a gap. That way, we are
also bringing up the sign to be more visible
in comparison to the sign, which we can move all
of these little parts. So, we select it like so. We can move it a little
bit more with the side. And maybe rotate it
even a little bit, but it wouldn't be glaring too much into our faces, like so, we'd have that entrance
walkway still visible for us. Let's go. Alright. There we go. Much, much nicer. This bridge over here, I'm just wondering if we should move it a little bit off to the side, small little weak, but maybe we can just a little
bit more to the side. Let's see how this looks like. We can rotate it a little bit. I think it would look very nice if that squiggliness
comes through. I'm quite happy that visible
detail is extra visible. The shovel that we
had on the side, just over here is not
quite as visible, so I'd like to pick
that shovel up and move it a little bit closer to the gate, something like this. And now it's going
to be visible. Also, let's turn on back
the fog that we had. So now we'll be able to see
a little bit better how it looks like with all
this fog coming in. There we go. The
shovel is now visible, making sure it's not floating. All right. Seems to be that we need to move this a little bit grave, a little bit to the side. There we go. All right. And final couple of
tweaks. Let's see. These plants I feel like are getting in our way
at the bottom. Let's see what's
going on with them. I'm going to click
to unlit mode. They seem to be not
needed over here. So let's go on to foliage mode. Let's select it all, make
sure we deselect it, like so, and we can grab
these foliage parts and just kind of remove them, make sure they're not
getting in our way. Like so. The rubs over here might be a little bit
too large for us. Because it's blocking
our way or the items. So what we can do is we can just change the scale uniform, put it to one and 1.5, and we can use reapply
option over here actually. That would be better.
You know what? No, we're just
going to replace it because that will
give us more control. So now we have ourselves less of those
shrubs getting in our way. So that's going to look
quite a bit nicer. Maybe the density even
here should be set to 300, so we can just populate it with smaller shrubs, just like that. That's looking much better. And now the tree itself is looking a
little bit off for me. We can go ahead and grab it like so if I was to find a tree, don't seem to grab it just going to hide this fog out of the way. And I'm going to make another duplicate for a
hollow tree at this time, much, much smaller and just
kind of make it stick out. Like, so, maybe even invert
this just like that. There we go. We got
ourselves very, very spooky. The middle part was a little
bit, how should I put it? Not enough, put it this way. Go to it's down now, it's blocking more of the view, which I'm more happy about. Like so. All right. And is there anything
else you'd like to do? Just turn the fog back on. And by the way, you
can click Shift and Sorry Control and H
to unhide everything. That's a nice little tip. Let's have a look. So
we have this setup. We have everything that
we need. And yeah, I think that's pretty much it. We're pretty much done. We can now go ahead and make
a video out of this. So thank you so
much for watching, and I will be seeing
you in a bit.
162. Animate the Camera and Render a Cinematic Sho: Hello and welcome back everyone to Haunted Street Environment. Blended ton Real Engine five. In the last lesson, we
left ourselves off with this lovely little setup and
a couple of adjustments. Everything is looking nicely. Now, in order for us to let me just have a
look from a distance, I think this This is
the wrong perspective. There we go. From a distance, this looked a little bit
too dark with the fog on, so real quick,
we'll just go ahead and fix this. Little
bit of tweaks. All of that lovely
stuff is right. Just going to find
the right item. There we go, and just bring this just a little bit higher. There we go. Have a look. Yeah, this is going to
look much, much better. Blends it much nicer. All right, so next up is just
simply setting up a camera. So we got ourselves this view, which is looking lovely. We're going to grab the camera and go out of the viewport,
have this selected. It should pop it up on the bottom right hand
corner, which is good. Then next up is we're simply
going to use this transform. So when we click on the camera, at the bottom, there
should be transform. Let's click on this button over here and then go all
the way to the end, and it should be 150 frames. If you're not seeing it, just
increase this amount over. Then the arrow over here
should be set on 150 as well. Make sure it is basically a full frame setup of a
couple of seconds, basically. It is set to 40
frames per second, so 150 would be, well, 5 seconds long of a
video, which I think is right. So next up is going to be
once you're at the very end, move the camera to the
front a little bit. So you can see it
move it a little bit, just a little bit, s and then hit transform button
at frame over here. And then afterwards,
you'll see that you have yourself this little
line going forwards. And once you hit Play, it's
going to move forwards. We can hit here over here,
this button over here. And you can see that it has
this lovely little motion. So looking nice, the only thing that we need to do is make sure that select both of
these frames over here and right click
select linear. This way, it's going to give us consistent speed when we're moving through with this motion. And then we're going to
well, keep it simple. I really want to see
this part over here. So I think it looks quite right. Okay, so yeah, we're
going to keep it simple. We're going to click on a
render button over here, and this will allow us to
create video sequence ABI. No audio, we don't need audio. We can increase the
video settings to 1080. If we go to Advanced, we don't really need
to do anything else. Then we can keep
compression at 75. That's going to be
all right. And yeah, select the folder
where you want to save your file using these
three dots over here. Don't think we need
anything here. Going to be all right.
Sequence is all right. Cinematic engine
scalability, yes, we need cinematic mode, this will give us the highest quality
real time rendering. And the rest will be over here. So warm up. We need a delay
before short warm up. We need to put it
something like 5 seconds. This will make sure that
before it records this video, it delays it a little bit. The reason being is that
it will allow the VFX, the fog to kick in 5
seconds should be enough. If it's not, just make
sure to increase this. And the rest will be good. Let's go ahead and
click Capture movie. Let's make sure that
we save it all. It's going to preview
it in a little corner. Ignore this. This is
not the actual frame. This is just showing small gap, small little setup, but outcome will come
up as full frame, so don't just close it. At the bottom, we can see
that it's capturing video. We can even click on this
open capture folder. And as you can see, it is done. So now we can open it up. If you're watching this, it means you actually
made it to the end, and that is no small thing. So first of all,
generally, well done. Not everyone finishes
what they start. You did. Over the course
of this training, we did not just
build few assets. We went through a full
production workflow. We designed and created
module pieces inside blender, thinking about resusability,
scale, proportion, variation, the things that actually matter
in real projects. Then we took it across into Reel Engine five and
brought it to life. We assembled the kit, built atmosphere, worked
with the lighting, fog materials, and
turned the collection of module assets into living,
breathing environment. That pipeline from
Blended tor Reel Engine five is a powerful skill set, and now it is one you own. Enjoy the course,
we would really appreciate if you
could leave a review. It generally helps us more
than you might think, and it helps other artists decide whether this
is right for them. And if you have feedback, good, bad, brutally honest, we
are always listening. We built these
courses for you and your input shapes
what we create next. Until next time, happy
modeling, everyone.
 3D Tudor, Bestselling Blender Author & 3D Educator