Transcripts
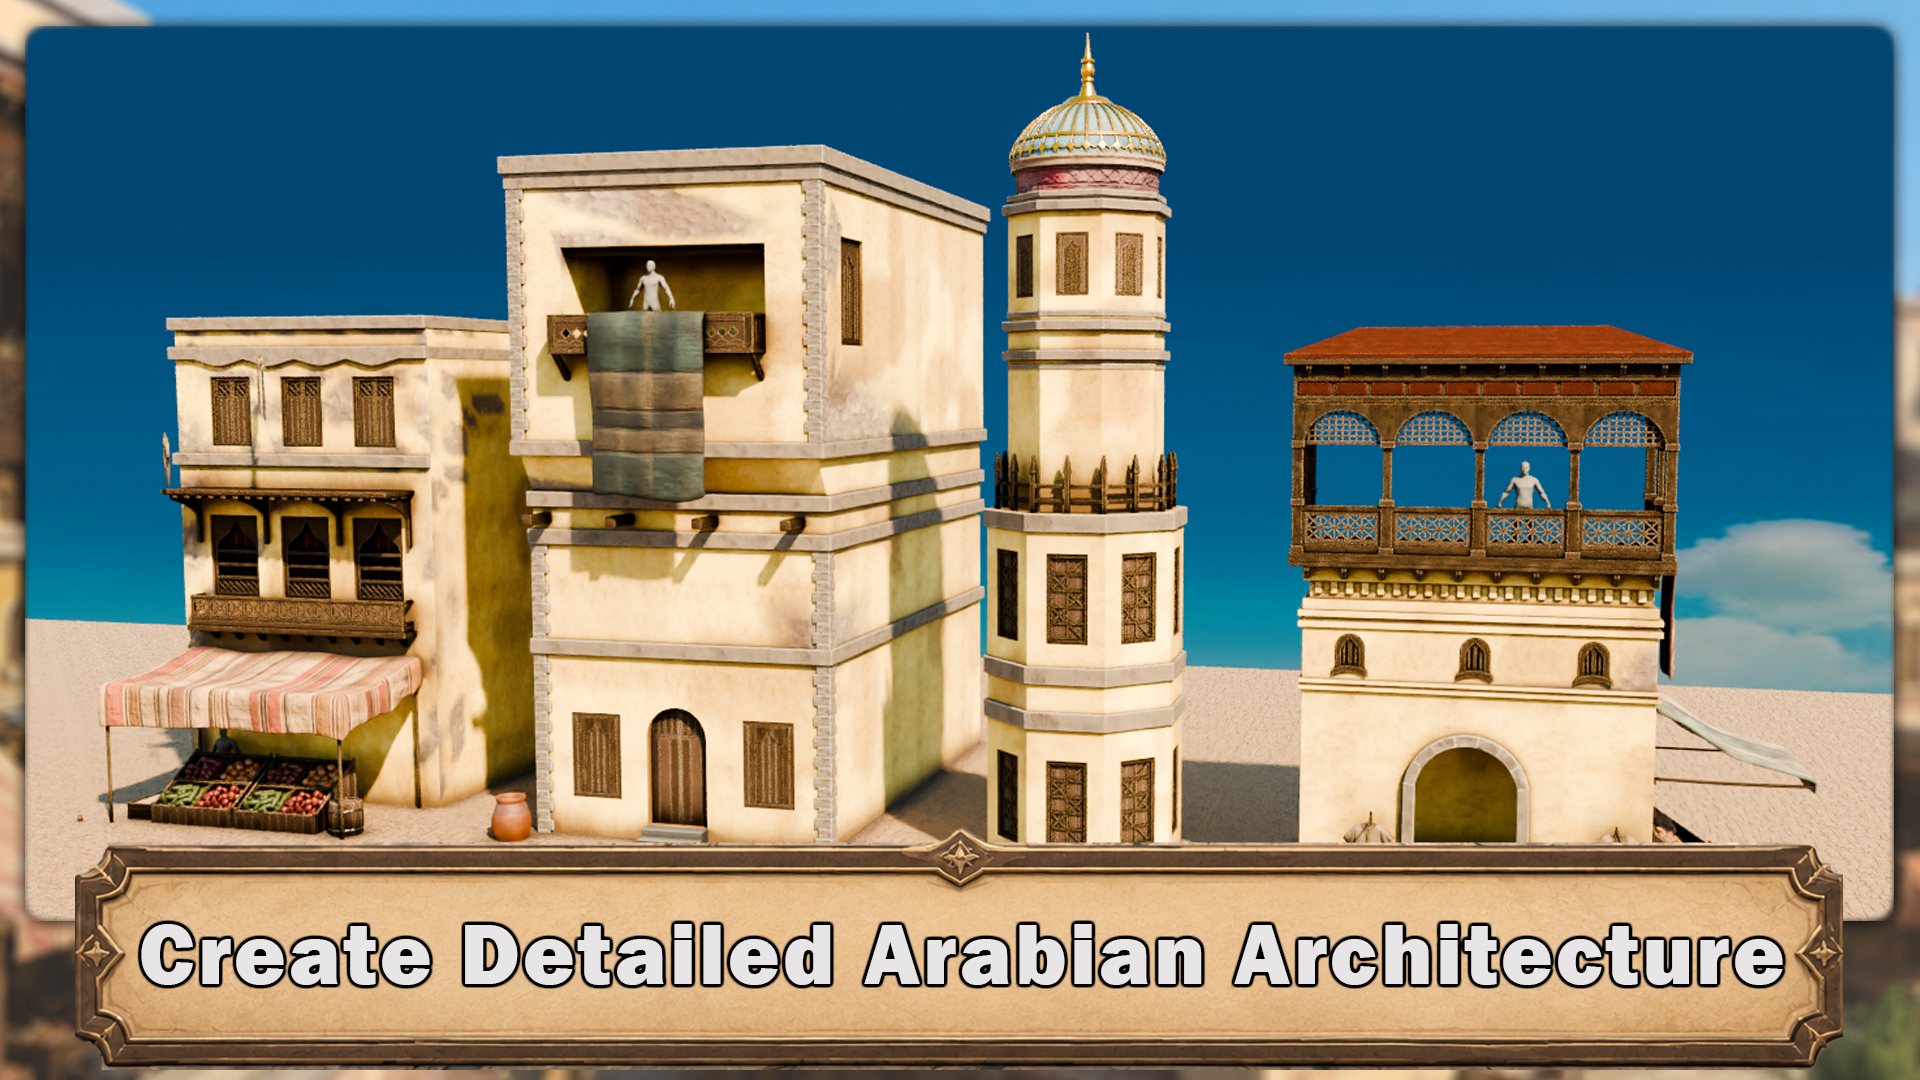
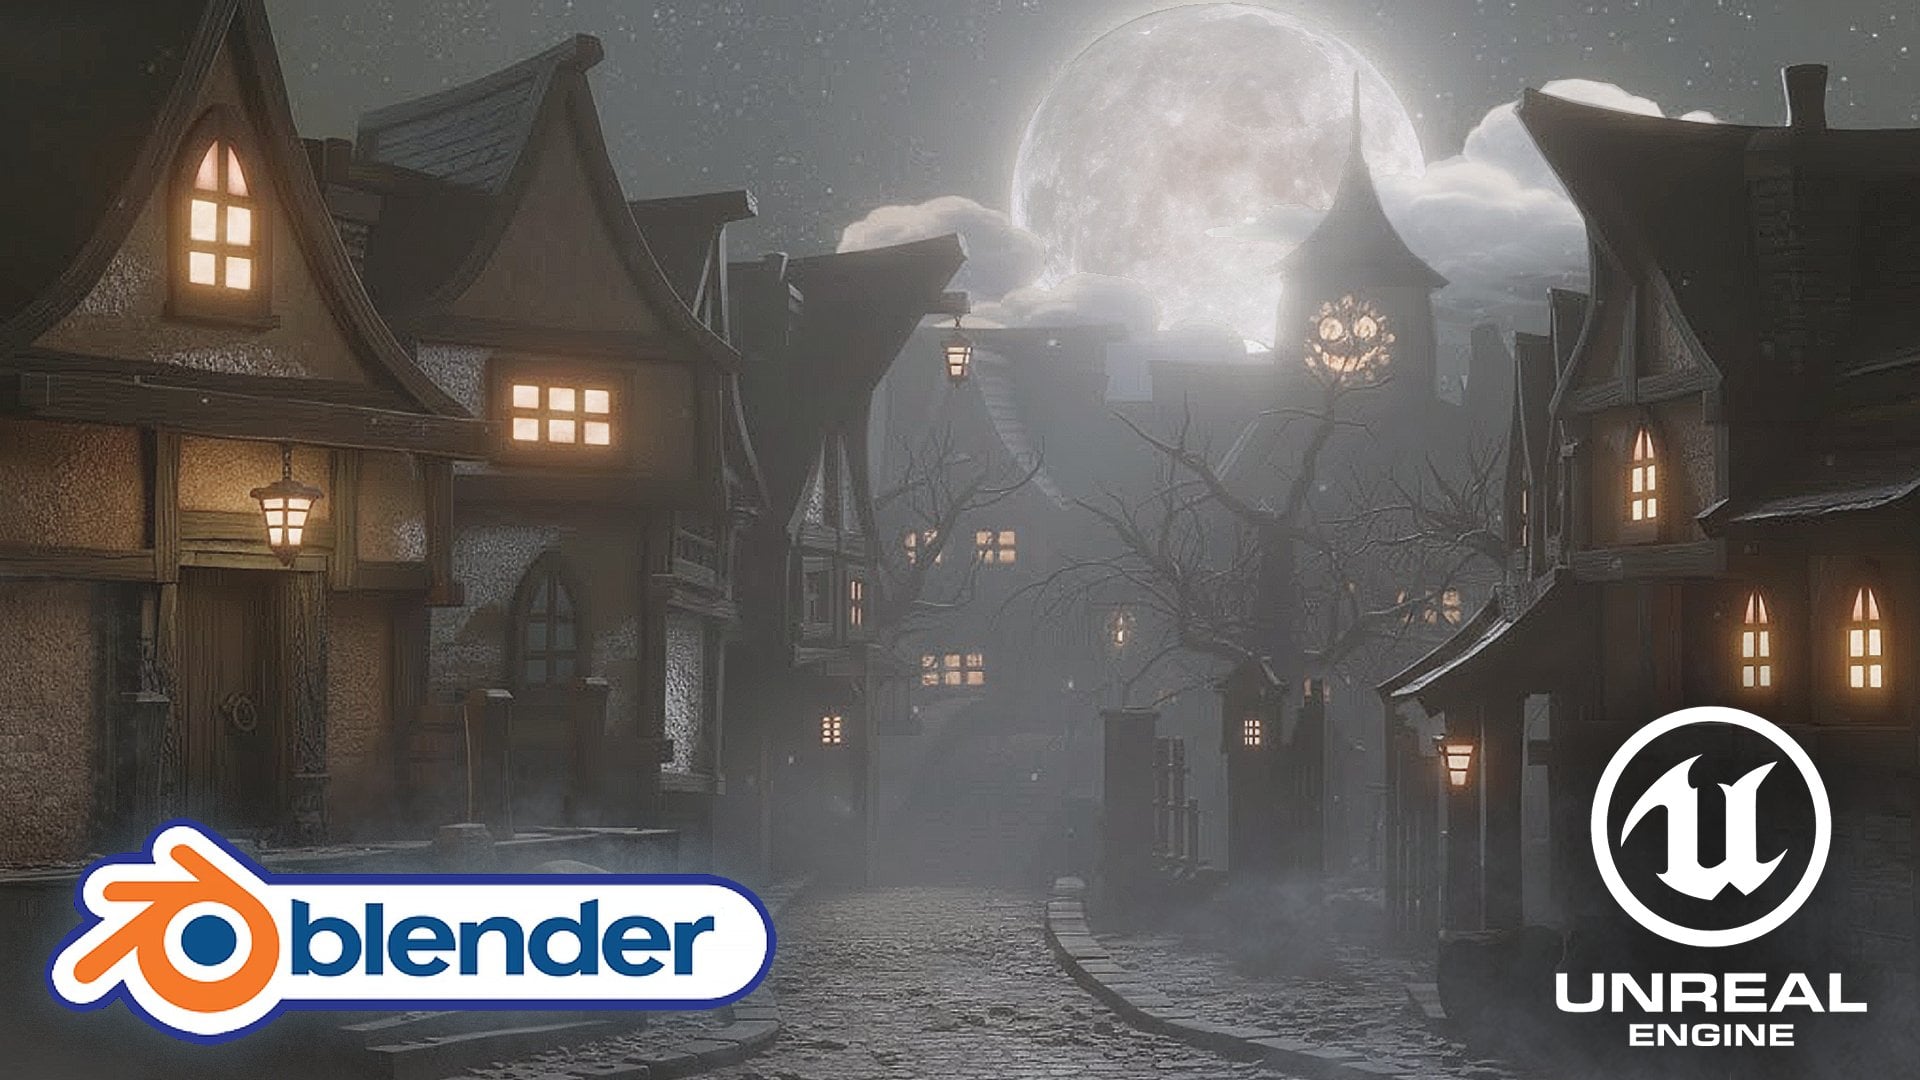
1. Arabian Market Course Intro no logo: Have you ever built
individual assets in blender but struggle to turn them
into a complete environment? In this course, we
solve that by creating a stylized Arabian market from the first Blocke to the
final render. Hi, everyone. I'm Rosefeld, the artist behind the stylized Japanese
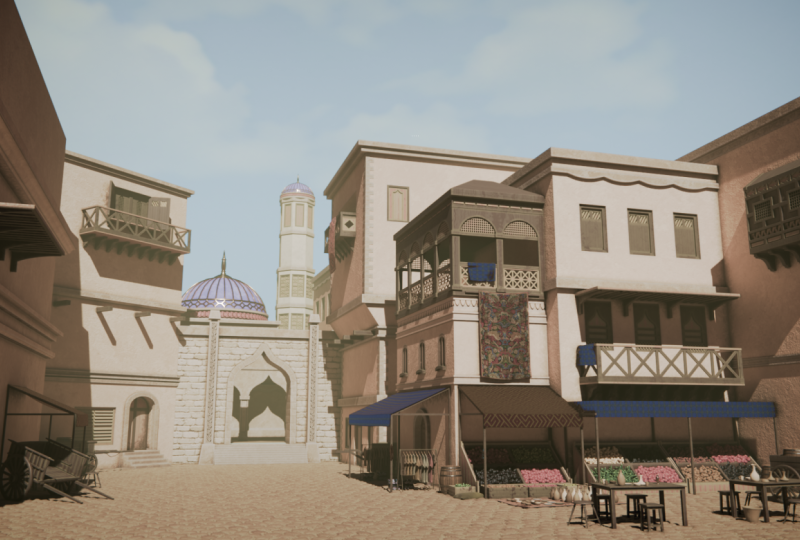
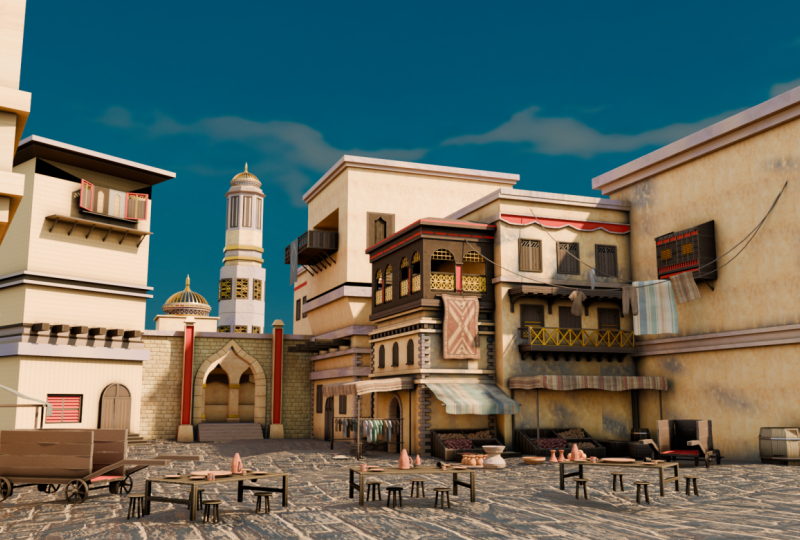
street environment. This time we are building a full sunlit marketplace
where architecture, props, materials, lighting, and composition
all work together. Just like a professional
environment workflow, we start with references, scale, camera framing, project setup, and a clean blockade, so the scene has direction before the detailed
modeling begins. From there, we
turn simple shapes into layered Arabian
architecture. You will build arched doorways, patterned windows, balconies, wooden shelters, carved trims, brick pillars, domes, a tower. Every section is broken
into mangeable steps, so a large scene never
feels overwhelming. You'll learn how to
control proportions, fix topology issues, reuse details and keep the environment
organized as it grows. Once the forms are in place, we move into UVs and materials. You will work with
textil density, linked materials, normal maps, procedural stone and
plaster, wood variation, vertex paint, and
stylized edgewaar so every surface feels cohesive. Then we bring the
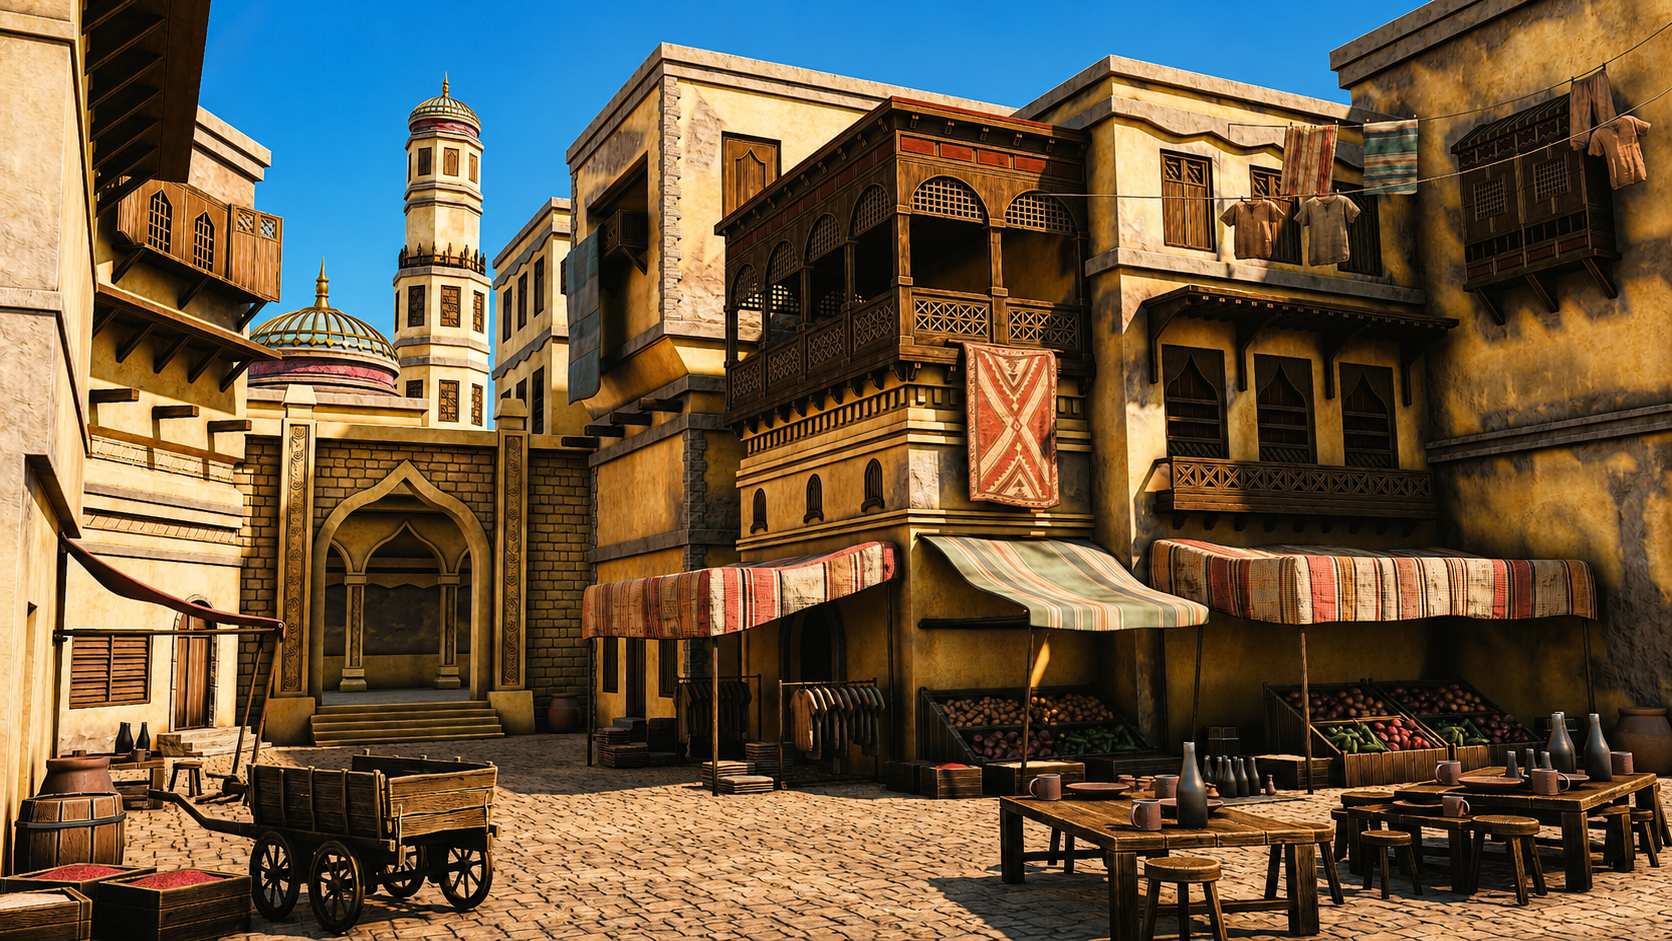
market to life with the details that tell
a story, tables, stools, bottles, plates, a wheelbarrow,
and hanging laundry. Finally, we shape the mood
with cycles lighting, sky texture controls,
shadows, displacement, composition checks, and
final render polish, turning the project into a warm, atmospheric Arabian market
ready for your portfolio. This course is for beginners
who want a guided route into Environment that and for self taught artists who
want a cleaner, more professional process for building complete stylized
scenes in blender. By the end, you'll have
more than a finish market. You'll have a repeatable
workflow for planning, modeling, texturing, lighting, and presenting environments
with confidence. So if you're ready
to move beyond isolated assets and start building worlds that
feel structured, detailed and alive,
let's get started.
2. 3D Lesson 1 Master Blender Viewport Navigation: Hello, and welcome to Blender stylized Arabian Market course. So in this first lesson,
we'll be going over the basics of
Blender navigation. Welcome, everyone to the
basics of Blender navigation. Now before we begin, it's
important to understand how the axises work within Blender. So we can see at the
moment, we've got a green line going this way and a red line
going this way. This is called the Y axis, and this one is
called the X axis. We also have one
that is the Z axis, which we can't see right now. It doesn't actually come in with Blender viewport as default. But if you want to
actually set it on, you just come up to the
top right hand side, where these two
interlocking balls are and just click the Z axis, and now we can actually see. So how do we actually move
around the Blender viewport? There's a number of
ways of doing this. One of them is over on
the right hand side here. You can see if are over here, it's the zoom in and Zoom out. I can actually left
click and move these up and down then to
zoom in and Zoom out, or I can use the actual
mouse to actually zoom in and zoom out using
the actual scroll wheel. There's also another thing
you can do with Zoom, which is holding control shift and pressing the middle mouse, and you'll see you have
a lot more control over zooming in and zooming out. Now, the next thing
we want to discuss is actually rotating
around an object. So how to do that First of all, we'll bring in a
cube with Shift A, bring in a cube. Now, if I press the
middle mouse button and move my mouse left to right, you can see we can
actually rotate around. Unfortunately, though, we're not actually rotating
around this cube. So to actually fix that, we need to center our view
onto the actual cube. We basically want to focus our view onto this actual cube. So to do that, we're
just going to press the little dot button on
the actual number pad, and then you'll see that we
actually zoom in to the cube. If I scroll my mouse wheel out, you will see now if I hold the middle mouse button
and turn left and right, we're actually rotating
then around the cube. And this is important because if I actually bring
in another cube, so if I duplicate this
cube with Shift D, move it over, so bring
in my move Gizmo. And now you'll see if I
rotate around this cube, I'm not rotating
around this one. So it's fix that, press
the dot button again, zoom out, and now
it can actually rotate around this cube as well. Now let's look at
something called panning, which means that we're actually going to move left and right. And we do this by holding the shift button, holding
the middle mouse, and then we can actually
scroll left and right around our
actual viewport. So now we've actually discovered how to zoom in and the
different ways we can actually do how to rotate around an object and
how to actually pan. We can also come up to
the top right hand side here and use these buttons here. So again, remember we're
looking at the Y axis, the X axis, and the Z axis. If we come to our Y
axis and click that on, you will see now that you've got a front view of the Y axis. If you click the X axis, then we can change it
to that red X axis, and finally, the
Z axis, as well. Now, there are
other ways as well that we can actually look
around the viewport, and these involve using
the actual number. If I press one on my number pad, it's going to te me into that
white axis or front view. If I press two, it's going to actually rotate
that slightly, and if I press two again, it's going to rotate
it slightly more. Now, if I press the eight, it will rotate it the
other way, as well. Now, to go into the side
view or the X axis, we can also press three
on the number pad, and that will give
us that effect. We can also press seven to
go over the top, as well. Now, what about if we actually want to go
to the opposite? So instead of going from
the bird's eye view, we want to come to the
underside of our model. Well, that's actually
quite easy as well. All you need to do is
press Control seven, and then will take you to the bottom view of
our actual model. We can also do the
same inside view and on the X axis and YXs. So, for instance,
if I press one, I'm going to be
going into Y axis. If I press Control one, I'm going to be going into the opposite side on
the actual Y axis. You can also find these
options just in case you forget at the top left
hand side here under view. So if I go down to view and
go across the viewport, you can see here that this actually tells me exactly what I need to press to
get the viewpoint that I've just
actually explained. Now, we also have the button on the number pad,
which is number five, a number five button
in Blender toggles between perspective and
orthographic views. Perspective view offers a more natural and
realistic viewpoint with objects appearing
small as they get further away, mimicking
human vision. Orthographic view removes
perspective distortion, making all objects appear at their true size,
regardless of distance. Useful for precision
modeling and technical work. The other thing that number
five does, for instance, if I come to my cube, at the moment, I am able to
actually zoom into the cube. However, if I press number five, I will not be able to
actually zoom into this cube no matter
how far I zoom in. I'll still be able
to move around it by pressing the little
dot button, like so. But if I actually
want to actually work on the inside of an object, I can quickly press number five, and then I can
actually go in and work around the inside as well. Now, if you're working on a
laptop or something like that or a tablet and it doesn't
actually have a number pad, you can also use,
if I press five, the actual squiggle key, which is under the escape board on the left hand side
of your keyboard, and that then will
give you pretty much the same options
as we had before. So we can click the right view, we can actually click the back and we can
click the left view, for instance, the opposite
to what we had before. So instead of pressing
one and three, we just press the
little squiggle line, and then we can actually view
whichever side we need to. Now, we nearly at the end
of this short introduction, there are a couple more things
that you can actually do. If you come over to
the right hand side and you see here where we've actually got the name of the actual parts
within our scene, we can also grab them from here and then press the
little dot B to zoom in. So I can grab this one,
press the little dot B, and that then will zoom us in. The other great thing about
this is we can also come in, shift select them press
a little dot button, and then we're able
to actually rotate around both of these
cubes. Alright, everyone. So I hope you enjoyed this short introduction to the
navigation within Blender, and I hope from now on, it won't be a struggle
navigating around the viewport. Thanks, lo, everyone. Cheers.
3. 3D Lesson 2 Append Resources and Install Essential Add ons: And then we'll come
back to Blender stylized Arabian Market course. So in this lesson, we'll be
going over the resource file and installing some add ons that we'll be
using for the course. Okay, so if you have a look in your course files folder
that came with the course, you will find a blend file called Arabian Market Resources. So if we double click
this to open it up, we should be greeted
with the screen here. And basically, in
this blend file, you have some stuff that we
could use for the course. So these over here, these are our different
materials. We have some wood. We have some gold metal. We have some, like, floor
tiles and some wall bricks. These at the front are
our different fabrics. So we can use these
for the market stalls, and these are like
our rug textures. This over here is
our wall texture. And if we look into
the shade here, it looks a bit complicated,
and we'll go over it. But we have two different
textures here that are mixed together that we can blend
by using vertex painting. And we have some trim
sheets over here as well to add some more
detail to our walls. You go over here, we have
some different types of food that we can
use for our crates. We have some clothes that we can put onto our clothes line, and we have a human
reference that we can use for scale, right? So we're going to move this human reference into
a fresh Blender scene. So I'm going to go to File and
then New and then General. And then we'll click Don't Save. So you should be greeted
with this screen here, and we can just press A to
select everything and then X, and then we can just delete. Next, we want to go to
File and then append. And then we want to navigate
to our course files folder here and find the Arabian
Market resources blend file. And we want to go to
the collection folder. So we'll find collection here, and you'll find the
human collection. We append this. We'll have a human reference
here in the scene. Next, we need to install some add ons that we'll
be using later on. So if we go up to edit
and then preferences, and then under add
ons, we can click this little down arrow here and
install from disk here. Now we'll go back
to our course files folder and find the
folder called add ons. And we have two add ons here. First one is the
Tudor compositor, so just left click that and
then install from disk. And then you want to do
the same with this one. This is the Texel
density checker. Left click that Install from
disk and do those here. I've already got them installed,
so you can search here. I can search Compositor, and it comes up here
with a checkmark, and then I can
search Tex density. Tex Density checker is
here installed as well. And then you can just go to here and then save preferences.
4. 3D Lesson 3 Build Powerful Reference Boards with PureRef: Hello. Welcome back to Blender
stylized Arabia Market Course. So in this lesson,
we'll be going over the PureRef file and having
a look at our references. So next, if we look
in our course files, we will find a PureRef file here called Arabian
Market references. So we can double click
this to open it up. And we should be greeted
with this screen here. And here we have some of the references are
used for the scene. So this is the main scene
that we'll be building eight. And I've also included some
real life references of some, like, Arabic buildings and
stuff, some marketplaces. So with this program, you know, you can resize and
move images around. You can, like, copy and
paste images into this, and you're quite
flexible with how you want to lay this out. So if you want to
find any references and add to it, just feel free. And if you're completely
new to PureRef, then I will play a short
introductory video on how to get it
and how to use it. Welcome, everyone to our in
depth referencing guide, and it's very important that we actually use
references in pretty much any kind of modeling or environments that we're
actually going to be work on. So before we actually
do anything, before we put any cubes
down or anything like that, it's really important
that we have some really, really decent references
to actually work with. So the first thing I want to recommend is that you can use something to actually
put all your references on like Photoshop or even word. But what I'm going
to recommend is that you use something
called PureRef. If you go to the site,
that's called purerev.com, you will actually open
this, and from there, you can actually
click Get PureRef, and that then will take you
to this download screen. And you will see at the moment, you've got 157 or custom amount, you can actually put this on zero and actually
get this for free. So it's completely free, and you can come back and
make a donation if you like. And then all you need to
do is click Download. So the only things
we're going to talk about pretty much for
reference in here, are going to be free except
our mid journey part. But there are other alternatives
like Dolly and a load of others out there that you can use instead of mid journey. Once you open up pura, then, this is what you will be
greeted by this screen. And if you want to right click, you can actually drag
this around to any of your screens or you can actually
make it smaller like so. And it's a really, really
good program this really, really handy, highly
recommend getting this. So now let's actually think
about getting our references. And there are a few
sources that we use to actually grab
references from. But generally, what you
want to do is you want to build up a kind of
reference pag if you're going to be a hobbyist or a professional in three D modeling or environments where
you're going to see things perhaps on
Pinterest or sketch up, and actually you want
to save them in a file. So I know people with
thousands and thousands of images that they've
saved over the years. And whenever they're
coming to a project, they'll then dive in
and actually find all of the images that they've
that particular thing, this could be a Samurai
warrior or a Chinese bell. Also, a lot of people
I know as well, who are working
professionally at this will go around museums. They will take their
own actual images, and then they'll also upload
those to the file as well. So the first point of call
if you're not actually got your own database yet is probably going to
be actually Google. So let's open up Google, and you can see here
that at the moment, I'm looking for a
Victorian delivery truck. I'm going to do is, I'm
just going to go through these and get some nice
references like this one, for instance, and then
I'm simply going to right click and I'm
going to copy image. Then what I'm going to do
is I'm going to go over to PureRef so I'm
just going to open it backup press Control V, and you'll see now that I've
got my nice image in here. What we're also able
to do with PUR RVs, we're able to also pull it out and make it
bigger if needed, which is really, really
handy when we're putting in lots and
lots of actual images. Now, the next thing
I recommend you do once you've actually
got an image in there, here is what you can
do is you can left click and drag it
over somewhere. And then what you can
do is you can press Control N and you can
actually make a note. So let's call this
Victorian Trucks. Let's put it Trucks.
Now, within my scene, I might actually want
a Victorian lamppost as well as part of the scene
or something like that. So let's actually
look at the next one. So the next point of call is actually going
to be Pinterest, and let's actually put
in Victorian lamppost. So let's try that. Like,
so let's see what we get, and we can see we've got many, many styles,
especially this one. This one's actually really nice. This one's also really nice. So what I'm going to do is I'm going to actually take this one, I'm going to right
click Copy Image, go back to my PUEv and then
drop the images in there, like so, and maybe make this
one a little bit bigger. What I tend to do is I gather a load of images for
each of these things. When we're actually
building a scene or even just the model, you want to grab as many
images as possible. I'm talking hundreds
of images here. And especially if
you're doing a scene, you want all of
the little parts. You want everything
down to the lighting, the environment, the trees. You want to grab references for absolutely everything because it will make your
scenes just really, really look so much better if you've got some
really good references. So now let me show
you this is one that I'm actually working
on at the moment, so if I come over
and load Reason, and I'm just going to
load this one here, and you'll see at the moment,
I have all of my props. I have all of my main
buildings that I'm going to be looking at
to use as references. I have a ton of doors. I even have a load of foliage. I have all my windows. I have my lights over here, and I also have, more
importantly, all of the lighting. In other words, it's a scene. So what time of day
is it going to be? Is it going to be, you know, early in the morning, or
is it going to be at dusk? Is it going to be a night scene, or is it going to be midday with that sun beating
down on my scene? Just make sure that it
actually matches the scene. There's no point having
a scene like this, for instance, so this one here. If you've got a log
cabin out in the snow, you really want it to
match your actual scene. Now before moving on,
there are a couple of other places that we do go
to use for referencing, especially something like
sketch up, which is really, really great because you can actually come into
an actual scene. And then what you
can do is you can actually rotate
around it and really, really check out how a model is put together like
something like this, which is one of our actual own. But you can see here how
easy it is then to get a good idea of what actually
incorporated in this scene. And what you can actually
do from there, then, is we can actually
come down and we can actually get
some screenshots of this or even right click and copyimage there's
also, let's say, if we wanted to do a Victorian
truck, for instance, to keep the same theme as
what we've been doing, you can see that
there's no end of actual Victorian or vintage
type vehicles on here. Not as many as what
there is on ArtStation, but still a very, very good place to start looking
for reference in. That leads me on to my next one, which of course is ArtStation. This simply is one of
the biggest resources for referencing or for looking
up artists in the world. Let's put in a
reference of Victorian, for instance, and let's
see what we actually get. Let's search artwork,
so we're going to search artwork and let's see what it
actually comes up with. Should be lots and lots of
things to work with here, especially good, if you're
looking for actual lighting. So you're looking for lighting effects
like this one here. And again, we can take these actual um use them
for references. And the best thing is about
ArtStation is we can also come down and look at things
that may be our concept art, so two D or actual
three D. And we can also come down as well and look at what subject
matter it is. So it could be automotives, so Victorian automotives, or it could be architecture
or something like that. So the possibilities with ArtStation are
pretty much endless, and you're able to grab
tons and tons of really, really high quality references. There are, of course,
hundreds and hundreds of other places you could probably
go to grab references, but I'm showing
you these because as far as references go, these are some of the
best places to go. Let's move on then to one of the things that we
really use a lot of now, which you want to thought
actually would come into it as far as
referencing goes, but it actually is
really, really handy. So let me introduce
to you now Chat GPT. So here is Chat GPT. You can see that we
have Chat GPT four, but we also have 3.5. 3.5 is actually free, and it is actually good enough
to do whatever you want. You really don't need to pay
for this. It's also free. So what I'm going to do
is I'm going to go to message, and I'm
going to type in, give me ten different buildings for a Victorian town scene. Something like that. Let's click Enter and let's see
what it gives me. So you can see now it's given me a lot of things to
actually work with here. And the best thing about
this is you can also say, give me ten more. And it will just then go
ahead and give you ten more. Now, these things
are really handy to use because then I can simply take these ideas and it'll
also bounce other ideas to me, and I can then go
into Pinterest. Or Google search and actually look them up or try and find
something like this. And I can kind of get
ideas and design my scene around there using all of those things and
especially PureRef. We can also take them in
to our actual Mid journey. Now, again, our mid
journey is paid for. I think the lowest amount is
$20 or something like that, but there are many, many
free things out there, but I will still show you
what we actually do with our AI based image generator. So you can see at
the moment, this is the image that we've
actually generated. I know we've called it is
Victorian era delivery van, and this is what
we actually get. If we go to my images, you will see that
we've generated a ton of images about
all of the things. Especially, we use this as
well to generate textures. It's not just there to actually generate images and ideas
and things like that. You can actually use it to
generate transfers that are going to go on Windows or
adverts or actual textures. And we do use this, especially for things like curtains
because it's really, really easy to get that look that you're actually
looking for. Can see here, we've got a lot
of ideas for living rooms. We've got a lot of ideas for bedrooms and
things like that. What we can also do
in mid journeys, we can also go and explore. And what you could do is
you could look up with a search prom Victorian. Let's put in carriage. And then we can also
get ideas from this. So if I put in
Victorian carriage, you can see this
as what comes up. Now, if we come over to here, we can also see if
we click on here, this is the actual prompt
that somebody put in, so you can actually
take that prompt, maybe change it around a bit, and then get your own
images rather than just simply copying
other people's images. It's a great place to start to actually gather
your own images. The other thing is
about mid journeys, I can come in for instance,
let's just go back. And then what I can do is I
can hold the shift but down. I can grab all of
these, for instance, and then what I can do is click the Download button and
download all of those images. And the best thing is
about PureRef is you can bring in multiple images
at the same time. So you can just drag, drop them, and then they'll all appear
actually next to each other. So really, really handy
things to so, lastly, then, to sum up, don't do what I did
a few years ago, where I just dive straight into Blender and not even think about references and just
find references if I had to while I'm
actually building something. Don't do it that way. It leads directly into building a
beautiful gray box as well, all this, because first of all, you grab all of your references, you make sure
everything's set out. You can go and find some more
references if you need to. You know, if you suddenly
have a spark of inspiration, you want to make
something on the fly, then grab some more references
for but to start with, grab all of your references, have them really,
really nicely laid out, and spend even half a day to a day grabbing all
those references. You can then save
the pura out as well into individual files, and then you'll have all
the other references around that particular
build in there, ready to use maybe on another
project in the future. A everyone, so I
hope you found this useful and I'll hope you'll
take my advice going forward. Thanks everyone. See you
on the next one. Cheers.
5. 3D Lesson 4 Essential Blender Modeling Tools and Edit Mode Mastery: Hi. Hello. Welcome back to Blender stylized
Arabia market course. So in this lesson,
we'll be going over the basics of
modeling in Blender. Welcome everyone to the basics
of modeling in Blender. And this is a short
introduction just to get you started on a few of the
basics in modeling. So the first thing I want to
do is bring in a primitive. So the way that we're
going to bring into primitive is press Shift and A, and then what we're going
to do is open up a menu, and you can see that
we've got all of these things along this
actual primitives menu. But the one we want to focus
on is the actual mesh. And from here, you can
see we can bring in many, many things like cylinders, cubes, planes, and the
one we want to bring in just now is going
to be our cube. That we brought our cube in
the next thing I want to discuss is object and edit mode. And you can see at the moment, over the left hand side, we're actually in something
called object mode, and this means basically we can manipulate this whole object. So if I press G, I can actually move it around
my viewport like so. If I press S to scale, I can actually scale the
whole of the object in. But the thing is, we
don't really want to work in object mode necessarily, and a lot of the
time, we're actually going to be working
in edit mode. So we can come up to
the top left hand side and put this in edit mode, or we can actually press the tab button and jump
into Edit mode that way. You will notice once we've
actually gone into Eddy mode, we have a lot more
options to use, and more importantly,
we have a lot of the topology now to
play around with. So the first thing you'll notice the difference being is that we have now these three options
up at the top and side. And if you have over them, it will say vertex,
edges, and faces. Now, vertex is going to be
these little points here. The edges is going to be these edges of my cubes
or any of the edges. And finally, we've
got the faces, which is actually the
whole polygon face. Now, you can also instead
of clicking on these, press one on the keyboard, and that then will jump
you into vertex select. If you press two, you
can go into edges, and three is going to
take you into faces. From here, we can actually
manipulate any of these parts. So you will notice
at the moment, I've got a gizmo here. Now, if you don't have
the Gizmo available, coming over to the
left hand side, and you'll have this
little button here that says move or you can press Shift spacebar and bring
in your move tool like so. So now because I'm on faces, I can actually pull
out this face like so, if I go to edges, I
can actually grab one of the edges and pull
this out like so. And if we're on vertexes, I can grab this vertex or grab the second vertex with Shift Select and then
pull this out like so. Really, really easy to actually
manipulate things once you know how to select
each of these parts. Before we go too much
in the weeds with actually modeling in
this actual Edit mode, let's just jump back into
Object mode for now. What I want to show
you is how we can actually move this
actual cube around. So as well as moving it
with the actual gizmo here, we can also press G
and actually free move this object around or we
can press G and Y, too. Let's put it along the Y axis, move it around or the X axis, for instance, and move
it this way or even the z axis and move
it up and down. To drop it back
where we started, let's just right click like so. So that's actually moving the location of it's
not a cube anymore, but let's just say it's a cube. We can also scale this in
as well with the S but so we can scale it in or
scale it out like so. Now we can also press the S but, hold the shift button,
and then we have a lot more Finesse
on actual scaling. Can also scale this
up by, let's say, a factor of two, S, two, enter, and there we go. And of course, we can scale
it down pretty small as well. Now the next thing I want
to discuss is rotating, because if we rotate it with
R and just rotate it around, we haven't got a lot of
control over how this rotates. So what I want to do instead is, I always want to press R, then attach it to an axis,
which might be the it, so the green one, and then
rotate it either by free hand. Or by actually inputting the
value under our number pad. So if I want to rotate it, let's say, by 90 degrees, press the end button,
and I've rotated this round by 90 degrees. Now, if I want to rotate
it back, I can press O Y, the little minus button
on the number pad, 90, and then we can
rotate it back. Now, there is something
else that you need to we also want to reset
our transformations, and this is one of the most important things within Blender, because if you don't reset
your transformations, Blender still
considers this a cube, even though it's not
really a cube anymore. So what we want to do to reset the transformations
is press control. A, all transforms, and
then you'll notice that the orientation has
moved over here because it will always move
to the center of the world. There, then we want to actually reset our orientation, as well. So we want to right click,
set origin to geometry, and then it's going to
put the origin right back in the center
of this object. Now, it's also important
to know resetting the transformations will also impact things like UV mapping,
things like modifiers. Basically, if you ever
have a problem in Blender, always make sure that you
reset your transformations, and then most of those problems
will definitely go away. Alright, the next thing about resetting our
transformations, it makes it really
easy then to get something back to how
we had it before. In other words, if I press
S and scale this down, and then let's press R and Z and rotate it round this way. Because before this, I
actually reset my rotations. What I can now do is press lns and put it back
to the scale that it was before I did anything
and then alternr and actually reset
that rotation as well. So really, really handy, once you've actually reset your transformations in
what you can actually. Moving on, we're
actually going to be looking now at duplication. So if I come round here, I'm able to actually
duplicate this. If I press Shift D and
then press the Enterbne, it's now a duplication, and I can move this over
to the right hand side. So now we have
actually two objects. Now, what if you want these two objects actually combined, and you didn't mean to actually duplicate it in object mode, for instance? Well, that's easy. We can just shift,
select the other one and press Control J, and now they're both actually join together,
as you can see. So if I press tab now,
we're able to come in and actually work on
them both at the same time. What happens if we want to
actually split them up, so we don't want the objects
to actually be together. That's also easy. Just make sure that you select
one of them first, and then all you're
going to do is press L, just to select everything. So all of these faces, then you're going
to press P. Come down to where it says selection, and now if I press Tab, they're both actually split off. Now, of course, using
the same command, if I press tab, I can
actually come in, grab a face, for instance, press Shift D. I
can actually also duplicate things with
inside Edit mode as well. So we might want to duplicate
all three of these. Shift D, I can actually come in then and actually
duplicate them like so. It also means, though,
is that these, when you duplicate them in edit mode will be part
of the same object, of course, because in edit mode, they're not actually
classed as an object. They're clustered as
the same actual part. Now, for the next
part, I'm going to bring in a brand new cube, and I'm just going
to show you some of the basic modeling
techniques within Blender and go through
a few of the options. So here we have a
brand new cube, and the first one I'm
going to show you is, if we come into Edit mode, we'll always be working
in edit mode to show you these things, make
sure you're in edit mode. I'm going to grab the top face. And what I'm going
to do is press E, and that then is going
to extrude this out. Sometimes you will need
to extrude something out, and it will need to be
along A axis, for instance. So all I'm going to do is go to Edge sect, grab this edge, and then what I'm going
to do is press E, and you can see, because it's not
tied to an axis, it's floating around everywhere. However, if I press the Xpon, you can see now it extrudes out, following along
that actual axis, which then makes it
really, really easy to manipulate it where I
actually need it to go. Next one we're going to look at is something called beveling, and then all I need to do is come in and I'm going
to grab my edge. So I'm going to press
two on the keyboard, grab an edge like so,
and then I'm just going to press
Control B like so. And you'll notice now it's actually bevelled off that side. You'll also notice down on
the left hand side here, we have something called
an operator panel. It will be closed. Just open it up, and from here then with the actual bevel, we're able then to
turn the bevels down, for instance, turn them
up, move how the shape of the actual bevel is going to be and all that
other good stuff. Pretty much anything you do in Blender is going to give you
an operator panel like this. We're not going to go too much
into this, but basically, the moment that you press Tab button to come
out of Edit mode, this is going to disappear, and then you're locked in
with the actual shape that you've chose or the
insert or the extrusion. So just bear that in mind. So the moment I press tab,
that actually disappears. What about if we want to bevel off vertices and not edges? So, for instance, if I come to a vertice like this
and vertice like this, press Control B, you'll see
that it bevels off like this. But if I come to one that are the
opposites of each other, press Control B, you'll see
nothing actually happens. However, if I press
Control Shift and B, then we're actually
able to bevel off the actual vertices like so. So that's another handy
tip for actually bevel. Now the next modeling
technique we want to discuss is
actually edge loops. So how do we get more
geometry onto this? So, for instance, I want to
bring some edges on here, I can press Control, and that then will bring me
one edge in here. If I left click then, you can see that I can put this either this side or this side. But let's say I want it
right in the center. I'm just going to right
click on the mouse, and that then is going to
put it right in the center. Now, the other
thing I can do with the operator panel
again is then come in and turn all of these up to give me more
actual edge loops, and I can even move them
to the on the right. Now, I can also, if
I press Control ed, come in, press control law. I can actually scroll up on the mouse wheel to give me as many edge loops
as I actually want. Or if I want a little
bit more fins, I can actually type it out
on the actual number pad, so I can type out 120, for instance, and
have 120 edge loops. To cancel it at any time,
just press the escape board, and then that will
cancel it out. The next modeling technique
I want to show you requires two actual blocks
or two cubes like this. And all I'm going to do is I'm going to come in and I'm going to select opposing
faces like so. And then I want to actually join these together,
for instance. So all I'm going to do,
I've selected them both. I'm going to right
click and come down to where it
says bridge faces. And now you can see I can
actually join those together. Now, if I press Control is dead and just go back a minute, you can also do
this by coming in, and let's say grabbing
this and this edge, and what I'm going
to do instead is, I'm going to press the F bone like so and come
down to the bottom, as well, and then
grab both of these and press the FBne like so. Sometimes bridge will
not work because bridge has to work with two edges
and nothing in between. In other words, nothing
selected there. If I come into this
one now and try right click and come
down to where it says, Bridge edge loops, you will see select at least
two edge loops. So we can't actually
join up from there, and that is when
it's a good idea to use the Fbne instead. Now the final modeling
technique that I actually want to show you is
something called insert. What I'm going to do is I'm
going to grab this face here. I'm going to press the
ebon and then you can see you can actually insert this
vase in and from there, you can actually extrude
it out if you want to. You can also then
press Control B and bevel it off if you want to. You can see now
it's really easy to use all of those techniques
that I've actually showed. Now, lastly, the
last thing I want to show you is the insert again, but this time we're
going to grab this base and this base, and if I press I,
it's true you can actually insert them
both at the same time. Now, the best thing
though about insert is, if I press the I and
then press I again, we can actually insert them separately from
each other like so. I see a lot of renders
on Facebook and other social media that kind of look really,
really blocky. And for instance, if I press Tab now and go into Object mode, you will see this actually
looks pretty blocky. But there's a really
easy fix for this, so it doesn't actually
have to look like that. All you need to do is once you've actually
finished, right click, come up and where it
says shade auto smooth, and that then will shade it off based on the actual angle. So really, really easy to
either shade flat, shade, completely smooth like so or
shade auto smooth, like so. If you actually are struggling
and you actually want it to shady a little bit
smoother than what it is, you can come over
to the right side where this little triangle is, go down and open up the normal, and from there, you can
actually increase this and shade it even more smooth
based on a higher angle. The default is always set to 30. So make sure you set it to 30 in case you
actually overdo it. The last thing I
want to show you in this introduction is the actual cursor because
I think it's very, very important to
actually modeling. So what I'm going to do
with the mono is I'm going to make another
cube with Shift D, and then I want this cube on top of this
cube, for instance. Now, if I move my
cursor over here, so shift right click. And then what I can do is
I can press Shift Desk, and I'm going to go selection
to cursor, keep offset. And that then is going to move the exact center of this cube, all the orientation
to my actual cursor. Now, how would I get this
then on top of this cube? I would literally
grab this cube. I would, first of all, right
click and set the origin to geometry just to make sure that origin is right
in the center like. So I would then press Shift
Desk cursor to selected, and that then is going to put my cursor right in the center. And then I would grab this
cube, and from there, I'm able to go Shift
Desk selection to cursor, keep offset. And now that cube is right
next to this actual cube here. From here, then, I can
actually bring this up, and let's actually
just have a quick play around of everything
that we've learned. So you can see now if I pull this going to join them both together
then with Control J. And then the first thing
I'm going to do is come in, grab this face and this face, and we're going to
right click then, and we're going to come
down to bridge faces. And then I'm going to
bring in some edge loops. So let's bring in two
or three edge loops. Left click, right, click. And then what I'm going to
do is I'm going to press Alt Shift and click
just to select all of this edge going
around here and press the S but and pull
it out like so. There, then what I'm
going to do is I'm going to bevel off
both of these tops, so I'm going to grab this
top, shift select this top. I'm going to press Control B and actually bevel
them off like so. From there, then I'm going
to bring in an insert, so I'm going to grab
the front off here. I'm going to insert this
with the eye button like so. And then from there, I'm
actually going to extrude out. So I'm going to extrude
this out like so. Now, let's say I
want a bigger piece on the next bit, I'm
going to press Shift D. Pull it out, so this is a
duplicate of this face. I'm going to press the S but to make it a little bit bigger, and then I'm going to press E and pull that out
along the axis. Finally, then what
I'm going to do is grab this one and this one and going to right click then
and bridge faces like so. You can see just how
easy this really is now to actually start
building out some really, really complex models with everything that
you've just learned. All right, everyone, so
I hope you enjoyed that, and I'll see you on
the next one, Cheers.
6. 3D Lesson 5 Accurate Building Blockout Using Cubes and Snapping: Hello, and welcome
back to Blender stylized Arabian market course. So in this lesson,
we will start with the blockout of our buildings. Okay, so to start with, we're going to add
just some simple cubes just to get the basic
shapes of our buildings in. So we're going to start with this bottom half of
the building here. And then we'll add a cube for this building and then this one, and then we'll start making
this basic shape here. If we're going to Blender, we should have our scene here
with our human reference. Now we're just going to
move him to the side a bit, so we can select him
and then press G and then X to move him
to the side over here. All right, so let's
press Shift then A. Shift A, and then
we get this menu. And under mesh, we
can add a cube. And if we press N, we can
get this menu over here, and we can see the size
of our cube over here. So I have the dimensions saved
for these first two cubes. So on the X, we're
going to hurt 3.5. Not 305. We want
3.5. There we go. And then for the Y, we're going to go 6.75. And then for the
Z, we can go 6.5. So this is the size of
the first building here. Now, we want this to be
sitting on the grid here. This grid is our
floor, basically. We can go into a front view by pressing one on the number pads, and then we can
just bring this up, so it's sitting on
this red line here. So if we press G and then Z, you can bring this up, and
then you can hold shift, so it goes a bit slower
so you have more control. And we can just zoom in and make sure it's like
sitting on this red line, so press GZ, hold shift and
move it down just like that. Now, any new objects we bring in are going to come in to
this free D cursor here. So we're going to move
this cube out the way. So we can just go G, X, move it over here, and then G Y, move it over here so it's
out the way of this cursor. Now, if we look at
our scale over here, our scale isn't uniform anymore because we scaled
in object mode. So we want to apply our scale, so it's one, one, one on each. So if we press Control A, we can choose apply scale. Now it's going back to one here. Let's add in another cube. We have Shift A, go mesh cube. And then the dimensions for
this, we're going to choose. For the X, we'll have seven. For the Y, we'll have ten. And then for the Z,
we'll have 11.5. So this is our next building. We can press one on the number pad to go
into the front view. And then we can just
bring this up with G and Z and get this nice and
close on the red line here. GZ, we can hold shift so we have more control, just like that. Right now we want
to put this cube into place. So let's go GX. We'll bring it to this
side of the cube. And we're going to use face snapping to snap
it to this face here. So if we go to
this menu up here, you have a little magnet with a dropdown menu next
to it. We click this. We have different snap
tags here that we can use. So we're going to choose Face. I choose face and then
with this selected, we can go G and then X. And then with our mace
cursor over this face, we just need to hold control and it'll snap to that face
and then left click. So now that's touching here. And then we just
move this backwards, so we'll go G Y and just move this round
debate here like that. So next, we want to
add a cube over here. So we can probably just duplicate
this cube with Shift D, and then we can hit X, and we can move it over
here, just like that. Then we want to snap
this one to this face. So we'll go GX, hold control, snap it
to that face there, and then we want to
move this forward. So we'll go GY, move it
forward, arrange about here. Now, we want to
bring this face up. So we'll go into Edit mode, so press tab into Edit mode and then free to go into
face select mode here. And then we can
select this top face, and then we can move
it up with G and then Z, just like that. And then tab again to go
back into object mode. Let's add another cube. Actually, we could
probably duplicate this one here. So
we'll select this. We'll go Shift D and then Y, and we can move this
back, and we'll just create a tiny little gap
here, just like that. Now, let's go into
Edit mode on this one, and let's select this back face. We'll go G Y and move this just a little bit further back. We'll choose this face over
here and then we can go GX and move this
over here somewhere. And now we want to use our extrude tool to create
a new face going up. So if we press E, we get the extrude
here and we can create a new face just like that. And we want to pull
this edge out. So if we press two to go
into edge select mode, we can select just this edge, and then we can just
press G and then X and move this out just a little bit like that to get
this kind of shape. And then we want to
extrude from this face. Let's press three to go
into face select mode. We'll select this face here
and then E to extrude, and we'll make this
just a bit taller. We can double check
our reference to see how tall it needs to be. So maybe a little bit higher GZ, bring this up just like that. Press tab to go back
into object mode, and we will add another cube
for the wall over here. So let's press Shift A, and then under mesh, we
can choose cube again. And because this is 2
meters by 2 meters, we just need to bring it up by 1 meter so that it's
sitting on the grid. So we can do that just by
pressing G Z, and then one. I'll bring it up by 1 meter, and then we can push
this back then with G Y and move it over
here somewhere. Now let's go into Edit
mode on this with tab, and then we can select
this face and then GX, move it past the building over here. We'll choose this face. We can go GX and move
it over here somewhere. And then we'll choose
this top face. And for the wall, I'm going to have it just
below this groove here. So we can go GZ and bring it up just a range here we'll do. And then we can choose this
back face and then it's go GY and just make it a little
bit thinner, just like that. So there's the beginning
of our blockade. In the next lesson, we will add the buildings over this
side. So I'll see you then.
7. 3D Lesson 6 Scene Blockout with Camera Setup and Tower Modeling: Oh Hi. Hello, welcome back to Blender stylized Arabian market course. In this lesson,
we'll be continuing with blockout of our buildings. Okay, so with this
building here, I'm actually going
to move it forward. So I'm going to snap
it to this face here. So I just going to select
it and press G and then Y and then hold control to snap
it to this face here. I think this amount of
distance here is fine. So with this wall, I'm going to just move this forward closer to
the wall, as well. Just like that. Okay, so now we want to have a
building over here. So I'm just going to duplicate this cube with shift and D, and then I'll hit X to
move it over this side. And then we can rotate this
by hitting and then Z, so it rotates on the Z axis, and just give it a
bit of a rotation. And then we can press
G Y, move it back. And then we'll hit G and X to bring it in
this way a bit as well. So GX here. And something
along here should be good. I also want to bring this
roof up a bit as well. So I'll go into Edit mode with tab and then select this face, and then G and then
Z to bring it up. And we'll bring it up just lower than this
building a little bit. Now, I'm going to hit Tab to
go back into object mode, and then I'll hit Shift D on this object and then Y
to bring it this way. And we can reset the
rotation by pressing Alt and R. I'll
reset it this way. And there we can just
press G and then X, we can move this
to the side a bit. I might rotate this one a
little bit more as well. So and then Z, rotate it a bit more and then
push it back with G and Y. And then this one, we could probably just move it forward. And maybe if we go into Edit mode and then we can
select this pace and then GY, and we'll move this
make a bit wider, that should be good for now. And we can have a look
at how scenes looking. So this looks quite nice so far. All right, so I'm going to go back into Object
mode with tab, and let's bring in a camera. So let's press Shift A, and this menu, we'll
choose camera here. So the camera should come in
at the world origin here. So what I'm going to
do now is line up my viewport to roughly where
I want the camera to be. And then for the camera to
be in the viewport location, we need to press Control Alt and then zero on
your number pad, and I'll snap the camera to
where we're looking here. Now, we want to lower the focal length here so
that we have a wider lens. So if you look on
the right here, we have this camera icon here. We can click this
under focal length, I'm going to change this
to a 30 millimeter camera. And now, if we press N
to get this side panel, and under view, we can
choose camera to view. So now when we
move out viewport, the camera stays with us, and there we just want
to kind of rotate the camera until we get something similar
to the reference here. So we want this building
to be just peeking up on the left side of the camera
and we're looking up. This building here is
going to be in the center. And you can make
little adjustments by pressing G and then Y to
go back a little bit. And then G and X as well
to go side to side. And if you want to
rotate the camera, just press R twice. So R, then you can
rotate the camera like this as well to kind of point
it to where you want to. And then GX, move it over here, and then you can
rotate the camera as well by pressing R and then Z to rotate it on
the Z axis a little bit. I and I think I'll have
it just arranged by tie. You can always go into
the object properties here for the camera and you
can check the location. So the Z location here, you can slide this to get a
different height as well. But for now, we will keep it arranged by tier,
that should be fine. Now, in this menu here, I'm going to uncheck camera
to view so that it doesn't move when we move the viewport around now. So now
we can move freely. Now we just want to get
a quick blockout of the tower and this little
sphere shape here. So I'm going to hit Shift A. And under mesh, we're
going to choose cylinder. And we have a little menu at the bottom here that
we can open up, and we can change
the vertices to eight so that we get an
octagon kind of shape here. And we can go into Ei mode with tab and we can scale
this up a bit with S and then make it taller with S and then Z and scale
it up a bit like this. Press tab to go back
into object mode, and then GZ to bring
it up a bit more, and then we'll hit G and
then Y to push it back. And we'll bring it
somewhere over here. Then we can press zero on number p to go back
into camera view. And now we can see where
this needs to go now. I'm going to hit X, and just
move to the side a bit. And then I'm going to
go into Edit mode, scale it up a bit more and
then S and Z to make it a bit taller then tab to go into
object mode and we can bring this up by here, and then I might just push
it back further by G, and then Y and then GX, have it somewhere around here. This building, I might press G and X to move it to
the left a little bit, so we have some more room
for the sphere here. Maybe push this further back. And then I'm going
to hit Shift A. And then under mesh, I'm just
going to choose for now, we'll just use the UV
sphere. This should be fine. We can go into Edit
mode with tab, scale this up a bit
somewhere around here. Then tab go back
into object mode and we can push this back
with G and then Y. And we'll have it somewhere in the front here in
front of this tower. Go back into camera view
with zero on another part. GZ, bring this up, then GX. We can just scale it
up in edit mode as well to somewhere like here. Then we can move a
tower to the side a bit more have something that looks nice and just
move things around until you're happy with
the composition. Maybe this could be
a little bit taller. But we can always
play around with these simple shapes later
on when we add more detail, more stuff into the scene. Well, this is a good
style of air blocking. I will see you in
the next lesson.
8. 3D Lesson 7 Blocking Windows, Doors and Balcony Openings: Hello. Welcome back to Blender stylized Arabian market course. In this lesson,
we'll be continuing with the blockout
of our buildings. Okay, so next,
we're going to add some shapes so we know where the windows and
doors are and the little like the Matrabia
on the side here as well. So what we can do is start
with some basic cubes. So let's press Shift
A and under mesh. Gonna choose a cube, and we want to make this
the size of a window. So I'm going to hit one on
number pad the front view. I'm going to use our guy
as a reference here. So with this, we can just
bring it up with Gene Z. And then we can go into
edit mode with tab, and then A to make sure
everything is selected. And then we can scale
it on the X with S and then X and can bring
this in a bit like this, and then S and Z to
scale it a bit smaller. And I'm going to have it
to around about this size. So the top of his head is
here and I'm going to go to the bottom is in
line with his *****. So that should be good
height for a window. And then we just need to
make this a bit thinner. So I'll bring this
face forward with GMY we'll just create something
very simple like this. So now I'm going to
go into object mode. And we can see the origin point, this little dotier
is all the way ATNA because we moved
that face forward. So to reset the origin point
to the center of an object, we just need to
right click it in object mode and then
set origin to geometry. And there the origin
is in the middle name. So when we rotate it, it rotates around
this origin point. So now we can grab this
and we can just bring this up and place this to where
we want our windows. Now remember, we can snap to this face with G and
then hold control, just snap it to this face here, and then we can press one
to go into front view. And we can place this to wherever we want
the window to be. So I'm thinking
somewhere around here. And then we can
duplicate this twice. So we'll go Shift E and then X and then Shift
D and then X again. We can just make sure
these are kind of evenly spaced by hitting G and X and then moving it
around just like that. Now we can select all of these
with shift and left click. We can duplicate
them all at once. So it'll go Shift D and
then Z to bring them down. And we'll have some around about here as well,
just underneath. Now we can press Shift A, and we'll add another cube. And this one, I'm going
to go into Edit mode, and I'm going to select
the face on the left and go GX and bring
it out this way. And I'm going to hit A
and then S to scale it, and then SZ will scale it on
the Z a little bit as well. Then we go back into Object
mode with tab, right click, set origin to geometry, and then I'm going to hit G, hold control to snap it
to this face over here. And we can actually go to
camera view with zero, and we can see where we
want this cube to be. So I'm going to hit GY and
bring it forward a little bit. And GZ, we can bring
this up a bit as well, and we'll just have
this in this area here. That should be good. Now, we also want to have
a doorway here. So for the doorway, we're going
to start with a cylinder. So let's shift a
mesh and cylinder. And then we're going
to rotate this. So let's go into Edit mode. Actually, before we do that,
I'm going to delete that. I'm going to shift a
mesh and cylinder. For me, I still
have the vertices here set to eight
from the tower. So we're going to change
this to something like let's go with 21, just so we have a bit more
of a smooth circle here. And let's go into
Edit mode with tab, and then let's rotate it
on the X by 90 degrees, which we can do
just by hitting R and then X and then type 90. And then what we want
to do next is delete this front face and
this back face. So you just delete
faces by hitting X and then delete faces. And then I'm going to
left click this face, and then I can control and
left click another face, and it will, select the
shortest path to that face. So I can control and left
click over here as well, and then just shift and
left click this last face here so that we have the
bottom half selected. And we can just delete
faces just like that. So now we want to
select these two edges. So I'm going to
press two to go into edge select mode and then left click and then shiftl this edge. And then we want to extrude
from this edge downwards. So I'm going to
hit E and then Z, so we get this blue line here, and then we can just extrude
this down just like that. And then we can fill in a face between these
edges just by hitting F. And then if we
select this edge, and then to select
the whole edge loop, we can hit Alt Shift and left click and all select
the whole edge loop here, and then we can press
F to fill that in. And then the same
for this edge loop. So Alt Shift, left click, but make sure we deselect this. I'm going to left click
here to deselect this. Alt Shift, left click, this edge, and then F to fill. So now we have the shape
of this door here. We can always bring this
face in a bit with G and Y, make it a bit thinner,
just like that. Tab to go back into object mode. And now we want to make this
the size that we want it to. So we could move it so it's
like behind our guy here, and then press one on number, pas goer front view. And I'm going to go into
Edit mode with tab, press A to select it all, and we'll scale this
just a little bit, and then GZ bring it down. We want quite a tall
doorway, I think, so maybe just a tiny bit more, and then GZ just get a
nice size of the doorway. This looks quite nice, I think. So go with this
tab to go back to object mode and then right
click Set origin to geometry. Now we want to rotate
this by 90 degrees, so I'll press R, Z, and then 90. And now we can press GY
to bring it over here, and we'll place it in the
middle of this building here. So GX hold control, and we can snap to
this face here. And we just want
to center this up. So GY put this in
the center here. So now we know there's a
doorway going in by here. Now there will also be like an opening for
the balcony here. So we can just do
a quick cube here. We could probably just
duplicate this cube. So I'll hit Shift
D on this cube, and then X, move it over here, and then GY, move it over here, and then GX hold control
to snap to this face. And then GY to put it
in the center and then GZ we'll bring this up
somewhere around here. And then we can go into
Edit mode with tab, select this bottom face here. So press free to
go into face mode, select this face GZ, and bring it up
somewhere around here. And then we can select
everything with A, and then we can scale
it on the Y then. So S Y and just make it a bit
wider, something like this. And then tab to go back into object mode and
just make sure this is nice in the middle
here. I'll do that. Now we can duplicate this
doorway here so we can go Shift D and then Y and bring one into the center
here just like that. Make sure this is
in the middle here. And then we could probably grab another one of our windows. So I'll hit Shift D, and then we can move this
over here somewhere. We need to rotate
this 90 degrees, I'll go Z 90. And then GY, we'll move this over GX hold control
to snap to this face, and then we can bring this down. So we have a window
here, and then GY, move this into place, and
then we can just shift D and then Y and move one
over this side as well. But now we will have a doorway here and a window where we'll do this later on because
this is rotated, so we'll sort this
building like a bit later. I also had a window here, so we could probably
just duplicate this cube here, shift X, and then GY holt control to
snap to this face up here, and we can just place
this somewhere over here. We could just make it a bit
bigger by just scaling it up S and just having
something along here. Okay, so we will also have
some windows up here, so they're different
kind of shape. Similar shape to this, so
we could probably duplicate this with shifty and then Z. We can bring this up, and
I'll just hit S to scale it in and make it small. And we'll have it around about here just
above this doorway, and then shifty Y we'll
have one this side. And then shifty Y, have one this side as well, and make sure they're
quite evenly spaced. And I think I think
that's fine for now. We have all our windows in. We'll sort out this
side later on, but we'll just focus
on this side for now. So I'll see you in
the next lesson. No.
9. 3D Lesson 8 Architectural Trims with Edge Loops and Extrusions: Hello. Welcome back to Blender stylized Arabian market course. In this lesson,
we're going to start adding some detail
to our buildings. Okay, so next we're going to add the details to our building, like the tops and the
little trims going around. So let's start with this
building on the left here. I'm going to select it. And I'm going to hit tab to
go into Edit mode. With this top face selected, I'm going to duplicate
it so it's separate. So I'm going to hit Shift
D and then right click, so it stays in the same place. Then we're just going to extrude it up a little bit with E. So extrude it up and
just make it a little bit taller like this. And then we want to select
this face loop here. So over this edge, I'm going to I'm going to left click over here
to deselect this face, and then Alt Shift left click here to select
this face loop here. And then we want to extrude all these faces
at the same time. But instead of pressing
E, I'm going to right click and we get the extrude
faces along normals. So if we left click
and then we can slide to extrude this
outwards a bit like this. And then once we left click, we have a menu that
appears over here. We want to choose offset even just so it's
all extruded evenly. And then we can also
adjust the slider here to get the right
distance that we want. So we want it just to be just a little bit out, just like that. And then to select
this whole piece, we can press L over this face and I'll just
select this one piece here, and then we want to separate
it from this building, so it's a separate object. So we just press P,
and we get this menu, and we can separate
by selection. Now, if we press tab to
go back into object mode, we can see this is now
two separate objects. So with this one selected, we're going to hit Shift D
and then Z to bring this up. And then we're going to snap
it down to this top face. So G, Z, and then hold
control to snap it down here. And then we want this
one to be a bit wider. So we can just go
into Edit mode with tab and then A to
select everything. And then we want to scale
it on the X and the Y. So we can do that by just
pressing S and then shift Z, and then I'll lock
it on the Z axis, and we can just scale
it just a little bit like this so that it comes
out a little bit like that. S shifts Z, it locks
it on the Z axis, and it only scales
on the X and Y then. So we just scale it out
so we have this kind of shape here, just like that. Then we could also
go into Edit mode, maybe and select
these top faces. So I'll select this middle face, and then Alt Shift click here to select these
faces here as well. And we can just maybe
make this a bit thicker, so GZ springs up a tiny
bit just like that. And then tab to go
back into object mode. We can do the same
for this one here. So we'll go into
Edit mode with this, select this face, duplicate with Shift D and then right click to put it into
the same position. And then we can extrude with E, bring this up, Rand at here, and then deselect the face
by clicking over here, and then Alt Shift left
click this face loop, and then right click extrude
faces along normals, and we'll bring this
out a little bit, and then offset even down here. And then we can play
with this offset slider. Something like this
would be fine. Cool. And then tab to go
back into object mode. And then we want to do
the same over here. So we'll select this one, tab into Edit mode. We'll select this
face E to extrude, bring this up, and then
Alt Shift left click. We want to deselect
the top face, Alshift left click, and then right click extrude
faces along normals, bring this a a bit, and
then we can play with this, offset even, and then
play with the offset. And then we want to hit L, but we don't want to
select everything. So let's just hit
L on this piece. And for some reason,
it's selecting it all. So pretty sure we duplicated it. So I'm going to undo until we get the flat face again and I don't
think we duplicate it. So shift E to duplicate
and then right click, make sure we have this E to
extrude. Just like that. Deselect the face. I shift, left click, this face
loop, right click, extrude faces along normals, and then offset even, and then play with a slider. And then we hit we can deselect and then
hit L on this piece, and then P separate selection. And then tab to go
back into object mode. And then this piece, we can go Shift D Z, bring it up, and then
GZ hold control, and it'll snap to
the top face here. And then back into
Edit mode with tab, press A, and then S, Shift Z to lock
it on the Z axis, bring this a a bit
more like that. Nice. Let's go back to
object mode with tab, and we need to separate
this one off as well. So I'll go into Edit mode. Deselect everything
L over this piece, P, separate selection, and
then back into object mode. And that's all sorted. Now, should we have this
a bit thicker, as well? Yeah, so I'm going to make
all of these a bit thicker. So I'll select this
into Edit mode. Select this face, Alt shift, click this face loop, and then GZ, I'll make this
a bit thicker, as well. And then the same for
this piece as well. So into Edit mode on this, we'll select this top face, Alt Shift click this
face loop here, and then GZ, make this
a bit thicker here. Back into object mode. So now we want some pieces going around the middle as well. So we're going to
use another tool called the edge loop tool. So we'll start with
this one here. It's going to edit mode on it. And to put in an edge loop, we just press Control and R, and we get this edge here. If we left click, we can then slide this edge
to where we want it. So we want one just by
here, just like that. So the edge loop tool, what you should know
is it only goes through faces with four edges. So if I show you here, I'll just quickly create cube. This is important to know.
I'll go into Et mode. Control R to add an edge loop. You can see it goes
all the way through because each face
has four sides. But if I was to undo this and join these two
vertices with J, so now we have two triangles
here and I press Control R, you can see it goes through
the faces with four sides, but it doesn't go through
the ones with three sides. So that's why we always stick to quads when we're modeling so that we can put
in edge loops. So knowing that we
have four sides on each I can put edge
loops, just like that. That's the edge loop tool. So let's go back to this one. And we have our edge here. Now, we want to turn
this into two edges. So with this edge selected,
if it's not selected, just alt and left click, an edge and I'll select
the whole edge loop. And then we can bevel this
edge to, like, double it. So if we Control B to bevel and then move
your mouse cursor, slide it, you can
choose the thickness. You can hold shift to make
it a bit more controlled. And we can just slide
and then left click. So now we have this and
we can move this up and down with G and Z to
where we want it. And what I'm
actually going to do is duplicate this face now. So I hit Shift D and
then right click, and then we can hit P
separate selection. So let's go back into
Object mode with tab and we can select this face. You might have to double click to select it because sometimes
it selects the building. So click again and
we can select this. And then we go into
Edit mode with tab. You can press A
to select it all, and then we'll just do
the same as we did here. So right click, make sure
we're in Face select mode. So we want to be up here with Face select mode or press
three on your keyboard. Right click Extrude faces along normals and extrude the
S L bit, just like that. And then we can add some more
edge loops going this way. So if we press Control R here, we can put it in edge loops. But then if we scroll
up on a scroll wheel, we can add more edges in here.
So we can just add a few. Make sure we have
one, two, three. So we'll just put them
in just like this. And then we can select some of these bottom edges
just like this, just so we have these selected. And then if we go G and then Z, we can drag these down
to create this kind of shape here, just like that. And then tab to go back into object mode. So
that's that one done. Now I might bring
this face loop up. So I might go back
into Object mode and Alt click this edge here. Make sure we're in Face mode. So press three to go
into Face mode and Alt Shift or just alt click this edge here to
select this face loop. And I might bring this
up just to make it a bit thicker, just like that. That should be fine.
Anything else? I might bring this face down,
so I might select this one. And then in edit mode, I'll click this
edge here to select this face loop and
GZ bring this down, make this a bit thicker,
just like that. And then tab to go
back into object mode. Then we want one going
along here as well. So I'll select this
edge, this face. I mean, tab to go
into Edit mode. We'll hit Control R to
put in a edge loop here, and we'll put one somewhere along maybe just under
this window here, we'll do, and then
Control B to bevel, we'll bring this out here. And then let's shift
D to duplicate it, and then right click and
then P separate selection. And then tab to go
back into object mode, and then we want to select just this piece and then
tab to go into Edit mode, AR click, and then we're not in Face mode, so we
won't see the option. So press three to
go into Face mode. Right click Extrude
faces the long normals. You bring this out a
bit, just like that. Now if you notice
on the reference, it has a little
indent on this one. So what we can do here is actually put an edge loop
in here in the middle. Left click right click, so it goes in the center,
and then Control B to bevel. We'll bring this
out just like this. And then we'll press three
to go into Face mode. Right click, extrude
along normals, and we can bring it
inwards, just like that. And then tab, go back
into object mode. And there we have
this shape here. So is there any
more we want to do? We have some over on
this side as well. So we will continue with the other pieces
in the next lesson.
10. 3D Lesson 9 Bevel and Array Modifiers for Detailed Facades: Hello. Welcome back to Blender stylized Arabian market course. In this lesson, we're
going to finish up adding the details
to our buildings, and I'm going to show you
some new modifiers called the bevel modifier and
the array modifier. Okay, so let's continue. So we have some over here
that we need to make. So what we can do is
select this piece here. We'll go into Edit
mode with tab and we can put an edge loop
here and bring this down. And I'm going to bring
it to around about here. And then we can Alt left
click this edge here. We need to press free
to go into Face Mode, Alt left click here. And there we have
this loop selected. We can press Shift D, right click, P,
separate selection. And then tab to go
back to object mode, and then we can
select this piece here back into Edit mode, and then we can press A and
then make sure we're in Face mode and then right click extrude
faces along normals, we can just extrude this
out a bit just like that. And then let's go back
into object mode, and we'll do the same
down here as well. So we'll select this
building into Edit mode, control R, and we can
bring this one up here. Just like that, and then press
free to go into Face mode, Alt left click here for the
face loop, and then shift D, right click, P
separate selection, and then tab into
object mode again, and we'll select this
and then into Edit mode. A, right click extrude
faces along normals. You can bring this
out just like that, and we can adjust
the offset here, offset even, and adjust the
slider something like this. C. Now, we can see this is clipping through
the wall here. I'm going to go back to object
mode, select this wall, and just push this back with GMY just a little bit like that. Now, with these pieces, they might be a bit thick
compared to these pieces, and we want it to
be a bit you know, we don't want them
to be too thick. So I just going to
go into Edit mode, press A to select
everything and S and the Z, and scale it in, and then GZ, move it down a little
bit just like that. Back into object mode, and
we'll do the same for this. So Edit mode, A, S, Z, scale on the Z, and then GZ, we'll move it up
a bit like that. And then instead of doing
edge loops on the building, we can just make sure we
select everything with A, and then we just do Shift D
to duplicate, and then Z, and we can bring this down
somewhere around about here, and then back into object mode. And then this can be one
piece then. I'll be fine. Okay, so now there are some details on this building
that we're going to do. So pretty much the
same technique. I'm going to select this
and then go into Edit mode. And let's add an edge loop
just under these windows. We'll add one here, and then I'm going to add
another edge loops, so Control R, and we'll bring this one
to round about here. And then I'm going to Alt
Shift left click this edge. So now that we have
both of them selected, and then we're going
to hit Control B to bevel and slide it out and create just two lines like this. We'll press free to
go into face mode, and then right click
Extrude along normals, and we'll push this
out just a little bit offset even down here. And we can adjust the offset
here, just like that. And then we can do the same
for above the windows. So I'll ask edge loops, Control R. We'll have one here. Control R again.
We'll have one here. Try and get the same kind of
spacing that we had here. And then Alt Shift left click this edge loop and then
control B to bevel. We'll slide it out,
get the same kind of thickness as the lower ones. And then press three
to go into face mode, right click extruded
faces along normals. And then we can try and much
the offset for this one to offset even and bring this
slider in just like that. Cool. And now we want an edge
loop in the middle here. And then control B to bevel
and make this quite thick. And then we're going to press three and then right click
screw face along the walls, and we'll push this one
inwards, just like that. And then back into
object mode with a tab. Okay, so I also want to quickly show
you the bevel modifier. So as we can see here, these edges are very, like, sharp and it becomes very
hard to see when there's no, like, bevel on these edges. So we're going to add
a bevel modifier. So if we go to the
spanner symbol here, this is our modifier tab, and we can click
Add to Modifier. And we get a whole menu here and this loads of modifiers
to go through. Different ones do
different things. But the one we want is we click
Search and type in bevel. We'll choose this
bevel modifier here. And you can see here
on the edges is added, like a little bevel
on each edge. And the way this works is a modifiers like nondestructive, so it doesn't apply to the object until we click this
down arrow and hit Apply. But the way this
works is that we can keep this on here and it
allows us to customize it, like make changes to it without committing to the change until we apply the
modifier, which is nice. So for the amount, this is the amount of bevel, so you can see the
effect it has here. I'm going to go with
a value of 0.15, I think, or maybe 00.015. Just have a small
kind of bevel here. And you can see it's still a bit like it has this low poly look. But if we go down to the shading option here
and click Harder normals, you can see it smooths
out the bevel here, and I quite like this look, and it becomes a lot
easier to, like, see the details in the Meshn
with this bevel modifier. And I'm going to
add this bevel to pretty much every
object that we create so instead of going
through every object and clicking like wrench symbol
and then adding the bevel, we can just select all
the objects that we want the modifier on and then copy them over,
like in one button. So I'm going to select all of
these objects that we made. Shift select to select
multiple ones and make sure we get every one that we made here. So all of these, this one, so we want all of
these pieces here. And I'm going to select this building last one
with a modifier on it, and you can tell this one's selected last because
it has, like, a yellow outline,
whereas everything else has more of
an orange outline. So this is the active selection. So now, if we press Control L, we get this link
transfer data menu. And what we want to
select is copy modifiers. So any modifiers on this object will copy
to the other objects. Do we hit copy modifiers? Now all of these pieces
have bevels on them. Now, we might want to adjust the bevels because they're different sizes on
different objects, and that might be
because of the scale. So if we press N on this piece, because this bevel
looks a bit bigger, you can see the scale here
is we need it to be 111. So if we press Control
A and apply scale, you can see the bevel changed. Now this is one, one, one, and that's why we always want
to apply the scale because, you know, we get different
results if the scale is off. So I'm just going to
press A to select everything and then just hit
Control A and apply scale. So that'll apply
the scale to all of our objects just to
make sure we have it. And now the bevels should be consistent across all
of these objects. So there we go. And then, that's the bevel modifier. Is there anything
else we want to add in here before we move on? We will have some bricks
going down the edges here, but we'll do that soon. We could add in quickly
some there was one more. So I'm going to select
this object here. I'm going to go into Edit mode. And we can press L over a
piece to select it all. I might move this
dan a little bit, and then I'm going to
shift D and then Z, bring this one just up by here. So we have a gap here. If you look at the reference,
we have some wood, like wood supports
going across here. So I'm going to go back
to Object mode with tab and then let's quickly
add in another cube. So we'll go Shift A mesh cube and just bring this
over to the wall here. And we can just scale
it down with S. We can G and then
hold control to snap to this face,
just like that. We can go into Edit
modes with tab, select this face, GX, and bring it out and
just create this kind of piece just like this and put it in the center
just like that. Very simple. And then I'll quickly show you
another modifier. So instead of duplicating
it separately, we can add another
modifier over here. And if you search array, we choose array, and
arrays copies it over. So at the moment, it's going on the X,
which is the wrong way. So let's set the X to zero here. And then we can slide
out this Y value. You can see what's
happening here. So if we increase the count, so we want four on
the count and then just increase the Y
to space these out. And it just basically
copies the object over. So that's the array
modifier. It's quite useful. And then we want to add
on our bevel modifier. So we have this selected. If we shift select well, if we copy over a bevel
modifier from this, it will get rid of the array. So let's just add
the bevel manually. So we'll add a bevel
modifier again, and we can adjust the slider on the amount to however thick we want bevel and then just put shading to harder normals and
we have a bevel on it then. So that scale because we
scaled in object mode, so let's hit Control A, apples scale, and
now let's adjust the amount on the bevel here
to tighten that up a bit. And that should be all good. Okay, so we will move on to the next
lesson. I'll see you then.
11. 3D Lesson 10 Boolean Window Cuts and Clean Quad Topology: Hello. Welcome back to Blender stylized Arabian market course. In this lesson, we're going to cut holes into our
building using the boolean modifier and fixing the topology
with the knife tool. Okay, I'm going to make
some quick changes to this piece here just to make it look a bit more
like the reference. So we can isolate the piece
by pressing forwardslash. And if we go into
Edit mode with tab, we can dissolve edges
by selecting them. So I'm going to click
press two to go into edge mode and then Alt
click this edge and then Alt Shift
click these edges. And then we can dissolve them
by pressing Control and X. Now, if I press seven, to
go into top view and then press Control R to add
some edge loops in here, we can see that they
come in at a slant here, and that's because
these edges on the end at a slant as well. So we need to press Control
X to get rid of these. And to have them
come in straight, we're just going to
put one edge loops, so Control R, left click, right click in the middle here. And then if we use Control
B to bevel, then scroll up. You can see they come
in straight now. So I'm just going to
put some edge ups in and then under
segments over here, I'm going to change
this to eight. So we have eight of these, and now we can go
underneath and then select every other
edge just like this and then GZ
to bring it down. And then we can alt, click and then Alt Shift
click these edges, and then Control B to bevel. And if you bring
in some segments, you can create a nice curved
shape just like this. And then forward slash
again to go back into your normal view and then tab to go back into object mode. Okay, so we're going
to cut some holes into our buildings
for the windows, and we're going to use that
using a boolean modifier. So I'm just going to grab
these windows for now, press one to go into front view, and I'm just going
to scale these up a little bits and then
control apply scale, and then just make sure these are right where I
want them to be, and then we're going to
join them into one object. So I'm going to shift select all of these
to select them all, and then control J to join them into one
object like this. And then we're
going to hit G and then Y to just bring them into
the wall, just like that. And if we select there
a building here, we're going to add
a new modifier over here called the boolean. The search boolean. And we want the difference the difference option here
that will cut a hole into it. And we can use this
eyedropper tool to select our cubes here. And then once it's selected, just press this down
arrow and then hit apply. And now if we move our
windows forward with G&Y, we can see we've cut a hole
into this building here. So then we want to do the
same for these windows. We can select them all
and then Control J to join and then G&Y to move
them into the window. And then we'll select
their building, add our boolean modifier to it, and then use the eyedropper
tool to select these, and then we'll apply
that modifier. And then GY to move
this over here. Now we have our windows here. Right now, if we
have a look here, we have a bevel modifier, but the bevel seems to
have gone a bit small. And that's because
of the topology. Might be blocking
the bevel somewhere. So I'm just going
to press forward slash to isolate this building. Let's go tab to go
into Edit mode. And we've cut holes in here, we can see the topology
isn't the best. So we're going to fix this with the knife tool we can use. So first off, we have
an edge loop here. Let's see if this is
needed for anything here. Okay, so I'm going to click this edge loop and then
Control X to dissolve it. I don't think
we need it there. And then I'm just going
to press A on everything, and then I'm going
to press M to get this merge menu
and then merge by distance just to make
sure we don't have any, like, duplicated vertices,
just to make sure. And then I'm going to press
one to go into front view. And then we can use our
knife tool to, like, cut into this mesh
to create new edges. So if we use K,
brings up the knife, and we can select
this vertice here, and then we can press Z
to lock it on the Z axis, and then bring it up to
this edge and then click. And if we hit Enter, it creates an edge going
all the way up. So we're going to create
like a grid kind of pattern so that we can get all quads
on this front face here. So it becomes a bit tedious,
but once you do this, it makes modeling later on a lot easier and
solves all that problem. To go into Knife too, we'll
select this vertice here, press Z to go straight up, and then left click
and then Enter, and we want to do these for
all of these vertices here. It's K, left click and
then Z, left click, Enter. I'm just going to do that
for all of these here. K, left click, Z,
left click, Enter. Okay. And then K, left click, Z,
left click, Enter. Okay, so we're going to these ones are joined
here, that's okay. We're going to join this
one and then this one, select them both with
shift and left click, and then we can just hit J.
I'll join them together. This one's fine. These ones, we can hit J and then J here, and then J here. Now, we don't need
this edge here, so we can select
this edge and then control X to dissolve it, and then maybe we can
dissolve this one as well. Can we dissolve this one?
This might be holding it, the shape in so it
might not dissolve. Yeah, that's okay. So
control X on these. So now we just need
to join up sideways. We need to do these ones here. So these bottom vertices, we're using a knife tool
against K, left click, and then Z, bring it
all the way down, left click, Enter, do
that for all of these. K, Z, left click, Enter. So we're just joining
these up so we can create so that every
face has, like, four sides to it, so we can, put in edge loops, and we have, like, clean topology
for our bevel modifier. A most of the time
you can get away with engons which are faces
with more than four sides, but sometimes it does get a bit weird. You
can see the bevel here. As soon as we joined
these two vertices up, you can see the
change in the bevel. So this is what it
looks like right now. Then if I join these up, you
can see the bevel came back. So I'm just going to join
these together as well. So just using J to join them just to make sure
we have all quads. And then we need
to join these up here and then these
here as well. So we can test by pressing
Control R and then right click to see if
we have quads here. So we need to fix
these side faces here because the loop
doesn't go through. So what we're going
to do now is K, left click here, and then
we can do X to go on the X, and then just left
click Enter here. So K, left click, X. It goes a bit weird, you can
press escape to go back. So K, left click, X, left click and then Enter and just do that
for all these sides here. Okay, left click, X, left click, Enter here. And then we just need to do
these side ones over here. Just like that. So
now, the edge loops should go through
every face here. So that shows we have all quads. Now, this is this face done, but now obviously this face here has more than four vertices
because of these here. So this face, we could maybe get away with
deleting it because it doesn't show in our scene. So the face on the
right, we can just press X and delete faces. That'll save us a lot of time. The bottom face we could
probably get away with as well. We can delete the bottom face. And then possibly the backface as well we probably don't need. I'm just double checking to see if we actually see
it in the scene. So yeah, we can
delete the backface. So these backface is here,
we can delete these. And now we just need to I'm going to press Control
free on number pads. That'll bring us
into this view here. I'm going to press one to go
into vertice select mode, and then we can just join here. So press K, this
vertice, and then Y, Left click Enter and just use the knife tool to connect
all the way over here. So okay. Left click, Y, left click Enter. And now we have all quads. So later when we're
doing vertex painting, we're going to put in more edge loops so that we have more
vertices to paint on. So, yeah, that's all fixed now, and we have our bevel
looking how it should. So that took up a bit
more time fixing that, but it's worth it for later on. It'll make your life easier. In the next lesson,
we'll continue adding booleans for these windows as
well, so I'll see you then. Oh, yeah, one thing
I just remembered, we didn't do the top face, but it's covered by
this top piece here, so we could probably
just get away with deleting this top face, as well. So we just have this. There's
one face here at the back. Now, that's part of
another piece. Never mind. So, yeah, we can just have
these two faces here, and this looks
perfectly fine. Cool. Right now. I'll see you
in the next lesson.
12. 3D Lesson 11 Boolean Windows and Doorways with Clean Topology: Okay. Hello. Welcome back to Blender stylized
Arabian market course. In this lesson, we're
going to finish off adding booleans for
the windows and doors. Okay, so let's move on to
the other windows here. So we can do this doorway. Alright, so I'm just going to move this down a little bit, just to make sure we
cut off the bottom, and then we can go GX, move this into the building. And then select
their building here. We'll add our boolean to it, and then choose our doorway
here and then apply, and then press G x on
this to move away, and we have doorway for this. Now, if you want this
to go a bit deeper, we can just select
this building, go into Edit mode with tab. We can select this face and
then press G and then X, and we can move it in
a bit more like this. Maybe have it
somewhere range here. That should be enough. So back into object mode. You can select these here. I'm just going to make sure that perfectly where I
want them with G and Y and just move them
Just like that. And then shift
select them all and then Control J to
join them together. All right, so now let's
move these with G&X, move them into the
building, just like that. Now, let's select
their building, add modifier, search, boolean, eye drop a tour, select these, and then apply, and then
GX, move this over. And now we can see here
where it's curved. You can see the flat faces here. We can fix this just
by right clicking this object and then hid and shade smooth. I'll
fix that right there. Okay, so next, let's
just go into Edit mode, and we'll have a look
at this topology here. Now, we will need to add
some edge loops here, so it hasn't affected us so far. And we can still put
edge loops here, then it does get a bit weird. But we're just going
to leave this for now. I don't think this will
cause us a problem. As long as we can put edge loops here to paint on this
side, we should be fine. So go back to object mode. We'll leave that. As long as the bevel is working,
you're all good. Now for this one, I
do the same here. I'm going to move it
down just so it goes underneath the floor just
to make sure we cut it. GX, move it into the building. We'll add a boolean to
this, add modifier boolean, choose our door and then apply, and then GX on this
to move out the way. And then we can select this face in edit
mode and then GX, move it in a bit more.
Back into object mode. We can shift select these and then Control
J to join them, and then GX to move
them into the building. And then we'll put a boolean
modifier on this again, select our windows, and
then apply the boolean. And then GX, move
this over here. My bevels still working. I'm just going to
have a quick look at the topology in Edit mode. And we may need to
fix this up later on, but it depends if we end up vertex painting it
because it's quite far, and we might just get away with adding edge loops up
here and we'll cut this off, we'll isolate it off and then
have quads up here instead. So we'll worry about that later. Don't worry about it.
This one's quite simple. It's just one square. I might
make this a bit bigger. So I'll go into Edi mode
on this and scale it up. I have a nice big window here. And then in object mode,
we'll go GX, move this in. And then select
this building here, and then we can add
boolean modifier. So boolean, we'll select this
piece and then hit Apply. And then this one as well.
I might scale this up. Control A, apply
scale, and then GY, move this in, and then add the boolean again
onto R building. So select this and then apply. So on this one, we can press GY. This is working, and then GX. This is working
here. Cool. And I think that's all of them. Now, there was an extra one of these below
the windows here, which we can quickly add. So we could get away with
just duplicating this piece. We Shift D and then Z and bring this below
the windows here. We'll have one here. And
somewhere around here should do. So we have this. I might
bring it down a bit, so there's, like, even space between the top and the bottom. So maybe or just in between the middle of these
two windows here should look good. All right. Now, we'll worry about this
later on the left side. But we'll just work on
the right side first. And I think that is everything. So next we will start adding some more pieces
in, some steps, maybe. And then we can get to work
on the balconies and stuff. Or I'll see you in the
next lesson. Okay.
13. 3D Lesson 12 Create Realistic Stairs with Bevel and Manual Modeling: Hello. Welcome back to Blender stylized Arabian market course. In this lesson, we're going
to be creating some steps. Okay, so I'm going to show you two different ways
to make steps, and you can use whichever
steps you prefer the look of. So if we press Shift
A and then mesh cube, and then we can press G Z one to bring it up to the floor, and let's press tab
to go into Edit mode. Press two to go into Edge Select and let's
select this edge, and then we'll control B, and we'll just give it
a bevel just like this. Once we left click,
we'll get this menu. And if we go to the bottom
here, we see profile type. We're going to choose custom. And then with this dropdown
menu here, we have preset. I go to click this and you
should see steps here. And we can see the profile with these points here that
are creating steps. Now if we just increase
the segments here, we go to about 16 we should have all our
steps in here then. So now with this, we want
to squish this down. So I'm going to press A
to select everything. And then if we go up to
the pivot point here, transform pivot point
and select this, we're going to choose
free D cursor. So when we scale this, it'll scale it towards
the free D cursor here. So if you do S Z and then
type 0.05, not 0.05. I'll right click to
and do that SZ 0.5. It scales it by half. So now this is
like 1 meter tall. And then we can scale it
on the X by going Sx two, so that will double
the scale on the X. So if we press tab to go into object mode and then press N, and then we can see
here it's 4 meters on the X and then 1 meter on
the Z to where we scaled it. And then let's go GX. We'll move the way. So there's
one way of doing steps. Another way is to
just do it by hand. So we're going just
do Shift A mesh cube. I'll go GZ one to bring this up to the floor and
then into Edit mode. We can select this
top face here, and we can choose
the height here. So just going to go
GZ and bring this down somewhere
around about here. And then I'm going to push
this front face back with GMY to get the width
of the top step. Just like this, we'll
go around about here. And then I'm going to put
in about four edge loops. So control our scroll up. We put in about four
edge loops here, one, two, three, four, e. So we
have five steps altogether. So now we want to press
three to go into face select and then we select
all of these faces, and then we can press E to extrude and create
our second step. And then we can select
these faces, E to extrude. And then extrude these. And then finally the
bottom step E to extrude here, like so. And then we can press A, SX and scale this out somewhere around about
here, just like that. So now we need to
add bevels to these. So this one, we can just
add modify search, bevel. We can bring the amount down and then shading
to harder normals. Maybe bring this up a tiny bit more so we have
more of a bevel. And then we can select this and then
shift select this one, so this one has the
yellow outline and then Control L copy modifiers. So now they both have the bevel. So now that we
have the steps in, they're looking very straight. This is like perfectly
straight line. So what we can do is if
we're going to edit mode on this and then control and add
some edge loops this way, just as menu as
you want, and then left click and then
left click again. And then I'm going to press
A to select everything. And if we go to this menu
up here, we see mesh. You're going to
click this and under transform, we have randomize. So this will mess up just
push for to seize the range. So with the amount under here, we're going to choose 0.01. And there's a tiny little
amount of movement. If you go back to object mode, you can see now the lines aren't perfectly
straight anymore. I just looks a little
bit more natural. And we can fix the shading here by just right click
and then shade smooth. I'll smooth any shading errors. And we can do the same for this one as well if you
prefer these steps, so we can just control
R to mesh loops. A, di select everything, and then mesh transform, randomize. You could even try 0.02, if you want it to be
even a bit more messy. And then going back
to Object mode, right click, Shade Smooth. And then we have two
different kind of steps here. I think I prefer these ones. Doing it this way is
easier for smaller steps, but I find it this way is easier when you're doing larger
steps because obviously, if you're extruding each step out individually,
it takes a while. So the bevel method
can be nice and quick. But this one you have more
control over how it looks. So I'm going to go
with these steps of mine might make
them a bit bigger. So I just go in edit mode and
scale them just like this. And then all we need to do
now is just press tab to go back into object
mode and then GY, hold control, snap it
to the wall over here, and then GX to move this
into the middle somewhere. Just like that. Cool.
There's some steps for you. I will see you in
the next lesson. No.
14. 3D Lesson 13 Model an Arched Window with Detailed Wooden Panels: Hello. Welcome back to Blender stylized Arabian market course. In this lesson, we're going to learn how to create a window. Okay, so where we did
the steps before, E bevel might still be set to the steps on
the custom thing. So let's just quickly
add a cube and go into Edit mode and select an edge and then hit
Control Beta bevel. And then if you're
still on custom steps, make sure to choose
super ellipsio and then just left
click somewhere, and then we can delete
this cube then. So now let's move over
to this window here. Let's go into Edit mode. And then press free
and select this face. Now we can invert the selection
by hitting Control and I, and then press X
and delete faces. Alright, so now with this, we're going to add
some edge loops in, and then we're going to split off the faces and then
extrude the mate. So if we press Control, and we'll add an edge
loop in the middle here, left click, right click. And then with this edge loop, we just need to press
Control B to bevel, and we will bring this
out to the edges here, and then press three
for face mode. And then let's shift
select these faces, and we'll press Y
to split them off, and now they're split here, and then we can just H to
hide the mate the way. So now we need some faces
at the top and bottom. So let's control, but one in
the middle here, left click, right click, and then
control B to bevel, and we'll bring these out
to the top and bottom here. And then we can press f
and then select these two and then hit Y and then
H to hide these out the way. So now we want to add an edge
in the middle here again. I'm going to slide this one
up to around about here. And then we can select this bottom face,
and we'll press Y. So now this one's
split off here. So now let's put an edge
loop in the middle here. F click, right click, and
then Control B to bevel. I'm going to scroll up once so we have an edge in
the middle as well. And we can have this
around about here. Press three for face mode. I'll select this face, press Y, and then and then this face, Y and then now let's put
in two edge loops here. Left click, right click,
and then control, scroll at once, left
click, right click. And now let's press Y
on all of these faces. So three, left click. Y, left click, Y, left click, Y. And then Y on all
of these faces. And then shift select them all. And then H to hide. So
now with this one here, we're going to control for an edge loop in the
middle, left click, right click, and then Control B and then
bevel this like this. So we have two faces here, and then we can
press Y on this face and then and then
Y on this face, and then And then
we N one over here, and then one over here as well. And then we can
select both of these. You'll hit Y and then H. So now we need to get a curved kind of shape going down here. So let's put an edge loop in the middle here and an edge
loop in the middle here, and then edge loop
in the middle here, and edge loop in
the middle here. And then let's select all of these edges here,
and then go GZ, and we'll bring this up
to round about here, and then we can delete
all of these faces now. Let's press one to go into vertice select and we'll select both of these vertices and then GZ to bring
them down like this. And then we can press two and then left click and then
shift left click this edge, and then Control B to bevel. And if we scroll
up, we can create kind of curved shape like this. Now if we press Altage, this will bring everything back. And we want to have a kind of we need some woods going diagonally
across here as well. So what we could
do is press free, and then we could select
maybe this piece here, let's press Shift D to duplicate and then Y, and
we'll bring this out. And then we can go SC, but our pivot point is
set to three decursor. So let's go to the top here. And with the pivot point here, we're going to go
back to median point. Now we press S and N Z, we'll scale this up to
make it a bit taller. And then let's go into front mode with one on
number part so we can see. We'll go GX we'll
move this over here. And then let's do to rotate, and we'll give this a bit
of an angle like this, and we'll just make sure this covers the whole face like that. And then we can go
Shift D and then X. We'll bring one this way, bring it down just
to cover up this gap here, just like that. And then Shift D X, we'll have another
one here somewhere. And then you can
probably select all of these shifty X, bring
them over here. We want to make sure we're not crossing over into
this gap here. So we'll just move these
around somewhere like this. That should be fine
right by there. Okay, so now, let's
select all of these, and I'm going to press G Y and just move them behind
the window like this. That should be fine. And then I'm going to press E to
extrude them at a little bit, give me a little bit of
thickness just like that. Now we can select this face here. We'll
select all of these. We can press L on it to
select the whole thing, and then E to extrude. We'll extrude this A a
little bit like that. And then we can
select these ones. We go E to extruded. We'll extrude just pass these. And now let's select
our panels down here. E to extrude. We'll go
just behind these ones, I think, or maybe if
you hold control, you can snap to
this face so that they are exactly the same here. Unless select these
middle faces here, we'll go E to extrude
and we'll extrude. Maybe we could hold
control and snap to this face as well just
so that they're in line. But we have these outer faces,
we'll select all of these, and then E to extrude, and we'll go past
the window so that they're pointing a
bit further out. Now let's go into
Object mode with tab and let's add our
bevel modifier to this. So add modifier, search bevel. We'll put shading
to harder normals and you can adjust the
bevel however you want. You can bring it down,
make it a bit tighter. I think this looks
quite nice here. Now, these are
floating behind here. So if you want to move these in, we just go into edit mode, deselect everything, and then press L on all of these pieces. And then just go GY. We can move these like insides. Just make sure they're not
poking through anywhere. You can go S Y to scale them
and make them a bit thinner, but be careful because
the bevel might catch. But then something like
this should be okay. And there in object mode,
we can just right click set origin to geometry to bring the origin point
back in and then GY, and move this into
the window here. Now, we will duplicate
this later on, but we may as well wait until it's textured just
to save some time, and then we'll duplicate
it over to these windows. So there is your
first window done. The next lesson, we will
work on this window.
15. 3D Lesson 14 Build a Decorative Arched Window with Boolean Cut: Hello. Welcome back to Blender stylized Arabian market course. In this lesson, we're going
to work on our second window. Okay, time for a second window. So let's select this here. We'll go into Edit
mode with tab. Press three for face mode
and select this face, and let's invert the
selection with Control I, and then X, delete faces. So we need an edge loop in here, so control, and we will drag this one down
somewhere around here. I'm going to press three
and then select this face. And we're going to press P
and then separate selection. Tab to go back to object mode. And then with this
top face here, I'm just going to duplicate it. Shift D and then Y, we'll
bring this forward. And then I'm going to
select both of these faces and then just hit H to hide
it out the way for now. So with this face, we can press Shift S and then cursor to selected to bring our
Fred cursor here, and then press Shift A mesh, and we're going to go
with cylinder here. So we want 32 vertices
might be a bit too much. Let's bring this down
to, let's say, 20. Yeah, 20 is fine. Now let's press X and then
90 to rotate this around. Let's bring this forward
with GMI for now. And in edit mode, I'm going to select this
backface. We'll delete it. And then I'm going to
delete all of these, so Alt click here to
select this face loop. X. Actually, no, no, we want to delete
this front face first. Delete this front face. And we only want to delete
the bottom half of this. So from here and then
control left click here, and we'll delete the
bottom half here. And then let's go into front
view with one on number pad. We'll press A to
select everything, and we'll scale this down
so it fits in the window here, just like that. We'll go GZ, bring it
down a little bit. So we have this here. And now, with these
two edges here, I'll press two and then
select these edges. I'll press E and then Z and we'll extrude
it down all the way, so it goes like past
the window here. And then we can press Alt left click this edge here to select the whole loop and
then just press F to fill, and then control I actually
make sure we're in face mode. Select this face, Control I, and now X delete faces. So we're just left with
this front face name. I'm going to press
one to go into front, and then one to select
the vertices here. So with this vertice,
I'm just going to go GZ and bring it up here. And then kind of
move these vertices around just like up and down to get a nice
kind of curve going. So we want it to be a nice
kind of shape going in. So we might have to select these here and then go S and then X, scale them in a
little bit like this. And then these two and
go SX, scale these in, maybe bring these down a bit, bring these ones
down a little bit, have a nice kind of
curve shape here. Just like that. And
then we can press A and then GZ and make sure
this is a bit lower down, so it's not poken
through the top here. And I'm quite happy with this shape here. This
looks quite nice. So now we can do E and
extrude this out this way. So let's press tab to go
back into object mode, and we'll go GY,
and we'll push this inside of our window
here. Like that. Now we'll click
on our Window and then we'll add the
Boolean modifier to this. And then with the
eyedropper tool, we will select the shape and then let's hit
Apply over here. And then we can delete
this out the way now. So now we're left with this kind of shape cut into
our window here. Let's press AltH and we'll bring the other
window pieces back. And let's hide this one out
the way for now with H, and let's get to work on this. So this top piece would
be nice and easy, press tap into Edit mode, control our scroll up, and we can add some
wood panels in here. So I'm going to
press three and then press Y on each of these
faces to split them. So now, these are all separate. We can go press tab
into object mode, and then we can select
this piece here. So with this, I'm just going
to go Shift D and then Y, bring this forward, and
then H to hide this out the way for now.
We'll use that later. And with this one, we can
go into Edit mode with tab. We'll put an edge loop in
the middle, left click, right click, and then
Control B to bevel, we'll bring these
to the edge here. And three, select this face. Y, select this face, Y, and then hide these
egg the way with H. And then put an edge
loop in the middle here, left click, right
click, control B, bring them to the edges here. Left click this face here. I'll go Y and then
Y on this face, and then we can hide
these egg the way. Now, let's add in some edge
loops here like this and then we could maybe add
one in the middle here. And now let's press A
to select all of these. And at the top here, we're
going to go to face. And then we want let's first try triangulate faces,
see what pattern we get. So we get this kind
of pattern going on. Now, how could we
work with this? If we select all of
these edges here, the ones going diagonally. See what kind of result we get. If we press Control B,
let's see what happens. So now this happens here. So we get this kind
of shape going on. No make it toothik.
Let's just go like this. And then press Control
I. Actually, Control Z. Make sure we're in Face mode, so press three for face
mode and then control I and then X and
then delete faces. So now we have this
that we can use. I'm going to press A, shift D, and then Y, and then we bring this forward. And then we're going to
scale this by negative one. So if you go S X and then negative one, it
will flip it around. And now we have this
kind of shape here. So now let's press Altag
I'll bring everything back. And let's go into
object mode with tab, we'll press Altag make
sure we have everything. I don't think we're going
to need this one actually, so we can delete this one here. All right, so let's
start with this piece. We're going to edit
mode with this, A, E to extrude it out, and we'll bring
this out like this here back into object mode. We'll bring this top piece here. We'll go G Y, and we want
this just behind here. So let's first Let's
first go into Edit mode, and let's press A, and we'll extrude this
out first like this. And then back into object mode. And I'm going to shift
select this window up here just so we can copy
the bevel over from this. So Control L, copy modifiers. So now we can see our wood
panels with the bevel here. And I'll go G Y and
snap to the back here, so it's snapped here,
just like that. And then with this, we could
go into Edit mode and then just push this face back
a bit, just like that. Back into object mode. And now we can play around with this. Let's go into Edit mode on this. Let's extrude. All right, so let's press L on all
of these pieces here. And maybe these ones as well. And then we'll extrude
these together. So E to extrude and then
Y to extrude these. I'm going to deselect everything and then just select
the front ones, so L on all of these pieces. And then we'll go GY, and then we'll just snap it to one of the front faces here. So they're just in
front just like this. Now let's select
these outer faces, and then we can go E
to extrude and we'll extrude just past this
kind of pattern here. So back into object mode
with G table I mean, and then GY, and
then we can move this somewhere around here. Now, this might need
to be a bit thicker. So I'll go GY and snap it
to this back face here. Go back into Edit mode. And with these front
faces selected, we can just go GY and then hold control on this
face to snap it to here. And then back into object mode, we will select this piece, select this piece, and
then select the one with the bevel last and then
Control J to join. And then we need to
fix this shading here, so we'll just go right
click Shade Smooth. And there is our
second window done. Now, these might need
to come a bit forward. So go back into Edit mode, Deselect everything
and then just hit Y on all of these pieces. Not Y L, I mean, press L on all of these to select
all of these pieces here. I might make them a bit
thicker with S and then Y. Make them a bit
thicker like this. And then GY, move them
forward a little bit. So they're more in
the middle here, and then back into object mode. And there is our second
window looking quite nice. So GY we can push this back. And there is our second window. Oh, actually, looking
at the reference, there is one thing
we're missing, and that's like wood
beams going across here. So select it and then go into Edit mode, Deselect everything. And then let's hit
L on this piece. We can just go Shift D and
then Z and bring one up here and maybe move it
back just a little bit, so it's behind this wood here, and then shift D
and then Z again. So shi shift D, Z, bring this up,
just like that. And now it's done. I'll see you in the next lesson.
16. 3D Lesson 15 Modeling Detailed Windows and Doorway with Bevel: Hello. Welcome back to Blender stylized Arabian market course. In this lesson, we're
going to continue with our windows and make a
start on the doorway. Okay, so before we move on, we need to learn about
face orientation. So if we go to the
overlays setting here and into this
drop day menu, we're going to turn on
face orientation here. And if we zoom into
this window here, we can see some of
these pieces are red. Now, every object has, like, an outside face
and an inside face. And when we flipped
these around, we scaled by negative
one to flip them over. But by scaling on
a negative number, it also turned them inside out. So this is Blender's
way of saying that these faces are
actually inside faces. And this is important
because we need Lender to know how light interacts with outside faces compared
to inside faces. So to fix this, all we need to do is just select the object. We'll go into Edit mode, and then we can press A
to select everything. And then if we hit Alt N, we come up with
this normals menu, and we can just press
recalculate outside, and then that will fix
that automatically. So that's that we're going
to keep this option turned on so that we know whenever
our faces are inside out. Alright, so back
into object mode, and we can get to work
on this window up here. So we're just going to
quickly smash out the window so we don't have to deal
with them later on, right? So into Edit mode on this, we will press three face mode, select this face, and then
invert with Control I, and then X and delete faces. Right? So let's have a look at our reference and see what kind of shape
we're going with. So we need the border
on the outside. So let's control R, left click, right click, and then Control B, we'll get these on the side, and then three, and then
select these hit Y, and then H the hide
these the way, and then we'll control R
edge loop in the middle. Control B, and then we
get them on the top, as well. Just like that. The shift select these Y and then now we want to duplicate this phase
so that we have two, we'll go shifty, Y. And then with this, we'll
go P, separate selection. We'll go back into object mode, and we will hide this
one out the way, and we'll work on
this piece here. So let's go into Edit mode. We want to cry and create a cutout like go
this way up here. Okay, so we need an edge
loop in the middle. Let's scroll up twice, I think, so that we have three
here like that. And then let's put one
in the middle here. Yeah, that should be fine. Now, let's add an edge loop here and then an edge loop here. And where is this going to go? Okay, so let's press one so that we can select
this middle vertice. And let's press G Z, and let's bring this up
this way just like this. And A, we need to
delete some faces. So let's press three, let's delete these two
middle faces here. And then we need to delete these middle
faces here as well. So we'll delete those. Now
let's select this edge. So press two, select this edge, and then shift select this edge. And then let's try beveling. Control B will bevel scroll up a bit so we
have some segments. So now we have this nice
shape going on here. Cool. Tap to go back
into object mode. We'll press lth to
bring this window back. And then with this, we'll go back into Edit mode. We'll add some edge
loops in here. Just like that. And then three and then press Y
on all of these faces. And then we'll press Altag
to bring back all of these. And then we should Let's extrude these
middle ones eight first. So we'll press E on these,
extrude these eight. And then let's extrude
these out a bit. Just like this, we'll go
E, extrude these out. And then let's go back
into object mode. We'll grab this and
then we'll go GY, hold control, and
we'll snap it to this face here into Edit mode. I'll go A, E, extrude this a a
bit. Just like that. Now, back into object mode, we can join both of these
together with Control J, and then let's
copy over a bevel, so we can shift select. Maybe this piece will be fine. And then Control
L copy modifiers. And now this has
the bevel on it. And then with this selected, we can go right
click Shade Smooth to fix the shading here. And now we can just
adjust these pieces. So I'm going to go
into Edit mode again. I'll press free for face mode. I'll select these
outer faces here, and I might just
push them back with GY and just have them pretty much just in
front of this face here. And then we can always adjust the bevel amount
here to tighten up the bevel to get something a
bit nicer, just like that. And there is that window done. So now we go GY and push
this into here. There we go. Done. And now we'll
do this window, but it'll take a bit longer, so we'll do that in
the next lesson. But this doorway will
be nice and quick. So what we can do here is going to edit mode on this and we will
delete this face. And then we will
delete this face and then delete
this bottom face. Let's add in some edge
loops here. Just like that. And then some on
this side as well. I'm going to press
three for face mode, and then I'm going to select every other face like this
so that they actually yeah, I'm going to select every
other face like this. But then with these, I'm
going to select two, miss one, select two. So we have the two middle
ones here, miss one, select two, and then all of these like this,
just like that. And then I'm going to hit
Y to separate these off. So now we have this going on, and then we can press A and then right click Extrude
faces along normals, and I'm going to bring this
inwards just like this. And we can see here this
kind of overlapping here. So maybe we don't
want to go that way. If we control Z, and then right click extrude
faces along normals, we can see that it's creating some gaps here, and
we don't want this. So maybe if we
control Z all the way to the point where
to here first, so that now, these are joined together now, so
we don't want them split. We want to press A, right click, extrude along normals,
and we extrude them before we split
them, basically. So we'll extrude them like this, and now we don't have
any overlap or any gaps. Next, I'm going to press
free for Face Mode, and I'm going to Alt click like this to select the whole
loop around like this. So Alt Shift left click, and then I'll miss one here
and Al shift these two, miss one. I'll miss two here. So we can get these
top two here. I'll miss two here, and
then Alshift click these, and then Alt Shift
click these like that. And there we can hit Y and then we'll press A
to select everything. And now that these
are separated, there are like holes in the
middle that we can't see. But if we go to mesh, actually, it'll be easier if I do alter end first
and then just flip, we can fix the normals and let's add a bevel so we can
see what's happening here. So let's go into object mode. We'll add a modifier,
so add the bevel, and then we'll bring the bevel down shading to harden normals. And then right
click shade smooth. So see these hard lines here. That's because we have
holes like inside the mesh. So what we need to do is
going into Edit mode, a to select everything. And then I believe it's under
face or is it under mesh? I believe it's under mesh
cleanup and then fill holes. And you can see where
it's filled the holes. We have a nice bevel here now, separating our bricks here. And now with this,
we can just go GX and slide this into our
doorway here somewhere. You have it poking out just
a little bit like this. That should look quite nice. Cool. I will see you
in the next lesson.
17. 3D Lesson 16 Finishing the Lower Facade with Bevel and Array Modifier: Okay. Hello, welcome
back to Blender, stylized Arabian market course. In this lesson, we're
going to finish off modeling the lower half
of the front building. Okay, so let's select
this one here. Let's go into Edit mode, and then we will select We could select let's get
rid of this face here. Delete this face, and
then delete this face here and then delete this face. And then let's press L
over these faces and then Control I and
then X deleteFaces. So now we're just
left with this here. So with this, we can press A and then right click extrude faces along normals and we'll extrude
them in just like this. And then with these faces
here, we could select some. So I'll select this face, these two faces,
and then this face. And then I'll go Shift D and then right click
to duplicate them, and then E and extrude
them down just like this. Now we want these
faces to be flat. So if we go S, Z, and then zero, I'll
flattenate the faces, and then we can go GZ, old control, and snap it down to this face here so that
they're all in line. Now, I'm just going
to add an edge loop here and bring it down
around about here would do. And I'm going to
select this face here. I'm going to press Shift
D and then right click, and then I will
extrude this one out, so go E to extrude a
little bit like this. And then this face over here. We can go G Y, hold control over this
face to snap it here. And then we can put an edge
loop in the middle here. And then we can select
both of these faces here. So this face and this face. And we can press GZ
and just bring it down a little just like that. So these corners
are touching here. Then we can press
two for edge mode, Alt click this edge loop and then Control B to bevel scroll up a bit to make it nice and curved,
just like this. And then maybe we could
select I'll press free, and we could select
these front faces here and then just go GY, GX, I mean, and just push
them back a little bit. And then we'll fix the
normals just by pressing A, lt N, recalculate outside, back into object mode. We can add our bevel to this. Add our bevel modifier, shading to harder normals, bring down the amount
just like that. And then right
click Shade Smooth. And then you can just push this back
into the window then. So GX, push this in. And we want this bottom shelf to be like, just
touching the wall. So GX just like that. And maybe I'm going to bring down this amount
on the bevel to 0.01, like that. That should be good. And there is a window done. Now we can quickly finish off this lesson by adding
details up by here as well. So I'm going to shift
right click here, and then shift A and then mesh cube bring
in a cube by here. Go into Edit mode, and we'll just scale this
down nice and small. And then we can go S and Z
to make it a bit taller. And then we can go G and
then X and just push it in a little bit like
this. Back into object mode. We can go GY, bring it
to this side over here. Let's add bevel to it. So add modifier search bevel, shading to harder normals, and let's bring down
this amount to 0.01. And then let's add
the array modifier. So on the array, we
want zero on the X, and then we'll push the Y
out to get a nice spacing, and then we can increase
the count over here. Something like that, and then
just adjust the Y so that this is closer to this
edge here. Like so. Then we want to duplicate this and rotate it and
put it on this side. Shift D and then Z 90, and then GY I'll bring this over here and then line up this
one into this corner. GX I'll have this one here, and then GY push it back. Now let's lower
the count on this. And then we will adjust this
Y value here just like that. There is everything modeled
for this bottom half now. Soon we'll get to work on
the wooden part up here. So, I will see you
in the next lesson.
18. 3D Lesson 17 Building a Wooden Shelter with Array Modifier Beams: Hello, welcome back to Blender stylized Arabian market course. In this lesson, I'm
going to create a shelter above the windows. Okay, so I'm going to select this piece here and
just move it up a bit so we have just a bit more room underneath for the shelter. I'm going to shift
and right click here to bring out
free Dcursor here, and then shift A mesh, and let's bring in a cube. I'm going to press GY to
move it forward and then GY, hold control to snap
to this face here. Now, let's go into Edit mode. And then I'm going to
select this top face, and we can bring this down. And then we can select the bottom face and
we can bring this up. And then we can select this
side face here and then GX, and we can bring
it over this side. And we can just see how wide
we want our shelter now. So I'm just going
to move these faces to how wide we want it. So I'll have this one this
side, and then this face. Push this in a bit here. Now, let's select
this front face and then GY and we can
push this back here. Now I'm going to select this
bottom face here and then just shift D to duplicate
and then right click, and then we can press E and then we can extrude
this down a little bit. So we have two
planks of wood here. I'm going to go back
into object mode and then add a bevel to this piece so we can see
the groove in the middle. So let's add the bevel
modifier to this, and then shading
to harder normals. And then we can bring the amount down something like this. Now let's shift A and
add another cube. And then GY, and then GY, hold control, and we can
snap it to this face then. So back into Edit mode, and we can bring this
bottom face down, and then we can go G Z and then hold control to snap
it to the bottom face here. And then we can just
make this finner by moving these faces in there. Just like this and
then move this one up and we can create a kind of flat piece
going long ways. And then with this face, we can go GY hold control and snap it to this face here.
Now this is in line. And we could add an
array to move this over. So if we go back into object mode with tab and
then add array modifier, we can push this X
value and then increase the count and then just line this up to where we want it to be
around about here should do. And then if we
select this piece, we could probably just duplicate
this bottom piece here. So if we go into
Edit mode with tab, make sure everything's
deselected and then press L on this
bottom piece here, we could shift D to duplicate, and then GZ, bring it down, and then GZ hold control and snap it to this
bottom face here. And what we could do is if we select this
bottom face here, and then you press
Control and then the plus icon on
your number pad, it will expand the selection. So it will select these
ewood faces here as well. And then we can
press X and delete faces just so we have the
top face of that piece here. And then we could add in some
edge loops just like that. And then we can press Y on
these faces to separate them. So I'll select these
two and then press Y. So now they're all separate. And then we can
select all four of these faces and then
extrude downwards, and it creates like kind
of wood panels here. And then we can press A, lt N, and then recalculate outside
to fix those normals later. If you go back into object mode, we can see we need to pull these faces forward
because they're kind of clipping
with this face here. Look, we'll go into Edit mode and just select this one face. We could go GY and just push
it behind just like that. And then let's go back
into object mode. And we can shift
select this piece and then just press Control
J. Now these are joins. But then you see it
got rid of the array, so let's Control Z, and we'll click this and then
apply the array here. And now we can join
it with Control J. Go. Now we just need
some support pieces. So we're going to
shift right click here and then shift A mesh cube, and we'll go GZ
GY, I mean, sorry. And then GY, hold control and
snap it to this face here. All right, so back
into Edit mode, we can bring this top
face down with GZ, and then we can snap it to
the bottom here with GZ, hold control, just like that. And then this piece, we can go GX and bring
it this side here. And then this face, we go Gx and bring it
somewhere along here. This bottom face, I'm going to bring it up
just a little bit, so it's going past the
top of the window here. And then this face, this front face will go G Y, push it back somewhere
around here. Okay, so actually,
with this face, we're going to go he Y and then push it back all
the way this side. So we have just a support
here going against the wall. We could make it thinner
by pressing A and then SX and make it a
bit thinner like this. So then we want to
press Control R, as an edge loop, and
we'll bring it up here. And then I'm going to press
free so we can select this face and then E to extrude and extrude
it along here. Then I'm going to Control and throw an edge loop
in the middle here. And then I'll select this
edge and bring it down. And then I will alt
click this edge loop and then Control B to bevel and then scroll up and we can
create a nice curve here. Then I'm going to press
A to select everything. I'll go GX and just move it to the side a bit and line it up. Then I'll duplicate
it with Shift D and then X and then move this side. And then we can duplicate again to have one in between
these windows. So I'll go Shifty X, move one over here, and then shift E X again and
put one this side as well. Try to line it up, so
it's nicely spaced, but then we might have to adjust these wooden pieces here so that they're not clipping
through like this. So this one is kind
of catching here. So what we could
do is go back into object mode and then click this one and
going to Edit mode. And we could just adjust the
spacing of these pieces. So I'll press L over this
piece here and just go GX. We could just move
this out the way here. And I think if we have them, so they're kind of
not evenly spaced, they might look a bit
more natural and, like, handmade, if
that makes sense. We just do it like this
and just have them kind of off center. That
should be fine there. So let's press tab to go
back into object mode. We'll click this
one and then shift, click this one and then
Control J to join. So now we have the
bevel on these pieces. And then for this
curved face here, we need to fix this with
right click and shade smooth. So there is a nice balcony. Now, if these are a bit thin, which I think they might be, we could go into Edit mode again and just press L on
all of these pieces. And we can scale them on the X, but we need to go to
our pivot point up here and choose
individual origins, so it will scale from each individual origin of each piece. So if we go SX, it
will scale like this, and we can adjust the thickness
of these supports here. Just like that. So now we
have a nice shelter windows. So I will see you
in the next lesson.
19. 3D Lesson 18 Designing a Detailed Balcony with Custom Bevel: He. Hello, welcome back to Blender stylized
Arabian market course. In this lesson, we're going to create a balcony
under the window. Okay, with this shelter,
I'm just going to right click it and set
origin to geometry. And then I might
make it a bit bigger because for me
it's looking a bit small, so I'll just scale it up. Make it a bit bigger like
that, and then I'll go GY, and then GY hold Control and
snap it to this face here, and then Control A
and apply scale. So now we can do pretty much the same technique
for the balcony here. So we'll go shift right click and then shift A and
let's bring in a cube. And then we go GY, and then GY, horse Control, snap it here. Go into Edit mode, we'll
go SC and scale it in. And then we can select
this face here, bring it this side,
and then this face, we can bring it this
side, just like that. And then we can select
this front face here and go Git and
push this back. It might be easier if
we go into object mode and grab our reference
here and just bring him up here just so we can
see how big the balcony is. So maybe we could
just push him up here and we can see
where it needs to go. So I imagine the bottom would
be somewhere like by here, so we could bring this
up here, just like that. So we can visualize
it a lot easier. So we have this. We need like two
layers of wood here, so we could just go shift D and then Z and bring this underneath and then
go GZ hold control. And then I'm going to go
into edit mode on this one. Select this bottom face and just make this one a bit
thinner just like that. So next, we need to create
the railing going across. So what we could do
is duplicate one of these faces so that we have
the right width already. So let's press three,
select this face, and we can just go shift D and then Z and
bring this face up. Somewhere like that. And
then I'm actually going to shift the again
and then press Y, and we'll just move this
one over here for now. And with this piece here, we can E to extrude
and extrude this one back to create the
front railing here. And then with this piece, I'm going to press Control R to add an edge up in the middle. And then Control B to bevel it, scroll down just so we have a single bevel like this
and just bring it to the ends here, just like that. And then we can delete
this middle face here. And then we can go GY
select these faces here. We go G Y, hold control, and snap it to the wall here. And then we can go
and extrude this out. So E, hold control and
snap it to this face here. So now we have the
side railings in. Now with this bottom
face, actually, no, we could press L and
deselect everything, press L over this piece here, and then go Shift D
to duplicate and then Z then hold control and snap it down to
this bottom face here. And then we need to create. Sometimes in Edit mode, when you snap faces,
it goes inside. So we might need to
just bring this up manually and get it as
close as we can here. I like that. So now we need
some pieces going long ways. So what we could do is
deselect everything. You could press L on both
of these side pieces, Shift D to duplicate
and then right click. And then X 90 to
rotate it 90 degrees. We could go GY,
move them forward. And then we can scale them
in by pressing Alt S, and then just scale
them in a little bit like this to make
them a bit thinner. And then we can just move
these faces into place then. So we'll select both of
these bottom faces here. And move them down. So we can try GZ, hold control, the snap to this face here. And then we select both of
these top faces and then GZ, bring it down, and then GZ
hold control, snap them up. So next, we want to create the wooden kind of
triangle shapes at the front. So what we could do now is
duplicate another face. So maybe this front face
here we go Shift D, Z, bring this up. And we'll go SX, scale
it in a little bit. And then I'm going to press
two to select this edge, and then go GX, hold control, we'll snap it to
this side face here, and then do the same for
this edge over here. So select this GX, hold control, snap it
to this face here. And then the top face, we'll go GZ and snap it
to this bottom face here. And then this bottom edge, you can go GZ hold control, and snap it to this face here. So I'm going to select
this whole face, and we can just move this
forward for now the way, go GY. And then I'm going to go
P and separate selection. So I'm going separate
this off for now. Then let's fix these
normals with A, Alt N, and then recalculate
outside, so that's fixed. And then let's go back
into object mode with tab, and then let's select
this front face here. So back into Edit mode. And we want to add
some edge loops here. So control R and then
scroll up until we get some squares. I like that. And then we want to
triangulate these faces. So if we press A,
and then under face, we can go to triangulate faces. Actually, not triangulate. We want poke faces. I'll
go with poke faces, so it creates this
kind of pattern here. It like pokes a vertice in the middle and then creates
these triangle shapes. And then we're going to
inset these faces with I. So we can press I
and then I again. So we inset each
individual face and then hold Shift and just
create something like this. And then with these
center faces selected, we can just press X
and delete faces. So now we have
this pattern here. Then let's press
A and we can E to extrude and give this some
thickness just like this. And then we can
press A again, lt N, and recalculate outside
back into object mode. And then we can go G
Y and push this into place now. Just like that. And then we can
shift select all of these pieces and then
Control J to join them. And then let's add
our bevel to this. So bevel modify it, shading to harder normals, and then the amount
can go to like 0.015. Now we just need some
support for the bomb, so we can do that just by right clicking or shift
and right click here. Shift A mesh cube. And then we can bring this down. Shift GZ, hold control, snap it to this face here. And then we need to snap
it to the wall as well. So G Y and then GY, hold control, just like that. So back into Edit mode, we can move this face in here. And then this face
can come here, and then the bottom face,
we can move this up. And then this front
face, we'll move this back somewhere around here. I'm going to create
a square shape here, and we're going
to use the bevel. So if we use Control B to bevel and do
something like this, and then we're going
to go into custom again on the profile type. If we go into custom,
there's a nice one here called I think it's crane
molding, not crane molding. I think it's cornice
molding, this one. And then if we increase
the segments here, we can see the shape that
it kind of creates here. Though I don't think we need 15. I think 12, I think
is a good one. You go for something like this, and then we can press A and then S X to make it thinner or thicker depending on
what kind of look you like. Now let's go back
into object mode of tab and let's add
an array to this. So add a array modifier. We'll bring the X value,
increase the count. How many do you want? One, two, three, four, five,
six, seven, eight. Nine or ten would do.
Let's go with nine. And we can bring this out
just like that on the X. And then make sure this is nice and symmetrical.
It's looking good. Now let's apply this array and then shift select this piece
and then Control J to join. And because we have
a lot of edges here, the bevel might catch like this. So we could either go into Edit mode and
dissolve some edges, repress Control X here and just fix up these
horrible edges here. We could have something a
bit more simple like that. But then we might have to
do it for all of these. But if your bevel is catching, we can just bring the bevel down just a little bit
and make it a bit nicer. So I've gone with
0.007 quite small, but we can see the bevels
looking a bit nicer now. So now we can just
right click and shade smooth to fix up that
curved piece of it. And now we have
something like this. So there is our balcony. Now let's double check
the size of this. Could make it a bit bigger, a bit smaller if you prefer. And I'm going to go into
camera view with zero on the number pad and
adjust it from here. So it might be a bit far out, might want it in
a bit like this. This looks a bit bit
too far forward. So if we wanted to push
it in a bit, we can. We can just go like
that and then go into Edit mode and press L on, like, all of these
bottom support pieces. And then just go GY to move them forward and then just push
them into the wall like this. And then that should
look quite nice there. So there is our balcony. I will see you in the next lesson.
20. 3D Lesson 19 Modeling a Detailed Balcony with Bevel and Custom Patterns: Okay. Hello, welcome back to Blender stylized
Arabian market course. In this lesson, we're going
to create our second balcony. Okay, so let's work
over here now. So I'm going to
select this building. And let's go into Edit mode. And with this face here, we can just press GX, and we can move this in quite a bit so we don't
see it from the camera. And I'm going to go
into Object mode. And this piece here we
could use for our balcony. So's going into
Edit mode on this. And this top face we could probably bring
down quite a bit. Now, we probably want to
bring our reference over. So I'm going to go
back to object mode quickly and bring
our guy over here. And rotate him by -90 and just bring him so we can see how
tall the balcony will be. All right. So now we have
this here, go into Edit mode. And let's start with let's duplicate some faces so we have some
stuff to work with. So I'm just going to duplicate
this front face for now. Go shifty X, move
it out of the way. I go go P, separate selection. So we have that. And
then with this piece, we can use this for the floor. So I might select the bottom face and then
go Control I to invert the selection and then delete these faces so we have a plane, and then select this edge
here and then go GX, hold control, and we'll snap it to the wall on the inside. And then with this
edge, we'll go GX and then figure why do we
want our balcony to be? So I'll bring it probably
this much we'll be fine. Let's control R, and we'll
have some edge loops to create some wooden panels,
just like that, we'll do. And then we press three and then select every other
one just like this. And then press Y
to separate them. And then we press A, and
then E to extrude or bring this up. Just like that. And then A, lt N and then recalculate
outside to fix that. Back into object mode. We could either bevel to this. So we just click out a building
and then shift click out balcony floor and then Control
L and copy modifiers over. And that didn't work.
Let's try again. Control L, copy modifiers. I don't know what's
going on here. Okay. It's very strange. So let's just add the bevel
manually if it's being funny. So add the bevel modify it. Shading to higher normals, and then amount can go to
like 0.015, just like that. And then right click set
origin to geometry as well. We have the geometry
the origin point here. So now we can use this face. That's Shift D and then X. And we want to go
into Edit mode, and let's do the top
and the bottom first. So let's do control lab or
edge loops in the middle here. Then we can control B to
bevel and scroll down. We have a single bevel here and have the top and
bottom like this. And then you can press Y to
separate this middle face. And then these two faces, you can just press
H to hide for now. We'll put edge loops
in the middle here. And then control B to bevel this way or get some side
pieces in like this. Press Y to separate
the faces off, and then we can well, we could probably lth to
bring everything back now. And then these top
and bottom faces, we'll extrude to give
some thickness just like that and then do the same
for these two faces. Extrude, just like that. So now we have this middle
face we could play with. Now, let's go P separate selection, just
to separate this off. Let's go back to object mode. And with this outer piece here, we'll go Gx and then move
this into place here. Now we might go GZ, and then GZ hole control and snap
it down to the top here, and then GX, move
this into place. Now, this might be
a bit too tall. Let's go into camera
view for now and just see this should be right. Yeah, it'll be fine with this. Now, we need to fix these normals, let's
go into Edit mode. A, lt N, and
recalculate outside. Now fixes that. Then
back into object mode. We can shift select this piece and then Control J to join. I like that. That
should be good. Now we need some pieces
going long ways. So what we could do here
if we go into Edit mode and add an edge loop in the middle here on the top one and then on the
bottom one as well, and then Althif click this edge. So we have both of
these selected. We can press Control B to
bevel and we can bring them all the way so that they're
in line with this piece here. So now if we go on the inside, we might have to,
like, isolate with forward slash so we can see. We have, like, the square these squared faces here
that we get extrude from. So if we select all of these, and then we'll shift D and then right click just so
that they're separate. And then if we E to extrude out, we can just create this then and just bring them so
they're inside the building, I guess, like that. And then forward slash again
to go back into normal view, and we can see
what we have here. Cool. So now we have this piece. We could probably
delete this extra face. We might not need this now. So with this, I'm
going to edit mode. I'll put another edge loop
in and bring this up here. And with this face, I'm
going to shift D and then X. We'll push this back and
get this into place then. So I'm going to bring this up to the top and then make sure
it's like all the way back GX, and then we screwed out
and bring it this way. And then if we go into
object mode and then shift click this one and
then Control J to join it. So that's part of that now. If we go into Edit mode, I might press select
everything and then press L on this piece and duplicate it and put it on the
bottom, as well. So Shift E and then Z can bring this one down and
put it on the bottom. So now we have this piece here. So with this edge, I'll select it and then just Control X to
dissolve the edge here. And then this edge, we want to be snapped
to the bottom here. So let's select it, and let's bring it
a bit closer with G&X just so we can see
what we're doing here. And then select
this top edge here, we'll go GZ and then
GZ hold control and snap it to this
bottom face here. And then we want the
bottom edge here. Bring this up, and then we'll snap it down
to this face here. So GZ hold control, a la so it's the right height. And now, let's add some well, I'll bring it forward again, so with GNX, bring it forward. We need some edge
loops in here now, so let's just add
some edge loops here. And let's press it. Well, we don't want
to select everything. We just want these
faces selected. So we'll select these.
And then under face, we could try some of these
options, see what we get. If we triangulate faces, we get this kind of pattern.
I don't think we want this. So our control Z, if we poke
faces, we get this pattern. Yeah, so we want to poke faces. But for the other balcony,
inserted these triangle faces, but for this one, I'm going to press one
for Validice select, and we're going to select all of these middle vertices here. We're going to bevel
these vertices. So to bevel vertice, I believe it's a bit different. Is it Control Shift B? Yeah, Control Shift B
to bevel of vertice. Just like that, we can
create some stuff like that. And then we want
to rotate these. So make sure we're on
individual origins here. And then we might have
to rotate on the Y, I believe, not the Y on the X. So if we press X and then 45, we can rotate it around
to make a diamond shape, and then we can scale these in then to get a nice
size on these. And then we can press three
and then X, delete faces. Now we have some nice
diamond shapes in here. And then let's press
L on this piece, and then we'll go GX, snap it to the front face here. Then E to extrude and give it some
thickness, just like this. And then we'll press A, Alt N, recalculate outside to fix that. And there we just need some wooden panels on the side here, so we could probably
go into it mode, select a face here, go Shift D and then
Z, bring this up. Press two for edge mode. We'll select this bottom edge, and then GZ hold control, and we'll snap this one down. This top edge, we'll
snap to the top here, so GZ hold control. And then we can put
in some edge loops. This piece here, just like that. If we press forward slash, we can see the whole thing here. So now we can select every other face like
this and then press Y. And then we could extrude it in. So extrude this in
just like that. And then let's press
L on Let's Control Z. We've pressed Y to separate these off and we need
to select these ones now as well and then extrude
all of them just like that. Then let's press L on
all of these pieces. And then just move
them in a bit. So GX now GY, I mean, just move them in
the center, just like that. And then we can shift D and then Y and bring them
over here as well. And then do we need any
supports for the balcony? Yes, we do. So we'll go forward slash again so
we can see everything. And then we can press A and then Alt N and then
recalculate outside. And then for the supports, we'll just go into object mode and then shift right click. We can just add a cube. So shift a mesh cube, good GX, and then
into edit mode, we can scale this down and scale it on the Z to
make it a bit longer, and then SX make
it a bit thinner. And then SY. And then make it a bit taller as well with S and Z,
something like this. If you go into object
mode and then press RX, RY, I mean, Y, and we rotate it just like
this. And then we go GX. We can just move this into
the wall and move it down. Now we want to bring this face. We want this face to be flat. So if we press tap to go into Edit mode and
select this face here. Could go S Z, and then
zero to flatten it out. But then it kind of
squishes it a bit as well. So we need to select
this back edge here, and then just go GX and
just pull this out the bit, just so it's not so thin, you know, back into object mode. And then we can
just bring this up here and then go G Y,
move on this side. And then we can duplicate
one on this side, so Shift D Y, have one there, and then we can have two in the middle here. So where is our middle This
one's in the middle, I think. So we'll go Shiftyy we'll
have one this side. So we got free panels
in the middle here. So this one, shifty we'll
have one this side here. And then, these are in
the wall, but it's fine. We won't be able to
see, so it's all good. We can just shift
select all of these, shift select this, and
then Control J to join. And there is our
balcony all done. Let's have a look from
camera view with zero. And we can see just
how tall it is here. Nice. I will see you
in the next lesson.
21. 3D Lesson 20 Creating Brick Pillars with Array and Mirror Modifiers: M. Hello, welcome back to Blender
stylized Arabian market course. In this lesson, we're going
to add some detail to our building and then start
working on the pillars. Right, so I'm going to select
these pieces and just press H to hide them just
so we can get over here and see, right? I'm going to press Shift and
then S to get our menu back. I'm going to put the cursor
back to the world origin here just so it comes back here. And then let's press Shift
A and then mesh cube. And then let's bring
it to the floor with G Z one, just like that. And let's grab our guy here, we can bring him back to
the center by pressing Alt G. I'll bring him over
here to the world origin. And then just G Y,
we'll pushing back. Now we need to create
a small brick. So it's going to edit mode. This top face we can bring down. And then we can go A and then S shift Z to scale it
in a bit like this. And then just adjust this. So we want it to be
longer on one side. So this back face here, I go go G Y and create
something like this, more like a rectangle. And then I'm going to press A and then Shift D to duplicate, and then Z and 90 to rotate it. Let's go GZ, we'll bring it
up and then GZ hold control. When we have multiple
faces like this, kind of the snapping
doesn't work very well. So let's just bring this up manually and
place this on top. And then GX, we'll
move it this side, and then GY, we'll
move it like this. So we have two bricks on top
of each other like this. So now we could just go
back into object mode. Let's add our bevel to this. So bevel shading to harder normals and then bring the amount down just like that. And now what we can
do with this is if we add an array modifier, and we want zero on the
X and then one on the Z. So now we have this
pattern and we can use this to go up the side
of our buildings. So let's put it on
the corner here. So we'll go GY. And then GX. And we want to place
this nicely on the corner here, just like this. So now we have this kind
of pattern going on. It creates some nice depth to the wall when we bring this up. So now we can increase the
count and go all the way up to up to this bottom trim here. So we'll increase
the count up here. And then if it doesn't
fit perfectly, we could just scale
in object mode. But then it's going to scale
from the origin point, and we want the origin point
to be at the bottom here. So if we go into edit
mode and we select this bottom face,
we can right click. No, not right click.
We want to shift S and then cursor to selected, so it'll bring the
freed cursor here. And then if we go back
into Object mode of tab, we can right click and then
set origin to freed cursor. So there are the
origin points here. So now when we scale, you could either use
individual origins, individual origins for this, so we scale from the origin point. You can use SZ to, like, make them thicker. So we have nice thick
kind of bricks here, and then we can lower the
count then to bring it down just like that. Now we might want to have this a bit thicker
like this way. So what we can do is
go into Edit mode, and we only have to adjust
these bottom ones now. So this face, I might go G Y, make it a bit thicker this way. And then this face here, I'll go GX, make it a
bit thicker this way. I think that looks a lot nicer. So now we can copy this over to the other side
using a mirror modifier. So if we add another
modifier here called mirror and scroll down, we have the mirror
here, and we have this eyedrop tool we can use
to select our building here. Now, it's mirrored on this side, because we have the X selected. So if we disable the
X and try the Y. So now we have the Y here, but it's not mirrored perfectly. So what we might
need to do is select our building because it's based
on the origin point here, so we need it to
be in the middle. So we can try right clicking and then set in origin to geometry. And we see it's not going
to the middle still, so we need to set
the origin manually. And what we can do is select
we go into Edit mode, and we select the bottom face here and then Shift S
cursor to selected. It will bring the cursor in
the middle of this face. And then we can just
go into object mode and then right click
Set origin DFredcursor. And now that's fixed
our center point here. Now we have this, and it
doesn't seem to be perfect. So what we could
do to fix this is find Find one where is
actually in the middle. So if we go back into Edit
mode and we try another face, maybe if we set the origin
to one of these faces here where it's just that's
forward slash to isolate. Let's try this top face. If we shift S and cursor to selected
and then into object mode and then right
click Set origin to three D cursor and then
forward slash again and see, so now we can see the
bricks here on this side, and that's perfectly
in the middle. So all we need to do now
is select our bricks, and then we can
shift D and then Z, and we can bring this up. And then we just
need to go G and then X and bring
it out this way, just like that, and then GZ
to bring this down here. And then we just increase the count until we
reach the top here. And if you want it to be
perfectly fitting here, we just need to
scale it on the Z, and we can just line up this
one brick to the top here. So there we have some
nice patterns here. So now we can start
working on the wall here. So let's press ALTH and we
can bring our objects back. Now, we don't need these window pieces
because we'll just use one of the
other windows we made. This door, we need to get around to
making this door soon. So we can just go GX and move this out the way for now.
Let's put it in here. We'll work on that
later. Let's get some pillars in for
here for the wall. So let's go Shift S again
and cursor to world origin. And then we can go
Shift A mesh cube, and then bring it to the
floor with G Z, and then one. And now, let's go GY. We'll push this back over here. Let's go into Edit mode. Bring this top face down
to round about here, and then AS Shift Z and we can scale it in
on the Z like this. And while we need it to be
a lot bigger than this, because it needs to be slightly
taller than our steps. So let's just scale
it up for now. And let's go into object
mode, and we'll go GZ, hold control and snap it to the bottom of these steps,
so it's on the floor. Go GY, and then hold control and snap
it to the wall here. And got GX. We'll move this. So it's like just next
to the steps here. It's going to edit mode. And with this top face, let's scale this
in just a tiny bit so we have this
kind of shape here. And then we're going to
press I to insert the face. Then we can scale up then. So E to extrude up, and then we can go to the top. Now, I might bring it up
a bit further because I might make the wall
a bit taller as well. So I'll bring it
just above the wall. And then all we need to do
is just I to inset again. We E to extrude,
so we have this. And then I'm going to
press E to extrude, and then I'm going to press S to scale it out just like that. And then E to extrude and
then S to scale this in. So we have this shape here. And now all we need to
do is select this face, and then we'll I to inset, and then E to extrude and we can push this in just like that. Let's go into object mode, and let's go GY and we can
push this up against the wall, so like this long piece
is against the wall here. And then we can go GX, move this into the
steps just like that. And then we can always
adjust the scale. So what I might do here is I
might select the wall first, go into edit mode, select
this top face here. I might bring it up
just a tiny bit. And then I'm going to shift
D to duplicate this face, and then E to extrude. And then with this
front face here, I'll just go G Y and push
this edge a little bit, so we have a top
on this wall here. So this pillar is looking
a little bit thin. So what we can do is go into edit mode and press
free for face mode. And if we alt click
this face loop here, we can press S to scale this
up, make this a bit thicker. We can do the same for this
face loop, so Alt click here. We go S and then shift Z. We can scale this a little
bit, make that a bit thicker. And then we press A and then Alt S, we
don't want to do Alts. Let's just do S and then
shift Z, scale it like this. We can have some nice
thicker pillars and then something
along these lines. And then with this top face, I might just bring it up a
tiny bit just like that. And then we go we have
our pillar sorted. Let's add our bevel to this. So let's go to modifier, search bevel, shading
to higher normals. And this is looking
quite nice now. I'll just adjust this
bevel, something like that. Then we can shift D and then
X and bring one this side. You can also use the mirror
on the stairs if you want. Let's have a looking
camera view. Now, we might need
to make this a bit wider because I might bring
this over a bit here. And with these steps, we'd have to bring them over
into Edit mode, A to select everything
and then just SX and scale them into
the pillar like this. That's looking a bit
better. And then we could start working
on the doorway. So I will see you
in the next lesson.
22. 3D Lesson 21 Cutting an Arched Doorway with Boolean: Hello. Welcome back to Blender stylized Arabian market course. In this lesson, we're going
to finish off our archway. Okay, so for the wall, we're going to create a doorway
using a Boolean modifier. So we need to create
the shape first. So let's press shift A mesh, and let's add a cylinder. And let's rotate this
with X and then 90. I'm going to go to one for
front view on the number pad. And let's move this into position and we can
get the right size. So's going to edit mode
and scale this up a bit. And we'll have it somewhere
around here should be good. Now, let's go into Edit
mode on this cylinder, and let's delete
the front face and the back face and the
bottom half of this. So we want these faces.
We'll delete these. And then I'm going to
press two and then select these edges and then E to
extrude and then Z to go down. We'll just go down
just so make sure we cut off the whole bottom
of the wall here. And then we need to
create the shape. So we select this top edge here. It's going to the front view, and that's GZ, and we
can bring this up here. And then let's go into let's press one
for vertice select. And we could probably delete
these back vertices here. So I'm going to go behind it and then left click and drag. So we can select all
of these vertices, and I'll just go X
and delete vertices. And we've deleted this one here. We don't want this one,
just the back vertices. So we have this. Now we just
have these vertices here. So I'm going to go press
one to go into front view. And now we can start
creating a shape here. So we want it to go
in and then out here. So I'll select
these two vertices, go gz, bring this in. These two, Gs, bring this down and do the same here
just so we have a nice curve so we have
this kind of shape here. And then we can
press A to select all these vertices and then E to extrude and then Y to
extrude it back like that. I'll press two for edge mode, and then Alt click this
edge and then F to fill. Alt click this edge, F to fill, and then A, lt N and
recalculate outside. And we need to fill in
this bottom as well. We'll just fill that.
So now we can go into object mode and then G Y and
push this into the wall, so it goes all the way
through the wall here. And then I'll probably
bring it down just a tiny bit because we want to give some space for us to extrude outwards for the frame. So now we can take this. We can click out a wall here and we can add
a Boolean modifier. And we can select our
cutter piece here. And if this happens, where it's going a bit strange. I'm going to disable this
using the display here. I'm going to go into
Edit mode on this, and then I'm going to press
L on this top piece here, and then P separates selection
just so it's separate. And then going back
into object mode. I'll select both of these
wall pieces and then control a apply scale just to make
sure it turns back on here. And it's not disappearing now. So it might have
been a scale issue. So if you apply scale,
that might have fixed it. So we turn this Boolean back on. Yeah. So now we can
apply this Boolean. And then I'll use GY on this piece to move
it forward here. And now we have a nice hole
in our wall that we can use. So with this piece,
we're going to use this. I'm going to Edit mode. We can delete this front face and delete the back face
and the bottom face. And I'm going to select
these two bottom edges and then go GZ and snap it to the bottom
face of the wall here, so it's in line with
this face here. And then I'll press A
and then f and then right click Extrude faces along normals and scale them
out just a bit like this. And then I'll go back
into object mode and then G Y and move this
into the wall here. We need to make
it a bit thinner. So we'll go back into Edit mode. I'll press A and then SY, we can scale it in, have it. Make sure it's going
past the wall here. The back doesn't matter so much, but the front what we see, so we'll just go
GY just like that. Now, this inside face is like clipping with the wall because it's like, in the same position. So let's select all of
these inside faces here. And we're going just
press Alt S and scale them in a tiny bit just so they're not clipping
with the wall there. And then maybe A and then S Y, we could scale it
out, make it a bit thicker, just like that. And now we have a nice
frame around our wall here. Back into object mode.
Let's add a bevel to this. Not boolean. We want bevel. And then shading
to harder normals, we can bring the amount down and then right
click Shade Smooth. And then let's add in let's
say add in a floor over here. So I'll go shift a mesh plane. I'll use a plane for the floor. I'll go into Edit mode and then press two and
then select this edge. And then this edge,
I'm going to go Gx and bring it just
past the building here. This back edge here. We can go GY, bring it
over here somewhere. This one we'll just
bring over here. And then this one
we can go GY and then push it back
towards our wall here. And then let's go
back to object mode, and we'll shift D
to duplicate this. And then we want it up
above where the steps are. So we go GZ and bring this
up to a roundabout here. Just like that.
And then we go GY, and we can bring this back. And we want this to be just behind the steps
here. Just like that. And make sure it's not poking
through the wall here. So we'll go GY and push this
into the middle of the wall. Then these steps need
to go forward so they lock into this floor here. So we can close this
gap here, just like. And then this, we can press tab for Edit
mode and then GY, and we don't really need the
floor to go that far back. So we'll go to about here, just underneath the sphere here. And that should be all good. If we go to camera
view, we can see. So we have a floor
in there that we can use a floor in over here. Now, we may as well just add a cube here for the building. So let's go Shift A mesh cube. And then let's go GY. We can bring this over here. And then GZ, bring
it up and then GZ, hold control to snap
it down to the floor. And then into Edit mode,
we can grab this face. We will GX, move it
past the doorway here, and then this one we
can bring up here. And then this top
face. I'm going to go into camera view and we go GZ and bring it just
above the doorway, but we want it like
below the wall. That makes sense so like
somewhere in the middle here. So just GZ bring this up just past the doorway where
we can't see the top of. And this looks like a good
distance, I'll be fine there. And maybe we could,
I'll be fine. I'll be, sorted. So there is a nice
doorway for our wall, soon we will get to work on the next while we have the door here
we need to create. And then we can start working
on these buildings here. I'll see you in the next lesson.
23. 3D Lesson 22 Designing a Detailed Door with Bevel and Wall Trim: He. Hello. Welcome back to Blender stylized
Arabian market course. In this lesson, we're going to learn how to create a door. Okay, so for the door over here, let's select this piece here. We'll go GX and bring this out. And let's go
underneath and go into Edit mode and select
this bottom face here. We'll go GZ bring it up
and then GZ hold Control, snap it down to the floor then. And then let's select this
front face or control I to invert and then X delete faces. So now we're
just left with this. And now we have to think about
some kind of door design. So I'm going to press one
to go into vertice mode. And let's shift select these two vertices and
press J to join them. So now we can put an edge
loop in the middle here, and then we can select these two vertices and
press J to join these. Now, let's start with
these top faces here. So I'm going to press three, and then I'll select both of these. I'll press I to inset, and then I again to inset them individually and just bring
them in to a roundabout here. I'm going to press
Y to separate them. And then we could put
it in an edge loop. Well, we want to separate
these faces first. So I'll press H on these
to hide the make the way. I'll press Y and
then H on this face, Y and then H on this face. And then the bottom faces, I'll do Y this one, Y and then I'll
select all of these, then Y and then and
then all of these, Y and then Okay, so now, let's put in an edge loop here, and then an edge loop in here and shift select
these two edges, we'll go Control B to bevel and bring these
out just like that. And then we can press Y
and H on these faces here. So Y Y YH, and then Y H on this one. We could add some at the
top and bottom as well. So actually, maybe we
just go with the bottom. Let's go top and
bottom. So we'll control put two edge loops
in here. Select them both. We'll Control B and bevel. And then we can just press
Y to separate these, and then we can select these
ones and press H to hide. Now let's put in two edge loops here, two edge loops here. We'll select these
two middle faces here and then press Y. And then we can press AltH
to bring everything back. And now, if we press we press A and then E to extrude and extrude them all
at once, just like this. And then we go into object mode. You can add a modifier, search bevel, shading
to harder normals, bring this amount down. Just like this. Right
click Shade Smooth. And then we have a nice
design for our door. And we can always go into
Edit mode and select some of these faces and go GX and
push them back a little bit, just to have some depth to our door if that's what you
prefer, something like this. And then with this,
we could just go GX and move this in
to our doorway here. Nice. So now we can add some
detail to the building here. So what we could do is going to edit mode
on this building. And let's add an edge
loop in the middle here. I'm going to go to camera view. And with this edge loops,
I'm going to go GZ and bring it down around about
here would do. Let's put another edge
loop in the middle here, and this one can go
somewhere around here. And with this edge loops I'm going to go Control B to bevel. And then I'm going to go
Shift D, so it's separate. And let's get nice
and close now. Right click. Well, let's press three and then right click
extrude faces along normals. We can bring this out like that. Now we can press L
on this piece and then go Shift D and then Z and bring this
down a little bit. And on this one, we can control R to add some edge
loops this way. Actually, let's add, just one
edge loop so it's straight. And then control B to
bevel and scroll up. We'll add some edge
loops in just like this. And then we need to
get underneath it. So let's select every
other edge here. And then once we
have these selected, we can go GZ and bring
it down to create this pattern like that. This here, we can select
this face and E to extrude. We'll bring this out a
bit, just like that. And then we need to bring
out the roof as well. So let's control Control. We'll throw an edge
loop here, I think, and let's bring this down
a bit, just like that. And then this front face, we can select this
and we'll just go E to extrude
and bring this out to create like a low roof
going just like that. Now, we can add in some pillars under here
in the next lesson. So we'll do that next.
Is there anything we can quickly do before we
finish this lesson? No, we may as well move
on to the next one. So I'll see you in
the next lesson.
24. 3D Lesson 23 Boolean Door Panels and Decorative Roof Details: Okay. Hello, welcome back to Blender stylized
Arabian market course. In this lesson, we're going to finish off the back building. Okay, so let's work on
this building over here. So this one, we need to
add our bevel to it. So let's add the bevel
modifier over here. The shading to
harder normals and then bring this to 0.015. And now let's shift
and right click here. And then let's go Shift A
and let's add in a plane. We'll go X and then 90. Then GY, we'll bring
this forward a bit. Now, I might hide some of these pieces out the way
just so we can see properly. And then we can go one on number pad to go
into front view, and we'll select the airplane.
We'll go into Edit mode. We'll grab this edge here, GX, bring it this way, and then this one
can go over here, and we could probably
snap it to the side faces here GX and hold Control. Just so it's a nice width here. And then the top edge, it'll snap it to this
bottom face here. So G Z, hold control, and then the same
with the floor. So GZ, hold control here. And then we're going to cut
some booleans into this. So back into object mode. And let's alter H. Maybe we could reuse this piece here
because it's a similar shape. So we'll go Shift D and then
Y. We'll bring it out here. And that's going to edit
mode on this and let's select let's select it this
edge going around here. So all the way here, we'll select this and
then I'll press one for vertices and then Control I and then X and delete
vertices like this. And then I'm going to join
these two vertices up with J. If J doesn't work, we can use F. And then we can fill
in this face here. I'm going to alt click here
so it selects all of them, and then F to fill, and then we can press E to
extrude and extrude this out. It's good this
way, so the normal go in the right way
just like that. And then back into object mode. We'll go GY and move
this into the wall here. Now, this needs to
be a bit smaller. So let's go into Edit mode. We'll press A and then S the
scale down just like that. And then let's bring this bottom face down and just bring
it down below the floor. So it cuts all the way through. All right, so let's go
back into object mode. We'll go GX and move
this to this side here, and then GY, move
it into the plane. And then I'm going to add
let's remove the bevel. We don't need the bevel on
this cutter piece here. And then let's add
an array modifier. Add the array. We'll move
this on the X a bit. I'm going to go into camera
view with zero on number pad. And I'm going to use
GX to move this. So this one is in the middle
of this doorway here, and we have the two pillars
either side of it showing. So we might need to move it just the side a bit like this. Now let's select there
were plane here and let's add a boolean modifier. And then select piece here. And then we can apply boolean. And then our cutter piece, we could probably
just delete this now. And now we have this here. Okay, so I might actually undo that and undo again and
then click cutter piece, and I might bring this X value and just tighten up this array a bit and then move it into place and then
apply the boolean. I thought it was a bit too wide. So I'll apply the boolean, and then we can delete this. And there we have this
here. So now with this, we could go into Edit mode. And let's press forward slash so we can isolate it and
see what we're doing. I'm going to press one
together vertices up here. And I'm going to
join these two with J and then join
these two with J. So now we can put in some edge loops but
first let's press A, and let's just extrude
this back to get some thickness, just like that. We'll press A and then lt N
and then recalculate outside. And now let's put in
some edge loops here. So we'll put one here
and then one here. I'll press two for
the edge select and then Althif click
this edge loops. We can bring these
up just by here. Then we can press three for face mode and then Alt click this and then
Alt Shift click this. I'll go Shift D to
duplicate, right click, and then right click
again, screw faces along normals and screw these
out just like that. Now, I need to see
where the floor is, so I'll do forward slash so
we can see where the floor is here and just getting
close like this, put an edge loop here and
an edge loop in here, and then Alt Shift
click this one, and we can bring this down here. Somewhere along just like that. And we'll put another edge
loop in here and in here. Alt Shift click this one, we'll
bring this up a tiny bit. Then I'll press
free for face mode. I'll Alt click
this face loop and then Alt Shift click
this face loop, and make sure we're on
individual origins here, and then S and then Shift Z, and we can scale this
out just like that. Now let's put in another
edge loop here and in here. Alt Shift click this edge loop. We'll bring this
down just like that. We'll press free
for face select. Alt click this face
loop and this one. And then we'll shift D to
duplicate, right click, and then right click
again, extrude faces along normals and bring this out just a
little bit like that. And then finally, we can select this face and then this face. We'll do I to inset. And then E to extrude
inwards, just like that. And then to get a
nice pattern on this, all we're going to
do is just I to insert this face a
little bit like that. And then E to extrude and push
this back just like that. And then if we press
tab to go back into object mode and shift
click this building here, we can just press
Control J to join, and it should have the
bevel applied to it. And now we just right
click and shade smooth, and that's finished all done. Cool. So next, we can start
adding the stuff up here. So let's shift the
right click here. And we want to add a cube, so we'll shift
shift A mesh cube. We'll go GZ, bring this up, and then GZ hold control, snap it down to the roof here. Tab for Edit mode. I'll select the top face,
we'll bring this down a bit. And let's go with this
face, we'll go GX, move this over here, this one, GX, move it over here. I'm going to go to
camera view with zero, and we can't see it. So this top face needs
to come up higher, so I'll just bring
this up so where we can see it like that. We'll bring this face
over a bit more, and then this black
face can go GY. We make it like a
square kind of shape. I'm going to go back
to object mode, and we could probably
delete this now. We probably don't need it. So now with this cube, we could go into Edit mode. We can select this top face and then go Shift
D to duplicate, and then E to extrude,
just like that. And then we can alt click by here for this face
loop and then just go S and then Shift Z and scale this up a
bit just like that. Okay, so now that we have this, we can just click this
and shift click this. And if we control J, this is joined, and there we have the bevel on it as well. So before we finish, we'll just go into
Edit mode on this. We will select this top face. We'll do Shift S
cursor to selected. So now we go back to object
mode and press Shift A mesh, and UVsphere It's in the
middle of this face here. Go to Edit mode
and scale this up. Just a bit like this. I'll bring it up a bit more as well. And then I'll do forward
slash to isolate it, and I'll alt click this face
loop and do X delete faces, and then L on this bottom piece, do X, delete faces. And then I'll press
forward slash again. I'll press two and
then alt click this edge loop and then do E Z, hold control, and extrude
it down just like that. And then maybe A and then GZ
to bring it up a bit more. Then I'll click
this edge loop and then GZ hold control just to
give it a bit more space. So we're going to use this
to create the piece on top. This takes a while so we'll continue this in
the next lesson.
25. 3D Lesson 24 Sculpting a Detailed Dome with Bevel and Extrusions: M. Hello, welcome back to Blender
stylized Arabian market course. In this lesson, we're
going to work on the details of our dome piece. Okay, so we have
this piece here. Let's go into Edit mode. And let's put an edge
loop in here. We control. And then there's
control beat to bevel, scroll down for a
single bevel like this and bring it like here. And then I'm going to alt
click this bottom one here and just bring it
up a bit more like that. And then I'll press free, and then Alt click
this face loop and then Alt Shift
click this face loop. Right click Extrude
faces along normals, and we'll have
something like this. Then I'm going into Alt click and then Alt Shift
click these face loops. I'll do Shift D, right click, P,
separate selection. Go back to object mode, and we can hide this piece. So now we're just left with
this duplicated piece. I'm going to shift D, right
click and then H to hide it. So we have another duplicate. And then let's go into Edit
mode on this piece now. So Edit mode. And I'm going to shift
select this edge here, and then I'm going to
go to select Select similar and then choose length, and it should select
all of these. And we just need to deselect
this bottom edge here. And then if we press
one to go into front view and then go to our wireframe view
here at the top, click this and we could
probably deselect. So I'm going to press
T to get this menu. Actually, no, we
don't need the menu. I'm going to press
C. If you press C, we get this circle here, and you can use the scroll wheel to change the size of it. And if we hold down
middlemose button and go over these edges, it will deselect these edges
like this, just like that. And then we right click to
get rid of that circle. And then we can go back
to our solid view here. And now we just need
to bevel this now, so we could control B to bevel and bring this out
just a bit like that. And then I'm going to
press free for face mode, control I to invert, and then X, delete faces.
So we're left with this. Then we go A to
select everything, right click and extrude faces along normals
and bring this a little bit like this
back into object mode. We'll do ltH and then we're going to hide
this piece the way again. And there we just have this
piece that we dated as well. So maybe we could hide this
the way as well for now. So now we're just
left with this. We can go into Edit mode on this and we need to do
the bottom pattern. So with this, what
I'm going to do is Alt click all of these faces and to delete faces just so we
have the bottom one here. And we're going to put an
edge loop in the middle here. Then I'm going to press one on number p to go front
view again and go back to our wireframe
view up here. And then we got it selected. We can just press
one and we have our vertices selected from when we did the edge loop,
right? So we just press one. And then with these
vertices selected, we can go Control Shift B to bevel these vertices
just like that. So now we need to
select some edges. Let's press two. We
need these edges here. So if we press A to
select everything, and then we can Alt Shift click these two edges
here to deselect them. And then we could press Control B to bevel,
just like that. Then we can press Control
I. Actually, Control Z. We need to press free for
face mode and then Control I, and then we can delete these
faces then just like that. And then with this,
we can press A, right click, extrude faces along normals and bring
the bit as well. Back into object
mode. We'll press AltH and we should be
left with this now. So we could add our
bevel to these pieces. So let's add modifier bevel
shading to harder normals. We'll bring this down a bit. Just like that and then
right click Shade Smooth. And then we should be able to join all of these together now. So control J, and then we have to shade
smooth again to fix that. And here we are left with this. So now we just need to do the spike on the
top now as well. So we're going to
Edit mode on this. Press one for vertice select, and I'm going to select this vertice and control
X to dissolve it, so we're left with
this flat plane here. I'm going to go Shift D to duplicate and then E to extrude and then we can
do I to inset and then do GZ and bring
this up just like that. Then I'm going to
I to inset again. And then E to extrude and then scale this
in a little bit like that. Then I'm going to
E to extrude and bring this up just like here. And then I'm going to control R, put an edge loop just
above this one here. Control R, we'll have one here. Control R, we'll have one here, just above this edge loop. And then this top face, I'll select this top face and scale this in to
create the spike here. And then I'll put an edge loop in the middle
here and then scale out, and then Control B to bevel and scroll up
to create a curve. Then I'm going to press
three and then Alt click, and then Alt Shift
click these face loops. I'll do Shift D, and
then I'll do right click extrude faces along normals
and scale these out at just like that. And then we could probably
put an edge loop in here, bring it down a
little, scale it in, and then give this a bevel
just to smooth it off a bit. And then maybe
bring this top face in a bit to make it
a bit more pointier. Then we have a nice
spike on top there. There we go, this
should be all done. Now, if you want to make
adjustments to this, you could go into Edit mode and then maybe alt click
this face loop and bring it up a tiny bit or make it lower depending
on what you prefer. Have a looking camera view
and see how this is looking. There we go. I'll see
you in the next lesson.
26. 3D Lesson 25 Building a Circular Tower with Boolean Windows: Hello. Welcome back to Blender stylized Arabian market course. So in this lesson,
we're going to start creating our tower. Okay, so let's hide our
floor right the way for now. And let's press our
reference here. We'll go Alt G,
bring it back here. Z 90, and then GX to move
and make the way a bit. Then let's do Shift S and
cursor to world origin. Then shift A mesh,
we'll add a cube. I'm going to go into edit mode, press one on the number
pad for front view. And we're going to scale
this in on the X and then on the Z a bit to create the
size of a nice window here. And then I'm going
to move this in edit mode so we keep the
origin point at the center here at the word
origin because we're going to use an array
and we need the origin points to be in
the same location. So I'm going to go back to object mode and then
Shift A mesh cylinder. For the vertices, we're
going to choose eight. And then we want this face to be pointing at
the front here. I'm going to go into Edit
mode and then Z 22.5, and I'll rotate it
perfectly like this. It's going to the
front view with one, and then we can scale this up, so our windows fit
inside the wall here, and then we can go GZ and
just bring it up a tiny bit, so it's centered just like that. Into object mode, we'll
select cutter piece here. We'll go into Edit mode and then GY just move this into
the wall a little bit. And then let's add
an array modifier. I'll search array.
For the shape, we're going to choose circle. And then for the
count, we want eight. And then I'm just going
to turn on X ray, this little icon
here so we can see inside the cylinder
and make sure these aren't overlapping here
so we don't cut into each other and then just
toggle that back off. Now it's back into object mode. I'm going to select this
cylinder and then just shift D and then Z, we
can bring that up. So we have that for later on. And then with this one,
let's add a Boolean. Search Boolean, and
then we can pick our cutter piece here and
then apply the Boolean. Now with this, we
can create a window. Let's go into Edit
mode. I'll select this face here and then
Control I X, delete face. And they let's put
in some edge loops. So put one here,
and then Control B. You can press Y to
separate this face here, and then we can
hide these faces. We'll put edge loop
in the middle here, Control B to bevel. And then we can press
Y on these faces and then I'm going to put one in
the middle here, Control B. We'll have a thin one here
and then Y and then and then put two in the middle
here, select them both. Control B, and then Y and then Then I'm going to put two edge loops in each of
these faces like this. Then I'll press one
for vertice mode. We can join these with J. We can join these with J, and then let's
select some faces. I'll select some of
these like this. We can go to face
and poke faces. And then let's press
A, I to inset, I again, and then we can
delete these faces here. Press lth to bring
everything back. Press A and then E to extrude. And then I'll select
these outer faces here, and then just go GY and bring these further out,
just like that. And then back into object mode. I'm going to select
there a cylinder here. Into edit mode, I'm going
to grab one of these faces and go Shift D and then
Y, bring this out. And then P separates selection. So now let's go back
into Object mode and select this plane
here into edit mode. Let's add some edge loops. And then select these faces. We'll press Y and
then let's press A, then E to extrude, and then A again, and then G Y and move this just
behind the window like that. And then into object mode, we'll shift select
our window piece here and then press Control J. So add that to all the windows. And now let's just add
our bevel to this. So let's add the bevel modifier, shading to harder normals
and amount to 0.015. And then into Edit mode, we'll press A and then GY, and then we can move
this into our building here. Just like that. So that's one layer done. We can move this
up a bit further. And what I'm going to do is
select both of these pieces. We'll go Shift D and then Z, bring this up, and maybe we could snap it down
to that face there. Now this one needs
to be a bit smaller. So let's go into weit mode and then just scale
it down a bit, bring it down here and maybe
that's maybe a bit bigger, something like that, and make
sure it sit in on top here. And then we want to
duplicate this piece, so we shift D and then Z, and then snap it down to here. Now we need to do pretty
much the same again. So what we could do is another
way we could do this maybe is if we alt click this face
loop and then press I to inset and then SC to scale
these down on the Z like this. We could also do right click and extrude faces along normals
to push them in like this. And then I'm going to select this front face here and then go Shift D and then Y and
then P separate selection. And then into object mode, we'll select this and we can create just a quick window here. So I'll just do something simple like this put an edge and
put them on the side here. We press Y and then hide
these two faces here. And then this one
we go Control B, put them on the top and bottom, press Y, and then
hide these faces. And then maybe we
could just put in some wood panels or
something like this. Then just select these, press Y, then we can do lt H, A, E to extrude, and then bring these side faces
over like that G Y. And then add our bevel to this. So we'll add our bevel modifier, shading to harder
normals and then bring this in. Just like that. Let's add the array
modifier to search array. We want shape to be circle, came to be eight, Itoated mode, press A and then G Y and move
this into place here. Just like that. So now I'm going to choose
this cylinder here. I'm going to control
put in an edge loop, do Control B to bevel this. And then press
three, right click. Actually, you know, we
want to shift D first, and then P separates selection.
So we have it separate. And then in object mode, we can select that piece
into edit mode. We can press A, and then right click
extrudes along normals. We can bring that out there.
Back into object mode. We can move this somewhere by here and then duplicate it
and put one like above here. Just like that. Then we
could duplicate it again, move it down, and scale it out so we can wrap it
around the top here. Like, so we can duplicate again, move this one down
here somewhere. And then shifty, we could have one at the bottom, as
well, just like that. And then we could make
sure everything's applied. So let's apply the array on these windows make sure
they're all applied. And then let's
select everything. We'll select all of our pieces. I'm going to move just
to make sure yeah. So we have them all
selected. I'm going to shift click a window last because that has
the devil on it. So then if I control J, the bevel should apply
to every object then. So then with this, we can
just go GY, move it back. I'm going to go to
camera view with zero on the number pad and move
this into position here. I just have it the
bottom is just below the wall so we don't
see underneath. And we could delete
this old cylinder no and we can have this here. You can always scale it
up a tiny bit if it's a bit too small or
move it forward. It's also possible. Then once we texture
this piece here, we'll duplicate it and
then place it on top here. There is our tower. I all
see you in the neck lesson.
27. 3D Lesson 26 Creating Realistic Materials with Normal Maps: Oh Hi. Hello. Welcome back to Blender, stylized Arabian market course. So in this lesson,
we're going to learn the basics of
texturing in blender. Okay, so we've done a
fair bit of modeling. So maybe we should take a break
and learn about textures. So at the bottom here,
we have our timeline. This is for animation.
We won't need this. So if you put your mace
cursor over this line here, you get this like two arrows and you can move this window up. And if you click this icon here, we can change the window
to Shader Editor. And then if you go
into the corner here, so your cursor
turns into a cross, we can click and drag
a new window out here, and we can change this
window to UV editor. I'm going to use
these two windows to create our textures. So I'm going to just add a
temporary cube for this. I'll go shift A mesh cube, and we can make
this a bit bigger and then Control A
and apply scale. Alright, so in this window here, we have this is where
we control the shader. So we can add a new
material by clicking New and we get these two nodes here. We
can scroll in and out. You can click a node and then
press G to move it around. And to add new nodes,
we just use Shift A, and then we get the menu
that we can use here, right? So, up here, we have
different viewpoint modes. So this one here is the material
preview. We click this. We just get like a
default white material. So with the cube selected, we have a material input node. So anything that goes
into this material input is what gets shown
onto your model here. And then this principle
BSDF node is your shader. So this is where we control
all the different settings. So here we have base color. We can change the color
of our cube here. And then metallic. So metallic
of zero is non metallic, and then one is fully metallic. Roughness is like how
reflective it is. So a roughness of zero, it becomes like a very reflective mirror
type of material, and then roughness of one
is like the opposite. Iowa we won't need
to worry about that. That's mostly for,
like, transparency and how thick the transparency is. And then Alpha, we'll be using this for some opacity
in the textures. And then normal we'll go
over normal maps in a bit, and then anything below this we won't really
be using here. But omission is
quite a useful one. It emits light. So you can use that if you like lights and flame and stuff like that,
which is quite useful. So we need to add in some images to use
as a texture here. So if we go to Shift A, and then we go to search, we can type in image texture, and we want this one here. And then if we click
Open and we go to our course files folder, we should see a texture folder. And we'll start with
wood for this one. And we have a base
color, we have a normal, and we
have a roughness. So I'm going to choose base
color and then open image. And then I'm going to
plug this color node into this base color node here. And we can see we have the
wood on our own material here. If I press tab and then
scroll out in this window, we can see our model is being cut up and
then placed into, like, a two D kind of
version of itself here. And each of these faces corresponds with one of your
faces on your model here. So by default, the Look at the default
shapes that we go with blender, they
come unwrapped. But if I was to make any
changes to this model, let's say I put in an edge loop here and then extrude
this face out, it doesn't update the unwrap, and we can see here the texture
isn't applied properly. So we won't really need to do much with UV
unwrapping in this course. All we really need to do is
just press A on our model. We can press U, and then we can just use
Smart UV Project. And then click Unwrap. And then that will unwrap
it automatically for us. And we can see now the texture
has been applied here. Now, if we do need to
make any changes to our UVs over here, we'll just do it manually. Let's say we wanted this wood
grain to go the other way, we would select these two faces here and then just rotate it. And now our wood grain
is going this way. So that's the basics
of UV and wrapping. We could also change the size of the texture here
by scaling these. So if we make this bigger, now the texture
is a bit smaller. We do have an add on to
get the right scale. So if we're going into
At mode and then press A on all of our islands here, and then you press N to get
this side panel up here, we have the texil density add on that we installed
at the beginning. If we scroll down.
This basically allows you to you can
press calculate TD, so we know the density of this is 0.5 pixels per centimeter. But we can set the size here. So for most textures, we're going to use 2.56. So this sets all your islands to 2.56 pixels per centimeter. So we want the same texel
density throughout your scene. So every texture is
like the same size, so it looks consistent, so we're just going
to use that to make sure the size is the same. Now we can see the wood is a lot smaller and more of like
a real life size now. So that's your base color here. If we can duplicate the node with Shift D and then move
this underneath here, and then we can click
this folder icon, and then we can add our
roughness image here. I'll open up image. We'll
plug this into roughness. Now roughness is a
black and white image. So under color space, we're
going to change it from SRGB to non color. And then this controls
how reflective it is. So this is set to
the wood material. So it's not very
reflective at all. So this is the right roughness. But now our textures
looking a bit flat. It just looks like a flat
image placed on our texture. And we want some of these, like, wood kind of like grooves in the wood to
kind of poke a little bit. And that is what the
normal map is for. So if we shift this
image texture here, and then we open
up our normal map and then we need to change
this to non color as well. And then you can
see here this has a yellow color pin here that goes into a
purple normal pin here. So we need to convert
it into a normal map. So we'll go shift
a search and type in normal and type
in normal map. Get this normal map here, and then we just plug
the color into the color here and then the normal
into the normal here. And we can kind of see
the effect it has. If you look at these
grooves, we can kind of see it's starting
to take shape now. I I change the strength
to something like ten, you can really see
the effect it has. And if I bring this back down, you can kind of control how
strong the normal map is. But I think a strength
of maybe one or maybe like 1.2 at the most makes
it look really nice. And now we start having some
kind of depth to a texture. So that's the basics of
setting up textures. Now, we will also use
some other nodes. So if we go Shift A and then
search and then mapping, and then we plug the vector into all of these
vector points here. And then we want we do Shift A search and what is it called texture
coordinate, I believe. Texture coordinate,
and then we plug UV into the vector here. So we're telling it
to use the UV map, and then with this mapping node, we could also rotate the texture around and
move it like this. That's a useful node to move your texture
around like this. So as basic sub
textrin we'll go into more detail of adding more of a stylized texture
in the next lesson. Okay. You
28. 3D Lesson 27 Stylized Sky Texture World Lighting in Cycles: Hello. Welcome back to Blender stylized Arabian market course. In this lesson, we're going
to set up our world lighting. Okay, so before we get
into more texturing, we're going to set up
our world lighting because we do our
lighting first. Our lighting has a big impact
on how materials look, you know, so we want
to get that sorted. So we're going to go into
edit and then preferences. And then under system, we want to make sure we
have optics selected. And then if you have a
GPU, choose your GPU. If not, then choose
your CPU here. If you have an older system
and you don't have optics, then you can go
with da, hopefully. So we'll close that once
we have these selected. And then we're going to go to
our render properties here. And then for the render engine, we're going to choose Cycles. And under device, we're going
to go with GPU compute. And then under sampling here, we're going to tick denoise. So now, if we go to our
rendered view up here, you'll get a nice,
dark scene here. So there are many different
ways to light up your scene. The first way is to go Shift A, and then under light,
we can choose Sun. And with this, you can
just rotate it around and get like a direct sun on
your scene. That's one way. I'm going to delete that because we're not
going to use that sun. We're going to use
something else. So I'm going to go back
into our shader editor here and I'm going to bring
my UV window back as well. So under the object menu here, we can choose world, and this is our world
shading, basically. So we have a world output, same as a material output. It just shows whatever's
on the world, and we have a background node. You can change the color of your background and the
strength of it. Here. But what we're going to use is a nice little node
called a sky texture. So go shift a
search sky texture. And if we plug this
into the color here, we get a nice little
skybox that we can use. So it's pretty self explanatory. Sun disc is your sun. You turn this on and off depending how strong you
want your sun to be. Sun size affects your shadows. So if I was to rotate the sun here somewhere where you
can see the shadow here, a smaller sun size casts
like a harsher shadow. And then if I was
to lift this up, you can see it creates
a softer shadow. So for sun size, I'm gonna go with a value
of two, quite like this. Look. Sun intensity, I'm
going to keep that at one. That's basic how intense
your sun lighting is. Sun elevation you know, is how high the sun is. I'm going to have
quite a high sun. I'll go with 45. And then sun rotation you can have whatever
angle you want, whatever it looks nice. I'm going to go
with 135 degrees, so it's pointing like
this way into our scene. Altitude can give, like, a different kind of look
on the ground, mostly. So we could probably bring this somewhere,
like four or something. It's quite cool. And then
these three settings here can change the overall color and the way the lighting looks. So with A, I'm going
to go with, like, 2.5. For this A sales, I'm
going to go with, like, a value of 0.5, and then ozone, I'll probably keep
at one, and I'll have something like this. So there's our world
lighting setup, and then we can get
into some texture. I'll see you in the next lesson. No. Mm.
29. 3D Lesson 28 Procedural Stone Material with Ambient Occlusion: Okay. Hello, welcome back to Blender stylized
Arabian market course. In this lesson, we're going
to add some more details to our textures and learn how to make them look a
bit more stylized. Okay, so I'm going to
change this back to object here so we can
continue with more textures. And I'm going to
go up to Edit and preferences and under add ons. We're going to search
for node wranguler we're going to make
sure this is enabled, and this just allows us to use some keyboard shortcuts to, like, speed things up when
we add some nodes in. So if you go Shift A,
we'll add in a cube, and we'll make this a
bit bigger and then control a apply scale and
let's add a new material, we can rename this
here to stone. On our shader, we click this and then do Control Shift and T. We can go to our
course files folder here, go into textures and
then under Stone. We can shift, click
all of these, and then click Add
here to add them all. And then the add on will
connect them all for us. So now we can go back up to
here to our rendered view, and we can see here
we have the texture. Now this is looking a bit
bright and blown out. So if we go down to
color management here, so scroll down a bit. We can turn down the exposure, so it's not so bright and we can see more of the detail
in the texture here. So we're going to go into
edit mode with this, and we all have islands
selected, let's press N, and then under textil density, we can choose 2.56, so we have the right scale of the texture and then
back into object mode. So I'm going to drag
these out here. So we have some space to put
some more nodes in here. So the first thing
you want to do is add some color variation
to this object here. So it's looking a bit too white. So what I might do is
go Shift A and then search and type in
hue saturation value, and we'll grab this node here, and we can place this on this
line here to connect it. And for the value,
I'm just going to bring this down to
something like 0.2. So we have more of a
grayish, brownish color. And then we're going to use a mixed color node to mix in some different
colors with this. So if we go Shift A,
search mix color, we can get this node. And we want to put
this into the A slot. And then we can plug this
into the color here. And now with this
color picker here, we can mix in another color, but we need something
in the factor to tell it where to mix to. So we're going to
use another texture to mix that and
use it as a mask. So if we go Shift A, and then we can search
for noise texture. We can grab this node, and then we're going to plug
this into a color ramp. So if we go search color ramp, and then plug the
color into this. I'm going to control
shift and left click this color ramp so we can see what this noise
texture is doing. And if we drag up this
black arrow, we can, like, crunch in these values to get, like, a different like, more contrast in the
actual texture here. So with this noise texture. We can plug it into the factor here and then plug
this shade of backup. And let's say we just go to pink for now so we
can see the difference. We can see how it's using the noise texture
to mix in this color. So this result is okay, but it's a bit
it's not the best, you know, it's kind of got
quite a harsh kind of blend. So we're going to use some
other nodes to create more of like a better
blending, basically. So we're going to add
another node here. Go Shift A search, and we're going to type
in Voronoi texture. And we can get this node. And let's just duplicate
this color ramp with Shift D and plug the color
into the factor here. And then if we control shift left click on this color ramp, we get this kind of pattern here that we can adjust
with this black value. And we have different
settings here. So for the F one, I'm actually going to
go to smooth F one. So we'll use this. This is more like a blurry kind
of blend we can use. And for Euclidean here, we're going to use a
different kind of shape. We have some
different ones here, but we're going to go with
this Chevy Chev texture here. So with this, we're going to take this texture here and then mix
it with this noise. But with the vorne texture, we're just going
to hit Control T, so we get this mapping and
texture coordinate node. And we're going
to use the object coordinate for this just to make sure it's like a consistent
size on each object. And then we're going to plug the noise texture color ramp
into the smoothness here. So now we get this kind
of effect going on. And we could probably bring this black value all
the way to the left here, maybe just a little
bit to the right. So we're just going to
adjust these settings here on the noise
texture and the Varinoi. So with the noise texture, we're going to
bring the scale up to something about like 50. The detail of two would be fine. Roughness, I'll just bump
this up to like 0.75, and that should do for
the noise texture. And then for the
Varinoi texture, we're going to lower the scale down to something like 0.4. So we get this detail
can be left as default. All the can be left as default, and that should
be fine for that. Now we can see here
if we can adjust the darkness of this vornoi
texture with this one, and then we can
adjust how much it blends in with this black
arrow on the noise texture. So you can see it kind of blurs in those
sharp lines there. So now we have this, like, nice, kind of kind of looks
like spray paint. And then we can always adjust the scale here a little bit. I think 0.4 about
0.4 is a good value. So we can use this as a mask now to plug into this
mixed color note here. So I'm going to drag all of
these to the left a bit. And then with this four and
texture with the color ramp, we'll plug this into our factor now and then plug up the shade
out to the material I put. And there we see we are
blending it like this. So we can always
adjust the scale of the vornoi to bring more
in if you wanted to. But I think I'm going
to keep it at like 0.4, maybe 0.42 or something. And then we can adjust
this color now. So if we go for a color
where it's like, kind of, we're in a desert environment, so I imagine like a yellowy, reddish brown kind of color. But we don't want to go
too saturated because this is going to be
like our grayish stone. So I'll bring the
saturation down a bit. And now we have some color
variation going on now. So we just adjust
the saturation. We could always
adjust the black on this noise texture to
adjust how it mixes in. And now you will see the effect once we
have more objects. So let's say we
scaled this one up here and then re unwrapped it, and then set there a TD. You can see the effect it has now on different
kind of objects. And as we move things around, the blending changes
because it's based on like it's using a
procedural node here. And this is looking a bit sharp. So maybe we could change this
Vornoi texture up a bit, so it's not so harsh. We just play around
with the settings and get a different
kind of result. So now we have this
kind of thing going on. And we could always bring
this black further back so the change in color isn't so intense,
you know, like this. Bring it back to
it's more of like a smooth kind of transition. So that's one way to
get color variation and different kind of blending modes using a mixed color node. Now, another thing
I like to do is, let's say we have this here. And we can create, kind
of, like, crevice here. And I like to add some
ambient occlusion to the textures to simulate, like, dirt buildup
and, like, dust. So if we drag these
two nodes over, and we'll go Shift A
search ambientecclusion, you want this input
ambient occlusion node. And then we'll plug
this into a color ramp. So search color ramp, and we plug the color
into the factor here. I'll control shift left click this so we can
see what's happening. And then if I drag
this black value up, we can see it gets darker
in the crevices here. So we need another
mixed color node. So we'll get a mixed color, and then we'll plug this
into the A from here. And then this one is going
to go into the factor. And then this one can go into the base color then and
we can plug this up. Now, these black
and white arrows, we might have to
switch them around. So let's change this
white color first. There's something
pink so we can see. And I'm going to
swap these around. And now you can see
the pink is coming into the crevice here, and we can, like,
crunch these values to control how tight it is and how intense it
is just like that. So now we have this, and we can just change this
color to, like, a sandy kind of color like
this. We can make it darker. And just have a
very subtle kind of transition in the crevices here. So you can always adjust this if you want it
to be more intense. But I think having
it just nice and so gives a nice effect here. So the last thing we
need to do is just add some edge highlights
to our object now. So let's drag this
out a bit more. And then we're going to add
a node called a bevel node. So we'll go Shift A
search, type in bevel. And we want two of these. I'll do Shift D to duplicate. And then we're going to put in a mixed color node and
plug these into here. And we're going to use a
different blending mode called difference. And we want two
different values here. So for the top one, I'm going to go 0.04. And then for the bottom one,
we're going to go with 0.02. And we're going to plug
this into a color ramp. We want the factor
to be one here, and then get a color ramp. And then if I can control shift left click
this color ramp, we can see it's added like a white highlight
over the edges here, and we can use this as a mask. You can adjust the radius here. You want more of
like a softer and bigger and then this
one to tighten it up. I'm going to keep this at
0.02, and then this one, maybe we could go
up to like 0.05, have it just a bit
thicker like that. And then you can bring this white arrow down to
make it more intense. And then this black arrow
to make it less intense, just to crunch those values. And then we just need to mix this with another mixed color. So we'll grab a
mixed color node. And then this can go
into factor here. This could go into the A slot. And then this can go into
the base color here, and then we'll plug
a bear shade up. And now we can just about see easier to see in the darker, there were white
highlights here, and then you can control the color of your highlight
with this color here. So we want to go white. We can use this color
picker, actually. We have an eye drop at all here, and we can choose like a
light color in our object. So if you choose this, it
kind of matches the color of our actual, object. And that's how you get
some nice highlights, and now we've ended up
with something like this. Now, if you want to preview
what it was like before, we can just control Shift Click. This here, or if we plug this up into the base color here
and then plug our shade, this is what it was like before. And then this is
what it's like now. So we've completely changed
the look of it, really. We've added some more
color variation, you know, some dirt
build up here, and then some edge highlights. And that's basically
the building blocks of creating materials, just
adding some layers, plugging them into mixed nodes, using different textures to create masks and plugging
it into the factor. Ambient occlusion and some bevel nodes for
some highlights. And you'll see this
setup on pretty much all the shaders that we have
available in the course. Now we could also adjust
the overall color. So if we take this
huge saturation value node here and then duplicate it and then
put it at the end here, you can adjust the final color
of your entire material. So if you put the value to one, this is what it looked
like before we added this. We could always, lower
the saturation to make it more gray and then, like, bring the value down a bit more to make it like darker. So it's more like a gray stone, if that's what you prefer. But yeah, you can just
play around with values and just experiment and
see what you end up with. So I might put the
saturation here to like 0.85 or something. And then the value
to, like, just 0.5. And then this will be a nice desety stone texture
that we all use. So yeah, I hope that
wasn't too complicated. If it was a bit too
complicated, then don't worry, we have made some shaders
for you that you can just throw onto your objects
and will be good to go. I will see you in
the next lesson.
30. 3D Lesson 29 Smart UV Project and Material Linking Workflow: He. Hello, welcome back to Blender stylized
Arabian market course. In this lesson, we're going
to take the material we made and start applying
it to our objects. Okay, so now we can
take this stone texture and start applying it
to some of our objects. Now, because all of
our objects are, like, pure white, it becomes a bit hard to actually see, you know? So what we're gonna do is we'll press AltH just
to unhide everything. And then we'll press A to
select all of our objects, and then we're going
to shift select our human reference last because this has
a material on it. And this material is
basically ambient occlusion with a color ramp set to, like, a grayish color
plugged into the base color. And we can copy this
material over to all of our objects just by hitting Control L and then
link materials. So now with this material, it's a lot easier to see
our individual objects. Now we can delete
these cubes that we were working with
just like that. And let's select the objects that we wanted our
stone texture on. So it's going to
be most of these, like, stone trim pieces. So we can shift
select all of these. And there's some over here
we can grab. Just like that. And then maybe this one, but we might have something
different for that one. So I have all of
these selected here. We can go into Edit mode with all of them selected
and press A, and then we can unwrap
them at the same time. So we'll press U and then smart UV project
and then unwrap. So we have the islands of
all of our objects here. We'll press A just to make
sure they're all selected. And then we can press 2.56 to set the correct
scale of the UVs. We'll go back into Object mode. And then here with
this drop down menu, we can choose stone material. And then this has added it to
the active selection here, and we can just copy this
over to the other objects so we could control L
and link materials. So now, all of these have our
nice stone texture on them. So we can drag this down a
bit so we have more room. And let's bring in the textures
from the resource file. So let's go to file. We'll go to append. We'll go
to a course files folder, and we want the Arabian
market resources blend file. And then in the
collection folder, we can choose materials
and append this. And then we should
see once it loads, our materials come
in here, right? So we can move these to
the side out the way. And we can start choosing
some objects to unwrap. So maybe we should start
with something simple, Let's go with this window
up here, this window here. So let's go into edit mode. We'll press A U smart
UV project wrap. And then we can set our TD here. If it's called 2.56 here, we can just press set the TD
or press this button here. So I'll set the size of the UVs, and then we can
change this to wood. So we could start with Wood DAC. We can choose that. And now this is just all
one wood texture. But let's say we wanted
multiple textures on this. If we go to this little
material properties icon here, we have a list of
materials here. So we have a wood dc. This is like a second
material slot, and we can always
add more materials over removed materials
using these buttons here. So I'm going to press Plus
to add a material slot here, and then we can just
choose another material. Let's type in wood, and we
could try wood light as well. But we need to tell
Blender where to put the wood like material. So if we go into Edit
mode and make sure everything's
deselected and we can press L on some pieces. So maybe maybe these
outside pieces. If we press L on
these to select them, and then we hit a sign
on the wood light, this will become the wood
light material here. So we can add another material, and we can put wood dry. Now we have three
different types of wood. We go into At mode, and
we can select using L on these wood panels behind it and choose wood
dry, hit a sign. And now we have this,
three different types of materials on one object. Now we can do the same with
all of our other pieces. So we could go with this window, we go into Edit mode, A U smart UV project.
We can unwrap. We can set there a TD. We can change this
material to wood, dark. This second material
can be wood light. And then we can just choose what we want to be
wood light now. So I might go with some
of these pieces up here. And maybe these two and
assign these wood light. And then we could put
another material on, make this wood dry, and then choose some of these wood panels here. And then hit a sign. And it is a second window then. So quite nice and easy.
So we'll do this window. We'll go into Edit mode, A U, smart UV project wrap. We can set T deep and then
change this to wood wood dark. And then this one could
be wood wood light. And for the wood light, maybe we could have some of these smaller
pieces selected. So we'll select all of these. And maybe these two going across here
could be wood light. So we'll assign there, and then we can add
another material. And this would be our wood dry. And then we could choose these wood panels behind it here and choose
wood dry there. So now that we have our
materials on these windows, we could just go
back to solid view, so it's a bit smoother. Go to front view with
one on the number pad, and we can duplicate
these across now. So go Shift D and then X and move these into
place just like this. I like that. And if you
want to get them perfect, you could just go
Shifty x and then hold control on this
face here to snap it. So shifty X, hold control. And now, we go to render
View, our windows are in. So one more, we could
do this shelter. So, into Edit mode, A U, smart UV project, wrap, and then set there with TD. And then for this
one, we could go with the drywood and we can have
a look at how this looks. And then if you wanted
any more pieces, you could just add
maybe the dark wood, go into edit mode and then just press L on any pieces
you want dark wood. So it's L here. Maybe these pieces
underneath could be dark. And then hit the sign. Now we have different wood types here. So yeah, just go
around your scene and just doing that just unwrapping and then setting TD and then setting materials. And then one thing
to look out for with the wood is with the wood grain, we want it to, like, follow
the face going long ways. So if I come across any, that the wrong way, I'll
show you how to fix it. But let's say this face was, like, going this way here. All we really need to do
is go into edit mode. Select that face. I'll
select the island down here, and then you just go 90, so it's facing long ways. Now I'll fix the wood
grain there then. So I'll see you in
the next lesson.
31. 3D Lesson 30 Scene Wide Material Assignment and UV Control: Oh Hello. Welcome back to Blender
stylized Arabian market course. In this lesson, we're
going to continue adding some textures
to our objects. Okay, so we're just going
to continue off from last lesson and just go around our scene and start
adding some materials. So we can do this
bargaining here, look into Edit mode and then AU, Smart UV project, wrap, set TD, and then we can
give this wood dry. And then we can have
a look if there's any pieces we want
to be different. So maybe maybe this one and maybe this one
in the middle here. For a second material,
we can give it the wood dark material
and then just hit a sign. Is that when done? Now we
have a window here we can do. We can just go Edit mode, A, Smit UV project, wrap, set TD. I'm going to remove
this material slot and then change it to
this could be Wood ****, I guess. It is the
Wood **** then. And then we can duplicate
this window over. So let's go shifty and then Y might need to go back
to solid view so we can see properly GY, move this into position, and then Shift Y,
move this one in. There's done. Back
to render view, we have these wood
supports here. So we're going to Edit mode. AU, smart UV project, wrap, set there with TD and then
set this material to wood, something whenever you want. And we can see here
the wood grain is going sideways here. I think we want
it to go upwards. So I'm just going to
go into Edit mode, select this front face here, and then just rotate
it 90 degrees in So you see here
when we rotate it, it's connected to
this face here. So all you need to do is press Y on this island to separate it. And then 90, and
then that fixes that then because some of these faces are connected to
other faces, right? So we need these stones
on the side here. I'm going to apply the
array and the mirror on these stones so that the
texture doesn't like duplicate. So we'll apply the
mirror and the array. And on these stones as well, apply the array here
and apply the mirror, and then we can shift select
them both into Edit mode. A U, smart EV project, wrap, set there with
textile dentity. And then into object mode, we can give it the stone
material that we made, and then Control L
and link materials. I might end up lowering the saturation on this and
making a bit more gray. We'll see how it looks later on because maybe this colors a bit better, but
let's carry on. We have our balcony up
here. Let's select this. And then A, Smart EV project, unwrap, set down with TD, and then let's give
this some material. So we'll start with
the dark wood. And then maybe we should have
light wood on some pieces. So we'll choose the light wood here and press L on
this middle one, maybe some of these panels. We'll just select
some random ones. And then maybe some
random panels down here. So we can choose some of these. And then hit a sin, and
maybe this will do. Actually, no, let's
add another one. We'll add the drywood and I'm going to apply
it to these two here, and then hit a sign. Then we have this. That
looks a bit bit nicer. Anything else that we should do, right? We have this wall here. We can do this wall, the
flat part of the wall. We'll go into it mode, A U
smart UV project, unwrap. And then we'll start
with 256 for this. And then we're going to
choose the Which one is it? Sandstone block masonry.
We'll choose this one, and we need to rotate the UV. So in the UV editor, press A to select
all your islands, and we can just go R 90, and these are upside down. So make sure these are
the other way around. So we'll go R 180, and these are correct now. So look at the
pattern here. We want it to be facing upwards like this. So there's a wall. Now, what else could we do? So we have this archway
here we could do. Go to Edit mode AU, smart UV project
wrap set there a TD. And then this one will be
OR stone that we made. We go the steps here we
could create with stone. So Edit mode A, U,
smart UV project, unwrap set ATD, and
create stone on this. It's looking quite nice. We have the doorway here,
which we need to do. So this doorway into Edit
mode A, Smart UV project, unwrap set ATD, and then we
will go with the dry wood, and then we can add the
light wood as well. And then we can select
our lightwood pieces. So maybe these panels
in the middle. And then these ones here
could be the light wood. Assign that. There's our door. Now we need some windows
at the front here. So let's take one of these
windows, I think we'll do. I'll go Shift D and then AZ -90. And then we can just GY, GZ, GX, and move them into
our window here. So let's go to the solid view, and we'll go GX and GZ, we might need to
scale this down a bit and then just get
this into position. Go GZ, bring this up, scale it up and get it as
close as we possibly can. So that looks good.
We could go GX, push it back a
little bit as well. And then we can
just go shifty Y, bring this one over here. We can even snap it to this face and get that one in there. Have a looking rendered view. And there we go, looking good. Any other pieces we should
do. We could do the floor. So we could select both of these floor pieces,
go into Edit mode, AU Smart UV project and
wrap into object mode, we will choose the
stone paving ground and then control
L link materials. And we need to go into Edit mode and set
out a TD, as well. So set TD. Now with the floor, we could also go a bit
higher so 512 or one, two, eight, if you
want bigger stones. But maybe we should
stick with 25, six, maybe that's fine. We're going to do
the walls later on because we're going
to be Vbtex painting, but we need to do this
building over here. So we'll do our dome, our dome thing, right? So interdict mode,
we'll do A, U, smart EV project, unwrap, and then let's set
there with TD. So the first one will be stone. Are there a stone material? And then the second
one will be gold. So we want the metal gold here. And let's press L on
these little kind of like these things up here
with the spike and the little metal kind of
pattern that we made. We'll assign this.
And now we got this. And then we're going to use the stone texture
for these parts, but we're going to
change the color. So we're going to select
there was stone texture here. Actually, we're going to press the plus to add
another material. And we're going to
choose stone here. And then we're going
to click this number. So this number
means that there's 17 other objects
using this material. But if we click this number, it creates like a copy
of that material. And we can rename
this to Stone red. And then if we go into
our shader editor here, at the very end, just
before our shader, we can add a mixed color. You have a mixed color here, and then we can
choose a red color. And then we just need to
assign it to some faces. Let's go into edit mode.
We select everything. We'll click this face
loop and then hit a sign. And you can see this
is turned red now, and you can adjust the
strength of the red with this factor here,
just like that. Let's create another material and then choose there stone red. We'll click this
number to make a copy, and then we can change this to blue and then change
this color to blue. So we can choose
like a bluish color. And then select some faces. So we can Alt click. I'm going to press
L on this piece and then just press H so
we can hide it either way. We might have to if
it doesn't disappear, we just have to go to Solid view and then rendered view again. And for some reason,
it's not hiding. So let's's go to solid view. We've hidden that
out of the way. So now we can select these face loops with Alt and
left click, just like that. And we're going assign
Stone blue here. We do Alt H to bring everything back and then go
back to render view. And now we can adjust
this blue now. We might want it a bit
darker, something along here. We can bring this down
to make it darker here, just the factor to get
something like this. And if we go to camera view, we can have a look how
this is looking now. So we have this. And we may as well just really quickly before we finish this
lesson is go to solid view. We'll go Shift D
Z, bring this up. We can press seven on
number pad to go to top view and get this
nice and centered, and scale it down
so that it fits onto our onto a tower here. So this might need
to be a bit smaller so it's not overlapping. Then just GZ bring this
to the center here, go back to camera view,
go back to rendered view. And there's a good start, so we'll continue with the
rest in the next lesson.
32. 3D Lesson 31 Tower Materials with Smart UV Project and Vertex Paint: Okay. Hello, welcome back to Blender stylized Arabian market course. In this lesson, we're
going to continue adding more materials
to our objects. Okay, so now we need to do some of the pieces on the tower. So let's select this. And, um, on this one, we could go into Edit mode, press A, U, smart
UV project wrap. And then let's give it the
stone material to start with. And then let's give it one of the wood materials.
We'll give it wood. Wood dark. Yeah, let's
give it wood dark, and let's select
some items here. So we'll press L on
some of these pieces. And then we could try doing
the select option up here. So if you select similar
maybe we could try Area. No, I don't think that
works because they're selecting random faces
that we don't want. So we're just going
to have to press L on all of these
manually, I think. So this one's probably going to take a while because we're doing so many different
kind of manual selections. So I'll just press L on
all of these frames. And then we all hit a sign
on these for the wood deck. And then we'll add another one. We'll give it the wood light. And then we can
select these panels. So press L on these panels here. And then we hit a sign. And then we go down,
we have this window. So I might select
the back panels. It would probably be quicker
if we just added wood, like, first, and then
selected the stone pieces. But we're locked in
there. We're doing this. So we're going to
select the wood panel just like this and
then hit the sign on wood light, I guess. And then we'll have wood dark
on these outside frames. You could always
skip the ones at the back because we won't
see it from camera view. There we go, we have wood
dark on knees, a sign. I'm going to add the wood dry. And then we could have these middle pieces as wood dry here. Okay, so we're dry
on these assign, and we can have Oh,
we got another layer. Okay, let's go. All right. So outside frames. Dawsey, we done on that.
I'll just get these. You could always fast
forward at this point. I mean, you know
what I'm doing here. I'm just selecting these and then applying materials on them. All right, so assign
the wood deck on these, and then the wood light
on the panels behind. One thing we could have done
with these is, did the texture first and then added the circle
array to it, you know? So these were wood light. And then we want wood dry for
these middle pieces here. Okay, so wood dry on these. Now, there will be
one more material on this for the main stone. I guess we could add them
now. Yeah, so may as well. So with this, we're going
to add another material, and this one is going to be the stone plaster
VP material. We're going to choose this,
and then we're going to press L on these like middle
cylinder pieces here. These ones will hit a sign. And right at the
moment, it's gray, and it's a bit we did set
our TD with this, right? Let's press A and then set TD. Calculate TD. Yeah,
no, we didn't. So we need to set TD. Okay, now we have our texture
looking good. So by default, it's going to
be gray, this stone plaster. And if we open this up, this
is our vertex painting one. Now, it's going to look
a bit complicated, but like all it is is we have
a plaster based material, and then we have a
plaster wall material, and this one has ambient
occlusion on it. This one has some ambient
occlusion on it and stuff. But it's mixed together here. It has a mixed shader here. Mixes these two materials, and it's separated by
a vertex paint mask. So if we were to
select this and then click this menu here and
then go to vertex paint, it will add this attribute
here, and now this is gone. This has turned into the like the plaster
wall material instead of the plaster base. So we just need to
go into vertex paint and then go back to object mode, and then we have this
yellow material now. And it's the same
with these walls. So let's say we select this wall here and then go
into weighted mode, and then smart UV
project, unwrap, set TD, and then set this to the stone plaster
VP material. It starts off gray, and then as soon as we go
into vertex paint, it'll apply the
yellow wall material. And we're going to use
vertex painting to paint in, like, the gray material underneath, but we'll
do that later on. So that is that. So before we move on, we could probably
do this archway. So we'll go into
edit mode, A, U, smart UV project, unwrap set TD. We'll add the stone this
stone plaster VP here. And then we'll just go into
vertex paint so it goes yellow and then
go back to object mode and then that's done then. And then we'll continue with some other stuff
in the next lesson. I'll see you then.
33. 3D Lesson 32 Smart UV Project and Vertex Paint for Stone Walls: Okay. Hello, welcome back to Blender stylized Arabian market course. In this lesson, we're
going to finish up adding the materials to our objects. Okay,
so let's continue. Let's select this wallpiece. I go into Edit
mode, and press A, U smart UV project, wrap, set TD, and then we can
choose our stone plaster. And then we just go to vertex
paint and then object mode. And then we do the
same for this. Edit mode, A, smart UV project, wrap, set TD, apply
the stone plaster. And then we just go to vertex
paint and then Object mode. And then the same for this one. So Edit mode, A U
smart UV project, wrap, set there with TD, and then stone plaster. And then vertex paint, and then object mode,
just like that. And this top wall, I might change to
stone plaster as well. So it looks a bit nice, I think. And then we just go to vertex
paint and then object mode. Oh, and these pillars as well. We'll select both of
these at the same time. A U UV project, unwrap, set TD, and
then stone plaster. Go into Object mode, we'll
do Control L link materials, and then vertex paint. And then it only does the one, so we need to
select this one and then do vertex paint again. And then Object mode. And we've missed this little piece here, so we could apply the array and then apply
the array on this, select them both into
Edit mode, A, U, smart UV project, and wrap, set TD, go back to object mode. We could probably shift
select this building and just do Control L and link materials and then go into
vertex paint on both of these, just like not and are
we missing anything? I think, oh, this building
at the back as well. So let's start
doing this as well. So let's start, it's
all one piece anyway. So Itoedt mode, we go A, U smart UV project wrap, set there with TD and then add
the stone plaster to this. So stone plaster. We'll just go to vertex paint, and then we'll go
back to Edit mode. And then we'll add another one, so we'll add stone material. And we can press L
on this top piece here and assign it to that one. What else? Let's have a
look at the reference quickly and see
what I did before. Yeah, so this face here, we'll apply the
stone to this one. And We could apply it
to this face as well. But then I think that's two DAC, so I'll keep it as stone.
I'll keep it like that. We could press L on
these pieces here if you wanted some kind
of variation here, if you prefer to look at that. And I think that's done. So we have a looking
camera view. And we'll do these
buildings later on, but we're just going to
finish off this side. So I think next, we should probably work on this, what's it called a matri beer. So we should work on that and start working on we should
tackle this big piece up here. So I think we've finally learned all the skills needed to create this wooden kind
of thing up here. So we'll do that we'll do
this, and then we'll do that, and then we can start working on the market stalls and
the props and stuff. So it'll be lots of fun. I'll
see you in the next lesson.
34. 3D Lesson 33 Modeling an Ornate Matrabia with Bevel and Array Modifier: M. Hello, welcome back to Blender stylized Arabian market course. In this lesson, we're going
to create our Matrabia. Alright, so let's start
working on this piece up here. So I've gone back to Solid View. And I'm going to hide this
building out of the way. So when we go into side
view, it's not in our way. And with this, we could let's
just bring it out a bit. And how should we start this? So it's going to edit mode
and select this face. We'll do Control I,
X, delete faces, and we'll just start with
a plane for now, right? So we want probably an edge
loop in the middle here, and we'll select one of these faces and press
Y, so it's separate. And then we could add some
edge loops down here. So actually, maybe
we should undo this. And we'll just
start with a plane here and we'll put edge
loops at the bottom here. Yeah, we'll do it like this. So we'll put edge loops here, and then put another
edge loop here. And then let's do another
edge loop around about here. Something like this. And then we'll put another edge loop to create this middle piece here, and then we'll put another
one around about here. And then we could
work with this. So I'm going to separate this face off for now
and just hide out the way. Now with this face, I'm going to press Y and then this one, Y and then this one, Y then this one Y I'll do Alt
H to bring everything back. And we're going
to start creating some extrusions and cut
out some pieces here. So this bottom piece, let's just extrude
this one back. This will be like our base here. And then this piece here, we could probably put in
some edge loops like this. And then we could
inset these faces. So I'll press I to
inset and then I again and do this like that. And then we need
to extrude these. So we need to alt click this face loop first and then
extrude this back. We'll press E and then X. Bring this back here, and then F to fill this back face in. So now we can extrude
these faces inwards. And then if we do
I to inset again, and we can extrude outwards
then just like that. So we have something
like this? Let's put edge loops in the middle here, and then let's inset
both of these faces. So I'm going to press
Y on this face first, so it's separate from this one. And then we press I to
inset, just like that. Now we're going to
have to Alt click this edge loop here and
this edge loop here. We'll go E and then X, extrude these back here, and then we'll fill in these
individually like this. And then we can select
these faces and then go E to extrude these back a
little bit, just like that. Let's put in edge loops
in the middle here, select one of these
faces and press Y to separate it from this face. And with this one,
maybe we could eye to inset maybe maybe
before we do that. Let's do that. We'll put
an edge lobe in the middle here and then edge lobe
in the middle here, and then we'll put one either side like this and
then either side like this. And then we can start
selecting some edges. So I'm going to
select this kind of pattern like this and then
the same for this side. Like that. And then we can do Control B to bevel and bevel
these out just like that. And then we could select these middle faces here and then press Y
to separate these off, and we could add in
some edge loops here. So I'll add three on
either side like this. And then maybe two. We'll go with three go
in side rays as well. And then we want to select
all of these edges. So we'll select all of these, and then we'll bevel them. So we could control be
to bevel just like that. And then we need to
delete these faces here. So we'll select all
of these faces. This is very, we can probably go select select similar area. Okay, so maybe we could deselect
the ones we don't want. So I'll press C
together circle and then just middlemce
button on some of these. And then we need to just get in here and paint these over. It's probably quicker
than pressing 1 million times, just like that. And then we don't need
these ones selected. As you know, we don't selected
the longer pieces as well. We do Alt click, then yeah, Alt
Shift click these, and it will deselect Deselect
the whole row like this, so we only get the middle faces. See, I try and do shortcuts
to speed things up, and I end up doing it
longer for myself. So you can probably just select these faces manually if
it's easier for you. Right. We're almost there. Or do you select these ones. So we just have these
faces selected, and we can do X
and delete faces. So we have some
holes in this now. Right, so we need to we need
to select these outer edges. I'm going to press L on
these pieces here and then just go Shift H so
we can isolate these. And we need to select I'm going to press
L on this one piece first, and then just hide it
away so we can just select these outer edges here, and we'll go E and then X
and extrude these back. I'm going to go quite
far back a sec, just so I can see where it is. I'll do Altag and then
L on these pieces, just so I can get to this edge without
selecting over here. So I'll just do L
on some of these. Why am I unable to
select this face? I'm in face mode.
Okay, there we go. So then we just have
this so I can get to this edge here and
select all of these, and then just go E and then X and bring this back for now. So lt H. So now with this, I can
select this face loop, this edge loop and go GX, move this somewhere here, then F to fill, and
then this edge loop, I can select F to fill, and then GX move this
back somewhere here. And then These faces, we can select all of these. We can go I to inset, I again because we want
to inset them together. And then we can do
either GY, GX, I mean, to push them back
like this or we can extrude them in like that. Yeah, so let's do the
same with these faces. We'll do I to inset
and then E to extrude, and then I'll hold
control over this one, so it's the same
distance just like that. No.
35. 3D Lesson 34 Creating a Mashrabiya Part 2: Okay. Hello. Welcome back to Blender stylized
Arabian market course. Okay, so we're almost there. Now, we just need some
kind of pattern here. So put in some edge
loops, just like that. We'll select all of these faces. We'll do eye to inset,
and then eye again. So they're separate
just like that. And then I'm going to I'm going to put in some edge loops
first, just like this. Now, I'm going to
press one to go into vertice select mode and we can select some of
these vertices like this. And then if we make sure
we're on median point here, and then go S and then Z, we can scale these in. We
miss the vertice here. SZ scale these in like that. Press free face mode, and then we can select all
of these inside faces here. And then we can do E to
extrude, bring those in. And then we want to select
this outer edge loop here. And then we'll go E and then X, bring this out over this way, and then F to fill here. And there we have this roof
shape that we can create. So let's put some edge
loops in like this, and then we can select this
top edge and then go G Y, GX, bring this back to here. And then probably easier
if we just press L. We'll press L on this face
and just delete it for now. And instead, we could
probably add a cube. If we go Shift A and add a
cube comes in over there. So let's do Shift S and
then cursor to selected. All right. Let's go
into Object mode. Shift S, cursor to selected. So now it's here
back into Edit mode. Shift A mesh cube. Then we can bring this up,
snap it down to the top here, get these side faces and snap it go GY hold control and
snap it to the sides. Just like that. This
front face, I mean, could go back and we could
snap it to the front here, so GX, hold control, just like that,
and the back face will go GX hold control. And then this top face can come down, something like that. Then we can select this
front edge and then do Control B to bevel
this somewhere like this. We can select this
edge here and then go GX and push it back further. And then we can
put an edge up in the middle and then Control B to bevel, just like that. Then we could select
these side faces here And then we
could go right click, extrude along normals, bring these out a
bit just like that. And then we could put in
some edge loops here. Quite a few. Just like that. We could Alt click every
other one like this. And then I'm going to
press Y and then H, so we can see inside
here and we're going to fill all of these in. So I'll click these
edges and then just press F to fill
in these holes. So I'll do all of
these on this side. And then turn my camera and I can do all of these
on this side then. So I'll click Alt click F. And then we need to do
AltH so it brings these back. And then if we do ShiftH, we just see these
then so we can do the same and fill in these holes. There's a face here
for some reason. I'm just going to hide this face for it. I don't know
where that came from. And then fill in this face. And then do the other side. Then we do AltH then we can
go into object mode. Let's add a bevel so we
can see how it's looking, and then shading
to harden normals. And we have this shape going on. Now this is looking
a bit flat here, so it's going to edit mode and let's select this out of face loop and
this edge loops, I mean, we can go E X, Extrude it back a little bit, and then fill in each of these faces
individually like this. And then we can press L on this piece and
L on this piece, and then just go E and
extrude this back a bit. And now let's press A, alt N, Alt N, and then recalculate outside
to fix all the normals. And there we have this here. Now, I'm going to shift
and B click here. We'll do Shift A, mesh,
and then cylinder. It's going to edit mode,
scale this down quite a bit, so it fits inside here. We could just G to
move E to scale, scale it up like this. And then I'm just going
to add some edge loops. And then we can click some
of these edge loops and just kind of scale
them in like this. And then we can select them and then do Control B to bevel and curve them
off a bit like that. Back into edit mode.
We'll add an array. And then zero on the
X, and then on the Y, we'll push these out,
increase the count a bit, just like that. And then we'll apply the array. Maybe we want a few more. I'll do a few more and then
squish them in like this. I might look a bit nicer. And then apply the array. We'll go shifty Y, bring them into
this side as well. And then we'll shift select and then shift select
the main piece, and then just do
Control J to join. And then we have this. We need to right click, Shade Smooth. And then we can just push
this into our wall name. I go GX, push this
up against the wall. And then we're going to borrow
some of these pieces here. I'll go into edit
mode on this balcony. I'll press L, Shift D, and then this we'll do
P separate selection. Back into object mode,
we can grab this piece and place it underneath here. I'll go GY, move one this side. I'll go GX, move it out
a bit, just like this. And then shifty Y
put in this side, and then shifty Y, put one in the
middle. There we go. There is a nice matroba for you. Let's go into rendered view.
And let's select this. We'll go into Edit mode, A smart UV project and wrap, and then we can set OA TD. And then let's start
with the wood DAC. We'll assign that. For the second one, we'll
go with Wood light. And then we can choose some
wood to put as wood light. So maybe some of
these pieces up here. That could be wood light. Now, I'm going to
add another one. This is going to be wood light. But then we press we need to go into object mode so we
can press this number, and we're going to
rename this to wood red. And we'll do what we
did with the stone. We'll just add a mixed
color at the end, place it at the entie and
we can put this to red. And if we select
some of these faces, like these inside faces, And then these faces here, we can assign red here, and then we can just
adjust this factor, bring it down a bit, so it's only slightly red,
just like that. And there is our matcha beer. Oh, we can also change these
cylinders to red as well. So just press L on these pieces. And then choose red here. And then, I think we're done. Let's go with the camera view. You know it's bring
down the saturation on this red here if it's
a bit too intense. And then we should probably join these support pieces
to this with Control J, and then we can scale this up and make it a bit
bigger if you want to. Just like that. There's a nice
mato beer for you. Hope that wasn't too difficult. I'll see you in the next lesson. No. Oh. Mm hmm.
36. 3D Lesson 35 Wooden Structure with Boolean and Solidify Modifier: Hello. Welcome back to Blender stylized Arabian market course. In this lesson, we're
going to get to work on this wooden structure here. Okay, so I'm going to select this piece and
go into edit mode. We can select this face here. Let's do Shift D and then
P separate selection. And then back into object mode, and we'll select this top face here that we made and go
into Edit mode on this. We'll press A and then S to scale it up just a
little bit like that. And then we want to
extrude upwards. So we'll do E to extrude
a little bit like that. And then we'll do Shift
D to duplicate again, right click and then E to extrude and make this
one just a bit thicker. And now we want to shift
D and then E to extrude, and we'll bring this one
up quite high to around about probably the same height as the top of these windows. It's probably a
good height here. And then we can do actually, let's go a bit lower.
We'll go a bit lower. And then we'll do
Shift D and then E, extrude this one up a bit. And then Shift D again then
we'll go E to extrude up. And then Shift D again, we'll go E to go up like this. And then we'll do
Shift D and then scale this one with S a little bit. And then we'll do E to extrude. So we have this
kind of shape here, and then we'll do E
to extrude again. And then with this one,
we can do I to inset, and then G to bring this up
just like that. The roof. And we're going to camera view
and see how tall this is. We can bring our guy up here and double check
the height of him. So it's tall enough for him to stand on we have
plenty of room here. And it looks like
it should work. Now, I'm going to
press L on this. I don't think this
is correct here. This needs to be
a groove in here. I'm going to Alt click this
face loop and then select all these top edges
here and then press Y. So separate this off and
then press L on this one, and then mesh
cleanup fill holes. So now we have that
groove in here. Then I don't think I
duplicate before extruding. Okay, so this face I
might adjust here. I want to go high enough where the bevel snaps properly,
so it looks like this. And that should be a good
start for our building here. So we're going to need a cylinder so we can cut
in the booleans here. So I'm going to shift
right click here. I'll go Shift A, mesh,
and then cylinder. We'll go X 90 to rotate this and then GY, bring
it forward a bit. In edit mode, we'll
delete the front face, delete the back face, and then delete the bottom half faces. Let's go into front
view with one, we'll press A, and then
we'll move this into place. We've missed a face
here. There we go. Move this into place. We'll have it somewhere around here. And then we want to extrude from these two bottom edges here, so we'll go E and then Z, bring it down here, and we want to go somewhere
around here would do. And then we can fill
in these two faces, fill in this face, fill
in this back face, and then fill in this face here. Okay, so now we want to press G, and then Y, we'll move
this in like that. And then we can go Shift D and then X, move one this side. And then we'll press
A and then Shift D, and then AZ 90 to
rotate this Runge and then GX then we can move
this one into place here. And then we can go shifty Y, bring one this side
over here as well, and just make sure we get all of these in place where
we want them to be and then we can
duplicate these ones. L, L, shift the Y, bring this side as
well to cut into here. So with this piece, I'm going to go into edit mode, and I'm going to press
L on this piece. Make sure we deselect
everything and then L, and then P separates selection
just so it's on its own. B into object mode. We can select this and
then add the Boole, we can just keep
the bevel on it. We'll just do the Boolean. And I'll probably move
this above the bevel just to make sure and then
choose our cutter piece here. Let's hide our cutter piece and make sure this is correct. Now it has gone a bit strange
because we're cutting into so many objects at once
and they overlapped a bit. So we'll just apply
this boolean here, and then we'll isolate
it with forward slash, and then we can fix
this manually now. So let's delete some of these inside faces
here like this. We'll delete all of
these inside faces. So now we can see that
these need to come back. So if we select these edge
loops and then go G Y, we can push this
back just like this. And then these edge loops can come forward with G
and then X just like that. And then these could
come forward as well with G and then
X, G, and then Y. Actually, one might
be easier actually is if let's delete the
top and bottom face, we'll delete those, and then we'll delete all these
inside faces here. So we'll click all
of these face loops, select all of these,
and then we'll delete these faces as well. So exlete faces. So we just have
like a flat plane going all the way
around like this. Could probably delete
this back face as well. We won't need that.
And then with this, we could add let's go
to the vertice mode, and let's join up some
of these vertices. So we'll do J here
to join there. Let's see if we
can join these up. Yeah, so we can join
those up at the corner. I'll join these up. And join these up. I'll join these with
J and then J here. And it will allow us to put
in some edge loops here. So we might need to
fix up the depot now. We can ignore that.
We'll be fine. Let's put an edge loop here. Can we put an edge loop
in here? Yes, we can. We put an edge loop in here,
I'll slide that up there. We can put edge loops in here
and in here, and in here. And I'm going to select
all of these edges. I go GZ, move them
all up together. This edge, I'll select
this and then go S, Z, and then zero
to flatten it out. And we can do that. And then with this now, we could add a new modifier that we haven't used
yet called solidify. So if we search,
we want solidify. We'll move this above
the bevel here. What this does is it takes
it from a flat plane, and if we increase
the thickness, it just makes it solid like this,
basically, quite simple. We can choose even
thickness, keep it even. And then we have this
kind of shape here. Let's press forward slash so we can see what
we're working with. And we might want this to
be a bit thinner, maybe. Something like this
would do. And then we should apply the solidify. And then we can go
into edit mode. We can alt click these face
loops that we made here. Just like this. We can go Shift D, right
click, right click again, screw the long normals
and bring these out, and then adjust this here. So there we have
that. Then let's press L on all of these pieces. And then we can go Shift D and then Z and bring them
to the bottom here. Then this one we might
need to bring a bit lower, so it's just sitting on the
bottom, just like that. Okay. So as most of it done, we will continue with
this in the next lesson.
37. 3D Lesson 36 Modeling Detailed Wooden Fences and Trim: Hello. Welcome back to Blender,
stylized Arabian market course. In this lesson, we're
going to finish off our wooden structure. Alright, so now we can start creating the fence
going around it. So what we could probably do is select one of these
bottom faces here. So going into edit mode on this. We'll press L on
this piece here. We'll go Shift D and then
Z and bring this up here. And bring it to the height of the top of the fence,
just like that. And then I'm going to select
this face, this face. Actually, let's press L, and
then P separate selection. And then into object mode, we can select this piece now
and then into edit mode. We'll press L. We'll
select these three faces, and then Control I and then X, delete faces just so we're left with these
three faces here. I'm going to press
A and then I'm going to go Alt S just to scale it inside. Just like that. And then we could we like extrude the long
normals and scale them in just a bit, just like that. You do A Alt S. And then just make
sure these are like inside inside the wood here, so we'll go GY, bring these in. These are all
inside. That's fine. And then this face, we'll go GY, push that one inside there. Then we go into A Alt N, flip. And then we can do Shift D and then Z and bring this
one down to the bottom here. And then we go back
to object mode, and let's add in plane. So we'll shift a mesh plane, and then X 90 and
then into edit mode. We'll grab this bottom edge and snap it to the bottom
of this face here. So GX, hold GZ hold control. This edge, we want to snap
it to like the side here. So GX hold control. This top edge, we'll bring
it down and snap it up to the bottom of this
fence piece here. And then this edge, we'll go GX and then snap it to the inside of this face so we're filling
in this gap here. And then we can basically start
creating the fence piece. So let's move and make the
way, right? Select this. We'll put an edge loop in the
middle and then Control B, just a single bevel,
put it on the side. And we can separate
these two faces with Y, and then we can put
an edge loop in the middle here, bevel these. We can separate
these two with Y. And then we can put a
couple of edge loops. Let's put three edge loops,
and then one in the middle. And then we can select
these faces here, and then we go to
face poke faces, I to inset, and then
X, delete faces. Then we press A, E to extrude. And then we can select
these outerfaces here, and then G Y, push these forward,
just like that. Into object mode, we
will add our bevel. So add our bevel modifier, shading the normals, and
then adjust the amount here, bring this down,
something like this. And now we can go G and then Y, we can push this into
place, just like that. And then we can fill in these holes now so
Shift E and then X. Just like that. And then
we can shift E Z -90, and then GX and then GY, snap it to here, and then move it into
place just like that. And then just duplicate
these across. So we can go Shift E, X, hold control, Y, hold
control. There we go. Do the same here,
Shifty Y, hold control. Shift D, Y, hold control. These two, we could shift D, and then AZ make sure we're
on individual origins, and then AZ 180. I didn't flip perfectly because the origin points
aren't in the middle. So we'll select them right
click set origin to geometry, shifty, AZ 180, and
now we can go GY. And bring them over
here, just like that. Then we want to do
the same kind of technique, create a
plane for the top. So what we could do is grab
one of these pieces here, so I'll press L on this piece. I'll go Shift D and then
Z and bring it up here. And then I'm just going to
make it smaller on the Z, so I'll scale it on the Z
like this and maybe actually, if I undo that and do Alt S, scale it in like
this and then Alt Z, make it thinner like that,
have a nice fin piece. And then Let's add a plane. So into object mode, we'll add a plane,
mesh plane, X 90. You can move this into place. Into edit mode,
we'll scale it down, and then just make sure
this top edge goes in here. This bottom edge goes into, like, snap it to the top of this piece here if
we can get to it. Like GZ hold control onto
this face. So it's like here. And then this edge
can go inside here, and then this edge
can go inside here. We'll add some edge loops. Just like that, add some
edge loops this way. And then we can select as
forward slash twice late. If we press A and then Alt Shift click
these outside edges, we can deselect them and then go control B to bevel,
just like that. And then we need to delete
all these inside faces now. So we need to select
all of these. If we select one and then do
select select similar area, it doesn't select just the one. Okay, so let's
select all of these. And then we can press X
X and delete faces here. Okay, so now we can press
A and then forward slash, and then we can extrude this
out a bit, just like that. And then we can add
bevel to this piece now. So let's add modifier,
search bevel, shading her normals
and bring this down as tight as we
can, just like that. Now, this piece here might
need to be a bit thicker, so I'm going to press L and then Alts, make it
a bit thicker like that. And SC, and that
should be fine there. And then this piece, we can just duplicate
this across now. So shifty s, shifty X, I mean, I can go there. And then we can go shifty and then Y, bring
it to this side. Make sure this is inside the
wood here, just like that. And then we go Shift D Z 90 to rotate and bring this one over. And then we can get
these into place and then just duplicate them across. And then I think I think
we're done modeling with this piece
then, so shifty Y. Shifty y, and then
one more shifty Y. Now, there was one thing I just remembered we need
to do on this piece. It's up to you if you
actually want to do it. But I'm going to select I'm going to select this middle
piece into edit mode. And maybe we could
scale these parts in, but they're already pretty thin. So in the first scene, I add these ones a bit thinner, but I think we'll just
leave these for now. You could always add in some extra detail if
you wanted to, like, I don't know, put in
something like this and then extruding along
normals or something. But now, we'll just
leave it flat. We won't overcomplicate things. And that's how wooden
structure done, I think. I think there's a little bit
of detail we're missing. Yeah, so we did have
some edge loops. So we did we're
going to press I to inset these faces here and
then extrude along normals. And they're kind of cutting
in here to each other, they intersect in so
you got to be careful not to intersect here. So we can just
extrude in like that. I did have some edge
loops in here and in here to create these kind of faces here so we could
select these faces. This is just kind
of extra detail that you can add,
it's up to you. And then we I to inset, and then right click Extrude long normals to
extrude these out. So now we have this around here. Yeah, it looks cool.
So we'll have that. And now, I think we just
need to texture it. So I've got a couple of
minutes left of this lesson. Texturing won't really
take that long, so we can just go
into edit mode. Let's go to rendered view here. Into edit mode, or go AU, smart UV project, unwrap, set TD, and then go to
add materials here, and then choose Wood
DC and then a sign. So now we have this. We also want the wood
red on this one. So we'll choose wood red here. And then I'm going to select
all of these faces up here. Just like this. And then do Control and plus on number pad to expand the
selection and then just assign. These are Wood red. I'll select this piece into edit mode, A, U, smart UV
project, and wrap. Se there with TD. This one
could be wood dark as well. And then we need to adjust
the UVs on this one. So let's go to a UV map here. And with these faces
here going sideways, we're going to click and
drag and select them, and then we're going to
press Y to separate them off and then do 90 to rotate these. So we want them to
go long ways here. There's two here
that we need to do. So we'll do Y 90
to rotate those. Now, these faces here so
let's press L on these faces. And these ones, we can see these archways
are going sideways, L. So we select these
and we do R 90. So now the wood grain is
going upwards this way. That fix is that? We could do these pieces here. I'm going to edit mode A
smart UV project and wrap. And some of these faces
here go in sideways. We need to select these shift and then click Shift and left
click while dragging. You can press Y and then 90,
so they're all straight. Press A and then set TD. And then we can choose
the wood dark here. So that's that one done.
And then these ones, we could select all
of these together. I'll select all of these. And these ones here. Into edit mode, A U smart UV project and wrap
set out with TD. We will choose the wood light. So W light into object mode. We'll do Control L
and link materials. So there's that one done. And the wood green here, we won't worry about this
because they're so small, it won't really
matter that much, but everything else
seems to be okay. And then if you wanted, we could go into wedded mode
and then press L on, like, these little trim
pillow pieces here. And we could have a different
type of wood on this. So maybe we could put a
different kind of wood here. So maybe wood wood light, we could try wood
light assign that, and there we go wood
light on there. And there is our
wooden structure. The pillows are a bit
thicker than the reference. That's because we
had a wider space between the cylinders. So just bear that in mind
when you create yours. But this still
looks pretty cool. I'm happy with this, and I
hope you're happy with yours. Now, this is we're 15
minutes into this lesson. Maybe we can quickly finish up. But we did have some of these
supports underneath here. So we could go into edit mode on this piece and
select one of these, go Shift, and then P
separate selection. Let's go back to solid
view so we can see here. And then with this piece that
we just borrowed from here. We could just put
this inside here. We can scale it down a bit. Let's do right click, set origin to geometry, and
then scale it in. And we can place these
underneath here. So GX, and then GY. And then we can add an array. So add modifier, search array, push this out here,
increase the count, and do that and then shift, AZ -90, GY, and do
this side as well. So we'll go GX, push
these out a bit. Like so and then increase the count here and
then adjust the value here. And then should be good. Just like that
maybe or just have something something
like that. I'll do it. It's all good. Maybe I should bring these
there a bit more. Because like this face comes
out further than this face, so these supports are, like, poking out,
but you know what? That still works.
Looks pretty cool. It's going to render view.
I'll drag this down. Go back to camera view and we can see how it's looking here. It. I'll see you in
the next lesson.
38. 3D Lesson 37 Building Realistic Wooden Crates with Bevel: M. Hello, welcome back to Blender
stylized Arabian market course. In this lesson, we're
going to create some wooden food crates. Okay, so I'm going to
go back to solid mode. And I'm going to bring our
reference down to here, and then just bring them
over here somewhere. Then let's go Shift S and
cursor to world origin. And now let's start with a cube. So we'll shift A mesh cube. Let's bring it to the floor
with GZ, and then one. And then we'll just
bring this over here, just up against this
wall, just like this. And let's go into edit mode. And let's bring these side
faces out a little bit. And then this edge here, we're going to bring
this down like that. And this back edge will bring
down a little bit as well. And then maybe we can push this front face
back and just kind of shape the food store, something like this
should be a nice size. So I'm just going
to move this into the center of this wall here. Now, it's going to edit mode. I'm going to select
this face here, and then I'm going to go
P and separate selection. I'm going to go back
to object mode, and we'll hide this
face out the way for now. And now we have this. So we could go into edit mode. We could probably just
delete the bottom face. We won't need that. And let's put in some edge loops here. So I'm going to put
a couple in here, just like that for
some wood planks. And then we want some thinner
ones on the end here, just like this. Like that. And then we want the
same for the other side. So we want to one, two, three, four, five, so five edge loops here, and then a thin one on one side, and then this side here. And then for these two faces, we can just put in
some edge loops for some wood planks
here, just like that. And now we need to start
separating some faces. So I'm going to select
these like this and then press Y and then This one, we'll press Y and then And then we can select
like every other one here, and then press Y
and then This one, we'll go Y H and then we
can select some of these, Y and then actually, you know, we we missed one there. So we'll go this, Y like that, and then Y H on this end one, and then we can
separate these as well. So Y and then so now we can press Altag
to bring them all back and we can make sure
these are all separate. Let's add our bevel
first just so we can make sure that they are
separate when we extrude them. So we'll add the bevel
and put the amount to 0.015 and then shading
to harder than normals. Now into edict mode. Let's
do these fin pieces here. So we can just select them
and then E to extrude. We'll go outwards with
these just like that. Let's select our
wood planks here. We'll go E to extrude, bring these out a bit. So we
have something like this. And then this side,
we'll do the same. We can probably just
select all of these, and then eo extrude,
bring these eggs a bit. And let's double
check the bevels on all of these, so that's good. And then we can select all
of these faces together, like the front and
the back ones. And then we want to
extrude inwards. So we'll go right click SrouFaces long normals and
we'll go inwards like this. And then we just press A, Alt N, and then recalculate outside. And there is the outside frame. One thing I'm going
to do is select the top faces on all of
these thin ones here, just like that, and then just go GZ and bring these up a
little bit like this. So go back to object mode and then do Alt H to
bring this face back. And let's go into a
mode, we'll press A, and we'll just scale it
in a little bit on the X, so it's not clipping
with these wood panels. On the X, it seems
fine, so that's fine. Then we want to go S Y and bring these on the inside here. We've been going to top view
and just make sure it's not clipping the edges here,
so that should be okay. Let's put an edge loop in the middle and then an edge
loop in the middle like this. And then we want to select
each face and then press Y so that they're all
separate like this. Now let's select every face, and we'll press E to extrude
downwards and then Z. You might have to press E twice
so we get this blue line, and we want to hold control on the floor and
snap it to the floor. Might be easier if
we hide this outer one out the way so we can
see. Now we have this. And then with these
bottom faces, let's go S Z, and then
zero to flatten them out. But we want to be in
median point here. So we got S Z zero. So we can flat these out
then and then just go GZ, hold control and snap
to the floor here. Next, I'm going to select
all of these faces, these top ones and
press I to inset. And then we can go E Z, Z again to get this blue line, and then we can just bring
these day in a little bit like this. That should be fine. And then we also go A, lt
N, recalculate outside. And then we'll go
into Object mode. We'll go Alt to bring this back, and we just need a
bevel on this as well. So these backfaces
here are a bit high, so we could just go S and then Z and scale them
in a bit like this, just to fix the shape
up a bit like that. That looks a bit better.
So into object mode, we can shift select our
outside piece and then just go Control L and
copy modifiers over. And then we have some nice
crates in the center for some food. Mm hmm.
39. 3D Lesson 38 Filling Crates with Geometry Nodes GeoStacker: Hello. Welcome back to Blender stylized Arabian market course. In this lesson,
we're going to learn about geometry nodes, the GeoStacker node, and how we can use it to fill
our crates with food. Okay, so now we want to bring in our food from the resource file. So let's go to the
file and append. And let's go to our
course files folder, and we want the Arabian
market resource blend. And then into collection folder, I'm going to click Food and
then I'm going to Control click GeoStacker and
oranges, as well. And we can bring in
these collections all at the same time and
then just hit a pend, we should have them in here. Let's go to material preview so we can actually
see them probably. And so the way this works, see these stack of oranges, they have a modifier on them
called a geometry node. And with this, we can basically choose a collection
here, which is oranges, and then just basically
stack them up and we can adjust them using
these settings here. So what we need to
do is we need to put these different types of food into the own collection
because right now, if we look over here
in the outliner, they're all in the
food collection, so they're all in one, and they need to be into a
separate collection. So I'm going to choose this one. If we select it
and then press M, we get this move to
collection menu, and we just click
New collection, and then we can type potato. And then these ones I'll
press M, New collection. Put this like fruit one. This one could be M, new collection, fruit two. This one could be M, new
collection, fruit three. And then this one will be M, new collection, fruit four. So we put those into
different collections. All we need to do
now is just go shift a mesh and then cube.
So we have a cube here. And then if we go to modifiers
and then add modifier, search, type in geometry nodes, and we choose this one here. And then we choose
this drop day menu, and we should see
crate stacker here. I'm going to choose
crate Stacker. And once we choose
a collection here, so let's choose the
potato collection. You should see a nice
stack of potatoes here. So all we're going
to do with this, we'll go G and then move
this towards one of crate. And then if we go
into edit mode, we can see our cube. And if we shape this cube
to fit inside the crate, we can move these potatoes
with it just like this. And then we can move it
in edit mode as well. And then move this face in here. Now, it's going to come
in as a cube, as well, because even when I rotate
it, I'll show you now. Even if I try and rotate
it, it still stays. It's like a cube shape, so we'll deal with that soon. Even if I drag down this edge, it still stays as a cube. So we need to just try and get as close as
we can to this shape, just like that. I
think this will do. Now, if we go into edit mode, not edit mode, we
want the object mode. And then we apply our
geometry nodes here. So now when we go
into Edit mode, these are applied now, and we can just press L on
some of these potatoes. I got delete faces, and maybe a few more. That seem to be poking at a bit. And maybe a few on this
side can go as well. And maybe some of
these. And that looks perfectly fine to me. And then with this,
we can just go Shift D and then X and
bring this one over here. And delete I might
delete a couple of these just so it looks a little bit different
from the other one. We can just delete maybe
some of these around here. And maybe some of
these at the back, and that should be fine. And we basically want to do
that for some other fruit. So we could choose maybe maybe one of these red ones we'll
go with fruit one. So at Shifte mesh cube the
modifier here, geometry nodes. Choose the dropdown menu, we'll go with crates slacker. And then we choose the
collection fruit one. And then we can move
this into place, go into wedded mode,
we can scale it in. And then just move this into
our crate here. We go SX. Bring the save the bit,
bring this face over here, bring this face down. Bring this one back and make sure it's nice
inside the crate here. I'll go SX just so it doesn't clip into
the sides as well. And then into object mode, apply our modifier here
back into edit mode. And then if you look
at these fruit here, we have a seam in the middle. So if we press L on this piece, make sure you don't have SM selected here because
if you choose SM, this is like the delimit of
the selection when you press L. It's only going to
press half of this here. So if it's on Sam, just
put it on something like normal and it should select
the whole fruit then. So just be aware of that. So we're going to delete some of these delete these,
see how it's looking. Maybe a couple of these
are like poking out a bit. We'll get rid of. And
I think that's good. We'll go with that, court. And then one more, we'll
go Shift A mesh cube, add modifier, search
geometry nodes. And then we choose
create Slacker. And then collection, we
could go with root two. And then this one,
let's move this in. You can always play with,
like, the max particles, the gap between objects, the scale and the
overflow if you want. But I think by default, the settings look okay to me. So I'm going to
scale this in here. Might play with a scale
on this one, though, because these are looking
a bit fat, you know. So we'll see how it looks
when we get the shaping. Just move these in here. And then let's play
with this scale. If I bring the scale up,
that makes them bigger. If I bring the scale
down, makes the smaller, but it adds more fruit, so just be careful because you don't want to make
Blender crash. You can play with this gap
between objects as well, but too much and it
doesn't really fill. So we'll have something
like this, maybe. And then we have to go to object mode to apply
the modifier here, and then back into Edit mode. And then press L on some of
these, we'll delete these. And then a couple more. I might have made the cube
a bit thin here, but maybe we could have one that's a little bit more empty. It looks like people
have actually bought our fruit, you know. So something like this would do. We could always move some around if you want
to just press L and then move them like in manually something
like this, you know. That's all good.
Maybe this can go somewhere over here like that. And then we could always
check from camera view, see how this is looking. And
we have something like this. Now, we could always
just click and shift click these woods and pieces here,
go into Edit mode. We'll press A, U, smart UV project, wrap. We will set there with TD here. And then into object mode, we'll give this the
atmoteral slot, give this the dry wood or something or
like the dark wood. And then this one could be maybe we give this one the dry wood here.
Yeah, I should look cool. Then we can look at rendered
view and compare it, and there is our first one done. I will see you in
the next lesson.
40. 3D Lesson 39 Customizing and Duplicating Food Crates: M. Hello, welcome back to Blender stylized Arabian market course. So in this lesson,
we're going to continue creating some
more food crates. Okay, so let's press Shift A, and let's add another cube. And then we'll go GZ one to
bring it up to the floor. And let's press H on the floor to hide this out the
way so we can see. Let's bring it over here, and then into Edit mode, we'll bring this top face down just so it's like
lower than the food here. So we'll bring it
something like this. And then we can bring
this face back, and then we go ASX and
bring it in like this. Let's delete the top face. We don't need a top face. And then let's select
the bottom face, and we'll press Y
to separate it. And then let's add in some edge loops in the side
here. Just two would be fine. And then maybe two
on the bottom here. And now we want to
separate some faces. So I'm going to select
these two faces and then press Y and
then We can select these two faces and then Y
and then This one we'll go Y We'll just press Y and then H on every face here just to make sure they're all
separate from each other. Just like that and then H
to bring everything back. Now, these side faces, we will select these click
extrude long normals, we'll extrude them
outwards like that. These faces here, right
click exude long normals, we'll extrude these inwards. And then these faces here, we'll have to go S and then Y to scale them in
because they go into actually, no, we could just
scale them downwards, and that'll be fine. Yeah. We just scale them down a little bit,
and now we have this. We can go A, Alt N, and
recalculate outside. And now we have a nice
crate that we can use. I'm going to go
into object mode. We'll go Shift D and then X. And then we can go
into Edit mode. I'm going to go into the wireframe view at
the top right here. So that we can press
one for vertice select. And I'm going to click and drag and select this half here. So we select these vertices
here, just like that. And then we can go G
and then X and move these in to create more like
a square shape like that. Back into object mode, we'll
go back to solid view. I'm going to shift select
this and then shift select our wood here so we can copy the bevel over quickly. Control L, copy modifiers. We have a bevel here. I
might tighten these up. So with these bevels, I
might go down to 0.01, and tighten these up a
bit, just like that. Now, for the food, let's go into material preview. And we can grab these. So if we look at these and then go into
Edit mode here and press A, and then under your
UV editor here, we can see the UVs over these. So if you want a
different kind of food, all we really need to do is just move these islands
over something. So we can just go
G and then move them over these green ones
or something over here. You know, it's pretty simple. If you wanted some what are these like olives
or grapes or something, we could just grab this. We could go Shift D, move
this into our crate here. And just make sure it's inside nicely just like this
and it's not poking through. So we have one crate there. This one. Well, let's duplicate
this crate, so we have another
one, and we could put like this red
one here, so shifty. I'll put this one in here. Just like this. And then for the long one,
I'm going to go shifty. I'll grab this here and put
this window out the way. We'll put this one inside
here, just like that. We might need to scale
it up a little bit so it reaches just like that. And then I'm going to
shift D and then X. We'll bring one this side,
and then shifty and then X. Bring one in the middle here. And then if you want to
flatten these eight, I'm going to select them
all and then just go S and then Z and
scale them down. You can make them a bit
flatter, just like that. And maybe so it looks
a bit more natural, I might have four in
here and duplicate ones. We have four like this. You'd always rotate them
around a bit, maybe. Just like that. Let's
duplicate this long one. Shift Y. And then we
can grab some of these, and then we could always
change the food here. So we're going into edit mode.
We have the islands here. I'm just thinking about color
more than the actual food. So we got, like, a red one, we got, like, rice. We got this color here. So maybe we could have something like maybe this orange
stuff here, whatever it is. I kind of looks like cheetahs. Right, we'll grab these and then make sure it's
inside the woods. Just like that. I kind of looks like beans,
actually, right? Shifty X. Move that
over there. Shifty X. And scale these on the Z to
make them a bit flatter. Just like that. And
now we can shift select all of these crates. Go into Edit mode. We'll go A, U, smart UV project, unwrap. And then we need to
set there with TD. Then I'll go back
to Object mode. I'll shift click
the inside crates here and then Control
L link materials. So we have this dry wood
on the crates here. And then to make things easier, we could shift select
these two and then just go Control J to join them. But make sure you
join the food to the wood and not the other way around because you might
lose your bevel then. We just do something like that. Select these and then shift
select the wood last, Control J, and then control J. So now, these are one object. Makes it easier to
move them around. And then we can
start placing these. So this one could go somewhere in front of this.
This one could go here. You can put, like, a crate here and then, rotate it a bit. We could do set origin
to geometry so that your origin point is in the
middle when we rotate them. Like this, and then have
this here somewhere. And then we're going to
have some more go in here, like some more of these crates. So we could make
our lives easier and speed things up just by
duplicating these crates. So we go shifty and then X. You could bring these over here instead of creating
another one, you know? It's up to you. These ones, I had, like, some space here for
some barrels and stuff. And then I had these a
bit further forward. And then Shifty X. And then in the reference,
these are a bit thinner, so what we could do
is to delete these. And then these ones,
we could, scale on the X and have them more
of like a square shape. And as long as we don't
scale it too much, the texture should look okay. Yeah, it seems fine. We just need to control A, I press control here. Wait for it to save. Right,
control apply scale, just to fix the bevel up. And then we could,
like, move this one here, go shift the X, move this one next to
it, just like that. And then we're going to
have to add some more food. So I'll quickly remind
you how to do this. If you forgot, we
just do mesh cube. We'll add a modifier
search geometry nodes, and then we choose
our crate stacker. And then to collection, we can choose one
of our food here. I'm going to go
with fruit three. And then we can move
this into place here. And then into edit mode, we just fit this
inside our crate. So GX, and then GX here, and then bring this one
down into object mode, we will apply the modifier
and back into Edit mode, and then we press L on some of these to delete them and make it look more natural,
just like this. Delete faces. I'll
delete some more. And maybe a couple more. These are inside each other
so we'll delete some of these and that should be fine. Maybe this one can go. You probably know
how to do these already. You can fill these in. I'll fill mine in off
camera so you don't have to sit here and watch me do
the same thing over and over. I will see you in
the next lesson.
41. 3D Lesson 40 Modeling a Stylized Wooden Barrel with Bevel: M. Hello, welcome back to Blender
stylized Arabian market course. In this lesson, we're
going to learn how to create a simple wooden barrel. Okay, so I'm going to
go back to solid View. And these food pieces here, we could probably
just move these out the way. Just like that. And then let's go Shift A, mesh, and let's add a cylinder. And for the vertices, I'm
going to go with ten. It's going to edit mode. And let's select the
top and bottom face. We'll press Y to separate them, and then we'll go S and then Z and scale these in just
a tiny bit like this. Now, let's put edge loops
in the middle here. We'll go S to scale, and then Control B to bevel and make this
nice and curved. Like that. I'm going to
put an edge loop here and an edge loop here and then Alt click to select
both of these. We'll go Control B to bevel, give it a single bevel
like this, just like that. And then we can go Shift D to duplicate and then right click and then
right click again, and while we want to want to press free for
Face mode and then right click so we can
extrude faces along normals and extrude these. Now, I'm going to Altclick every other face loop like this. So we can select these.
And then we can press Y. And then I'm going to press L on the ones we haven't
selected here. So now we can right click extrude these along normals and bring these
out a little bit. Now we might need to click
these face loops and just scale these up just a tiny bit
to bring them out further. Just like that. Now let's select this top face. We'll go Shift H to isolate it. I'll press one for
vertice select. I'll join these two
vertices with J. I'll join these two with J and then
these two with J, as well. Then I'll press three
and then select both of these faces and then
Y to separate these. And then we can
select them all and then extrude these
up just a tiny bit. We'll do ltH to bring
everything back. Let's go into object mode, and let's add our bevel. And then we'll put
this to like 0.01, shading to hard and normals, right leg, shade smooth. And we have a nice barrel here. Now, if you want to close
up these gaps here, we just need to go
into edit mode. We will press L on all of
these wood panels here. And then we can close these
gaps up by pressing Alt and then S and just scale them up a tiny bit
to close those gaps there. So now we can go into
material preview, and then we can go
into Edit mode. We got A U, smart UV project unwrap. Let's set our TD down here. Then we'll go to the material
properties down here. We'll add two material slots. The first one will be wood. So we'll give this like
a wood light material. The second one, we're going
to use this type of metal. We have a metal gold here. I'm going to go into well, let's press L on these
pieces here and then apply. We'll assign the metal
gold to these pieces into object mode so we can click this number here
to create a copy, and let's just call this metal. And if we go into our
shader editor here, and towards the end, we have a mixed color node here with this
yellow color here. We can just click this, turn
the saturation down to zero, and maybe we could bring this
value down to make it a bit darker and create this
kind of metal color here. And now with this, we can
just get the right scale. So we can just scale
it in object mode, maybe go SC and make it a
bit taller and then smaller. And we can put it
tag guy here as reference and find a nice
size for this barrel. So something like this
seems good enough. And then we just
control a apply scale, and then we can check in
rendered view how it's looking, and now we have a nice barrel. So with this, I'm going to press lth to
bring the floor back. So with this barrel,
we can go G, Z, hold Control and make sure it's snapped down
to the floor then. And then we can
bring one over here somewhere. Just like that. And then we can go Shift D X, bring win over here somewhere and make sure it fits
inside this gap. There we go. Nice
little barrel for you. So I will see you
in the next lesson.
42. 3D Lesson 41 Realistic Draped Carpets with Solidify and Subdivision Surface: Okay. Hello, welcome back to Blender stylized Arabian market course. In this lesson, we're
going to learn how to create some carpets
and some rugs using the solidify modifier and the subdivision
surface modifier. Okay, so let's press Shift A, and let's add a cylinder. And we're going to go Y and then 90 rotate it on its side. And the inter edit mode, we'll scale this down nice and small and then go SX,
drag this out a bit. Let's bring this
up here and bring it up against our wood here.
I'm going to wed it mode. I'll do Alt S to make it nice
and thin, just like this. And then we could center this
up here. Just like that. And then we would
go, GY hold control and snap it to the wall here. And then maybe we could use Alt S and make it a bit thinner. And then go SX and bring
this out a bit like that. And then into object mode, we could go to material preview. Now, in object this small, there's no point
adding a bevel really because we won't really
see it at this size. So let's just add material. So we're going to edit
mode. We'll go A, U, smart UV project, unwrap. Let's set TD here, and we can give this the
wood light material. Just like that, and place
this somewhere here. Now, let's go Shift A
and let's add a plane. We'll bring this up
where we can see it. And in the materials, we're
going to give it a texture. We're going to go with carpet, rug, hero texture one. And we should get this. So let's go into Edit mode. We'll put an edge loop
in the middle here, and then I'm going to press GG to just slide it
across just like this, just so we can get the edge just on the edge of
this texture here. And I'm going to
put an edge loop in here and we're going to put this one just
on the edge here, and then one on this
side, just like that. And then one up here. And then we can just delete these faces here and then delete these black faces just so we get the texture just like this. So now we have this. Let's
go into Object mode. We'll go X and then 90. And then's going to front
view with one on number pad, and we can bring this up here. I like that. And then
we could go SX to scale it out this way a bit and then SC, make
it a bit longer. And I want this to come just
above these pieces here. We'll go SC and scale
it up a bit more. I think a size of this
should be perfect. Now we want to
make this thicker, so we'll add a
solidify modifier. And we'll just increase
the thickness just a tiny amount, not too much. Just something like
that we'll do. And then we're going to add another modifier called
a subdivision surface. So type subdivision
surface, we'll have this. And what this basically does is it adds more geometry so that we can easily create a
mix it quite bendy. You CNA wants to be adding
more geometry to this. So I'm going to put this to
a level of two should do. Now we might need to put
this above the solidify. I'll put this first.
So then we get this. And what we're
going to do is just add some edge loops in. So let's put a couple of
edge loops go in this way, and a couple of edge loops
go in this way as well. And then we need to tighten
up these corners as well. So I'll put in an
edge loop and then slide this up towards the edge here just to tighten up these corners here
so it's not so rounded. Now, a way to visualize
what's going on here is if I was to press this button, we can see what the
geometry is doing, and it kind of rounds
things off and adds more I basically
subdivides your faces, so there's actually more
geometry here than we can see. So if I was to apply this, if I was to apply
this, you can see this is how much geometry
we actually have. If I control Z, we have
that amount of geometry, but we can manipulate it with this amount
of geometry here. So it just makes things a bit easier rather than
trying to manipulate, you know, this
amount of geometry. So it makes working with high density messes
a lot easier. Now, this is very flat
and we want this to be shaped as if it's been
hanging off this pole here. So we're going to use a new tool called
proportional editing. Now the hot key is
O on your keyboard, or we can enable it and disable
it using this icon here. And what this basically does,
if we go into edit mode and we click a vertice
and then press G, we need to turn it
on in edit mode. We get this little circle and then it is like a
circle of influence. So if I do it really small, anything in this
circle will move. And then if I make
it really big, you can see how it moves
the whole mesh like this. So what I'm going
to do with this is select one of these
bottom vertices here. Make this size around
about this big, we can push this up and go GZ and just move
this a little bit. Can move this one up a
little bit with G&Z. We'd push these in
with G and X a bit, make it really big,
and just add some, bend to this carpet to, like, make it a bit more
realistic looking. And then I'm going to, like, select I'm going to put it in an edge loop somewhere
around here. Just like, hold the
shape and then select these top ones here
and then just go GY, make the circle quite small, and just make this like a
slight little bend here. And then we could select
this top one and then go GZ and create a little
bend at the top here. And then we could select, like a whole row of vertices here and then go GY and push
them back a little bit. And we could select this row here and then go GY and push
this forward a little bit, just to add some
bend to this carpet. So now this is looking
a bit more real. We can go G Y and then push this up against our pole here. So it looks like it's kind of hanging from here and there. I just have something like this. So there's one carpet done. Now we could do the same thing for the one coming down here. So let's go back and,
we're in object mode. Let's go shift a mesh plane. We'll bring this up. You
know why is bring Oh, yeah, we got proportional
editing on in object mode. We on that off. So
we'll bring this up. And let's add a
material to this. We'll go with rug
texture two here. Pretty much the same thing,
and we can use one of these. So going into edit mode. Add edge loops here, make sure it's all the way
to the end here. And we'll have one this side. And then we could have
one this side as well. And we'll cut off this rug, as well. We'll use this as well. And then I'm going
to cut off these, like, little tassels
at the end, I think, because it might look
weird because they're not transparent and we'll see the black behind it, so
we could just cut these. So I'll add edge loops down here and cut
these off as well. So we'll just have this.
Then we can press three. We can select both
of these faces, control I, and then
X, delete faces. We'll select this face and
then go P separate selection. Back into object mode. And
then we'll take this one. We'll go X 90 to rotate it, and then R Z -90 to
rotate it this way. And let's bring it up
to our balcony here, up here, and then we'll
make it a bit bigger. Just like that. Now, let's add the subdivision
surface modifier. Put this to two. Then
we'll add our solidify. Give it a little bit
of thickness here. Like that. Into edit mode, we'll give it some
edge loops like this, some edge loops going this way. And then we'll tighten
up these corners here. Just like that. And then we want to kind of
bend this over our balcony. So what we could do is we
put an edge loop here. Let's bring the whole thing down a bit and then go closer. We'll just put it right in
front of the balcony here. And then we want
this edge loop to be just above the balcony here. So then with these edges here, we can select these
and then go G X. And then GZ, we can
kind of bend this. We might have to rotate these. So we go Y 90, we can flatten these out now. And now we can just move
these into place like this. And then we can select
this holding edge here and go GX, push
this out a bit. You could add another one
here if you wanted to, and then go GZ, bring this up. And then we can move
the whole thing down, sort of like sits on top. This might be a bit thick,
the solidify so might make it a bit thinner,
something like this. Then GZ move this
down just like lat. And then we go into edit mode, and then with
proportional editing on, we can just move some vertices around and just make this
look like it's not so flat. Just like this,
just moving around, giving it some flow
to it, you know. And we could have a look in camera view in a minute
once we've done this. So I'll just push
this out a bit. I'm going to play
around with a solidify, try and get a nice
kind of thickness. That looks good from this angle. Maybe push these
out a bit as well. I'm going to camera view, and that looks quite nice there. Cool. So that's how you
make some nice carpets. We have one here that
we could quickly do. Now we could add the
subdivision surface modifier, put it to two, add our
solidify into edit mode. We'll give it some
edge loops here. And this way, we can tighten
up these corners here. And then we'll go AZ 90, GZ, hold control, snap it
through the floor, then we can go GY and then GX. We can scale this up and put this in front
here somewhere. Maybe bring it a bit forward, and then we'll have
loads of pots and, like, plates on this then. So we'll get a nice big
rug, just like that. And then into edit mode, and then we'll use
proportional editing to just move these
around a little bit. And then bring it up maybe just a tiny bit on some of these vertices,
just like that. And then go to camera
view with zero. And how is this looking? We
could play with a solidify. It might be going
into the floor, so we can just bring
it up like this a bit. That should work well. Okay, so I will see you in
the next lesson.
43. 3D Lesson 42 Cloth Shelters and Canopies with Subdivision Surface: Hello. Welcome back to Blender stylized Arabian market course. In this lesson, we're going
to get to work on shelters. Okay, so for the shelter, it's pretty much the
same kind of technique. So oh, with these as well, we probably want to right
click and shade smooth we can see some shading errors. We'll just shade smooth
on these just to make sure. Yeah,
we can see here. So shade smooth on
those, I'll be good. Right. So now let's add a plane. And then this one, we're
going to bring this one up and we will make
it a bit wider. Let's push it up
against the wall here. And then into edit mode, we'll move this edge over here. I'm going to turn off
proportional editing for now and just get the
right kind of width here. I'm gonna go into object
more quickly and just duplicate this pole here. I might actually
make this tiny bit thicker and just move this out. And then let's go
Shift D and then Z, and then into edit mode. We want to do SX, make this wider a bit, I think, just like that. And then we can
push this up a bit. So now this plane,
we can go GY and move this forward and just
have this resting on this. Go go into edit mode. And
then with this front edge, we'll go GY and just
push this forward. And then we want to
bring it down, don't we? So we'll bring it down this way and just get this into position. So it's just in front
of these crates here. We can look in
camera view and see the angle, and that
should be okay. And then let's just go E
to extrude and then Z, and we're going to bring this down a little bit like that. So there's one. So we
can add our subdivision. It's like that, levels to two, we'll add the solidify modifier. Give it a tiny bit
of thickness here. It's like that into edit mode. And then we will tighten
up these corners here. And then here we need some. And then on the sides then, so one here, and then one here. And then we need one on
this corner edge here, so we'll slide one up
here just like that. And you can control how thick this kind of bend
is just like that. So we'll put it
around about here. Then we need some
in the middle like this and then some
going this way. Probably won't need as
many going this way. Maybe three is enough. So now with this, let's
go into material preview. Let's press A and then U, and then smart UV project.
We'll unwrap this. And then let's set
there with TD first, and then in the
materials, let's choose. I think it's Canvas
awning material here. This one. Now, we may need
to rotate some UVs around. So we might have to do a
different kind of unwrap. So what if we just let's try U, and then let's try the
normal unwrap here, see what happens.
So now we get this. This looks a bit
better. And then let's rotate it 90 degrees. And now we get this, it's flowing downwards here. So this looks quite
nice. We can use this. Let's drag down this window. So we have some room.
Let's go into edit mode. Let's turn on
proportional editing, and then let's grab some vertices and just give this a little bit
of a bend here. Like this. Bring
this one down a bit, drag some of these
down because I imagine gravity is going to pull
down the middle a bit more. So what we could
do is alter click this middle edge here and
just bring this down a little bit and then bring
down this one a little bit. Just like that. We could select these side vertices and bring these down a bit more. And then maybe like one
of these middle ones. Bring these down. That should be okay there. Yeah,
that'd be cool. Now, let's do this
one over here. So this one is going to
be a different shape. So we're actually going
to use a cube for this. Let's bring in a cube. And let's set this up
over here somewhere. Let's bring this down. And then into edit mode, we'll bring this face
over this side here. And then this face could
come a bit forward. And then this bottom face, we could bring
this up, and let's bring the whole thing down
a bit, just like that. And we're going to delete
this bottom face here. And maybe we could
delete this back face. Keep the back face for now. We'll just keep that
there. And then with this, let's add our
subdivision surface. Put it in the two.
Let's add the solidify. Let's increase the
thickness of the solidify. We can't really see
much from this angle. So let's add some
edge loops in here. So let's bring this side
to tighten that up. We'll bring one this
side to tighten this up, and then one up here, and then one this way. There we go. Now with our solidify, we can kind of see better, bring that out a bit. Then let's add in
some edge loops here, and then just a couple
go in this way. Now with this, we're going to A. Let's try a cube
projection with this. We'll try cube projection and then see how
this is looking. Let's give this
the faded canopy, like the second one here. So this is a blue one. And how does this look? So this looks quite nice
how it's flowing here. Let's go into Edit mode. And let's rotate these UVs
around. And now we get this. Does this look
better? This looks better, how it's
flowing this way. Maybe we could select these faces and then try
rotating these islands around. G to have to press Y on these islands down
here and then go 90. Make sure this selected. We got proportional edges, non down here as well, so we
need to turn that off. So these are separate 90. And maybe we could
give it something like something like this probably looks a
bit more natural. Go to camera view,
and we have this. But I do like having
some stripes here, so maybe you do something like
that, that should be okay. Now with this, we
could just turn on proportional editing in edit
mode and start shaping this. I'm going to select this
middle loop here and go GZ and just make it nice and big and we
can bend that down there. I'll select some
of these vertices, make it small and start
bending some of these. These corner ones we can make a bit lower, just like that. And then we don't want
to go too exaggerated. Just kind of make it as
natural as we can get it. And then these back ones, we could pull some of
these up a little bit. Just like this should do. So there's another one. And then we could probably
duplicate this one here. I'll go Shift D X Z -90, and then we can put this one in front of the doorway here. Goo GX. And then I might select like a load of these at the
front here and then go GZ, make it nice and Mm. Maybe if we rotate in
object mode on the Y, give it a little bit of
a slant, not too much. Just something like that. Put this in the middle here,
and this should look okay. And then with this one, yeah,
we'll keep it like that. In the reference,
I just realized this one is blue,
and these are red. So we'll keep it like
this. I'll be fine. So we have these in, and then we just need some
wooden poles for these now. So what I'm going to do is
take this wooden pole here. We'll go shifty and then
Z can bring this here. I'll go shifty then AZ 90
to rotate this 90 degrees. And we just kind of create like a little wooden frame.
So we want one. I'll go shifty Y on
this one and bring this into probably easier if we
start with these corners here. So we'll get that one in there. Make sure it's wide enough, so I'll go SX and just
scale it out a bit. So we have that
holding, and then this one could go
underneath here. So it's like so it's
like this, look. And then this one we'll go SX, make this bigger, and then
put this underneath this one. And then this one can be
duplicated to the other side. We go shifty X, bring
this one this side. And then we need one
going downwards. So we'll do Shift
D and then RX 90. You can bring this
down to the floor. We got GY and bring it
on the inside like this. And then in edit mode, we can select this
top face here. Grab the top face, turn off
proportional let it in now. And then we can bring
this somewhere like that back into object mode, and then we can go Shift D and then X and then put this one somewhere
like right back here. Should be alright. And now we need some four here. Now, from camera view, we can't really see
behind this shelter, so we can get away with just
getting these front ones in. So if we just duplicate one of these and go shift
the Y and then GX, we can get away with
scaling this up a bit and then placing it
in these corners here. And then go shifty X
and bring one over this side us from camera
view, that should look okay. And then probably the same
for this front one here. So we'll have shifty X. We'll put one in
this corner here. I'm going to move it down and move it into
the corner like that. We'll go shifty Y,
have one this side. It's okay if they go into the
floor, it's not a problem. And then maybe we
could just shift D X, have them against the wall here, and angle GZ, and move
these into position. So they're nice in
the corner here. Double check from
camera view that we can't see underneath
these shelters, and that looks quite nice. Cool. So there are
some shelters for you. We will Well, we
could probably apply, so for this one, let's apply the subdivision
and the solid five. And then I'm going to
join this one together. Like this. So go
all these pieces, Let's Control J to join these. And then we'll go Shift D Z 90, and then we're going to
bring one over here. So we'll go GY, and we'll have this one somewhere
here for now. Let's have a look
on camera view. So this needs to go
back a bit further. So this is in the wall here. Then we can go it's a bit weird moving it
from camera view. So GY, we can move
this somewhere opposite, just like that. Now, one last thing I've just noticed while I was
playing around here, this blue material here. See how this one
has a 0.001 on it? Now, it's saying there are
two users with this material, but I don't know how this
material got in here. The one we want
is this one here. So this one is just
called material 01. It doesn't have the
the 0.001 on this one. This one's the old
version of the material, and you can see
this one is quite clean because it's just
the image textures. But this one here,
I've added some like ambient occlusion and
the like a noise texture as well to add some dirt to it. So this is the one you want.
Make sure you have this. I don't know how this
one got into this file, but I'm just going to change
this to the material 01. So this is the material
that you want. So there are some
shelters for you. I will see you in
the next lesson. M.
44. 3D Lesson 43 Creating Clay Pots and Plates with Bevel and Solidify: Hello. Welcome back to Blender stylized Arabian market course. In this lesson,
we're going to start working on our smaller props. Okay, so I'm going to shift
and right click over here, and let's go Shift A, and let's add a cylinder. Now, let's go into edit mode with this
and we can scale it down nice and small. We
can bring this up a bit. We could probably bring
our reference over here so we can see how
big this will be. And now with this, we
can go into edit mode. We can scale it on a Z a bit, maybe make it a bit smaller. And now we're just
going to put in some edge loops and just
scale these edge loops in, so we can put edge loops here. And then I'm going
to shift select. I'll do I'll shift and
click this edge loop as well and scale both of
these in like this. Then we can put an
edge lob in here. We should scale down the
bottom edge loops as well. So I'll click this one,
scale this one in a bit. And then we'll put one in
here and scale this up. And then if we
bevel this, we can create a nice curve
shape at the bottom. We can put an edge lob in
here and scale this in. And we're just scaling
some edge loops to create a nice shape of a pot here. And then for the top, we could
put an edge loop in here, and then another one
here, scale this out, and then bevel this for
like a nice curve here. And then for the top,
all we have to do is select the top face
and then I to inset, and then we can scale
down something like that. Maybe we could make
this a bit bigger here, so we'll go S and then shift
Z, something like that. And that'll do for a pot here. We can go into object mode. I'll right click Shade Smooth, and then add our bevl modifier. We'll go shading
to harder normals and then we can play
with the amount here. I'll put it to like
0.01 should do. It might not make a
difference because it's quite a curved object. We don't really have
any, sharp edges, but you can always bring this face down a
bit further as well, and make sure it's
small enough where it doesn't cut through
the edge here. So into object mode, we could add a now, we don't have a clay or
a terracotta material. So what we could do is, use the we go over here to material properties.
We'll add a new one. And if we add our stone
material, we can use this. This already looks pretty good. But if we create
a new copy here, and we can rename this
to clay or something. And then if we scroll into the shader editor and look
for our mixed color here, we can play with this color and get a nice This
is ambient occlusion. We want this one
at the end here. We might have to add
a new mixed color. So if we drag this out here and let's add a
new mixed color node, and just place this
in the end here. And then we can play with a factor and then just play with this color to get a nice
kind of color for our pots. And then play with
the factor here. Maybe make it a bit darker. And something like this
should do for our pots. And then I'll go right click
Set origin to geometry, and then we can bring this
down into the carpet. Maybe this is too small, so we can just scale this up a bit and make it a bit
bigger, just like that. And then what I'm going
to do with this is just move some over here, G Y, and then I'll just shift D and
then X and duplicate these just to create a nice collection of pots here on the carpet. Just something like this. Now we can create
different variations. So if we wanted to just take this and duplicate it and
then go into edit mode, we can scale some of these edges in to create a different
kind of shape. So it might be
easier if we like, dissolved some edge loops
to control X like this. And then just move some edges around and then, bevel them. And we can get a
different shape here. So be careful of
this inside face. With the inside face, I'm
going to scale it down a bit more and scale in
this edge here. Let's dissolve some
of these edges at the top. Just like that. This edge can go down. We can bevel this top edge
here, just like that. And then we can play around
with this edge here, maybe scale this in and bevel it to create something unique and just do whatever
you feel like you want to do. This one's looking a bit
ugly, but, you know, you should understand the
whole method of creating pots, just adding edge
loops to a cylinder and scaling them in and stuff. So this one, we could
create a new clay material. Just have this as clay
0.001 or something. And we can lower the saturation
and then make it darker. So we have more
of like a grayish pot, something like that. You'd also play
with this metallic, maybe it might look better,
as like a metallic material. Maybe not. So play
with a factor here. We'll have something
like this, maybe. Maybe a bit brighter,
something like this. And then we could just
duplicate this one. So shifty X and just create
a collection of pots here. And we can always move
them around so they look a bit more like chaotic, you know, rather than just, like, rows of pots
like this one. So we got shifty X and then GY. Just like that.
Now, we could also add, like, some plates. So shift a mesh, and then bring in
a new cylinder. We can scale this down
and bring this up, bring this face down here. And then I'll do
Control E and then delete these faces so we
only have this plane here, and we'll go eye to inset and then GZ to bring this
down a bit like that. And then with this, we could
add a solidify modifier. And then by default, that thickness should be okay. And then we just add
a bevel, as well. But the shading to add enormo and then play
with this amount. Something that should be okay. And then if you're going
into wearing mode, you can always adjust
the shape with this inside face here, just
moving it up and down. And then we could give
this the clay material as well, something like that. And then bring the
stain to the carpet. Could make it a bit
bigger. And then duplicate this a few times. Just like that. Now if you wanted to make
more of a bowl kind of shape, we just take one of
these, go into edit mode. And then if we add click this outer edge and bring
this up a bit more. And then we alt click the
edge going around the face. You might have to disable the bevel so you
can see the edge. And then if we control
B and bevel this, we can create more of like
a rounder shape like this. And then into object mode, we should probably
shade smooth this one and then turn
on a bevel again. And then we have a nice bowl
and then we could maybe give this the other clay
material like this, and then just duplicate
this a few times. And then we have a nice
collection of pots on our carpet. Now, we could also
make a bigger pot, like a big like flower
pot or something. So let's go Shift A
mesh and then cylinder. And then this one we'll scale down to something around
about this size, I think. And then let's bevel the
bottom edge here. Bevel this. And then add in an edge loop, we'll scale this one in,
scale this face in as well. And then we could do E to extrude and then
scale this one out. And then if we I to inset and
then extrude this one down, and then we can bevel some of these edges to run them off. So we'll select all of these, control B to bevel, make
that nice and round the. This one, we'll bevel
this one just like that. This one should be beveled. And then we need to
bevel this edge here. Something like that. And then maybe we could give
this a bevel, as well. Now, we have a nice
big flower pot. Maybe make it a bit
bigger, Shade Smooth. Probably don't need a bevel
on this one. Should be okay. And then we can give
this the clay material. And then maybe Okay, so this one's a lot bigger. So I'm going to go into
edit mode and unwrap it. We'll unwrap and
then set out with TD because we had a bit of
stretching on the texture. And then if you wanted to have a little some
little detail here, we could like alt click
this face loop or something and then add a new
material and give this, the second clay that we
made and then hit a sign. So now we have
something like this. And then this one
could go over here. We could shift D and then X and then bring this one
somewhere over here as well. And play with the size, make
them a bit bigger, maybe. And just put your
props around your seam wherever you feel
like they should go. You know, you don't have to go exactly like the reference. You could just play around with your own environment, make
something yours, you know? So that's the basics of making some pots and plates and bowls. I will see you in
the next lesson.
45. 3D Lesson 44 Modeling a Clothes Rail with Bevel and Custom Hangers: Hello. Welcome back to Blender, stylized Arabian market course. So in this lesson, we're going
to create EWA Closesail. Okay, so now let's go to
File and then append. And let's go to the
resource blend file. So Arabian Market resources. And under collection, we want the cloves collection.
We're gonna bring these in. And we can start playing
around with these. So these are just basically image textures placed
onto like a mesh. This one is just like a plane
with the texture on it. So we can start creating
the cloves line down here. So what we really need to add some cylinders
to get the frame. So I'll shift right click here. I'll go to a solid view and
then shift a mesh cylinder. We'll go R Y 90, rotate it this way, and then
we can scale this down. I'm going to bring a
reference over here. Then with this, we can make it a bit smaller.
So we'll bring it up. We go Alts to make it
smaller like that, and then SX and
scale this up a bit. Something like that, maybe alts and make it a bit
thinner as well. And then we could go
Shift D and then Z, bring one above, and then
Shift D and then RY 90, and we'll have one
either side like this. Now, this one should
probably be a bit thicker than the
ones going across. So I'll go into
weedi mode and then Alts may get a bit
thicker like that. And then this top face needs to come down, so we'll select that. And just bring this
somewhere like here, and then into object mode, we go shifty and then
X, rip on this side. And then we want
something for the legs. So let's add a cube. We'll make this nice and small and then bring this over here. I'll go GZ, put it
down to the floor. Maybe make it a bit
smaller like that. I'll go A, S Y,
scale it this way. And then we could just, like, bevel these
two edges here. I'll go control B. I'll give it some segments and
make a curve shape like this. And then once you left
click, can get this menu. If we go to profile shape
and then drag it down, we can control the shape
of the curve here, so we can create
something like this. And then maybe I'll bring this face to the
side a bit more, make it a bit thinner like
that into object mode. We can add a bevel to well, maybe if we let's go
shifty and then X, we'll bring on this
side, and then we will join all of these
together with Control J. But let's make sure this
is the right size first. So maybe this needs
to be a bit higher. And then these two, we'll
bring these up a bit. We can scale them on the Z
to make them a bit taller. Yeah, so I think
that's a lot better. And then if you wanted
this to be longer, no, I think this is right.
Yeah. This will be fine. Let's select all of these, and then control J to join. We'll add a bevel to this. At a bevel, and then 0.01, shading hard and normals. And then we'll write
collect Shade Smooth. Then we'll go into Edit mode. We'll go A, U, smart UV project, wrap, set press A to make sure we select all
the items and then set TD. And then we can give
this the wood material. So choose one of
your woods here. Let's go with wood
light or something. So there we have a nice
frame for our clothes. So let's grab our T shirt here. We go shifty and then Y, and then Azzi 90. And we can put this
into position here. And then we could create just like a little shape
for the hanger. So if we just add a
cylinder or something. We'll go Ax 90.
We'll bring this up. We'll delete the front
and the back face, and then delete some faces,
something like this. Right, Let's rotate this by
-90 and make it smaller. And then we need to make
it thinner as well, so I'll go S&X, make
it thinner this way. And then we need to make this smaller and then
push it in here. So we just have something
that shows this, some kind of hook coming out
here making much smaller. And then these faces, we
could probably just, like, E or extrude and then
make sure it's going down on the Z,
something like that. And then we might have to
fill in these faces here. And then these faces, we could select all
the way up here, and then right click
extrude along normals. Now these normals
are different here. So I'm going to select
both of these and then go Altn and then flip
so they're the same all the way around and
then extrude along normals, and we can extrude
like that then. And then we could
just probably scale this something like that. And something like this
we do we might not even need a hook
because it's so small. We might not even see
that amount of detail, but just something simple to
go around here should do. And then we could always give
this a bevel or something. And then we need to
fix these normals. So let's recalculate the outside and then play with
the amount here. And then shading
how the normals. And we can just give this
like our metal like that. And then we can right
click Shade Smooth. Let's just apply the bevel to this so that we can join it too. So on the T shirt here, I'm going to apply this mirror, and then we can join
these two together then. So now we can go Shifty X. And if you wanted these to be a bit different, you
can go into edit mode. I'll press L on the T shirt,
so we only select this, and then just go S and then Z, make this a bit longer,
and then go GZ, move this back into
place like that. And then we can just
duplicate these a few times. Just like this. And then if you wanted, like, a different
color on these, let's go into the
materials over here. And for the clove, hanging cloth atlas material,
let's create a new one, and we can scroll up and add a huge saturation
value node plug this here. And then we can, bring the
saturation down a bit. And then play with the hue. Maybe we could go for, like, a light greenish color like that. And then we can shift
select a couple of these. Shift select this
one last and then Control L and Lincoln materials. So now that we have this, we can shift select all of these and then just
go shift the Y. We can go AZ 180
to flip it round, so it's a bit different and then just move this one
into place over here, and then we have a
nice little clothes rack that we can
use. There we go. I'll see you in the next lesson.
46. 3D Lesson 45 Create Cloth Piles and a Realistic Clothesline: Okay. Hello, Welcome back to blender stylized Arabian market course. In this let's see,
we're going to finish up with our cloves. Okay, so I'm going to
shift the right click here and let's add a plane. We're gonna shift a mesh plane.
I'll bring this up a bit. And I'm gonna go into edit
mode and just scale it down and create something
like this we do. Now, I'm going to add just
a couple of edge loops. Something like this. And then let's give it
the subdivision surface multifierPut the levels to two, and then let's give
it the solidifier. And then we can tighten up these corners
if you wanted to. And then let's go to mode,
proportional editing. Let's turn this on. And let's just give it a little
bit of a bend. Something like this will
do. And then we can bring up some of these
edges like this. And then I go to play
with this solidify here. Now, we might want a That's
right click Shade Smooth. And this might be fine as it is. I'm just going to
quickly add a bevel and see what it looks
like with a bevel. I don't think there's
any point in adding one. You could do if you
really wanted it, but I'm going to go with it. That should be fine as it is. Now, with this, I'm just
going to go Shift D and then Z and bring it up. I'm
going to go to solid view. It might be easier to C. So we could do
something like this, and then we could go Z 180
and flip it around this way. And we can always make it
a bit thicker, as well. Something like this. And then we can select
both of these and then go Shift D and then Z, and then AZ 180 to
flip these around. And then we can select all four of these and then go
shifty and then Z, bring these up, and
then go AZ 180. So we have something like this. And then we could select all of these again and then
just go shifty, Z, and then AZ 180. And now we have a nice stack
of clothes that we can use. Now I'm going to
select all of these. And a nice quick way
to apply modifiers and multiple objects is
to just go right click and then convert to mesh. So now they're applied
on every one of these. If you're going into Edit mode, we can see the topology here. Now, with this, we can control J to join and then into Edit mode. We go to material preview. Lo go A, U Smart UV project and wrap and then let's add
the material to this. So we want the same
as our canopies here. So it was cannabis faded
canopy material one. So there's one of them. Now let's add the
second material, and we want the other
canopy material. So the red one, canvas
awning material, this one. And then let's go
into edit mode. Deselect everything,
and let's press L on some pieces just to make
it a bit different. Something like this
and then hit a sign. And now we have
this, and then we can place this on
the ground here. We can just duplicate
these and put them around. So you can go shifty
and then X or Y. And then we can go shifty Z. And then we could
turn it over maybe, just like by going X 180. So it's like upside down. And we can snap this down here. And then we could
duplicate one of these, put this over here, and then we get to select all of these and put some
over this side, we shifty and then Y. And just place these arranged
somewhere just like that. We could always just,
like, give them a bit of a rotation to make it
look a bit more natural. It's not like they've been
like hands placed, you know. Just something
like that will do. Now, I might bring in one
of their barrels as well, so I'll get a barrel and bring this one over
there as well. And then I'm going to go to
camera view and just have a look from camera view
and make sure we can kind of see everything
from Camera view and let's move this it the way so I could go like here
right here somewhere. And this is looking quite nice. So that's an easy way to
get a nice pile of clothes. Now, maybe we should work
on the clothes line. So we're going to make the
clothes line here first, and then we can move it up here. So we're going to go Shift A, and then we're going to
use a curve for this, and maybe we could
use a Bezier curve. So we will get this over here, just like a little
curve that can bend. Now, if we go into
Edit mode on this, we have these handles. Now, by default, this curve
is a little difficult to see. So I'm going to go into
our modifiers and add a new modifier called
curve to tube. I'll choose this, and
then we can bring down the scale and create a nice little clothes
line just like this. And then with these handles, we can rotate these. I'll turn off
proportional editing. And we can bring these out and create the shape of
our closes line here. So we can always scale
these up and bend them and helps to control
the curve just like that. So with this curve, we could bring one over here. We'll go RZ, rotate it a bit.
We'll go into edit mode. And with the first
one, we could place it somewhere where we want
the closed line to start. Let's say, we put it
up here or something, and then this one can
go all the way up here. And we want it to
make sure it's, like, bending with gravity. So I'm going to select
these handles here. And if we move this one down, you can see it creates like
a bend, just like that. I'm going to go to camera
view and see how it looks here and make it nice and like, so it droops down
quite a bit, maybe. And then we can add a
second one just by going shift and bringing the started this one
up here somewhere. We'll select this one. And then we can adjust these handles to make
it a bit different. So something like this
so now with these, we could just give it like we just give it
the wood material, like a wood dark or something. It won't really,
like, look like wood. I'll just look like something
brownish, you know. So I'll give this
the wood material. You could try wood light. Maybe
wood lights a bit better. And then we're going
to duplicate these. We'll bring these up. Let's grab one of
our green T shirts as well. Grab one of these. We'll have to go into
edit mode on this and then delete the little hook, so I'll press L and
then delete the faces. And we're just going to put
these under the clothes line here just by rotating
and moving it around. I put this one here, make
sure it's the right rotation. We'll have that there. And then this one got Azzi to top view. And then this one could
go somewhere over here. This needs to go
further. I'm going to rotate it a little
bit like this. Make sure it's in place here. And then to make it
a bit more natural, I'm going to go into edit mode on this and then turn on
proportional editing, and then make sure we
have a nice big circle, and I'm just going to kind
of move it so it looks like it's like shaping with
gravity, if that makes sense. Just give it a bit more of a straight kind of something
like that or something, maybe not so bendy, but where it's kind of pointing down rather
than as an angle. These ones should be okay because they're
more in the center. Maybe this one we could
play with a little bit, just kind of move it slightly,
something like that. Now we also want to create
some, like, blankets, as well. So I'm going to shift
right click here, and then go shift A,
mesh and then plane. Go RX 90 and then bring
this forward or rotate it. We can make it a bit smaller. We'll turn off proportional
lets in as well. And then we'll make
it thinner like this. Move it just above like that. And then in edit mode, I'll select this top edge
and then E to extrude and just kind of extrude this over
and then move these edges closer to the line here
as close as we can. Now, we might need to
rotate this just like that. And then we can give it the
subdivision surface modifier. And then put it to two.
We'll give it the solidify, increase the thickness of this. We all right shade smooth, and then let's give it some
edge loops on the corners. And then down here as well. And then we want some edge loops in here and then go
long ways as well. So like that. And then with proportional
editin I kind of move some of these
vertices around. To something like this. And then we'll go shifty, another one, rotate it so
it matches the curve here. And then with this, we're
going to edit mode, and we can move some
of these vertices around Something like that. And then with these, let's go into Edit mode. I'll go AU, smart
UV project unwrap. And then we can give
the materials then. One of them was canvas
awning. That's that one. Gonna go into edit mode and then rotate these
UVs by 90 degrees, so it goes a long ways. And then this one faded canopy and no one should be finding. Let's go into camera view
to see how this is looking. Now this T shirt, I might
adjust the way this is flowing. Something like that
would be fine, I think. I'll move these
closer to the line. And now with these clothes,
we could just, like, shift a mesh cube, and we'll make this
nice and small. Even smaller than this and create some kind of cloves peg. You just do a simple shape. I'll just go like SX then SY, make it nice and thin
like this or something. Maybe eat. I'll go Alts
and scale it down a bit more and then just give this the wood material,
something like that. And just duplicate
them and just put them here like soap and
then duplicate these Maybe they need to
be a slightly bit bigger. Then we can always adjust the
thickness of the curve as well by going into the modifiers and then
playing with the scale. So 0.01 should do. And have one this
side. Just like that. And then for the T shirt, we probably have some Okay. And something like
this should be okay. Let's have a looking camera
view how this is looking. And then we have a nice
clothes line for you. Now, if you're happy with these, we could probably
delete these now, I think we done
with the clothes. Maybe we could have like
one more up here somewhere. So there we have a nice
little clothes line. Once you've done with
that, we could probably just move these out of the
way or delete them up to you. Have a looking camera view. And we're getting close
to the finish line now. All we need to do is
a few more props, and then work on
the left side here. I'll see you in the next lesson.
47. 3D Lesson 46 Modeling Detailed Tables, Chairs, and Props: Hello. Welcome back to Blender stylized Arabian market course. In this lesson, we're
going to create some tables and chairs. Okay, so let's grab our
reference and then go Ot G, and then let's go shift S and then cursor to world origin. And I'm going to go
back to solid view. So table is pretty simple. All we need to do
is shift a mesh, and then plane, and then bring this up to the
height of the table. And then put it
into way that mode. We'll just scale
it on the exhibit. Just like that. I'm
going to turn off proportional edit and
you don't need that now. I'm going to add an edge loop in the middle here and
then go Control B and give it like a single
bevel and bring it this way. And then an edge loop
in the middle here, Control B, and bring
it this way here. So we have these four squares. So with these four squares,
we can select these. We can go Shift D to duplicate
and then E to extrude, bring this down to the floor. Now, this table is
looking a bit tall, so I might bring these
up a bit just like that. I can select these edges here. Make sure they're all selected. And then I'll do
Control X to dissolve. And then we can put in some edge loops here
now. I like that. Now, this face is
going to be weird, so I need to undo I'm going to press L on these
legs and hide them the way, just so I can select
these edges without selecting the legs
and then Control X. Now I can add some
edge loops in. Then I'll select every other
face like this and then go Y to separate
them off like that. Then we can select these
and then just go E to extrude and bring them up
a bit, just like that. I'll go lt H to bring
everything back. Then A, Alt N, recalculate outside, put
this down to the ground. I'll give it the bevel. 0.01 and shading
two harder normals. And then we could
add a little bit of extra detail to this just
by going into Edit mode. We could put like an edge
lopeer and then like, bevel it. Like this. So we have a face
here that we can go Shift D, and then I'll do E, then hold control and snap it
to this leg here. Then I'll press L on
this and then go S Y to make it a bit thinner
and then SZ as well. Then we can just go Shift E
Y and bring one this side. So now our table is done. Then for the stool, we'll just go and bring in a cylinder. We can scale this
down quite a bit. I'm going to move guy
to the side a bit. And then get the right
size for the seat. Something like that will do. Now let's bring in a cube. And with this cube, I will scale this down, make it taller. I'll go ltest and
make it thinner. And we want this to be between the face and
the floor like this. I'll select everything,
and I'll move it in edit mode to keep the origin
point in the middle here, so I'll bring this out and
then go Y, rotate it a bit. And then just make sure it's
tall enough just like that. So now the origin
point is a middle. We can just duplicate
this in object mode. Make sure we're on
freed cursor up here. So then when we do R and then Z or rotate around
the freed cursor, and we can get it just like this going around
around the store. So I might go with three legs just like this, going around. And then with this,
we can select them all and then just control join. But I might make
this a bit thinner here and then join them
all together. Control J. I'll shift click our table, Control L and copy
the bevel over. And then with this, we can
right click Shade Smooth. And now we can go into
material preview. We can give this
the wood material. So we can select them
both into E mode. A U S MiURpject wrap, set there with TD back
into Object mode. We can give them the
wood Woodl maybe. Let's go to render view
and have a look, actually. Which one looks better.
Maybe wood light or maybe Wood Micood and then
control copy modifier. We want Link materials. Maybe we could have
a different material on the store. It's
up to you really. Maybe it would dry, just like. So now we could grab maybe some plates and place
them on the table here. Just by jupicating and
moving them around. Now we could create
a like some cups. So it'd be very
simple. We just add a cylinder, make
it nice and small. Then I'm going to select
half of these faces here like this and then go Shift D and then
X to bring this out, and then X 90 to bring them this way and then SY to scale them
in just like this. So we have half of
a cylinder here, and then we can just
extrude the long normals, bring these in, compress L, scale it down, and just put
it into a Mg like that. And then alten and then
recalculate outside. And then for the top, we
just need to I to inset and then E the scale we have
a nice simple murkier. And then we just give
it our bevel modifier. And then shading
to harder normals, right click, shade smooth. Give it like the clay material. Might need to unwrap it if we have some
texture stretching. So I'll go A smart U
V project, unwrap. That should be okay. And then we can
duplicate these around. I might give these a
different material, so I'll give these, like, the second clay material, just so they're not the
same as the cups, you know. And then we could
create like a bottle. So I'll go shift a
mesh cylinder again. I'll make this a bit smaller. And then make it a
bit taller as well. We want an edge loop in here, and then this face and
then this edge loop. Let's scale down
the top face first. So make sure we're not
on fredcursor anymore. We want medium point up here. We'll scale this face in. And then we want another edge
loop here, just like that. This one could be beveled. Now, if you'll bevel
this weird like this, it's because we did
the profile shape. We just need to reset this 2.5. And then this face, maybe we could scale
it up or down. And then we just need to
I to inset, E to extrude. And then we could bevel some
of these edges as well. Just like that, bevel
this edge a bit. And then the bottom edge
as well, we could bevel. And then with this
one, I might give it I'll right click
shade smooth and then give it maybe the metal material and then just duplicate
these around. Like so. And then with this table, I'm going to go
shifty and then X. But maybe if we select them all, like that and then go Shifty X and move them all together. So this one could go, like, under our shelter over
here somewhere like this. And then this one I'll go
shifty Y, bring this out. I go to camera view, maybe this needs to
be a bit bigger. Just kind of try and match
our reference a bit. It's not going to
be the exact same, but we'll get, like, a similar kind of vibe here. And then the store, we
could just duplicate these around and just place
them wherever you want. And then make sure to
rotate some of them so the legs aren't like
pointing the same way. Have a camera view,
and there we go. Now we have a table over there, and then this one, maybe we could put this
somewhere else, as well. So like maybe try not to
select the floor right. Move this one. Maybe
this can go over here. And it could just be pointing on the edge of the camera
a bit, I'd be fine. And then this one probably
needs to be a bit bigger, so I'll scale these up
and slap it down to the ground and make sure it's in the
shelter just like this. So now we have a nice table
chair with some props. I'll see you in the next lesson.
48. 3D Lesson 47 Building a Detailed Wooden Wheelbarrow: Okay. Hello, welcome back to blender stylized Arabian market course. In this lesson, we're going
to create a wheelbarrow. Okay, so we're going
to start with a cube. So let's shift a mesh cube. And with this, let's
go into Edit mode. We'll go SC get a bit
smaller and then X. And we want the kind of basic
size of our wheelbarrow. So we can delete the top face. And then we should probably
separate some of these faces. So let's press Y on every face here just so that they're
all separate like that. So for the side faces, I'm going to add
three edge loops. Like so. And then for the
front, we'll add two. And then this face could
probably be deleted, as well. And then for the bottom,
let's add three. And then we want to press Y
on all of these faces here. So these are all separate now. Now, we can add some variation into the way these
wood panels will look like if we add in an edge
loop and then we could move. Actually, what we can
do, I have an idea. We'll add a few edge loops
in all of these faces. We might have to press L on
some of them and hide them, so we can put edge
loops in here. Like this. We could
put some in here. Just so we have more
topology to move around. And then the bottom,
we could put some in. Like so. Now, let's
go to edit mode, and then we'll extrude
along normals like this. Like that. Now we can give it
the bevel modifier, search bevel 0.01 and
then harden normal CN. And then into Adic mode, you can press A and
then under mesh, transform, randomize,
and then we can put this to like 0.01, 4.02. So now we have some random
movement in the wood. So that's right
like shade smooth. So now wood's bit like
crooked and bendy. So now we need to start adding like, like,
the handles, I think. So we'll go shift a mesh cube, and we'll scale this on the X, nice and thin, and on the Z, nice and thin like that. And we'll move this to
one side like here. We'll go Alts, make it a bif in a just like that and
then move it back a bit. And then this face can
come forward with G and Y. Then we can put an edge
loop somewhere like here, and then another one here. And then click if we
select this face and then Alt Shift click
this face loop and then go GZ, we bring this up. So we have some
nice handles here. Let's go A, Alt N, and then flip to
fix those normals, and then we go shifty and
then X, bring them this side. Just like that. We could put in some more edge loops here. We'll go with quite a few. So now, once we have
some edge loops in, we can go A and then mesh, transform, randomize, 0.01, just to make
these a bit bendy. Go tr 0.02, as long
as it's not too much. I think this is too much here. So we'll go with 0.01
here. Just like that. And then we can just click shift this and then Control J to join it to the wheelbarrow. So now we need some pieces
that will hold the wheels. So we'll go shift a
mesh cube, go SX, scale this in SY, and then SC, maybe a bit bit thinner on the X and on
the Y, just like that. And then this can
go somewhere here. Now, I'm going to
bring this up a bit. So now we can get underneath here and maybe make
this a bit smaller. And then this can go
somewhere around here. Just like that. And then we go shifty, X,
bring it this side. And then we'll press A, shifty Y, bring them this side. And then we could select
all of these edges. Like this. And we can bevel
these control B to bevel, just like that. Now we want some
cylinders going across. So let's just control J to the wheelbarrow,
so now they're joined. And then let's shift A
mesh and then cylinder, and then we'll go Y
90 into edit mode. We'll go Alts, scale it
down, nice and thin, good G Y, and then put this into position
here and scale it A. We want it to be a bit thinner. Something like that. And
then we want to make sure it comes to where
the wheels would be. So I imagine
somewhere like here. And then we can just go
shifty Y, just like that. And then we could go into we could try put
some edge loops down here and down here and then
going in A faces I mean, mesh transform, randomize 0.01. But then I don't think it works so well
with the cylinder, so I'll Control Z and
just keep it like this. And maybe we could select one of these edge loops and just kind of move them
manually like this, move them up and down just
to create a bit of a bend in this wood I have to zoom in, so we can just click this
edge loop and then go GZ, great little bend
in the wood there. And then we can control J to the wheelbarrow,
just like that. Now for the wheels, we need
a cylinder. Mesh cylinder. We've got RI 90. And then we want to scale this down to get the
size of our wheels. So I need to be a bit bigger, go SX make it a bit thinner. And then we can
place these in here. Now, these might need
to be a bit bigger, which means these cylinders might need to come
out a bit more. I just trying to think
where these would go. So maybe on the outside of these handles so make
the wheel a bit thinner. So we're going to
scale these cylinders, so it goes all the way. But for now, let's delete these faces
here, just like that. Now, before I do that, let's go into edit mode
on this and let's select our cylinders with L. We'll go SX just bring it so it goes past the
wheel just like that. So now we can select
the wheel here. And then into edit mode, you'll press A, right click, extrude along normals, extrude
them in just like this. And then we want to
select some faces. So we'll just select
a couple going around for the what
are they called? These things. I'll
select some faces. We'll go Shift D. Then
we'll go SX I mean, to scale them in just
a little bit like this and then right
click extrude along normals and we can bring them we can just bring them
inside like this, maybe. We can press L on
all of these pieces. We try Alts to make
them a bit thinner. And then if we go S
shift Y or S shift X, we could just adjust
a scale like this. I'll just scale
them up. So we have something like this, and
now we can move this. So this is in the center here. And then with this cylinder,
let's go into edit mode. We'll put an edge loop
in the middle here and then control B to bevel,
give it a single bevel. So now we have this here, and then we can
select these faces and then extrude along normals. So we have something like
this, just like that. So now with this, we can
fix these normals here, and maybe we should, I'm going to go into Edit
mode on the wheelbarrow, and I'm going to delete this
backwards cylinder here. And with this cylinder, I'm going to mirror it. So I'm going to click this
face here and then do Control plus on number pads to
delete some of these here. So we'll go ex delete faces. So we have half here. And then we want
to add a mirror. So let's go add
modifier, search mirror. And we want to separate from the
wheelbarrow because we've mirrored the
whole wheelbarrow, so let's press L on this piece. We'll go P, separate selection. Let's remove the mirror from the wheelbarrow
into object mode. We can select this
name. We're going to make sure we
turn on clipping, so like eclips in the middle. And then we can
select this face loop here and then just
go Gx and connect it and then back
into object mode. Now we can shift
select our wheel, so we have this
selected and then go shifty Y and bring one this
way. Then we have this. And now we just need to copy these wheels to the other side, so it'll go shifty X and just
bring them into place here. And now let's apply
the mirror on these cylinder pieces,
just like that. And now we can join all of
these to the main wheelbarrow. So it's like this last
controlled J to join. So everything has a bevel on it. Now we just need to right
click and Shade Smooth. And that's the modeling done. So now with this, we can
just go to material preview. Going into Eit mode, we'll go A U Smart UV project,
unwrap, set TD. And then let's give
it a wood material, so maybe wood light. We'll bring it
down to the floor, and then we can place this somewhere here. We're
going to camera view. Rotate this, maybe
make it a bit bigger, and just have a look
at a reference and have this somewhere around here. Maybe have a nice wheel barrow. I will see you in
the next lesson.
49. 3D Lesson 48 Boolean Doorways and Architectural Window Details: Hello. Welcome back to Blender stylized Arabian market course. In this lesson,
we're going to start working on our final buildings. Okay, so with this building, because it's on a slant, it's going to be quite
hard for us to, like, model pieces and then
get them into the wall. So to reset the rotation, we just do lt air so we can
have this this way now. And maybe we could
just bring this to the side and we
can work over here. So first thing we
want is some steps. So let's shift shift
them right click. We'll bring our freed
cursor over here. We'll go Shift A mesh
cube and we'll go GZ, hold control, and we can snap
this to the bottom here. Now we also want our reference. So I'll bring over
our reference here. And then he's on the
floor, so that's okay. And then let's add
in some steps here. I'll go G, X, and then snap it
to the wall here. And then we can bring down this face and then bring
in this face here. And then I'll add a
couple of edge loops in, maybe three edge loops. We'll select these
faces, we'll go E, and then these
faces, we'll go E, and then this bottom
face E, just like that. So now we can just
give this the bevel. So we'll search bevel 0.015
shading harder normals. Now we want our doorway. So we could grab
the door over here. We grab this door, we'll
go shifty and then X. And then with this, we could place this
into position here. So I'll go GZ and snap it down to the top
of the steps there, and I go G Y. And then we need a cutler
piece for this door. So what we could do is
going to edit mode, and we select some edges, like these outside edges. So I'll go and
select all of these. And then some edges like
these bottom edges here. We'll go Shift D and then
X to bring these out, and then P separates selection. So we'll go into
object mode and then select these edges
that we duplicate. We'll press one for
vertices select, and we can join these up with F and just join these
up with F here. And make sure all these
are joined together. So these aren't
joined together here. So what we need to do is just go A and then M for the merge menu, and we'll merge by distance. And it says here,
removed free vertices. So hopefully, these
are all connected now. So now we just need
to alt click this, and then we just F to fill, and then we can E to extrude, and then we can bring this
out into object mode. We can go GX, put this
into our wall here. And then we can add Boolean. But before we do Boolean, because it's going
to give us an go on, we should probably add in
some edge loops first. So let's go into
edit mode on this. For the top face, we'll go
Shift D and then E to extrude. And then we can press
L and then S and then ShiftZ to scale
this out a bit. And then we could
duplicate this. Shift D Z, bring this up. We'll snap it down
to the top face, and S shiftZ scale this
up a bit like that. Then we have this. Let's
put in an edge loop here, and then we can go
Control B to bevel. We'll go Shift D, and then right click extrude along normal supress
three, right click, extrude along normals
here, bring that out, and then we'll press L
on this and then just go GZ and bring this down here. Now select I'll click one
of these edge loops and go GZ and bring this down a bit. Then I'm going to alt
click this face loop. And then, actually, let's put another edge loop
in the middle here. Control B to bevel, I'll create a bevel like this. And then with this, we can go S, shift Z, scale this in. So now we have something like this we can add
another one above it, so we'll we'll add
an edge loop here. We'll go Control B to bevel like this and then put an
edge loop in the middle, Control B to bevel,
and then S shifts, and we can bring this
one in just like that. You can always adjust it by scaling a bit like that.
Then we have that? Now we can press L on
this piece here and go Shift D and then Z,
bring this in between here. Now, I'm going to go into object mode and grab
another window. So I'm going to grab one
of these windows here. We'll go Shift EX,
bring this over, and then AZ 90 to rotate it. And let's bring this up somewhere over here,
just like this. Now we want a cube here. So I'm going to
shift right click. We'll go shift a mesh cube. And I'm just going
to scale this. So it's roughly the same
height as this window. Doesn't need to be perfect. And then we can bring this
to the side a bit with GY. And then I'm going to push this into the building a
little bit like that. That's going to be
another boolean cutter. So I'm going to bring this
one to the side here, and then this one
can go just here. That should be okay. So yeah, we could probably
add our booleans now. So I'm going to shift
D and then Z here, and then GX GY I mean, and move this one here, so we have a window
here as well. Now, let's start adding
booleans to this. So add modify Boolean. And then we'll select
this door cutter here, and then we can apply, and then we can
delete this cutter. So we have a hole here now. This seems to be going
a bit strange here, so I'll just go into edit mode. That's why. So I'm
going to control Z. It's because the cutter
had a bevel on it, so you want to remove the
bevel from the cutter here. And now, if we add our Boolean, yeah, we need to control
Z a few more times. So we have the Boolean
here, but remove the bevel. And now we can
apply the boolean. So now if we check, this looks good, so we
can move that doorway in. Click on the building again,
we'll add a new modifier, Boleion and then we
can select the window. And then we have a hole here, so I'll move this, apply the Boolean and then
move the window out. And then one more Boolean
up here, so search Boolean, choose this one, and then hit apply and move
this one out here. So now we can get
work on our windows. So this cylinder piece here, this storway piece
can be deleted. But this one, I'm going
to go into Edit mode. I'll select the front face. Control I, X, delete faces. And we'll just do
a quick design. So let's put edge loop here. We'll Control B, get the
side pieces and then hit Y, then put an edge loop
in the middle here, so we might have to hide
one of these faces. So we can get an
edge loop in here, Control B to bevel. And then let's Y. And now let's hide
one of these faces so we can put an edge loop
here and an edge loop here. I'll select both of
these Control B to bevel a little bit like
this and then press Y. Now I'm going to put
in some edge loops in these faces here just like that. And then we want to press
Y on all of these faces. So now these are all
separate from each other. I'm going to go up here
to individual origins and then select all
of these faces. And then we want to press R and then Y to rotate them this way, so we can create
some panels here. And now we just need
to E to extrude. We'll extrude them
inwards like this. And then we'll do
Altagepring everything back. These center faces. We'll go E extrude
these out a bit, then these wooden frames here can be extruded
out just like this, and then we go A, lt N, recalculate outside, and then we can push this
into position here. And then we can get to
work on this window here. So we'll continue
in the next lesson. O.
50. 3D Lesson 49 Final Building Details with Array and Bevel Modifiers: Mm. Hello. Welcome back to Blender stylized
Arabian market course. In this lesson,
we're going to start working on our final buildings. Okay, so now for here, what we could do is going
into Edit mode on this. We'll select this face here. Let's press Control I and
then X, delete faces. And then I'm going to put
an edge loop in the middle here and then delete
this side face here. So we can do two windows at once if we add a mirror modifier. And instead of the X, we're going to
choose the Y here. But and we need the origin
point to be on this edge here. So let's select this edge. We'll go Shift S,
cursor to selected. And then into Object mode, we'll go right click Set
origin to free Dcursor. Make sure we have merge
de selected here, so they don't merge together. Now we'll go into
Edit mode and we can just work on this one face here. So put an edge loop in
here and then Control B, and we'll put these
to the side here. We'll select these
faces and then go Y and then H and then put an edge loop in the middle
here, go Control B. Like this and then Y and
then H on these faces. Now, I'm going to select
this face and then just shift E and then Y shift in the X, we'll
push these back. So we'll use these later. Let's put an edge
loop in the middle here and then an edge
loop in the middle here, and then we'll move these up. And then this edge, we'll control B to bevel, scroll at once, so we have
an edge in the middle and just move them out
somewhere like this. I'll press one and then select this vertice and then go
GZ and bring this up. And then we can delete
these two faces here. Is like that. And
then this back face, we can put in some edge loops. And then this way as
well. We can press A. Actually, let's press L, so
we only select this face, and then we'll press I to
inset and then I again, and then X, delete faces. So now we have this. Let's press L on this piece and
then go E to extrude. We'll extrude these out a bit. And then let's extrude
these faces out. E to extrude, we'll
bring these out. Let's do Alt H, and then we
can extrude these faces out. And then we can press L on
this back face, we'll go G, X and move this behind
our windows here. We can snap it to the face, maybe and if it
goes a bit weird, we'll just move it back and just have something like here. Then we have this. So now
if we go into object mode, we will push these back
here into our window. Now, this one, I'm just
going to rotate on the Z a bit and then go G and then X, bring this out, and this can go on the side here,
just like that. And then we go Shift
D and then G Y, and then we'll rotate this one. So this is on this side of
the window. Just like that. Now, let's go Shift A, mesh. We'll add a cube. We'll go into Edit mode. We'll scale this down. Actually, let's
select this top face. We'll go Control I
X, delete faces, so we just have a plane,
and then I'll go SX, make it a bit
thinner, and then SY, make it a bit longer, like this. And then we can put it
towards our wall here. Just up against the wall,
we'll bring it down. Maybe we can bring this edge
further back like this. We'll put in some edge loops here and then
select these faces. We'll go Y to separate them and then A and then E to
extrude them down. And then this needs to go a bit further so it's not
poking off the edge here. And then we'll go A, Alt
N, recalculate outside. So now we have a nice little
balcony underneath here. Et's actually go
Shift D and then Z. We'll bring one
underneath this window here into edit mode, we'll select these faces. We'll go G and then Y
and push them back here. And then maybe we could press L on these two and delete them. So we have two here. And then press A, S, Z, make it a bit thinner and just have a thin one
under the window there. So we can bring this down
a bit more just like that. Now, let's grab some support
pieces from over here. There were some on this
balcony we can grab. So let's go into
wearing mode on this. We'll press L, Shift D, X, and then P separate
selection into object mode. We'll select this piece here
and then move this over. We'll go RZ 180
to flip it round. And let's bring this underneath underneath
our balconies here. So we'll go G and
move it down a bit. And just place this
underneath here. We can go Shift D and then Y, have one in the middle, and then Shift D Y, just like that. Then we go Shift D and then Z, and we can have some
of these under here. And then we could add
an array to this one, so add modifier search array, and then we want
zero on the X here, and then we drag out the
Y, increase the count. And something like
this should be fine. And I think that's all the modeling for
this building done. We do need some of these
wood supports here, so we'll grab these
wood pieces here, we'll go Shift D, and then X, bring these over, place
them into our wall here. We'll bring them up a bit and just place them
against the wall. If they have the array, we can
increase the account a bit more and then just go
GY, just like that. Okay. So now let's apply the
arrays on every piece here. So we'll apply the array so
that these are all applied. And then we want to
join all of these together so we can move
it all at once, really. So let's shift select
every piece here, and we'll make sure that
we have everything. But we go G to move, make sure we grab
everything here. Yep. Okay, so now that
they're all selected. We can go Control J to
join them together. So Control J. So this is all one piece. And now let's just
add a bevel to this. We had the bevel modifier. And we can get away
with this maybe. Now it is looking at a bit off. If we Oh, yeah, so we need
to add harder normals. And then right click Shade
Smooth, just to make sure. And now let's go into
material preview. And it has let's just remove all the materials here.
Let's go into edit mode. We'll go A, U, smart UV project, wrap, and then we will set TD, and then we can start adding
some materials to this. The first one we
need is our wood. Let's add the wood
dark material. So now we have wood. Now
we can add a second wood. Let's add the wood
light material and choose some pieces
to be wood light. So maybe maybe these
outside frames here could be wood light. And these pieces in here maybe we could select
these to be wood light. Just like that, we'll we'll grab these outside
pieces as well. So we'll grab these and these frames here,
and then a sign. And then maybe these
wood panels here, and then these two here, we'll hit a sign. Now these are wood light.
Let's add another material. We'll add our stone material, and then we'll press L on our steps here and
then hit a sign. And then we want the stone
on these frames here. And on the top as well, we hit L on these, hit
a sign for the stone. And then another material. We need our stone
plaster material. And then we can hit L on
the wall here, hit a sign. And then we need
one more material for this face loop
here and here. So we'll add another one, and it's another material
we haven't used yet, and it's one of these trim sheets so I'm
going to scroll through. I'm going to type in Trim. So sandstone carved wall
trim, we'll have this one. And then we'll just select let's select these face loops
here and then hit a sign. And then we need to
go into our UVs here. And we need to I'm going to press this law
arrow icon here. So it only shows the UVs of the faces
we have selected here. And with this, we just need to we probably need to unwrap
these in a different way. So let's start with the top one. We'll go U and then
cube projection. Let's try cube projection. And our UVs should come like this as like a flat
kind of line here. And we can move this into
one of these patterns here. And as long as we have
it over the pattern, we can have the trim on the face like this, just like that. So we'll do the same. We'll
click this face loop. We'll go and then projection. So now we can move this
one to another design. Maybe this triangle shape
here, and then you can always, scale it up and then
move it around, so the corners kind
of line up here. And now we have a
nice pattern here. So now with this,
we just need to go into vertex paint as well. So we get the yellow material here and then back
to object mode. And there we can move
this back into place now. So I'll move this with G and
X and then R Z to rotate it, and then G Y and then
we'll go into camera view, and there we have
this placed here. Now, we forgot to apply the
mirror on this window piece. So what we could do
go into Edit mode, and we could press
L on these here. And then if we go to maybe local transform and then go shifty and
then shifty Y, we can move these across
here now. Just like that. So I'll fix that. Back
into object mode. We'll go to camera view, and then we can always
adjust the position. Make sure we go back
to global transform here and then go GX, and we can move this somewhere around here, just like that. Now to finish up, we could grab this building and we can shift select all
of these pieces here. We don't need this balcony. We just need these
windows as well. So we have these, and we can
go Shift D and then AZ -90. But I'm going to
control Z and make sure we're on medium point, so it rotates properly, AZ -90. And then this building can
come over here somewhere, just next to this building
to fill in this space here. Let's go to camera view, and we can see here we can
push it back with GMY. Now, we don't have a
wall on this side, but we have a wall on this side. So what we can do is just go S Y minus one to flip it around. And we could probably
get away with that. I'll go into camera view
and then just go GX, move it out this way a bit, just to fill in this space here, just have something like
that to fill in there. Maybe we could move this
tower to the side a bit. And adjust these
buildings just a little bit like that. So
that's looking good there. Now, for this final one, we
could just go into Edit mode. We can put an edge loop
somewhere around here. We can select this
face here and then go E to Extrude and bring this out. And then if you wanted
any more details, we could put in an
edge loop like here, and then go Control B to bevel, give it a single bevel,
and then right click, we'll press free, and then right click extrude
along normals. We can bring this
out a little bit, and then offset even. And then we could have
another one appear somewhere. Let's go to camera view
so we can see where it will be just like that. And then, Control B to
bevel, right click, free, right click, extrude
along normals, offset even. And then we can Alt S to
adjust. Just like that. We're going to Edit
mode on this AU, smart UV project wrap. We'll press A so all the islands are selected and then set TD back into Edit mode. And then we can give this the
the stone plaster material, and then just go
into vertex paint here back into object mode. And that should be okay. If you wanted a little doorway here, we could just go into edit mode. We could just put like
an edge loop here somewhere and then like an
edge loop somewhere here. And then if we alter click this edge and then just
go Control B to bevel, create a little doorway and
then select this face and then go E to extrude,
just like that. Might have to delete
this bottom face here. There's two faces, so we
can delete both of those, and we just have to re unwrap it because we've got some
stretching on the texture here. So we'll go A, U, smart
UV project, wrap. We'll press A, so all the lands are selected and then set TD. And that should be okay
for that building there. Now we could also
grab, let's say, like this balcony here,
this shelter thing, we go Shift and then X, move this over AZ
-90, AZ 90, actually. And then snap this to the wall. Go GZ, go into camera view. And that's looking
quite nice here. You also bring it down or have it somewhere along
here, just like that. And there are buildings. Now we also want some trims. We'll quickly do these
pillars as well. So let's just delete one pillar, and then we'll just
work on this pillar. Let's come into edit mode. And then for this
second material, we'll add another trim. It's called arch and wall trim. And then we'll just select this face here and
then hit a sign. And then with the UVs here, we have our face here. We'll just go at
90 to rotate it. And then we can choose
one of these patterns. I'm going to go with this one with the circle pattern here. We'll just place
the face over this. And now we have this
pattern on our pillar here. And then we can
just go Shift D and then X and bring
this over this side. Now we have some
nice pillars done. So let's have a look
in rendered view. And we're almost done more a few more props that we could place
around the scene. And then we could just
add the final details. I'll see you in the next lesson.
51. 3D Lesson 50 Skybox Control with Light Path and True Displacement: Okay. Hello. Welcome back to Blender stylized
Arabian market course. In this lesson, I'm going
to show you how to change the image of your skybox and teach you about
displacement. Okay, so I'm going to
show you how to change the sky without
changing the lighting. So let's go into our
Shader editor here. And let's go from
object to world. And we have our sky texture going into the background here. So we want another node. So let's go shift a
search image texture. We'll bring this in, and we'll open we'll go to
our course files, and in textures, we have this desert background image.
We can open this image. Now, if we plug this straight
into the background, it's going to
change our lighting and it doesn't work very well. So what we can do can
plug this back up here. And what we want is a little
node called a I camera ray. So this is basically saying if this image can be
seen by the camera, then we're going to replace it. We're going to add it
over the top, basically. So we want to add in
a mixed color node. And this is going to go
into the factor here. And then I'm not sure
which way this will go. I think the background
goes into the B, the sky goes into the A, and then this goes
into the background. And now we can see we have the lighting from
the sky texture, but the background is
now this image here. Now, we might have to
adjust this a bit. Now, if this isn't working, like it isn't here, maybe it's because it's the wrong node. So this is an image texture. If we delete this and
try a different one, if we try environment texture, get an environment texture
node and then open up our desert background file
here and then plug this up. Now we can see it's added just
added the image from this. So now we have a nice
blue kind of sky here. That's all you really need,
little mixed color nodes. Maybe we could try different
blend nodes like maybe ads. Add doesn't work.
We'll just go and mix here. That works well. And now we have a nice blue sky. So yeah, just an
environment texture node, not an image texture,
you want that. And then just a mixed color and then camera ray here
into your background. So that's how you get
a nice sky there. Now, I'm just going to go back into let's go back
to material preview. And we want we want some props on this
side to fill in the space, so I'm just going to grab
some of these props. Go shifty x, bring this one over here and put it like this
side of the doorway. I'll grab a barrel, go shifty X, and then bring it to this
side of the doorway. And then I'll grab
some of these crates, as well, and just
bring these over. I'll go into camera view
and have a look down here. Now, I might duplicate these and just kind of fill in this corner here
with some objects. Now, this one, I might scale
these up a bit bigger. And then this one, I
might go into Edit mode, press L on the food here and just give it a
different kind of food. Maybe maybe this
rice here will do. So it's a bit different here, and then that'll be fine. That should be fine, no. Co. Now, I think we're pretty
much ready to render. Now, we could add in some
displacement on yeah, we need to do the displacement, and then we need to
do Vertex painting. So I'll show you the
displacement quickly. So with this plane selected, let's go into edit mode,
and we're going to add quite a few edge loops. Now, this is going to add a lot of topology to your scene. So if you have an older system, you probably want to
avoid using this method because it might become a
bit heavy for your scene. So if you have a good computer, then by all means, go for it, but just add in a
load of edge loops. And then we want to add a
subdivision surface modifier. We're going to start
with one, first off, and let's go to rendered view. And let's open up
the material here. We'll go to object in
the Shader Editor. And if we see here, we have a little
displacement node and what displacement does, it moves your vertices
so that you have actual freed geometry
based on your texture. So these individual tiles are
actually going to pop out. And what we need to do
is in the shader editor, we need to press N, so we get this side panel here, and I believe it's under
options and then settings. And then when it
says displacement, we need displacement and bump, make sure that's selected. And I'm just going
to double check this is all connected up properly. Yeah, it should be. Yeah,
we should be good to go. Right. So now, if we
have a look here, once we increase
the levels here, we should see some movement
on the actual tiles. So if we go quite high to, like, it's going to get quite slow, five is a good kind
of value here. And now we see these tiles. Have actual geometry
to them now. So that's a good way
to get some detail. You can see the
difference here if I turn the subdivision off,
it's nice and flat, and if I turn it on,
it's we have some nice, like, geometry on our tiles now. So I'm going to do is, like, under render, I'm going
to put this to five. And then on the levels viewport, I'm going to keep this at one. So in our viewport, it will stay flat and it won't
be so heavy on our scene. But then once we render, it
will change this to five, and we'll keep
this on here then. It's a good way to get
some some geometry on our floor, right? So in the next lesson, we're going to go to have to re apologize
our buildings to make sure we have some quads
so that we can put in some edge loops and then
start vertex painting. So I will see you
in the next lesson.
52. 3D Lesson 51 Vertex Paint Damage and Sand Variation: Hello. Welcome back to Blender stylized Arabian market course. In this lesson,
we're going to start Vertex painting Ear Buildings. Okay, so we can go
back to Solid View. And let's start with
this building here. Let's forward slash
to isolate it. And let's go into Edit mode. And this one is all
quad, so we're fine. All we need to do is just
add some edge loops. Here, and then we can have
some across going this way. And the more vertices you have, the more control you'll
have over your painting, the more details
you can paint in. So this amount should be
plenty. So this one is fine. Let's select this
building forward slash, and then into Edit mode. And we did this earlier
with a topology, so we can just add in
some edge loops down here and add some between
these windows here. And then you can put like two going long ways
down this side. And then I don't think we
can see this face, can we? Not really, but we can
add we can add a few. I mean, it won't hurt. So that'll be fine
for that building. Now, this building, this one, this is going to
take a while to read apologize all of these verses. So we'll probably just avoid
painting on this face here. But on this face,
we could probably add some going this way. And maybe we could add some, it's going to go weird if
we put some going across. So can we get away with
deleting these faces? No, it's just going to go weird. So unless we spend the time, but with our knife tool and connecting up all
of these verses, we're going to have
quite an annoying time. So what we could do is I'm going to dissolve
this edge here. I'll just put some
edge loops going this way and we'll just work
with what we have. So maybe we could
just get away with only just a little bit of
dice painting on this one. Now, let's go into this
building and this one. So what we could do,
I'm going to press Control free to go into
the side view here. Let's grab our
knife tool with K, and we'll we'll cut just above our windows
and doors here. So we'll just cut the
line going that way, and then we'll cut
this going this way. And then we'll just
connect this all the way around so that we have an edge loop this last one
we can just j to join. So now we can put in some
edge loops here like that. We can put some at the
front here, just like that. And then we'll have a couple
just on the corner here. I like that. And now we can just paint some details in
by here. That'll be fine. So now let's go back
to material preview. And we can start
vertex painting. So let's start with
this building, and let's go to vertex paint. And I still want to
check here, yeah. So for black, we
have the color here, so black will add the
painting just like this. And then if you change
this color to white here, you can, like, erase. So all I'm going to
do is just, like, switch this to black and
just paint in some damage. So I like to go, like, around the edges here. And then I like to go,
like in the corners a bit. And then some up here
maybe and just, like, add some stuff wherever
you feel like you want it and just go around your building.
Just like this. It's quite nice. Just do
add whatever you want. I like to go at the
bottom, as well. I guess I'm in here.
Just like that. And you could probably take more time than I'm
going to take, but I'm just going to quickly go through it and just
show you how to do it. So mine might look a bit
not as nice as yours. So once we're done
with that, we go into object mode up here. Like out second building
into vertex paint, and then add some to this one. So I might go, like,
underneath here under the balcony and then
put some around here, maybe some up here, try and get in
between these windows and then up here a bit. Just like that. And
then this building, we had just these vertices here. So if I go to the vertex
paint and just kind of add some on these vertices here, that
should be okay there. Maybe we could get
away with some up here as well. That should be alright. Now, this last building, I'll probably just add
some on this wall here, so we could just add a bit bit of damage on this wall
here, just like that. Now, we also have vertex
painting on our floor, as well. So if you want to
Vertex paint here, it will change to,
like, a sandy material. So now if we add in the black
here, it removes the sand. So what I might do is, like, go to black and kind of, like, paint all the way over here, paint everything black
so we can get rid of it. And then I'll go back to white, and I'll start
painting in, like, the sand, like in the corners. By the way, you can use F to change the size of
your brush here. And I just like to add some sand in the crevices where
they would build up here, just along, like
kind of buildings. And all in these kind
of crevices down here and around here as well. And then, if you go to, like, a grayish color,
it won't be as strong. So now you can kind of, like, mix in some sand, like in the middle here and just have a nice color
variation going around just seen just like that. And now you can just add some more creativity
to your texture. So that's the basics
of Votex painting. I'll see you in the next lesson. A
53. 3D Lesson 52 Final Render with Mist and BlendCraft Compositor: Oh. Hello. Welcome back to Blender stylized
Arabian market course. So in this lesson, we're
going to finish up by rearranging our scene
and then compositing. Okay, so once you're happy with how your scene is looking, we can start setting
up for a render. So I'm going to go
to camera view, and we can have a quick, last looking rendered view here. So before we start rendering, let's go into our
render properties and double check our setting. So I'm on cycles. I'm
on GPU compute here. Now I have under render. Now we have Mac samples. So the more samples
you add, like, the better quality
image you'll have, basically, the
longer it will take. So sometimes you can get away with maybe
like 500 samples. Like, sometimes
I'll start low and then render and then see
how the scene looks. And then if I'm
happy, then I'll do another render at,
like, a higher sample. But for me, I'll probably
just go with something like 2000. I'll go
with two phase. This will probably take a while. It'll be a high quality, but two pasan is
like a good amount. Sometimes you can get
away with even lower. Sometimes it's like free 500. It's just about like
trial and error, really. So we'll make sure we
have denoise turned on, and everything else should
be all good to go here. And if you go to this
printer icon here, this is your output properties. So here, we can change
the resolution. So by default,
it's like ten ADP. If you want to change
this to four K, we can just go asterisk
and then two, I believe. So 3840 by 21 60. So I'm going to do a
four K render here. And then output, you can choose where to save it
here if you want to. Media type image,
file format, PNG. You have different types here. You have JPEGs and stuff. And then everything
else should be okay. So that's where you
change your resolution. Now, we want to go to the
compositing tape up here. So if we click this, and then we can drag
this window up here. And then on the right here, if you don't see
this, just press N to get your side panel up. And then you should see the
free D compositor tap here. We're just going to
click Setup compositor, and then click Okay. So now you should
have this scene. And then we should have a menu here with all different
kind of settings. These are our compositor settings here that
we're going to use. So let's go back to layout. So now we're back
into our screen, and our sky should have turned into this kind
of checkered pattern. That means it's
worked, basically. And what it basically does is we go to our render properties
here and then under film. You can see it's
turned a transparent, so it's just basically a transparent
transparent background. Now, it's up to you if
you want to use that, but I'm going to disable that because we don't need
a transparent world. It just does it by default. Now, another thing
we're going to do is just quickly go
back to a solid view. And if you have a
ier camera here, you can see it has this
line booken out of it now, and this is your mist. So we want this line to be going all the way
through our scene. So we want it to be over here. So if we click on our I believe it is is it
in world Miss pass? Yeah, so you want the
world properties here, this red world icon. And under the miss
pasta setting here, we want to increase
this depth so the line goes all the
way through scene here. So we're just going to increase this just so it goes all the
way past our buildings here. So that'll be fine. I've
got like 57 meas here. And now we can
just go to render. But first of all,
let's save first. Make sure you save and
then render Render Image. So click Render, and then you'll be greeted with
this pop up window. And then we just wait
for it to render, so I'll pause and then come back when my
render has finished. Okay, so once your
render is finished here, if you wanted to save
this version out, you just go to Image up here, and then you can click Save As. Now, I'm going to
minimize this window. So we're back into Blender here. And now you should see a tab at the top called Fred
tower Blend Craft. Let's click this tab, and
we should get this window. Now you can zoom in and
out on your image here. And we have our
settings over here. So under presets, if you wanted
to click this plus icon, you could save your settings and then load them if you
wanted to keep them. At output, this allows you
to change your resolution. You can change where to save it and you made the
compression and stuff. And if you had a bloom pass, you could save that out
separately as well. Now, background. If you wanted to have a different
image for a background, you can choose
different images here as long as they're
inside your blend file, but we're not going
to use that we just can use none because
we have a skybox. And for miss, we check mist, you can see it adds
mist to our scene. Now, you can change the color of the mist
if you wanted to make it like a desity sandy color,
do something like that. And then you use these
arrows to adjust your mist. So you click this white arrow and then click this
white bar here, and then you drag this
down towards black. This will change the
strength of your mist here. So I'm just going to bring
this down a little bit, just so it's not so intense. And then this black
arrow changes like the depth of your mist. So you can see it
moves away from the camera the more
I bring it out here. So I'm just going to keep
this to the left here. And with this, we can
adjust the color. So I'll go, like
a brownish color, I think, and then just
play around with that. And then I'll play
around with the strength by clicking the
white arrow here. Like so. I have mine
somewhere around about here. Now, I'm going to minimize that. And now for color, this
is like your color depth, so you can change this curve here to affect the
depth of your colors. So I'm going to just
push mine up a tiny bit, and then you can choose
the hue saturation and value as well
if you wanted to. So I'm going to keep
mine at default. So is it saturation one? Yeah. I'll keep mine at default. Maybe lift the value up a bit. Make it a bit brighter
or make it a bit darker. It's up to you. Name for gloss, this is, like, your metal stuff. So these bottles and, like, the top of our towers, you can choose the brightness
and contrast here, the metal glintser
the main one here. If I put this to one, you can see it's very
glimmering and shiny. So this is a bit too strong. I'm going to go with
like 0.2 for mine. Just add a little bit
of shine to this metal. So that's gloss.
Transmission and volume. Transmission is for,
like, transparent stuff. We have gonia. This volume we didn't add, so we can skip that.
Light and bloom. This is like for
adding bloom and like, lens flares to, like,
your emission textures. We didn't use emission, so we can skip that
one on this one. Environment. So this
will change your skybox, so you can choose
the brightness of your sky with this curve here. Then adjust the factor here. So I might bring this up a bit, bring the brightness up because the mist has covered the sky, so we need to bring
back the blues. So if we go to lift here, we can start adding in this blue again and then maybe adjust
some of these settings. So maybe if I put a factor to one and play with this curve and try and
bring back these blues. So this is going
like a purple colon. So maybe we try again. And we can see the color
is coming back slightly. So I'm just going to put
this to blue and then see later on in the color correction, we
can change that maybe. So ambient occlusion.
We check this. We check this color here, and then change this color
to, like, a dark color. We can see the ambient
accusion comes in there. So I'm going to spring
this up tiny bit. And then we can always
change the color of it maybe like a
yellowy sandy color. So we have some sand in those crevices, just
add some color there. I could always adjust
the strength using these arrows and get a
different kind of look, increase the contrast
by moving these arrows. So I might bring
this black fervor in actually and have it
like around here somewhere. Inclusion. Now for effects, you have different
sharpen options. Diamond sharpen if I bring this up, you can see
the effect it has. So I'm just going to
have a low value. And then box sharpen is
another kind of sharpen. So I'm going to
keep this disabled, we don't want to soften
can soften it up a bit. So maybe a little bit
of soften could, like, especially for this
wood, so maybe we can play around with
these sharpen options. And just have something
like this, Antillasin. We can just check
that to get rid of anything. Color balance. So we can play with
the lift and add some color and just do some
color grading this way. So if you wanted
to play with this, you could get different kind of effects for your scene here. So I might just keep this
at like default maybe. AB curves, so you can adjust this curve to increase the brightness and
stuff if you've seen here. So I'll probably just bump this up a little
bit like that. And then we have hue correct. So maybe we can get this blue
back with hue correction. So we have saturation. We have hue saturation value
with these letters here. So saturation, maybe we
can bring these blues up and get the blue
back in our sky here, and then bring this up. And there we have quite
a nice blue sky now. So we have value as well. We can make it brighter.
So maybe not too much. We just kind of bump
up those colors a bit. Something like this. So now we have our
blue back in our sky. And then this will
change the hue. I probably will mess with this. Then we have
brightness contrast. We can increase the
contrast if you wanted to increase the
brightness as well. So I will probably keep mine at default. I think mine's okay. And then hue saturation value, you can change the hue and saturation of your entire image. That's why you wanted to do, but I'll keep mine the same here, and then just increase the
value a little bit, maybe. Something like that.
And then I'll just check the noise just to get rid of any
noise in the scene. So there is your compositor. Feel free to play around with those settings and see
what you come up with. So now, if you wanted
to save this out, you just need to open
up your render window. So this window here, and you can see your
composite here. If you want it to compare,
we have a drop day menu. So right now it's on composite. If you go to Viewayer, this is your render here,
and then to go back, you just click Velayer
and choose Composite. And then if you wanted to save, you just go to
Image and save as. And then you can save
out your image here. You can change your
file format and stuff. Compression. You have
all these options here, and then just save here. So, yeah, I hope you
enjoyed the course. I hope you learned
some new skills. Now, we do have a
discourse server if you have any questions or if
you get stuck on any point, or if you just want to share your results,
that'd be cool. So feel free to
join. Little there's a little text document
in the course files folder with the
link that you can use. And feel free to leave a
review, leave some feedback. I'm always trying to
improve my courses. So any review, I would
love to hear from you. So I hope you enjoyed
and take care.
 3D Tudor, Bestselling Blender Author & 3D Educator