Transcripts
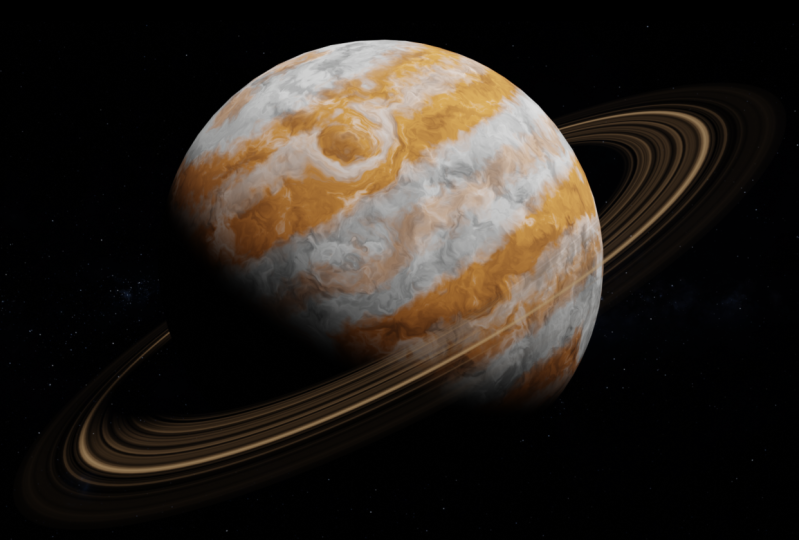
1. Trailer: Hello, and welcome to Creating Procedural Planets in Blender. In this course, you are going
to learn about the world of proceduralism in Blender
by creating Jupiter. The concept of a guest planet is just a vehicle to
explore other topics. What is proceduralism?
How it works? How do nodes connect and
speak to each other? Lighting, rendering,
compositing, et cetera. By the end of this course,
I hope you will have a solid understanding on how to create procedural
materials in blender. I want to help you entangle some complicated topics
when it comes to nodes and shed the light on some areas of blender that people
always assume. It is reserved for the elite of us to deal with
vectors and math. Yeah, if that's
something you're into, I can't wait to
see you in class.
2. Scene Settings: Hi, in this video we will
start shading our planet by creating the basic
geometry of the planet. Building our lighting set up, setting up the camera, tweaking some render
settings, and lastly, activating some add ons we
will need during the course. Yeah, let's jump right into it. A Lord, welcome everyone. Inside of a blender, we
are going to prepare the blender scene for all the
work that we will be doing, as I mentioned before. First of all, I'm going to
pick the template general, that's what you will
find yourself using. Most of the time,
surprisingly I'm not going to delete
of these elements. I'm going, first of all, to transform this cube
into a sphere. Now you might wonder, hey, why don't you just go
shift a and add a sphere? The thing is about
spheres in blender is that they do have
a really bad apology. If you focus right here, you will notice the existence
of a lot of triangles. Generally, triangles are bad. That's why I would highly recommend that you
somehow figure out a way to use instead this cube and transform
it into a circle, because cube tend
to have all quads. First of all, I'm
going to jump into the edit mode by hitting
Tab right mouse button. And you will have an option for subdivide because we need to add more geometry to be able to transform this
cube into a sphere. It's subdivide, subdivide again, subdivide again, and
subdivide again. You will get this cube
with a dense geometry. Now to transform this
cube into a sphere, all you have to do is to
hit shift alt S. Basically, when you drag, you
will be able to transform this cube
into a sphere. Notice the more I grab, the more I will be able to transform the cube
into a sphere. Make sure you set
it completely to a sphere and then hit Enter. And then once you hit Tab,
begin to exit the edit mode. Notice that we turn this
cube into a sphere. And the really nice
thing is that it is all based on a quad mesh, which is exactly what we want. Let's hit Tab again to exit. And just to make everything
easier and the math matches, I'm going to hit end
to open the sidebar. And as you can see right here, the dimensions are now
more than 2 meters. That's why I would highly
recommend that I'm going to pick these to 2 meters, so I will have a sphere
with two meter radius. And I'm going to go control
A and apply the scale. Right now my scale is one. And to finish everything I'm going to go here
and shade smooth. Right now, we do have
a perfect sphere with a perfect topology. I'm also going to rename this
cube into planet surface. This is how you create the
surface of the planet. Next thing I'm going to adjust some of these
different elements. Mostly, let's say the light. For now, I'm going
to select the light, and as you can see, it's not
perfectly in the center. There is a really nice
shortcut in blender to move the object to
its original position, which is old J, which will basically move the light into
the center of the scene. Right now my light
is in the center. I'm going to hit J, Z to
move it on the Z axis. And I'm going to bring it way up so it is perfectly
on top of the sphere. This light will emulate the sun. So if I just jump into the
rendered view for a second, as you can see the light is casting light on the
top of the sphere. There are a couple of things
that I need to change. First of all, I'm going to
jump to the light settings. And I'm going to change
the type of light, not from a point light
but to a sunlight. The sunlight is a type of light that doesn't care
about its position. No matter where I
move the light, it will always be the same. Really control the light is the direction,
just like the sun. So by controlling the direction or the rotation of
this sun light, I will be able to control where I want to point
the light overall, I want this light to be perfectly pointing
down on my planet. That's why you can hit alt R
to resist the rotation and you will have the sunlight pointing perfectly
down on my planet. The strength is too big, that's why I might
change it just to ten. This will do the job, and
for the angle I'm going to resist to default value which is 0.526 The really
nice thing is that we can change all of
these different values later in case we need, this is what we need
to do for the light. And something
important I need to mention right now
we're using EV. If I just jump to
the render settings, you will notice that
we're using EV legacy. The main reason for that is
that they are planning to introduce a new EV engine in
the next Blender release. But either way, we're not
going to use EV at this case, we're going to use cycles. So make sure to use cycles, and if you have a GPU
cardon in computer, make sure to change it to GPU. Compute. I'm going to disable the noise from here
because I'm going to do all of my denoising later using the blender compositor and
also in the light paths. Make sure to change
the total to zero, diffuse and transmission down to zero and leave
transparent as eight. Wonder hey, why am I basically zeroing all of
these different properties? The main reason for
this is that in space you don't have
a lot of bounces. This will make it
easier for Blender to do its different
computational stuff. So we will save a little
bit of memory and also it is more
physically accurate. Let's say this is for
the render settings. We're still going to get back to by the end of this course, but for now this is more than
enough to start working. Number two, I'm going to jump
to the world properties. And as you can see right here, blender already
uses some sort of a global lighting to
basically lighten the scene. This will be visible if I
just turn this to zero. You will notice how
everything turned into black. And this is what you
should actually see. Everything black
beside the areas that are litten by the sun. But when this is set to one blender does have
a uniform lighting that is basically using to light the entire
scene in space. There's no such thing.
That's why you should pick this and bring
it down to zero. Right now, what we need to do is to set up the camera position, set up the blender UI, and also activate
some really handy add ons to set up the
position of the camera. I'm going to hit basically one from the number pad to
jump to the front view. And I'm going to hit control alt zero to move the camera
to my viewing angle. If I just jump to the camera and to the camera properties
you will have here, the location and
rotation of the camera. What I want is the camera to be perfectly zero on the Z axis, so it will be pointing perfectly straight
into the planet. I also want the X
to be also zero, so the planet will be
perfectly in the center. The only value I need to
control is the location. Basically, by controlling
the Y location, I will be able to change how far or how close my
camera is to the planet. This might be easier to
see if I just jump back to the normal view and
you will see that my camera is pointing
straight into the planet. And by changing the Y location, I will be able to
change how much or how big the planet will
be inside of my frame. This actually
brings me to one of my favorite UI
organizations in Blender, which is by dragging another window from
here in this window, I'm going to hit zero to
jump to the camera view. Hit to hide the sidebar, hit to hide this also
side bar right here. And I'm going to jump
to the rendered view. And let's hide all the overlays. And also if I just
jump to the camera, I also can't change
the focal length. One of my preferences that
I like is actually to change the focal length to
35 millimeter. I don't know, I just find it more
appealing somehow. Probably the main
reason for this is that most of the
movies we watch, a lot of them are shuttled
with 35 millimeter lenses. That's why I always find myself picking the 35
millimeter focal length. The camera right now is
really far from the planet, so I'm just going
to select it G and hit to move it closer,
something like so. And in the viewport
display I'm going to bring the passport up up to one. So basically all of
these areas that are outside the
camel will be black. And maybe let's just make this
smaller and bring this up. Let's hit from here
to hide the sidebar. And hit T. This is my
favorite blender set up, so I will be working on, on this window and I'll be
seeing what the camera sees. And the final result in
this window right here. Let me jump back to my
solid view right now. And the last thing
we need to do is to enable a couple of add
ons that we will need. I'm going to jump to
Edit Preferences, and from here let's
pick Add Ons. The first add on we need
is really important add on for all the shading
process that we will be doing, which is called Node Wrangler. This is a life saving node. This is a life saving Eron and I don't know why
up until this point. Blender doesn't
enable it by default. And I also am going to
enable another Eron called import images as planes. That's basically it. These are the erons I will use
during this course. Let's close this,
and right now we're ready to start
shading our planet. So I will see you everyone
in the next video, where we will start doing
some shading work and also, as usual, make sure
to save your file.
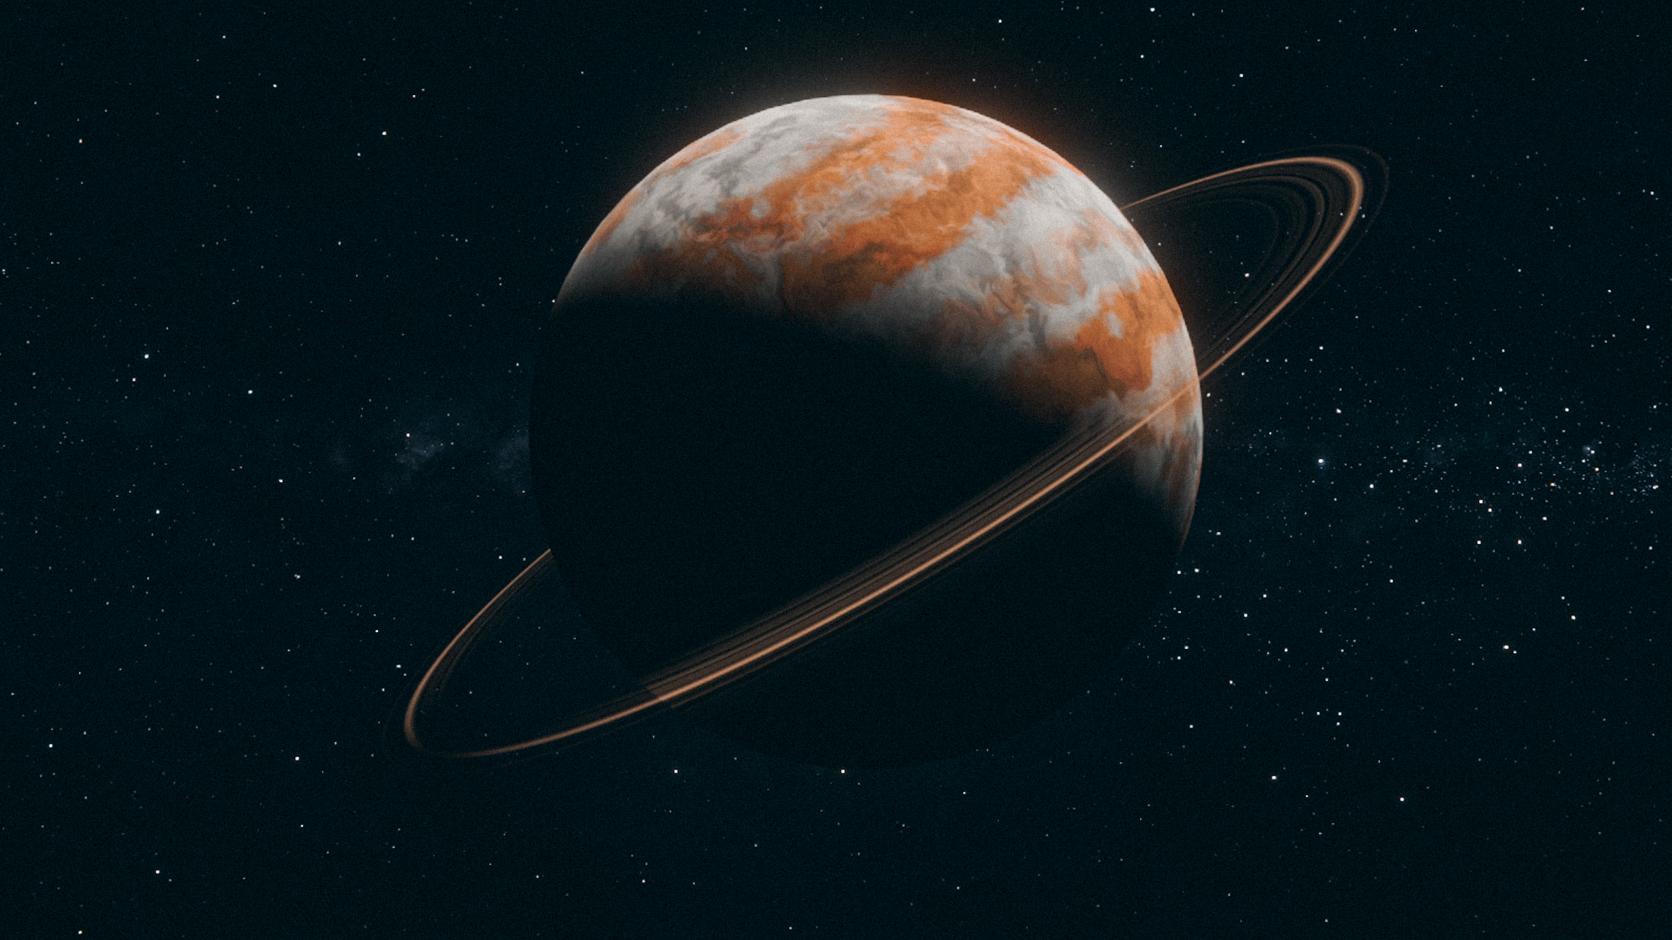
3. Creating the Planet Shader Part 1: Hi, in this video, we'll start shading
our planet by creating the general look
of a gas planets surface, even though gas planets
don't have a surface. So yeah, let's
jump into Blender. Hello and welcome right
now inside of Blender, and as I mentioned
in this video, we are going to create the
surface of our planet. The first thing I'm going to
do is to select my planet. And I'm going to change
this from the time line, I'm going to change it
to the shader editor. And basically this is my
default Blender material. I'm going to rename this
from Material to Surface, because this is the
surface of our planet. And I'm also going to enable the snapping tool so that
when I move my nodes, they will stick to the grid, which I find super satisfying. Now if I pull out
some references, the color of Jupiter
is a combination of brown and white, grayish color. These colors are distributed
in the form of stripes. In a perfect world, we
will be able to create, first of all, a stripe
texture in blender. And we will tell
blender that, hey, use both of these two colors, which are brown and white to
fill this stripe texture. Let's get back to blender and the first thing I'm going to do is to add a node
called combined color. I think actually they changed its name from combined
color to mixed color. Easily, you can go
to add color and you'll have here an option
for mixed color. I'm right here. And
what this node will do is to combine two
different colors. Amb, if I said this
to grayish color, which is exactly what we want. We want the first color
to be gray and we want the second color to be some
sort of a brown ish color. Let's say something like so. And if I do control shift
and click on this node, this is one of the
handy shortcuts that comes with the
node Angular add on, which will allow you
to preview any node by hitting control shift
and clicking on a node. Right now it is not visible. The main reason for that is because we're not in
the rendered view. So make sure to jump to the
rendered view and boom, this is what this
node look like. But there is a
problem right now. Blender is combining both
of these two colors. But the problem
is that basically blender is combining them
on the entire surface. What we actually want is
to tell blender that he distribute both of
these two colors in the form of stripes. And this is where this
factor socket comes in. The factor socket
basically accepts a black and white image as
a way to tell blender which areas blender should use
the gray color and which areas it should use
the brown color. Here's what we will
do. I'm going to add or actually I'm going to create a wave texture that is similar to the texture
that is on Jupiter. Here's what we will do.
I'm going to go shift A and I'm going to look
for wave texture. It is this one right here. I do control shift
and click on it. This is what it will look like. The stripes are
going vertically, so I need to rotate
them to be horizontal. We're going to use
another handy shirt cuts of the node angular iron, which is control which will add a mapping set up
to this wave texture. I'm going to the rotation and change the Y to nine and boom, the stripes right now
are going horizontally. Technically, if I
plug this color right now into the factor,
here's what will happen. Blender will fill
the black areas with gray and it will fill the
white areas with orange or brown. But before I do that, I want to play a little bit with the settings of
this wave texture. I'm going to drop the
scale way, way down. Let's say something like
0.5 for the distortion. Let's say something like
two for the detail. I'm going to lower it to
the health which is one. And I'm going to keep the rest of the settings
the way they are. This might not look like the
wave texture on Jupiter, but we are actually going to add another texture to make
it look like Jupiter. I'm going to take this
and plug it to factor, and if I control shift and
click on this mixed node, boom, this is the
result you will get. What we need to do right now
is to continue working on this wave texture set
up to make the wave, these colors are distributed look like Jupiter.
Basically we need refine the wave texture. I'm going to go to this wave
texture and I'm going to do shift D. And also this will disconnect it from
this mapping node. So I'm going to take this
and also plug it here. If I control shift
and click on this, this is what it will look like. I'm going to change a
couple of settings right now in this other instance
of the wave texture. Let's bring this a little
bit up to something like 1.2 and I'm going to keep the rest of the
settings the way they are. What I want to do
right now is to combine both of these two nodes. Where is the node that
will allow me to do this? It is a mixed node
node. Let's go to Add color. It is the mixed color
node. Let's put it here. And let's take this
and plug it to B. If I control shift
and click on this, this is what it will look like. Basically what we did is to combine both of these
two nodes together. We're adding more details
to the wave texture. If I just control shift and
click in this mixed node, this is what the result is
looking like right now. I'm going to go shift A and
let's add a color ramp. So look for color ramp, it is this one right here
and let's put it here. I want to flip the areas. Basically, I want these
brown areas to be white and the gray
areas to be brown. You can do that easily by jumping here and
flip color ramp. All you need to do is let's say bring this somewhere
around here. Let's take this and bring
in somewhere around here. If I just control shift
and click on this, basically we're
making the texture a little bit more contrasty. If I control shift click, this is before the
color ramp node, and this is the after. This is the before,
and this is the after. After I do the mix operation, this is what the whole
thing is looking like. We're still going to add more
and more details to this, but for now, this is what my
wave texture will look like. If I just jump to
the principle BSDF, I'm going to plug the mixed
color into the base color. This is what my planet
is looking like and I'm going to bring
the roughness up to one. As you can see, these gray areas are really boring. The main reason for that being that they're just plain color. So what I want to
do is to introduce a little bit of texture
also to these gray areas. So the question now
becomes how can we introduce a little bit of
texture to these gray areas? This is actually really simple. What is the thing
driving the gray color, this socket? Right here it
is, the A. Technically, if I plug some texture into A, I will be able to put this texture on the gray
zones or on the gray areas. I'm going to jump
here and I'm going to add another node or
another texture. It is called noise texture. Let's go and look
for noise texture. This is probably the most famous type of
textures inside of Blender Control shift and click on it to see what it
looked like and boom, I'm going to change the
scale or actually bring it down to something like 2.5
Let's bring the details five. Also I want it to be a
little bit more distorted, let's say 2.5 If I
take the factor and plug it into A and control shift and click on my mix node, basically we're putting
this noise texture or we're overlaying this noise
texture on the gray zones. And actually to finish
everything I'm going to change the blending mode
from mix to overlay. I feel like this effect is
a little bit too strong. That's why I'm going to add
another color ramp node. After this noise texture, go shift a and let's
look for color ramp, put it here, Let's bring this
flag somewhere around here. Let's say I'm going
to change its value. Let's bring this
a little bit up. Okay, let's say 0.075 This is what the set up we
built look like right now. Now this might seem like it is too vanilla of a set up to
create a realistic planet. But actually the only thing
that we need to do right now is to start introducing
more and more details. This is exactly what we will
be doing in the next video. We're going to start
adding more mapping nodes, adding more distortion
to this planet. And basically make it look more realistic by adding
more and more details. This is what we will be
doing in the next video, so I will see you
everyone there. And also, as usual, make
sure to save your file.
4. Creating the Planet Shader Part 2: Hi, this is the most
complicated video during this course
because for some people, it might be tough to wrap their minds around the
logic of the nodes. But actually, if
you give it time, every concept will
start to sink in. In this video, we are going
to finalize the look of our planet by Addings
and Victor Distortion. See you in Blender alone. Welcome everyone
again in Blender. In the second part of creating
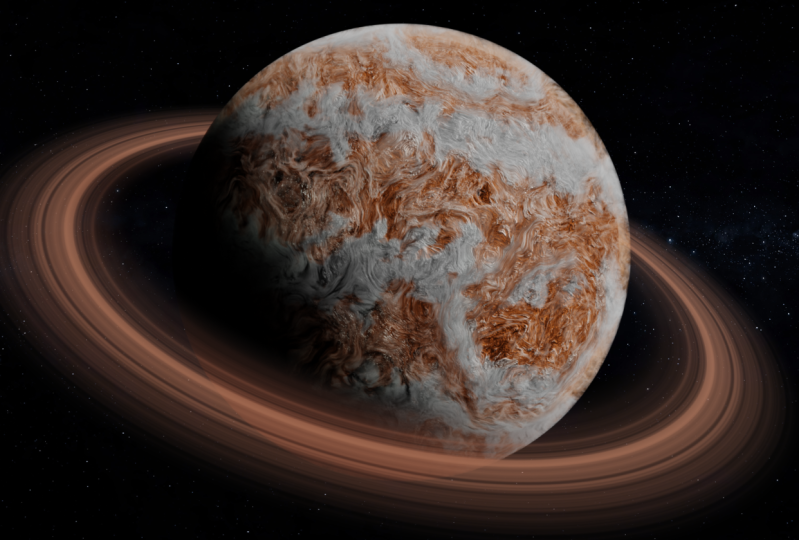
the shader for the planet, we're continuing our journey and I'm going to pull out
my reference again. And as you can see
beside the stripes, generally this planet or Jupiter tend to have a lot of texture. If you just focus right here, you will see a lot of like
swiggly lines and a lot of distortion and waves
happening in real life. This is happening because of the insane atmospheric pressure
inside of this planet. But we need to recreate something similar
inside of Blender. And this will
actually bring me to really important concept
inside of blender, which is how to do these
sort of distortion lines. Or how to apply some sort of distortion effect to
your different textures. So let's jump back into Blender to learn exactly
how we can do this. So here's a really
stupid analogy. I'm going to maximize this editor by hitting
control space bar. And let me explain an
important concept. Imagine you have, let's say, a plate, and you're going
to put water in it. By default, water will fill basically the shape
of the plate. Okay, this is how
real life works. You need to think of
textures like water. What I mean by that
is that when you put a texture into an object, it will basically
map itself or it will basically fill the
shape of the object. Same as water. When
you put it on a plate, it will fit the
shape of the plate. Same for the textures
inside of blender. When you put them on an object, they will fit the form
of the object right. Now, what if you want to apply
some sort of distortion? Let's say you want the water to fit or actually to be
in a certain shape. You definitely cannot
change the shape of water. But what you can
actually do is to change the type or the
shape of the plate. For example, let's imagine I'm looking at this
plate from the top. If I create a
plate, for example, and it does have some sort of
an S right here like this. Basically when I will put water, it will fill the shape
as this S shape, this, I can control the
shape of the water. This is actually really similar to the concept we will
be doing right here. Some of you might
think like, hey, we want to introduce some waves or some
sort of distortion. You might think we will do
this somewhere around here. After the wave texture, what we actually need
to do is to change the plate or to change
the underlying geometry, or actually the
mapping set up that is controlling how
this wave texture is mapped onto the surface. This might not make sense a lot right now, but believe me, once we start working, it will start to make
more and more sense. Okay. And right now, I
need to waste some time deleting all of these swiggly
lines that I just drew. So now we're back to our
usual shade of view. And as an advice, always think of the analogy of the
water and the plate. Let's right now think
what is the water? In our case, the water is the different
textures we're using, which is the wave texture and this wave texture, and
this noise texture. And what is the
plate? The plate is the thing we're putting
the textures on. You might think at first
it is actually the sphere, which is not wrong to be honest, but what I'd like
you to think of, think of the plate as the
mapping set up we're using. If I just jump to this
texture coordinate, I'm going actually to
change it to object. And yeah, okay, this will
change the shape of these, but actually this is
not a better all. And if I just hit
control shift and click multiple times
until I jump to object, this is what the
plate looks like. Now you might think like, hey, why the splate is orange? The plate shouldn't be colors. But this is what we
mean by a mapping Ce. Basically, all of these
different colors represents a visual representation of how blender will map the different textures
that we're adding, like these wave textures and all onto the surface of the sphere. If we figure out a way to make all of these colors
right here distorted, basically all the
waves will fit into that distortion and they
will also be distorted. So actually what we will be
doing will be around here and not after the noise texture to exactly see what will happen, I'm going to jump back to this last mixed node
and I'm going to control shift and click on it to be able to see
the final result. And let's do a little
bit of distortion. Here's how you do
distortion and blender, I'm going to add
another mapping node. So let's look for mapping node. Technically we will
not be using this one, but just for the sake of being able later to change all
of these different values, I'm going to keep
this node right here. Here's how you will introduce
a little bit of distortion. I'm going to add
a noise texture, let's put it here, control
shift, and click on it. And here's an important concept. The noise texture will
generate a texture that goes from zero up to one. I want the zero to
be in the center, which means I want some values
up and some values down. How can I achieve such thing? It is by doing a simple
mathematical operation, which is -0.5 The
one will be 0.50, will stay zero, but I
will also have -0.5 If I just go and add
a vector math node, let's add it here. And I'm going to plug the
color into the first socket. And I'm going to change
this to subtract. And basically because any color does have three
different values, red and green and blue, I want to -0.5 here or actually just 0.5 because we've already set the
operation to subtract. If a control shift
and click on this, this is what the texture
will look like right now. If I combine subtract node or this simple set up with
the original mapping set up, I will get some distortion to see exactly what's happening. Let's get back to
this overlay node. Let's get back here
and I'm going to add a mixed color node. Mixed color, let's put it here. Nothing is happening so far, but when I take this
and plug it to B, as you can see
something is happening. I'm going to change
from mix to add. And as you can see right now, this is introducing more
and more distortion. And this is kind of what we want now for all of these
different values, I'm going to change
them a little bit. Let's bring this up. Let's say something like 10.5 I'm going to keep the rest of the values the way they are. And maybe let's start lowering this a little bit
to something like 0.08 If I select all of these, hit M, this is the before,
and this is the after. This is the before,
and this is the after. And by the way, M will
allow you to mute nodes to enable and disable them to see the before and after results. What I'm going to
do right now is to repeat this operation
of this node set up. I'm going to repeat
it multiple times. I'm going to also add some
distortion right here by creating some sort of
spherical distortion that will happen on the
surface of the planet. To emulate the look
of the storms, I'm going to go shift A. And let's look for
another type of texture which is called
Voronoi texture. Let's take this and plug it
into the vector and control. Click on this to be able
to see how it looked like. Let's bring the scale way, way down to something like two. It needs a little
bit more contrast. Let's go shift A and let's
look for color ramp. Let's put it here. I want
to flip these areas. I want the majority of the
texture to be actually black. Jump here and choose
flip color ramp. Let's bring this white
flag somewhere around here and let's bring the black flag
somewhere around here. These circles will be, let's say the storms on
the surface of Jupiter. And after doing this, I'm going to bring all
of these known here so that everything I
will have more space to work. Let's add another mix
color. Let's put it here. And let's take the
color and plug it to B. And control shift
and click on this. This is the mapping set up we do have right now
in technical way, or to use the analogy right now, we're changing the plate, the texture will fit in. Let's lower the factor
to something like 0.2 and change the mix to add. If I preview the final result, I will get something
looking like so you might be wondering why
nodes are over each other. Let's just do this to
have more space to work. If I select all of
these three nodes, hit M, This is the before
and this is the after. Before, and this is the after. As you can see, it is creating this shape of storms, let's say. That's what I want
it to look like. It is like storms happening
on the surface of the planet. To finish everything, I'm going to also repeat this operation of distorting the texture
a couple of more times. Let's select these
three textures at first the noise and the subtract,
and the ad operation. Select the three of them. Hit shift to uplicate them. Let's do the same operation to this wave texture right here. Let's bring this here. Let's take the vector coming
to this one. Let's plug it here to this Noise And take
this and plug it to vector. This is looking weird, Let's try bringing the scale
up to something like 20. Let's bring the details up
to something like five. Okay, This is not doing much. Maybe let's bring this
value a little bit up. Okay, Now we can
see what it does. Let's settle on a value of
zero point. Let's say 15. This is looking decent.
There is a problem, a small problem,
which is that we're taking this data out
of this mapping node. And as you can see,
this mapping node is responsible for rotating
the wave texture. If I just do this, you will see that it does
rotate the wave texture. If I'm going to also take
this mapping node, the result this, and for example, also plug it into the noise texture. This will actually also cause the noise texture
to also be rotated. This is not what I want, here's what I will be doing. I'm going to delete this one. Instead of doing the
operation right here, I'm actually going
to do it right here. Go shift a, and let's
add a mapping node. And let's put it
here. I'm also going to rotate it on
the y axis to 90. Let's add and plug it to the vector of the
first wave texture. Let's do this. Also
plug it to this. Let's also plug it into the
noise of the noise texture. Let's bring all of this here. I'm going to select this entire set up shift to duplicate it. Let's take this and plug
it into the vector. This should go here technically. If I play a little bit with the values of all
of these three, or actually mostly with
the noise texture, we'll be able to achieve
a better result. Let's lower this to something. Let's say nine. Let's
bring the distortion up, Let's say 2.5 Let's keep
this the way it is. Let's see how our set up is looking like right
now. Bring these here. You can hit eight to select
all of your nodes and hit the period key to frame all
of these different nodes. Maybe we can hit control
space bar to see exactly all the different
operations that we did. And for whatever reason, this result looks kind of weird. So let's get back
to our first node. So object will go to
the mapping node. This mapping node is
not doing anything. Okay, I forgot to plug
this into the vector. This is number one.
This is a mistake that we did and let's keep on going. So we're combining this, so this is doing
some distortion. Let's see. This mapping node is responsible for rotating
the whole result. And this Voronoi texture
is responsible for creating these circles
that looks like storms. And then when combining both of them together
by using this mix. Okay, up until this point
I don't see a mistake, so let's keep on going. We connected this to the wave texture which we're actually combining
with another wave texture. Okay, this is straightforward, but something weird
happening here. Okay, we're combining
it with white color. I don't think that
this is right. Let's try to combine it with the original mapping
set up like so. Ah, okay, this will
look way better. Let's do the same thing here. Let's take this and plug it
into the of this ad node. Yeah, this is way, way better. So right now, technically, if I preview my last note, which is the principal BSDF control shift and click on it, this is the result
that you will get. I feel like the
sun is too strong. Let's jump here and let's make this to
something like six. Yeah, I think this
is a better result. Let's jump back to
the planet's surface. Let's hit A and hit the
period Q to frame all this is basically the procedural setup that I used to create the
surface of the planet. In the next video, I'm going
to elaborate a little bit more and try to explain
what is actually happening. Why are we doing this and this? Yeah, I will see you
everyone in the next video.
5. Understanding Distortion in Blender: Hi, this is a follow up
to the previous video. In this one, I'm going to
try and break the logic. We built our node tree around
in the previous video. Basically how to do
operations between the texture and the
texture coordinate node. So yeah, let's go. So hello and welcome everyone
back inside of Blender. And as I mentioned, my goal throughout this
video is to give you a solid understanding of mapping and how you can distort
textures and all of that. So this is a really
basic set up. This is just an image that I
have downloaded from Splash. It is a picture of a
nice city and all I did was basically to add a plane and I slapped this texture on it, and that's all I did. Nothing more. As you can see, this is the most basic
set up that you can do. Material output principle as DF. And just one image that
I'm using as a base color. Now let's say hypothetically, I want to distort this image. I will get back to the analogy I explained before
in a little bit. The thing is about, for example, the photo editing apps that
you use on your phone or, for example, Photoshop
or any editing software. Most of the time we
think that, okay, you will have the
image and if you want, for example, to apply some
sort of a distortion for it, most of the people
will think like, okay, this is the image and maybe just maybe there is a
node in blender that you will put it right here and this node will do
the distortion work. Let's say I wish
it was that easy, but blender doesn't
work that way. The analogy that I always
used to explain this, think of the texture
as something liquid, something you cannot shape. But what you can do is to change the shape of the thing
that it will be put on. For example, the analogy I
used in the previous video, think about it as water. You cannot change the
shape of the water. But what you can do is to change the shape of the plate basically that will
contain the water. And by doing that,
you indirectly changing also the
shape of the water. In blender, what is the plate? The plate is basically
the mapping set up. If I just select this
node and I hit control, blender will add a mapping
set up into this node. You might be wondering, hey, what is a mapping set up? The mapping set up is basically
the texture coordinate, and here's how you should think of this texture coordinate node. It is basically a node that
will tell blender how it wants or how to put the image onto the
surface of an object. And there are different
ways to do this. If I control shift and click on the first one
which is generated, this is one way of
how Blender will put the texture on the
object. This is another way. If I hit control shift
again, this is another way, the UV is another way, the object is also another way. Camera, window, and reflection, all of these are different
methods of how blender will put the image into
the surface of the object. Let's say hypothetically,
this is my, okay, I'm not seeing this
control shift and click on Principle SDF right now we're seeing
how Blender will map this texture using the UV. Let's change it, for
example, to generate it. And see how it will look.
Okay, It will look the same. Let's try the normal, okay? Right now it looks kind of weird because we
cannot see anything. Let's try, for example, the UV is the normal one.
Let's try object. And as you can see,
object right now, the image will only
be map on the corner. Let's try camera. It will use the object as a window
or something like that. Let's try window, and
this is basically using the plane as a
mask for the image, and the image will
always be in the middle. Let's try reflection
And reflection, it should show the image in the reflections,
as far as I know. Anyway, these are different
ways to do the same thing, which is putting this image onto the surface of the plane. Let's get back to UV. This mapping node is
just a way to control basically the size and scaling
and rotation of the image. I can even actually delete
it and just do it this way to give you a really simple way of
how to think of this. Think of the data that
is getting out of this texture coordinate
node. Think about it. At the information defining
the shape of the plate, let's say hypothetically, I want to change the
shape of the image. The operations I will do, I will do them right here, because I want to change
the shape of the plate, not the shape of the image. We can achieve this by doing some mathematical operation of distortion that we can
do somewhere right here between the
image and the plate. And the basic concept of how we do this operation
is really simple. You add a texture that
can be a noise texture, a wave texture, whatever, and we combine it with the
original mapping set up. Basically it's like we're
mixing different informations, like we're distorting it, we're introducing more noise to it. For example, shift A, and if I look for
a noise texture, if I just jump back
right now to the UV, as you can see, this is a
really nice even gradient. Meanwhile, this noise texture, as you can see it is called noise for a reason
because it is so noisy. When we introduce this
noise into the UV, it will basically
make it more noisy. It will create more distortion. And how can we add this
noise texture to the UV? By adding a mixed color. If I go shift A, a
look for mixed color, let's put this here and take
this and plug it into B. And let's get back to looking
at my principal BSDF. Let's see how it will look like. This is the result that
you will get right now. We're doing some form of
distortion, for example. Increase the scale.
You can lower it. You can, for example,
increase the detail and do a bunch of operations to
your heart's content. And this is basically
the basic way. This is the concept behind distorting images
inside of blender. I can, for example, take
the UV and plug it here. That shouldn't actually
change anything. Yeah. Because the UV is even and doesn't have any sort
of weird stuff going on. But this is the basic concept. The thing is about this. You can do it however you want. You can literally create, add more noise texture, for example, like this right now, okay, You will have a
picture that is way more noisy as you can see you. For example, instead of
using a noise texture, you can use Voronoi texture, you can a chicker texture, a wave texture, and you can
introduce those texture. Also another form of distortion. And by doing that, you
can start to see how flexible the set up is and how far actually
you can take it. You can introduce distortion
level as much as you want. And sometimes you may end up with something
looking really cool. Actually, if I just get back to the planet we created all of this operation we're doing right here after the mapping set up. For example, right here at
the texture coordinate. This is the exact same
set up we did right here. Basically, we introduced
a noise texture, we subtracted 0.5 to make,
as I mentioned before, the values go from -0.5 to 0.5 and then we added it the
same as we did right now. Same thing actually we
did also right here, we introduced some
more vector vector. Noise Same thing also here. This is basically
what we did during the last video just to finish everything whenever
you find yourself using or actually plugging something into the
vector socket, especially when it
comes to textures, what you're doing is
basically telling Blender, the vector data that you
will plug into the vector is information that define
the shape of the plate. In other words, it is
information that tells Blender how to map this image into
the surface of the object. That's it for me for this video and I'll see you in the next.
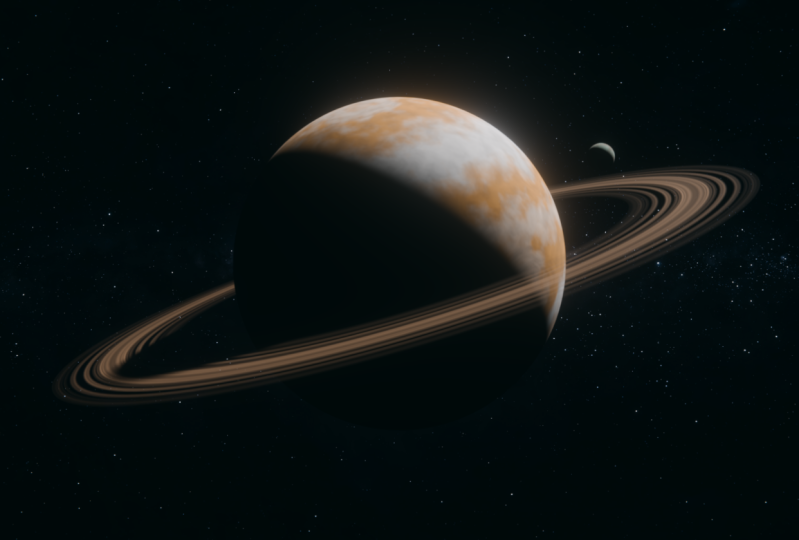
6. Creating the Rings: Hi, in this video
we are going to create the rings
around our planet. This will be fun. Let's go. Okay, hello and welcome
inside of Blender. And as I mentioned
in this video, we are going to create the
rings around our planet. First of all, I'm going to jump here and I'm going
to add a circle. So go shift A under mesh, you will have an
option for circle. Jump to the edit
mode by hitting Tab. Make sure you select
all of your mesh by hitting a and then
hit S to scale it, let's make it slightly bigger. Now this is just a simple, basically line of points. What we want is to extrude it so that we will have
an actual mesh, actual faces. To do this. While you're selecting
your entire circle, make sure to hit, to extrude, and then hit for scale. This will give you something
that looks like so, which will allow you to
create this thing that look like basically a ring
around our planet. Let's say something
like so in case you find it a little bit too big
or a little bit too small, you can always just get
back and change it later. I'm going to hit two for a name, and let's call it Rings. Right now I'm going to click
New for a new material, and I'm going to call
this also rings. Let's move to Creating the
Material for the rings. To do this, I'm going to
select my planet and hit H, just to hide it momentarily. I'm going to select the rings, and let's say just jump to the normal
viewport, shading mode. We don't need the
rendered view right now. Let's start thinking
about how we are going to create or to
texture these rings. Basically, the rings are
just a bunch of circles. Technically, if you think
about it, if we can add, for example, a wave texture which will give us
a straight lines. If we can figure out
a way of how to make the texture as circular
waves, we will be good to go. And that's exactly the process we will do during this video. The starting point,
I'm going to go shift a look for wave texture, this one right here,
control shift. And click on it to be
able to preview it, and this is how it look like. Now the question becomes, how can we transform
this into circles? If you watch the previous video, when you think of
changing the shape or thinking about how
a certain texture is mapped on the surface, you should always
think that we will be doing some processes
on the left, on the node, on the way of
how the texture is mapped. To start everything, I'm
going to go shift A, Let's look for
texture coordinate. This is a really handy node. I think you should know
that by this point because it is the node
that tells blender or that gives us certain
information about how to map a certain texture on
the surface of an object. Right now, you might think
that this texture is not using any sort of coordinate
mapping, but actually it does. By default, when you only have texture just
floating right here. By itself, blender is automatically applying
degenerated, I think. Let's see. Yeah, it is basically
the same as generated. So even though it is not plugged to a text
recordinate inside this node blender is actually secretly using the
generate a text re, coordinate map because we
want something custom to us. We're going to change it to UV, but something weird will happen, everything will turn black while you're selecting your rings. If I jump here in the object properties
or the object data, you will have here UV maps. And basically each
object does have UV map. So right now, this object
doesn't have a UV map. Yes, there is a UV map
layer here, as you can see. But this UV map
is actually empty because we didn't UV
and wrap our model. So to do this, let's
jump to the UV editing, and basically we'll have your rings right here
in the editing mode. Let's jump to selecting faces. And let's select all of these, basically by double clicking
on one of the edges to select the entire ring
or the entire loop. And then hit U for unwrap. And you'll have an option
for Follo active quads. Click on it and here. Okay. And for whatever reason, we're not seeing anything here. Okay. Something really
small right here, scale. No, this is not it. Something wrong is
happening. Let's try again. Select all of these U and
Polo active quads and here. Okay, I'm not seeing
anything here. Let's make sure this is enabled, Okay. Oh, wow, interesting. I seem to not see my UV map. You follow active quads, okay? Okay, something
weird is going on, so I'm just going to jump
to the object data and under UV maps I'm going to get rid of this and
create a new one. And let's try it again. Hit and follow
active quads, Okay. Now it worked. For
whatever reason. I actually don't
know what happened. So in case that problem
happened to you, also just create another
layer for the UV map. What I did is basically
to, as I said, to select the entire loop
and follow active quads. And he okay, this will give
you the following result, which is basically
a line of squares. What we want to do
right now is to pack all of these squares
inside the main square, which actually you should be able to see underneath this one. Hit A to select everything. If you go to UV, you will have here an option
called Pack Islands. When you click on it, you will
have this menu Just okay, everything will be packed
inside the square. We want the squares
to actually fill the entire canvas
of this square. Select all of these points. Now let's make sure you
are in the vertex mode. Select all of these points. Hit to open the sidebar, if you move this to Y. Actually, if you move this on the X and change this to one, they will be perfectly
on the edge. All of these are one which is perfect. Let's
see, all of these. These should be zero, so make sure they are zero. These ones also should
technically be one. Okay, sorry. One. And all of these should be zero and they are non zero, so let's pick zero. This is how we
vunwrap this ring. Now if I jump to the layout, you will be able to see how this wave texture right now is mapped in the shape of different circles that gets
bigger and bigger and bigger, which is exactly what we want. Now it's a piece of cake. All we're going to do is to just try and make it look good. So here's how we
will do it. Why I'm selecting this wave texture, I'm actually going to
add a noise texture, so go shift A and let's
look for a noise texture. I'm going to plug
it right here and make sure the socket
goes into vector. So technically, if you really understood what we
talked about less time, this wave texture
right now is doing some weird distortion stuff
on the noise texture. Let's make sure to
look at the factor by control shift and
clicking on this, so we're seeing the factor and this is the
result we're getting. I think I need to make the
scale a little bit smaller. So let's slower it down. Let's say something
like one for now. Okay, let's try 0.5 B, one will do the
job, so this is 0.1 Reduce the details down to zero. Details scale down to zero, and this is also down to zero. And let's play a little
bit with the settings of this bad Boy right here.
The noise texture. I'm going to bring the
details maybe up to five and let's try to bring the
distortion up, okay? I guess 2.5 will do the job. And then to make the whole
thing a little bit puncher, I'm going to add a color ramp. So go shift, let's look for
color ramp, color ramp. And let's put it
here. I'm going to make it way more contrasty, Something like, okay,
this is looking good. Let me just bring these here. And if I control shift and click on this, okay,
nothing is visible. Let's plug this to base color. You should get the
following result. And let's also maybe jump to cycles to see how
it looked like. There are a couple of issues regarding these rings right now. The first one being is that
they start really harsh, the cutting line
is really harsh, and also they end in a really harsh way.
This is number one. Number two, we want
the black parts to be actually transparent,
so we need to do that. And also this is really
low risk because you can clearly see the different
edges of this ring. So we need to add more
subdivisions to it. So these are three problems. The easiest one to solve will be to just add more geometry. Jump here, add modifier. Let's look for
subdivision surface, and let's bring
the levels to two. Okay, We got rid
of that problem. Everything is smooth right now. Let's jump right now
to the second problem, which is making the
edges smoother. Or let's say to create
or add some fade. It will fade from basically emptiness or
totally transparent. They will become visible.
And the same thing also from this area right here. They will start as transparent and they will slowly fade in. Let's jump back to the usual viewport shading
because it's faster. Now, how can we do this
thing of creating some fade? Whenever you talk about fading, you talk about ingredient
texture. Basically, I go right here and
let's look for gradient. Oh no, Yeah, it is this
one gradient texture. Make sure to take the
UV and plug it here. Control shift, and
click on this node, and you will have this fade. What we're going to do is to use this gradient texture as a mask. The black areas
will be invisible and the white part
will be invisible. We want this fade to
actually go from this area, or let's say in this direction, and also in this direction. To achieve this, I'm
going to duplicate this color ramp by hitting Shift D. And let's put it here. You can hit the back space to reset it to its default value. Let's hit this plus
button right here, which will add another
flag in the middle. I wanted to start as
black, which is here. I also want it to
end with black, which is the other direction. And in the middle, I
want it to be white. And this is basically how
you create this mask. Now all we have to do is to figure out a way to
tell blender that a blender use both of these two nodes as a
mask for all of these. And how can you do this by
adding a mixed color node. So go shift A and let's look for mixed color. Let's put it here. And I'm going to
take this into B. And what is the operation
that will allow me to combine both of these or to use this as a mask? It
is the operation multiply. So let's
go to multiply and bring this factor
up to one and boom, now it's start from black. And then it will also go into
white, to totally visible. And then it will
go down to black. Don't worry about
the black parts, because these black parts
will become invisible. That will be really simple.
Don't worry about it. And now the last thing
we're going to do is to set up the whole thing
basically to work. Let me bring both of
these two nodes here. First of all, how can we turn the black areas into
transparent areas? All you have to do
is to open under, okay, you don't even to open. We will have this
option for the alpha which controls the transparency. If I just jump to
the render view, okay, nothing is happening, okay, because I'm
not looking at this. So control shift
and click on this. Right now the alpha is zero. So when I start
bringing this up, it will start to become
more and more visible. So technically, if I take
this and plug it into alpha, you will have the
following result. This should be clearer. Maybe if I just jump to the
viewport shading, okay? It is not that visible. So let me get back
to the render view. Just trust me, this
is actually fading. And you can see the
clear fading happening. In case you want to
make it even smoother, you will add a math node. So let's go shift a and let's look for math,
let's put it here. Here's another handy shortcut. If you want to take both of
these and plug them here, all you have to do is to hit control and take both of these, and let's put them here. And let's take this and
plug it into the first one. And change the operation
from add to power. This will allow you to control how smooth the transition is. Let's say 1.2 I guess we'll do the job last but not least, let's give this
whole thing a color. So go shift a and let's
look for a mixed color. We're going to plug it
before the base color. It will look something
like the following. Let's change the operation
from mix to multiply also, and bring the factor
up to one right now, whatever color you will pick blender, we'll basically use
it to colorize our rings, and this is exactly
what we want. Let me get back
to my usual view, and also let's make sure our
planet's surface is visible. Let's move to an angle
that looks like so. And let's jump to
the rendered view. These are our rings and
they're looking dope. This is basically how you
can create some rings. As you can see,
actually it is not that complicated once you break it down into its
different components. Proceduralism can be sometimes hard when you have really
elaborate, not trees. Sometimes it can
be really simple, like just applying a
simple wave texture. And it also can be in between, like the software
doing in this course, the biggest takeaway
that you should have is that this is not simple. And it took me time to actually
figure out all of this, and that's totally normal
because it is like we're using math for
artistic reasons. I know that this
feels like you're trying to juggle two
different fields, but whenever you find
these intersections, they are really cool. Make sure to save your file. And I will see you in the next video where we are actually going to finalize this
shot and render it. Yeah, see you everyone
in the next video.
7. Rendering: Hi, in this video we're going to finalize our scene and prepare it for rendering by locking the shot and the
lighting for our planet. Adding some simple
camera animation. And lastly, setting up
our render settings. By the end of this video, we'll have a scene
that is ready to hit Render Hello and welcome
back inside of Blender. And as I mentioned,
we are going to set up and prepare our
scene for rendering. We're going to adjust the
composition of our shot, maybe do some animations
here and there. Then we will set up our
compositor and render settings so that by the end of
this video you will be able to render your scene. Okay, so this is what my
camera right now is seeing. And I can always hit zero from the number pad to jump
to the camera view. And let me just do this, and let's hit zero again. And yeah, this is what my
camera is seeing right now. This ring right here
is infinitely thin. That's why it is not
visible right here. In order to make it visible, we need to rotate
this entire planet. To do this, I'm just
going to jump to the viewport, shading
really quick. This is what my
planet look like. And I'm going to adjust and rotate all of these
different elements. The sunlight, the ring and the, sorry, the planet. And the ring. To get a more
pleasing composition, I'm going to select all of
these elements and hit, let's say R for rotate and Y
to rotate it on the y axis. Let's do something like so. Then maybe we can also rotate it a little bit on the z axis. R, z to rotate it on the Z axis, what we're trying to do is basically to get a
decent composition, maybe we need to
move them a little bit x to move them
on the x axis. Something like I think will be good in order to see
the final result. We can always jump to
the rendering view, but actually I'm going to
do really stupid thing, which is to jump to
the render settings and I'm going to
change the feature, oh okay, I'm going to
change this to CPU. You should not do that if
you already set it to GPU. Compute. The only reason
I'm doing this is that because I'm recording using OBS. And OBS is really heavy
on my graphic card, that's why I'm just
going to change to CPU temporarily just so that the video basically
will play smoothly. So let's jump to
the render view and this is how our result
is looking like. Yeah, I think it is a
decent composition. The only problem with it
is maybe the lighting. That's why I'm going to select
the sunlight from here. And I can always
hit, for example, R, Y, to rotate
it on the y axis. And what I'm trying to do is
to get a better composition. Or not a better composition, but better lighting in my scene, let's say something like
so maybe I can also hit R, Z to rotate it a little bit on the z axis to something like. So let me get back to this
view port shading and I think these rings are not
visible in the rendered view. That's why I'm going
to select the planet. And the rings hit R X and let's rotate them
a little bit on the Y, X axis, something like. So let's also play a
little bit more with the lighting R Y to
rotate it on the Y axis. Yeah, this is better.
Yeah, I think that this actually
kind of works for me. Maybe I'm going to
select the planet and the ringing and R Y to just still slightly
less and Yeah, looking good. This
is looking good. Let me jump back to my GPU. Compute, let's just disable
this and put this to 32 so everything will render
faster for the viewport. And after doing
this, I'm going to jump to the light
settings from here. And let's jump to light, and you will have an object for angle. And this angle will control
how smooth this lighting is. This will mainly affect
the terminator line, which will basically allow me to make this transition from the dark areas to the bright
areas slightly smoother. Let's set this to
something like 15. And this will give you
the following result. And I really like, let's say the more smooth fall of that you will
get by doing this. Now let's jump to doing
some camera animation. Okay, for camera animation, I'm going to jump
to the solid view so that everything
would render faster. And let's just start playing a little bit with the
position of our camera. I'm going to j, y to
move it a little bit on the y axis so that the
framing will be like so. And after doing this, here's how I imagine the
camera to move. I'm just going to change
from here to three decursor. What I want the camera to do is basically rotate on the z axis, just like it is basically looking at different
sides of this planet, just like R Z. This, I think will be good, but the question now is
how can we do such thing? You might think
that, okay, you can probably animate the rotation. But actually because
we're rotating around the three decursor, there is no way to
tell blender that a blender rotate around
the three decursor. What we need to
actually do is to go shift a, let's add a mesh. Or actually not a mesh. Let's go to empty and add a plane axis. By default, it will be
right here on the center. We don't care about
its location. We will leave it at the center. And what I want to do is to parent this camera into
this empty object. Right now it is not visible. That's why I always like
to do it using the. Outliner. While you're
selecting your camera, hit Shift and move
it inside the empty. And you will notice that
right now they are parented. And you can see this dotted
black line right now, whenever I move the empty, I will be moving the camera
while I'm selecting my empty, if I hit R and Z
totto on the Z axis, I will be able to change
the position of the camera. This is a really
common work flow by adding an empty object and
then pairing the camera to it. This will give you more
flexibility and it will allow you to do
certain camera moves that are really hard to do
just by animating the camera. Right Now, let's
animate our camera. And I'm going to
change this editor from the shader editor
to the time line. Where is the time
line? Time line? The length of my animation
will be only 5 seconds. That's why I'm going
to jump to the output. And for the frame end, which is the length
of my animation, I'm going to change it to 24, multiply by 524 is the frame rate and five
is the 5 seconds I want. And hit Enter, so we will only
have to render 120 frames. So let's start animating. While you're selecting
your empty object, Hit this will basically add
a keyframe and hit again. Okay, something
weird is happening. So let me just jump to
the object properties. Okay, it animated the location. We don't want the
location. So let's remove all of these key frames. We only want to animate the
rotation on the z axis. Let's hit this to add a key frame for the
rotation on the z axis. As a starting point,
I want it to be, let's say let's say -15 and
Blender will forget that. So make sure to double click this and let's jump
to the last frame. And here I want it to be 15, so I will have an
angle like this and hit this to add a keyframe. By default, Blender will make the animation start
slower then go faster, and then slow down. We want this animation to
keep the same velocity along the animation.
That's why I'm going to select both
of these keyframes for the temporal interpolation or the key frame interpolation, and change it to linear. The animation right
now will keep the same speed for
the entire animation. Also, we can do some animation
on the planet level, that's why I'm going to jump to the rendered view from here. And let's, or actually I'm
not going to jump anywhere. Let me just get
back to this view. And I'm going to
add another editor. And this one will
be shader editor. So we'll have the timeline
and the shader editor here. Let's select our planet. And what we want
to do is to make these clouds slightly move and distort and merge
into each other. That this will allow us to make this planet look like it is
an actual active planet. The question now is how
can we do such thing? This is actually really simple, and this is where
the mapping node, we added the first
node right here, or actually the second
node will come into place. If you start rotating
on the z axis, you will notice that, okay, you're having some activity right now on the
level of this planet. And we are rotating and changing the shape of all
of these different clouds. All we need to do is to
animate this z location, or actually z rotation. I'm going to set
it back to zero. Make sure you are in
your first keyframe. Jump here with the
right mouse button. You will have an option
for insert keyframes or insert single key frame. I'm going to choose
insert single keyframe. And let's jump to the
final frame which is 120. And let's set this to
something like 30. Right mouse button,
Insert single keyframe. While you're
selecting this node, make sure it is selected to
be able to see the keyframes hit while you're selecting both the keyframes and
change it to linear Always. For this
type of animations, you will find yourself using the linear key
frame interpolation because it will give you a constant speed
along the animation. And that's exactly what
we want right now. I'm going to leave it at this. This is more than
enough, honestly. But I will encourage you to actually try and make
a different animation. Try for example to
change the angle. Try to change the
lighting set up. Try to play a little bit with all of these
different nodes. And maybe you will find
something else you can animate that will
give you a better effect. Basically, give yourself
the flexibility to change all of the stuff that we created
without any further ado. Let's jump to setting up scene for rendering.
Okay, first things first, I'm going to jump
to the compositing. And there's a line,
I always say, think of compositing
as the stuff that happens after you
render your project. After you finish, your
rendering comes compositing. So make sure to select
Use Notes because this is important and this is our layer. What will come out of this is the rendered stuff
is the final render. First things first, we
want to noise our render, but Blender right now doesn't
give us the information for the denoising data. That's why you need to
jump to the view layers. And right here you will have
an option under passes, you will have an option for denoising data and focus right here before I
check denoising data. Once I click on it, you will have some extra
options that will blender will give you access to mainly the denoising normal, the denoising albedo,
and the denoising depth. And these are useful information for the denoising
process right now. You can go to add
an ender filter. You will have here an
option for denoise. Let's plug it here. And connect the denoising normal to the normal and the denoising
albedo to the albedo. Right now, once we render the layer or the final
render, we will denoise it. Then it will go to
this last node. What we actually want
Blender to do is to export all of these
renders into a folder. I'm going to go shift
a and let's look for a node called file output. And I'm going to plug it here. Blender will render Noise And then it will go
to the file output, where Blender will save it as
an image we can use later. Now let's adjust the settings of what those images will be. While you're selecting
your file output, jump to the node to be able
to change its propertse. Let's play with all of
these settings right here. First things first, which is the base path which where Blender will save
all of these images. I'm going to click here. From here I'm going to create a new folder and I'm
going to call render. I'm going to enter inside this one, and I'm
going to call this, for example, planet underscore. And I'm going to
leave it there so my render will look
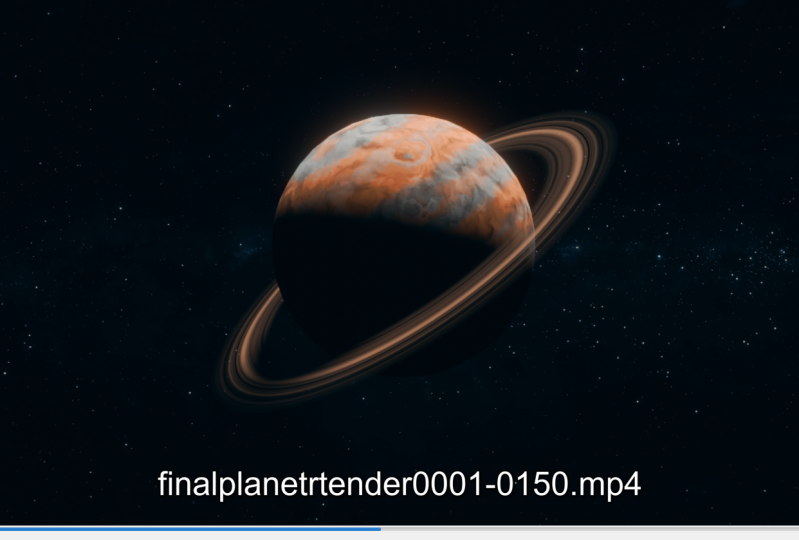
like planet 000, planet 001, et cetera, until the end of
the Mer sequence. And hit accept for
the file format. I'm going to change
it to open XR, I want it to be RGB and I'm
going to just render health. This is more than enough
for most of the stuff you will actually need
for the Z lossless. I'm going to change it to DA
loss and I'm going to change this file subpath to something
like Planet Underscore. And this is all the
settings you need to adjust for your file
output right now. Once we tell Blender to start
rendering the animation, we will have our
image sequence with the settings and the path
we selected right here. Right now, let's
do a final check and adjust our different
render settings. Let's jump here. So
cycles supported, These are for the viewport, for the noise threshold, and the settings for
the rendered view. I'm going to actually change the max sample to
something like 128. Yes, the more
samples, the better. But overall, because we didn't do any sort of
complicated stuff, all we do is just
simple texturing stuff, that's why we don't need a
really high max samples. 128 will be enough and also it will give
us faster render, and that's always a good thing. The lights I think
we adjusted or not under lies in the
advanced light paths. Yeah, we already adjusted
all of these to zero, which is exactly what
we want in space. There's no bouncing. And for film there is here an
option called transparent. If I just jump to the
layout blender right now, we render these as the planet in the middle of really,
really black background. Later on we're going to add
our own background to this. That's why I'm going to check
in the render settings. I'm going to check the option for under film to transparent. Doing this I will render
the planet on its own with a transparent
background and that will give me later
the flexibility to change the background and
add stars and all of that. This is basically it for
the render settings. I'm going to render
all of these elements, so there is no element
I want to hide. I'm going to save
my project file, save as 06 rendering. And lastly, but not least, go to rendering and render
and render animation. All we have to do right
now is to wait for your final render to render. I will see you in the
next video where we are going to do our
composite work.
8. Compositing: Hi, in this final video, we are going to add
a background to our planet and add some global adjustments
to finish everything. So yeah, our journey is finally coming to an end.
See you in Blender. Hello and welcome
in this final video where we are going to
composite our shot. Something I always
find myself doing is that instead of using
our old blender file, I like to start a fresh blender
scene because it will be faster and we can avoid sometimes some glitches that
can happen in the software. And also I always dealt with compositing as its
own separate process. That's why I like
to separate it to its own blender project way. This is a fresh blender scene. Let's click on
General right away. I'm going to jump
to compositing. Let's check Use Nodes. And I'm going to delete
this render layers node. But we'll start by importing
our image sequence. Shift a image
sequence from here, I'm going to select A to select all of my
rendered images. Import image sequence. Let's put it here,
Control Shift. And click on this node, and you will be able to see your planet. And you can always select the viewer node and hit V to
make the preview smaller. Something like so will be good. There are two things to do. First of all, to slap a
background behind our planet. And number two, we're going to add some
global adjustments. Let's start by
adding a background. Let's go shift A,
Let's put it here. Click on Open in the Images folder that
comes with this course, you will have the Milky
Way. Select this image. If I control Shift and
click on this one, this is a picture
of the Milky Way that we are going to
use as a background. We need to put the
planet above this one. And the node that allows me
to do such thing is called alpha over Alpha over. Let me plug this to
the second socket, and this one to
the first socket. Control shift and click on it. Right now my planet is in
the middle of the space. Now here's something important. I'm going to hit
control space bar To maximize this editor,
let's select the viewer. And hit V to make it smaller. The size of the Milky
Way image is four k, but the resolution of our
planet is 1920 by 1080. If you remember,
let's say the planet seems like it is way smaller. But here's something important because in the render
settings right here, we set our resolution
to be 1920 by 1080. Blender will automatically
limit the render to 1920 by 1080. All of these areas
that are right here, blender will
automatically override them and will not render them. The main reason I'm
providing you with a four K image is
that we can slide it left and right to create some subtle animation for
the steri background. That's the first thing
that we will be doing, adding some slight animation to the background control space bar to get back to my usual view. Let me move this here. The first node I'm going to add to create this
animation is transform. I'm going to animate the
X property which will allow me to control the
sliding of this background. Let me get it back
to zero, right? Not button, insert keyframe, and let's make it for example 50 or actually -50
replace keyframe. Let's go to the last frame which technically should be 120, which I'm going to
change from here, 120. Let's go here and change this
to 50. Insert key frame. Technically, right
now you will have the animation of the
background sliding by default. As you remember, blender will
make the animation slow, then go faster, then slow down. We want to keep it linear, so make sure to select
all of your key frames and you will have a linear or the linear key frame
interpolation. Second thing will be to add
some global adjustments. The global adjustments,
I'm going to do them after this alpha over node. I'm going to start
with my favorite node, which is the RGB curve
shift RGB curse. Let's play a little bit with the settings of the RGB curves. I want to introduce a little bit of blue tint in the dark areas. How can you get blue? It's either by adding more blue or by reducing the red
and reducing the green. That's the approach
I'm going to do. I'm going to use the
red and do this. Don't worry too much
about the strength of this effect because we can
always change the factor. That's actually what
we'll be doing. Let's also do it with the green. Do something like so. I want to also introduce a little bit of yellow
tint in the highlights. By the way, if you hit old V, you will be able to make
your preview bigger. I'm going to jump to blue and let's reduce it
from the highlights, which will introduce a yellow
tint in the highlights. This is looking good now. Because this effect
is too strong, I can always reduce the factor. Which will allow me to control
the strength of this node. Let's say something like
0.25 We'll do the job. I'm going to add a glare node, shift a and look for
glare for this node. Let's change the streaks to fog glow and reduce the
threshold to something like 0.1 And this will give you a very soft glow around the
highlights of your image. Which will make it slightly
softer and more cinematic. Let's say, to finish
everything off, let's add a lens distortion. Shift a lens distortion. For the distortion, I'm
going to make it zero point -0.01 And for the dispersion, which will add the
chromatic aberration, let's do 0.01 That's basically it for all the compositing work that
I will be doing. Of course, you can keep playing with all of these
different settings. Maybe play a little bit
more with the curves, which actually I'm
going to jump to the C. I'm going to bring this
a little bit more on top so the look will
be slightly faded. So something like. So
let's reduce this. Okay, this is better
control space bar to get back again
to our normal view, Hit V to make the
whole thing smaller and this is how our
render is looking. I'm digging this result. And now to finish everything, let's adjust our renter settings and render our scene
one last time. In our renter settings,
we have the format 1920 by 1080, that's
what we want. 24 frames per second. The length of our animation is 120 frames. We're good to go. Let's pick a folder where
to render our final render. And let's call it, for
example, gas lane render, except for the extension and the file format look generally, if you're working in a
professional context or for a company or
something like that, probably you will end up picking either open EXR or
PN J in our case. Because I just want to say one more step, my
final delivery, I want it to be a video
MP four that you can post on social media or
art station or whatever. That's why I'm going to
render it as a video. What I used to do
before is to render an image sequence and then
transform it into a video. But there is the option also to convert it
directly to a video, to render it directly
to an MP four, which is this option,
FFmpeg video. And also our render
is really simple. So worst case scenario,
let's say hypothetically, or render crashes or something, it is really easy to
re, render this scene. Ffmpeg for the color management. I'm going to keep it
the way it is for the encoding Meta,
Osaka or Metrosk. I don't know how to
pronounce this word. The only thing you need to
know that the container, this is what we call MKV, if you ever downloaded
videos from the Internet. This is the file format. As far as I know,
it is optimized and it is better than MP four, but it lacks support
in a lot of softwares. That's why I always like
to change it to MPG four, which is MP four for
the medium quality. Let's change it to loss less. Our render is really short so there is no
problem of storage. Yeah, these are all the
settings I'm going to adjust. Make sure to connect
your last node to the composite node. Let's bring this and
bring it to composite. Let me save my file and now I'm ready to
render this shot. So go to render and
render animation. This should go really fast, so I'll see you
on the other side once my render is finished. Okay, the final render is over. Let me close Blender. Let's close this. Let me
jump to the Render folder, and right here you will have
Final Guest Planet Rendered. This is an old render,
so if I open it, this is our final video. Finally rendered. Thank you everyone for
tuning into this course. I hope you've learned
a lot and you can always check the rest of my
courses here on the platform. And I can't wait to see
you in future courses.
 Yassine Larayedh, VFX Artist