Transcripts
1. Trailer: This course will teach
you everything you need to know about 3D
environments in Blender. Lot of people, when they tried
to make 3D environments, they end up with a result
that looks like this. I don't want you to
get such results and my mission is to
help you with that. This course will teach
you everything about how to make epic through the
environments in Blender. And I mean, every day, what are the
different approaches to create 3D environments? What do we mean by displacement? How to make something
look realistic and get results
like professionals, how to understand
nodes and build complex materials easily like the one you see it right now. Lighting, compositing,
rendering layers, cycles versus EV and more. We will demystify all of those topics once
and for all in a way that you will never have
to struggle with them again from creating hot deserts, deep oceans do huge
snowy mountains. We get them all net only
when you finish this scores, you will end up with a
solid understanding of how to make your environments
look so in gorgeous. But you will learn along the way some really valuable
informations and tricks that you won't
find anywhere else. And that will take your
skills to the next level. So even though this
course might sound like it has just about
3D environments, it is just a topic
that will help me explain a lot of things, but don't get me wrong. I'm not going to give you fish. I'm going to teach you how to fish so that by the
end of the scores, you will be able to create
whatever you have in mind. This course is built
from the ground up to suit whatever
your level in Blender, we will explain
everything in detail that you understand
exactly what we're doing. And most importantly,
why in the first place, this scores is not just about showing you
the buttons to hit, but most importantly,
why am doing whatever I'm doing and what is my thought process
along the way, which I think is the most valuable skill
that you can develop. So basically the scores is a really tasty pastor for all the beginners out there with some spicy sauce on top for
the ones who are looking for some advanced stuff
and wanted to take their 3D renders
to the next level. There is a value in this
scores for everyone no matter your level and simply it will just blow in your mind. Now if all of that sounded
exciting to you, believe me, this scores will be
a huge investment in your 3D skills that
you will never regret. Trust me and dad enough
for me for this video, and it is time to talk to
you all and saw the course. Yeah, go down.
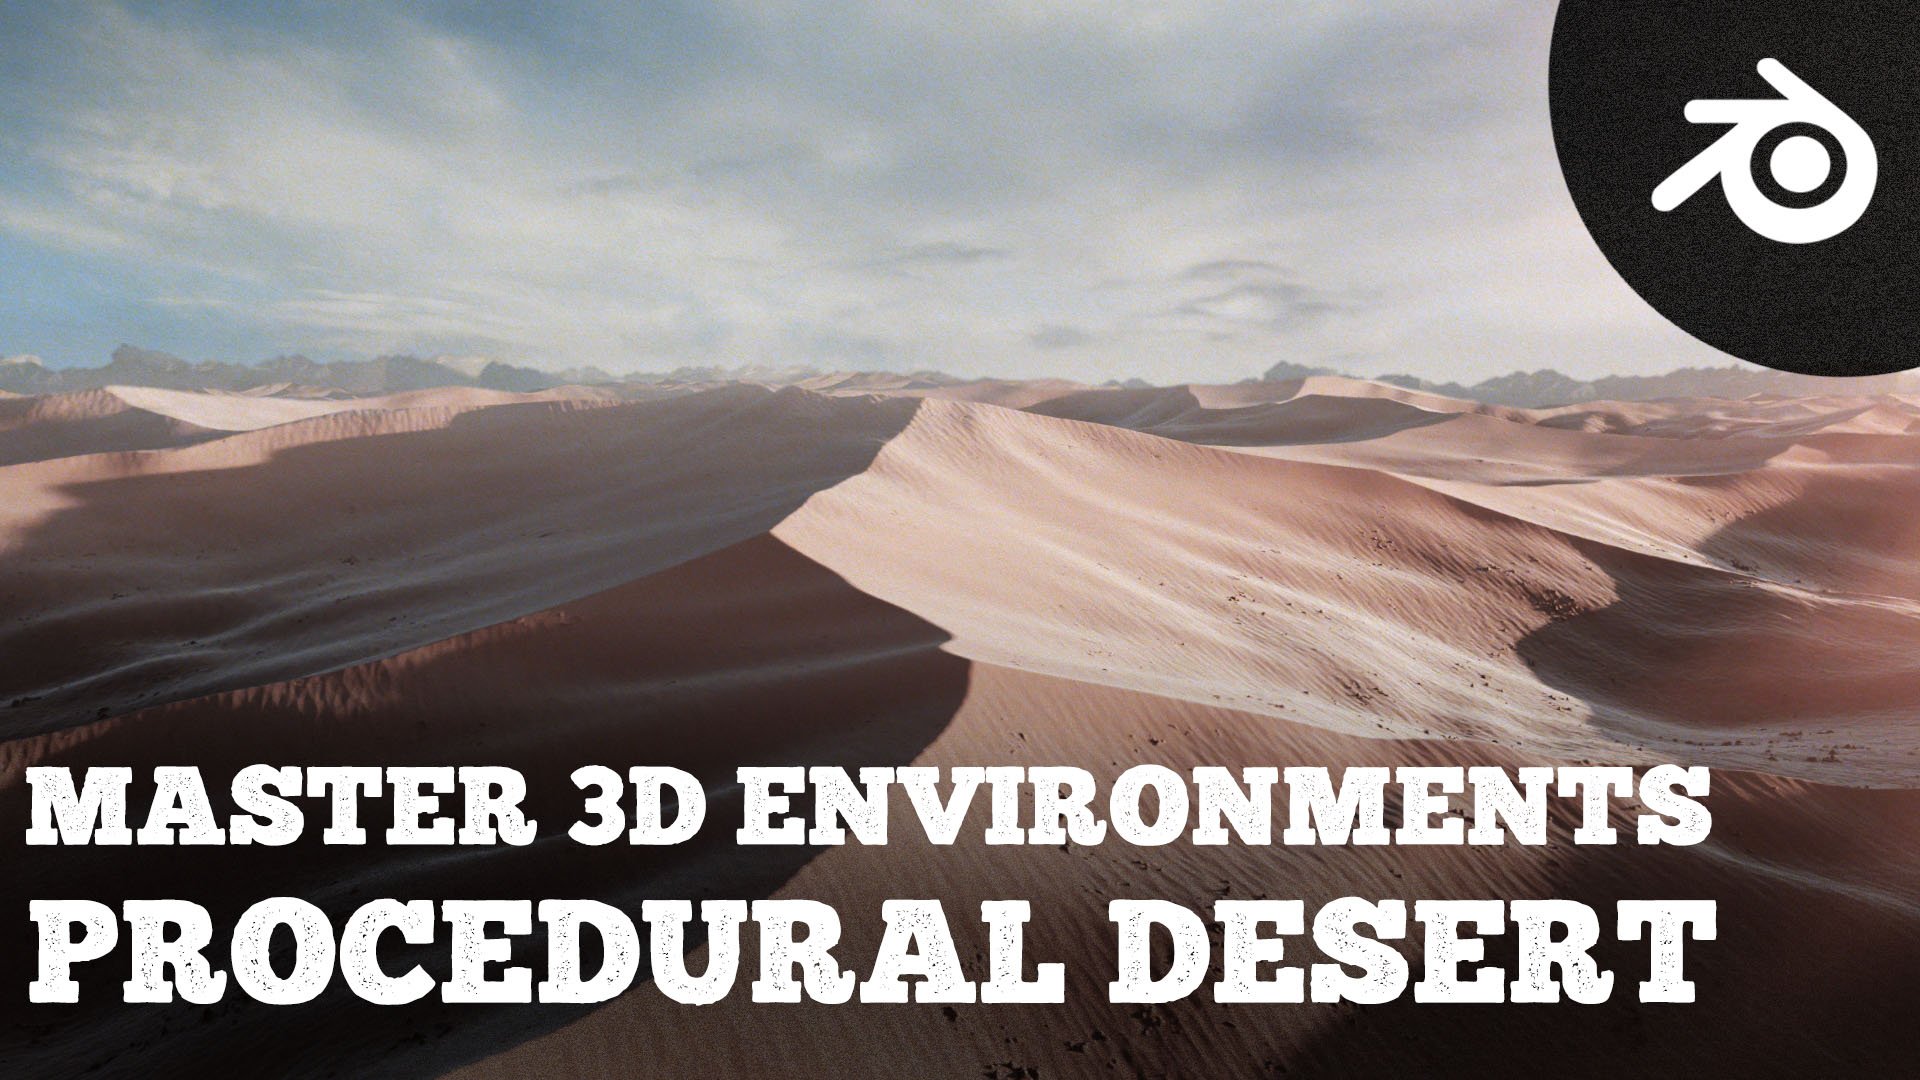
2. Studying References: Hello and welcome everyone in the mountain chapter where it is kind of self-explanatory, we will be creating a mountain. But only thing is that most of the approaches
that you will find in the internet or
image-based processes, which means that you need
some sort of software to create a texture that you will displace it or actually you
will use it to displace a plane which will give you
the look of a mountain. In our case, actually, we will be creating
the whole thing in 100% all in sign of blender, which means that this
workflow will be like really intensive in terms of like nodes and shading
and all of that, as you probably remember
in previous videos, because I mentioned
it every single time, the cheapest way to achieve photorealistic results is to study a couple of references. And here are the references
that I have gathered. The thing is I didn't
find like really close shot to what I
exactly want to create. But I feel like this
image and this image are the closest to the
thing I have in mind. Basically they will be like
really high mountain peaks. Probably will fly close to them. And we will have some
sort of a look in terms of color that is
similar to this, like this blue and cyan
look the only reason I've gathered also these
images because they do have a certain
field or a mood. I really liked this sunset look that I ended up abandoning this look because it is just so hard to achieve such
results in Blender. Then also there is
this one which is like all covered in clouds
and all of that. We might also actually create some clouds and all
bad in our Shawn, just to make it a little bit more dramatic
and all of that, the most important thing
is that if you notice that we will have
a similar workflow as we did in the
desert because there are primary details which is
like the big shape of the, basically of the rocks are actually of the big
rocks of the mountains. And then we need to add more and more
details to them like the different trucks and the texture that
isn't the rocks. And then we need to
put snow over it. So there will be a lot of procedural working
throughout this chapter. You can study these
reference images because they already come
shipped with the course. So we're trying to guess what
kind of features you should focus on and what are basically the big features
that we need to focus on. So that would give
the illusion like, Hey, this is
actually a mountain. Maybe actually before you
start following this chapter, you might want to try
actually to create this environment because
here's the thing, all the techniques that we
will be using in this video, or actually throughout
this chapter, most of them are really similar, just like more complex than
we did in the desert chapter. If you really understand
it hasn't shared through, you should be ready to
go to a certain extent. Guess how we will create the environment or this mountain
without any further I do looking forward to
see your results and I will see you in the
next video where we will basically start creating
these procedural mountain. See you there.
3. Scene Preparation: Hello and welcome. In this video, we will
basically start by preparing our blender for the mountain that
we will create. Of course, as usual, I will delete the
light and the cube x Delete and first things first, I'm going to my render settings. I will change from
EV two cycles. And for the feature set this time we will be using
micro displacement. So I will change from supported experimental for the device as you probably
already guessed it. If you have a decent GPU card, make sure to change it from CPU, just change it to GPU
compute so that you can use your graphic card and
therefore you will get faster renders for your
viewport max samples. I will change it to
something like 32. I don't need a lot of details and for the render settings, I will like keep it
the way it is for now. I might just change it later when I will be
rendering my scene. Now I will go to my 3D viewport, hit Shift a to add a new object, and I will add a plane. We will be creating a mountain. Mountains are huge. So I will open this menu and change the size of
from two meters. I will just change it to one
hundred, ten hundred meters, basically one kilometer wide, which is more suitable, I think for the mountain
that we will be creating. One thing that you'll notice
if you zoom out There is some sort of clipping
going on how to fix that. Open this menu from here, make sure to go to View. And right here you will have end and it is basically
1 thousand meter. So blender won't see
anything that is far higher than
basically 1000 meters. So we need to change this
and let's just add 10, so it become 10 thousand meter. And bam, now we can see all
of our plane, which is good. I will hit End to hide
the sidebar again. And for this, I will
hit the tab key to enter into the edit
mode right-most button. And you will have an
option called sub-divide, which it is self-explanatory. It will subdivide your
mesh or your face. In this case, I
will hit Subdivide. And for the number of cuts, I will actually pump it to
the maximum number, just 100. And you will have this
a tab again to exit. So right now we have
like a really huge plane and at the same time it is
like basically subdivided. So we do have enough geometry in displaying to displace
it the way we want. Go to your Modifiers tab. I will go to Add Modifier and
add a subdivision surface. As I mentioned before, we will be using adaptive sampling. So I will just check adaptive subdivision
and make sure like to just change it to
simple because that's what we need change
do you render view? And from here I had
this small arrow. And because everything
is gray right now, we need basically to add
some lighting to our scene. And the easiest way is basically to uncheck the scene world, which Blender will
basically use one of these HDRI that are right here. I would like probably just
switch to this brutes and rise because I used it before and it looks pretty sick. I will bring this
menu like this. I might zoom out like this. If you want to hide
all the overlays and the grid and all of that, you can probably just
click on this, this, and this way you will have only you're playing
visible without any sort of things that might distract you from your plane. And that will
change this editor, which is basically by default, it is actually the timeline. I will change it to the
shader editor because that's the main editor
that will allow us to create the
displacement we want. I will hit New and that
we'll call this mountain. The last thing that you need
to do is basically to go to your material properties
which are right here. If you go down, you will have an option
called settings right here. Click on it and you will have an option called displacement. By default, Blender
will just like you use displacement which
is like Bump only. You need to change
from bump only to displacement and bump. And that's basically it. One last thing,
make sure to rename this to something
like mountain by double-clicking on the name
and I will type Mountain. Yeah, and that's
basically how we prepare our scene for the mountain
that we will create. I will see you in
the next video. Bye everyone.
4. Mountains Base Form: Hello everyone. In this video, we will create
the base of our mountain. As I mentioned in
the previous video, we will be using the micro displacement
features inside of blender, which means that we
will need some sort of displacement data that we will feed to our
displacement socket here in the material output, I won't be focusing right now on the colors and the
shading and all of that. What I want basically to do in the next couple of videos is to nail the shape
of this mountain and to create the
base of our mountain, we will need displacement. As I just said, I will just
collapse this for now. I will take this right here. I might also drag
this just like this. So I have more space to work in my shader and I might zoom out. And as I mentioned, we need some sort of displacement data. And to edit, we will need
a displacement node. Go Shift a to add a new node
and look for displacement. After doing this, I will plug the displacement
into the displacement. I won't be seeing
anything because right now I'm not
on the render view, so I will change to the
render view from the top, and that will keep
it the way it is for now to create the
base of our mountain, we will be using
different textures, mainly the Voronoi texture. So I will go shift a. Now we'll look for voronoi
texture because we're using Node Wrangler Control Shift and click on the
node to preview it. And that's how our Voronoi
texture looks like right now, I will change the type from F1, which looks something like this, to distance the edge, which I think it is more
similar to the way like the peaks of mountains are distributed on the
surface of Earth. And just to make the whole
result looks better, I think I will drag
the scale way, way down to something. Let's say like, Let's try 0.1. Let's try for example, 0.05. I will keep it just
like this for now. You might say, hey, why it is just like some
sort of gray color. We need to scale down
this whole texture so that we see the
pattern that we will use. I'd actually know, you will see what I mean just in a second. After this, I will
add the math nodes, Shift a and look for mass
and just put it right here. And that will change the
type from add to multiply. Some people might ask me why
you're using a math note, even though I explained
this point before, but just like remind you why basically instead
of me later on, when I'm like trying to change
the different values of all the different
nodes instead of like twinkling with two values. Basically, by
controlling this value, I will be changing
the intensity of this Voronoi texture
without bothering myself, changing plenty of
different values and losing myself like basically just an experimenting with
different values. So this multiply node or actually less math node will
allow me to do such thing. And this slider
basically with control the intensity of this
Voronoi texture. And I think that
the value of 0.5, which is basically means health, will probably drag it a little bit down to something like 0.2. Now, I will mix this
entire setup with another Voronoi texture shift
a look for voronoi again, put it right here, Control Shift and click on it to preview it. I will leave all those different settings
the way they are except actually I'm going to put the same
number right here. So I will maybe put
like just 0.05 and I need to mix this with
this to mix nodes, a lot of you will just think, hey, just use the mixed RGB. But remember we're having
like black and white data coming out of the setup and the black and white data
coming also from this setup. And the best way like to
mix black and white values, it is basically by
just using math, like multiplying them,
subtract them and all of that, it won't make a big difference, but just in a logical way, I feel like it makes more sense. Shift a look for math. Let's just put it right here. And I will take this value and put it in the first socket. And Blender will automatically
move the socket, or actually the input
that is coming out of this Voronoi texture will automatically move it
to the second socket. If we hit Control Shift
and preview this node, which actually already it is hooked to the viewer,
so we're good to go. And I actually, I want to take this value and plug
it into the height. If we preview right now our principle be SDF to
see what's happening, Control Shift and click on
your principle. Be SDF. Nothing much is
happening because we don't have a lot of
displacement going on. So here's what we're gonna do. We will basically need to change the contrast of
this entire setup. I will take all of these
nodes right here and how to control the levels of
contrast and all of that. A lot of you are like
basically scream, Hey, just use the color ramp. And actually no, we will not
be using the color ramp. We will use the RGB curves just because it gives
us more freedom. Shift a and just look for RGB Curves and just
put it right here, Control Shift and click on
it to see what's going on. And I might just take this point and put it
something like this. So it is basically becoming
sort of like darker. That's looking pretty good. I think if we preview our principal BSD FOE now
Control Shift and click on it, that's the result we've got. The main reason we're not
seeing that much going on, on the surface because
we don't have like some sort of data
to tell blender where to put or how to map those two textures
on the surface, what is the node that
allows us to tell blender where to put
everything on the surface. It is basically
the combination of a texture coordinate
with a mapping node. I will select one,
these two textures, and I will hit Control T. And because I'm using the
Node Wrangler add-on, it will automatically
add the texture coordinate with
the mapping node, take this output,
which is the vector, and also plug it
to the vector of the second texture and change the texture coordinate because it used to be
generated right now, change it to Object and
slammed right here. And you will see this
basically happening. So I need to change
the scale right here. Let's maybe bring it
a little bit down. Let's try 0.1. I will keep
it like this for now. Probably a lot of
you will just say, Hey, nothing much changed. But actually it is, the last thing I'm gonna do is basically to select
this entire setup. It Control G to group them, hit F2 to rename this group, and let's call it base
mountain and hit enter. One small thing I
wanted to mention, because probably a lot of you want to see the results right now and not basically just
work on a gray plane. All we have to do is
basically to zoom on your displacement
node and you will have here an option
called scale. Just make sure if you
start bumping the scale, you will start
seeing the results. The problem is because our
plaintiffs sue a huge rule, probably need to input
some big numbers. So I will recommend
for you to plug 200. And that's actually
the number that I will plug later on because
one of the thing I realized probably not a lot of people like they are usually used to not seeing the results and assuming
how it will look like. So at least for you to have
some sort of visual feedback, make sure to plug 200
for now and later on, I will show you the right way
on how to change the scale. Let's basically it
everyone for this video, I will see you in the next one
where all the work we just did will make more sense when we start creating the rocks. See you there.
5. Rocks Variation 1: Hello everyone. This is where we stopped last
time and as I mentioned, we will create the
first variation of the rocks that will
populate the surface. This is the texture that
we finished with in the last video Control Shift and click on the RGB
curves to see it. This is the texture. And in this video
basically we will start creating the rocks. Now as probably a lot
of you will assume, I will use a Voronoi texture to create the illusion of
rocks and that I want. So I'll just zoom below
the base mountain. I will go shift a
search and look for voronoi texture and
make sure to take this vector socket out of
the mapping note and plug it all sort of vector control
shift to preview this node, it will look
something like this. And I guess I will
change the type from F1, the distance to edge. It looks like some
sort of noise right now because of the
scale is pretty high, so I need to lower the scale. Let's see, 0.2. That's kind of a lot. I think Let's try
0 for the double. Yeah, I think this looks kind of good for the effect
that we're looking for. Going back to the trick
that I always use, adding a math node behind
this to control us later. Shift a mass it right
here and change this operation from add to multiply and maybe also lower
this value a little bit. Let's say 0.3. Right now, I will mix it as Voronoi texture with some other noise textures. So to do this, Let's go Shift a and instead of the
Voronoi texture, I will look for noise texture, Control Shift and click on
the node to preview it. It looks like some
sort of black clouds. Let's bring the scale
a little bit down. Let's say something like 0.4. And actually I forgot to plug
it into this mapping setup. So I would just
take it like this, put it right here
for the detail. I will keep it 24. The roughness also, I guess I'm gonna just leave it at 0.5, but I feel like I need more
contrast in this texture. So what is the best
way to control that? Basically by adding
a color ramp, shift a color ramp, and just put it right here. Blender will
automatically block it between those different
basically sockets. Let's drag this
flagged as something, let's say until we start getting the result
we're looking for, Let's just put it 0.45,
almost the health. And for the white flag, I will drag it something like, let's say just 0.55. And yeah, that's looking
actually pretty good. I think let's add another
instance of this noise texture. So go shift a noise. Here's a general trick. Instead of like basically
trying to capture the socket and you might not be able to do that
because it is so small, there is an easier
way to do that because we're using the
Node Wrangler add-on. There is a really handy
shortcut that we can use, which is if you hit
Alt and click with the right-most button on the
node holding the Alt key. Notice that what will happen, basically the Node Wrangler
add-on will allow you to plug this node with any node
that you select from here. So I want to plug this, the noise texture hit Alt
right-most button on this node, the mapping node and just drag the circle to the noise
texture and release and Blender will
automatically know that because the output of
this node is a vector, data will automatically plug it into the vector of
the noise texture. This shortcut we will use a lot because we don't
want basically to keep navigating or
zooming out just to connect to like
really distant notes. I will zoom again on my
nose texture and maybe Control Shift and click on
it to see how it looks like. And the first thing
I guess I'm gonna do is basically to lower this value to something like
0.1. It looks like clouds. Again, I will keep the detail, roughness and distortion
the way they are. And I will add a color
ramp, node, color ramp, and put it right here
for the white flag, I will maybe drag it to
something like, let's say 0. I guess I'm just gonna plug the same value, which is 0.45. And for this one I will
plug also the same value of 0.55 and it will look
something like this. I kinda like it. The last
thing that we get to do is basically to mix these length
three textures together. I will mix it the noise
texture together. Then I will add the third one, which is the Voronoi texture. We do have black
and white dietetic coming out of these two outputs. So it will make
more sense to use a math node to mix
them, shift a mass. Let's put it right here. Take this color out of the first color ramp and
plug it to the first one. And Blender will automatically
move the first one to the second socket and change the blending mode
from add to multiply. And that's how it
will look like. Basically what's
going on is that if we look at this texture, notice the white areas. And if we click on this texture, notice the white areas. What's going on is
that a blender will multiply 0 or one that
are coming out of here. Well, the 01 coming out of here. So that's why if you focus
on these dark parts, they are basically
0 value when we multiply them with the white
parts of the second one, they will basically
black because this is 0 and multiplying them by
anything will always be 0. That's why if you hit control
shift and to previous node, Let's way they will always stay because they are black values. They are 0 to the computer. And that's why no matter
what color basically is coming or no matter what color
we're multiplying them by, they will always turn black. I hope this will make sense. Let's right now, makes it
a less Voronoi texture. Go Shift a and look for math, but a trite here after the first multiply node
and take the first socket and plug it to the
first socket and change the operation from
add to multiply. And you will have something
that looks like this. And let's actually going
to be the main setup for our rock shader or the first variation
of our rock shaders. I will select all of these
control G to group them, it F2 to rename them. And let's call this rock
underscore variation, underscore one and hit Enter. The last thing that we
gonna do right now is basically to mix it
this rock variation with the base form. I will take all of these
nodes somewhere right here. The best way to mix them is basically also by using MF node, what we'll have a
lot of math nodes right here because we're only dealing with
black and white data when we're working
on displacement. So I'll go Shift a
and look for math, and I will put it right here. And that will take this value
socket and the plug it into the second socket of this add node or the node
that we just added, Control Shift and click
on it to preview it. And that's how it
will look like. I will not change the
operation right here. I will keep it at add
because I want the rocks to be putting on top
of the base mountain. And that's basically
how I created the first rock variation for this mountain scene
in the next video, where we will add another
variation of the rocks.
6. Rocks Variation 2: Hello everyone. In this video we will create the second variation of our rocks that we're putting
on top of our mountain, as I mentioned before, this is how our texture
look like right now. But because we don't have an a value right here in
the displacement, in the, actually in the scale, we barely can see the effect of displacement
taking place. There are two different
things that you can do. You can probably like, maybe crank this number, something like 200, which will make your mountain looks
something like this. Or instead of that, I will keep this number one. I don't like fidgeting with it, and I will probably just add
one of my favorite nodes, which is the math node. Let's add math and
put it right here. And basically what I want, I will multiply all
the values coming from the entire displacement
setup going right here, I will multiply all
of these values. Let's change this
to multiply by 200, which will give you
exactly the same result because all the values
I multiply them by 200, it is basically the same as
changing the scale to 200. Yeah, I will keep it
like this for now. And now, let's work on our
second variation of the rocks. I will zoom out and
get back right here. I'm gonna do is basically to
add a noise texture shift, a Noise Control Shift, and click on it to preview it. But before we do that, make sure to plug the
vector to the vector. We mentioned the last
time the shortcut hold Alt right-most button and just drag over the two nodes
that you want to connect. I will get back to working at this Voronoi texture or
actually this noise texture, this scale is too big. I will bring it to something
like 0.3 for the detail, I will keep it at two and
the roughness and the distortion I will give them
also at the default value, 0.5 for the roughness
and 0 for distortion, I needed this texture
to be a little bit more contrasty Shift a, and let's edit color ramp. Let's put it right here. I will take this flag, let's say to something like 0.5. And for this flag, let's put it at
something like 0.6. Let's add another instance
of a noise texture shift. A noise texture,
put it right here, control shift to preview it. And don't forget also to
plug it to the rest of the mapping node Alt
right-most button. Drag it to the node that
you want to connect. The scale is too big. Let's put 0.5 this time
slightly bigger than 0. Then the zero-point
three that we've put in the first noise
texture for the detail, I will keep it at two, same for the roughness, same for the distortion. We'll make it a little bit more contrasty shift a color ramp. Let's drag this value and
let's take this value. Let's say something like this. That's looking good. I think I will just probably just leave it looking
argue this and right now, I need to mix both of these. So go Shift a and
look for a meth. Put it right here. I will take the color coming out of the
first noise texture, lug it to the first
socket so that blender moves the second socket, the first socket for
the second socket, they looks neater this way. The last thing I
will mix both of these two nodes with
a Voronoi texture, same that we did right here. So go shift a, look
for a Voronoi texture. Change the type from F1
to edge to distance. The edge makes
sure to connect it with the rest of the
mapping note Alt, and do it like this way
holding the right-most button for the scale control shift to preview this node and the scale, Let's lower to
something like one. Yeah, that will be basically
our small rocks, let's say. And to control the intensity
of this Voronoi texture, I will add a mask node, shift a mass, put it right here, change the mode from
add to multiply. And for the value I
will lower it to 0.1. And now I will mix this setup
with this Voronoi texture, shift a math node it right here, take the first value coming from the first setup and
put it right here. And also one thing that I forgot to mention
is that makes sure to change the operation
of the first math node. That is mixing the two, the two noise texture
changed from Ed to multiply and also change this
one from add to multiply. We will have something
looking like this. I will select all
of these nodes, control G to group them, F2 to rename the entire group. And let's call it rock underscore variation,
underscore two. And what I'm gonna do
is basically to combine the entire setup with this
rock variation number two. To do this, Let's
add a math node, put it right here, and that will take the output that is coming out of
this multiply node. I will take it as move up and plug it into
the second socket. And you will have something
looking like this. And to see exactly how
our results looks like, just move on to the principal BSD F Control Shift and
click on it to see it. And that's how our mountain
looks like right now. It is somehow
starting to give us the illusion of like
actually it is a mounted, except we probably need to add more and more details
to it so that, let's say fits more into like
the shape of a real mount. And that's actually the
main thing that we will focus for the next
couple of videos. Let's sit for me for this video. See you in the next one.
7. Add More Variations: Hello everyone. In this video we will add more
variation to our mountain. To do this, I will
basically makes this entire setup where
the noise texture. So here's what we're gonna do. I will zoom out and
we'll go ride down here. And that will add a nice
texture shift a noise. Make sure to plug it also to
the mapping node right here. I'll probably just select
it and move it down here so it is closer
to where I work. They will take the vector
and just plug it to the Vector Control Shift and
click on it to preview it. And for the scale, I will bring it down to
something like 0.1. And for the details, I will bring it to,
let's say eight. Now I need to add the
math node to control the intensity of
this noise texture shift a and look for math. Put it right here, and that will change the
operation from add to multiply. I might drag this value
a little bit down. Let's see. I will keep it at 0.4
and I will mix it both of these two nodes
with the rest of the tree. To do that, I will also just add the math node right here. Go Shift a and let's
look for math. Put it right here. And here's also another trick. Hit Shift and click
on this socket. Let's move on to this
node right here, which is the Multiply node, collect shift again
and hit the socket. And basically we
are right now we selected both of
these two sockets. If you hit right now f, basically Blender
will create the link between this node
with this other node. So this is another way. If you want to link
like really far nodes, That's another way
you can do it, except this time for the
operation for this math node. Instead of using our typical ad, I will actually use a different operation,
which is subtract. I want to subtract that texture from the mountain
right now if we get back to our principle be SDF Control Shift
and clicking on it, this is the result we got. It made a huge difference. I think let's see the
before and after. If I select both of
these two nodes, hit M to mute them. So this is the before
and the after. This is the before and
this is the after. It looks miles better, I will hit Control G to group them and hit F2 to rename them, and let's call them variation. The last thing I'm going
to add basically to finish this displacement
tree is basically I want to remove a
little bit more out of this Mountains because
it's mountains are not just like small peaks. There are all select
some sort of like caves inside of the
mountains and all of that. And we need to create
the illusion also. To achieve that effect, I will heavily rely also
on the noise texture. So I will go Shift a and
let's look for noise texture. Make sure to plug it
with this mapping node, a vector to vector control shift and click on it to preview it. It will look
something like this. And for the scale I will
bring it way, way down 0.6. Let's try 0.3, Let's try 0.15 and basically going
by health every time. Let's try 0.75. No,
actually 0 actually 0.075, I guess I'm just
going to put 0.01. It will look
something like this. I will keep the rest of the
settings of the way they are. And die will add shift a, basically a color ramp. And let's just put
it right here. I will take this and let's see. I want to make it
more contrasty. Maybe let's just put a 0.45. Then let's take this
flag something let's say like let's just keep
it at this value for now. And that's the
result we will get. As I mentioned, this
basically map will act as the removal or as a remover
from the rest of the mesh. So here's what we're gonna do. I will mix it with the
rest of the notes setup. I will probably take all of these nodes somewhere
right here. And that will go Shift a and add another one final math node
and put it right here. Because I want to
remove the dark parts. I want them basically to
be some sort of flat. And to achieve that effect, I will need to change the
operation from add to multiply, shift and click on the socket. Let's move on back to
our color ramp Shift and click on the color socket and just hit F to create
the link between them. And that's how our
shader we're looked like or actually our displacement
map will look like. And the last thing,
Control Shift and click on your principal, BSD f, and that's the
result that we will get. Basically we create the
illusion like there are some flat areas that
are going right here. But after that, we will move to our big mountains
and all of that. So I think that this will
give us some sort of like, let's say a cinematic
look or will give us the freedom to create
some really interesting. First of all, environment
and Secretary volts, some interesting
camera movements later on when we
create our shots. So yeah, that's how I
created the base form and all the different levels
of variation from rocks, removing stuff, adding stuff and all of that and how
I mix them together. In the next video, I will
explain or actually review this entire node
tree so that you understand the
concept behind it. And in the next
couple of videos, we will basically shade this
mountain in realistic way. That's it basically for me, for this video, see
you in the next one.
8. Displacement Network Overview: Hello everyone. In this video I want to explain basically the
hierarchy of all this, like basically nodes and how
they work with each other. The base form of our mountain which is looking right
now, something like this. It is actually driven by a
lot of unlike are actually a combination of a lot of Voronoi texture and a
lot of noise texture. That's actually the base texture that we use to create
our displacement, which is this node right
here, to this node, which is the displacement we plug or actually
we put before it, math nodes are
multiplying so that we multiply all the
values that are coming out of here by 200 would give us the illusion of
displacement because the number one that wasn't
the scale air is pretty low. And as I mentioned before,
you probably can just plug 200 right here and it will give you the exact same result. I just want to do it separately. It is just a self preference, but as I mentioned, you
can put 200 right here. Now let's focus on the
biggest part of this shader. First of all, we created our
base mountain by combining a Voronoi texture and another Voronoi texture
to voronoi textures, we combine them using a math
node because we're dealing with black and white values
in the entire node tree. And then we use an RGB curves to make it a little
bit more contrasty. We combine this with another, or actually the first
variation of the rocks, which is the combination
of two noise textures. Basically we put them inside of a color ramp to make
them more contrasty. We combine them using a map node and a
multiply operation. Then we mix them finally with another Voronoi texture
using a multiply node. And the only difference between the rug variation number one and the rock variation
number two is that we slightly changed the values of the
two noise texture and the Voronoi texture. Same thing with combine the two noise texture
using the Multiply node. And then we added
the Voronoi texture, or actually we
multiplied it on top of all of that using
the Multiply node. After we created this, we added a variation which will basically create or actually emphasize the effect of like jagged edges
on the mountain. And another one which
act like as a remover, which I forgot to put
inside of a label. So select them, Control J, F2, and let's call them remover, all of these different maps, we combine them
using math nodes, mainly when we want
to add other stuff, we will use the add operation. But when we want
to remove stuff, we will use either
subtract or multiply. They are actually
the same operation that you'll learn in school. Adding and subtracting and multiplication,
they're all the same. There is no difference. And that's actually one of
the things I tried to keep the different operation
that we will use as something we can
all understand. And yeah, this entire setup, as I mentioned before, will be fed to the Multiply
node, then the displacement. And finally our material output, which will give us a result
that looks like this. And that's actually
the hierarchy of all of these different nodes. They might seem scary and I understand that because there
are a lot of layers to it. But actually once you understand
the concept behind them, they are not actually
that complicated. Let's sit for me for this
video and the next one, we will have only
focus on how to shave this mountain
in a realistic way. See you in the next one.
9. Snow Shader: Hello and welcome everyone. In the first video where we will basically start
shading our mountain, which basically means like
given it the realistic look, let me zoom in my principal
BSD F right here. I will expand and using
this small arrow. And here's what we're gonna do. Basically, if we think
about it in a logical way, our mountain will be composed
of two different materials. One material will be
meant or responsible for the color of the rocks and the other one will be
responsible for the snow, which means that we need to
make stew differentiator, one of them for the rocks and one of them basically
for the snow. So first things first, let's take this
principle, BSD F, and that will hit Shift D to duplicate it and I will
put it right here. I might move them a little
bit up somewhere right here. And as I mentioned,
I need to mix them. I will go Shift a and let's look for mix and we're
mixing shaders. So make sure to
pick mixed shader. I will put it right
here on the line, and I will take
the second one and just plug it into
the second socket. And I might put it right
here in the middle. So basically at this first
one will be responsible for the rocks and the second one will be responsible
for the snow. So first things first, let's just start by creating
some sort of a material for our snow Control
Shift and click on this principle by SDF to
see how it will look like. And the first thing I think I'm going to do is basically to change from Gx to
multi-scalar gx. And for random walk, I will just change it to Christian barely
for the metallic, I will keep it at 0. And for the specular I think actually I'm going to lower
it a little bit down. Let's say 0.25, which is
basically the health of 0.5. Now comes the most
important part, which is the roughness. The thing is I won't variable
amount of roughness in instead of basically
just picking one number, I wanted to drive this
roughness using a map. And to do that, I think that's our best option will be
to use a Voronoi texture. So I will go Shift
a and let's just look for voronoi texture. I will put it right
here and I will take the distance and just plug
it into the roughness. Let's Control Shift and click on it to see
how it looks like. Basically it looks
something like this. And the first thing I
think I'm gonna do is basically to bump this
scale way, way up. Let's say for example, 50. Let's try 100. For my taste, I think that this is
looks pretty good. The only thing that
I noticed is that it doesn't have enough contrast. So actually I think I want to make it a little
bit more contrasty. So let's go Shift a and
look for color ramp. Put it right here, Control Shift and click on the Color Ramp to see
how it looked like. And let's maybe take this
black flag somewhere. Basically, I want it to
be barely noticeable, so I will go with 0.85
and for the white flag, alright, I think I
will go with 0.86. So they are really, really
close to each other, barely touching each other. So this will be our snow
to drive the roughness. And if I hit control
shift on our principal, BSD f, That's what we
will get right now. I think I will connect
this Voronoi texture to basically a mapping setup, which is basically this
mapping node right here. I will select it. Let's move it way, way up. Let's put it right here. And as I mentioned before, you can hit Alt
right-most button to connect both of
these two nodes. And Blender will do its
magic to connect them. And as you can see right now, everything kind of vanished. But we basically
created if we hit control shift on this
Voronoi texture, notice that actually it
is not like fully white. It is composed of like, really, really small dots like this, which will act like the
small grains of snow. So basically our snow will be
a little bit more textured, not just a blob of whiteness. And that's actually pretty good. I think let's see how
our shader looked like. Control Shift and
click on it and that's how our snow will look like. Let's select this entire setup. Hit Control G to put
them inside a label, hit F2 to rename it, and let's just call it
snow and hit enter. And that's basically it
for our snow shader. And in the next video, we will take care of
creating our rock shaders. See you in the next video.
10. Rocks Shader: Hello everyone. In this video we will create
the shader for our rocks. First things first,
I guess I'm gonna do the same thing as I did
for this principle, BSD F for the snow, which is basically
to change this GTEx to multi-scalar GG x. And for the random walk, I will change it to
Christian barely Control Shift and click on it to see how it looked
like right now. And let's start shading. Here's what I think. I will basically create a
map for the roughness and another one I will create
it for the normal input. The roughness will basically, it is kind of self-explanatory. It will control the roughness of our shader or of our rocks. And the normal, it
will basically add more bumps and like small
peaks to our rocks, would, we give the illusion
of more details on our rocks? So let's just do that. And one thing I think I'm
going to lower this specular a little bit down to
something like 0.45. Well, let's say just
0.4. Let's first start with the roughness. And as I mentioned,
I will create a mapped drive our roughness. To create this map, I will combine a
Voronoi texture. So just add a Voronoi texture. I will put it right here, and let's add a noise
texture. Noise. For this Voronoi texture, I will connect it to this
mapping setup right here. So all right, mouse button and connect it with this
for the noise texture, I'm not going to
actually connect it with the mapping node. I'm going to add a
mapping no, Just for it. So I will go Shift a and
let's add a mapping node. Let's put it right here. I will connect vector to
the vector and I will connect this mapping note
to this mapping notes, so ALT right mouse button
and connect it together. So basically it is
like a mapping note. For our mapping note,
you will understand why I'm doing that in a second. Control Shift and click on our Voronoi textures
to see how it looked like and it looks
something just like this. I think I'm going to change
the scale a little bit, so I'll start bringing this
number a little bit up. Let's say something like
50, maybe even more. Let's try 100
basically we want like really, really small circles. And for this I need to make it a little bit more contrasty. So the best way to do that is basically by adding
a color ramp. Let's put it right here. And let's just start cranking
this number way, way up. I guess even a little bit more. Let's try 0.87. And
for the white flag, I'm going to take it to
something like 0.895, which will give us this sort of things looks kind of like noise, but it is actually our texture, which as I mentioned, it will act like the small peaks and grains that
are on the rocks. I hope what I'm
saying makes sense. It is basically just a texture
so that our rocks will not just be smooth and flat. They do actually have some
sort of texture on them. And for this right
now let's see our, how our noise texture looked
like Control Shift and click on it will look
something like this. And the first thing I'm
gonna do is basically two. Let's try lowering
the scale this time just to make it
a little bit bigger. Let's try one. It will look
something like this, which I like it. Let's bump the details
to the doubles. So to multiply by
two, that's four. So we do have more detail on
the edges and all of that. So it is more structured. And for the distortion, Let's try to bring
it a little bit up. Let's say 0.5. And that's actually, in my
opinion, looking pretty good. And also as usual, I will add a color ramp to basically add more
contrast to my texture. I will take this probably, let's take this to something, let's say 0.4 for this flag. Let's also lower it to
something like, let's say 0.6. So we have something looking
like this right now. Basically by
combining the setup, which is the Voronoi texture
and the color ramp with the noise texture will create a map that will
drive our roughness. How to mix them? Go Shift a and let's
look for a mix RGB. Let's put it right here. I will take the color
to the first socket, the color of the
noise texture to the second socket Control Shift and click on it to preview it. But actually instead of doing that and basically just
mixing both of them, what if we mix this noise
texture with a gray color? So here's what we're
gonna do Control right-most button
to get the links. I will take this color, which is basically
that belongs to the color ramp,
the noise texture. I will plug it to the color one. It will look something
like this and I will keep this number
actually the way it is. Maybe later on, we
might make it a, basically a darker shade
of gray, but for now, I'll keep it like
this and I will take the color out of this
color ramp and it will plug it actually to the
factor and you will have something that
looks like this. So basically right
now we don't have those small dots that are
here on the whiteness. They are basically
right now limited only on the dark parts. And that's exactly what we want. And let's take the color and
plug it into the roughness, whereas the roughness
it is right here. And Control Shift and click
on our principle be SDF. And it will look
something like this. Probably you will say, Hey, nothing much is happening,
why we did that. But as you can see, if you
like you really pay attention, you will notice
like there are like small grains that
are on the rocks, which will add more details to our rocks that
are on the mountain. So our shader is working. And what I'm gonna
do is basically to select this entire setup. I will hit Control J, hit F2 to rename it, Let's call it rocks and rescore. Roughness will move
it right here. Let's take this
mapping right here. And right now let's
work a little bit on our normal input, which actually I think it will take a little bit more work. And basically for our normal, we will do all amongst
the same thing, which is basically combining
and always texture with a Voronoi texture to drive
our normal Oligo Shift a. And let's just add
a Voronoi texture. Let's also add the
noise texture. So go search noise
texture and window. We'll put it right here and
I want to pause the thing. Let's just move this setup like similar right here so that we have more space to work
freely on our Shader. All right, that's looking
pretty good like this. Alright, let's start
basically by seeing how a Voronoi texture looks like Control Shift
and click on it. It looks something like this. And actually before
we do anything, we will be using the same
technique that we used in the first chapter of
the light of this course, which is the desert chapter, which is that we will mix the original mapping
with a noise texture so that we have more variety to the way this Voronoi texture, it is mapped on the
surface of our mountains. So yeah, let's just
do that pretty quick. So if you remember, we have our mapping node. So let's add a noise texture, noise texture, Control Shift and click on it to see how it will look like. It looks something like this. And we probably need to hook it to our beloved mapping setup, which is right here, alt, right most button
and connect to it. It will look
something like this. I will keep all the
settings the way they are. I'm not going to change them. This is our original mapping. This is the mapping that we will basically combined with
this mapping setup. So go Shift a and
let's add a mix RGB. Let's put it right here. I will take the vector two color one and take this factor to color to control Shift and click on it to see
how to look like. It looks something like this. And I actually will lower the
factor a little bit down. Basically the effect will take place here and the transitions. Let's maybe put a 0.15. The mapping setup right now that is coming out of
this mixed node or actually the map will drive our vector of the
Voronoi texture. So Control Shift and click
on your Voronoi texture and it will look something
like this, please, if you don't understand
what we exactly did, That's actually the
exact same method that we learned in
the desert chapters. So make sure to check the desert chapter so
that you understand what we're basically doing for the type of this
Voronoi texture, I will change from F1
to distance the edge, which will make it look
something like this. And for the scale, Let's try lower in it a little bit down. So we'll tool basically means
that they will be bigger. Let's put one and I think that's a fair size for
our different rocks. I think so. Yeah. We'll keep it at one. The only thing that I
think I'm gonna do is basically to make it a little
bit more contrasty Shift a, and let's add a color ramp. Let's put it right here. And the only thing I'm
gonna do is basically to take this flag somewhere. Let's say 0.25. That's perfect. And basically we will combine this Voronoi texture right
now with this noise texture. First things first,
let's basically Alt and connect this
Voronoi texture to our original mapping setup or our original mapping node. Control Shift and click on it to see how it will look like. It looks something like this. Let's zoom on it to see how
it look like and dwell. Let's bring the detail
to something like eight. And right now let's
combine the noise texture with the setup that is out of the Voronoi texture
and the color ramp. Do you do that? You can
probably just use mix RGB, but instead of that, I would
like just using math node. Take the color from the
first socket and take the factor to the second socket. And for the operation
I will keep it at Add Control Shift
and click on it. And you will have something
that just look like this. So basically we're adding
the noise texture over our Voronoi texture after we basically made it a little
bit more contrasty. Now unfortunately,
we can't basically directly plug this value
directly to the normal map. That doesn't make any sense because we need to
tell blender that, hey, this is like some
sort of a height data. But actually if you
remember our normal map, we're supposed to feed
it a combination of red and green and the
blue value of one. And that's actually
something that we explained in the ocean chapter. So make sure also to watch it. And instead of that, we do have right now a
black and white map. So to do that, instead of using our normal map to basically
to drive our normal setup, actually we will add another
node which is called bump. I will move this
principle-based. If somewhere right here, I will take this
bump right here. And if you focus basically
this bump node will take a black and white data and
turn it to unnormal data. So basically I will
take the value out of the height control shift and click to see how
our bump look like. And notice that it is basically turned this black
and white data to our like usual red and
green and blue map. And that's actually the
magic of the bump map. So instead of that, we will basically,
as I mentioned, just using bump node
and connect the normal, rather normal if you hit right now Control Shift and
click on your principal, BSD F, this is the result
that you will get. So notice that we created a lot of details right
here on the surface, which will basically make our mountain look
way, way better. And it added way more variety to basically to our mountains. So it is not like just
a block of white clay. So yeah, let's basically right now select all of these nodes. It Control G to group them, hit F2 to rename this group. And let's call it, for example, rocks and underscore bumps. Let's move it somewhere
right here so that everything will be
visible later on. The only thing that you
might say right now, hey, but thus doesn't look
like rocks at all. So yeah, the main
problem with that is that we need to
change the base color. Let's select our base
color, make it way, way darker, will look
something like this. Maybe even a little bit darker. Maybe drag the saturation a little bit up,
something like 0.06. And for the hue, Let's
play a little bit with it. Let's say 0.6 and maybe bring
this value a little bit up, maybe a little bit darker. So I think like this actually looks pretty
good for my taste, so I will keep it like that in case you want the exact color. This is actually the the
color to B to C to D. Yeah, water coincidence. Yeah, that's basically
it for how I created my rock texture. And right now we
basically finish creating our snow shader
and our rocks shader. And the only thing that
we need to do if I click on our mix shader Control
Shift and click on it. This is how our
setup looks like. And I think you already guessed what we need to do
in the next video, which is basically to
create a factor map, which basically will
tell blender where to use the rocks and
where to use the snow. And that's actually what we will be doing in the next video. And also the last video of how we created the shader
for this mountain. Yeah. See you everyone
in the next video.
11. Snow and Rocks Factor: Hello and welcome. In this video we will create the MAB that will
drive our factors socket that we tell
blender where to use our snow and where to
use the ROCC shader. This actually will
be super easy and it might sound at first
a little bit tricky, but it is actually super
simple if you pay attention. So here's what we're gonna do. Basically, we need to figure out a way to tell
blender that, hey, the snow should be on top, the rocks basically
will be under it. It is easy to say what we need, but probably it will take
a little bit of work to exactly do such
a setup instead, let's first of all start
with an ambient occlusion, which is for our luckier, is the first node that
lender will show to you. And if you hit Control Shift to see how this node look like two, basically it will
give you somehow the areas where basically the
rocks will meet each other. For example, if I get back to my principal BSD F Control
Shift and click on it. Basically the ambient
occlusion map will give me the areas that are basically separating all of
these different rocks. Control Shift and click on it. This is how it will look like. Notice that it is
basically giving me those areas of contact. We do have a couple of
settings right here. And actually one of them
is actually distance. If you start cranking
this number up, you will basically add
more and more detailed. But I'm not going to go crazy with it because it's
slowed down a renders. So I will keep it something like four and I will hit only local. And that will have basically
this black and white map that looks something like this. Which if we think about
it in a logical way, that's actually where
the snow should be, but that's not enough because we need to mix it with other stuff. To do that, let's add our
beloved texture coordinates. So we'll go texture coordinate. I will put it right here. And if you hit basically
Control Shift to see the generated control
shifting into see the normal, this is our normal
data and we need to turn this to a
black and white map. To do that, go Shift
a and add non-normal. And let's just put
it right here. And if you hit
Control Shift again to this node, you
will see the dot, which will basically give
you a black and white data. So we basically turn the normal, which is like this kind of mix
of red and green and blue. We turned it to a
black and white map, which is actually what we want because we will be
combining it with a black and white
data that is coming out of the ambient
occlusion map. But before we do that, I want to make this map a
little bit more contrasty. Go Shift a and let's
add a color ramp. Let's put it right here. And I want it to be like
super contrast you. So I will take this
somewhere, like, let's say 0.7 and I will take this to somewhere,
let's say 0.8. And it will look
something like this. And I will do the exact
same thing for our, for my ambient occlusion
Control Shift and click on it, I will add a color ramp node. I will put it right here. I will take this
black flag, right? Something like, let's say 0.9. Let's take the swatch
flag way, way down, something like 0.93, maybe also at stake this flag to something like basically really
close to each other. So we basically crushing
the contrast as much as we can right now we do
have two different maps. One of them is driven by
the ambient occlusion, and one of them is driven
by our normal map that we get from our texture coordinate
and we need to mix them. And because basically they are
just black and white data, I will use a math notes, so I will go for math and
let's just put it right here. And I will take the
scholar and plug it to value two or the second socket and make sure to
hit clamp that we don't go above one or below 0. And that's how our, basically our map right
now will look like. But here's something
if you focus, we do have in this
ambient occlusion node, we do have a normal socket. But what if, if we like drive our ambient occlusion with another texture in
the normal socket, this will basically give us a better map to
control our factor. So to do that, it is
actually super easy. We will combine a couple of noise texture and we will feed
them to the normal socket. So to do that, go Shift a and let's look for noise texture. Hit Shift D to duplicate it. And we will basically link them to our beloved mapping node, which is somewhere right here. So Alt right-most button
connect the first one, alt, right most button to
connect the second one, Let's zoom back on them. It Control Shift to preview
the first noise texture. It will look
something like this. And maybe let's start
dropping down the scale. Let's say something like
0.2 for the details, I will keep it at 24, the roughness I will
keep it also at 0.5. And maybe let's add
a little bit of distortion, something like 0.5. The second noise texture, I will change the scale, Let's say Control Shift and
click on it first to see it. Let's maybe put ten. So it is basically the double. And the only thing
also I'm going to change is basically to put the exact same number for the distortion,
which is 0.5. I want to crank the
contrast of this texture. So go Shift a and let's
add a color ramp. Let's put it right here. And I will basically take this white flags
somewhere like 0.6. And for this one, let's say 0.73 and it will look
something like this. I will do the same thing for
the first noise texture, which is basically to crank the Contrast Shift a and
let's add a color ramp. And I will take this value
way up to something like 0.6, and it will look
something like this. I will multiply them
with each other. So I'll go Shift a and
let's add a math node. I will put it right
here and take with color and plug it to
the second socket. And instead of add, I will change it to multiply. And you will have
something like that, looks just like this. But as you can see,
the normal socket needs a normal map to
be plugged right here. So we need to turn this
black and white data to a normal map or to an RGB color that basically
represents the normal man. It actually we did that before. Right here when we did
basically the rock bumps, which is by using the bump node. And that's actually the same way we're going to do it right here. So let's go Shift a
and let's add a bump. I will put it right here. And make sure to plug
the value to the height, not the normal and disconnect
the socket right here. And you will have something
that looks just like this. And right now all
you have to do is basically to plug
this normal to the normal if you hit
Control Shift to see how our ambient
occlusion will look like. It will look
something like this. And that's how our
final map will look like right now let's take this, basically the output that is coming out of this operation, shift and click on the socket. And let's move on to
the factor which drives our mix shader Shift and click
on this socket and hit F. And if you hit Control Shift and click on your mix shader, you will have something
that looks just like this. And as you can see, mostly our mountain
right now it is actually covered by snow and we
barely can see right here, there are some areas
basically that are covered with or actually
where we can see our texture. The main reason for that
is that we need to play a little bit with how our basically this map is actually looking like
and how it is working. But instead of doing
that right now, I will actually do that in the
second video where we will fix a couple of problems
in our shader network. But before we leave, let's just select
all of these it Control G to group
them into two. Basically rename this group
and let's call it snow slash mountain
underscore factor. So we know exactly what does this node or this setup does. That's basically it for
basically everything. And the only thing that
we need to do right now is basically to
play a little bit with all of these
different settings so that we have a better
looking mountains. See you there everyone.
12. Finalizing The Mountain: Hello and welcome everyone. In this video, we will basically finalize our mountain because I still think that our mountains still didn't reach
its full potential. And you will be surprised
by the end result. First thing is first, I think that the height
of our mountain is a little bit too low and I
don't like it that much. So the first thing I'm
gonna do is basically to go back to our math node, which is before the
displacement setup. And it will crack this
number to 300 and it will look something
like this right now. Maybe also I feel like there are a lot of like rocks
actually pointing. I'm like away from the mountain, which doesn't look that
good in my opinion. So we'll get back to my, all of my different
nodes right here, which are like the bolus, the bass mountain, and
the raga variations. And for this actually, I think that it is two
contrasting right here. Actually, I'm going to give it a little bit more reading room, so it looks something like this. If I get back to my normal shader Control Shift
and click on it, basically I'm somehow trying to make it less contrasty
than it used to be, or let's say less
edgy basically by giving those black and white
maps more breathing room. And same thing I
will do right here. And also if you remember, we do have this remover, which actually if we make it a little bit more contrasty tool, basically actually add
more height and yeah, let's maybe crank the
contrast a little bit above this color ramp
and you will have something that looks
just like this, which I think it fits better the shape of the mountain
that we're trying to create. The other thing, we get
back to our map that drives our snow and mountain factor Control
Shift and click on it, it will look
something like this. And basically blender right
now is using white for the areas there will
be snow and black for the areas where we
want to see the rocks. But actually we want to
see more of the rocks. We want the majority
of this shader to be dominated by rocks. So to do that actually I figured out a small problem
or a small issue. If you see the ambient
occlusion map, you'll notice that basically
everything is white. And if we look at it after the colorRamp to look
something like this, and actually we want to invert
it so that the black areas will contain snow
and the white areas, we want them to be rocks. So basically we
need to invert it. The good thing is that if you jumped to this color ramp node, which is basically controlling the contrast of the
ambient occlusion map. And do you hit the small arrow, you will have an option
called a flip color ramp. And if you click on it, you will have something
that looks like this. So basically the majority of our ambient occlusion
map is right now black. And if you see the final map
that we will end up with, it will look
something like this. And just basically by
seeing it like this, which is like just
black and white, we can definitely see that
this looks way better than just our typical map
that we used to have. And right now if you
hit Control Shift and click in your mix shader, you will be surprised
because this is or mountain is
looking like right now, isn't that really good? So yeah, basically by
controlling the amount of contrast inside of this map, you will be able to control how much snow it is
on the mountain. And also another thing I
noticed is that there is a little bit of reflection
going right here. The reflection of all
of these mountains, it might be yourself preference, but I actually, I don't
like it that much because it looks like this
is actually super glossy. I don't like that
look to be honest. So I will actually lower the
specular of my snow texture, which is this one right here. My principle be SDF,
that belongs to this. No, I will lower it
way, way down to 0. So it will look something like, let's say more rough
and it fits better. The aesthetic were looking for. Yeah, that's basically it for all the different
settings that I changed basically to finalize
the look of this Sean, I didn't do a lot to be honest, because I didn't want
to bother you with like different numbers to
change and all of that. I tried to keep it as simple
as possible, but hey, please feel free
basically to play with this shader
the way you want. Which by the way,
in the next video, we will take an
overview look for our entire setup and mainly
for our shader network. Yeah, see you in the
next video, everyone.
13. Shader Network Overview: Hello everyone and welcome In the final video of
our shader network, because in the next
couple of videos, we will finalize the
look of our shot. It does definitely has
been a long journey. And just by seeing
this entire node tree, it wasn't easy at all
creating it and you should be proud of yourself
if you reach to this point. So yeah, tap yourself
in this video, all I wanted to do
is basically to take a look at this
setup right here, because we already reviewed this setup right here that belongs to the
displacement setup. So yeah, let's just take a look. Our shading network right here. Here's our approach for it. Obviously, when we
create a mountain, we will need different, or let's say two
different shader. One of them is for the rocks
and the other for this node. So the first thing
that we did is basically to create
a snow material, and it was actually
super simple. The only thing that we did is basically to drive
our roughness by using a Voronoi texture that
we made it super contrasty. And this was responsible
for our snow texture. It was super simple
and super easy. And after we do that, we needed to create
our rock shader. Shader, except of
course that we use the principal BSD F would
like really dark color to give the illusion
of like that there are actually rocks and basically we created two different maps. One of them is a map that
will drive the roughness. And it is basically
the combination of a Voronoi texture
and the noise texture. We made both of them contrasty, we mix them and we plug them into the roughness,
straightforward, the rock bumps, which is
a little bit more tricky, where we basically combined or voronoi texture with
a noise texture. We combine them and we fed
them into a bump node, which will basically
go to the normal map. The main reason we use this bump node because
as I mentioned, the data that is coming
out of this ED node, it is actually black
and white data and the normal map
needs a color data. So the bump node will
take the height and convert it to a normal
map, which is really good. The other thing, instead of
mapping this Voronoi texture directly with this mapping setup right here or this mapping node, we use this slightly
different technique which I discussed in the
desert chapter, which is basically by combining the original mapping
with a noise texture. We combine them so that we
do have like a modified way on how we want to map this Voronoi texture
on the surface. And that's exactly what we did as I mentioned in
the desert chapter. And by doing this, we
created our rock shader. And the last thing because
we need to tell blender where to put the snow and
where to put the rocks. We created this
setup right here, which is basically
the combination of an ambient occlusion map, as I mentioned before, it will tell us the areas where rocks basically would
meet each other and the texture coordinate where
we need the normal data. We converted them to a
black and white data by using a normal map, we made a super contrasty and same thing for the
ambient occlusion. We fed it to a color ramp and
we made it super contrasty. And then we mix them by using MF node and an add operation. The other thing is that
we use a couple of combining by combining
the noise texture and another noise texture. We made them super contrasty. We multiply them and we
converted them to black to a color data for the
normals through a bump node, as I just explained, and basically we fed it into the ambient occlusion or actually the normal socket
in the ambient inclusion, which as I mentioned, will
give us better details. And by doing this, this is actually our
entire node tree or entire setup that is responsible for
coloring our mountain. And if you hit
Control Space bar for this entire setup inside
the shader editor, this is our entire node tree. It is definitely huge and a
little bit intimidating for someone who doesn't know exactly what we
basically created. But right now, you're
supposed to have a solid understanding of how this entire new tree
actually works. And you should be comfortable
basically twiddling with different values
to get different looks, which is basically
the ultimate goal. You don't need to stick to the result that you're
seeing right now. But there is actually a large
room for experimenting, maybe improve this
shader that I created. It is up to you in the
next couple of videos. Let's have more fun
by adding a sky, maybe add some camera
movements and finalize our short for the final
render without any further, I do see you in the next video. Bye everyone.
14. Displacement Map Baking: Hello and welcome everyone
in this video where we will basically start trying to
create our camera animation. We want to be creating
it in this video. We're actually
going to do that in the next video because our
camera will be moving. There is no way that we can see this animation in real-time because our shader
is really heavy and unless you have like
really beefy machine, it is almost impossible to see this animation in real time. So that's why in case we
want to see this animation, we need to figure out
some sort of a solution. Some of you might
suggest that we can maybe jump to
the solid view, but as you remember, we're using micro
displacement features inside of Blender so they won't
be visible in daylight. Solid is viewport shading.
What is the solution? Some of you might say, hey, like maybe just, for example, instead of
using cycles, just use EV. But actually it is gonna be the same problem because
as I mentioned before, the micro displacement
features unfortunately are only supported in the
cycles rendering engine. And when you will be using EV, you will end up with a result that looks something like this. And as you can probably notice, my viewport is super
laggy and slow. So also this is not a solution. Let's get back to cycles. The easiest solution for this, and it will take probably
a little bit of time to basically optimize
the scene, or let's say, to be able to see our camera
animation in real-time, which says that we
need to figure out a way to tell blender to displace this plane and the
solid viewport the same way. Basically after the
micro displacement, after we displace it using
our Shading Network. So here's what we're gonna do. Make sure you are in
your shader editor. And from here, I will hit Control Shift and click on this math node that
we used before, the displacement
node basically to see our final
displacement texture. And after you do that, go shift a hit new
type image texture. Let's just put it right here. And I will hit New. And from here
let's, for example, call it mountain and rescore
displacement for the size, Let's plug 4096 so it is four K. The most important thing. Make sure to check 32-bit flow that's
important and hit Okay, what we will do is basically to kind of convert this texture, which is like after
the math node, we will convert it
to a normal image, which later on we will use
it to displace our plane. To do that from the
properties editor, you will have a tab
called the bake. And from here you
will have big time. Make sure to change it
from combined to emit and blend rule automatically begged the structure into this image. And after you do that, make sure also to
change your sampling from this crazy
number which is 4096. Let's maybe just change it, for example, to a low number. Let's say even something like, I don't know,
maybe like two. It doesn't matter that much because it is just
for reference. So we don't need a
lot of samples to create basically a good texture too will be more than enough, and also it will allow
you to bake faster. After finishing that,
Let's get back to our Bake tab and just hit bake. And you will have
this like small slide right here that will show you the progress of
your baking process depending on the power of your
computer and all of that. It might take a
little bit of time, but actually it will
be like really quick because most of the time it
doesn't take a lot of time. Yeah, see you after the
begging has finished. Alright everyone, my baking
just finished and we basically baked our texture
into this image to see it, make sure to jump from the shader editor to
the image editor. And from here, open this small tab right
here and you will have your texture right here called Mountain
displacement. I'll click on it. This is basically our
displacement texture. Now we need to save it, go to Image, Save As, and I will probably save it
into my images folder or the resources folder
that you will find with the project files. I already saved it
before for the course, but here's what we're gonna do. Make sure to change
from PNG to open in XR and make sure to give it an RGBA and follow
the color depth. Make sure to change
it to float full. Other than that, everything will be good except the
only thing I'm gonna do is basically to just
add a small number effort, for example, 02,
because I already have a displacement texture
right here and I will hit Save As image. And basically right now we save this basically this
displacement map into our hard drive so we won't
lose it after we did that, Let's get back to our
shader Control Shift and click on your mixed shader
to see the final result. And let's maybe
collapses like this because you won't need the
shader editor for now. Let's get back to
the solid view and maybe also show our overlays. And that will go Shift a
and add another plane. It makes sure that size is
going to be one hundred, ten hundred meter because
of the size of this plane, it is actually 1000 meters, so I will change it
to 1000 and you will see some sort of clipping going on because they are
basically identical and we're overlaying
one on the other. So to fix this problem, let's just hide our, our main mountain and for whatever reason we
change this name. So let's call it mountain. This plane makes sure
to hit Tab to jump into the edit mode at the right
mouse button sub-divide. And from here let's input 100. Now after doing this, let's just jump
to our modifiers. I will add a
subdivision modifier, maybe with a level of
two, will collapse it, add the modifier displays, which will basically
displaced this plane in the same way we displaced
our original mountain. How are we going to
do that basically by using the texture
that we just baked. How to edit texture into the displacement
modifier super easy. Just hit New and it
will call a texture. Let's maybe call it a mountain. And their score displacement, it needs to be the
exact same name of the image that we saved. It was just myself preference
that I wanted to save the images basically or actually whenever
I use the image, I wanted to call everything
related to it with the same name so I don't
get lost after doing that, Let's jump to the
Image Texture tab. And from here we need
to open our image, it open and let's
jump to our images. And we will have our
mountain displacement hit Open Image and they will have something looking like this. The most important setting
is makes sure to change the color space to linear and make sure it is actually linear. Some people might find it as non-color and all of
that makes sure to just change it to linear because we do have a black
and white image. And also you will have here another type called mapping
also makes sure it is one-to-one because by
default some people will find it like for we
want it to be only one. And of course right now this doesn't look like our mountain. To fix this hit tab, hit a to select
all of your mesh, hit you and hit unwrap. So basically right
now we unwrapped our model Deb again to
exit the edit mode, Let's get back to
the Modifiers tab and from the coordinates, make sure to change
from local to UV. And bam, this is our mountain. It is basically the
exact same mountain we created like basically just
by using the shading nodes or the Shading Network and the image that we saved
basically will be responsible in
displacing the spleen in the 3D view port or in the
solid shading viewport. Also, you can probably just
select your UV map from here. Also maybe let's just bring them at the mid-level back to 0. And you can change
the strength of your displacement
modifier from here. By doing this, we
basically recreated the same exact mountain and
the solid shading viewport. And right now when we will
create our camera animation, it will be super easy for us
to animate it and see it in real-time because we already
have to a certain extent, small mesh, small number of
vertices and all of that so that we can see the
animation going in real time.
15. Camera Animation: Camera animation, my friend, as simple as it sounds, it is actually the
most annoying part of the entire process
because at this point, you can draw in
everything if you pick the wrong camera movements
and the wrong framing. So we will try to do our best to create a good
camera movement. We have our plane
that we displaced in the last video using this
displacement modifier, which as I mentioned before, it will basically
allow us to see our camera animation
in real time so that we can basically
create a nice frame. But here's something,
even though yes, this displacement modifier and seeing it like this in
real time will be helpful. The thing I've noticed for wherever reason
Blender doesn't like, basically recreate the
exact same displacement the way we see it
in the mountain. And if you show your mountain and let's jump to
the rendered view, notice that first things first, they are not basically identical in terms of
rotation and all of that, the peaks of this
mountain which is using the displacement modifier it from this way or from the right. And the other one is from here. So we need to
select our plane or our second mountain
hit R to rotate it, hit Z to only rotate
it on the z-axis. And let's just type 180. So basically right now both of them are orienting the same way. But even with that, notice that, for example, let's change
the strength to one. Even with this, they're
not technically identical because
in a logical way, this white peak right here
should be covering this one. And same thing for
these should be somehow at the same level of
these mountains right here. But that's not happening for whatever reason
because I don't know. Maybe blender have some
weird things on how it makes its geometry totally
understandable and we can't complain. But yeah, that's
one of the quirks of blender that we somehow need to deal with whenever we're
using displacement maps. I've tried playing with all of these different settings
right here and all of that, but nothing actually
seems to help. So, yeah, we will just need
to work wherever we have. Let's hide our
original mountain, the heavy one, and let's get
back to our normal view. And here's how I'm imagining
my camera movements to be. I think I will fly from
this way like this. Basically, it will be going in a parallel line to this kind
of formation right here. We're seeing the horizon
from this point. That's actually the
camera movement that I have in mind and wire will we basically get
closer to the horizon. The camera will pent up to
something that looks just like this so that we can see the high peak of the
mountain from here. Yeah, let's just do that really
quick first things first, let's change our camera settings from here for the focal length. Let's change it to 24
because we're having landscape shooting
right here for the end, as you can probably see,
our camera can see further than a 100 meter or plane
is actually 1000 meter. So let's crank this number to 10 thousand for the
viewport display, crank this number up to one, and let's jump to our
output settings from here. As you probably can remember, I'm using a weird aspect ratio, which is basically by
plugging into 560 in here. So basically that we do have a cinematic aspect ratio right now let's add another viewer
by dragging like this, hit 0 to jump to
the camera view, hit D to hide all
of these tools. Maybe let's hide all
of our overlays. Let's maybe zoom in a
little bit, just like this. Hit N. Let's go to View, camera to View and
hit and again. So basically right now, wherever I move this basically
also I'm moving my camera. So yeah, let's just try to
create in a nice frame. I will always get back to
my mountain view also just so that I can see how the
final result will be. Because as I mentioned, we do have this problem that they are not like perfectly
overlay onto each other. So I think I will
zoom a little bit like this, maybe zoom out. So our first frame will be
looking something like this. Let's actually, I think it
is looking pretty solid. So let's jump to our timeline. I will go to the
frame number one and make sure you're
selecting your camera, which actually I
will hit scale to scale it a little bit up here, hit I and create a keyframe
for the location it I again and create a
keyframe for the rotation. So we're basically animating
two different properties. This is our first frame. Let's jump to the frame 240, and it will change
the range to 240. And let's move the first thing. Let's move a little bit
forward, something like this. And let's maybe also
rotate on the z-axis, something like this so
that we're shifting. We're basically also panning to change the focus
of this shot. And maybe let's move a
little bit forward also until it looks
something like this. And from here I will hit, I hit all channels. So basically right now we
will have a camera animation that looks something
just like this. Instead of like this kind of speeding up and slowing down, I actually want this
camera animation to keep the same
Executive Velocity. Why are we selecting all
of your keyframes and just select Linear and let's
preview our camera animation. It will look
something like this. In case your computer
won't handle it. Just maybe switch, as I mentioned to the plain
view and you will have a feeling of how fast
your camera animation is. Maybe let's jump to
the normal view, to the solid shading and
let's see how it looked like. As you can see, it is like
really cinematic for my taste. It looks pretty
good. It is slow and steady and I think it
looks pretty good. So basically I will
keep it at this. I'm not gonna official launch
with this camera animation. The only thing go wild, please, if you want to create some
crazy camera movements, probably not recommended at
what I'm trying to say is basically just take your time to find a good camera
movements and all of that. But just for the sake of keeping this course short and
sweet to the point, I will stick to this
camera animation, but yeah, you can go wild. And also, for example, if you don't like this
mountain formation, you can probably just get
back to your mountain. Let's get back to
the render view, changed back to
your shader editor. Let's select our mountain
and basically just start playing with all of these
different values right here. And you will have plenty of actually infinite amount of variation of
mountains formation. So you can go crazy
with that and create some really interesting
formations and all of that that will allow you to have different camera movements. So yeah, please
take your freedom and playing with the
camera movements. It is like probably the
most thing that will give some sort of uniqueness
and identity to your shot. So yeah, take your time in it. And the only thing that you
will probably notice right now that when our camera
is actually moving, there is no way we will see only like emptiness right here. We need to figure out a way to fill this background
with other stuff. And that's actually
what we will be doing in the next video. See you everyone there.
16. Background Mountains: Hello and welcome. If we wanted this brand new video where we will basically try to
fill our empty horizon. Of course, there are multiple
approaches to do this, but the easiest way
probably is to just duplicate this mountain and basically changed
the form of it. So it won't be
like 100% applica, but as you probably know where this will add a lot
of render time. And instead of doing that, there are a couple of
tricks that we can use it just so that we optimize our scene as much as
possible and that we do have some sort of
faster renderers. If you remember, we do
have our plane right here. So what if we basically just move this flame to the horizon? This should be, I think, more than enough for our scene. So I will probably just put
it somewhere right here. Basically all what I'm
trying to do is to just maybe GZ to
just try to put it somewhere in the background
so it folds the horizon so we don't have just an empty
horizon with no details. And at the same time, I'm looking right here so that I can see the final result
rotate on the z-axis GZ. One thing that you
will notice is that if you focus right here, there is some sort of
clipping going on. Or actually let's jump to the normal shading view or
the solid viewport shading. As I mentioned,
notice that there is some sort of
clipping right here. So we need somehow
to fix this problem. And actually the easiest
way to do such thing is basically by going to
the tab and from here, jump to wait paint. And what I'm gonna do
is basically to paint over all of these
areas right here. The areas that I'm painting over right now we're basically will be excluded from
the displacement, maybe also from this
area right here. I'm just painting on the edges. All right, guys. So all what
I did is basically to just paint over the edges of
this plane to do that, make sure that your weight is actually one and
change the radius wherever however you want and your strength
should be at one. After you do that, if you
jumped to your vertex group, you will find here a group
and let's maybe call it flat underscore areas. And let's jump back
to this object mode. Nothing will change
except if we jump right now to the Modifiers tab, you will have here something
called vertex groups. If you select your flat areas, notice what will happen. Basically the
displacement drain now is basically only
happening on the edges. The main reason for
that is that Blender, if we get back to the
white paint mode, we'll use the red areas
to be displaced as one. And this gradient is basically, the closer it gets to blue, the closer it gets to 0. So the blue areas, the displacement value will be 0 and the red areas will be one. So we need to invert this map. The easiest way to do this is
that if you go to Weights, you will have an
option called invert. If you click on it,
notice what will happen. We basically converted
everything so that the edges right now are
blue, which means 0. And they will basically grade
D8 or gradually go to red, which means they
will gradually go to a displacement value of one. Let's jump back to
the object mode and notice that we basically got rid of all of these clipping
that took place right here. They are basically
right now flat. And we fixed that issue here. So yeah, that's
pretty cool I think. And let's move this a little
bit down on the z-axis, maybe scale it a little
bit on the z-axis also. Well, let's just scale it. Overrule. Hit seven to jump to the top view so that
you have a better view. Let's do this, right? We will look something
like this if we jump forward in our camera movement. I think also we need to have
some mountains right here. So let's just do that. Let us move to this frame 240. Instead of hitting Shift D, you can hit Alt. The which will basically
create an instance will be faster to render Shift D will duplicate all of the
different datas. Aldi will create a linked copy. Let's put it
somewhere right here, and let's maybe just change the rotation to
something like this. I want to have some sort of a flat area that
looks just like this. I wanted to I don't want
it to be distracting. Let's actually, I think looking pretty sick
if you asked me. All right, let's
jump to let's see our camera animation or
other areas we need to fill. And yeah, we probably need
another mountain from here. So make sure you select
your plain old D to create a linked copy it seven
to jump to the top view. And let's just move it. If we scrub through
our animation to look something just like this. If you ask me, this is
actually looking pretty sick. Now to fix the rest
of the problems related to these planes
is that we need to basically shape them
to the same way we shaded these mountains
to do such thing, it is actually super simple. All you have to do is basically to select one of these planes. Let's jump to the shader
editor in from here, select your mountain and you will have an option basically to new material which will create a new material based
on this material. So let's click on it and
let's call it, for example, mountains and your
score back ground. And because we're using
a displacement modifier, we won't need this
entire node tree which is related
to displacement. And we won't need the multiply
and displacement node. All we need is basically just
our normal shading setup. And also I don't need this one. So x Delete, and let's move
this bad boy right here. So basically we deleted the entire mapping setup in this new material because
we don't need it, as I mentioned, because
we're displacing this plane by using our usual
displacement modifier. And you will have a resolve
that looks just like this, which if you ask me, it looks pretty good. You can play with
different settings for all of these mountains
like changing, for example, the strength
or lower than it down. Let's try for example, 1.5. I will just keep
it at one because that's the default value. You can go wild for this and basically create
wherever you want. That's just myself preference
for this shot or my taste. But yeah, by doing this, we basically finalize
the look of this short in terms of like
the biggest elements. And in the next
couple of videos, basically we will
fix the lighting, maybe add a dramatic sky to make this whole
thing more beautiful. Then we will learn
how to render it. See you everyone
in the next video.
17. World Lighting: Hello and welcome. In
this video where we'll basically fixed the
lighting of our scene. What I mean by that
is basically to add a sky and all of that
in your shader editor, make sure to switch
from object to world. And basically right now, blender to lighten our
scene is basically just using the built-in HDRI that
we selected right here. But we don't want that. We need to create our own sky because
as you probably know, we can trend are
using this one in the last couple of
videos or actually in the last couple of
chapters most of the time knew some HDRI is
too light in our scene, but in this case
we will be using the built-in sky texture that
blender comes shipped with. So here's what we're gonna do, go Shift a and here we will
look for a sky texture. Now we'll just plug it to color. Nothing will happen. And the main reason for that, because we're still using
our HDRI right here. So make sure to check
scene world and you will have a resolve that
looks just like this. Now of course, it is
too intense and here's the magic of the sky
texture inside of Blender. First of all, you do
have multiple presets. In my experience,
if you won't like the most settings
and the most freedom to that you to a certain extent can nail the look that
you're looking for. Most of the time you will find yourself using the
initiator sky. Most of the settings
right here are kind of self-explanatory
sand size, which would basically
control how big the disk of the sun
is an intensity. It is kind of self-explanatory and we already know it from adding the sunlight into the
scene and sudden elevation, which to a lot of
people might be a little bit complicated
or not like they're intuitive because
actually what we mean by elevation is how high
the sun in the sky. And by controlling how high
the sun is in the sky, you can basically control
the time of the day. For example, if I start
dragging this number down, I will start going to sunset
or sunrise and vice versa. If I start bumping
this number up, I will go more toward
noon and all of that. So yeah, this is the
slider which will basically allow you to control what time of day your sky
will look like in rotation, the direction of
your sun, altitude, which depends on how
high your object is from sea level and actually will be changing this
number later on. And some other couple
of settings like air and dust and
ozone, to be honest, I've never changed them
for wherever reason, whenever I change them, it just ruined the
entire result. So maybe you can
experiment with them. And here's my workflow to define a good lighting
setup to this scene. First of all, I will start
with the sun rotation. I lock my son in terms of rotation and I start
polishing it and start changing the setting until I get the look I want from
a certain angle. Because the worst thing
that you can do is basically to just
keep experimenting and keep experimenting without actually getting
any good result. So it is always good to lock yourself and
basically tried to get the best result possible
from certain angle. And if it didn't
work, then you can go to change other settings. And I will start
with sand rotation. Let's start dragging
this number up. And as you can see, my son
right now it is somewhere right here and you probably can see a small disk right here, but I'm going toward
more of a light, a light that will be hitting
this part of the mountain. So I will keep
bringing this number up until I think some thing, Let's for example, say 230. And yeah, I really like this
kind of lighting setup. I think I want to see how it will look like
during the animation. So I will come
right here and just drag over the top to
add another editor. And I will change it
from the shader to who? The timeline. And let's see if I scrub through my animation. Yeah, that's pretty good. I think right now I
will start basically changing the sun elevation
or actually before that, let's change the
altitude because our mountain art somewhat high. Considering the level, I
will take the altitude, for example, to 10 thousand, which mean I know 10 thousand. It's not realistic and there is no mountain in Earth which has lie 10 thousand meter
from the sea level. I think like the Mount
Everest is actually just 8849 meters
from the sea level. We are in Blender so we
can do whatever we want. Right now I will change, I think the Sun and
density because it is too strong and I will start
dragging this number way, way down until I get
something, let's say 0.12. And I'm getting this
really cool blue result, which I really like
for the same size. Let's try to bring
it a little bit up. Let's say one which
would just make the whole lighting
just feel softer. And for the sun elevation, what about we start to
basically lower it a little bit down,
something like 0.1. I don't care about how
the sky look for now because actually will be replacing that sky
with another one. What we will be doing
is basically to use the lighting that is
coming out of this setup, the sky texture, then
she just Sky texture. And for the actual
look of this guy, we will be using another
image or another HDRI. That's what we will do. By doing this right now
we finalize the look of these mountains and I'm pretty satisfied
with this result. The only thing I feel
like I need to do still, these mountains are really sharp and they doesn't
look that good. I will get back to my normal
shader by changing from world to object and make sure you select
your main mountain. And from here, I
think I will give a little bit of breathing
room also to the remover, just so that I make the mountain feels a
little bit more flat, which this doesn't look good. All right, What about
we start experimenting with the bass mountain with the rug of
variation number one, I will give it a little
bit of breathing room. All right, everyone,
so I ended up changing these values right here from
they were really contrasty. So I just gave them a little bit more of a
breathing room so that I remove those sharp edges that used to be right here
on the main mountain. I think that this
result fits better. They aesthetic were
looking for, yeah, that's basically it
for how I created this guy and the general
lighting setup for my scene. And then the next video, I will show you how you can add another sky to basically change this just blue sky with another more moody
or dramatic sky. Yeah. See you there.
18. Adding The Sky: Hello and welcome
everyone in this video, where we will basically add
another sky to our scene. Now of course, probably
the easiest way for a lot of people will be just to like to
change the world and they will import any
HDRI right here. But unfortunately, Blender
doesn't have such feature. You will need to replay the
sky texture but just doom. Understand what we want to do. We want the lighting
that is coming out of our sky
texture better the same time we need to replace this guy to a lot of people may sound a little bit confusing, but you will just understand
what we want in a second. So here's what we're gonna do. First of all, we need to remove the sky that
is right here. And we already learned how to
do such thing basically by going to the render settings
and inside of film, which is this one right here, you will find an option
called transparent. Just make sure to check it. And bam, we removed
our sky right now. Whatever we want to put right
here in the background, it will act a sky.
But here's the catch. Previously we used to
just import flat planes and slab sky texture on
them to act like the sky. But we need more variety in this scene for one just
very simple reason, which is that our
camera is rotating. So we basically need to fit this entire horizon
where the sky, there are multiple approaches. Some people might like
just for example, on port a cylinder and project
the sky image onto it. But here's the easiest way
that I figured it out. Basically we need to import this sphere or actually
to create a sphere. So go shift a mesh
and UV sphere. It is pretty small right now. So for example, let's crank this number to something like one hundred,
ten hundred meter. So it is like basically
really huge ball. I think 1000 meter will be enough for the
segments and rings. I will crack them to one
hundred, one hundred. So it is a pretty smooth
sphere and hit enter, and I will go with the right mouse button and shade smooth, hit seven to jump
to the top view. And for example, let's try to put it somewhere right here. And I think the size
of this fear is to certain extent
pretty small because I wanted to cover
the entire scene. So hit S to scale it
and just scale it up, something just like this. Everything is black
right now because there is no light
inside this sphere. But here's what we're gonna do. First thing, let's come back to the world or actually
to the object mode. I will select the sphere
and I will create a new material and I will
call it sky and hit Enter. What we will do is
basically that we will import NHGRI and plug
it to the surface. I will delete this principle, BSDI because we don't need it x, I will go Shift A Search
Image, Image, Texture. I'll put it right here. Click on Open and inside the Resources folder or
actually the images folder, you will find
something called fish heroic beach to 2k EXL. And that's actually
NHGRI that I downloaded from HDRI Haven
double-click on it. And if I take the color and
plug it to the surface, notice what will happen. We basically projected this HDRI onto the surface or
actually into the sphere, are actually on the sphere. So basically right now if I also jump right here
to the render view, I will basically
be able to control this HDRI just by rotating
this one right here. I can move it, I can
do whatever I want. And basically what we're
doing is that we're doing the same thing as NHGRI,
only the HUD or right? It is a huge sphere
that we can't see. It is a virtual sphere
inside of Blender. But in our case, we just
created a sphere and we will make it act
like just NHGRI. So yeah, the more, you know, but here's the catch
blender right now is also using this sphere
to light in our scene, or actually it is using
the texture or the HDRI that we projected on
the surface of a sphere. As an HDRI, we need to tell
blender some have at, Hey, we only want to see it, but we don't want it to influence the lighting
of the scene. The good thing it
is not that really complicated actually
to do such thing. Let's go to the
object properties from here and also
make sure you selected your sphere and invisibility
and Ray visibility. You will have multiple
options right here, uncheck all of them. And basically the sphere is basically right now,
kind of disappeared. Let's make it visible to our camera because
we want to see it, and that's all we only
want the camera to see it. We don't want
neither to see it's diffuse because it will
affect the lighting. You don't want to
see anything that is coming out of this picture. The only thing we want is
that the camera to see it, but we don't want it to
influence any other thing. If you don't know by
doing this right now, we basically just slab
that sky background right there in the
background without actually affecting the
lighting of our scene. The only thing that
you will notice that we need to do is that there are some sort of buildings and all
of that right here, but it is actually
pretty easy to fix. Just hit R and just rotate it
a little bit on the z-axis until they are basically visible and it will look
something like this. And if I start scrubbing
through my timeline, it will look
something like this. And I think there is some
sort of amount right here. So I will also hit j and x0 to only move
it on the z-axis. And I will move it a
little bit down and it will look something
just like this. Let's also get back to the
first frame to see whether there are some sort
of building that popup right here on the horizon. And I think this is
looking pretty sick. I think I will get back here
to my solid view and just in order to hide the sphere to minimize this kind
of mess right here, because we want to see our
scene inside the sphere, inside the Viewport Display, you will have here an
option called display. As by default it is
textured and that's why we're seeing the clay
model of the sphere. I will change it from
textured to either wire, where you will see the
wireframe of the sphere, but it is too dense
for my taste. I will like actually just
change it to bounce, which will create a
cube which present the bounding box
of our 3D sphere. And by doing this,
you will be able to see your 3D scene that
is inside the sphere. And by doing this, everyone, We've finished like
to a certain extent, the general look of the
shot in terms of lighting by using our new sheet of sky that we learned in
the previous video. And also by using a custom sky to fill the horizon with
and not just likes him. Very simple, minimalistic blue sky that comes out of
the initiator sky, and that's basically
it for this video, I will see you in the
next one. Everyone.
19. Adding Clouds: Hello and welcome. In this new video where
we will basically start adding some clouds right
here in the mountains. Now of course, there
are multiple approaches to do such thing, but I think the easiest way
will be to just add volume, which will act like our clouds. So here's what we're gonna do. Let's zoom in on
our scene and we will basically add
a simple cube. So go shift a mesh cube, the dot and the number pad
to zoom on this object, hit Tab g, z, one to move it in the z-axis
by one meter and hit Enter, then Tab again to exit. And by doing this, we basically
move the anchor point or the origin of our object
into the bottom face. And right now when we scale it, it will always scale
from the bottom up. So let's zoom out
a little bit and just hit S and start
scaling this object. We want it to be huge. Let's say something like this. It doesn't matter the size in
terms of the z-axis because we will scale it down so
it s z and scale it way, way down, scale z and till it
looks something like this. So basically the surface of the clouds will be the
surface of the cube. Now will come the
trickiest part, which is basically
creating the shader. So first things first, our cube, basically we deform it
in all sorts of ways. So make sure to go Control
a and apply the scale. And let's start
shading everyone. I will also change this to the shading view or
to the Render View. Click on New to create a
new material and let's call it clouds when it comes
to create and volumes, we basically we can't use
the principle be SDF. We need to use a
different shader, which is gold, the
principled volume. Let's put it right here
and then we'll take the volume and luggage
to the volume. It will turn to something looks somehow like foam because yeah, it is too dense and all of that. But we will fix
this in a second. And that basically by
controlling the density slider, as you can see, but we need to add more
variety to the wave. This density works. Here's what we're gonna do. I won't go Shift a and I
will add a noise texture. I will hit Control T to
add a mapping setup to it. We already did all
of that before. So it is pretty self-explanatory and they will take
the factor and plug it to the density control shift and click on the noise texture
to see how it looked like. And I think I will bring the scale a little bit
up to something like 15. I think I'm going to lower the details a little bit
to something like 1.5. And let's add a little bit of distortion, something like 0.5. So in terms of view
to a certain extent, it is somehow similar to the
distribution of the clouds. But even with that,
I think I need to crank the contrast
a little bit up. So the best way to do
that is by going shift a, and let's just look
for a color ramp. It will put it somewhere
right here and Control Shift and click on your principal PSD F to
see how it looked like. Or actually let's see
after the color ramp and let's basically just start cranking.
The contrast. Looks something just like this. I really liked
this distribution. I think after you do that, Let's get back to our
principal volume. And this is how our clouds
is looking like right now. It doesn't look
that good because the color right now it
is some sort of gray. So make sure to put
it up to white. And by doing this, you do have your clouds. That simple actually. And basically the motor start cranking the
contrast right here, the more this fog will be
less than and more cloudy. And I like this
result right here. So I'm gonna stick
to this result. And yeah, that's
basically it for how I created the clouds
in these mountains. That's it for me for this video. And I will see you in the
next one where we will basically break down this scene into different render layers.
20. Background Mountains: Hello and welcome everyone
in this new video where we will basically
finalize the look of this shot. Now here's the thing
to a certain extent, or actually to a large extent, this scene right
now is finished and probably you can go to
the rendering setup. But there is something that
I really hate about blender, which is that when using the displacement modifier for whatever reason it
doesn't work that good. And it gives you like these
weird beaks right here. And actually even if we
maximize this editor, you will notice that there
are some really sharp edges for whatever reason taking place on the top
of the mountains. The mountains
exactly where we're basically just using the
displacement modifier. This doesn't look
good and I feel like it is killing the
potential of this chart. So we need to figure out
a solution for this. Now, of course, to some people, this probably would be
the ideal solution, especially if you don't have enough computing
power and such case, I will stick to the result
you're seeing right now. But in case you do have a
little bit more of a juice, I think we can make
the scene it will look better in terms of the mountains
that are as background. And that's what we will do. So here's the thing I will
rename all of these objects. For example, let's start with
this one and I will call it background underscore
mountain, underscore 01. This one will be
hit F2 to rename it back ground underscore mountain. And for this one same thing, F2 to rename it, and let's call it
background mountain 03. I will select the three of them, hit M to move them
to a new collection. Click on New Collection and
let's call it back ground. And your score, mountains and rescore
displacement modifier. This collection is
basically responsible for our background mountains that are using the
displacement of fire. And I think I'm just going
to disable it because they don't need it and you will have a result looking like this. Now for filling the background, I will basically just duplicate this bass mountain,
the big mountain. And here's how we're
gonna do that. Hit seven to jump
to the top view, hit Shift D to duplicate it. And maybe let's put it
somewhere right here. And as you can
probably remember, if you focus on our camera, it will go to like a
direction like this. So what I will do
is basically to go rotate on the z-axis by
hitting Z 45-degree. And I will put it
somewhere right here. Right now, what I will do is basically to
scale the spleen a little bit more in the z-axis
or actually in the y-axis. So hit S double. Why do only scale it
in the local y-axis? And it will just make
it a little bit bigger in a way that it will
cover the entire horizon. But what you will notice if I click on the render
view right here, and let's maybe hide this
sphere which acting as the sky. You will notice that our
mountain is really stretched. It makes sure to select it, it Control a to apply
the scale and click on Scale and you will
have a resolve that looks just like this. Now, here's the most
important thing we need to bring a little
bit of variety to these mountains because
right now they are a duplicate basically
of the main mountain. So here's what I'm
gonna do by selecting this mountain and make sure
you are in the shader editor. Click on this really
small icon right here, which will basically
duplicate this material. So right now we do have
two different materials. And most importantly, let's
change its name, for example, to a mountain and your
score back ground. So right now we do have two different replicas
of these mountains. And the most important
thing is basically to change the location
of this texture. So if I drag over the three
different location axis, x, y, and z, and I
taught for example, 300. Notice what will happen. We basically changed
the distribution of all of these
different mountains. Let's try, for
example, to go for 50. And I actually really liked
this formation right here. And here's where
we're going to do. Let's rotate it a little
bit and maybe let's hit G to move it
somewhere right here, rotated a little bit Gy to only move it
on the local axis. The thing that you will note it, there is some sort of
clipping going right here. Unfortunately, the
only option we do have right now is basically to move it a little bit down on the z-axis
until we hide it. So a j, z and move
it a little bit down until it looks something
just like this. Now of course my
viewport is pretty slow, so I'm going to change to
the viewport shading GZ. Let's see What
about to bring it a little bit up, a
little bit down. I think I'm going to change the location to
something like 100. Let's see. Now there is some
sort of clipping that will take place right here. Let's try 150 US change
to the render view, basically for people who are
wondering what I'm doing. I'm trying to find a formation that will
act the background. And I don't want to have these really harsh lines
that are right here. I only want them
to be mountains. And I think my best
option right now is basically to also scale it
a little bit on the x-axis. So hit S XX to only scale
it on the local x-axis. And I will scale it
a little bit up, something just like
this and hit Control a. And let's apply the scale. I will get back right
here, Two, Three, 100, and that's actually
looking way, way better. Let's hit seven to get
back to the top view. And I think I'm going
to rotate this, something just like this. Let us see in 3D viewport
how it will look like. I'm going to hit our double white only rotate it
on the local y-axis. And I'm just going
to rotate it just a little bit until you get something that
looks just like this. Let's get back right
here in the 3D Viewport. Let's say G YY to only
move it on the y-axis. And maybe let's
try, for example, 500, let's try 400.
This doesn't look good. Let's try 100. That's not bad, but I think I'm
going to add 150, which I already use dynamin 200. Well, this actually
looking pretty good at 20, let's hit seven. And yeah, I really
liked this result. I think what if I disabled
the removal right here? How will it look like? So hit em, it will look flat again because
let's, for example, disable this multiply
node that is in the end, which is responsible to adding this kind of path right here, hit M to mute it. Basically right now it will all be just a
mountain formation. And maybe let's say G, YY to also move it on the
y-axis, the local y-axis. And let's see how
it will look at start to look
something like this and how it will look
at the end will look something just like this. Now, I will restore
my sphere 120. All right, not bad, not bad at all except I think I'm going to
change this to 300. And for the
background mountains, I'm going to hit G double
white only move it on the local y-axis because
I basically want some mountains to cover this
part that is right here. If I jump right now
to frame number one, I need to scale it even a
little bit on the local y-axis. So SY, why again, scale it up or actually let's
hide also the sky again. And let's zoom out as YY, something just like this, control a and apply the scale. There are some
mountains right here, I think let's hit G YY to only move it on
the local y-axis. Let's say something
just like this. What about frame 240? And that's actually looking
pretty sick for my taste. And I will get back
to my sphere again. Again. I know there was
a lot of tweaking for this background mountains to basically let them fit in
the aesthetic we want. But I think it is worth the shot because this is the result
we're getting right now. And here's the result we
used to have miles better, especially when you consider the really ugly look of
these mountains right here. So I will stick to this copy of my procedural
mountain shader. By doing this, we're
finally ready in the next video to break down this scene into
different layers. Yeah. See you everyone
in the next video.
21. Rendering Layers: Hello and welcome. In this video where
we will break down our scene into
different layers. Now, as you probably remember, the first thing is
that we need to put each object into
its own collection. But before we do that, here's how I'm imagining the
setup of the render to be. First of all, we will have one layer that is only
meant for the sky, another one that is meant for
the background mountains, and another one for
the main mountain and another one for the clouds. And beside all of these, we will have another pass, which is called a mixed pass. And the main reason
for that is that when we finally start
composing this shot, we really want to create some atmospheric depth to the scene so that
in a logical way, the farthest mountains that are right here in the
background should be like way more foggy and it
doesn't look that sharp. And that's what the midst
best will allow us to do. Of course, it is some sort
of cheating and it is a cheap way to
achieve such Look the right way will be
basically to just add huge volume that was covered the entire scene
and all of that. But this will make your
render time exponentially, really, really long and
we don't want that. Yeah, first of all,
let's start breaking down all the different
layers that we will need. First of all, this cube, which is I think
responsible for the clouds. Let's double-click on
it and let's call it Clouds hit M to move it
to a new collection, and let's call it also
clouds and hit, Okay, now for this sphere which is basically the sky, hit empty, move it to a new
collection and call it Sky Mountains zeros 01, it is actually the
background mountains. So double-click on
it and let's call it back ground mountain empty. Move it to a new collection
and let's call it back ground and rescore
mountain and hit Okay, the last thing which
is the main mountain, we already named it mountains. So at m new collection and let's call it mountain and hit. Okay, for this main collection, I will change its name to scene. And by doing this right now, we do have all of our
different collection and we're ready to start breaking the scene two different layers. The first layer will be the sky. So let's rename this to sky. Hit Enter and dual, disable all the collections
except the sky, and it will look
something like this. Let's click on this small button right here, Copy Settings. And this one will be meant for the back ground and rescore
mountains and hit Enter. It is kind of self-explanatory. We only want the mountain, the background mountains
to be visible, which will be something
looking just like this. Click on this small button
again, Copy Settings. This will be for the main
underscore mountain, and we only want the main mountain to be visible unless they,
but not least, let's create another copy, Copy Settings and let's call
this clouds and hit Enter. And we only want the clouds
to be visible right here. And lastly, but not least, I will create another
collection or actually another
layer Copy Settings. And I will call this,
for example, master. And in this layer what I will
do is basically to activate all the objects which are mountain and the
background mountain. I'm actually not all the
objects, only the mountains. And the main reason I'm doing
this is that I will use this master collection basically
to render my mask paths. You will understand
that in a second. Let's just review all
the different layers. So we do have this guy, it will look something
like this. Perfect. We have the background mountains which will look
something like this. Also perfect. We do have the main mountain which will look something
like this. Perfect. The clouds. Yeah, here's
an important thing. Basically, the clouds
will not be in the inside of the mountains
in a funny sort of way. So it is important
from here to check this option which
called hold-out. And what I'm going to
do is basically to enable the background
mountain and the mountain and just change them to
hold out so that your clouds would be looking
something like this. And that's how your Cloud render is supposed to look like. The clouds shouldn't be
right here on the mountains, should only be visible somewhere right here and these
valleys and all of that. And finally, this be
our master layer. And yet by doing this, we broke down this scene into its different rendering layers. I will see you in the next
video where we will prepare the composite tree node tree that we will use to
render our scene with. Yeah, see you in the next video.
22. Rendering Node Setup: Hello and welcome.
In this new video, where we will basically prepare the composite or node tree that we will render our scene width. So first things first, make sure to jump
to your compositor. Check Use nodes, and let's
start creating the new tree. We won't, we already discussed
a lot of concepts in previous video when it comes to setting up the compositor. So I'm not going to explain
each and every single step. I'm just going to show
you how we will do it. So first things first, I think we need our
denoising data. We need to check the noise
in every render layers. And I will select
denoising data, will move to
background mountains and check denoising data, main mountain denoising data,
clouds, de-noising data. For the master. I'm not actually going to check denoising data that I'm going to check missed and you will understand what we
will do in a second. Let's right now we'll start
breaking down this node tree. So first things first, I will delete this
composite node because I don't need it for
the rendered layers. We will start with the sky, so I'll go Shift a
and look for denoise. First of all, d noise, I will take the
image to the image, the denoising normal
to the normal and the denoising albedo, albedo. I will go Shift a and
look for file output, and I will put it right here. And that will take this
image and plug it to image for this file output node. First of all, let's
select a path. Blender will give you the
panel to pick a folder and I will create a new folder
and I will call it Sky, enter inside it and hit Accept. So basically right now, all of our sky images will be
saved into this folder. After you do this,
make sure to select your file output node it, and to open the
sidebar in properties, we need to change a couple
of settings right here. As I mentioned before, most of the time
we will be using the PNG quantity to
render our scene with. But actually this is one of the rare occasion where
we will not use PNG, but actually we will
be using the Open XR. And the most important
thing is that we need to change the codec from zip lossless to D WA a lossy. The good thing about this codec
is that it will basically give us a lot of freedom when it comes to editing
the photos better. The same time, we will
not have huge file sizes. The main reason I'm doing that because we will need
to a certain extent, some level of flexibility
in editing our final shots. So by using this conduct, we will be setting up
ourselves for success when it comes to the compositing
process for the file path, make sure to change it to sky
underscore and hit Enter. I will hit Enter to
close the sidebar. And the most important thing is that I will select
this entire setup. I will hit Shift D. I will put it right
here and I will change from sky to
background mountains. And from here I will create a new folder and I
will call it back ground underscore
mountains accept it and open the
properties of this node. And let's change the
name from sky to back. Ground underscore mountains
and hit Enter. Same thing. Let's duplicate it
another time shift D. And from here I will change
to main mountain, create a new folder and call
it main underscore mountain. Accept and rename this to main mountain Shift
D Another time. And let's go with clouds. And from here let's create a new folder and call it Clouds. Hit Accept and
rename it from here, two clouds underscore
and hit Enter, select all of them,
shift D one last time. And from here from clouds, Let's change the semester. I will delete the denoising data because they don't need it. And instead of taking the image and plugging it to
this file output, I will actually take the
midst and plug it right here. And from here, let's
create a new folder and I will call it
missed, enter inside it. And I will rename this node from clouds to missed Andrew score. So our midst render will
be rendered right here. And make sure you select
Master and hit N. And By doing this, we broke down our scene into its different rendering layers. And right now we will be ready to start
rendering the scene. But before we do any of that, it is time we change
and we nailed our render settings
for the best result. And that's actually what we will be doing in the next video. So without any further I do. I will see you in the next
video where we will change our render settings to optimize our render time as
much as possible. See you there.
23. Render Settings: Hello and welcome. In this video where
we will change a couple of render
settings for our shot. First things first, let's change the overrule rendering
settings that will work for the entire scene cycles experimental GPU compute
for the viewport. We don't need it
for now and it is time to see our render samples. And that's actually the
most trickiest part. Our scene is huge, especially after we duplicated
this entire shader, the number that I will be using, it will be a little bit
overkill for a lot of people, but it will give us the best result
possible, which is 256. But here's the thing. Based on my
experiments actually, I was able to render this
scene even at 64 samples, but it was a little bit
noisy. Don't get me wrong. But after the denoising process, it looked pretty
good for my taste, for the max samples. You can also drop it down
to something like 64. If you're noticing that
you will have really, really long rendering
times, that for me, I will stick to 256 for
the light paths total 12, it is overkill in my opinion, So I will drop it to eight. Keep moving down
for the volumes. By default, the
step rate render. The higher this number will be, the more you're lowering
the resolution of your volume or in our
case, of the clouds. So if you feel like your volume or your clouds
are really slowing down, the render makes sure
to bring this number, which is called
step rate render to something like four or eight. But please remember that
you will be lowering the resolution of the clouds
inside the render settings. You will have an option
right here called the advanced cold subdivision. Make sure insight for
this dicing render rate, render for the offscreen scale, you can probably take it even to something like ten
because it is basically the scale of the
elements that are in outside of this camera view. And by doing this,
basically we will have fast renderers and the other
thing for your days in camera makes sure to
select your camera so that Blender basically will put
more computation power into this really basically
close backgrounds and less computational power for the really far backgrounds. And that's basically it for our general rendering settings. Let's see the file output, even though we
already plugged in all the different settings
right here in the compositor. Let's just check what
do we have right here. And yeah, everything
seems to work fine. Just as a small reminder, if you want to only
render it at 7720, you can drop this number
to something like 50% it by doing this, we're ready right now to change a couple of settings when
it comes to the layers. And most importantly,
if you remember, we plugged the
rendering samples 256. But the thing that you
will just noticed is that why do I need 256 samples? Just render a simple sphere
with an image on it. And that's why if you go to your layer properties
and go down, down, down, you will have an option
called override, basically the number
that you will plug right here and the sample it will cancel the number that we plugged for
the entire scene. So for example, if I plug
right here too for this layer, the sky layer blender, it will only use two samples to render the sky or the sphere. And that's actually
a really helpful setting aside of
Blender for this guy. Actually, you can probably even go with something like just one. But in my case, I will
just keep it at two. It is more than
enough in our case, let's see for the
background mountains, for the background
mountains by default it is, as you remember, 256. So I will drop this number
to something like 128. It is basically the health
for our main mountain. I will keep it at 0, which means that
Blender will use the main rendering
samples, which is 256. I will keep it at
0 for the clouds, I will keep it also at 256 because I want them to be a
really detailed and Leslie, but not least for the master, I will drop this number way, way down to something like to the main reason
I'm doing this, because the only reason
I'm rendering actually this layer is that I will take
the midst pass out of it. What do we mean by mess paths? That's actually what we will
prepare in the next video. So without any further I do. I will see you in the
next one where we will change the different
setting and the best. See you there.
24. Mist Pass: Missed best is an image
that looks just like this. And some people might wonder what is the point
of views in it? It is actually, if you think
about it in a logical way, when we overlay
it over our image or over our render and
change the contrast of it. We will be able to add this effect that
looks just like fog. And what we will do
in this video is basically to change a
couple of settings to basically render a really
good missed past that will allow us later on
to create some missed. The most important
thing is that as you remember in
the master layer, we already enabled an
option called Myst. And right now we need to go to our camera properties from here, inside the Viewport Display, you will find two options
which are limits and missed. Let's see how it will look like. So we do have right
here our solid view. If you check limits and missed, you will notice that a
blender will basically show you this really long line. And right here close
to the camera, you will notice that there
are two different points, which will basically tell
blender from where it should start calculating
your message pass. So here's what we're
gonna do from here, makes sure to jump to your, actually your world settings. And you will have here an
option called Miss paths, which will basically control
the start and the depth. And here's how it
work, the start point, and if you notice,
it will basically start moving one of
these two points. It will basically control where the fog or where the message will
start to be visible. So in our case, I want
the midst and I think I'm going to jump to the render view just to
see the result better. I want the mess, for example, to be to start, It's something around,
let's say 100 meter. And the next slider,
which has depth mean wet, is the point where basically the entire scene will
become like fully opaque. It will be 100% for gate. So if I start dragging
this number up, which will basically
move this point at this point right now Blender, we'll basically, the midst
paths will basically be completely white and
we can't see anything. And in my case, I
think I'm going to put this number at 1200, which I think it will
be good for now. So yeah, after 100 meter
away from the camera, we will blender will start creating mist or start
calculating the midst pass. And at 1200 meters or one
kilometer and 200 meter, it will be 100% fully opaque. It is actually that easy
to set up the mess. Pass. The trickiest
part about it is that some people may not block the
right numbers right here, but here's the thing. It doesn't take a long time
to render a mask paths. And as you can
probably remember, we only plug two samples on it comes to
rendering this mist. So it will be good
even if you plugged the wrong numbers all
overhead and all of that, you can keep experimenting
until you get the path that works
for your shot. But yeah, in our case, one hundred and twelve
hundred will be good. And by doing this, we finished basically preparing all the different elements
to render this shot. The only thing
that you should do right now is
basically to jump in both editors to the solid
view so that we optimize, so that we save a little bit of memory for Blender when
it comes to rendering, makes sure also to save your
file by hitting Control S. Just go to Render
and Render Animation. And right now it is
just a matter of like keeping your computer
maybe render overnight on the hope that in the
morning you will find your scene ready for you
to start compositing. So yeah, render your scene. And I will see you everyone in the next video where we will
start composing this, sean. Yeah, See you there.
25. Compositing Part I: Hello and welcome. In this new video where we will basically start
compositing our shot. And as you probably remember, I always like to start a fresh blender seen when
it comes to compositing. So let's exit and
let's go directly to compositing while
bringing my timeline and let a bit down. And I will check Use
nodes from here, I will delete the render layers by hitting X and
also the reading, the composite, I will go to
add input image sequence. And in the background
mountains are actually in my render folder. I will start by importing
first of all, the sky, select the first image, import image sequence, and
let's put it right here. Same thing. I will go add input
image sequence. I will input the
background mountains important image sequence
at input image sequence, main mountain import
image sequence. And I will put it right here
at input image sequence. And I will take my
clouds right now. We'll put it right here, add input image sequence, and right now my Miss pass and import image sequences
that will put it right here. So here's our sky hit V. If you want to make
the previous smaller. This is our background mountain, this is our main mountain, this is the clouds, and
this is our midst pass. So let's start first of all, laying them over each other, which we already learned
in previous videos, which basically by using
a node called Alpha over. So let's add alpha over there. We'll put it right here. Right now it is laying the white color over the
first image or over the sky. So I will take my
background mountain and plug it to the
image number two, make sure to check convert pre-multiplied Shift D
to your alpha over two. Duplicate it. Let's put the main
mountain over. Shift D again for your Alpha over and let's put
the clouds on top. And lastly, but not least, go Shift D to duplicate the
alpha over one last time. And let's actually
plug the image. And actually, I shouldn't
duplicate the Alpha over. I should use a mixed node, so I will change it with a mix. Take the image to
the first socket and this second socket. And for the blending mode, make sure to change
from mixed to screen. Control Shift and
click on it and it will look something like this. But actually for
now, I will disable this one by hitting
M because I want to change a nail the coloring of this shot then I will
add them as pass. So yeah, let's start
just doing that. But before I do any of that, I want to make all of these previews a
little bit smaller. So I save a little bit of screen space so I
can't work freely. Also, by the way, you
can select all of your nodes and hit
S to scale them, which will basically make them
get closer to each other. I will move them
somewhere right here. If you select your view where
you will be able to move this image and I will put it somewhere right here on the top. And if I zoom right here, it will look
something like this. And I select all of the nose, scale them a little bit up. All right, that's looking pretty good for now and pretty neat. Let's basically just start changing the general
look of this shot. First thing I want the sky to be a little
bit more contrasty. So here's what I'm
going to do after this. I'm going to go Shift a
and add our RGB curves. And I will put it right here. And what I want to do is
basically to make it way more contrasty by creating an S-curve are actually not an S-curve. It is like parable or
whatever they call it. And it will look
something just like this. And I think I'm going to
lower a little bit of red so that I give more
of a silent look to it. And that's actually looking
pretty sick if you ask me, what about if we add a
little bit of blue and maybe lower the green so that we add a little bit
of magenta to it. I will collapse it and
if you hit M to mute it. So this is the before
and this is the after, this is the before,
and this is the after. And I really liked
this result except I feel it is like a little
bit too saturated. So I'm going to go Shift a and add saturation,
saturation value. I will put it right here
for the saturation, Let's try, for example, 0.9, which will basically just make it a little
bit desaturated, which I think it fits better than aesthetic
we're looking for. So yeah, that's basically
it for our sky. Let's move on right now to
the background mountains, which I will go also RGB curves. I will put them right here after the background mountains. And what I want to do is
basically just bumps, bump them a little bit up. That's not how
they're supposed to look in real life
because they should be forget that I'm relying on
my Miss best to do this job, and that's all what I'm gonna do for the background mountains. I might also go Shift a and
add hue and saturation value. Let's put it right
here and I'm going to drag this iteration
a little bit down. Let's say something like 0.85, and I will put them right here. Let's move in right now
to the main mountain. And after that, the clouds
for the main mountain, I think you've
already guessed it. Go Shift a and let's add
the same thing, RGB curves, I will put them right here, and let's just try to make, make them a little
bit more contrasty. That's looking pretty sick. I think I'm not gonna change anything when it
comes to the colors, I will give them like this. Or actually I'm going to
desaturate them a little bit. So go hue saturation value. I will put them right
here and I will bring this iteration
something like 0.8. Lastly, but not least, let's move on to the clouds, which surprisingly I'm not gonna change anything
about the clouds. I will just give them like this. And also by the way,
if you think like they doesn't fit the aesthetic
and you're looking for, you can mute this alpha over
and you will remove them. Some people might
prefer this clean look. In my opinion, I will
just keep it because we rendered it and I
think we should use it. Lastly, but not least,
let's take our screen node, which we already muted before and hit M to add
our myths passed. And as you can see, it basically created this sort of
fog in our scene. I'm going to go Shift
a and let's add, for example, a color ramp. And I will put it right here. And by controlling this slider, you will be able to control
where the fog we'll start. Yeah, for example, you can make the fog starts right
here and all of that. But actually I don't like it this way because the color ramp, it is just a simple
slide controller. But then instead of using the
color ramp because it will limit my option when it comes to manipulating this mist paths. I will delete it and
instead of that, I'm going to add
another RGB curves. I will take the mispriced
and plug it to image and take the image and plug
it to the screen node. And this node will basically
allow me to control in a better way how am I
missed pass will look like. So, yeah, let's for example, drop it a little bit, something just like this. Maybe also drag this
little bit down. Or actually I'm going to delete this point by pressing
this small x. And I'm just going to lower
this point a little bit down until it looks
something just like this. And if you asked me
this looks pretty good. And also maybe you can go in the screen node and if you
start lowering the factory, you will basically change
the transparency of how much we're using out
of this mismatch so it can make it a little
bit more subtle. Let say something like 0.4 and this actually looks
pretty sick if you ask me, Let's minimize this screen node. And by doing this, we basically composed all the different
elements into one image. And then the next video, we will finalize basically
the Lux by maybe grading it, adding some chromatic
aberration and lens distortion. And after that, you
will basically be ready to render your final sequence. Yeah, see you in the next video. Bye everyone.
26. Compositing Part II: Hello and welcome everyone. In the last video of
the mountain chapter, where we were basically
finalize the look of this shot, this video, we'll be
mostly about like some ideas on how you can manipulate this render
the way you want. So the first thing
I'm going to do is basically after compositing
the whole shot, I'm going to go Shift
a and just add an RGB curves when it comes to manipulating colors
and all of that, the RGB curves is your friend because it will
give you a lot of flexibility in manipulating
the shot the way you want. And maybe let's add
a little bit of more like an S-shaped curve. And the first thing I
noticed that there is some sort of magenta tint
on this entire shot. So to combat that, let's add a little bit of green, and also let's add a
little bit of blue. And maybe also let's lower
a little bit the red, which will give
you a result that looks something like this, which I kind of like it. And also I might add
a hue and saturation. Let's go hue and
saturation value. Let's put a two right here. And if you start just hit
Shift to start basically changing the hue value
in small increments. You can probably give a
different feel to this shot, which I really like. This kind of look it right here. It feels like it is a someone
who shot or something. So 0.48, I really liked the way this
shot looks right now. Maybe let's bring the
value a little bit down and that's looks
pretty sick or my taste. Other than that, I think
it is time to start adding some complimentary effects
to finalize this shot, which means it is time
to add a vignette. We already discussed multiple times how to add a vignette. So without bothering you
with the exact same details, Let's go add input image. Let's put it right here. I will hit open and inside
of images, project files, images, you will find gradient, just open it, Control
Shift and click on it. That's how it will look like. Let's edit transform node
or put it right here. And we basically need to overlay it over the rest of the image. So go Shift a and let's
add a mixed node, makes the egg the
first socket and plug it right here and take
this and plug it right here, Control Shift and click on it. You will have a result that
looks something like this. And most importantly, make
sure to change it to multiply. Right now it is too
strong and it doesn't fit the square or the aspect
ratio of our shot. So let's start bringing
the scale a little bit up until it looks
something like this. And now it is time to change the level of
contrast and all of that, which we will basically do
by using a curved node. So add curves, Let's
put it right here. And if you start
bringing this number up, you will basically make your
vignette way more subtle. And I think that by doing this, we added a really nice
vignette to this shot. And the last thing
will be basically to add some lens distortion, which would basically do
through going shift a. And let's look for
lens distortion. Put it right here. And for the distort, I will put minus 0.01 and it will look
something like this. And for the dispersion 0.01 and that's basically it
for the entire shot. I might also bring
the saturation of the entire scene a little bit down because I feel it is a
little bit too saturated. Let's say something like
0.8 or actually 0.85. And also I feel like the clouds are a little bit blown away. I might in this RGB curves, what about we bring
them a little bit down, or actually this is the red. So I need to change
the overall look. And yeah, I think I like this fits better than
aesthetic or looking for. Yeah. By doing this, we composed all the different
elements of the shot, we color corrected it. And the only thing
that we need to do basically right now is to go Shift a and let's
add a final output. Let's take this and
put it right here. Let's select a folder, my project through
the environment procedural mountain renders and maybe let's call this
final and rescore render. And inside of final render, hit Accept in your
node properties, which is right here in the
properties we don't need basically to render in
opening Excel or any of that. So it would be good at P&G. Drop the compression
way, way down, maybe also render it at 16 bits. So you have more details. And for the file subpath, let's call it final and rescore mountain underscore
and hit Enter. And all we have to do
basically right now is to go to Render, Render Animation. It won't take so long
before it finishes. Thank you everyone for tuning in to the mountain
chapter so far, this is probably the
most complex environment that we created. But if you finished
it, good job, and I will see you in
future chapters B-cell.
 Yassine Larayedh, VFX Artist