Transcripts
1. Course Trailer: This course will teach
you everything you need to know about 3D
environments in Blender. Lot of people, when they tried
to make 3D environments, they end up with a result
that looks like this. I don't want you to
get such results and my mission is to
help you with that. This course will teach
you everything about how to make epic through the
environments in Blender. And I mean, every day, what are the
different approaches to create 3D environments? What do we mean by displacement? How to make something
look realistic and get results
like professionals, how to understand
nodes and build complex materials easily like the one you see it right now. Lighting, compositing,
rendering layers, cycles versus EV and more. We will demystify all of those topics once
and for all in a way that you will never have
to struggle with them again from creating hot deserts, deep oceans do huge
snowy mountains. We get them all net only
when you finish this scores, you will end up with a
solid understanding of how to make your environments
look so in gorgeous. But you will learn along the way some really valuable
informations and tricks that you won't
find anywhere else. And that will take your
skills to the next level. So even though this
course might sound like it has just about
3D environments, it is just a topic
that will help me explain a lot of things, but don't get me wrong. I'm not going to give you fish. I'm going to teach you how to fish so that by the
end of the scores, you will be able to create
whatever you have in mind. This course is built
from the ground up to suit whatever
your level in Blender, we will explain
everything in detail that you understand
exactly what we're doing. And most importantly,
why in the first place, this scores is not just about showing you
the buttons to hit, but most importantly,
why am doing whatever I'm doing and what is my thought process
along the way, which I think is the most valuable skill
that you can develop. So basically the scores is a really tasty pastor for all the beginners out there with some spicy sauce on top for
the ones who are looking for some advanced stuff
and wanted to take their 3D renders
to the next level. There is a value in this
scores for everyone no matter your level and simply it will just blow in your mind. Now if all of that sounded
exciting to you, believe me, this scores will be
a huge investment in your 3D skills that
you will never regret. Trust me and dad enough
for me for this video, and it is time to talk to
you all and saw the course. Yeah, go down.
2. Scene Preparation: In this first video, as I said, we will basically prepare blender for the work
that we will be doing. As you probably guessed it, we will be using a lot
of adaptive sampling, micro displacement, and
all of those techniques that needs certain parameters
to work inside of Blender. First things first, let's start with changing our
render settings. I will go to the Render tab and inside here, first of all, we'll be using cycles
for all of our work. So I will just
change it to cycles. And after that in feature set, I will change it
to experimental. The reason for that is that micro displacement
features is only available in the
experimental feature set. So make sure to change
this to experimental. And in device if you
have like decent GPU or an extreme more graphic
car and make sure to use it because it will
give you faster renders. So that's first. Second of all, it will basically take a lot of
heavyweight from the CPU, so you can work faster
basically on your scene. So I will change
it to GPU compute. I will leave for now
the sampling settings the way they are until basically later on if I starting to notice some slowing
down in my computer, I made like basically
change them later and I will go directly
to the light paths. And here I have
the max balances, which is by default 12. And it is a little bit
overkill to be honest. So I will change it
to eight and this will basically give
us faster renders. We will have some other
options to change them later, but they will probably be
in the end of the course, I will delete the
light and the cube. I won't delete the camera
because I will need it. So I'll hit just x and delete, and I will add a plane. Let's add a plane here. Makes sure that basically
the size is going to be 200 meter because we want
somehow a big deserts. So we have 200 meter plane. And what I'm gonna do is
basically click on it, it F2 to rename it, and I will call it
desert and hit Okay. After doing that, we need to add a certain modifier
to this plane. I will go here, add modifier
subdivision surface, and just make sure to select the option adaptive sampling or actually adaptive
subdivision and change from Catmull Clark, change it to simple.
There is no distortion. What we're doing basically
is to try to optimize the scenes in a way that it doesn't slow down our computer. That's basically
what we're doing. The adaptive subdivision option basically will subdivide
the areas that are closer to us more than the areas that are
basically far from us. We don't need details
in far spots because probably we won't be
able to notice those. This option adaptive subdivision will allow us to do such thing. Let's get back to our plane. I will hit Tab to jump
into the Edit mode, I will hit the
right-most button. And here we will have an
option called sub-divide. I will click on it and I will probably pick a high number. For now. I will pick 100. Some people might think it is a little bit overkill,
but believe me, it is not in probably
at the end of this basically shaft or when we are basically
preparing for rendering, we might basically
subdivided even more. But for now, this will
basically be enough for us to start working on this environment
desert hit Tab again, basically to leave
the edit mode, I will go right now
to the render tab. And basically we
don't have anything because we don't have
lights in the scene. The good thing
about blender that it already comes with some really useful initially
arise that are already made. So if you want to access those, all you have to do is
basically make sure to open this arrow and just uncheck
Seen world and blender, it automatically will
basically use some default HDRI is that it has to
light in your scene. In my case, I will really
like this brutes and rise, which is this one right here. So I will just click on it. And basically it is like
right now the URIs that we are lighting our
scene width and by that, we are ready basically to
start working on this desert. And one last thing
before I leave, and I will probably forget mention it later
on in the course, which is saved your files
as often as possible. We will be working on a lot of displacement and self
will get heavy with time. The last thing you
want is that you're following the scores for
three or four videos, something like an hour and then blend or crashes, that
would be a nightmare. So do yourself a favor. Please save your files
as much as possible. In my case, I would
go to File Save As and basically just save
it into your hard drive. I will go to My Projects
environment course and he had desert
and I will create a folder call it blends
because we will be saving different iteration
of this blender file. And I will call it desert
underscore 000 and hit Save As. And yeah, we're basically
right now ready to move on to the next video where we will start creating the
shape of the dunes. See you there.
3. Create The Dunes: The last video
basically prepared blender for the scene that
we will be working on. And in this video
we'll start basically by creating the
shape of the dunes. So first things first, let's just basically
bring this up and I will change it to
the shader editor, which is this one right here. Click on the plane
and click on New. And here I would like
just basically call a desert underscore
displacement. One important thing
before we keep ongoing is that makes sure to go
to the Material tab. And if you scroll down, you will have here
an option called settings and the
displacement makes sure to change the displacement from bump only change it
to displacement only. So you can see the
displacement effect when we start doing it. So we have here our
basic principle be SDF. And I will basically bring this material output here
and I'll take this up. What we're gonna
do, as I mentioned, is basically create displacement to change the form
of this plane. So it looks something
similar to sand dunes. I will go shift in a search and I will search
for displacement, basic stuff for
the displacement. I'm not going to change
the settings for now because I will probably get back to them later on when we basically have
something to change. So I will just connect
the displacement to the displacement and we're
ready to go for now. Now what I'm thinking
about is what is the texture that is similar
to the shape of a dunes? If I pull out here
my reference images, is there a texture in
blender that is similar to those like kind of wiggling
lines inside of Blender. And you probably already
guessed the answer because we already made
the course about it. Yes, there is. And it is basically
the Voronoi textures. I will go Shift a and
just add Voronoi texture. Remember when we activate it, the Node Wrangler add-on. Now it will come really handy if you want to see what
does this node look like, you can hit Control Shift and click on it and Blender will basically show you how does
this texture look like. As you can see, it is a little bit similar to the
shape of dunes, but we probably can
change some settings in the notes so it fits better
what we're looking for. So let's zoom on it. And first of all, I will change the type
from F1 to smooth F1. This, you will
notice that it will hide those lines that will get them back pretty easily basically by changing
the smoothness. And I would like
basically just drag it down maybe to
something like 0.01. This will basically
give us this result, which I think for
now we'll be good. And probably in
case you don't know the way of how micro
displacement work or actually how displacement work Blender the areas that are kind of in black will be pushed down. The areas that are white
will be pushed up. And the gray zones
basically will be the transition from the lowest point to
the highest point. And that's basically
how displacement work. If we imagine this in 3D, if we rise up the white parts, bring down the dark parts. This will basically
give us the shape of the dunes to see this
better or to visualize it, Let's plug this
distance to the height. Probably won't see anything because we're still seeing
the Voronoi texture. So we need basically to get
back to the principle be SDF, Control Shift and click on this. And as you can probably see
something is happening. We're basically creating
some sort of displacement. Notice that there are those
lines that are pushed up, so we're good to go. Our shader is working. Now I need a mapping
know with basically to change the position of
this Voronoi texture. To do that, There is another really
useful shortcut that we will be using a lot
which is Control T. And this will add the texture coordinate
and the mapping node. And they are really
useful in case I want to change the scale, irritation or the location
of this Voronoi texture. But for now, I will leave
them the way they are. And if you want, you probably can play with those settings. I don't know, maybe increase the scale or
anything if you want basically to just experiment
with different results, for example, I'll just put it to for the sake of fun
and the good thing, because we're working on
a procedural environment, it doesn't matter to be honest, the values that you will put
right here, for example, in the location, because
probably it is fully procedural. So you're basically
not destroying anything or you're not
ruining the results. So that's why it
will always work. Now as you probably notice, there is not much
going on because the scale value is
little bit pretty low. So I will basically
just change it to ten. And that's more like dunes, or let's say for now it
looks more like dunes. It is still really far from like sand dunes and
it looks like it. Let's just keep on working. What I want to do right now
is to add more variety to the way the Voronoi texture
is applied on this plane. To do that, let's just
bring those nodes here, Shift a and add a noise
texture, noise texture. If you want to see what
does this texture do, hit Control Shift
and click on it. And that's the noise texture. What I want to do, as I said, is to add more
variety to the way this Voronoi texture
mapped onto the plane. So what I want to
do, for example, I will drop maybe the scale
to something like 1.5. And the details, I will maybe double them
from two to four, and probably I will leave the other settings
the way they are. And just maybe a little
bit of distortion, something like one for now, I don't see the result
pretty clearly, but I think it would be good. And to mix it with
the original mapping, we will basically just use a mixed node or in
Blender cold mix RGB. And I will plug it right
here and take this socket, the factor socket, and
plug it into color too. If you want to see this note
Control Shift click on it, and we will have this. And maybe let's just drag
this value a little bit down. Probably there is
not much happening. I'll put it like
just 0.2 for now. And if you want to
see this effect, we will basically
need to get back to the principal BSD
F Control Shift. And let's see what it does. As you can see, what we
did is basically to add more variety to the way it's
Voronoi, texture is applied. And notice that we created lists sort of texture right here, which basically will give
us some sort of like those small details
that are on the dunes. After doing that, Let's add even more details to
those like big dunes, which is by adding another
noise texture noise. And right here I will take this vector and plug it
from here, the vector, so on basically using
the same mapping node through the
Voronoi texture, I will leave the
settings the way they are and just basically bring the roughness up to one and add a little bit of distortion,
something like one. And what I want to do is to mix it with this
Voronoi texture. How to mix nodes, shift a search and just mix RGB. And I will put it
right here before the displacement effect
or the displacement node. What's happening right
now is that probably blender is mixing
the generic texture with the color tool,
which is just twice. So we need to plug the factor into color to
notice the results. There are those really
weird swirling things. We need to change
the blending mode from mixed to overlay. Just change it to
overlay and band. We just added some more
details to this dunes. One thing I think that I
might want to change is that the value of the distortion
is a little bit down, so I might bring it up
to something like 1.5. So yeah, that's looking
pretty good, I guess. One thing I noticed right now, even though we probably
raised up this value here, I guess the Voronoi texture needs a little bit of a boost. Now you might think that, hey, just get back and change
some settings right here. But here's a general
rule that we will be applying along
the scores if it is possible to change the value of a certain node just
by using one slider. Just do it because
it will get back to it later and you will thank
yourself for doing that. Instead of changing all
of those values and spending hours and hours
of just changing values. It would be really useful if
we just change one value. To do that, let's add
what we call a math node. Now I know a lot
of us hate math. Here is complicated, but
believe me, it is super simple. I will just add the math
note and put it right here. And in a logical way, if we want to make, for example, the Voronoi texture stronger, or if we need to boost it, we will basically
need to multiply it. For example, imagine you have
two and you have a three. What is it like basically
the biggest number that you can get out of them. If you do two plus three, you will get five. But if you multiply two
by three, we get six. So we need to change
the value from Ed to multiply to basically
make it stronger. And I will change
the value to 1.5 and we're getting this shape, which I guess will
be good for now in terms of as a basic
form for our dunes. And later on we will
probably be changing the values of the
multiply settings to get better results. But for now, we're good to go. The last thing I want to
mention in this video, it is super crucial to organize your notes because we
will have loads of them. So what I'm going to do
is basically to create a box around all of
those nodes except the displacement and
just hit Control G to basically join them and
put them inside this box. So if I wanted to move them, I can move the box, hit F2 to rename them. And I will call them dunes, which is like the basic form of the deals that we worked on, lets it for this video. And in the next one, we will add more variation to those dunes
basically by creating some waves that
represent the waves that are in the sand of the
desert. See you there.
4. Create The Waves: In the last video, we
created the dunes. So today we will
create some waves, not ***** waves
because we are in a desert that the waves
that are on the sand, how to create those. It is actually pretty easy and I guess you probably already guessed how we're going to do it basically by using the
bottleneck texture. We will have a lot of autonomic texture
along this course. So Shift a and add Voronoi the extra and put it right here. For this Voronoi texture, we're going to change
some settings. The first thing first, I'm gonna change
this to smooth F1, and probably I need to see
what does this node do? So Control Shift
and click on it. And this is our node. We need to create waves on it. So we're basically need
to bring the scale up. Let's say something like
maybe 100. All right. I feel like there's
still a little bit big, so maybe just bring it
to something like 120. And for the smoothness, I will bring it way, way down and that will leave
the randomness up to one. After doing that,
we basically need to change the scale
of those dots. So they will be like
kind of elongated. To do that, let's add a mapping note click
on the node and hit Control T. And we will
have our basic mapping node. But I forgot to
mention that we need to UV unwrap our geometry. We're gonna do that really fast. So let's just get back to the solid view hit Tab to
jump into the edit mode, hit a to select all of
your mesh, hit you. And here just hit unwrap where a little bit for blender to do its magic and bam,
we're ready to go. So hit Tab to exit the edit mode and get
back to the render view. And right now we can
basically use the UV. Let's plug it right here. And what I want to
do, as I mentioned, is that I want to make those
dance a little bit longer, a little bit elongated
or distorted. So I need to change the scale. I will change it from one
to something like five. And notice what will happen. We basically created
this wave effect. We're like stretching
those dots in a way that they give us
those kind of lines. That's really good for our
environment to see the, really the effect that is
doing on the actual geometry, we need to mix it with
the dunes shader. And here's something
whenever you say you need to mix two things, there is a node for the
evidence called mixed. If you find yourself
using the word mix, just look for mixed, mixed RGB. I will put it right here and basically plug this distance, lugging it to color to let's visualize
what's happening by clicking on the principle
be SDF Control Shift and click on it and we
have those lines. I don't know what they call
them actually in English, but those like weird beaks
that looks like sponge. The main reason for
that is that we're basically using the wrong
blending mode right here. Notice that it is
by default makes, but we need to change it
from mixed to overlay. Now we have this. The only problem right now is
that the value is a little bit too big or the mixing
value is a little bit too big. So I will need to drop
it way, way down. Let's just maybe put it for now. And 0.1, it is a little
bit too strong steel. Let's put 0.05. It is a little bit too big, so maybe I will add
another 0 right here. That's better, I guess. Let's just create a
box around these. Hit Control J and hit
F2 to rename them. And let's just call
them waves, hit Enter. Right now, we basically created
some waves on the sand. Now probably the effect of those waves is still
not visible yet, but we will be adding a lot of variation of light,
bigger waves, small waves until basically they were basically becomes
super pronounced. But that's it for this video. This was a short one, and I will see you
in the next video where we will be creating some small waves which will basically add more
variety to those dunes. See you there.
5. Camera Adjustments: Welcome In this video
and you're probably expecting me to create
the small waves. But actually before we do that, there is a really important
thing that I need to explain because we're working on
a procedural environment. The variety is
basically infinite. So that's why we need to launch
our camera to a position. And we will base
all of our edits and all of our shading
based on that angle, if we would like
basically just keep staring at it as this review, we will never get a sense
of how it will look like. We need to position our camera and that's what I'm gonna do. The easiest way to do that, make sure we have your
camera and that you didn't delete it in the
first video and just click on 0 and
basically blender right now we'll change to the view of the camera that
probably the camera is right now is basically
staring at emptiness. So make sure to hit N
and go to the View. And you will have here an
option called camera to view. By the way, there
is a really useful shortcut that you
should be using, which is Control Space bar, which will basically maximize the editor that you
are working on. So this way we can see the 3D
viewport and a better way, click on this option
camera to view. And right now wherever you
move your 3D view port, you will be moving the
position of the camera. It will scroll down
something like this. And there is a
problem happening, which is I guess it is
related to clipping. So let's hit Control Space
bar to get back here. Notice that blender or actually the settings of the camera
inside the properties editor, the end clipping is
starting at 100. This means that the
camera inside of Blender will only see 100 meter
away from the frame. And if you think about it, our surface is
actually 200 meter. It is super big for this camera, we need to change the
settings unless it just change it to
something like 100000. And bam, we can see
our desert right now. We increase basically
the end two kilometer. That's pretty good.
Let's get back to the 3D view port Control
Spacebar to maximize it. And let's just start moving
our camera until you get a view that you
are satisfied with, which I actually think
I like this view. It is super cool, so I will just leave it
at this position for now. We might change it later, but for now it's super good. Another thing that
you might want to do to save more memory, hit Control B and just drag a square around
this thread square. So basically we created
a render region. So blender right now, we'll only render
inside this frame, and we will save a lot of
rendering time later on. Now just hit Control Spacebar again to get back
to the normal view. And another thing that
you might want to do is basically to
change the focal length of this camera to something
like 24 because it is more suited to basically
landscape shooting. And as you can see, I need to zoom in a
little bit like this. That's nice. And the last thing
before we finish is that we might want to change the
aspect ratio of this shot. If you're watching a
movie or something, you will notice those black bars on the top and the bottom. They are little bit cinematic. Do we need basically to create the same effect here in Blender. What I'm gonna do is to go to the Render Settings and you will notice that I have a resolution
which is 1920 by 1080, which is the basic
full HD aspect ratio. What I want to do is to give
it more of a cinematic look. If you do a little
bit of research, you will find that the cinematic
aspect ratio is actually 2.39 and we need to recreate that same aspect
ratio inside of Blender. So what I'm gonna do
first of all is basically to change from full H22 for k, basically by multiplying by two. And I will copy this number
and put it right here. And basically right now we
will have a square frame and I need to give it the
2.39 aspect ratio. To do that, all we have
to do is just to click on this y-axis or resolution in
the y and divide it by 2.39. And Ben, we got our cinema
scope aspect ratio. And as I can see, there's still a little bit of eclipsing
going right here. I'll just zoom in a little bit, just like this,
That's super good. I might also go over
this part right here. So let's just zoom
a little bit more. That's looking super good. Maybe also there is a little bit of clipping
that is going right here. So I will move my camera
to something like here, and that's a little bit better. And by doing that, we will
save a lot of resources, so our blender will work
a little bit faster. One last thing before
I finish this video is that in case
your computer is a little bit slow and it can't handle basically
the aspect ratio. Just drop this
value to send elect 50% and you will have
the same aspect ratio. Makes sure to plug
those numbers and just basically divide it by 50%. And you will get basically the
same resolution as full HD or the equivalent of
full HD in cinema scope. I will see you in the
next video where we will actually create
the small waves. See you there.
6. Create The Small waves: Welcome again everyone. And as I mentioned
in this video, we'll create the small waves. First things first,
I'm just going to take both of those two nodes
and move them right here just to basically
leave more space for the other nodes and to
create those small waves. I guess you probably already guessed the node that
we will be using, which is the Voronoi extra. Let's just zoom in
right here and go Shift a to add a new node and
just look for Voronoi. It Control T to add the
mapping note to it. And let's visualize
this Voronoi texture by clicking Control Shift
and clicking on it. This is our Voronoi
texture and I will probably bring this scale
to something like 100. Alright, I guess it can
be a little bit more, let's say something like 150 because they are
a little bit small. And actually I think what is the value that
we used right here? It was 120. So this number is a
little bit bigger, so this will make them
basically smaller. I will keep it at 150. And to give the illusion that
they are basically waves, we need to stretch them. So I will take this y-value
and it something like five. And this basically gives us the effect of those
swirling lines. Or let's say just give us
the illusion of waves. One thing that I like always to do with those
types of details, it is to change the type
from 3D to basically to 2D. I will change this to 2D. And just this basically
create this different type of effect that I feel
like it is more suitable for the details
that we're going for. Another thing that I
always figured out that kind of work with
those kinds of textures. Actually, we best kind
of workflow is to map the nodes at the same
way we did right here. Basically just
adding more variety to the way the Voronoi
texture is mapping. All basically do
a similar effect, which is by adding a noise
texture search for noise. Let's put it right here and hit Control T to add the
same mapping node and just change this type of the first mapping
node from generated. Let's just change it to U, V. So we're using our UV map as a texture coordinate
for the noise texture. I will keep it as
generated, not uv. Let's see what this
noise texture look like. Control Shift and click on it. This is how it looks like. So let's make bring the
scale to something like 50. Let's maybe make smaller 40. Yeah, That's more of
Warum like looking for. Let's try, for example, change the type to 2D for the details too is a
little bit too much. I will basically
divided by half, which is one in
further roughness, Let's see, this is to graph. Let's just drop it to 0 and let's add a little bit
of distortion to it. Maybe 0.2 will do the job. Let's look in pretty
good actually. And notice that we're getting those swear length of the
way that we want them. And what I'm gonna
do is basically mix the original mapping that belonged to the voronoi texture. I will mix it with
this noise texture. So I use the word mix, so we will probably need
to make snowed shift a search makes RGB put it here and just take this
factor and basically slam it to the color to socket for
the blending modes here, make sure to change it from mix, change it to overlay, which is this one right here. And for the factor, Let's just see the effect
that we're getting. So Control Shift and
click on this node, it is a little bit too intense. So what I'm gonna do is
basically to change this value, Let's drop it down, still too strong for my taste. Let's maybe even drag it a
little bit too. Let's try 0.1. Still too intense,
Let's say 0.01. Yeah, that's way, way better. Actually, that's way better. And let's see how it looked like by basically plugging
the principle be SDF. I will just move
it right here so it is closer to
where I'm working, Control Shift and click on it. Now probably lying is visible. And the main reason
for that is that we didn't mix this
block right here, the small waves with
the rest of the nodes. So let's just add a new
mixed node pretty fast shift a mix mixed RGB. And as I said, we will
mix those with these. So let's plug this one
right here and just take the distance and
plugging it to the color too. We get the same fact, the SpongeBob effect,
those big things. The SpongeBob effect,
I don't know, it looks like a sponge. What I want to do is basically to change the blending mode. That's why we're
getting those peaks. So let's just change it
from mixed to overlay. As usual, it is definitely
looking better. And let's just drop the
fact we're way, way down. Let's say something
like 0.01, maybe. Let's try 0.1. No,
this is too intense. 0.01. Yeah, I guess that's good. We're getting like
a slide bumpers, if you know what I mean, that will basically represent those small things that are. Those small waves that
are on the dunes. One thing I always like to do is to add a math node
after this block. So I don't have to change all of those values again
and play with them. If I want to change the
intensity of the small waves, I only want to change one value. Let us go to shift a search
Math node plugged right here. And for the operation, I will change it from
air to multiply. And let's say for the value
I will put 0.1 for now, keep itself for now and later on off we need to
basically boost it. We can do that. What I want to do right
now is basically to select all of these hit Control. J hit F2, and let's call
them small waves. Nice. And we're now we basically
created a small ways shader. I might add more
variety to this. And to do that, I
will just basically, let's take those
nodes here again. And I will mix all
of those nodes, all of those groups with
another noise texture. What I'm gonna do is
basically go here, shift a. Let's look for noise,
noise texture. We'll put it right here. Let's visualize this node how it looked like we have this. Let's change the scale
to something like 20 and the details, let's bring them to
something like five. And for the roughness,
I'll just bring it up. And what's this
basically, it's given us, notice that there is a lot of details right now on our mesh. So this will be good to create the illusion of the sand
and that's what we want. And basically in right now, all I have to do is
to add a mixed node, shift a mix, mix RGB
and put it right here. And what I want to do is to
take this factor and plug it into color to let us get
back to our principal, BSD f, it is way, way intense. I need to change
the blending mode. And instead of using mixed, I will try to use this time
the lighting blending mode, which is this one right here. The main reason for that is
that because when we use the overlay blending mode is like we're carving
into the mesh. What I want to do right now
is basically to just give the illusion that this noise
is just on the surface. So to do this, just make sure
that you drop this factor. Let's say something like
0.05 still. I don't know. It looks good for now. It's enough and I will
keep it at 0005 for now. Even though if you
focus right here, it is still a little bit
too intense for my taste. So maybe let's just drag
it to something like 0.02 and that's really nice. I feel like it is more settled. One general rule that I
always keep saying, Actually, I didn't mention
anytime of the course, but I always say
it in real life. If you combine a lot of
subtle effects together, they will form a bigger effect. And that's what we're trying to do basically in this course, we're adding small details, more and more and more layers
of those small details. And until we have a whole
basically environment and that's the right
a way actually to approach those
3D environments. That's it for this video
we basically created for now our basic mesh
for this desert. What I wanted to do basically
in the next video is to create those little
rocks that are popping from the sand will give the
illusion like there are some rocks actually
in those sand dunes. That's what we're gonna
do in the next video. See you in the next video.
7. Create Small Rocks: Hello everyone. In this video we'll create
some rocks on those dunes. One thing I wanted to mention before we move on to
creating the shader, I want to change
some parameters or some properties in the
render settings just to optimize our scene
and to make it basically faster in case
it is getting slower. So let's go to our
render settings. And right here you will
have an option inside of subdivision is called dicing camera blender right
now is calculating everything from this view to the last basically
point of this plane. We're just calculating
everything. Yes, we added a
subdivision surface, but still blender is
still basically kind of calculating everything from this point to
the end of the plane. So we might want to add
the dice and cameras. So blender will do all of
its job from this angle, but we're looking at, so let's go to dice
and camera and basically pick our camera, the camera we're using to
capture the scene width. This will make
everything faster. And another thing there is this option which is
off-screen scale, which is basically the amount
of how much blender is doing subdivisions inside
is actually outside. This frame. We probably want, need a lot of details
right here on those dark areas because they're not actually
in the field of view. So they are basically
unnecessary details. So this value work
kind of inverted. So if you drop this value down, you will be adding more details. And if you bring this value up, you will remove a
lot of details. So we need to remove
a lot of details. So let's just change it
to something like ten. And this will basically make
your blender way faster. It will help you and you
should always look for those kinds of
tricks basically to optimize your scene
and work faster. So now we're ready to
tackle the rock shader. We have right here, our node network that we worked on it in the last video is starting getting bigger
and bigger with time. But that's good. Let's select those two nodes, which I actually
think that I kept moving them away
the whole course. So I will just put them right here and I will never
change them again. To do this, I guess you will probably know what
we're going to use another Voronoi extra shift
a and less look for voronoi. Alright, let's add
a mapping note to this by hitting Control T. And let's change the texture coordinates sayings
from generated to UV. Alright, let's visualize this
node how it looked like, Control Shift and
click on it to see it. And let's way, way far from what we want to fix this issue, Let's change the scale
from five to 40. That's looking better.
If we crunch it, we might get the illusion like
they are basically rocks. And let's add another
noise texture. Let's serve for noise just basically to add more
variety to this. And I think I don't need an individual
mapping node for this. I will just basically make the Voronoi texture
and noise texture. Basically just both of them
use the same mapping network. And let's just first
of all mix them. Shift a and I will add, for example, is NMF node after the Voronoi texture
just to control it. And let's go Shift a and add another math node and
put it right here. And I will basically
multiplying this setup, which is this one with
this setup right here, which is the noise texture. A lot of you right now, my ask, why are you using a math node y? You just didn't basically
use our typical mixed node. The main reason for that, if we think about it, we're taking black
and white data from the Voronoi texture, black 0, white one. And we're taking
black and white data from the noise texture. Black is 0 and white is 12. Will make more sense if we use mathematical operations
to mix them, read with and basically our
typical mixed RGB node. So that's why I'm
using a math node. I will plug this value
to the value one, and I will take this
factor right here. Before I move on, I will
change this from air to multiply the one that control the Voronoi texture
and maybe drop it. Let's try drop it by a
half, which is 0.25. That's better. And I feel like the noise
texture needs to be a little bit like basically more contrasty to do such thing, Let's go shift AD and
let's look for color ramp, the almighty colorRamp, probably one of the most peripheral
nodes inside of a blender. And I will basically just
try to create more contrast. I will click Control
Shift and click on the Color Ramp to see
the noise texture. And when I see right now, I feel like it is a
little bit too big. So let's just make it 40 also. For the roughness, I
will bring it up to one and maybe let's
add more details, something like five or right? And let's basically just crunch the contrast of this picture,
something like this. Maybe let's scratch it
even a little bit more. Yeah, That's even better. Those basically white parts will be these points where the
rocks will be sitting. So let's scroll down. And what I want to do right
now is basically to mix it a setup with the
rest of the nodes. And one thing I just noticed
is that the operation, I actually, I want to
change it to multiply. So we use some data from the Voronoi texture
and from the color ramp. I don't want to add them.
I want to multiply them. One important thing
when you're using a multiplying or
actually a math node, the combine two different, Let's say nodes or shaders, make sure to use clamp. The main reason you're
using clamp is that you don't go over one and
you don't go below 0. That's why, and why if this nodes basically,
you know what? Yes, I said that I'm not
going to move those, but I'm going to move those. Let's just move them right here, G and put them right here. I'm going to add another
mixed node search mix and put it right here. The main reason I'm adding is to basically combine all of
those with the rest of their network and just take this value and plug
it into color too. That's looking really nice for the blending
mode right here. I will change it from mix. Let's just change it
to think about it. The rocks will be pumping, not carving into the mesh. We need, let's just
change it to screen. We need to see the effect. Let's just get back
to our principal BSD F Control Shift
and click on it. The effect is still a
little bit to settle. I feel. So let's bring this value up. And if you focus right here, they're a little
bit more details of the road going right here. Maybe let's just put a 0.7. There is not much
rocks distributed, so I might want to change
the location right here. Basically just change the
location of the map so that maybe we can get
some more details. Let's just changed, for example, let's say one.
Let's just try it. Five. Yeah, we will have a little bit of rock that
is going right here. Maybe change it to
ten and disappeared, but we have some rocks going
right here. All right. I'm not going to pull a lot
with this shader. Later on. I might basically just
change the contrast and all those stuff and it will
basically add more rocks. I want basically waste a
lot of time on this part. Let's just select all
of this network control J at F2 and color
two rocks actually. Yeah, this is our rock shader. And ladies and gentlemen, we basically finished creating a basic mesh of our desert. The only part that
we still didn't do is basically to
shade our desert. And in the next video, that's what we will be doing. See you in the next video.
8. Displacement Node Network Overview: Hello everyone. In this video, I just wanted to do
a small recap for all the work we did to
create this basic mesh. And also one thing, sorry guys, I changed the location
all of those nodes and I basically had to change also the location
of those two nodes. Sorry for that, I failed you. Here's a bonus video for you. So first of all, we started with this
dunes basically network. What this node group
is doing is basically creating the basic
form of the dunes. After we created the basic form, we moved on to basically adding more and
more details to it. To do this, we first starting by creating those small waves, basically using the
Voronoi texture and just basically blending it
with the first setup. And also by the way, the main takeaway
of the first setup is this idea right here. Have you mix the
original mapping with, with another noise texture? If someone asked me,
this is probably one of the most important
techniques and really useful things that you should always keep in
the back of your mind. Basically this node
setup right here, mixing the original
texture with or actually changing the original mapping
with a noise texture. That's really nice.
Strike the second. We went through the, we went through the waves. Let's go right now
to the small waves. The small waves, we use a
similar technique right here, which is basically mapping
the Voronoi texture based on the original mapping of the UV and also of
the noise sector. We basically mix them together to create some more
variety which, which are those small
waves going right here. After doing that, we created this small shadow right here. And unfortunately, I didn't
add a mapping note to it, sorry for that noise texture. But anyway, this noise
texture is men basically to create the illusion of the
grains of sand on the, basically on the dunes. Let's why we're
putting it there. It is just really subtle
effect because notice that the factor is actually
super small, 0.02. So it's not doing that much, but it just add more details, as I said before, when we
add a lot of small details, we basically create the
illusion of big details. Let's write now move
to the last part, which is the rock texture or actually the rock node setup, which is pretty basic. It is just basically
combining of ordinary texture with
noise texture and driving this noise
texture through a color ramp to basically
create more contrast on it. And just make sure to mix it
with a screen blending mode. So it gives the
illusion of some bumps that are basically
looking like rocks. Later on when we started
basically coloring this, those dunes, this desert, they will give us the
illusion like there are small pieces of rocks distributed on the
surface of his desert. And the last thing
this whole setup is basically driven by
this displacement node. We didn't do that
much with this node. We kept all the values
the way they are except the scale will
change it to ten. And this node will basically
go to displacement. And this is our shader or our displacement nodes that are contributing to creating
the shape of this desert. Let's sit for this
video and the next one, we will basically
create the color or actually color this desert
in a realistic way. So yeah, see in that video.
9. Create The Main Desert Shader: Hello everyone. In this video we will basically finish
shading this desert has been a long
journey through it and it is time
basically to finish it. So first things first, let's think a little bit about
how we want to shade it, because that's really important. Here's how I'm
thinking about it. I will just quit my camera
view first things first, I want to have different color for
those like lower parts. I want them to feel
like they are wet, like they are basically were covered on
water or something. So those parts right here and the shadow that
are little bit dark, there will be little bit darker, slightly darker than the
areas that are on the tongue. Because the areas
that are at the top, they are basically more
headed by the sun. So that's the first thing
that I wanted to do. Also, if you remember, we added this rock
module right here. So it is important also
to consider this or actually to color those rocks
with their own material. In general, we will be creating three different colors or
three different setups. One for the sense
that are on the top, one for the wet sand and the other one is
men for the rocks. We're not going to
create another material which all going to
happen right here. Let's just get back to our
camera view by hitting 0. What I'm gonna do is, first of all, is to
change the base color. For the base color, Let's just maybe change
it to something. Or at this part is always annoying finding
the right color. So I guess I'm just going to use the value that I
used for the trailer, which is basically
this code right here. So I will hit Control C and just basically
put it right here, guys, I didn't want to bother
you with other values. And basically looking
for the right value is just a matter of basically
is picking the right color. So please just use this
code which is B7, D 51. It will give you the same color. I remember the first time
I created it was really annoying and just blink trying
to find the right color. So just use this color, it
will just save you some time. But yeah, if you want basically
to do with the right way, just do it and just
look for the scalar. Yeah, I will use
this color for now. And actually I'm gonna use a really useful trick
that I learned, which is basically
by adding a for now to drive this
principle, BSD F, which will basically create some really nice
effect on those dunes. It might not be the most
realistic thing in the world, but it looks sick and
that's what matter. So we'll edit for now. I will put it right here, and I will add a
mixed node search mix and put it right here. And I will plug the factor
into the corner one, move your cursor or
above the scholar and it control C to copy
the scholar and go right here and hit Control
V. And what I want to do is basically to take this color
and just plug it right here. Notice that it's kind of give some more life
to this desert. Those kind of basically creating some darker parts
for the metallic. I will keep it at 0. I will
also drop my spec or up to 0. And also for my roughness, I will just take it to 0
and we have this result. It is looking super
sick actually. Let's maybe also add
0.6 just to make the effect that is
coming from the color to a little bit more intense and
reduce the effect of that. For now, this setup
is basically will be used for basically
the upper parts. Now we need to create another
variation of this shader, which will be the darker parts. So what I'm gonna do is
select all of the setup and just hit Shift D and
put it down here, maybe move both of them up. All what I'm gonna do is
basically to just make this color as a
little bit darker. So click on it and
just make it a little bit darker just slightly. This will be good for now. And to see what does
this look like, just hit Control Shift
and click on it. And yet it is just
the same shader, just a little, just
a little bit darker. And for this one I will maybe bring the roughness
a little bit up. Maybe let's suggest say 0.8. And what I need to do is to mix those two shaders that mixed RGB we're working with shaders, so we need to use
mixed, mixed shaders. Shift a mix shader and
put it right here, take the first and plug it here, take the second and
put it right here, and click Control Shift on the mixed shader to
see the final result. Now, as you probably remembered, I said that I want the
dark parts to be right here and the light
parts to be on the top. But this is not happening. The main reason for that is that blender natively
doesn't know like Hey, this guy once,
basically the darpa, the dark parts right here and the light parts on the top
letter doesn't know that. So how to tell blender
to do such thing? It is actually super
easy by adding a factor which basically will tell blender where
to use each setup, where to create the setup. I will try to explain
it as easy as possible. It might feel for a second
a little bit too complex, but it is actually not
what I'm gonna do. First of all, let's add
any texture coordinate, but it is not meant
for coordinate, it is actually
meant for geometry. So we'll add a node that
is called geometry. This node will basically give us information about the position of basically the real
vertices of the geometry. I want basically to distribute those to texture based
on the position of them. The ones that are here. It will be dark, the one
that are here will be light. So what is the axis
of that control? Whereas up and down, it is the z-axis. So I will go Shift a and
add separate x, y, and z. The main reason because I only want to work with the z-axis, I will plug the position
into the vector and let's see what does
the z-axis looks like. Notice that it is
basically given us the parts that
are really low. What I want to do basically
right now is to add MF node math and
put it right here. And I will change
it to multiply. The main reason I'm adding this multiply node
is basically if I want to make or actually to add more contrast
to the separate x, y, and z, or remove
more contrast from it. So maybe let's just drop
it a little bit down. Let's do much, maybe
something like 0.2. Yeah, that's nice. So it is like more
even distributed. If I mute this node by hitting
M, this is the before. There is not much details on those areas that are right here. But if I hit M again, notice that we added more blank, which means that more of those basically wet parts
will be right here. And yeah, now we
can basically take this multiply and just basically
plug it into the factor. And let's see how it looks like. And as you can see, straight drink now
it is inverted. The parts that are dark there on the top and the parts that are
light there on the bottom. How to invert that? It is actually super easy. If you invert both of these, you will get the illusion
we're looking for here. Dark up is basically
looking good, but I freaking hate those kinds of colliding
lines that are right here. So what I'm gonna
do is basically do restore them
the way they are. I will go Shift a and
add a color ramp. This is actually guys,
this is unnecessary, but just because I hate those
crossing lines that are right here and just go here and basically flip color ramp. And basically right now we've
just created another node just to fix this crossing
lines that are right here. It is super dumb. I know, but I mean, it is just
more visually appealing. So yeah, let's just move
this setup somewhere right here and move this mix
shader right here, and we're good to go for now. The last thing we want to do
right now is basically to add another color to this small rocks that
are on the surface. And to do that, let's just take this
setup right here. And let's suggest add a diffuse BSD if we don't
need principle BSC, if let's just edit the USPSTF, put it right here, and I
will copy the same color, control C and control V.
And I will make it darker. This will basically become
the color of the rocks, maybe even a little bit darker. One important thing right now, we need to mix the color of the rocks. Well, there
are sort of the shader. How to do such thing, mix shader, you guessed it. Let's put it right here. Why it's not connected? Yep, it is right now. And let's plug the
second one right here. And as you probably know, blender right now is using 50% of the scholar and
50% of the other setup. The main reason for that
is that we need to tell blender where to put
the color of the rocks. We need to basically
tell blender that, hey, this diffuse BSD F
should be on the rocks. Again, super easy
if you remember, we created actually
a node network which is meant for the rocks. So if we take the positions are actually the setup
of those Iraq's, all we have to do is
basically to just plug it on the factor. I will maximize this editor
and it will just take this value and just plug it
into the factor right here. Let's see how it will look like. Let's just hit 0. Probably nothing is
visible right now. You might see a little stuff
that are going right here. And actually we need to bring a little bit
more contrast to it. That's why we don't
see it clearly. So let's hit Shift a color ramp, put it before the mixed shader, and let's just
basically increase the contrast to
something like this. Yeah, that's way better. Notice that we basically created the illusion of small
rocks right now. Yeah, that's super epoch. So right now we have
our old shader ready. Let's, that's
looking super sick. That says for this video guys, we basically finish
creating the whole desert. And the next couple of videos, we will basically finalize
it for the final render. In the next video, we will
fix the world lighting of the scene and light it for the final render. See you there.
10. Desert Shader Overview: Hello guys. In this video, we'll just discuss the
whole node setup that we created to basically
texture this desert. Basically quick overview before we move on to the lighting, just so you know the
mechanism of how this works. It is actually super easy. As you probably knew that
I basically combined, Let's just maximize this one. I combined the light color
with the dark color. For that I use a for
an L, which basically, as I said, will basically
create those kinds. Basically just add
more contrast. I don't want to get
super detailed. What do we mean by for now? But it is simply that
on if you see a circle, basically most of the time the reflections on the
edges of that sphere, actually not circle
on the edges of this sphere will
be more intense. For nail is basically
simulating that effect. If you want, just Google
it and you can know more about the physicality of
what do we mean by for now, but that's basically
what you need to know. We combine those
two shaders with a mixed shader and a factor. Basically this
entire node setup, it is super basic. I think that this node set up, you probably need to kind of memorize it and understand
the basics behind it. Because you will
always need to put some elements on the top and
some elements on the bottom. This node setup will
basically allow us to do that exactly. We said that we
take the position, we only need the
z-axis because it does the axis that
control up and down. We're plugging it into a
multiplying to control basically the intensity of that map getting from the
separate x, y, and z. And we add, adjust the
color ramp to invert those two colors just so we don't have those crossing
lines right here. And the last thing, we mix this entire setup
with another mixed shader, which is men basically
to color the rocks, we just use a diffuse BSD super basic shader inside of Blender
and one of the oldest. And we just added
this dark map or actually black and white map
that we get from the rocks. We made it super contrasty and we plugged it
into the factor. So let's diffuse be SDF is only applied on the dark areas. And the last thing it is
all goes into the surface, which is basically
our material output. So we can see the
beautiful desert that you're seeing right now. This video is basically the final recap of how we
created this environment from going from just a plain to displacing it and
finally texturing it. In the next couple of videos, we'll focus a little bit more and how to
optimize the scene. Add more details like sky, some dust, some
background elements. But for now, this is it for the foreground
element of this desert. See you in the next video
where we will start basically preparing it
for the final render.
11. World Lighting: For lighting the scene
will be using an HDRI. So to do that, let's just change from the
object to the world. This is basically where we can, we can control the lighting of the entire environment
and we were here. So make sure to find
those two nodes and just say dot to move to them. So as I mentioned, we
basically need to add an HDRI. To do that, let's
just go Shift a and add an environment,
texture, environment. The picture actually
I'm going to use it as a super famous VRI calls Fruit
Sunrise by Greg's zones. Sorry Greg, if I
pronounce her name wrong, it is such a really nice HDRI and it is the one that
we will be using. We'll go open and basically
you will find it in inside of the resources folder to care resolution will
be more than enough. I will plug it
into the color and also hit Control T to
add the mapping node. One thing you might
notice right now is that why we're not seeing the
effect of this node? The main reason for that
is that we basically didn't disable the world
lighting right here. So you need to enable sin world. And Ben, we're seeing
right now the effect. One thing I might change the rotation of
this mapping node. Let's just try to
find a nice angle. Let's, for example,
hit one hundred, one hundred and fifty. All what I'm trying to do is
basically to just try and find a cool angle or a cool
lighting setup for the scene. 150, I guess we're good. I will just type 155 because I kinda like this shared or
it is going right here. And also another
thing I just noticed, it is a little bit too
saturated for my taste. I will probably drag the
saturation a little bit down. And so let's just
look for saturation, hue and saturation and
put it right here. And let's drag this to
something like 0.7. So yeah, that's way, way better. And for the value I want
to make it brighter. So let's take it to 1.2
and that's way better. One thing, because this
background coming from the HDRI doesn't make any
sense in our situation. We will probably
need to replace it. But for now, let's just go to the render settings
and inside of film makes sure to just check Transparent and we will
basically remove it. And this is our desert
in its full lowering. One thing you might notice
is that it is kind of a little bit flat and doesn't
have a lot of details. And the main reason for
that I feel it is probably because we don't have
enough geometry into it. And where it comes, probably the tricky part. If you know that your
computer is a little bit slow or you don't have trust
in your hardware, makes sure to save
your file right now. Please do that so you
don't lose your work. If you find that your computer
right now is super slow, then you don't need
to do this step. It is just basically it to
push everything further. I'm gonna do it because
my computer kind of handled it pretty well. So what I'm gonna do,
let's just get back to the solid view or actually the Solid V,
which is this one. Hit tab and hit a
to select all of your mesh and just click
and hit sub-divide. What I wanted to
do is basically to sub-divide it twice
and just hit tab. We're just subdivided our
mesh just a little bit more. We added a ton of
geometry right now. So there is that if I hit 0 and render the
scene right now, it will look way, way better. And as you can probably see, even my blender is slowing
a little bit down and see all of those details that
were in the visible before. They are now super, super pronounced,
which is really nice. So yeah, that's it
for this video. Actually, that's how
we light the scene and that's how we added
more details into it. This basically desert right
now is ready for rendering. The only elements that
we will try to focus on the next couple of
videos is basically to add some background
elements and the sky. And then we will
render this shot. See you in the next video. Bye everyone.
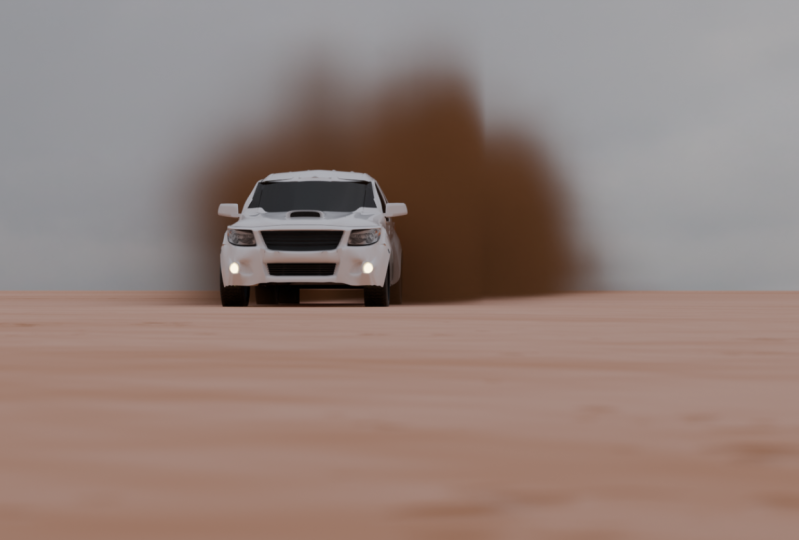
12. Adding Background Elements (Dunes): Our journey along this
desert is coming to an end. So yeah, this video, I will show you how to add some background elements
to this desert. This probably going to be
the only part where we will need an external
software to do our job. So here's what we're gonna do. We think about it
in a logical way. We should see more kind of
dunes that are here far, far away to create those dunes, there is actually a super
easy technique to do that. First of all, I'm gonna add
another camera shift a. The main reason I'm adding another camera is that I
don't want to ruin this. The main camera, the position of the camera is already perfect.
I don't want to ruin it. I'm gonna go to my scene
settings and change from camera to camera zeros 01 at 0, and go to camera view. And what I want to do
is basically to kind of shoot this desert
from far angle, which would be something, let's say like this. You don't need to
make it super close. Maybe just try to estimate
the position which would be something that
looks kind of like this. And we're going to
render this exact angle. Let's hit Control Space again to get back to the normal view, let us go back to
the Render Settings. I will bump this to 100%
so we get more quality. And the main reason I'm
rendering this part, because we're going
to render it, then put it in the background. Some people might say, hey, why just duplicate
the main setup, which is why don't you like just basically duplicate
this desert more times, but the rendering
time will be crazy and I don't know even if the
computer will handle it, That's why it will be way, way easier and it will
save you a lot of time to just render
a small plate of it. And basically just
later on important into the project and put
it on the background, nobody will notice that
it is just a 2D plane. So basically after having
this element right here, so I will go to Render
and Render Image. Alright guys, might
render just ended. And what I'm gonna
do is basically to go to image and save, make sure it basically
to just save it inside of the renders, let's just call it as a sad background
elements and make sure those settings are RGBA and basically eight and the
compression is 0 and save image. Nice. And I will close right
now in the render tab. Right now we're going to
need an external software. You can use some free softwares lying Gim to do the work that
we're gonna do right now. But just because
they have Photoshop, I will just use
Photoshop for that. And also if you don't
know how to use them, you will probably find in
the Resources folder at this image basically to
use it after I edited it. So what I'm gonna
do is basically open the image
inside of Photoshop. What I want to do is
basically because I have this separation line
that are right here. I need basically to hide that separation line just so
we have a smooth transition. Alright, I just finish it. I will go to File Export, Export As I will make sure
to export it as PNG so we keep the transparent background and we'll go to export
and just save it. All right, So now
back into Blender. Let's just get back
to our main camera, which is basically the
camera zeros 01 and hit 0. And basically we need to add
those elements right here. And right now we're going to
use another really useful add-on which is called
import images as plane. So hit Shift a and
inside of image you will have Images as Planes will go to where I
saved this image, which should be basically
inside the Resources folder. Background element is
super tiny right now, so I will scale it
a little bit up. I'm bringing it up, scale
it a little bit up. It's 0 to move it. And basically what I'm
trying to do is I'm going to put it somewhere
here on the background, which should be right here. I'll rotate it this way and
put it somewhere right here. Let's see. Let's just maybe drag
it, put it here. That's looking really good. I guess. Let's put it right here and
maybe I will duplicate it another time shift D and put it maybe right
here, Let's see 0. Let's put it maybe right
here a little bit, bring it up just a little bit, and maybe add another
instance also right here. So Shift D, move
it right here, 0. Let's add another
duplicate right here. Shift D, put it right here. Here. Yes, So basically right now we extended the background
a little bit further. You can go wild
with those planes because they don't take
much time to render. So if you want to add more
planes, you can do that. In my case, I think
that this is enough, but you can probably
go as I said, you can probably add more
details in the background like duplicating those
planes a little bit more. One thing that I'm
going to do right now, which is that if you go to the material settings of those, basically of those planes are
in the background elements. I will go from world to object. This is the basic setup, the import images as Blaine was, We'll do one thing. It is really important
make sure to also plug the color
and do the emission. And the main reason
for that is to make those planes look the way
they are supposed to look. And one important thing
that you might want to do is basically to add curved node. So let's add curves, RGB curves, and
put it right here. And what I want to
do is basically to reduce the amount of light coming from it by just dragging this
a little bit down. And actually I
probably should also connected to the
emission like this. This will make it a
little bit darker. I'm just trying
basically to give the illusion like it is far, far in the background. It is supposed to look
something like this. Yeah, that's way, way better. Probably even add
more contrast to it. Yeah, that's even better. And that's basically how I added the background elements
of this desert. There's just about
rendering, small, quick render of a side
view of the desert edited in Photoshop to
remove the bottom part of it and fix some issues
with those edges and just import it here using
import images as blame. Don't forget also to
basically add a curve, adjust the lighting
coming from these ones, and plug it also in the base
color and the emission. That's it for this video. This is how I added the
background elements. And in the next video, I will show you how
to add the sky.
13. Adding The Sky: Hello everyone. In this video we will add
the sky, as I mentioned. So yeah, let's just
do that real quick. It is super easy. There is a technique
that I want to mention it just so that
you know about it. If you remember when we jump
into the world settings, we basically use the best
brutes and rise HDRI, there is actually a
built-in node and blender that can stimulate the sky
and we will be using it. But just for this video, just so you know about it, if you want to
experiment with it, I will cut this selection by hitting control and
dragging over it. And if we go to Shift
a and go to sky, there is this guy texture, which is basically a tool
in blender that will allow you to create the sky. I will plug it into
color and I will go to film and basically uncheck
this option transparent. And it is basically
just a matter. You can adjust the sun
intensity right here. You can adjust the ST elevation will basically control
the time of the day. To be honest, I was able to get some really cool
results with it. Not in this particular
example of the desert, but as I said later on, we will be using it a lot. For example, this is kind of
a sunset look or something. You can experiment with it. But for now, I will stick to my HDRI because it gave
me better results. This is a technique
that you can use in case you don't want
to use an HDRI, I'll just plug it into the color and make sure to
check Transparent. The method that we will be
using is basically just importing an image of a
sky and put it out really, really far in the
background where to get nice picture of the sky. There are different resources. One of my favorite is
basically Unsplash. So if you just
look for dark sky, you will find plenty of really, really, really nice pictures taken by professional
photographers. Just pick one that
works for you. Maybe change the rotation from any orientation to landscape. And here as you can see there plenty of different options, plenty of different really
nice picture that you can use for this
particular video. I will choose a different
one from the one that I used in the trailer
of the scores, which will be this
one right here. I really like this blue color right here. I really like it. I will go to Download and
I will original size, make sure to download it
as high res as possible. If not, you can basically just find it inside of
the resources folder and basically go
to shift a image. Image as planes blends. It is probably instead
better sources folder and it is called Storm seeker. That's such a really
nice name actually. And we'll get back to this
view and scale it way, way up, way, way up. This guy should be huge. I will just hit seven
to move it and make sure to make it aligned with the direction
of this camera. So it's gonna be
something like this. Will probably put it
somewhere right here. Let's hit 0. It is little bit too small, we need to scale it even up. Let's just do that. Scale it at 0, and maybe right now we can
move it really, really far. Let's hit 0, and we need probably to change the
clipping of our camera. Let's get back to the camera. Let's add another 0 to it. I will draw, take
a little bit up, make it a little bit further, maybe also somewhere here 0. And the thing that I'm gonna
do right now is basically to rotate it a little bit on the x-axis because
in the real-world, the upper part of this guy should be
closer to the camera. So I will hit our x twice and just rotate
it slightly like this, just to give it like some
kind of more distortion. Maybe bring it a little bit
up to something like this. And let's look super good. I guess the thing that I'm going to do right now is
basically to go to the shader
settings by going to Object and I'm going to change a couple of settings right here. First of all, I don't need the alpha because there is
no Alpha for this picture. And I'm going to plug, or actually before that, let's
add a hue and saturation. Note you saturation. And I'm just going to reduce this iteration to
something like 0.5. So it has more flat
maybe let's try 0.7. And I'm going to plug it
also into the emission, which is little bit
down right here. Let's stay color and
plug it into emission. And probably I will have to
change the Emission Strength. Something like 0.4 will be good and maybe add a little bit of saturation,
something like 0.8. That's even better. Yeah, that's looking
actually pretty good. I guess it is
looking pretty good. Let's just drop it
a little bit down. And as you can see,
there is a little bit of clipping going just right here. So to fix that issue, Let's just probably I'm not going to duplicate
this another time. I will just maybe take
my camera lock camera to view and just zoom slightly just to hide it. Yeah, this is perfect.
That's really nice. That's basically yet
for almost everything. Yeah. See you in the next video.
14. Adding Background Elements (Mountains): Another thing guys, which
is that I feel like the background is still empty, so I want to add more
details into it. There is another
picture that you will find inside the
resources folder. So shift a Images, images as plane and I will go to the Resources folder and
there is this mountain. It is also another basically
picture of a mountain that we will try to put it really also far in
the background. I will go to the top view
and basically just try to rotate those mountains and the same direction
of our camera, maybe something like this. I will scale it a
little bit up and I will put them behind the dunes. They're not visible right now because I need to bring
them a little bit up. But yeah, as you can see, they will add way more
details to this picture. I will maybe put them
right here and just basically the oblique
gave them a bunch. So Shift D, Let's put the
other one right here, Shift D, Let's get back
to the camera view. I could've added another view, but I just too lazy
to do that right now. Seven Shift D and other
time maybe put it behind 0. Yeah, that's looking nice. One last one, shift D, not unless one
accidentally to shift D and just put it right here. Shift D input in here, make sure to select one
of those mountains. And as I said, let's add curves, do
it, curves, RGB curves. I will put it right here and just basically bring
the contrast up. Also, let's go to the
red channel and add some red to it and go to the
green and go to the blue. Actually remove a little bit. So basically tried
to make it look kind of similar
color to the rest. I guess this will
do the job for now, and that's it basically
for this video, we added a lot of
background elements to fill the background. And in the next video we
will add like some kind of more atmospheric depth
using some other planes. And yeah, and after
that, this scene, we'll be ready to go see
you in the next video.
15. Adding Dust: As I mentioned in this video, we will basically be adding some fog to add more
atmospheric depth to the scene. When it comes to adding
fog and atmosphere, there are two big
approaches that we can use or if there are
two big techniques. The first one is using the
principle of volume shader. If I look for principled volume, which is this node right here, and it is basically the main
technique you that you might want to use if you want some
super realistic results. But to be honest, the
only problem with the principal volume and volumes in general
inside a blender is that they render
really, really slow. Use this principled volume node and factor the
size of our scene, which is something
like over 200 meter. It will basically
take ages to render. You will need a
really beefy machine to render such an animation. That's why we will be using another technique which
is closer to cheating, but it will allow us to get
somehow similar results. But at the same time we'll
have like faster render, like really fast renderers. How to do this thing, it is actually super
easy. Let me do this. First of all, my
principles, volume node, I will drag this down to have more space in the 3D viewport. And I will go shift a image, image as planes, and I will
go to the Resources folder. And here you will have
an image called Font. Double-click on it to import it. And if you click on the dot, you will basically have this plane in the
middle of the scene. The technique that
we will be using it is actually super simple. We will distribute
those funk elements or those fog planes on
the entire desert plain. This practically will
give us the illusion of fog or does the desert. So here's what
we're going to do. I'm going to shift a mesh Blaine and make sure that
the size is 200 meter. Some of you might ask, hey, why are you creating
another plane? Why don't you like just create the particle system
on the desert layer. This actually will cause
some problems later on because we already have like a super dense mesh
for the desert. And it will be
really helpful if we just use a simple plain like basically
just four vertices to distribute our geometry, this will save a lot of memory. So after creating this
200 mirror plane, which is really simple, make sure to rename it so
you don't lose track of it. I will call it, for
example, for particle. And maybe let's hide the
object of the desert. And we have our simple plane. It is basically
just four vertices. I'm going to add a
particle system to this plane by going
to the particle tab, go to New and just call it funk or let's just
call it a dust, double-click on the
particle system and hit dust for whatever
reason this bug, when you change this name, it doesn't change this name. It's still going till blender 3. So it is really weird. I will change the type
from emitter to hair. Make sure to check advanced. And we need basically
right now to change the type of the elements
that are used as particles, because right now it
is using just paths. So go under the Render tab and here you will have
render as path. Let's change it to our object. And our object is the
element that we call it fog. It is basically the plane. If you zoom really close, you will have little
tiny planes right here. So our particle
system is working. It just needs some settings
to adjust it to, to, uh, resolve that suits us
here what we're gonna do, make sure to check
object rotation. So right now,
basically Blender will use the same rotation as
the main fog playing. All the small planes
are right now rotated the same way
as the big plane. And after doing that, make sure to select your
plane, then go to scale. And right here you will have
a slider for the scale. If you start changing that, you will basically make your
planes bigger or smaller. We want somehow resolve
that we can see. So let's jump the
camera view hit 0, and right here let's
switch to the render view, and we have this. So let's make them a
little bit bigger, something just like this. And probably they need to be basically pointed to the
position of the camera. So make sure to check rotation. And if you open
rotation and here you will have orientation axis, which basically will control
the angle of those planes. If I change it from orientation
exit from the velocity in hair to the object z and
I sat, randomized Phase, I will basically be able somehow to change
the direction of all of those Blaine to a result that somehow fits my needs. And using also the phase, I can basically changed their
rotation the way I want. I want them to be basically
pointed to the camera, something just like this. Don't worry about those basically
block parts right here. We will get rid of them later, but right now let's
just focus on the size and the randomization
of all of those planes. I might add a little bit of
randomized phase just to make more variation in
the rotation of those because nothing
in nature is perfect, it is all kind of random. And also I might check
the scale randomness. So I will have big
ones and small ones. So it will be more realistic. And here's something we
will encounter which Are those black parts
that are right here. They are actually caused
by Blender not being able to calculate the transparency
really, really far. If we go to the render tab here, you will have an option
called transparent. And we have basically
eight bounces. This number basically
control how far lender can calculate the
transparency of layers. So if we start dragging
this number AMP, we will get rid of that. Keep it at 40. It is pretty
good number I guess. And let's get back to our
particle system here. I might want to
change the emission because I feel the number 1 thousand we do have
actually 10000 plane. It is a little bit overkill. I think I will change this
number to something like let's start by 750 and
see what we will have. Yeah, that's kind of cool. I guess I will just
stick to this result. And here's another problem
which is that all of those planes are literally
just White Plains. We don't see any kind of font. Let's get back to our shader. Select the main fog element and let's see the
material we have. Maybe click on the
dog just so you can zoom on this element
really, really close. And let's just see what we have. We connected the
alpha, the Alpha, and we're good to go and we have the color into the base color. The problem that we see all
of those planes as white, it is not actually
coming from the shader. Whereas the other problem, what might be causing this
problem other than that, it is actually probably
because the color of this plane is y and
the focus also wine. That's why we're not
seeing the fog elements. So let's get back to our
fog particle element and go ender basically
viewport display. Inside the Viewport Display, you can basically
control whether you want to see the emitter, which is displaying all of those fog elements are actually
popping from the plane, so we need to hide the plane. You will have an option
called show emitter. If you uncheck it, bam Blender will basically hide the plane or the emitter of those elements and also make sure to hide it also
from the render. So later on when we
render our scene, the plane won't be visible. And as you can see right now, we do have a small problem, which is that our fog
planes are kind of flipped and that's actually
due to the orientation axis. To fix this problem, you can basically visual with all of those
settings right here. But to be honest, it
will always lying doesn't work the way you
expect it for whatever reason. So the easiest way I think
to fix this problem is if you click on the
fog element and just hit Done to zoom on it, and let's just click on the
tilt so we only see it. We can probably hit Tab. And if we rotate this plane, the y-axis 90 degree,
we will be good to go. So hit R, Y and hit 90. And we basically flip this
plane right now if we get back to our normal view by
hitting the tab key again, we will basically have the
result that we will expect, which is that all of
those planes aren't oriented the way we're
expecting that to be oriented, let's say 0 and band, as you can see, they're rotated the way we want
them to be rotated. Only one problem right now is
that we can see where they ends and it doesn't look
realistic effects this issue, we will basically need
to stretch all of those elements a
little bit to do such thing it is
again, super simple. Make sure you're selecting
your fog elements. I will zoom on it.
I'm hitting the dot. So what I'm gonna
do is basically to scale this plane on the z-axis. So it will give us the illusion like this folk is
actually stretch. Again, if you can't see
clearly or fog elements, just hit on the Tilt key, you will jump to this local view where you can only see it hit S scale and on the z-axis and make it
a little bit stretch. Something like this, I
guess will be enough. And to get back to
the normal view, hit the tilde key again. And if we go 0, yeah, that's way more like it. And that's looking
actually good. Let's make our desert
object visible. Uh, probably right
now it will take some time to render
because we have a lot of degrees of transparency right here
in the scene. Let's see. This is the result that
we're looking at right now. There is a big problem with it, which is that this focus inside the sand and
that's not realistic, that's not how sand is
supposed to look like. The main reason for
that is the position of those font elements. So we need to fix that problem. The easiest solution, it
will have two options. Either you can move the fog particle system up and this will basically give you the result that you want. If I go G grab and
move it on the z-axis, you will basically move
all of this fog up. There isn't another
approach which is more correct to be honest, and it is basically by
going to the fog element, Let's hit the Tilde
key to see it. And you need to basically
put the anchor point, this orange dot,
somewhere right here. Let's go tab, grab
on the x-axis, and let's move it
somewhere right here. And we have this result. We basically move the anchor
point somewhere right here. Maybe even let's
make it somewhat somehow on the edge
which is on this line. And we will have this result
hit tab again to exit and the tilde key to get
back to the normal view. And let's just
wait it to render. You will have the
exact same problem. So make sure to select
your fog particle, grab it by hitting g z axis and just
move it a little bit. Basically just try
to fiddle with it until you get a result somehow
that you're cool with it. And in my case, I think that this kind of look good
also you can probably play with this see to have
different kind of pattern or a distribution
of those fog planes. So yeah, you can play with that. In my case, I would like
just keep it at two. And the final thing, the fork right now
it looks more like clouds because it's not color. Let's just check our fog element and we need basically
to colorize it. And the easiest way to do
such thing is basically by adding a color ramp right here and color our main fog element. I will get back to the local view just to
focus on this plane. And let's go shift a color ramp and edit after the
color right here, I want to basically create a certain color to this element. So just click on the black and
let's maybe make it brown, something like darker
brown like this. Probably even
something like this. I guess, hover your
mouse over the color and hit Control C to copy
the color and go to the white one and hit
Control V to paste it and make sure to bring
the brightness way, way up, something like this. And as you can see,
probably I have to drag this iteration a
little bit down, just so I get this
really bright color. If we get back to
our normal view by hitting the tilde key again, wait for it to render. We work in only a
huge scene right now. So that's why it is a
little bit slow to render. And yeah, as you can see, we basically added this kind of dusty looked at those elements. So it kinda look more
like dust on a desert, which is to be honest,
way, way more realistic. You can probably play
a little bit more with the color ramp and all
of those nodes play also with the fog
particle system settings until you get somehow Arizona that you're
really happy with. I don't want to bother
you with a lot of members in details
in this video. Make something that
looks good to your eye. Of course, based
on the references, those four planes would be super easier later on to render. And I will show you the
right way to render them. That's it for this video. This desert environment is
basically right now finished. In the next video, we will add some camera animation
to the scene. And after that, I
will show you how to render it based on
different layers. And for the final video, we'll learn how to composite. That's it for this video. See you in the next one.
16. Camera Animation: As I mentioned in this video, we will create the animation of the 3D camera inside
of this scene, it was actually super simple. The only problem that I stumbled upon is
that I can't see it in real-time because the scene
is super heavy right now. So that's where we
will basically need to just somehow adapt to that and expect how our camera
animation will look like. So here's what we're gonna do. Let's just jump back
to the Solid View. Click on n to hide this tab. And let's exit the camera mode. And let's maybe collapse this one to something
like here and change the editor to the
timeline because that's what we will need
to create this animation. Let's select our camera. Our camera will basically move. If I jump to the top view, it will look something
along this axis. That's what we will try
to do in this video. The easiest way to
create this animation is actually not by using
the camera elements, by actually by parenting the camera to another
object that will act like a controller
of the camera because I don't want to ruin the
position of this gamma. So here's what we're gonna do. I will go Shift a
and inside of empty, I will have an object
called plain axis. I'll just click on plain
x's and maybe you can scale it a little bit up
so you can see it better, something like this
and maybe click on Control a and apply the scale. I will go to my camera
and hit Shift S. And you will have here an option called cursor to select it, which will basically move
the 3D cursor to the schema. I will go to this object Shift S and selection
the cursor. And basically right now blender move the empty element
that we added, which I will call
camera controller, moved it basically to the
position of our camera. If I go right now to my
camera properties here, I will find that it is actually the rotated 155
degree on the z-axis. So I will hit Control C. I will go to my empty
object and hit Control V, just so that both of
them are actually rotated the same
way on the z-axis. And basically I will pair on this camera to this null object. I will select the camera, then select the null
object, it Control P. And then we'll have
the menu set parent to just hit onset parent to object. And right now if I move this
axis or this empty object, I will basically move
the camera with it. If I animate this empty object, I will animate the camera. Let's jump to the top view
to see everything better. And I will select
my empty object. I will go to the
location and just hit I to create a keyframe. We basically saved
the position of this empty object and therefore
the camera at frame one, it will be at this place. I will have a ten
seconds animation. Let's say I will go to 240. Those are actually frames and a normal video is 24
frames per second. If I want ten seconds, I need to multiply 24 by ten, which will give me 240. So make sure to change
the end to 240. Right now I need to
save the position of this empty object
in a new position. So I will go G and
make sure to hit y, which will give you
the normal y-axis. I want to jump to the lock
and y-axis hit Y again. And as you can see,
I can move right now this camera on somehow
or normal line to it. It is kind of diagonal will
the position of this camera. So I'll go Gy, WY another time and just move it maybe a little bit similar right here. Don't go so far because we're basically dealing with
Somehow meters right here. So I don't want the camera to be super-fast camera animation. I want it to be settled
and super slow. After doing that, make sure
to go to your timeline, hit again and select
all channels. And if we go to the
frame 0 and hit Play, as you can see, our
camera is animated. One important thing right
now, as you can see, the camera will start slow, then start to go faster and
faster and faster and faster. And at the end it
will slow down again. This is not the kind of
animation that I want. I want it to be
basically linear, so it will keep
the same velocity along the animation path. To do that, make sure to
select both of your keyframes, hit T and just change
it from busier, which is the normal
interpolation, just change it to linear. And right now it
will always give the same velocity when it's
moving as a warning to be. Now we come to the tricky part. Yes, we can see the
animation of the camera, but we can't see
what does the camera exactly see the main reason
for that because as I said, if we go to 0, you
might be able to watch the result basically
from the solid viewport. And that's basically
what we will use. But you can see it in real-time
using the render view because the scene is so huge and blender can play
it in real-time. Unfortunately, that's why we'll just rely on our soul view. I will jump back right into it. I would go to frame
0 and just try to judge how fast the
camera is moving. The only way to do it. Unfortunately, there
is no other way. So let's just hit Play. All right, Let's
actually in my opinion, looking super good
and I really like the velocity and the
speed of this animation. So I'll just keep it at that. And by doing this, we're basically ready right
now to render the scene. The only thing that we
still need to do is basically to adjust the
render settings and break down this entire scene two layers and prepare
it for rendering. Yeah, see you in the next video.
17. Render Layers: First of all, let's
just discuss why we need to break our
scene into layers. If you try to render
this scene as a whole by basically just render
it as one image. This is not an ideal solution because you want to be able
to later on, for example, to adjust the color of
the sky on its own, maybe adjust the intensity
of the FOG may be addressed the intensity or the color actually
of those dunes. You won't be able
to do such thing. And that's why it is important to break this scene into layers, which will basically allow
us later on to composite and change some settings in
each element on its own. That's where basically it is important to break your scene
into layers to do that, it is actually super simple. All we have to think
about is what do I want? For example, I might want the
sky to be on its own layer. So what I'm gonna do
is basically let's just make this way, way bigger. And this view layer, I will change at the sky and
I will just click on Enter. And on this layer I only
want to see the sky. Let's move our mountains, all of our mountains
by selecting them, hit em a new collection
and just call them mountains were basically just organizing all of those
elements we have right here. So this is our mountains and also the
background elements. Let me just select all of them. Hit M and let's
new collection and just call them
dunes and hit Okay, Both of the dunes and the mountain are both
our background elements. So I will create
a new collection, New Collection and let's
just call it background elements and basically move the dune and the
mountain inside it. We have right now
a collection that is meant for the
background elements. Let's create a new collection
and let's call it sky. And I will move this
one which is the sky. I will move it basically
inside the sky collection. I might also rename it to sky. I will take my fog elemental particles and
let's select both of them, hit em new collection
and let's just call them fog and hit
Okay, the last thing, new collection and let's call it desert and move the
desert element inside it. And maybe also let's just change the name of this
collection to scene. So right now we do have multiple collection for
each element of the scene. Scene is basically we'll hold our cameras and controllers
background elements. It is a desert and the mountains
in the farm background, the sky, it is the sky. The fog is that us, that we edited the
sane and the desert. It is basically our
main desert shader or our actually our
main desert element. This layer is called sky, so I need to disable all the other collection
except the sky. One thing I just want to
mention that in case you don't have this checkbox right close to the name
of the collection, you will have plenty of
options that you can show. In my case, makes sure to check the select box also maybe
you want to check this, which is like cold holdout. Make sure also to check it because we will be
using it later. All disabled desert,
I will disable fog, I will disable the
background elements, and I will only have
this guy invisible. And that's basically it. I will duplicate this
layer and just choose New. And let's call it, for example,
background elements. And it is self-explanatory. We will only have the background
elements in this layer. So make sure that the select all the objects that
you don't need. Yeah, we only see the
background elements right here. So we're good to go. Let's click on this button New, and let's call this a desert. And we only need to see
the desert right here. So make sure that
it's able to fog, is able sky and disabled by ground elements so we
only can see the sky. Lastly, but not least, let's just do New
and I will call this dust it enter and I
only want to see the fog. So all disabled
desert, disabled sky, disabled background
elements, and we only can see the dust elements. One important thing right
now is that I might want to clip the desert
element from this layer. Because if you think about
it in a realistic way, the desert would
probably be carving some parts right here because that's the
shape of the dunes. I don't want this dust or fog
to be visible right here. The easiest way to do that is basically by enabling
an option right here, which is called holdout. If I click on it and if I
disable the desert layer, so I will see it. And you check this
option which is holdout. If you click on it, Blender will basically hide some parts, the fog element
that are supposed to be covered, let's say hidden. So that's what we exactly
want in this case. I will just skip it
like that for now. So basically right now we broke down the scene into
different layers. So it will be faster and easier for our
computer to render. And also we will have the
option later on to adjust all the different settings
and colors and hues of all of those different
elements on their own. Because it will probably take a long time to redo the
whole thing from scratch. Otherwise, if you wanted
to change, for example, the color of the sky, you might need basically
to get back to Blender. Adjust the color of the sky from the shader editor and
re-render this in again. And that's definitely
not practical. And it will take you ages
to find allies one shot, and we don't want
that right now, let's just talk a little bit about how we're going
to render the scene. I'm not going to break down our render settings
in this video. I will keep it on its own video, which has the next video. But there are a couple
of options that we might need to check before
we render our scene. So we'll move our this editor a little bit up,
something like this. And right here I will go
basically to render passes, which is the step bright here, and makes sure of
all the settings, make sure to check
the node using data. This way we will be able to use more data to do know
is our renders. Here's how we will
render the scene. We want. For example, this kind
renders are the sky images. Do we own their own folder? We want the background elements, images or renders to be
on their own folder. Same for the desert, same for the dust elements. And one important thing, make sure to check
the noise in data for each and every
single layer the sky. We checked denoising data, background elements check
denoising data, desert, check denoising data
in our final layer, which is basically
just make sure to check denoising data. It is kind of weird thing
inside of blender that you need to check this option for
each renderer layer. That is just how blender works. So after checking this option, makes sure to go to your
compositor and select Use nodes. And that's where
the magic happen. And it is actually
where we will use different nodes to tell blender where to
save each render. Let's just move this
component that right here, I might hit Control and the right-most button
to cut this link. And I will go Shift a
and select file output. It is kind of
self-explanatory file output, which is the node that we
will be used for rendering. And I might make it a little bit bigger, something like this. If you focus a little bit
on this render layer node, it will tell you which
layer Blender will render. So right here I have Skype. This render layer is
responsible for rendering. Let's guy, I will link
the image to the image. And as I mentioned before, we check the denoising
data property. So we will need to
add the noise in data or actually denoise
and put it right here. And just link the
denoising normal with the normal and the denoising
albedo, albedo. This node right now is
basically ready for rendering. The only thing that I'm
going to do is make sure to select your final
output. Click on n. And you will have
here this small menu. If you go under properties, you will have here an
option called base path. And this option basically
will tell blender where to save this render. And here's what we're gonna do. We want to save this sky
to its own unique folder. So I'll go here and I
will go to my resources, may be a little bit
up and I will create a folder and we'll
call it renders. Later on you will find
this folder and inside it, I will hit Accept. And inside here you will have an option called file subpath, which basically Blender
will create a folder inside that render folder that we created that will
contain our render. So I will just rename it to, for example, sky and hit Enter. This right now is
basically our sky layer. By doing that Blender will
render right now all of the images that belongs to the sky layer with
the word sky in it. And this will save us later on because we will
not just have image one image to image of
three and it will be basically just a mess
trying to organize them. We will have all the
images that belongs to the sky layer called
Sky 001002, etc. The layers, for example, that belongs to
the desert will be called Desert one desert to etc. So basically it
will basically save us from a complete chaos. The only thing right now
that we still need to do is basically to duplicate all of this setup and adjusted for each layer will go select
all of them, hit Shift D, move it maybe right here, and just change
the render layer, for example, from sky
background elements and go right here, make sure to keep it at
renders, hit Accept, and right here let's
just change it to background elements
and hit Enter. Let's duplicate it again, shift D of it right here. I will choose right
now the render layers, which is desert, go right here. Actually, it is inside
the renders and I will change this to Desert. And finally, I will
duplicate it one last time shift D put it right here. It is the same path,
so we're good to go and change this to dust. And let's call it dust. Hit N again. And if you want to maximize your editor hit
Control Space bar. And we have this, and we basically adjusted all the different layers to
be rendered on their own. Basically set up another thing
that I forgot to mention. Make sure after you create a dual whole notes setup
for the rendering layers, make sure to like
basically select one of your file output nodes
and to open the site tab. And here makes sure to
check the base path, makes sure it is the basically
the best that we want. And also really important make sure to check
the file format, make sure to put it as
PNG and check RGBA. That's crucial. We want to render the RGB, our color channels, and
also the alpha channel, which means that our images
after rendering will contain the transparency data that are basically crucial for
compositing for the color depth. Keep it at eight. We don't need it for the
compression mixture, it is 0%, please guys exchange all of those settings for all the
different file outputs. It is crucial if
you don't do that, the final images that you
will get after rendering, they are basically unusable, so yeah, just change
those settings. And that's basically it for how to prepare your
scene for rendering. The next video will
basically adjust the render settings based on the power of your own computer. And we will be ready to
go and render our scene. So without any further, I do see you in the next video.
18. Render Settings: As I mentioned in this video, we'll change some
render settings to make our render basically faster and optimize it for rendering. So first things first, make sure to get back to the solid view. Actually when you leave
it at render view this we'll use some computing power. So just to be safe, make
sure to change it to the viewport shading so you save a lot of memory
by doing that. Next thing, I'm just
going to maximize this a little bit and go to
our render settings. They render engine, it is
cycle, as we mentioned, we need the micro
displacement option, so experimental be crucial
in case you do have a GPU, makes sure to use GPU, compute that in case
your computer crashes while you're rendering
or it is out of memory, just change it to CPU. In my case, I will
just keep it to GPU compute for the viewport
sampling and all of that. We don't need it because it
will be rendering the scene. And here you will have an
option called samples. And that's where it
will get a little bit tricky when header than 28 is actually a safe number and it is actually what I will be using. But in case your computer
is a little bit slow, you can change this number, for example, to
something like 64. And I tried actually this render and it's still
kind of look good. Also 32 in case your computer barely
can handle this scene, 30 d would be the way
to go, but in my case, I will just change it to
128 basically samples. So depending on the
power of your computer, just adjusted the way I said. Other than that, I
will keep the advanced the way it is for
the light path. It used to be 12, we
change it to eight so I will keep it the way
it is transparent. Make sure it is 40. And other than that, I will keep all the other
settings the way they are. I will make sure to go
to my desert element, which is inside desert. Let's just select it. I will go to the Modifiers tab, and right here you will
have final schedule, render, render one
pixel viewport eight. I actually might want to change the dicing scale from
one to a smaller number, something like 0.7, let's say, which will basically make more subdivision for
my desert objects. So it will look just better in case your computer
doesn't handle it. Just keep it at one. If it doesn't work with one, just start
experimenting maybe 23, and just work your
way up until you basically find the
perfect combination for your gear or your computer. In my case, I will
leave it as 0.7, which I think would be good. Another thing that you
might want to check is actually in the
output properties, which is your resolution. And as I mentioned before, in case your computer
won't handle it, just drop this to 50%. And that way you will
basically drop from four K to the full
HD aspect ratio. Not full HD, but actually the equivalent of full HD in cinema scope for
your frame rate, make sure it is 24 FPS. That's actually the frame
rate that I'm using, the same one used in movies. And it will give you kind of the cinematic look that
our eyes is used to, should just keep it at 44
and you will be ready to go. For my frame range. I have a ten seconds animation, so it goes from
frame one to 240, which means I will have basically ten seconds
for the output. We're not going to bother a lot with it because we already set up everything we need
inside of our composite. The only thing that you
might want to check it is actually your file format. By default, we have
PNG right here, which is not that practical because it will compress
your files a lot. If you want more flexibility later on when you use composite, you're saying you
can probably use Open XR or Open XR multilayer. In my case, I'm not going to
basically use any of those. I'm just going to
keep it at P&G. And another thing I
forgot to mention also the full work,
but as I said, I will just keep it at P&G and just by default it will be 11%, just drop it to 0%. So we have the least amount of compression on our final images and also make sure to have RGBA so you render also
the alpha channel. That's the crucial
option to check. Other than that, there is nothing much to go
through that set. And that's basically it
for the output properties. Other than that, make sure to
save your scene right now. So in case blender crashes, you won't lose all
of those settings. So make sure to go
to File and Save it. And the other thing that I found while I was rendering
the scene the first time that the desk elements will take most of the time when
it comes to rendering. There is another
approach that you can use even though I don't
highly recommend it, but you can do it and it
will save you a lot of time, which is basically by using
multiple rendering engines. Certain layers will be
rendered as cycles and other, and other layers will
be rendered by EV. The only way to do such thing
is basically by deleting. For example, I want to render the desk elements
using using EV. I will select all of those
anterior setup render layers, dust and all of that. And I will basically
just delete it, literally just
delete it and render the elements that you want them to be rendered with cycles. And later on, reopen your file, hit Control Z to restore the node setup that we
deleted and right now delete all the other setups that you render them using cycles and go to the Render
Settings and change from cycle to EV and just
hit Render again. And this way, you will only
render the desk element. This way, you will have certain layers that
are rendered using cycles and other layers
that are rendered using EV. Generally that's an escape and it will save
you a lot of time. So by having that in mind, we're basically right now
ready to render our scene, adjust your settings,
recheck them again. So once you start rendering, the last thing you
want is that in the middle of the
render or something, you've discovered that
you did a mistake and you will have to do
everything from scratch. That's a nightmare. Recheck your settings, make
sure everything is perfect. Check again all of
your render settings. And when you're ready to go, just go to Render and
Render Animation. And basically blender right
now will start rendering. You're seeing, it will
probably take you sometime. I will highly advise you
just leave your computer rendering at night and
probably at the morning, depending on the power of your computer you're seeing,
you'll be ready to go. That's it for me right now. I will keep my computer
rendering and I will see you in the next video after the
rendering is finished. See you there.
19. Compositing Part I: Hello and welcome everyone. In this video, we will like
basically compose our desert. The first thing that
you will notice is that whereas my scene
did I delete it or what? I rarely do the compositing in the same blender file that I created this
scene in an all of that because at this
point the scene is already heavy
and I don't want like basically to add more memory and all of that to the scene
that I'm working on. So that's why I
would like just open a fresh blender scene and do
all of my compositing here. The good thing about
compositing that basically has nothing to do with the 3D
data that are in your scene. We don't need that right now. We already have our images. There is nothing we
can do to change them. And the only thing, as I said, it's still that we can do
is basically to tweak it a little bit more to
get the result we want. So, yeah, just to start
a new blender scene. And after you do that, the good thing is that blender offer a workspace that is
meant for compositing. So I would like to change
to compositing and you will have this
nothing is visible yet. And the main reason because we don't have like some sort of data to tell blender that
what we will compose. So that's why make sure to check this box called US nodes
and it will open this. The first thing that
we're gonna do right now is basically to go Shift a. And by the way, most of the shortcuts that you
use in the shader editor, almost all of them like
also works in the composite because both of them are
actually node-based workflow. And you will find
like they are pretty similar in terms of
the way you work in and we need an input
and right here you will have an option
called image sequence. If you remember, we actually rendered our images
or our desert, a different image
sequences for the sky, for the main desert element, for the background
elements and the fog, I will click on
image sequence and blender automatically
will open this menu. And all we have to
do is basically to navigate to your folder. And here's a general advice. Think of your scene from the farthest element to the
closest element to you, the farthest element in our basically seen it is
actually the sky. It kinda makes sense
like to import it first. It doesn't matter for now, but you will know why we
need this kind of order in our mind to make the process
of compositing easier. So I will click on
one of the images and just import image sequence. You will have this node
which basically will tell us that we imported our
image sequence it is. And actually if you can hit Control Shift and click on this, it will show you
actually your image. They're rendered that we've
got out of the 3D scene. One thing that a lot of
people will suffer is that basically why I can't
scale this picture down. And it is for whatever
reason it is not something like easy to do
or actually it is easy, but no one will think about it. If you want to zoom out, all you have to do is to
hit V and you will make the images smaller if you
want to make it bigger, hit Alt V, and this will make it bigger or smaller or bigger. And in case you want to move it, make sure to hit Alt and hit the middle mouse button or the scroll wheel to
basically move it. I don't know why they
did it this way. It is what it is
after we do this, we have our skies right
now let's just go shift a input image sequence and I will import my
background elements, click on one of
them, import image sequence and just
put it right here. We go shift a input
image sequence and let's go to our desert, desert important image sequence. Let's put it right here. And finally go shift a
input image sequence and open our fog element fog important image sequence
and put it right here. Alright, So right now
we imported all of our different footages or all of our different
image sequences. We have the sky in
the background, the desert and the fog. Why it is looking like this. We're going to fix
that in a second. What we need to do right
now is basically to tell blender what to put over. What, for example, I want this background elements
to be over the sky. That's why there is a node called Alpha over
it is this one. Why is it called Alpha over? I don't know why, but
it kind of makes sense. You can remember it
by the word over. So I will open this node
and here's how it works. Image number two or the image that will be
in the second socket will be put on top of the image that is on
the first socket. So if I want the background
elements to be over this, I will take the image
and put it into image two and take this image
it into image one. And if I hit Control Shift and click on the
Alpha over to see it, notice what we will have. Basically we put our background
elements over the sky. And one problem that you will
probably notice right now, which is that you have like this kind of white stroke
around your element. The main reason for
that is that there is something that we
call pre-multiplication. And I don't want to go in
deep like where it is, pre-multiplication
and all of that, but it is easy to fix. All we have to do is
like to just check this box called convert
pre-multiplied. Click on it and bam, we hide that white stroke. We won't see it anymore after we do that basically right now we want our desert to be
over both of these. What to do? A at alpha, alpha
over put it right here and take the image
and put it right here. And bam, you have your
result and make sure to check convert pre-multiplied
to hide the white stroke. It is actually that easy. And here's why I
mentioned when we were importing our
footage is that you should think of the hierarchy of your different image sequences and they are positioned
in 3D space. Because as you can probably see, we start from the
farthest element and get to the closest elements. So having this
organization in your mind, it will make your job easier
in compositing and you will not lose yourself
in different nodes. That tells you where each object is supposed
to be an olive. That by doing it this way, you save yourself from being chaotic in the
compositing process. And believe me, when you are
working in a huge scene, this can be a nightmare. So probably the last
thing we need to do is basically to put the fog
above all the other elements, but I'm not gonna
do it right now. I want basically to
fix the lighting or actually to shift the lighting and all
of that in our scene, then I'm going to basically just add the fog element on top. So yeah, let's just do that. And here's just one simple trick mixture,
electrical lips, all of these so they become smaller to save more space so
that we can see our scene. So we'll have this and yeah, alright, we have
this guy, Right? Also, you might want to delete this rendered layer
because we won't need it. We won't be rendering
like any sort of 3D data. So there's deleted right now. Here's what we're gonna do. I feel like this guy is a little bit too
blue for my taste, so I want to make
it slightly darker. So let's go to our sky
and just go Shift a. And let's add the curves, RGB Curves and just
put it right here. If I start changing this curve, notice that basically the data from the sky will go
to the RGB curves. This way we basically
only affecting the sky. So I want to make this
guy kind of like, let's boost the highlights. Maybe it looks
something like this. That's better. And
maybe like just and make it a little bit more
dramatic by doing this. Maybe also let's add a
little bit of light, are actually remove a
little bit of contrast. So we have it looking like this. Maybe let's go to the
red channel and add a little bit of red because
our deserts is a little bit going into the red color and
go to the blue and removal a little bit of blue because
when we remove from blue, we're basically adding yellow. Let's collapse this
and let's go Shift a and add hue and
saturation value. It is basically
almost the same note that we use in the
shader editor. And the only thing that I
want to do is basically to drag the saturation
a little bit down, something like 0.8 for
the hue may be also, you can play with
it a little bit. Maybe our life, I don't know, like just keep it almost at the default
value, which is 0.5. And the value, of
course, it will basically just control how dark or light your image
or just keep it at one. I'll collapse this. And right now let's move
on to the second element, which is like those background
mountains and dunes. Let's go Shift a and
add an RGB curves. Let's just keep on working
on this RGB Curves. Maybe I want to make the background mountains a
little bit less contrasty. Let's say I will
just bring this up. So basically we give the
illusion like they are actually really far in the
background and maybe we can boost a little
bit of highlights. So they looked like this, maybe like do like this. The Let's zoom out V. Yeah, and that's actually
looking way better. I think the last thing that I might want to do is basically to add some sort of like
a yellow tint to them. And to do that, as I
mentioned, go shift a, add a hue saturation value, put it right here, and let's just shift the hue a little bit. Let's say something just like this and maybe drag the
saturation a little bit of yeah, 1.15, that's actually
looking pretty good. I think the last
thing is basically that we need to work a little
bit on this main deserts. But before that I actually noticed something which is that these mountains there was like a really harsh line
separating them from the sky. So I might want to blur
them out a little bit. So to do that, go
Shift a and add blur. There are different
types of blur. The one we need is like
just the simple blur and maybe like ranked this number
to something like two. Let's try to also in the y-axis, maybe let's try 33. If you click on the node
and hit empty muted, this is the before, this is the after, this is the before. This is the after the
transition right now, or actually the edges of those mountains are
less pronounced, let's say which like they
look kind of better this way, I will collapse this node. And let's, as I said, move on to the final element, which is like the big desert. The desert I will go, as you probably already guessed, a shift a and just
add an RGB curves. Put it right here. Let's maybe add a
little bit of contrast to it, something like this. Let's also maybe add
a hue and saturation. You saturation,
put it right here, maybe drilling down like this iteration to
something like 0.95. And what about if we shift
the hue a little bit? Let's say something like, yeah, that's way better. I think maybe 0.950.45. That's a lot. It's 0.495. Yeah. That's actually
looking pretty sick. I think the last thing
we're gonna do is basically to finally add the fog above
the rest of the image. So we'll go Shift a and I will
add the Alpha over again, alpha over, hold it right
here it is right now, like just putting
whiteness above our image. So we needed to put
the fault like the fog right here and make sure
to hit pre-multiplying. And you have this, of course, you can probably play
a little bit with the contrast of
this fog elements. So my goal shift a curves. I like curves when
working with images because they give you a lot of freedom more than just
like for example, the color ramp, because it is simply just the Level Slider. The RGB curves will
give you the chance to basically manipulate each and every single color
of the way you want, or actually in this case channels the red
and green and blue. I might add a little
bit of contrast to it. Let's say something like this. And also maybe add a
little bit of red, maybe removal
little bit of blue. And basically you're
FOG will look something like this
right now in terms of coloring or render and fixing the level of contrast and lighting
and all of that. It is basically finished, but we might want to add other small effects
above this image, and that's what we're gonna
do in the next video. See you there.
20. Compositing Part II: Hello and welcome everyone. In this video, we will add some extra effects to
finalize our render. The first thing
that I will add is basically to add some
sort of a vignette. The vignette is
basically like making the edges of this image a little bit darker
than there were. Save the image to do this, there are multiple approaches. Some people might
choose to create some textures inside of Blender and venues them
in the compositor. In my case, I will go with
the easiest approach, which is basically just
don't loading an image from the Internet of a gradient and I would like just slap
it over this image. So we'll go Shift a
and look for image. If you hit open inside
the resources folder, you will find an image
called gradient. Import it by double-clicking
Control Shift and click on it to preview it. And this is basically
our gradient. What we want to do is
basically, as I mentioned, we want to overlay it over
our basically main render. And a lot of you probably
already know like just scream, use the Alpha over, but actually we won't be
using the Alpha over. We will use this
slightly different node and this node actually we are really familiar with hit
Shift a and look for mix. Unlike just put it right here, a lot of you might say, Hey, are you just using
the same mix node? And the answer is
yes, I will take the gradient and
put it right here. And you will notice that it
is acting a little bit weird. Everything is black. And the main reason for
that is that we need to basically change the blending
mode of the mixed node. We need to change
it to multiply. And you will see that it
is looking like this. The first thing that
I need to do is basically to bring the
scale of this image up. So we'll go Shift
a and like look for transform and
put it right here. I need to bring the
scale up because this is my render and this is my
basically gradient texture. I will start scaling it up. And notice by doing that, I'm basically showing more
and more of my render, scale it up a little bit up. And we have this right now. And I feel like
it is like really darkening more than
basically need to change the nature
of this grid in texture list just hit Control
Shift and click on it. Or maybe at the transform node, I will go shift a search and let's look for
curves, RGB curves. I will put it basically before
the Multiply node right here and Control Shift to
preview the RGB curves, nothing is changed right now, but if I start
basically bringing this to white and drag this
a little bit to black, you will notice that
I will basically make this gradient a little
bit more contrasty. Let say if I preview right now my mixed node by Control
Shift and clicking on it and start
basically changing the levels of this curve. You will notice that I'm
able finally to change the main focus of this gradient
texture the way I want. So probably I want
it to be something, maybe like this, let's say, yeah, that's looking good. If I mute this gradient texture, this is the before and
this is the after, this is the before and
this is the after. If you ask me, it looks better, I will just collapse this. And right now what
I'm gonna do is basically to add some
sort of lens distortion. Our render is basically
right now like somehow took with a perfect
lens and a real life. There is some sort of
like we call it lens distortion that happens also
in the edges of your image, of course, because of
physics and how the light hits it like basically the edges of the lens or
something like this. The good thing you don't need to understand over math behind it, there is actually
a node that would like just do that
inside of Blender. If you go Shift a and look
for a lens distortion, you will find a note
card lens distortion, but it after the Multiply node. And like just take this number, for example to something like 0 to nothing much is happening. Let's try minus 0.02. And yeah, if you focus a
little bit on our desert, this is the after and
this is the before, this is the after.
This is the before. Notice that basically
there is like some slides that is happening right now in
the edges of the image. You can probably just
crank this number to something like this to
see exactly what it does, but be careful to change
your render to an egg. So I'll just skip
it at minus 0.02. And there is an option
called dispersion, which basically will give
you like some sort of like shift of the red and
green and blue channel. Let's just put it at one, which is a lot just
to see the effect and that's the effect it
creates, as I mentioned, it like shifts the color
on the edges of the image, or let's say shift
every channel, the red and green
and blue on its own. Most of the time you will find yourself like basically plugging the same number as
the number you're plugged in the distort
collapse this, That's basically it for
how I compose this desert. If we scroll down to see our entire node tree,
that's what we did. It is actually super simple and basic old what
we're doing is like overlaying stuff over
other images and change some different
settings on those images, like contrast colors, the curves of every
different channel. And that's actually the
main core of compositing. We're not doing
anything complicated. We're just changing the
images after we created them, or in our case after
we render them. The last thing a lot of you
in right now might ask, all right, how are we supposed
to render this image? The easiest way is
basically to go right here as we saw before, go Shift a and look
for file output, put it right here and plug your lens distortion
to the image. Open the sidebar, like just to see all of your
different settings, pick your file output and
inside of node properties here, all the properties that we
will need first things first, let's just call it
final desert render. Let's choose a
folder to save it. For example, in Southern
resources folder, I will maybe go right here
instead of renders new folder, Let's call it final desert. And hit Accept,
choose of course, your different settings
and all of that. I would like to just
save it as PNG. We don't have an alpha channel, so it is basically just RGB. Maybe bring the compression
to the back to 0. If you don't want any sort of compression going are
happening on your image. Even though that doesn't
make a lot of sense because we already
composed our images, so we won't need the extra data for now unless of course you're planning to grade it in other softwares like Da
Vinci Resolve or something, then just bring this
number back to 0. And after you do
that, save your file, as I mentioned before, go to Render and
render animation. And it will happen really fast because we're only
like just saving images. It won't take that much of time. It will probably take
a couple of minutes based on the power of
your computer and you will find your final
image sequence after rendering and all
of that ready for you. That's it for this chapter on
how to create your desert. We finally finished it and good job for like
basically finishing it. I'm really proud
of you and please make sure to upload
your renders so that we get the chance to see
them and maybe give you some feedback on them and maybe how you can
make them better. Also, you will probably
find other videos after this related to Chapter
desert where we might want, for example, to add some grass to this desert and
how to animate them. Basically just some other
smallest topics that you might want to check in case you want to take your render
to the next level. But for now, that's
it for the chapter. Thank you everyone
for tuning into this chapter and I will
see you in the next one. See you.
 Yassine Larayedh, VFX Artist