Transcripts
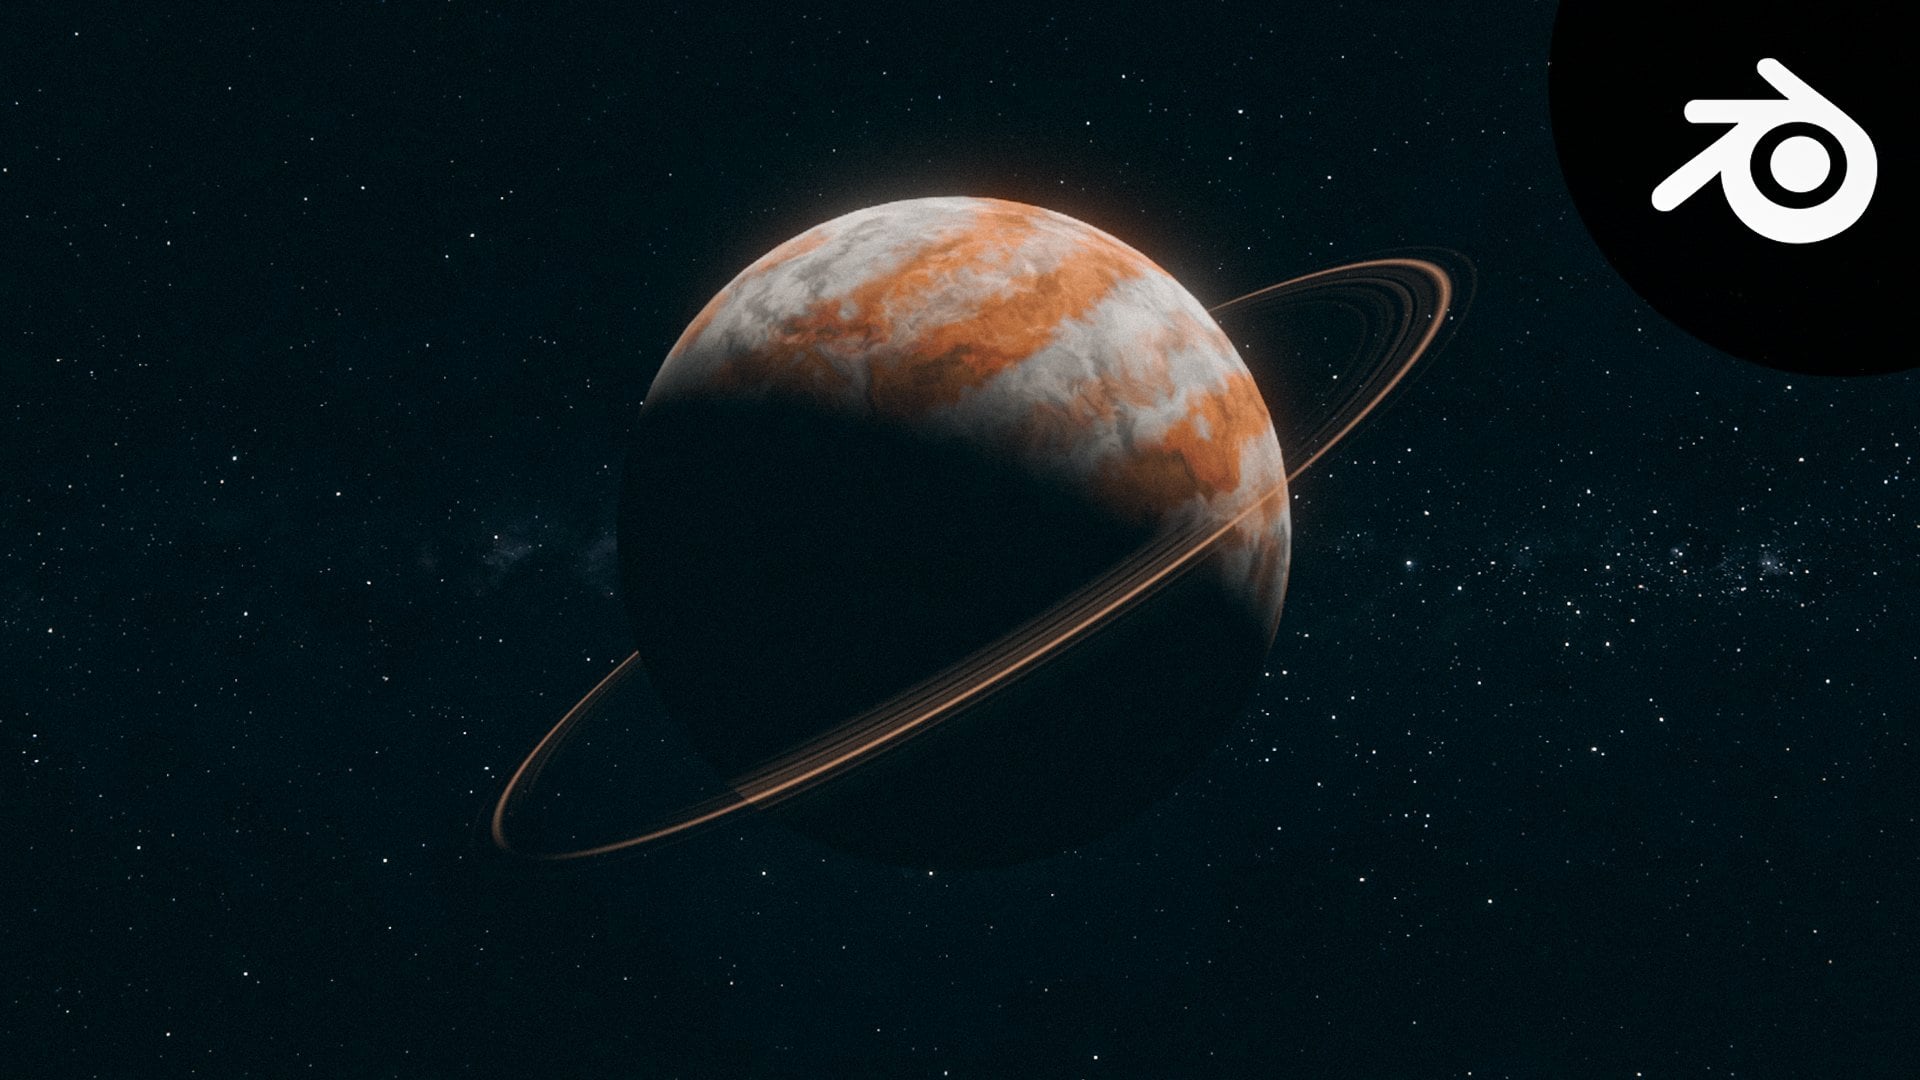
1. Trailer: Hello, and welcome to creating realistic looking
nebulas in blender. If you ever dealt with nodes
and volumes in blender, you know how
frustrating it can get. Probably you have
also seen some of those crazy note
trees and wondered how someone can create such a thing and how they even understand
what's happening. Well, this course is trying
to make this easier. Throughout this course, you will learn how to create a nice, realistic looking
nebula, 100% in Blender. At first, we will
start by creating the basic shape of
the and then we will move to how to mold
and shape it the way we want using some
clever techniques. This will be really
fun. I promise. Once we have a shape
we're happy with, we will introduce more details to it to make it
look even better. To finish everything,
we will also cover how to render
and composite nebula. So by the end of this course, you will have a nice piece
of art you can share. But most importantly, this
course is a nice exercise on certain aspects of blender that most of
the time get neglected. Or people simply assume
it is complicated, so they glance over it, like how to use nodes to create procedural stuff using math in blender or even how to use math to shape things
in artistic ways, which I think is a really
important skill to have. And besides creating a
nice looking nebula, my goal is to unlock
new concepts, new ways of how to
think about nodes, and to better visualize and understand
exactly what they do. I'm really trying to make something new click
on your mind, and I'm really chasing that
moment when you will say. Ah. Okay, I finally get it. Honestly, that will be the
ultimate goal in this course. So if this sounds like
something you're interested in, I can't wait to see
you inside the course.
2. Scene Preparation: Hello, welcome to
the first video of creating Nebuls in Blender. In this first video, we
will prepare Blender for all the work that we will be doing throughout this course. We will activate some add ons, adjust the render settings, and overall, set the
environment for the nebula. So yeah, it's time to
jump into blender. Okay. Hello, and welcome
inside of Blender. And as I mentioned
before, in this video, we are going to
prepare the scene for all the work that
we will be doing. We will be adjusting
some render settings, activate some add ons we will
need during this course, and we will just prepare the overall environment
for the nebula. So let's start doing that. The first thing I want to start with is to enable some add ons. What I mean by add
ons, honestly, is just one add on, which is the node wrangler. So go to edit preferences,
and from here, go to add ons, which is here, and let's
look for node wrangler. And yeah, I already enabled it. So make sure to check this
box to enable this add on. Up until this point, I
don't know why Blender doesn't ship with this
add on already active. I did some research on
why is that happening. And what I found is that
the nodragular add on, it's not developed by blender, and it does have
some quirky things on how to enable
certain features. Let's say it uses some
cheating sometimes, and that's why the
developers of blender, they always were hesitant to, like, fully integrate
it in the software. But the really nice thing
is that they are slowly implementing more
and more feature that does exist in
the node wrangler. They are integrating it
directly into blender, which is always nice. So maybe one day, Blender will come with
all of those features of the node regular add
on already built in. Anyway, this course is not
about the node wrangler, so let's get back to
creating our nebula. Once you activate the add on, I'm going to close this,
and let's start working. And one thing that which will be the most special
thing during this course, we will not be deleting
the default cube. We will actually keep it because that will be the
base of our nebula. The second thing I'm going to
do is to check this light, which is called
light surprisingly. But if I jump here
to the properties, you will find that
it is a point light. Later on, we will probably
use one point light. But as the main source of
illumination for our nebula, it should be a sun, which I find kind of poetic because we're talking
about nebulas, and there's a lot of
stars, so a lot of suns. So kind of makes sense. Okay, this was a silly joke. Anyway, so make sure to
change this point to sun. And for the strength, I'm going to get it back to one or actually, you know what, instead of changing all of
these settings and trying to remember what does the sun
have as default settings, let's delete the
slide, select it an x, and then delete, and
let's go shift A, and let's add a sun. This was easier. Sorry
for wasting your time. I'm going to hit
Z and move it up, let's say 3 meters, and something to always
remember about the sun light. The location of the
slight doesn't matter. If I just jump really quick to the rendered view and I
try to move the light, it doesn't matter that
I'm moving this light. What really matters is
the direction of the sun. So yeah, don't worry
about the position. Worry about the rotation. The
only reason we're moving it up is just for visual
clarity. This is number one. Number two, because
obviously, right now, I'm using EV, I need to change it to cycles
because cycles is better. To do that, let's jump
to the render settings. From here, change
from EV and you can see EV next,
which will come soon. But for now, we will
still be in cycles. Let's change the device
from CPU to GPU compute, which will allow you to have faster renders because you're using your external
graphic card. For the viewport sample, when we are looking
to the scene, I'm going to disable
the noise threshold and reduce the samples
to something like 32. This will not the ideal. You will see later
when we're dealing with the nebula and
lot of volumes, 32 is really low to actually
make any creative decisions. But at the same time,
you will find yourself limited by how much you
can do in real time. So in my case, 32 was the right balance between performance
and being able to see at least some big shapes to make some creative
decisions about the look. So in case you have
really decent GPU, you can probably even
crank this number a little bit up to something
like 64 or 128. This will give you
more visual clarity and will allow you to make
more creative decisions. Later, especially when
it comes to shaping the nebula and colorizing
it and all of those stuff. Now for the noise
threshold in the render, I'm also going to disable that, and I'm going to render
the scene at 128 samples. The render you're seeing
right now is at 128 samples. So I think it is suitable, and it is a good point between
performance and speed. Even though it took me like
decent time to render it. But 128 will be good enough for a good visual colarity when it comes to
creating this ebula. Let's disable the
Denise because we will be doing it
later in compositing. Now let's move to light paths. The light path settings
will allow you to change how the different rays of light behave
inside of your scene. As you can see right now, the
Mx bounces are set to 12. Which means that for
one ray of light, Blender will calculate
12 different bounces. In other words, let's say there is a light coming from here, it will go here, here, here, here, here, here, here. Basically, what
I'm trying to say, Blender will
calculate 12 bounces. Now, of course, the
reality is way more complicated than that because these rays are not
emitted from the light. They are actually
emitted from the camera. And that's why it is
called rate racing, but that's a topic
for another time. All you need to know
because we are in space, there is no bounces. I hope this is
physically correct. That's why I'm going
to kill the total 20. Let's kill also the
diffuse to zero, kill the glossy to zero. And let's keep the
transmission to 12 because that
number scares me. Nebuls does have certain
level of transparency. It makes sense to keep
this transmission high to have some transparency
going on. Keep it at 12. I didn't encounter
any problems with 12. Let's jump now to
the second tab, which is the output. I'm going to keep all of these
settings the way they are. The only thing I want this animation to be
5 seconds in length, which is to be honest is already overkilled because nebulas
take a lot of time to render. And yeah, so do five
multiply by 24, which is my frame rate, and that will give you 120. Let's jump to the view layer. This will allow you to check some different passes that will help you later
on in compositing. For now, we will not stress a lot about compositing
and all of those stuff. The only thing you
need to keep in mind is to check denoising data, which basically means
that Blender will render some extra data to help
in the denoising process. How can you use
the denoising data by jumping to the compositing, and there is a really famous
sentence I always use. Think of compositing as the process that happens once
your render is finished. So when I check use nodes, my render will be coming out
of this render layers node, and everything that
will happen here, it is something that
will happen after that. So what I want to do is
to denoise my render. So go Shift A, and
let's look for denise. Let's pick de noise
and put it here, plug the denoising
normal to the normal and the denoising
albedo to the albedo. And really handy thing,
make sure to activate this magnet because this will make the nodes
stick to the grid, and I always find
that so satisfying. This is number
one, and also once we denise our render,
we want to save it. How can we tell Blender
that, hey, Blender, please save these files because they take a lot of
time to render. You can do that by adding
a file output node. Look for file output, this one right here, and
let's plug it to the image. Let's check this file
output and jump to node and properties to change
all the different settings. Here's a shortcut that changed my life.
Actually, it didn't. Basically, if you
write three slashes, or let's say if you write
two slashes, this way, you're telling blender
that, hey, Blender, I want you to save it inside the folder where the
project file is. In other words, Blender
will save the images inside the folder where
this blender file exists, which is a really nice
thing because you don't have to actually manually
pick to save each time. But we don't want
blender to save all the images in the folder where our
blender project lives. That's why I'm going to do another slash
and write render. And then another slash.
And by doing this, you will tell Blender
that hey, blender. Jump to where this
blender file exists, and then create a folder called render and save
all the images there. Especially once you memorize
this, three slashes, render slash, and
you don't have to actually use this feature
anymore, which is really nice. For the fire format, let's jump to open XR, which is better. And for the RGB, I'm going to keep it at RGBA. Probably we will not
use the alpha channel. In case you don't know,
the Alpha channel is the transparency channel. We will not be using it, but just in case if
somehow we needed it. I'm going to keep it at RGBA, but probably will be
good also with RGB. For the color depth, I'm
going to use float health. Float fo honestly is
so overkilled and probably most of the movies will do just fine with
just float health. And for the Cx plus less, I'm going to change
it to DWB loss. I'm still trying to understand all the differences between
all of these different codex. But as far as I research, the best option and the best
one in terms of quality and in terms of the size of the
final files is the DWB loss, and that's what I will
always recommend. And for the image, I'm going to call this nebula. Score. Later on, the sequence of images I will have will
be called Nebula 001, nebula 002, et
cetera, et cetera, et cetera until Nebula 120. Later on, we'll be
doing more compositing, but that will be in
the end of the course. Now, let's focus a little bit more on how to
create this nebula. Let's jump back to the layout, and let's finalize
everything we'll be doing. Number one, let's organize all of these different elements. The sun will be under
a folder called let's call it sun.
Because it is the sun. For the cube, this will
also be called the nebula. So let's move it in a new
collection by typing Nebula. And the collection that
does contain the camera, I always like to call it scene because it does have
all the scene elements. So this is how we will
organize our blender file, the hierarchy of the
different objects. Let's also do some
window management. I'm going to bring this up, and let's jump to
the solid view. I'm going to also bring
another viewer from here and hit zero from here to jump to
what the camera sees. I always find the setup really appealing because I can
always work in three D here, see what my camera is here. And if I need any other thing
like the shader editor, I will use it in this
area right here. Let's clean this visual
mess a little bit here, so it to hide the toolbar. Let's hide all of these
different overlays. I also like to
jump to my camera, and I'm going to change
the focal length to 24. When I was creating
my original scene, I didn't know that
I will use 24. And it took some trial and
error until I found 24. It's not like a big deal, but I'm just going to
set this for 24 because that's the same focal length
I use for my final shots, especially because this
cube is kind of small. I want wider lens to capture as much as possible of this
nebula, set this to 24. And also in the
viewport display, there is an option
for the pass partou which is actually a French word, which in Blender means that it will make
all the areas that are not inside what the
camera sees will be black. So it will turn all
of these areas right here to black and look
what will happen. Boom. Speaking of that, also, you can always jump if I'm
not mistaken to the output, and you should have here to render region and crop
to render region, which will basically mean
that Blender will only render the stuff that
are inside this box. This is the same
thing as when you hit Control B and you create a box around the area
you wanted to render. This is our basic
window management. And I think I'm also
going to move my camera. So let's move it a
little bit closer, something like so and hit Control A zero to move
it to this position. So this is what my camera
is seeing right now. Let's change this to
the shader editor. Let's select our cube, and let's call this
material nebula. We're not going to use
the principle BSDF because we're going
to deal with volumes. So let's delete
the principle SDF, and I'm not going to tell
you what shader we will be using that I will
keep for the next video, where we will create the
basic shape for our nebula. So now, make sure to save your blender file for
the next session, and I will see you
in the next video, where we will create the
basic shape for our nebula. Thank you and see
you in the next one.
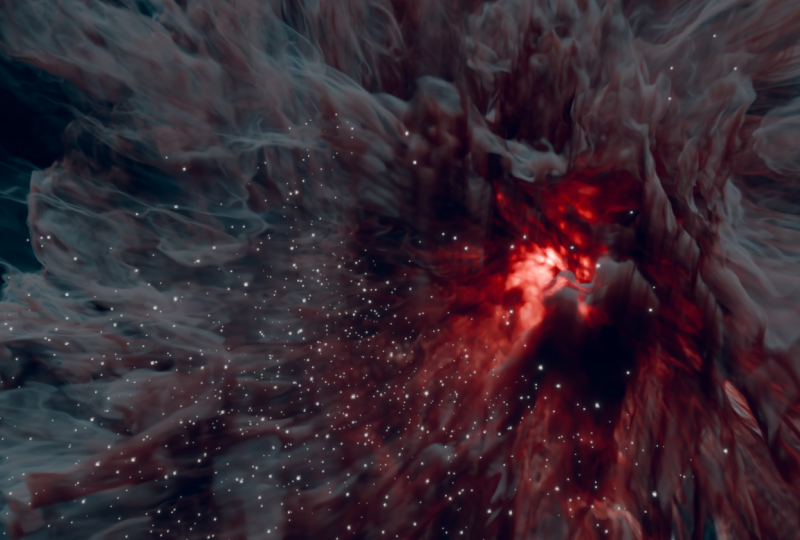
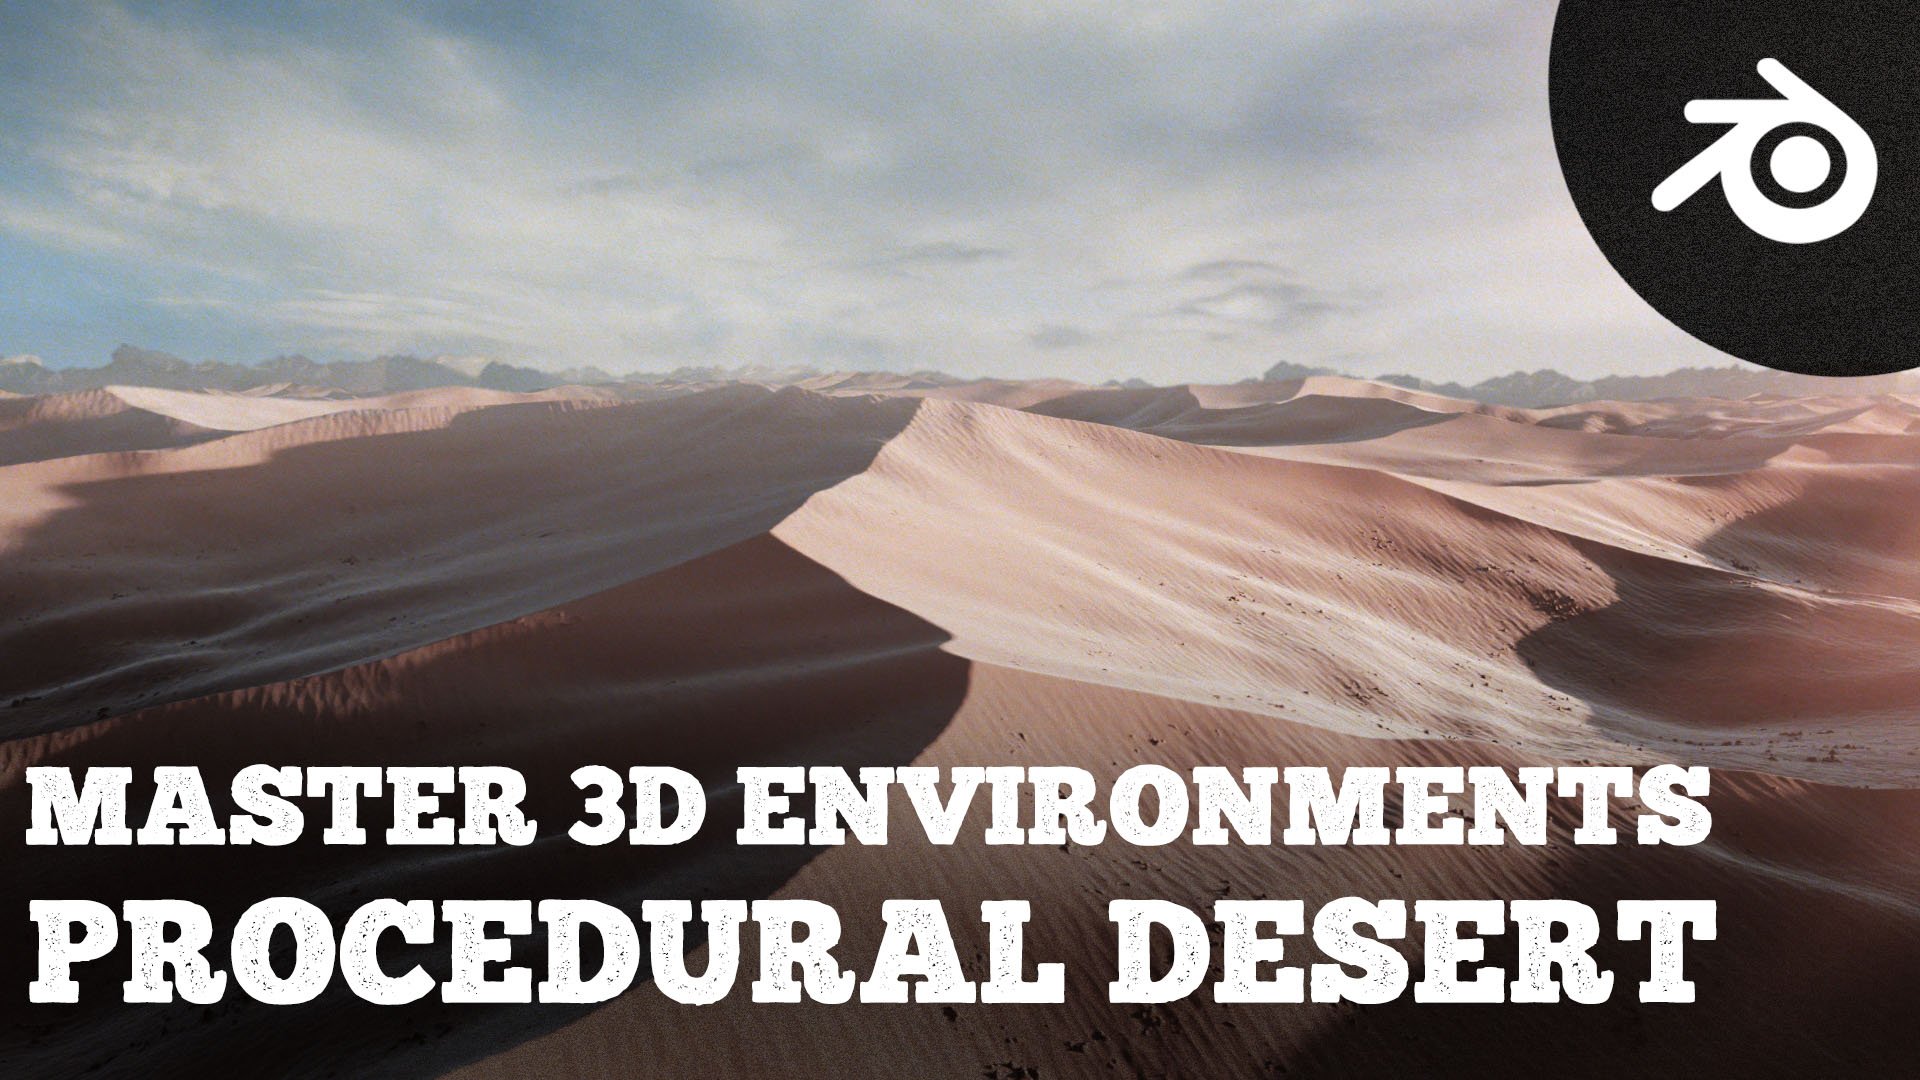
3. Create the Base Shape of the Nebula: Hello, and welcome back to the second video of creating
Nebulas in Blender. This video is special
because we will create the basic shape of the
nebula using volumes. This will be a great
opportunity to learn more about volumes and how to shape and transform them
in really cool ways. So, Let's jump into Blender. Hello, and welcome back
everyone inside of Blender. And as I mentioned
in this video, we are going to create the
basic shape for our nebula. Now, here's something. When I first started
thinking about the way of how to create a
nebula, I thought that, you can maybe just maybe
create, for example, sphere. Let's say Shift A, and let's add UVphere let's
jump to the localized view. And maybe somehow if I
do enough extrusions, I will be able to somehow start getting certain shape
or create the shape of ebula basically trying to create the shape of nebula
by actual modeling. I doubled a little
bit with that, because that's the first
instinct you'll have. Okay, I want to create a nebula. So try to model it. But that's a really
trerible thing because there is something
that slipped away from me, which is what are nebula. If you Google atar Nebula, you will find this
interesting thing. Actually, it is not interesting, but in my case, or our case, it is interesting,
which is Nebula is a cloud of gas and
dust in outer space. This is all I care about,
a cloud of gas and dust, which means that either
you should create really small particles to simulate how gases
and dust acts like, maybe using something like
geometry nodes to do that. And Technically, or let's say theoretically should
get you close to the idea or nebulas, by creating small
particles, as I said, and making them behave and shaping them in the
form of a nebula. That can be a viable
process or number two, by creating volumes or
volume shading in blender. And that's the path we will
take during this course. We will try to create nebula by using the principled volume
node inside of blender. I'm going to delete
this weird shape I have created X
and then delete. Let's jump back to
the normal view, and yeah, let's
select this cube. And as you remember, last
time I said that I deleted the principle B SDF because it is not what
we will be using. We will be using the
principled volume, which you can add by hitting Shift A and looking
for principled volume. And let's connect the
volume to the volume. The best way I can
explain what are volumes in blender or what is
actually volume shading. In normal shading,
you're addressing what should appear
in the surface. Okay? When you add, for example, a texture and you put it
inside the surface socket. What happens is that
blender will slap the texture on the
surface of the object. When we talk about volumes, blender will put whatever
you plug into the volume, it will try to put it
inside of the cube, so it is bigger. So we're talking about
the inside of the cube. And that's how you create
gases, explosions, et cetera. If I jump right now to the rendered view to see
what does it look like, you can see it is just a black
thing here in the middle. That's not what we
want, and there are actually two things
I notice right now. First of all, if I just jump to the environment or
the world properties, you will notice that the world is already emitting
some sort of light. In space, there is no such
thing as global illumination. That's why I'm going to drop
down the strength to zero. So everything is black, and somehow this principled
volume is right now gray. The main reason for that
being is because of the sun, the sun is the one responsible for eliminating this volume. And it feels like it is
too low the strength. So let's bring it up to
something like two, double it. Let's jump back to the nebula. This density factor
will allow you to control how dense
the volume is. Basically, if you crank this
number to something like 50, it will almost act like it
is a cube, a solid cube. But when you lower it down
to something like one, it acts like a gas. This density slider does have a really
interesting implication. Because it control the density, if we can just find a way to
tell Blender, Hey, Blender. In certain areas, we want
the volume to be dense, and in other areas, we want the volume
to not be dense. This theoretically
should give us something similar to
how nebulae look like. We need to plug something here. And what is the node that will allow you to do such a thing? It is the famous node
called, Noise texture. So go shift A and
look for noise, noise texture, and plug the
factor into the density. This will give you
the following result. I don't know if you
can see it clearly, but right now, there
are certain areas that are less dense than others. To make this effect
more visible, I'm going to add a
color ramp after this, so go shift A and
add a color ramp. Let's plug it here. And if I
start dragging this flag up, You can see how I'm controlling. I'm basically making
this noise texture a little bit more contrasty. Just to see what's happening, if you hit control shift and
click on a certain node, you will be able to preview it. So this is how the noise
texture looks like. Here's what it looks
after the color ramp. I'm basically making
it more contrasty. And when I plug
this to the volume, it will give me, okay, I'm going to
disconnect this from the surface because I want
it to only go to the volume. This will give you
the following look, which looks like clouds. Let me also bring
this white flag a little bit to the left. And we'll adjust all of these settings later
a little bit more. But now, we're starting to
get something interesting. We're starting to get something
that looks like clouds. And theoretically,
if we just know the right buttons and the
right settings to use, we will be able to
shape this blob into something that
looks like nebula. Everything we will
be doing during the next couple
of videos will be attempting to shape this volume into something that
looks like nebula. But at the heart of this setup, it is this noise texture plugged into the density
of a principled volume. Everything else is just a way
of how to shape the volume. Now, I want to make all of
this a little bit denser. So how can I do this? Maybe some people might suggest playing a little bit
with the noise texture, but that's not what
I will be doing. I'm actually going
to add a math node, so go Shift A and
let's add a math and change this operation
from D to multiply. So I'm multiplying
the values that are coming from here by this value. So right now it is 0.5. When you multiply
a number by 0.5, you're basically
dividing it by two. So right now, I'm dividing the density by two.
That's not what I want. I want to multiply it
a little bit more, and you can do that by
increasing this number. So let's say I
increase it to 100. And something happen. Now, this volume
is way way denser. Let's pick something
like 50 to see the effect more clear, 25. And yeah. This is how our volume is looking
like right now. But there is a
problem right now. This volume doesn't look good. It looks like it is just a blob. So how can we increase the resolution or the
quality of this volume? This will bring me to the most important setting
in this entire course, which is related to
the render settings. I'm not going to touch on these, the rendering samples
and all of that. I'm actually going to jump
way way down to the volumes. This step called volumes, control the quality
of your volumes. These settings right here are
the main settings that will decide how good and how defined your final
nebula will look. The lower these two numbers are. The more quality you will have and more details you will have, and the bigger this max steps, the more also steps
you will have, and therefore, better quality. And the most time
consuming part for me was trying to find
the right values or where you can actually
be able to render the scene while also having
a good visual clarity. In my case, both of these
two numbers were 0.01. And once you do that,
you will notice that your volume kind
becomes more detailed. This volume right now
is really detailed. You might wonder, hey, but
there's not that much of a change if I get
this back to one. Okay, so this is one, and this is 0.01, and there is not that
much of a change. In this case, this volume
is really detailed, but the problem, it looks blobby is because of
the noise texture. We didn't adjust
the right settings. But once we adjust the
settings of the noise texture, we will be able to get a
really detailed nebula. And for the next
steps, I think it is a little bit over killed
when it is 1024. That's why I'm going to
drop it down to 128. Later on in the course, we
will be getting back to these volume settings to see how our nebula will hold with
different step rates. But for now, we're going to
keep it at 0.01, but also, I need to mention this in case your computer
doesn't hold up, which is that you can bring
this number up to one. These numbers work in reverse, so bigger number are
easier to render and smaller numbers
means more details. Let me get it back to 0.01, and now let's adjust some
settings in my noise texture. I'm going to change the type
from three D to four D, which will act like
a seed number, which will allow you
to change the look of the nebula in case you don't
like what you're seeing. You can play with this
slider until you get something interesting or
a look that you like. In my case, I'm going
to leave it at 22. For the scale, I'm
going to drop it down on to two or let's
say three for now. Later, we will drive the scale also using another
noise texture. But for now, I'm just
going to use three. For the details, I'm going to increase it to
something like four, let's say, and now
let's let's try six. And yeah, six seems to
add way more details, and you can clearly start seeing some visual details
here in my volume. And also, right now, we're not using a texture coordinate node. So go shift A, and let's add
a texture coordinate to tell exactly Blender how it should maps the volumes where I'm
going to use the object, which means I can
bring this number even down to something
like one or two, And for the scale,
if you remember, I mentioned that
I'm going to drive it with another noise texture. If I select this node and
hit shift D to duplicate it, let's take the
object and plug it here and plug the
factor into the scale. When we plug this noise
texture into the scale. This means that the scale of this noise texture will also
vary from place to place. I'm going to select
this noise texture. Here's the back space to rest
it to the default values, and let's increase the level of detail to something like six, and I'm going to
add a color ramp, so go shift A and
add color ramp. Let's put it here. I'm going to make it way more contrasty. Let's say zero point Um,
maybe slightly more. Okay, this is too much.
Let's reduce this. Let's say 0.7 for this one. And for this one, let's give
it more breathing room. Let's say 0.35. Now this is still looking
a little bit too dense. But instead of changing the different settings
here on the noise texture, I want to play a little
bit with this color ramp, the one coming after
the main noise texture. Let's say this should be 0.52. And this one Let's say 0.61. And I'm going to
add another flag in the middle by clicking
on this new color stop, and let's make it
way way darker. Something like, I guess the value of 0.15
will do the job. Let's increase the density
to something like 100. If I Zoom right now, you will be able to see a lot of details now happening
in my volume. Let's zoom a little bit more. You can clearly see a lot
of details right now. If I just drop this to
one, Look how it looks. There is no details at all. Okay, yes, my render
is no way way faster, but there is no
visual details here. But when I get it back to 0.01, this is actually
the same quality we will use for
the final render. Let me hit also
zero to get back to my usual camera view because
now the volume is smaller, which means faster renders. But this is the core of
how I'm going to drive this noise texture
that is responsible for creating the main
shape of the nebula. In the next couple of videos, we're still going to shape
this nebula more and more until we start
getting a result we like. But for now, this is the
main setup we will be using. I'm going to let's say, select these three nodes, hit Control G to create
a labor around them, hit F two to rename it. And let's call it, for
example, main noise. And as I mentioned in the
next couple of videos, we're going to spend
most of our time trying to shape this
nebula to a shape we like. So yeah, I will see you, everyone in the next video.
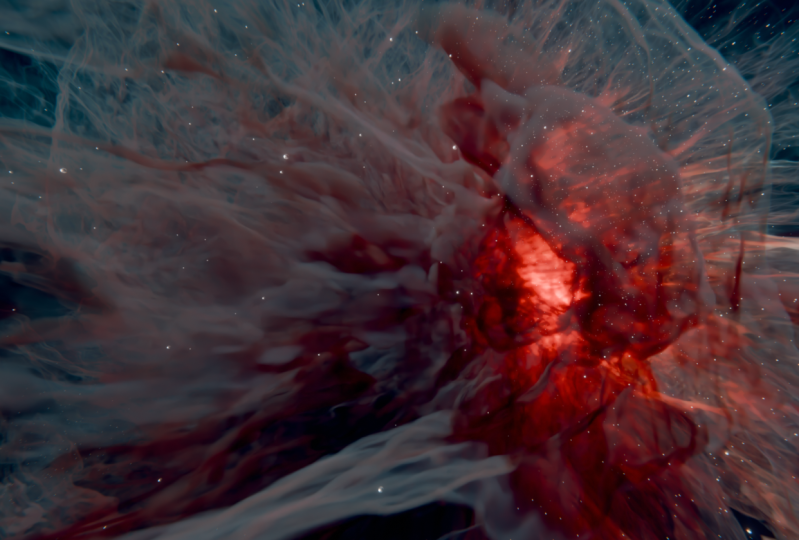
4. Spherical Falloff: Hello, and welcome back to the third video of creating
Nebulas in Blender. This video might cause
some headaches for some people because we're going to talk a little
bit about math. But rest assured,
nothing too complicated, and I will try to explain
everything in detail. The goal is to add some spherical
fall off to the nebula. What do I mean by that? Well, let's jump
into blender first. Hello, and welcome everyone
in this video where we are going to create the sphercal
fall off for our nebula. If you notice because
we're using a cube, you can clearly see all
the edges of the cube. So our goal during
this video will be basically to make
all of these edges slightly smoother by making the inner or the center of
this cube really dense, so we will have the center of the nebula inside the
center of the cube, and gradually, we want
everything to fall off. This will be a really
interesting exercise to deal a little bit
with math nodes. So yeah, Let's do that. Now, actually, before
we start doing that, there are a couple
of things that I notice that I want
to adjust from now. The first thing, I still think
this volume is too dense. That's why I'm going to jump to this noise texture right here, the one driving the scale, and I'm going to lower it
to something like one. So now I can see more
shapes in this volume. Number two, I'm going to jump
to my principled volume, and I want to start
seeing some colors. The way we're going to
change the color of this nebula is by changing the color here and
the absorption color. You can think of color as the color for all
the surface areas, and the deeper the lights
will go into the volume, the more it will shift
into another color. So basically, when we set
a certain color here, that will be let's call it for the shadow areas that are not
that deep into the volume. And the deeper the
lights will go, the more we will have more
of the absorption color. And the nice way
of how to do this is to use complimentary colors. So if I go right here and I pick some sort of let's say
shades of sen like this, and maybe can increase
this to the top. Now, from here, I'm going to select a complimentary color. So I will bring this up, and bring this
somewhere around here. And this will give you
the following result, which actually I'm
kind of digging. As you can see, if I
zoom a little bit, and I hope that my
blender doesn't crash, you can see that
the shallow areas will have the cyan color, and the deeper we get into the volume and the
denser the volume is, the more we will have
more of this color. The main reason you might
think like, hey, this is red, while this is like
crey beige color. The reason for that is because this color is getting
multiplied multiple times. That's why you will
get the darker shades of red or brown. But either way, I think that
this is looking pretty sick. And now we can move on to
creating this furcal fall off. And to understand exactly
how this will work, we need to talk a
little bit about math. Okay, this is a different scene, and I'm going to
use it to explain the math operations
we will be doing. It is a really simple scene. I just added a plane, and I added a noise texture, made the noise texture a little bit more contrast
using this color ramp, and I'm using the whole
thing as a material. This is the most
vanilla thing you can do in There is a concept. I'd like you to always
keep it in mind, which is that three
D operations or three D math operations are
just two D math operation, but they are done in three D, because sometimes it happens that because we're doing
everything in three D, you might have a hard time trying to visualize
what's happening. But when you bring
it down to two D because you only have to
deal with two dimensions, it is always easier to
imagine what's happening, and based on that, you can imagine how the three D
operations will look like. And that's exactly what
I will try to explain. So let's imagine
this is our nebula. We're going to create a
two D nebula, let's say. Our two D nebula is
bounded by this box. I'm going to hit seven
to jump to the top view. And what we want is to make the edges basically
becomes smoother. That's exactly the
same thing we want to do in three D because
we have a cube, and we want the
edges or the nebula that is inside this cube
to fall off gradually. So it's basically the same
thing. It is just done. In two D. So what we really want to do is to tell Blender
that hey, blender, make the nebula visible here, and the further you go from
the center, make it fades. And let's imagine how
we can do such a thing. There is a famous operation in blender called
multiplication. I'm going to show another plane. And for this plane,
I only want you to think about the texture that is right here,
this gradient. If we were to multiply
this texture by this one, try to imagine what will
happen because all of these values right here are
white, which means one. I will see the noise
texture on these areas. Meanwhile, because
the center is black, I won't be able to see the
center of this noise texture. That's what will happen when
I multiply this by this. Basically, black is zero. That's why nothing will
show up in the black areas, and white is one, and
that's why I will be able to see the noise texture
in the white areas. But what we want actually is to inverse this by making
the center white, and it gradually
falls down to black. Why is that? Because when
the center is white, I will be able to see
the noise texture. And because it fades to black, also this noise texture
will fade to black. So now let's think of how we can do such a thing on my plane. I'm going to hide also
this plane by hitting H, and let's focus on this one. What we want is to figure
out a way to generate a gradient that is white in the center and gradually
falls into black. Now, before we
actually jump to that, let's think of an easier thing, which is, let's
try to figure out a way of how to tell
Blender, that hey, Blender, I want you to generate
a texture that is black on the
inside and gradually goes to white because we can always invert that and get
exactly the result we want. So what is something that
will tell me that hey, The further you go
from the center, the greater the value will be, which means basically
the color white. If you focus on
what I just said, I said the distance
from the center. So this problem will be solved, just if I had an operation that tells me the
distance from the center, and there is this
exact operation. If I go right here and add a texture coordinate
and add a vector math, and I'm going to plug the
object into the vector, from here, there is an
operation called length. And this length operation is responsible for telling me
the distance from the center. If I take this and
plug it to the surface to be able to see the result,
notice what will happen. Right now, this length operation is giving me the distance
from the center. So because I'm really
close to the center, the distance will be zero, and that's why it is
represented by black, and the further I
go from the center, the bigger the distance will be, and that's why I'm
going to white. Actually, these values
go even over one, but Blender basically will represent anything
above one as white. So what you need to keep in mind right now is that we're
going from black, a distance from zero to white, which is a distance
from one or above. And if I multiply
this length by the noise texture, I will get
exactly the result I want. So let me do just that. I'm going to go shift
A and look for math and change this operation
from D to multiply, and let's plug the color to
the second socket and boom. Maybe the effect is
not that visible, so let me hide this line
and hide the overlays. And if you focus, you
will be able to see that these areas right
here are now darker. If I select the multiply node, and I hit M, this is the
before, and this is the after. Or to actually make the
result even more obvious, I'm going to take
this and plug it to the second one and take this and plug it
to the first one. And if I hit M, this is the before, and
this is the after. This is the before,
and this is the after. And as you can see right now, the center of this noise
texture is now black. What we want is the
reverse of that. So if this length texture is
going from black to white, I want it to go from
white to black, and you can do
that by inverting. The length operation.
How can you do that? By adding another math node, so go Shift A and let's look
for math and plug it here. Change the operation
from add to subtract, move this to the second socket and change the
first value to one. That's how you invert a number. So let's say you have five and you want the
inverse of five, you do one minus five, one minus the number. So we have this length
that we want to invert. So what we do is to do one
minus this length operation. And now, if I take this and plug it to the second socket of the multiply and get back to this one, that's
what you will get. And now, if I want to control the fall off of this texture, I can always add
another math node and change the operation
from add to power. And by changing the exponent, you will be able to
control the fall off of this noise texture or
actually of this mask. What we just did
in two D will be the same thing that we
will try to do in three D. So right now if you
try to imagine how these operations will be in three D, here's
what will happen. Let's imagine this is our cube. I'm going to figure
out the distance from the center by using
this length operation. And since we are in a cube, if you try to imagine how will the distance from
the center look like, it will look like a sphere
because we are in a cube. So the distance from the center from all the
different directions, it will look like
it is a sphere, sphere that is black
in the inside, and the further you
go from the center, it becomes white. We want
the reverse of that. That's why we are going to
do a subtract operation. And when we do the
subtract operation, we will have a sphere
that is white in the inside and gradually
falls down to black. And later we will
multiply our nebula, the volumes that we created by that mask that we generated
using the length operation, and we will also add a power
node to control the falloff. It is basically the same
exact concept we just did just in three D. I
hope this makes sense. So right now, let's get
back to doing that in three D. And now it is time to
create the spherical fall off. And as I mentioned,
to get what we want, we are going to
multiply this volume by a gradient texture that we
need to generate. So now, Let's jump on how we can
generate that texture. I'm going to zoom
out, and everything I will be doing will be
after the main noise. So select all of these nodes
and let's bring them here. I'm going to add a
texture coordinate. And if I zoom on it
and control shift and click multiple times
until I jump to object, and let's also click on this. This is what our object
coordinate system looks like. We want to figure out a way on how to tell blender that he. Blender, we want you to tell us the distance from the center. In other words, the points that are closer to the center of this cube will be zero in
distance or closer to zero, which means they will be black, and the further we
go from the center, the greater the
distance will be, and therefore we will be having bigger numbers like
one and all of that, which will be
symbolized as white. And the really nice
thing, there is a function in blender
called length. So if I go shift A and
look for vector math, and let me put it
here and change the operation from D to length. And if I control shift
and click on it, this is how it is looking. Now you might say hey, but that doesn't look
like a gradient. The main reason for that is that because it is right now
plugged into the surface. We want it to be
plugged to the volume, so I'm going to take this
and plug it to volume. And now, something is happening. If I zoom in here, and I go shift A and
let's add a math node to change the intensity of this and change the operation
to multiply, and I start multiplying this. As you can see, now
we're starting to get some sort of gradient
that goes inside. As black, and it gets denser the closer you get to the
edges of the cube. And this is exactly
what we want, except it is kind of
reverse because we want everything to be
dense in the center, and it will gradually fall off. So we need to
figure out a way of how we can inverse what
we're having right now. There is a node actually for this called invert invert color, which you can use. But because I love math, I'm going to use
another math node by selecting this hit Shift D, and let's put it here and change the operation
to subtract, and let's bring this here
and change this to one. Subtract operation
happening right now, it is the exact same thing as the invert node I just added, because if you want
to invert a number, you do one minus the number. So this is the exact
same operation. I think I need to lower also the intensity a little
bit more. Let's try 0.5. No, this is too much. Let's
try 0.01, 0.02. To four. Okay. Now, as you can
see on these edges, we're starting to get really
smooth fall off happening. And now, all I have to do is to multiply all of these by the noise texture that
is coming from here, and that will create the
gradient fall off we want. So how can we do such thing? Go shift A, and let's look
for color mix, mix color. Let's put it here, select all of these nodes
and bring them here. Take the subtract and plug it to the second
socket in the B. Control shift, and click on this to be able
to preview it, and let's preview it
inside the volume. And if I change the
operation from mix, we want to multiply it
and bring this factor up. As you can see right now here, maybe you'll be able to notice the noise texture
doing things here, and it is gradually
falling into black. So that will be smooer fall off, which is exactly what we want. And let's say
hypothetically you want this gradual fall off
to be even smoother. You can do that by
adding a power node. So go after this multiply, hitch d two duplicated and change this from
multiply to power. If I zoom a little bit down, you will be able to see
this effect happening. This power node right now
by changing the exponent, will allow you to control how smooth the fall off will be. We fall into negative areas. This will allow you to control the transition area or how smooth your gradient
fall off will be. In case you don't
want to do anything, you can pick one
and that will give you the same result basically. So you can play a
little bit with that in case you want
smoother fall off. But in my case, I'm actually
going to delete it. I don't need it because I'm digging this result
the way it is. And now I'm going to get
these nodes closer to each other because I'm going to label them, select all of them. Control G, hit F two
to rename this label. And let's call it
spherical fall off. And if I preview
the final result by plugging the volume
into the volume, Boom. Now we're starting to see a really nice gritty
and fall off happening. Of course, there will always be some hard edges right here, but at least it
will go smoother, the closer it gets to
the edges of that cube. That's it for me for this video, and I will see you
in the next one.
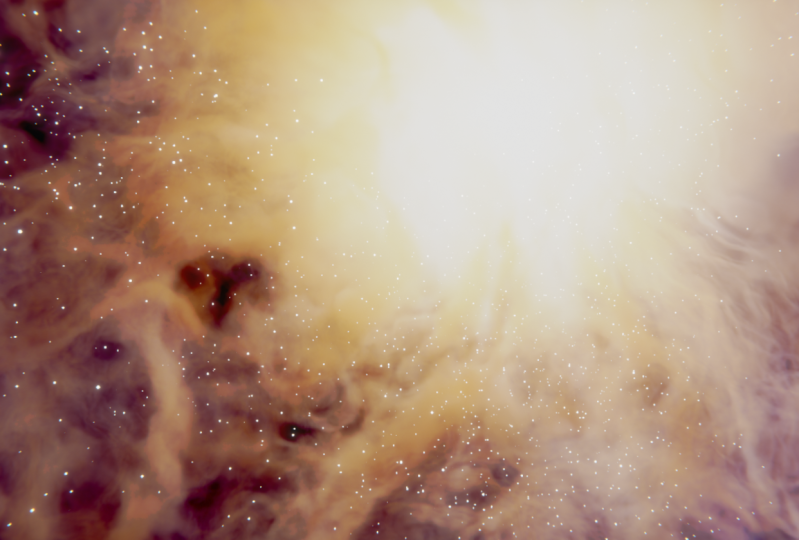
5. Core Density: Hello and welcome back to the fourth video of creating
Nebulas in Blender. Previously, we used some math to lower the density
around the edges. In this one, we want
to do the opposite. By increasing the density, the closer we get to
the core of the nebula. So, let's jump into blender. Hello, welcome. This is where we
stopped last time. In this video, we are going to create the core density,
as I mentioned. What I mean by core density is that if you remember,
in the previous video, we created the spercal fall off, which is responsible for creating the fall
off of the volume, the further we go
from the center. But also, I want
a way to control how dense the core and the
center of our cube is. And this will have
really similar concept to what we did with
the spercal fall off, except that we will
not be inverting it because we want the
center to be denser. So yeah, let's jump
into doing that. This is our no tree, and everything we will be doing will be happening around here. You might wonder why we
don't do it around here. The reason for that is that we already created the
spercal fall off. And if we are going to do operations that makes
the volume denser, basically, we'll have
operations that are clashing. So in one way, you have the
spercal fall off trying to reduce the intensity of the
volume in certain areas, and another operation
that will happen after that is trying to
make the volume denser. Simply, my thought
process is basically, let's make the
whole volume denser from the center by doing
some operations here. And that's what will
be the core density we were created
during this video. And once we create
the core density, then the spherical fall off will be applied on
the whole thing. And this is a neater
and cleaner setup, and also in my mind,
it makes more sense. I'm going to add a
texture coordinate node, shift a texture coordinate. And because we did this before, I'm going to plug the object
into a length function, vector math length,
As you remember, this function will give you
the distance from the center, and always try to think of
how will this look like, how will a texture that does have the distance from the
center will look like. It will be black on the center, and it will gradually
go to white. The further we go
from the center. Let's add a power
node to control the fall off or the
intensity in this case, and let's also add a multiply. Node to actually
change the intensity, and we need to combine
the setup somewhere here, and that will be by
using a color mix. Let's put it here.
Everything vanished. So let's take the result out of this multiply node
and plug it into B. Let's bring the multiply up to one so that is not
doing anything. Let's start reducing the
exponent to something like so. Let's reduce this 0.5. Okay, this is a really
interesting shape. As you can see, now we're
basically making the center and the core of the
nebula weight denser. And I want to change
this from x to multiply, and let's bring the
factor up to one. And maybe let's do this as one, and this will give you
the following result. To see exactly what's happening, you can select this multiply
node hit empty mute it. So this is the before,
and this is the after. This is the before, and this is the after. I don't know if you
can see it clearly, so let me zoom in a little bit. This is the after, and
this is the before. This is the after, and
this is the before. Now, technically, what
this whole setup is doing, as I mentioned, is trying
to make the center denser. Let me get back to it
already being activated. And to try and see the
effect in a better way, let me zoom out a little bit, and I'm going to disable
this multiply node. Mm. So now there is no
spherical fall off. We killed the spherical
fall off because this was the node responsible
to activating it. Let's kill this, so this is the after, and
this is the before. And this is the
after. And when I activate this multiply node, you will have the
following result. To exaggerate this effect and that you see exactly
what's happening, I'm going to go to
this power node, the -0.1, and let's
drop this to minus one. As you can see, now, you
will have this shape, which looks like a sphere. It's like we crunched the whole volume to the
center of the cube. So it forms something
like a sphere, this really interesting shape, which if you focus,
you will see this is an and also this is an and
maybe this is a mouth. But the moral of the story, this whole set up cteria is
responsible to crunching and increasing the density toward
the center because nebulas, that that actually happens
because of gravity. This is kind of
physically accurate, but we don't this effect
to be really strong. That's why I always kept
it to something like -0.1. It is a nice way of how
to actually push and pull everything together in
really smooth and nice ways. So now let's organize
this note tree. I'm going to select
these three nodes, control G two label them, F two for a name. Let's call it core density. I'm going to hit
control space bar to maximize this editor, bring these nodes here, bring this one here. Let's take this here, and let's take this
hercal fall off here. Basically, what I'm
trying to do is to make this note tree easily readable. Okay, so this is our notary, and this is our nebula and
how it is looking right now, but it is still missing
a couple of things. First of all, we need to adjust our camera position
because surprise, we're not going to look at
this nebula from this angle. We are actually going
to put this camera inside the cube to see different
shapes and all of that. So we will be inside the nebula. Number two, nebulas tend to have some sort of you can
call them tentacles, I guess, but it should be having some twirls and it should be
spinning and all of that. So we will try to create
that in the next video. So yeah, I will see you
everyone in the next one.
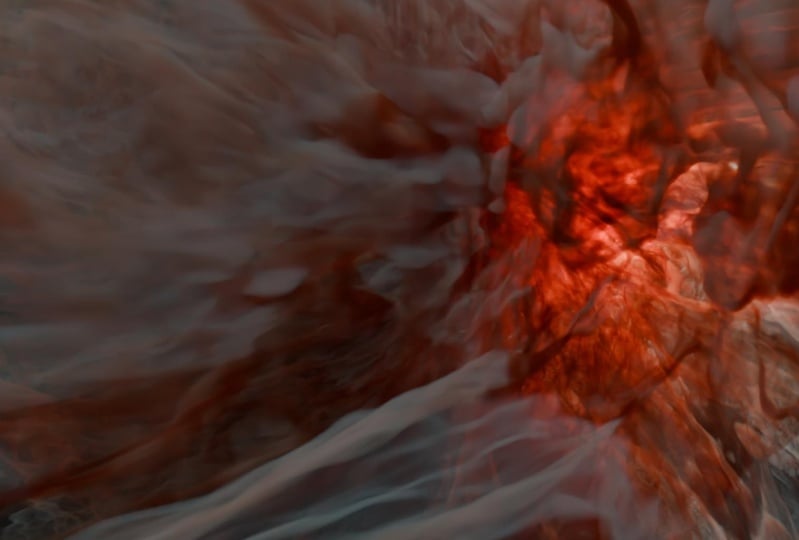
6. Twirls: Hello, and welcome back. In this video, we'll add
the twirls to our nebula, which I also like
to call tentacles. We create them also using
M. But rest assured, this will be fun as usual. Let's jump into Blender. Okay, so, hello, everyone
inside of Blender again. And as I mentioned in this one, we are going to create the
twirls for our nebula. So, yeah let's do that. What we'll be doing will feel like it is a little
bit complicated. Let's try to explain
everything in detail. I'm actually going to
go to file new and general and don't save it because I already
saved that file. Don't follow me in this
because the goal of this is to visualize what we'll
be doing in a better way. Let's hit A and x and
then delete everything. I'm going to go shift A, and let's add a plane, hit seven to jump
to the top view, and let's jump to
the render view, and I'm going to change this to the shader editor and pick
the default material. And now we can start working. Three D operations are
just two D operations, but they are
happened in three D. Sometimes because it is
hard to visualize how certain operations will happen in three D. I like to bring them back to two D so that you will be able to see what will
happen on flat plane. And in your mind, I guess it will be easier for
you to visualize how this will look in three D. I'm going to delete
this principle, B SDF, and I'm going to
add a noise texture. And I'm going to
bring the factor into the surface and to make the whole thing more contrasty
and easier to visualize, I'm going to add a color ramp, and let's make it a little
bit more contrasty. Something like so, and let's
make them snap to the grid. Okay. This is the
most vanilla thing you can basically do in blender. I just plug a noise
texture into color ramp to make it more contrasty and
I slap it on the surface. And also, let's add
a texture coordinate and take the object
and plug it to vector. Okay. So in our case, imagine this is our nebula. It is inside this box. What we want to do is to create some sort of twirls
that goes like this. So how can we do such things? Well, let's start
breaking it down. This motion of the twirls, it looks like it
needs some rotation. Or another way, let's say, the twirls are basically rotating based on their
distance from the center. In other words, if
I go and add a node called rotate vector
or vector rotate, And I start rotating
here from the angle, you will notice that everything that texture will be rotating. So if I can just figure out a way on how to
tell blender, that hey, the areas that are right here will not be
rotating that much, but the areas that are
far from the center, which is around
here will be here, will rotate way more. And if you try to imagine it, the further we go
from the center, the greater the
rotation will be, this will give you these twirls. So how can we do that? Well, happily, there
is this angle socket. So we need to plug
something into this angle socket that will
tell blender that, hey. In the center, don't rotate. The further you go from the
center, do more rotation. And what is a node that will allow me to tell what is the
distance from the center, it is the length node. We already use it multiple
times, look for length. Let's put it here
and notice what will happen when I plug the
length into the angle. Boom. We got the twirls
we're looking for. If I just hit control shift and click on this length node, as you can see, it will tell you the distance
from the center. So in the center, it will be black because the
distance is zero, and the further you
go from the center, the whiter it get because you
will have greater values. And when you plug that
into the angle, basically, there's no rotation
in the black areas, and the further you
go from the center, the greater that
rotation will be. Let me get back to my color ramp to see exactly the final result. And in case you want to control the fall
off of this length, let me get back to
control shift and clicking on it to see
what we will be doing. If I add a math node and I
change it here to power. This will allow you to control, as you can see the fall off of that dark circle or the fall off of the
distance from the center. Let me lower it to something
like Let's say 04. And if I plug this into the angle and control shift
and click on the color ramp, you will get the
following result. This will allow you,
as you can see to control the strength
of the effect or the areas affected
by this transformation. And if you want to make
it more intense now, you can add a multiply node. Now we are multiplying
the whole thing. So let's bring up to
something like two. And yeah. I'm
digging this result. If I select both of
these two nodes, this is the before,
and this is the. This is the before,
and this is the after. Both of these two
operations are just for us to manipulate
how this texture, the length texture looks like. Number two, which will be
slightly harder to explain, which is that think of
these points in the center. As we mentioned, there's not much rotation applied
on the center. But the further we
go from the center, the more rotation is applied. I also want to make
the areas that are in the center sharper and the
areas that are outside, which means the further we go will be slightly
more stretched. I hope that makes sense. So
when we start talking about, I want them to be smaller, I want to have smaller
details in the center, and I want to be stretched
based on the distance. Kind that begs to use something that can do
something like scale. What I'm trying
to say is if I go shift A and look
for a vector math, and I'm going to
change this operation from A to multiply, everything right now
is multiplied by zero. And if I start playing
with these numbers, as you can see, it is changing
the scale of this texture. Of course, this can open an entire tangent about how the different
operations in blender work. But what you need to
know is that when you talk about moving something, you are talking about adding
and subtracting operations. But when you start
talking about scaling, you start talking
about multiplying. That's why when I
plug this multiply and plug it into the vector. As you can see, it is basically changing the scale
of this texture. This multiplying operation is the exact same thing when
you add a mapping node. As you can see, or you will have here a property called scale. This scale is the exact
same one as this. We just simplified it
down because we only want the multiply features or the
scale feature in this case. Now, if I bring this
down to something like one to see the
default result, try to imagine what
will happen if we plug this length
into the vector. Let's think of how
this length look like. It is black on the center
and white on the outside. So when I will plug this, the scale in the areas
that are closer to the center will be almost zero, and the further we
go from the center, the greater the scale will be. Let's take this and plug
it into vector and boom. Now, the scale in the dead
in the center will be zero. And the further we go, the
bigger the scale will be. And that's why you see
this blob right here. And to control the look of this, I'm going to add a power node, so let's go and add a power. Oh, wait. I need to write. Let's put it here, and let's change the operation to power. And if I start
bringing this down, as you can see, you will be able to create this
really nice effect. Let's say something like 0.5. Now, as you can
see, you will get this really interesting result to see the before and after, this is the after, and
this is the before. This is the after, and
this is the before. Basically, it is like we're
stretching the whole thing, which will give you a sense of motion or sense of
motion blur, maybe. I don't know how to explain it. But yeah, this set
up we did in two D, imagine it now it will
happen in three D. Okay? Imagine that we are
going to do all of this stretching and
pulling on our nebula. So let me get back now to
my usual blender file, open recent core density. Save. And let's do that. Let me bring this here. And because we understood how
the whole setup looks like, I'm going to rebuild it now
from scratch really quick. So I'm going to take the object and plug it into a
length operation, and this length operation will
go into a power operation, which will go into a
multiply operation. And that will go into
a vector, rotate, but it should go to the angle, and let's plug this into this and also plug it to the
other noise texture. So both of these will
be connected like this. If I control shift and click, already connected, let's
jump to the rendered view. You will have the
following result, which looks kind of weird
for whatever reason, which means I need to play a little bit with these values. Let me bring the intensity
to something like two. Okay, nothing much is happening. The scale is too small, which means we need to add the other branch
of the snow tree, which will go into a multiply, and let's take the length
and plug it into the vector, shift A, and let's
add a power node. Let's shift de duplicate
this and put it here -0.5, and let's plug this
into the vector. Boom. Now it is working. As you can see, we're creating
these really nice shapes. Basically, we're
making our nebula have these two whirls and these tentacles. If
that makes sense. Also, I guess it will
be interesting if we take the color and
plug it to the vector, This will give you
the following result, which I think it looks
better honestly. Okay. So now let's select this entire setup and hit
Control G to label it, F two to rename it, and let's call it to Wirs. And this is our
nebula right now. I hope this swirl setups make sense right
now in your head. It is just some clever
cheating using math. As I always say, if
you try to create this in two D and then
transform it in three D, that will make it easier for your brain to basically
visualize what's happening. I hope it was fun.
I hope it was easy, and I will see you
in the next video.
7. Camera Animation: Hello, and welcome back.
This video is simple. We will create a nice
camera movement. That's it. Let's
jump into Blender. Hello, and welcome back
everyone inside of Blender. And as I mentioned in this one, we are going to create
the camera animation, which will allow us later
to create the star field. I'm going to jump to
the rendered view. And since we will be
working with animation, I want my viewport to be a
little bit more responsive. That's why I'm going to bring these numbers up to
something like 0.1, which will give me lower
resolution for the volumes, but it will allow me to
work real time more or less on my volume so that I will be able to preview
the animation. You can even drop
it down to one in case your computer also
doesn't handle 0.1. Number two, I'm going
to select this cube, and I'm going to jump to
the object properties, and under viewport display, you will have an option
for display as textured. Right now, we're seeing a cube. What I want is to only see
the wire frame of this cube, which will make it easier
to put the camera inside. That's why I change it
from textured to wire. Nothing will change except
that as I mentioned, the cube right now is
just a wire frame, which makes it easier when we will put the
camera inside it. Now, here's the whole concept
of what we will be doing. We will put this camera
inside this cube, so we will be inside the nebula. To do that, you can a J z double times to move
on the local axis, and I'm going to bring it inside this cube as
you can see right now. For whatever reason, this
view is not updating, and my theory is because I'm not looking to what
the camera is looking, so head zero from the number pad and this is what my camera
is seeing right now. Now, to be honest, one of
the hardest things about nebulas is trying to fight the right angle
and right shapes. That's why something
I like to do is to jump to this lighting
group called the sun, and I'm going to go
shift A under light, you will have an option
for point light. And I'm going to
bring the brightness or the power of this slide
to something like 200. And my thought is this
maybe will make it easier to frame a nice shot. And I would love to move this point light somewhere
right here. So while you're selecting
your point light, hit G, and let's move it somewhere And it seems like the strength
is too much at this point. That's why I'm going to lower
this number to something like 100 or maybe even 50. Maybe I can also push it a
little bit inside this nebula. So let's jump here, hit seven to jump to
the top view and hit J and let's move it
slightly inside the nebula. And you can now increase the intensity to
something like 100. And that will give you
the following result. Which I'm kind of digging. I still think that the intensity is a little bit too strong. That's why I'm going
to lower this number 275 or maybe even 50, honestly. I don't want to
go overboard with this number because we
will also be adding a lot of small stars that will also eliminate
the scene more and more. I'm going to keep
it at 50 right now, and in case we want to
change it in the future, we can always do that. I'm going to jump to my camera. And from here, you
will have two options, clip start and clip end. Which means which areas the
camera will be able to see. The clip start means that the camera will only be
able to see something that is further than 0.1 meters or 10 centimeters
away from the camera. Anything that is closer than 10 centimeters to the camera, the camera will not
be able to see it. That's what we
really care about. And for the end, that means that the camera
will not be able to see anything that is further than 100 meters
from the camera. At this case, usually, we don't mess a lot
with these numbers. But what I found is
that you can play a little bit with the clip
start to actually tell blender which areas of the nebula you want to actually
see in the final render. And you can start increasing
this number slowly. Let's say 0.3, and this will give you
the following result. And as you can see now, certain parts are being hidden. The main reason for that is
that all of these shapes and clouds that were closer than 10 centimeters
are now hidden, which means right now we will only be able to see something that is further than 30
centimeters away from the camera. Let's try 0.5. Okay, I think I'm going
to leave it at 0.5. I'm kind of digging this result, and now we are going to
create the camera animation. What I have in mind for the
camera animation is to make the camera spin in an arc like this while it is
looking on the center, so it will be moving along
this line that I just drew. So how can we do
that? The easiest way will be like the following. I'm going to go shift A, And under empty, you
will have plane axis. And let's move it to
the scene collection. And while you're hitting shift, move the camera
inside the empty, and I'm going to rename
this camera controller. So now, while I'm selecting this camera controller
when I rotate it, I will also be able to rotate the camera
around the center. Technically, I'm
rotating the camera around this empty object. But because this empty
object is in the center, that means that I'm also
rotating the camera around the center of the scene and the center of the cube
at the same time. From here, let's
jump to time line. I'm going to the first key
frame and let's jump to the object properties and we want to animate the
rotation on the z axis. Let's pick something
like -15 or actually, let's say 15 because I wanted to start from
here and then go here. Put a key frame, and let's
jump to the last keyframe and say that I want it to be
-15 and put a key frame. If I just jump to
the solid view, I don't know whether I will
be able to see anything. Okay, let's focus here. This is how M animation
is playing right now. As you can see, the
camera is rotating. But there is a slight issue, which is the bidfal
blender will make the animation interpolated
in a busier way, which means the animation
will start slow and then go faster and
slow down at the end. What we actually want is to keep a linear velocity
along the animation. That's why while you're selecting both of
your two keyframes, hit T and change it to linear. And now you will keep the same velocity along the animation. If you think that this is slow, you can always
increase the values. For example, you can start
from 30 and end at -30, which will give you a
faster camera animation. But as a general advice, always remember
that these nebulas are measured in light years. So it makes sense
for your camera to travel in a really
slow controlled way. Also, since I'm seeing these
weird shapes right here, which I will assume it's
because of the camera clipping. I'm going to jump
back to this camera and jump to the
camera properties, and I'm going to lower the clip start to
something like 0.2, which I think will
look better since these areas right now
doesn't look that weird. And just to verify that
everything is looking good, I'm going to jump to
the render settings, and let's get these
back to 0.01. So this is the result we have, and I still think that these
shapes are really ugly. They are really out of place. That's why I guess
for this shot, I'm going to select the
camera and actually kill all the camera clip start. I'm going to bring it back
to the default value, 0.1. I think this will look better. In the scene I used
for the promo. I remember using a
number of 0.5 here, but I guess in this example, I think it looks
better with 0.1. Anyway, make sure to
save your file as usual, and I will see you
everyone in the next one. Where we will be creating
the star field. So yeah. See you in the next one.
8. Starfield: Hello, and welcome to the longest video of
creating nebulas in Blender. Nebuls have stars. Our Nebula doesn't have stars. So we need to add some stars, and that's exactly what we
will be doing in this video. But we will create the stars in a separate blender project for reasons I will
tell you about later. So in a rambling and
let's jump into blender. Hello, and welcome back
inside of Blender. And as I mentioned
in this video, we are going to create
the star field. Basically, we are
going to attempt to distribute a lot of stars within this volume of our nebula because Nebula tend to
have a lot of stars. Now, there is something
I need to explain. The way of how we are going to create this star field is by distributing a lot of small points and we will
make them emit light. But that will cause
a huge problem. This render is
already complicated. Blender will already need
to do heavy amount of calculations to calculate how
will this nebula look like. If we introduce a lot of small points of light that
will act as the stars, that will make the computation
even more demanding. And that will also cause a really huge problem,
which is noise. And that's something
you need to keep in mind when working
with volumes. The more sources of light, the harder it will be
to keep the render consistent from one
frame to another frame. What will happen if
you try to render this entire scene all at once with a star
field is that you will end up with a really
glitchy and noisy render where it is impossible to have consistency throughout
the animation. That's why the solution I
came up with is to render the star field separately
from our nebula render. And that's exactly
what we will be doing. So, yeah, let's see
how we can do that. I'm going to jump to file
new and pick general. Everything will be in
a fresh blender file. Later on, we'll
combine everything. I'm going to delete this
slide, X and then delete, and I'm also going to
delete this camera, and I want the same exact
camera animation I did before. That's why I'm going
to go to file. Link, and from here, I'm going to choose camera animation collection and scene, because as you remember, in my scene collection,
I have my camera. So hit link, and you will have this collection called scene. You can think of
linked collection as elements that are shared between
different blender files. So right now, if I go and change the camera animation in
my previous blender file, the camera animation
will also update here. And therefore, later on, when I will try to put the stars above the other
render of the nebula, they will match
perfectly because they have the same
exact camera animation. I hit zero to jump
to the camera view, nothing will happen because we didn't pick a
camera for our scene, so jump to the scene settings, and from here you can pick what camera you will use
to render the scene. So from here, make
sure to choose this camera with
the link near it, because that's the camera that is coming from the
other blender file. So pick camera, and if I hit
zero from the number pad, I will be able to
see the render, And if I bring the time line up, you can clearly see the
animation is now playing. And since we're here, let's adjust the length
of our animation to 120 to match exactly
the other animation. Let me add another
editor and hide the toolbar hitting T. Let's
hide all of these overlays, and let's jump to
the rendered view. And from here let's
get back to our normal Also, for the render, I'm going to use V by the way, make sure you're also using
V. You can use cycles. At the end of the
day, this render will not be that complicated, so you can easily
render it using V or you can render it
using cycle as you want. In my case, I'm going to use EV just because it is faster. Let's select this cube, and I'm going to jump to the
geometry node editor because The way of how we
are going to create these stars is by using
some geometry nodes. What we want to do is
to distribute a lot of small points
inside this cube. And these small points, we
will make them emit light, and that will technically look
like they are just stars, because at the end of the day, stars look like just small
points, emitting light. While I'm selecting my cube, I'm going to click on new to Add new geometry node modifier, and I'm going to rename this two star field.
You can either work. With this regular cube, or you can x to
delete and go shift A and look for volume cube, this one right here, and
connect this to the geometry, which will give you
the exact same cube, except this time it
is a volume cube. Once you have this volume cube, you can control the density of that volume from here.
Let's keep it at one. Later, we will plug a
noise texture here. But let's focus a little
bit on this volume cube. I want to distribute a lot of
points inside of this cube, and those points will
be emitting light. And what is the node
that will allow you to distribute points
inside the volume? Surprisingly, it is called distribute points in
volume. Let's put it here. And as you can see, now, we have a couple of points
doing some things here. The distribute points in volume node will
distribute virtual points, Hose are not physical. This is just a preview for us to be
able to see what's happening, and later, we can use those points to tell
Blender that, Hey, Blender, I want you to put
this object on these points. And the node that
will allow you to do such a thing is called, distribute or actually
instance on points. Let's take it and put it here. And what we will plug in the instance will be
put on the points. Now, what is an object
that looks like a star. Well, you can either use
a sphere or you can use an icosphere because
I think it looks more like a star more than
an actual perfect sphere. Shift A, icosphere and plug
this into the instance. As you can see from here, now we're having
something going on. We distribute the
icospheres on the points that this distribute points
in volume is generating. Of course, now they
are really huge, let's bring the radius down
to something like 0.01, and they are barely visible. The main reason for that being is that they're
not emitting light. So to see everything clearly, let's switch gears and
switch to shading. I'm going to add another
editor from here, and let's change this
to shader editor and hit to hide the side bar,
so we have more space. And now we are going to create the materials for the stars. Select the principle BSDF and deleted because
we don't need it. Shift A, and let's add
an emission shader. This is the simplest shader and blender and take it and
plug it into surface. But nothing will happen
because blender doesn't not to use this material
on these points. So we need to tell it through these geometry nodes that hey, Blender we want you to
actually use this material, and you can do that by adding another node called
set material. Shift A, look for set material. Let's put it here after the instance on points
and select the material. And now, Something is going. Now Blender is
using this shader, which we will also call stars. Now it is referenced in
my geometry node tree, which means Blender
will be able to use this material to
colorize our stars. I'm going to hit also
to hide the side bar, and let's bring the emission
to something like 20. Instead of having
this gray background, I'm going to jump
to the environment and kill the strength
down to zero, and in my render settings, I'm going to enable the blue, so all of these stars
will be glowing. I think this is a better way to visualize what's happening. Let's now focus on increasing
the density of these stars. Surprisingly, there is a slider
for that called density. I'm going to pick 100. This is already too much, but I'm going to leave
it the way it is. We can always change that later. You can clearly see
some clipping happening here and here because these
are the edges of my cube. I want to make this
cube slightly larger, which you can do by changing
the minimum and maximum. You can drop this two minus
two and make this two. Now the cube is bigger, which means more stars, and also by doing that, I can avoid seeing the
edges of the cube. Number two, all of these points right now
have the same exact scale, and I would love to find a way on how to tell blender
that hey, blender, I want you to make
certain points slightly bigger and other points slightly smaller,
because right now, all of these icospheres
have the same exact size, and even the small ones, they're not actually smaller, they're just further
from the camera. That's why they appear
like they are smaller. And the really nice
thing is that you can change the scale of
these points using this. So if I plug a node
called random, value. Let's take it and plug
it into the scale. What this ID will do, it will set a scale
for each point 0-1. So this is the minimum scale
at this case, which is zero, which technically means that those shares will be invisible. That's why I'm going to lower
it to something like 01. And for the maximum, which
is the maximum scale, I'm going to lower this
to something like 02, maybe, or let's say 0.5. You can hit control space
bar to maximize the editor. I still think this is too small. Let's try 0.1,
control space bar. This will give you
the following result. Which is not bad. I still think I need a
little bit of scale. So let's increase this to
0.02 and this to 15 Yeah, I still need to make this 6.05. This one looks really big, so I think let's drop this
2.1. Actually, you know what? I'm going to lower the radius in the icosphere to
something like 0.01. I'm going to play a little
bit of these values. Let's set the minimum to
one and set this to two. No 1.1. This is slightly better. Let me bring this back to 0.1. Sorry, everyone,
and let's make this 0.1 and reduce the scale. Okay, sorry, because
I jumped that part, because I was trying to
find the right values. And after some trial and error, I stumbled upon these values. I left the radius at 0.1, and for the random value, I picked for the minimum 0.0 16 and for the maximum 0.0 17. And that will give
you this look, which I think it looks decent. I still think there
are more small points than larger points, but I think this is
already good enough. What I want to do
next is to drive the density of these
points by a noise texture. What do I mean by that? Well, the distribution of all of these points right now
is kind of uniform. There are stars in every
single part of the frame. We don't want that, because
if you think about it, nebulas are huge
clouds of gases, which means they should obscure certain parts of the frame, which also implies
that the stars will not be visible in every
single part of the frame, because at certain parts, the gases of the nebula
will hide those stars. We need to figure out a way to tell blender that hey, blender. Yes, we want you to
distribute these stars, but also certain
areas shouldn't have stars because those areas will
be covered by the nebula. And that's really simple
because if you remember, we have this volume cube, and it does have
a density socket. And if we plug a
noise texture here, theoretically, this will
give us the result we want. So go shift A, noise texture. Let's plug the factor
into the density. And in the same exact way, if you want to preview
a certain node in the geometry nodes, especially textures,
you can do control shift and click on a node
to be able to preview it. And the viewer in the
geometry nodes works in a different way because you need to specify what
you want to see, the value, in this case, this is the noise texture. On what geometry, you want
to see that happening. And in this case, this will be the volume cube, Now, if I play, for example, a little
bit with a scale, you will be able
to see the result of what's happening here. The preview now is not
that clear because this noise ature need a
little bit of contrast. Let's go shift A and
add a color ramp. Let's put it here. Let's make the whole
thing way more contrasty. Let's reduce the scale
down. Let's say 0.5. You can maybe also
increase the details, but that's not doing that much. So let's try plugging this
now into the density. And this will give you
the following result. And to explain what the
setup is doing again, we're using this noise texture, we're making it more contrasty, and we're using
this entire setup to drive the density
of this volume cube. In other words, we're telling
lender that, hey, yes, we're using this volume cube, but we want it to be
denser in certain areas. Technically, if I jump
right now back or actually, if I delete this viewer node, as you can see, we have this
distribution of the stars. Now there are certain
areas that are black, no stars and other areas where you will have
a lot of stars. And what's driving this mask is this noise
texture right here. I think I'm going to open
the contrast a little bit. Let's say 0.58, and let's
make the green flag, the black flag, 0.54. This is not bad at all. In case you don't like this shape, you can always go back
to the noise texture, change this from
three D to four D, and this will introduce this
width or actually W socket, which I don't know
what W stands for, which will act like a seed. Now I can change the distribution
until I find something that I dig. Three. Let's try one. Okay,
I'm liking this log, but I think I need to increase
the density a little bit. So let me go back to the density of the distribute
points in volume. Let's increase it to 500, which will give you
the following result. And I still think these
points are so big. I'm going to make
the maximum scale here, smaller two point. Let's try the same scale
016. Still too big. Let's try 0.01. Let's try 0.005. Okay. This point is still really big. 0.001. Okay, let's also reduce this to 0.00
or let's say 0.01. Let's leave it at this for now, even though we flipped both
the minimum and the maximum, but that's technically wrong, but it's not a big deal because
the maximum right now is acting like a minimum and the minimum is acting
like a maximum. And I'm going to double the density to
something like 1,000. Okay. Let's try changing the seed to zero or 0.5. Okay, this is looking good. This is the geometry node setup we used to create
the star fields. And the last thing now I'm going to do is to finalize my shader. Same as introducing
random scale variations to the stars to the
scale of the stars. We also want to introduce the randomness to the brightness
of the different stars, which means certain
stars will be brighter than others because
that's how nature works. We are going to use
this strength socket. We are going to drive it
using a noise texture. Let's collect this to this. We only have the shader editor, Shift A and texture, noise. Let's plug this
into the strength. I want to use the object
coordinate system, texture coordinate. Plug the object to the vector. Now the stars are really dim. I need to increase
the intensity, so let's shift a math node and change the operation
from add to multiply, and let's multiply it
by something like 20, control space bar to maximize. Now you can already see
the effect happening. Certain stars are
brighter than others. If you want the effect
to be more visible, you can add a color ramp. Let's bring the black flag. Somewhere around 0.4. And maybe introduce
another flag, and let's make it
way way darker. Let's say 0.01, and let's
put it at the 0.6 mark. And this will give you
the following result, which I'm actually
kind of digging. Now you might say bate, see, these points
are really dim. You can always
increase the strength by using this multiply node, let's say multiply it by 50, which will make them
slightly brighter. But instead of doing that, I'm actually going to
do that later in post. Since this image is just some white points
on a black background, it will be really easy later in compositing to make
these points brighter, add some glare and all of that. What we will do later is
to comp the render out of the suplender file
on top of the nebula, and that will look really good. The last thing we are
going to do now is to set up our compositing
node tree for rendering. So jump to compositing,
use nodes. Since we will be using V, we don't need any complicated
de noising and all of that. So just go shift A and
look for file output, plug the image into the image. Write two slashes to
tell Blender that he. Jump to where this
blender file is living. Create a folder
called star field, and in this file output, node properties, change
the format to open XR RGB, float health, for the zip
lossles change it to DWB loss, and for the file subpath, let's call the star field
underscore and Enter. So you will have Starfield
001002 until 120. And, yeah, that's basically it. You can either render
the image sequence right now or you can
wait until we finish everything and render
everything all at once in case we end up changing
the camera animation. My advice will be save this blender file right
now, put it somewhere safe. And once you finish
rendering your nebula, you can render the star field. The star field shouldn't
take that much time. Probably you can render it
within minutes because it is really simple and we'll be using because it is really fast. So save your file, and I will
see you in the next one.
9. Rendering: This video is straightforward. We will prepare
Blender for rendering. This can either be good news because you can finally
go touch some grass or bad news 'cause
you'll probably need to wait hours or honestly, maybe even days
for it to finish. So without any further ado, let's jump into Blender. Hello, and we'll
come back inside of Blender to the rendering video. Rendering is always my
least favorite part because it tends to take
a lot of time to finish, especially when you really
want to start compositing. But, yeah, the goal of
this video is to give you some advices when it comes
to rendering volumes. The main thing I want
to focus on is under the render settings
under volumes. I already mentioned this before. This number is the main
factor that will decide how good your render is and how
fast your render will be. 0.01 will give you a really good quality at the
cost of longer render times. And since I don't know the
specs of your computer, here are a couple of
things you might consider. Number one, ask yourself, do you really need
the animation. If you don't need the animation, then that's really good news because you will only
need to render one frame, which means you can
go a little bit overboard with your
step right render, which will give you a way better visual clarity for
one frame that you can drop in
your portfolio or post it on the
Internet or whatever. So my general advice
will be if it is just you practicing blender
and all of that, Yeah, feel free to drop this number
to something like one or 01 to have faster renders
and see the final result. But if you really want a
really nice looking result, especially if you
will drop it in your portfolio or
something like that, then I would highly
recommend like, hey, just render one frame and do the compositing
on that one frame, and that one frame
will look really good. Because in my opinion, even one frame that will
take 2 hours maybe to render is way better than an entire animation.
That is low quality. Rendering the entire animation will probably take
you depending on how good your computer is from a couple of hours to
a couple of days. In my case, it took me a
couple of days to render the entire animation because
my computer is not the ABF. Let's jump to compositing. So we have our render layers. It will get de noised and then it will go to
the file output. And actually, I'm
going to create another sub folder for
this and call it nebula. So I will have inside the
folder that is called render. I will have a folder
called nebula where blender will drop
all the nebula renders. Hit control as to save
your blender file, and then you can go to render. And render animation, and you can start rendering
the animation. Or in case you want to
render only one image, you can always go to
layout and maybe pick an angle that you kind like
because our camera is moving. And once you find a
frame that you like, you can go to render
and render image, as I mentioned, in case you
want to render one image. And always remember, even
when you render one image, this compositing will happen, so you will find that image inside the folder we created
here. That's number one. And also, number two, if you are going to render as an animation. You can always, for
example, each day render ten frames overnight, and each day you can start
changing the scene output. So let's say you are going to render ten frames for today. So you can set the frame start to something like one for today, and it will end at ten, so
it will render ten frames. And tomorrow, you
set the frame start to 11 and the end at 20. And by doing that,
you can render the animation on multiple days, and that can be helpful
in case you don't want to overload your computer or in case you need it
throughout the day. Also, since we will need the rendered file
in the compositing, you will also have access to my render so you can use
them later for compositing. Now, hypothetically, let's say you finished rendering
your animation. I wish it was this fast. Now also, you need to
render the star field. I'm going to go to file, open recent,
Starfield, don't save. From here, I already prepared the animation
as you remember. Just go also to rendering and render and render animation, and you should find it under the folder called Star field. Now since I'm looking at
this, let's say render. Slash star field.
Blender will also create a folder inside the render folder
called star field. Technically, if you
imagine the render folder, you will have a
folder for the Nebula and another folder
for the star field. Once you set up your notary, as I said, you can go to
render and render animation. Once your render is finished, you will find this
folder called render. Inside render, you
will have Nebula, where Blender will drop
the Nebula images, and Starfield where Blender will drop the star field images, and these are the images we
will use for compositing. The sit for me for this video, and I will see you
in the next one, where we will be doing
the compositing work. Mm.
10. Compositing: Okay, let's do this
one last time. Hello, and welcome back to the final video of creating
Nebula's in Blender. In this video, we will co all the different
elements together and do some post
processing stuff to make the whole
thing looks better. This will be simple, so
let's jump into blender. Hello, and welcome back when
last time inside of blender. And as I mentioned
in this video, we are going to
composite our shot. I'm going to start a fresh
blender scene because I don't want to do the compositing work in the previous blender file. I always saw the three D part and the compositing part
as separate things. That's why I like to start a fresh blender scene
and do everything here so that it will be separate and everything
would work faster this way. And at the end of the day, we don't need the
three D data from the three D scene because we will be dealing
with images right now. So start a fresh blender
file, Let's pick general. And right away, I'm going
to jump to compositing. Let's check this magnet to make the nodes
stick to the grid, and let's check use nodes. I'm going to delete this
render layer by hitting x, and let's import our images. Shift A, and let's look for image sequence because we will
import an image sequence. You will have a
folder called render. Let's start by
importing the nebula. So enter the folder, hit a to select everything and
import image sequence. Shift D to duplicate this
node, click on the folder. And right now, let's import the star field A to select
everything, and open image. Now we need to put these
stars on top of the nebula. And the node that will
allow us to do such thing, it is called mix shift A, and let's look for mix color. Take the first image sequence of the nebula and plug it to
the first socket and take the nebula images and take the star field images and plug
them to the second socket. Let's move this composite node
here and also plug this to the composite node
and control shift and click on the mix to be
able to see the result. And to have more
screen real estate to actually focus on compositing. I'm going to hit control
space bar to maximize this editor and also hit
to hide this side bar. And while you're selecting
your viewer node, you can hit V to make the image smaller or V to make it bigger. I'm going to make
it smaller v. Also, if I move this node down and make sure I'm
selecting the viewer, you can move the image a
little bit up, and this way, you can do your compositing work here while you're seeing
the preview here. It is one of the weird things of how Blender do
things, I guess. Right now, we're only
seeing the stars. The main reason for that is that the stars doesn't
have an Alpha channel, because, as you remember, we render these stars
with a black background. So how can we get rid of
this black background? Well, because we
have this mix node, we can change the
operation from mix to add, and this will leave the stars and get rid of the
black background. Just by doing this, our
render already looks good. I'm going to do a little
bit of color grading first. So after this add node, let's go shift A and look
for curves RGB curves, and let's put it here. Control shift and click on RGB curves to be able to
see the results after it. And my goal is to create a nice, creative film look by trying to imulate the
contrast curve of a film. Which usually look
like an S curve, so I might bring
this slightly up. Around here. Move this
point down and maybe bring this a little bit up and move also this slightly down. Now, of course,
this effect is too strong because these points
are really sensitive. Even though I didn't move these
points by a large margin. It's still the change
is really drastic. That's why I always like to drop this factor to a number like 01. And by doing this, I'm lowering the sensitivity
of these points. I'm lowering the strength
of the gB curves. And by doing this, I can move the points of the gB
curves in a better, more flexible way because I lower the sensitivity
of the curve. So let's select the gB
curves, it to mute it. So this is the after,
and this is the before. This is the after, and
this is the before. And, to use the terms
of colrisight now, we made the dark areas
or the black level slightly milkier because we brought the black
levels slightly up. I can also play a little
bit with the red channel, so I'm going to remove
it from the shadows, and that will introduce some can into the
shadows of my image. Let's say something like this, and I can introduce
some red right now into the highlights of the
image. Something like so. I can also lower the green
from the shadow areas, which will give
you a result like the following and also reduce
it from the highlight. And for the blue, I'm only going to lower it
from the highlight, which will give you
the following result. If I select this node, so this is the before,
and this is the after. This is the before,
and this is the after, And I'm digging this result. Now, let's try to make
all of these stars glow. So go shift A and look for
a glare. Let's put it here. If you like the streaks, look, you can leave it at this, or you can change
it from streaks to fo glow, which I like more. Let's lower the threshold
to something like 0.1, and this will add some glow
to all of these stars. If I select this, hit
M, this is the before, and this is the after, this is the before,
and this is the after. A. This looks good. I can probably even bring
the size up to nine, and I'm going to
leave it at this. Let's also add some
lens distortion. Shift A, look for
lens distortion. The first option here is responsible for controlling
the lens distortion. I'm going to put it at -0.1, and the dispersion will control
the chromatic aberration. I always like to set
this number really low. That's why I'm
going to pick 0.01. Let's now organize our node tree by bringing the
composite node here. Connect this to this. So this is our
compositing notary. If I select these three nodes, this is the result without any
effects, and this is with. And I think we improve
this shot drastically. Also, I need to mention
that blender is not mainly built
for compositing. That's why if I were to do this professionally or this was
some work for a client, I would probably opt to
choose something like fusion. First of all, because it's free, you can download it
from Black Magic, and it does have way more tools to do the compositing work. But for the stuff we use for this course, blender is enough. And right now, we can
jump to rendering. I'm going to hit
Control Space bar again to get back
to the normal view, and we need to adjust some
render settings from here. Mostly the end frame, make sure to set it to 120 because that's the length
of the original animation. For the output, let's
do the usual thing. Three slashes inside the
folder called render slash. For the file format, you can either render as open X R and then
convert it to a video, but we already rendered the
scene as an image sequence. That's why I'm going to
choose FF MPEG right away, which will give me an MP four
that is ready for sharing. For the encoding, you
could choose metro Saca, which I think is the
MPV file extension. I'm going to choose MPEG four, which is the usual MP four. H264, for the medium quality, you can choose lossless. At the end of the day, our
animation is just 5 seconds. So it shouldn't be a big deal. And yeah, that's basically it. Make sure to go
to File, Save as. Let me call this, for
example, compositing. Save as. And once you
have your file saved, you can go to render
and render animation. This should go really fast. Okay, the render is finished, and if I jump to the folder,
and as you remember, because we did use
the three slashes, that means that
the rendered file will be in the blender projects. From here, you will have
a folder called render. And here's our nebula. And that's it for how to
create Nebula's in blender. I hope this course was fun. I hope you learned a lot. And if you like this
course, please, please leave us a review, and while you're here, you can check the rest of our courses. So thank you for tuning in, and I'll see you
in future courses.
 Yassine Larayedh, VFX Artist