Transcripts
1. Introduction to Blender Building Masterclass from Concept to Final Render: Ever dreamt of creating incredible three D
buildings and environments, truly mastering Blenders power. Welcome, I'm Neil
from The D Tudor, and this is the Blender
building master class. From concept to final render, get ready to transform your
architectural visions into jaw dropping portfolio
ready three D masterpieces, entirely within Blender. No more struggling
with complex scenes, no more feeling overwhelmed, just pure creative power
at your fingertips. I've taught over 250,000
students to conquer blender, and I've distilled years of professional experience
into a proven workflow. We'll cut through the
noise and get you build in intricate detail
structures faster than you thought possible. In this master class,
you'll dive deep into a complete modular
building system, creating powerful,
reusable three D assets that unlock
endless possibilities. We'll guide you through
every critical step from professional concept referencing to developing complex geometry, using blenders powerful
modifiers and tools. You'll master
intricate texturing, create dynamic lighting setups, and apply crucial final
compositing techniques to make your renders truly pop. This isn't just about
learning tools. It's about building efficient, professional pipelines
exclusively in blender. You're an aspiring three
D artist, game developer, or simply passionate about creating or inspiring
environments, this course is your next step. Stop chasing perfection and
start building with purpose. It's time to elevate
your blender skills and confidently bring your grandest architectural
designs to life. Join the Blender Building
master class today, and let's create something
amazing together.
2. Blender Version Guide and Resource Pack Overview: Welcome, everyone to Blender
Building master class from concept to final render. I'm Neil from three D Tudor,
and as you can see here, we are using Blender 4.4 0.3, which is pretty important. So when creating or
following a blender course, it's not always best to use the absolute nose
version of Blender. In fact, using the second or
third most recent version often provides the most stable
and accessible experience. That's because brand new
blender releases can sometimes introduce
breaking changes, experimental features, or updates that
haven't yet been fully adopted by the wider
blender ecosystem, particularly when it
comes to add ons, and we will be using
within this course, a lot of asset libraries. We'll be using a
lot of resources. We'll be using a lot of
jumndes and things like that. So it's very important
that you perhaps don't get the brand
new blender version. For example, the jump
from lender 2.7 to 2.8 brought a
complete UI overhaul, real time rendering with EV, and a major rework
of the layer system. And then moving
into the blender, three series involved, quickly
introducing jumgy nodes, refining the asset browser, improving lighting
and workflows, and shifting how materials
and modifiers are handled. Even between versions
like three and 3.2, these systems saw
meaningful changes. With each update, there's
a balance between exciting new tools and the
need for compatibility, especially for add
ons, which often lag a few months behind
the latest build. So even though this course was recorded using Blender 4.4 0.3, any version from Blender 3.6
onwards will work just fine. You'll be able to follow
along, build assets, apply everything without
issues while also benefiting from the improved stability
and add on support. Now there will be one issue, and that will be the
compositor we will be using. That does require
the latest version. So I recommend if you
want to build it out in 3.6, download 4.4 0.3, bring everything into that
blendfle or open it up in that blendfle and then you should be fine using
the compositor, or use something like
blender 4.4 0.1, 4.4 0.2 or something like that. Finally, then, wherever you
got this actual course from, there will be a resource pack. Generally, it's actually in the file downloads or
underneath the description, or in the first lesson, there will be a link to a resource pack where you
can actually download that. Very important that you download that as we're now going to go through that just to make sure that you're ready to begin. This course is going to
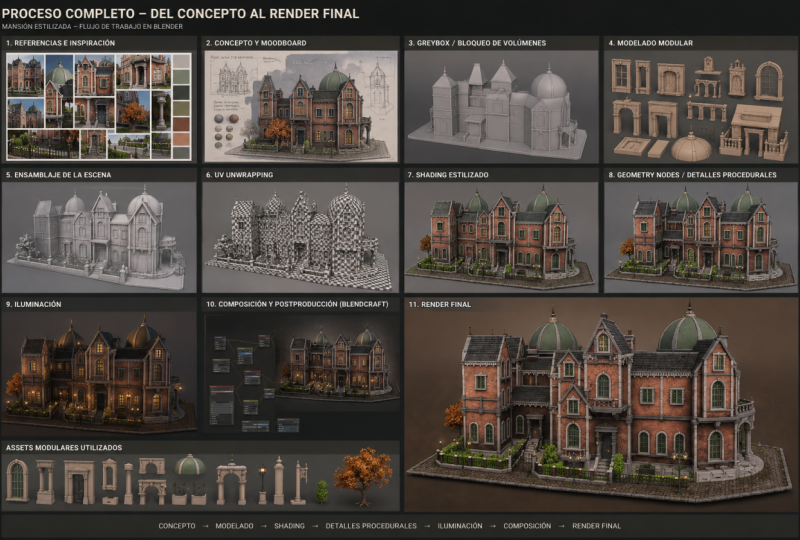
take you through everything that includes how to get
all of the references, how to build a gray box, how to do all of
the basic lighting, how to create the
little modular pieces, how to bring them all together, how to use geometry
nodes, textures, shaders, and everything right up to the point where you're
actually rendering it out, and then you're going
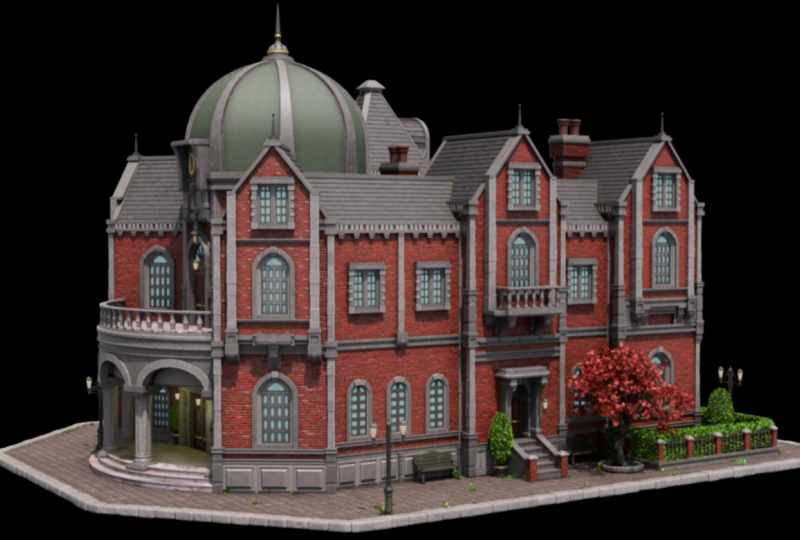
to be compositing it. So all the way through, you'll be learning
from concept to final render how to build
a stylized building. And from there,
then, you'll be able to go away, and in the future, you'll be able to set
up your own buildings with this exact workflow. So first of all, this is
the actual resource pack, so just make sure that
you've got this available. We've got our composite in here. We are going to go a little
bit more in depth into this resource pack once we actually get a little bit
further in the course. But for now, just make sure
you've got everything. So you will end up with our
own blender compositor, and this really helps
those final renders. I will go through that
later on in the course. You will have your
grey box scale. So a lot of the time
when we're building things, especially gray boxes, people really find
it difficult to actually look at how big
they should be building, you know, the first
floor, the second floor, the roof, and things like this. So I've actually put in here, if I quickly go into here, a gray box scale when
you open this up, you will see if I
bring this over, you can actually see there's
an extra scale there on these parts telling you how long or short
they actually are. Now, I haven't put
scales all the way around because you simply have to sometimes make
it up how you want it. So you know how
long this might be on my own might be
not the same for you. You might actually
want this longer. And also, it's important
that you don't have to stick to this scale
if you don't want to. Next of all, then
we've got our HDRI. So I have put in
here one HDRI which you can use in your own works. It's downloaded from Poly haven, so you're
free to use that. Next of all, we've got in
here our PUR Ev references. So as I said, we're
going to be going through basically how we set up our PUREv and we'll go a bit more into PRV
on the next lesson. But on the next lesson,
I'm going to show you where to download it
from and things like that. It is a free actual
piece of software, and it's one of the
handiest things for actually
gathering references. I'm actually going to share with you my own PUREv document, so you'll see
exactly how I do it. And then we've got
our references. Now, the references
are going to be very, very handy for all of you. This is where we're
going to look at the actual parts
that I've built. Now, generally, of course, you're not going to have
your own references because you won't
have built them yet, but I'm going to put
these references here, which makes it easier for
you guys to follow along. You know, you've got in here pillars and things like that, so you have a good idea of
what we're actually going to be building before we
actually build it, and that then is going
to make this really, really smooth from beginning to kind of some pro actual modeling skills and
all the way through. Alright, if we go back then, we can see one last thing,
which is our resource pack. This is the most important
one within here, which I'm going to show
you later in the course, you're going to see all
of the geom genodes. You're gonna have all the
materials and shaders in there. Now, of course, you're
not going to have the actual pots in there because we need to
build those parts. That's the idea of this course. And so you'll be able to have access to all of those things. I'm going to show you how
to use the asset manager, I'm going to show
you how to bring those things in.
Alright, everyone. So now what I'm going to
do is I'm going to play a short guide on how to use how to set up references
and how to actually get PUF. Alright, everyone,
so I'll speak to you on the next
one. Thanks a lot. Bye bye. Welcome, everyone to our in depth
referencing guide, and it's very important that we actually use
references in pretty much any kind of modeling or environments that we're
actually going to be work on. So before we actually
do anything, before we put any cubes
down or anything like that, it's really important
that we have some really, really decent references
to actually work with. So the first thing I want to recommend is that you can use something to actually
put all your references on like Photoshop or even word. But what I'm going to recommend is that you use something called Puref if you go to the site,
that's called purerev.com, you will actually open
this, and from there, you can actually
click Get Pure Rv, and that then will take you
to this download screen. And you will see at the moment, you've got 157 or custom amount, you can actually put this on zero and actually
get this for free. So it's completely free, and you can come back and
make a donation if you like. And then all you need to
do is click Download. So the only things
we're going to talk about pretty much for
reference in here, are going to be free except
our mid journey part. But there are other alternatives
like Dally and a load of others out there that you can use instead of mid journey. Once you open up pura, then, this is what you will be
greeted by this screen. And if you want to right click, you can actually drag
this around to any of your screens or you can actually
make it smaller like so. And it's a really, really
good program this really, really handy, highly
recommend getting this. So now, let's actually think about getting our references. And there are a few
sources that we use to actually grab
references from. But generally, what you
want to do is you want to build up a kind
of reference pack if you're going to be
a hobbyist or a professional in
three D modeling or environments where you're
going to see things perhaps on Pinterest or
sketch and actually, you want to save them in a file. So I know people with
thousands and thousands of images that they've
saved over the years. And whenever they're
coming to a project, they'll then dive in
and actually find all of the images that they've
that particular thing, this could be a Samurai
warrior or a Chinese bell. Also, a lot of people
I know as well, who are working
professionally at this will go around museums. They will take their
own actual images, and then they'll also upload
those to the file as well. So the first point of call
if you're not actually got your own database yet is probably going to
be actually Google. So let's open up Google, and you can see here
that at the moment, I'm looking for a
Victorian delivery truck. Now I'm going to do is I'm
just going to go through these and get some nice
references like this one, for instance, and then
I'm simply going to right click and I'm
going to copy image. Then what I'm going
to do is I'm going to go over to PUR RV. I'm just going to open it
back up, press Control V, and you'll see now that I've
got my nice image in here. What we're also able
to do with PUR RVs, we're able to also pull it out and make it bigger if needed, which is really, really
handy when we're putting in lots and
lots of actual images. Now, the next thing
I recommend you do once you've actually
got an image in there, here's what you can
do is you can left click and drag it
over somewhere. And then what you can
do is you can press Control N and you can
actually make a note. So let's call this Victorian
Trucks. Let's put it Trucks. Now, within my scene,
I might actually want a Victorian lamppost as well as part of the scene
or something like that. So let's actually
look at the next one. So the next point of call is actually going
to be Pinterest, and let's actually put in Victorian lamppost.
So let's try that. Like, so let's see what we get, and we can see we've got many, many styles,
especially this one. This one's actually really nice. This one's also really nice. So what I'm going to do is I'm going to actually take this one, I'm going to right
click Copy Image, go back to my PUEv and then
drop the images in there, like so, and maybe make this
one a little bit bigger. What I tend to do is I gather a load of images for
each of these things. When we're actually building a scene or even just a model, you want to grab as many
images as possible. I'm talking hundreds
of images here. And especially if
you're doing a scene, you want all of
the little parts. You want everything
down to the lighting, the environment, the trees. You want to grab references for absolutely everything because it will make your
scenes just really, really look so much better if you've got some
really good references. So now let me show
you this is one that I'm actually working
on at the moment, so if I come over
and load Reason, and I'm just going to
load this one here, and you'll see at the moment,
I have all of my props. I have all of my main
buildings that I'm going to be looking out
to use as references. I have a ton of doors. I even have a load of foliage. I have all my windows. I have my lights over here, and I also have, more
importantly, all of the lighting. In other words, it's a scene. So what time of day
is it going to be? Is it going to be, you know, early in the morning, or
is it going to be at dusk? Is it going to be a night scene, or is it going to be midday with that sun beating
down on my scene? Just make sure that it
actually matches the scene. There's no point having
a scene like this, for instance, so this one here. If you've got a log
cabin out in the snow, you really want it to
match your actual scene. Now before moving on,
there are a couple of other places that we do go
to use for referencing, especially something like
sketch up, which is really, really great because you can actually come into
an actual scene. And then what you
can do is you can actually rotate
around it and really, really check out how a model is put together like
something like this, which is one of our actual own. But you can see here how
easy it is then to get a good idea of what actually
incorporated in this scene. And what you can actually
do from there, then, is we can actually come down
and we can actually get some screenshots of this or even right click and copy image. Also, let's say,
if we wanted to do a Victorian truck, for instance, to keep the same theme as
what we've been doing, you can see that
there's no end of actual Victorian or vintage
type vehicles on here. Not as many as what
there is on ArtStation, but still a very, very good place to start looking
for reference in. That leads me on to my next one, which of course is ArtStation. This simply is one of the
biggest resources for referencing or for looking
up artists in the world. So let's put in a
reference of Victorian, for instance, and let's
see what we actually get. Let's search artwork,
so we're going to search artwork and let's see what it
actually comes up with. Should be lots and lots of
things to work with here, especially good, if you're
looking for actual lighting. So you're looking for lighting effects
like this one here. And again, we can take these actual um use them
for references. And the best thing is about
ArtStation is we can also come down and look at things
that may be our concept art, so two D or actual
three D. And we can also come down as well and look at what subject
matter it is. So it could be automotives, so Victorian automotives, or it could be architecture
or something like that. So the possibilities with art station are
pretty much endless, and you're able to grab
tons and tons of really, really high quality references. There are, of course,
hundreds and hundreds of other places you could probably
go to grab references, but I'm showing
you these because as far as references go, these are some of the
best places to go. Let's move on then to one of the things that we
really use a lot of now, which you wouldn't have
thought actually would come into it as far as
referencing goes, but it actually is
really, really handy. So let me introduce
to you now Chat GPT. So here is Chat GPT. You can see that we
have Chat GPT four, but we also have 3.5. 3.5 is actually free, and it is actually good enough
to do whatever you want. You really don't need to pay
for this. It's also free. So what I'm going to do
is I'm going to go to message, and I'm
going to type in, give me ten different buildings for a Victorian town scene. Something like that. Let's click Enter and let's see
what it gives me. So you can see now it's given me a lot of things to
actually work with here. And the best thing about
this is you can also say, give me ten more. And it will just then go
ahead and give you ten more. Now, these things
are really handy to use because then I can simply take these ideas and it'll
also bounce other ideas to me, and I can then go
into Pinterest. Or Google search and actually look them up or try and find
something like this. And I can kind of get
ideas and design my scene around there using all of those things and
especially Pure Rv. We can also take them in
to our actual Mid journey. Now, again, our mid
journey is paid for. I think the lowest amount is
$20 or something like that, but there are many, many
free things out there, but I will still show you
what we actually do with our AI based image generator. So you can see at
the moment, this is the image that we've
actually generated. I know we've called it is
Victorian era delivery van, and this is what
we actually get. If we go to my images, you will see that
we've generated a ton of images about
all of the things. Especially, we use this as
well to generate textures. It's not just there to actually generate images and ideas
and things like that. You can actually use it to
generate transfers that are going to go on Windows or
adverts or actual textures. And we do use this, especially
for things like curtains, because it's really,
really easy to get that look that you're
actually looking for. You can see here,
we've got a lot of ideas for living rooms, we've got a lot of ideas for bedrooms and
things like that. What we can also do
with mid journeys, we can also go and explore. And what you could do is
you could look up with a search prom Victorian. Let's put in carriage. And then we can also
get ideas from this. So if I put in
Victorian carriage, you can see this
as what comes up. Now, if we come over to here, we can also see if
we click on here, this is the actual prompt
that somebody put in, so you can actually
take that prompt, maybe change it around a bit, and then get your own
images rather than just simply copying
other people's images. It's a great place to start to actually gather
your own images. The other thing is
about mid journeys, I can come in for instance,
let's just go back. And then what I can do is I can hold the shift button down. I can grab all of
these, for instance, and then what I can do is click the Download button and
download all of those images. And the best thing is
about PUREv is you can bring in multiple images
at the same time, so you can just drag, drop them, and then they'll all appear
actually next to each other. So really, really
handy things to have. So, lastly, then to sum up, don't do what I did
a few years ago, where I just dive straight into blender and not even think about references and just
find references if I had to while I'm
actually building something. Don't do it that way. It leads directly into building a
beautiful gray box, as well, all this, because first of all, you grab all of your references, you make sure
everything's set out. You can go and find some more
references if you need to. You know, if you suddenly
have a spark of inspiration, you want to make
something on the fly, then grab some more references
for but to start with, grab all of your references, have them really, really
nicely laid out, and spend, you know, even half a day to a day grabbing all
those references. You can then save
the pura that as well into individual files, and then you'll have all
the other references around that particular
build in there, ready to use maybe on another
project in the future. Or everyone, so I hope
you found this useful, and I'll hope you'll take
my advice going forward. Thanks everyone. See you
on the next one. Cheers.
3. Leveraging AI Tools for Creative Reference in Blender: Welcome back, everyone
to blend of building master class from
concept to final render. So I hope you enjoyed
the referencing guide, and now we're going to do is
dive in a little bit deeper. So first of all, Ward is PUR Rv. It's a lightweight
standalone application designed for organizing and viewing reference images in a clean, distraction
free workspace. And even this here is
actually in PUREv. I actually just copied printed the screen and put it on
here and then cut it out. So how easy is that? It allows you to drag and drop images into an infinite
canvas arrangement, then freely zoom scale and pin the window on top of
your main application, making ideal for artists, designers and three D creators. It really is, guys, one of the best actual referencing
softwares in the business. You should use PUR Rv because it helps you stay focused
and visually organized, especially during the
concepting and modeling phases. Instead of flipping between browser tabs or
scattered folders, PUR Rv gives you a central
always visible reference board perfectly for
understanding style, proportion, materials, details,
and lighting, and so on. It is very, very easy to use. You can basically
right click copy, bring it straight into PUREv, organize them way, way
easier than like we used to do using Photoshop or
another piece of software. Now, let's close that down.
And what I'm going to do is open up my own
PUREv document. And the way we're
going to get to that is through the download pack
that you've actually got, you will see in there
Pure Red references. If you double click
that and then let's open it up,
make sure, of course, you've got PUREv downloaded, and then you should be
able to open it up. Now, let it load up. It
will load everything in. Now, what you can do is you can actually move this by
zooming in and out. You can grab it with the
middle mouse or you can right click and move it over to
your screen if you need to. So now a few things, though, before we get
started with PUREv, which I haven't discussed yet, but why aren't the
other ways of you know, finding images from Google, why are they not as good
or why are they important? Because these images on here, a lot of the time
we are using AI, which we'll discuss
in just one moment. But a lot of the time
when we do things, we're actually grabbing
images as well from Google or Pinterest art
Station, CG trader, Sketchfab. Even Chat GBT is incredibly
good now at creating images. So let's go through a few of
these because I've actually made an image of these
to actually go through. So if I just bring
this over here, we can see then we've got pros
and cons of Google images. So pros, fast,
broad and familiar, you'll find everything from real world photos to
stylized artwork. So cons results are
mixed in quality, often uncredited and can like consistency in
style or resolution. Now, before actual chat
GBT or Mid Journey, I used to use Google a lot, a real lot and then
bring everything in, you know, to paint or
something like that. And it was hard work
because really, whenever you put in you know, a word or something, it
brings up the images are so different and far from what you want or
what you don't want. Now, Pinterest is the next one, and this used to be pretty good. So the pros, great for
building creative mood buds, often surface clean them collections of concept art
and real world references. And the cons are pins aren't always linked
to original sources. Some images are separated
or overly stylized, so you may need to dig deeper. Generally, with Pinterest,
it is pretty good, but you need to
click on something to then get something else, and you kind of
end up in the end with a lot of, you
know, the same thing. That's not always
something you want. So then you have to
click all the way back and go through again. Art station in, let's
look at that one. So high quality concept art and three D models from
professional artists. Fantastic for inspiration, especially for stylized
and game ready work. And the cons can be
intimidating for beginners, also more finished rather
than raw references, which can make it
hard to break things down into component ideas. Generally, with
rtstations pretty good. You do end up with, you know, a lot of also rubbish
models on there, as well as very, very
high quality ones. But a lot of the
time for ArtStation, I will use it for concept art. In other words, I'll be
using it for environments. I'll be looking at the
lighting, you know, these amazing
conceptual art pieces. That is what I will
be using it for, not so much finished models
or anything like that. So let's look at CG trader. This is another one
you should be using. Everyone forgets
about CG trader. Also sketch fab. Now, they're two different
things, really. I know they've put
them in the same kind of situation here, but CG trader and sketch fab are used very, very differently. For me, CG trader, I use a lot if I want to put together something
really, really quick. So let's first of all, look
at the pros and cons oh. So the pros, it's ideal for looking at three D
models in real time. You can rotate them,
examine topology, materials, modularity, perfect for learning
how assets are built. I should say, actually,
that is true about Sketchfab sometimes on CGTrader, you will end up with a sketch
fab link where you can actually go in and look
at that, but not always. And the cons, some models are low quality or wireframe views. Commercial restrictions apply, and if you attempted
to use them directly. So a lot of the time
with CG trader, we will use it to actually
grab references from, Hey, this is what we
need in our pack. There are a lot of
packs on CG trader. So if we're putting
together a Viking pack, it's great for things like that. The other thing it's
great for is if you want to put together a
concept really fast, there's a lot of free
models on there. You can just download them.
Bring them into blender. The one thing I would say
is they're not always good. You know, a lot of them
sometimes don't work. A lot of them are missing
textures materials, and they're done by real, you know, people
in the real world who don't really know
what they're doing. And that's fine if you're
using them in that way. Okay, so let's move on
then to sketch Fab. Sketchfab is amazing in a way where you can go
and see all around. You can actually
view all around. You can view the wireframe
and everything like that. So it's really good. If you've got a real idea like a windmill, and then you want to have a look around what someone
else has done, it's really good to
see all the nooks and crannies and
how they did it, how they put the textures together and the shaders
and things like this. That is what we
use Sketchfab for. And finally, hathPTNAITols
like Mid journey. There's a lot of them
out there now, guys. Some of them paid,
some of them free. Honestly, though, I
would say the paid ones, regardless of
whatever, you know, Facebook advertisement says
are always the best ones. So I've found, like, Chat chBT and Mid journey
are definitely the best. So let's go through the pros. AI can generate endless prompts
and mood board in seconds helping you explore
ideas visually before committing to modeling. Mid journey AI images tours can produce very specific
generous scenes, EG stylized medieval docs at sunset to get your
imagination flowing, and that is exactly
the point of this. AI images often contain visual artifacts or
unrealistic shapes. They're not reliable as
modeling blueprints, but they're great
for vibe, mood, lighting, and composition. I really believe in this. So before we move
on, is AI cheating. And I don't believe
so. Absolutely not. As long as you're using
it in the right way, and that is as a tool like Photoshop or any of
the other tools. Artists always gathered
references from books, from movies, from photos,
and from each other. And being as, whether you sit on one side of
whether the art was stolen or not is not what we're actually
talking about here. It is a mix of all of those
reference added in together. And as much as I don't
agree with how you know, AI bots were put together. I absolutely don't.
They are here, and there's nothing
we can do about it. And allly we'll do is speed up the process of creating
art from here on out. So AAR AI tools are just
another step in that evolution. The key is not to
copy a single image. Definitely, I've seen
too many people. They get an AI image. They try and copy it, and it's never going
to work like that. You need to grab
loads of references, which we'll go into
in just 1 second and build your own
thing from those. So it's always good to a
blend of multiple references, gathering ideas
for architecture, lighting styles, textures,
atmosphere, and more. So think of it this
way. Your job isn't to replicate, it's to reinterpret. And that's always been
the job as an artist. By pulling 10-20 images, breaking them down,
you can start to learn the rules of visual
language you're working in. That's how you train your
eye and elevate your design. So a lot of the time
with these AI images, they do have amazing lighting. And you'll find the more
you work with these, the better you are actually
bringing in decent lighting, compositing and making your
models look more realistic. As long as again, you're
not copying from it. So in this course, for example, we're thinking ahead not just about building a single scene, but creating modular,
reusable assets. So you'll see in this when I
go in it on the next lesson, we've got all these little pots that we can pull from
all the windows, the doors, the signs
and things like this. That's only possible with strong referencing work
from the beginning, guiding everything from a
material choice to prop design. So use every tool available, use Google, use ArtStation,
use Mid journey, make sure you're
always translating those references into
your own unique, reusable, three D assets. That's where the real
creativity happens, and I couldn't agree
with that more. What we're going to do
then on the next lesson is we're going to actually go through my own reference and show you what
I came up with, how I got all of my ideas, and I've even got down here, as you can see, the actual
prompt that I am using. This one, by the way,
is for mid journey. Alright, everyone, so I'll
see her on the next one. I hope you enjoying it so
far. I hope you learn a lot. It might seem like it's a
little bit slow getting into the actual build up this
thing, but trust me, building up this foundation is the best way because
going forward, you really will have a
good idea of how to create something from a concept to a final render within buildings. Alright, everyone.
I'll speak till the next one. Thanks a lot. Bye bye.
4. Showcasing AI generated Images, how to use promts as referencing: Welcome back, everyone to
Blender building master class from concept to final render. So here is my reference in. Now, first of all, let's
look at these buildings. So what I've gone
is, I've gone in. I've put stylized three D model, 19th century window gain asset, highly detailed cross hatching. Now, what I did with these
buildings over here, I put in stylized three
D model, 19th century, and then put something
like building diorama or hospital diorama,
something like that. And then at the
input, game asset, highly detailed cross hatching. Try that in your
own mid journey, and you'll see it does a very, very good job at putting
all these things together. You can also with mid
journey take an image, you can put it in there and
ask it to give you a prompt. That's also a good way. Now, don't forget, though, about Chat GBT because we're going to come to
that in just 1 second. These are actually
created in mid journey, and they do a great job of actually giving you
a kind of layout. They also do a
relatively good job of getting you ideas
for these pots. So you can see how these
parts are put together. Now, if you take a closer look, we're not going to be able
to create these pots. This is why it shouldn't
be used in that way. It shouldn't be
used to just make a model from because it's
never going to work. It might look good
on the screen, but building these
pots out and how these parts are done
is not the way to go. As you can see here
with this part, come round, just, you know, you've got these two
little lumps here. They don't make a lot of sense. You'd have to bring this part and put it around the center, and then you need to know how
to actually fit this round. So you can see, again,
this thing, what is it? The light doesn't look like it's even, you know, centered on it. And what is this again? It looks like there's a sol here merged with some
kind of other sol, and they don't make
a lot of sense. There's one over here, which is a half one
makes zero sense. So again, these should be
used as conceptual ideas. These parts here should
be used again as ideas for creating the
little modular parts. You can see we've
got a lot of these. And from here, what I do I
take also the overall shape. So what I'm looking for in
this is how the buildings were built out because it is very good at
actually doing this. You can see here
this is like one of the asylums or
something or a school, but you can see the
ideas are here. So we have some thinner
spires, some bigger spies. You can see where the doors
are and things like this. It is laid out pretty nicely, not perfectly, but pretty
nicely to get ideas, and it is much, much
quicker using this than trying to get a load of ideas
off of Google, for example. So I go in, I get a ton of ideas even going
down, you know, to some of the older buildings because these were around
in the 19th century, but they weren't from that era. But again, this one, looks like it's been repurposed or
something like that. You can see it was a
very old building, and then now it's
been repurposed. It's got some, you know, modern ish bricks on
there and things. And sometimes that might be something that
you're going for. Alright, so moving down the
other thing that mid journey, especially is good
at, is repeating. So you can put in a
prompt and then put dash, dash, repeat, however
many repeats you want. Look that up if
you're interested, and then it'll just
repeat it five, ten times, and that then makes it really handy for
things like windows, especially when we're aiming it at a certain
point in history, which is, as I've put
here, the 19th century. So it's a 19th century building. And you can see there's a
lot of gothic architecture, old world, really, really
detailed stonework. Again, I would say it's
nice to see these. Because they're, you
know, smaller images, they have a little
bit more to them, so they're not just, you
know, kind of glossed over. They do have a little
bit more to them. But again, I would use this, grab ideas like this, go then and find
how these things, you know, were actually
put into stone to get some proper
references for them, and then you can build
out things like that. But as an idea, like with this, it's a beautiful idea, the way this slopes
up and round. And I would actually use these actual shapes
in my own build. I think they look fantastic. Alright, the doors
pretty much the same. Always good to see doors
because it also gives you an idea of single doors. So we do have doors like this. This is a single door.
It opens up one way. We have double doors in there. This is a great one
because it shows you made out of wood, as well. Whenever I'm looking at
these references as well, I'm always getting an
idea in my head like which parts are
going to be made out of stone, which
parts out of wood. It's not always so obvious,
and this shows that here. This is all made out of wood, as you can see, and it
works really, really well. Where it's a little
bit more detailed around these parts maybe. This one's made out
of stone and you can see there's stone
and there's wood, and they're around the
same level of detail, but they both work very
well in their own right. Now, you've got to
understand like things like this probably
won't exist. You know? This is a stone door
with a stone arch. This probably wouldn't
exist in this way. So things like that, you've
got to think to yourself, you know, I'm going to
make this out of wood? This glass, this stone. Sometimes you have to
think a little bit harder. This one's a good one again. Because not only is
it made out of stone, not only is it made out
of some pots of wood, but the colors are
really, really nice. It gives you a lot of
ideas of where to put some gold trim in there maybe
or something like this. And I really like
the idea of that. Alright, so moving on then,
I've got lamps in here. So in my own build,
you should think about what parts are going round the build to really
bring it to life. So when we're
building buildings, as we'll go into as
we're building it, we're looking for depth. We're looking for lighting, and we're looking for life
within the actual scene. If you've got just a building
and nothing else around it, so you've got no foliage,
you've got no benches, you know, you might even put it in unreal and
have some people walking around to
really take you up to that level to
really bring it to life. But failing that,
because, you know, we don't want to
do a course about creating characters and
bringing those in failing that, we want to bring in, you
know, decent lights. We want to bring in benches,
want to bring in foliage, and we want to bring it
to life in that way. So getting, you know, a lot of references for
lights is always a good idea. Next of all, then,
I've got streets, what brings the streets to life. Generally, it'll have a
lot more images than this, but you can see
we've got gateways, we've got lights
on here, we've got a lot of weeds and
things like that. We can see how the
ground terrain is actually laid out,
somebody stood over there. Again, some of these
are a little bit silly. I don't know what
these things are or somebody's tiny car here or anything like that, and
that is what I'm saying, Don't rely on AI to
create a model W. Okay, so next we're moving
on to the signs. Sometimes I just like to get a general idea of what
the signs might have looked like or what something might have looked
like in that period. So even though these
don't say anything, I've just got a good idea of
how the signs are laid out, and you'll see that
when we come to build or actual street lights
and put the signs on them. I've taken a lot of
ideas from this. Okay, so next we've
got the gates. We have got a part in
the build where we need a gate gate sorry. Now, it might not
be as intricate as these because, you know, it would take a
course on its own to create something like this
is incredibly intricate. But we have created a lot of intricacy within
the gate itself, and I'll show you
that in a while. And finally, then, one of the most important
things that you should do. And it's best to actually
use hat GPT for this. So what I do is I will
take one of these images. Let's say we take this image, we bring in Chat
GPT, and we tell it, basically, Do not alter
the image in any way. All I want you to alter
is the background, the sky, and I want you to make it let's say, a dawn scene. So for me, I had already
created the building. And then what I did
is I did a render, took it into Chat GPT, and asked it to create
a beautiful dan scene, and this is where it
actually created. This thing gives me a real idea for how I actually
want to light, you know, whatever it is I'm actually building before
I've actually built it. Now, generally, I
will say that we here render things in midday. And the reason we do that
is because the thumbnail generally grabs more attention than something done at dawn. You know, something
done at dawn, it's a little bit darker. It's very hard to pull off as a thumbnail to make something a little bit dark like that. Generally, if it's really
bright and sunny like this, it's way easier then for people to see that and want
to actually create that. Next of all, then
we've got dust. Now you might think that we've got dusk and dawn and
are they the same? They're a little bit
actual different in how they're lit, actually. And I think Chat EPT
has done a very, very good job in showing
the difference in there, as well as, I've got a lot of
ideas for the actual light. So you can see how
the lights seem to, come on, and there's
a little bit of light shining on them, a little bit of light shining
on here, as you can see, and that is something
that I'll take with me when I'm actually
creating the render. Finally, then we've
got a few others. We've got the nighttime
render with a starry sky. Again, it's very
hard to pull off as a thumbnail this because we've
got a lot of dark areas. How dark do you and then I've also done
two others because you might want to bring in some effects into
there, as well. So you might want a rainy scene or you might want a snowy scene. And again, all these
were done in ChachPT. And finally, before
I actually go, we also have Karnak on here. So you can see that
whenever I click, you can see down
left hand side here, there will always be, let's say, if a press P, you can see
that comes on down there. So whenever we're building
out, you will always have those on screen
commands being shown. So if you ever get
lost or speaking too fast or my accents too thick, then you will be
able to follow along with those when we're
actually building things out. So on the next lesson
now going forward, we are going to be jumping in to the actual resources and actually doing some
work in blending. So this is kind of the the build up to starting your creation, and it is very important that we follow these principles along. So that is getting the
ideas, coming up with, you know, the references, all the references
you're going to need, coming up
with the lighting, looking at the prompt work,
whites we use this one over this one and basically
having everything together before we even
start in blending. Very important. We
don't start anything until we get all of those
references in place. Once we've got those in place, then we can go and start work. It's going to save you tons and tons of time down the line. It's going to make your
buildings look way, way better as a finished result, and it's going to keep
you honed in as well. A lot of the time,
when I first began, I would be starting
something in blender and then jump with something else and jump with something else. This keeps you really honed in, gets you to finish a piece, and that then speeds up how quickly you'll become a
decent three D modeler. Alright, everyone. So I hope you enjoyed that, and I'll
see you in the next one. Thanks a lot. Bye bye.
5. Exploring Asset Organization in Blender’s Resource Pack: Welcome back, everyone to blend the Building master class
from concept to final render. Now, what I want you
to do? I want you to go into that resource pack. And the one I want
you to open up now is called Resources Blend File. And this is what you
should actually open up. Now, we're going
to be discussing what's actually in
the resource pack, even though if
you're a beginner, this is way what you're
doing right now, you still need to see what
things are actually in here, so you have a good
idea what we're going to be doing in the future. So let's first of all, on the right hand side here, you can see that we've got
these four options here. Now, one of them is wireframe. One of them is shader. One of them is material view. When you first click
on Material View, it's going to take a
while to actually load up because it actually has to
build all those shaders. So when you first get a game on steam and you first
try and load it up, it will say build in shaders. So building shaders takes quite a long time the first time that you
actually open them. In the future, though,
when you click this on to see what the things
actually look like, it will be much, much quicker. So all we need to do at the
moment is just click that on, wait for it to load up, and
then we're going to have a better visual idea of
what everything looks like. All right, guys, so
everything is load up. So let's first of all, go into the relatively
simple things, which is all the materials. We are going to be using
all these materials. Now, remember something.
This is on material view. We do have another option
here called rendered view, which will give you a really, really good idea of what they're going to look like in real time. Again, though, you will
have to let it load up. It's going to take a
little bit of time. So each of these, though
once you've done it, you know, the first time
takes quite a while. After that, it's going to
be much, much quicker. So let's first of all,
wait for these to load up, and then you'll have
a real good idea which one you want to wear
between because you'll have a good idea of what they look like in real time and what they look like just as shade of you because in
the shade of you, they're not going to have
all the lighting on there. They're not going to have all the gloss on there
and things like this. So that, for me, took about three or 4 minutes
to actually load up. And now you can see when
we swap between those. So if I go back to shader mode, if I go back to object mode, or if I go back to
real time mode, it's going to be relatively
quick as you can see. Now, there are a few
things that we can do to actually speed
up this process, which I'll show you in the actual blend when we actually go to our
own blender file, and then from there,
you can actually implement them into
your resource pack. I don't want to
overwhelm you all at the same time is the thing
I'm trying to avoid. So now you can see just how nice these actual
materials look. So you can see if you
click on one of these, so let's click on just this over on the right
hand side, then, if we come to the material tab, which is this one here, you will see it actually has a name. So you can see stone light. You can see we've
got light streets. You can see we've got glass. You can see we've got marble
and everything in between. So all of these materials are already done for you.
We'll be bringing them in. I we'll be going through how
the materials are set up just so you have a good idea of how to set up
your own materials. Now I'm going to do is
I'm just going to put this onto material mode, because we're going to
look at geometry notes, generally, it works
much, much faster. The lower down,
the easier you go. So if you go to
wireframe for instance, it's going to be very fast
in the actual viewport. If you go to object mode, it's going to be a little
bit slower than wireframe, barely noticeable, but very fast and if you go to material, a little bit more sluggish depending on what
machine you run. Now next of all, we've actually
got geometry nodes here. Now, these geometry nodes
are incredibly useful, incredibly useful guides, and getting geometry
nodes isn't cheating. It really isn't the way to
speed up your own workflow. Same as add ons are used, it's exactly the same thing. I would say, as long as you have a good idea, of how
they're working, which we're going to show
you within the course, then they're
perfectly acceptable to use to speed up everything. So, in other words, creating
these tiles, you know, once I've showed you
the basics of modeling, you will know how to
create these tiles. It's going to take a
long time, though, to create every single tile and roof for all of the
parts that we need. So way better to use something like a
geometry node in this. Now, you will notice
something else, as well, that if we come
over to this geometry node, click on you can
see that it just says three DT oat bark.
There is nothing on there. And the reason is,
if you go over to the right hand side where
this little spanner is, you can see that I've
actually turned it off. So if I click this on, you will see now that we
actually have a tree. So it went from
nothing to a tree. If I actually click
it on Render view, you'll see exactly what this
tree is going to look like, and you'll also see that it took slightly longer
to actually load up. And that is because this tree has a lot of leaves
and things like this. It has a lot of bark and
little pieces and things. And that's why I've
turned all these off just to make sure that when you
actually bring it in yourself, open up your resource pack. It is loading
really, really fast. We don't want it
where it's, you know, crashing or people
can't load it up. And sometimes that
happens with jumpi nodes, especially when
they're very complex. And when we come to
put them in our scene, I will show you how to do it the right way just so
you're not having issues with running out of memory or VRAM or
issues like this. But for now, you can
see each one of these pretty much is turned off.
So this is the tree one. I can turn that off
and come to my hedge. I can turn this one
on, double tap the A, and you can see now
this is what we've got. So all of these are
junction nodes. We're going to be
going through these in the actual main course. I'll just turn this
one off for now. Lastly, then, in here, you've and things
like this guy here. So he's really, really handy
because what he does is he basically shows us how tall
a human is in the viewport. And that's really important. Whenever we build something, we want to make sure, regardless of whatever
we're building, even if we're building something
for World of Warcraft, where things are a
lot more stylized, a lot more chunky, we want
to still have a reference. So a reference to how tall
the average human is. This guy is around
I think 1.8 meters, something around there, which is the average size of a human, maybe not in somewhere like
the Netherlands or somewhere. But generally, you know, around Europe or, you know, in the US, this is
around the right height. And so that's why we're
going to use here will be the first thing that we
actually do in our own built. So make sure that
you save this guy out and you put him
in another blend file or you save him out as an OBJ. We can do that, and
then you can bring him in to any of your pots. So what I'm first
of all, going to do is I'm going to open up. So let's open up our file so
I'm going to open up this, and this is you can
see, our resource pack. I'm going to call this course. So what I'll do is I'll
call it blender course. And for me and you, this is where we'll
be saving all of our own blender files. This will be saving
out our work. So we've got a file there now. So now I'm going to do is
I'm going to take my guy. I'm going to go to file. I'm going to go to Export, so you can see we've
got Export coming down, and the one that you
want is going to either be OBJ or FBX. For just a guy like this, just save our as an OBJ.
So let's go to OBJ. We're then going to
go to Blender Cs we're going to make sure
that this is ticked on, so selection only is ticked on. And then what we're going to
do then is just name him. So we'll call him human scale. Let's call him that.
So human scale. And then we're going to
click Export way from OBJ and there we go.
It's as quick as that. And now if we come
back to our file, open up our file, you
will see within there, hopefully, there he is. There's our human scale. You have got an MTL file.
Don't worry about that. That's basically a
material you know, they're not that useful
anyway when it's just an OBG, all we want for now is just
that scale of that guy, and we can bring him
into our own file. Alright, so let's now finish
looking at the other parts. So we have in here
things like rocks. These parts, basically, whenever you're bringing
in a geometry node, so the Jumptre node like the hedge or the tree that you saw, they have to come in
with all of the leaves, all of the foliage. Whatever it is the
Jumptre nodes has, it has to have a way to
bring all the parts in. So, for instance, within here, one that we didn't
speak about it is going to be the curve meadow. If I put this on
and zoom into it. I'm going to press
the little dot next to the zero
on the number pad. If you click that on,
double tap the A, you will see now
that we've actually got these foliage, basically. Now, within here, we have plants and flowers and
things like that, and that is why within
the resource pack, you actually have, if I
click on one of these, press the little dot button. You actually have
all the flowers and things if you want
to bring these in. Now, the other thing is, all of these geometry nodes that
come with the course, you are free to use those
within your own builds. Not in a commercial sense, but within your own
personal builds, even if you put them on
ArtStation to show them off, you are free to use
these Jummage nodes. It's a huge bonus of actually
getting this course. Now at the moment,
we don't have any of these in a way that are
accessible in an easy way, apart from exporting them out. So as we go further
into the actual course, I'm going to show
you how we can put these into files where we
can then drop and drag, drop drag and drop within
our own blend of files. And that then will
make it very easy. A give you a good
idea of how you can actually do that yourself
with your own jump nodes, with your own models
and things like this. So, lastly, before we finish, on the right hand side here, you will see that we've got this kind of globe
and it's called Wild. And you will see here it says
HDRI set I have also given you two lighting environments
that are actually self. So we've got HGRI setup, and we've got sky texture. Now, as we click
between both of these, you will see there
is a huge difference between each of these. And again, we're going
to be discussing this in the future,
but they are in there, ready to be using, you know, in this actual build and
all your future builds. So now if we go back then
to the resource pack. So if you come up to
here, you will see now we've gone through
our resource pack. We've gone through
the references. And we've only gone through
these in a small detail, I know, but it's just to get you started just so you
understand what you've got. And on the next lesson
then we're going to go through the blenders files that we're going to
actually create. So this will be me and you creating them as you
should be creating them for building any kind of building or
anything like that. We're going to bring in our
human into the actual scene. I'm going to show you how to set up your scenes and how to actually save them out before
we begin anything else, and then from there, we
can actually make a start, hopefully, on building
some of the parts out. I know it's been again,
a long introduction, but you need to know
all of this information up front to know
where to start from. Alright, everyone, so
hope you enjoyed that, and I'll see you in the
next one. Thanks a lot. Bye bye.
6. Mastering Basic Navigation in Blender for Beginners: Welcome back if
you want to blend, build the master class from
concept to final render, and this is where we left off. Now, what I'm going to do is I'm going to close this down. So you might want to save
it out, so file, save, and then let's close
this down because we don't want so many blender
files open at the same time. We're already going to
have enough as it is. And the way that I'm
going to show you how to work things means
that you're not going to have to have
these blender files open all at the same time. It's going to make it much,
much easier workflow, and you should definitely use this workflow going forward. So let's actually
close that down. And then what we're going
to do is going to have a new blender file. So this is a brand
new file guys. This is what you'll have when
you first open up blender. And again, you can see
down here 4.4 0.3. Now, what I'm going to do
before doing anything, because we're going
to be moving around the viewport and all
that other good stuff, we basically need to
play you a short video, which is blender
basic navigation. Now, for those of you
who already know how to navigate around blender and
all of that good stuff, please just go on
to the next lesson. What we'll do is
we'll play that now. At the end of this, then we'll be moving on
to the next lesson. We'll be going through
this actual blend file. Alright, everyone. So I hope you'll learn a lot from that, and I'll see
you in the next one. Thanks a lot. Bye bye. Welcome everyone to the
basics of blender navigation. Now before we begin, it's
important to understand how the axises work within blender. So we can see at the
moment, we've got a green line going this way and a red line
going this way. This is called the Y axis, and this one is
called the X axis. We also have one
that is the Z axis, which we can't see right now. It doesn't actually come in with blender viewport as default. But if you want to
actually set it on, you just come up to the
top right hand side, where these two
interlocking balls are, and just click the Z axis, and now we can
actually see that. So how do we actually move
around the blended viewport? There's a number of
ways of doing this. One of them is over on
the right hand side here. You can see if over here, it's the zoom in and Zoom out. I can actually left
click and move these up and down then to
zoom in and Zoom out, or I can use the actual
mouse to actually zoom in and zoom out using
the actual scroll wheel. There's also another thing
you can do with Zoom, which is holding control shift and pressing the middle mouse, and you'll see you have
a lot more control over zooming in and zooming out. Now, the next thing
we want to discuss is actually rotating
around an object. So how to do First of all, we'll bring in a
cube with Shift A, bring in a cube. Now, if I press the
middle mouse button and move my mouse left or right, you can see we can
actually rotate around. Unfortunately, though, we're not actually rotating
around this cube. So to actually fix
that, we need to center our view onto
the actual cube. We basically want to focus our view onto this actual cube. So to do that, we're
just going to press the little dot button on
the actual number pad, and then you'll see that we
actually zoom in to the cube. If I scroll my mouse wheel out, you will see now if I hold the middle mouse button
and turn left and right, we're actually rotating
then around the cube. And this is important because if I actually bring
in another cube, so if I duplicate this
cube with Shift D, move it over, so bring
in my move Gizmo. And now you'll see if I
rotate around this cube, I'm not rotating
around this one. So it's fix that, press
the dog board again, Zoom out, and now I can actually rotate around this
cube, as well. Now let's look at
something called panning, which means that we're actually going to move left and right. And we do this by holding the shift button, holding
the middle mouse, and then we can actually
scroll left and right around our
actual viewport. So now we've actually
discovered how to zoom in and the
different ways we can actually do how to rotate around an object and
how to actually pan. We can also come up to
the top right hand side here and use these buttons here. So again, remember we're
looking at the Y axis, the X axis, and the Z axis. If we come to our Y
axis and click that on, you will see now that you've got a front view of the Y axis. If you click the X axis, then we can change it
to that red X axis, and finally, the
Z axis, as well. Now, there are
other ways as well that we can actually look
around the view port, and these involve using
the actual number. If I press one on
the number pad, it's going to te me into that
white axis or front view. If I press two, it's going to actually rotate
that slightly, and if I press two again, it's going to rotate
it slightly more. Now, if I press
the eight, it will rotate it the other
way, as well. Now, to go into the side
view or the X axis, we can also press three
on the number pad, and that will give
us that effect. We can also press seven to
go over the top, as well. Now, what about if we actually want to go
to the opposite? So instead of going from
the bird's eye view, we want to come to the
underside of our model. Well, that's actually
quite easy as well. All you need to do is
press Control seven, and that then will take you to the bottom view of
our actual model. We can also do the
same inside view and on the x axis and YXs. So, for instance,
if I press one, I'm going to be
going into Y axis. If I press Control one, I'm going to be going into the opposite side on
the actual Y axis. Can also find these
options just in case you forget the top left hand
side here under view. So if I go down to view and
go across the viewport, you can see here that this actually tells
me exactly what I need to press to
get the viewpoint that I've just
actually explained. Now, we also have the button on the number pad, which
is number five, a number five button
in blender toggles between perspective and
orthographic views. Perspective view offers a more natural realistic
viewpoint with objects appearing
smaller as they get further away, mimicking
human vision. Orthographic view removes
perspective distortion, making all objects appear at their true size,
regardless of distance. Useful for precision
modeling and technical work. The other thing that number
five does, for instance, if I come to my cube, at the moment, I am able to
actually zoom into the cube. However, if I press number five, I will not be able to
actually zoom into this cube no matter
how far I zoom in. I'll still be able
to move around it by pressing the little
dot button, like so. But if I actually
want to actually work on the inside of an object, I can quickly press number five, and then I can
actually go in and work around the inside as well. Now, if you're working on a
laptop or something like that or a tablet and it doesn't
actually have a number pad, you can also use,
if I press five, the actual squiggle key, which is under the escape board on the left hand side
of your keyboard, and that then will
give you pretty much the same options
as we had before. So we can click the right view, we can actually click the back and we can
click the left view, for instance, the opposite
to what we had before. So instead of pressing
one and three, we just press the
little squiggle line, and then we can actually view
whichever side we need to. Now, we're nearly at the end
of this short introduction, there are a couple more things
that you can actually do. If you come over to
the right hand side and you see here where we've actually got the name of the actual parts
within our scene, we can also grab them from here and then press the
little dot B to zoom in. So I can grab this one,
press the little dot B, and that then will zoom us in. The other great thing about
this is we can also come in, shift select them press
the little dot button, and then we're able
to actually rotate around both of these
cubes. Alright, everyone. So I hope you enjoyed the short introduction to the
navigation within Blender, and I hope from now on, it won't be a struggle
navigating around the viewport. Thanks, lo, everyone. Cheers.
7. Using Scale References and Asset Manager Library: Welcome back, everyone to
Blender Building Master Class from concept to final render, and this is where we left off. Absolutely, no way, because
we haven't done anything yet. So first of all, though, you will notice within
your own Blender file, we have this point light, we have a cube, and we
have an actual camera. We don't need any of those, so you can click on
each one individually by left clicking, Shift click while you're holding Shift and
shift clicking again, and then all you need to do is just press Delete while you're
in the actual viewport. So when I say viewport, I mean this little
box or big box here, which is this massive
visual thing right here. If I say in the viewport, you may need to make sure that your mouse
is in the viewport. You don't want your
mouse over here because if you press
delete over here, it will start deleting things
like collections and stuff. Wherever your mouse
is, generally, that is where it's going
to be deleting something. Now the th thing we want to
do then is we want to bring in our guy into here
because this file here, we will be building
out the gray box. So we're going to
have three files. One of them is going to
be the resource pack, which you've already seen
with the geometry nodes, the shades in and
things like this. One of them is going
to be our gray box, which will be this one here, and the final one
will be the place where we're building all
of our modular parts. I recommend setting
it up like this. Generally, you'd normally
have 21 would be, were you doing the actual build? And the second one would be, were you having
all of, you know, the modular parts, the Jumpton
nodes and all that thing, all that sort of thing. But what I've done
here, because the jomtre nodes and the shaders, they're quite complicated, so splitting those files up is actually probably a better way. So in other words, you've
got the modular parts for the building in one. You've got all of
the Jumpt nodes and shaders and things
like that in another. And then finally,
you've got the actual. Putting them up like this means your blending is
going to go a lot faster because we're going to be taking into account
using the asset manager. The asset manager is
absolutely amazing, and it's something
that definitely will reduce things like V RAM, RAM, you know, because when you bring them
in from the asset manager, as we'll get into, you will see that we're not
duplicating things. It's like an instance
of something, which makes it
much, much quicker. Now, I don't want you
to take my word for it. Wow, using asset manager. I've actually put a
document together so we can look through this
before we actually begin. So using Blenders asset manager is a smart and more
efficient way to work, especially when building
large environments because it allows you to reuse, organize, and update assets without the clutter
and duplication. And that is the main
word there, guys, duplication that comes from simply copying
objects into a scene. The larger your scene goes, the more issues you will
have with duplicating. The more issues
you will have with bringing in hundreds
and hundreds of parts. It's great in the beginning
just put everything in your blend file and
build everything out in the same file
and all of that stuff. But honestly, in the long run, working in this way is going to be much more
beneficial to you, and absolutely it will
speed up your workflow. So centralized reusability, instead of making
copies of the windows, doors or props across
multiple scenes, you can save them as assets. Then anytime you
need the adj asset, you simply drag it in fully
textured and ready to go. Another great, important thing
is when you're creating, let's say, 19th
century buildings, you will have a blender file which just has 19th
century building props, modular parts, things like this, and then you can
always bring those in depending on what
you're building. So you can have all the
parts in one place. And as you go along in your
journey through blender, let's say you're doing Sci Fi, you can put all of the
pots in one place. You might build five
objects one week, five objects a month
later and something, and you'll put
them all together, and then you can bring
them in to build environments extremely
quickly from. It's also a non
destructive workflow if you update the original. So you've got to update
it in, you know, the original blend file and save you improve the detail
of the wooden beam. So let's say you update the shade and make
it much better. You can update that
then in real time. And every time then
that you bring it into the old blend file,
it will be updated. So every instance across your project can
be automatically updated without you having to manually replace
every duplicate. So again, you can go
into an old file. And you can actually update them in real time from
the actual file. So really, really easy to use, and you can see it's
really non destructive, much better in the long run. So better organization. The asset browser lets you tag, preview, and categorize
your objects, so you don't need to dig through dozens of collections layers or random file names to
actually get at what you want, because they're all set out, as I'm going to show you in a very, very nice neat way, and then you can just
see them really easily. You can see them named
very, very easy to use. And one of the most
important things. So seeing up so
scene optimization, instead of bloating your file with multiple mesh duplicates, asset instances or
lighter on memory, and they're not
just a little bit. As you go more and more
and more, it adds up. It's way, way lighter on memory, especially when linked properly, and it keeps large scenes more responsive and render
times more manageable. And not only that, sometimes when you come to
render massive scenes, if you've not done this, it
won't actually render out. You'll have some real
issues rendering it out, and it means you'll have to
render it out in layers, depending on how
big the scene is, depending on what your
computer setup is. So it's really a good idea to start in this way
from the beginning. And I've duplicated
this as well. And just to show you that, you know, you don't really
want to duplicate things. I actually did it by mistake. But anyway, in short, the asset manager isn't
just about saving time. It's about working smart,
clean, and scalable, especially when your
scenes grow from one building to entire cities. Now, what we want
to do here, guys, is we want to start the right way from
the very beginning. So the way that we're you know, this is from concept
to final render, and it is a master class. So starting in the right way is the best way
rather than working that out as you get further
and further down the road, because it's all about
muscle memory as well as, you know, knowing how to get
from point A to point B. You might have A, B, CD, and everything else in between. But if you have a
really fast way to get from point A to point B, it's going to make it much,
much better in the long run. Now for now, we're
not actually going to go to the asset manager
because first of all, we're going to start
some gray boxing because it is a little bit too complex to get into
right in the early beginning, and there's a lot of other
ground that we need to cover just to
actually get started. So what I'm going to do is
I'm going to close this down. So let's close that down, discard that. We're
not going to need it. And now let's bring
in our little guy. So normally we would bring him in using
the asset manager. But on this occasion,
we're just going to import him from our OBJ because
the asset manager, I'm going to cover it
in its own section, covering it as a whole, which I think is
better than just now. Hey, let's just set up an
asset manager just to bring this little guy and I don't
think that's the best idea, and I think it'll be
too overwhelming. So that's the reason
why we're doing this. So let's go to file. Let's go to import, and we want to import
the Wavefront OBJ, which is how we saved him out. So wavefront OBJ now we
need to find that file. Now, generally, when
you're looking for files, it can be a bit of a
pain down here where it says recon is where
you're going to find the most recent ones once
you've actually used it. So I'm going to go to
G, and I'm going to go to the Gothic style building. I'm going to go then
to the course setup, and within there, I've
got blend of course. Now, of course, you
can see in here, I've got my human OBJ. So let's double click it, and, of course, we should
end up with our guy in. Now, wherever he was in
the actual resource pack is where he's going to
appear within you know, within our actual viewport. So all we need to do now, we
can see we have two issues. First of all, let's talk
about his orientation. His orientation at the
moment is over here. So if I press a little dot B, you will see that
I zoom in here. But when I try to,
you know, move him, so let's press Shift Spacebar
to bring in our move tool, you will see that his move is all the way over here, and
we don't really want that. We want to be able to move him from you know, his actual model. So what I want to
do, first of all, is press right plate, I want
to set origin to geometry. And now you can see
his actual orientation has moved to the
center of his model. Now, next of all, I want
to put him right in the center of our viewport. I can either drag him over, you know, and stick
him in the center. So what I can do is
I can press Shift S, and where is it selection
to cursor keep offfset. And then we'll drop
him right in there. Now, on the viewport, of course, we can press one to go into
front view on the number pad, and then what I can do
is I can drag him up, making sure he's on
the actual line here. Very important
because I want him to be on the actual ground plane. So the ground plane is
basically where the X and the Y. Interact
with each other. This is basically
the ground plane. We want everything to stand on this because below
here is kind of, you know, under the ground and
above there is in the sky. It makes it really easy to build things if we stick
to that point. Now, finally, what
we're going to do on this one is we're
going to save it out. And I recommend that after every single lesson you're
saving out your work, because if not, you know, you might end up
losing some work. On the next lesson,
we are going to go into how to sep your blend file. I think that's very important, even though it's a little bit technical right off the
bat to actually set it up. And what I'm going to do is
I'm going to go to file, I'm going to go now to save Art. So save s and I'm going to go to course setup, Blender course. And then what I'm going
to do is I'm going to put the name of this file. So it's the actual built. So let's call it 19th century
sent to course, build. And then we know
which one that is. So if I now enter, enter, like so, and now
it's actually saved out. Now, if I move
something like here, you can see that we end up
with a little star over here, even if I press control z. So if I press control
z and putting back, you can see that
star still there. That basically means
it's not been saved out. So all you need to
do is come now. You don't need to click save us. All you need to do is click Save and it will
save out your work. So it's really, really quick now to actually save things out. The other thing is now, if
you go to File Save As, you will see now over
the left hand side, as in recent, you can see
now it says Blender courses, and you can easily now click to where you actually
want to go to this file. So if you're saving
something else out and you want it to go
into the same file now, you can see it's
going to be there in recent. Alright, everyone. So on the next one, then, we're going to go
through setting up the blendfle We'll set
you up in a basic way. As we go through the course, we'll add little bits in there, but setting up
your blendfle from the beginning is
pretty important, especially when
we're coming over to the right hand side where you can see there's
render properties. All of these make a
difference, actually, in the viewport,
as well as setting up some of the things
in the edit menu. So edit and preferences. We have a lot of things
along here that we should change to make sure it's going to run much,
much faster for. Let's put that down
for the elbow, and I'll see you on the
next one, everyone, and I hope you're really
enjoying the course so far. Big buildup again, but soon, very soon, we will actually
start modeling something. Alright, everyone. So I
hope you enjoyed that. See you on the next one.
Thanks a lot. Bye bye.
8. Understanding Blender System Preferences and Optimization: Welcome back
everyone to Blender, building master class from
concept to final render. And this is where we left off with our little guy in here. So now I want to do is I
want to show you how to set up your own blender. And you will notice that over on the right hand side,
in this new blender, we've got the vision, and then we've got this little
but here which says, Network Access, basically. And we want to have Network
Access on sometimes. So how you can do that,
you just click this and you'll see it says
Allow online access. This is important when
you begin to set up your own blender file to
actually bring in add ons. So some add ons that you might really a lot of them
have been taken off. So if we now just open up
this and we go to add ons, you will see if I put in
something like loop tools, which some of you may
have used and some of you might not, it's
incredibly handy. A lot of the tools now
like node Wrangler, for instance, are
actually built in. You can see now it's built in, you just need to turn it on. So first of all, let's look at how actually we bring
in addons nowadays. It's a little bit different. Before we begin
with anything else, because as we're going
on in the course, we might need to bring
in some of the add ons, you might need to download them. So what I've got over here, if I bring this over, as you can see, I've got the
extensionsblender.org, add ons Loop Tools, and you can see,
here's the loop tools. Now, generally, these are
not going to be updated so much nowadays unless they actually change how this works, but you can see
over here it says, drag and drop into Blender. So if I just drop
this back over here, and then I drag on my left
screen I'm bringing it over, I'm going to drop it in, allow
online access, click Okay. So we just need to turn on
allow online access, like so. I'm going to close that down, and then we're going to drive
and drop and bring it in. And it says check in extension. Do you want to install
the following add on? Click Okay, and there we go. Now, if I come up to edit
preferences, go to add ons, we should see now if I go into loop tools is
actually there, and there we go, it's actually
imported into blender. That is a new way of
bringing in add ons. I don't like it as much as
the old way, and the old way, you might still be running a
blender where the old way, is working, but that's what
we need to do for now. So enough about add ons, that's how we'll do it
unless they're built in, and as we've gone through
the courses that say, we will be bringing
in some addons like the node wrangler
for instance. All right, so let's
look at the next part. Which is going to
be the interface. So as you can see, if you
click on the interface, come down here and you will see that we've got a status sp. Now at the moment down
the right hand side, all we've got is
blender version. We want a little
bit more than that. And when Blender first comes in, you won't see anything
else down there. If you click all of
these on though, like so, you will see now
down on the left hand side, you'll see how many vertices we've got in our entire scene, how many faces,
how many polygons, how many objects
are in the scene. And most importantly, for me, at least, is this VRAM. It's very important. I
do keep an eye on that. The memory and VRAM tell you basically how much is, you know, in the scene, how much is, it costs in all of these
things that are in there. Basically, Blender will
always try and keep it within the VRAM on your GPU, which we'll discuss
in just 1 second. So before we move on,
Ward is actual memory and the difference
between memory and VRAM and why they're
so important. So RAM, which is
this memory here, random access memory, is your
computer short term memory, and Blender uses it
to store and process everything you're
working on LTD models, textures, modifiers, simulations, and everything
else in between. So why is it important?
The more RAM you have, the more complex
you seems can be. If you think of big
environments, high polymehurs, lots and lots of dense textures, and if you don't
have enough RAM, your computer may slow down, freeze, or even crash. That's basically what the memory does. Now, what is
the difference? So what does VRAM? And
this is video memory, and it's actually based
on your graphics card. So your GPU has an
amount of VRAM. Some of them have
four, some eight, some all the way up
to 32 and beyond. And this is used to
render your scenes, preview your shaders, display
graphics in real time. So why is this one important? So VRAM is especially critical when you're using things
like blender cycles, rendering or EV, very important. So the more VRAM you have, the easier it's going
to be to render things out or view things in real
time within the viewport. And if you've seen uses more
VRAM than your GPU has, it will fail to render. So it might say something like out of date or
something like that, or it will just crash. What it'll try and do, though, instead of crashing, is it
will switch to your CPU, and then you'll end
up with a lot of stuttering because
the CPU is way, way slower in the
viewport and rendering. So, the more basically
this, I've noticed myself, I've got a lot of RAM on here, which is pretty
cheap RAM nowadays. So you can easily
get, you know, 24, 32 gig of RAM, and it will make
things run faster. You'll always run into problems
though with your VRAM. So the more VRAM you have, the
better you're going to be. Generally, 8-12 is going to be ideal, and you
can see on here, I have actually 16
gigabytes of VRAM, which makes my computer run pretty fast when
we're running blender. So now we've got all those on. We've got a good idea of
how everything's running. That makes it then
very, very easy to just get an heads up
overview of everything. Now as far as performance
and optimization goes, we'll be going a lot
more deeper into this as we go on
through the course, so much, much later on because this gets a little
bit too complicated. But for now, we will be
looking at things like system. System is a very important one. It's one we should set
up right from the get go because pretty much
how the viewport runs, how the renders run
is based on that, and we're going to be jumping
around between those a lot. So let's make sure we've
got the right one on. Now, at the moment, you
can see mine's on non. We've got Cuda, sorry, and we've got Optics X. Luckily, you guys actually went away and did a little bit of
research myself, so you actually know
exactly what they are. So it sees it says
here above KD and Opex or technology is made by
NVDA Notice doesn't say AMD. So QDA system that
allows blend to use NVDA GPU, speed
of rendering. It's been around a long time.
Optics X is the new one. So I recommend if you're
using AM Video card, using the Optics X. So it says, see a
new faster system. It's better ray tracing. It can run the scenes
even faster than QDa, especially for complex lighting, which, I mean, although
lighting isn't complex, it will make a difference
with other shaders that you'll only see OpticsX an option if
you have a ATX GPU, 2060, 30, 70, et cetera. I think we're running
at 40 70 here. So even from the 2060 series, you can see you can use OpticsX. So what about AMDs,
for instance, if you run an AMD out there, guys, you should be
using the hip HIP. It's a blender alternative. It allows GPU rendering
on AMD cards, just like Cutter optic sex. Don't ask me which one's
faster. I have no idea. So I'm not going to get
involved in all that. Alright, so then you can
see the summary here. Take a screenshot of
this if you want to, and then it tells you basically what you should be
using in blender. Now I'm going to close that
down, and pretty much for me, I always do the same thing,
so I put it on Optic sex. I do make sure then I've
got my G four ticked. I don't tick the bottom one. I always find if you
tick this bottom one, it slows things down because it tries and uses both of them
and not in a good way. I don't think it's
optimized too well, so I always just make sure
I click the top one on. So whether you can
click OptiSX or Hip, make sure you've
got that selected and then make sure you've
got it ticked here. And hopefully, you've
got one of these and not none, something like. Now, just so you know,
one of the things I would not mess around
with is the undo steps. If you turn these up, it is incredibly hard on your
blender and your computer. I've seen people ramp these up to 250 to make sure that
if they make a mistake, they can go all the way
back to the beginning. Bad idea. Don't actually mess around with
this, leave it on 32. In fact, if your systems really, really struggling
to run blender, I would actually turn this down, not up, so don't mess
around with that guy. Okay, so next of all, then we're going to go down to save load, and you can see here
as a save prompt as save versions
and recent files. Now, what blender
typically tries and does, it will have another
saved version out. So if you lose your work, more than likely you
will be able to find it. I'm going to show you
that in just 1 second. So we'll look at that
in just 1 second. And lastly, the last
one that we will be using fairly early on
is called file pass. And you can see here
there's one that says asset libraries. We're going to get into
this pretty early on, not right now, but
pretty early on. This is the one that
we're going to look at. So now let's close that down. And what I want to do is I
want to go to file open recon, and you can see, these
are all the files that we've actually created
within Blender or I have. And you've also got one
here that says recover. It can recover the last session, or it can recover a autosave. If I go to recover an auto save, you can see here the
time here is 1026. You can see it automatically
saved out my work at 10:25. Now, it's not always
handy because, you know, you're not going to end up
with ten saves on here, and I don't recommend
you do that. You can, of course, come
up to edit preferences, go back to save,
and turn this up. So save versions, you
could put this up to ten, the number of all
versions to maintain to the current directory
when manually saving. So we could put that up to two, for instance, and that
shouldn't be any big deal, and then we'll have
two saves always from let's say 1015
and then 1025, and then the one
you're working on. So I do recommend
turning that up to two, but apart from that, I
wouldn't touch anything else. So now let's close that down. Now, on the right hand
side, we're going to get now and have a quick look in these parts on the next
lesson because it's very important for the way that we're going to be actually working. We're not going to be
using too much EV. I will discuss on
the next lesson what the differences
between EV and cycles. And I know, again, there seems a lot of upfront knowledge, but you will need
this to actually get started to give you
the best chance of creating things and
making sure that we don't have problems
going forward with, you know, blender crashing
and things like that. Alright, everyone, so I
hope you enjoyed that one. I hope you learned a lot, and I'll see you
on the next one. Thanks a lot. Bye bye.
9. Setting Up Lighting Parameters for Performance Rendering: Welcome back everyone to
blender building master class from concept to final render. So now we said,
we're going to look at over here on the
right hand side, we've got the render engines, and we're going to be
using mostly cycles. I do recommend,
though, if you have a lower end machine using EV to actually just have a quick view on the
viewport, for instance. So having this in the viewport,
putting this on render. There won't be any
line the scene, so it'll probably just be black. So let's just actually click
it on, let it load up. And once this is loaded up, it will be very fast with easy. We'll just bring
a quick light in just so I can show you
what I'm talking about, and then you'll see
how it actually works. So here we are. Let's bring a quick light in, so shift day, and all we're going to do
is come down to light, and we're going to bring a
sun in, and there we go. Now, if I just rotate this sun, so if I just press R
and X, rotate it round. Let's press R and E rotate
it round to the front. Like so, and there we go. Now we can see when I'm
moving around here, you can see it's just
loading in real time, like it would do
in Unreal Engine. If I now put this to cycles, you will see it takes a little bit of time before
it renders everything out. And over here on the samples, you can see when I
turn this around, it goes up so far and
then it clicks done. So it has to go up to
a certain level before it's happy with it, and
then it's actually done. But you can see every
time I move around, it's actually having to
recompute everything. If it's on EV, it's going
to do it automatically. There is no compute
lock, nothing on here. It's just in real time. So it's way, way quicker. So EV is basically Blender's
real time renderer, and it's designed for speed and responsiveness. It's very fast. It's great for animations, previews, stylized
visuals, things like that. Uses screen space effects. So it takes things like
reflection shadows and lighting, and it works more like, as I said, a game engine. Yet it has some
limitations, though. It's not physically accurate,
especially with light. You can't render complex materials out and
things like this. Some effects like caustic, soft shadows, they're
going to be missing, and it won't match
the final render if realism is your goal or if
you want a very high render. You can work, you know, incredibly hard with EV
and get it to be very, very close to cycles, but
it takes a lot of work. And then we move on to cycles. So let's put it on cycles. And it blenders path
tracing render, designed for realism
or designed. I don't just think it
should be under realism. It should be very, very nice renders This
is what it should say. Of course, it doesn't say that. So it's physically
based rendering. So light behaves the same way
it does in the real world. It supports global illumination, real reflections,
caustics, and shadows, and it's ideal for
photorealistic rendering, product shots, architecture,
and cinematic shots. Limitations, much
slower than EV, especially at high quality, as I said, and requires
way, way more memory. So, again, if you're running
a lower end machine, better off viewing everything
in EV and then switching around to cycles when it comes to actually render
out the final scene. Alright, you will notice then, as we have got it on cycles, at the moment, it says CPU. This is one of the
most important things. So you'll notice at the turn
this, it goes up to this. It takes quite a bit
of time. If I now put this onto GPU compute, now you'll see when I turn it. Done, done, done because
it's using my GPU, not my CPU, real big
difference there. Now, if I just quickly
switch back to EV, we're not going to be going
through these at the moment. Now, I will play you rendering out in cycles and EV
later on in the course, but for now, we're not going
to be going through these. We are just going to be going
through these on cycles. So at the moment,
you can see that we have a view port and
we have a render. Now, turning on denoise
in the actual viewport. So if I put denoise on, you will see as a turn,
it's very, very smooth. Only put this on if your
computer can handle it. It does take a lot more GPU
power to actually use that. So that's undersampling.
Next of all, then if we close that down,
we've got light paths. Now, this is one of the things. You may as well turn this
down something like five. Because, you know,
the higher this goes, the more light
bounces there are, which means the more GPU
you're actually going to use. So very important
to turn it down. The other thing is, when we go a little bit later
on in the course, I'm going to show you
about transparency, this generally for leaves
and things like that, it said a little bit too low, and we will start turning
that up as we go through. Now, I always turn on
fast GI approximation, and you can hover over here,
we'll tell you what it said. So why do we have it ticked
on? Is it worth using? And what does it do? So instead
of letting cycles spend tons of time calculating
full light bouncers, so bouncing off here,
which is accurate. Fast GI approximation uses a pre computed cache
of lighter behavior. In other words, it speeds it up. It gives you roughly
accurate lights bounce the fraction of the rendert
and it works more like a light bat but still
keeps cycles ray tracing for direct light
reflections and shadows. So what are the benefits? It usually speeds speeds
up complex scenes. It's much faster at
previews and final renders, and it's perfect
for environments. Limitations or it's
an approximation, so it won't be exact may cause subtle lighting
differences or artifacts, and it's best used for
soft indirect lighting, not shop caustics or
precision renders, which is exactly what we
will be doing with it. Okay, so there that.
Let's close that up then. And as I say, we're
briefly going over these. Next one we've got
then is simplify. This is a really,
really handy one. If your computer is
slacking a little bit, you can click this on, and
what you can do is you can turn down the maximum
amount of subdivision. So if you're subdividing
things, we can turn those down. It won't show up
in the viewpoint you can say viewpoint here. The main thing is, though, the main thing I use this for, especially when they
had a lower end machine is turning down the
texture limits. I can turn down those
shaders and textures, which means I'm going to get my viewport much, much quicker. So if, guys, if you're
having a sluggish time, once we've got a lot
of parts in here, make sure to turn the texture limit down all the way down. Just start from 128 until you
get it in that sweet spot. And then it should be fine. Again, you can do
it in the render, but generally, it's more for
the viewpoint, I would say. Alright, let's close that up. Let's turn off simplify. And then what we'll do is, as we work on, we
will come to film, and I'll show you how if you put transparency on or off when
it's a good time to use that. Next of all, then we've got performance and we've
also got compositor. Now, being as we here, we
might as well set this up. Obviously, if you're
using your compositor with GPU instead of CPU, it will work much, much better. So we might as well put
it on GPU straightaway. Next of all, then,
we've got memory. So let's close up, yes, performances under
memory, anyway. So let's most people
miss the composite part. I know I missed it for a
while before I saw it. Next of all, then
we've got memory. Let's close up threads. 2048 is the perfect tile size
if you're using a GPU. If you're using a CPU, I recommend that you
drop that down to 256 or something like that. As we get further
on in the course, again, I will explain
more of this. But for now, make sure
you've got tiling on. Make sure it's on 248 and make sure persistent data is on. I always find that really
helps in our final renders. And finally, then we've
got our color management, and this is a little bit different to how
it used to work. So you'll notice now we
have something called AGx. Those of you out there might be running
older versions of Blender, and you will probably
have this on filmic. Now, luckily for you guys, I've actually
prepared something, so let me just open that up. So I have here the
difference between filmic and AGX which
we'll quickly go through. So filmic is the old version of um the color management and
expands the dynamic range, so you can see a
good dynamic range, realistic tone, but it has some issues with
color flattening. And there's definitely
a difference between them when you
compare side by side. That is, for sure. I always find that the new AGX is a little
bit harder to work with. But I do feel like it gives a much more realistic
color palette, let's say. You can see AGX it replaces the color management
in Blender four, and you can see the strengths
here, clean colors. It's actually, I think, really, really good for stylized
work, personally. That's what I think.
So it's still new. So some workflows, you know, most tutorials may
assume filmic, so make sure you're
aware of this. And if you're
watching a tutorial, yours doesn't look the same. It's going to be down
to basically the AGx over the filmic. And finally, in simple terms, I've got you this
and when you should use it and things like
that. All right then. So now that is
everything set up. I'm going to close
all these up now just to make sure
close all these up. So it's nice and neat and
all of these are closed up, like so and making sure that
I've gone cycles and GPU. And finally, then what
I'm going to do is I'm just going to get
rid of this light. I'm going to put it
back onto object mode. And finally, I'm
just going to go and save all my work and
on the next one, so I'm going to save it on
here in the same place. And on the next one, we will finally be making a start on
building out our grey box, and I'll explain all that on the next lesson.
Alright, everyone. So that is all of the kind of master class of the beginning
of building anything, how to sell blend and
everything like that. I hope you really
enjoyed it. We spent a lot of time going
through all that, but I definitely think it's
worth it in the long run. Alright, everyone, so
see you in the next one. Thanks a lot. Bye bye.
10. Integrating Reference Images into Blender Projects: Welcome back, everyone to blend the Building Master Class
from concept to final render, and this is where
we left you off. Now, before we go on,
there is one other thing. Let's first of
all, save you out. So there we go. And what we want to do now
is we can come to File, and we can go down
to where it says defaults and save startup file. What that means is it'll
save in our human. It will save all of these things that we've actually done. The only thing is
with the new blender is if we go to edit preferences, you will see if we
come to interface on the status bar all of these are ticked off again for whatever reason, I don't
know why it does that. But anyway, if we now come
over, in fact, you know what, before we do that, what we'll do is at the moment,
we're on layout. Now, layout has the actual animation
timeline in here for doing simulations or doing any
animation, anything like that. We don't really
want that. What we want is a full view port. So what I'm going to do is
just click on a full viewport, like so and now what I
can do is I can now come up to file defaults
and save Startup file, which means I will
always start with the file exactly like this. So if you now go and
open up a new blendfle, you'll see it comes in with umenin with all
of those options, probably with these missing, but everything else,
including the cycle setup, should be set for you as well, including all of these options, which is really,
really handy to have. Now in this one,
what we're going to do is we're going to be showing you the basics of
modeling within blender, so I'm going to play a
short video on there. But before we do
that, what we want to do is we want to
discuss references. Obviously, we've got a lot
of references to work from, and we should be using them.
But how do we use them? First of all, show you a
way where you can bring in the references into the
blender viewport on their own. So Shift A, if we come down
and we go to image reference, we can actually then bring
in these references. So if I go to references, I can see I've got a lot
of references on here. I can't actually
see them, though. So if I come over to where
these four square parts are, then I can actually see them, and I can also make them larger, so I can make them
larger, larger, larger. So I've got a good view of
what I actually want to see. And one of the references
I'd like to look at is this one here
so I can bring it in. Now, one problem is when
I brought it in now, you can see it's
at a weird angle. Let's delete that, and
let's press one on the number pad, Shift
image reference. And now because I've got this straight on,
if I bring it in, you can see now and bring it in, like so shift spacebar move
and I can bring it out. I can scale it with S, and there we go. That's
one way of doing it. The second way of doing
it is if we come over, to the right hand side here, and you'll see you've
got a little cursor in this right hand side
right around here. We can then drag this up, and you'll end up with
exactly the same one as this. But what you can do now is you can click the little down arrow, go over to Image Editor, go to Image, open, and then what we'll
do is we'll go and open those images that
we just had open. So references here that,
and there's your image. So you can work with it over here within the
blend file as well. Now, to get that off, if you don't want that because
I don't work like that, on the left hand side,
you can click the little, left click, pull it down,
drag, and there you go. You've got everything
back to how it was or you just reload your blend
file. That might be easier. Now, the way that I like
to do this is I will. Create a Puri file, bring in the images that
I want to wherewith, so the main images, and I will have those on
my other screen. Most people have two
screens nowadays. If you haven't, you'll have to do it the way that
I've showed you. And if you have, it
makes it really, really easy then to
create these things. Now, I always
recommend, as well, when we're starting that we've got all of our
references ready to go, and we've done all
of this work before even even touching blender. So before even
starting any modeling, any grey boxing, we've already
done all of this work. From there, then it's
going to make things much, much easier to build
everything that we need. And I also recommend
that you actually really take the time
with your grey box. It might take us four or five
lessons, an hour of work. It doesn't matter because
it's going to make such a huge deal long term. So whenever you're building
a building like this, always, always build
out your gray box. And now I'm going to do
is I'm going to play your basic modeling video just to get you started in
the basics of modeling. This will discuss things like object mode and edit
mode, for instance. So when you come back,
you're not going to be too lost in the things
that I'm going to do. Alright, everyone, so I
hope you enjoyed that. I'll see you on the next
one. Thanks a lot. Bye bye. Welcome everyone to the basics
of modeling in blender. And this is a short
introduction just to get you started on a few of the
basics in modeling. So the first thing I want to
do is bring in a primitive. So the way that we're
going to bring into primitive is press Shift and A, and then what we're going
to do is open up a menu, and you can see that
we've got all of these things along this
actual primitives menu. But the one we want to focus
on is the actual mesh. And from here, you can
see we can bring in many, many things like cylinders, cubes, planes, and the
one we want to bring in just for now is
going to be our cube. That we brought our cube in
the next thing I want to discuss is object and edit mode. And you can see at the moment, over the left hand side, we're actually in something
called object mode, and this means basically we can manipulate this whole object. So if I press G, I can actually move it around
my viewport like so. If I press S to scale, I can actually scale the
whole of the object in. But the thing is, we
don't really want to work in object mode necessarily, and a lot of the
time, we're actually going to be working
in edit mode. So we can come up to
the top left hand side and put this in edit mode, or we can actually press the tab button and jump
into Edit mode that way. You will notice once we've
actually gone into Eddy mode, we have a lot more
options to use, and more importantly,
we have a lot of the topology now to
play around with. So the first thing you'll notice the difference being is that we have now these three options
up at the top and side. And if you have over them, it will say vertex,
edges, and faces. Now, vertex is going to be
these little points here. The edges is going to be these edges of my cubes
or any of the edges. And finally, we've
got the faces, which is actually the
whole polygon face. Now, you can also, instead
of clicking on these, press one on the keyboard, and that then will jump
you into vertex select. If you press two, you
can go into edges, and three is going to
take you into faces. From here, we can actually
manipulate any of these parts. So you will notice
at the moment, I've got gizmo here. Now, if you don't have
the Gizmo available, coming over to the
left hand side and you'll have this little
button here that says move or you can press Shift spacebar and bring
in your move tool like so. Now because I'm on faces, I can actually pull
out this face like so, if I go to edges, I can
actually grab one of the edges and pull
this out like so. And if we're on vertexes, I can grab this vertex or grab the second vertex with Shift Select and then
pull this out like so. Really, really easy to actually
manipulate things once you know how to select
each of these parts. Before we go too much
in the weeds with actually modeling in
this actual Edit mode, let's just jump back into
object mode for now. What I want to show
you is how we can actually move this
actual cube around. So as well as moving it
with the actual gizmo here, we can also press G
and actually free move this object around or we
can press G and Y, too. Let's put it along the Y axis, move it around or the X axis, for instance, and move
it this way or even the z axis and move
it up and down. To drop it back
where we started, let's just right click like so. So that's actually moving the location of it's
not a cube anymore, but let's just say it's a cube. We can also scale this in
as well with the S but so we can scale it in or
scale it out like so. Now we can also press the S but, hold the shift button,
and then we have a lot more finesse
on actual scale. You can also scale
this up by, let's say, a factor of two, so S, two, enter, and there we go. And of course, we can scale
it down pretty small as well. Now the next thing I want
to discuss is rotating, because if we rotate it with
R and just rotate it around, we haven't got a lot of
control over how this rotates. So what I want to do instead is, I always want to press R, then attach it to an axis,
which might be the Y, so the green one, and then
rotate it either by freehand. Or by actually inputting the
value under our number pad. So if I want to rotate it, let's say, by 90 degrees, press the ends button,
and I've rotated this round by 90 degrees. Now, if I want to
rotate it back, I can press O Y, the little minus button
on the number pad, 90, and then we can
rotate it back. There is something else
that you need to know. We also want to reset
our transformations, and this is one of the most important things within blender, because if you don't reset
your transformations, blender still
considers this a cube, even though it's not
really a cube anymore. So what we want to do to reset the transformations
is press control. A, all transforms then
you'll notice that the orientation has
moved over here because it will always move
to the center of the world. From there, then we
want to actually reset our orientation as well. So we want to right click, set origin to geometry, and then it's going to
put the origin right back in the center
of this object. Now, it's also important
to know resetting the transformations will also impact things like UV mapping,
things like modifiers. Basically, if you ever
have a problem in blender, always make sure that you
reset your transformations, and then most of those problems
will definitely go away. Alright, the next thing about resetting our
transformations, it makes it really
easy then to get something back to how
we had it before. In other words, if I press
S and scale this down, and then let's press R and Z and rotate it round this way. Because before this, I
actually reset my rotations. What I can now do is press lns and put it back
to the scale that it was before I did anything and then alternR and actually
reset that rotation as well. So really, really handy, once you've actually reset your transformations in
what you can actually do. Now, moving on,
we're actually going to be looking now
at duplication. So if I come round here, I'm able to actually
duplicate this. If I press Shift
D and then press the Enterbor it's
now a duplication, and I can move this over
to the right hand side. So now we have
actually two objects. Now, what if you want these two objects actually combined, and you didn't mean to actually duplicate it in object mode, for instance? Well, that's easy. We can just shift,
select the other one and press Control J, and now they're both actually join together,
as you can see. So if I press tab now, we're able to come in and actually work on them
both at the same time. What happens if we want to
actually split them up, so we don't want the objects
to actually be together. That's also easy. Just make sure that you select
one of them first, and then all you're
going to do is press L just to select everything. So all of these faces, then you're going
to press P. Come down to where it says selection, and now if I press tab, they're both actually split off. Now, of course, using
the same command, if I press tab, I can
actually come in, grab a face, for instance, press Shift D. I
can actually also duplicate things with
inside Edit mode as well. We might want to duplicate
all three of these. Shift D, I can actually come in then and actually
duplicate them like so. It also means, though,
is that these, when you duplicate them in edit mode will be part
of the same object, of course, because in edit mode, they're not actually
classed as an object. They're clustered as
the same actual part. Now, for the next
part, I'm going to bring in a brand new cube, and I'm just going
to show you some of the basic modeling
techniques within blender and go through
a few of the options. So here we have a
brand new cube, and the first one I'm
going to show you is, if we come into Edit mode, we'll always be working
in edit mode to show you these things, make
sure you're in edit mode. I'm going to grab the top face. And what I'm going
to do is press E, and that then is going
to extrude this out. Now, sometimes you will need
to extrude something out, and it will need to be
along A axis, for instance. So all I'm going to do is go to Edge Select, grab this edge, and then what I'm going
to do is press E, and you can see, because it's not
tied to an axis, it's floating around everywhere. However, if I press the Xpon, you can see now it extrudes out, following along
that actual axis, which then makes it
really, really easy to manipulate it where
I actually need it to. One we're going to look at is
something called beveling, and then all I need
to do is come in, and I'm going to grab my edge. So I'm going to press
two on the keyboard, grab an edge like so,
and then I'm just going to press
Control B like so. And you'll notice now it's actually bevelled off that side. You'll also notice down on
the left hand side here, we have something called
an operator panel. It will be closed.
Just open it up. And from here then
with the actual bevel, we're able then to turn the
bevels down, for instance, turn them up, move
how the shape of the actual bevel is going to be and all that
other good stuff. Pretty much anything you do in blender is going to give you
an operator panel like this. We're not going to go too much
into this, but basically, the moment that you press Tab button to come
out of Edit mode, this is going to disappear, and then you're locked in
with the actual shape that you've chosen or the
insert or the extrusion. So just bear that in mind. So the moment I press tab,
that actually disappears. Now what about if
we want to bevel off verts and not edges? So for instance, if I come to a vertice like this
and vertice like this, press Control B, you'll see
that it bevels off like this. But if I come to one that are the
opposites of each other, press Control B, you'll see
nothing actually happens. However, if I press
control shift and B, then we're actually
able to bevel off the actual verts like so. So that's another handy
tip for actually bevel. Now the next modeling
technique we want to discuss is
actually edge loops. So how do we get more
geometry onto this? So, for instance, I want to
bring some edges on here, I can press Control, and that then will bring me
one edge in here. If I left click then, you can see that I can put this either this side or this side. But let's say I want it
right in the center. I'm just going to right
click on the mouse, and that then is going to
put it right in the center. Now, the other
thing I can do with the operator panel
again is then come in and turn all of these up to give me more
actual edge loops, and I can even move them
to the on the right. Now, I can also, if
I press Control ed, come in, press control law. I can actually scroll up on the mousewheel to give me as many edge loops
as I actually want. Or if I want a little
bit more fins, I can actually type it out
on the actual number pad, so I can type out 120, for instance, and
have 120 edge loops. To cancel it at any time,
just press the escape board, and then that will
cancel it out. Now the next modeling
technique I want to show you requires two actual blocks
or two cubes like this. And all I'm going to do
is I'm going to come in, and I'm going to select
opposing faces like so, and then I want to actually join these together,
for instance. So all I'm going to do,
I've selected them both. I'm going to right
click and come down to where it
says bridge faces. And now you can see I can
actually join those together. Now, if I press Control's dead
and just go back a minute, you can also do this
by coming in and let's say grabbing this
edge and this edge. And what I'm going
to do instead is, I'm going to press
the F bone like so, and come down to the
bottom, as well, and then grab both of these
and press the FBne like so. Sometimes bridge will
not work because bridge has to work with two edges
and nothing in between. In other words, nothing
selected there. If I come into this
one now and try right click and come
down to where it says, bridge edge loops, you will see select at least
two edge loops. So we can't actually
join up from there, and that is when it's a good
idea to use the FBN instead. Now the final modeling
technique that I actually want to show you is
something called insert. What I'm going to do is I'm
going to grab this face here. I'm going to press the
ebon and then you can see you can actually
insert this face in, and from there, you can actually extrude it out if you want to. You can also then
press Control B and bevel it off if you want to. And you can see now
it's really easy to use all of those techniques
that I've actually showed. Now, lastly, the
last thing I want to show you is the insert again. But this time we're
going to grab this base and this base, and if I press I,
it's true you can actually insert them
both at the same time. Now, the best thing
though about insert is, if I press the I and
then press I again, we can actually insert them separately from each
other like I see a lot of renders on Facebook and other social media that kind of look really,
really blocky. And for instance, if I press Tab now and go into Object mode, you will see this actually
looks pretty blocky. But there's a really
easy fix for this, so it doesn't actually
have to look like that. All you need to do is once you've actually
finished, right click, come up and where it
says shade auto, smooth, and that then will shade it off based on the actual angle. So really, really easy
to either shade flat, shade completely smooth like so or shade auto
smooth, like so. If you actually are struggling
and you actually want it to shade it a little bit
smoother than what it is, you can come over
to the right inside where this little triangle is, go down and open up the normal, and from there, you can
actually increase this and shade it even more smooth
based on a higher angle. The default is always set to 30. So make sure you set it to 30
in case you actually over. The last thing I
want to show you in this introduction is the actual cursor because
I think it's very, very important to
actually modeling. So what I'm going to do
with the mono is I'm going to make another
cube with Shift D, and then I want this cube on top of this
cube, for instance. Now, if I move my
cursor over here, so shift right click. And then what I can do is
I can press Shift Desk, and I'm going to go selection
to cursor, keep offset, and that then is going to move the exact center of this cube, all the orientation
to my actual cursor. Now, how would I get this
then on top of this cube? I would literally
grab this cube. I would first of all, right
click and set the origin to geometry just to make sure that origin is right
in the center like. So I would then press Shift
desk cursor to selected, and that then is going to put my cursor right in the center. And then I would grab this
cube, and from there, I'm able to go Shift Desk
selections cursor, keep offset. And now that cube is right
next to this actual cube here. From here then, I can
actually bring this up, and let's actually just have a quick play aound of
everything that we've learned. So you can see now if I pull this going to join them both together
then with Control J. And then the first thing
I'm going to do is come in, grab this face and this face, and we're going to
right click then, and we're going to come
down to bridge faces. And then going to bring
in some edge loop. So let's bring in two
or three edge loops. Left click, right, click. And then what I'm going to
do is I'm going to press Alt Shift and click
just to select all of this edge going
around here and press the S but and pull
it out like so. From there, then what
I'm going to do is I'm going to bevel off
both of these tops, so I'm going to grab this top, shifts like this top. I'm going to press Control B and actually bevel
them off like so. From there, then I'm going
to bring in an insert, so I'm going to grab
the front top here. I'm going to insert this
with the eye button like so. And then from there, I'm
actually going to extrude out. So I'm going to extrude
this out like so. Now, let's say I want a
bigger piece on the next bit, I'm going to press
Shift D. Pull it out, so this is a duplicate
of this face. I'm going to press the S but to make it a little bit bigger, and then I'm going to press E and pull that out
along the axis. Finally, then what I'm
going to do is grab this one and this one and going to right click then and
bridge faces like so. And you can see just
how easy this really is now to actually start
building out some really, really complex models with everything that
you've just learned. Alright, everyone, so I
hope you enjoyed that, and I'll see on the
next one Cheers.
11. Starting Environment Blockouts with Primitive Shapes: Welcome back, everyone to Blender building master class from concept to final render. And finally here goes.
We're finally here where we can actually start
building something out. Now, we're going to be using a few tools to build
out the grey box. One of them will be visual. One of them will be me telling you the correct
sizes or roundabout the correct sizes
because building this building isn't so easy
just working off a reference. As you can see the
reference, which is here, it's pretty hard to, you know, establish the exact
sizing of things. And although I do
want you to build out your own buildings in your
own way and things like that, I think it's important that
you have a good start. So what I would do is I would
build out this gray box. Once you've built
it out, then you're free to go in and
change the things. You just have to make sure that the modular part you put in will go corresponding
to your own gray box. But I think for this building, if we take a quick look at it, I have looked at how
everything is built out. It's got a lot of depth to
this building, as you can see. You see, there's a lot
of things going in. There's a lot of extra
sticky out parts everywhere. It had this amazing front on this building, and, you know, each side from this side to
this side is very different. These are things that you
really need to think about. You need to think about
height need to think about things being different
heights, for instance. We need thinks about
things being set back, and we need to especially
think about how it's going to be set out with foliage
to bring it to life. Where the benches
are going to be, you can see the bench here. This part comes down
here into the street. These are all things
that give it life. These are things that
don't make, you know, the buildings you're
creating too flat. So saying all that, let's move this over
to the left hand side, and let's discuss how we're
actually going to do this. So first of all, let's
move our guy over here, and what we'll do is
we'll bring in a cube. So if I come in,
bring in a cube. Now, just watch this part, and then you'll have a good idea of what
I'm actually doing. A number of ways then
to scale things. So if we come into Edit mode, we can come in, of course,
and pull things out. We can pull out faces like this. We can pull out edges like
this and so on and so forth. But the thing is
there are better ways than simply just
pulling things out. There are tools that are
going to make this easier. If I bring this back with Control E and come
up to this here. So these square here with
this little white block, you will see it disappears
in object mode. So it can only be
put on in edit mode, come down, and then you've
got edge length measurements, which makes it really
easy then to pull things out and get a good idea of
what the measurement is. So when we're talking
about measurements and how high things are, like we've got on
this building here, 7.16, you know,
these measurements, that is one way of doing it. The other thing is, as well,
if I pull this back over, knowing the distance
from here to here, especially if you're new,
is incredibly important. And I'm going to be going
through that with you as well, and I'm going to be showing you the ways that
you can do that. Now, the other thing is to
make something the right side. So at the moment, you can see
2.57 along this edge here. Now, if I come over to the
right hand side, open this up, you will see it says
2.57 on the X axis. I can come in and
actually alter this on the dimensions over here as
well, which makes it really, really easy to get a good idea, not only in edit mode
of how big things are, but also in object mode, we can actually use this to create the right
scale of things. So both of these
tools together now the last tool I want to speak about is the measuring tool. Very very few people use this, but it's incredibly handy. If you come over to
the left hand side, you will see you've got a measuring tool where
you can just select it, drag it, put it on,
and there you go. You've got the measurement or roughly the measurement
of what this is. You can go from here to here, for instance, and just
measure everything out. Now, this gives
me a good idea of what size and everything
is, and from there, I can actually come in and click on the actual measurement, press delete twice, and then I can actually take
it off, like so. All right, so now
we've got the ideas of what we're going to use. Now what we're going to do's come in and create
our first block. Now, our first block is going
to be this block in here, and that then will give me
a good start of, you know, knowing how big these steps are, how big this is,
going all the way up. In other words, probably
better off building out the dome first and then
adding these things on, you know, after we've done that. So I think it's just going to make things much, much easier. Alright, 'cause the front of this is pretty
complicated, to be honest. When we come out to
actually build it out, you will see how
complicated it is. Building a gray box is
a little bit easier. But still, getting all of these things all tight together, all working as they should
is going to be fairly hard. Alright, so let's move
that over to this side. And the first thing
I'm going to do then is put that right. I'm going to, first
of all, come in, bring in a cube. So shift day, mesh. Let's bring in a cube. And now all I want
to do is start out with where the doors
actually going to be. So my cube on here is going
to be 5.355 0.15 0.8. This is the size
of my first cube. So now if I press one, I'm going to press
Shift space bar to go to MVT because I had it on measurement tool and bring it and this is how
big the front. So this part here
is going to be. Now, a lot of this is actually hidden away
in this part here. So there's a ceiling
on here, for instance, and also it's a little bit higher up because of
where the door comes. Now, the next thing
we want to do, if we zoom in here, you can see this has actually pulled
out a little bit. So what we need to do now is put on this little bit
that comes out here, and we need to measure it out. So what I'm first of all
going to do is I'm going to press tab, go into Facet. And what I want to
do is I want to pull this back now a little bit. So you can see at the
moment because we moved it out in object mode, you can see now when I move
that back, it moves on here, but they're not correlated
to the ones on the inside, and you need to take
that into account. So what I want to do now
is if you're working on, you know, edit mode, make sure you keep working
on Edit mode. If you're working
on object mode, make sure you keep
working on object mode. So what I want to do
now on the Y axis, I want to pull this back to 4.7. So 4.7 like so, and then I want to
come to the front now and bring it out. So I'm going to press tab,
I want to press Controller. To bring in an edge
loop. Now, most people bring in two edge
loops like this. So left click and
then they split them. So S and X pull them
apart like this. It's not the best
way of doing it. The best way of doing
it is pressing Control. Left click, right click, dropping it right in the center. And then instead of
doing it that way, just go over the top. Press Control B as though
you're going to bevel it, and then what you do
is you can actually pull these out at the same time. It's much, much quicker
to do it this way. So I'm going to pull them
out something around here. So we've got a little
bit of a gap each way. Now, mine is no 0.292. So around no 0.3. And then what I
want you to do is I want you to come to
the front of it, seven to go over the top, and I want to extrude
this out now. So I want to extrude this out, and then this is going to
be the extrude out part, which we can build around. So if I come to the top,
press the extrude bone, which is E and just pull
it out a little bit, like so, and there we go. Now, if I put my guy there, you can imagine he's going
to have a pillar this side, a pillar this side, and
a big door in there, and then the ceiling's probably going to come from
round about here. Alright, so far so good. So we've got this part in now. So the next part
we need to think about is the part that's
going to go on top, and that then will
lead to our dome. Now, our dome is going to be larger than this
part because it's going to be slightly hidden, you know, by these blocks
that are going to be here, by the roof and
things like this. So just bear with the process, create the dome a
little bit bigger, and don't worry if it
doesn't look quite right. Now, the first thing we
want to keep this centered. We want to move our
gout a little bit, and we just want to go
through a couple more things. So what I'm going to do is going to hide
this out of the way. So hide is H to hide
it out of the way. And then we're going
to press Shift A, and we're going to
bring in a cylinder. And the reason we're
bringing in a cylinder is because we will be using cylinders a lot in
this actual build. And it's important to know what I'm going to tell you now. If we bring in this
cylinder at the moment, you will see it's on 32. So 32 vertices, move it over there. Let's
bring in another one. So shift, bring in a cylinder. Let's instead put
this one on 24, and let's move this
one over there. Let's now bring in another one. So shift, bring in cylinder. Let's put this one on 12. Move it over there. And
finally, the last cylinder. Mesh, cylinder. Let's put this on 200. Like so. Alright, let's look at these cylinders then.
This one looks amazing. Really, really nice and smooth. If we go into it, though, we will see we've got let's just take
off the measurements. Crazy amount of verts in there, crazy amount of polygons. If we come to this
one, oddly any. And if we come as
we go further up, we can see more and
then more again. Now, if we come in and we
go to this one over here, and we right click and
we shade auto smooth, we can see this
shade's pretty smooth. There's a little
bit of jaggedness on here, but all in all, unless we're doing
something hyper realistic, there's no point in having
200 polygons in there. Now, if we come to this one,
which is 24, right, click, shade auto smooth, again, we can see it's
shading really smooth. Now, some people believe
that they should put in more polygons to create something that's smoother, but you
don't have to do that. You just need to
get a happy medium. And this one, right click, shade Ato Smooth, you can see, doesn't shade smooth very well. Now, this one is on 12, this one on 24, this one on 32, and this one at 200. How much polygons
are we actually saving by going to the
200 or even the 32? So I recommend when
you're building anything like the
steps or the dome, you stick to round 24
unless you really, really want it to
have smoothed out. And if you do want that,
then go to the 32, but I don't recommend
going over there. And this is a really important lesson because going forward, we will be making a lot of cylinder we will
be making stairs. We will be making things
like columns, the dome, and we really need to
understand why it is that we're using round
about 24 vertices. So you can see here
if I click on this, we have 796 triangles
and polygons are 202. If we click on this one,
we only have polygons 14. If we click on this one, we only have express tab, 26 polygons. So we've gone from 202 to the one I'm going
to be using 26. Massive difference,
especially when you start adding
those up over time. So what I'm going to do is, I'm just going to
delete all these. Now, I need to bring that block
back that I actually had. So all I'm going to do is
press TH, and there we are. It's back in place. And what we'll do then on the next lesson is we'll actually start
getting out our actual steps. So we'll make these
small steps here that will give us a grounding
then to actually start from, and then from
there, we can start putting the dome on here. Alright, everyone, so you enjoyed that I'll see
you on the next one. Thanks a lot. Bye bye. Oh
12. Enhancing Greybox Symmetry with Mirroring Modifiers: Welcome back if
you want to blend a building master class from
concept to final render. Alright, guys, so what
we're going to do is if I bring this over here, we're going to build
this part next. So this part here is what
we're going to be building. We're not gonna build this out part on there,
anything like that. We simply building the grey box and we're going to get
just this part in. This is one of the
hardest parts to do because of the angles
that are involved. It's very complex
actually building, you know, all of these,
getting them look right. But the front of the building is one of the most
important parts. You'll see in any building
around the world, the front is the part where
they spend the most time, and the rest of the parts, then you have to build after. So I always work the same way. I think about the
front whenever I'm designing this, I
build the front out. And this, to be honest,
the back and, you know, these tops and things
comes right after that. So saying that, let's
bring up our reference. Let's put it wherever
you've got your reference. And what we're going
to do first is we're going to bring in a
plane because I think a plane is going to help us much
more visualize scale and size and things like
that, just for these. So what I'm going to do is I'm
going to bring in a plane. First of all, make sure that your cursor is in the center, so you can see here my
cursor is in the center. So shifts, cursor
to world origin, shift D, and let's
bring in a plane. So bring your plane over, and you'll notice it
always comes in flat. You can actually I will show
you something else, as well. Bringing a plane, so shift A, bringing a plane,
you will notice that you can actually
bring it in rotated. So if I come in, you can see I've got an X axis
running this way. If I put this on 90, that means then it's rotated. Now, if I delete that press
shift A, bring in a plane, you will see it's not rotated. Now, there
is one other thing. If we come in and scale it, so I'll come in and
scale it up like so. It should now, if I move let's
see if it comes in scaled. So I'm going to press Shift
A plane, and there we go. It's actually
scaled. I'm actually going to rotate it,
as well, you know. So I'm going to rotate
it by 90 degrees. And then what I'm going to
do is move it, delete it. Shift A, let's bring
in a plane again. Yeah, it's still not rotated. So you can only actually
change the scale, and then it will
save out the scale till you actually
reopen blender. So I learned that, actually. So anyway, let's bring it
over. Let's rotate it. So RX 90, let's rotate
it the right way, Ram. And then what we're going to
do is get the scaling right. So what I want to do
is 5.2 along here, 5.2 going along the X axis. So let's put it on 5.2. Let's put it then on
the height at 6.56. So we'll go here, 6.56. So, in fact, it's
not it's this axis, 6.56. Let's try
that. There we go. Alright, so that's the
right height for this. Now what we're going to do
is we've got the width, we've got the height
of this part. And what I'm going
to do now is shift D and bring up the next one. So I've duplicated it,
I'm going to pull it up. And then this one on
the Y, I think it is. Yep, on the Y is
going to be 5.23. So 5.23. It's gonna, of course, be exactly the same
on the actual width, and I'm going to put that
one back in place now. So this is the second floor, and now we're going to
work on the third floor. So what I'm going to do
is I'm going to press Shift D. I'm going
to bring it up. Up to here. And this one
then is going to be on 3.65. Now, bearing in mind, this is our actual roof. So this is this roof bit, is this part here. And
this is the bottom part. So we need to see
if it all fits in together once I've got
this part here, 7.16. So let's give it a try anyway. So what I'm going to
do is I'm going to put this then to 3.65. So 3.65, there we go. And now let's see if
it all comes together. So I'm going to pull
it up, like so. And then what I'm going
to do is I'm just going to grab this edge here, and this is my roof,
so I'm going to press S and X and pull that in. And you can see now if
I get my measurement, so let's bring my measurement. I should from here to here be 3.65 something around
there, which is what it is. Alright, that's perfect.
Now, to get rid of this, click on it, press delete and delete
again, and there we go. Alright, so we've got the
right dimensions now. Now we need the
dimensions for this because obviously these
are two D planes. Sometimes I think working with these two D planes makes
things much easier when I'm working with gray boxes because I can get the right
shape and things like that. So what I'm going to do
is comb around here. I'm going to grab
the bag like so. Now the thing is these
need to be joined as well, so I'm just going to
join them up, so I'm going to shift,
select, shift, select, shift select, so the last one here is a yellow
press Control J, and then we join them up. And from there, can press tab. Make sure they're all selected, so you can press A
to select them all. To deselect them, you
can double tap A. So A to select them all, and then I'm going to press
E and pull them out like so. Now I want these at 5.3. So we can see here
if I put my edge on, so let's go to edge. So edge length. And it's this edge
here that I want. So five, pull it out, you
can see now it's moving. So we want to hold the shift button down
when we get close. 5.3 is where we want it. So around 5.3, so something
like this. And there we go. Alright, so next
of all, then what we want to do is you
can see at the moment, my orientation isn't
in the center, which means if I
rotate this round, it's not going to rotate
it round the correct way. So what I'm going
to do is Control. All transforms, right click, set origin to geometry,
and there we go. Now it's right in the center, which means if I press and Z, you can see now I'm actually rotating it around the center. Now, one of the
hardest things to see from here is this angle. It's very hard to measure
what this angle actually is. So I'm going to put
it around 55 degrees. So it's just you do the same. But of course, as you
build this gray box out, you can change that if you wish. So what I'm going
to do is put that back over. I'm going
to go over the top. So seven to go over the top, Z 55 degrees like so. Now I'm going to do is I'm
going to put this into place. So I'm still over the top. And if I press G
now, it will follow. So if I put it over
here, you will see that it doesn't
actually drop down. So it does follow
the ground plane. And if I press G, a long key, you can see I can move it up, I can move it down, but you will see it's actually
locked to one of them. In other words, it's not
going further this way. If I put it over here, you can see it's still
in the same place. So it's really, really handy
to actually have that. So I'm going to go over the top, and what I'm going to do is I'm going to put it into place. So we've got a little
bit of a gap here. And don't worry, we're going
to measure this as well. But what we want to
do, first of all, is just get this into place, and then what I can do
is measure this one and this one once I've
got my mirror on. So, speaking about that, let's bring in our
first modifier, which will be a
mirror, obviously, we want to bring then this. So this one here over
to the other side. So let's do that now. So
if I come in, we can also, once we brought a mirror in alter pretty much
anything we want. Now, I will show
you the wrong way to use the mirror
and the right way, and I'll show you
why they don't work. So if you come over
to add modify it, come down to generate and
then go down to mirror, you will see that nothing
kind of happens if I put it on Y or can see
something's happening, but it's not really
doing anything. And the reason is because
orientation is set here. So basically, it's mirroring on itself because it's not
mirroring from here. So let's right click Set Origin, two, three D cursor,
and there you go. Now you can see it's
mirroring from there. If I put it on Y,
if I put it on Z, you can see that it's
mirroring from that place. But the problem is that it's not actually
mirroring from here. So what we need to
do is we need to mirror from an actual
object instead. Now, generally,
sometimes, for instance, if I set the orientation now, this will actually mirror
from this point perfectly. So if I go Control A, all transforms, there you go. It's mirrored from that place. Now, sometimes, you will come across where the
mirror has a problem. And if we go here,
click on this, then we can actually
mirror it from that angle. So two ways of doing it there, both of them really,
really handy to know. Alright, so now we've done that. What we need to do now is I want to measure this gap
from here to here, making sure that we're
in the right place. So let me get my length, so my measurements here. Let's come from here to here. So this is 3.85, and I want it round about 3.9. So if I bring it
round about here, and unfortunately we should be able to drag this
in, which we can. So three point, I'm
going to want it 3.9. So what I'm going to do
is I'm going to come in, I'm going to actually
delete the other way so it doesn't confuse you. And then what I'm going to do
is I'm going to press tab. And because we've
got a mirror on what I can do is I can press A to select everything and then
move it slightly this way, very, very slightly, guys. And then I'll come in,
grab my measurement tool. Let's delete that one. And let's pull it now from there to there, and it should be 3.91. It's a little bit too far out, so I've gone a
little bit too far. So let me just move it again. So we're going to move
it as to slight bit. And then I'm also going to come in with my measurement tool. And measure it around the top, which should be around 10.25. We can see it's a
little bit out. So what I'm going
to do instead is, I'm just going to rotate this. So hopefully, I'm going
to rotate this round. Now you can see that
as a rotated round, we can bring it now a little bit easier into places I
rotated jaws to slight bit. And then what I'll do is
I'll move it down now. So if I breast shift
and space bar, bring my move toll in, I should then be able to move it down a little bit. Around here. And now let's see how close we are because we need to
get these kind of right. So what we're going
to do is I'm going to delete this. So delete it. I'm going to go from
there to there then, it should be around 10.25,
which is about right. And then we're going
to go to this one. So delete, delete. And
this one I want at 3.91. So 3.8, it's a little bit out, which means I need to just
rotate it a little bit more. And Z, I've got my measurements
there, as you can see, which means that I can press
Shift space bar and move, so I can move it out a
little bit, like so. And then back to my
measurement tool, and now we can see if
I delete this one. So delete, delete grab it from here to here. It's close enough. So you can see I've
grabbed it from the corner, and that
is close enough. So we want it around
those dimensions, and I know it seems
a little bit fiddly. I know we're talking about
a few centimeters here, but it's important
if we're building the same sort of gray box, and that's why I'm
spending this time just making sure we're
in the right place. Again, as I said, everything
is coming from here, so everything is from this
kind of central point. So delete all your measurements, and we should end up with
something like this. And then from there,
what we can do is we can come to file
and save it out. Now in the next one, then what we can
actually start doing is we can actually start
building out this part here, and we can start building
out this part here as well. We don't really need some accurate measurements
for anything like that because we know
we've already got these parts pretty
much built out, and then from there, then we can start building this actual dome. Alright, everyone. So I
hope you enjoyed that. I hope you'll learn a
lot, especially about gray boxing, and I'll
see you on the next one. Thanks a lot. Bye bye.
13. Designing Circular Greybox Fronts for Stylized Buildings: Welcome back, everyone to blend the building master class
from concept to final render. Alright, so let's get
this step in here. So first of all, let's
bring in a cylinder. And remember what I said if you come down on
the left hand side, let's put this on 24. And then what we'll do
is we'll bring this out, so I'm going to press the Sp. Bringing out really,
really nice and big. Now, you can see
from the reference that this stone has a
few steps going up, but basically, it comes near
enough to this point here. So let's actually
do that part next. So what I'm going to do
is I'm going to press Esn'sEad and bring it down. Now, what kind of
height do I want it? I want it round about no 0.9, so I'm going to put
it on 0.9 light. So I'm going to go
over the top again. Then what I'm going to do is just make sure
that it's actually coming out the way that I
want it. And you know what? That's actually looking
pretty good already. If I press one now, you can see, though, we do seem
to have one problem. In that Shift space ball.
Let's move this down. In that, these are not
actually touching the floor. So this is touching the floor. These are not actually
touching the floor, and I need to make sure
that they actually are. So I think what I think is, we've gone a little
bit high with these. So I'm basically
going to grab these, I'm going to pull them
down to the floor like so, and there we go. I think that's looking
much, much better now. Alright, so now what we'll do is we'll pull this up into place. So that also sits on the ground plane just
into the ground plane, as you can see, we'll pull
these down a little bit, then and sit those in the
ground plane. And there we go. So we've got a big door
that's going to be in here. And then above there, we're
going to have another part. So I might as well use this actual cylinder
while I've got it here. And then what we can do is
I can show you how we cut this part away because we're really, really
not going to need it. But we want to cut it
away, that makes sense. We don't want to cut it away, so it's, you know, just broken. I'll show you those
two ways as well. Alright, so where do
we come up to then? We haven't actually built
this second part yet, but we do know it's going to
be around this part here. So that's something that we
need to, you know, build up. So what I'm going to do is
I'm going to grab this part. I'm gonna press Shift. I'm going to bring it up then
to the second floor. And what we absolutely need to make sure
that we're doing is we're putting it just on
top of this building here. So you can see here that we're going to be building
within this part here, so it's going to
have some, you know, supports and things like
that in that part here, and then the balcony
over the top. Now, the one thing
I want to do is make this a little bit thinner. So a said, let's
make it a little bit thinner and let's
pull it up. Like so. And I think to put this in, I will actually also
extend this out. Now, rather than lift this up, all I'm going to
do, I'm going to press one, we can
see the gap there. I'm going to press Essen'sEad
and just pull it up a little bit and then pull
it into place like so. So you should end up with
something like this. Now the next thing
we've got to think about is if we come
to our reference, you will see that this
balcony is set back. So we've got one,
two, three steps, and this balcony
then is set back because these pillars are actually going to
be set on them. Again, when we come
to all of this, it's important to understand
this is just a gray box. When we start
building things out, things will move even up
to a meter or something, just depending on, you know, how accurate your gray box is. So your gray box is just there to get a vision of what your building is
going to look like. Isn't there for
complete accuracy. Alright, so what I'm
going to do then, is I'm going to make
this a little bit smaller while still
keeping this set. So, this sets around
six, not this one. This s is around no 0.65. So what I'm going to
do is bring it in now. So if I press the S but, I can bring it in, bring it in. And then not 0.65, so will get me then
the size that I had, and then I can pick it
up again, as I said, just to get it into
place, like so, and then is that going
to be far enough back? Maybe, maybe not. I think it needs to come back
a little bit more, so we're going to
bring it back a little bit more like so. Now, the other thing
to check here is, if I bring my guy up, what I'm going to do is
I'm going to press G, bring him so he's just
stood on this balcony. And if we pull him
back, then we can have a really good idea because
it's a bit hard to see how much room he's actually
got from the actual door. So once we put this bit in
now, we've got a guy here, and we can see how much
room is around these, you know, to get a
good idea of scale. So if he walks over here,
looks over the balcony, we don't want it too small where there's no room to
actually walk around here. The point of this balcony
is he can come to, walk around it and
look over the side. So we've got to take
that into account. Now, let's work on
this part here then. So this is a hexagon. So what we'll do is
we'll press Shift A. We'll bring in another cylinder, and what we'll do is
we'll put this on eight. So eight sides, like so, and then we're
going to bring it up. We'll make it a little
bit bigger just for now. Now, you will notice that we do have a problem here in that. Rs is flat here. So we can see this is flat, but one here isn't flat. It's got this edge on it.
It means it needs rotating. So if we go over the top, so if we go over the top here, we're going to
rotate it slightly. So what I do is Rs head, rotate it so it
is flat, like so. You can see it's pretty
much flat there. And then we can see that
this should be on 22.5. Because if you do 22.5 degrees, divide it by eight. So 360/8. 360 is the complete circumference
of the circle. Divided by eight equals 45, but we're only turning
it half a kind of half a turn because we're
just trying to get flat, which means it's 22.5. So now for this part, I'm
actually going to give you then the right dimensions.
Now we've got it in place. Let's come over to
the dimensions, and I'm going to
grab both of these. I'm going to put it on 9.17, and then we're going to come
down to the bottom one, and we're going to put
that on 7.02, like so. Then what we're going to do is I'm just going to press one. I'm going to pick it up and
put it onto the top of here, and then we're going
to go over the top, so seven, go over the top. And now we're just
going to line it up. So if I pull it back, pull
it back, pull it back, we should end up with
something with a little bit of a gap like this,
maybe even more. Let's pull it back
a little bit more. And a little bit of a gap
coming out here like so. So something like this,
I think, is about right. And now we can get an
idea of the scale. So first of all, we've got some walls that are
going to come this way. We've got a wall
that's, you know, a support that's going
to come up or a column, and we can actually
work with this. We might even pull it
out a little bit more. We've also then got a big door that's going
to come from here. We're going to have
a balcony on here, so he's got plenty of room
to actually walk around in. And you can see already
now it's really, really starting
to come together. Now, let's go back then to these kind of half circles
that we've got here. Now, if you go over the top, you will see if I come over, let's do the bottom one first. So I'll just hide
this one out the way. I'll grab the top one,
hide it out of the way, come in and put it
onto this button here. So if we click on this,
we can actually click on this then and we can
see through this now, which is really, really handy. You'll hover over this, it
says Toggle X ray on and off. Now, you could also come in and put it on
wireframe instead. That also helps,
but I always find toggling on the Xray
is much much easier. So I can see that if I
cut from here to here, get rid of, you know, all of this part in
this part around here. That then should be fine. You could even go one step
further and come to, you know, kind of this part here,
split it down the middle, you know, make it even more
refined. That is up to you. For me for now, I would just cut it over here and there's
another reason behind that in when you want to create these steps if you start
cutting around here, so bringing it to here and here, that's probably a bad idea. Let's first of all, come in, and what we're going to do
is we're just going to grab this edge and
this edge like so, and I'm going to
press the J button. And what I'll do is
that will actually create a new edge
going along there. You can see now we've got
if you come around here, we've got an edge between
the bottom like so. Now we come to
this and this one. Press the J button,
and there we go. Now we've got another
edge going around there. Now it's important
that you don't grab one here and one here, because if you press
J, it will try to put a loop in there, but
it actually won't work. Now, what we should be able
to do it's coming now. You know what? I'll just take this off
because we don't need this. Let's delete that
out of the way. What we should be able
to do now is come in, grab this face and
grab the bottom face. So you can see these little
points here, grab this face, the one inside, and
we should be able to press Delete and faces. And now we should be
able to come in and grab this one and go all the way
around and delete the faces. Now, rather than selecting
going all the way around, just select a new face
and press Control click. Like so. Let's put it on move. Control click Go round. Control click, press
delete and faces. And now you'll see
if you take this off that you've got
half of that there, and it's much, much cleaner now. Now if we press Altage, bring back the other bit, do
the same with the other bit. So again, we'll go over the top. And what I'm going to
do is put it on X ray. I'm going to press the
Tabb. I'm going to make sure that I grab
this one and this one. Now again, making sure that
they're both at the bottom, like so, press J, grab this one and this one, press J, and now it can
come in and delete the top. Like so, delete faces.
Grab this face. Control select, going
all the way round, control select, going
all the way around. Delete and faces,
and there we go. And that's looking pretty good. So now let's turn this
off, double tap the A. And yeah, I'm actually really, really happy with how
that's working out. I think now on the next lesson, then what we'll do is
we'll create the dome on top of here, and
then after that, we'll actually bring
in our first material and bring in some basic lighting because once we've
got the front on, it's a really good idea then to actually get some
lighting in there so you can click on
the rendered view and see exactly what
you're building, see how everything's
come together. See how the lights
bounce off things. So I'm going to show
you a really, really great technique to
actually do that, and it's something you should
be using, you'll notice. Even when they're building
games and things like this, they will be building
out a gray box. They will be building
in some basic lighting, some basic materials, and
they do that for a reason. So I'm going to show you
whenever you're doing your own buildings,
this is the way to go. All right, everyone, so
I hope you enjoyed that, and I'll see you on the
next one. Thanks a lot. Bye bye.
14. Modeling Domed Roofs and Skylights for Ambient Lighting: Welcome back, everyone to blend the building master class
from concept to final render. Alright, so the part
we're going to do now is this actual dome. Now, when we cran the dome, you will have a little
bit of leeway of how tall your dome
is going to be. I'm going to keep mine
round about the reference, but you might want yours a fair bit higher
or a bit smaller. It's completely up to you. The one thing we do need to take into account is this part here. This little part here
is quite a chunky part, and it is actually
part of the dome. So we just need to make
sure that we've got a nice flat bit coming
down from there. Alright, so I'm going
to move that part over and what I'm going to do to
create the dome is then, I want to keep this cylinder. So if you look just one
more time on the reference, you can see that we've got
these parts going over here, which is following
these parts down here, which means the dome is
essentially also an octagon. So what I'm going
to do or hexagon, I think it's a hexagon
with eight sides. So what I'm going to do
is I'm going to come in. I'm going to press Shift D to duplicate the
top face up here, and then I'm just going to
pull it up very slightly. I'm going to press E then
and pull it up like so. Now what I want to do is I
want to split it off from here because this is the part that I want to actually
create the dome. So I'm going to press L
to grab all of the faces, P, selection, and there we go. Now, the next thing
I want to do before I actually use my bevel is I want to reset
all the transforms because if I come in
and grab this part, so let's grab this
part, bring it down. You can see that it goes to
here and actually goes over, and we don't really want that. We want it to come up
to a certain point. So there's two things
that we need to do here. And the first one is to
resell the transform. So if I press tab, controla or transforms right click
origin geometry. And then what I want
to do is I want to change the dimensions
of this to make it a little bit bigger
because then we're not going to get it
colliding like that. So what I'm going to do
is I'm going to come in 9.92 on both of these. And then what I'm
going to do on the z, I'll put that four
point, so four. 0.9, like so. Now if I come in, grab the top, press Control B, I should be able to come
in and get it relatively, relatively looking pretty
nice down to here. So you can see this
is what we get. Now, you can see that
it's not tall enough. So if we press S and E, we then can increase
the size of this dome. Now, also, I'm not happy with, you know, I'm not happy
with this how it is. I want it to be probably probably a little
bit more rounded. So what I'm going to do is
I'm just going to go back Control Z, and I'm
going to come back in. I'm going to pull it up a
little bit more, like so. And then what I'm going to
do is I'm going to press Control B now and bring it in. And this is kind of the
way that I want it. So something like this, to me, looks way, way better than
what I had it before. Now, of course, we've
got the problem of we're crossing over
all of these points, and we don't
particularly want those. And we've also got a top on here that we need
to think about. So the easiest way,
let's just come in, take off the edge length, and I'm going to
grab this top here. Press Control plus, Control
plus, Control plus again, and then just press
delete and faces, and we'll end up with
something like this, which I think is much, much
better than what we had. Now, the next thing I want
to do is bring this in a little bit because it's
a little bit too big, so I'm simply going to press seven to go over the
top Press the Sb. And as I bring that in, you will see then it
goes over there. So I want to just bring it out, past these points here. And now you can see it's
going to fit much better. And finally, then I just want
to bring this part down. So again, this part here
is what I'm looking at. Now, before I do that, let
me just have a look and make sure I'm happy with
the actual dome. Et's right click and
shade Auto Smooth, so we've got a good
idea of how that is. And then from here,
you can kind of, if you want to press
SSD to bring it up or Ss to bring it down and make it more like this sort of dome. Completely up to you how
you want to do that. Alright, so think for me, I'm going to leave it as is. I'm going to come
then to the bottom. And instead of going
Control, click on here, I'm going to press
Alt Shift and click, and that then is going to
bring it all the way around. And then I'm going to
press the E button and bring it down into place. So now we've got a nice flat bed that's
going to go on there. And from there then, I'm
actually going to bring this out as well just to show this
is where it's going to go. So Alt Shift, click facing towards here because then it will grab them going
all the way around. If you face it, let's say, towards this middle
part, Alt Shift click will go all the way up. So I want it going all
the way across here. So Alt Shift click, you can
see it just grab these, and then I'm going
to pull these out. So I'm going to press E, Enter. And basically what
we've done here now is we've got an extrusion there. Now, if I press S, I
can pull these out. But I don't really want
to press S because S is the worst thing you can do because when you pull
them out with S, you will see that we
end up with slightly, slightly going up on a tilt like this, and we
don't want that. So instead of pressing S, just press Alts, pull it out,
holding the shift button, and then it will pull it
out based on that angle, which means it'll be nice and flat on the top and the bottom. So that's just Alts. And now you can see we've got a pretty nice dome up there. We've got a pretty
nice top on there. And the other thing I'll
do is put the top on. So we'll put the top on just to get an idea where
that's going to be. So I'll Alt ship click. And then what we're going
to do is just press F to fill that face in. We're going to come
then to face select. I'm going to grab that
top face and press E, like so I'm then
going to bring it in. So I, bring it in a little bit, and then E. Now, do not worry at all. About how it looks
at the moment. This is not going to be
nowhere near finished yet. We simply want that
on there to get an idea of scale and how
everything's going to look. And we don't want to
go in there, you know, putting hundreds of things
in there as a grey box. We just want the general
outline and silhouette. We can go one step further with this as well to
help us even more. So if I come in, I
press the I button, bring it in a little bit, I press the E button
to bring it up. And then what I'm going to do is I'm going to press Control B, and I'm going to
bevel that top off, so let's bring it all the way
down a little bit, like so. And finally, then, let's
come to this middle face. I'm going to press
E, bring it up, press the S but to bring
it in. And there we go. Now, you can see that we've got our top on there and you can see just how good now that actually looks
and what kind of, you know, silhouette
we've actually got from just that point here. Now, remember, when
we build this out, we're going to have, a bit poking out here, you know, roof tiles,
doors, windows. We're going to have a big
chunky bit in here as well. But for now, this is giving us a great idea for our silhouette. So what I'm going
to do now is go to File. I'm going to save it out. So, guys, now, let's actually bring in
some basic lighting, and let's actually
talk about lighting. So first of all, if we
put this on to Renve, let it load up, you will see that this is on
cycles at the ums. Just make sure yours
on cycles, and if not, put it on EV, but it might interact a
little bit different. We'll actually check that
out, but let's put it on cycles for now because we haven't got a
lot in our scene. So for most of you, it
should actually work. And let's actually
look at lighting. Now, there's many ways
of doing lighting from three point lighting to sunlight to all kinds of
different other ways. But basically, if you
come down to light, you will see, let's bring in
a point light, pull it out. Pull it up over here,
and there we go. We've got some basic
lighting in there. We can also come over to the right hand side and actually turn up the
power of the lighting. We turn up the color.
We can turn up pretty much anything we
want over this side. You can also see with
the light being there, we've got some basic shadows in here and all that good stuff. Now, we also have if
you come over to light, we also have a spotlight
and an area light. So if we bring in an area light, let's just bring that in. Rotate it round. So we'll
rotate it around here. We'll make it a
little bit bigger, and you can see now with
this type of lighting, we've got much, much
softer shadows on there. We can actually increase
the shadows a little bit, like so so increase
the brightness, but you will see it's
relatively soft. Now, I recommend when
we're doing buildings, there's a couple of
ways of doing it. And we're going to be
bringing in both a HDRI, which is real time lighting, which I'll talk about
when we actually bring that in and a sky texture. But I do recommend when
you're creating a great box, don't just bring in a sun. The best way to do
this is actually to bring in something
called sky texture. So what I'm going to
do is I'm going to go over to my shading panel because that's where you're
going to find this build. So this is where we create
all of our shaded nodes. And if we come over to
here and we go down, we can actually
put it onto Wild. Now, at the moment, you will see we've just got our
material preview on, so we want to put this
on rendered view, and at the moment, you can see that we've just
got a background lighting in. If we turn this up, you see, we can actually
make it brighter, and you can see already this is looking a little bit
different from what we had, but not as nice as
what we can make it. So first of all, as well,
the other thing is, when I'm working in
the shaded panel, generally, I'm not
going to want this on. So this part or this part,
I'm not going to need on. So generally, leads
actually come in, grab the bottom left hand
side here and pull it out, and then we'll do the
same thing on this one. So the top part here, left click and pull it over like so. And now that's that's
not the right one. So let's actually You know what? We've actually got
it above here. So what I'm going to do
is I'm going to go left, pull it down, and there we go. That is our when
you're to set it out. If you're struggling,
by the way, you can pull it this way
and bring in another one. You can also see at the moment, we've got Shader Editor. So if you lose which one it is, it is on Shader Editor. So let's pull that over like so. Alright. So now what
we want to do is we want to delete
the background. So you will notice it all goes dark because we've
set it on world. And what we want
to do now is per shift day search and
let's go for sky texture. So sky texture is this one here, and all I want you to
do is just plug it in. So plug it into the
surface, and there we go. We've got some pretty
nice lighting, if not a little bit bright. But for what we're doing right
now, it works perfectly. Now if we go back into modeling, you will also see on
the right hand side that we've got this
little tab here now, which says world, and this is our sky texture within there. And from there, we can actually alter, you know,
how bright it is. So, for instance, if we bring it round here, we can
make it brighter. So let's just put
that back to one. Now a little bit further
on in the course, we will be going through these because in the resource pipe, we do have, as I said, a sky texture setup and HDRI. So all of these things can be altered and actually
does make it much, much better once we start
playing around with these. But for simply building
out gray boxes, I recommend bring in
just a sky texture. One thing I do want to
do before we actually finish is I do want
to bring in a plane. So I want to bring
in a plane for this all to sit on
because I find, at least for me, when I'm
looking at buildings, it's much better if we get
some light bounces off of the actual plane where the
buildings going to be sit on rather than just staring
through into thin air. So let's just press Shift day. And what we'll do is
we'll bring in a plane. And I'm going to make
this plane much, much bigger, like
so. And there we go. Let's pull it back a little bit. And there we go. You can see now that's looking pretty nice. And the other thing
I like to do is I like to just come over
to where the world is, and I'm going to change
the sun rotation. So at the moment, you can
see we're kind of square on, I hear when it's like that. So what I'm going to
do is I'm Jas going to turn it around, like so. So Jas bring in some
nice lighting in there, and then I'll just
bring down this to something like not 0.2 maybe. Maybe 0.3 something like that. Now, don't worry if
this seems a little bit bright because
on the next lesson, I'm going to show you
how you can create a proper gray box
and have it set up. Alright, everyone, so I hope you learn in this one, and I'll
see you on the next one. Thanks a lot. Bye bye.
15. Setting Up Ambient Occlusion for Visualizing Greybox Forms: Welcome back everyone to blend the building master class
from concept to final render, and this is where
we left you off. Now, I'm going to
save out my work just so I don't lose
anything, so save. And then what we
want to do is now, I always find when you're
building that gray boxes, the best thing you
can do is bring in something called
ambient Occlusion. Ambien occlusion basically
gives you all of those little shadows in
here, these contact shadows. You know, the shadows
were the actual ground meets the steps, for instance, so this part here right in between here meets
this part here, all the wall or
things like that. Actually gives you an idea of what the structure's
going to look like, and that for me is
what, you know, I intend for a gray box. So what I'm going to
do is I'm going to go back to shaded mode, and we're going to go
onto instead of Will, we're going to go to object. And this is the place
where we're going to be building all of our shaders. Or we're going to be
bringing them in from our resource pack and
looking at them within here. So let's first of all, create our first shader I'm
going to click No. I'm going to rename
it, so name it ambience occlusion. Like so. Press the antibonne
and there we go. Now over the right hand side, you will see that we've
got ambient occlusion. I also put it onto my plane. It doesn't matter which part of this you've got
it on at the moment. It won't make any difference
in the long run, trust me. So what I'm going to
do now is come in. I'm going to take
this sir principled, and I'm going to drag it
over here because we do want the principled for
this white part here. Next of all, what I'm going
to do is I'm going to press Shift day to open
up my node search, do a search, and the one we
want is ambient occlusion. Bring that and drop
that in there. And this, by the way,
is the simplest way you can get ambient
occlusion cell. There's way more complex
ways to do this. You can bring in, you know, your own what they
call grunge maps. You can bring those in way, way more complex
ways of doing it. But I'm going to show
you the easiest way and especially the best way when you're working with gray boxes. So Shift day, let's
go for search. Let's go to color ramp. Let's drop this in here. And finally, then we'll
bring in a mixed shader. So search, mix, shader and
we're going to drop that here. Now, the mixed shader wants
to be dropped right on here, and then all we
want to do is just bring this down to the bottom. And now we're going
to do is plug in the color into the fact of here, and then we're going
to go with the color here and drop that into here. And now, you'll see that
if I bring this up, you can see now we've
got contact shadows. Now, one of the things is this needs bringing up a little bit. So because we're in Shader, you know, our shader tab. We need to press shift space bar to bring back our move tool. And then what we can do
is we can bring this up very slightly and have
better contact shadows. So you can see, as, well, these are a little bit
higher up than these, but you can see already this
is looking pretty nice. Now, before we go any further, what we want to do
is we want to put this shader on everything else, and then we'll discuss these parts here that
we've plugged in. So to do that, what we
want to do is if I grab this and I grab my plane where my
ambient occlusion is on, so I grab this second,
so shift select, and then I press
Control P. Sorry, control and L. And
what I want to do is come down to Link
materials, and there we go. Double tap the A, and there is our shader on there as well. Now, the other thing
is because we've tied this one and this one together with the same material, whenever I come in and let's say change this material to red, you will see that it has an effect on both
of these parts. Let's put it back,
though to white. And then what I'm going to
do is just turn it down very slightly because I feel like when I'm looking
at a gray box, it is a gray box,
not a white box. I feel like this looks way, way better like this. So now I can really see the details of what
I'm actually building. Now, before we go any further, let's first of all grab
the rest of these. Like, so grab the plane last. Control L, link materials, double tap the A,
and there you go. You can see exactly why we've done that.
Let's grab this part. Well, control L, link materials, double tap the A,
and there we go. Now, what I also tend to
do with my little guy is, I will come in and click No, and this is so I don't actually lose him, so
it's easier to see. So what I'll do is I'll
click No and I'll just call it to Human material, like so, and then
all I'll do is put this on a bright red, like so. Let's pull him out a little bit. And now I can actually
see him much, much easier than
what I could before. Let's also, I think, let's turn up the
metallic a little bit. And then we can make this a
little bit tiny bit brighter. So, and then we can see
him much, much better. Now he really
actually stands out. Alright, so we've
got our lighting in. We've got our ambient
occlusion in. Now we can see that our gray box is looking much, much better. Now, if we go back
to the material, we can, of course, control
how far this is in. So how dark is this part? We can bring it back a
little bit if we want. But I think for me,
this is about right. We can also obviously
control this. Now, let's just go through
a few of these parts. So before we carry on, let's look at this one here. So this one is the
main blender shader, principleed BSDF and it's a universal shader used in
cycles and EV render engines. And it was designed to simplify
the process of creating realistic materials by combining multiple shaders into one. And it is based on the Disney
principled shader model. So expect that kind of look. So many, many shaders
have been put in making it really easy, not like in the old
days where we had to put tons and tons of
shaders together. This has been put together,
so it's easy to use. And this is the main shader within blender,
especially cycles. Now, the next one we'll want
to look at then is the ***. What is the fac? So the FAC or factor is a control system. And basically, if I unplug this, you can see it's halfway between the principled and
nothing, basically. If I pull it all the way down,
you'll see nothing there. All the way up, that is
fully on the principled. But we're not actually
using it that way. What we're doing is we're
letting it be controlled by actually ambient occlusion and then via our color ramp. So that's what it is when
you're plugging that in. So a lot of the time when
you're using factor, you will be putting it on zero, no 0.5 or one, or you'll be letting the
other nodes actually control. Alright, so that's
enough of all that. Let's actually now go back and I'll just show you quickly
before we carry on. If you're on EV, so
let's put it on EV, you will see that it's nowhere
near as good as cycles. And that's what I
was trying to tell you you can get something, you can mess around with these, but it's not going to
be at the same level as cycles, and that is why, especially when I'm
building gray boxes, I really do like to work with cycles because for me,
it's much quicker. I've getting an idea of what something's
going to look like. Alright, so, lastly, then, let's go back to modeling now. And what we're going
to do is we're not going to be always
working in cycles. We don't want to build
in cycles because that will make the viewport
extremely sluggish. But what I do want to do
is I do want to grab this, right click and
shade auto smooth. I don't want to grab
this one, right, click, shade auto smooth. I don't want to grab this, right click and shade auto smooth. Just making sure that smoothed
off a little bit because it does give me a better idea
of what we're looking at. Alright, so the next
part, then we're going to build out is going to
be this part over here. So this flat wall over here with the roof will start to
build down this side now, and then hopefully
hopefully we're able to tie this all together. So let's before carrying on, come up to file and save work, and let's go back
to object mode. And what I'm going to do
now is bring in a cube. So I'm going to bring in a cube, so shift a cube.
Let's bring one in. And just pull it up
to the ground plane. So we want this part going across here and I'm going to be giving you some dimensions. And also, we're going to be
working on this part here. So you can see 6.5 going
up, 5.15 going up. So we've already got that.
So let's do that first. So 6.6 0.5 on the z. So 6.5, so let's pull
that up then into place. And then what I also want to
do is I want to pull it to the right dimensions on
the X, which is the red. So let's put this on five
point on six, like so. Now, at the moment, we're just going to be doing the up part. We're not going to be
actually extruding this out. So sometimes when I'm
actually doing that, I do find it easier just to
kind of delete both of these. So if I grab the bag,
press Control plus, press delete and faces, and then end up with
something like this. Now I want to do is I want
this next part going up. So the next part going up, as we can see here, 5.15
meters. So let's do that next. So what I'm going to do is I'm simply going to press tab and then going to press Shift D. Bring this up to
our second floor. So you can see this floor
now lines up with this one. And then on this floor, then, what I want to do is I
want to put this at 5.15, so 5.15 meters like so. Now, we do know that we've
got a big chunk in here, so we're measuring kind
of from here to here. And we also know
that this part here, I'm not actually
showing you that, so let me just pull it down
and pull them over. So we do know that we've
got them lined up here, as you can see, so
they're lining up nice. We do know that the roof on this part needs to be a little
bit smaller than this one, so it all fits together nicely. So what do I mean by that? Well, first of all, let's
now bring this part up. So what I'm going to do again is I'm going to grab this part, shift, bring it up into place. And what I want for the roof
is I want this to be round about 2.2 meters tall. So 2.2. Let's bring
it down into place. And now, hopefully when
I brought this in, it should fit into
here very nicely. So you can see
it's going to come into here and then go this way. Alright, so what I want to do
now is bring this roof in. So I'm going to press tab, I'm going to come up to the top. And then what I'm
going to do is press S and X, pull it over, nice and even to
start with, like so, and with this particular roof, as well, I don't always
want to make it straight. So what I'm going to do is just pull it at a little bit of an angle like so so
that this slope towards the back is a little bit this front bit sharper
than the back bit. So something like this, I
think, looks very nice. And then finally,
what I'm going to do now is join all these together. So Control J, join them all together.
Press the tab button. And what we're going
to do now is just grab all of the faces on here, and then we want to
extrude them out. Now, I want to extrude them out around 8.6 meters,
something like that. So if we extrude
them out, like so, let's now go back and
actually press tab. Can we pull them out along
this X axis to 8.66 meters? No, that's the
wrong one, so let's try this one. You know what? It's actually not going to
pull them out like that. So I'm actually going to go
in and instead of doing that, I can see what I've
got it down here if I put on edge length,
if I pull it out. And this is a little
bit too long, I think. So what I'll do is I'll
press tab and I'll put this on 8.66 like so. Alright, so that seems now
round about the length. And then on the next one, what we'll do is we'll pull
it into place properly. So I'm just gonna put
it around here now. We'll pull it into
place on the next one. And hopefully we
should be able to get everything lined up correctly,
ready for the next part. Alright, everyone, so you enjoyed that, and I'll
see you on the next one. Thanks a lot. Bye bye.
16. Refining Greybox Backside with Accurate Measurements: Welcome back, everyone to
blend of building master class from concept to final render, and this is where
we left it off. Alright, so let's
go over the top, and let's pull this into place. So when I'm pulling
this into place, I need to make sure that
this is fully into here, first of all, and I
need to make sure that the distance from
here to here looks right. So I'm going to pull it
into place into place. So it's actually in that part, maybe even a little bit
more. And there we go. Now, you will see now
that we made the roof, so it actually slants
all the way down there. And you can see now that as
we look at the front of it, it's actually pretty steep. And that's why we've
actually done that to give this building a
lot more character. Now what we need
to do is we need to build out this part here. And once we've got this
part built out here, so this is the first tier. So let me just show you
first tier, second tier. This part here is basically
this part, but shrink down. So if near enough, once we've built
this part, we've got this side actually done. So let's put this
over here once more. So for this part here,
the best thing we can do is come into the
part we've already made. We can grab both this
one and this one, press Shift D, and then we
can drag those over like so. Let's separate them
out now from this one. So P selection. And you'll notice that the
orientation is over here, exactly the same
as the other one. So what I want to do is
resell the transforms, we clicks at origin geometry. And then what I want to
do now is put the Y. So this is this one,
squishing it in onto 5.55. Now, the other thing
that's different, if we look on here, we will see that from
here to here is 6.15. So let's now make
this part here 6.15. So I'm going to do that
is I'm going to come in, grab the edge here, make sure that I've got
edge length on. And as I pull this out, I
should be able to pull it to 6.15, like so. Okay, so now we're on the roof. So what I'm going to
do with this roof is, I'm just going to press E, and I'll pull it up along here. So making sure it's on
the z axis, pull it up, so I'm going to
want it around 3.3, holding shift but again,
something like this. And then what I'm going
to do is pull it in. So S and Y, let's pull it in to the center. Like so, and that is basically
what I'm looking for. And now what we need
to do is just pull it back the length that
this is going to be. And the length I want this
is around 5.2 meters. So let's grab this
one and this one. And then what we're going
to do is pull them out. Now as we pull them out, we should be able to get
the bottom of it, so we can see here s and pulling this out
round about here, 5.22 meters. There, perfectly. Okay, so now let's try putting
this into place. So if I bring this over, I should be able to put it
into place. In front of here. Now, remember, on our reference, we do have a little bit on the front of here, so
you can see this bit. You can see there's a gap and there's enough room to where the actual this column
actually comes down. So we need to make sure that
we've got enough for that. So I'm going to pull it out
a little bit more like so. And then I need to
think about the back. Do I have enough
room there? And I think what I'll do is I'll
pull it out a little bit. So S and X, pull it out a little
bit more, like so. But generally, this part here is going to be hidden
by another part. So something like this, I
think, looks pretty good. And then all we need
to do, obviously, we need to pull it
over a little bit, so I'm going to pull
it over into place. And we should have enough
room now for a pot going down here and the two
windows either side. So you can see already now if I put it onto rendered view, if I grab both of these now, grab this last press Control L, and we're going to link
materials, double tap the A. We can see now we've
got a little bit of height difference between
this one and this one, and we've definitely got a
height difference there. So as we come round, it
doesn't look boring. You can see we've
already got depth, and that's exactly what
we're looking for. And remember, once we've got this outcropping on here,
we've got the steps down here. It's going to give
us even more depth. But the idea is when you're
building a gray box to really think about
differences in height. It would look a lot more boring if these were all the same
height, for instance. And as we go along, we can
reiterate a little bit more. For instance, this might want to be just a tiny bit
higher than what it is. So what I'm going to do is I'm going to rather than
pull the roof up, I'm happy with the
angle of the roof. So all I'm going
to do is just grab this center part,
press Control plus, and I'm just going to pick it
up just a slight bit more, like so, just to
make it a little bit more distinctive
to that one. All right, so now we've got
that. We need to grab this, put it here, grab this
one, put it on the end. So let's do that
now. So let's once again put it on object mode,
come back to this pair. Always save out your work just so you don't lose anything. And then what we'll do is
we'll just press Shift D. O, Shift D, bring it over. So drop this into place, making sure it's in
the actual roof. And then what I want to do
is bring this one over, so you're going to bring this over and put it
right next to it. So shift D, let's bring this
over and pull it over here. Now, the gap I want between
here and here is going to be around 3.85 meters and again, and no, we can't
see that on here, but the gap is relatively small, going to fit 1 meter in there. So what I'm going
to do to actually measure that is I'll
put it from here. So I'll grab my measuring tool, 3.85 or eight 3 meters
around about there, something around there,
which is already near, so I'll go back and pull it back in and then make sure my
measuring tool is on there. Something like this
will fit one window in. And I think, yeah, that's
looking pretty good. We can have a window
down here as well, and we have our
trees down there. And they're the same height. And yeah, that's looking
really, really nice. So now, if we look our
reference once again, we can see now we've got
all of this part built. We've got this side built, and now we're coming
down to the backside. So this part here
is this one here. So we can see that we've got a part that goes
really, really far back. We've got a part
that goes up there. We can just make out
that from this image. I'm thinking, I got another image where we can
show that? Not really. So we'll just focus
on these parts now, getting these parts in, and then we can focus on the other side. I think from the other side, it might be easier. So when I'm looking
at building this out, is it going to be easier
to come straight to, you know, this bit here, so this bit going along here? I think it probably will be. So I think what
we'll do is we'll make a start on this part here. It might seem a little
bit topsy turvy. You know, we're going from
this angle or where is it? This one here, and then we're going straight
to the other side. But honestly, when I build, I tend to do the
front, do one side, then do the other,
and then do the back. I generally leave
the back to the last because it's something
that most people neglect. You know, you'll see
it where they've just got an alley way down the back. Not a lot of thought
gone into it. It's all kind of
position on the front. But when you're building
these buildings, I think it's very, very
important to focus on the back. And you can see the back is just as intricate
as the front. The sides are actually where
it's a little bit boring, actually, but you can see the
work that's gone in there. Alright, so let's actually
move then to this other side. So I'm going to put this
out of the way once more. I'm going to grab the reference on my side, making
sure I've got it. Okay, so the way I'm going to approach is, I'm
going to take this, and I want this to be
exactly the other side, but then I'm going to
pull it that way more. So what I'm going to do is I'm
going to get the center of this so you can see
the center of my dome. I'm going to press Shift desk
and cursor to select it. Then what I'm going to do is I'm going to come to this part, and I'm going to right click Set Origin to three D cursor. And then what I'm going to
do is bring in a mirror. So add modifier, add,
generate a mirror. Then that, if we
go over the top, is going to put it exactly in
the same space as this one, which is exactly what I
want because I want to make sure these things
are pretty even. Now, we do have a kind of if I pull over this. Where is it? Let's have a look. We do have kind of this bit
here that's stuck out, so we'll put that bit in, and then we have it kind of
even here and even here, and then we have this big block. Now, I'm not going to put
this bit in until we've put our big block in because
once we've put this in, then we can work out where
is the center of this piece. So let's actually do that first. First of all, though,
let's pull it out roughly to where
from here to here, and then the big
block is going to be. So let's do that now. We also need to take off our mirror because we
need to pull it out. So it's roughly going to be
round about this point here, so it's going to be this length. So we'll bring it down to there, then we'll put
that big block in. First of all, the let's actually learn how to apply our modifier. There's a few ways of doing it. You can either press Control
A, hovering over it, or you can come up to
it and press right, click and click Apply. There is another way if you've
got many modifiers on it, where you can go to it and
you go to modeling Object, and then what we're going
to do is convert to mesh. That will also do
the same thing, and that way is much better
actually learning to use that way because then
what you'll do is you'll apply all the
modifiers at the same time. Okay, so now we've done that. We have one problem in that. These are joined together, and
we don't really want that. So what I'm going
to do is press tab, and I'm then going to come in, making sure I've
got edge select on, grab them all, press P
selection, and there we go. And then what I want to do
now is come back to this one. So press tab, come
back to this one. Control A, or
transforms rightly. Set origin geometry. And now I want to do is I
want to pull this out to where that actual big block
is actually going to start. And then once I've
got the big block in, I can pull it back further or inwards or whatever
I want to do. So I'm just going
to come in for now. I'm going to come
in, grab this part, and then just pull it
along round about to here. Doesn't need to be exact
or anything like that, right now, we're just going
to pull it round about there. And then, as I said, we're going to build
this big block out. Then we're going to put this
middle part in like so. Alright, so let's move on
then look at the big block. But before we do
that, let's come in. And what we'll do
is file and save. And then what we'll do
is we'll actually start. We'll delete these out
of the way, actually. So I've got too
many of these in. Let's delete these
out of the way. Got another one over
here, I can see. So delete them out of the
way, clear out the scene, and then on the next one then we'll actually start our blocks, so I'll bring in a cube
and start it from there. Alright, everyone, so I
hope you enjoyed that. It might seem a little
bit slow and tedious, creating gray boxes,
but honestly, keep with the process, and
you're going to see just how easy it becomes once you've
actually built this out. Alright, everyone. See you on the next one. Thanks
a lot. Bye bye.
17. Creating Stylized Tower Greyboxes for Architectural Detail: Welcome back everyone to blend the building master class
from concept to final render, and this is where we left off. Now I want to do is
this block, as I said. So what we're going to
do is bring in a cube, first of all, bring in a cube. Now, it's a little
bit different, and you can also see
that my cube came in right up here because that's
where we had our cursor. Let's press Shift Spacebar
bring in the moveTol again. And then what we're
going to do now is get the right dimensions. Now, the thing is,
with this block, so we'll show you if
you go to this here, you can see, here it is, that it goes up to. So this part here goes up to
the same point as on here, so we know that the same
measurement is correct, but then the other part goes
all the way up to here. So, in total, it's
15 meters high, but it's still based on, I go to here, this part in here. So 6.5 and then up to
15 meters from here. So I think we should
kind of stick with that. So we'll do the
first part of it, 6.5 meters. We'll get that part. We'll get the right, you know, width and length and
things like that, and then we can go all
the way up to 15 meters. Now, then we've got this topion which I'll discuss in a minute, and we've also got
this part, which comes a little bit
down below here. So let's do that first
bit. So we'll come in. And we'll come to the X and Y, and we'll put this on 5.85, not 8.85, 5.85 like so. And then what we'll do
is we'll bring this up to 6.5 meters. So, 6.5 meters like so. Now I want to do is
I want to come in. And what I want to do is I
want to bring this part. So if I press three on the
number pad to go to the side, I want to bring it down then. Do this part here. And
then what I want to do is I want to pull it
up now to 15 meters. So I'm going to go in, I'm
going to press my face select, grab this face, and then
I'm going to pull this up. Now, I'm hoping
that it should go all the way up to
round about here. Let's have a look.
So 15.3 meters, you can see we're a little bit higher than
what we should be. So let's bring it down slightly. And then we're on 15 meters. I don't know who did that,
but I did that pretty well. So you can see now that this is way higher than
these parts here. And now I want to do
is put the roof on. So I'm going to
grab the top again. I'm going to press Shift D I
want to split the roof off, just a tiny bit, pull it up, just a little bit, like so. And then what I'm going to
do now is pull this up. Now, I want this to be
round about 5.2 meters. So as I start pulling it up, let's go over to this side. So I'm going to also
split it off, I think. It'll make it a little
bit easier for me. So L, P, split it off. Grab this one and you can
see if I press Control A, all transforms right click. Origin geometry. We can see the Z is at 2.23. Let's put it at 5.2, like so, pull it up. Into place like so, and then finally, we want
to bring this in together. Now, this roof, as you can see, it goes all in together
with a little point on it. So we're not bringing
it to one side or the other side. So
let's do that now. So all I'm going to
do is grab the top, press the S but to bring it in. And, of course, we need to leave enough room for
the top on there. So we can see now let's put
that top on there, actually. So all I'm going
to do is press E, no S, bring it out, and then E pull it up and
then the S to bring it in. Just a little top
on it like that, just so we can get a feel for how this is
actually going to look. Alright, so now we've done that. What we can do is we can
join all of this together. So control J, join
it all together, press Control lay transforms
set origin to geometry. And now we want to
do is we want to put it into this part here, and then we're going to build
this little block on here. And then finally, we can start filling in this back space. Now, I would say, as
well, looking at this, I think I'm a little bit
out on this point here. I've not left quite
enough gap there, so we'll fix that now. So what I'm going to do is
I'm going to grab this side, this one, this one, and this one, and I'll
go over the top. So I'm going to press seven, and I'm just going to then
pull them in a little bit, giving her a little
bit more gap like so, and then I'm going to do the
same with this one as well. So I'm going to pull
them in, giving them a little bit more gab
from there to there. And then that will give us
a little bit more length, what we can do down here. Alright, so now we want to do is we want to get
measurement from here to here and then put this blog up to wherever we
actually need it. So the way I'm going to do
that is going over the top, and I'm going to measure
from here to here, and we want it around 11 meters. So what I'm going
to do is measure it from there to there, and we want to around about
11 meters, something. Something around 11
meter mark, like so. Now, let's grab our block, and then what we can do
again is we can press the G but because
we're over the top. And what we want to
do is we want to set it right down round about here, like so, and how far
do we set it in? I actually think that, you know, how far we've pushed
this in is about right. I think that's about
right where we've got it. And we know this is 11 meters, so we know the center of here
is going to be 5.5 meters. So as long as we've
got 5.5 meters, we can put it right in
the center of there. So let's now make sure that we've got the
center of this in place. And the way we're
going to do that is I'm going to look
at the overall length. I'm going to bring an edge
loop in here and here. And then what I'm
going to do is bring one more edge loop
right in the center, and that should really,
really help us out. Now, the way that you can
bring an edge loop in isn't the easiest way is not
to come in and press control law and bring an
edge loop and pull it over. And the reason why
I don't want to do that is because I have
to put an edge loop all the way through these to get the right scale if I
was doing it that way. So there is a better
way of doing it to put an edge loop through all of
these if you so want to. So I'll show you
that because it'll be a good time to
actually do that. So what I'm going to do
is I've grabbed all this. If I press A, now you can
see all this is selected. I'm going to just turn off
my edge select just so you can see what I'm I'm going
to go over the top then, and instead of doing that,
I'm going to go to mesh. Come down to Bisectol and I'm now going to
pull this across. You can also press the space bar to move this exactly
where you want it. So I'm going to put it
round about here, like so. And then what I want to make
sure is that the X axis, so you can see the X axis here is set to zero
because at the moment, this is slightly tilted. So what I'm going to do is
just press zero on here, and then you can see it slightly moved out, and now this is set. Now, the other thing you can
do is move this up and down. I'm not going to
do that right now. Because it's actually in the perfect position
of where I want. I will actually show
you on the next one. So now I want to do
is I want to come in. I want to press the Ab, and I'm going to do the
same thing along here. So mesh, come down to
where it says bisect, and I want to pull it
over here like so I want to put it at a
strange angle as well, just to show you. And then what I'm going
to do now is you can see the X value is way,
way all over the place. Let's set that to zero. That then we'll
straighten it out, and then we can actually
pull it out like so, so we can pull this ring out. Or we can move it down
backwards and forward. So I can move it down,
backwards and forwards. So you can also do
with this. So let's again, set it to zero. And then what we'll
do is we'll pull this down now, so I'm
going to zoom in. Pull this down to
where I want it. You can still hold the
ship but, as well, exactly where I want
it, and there we go. So now it's cut through all
of those at the same time. So that's one great
way of doing it. Now what I need to do is, I need to find the
center over here. So if I press
Control, left click, right click, we can be fairly sure that that is the center. And even if I come down to these now, left click, right, click. Control, left click,
right, click. You can see now
they're all centered. So rather than doing them one by one, trying to line them up, we did everything over the top with the
actual bisect tor. It's incredibly valuable tool. Alright, so what we're
going to do now is we're going to basically
bring in our block. So let's just bring
in a cube for now, so I'm going to press shifts, cuss to selected, Shift A, and then all we're going
to do is bring in a cube, but I don't want to bring
it in in edit mode, and I'm going to bring
it in in object mode. So Shift A, bring
in a cube like so, and this is exactly
centered now. So now let's get to
the right length. So what I'm going to do
is just grab my cube, I'm going to put a tab
to go into editing mode, and then going to come
in, put edge length on. And then what I want to
do now is pull it out. So I'm going to press S and Y. And I want it to be 3.12 meters. So holding it down
3.12 meters, like, so. And then what I'm
going to do is I'm going to pull this all the way up right to the
top. Of this here. And I'm also going
to go over the top, and I'm just going
to pull it back just so it's sticking
out in the right place. And now we should have space for a window this side and
a window this side. And then what we're going to do now is grab the bottom of it, in face leg, and pull it all
the way down to the floor. So let's pull it all the way
down to the floor, like so. Alright, so now let's press tab. And finally, what I want to do now is I just want to
grab the whole thing, so grab not with that. Not with the measuring tool, let's delete it out of the way. Let's also come in
and let this one, as well. They're out of the way. Unfortunately, it's
not a way to delete them all at the same time.
Trust me, I've looked. It doesn't exist. And what are we going to do
now is just put it on the move tool,
grab everything. So just **** left click,
drag, grab everything. Grab the floor last,
press Control L, and we're going to link
materials. Double tap the A. Save out your weight
before putting it on rendered view because that's the time when it's
gonna crash generally, and then let's have a
look on render view, and there we go. That is looking pretty cool. And we can see we've got a
lot of different parts now, a lot of different sizes, a lot of depth to it already. And yeah, it should be
looking something like that, and you should be very happy. If yours looks
anything like this, or you might have gone
away and built your own. I'll be very happy, actually, if you go and do that anyway. Alright, everyone, so I
hope you enjoyed that, and I'll see you on the next
one. Thanks a lot. Bye bye.
18. Introducing Vertical Variation in Greybox Structures: Welcome back,
everyone to blending Building master class from
concept to final render, and this is where
we left it off. Now, let's drop back
into object mode. And what I'm going to do is
I'm going to take this part. So we're going to
build this part here, and then we're going
to get these kind of alcoves that are
going to go in here. We're gonna have
those on as well, because that then gives us more of a silhouette of what we're
actually going to have. And that's important. Putting
those little parts in. Don't get too fine details, but something like,
let me just show you, these parts here are
absolutely important. So you'll notice I've not put on these
little details here. I've not put on these kind
of parts that are coming out here nor any of the windows. The chimneys we will be pouring on for the grey box because
that's also important. I've also put the spire on here because that gives the
overall silhouette, but I've not even put on the
steps or anything like that, because these parts here, they're kind of like you know, they do give it depth, but
they kind of smaller parts. The main part we're focusing
on is the actual building. So let's put this
out of the way. And then what we're
going to do is we're going to come
into this now. We're going to press Shift D, and we're going
to pull this out, and then we're going
to press P selection, split it off, come
back through it, press Control A or
transforms right click set origin to geometry. Now, we want this to
be the same height. So we've got it the
same height as this because if you'll
notice this part here, you can see comes
around to this part. So everything along here
pretty much lines up, and this part really does
line up with that as well. This part goes up higher, of course, you know, to give it a variation, but this part actually
lines up with it. So it's important
to see that and think about that when you're actually building these things. You're not, for instance, going to have this part up here, this part over here up here.
They all going to line up. If you look at, you
know, real world references or even the
references that you've got, you will see a lot of
time they do line up. Alright, so let's put
that over the side. And then what we're
going to do now, we need an actual roof on here. So what I'm going to do
is I'm going to come in. I'm going to grab the top
of this with edge let. I'm going to press Control one because I want it
around the back of here, of course, around the
back of the building now. And then what we want to do
is we want to pull this up 3.7 meters, something
around there. So if I pull this up,
3.7 inch meters like so. And then what I can do
now is pull this in. So S and X, let's pull it in. Like so. Now we need to do is we need to think
when we're moving this? So where am I moving this, too? If I move this over here, as you can see in the reference, we do have a window
around there. So that so you can be in
line with my own gray box. Just make sure come
into measurement, grab the edge from here, pull it over here, and you
want to around 3.7 meters. So round about 3.7 meters is
where I'm going to put mine. So round about there, if
yours is round about there, I think I need to move it
over just a little bit. So shift spacebar, move. Let's bring it
over a little bit. And then if I press tab and come back to my
measurement tool, you can see now
roughly around there. Maybe we've gone a
little bit too far. But I think, you know what?
I think that's about right. I'll move it tiny, tiny, just a tiny bit over maybe
even a little bit more over. And there we go, that
will be perfect. Now we want is the
actual length of this. I'll give you the
dimensions for that. And it's going to be
around 5.2 meters. So if I grab the whole
thing, I can then start pulling this out 5 meters, so 5.22 meters,
round about there. And then I want the
gap from here to here. So this wall, basically, to be around 3.6 meters. So if I come in, press
Control A or transforms, set origin to geometry and press Shift spacebar,
bring in my move tool. And then what I want to
do is go to the side view now so you can see here,
this is the wrong side, so control three to
go to that side, and then I'm just
going to pull it in, like, so to where I
actually want it. So it's probably going
to be round about here, and then I want to
measure this out to 3.3 meters something like that. So let's bring this
out 3.6 meters, sorry, 3.6 meters. So
it's a little bit out. So if I put this then
around about 3.6 meters, I'll just then bring it in
a little tiny bit more. So yours back a little bit more. Again, put on my measuring tool, and something like
that should be fine. Because if we come out, we can see now we've
got our window on here. We've got a bit of a
greenery going around there, and then we've got a
chimney on here as well, which we need to put in. Now, I don't know if I have an image which shows
the back of it. I haven't got an
image, but this part here is slightly past
this part anyway, so it goes slightly
into this part here. This is where it gets
complicated, actually. Pulling everything together
is the hardest part. So you can see here it's
gone slightly back here. We're also going to
need another building in here to actually
block this out, and we're going to put
that part in right now. So we'll put this building in here and then
finally find that we can get these two parts in that are going to
pull it all together. But now, let's first of all, delete these parts here. We're not going to
need them, like so. And then what we'll do is
we'll bring in another cube, so Shift A, bring in a cube. Let's put it on
move, move it over. And then to start
with, what we'll do is we'll put the X on 6.74, the Y on 5.17. Now, this way it
gets interesting. The z needs to be on 11, and then we'll create
the roof from there. So something like this
looks about right. And you can see already, if I try and pull this
into place around here, we should be able to,
if we go over the top, pull it into place so
that it's kind of. You've got the same gap
here and same gap here. So pull into place like so. Make sure that it's on the floor because at the moment,
we're not on the floor. So let's bring it all the way down till it's just off
the top of the floor. And then what we want
to do is now we want to put the roof on there, and then we should be able
to once we've done that, put another roof coming
off of this part. It should be quite intricate then and all fit
together very nicely. So the roof on this
one is going to be round about 3.5 meters. So if we come in with face leg, grab this, press E, and start pulling it up,
we should be able to then pull this up 3.5 meters. Let's grab this
here, making sure. It's a little bit out, I think, so I'm just going to pull it slightly, slightly under here, like so, because this
is definitely not I don't even think this is 1
second control, and one. Let's go to the back of
it. Let's just measure that out from here to here. There we go. Three. It's
not measuring out properly. It should be around 3.5 meters so I think I've gone
a little bit too high. I'm going to delete that off. And then what I'll do is
I'll just pull it down very, very slightly because it's
a little bit too high. Based on this part here,
I want a little bit. We go a little bit
of more gap here. And then what I'm going to
do is I'm going to press S and Y and pull it in. And there is that roof. Now, we need one more block which is going to come up here
and create this roof here, and we also need those little alcoves
we spoke about here. I'm going to save that
my work, so save. We need the little
alcoves that are going to be in this part here. So let's simply bring in
a block for this part. So shift day, bring in a cube. Let's bring it over, like so, and we want it come
in on of here. So it's going to be
just on here like so, and then we want it coming out. So S and X, let's pull it out a little bit. The other thing is we need to
make sure this is centered. At the moment we've just
pulled this into place. It's definitely not centered. So what we want to do is want
to grab the bottom of here. So shifts, cursed to selected. That's the easiest
way to do this. And then grab this
part. Make sure the transforms are reset. Resell transforms, set
origins geometry and then shifts and
selection to cursor. That's going to put it then right banging the sends for us. Then we can lift it up now to
where we actually want it. And you can see now it
should be should be. Even. So now if I
pull up this top, if I just process it, that'll
make it a bit easier. Pull it up to where
I actually want it. Maybe even higher than that. So Wes said, let's pull
it up a little bit more. And then what we want to do
is round off these edges now, and this is obviously going to have another window in place. And we want it to be fairly
tight around this part. So maybe even a little bit
higher. I won't do that yet. What I'll do instead
is, I'll put it into place so we can see at the
moment, we're pretty far out. So let's come in,
grab these two, press the tab but, and again,
resell your transforms. And then what we're going to
do is just bevel these up. So I'm going to press Control
B. I'm going to turn up my bevel so I can scroll my mouse wheel up to
turn up my bevels, like so. Let's turn them up. Left click, and there we go. Now, the best thing
about having this open this little mini
menu for the bevel, is that I can now just come in and actually increase
that if I want to. I can also increase the
segments if I want to, as well, which just
makes things really, really handy, so I can
bring it in to where I want it as long as I'm
not breaking that. Now, one of the things
you can do to stop breaking it is you can put
an edge loop down here, and that will stop
that happening. But for me, building
this I think, actually, I don't need
to do that right now. So I think I'm just
going to leave it at that. I think
it's out enough. And I also think
it just gives us a very good silhouette of
what it's going to look like. So let's right click,
shade Ato smooth. And then what I want
to do is I want to put this over to this side. So the way that I'm
going to do that is I'm going to
come to the center, grab the center with
a select, shift this, cursed to selected,
come back to this part, and we're just going to
use a simple mirror. So Control A, all transforms, right click Set origin this time to three D cursor
adding a modifier, and we're going to
bring in a mirror. We're going to put it on the Y. Make sure you turn off the X. If not, you're going to
have overlapping pieces. So we're going to turn
that off, and there we go, There is our silhouette now
of that part of the building. So as we come round now, we can see it's
coming round here. So next of all, we need three more
buildings in basically. We need the smaller
building here. We need a block here
and a block here which kind of pulls
everything together. So let's focus on this
little part here. Now at the moment, we
are running out of time. So what I'm going to do is I'm just going to
grab everything. Again, I'll press Controller, once I've selected that
bottom actual plane, double tap the A. I'm
going to save out of work, and we're just going to bring
in our rendered view again, and now we can see what that's actually
going to look like. So we can see now
visually it's very, very it's got a lot of
depth to the building. It's looking very interesting. It's already looking
pretty intricate, which is what we're looking for. The one thing I
would say is that these buildings
definitely definitely need pulling out
further. You know what? I'm going to do that
before carrying on. So what I'm going to
do is I'm just going to grab all these, so all these down here and I'm going to pull them out so they
go further than this part. Let's pull them out so that they go further than this part. And now you can see that is
looking much, much better. I'm looking at the front, making sure we've still got
that depth of the front. And yeah, I think this
is looking really good. I can imagine our steps are
going to be at the back here. So if I pull over my reference, we can see in here, we've
got this part here. You can see now these are in
front like we've just done. And if we zoom in
now, we can see we've got a window and we've got
some steps leading down. It's pretty tight down there. And I'm just making sure then. Hopefully we might need to move this over a little bit,
but you know what? I think we can get
everything in there. I think what it is, is this part is a little bit too far out, but if we have to move things
over, then we'll do that. But I think for now, this
is looking pretty nice. Alright, everyone, so I hope you enjoyed that, and I'll
see you on the next one. Thanks a lot. Bye bye.
19. Modeling Greybox Extensions for Complex Structures: Welcome back, everyone to blend the Building master class from concept to final render.
This where we left you off. Now, it's very important
that we make sure that the dimensions of
these back bits, you know, pulling it all
together are correct. We might have to
move a few things around a little bit just to make everything fit because it's important because we have a
hedgerow going down here. We have some steps
going down here. As you can see here,
we've got these steps going down here to
a beautiful gate, and everything kind of
needs to fit into that. So what I'm going to do is I'm
going to bring in a plane, measure this part, and make sure everything's
going to fit in there. So let's press Shift
day, bring in a plane. So we'll bring our plane over. To run about here, so I'm
pressing G to go over the top, and the dimensions of the
plane on the X need to be 6.9 meters like so. And what I want to do is I
want to measure it from here. So this bit in here
to this part here. This is how much room
we actually need. What it means is we
probably going to have to move these parts
back a little bit. So just these parts
back a little bit, and then actually
move this part in a little bit as well to make sure that we can
fit everything in. So how I'm going to do that
is I'm going to first of all, come to all of these parts. So all of these parts here, I'm going to press the tab on. I've already got
these one selected, I'm going to select
these and these. And then what I'm going
to do is just go over the top and pull them
all back a little bit. Now you can see I haven't got
the roof selected on here, so I'm actually going to go
in and select those as well. So let's select the
roof, the roof on here, press seven to go the top, and now when I pull
it all back in, everything should come
back, which it does. Now, I do want to be careful. I don't want to pull it
past here, for instance, because I still want that
little bit of a gap on there, so I'm just going to
pull it this way, like so, very slightly. Now, what that means
is now I can come in, go over the top, and I can also then how far
did I pull it back? Let's have a look. Let's
pull this round to there. Let's pull it down, and let's pull it out into place like so, and I might even
need to come back. And pull these slightly
slightly more. So I'm going to grab
all these again, going over the top.
Press the tab on. I'm going to pull them back
slightly slightly more. Like so. Grab this part, pull it into place, like so. Now, let's pull this part back, so I'm going to grab these.
To where it's going to go. So this one and this
17 to over the top, and it's going to be
round about into here. Now, we can see we want a bit of a gap on here for
the actual hedgerow. So probably a little
bit more than that. So what I'm going to
do is just pull this into a little bit further over, and I still need to
make sure that I've got enough gap for my
actual window on there. So I would say that
this part here, so all of this part
probably needs to come out just to tad
more than what it is. So it's into there. I'm
going to pull it out a little bit more, like so. And now I've got a
little bit more room for that actual window there. And I'm looking at
the front of here, wondering whether I want
to pull this out as well. So this structure here, whether I want to pull it
out a little bit more, let's actually have
a look if we pull it out a little bit
more because this over this side and this side doesn't need
to be exactly the same. And I think maybe maybe
I'm going to leave that and I'm just looking now at how far this
part is out from here. I think instead,
what I'll do is, I'll come in and I'll
grab all of these, and I'll pull those in
just a tad like so. I'm going to grab the roof, as well, like we did
with the other one. So let's grab this one,
this one, and this one, and then let's pull it
all back into place. Kind of matching what
we've grown on this side, so you can see, it's
a little bit out. Let's pull it in. Kind of
matching like here and here. Double tap the ay.
And there we go. So now we've got our
window in place. We've got this bit just
in this part on here. It's going all the
way over to there. I'm going to put it on to
Render view to have a look. And this is actually
the most important bit. So really fiddle
around with this just making sure that you've
got enough gap in there. Yeah, and I think that's gonna look it's going to
look about right. I think I can still get
my next block on here. And I'm just looking round and making sure that
the gap here is right. Yeah, and this looks
about right now. This is about right.
And now to finish them, we'll put in this block here. So a little bit fiddly, I know. Now, putting this block in
here is a little bit easier. So let's go to object mode. Let's get rid of this now. We're not going to need it.
Let's bring in another cube, and we'll just do this
one pretty much by eye because yours might be a little bit different to
mine on these last parts. So what I want to do is
I want to bring this, and this is going
to be a chimney. So let's pull it out,
and I want it come in just past this part and
just up to this part here. So I'm going to press the s because I want it to be kind of square, and I'm
going to lift it up. So I want it just
slightly past here, so maybe a little bit
smaller, lift it up. Something like this, we've got a little bit of a
gap down there. And maybe maybe we need to pull this slightly
slightly over, leaving a little bit
of a bigger gap there. So, something like
that, I think, let's press SCD then and pull it down into this part here. Now, how far does it come out? I don't want it
coming out that far. I want it coming out
round about this. And I know I'm saying
round about this. We can measure things out,
but I think with your eye, it's important as well that you also get used to doing that. And I think then
what we'll do is we'll come to the top of it. On face select, and
we're going to bring it up round about up to the
halfway point, so up to there. And then what we're going to
do is we're going to press E and bring it nearly
up to the top. Now, it's important that
it goes all the way back. So let's put on our X ray, and then we can grab
this face and this face, and we can pull it all the way
back into the actual roof, turn it off, and there we go. And then what we want to do is now we want to bring this in. So if I press S and X, I can bring it in. Like so. Alright, that's looking
Round about how I wanted it. Maybe, maybe this has come
a little bit too high, so I'm just going to
grab all three of those, and I'm going to
drop them down a little bit because
I have to take into account that there
will be something on top of here because
we always put, you know, deep as in here, as you can see, we always put kind of
things in the roof so we can mess around with
the height once we got in, but we have got a
window in there, as well as you can see. So we just have to take into account that we've also
got a window in there. And now because we have
got a window in there, I think I'll make it
a little bit wider. So I'll come to it
and I'll put it on Is this the X? Yes, it is. So I'll put this on 3.15. And then what I'll
finally do finally, is just bring it over now. So it's fitting a little
bit more into place, leaving a little bit
of a gap down there. And then I just want to come to the underneath of it and just
pull it down into place. Alright, that is looking
the way that I want it. So you can see it's
slightly slightly higher. Then this one here. It's near enough, away
from it, as well. So given a lot more depth, a lot more it's a lot different to this part on
here, so that looks great. So the final part now is getting in this
front part on here. Once we've got this in, we
can build the back part, and then after that, we can get the chimneys in. Alright, really happy with this. Okay, so let's get this
new block in here. So shift D. Let's
bring in a cube. And what we'll do is
we'll pull this out, and we'll make it the
right X and Y dimensions. We'll have to, let's
put it 11.5 on the Y. So 11.5 and let's put the X. I think I've actually done those
the wrong way around. Yes, I have. So let's
put it 11.5 at the top. And then at the bottom let's
put it at 6.22 like so. Alright. Now, the height, let's put it at 6.9 or 7
meters, something like that. So 7 meters we'll do it at that. And then what we're
going to do now is just slot this into
this part here. First of all, we'll make sure we're actually on
the ground plane, let's just drop it in, holding shift bump, pulling it back up, seven to
go over the top. And then what I'm going to do now is I'm going to press G, and I'm going to pull
it all the way over. So I want it all the way over, lining up with this. And then what I want
to do is just pull it back a little bit like so. Now, the one thing is when
you're doing things like this, you want to make sure
that you're not, you know, pushing it
too far into the wall. So in other words, this
one is way way in there, because what that means is using a lot more texture space
than you actually need to. So what I want to do which we'll talk
about in the future, but you'll see
exactly what I mean. So what I want to do is just
pull that back a little bit just so we've got a little
bit of a gap down there. We've got a gap down here, and now we actually want
to put our roof on. So where does the actual
roof want to come up to? Well, first of all, we've got a window that's
going to be in here. I mean, I'm looking
at thinking there's a window going to
be in so we need to actually measure how far this
is overall to our height. So I'm going to say this
roof on here needs to be around 2.1 meters,
something like that. So if we come in, we can
actually pull it up, like so and I know already
that it's going to be a little bit out on
this measurement here. So let's come in and measure
it properly. So control one. Let's come in and see
how far we've got from here to here, it's
a little bit high. We want it a little
bit smaller than that. You know what, first of all, though, we'll
actually bring it in. So S and Y, let's bring it in. Like so. And then we've got
our window on here, and it's a little bit high. So what I'm going to do is I'm just going to grab
the top of it. Shift spacebar,
bring in my move, and I'm going to bring it
down a little bit like so. And I'm gonna zoom out, press Control one just so I
have an idea of the height, and I think it needs
coming down a little bit. Roundabout to there. And now if I go over
all, you can see, it's a 9.3 something around
there for the overall Z axis. So that looks about right because we're also going to have another window under here. Now, we can see now we've got enough room in this bank for the hedgerow that's
going to go round, for our stairs that are
going to come here and here. And that'll be one of the
things we'll work on, you know, and I'll
show you how to put all of that together. But I think for now, that is
looking round about right. And on the next lesson,
then all we need to do pretty much for our main part of our gray box is putting
this block here. I think though before we
finish, we will pull these in. So I'm just going
to go to Xray view. I'm going to grab this
one and this one. And then what I'm going to
do is just go over the top, and I just want to pull them back because I
don't want all that wasted space that we're
not using in there. I can't really do
the same for this. I need to pull it
back a little bit, but I can't really get
away with pulling it back so much because we've
got this part here. So if I pull it back to there, everything should be in there. So let's turn it off. Have a
look. Everything's in there. Everything seems
to be lining up. And I'm just looking
at this bit, so this bit here will be where
the last one comes down. And yeah, I think that
looks pretty good. Alright, that's good enough. Let's go up. Let's
see if that'll work. And I'll see her on the
next one, everyone. Thanks a lot. Bye bye.
20. Adding Chimneys and Detailing Rooftop Greyboxes: Welcome Mahon to blending
building Master Class from concept to final render, when we're nearly there
with our great box. So first of all, let's come
in and bring in another cube. So Shift A, mesh,
bring in a cube. Now, dimensions for this cube. So let's put it 13.2. Let's put it at 6.46, and let's put it
at 10.9, like so. And then we need a roof on here. So what I'm going to
do is I'm just going to I think I'll bring this
up and look at the height. So I'm going to press Shift
DG bring this up. Like so. And the height on this then
will be 2.23. So 2.23. Like so, let's bring it
back down then just so it sits on top of there. Like so. And, of course, the walls and the roofs are all going
to be split off anyway, so don't worry about that. So let's come in now,
grab the center of here, press S and Y and
bring the roof in. So it's a relatively flat
roof, as you can see. Let's join it all together
now, so control J. And then what we'll do
now is pull it down to the ground plane,
just so it stuck out, and hopefully hopefully this now should fit in there.
Absolutely perfect. So let's now go over the top. I'm going to put it in. So press in G. Let's move it into place. It should be a little
bit out from there, and you can see we can
bring it in, as well. But what we want to do is make sure that we're
hiding this part in here. So you can see this
goes way past here. We also want to make sure that we're hiding any of the parts. So you can see here
there's a little bit of a gap that's
going down there. So we could pull it back a little bit
more if we wanted to. But what we also
need to make sure is that this part here
is not touching it. So you can see you've got
a little bit in there, and I think that's
absolutely fine, actually. I don't think there's
anything wrong with that. As long as this part lines
up, this part goes down. And now I would
say, all we need to do is pull it in a little bit
because it's way too wide. So let's press S and X and
pull it in a little bit. Now, if we go too far,
we're going to go past where it actually
insects into the roof. But we don't want that, so we can see now it's
in the roof here. It's in the roof here.
It's in this part here, and it's in this back bit here. Now, finally, let's come in, grab everything,
grab the plane last, Control L link materials. Again, save out your work, double tap the A, and let's
put it on and have a look. And yes, that is looking
very, very nice. There's a gray box,
a lot of room, put in stuff going round. You can see we've got a bit of a place where we can put
our garden going around here, place around here, some benches and things and the
main street on here. Yeah, this is really nice. Now what I think
we should do is we should just add in our chimneys. And once we've got our
chimneys in, basically, we've got a finished gray
box, and from there then, we can actually go ahead back to our resource pack
and we can look at things like the asset manager. Now, the other thing is,
before we go on any further, in fact, you know what, we'll
finish off our chimneys. And then what we'll do is
we'll talk about collections. And once we've done collections, then we can go and look at the resource pack and
discuss asset manager, which is one of the most
fundamental things in blender, especially when you're
building things like this, and I'm going to
show you exactly how it works and why it is you need more than one
blender file and why you should be using more
than one blender file, but how to use them
in a way that isn't using up all of your
resources on your computer. Alright, everyone. So let's now go and build those chimneys. So let's first of all,
go to object mode. We'll bring in a cube then. So we'll bring in a cube, and we want to make
sure that they run about the right
scale first of all. So we will have one
square chimney, and the other ones will be
just standard chimneys. So we'll bring this
block over here, and the first chimney will
be in line with this. So we can see this as that
would be the first chimney. I will fit into this
part into here. I'll make it tiny, tiny bit smaller, pull it
out a little bit. And then what I'm going to do
is just pull it into place. It's gonna drop
into place like so. At the edge. Here, so
it's just in there. And then what we'll
do is we'll pull this up, so pull it up. And then all I'm going
to do is I just want to pour top on it just to
make it very simple. So all I'm going to
do is just press E, pull it up, so to the
height that I'll want it. Now, how high do I
actually want it, I think something like this is perhaps a little bit too high. So I'll just Alt click,
so I've grabbed the top. I'm just going to pull it down. And what I want to
do is just make sure it's in line with this part
here, something like this. I think it's a good height.
And then what we'll do is now we'll just bring in
we'll bring this part out. So we'll bring this
part out. So alter shoull heat ter Alter Ness. Remember alter ness. Like so. And then what we'll
do is we can use this now as another chimney. So if I press Shift D,
I can bring it over. And then what I can do is I
can make this a thin chimney. But before we do that, let's first of all,
bring in the cylinder. So if I grab this, I'm going to press shifts, Custer selected. Shift A then, and then
what I can do is I can bring in a cylinder. I'll put the cylinder
on eight because we really don't need to have it rounded off or
anything like that. So what I'm going to
do is bring them down. I'm going to press seven
to go over the top. And then what I'm going
to do is just press G. Pull it over. And from here, then
what I can do is I can right click Set Origins
three D cursor, add in a modifier, we'll
bring in a mirror, like so. We'll put it on the
other side as well, so that then it'll bring
us four, as you can see. And now we just make them either a little bit taller or
a little bit smaller, whatever you want to do
with them, basically. Let's make them a little
bit thinner, first of all. So Alt Shift click going
all the way around. Let's turn off our edges, by the way, we're not
going to need those. So edge length, Alt and S,
we can bring them more limb, and then S and Ed
and we can make them taller and then just stick
them into place like so. Probably a little bit out these, so I'll just finally just bring them in
a little bit more. So to do that, all I want
to do is just move them in. Like so. And there we go. Now what we want
to do is we want to make the other chimney. So this one here. So all
I'll do is I'll grab these. I'll press Shift D, and I'll bring them over just
to this point here. And then for this
one, all I'll do is I'll just turn off the X, and then finally I can come in, grab this point here. So I want to grab
this one, this one, all the way down, and this one. And then what I can
do is pull them in. Now, I'm doing it like
that just so I don't, um you know, ruin the
actual shape of it. So you can see now it's
still the same distance going all the way around, and
that is why I've done that. Now, let's supply or modifier. So again, hover over the mirror, Control A, hover
over the mirror, J, and join these up. So Control J. Join these two up. Control J. Now, we've got
the main chimney in place. So where do we want
these other ones? So I'm going to just zoom out. I'm going to spin
this one round. So Z, 90, seven, to
go over the top. And the place where
I'm going to put this chimney is going to
be right around here. So I'm going to press Control
A, when I've grabbed it, troll or transforms
a origin geometry, G, and let's put this
chimney round about here. And then I'm going to
make two more chimneys. One's going to go over here, and one is going
to go around here. So let's do Shift D and
then sad 90, and then G, let's put this one over here, and then Shift D, pull this one, and we'll put it right at the edge
of here, I think. So somewhere around there. And it wants to be in the roof, so let's just come around. Yep, it's in the roof,
so that's looking pretty good except I
need to pull it up. Like so or do I? Is it a little bit too
big, this chimney? I think it's a
little bit too high, so let's pull it
down a little bit. Yeah, something like that, just so the tops
of them come out. Now, this one here, I think Perhaps needs to be a little bit lower
places like so. Then we've got this
one, of course, which needs to be just above our roof that we've actually created and double tap the A. And finally, then, we've got all of our chimneys in place. Now obviously, they're going
to be refined a little bit. But what we're going to
do now is grab all of this contro LL link
materials and then file, save now, what we're going to do is when we
bring in the materials, obviously, a lot of these parts, we're going to be using to
build the side of them. But the main parts underneath. So these roofs and
things like that are actually important
because we will be using textures to use these kind of planes
that we've created. So underneath the roof, so you don't get any gaps
and things like that, we'll be using a wood texture. And on the walls, of course, we've also got a texture
on there as well. So it's very important
that we've actually built this gray box out not
just for how it looks, but to actually lay
down the foundation of our building, as well. So let's have one
final look at it. See what it looks like, and I'm very, very happy with that. The only thing
that we don't have right now is we don't
have a gap in this one, so we don't really know, you know, where it's
going to come up to. We can see we've
got gaps on here. So I think though the gap along here will
be this part here. So I'm not really going to
both with that, actually. I'm going to leave it,
but I think the rest of it it's looking pretty nice. So on the next lesson, we will be going
into collections, so we'll be discussing
collections, and then after that, we'll be going into
our resource pack, and we'll be going through
the asset manager. So once again, I'm going
to say about my work. And hopefully, guys,
you got to this point. I really hope you did because now is where the fun starts, and I'll see you
on the next one. Thanks a lot. Bye bye.
21. Organizing Blender Projects with Collections and Layers: Welcome back everyone to blend
of Building master class, from concept to final render, and this is where
we left you off. Now, what we're going to
do now is we're going to go over collections.
What are they? How do they work? How do we use them, all
that good stuff. It's very important that
you're using these. It's very important from
the absolute beginning that you really are trying to put things in their own collections. So what we're gonna do
is we're going to I'm going to show you a video
now all of our collections, and then from there,
we're going to be putting them in their own collection. It won't be that
hard because we've only got a gray
box at the moment. But once we actually start
getting a lot of things in, really important that
they go in collections. Alright, everyone, so I'm going
to play that for you now. Hopefully, you'll enjoy that. And when we come back, we'll put these in their
own collections. And then then guys, we'll be going over
to the resource Pip. Alright, everyone. See you on
the next one. Thanks a lot. Bye bye. Welcome everyone
to our collections guide. And you'll notice over the
right hand side in Blender, you will have something that's called them
collections over here, and this is Basley how the old blender used to
actually handle layering. So with different layers, you would have different scenes or different objects in place. It's changed a little bit now, and in the new
blender 2.8 onwards, we're now dealing with
scenes and collections. First thing you'll
notice is over here that we've got one
that says collection. Let's call this
collection plane. And then what we'll
do is we'll actually put plane into that collection. Now, at the moment, you can
see within this collection, our plane is actually here, and we don't actually
want the other three. We want them basically into
a different collection. So what I'm going to do is
I'm going to right click. I'm going to go and
click New collection. And then what I can do is I
can call this cube like so. And then what I can do is I
can left click and drag and drop my cue into
the new collection. And then what you can actually
do is you can actually close these up and you
can see how neat that is. Now, what we're going
to do is I'm going to show you the other
way of doing this now. So if we come to
our actual sphere, what I'm going to do is I'm
going to press the button. I'm going to then
click New collection, and I'm going to
click sphere like so, press Enter or hit the Okay
button, and there we go. Now we've actually
got a new collection with our sphere in there. The other thing is,
you can also come, you can press the end button, and then what you
can do from there is you can actually
click on one of these. So let's say we wanted
this cylinder in the cube, and it will automatically put
this cylinder in the cube. Now, if you don't want
that, you can press the end button again.
New collection. And let's put cylinder like so, and then click Okay.
And then we go. Now we've actually got a
really nice collection sorted out really fast. Now, what about the
objects in there, then? Well, what you can
do as well is, let's say we want to change
the name of this cube. We come on over to
it. And instead of actually going in
here and renaming it, what we can actually do
then is press F two, and there you go, the
object name comes up. And if we change
this to cube 33, press Enter you will see now if we go to
the right hand side, this cube is called 33. Now, it's important
in large scenes to actually put things
into collections because that way
you can actually increase the performance of blender or you can hide
certain things out of the way. Because what you
can also do is you can grab multiple objects, press the button again, drop them in a new scene. So press new collection. And let's call this one objects
like so, and there we go. We have our new one with all of the objects
actually in there. Now, you can see, as well that because nothing
is left in there, we've not got this
little arrow there, so all of these are now empty, but it's quickly and
easily able to just press M and put them in their
own collections once more. The other reason why
this is actually important is because many of the displacements
or particle systems and lots of other things within blender or even geometry nodes, you can actually use
collections to do certain things to a certain
bunch of collections. Okay, so the next thing
we're going to look at is over on the
right hand side, we're also able then to hide
any of the collections. So if we click the
little on here, that will mean that this
collection has been hidden away from
the viewport view. Now, it's important
to distinguish between viewport
and came review. So the came review basically means that if I click this off, when I actually I'm
to render this scene, everything within
this collection will be hidden out of the way. It won't cast any shadows
or anything like that. I will all be hidden
out of the way. Now, the other one we've
got is this little tick B. If I select this, you will see that it just
turns both of them off, so it won't be visible in the
viewpot nor in the render. Now, the other thing to look at is if we click this
little down arrow, we also have a few
interesting ones here. So we have one that
says indirect only. We have one that says hold out. But the ones we're
most interested in is actually this one here. So if I click this little arrow you can see now we
get a new option, and if I come and
click it on here, you will see now that
if I come across, these will still be
rendered in the viewpot, still rendered in the render, but I'm not able to
actually click on them, which makes this really
handy if you're trying to grab a load of actual assets or objects that you
won't actually be actually selecting this
collection on top of that. The other thing is,
if I turn this on, I can also do a search here for, let's say, cube, so
if I type in cube. So I'm able now to
quickly and easily find it within my actual scene. The other thing is over on
the right hand side as well, the double tap, the A button to deselect everything
also actually works. So let's turn this off now. So now let's have a
quick look at this in actual action in a real scene. So you can see here
we have a scene here with many,
many, many parts, which aren't named,
and we need to basically put these into
their own collection. You can imagine a
scene like this with thousands of parts all in the same collection
is obviously having an impact on the
blender performance. So what I'm going to do is I'm just going to hide the floor, hide this part of the floor,
hide maybe this core. And then what I'm
going to do is I'm going to go over the top. And all I want to
do now is just make sure that I'm not
going to select anything else apart from
this actual building here. And then all I'm going
to do is I'm just going to press B and just try and select everything on that
actual building like so. Just make sure I've not got my camera selected or
anything like that. And then what I'm going to
do is I'm going to press the N bourne new collection, and let's call it butchers Shop, and then press Enter
and click Okay. And now what I'm able
to do is I'm able to now come all the way
to the top of here. So if I go all the
way to the top and then start closing up, these collections like so. So we've got square
building there. We've got bookshop and butchers, and now we've got
the butcher shop, which is the one that
we've just made. And now you can see just how quickly I can actually
clean all that. I have come along and
I double tap the A, so I've not got
anything selected, I bring back my floor like so, I double tap the A again. And then what we're
going to do is just close hide the butcher
shop out of the way. And you can see this is the parts that I've actually missed. And then all I can
do is I can select these three parts or
four parts like so, press M, and let's drop them
into our butchers shop. And then they'll be
hidden out of the way, leaving the other
parts that are left, which I actually missed. So butcher shop again,
and there we go. So now we're able to hide the butcher's shop or we're able to bring it
back into the scene. So from there, going a little
bit more advanced now, what we're also able to do is hide all of our
collections in one go. We just need our mouse
in the viewport, and then all you need
to press is number one, and what that'll do is hide
all of these collections. From there, what
you can actually do is you can press number two, and what that'll do
is actually bring in the gray box or the second
collection on there. Number three then brings in the third actual collection and so on and so on and so on. As you can see, up to a maximum, I think, either nine or zero. So you can see very, very
easy once you've put them in collection to rename them to actually increase the
performance within blender, to hide them in the actual viewport or
hide them in the render. And then also once you've
done that, to select them. I'd have to be a
very, very big scene to have more than
ten collections. Within the collections as well, you can also add
inner collections. So if I put new here, and you'll see if
I open that now, we've actually got a
new butcher shop one. So within the collections, you can also have collections
within themselves, and you can build a really, really large
hierarchy from there. Alright, everyone, so I
hope you enjoyed that. I hope you found it useful. Thanks, everyone. Cheers.
22. Asset Manager Fundamentals for Blender Workflow: Welcome back if
you want to blend building master class from
concept to final render. So I hope you enjoyed that
all about collections. And now what we're going to
do is we're just going to put this in its own collection. So what I like to
do is I like to put this in three parts when
I'm building the gray box because they don't really
need to be broken down anymore until you start building walls and
things like that. Once you create walls, then
you will need to put them, you know, in a
different collection. But for now, what
we can do is we can pretty much get away with
putting them in their own. We don't even need to name them when the gray box is either. Honestly, there's no
point in doing that. I know we want tidy
blendhles and stuff, but honestly, when
it's a gray box, a lot of it will be deleted, and some of it will be changed dramatically, so I
don't recommend that. So what I tend to do is
I'll grab the whole thing. I'll press M, and we'll put
it in a new collection, and we'll just call it gray box. Like so. Gray box. And there we go, we've
got one in gray box. We've got a cube left. So also, you know, I didn't grab those, so I'm also going to put
those in gray box. So, come on down to
where it says gray box. Alright, so everything
is in here now. Now, what I'm going
to do where it says collection is I'm going to
call it my human reference. Like so, and then I'm just
going to go to my human. I'm going to press M and put
them in Human reference. So now I've got
something in there. Let's tidy that
up. Finally, then I want one for the ground plan. So I'm going to
press M, come down, new collection, and
let's put ground. We'll just put it
ground, actually, like so, and there we go. Now we've got three
different collections. Alright, so as far as
this is concerned, right now, we're pretty
much finished with it. What we're gonna do
is just save it out. And what we're
going to do now is open up our resource pack. So here is the file. This
is my blender course. Now we want this resource
pack in its own file, and we also want to make
a new blender file, which is going to be
for our modular parts. So as I said, three parts. One being the build, which is this one
that we've just been working on with the
actual gray box, one being the resource pack, which has been supplied to
you through the course. And the second one is going to be where we're building
our modular pieces. So let's first of
all, call this. Let's actually make a new one. So a new folder,
and we will call it blender course resources. And it's important you do this before doing anything else, because when you
come to your asset manager and set it up, you will need to know
where these resources are. So all I want to do now is drag this one and
drop it in there. From there, then, once it's in there, I'm going to open it up, and let's open up
our resource pack and just wait for
that to open up. And now I've opened it, but I
can see there is one issue. So one of the issues
you might have, which is important
that we discuss is you can see that
we've opened it up, and we've got this issue here. 4.3 0.2, it says pile saved
by a new version of Blender. Now, there will be loss of data, and you might not notice
it straight away. So the way that we
can get around that is not directly just double clicking it because it might be the wrong version of Blender
which you're opening up. So what I'm going to
do is close that down. And instead of doing that,
what I'm going to do is open up a new version
of Blender 4.4. So you'll see here
is the version where we save down the defaults. Then what I'm going
to do is go to file, go to open find the resource
pack that I just had, so you can see here, blend of course resources.
It's in there. Double click this, and then you'll find that you don't
get that issue there. Alright, so this
is now all set up. This is our resource pack. And basically, now what I'm going to do is
I'm going to play you the video that tells you
all about asset manager. And then once we've done that, we're going to come
in and actually add these to our own asset manager, and you'll see why
we've actually put them in their own file. Now, before I go, though, let's actually close
down the other one because we're not going
to need it for a while, and it's using our resources, especially if it's
in random mode. So what I'm going
to do is just make sure that it's saved out. So save it close it down and then have
your resource pack. And now I'm going to do
is I'm going to actually play you the asset
manager tutorial. Hopefully you enjoy that. Hopefully you'll
get a lot of it. And from there then we're
going to be creating our own asset manager
for the resources. Alright, everyone. I
hope you enjoy that. Speak to your next
one. Thanks a lot. Bye bye. Welcome, everyone to the Blender Asset
Manager guide. And basically what we're
going to do in this one is just go through the asset
manager, show you how it works. It does seem fairly complex
when you first start this, but actually it's quite simple once you get your
head around it. So here you can see, I've got a standard scene here and
I've actually brought in some actual assets,
and they're named. This is important, actually, that just make sure you
name the assets before you actually put them
into the asset manager. Now you will notice when you
first come into Blender, whether that be Blender
three or Blender four, at the top here, it doesn't
actually say asset manager. So that's the first
thing we want to do. So to do that, all we need
to do is come to the little plus p. We're going to come across to where it says general, and then we're
going to go down to where it says asset manager. And once you click that
on, you'll actually be taken into the asset manager, and this is the easiest way
to actually work with this. And the thing is now
you'll see at the moment, we have our asset manager down here with all other files
on the left hand side. And in this, we'll be
populating all of our assets. Let's actually just pick
this up a little bit, then. And then what we're going to do is you can see at the moment, we have current file
and we have essentials, and under essentials is
basically all of the assets that Blender has decided to put into the asset
manager as default. What we want to do is we want
it to be on current file. So now I'm going to
do is I'm going to come to my first asset, which is going to be my tree. And now what we're going to
do is we're going to add this into our current
file asset manager. With this selected, if you come over to the
right hand side, you can see here it says tree. If a right click,
you'll see here, it says one that
says mark as asset. The moment we actually
mark as asset, you will see now that actually appears in this space down here. You will also see that if we
put this onto material mode, and now if I come in and
actually drag this out, you will see that it
actually comes out with materials
actually attached, which is really, really handy. Now let's delete
this out of the way. And what I'm going
to show you is now, if we focus on our actual car, let's press Shift and Spacebar
just to move it over here. And then what I'm going to do
is I'm going to come over, right click and a markets asset, and you'll see now our
car appears there. Now, if I come up and right
click and put clear asset, and then spin this
round Z -90, like so, right click Mark as asset, you'll see it appears
exactly the same way. So to actually change the rotation in the
asset manager itself, what you need to
do is you need to now reset all of the transforms. So what I'm going to do is I'm just going to clear the asset, and then I put Control
A, all transformed, right click, set
origin geometry, and then right click and when
I come down, mark as asset. And now you'll see it's actually rotated that round for you. You'll also see, as well, now, if I pull this out, it comes
in with all the material. Can actually do some
other things as well. We can actually also
save out materials. So what I'm going to do,
first of all, though, is I'm going to come down and click the little plus button. And what I'm going to do is I'm going to call this Assets. Like, so I'm going to call the next one materials. Like so. Now I'm going to do is I'm just going to save out my work, and then I'm going
to go to unassigned. And you'll see at
the moment we have these two assets that
we put in there. We can simply shift select them both or shift
select them all, if you've got a
lot and drop them then into our actual assets, and now they're going to
appear in our assets. Now let's move on. And if
we click on this bench, what we'll do is we'll
come over to our material. And we can see we've got
two materials in here. So let's right click this one, Mark as asset, the same thing. And then what we'll also
do is come to this one, and we'll right click
and mark as asset. Now, you will see when
you've marked them as asset that we've got
this little book here, the same as we've got up here. And now you'll see we haven't got any assets in
there at the moment, so these two materials
didn't go in there, and that is because they
will be in unassigned. Now, let's grab both
of these materials. Now drop them into
our materials, and there we go, we've got materials, and we've got assets. Now, the best thing
about asset manager, what you can also
do is you can also use this for things
like geometry notes. The only thing that
you can't use it for at the moment is animations. But pretty much
everything else you can use it with
the asset manager. Now the next thing we
want to look at is actually doing that then with
an actual geometry node. So I'm going to do
is press Control V, and here is a geometry node
that I've actually created. You can see here that if I pull this up over on the
right hand side, you can see it's actually
a geometry node. And at the moment,
if I press tab, you'll see it has
actually no mesh or any kind of topology because it's obviously
a geometry node. Now, what I want to do
is, I want to come up, right click Markers
asset and now you'll see that I've got
something that says unassigned. So let's make one more
now and what we'll call this is geometry or geode. Like so, and then I'm
going to come to it on a sign and put it into
my geometry node there. So you will see now
if I bring this in, it actually comes in as a
geometry node, which is really, really handy if
you've got loads of geometry nodes and you want to bring them and drop
them in your scene. Now, let's first of all, come up to file and save because this is
all great in that. But actually, how do we
use this in other files. So the way that we
can do that is we can come up to a new blend file. So let's open up a new blendfle so here is our new blend file. And what I want to
do, first of all, I want to come up and
add in my asset manager. So plus asset manager. And at the moment, you'll see
there's nothing in there. And what I want to do now is, I want to go up to Edit. I want to come to preferences. And within preferences, you will have one that
says file path, and this is basically go to tell Blender where it needs to go to look for asset manager. So let's actually come in, and what we'll do is
we'll click the plus, and then all I'm
going to do now is find where I've
actually saved out that previous file
and I saved it in something called Blender
Asset Manager, which is here. This is the one that
I'm going to add it to. You'll see here that
it doesn't show any blend files or
anything like that, and then all you need to do
is add asset library like so, and then we can actually
close that down. Now what I can do is I
can come down and you'll see that I've got one that
says Blender asset manager, and here are all of those actual files that
I actually put in there, as well as where it says
assets, geodes and materials. So now I can simply come in, drag and drop my
actual truck in there. I can actually turn
on the materials. And now you can see, once again, it actually comes in
with all the material. Now the best thing is,
if I actually bring in a cube now and
just drop that there, shift spacebar just to move it, and then what I can also do is I can come to where
my materials are, drag and drop straight
on to my actual cube, let the actual shader compile and load up, and there we go. Now we can actually drag
and drop materials as well. Let's come to our
geometry node then, and I'll show you
that that also works. So now we can see we've got a geometry node that
we can actually use, which is really, really handy. And now you can see just how useful the actual asset
manager really is. Now, the other thing,
if we go up to edit and go to preferences, you will see that
we are able to to add many, many asset libraries. Just make sure that you
save your blend file. So if I bring this over
here just to show you, just make sure you make a file, and then within there, you're going to actually save
your asset manager. Because the most
important thing actually is when you're actually
saving it in here, you will see that what else comes in is an actual text file. This text file gives
Blender all of the data that it needs to
actually set up these groups. So very important if you're moving your asset manager
to a different file, make sure you move this
text file as well. All right, everyone. So
let's close that down. And lastly, before I finish,
what I will show you is, if you come to current file
where we don't have anything, you can also select all of
the things in your scene. Right click, go down
and mark as asset. And then you'll see that the get put into the asset manager. Alright, everyone, so I
hope you enjoyed that, and I'll see you
in the next one. Thanks a lot. Cheers.
23. HDRI Lighting Setup and Asset Library Integration: Welcome back, everyone to blend the Building master
class from concept to final render and this
is where we left it off with our actual
resource pack. So I've got my resource
pack behind there. We've actually viewed
the asset manager now so we have an idea
of what we're doing. And now I'm going to talk you
through the whole process. One thing I actually
do want to do is, I want to go into where my
blend course resources are, and I'm going to actually
make a new file. So I'm going to put a new file, and we'll call this
resource Pack. Like so. And then what we'll do, we'll actually make another one, and we'll call this
one modular pack. Modular. And I just
want to split those up. And the reason I want to split those up is because now you know that when you actually
creating an asset manager, there's a little TXT
file that comes with it, and I don't want those
things getting mixed up. So what I'm going
to do now is drop my resource pack into there, like so, and there we go. Now, it still should go when
I go to come up to save, so it's going to save
out in the place it was. So I'm just going to go
to SavRsRsource pack, double click here,
and there we go, just to make sure
there's no issues with my asset manager. Now, as I said, in
the resource pack, you will notice that we've got HDRI setup and we've
got a sky texture. So let's deal with
those two first. So what I'm going to do
is you can, first of all, see at the top of here, there is no asset manager. So let's go to plus. We're
going to go to general. And what we're going
to do is we're just going to bring in animation. This one I always like to work like this
when I'm doing this. So animation, let's
bring that in. And then all I
want to do is come down to the left hand side and swap this over to
Asset Browser like so. Now you'll notice as well, because we've already
done the actual tutorial that we've got all
of these in here. We don't really want those.
So what we're going to do is go to Edit, go
Dance preferences. We're going to go to File pass, and we're going to take
off this user library. So let's just take that what we want to do now, this is
going to be its own one. So we don't need to
create a new one. We just need to take that off. So now let's come up and
actually close that down. And then what I want to do is if I come now to current file, so come down to
current file like so, and then let's just
save everything out once more, like so. Alright, let's as well
call this asset manager. So asset manager. So we know where
everything's going to be. So manager, like so,
and there we go. And now everything
will go in here. Now, you can see at the moment, these are already put
into asset manager. So you can see this is all
we've got in here now. I don't really want
those in there because I want to do it fresh. So just come up Shift
click, vote for these, right click and what
you're going to do is you're going to clear assets, so that will get rid of them, and it'll also mean then they're not actually classed as assets. So as I said, the first
thing we want to do, now we're in this new view is coming over to the right hand
side where the world is, and you can actually
see the HGRI setup has this little tick on here. Very important if you've
got two different skies, for instance, because when
you open up the file, whichever sky is being
used, that will be the one. The other one will
just be deleted. So you need to make sure
if you're doing sky, just make sure
we've got this on. I basically means
that this tick is on because we want to save it out even if it's not being used. All right, so the next
thing we want to do then is we can right click. So right click in
this space here, sky texture and Markers asset. And here we go, Here
is our sky texture. Let's click the little down
and we'll go to HDR, right, set up, right click, and then we're going to
go to Markers asset. Alright, so there's
those two in. Now we want to do is we want to create a new file in here. So what we can
actually do is here, you can see that we've
got unassign, we've got. We've got a save asset catalog
and we've got a plus B. And what we want to do is
click this little plus B, and we're going to call
it Environment Lighting. This is so that when
we bring it in, so we can see now environment
lighting like that, and you can see it's got
a little star on there. And what we need to
do then is bring these ones here into unassign
into environment lighting. Now what I've done is
I've just moved this out of the way so you can see my
Cornaks not in the way now, so everyone can see what I'm doing because I
know that would get a little bit irritating while we actually deal with
the asset manager. Now, you can see
they're unassigned. So what I want to do is I
want to grab them both, so shift click them both and drop them into
environment lighting, and now you'll see
we've got two of those in environment lighting. Now what we can do
is we can go to file and we can go to Save. Now, to save you the trouble, I'm actually going to show
you how this actually works. So what we're going to do
is we're going to open up. Well, I'm going to
open up my other blend file complete
with the gray box. We are going to go
back to that file, so it's up to you
whether you do this now or whether you
do that later. So let's quickly
open that up now. So here is our actual gray box. And what I also want to
do with this open now, probably better off
actually opening your own because what we're gonna do is we're going to go to plus. We're going to go
across do animation. We're going to rename this
then to Asset Manager. Asset Manager, like so. And then what we're
going to do is pull this aside over here. We're then going to
come down and we're going to put it
onto Asset Browser. And again, we want it to
be in a file of the mod. You can see just
current file essentials and things like that. We
don't actually want that. So what we're going
to do is go to Edit. We're going to go
to preferences. We're going to go to file paths. We're going to minus
off the user library. We're going to click
the plus, and now we need to search for
wherever this may be. So let's go up, and I know it's under where
is it resources. I think it's under blend
of course resources. Here we are. We've got
resource pack, modular pack. They're the two packs
we put, and the one we want is the resource pack, I'm going to double click that. You will see that
nothing comes up here. I think there's a button where
you can put blendfle like so and then actually
see what's in here if you want to see if
it's definitely in there. And then all you need to
do is add Asset library. Now, let's close this down, and then what I'm going to do is I'm going to come down now, you can see the one we've
got here is resource Pack. Now, when we've built
our modular pack, you can have two of these here, so you can add in two files, but I'll show you that later on. But now let's come
to resource pack, and this is what we've got. So we've got all we've
got environment lighting. Now, how does this work, then? So the best thing is
we can now come in. Let's put it onto our rendevew and we can see at the moment
that we've got this here. So this is our world that
we actually created, has no fake user on there. As you can see,
it's the only one we've actually brought in, so
it's saved it out as that. Now let's bring in
our other lighting. So let's just drag, drop it in, and there is our other
lighting all in place. We can turn up the strength here and there is our HDR lighting. You'll see it looks very, very different from the other one. I tend to remember, as well, when we
created this shader, we created it for our actual
texture that we brought in. So this might look
a little bit dark, but what you can see if
you come to this angle is the lighting is really, really nice and because
it's based on HDR lighting. So let's talk a little
bit about that now. So HDR lighting
is a way to light up your scenes using
a real photograph. So you can see here behind
here is a real photograph. And imagine stand in the
middle of a p taking a photo in every direction going
around up down left, right, all the way
around 360 degrees, and that's called a HDRI which stands for high
dynamic range image, and it captures not
just the colors, but also bright
things like the sun, the sky, and how the
actual shadows are. So now in Blender
or another program, instead of using fake Lights, which is the one I'm
going to show you, which is the sky
texture after this, you can use real world
lighting. It saves time. It looks realistic, and it makes your three D models look like
it's really in that place. So depending on
where you actually grab your HDRI,
you can see here, we've got a beautiful kind
of meadow, I would call it, actually looks like
where I actually live, and you can see it's
very, very sunny day. Now, depending on
what you got, you could get a city, for instance, a dark night theme based
in Japan or something, and that will actually
have the correct lighting for in that place. So the thing is about HDRI, it simulates real world
lighting conditions without manually
placing any lights, and it provides natural
looking reflections on shining materials and glass and things
like that, as well. That's very important
when you're actually bringing in shaders and you want them to look more realistic. And also, you can
quickly change it. Now, in blender, the HDRI, it actually unlike
JPEG's HRI store a wide range of
brightness levels from very dark to
intense sunlight, and it makes them ideal
for things like this. Alright, so that's a
quick detonation on HDRI. Now, let's come in, and what I want to
do is I want to come in and actually click
the little shield here. That basically means that
when I save this out, then this HDRI
will be saved out. Now let's come to
our sky texture, exactly the same thing. Let's drag and drop it in, and there we are a completely
different setup now, and you will be able to
play with both of these. Now, you will notice, unlike the sky text that we created, some of these have
actually been moved, and I recommend that
you play around with these play around with them
in your own sky texture. So create your own
sky texture like you did before, play
around with them, and then you'll be able
to get wherever you want, because these make such
a huge difference. Let's come, especially things
like the sun elevation. If I put this on zero, you will see now completely,
completely different. Let's pres Control's head and especially as well,
the sun rotation. But the sun elevation means you can take it from, you know, dusk till evening to morning to midday quite easily just
through sun elevation. Alright, so now we've done that. What I want to do, again,
is click on Fake User. I'm going to go
over then to File, and I'm going to save it out. And now then this is
actually in here. So when I actually
load up blender now, this file that we've
opened, so in preferences, this file should stay in
here, the resource pack. And as we put more things
in the resource pack, this should actually update. So what I'm going to do is
I'm going to close this down. I'm going to put this
on Object Mode just so it's not taking up
too many resources. And then what I'm going to do is come back to my file now. So on the next lesson, what we're going to
do is we're going to actually make a start
in the actual material. So all of these materials here, we're going to be prodding
into the asset manager, jumping over to our own course, actual file, and then seeing if they actually
come in there. Alright, everyone, so I hope you enjoyed that, and I'll
see you on the next one. Thanks a lot. Bye bye.
24. Shader Library Setup and Asset Duplication Techniques: Welcome back, if you want
to blend the building, master class from
concept to final render, and this is where
we left it off. Okay, so let's
look at materials. You will also notice
I've put my, um, overview up further up, so we can see what we're
actually doing down here. Okay, so first of
all, then let's come in and put it
on material view. Your material view
is probably going to take a little bit longer
to build than mine. The reason is I've already
built mine, basically. But it's just like when you boot up a game in Unreal Engine, you will see that it takes a long time to build the shade. It's one of the main things
that takes the time. And that's because shaders
take a long time to build. They're incredibly
complex things. Next of all, then you can also put it on the
rendered view. And the render
view up here might say building kernels or
something like this. And what that's doing is it's getting loads and loads
of chunks of code, putting them all together to
create the actual render. So kernels are basically
just chunks of code that GPU CPU needs to create
this actual render. So now we can see
now we've done that. We've got all of these different shaders and materials in. So difference between
a shader and material. So a material is a collection of settings that define
how a surface looks. So color, reflectivity,
textures, et cetera. And a shader is a piece of
code or logic that tells the computer how to calculate the look of what
we're looking at now. So the material is the container that holds
the shaders, textures, and inputs, and the shader is the instructions
inside the material. Define how it basically
looks to light. So think of it more like this. Think of the material as like the recipe for a cake
and think of the shader, like the individual steps
that will show off the cake. That's basically how you
want to think of it. So now we've got that down. Let's go back to material. I'm going to do is I'm going
to show you how to bring in materials into asset manager, the right way, not
the wrong way. So first of all, let's
come to this one. Let's go over to the
right hand side. Now, click the little dot B, and this one says Stone Light. Let's also coming
over to our material. And we can see here it's
called Stone Light, as well. Every one of these is named out really, really
nicely for you. If I come to this one,
click the little dot B. You can see Light Street. So all named out nicely
for very, very good. Alright, let's first of
all, then bring in the cue. So shift a bring in a cue. Let's bring it over just to show you how this
is going to work. So if I come to
this stone Light, right click and come
down to Mark as asset, you will see we have a
little bit of a problem. In that, we actually
end up with the sphere. Now, if I want to
bring this sphere into my project or this
shader into my project, I drop it in and it
comes in like this. And then from
there, I have to go around and find which one it is. So stone light, I've got
to go through all of these to drop it on to my cube. There's a way way
easier way than that. Let's delete this out of the
way, so let's delete it. Let's come over to here, right click and what we're going
to do is clear asset. And instead of doing it that way, we're going to come over. We're going to right
click and we're going to mark as asset. And now we have stone light
that looks like this. Now, don't worry,
it will load up, so you'll be able to see
exactly where it is. You can also come over here, this one here and make
these a little bit bigger. So if you want to see them
a little bit bigger so you can see exactly what you're
looking like, do it this way. And from there, what we
can do is we can drag and drop onto our cube, and there is our actual shader. Waysier to do that, especially when you're working with
a lot of assets and things you want access to
all of these materials and shaders and just
drag and drop them on. It's incredibly powerful
using it in this way. Alright, so now we've done that, what we want to do is coming
over to where it says all, click the little plus button. And what I'm going to do
is double click this, and I'm going to
call it Materials. And shaders. So, okay, now what I want to do is
I want to drag this over. So now we've worked that out, what we want to do is just
change its name because that's wrong so
materials and shaders. And then we can see in
assign this is here. Now, what we need to do instead of going on the right hand side, we could have grabbed them all, and then right clicked, and you can mark as asset all in one go. But unfortunately, because
we're doing it this way, we need to go into each one. So Markers asset, right
click Markers asset. And it is a little bit
tedious, but honestly, it should be you should be able to get it done
in under a minute, which to be quite honest, in modeling terms, isn't that long. So let's just keep going
down them. Mark that set. And this is, again, incredibly powerful
once you've done this because you will have
access to all of these materials and shaders within any blend file
that you open up, as long as you've set the file
to this actual blend file, you'll have access to when
we've done it, the Human OBJ. You'll have access to all
of the jumre nodes as well, I'm going to show you
how to set those up. So it's not just
about this course. These can be used as long
as it's not commercial, right across any of your blender projects or
builds, feel free to use them. And you will see a
little bit later on because some of these
shaders are pretty complex, and you will see a little bit later on just how
complex they are, just how much work has
actually gone in those. Let me make these a little bit smaller because for me,
they're a little bit big. I would like to see them
all on here, like so. Now you can see, it's taking a little bit of
time to build them all up. So just let them build up. You can say, Vo, it won't
do anything to them, but you can see now they're
all pretty much built up. And then what I'm
going to do now is grab each one of these, so grab all of
them and drop them into my materials
and shaders lights. Now, I'm going to go up to file, I'm going to go down to
save, and there we go. Now, one other thing
I want to discuss is, if I open up this file, so I come to here, you will
see this is my resource pack. This is what I've been building. So I've been building out
my, um, asset manager. And you can see within here
we have our resource pack, and then we have ATXT file. If I open up the TXT file,
you will see in here. It does say
environment lighting, environment lighting, material shaders and
things like this. This basically is the blueprint
for your asset manager. If you don't have this within the same file, you
won't have any of this, which means all of that work
where you've tied them up, sort them all out
nice and neatly. If you don't have this,
it ain't going to work. What you need to do
is if you're sending this to a friend or
you're sending it to another computer is
make sure we just send both of these files
through at the same time. And when we open them, make sure they're both
in the same file. We need both of these together. This is another reason
why I've split these up. So you'll notice that I've split up modular pack
and resource pack, so they're two
different blend files. So when we create
the modular pack, we'll be saving it in here. And the reason I did that is
because as far as I'm aware, Blend assets dot cats dot TXT has nothing to do with
the naming of this. In other words, all of
them are named this name. So I want to avoid
any conflicts with the TXT files, and that's
why I've done that. Alright, so now we've got that. Let's put that down. Let's
then open up our other file. So's going to open
up our other file, and here we are.
Let's refresh that. And then what I'm going
to do, by the way, all of that was done because
I recorded a lesson, and then I found out the
microphone wasn't plugged in, so I had to re record them all. So this is probably the third
time I've recorded this. But anyway, here's
all our materials and shades in there
because I've refreshed it, and it means that I
can just drag and drop them into my scene like so. So they're very easy now to drag and drop them
into the scene. Now, the other
thing is, we won't be using most of these
within this gray box. We'll be using things
like the bricks. They will be going on here
once we've UV unwrapped. And, you know, the
walls and things because these walls
are already set out, so we may as well
actually use this. But generally, all of these shaders will be being used within our
actual modular pack. So basically, build
a modular pot, we add in the shader, and then when we bring it into this file,
it's already built. Everything's already
built for us pretty much. Now, we will be using om
gendes in here as well. But again, it will be
a drag drop operation because most of
the time you know, dragging dropping things
from the asset manager means you're using an instance
and not a duplication. So a duplicate of something uses a lot more GPU power
than an instance of something because an instance of something can't change. If you change the main one, you're going to change them all, which means that if you update something in real time
with an instance, all of the instances
are going to change. If you do that with
a duplication, that's not going to happen. So very important that
you know the difference between duplicate and instances. And I'll just quickly show
you now how that works. So if I press Shift A,
we bring in a cube, and if I come to this
cube and I press Shift, that basically is a duplication. Now, we don't want to do
that. What we want to do is we want to press Alt D, and now this is an
instance of this. So if I come in now and grab the top of this
and move it up, it should change the
other one like so. Now, if I come in and grab
this one and press Shift D, and I come in and I mess
around with this one. Nothing happens to this one. So a bit of an example there in real time of what
we're talking about. And let's delete these out
of the way, and there we go. So what we're going
to do now is drop back to our resource pack. And on the next one,
what we're going to do is we're going to first
of all, delete this. We're going to deal with our human reference because we want a human reference
that we can use every single time that
we've got a project, and then what we're going to
discuss is geometry nodes a little bit more complex when
it comes to asset manager. Alright, everyone, so I
hope you enjoyed that. I'll see you on the next
one. Thanks a lot. Bye bye.
25. Overview of Procedural Assets in Geometry Node Library: Welcome back everyone to
Blender building master class from concept to final render, and this is where
we left it off. Alright, so let's come
to our human reference. And what we're gonna do is click the plus B where it says, and I'm going to call
it Human reference. Right, so I'm also going
to go to where it says, Oh, can I actually change that? You can see here as
well, for some reason, it's put a calogu in there. I really don't want
that. What I'm going to do is just
delete that calog. Materials and shaders are
all in there, unassigned. We don't have anything in
there, which is perfect. And now what I want to do. Unlike the shaders, we basically can come over to the
right hand side, and we can right click
and mark him as an asset. He's in unassigned the moment. Let's dropping in to
our human reference, and finally let's click Save. So things like this, the same
as our modular parts will be in here as full you know, actual um objects or
props or whatever it is. And again, this is now or
should be an instance of this. Now, let's say, for instance, you want to update this, as well. You can actually do that. So you can see at the
moment, if I bring this out. If I update this, let's say
I pull him out like so, and then I bring
out another one, you will see there you go,
it's actually updated. So now let's put him
back to the size he was. We don't want a guy like a bodybuilder or
anything like that. And then what I'm
going to do is I'm just going to delete
both of these. We don't want those. This is the one that we want,
which is this one here. Okay, so moving on to
more complex things. Now we're on to geometry nodes, and we see that this ain't a good geometry node because
all it is is a curve. If I press tab, we can
see it's just a curve. The reason it looks
like that is because I've come over to here
and turned it off. And the reason I turn it
off is because this curve uses virtually no GPU.
To render it out. If I have all of these
turned on, you know, if I've got 100 trees in here, that is going to use a lot of GPU to render them
and things like this. But you can see that
you can just turn them on and off with this
little box here. You can even, you know, turn them off when you
come out to rendering, but that's something we'll be
discussing in a little bit. You can also turn
this one on and off. It says here, Look,
if you hover over it, it displays in edit mode. Let's turn it off for now. And then what you can see is, as well, if I come to render, you'll see everything
pops up really nice, and then what we can do is
turn them on like this. And this is probably going
to make it a little bit quicker for your actual
viewpoint rendering. Alright, so now we
understand what that is. Now, there's two ways to
actually save out Jumptre nodes, and they're both actually
really important. There's the roll way, which
is just the Jumptre node. None of these have been
altered or anything like that. And these are called the
perimeters of the geomete node, and a little bit later
on in the course, we will be going through these. When we talk about in
geometry node terms of exposing perimeters, this is
what we're talking about. We basically have these to change things within
the geometyde itself. Ometendes are pretty complex, so we will be going
through how to change, you know, the trees
and things like that. I'll also be showing you within
the geometry node itself, which is pretty complex
stuff, how they're built. And if you really want
to get into those, I highly recommend, you know, trying to starting
off very slow. We do have a lot of courses
on geometry nodes as well, so you might want
to check those out. But for now, let's
actually close that down. What we're going to do then is coming over to
where it says, Oh, we're going to click
the plus button, new catalog, and we're going
to call this Geometry nodes. And then we're going to
click the Plus button, and we're going to call
this one Geometry nodes. And we're going to
call it raw, like so. Alright, let's save out this. And basically,
we've got two here. And the reason we've got two
is I'm going to save it out twice just to show you how it works and also
to put it into these. So first of all, let's
come to the Jumptonod. Go over to the right hand side, and you will see that this
one is called Oak tree. So let's right click and you
might just be called Tree. If it's not, call it oak tree. So double click it
and call it oak. I'm not sure if I
rename mine or not. And then right click,
and all you're going to do is mark as asset. Come down to unassigned.
There is the oak tree. Now, the other way is going over to the actual modifies tab, where you'll find the
actual Jumpton node, right click in and
Mark as asset. Now, you can see
they both look very different. This one
is the raw one. This one is the untouched Jomgoe which I'll explain to
you in just 1 second, and this one is the
finished Jumptre node. So let's drag this
in, put it into aw. Let's drag this one, and we'll
put this into Jomgre node. Then let's go up to file
and save everything out. And then let's open
up our resource pack. So here's our resource pack. Nothing there at the
moment. Let's click Refresh. And here we go. Jomgon nodes and Jumg Nodesaw. So let's bring in
our Jumaje notes. So if we bring this one
in, you will notice as soon as we brought it
in all of the leaves, all of the bark, everything comes into place,
as you can see. All of these parts
is what is going to need it to actually
create this jumjioe. So this is the plus of
bringing Jumigoes in that you've already created because it brings in all of these parts. If I come now and
actually click this on, you will also see my actual tree comes in exactly the
way that I wanted it. So it's up to you which
way you go with this because now I'm going to
show you the other way. So the raw files. So if I press Control's head,
just take this off. Imagine I didn't bring it in. Let's go to Junction nodes raw, and we're going
to drop this in. Now, you'll see that
it turns my plane into this tree. That's
not what we want. This is because this
actual junction node is based on a curve. So shift day, let's
bring in a curve. So just bring in a
simple bezier curve. Move it over, and let's drop this onto my curve,
and there you go. There is my actual trick. Now you'll notice no
leaves are brought in. You can see the bottom
material is not there. This is the basic version
of this jumge node. It's basically like
starting again. So with the trees, I
recommend bringing them in not as raw as a
completed jumge node. And with something
like, for instance, the columns or maybe
the roof tiles, it's perhaps actually better off bringing them
in as raw versions. Either way, though,
you want both of them. Sometimes the oak tree it's not going to
be what you want. And going in and
trying to change it all back to something is way, way harder than
just coming in and just bringing in the raw
version and starting again. Alright, so now we've
discussed both the versions. Let's actually get
rid of this tree. So Controls head and then I'll get rid of this
curve, delete it. And now we'll actually go back. Now we understand the
difference between them and actually sort out
the junction node. So we've got this one. We've got the actual
columns here. So you can see this
is a stone path, but we're going to
use this for columns. And again, we're going
to go through all of these options when we actually come to
actually using them. So don't worry about, you
know, anything right now. All you want to do
is actually bring in the raw version and the
actual finished version. So I'm going to right click. I'm going to come
down to Mark Asset. I'm going to right click,
come down to Markers asset. Alright, so I'm
going to leave them in a sign because I'm gonna
drag and drop them in. They're very, very easy to see. Now, you can see here. This one, in fact, there's another
one there as well. I'm going to turn
this one on just so you don't miss it because you can't see it unless I think
you're in Object mode, let's put it on object
mode. Now you can see it. Let's turn it on, and then we can see
exactly what this is. So this is basically grass. It's a type of
grass, and this one basically goes around
all of the crevices. So this one's more like weeds, and this one is going to go if I quickly show you the
difference between them. So if I bring this
over, this one is going to go down here. Probably can't see it from this, so let's fine I got
a better version. It's going to go
in here. I think these renders actually
weren't taken. You can just see
the grass in there. That's where this
one's going to go. And then you can see all
of these little kind of weeds and things going around the outside. That
is the other one. That is why we used
two geometry notes for this to make it live, you know, as alive as possible. Alright, so now we've got that. First of all, let's
turn this off. And then what I'll
do is I will come. I'll right click my
grass on Mark as asset, right click my grass again, Mark as asset, and now
we'll come to our weeds. And again, I'll go in and probably turn this off 'cause it'll be easier
once we bring it in. Right, click my meadow, press the little dot but right, click my meadow, on mark
as asset, and there we go. Now, let's come to our roof, and again, exactly
the same thing. Now, it's up to you whether you want to turn
this off or not. I don't recommend with this one, it's it's not like grass
or something we're using, you know, tons and tons and tons of topology and
things like this. So I recommend just right
clicking Maker's asset. They're nowhere near
the right size, as you can see in scale,
but it's easy to see. So we can make it
smaller as we come in. This is one of the more
simple actual geometry notes. Let's press the
dot B right click and where is it Maker's asset? And then we'll come
to this one. We can see this is a bosch and, um, this one's easy. It's a rooftle. This one's a bosch, but we
can't see anything. If we click it on though,
and there's our bosch. If we go to rendered view,
we'll see, actually. It's a very, very nice
butch as you can see. So yes, we've even
put these in here. They're going to
make life really, really easy when
you're doing things. So what I'm gonna do is I'm going to turn that off, though. I'm going to come right,
click Marks asset. I'm going to press
the dot board. I'm going to click on it first. Press the dot board, right
click and where is it? Mark as Asset. And then what I'm going to
do now is this last one. So this is our
hedge. Again, just looks like a square block, a beautiful geometry node,
very, very easy to use. If I click this on
now, double tap the A. There is your
hedgerow. You're gonna love how this works
because you're basically just bringing a cube. Put this on there, and you're going to end up
with something like this. Amazing geometry node. Let's turn it off, though. Let's grab it.
Let's right click. Here, Mark as asset. You will see as well this
is called Bush Ooh two. And the reason is because this is the same geometry
nodes as this. This one's just done a
little bit different. So the thing is with geometry
node they're so pliable. You can make something from, you know, a complete bush
like we've got over here. So you can make something
like this all the way to a hedgerow or using
the same jutre nodes, as you can see, 'cause
it's the same leaves. It's just the way that
we've laid it out. Alright, for now, then, let's make sure we've
got everything. I might have lost
track of getting everything. Let's grab this one. Press the dot bo right
click and mark as asset. Before I actually
do that, you know, what I'm going to call it hedge. Like so. And then
what I'm going to do is right click and
Mark as asset. Alright, so we've
got most of these. We've got bush, we've
got hedge stone paths, and they look like they're named correctly. So
that's the main thing. Now we're going to
do is we're just going to grab each of these, so I control clicking a shift clicking won't
click with all these, drag and drop them into raw, and then I'm going to
grab all of these. I can share, click,
all of these, drag and drop them into
Jump genodes like so. Alright, so that's that part
of the asset manager done. Now, you might be asking what
about these parts on here? These parts actually
will come in when we drag most of the juncture notes. The only ones that won't
come in are these ones here. And on the next
lesson, we'll be just sorting these out. So
sorting out some rocks. I'll make a new one for rocks, and then we can actually
get on and make a start on our
actual modular pit. Alright, everyone, so I hope you enjoyed that and I'll
see you on the next one. Thanks a lot. Bye bye.
26. Creating Stylized Support Beams Using Reference Images: Welcome back everyone
to blend of building, master class from concept to final render, and this is
where we left you off. So let's make a new one, and we'll call it rocks. We'll call it stylized rocks because these rocks
are pretty stylized. Rocks. Like so. And then what we'll do is now
we'll come to these rocks. So let's grab all of them. And then if you go over
to the right side, press a little dot on, you'll see they're all
in the same place. It doesn't matter
if they're all, you know, below
each other or not. As long as you've got m
selected, right click, and then what you're
going to do is mark as asset, and then you'll find, if you go to a sign that all of these have actually been
put there at the same time, unlike when you do materials. So now I can simply
grab them all and drop them into my
stylized rocks like so. There we go. We
can save that out. So file, save and this file
now, we don't need to touch. The only reason we
would need to touch this is to add
something to it or make a change within the master file because this is basically
the master file. So now I can basically
close that down, go back to my actual build, and now we'll see if we update this, everything is updated. So we've got our
geometry notes in, we've got stylized rocks
in, human reference in. Everything is there now to use. Now, as I said,
most of the time, as we're going to
be building out, we're not going to be using
this gray box initially. What we're going to be
doing is they're going to be building everything
out in a new file, which will be called
our modular pack file. So for now, let's right
click the Blenhle. So right click Blend,
and what you want to do is open up a new blend file. So open up a new blenfle. It will open up with your guy in there because we
saved it out as default. And now we want to do
is want to go to file, and we want to go to Save As. And then what we want to
do is now we want to come, and you can see we've got a
blender course file here. We want to go too, or where is it
Blender course here. This one here where
it says modular pack. So we have our resource pack
that we've talked about, and we have our modular pack,
which is this one here. So what we're going
to do is save it out as course modular pack. Like so. Then what I'm going to do is I'm
going to just save us. And now that's all saved me. First of all, before
we go anywhere, let's go up to put it
down as animation again. Let's come over and put
this on Asset browser. Let's drag and move this over, like so over there,
and there we go. Now, let's come up and
instead of it being on file. So the file path, we don't
want anything on there, so you can see at the
moment this is ticked off. So now let's click this on. We'll put it on the
current file only. And here we are.
We're nearly nearly set up now, ready
to rock and roll. And you will notice
at the moment and we've just got our
human OBJ in there. We don't really need
to put him in here. But now what we can do I will show you actually so you
know how this works. So if I come up, right
click and Mark as asset, I'll leave him in unassigned,
and you can see, as well. I we'll discuss
that. He's coming in like this, and we
don't really want that. So let's clear the asset
because it's important to know that for when you're actually building
modular pieces. One can do nice Control
A, all transforms, right clicks Origins Geometry, right click now
and Mark as asset, and you will see now he
comes in perfectly aligned. Now, we're going to we'll
put him in his own. So what we'll do is
we'll click the plus, and I'll call him
Human reference. I know we're gonna have two, but I'll just show you how it works. So if a drag and drop now, put him in there, God
to file, and safe. Now we're gonna do
is we're going to go back to our gray box, and I know it's a lot
of jump in between, but we're not going to
jumping in between that much. And then what we want to
do now at the moment, you can see we've
got resource pack. And the only one we've
got is resource pack. So we need to add
in the other pack. So what we're going
to do is go to edit. Preferences, file paths, plus, and the one I'm looking for now, let's search Show Hidden again. So blend files,
let's show those. Let's click this little
Ub, modular pack, double click the
modular pack, like so, so click it and then click
Add to Asset Library. And now, if I move this over, you've got your resource pack and your modular pack in there. Close that down. And now
you can jump between them. So resource pack modular pack. Human references in there. So, again, I want to go
to my resource pack, jump between them.
Very, very easy. In fact, we can bring in the
guy from or resource pack, and we can also bring in the
guy from or modular pack. And there you go. We
can do it like that. What this means is then
now the modular pack is going to have all of
our assets in there. So all of the modular
parts like the windows, the doors, things like
that that we build. This is where it's
going to be found. We can simply drag and drop
them as instances then. And then we've got also
the resource pick. We're just going to have
some of the shaders that we want to
put for the walls, some of the geomogy nodes, because we don't need to
put these geomogy nodes, you know, in with the
assets we're building. So you can see now two master files completely
somewhere else, everything we bring
in from them, is an instance and will
run much more smoothly, and this is the reason
we're doing that. Alright, so now we can
just put this up a minute. We can put this
onto object mode, because what we're going
to do now is make a start on our actual resources. So on our modular pack, what I want you to do
is I want you to drag over a pure rev, like I've got, so you can see
you've got a pure rev here. And then what I want you to
do is I want you to come in, open up your court setup. So what we're doing
is court setup here. Within there, you're going to
have a load of references. This is the one I want to use. So you can see here we've
got all of these in. Now, the one thing I don't want in there
because I've already got them is these buildings,
and what you want. You can either, you
know, do it this way, I'm doing it, which I
find way, way easier, especially if you've
got a second screen, or you can bring them in, as I showed you a few lessons ago. What I'm going to do,
though, I'm going to grab all of these I'm going to grab, where is it from this one, this one, this one,
this one, this one. And finally, this one. I'm going to make it a little bit smaller, and then I'm going
to move this over, and I'm going to drag
these into here. So 13 of them, and there we go. They're all dragged in now you
can see, it's really easy. I like doing this because it's really easy to grab one of them. Grab this one, actually. This is the one
with the supports. This is the one we're going
to be working on first. Drag it out. And
pull it up like so. Alright, so you can see
just how easy that is. Now, the next thing
that we want to do, then, if we're working
on this one first, we want to make sure that we
stick in to some kind of, you know, sizing or
something like that to make everything slot together
really, really nicely. What we don't want to do is just willy Nillly
bringing cubes, so bringing in cubes
and just creating them, you know, let's just create
this big, for instance. We don't really want
to be doing that. Let's actually open up this, as well, 5.88 meters. It's not 6 meters.
It's not 5 meters. It's somewhere in the
middle. Want to keep as close to actual
scales as possible. And the reason is then when
we come to fit them in, they will fit in easier. They won't fit in perfect
because, of course, as you can see on this one, you've got this here, but
then or this one here. But at the side of this, you've also got a column going up. So you've still got to
fit them into place, but it's still better to
stick to 1 meter, two meter, 3 meters or even 2.5 meters
generally. Not all the time. So Windows, for instance,
don't need to be set exactly a set size
or something like that, but especially when we're
bringing in things that, you know, kind of go
together like these. Alright, so let's move that
over to our second screen, and let's actually make a
start on these actual assets. Okay, so the first
part we're gonna build is going to be
very, very simple part. If I come over, this is the part that
we're going to build, and then what we'll do is we'll build this one and
then this one. So I'll keep it pretty
simple for the time being. So I'm gonna be working on this, as you can see, so we're going to go this one, this
one, and this one. And so when I'm building, you'll have an idea of what
we're actually building. Now we'll again come in and say, right, we're building this one. But from now on, pretty much, I'm going to show you
what we're building, and then I'm going
to be, you know, giving you some sort of scale and way to actually build that. Let's put it over to the
right hand side, then. And what I want to do now
is I want to come in. And the first thing I'm going
to do is bring in a plane. So shift, let's
bring in a plane. I would sooner work with planes rather than actual
cubes a lot of the time because it does make
things easier to pull them out rather than trying
to work with a cube, which is three dimensional
from the start. So let's first of
all, spin this round. So we know this is the X axis. We can press RX
and spin it round. So spin it around
90 degrees like so. The other thing
is at the moment, I am in asset manager. Let's rename this
to asset manager. Like so. And then
what I want to do now is you can
also reorder this. You can also put
this to the front, so you can reorder to the
front if you so wish, like so. And I think we'll do
that on this one. And then what I'm
going to do is I'm going to come now to modeling. So modeling press the tab on, and there we go, I'm
going to save it out. So when I want to actually
come in and save it out as my asset manager, it's
going to be over here. But for modeling terms,
we want it right in the center of here so we can
see our entire viewport, giving us plenty of room
to actually model with. Alright, what I'm going
to do then is press the end button to
open up this panel. And I can see here these
are the dimensions. I want this Z axis to be a
little bit further down there. You'll notice, Z axis is
on zero at the moment. That's because
first of all, let's reset all the transforms, set origin geometry and now, of course, the z axis is here. Let's put this on Nopoint two. So no 0.2 is going to be about the size that I actually
want this first part. This is going to
be a kind of very, very thin support,
so it's going to be a thin support going
along the wall. Next of all, then what
I want to do is I want to bring in a bevel. And that might seem
strange you know, on something like this, bringing in a bevel,
let's press tab, contro law, Left click. And when you do left click, you will notice you have
the ability to move it up or down. We
don't want to do that. What what we want to
do is right click and then set it right in the center and now
for the bevel. So we want to make it. If you go over here, you can see it's got top
and it's got a bottom. Let's pull it out there,
and all we're going to do now is press Control
B and pull it out. Like so. And now we have
a top and the bomb. Now, we don't want to bring these two parts out right
now because at the moment, it's still a two D plane. And if we bring them out,
you will see that we end up with a flat bit there.
We don't want that. We have to think about these three D objects and the fact that they're
going into a wall. So the first thing
I want you to do is just grab each
of these faces. And then what I want you
to do is pull them out. So press the EB, pull
them out like so, making them quite chunky because we're going to
be pushing them back into a wall and then grab
the top and grab the bob, press the E born and
pull them out like so. Like that. And there we go. Now you've got your first. Nearly finished part. Let's hit the save born and
I'll see you on the next one, everyone. Thanks a lot. Bye bye.
27. Bevel Modifier Basics and Edge Sharpening for Supports: Welcome back everyone to blend the building master class
from concept to final render, and this is where
we left you off. Alright, so what we want to do now, we've got this first bit. It's looking a little
bit like it's got very, very sharp edges on it. You'll also see down here
on the bott left hand side, active object as
non uniform scale. This is because now we've
actually created this. Let's reset all of
the transforms. So reset transforms right. Clicks origin to geometry. As I said, normally,
with any problems with these parts with blender, it's normally
because of the fact that we've not reset
all of the transforms. Next of all, then we want
to look at the bevel. So why is this so sharp? Can we actually smooth this off? We are dealing with
stylized parts, after all. So what we want to do
is we want a way to put a non destructive
bevel because we can come in to each
of these parts. And don't worry, I'm only
going to show you this once, and then Control B, and you
can actually bevel them off. You can bevel them off, like so. But it's not very good. Takes a little bit
of time to do that. So instead of doing
that, once you've reset all of your transforms,
add modifier, generate bevel, let's
bring that over now, you can see, it's beveled
it off in a very, very weird way. We don't
actually want that. What we want to do is bring it down to not point, not three, something like that,
and then you'll see you end up with a
nice smooth bevel. And you can see this is actually already looking pretty nice. Now, the other thing
at the moment is, I've got no wild in here or anything like that.
Sorry, not no wild. I haven't got any
lighting in here. I prefer to actually bring in the lighting
from our other files. So what I'm going to do is I'm
just going to save it out. I'm going to go to
edit preferences. And then at the moment, I've got my resource pack in
here, as you can see. I don't know if I showed
you bring in resource pack, but anyway, I'm going
to manage that off. And first of all, what we'll do is we'll bring in
those parts now. So we've got our resource
pack, double click it. Click Add asset Library. Let's close that down now. Let's go to Asset Manager, and then over here we'll
go to Resource Pick. In the resource pack, we've
got environment lighting. This is the one that
I want to bring in. So what I'm going to
do is I'm going to bring in my sky texture. And now, when I
come to RenderVew, now you can see my
sky lighting is in there and it's looking
very, very nice. And you can see the
difference now if I click on this to Bevel and not Bevel, you can see it looks
way way better, way way smoother, and that's
exactly what we want. Now the next thing is, we
want to bring in our shader, so I want to drop
our shader on there. But before doing that,
what I really need to do is actually
explain to you about seams and sharps and
also textures and shaders you'll need to know those before actually going
in and putting anything on. But the first thing
we'll do is seams and sharps, and then
I'll come back. I'll mark my seams and shops, and I'll show you an easy
way to actually do that with the majority of actual
um you know, pots. You will need to know both ways, because if you have
problems with your seams, you'll need to know the
proper way of doing it, and you'll also need to know
the lazy way of doing it, because we're all
artists around, we all like to get
away with things. So I'm going to play your
seams and chops now, and I'll see you on
the next one everyone. Thanks a lot. Bye bye. Welcome everyone to the
shut introduction to marking seams and Sharps
part of the course. So before I give you examples of what I'm
actually talking about, let me just briefly
explain what they are. Seems you can think of like
seams on a piece of clothing, like a shirt or
pair of trousers. The main job of seams
is to make sure the texture that
you're trying to place on your mesh
goes on correctly, but more importantly, gives you control of how that
texture will look. Sharps are mot like seams, but serve an entirely
different purpose. We use sharps to
give us control of how sharp and soft angles
are on or measures. This makes them look realistic. It is also important we do this not only for
rendering and blender, but also sharps carry on through to other software
or games engines we want to use like substance painter or unreal
engine as an example. So with all that said,
let's get started. So here we are in blender
with our starting Queue. Now, if I click on my cube
and go to my UV Editing, you'll see that the cube is basically unwrapped
in this actual way. So basically, it
unwraps like a present. Now, if I come across and I grab this circub and
I press Shift D, and then we press Shift
Spacebar to bring in our Gizmo, and we
move it across. And now let's say I want to
alter this cube a little bit. So what I'm going to do is I'm going to press the tab button, and I'm going to go
into Face select, click the top face Shift Spacebar to bring
in the move tool, bring it like so. Now, let's say I
want to unwrap this. Now, if I grab this
with L just to grab everything and I press
the U button for unwrap, you'll see that it unwraps
exactly the same way. Even if I reset the
transformations of this, it will still unwrap
exactly the same way. Now, let's mark some
seams and see how that has an actual effect
on our actual unwrap. So let's grab the top, and
we'll come down to the bottom. And what we're going to do
is we're going to press Controlle then come down
to where it says Mx SMs. Now, it's important
to remember that it's Controlle to mark
Seams in facelet. But if, for instance, we're in EdgeSlt, if we
come to this edge, if we press sear Controlle, you will get this option
up as well, MokeMs. But you can also right click in Edge Sect and you can also see we can mark Sam
this way as well. So for now, though, I'm not going to actually
mark this scene, what I'm going to
do is I'm going to grab the whole thing with L, like so, and now I'm
going to press unwrap. And you can see it unwraps
completely different. Now, let's bring
in some textures so you can see what
exactly I'm talking about. So if I press S tab, I'll come up to my
materials panel up here and I'm going
to give this material. So I'm going to come across
to the right hand side, click on my material button. So let's now bring the material
I've already prepared. So if I come across
this little down arrow, come on down, you
can see I've got one here called wood, and
let's click that on. Now, you can see
what's happened. We've actually applied our
material to this object, where you can see, it's
pretty much a mess. The top of it looks fine, but the bit going around the
side is all bent and skewed. So if I zoom out and
I press Tab now, you can see that the
reason is that it's not actually UVunwrapped correctly.
So how do we fix that? If we come up to Edge set,
and we grab this edge, and now I'm going to do is
I'm going to right click, come down to mark seams, and now grab the
whole thing again. I'm going to press you, unwrap, and now you'll unwraps
absolutely fine. You can see that
woods looking really, really nice actually
on this mesh now. So what this does, the seams do is actually gives you control of how this actual texture
is placed on this mesh. You also need to take
into account that this is basically
an infinite loop. So if I come round and I look
at this face and this face, you can see that
they're going round. If we have no seam, when I
talk about infinite loops, it's basically going
around and around and Blender doesn't actually
understand how to unwrap it. So you'll end up with
that mess we had before. Now, the other thing to
take into account is, if I turn this wood around, for instance, I'm going to do, I'm going to come over
to the left hand side, the view pot of my UV editing, press A to grab everything, 90, spin it round. Now, the other thing
I want to show you is that where we join these
actual seams up is also really important because
you'll never ever get it perfect on here where
there's an actual seam. So let me exaggerate
this a little bit. So I'm going to do is
I'm going to press tab. I'm going to make
this a lot smaller and I'm going to move it into the center of my UV map and
then going to press tab. Now you can see that
these edges don't line up whatsoever against
this other side. So this texture here doesn't
line up with this texture. And the reason is because
we've got a seam down there, and that is the actual
break in the texture. Yet, if we come
round to this side, and I spin this round. So if I grab it or Z 90 and now go to this
one where we can see, you can see that these
line up perfectly. And the reason is
because obviously, there's no seam there.
The seam is here. So you need to take
that into account on your own measures and
objects that when you're playing textures and materials that try and put seams where you're not
going to see them. So if it's on a door
handle, for instance, try and put them on the inside where no one's actually
going to see them. So always bear that in mind when you're actually
marking your seams. So now let's discuss sharps. So if I bring in
a new primitive, so if I press shift A, I'm going to go across the mesh, I'm going to bring
in a cylinder. Now, you'll notice
that this cylinder has all these little
edges around there, and let's say you want to
make a cup or something, the last thing that you want is all these hard edged
faces in there. Now, there are things we
can do to sort this out. So the first one we can do is we'll bring in another cylinder. So I'm just going to move
this one out of the way. So shift Spacebar, bring in my gizmo, move it
out of the way. Shift A, bring in
another cylinder. And this time, I'm going to
come down to where it says, add cylinder and turn
up the vertices to 100. And now, you'll notice that
we do have a round edge. But the problem is
that we've brought in 100 vertices to
actually achieve that. And that's not
something we want. We want to use as
few polygons as possible while still getting
a really good looking mesh. So how do we achieve that? Well, there are a number
of things we can. First of all, we can come
across to this right hand side, and what we can do now
is come to where it says normals and
click on Autosoo. Then we can right click on the viewport and
click Shades Move. Now you'll notice it's
actually been smoothed off. But the problem with this is, if I turn up my autos move, you can see if I turn it up
all the way, it goes really, really funky, and that is
because at 107 degrees, Blender decides that these edges along here needs moving off. So it doesn't give
us a lot of control. If we do this on the other
one, so if grab this one, right click Shapes
move, autos move on, you can see again, even with
lower amounts of polygons, we're still able
to smooth it off. But if we turn this up, we're still going to end up
with the same problem as what we had before. So
how do we solve that? Well, if we come in now,
press the tab button. Come to the top, grab the top, shifts
like the bottom. Press Controllee
because we are in face leg and we'll come
in and mark a shot. And now you'll notice
if I press tab that now is got Hard
edges on there. This gives us control. So this is why we
actually use shops. No matter what I turn
this up to 180 degrees, which is the highest it goes, it will not get rid of
those shops that we mark. We can also mark shops
around the edges as well, Server grab this
one and this one. And now because we're in Edge
select, we can right click. Come down mark a shop, press the tab button,
and now you'll see you've got hard
edges on there. So it's very important
that you mark sharps, where you're going to
actually want hard edges. It's also important that
you get into the habit of marking shops when you're
actually marking seams. And then what happens is,
when you join two objects together and you turn up
the auto smooth if needed, you're not going to end up
with some measures like this. Okay, everyone, so I hope you enjoyed that
introduction to marking scenes and shops and as
they say, on with the show.
28. Introduction to Blender Shader Materials: Welcome back, everyone to
Blender building master class from concept to final render, and this is where
we left it off. Now, again, let's go back to modeling so we can actually
see what we're doing. So you watch the
seams and sharps. So what we want to do then is actually mark in
some seams like so. So we're going to come
round the side off here. You can click Control Click, and then that'll go
all the way around, right click and mark a Seam. Then we'll come
to the other side and we'll go all the way round coming all the way down
like so all the way round. Even this one, right
click and mark a seam. And then what we want
to do is we want to put a seam on the back and
a seam on the back, right click and mark a seam. Now, with things like this, you can delete the back. It's three polygons,
as you can see, and it will definitely
reduce file sizes overall. But whether you
want to keep these or not is completely up to you. Either way I've marked a
seam in there, and for me, I'm going to then come
in, grab the back of it, press delete and faces,
delete the back, and then it'll cut down all of those polygons and
things like this. Now what I can do
is I can actually come over to my UV Editing. And come back to this, so grab it press a little Db on. I can grab it all, press A, U, and I can unwrap. So unwrap angle based, and there we go. This is
what we actually get. Now, there are other
ways of doing this. There are, of course, lazy ways of doing this, but pretty much, if you ever need to you know, building things like this, it's a good idea probably to
mark all your seams out. Now, if I wasn't doing that, I could just press Controlle. I can clear my seams, and then I can press
and SmartUVPject. Click Okay, and you'll pretty much end up
with the same thing. Now, the point is here, this will normally
do a good job. But if it's something
pretty complex, it can mess up in a bad way. So we just need to be aware
that when we've unwrapped it, we check it over, making sure
everything's looking okay. And if it's not, then
we know how to fix it. And that was the idea of showing you seams and
sharps and how to use them. Now I'm going to do is
I'm going to play you another video which is
called Textures and shaders. This will then go through
the UVon wrapping part, and from there, we
can actually come in and actually start
unwrapping these things. All right, everyone,
so I hope you enjoyed this introduction, and I'll see you
on the next one. Thanks a lot. Bye bye. Welcome everyone to
the blender shading and texturing introduction. And you can see here
within my scene, I've actually brought
in a few shaders just to kind of explain
how they actually work. So first of all, what
is an actual shader? A blender shader is a
type of material that can be applied to three D
models within blender. Shaders define the
way surface of objects appear under various
lighting conditions, simulating a wide range of materials and effects
such as metals, glass, plastics, wood, and more. Essentially, shaders tell
blender how to render the surface of an object based on its
properties like color, transparency, shyness,
texture, and reflection. So within blender,
we use actually a node based system for creating
and customizing shaders, particularly within its
powerful rendering engines like cycles and the newer
EV render engine. Now, it's important to note
that the actual shaders within blender react differently to each of those shaders. So at the moment, you can see that I've actually
got this on EV. But the moment I
put this to cycles, these actual shaders, some of them at least, will
react differently. So now you can see that
our emission here that we had that was glowing
doesn't glow anymore, and that's what happens
typically in blender cycles. Also, the glass now we
can actually see through the glass and see this is
actually a glass shader. So it's important to
know straight off the get go that some shaders will work in EV and
some in cycles. Now, next of all,
we need to look at the different types of
shaders within blender. So some are created entirely in blender
through node systems, which we're going to look
at in just 1 minute, and the others are
created through textures. Generally, these will
be PBR textures. Now, a PBR texture is a physically based
rendered texture it's a texture map designed
to mimic the way light interacts with
surfaces in the real world, based on physically
accurate models. These textures ensure
that materials rect to lighting conditions in
a realistic manner, making them essential
for creating lifelike three D models and
environments within blender. So now, enough of all the
backstory on textures, let's actually go up
then, and first of all, we want to bring in an add on. Now, this add on is in
built within Blender. In other words, it
comes with blender. I wish they would actually
turn this on a standard. So far, you have to
actually enable it, but trust me, when
I say it's one of the best add ons that
blender ever produced. So let's go up to Edit, and what we're going to do
is come to preferences. We're going to go
over to add ons, and the add on we want is
called the node wrangler. So type in node, make sure the node wrangler
is turned on, and then all you need to do
is just close this down. Next of all, we're going to
go over to our shading panel, which is this one over here. And then what we're going to do, we're going to
click on this cube, which at the moment,
doesn't actually have a shader on it
or any material. We know that because if you come over to the
right hand side, where our material
panel is here, you can see this is
completely empty. Also in the shader panel, you can also see if I zoom out, this is also completely empty. If you do happen to
have a shader in here, and then there's
nothing in here, just zoom out as far as you can, and then you'll find
all of the nodes. Now, what I'm going
to do, first of all, is add in a new shader, and what we'll do is
we'll double click it and we'll call it wood. Like so. And now you can see
how it's actually set something up within blender, just a basic principle BSDF. Now, this basically
is the super node. It's where all of the
texture maps will plug into. This is the main node
that you will be using. Alright, so now what
I want to do is, I just want to
click on this node. And what I'm going to do is
I'm going to press Control, Shift and T. And what then
that will enable me to do is open up my
actual computer file, and from there, I just
want to find my textures. So here are my textures that I'm going to use as an example. You can see here
we've got wood grain, and you can also check out
what these actually look like by coming over to
the right hand side here and clicking this on. And now you have a good idea of what these are actually
going to look like. We can also make them larger
as well if we need to. So you can see here at the
moment the size is 128, and we can just bring that
up to actually make them bigger and see exactly
what textures they are. Now to bring them in, all I need to do is select
the first one, Shift select the last one,
so we've got them all selected and click
principal texture. And what blenders
going to do from there is is actually going to bring them all in and set
them up for us like so. So you can see now because
of the node wrangler, everything is set up for us. Now, within our
actual shading panel, you will see over
the left hand side, we actually have a UV map here, and it's not actually showing
anything at the moment. If we come on over and we select one of these actual
textures like so, you will see if I zoom out, we've actually selected this
actual metallic shader. I can also come down and select the roughness,
for instance, I can select normal, or I can select the actual
image texture like so. Just remember if it's
on the wrong one, it's probably because
you've got one of the textures or the wrong
texture actually selected, and I generally want to
have it on the base color. Now, with blender four comes
a new principled BSDF, and now a lot of the options are actually hidden behind
these little tabs here. So omission, for instance, is now hidden behind here, so I can turn this
up, as you can see, bring it down, and change the
color of it if I saw one. So just remember that some
of them might actually be. Because this is a basics video, we're just going to
go through a few of the actual options that we normally get within
our actual textures. So a PBR setup normally
consists of a base color, known as the albedo or
cut just a color map, a metallic map, a roughness
map, and a normal map. They're all more maps, but they take a
little bit of work to actually set them
up within blender, and this is a basics video, so we won't be going into those, but we will be going into
those later on in the course. So the first one, which is
the Albedo it just defines the basic color of the material without any
lighting or shading effects. It represents how the material looks under natural lighting. If we go to the next
one, we've got metallic, and this map defines which parts of the texture
are metallic and which are not influencing how the material reflects light. Metals have a high reflectivity and distinct coloration
in their reflections. Now, you will notice if I click on this one, it's
completely black. Because this wood has
absolutely no metallic. If this was completely white, all of this wood would
be completely metallic. And if it has kind
of graze in there, that then is defined the roughness of the
actual metallic. In other words, those
little spots that you see when you shine
light on something. The next one is roughness, and this isn't to
be confused with metallic because roughness
is how shiny something is, and metallic is obviously
how metallic something is. Generally, as well,
with metallic, either something's
metallic or it isn't don't really get in the
real world half and half. Roughness map controls how rough or smooth the surface of
the material appears, affecting how sharp or
blurred the reflections are. A lower value results in a smoother surface with
sharp reflections. While a higher value leads to rough surface with
diffused reflections. Now, when I'm talking
about values, I'm talking about
these values here. So the more sharp this
is or the more blurred this is or the more darker
these little spots are, that will give you the result that you're
actually looking for. And finally, we're going to
go now to the normal map, perhaps one of the
most important maps. And the normal map simulates
small surface details and textures without
actually changing the geometry of
the three D model. It affects the way light
bounces off the surface, creating the illusion
of depth and detail. And this is used
a lot in games to actually look as though there's more geometry than
what there is. Now, let me show you
how that works, then. So if I come down to this
strength at the moment, you can see that we've
got our wood here, and it's kind of defined. So if we look from here, it
kind of looks like it's, you know, three D, and these
little grooves are going in. But if we turn this
all the way up now, you can see that's the
effect we actually get. So you can see now
it looks as though it's much more ripply
along the edges. We can see big grooves
going down there, and this is what the
normal map actually does. Now, at the moment,
with our actual QPA, you can see we've only got
one actual material on there. And what about if
you want to put multiple materials
onto an actual object? I'm going to do is, I'm just going to
click the plus button, I'm going to click
the down arrow, and I'm going to
choose one like glass. I want to click the
plus button again. Click the down arrow,
and this time, I'll choose one that says stone. Now, if I go into my cube and press the tab button
in actual edit mode, come over, select
one of these faces. It only works on faces. By the way, you can't select an edge and apply a
material on there. You have to select a
face or multiple faces. So what I'm going to do
then is come down to glass. And finally, then I'll
click a sign like soap. Then I'll come round
to the other side. I'll click this
face and this face. And what I'll do
is I'll come down, click the stone
and click a sign. And there we go. Now
we've actually got stone, we've got wood, and
we've got glass. And if we put this on
our rendered view now, you can see exactly how
that's going to look, and you can see how the light is interacting with all
of these surface. I come over just to
the right hand side quickly and turn around
my sun rotation, we can get a clearer view of
what we're talking about. If I come even further around
and bring it to the front, so you can actually
see that glass then is actually starting
to be seen through, and you can also see
that actual normal map working on the
inside of this cube. Now, let's quickly
go back to our wood. So to do that, what I'm
going to do at the moment, you can see that
we're probably on the stone in this one in
this shade of view here. It says actually stone here. Actually come down
and click on my wood, for instance, and
then it will take me and put the wood
on there as well. So that's another way
to actually apply them. Instead of the stone,
it's actually just put on wood instead,
as you can see. Now, what I do want
to do is I want to come in to my actual wood. So that's the one that
we actually brought in, this one here and just show you, for instance, can actually interact with all of
these texture maps. Now, there's thousands of
nodes available in blender, and the way that you
put them all together, it can become
extremely complex with huge hundred node
maps and shaders. So I'm just going to
show you something of the basics just to
get you started, and that will be an RGB curve. So an RGB curve, as those of you may know, who use Photoshop
changes basically how the actual image
is actually lit, darker spots, lighter
spots, things like this. So if I come in
and press Shift A, search RGB, and you can see, I've got an RGB curve here. Now, just before we do that, if you do press shift
day, you can come down. You can just see get a flavor of how many nodes there are
actually within blender, and you can see also how many shaders there
are within blender. Let's discuss that
after, but first of all, we're going to go
with RGB curves, bring that in and drop
that down like so, and from here now, you can see
that I can actually affect the color of this actual wood on the fly in real
time, like so. We can also put this
onto the metallic, onto the roughness and even
onto the normal to get different effects and
different ways that the metallic or
roughness actually work. Now the next thing is we want
to discuss is just shaders. So as I said, this is the
main shader within blender. This is like the one
ring of shaders. And basically, this will be the main one that you actually use. But of course, there's
plenty of shaders. So depending on what
you want to do. If you come down, you can see, we've got diffuse, we've
got emission shaders, we've got glass glossy, and a whole range
of other shaders that you can actually
try out and use. Now that we've discussed that, let's actually come over two are actual shaders that
I've got set up here. Now, you can see
with this glass one, it's just a very
simple shader of glass and got some
roughness on and, of course, an IOR value. Next of all, then we've
got an emission shader, and you can see now this
is using texture maps, and it's slightly more complex, and you can see how all
of these things plug in. In other words, what
I'm showing you is shaders can be very, very simple or get
to be very complex. So the next one is the metal, and you can see this
gets even more complex. The next 1 stone, and
you can see, again, this is slightly more complex, and the final one is wood, and you can see
things like this. So we can see that
we've actually got some edgeware on this wood, and all of this is actually
done within blender, again, with quite a big
setup for the nodes. But it's unbelievable really what you can actually do with these shaders once
you've actually got your head around how to
set up the node system. Really are just
scratching the surface in this blend of shaders and
texturing introduction. And even on the right
hand side here, you can see you've got
all of these options as well to play around with, as well as the fact
that you can actually put these into your
asset manager as well. But this is just a
basic introduction just to get you started. Alright, everyone, so I hope
you learned a lot from that, and I'll see you
on the next one. Thanks a lot, cheers.
29. Applying Shaders and UV Mapping Concrete Surfaces: Welcome back everyone to
Blender building master class from concept to final render, and I hope you enjoyed that. Hope you got a lot out of it. Now we're going to do
it. I'm just going to quickly show you
them. We can come in. We can grab all of these. We can press the expo,
make them smaller. We can rotate them, so
we can press R Y, 90. Now remember, you're dealing
with a two D plane here. So there isn't that kind
of three dimensional. So you'll only be able
to go, for instance, if I want to move this GY
moving it up and down, and GX moving it left and right. There is no Z, for instance. You can't press because it doesn't go up. Now,
let's put this back. We've got it something like
this. Now, what about if we want to make
this much bigger? Because we are using seamless textures pretty
much throughout this course, we can get away with
making this bigger than the actual UV map because those textures are
actually tiled. If they weren't tiled, we wouldn't be able to do
this because you would be able to see all the times where the texture is repeated. You'll be able to see a
line it definitely be off. So just take that into account when you're building out things. There's also the
other way, of course, of taking in substance painter and painting it on
the actual UV map, which means, as well, everything
needs to fit in there. Now, there are other ways
of fitting in the UV. You can actually go to UV and
you can go to Pack Islands. You can choose between
if you want to keep the scale or the rotation. Now, the scale isn't the scale of this that
we've just created it. It's the scale based on
each of these parts. So yes, we want to
keep the scale. Do we want to keep the
rotation? Yes, we do. Let's pack the island
and it pads it in few. Now, the other thing you can do, let's say you've
grabbed just this part. Let's make this
part much bigger. And then these parts now
are not the same size, which means that the
texture on here is going to be a lot smaller
compared to these, for example. How do
we get that back? We press A to grab
the whole thing, UV, and we go to
average Island scale. Then it will scale
everything back based on the size of each of
these parts, like so. And then we can simply
go UV, pack islands. And pack the island like so. Now, so far so good. So we've got it unwrapped, and now we want to bring
in our shaders. So what we're going to
do is we're going to go now to Asset Manager. We're going to go down then
to materials and shaders, and the one we want is going
to be called Stone Light. So this one here, I want to drag and I'm going to drop it
on there, and there we go. Alright, that's
looking pretty good, except the fact it
looks a little bit, um, too much like, you know, it's a
little bit bitty. So what we're going to do
is we're going to go back. This is because if I go
back now to UV Editing, this is because if I put
this on Render view, so pull this across, and you should be able to put it on rendered view, like so. If I go in then and
make this much, much smaller, now you can see that it's starting to
look much, much better. And you can also see, we're going to go into the
shader in a minute. But you can also see now it's starting to look a
lot more like stone. You can even come in and bring
it to whatever you want. You can make it really
small if you want to. And there we go,
It's a little bit blurred out now. Does
that look better? Let's make it a
little bit bigger. Like so. And I think that's the best of both worlds that there. Finally, then, we
need to discuss the shader because the shader
is extremely important. How is this shader working? If we go over to
our shader board. So let's open up our shader. This will take a little bit
of time because as I said, shaders are pretty
complex things. If we then open this up, you will see we've
got two options here. We already discussed if we go on to Wild, so we
know about the world. Now let's discuss going
on to the object. So the object, as you can
see here, if I press tab, in this view, it's
a good idea to put this onto UV editor. So just this one, and then we can actually mess around with it and move it within
the actual shader panel. I also like, because
I don't need any of these to move this over
just to the left hand side, so we've got a little
bit more room there. Alright, so where is this shade? There's nothing even in there. What I need to do is I need to come into this screen here, zoom out, so pulling my
mouse out, and I should. If it's on there,
let's have a look. And I think it's
because we really need, it's because it was so zoomed
in, as you can see it. So just keep zooming out, and then you should be able
to find your actual shader. Now, we can see this
shader is pretty complex, and it's not as complex
as you might think. It just takes a
lot of work to get these shaders working the way
that we actually want them. So I will break this
down now for you. But again, it's not something
you're just going to jump into and you're
just going to start building shaders, you know, straight off the bat. Generally, when we're
working with shaders, we want to make them simple
and then go from there. But this shader,
how it works then. First of all, we can
see if we go into here, let's put it on Render view because we can't
see it until that. We've got this part
here, as you can see. This is controlled
by these bevels here and the difference
between them. So we can see if
I move this down, we can see we get a
difference in there. If we move this to
black, let's say. So if I put this
on extreme black, you can see, look,
everything disappears, everything goes white,
as you can see. What this does then, it creates kind of edgewar on
our actual stone. From there, then we've
got a concrete part, which is basically
making this a little bit more bumpy and less actual flat. So it's kind of like a
mask going over there, making it look a little
bit more realistic. And finally, everything
plugs in to, you know, these overlays and curves
and things like that. That part of it, you don't
need to worry about. You just need to understand
how this part is set up. From there, then we
have an actual texture, and you can see it's called
concrete color texture, and it slots in to all of
these parts down here. And again, for now,
you don't need to actually know how
these things worked. What you do need to know is that the reason
this is sell like this is that we have two textures over the
top of each other, and we have some noise
breaking it all up. So it's not just
a simple texture. This is how far you can
actually push shaders. Now, when we bring in a new
shader like the wood shader, we can go in there
and see a much more simplified
version of a shader. But this one here
is pretty complex, and I've just tried to break
it down as simply as it can. You can also see here for
zooming have a noise texture, another noise texture,
going into a curve, which makes us able to change that noise texture orever
we really want it, and then finally, this is all
going into another curve. And everything is being mixed up from the actual
original texture. So it's basically like taking
two textures, the same, but taking the second
one, moving around, breaking it up, and then
joining them back together, and this is what gives
you something like that. Then on top of that,
you're going to have the edgeware which is
done with the bevels, which I've just talked about, joining everything
back together, and this is what
you actually get. This is what we've done with a lot of the shaders in here, and the reason we've done that is because generally in blender, you can bring in seamless
textures like we've done here. But you can't make it
look like something that's come out of,
say, substance painter, where it's painted within
substance painter, all the edgewas
added within there, and then it's export
out as a texture. We wanted a way to make
something look nearly as good as substance painter as a shader that everyone can use within blender
straight off the bat. And that's why we created these. So they might look complex, and they are pretty complex, but that's why we're
actually using them. But when we've got
some simple shaders, I will show you those as
well. Alright, so moving on. We've got this now then. So this is our first actual support. And what we'll do now
before doing anything else is we'll make
a new collection. So what I'm going to do is I
can press hover over here, press the Nborn new collection, and we'll call it supports. Like so, and we already know if we come back to
modeling that this, if we go to item, press the tab on, this
is 2 meters along the X. So we know it's a
two meter support, and it's a small
support because if we also pull over this part here, we can see that we've got
all of these supports here. So this is the one
that we've worked on. So I would call it
in small support, 2 meters, something like that, something
that's memorable. Well, not memorable,
something that we can actually look at and
understand what it means. So we'll call it small support. 2 meters and we'll
call it in, like so. Okay, there's our support. Now we can put it into
the asset manager now, but we're not actually
finished because there's something else
that we need to do. We've got it in our collections. Now. Now I want to do is I want to make it easy
so I can actually just bring it in to my file and make it smaller
or bigger, let's say. So what I want to do
is, and probably, I've got a two meter one here. Let's create another one
that's going to be 1 meter. So all I'm going to do is
I'm going to press Shift. Bring it down and then
put this to 1 meter. So I'm going to put this
to 1 meter like so. And then what I'm going to do is I'm just going
to change this, so delete this off, pump to the 1 meter, sorry, the two meter and just put
it at 1 meter like so. Now, we're not going to do
this for every single one, but some of them, it definitely makes it easier to
actually do that. Now, the next thing I want to do is I just want to
put it next to it. To show you what
else we want to do, so I'm just going to put it
just behind it, like so, because that one's the smaller
one and then like this. Alright let's move our guy a
little bit out of the way. Now, finally, before
finishing this, so you'll notice now if I
come to my rendered view, you will see that this
one looks like this. And the reason it
looks like this is because we've actually
made it smaller. So what I want to do is
I want to change the UV. Now, a bit later on,
I'm going to show you how you can get away
without doing this, but we need to basically
unwrap it again. So I'm going to press
the tab, I'm going to press U, smart UV project. I'm going to click.
Okay. And then we've got something
like this again. So let's go to our UV map. And what we want to do is match it pretty much with
how this one is. So this is the long
way of doing this. I'm going to make it smaller, make it smaller,
make it smaller. And even then I'm going to make it even a bit more smaller, a bit more smaller, like
so. Is that matching up? No, it's not. So let's make it. You know what
I'm going to do? I'm also going to
reset the transforms. Here we go right clicks
at origin geometry, and now let's unwrap it. So Smart UV unwrap, like so. And now let's make it
smaller. And let's rotate it. So R 90, make it smaller.
And there we go. Now it's looking
something like this one, maybe, maybe a
little bit bigger. And there we go. That's
looking like that one. They're looking the same
now. I'm happy with those. And there we go. Now, there's one last thing that we need to do before finishing up these, and we'll do that
on the next one because it's going
to make it very, very easy then when you
brought these into, you know, your own build, that you should always put these on, especially on parts like these, because then you've got
the choice of taking it off or, you know, adding on creating more of them, for instance, and
things like that. Alright, everyone, so I
hope you enjoyed that, and I'll see you in the next
one. Thanks a lot. Bye bye.
30. Building Support Variations and Organizing Mesh Sizes: Welcome back, everyone to
Blender Building master class from concept to final render. Now, all the things I've gone through seem incredibly complex, I might seem like I'm
going around the houses. But these are all things
that you're going to need to know for in the future. So as we move on
through the course, you will find it
speeds up the pace. We build things much
faster, the more you learn, but we want a slow
gradual learning curve so that you're learning
the right way. That's why we took
our time to go through all of these
things, you know, bevels. But when we come to the
next part, dropping on the bevels
shouldn't be too hard. Dropping on an array modifier, things like this should
be much, much easier. So saying that, make sure
your work saved out. Let's go back to modeling. And what I want to do is
come to this one first. I'm going to go on over then
and add in another modifier, and the one we're going
to do is an array. And what that's
going to do is it's going to put it on here like so. Now, with this, we want to save it out with
the array on there. So I can turn this off now. And then when I bring this into, you know, my build, what I can do now is instead
of it being 2 meters, I can make it 4 meters or 6 meters or 8 meters
very, very easily. So what I'm going to do
is I'm just going to turn it down to two, and I'm also then
going to turn it off. Now, the thing is, it's
got a modifier on it, so I want to make sure if it's not needed,
I've got it off. I don't want it
being rendered out. So I not want it rendered out
and I don't want it to be, you know, on the screen on
the in the view port either. So what I'm going
to do now is come in to this one, do
the same thing. Now, this one and this
instead of, like, you know, copying this, for instance, and just putting
on a new modifier, I might as well grab
this one first. Always grab the second one
what you want to copy. So shifts like this
one, press Control L, and then what we'll do
is we'll copy modifiers. Now, if I come to this
one, you'll see I've got the bevel and I've
got the array on. And again, with this
now, we can make it. So we're creating
new parts really, really easily like so.
Really easy to do that. Alright, so let's drop
this back to two. Let's turn this off,
and now finally we're ready to put them
in our asset manager. So now we're going to go
over to asset manager. Making sure that we're
in the current file, so we want to make sure
they're in the current file. And then what we
want to do is we want to click Plus on here. We're going to call it supports. Like so. And then what
I'm going to do now is I'm going to come to
this part and this part. So both of these
parts right click and we're going to
mark as assets. Then we're going to
go to unassigned. And then what we're
going to do is drop these into supports, like so, and we're
going to go to file and save, and there we go. Now, before carrying on, I'm going to show you how
this works then within the actual main blender file. And from there, then
we'll come back to you and we're going to
build out a few parts because there's no
point just testing everyone out and just showing
you how it actually works. So here we are once again
in our main gray box. And what I want
to do now is come down and I'm looking
for the modular pack. As soon as I bring
in the modular pack, we've got supports in
there, as you can see. Let's save out a work
before doing anything else. And what I want to do
now is go to RenderView, and I'll just show you how
easy it is to use these. So let's bring in the
big support, like, so if I press the dot board
now and zoom up to it, first of all, you
can see that we've got the actual shader in. You can see all the
bevels have come in. I can actually turn this on now, and there you go. Same
with the other one. And same again, and same again. And really, really easy every single time you drag
one of these out. You're actually then um this is where these
parts are going to go. So, for instance, if I
want to press A's head 90, I can bring that out then
and put it into place, making it as long as I want it. So let's just bring it in. And this is just to show
you an example, of course. Let's bring it up to here. Press the dot board, making
sure it's against that wall, so push it into the wall, and it's not quite long enough. So what we're gonna do
is we're just going to turn this up again, and up again. And there we go. Just make sure
that it's rendered out because you want
it to be rendered out, as well. And there you go. There's the actual
first part in there. Simple as that. Really, really
easy to use, as I said. And then what you want
to do, then you can bring another part out if
you want another part. And all you need to
do is just stick it on the wall or Y -90. And there you go. You can just stick it
on the wall like that. Because the other
thing is, as well, when you're bringing
these parts in, you'll notice how they glue themselves to the actual floor, making it really, really
easy to bring in more parts. Alright, soapen out,
let's get rid of that, get rid of this,
get rid of this. Like so, like so,
and there we go. Okay, save this out once more. And then what we're
going to do now is go back to our modular pack, and let's build
out our next part. Now, when I'm building
out these parts as well, I like to put them on a plane because I don't
like viewing them, especially in the viewport
straight through, like that. So I'm just going to press
Shift, bringing a plane, make it bigger, and then all I'm going to do is
just move it to the side. So I'm just going to
move this to the side, as well as moving
these to the side. You know what I'm
going to do as well. I'm just going to grab this one. I'm going to pull
it back over here. I'm going to put it
behind. Same for this one. Let's
pull it over here. And then what we'll
do is just grab both of them and pull them down. I do like things to be pretty neat when I'm actually
working with them. Alright, so now we're
going to do is we're going to work on
the neck support, and this one's
going to be pretty much exactly the
same as this one, except it's going to
be much, much thicker. So what we'll do is we'll bring in we'll go to object mode, first of all, and
then what we'll do is we'll press shift D.
We'll bring in a plane. We'll rotate it round. So X because you can see
that's where it's rotating, 90, rotate it round. And then what we're going to
do is then we're going to actually come over to
the right hand side. Now before we do
that, of course, let's resettle our transforms, right click Set
origin to geometry. And then what we'll do
is we'll come in and create this width here on the z 2.40 0.415, not point. Four. One, five. There we go. This thickness now, so it's nearly twice as
thick as these ones. Now, again, we want
it on 2 meters, so we've got a two meter one, so you can see, in
fact, you know what? This is let's have a
look. This is 1 meter. This one's two. So we'll have a 1 meter and a two meter
exactly the same way. So we'll go 1 meter for now, 1 meter, like so. And then what we're
going to do is exactly the same as what we
did on the other one. So control R, left click, right click, Control B, bring in a bevel, quite thick, like so, and then
grab the whole thing. So press L to grab
the whole thing, press in the E button.
Let's pull it out. And then what we'll
do is grab both of these with face select. By the way, you can
press on your keyboard, one, two, and three
for each one of these. I've just got into the habit of clicking on them
most of the time. But if you ever seen me swap these over without
clicking on it, it's one, two, and
three on the keyboard. Grab the top, grab the bottom. Press the E to pull them out, like so, and there we go. Alright, so now we've got
something in place, though. It's actually very easy
when we've done these now to actually build
them out. Very easy. So all I'm going to
do is Control A, A transforms right,
clicks origin geometry, I'm then going to
make another one. So shift D. This one, I'm going to put a
little bit back like so. What I'm going to do then
is put the X onto 2 meters. So there we go, 2 meters. And then finally, what
we're going to do is we're going to
grab both of these. Grab this one over here, press Control L. And we're
going to copy modifiers, and we're also going
to press Control L, and we're going to
link materials. And you can see now
if I come into there, they're not unwrapped properly,
but what you can see, if I put it on object mode, we've got a beautiful
bevel on there. We've also got array
on here as well, which we know how that works. And so you can see
how that process has been sped up dramatically. Now what we need to do
is we need to kind of copy the UVs from
one to the other. So what I'm going to do is I'm going to grab both of these. I'm going to then
go to UV Editing. And what I'm going to
do is I'm going to grab all of this
and I'm going to press U smart UV
project like so. Click Okay. And then going to
press As and bring it down. Put it just over here. And then what I'm going
to do is I'm going to come to this one,
press in the b. And now you can see just
how small that one is. So what I'm going to
do is grab this one, 90, spin it round, make
it a little bit smaller. And now I know this is going to be about the right
size of the other one. So something like this
is about the right size. And then all I'm going to do
is the same for this one. So I'm going to grab this one A, small UV project, click Okay, A, spin it round. So, 90, make it a little
bit smaller, like so. And then grab this one. So we're going to grab
this one and this one, press the tab but. And now we can see
that this needs to be a little bit smaller. So let's go to this one
actually and see how big this one is this
one's the chunkier one. So if I see it here, you can
see this is what I've got. If I then come and grab
this one at the same time, you can see now if I spin
this round the other way, maybe I can get away without doing that, so I'm
just going to grab it. Press the G board.
Let's actually have a look what
that looks like. You know what? I think they
look. I think they look fine. I'm just looking at this one and wondering why, it's
got a line down there. Is it from the shadow?
Let's have a look. We'll put it on material view. And yes, it's from the shadow, I think of my guy. Let's have a look.
So we'll grab him. And in object mode, there we go. Or it's from the angle
of the sun, I think. Let me try and change this
over just to make sure. So, A, G Go, that looks better already. I think this is just from
the angle of the sun. This part here, though, the stone looked a
little bit weird, so I just moved it over. No problem with the G bon. So again, just make
sure you grab it, press the GB and then you can
move it wherever you want. Alright, so let's get
these in place, finally. So we're just going to press
seven to go over the top. We're going to press
G to go over there. I'm going to go
back to modeling. And then what we want
is to double click this, press Control C, just to copy it, and
then we're going to come to the small one, which
is this one here. We're going to double
click it, press Control V, and I'm just going to put
a large so large, like, so support inner, and then I'm just going to
copy that so Control C, and then going to
come to the next one, which is this one here,
Control V. And there we go. This one, though, is 2 meters. So we're going to change
this 2 meters, like so. And finally, finally, I
just need to make sure that I'm lifting
them onto the floor. Now, I've done all that
work, got my rays in. Let's press Control A,
reset all the transforms, making sure that when I bring
them in to my own file, all the transforms are reset. Now, finally, then let's come
to this one and this one, we're going to right click and we're going to mark as assets. Asset manager, drag and drop
these in to my supports. Now, this is the same process that we've been using
throughout these. Some of them are a
little bit more complex, of course, you know, if you look on here, for instance, you
can see some of these are a little
bit more complex, but most of them
are pretty simple. So this is what we're
trying to replicate. You can also see down
here these are a little bit different as well as in
the actual shade of color, and we're also going
to replicate that. So first of all,
we're just going to finish building out all these. And from there, we'll
probably go and build out just some columns because once you've got the columns and
you've got the supports in, you put supports in,
you can put columns in, and you pretty much
can start building out the outer shell of
your actual building, which makes it actually
start feeling like it's starting to get
somewhere and come together, 'cause you can see
a lot of these parts like these ones here. These are, you know,
for the roofs. These are for the stairs. These are adding
all the details on, but the main components are these kind of columns here and definitely
these parts here. So we're going to spend time
now building those out. All right, so last of all, let's save out our work, and I'll see you
on the next one, everyone. Thanks a lot. Bye bye.
31. Designing Alternative Structural Supports: Welcome back, everyone
to blend of building master class from
concept to final render. Now, we're going to be creating these more
simplified ones. Now you can see this one
has a rounded part on it. So this is so long and then
it's rounded on the edges. And what I want to do is, I just want to create
this one and this one. Now, as far as putting on things like the
shaders and things. We might as well do that all at the end from here, I've
showed you how to work. I've showed you how
to put them on. I've showed you how
to do them in UV. But the thing is we're
forever going to be keep going in and actually
making them smaller, bigger and all of that stuff. And we don't really want
to do that for these. So rather than do
that, let's do them all at the same time,
right at the end. It's going to make things
much, much easier. So let's first of all, then
come in and create this one. Again, what we'll do is we'll do pretty much
the same thing. So we'll start. We'll start with a cube this time,
so I can show you. So shift day, let's
bring in a cube. Let's bring it over here. So
you'll see straight away, it's a little bit harder
with an actual cube. You can see it's, you know, much, much bigger to
actually deal with. We've got to then pull it back. So you can see here we've
got to pull it back. So S and Y, let's pull it back
into place, like so. And then we've got to actually
bring it down, as well. So let's bring it down to
naught 0.156, like so. And only now, we've got something we can
actually work with, so you can see now why I
actually prefer to use a cube, use a plane rather than a cube. Now, the other thing
is, these two here, we need to update these
a little bit of thing, but once we've saved
them out, they should update on here anyway. So at the moment, if I go
into supports and I bring in, I think it's this
support, let's bring in this one. This
is the support. Now if I come in and actually make this
a little bit wider, so let's just go to
seven over the top, S, and Y, let's pull it
out a little bit more. Let's see, then if I come
up to file and save it out, let's see now if
I bring this out, and there we go.
It's the same size. So we know if we change that, we can actually use
that in that way. Now, I'm wondering if I want to do it like that
because at the moment, I think we just need to
pull it back a little bit. And also, we've not got
these backs taken off. So what I'm going
to do, I'm going to make them a
little bit thicker. So I'm just going to
come in, and again, we'll be re
unwrapping everything at the same time, so
don't worry about that. And I'll also do them
both at the same time. So you can actually
shift select them both. Come in then grab both the
backs of them like this. So shift, and click Shift space, barbing and the move tool, and then just pull
them back like so. Now we're going into each
of these at the same time, and all I'm going to do is
delete the faces on the back. So shift select, control select, shift select, control select, delete, and we're only
going to delete faces. So just this one here, like so. Alright, so now let's
actually do this one. So we've got this
one the right size. All I want to do
then is just put a little bit of an edge
on the front of there. So I'm going to come
in, control law, left click, bring it
up maybe a tiny bit, like so pull this out, so E, pull it out a little
bit, like so, and it's just going to be
very, very simple this. Now, you can see this
one is this one here. You can see at the
moment, it's 2 meters. So I've got one that's 2
meters and one that's 1 meter. So let's do the
same thing on here. So what I'm going to do is I'm just going to put this one here. I'm going to press
Shift D, bring it over. And what I should have
also done, first of all, is grab them both now and I should have took
off the face before duplicating it to
make it a little bit easier myself, delete and faces. Now, let's grab them
both at the same time. So Control A, all transforms, itiginT geometry,
grab this one last, and we're going to
press Control L, link materials, Control L, and we're going to
copy modifiers. And there we go. Let's
double tap the A then, and we'll see if we end up
with something like this. You can see it's
very, very, you know, kind of greening not
really working properly. But for us at this point,
that's what we actually need. Now, what we'll do now is
we'll come in and rename them. So at the moment,
we have supports. These supports here. So these two should be in this
support here as well. I'm gonna come up
and save my work because I know when
I'm in viewport, higher chance of it crashing. And now I want to do is
I want to name these. So I'm just going to
come in, grab this one, Control C. And then what I'm going to do is I'm going to make this one a
little bit thinner, so I'm going to go to
1 meter, and again, I'll resell the
transforms, like so. And then I'll come now and
rename this Control V, and we'll call it large
support. I'll call it thin. Like so, and then I'm
just gonna copy it. Control C. Come to this one. Control D. And then we're
going to put 2 meters like so. Alright, both of those are done. Now can drop these into
supports, like so. And then I can
also tidy this up. So I want to come to my guide. Now, the other thing is
you don't need to come over here to keep creating, you know, collections, I can
just press the N button. New collection, and we'll
call it human reference. And trust me, guys, keeping this nice and neat right from the start is going
to help you a lot. Human reference, and then
we've got ground plane. So I'll just rename this one,
so I'll double click it. Call it ground plane. Like so. And there we go. Now my
ground planes in there. Alright, so now moving on.
We've got this part here. Now, this is just a block,
so we can create that. And then we've got
this one here, which is a little bit
rounded on the sides here. Alright, so let's create those. These should be pretty
easy to create. Okay. So let's first of all, because it is this one here
is just a square block. So let's just bring
in a square block. So what I'll do is
I'll press Shift A, mesh, bring in a cube. And then all I'm going to do
is come and put it 3 meters, and then we'll put
this to no 0.72, and then finally this
one at 0.275, like so. That is the square
block that I want. Now, I'm just going
to put this over here because I'm
going to rename them, put the bevels on all
at the same time, resell the transforms
and things like this. Now we're on to this one here with a slight rounded
edges on there. So what I'm going to
do is I'm going to again probably bring in a plane. So let's bring in a plane
first, so we'll press Shift A, bring in a plane. I'm going to rotate
it round, so Rx 90. And then what I'm going to
do is reset the transforms, all transforms rightly,
set origin to geometry. Now, let's come in and actually, um, this is quite a
big chunky piece. So we need to keep the
same dimensions on this because this part here is actually going
on this part here. So we need to keep exactly
the same dimensions. So I'm going to give you those. And once you've got dimensions, it does make it incredibly
easy to actually create. So it doesn't matter how
far it comes out here. The point is we need
the right dimensions on the actual height and the
actual length of this. So what I'm going to do is
I'm going to put the height on not 0.65. So
that's the height. And then we'll put the
width on 5.4 meters. And that's the wrong
way round, so we'll put this one on 5.4 meters. Alright, so that's
the size of it. Now we can come in, and what
I can do is I can come, grab this part here,
press the E button. We're gonna make it
pretty chunky, like so. And then go to press Ctrolo
bring in an edge loop. Left click, bring
it up a little bit. And then what we're going to do is we're going to
bring this part out. So I'm going to grab this, press the E button and pull it out, and then finally, we're going
to bevel off these corners. So we're going to bevel
off these corners now. All you need to do
to bevel it off as we've discussed is
press Control B. Now, you're going to
get going like this, and you can see it
looks kind of weird. It's not beveling off properly. Again, it's always down to
resaing all your transforms, origin geometry,
pressing Control B. And now we should
be able to bevel that off quite nicely, like so. Now, all I want to do is
just bevel it off enough. Where it's going round
and if I right click, so if I put this on object mode, if I right click
and shade smooth, so shade or to smooth, you can see that it shades
them smooth around there. The other thing is,
I really want to be working in modeling, and I want to put
it on object mode. And now we've got this far. I actually want to show
you something else. When you're actually setting up your modeling to work on things, it's not always the best idea to work just in object mode. It's also a good idea to
come down and put on cavity. So put on cavity,
you're going to get a much better idea of what
you're actually doing. You can see already just how much that gives you an idea
of the shape before this, so if I turn this off 1 second, turn this off, you can see
much harder to see shapes. And that's why I do this.
Once I bring this on now, we can see this is
smoothed off very nicely, and this then is the right size of what we want to
even though it's, you know, kind of big, but we're going to name them
the right things. So everything now
seems to be fine. And then what we'll do now
is on the next lesson. So let's zoom out of here. Let's go down and look what else we're building next,
so it's over here. We're going to
start work then on probably these ones
because they're a little bit more
simple than these. So we want to have
a nice, you know, transition between
simple and hard, especially when we're dealing
with the first things. This one's a little bit harder, as well as you can see, and
then we've got this one. So I'm not sure whether
these are hard or easier, but I think this one is
definitely the easiest. So we'll start with that
one on the next lesson. All right, everyone, sir.
I hope you enjoyed that. I hope you're liking the way that we've tried
to sell the course, we'll be going
nice and smoothly, and then just ramping up the
difficulty as we go forward. Alright, one. Thanks
a lot. Bye bye.
32. Modeling Wall Panels with Inset and Extrusion Techniques: Welcome everyone to
blend of building master class from
concept to final render. Now, what I'm going to
do with these parts because they are so chunky, I'm just going to put
them further back on, move the actual floor as well, and we'll
put that over there. And we'll also extend it out a little bit just to
accommodate these two, as well, just so I can
see what I'm doing. Okay, so what we're
going to build now is, as I said, this one
and this one here, and then we'll probably come
to this one afterwards. So let's put that over there. So the first thing we want to do is want to bring in a plane. So shift D, bring in a
plane, rotate it round, so x -90 or X 90, whichever one is the case. And then what we're going
to do now at the moment, this is 2 meters by 2 meters. It's pretty big. We don't
want it 1 meter either. And the reason for that is
because if I go to these two, put it at 1 meter, it's too small, and I don't
really want that. So what I'm going to do is
I'm going to put these at 1.3 meter and there we go.
That is what I wanted. So a little bit chunkier,
as you can see, it's going to be kind
of the supports, you know, where
people walk past. If I lift this up, you can see now that's how chunky
it's going to be. So I think I'm going
to be happy with that. In other words, it's not
going to fit in 1 meter. And basically, what I tend to do is make them smaller
once they're in place. So once they're in place,
I can actually bring them down slightly and get
everything fitting in. Now, this one's
quite easy to do. So all I'm going to
do with this one is pull it out, first of all. Always pull it out a little bit further than what
you think you need, because you are
going to be slotting that back into the wall. It's better to have a little
bit more distance than less. And the other thing is, like we haven't done with these yet, we should also come in and just make sure that we're
removing the back of these before we actually
come in and UV unwrap them. So delete faces, no
one's ever going to see the inside of
their delete faces. And it is overall, once we start bringing
all these parts in, go to save us a lot of polygons and a lot of V space
on top of that. We're always thinking ahead
on how we can make this, you know, better
than what we had. Alright, so well, more better performance because when you've got big scenes,
big environments, big buildings, you really want to make sure that
right from the offset, you're really refining down
how optimize parts are. Okay, so let's come
to this. And what we'll do is we'll press
delete and faces, so delete that back face. And then what I'm going to do
is I'm going to come in and I'm going to press insert.
So that's the ebon. I'm going to insert this down. So because I want to make
now this part here go round. So what I'm going to
do is press Control B, and I should roll them back
and create that while wanted. Now, from here, I
can actually press Alts or I can press
S on this one. So if I want to move this now, instead of pressing ltes, I want to press the S but, and then that will bring it into place without changing
it, moving along here. If I press Altes, you will see if I press Alts,
it starts to pull it out. That's not what we want.
So I'm going to press the S but just making
sure this is in place. L so. And I think I'm
happy with how that looks. Now, it's easier, honestly. If you're not happy with the thickness or
anything like that, if it's a little bit too thick, just go in and recreate it. Don't mess around you know, trying to mess around
with this, just go in. It's so easy to do. Just press Control B again
and just bevel it out and make it a little bit thinner
and then press AlterS sorry, S and bring it out wherever you want it,
something like this. Alright, so now I'm
going to do now I've done that is press the EB and pull it out
to make that actual, you know, kind of what
would it be called ornamental design or something like that, you know,
where it just pops out. Just make sure you're
happy with it. And if you're not, you can
actually go in and just push this part back so you can push this part in if you want to. Alright, so that's
that part done. Now, again, these
ones all need fixing, they all need naming
all of that stuff. But now for now, let's
work on the next one. So what we're going to do
is come to the next one. So again, bring in a
plane. So shift A. Let's bring in a plane, X 90. And then what we're going
to do now is we're going to keep to these dimensions. So we're not bothered
about the thickness here. What we bothered about is the X. So what is the X set
at 1.65, like so. What is the z set up? Sorry, the Y set out,
1.1. Let's try that. And there we go, There
is the dimensions. Now, if I bring this back,
you can see it's way way thinner than the
ones this one here, the square block, and that's
exactly what we want. Again, with things like this, we don't want to always
stick to the correct size. As well, you know, when
you're going in the building, you can see over here, so we can see over here. It's going to be pretty hard if we're trying to keep
this 5.15, you know? So that's going to
be pretty hard to put things next to
each other when we're dealing with things like this or things like this where there's
lots of them on there. So when you can, try
and stick to, you know, a certain size and
then shrink them down. So everyone thinks
when you're building modular packs like you should
be sticking to 1 meter 1.5. Sometimes that's
incredibly hard to do when we're dealing
with things like this, use putting these next to each other when this isn't
always going to be exactly the size when
you've got posts and things like that also in
there, not always the easiest. One good thing you have, though, is when you stick
to things like one, two, 3 meters, is when you're snapping things together
based on 1 meter. But you can snap
things together just based on snapping next to a vertice or
something like that. So now let's put this
over the other side. Let me just go in and get
what I'm actually building. And now I want to do is I
want to bring this out. So I want to bring
this part out, so I'm going to press E, pull
it out to where I want it. And then what I'm
going to do is press the I for insert again, so bringing this in, making sure it's a bit further
than we wanted. Now, the other thing is, because I've not reset the
transforms on this, when I come to insert it, it's not going to be square, so I need to press all
transforms rightly. So origin geometry,
press the tab bun, press the Ibn to bring it in. And now you can see
it's way way better. Then I can press Control
B and pull it out, like so maybe not that
much, something like that. And again, if you want
to pull it further, just press the S
button to pull it out. But I think for me, I'm pretty
happy with how that looks. And now I'm going to
do is I'm going to insert the middle one. So I'm going to
press I to insert. You can hold the shift button down to get it to
where you want it. And then what we're going
to do is we're going to press E and pull this bit out. Now, the problem is,
before we do that, we need to make sure that this one is pulled
out a little bit. So what we'll do is
we'll pull this one out just a tad like so, grab the center one
then and pull this out, like so, and then
pull it out again. So E, pull it out again. And now I want to do
is bring this in. Now, you could bring it
in altogether like that, or you can bring
in on just the X, for instance, so
bring it on the X, bring it on the z,
and then you have a little bit more control
if you want to do it. So you can see now that it's going in further on the
sides than the top, and I think that's how
I actually want it. So you can see, as well. If we go over the
top, you can see that we're a little bit further
out on this part here. Now, of course, we can
come in and fix that. So if you grab this face, press Control plus seven
to go over the top, then what we can do is we
can pull this back holding the shift and make sure they're pretty much in line
with each other. But you will create a much, much thinner part
on this part here. Alright, so that is
that part, Bill. Now, I'm going to pull this into place with this one. Like so. And you can see
now we're getting down these things
pretty quickly. So now we're going
to do is we're going to be building
this one here. Now, this one's a
little bit more intricate than the ones
that we've been building. I recommend building this in probably two or three parts rather than trying to
build this all in one. A lot of people think when
you're building models, you know, you need
to build them all in one part because, you
know, it's more optimized. Simply doesn't come
into it, really. Building models in one part makes things actually
much, much harder. So don't do it like that, but actually look at where
you can break this down. If you can build a
model in one part, then do it, but don't go
out your way to do that. Alright, so let's come in.
Pull that to the side. And then what we'll do
is bring in a plane. So shift a plane,
spin it around. So RX 90, spin it
round into place. And now let's get
the right dimension. So what we'll do is
we'll put the X on 1.54. We'll put the Y on or the Z. Let's try the Z 1.31. No, it's not the z, so
we'll put this on 1.31. And then we go, There's the dimensions
that we actually want it. I'm just going to pull that
up to here and you can see round about the
right scale as this, slightly bigger than this one over here. So let's
pull it back. And then what we're going
to do is, first of all, we don't want to it's
probably easier if we don't extrude it
out straightaway. It's probably better
if we bring in an edge loop or two edge
loops, first of all. So what I'm going to do is
I'm going to press tab. I'm going to press Control law. Right in the center,
left click, right click. This is one of those where you
need to be thinking ahead. And then what I'm going to
do is I'm going to press Control B and pull them out. And these will be
those side points that are over there if you
look on the reference, so pull them out to
where you want them. And then Control on. Left click, right
click, Control B, and then this will
be the center one, which is slightly thicker
than those ones there. Then what I'm going
to do is I want to pull this out tiny, tiny bit. So I'm going to
press A. I'm going to press E and pull them out just a tiny bit like that because the other parts
will add the thickness. So in other words, these parts are going to add
in that thickness. Now, the other thing is, I want an edge loop in the top and
an edge loop in the bottom. So control, bring it up. So this will be the
edge loop on here. And then this one down here is going to be slightly thicker. So control, bring it down to be thicker than
that top piece there. Alright, so far so good. Now we want to do
is we want to bring out all of these round here. So these want to be slightly
slightly not as thick. As the top and the bomb.
So how do we do that? So let's come in. We're
going to grab all of these, all of these, all of
these, pressing Control. Click. Click this one. And then what we're
going to do is press E to pull them out like so. From there, then, we're
going to now come in to the top, so I'm
going to grab this one, this one, this one, this one, and I'm going to
press E and pull these out further than those. So probably around two there, and then I'm going to
grab the bottom one. And I'm going to pull
that out even further, this is the bomb
part of it, right? So this is going to be
supporting it. And there we go. We've already got then the
main point parts in here. Now, the other thing because
we've done it like that, you can see now we can grab both of these, which
makes it really, really easy to put this
part in that we actually want to but that I'm going to show you on the next lesson. Alright, everyone. So let's save our work after every lesson. Make sure you save
all your work, and I'll see you
on the next one. Thanks a lot. Bye bye.
33. Advanced Panel Modeling Using Edge Loops and Selections: Welcome back, everyone to blend the building Mass class from
concept to final render, and this is where
we left it off. Now, why did we pull
out little bit? Well, the reason we
play our little bit is because we don't want
this to be into the wall. In other words, we want probably this part here when
I get rid of this, so you'll see I'll get rid of the bag because we're
not going to need that. So going round, control
clicking, delete and faces. You will see that this
is pretty close to that. In other words, if I
put this into the wall, we're going to lose
this point here. It's going to actually
disappear into the wall. So it's always a good idea when dealing with
something like this, that we give it, you know,
this isn't the flat part. So that's why we
actually extrude it out and then
extrude it out again. What I'm going to do now
is I'll shift and click and pull that back a
little bit like so. Alright, before I move on, then, let's press Control. I'll transform set
origin to geometry. And now we want to do is we
want to pull these parts and create kind of a band here and a band in the
center. So let's do that now. So what I'm going to
do is I'm going to grab both of these
at the same time. I'm going to press the eye
button to bring them in. And then what I'm
going to do now is press Control B and
bring them out. You can hold the shift
bun down again to bring them out, like so. Now let's move to the center. And then all we're going
to do is bring them in again. Like so. And now finally we can press Al Shift click right
in the corner of here, Al Shift click, and
bring those out because they're pretty much the
same length coming out. And we're not beveling one of them off like the other one we did. I'll show you
that in a minute. So just bring them
out a little bit, like so. And there you go. Let's just make sure
you had cavities on. And now, if I come to this one, this is what I mean
by beveling it. So we brought it out,
and then we beveled it. I didn't want to do that
on these ones here. Up to you if you want to do
that or not, but I think, for me, pretty happy
with how this is now. And now I just want to make sure I'm happy with everything. So you can see this
part just going over it comes out a little bit further
than this top part here. You can see we did
it with one mesh, but you don't have
to do it like that. If you don't want to
completely up to you. If you find it easier
in the long run, doing it with multiple parts. Always do that if you want, and then let's bring
it over to this side. So we've got all of these parts. Now, which ones
are we doing now? So if I move this over, it's
going to be not this one. We've done that one, we've done that, and
we've done that one. So now we're going
to start on these. So I think these are pretty
much the same as you can see. One of them is just
two, and one is one. I think one of them is actually slightly small and
the other one, this one's a little bit longer. I will check that before we do so I'm looking
on my other screen. One of them is 1.62 meters, and the other one is,
one of them is much, much smaller, I think,
than the other one. So we'll actually, I
think we'll create, we'll create two of these. I'm just wondering if I want to shrink it down
before doing that. We'll have a look at
that as we create. First of all, though,
let's create this one because this one's actually
easier than this one. So we'll go straight
into this one. Alright, so let's first of all, as we normally do,
let's bring in a plane. So I'm just deleting them
off me on the screen, so I know which ones
we're actually on. So what we'll do is
we'll bring in a plane. So shift, let's
bring in a plane, rotate it around to RX 90. And instead of
doing that, Walkins and just put this
out on the side, and then I just don't
have to bring it in. I just copy it. That
might be easier to do. Alright, so Shift D, duplicate
it, and there we go. It doesn't need to be
in the center anyway. And then what we're gonna do is get it the right dimensions. So with this one, let's
have a look 1.78. So let's call it 1.8.
That will be fine. And then the Y axis
will be not 0.5, something like that, not 0.5. I think they'll be
the right length of 1.8 and not 0.5. Let's
put it like that. And then what we'll
do is the problem is, as well, when we
duplicate these now, it might be better
if we actually put this to two because, you know, when we duplicate them across, we can then shrink them in, but they'll actually go
together much nicer. So what I'll do is
I'll put this at two and have a look
how big that is. So two, it's slightly slightly
bigger, as you can see. And I think actually,
we'll work off that. So let's come in then, and
what we'll do is we'll press the dot but because
sometimes what happens is, when let's say you
click on this, I'm still rotating
around this one, and I can move and
rotate around this one, but it doesn't work too well. So what I tend to do is I'll grab this, press the dot bon, and then I'll rotate
around the origin of here, which is much, much
easier to get around. Okay, so what I'm going to do
is I'm going to press tab, I'm going to press E then
and pull it out quite far. This one is going
to be quite chunky. And what we'll do
first is we'll get the bottom and the actual topping first s. We're
just going to press Control law. Left
click, right, click. Control B, pull it out, like so. And then what I'm going
to do is grab the top. And the bomb, like so. I'm going to press
E, pull them out. Like so. Now we need to think about the center part of this. So again, look on your
reference if you're sure. But what I'm going to do
is I'm going to press Control R. I'm going
to press left click, right click, and then I'm
going to press Control B, and I'm going to pull it
out to something like here. And what I'm going to
do is I'm going to use that then to
create this front bit. So I'm going to grab the front
because then I know it's going to slot into
there perfectly, and that's exactly what I want. So I'm going to press Shift D. I'm going to drag
it out like so. And the other thing I'm going
to do, if you remember, we've got rid of the backs of all of them, except
this one here. So let's come in, grab the back of this,
delete and faces. Let's then come round to here. Now, you will notice that now we've got some
edge loops in there, which we simply don't need. These are adding a lot
more polygons in here. So if you come down
and you look at your faces, there's 47 faces. But if I come in, l, shift, click, lt
shift, click, Dissolve. And what I want to do is
dissolve edges, this one here, take them off, and
now we've gone from 47 hoving it, basically. So that makes a lot of sense. Now, let's come
back to this part. What I want to do,
grab the whole thing. I'm going to pull it out
a little bit, like so. And now you'll see if I grab the whole thing
again with hell, I can pull it back
into place, right on. The front of there. And now from here, I can
actually build this out. You can see it squeezes in
there really, really nicely. Now, of course, we want
to bevel this on here, but we want to pull
it out a little bit first because it's a lot, much, much further out
than the other parts. So let's come in, and we're going to pull this
out all the way over here. Now, I'm going to bevel this
before doing anything else. But, of course, if you're
beveling anything, just make sure you're resaing all these
transforms like so. And then what we'll do is we'll
come into this part here. So this part here
and this part here, I'm going to press Control B, and I'm going to bevel
them out like so, and you can see we've got
nice roundness there. Now, if you don't want your
bevel to go back so far, so you can see here it's going
all the way into my wall, adding another edge loop. So control our left click and put it to
where you want it to go. So I want it come just to the edge near enough
in line with this one. And then you'll notice if I come in now and
grab both of these, press Control B, the bevel will only go up to the point
where I want it to. So now I can actually bring in that bevel and bring it
up to the point where I want it to and change the entire look of how something
looks, as you can see. Right click, Shade Smooth, like so, and there we go. Now the thing is, I think I
want a few more bevels in there because we've
got a little bit of a line issue on here. We can turn this up and get rid of it, but I
don't want him to do that. So what I'm going to do
instead is, I'm just going to press Control Z
and just go back, and then I'm going
to press Control B. Bring them up, left click, right click, shade at smooth, and there we go. That's
looking much better. Now, the other thing
is, when I did that, I'll just do it once more, so Control B, pull it out. Making sure that you come
down here if you want to, and then you should be able
to stretch them out or change the actual width coming
out as you want to. And I think I want
mine just like this. Alright, right click
and shade Auto Smooth. And there we go. That's
looking pretty nice. Now, of course, we need to
put that center part in. If we go to our reference, we will see there's
a center part in. Now we'll have a little bit
of a problem with this. In that, we can't
go this way around. So the thing is now
we've done this, we can't actually put the edge loop in the top,
as you can see here. So we need to actually
find a way to fix that. So what I'm going to
do, first of all, is I'm going to delete the bottom off here
and the bomb off here. I'm just going to press
Delete and faces. Now, that's okay, but we've also got
another one in there. So what we're going
to do is just hide this part of the way
with the H button, and then we're going to grab
this part and this part, then delete and faces. Don't worry, we're going to
fix those a little bit later. Now we're going to do is we're
going to press Control R, bring in that edge loop then, so left click, right, click. And now we should be able to
bring this band into here. So what I'm going to
do is press Control R. Left click, right, click, Control B, and I'm going to bring that bring
all the way down. And what I'm looking for now is how big is this
block going to be? So this block in the center. So when I do it like that first, then we'll press Control R. Control B, bring it out, like so, and then
Control R again. Left click, right click. Now we've got the
block in there. We're looking for this
band going around. So you can see this
block is this part here, and now we need this band. Control B, bring it out. Control B, bring
it out. Like so. Alright, so now we want
to bring everything out. So what I'm going to do is I'm
going to grab all of this. So press Control's just to
go back, grab this face. So shift's leg, shifts leg. And now we want
to bring it out. So I'm going to press
E, enter, old Tens, and I should be able
to bring it out nice and even, like so. And then what I want to do is just grab all three of these. E to pull them out,
and there you go. That's exactly how you're
going to create that part. Now, of course, we've got
the top and the bottom. So what we'll do is we'll fix that now. So I'm
going to come in. Again, I'm going to press lth just to bring
everything back. So to bring something back, it's the to hide something it's H. And then what we'll do is
we'll grab this once more, hide it out way, and we
need to fill this part in. So the easiest way
to fill something in is just to grab this
part and this part, and I'm going to press F. And then what I'm going to
do is I'm going to press Old shift and click
going all the way around there and press F.
Now the thing is, we have got engons in here. In other words, we've got
all of these edges up here, and that should be something that you
don't actually have. Albeit only if you're
animating something. Most people think you
should never ever have engons, but trust me, guys, you can have engos if
it's a flat like this, and there is going
to be no issues with things like beveling, with things like shading. If there's no issues, guys, don't worry about whether or not I using engons or
polygons or triangles. In fact, I think there's
generally more issues with triangles than there
is enguns or polygons. If you can, though, make
sure your mess is polygons. So, you know, if
it was easy just to create polygons, do that. But if N guns are fine to use, as long as it's not
causing any issues, as long as you're not
animating something, as long as it's not on a
character or something, you know, where arms
are moving and stuff. But if it's just a flat wall
like this, it's fine to you. So right, click,
Shad Auto smooth. Let's then come down
to the bottom now. So I'm gonna press
Tab once more. Exactly the same
thing down here. G to grab this one and this one. Press the F button. Oh ****, click, press the F
but, and there we go. Press TH in Edding mode just
to bring everything back. Right, click Shade Auto Smooth, and there we go, that's that
piece of wool all done. Okay, so now I can actually
move that to the back. And on the next lesson, then
what we're gonna do is we're going to attempt to
do this one here. So these are the same parts. Basically, just one is stretched
out mud than the other, but we'll actually
create that next. Alright, if you
want, so enjoy that. See you on the next one. Thanks a lot. Bye bye.
34. Refining Panels with Bevels and Smooth Angle Modifiers: Welcome back, everyone to blend the Building master class
from concept to final render. Now, let's grab the
plane we already did, so shift D, bring it over a little bit easier on
the rotating every time. Let's put the X on 1.6, and let's put the Y on
0.414, something like this. And this is around
about the right scale to what we're actually
going to be working with on this first part. Now, the other one going to be a little bit
thinner than this one, so just bear that in mind. Okay, so first of all, what we're going to do is
we're going to come in. We're going to grab
the whole thing here, and I'm going to pull it out. So I'm going to pull
it out like this, and then we'll go into the wall. And then what we want is
we want an edge loop on the top to pull the top part out. So
I'm going to come in. And I'm going to
bring in edge loop. So I'm going to bring in an
edge loop in the center. Left click, right click. And then what I'll do is I'll bring this down a little bit. So just gonna drop it down
a little bit like so, and then I'm going
to press Control B, pull it out a little
bit, like so. Alright, so now at the moment, we can pull this part
and this part out, and then we've got a little bit of a gap
in between there. So let's grab this
part and this part, and let's pull them
out a little bit. Like so. Okay, so we've
got that gap down there. If we go back to our reference, this is where this gap is. We've got this part on here, and then we've got
this part on the top. Okay, so let's pull it back. And now what we'll
do is we'll bring in another edge loop for
the top part of it. So just the part that comes out, and then we need one
that's going to come out, this kind of bar
going over there. So I think the easiest way to do this is we'll do the bar. The bars very, very simple. If I just press Control A, all transforms, set
origin to geometry. So set origin to
geometry, like so. Then I can actually
create my bar. Now, it's important that we create the bar separately
from the rest of it, because if not, what we'll do is we'll end up trying
to put edge loops in. So if I bring an
insert there, like so, we'll end up bringing
edge loops in there, and I don't really
want to do that. So instead of doing
that, all I'm going to do is I'm just
going to press shifty. I'm going to press the S button
and bring it in like so. And you can see, we've
got a problem here. When I bring it in, it's
coming in in this way. Even if I press dS, I don't think that's going
to work, as you can see. So what I'm going
to do is I'm just going to bring it in
to where I want it, and then I'm going to press SN s and bring it into
where I want it. And finally, then, I'm just
going to press E and pull it out to how I actually
want it, and there we go. Now, the other thing is on this, we can see that we're going
to have a back on here. We really don't need that, so let's fix that first of all. So what I'm going to do
is press to grab it all, shift H just to hide everything
else out of the way. Press the dot bomb, so I'm
actually rotating around here. Grab the back of it,
press delete and faces. Old H to bring back everything. Then I want to delete the
back, so I'm just going to delete all of this
back, gleat and faces. Now, let's come round
then to the front. So this front is going to be a little bit
different, as you can see. It comes out around here. So it's got another
edge loop in there. It comes out, and
then there's going to be a pot underneath that
we're going to bevel, and then we're going to
put this front bit on. So let's do that now. So what I'm going to do
is I'm going to come in, bring another edge
loop in, so control. Left click, bring it
down a little bit. Like, so bring it out, so E, pull it out. And then we can
have that bevel bit going under the underside. Now, before we do that,
let's bring in an edge loop. So control, left click, right, click. Control B then. And we're going to
bring this up to where we want our actual bevel to start going
underneath because I'm going to pull this one bit down. So I'm going to come in now
and pull this face down. So I'm going to press E to pull it down to where I want it. And then I want to
bevel this off. So I'm going to again,
resell my transforms. Control A, all transforms, Surrogen geometry, tab, and let's come
in, grab this part. And this part C troll B. And let's turn up the
bevels and bevel it off, however we want it, like so. Okay, so that bit's looking pretty nice. Now
we've done that. We need to bring this part in. So you can see now we've
got here if I pull it over. Oh, if I pull this over again. We've got this part
here coming down here, rounded here, and now we've just got this part to bring in. So that's actually
not that hard. So what we can do
is we can come in. We can grab this one,
this one, and this one. And then what I can
do is I can press the ibn and bring
it in, like so. Just be careful we don't get any overlapping or
anything like that. And then what I can do is I can press when I'm doing this, I tend to not work
so destructively. So instead of doing this,
I will actually come back. I'll press Shift and I'll
pull it out a little bit, and then I'll press the
ibn to bring it in. So bring it in, bring
it in. Like so. And this, then I feel, gives me a lot more It makes it a lot easier to actually create
things like this, because all I'm going to do
now is just press shifty. To duplicate it, come back to the part I've just
messed around with. Press the albor,
delete and vertices. And then what I'll do is
with this one, come in, eat to pull it out, so
I'll get rid of the bag. So these parts here,
let's go round, get rid of the bag,
delete faces, like so. And then what I'll do
is grab the whole thing and pull it back into place. And the reason I've
split that up is it makes it much
easier for me then. Let's say I want to
just pull this back up. So if I want to just pull
this up a little bit, it's very easy to pull it up. Let's say I want to make
this a little bit thicker. It's very easy to come in. And make it a little
bit thicker, then. So thicker or thinner, whatever you want to do with it, it's much easier to work with. And that's why I've
actually done that. And even though it looks exactly the same, it does
make things easier. It's the way it's why
I've split them up, and I say to you, Don't be
scared of spitting things up. Okay, so the other
thing as well is we could line these up
more if we wanted to, not that I want to, but just because it's its own piece
of mesh, it's easier. Just make sure you
delete the bags of them because you're never
going to need them. Right click and shade
Autosmooth Control A, ultransons right click
Set origin to geometry. Now, we've got this
kind of thick one here. And what I need to do is now
I need to create one more, which is going to be
a little bit thinner. And what I'm going to
do for that one is, I'm just going to press Shift D, bring it over. Like so. And I just want to
see if I can put this on instead of being
1.6, 1.2, like so. And let's have a look at
the difference that's made. So I'm just going to
put it onto there, and we can see they look
pretty much exactly the same. One's a little bit
smaller than the other, so I'm just going
to go with that. I could have thought about, you know, creating a whole new one, but you can see the
difference between these parts here, it's
barely noticeable. They do look like two
different blocks, but just one's a
little bit smaller. So I'm going to keep that,
save myself from some work. I don't want to, you know,
repeat loads of things. Alright, so now we've done
that, let's go over there. And what I'm going
to do is, again, I'm going to move
these to the back. And, guys, we've pretty much
finished with these parts. You'll see we've got
this chunky part here. We've got this part, this part. We've done all of
these, basically. So they are the wall supports
near enough, all done. So they're all done as
far as modeling goes. All we need to do now is just make sure that
everything is named, so you can see these
are actually named, they're put into the whole
thing. These are named. These parts from
here are not named. They've not got UVs on them
or anything like that. So that's something that
we need to sort out. So first of all, let's
just make sure all of the backs are actually off these. You can see
this one here. The back hasn't been taken
off, so I need to fix that. So I'm going to
come in, grab all of these, delete and faces. I'm going to make sure,
as well that you can see if I grab this part here, has the bag been taken
off, so press L, H to hide it, and all the backs taken off there, so that's okay. So now we've got all
the bags off there. We know they're okay, so
let's grab them. Like so. And then what we're going
to do is press Control A, all transforms set origin to geometry of the M. Then
what we're going to do now, I'm just going to hide
my floor out of the way. I'm going to press
H to hide my floor. I'm going to also hide my guy out of the
way just for now. And then what I'm going
to do is I'm going to grab all of these. I'm going to grab this one last. This one has my bevel, my array, and my material on there. So what I'm going
to do then is press Control L. Copy modifiers. Control out, link materials. Right click, Shade Smooth and everything, and there we go. Now, these have the bevel.
They have the array on. Everything basically
has this on. Now, for something like this, we don't need any array on,
so let's just take it off. Same for this one, we'll
take the array off. Everything else, though
can have the array on. So let's say we
come to this one, we want to turn up the array. So we just turn it
on, and then we can put it up as much as we
want, and there we go. Really, really easy to
actually put that on. Now, let's put this back to two, and let's turn this off. And when we're not
using the array, we can just turn them off.
So that's no problem. The other thing you're
going to see is now everything is
beveled off very, very nicely, as you can see. Now, you can see with this one. We might as well sort
this out because you can see here it's a little
bit flat on this one. No matter what I do, it's still going to end
up in that way. So what I'm going
to do instead is, I'll grab the front of
it, press Control plus, and then right click and make
sure that you're on faces, right click, shade
flat. And there you go. Now that's been flattened out. That is a good idea to do that, because when you're bringing
this into, you know, your main build, you don't
want any issues like, you know, whether it's flat
or not or anything like that. Okay, so now we've done that. What we'll do then on the
next lesson is we'll bring in the materials for each of these because we can see
if we go onto this, they've all got materials, but they're not
unwrapped correctly, and we want to have them
run about the same as this. So let's do that on
the next lesson. Let's save our work, and I'll see her
on the next one, everyone. Thanks a lot. Bye bye.
35. Creating Stone Panel Material Variations: Welcome back, everyone to
Blender Building master class from concept to final render. And it should be Blender
building, master class. Alright, so this is
where we left off. If I come now to my rendered
view, I will see that, although they look pretty good, they're not actually
unwrapped correctly. So what I'm going
to do is actually, I'm going to unwrap them
all at the same time. So let's even get
away with that. So what I'm going to
do is grab all of the press the tab but, test eight to select the mole, and smart UV
project. Click Okay. Now, generally on
something like this, you will be able to get
away with unwrapping them all at the same time
like I've just done. I would say with
these, as you can see, I would say these are a little bit too small on
the texture map, which means now if I go into
UV Editing, select the mole. So as you can see, I can select
them all over this side, select them all over this side. Let's go into this
one so we have a good view of what we're
doing. So this one here. Then what I'm going
to do is I'm actually but what we can do to make this a little bit easier is
we can actually come to this one here
and turn off bases, and then you'll have
a little better view of what you're actually doing. Now what we can do is we can
actually come to our UVs. I can press the S bun and scale them in all
at the same time. So I press S, I can scale
them in all at the same time. And now you'll see if I press the Tabb that these are
looking pretty nice. And not only that,
these are scaled, they're all basically the same. If I come in the
average Island scale, it would all work out
around about the same. Now the next thing we want to do then is these three here. We actually want to change them so they are a little bit
lighter on the shader. Now before we do that,
if we just press tab and go back into it and
just turn on faces again, so we've actually got something that we
can actually select. And then what we want to do is we want to grab these three, go into let's actually go to modeling first, so
we'll go over to modeling. And what we'll do is
we'll go to our material. So we've got our material here. Now, this might be better if
we go and take one of these. So if we take one of
these and go in, in fact, you know why I think, I think we'll just change one of
the materials within here. So we'll just
change one. So what we'll do is well at the
plus button, click No, and we'll call it Stone
lighter, like so. And then what we'll
do is we'll come, click the little down
arrow copy material, down arrow paste material, and now they're
the same material. So now if I come in,
grab all three of these. And come over to here
and click Assign. We should have assigned
that onto each of these. Now just have assigned it onto this one.
Sometimes it happens. No, it's actually assigned
it onto all three. Now all I'm going to do is
just minus off this one. Like so. Stone lighter. Yeah, you can see it's
actually done there. So what I'm going to do
is I'm going to grab these two, grab this one last, click Control L. Link Mateals Stone Light,
Stone light, Stone Light. That's not what we want.
We're on Stone lighter. Let's put it on that one.
Now we'll try that again. Grab these two,
grab this one last. Control L link materials. Stoneighter, Stoneighter. Okay, they're all
on Stoneighter. Now, let's go over then
to our shading panel. Now, the last thing we want
to do really is we don't want to mess around with anything else except
really the color. So we need to go into
let's say one of these. Now, the way that you
want to do this really is it's all to do with
these colors over here. So if I zoom in to
let's say this one, press the db on, you can
see this is the texture. So we've got concrete color. We've got the concrete
roughness and concrete normal. So generally, what I tend to do is I will go
straight to here. So where are these
two being plugged in? So if we move over here, you can see it's being plugged
in here and it's being plugged in over here, not
even sure where that's going. So what I'm going to do is
I'm going to try plugging in my let's first of all, try. We can either bring in
a color ram and see if that works or we can
bring in a curve. So before we bring
in the RG per curve, if I come in and I look at where the color one is coming
from, so it was the top one. It goes into here, all the way along
here, down into here. And basically, what we want to do is whatever you're doing, you want to pull
either the curve or the color ram or even a gamma actually Gamma might actually be the best one to use here, but you want to put it right at the end right before
where it goes into Prince bud and the reason is is because all of
the if I come in, Prinstan, I'll just
give you an example. If I come in and alter these, you will see we
can get it white, but we're losing the brick. And the reason we're losing
the brick is because part of this noise is this part here, and the other part of the noise is this little white bit here, and the other one is the
gray going around there. So we have to be very
careful where we alter. Again, if we come to this
one, you'll see what happens. If you bring that out,
it makes it lighter, but only part of it. So only part of this
is becoming light. We move this, you can
see it becomes lighter. But then we end up with these swills and
things like that. We don't really want that. So what we want to
do is we want to come even this one seed will come in, and
that will alter it. But let's if it will,
let me. Here we go. You can see now it's
lighter, but it has altered. Maybe maybe we could
get away with it. You know what, instead,
though? This would be a curve. I'm not going to use that one I'm going to use as a gamma. So three ways of
making things lighter. Even by a curve
which you see here, you can use a color ramp,
which I'll show you. So color ramp, we can
drop that in there, and then you can actually
bring this down, as you can see, and you can play around with the
darks and lights. So it actually gives
you a little bit more, you know, play with that. Or if you want to take
this out as well, let's come up, first of
all, to edit preferences. And what we'll go is
we'll go to add ons. And the one we want
is no Wrangler. So come and put no Wrangler,
make sure it's TikTo. Once you take that on,
it allows you to do a lot more things within the
actual shade of view port. For instance, we can come
in now, hold Control, pull the color ramp, select the color ramp sorry, Alt it is. Hold Alt, select the color, and you can just pull it
out of there like so. Now instead of
using the color m, what I'm going to do
is I'm going to come in and add in a gamma, like so, drop in a gamma there, and now you'll see that
when I turn this up, it goes darker when
I turn it down. I actually goes
lighter while still keeping that kind of stone
that we actually had. Now, unlike the curve or the
colour Am, for instance, the colour Amp actually messes around with highs
and lows in color. You can change them as well. You can change these darks to red and things like that.
Very, very versatile. A RGB curve, you can even move
it over here or over here. A Gamma actually main thing that he actually changes
is the midtones, and that is what we want
with something like this. So he can actually
bring that down. He's changing the mid tones while still keeping
that stone there, as you can see, and now these
are looking like the stone, but much, much lighter. Now we could also come
in and change the color. For instance, we could change the color overall
if we so wished, but we're not going to mess around with anything
more on that. What we're going to
do is leave these as is because I think
they're pretty good. Now the next thing we
need to do then is we need to come back
to asset manager. So let's come to
our asset manager. At the moment, we've
got everything named. So we've got large support,
lodge support, lodge support. So these are these
two here, I think. And I think we've
got these names. Let's just have a look if
you've got these names. So I've got these two named. We just haven't put them
into our asset manager yet. So what I'm going to do
is grab these two first. Right click, and we're
going to mark as asset. And then what I'm going to
do is come to this one. This one's just a square block. So what I'll do is I'll call it. And what size is it
let's have a look? It's 3 meters. This is
the w 3 meters long. So all we'll do is we'll
come, and we'll call it. Let's have a let's go down.
Where is it? Let's find it. So we'll call it large
block Support. 3 meters. Now, it's not so important what you're actually
calling them. It's just so you know
what it actually is, and you can easily find it if
you need to think about it. And the other thing
is, they need to be called something different, and it's better to call them something rather than
just cube three, for instance. So that's
why I'm doing this. This next one then
is 5.4 meters. So what we'll do is we
won't name the meters. We'll just call it
large rounded block or something like that. Large rounded block support. Let's try that so large. Rounded block support. And you know what? I will put 5 meters just so
we've got something. Alright, something like that. Okay, the next one then is, these are similar to these,
so what can we call them? If we go to dot and have a look, large support 2 meters. So this one can call them
large decorative support, and it is 2 meters long. So we'll call it that,
so we'll go down and large decorative support. And it is two metres, like so. All right. And then we're on to these
small ones, so small, decorative support,
so small, decorative. Support. And we'll call this. This is 1.6 meters, so we'll call it
actually 1.6 meters. Control A, Control C, press the enter
bun, and then I'll come to this one, double tap it. Contro V, and this
one is 1.2 meters, we'll call it 1.2 meters. And then finally, we've
got these three here. Now, these are going to be
the bottom wall supports. So we'll call it
bottom supports, and this one will be squared, this one will be rectangle, and this will be decorative. Let's call it
something like that. So we'll call it bottom
wall, support, square. So Control A, Control C, Enter. Then we'll do the same
for this, Control B, and we'll call this rectangle. Like so, and then we'll
come to the next one. And we'll call this
square decorative. So contro vise square
decorative decorative. And there we go. Alright,
so now we've got all these. Now we should be able to
put all of these into. So let me just see if
they're all named. So we've got the plane,
which is this one here. We don't really need that.
So what I'm going to do is I'm going to grab these
three, first of all, and then these
three, these bunch, and I'm going to
right click and we're going to mark them
as assets like so. Then we're going to
go to unassigned. We're gonna grab them
all, and we're going to drop them into our
supports and there we go. So now we go on to rendered
view this is what we have. So these are looking
pretty nice. Now, I think I've probably
probably gone a little bit too far with how
light these ones are. I think I need to pull it
back a tiny, tiny bit. So what I'm going
to do is just go to shading, and we
know what this is. We know how we can change this. So all I'm going to do
is just turn this up maybe to not 0.6,
have a look at that. Yeah, and I think that looks much, much better
than what it did. We've got a clear
distinction between them. I think that's looking
better as it is. Okay, so now we can do is
we can just update these. So I just grab these three, and I think I can mark
them as asset. He already says they are. So let's just see if we
go to Asset Manager. If we now bring this one out, for instance, Yeah, the same
material as you can see. So that's all updated
now, and there we go. Alright, so on the next lesson, then we'll tidy all these up.
These will be our support. We'll make a text for
them saying supports, and then we'll be moving
on them to our columns. We'll get our columns done. And then once we've done that, we can actually start
bringing something in to our gray box and
put the supports in and, you know, once we've got
our actual columns in. So we can do the sides,
we can do the middles and all that good stuff, you know, start working on that
because it would be nice if you can jump off
of this a little bit, you know, jumping
off other things, keeping things interesting. Alright, everyone, so I
hope you enjoyed that. I'll see you on the next
one. Thanks a lot. Bye bye.
36. Modeling Vertical Columns with Geometry Nodes: Welcome back, everyone to blend of Building master class from concept to final render. And this is where
we left you off. Alright, so what
I'm going to do now is we want to put
all of these in, so all of these here want
to go under support. So what I'm going to do
is grab them all, press. So let's press the N born and put them then all into support, like so, and then we should be able to open this
up, for instance. Now, let's tidy them up. So let's make sure they're
all nice and neat. So what I'm gonna do to do that. And this is Batali so that
when you come to this foul, everything is nice and
neatly laid out so you can actually see exactly what you've got. I recommend doing this. It's up to you if you
really want to do this. I make sure that I do
this all the time. I'm going to do is
hide out of the way, and then go to move these ones, seven, put them into place, like so, old age,
and there we go. And then all I'm going to do it's pulled these into place. Now the other reason I do it is if you ever want to add to this, it's always a great idea if you can see exactly
what you've got, so I'm going to
go to file, save. And generally, a
lot of the time, I'll actually put
a text on there. Easy to do a text,
press Shift day. Come down to where
it says, text here. And then all you can do is
you can spin it around. So rx -90 or 90, so RX 90. And I tend to just put
it a bit of an angle. So we can see here 90. We can just tilt it
down a little bit. Come over to your Tex M, which is over here on
the right hand side, and then all you want
to do is you want to go where it says geometry, and you want to bring
out that extrude, just a little bit like so. From there, then you can
just press tab and let's put in support. Like so. Press the tab button, and
then we can make it a little bit bigger and
move it into place, like so you can see
we've done this on the actual resource
pack so there you go supports you can
also as well come in. And change the font so you can bring in any font that you want, if you click on
this button here, should come up with
all these fonts. Let's just click on that
one. And there we go. It looks a little
bit better then. Finally, is what you can also come in and
change the material. So you can come in new material. Let's put it on a
reddish color, like so. And then you've changed
the material as well. So really, really easy to use. I'm going to make it
a little bit darker, maybe even a little bit darker than that, so it
will come to color. Pull it down a little bit more. We'll tap the A.
And there we go. Now I'm going to do
this for everyone because obviously
this is for a course, and I'm just trying to
show you how to do it. Maybe that's a
little bit too dull, and things like that will
start to irritate me, as well. So I don't really want to
be messing around with, you know, making all of these because we've already
built them, as well. But I recommend if
you're doing it, you always build these es. Just go to add probably an hour onto the course, which
we really don't need. So I've showed you how
to lay them out now. Now we're going to
move on to columns. So I'm going to leave
those like that. I am going to put
these two parts. So these two parts
here into my supports, just so everything
in there, and then I've got this planear
to start work. Now, let's come in. And
the third thing I want to do is I actually
want to bring in a geometry ode to
start with these. And I haven't grade
here, I don't think. So current fw resource
pack is here. So let's come down to ometreoes. I don't want the raw
emitreoe when I want to do is bring in this
ometureode like so. So there we go. Let's
pull it into place. Now if I measure this, I
can see it's 6.28 meters. And actually, that's
about the right size. I also want it to
be not 0.326 ish, something like that, so
I can put this down. So what I'm going to do is I'm going to put this on not 0.336, and I can make it
thinner like that. And then I'm going to
put the Y on note 0.321. Like so now you can see
it's pretty square. And now, because we've
brought this in, what we can do is
we can come back and put it onto
current fowl, like so. Now, these are going
to be the columns. And on top of
these, if you go to your actual pureb
where you've got this, let's actually put
this one back to dum. So I'll just make
it a little bit smaller, put it over here. And then the one we're
looking at is this one here. Let's make it a bit bigger. And as you can see, these
are the actual columns. So you can see this column
that we've just created, this one here is going to
be the thin columns here, and then we've got some
thicker columns as well. So we're going to make the
thick columns as well. And then what I'm going to
do is I'm going to show you those in the actual over
here in the geometry node. So if I pull that
out of the way, you can see at the moment, if I come over here,
we've actually got the geometry node here. I'm going to show you
exactly how you use that from the raw
form to create these. But first of all,
before we do that, what I want to do now is I
want to create another one. So I'm going to
and you know what? I'll actually show you how
that works in real time. So if I press Shift A
and we come to curve, let's bring in a path. So we're just going
to bring in a path. And what I'm going to do is
go back to my resource pack, come to geometry node rolls, and the one I want to
bring in is Stone Path. I'm going to drop that on there, and you'll end up with
something like this. Now, the moment you can
see there's live UV, and the one we want on this, so we do want the material to be the same stone as
these ones over here. So what I'm going to do
is I've got my ID here. I can come to stone light
and put it on there. And if I put it on live, you'll be unwrapped, you will see the unwraps here
at the same time. Now, okay, it's not brilliantly unwrapped or anything like that, but it actually
tries to unwrap it. Now I'm going to do is I'm
going to spin it round. So Y, 90, I'm going
to press one. And what I'm going
to do is just put it on the ground play like so. Now, at the moment, I
want the ad on this one. Which is this one
here to be 5.56. So what I'm going
to do is now resell the ransoms, so control, eh, resell the transomsOigin,
to geometry, and now we've got this on 3.99. And I want it on 5.56. So what I'm going to do is
I'm going to press EnsEd and pull it out a little
bit, and it's 5.27. So a little bit more ns
very, very slightly, like, so 5.5 meter something
like that, that will do. So I'm going to bring
that up then into place. Now, these blocks on here, need to be quite chunky. So at the moment,
we've got them on no 0.5 and not 0.2, so you
can see they're very thin. They need to be more square. So the way that we're going
to do that at the moment, you can see we've got a width,
and we've got a length, and we've got a thickness
of not 0.2 here. If we come in and
put this on not 0.5, now they're all
going to be square. The other thing is
we've got many, many blocks based on length. So we need to change
that as well. We've got a gap here that
we can change so we can change the gap in between
a randomness gap, for instance, so you
can see here's the gap, so we can change a nice
even gap between each one. What I'm going to do is I'm
going to leave it on no 0.1, and we're going to
do is go on these. So we can actually bevel it off, so we can really
bevel those off. We're going to
leave it on no 0.5. We can change the noise scale, and what does the noise sale do? You can see we can add a lot of bumps and things like that
in there if we want to. Now, to make this
work effectively, you would need to ramp
up your subdivision, so the higher you put those up, you can see the more
actual bump you get, you can also write
plate and shade smooth. Or if that's not
gonna work, just put on to smooth and then it's going to shade,
then smooth anyway. Now, for me, we're not going to be doing anything like this, so I'm just going to
set these to one, and not, in fact, you know what we'll
set that tone. We'll put this back to one. And we're going to use it
like that because once you start ramping up
these subdivisions, it really, really brings a lot of polygons in
because, of course, you're giving him
more topology to make all of those bumps
and things like that. So you've got to take that into account when you're
actually doing this. Now, the next thing we
want to do is the length. So the length is how long
each one of these are. So the way that you
would be able to make more or less blocks is by
changing the actual length. Now, the good thing is on these, we've actually got a
length, randomness as well. So if I bring this up,
you'll see then it just lengthens some of them
completely at random, and it's very, very handy then. Actually end up with
something like this. And the other thing is,
we've got a seed on here. So you can click on a seed
and you can change them over. So now it's completely
random, as you can see. So they're looking pretty nice. Now let's come to this one.
We'll do the same on the ID, so we'll put it in as a
stone light, like so. And so now, pretty much, we've got our blocks laid out. Now, what about the
width and the lens? You can see they're
slightly stuck out. This then is a width randomness. Now, if I turn this up, not on this one,
sorry, on this one. You can see at the
moment it's on zero. If I turn this up, though, you can see now we've
got width randomness. Again, if we come to seed, we'll change which seed it is. So I'm going to put it, though not so high. I kind of want it around
the same as here, so you can see Nut, point note four. Let's do that. Then let's go to naught
point note four. Like so, and now it's a little bit random just as it would be. And we also want to do on the same so thickness random,
which is the other way. So for the note point
note for like so. We've also spoke about gaps and then you've got
the gap randomness, which is self explanatory and this then is
basically the stone path. So that is the perimeters
on the geometry node. Now, if we go into the
actual geometry node, I did say that we
won't be looking into or going over much of this. But you can see how this has
broke down. These are more. Honestly, if you're
working with these, they're more about programming, it was a guy at university who's doing
a science degree in programming or
something like that, who actually created
this for us. And you can see here it's Create Straight Line from
Curve, randomized points. You've basically got to
think everything out. And it's extremely complicated. And then to bring
it all together, then you've got rid of the
bugs and things like that, and then finally, you can
actually plug it all in. And he press do, you've
got all things like this. So the main things is
that you want to look at when you're doing anything
like this are the perimeters. You need to think
about what perimeters. What are we actually going to be wanting to do with
this drumming node? What don't we want to do
with this rummage node? What is impossible to do
with this geometry node? It's okay. Thinking
up a geometry node. Is it actually possible, though, given the nodes that we've got? They are limited in some ways, and a lot of time as you'll find that you'll
be testing something. They'll just break blender
because, you know, we'll be using millions
of polygons or the GPU to actually compute
it will be way too high. We've been trying to
find one, actually, which takes things like this
and turns them into stone. So basically it
turns into stone, makes it all cracked, makes little bumps come off in,
everything like that. But at the moment, it's
incredibly hard to do that. Not only is a very,
very complex node, it's also very heavy on blender, so we're having to find
other ways around that. So that's geometry nodes. In a nutshell. As I said, we're not really going
to be going into any more of the Geomet nodes. We have got costs on jumps node, so ify interested, then
go and check those out. Alright, then, so we've
got two blocks now. These are the main
blocks. So these are these blocks here. What we need to do now is we need to create these parts here, and then we need to create the top parts for each of these. These then we'll be going,
if we zoom out into, as you can see,
these come up here. Then we've got a block
here, as you can see, or a block on the bottom. We've got another block on
here mixed with a support. You can see pretty much we've
built all of these parts. We've got this part here.
So once we've built these supports, we've
also got these here. All we then need to do is
probably this part here. Once we've got that, we've pretty much got the
main structure, the main skeleton of the building done
and out of the way. Now, that's not to say the rest of it is piece of
cake or anything. The rest of it is actually
going to get harder because the other parts
of the buildings like these windows or these railings and things like this
are actually way, way harder to model. But as far as actually, when you're building your grey box, if you've got these nailed down, you start getting those in, then you can build off of that. Alright, everyone,
so you enjoyed that, and I'll see you on the
next one. Thanks a lot. Bye bye.
37. Creating Smaller Column Variants for Scene Variety: Welcome, Macon to blending
building master class from concept to final render. Now, one of the things
that we have done here is we've left
these as they are, we've left these as they are
because when we come in, so we'll do a couple of
things, first of all. We haven't put these yet into our asset manager
or anything like that. What I want to do, first of all, though, is just
delete these off. So you can see within the curve, I've got many, many points. Now, if I pull the
curve up from here, so if it's press shift spacebar, pull it up, you will see
it adds more of these on. But actually, I don't actually
need these points in here. So what I'm going to do
is just press delete, delete verts, and you'll
see nothing happens. What that means is then now
I can just pull this up, and it's just really,
really easy to do that. I don't get mixed up
with any other points. Now let's do the same
thing for this one. This one, as you can
see, I've already moved all of those points,
so that one's great. When we bring these in, then we can move these up and down, and that is the best
thing about jumps, they adapt in real time. So if I bring this all
the way down to here, you can see same size blocks, same, you know, randomness on the width on the thickness,
things like that. And let's press control so
you can see a difference. And everything just basically
procedurally is made. If I come in as well, and I
want to grab the top of this, pull it over this side, pull it over here, I can
actually do that. Really easily, and other
bricks just follow along. Now, you will see that
it's bend down here. Sometimes that
happens, especially when I'm actually rotating
it in a weird way, but pretty much if you
keep this straight, so if I keep this
straight from here, let's say I go to,
let's go to three. And then what I'll do
is I'll just press E and go this way, hopefully. Okay, I. It's broken a
little bit on there. Generally, that
happens because we haven't got any more points in, but either way, I'm not going
to mess around with that. Trust me, guys, it's a good geometry node,
so we'll go with that. Yeah, that's not to
say things don't break things break all the time
with geometry nodes, with shaders, all the time. So anyway, let's come in and actually create our
first actual one, and what we're going
to create if I move over here. We'll have this open. And you can see
here that this one here is exactly pretty
much the same as this one. They're a little
bit different in the I think the thickness of this boton bit here
is the only difference. This one here is a
smaller version of this, and then we've got this one, which is the same as this one. It's just stuck on, you
know, another part on here. So this is what we're
going to replicate. The first part should
be really, really easy. Alright, so let's come in. And what we'll do is
we'll bring in a cube. So we're going to
bring in a cube. And now I'll press Shift
spacebar, bring in a move. I'll also put it on object mode. Shift spacebar again, put it on move while you're not working. Where is my move tool. And
the reason, by the way, why my move tool is not there is because I press
Space Bar by mistake, which starred the animation. So if you ever get that, make sure you press Space Bar, then you'll have your move too. Okay, so let's press the Spawn and then what I'll do is I'll bring
it down to size now. So I won it 4.421, like so. And then the z to
be 1.8 like so. This is about the right
size that it's going to be. Now, as you can see, this actually will go
on top of there. Fits perfectly on there. It's a little bit too
small for this one. And this is why we
have these blocks, and we have these parts
here cause these partiers, you can see going
these big blocks here, and then we've got the
smaller ones which go in here and they fit
kind of nicely on them. Alright, let's carry on them. So when we look at reference, you can see that we've got a split here and a split
here. So let's put those in. So first of all,
I'm going to do is I'm going to press Control R, bring in one edge
loop, left click, right click to drop it
right in the center. And then what I'm going
to do is I'm going to press Control B to pull it out, bringing back all of the bevels. I'm going to pull it
out round about here. And then what I'm going
to do is I'm going to come down and grab
this edge loop, so hold shift click,
l shift click, press Control B,
and bring it out. Something like this.
Remember, then we've got a top and a bomb. Now, if you're not
happy with, you know, how far or how square this is, now's the time to change it. So Ess and's head
bring them together. Just make sure when
you're doing that, you've got median point on. If you try doing this
with individual origins on, it won't actually work. Now I want to do is I
want to actually put individual origins on because I want to pull these
from each other. So if I now press EssnsEd, you can see I can actually pull them away from each other. Now, finally, I want
to bring these in. So I've got a choice. I can either pull
these outwards, so I can grab, let's
say, the face on these. I can extrude and then press Alterns and pull
them out, like so. But if I do that, I'm going to lose the actual
scale of this. So at the moment, 40.421, I'm going to lose that. So
what do I want to do instead? Oh, shift, click,
Al, shift click, E, Enter lns, and bring those in instead holding the shift
boom to something like this. Alright, that is actually
the first part done. Now we want to do is we've got two others,
one top, one bomb. You know I'm looking
at this one here. If I look at this
one and this one, I think this one's stuck in
the ground a little bit, so it's kind of deceiving. But I think let me
just check that. So yeah, it is actually a
little bit smaller is all. So it's got if I move
this out of the way, it's just got a top on it, and then it's just a little bit smaller. So we're
going to go with that. So first of all, then,
we've got this part, and we need to put a top on it. So all I'm gonna do is
I'm going to come in. And also, the other thing
is yeah, this one's 1.8, which is what we've got,
then we want to top on, and that'll make it. Yeah,
okay, let's do that. So what I'm going to do is I'm going to grab
the top of this. I'm going to press E, enter, S, pull it out to where
I actually want it. And then what I'm
going to do is press E and pull this up. Now, I want it to be
round about 2 meters. So I'm going to pull it
down a little bit more. Maybe a tad more,
and it's on 2.03, maybe just a tad more. 2.02 meters. It doesn't matter if it's,
you know, so far away. Then what we'll
do is we'll press Control off on this
top bit, left click, right click, and then Control B, pull it out, and then find
we're gonna extrude it in. So eat, enter
alternsEtrude it in, holding the Shift bum to
where we actually want it. The other thing is,
well, you know, if you're scaling
it in with l test, you can also press Alt S again, hopefully. Let's try that. So S, yeah, ltest
doesn't work again, so we can just press the S
boar and it seems to work. So I can pull it in,
like, so I'm just going to test that by pressing
the door moving around it. Just don't want to make sure
that I've bent these in. And it looks pretty
straight to me, so I don't think I bend them in, but I do think it's
got to the point where I actually want
it, and there we go. So that's that part done.
Now I can press Control A, A ensoms set origin geometry. Now what I want to do is I
want to come to my other one. So what I want to do is shift D, duplicate this, spin it round, so R Y, 180, so spin it round, so it's
on the other way round. Put it down to the ground plane. And then what I'm going to do is I'm going to
come into this one. So this one, I've got some
scaling on my other screen, and I can see that this
one is 1.7 and nero 0.38. So I'm going to put
this on naught 0.438. And then move on down to this, and we'll put this on 1.7. So it's slightly
smaller. And there we go. That should be
where it looks like. And because it was all square, just because we brought
down the square, it's brought everything down. It's just slightly smaller now, so it should fit
nicely on top of that. Alright, so the next one then, so we've got this one. We've got that one. We need
a smaller version then. So what I'm going
to do is I'm going to grab this one, Shift D. And then what I'm going to do is make the smaller version. So I'm going to come to here,
not 0.266, and then 104. 1.04, like so, and there is our smaller version
of that one. Right, so. So now if I bring this over, we've got the small version, we've got this version here, and we've got this
bigger version here. And finally, we need this
block on one of these. So I think this is
like this block here. So this blocks on top of here. I think we've, you know,
put one on each of these. So I think this block is just with this one with this bon pot. So we will create it, but I'm fairly sure it's
this part here. And we'll actually do that in the next lesson
because then it all starts fresh on the next
one. Alright, everyone. So I hope you enjoyed that. Let's move this back over here. Let's make sure we saving
out our work. There we go. That's what we're actually
left with our columns. All right, every one, so
I hope you enjoyed that. I'll see you on the next one. Thanks a lot. Bye bye.
38. Iterating on Column Designs for Stylized Consistency: Welcome back von to blend
the building master class from concept to final render, and this is where
we left it off. Alright, so what I want
to do now is I want to build this bit, so
this bit down here, and then what we're
going to start on is, we'll probably make one, which has got nothing on it, so just one on its own. We've got a small
one there, and then we can make a start
on these parts. Now, basically, this part
and this part are the same. It's the same for all of them. This part is the
same as this one. This part's a little bit
bigger than this one. So all of these parts are
relatively easy to create. Okay, let's put that
over there, then. So what we'll do,
first of all, is we'll grab this part here. I'm gonna press Shift D,
I'm going to drag it over. And then what I'm
going to do is, I'm just going to take
the top off here. So I'm going to come over
click the top of it. And if we press Control plus Control plus and just keep
pressing Control Plus, you will see that we can actually go all the
way round to there. You can also press Control minus and go the
other way as well. But for now, I'm
going to go there. I want to then press
delete and faces. And then all I want to
do is fill in this face. So we just come, come here
and fill in the face. But I'm going to show you a better way of
filling in faces. What you can actually do
is, if I double tap the A, come up to mesh. Come
down to cleanup. Fill holes, you'll
see nothing happens because you just need
to make sure that you're pressing eight
over the whole thing. Mesh, come down, clean up. Fill holes, and there we go. It fills the holes in for you. That doesn't matter
if you've got hundreds of holes
on the same thing, it will fill them in for you. Alright, so that's
that part done. Now, let's bring over this and then let's
make a bottom for it. So we're going to bring
this one over here. We're going to
press Shift D. And then what I'm going to do is
I'm going to make a bottom. I'm wondering whether to make the bottom separate,
and I think it will. So what we'll do is we'll
have this one here, and we lift it up a little bit. And then what I'll
do is I'll press Shift A. We'll bring in a cube. We'll bring this cube
over so I can use this to basically look at how big or small this
is going to be. So I press S, and I want to line it up really
with the bottom of here, making sure it's a little
bit bigger than this. Now, at the moment, as you can see, it's
a little bit out. So what I'm going to do is
I'm going to grab this one. Shift Control A,
all transformed, right, cliques origins geometry. That then's going
to make sure that this origin is right
in the center. Shift Ds, cursed selected, grab this one, shift Ds
and selection to cursor. Now it's going to put it right bang in the
center, and from there, I can bring it down
a little bit and see how big this is going to be. Now, for me, it's still
a little bit big, so I'm going to press
the Sb Js to bring it down to something more
manageable like that. And then what I'm
going to do is I need a hole in this side, and I also want tops, but I want to keep the
kind of cube on this. So what I'm going to do is, I'm just going to pull
it down in a minute. I'm going to press
the tab button, grab the top in face
lick, so press three. Press E to bring it up, and then we just want to
put a bar along here. So remember what I said, we don't ever go Control R and two. For instance, we don't
bring in two ledger loops. Way easier just to go
Control R one, left click, right click Control B, bring it out, and
then E, enter lns. And that's the easiest way. And if AltnS isn't working
for whatever reason, and I'm not sure why it's
not working on this, I'm just going to
press the S button and bring it out like so. Now, the one thing I do want to see is that these are flat. At the moment, you can see that they're bent in, so you
can see it's bent in. I don't know why it didn't
come out with Alts, so what I'm going to do
is I'm actually going to check this just to make sure
there's no doubles on there. If I press A, mesh,
clean up again, come down to merge by distance, you will see that
not vertica removed. If I turn this up one, you'll see still nut verte removes, which means we've got
nothing over there. Now, I'll show you how
that works in real time. If I put this down to
Not point note one, and then I come in, let's say I've grabbed this
top and I press E, enter, and I forget that
I've actually extruded. If I want to check my
meshes to make sure that they've got no overlaps
or anything like that, if I come to mesh, clean up, merge by distance,
not vertices removed. What you must make sure
that you do before doing that is press
the A button, mesh, clean up,
merge by distance, four vertices
removed because then these vertices here are extremely close to each
other this distance here, which means it'll just
remove them and clean that off now dealing with
this part here, as you can see,
this is not flat. You can see it
bends in slightly. The easiest way to deal
with anything like that is just to
grab all of these, so Alt Shift click, grab
them all, and then press S, Z and zero, and
then we zero them out and basically reduce
any slants that you've got. Same on this one.
So Alt Shift click, going this way,
and then S z zero. And then we go, now we know
they're completely flat. So that's exactly what we want. And now what we want to
do is we want to come in and create this bit here. This is another reason
why when I came in, I wanted to actually have it as cue. So now I can come in. I can press the I button and
bring it in and then press the E button and just drag it back like
so, and there we go. That's exactly what
I'm looking for. Alright, so now I'm going
to do is I'm going to make sure that this first of all,
is on the ground plane. So I I press one. I
can pick this up, put it on the ground
plane, like so. And then what I can do with this part is I can pull it up. Just onto there, like so, and that is that part done. Now the next thing
I want to do is I want this part to be on its own, because if you look over here, you will see that
we do have one part on its own because we're
going to create these now. So we might as well
use that. So what I'm going to do is, I'm just
going to press Shift D, bring this over, like so, and then I'll join
these two together. So grab both of them, contour
J, join them together. Now, one thing we
haven't done yet is set all of the origins, but we are going to do
that once we've finished. The other thing we
haven't done is talked about normals yet, and we're also going
to check those, and I'm going to show you how those work in real
time, as well. Alright, so what
I want to do now is bring this over here. So we're just going to
bring that over here. I probably still
going to keep this. Let me have a look while I'm actually building
because, you know, when we're building
things like the doors, the walls, things like this, for instance, we've
got some doors here. It's way easier to do it
with a You know what? We'll actually just
bring another one. It's just in the way
there, isn't it? So we'll just let
it out the way. Alright, so let's now look at the other parts
that we need to build. So we've got these parts
here, so we've got this one. We've already built this one. They're pretty simple,
as you can see. Some of them are
smaller, some of them are a little bit bigger. You can even use, you know, the blocks that
you've actually got. So the columns you've got
to actually build them out, and I think that's probably
going to be the easier way. So let's start then. We'll go from this way because we've
already got this one, and we'll go to
this one over here. Now, you can see
that this one here, for instance, should
line up with this. So if I press one
and I press Shift, let's line it up and see if it actually lines up pretty well. So you can see that
they're near enough. Line up. If I pull this out,
you can see, there we go. If I make it then just
a little bit bigger, you can see now just how easy that is to put in
there, so that's great. And that's basically
what these do. Okay. Let's make another one. So what we want to do is we
want to use a cube. So I'm going to press Shift A, I'm going to bring in a cube. And then what I'm
going to do is I'm going to put it on top of here. So if I grab this, I'm
going to press Shift Desk, cursed to selected,
grab this one, shift Ds and selections cursor. Let's bring it up
then, drop it on top, press the S but just
so it goes down. And then what we're
going to do is we're going to put it on top of there, making sure that
it's just just a little bit bigger than what
we're actually dealing with, and then we have the
option to make it bigger or smaller as we wish. Now, this one isn't
exactly a cube, but what I want to
do is I want to keep this kind of shape. So I'm just going to press Shift D and move this over here. That then will be for the next. If you look on your reference, you will see that we've
got three of them. So let's press your D, and
we'll bring another one. So we'll put that
one there. So let's do the small ones first
is what I'm saying. Alright, so what we want
to do on this one, then, is we want to bring this a little bit longer
because as you see, again, this is the one
we're dealing with. And you can also see
that pretty much this one and this one
are exactly the same. They're exactly the same, apart from the fact that this
has got a top on it. So that's going to be easy. So what we want to do then is make it a little bit longer. So S said, make it a
little bit longer, like so, put it on the top
of there, press the tab on. And then what I want
to do is I want two bands, basically. These two in here. So I'm going to do is press Control on. Left click, right,
play, Control B, bring it out, and then these
now going to be my bands. Now, is this, I think
actually this will be okay. So let's circum in.
Oh, shift, click, Oh shift, click, press
Contour B, and there we go. These will be the bands.
I think they need to come in closer
together, actually. So again, I'll press S and E. If they're not coming in close, make sure we're on
the medium point. S and E, then bring them together, and then I
want to pull them out. So I'm going to put them
on individual origins. S and Z pulled them out. Like so, and there we go. Now, I'm just wondering if now they need pulling out again. So medium point, S, and Z, let's pull them
out a little bit. And yeah, I think I'm
happy with those. Now what we want to
do is bring them in. So all I'm going to
do is I'm going to press E, enter altern. Let's bring them in
holding the shift board, slow it down, like so. And finally, then the outside. So this one here, let's just
grab it from the outside. Alt shift and click,
and let's sur press Alterns and we should be able to pull
that one out like so. Now, I'm worried
about the slanting and worried if it is
actually slanting. You can see this quite easily. If you come in and just
put it on wireframe, so come in, put it on wireframe. You can see, let's say I
bring this out further, is it actually creating any
distortion in the two parts. What do I mean by that, you will see another band
going down this way. So if I press the S but and
pull it out, there you go. You can actually see
it there. So you can see this is distortive and pressing S. But when I'm pressing TS, it
seems to be fine. Alright, so let's put
it back on object mode. Make sure that we've
pulled them out so you can see that's pulled
out a little bit. Do we want it out
a little bit more? Maybe, so a little bit more lns. Like so, and there we
go, that's looking fine. The other thing is,
you might want to go in and just press Alt Shift click S Z and zero because
that takes no time at all, and just make sure
that part is flat. Alright, so that's that part. Now we need one more part
which has got a top in it. So we did have two of these, but we might as well
get rid of one. Why? Because we might as well use this to
actually create that. So shift D. Let's bring it over. And then what I
want to do now is just put a top on this part. So all I'm going
to do is come in, grab the top of
this, press the EB, press the S bun just
to bring it down, and there we go, that's
actually that top on there. Okay, so those are those two. So on the next lesson,
then what we're gonna do is we're going to create
this third one here. Now, this one actually
comes out one way, and it also comes out
this way as well. So it's like a kind
of corner piece. Again, we'll use the cube
we've already created, put that on top, and then I'll show you how
to bring that out. Alright, everyone, so I
hope you enjoyed that, and I'll see you on the next
one. Thanks a lot. Bye bye.
39. Cleaning and Optimizing Column Assets: Welcome back if
you want to blend the building master class from
Concept two, final render. Alright, so we've
got this pot here. So now we want to create the pot that I've
just showed you. So all I'm gonna do is just
pull it down into place. I'm gonna press EsnsEd then Js to pull it
up a little bit. And then what I want to do is I want to actually
pull it out now. It's important that we
pull this out before doing anything else before
putting that band on there, it's just going to make
it so much easier. If I come up to the top, then, you will see that I can actually
come to the top of this. So if I grab this top as
I pull this over then, you will see down on
the left hand side, it says the movement over here. Now, if I move round, it shouldn't actually disappear, which means I can pull
that out to there. And then what I can
do is I can click on it, press Control C, so enter, and then I can come
to this side and this side, of course, is coming on the Y. So if I then pull this
out a little tiny bit, come to the Y, press Control V, you will see it
goes the wrong way. So it's going to go in that way. And that is because this was a minus and this one
should be a plus. So come over here
and all you want to do then is just get
rid of this minus, press the enter button,
and there you go. If I go over the
top now, you can see these are
perfectly lined up. So if I come round
here, you can see, L, they're perfectly lined
up with each other. So really, really easy
way of doing that. Let's now press
Control R. Left click, right, click Control B, then. Let's pull it out as we've
done many times before, like so, and then we just want
to put that band on there. So E, enter Alter Ns, and pull this out a
little bit, like so. Now, again, we want to make sure that we're zeroing
everything out. So we want to make sure
that we're doing that. So Alt Shift click. Like, so let's go into it. You can see, look, it's
a little bit bent. So S Z, zero, zero that out, and then do
the same thing on here. So Alt click S Z
zero, zero it out. And there we go now, everything
is lined up perfectly. Now, you can see, as well, so far, the parts that we've built are very,
very simple parts. They will get a lot more complicated and actually
a lot more techniques as we go through the course, but we've tried to make it
linear so that, you know, we're going from really easy all the way up to really,
really difficult. So just take that in
mind, if you're thinking, this is a bit tedious creating all these little
parts because there's only one more left before
moving on to the next things. Okay, so now let's come
in on this one here. So what we'll do is we'll create We have two more
to create, basically. We've got this one here. And we've got this one here. So these two parts now, and then we're pretty much
done with the support tops. So what I'm going to do,
I'll use this one first, 'cause we need a
bigger one for this. So what I'm going to do, instead of doing that, I'll
just grab this. In fact, you know what
I can't grab that. So what I'll do is I'll
just press shifts, cursor selected, so we've
got the cursor there. Shift come on in, mesh, cube, bring it up, make
it a little bit smaller jaw so it's
just outside of there. Make sure it's a
cube at the moment. And bring it up like so. Now, let's press Eons and
pull it up a little bit. Let's go underneath, and we just see that it's
actually fitting on there. And then what I want to do
is a bevel off the top. But I also want to make sure
that I've got a pot in here, so a line going down here, as you can see on the reference. So what I want to
do, first of all, reset your transforms,
set origin geometry, grab the front of
this, press Control B, just to bevel it
bring up the bevels with your mouse like
so, so bevel it off. Like so, and there we go. Make
sure you're happy with it. Press the tab on. Right,
click, Shade auto smooth. Now I want to do is just
add in that final part. So all I'm going to do, I've got it coming down to here already. And I want it coming from probably a little
bit further back. On there. Yeah, probably from here to here
is fine, actually. So I'll just press control that. Left click, right,
click. Press Control B to make sure I've got my band
the size that I want it. So maybe maybe
something like this. And then all I'm going to
do is I'm going to come in, grab this one, corn
choslk that one. And then I'm going to press
E to Altern and pull it out, and it should come out
relatively even to each other. Now, you don't want it poking
out like this or anything. You do want it poking
out, you know, so it's just kind of a
bump on there, like so. And there you go. You can see
that part's actually done. All right, so now we're
on to the last part. Now I should have probably kept that cube that I had there, but oh, well, I'll
pull this out. And then what I'll
do is I'll press Shift day and I'll
bring in a cube. I'll pull it up, press
the S but again, so it just go past there. I'll make them a
little bit bigger. So n's head so. And then all I'm going to
do is press Control on. Left click, right click,
Control B, pull it out. And then I think that this is probably a
little bit too far. So all I'm going to
press is EnsEad, bring it in a little bit. Then there we go to think
I'm happier with that. Alt Shift click Alt Shift click, heat enter alters,
and pull it out. Now, these should pull
out fairly evenly. So this should be
zeroed out already, as you can see with the top. You can, of course,
check this if I come in. Al shift, click, and see
if it actually moves. So if I press S, Z, zero, you can see nothing
happened there because they're already zeroed
out. And there we go. That's the actual final
part of these supports. So let's now put these
supports in front of these. So all I'll do is I'll
go seven over the top. In fact, you know what?
I'll grab them all first. Seven to go over
the top, move them forward, and then
I'll press one. And what I'll do is
I'll bring these ones down to the ground plane, and then I'll bring
these three also down to the ground plane and now I can kind of straighten
them all up. And then what I'm
going to do, I'm going to move these over here. Now, there's a difference
between these. One is columns, and one is support tops or
tops and bottoms. So what I'll do is I'll probably keep these together because I think it makes it easier
when you're bringing them in. You don't want to be
jumping around between support tops and
support bottoms. You don't really
want to do that. But I will make sure the
columns are separated. So what I'll do is,
again, remember, if you want to, you know, put yours out like
this, you know, with a plane on there and with the name of it,
make sure you do. I would if it was me personally because I would want
to keep it tidy. As I said, though we
already have one of these. It's just going to take up time. So what I'm going to do is I'm going to move this over here. I'm going to call this columns. So I'm going to
press the button, New collection, call it columns. We have to do this anyway, because it will
make things much, much easier to, you know, work through as we're
building the course. So columns, like so. And then what I'll do
is I'll grab all these and I'll press M. I call them support, tops and bottoms. Like so, and there we go, press nth twice, and now
they're all in there as well. Let's pull these
over here, then. Now, let's come to our column. I know we need to do if
we come over to here, press the dot but, you will
see now it's in columns. If I pull this
down a little bit, this is another
reason I like doing that because it's really, really easy just to
push everything up, so click on these, and then you can see everything's nice
and neatly laid out. That's why I like doing
that. Alright, so we've got this one here.
We need to rename it. Now, it could come
over here to rename it or it could just press F two, and what we'll call
it is large pollen. Like, so and then I'll come
to this one and F two, and we'll call it
small Hollen. Like so. Now, with these, I can't
really do anything to them because they are
still a geometry node. You can see we've still got
the geometry node on there. We could come in and
come down and go to apply so you can see cannot constructed
modifiers on curve, convert mesh in order. So you can see that
we've got nothing there. There's no reason why we can't. So to convert these things, we have to go to
object, convert, and mesh, like so, and now you'll see
that we've got it actually converted to a mesh. Now the problem is here, now you can add on your modifier. So now you could add
on your bedal modifier and also you can actually
come in now and unwrap it. So, for instance, at
the moment, you can see we've got this stone IV press A, U, smart UV project, click Okay, and now you can see it's looking a
lot more like stone. Problem is there, though,
is that we want to stretch these out or make them smaller depending what they are. So I recommend that
you don't do that until you've actually
brought them into the scene, and then
you actually do it. The other thing
is, of course, you would be beveling these and you can't bevel them until
you've actually Well, you can bevel them
because there is a bevel on the jump to note
our press Controls, go back a minute,
bring back this here. You can see that we have
got a bevel on here, so we can bevel them. But the problem is it's not
going to bevel too well unless you actually turn
up the subdivisions. So it's only going to bevel
better if you turn up these, and we don't really want to
do that in the beginning. So let's just set this to
0.5. We'll leave those as is. What we want to do, though,
is we actually want to bring them into
our asset manager. So we've named them now.
What we're going to do then is go over to
our asset manager. And on the next lesson, I'm just going to put this on material just so I can
see what I'm doing. On the next lesson,
then what I'm going to do is I'm going to start
bringing them into here. Just make sure, though, that we have got it on current file. So at the moment, you can
see you've got supports, and then we've got human
reference in there. So that's all these, and we need to make, you know,
some others to go in. Alright, everyone. So, I
hope you're enjoying it. I hope you're
enjoying it so far. Once we've done this,
we're gonna hop back in to our actual build, and we're actually
going to start putting some of these parts in, and then you'll see just
how well this works. Alright, everyone.
Thanks a lot. Bye bye.
40. UV Mapping and Saving Columns to Asset Library: Welcome back, everyone to blend the building master class
from concept to final render. Make sure you save
out. By the way, guys, don't not
save your workout. Alright, so now, let's think, first of all, let's
make two more. So if I click the plus B, we will call them then columns, and we'll do the easy
one first. So columns. And then we'll do
plus, and we'll go supports tops and bottoms. So supports. Pots and
bottoms. Like so. Alright, so we've
got those two in. Now what we want to do is
we'll do the columns first. So if I come over to
the right hand side, what I want to do is I want
to grab both of these, and I want to right click
and I want to mark as asset. And then if I go over here, I should have both of
these assets here. Now, it's important that
we test these out before obviously using them
because they have got a junction node on there. They should come
in just like that, as you can see, and it comes
in with the junction node. That is exactly what we want,
and we will be testing it out in a few minutes, basically. So let's actually
delete that out now. And what I want to do is
drag these into my columns. And you'll notice you've
got a little star there. Just make sure you save it. That little star will disappear. Okay, so now we've got
our actual supports. So what we want to
do first of all, is you can see none of these are actually unwrapped or
anything like that, and we want to get them the same stone as these ones here. So to do that, all
I'm going to do is, first of all, I'm
going to grab them up. Control A, all transforms, right click, set
origin to geometry. So we're going to set origin. You can see you haven't
got a set origin, and the reason is because I need to click on
one of them last, so I'm going to shift
click this one. Right click Set
origin to geometry. Okay, so now what
we want to do is we actually want to bring in the same materials
here and also have on. If I click on this
one, for instance, we've still got the
bevel on there. So what I'm going to do is
I'm going to press Control L, making sure I've clicked on
this one last, so Control L, and then we're going
to link materials, and then we're going
to press Control L, and we're also going
to copy modifiers. And now, hopefully,
if I zoom in to here, we should have those bevels
on there, as you can see. So everything now should
have a bevel on there. If I go to Object Mode, you'll see all of these now have a beautiful
bevel on there, and everything should be working fine and looking
a little bit smoother, you know, very stylized, and
that's what we're going for. Okay, so now then we want to unwrap these all
because they're all looking a little bit we want to keep them the same
as these, basically. If I go to material view, you can see that we have a
lot of problems in these. So I'm going to unwrap
them all at the same time. Pressing the tab on A to
select them all, and unwrap. So we're going to
not unwrap, sorry. Smart UV project.
Let's click that on. Click Okay, and there we go. Now, just make
sure that you have any problems like with
things like this. Sometimes smart UV unwrap
doesn't always work so well on, you know, rounded parts
and things like that. Sometimes you'll get
some stretching. I already showed you
how to do the scams, but if we do come across those, we will be working on those,
so don't worry about that. Now, what we want to
do is we want to make sure that they're the
same as these here. So I think with these,
they're a little bit spotted. So what I want to do is make
them a little bit smaller. So I'm going to go into UVEit I'm going to then press the dot boon to
highlight them all. Eight to select them all. And then what I'm
going to do is, I'm just going to zoom into
this one, this one here. I'm going to press
the S bone and make them a little
bit bigger, like so, and now you can see
they look tons, tons better, and they're all
basically the same size. Okay, so now the
most tedious part of them now we've done
that, is the naming. So we've got support bottoms, which are these
basically back here, and then we've got support tops. Now, some of these can be used the other way round, of course. But I'm going to do is I'm
going to call this support bottom large top and this one, support, bottom, large, top and bottom, something like that. And then support
bottom medium and then support bottom
medium with bottom once loads of things like this. So decorative top deck, top, deck, top and bottom. Let's name them like
that. So what I'm going to do is I'll call it. So F two, support bottom. I'm just going to put
bot deck top, like so. And then if I press Control A, Control C, I can rename that. I'm going to press H to hide
that one out of the way. Then I'm going to come
to this one, F two, Control V. So deck,
top and bottom. Now, I'm normally very
careful when I come to naming things that I'm not
naming them with this, for instance, so
where is it here? This sort of font, not font. It's character. Not using this character because a lot of places actually where you're trying
to bring things in, this does cause
problems because, you know, it's not part
of the actual alphabet. So I'm always careful
when I'm doing this. I'm actually putting Anne there, even though it makes it
a little bit longer. So support, but
deck top, bottom. There we go. Hide that out the way. Now,
this one's medium. So F two, control V. So
we're just going to call it support, bottom decorative. And we didn't
actually put large, so I'm just going
to call it mid. So support mid, bottom. So and there we go. So let's hide that
one out the way, and then we'll do
the same one here. So F two, C, troll V, and support mid and
then we've got not kid, mid, like so, and
then we've got bottom decorative and then we've
got bottom on there as well. Okay, Hide that all the way. And then we'll press F two, and we'll go Control V, and then support small, and it's decorative
top, like so. Okay, that's that
one. Alright, so now we've got these ones. So I'm just wondering, so we'll call these supports and bottom. So bottom and top. So we've called these top
because we haven't got them. We've called them all
bottom, aren't we? So if I press F two, I'll go Control V
and support bottom. This will say top. Top and
then decorative middle, let's call it that mid,
then press Control A, Control C, Enter,
hide it out way, and then we'll go
to this one F two, control V, and we'll call
this support top, big. And then we'll call
it no decks on that. No decorations like
so, hide it out way. And then we'll call
this one angle. So if I press F two, control V, support top, angle, Angle deck. And it's just basically
coming up, as I said, some name that
you're going to be able to at least understand
something about them. Completely up to you
what you call them. F two, CtroV. So sport top decorative point. Let's call it that. Like
so. Hide it out of the way. And then this one, and
we'll press F two, Control V. Support, top no deck. So we'll just call it
support top, mid or big. We'll call it big because
that one looks like it is. Eight to block support. Try force, rename it, support top big because it
might have the same name. So if a press dot
coming over here, you can see that
we've already got one support top big, so
we need to rename that. Alright, sport top,
big, decorative. So let's put decorative,
and there we go. Now, it's actually happy with that. Hide them out of the way. Now what we can do is
we can come to this final one, and
we'll put beveled. So we'll go Controv support
top, decorative, bevel. Like so. And there we go. It's happy with all of those. Press voltage to bring
back everything. Now, the other thing
you can do with this is if I come over, we've sort these out
into their collections, I can just come over and
hide them out of the way. Now, if I come into here, I can press oltage and nothing happens because
they're hid over here. Sometimes it's a real pain when you're trying
to hide things. So, for instance,
you hide these out of the way, and
then you realize, like, you need to
bring something back, you press altage and it
brings back everything. It's just way easier
sometimes to work over here. Now, then we've got all those. They're all looking good. So what I want to do
now is grab them all. I want to come on over to
here, so open this up. I want to right click then
I'm going to mark as asset. Now if I come over then
to my asset manager, I've got them all in here. I've got my support
tops and bonds, so let's drag and drop
them into place like so. All right, and
there they all are. So we've got support
tops and bombs. We've got all other
supports we need, got a human reference, and
we've got our columns. All right, so now what do you
want to do is save it out? In the next lesson, then
what we'll do is we'll start actually bringing
some of these parts in, so I can show you
actually working in real time within our own gray box that we've
started to build out. Alright, everyone, so hopefully
you enjoyed all this. Hopefully you're
following along fine. Hopefully, it it's a
linear curve on learning. Leave us a review if you
can on how happy you are or what needs to fix in within the course, and I'll
see you on the next one. Thanks a lot. Bye bye.
41. Applying Base Textures to Greybox Structures: Welcome back everyone to blend the building master class
from concept to final render. And this is where
we left it off. Now, we're in our grey box. I wouldn't recommend
keeping it on rendered view because that's then go to use up a lot of resource that
you don't want to use. I would, however, recommend, though coming down
once you've got it on object and putting
on cavity on there. It's just going
to make it little bit easier to see
what you're doing. Now, one of the things
that I did forget is these tops and, you know, these walls,
things like that actually are probably better
off need splitting up. So what I'll do is I'll
show you this one first. But what we first
of all going to do is you can see this top here. You can see how
they're a little bit, you know, broken over here. What I want to do is I just
want to grab this top, press Shift H, and hide
it out of the way. Now, you can see that it doesn't hide out of the
way from the whole thing. So instead of doing that, what
I want to do is press tab, press the little question
mark on your keyboard, and then you'll isolate
the whole thing out. And from there, what
you can do is you can grab kind of
this one and this. Now we already know that
these parts here are actually in the other roof, so we're
not going to see them. So what I tend to do
then is I'm going to break this one, this
one, and this one. I'm going to press Delete
and faces, like so, and I'm also going to delete the bottom of here because I'm simply not going to need it. Delete and faces. Now, why I have I done that
the roofs and the walls are going to be completely
different textures. For instance, the roof here. Before that main
roof goes on there, underneath here is going
to be actually some wood, just in case there's any
gaps or anything like that. I always do that
because it's one plane. It's got a texture on there. And as we move on, I'll show
you exactly what I mean. So first of all, though, let's actually come in then.
So we've got a wall here. We want to put a
base wall texture in here just so we have an idea of what we're
actually doing. So what we're going to do is
as we build out the walls, we will be bringing in
the textures for them, getting them in place, and try and get
everything lined up. Now, at the moment,
we're not going to need this part here,
as you can see. We're certainly not
going to need the bomb, so we can delete
both of those faces. We can come in there,
delete this face, and we can delete
this phase like so. Now, the one thing
we've got with the wall is that once we
bring that texture in, it's not actually going
to go on there properly because we haven't got a
seam in there or anything. So it's going to try
and wrap around. It's probably going to put this one at a weird
angle to this one, and I will show what
I mean with that. First of all, though, let's make another couple
of collections. And I'm going to call it let's call one inner roof and wall. So we'll grab both
of these parts. I'm going to press P selection and separate those out
from these ones here. Then what I'll do is I'll come into my roof now
and I'll press M, and I'm going to call
it new collection, and we'll call it roof inner. Like so, Enter, Enter. And then we'll call
this one walls. So if I come in
now and I press M, I'm going to call this
one new collection walls. And again, when you're
building a gray box, you know, when you're adding
things to your gray box, it's important to keep your
collections very clean, it'll make things easier
for you in the future. Okay, so now I'll show you
the roof, first of all. So if you come on down to
instead of modular pack, you will see resources, and let's come in to
materials and shaders. And this one down here is the one we want to use.
This stylized wood. So what I want to
do, first of all, is I just want to put
it on to material view. Let it load up. Then what we want to do is
resettle the transform. So all transforms right,
plates at origin to geometry. And now I'm going to
do is just drag and drop this on there.
Let it load up. We obviously haven't
unwrapped it yet, so all I'm going to do with
the inside of the roof, I'm going to prove and
press U and Smart, you can just click
Unwrap like so. Alright, so these then
are going the right way because wooden planks
would go this way down. It's up to you though how
small you want to make these. So let's just go over to UV. So I'm just going to
go over to my UV. I'm going to put this
or drag it across, put it onto material view, let that load up, press
the dot one to zoom in. And then what I'm going
to do is I'm going to press A to grab them all, press the S bone, and I'll make them bigger,
actually, not smaller. So making them bigger,
and there we go, now, they look more like
planks of wood, and they are going to
hide behind there. As you can see,
these parts here, we didn't need the fronts on here, so we got rid of these. Now, the thing with the walls is we've actually got
a texture on here, which is going to be able to and basically come in and
use vertex painting on it. That is for later
on in the course. But for now, what we're going to do is come in to our walls. I'm going to press the
I'm actually going to put it on asset manager again. So let's come to asset manager. Here is our brick
normal or brick grungy. Now, we can change these
over whenever we want. So what I'll do for now is, I'm just going to put my
brick normal because if we go to shading and we go to brick
normal once I've put it on, I haven't got it on
yet, so sorry, guys. Let's actually put it on first. So brick normal,
drop that on there. Then let's go to shading. And you can see my brick normal, it's relatively simple one. It's got a little bit of, you know, grunge on it
or something like this. But it's relatively simple. So that's the one we're
gonna be using now because the other one is
very, very complex. So let's come back to we'll
go to UV editing, actually. I think I'll make it easier. Now, let's come in and
actually isolate it out. So we're going to press that
little question mark again, like so, and I'll
show you what I mean, I I grab this now, press
the button, press, unwrap. You'll see it unwraps like
that. That's not what we want. Smart UV project, click Unwrap. And you can see
now that it's put, you know, then going
the wrong way round. And even if I change
these rounds, so, 90, let's spin them round. You'll see it does
actually not a bad job, but you can see
they're not lined up. So you can see they're
not lined up here, not lined up here, and it makes it a little
bit harder to do. So what I tend to do instead
of doing is I'll come in, grab this point
here, right click, and I'll mark a seam in there. Then what I'll do is I
can grab the whole thing, press U, and unwrap, and now it should
unwrap absolutely fine. And now I can just
spin it round. So I can press R,
90, spin it round. Now, of course, these bricks are way way too big on here,
too small on here. It's not unwrapped it properly because it is based on angles. So what I want to
do is I want to unwrap it even better than that. And so I'm kind of glad all of these things
are happening in one go because it is showing you exactly what
problems you might have. So, let's press Tab. Let's
press Control A, A transforms, Satigent geometry,
press the tab again, and U, and finally unwrap
angle base, and there we go. Now, if I press 90, we can see all of
the breaks line up. You can see even
when they come to here where the seam is,
they still line up. So you can see here
they're still all line up, and you shouldn't have
any problems in here. In fact, you can't even see
which one the seam is at. It's that good. So that's the way that you
should actually do it. So the seam is actually here, and I would have a
guess that it would have been this but I'm saying, though, it's pretty good, guys. So what we want to do now, though, is replicate
that over here. And so now we just want
to do the bomb part. So I'm going to press
put a seam in here. And if you notice, as well, if I press oltge or press
the little question mark, you will see once that loads up, I've put a seam in a place where you're
never going to see it. So my seam should be either
in a wool or around the back. So just make sure when
you're doing your wool, you kind of not
print a seam here. You don't really
want a seam here. Even though it's
gonna be covered up, you want to get in the habit
of always hiding your seam. So around the back up here
would be a much better place, for instance, with your walls. Let's press the little
question mark once more, and let's come to this bom part. So if I press then
what I can do is press and I need to seem first stone tight,
so let's bring that in. So I'm going to come
in, right click and mock seam, grab
this one, then, press L angle based, A, 90, spin it round, and now you can see
they're exactly the same. Now, the one thing is,
how big are my bricks? If I press the question
mark, bring back everything, bring my little guy across, so I'm just going to
press Shifts Base bar just to bring him over. And this is the
easiest check I do. So if I pull him right next to my wall,
press the little dot. How big are these bricks? Can
he hold them in the hand? No, he can't. They're
absolutely massive. So I'm just going to
grab both of these, so I'm going to press
A in edit mode. And what I'm going to
do is you can see, also, one is bigger
than the other. So I'm going to press L, S,
and bring them together, or you can grab them
both and press A, U V, and then
average land scale. And it is because apparently one of these is bigger
than the other. So just make sure of that. Average non scale, if you're going to shrink
something down, just make sure they
are the same size. And now I'm going to do
is make them bigger, so I'm going to pull them out into the size
that they should be. So again, I'm looking at my guy. How big is his hand? So if I pull this out, how big
is this brick to his hand? Now, we have to be
careful because these are quite thin bricks and
they're quite long bricks. So let's say I bring
them out so he can actually come in and
let's say grab them. So, A, let's grab all of these. Press the bum, bring them out, bring them out. And there we go. Now, I think these bricks now are about the right
size for what we need, even though they look
a little bit dinky. So maybe, maybe a little bit the other way,
something like this. Alright, I think
they're looking good. And now we can actually pull
him over to the other side. Now, I know this bit
took quite a long time, but I think it needs a bit of explanation on how
we're going to proceed with all
of these routes. Now, if you notice, as well,
if we go back to modeling, you will notice if
I come to this, you'll see that this is
the only one in walls, this is the only one in roof. And the reason I've done that is simply because then
once I've done one, I can move on and I only move them in here once I've
actually done them. All right, so that took a long
time to actually explain. On the asset manager
then, on the next one, what we're going to do is
we're going to first of all, press a little question mark
to bring back everything. We're actually going to start then bringing some things in. So we're going to bring in the bottom of here, for instance, we're going to bring in
probably a post along here just to show you how
everything's going to work. And then hopefully
we should be able to build most of this part out. Now, on the tops on here, you will see if we go to our reference, so
we will see here. We do have some tops that we've not actually created
yet on here. Obviously, we've got
roofs and things. But if we actually come
back once we've put some of these parts in and create, you know,
this part here, and we look at actually creating this part that's actually
coming out here, then pretty much we can actually build quite
a lot of it out, or you can build quite a lot
of it out if you want to. All everyone. So what I'm
going to do is I'm going to go back to my file, I'm
going to save it out. And by the way, your other file, so you're actually one where you're actually
putting the parts in, you don't need to
keep that open. In fact, it's better off if I just put it on
object mode as well. You don't need to
keep this open. You can close it
down, but you're all going to be going backwards and forwards
because it is a course, so you're all building
out the parts. What I'm saying
is, you don't need to keep it open for
the asset managers, so just bear that in mind. All right, everyone.
So I hope you enjoyed that, and I'll
see you in the next one. Thanks a lot. Bye bye.
42. Applying Supports and Panels to Building Structures: Welcome back if we want to blend the building master class from concept to final or render, and this is where
we left it off. Now, what we want to
do to start bringing those parts in is we
actually want to come over. Instead, have the resource pack. We want to put it on the
modular pack, and here we go. Now, let's just update it so make sure everything's updated. And here's all our parts. Well, all the parts
we've built so far. So you should be
able to see fairly easily what each
of the parts are. Now, let's actually
start building that out. I've actually got
over my other side something to actually work on because it will make you way, way easier than actually just
looking at the reference. For you, just so you know
what we're building out. If you just open
up your pure rev, you should see that we've got a lot of references in here, and this is the point that I want to actually
start building out. So I want to build
this pioneer going, going up to halfway
point and then putting the column and
things like that on top. Alright, so let's pull that over then to
the left hand side. And what we'll do is
well, first of all, come down to where it
says support and it looks like the first support is going to be this point here. So if I bring this in, like so, wait for it to load
up because it has to load up the shaders. Every single time it'll have to do that when we
bring it a part. We can put it on object mode so we can just see it like this. It might be actually
better doing that. Then what I'm going to do
is I'm just going to press Z 90 and then pull
it into place. Let's grab this and
pull it into place, and it should be just about
on that ground plane anyway. Let's pull it out and make sure that it's on
the ground plane, so you can see
it's right down on that ground plane,
which is great. Now, I'm going to pull it
slightly into the wall then, so slightly into
the wall like, so. And then what we
want to do now is we want to put in a pot, so one of the supports
going over the top. So the support that
I'm going to bring in is going to be one
of the longer supports. So I'm thinking maybe this one, so let's just bring this one in. That one might be a
little bit too thick. I'm going to try
the smaller one, so let me come in and try. Let's try this one.
Yeah, this one here. So we're going to
bring in this one. It's called small support. I'll delete that
one out the way. Spin this round round.
As he 90, spin it round. Now, remember that with these, we've got on the array. So that is how
we're going to put it going all the way across. We don't want to
come in and start stretching these out
or anything like that, because what you'll end
up doing is messing around with the basically, you can't really stretch
these out because then you'll end up with a duplicate
and not an instance, so it's way way easier
just to put it into place, like so, bring it down. And then all you want to
do is increase this here, so the array on this one, turn it on, turn it on, and then just increase that. And you're going to
get some little breaks in this quite normal
for buildings anyway, so we haven't got to
worry about that. All right, so that's
going on top of there. Now we need a supporting here. So what I'm going to do
is I'm going to come over to my support.
So these ones here. The one that I want is probably going to be,
let's see this one. I'm going to bring this one in. And this one is support. I over over it, it's
SN bot December top. So I think that one is
the actual small one. Let me bring this
one in as well. And that one is the big one. So you can see that this one is probably going to be way
too big, as you can see. So what we're going
to do is bring this one in, pull it over, press a little dot board and I'm going to pull
it out into place. And also, you can see that, you know, it's a
little bit too small. So what I'm going to
do is I can either stretch it so I can go SE. There's nothing wrong
with stretching it, because then what we can do
is lt D and bring it across. So what I'm going to do is jaws fix it under there, like so. I'm going to then pull
this part into place. So pull it into place, making sure that
everything is lining up. So you can see here it's a
little bit too far in front, so I'm going to pull
it back, pull it back, pull it back into place. And there we go. That's looking
very, very nice already. Now what I can do is I
can actually come in, turn this on. So we've
got two of them. And then what I'm going
to do is I'm going to come bring this over here. So I'm going to press Alt D.
Make sure you press Alt D, not shift D, bring it all
the way over to this side, like so, and stick it in there. And then what you're going
to do is Alt D again, bring it all the way over here, put it in there, like so. And we can see
here that probably needs to pull in this
way a little bit, and then we go just
so it fits in. And then what I want to
do is grab both of these, and I'm going to
press Alt D again, like so, and bring them over and making sure
everything fits in. Now, we can see that these
are not fitting in properly. This is one of the things
you're going to come up again. So all I want to do
is grab both of them, press S and Y, and just bring them
back a little bit, and then we'll try
and fit them in. So I'm going to pull this
one over here, like so. I'm going to pull
this one over here. Like so, and then I'm going
to put this in the middle. Now, I need these to actually fit together,
as you can see. So all I'm going to do
is press S and Y again. I'm going to pull them out, and I'm going to move them over, again, move this one over. Like so you can see, I need
to go Jas a tiny bit more. So just a tiny bit more, and then I can actually
have them in place. So I'm going to grab them
both again, S and Y. Let's pull them
out. Tiny bit more, like so, and let's
see if this one fits. And there we go. And let's
see if this one fits. And then is it going
to fit in there? You can see there's a
little bit of a gap there. Let's pull it over
a little bit more. Double tap the A,
and there we go. Everything now is
fitting in place. Let's save out all work, so
we're going to go to save. And then what we want
to do is we want to put this going up to where the
windows are going to rest. So the windows are going to rest around here, here and here. So we want another one of these. So what I'm going to do
is, I'm just going to grab this I'm going to
move it more in line, as you can see, like so. And then what I'm
going to do is I'm going to press Alt D, bring it up, and put it
in place around there. And then we want
a big chunky bit, so the big chunky one is
going to go along here. So let's come back
then two supports, and we've got this big
chunky one that's here. I'm going to press RSE 90. I'm going to press three
to go in side view, and then I'm just
going to press G just to move it into
place where I want it, which will be
somewhere around here. And then what we'll do is
we'll pull it back into place. Like so, pressing the
dog bone zooming in. Now, remember, we're going
to have the corners. So when you do a corner,
we can rotate it round and then put something in here. We'll
actually sort that out. But for now, let's just
pull this into place. Now, we don't need to
duplicate this or anything. What we need to do is just make sure that it's in
the right place, so half and half,
as you can see, so it fitting in
there beautifully, and then we can
just turn these on, like so, turn it up.
And there we go. That is that part in. And
now what you would do is you would come in and make sure
you've got the center point. Now, the center point in here
is going to be a little bit harder to actually get
because we've got this side, so it's all over this side
and all over this side. So what I think I'm
also wondering, as well, do with the wall, are we going to need
the front and back? I don't actually think
so building this out. I'm just looking down there. And there is a little bit of
wall just on this part here, but it's going to be
covered up anyway by probably a block
or something. So I'm thinking
for this one here, let's just press the
little question mark, and what I can do instead
is I can just come in and keep the wall
that we've unwrapped, but actually delete these because we're not
going to need them, so delete faces, like, so press the tab but, press the question mark
again, and there we go. Alright, so now we've got
those in. You can see already. We can't actually see, you know, into the wall or
anything. That's great. So now let's work on the
actual center of here. So what I want to
do is the supports, and the support I actually
want is this one here. So I'm going to bring
it in. I'm going to rotate it round,
so's head 90. I'm going to rotate it
round then by the X by 180. So RX 180. I'm going
to press three. And what I want to
do is I want to measure from here to here now. So if I come in and
press the T button, then we'll open this
menu over here. I can then come can delete
this one out of the way, delete, delete come in then
and grab it from here. To here. And it's around 6.9. So 6.9 is going to be 3.45. So I can actually
move this to 3.45. So somewhere around there
is going to be the center, which means then I can
come and put this into place in the center around 3.45. Now, we can't actually
see that anymore. So what I'm going to
do is I'm going to come in and actually
draw it on, as well. So if I come in, we
can't do both actually. That's kind of
irritating. I can see this is round about
the center of there. So what I'm going to do is I'm
just going to come back to my move tool. And
actually put it in. Now, it's kind of irritating because you need to
probably, can we draw on, we can probably draw on Edim, which means then IPA come in,
and let's move it to there. I can probably then
come in and bring in control law, bring
in an edge loop. The problem with
doing that, though, is when you move this across, ah, let's bring it in, and
I'll show you what happens. So if I put this onto
Shader mode, Shiftspasbr, you have to be very
careful when you do it, because once you
start moving it, you can see you're moving
your bricks over there. The best way actually of doing it is coming in,
pressing control. So let's just go
back to object mode. Let's put it back
onto measurement. Let's come in and
press Control law. Left click and then
move it over to where you actually want it.
So somewhere like that. And now you should
be able to come in. So, you should be able to
grab this one and this one, press the tab but,
grab just this one, press shift space bar. And finally, then
you can actually see where you're supposed
to be moving it to. So somewhere around
there, it's long winded. Honestly, I wouldn't bother so much trying to get it
perfectly accurate. I would just actually
try and just put it in. You know, relatively
where it's going to go. So now if I come in, I should be able to pull this into place, like so, and it should be
able to stick in, like so. Now, on the next lesson,
then what we'll do is you can see that's
looking very, very nice. We'll bring in the column that's going to go up this part here. And then what we'll do is we'll actually look at this wall here. So we'll start looking
at this wall here and how we're going to actually
bring this part here, how are we going to bring
that out a little bit? Because we need to get
some measurements to take it into, you know, our modular pack to
actually build these out because we don't
actually want to keep building these
parts all the time, and sometimes it just makes
it a little bit easier. Alright, let's go to
Film, go to save, and I'll see you on the
next one, everyone. Thanks a lot. Bye bye.
43. Creating Column Based House Supports: Welcome back, if you want to Blender Building master class from concept to final render, and this is where
we left it off. Now, let's come to our columns, and the one we want is going
to be the small column. I always, first of
all, bring things out just so they
start on top of you. Now, you can see
with this one for some reason, it's
not on top of there. I don't actually
know why that is unless it's because it's
actually a geometry note. What I want to do though is actually bring this
then into place. And again, don't worry
about it being exact. All we want to do is just put it somewhere around the middle. So just make sure
it's as, you know, centered as you possibly can. Let's put it up to the top then so it's going
to slot into there. Now, when I put
the bomb piece in, I always want to make sure here if I press the top on
to zoom into this, that the bottom is
actually this part here. So, in other words, this
bottom here, you can see, it's not going to be quite beveled there because
it's stuck in. I want it flush, wave
the top off here. So I'm just going to
come in, hold my shift but and just make sure
that there's a tiny, tiny, tiny, little gap there, as you can see, like this. The next thing is,
I want to make sure that this is not
going up this high, so I can actually come
in, shift spacebar, move, grab this, and pull it down to roundabout here
because on top of here, then we're going to have
our roof supports on there. So I want to make
sure those are in. Now I want to do is I want to bring in this first part here, and then I should
be able to then work around going up this side. So to do that, I'm
going to come in and we're going to go
to supports again, support tops and bottoms. And we want the big
chunky one. So let's see. So we've got support. This one, we've got support, this
one, small one, big one. This is the one that we're
going to use, I think, so we'll use this one here, so I'm going to come
in, bring it in. And I'm going to put it
right in this corner here. So again, I'm going to press the dot bond just to zoom in, put it right in the corner,
like so, something like this. Now remember, if you
look at your reference, you're going to see that
there's some stairs here. We're not going to
worry about those right now because we're going to
get the stairs in in a bit. But for now, we're just kind of building this
out a little bit. So what we want to
do is press Alt D and bring it over this side. So Alt D, bring it over
to this side light. And then what I'm
going to do is then I want to have a base in here. So if I come then
to my supports, I've got this one here. So if I bring this in,
if I press R z and 90, this is what I want
actually to come in. So I've got this and then
my stairs going here. I'm going to pull
this into place. Let's move it over to here, and then my stairs will be
going in this part here. So if I pull this back just a little bit because
I want to make sure that this is a little
bit of a gap there, as you can see, like so, and then I'm going to
press Ode again and bring it over to the other side. Like so. Let's press three, so I can see this
one slide in here. This one slide in here, you can see this one's a tiny, tiny, little bit
out, so I'm just going to pull it over,
and there we go. So we've got our whole
stairs coming in here. Let's make sure you
can see they're not quite on the ground
playing these parts. So I'm just I'm actually
measuring them to see. This here is slightly below. So let's pull them
down a little bit. So we'll pull them down
a little bit like so, and they near enough then line up with the
bottom off here. Alright, so let's now
bring in the column again. So I'm going to grab
this column again, alt D, and I'm going
to pull it into place. So this is right in the corner, pull it down into place like so, and then I'm going
to pull it out now. So I'm going to pull it out
into that corner like so. And this is the smaller
column we're using here. We're not using the big
column yet or anything, and then pull it into place. And there we go into there. Now I just want to lift
it up a little bit. And then what I want
to do is I want to get the post on here. So I want that post on here, and then I can
actually work my way around where the gap is in here. I want to fill this gap in here, this one here, and I can do that once I've actually
got this post. So let's bring that post in. So the post is going to be the big post with
the bomb on it. So if I come here, I've got
a big post, this one here. This is the one that
I want. I'm going to bring the big post in, like so, and we're going to have
it facing this way, and we're going to put
it right on top of here. So right on here, press three, and let's move it into
place so it's centered. And then let's pull
it into place, and then what we're
going to do is we need the bottom on here. So I need to see, first of all, where is the bomb
going to line up. So basically the bomb on here. So this bat going
across here is going to be perhaps this small
one or this big one. So let's see the
difference in the size. So let's pull it
back, first of all. And then what we'll do is
we'll bring both of these in. So that's the big one. No, this one's the big one, this
one's the small one. So what I'm going to do is, I'm just going to
grab this one s, 90, three, bring
it up into place. Like so, turn on the array, make sure you turn on the rends you won't end up
with render out. Turn it up. And
then what we want to do now is we want to put
this on the other side. So I want to make sure, first of all, that this
is going to go in place, so then we can see how close
is it going to be to this? So you can see now we've got the round a bit
coming from there. If I move it over a tad, then we've got a little
bit of an edge there, and that's looking pretty good
like that. It's in there. And now I want to
do is I want to move this over to this side. So both of these,
I can grab them both. In fact, you know what? Before doing that,
let's just bring this down because it's
actually stuck in there, want it right on the top of
there. So it's underneath. So if I pull it up into
there, and there we go. Alright, so now we can see though we need to pull
it out a little bit, because we can see we've not
got a lot of edging on here, so pull it out a little
bit, and there we go. Does it look like
it's supporting it? I think so. So now I can do
is I can grab both of these. I can press Alt D. Now, of course, we're going to have
them the wrong way round. What do I mean by that?
A D, bring them over. You'll see once I
put this part on there, you can see
that this one, maybe, maybe is a little bit
different from this one, so you can see we've got a little bit of a
difference there. This one actually
doesn't look so bad. So now I'm going to put
it into here. Like so. And then what we'll do is we'll come over to this one here, I'm going to move
these then very slightly just so they line
up a little bit better. And then with this then, what I want to do is I want
to pull it out. So S and Y, let's pull it out
just a little bit, so they line up a little bit
better so they're in there, and then S and Y
a little bit more holding the shift
bun and there we go. They line up now pretty nicely, and they line up just
under these parts as well. So that is looking pretty good. Now, we have a balcony on here, which we're not actually
going to put in yet, but what we need to do now is we need to bring this part up all the way up to
here because we've got a block in this wall here. So I recommend, first of all, we'll bring in the block
on the top. Just on here. And from there,
then, as well, it'll give me an idea of where I can actually work out how long, you know, this
is going to be. So let's do this bit
that comes out of here. So where is it going to be to? Okay, so let's first of
all, bring the block. So again, down to here, and the block that we want it's going to be this
simple one here. So I'm going to bring this in and let this one
out of the way, so I'm going to bring
this in, press in three. And then what I'm
going to do is press G and just drag it up. And we want it right
on top of here. Now, at the moment,
we're not quite sure where it's going to go exactly because we need
to put the rooftop on. And we're not even sure if
this is a little bit too big. I think it's a
little bit too big. For now, I'm going to line it up just so it
sits on top of there, making it a little bit smaller. Making sure that this bottom of here just lines up
with this one on here. Then what I'm going
to do is just make sure that it's
pulled back enough, so it looks as though it's
actually in there, like so. And now I want to
bring up this column. Now, I might as well bring
this one over first, so do them both
at the same time, or I can do it the other way. I can bring up this column, then bring them both over.
So let's do it that way. We're going to press
Old D, bring it up. Put this one into place, so it's just on there,
like we have done before. Grab the top of it, pull
it down into place. Now you can see because
we're pulling this down, this is actually changing
all of the other ones. So you can see I don't
really want to do that. You can see we've already
changed this one as well. And why is that happening? That's because we've
brought these in, and we've not changed them
from geometry nodes to, you know, our stone. So let's actually fix that. So what I'm going to do
is I'm going to come in to B for these. And what I'm going
to do is, in fact, you know what? Do I
actually want to do that? I should actually be
duplicating it instead, because, you know,
at the moment, we're changing it
in the edit mode. Maybe it's better to come in. And instead of doing that, what we'll do is
we'll delete this way because I don't think we
can actually um yeah, we could press Shift D, and then the won't be linked.
So we could do that. So instead, I'll just
press Shift D, Enter. And then what I'll do is, I'll just hide that one
out of the way. So Shift D, hide the
one out of the way, delete this one, OH,
bring the other one back. And now, if I pull this up, it shouldn't affect the others because I actually
duplicate it instead. Again, with this one as well, I can come in Shift D. Now
they are geometry nodes, so they're not going to
cost too much anyway. As far as geometry goes until
we've actually turned them, you know, into actual mesh. So what I'm going to do is, I'm just going to
bring this here. And then now I should be
able to pull this down. Why? Because it's a
duplication and it's not an instance.
Alright, so there we go. Now I can actually use
the instance way, so t D, enter, bring them over, put them into
place. There we go. That is looking pretty nice. Let's go over the top
and just make sure then that both of these
are in roundabout. So if I come to this
one, you can see, if I come to this one, that
spot is right next to here. This spot's a little
bit out. What that means is then I can
drag this over, so let's grab this one. Woops. And this 17 to go over the top. And now I'm just
going to bring it in, bring it in, like so, and let's have a look
at how that looks. I'm thinking that this
is in the right place. So this one and this one
now are in the right place. If I grab that, let's
go over the top. Yeah, this looks to be
in the right place. Now I'm looking at this one. This one, I'm wondering if
they are a little bit out. And I think of a go around
here and around this one. Yeah, they're a little
bit out on here. So I can grab this, this, this, and then just pull them so that they more or
less line up like this. It's a lot further over,
so bring them over. So which means then I can come
back to this and S and Y, pull it in, pull it over, double tap the A,
and there we go. Now, let's come in and
save our works or file and save this is
looking pretty nice. Now before we end, let's actually have a look at
what that looks like. So let's go to Render view. And there you go, guys. That's
what you've got so far, and you can already see really, really starting
to come together. Imagine when we've got roofs on there and windows and
things like that. It's gonna really come together and look really,
really beautiful. Alright, everyone. So, as
I said, on the next one, then, what we're
gonna do is we're going to create this
outcrop in here. We're gonna actually
create that, send it through to our modular pack one, and then we'll have a
good idea of the sizing, and then we can just
bring those parts in, put windows on and
things like that. Alright, everyone, so I
hope you enjoyed that. I'll see you on the next
one. Thanks a lot. Bye bye.
44. Continuing Texture Application on House Blockouts: Welcome back, everyone to blend the building master class
from concept to final render. So let's get one of the
difficult bits down. Let's go back to
modeling because we're not going to need
these parts in right now. And what we want to do then is we don't want to
actually alter this. We don't want to bring
in bricks to the mum. What we want to do is
get that outcropping. So, in other words, we want
to create these outcropping. These outcropping and all of these are pretty much the same, but we need to make sure that
we line everything up so, you know, they
line up perfectly. So the way that I'm
going to do that is I'm going to, first
of all, come in. And I'm thinking that
I'll probably be better off duplicating
just the front. So if I come in and
grab just the front, so I'm going to press shifty, and then what I'm going to do is I'm just going
to pull it out, so I'm going to press
P and selection. So I've got this point here, and then what I want
to do is really, I want to move this up
and then cut it away. What I'm going to do is
I'm going to press three, and I'm going to
go to the X ray, go to object, go to X ray, and now you should be able
to see if press control A all transforms set
origin to geometry, I should be able to see once
I start pulling this up, it actually rises above this
one here, as you can see. So we need just a little bit of it rising to
actually make it now. So if I turn this off, if I
come in now and press tab, A, E, pull it out, you will see
although it's not cut yet, you will see that
it's just above that. So it's just above
sticking above like so. And I think, actually, maybe, maybe it's a little
bit too high. So what I'm going
to do is I'm just going to in fact, you know what? We've got roofs
on stuff as well. So I think I'm just wondering if it is a little bit too high if it is
about the right height. You know what? I think I'm
going to leave it like that. Now what we want to
do is cut it away. Now, because I've
just showed you, you know, extrusions, how it is, we need now to pull
it out a little bit, and now I need to do is I
need to cut it down here. Now, to do that, it's way easier if we get rid
of these parts here. So, let's press Control plus, delete faces. Now
we've pulled it up. And then what we want to
do now we split this off, we can press the question mark and just work on this bit on its own because I'm
going to give you some dimensions to
actually work with. So now let's come in. And what I want to do is I want to
get the center of here. So I'm going to press three.
Shift S, cursor to selected. That's going to put it
right in the center there. Okay, so what we're gonna do is we're going
to bring in a cube. So, or a plane can do it. We'll bring the plane, actually, I'll make it a
little bit easier. Bring your plane, spin it round, so R Y 90. Let's spin it
around, like so and the size of the actual
plane is going to be 3.55. I think it's on the
y. So let's put it on here, 3.55 like so. So this is going to
basically be the whip. So what we need to do
now is we need to cut it from here so you can see
from this part of here, going all the way down, and
we're going to cut that way. So the best way of doing that. Well, first of all,
the best way of doing it is by putting something
right in the center. So in other words, put in a um what's it called an edge
loop right in the center, and then we can actually mirror it from one
side to the other. So the way we're going
to do that is if we grab this one, this one, and this one, and what
we can do is we can right click and subdivide. That then is going
to put a division right down the center for
us and make it really, really easy to cut each side. Now if we come in,
we can actually come in and grab this
side and this side, press delete and face and now we already know that the orientation is right
in the mirror, so we can come back now
and add in a mirror. So come in, generate a mirror. That then will go to the
other side, turn off the X. And now when we come
in, we can actually come in and cut this down.
So how am I going to cut it? I'm going to cut it perhaps the easiest way which
will be with a bisect. So all I'm going to
do is come to mesh. I'm going to go down to
where it says bisect. And then what I'm going
to do is cut this away. Now, remember with the bisect, you can press the space part to move it a little
bit if you want, or you can move it
with this here. So I'm going to move it a
little bit over with this here. The main thing is with the bisect is you want
to straighten it up, so I'm going to pull
round about there. And then I want to make
sure that it's on zero. So this z, you can see
is a little bit out. So let's zero out the z, and then I'll make sure
that's perfectly straight. The next thing that I want to do is I want to come over and delete this part and this
part, delete and faces. And there we go. That is
what we've actually got. Now, let's come
in now and delete this actual plane because we're not going to
need it anymore. Now, the overall
length of these, we want it to be on 8.45. But what we're gonna do is we want to lift it up
from the bottom. If we just put this to 8.45, it's going to
squish it all down, and we don't really want
that because we want to keep the same kind of roof as what we've got
all the way around. So what I'm gonna do
instead of doing that is, I'm just going to come in and
lift up this side slightly, press the tab but 9.21, lift it up 8.77, bit more, 8.45. There we go. I got lucky.
I got lucky with that. But anyway, now what we want to do is we want to
actually bring this out to have a width of
round about half a meter. So if I come in and I press A and then E and pull this out, like so, we want it to
be round about not 0.5. So not 0.5, quite chunky, and that then pretty much
is ready to go on the top. Now, the one thing is, I
want to make sure as well the top it's probably,
you know what? I think I'm going to
leave it like that. It may need to come in a
little bit on the top of here. So I'm going to first of
all, though, applma mirror, control A mirors sometimes
cause a lot of problems. Now I want to do is
I want to come in. I want to make sure
all of this mesh is done correctly because you
can see here at the moment, we've got one coming
down the middle. We've got a piece
coming down here, you know, and it's
not done correctly, and that's going to cause us problems because
we will be putting things like windows and
things like that in. So what I'm going
to do, you know, instead of doing it this way, I'm just going to take
the front of it now. I'm going to press
huck D. Like so, and what I'm going to
do is I'm just going to bring these in
a little bit more. So I'm going to
grab both of these, not this one, this one,
this one, and this one. And then I'm going
to press S and Y and just bring them in
just a little bit like so. Now what I'm going
to do is instead of having this here
because we can see that, you know, it's really a bit of a mess here where, you know, everything kind of doesn't go together. We've
got a piece here. We've got a piece over here. Why is this piece even here?
Doesn't make any sense. So let's press L P selection. First of all, Control A, hold transforms right click. Set origins geometry, tab now, grab the whole thing,
and let's press delete and limited dissolve. That then is going to dissolve
all of those edges for us, and now it's one plain mesh. When we've got one plain mesh, actually, it's
easier to work with. It's easy to put a
boolean in here. It's easy to do things with. So it's up to you
whether you want to actually put just one
edge loop going in there, because pretty much
around the top, we're not really doing
a lot with that. So I think one edge loop in here is going to make this
extremely easy to work with. So let's do that now.
So what I'm going to do is grab this
one and this one. And then I'm going
to press the JB, like so, and there we go. Alright, now we need
to pull it out. So I'm going to press
A, E, pull it out, set this then to 0.5, like so, and there is our part. Now, let's delete this one out the way. Let's
bring this one in. Control A, or transform, set origin geometry, press the little question
marks, bring back everything. And now you should be able to
pull that back into place. And that is how it
should actually look. So you can see that is now
stuck out the right way. We can actually put
this on here over here. As well as that, we've also
got 55 degrees as well, so we know what this
is, which means we can put this right in
the center of there. We can do that all the way
around on these things, so that then makes it
really, really easy. Now, what we want to do now we want to take this part into our modular pack
and build it out to make sure that it's looking
exactly the same as this. It's exactly the same as this. Now, what I want to do is I
want to take out the bricks. So I want to take the bricks, and I want to match
them up with this. So all I'm going to do is I'm going to grab both of these, I'm going to press
Control C. Then what I'm going to do is
I'm going to go back now to my modular pack. So let's open up your modular pack if you're not
going to open. So here is my modular pack, and then what I'm going
to do is press Control V and bring it into here. Then finally, what
I'm going to do is, I'm just going to
grab both of these. As 90. Let's spin them around. That was the wrong
way. So As 180, what am I talking? Z 90. A z -90. So z -90, spin
them around like so. So now you should have
it. If you click on the Shader, you should
have the bricks there. You'll have this part here. And now we should be able to, you know, work on
this part as well. Alright, so what I'm
gonna do now is I'm just going to save out now
I've brought these in. And then what I'm gonna do now is work on this on
the next lesson. So we'll get working on this. We'll build out the columns
and things like that, basically so we can just bring this in and slot it into place. Alright, everyone, so I
hope you enjoyed that. I'll see you on the next
one. Thanks a lot. Bye bye.
45. Modeling Roof Support Structures: Welcome back, everyone to
blended building master class from concept to final render, and this is where
we left it off. Now, if you come
over and bring over your resource or
reference guide, this is the part that
we're building out. So this part along
here, this top on here, which we'll make
separate as well, because we want them part of
it and basically separated. So this is the part
we're building out. And what we're also
trying to build out, so we don't have to keep
doing it is this part here. So we're going to
build this part. We're going to build
this part on top. We're going to build
these points going down, and we're not actually
going to put this in because the thing is,
have they all got it in? You know what? Actually, they all look
like they have it in. I'm not sure if like they have this pot in going
all the way over, but I don't think so
I think all we'll do is we'll build this part, and put this part on top. We might even get away with not putting this part on top
as well. So you know what? We might just build
out this part. Build this down, and
then from there, we can actually stick
our windows in. The thing is, you can see here, these windows pretty
much look all the same. Let's look around
the rest of it. If we're going to build the parts where they're
actually coming out. Yeah, this one here looks
exactly the same as well. I'm just wondering if I've actually put the
windows in because that might make things easier if we actually put this hole in, which means that we
would leave this for now because they're all
basically pretty much the same, and it would make
it a lot easier. I'm looking at this
side you can see this is the part here,
going all the way down. They've got different bombs on. But pretty much, they all look
the same with the windows. And that was the
one I'm looking at. Even around this side, it
looks pretty much the same. So I'm wondering
whether we should actually just create
the whole thing. Now, of course, that brings
with it its own problems. We actually have to build
windows then at that point, and we do have three
different types of windows. But then that's obviously taking it to another level of muddling. So I'm just wondering
whether we actually do that. So I'm just going to come in and look at where so we
have our doors here. We have our windows, which are around here because
they're quite difficult to make windows, and we have all of
these other pieces. So I think what
we'll do, actually, is we'll create first
of all this top. We'll put the columns
in. Then we'll come and we'll create
this part here. So this one here, because
we haven't done that yet, this is for the top underneath the actual roofs and
things like that. And then finally, what
we'll do is we'll actually probably move on to
creating our windows. And then once we've
got those in, we can finish that
part on the outside. So I think from now,
we should actually do a little bit more work in
our actual modular pack, so in here. So I'm
going to save out this. I'm going to save out
this a little bit. And then what I'm going to
do is I'm going to go back to my gray box,
which is over here. I'm going to go to
file, save that out. And then what I
do, you can close that down for a bit
if you want to. I'm just going to
leave mine open, but I'm going to do
some work on here, I'm going to do some
work on the windows and this topic going along here. We have to get round
to eventually anyway, so let's actually do that now. So first of all, then
what we'll do is we'll come to those bits that I've
said that are underneath, which are going to be if I pull up the reference
guide again, they're going to be
let me find them. So it's going to
be this one here. So we're going to do
it pretty much the same way as we've done
with the support. Apart from these,
we'll be roof support. So let's move that over
to the left hand side. And then what we'll
do is we'll just move both of these just over
here just for now. Let's set our curs, then
right to the center, so shift desk, cursor
to world origin. Let's bring in a cube, then, so we're going to
bring in a cube and the dimensions of this cube. I want this on naught 0.8. I want this one on naught 0.38, and then naught 0.76. Let's put it on
something like that. Now, these dimensions here, if I press a little dot bu, these are the
dimensions that are one for my under the roof support. So what I'm gonna do is
just move that to the side. And I'm going to then
bring in a plane. So shift A, let's bring in a
plane. Let's spin it round. So RX -90 or Rx 90, so Rx 90, and then let's make
sure it's the right side. So all I'm going to do is
I'm just going to press S, bring it down to the right size. You know what? That's
silly doing it that way. What we'll do is we'll just
grab the back of this. Shift D. Grab the back of there, and there we go, right sizing. Okay, P, selection,
grab this one, Control A, or transform
set origin to geometry. Soap, and then we're
gonna press tab. And then all I'm going
to do is pull it out. So I'm gonna pull it out. You can see it's
lined up with this. I'm going to pull it out
to round about here. Like so, and then I
want a top and a bomb. So what I want to do
press control lay, left click and I'm
just going to move that up somewhere like here, and then I'm going
to press Control, left click and bring that one
down somewhere like here. Now, I want some bricks in here, and I want
these pulled out. So now what I need to
do is grab this one, so this part and this part, and then go seven over the top, and then E pull them out to be roughly in line
with this one here, like so, and you should
end up with something like this. And now
I want to do is. The other thing is
when I've done this, am I accounting for the
bottom of the thing. I don't think so, so I
think I need to squish it in because I'm going to
put a bottom on here. So if I put it on object mode, I should be able to then
put it onto cavity. Cavity has gone off
for some reason. Let's press three to go into
one to go into front view. Let's make sure we're
actually seeing through there so we can
see we've got a line here. No actually seeing
that, so you know what? I'm just going to turn that
off. There we go, like so. And then let's press S and Z and squish it down just
a little bit like so. Bring it back up then
in line with this one. And then what I want to
do is put a p under here. So I'm going to press Shift
S, cursed or selected. Shift A, bring in a cube, make the cube march
much smaller. Like, so bring it
down to the bottom. ETNs Ed, bring it up. Like, so we know that now
is right in the center. And then what I want
to do is I want to put a bottom on here as well. So I'm going to pull
it up a little bit, press EnsEd, pull it up a
little bit more like so. And then what I'm going
to do is I'm going to duplicate it, so shift D, bring it down into place, and then S and X, pull it in. Like so. Now, once it's
something like that, I can still see that this is probably still
a little bit out, so I'm going to
press ssn's head, squish it down a little
bit, pull it up, bring this part up
and this part up more in line with this
going along here. And I think now
it's nearly there. So essens head put it into
place, and there we go. Alright, that's a
roundabout in line. Maybe maybe it
needs coming down a little bit more. There we go. And then what I'll
do is I'll come in now and bring this bottom part. So this bob section, I'm
going to bring more in line just so it cuts
into there like so. Alright, so let's
see what we've got. So if you put it on
object mode now, take off the transparency. I'll call it ghost, but
it is transparency. And then what I'll do is I'll pull these out to the front. I'm going to press S and Y, squish them in, like so. And what I also
want to do is make sure that this one is a little bit wider
than the bomb one. So S and Y, pull it
out. And there we go. And now we're going to do
is pull them to the front. So pull them to
the front like so. Now, it's up to
you if you want to make these more
intricate, you know, on your own, you know, more intricate than what these
are completely up to you. Now, what I want to do
now is bring in a cube. So shift a leads,
bring in a cube. And what I'm going to
do is press S. Like so, and then I'm going to pull
it over to this side. And then what I'm going
to do is press S and X. Bring it in. Add some Y. Pull it back because we want
it just in here, like so. We don't want to waste
any of the backs or the sides or
anything like that. Now, there is something you
should know about these. They might poke up a
little bit over the top. So when you're deleting
the backs of them, only delete the backs
of these bottom two, because this one
might poke up over, and we need to think about that when we're actually
creating them. Now what I want to do is
I want to bring this up, so Eons, bring it up into
place, pull it back. Into place slightly, like so. And then what I want
to do is control A or transforms right
clicks origins geometry, tab, grab the front face, I to insert, like so, and
then we'll pull that out. So E, pull it out. It place, like so. Now, we do want one
each side of this, and the problem you're
going to have is where is the center of this? So we need to work out so
it's properly centered. So what we're going
to do to do that is we'll press Control R. Left click, right,
click Control, left click, right,
click Control, left click, right, click. Now, we can see now that
we've got one in the center, and then we've got
these two here, but we don't really want
these two like that. So all I'm going to
do is pull them out. So S and X, pull them out
to where you want them. And then what we'll do
is we'll grab this part here and we're going to
press Shift D. Like so, and then I'm going to
come back to my line. So if I come back
to this line here, I can press shifts,
cursor selected, grab this one, press shifts
and selection to cursor. You can do selection cursor, keep offset, or you can
do selections cursor. And, you know, sometimes it changes the way that
it actually goes in. But for me, I'm
going to pull this into place, pull it down. Like so. And I'm just going to work out roughly where
that's going to be. So this is the center of here. Now, if I use the mirror, I can go exactly over that side. Now, I don't really
want to do that because I know this one's
lined up perfectly, but this tells me this
is where I can put it, and then we're going to
get an even distance between them, and
that is what I want. So all I'm going
to do now is press Shift D. Come to this one. One to go into front view, and I'm going to
pull it over right to where this one
is this shift done. Hide it out of the way.
Delete the other one then. So delete, tach, bring
back the other one. And now what I want to do is I want to mirror it
over the other side. So I'm just going
to grab this one, shift desk, cursed and selected, grab this one, and right click
Set Origin three D cursor. And now we can mirror
it right over. So add modifier
generate a mirror, press control, and there we go. Now they're all
lined up perfectly. And now we can join
them all together. Before we do that,
however, though, we want to make sure
that we're deleting the backs of things that
we don't actually need. So these bags, though here, sometimes they might
not stick in the wall, so we need to be careful we're not actually
deleting those. These backs in each of these, though, we can actually delete. So if I grab all three of
these, I can press tab, come in, and just delete
those because they're in the wall anyway,
delete and faces. Now, what about the
tops and the bombs? We can also get away with deleting the tops and
the bombs off here. So Xray on. Let's come in, grab the tops of all three
of these. Come underneath. Bottoms of all three of these
pretty delete and faces. And that then is
going to save us a lot of polygons in the future. So now I can do
is I can come in, I can join all of
these together, so join all of this. Like, so press Control J, Control A or transforms
set origin to geometry. Now on the next one,
what we'll do is then we'll bring in the array. We'll also then get well, we'll delete
this out of the way. We'll save that'll work. We'll bring in the
array on the next one. We'll get the stone. So similar to this on here, and then this will
be our roof support. From there, then we can actually start creating this part out, so we can start
creating that part out, and then we can move
on to our Windows. Alright, everyone, so I
hope you enjoyed that. I'll see you on the
next one. Thanks a lot. Bye bye.
46. Enhancing Upper Floor and Roof Front Details: Welcome everyone to blend
the building master class from concept to final render, and this is where
we left you off. Alright, so what we'll do now is we'll actually unwrap this. So make sure you resell
your transforms, press the tap button,
A, U and SmartUVPject. Click. Okay. Now, I
want to make sure that, of course, these and these
look exactly the same. So we also want
to make sure that we've got the bevels
on here as well. So all I'm going
to do is I'm just going to grab this one. Grab this one here,
press Control L. We're going to
copy modifiers. We're going to press Control L, and we're going to
link materials. Now I want to make
sure, as you can see, this one is very
different to this one, so I really want
to bring this out. So what I'm going to do,
I'm going to grab this one, go over to my editing, and then I'm going
to zoom in with the dot bon, press the Ab. I'm going to make this
much much smaller, like so, press the tab bon, and just try and line
it up with this. Even there is too big,
so bring it down. Like so, and there we go, now it's looking very, very similar to how these look. Again, it's up to you
how you want your brick and things like that to
look completely up to you. All right, so now
we've done that, we can go back to we can go
to actually Asset Manager. That will be the
easiest. And what I want to do now is
add in the array. So if I turn this on, you can see the arrays
working perfectly, which is great because we
added that as a modifier. These as well, I
got the array on. I don't know why we have
the array on these, because I copied them over, it means that when
they come through, they have got this modifier on. Luckily, though, the array actually isn't
working because we've got it turned off on the render and we've got it
turned off on there. Okay, so now I want to do is
I want to come to this one, and I want to put it in support. So we've got support
tops and bombs. Let's make one more, and we'll call it
and then if you make any more roof supports,
you can put that in there. So supports. And then
we'll call it roof, like so, and then
put that in there. And then what I'm going to do is I'm going to go over here, and I want to put
it into support. So first of all we got
sports tops and bombs. Let's make a new one
then. So we'll call it same thing. So supports. Roof. So and then what
I'll also do is name it, and we'll call it support. Decorative roof. Like so. And there we go, we've got
everything in there now, and now all need to do, right
click and Mark as asset. Come to unassigned, and
then what we can do is, wait a minute, because I need
to make sure that's okay. That doesn't look okay to me. So let me just clear the asset. And let me go to Control A, A transforms set
origin to geometry. Let's try that again, right
click, Mark as asset. And I think it's
a shading issue, actually, that bit. I
think it's just a shading. Sometimes blender,
it really doesn't do that good of a job in
actual taking the image. You know what you're doing. Sometimes you can turn it round, turn it back, and then you're
not going to get that. But generally, it doesn't
actually put on the stone, so it's a little bit harder to see than
what it needs to be. You can, of course, come in here and create your own
images in here. So you can say, where is it? There used to be a
button where we can actually create our own images. Have a looks a look on here. There's a preview. You
can see the preview here. I can change this for a
preview of my choice. So it can load and
custom preview, for instance, we can do that. But in all honesty, I'm never going to mess
around doing that. Alright, so everything's in. Let's actually save that out. And with this, I'm just going to leave it with
the rest of those. Okay, so now we've
got roof support in. What I want to do
now is actually come and get to
work on this part. So on this part, I
want to make sure that this has a full support
going across here. So if we bring in our reference, let's bring in our
reference over here. So you can see now we've done this part. Let's
come in over them. And what we want to do then is we want to create
this pot going up, and we want to create
this pot separately and on top of this one because it's going to make it a
little bit easier. So what I'm going to do
is I'm going to I think, first of all, we'll
create this part. I'll make it a
little bit easier. So let's pull that
over to that side. Now you know what
you're creating. So the easiest way to do that is just come to object mode, grab this part here. So
what are we going to do? Just press dot, making
sure you're there. Let's go to Mullin because
it is going to make it a lot easier to actual we've
pressed the dot board again, go to Object mode. And now you can see
very, very easy to work. The other thing is, of
course, you don't need to see all these, you
know, all the time. So because of the way that
we've sorted out, you know, we can come in now and pretty
much hide most of those, like so, hide them out of
the way, and there you go. And now we can actually
it's going to speed up the viewport if it's slowing
it down a little bit. Alright, so how do we
create that first part? So what I'm going to do
is I'm going to come in. I'm going to grab
this part here, I'm going to press Shift D.
And then what I'm going to do is I'm going to just
move it over a little bit. So I'm just going to
move it over here. And now what I
want to do is pull this part out. So I'm
going to come in. I'm going to grab
this bottom part. I'm going to pull it out based
on whichever axis it is. So it's going to
be for me, the X, so I'm going to pull
it to something like here because I want a column going actually
under there. All right, so that's
the first stage. Now, what I want to
do is split this off, so P selection, split it off, and then I'm just going
to press Control A or transform set
origin to geometry. Next of all, then, I'm going
to bring in a new modifier. It's a very, very
handy modifier. Never used it before, and
it's called solidify. It basically turns something
from two D into three D. So let's come add
modify, generate, solidify. Press the dot board, and then what we're gonna
do is bring it out, like so, make sure even thickness is on. It
will make a difference. You can see it's slightly
slanted, and there we go. Simple as that. Now, the
other thing we want to do is we want to make sure that this
is stuck out a little bit. So even though we've
got solidifion, we can still come in, press the S Y and then bring
it out a little bit like so. So we've got a little bit of
a lip on the front and back. Now, we don't know if this is the right thickness
at the moment. So let's bring in our column. Now, our column
obviously is under here. So what I'm going to do is
I'm going to grab this. I'm going to press
Shift D because we don't want to have this as Old and then what
I'm going to do is press three or one to
go into front view. I'm going to press
G and just slide that into plate because this is where we
actually want it, and then we're going to pull
it back into plate like so. Now, remember this is
sliding into the wall. So this column isn't designed to go all the way through it. It's designed just to go onto
the front of it. Like so. Now, if I pull this out,
so pull, pull, pull, pull it out, I can see now I need to pull this
bit further back. Is that big enough lip on there? I think maybe it is. I think this is not
quite thick enough, and I also think that this needs to come further this way. So if I bring it, bring
it all the way over, you can see here, I can get
it just into there, like so. And then what I
want to do is bring this lip out a little bit. So I can pull it
out a little bit, keeping the solidify
the libifle update. And then what I
want to do is just make sure, then this back. So I'm going to grab
this back and this back. Pull them back into place, giving me a little bit of a
lip on the back, as well. And there we go. Okay, that's looking really
nice. This is nearly right. I just need to bring this
down probably to the bomb. I can keep this on there anyway, so I can keep the
geometry node on there. Can I actually do
that? Actually, I might not be able to do that. Yeah, I probably won't be
able to do that because I'm just thinking, can I
save them all out? The problem you've got is here. If you try and save
all of these out, let's say we save all of
these out as an asset, it doesn't do a good job
at saving them all out. So we need to
basically turn this into mesh before saving all out. So what I'll do is,
I've got a bomb here, probably better off
leaving the bricks a little bit higher
up because we're always going to have
some saw a bob on here, so some saw a post, it's just basically which
post are we going to have. So what I'm going to do is
I'm just going to grab it. I'm going to move it up
a tiny bit, like so. Then what I'm going to do now, I want to mirror this
over the other side. So I'm going to come
into this main part. I'm gonna grab this, I'm
going to press Shift desk, cursor selected just to put
that right in the center. I'm also going to come and make sure that I'm happy
with the thickness. I think I need this
a tiny bit thicker, so I'm just going
to bring it up, holding the shift bon down, like so and then
what I'm going to do is I want to mirror these
over the other side. So I'm going to press I could actually already
add in mirrors. So SiginT Dcursor,
add in a mirror. And we can pull that over
the other side like so. Is that in the right place? Let's have a look? Yeah, it
looks in the right place. Grab this one, add in a mirror. So generate a mirror
over the other side. W mirror. There it is. Let's put it onto the
Y, turn off the X. In fact, right clicks
origins three D cursor. Taking off the Y, put on the X, and there you go. Now it's mirrored
over the other side. Now, the problem here is,
though, if we do it like that, we won't be able
to press controle on it because we've got
that Jumptinode on there. So that's a problem that
we've actually got. So what I want to do, and I also want this to be a
little bit different. Now, what I could do is I can
just simply click this off, bring this over now, so
I can actually press Z. So shift D Z 180. And spin it around like that. And it just means that I just
need to move it back now. So I want to mirror it back the other way. So how
am I going to do that? I can just come in now
and go to object, mirror, and I'm mirroring it on
the Y, and there we go, put it right into the same
place as this one here. Hopefully you understood
what I did there. Now what I want to do is I
want to change the seed of this one to make it look different from this
one on this side. So something like
this, different seed on, and there we go. Now, we are pretty much done
with the first part of it. Now, of course, we need to start our windows and put
those in there. So we're going to leave
this as is just for now. The only thing I would say
is that on the next one, we should probably
bring in the bricks, so we'll bring in the
bricks. You know what? We won't do that, actually,
and I'll tell you why. We're going to be using a boolean to put
the window in here. So there's going to be
a round window in here. So there's going to be a round window in here and
a square window in here, and then it's going to
be going across like so, and then you're going
to have some sort of base on the bottom. Now, if you're using
this, by the way, it's incredibly easy to use the grease pencil to show people exactly
what they're doing. Now, if you like me,
you try and press Control's to get rid of it. Don't do that. Just
come up to where it says notes and
just minus it off, and then they'll all disappear. Alright, so that's what we'll
do. In fact, you know what? Before we do that, on the next lesson,
we'll add in this top. We'll add in the top,
and we'll also add in the bit that goes along
the top of the roof. We'll also add that bit in, and then finally, we'll
move on to our windows. Alright, everyone, so
hope you enjoy that. I'll see you on the next
one. Thanks a lot. Bye bye.
47. Designing Front Rooftop Decor for Stylized Buildings: Welcome back, everyone to blend the building master class
from concept to final render. Now, let's bring
in this top even. So shift day, let's
bring in a cube. And the size of the cube, I'm going to put at not 0.742, not 0.707 and not 0.289. Something like that should
be perfect for the top. And, yeah, that's the size
I think we should go with. So if we put this in,
actually, you know what? We might need to make it a little bit thinner
for this part here, and this is why I didn't
actually save it out yet, so we can press X and Y and
bring it in a little bit. Pull this forward, and I want
it fit in just on there. Like so you can see it's
fitting pretty nicely. Alright, so now let's
bring the top bit in. So what I'm going to
do is I'm going to press Control or left
click, right click. And then I want to
bring this top bit in. So they select Alt
Shift and click. And the problem you're
going to have here is when you try and bring
this in with Alts, you can see you'll bring
the whole thing in. If I press the E button and then try and
bring in with Alts, you can see we also
end up with a lot of issues here,
especially in the top. It's you can get away
with doing this, but you just need to make sure that you are aware
of those problems. When you come to the top, you
need to press Control plus, press delete, and press faces. This only happens basically
when you're bringing something in with
extrude inwards. So just remember
that if you bring it outwards, everything's
normally okay. If you bring it inwards, you normally end up
with a few issues. So what I'm going to do
is just pull that up now. Put it on top of
there, and let's have a look at how that
looks. Like so. And then what I'll do is
I'll put a top on this. So F, fill in, put
a top on there. Alright, now let's press
shifts, cursed to selected. And now I want to do
is create this top. So I'm going to
create this top here. So we're going to have
cylinders, bringing it up, creating this lit
ball on top of there. Okay, so the way I'm going to do that is I'm going to press Shift A. I'm going to
bring in a cylinder. So mesh, bring in a cylinder, not on 32, of course. Let's put this on
something like 20. So 20. Let's right click and shade Smoove just to make sure it's okay,
and I think it is. Let's bring it down
to where we want it. SNE and let's sit it
right on top of that. Now, first of all, we're not
going to need the bottom. So let's just press
question mark. Come underneath.
Delete this bottom. So face, delete faces, and then press tab and question mark again to
bring everything back. Alright, so far so good. Now let's come in, lift
it up a little bit more. Now let's come in
and make this top part before going inward. So what I mean by that is
we're going to press IF insert We're then going to
press E to bring it up. We're then going to press
I again to bring it in, holding the ship but like so. And then what we're
going to do is press E to drop it down like so. Now, we might as well use this to create that
spire going up. So what I'm going to do is
I'm just going to press I again to bring it in. Like so. And then what I'm going to do is I'm going to
create the spire, so I'm going to press E
to bring it in, like so. Now, you will notice if I try
and just bring this in now, so if I press the S butt and
just bring it in like that, I'm kind of not looking
for that shape. I want a different shape. So what you can do instead of doing now is if you
can press Control, bring in a few edge loops, left click, right, click. And then what we can do is
we can come to the top. Grab the top of it, and instead of just bringing
in with the S bon, come over to this
little bone here and it's called
proportional editing, and it's going to help you get
loads of different shapes. So you can see you've got
sphere shape or smooth shape. Now if I just leave it
smooth to start with, press the Sp, you'll see
a big bar going across. Now if I zoom that bar in, you'll see it only affects wherever and bringing
that bar out to, which is really, really nice. To create, you know, something like a spire
or something like that. Now we can also put it on different ones, so we
can have it as a shop. So again, we'll press the Sp and you can see now
it creates a shop. We can also inverse it, so inverse square, and you can see now it's creating
something like that. Actually, I like this one, so I think I'm going to
stick with this one. Alright, so now we need to do is put a sphere on top of that. So shift day, let's
bring in a UV sphere. Let's turn this down
to something like 12. Let's turn down the rings
to something like 12. And again, let's see how
this actually shades smooth. So all I'm going to do is
right click Shade Smooth, S to bring it down
to the right size, and then bring it up, and I've lost my sire
for some reason. Let's have a look what
actually happened there. So, Boy brought that
in, it was on here. Maybe it turned this
into just a sphere. So what I'm going to
do instead, shift D. Let's bring in a
sphere on its own. It's a UV sphere. 12 and
12 is the way we want it. Right, click shade up to smooth. Press the S but,
and there it is. Maybe it changed it into that for us, which I
didn't really want. And let's bring this
down to here, like so. All right. Let's have a look at what that looks
like, and there you go. Now, it's up to you whether you want yours a
little bit higher. So I'm just checking my height, so it's one, and with this
one, let's join together. Control J, control A, or transons right click
Set origin to geometry. Okay, so I think it needs to be maybe a little bit higher. What I'm going to
do is I'll just pull this up without
proportional, turn it and you can see it's actually I didn't even
know it was joined to there. I don't actually know why
it's joined to there. I didn't think I'd
joined it there. So let me just come
back, pull that back. Let's see if it's all joined.
So it's not all joined. So we can see now, though,
if I grab this, pull it up. There we go. I've not got proportional
editing on, so that's okay. Now, if I come in now, these two are joined, but I just want to pull this
up a little bit. So I want to pull
it up a little bit, so I'm going to split this off. So I'm going to press L P, selection, split it off. And then what I'm
going to do now is come to the top of here. I'm going to pull it up with
proportional editing on, so I can just pull it up and it will kind of pull
up the rest of it, keep in that actual
shape what I want. Now I can join both of
these press control J, and it's a little bit
taller than what I want. Still not perfect. It's still
not exactly what I want. I still want it
probably a little bit, a little tiny bit higher. So I'm going to come
if I grab all these, you can see they're
joined together. I don't really need
them joined together. So what I'm going to do is
I'm just going to go, Oh, shift click Control
plus, Control plus, Control plus, ContoPlus
Control plus. So instead of pressing P, I just want to split them off. From the mesh. So I want to
split it within its own mesh. So the way to do that
is just press Y, and now you'll see
that I can actually split this off without
portion, I can split this off. So that's another way of
splitting things why you're in edit mode rather than trying to make
everything different objects. So let's now hide
it out the way. And then what I'll do is I'll pull this
down a little bit. So I'm going to grab
this Alt Shift click, and I'm going to press
E just to pull it down. Z to pull it down a
little bit like so. And now, finally, I
can lift this up. So if I press L and L, lift it all the way up, lt H, bring back the
part, and then grab this part and this pull
it down then into place. So it's just setting there, and then I can do this. And that is around the right height I
actually want it now. Before it looked a little bit too low for the
overall building. So yeah, I think I'm
happy with that. Now, what we want
to do is with this, is we actually want to have
this as a separate piece. You know, you might want
to put it on something else and to put it onto here. So I'm going to actually bring this over, so I'm
going to grab this. I'm going to join it together. First of all, Control J, Control A or transform
set origin to geometry. And then what I'm going to do is I'm going to press Shift D. Just bring it over
here, like so. You know what I'm
wondering if I press Alt D but then I'm going to be joining
it all up together, so then I might end up
with other problems. So I'll just press
Shift D for now. I need stone on here, and so this is a spire. So we've got a few spires in. I'm going to first
of all, put it down, so I'm going to put it down
into the floor, like so. And then what I'm
going to do is now, I'm going to you know
why I'm just thinking if we'll paint it the same time
as we're doing the windows. Probably so probably better
off doing it in that way. I'm just wondering now if
I go to this part here. So I've pretty much
built this part out. I still need this part, so we'll build that part out next, and then I think we'll
come to our windows. Alright, so let's
put that over there. So we'll come to this part here that I've
just showed you. So let me just go
back and show you. This is this part here, so
this goes on top of our roofs. We also need this
part in here as well. But the thing is, I don't know
what size of that is yet. We need it on the
backs, as well, because on the backs, you
know, it's different. We have to pull it
all the way up, things like this, and
we have to cut it. So generally when
we're doing this part, it might be better just getting the overall shape and then just, you know, kind of turning it
and putting it into place. It might be better
off doing that way. And I will show you
how to do that because there's a little trick
to all of this, as well. I'll show you that actually
on the next lesson. So what we'll do for this one is we'll just finish with this. On the next one, then
we'll get this part in, and then we'll start
with our windows. Let's go to file, and
let's save everything out, and I'll see you on the
next one, everyone. Thanks a lot. Bye bye.
48. Flipping Normals and Initiating Window Design: Welcome, M, everyone to blend the Building master class
from concept to final render. Alright, so what I
want to do now is I want to create this
part going over there. So let me just get
my scale on here. So let's bring in a
cube, first of all. So Shift Day will
bring in a cube, and I'm going to
do it a little bit different to how I
did my own, actually. So I'm going to come
in, first of all, with a scale. So 5.43. This is where I want it to
be round about 1 meter, but I'm going on the X O I actually want it
the other way round, so on the Y 1 meter. So it's going mo meter that way, and then I can
basically duplicate it going over. You know what? I think we'll put it at 1.5, I think, should we
go away with two? Could we go away
with two? You know what? We'll have 2 meters. Then what we'll do is
we'll go to the next one, which is the X, and we'll
have this on not 0.3, six, two, and then
finally the Z, and we'll have this on
naught 0.216, like so. Alright, so that is the
kind of scale that we want. However, we don't want it
to be chunky like this. We want it on top of the roof, and we want this part
here to be going in. So the way that I'm
going to do this, so you can see no 0.216.
So let's press Shift D. And then what we'll do is
we'll bring this part in. So S and X, bring it in. And there we go. We can
see how that looks. And then what we want to do
is we want to press tab, bring in a edge loop. So left click, bring it
up a little bit, like so. And then what I'm going to
do is I'm going to come in. Put on my X ray,
go to face select, and I want to grab this face
here and this face here, not the one unneath,
the one on the sides. So both side faces, press E, enter S and X, and
pull them out. Now, make sure when
you pull them out you are on medium point,
and there you go. Simple as that. Now what we
can do is we can press Delete and take off our X
ray, and there we go. Now we've got that
part in easy as that. Now, again, this part wants
going over with our spire. So we're just going to press G, drop it down onto
the ground plane, and then I'm going
to save out or work. Now, the next part, this
is a step up for sure. This is the actual window. So if we bring
over, first of all, this part here with the windows, let's go to our windows. These parts are done
now. We can actually put those over there out of the way. Now we come to our windows. Let's make this bigger, and let's have a look at what
we've got to create here. Now, it might seem
counterintuitive that this one is probably
the most complex one, but the thing is all the skills you're going to
learn in this one, you can then replicate
to the others. So it's probably worth
building this one out first. And I think the way that
we will do it is we will create a plane to give
us the right dimensions, and then from there, we
can start building it out. Now, there are a few things
that I want to go through before we actually
start these windows. If we come back, and you don't need to do this because I'm just going to
show you something. If we come back to our gray box, there are two ways of building
things like this out. First of all, the gray box absolutely necessary. You
need to build that out. But the other way then of doing it is once you
build your gray box out, you can actually start
building these parts, so all of these parts
within the gray box itself. So you build them all in there. And then what you do
is you save them out as part of a modular pack. That is the way that
I like to work. The reason we're working on
it this way is because I'm trying to show you how you
can have a modular pack, a gray box, and a resource
pack all at the same time. And now you can get a
really, really nice flow between all of
those blender files. If we came and we just started building within
this part itself, we're going to end up with
lots of duplications. For instance. We're
going to end up in a little bit of a mess
because when we finished, we have to send all of these out to their own modular
pack to split it up. But generally,
that's how I work, so just be aware of that
if you think this is a little bit of a weird
way of creating it. It makes the course flow better. It makes it so we can choose
what's easier to actually create and it's then easy to show you how we
can bring them in, put them in, duplicate
or instance things, much much easier to
work in that way. All right, so now I'm going to do though is put this down. And what I'm going to do now is talk about
something else. So we're going to talk
about normals now. What I want to do is just
click all of these on. Like so. And normals,
what are they? Okay, so at the moment, you can see we've built all
of these things out. It's something we should have checked before creating
all of these things. We should have gone
over it. So what I'm going to do is click
this little down arrow. And you'll notice right down to the bottom is something
called face orientation. Click that on, and what
you'll end up with showing is all of the normals that are
the wrong way round. So you can see these are
all the wrong way round, so I need to actually
fix these parts. So what I'm going to do is
I'm going to come into you. And I'm going to tell you
what it is. So why is it red? It basically means that
this is inside out. And it's important if we're
sending these through, especially to something like substance painter or if we send it through to something
like Unreal Engine, for instance, because generally, to save on GPU or processing, we only show one
side of the mesh. So we only basically render like the inside or the
outside with the shader. If we're talking about something like leaves
in unreal engine, then you will render out it
would be a two sided shader, for instance, and it will render out the front and the bike. But generally, to cut
all of that down, we only rendering the outside, which is most of the time, if not all of the time, and the inner never gets rendered. If it is the wrong way
round, it's red like this, it means that when you bring in substance, it'll be invisible. You won't be able to see
it because it's rendering the outside and the outside
is not the one turn round. If you send in some really have the same problem unless
it's a double sided Shader. So when we're actually
creating these, we need to make sure that we've got them the
right way round, because if not, we're going to cause ourselves
a lot of problems. Now, I don't think I brought
any of these in now. Let's go back to our
build and actually see. I'm hoping the update. So if I come in, put it
onto face orientation, you can see that all these all of these blocks are
the wrong way around. And we actually
need to fix that. We should fix this
before moving on. So I know I said don't
open up your grey box, but remember it for later on, but let's go in and fix these
problems that we've got. So I'm going to put
in object mode, I'm gonna then go
in press tab on, grab each of these where
there is a problem. So each of these, each
of these, each of these. Press the tab on, press A, press Shift N, and what I'll do is turn
most of them around. You in still end up with
some problem ones like this. It always happens like that, and I'll show you the other way. So we'll come to this
one now, Baslect. We'll press Shift N. And
instead of it's spinning round, we'll just click on inside, and that'll turn
it round for us. And then we'll come
to this one here. We'll do exactly the same thing. So grab this, shift N, spin it round, and there we go. Let's now come to
this part here, tab A, shift N, spin it round, and there we go. So everything now spin round, and you can see exactly
what I'm saying. Underneath here, this is red, because that is the inside, and over the top,
the one we see is the normal color because
that is the outside. Alright, so all of that
has been turned round now. The normals are facing
the correct way, and now we can actually go
back and turn these around. So I'm going to come press tab, shift in, spin them around. Come to this part, press tab, shift, spin them around. And now everything is
facing the right way. Now, we can see these
are also the wrong way, so we might as well spin
these around as well. A, shift in, spin them
around. This one here. We're not going to be able
to spin them around because if I press shift in, you'll
just turn around this one. So we'll come to this
one, shift in inside, and now they're all spun around. And we check that we need to do before actually,
you know, continuing. So when we've created things, we should be checking the normals. It's pretty important.
If we bring in, so just to reiterate on
this, how does it happen? That's one of the things
that we need to know. So I will show you
how it happens. So curse to world origin, bring in a plane, so shift D, bring in a plane, spin the plane
round, so R X -90. And straightaway, you've got it facing the wrong
way as you can see. So it's about rotation. And then what happens is, if I come in now and
extrude this out, so E extrude it out, and there you can see
exactly how that happens. Extrusion is a way
that actually, you know, messes it
up a lot of the time. Alright, so let's leave the way. Now we've got that. And
what we're going to do is now now we've gone
through all that, we're going to first of
all, save out our work. We're then going to come
to our asset manager. And what I want to do is
just make sure now that this is the right way
round If I zoom into this, come on to face orientation,
and there we go. We can see that's
actually corrected itself because it's
updated it in real time. Finally, then we can
go back to modeling. And what I want to do now in preparation for I'm just
going to move these over. So I'm going to move
these all over there. We haven't put these
in. I don't think yet. So I just need to
make sure that these three are not done quite yet. This one might be.
I'm not 100% sure. But what I want to
do, first of all, is bring in a plane. So I'm going to bring
in a plane, and this plane is going to give us the dimensions for our first window, which
will be the square one. So X minus, not x 90. There we go. And then what I'm going to do is
come over here. I'm going to put the X on 1.77, and we're gonna put
the Y on 0.566. And then that is
definitely not right, so I need to fix that, actually. Let's press Control A because I didn't actually turn it round. Set origin geometry.
Let's try that again. 1.77, no 0.566 and
2.04. There we go. Now, that should be
the right scale. So I'm just going to
bring my guy over. I'm going to pull this up as well and put it on
the ground plane. There we go. And now you can see this is about the
right size for the window. Now, one thing I don't
want to do is I want to put it in the center, so I don't want to
move out there. What I want to do is move my guy over to the
side, like so. And now we can start working on this window
on the next lesson. So, you know, when you're
building your own windows, it's a little bit easier
because you haven't actually got a plan in mind. You've got a reference,
kind of, but on this, I want to stick as close as we can to the actual reference. So this reference
is the square one. So this one here,
I want to stick as close as I can to this one. So when we're doing
things like that, we need to make sure that we're, you know, creating
in a certain way. Normally when I create these, I'll create the glass
probably first. Then I'll build
around the outside, but we're going to do it
the other way around. So don't worry if
you're thinking, This is a bit we're
building it this way. Yeah, it's because I'm trying
to stick to the reference. Alright, everyone, so I hope you enjoyed that, and I'll
see you in the next one. Thanks a lot. Bye bye.
49. Modeling a Basic Window Structure: Welcome back, everyone to
Blender Building master class from concept to final render, and this is where we left off. Alright, so the first
thing we should discuss is when we're creating these
round archers for the windows. That's one of the key things
that you want to get right. So what I'm going to do
is I'm going to press Shift A. I'm going
to bring in a plane. I want to rotate it
round, so RX 90. I want to make it a
little bit smaller. And then what I'm going
to do is I'm just going to pull it into place. So I'm definitely
definitely going to press S and X and bring it in. So like, something like this. I'm going to get it roughly
to be the right side. I know it's not going
to be exact because we can see that they've
got a middle line here. We've got a lot of building
that needs coming out here. So what I'm going to
do is press S and X, bring it in a little bit more, and now I can kind of place it in the middle
somewhere around here. Now, is it going
down far enough? Probably want it
coming down to here. And then what I'll
do is, is that rotated a little bit
weird? Yes, it is. I don't know how that happened, so let's actually come in and kind of fix my
rotation on here. Noy sure why it
rotated like that. So let's come to see if I can rotate it
back the other way. Transform is on there. Not even Oh, that's why. This is rotated. Okay, so we rotated this
a little bit weirdly. So if I come up, can I
rotate this back on the z? That's the location,
the rotation. Let's press tab and see. If anything, I can rotate
it. I don't think I can. So you know what I'm
going to do? I'm just going to press Shift D, bring in a new plane. I'm going to press R X 90, pressing one to go
into front view. I'm going to bring it
up then into place. I'm going to press S and X, like so, and then S
and Z and bring it up. Now I'm going to do is, I'm just going to get
the right scaling again because the scaling
might be a little bit out. So let's see if it
was actually out. So I'm just going to
grab this scaling. So if I come to this now, I'll put in 1.77 or 1.782 0.04 and then I've not
got any width in this, so I don't need to
worry about that. So it's about the
right scale now. Alright, let's leave that one out of the way. Now we fix that. Now, this one here, we need
to obviously pull it up. And what we need
to think about is you've got a top and
you've got a bomb in here. So we need to make sure that
we've got a top in there. We've got a bomb
in there. And then we're going to put
our windows in here. So if I press one, like so, and if I come to
the center of here, so I'm going to press Control
A or transforms set origin, two, three D cursor, and then we'll mirror
this over the other side. So generate a mirror, put
it over the other side. Now, we've got to now work out building around this because
we want two windows in here. We need some kind of
stonework going down here. So the first thing
I want to do is bring in the tops of these, and then we can
work on the bottoms of these. So let's
do that first. So first of all,
I'm going to press Shift A, I'm going
to bring in a cube. I'm going to press the
Sp to bring it down. And then what I'm going to do is I'm going to bring it up. And then I'm going
to press S and X, bring it out all the way out to pretty much where our
actual scaling is, and then going to bring it
down because the scale wants to be all the way down to here. And then what I want to
do is bring down the top. So if I grab the top, I can
bring that down down to here, and then what I can do is
I can press Control A, all transforms, set origins, geometry, tab, press the bone, and then it should come in
nice and neatly, like so. Then finally, I want
to bring this up. Now, one problem I have
got when I brought this up is it's looking
a little bit thin, as you can see, and I kind
of want to stretch that out. Now if I come in and I just press and Y, we can
stretch it out, but you'll end up with
a bigger distance from here to here
than here to here. So we don't really
want to do that. We do, however, want
to stretch this out to round about, let
me just have a look. So on the Y, not 0.5, I think it's
that way. Yes, it is. So what I'll do is
I'll put this back. I'll press Shift. And then I'll come
to this one here, and I'll put it on no 0.566. So 0.566, so this is the
width I actually wanted. It seems actually pretty wide, but it's about the right width because this will be
going into the wall. So then what I can
do is I can now pull this back over here, and I can come into
the front of it. Putting on my Xray and coming
to the front of it now. So this one, this one here, and the front of
it here, and then I can pull these out into place. And what that means is
now, if I take this off, is that if I delete the
other one out of the way, now we've got the same distance
going all the way around, and now it's the kind of
window that we actually want. I'm also going to
pull these out. You see that flashing. Sometimes you'll
see that in games. And basically that
is because the faces are too close to the other face. That happens a lot in games I will happen in blender
and things like that. All right, let's press
Control A, A transforms, right, clicks origin to
geometry, and there we go. 0.79, no 0.588, not 0.207. What is this actually?
Why? Yeah, that's right. No 0.7 is absolutely right. We've got that net there. Now we can do is we can pull
that back a little bit. So that goes into the wall. And now I need to build out these bricks going
down the side. So we need a chunky brick here, a part going down, and a
chunky bit down the bottom. So let's press Shift
A. Let's bring in a cube. Let's press one. Let's press the S bone. And all I'm going to do is
pull this over to this side, and I want to fit this
underneath this part here. So press in the S born. Fit this underneath here, and you can see why I'm trying to get everything to scale. So we can see at the
moment, the windows are probably going to have
to come in a little bit because this is I'm just wondering if I've
got this the right width, and I think it might need to be. I'm going to put this
into where I want it. You know what? I'm going to grab this. I'm going to press shifty. And then what I'm going
to do is I'm just going to pull it over here and see how it looks
in this part here. And maybe, maybe we
can get away with it being a little bit bigger. So if I press the S button, can I get away with it
being a little bit bigger? Just wondering if that's
a little bit too big. Now, let's look
on our reference. So we're going to
grab our reference, go to our window and see here this is kind of
the gap that we've got. If I go back to here now, we can see this is
kind of the gap. So it looks about right. The actual scale of it. Let's make it a little bit. Yeah, I think that
scale, what we've got right here now
is about right. So what I'll do is I'll
grab this part last. And what I'm going to
do is then I'll press. In fact, you know
what? We'll come in. We'll delete this
one out of the way. Then we'll come back to
this one because we've just duplicated it,
grab the whole thing. Make sure you grab the sense part last so this
sense part last, shift Ds and then
selection to cursor. Got that one. You see
what happened there? Because they all have
different orientations. When I press Shift desk,
selections cursor, it will put them
all in the middle based on their orientation. If we don't want that, though, you want to press Shift
desk and selections cursor. And there we go. All right, so now we've got
the right skill. Let's pull it up and we can
actually work with this now. So what we want to do is grab each of these because
they've got mir on, tab, A, S and X, pull
them in a little bit. And I also want to pull
them further over. So this needs coming
now further over. Like, so how much gap
do we want down there? Probably around that much gap. And the other thing is, all these things
now in the center? This doesn't look in
the center to me? This is the center.
What is going on here? Let's see if we can actually
put it in the center now shifts and
selections cursor. Yeah, this is because
our cursor is here, this is the one that
we're actually selecting. Instead of doing
that, what I'll do is I'm going to grab
the whole thing. I'm going to press Control P, and I'm going to set
the parent to object. Now, when I move this part now, all of the things should
move at the same time. This part here is
exactly in the sense. And if I press Shift Ds
and selection to curse it, now it's right in
the center like so. Because we pair it in them up, then we put it in the center. And what that means is now, I can come in and I can
grab the whole thing, and I can press P instead, and I can clear the
parent, like so, but I want to clear the parent while keeping the transform. So clear parent,
keep the transform, and there we go, everything's
staying in place. So what we did there, just
to reiterate is we grab this one because the center of here is where we actually
want to place something. Then we grabbed everything else. We grab this one last, and we press Control P
because that then is going to set the parent to the object that
we selected last. And finally, we
move them over to the cursor brought
them up and then O, which was clear the perron
but keep the transformation. That is exactly
what we did because then nothing's going
to be moved around. Now we've got that. We can see exactly what
we're working with. So we can see where we
want these windows. We can also see this is
probably a little bit too big, so we're just going
to move it out. Now, the other thing
is, I want it in, so I want it in a little bit. So Es and Ed, let's
pull it down. Let's pull it in slightly. Like so. I'm going to
grab this as well. I'm going to pull
it in, so and jaws, pull it in just so I can
see where I'm working. And then what I'm going to do
is pull this up into place. So I want this slightly
slightly, as you can see. This is all going
back to the wall, and the thing is the windows are actually going back as well, so I've left a big gap in there. And what I also want to do now is make sure that the lip here
is a tiny, tiny bit more. And this lip here maybe is
just a tiny bit more like so. Alright, so that's
looking good so far. Now, I want to put this
at the bottom, as well. So I'm going to press
Shift D. I'm going to bring it down to
the bomb on here. And now we can start work on the next lesson
on this side bit, mirror it over to
the other side, put in the bomb bit, and then
once we've done now we can actually start with
the hardest part, which are the windows. Alright, everyone, so hope you enjoyed that, and I'll
see you on the next one. Thanks a lot. Bye bye.
50. Adding Detail and Cutting Mesh Holes with Booleans: Welcome back, everyone to
Blending Building master class from concept to final render, and this is where
we left you off. I don't like these ones here.
I'm going to change them. No 0.279. There we go. I want them both
like that, actually. So not 0.279. I want the M square basically
is what I'm saying. So I'm going to
pull them down now. I think it looks much,
much better like that, so I'm going to pull
this one down, so. And then what I'm
going to do is I'm going to bring this
even further in. So S next, bring it further in. And now I'm going to do is
I'm going to grab this one. I'm going to press Shift D. And what I'm going to do is I'm
going to bring it down. Make it smaller, so
S, make it smaller. Put it right underneath
you. So right underneath. This one like so come under, grab the face and pull that then all the way down to here. Then what I'm going
to do this, I'm going to need three in here. So this will be one
of the times when it's perhaps easier to just
bring three edge loops in. So control, one, two, three, left click right click because it balances them out
when there is three. Then what we're going to
do is press Control B and bevel those out from there. Now the thing is about these is we don't want to pull
them out like they are here. We want to pull them
out from this part here and this part here. So if you look at
the reference, you will see that
they're pulled out. If I open this, I'll
go back to my window. They pulled out kind of halfway and halfway
on the other way. So we're going to try
and replicate that. So what I'm going to do is
I'm going to press Control R. Left click, right click. And I want to move it over, but if I move it over, I've got to make sure I
move the other one over. So if I move it over like this, you can see that we've got
this moved over on the X, which is this axis, and
we can just copy it. Control C, let's copy it. Then we'll do Control R.
Left click right click. Move it very slightly
over with the Y, like so, and then come to the Y, press Control V, press Enter, and then I'll move that one over exactly the same
distance as here. Now we want to pull these out, so I'm going to grab this one, this one, this one,
this one, this one, this one, I'm going to press E, enter, lns, and
let's pull them out. Now, you will see that when
I pulled them out like that, we need to make sure that
the offset is even on. So just click that
on, and there we go, we've pulled them
out, and there we go. They're looking pretty nice. Now, from here, we can actually
join all these together. So control, Jay. Control A or transforms right click
Set origin to geometry. Put the origin, then
right in the center. So right, clicks
origin, 23d cursor. Adding a modifier, bring in
a mirror. And there we go. So we're actually
getting somewhere now. We can see, actually
this is coming along very, very nice. And now we want to
do is we want to create the bottom bit. So the bottom bit on here,
with the little ledge. So what I'm going to
do is press Shift A, bring in a cube, and then I'm going to make
this cube much smaller. I'm going to pull it out
on the X, so S and X. And then what I'm
going to do is pull it up a little bit to
where I want it. So if I pull it up
to round about here, that'll be where I
actually want it, and then I want another bit
that's going to actually come off here and have a little
bit of a rounded part on it. Also, I'm wasting a lot of p, you know, this part in
here and wasting it. So what I'm going to
do is just press S&X and bring it back like so. Okay, from there, then,
I'm going to come in. I'm going to press Control R. Left click, bring it
up to where I want it. So the ledge will be
something like here. I'm going to press
Control R going this way. Left click, right click,
put it right in the center. Control B, let's pull it out. So we're going to pull it
out to round about here. And then what I'm
going to do now is I'm going to come grab this part, and I'm going to
pull this part out. So I'm going to press
E, pull it out. Now, you might be looking
at this thinking, Well, that doesn't look
anything like the reference, because if you look
on the reference, you will see that it's
got kind of a lip there and all kinds of
crazy things like that. Can do that really easily. Watch how we do this.
So we'll come in here. We'll go to this part, or this
part here, and this part. Before we begin,
though, same as always. Control A, all transformed,
SeiginT geometry. And then what we'll
do is we'll come in, grab both of these,
press Control B, and I'm not going to
do anything else. Apart from Jaws, put it around here for
something like this. And then what I'm
going to do is go over the left hand side where
the bevel options are, and when I come down,
put it on custom. What I'm then going
to do is turn this up, so turn this up, and now you can actually
play around with bringing these in
and out like soap. You can also save
this out as well. You can see if we come
here, we've got presets. You know what? I actually don't know how you
save this out. We can put it to default. I'm sure what's this
but here? What is this? I'm not sure if this is the Saban profile
clipping on or not. I don't know how
to save this out. I never have worked out how we actually save this. I've
tried right clicking. I've tried going all over this. So at this point, I'm near enough certain that you
can't save these out. Now, when you come to, as long as you don't close
blender, it's fine. But the moment you
open blender again, this will have disappeared, which is kind of a pain because sometimes I like to keep
these curves, you know, I like to keep them, you know, and this is the curve
that I won, you know, sometimes when I'm doing
Gothic architecture, I wish there was a way to
actually save these out. Anyway, let's actually
have a look at this now. So let's right click and shade Auto Smooth. And there we go. Now you can see exactly
how you get that. Now, I think with
this part here, so just wave this part here. I think what I'll
do is I'll pull it in a little bit, so esten it. Just pull in a little bit, make it a little bit
more rounded like so. Okay, so so far so good. We can see now we've got
our windows in there. What we need to do now
is actually create the inner part of these so we can see where our
windows going to go. If we come to this here, we want to make sure that
this is rounded here. We want to make sure
there's enough gap here because the windows, they're not just going to
sit on top of the wall. That's not the way you
should be doing them. You should be really
thinking about how you can actually
place them, you know, inside going inwards,
because that's why we're giving this such
a big gap at the back. Alright, so saying that, let's actually come in
and create our windows. So we've got a mirror on here. If will come in, and the
first thing we'll do is we'll create the actual
boolean for our windows. So we can see if we
do them from here, we've got enough room each
side to make the boolean. So let's come in, grab
the tops of these. So both of these vertices here, Control Shift and B and
bring them in like so. Now, you will notice they've come in exactly the
same as we did here, and that's why I'm saying, Let's put it on super clips instead. And then what we can do now
is alter them like this. So we can alter them, make them, you know, as far as we
wanted to, like so. We can change the number of segments that
we've gone them, for instance,
something like that. We can even make them a
little bit more rounded. So we can make
them more rounded. And I think on this
one, something like this actually
looks pretty nice. Alright, so that's
looking pretty good. Now what I want to do
is I want to actually make a boolean out of these so it can actually
push them in there. So what I'm going to do
is I'm going to press A, E, pull them out. Like, so let's press A, shift and N, spin them round
so they're the right way. And then what I'm
going to do now is pull this into place. So if I pull these into this
plane that I've got here, we should be able to create
an actual boolean in there, which means then we've got room to, you know, put our windows. What I'm going to do is
just grab both of these. I'm going to grab my
plane, grab my window, press Shift H. Now, a lot of the time when you're
dealing with booleans, they don't like flat
planes generally. So it's normally
better if you give it a three D object.
So we'll show you. So if we come to this, we'll make sure every cell transforms set origin to geometry,
add modifier. And then what we're going to
do is generate a Boolean. Now, the boolean is, of course, going to be these windows here. So we're going to
click this little what's it called Pipet click
on there, and there we go. You can see the Boolean in. If it doesn't work,
though, just remember, make sure that you're doing
this on a three D object, no two D if it's not working. Now, what I can do from
here is I can apply my boolean then if I move
these out of the way, you will see now we've
cut a hole in those. Now, I tend to save my
booleans for other, you know, projects
and things like that. So save these out
just in case I want to make more windows when I'm
actually building this out. So I'll just have
them in a special one called Boolean
cutters or something. So you might actually want to
do that. Now I've got this. I'm going to delete them out, though, for this one, because, you know, that's
generally what I'm doing and recommending you
might want to do that. But for me, I don't
want it too cluttered. I'm showing it, of
course, so let's actually delete those
out of the way. Now we've got these in
here. What we can do is we can come in, Oh ****, click. Make sure you grab the bomb. Oh ****, click, grab the bomb. And then what we're going
to do is press E and Y and pull those out
into place like so. And then we should end up
with something like this. So something like this is
what you should end up with. And from here, you
can just press the F but and fill both of those in. Now, it's a good idea to work where you want
to bring these. So when I'm doing windows, I will pull them up to here because if you
look at a window, it's not just stone and
then glass, it's stone, wood, so wooden
outlay going around, and then an inner
wooden outlay, as well. So you need to think
about those things when you're actually
creating these. So now I've got these on here. What I'm going to do
is I'm just going to press the i button and I'll bring those in and then what I'm going to do
is pull it back again. So now I'm going to press
E and pull it back again. And there is now my
outer piece of wood. And not only that, because if
I press tab, press ultage, bring it back, you can
see now just how much better that actually looks
because we've set it back. It's not just stuck
on the front of it. If you right, click
now and Shade Smooth, you can see just how
nice they actually look. Now what we've got
to do is we've got to work on this inside. So, in other words, this is
a little bit more complex. It's taking you up that
little bit extra notch. We need to work on this inside now and create that window. So I'm going to do is
I'm gonna go to File, I'm gonna save it out, and I'll see you on the
next one, everyone. Thanks a lot. Bye bye.
51. Creating Window Frames with Bevel and Edge Flow: Welcome back everyone to
Blender Building Master class from concept to final render, and this is where
we left you off. Now, the windows as well are probably going to take
the longest amount of time, except things like the
stairs and things like this. But they're quite
complex things. I think even the
doors are actually a little bit quicker
than windows. Alright, so now I want to
do is, I want to come in, and I actually want separate
these off at the moment. So what I'm going to do is
because it is going to make it easier to actually work with these parts without
separating them off. So that's what we're
actually going to do, and then we'll bring
them in and make the wood and then
put the glass in. And I'll explain as well, how the glass works when
we bring that in as well. So for now, what I want
to do is I want to press P selection, separate them off. And then what I'm
going to do is I'm going to press Shift H, hide everything else
out of the way, just so I can work
on these parts. Now, again, we've got we
haven't got any mirror on here. I thought we did
have a mirror on here, one side than the other. I'm sure we had a
mirror on here. Let me just go back and see if I actually did I take that
mirror off?'s have a look? I actually think we didn't
put a mirror on here. So what we're gonna do is
we'll actually come in. And we'll get rid of this one. So we're going to
delete and faces, and then we're going to come
into this one P selection. We're going to resell
the transforms first of all, all transforms. And then what we're going
to do is we're going to add in a mirror modifier, so add in a mirror,
and there we go. Now it's split off from
this one, so that's okay. We can press Shift H now, and now we've got a mirror
where we actually want to. Now, the first thing
I want to do is I want to put a centerpiece
going down here. Now, the easiest
way to do that is just come to the center of here, come to the center of here, right click and put subdivide and then you're going
to get that in there. Next of all, what
we want to do is we want to join this
one and this one. Now, joining them, there's
many ways of doing it. The easiest way
though to do it is not to press F or
something like that, because what you'll find is that you won't have
this center point. It won't actually be joined up. So the easiest way to do it
instead of that, is press J. And now you've got
that center point. Next of all, then
we need to bring in some more edge loops because if you look on your reference, you will see we've got
one, two, three, four. So we've got four window panes and a fifth one at the top. We want to kind of
replicate that. So one, two, three, four. So four window planes, one, two, three,
four, one at the top. Alright, now we want to do is I want to bring
all of these in. So all of these, I want to bring in, but we're
going to have a problem. First of all, if we grab them
all and we press the ibn, they all come in very nicely, and this is what we want
because we want actually this part in because we're going to create
our wood from there. So everything is okay
with this part so far. The problem's going to come now when I want to
bring it in again, if I bring in, again, you'll
see the start crossing over. If I press the Ibn again, so you press the I twice. So I press I, press it again, now you can see we're actually getting
broken mesh like so, and that is something that
we actually don't want. So let's just go back a
minute with Control Z, and what we're
going to do instead is we're going to
come we're going to delete both of these off because these are the
ones that are causing it. When I'm inserting it in, these are actually so close to this one that they're
actually crossing over. So if I press delete, come down, and I'm going to dissolve
vertices like so, and now we should be
able to work with this. So when I'm going to do it, I'm going to come in, I'm
going to grab them all. So just press L, press the IB, press the I button again, and then you should be able
to bring them in like so. Now, if I press tab now, press LTH and bring them back. I should now be able to press tab, and this is
what you've got. So you've got a um 1 stone here, you've then got
the window, sorry, the window sill, I think it would be
called on the outside. So this big chunky bit of
wood or stone up to you. And then you've got the inside where these will be as well. And then finally, finally, you will have the
glass in the center. Now, what I'm going to
do is I'm going to at the moment, hide
these out of the way. And then what I'm going to do is I'm going to mark some seams. Being as we've got
the mirror on, it will save me a lot of work in the long run because
the thing is, if we mark seams on
these parts here, then what we can do is
when we unwrap them, we can make sure the ward
is going the right way. If we don't mark the scenes
now, it's going to be way, way harder in the long run to actually put these seams in. So what I'm going to do
is just show you quickly. So we're going to
grab all of these. We're going to right
click, and then what we're going to
do is mark a scene. Now, I'm hoping if I press
A and E and pull those out, you can see now we've got a seam going all the
way around here, all the way around here, and
all the way to the back, which is exactly
what we want to. Now, if we didn't do that, we'd have to come in Alt, shift, click, all shift, click, all shift, click, at shift, click and mark them individually like that
and make sure we get aml. So we're going to mark seams. If the press controls it, hopefully we'll go
back. There we go. We're going to mark seams all
the way around like this, including these because wood, we don't want it where
we're unwrapping this and we've just got wood
going the same direction. So, you know, wood grain going this way and then
going this way, it doesn't look right like
that because wood grain, when they put these together, wood grain goes this way. So let me just put
on my drawing. So you've got wood grain
going this way, like so. And then you've got wood
grain going this way, because these two parts go together and stuck here
or hammered in here. So the wood grain is always
going this way and this way. What most people do when they unwrap it is they'll unwrap it, and it'll be going like this. It doesn't look right because that's not how they
put winds together. So knowing that,
let's clear this off. And also, can I actually
show you on here? Yeah, it's a bit grainy
a bit grainy on here. Um I would I'll pull
up an image for you, so I'll grab you an image. So here is an image that
I've pulled up for you. So you can see the wood
grain is going along there, and then you can see the wood
grain is going along there. So whichever way the
piece of wood is going, you can see the wood
grain is changing direction because they put these things together,
especially in the corners. Now, these are a little bit more modern, you know, but generally, you can see this is
the corner here, and you can see if you zoom in, the wood grain is
going down this way, and it's going this way on here. That is why we're trying to replicate that because
you can really, really tell if you're
not doing that, something looks a
little bit off. So always just spend
the time in coming in and just going in before you do anything else because we've
got the mirror on, so it'll do exactly
the same over the other side, so you
might as well come in. Wherever the wood is going to
be kind of glued together, make sure that you
put in your seams in here because it's going to make sure that
it splits it all up. Now, going around here, you would end up with a piece going around
here like this. So right click, and what
we'll do is mark a seam. Now, I would say generally, these parts here are also
all going to be spl up. In other words, going all
the way down to here, you can just control click,
right click Marcosin. Then what you can do is also do these ones because it's
just going to make it look so much better if you do it and spend
the time doing it, even though it takes a little
bit of time right here. Right click Marcosm. Now, what you should be able to do is you should be
able to press A, and you should be able
to pull them out. So press E, pull them out
like so. And there we go. You should end up with
something like that where all the seams are
actually marked. Now, it's a good job when we
pull out that we've got no back on here because we really don't want to back
on there anyway. And now, if I press Aldag, I can bring back
those window panes. Now, the one thing
about the window panes is I need to probably pull
them out a little bit, so I'm just going
to go in and spend that little bit extra time just pulling these out a little bit because
they're probably a little bit too far in. Pull them out. A tied, like so, and there we go. Now, the final thing
I want to do then is I want to put something
on the end of here, some metal actually
going on here. So what I'm going to do I
can come in and easily, easily just come in and grab this here right
in the center, press Control, Shift and B, and pull it out like so. Now, it's determined
by your actual bevel. So pull scroll your mouse
wheel all the way down, and you'll see that you can
actually bring them in. Now, if I go back to this here, it's very, very hard to see, but we've got little knobbly
bits on the inside of here. Now, what I'll do is
I'll do these together. So I'm going to grab
this one, this one, this one, this one. And yeah, that'll do. And then what I'll do is
I'll press Control, Shift and B, pull them out
all the same time, like so. And then what I'm going
to do is I'm going to press the E button
to pull them out. So pulling them out like so. And then what I want
to do is I'm going to also yeah, I think
you know what? I think I'm going to
leave them like that. So just like that, maybe, maybe. I'll pull them out
just a tad further. Now, we can see that
for some reason, we've pulled them out like this. So all I'm gonna
do is just go in. I'll have to delete
both sides of them. Doesn't my it'll be pretty
clean once I've done it. Delete faces, and we'll have to do that
once more, I think. No, they're actually done now. I'm just looking this way. Making sure everything's clean. And then finally, the
last thing I want to do this bit here, I'm just wondering is that yeah, I think, you know, well,
these are going to be melts. I'm going to leave them. I could pull them out and pull them in and do
some other things, making them a little
bit more intricate. But you know what? I think
I'm happy with all of this. I think this is going to work
out really, really fine. Now, of course, the
moment of truth is when we actually get all
of the materials on there. So I think on the next lesson,
let's actually do that. Let's get it all in, making sure that it's working out fine. And then finally what we
can do is we can actually probably bring them up and
stick one of the windows, at least in here. So we'll actually do
that. Alright, everyone. So don't forget to
save out your work. So file, save out your work. And as I said, on the next one, then we'll get devils in there. We'll get our
materials in there. And before I go, you know
what? I'm going to hide this. This is an issue. Let's
fix this before we go. So let's pull this
down. We want it. Let's pull it in to
where we want it. So and X, pull it in, to there. And let's also make
sure how high is this. I can pull this up a
little bit, as well. And there we go. Now, this
is stone, so that's okay. You know, we're just
going to unwrab this. I brought this too too
low. No, I've not. It's in there.
Everything's in there, and have a good look round and make sure you're happy
with everything. Make sure, for instance, that the glass on
here is not going past this per because when you come to put
this into the wall, the last thing you want is your glass disappearing as well. Just make sure that's okay. And if you want to, you can also come in, and this will be quick because we have got mirror
on the other side. So if you want to,
we can also come in and grab just this backport here and we can
actually pull this out so there goes in the
wall a little bit better. I think actually that's going
to be very, very nice now. Alr, save our work and I will
see her on the next one, everyone. Thanks a lot. Bye bye.
52. Customizing Glass Shader and Grid Patterns: Welcome back, everyone to blend the building master class
from concept to final render, and this is where we left off. Alright, so let's first of all, take a look at our actual class. So what I'm going to do is come over to our asset manager. I'm going to basically
unwrap all of this, so I'm going to press
A, unwrap it all. So we can unwrap it all
like this because we've actually got this with seams on. Let's see tie actually
works though. Sometimes we might need to put a seam going round
here in the inside. So let's just have a
look, I UVE editing. You can see, actually, it's done a pretty good job
of unwrapping this. We've got a few
issues with here, which I'll show you
how to straighten up in a little while. But first of all, let's
see about that wood. So if I go back
now to my shading, press the little dot on, let's put it onto
our render view. And we'll also have
to come over to Asset Manager and then
put it on rendered view. And then what I'm going
to do is just change the current file to go
down to my resource pack, and I want materials
and shaders. And the one I want
is the cracked wood. So this wood cracked. Let's bring that in.
Drop that on there. Now, of course, you can see
that these parts around here, especially, these parts going down here are all
going the wrong way. So let's actually come in there, put our glass in, and
then we can fix those. So what I'm first of all
going to do then is I'm going to come over to the
right hand side here, wood cracked, click the plus B. Coming up, and then what
I want to do is drop on the glass onto there. And now, basically, this
has two materials on it. So what I'm going to do now
is just grab each of these. So each one of these
panels because these are going to be my glass, like so. And then what I'm
going to do is come to my glass and click a sign. And there is my glass on there. From there, then
what I can see if I go onto this one here, I can see now just which ones
are going the wrong way. So I can see these are
all going the wrong way. And like I said, you can really tell that these are going the
wrong way on these parts. So we need to fix those.
First of all, though, I would like to come
into the glass, so let's go on to shading. We can see our glass here and make sure that it's selected, so make sure you got
it selected over here. And then what you want to do
is now you want to zoom in, so scroll the mouse
wheel out first, pull this one up,
and then you should, as you pull it further up,
be able to see something. Now, this is called the noodle, and it's a very
complicated noodle. But what I want you to do you can take a look at this
outside of the course, if you want to and have a look at how it's all put together. Has some very, very
complex things in. First of all, though,
what I want to do is I want to come in and I want to find where
it says, emissive. So over here, you can see
emissive color A and B. So another thing is when
you're looking at noodles, the more that you
start looking at them, the more you'll
actually understand what actually
everything is doing. And what I want to do
is come into this one, and I want to turn this
to something like blue. And you'll see, as I turn
that something like blue, we can actually
change the color. Of our actual windows like so. You can see now we've
changed the color. We've stuck all that
grunge around the outside. Now the next thing I
want to do then is also plug in this one over here. If I plug this one
in through here, like so, you'll see now
that something's happened. Something else has happened. Now, what I want to do
is I want to come over now to where it says, metal pan, and I want to come
down to this melt scale, and I want to turn this
up or turn it down. Let me see if I can
turn it the other way. Go, go, go. So and what I want to do is put this on something like naught 0.7. And then what I'm going to do is I'm going to come over and make sure that this is
plugged in directly. So before, let's just go
back so I can show you. Was plugged in like
this, so I want to plug this in from here into this one. And the reason I
want to do that is show you something else
about this shader. So if you're coming
now, put this on 0.7. You won't see
anything happen yet, but if you come over here now, this part is the metal decor. And what I want to do
is put this on white. So let's bring this to white. And as we bring
that to white now, you can see that
we've got these parts coming on to the shader now. So let's reiterate what
we've actually done there. So if we come over
to this side here, we've got the emission color. This is the one where
we can change it to purple to blue to
whatever color you want. So we're going to have
it on this color here. Next of all that
we did the is we just came over and we
plug this straight in. So just grab it,
plug it straight in. Next of all, then, what
we did was we came over to the metal pattern, and I put this on no 0.7. Then what I did is, I
came over to this here, which is the color ramp, and I put this one to white. If we bring this one down now, you'll see who
makes it darker or makes it less refined, like so. And finally, then,
the thing that you want to do to
finish this off is coming over and bring this up or bring it down
to where you want it. Again, you can hold
the shift button. I think something like
that looks very nice. And then the last
thing you want to do is coming over
to the emission. So what we need to do now is we found where we
found the emission, which is non emissive. So we want the emission,
which is over here, and we just want to turn up the emission strength
which is this one here. And so now we can actually
turn up the emission strength. And now we can actually
set this to what we want. Now, I think that's
a little bit high. If we put it on
two, I think that's maybe a little bit higher,
maybe something like that. And I think that looks
very, very nice. Now, then let's come back
then to our metal first. So we need to come in
grab each of these. And what I want to
do is I want to set them on a different material. So I'm going to grab
each of these like so. I'm going to press Control Plus, and what I'm going to do is
go back to my asset manager. I'm going to click the
little plus button, and I want to bring
in a different material just on these parties. So I'm going to
press little dot, just to zoom in so I can
rotate around these. And then what I'm going to
do is I've got all of these. I've got metal building. I've got this mele mel polished. Let's try the Mel building, so I'm just going to drop
that on there, click a sign. And now, once they're in, you should see this
is what you get. Now, if I go on to RenderView
this is what we've got. Now, the one thing
I do want to do, as well, is if I come
over to my wild, make sure you save
out your word before doing this because if
you've got low VRAM, when you rotate it round, you probably will
crash, blender. If you've got a decent
compution have any problems. So let's come in now
and rotate this round. So the sun is shining
pretty much directly on there and gives me a better
view of what I'm doing. Now, if your blender
does crash, they say, open it back up, try
rotating it around, you'll find out that
that works pretty well. I've got mindset 135. So now I want to do is I'm
just checking out the metal. What does the meal look
like on each of these? And you know what? I think it's looking pretty
good from here. Alright, so now what we need
to deal with is the wood. So I'm going to
come now to these. I'm going to hide
these out of the way. I'm going to come to
each of these, as well. I'm going to hide
those out of the way. So hide these out of the way,
hide them out of the way. And now I'm going
to do is I'm going to go to my UV Editing. And what I want to do
is press the dot boon. So grab one of these, if we can. So if
you can grab one. Press the little dot boon. Okay. Now I'm going to
press the A button, and this is how these
have unwrapped. Now, let's have a look at which ones are going the
wrong way round, and I'll show you the easy
way to actually do this. So if we come in and
we grab this one, we can see it's going
the right way round. We can see this one's
going the right way round. So if I hide those out the way, then what I can do
is come into each of the ones that are going
the wrong way round. So all of these are going
the wrong way round, including this one, this
one, this one, this one. These ones down here are
all going the right way. This one's going the wrong way, this one's this one and this one and I'll just keep
working my way down this one, this one, this one,
this one, and this one, and make a mental no because you will see the
difference in these. And now we're going
to do is come over to the left hand side,
press the A bon, 90, rotate them all round, press the tan, and W a
difference that actually makes. Can you see the difference
in those? What a difference. Alright, so now the
final thing I want to do is I want to
straighten these up. So now we've got two problems,
so this one and this one. And as you can see,
if I go into here, you can see how the
wood is on here. That's not right. So
what we want to do is we basically want to come
to both of these. So what I want to do is I
want to select both of these. Let's go to this one here,
select both of these. You can see I'm
selecting them all. Don't really want that. What I want to do is I want
to select all of this. So and he Shift H, and then I can add the rest
of them out of the way. This will leave me with these. Now, there's two
ways of doing this. One of them is through
an add on called this. So if I just bring this over, you will see it's
called UV squares. Now, this used to be free. I'm not sure if
it's free anymore. It is really, really good. If you can get this
for free, that is the one that you
want, UV squares, but I am going to show you
the other way of doing it just in case you
can't get that. So let me show you
that way first. So if a grab all of
this, press the button coming over to edit
preferences, put in UV. So I'm going to put
in UV and you can see here UV squares. Once you've installed
it, you can tick it on, and then all you need to
do is just press Alt. Now, you won't see
just how easy it is. All that is straightened out. Now, if you can't get
your hands on that, let's do it the hard way. So all we'll do is we'll come, make sure you're on vertex select select this
vertex and this vertex. And what you're going to do
is you're going to go to UV, sorry, right click
and Auto Align. It's going to line it there, and then you're going
to grab these two, and you're going to
right click a line Auto. These two, right click a
line Auto and these two, right click a line Auto. Now what you want to do
is you want to come. Select this face, so
select this face. Shift select all
the other faces, and then all you're going
to do is you're going to press follow active quads. Click Okay. Now let's
just spin it around. So 90, spin around,
and there you go. Now you can see these
are lined up perfectly. Now we need to do is
just this one over here. Again, we can go Alt and
turn them around much, much easier than actually doing here the way
that we were doing it. Alright, so this
window now is done. Now, the problem we
have is at the moment, the windows look
exactly the same, and they look if we
go render view now, they look exactly
the same because of the fact of the wood, you know, here and here
is actually mirrored. So let's saw do next. So what I'm going to do is I'm just going to pull this over, go back to my mirror. And then what I'm going
to do is I'm just gonna press Control A and apply that. And then what I'm going to
do is I'm going to come in now press voltage to
bring everything by. Press one to go into front view. And what I'm going to do then is just select all of these. So if I just click on
one of these, press B, I should be able to
select all of these, press Control plus just
to make sure I've got everything and then
A over the side. Because everything is seamless, this piece of wood is seamless, I can just simply press
G and move it over, and now you'll see
this window looks completely different
from this window here. That is exactly what I want. By the way, the metal
is just the lighting. It's not actually, the same
or anything like that. All right, so let's
go back to modeling. Let's double tap the A. Let's save out our work. And what we'll do finally
is just put it on renovew and have a look
at what we've got there. And, wow, does that
not look good, guys? Okay, so what we'll do then
on the next lesson is, we'll get in the stone here. You could have also, instead
of using wood as well, you could have used metal
quite easily in here. I just want to go with stone. But honestly, you
know, you could easily swap over now this. So if you come over here,
you could just drop it onto here any kind of
metal and swap them over. And we'll look at that maybe a little bit further
in the future, but swapping over
materials is quite easy once you've got
them on because one, they're all UV mapped, and two, they're already all the seams and everything like
that are already done. Now, it might have took a
long time to do this window, or it seemed a long
time to do it. But that is because
we're trying to go through all of the things
they need to watch out for. In the future,
though, it's going to be a lot faster for you. Now you've got the technique. And once you nail
that technique down, really, really quick workflow. Alright, everyone, so I
hope you enjoyed that. I'll see you on the next
one. Thanks a lot. Bye bye.
53. Finalizing Window Panels and Fixing Overlaps: Welcome back, if
you want to blend the building master class
from concept to final render. I do feel like
saying good mine and everyone because it is a
new morningll be here. Alright. So now let's
carry on with this, then. So as I said, we're
now going to go in, and what we're gonna
do is we're going to grab this part here. So you can see,
though, if I grab it, it's going to go
all the way around there, and that's not
quite what I want. If I come round
here, you can see we've got this back
on here as well, and I don't really
want that in here. Either I don't
think. So what I'm going to do is I'm
going to come in. Grab this, so I'm going to
press Alt Shift and click. I'm going to come to this
one, Alt Shift click. I want to put it onto
Object mode as well. And then what I'm going
to do is it should go all the way around like this, right click and mark a seam. Now, if I come in
with Edge Select, you will see that I'm not actually going to
come in with Edge slicks. I'm going to come in
with Face select. I'm going to press
L just in here. Right, that's what
I want to show you. If I come in with Edge
selects and press L, you will see it goes
through the whole thing. If if I come in with Facelk double tap the A and
grab just this thing here, you can see it only goes
up to where mark seems. That is exactly what I'm after. Now you can see that
we've grabbed it going all the way around here
all the way up to here. Basically, if you come
in with Edge set, it will just discount
the actual seams. If you come in with Face Leg, it'll only go up to where the
seams are making it really, really handy,
actually, if you want to grab a certain island
and things like this. All right, what I'm going to do then it's Alt Shift click, Alt Shift click, Alt Shift
click and Alt Shift click. And then what I'm going
to do is down the bottom, Alt Shift click,
Alt Shift click. Old shift click and is that Mul? Yes, it looks like ul. And then what I'm
going to do is I'm going to minus off these. And the reason is these
are going to be stone, so I don't really want these on. Stone can be you know,
we can just unwrap it. There's no problem
there. It's just things like wood where we're
going to have a problem. Even metal is the
same thing, as well. Alright, all of those minus off. Right, click, Mark seam. Now, let's come in, and what
we'll do is we should be able to come in now and
grab each of these islands. So if I come in and
press the not the O, the L, L, L and L, and then we're going with L, L and L. And you see now why you can't
just automatic unwrap. So you can't do smart unwrap
and things like this. So U, and all we're going
to do then is unwrap. Now, let's, uh come back now. So we'll just put it on material mode just so we
can see what we're doing. And then what we're going to do now is we're going to come over. And you can see
straightaway that we've got two materials on here. But when we join it together, then it will add
the materials on. So what I'm going to do is
I'm going to grab my windows, grab this part here, so grab
windows and grab the stone. So all this, all this,
and press Control J. Join it together, and
we end up with this. Right, click, shade or toast
move, and then it goes back. Okay, so what have
we done there? Basically what we've done
there is joined it all up. Now, if I press G
just to move it, you'll see I've
missed a part out. So all I'm going to do
is just grab this one, I'm going to press Control J. So this one and shift
select this one, Contoj, join it right
click, shade A smooth. Now, you will notice that
there is a color in here. So this top one, you
might have this in here, which just means like
it's this color. This is basically what it
is. If you come in here, you will see it shows
me it's this one. I I come and click on this one, you'll see it shows
me it's wood. Now, you can only see that
if you're clicking on it in Facelk so you notice them
on FaceLkT one is metal, this one is glass. Alright, everyone. So
that's looking good. Now, what I want to do
is I want to just come in and actually grab these, and I want to give
them that wood then, so I'm going to come in, grab all of these,
like so, like so. And then the rest of it,
I'm going to make stone. So these two here,
let's come in. Wood cracked, click a
sign, and there we go. Now, let's make sure these
are all going the right way. Now, of course,
the tops, we know that we can deal
with those separate. Just make sure that these around the outside are going
all the right way. You can see here, these
look much better. If they were turn around,
they wouldn't look the same. So they're looking really
nice. It's just these tops. So let's come in, and we'll just grab both of these now, like so. We'll make sure works saved out. We'll go to UV Editing. And then what we're gonna do is we're going to
straighten these up. Now, again, you know exactly
how to straighten them. If you're using the add on, it's Alt E, but you can
do them one at a time. Sometimes, if you
grab them both, so if I go back and
I grab them both, press Alt, you'll see that sometimes they
end up a bit weird. So what I tend to do is always always Alt and then
grab the second one, Alt and then I find that
they work out much, much better. Okay, so
now we've done that. Let's just make sure they're going the right
way, and they are, as you can see, but they
have, for some reason. What has happened to
that? Let's have a look, make sure we've not
messed up. There we go. Never seen that happen
before. Let's go to I've never seen
this happen before, so I think let me
just have a look. I think I'm just going
to go to modeling and see what's actually
happened there. And yeah, I've not seen that might be
from an actual add on. So that's the first time
I've actually seen that. So I'm just going to
check, first of all, to make sure that if I
hide this out of the way, it looks like it's a
duplication over there, and that's what's causing it. So we can see here that what has caused that
is the actual mirror. So I've still got a mirror
on there, basically. So what I'm going to
do is I'm just going to take off the mirror,
and there we go. There is what the issue is. Now, I should have
applied and checked my my modifiers before
actually doing that. I think, though, it's
gone too far now, which means that I need to come in and put
this over there. So we'll do it separate. So
what I'm going to do is I'm going to come in and I'm going to show
you how to fix this. So I'll grab all of this. I'm
going to press P selection, and then Control
A or transforms, set origin then, two, three D cursor because it's set right in the center of here, and then I'll come in
now, grab this one. And what I'll do
is add modifier, and we're going to
bring in a mirror. So we're going to
bring in a mirror, put it over the other side, apply a mirror, control A, join it back altogether,
Control J, like, so, press the G bun just to make sure everything's put together. And now finally we've got
that bag where we wanted it. So now I'm looking at
this wood on top of here. You can see it's flowing
really, really nice round. And yeah, made a bit
of a mess there, guys. It's one thing I normally check, but this is the first time we're building
something complex, so I entirely forgot,
so sorry about that. And now let's come in
and work on our stone. So our stone, we know it's going to be the two types
of stone over here. So if I co to this one here, so you can see this one here is going to be stone lighter, so I can bring in a stone
lighter and a stone, which is going to be
this one, stone light. So stone lighter and stone
light. Now, let's come in. And one thing I didn't do is put a stone lighter
in my asset pack, so it wasn't in the asset pack. So what I'll do instead
is, I'll just come in, click the down arrow, and the one I'm looking for is stone light, and there we go. And then I'll click
the plus button, click the down arrow, and the one I'm looking for is stone lighter. There we go. And now I want to
do is I'm thinking, I need to unwrap
all of this part. So the easiest way to
do that, actually, I want to select just the
one with stone light. So if I come to just select one of come then to selection, and then what I'm going
to do is want to go down to select similar and material. It means it won't select any of the glass or
anything like that. And now we know from this we should be able to get
away because it is stone. Smart UV project, click
Okay, and there we go. Now we can also see on this
one, if I bring this over, so if I just bring this over, so I'm just going
to press Shift D because I'm going to
delete it anyway, press the little dot one. Now, what I'm looking for is how close the stone
is to each other. So do they look
similar to each other? If I put this on here,
would it look the same? And you know what I think it is. And the reason why it's
actually gone like that is because
it's a big block. So when I've unwrapped it,
it's actually unwrapped, with these parts being much, much smaller in the UV map, and that's the reason
why it's worked. Okay, so now let's come in
and add in our stone lighter. So all I'm going
to do is I'm going to come to these parts now. So the way I'm going to do this is I'm just going to shift, click the front
of them, like so. Shift select the front of them. Like so, because they
are part of that mesh. Control plus, and then come down Stoneight to click a
sign, and there we go. Alright, something like that. Now, I think that we
might also want to do the tops and bottoms of
these completely up to you. Let's have a look what
they're gonna look like. So if I grab each of these because they're not
attached to this, click Stoneight to click a sign, and there's
what we end up with. And I think actually, it makes it look a
little bit better. Alright, everyone, so that
is the first window done. So now let's open up
our referencing guide, and let's actually come to that. Now, the other windows, as you can see, are not
quite as complicated. In some ways, this one here is basically what
we've created here. This one in here is basically a bigger version of this one, and this one here is
a bit specialist. I'm going to go
to that one last, and I'll show you
how that one works. But, first of all, I think
we should create this one. I'll get the right dimensions. We'll put the bevel on. But
all of the skills we've learned from doing this one can now be transferred
onto this one. It will be quicker because we've already got all the
materials on there. We've already set up the
way that we, you know, straighten UVs out
or use the add on, and we've always got the glass which we've
already set up. So everything's pretty
much done for this one. So let's actually start
that on the next lesson. Alright, everyone, so I
hope you enjoyed that, and I'll see you on the next
one. Thanks a lot. Bye bye.
54. Designing a New Stylized Window Variant: Welcome back everyone to blend
the building master class from concept to final render, and this is where
we left it off. Alright, so I've been building pretty much in rendered view, so you can see that it
is possible to do that. But I think what I'll do is I'll put it back on object mode. And what we'll do is also
reset all the transforms, set origin to geometry, because at the moment, it's
right down the bottom. We don't want that,
move it to the side, and we'll put it in with everything once we've
actually done them because we've built quite a lot now we've not
actually sort it out. And then what we'll do
is save out or work. Now, let's bring in a
plane, first of all, so shift day, bring in
a plane, spin it round. So RX 90, reset all
the transforms. Like so. And then coming over, and what we'll do is 1.34. Not 0.286, but that's the Y, so we don't need to change that. We'll just leave that on
zero for now and then 2.8. Now, this, if I press
one now and bring it up, should give us the right
dimensions for our new window. Now, what I want to
do, first of all, is, then I want to bevel
off these points here to make that rounded
part for the window. So let's do that
first. So all I'm going to do come into Vertex. Let grab these two and then Control Shift and
B and bend them over. Now you'll notice I need to
bring them out a little bit, like so, and we want to make it nice and rounded on
that part there. Now, at the moment, it's
not quite far enough. So what I'm going to
do is I'm going to bring them to where I want them. So something like this, and then I'm going to bring
them probably closer together and then
bring them out and get that right nice round effect that I'm
actually looking for. Now, as well, at the moment, I don't actually
like how this is. Even if I bring these down, you can see it doesn't
really do anything. So what I'm going to
do instead is, I'm just going to press
controls, go back. I'm going to press
control, and I'm going to control where that actual
roundness comes up to. So I think something
around there is where I want it, and
then come back to it, press Control Shift B, and then we've got
a lot more control over how that's going to look. So now what I can do
is I can actually control how that looks, and you can see I can get a much more rounded look to this. Alright, so now we've done that. Let's then make the inner part. So we're building
this in sections. So we've done, you know, we've created this
round bit on top, and now what we need to do
is create this inner part, so it goes into where
the actual window is. So what we'll do is we'll
grab both of these, and we're going to
press the I button, and we're going to bring it in. Now at the moment, you can see the both
coming in together, I think, so just press I again, and that's not working either. Sometimes that will be the case. If that is the
case, just press E, enter, S, and bring
it in like this. Let's see if we can
bring it in like this. And you know what? That's
not working, either. So I'm just going to press
Control Z instead of using the E. And I'm going to actually come and delete this
edge out the way. So delete and dissolve edges, and now we should end
up with a flat piece. So it should be nice
and flat for us. And now if I press I, I should
be able to bring it in. Now the thing is, I need to reset all my transforms,
so we'll do that first. So Control A, all
transforms, right click, Setigin geometry, press the tab button,
and now bring it in. I should come in, nice and
neat for us, as you can see. Now, the other problem
we've got is here. If you look on the reference,
we've got one, two, three and then a big block.
Let's see if and do that. So, one, two, three,
and a big block, but it looks like
when we've done it, we've actually got four on here. So maybe I've gone a
little bit too far. So I'm going to actually
go back before doing that because I want to keep to the reference a little bit more. So instead of going with what I've got here, so
let's just go back. See if I can go back.
Here we go. There we go. Control Shift B, bring it
in to where I want it. And then what I'm going to do
is just turn this down one, and there we go, that should
be much, much better. We've got one, two, three, big block. That's
exactly what want. Then we'll come in again,
delete, so dissolve edges, and then reset the transforms, control layer transforms, right, click origin two geometry, press the tab button, and then come in and
press the eye button, like so and bring it in to where you want
it or where you want your actual bit block
to actually come from, and then the window inside. Okay, so now we've
got this part. Now, before we actually
split it, let's take a look. If I press one, you can
see that these parts here, they're going this
way like this. Now, that's fine for wood. But honestly, when you're
thinking about this, stone doesn't really
go like that. So we need a way to come
down and actually make, you know, kind of an edge
coming straight down here. And we can't do it with pressing Control R. It's
not going to work. You can bring it across, but you'll see what
happens like that. You can press E to go the
other way or E. You know, it's just simply
not going to work. So what I want to do
instead of doing that, press Control E is
use our knife tool. So if you come in and press K, you will see that I've
actually got a knife tool, which I can cut things
out with, like, so and you'll see
when suppress Enter. Now we've got to
cut along there. We will be using this in the
future on certain things. It's a very, very handy tool. But for us, we don't want
to use it in that way. What we want to do is
we want to come to this point and we want
to drop it down here. Now, instead of trying
to line it up like this, just press the A button,
and then what it'll do is it'll line it up at a
certain angle, as you can. Like so. And then what I can do is I can just
click it again, press the Enter button,
and there we go. Now what I can do is I can
do the same thing, press A, drop it down, press
Enter, as simple as that. Now finally, the
last thing I want to do is I don't
want these in here. So all I'm going to do is
delete and dissolve edges. Can't do it that way. Sometimes, sometimes
that will not work. So try deleting edges. That doesn't work. And the
main reason why it probably doesn't work is it's probably still got these attached to it. So in other words,
this part here is attached to these parts. So I will show you how we
can actually clean that up as we go further on
then. Just word for try. Alright, so what
I'm going to do is I'm going to split these off. So these and these and this,
I'm going to split off. And then what I'm going to do
is split off these blocks. So split off these two here, and then finally split
off this one here. I want them all split up. I don't want them touching each other or
anything like that. So what I'm going to
do now is just press the Y to actually
split them off, press the H, and this
is what I've got left. So now I can come
in, split these off. Like so, press Y. Press Well, press H, and you should be
left with just this. Now, when you press ltH
and bring everything back, all of this now
should be split off. Now for now, what I'm going
to do is I'm just going to hide this part
out of the way. So I'm going to separate it and then hide
it out of the way. So I'm going to
press P selection, and then going to
press tab, hide it out of the way, and
I'm left with just this. Now, if we come into
these parts now, we shouldn't have any
problem dissolving edges. So come in here,
delete, dissolve edges. Okay, we've got a little
bit of a problem. Let's see. Let's
try dissolve edges. Like, so instead of that, yeah, it's here. Look,
this is the issue. So what I'm going to
do is I'm going to try and do limited dissolve. So I'll grab this
one and this one, and I'll go to delete
and limited disolve and then explain why that works. The reason that works is when
I'm trying to delete these, I've still got this point. So if I just hide this one
out of the way for now, you can see if I go to vertex, I've still got this point here. So when I'm trying
to delete this edge, it's still leaving
this point here, which is causing it to
collapse in on itself. When I come in and I go L and L, and then I press delete and
dissolve or limited dissolve, it deletes not only this point, but also these edges
that are in there that blender sees a not needed. So that's the reason
why that works. Okay, so now what
we want to do is we want to actually
bring these out. So we need to actually make
them a certain thickness, and it's not 0.286 is around
the big chunky part on here. So what we're going
to do is we'll actually bring
them out to naught 0.25, something like that. So let's actually try that.
So I'll do is I'll come in. I'll press A, I'll press E, and I'll pull them out, like so. And then what we'll
do is we'll actually press tab and you can
see it's nearly there. So let's press Control
A all transform, set origin to geometry, and let's then pull it
out a little bit more. So we're going to
pull it out to naught 0.20 0.257, something like this. So yeah, round about here. And then what we'll
do is we'll make this part here a
little bit chunkier. So if I come in, I should
be able to press L on here, and then I'll press S and Y and pull this out
a little bit more. Now, you can also see
that with this one here, it's a little bit chunky
going around here as well. So I'm just going to
come in, face select, Alt Shift click, Alt Shift, click, O shift, click. And then what I'm going
to do is press Alns and I'm going to pull
it out a little bit more to give us that part in
the actual center like so. Okay, so far so good. Now, last of all, we want to right click and
shade Auto smooth. We want to also then come
in, resettle the chansom, set origins geometry,
and add in a modifier. So if you come in, add modify, we're going to generate a bevl. Let's put this on note
point note, note three. Like so, and there you go. You've got your actual
bevel on there. With these, by the way,
when it comes to stone, I want to turn it up to maybe
not point not not five, just a tad because
I think it looks a little bit better
than the other one. And then you can
see now what I mean by this part as well, that
looks actually great. Now, if I press Altag
and bring back this, you can see now it's
all the way back here. So we do need to pull this forward into place
round about there. Alright, everyone. So now on the next one then, you
already know that. We've already done
a window like this. This is going to be pretty easy. But first of all, as I said, when we're building
these, we don't just want stone and
then a bit of glass. You always want to
think you want stone. Then you want the
kind of, you know, wood and trim going
around here or support because
that then supports all of this stone block. And then on the inside then, you want the actual
window, which is made of metal or wood. Doesn't
really matter. So the one that goes around the outside first
is the support. The one on the inside is
basically supporting the glass. That's how it actually works. Alright, everyone, so let's
come in, save out our work. So file, save, and then I'll
see you on the next one, everyone Thanks a lot. Bye bye.
55. Enhancing Window Textures with Detail Passes: Welcome back everyone to blend
the building master class from concept to final render, and this is where we left off. Okay, so now let's come in and do the wood in here. So
what I'm going to do? I'm going to come
to Face Select, I'm going to press the i
button to bring it in. So we've already reset
all of those transforms, so how thick do you
actually want it? I think something like this is relatively thick, and
that should be fine. Again, what I'm going to do then is I'm going
to split this off, so I'm going to press Y,
hide it out of the way. And then what I'm
going to do is now just mark in a couple of seams. So I'm going to mark a
seam here, a seam here, a seam here and a seam here
because it's made of wood. And then what I'm going
to do is right click and mark a seam. Now, the other thing
is, when we did these what else we did is we
didn't actually break these. So in other words, we haven't
actually got gaps in here. So if you come in, you will see let's come in and just
put it onto rendered view. We haven't actually got
breaks in these parts here. And sometimes it's actually better if you have
breaks in here. Now, I'm going to show you
on here what I mean by that. If I come in and grab, let's just hide this one,
let's split it, actually. This is split. So let's press
ALTH. Split out of the way. P selection. And now
we've just got this part. Now, if I come in now and
go, In fact, you know what? I'll save it out, and
then I can reload it. So I'll go, L and L, split them off, press Y, and then press A, E, pull them out, like so. If I now join this to
this and press Control J, you will see now that we've actually got those
splits in there. And that sometimes actually adds a lot to how something
is going to look. So you might want to think about doing that on these bigger ones. So you know what? I'm going
to leave mine for this one. Like so I'm going to
leave this in there. I'm going to go back
to object mode. And now you can see
exactly what I'm saying so you can see
it looks like this. Now, the one problem
with that is now we just need to make sure that
the back of this, so the backup here is we haven't got the back on because we really
don't need the back, so I'm just going
to hit Control, I'm going to come
into then these ones here when I unwrap it as well, it's going to be
way, way easier. So delete and faces like so, and we should still be left with something like this. All right. So now let's pull this
part forward and this then will be the
inner piece of wood. Let's pull it a little
bit further forward. And on this one, then, we need to create it
basically like this. So the way that we're
going to do it is let's press question mark
just to isolate it out, and then what we'll
do is we'll come in and we'll grab both of these, press in the J button. And then what we'll do is we'll split this part here
and this part here. Now, we already know
when we're doing this, it's easier to grab the top
grabbing this bottom here, and then just right
clicking and subdividing. Now, it can't subdivide
at the moment, and the reason it
can't subdivide is because we put this in first. If you do it that
way, just come in, grab this one now and this one now and
press the J button. And maybe next time
not put this in first. First of all, you know, put this split this subdivision
in, then put this one in. Alright, now we also know that if we don't do
anything about these, we're going to end up
when we insert it, it's going to cross over.
So let's fix those. So I'm going to do is
grab this this one, grab the center one,
press the end button. And what I want to do is
merge them at center. Now, if the Enbons not
working, just right click, come down and you'll
see merge vertices, merge them at the
center, and there we go. We've got this now. Okay,
so now let's come in. And what we'll do
is we'll bring in some more edge loops
going this way. So control. Let's
bring in this many. So four, left click,
right, click, like so. Press the A button, and then what I'm going to do
is press the I button. Press the eye button again, and I should be able to then
come in and split them off. Now, I've got mine relatively
thick on my other window, but I think for me, this is
going to be fine like this. Now, remember what I said
once you've done this, make sure that you hide
these out of the way. So I'm trying to hide these, but I can't hide them
because I'm not in face leg. Now I can hide them out the way, and then I can come in
with my edge slick. And what I can do is
split all of these off. So all I want to do not
split them off, sorry, Mark Mark the seams,
not split off. We're not splitting
anything off here. Okay, so just take
a little bit of extra time because it's
going to save you a long, long time in the future and
marking all these seams. Now, you know what? I might
as well actually come in, press A, right
click and markers. Mark asm on everything except
these parts going here. So where do I want to see them. So all the way up to there,
all the way up to here, and then right click
and we're going to clear seams. So let's
have a look at that. Double tap the A,
and there we go. Okay, TH, bring back this part. And then what I'm
going to do is I want to actually, you know what, probably probably
instead of doing TH, let's just press Sir Controls, A to grab it all, and then what we'll do is just
extrude it out first. And when I extrude it
out, then press ltH, bring back my glass. Like so. And I'm just looking
now, so you know, that's gone absolutely perfect because we've got a wood
there on these parts, and we haven't grew
on the inside, as you can see. So
on the back, I mean. Now, let's press tab, press question mark to
bring everything back. And this is what we
should be left with. And now I want to do is I
want to squish this up. So I want to pull
my glass forward. So first of all,
though, let's pull this bag. Into place like so. And again, you can see because we've done this
with this open bit, you'd probably be better off splitting all of
these up as well. I'm not going to do that,
but if you wanted to, you could just literally split them all up so you can
split them all up. If you do that,
though, you've got to remember that you've got
to fill these gaps in, so I will quickly show you. So I'll quickly
see that my work. I will come in. I'll press
L on here and L on here. And there's going to
be one on the inside. So let's come in and L on here. Then what you'd do is
you'd split it up with Y, and then you need to
actually come in. So let's go take this off. And then what we'll
do is we'll grab this Shift H. You need to
fill in these gaps. You need to actually put in
a face on here and on here. And that's why I'm not actually going to bother with
the inner part. I'm just going to
leave the outer part. Now I'm going to do is
quickly open it again. So course modular pack. Let's make sure course
modular pack, don't save. And here we are back
to where I was. Alright, so now we said we're not going to do
that, so that's fine. What I want to do, though, is bring these windows forward. So if I come to all
of these windows, I'm going to bring them forward. So I'm going to grab
them all. Let's bring them forward into place, like so, and there we go. We're near enough, done. With the modeling of this one. And that didn't
take long at all, and that looks
really, really cool. Now what we want to do is want
to join these altogether. So if I grab this one,
we've got a bevel on here, grab this one, press Control
J. Can I join it altogether? You know what? I'm just
going to grab it like that. Grabbing this pot laughs
because that's got my bevel on. Press in Control J, and there we go,
double tapping the A, and now it looks fantastic. Now, the next thing I want to do is I want to grab this one, grab this one, press Control L, and I'm going to link materials. Now I want to go into material
view, let it load up. Save out my work once
this is loaded up, and that's looking really bad. But hey, ho, let's
come in, first of all, grab all these soon
as we've got them, come over to my
materials, press, and we'll go with unwrap
because they're just planes, and then come in glass, a sign, and there we go. And then I'll hide
those out of the way. And then what I'll
do now is I'll come into these parts here. So this stone, we'll come
into that part next. Like so. And we've got no teams or anything like that, but
we know it's stone, so all I can do is press U and smart UV
projects. Click Okay. Now I can see these are
going to have to be made a lot lot smaller. So I'm going to come
to those in a minute. But first of all, I'm going
to come to my wood here. So I'm going to press
L, L, L. You know what? I'm just going to make
all of this wood. So, A, you unwrap. Like, so bring him a wood, click a sign, and there we go. Now we can see we've got a
lot of problems in here. So a lot of problems with
the wood on the top. Only on the top, I think. I'm
just looking at the wood, making sure it's all
going the right way. It is. So it's just these
wooden parts on top. Bun gon is L, L and L, and then going to go
over to UV Editing. I'm going to grab this
one first with L. I'm going to press Altne
straighten all that out. Now, I want to make
sure that this one is straightened out
properly because you can see it looks a little weird. So I want to press tab, and I'm J looking
now. You know what? That actually looks
fine. It looks good. And then I could actually split this down the
center, but you know what? I'm not going to
do that. What am I going to do then it's
come to these parts. So, L, Alt, L, Alt, and there we go. Alright, that's looking good. Now, let's come to
the actual stone. So Alt H will come
to this stone now, and we want it to be the same as our stone on our other one. So once I've grabbed
it, and go over it, this is how I want it to look. So what that means is A
and S, no, S this way. There we go. Let's make it a little bit smaller,
and there we go. Now, let's look what that
looks like on a rendered view. And there we go.
That is looking. That's looking fantastic. I
really, really like that. The only thing I would
say is this wood on here. It's a little bit too big in
comparison to these bits. So what I'll do is
because it's made it obviously much more
on these parts. So only on the front, I'm
just going to grab the front, like so, and then I'm
going to press A. And what I'm going to do is
press S. And make it much, much smaller like so and now it fits into place,
much, much better. Alright, so that's
that window there. Now, if I move this,
shift spacebar, bring the move tool,
move it over to here, grab both of them,
and move them over. You will see now they go with each other,
two separate windows. You can see how easy
it was to do that. Now we're going to do is on the next lesson
is we're going to move on to our final big window. Now, this one is a little
bit more intricate. The reason is
because it's stone. It's kind of we will put wood in here because I
think wood suits it better. But this part in here
should be made of stone. You know, it's kind of more of a gothic feel to this window, and we're going to
stick with that. The rest of it, though, is just the same as
building this out, pretty much, so I'll show
you how to do that next. Alright, everyone, so I hope you enjoyed that, and I'll
see you in the next one. Thanks a lot. Bye bye.
56. Building a Large Arched Window for Structural Flair: Welcome back, everyone to blend the building master class
from concept to final render, and this is the one we're
going to work on now. Now, you should be
able to now look at something special windows
and break them down. So we can see break this down. We can see we've
got this part going around here. We know
how to do that. We've got a little piece of stone that's going
to be going in here. This is clearly we're going
to put that separate. We've got this little
band going across here. Again, we can put that separate. We've got this part
going around here, which we'll do separate, and then we can use the
bevel to bring this in and make this kind of shape, which I'll show you about. Finally, then we've
got the inner window, which we've got a
edge loop going across here and a few edge
loops coming down here, and this is a big open part. So then we know we
can use the insert on here to get this
actual kind of shape. We could end up doing
the insert just on the top and then doing
the bottom separate. That might be something that
we actually have to think about because it's a little bit more complex than this one. This one's got,
you know, four on each row, and this
one only has two. So something to keep in mind. First of all, though, let's
get the correct dimension. So we're going to go
back to modeling. We're going to put
it onto object mode, and what we're going
to do is we're going to bring in another plane. So shift date, let's
bring in a plane, RX 90. And then over here on
the left hand side, we're going to point
some dimensions. So Control A, all transforms set origin to
geometry, just like last time. So let's go in and
put it on 2.05, and let's put the
Z axis because we can't do the Y axis yet on 3.44. So it's quite a big window this, quite a chunky window,
and let's bring it up. Now, we should still have our bevel on here from
what we had earlier. So let's see if that's
actually going to work. Again, though, let's
first of all, though, bring in our edge loop. Now our edge loop is
probably going to be best off lined up with this
window over here. So if we come and line it up just above this window,
that should work fine. So I'm going to do is
I'm going to press tab. Control off. Left click,
right, click, press one. And then I'm just
going to put it up a little bit further. We can see this line
going across here, so it's a little bit further
than that window there. Bring it down a little
bit, and there we go. Now, let's come in, grab
this one and this one. Control Shift B, bring it in. Let's bring it round, bring these together like so. Now, we can see here
that we've got one, two, and then one and two, and then one on its n. Now, I think that we need
to bring these in probably a little
bit more because this is more of a Gothic style. So if I come in, I
should be able to make it more of a Gothic style, like so just with doing that. Alright, that's looking pretty good. Now let's come in then. And think about
creating that shape. So if I bring this over, we're going to create
this shape first, then we're going to
create this bottom part. So we'll do it all in one
go though with this pot. So what I'll do is, first
of all, I'll come in. I will get rid of this,
so we're going to press delete and dissolve
edges, like so, and then we're going to
come in to the top of it, and I'm going to
press the eye button to bring this in, like so. Now, you can see it's
not coming in evenly, and we know that's
down to generally, resetting all of our transforms. Then we can press tab,
then press the eye button and everything's coming in
very, very nice and neatly. So let's bring it in
something like this. Maybe it's a little bit more
chunky than these ones here, that is exactly what I want. Now the next thing
we want to do, of course, is add
in these streets. So we'll come in. We'll press K. We'll come in and then press A to go down like we did before, and then K and A to drop down. And there we go.
Okay, so far so good. Now, let's separate
this inner part off. So I'm going to grab
just the inner part. I'm going to press P,
like so, and selection. Okay, that's separated off. Now, let's come in
and split these up. So what I'm going to do
is I'm going to come in, I'm going to mark a seam
on each of these, like so, and then I'm going
to go one, two, and then one and two, and then leave the top part in there because that's
how I want it. And then what I should be
able to do is mark a seam. From there, then
let's split them off, so I'm going to
come to this one. So, L, L and L. You can see now
once I press the Y button, all of these are split
off, so that's great. So Y. And finally, I want to come to these ones, so L and L, press delete and limited dissolve, then
we'll get rid of those. Now what we want
to do is we want to pull these parts out. So we want to get some
thickness actually on these. Now, the thickness
is going to be not 0.554. It's quite thick. So I'll go with naught 0.53 oh because we've got
a big chunk on here. So let's try that.
So I'm going to do is I'm going to grab them all, I'm going to pull
them out like so. And then when it come in, I'm going to check what this is. So on my Y, you can see
if I press Control A, all transforms set origin
geometry and put this on naught 0.52 oh. Let's try that. You can see that's probably probably a little bit too thick. So let's bring it
back a little bit. I don't know why my
measurements are a little bit. I'm gonna make it thicker,
but not that thick. Okay, so now what I want to do is I want to come
to this bottom pot. And because these are
split, it means I can pull that back
then into place. Like so, and there we go. Now we've got this side,
this side and this side. Now, let's put on the bevel. So what I'm going to do is
I'm going to grab this one. I'm going to press Control L, and I'm going to link
or copy modifiers. And there we go. That
is as easy as that. Let's right click
and shade or smooth just to get rid of those little
marks that are on there. And there's the
first bit of this. Now I want to do is I want
to bring in the inside, which is mainly the more
complex part of this. So what I'm going to do is you
can see that this in part, it comes in here, goes down there, comes in here,
goes down there. How are we going to do that?
Well, I'm going to show you. So first of all, let's come in and bring the eye tool in again. So if I press the eye, I should be able
to bring this in, like so and you can see,
these are nearly touching. At this point, we should
make them touch, actually. It's going to be
easier for when we do the kind of wooden
bit in this part. So I do probably want
to cross them over. So in other words,
I probably want to bring it in a little
bit more than what it is. So I'm just going to
press Control's head. I'm going to press the eye bun and bring
it in, bring it in, bring it in and have a nice
bit that I can actually use. Like so. So this
is looking good. And then what I'll do
is I'll come in now. You can see the breaking here. So what I want to do
is come to these two, grab both of these, like
so, right click, merge. So we're going to
merge at center, and there we go fix that issue. Now, with this part coming in, we again don't want
this part on here. So we don't want you know,
this stone coming in here. If you look on here, actually goes straight down to the point. So let's actually sub that out. So what I'm going to
do is I'm going to press one, going into front you. I'm going to press
K, knife tall, press the A bone
straight down. Enter. Same on this side, okay. Press the Abn straight down. Like so. Okay, so
now we've got that. Now, let's split off this one. So if we come, we'll
split this and this, and let's press P.
Selection and split it off. Now we should just be
left with this part here. Now what we can do
is we can actually pull this out onto here. So if I press tab, I should
be able to press A and then E and pull it out onto
this part round about here. All right, so now
I want to do is I want to bevel this part now. So bevel all of this and kind of make it look like our
actual reference. So you can see, we've got
a part going inwards, pot in, part in, and part in and got
that real gothic look. So let's see if we
can actually do that. So the way that I'm going
to do that is I want to come Corn troll going
all the way around here. Now, we might have some
issues with this top part, and this is probably why
I've, you know, put this in. It's probably hidden
away this part in here. So just there, remember that. There's also, you know, this bottom part as well that also might need fixing, as well. What I mean is, I
might join these two together or join all of these. But let's see if we can actually
get away with it first. So I'm going to press
Alt Shift Click. And it also might be because I've joined the back of this. Let's just press Shift H minute
and have a look at this. Now, what we're going to
do is we're going to press Control B and see if I can
actually get away with it. We've also got issues with
these as well, but let's see. Control B, bring it down. You know what? We've
actually got away with that, so that's looking pretty good. So before we
actually go further, I'm going to actually
delete this off, so I'm going to come in and
dissolve the edge here. So let's press delete
and dissolve edges, and there we go. Now you can see, we've
got no verts in here, so I've took the vertices away. It's nice clean mesh. So now I should be
able to come in. Oh, shift click. Oh, Shift
click, press Control B. Pull it into where
I actually want it. And then what I'm going to
do now is put it on custom. Now, once I put it on custom, now I can get in
whatever I want. You can see it comes
down, goes back, comes in, comes back, like so. So now what I need to
do is I can come in, first of all, and
reset this curve. So if I come in, I
can reset the curve. Then I can add in one here. I can pull it back, so I
can pull this one back, so you can see,
bends in, bends in. I can then come
in with this one. And bend this one out, so I
can make it that real real, as you can see, gothic look that I'm actually
trying to go for. And you can add
in more of these, so if you add in
another one, you know, and then you can add in more
points and things like this. But I think I'm pretty
happy with how this looks, so it goes in, sharp
and comes round. Yeah, I'm pretty happy
with how that is. So if I press Tab now, right click and Shade Smooth. Now, the other thing is
when I actually did this, you can see when I
shaded it smooth. It doesn't actually look right. But if I go to shade flat, for instance, you can see now let's go to
Shade Auto Smooth. There we go. Now it looks right. So there's the
difference between them. Sometimes, when
you're doing this, you might not want
it to be round. If you don't want
it to be round, just remember you always have the ability to come
in old shift click, right click and mark a
sharp, and there you go. You've got that
sharp in there now. So you might actually
want to do that. Sometimes I actually do that.
Alright, so we've got that. Let's press Altage,
bring back everything, and this is what we're
actually left with. And you can see now that's
looking really, really nice. What we'll do then on
the next one is we'll bring in this window.
So bring in the window. We'll put our little
chunky part on here, and then we've nearly done
with this window, as well. Alright, everyone, so I
hope you enjoyed that. Let's save our work, and I'll see you on the
next one. Thanks a lot. Bye bye.
57. Refining Large Window and Correcting UV Issues: Welcome back, everyone
to Blend the Building, master class from
concept to final render. Alright, so let's now
we've got this in place. So what I'm going to do is
I'm just gonna press shift. I'm going to drag it out. And the reason I've done that is I know then where roughly
that's going to be put back to. So I've got this part
here, and what I want to do is create
the actual window. So if we look on our reference, let me just pull
our reference up, you can see that we've
got one, two, three, four parts here, and
this big part in top. So it might be better
probably splitting this up. That might make it
a lot easier to actually work with. So let's
actually look at that. So what I'm gonna
do is I'm going to come in and I'll do
the top part first. So let's come in. Let's
come into this part here. And then what I want to do
is I want to put a bar going across there or even under here. So let's
do that one first. So if I come in, and what I'll do is I'll press J and
drop that part in there, and then I'll come
to this part then. And then what I'm going to
do is press the i button to bring it in, like so. So bringing in that window. Who ran about that thickness. And then what I want
to do is I want to bring this one in. You can see I've also got
this part in the bomb, which is, I think, let's
actually have a look. Is it that part there? So we'll go to this part. Yes, it is. So I can come in and delete
that part of the way. So this part here, delete
and dissolve edges. L so. Now, let's work on
this part here. Is this thick enough? You can see maybe I've
not made it thick enough. So you know what
I'm going to do? I'm going to come in and I'm going to press the Sp and bring it in a
little bit more. So I have it round
about that thickness. Then what I'm going
to do is I've got to think about the top part here. So you can see that this is round about the same thickness as this same thickness as this. So I've got to kind
of replicate that. So I probably only need
maybe one, two, three. I might even make it a
little bit different. What I'm going to do is
I'm going to put control. I'm just wondering the
best way to do this. So let's first of all, come in, and what we'll do is
one, two, three, three. And then what we'll do
is four going this way. So Control one, two. Now, you can see I've
still not split that off, so I'll just come in. Control select, split
it all off with Y, and then Control law one, two, three, four, left click, right click, and there we go. Now, if I bring this in, so if I bring all of these in, press in the I button, I again, you can see now I can
bring them in like so. And then you can see, though the thing is, we've got this really thick part on here. And I'm just wondering
if I actually want that, because if I don't, what
I can do is I can bring the window down to this
part here if I wanted to. In other words, I can either keep it like this or you
can keep it like this, or I can actually cut it down here and then keep this
whole thing as a window. That's what I'm actually
thinking about. Now, I think with these, I'm
going to press the s button, or I'm going to try and press
OTS. That's not working. So what I'll do
is I'll make sure I'm on individual origins, then press the S button, just to bring them
out a little bit, because they're a little
bit too small, I think. And then what I'll do is I'll show you what
I'm in with this. So if I come in, press K, grab this part, press A to
go down, grab this one. On the A. And the other
thing is here at the moment. These are getting confused
now because we've got two of these in here and these
edges aren't joined. So instead of doing that,
we'll just come in, we'll press L, hide
it out of the way. Then we'll come to this
point here, press K, and then A, all the way down, press Enter, and there you
go, we'll actually work. Same on this one. So,
A, all the way down. And there we go.
Now what you can do is you can get rid
of this line here. So I can come in and I can go dissolve edges and
get rid of it. And then if I press
ltates you can see now this is what
I'm talking about. So we've got this part in here like this where it's
the four window, or you can have it more
like so at the moment, we've graded like this, same
thickness, same thickness. And then we'll have the
same thickness going over. So it'll be sat on top of here or you can
have it going in. Completely up to you
how you want to do it. Now, the other thing
is, at the moment, I'm just looking to make sure I think as well that
on these points here, so if I grab this point
here and this point here, I'm going to press S and X and just pull them
out a little bit. They're a little
bit too straight, and I think that
actually looks better. Now, finally, let's come in and we'll just
split off our windows. Like so, like so. And these will be
made of metal because it's quite a big window
to made of wood. And then what I'm going
to do is just press H to hide those out of the way. Now what we want to think
about is our seams. And seams if it's metal, the reason I want to
put seams is I'm just wondering if I do
want to put a seam in each of these. You know
what? I don't think so. What I'm going to do
is I'm just going to press A and then E
and pull it out, like so, and there we go. Right, click, shade at smooth. You know what? I think that's
gonna look pretty good. Now I'm going to do is I'm
going to come wave my glass, so I'm going to press tag, grab each of these, and I'm going to pull these
out now just a little bit further for the actual glass because they side a
little bit too far back. So I'm going to grab them
like that. Hold them out. Like so. Alright,
so far so good. Now, let's grab this and pull it all the way back to
where the other one was. Let's then hide out of the
way, grab the other one, press delete and face
press just delete. All tag, bring everything back, double tap the A,
and there you go. That is this window done, as you can see, that's
looking pretty nice. Now, let me just make
sure I've got cavity on. So now we can see we've
got the same thickness. In this one, in this
one, I'm just looking. I have got the same
thickness in there. It's a little bit thin on
there. We can, though. We could come in and join, you see, it's double
thickness in there. You know what I'm going to do. I'm actually going to come in, and I'm going to
join this on here. So I'm going to press J
to make that line there. And then what I want to do
is make this into a piece. So the way I'm going to do
that is I will come in and grab this one and this
one. I'm going to press J. And then what I'll do is
grab the wrong one, I think. Instead of pressing
J, just press F because there's nothing there. And then what I'll do is
I'll grab this, this, press in F. And now
let's fill in this this. And you can see it's going
all the way across there, which is going to
cause some problems. So instead of doing that, I'll just grab this one and
this one and press F. Like, so and then what I'll do
is press out the way. And then all I want to do
is delete this part off. So if I press delete
and faces like so, press TH, bring back everything, spin these rounds, so I'll
grab this one and this one, shift then, spin them around, and that is what
you're left with now. And that probably is
going to look better. So even if you win
the other way, you can actually fix it just
by doing what I did there. Now, if I come in
now and grab this, you can see it's fitting
in perfectly in there. If I press G, you can see
it's all attached to it, so everything should be good. The only thing that's
not attached is this top bit to this bobt, but because it's mele, we should be able to
get away with that. Alright, so now let's think
about creating the stone. So I'm going to break
this into parts. So first of all, though, I
want to grab this, this, this, and then press Control J, double tap the A, and we
should be left with that. And we can also see
that we do have some problems in the
shading on this glass, on this bit in particular. And that's caused by we've
got a load of actual edges, sorry, verts on here. So let's try and fix that. So what I'll do is I'll grab this and I'll triangulate it. So triangulate faces, press
the tab, and there you go. Now you can see it's
actually fixed. So what was causing
that was the fact, you can see, as
well the triangles. Actually, it's still not fixed, I would say. It's
still not fixed. It's still having some issues. So let's try instead of that, let's go with tries to quads. And see if we fix
that any better. I would say it's still
not quite fixed. And what's causing it is because we've beveled it
round this part here, so you can see this bevel here. That is what's
causing the issues. If I press Y, you will
see now that we haven't got any of those
problems with it. But the problem is with pressing Y is it's not joined anymore. So all I can do is I can
come in and press let and let it to dissolve.
It's not joined anymore. It looks really nice, but it's not actually joined, which might cause
issues when it comes to creating or glass. Well, it will cause issues, because if I drop glass on here, so what I'm going to do
is I'm just going to go back before I
actually split it up. So let's just go back. There we go. Now it's actually together. And instead of doing that, I'll just show you
exactly what I mean. So if I come in, I'll
grab this one here, I'll press Control L, and I'm going to link materials, and then I'm going to
come into this top one, and I'm going to assign
it the glass like so. Now, it's a sinned
glass like so. If I grab now don't press Y, hide it out the way, you can
see it changes slightly. Now, you know what? It's not changed enough
where I'm thinking, you know, I shouldn't
have done that. So let's just press
the limit to dissolve. And you know what? That's
looking pretty nice. Now, what I'm going
to do is I'm going to try now grabbing all of these, so I'll grab all of
these coming down. And we'll just see if
I can get this glass right before anything else. And I'll click a sign. And then what I'll do is
I'll press you and Unwrap. You know what? Let's put
it onto rendered view. There we go. You know what? That's looking pretty
good. Okay, let's come in and hide
those out of the way, and then we'll grab
each of these. So L and L, and I'll press you. Smart UV project, click wrap. Metal building, click a sign. And you can see we've also got looks like some issues
on this part here. So what I'm going to do
is I'm just gonna go in, right click and shade flat. And there we go. That's
looking pretty good. Albeit, is this one as
well causing the issue? So I'm going to go in,
right click, Shade flat. No, it's just the
light, as you can see. So it's yours, the light. I come down here. S
the light coming in. You know what, though,
I'm just wondering if these parts here, are they actually connected? Because I want to make
sure it is connected. I'm just wondering
if it's, like, not flat or if it's
cause it's poking out or the light is a little
bit different on here. And I'm just wondering what
is actually causing that. So if I come in and pull it out, you can see it's a
little bit darker than these parts here.
Let's pull it back. Let's pull it back now. Let's right click
and Shade Smooth. Right, click, shade flat. Let's press Delete and limit to dissolve. And no,
that's still it. So I'm just wondering if it's because of where the
light is bouncing from. Now, the one thing we have
forgot, as well, of course, is this chunk on here, which
I completely forgot about. But the more concerning
point to me is fixing this issue
with the light. So what I'll do on
the next lesson? I'll try and figure out
what's going on here, and then we should be
able to get that fixed. Alright, everyone, so I hope you enjoyed that, and I'll
see you in the next one. Thanks a lot. Bye bye. Oh
58. Completing Arched Window with Frame and Concrete Decor: Welcome back, everyone to blend
the building master class from concept to final render, and this is where
we left it off. Well, we didn't leave
it off quite here. We left it off on this, where we've got this kind of problem here with
the extra metal. And good news. After a lot of, you know, trial and error, I have actually found
what the issue is. So what I'm gonna do,
first of all, though, let's shade it flat because it doesn't
look right like that. So I'm just gonna
grab it all going around there, right click, and then what we're
gonna do is tries to not tries to quad. Not tries to quad. We're gonna come down shade
flat. There we go. Now it already looks better. Now I want to do is I want
to come in to my glass. So let's sort the
glass out first. And then I can show you exactly what the
issue is on there. The other thing is, just
make sure you can see here that this is glass. I don't really want
that as glass. So what we'll do is we'll
just come into these. And what I'm going to
do is just unwrap them. So unwrap, like so. And now you can see they're
roughly the same size as those, so they're great. So now I can do is I can
grab all of this now. So all of these going
all the way around, U, smart UV project, click Okay, and then they'll just make sure they're all the right size. Then what we'll do is we'll
come now to these parts here. So I'm going to come
into these parts here. If they're not showing up, just press L TH,
and there we go. Now I can do is I can press, smart UV project, click Okay. And then what I can do
is I'm coming over now, and we want this on
maybe Stone lighter. So let's click a sign. And then let's come to this one here. So all of these, we're going to unwrap them,
including this one here. I'm going to press U, Smart
UV project, click Okay. And then what I'm going
to do is stone Light, click a sign, and there we go. Now I can see that I've not
actually unwrapped that one, so maybe I should come in and
grab them all. Like this. I'm hoping that I've
actually grabbed that one because I can see it doesn't look
like I've grabbed it, so I'll have a look
at that in a minute. Smart U Vp jerk. Click Okay. And we can see that this one for some reason, isn't
being grabbed. So let's just press
G. It looks like it's not part of all of this, the
way that I've pulled it out. So instead of doing that, I'll
just grab it come in here, grab it come in here, and
then come in. Edge select. So L, on here, here, and here. And honestly, guys, it's
not like you're never going to have problems unwrapping things because you always will. So kind of get used to it
because this is the norm. So now we can see this is a little bit lighter
on the inside. This is darker on the outside, and then we've got our metal in there, our glass in there. Everything is nearly fixed except we've not got
that chunk in there. We'll do that in a
minute. First of all, though I want to show you what's going on with this glass. The reason why it's like that is because this is a
separate part to this, and it's based on normal. So you will see that if we go to shade we put it onto
our rendered view. We make sure that we're
on our metal, so metal. And we can see it's a fairly,
fairly complex shader. And one of the things
with shaders is the more complex
complexity you add to it, the more problems you
can actually have. So that's one of the things that we need to sort out here. Now, I'm not sure whether
when I came in here, did I actually unwrap
it let's have a look. Yours looking. Yeah, it is
different, so that's okay. But if I come down,
and put it here. If I come down to
where it says normal. So base metal normal. This is actually set too
high, so way way too high. So let's just turn it down. And you'll see, as I
start turning that down, it all starts to come to
the same color. So no 0.3. There's no reason why
we'd need that on, you know, higher anyway. Now, of course, this will
affect all of our metal, whatever we've got in here
right across the board. You can still see
there's a slight slight variation in there, but nothing like it was before. So only if you come up
here, if I turn this down, let's say to not 0.1, and now you can
see, there's hardly any difference if I go
up or if I come down. And that's exactly
what it. Alright, so we've still got that
shine on there. We've got a little
bit of normal on there from these kind of bands. Now, one thing I can
see with this metal is, as well, while I'm here,
I'll select one of them. So I'm going to face
select, select one of them. And then what I'm going to do is I'm going to go to select, and I want to select
similar based on material. What I'm going to do
is I'm just going to either make it a
little bit smaller. So if I make it a little
bit smaller, like so, and now you can see that these scratches and bumps
and things like that, they're not not so well, they are more profound, but
they're not so repeating. Let's see if I bring it out,
you'll see what I mean. If I bring out like that,
you can see the repeating. Press control, put it back in. You'll see now they're not
so repeating like there was. You've also got a lot
of controls on here, which can bring down the
actual metal chip strength, metal scratch strength. You can see all of
these things here. So it can actually come in, turn all of these
down, as you can see. So I don't need
it quite so high. So if I want to bring this
down just a little bit, and that's looking much,
much better already. I think, yeah, we're
going to go with that. Because we are going to be adding metal onto other things. It's not like we're
going to be doing that. Okay, so now let's
go back to modeling. And what we've got now we should have if I go back to object, I should have all of
this put together. So I'm just wondering if all of this is one part, which it is. So now let's go to our
reference quickly. So open up our reference. Here is the bit now want to do. So I want to create kind of
this bit going into here, not quite to the male just into the top of there, I think. So what we'll do
is we'll come in. Cursor is in the center, so shift a mesh, cube. That's a plane. So shift A, mesh, cube, bring it up. And it's funny that
this is the last one, and we had all these
problems with it, but it's honestly bed guys, if we have problems now, so I can actually show you
the solutions to them. So S and X, rather than just going through
a course where there's never any problems because
it's just not realistic. And then what we'll do is we'll
bevel off this part here. So what I'm going to
do is I'm going to come in, grab this part, press Control B, bevel it off, bring it round, like so. And then I'm just going to
go to my custom, like so. And the custom was already
set from what we had before. And you know what?
I already looks. I already like the way it
looks, so I'm happy with that. The one thing is, it's
a little bit too thick, so I'm just going to
press Nx, bring it down, and maybe it's a
little bit To blow. So, something like that,
does that look good? And, yeah, I think it does. This is going to be
stuck in the world. Maybe maybe it's a
little bit too far, so we'll just pull it back
a little bit, like so. And then what we'll do is
we'll join it to this. So Control J, join it together. Then we've got our devil on. And finally, finally, let's just see what material
it's got on there, 'cause I don't even
know. So let's press L. Come down, and we'll
minus this one off. Can't minus it off in edit
mode, so we'll come up. We'll go for stone light.
We'll click a sign. And then what I'll do
is I'll press Tab. Come on down to this one here. This is basically a material
that's not being used. So we'll just minus it off
and keep everything tidy. And there we go. That is
looking very, very nice. Now, the thing is, is this a little bit
too much for this? You know, it's a
little bit more stone, you can see in our
rendered view, anyway, doesn't quite
look like this one. So what I'm going to do is
I'm just going to press U, smart UV project because I don't even think
I unwrapped it. And then what I'm going to
do is go to the UV map, press the Abn, bring it in. Go back to modeling,
and I think that might be in Is that
gonna be enough? Let's have a look? Yeah,
it looks about right. Alright, finally, right
click, shade or smooth. And then I just want to come in now because
I've shaded smooth for this and just come in and
finally shave flat on here. Now, shade, where is it? Shade flat? And there we go.
Alright, wonderful. That is looking
really, really nice. Just make sure, then that
I've got all of these now. So I'm going to pull this over, zoom this out, pull
it to the side, put my reference back, like so, Alright, so these
are the three we've got, so we've got this one here. You can see pretty much
they're for light. We've got this one here, a
little bit tiny different. You can see just how easy
it is to get, you know, these kind of details and
things like that in now, you could change these quite easily to be whatever
you want them to be. The only thing is, I
would say, there's a big difference between
the dark and the light. That's maybe something we want to think about
in the future. We've got them both
set up so that when we bring them in to Blender, we can actually easily
make them dark or lighter. So what we're going
to do now then on the next one is we're going to create
this window here because, you know, we've already
created these windows. We might as well create
the last window. So let's actually create
this window here, and then from there, all
of our windows are done. And then from there,
what we can do is, if I come back, we can
come then to this part, stick our windows in where
they're actually going to go, and then we can actually put
all this together, you know, all of these parts
we can put together, and we can go back
in then and actually start building out
a lot more parts. Alright, everyone, so I hope you enjoyed that, and I'll
see you in the next one. Thanks a lot. Bye bye.
59. Modeling a Radial Symmetry Window for Stylized Designs: Welcome back, everyone
to blend of building, master class from concept to final render, and this
is where we left off. So, this is the one that
we want to create now. There's many, many ways of
creating this but I want to show you the easiest
way of doing this. So again, we break this down. So we need this center bit, and then we need this
outside bit along here. From there, then we're going
to build this part along here and then find this
outer rim on here. So let's actually
have a go that now. First of all, then,
let's actually move these out the way. Let's put it on object mode so we can actually
see what I'm doing. Make sure your work is safe because you don't
actually lose anything. Just go to put these
windows back there. And then what I'm
going to do is I'm going to go over the top. I'm going to move
my guy over here. I'm going to press Shift A, and I want to bring in
a let's go to curve, and we want to bring
in a no, not curves. We want to actually bring
in the mesh and the circle. Let's bring in a circle.
And what we'll do is we'll put that onto 16 so and then what you
want to do is you want to pull this up here
and you want to rotate it. So you want to set
the orientation to somewhere around here. So right click to the
center, actually, set origin, two, three D cursor. Then what we want to do
is we want to rotate this round because now we've
got the orientation there. We can rotate it around here. So what I'm going to
do is then going to press Shift D and then R Z 72, like so, and then Shift D. A Z, 72 and then shifty z 72, like so, and then shifty Z, 72. And we should end up with
something like this. And you can see already we're starting now to get
exactly what we wanted, so we're starting to, you
know, get all these parts. So what I want to do now is join these two together.
So I'm going to come in. I'm going to join
these together now. So press Control J, join them all together. We're not
worrying about scale. By the way, you can see
this as massive of them. We're not worried
about that right now. What we want to do now is
coming in, 70 over the top. Come to my vertex
select and grab these. And what I'm going
to do is press M, and I want to join
them at the center. So merge at the center.
Come to these two. And rather than pressing
M and merge at center, just press Shift R, and it's just going to repeat
the last move that we did. Same again on this one. Just make sure, though, you're
doing it from the inside. You could come all
the way to here, but it makes no sense. So shift R, always
on the inside. So the closest one
to the outer part. So Shift R like so, and then we're going
to do is these two, shift R, like so. Now I want to do is you want to actually delete all of these. So if I come in and I press C, you can see it's easier to select with C.
Select one of these, press the C button, and all I'm going to
do now is come all the way all down to here, all down to here, all
down to here, like so. And with the C button, it's basically a circle select. You can move your mouse
wheel out, and in like so, and to get it off, you just
press clip. Just like that. Alright, and then what we
can do is we can press delete and we're going
to dissolve edges. Nope, let's try different one. So let's try
instead of that. Let's dissolve ertzes No, because I don't want to
leave this space here, so I'm just going to come in and dissolve or delete
edges. There we go. Or let's try delete vertes
see if that works better. And finally, there we go. So you can see now we've
got the space that we want. Now, what I'm also going
to do is I want to make sure this is a little bit
more squared than what it is, because at the moment,
it's a very sharp edge. I don't really want that. So what I'm going to do
is I'm just going to grab all of these, and I'm going to
press Control, Shift, and B, and I should then
be able to bevel it off. Now I'm going to
bring it back, so it bevels it off nice
and straight for me, as you can see, so
I've brought one in. I'm just going to
bevel it off very slightly just so
we've got a hard edge there because we
don't want to end in a really, really hard edge. Now I want to do
is I want to bring a circle that's
going to go around the outside so I can join
all of these up together. So what I'm going to do is, I'm just going to press Shift A, I'm going to bring in a circle. It's got 16 on it a moment. Maybe maybe I'm going to
need a few more edges to actually get this shape
that I actually want. So what I'm going to do
is I'm going to put this on 30, and then I'm
going to pull it out. So I'm going to pull it to where I want the
actual rim to be. So maybe maybe
something like this. Now let's see if we can
actually get these joined up. So we're going to try and bridge all of these in some way. So what I'm going to
do is I'm going to grab this one and this one. I'm hoping that if we come down now to bridge edge
loops, is that going to work? And there we go. We've
bridged the edge loops. Let's press Dot, go seven over
the top, and there we go. Now we can see this is
looking pretty nice. Now, the other thing
from here, what I tend to do is
I'll press delete, and I'm going to go down
to Limited Dissolve. And you can also do it that way. Let's go back
though and show you a different way
instead of doing that. So what I'm going to do
instead is I'm going to press te fill them in like so,
you can do it that way, or you can go F and
fill them in like that, and that is the worst
way of doing it, because obviously
it's not working. So what we'll do instead is, I'm just wondering the
best way to do this is going to be probably old F. I'm going to
fill it in like that. I think that's going
to work much better. Shift in then because we can see they're the
wrong way round, put it to the inside,
and there we go. Alright, that is that part done, and you can see just
how easy that was. Now, one thing I do
want to do is I've got control right now of the
outer and the inner. So while I've got
the control of this, what I'm going to do
is I'm going to grab this part all the
way around here, I can press the S bone
and bring it in like so. Then what I'm going to do
is I'm going to press E, enter, S, and pull this one out. And then finally, what
I'm going to do is just drop this
down a little bit. So making a little
bit of a rim like so, and that then, if I right click, shade smooth, makes it
just that slight bit bent, and I like the
actual look of that. Okay, again, we're not worrying
about scale right now. We want to move our guy over let's make now the
next actual pot. So if I go over
the top, this part will be separated from this. So what I'm going to do is I'm just going to
go over the top. I'm going to press Shift A
and bring in another circle. And this time, we'll put this onto Let's actually have a look. So how many have we gone here? So you can see one,
two, three, four, five, six, seven, eight, nine, ten, 11, 12. So 12 on the outside
and on the inside, I think we'll put
it slightly higher. So what we'll do
on the inside is, we'll have this on 24. So 24 on the inside. So let's bring this out.
So S, bring it out. And remember, we've got
no thickness on here yet, so just remember that we
need some thickness on here. And then what I want
to do is I want to now come to this and
bring it in to this part. So I'm going to press tab, and
then I'm going to press E, enter S, and bring it in. Is that actually on there? I'm actually extruding on there. Let's have a look. So E, yes, I'm extruding on that part. So let's see if I can
actually extrude E, to S. There we go.
Now it's wigging. I have no idea why it
didn't wear it before, so S, bring it in. Like so, and I think it's
a little bit too white. I'm going to grab the
outside. S, bring it in. So. And now we're on the final bit. So the final bit on the
outside is going to be 12. So I'm going to press Shift A, bring in Shift A, bring in another circle. And on this one, we're
going to put it on to 12. And then we're going to bring
it out. So S, bring it out. And if you're not happy with it, just make sure you go
a few more because I think maybe maybe this is not enough. So you know
what I'm going to do? I'm going to put this on 16. And then I'm going to
try bringing it out, and I think that's
going to look much, much better from there. So I'm going to put it around about just on there
look like so. And then what I'm going to
do is I'm going to press tab, I'm going to press E, enter S, and pull it out to make that stone part that's going to go
around there, like so. Then I'm going to press A,
shift and N, spin it around. And there we go. Now,
the last bids before, I don't want this flat. I
don't just want it flat. So what I'm going to do is
before doing anything else, I'm just going to come
to the backup here. So I'm going to grab this side here going all the way around, and then I'm just going
to pull it back like so. So now you can see, it's
looking pretty nice. And now what we can
do is we can actually work on actually
solidifying this. So first of all, we'll
come to this part here. We'll press Control
A, all transform, set origin, two geometry, adding a modifier, and
the modifier we're going to generate is going
to be a solidify. Then what I'm going
to do is I'm going to actually bring it out
a little bit more. So bring it out a
little bit more. To the thickness that
we actually want it. So yeah, something like this. And then what I'm going to do is I'm going to grab this one, this one, and finally this one, peruse Control L. So Control L, and I'm going to copy
modifiers like so. Now, you can see that we've
got some problems in these. First of all, we'll come
to this one Control A, all transforms, set
origin to geometry, making sure even
thickness is on, to this one, Control A, all transforms, set
origin to geometry, making sure even
thickness is on. And now you can see that's
looking much, much better. Albeit, this one should
be a little bit thicker, so I'm going to make this
one a little bit thicker. And then what I'm
going to do is now I'm going to pull both of these out. So I'm going to
grab this on this, pull them out, like
so, and then this, I'm going to pull out even more, like so, or I'm going to drop it back and
pull it out to here. Maybe something like that
looks better. You know what? I actually think that
is looking better. And finally, then I'll
just grab the whole thing, bring it up, rotate it round. So X, 90, rotate it round. And then now I want to have it, you know, gain the right skill. So basically, I want it to be about on this one
from here to here. So it's still a big window. So if I grab this one,
shifty, bring it over. It's still a big window, and you can also see I'm not happy with the
actual back of you. You can see that
when I've actually extruded it because
of the angle, I need to now come in before doing anything else
and bring these out. So I'm going to
actually do that. I can also see, do I want I want this
dropping back, actually. I want this dropping
back because I'm not sure about
that edge on there. So, you know what? I'm going to pull it back before doing that. Holding the shift bon, double tapping the eye,
and there we go. Now, these stones are
going to be split. I also need to pull this back
a little bit into there. So. And then finally, we're going to grab
all of them, right click and shade Auto smooth. Now, I can see we do
have a problem in that it seems a
little bit small, so you can see here.
It's not quite in there. I press one, let's have a look. I press one on my number pad. This looks it doesn't look
like it's in there properly. Let's have a look. Maybe it is maybe it's the
angle I'm looking at. Is one of these a
little bit out? I think one of these
is a little bit out. So you know what? We'll sort
that out on the next lesson. So sorry about that. I've
done what I've done. I can see it's a little bit out from the
top and the bottom. It's not centered properly. But you know what, we'll
get all of that sorted. And again, mistakes happen. It's the best thing that can happen because it's only through the mistakes that you make we actually get any bear,
we learn something. You're not gonna learn
anything if you're just going along and everything
just works out perfectly. You're never
gonna learn anything. You're never gonna
get any bear, so mistakes are the best
thing that can happen. Alright, everyone, so I
hope you enjoyed that. I'll see you in the next
one. Thanks a lot. Bye bye.
60. Finalizing Radial Window and Unwrapping Roof Supports: Welcome back everyone to blend
the building master class from concept to final render, and this is where
we left you off. Alright, so what
I'm going to do is I'm just going to
grab everything, Control A, or transform, set origin to geometry. And now, basically I
want to put them all in the center. So shift Des. Don't go selections cursor
I line everything up. But if you go the
other way, so shifts. Whoops. Let's go back, Shift S and selections
cursor, keep offset. We don't want that because then it'll just put them
to the center, but keep everything
offset to the middle one. So we want to do
selections cursor, and then you can see it's
going to line everything up. Now, on this, now, what I
want to do is sort these out. So first of all,
I'm going to pull this and then second of all, do I want to pull this back
a little bit, like so. Alright, so let's start now working on a little bit
more on the inside. Let's come in first of all,
and I'll show you how you can apply these solidify
to all of these. So if I come to this one,
this one, and this one, go to object, I can convert a mole to mesh
at the same time. And as you can see,
there's converted a mole. And then what I want to do now is work on this part first. So we can see if
we go over here, all of these are actually split. So let's do that first.
So what I'll do it. First of all, I can join them together at this
point, no problem. So let's join them all
together with Control J. And then what we'll do
is add in a modifier, generate, and we'll
generate a bevel. Control A or transforms right
clicks origin to geometry. And what I want to do
now is put this on Notepoinnn three.
Let's try that. Or Note point, not not
five. Let's try that. I think Notepoint not not five might be a little
bit better for us. We've got no gaps in
there at the moment. I can see, though, if I come to this, so let's
actually have a look, put on our See
through transparency. Yeah, they're easily in
there, so that's no problem. Alright, so what I want to do now is pull these out
because obviously, these aren't right. Press one. I should then be able
to see through again, and I should be able to
press S and pull them out, so they're slightly
bigger than the outside. So they should look
something like that, and I think that's
looking much much better. And then what I want to
do is split these up. We have a number of
options splitting them up, but I find
the easiest way. Al, shift, click,
Alt Shift, click, Al, shift, click, go
around, Alt Shift, click, every other one, like so, press the Y but, and then
they're now split up. Now, the one problem we've got is we can see that
they're split up, but they're not
bevelled or anything. And the reason is because each of these, if I pull this out, you can see if I put it here, it's got a hole there. We
don't really want that. If we put a hole on this, so let me just show
you put fill that up with F. Now you can see it's actually beveled
off looking much, much nicer. So how
do we do that? Well, the easiest
way of doing that is just to grab everything, come up to mesh,
go up to cleanup, and all you're going
to do is fill holes. Fill the holes, right click. So tab, right click and Shade
Smooth, and there you go. That's how you get that sort of style that we've
got on the window. Finally, then, you want to now put the inner part in,
easiest part to do. So all I'm going
to do is come in. Li click. You know what? A I'll do is I'll just
add in an edge loop. So control lot, left
click, pull it back, like so, press the F button, and there we go,
that's that part in. So there's the actual
glass in really, really easy to do. And also, what you can do
is you can actually come in and pull it forward a
little bit if you wanted to, because now you can just come in and grab that
part, as you can see. So really, really
easy to do this. And now I want to do
is we want to bring in some materials and make
it the right side. So I'm going to, um,
bring this over. So if I bring this one over, so put it round about here, and then what I can do
is I can line this up, press the S board and
bring it all the way down. And the size that I
want it is going to be maybe even a little
bit smaller on that, so let's make it a
little bit smaller. Or something like
this, you can see, it's just fitting over
this window roughly. So something like this size,
I think is about right. Let's delete this
one out of the way. And then all I'll do is now
I'll bring in the materials separately because these have got a lot of materials
on I don't want, like, loads of wood, loads of different stone,
things like this. So what I'm going to do is
I'm just going to come in. And I'm going to come into
all of this part first. I'm going to press tab A, smart UV project, click Okay, and then I'm going to
go to my materials, click the down
one, and the one I want is stone light. I'm
going to bring that in. And then finally, I'm going
to come to this part here, and I'm going to put
this on plus down arrow, and the one we want is
glass green, click Assign. So I can see that's way too big. Unwrap. Now it's the right
size, as you can see. And finally, finally,
this one here, plus down arrow, stone lighter, click Assign. And there we go. That is, this part done. Now, the one thing I'm not
happy with these stones, you can only just see them,
and I'm not happy with those. So what I'm going to do
is I'm just going to come in and grab each of these, and I just want to make them
a little bit smaller just to give us a little bit more
of a gap going round. So jaws gonna grab them, making sure then I'm
on individual origins, pressing the S borne and I should be able to
then bring them in. Now, the other thing is,
I've got my bevel on. Is that actual bevel
working on there? Not really, not so much. So what I'm going to do is, I'm just going to
press Control A, A transform set
origin to geometry. And now that bevel is working much, much better,
as you can see. The bricks are now
really standing out. We've got light
and dark in there. And this, basically,
guys, is the window done. So now I can pull this over
there, and there we go. Finally, all of
the windows done. Let's just line them up, like so. So what
have we done then? So we've got the
four windows down, we've got the roofs down,
we've got all of these in. Let's actually sort these out. So this, of course,
is going to be stone. We also need to put
on here a array. So let's put the array on. Again, we'll go to object mode. Let's pull it over. So this
will be the stone roof. So let's do that
first. So Control A will transform set
origin to geometry, and then what we'll do
is we'll come add in a modifier and
genera and an array. And we don't want to go
in that way, of course, so we want to zero this out
because this is on the X, and we want to put
the z onto one. No, not the z, the Y onto
one, and there we go. Now we've got that looking
really, really nice. Now, the only problem
with this is, as well, we've got no, um, modifiers on here, we've
got a bevel on here. So what I'm going to do is I'm
going to come to this one, this one, this one, and I've got a bevel and I've got an array on this one
as well, which is fine. You know what I'm going
to do? I'm just going to come in, add in a modify, generate a bevel, and I'll put it on note
point no no three. If you come down, note point, not not three, there we go. And then we'll come to this
one, do the same thing. So I'll add on a bevel and we'll put this one
again on note point, not not three, and there we
go a slight bevel on there. Okay, so on this one,
then we can come in now, hide the array, hide
it on the render. And now let's come
in and actually see what needs unwrapping. So if I come onto here,
let's have a look at what we've unwrapped
because I'm not sure anymore. So we'll unwrap this one first. So A, U, smart UV
project, unwrap. And then what we'll
do is now we'll copy this material
over here first. So we'll grab all
three of these, actually, Control L, and
we'll link materials. And then for this one here, we'll come in two
materials plus down arrow, and the one we want
is metal building. And then we're just going
to on this part here. So on this part, we're going
to click a sign like so, and then now we're going to move over to we'll do the
same on this SR press. A U, smart UV project. Click Okay. Like so. Now we need to do is obviously, we need to grab both of these, so we need to grab this one
and this one, grabbing this, this and this and go over to UVditing and making
sure that if I zoom in, put it on material that they look something like this
because at the moment, let's put it on rendered view. At the moment, they look a little bit too heavy
as you can see. So all I'm going to do is A, S, bring them down, and then we go, Nah they're looking much,
much better as you can see. Alright, there we go. And
that metal looks really nice. It's going to look really
nice on top of our building. So if I bring this over, you can see that
what we've created now is we've created all
of these parts here. We've created the window here, the window here, and
we've created this part. Pretty much most of
this part on here, we've created these top parts, we've created this part here. What we've got to create
now is part of this. So we also need to
create part of this, which we'll do we'll do next, actually, we'll grab
that from our gray box. And then we'll bring
that in. And then what we'll do is we'll
work on this bit. So we'll need to put
these windows in. So one of them is
stuck on the outside, one of them the inside, and then that will help us then when we come to build everything out. Alright, everyone. So let's actually do that on
the next lesson. So for now, I want you through, then we just go
back to modeling. When you to save it
out, so file, save. And on the next one,
before moving into that, what we'll do is we'll actually
save out these windows. In other words, we'll put
them in the asset manager, we'll name them all
of that good stuff. Then what we'll do is we'll open up our gray box once more. We'll grab the actual the wall where it
goes up to the roof, and then we'll make those side bits that go on top of the roof. Alright, everyone, so I
hope you enjoyed that. I'll see you on the next one. Thanks a lot. Bye bye.
61. Brick Wall Detailing with Orientation Tools: Welcome back, if
you want to blend the building master class
from concept to final render, and this is where we left off. Alright, so this one
is our roof support. So we've already put
that one in place. I'm not sure. Is it? Yes, it is. It's already in our asset
manager. This one is our Spire. We haven't got that one in, and we certainly have
got this one in. So this one here we'll
rename, we'll press F two, and we'll call it roof top. Like so, and then
we'll actually make one for roofs. So we
can have rooftop. We can have the roofs in
there, things like that. So what we'll do is
press M, New collection, and we'll call it roofs. Like so. Then what
we'll do is we'll call it decorative parts, maybe, something like that. So we'll call this spire. So spire. And then
we'll press M and decorative decorative
parts. Like so. Alright, now we'll
go to our windows. Then we'll put them
into our asset manager. So we can see we've got
all of these things here. A four, so let's go one, two. Where is the other one? Okay, so there are those ones over there, so no want
to worry about those. Alright, so let's put
this in square window, so first of all, we'll go new collection
windows and then we'll come to this one and we'll put square because you might add
more windows in here, so we'll call it square
double pane window. Then we'll have
round small window. So F two, round
small arched window. I'm going to press Control A, Control C on this one. Press the enter bone.
Then I'll come to this one F two, Control V, round large arched window, press the enter bone, and
then we'll come to this one, and we'll call it a small
round Gothic window. So control V. So round, small Gothic Gothic. Window. Like so. Now, let's grab
all four of these, press the end button, come down and drop them in
Windows, and there we go. Now what we can do is we
can actually come in, so we've got roof, roof top. That's that one Spire
and then these four. So let's actually fix those now. So we're gonna come
over to Asset Manager. Let's come over to current file. Let's save our work before doing anything. And let's
zoom into them. Now, one thing I did forget before we do that,
yes, no, I have not. I've not forgot. We actually put some materials on
them, so that's okay. So what we'll do now
is we'll come in, grab all four of these. Press a little dub
on, right click. Mark as asset, make a new one. We'll call it Windows. Like so, and we'll come in then and
drop these into there. Now, this one's unassigned, so we'll drop these
into Windows first. And then we've got
this one here, which is the support roof.
Haver got anything in there? No, I've not, so let's
drop that in support roof. And then finally, we've got decorative pots,
so we'll make one. Double click it
decorative pots. Like so. And then we've got this
one which is under roofs, so we can call we've
got support roof, so we'll have one
actually called roof, so we'll come in roofs. Like so. Now, let's see. So we've got this one in here. This one's already,
as you can see, we've got a little icon there. This one hasn't,
so we're going to right click Markers asset, and this one also has an
right click Markers asset. Go down to unassigned, and then this one is
going to be in roofs, and this one is going to
be in decorative pots. Like, so let's come
up then and save. So let's go to file
and save it out. And now I want to do is I want
to go over to my gray box, and I want to grab the other bit to the roof. So the bigger bit. Because we've already
got these parts in. From there, what I can do
is I can come in then and actually create these parts that are going to go down to
the other part of the roof. And then what I can
do is the window, get the window in this part, replace these, you
know, this part here. We can even turn this already into mesh.
Let's have a look. It's got the jumpon at the
moment, turn it into mesh. Let me just check
something on here. So if I bring that down,
yes, I can do that. Okay, that's perfect. And then we can actually get our windows in and then have this big
chunk as an actual part. That'll make things
much, much easier. The only thing is, I
would say is the wall, but we can actually change
that over as we go along. So I'm just wondering
with the materials, I just want to check, see
what the material looks like. We should have two
materials on here. So you know what I'm
gonna do. I'm just going to go to resource pack, go to materials and just
want to look at my brick. I want to look at what the brick looks like when I get on there. So this is the grungy brick. You can see we've got a lot of then we've got
dirt. Look at that. Yeah, that one looks
quite a bit different. And then, obviously, we've
got our brick normal. I think what we'll do is
we'll leave it for now, and then we'll come in and fix
those bits way later on in the course if we want
to because there are ways to fix those
to make them look very, very nice. What
am I going to do? Then I'm just going
to save this out, so everything's saved out. I'm then go to hop back in. I'm gonna put it
on too jet mode. Hop back into my other file, and the other file is
the gray box here. And what I want to do is,
this is the bit here. So you can see this
bit and this bit. So this is going to
kind of slot on there, and then you've got a
bit that's going to come down and go
into these parts. So what I'm going
to do is I'm going to grab all of these. I'm going to make sure
then if I press G, I've got all of the parts, except this front
bit, so I'm going to grab all of these parts like so. And this is where I want to
make this part going up here. So what I'm going to do
is I'm just going to press Shift D, bring them over, press Control J, join
them all together, and then I'm going
to press Control C, go back to my other file. So this one here,
and then I'm going to press Control V, bring it in, and then back to my other file, and then all I'm going
to do is just delete this out of the way because I'm not going to
need it anymore. Okay, so now I can
actually save that, close it down if I want to.
I'm not going to do that. All I'm going to do
is open this up. Now, if I come in, I
can press Control A or transforms set
origin to geometry. I'm also now going to
just move these out of the way a little
bit more, like so. We don't need to know
worry where we're putting in this course file. And then what I'm going to
do is come back to this. So control layer transform
set origin to geometry, so z -90, spin it round, and then let's bring
it up to here. So just so we know what
we're actually working with. So then if I press one, I can see this is what I'm
actually working with. So this is going to
be the front of here, so a little bit lower,
as you can see. And then we've got the
frontier coming down to here. And so what we need
to do is we need a part that's going to
come all the way up there. Alright, so let's
do that part next. Now, we can't have it the same, obviously, it's
just a little part. The thing is with those parses, you need to kind of
move them up and down. So that's something
we need to think of. Some of these might
be longer, shorter. So this is where I can show you another thing that
you can actually do, especially when it
comes to UV editing. Now, what we'll do
then is we'll come to this building and I want to
grab this edge, first of all. So if I grab this edge, I should then be able to press
Shift D and drag it out. So that's that edge
there. And then what I'll do from there is I'll press Y and pull
it over, like so. And now I'm going to
do is I'm just going to because I've
actually got it here, I'm going to split it off. So L, P, selection, grab it again, control A, all transform, set
origin to geometry. Now, I'm not going
to spin it round yet. I know it's
going the wrong way. I am going to go to
modeling though, because it is going to
make it easier for me. So let's go back to modeling. Let's press the dot bone
so it can zoom into it. So grab it here. Dot bon. And then what I'm going to do
is I'm going to come over. I modify, and we're going
to generate a solidify. So generate a solidify
and let's bring it up. And now what I'm
going to do is I'm going to bring this into place. So if I bring this into place, you know what, it's
going to be easier because we've got
this part on here. So I'm going to I'm going
to leave it there for now. And what I'm going to do is I'm actually going to
drag this part over. So I'm just going to
grab all of this. I want to press
shifty. I'm going to delete it after anyway,
so don't worry. And I'm just going to put it in right in the center of this. So if I press one, let's
make sure it's centered, so I can see here
it's a bit out there. Let's make sure it's
centered, like so. And then what I'll do is,
I'll pull it back into place. So pull it back, pull it back. Let's put it on object
mode, and there we go. Now, we can see that now with this, how it's
going to fit in. So you can see that it needs probably a little bit thinner. So S and Y, let's make it a
little bit thinner. And then what we can
do is we can make sure if we come around this way, we need to make sure that
it's out enough here. So you can see out enough
here. Fitting in there. We don't want it going
over there, though. Now, the other thing
is, you can see at the moment it's
sticking through here. That's to do with the thickness. So let's put it on
even thickness. Let's pull it back
down a little bit, and now you can see it's
fitting in very, very nicely. Now, some of these roofs
are going to be, you know, a lot thinner, some of them are a bit wider,
things like that. So we just need to
be aware of that. But what I'm going to
do, I basically got it in place now where it's
actually going into here, maybe maybe it's going into
place a little bit too far. It is fitting under there, so maybe I just need
to pull this up. So that's the perfect time to actually show you
this next part. So what I'm going to do now, because I've duplicated that, put it over there, I'm
just going to come in and delete this
off. So delete this. Delete these, delete these, and maybe even Leave
this one behind it, so delete in this off as well. Okay, this is the part then. So this is the part
we're going to use. Now, the thing is, as I said, it's a little bit far that way, but first of all,
let's unwrap it. And we'll also give it, obviously, apply the solidify. Control A, and then
we'll go Control A or transforms set
origin to geometry. Adding a modifier and the modifier we're going
to generate is a bevel, not point, not three, so press the tab A U
smart U V project, click Okay, and there we
go. Bring in the material. So we want to bring
in none of these. So we don't want any of these. Stone light, Oh, one,
we don't want that. What we want is stone. Where is it Stone Light. So we've got Stone Light.
Let's bring that in. Let's press Tab U and
smart UV project. So smart UV project. Click Okay. And then what I'll
do is, I'll actually go now and look at
what this looks like. So let's press tab.
You know what? That's looking pretty
good as it is. Now, I'll show you
what I mean then. So you can actually come over here and let me just find it. If I go in, grab this, if I go into it, you will see that you've
got these on here. So this is mirroring. You've got this
button here where it says, correct face attribute. Let's just turn
that off a minute. It will be turned off
probably by default. If I come in then to this face, and I want to bring
this face down. So if I want to bring it down, you know, within my own,
you know, my other blend, far a grey box and bring
it down and make it work, the UVs are going to move. If I go to normal, you will see as I
bring this down. That all of these UVs
move along with it. They all get stretched
out. We don't want that. So just coming up, clicking this on means now if I move this, up and down, it's
actually not doing. What I want. It should actually move the UVs without
actually making them small. It should just cut it away. I'm just looking if it actually is working or if it's just me, let's have a look yes, it's keeping the UVs on top. You can see here it's
actually keeping them. What's happening is all it's moving underneath
is the actual edge. So the edge is changing. But the actual UVs
themselves, as you can see, these actual dart marks are
actually staying the same. So it's actually working.
So that's one little trick. It's probably easier to do or show you on the wall.
So, you know what? Rather than show you here, I'll show you on the wall
on the next lesson, and then you'll see exactly
what I'm talking about, cause here it just
looks like I'm talking about something that's not
actually working, but it is. It's just hoods. Alright, everyone, so I hope
you enjoyed that. I'll see you on the next
one. Thanks a lot. Bye bye.
62. Boolean Techniques for Wall Window Integration: Welcome back, everyone to
Blender Building master class from concept to final render, and this is where
we left you off. Now, as I said, let's
then come to this part. Let's come then to this edge. And you'll see, as
I move this edge, as long as I've got
this ticked on, you'll see as I move it. There you go. Nothing
gets squished up. If I tick this off, you will see then everything
gets squished up. You can see just how small that is now and what
this actually does. So it's incredibly handy when we're actually
moving things around. It's going to be really, really
handy when we're actually moving these edges around
for the actual roof. So now what we're going to
do is we've got on rooftops. This is where this
one wants going. So let's actually put this straight into place.
I'm going to press one. I'm going to press G, and I'm going to drop it around here, making sure it's
towards the back, so again, if you want to put these in nice groups,
then make sure you do so. And then what I'm going to
do is I'm going to rename this and we'll call it roof, edging like, so
and then what I'm going to do is I'm
going to put it into where it says, roofs. Let's put it into roofs. And finally, let's right
click and mark as asset. Let's go to our asset manager. Make sure run our current file, and then we're going to do
is come down unassigned, and this one wants
going into roofs, and then we're done with those. Okay, so now what? Now what we want to do is we want to
come over to this part. So we're going to delete
this part out of the way. We're going to come over to
this part and actually put in our windows because
you can see if we come to our reference guide, all of them, all of the fronts
of these have these on. And they all are the same. So you can see here square
window round window. On this side, it's
also the same. So we can go to the other side, wherever this is square
window, round window. So basically, it'd be really good if we actually
built those out. Once we've got them built out, it's really easy then to
actually come along and, you know, put them on the
front of all of these. So let's actually do that.
So what we're going to do is we're going to come
to this part here, and what we want to do is
grab one of our big windows. Let's put it in object mode so it can actually do something. And we want one of
these and one of these. So let's grab this one, making sure that we
can grab it all, grab this one, again, making sure we can grab it all. And what you're going to do is you're going to actually press Shift D because you're going to join this together anyway, so you might as well just press Shift D and bring
them into place. So let's bring them into place. The reason we said
why we didn't put this wall on yet
is because once we start booying this then we're going to have
a few problems. So first of all, though, let's get the center of here. So shifts, cursed to selected, and then we can go Shift,
put this right in the sense. So shifts, selection to cursor. Now, let's pull it out
where we actually want it. So we want it sticking out probably just before these pots. So you see these pots that we made just before those pots. So I can move out, move out, and then we've got a
slight bit of a gap, giving a little bit
more lighting on those. Now, one of the things
that we want to be careful is if we put
this on rendered view, we want to make sure
that this here, you can see the glass here isn't buried in
there, which it is. So we've got a choice. We pull it out, like so, just a little bit further. Up to you if you
want to do that, or you make a boolean in here. Now, I recommend seeing as we're doing the boolean anyway. Let's just put it in place, and then what we'll do is we'll put it into the right place. So if I come in, let me just grab my other one so I can actually see where
it's going to line up. If I come in, press one, I want to then line this up, so it's nearly up at the top of here,
something around here. So something around here, maybe, yeah, something
around there like that. Now let's grab the other one,
shifts selection to cursor. And then what I'm
going to do is pull that down into place. So I want to pull it,
pull it, pull it down into place, like so. And then what I'm
going to do is pull this out where I
actually want it. So the way that I
want this one Again, I'm going to look
on my other screen just to see how
close this is in. So the way that one, this one is probably going to
be around here. So this close in,
which means that this part down here is
going to have a little bit, as you can see, a
little bit of a lip, but it's going to be
hidden this lip anyway, because we're going to put
something else underneath it. So something like this
now is the time where we need to move these around if we want to move them around. So first of all,
looking at this, I think we'll go Shift Space
bar, bringing the move tool. We'll bring this
up a little bit, like so, just a tiny bit. And now the gap
from here to here, I want around not 0.72,
something like that. So if I come from this part
here with my measuring tool, naught 0.72 or not point, maybe a little
something around there. And then what I'll do
is go to Move Tool. We'll move this up. Like so, and then we'll come
back to this measuring tool. Yeah, it's got to move
up a little bit further. You can also, instead
of doing that, you can just go G and Z and
then holding Shift B down. You can actually
pull it up like so. Alright, now we want
to do is I want to bring in the bottom of here. So the bottom of here,
and I also want to bring in one that's going
to go underneath here. Now, they are the thin parts
that we've got over here. So if I come over this part here, let's
look what we've got. Let's press dot on this one. So it's not that one. It's going to be
just a thin part. So maybe even I think it's
going to be this one. This one here is going to be it. So press dot. Yeah,
this is going to be it. So what I'm going to do is
I'm just going to press Shift D to duplicate that Shiftspasbr,
bring in my move tool. And then what I'm going
to do is press shifts and selections cursor. Press the dot but, and
then what I can do is I can pull it out into place. Now, with this, we're
going to have on array. I'm not too worried about that because I just want
to pull it out, so I'm going to
turn off the array on this because we don't need an array on when we've joined
it together, especially. So now if I press
one, what I can do is I can press S. In fact, instead of doing
that, you know what? We'll try out that thing
that I've just showed you. So we're going to
pull this into place, so pulling it back into there, so Make sure it's in the right place,
something like this. And then what we'll
do is we'll come now, making sure correct
face annotation is on, and we'll come, grab this face. And then all I'm going to
do is just pull it out, like so, and we're going to keep everything that we had before. Okay, so now what we want, though is the bottom
part of the window. Now, I would say
that this is maybe, maybe a little bit too big. So what I'm going to do is
I'm just going to think, make it a little bit smaller. So I'm just going
to come in, make it a tiny, tiny bit smaller. And I think it's going
to work better like so. And then what I want
is this bom part underneath this one on here. So I'm going to press Shift
D. And then what I'm going to do is bring it down
under this part here. So it's actually sat
on there, like so. Sat on there. And then
what I'm going to do is grab both of these, and I'm
going to pull them down. So we're going to pull
both of these down just to the bottom of
here, and there we go. Alright. Now, the one thing is just make sure that
it is sat back, so you want to make
sure it's sat back. And, yeah, I think that's
looking pretty good. Now, the other thing is,
then I need to now make sure that both of the windows can be seen
because at the moment, we can't see anything
through here. So how are we going to
do that? First of all, let's do the square one because
that is the easiest one. So we'll come to this shift
desk to selected Shift A, we're going to bring in a cube, and we're going to make the cube then a little bit smaller, and all we want to do is lining up basically with our window. So if I pull it to there,
I'm going to pull it up a little bit more so I'm
going to grab this, pull it up a little
bit more like so, and there we go there
is our actual cube. And now I'm going to do
is I'm going to change this into a boolean. So first of all, let's
press Control A, all transforms, set
origins geometry. Come to our wall. Control A, all transforms, set
origins geometry. Now, grab this one and grab this one and press
Control minus. If that doesn't work,
the reason it's not working is because we have to
actually enable an add on. And to get there, what
I want you to do is, I want you to come over
to extensions.org. So extensionsblender.org, and the one we're going
to look for is called BL. So BL BLT. Let's actually look for
it, so we'll do a search. And there we go. Here it is. This one here, it's
a free add on. Once you click on it, you will see that if
you come down here, it says, Get add on,
dragon drop into Blender. So if we move this put
it back over there, and then I'll drag and
drop this into blender. Checking for extension
updates, and there we go. Enable add on.
Okay. Now, the add on should already be enabled. So if I go to preferences, Ball and there's
Ball tool enabled, it is as simple as that, guys. Now I can do is if I grab this, grab this one, press Control
minus, we actually there. We can actually have a
Boolean, as you can see. Now, the thing is with this, the best thing about it is, I can now move this in real time. So you can actually
see what you're doing. Unlike the original
Ball tool, you know, the Boolean tool,
we can move this in real time and really check
what we're actually doing. Now I'm going to put this back
into the center, like so, and you can see it's going
all the way through there, which is really, really,
exactly what we want. So now if we come to my wall, I can actually come
just apply that. So I can press Control
A and apply that. The other thing, of course, you can see is you
can do a union. You can do an intersection, like so you can do basically
what you could before. Now I recommend when
we're doing this, you put it on fast. It generally works
better than exact. And then all you want to do is press Control A,
and there we go. Now the thing is getting this back how do
we get this back? Because we've got our tool here, but we can't get it back. I used to This used
to bother me before, but let's remove cutter,
and there we go. Just as simple as
that to get it back. Alright, so if you're
struggling with that, that's the actual
button to do it. Let's leave way because I don't need it
myself personally. Okay, so what I'm gonna do now is we're gonna
come to this part. We're gonna press Shift
desk. Cursed to selected. We're gonna press Shift
A, and we're gonna bring in another cube. So let's bring our cube down. Let's make it a
little bit smaller into the places
that we want to go. So just inside there, it's going to be intersecting. And then what I want to
do is I want to bring it up all the way to
the top of here. So all the way to the
top if I press one, I can just bring this face up all the way up to here, like so. And then on the next lesson, we're going to bevel this off, and we're also going to
put the boolean into here. And then we should once
we've got this wall in, once we've replaced
these few parts, we should then be able
to have this part in, and we then should be
able to go back to our great box and actually start building
some more stuff out. That will be nice.
Alright, everyone, so I hope you enjoyed that, and I'll see you
on the next one. Thanks a lot. Bye bye.
63. Resolving Wall Geometry and Mesh Corrections: Welcome back everyone to blend the building master class
from concept to final render, and this is where
we left it off. Alright, so what I want
to do now is come in. I'm going to go and grab
both of these parts. I'm going to press one. And
then what I'm going to do is press Control B
and bevel them off. Turn up the bevel, like so. And then we want to make sure we've got a little
bit of gap there. So I'm not going to turn
it up too much because it is a boolean. And it's not you know, we're not going to
see behind there, so we don't want to
turn it up too much. But what we actually
want to do is just make sure that we're bending
it in the right way. So you can see now it's got a little bit more
of a curve to it. Fits it a little bit better. And I think, yeah, that's
going to much, much better. Now I want to do it, I want to do the same thing as
what I did before. So grab this back wall, press Control plus, and there you go. You're going
to get your Boolean in. Let's put it on difference, like so and there you go. We don't need to
do anything else. As I said, it's a great
way to actually use this. So all I'm going to do
is just press Control A, come in now and delete
out of the way. Now, what you will notice now is just how nice actual
looks because we've took the time to not just stick them on the front to actually
build the other thing in. Now what I want to do is
I want to fix this wall. Shift H, get rid of everything, and here is what we've got. So again, it's end guns. The topology is a
little bit of a mess. Now, we can use this, of course, but I would sooner actually just clean it up a little bit, probably. So let's
just clean it up. So first of all, all I'm going to do is
I'm going to come in, and I'll try limit
to dissolve first, so let's just grab it so
delete and let me to dissolve. That's not going to
do anything. Can I come in and delete these? So dissolve edges.
Can't dissolve edges. So what I'll do is I'll come in. I'll grab both of
these and this one, and then I'm going to
right click and I'm going to triangulate faces, and then we're going
to right click and then tries to quads, and then we can clean
that up a little bit. Now, have we got any edges
in here? Probably not. So what I'm going
to do is instead of it being like this now, because I've got
everything on there, I just need to
make it, you know, as far back as this, and
then it should all be nice and clean topology
for me to actually use. So I think what we'll do
is Joe's looking at this, how this has actually broken up because we can see we've
got some edges in here. Do we really need those in? So what I'll do is
I'll just press Shift D, and I'll drag this out. And then all of these pods. So we've got some
points in here. They're right. It's
just these ones here. You can see we've got points
in there for no reason. Can I actually come in and
just delete those pods? So dissolve edges. Yes, I can. And now this is nice and clean. So you can see it's nice,
clean topology, like so. And now I want to do is
I want to pull this out. So I'm going to come
in. I want to press L. I'm going to put it
right up against here. But right against here, like so, and then we're going
to press E X or Z. The reason why that is, by the way, is because it's normal. So let's just set
it back to global. I already pressed E, so I should be able to pull
this out now like. Then what I should be able
to do is press Control plus Control plus. And there you are. Now you can see the whole
thing, shift and then, spin it round, hide
it out of the way. Come back to your
other one then. So let's just put it
on an object mode, come back to this one where the topology was
rubbish as you can see. And then what we want
to do is press L, delete, and ertzus. Alt H, bring back the other
one, and there you go. Now you've got the one with
the clean topology in there. Right, click Shade to
Smoove if you want to. And finally, then
what we can do is we can now come in and
we can mark a seam. So what I'm going to do
is I'm going to press Alt Shift and click
Alt Shift click, Controllee and I'm going to mark a scene going all
the way around here. So I'm just doing this
just to show you. So now you've got a scene
going all the way around here. Now, the problem you've got is you don't actually want
these parts in here. You just want kind of one
in here, maybe one in here. We're not going to see
in there. But we don't want to have little parts all over there or
anything like that. So what I'm going to
do is just I'm just going to clean it up just
so it's nice, basically. So I'm just going to come
in and remove these. You really don't need
to, but I prefer to. So right, click. Let's clear
scene, and there we go. And now we want is a scene going all the way
round the outside. So I'm just going to Control
click, Control click. So Control click, ci, control, click here, right,
click, Mark scene. I'm going to mark seam
in here and here. So right, click, mark seam. I'm going to mark seam
in here and here. Again, this is all covered up, so right, click, Markem. And finally, then
I'm going to do the same thing going
around the outside. So going around here, here. And here, right click
and mark a seam. Alright, so the moments of Tu
let's press the tab button. I'll tag, bring back everything. Let's put it onto Render Ve so it can
see what we're doing. And what we want
to do now is get the bricks looking
exactly that way. So what I'm going to do is
I'm going to press tab A, unwrap because I've
marked all the seams out, and now I should be able to come in and add in that brick. So what I'm going to do is I'm just going to grab this one, grab this one, press Control L, and I'm going to link
materials, and there we go. If I press one now, we can see not quite the same, but you can see the
best thing you can see is that on the
front and back, pretty much, they're
all the same size, and that's because we took
the time to unwrap them all. So what I'm going to do
is going to press A, and I'm going to go over
then to UV Editing. Let it load up,
suppress the dot but. And then what I'm
going to do is now grab them all with A, and I'm going to
come in and match the sides up with
these actual bricks. So if I press the S but, bring them in, and
I should be able to pretty much match up the bricks. Like soap. And that
is about the same. You would never know these
are not the same bricks, even if there's a minute
difference in them, and now you can see just how
nice that actually looks. Now, let's think about the other parts of this because
a lot of parts on this, for instance, like
these geometry nodes, we don't actually need. So first of all, with
the geometry nodes, I'm going to turn down
these subdivisions because if I come in, go to object and
convert to mesh, you will see we have a subdivision going all
the way down there. We don't really want that. So what I'm going to do instead, turn down the
subdivisions to zero. And then come to up to
object, convert to mesh. Press the tabbid and
now you can see we've got nowhere near as many
subdivisions in there. You could probably come down here and get rid of these
middle points as well. So let's now do the
same with this one. So turn it down to one. Let's come up to object,
convert and mesh. And then what we'll
do is now we'll just go down each of these, and we're going to go Alt Ship click just in the
middle of all of these. Can I actually do
all shift click? Now, we've got another
problem with these. If I come in, press the G, you can see they're all split. Let's fix that first. So what I'm going to do is just press A. In fact, you know what?
We'll do on both of these. Control J, join them together, press tab, A to grab everything, shift N, spin them around. And the reason we're not
spinning round properly is because these are
not joined together. So this here, as you
can see, is not joined. We need to actually fix that.
So we're going to press A. We're going to go to mesh.
We're going to go to cleanup, merge by distance, and there
we go, 440 vertices joined. Now, the one thing we didn't want to do is we didn't want to make sure that these points and these points are
joining each other. And the way we did that is by
making sure it was on very, very low amount when we do it. So now you can see
everything's joined, and now we can do is
we can press Shift N, spin everything round, and it all actually work perfectly. Now finally, what we want
to do is we want to we want to come into everything
and see if we can just use limited dissolve. And there we go,
limited dissolve got rid of all of
those center points. And now these are
looking pretty nice. Now I want to do is I want to
press A, smart UV project. Click Okay. I want to then bring it the same
material as this, so it's going to be my stone. So I'm going to go over to stone minus this one off and
there's my stone on there. Stone light, is that
the one that we want? Let's look, stone light, it is that one, so
that's the right one. And then what I want to do
now is bevel these off. So I'm going to add in a
bevel, generate a bevel, and we're going to put it
on not point note three, like so, and there we go. So now we've got
pretty much all of these done except
these two parts. These parts, they'll
need wrapping. I need the spire on there.
So let's come to aspire. Shift S, curs selected, and then we'll go to aspire over here, which
is this one here. Shift D to duplicate it. Shift S, selections cursor, press the dot to zoom in, and it should be in
there somewhere. It is here, if I move it out. I'm going to press H to hide it, grab this one, delete
it out the way. OH to bring it back.
And there we go. Now, we just need
these two parts. So what have we got here? We've got a mirror, and we've got a solidifive.
So let's fix those. Object, convert
because we want to put on both of these
modifiers or object, convert to mesh, tab
A to grab everything, U, smart UV project,
click, unwrap. And then what we're going
to do is grab this one, Control L, and we're
going to link materials. And there we go, that
is that part done. Now, at this point, we
can pretty much get rid of this wall here.
In fact, you know what? I'm going to just
keep the wall in just in case I have any other parts that I need to do with. Now, you can see now
all the bricks done, they come all the
way back to here, and pretty much this part. I'm just looking
at it now, making sure if I double tap the age, just making sure there is a
point on here that I can see. I'm just going to have
a look at what that is. So if I go into
here and press tab, I can see there seems
to be an extra point. So let's have a look. I press G. There it is. I don't even
know how that got there. Let's press delete and Voss. Why? How did that get there? Let's have a look now to
make sure that's gone double tap the eh. And there
we go. It's now in there. No idea how I duplicate that, but y, I saw it. Maybe you have the same
thing and didn't notice it. Now, the one thing we need to
check no point no no five. We can see no point,
no, no three. This one doesn't seem to have a bevel on it
for some reason. That's a bit strange why it
hasn't got the bevelon still. Let's have a look at this one.
This one has the bevelon. Let's come to this one
and add in a modifier, so we'll generate a bevel. Now, what I need to
do is I just need to, it's not got a
bevlon we can see. So he didn't have his
pavlon Let's put it on note point note
note five. Like so. Now, let's put it on object
mode. And there we go. This one's point no or five, no point no or three. Now, we're going to join
all of this together. So these bevels, you know,
they're going to be added on. So it's a good time
to show you what happens when you actually add bevels on what it
does to the mesh. But I'll show you
that the next one. So now let's go to file,
save, save out of the way. And then what we'll
do on the next one is I'll show you how to
join these together, why the bevels are important, making sure things like this
are in the right place. So these here are
in the right place. They might need popping
up a little bit, just fixing general
things on there, then saving out to
our asset manager, and finally, then going back to our grey box and
getting these parts. All right, everyone. I
hope you enjoyed then. I'll see you on the next
one. Thanks a lot. Bye bye.
64. Adjusting UVs for Wall Texture Consistency: Welcome back everyone to blend the building master class
from concept to final render, and this is where
we left it off. Alright, so the first
thing we'll do is we'll come in and fix
these parts here. So if I come in, I'm
going to grab this part here and I'm going to just drag it up just making
sure that's in place. The other thing
is, just make sure that these are set
back far enough. So if they need, you
know, these parts, jaws pulling back a little bit
further, make sure you do. Like so, making sure
there's an edge there. Everything fits in still. So making sure these parts and these parts,
you can see here. This is a little bit over now. We can pull this window back, tiny bit holding the
shift bon, like so. We can then come in and pull
this one back, tiny bit. Like so. And just making
sure everything's in, and then we can come
to this one here. And making sure
like final checks before joining it together
is better what I'm doing. So make sure we're pulling
this up. Press the dot bon. Pull it in place, like so. Alright, pretty much
everything is done. Now what happens when we
join all of this together? So we should have, if
we check this, a bevel. So what I'm going to do
is the final checks. So a bevel, hide
this out of the way. We've got a bevel and smooth. Smooth ins take it off, 'cause we're going to smooth it all out at the end anyway. So take that off. Same with
this one, take it off. All you want on
there is a bevel, the same as this one, a bevel, hide it out way,
the same as this. If it doesn't have a bevel, it doesn't mat with
this because we'll add in a bevel once we
actually join it all together. So we'll take off
the smoothness, though, hide it out way. Same on this,
nothing on this one. Same on this. We'll
leave the bevel on. Like so, hide it other way,
and then the same on this. Hide the sorry, take the smoothness off and
hide it other way. Altag bring back everything. Now I want to do is I want to
apply all of these bevels, because, you know, we can
either do it one or two ways. We can apply the
bevels onto there, which means some will be
on Not point naught three, some will be on outpoint
naught not five. We can't join them
together, though, and keep both of those
bevels on different parts. It just can't work like that. You can see we don't
actually have an option, you know, to pick the geometry where we're
going to put that. Instead, what we're going to do is we're going to
grab the whole thing, go to object, convert,
and convert to mesh. Now you'll see that the bevels, if I press tab, have
all been added on. So you can see bevels here. You can see bevels
on my stone here. You can see bevels on here. In fact, does this
have a bevel on? This one doesn't have a bevelon, so I need to actually
look at that. This one has the bevel on there. So this is the only one that
doesn't have a bevelon. So instead of doing that,
I'll just grab both of these. I'll separate them
out, so separate them, add in a bevel, so
generate a bevel. We'll put it on not
point, note three, so we'll press Control A over
here, join it all together. Yeah, and everything now should have I go to this should
have a bevel on here. Everything has a bevel on. Everything's looking
nice. Finally, then. Now we've grow that.
Join it together. So Control J, join it together. And then Control A, all transforms, right,
clicks origin to geometry. And then right click
shade Auto Smooth. And then tab A, shift and
then spin everything round. And there you go.
There is your part. Now, let's have a quick look
at what that looks like. And there it is all done. Now, we have got a problem in this part here, as we can see. This needs spinning around. So Alt Shift and click, shift and, turn it on the
inside, and there we go. And we can also see that we
need to shade this smooth. So Alt Shift click going
all the way around here, not shade smooth,
so shaved flat, can still shade it flat, and there we go now
that's looking beautiful. Alright, so that
is that part done, and that is one of the most complex parts in
the whole of the scene. So once you've got
that part nailed down, pretty much, there's nothing in the scene that's
gonna trouble you, pretty much, apart
from, you know, some geometry nodes with hedges, some trees, some of, you know, the ground,
things like that. But as far as modeling goes, if you've got this part done, you should be okay
with everything else. Now, let's move this
over to this side. And we'll call this. Let's just put it down to the ground plane. So I'm going to press
G, drop it down. You know, who'll put
it over this side. And we'll call this building modular we'll call it modular building
something like this. So have to what do we call it. So out to building modular. Parts. So again, call it whatever you want
my naming is not very good. And then we'll press the button. We'll go to new collection. You can see one
we've got here is Boolean cutters, as well. I don't really want that.
I'll saw that item in it. So now we'll call
it modular parts. So and then we'll go
down to this one here. There's nothing in here.
Always, they'll have an arrow. So when it's closed up, you will see they'll always have an arrow if
there's something in here, so you can just come in
and delete them away. That's the other thing I
like about the boll tool. It actually puts them, you know, boolean tools in their own part, which is really, really nice. Now, let's go to
our asset manager. And then what I'm going to do is I'm going to call Modular parts. So plus Modular parts. Like so. And then what I'm going to
do is now go to my pot. So here's my part, dot button, and then I'm going to
go over to this side, right click and Mark as asset. Come down to unassigned. Here it is, and let's
drop into modular parts. Save it out of the
way. And there we go. Now, before we end, let's make sure saved it. Let's go now to our building. So we're going to have a look at our reference in once more. Let's come to our
main reference. So we've got these parts here. We've got these parts here,
we've got the spires on. We've got the tops of the roofs. We've got these parts here. These parts are coming down. We've made these parts here. We can pretty much
build the entire thing. All the way around,
except, you know, balconies, you know, some
stairs, things like this. But apart from that,
everything else, we can pretty much build
out as long as it's, you know, the sides and things. We got all the windows
in and stuff like that. So at this point now, what we should do is we
should start, you know, putting some of these
parts in, you know, especially the windows, getting in the walls on the gray box. But I'm thinking
that the only thing that we're really missing
to really build this out, you know, is the roofs. So I'm thinking that instead of jumping right into
the grey box now, we should probably have
a look at our roofs, make sure that we've got
those, you know, in place. And then once we've done that, then we can actually
come and, you know, the roofs basically
are geometry notes, so we could use them straight
from the resource pack. So straight from
the resource pack and then bring them in there. That's also probably
a good idea. But I'm saying if you want to, you could take your roofs in, design them in, you know, this modular pad that you're doing, and
then bring them in. So let's actually have a look at the roofs then as
we're in the grey box. So we will go into our gray
box, just trying to explain, like, you could do it either this way or either or that way. Alright, let's put
this over this side. And then what we'll do
is we'll actually file, save, put that down, come
back to our gray box. So here is our actual great box. We put it onto renovew. This is what it's
actually looking like. So you can already see we've
got some pots in there. I'm just going to check
with the lighting. So we've got our sky texture and we've got our HDRI just
want to see what it does because I think I think
that actual this one here. So this material, stone lighter, it might be a little
bit too light. We'll have to see
when everything's in, but these might want darkening up and this one making
a little bit light. We'll see when we've
got everything in 'cause everything
should be named. Stone lighter, stone light
and things like this. Now, what we're gonna do at
the moment is we're going to delete that out of the way.
We've got our roofs in. As I said, let's bring in, let's bring in just this part, just to see what it
actually looks like, because it does kind of make, you know, an impression
once you've got that in. So what we'll do
is we'll go over to our asset manager,
so open it up. We'll reload this
up, and there we go. So we've got modular
parts in, as you can see. Then what I want to do is, I'm just going to
grab this one here. I'm going to press Shift
Desk cuss to selected. And then what I'm
going to do is I'm going to bring in
my modular parts. So I'm going to bring it in, so I'm going to then spin it round. So art Z 90. And what I'm then going to do is shift desk and
selection to cursor. And there we go. And
now we can bring it up. So bring it up into place. So it's over there like so, and then bring it
out to where you want it so you can
see that brick. And finally, then we
want to make sure that we've got this
part on here as well. So this part on here. And
then once we've got that, we can just move it
over to the other side. But you can see already, Wow, that's looking pretty cool. Okay, so let's come into roofs. We've got these parts here
and these parts here. Let's bring in then this part. Let's spin it round
towards head, 90. Let's press one so we can all three to go into the
view that we need it. And let's press G and put it into place where we're
actually going to want it. Press the dot but, and then
we should be able to zoom in. And then what I'm
going to do is put this into place where I want it. And you can see it's jaws
poking out past there, so I'm going to drop
it down into place, making sure then that
it's at the right angle. So you can see here, is
it at the right angle? So we can see if we pull it out you can see it's
kind of in place. It's at the right angle
because we can see the roof can go against
that, which is what we want. What we want to do, though, is pick this up because
it's a little bit too low, so I'm going to pick it up,
pick it up, pick it up, put it into place, like so, and then I'm also probably
going to move this over just so it's
hidden under there. So it's hidden under
there, like so, making sure it's not
poking past there. So maybe maybe I've gone a
little bit too far here. I'm also looking at how
far back this goes, so you can see
this is into here. We need some bricks
on here as well. And then what I'll do is I think I'll just move it a
little bit more this way. And it's important
we get this right. And there we go. Now,
that's looking good. It's not sticking out the back. Now, if you want to look behind, you can just turn your sun rotation round.
That might be a good idea. What I'm going to do,
though, is I want to mirror this over this side.
So I'm just going to come in. I'm going to press Shift desk, cuss to selected,
grab this one, right, click Set origin, two geometry, like so set origin. Sorry, it's 23d cursor, add in a modifier
bring in a mirror. So we're going to
bring in a mirror, and there it is on
the other side. And there we go. Now I can do is I can
actually apply that. So I'm going to
grab both of these, and I'm going to go
to controle like so. And then what I'm
going to do is, I'm just going to grab
both of these, and all I need to do
now is press Alt and D because we want to
instance them, like so. And then what I want to do
is put them over this side. Now, I don't need to really
line them up, you know, perfectly because I can pretty much do that just
going over the top, using something like wire frame. So I can see here
where is the center? So you can see if I
pull it this way, we can see roughly
that now we've got this kind of corner here and this kind
of corner here, we can see that this is roughly
in the center of there. If not roughly, it's
nearly perfect. So if we now come out, we can see we've got pretty much one
and two buildings Step up in our actual gray box. Let's put it on
our rendered view, and there we are.
Pretty nice, guys. Okay, so what we want to
do then on the next one, as I said is, we'll start working on our roof, so
we'll bring the roofs in, and then I can show you how
we put the tops on here, and then we can start working our way around a little bit on this roof rather than just keep muddling something
all the time. Alright, everyone, so I
hope you enjoyed that. I'll see you on the next
one. Thanks a lot. Bye bye.
65. Procedural Roof Tiles with Geometry Nodes: Welcome back, everyone to blend the building master class
from concept to final render, and this is where
we left you off. Now, what I want to
do at the moment is, I just want to grab all of this and just hide
out of the way. Suppress H, hide out of the way. And then what I want
to do is I'm just going to bring in a
plane because I want to show you how the roof works
before actually using it. So shift day, bring in a
plane. We'll leave it there. And what we'll do is
we're coming over. Instead of modular pack, we're gonna put it on resource pack, go to Jump nodes. Then what we're going
to do is grab the roof. We're going to drag and drop
that in and nothing happens. Let's go over to the
right hand side, turn up the horizontal
count, and there we go. We have a roof tile. So we have a vertical
count, horizontal count, so we can see if
we bring this up, we can then bring this up, and then we have
some roof tiles. Now, from here, we
have subdivisions. This will control the bend. So basically the
bottom bending of the roof tiles will be
controlled by the subdivisions. Less subdivisions, less
bend you're going to get. So basically, if you've
got that on ten, you can control then the
actual bend on here, this one here, as you can see. We can also, as well, control
from here the rotation. We rotate it this way. I tend to not use that, though. Then next, we've got
the tile length, if we bring this over or back. If we bring the tile width over or back and bring
it in wherever we want. Next of all, then we've
got the random sizing, so we can actually change the actual random sizing.
And what am I doing there? You can see on here, if I come in, random
size, bring it down. We're changing it based on here. We can also change the
tile length randomize, so we can change that as well. So I come back round here, see now it's a
little bit changed. And of course, we can also
change the thickness. So we can randomize the tile thickness, randomize the width. We can do all kinds
of crazy things. We can even change the gaps in between each of
these roof tiles. You can end up with something
really, really nice. Very, very easily.
We can also change, you know, the actual offset. So the gap offset, we can change the even offset,
like so if we want to. And finally, we can
change the roof angle. So what we can actually
do with this is bend it, you know, this way, we can
bend it from here and start bending it
round, as you can see. We can also reset transforms. Does make it a little bit
better if you're doing that so. Now we can actually change
the where is it roof angle. So you can see now it's
bending very nicely. We can also change
the roof angle this way. In fact,
you know what? Let me put this to zero. Let
me show you from here then. This one's not zero. It should be on one, I think. There we go. We can actually bend it.
So we can bend it from here. Not this way. I'm trying to bend
it the other way. So bend it from here, or we
can compress it as well. So we can bend it from here
as you can see, like so. Now, of course, you
don't want to be bending it crazy amounts. We can also come in and bend and compress these parts here, so we can bend it this
way, bend it this way. Let's turn off bend, and
we'll just bend it one way, like so, so we can
compress it this way. And you can see just how
versatile this thing is. Its a little bit of
playing around with. You can also change the seed
on making different roofs, and you can also bring in your own material
and have it on, you know, material
or material even. So you can have two
different types of material on there as well. And finally, of course,
then we can just increase this infinitely
procedurally, and everything
will be randomized and everything
will be different. Incredibly powerful tool. Now, luckily, you guys, though, have actually gone ahead
and already created one. So what I'm going
to do is bring in my roof tool, bring in my roof. I'm just going to pull
it over the side, press voltage, bring
back our roof. And then what I'm going
to do is I'm going to put this into place against
this roof tile here. So what I'm going to
do, first of all, is I'm going to come over to modeling just so I can see
it's a little bit easier. And then what I'm going
to do is I'm just going to show you
how this works. So we can see, as
well this is red. We don't really want that,
so let's come down to face orientation.
Let's turn that off. We're not really worried
about that at the moment. And then what I want
to do, we've got it at the right angle,
right thickness. All I want to do is put it
against this roof here. So I'm going to press
S, first of all, to bring it round, and
then rotate it around. So at 90, and then we'll
put it into place. And get it to be the right size, and then from there, we
can keep using this one. So if I now come
in and rotate it, so and Y, rotate it round just
so it's nearly into place. And then what I can do is
I can put it against here. You can see that these roof
tiles are a little bit big, so I'm going to make them
a little bit smaller. And then what I'm going to
do is grab this and this, press Shift H, and
now I'm going to do is I want to come
up to snapping. So there's a whole procedure with snapping where you can do. You can basically snap it in increments, so
let's press it on. So to press it on, you
can click this magnet, or you can press Shift tab. Click it on and on, like so. And now you'll notice as
soon as I turn it on, this is moving in increments. You can also then come
and see that it's moving in increments, but
we don't really want that. You can also see the
increments is down here. So you can move it, you know,
the rotation increments. You can move that.
You move out for it's moving away from each
other, all kinds of things. Now, honestly, the snapping
tool has so much to it. It could be its own
complete course in one. So we're not going to go
through every option. The one we want is
the face project. So on the face project
and we want it to rotate. So we want it to rotate our
part with the face select. Now, if we move this now, bring it down, you can see
it's lining up with this. So wherever I move it
to, you can see it's lining up with this
bon part over here. Now what I want to do is I want to just now I've
got it lined up. What I can do is I can press
R Y and just pull it up, and now you'll see it's
basically on top of that. From here, what I can do is turn the snapping and now I can move it to my heart's desire,
turn the snapping back on, and if I pull it down now, so if I pull it down into
place where I want it, you can see now it's pretty
much snapping to that. What I want to do is I want
to pull it down a little bit further so that it's at
the top and at the bottom, and there we go. Now
let's turn it off. Let's put it into place. So right in to about here. And then what we want
to do is we want to increase the amount of these. So you can see these
are all set up. They're really nice and
neatly actually set up. So all we want to do now
is come in and increase the not the vertical count,
the horizontal count. So just increase it, and it
will come from the middle, which is a bit of a pain, but
let's put it in the middle. Let's increase them like so. And then maybe one or two more. Let's press ultage, bring back everything, and there we go. You can see it's
perfectly in place. Double tap the A. And that is exactly what
we're looking for. Now, as far as the materials go, we want to make sure
that when we've got this roof in place and we've
got everything built around, then we bring in the materials because we can bring the
materials right now, but the thing is, they're
not going to look right. So, for instance, and the reason they're not going
to look right is, of course, this is
still a geometry node. So if I just show you let's
go and put in a wood cracked. So you can see here, we
haven't got any details on here or anything
like that because they're just not
unwrapped correctly. So I prefer to put my
material on after. Now, the other thing is, when we're using this geometry node, we want a final render of this, so we need to make sure
that everything's in place. And we can see here
that pretty much this roof here we
could use on this one, we could use it on this
one going across here. And then we would
have another roof, so another bulkier roof, which we could use on
this one, this side, this side, this side, pretty
much all the way along. We can also use it
on this one, see. And then we've got a big
roof which we've got here. So basically three
different roofs. So we can really, really
turn this jump node into our roof what I mean is we can set these
roofs up, put them on, and then go in there,
unwrap them all, get rid of the backs
what we don't need, and basically do it that way because it's going to be
way, way quicker for us. So all we need to do
is grab this roof, create it a little bit longer
so it can go onto this one. And then grab that roof, put it on this part here, making sure you've
got a roof on here. And then from there, we can use this roof on pretty
much all of the parts. So this roof and this
roof and this roof, we can use it on all of
the parts that we've got and making sure that
it's very well optimized. So that is what
we're going to do because that is quite a
long process, actually. And I'll show you on this roof how we're
going to do that. But before we do that, all I want to do is I want
to grab this roof and I want to press Shift D because we've got this in
the right side. So this one over here, you can see, it's going
to be the right size. It's still got the Jumptnod on. We can still bend it to put it in this place and
things like that. So that's the way
we're going to do it, and I think that's going
to be a much better way of dealing with these roofs, you know, once we unwrap
them and things like this. Alright, so the other
thing is these roofs, the backs of these roofs
are never going to be seen. These roofs only come
up to these edges here. So we're going to
put these edges in, I'm going to put a top in
here on the next lesson, and then you'll see we don't
need the backs of the roofs. All we need is the fronts and the sides of the
roofs, and that is it. Alright, everyone, so we're
going to save our work, so we're going to
go to file, save, and then on the next one, we'll deal with this roof first. Alright, everyone. Thanks a lot. Bye bye.
66. Converting Procedural Tiles to Mesh for Optimization: Welcome back, everyone to blend the Building master class
from concept to final render, and this is where
we left it off. We actually left it on
our render view, but Ao. So now we want to do
is we just want to bring in this part here. So I've placed this here, but I'm going to
delete it just to show you what I'm
actually going to do. So first of all, let's come in. Let's just save out or work because I haven't
saved it out yet. And then what I'm going
to do is I'm going to come to my asset library. So asset manager. I want to
bring in this roof support, so I'm going to bring
my roof support. And then what I want to
do is pull it up or Z 90. I want to press three to
go into the side view. And what I want to do
is just press G and put it whereabouts.
I'm going to have it. Now, if you remember, I told
you when we put these in, they want to go into the
roof and it also wants to go up high enough so that we can see this part here, like so. Now, I think at the moment that this is a
little bit too wide. So what I want to do is
press S and Y, like so. And I'm going to copy this
over the rest of the building. So when I bring this
out, I'm actually just going to copy
it round because I found a bug in blender where I tried to update this in
the other blend file. So in this file here, I actually tried to update. You can see no 0.224. You can see if I come over here, it's actually in roof support. If I bring it in, so it comes
in no 0.224, you can see. And yet, if I bring
this into blender, it comes in at 0.304. I have no idea why that is. I've played around with it.
But if you ever get that, then you know it's a
little bit of a bug. So if you want to get around it, change it within
this blender file. And then what we can
do is we can come in now and go to this part. So I've squeezed
in a little bit, and let's actually
increase this array here, so we'll increase the array going all the way
over into there. Now, you can see it's not quite level and the other thing is, I want to use one of these, so I'm going to press
Alt D, so Alt D. And then what I'm
going to do is I'm going to rotate it round, so all dead, 55. I'm rotating it to 55 because that's what this
is. You can see 55. And then what I'm going
to do is I'm just going to turn off the array. I'm not gonna have
an array on this. So it's gonna be looking
something like this. And then what I'm going
to do is just press G and I'm just going to
put it there for now. Now, in the end, it might
be a little bit different and the reason is because of the fact we're going
to have our roof here, but for now, this will do. You can see we've got
some flashing on here. Always best to jaws, pick it up just a little bit like so to get those into place. And then you need to think, how far back is
this going to go? You can see these
probably too far forward, so let's pull them
back a little bit, they're all going
into place like so. Let's do the same thing with this, make sure
you're on normal, and then we can pull these
back into place like so, and now you can see these kind of line up much, much better. Alright, so this
is looking good. Now, if yours is poking out
too far this part here, just pull it back into place. You know what? I think
that's looking pretty nice. The one thing I would say is, you can see here that these
aren't quite lined up, so let's bring it over. So bring it over a little
bit more into place. And again, we can pull it on just to get rid of these two
parts here if you want to, so you can press ENC and pull it out and then put it a
little bit more into place. So we've got a gap either side, and maybe that's going to
work a little bit better. And I'm just looking if
I want it like that. You know what? I think we're
gonna leave mine as is. I don't think it's
such a big deal. One thing I would say
is I will pull it over Jaws just to get this
a bit more in center. So in the center pull it over. Like, so, double tap
the A, and there we go. Now, let's have a look
at what that looks like. And there we go. And we can see our
roof comes down. We've got a little bit
of a slant on there. So then we put one
roof over here. Now, what did it mean
with this roof then? Well, we've got our roof in. We just want to make
sure that it's actually in the wall here. You want to make sure
it's in the wall, this side as well. And what we want to do is
based we don't want to waste a lot of resources. All underneath this roof is going to be resources
that we're wasting. If I pull this over, you can see a lot as well
are wasted in here. You can see all
these roof tiles, if we look, are actually wasted, and we don't
really need them. Also, the backs of this, you know, of this roof are
also going to be wasted. So what we want to do is we want our Bay turn the subdivisions
down because first of all, these, if we turn them down to two, so just
make sure it's on two. Then once I actually
apply this geometry node, you will see you'll just give us flat tiles there won't be any other
subdivisions in there. So let's do that first of all. So what I'm going to do is I'm just going to save I'm work, just so I've got a
place to come back to if I make a mistake. And the other thing is, I'm
just going to make sure that I'm happy with these roof
tiles are they going out. You might want them a little bit smaller because
you can see here. If I bring them
in, bring them in, and then I just pull
them up a little bit. Now they're going in
a little bit better. I've only brought
them in a tiny bit. I'm going to pull this over. And then all I'm going
to do is just pull it over S and X, pull it over, so the slot
in place, double tap the A. And you can see underneath these why I've got that wooden
bit on there as well. But I think the roof
tiles coming up to here now is way better than
where they were before, which means that I just need to delete this one
out of the way. Come back to this one,
press Shift D because now I'm going to have the same roof tiles on each of these when I get
around to doing. So now what I want
to do is I want to save out again
before doing anything. And then what I'm going
to do is I'm going to put roof the top on here just to make sure
everything's fined. So if I come in to
support or roof, let me just actually go back to this file here. This
is the one that I want. So is this in there? So rooftop. Yeah, the rooftop is
actually in there. Where is it under,
though? That's the thing. So rooftop, here we are. Rooftop. So it is in there, so let me go back going on
the roofs, and there it is. Okay, so let's put
it down here first, and then let's bring it up. So we're going to bring it up. We might as well
press Shift desk, cursor to select sorry, selection to cursor, and then I'll drop it
right in the center. Now, how do we get that in the center? That's the question. Hide your roofs out of the way. Come to your wood, grab
both of these edges here, shift desk, cursed to selected, and then you can move
this into that center. All takes to bring
back our roof. And finally, then I can actually lift this up to where
I actually want it, and you want it so
that it's just got a little bit of an edging
going over your roof like so. Next of all, bring it over. Put it in place, turn up
the array, so turn it on, on rendered mode, turn
it up. And there you go. Simple as that
together in place. Alright, so now this roof, we need to bring
in the material. We need to make sure that it's fully optimized, all
of that good stuff. So how do we do
that? First of all, we're going to go up to object. We're going to go down to
convert and convert to mesh. And now you'll see we've got
all of these roof tiles. Now, let's press Shift H, and what we want to do now is grab some of these roof
tiles and not others. And what I mean by that
is we want to grab the front of them, but
not the backs of them. So the way we're
going to do this is first of all,
we'll press Tab. We'll go into, you know what, we'll do the fronts
and backs first. We'll do those first because that's the
easiest way to do this. So what we're going
to do is we're going to as well you can see, if I come in and
grab these ones, you can see they're
actually split off as well, which
we need to sort out. So first of all, grab one
side one and one top one. And then what you're
going to do is you're just going to go to select. You're going to select similar, and you're going to select
and buy the normals. And you should
select all of these, all of the sides all
the way through. Then what you can
do is you can see, we've got another
one here that's not quite right, and
if we go anymore, we've got the bottom ones
that also need selectin, and we've also probably got these ones as well
that need selectin. And you know what?
Instead of doing it that way, we'll do
it a different way. We'll select the
front of these ones. We'll go to select, and then
we'll go to select similar, and we're going to
select normals. And we can see we've
got some missing. Only a few, though, missing, which we can simply select. So we've got all
of these missing. And then what we can do is
we can go around the back, and you can see we've got
loads of them missing. Now, luckily for us, we want to delete all
these back ones anyway. So we'll just actually come
in and select them like so. And there we go, and it's
a little bit tedious this. I know, and I wish there was a way to remove
the bags of them. And I think we'll actually add that into the drummige node. But now, we're going to
select them all like that. And then what we're going
to do is we're just going to press P selection, and then I'm going to hide
the side parts half the way. So you should end up with
something like this. Now, if you look on wireframe, you'll see that's
where you end up with. You shouldn't have any
sides in here now. So if you go back
to object mode, we shouldn't have
any sides in here. And the cavity is not
showing up because we haven't got any edges
in here right now. So what I want to do now
is if I go to sideview, which is one, I can't actually see anything until I
put my wire frame on, and now I can see something. And what I want to
delete is these bags. On each of these, I want
to delete these bags. Now, the way I'm going to do
that is if I come into it, press the tab but, press C, make sure I'm on faceleg. I should then be
able to come into each of these and select the backs of each
of these, like so. Now, once we've
done one of them, it's going to get much, much easier to do
the rest of them. But the backs of these roof tiles we are
not going to need. And the other thing is,
once we've done this one, inevitably is going to do like two or three
roofs, as well. So now we can press
delete and faces. Now we can press ultage,
bring back everything. And if you're not
coming back, just press Altage Now, bring
back everything. Let's put it on an object mode. And what I want to do now is I want to just hide
this out of the way. So I want to grab this and this, and I want to join
them together. Control J, Shift H, and now we should end up
with all of the sides on and just the backs actually missing, exactly what we wanted. Now, on the next lesson, what
we're going to do then is, we're going to join all these together
because at the moment, you can see, if I press G, we still actually they're not actually joined together
or anything like that. So that makes it, you
know, kind of hard. I'm also thinking, as well, yeah, we'll do it that way. I think it'll be the easiest
way to do it where we just put on our material and shader once we've
actually finished that. Alright, let's do it that way. So what we're gonna do now is
we're gonna save our work. And this will be like
the template going forward for the other two roofs, because we're going to
need three in total. And yeah, I'll see you
on the next and one. Thanks a lot. Bye bye.
67. Painting Grunge Masks on Roof Tiles with Vertex Tools: Welcome back everyone to blend the building master class
from concept to final render, and this is where
we left it off. Alright, what we're
going to do is press A. We're going to go to mesh. We're gonna go to cleanup and we're gonna go to
merge by distance. 4,000 vertices. There we go, guys,
4,000 vertices. Now, let's right click
Shade Ato smooth. And finally, let's put
it on rendered view. And what we want to do now
is just grab everything. Let's put this on globe because it's getting
a bit irritating. And let's actually unwrap them. So unwrap smart UV project. This is when you'll be
really glad you've got that. And then let's go over
and what we want to do. Is go to our resource pack. We want to go to
materials and shaders, and we want to look for our
roof, which is this one here. And what we want to do is we
want to drop it on there, like so, and make an
absolute mess like this. Now, don't worry,
guys. It's gonna be okay. So don't worry. If you put this on,
you're thinking, Whoa, I don't like
my roof like that. Don't worry on. Let's go
over to shade and I'll show you why it looks like
that. Let's zoom into it. Let's put it onto rendered view. Let it load up. And then
what we want to do is we want to come into
the actual shader. And the part we're looking
for is going to be let me just find
it because it's a little bit hidden away, I think, Yes, here it is. So it's this part over here. We've basically put
on top a kind of grunge map on top
of there because we think that would
be looking very nice. What do we need to do we
need to go its scale, grab all three, so
left click and drop, put it on two, and there you go. You'll see already looks better. Now, the other thing you
can do it's coming over now to object mode and come
and put it on vertex paint. The moment you put
it on vertex paint, this will get activated. So we're going to
go Object mode, vertex pain, and there we go. Now, you can actually
come on now and draw on your actual roof wherever
you want, this vertex paint. So what I recommend doing is
just pressing Controls he, and all I want you to do is just come in and see how you like it. So if I come in and draw this, you can also see that
I can also pull this up and bring it back
a little bit as well. So if I'm just going
to pull that back, and then you can also
see if I draw on again, let me just go back a
minute because I think I've changed something, and there. Okay, object mode, vertex pane. There we go. Now
we can draw on it. Now, if I turn this down, I can change the way that it's
actually distributed out. If I then turn this down, you can see I can drop it all the way back or
bring it forward. Now, for me, I'm not actually bother about
putting a load of, you know, bits on there
or anything like that. I'm not bothered
about doing that. But if you want to
do that, you can see here that I can put a
little bit on there. So if you want to do that, it's actually ready and enabled for you to actually
use it in that way. There's lots of other things as well you can play
around in here. But I think if I go
back to modeling, I'll ever go back to modeling, press the tab on, press Altag
to bring back everything. So let everything load up. There we go. Double tap the A. Put it on rendered mode. And there you go, I
think I'm actually happy with my roof
tiles like that, but it is enabled if
you want to do that. Okay, so that's
looking pretty nice. Now, the one thing I would
say at this point is, it might be worth
actually going in and looking at this stone light. So this stone light, it might
be a little bit too light. I think it's a bit too light
compared to everything else. It needs to be a
little bit darker. So what I'm going to
do is go to shading. And I'm actually
going to zoom out. So, let's zoom out. Where is my stone? So let's bring this. There we go, bring this down. Here is my stone. And now we're going to actually make
this a little bit darker. And then this lighter version, we can actually bring
that up as well and make that a little bit
darker, as well. Then what we're going to do
is we're going to come over here and we want
to bring this one. So, this one is the one. So this color ramp here, which is coming from
the color over here. So this one here, here is the one that's going
to change the color. So if I come in,
let's say to this, and I make this part darker, you will see it makes the
whole thing darker like so. Now, of course, we don't
want it that dark, and there are all the things
that we want to do as well. What I also want to do is I also want to come over to here. So, like we did with the other one where
we brought it in, I want to press Shift day, and I want to bring in a gamma. So I want to have a bit
of control over this. But instead of making it light, I want to make it a little bit darker so I can
go the other way look like so and make it
just that little bit darker. Now, if you look
where it came from, so it came from this. And now we're going to this. So control shifts there we go. Control Z. And now we're
going to do is we're going to go over to this part here. Now, we have got
control over all of it, so you can see we
can make it all darker or lighter, but I
don't want to use that. What I want to use
is this one here. So what I'm going to do is
just come to this one here and I'm going to come in and make it slightly
slightly darker. Come to this one. The most are going to make
this part slightly, slightly darker
as well, like so. Now, that to me is
looking way, way better. The only thing is that
this white on here, the edgewaar on here, I'm not actually
100% happy with, so I need to come over to my edgeware, which
is this one here. So click on this. And then what we'll do is bring this
down, and there we go. It doesn't have to be as
white as what it was. And now that's looking much, much better than
what it was before. Now, of course,
the problem we've got now is now we've
made it darker. This white in here
is way too dark. So what we're going to do is
pretty much the same thing. So you can see, the more you alter this and this is why we're
going through it, the more you'll actually realize what the
things are doing. This is the bevel, so this is this edgeware that you see here. This is the color ramp for it. So if we put this
on bright white, you will see a lot more
edgeware on there. And then these parts are coming
from the color over here, and we're altering basically
the overall feel of these two actual noises that are overlaid
over each other. So you can see one of them, if I go here, one of them, this side, controls this
kind of inner part, and the other one
controls the outer part. Alright, now we've
done that, then, let's come to this part here, and we can see that if we click on here and come on over here, we've got one that
says Stone light, and if you scroll
down, stone lighter. This is the one where we want to make it a little bit darker. Now, you can see I need to
bring it down, bring it down. I'm struggling to make
it a little bit darker. And the reason is
because we know we already put in
a gamma over here. So let's come in and turn
that gamma up, not down. Let's turn it up like so. And now you can see that's
looking really nice. You can see now it's
really fitting in, even though it's a
little bit whiter here, you can maybe even go one more, but you can see now you can see the variations in the wall. That is what we actually want. We don't want them
to be too close. We want it to kind of
blending with everything. We don't want extremes of
colors or anything like that. Alright, so now I'm
going to do now we've done that, we've
got our roof on. We can start building this
out a little bit more. And then what we
can do is we can put our roof on the other side, move our roof over here, but really start to
just build this out a little bit with the windows
and things like that. Alright, everyone, so I
hope you enjoyed that. I'm going to save out my work. And you know what, I'm going
to save it again because what I'm going to do is I'm
just going to go to modeling. I'm going to press the tab
on, and then I'm going to save out my work from here
so I can carry on from here. Alright, everyone, so I
hope you enjoyed that. I'll see you on the next
one. Thanks a lot. Bye bye.
68. Beginning Roof Tile Placement on Stylized Structures: Come back if you want to blend
the building master class from concept to final render, and this is where
we left it off. So what we intend to do now is we intend to build
these parts out, so this one and this one
and probably this one. And the reason is because
this one has an actual well, it has a balcony here, same as this one, it has a
balcony under here. But this one has a stairs, which we haven't
actually created yet. These ones here don't
have anything like that, so we can pretty
much build these out and see how exactly
it's going to look. So let's do that first. So
what we'll do first of all, though, is we'll grab our roof. We'll press I'm thinking
if we press Alt D, we won't be able to alter it, but it will be better because
of the fact we're not going to have I'm just
wondering about that. Let me just put it
onto Rendered view. And let's see if we
can press Alt D, bring it over this side
and put it into place. You can see it's way way over, and that's one of the
issues that I've got, because if we press
we can ltd it over the other side and we can
probably ltd it over here. Let's see if we
can get away with Al Ding it over
this part as well, because it's round about
the same, I think, on here. Might need stretching a
little bit, but we'll see. So we'll do ltd.
We'll bring it over, and this is just testing it out. And you can see that it's not
quite level with this one. It's also going to be
a little bit small, so I need to make it a little
bit bigger, as you can see. And then what I'm going to do is now going to pull it away. I'm going to put my
snapping back on, and hopefully then it
should nap. Into place. It's actually not snapping. It's trying to snap on this bit, as you can see, so let's
hide this out of the way. You know what? Let's just
grab this and this ShiftH. Let's put it on object M so
we can see what we're doing. And then what we'll do
is now it should snap. There we go. Now we're
snapping into place. Alright, so we can see now that's the size that we want it. We can see though
it's going to be a little bit too small, I think. If I press snapping off, I press Altag, I'm gonna be able to get away
with it. No, I'm not. So I'll probably need
to create a new from this one that we've
left here for this part here because it's
a little bit too long. And then we've got this one over here where if I pull it up, I'm not just
going to put it on. I'm just going to leave
it there for now. And you can see we've got
a lot of difference there. So pressing Alt D on these might not be the
best thing to do because they're a
little bit too big. Let's have a look
at this one again. Yeah, they're a
little bit too big. So what I'm going
to do is I'm just going to delete that
one out of the way. I'm going to press delete on this one. I'm going
to come to this one. Instead of A D, I'm just
going to press Shift D. We can do it that way.
We can bring it over then. And what we want to check
is what we want to check, is just to make sure that when we look at this
one and this one, they don't actually
look the same. So you can see here they
don't look the same. For double tap the A, you
can see you can't tell, you know, the
similar in any way. Now, the other thing
is, I really want to, you know, kind of cut this down. So the way that I'm
going to do it, if I go over the top, like so, and then I can pull it
all the way out just so this one fits in here and I can cut away
this part then. So if I press tab
and go into here, let's put it on wiping, and hopefully then we can see this here is where
it's coming up to, I think, the L Nope not there, so it's coming to this one here. So this one here, if I grab it. I know I can basically
come down then and grab all of these
coming down like this, the leads and vertices. I can get rid of all
of those. And then what I can do use box select, which is B drag, let go. Breast control plug just in case you've not gone
through them on, you've not griten wireframe or something, press
delete vertices. And now let's go back, and what we'll do is
press object mode. Double tap the A,
and there we go, we sure be able to
get away with that. Now, let's bring this one over. So in this one, we can
actually do Alt D. So we're going to press Alt
D, bring it over into place, come over to our array, bring it down, maybe even
two. Can I get away with two? I might even be able to just
pull it out a little bit, which I think I can get
away with actually, sorry if I press S, and why? Jas pull it out a little bit, pull it into place,
and there we go. Now let's come to this
part. We're going to do Alt D again, and I'm
going to bring it over. Press the little db one, so I can see where I'm
actually pulling it up to. So I'm going to
put it into there, as you can see, and then I want to again bring
down the array. So at the moment, we've got nine, that's
bringing it down. And we need to bring
it to count of this, and there we go,
that's that part in. And there we go. It's as simple as that once you've
got the parts in. Now, let me just move
this over a little bit. And now what I want to
do is you want to put this on the other side. So this one wants
going over here. Now, we could mirror
it over there. Or we could mirror it. I'm going to try and see
if we can mirror it over there using object
mirror. Let's try that. So instead of the
orientation being here, what I'm going to
do is I'm going to put the orientation
in the sensor. I'm going to grab this part,
shifts cursed or selected. It's going to put it over
there, but it is in the center. Grab this one, right
click and set origin, two, three D cursor. Then what we can do is we
can try and press Alt D, so Alt D and then mirror. So object mirror, and it's
going to be on the X. So mirror on the X. And it's not quite
working as intended. And that is because, of course,
this one is a long one. I did forget that we've made
this one slightly longer. And the other thing is,
you can see down here, Ama going to be able to get away with actually having
it like that. I'm just looking at
this one, as well. This one's also a little bit
too long. You know what? On these ones, I think,
because they're not straight, we have made a little
bit of work for us, but I recommend that
we use this and we put it in there like
we did with this one. So let's actually do I'm just wondering
whether we do that first. It's a little bit tedious
to go straight onto there, but I think it's probably going to be the best thing we can do. So what I'm going to do is
I'm going to grab this one, this one, and this. I'm going to press Shift H to hide everything else out of the way, and we
should end up with this. And then what we'll
do is we'll press Shift D on this because we
don't want to press old D, it'll end up changing it. So shift D, bring it over. And then what we're
going to do is we're going to just put it
on the other side. So if I rotate this round, so Z 180, let's rotate it round. And then what I'm
going to do is I'm going to put my snapping on, and we're hopefully going to
snap it to this one here. So we're going to snap it there. We've got the right
angle nearly. It's snapped to it. We just
need to change the angle now. If I press one, we can see
now it's snapped to this bit. We just need to alter the angle. So I'm going to do, click on
my snapping and the reason, by the way is, this
is the flat bit. It can't snap on this
one and this one. So it's snapping to the origin. Now, if I press S R and Y, I can then bring it into place. It still makes it much, much easier to get
this thing into place. Now what I can do
come to normal, and I can actually lift it up into place where
the other one is, make sure that it's
going over this. And then what I can
do is just turn these up. I'm just
going to have a look. Now, I'm just going to
press Alt and H again. So AltH. Let's have
a look where we are. We might need to pull it out a little tiny bit because
as you can see, if I put this on and Zoom out, you will see that we
will be able to see probably probably some of the
wood, as you can see there. So it's a little
bit too far out, so I'm just going to pull
it out a little bit. And then I'm just
going to as well, make sure that like this one, so you can see this one's just got a little bit
of crease under there. That is exactly what
I want for this one. So I'm going to then
pull it back this way. I'm going to pull
it back this way then. And put it under. So it's js going under, like so. And now I know where
I can increase it. So I can move it
over and those two in adjusting to increase
it going down the bottom. Now, I might have
gone the wrong way, when I actually
turn up the count. So this count here, let's see. Yeah, it's got it would be. Okay, so now we can
pull it back down and pull it back into
place, and there we go. Now, if I grab I just hide this out of the way and hide
this one out of the way. If I grab both of these and
the roof for a shift H, let's look now at how that's
actually balancing out because we want to make sure
and it's actually on there. Now, you can see it's a little
bit bent in the center. As you can see, if I press one and then put
it on wireframe. Here we go. Now we can
see how close that is. So what am I going to do now? I'm just going to grab this. I'm gonna pull it into place, and I don't want it
slotting through there. And something like that, I think is going to
look absolutely fine. And again, you can see why I've put that wood underneath now. Now, if I press Saltag, bring back everything, this is what we
should be left with. And I want to do the
same thing now before actually coming in and
altering any of these. So shift D. Let's bring
it over into place. I'm going to pull it
right up to about there, and then I'm going
to go over the top. And now I know from
around this point here, I can get rid of all
of these going down. So upon my wireframe, I'm going to press the tab
bone and it's this one here. So let's, you know, what we need to go into there. Why we're not able
to select those? Let's actually have
a look because I didn't grab them
and I select them. Base Oh, that's why that's
why I can't select them. I need to change it
to geometry first. So before we do that, because we have a lot of things
to do with the geometry, you know that we need to get
rid of the backs of them. You know that we
need to then bring in the roof actual texture. So before we do that, what we'll do on the next lesson is, we'll grab both of these, and we'll do them both
at the same time, exactly like we
did the front one. And then we'll get rid
of all the back ones. Using our circle select. We'll do it that way.
Alright, everyone, so I hope you enjoyed that, and I'll see you
on the next one. Thanks a lot. Bye bye.
69. Continuing Detailed Roof Tile Placement: Welcome back, everyone to blend the building master class
from concept, final render. Now with this one, we could actually, as
well, just turn it down. If we turn it down, look, we
can then put it into place. We don't need to
have it so high, we've still got a jump genodon, so I can just put it
up to maybe one more. Like so. Is it going
to fit like that? Let's have a look. It's
sticking out the top. I don't actually know why
it's sticking out the top on this one. We pulled
it over here. I don't actually know why
it's sticking out at the top, because it should be
the same as this. So I'm going to
do is just delete that one. I'm going
to grab this one. I'm going to press shift, and I'm going to bring it over and see if it's stuck at the top. And no, it's not. So maybe when we turn this down,
then, let's turn this down. No, it's not moving
it. I don't know. But anyway, we've fixed it now, so all we can do is we
can just pull this in, maybe get rid of even one more. Pull it into place,
and there we go. Alright, so that's on there. Now, the next thing we want
to do then is we want to make sure that we've got
wood under here as well, because I'm not sure whether I, you know, copied this over. So what I'm gonna do is just
hide this out of the way. Yeah, there's no wood on there. You can see there's
wood under here. Let's split this off then. So what we'll do is we'll hide this part out. We'll come in. And what we'll do is
we'll split this one off. At this point as well,
we really should be thinking about our roof
thinners, for instance. So if I click on there, you can see that's
the roof thinner. I want this to be added
to that, as well. So I'm just going to press P
selection, split that off. And then what I'm going
to do is I'm going to grab these and these. I'm going to press Control L, and I'm going to link materials. And then what I'm going to do
is come back to these tab, A, U, and we'll do unwrap. And we'll unwrap them like
that, and there we go. Now, we can see these
are a little bit bigger, and I actually think that looks better looks a lot
better than this one. So that means I
can come back now, grab both of these,
UVedit let's zoom in. And I think they've been
made even smaller, like so. That's how they've
done that. Yeah, and I think that looks
actually better. Now, let's press SaltH
and there we go. Let's go back to
modeling, actually. And now let's work
on both of these. So we need to get rid of
the backs of all of these, and we need to also
just keep the sides, and we brought it down. And we also need to put on
the texture, of course. So Shift H, let's try and do them all at the same
time because they should be in the same angle. So first of all, I could
probably just looking. I could probably, I'm going to I'm thinking that the
easiest way to do this is, first of all, to hide the
sides like we did before. I do think that's
the easiest way. Well, the easiest
way is to turn them, first of all, into geometry. So I'm going to
grab both of these. I'm going to go to
object, convert, to mesh. And then what we're going to
do is now we're going to try and s grab both of these. So I think we can probably
go away with doing them all at the same time,
because if I press one, you should be able to see like they're perfectly lined up, and we should be
able to use that to our advantage. So
we'll use that. So what we'll do
is we'll come in and we'll grab this one, not this one, this one. This top one, like so. We're also going to grab
an inner one, as well. So we'll come around this side, and we'll try and
grab this inner one. Then what we'll do is
we'll come up to select, and we'll come down to
select similar by normal. Alright, so we can
see that we've got some normals here that
are still on there. So all I want to do is hide these away.
So hide them away. And then we've got
these normals here. So we'll go to select, and we'll go to
similar and normal, like so, and then
hide those away. Now, have we got
any more normals? Yes, we have. We've got
some normals here as well. So select similar, normal,
hide them out of the way. Now, let's have a look. What have we got here?
Have we got any others? If I look through there, if
I put it on Face Select, have I got any others on there? I don't actually think so. I
think they're all clear now. And now I'm looking
at this side. Are these the same?
I've cleared them all. It looks like I've cleared
them all that side as well. So now what we can do is we can press one to go into side view, and now we can have a good view, and we can see there
is no normals on here, and what we need to clear now is all of these faces going up. So all of these faces, as you can see, there is nothing in there,
so that's great. So now I'll do I'll
come on to wireframe. And then what I'll do is
I'll press the C button, and I'm clearing each of these
going all the way along. So see. And you can see it's quick because we're actually doing two
at the same time. So see, like so, like so, like so, and then see like so, like so, and like so. And then what I want to
do is just press delete and faces. So delete faces. Tag, bring back the other parts. A to grab everything, mesh, come down to where it says, cleanup and the one we're
looking for is merged by distance, 8,360
vertices removed. Let's then put it
on the object mode. And what I'm hoping is,
I've got rid of these. I'm going to right click
then Shade Auto Smooth. And then we've got rid of
all the backs on those. On all of those, as you can see. Now, the way to check
this as well as you can come up to here and go
to face orientation, you can see now all of them
are faced round this way. Now, if I grab them all,
press tab, shift N, I can spin them all round, and then I can see that they're all on the back,
except this one here. So what is wrong with this one? Let's have a look.
So we can see that this one here is the only
one I've missed, I think. So if I press tab, I should
be able to come into the backup here,
delete and faces. I just a bit of an
outlier, same as this one. So if I come to this one, delete and faces, and there we go. So the rest of them
are absolutely fine. Now when I do it, I want
to go and press ALTH. And what I'm going to do is I'm better going to unwrap them all, so I'll unwrap them
separately, though. I'll press A smart UV project, click Okay, and then
go to this one, tab A, smart UV
project. Click Okay. Now, being as we're
here, we might as well grab both of these. Press tab, A, and shift
N, spin them round. So they're facing the
right way, like so. And then what we
might as well do is put this on to material view. Grab each of these, grab this last press Control
LL, link materials. And then finally, what we might as well do is
just come to this one, go to vertex paint, and then take it off. And I'm just looking if
they're gonna look the same. So let's actually
have a look now. Let's go to Renard
view. Let's take off our face orientation. We don't need the on
anymore. Double tap the A. And there we go.
You would never, ever be able to see that
these are the same worsever. And it was very, actually very quick to put those into place. Now, while we're here with that, we might as well do
this one because then it means I can
do this one across. So I'm going to again, come in Shift D. I'm going
to also save out my work, so I'm going to go
to Global on here. I'm going to come in
file, save out my work. And you can see it's
really speeding up now, which is great for us. I'm going to press
R z -90, like so. I'm going to grab this
one and this one. I'm going to press Shift H to hide everything else
that's out of the way. Put it on object mode. And then what we'll do is we
need it right near the top. Now, first of all,
let's pull it out. Put on our snapping
tool. So this one here. Let's then grab it and then pull it over to
where it needs to go. We can see the angle of
this is a little bit out. So what I'm going to
do is press R and X, rotate it round just to
get that angle right. I'm going to press three
to go inside view, and you can see, now that's lining up very, very
nicely with this. So now if I bring
this over, though, even with snapping on,
you can see it's lining up perfectly. Like so. Now, we already know it needs to come from the bottom because it will snap to going up. So I'm going to put it
right down at the bottom, like so, and expend
it out a little bit. And then what I'm going to
do is increase this amount. So keep going up to the
top, and there we go. Now, if it goes over
a little bit too far, that might be a little bit too far. We'll have a
look in a minute. And what I also
need to do is make sure that this is
the right scale. Now remember, we've got
the front and back, so we will have the front
and back of the roofs, you know, hiding
some of the tiles. So I can actually freely get away with bringing this down. Like so let's see if
I've gone too far, and that is that
should be about right. So now if I press tag,
bring back everything. We can see it's nearly hidden. It's nearly nearly hidden. You can see it's
just slightly out. So what I'm going to do
is I'm going to come in. I'm going to go to normal. And then what I'm going
to do is just pull it back into place,
turn snapping off, pull it back into place, holding the shift a little bit, like so. Now, this is
what I don't want. I don't actually want it.
Come in through there. You can see the wood
coming through there, which means I need to change
the angle a little bit. So I'm going to press R and X, change the angle just slightly
so it's all the same. So you can see now it's all the same and then pull
it back into place. And hopefully we should be
able to get this right. So if we double tap the A now, we don't want any tel
stuck through like this. That's what I'm
basically saying. We could, as well. I'm
going to leave this actually because I don't want these tiles
stuck in like that, so what I'm going to
do is I'm going to press I'm going to
bring this part in, I think, once I've done this. So I'm going to get this lined up perfectly till I want it. So I'm going to press R and X, rotate it back a
little bit, like so. Double tap the A, and now I'm
happy with how that's in. So what it means is, I need
to then come into this bit. So these are the parts
that we've unwrapped. We make sure that's the case. Did they unwrap those or is
it those? Let me have a look. Which one did I sort out? Did I only put wood on
that et's have a look. Oh, it was this one, wasn't it? We haven't done these yet. Okay. So we'll come to these. We'll grab this one as well, and then we'll
press P selection, and then we'll come to
this one, grab this one, press P selection, like so. And then what we'll do is
we'll resell the transforms, right clicks origin to geometry. And then what we'll
do is we'll just hide this one out of the way
and we'll do this quickly. So what we'll do is
we'll grab this one, this one, this one last, press Control L, link materials, and then we'll grab these
both at the same time. Press A, U, and unwrap. And then what we'll do is going
into UVE diting A are 90. Put them into place, make sure that we're happy with them. And yes, we are.
Then we'll press Altage, bring back our roof. And now what we need
to do is we need to bring these in a little bit. In other words, these pieces of wood because we
can bring them in. So I'm gonna come
to this one first, A and then S and Y and
bring it in a little bit, and then we won't have that
problem with the roof. But we'll still be able to see inside there if there's a little gap or
anything like that. Alright, let's go to modeling. Let's go to file and
save everything out. Alright, everyone,
so on the next one, then, we'll finish this roof. We'll get it onto
the other side, and then from there, um I'm
just wondering from there, we will then be able to probably once we've
got this roof on, put the top of this
on and then start with probably the actual
windows going down there. I think that'll probably
be the best way to do it, because what I'm trying to do is I'm trying to get this part, you know, figured out and
not make it too boring. Where all we're doing is just building,
building, building. We don't actually
want to do that. Alright, everyone, so I
hope you enjoyed that. I'll see you on the next
one. Thanks a lot. Bye bye.
70. Creating Roof Corners and Decorative Frames: Welcome back if
you want to blend the building master class
from concept to final render. Now, while we've got these, we might as well put these into the roof inner. So
we might as well do that. So I'm going to
grab both of these. I'll press the M, and I'll come down to roof inner, like so. I want to hide the roof
out of the way then, and I should when I
come down to this, be able to hide these
out of the way. Now, you can see,
for some reason, I've got this one here, as well. That one needs going
in the roof inner, so roof inner and there we go. Now, if we bring these
on, there we go. Now everything is working. It's just that I
didn't hide that. So now if I do
this, there we go. Alright, so now
we've got our roofs. Now, if I press oltage,
bring back my roofs. I should also be able to
put these into the roof. So have got one that says
roofs that says, Look. I've got one that says walls. Let's make one that says roofs, so I'm going to press M,
and we'll call it roofs. And trust me, guys, it's really worth no matter if
you're building it for the court or not putting them
into collections like so. Now, I can come in and
work on my roof here. So this roof here, we know that it's going to be a
back on this part, which is this part here. So what we deem to
do, first of all, is we need to drag this
over to that other side. So I'm going to press Alt D, and I can bring that over then to the other side, like so. We can see that this top
bit is a little bit out. So what I need to do is I
need to pull them apart. So I'll do that
first. First of all, uh I'll just make sure that I'm happy with how four
that goes out. Now, we will have a little bit of something
on the back of there, so you do need a
little bit of a lip. And then what I'll do
is, I'll come in now. I'll grab both of
these top pots. And all I want to do is just pull them one way and
then the other way. So it might you can either
do it one of two ways. If it's a very small amount, you can press S and X and
pull them out this way. So we'll put it onto medium
T is on medium point. Sometimes you can get away with pulling
them out like that, as you can see, but on this occasion,
probably not worth it. So what I'm going
to do instead is, I will put it onto normal, and then what I'll
do is I'll pull it up into place like so. So I'm going to pull it
up into place, like so. Now, as I'm pulling that up, you can see I've not gone
quite far enough there. You can see, though, this X, this is what
I'm interested in. So if I press Controls, just go back, pull
it up, pull it up, pull it up, and then I can see this X is this,
so control C. Like so. Now, if we do
the same for this one, so I can pull it up, pull it up, pull it up and come into the X. Now you'll notice that
it's plus, it's not minus. So just press Control V, and then take off the minus and then press the end
button, and there we go. Now that then should be perfectly
lined up with this one. Alright. So now let's
deal with this roof because this roof
should be able to come over to this roof, as well. We've got these pieces now, so let's come in,
first of all, then, and grab this part, press Alt D. And then what we'll do
is we'll spin it round. Now the other problem
I've got is dad I press Did I press? That's another problem I've got. Did I press Shift D?
Let's have a look. I'm wondering, let me
see if I alter this. Let me come back to this one. Yeah, that's the problem. I messed up. That's
the difference. Shifty and D. So let's go back. Let's just put these back 1 second because I
messed up there. Let's put the other
one back. All right. I need to get rid of
these and I need to bring in this here instead of old, I need to press Shift D. And
the reason is just on these, if I press Old D, you can see that once the
stads are in the mesh, it's going to mess
these up, so I need to be very careful about that. Okay, so now we can
come to this one, and I can do exactly the same. So I've still actually
got the amount. So if I pull it up to here, I
just go in, control, Enter, and then I can come to
this one, pull it out, and then I can Control V, minus it off, and enter. And then I'm just going to
go around making sure that lip's okay and that looks fine, and then just want to top now. Now with the top, of
course, I can go Old D. I can pull it up. I can
spin it around then. So Rz 90. I can press I can bring it right into
the center, actually. So all I'll do is I'll just
grab the center, Shift S, cursed to selected,
grab this one, shifts and selection to cursor. Now, I'm going to
look to see if that's actually right in the
center, which it is. I'm then going to pull
it into this part here, and I'm also going to
minus off the array. So let's minus it down. And I think that will
do in there like so, and then all I need to do is
just pull it up into place. Now, of course, the back it needs hanging
over a little bit. So this part on here
needs hanging over. So I'm going to pull
it out, pull it out. And I've also, I
think, have a look. Ah, my a little bit
too ball with this. You can see on this
part because it's not got the roof in. That
looks fine there. This bit here is
going into there, so that looks fine on there. The one thing I'm looking at is if these it needs coming down, I think a little bit further. So if I bring this down to here, and then Jas pull it
out a little bit. So if I press S and Y, holding the shift, pull
it out a little bit, yeah, that's going to
look much, much better. If I double tap the A now, save out my work, let's
have a look at that. And there we go, Yeah,
that's looking fine. Now, just making sure
nothing's sticking out. Now, we've got this roof. So it means once
we've done this, we can actually bring it
over to the other side. So basically, what I want
to do now is want to press Alt D and move
it over to here. So moving this
part over to here, these two parts, and
especially this roof. So what I'll do is I'll grab
them all at the same time, grabbing my roof
at the same time, and then I'm going to
move everything over here cause this should
be the right size. Now, where do we base
the center of here on? So first of all, let's
put it on Global. And then what I'll do is I'll
press Alt D because I'm not planning to change well, I'm planning to do this roof, which means when I
change this roof, this roof is also
going to change. So that's the best
thing that I want. So what I'm going to do is
I'm going to come over. I'm just wondering if I
press Alt D on this one. Yeah, I should be able to
mirror it over the other side. I'll show you that in
a minute. I'm just trying to work this
out for myself. Now, we've got all of these. We want to though put them
in the center of here. So I'm just wondering
the best way to do this is probably if I grab one of these
and then center it by coming in and putting it right
in the center of here. So if I press shifts, cursor or selected, that then is going to put it
right in the center. Now, we want one that
is right in the center. So if I grab all these three, grabbing this one last, press in shifts, and selections
cursor not like that. Sorry shifts, selections
curse keep offset. Yeah, it's grabbing that one for some reason. That's
not what I want. So I'm just wondering if I can actually just grab
these grab this one, grab this one, press Control P, and then set parent and
keep transform, like so. Now, when I move this one, everything should
move, which it does. And now if I press Shift
desk selections cursor, there we go. Keep offset. And now I should be
able to pull these in to be exactly the same. And just wondering if it's even going to be what I intend.
We can see that's there. We can see down here,
is fitting nice. So why isn't this fitting
so nice? Let's have a look. Might even be needs
rotating or something. This roof, I mean. So what I'm
gonna do we can rotate it. We just can't alter
the mesh, as we know. So instead of that, what'd is, I'll just press on these two. I'll press at P,
so clear parent. And then what I'll do is I'll move these two into place first. So if I go over the
top, I should then be able to do this manually. So jaws go to bring these in and look at where they are
over here so you can see here, cane boll them to get them
into the place. Like so. I've got enough room,
then I think on those. And then what I'll do is
I'll bring this one over. Now, with this one, I should still be able to put
it in the center. If I go over the top, I can see that that's
right in the center, which means I should be able
to press selection cursor keep offset and bring this into place, and
that should work. And then all I've got to
do is just bring it up. So if I bring it up, and then just make sure it's
sat on that pot there. As it sat on that pot there. Let's bring it
down a little bit. Holding chef bun,
and there we go. And now with my roof, I should be able to
bring this into place, making sure then
that I pull it this way in in in and into my roof. Now, the one thing that
we didn't do, of course, is we didn't bring
this piece of wood in, so that's the next
thing we want to do. So if I grab this, I
should be able to press A, and then what I should
be able to do is press S and Y and bring it in. That might be what
the key here is. Okay, so we've got this one. We've got this one. Now
what we want to do is want to put this roof
over the other side. So to do that, you can see
I can just grab my roof. I've got this right
in the center, which means I should
be able to right click and set origin
to three D cursor. But it's going to move, and
the reason it's going to move is because we've got
that actual Jumptre node on. So what we want to do instead
is, instead of doing that, we will actually fix
both of these roofs, and then once we fix
them, in other words, turn them from a
Jumpton node into mesh, do all of the stuff
when it comes to, you know, altering the
textures and things like that. And then what we'll
do is we'll duplicate them and put them
over the other side. That is the way that
we'll do it, then. Alright, ever so I'm going to do is I'm gonna save on my work, I'll save, and I'll see you on the next
one. Thanks a lot. Bye bye.
71. Optimizing Roof Tile Normals and Backfaces: Welcome back if
you want to blend the building master class
from concept to final render. Okay, so let's get
these into play. So I'm going to do is
put it on object mode. I'm going to grab
both of these then. I'll press Shift H, hide
everything else out of the way. And then what we'll do
is we'll try and do these pretty much herd the
same time. So I'll come in. I'll change both of these,
first of all, to mesh. So object, convert to mesh. And then what I'll do is
I'll come to this one, and I'll come in and I'll
grab the top if I press dot, I should be able to zoom
into it, this one here, and then I'm going to
go all the way around the other side because I'm
looking for the normal. So we have one normal
facing that way, one facing downwards,
and so on and so forth. And then I should be
able to go to select, come down select similar, select by normal, and I should be able to hide
those out the way. Now, once I've done
that, if I press three, I should be able to
see that there's nothing in there whatsoever, and that's exactly
what I'm looking for. My other one is over here. Then what I should be
able to do now is come in with Faceelet,
put it on wireframe, press the C button
for the circle, and now by this point, you should be extremely
used to doing this. So we should be able to
speed this process up. Like so. It's just
rinse and repeat. And I know it's a bit tedious
doing roof after roof, but I think it's going
to be easier for us once we've done these before putting in the windows
and things like this. Now, I can see on this one, for instance, we still have, as you can see, faces
there and faces there, and I'm hoping that I've not actually
grabbed hold of those. So these faces here. So let's press Delete and
faces, and there we go. Now, let's put it on object mode and see
what we've got there. So we've still got all
of these faces here, but you can see that I've not got faces along
here, which is fine. Let's press Altag, bring back the rest of it,
double tap the A. There we go. Now, we should be able to see now if
we've got this correct. So we'll do that first. So
we'll come on and we'll put it onto face orientation. And then what I'll do is I'll
grab all of these faces. So A, shift and then,
spin them round. Now, that's Sometimes that will happen, we really
don't want that. So I'm looking, is it because we really don't
want that to happen. So I'm going to press Tab, A, shift and N. And why are these spinning round like that?
I really don't want that. And the reason this spinning
round I remember now is because we need to join them all up first.
So let's do that. So we'll go to mesh, clean up, and we'll go to Merge
by distance 4,332. Right click, shade Auto smooth, and then we'll press
A, shift and N. And then finally we
can spin them round. Okay, one over here, look. You can see double tap
the eight, one over here. And we can see if I come in. I don't know why there's
just one over here, but let's have a look. Here's that face. Let's press delete and faces,
and there we go. Alright, so all of
those are fixed now, and we've got rid of thousands of polygons. Now, let's
come to this one. Same thing again, right click shade or to Smooth,
first of all, and then we'll press Dot
to go into this one, and I'm going to come in. I'm going to grab these here. I'm going to grab this one here. I'm going to come
around the other side, pretty much the same thing
as what we just did. And then we're going
to go to select. Select similar, and
we're going to go to normal. There we go. And then what we should
be able to do is hide, although it's
out of the way. We can press three
then. Where are the faces? Is it this one? You have a look at
this. Which ones do we do as press tab? We'll zoom into these ones. This is the one
we've already done. Let's zoom into these ones. Oh, I know why. I
forgot something. What we didn't mention is
these are joined together. So when we deleted this mesh, it's actually deleted this mesh. You know, remember, we
shift Ds and put it in. Well, then we alt deed it, and we basically made
an instance of it. So that actually made it way, way easier because
they're exactly the same. Oh, wow, I forgot about that. Okay, now what we want to do then is bring in my material. So I'm going to do is I'm
going to grab this one. I only need to grab
this one. I can press U. Smart UV project. Click Okay. And then
what I can do is now I can come in,
bring in the material, which will be roof, bring
in the roof material, like so, and there you go, now they're exactly the same. Now I can come to this
one, go to Vertex paint, put that on, bring
come out of it. And then what I can
do is I can just come to this one and rotate it. So I can come to this, rotate
it round the other way. And the way I'm
going to do that is pressing Control
A, all transforms, apply object, warning
multiple objects, share the same data, make single use and then apply
the transformations. No, we don't want to
do that. So can we go set origin to geometry? Yes, we can, but it's
going to move it other way, so we don't
want to do that. So all I want to
do then is come to this one object, and
can I mirror it? So can I mirror it on the X? So the X is going this
way, as you can see. So object, mirror on the X. Yes, I can. I just need to
pull it back into place. So now if I press ltH, bring everything
back, let it load up. There we go, and
then just make sure that this one is in place, so not poking through
any of those, double tap the A, and
now let's finally finally take off
base orientation. And then what we'll do is
we'll save that'll work. And then we're just going
to have a quick look on the rendered view and see what
that actually looks like. So now you can see, because
I rotated that round, these look different
from each other. So you can see here
they look different. You can't tell the same. It's just a simple
trick of the eye, and it's actually
worth doing that. Now, then what we want
to do is I want to bring this one to this side and
this one to this side. All I'm going to do really
is grab both of these. I'm going to press Alt
D, bring them over. I'm going to grab them
individually then, so I'm going to
grab this one and this one, and I want
to spin them round. Z 180 spin them round. Now, we can see that
if we pull these here, press the enter button and
now pull them into place, hopefully they should both
drop into place perfectly. Like so, double tap the A. Let's make sure this one's
in, and there we go. No, I just want to make
sure the wood's poking through a little bit
too much on this one, so I'm going to
grab this one, move it slightly, very slightly. Pat the A, and there we go. And then we'll come to this
one and make sure that this one is also
moved very slightly. So, double tap the
A, and there we go. We've got our roofs on now. You'd never be able to tell
these are the same roofs again because this over here, as you can see, is the
same as this over here. So they're mirrored
round, you can't tell that they're the same.
That is what I mean. Okay, so now we can come in and grab all of these
roofs, so all of them. So, and we can put them into one that we've
made called roofs. So no roofs are there. Now, the best thing
is now you can come in and just close that up. And you know, if
it's a bit heavy on VRAM or something like that, you can simply just come and
hide them out of the way. It's going to make
it, you know, much, much faster on the
actual viewport, you know, especially
when you're in rendered mode like I am. Now, if I bring
those back, though, put it on object mode, so
this is what we're left with. Now, from here, I can see that these might need pulling
out a little bit. If I'm going rounder, you
can see everything is fine. But on these parts here, you can see the woods poking
through a little bit. Always check that and make sure. And the reason for that is we haven't brought in
these pots of wood. So if I come in just
hide these two, I should then be able
to grab both of these. I should be able to press
tab A to grab them all, and then S and X and just pull them in just
a little bit, like so. And then if I press tab
Altag, bring back everything, double tap the eight, and now you can see
it's disappeared, and those roof pots are
fitting in perfectly. Alright, so that's that bit. Now, we can move on now to
putting in these windows. And again, what we need is
one that's called walls. If I turn off my walls, you'll see we've only
got this one as walls. We've not got this as
wall, for instance. I'm not even sure we
actually unwrapped this Lo. We haven't unwrapped this one. We haven't unwrapped this one. We can see that we've
got on here these parts. So this part, if I come in, if I grab this and hide it out of the way,
where is this part? Oh, it's these corners here, which means that because I've selected this and I can see
now these are some issues, I can actually come
in and make this, first of all, a
little bit smaller. So we'll do that first
if I press S and Y. So we're not wasting all of that UV space because it will have a cost
associated with it. Now, another thing is we don't need these top bits
on top of here, so I can just simply
press ShiftH, hide everything out of the way, and then I can just come in
and delete all of these. I really don't need them, so I delete all of these
delete faces. Now, the other thing I don't need is I don't
need these either. None of these parts
I'm going to need. All I need is the walls. I don't need this part, either, so delete and faces. And you should be left
with walls like this. We want to cut down the
amount of walls space. We're actually using
as much as possible because the more space
you're using for UV, the higher it's going to be on the performance
and optimization. So we really want
to do everything we can to bring that down. So saving ourself a
load of use V space by doing it as we're building is going to be the best
thing we can do. Now, if I press S tab old age, I should be able to
bring that back in. And then what I'm going to do
is look on this wall here. Again, we can see on this wall we've got
these points up here, but the wall comes to here. So we just need to be
careful on both of these. What we can do, though, is get
rid of the flaws on these. So we're going to
check that out now. So shift H. Let's come in. First of all, we can
see we will need these walls here because
these ones are coming. I just press Tab again,
not H, if I show you, these are these in fact, yeah, this is this wall here,
this is this wall here. So we will need these
in some capacity. So probably better off keeping those rather than trying
to mess around with them. So what we'll do again, is
just press Control's head. So I'm going to keep those. What I'm going to
get rid of, though, is these bottom parts here. I'm going to join them both
together at the same time. Press tab, grab this
one and this one, delete vases. Keep
going through then. And faces, and then
the bottom part, delete and faces,
and there we go. We should be left with
something like this. Now, what we probably should do, I'm just wondering
if it'll be easier to unwrap these going straight down the center because we will
need these parts. So what we'll do is we'll press ControlR left click,
right, click. Control left click, right, click and just do the same. Going all the way through them, like so, and the same
on the bottom, as well. So control, left click, right, click. Same on this one. Control, left,
click, right, click. Control, left click,
right, click. And now I want to do is
go to each of these, grabbing each of these,
and I'm just going to mark a scene, like so. And then we'll make
sure that when we open these, they're
open from here, so they'll open round,
and it'll be very, very easy for us then
to line everything up. And that's what we're
going to do on the next one. Alright, everyone. So again, let's say
about our work, and I'll see you on the next
one, everyone. Thanks a lot. Bye bye.
72. Inserting Windows and Cutting Wall Openings: Welcome back on to blend the
building mass class form, concept two, final render, and this is where
we left it off. So what we want
to do now is want to grab all of these with A, U, and we can unwrap
based on angle. Now, you can see we've
got this problem here, and that is simply
down to the fact that we need to reset all
of our transform. So let's reset all of those,
and let's try that again. And he pressed out, it works. So now if we go to UV map, we can see the unwrap
exactly how it said. Albeit they're probably
the wrong way round. And albeit, we've got, you know, one at the bomb and
one at the bom, but it's still the
best way of doing it. Now, if I come in,
press the tab bo, press TH, bring back
everything, like so. And then what I'm going
to do now is I'm going to come to these parts. So these are the two
parts that I had, and I want to basically
grab this one last, press Control L, and we're
going to link materials. And then what I'm going to
do is grab both of these. First of all, we'll spin
them round. So press tab. Make sure you've got
them all with A, and then A and the UVMa or 90, spin them round, like so. Now we need to line them
up with these ones here. So I'm not going to go in and just try and line everything up. What I'm going to do
is I should be able to pretty much get them to be
round about the same size. So if I press tab on all of
these, you can see them. This is the size of
this one down here, but it's way, way
bigger, as you can see. So the bigger I'm making them, the better it's going to be. So what I'll do is I'll
come now. You know what? I'll just do it the easy way. We're not going to
mess around like that. Instead of doing that, you
know what we're gonna do? We're just going
to press Tab, A, and then we're just going
to make them bigger. Make them bigger and just line them up. That'll be
the easiest way. So if I zoom in here, press
three on the number pad, I'm going to press the Sp,
line them up, line them up, line them up, get them to be roughly the right
size, and there we go. That will do. No one's
ever gonna notice that, so we'll just do it that way. Okay, so we're on
to this wall now. Now let's press Shift and
have a look at this one, as it going anything on it?
No, we've already done that. So all we need to do is A. In fact, we'll reset all
the transforms first. So we'll transforms,
set origin geometry, tab, U on the wrap,
and there we go. And now let's press tab, Alt grab these, grab this one, Control L, Link materials, and these were nearly nearly perfect to what we need. So we're
gonna leave those. They're very close anyway. Okay, so let's come
back to modeling. Alright, so now what we need is we've got
our walls on there. We have a balcony
that's on this one. This one doesn't have a balcony. So we can pretty
much do this wall. We can do all of this one, and we can pretty much do all of this one to
the front of this. Yeah, that's what
we'll do, I think. And then what we'll
do is we'll probably start work on another
part of this. I'm just wondering maybe
we'll start work on some of the other
parts like the stairs. We could start work
on the stairs. I think that's probably
going to be the thing, too. When it comes by
the way to creating this dome and creating
this round a bit, it's probably better
off if we build them in here and then send them through to our resources and
drop them in there. It's sometimes
better doing that. It makes more sense because
we've got this built out, and trying to build
this round bit while we're not actually in here is going to be it's hard enough
building this round bit. Trying to build it and trying to hamstring yourself
is not a good idea, so we're not going to do that. So file save. Now what we want to do is let's bring in then those
square windows. So luckily for us, as we know, we do have all of our windows. If we come over here and
we put it to modular pack, let's go down to windows. And here are all of our windows. Let's bring our windows in. So we've got a couple
of square windows. Let's pull it in, not there. We'll pull it down to grand plane to make
sure it's straight. And then what we'll do is
we'll press Arshad 90. We'll press three
on the number pad, and what I so be able
to do then is put these into some sort of place right
in the center around there. Now, for now, I'm going
to pull them back. I'm going to put it
onto material view, and I'm going to pull
them back just so that glass disappears. So
keep going, keep going. And there we are. There's
the glass disappearing. And we want to make
sure, as I always say, that these bits here, there's just a little bit
of a gap there. So if I pull them
back I'll grab them, pull them back, pull
them back, like so. And then what I'm
going to do, it's up to you if you want to
just stick them on the side, by the way, it does
make a big difference. I think it makes
them look better. So now I'm going to do is
I'm going to press Old D, bring it over, put
this one into place. Now, let's come with
the bott windows, then. So these are the bottom windows. I'm gonna have three in them. I'm going to have
them sat on here. So I'm going to bring in
this window here or Z 90. I'm going to press
three. And first of all, I'm going
to line them up. So let's get them all lined up. So one. And then I want to
bring in probably an array. So I'm going to add in an array. So let's generate an array. And what I'm going to
do is split that up. So I'm gonna pull it
out a little bit. I'm going to put in another one. And what I want to make sure now is I've got the same gap
between them, which is great. And what I want to do is
just make sure that I'm happy with the gap on this side. I think I want to bring
this down just a tad, like so, and then I'll
pull them out accordingly. And there we go, now
we've got that even gap. Now, you might want
it where you've got the same gap here as what's in the middle. We can
do that for sure. So let's just bring it down,
hold in the shift but. I'm moving them over and just playing around
with them a little bit, and now you can see it's
a little bit more even. And finally, then,
that's just pull them back into
place, into place. Now, for some reason,
Yeah, that's why. This is on, I need
to zero this out. There you go. That makes
them more level now. And I'm going to pull them in. Maybe that's gone a
little bit too far. Maybe in something like that. Alright, that's looking good. Now, the thing is, now what I need to do
is I need to come in and obviously the boolean. This is where it probably
would have been a good idea to save the boolean from before, but you know
what I'm gonna do? I'm going to save it out in
here now when I've done that. And we've also got the tool. So let's see if I've got
the ball tool in here. So if I go to preferences, I go to ball, so I put in
ball. There's my ball tool. So let's click that
on. There we go. Then what I can
do is I can press three, and I can, first of all, come to this one, shifts
cursor to selected. I can also come in and
just apply that array. So control A. Let's apply
that array, like so. And now with this one,
let's press Shift A, and we'll bring in a
cube. So bring in a cube. I'm going to make it a
little bit smaller, like so, and then go to press S and Z, bring it up a
little bit, just so it's going to fit
in place, like so. Alright, that's that one.
And then what I can do is I can probably do all
of these at the same time. But I do want to save,
you know, this side. So what I'll do is
I'll press Shift D, bring it over to this
side here. Like so. And then what I'll
do is I will press Shift D, bring it down. And what I want to do is put it right in the center of here. I'm going to press S and Y, bring it in, and then pull
it down to where I want it, and then finally,
I'll come round, just grab the top of it. I'm going to pull it up right up to round about there. So
it's nearly at the top. And then what I'll
do is I'll come to edge select, grab this edge, press three, and then
I'm going to press Control B, bevel it off. Now we can see we do have a little bit of a
problem in that it might need to be a little bit wider
and come down a little bit, so I'll bring it down,
and then I'll press A, S, and Y, pull it
out a little bit. And there we go, that
is the perfect size. Press the tab but,
and now Shift D, bring it over, line
it up with this one, and then shift D, bring it over. And finally lining
up with this one. So there we go. We've got
all of our booleans in, so if I grab this one,
this one, this one, and this one, join
them all together, and then what I'll
do is I'll grab my wool. You know what? I'll just hide these out of the way for now just so you can see this working Hi,
those that the way. Now, grab my wall last, press Control minus,
and there we go. Simple as that to
actually do that. You can see just
how easy that is. Alright, so now I want to
do is just hover over here, press Control A, press TH, to bring back everything. And now I want to actually
put these cutters back. So I'm gonna come on over
to my Edits, I think it is. Let's have a look.
Boolean. There we go. Remove cutters. Okay, I
want to pull these out, and I want to save
these cutters now. So you will see
that these cutters, HippaPress dot bon should be
Has it made a cutter for me? Let's pull this down a minute. It doesn't look
actually like it's made a file for this one. Unfortunately. So what they'll do is
they'll just come in. I'll grab each of
these. So L, L, L, delete vertices,
split these off, so L P, selection. So these now are split off. Control A, both of them grabbed at the same
time, all transforms, set origin to geometry, and now finally,
we'll just put these in their own place.
So into cutters. So for some reason as well, you can see that both I don't
know why that is actually. I don't know why they're
actually grade out. I'm just wondering if yeah, these are my boolean options. I'll just keep them like
that. I'm not gonna worry about them because I'm just gonna put them over to the side. But at the moment, what is, I'll just put them in
their own called booleans. Like so. And have we moved
them, that's the question. Yes, we have. It
looks like if I hide this. That's a little bit weird. I'm not sure why they're
Oh, they're attached. You can see, look,
they're attached. I see these little
two dots lines. So I'm just gonna
grab them both. Oh, P, and we'll just clear pair and keep transformation.
And there we go. Now they're in the booleans. No idea what I attach them to. But anyway, let's move
them over then to my roof. We'll move my roof over here a little bit. And then we go. Let's actually have a
look then at what that looks like and if we are
actually happy with that. So I'm going to put
it on render view. And there you go, guys,
that's what you should have. And that's looking pretty
nice. I'm happy with that. Now we can see that our wall is going a bit funny when
we actually move it, but don't worry because
we're actually going to be working on this wall. So in other words, we're
going to be bringing in another actual,
what's it called? Another texture and shader. We're going to bring
in another one. This is just to sit there. So we can change it over very quickly because they're
all sharing the same one. And not only that,
we've got all of our walls or we should have all of our walls in the same place. We'll put those in place now. So I'm going to grab
all of my walls. I'm going to press M, and
we'll put them into walls. And then we go, If
I now come into my wall and close
that and there we go. Except these parts, which, you know, they're not walls, these, these are the outcroppings or whatever we
want to call them. Alright, everyone, let's say
let's save about our work, and I'll see you on the next
one. Thanks a lot. Bye bye.
73. Blocking Out Structural Supports with Array Modifiers: Welcome back to blending
building master class fromm concept
to fine or render, and this is where
we left it off. Now, let's come in then. And what we'll do is we'll
pull this pot out because it's stuck in our wall
for some reason, we really don't want that. So let's hold ship,
bring it out, bring it out, bring
it out a little bit, making sure that we're not
passing for double tap the A, we're not passing this point on there, so it's
actually stuck out. Next of all, then,
I'll grab this. I'm going to press Alt D. I'm going to
pull this out then. And what I want to
do is I want to actually drop it a
little bit further down. So I want it basically
to come under. So under roundabout there. Now, we're going to
put some stairs in, so we're going to see exactly
where this is going to go. But for now, I need
to make sure that this is, you know,
kind of level. So what I'm going to do is
just turn down the count, and then I'll press S and Y, bring it in a little bit, and I should be able to
put that into place like so without causing too
much stretching on the UV. You shouldn't even
be able to see anything really on that UV. Bring it back, bring it
back. And hopefully it slots right in there.
And there we go. That's looking pretty nice. Now, then, down on this one, we've basically done
this wall here. So because we've done these, I might as well then come in
and put these into supports. So all of these might as
well go into supports, like so, and even this
and even this part. Now, it's up to you how far
you split all of this up. But for me, the
supports like so, and then I can go and do I have one for
supports? No, I don't. So new collection.
Supports. Like so. And then what I can do is
I can double tap the eight coming over to master ports, which'll be down
near the bottom, hide them out of the way, and you can see I've
missed these parts. So I'm just gonna come
in, grab all of these, like so, pressing,
putting them in supports. Now what I can do is I can
close this up a little bit, making it a little bit
easier for myself. And you can see we've
got a lot of parts. In these windows. They're in human reference.
We don't want those. So what we're going to
do is we're going to grab all of these windows. Press M. New collection. Let's put them in Windows. Like so. And there we go. And now I can do is
I can close that up. Now, these ones here, this is the next one
that we want to do. So I'm thinking that we'll
put these in their own. So we'll call them
wall outcrops, something like that. So
let's call them that. So, new collection wall
outcrops. Like so. And again, you can call them whatever you need to call them, and then I'm going to hide
those out of the way. Next of all, we've got this one, so we're putting wall outcrops. Now, all we're going to do is
put these in the supports. So these are going to
be part of the roof. So I think we've got roofs. We need roof supports, and these will be
these parts here. So I'm going to come in.
And grab all of these. And again, we'll put
these into supports. And again, is it
worth doing this? Absolutely. It's worth
cleaning it up for sure. So supports, drop them in,
hide them out of the way. Now we'll make one that's called a roof supports. I'm
going to grab this one. I'm going to press the M button, and then I'll go
to New collection, and then Roof supports. Like so, and then we
can drop that in there. Now I'm going to move my
roof supports under roof, like so, and then hide
it out of the way. Now I can grab this and I can
grab these two at the back, grab this one, and then
I can put them in. Roof supports, of
course, like so. Now we're left with
this. This one is going to be roof supports. This one's roof supports,
this one's roof supports, and these are the bag
or also roof supports. There we go. Now, this one is
going to go into supports, so M, put it into
supports, and there we go. Finally, then, these
are all in the roofs. If I close down my roofs, I should end up with
something like this. If I go to this one,
I've got roof inners, and if I close that down,
should hide all those. And now if I come to my walls, which is this one here, I should be able to
hide all those. So very easy, as you can see, to break the actual thing down. That's really important if you want to only
work on something, it's causing you a lot of
problems in your viewport, you can actually hide a lot
of things out of the way, especially things
like the roofs. At the moment you can see
Um, 54,000 triangles. The moment I bring
back my roofs, so bring back all my roofs, and now we're up to 81,000. So big, big difference. Now, what is causing
that 51,000? I can't just be the
grey box, of course. Well, it's probably
this guy here. If I come to him,
hide him out the way, you will see that we
dropped down to 16,000. So you can see, even
when we've got roofs in here now, sorry, 32,000. Even when we've got
roofs in here now, it's only 32,000 polygons, which is pretty low, you know, for a building with
actual topology as the roofs and things. So now, let's bring
back our guy. So all takes. You can see
only brings back our guy. Now we back up to 81,000. And then what we
can do is we can bring in the roof in there and just drop down all of these parts like so,
and there we go. Now, as far as at the top, we definitely want to
have if I come into this, this is in human reference. Let's put this in
Roof geometry nodes. So we'll put that in its own. So M, and we'll put
new collection, roof Yo node, like
so, enter, enter. And what I'm going to do
is just move that right to the top to the top here. And then what I'm
going to do is these are going to be my booleans, as you can see, and
I'm going to move these right to the top, as well. And now what we've
got in here is just our human. That is great. We've got the rest of
our gray box in here, so we can hide that
out of the way. And we've also got
our ground plane, which is this one here, and
we can hide that out of way. Finally, then, just hide
these out of the way. We're not going to need those
in the scene at the moment. Now, then, let's finally
start working our way around. So what I want to
do is pretty much I'm just going to look at my
own and I've pretty much, I think, done with
this part here. Now what we can do
is we can look at working on this part in here. If I come in, I'm wondering whether I need
a little small part, I'm just going to
go to support and I think I have a
little tiny part here. Yes, this one here. I'm thinking that I'm going to stick
that in there and there and this
other side as well because I think it's
going to give it a little bit more support, and I'm also, that's the
reason I've done that because it around
here, under here. I've actually got
another support in. So we've got two support, and we're going to leave
that pot there for now. So just bring that pot in and leave it for there,
leave it around there. And then what we'll do now
is we'll grab this pot, and we'll press Old D,
and we'll bring it over. And then what we'll do is
we'll press a little dot born. Making sure that it's in place. You can see here it's not
really in place, like so. And then what I'll do is I'll
come in and drop this down. So if I come into my array, bring it down, bring it down, and then just make
sure that that bit is also set in the wall like so. Now, we can see that we've
got gaps in these parts here. So I'm thinking because we've got gaps near,
we have a choice. We can either, you know,
bring this down to the right place or we can just carry it on
around. I think we'll do that. So what I'm going to do now is, first of all, we'll
bring this part out. So I'm going to press
Alt D. And then what I'll do is bring this
part out over to here. And put it into place along here, press
in the dot button. Now at the moment, I can't see how far it needs to go out, but I do know that
I'll probably need one more array on there and then make it a
little bit smaller. Now what I want to do
is fix these bits. So if I come in, I
can grab this one and put it into these parts
here, where we've got this. So if I press Alt D, bring it down to so pull it out, first of all, bring
the array down to one. Make it a little bit smaller. So S and Y, just make it a tiny, tiny bit smaller Z 90. And then what I
should be able to do then is put this into place. Into here just to
hide that bit out. So no, jaws pull it
into place. Like so. Now, always, when
you're doing this, if you will end up with
a black pot just here, just make sure that
you just pull it up very slightly and then
that will go away. And then what we'll do is we'll do that on the other side now. So if I press shift
D, drag it over. And then what I'm going
to do is spin it around. So, 180. Press the little dot bon just so you can see
what you're doing, and then put that one
into place in there. And then we'll do
this one over here. So just this one here. This one here we'll do a bit later on. So, did I press Alt
D or Shift then? You know what? I'm going
to just come back to it. I want to make sure that
I'm pressing Alt D. So Alt D. And then
RZ 180 Rs, 180. Press the little dot bon. And put that in place
and then td once more, bring it over, and we're going to put this
one in place here. Now at the moment,
as I said, we've not done this support going up here, and I think probably
on the next one, that is what we'll
actually work on. So we'll do the
support from here. We can take a lot
of things we've already built over here, and then from there, we can
actually start building this part up and then
kind of work our way in. Alright, everyone, so I
hope you enjoyed that. I'll see you on the
next one. Thanks a lot. Bye bye.
74. Modeling Vertical Beams for Decorative Supports: Welcome microphone
to blend of building master class from
concept to final render. Alright, so what
I want to do now is grab this one
here and I'm going to simply press Alt D. I'm gonna bring it
over into this corner. And what I'm going to do is
just put it round about here. So I'm gonna pull it out
a little bit, like so. And then what I'm going
to do is comb to the top. So just make sure you've
got your top piece here. I'm just wondering, yeah, your top piece is going
all the way up to there. And then I don't think I actually need to
pull it out or anything, but what I want to do is just
make it a different seed. So I'm just going to change
the seed over, like so. Now I'm going to do is,
I'm going to grab one of these I'm going to press Alt D, spin it round to z 90 or
Oz -90, in this case. And then what we'll
do is we'll just, bring it into place in here. So just so that center
point is there, and then we'll pull it out, like so, and then we'll
grab this one. We'll press Alt D and then
s -90 to spin that round. And what I want to do with
this is I'm going to cut down the amount of
array down to one, press the dot bon,
bring it into place, just in front of that one there. Now, if I need to pull
this back a little bit, I should be able to
pull that back and then pull this back into place, like so, pull it into place. And there we go,
We don't even need to lift you up because
that pot's there. Now we'll do the same
thing, so I'll just press Alt D, bring it up to this one. Doesn't need to line up perfect, but it does want to be
past this part here, so pull it back if you
needed, and there we go. And then let's have a
look at the next one up. So the next one up is going to be here, so we'll
do the same thing. So D, let's bring it up. Like so. And you know what? This one's a little bit small. I don't think it
should be that one. You know what? I'm
going to delete that one out of the way. So delete. I'll grab this one D or Z -90, turn it down to one. So let's put this on one and
then we'll come and drag this If I press the
dot bond to zoom in, I should be able to pull
this over into place, so making sure that it's
not stuck through there. And there we go. And now
we've got this one here. So again, old D, z -90, and then we'll turn
this down to one. Let's even go away
with one, actually. Press the dot bon,
pull this into place. Pull it out, like so, and then in just in there, just so it fits, and we can see we've got a little
bit of an issue there, so I'm just going to
pull it up, tiny bit. Now, how much issue are
we going to have here. Let's pull it out, first of all, but it's in place like so. It's just in the middle
of each of those. Pull it out then. Let's
keep going, keep going. Let's keep going out there. How far do we need
to pull this out? Keep going, keep
going. And there. What I'm going to do
instead is with this one, I'm going to press S and
Y and just squish it in, squish it in, squish it in. Double tap the eight, and now
it's actually behind there, and we can still see
these parts here, and that's exactly what we want. Now we need this part on here. So again, I'm going
to grab this part, Alt D, R Z -90. And it might seem a little
bit finicky, but honestly, it's definitely worth
doing this because it's going to look so
much better. So two. And being as you're spending
all this work on this roof, sorry, on this building, anyway, we might as
well get it right. So let's pull this
into place into place. Right around there,
and then let's pull it back just so it's
poking past there. Like, so double tap
the e. And you can see now the benefits of what
I've been talking about. Once you have, like, a
lot of the pots in place, it really, really does
make things easy. Now, what I want to do now is I want to put these all
over the other side. And I don't particularly
want to do all that again. So what I'm going to do is
I'm going to try and just grab all of these parts like so. This one here, let me just
have a look at this one. Is this one? Yes, it is. Okay. So we'll grab this one, this one, this one, and just work our way up. We'll grab this one,
and we'll grab. We might this one here, and then we'll grab
this one here. And what I'm going to do is
I'm going to press Alt and D and bring these over to
this other side, like so. And basically, then I
want to mirror them. I want to mirror them from
one of them, I think, because if I mirroring
them from here, I don't think
they'll all fit in. So if I go to object mirror, and again, we're
mirroring on the Y. So make sure you've
got mirror on the Y, so mirror on the Y, like so, and let's see if
these actually fit in. So can they all fit into play. So first of all, I can see
that this is level there. This is the one where
I can actually use. Now, there is a way. You know, I've got to zoom out to see
where my actual cursor is. I don't really want
to do that. So I'm going to do is
shift right click, put my actual cursor there. Press the little
sideways V then, the right one, and you'll actually be able to
come to three D cursor. And now from there, I should
be able to pull these back into place where
I want them, like so. And then all I want
to do is just check, see if my roof is on there. You can see it's a
little bit out on this, I think, or is it
about the same? You know what it's
about the same? I think I think that's
going to be okay, except we can see we've
gone a little bit too far, so I'm just going
to pull it out, pull it out, pull it
out, pull it out. There. Maybe then it's just this one that needs
pulling out a little bit. So again, I'll pull this out to there. Now my roof looks good. This looks good. I'm just going to have a look at
this one round this side. I got about that much gap on it underneath, as we can see. This one needs a
little bit more. So I'm going to pull these
out a little bit more. So making sure it's
still in there, which it is, and then
work my way down. So I've got this part here.
This part looks good. We've got this part here, we can see this is a
little bit out now. So I'm going to pull
this out a little bit. I'm going to shift
right click and then I've got my
cursor there now. I'm going to pull this
out, pull it out, so now it's looking much better. I think it was this column
that was the problem that was a little bit out
than what it should be. It can probably go a little
bit further as well. Let's pull it out a little bit further and see if
you can still sit on this stone slab down
here. Not that way. Let's pull it out on the green. Let's have a look this and this. These are still a little bit out, so you
know what I'll do? I'll come here, Shift
click, pull these out. So, now we've got the problem of them sticking through there. So is this sticking through
there? Let's have a look. Doesn't seem to be. But this
one. Oh, it's the column. It's the column that's
sticking through there. As you can see, the columns
sticking through there. You know what? I'll just
grab both of these columns. Grab I can't do them both at the same time,
so I'll do this one first. I'll press a little
sideways V once more, and I'll just go to
individual origins, and then I should be able
to just pull it up like so. Oh, they're all Ds. That's why. They're all Ds of each other. So when I pull one out, it's going to pull
the other one out. Right. So we've got that in now. Let's pull these out
because these are a little bit not in the place. These two here, especially. So let's just pull them
out a little bit, like so. And then what we'll
do is pull this out. And then finally, what
we'll do is pull this out. So if I come in now, I sure be able to just pull
this out into place, double tap the A and I think now it's looking
good from the front. And I know it seems
like a lot of work again, but I
think actually, it's really, really made
everything that much better, looks that much nicer. I'm just looking at this,
and I can see under here, this is this part
here, as you can see, and I think we need
to pull this up. So if I grab this, it should
pull up the other one. And now we can see
it's a little bit out, so you can see it's a little
bit out in this corner. So what I'm going to do
is grab both of these. And I should be able to just pull them back
just a little bit. So if I pull them
back a little bit, maybe even a little bit more. So let's pull them back
a little bit more. I don't want to go too far. Let's have a look at that.
Double tap the eight. Now, I'm just going to check
down now and have a look. Do I want it coming down to
here? That's the question. Yes, I think I do. So if
I pull this one down, that is going into there, then that's the reason
why because it's an D of this I just made sure I
didn't pull it so far down. Yes, it is. It's
poking through there. So with these, I think we need to right
click and what we'll do is, I'm wondering if we can
separate them so we can get rid of the linked instead or press Shift D and
then it won't be that. So yes, we'll do that. I think what we'll do with these
because I need to pull it up and these two are exactly the same because
I've pressed Old D. What they'll do is I'll press Shift D. To duplicate it, hide it out of the way,
and then with this one, I can press Delete. And then I can press
ltge, bring it back. And when I come in now
and pull this one up, I should be able to pull it up without altering the other
one, which is the case there. Now I want to do is I want to do the same
thing on this one. So I'm going to press Shift D, like so. Hide it out of the way. Come to this one, delete
it out of the way, ltge, bring back this one, and then go into it, tab
and then pull this one up, and now everything
should be fine. Alright, that is the way
that we can do that. Now, that's looking pretty nice. And what I need to
do now is I need to kind of bring them
over on this side, as well I want to actually
have everything lined up. So along here, we've
already got it. We'll need a chunky bit on here, so I think I can get away. I think what we'll do is first, we'll bring these parts in, so we'll bring these parts in, build out this part
on the next one, and then from there,
we can actually bring in the column that's
gonna go here. Alright, everyone, so I hope you enjoyed that, and I'll
see you on the next one. Thanks a lot. Bye bye. Don't
forget to say how you work, by the way, after every
listen. Bye bye, everyone.
75. Refining Decorative Framing Around the Manor: Welcome back if we want to blend the building master class from concept to final render, and this is where
we left it off. Now, what I want to do is I
want to bring this part here, and I want to put one
here and one here. So I'm going to press
I'm just wondering, as well, being as, we
will need these columns, probably better off using Shift
D or Alt D because I will be altering these on
the scale on here. I need to think about how I'm going to do this bit because you can
see it poking out. Now, the column there's a smaller column in here and
a smaller column in here. So, yeah, I think
I'll do it that way. What I'll do then
is I'll grab this. I can press Alt D
on these because I know these are going
to be the same size. I can bring it in
then to that corner. And then what I can do is
I can press Alt D again, bring it over to this corner, and then I can grab this part. And we know already we've
got an array on there, so I can press Aldi on this one, bring it over, and it should fit in there very
nicely, like so. And then what I can do
is I can turn this up, so turn the count up,
and wind it going. Oh, it's because it's
hidden. There we go. And then what I can do is I
can pull these out slightly. So if I press S and Y, I should be able to
pull them out very slightly and get
everything S and Y fit in, holding the shift
into where I want it. So double tap the
A. And there we go. Everything's fitting
in there nicely. Now what I want to do is I
want to grab this point here. So this one here, and I want
to put this over this side. So I'm going to press t D, and I'm going to drag this over, pull it over two here, like so. I'm just wondering whether
that is lined up correctly, so you can see it's
a little bit out. I'm wondering whether
I want to raise these up a little bit. I'm not sure if you know what? I'm going to
leave that on there. I'm going to pull it over because we're going to
have a column in there and bring it back one and
then make it smaller. S and Y, bring it
down there like so, and then we'll bring
in this column. So I'm going to press
Shift D with the column, bring it over, put
it into place, making sure that this is a
little bit further back, so pull it a little
bit further back, maybe even a little bit more. And on top of here,
I want it level, and the reason is because I want to sit on the
window on here, albeit it's a bigger window, but I want to sit it on there. Now, from here, let's think about the column going up here. So what I'm going to do is
I'm going to come bring this down to perhaps
there, like so. And then what I want
to do is I want to bring this part over, so I can press Salt
D on this one. Bring it over to here and drop
that right in the center. So if I press three, we can see we can drop it
right in the center. We can see it's poking out
a little bit past here. Now, I think with this, we can pull it out a little bit. Js like that, like so. And I think just to make it a little bit different under here, we will go to our supports. Let's have a look at
what supports we've got. So we've got all
of these supports. I think we'll use this one here. This is the one that's got a bit of a diagonal angle on it. So if I bring that out, you
will see if I bring it up, if I zoom into it,
this is the angle. Now, if I press R z -90, we can spin it around that way. So what angle I'm looking
at is I want it to. You can see this corner here, it's coming out, so R z -90. So basically, I can see now that it's coming out in this
angle. That is what I want. So if I press three now, I should be able to put this up under here, right around there, and then put it in over
my actual this part here, making sure that it's even. And yeah, that is exactly what I want,
something like that. Now what I want to
do is I want to come in and build this up from here. So I want to build this post. So again, I'm going
to press Shift D, not l D, bring it up, and put it into
place around here. And then what I
need to do is make a post for the top of here. I want to put this
in here. And then I'll put in one of these posts. So the post I'll
put in is this one. I'm going to press
tab. I'm going to bring this into here. So first of all, I'll bring
it in. Drop it there. I'll grab this one, press Shift
desk, cursed to selected, grab this one, Shiftsk
and selection to cursor. And then what I can
do is bring it up. Now, it's probably a little bit too big this
part of the moment, so I'll just shrink it
down, making sure it lines up more with that post. Now, again, I don't
want it you know, I don't want this part poking through. So I've got a choice. I'll make it a
little bit bigger. Like so, and then
I need to think, right, is that a
little bit too big? And I think it is, so I'll
make it a little bit smaller, and instead of that, I'll
just pull it forward. Making sure the back of
it is there, like so. Now we need to just bring in this part here. So
we'll do that next. So what I'll do is I'll
press Alt D because I can press Alt D
on here, R z -90. Bring it over, make
sure it's in place. Again, if it's not in place, you can see it's squishing a little bit. We need
it in front of there. So what I'll do
is, first of all, make sure it's in
the right place. So it's going to be
here. Pull it into here, turn down the amount of count. So let's bring it down. Okay. And then we can
pull this out if needed. But let's make
sure, first of all, it's going to line up nicely. So, it should be lining
up around there. I'm going to have to
pull it back a tab. But instead of doing that,
I'll just press SNY, and I'll pull it back
that way instead. Let's look to make sure they've got a lip on
there, which we have. And there we go.
Double tap the A. And yeah, I think I'm
happy with how that looks. Now, of course, we need to put another one in here because I think that's going
to look better, like we've done
in this one here. I think these look
very, very nice. We've got the one that's
coming down here. We need to think about then what we're actually going to
do in this inner part, and I think I'm going to bring this over and
put that in there. So we'll do that next. So what we'll do is we'll
come in, first of all, we'll press old D or Z -90, turn it down, so turn down
the count, pull it over. Zoom in. Pull it into place. And again, we're
going to have to press S and Y and
just squish it in, and then we can pull
it back a little bit. Maybe I've gone a little bit
too far there, so S and Y, pull it out a little bit, and then just pull it into place. Lift it up very slightly. I think on this one, you
know, we'll lift it down. I think it looks
better. Double tap the A. And there we go. I might even just make
sure it's more centered. Okay, so that's that part.
Now we've got this part in. Now let's deal with
this part here. So we've got a bit
going round there, a bit going round here, which is this part here. So let's put that part in first. You know, I'm not even sure
if that is a top on there, so we can have that going round as well, 'cause
this part on here. Okay, so let's go in, O D.
So do you remember three. Let's pull this into place,
wherever it's going to go. Let's bring it down, like so. And we can see that
this might need either stretching out or
adding another one on. If we add another one on
and then stretch it in, what is that gonna look like? So let's give that try. So S and Y to where we want it. Perhaps around there,
as you can see, they're a little bit thinner. Let's bring them
into place then. Let's press the dot bond
just so we can actually see. So, left and right, we can see this is
what we've got. Now, are they pulled
back far enough? I don't think so, so
let's bring them back. Like so. And then what we'll do now is we can grab this part. We can press Alt D Z 90. No, Z -90, bring it forward, so it goes in front
of it like so. Bring it out, put it in
place, turn those up. It's gone the other way,
so I need to pull it over look, there we go. Now we can see that
we're still a little bit out on this, so I'm
going to pull it over. I'm going to pull it out. So
S and Y let's pull it out. There we go. That is
looking pretty nice. And now we'll use this one. So I'm going to press Old D, bring it over, spin it
completely around, so's head, 180, and then just drop that
one into place in there. And then we need this one here. So just this one here. So
old D, spin it around. S head, 180, and drop this one right in there making sure it's not
going through the wall. So bring it out, bring it out. Double tap the A. All right,
so this is looking good. Now we need this bar in here. So again, old D, three bring it over. Let's
bring it down. We can either shrink this
down or the other way. And I think if I
bring this down, I'm going to be pretty close. So I'll make it just
slightly bigger, so S and Y, pull it
out a little bit. And then what we'll do
is put that in place, so drop it in place. So it goes past this. We don't want it
coming out past that. I like that. There we go. And then we can use this one because we know this
one's the right height. Where does this one go up to? It goes all the way up to this, so we can actually use
Old D on this one. So Alt D, bring it over and make sure then
it fits into place. So we can see we've got kind of this much gap on this one, and on this one, we've
got a lot more gap. So let's pull it
out a little bit. And again, our things
all the way down here. Let's pull it out. Now, they
don't have to ever be exact. You can see they've got a
little bit of black male. They don't ever have to be
exact, perfectly placed. That's not how it would I
mean, it would be like that, but you're never going to
notice that small increment. So just take that into account. Finally, then, I think
we've just got this one, so D, bring it round. Z 180 and drop it over there and then press the little dot just to go round. Obviously, this one
needs pulling back, pulling back, and pulling in. Now, let's see up to
here, up to here, up to here, and all of
that looks very nice. Now, what we want to do
then on the next one is we want to bring in
another one of these windows. We want to bring in then one of the small windows into here, and then we want
to bring in one of these big windows into here. So I think before
we do that, though, what we'll do is we'll
just finish this off so you can see this once
going over this side, that we'll finish the
front of that off. And from there, then, we've also got this pot to finish off, so we can finish
that off as well. And we should on
the next lesson, get pretty much
most of this done. Then that will
leave us then onto the actual door and the archers. And I think what we'll do
then is we'll jump back into our modular pack file, and we'll build those out there a building doors and things
is easy to build out there. Building arches, as long as
you've got the right size, again, is easy to
build out there. The one thing that
is a little bit harder is when you come
to build the steps out. But as long as you've, you know, got your door in there and
you've got your arch in there, you can kind of
build around them. So we'll probably end up
building the steps in here. Now, let's go and
save that our work, and I'll see you on
the next one everyone. Thanks a lot. Bye bye.
76. Adding Structural Integrity to Second Floor Supports: Welcome back, everyone to Blend the Building master class
from concept to final render. Now, first of all, let's open
up our actual reference, and let's go to this
reference here. So we can see pretty much
what we've built here. We can see that on this
part, for instance, we have got a few parts
which we haven't made yet. We can actually make these, you know, these parts
here I'm talking about. So these I don't think we've
actually made these parts. We can make these and
these underneath within this f. Send them through and I'll show you with
smaller parts, how you can actually do that
to make them, you know, fit whatever you're
trying to fit, and then save them
out the same way. Alright, so what
I'm going to do is, I'm just going to put
this over on this side, and then what we'll do is
we'll come in first of all, and bring in this square one. So I'm going to bring
in this square one, I'm going to drop it in here, and then going to spin it round. So Z 90. I'm going to zoom in
just to make sure it's the right way and
you can see it is. And then what we're going
to do is just bring it in. And the reason, by
the way, I'm not using snapping on this is because I'm not actually sure myself how far I
want it pulled out. So sometimes you can pull it
out a little bit too far. So let's pull it out, and as
you can see, there we go. And what I want this to do is to come up and sit right on there. And so it looks like we've actually got that
square bit on here. This then is going to really determine like this part here. So what I'm going to do then
is then grab this part, I'm going to press Alt D. I'm going to bring it
up then. I'm going to pull it out into place. And then what I'm going to
do is just drop it down one. So let's come in one and
drop it into place, like so. And then what I'm
going to do is just pull it back because
at the moment, it's stuck through there,
we don't really want that. Like so. And there we go. So we've got a little bit
of a gap of a wall there. I'm just wondering then we'll
put the bottom on here. So we'll put the bottom and
it'll go against there. So I'll go to support.
The bottom we're looking for is going to
be this one here. So I'll go and grab this, I'll press shift desk, cursed or selected, bring this out. And then what I'll
do is I'll press shift desk and selections cursor and then we'll drop that in for me round about the
place that I want it. So if I press three then, what I can do then is
bring it all the way up there and then
pull it out to there, and it should still
be set in the wall. So I should be able
to bring it back a little making sure
it's stood in the wool, and that then is
looking pretty nice. Now, we do have a
bit underneath here. We could use this part, for instance, and drop that in. We'll actually look at that
bean as we've got this pot. So I'll spin it round,
first of all, so R Y, 180, spin it round, then Rs 90. And then what I'll
do is I'll press shifts and selections
cursor just once more. And then what I'll do is
I'll pull it in and down. We can see it's way way too
big, so let's shrink it down. Pull it more centered,
and then drop it back into the place
where we want it. And then double tap the A, double tap the A, there we go, Yes, that's looking pretty good. Now, we also know that we've got a pot in here
and a part in here. But first of all, let's make
sure because we can see that this post here
is a little bit out. So what I'm going to do is I'm going to stretch
this a little bit, S and X, pull it
out a little bit. Like so. There we go, now it's fitting a
little bit better. Now we'll actually
pull this one out, and I'll also press S and X on this and pull this one
out a little bit as well. Yeah, I think now that's
looking tons, tons better. Now I want to do is put
this over this side. So I want to grab this one,
this one, and this one. I want to press OTD
to bring them over. And then what I want to
do is just mirror them. So I'm going to go to Object and come down to
where it says Mirror. And we're mirroring on the Y. We can see over there
were mirroring on the Y, and it's not mirroring
now I want it. So instead of that, let's try
mirroring Y on the local. That's not going to work either. So we're not gonna have that. So what I'm going to do
is I'm just gonna pull it out and try putting in place. Sometimes it works, sometimes
it doesn't. We can see. It's quite far over. Now,
let's put this part in. So all of these pots, let's get those over
because then it's gonna make it way
way easier for us. So if I grab this one, this one, this one, and even this one
going all the way up, I can then press Alt D and then pull them over
to where I want them. To where they're
actually going to be. We can see this
one is a mile out. Let's see how far
over they need to go, though, because they need to
be stuck out they're white. So something like this,
it still sat on there. This bit here we can
see is a mile out. So what we'll do is
we'll press S and Y and bring that all the way in
just so it's not stuck there. We can see now that these
are in very nicely. And then this part here
is also in very nicely. Okay, let's have our w
before we lose that. Now, let's look at
this part here. So this one here is
really in the wool. We've got the square
bit going up to there, and we've got the square
bit going up to there. So they're perfectly
aligned, so that's great. And now we want to do
is we want to bring in, as I said, we need a part
that's going to come in here. First of all, though, I'm
just going to look at what actual parts I have if I can use any of those instead. And
you know what? I think I'm going to
create a new part in here. So what I'm going to
do is I'm going to put it right next
to this part here, and then this part
in the middle. So what do I mean by that? Let's first of all, go
back to here first. And the one that we
want here for Zoom out is going to be this. Let's have a look
and see how that's going in. That one's
a little bit small. Let's try this one.
That one looks. If I spin this round, R
z 180, spin it round. Three, is it going
to be this one? You know what? I
don't even think these are facing the right way. So R Y -90, and then R X, 180, and there we go, Well, that is the way
that it should be facing. And then I can simply
bring this out. And put it into place here. Double tap the A,
and there we go. Now, let's create those
parts that were on about. So first of all, let's get a chunky part into this and
then put something behind it. So I'll just press Shift A. You know, I'll grab the
center off here first. So shifts cursed or selected. And then what we'll do
is we'll press Shift A. So Shift A, we'll
bring in a cube. We'll make the cube a
little bit smaller. So it goes under here, so E
and E, and let's pull it out. We want it sat right along here. So right along here is
where we want it sat. So up here, and then we want to pull it back a
little bit, like so. And then what we want
to do is make sure that it's much, much
thinner than this. I'll go face select,
grab this face, pull it up, like so. And then what we'll do
is we'll bevel off this. So we're coming
now bevel it off. So Control B, bevel it off, like so, and there we go. And then I want a
piece underneath this. So I'm going to press
Shifts, cursor selected, bring in another cube, Shift A, cube, press the S
bone, bring it down. And I want it sat
under here, like so. Under this and then going down. Let's pull it down to
let's say around there, and then what we'll do is
we'll pull it down again. So E, pull it down. And I want it dropping
right down to there. And then what I'm going to do
is just pull this bit back, so pull it back, like so. And then finally, I want
something behind here, which is covering up these
two pots of the brick. So I want to press sir Shift A, bring in a cube,
make it smaller. To here, as we can see. And then what we're
going to do is just bring it down all the
way down to the bom. So I'm going to grab this
face on here, press in three, and grab the face, pull it
all the way down into there. And then what we're going
to do is pull it back into place. Like so. And finally, I just want to make sure that that part there
is actually in there. I can see it's not
quite so S and E, let's pull it up into place, like so, and there we go. And we can also see that it's
not quite touching here. So let's press S and Y. Pull it so it's
actually touching. And then what I want to
do now is I want to bring in 3 bars, basically. So I'm going to press tab, Control R, one, two, and three, like so. And then with
these, I'm going to press Control B to
bevel them out. Something like this.
And then finally, what I'm going to do
is alt shift and click with the top Alt Shift
click and the bottom, and I'm going to pull them
apart from each other. So I want to make sure
I'm on medium point, and then I can press S and E, kind of pull them
apart, like so. Finally, I'll grab all of them. I'm going to press
E, ter Alt and S, and we should be able to
then pull them out, like so. Now the last thing I want to
do is make sure that this is in front of the now we go, that is what
I'm looking for. Alright, so now with this,
we can join these up. Now, it's up to you
if you're going to keep all of them
together or not. I can press Control J then. And then what I can do
now is press Control A or transforms right click
at origin to geometry. And then what I can do is
I can press Control C, and we're just going
to take that into our resource pack now, drop it in there, and
then bring it back in. So let's say that'll work,
and we'll quickly do that. So we should be able
to hop between them, always putting on object mode just so you don't
lose out your work. And then what I'm
going to do is now go into my resource pack,
which is this one here, press Control V, to copy that in there and then shift and selection to curse keep
offset, and here we are. Now what I'm going to do is, I'm just going to
spin it around. So s -90. And then I've got it here,
and this is what we've got. And we can see it's
squashed back a little bit. So this part is not even with the other
part for some reason. I actually don't know
why that's happened. But I can should be able to fix that by just grabbing the front of it and kind
of recreating it maybe. Yeah, we probably should
be able to do that. So what I'm going to do is
I'll just grab this one, this one, and this one, like so. And then what I'm going to do
is press Shift D. Like so. And now I'm going to
join these all up. So if I grab this
one and this one, F, and you can see again, little tips like
this really help because it really builds
your problem solving skills. So once I've done that, I can press E now and pull
it back to where I want it. I can press L on
it, press Shift N, just to spin it round, making sure it's
going the right way. And then finally what I can do now is press O shift,
click, O shift, click Ok shift, click,
press Enter lns, and then pull it out,
and there we go. Now you can see
it's much better. Now, from here, what I can
do is I can grab this, bring it over to where
I actually want it, so you can see just there. And then the other
one I can press L and press Delete and faces.
And there we go. Now we've got exactly
the same thing, but everything's
fixed, of course. Right, click, shade Auto smooth. Now, what I want to do now
is save out my work again. So file, save. I'm going to grab
this one. Now you can see because I've
saved it shaved. Because I've shaded it smooth, let's bring in before we finish old shift click
'cause you can see, it's shaded this part smooth. So let's right click and mark
a shop. And there we go. Now the shops back in there. That's looking a little bit
nicer. Alright, everyone. So I hope you enjoyed that. On the next one, we'll
get this finished off, and then we'll get it back into our main actual course built. Thanks a lot. Bye bye.
77. Expanding Decorative Elements on Smaller Walls: I'll come back her run to blend the building master class
from concept to final render, and this is where we left off. Okay, so what we
want to do now is come into the front of here. And what I'm going
to do is press the i button to bring it in. Like so, and then I'm just going to press the E button and bring it out and just give
it a little bit of something extra on there. I think that, you know, makes
it look much, much better. Now we're going to
do is we're going to grab this one, grab this one. Control L, and we're going to copy or link materials
and then Control L, and we're also going to
copy modifiers like so. I'm going to resell the
transforms once more, set origin to geometry, and then going to press
tab A U smart UV project. Click Okay. Let's make
sure it's unwrapped. So now it'll do is
go to UV Editing. We can definitely see here in here because it's rendered view. And what I want to
do is just make sure that this and this
kind of look the same. Now you can see, maybe this
is a little bit too much. So what I'm going to do is AS, bring it in, like so, and now they look
exactly the same. And there we go. That part
then is pretty much done. So what I want to do
now is called cube. Now, let's call it. Let's
look what we've got. So we've got supports,
tops and bottoms. If you know what, we'll go into asset manager first because then we're built to
have a good idea. So supports, tops and botms,
these are these ones. So if we go to this one, we've called this revolver over it, support, top deck devil. So if we call this, let's call it support, top, decorative, and
then something else. That's what we'll call it.
So if we go over here, we can press support. Top decorative. And then we'll call it
rounded or something, something like this.
Alright, we've got that. Now what we want to
do is we want to come over to this side. We want to come
over, right click and mark it as an asset. And then what we want to
do is go to unassigned and drop that into support
tops and bottoms. And finally, then we want to
put that into our support. So we've got support roofs. We've got support tops
and bobs. There we go. So let's put it in there.
Let's move it over. We'll press M, support top
and bottoms, and there we go. Alright, everything
then should be done now so I can actually
save it out. And then what I can do
is I can go back over to my actual Build, and
I want to replace this. So what I'm going to
do, first of all, you can see in my supports tops and bombs, nothing's there. But if I come and refresh
this, there it is. There's our actual pot. Now, if I bring
this in, like, so, I should be able to
then grab this part, shift Deseleci selected,
grab this part, shift Ds and selections
cursor O Z 90, spin it round, delete this other
one on the front, so delete it out of the way, and we should then be left with one that we've
just created. All I need to do now is
pull it out into place, like so, and there we go. Simple as that, guys.
Simple as that. Let's just put it into place. And that really does look nice. Now, come, put it
back on render view. Here we go. That's what
we've actually got. So now if I press old D, you'll be able to
bring this over and put it into the place
where I'm going to go on here, so you can see a little
bit of a gap down there, little bit of a gap down there, double tap the A, and everything is fitting
in very, very nicely. So now we've got that. What
we need to do now, though, is fix probably this
part coming here, so this top part here. So what I'll do is
I need a thin part. So do I have a thin part? Yeah, we have a
thin part on there. We don't have you
see this one here. Probably want to
put that on top of it because it doesn't quite
look right at the moment. It just needs finishing
off slightly. So I need a little thin pot. So if I come to not supports
supports yet this one here. And then we're looking for a little thin pot that
looks like that. And I think it's this
one. Let's have a look. Let's bring this out. I think
it's the soars head 90. Shifts, selection to cursor. Three yes, and that's
exactly what I need. So, what I'm going to do is
just drop that in there. You can see that we've
got our count on two. There we go. No, that's not it. Let's leave that.
Let's go to this. Let me just have a
look. Oh, we need to show, there we go. Let's turn the
count down to one. And then what I'll
do is I'll press S and Y and bring it in
just a little bit. And finally, I'll just
drop it back past there and making
sure it's on top. There or on there. Have a look. Like so. Then what we can do
is we can grab this part, press Alt and D, and
just drag it over. Into place. Like so. Alright, so you can see just how easy it was to
build that out. So file, save out our work. Now, let's look at what
else we've got to do. So we've got this part here, we've got it going all
the way down to here. We need a window in this part. We need a window in this part, and we need a window
in this part, but before we do that,
just make sure that you've got all of your parts
on everything is done. You might want to put
one more part over here, you know, like we've
done with this one. I think, for me, I'm absolutely
fine with how it looks. And this one here, by the way,
is going to be a balcony. So that's another
part that we can actually build within here. So within this actual scene. Now, for now, though, let's
actually do our Windows. We've got our booleans, as well. So if we come back
to our booleans, we've got the square
one for this. We've got this one
for the little one. We didn't create one
for the bigger one. So let's actually do that first. Let's go on to object mode. Let's look at what's
going on with these because we can see we do
have a problem with these. They're actually
going over, so it looks to me like
they're too far. So if I pull this down, pull it down, pull it down, it should be going
all the way to there. And I think what's
going on with that. I'm just looking to
see if it's tied to another part. I don't think so. So what I'm going to do is
just pull that down to there, and then I'm going to do the
same thing with this one. I'm going to pull
that down to there. Like so. Is that in
there? Yes, it is. And now I can see we haven't got any flashing
now, so that's okay. Right, so let's come to
this one, this big window. Now at the moment, I just
need to get scentered. So all I'm going to do is just grab this window here, shifts, cursed or selected, tab, shift A, and then what we'll
do is just bring in a cube. First of all, then
I'll press three just to get it to
be the right size, S to come down, and then S and Z and pull it up. All the way to the
top, as I said, you want to pull it up
to round about here. So S and E, keep going, keep going, keep going.
Round about here then. And now I can see
that, you know, if I make a hole, I've got this if I
just pull it up, you can see I've got this
bit in here as well. So control E. And
then what we'll do is we'll come to the
side with edge slate, grabbing this side
and this side, pressing Control and B, bringing it in, like so. Now, at the moment,
let me just see if I need to reset
all my transforms. And then try that again.
Yeah, there we go. Now it's coming in a lot nicer, so now I
can bring it down. Now, we really don't want
it crossing over like that, but we do want it
coming to here. So what I want to do is, I'm just going to
bring it to there. And then what I'll
do is I'll just shift each just to
bring this part in, and I want to just
join these all up. So I can come in there. Go on to vertex select, select both of these, M, and we want to put
it in the center and then in the center, like so. Okay, so that then
is my new boolean. So control A I transform
set origins geometry. M, let's drop it into
Booleans, and there we go. And then what we'll do is press Ot H, bring
back everything. Now, before we bring
those booleans in, let's just grab it, pull it over here, so then we should be able to hide it
out of the way if needed. Now, we've got some other
flashing points which are, as you can see, this
part down here. Might be a little bit
too close to wall. So let's just zoom
into there and make sure that this can be pulled
out a little bit more, so on the red, should be able to pull it
out a little bit. And then that gets rid
of that, as you can see. And then let's bring
in our window. So if we go over to our windows, the only one we really want
to bring in is going to be this big window here because these will be
perfectly lined up with this. So let's come to this one first. Press Alt and D. Pull it
over, and let's line it up. So if I press three, let's line it up roughly
where it needs to be. You can center out perfectly,
but you know what? I'm not going to do that. I'm just going to
line it up like this. And then we'll come to
these three Alt and D, bring them over
and put this one. So let's turn down the
amount of You know what? We'll have to get rid
of these, actually. So I'm just going
to pull them out. I'm going to press
three. Tab, and then I'm going to
put it on wireframe, put it in wireframe. Double tap the A
because you've already got some selected
there, like so, and then B, box select, grab them all, delete
vertices like so. Then we'll go to object mode. And then we're
going to pull this over and put it into place. Now we want the last window, which we haven't
brought in before, so that's going to
be this big one. So we'll bring that
in Rs head 90, make sure that it's
facing the right way, which it is, as you
can see, three again. And what we want to
do now is want to line it up right in
the center of here, level with this because the
thing is back in that time, a lot of the time, they did
have supports holding them. You can also see we've
been looking at this, this is too far forward, or these aren't far enough. So let's sort that out first. I would say we could pull
that back a little bit, holding the shift
but, pull it back a little bit into place like so. Now, let's deal with our window, so three, pull it up into place. We can get it roughly where
it needs to be as well, because the other thing is, I've not brought that
over, so it's a good job. I'm seeing all this. So D, let's bring that over. To here. And then what we'll do is
we will mirror on the Y. So object, mirror on
the Y, and there we go. Now I can put that into place. I'm just making sure I've
not missed anything else. Everything else looks
fine there. Yes, it does. And then what we can do
is we can look to see, you know, what's the
distance between here. Now, the problem we've got is, it should be the distance
between this and this, not based on the center
of this because this, you know, might not
be quite aligned. So that's why normally, line them up in this way. Now, we can also see that
this is a little bit out. So if I pull this over, now it's like half
and half on there, and to me, that
looks about right. The next thing I want
to do, of course, is pull it back, so pull it back to where
it's going to be. Now, if we come to
this window here, we can see just how
far back it is, and that's something we need to think about when
we pull this back. So I'm going to pull it
back roundabout to there, and I might even
pull it back further because it should
really be sat on here. It's okay to have a
little bit of a lip. Let's see how far we'd have to pull it back to
get it over there. So if I hold down
shift, bring it out. Now it's sat on there, and we'd have to pull it
back all that way. But you know what I think it's probably going to look better if we
actually do that. We're going to do
the same on this. Double tap the A. There we go. Ever look at these ones. And the thing is now because
I went in and deleted those, you can see what happened
because I pressed Old D. Always a problem. I went
in there and deleted them because they weren't
done with a modifier. So instead of doing that, I
need to on the next lesson, come back to this one and use
a modifier to put them in, and then it won't
affect this one. Either way, though, we've
got them in place now. Again, easy to make
these mistakes. Always good if
you're checking them all the time. Alright, everyone. So I hope you enjoyed that.
I'm going to save on my work, and I'll see you on the
next one. Thanks a lot. Bye bye.
78. Fixing Window Meshes and Planning Balcony Structures: Welcome back everyone to blend the Building master class
from concept to final render. So you can see even
someone like me, who is seen as a professional
within the blender space makes mistakes a lot of the time when building
these things. The point is,
you're always going to make mistakes all the time, making mistakes, the
best thing that can happen because then
you learn from them. But the other thing is
that knowing how to fix those mistakes and
seeing those mistakes, that's something
different entirely. And the more that you, use blender and the more
experience you have, the easier it will be to fix mistakes and
see them as well. Because they are two
separate things. Seeing things and fixing
things, you know, seeing what makes a
building look good is entirely different
from fixing mistakes. So don't expect them to
come at the same time. When you're building things
like this, generally, seeing how the building looks, that part takes way longer than actually the muddling part. So just bear that in mind whenever you're making mistakes. Okay, so what we're
going to do now is come to this pot. We're
going to press S three. And what I want to do is I
want to array them over. Now, I should be
able to put it on wireframe and see
exactly where they are. So if they're coming
now, go to add modify, generate where is it an
array, This one here. Now, I'm hoping that it's not arrayed this
one, which it has. Now what I want to do is
I want to move this over, so come down, move your array over on the X,
hold in the shift but, and get it right in the
center of that place, which is round about there
and array it once more, and everything should fit. Now, you can see we're
a little bit out. You can see the gap between this and this is a lot further. What happens is the
more you array, the more compounding
it actually gets. So you need to make sure
that on this one here, let's pull it back
just a little bit. So the last one fitting in very nicely, as
you can see now. Alright, so that's
that bit done. You might as well
leave the array on because it's not using then as much geometry because it is actually a modifier on that. Let's put it back on then, and there we go. That's
what that looks like. And now we can come
in and actually think about bringing in the
booleans on these. So I'm going to come
over unhide my booleans. I will grab this one first. I think this was the
last one and this one. So I need just these
two. What I'll do is then I'll grab this one, shift Dess, curse to selected, grab this then, shift Ds
and selection cursor. And we can see if we zoom
into that, press three. It's near enough in there. Is it perfect? Is that one perfect. These must be a
little bit smaller. I think these are a little
bit smaller than this one. You know what I'm going to do. I'm going to make
this a little bit bigger because it should
fit in perfectly. It's just a little bit smaller because it
was based on that. Let's make it a
little bit smaller, get it to be the right size. And then we've actually got it. I might even press SNY yours, pull it out tiny bit. Okay, so that's that one.
Again, resell the transforms, and then make sure it's
actually in there, which it is. And then I'm just gonna look and make sure
I've got my walls on. Yes, I've got my walls on. So now I'll come to this one, and I'll drop it right in there. So Shift S, cursor selected. Shift S, selection to
cura and there we go. Press three, making sure
that one's in properly. Yes, it is. That
one's in beautifully. And now what we can do is we can do this one first all grab this. Grab my wool, press
Control minus, and there we go. That
is that one done. And then can comb to
my walls to make sure the wall's selected
press Control A, and that's that one done. Now let's come to this
one, grab my wool. And again, when
you're doing anything like booleans, the more simple. So if we grab this wool, the more simple, the actual
part it's going to go into. So this is a very, very
simple piece of mesh, the easier it's going to be. So that's another reason
why we actually break these down to make sure
they're as simple as possible. Now, let's press Altag just
to bring back everything. And what I also need to make sure you can see,
I've got this one. So grab this, grab this. And then what I'm going
to do is press Control and minus s. And there we go. Again, coming over, Control
A, let's apply that. And then what I want to do
now is grab both of these. Come on over, remove cutter, and then I
can bring them over. And again, I can hide the
booleans out of the way. And there we go. There
is our parts in. Now, again, with this one,
I think it's coming in. With a part that we need to update because it keeps coming
in with this part on here, and I don't really want to
if you come to Edge select, you will see if I
grab this edge, I can pull it out, and it's like a separated edge on there,
so delete vertices. So what I'm going to do
instead of that keep happening because we don't want that happening and having
to delete it all the time. I'm going to save
out my work and drop back quickly into
my resource pack. You've probably not
got this problem, but I'm going to drop back
into my resource pack and come to my window. And
then that's safe. The problem is on here.
So it's this part here. So Altlt shift
click, bring it out, delete vertices, delete,
vertices, like so. And then what I'll do
is now I'll update it. So if I come in, it should be
updated. So let's just see. If I come in, save out
my work, so save it out. And then let's go back
down to this part. Reload it. Bring out my window. So let's bring in this
window, spin it round. So hoards 90, press
the Db on, zoom in, and then let's come in
and then holt shift and click and see if it pulls
out. And there you go. You can see it's fixed now. So let's delete
that out the way. Alright, so far so good. Now thing, what we want to do
now is put in this balcony. And a lot of these
buildings, as you will see, it's like they have
the window there, and how do they actually
get onto the balcony? Some of them just have
fault balconies on. Some of them you can lift the
window up or open them out. We're not gonna worry
about that too much. What we want to look at, though, is creating a
balcony on this one, because then it sets it
out. Now, we can see. We still have a
problem in this one. I thought it actually
did actually, I didn't actually
finish this one. You know what? Forget that,
guys. Let's come back. And let's do this one first. First of all, though,
let's bring these in. So op, clear pairing,
keep transformation. Then what we'll do is we'll
grab this window here. Let's fix that. So shift Des cursor selected.
Grab this one. Shift Des and selections
cursor keep offset. Let's zoom into it, making
sure then that it's in line, so you can see it's
in line there, and then grab this
one and this one, press Control and
minus, and there we go. Let's press Control A, and then we can grab our cutter. We can press remove cutter. And we can also, when we pull it out now, just remove this. So opp, clear pairing. There we go. Let's move
that back in place. Really, really easy
to fix that anyway. Okay, so now we're looking at this. It's looking very nice. And what we want to do now
is bring in our balcony. Now, if you bring over
your reference guide, you should end up with
something like this. We have two balconies here or what looks to be two balconies. But they're actually
two balconies. They are pretty much the same balcony as you can see here. It's just what's underneath
holding them up. So these parts here, we already made pretty much. So we've already
got something made to actually use on those. These parts here
we haven't made. So what I would do in this case, is I would make the balcony with these two parts and
then take them into my resource pack and split
them off because you might want these to create another balcony or
something like that. Completely up to you
how you want to do it. Now, as you can see, if we zoom, this is this balcony here, so you can see the balcony here. You can also see a better
version of it on here. So you can see on
this, this part here comes all the way out
to these columns here. You can see that if
we put a guy on here, it should come up to
where his belly button. Somewhere around
there is when you're looking you don't want a
balcony where, you know, you're hanging over
it and, you know, it's up to your kneecap or something. It doesn't
want to be like that. So we want to build
this part out first, using what
we've already got, and then finally, we can
build this part out and actually drop these on top of these that
we've already created. So we've already got
the size in there. We're just going to
make it very easy. Now, you can see that this
balcony is used over here. So this is the same balcony. You can also see if I come
around the other side. So this is that balcony there. We've got no other balconies
on there, as you can see. If we go around the other
side, this is the same one. If we come around the back bend, you can see we've
got it here as well. So basically, we've
got, I think, three balconies in here, and it basically breaks
up the actual build, and that's why they put okay, so let's actually on the next lesson and
then make a store nose. What I'll do then is I'll
put this over to this side. I'll make sure,
though. You know, that I'm using my reference. So you've got a reference to
actually guide you on this. So if you zoom into here, this is the one that
we're going to be using. We're going to be
using these parts on here, so I'll
be creating those. And then what we'll do is this is where we're
actually creating it. So we want to bring
our guy over first. So we'll do that
first. Let's come in. We'll press Shift
desk, cursed to selected. We'll grab our guy. We'll press Shift desk and selection to cursor.
We'll spin him round. So a 90, and then we'll just
bring him down into place. So if I press three,
we'll bring him down into place to where we
actually want our balcony. So our balcony realistically
wants to come to let's have a look to the
bottom of this part here. So to the bottom of here, if
we put a balcony in there, that means then that, you know, the little pillars are
gonna come from here. And then we build the other bit. So the bit that's
going to support it under this part here, like
we've done with this one. Alright, everyone. So we'll
do that on the next one. Thanks a lot. Bye bye.
79. Building Balcony Pillars for Stylized Architecture: Welcome back everyone to blend
the building master class from concept to final render, and this is where
we left it off. Now, let's go into modeling because it is going
to make it much, much easier to see things. So go into modeling, save out your work, and
then we've got it. Let's also put it
on object mode. Let's go in there and make sure this guy is on object mode, and let's actually pull
him out a little bit. So we have a good idea of scope once we've actually
brought him out. We want to do is then we want to make sure you save
about your work. As I said, make sure
that your cavity is on. Sometimes it clicks off. Don't know why that
happens, but it does. And then what we
want to do is now we want to build out from
the bottom of here. So from the bottom of here,
we're going to build it out. We have got a little
bit of leeway to drop this down a
little bit if needed. So we've got that in
our back of our mind. But for now, let's build out the main block that's
going to come out here. So what I'm going to do is
I'm going to press shifts, cursor to selected, and then
I'm going to press Shift A, and I'm going to
bring in a plane. So if I bring down this plane, I can see that I'm probably
going to want it here, which means I put
my guy up to here, and then this will
be the first chunk of my actual balcony. If I press S and X and bring it in a little bit,
so let's bring it in. And then what we'll do
is we'll pull it out. So S and Y, let's pull it out, and we want to going all the
way past these parts here. So roundabout there's where we're going to pull it out to. Now, the other thing
is, is this centered? And the best way to do that is, first of all, we
centered it on our guy. He was centered to
this, so just make sure that this is
actually centered. So in other words, if you
put on um wire frame, you can see that this here this here is from here to here, and it looks very much center to me, so I'm going
to go with that. Next of all, then, now we've got it coming out as
far as you want it. What we want to do
then is make sure that once we've got
the pillars on here, so if I put in,
let's say a pillar. So let's bring in Shift A. We're just bringing a mesh just for now, bringing a cylinder, making it a little
bit smaller to roughly the size our
pillars are going to be. So they're gonna be
round about that. If I put then my pillar
round about here, maybe a little bit smaller, you can see that he's going
to just walk up to there. We're not going to have
enough room at the front. So what we're going to do
is we're going to come in, pull it out a little bit more. Like so. And now we should have enough room to walk out there and actually
come with a pillar. So you can also look
at it from the side. How far is that actually
going to come out? And you will see
that they do poke out quite far these balconies
because they've got very, very heavy support in
the bottom of them. So if you want to pull it out a little bit more, you can do. So for now, let's get this in, and then what we'll do now is we'll put the
actual top on here. So what we'll do is we'll
grab this. We'll press Shift. And then what we'll do is we'll pull it back a little bit, so S and Y, pull it in a little bit, just so it's going to
the sides of there. And then what we'll also do is we'll pull it back a tiny bit. So if I press tab, grab
the front of here, can just pull it back like so, and then finally I can
press L and press E and pull it up like
so into place, just a little bit of a part that goes on top
of the balcony like so. Now, we've done that, because what that means is now before doing anything else, we can actually bring this
bit in and show where he's actually going to be stud. So what do I mean by that? If I come in, it's a face leg, I'm going to resell the
transforms, first of all, and then we're going
to press the I button, and I'm going to bring it
in because this is going to be where the actual
these parts here. So these pillars are
going to be stood on. Then we're going
to do is press E. So there's a little
bit of a lip on there. And finally, then I can bring my guy up and put him on there. Now you can see,
we've got a place where we can actually
put you know, these pillars and
things like that. Now, speaking of pillars, it might seem a
bit of a weird way how we're actually creating
this, but trust me, this is the best way to
create it from, you know, creating the pillars around,
then creating this bit after because it's
going to give you a good idea of scope. Because once you put these
pillars in in the balcony, then you're kind of screwed if you've already created
all of this bit below it. So I tend to work like this, and then I get to see
how much room it has if I need to make it a little bit bigger or anything like that. So what I'm going
to do then is I'm going to create a
pillar out of here. So I know if I press Eons head, so this is how I tend to do it, I'll bring this, you
know, to roundabout. So it is to his
belly button nearly. But then what I'll
do is I'll come and I'll grab this part here. So I'm going to grab this part, this part and this part, and then I'm going to
press Shift D and bring it up to here just to
sit on top of here. Now, this part here, I
want it to be slightly, slightly smaller
than the bottom part because then it just
looks better like that, rather than it being, you know, exactly the same copy
from here to here. So what I'm going to
do to do that is, I'll press Alt Shift
click Alt Shift click, Alter nest then, and I should. If I can't bring
it in, I'll just press the S bone to bring it in. And I'm not so sure, actually,
if that's bringing it in. So you know I'm going I'm
going to do it the other way. I'm going to bring
it in, first of all, if I go seven to
go over the top, I'm going to press S
and Y and bring it in. So it's a little bit
of a difference there, and then I'm going to
grab the front of it. So I'm going to grab
this from seven, and I'm going to
bring it in here, like so, trying to keep the
same distance going round. Now, it's up to you if you want to do it the other way, as well. I don't mind these
parts lining up, but this part on here want it to be a little bit different. From there, then what
we'll do is we'll press L, grab it, press E, and pull it up like so. So he's got a bit of a chunky
part to actually grab. And then what we'll do is we'll come to this part, this
part and this part. I'm going to press the I button
and bring it in like so. Now, just make sure you've
reset your transform, so it's nice and even
each side as you can see. And finally, then we'll
just press E and pull it up a little bit and just
make a little bit of another part on there. Now, remember this
is made of stone, not wood, so we can get
away with that as well. Now what we need to
make sure we're doing is that this fits under there. Now we can press S,
make it smaller, and then S and Z and pull it into place and see exactly
where we need it to. Now this is looking pretty
nice now, as you can see. Now, what we need to do is we've got an underneath on there, so there'll be a
square block under here and a square
block under there, and we have to take
those into account. So what I'm going to
do is press shifts, Custer selected, Shift A, bring in a cube. I'm going to bring my
cube down on this, so I'm not having to keep bringing cubes, and they're
going to be massive. And then what I'm
going to do is sens, bring it down into
place for the bottom. Of this to sit on. There you go. You can see it's just
sitting in there. Albeit though, it's
still a little bit big because you can see it's
actually hanging over this side. Now the problem is, we need to make it
smaller because if not, it's not going to go
around there either. So all we're going to do is make it smaller, smaller, smaller. Pull it into place,
so there fits. There we go, this side and
this side, pull it up, and then what I'm going
to do is press sns just to make it a
little bit chunkier. Now, when I'm doing this, I
normally make the bottom one, a little bit thicker
than the top one. So shift D. There you go, you can see now that we need to make this a
little bit smaller, like so, even smaller, like so. We also want to center this. I'm going to center
this roundabout here, and then I'm going to make this a little bit smaller again. And now we just need to make
sure everything lines up. Because if we pull
this over here, you can see it's not going to fit in the top and bottom,
so we need to fix that. You know what I'm going to
do instead of doing this. I'm going to leave
it like that, and I'm going to go back to
where I pulled this one. So you know I pulled this
one over. There you go. Now that is centered. So what I want to do is I
want to pull it up, son's, pull it out. Pull it into place like so. And then what I'm going to
do now is come to this part, and I'm going to
grab each of these. And hopefully, hopefully, I should be able to make
it the same distance. So if I grab all of those, press lns, I can pull it back to where I actually
need it, and there we go. Okay, so now we
just want the top. So I'm going to grab this bomb, I'm going to press
Shift D, bring it up. It's going to fit in, except it's going to be a
little bit thick, obviously, for this, so I'm
going to press the Span. Bring it in, just so
it fits under there. And now we have a good idea. Of how big we want
our actual pilar. And from here then, we can work on creating our
beautiful pilar. The other thing is,
of course, this is still a little bit too thick. So I generally start with something like
this, and from there, then I can actually work
out even thinner there, even thinner than that, sorry. So Eds and's Ed, pull
it into place, like so. And we're not going to
be using this anyway. And the reason we're not going
to be using this is it's 32 on the verte count. We
don't actually want that. So I'm going to do it before we finish, I'll press shift day, bring in a cylinder,
and we'll put it on 24, which is much more
manageable to work with. Bring it down to similar size. Delete this one out of the way, come back to this one, son's Ed, pull it up into place. Then what we're going
to do is right click and shade, to smooth. All right. Now there are many
ways of creating pillars. We'll just do the basic
way of doing it right now. All right, everyone, so
I hope you enjoyed that. I'll see you in the next
one. Thanks a lot. Bye bye.
80. Detailing Balcony Pillars and Arranging Them with Arrays: Welcome back, everyone to blend the Building master class
from concept to final render. So let's come in now
with these pillars. So what I tend to do is I'll drop one right in the center. So left click, right click. Then I'll drop like three
or four left click, right, click, three or four on this one, left
click, right click. So now we've got one
right in the center, and that to me is the
most important one. So Alt Shift and
click, grab this. Let's put proportional
editing on. You can either click up
here or press the O button, and then what we'll do
is we'll bring them out. Let's try the sphere first, so we'll bring them out based
on the sphere, bring it in. You can already see that's
what we're actually getting. Now, Is that smooth enough?
That's the question. So you can also come in
and just give these a try. Like so, and I can see that one is probably looking
a little bit better. And then what I want to
do is bring these in. So I want to bring this one
in and bring this one in. So I'm going to
press the S bone, bring them in, like so. And for me, that one's not working on this, so
let's try the shop. Like, so I'm just wondering
if I should try the smooth. Let's try the smooth.
And there we go. That one's working much better. And then I want to bring
in one more edge loop, so control ar, left
click, right, click. Control, left click,
right, click. And what I want to do now is I want to grab the top of you. So old shift, and click, old shift, and click
and bring these out. So I want to bring this one out. And because I've grabbed
it right on there, it's kind of pulling
in a weird way that I don't particularly want. So what I'll do is I'll
turn this off for now, and I'll pull these out
based on individual origins, and I should now, if
I pull these out, be able to pull them out in the right way that I actually
want them, as you can see. Now, I don't want to
pull them out too much. I just want to pull them out. Probably around there, making sure that they still fit in. And now, this is looking
pretty good to me. I'm just making sure
if I right click, now shade or smooth. Now, we have got our
reference here with these, but I think like the
ones we're creaming, we could actually
probably do a better job. Something like this,
I think, looks a lot more old worldy, let's say. So I think I'm going
to go with these. Now, the one thing is,
we've got a bit of a problem with the band on here. So all I'm going to do
is I'm going to come in, Alt Shift click, and then I'm
going to press C troll B. I'm going to press C,
troll B, and pull it out. Like so. And then for this, I'm going to press E, enter lns. Now, again, we've got on proportional editing,
just press O, turn it off, lns, bring it out, like so. And then what we'll
do is we'll have a little band either
going in on this, so you can have it
going in as well. So lt, shift, and click. And the other thing is, if
you want to smooth off that, you certainly can
completely up to you. So we'll do this one
first. We'll go E, enter alters, bring
it in. Like so. So you've got
something like this. And I'm also thinking that this is a little bit
too thick, maybe. So what I'll do is
I'll press the S but and then press
N's and pull it out. Like so, and now that's
looking much, much better. Now for this one, what are we going to do
on the bottom one here, shift and click, E, enter Alons and we're going
to pull this one out. And you can see, it's
not coming out properly. Let's try medium point alters. Still not coming out
the way that I want it. Let's try the S bone
instead. And there we go. But it's not pulled out evenly, so I'm going to press S ands and pull it down a little bit. We've got something
like this. And finally, then we need the
top and the bottom. So I'm going to
come to the bottom. I'm going to press E enter
alters, pull it out. And again, it's not coming
out the way that I want it. I put it on individual origins. It should come out
with Alter nets, but sometimes it does that. If I press S, I can pull it out and then press S and
Z and line them up. And I can line them
up perfectly as well by grabbing the
outside of here. So you'll see if I grab Alt
Shift click Alt Shift click, S Z zero or S Z
medium point instead. So S zero, I can line
them up like that way. There we go. Now
they're nice and flat. Let's do the same with
this one as well. So Alt Shift click
with face slick, so AlshifClick, E
S, pull them out. Then what I'll do is now
I'll come in, grab this one. So Alt Shift click
Alt Shift click. S, said, zero, and there we go with line those up. So they're looking nice. Now, this one here,
to be honest, should be a little bit
thicker than this one. So what I'm going to do is, I think, I'll just give it a try. So Alt Shift click Control Plus. I can pull it up and make it obviously
much, much thicker. Then the other one,
as you can see. Basically, when I'm
looking at this, these look the wrong
way round to me. So what I'll do is, I'll
just try spin it round. So it, 180, spin it round, and let's have a look
what that looks like. You know what? It looks a lot
better than it did before. Okay, so I'm happy
with how this looks. And now we need to do
is you need to make sure that we're going over, you know, I'm just going to
pull it up a little bit and make it a little bit
thicker on the bottom. There we go. Yeah, that's
looking pretty nice. Okay, so now we've got this in. We need to make sure then that we join all of this together. Just make sure that you're
actually happy with everything. And I think I am. The other thing you
can do, if you want to round it off more is
come to add modifier, deform, and come down to smooth, and you can see that you can
actually smooth it over. You can even do it just on
the z if you wanted to. So now if I pull this out in, you can see I can really
start smoothing that off a lot more than what
I've actually got it. So you have a lot
of control how you want to do this. You
might want it like that. I'm going to then
just take that off. I'm happy with what
I've got here, and I think it actually really,
really suits everything. I'm going to do now is I'm going to grab this
and grab this, and I want to place them
in the right places now. So we might need to make
them a little bit smaller, a little bit bigger,
but we'll see. We'll join them all
together first, and then what we'll
do is right click, shade or two to move. Control A or transform, set origin to geometry. And now I want to do is
put them into place. Now, if I go over the top, before I do that, you know
what? I'll grab all of this. Shift H, seven to
go over the top, and then let's put
it onto wireframe. Now I can see if
I grab just this, so if I grab just this, I should then be able
to put it over here. So if I press Shift D, bring
it all the way over here, making sure that
it fits in place. You can see now it's fitting in place by going along here. So if I come back round, I'll
just show you what I mean, you can see it's
fitting in place. You can come down here and it's stuck out a
little bit of this, which means that we
need to pull it back to tad make sure all fits in, and now you can see
it's fitting in place. That's what we want.
And now we can do is we can mirror this
over the other side. So I'm going to go add
modifier, generate a mirror. Not this one. This
is the one we want. Right click origin to
three D cursor and modifier, generate a mirror. Let's put it over the Y, turn
off the X, and there we go. Now, what we can also do
is we can come in now, grab this one, press Shift
D, and then bring it over. And as we bring it over, we can actually bring in another one. So I'm going to
put this one here, I'm going to press Shift D, and I'm going to bring
in another one, like so. And at this point now, we
just want to make sure that each one of these
is lined up perfectly. So how do we do that? We've got one, two,
three, four, five, six. So now we've got them in place, what we can do is
we can shift D, this one, bring it
all the way over, and then press P selection. And now I'm going to do is
just remove that mirror, so I'm going to remove
the mirror off, like so. I'm going to press Control A or transonsri clicks
origins geometry. I'm going to bring
it in place, and let's see how these line up. So if I put this
here, I can go to add modifier,
generate and array. I can put the array on the X, so we're going to put
it round about there, turn this to zero, and
then let's turn this down. If I shift s, put it there. And then what I'm going to do is get it to the other
side, one, two, three, four, five. Let's
bring it down now. We'll bring it down,
put it all into place, and you can see pretty much
they are lining up perfectly. That's one way you can check it. Let's press delete on those. We don't need them,
and then just make sure they are happy with the
gap between each of these. Now, you might not
want to center one. Completely up to
you if you want to center one in there or not, or if you want them, you know, spread out from here, because what you can do
now is you can do what I've just done, but
play around with them. So I'm going to go back
before I lead to that. So what do I mean by that? I mean now I can move this up. So if I move this up
and put it there, you can see now if I hide
these out of the way, let's just hide each one
of these out of the way, bring this one down to one. Like so. And now you can see that instead
of a center one, we've got three each side. Now, if we bring back guy, double tap the A, and
then what I want to do is just hide these
out of the way. So this is the one
with the mirror on. This is the one that we want
to hide out of the way. So hide it out of the way, hide the center one
out of the way, and now you want it
either like this, or you want to press ltH
and have it like this. So if I hide these out of the way, or you
want it like that. So now you can press Control Z. Or Control Shifts Head and
whichever way you want to. I think I want mine like this. I like the gap between them. I think that looks good, and
I think I'm happy with that. Alright, so what
I'll do now is I will press Controls Ed
just to bring those back. I'm gonna delete
those out of the way, and these are the ones
that I'm going to keep. I'm going to go up to file
and save out my work, and I'll see you on the
next one, everyone. Thanks a lot. Bye bye.
81. Creating Balcony Base Decor with Bevel Techniques: Welcome back if we want to blend the building master class
from concept to final render, and this is where
we left it off. So what we want to do now is we want to grab
this one over here. So we're gonna grab this one, this part and this part. And now we want to
put it over here. So if I press Shift D, we
should, when we move it back, move the other one
back, and we should be able to put it in place like so. And that is basically that part of the
balcony, at least, done. We want to do some final checks just to make sure
everything is in, making sure they're
happy with, you know, how big these things are, how big this balcony part is. We've made it so
that's a little bit I think it should be a
little bit wider on the top. I think these are a little
bit too close to it. So what I'll do is I'll come
in to these parts here, and I'll just press Alternt and bring them out a little
bit more like so, and I'm just looking
over the top. I brought these
out. I think I need to bring this one out
a little bit more. So seven, go over the top, bring it out a little bit
more holding the shift but as you can see now,
these are lining up. Then what I think I need to do is also bring this
out a little bit. Alt Shift and click Alter Ness. Let's bring out just a tad, a little bit more like so. Okay. Now I want to do is I want to make sure that this
part is poking out enough. What I'm going to do
now with this part is, I'm actually going to give
this some actual depth. I'm going to press A, E
to pull it down, like so. And don't forget
we're going to have another part underneath it. But before we do that, let's actually come in and
bevel these parts off, so I'm going to grab
this one and this one. Now the problem when
you bevel these off, you want it only to bevel
to this point here. So what I'm going to do is
actually sort that out. And the other thing
is, I can see, you know, what we'll
give it a try. So what I'm going to do is
I'm going to press Control O. Left click, right click,
and then Control B, pull it out, and
we want to pull it out all the way up
to there like so. And the reason I've
done that is you will see in just 1 second,
if I press tab, Control A or transforms,
set origins geometry, save that my work, and then
come in, grab this one. And grab this one.
And what I'm going to do is press Control B
and bevel them out. Now, I don't want them
beveling like that. I'm going to turn it up like so. Left click. And then
what I want to do now is I want to
bevel them inwards. So I want to bevel
them inwards, like so. And now you can see why why
it is, I put those there. If I didn't put those there,
I wouldn't have control. It means it would have beveled
all the way into here, and we didn't
actually want that. We can also from this as well, control how much this
is going to be beveled. So as you can see, I can hold the shift bun
and put it like this, and I think that is about right. The one thing I would say is that this needs to
be a bit thicker. So I'm going to come in,
I'm going to come in with face out,
grabbing my faces. And then what I'm
going to do is just pull it down past here, making it a little
bit thicker like so. Next of all, then
I'm going to right click and shade Auto smooth. And then we're going to come in while I've got these here, I'll reset my transformations. And then I'm going to
press tab, I'm going to press the Ibr then
and bring them in. Now, you can see
we're ending up with broken mesh already.
Now, we don't want that. What we want to do is press E, enter, S, and bring them in. Now, if they're not coming in, let's just check
what we've got here. We've got it on medium point. Will it be better on
individual origins? I want to make
sure that you know this is like this
one underneath. So you know what I'm
going to First of all, I'm going to press A
because I extruded it out. I'm going to press
mesh, clean up, merge by distance,
26 polygons removed. And what I'm going
to do instead is, I'm actually just going
to duplicate this, Shift D, bring it down, so bring it down to
wherever I want it. And instead of doing that,
I'm going to come in and press Alt Shift click
going all the way around, and then Alt and S. And I should then be able to bring this
in a little bit better. We still end up with some
broken mesh on there, which I really don't want. So what I'm going
to do instead is, I'll just press tab,
press the S button. Yeah, and it's
coming from there. It's not really making
any smaller on there. I want to really line it up. So what I'm going
to do is I'm just going to bring it over and then press S and Y and
bring it in like this. Control seven to over the top. Hide my terrain, so
hide my terrain. And now you can see we've got it looking pretty
nice, actually. Alright. So is that
far enough, though? Let's come a little
bit smaller, I think. So S, bring it in. Like so. And then let's bring
it back and line it up. Like so, and I think now if I pull this down or
pull it down to here, grab the bottom of
it, pull it up, and I think that is what I want. That is exactly what I want. Now that is looking pretty
good, as you can see. Alright, that's
going into the wall. That part's going into wall. Okay, let's save our work
once more. So far so good. So we've got all of
those. Now, let's just go in and join all of these up. So what I'm going
to do, I've got my mirrors on there
and everything else. I'm going to go to Object, I'm going to come down
to convert to mesh. So I'm going to
convert that to mesh. Join them all together.
So Control J. And I want to just check now, and I think you should, as well. If you press A, come up to mesh, come down to cleanup
merge by distance, and just make sure you've
got no extrusions leftover. I've not got any leftover, but you absolutely might. So that's the one thing
I want you to check. Now, then we need something
to support this balcony. So we're definitely
going to need, you know, some supports under here. So first of all, let's work
on the big chunky part. So the bottom, I tend
to when I do this, I work on, like, this kind
of corner, so this corner. And the reason I do
that is because then I understand the size and
scale, what it's going to be. So what I want to do
is I want to press Shift day and we're going
to bring in a cube. And my cube comes in
this size because obviously, I fix that. And then what I want to do is I want to just bring it down. And understand how far and how chunky this
is going to be. So I'm just going to
bring it to there. I'm going to grab the top
and pull it up underneath. And then what I'm going
to do is I just want to then pull this out to
where I actually want it. So I want the first bit to
be, you know, in there. So this will be the first bit going down to these parts here. So if I pull this
out, come underneath, just grab the bottom
of it, pull it down, and then I've got a good idea where I need that to come up to, because I don't want it
coming past these parts here. And then what I can do from
there is I can pull that over now into the place where I
want it. So five, press three. I'm going to have it
over here, sorry, for press Control plus and
then bring it over here. And then I can see that this is probably not going
to be chunky enough. So I'm going to press S and Y and pull it out a little bit. And from there then,
I'm going to control A or transform set
origin to geometry, right click set origin
to three D cursor, add modifier, and we're
going to mirror it over. So mirror it over
the other side. Which will be on the will, and now I can see how far
they're spread out. Now I want the next part, which will be this
part underneath. I'm also thinking that I think I'm going to have to
move this down a little bit. So I'm going to move
it down to here. And then what I'm going
to do is come under here, grab the bottom of
this and just give us that extra little bit of
support because, you know, the closer they are to here, the more technical level of engineering
you're going to need, because basically,
you're going to need some metal going into the brick. And that's not something
they really did. So we've got a
thinking that way. So now we want to do
is we want to have it. So we've got a top
piece on here and then a kind of arch
coming under here. Now, the top piece needs to come to round about this part. So what we'll do is
we'll press Shift D, we'll rotate them round then, so we'll press tab, A, Y, 90, rotate it round. Now, of course, it needs to be either thicker or
thinner than this. So I think on this
particular one, I'll press S and Y and make
them tiny bit thicker. I'm going to pull them out
then. Keep them in the wool, pull it up, so it's just under there and just get my dimensions
to where I want them. So roundabout
something like this, I think looks good, and
we can see now we've got quite a big support on that. Now, the good thing is,
once we've got this in, we can then have a look and see how it's going to
actually be supported. So now what we'll do is
we'll grab this pot. We'll press Shift D.
We'll bring it down. We'll press the Sp
to shrink it down, so pass this point as well. And then what we're
going to do is we're going to bring this down to here and then we're going
to bevel this off now. So if I come in, grab the front
of here, press Control B, we should then be
able to bevel it off and have a look
how that looks. Right click, shade At Smooth, double tap the A,
and there we go. Now, you can see they
definitely definitely look like they're supporting
this, or they too much. This is the point
then when you can go in and you can press S and Y and shrink them down
a little bit if needed. Now, I'm just looking
because I need to also grab this
part here as well. Now, this part has
also got mirror on, so join it to here,
so Control J. Press the tab but,
grab everything now, and now just shrink them down. A little tiny bit, and I think, actually, they are looking
much, much better. Now, from here, this
is where now you can actually start you've got the right
dimensions for them. You've got the base of your actual balcony built,
and from here, then you can actually
start building these how you
actually want them. Now, online, I actually made a very kind of weird
bevel on there. You might want to
actually do that. I think with these, I'm just going to play
around with it, actually, you can see on our reference, this
is what we've got. So we've got
something like this. We've got these parts in here, and we've got these front bots. It's kind of all net, kind of decorative, and that's what we're going to try
and achieve with this. Alright, everyone, so I hope you enjoyed that, and I'll
see you on the next one. Thanks a lot. Bye bye.
82. Detailing Balcony Foundation Supports: Welcome back, everyone to blend the Building master class
from concept to final render, and this is where
we left it off. Okay, so what do I
want to do then, first of all, let's deal
with this part here. So we'll come in. We'll
make this controller. Let's bring in two. So two, left click, right, click Control B. Let's bring the bevel
back in, like so. Let's press E then and then
Alt S and pull it out, like so, and there we go. Something like that, I
think, looks pretty cool. And then what we'll do is we'll come and deal with this part. So we're going to
bring it out. Like so. And I only want really
the front of this to be beveled off in whichever
way I want to bevel it. So I'm going to
press Control of. Left click, and I'll bring it back to something like that. And then from there, I can
grab this edge and this edge. I can press Control B then
bring in the bevel, like so. And from there, then what
I can do is I can come and use my own custom
one if I want to. So what I can do is I can
pull it out and pull this one in like so and just get a
better design than what it was. And I can also turn these up to make it a little
bit more smoother, if I want to, like so. And then we can come in
then to the bottom part. Now, it's up to you
how you want this one. I would say, though, for now, probably grab the top of this so you want to grab
the top part of this. Now, I can probably grab the top going and
looking in there. So put it on Face Light.
We might be able to grab. That's the top of the, as
you can see, and this, if I pull this down is the top of that part,
so it's not that one. So it's this one. Is it
this one? So have a look. There we go. That's the one
that we're looking for. And then what I can do
is I can just come in, turn this off, and
then I can press E, so shift D and then
E and pull it down, and then that creates
a new one for me. From then I should
be able to come in, grab the whole thing,
hide it out of the way, grab this one, press L, delete, and delete vertices. OltH, bring it back,
and there we go. We've got that in
place. Now, again, how far do we want to bevel this off then? So let's come in. And what we'll do
is we'll press tab, corn troll be bevel it in, and you can see that's how I got that first shape that I was
showing you for with this, as you can see, and now we
can actually bring this up. Round it off, like so, and then we get
something like this, and I think that
looks pretty cool. Now, the other thing
we can do as well, is we can come in,
wave this part. And what I can do
is, first of all, reset all the transforms, but I need to make sure if
I resell the transforms, then I'm putting it
back in the middle. So Control A, resell
the transforms, right click, the
origin three D cursor. Then we'll put that
back down there, and now I can come in and press the i button, bring these in. We can see we've still
got some crossover, which we really, really
don't want, like so. And what I'm going to do to fix that I might as well fix it,
so I'm going to come in, and I want to join this I need to really join them up to this point
here, as you can see. I actually need a
point in there. I'm just wondering the
easiest way to do this without actually ending up with this part. I'm
going to go back. You know what I'm going to
do I want to press E, Enter, and then S, and I'm going
to bring it in that way. Like, so I've got a little
bit more control over it. I'm going to bring it up
then. I'm going to press S and X, pull it in. Now we can see that we end up
with it kind of like this. So what I'm going to
do is I think I'm just wondering the
easiest way to deal with this because
this is not what I want. You know what I'm going to do?
I'm just going to go back. And instead of that, I'm just
going to grab this side. I'm going to press Shift D. And I'm going to see now if
I make this smaller, is going to come in
the way they want it. Still not want it. Instead of that, can
I press Alt and S? That's not also going to work. This kind of isn't working. So you know what
I'll do? I'll just come in and I'll do
it the hard way. So delete vertices. I'm going to grab both of these. I'm going to press the Ibn
just to bring them in. And I know there's
some cross over there. But you can see it's all
nice and even going out. It's just these two parts
that I need to actually fix. So what I'm going to do is
just press Shift and H, hide everything else
out of the way. And I need to kind of this is let's actually have a look if this is
actually straight. So I can see that
this is straight, which means that I want to
really bring all of these. So if I can bring this to this. So if I press the NB and
I'll I'll go to the last. So the last one, like so. And then if I pull that over, that is going to give
me exactly what I want. So what I'm going to
do is I'm going to come to this one now. So I'm going to come
to. Let's have a look. Let's have a look at the
mess we've got here. So this and this one, so
the top and the botm, and then we'll do
outlast, and there we go. Now I can grab both
of these ones. I can press three or
one to go inside view, and then I can actually bring them up to where I want them. There we go. Finally,
we got there. Alright, so now we should
be able to do is we should be able to come
grab both of these. And the reason, by
the way, that's happening is because
this on the top here, they're just too close together. So what you might want
to actually do is grab this one and this one,
press the button, and do it at the
last again, like so, and then grab this
one and this one, M, and at the last again. And then let's do the
same thing on here. So it's always the top one. There's two vertics
there crossed over, and that's the reason it's
causing this topology issue. So this one and this
one and at last. And now that actually
is cleaned up. So now we've got a nice piece of mesh to actually work with. From here, then what we
should be able to do is grab this and this, press E, enter, and then
S and Y and bring it in. If it's not coming in, just make sure we're on medium point, S and Y, and then we should
be able to bring it in. Like so, and there we go, Now I've got a bit
more topology. Now, the other thing is, I want to make sure cavity is on. Both of them look the same. And yeah, that's looking
much, much nicer now. The final thing I want to do, I think I want a little
bit of an edge on here. So all I'm going to
do is press Control law, left click, right, click and then contro B and pull it out a
little bit like so. Now, because I only
want, you know, this part on here,
all I'm going to do is I'm just going to
grab each one of these. I'm going to press lth actually bring back
all of this part. Grab this part and just check. So E, enter lns pull
it the other way out, like so, and let's just see what that looks
like. You know what? I think that looks better.
Now, the one thing is, we've added all
these extra lobes on here just to
create this part. That's not actually what I want. So what I want to do is I just want to press Control plus, and I want to press Y, just to split that away from
my mesh, hid out of the way. And then all I'm going to do is just Alt shift and click
Alt, shift, click, making sure and I can then come to dissolve and I'm
going to dissolve. You know why I can't
do it that way, actually, because I need
to fill in this surface. So you know what?
We'll just do L, shift H, and then we have an idea of what we
need to fill in here. Now, because it's got a
mirror on the other side, we can simply just come in and press F and just
fill in these again. So F and F and F, like so, and then Alt Shift, click Alt, shift,
click, and Dissolve. And what we're going to do?
We can already see we've got 432 triangles so delete
and we can dissolve edges. And now we've got 376. So I know it was only a few, but it will make
a big difference. Now, if we press Altage,
bring back everything, double tap the A, this is what we should be left
with. And you know what? I think that looks
very, very nice. Now, what we need to
do now is we need to obviously finish this up so we can take it into or the file. But we thought we'd
do that. Let's just make sure the rest
of it goes together. So I want a couple of
blocks either side. So I'm just going to
go to my set manager. I'm going to go to my supports
or supports bob and tops, and the one I want
is this one here. So I'm going to bring in, first of all, we'll bring
in where's my plug on. Let's press Altag,
bring back my floor, drop this on the
floor, spin it around. So I want to press R Y, 90. I want to spin it
around again, so R Y, 90, z, 90, and that is
the way that I want it. Then what I'm going to do is
just drop this into place. So if I press three, I'm going to press G then,
and I want to pull it back. And the place that I want it is going to be
sat right over here. Now, I know this is a
little bit too big. I'm going to press the Sbne
just to bring it into place. I want it right around here, just to look like it's giving her an extra bit of support. Now, it's up to you
whether you want to pull it all the
way back in there. I don't actually I
think that is needed. So I think even in front
of it a little bit. So even up to, you know, something like here, I actually
think looks pretty good. And the last thing I
want to do is probably drop it down to there, making sure that it's
just in the wool. Like so. I'm just
wondering if I like that. If I need that, or if
I want to put it here, I can also put it here. Like so. Double tap the A. You know what? Actually think
that looks better. Yeah, I think that looks better. So what I'm going
to do is I'm going to mirror over the other side, right click Seragen to three
D cursor add in a modifier, generate a mirror,
and then we go, I'm going to minus off my array. I don't need that. I'll
apply my mirror, contro A. Now, the other thing
is, I brought in from you can see
here what it's done. You can see that we don't really want that. So you know
what we're going to do? We're just going to press
Control Z, go back, so we don't mess
around with any of those because we
brought in from here, what I'll do instead is, I'm going to press Shift D.
So, hi that one out the way, delete this one, old
age, bring it back, bring it back here, and
now add in your modifier. Right click Origin three D
cursor, take off the array, add in the mirror, ad in the mirror, and there we go, now,
everything's fixed. Just be very careful guys when you're messing
around with that. Alright. I've also got
this part in here. I was going to use
it on something. I don't remember what that was. I'm sure it'll come to me. I'm going to delete
that away for now, so delete it out of the way. And now we want to
do is we want to take this into our other files. So before we finish, we'll
just grab all of these parts. Now the thing is
we've just got to be very careful because
you know what? We'll do this on the next lesson because it's a lot
of work, actually. It's not so simple.
I'm also looking at, you know, this inner
pot here, just making sure everything's right
before I actually finish. And yes, I think it is. Okay, so what we'll do then on the next lesson is we'll
put all this together, take it into our resource pack, get on the materials,
all of that good stuff. And then what we'll
do is I'm also thinking that the textures. So we've actually,
you know, the stone. So if I go onto here, I just want to make
sure that this is the same stone as what
we're using in here. So when I bring this in,
will it look the same? You can see here that this if I go down, is stone lighter. This one here, is stone lighter. Okay. We'll give it a try. On the next lesson,
then we'll bring this into our other file. Alright, everyone, so
let's save our work, and I'll see you on the
next one, everyone. Thanks a lot. Bye bye.
83. UV Mapping and Shading Balconies in Blender: Welcome back everyone to blend the building master class
from concept to final render, and this is where
we left you off. Now, all I want to do is,
I'm just going to check to see if we've got any modifiers
on or anything like that. So I'm gonna hid that
one out of the way. This one here, no modifiers
on, hide it out way. Just to smooth on. That's fine. So let's hide it other way. Let's come to this
one, just to smooth. Come to this one.
It's got a mirror, so Control A, hide it out way. And then we've got
this one here which has a bevel on.
Take the bevel off. We're not gonna want it
on, and we just need to make sure that there is no
bevel on, as you can see. Then what we're
gonna do is we're gonna apply that mirror. Now if I press TH,
bring back everything, I should be able to
grab these parts last, press Control J, and join
it together like so. Right click and
shade Auto smooth. Okay, now we're going to
do is I'm going to press G just to make sure that
I've selected everything. And then what I'm going
to do is press Control C and take it through
to my other file. So the other file is going to be here and let's bring it in. Let's press Control V,
bring it in to place, pull it over z -90. There we go. Then what we want to do is we can see
straightaway we've got problems with the normals
on here. Let's zoom in. Let's put it first of all, on top of here, like so. And then what we'll do
is we'll press tab, A to grab everything, shift in, let's spin all those
things around. Now, we've got everything on
here. Everything looks good. We don't really need
to do any work on here except bring in our bevel. We don't need an array on here. So let's see if any of these, have we just got a bevel
on them like this one? Yes, we have. We've
got an array on there. Let's first welcome
in. We'll grab this. We'll grab this one. We'll press Control and L. And what we're going
to do is link materials, and then we're going
to press Control L, and we're also going to
copy modifiers like so. All right, so now
if I click on this, we've got a Ron, which
we can take off. We've got a Bevlon which is set to naught point
naught not three, so I can see here
if I turn this up, is it going to affect anything? Now, one of the problems that
we're going to come up with, first of all, let's resell the transforms, set
origin geometry. And the problem
we've got here is the bevel is not
working properly. So you can see, we've
got a tiny, tiny bevel. So if I hide half the way, tiny, tiny bevel, but we
cannot go no more, you can see we can't go no more. Sometimes this happens
if you've got very, very close intersecting
points or vertices. And the way that
you can get around that is if you come to geometry, you want to turn
off clamp overlap, and now you'll see
that I will be able to bring that all the
way up if I want to. So now I can put a
no point up five, and then you can see I've got
more of a bevel on there. Not that we won that
bevel on there. I'm just showing you in
case you need to do that. Because it does bring
its own problems. Of course, you might get over, you know, verts crossing over. It's there for a reason. But if you ever have problems
like that, turn that on. I'm going to put it to note
point note note three, turn it down a little
bit, and then turn this back on, and there we go. Okay, so now let's
actually have a look. At this. Alright, that's
looking pretty nice. Now, what I want to do
is I want to press Tab, A, U, smart UV project. Click Okay, unwrap it
all, and there we go. That's what we're
left with. Now, do we want these different colors? I think for me, we want
this relatively dark. So what I'm going
to do is I'm just going to minus off this one. And then what I'm going
to do is with these, these parts, I think, let's have a look if we bring
in the stone stone lighter. The click the plus,
click the down. So we're looking
for stone lighter, this one here, let's click
a sign, and there we go. Now, do we want it like that, or do we want them
all the same color? So let's just try
minusing this off, and then you can
go between them, so Control Z, Control
Shift, like so. Or what you can do is you can
just do a little bit of it. So, for instance, let's just
press Control Z a minute. Bring back the stone lighter. And instead of that,
we'll just put on this and click a sign. And then what I'll do is I'll
come to the top of here, grab this one, this one, and this one, press
Control plus, Stone lighter, click a
sign, and there we go. Might look better. Like this. And it might also
look better if we've got maybe maybe even this part. Let's try it. So stone lighter. Click a sign. Maybe
even this part is stone lighter. You know what? I don't actually like that,
so I'm just going to go back. And I'm just going to go onto these and click Stone
lighter, click a sign. And I think actually,
it's going to look better like this. Now, of course, I can't
click all of these, so I'm just going to
click Old shift click, A shift click, Al shift click Control plus Stone
lighter, click a sign. Yeah, and I think that
looks just enough. I think the other way is
a little bit too much. Okay, I'm going to
resell the transform set origin to geometry, make sure I've got my Bevelons movings on, everything's on. Now, let's move this
over to this side, and then what we can do is
we can put it under balcony, so we'll call it balcony. And we'll call it large just in case you
want to do any of, you know, your own balconies,
some smaller ones. And then what we'll do is we'll press we'll put it
in its own one, as well, because we haven't
got balconies, I don't think. We haven't made one, so
we'll put balcony like that. And then what we'll
do is we'll come over here and we'll make
one for balconies. So balcony, like so, and then what we'll do is
we'll come to unassigned, and we'll go find it on here by pressing the dot,
right click in, marking as asset, and then we'll drop this
into the balcony. And then what we're going to
do is file and save it out. Let that little star disappear. Go back then to our
build, which is here. And then come down to
where we've got reload it. Balcony. And here
is our balcony. Now, what I'm going to do
is just drag this out. I'm going to spin it
around, so Is a 90. And then what I'm going to do is I'm going to put
it around there. So I want to press shifts
and selection to curse her. I'm going to hide that
there out the way, and then delete this other one. This other one's got, nothing on it. It's not been bevelled. Let's delete it out of the way. Alta, bring it back,
and there we go. Now, let's come in and have a look at what
this looks like, so let it load up.
It's a bit slow. And the reason mine's so
slow is simply down to the fact that I've got a few
blends open that I'm using. So I'm just going to
see now if I go back, put it onto rendered View. There we go. Now it's faster. Just having three
blender files open all the rendered isn't
the best idea. Now, what I want to
make sure, though, is you can see, we're
not in the wall there, so let's pull it
back into the wall. Making sure this is also in the wall, double
tapping the A. There we go. That
is how we do that. So you can see now he's
got a thermot room there. It's up to the right height
where he needs to be. And actually, that is
looking pretty nice. So now what we want to do is, we've got a couple of options. We can now start
working on or does, or we can come over
and start working on this piece here and then mirror it
over the other side. I think what we should
do is we should probably take a break from, you know, just creating things
on here and go away and actually create our doors. So I'm
going to do that. So I'm going to do
is I'm going to put it on Object
mode, first of all. I'm going to come up
to file and save. And then what I'm going to do
now is going to hop on back over to my resource
pack. So this one here. I'm going to pull this
over to this side. Like so. I'm going to then make sure that I've got
my reference guide. So if I open up my
reference guide, we can see that this balcony is done, so we'll
put it over there. The windows are all done, so we'll put those over there. We've done, we've not
done the chimney yet, but these are the parts
that we're looking at. So we've got the three doors,
and we've got the gate. Now, I'm not sure if we want to create the
gate at the same time, but we definitely definitely want to create these
arches as well. So I think it's important
that we create these pretty much at the same
time because you can see that a lot of the time, you know, the doors
go with the arches. I don't so much mean
that the doors, you know, are fixed
in with these arches. But what I mean is you know, we normally have an arch where a doorway is, so
there'll be an arch. It'll be pulled back
with a boolean, and then you'll have
an actual door. We can also see just how nice these actual
gate parts look. So I'm not sure if we want
to create those as well. But I think actually, once
we've got on with this, we've nearly created all of the parts that we're
going to need, especially for things
like the steps. If we create the gate,
it does mean that we've also got these parts on here as well. So
that's important. And then we can move on to more difficult parts like especially the dome
and this part here. Alright, so I think
that's what we'll do. So we'll start with these doors. So we've got a few simple doors and they get more
complex as we go up, and then we'll move
on to the gate, and then we'll move
on to these rchards. That's the way that we'll do it. Okay, so we'll put that
over to the left hand side. We'll save out our work, and I'll see you on the
next one, everyone. Thanks a lot. Bye bye.
84. Modeling a Stylized Door for Architectural Assets: Welcome back everyone to blend the building master class from concept to final render, and
this where we left it off. Now, let's put our cursor
to the world origin. So cursor to world origin. Let's press one, so we're
going into front view. Let's press Shift Day. And what we're gonna do is
bringing a image, and we're bringing
the reference. Now, I want to go
to my references, so I'm going to go up
PureRvRferences. Here it is. And the one we want is going to be if I make this a
little bit bigger, the one I want is
going to be door, and I'm going to bring that in just so we have something to actually reference so we can see here this is what
our door looks like. It's missing,
actually, the handles, so the handles are not on there. But we can see them on here so we know what we're actually
going to be creating. So if I zoom in now, this will be the door that
we're creating first. And I know it's a
little bit hot seat, but you can see when
you're looking at this, again, you want
to break it down. You can see this top
is split from these. So these have got a gap in here. Then we've got the next part, which is, you know, the inner part, which goes
around these parts here. So we've got inner
parts that go in here. We've got a pot
coming down here, pot coming down here, and then we've got these inner pots. So when we break it
down in that way, it makes things
much, much easier. So the way I'm going to
do it is I'm going to probably create this top by
bringing up an edge loop. Then I'll create the
sides going down here. Then I'll think before
I bring these out, then I'm going to
create this part and this part and this part
going all the way down. And finally, then
the inner part. So let's give it a try. First of all, though, let's
get the right dimensions. Let's also pull it
back a little bit, so we've got it
just there to see. So what I'm going to do
is bringing a plane. Did I leave a plane over there? No, I didn't. So we're
just bringing a plane. Shift A, bring in a plane. Let's rotate it round. So RX 90. Let's press Control A, or transform set
origin to geometry. Now, let's go to the X, and we'll put down 2.3 meters, and then we'll go
to the Y. Yeah, that's not the Y. It's the Z. And we'll put the Z
on 3.07 like that. Now, let's have a
look at our guide. So if I pull it up, we can see that this is quite
a chunky door. So very, very big dog. But this door is, these are the kind
of smaller doors, so they're kind of thinner.
This is the main door. If you look on our
reference, you will see. And if I go to it,
let me find it. No, it's not that one. This
is the main door down here. So it's a big,
solid, massive door. If you look, actually, I don't think I've
used that door on anything else because I saved it specifically for the entrance. And if you think
about these kind of massive buildings, you know, in this style, the
old World buildings, they really do have big massive doors at
the front of them. Alright, so let's
move this over. And let's make a
start on our door. So the first of
all, let's come in. Let's press one.
Let's press the tab. I'm going to press Control then because I want to bring
up this top section. So this top section,
it's quite thick. So something around there, and then I'll press Control law. Left click, right
click Control B, bring it out with the bevel, and we want it basically to match this side and a little bit thinner
probably on there. So something like
this, nice and sturdy, I might need to go a
little bit further. And if I do, I can
just press and X and pull them out a
little bit more like so. Now we need to
think about, we've got a big block here,
smaller blocks here. So what I'm going to do
is I'm going to bring in two edge loop so Control,
not two edge loops, sorry. Yes, I'm going to bring
in one edge loop, sorry. Control. Left click, right, click, Control B,
and pull those out. So the size I want the center, if we look on our door is much, much bigger here and
much smaller on there. So if I build it like this, you can see already, now we're actually starting
to get somewhere. Now I need a center
going down here. So control, left
click, right click. And now I want to do is bevel
these all at the same time. So old shift, click,
Old shift click. And now if I bevel them
all at the same time, I'll get exactly
the right thickness that I'm looking
for. So there we go. Now we've got bevel, bevel there, and a bevel
that I did on here. So now we can actually bring these parts out and then bring these parts out separately and then do this
part on the door. So what I'm going to do
is and first of all, going to bring out this part. I'll bring out the top
separate from everything else. I I press the dot but, and then what I'm going
to do is press extrude and I can extrude it out. Now, extrude is further
than what you think because obviously, it's
quite a thick door. It's going to be
going into a wall, and then we'll come down now
and we'll extrude these out. Now, I'm just wondering because the way that this doors built, when I extrude this out, so I'll go back. I
extrude this out. I might as well press Control
plus and then press Y. And then what I might
as well do now is press delete and
limited dissolve. I might as well do
that because it will keep the mesh nice and clean. Now, if I come to this one now, I'm going to do exactly
the same thing. So I'm going to come
out, I'm going to press the E and then bring it
slightly slightly under there. And then what I'm going to
do is press Control plus Y, and then delete and
limited dissolve. And now we've got the
outside of the door. Now, let's bring
these parts out. So I'm going to bring
out this part first. So control. I'm going to press the E button and I don't want it coming out
as far as these. So a little bit further in,
so I'm going to press the E, bring it out to
here, Control plus, Y, and then delete and
limit to dissolve. Now, let's do these parts. These parts one coming
out round about the same. So I'm going to come in, I'm going to press E just before this part
here, as you can see. Then I'll press Control plus,
and I'm going to press Y, and I'm going to don't need
to limit to dissolve those, but I'm going to
leave them like so. All right, so now we've
got all of these parts. Now what I'm going
to do is I'm going to resell my transforms, right clicks Origins, geometry. And then what I'm going
to do is just take another look at my door so we can see we've
got these panels, these panels, these panels. Now, even if we zoom in there, it's quite hard to see what these parts in are
in the inside. So I'm going to actually
do this with you. It's quite or net. So let's press dot and zoom in. So what I'm going to do
is I'm going to grab all of these. Like so. I'm going to press the
eye bone to insert in and get the first insert
into there like so. Then what I'm going to
do is I'm going to press the eye button again and bring the second
insert in like so. So we've got a gap there. And then finally a third insert, so I, bring it in, bring it in, bring
it in, like so. And then what we're going to do is now we're going
to pull these out. But first, before we do that, what I want to do
is bring this out. So I'm going to
press Control plus, like so, and then
we're going to go back to these outer ones. So these ones here,
Alt Shift, click, Alt Shift click,
Alt Shift click, and then go down to these. Oh, shift, click,
Oh shift, click. And then what you're going to
do is you're going to press E and bring them out. Like so. There we go. Now we've got that part.
Now, if I press tab, that's what we've got so far. Okay, so now we want to
do is we want to make sure that this is the point where you can change
something if you want to. So in other words,
this point in here, you can now come in and drop
them back a little bit, which I think actually was probably the better
way to do it. So if I come in like
this, press Control plus, and then what I'm going to
do is I'm just going to drop them back just a tiny bit, like so. And there we go. Now what I'm going
to do is I'm going to come to the front of these. So I'm going to grab
each of these like so. This one here, and now I'm
going to pull these out. I'm going to pull
these out, press in E. Like so. And then what
I'm going to do is I'm going to make sure I'm
on individual origins, and I'm going to press S
and Z and pull them down. Then I'm going to press S and X and pull them in like
so, and there you go. You can see now that
looks pretty nice, making sure cavity is on, where you can see now we've got a lot of complexity in here. Now, one thing I would
say about this door, I think I've gone a little
bit too far on these parts, especially the outside, or these parts are definitely
not pulled out far enough. So I think what I'll
do is I'll grab all of these and what I'm going to
do is just pull them forward. So I'm going to pull
them forward like so, because I want them
looking more like this, so more like up to this
wooden parts on here. And now you can see, I've got
a ton of room at the back. I've got no backs on
them, which is great. The topology on these is very, very clean, as you can see,
so very, very clean topology. And yeah, I think that is the perfect way to
create these doors. Now on the next lesson,
what we need to do is we need to create the handles that's going to go
on each of these. Just make sure you're happy
with how your doors look. Maybe you want yours coming
in a little bit more on here. Maybe they're tilting down a little bit too much on these. You know what? I'll
fix that before. So what I'm going to do is
just press EssnsE and not have these tilted quite so
much down, and there you go. I think that looks actually
better than what it did. Now, well, again, you can go absolutely crazy with these
so you can come in, come in. And then put in an
inner one on here, so I can grab these like so, and then I can press E and
pull them back like so, and now you can see they look
even better. You know what? We'll actually do that. So I'm going to do the same thing. So I'm going to grab
each of these, like so. I'm going to press the
Ibn and bring them in. And then I'm going to press
I again and bring them in. Like so. And then what
I'm going to do is just grab each of these.
So Alt Shift click. Old shift, click on the
middle one or the inner one, Alt Shift click Alt Shift click. Shift click Alt Shift, click, and then what we're
going to do is press B, pull them back holding
the Shift button, like so, and there we go, I think they look
even better now. Even better than what they did. All right, so I'm
very happy with that. Let's come up to fail
and we're going to save. And I'll see her on
the next one everyone. Thanks a lot. Bye bye.
85. Fixing Door UVs and Aligning Wood Grain Textures: Welcome back, everyone to
blender building master class from concept to final render, and this is where
we left you off. Okay, so what I want to do
now is I need to unwrap them. I need to bring in the material. So what I'm going to
do is I'm going to go to Resource Pack. I'm going to comb to these. I'm going to press A U, smart UV Pj. Click Okay. Now, I already know when
I drop on the wood, for instance, it's probably
going to be wrong. So let's have a look. So we've got wood aged. We've got that one, and
we've also got wood cracked. Now, you can see the
wood crack nearly, it's nearly all
going the right way. Some of it is, some of
it isn't need to fix it. But what I would say is
if I drop this on here, you can see, it's not so obvious with the
wood, which way it's going. Some parts are, some
parts aren't I'm just looking if this part
here is going the wrong way. So if I bring this on, I'm just wondering whether
which one's the better one, actually, 'cause they
both kind of look nice. It's up to you
whichever one you pick. One of them will probably take a little bit more work
than the other. So let's look at this. We can see that these
are going the wrong way. Let's come over to
the UV Editing. Let's first of all, do that. So we're coming over,
press the dot on, go to my door. Let's press Tab. Let's spin them all round first and see what
that looks like. So, Oh, 90. Let's
spin the more round. And now we can see that that's going much, much better way. These are going much
better way. You know what? I actually think we don't need to really do a lot
of work on this. It's not so obvious
where the wood green is. And so, actually,
I think that looks pretty nice without really
doing a lot of work. We have got parts where you could probably
turn them around, so you could
probably come in and turn these parts around, for instance, so 90. Let's spin those around. And then they look a little
bit better, as you can see. You've got parts
on here as well, which you might want
to turn around. So these parts
here, let's see if it actually made such
a big difference. So we'll spin those
around. Like so. And yes, it does make a
little bit of a difference. So, you know what? I'm
just going to come in. I'm going to grab the
inner on these press R, 90, spin them round. And you know what
else, I'm going to see if I grab the whole thing, if I make them bigger, like so, is that going to make it look
a little bit better? And, yeah, you know
what? I think it does. I think it makes it look
a little bit better. So yeah, I think I'm going
to be happy with this. Also, we can spin
these ones around, so these inners, we might
as well, while we're here, being as we're grabbing things
and spinning them around, let's go down to the next one, and we'll look at which
way these are going. These are all going
the right way. I can see that these
here probably going. So I'm just shift
clicking on these parts. Like this one, this one, this one, this one, this one, spinning them round, I can also see this
one. You know what? It looks like it's going
all the way down here and all the way
through this one. I'm going to do the
same thing on this. I'm going to control click going all the way down to here. Shift click, control, click, do them all at the same time
or 90, spin them round. Now they look better,
as you can see. And let's have a
look on this one. So I'd say here on this one. I'm going to go all the
way from this point. Control click to this point. Shift, click, Control, click. Same on this one. So shift,
click, Control, click, shift, click,
Control, click, 90. Let's spin them round, and now they look fantastic, actually. So that is looking
much, much better. I would say that this here, is this one going the
wrong way around? I think it is. So 90. Let's spin that one
round. No, it wasn't. It was going exactly the right way round, so let's go back. There we go. And you know what? That's looking pretty cool. Alright. So some of you out there might
not like the wood, so that's the next
thing we'll look at. So we'll go to shading. We'll
put it on to rendered view. We'll save out our work
so we don't lose it. And then what we'll
do is we'll just zoom out and find this wood. Now, you can see on this wood as we know, with any edgeware, we have bevels on here, and we can see that
if we turn this down, we can actually drop
that bevel back or we can make it
much, much brighter. So that's the first thing you
might want to actually do. You can also bring down the bevel, not that
one, which one? Is it this one?
Yeah, there we go. You can bring in more of the
wood instead of the bevel. So if I bring this
in, you can see now it's brought it
back a little bit. And I actually
think that looks a little bit better
than the other way. Yeah, and I think I think I'm not going to
touch this anymore, but have a play around with it, see how you like it, but I think I'm actually
happy with this. So from there, then what we
need to do is we need to come now back to modeling, and we need to actually work
on our actual door handles. So if we look at this, we can
see the door handles here. Don't worry, we're going to explain exactly how
we're going to do this. First of all, though,
let's press Shift day. And what we'll do is
we'll bring in a curve, and I'll show you
exactly how you can use curves to create door handles. So what I'm going to do is because I'm going
to pull it over. We're going to press one
to go into front view. I'm going to pull
it up, and because I can't see it because
it's behind there, I'm going to pull in, press one, and now I can
actually see it. I'm not too concerned at the
moment with the scaling. I'm going to get
that in a minute. What I actually
want to do, though, is create it so it actually
looks like a door handle. So first of all, let's pull
this out a little bit, and then you'll see exactly
why I'm doing that. Now if I come on over
to the right hand side, when you're bringing in a curve, you will actually have
some more options. So over here on the
right hand side, it's not actually geometry yet. It's a bit like a modifier or a geometn node. It's a curve. So if we come over here
and go to geometry, we can actually come in then and increase the extrusion
or the depth. Now, I prefer to
increase the extrusion. If you increase the
depth, you'll see you end up with a round kind of point, you can turn down the
resolution and do it this way, as you can see, but you end
up with it slightly bent. So I don't particularly
like doing it that way. So what I'm going
to do is put you can also put it on
profile as well. We're not going to worry about
profile because for this, we actually want to
make it quite simple. So if I bring up the extrusion, you can see I'll bring it up. And then instead of
doing, you know, messing around with
the bevel on here, what we'll do is we'll
just bring in a solidify, bring in a solidify,
bring it out. Like so. Right click, and then what we'll do is
we'll shade flat like so. And you can see already now, we're actually starting to get somewhere with the
actual door handle. Now at the moment, I need a
little bit more on this way. So what I'm going to do is I'm going to bring this out more, like so, and then I'm going
to put it into place. So if I press one, I should be able to if I
put on wireframe, be able to put this into
place where it's going to go. Now, I can see as
well at the moment, it's not quite thick enough
this, so I'll go back. I'll bring up my extrude
jaws a little bit more, as you can see, so bring up
my extrude, and there we go. So we want people to see it. The other thing is, let's
pull it in a little bit. So if I press S&x, I can actually squish
it all in a little bit. Now, you can see, as
well on the wire frame. It's really easy to see this. We can actually turn up the
actual resolution of this, and we need to be
careful with this because it's like
everything else. We don't want to have loads and loads of polygons on there. We want to get away with
as few as possible. And the easiest way to see that is when we
actually come in. So if we put it on there rendevw we can see at the moment
it's nice and smooth. If I bring this down, though, you'll see now it's
very, very jagged. So what is the smoothest
we can get away with? Probably around six and
still keep it smooth. So I'm thinking
something like this. If I pull this back, then into where it's going
to go in my door, I actually think that
looks pretty nice. Now, while we're here, let's just put it on
object mode again. Now we can actually come in,
and the problem we've got here is if we shade smooth, you're going to
get it like that. You can't actually see what it's really going to look like until you've actually applied
your curve. So let's go in. And what we'll do is we
go to object, convert, and to convert a curve to mesh, we just go to convert to mesh. Now we can actually right click shade auto smooth,
and there we go. We've got our curve
in there. Now, I'm going to use this
for my other doors. So what I'm going to
do is press shift desk, cursed to selected, Shift D, bring in a cube, M my cube much smaller. And then bring it
over to the side, and then this will be
in the side like so, and this will be
holding it to the door. I'm going to pull it
out a little bit. What I'm going to
do for this is I'm just going to bevel this edge. I'll resell my transforms. It's our original
geometry, grab this edge. I'm going to press Control B, bring it down a
little bit like so, and just bevel it off. Like so, and maybe maybe. I'm actually going to I
think let's have a look. Let's have a look
for a bevel that. Will it actually look
better? Like so. Let's right, click,
shade At Smooth. And yeah, you know
what? It probably does. Now what I'm going to do is
bevel the top and the bott. So I'm going to
come in, Control B, bring it back, so it's
just one, like so. And it's probably at this
point, a little bit too big. So I'm going to bring it
down, pull it up into place, and then I'll probably squish
it a little bit as well. So S and Y, making sure it's
still in the door. And there we go
something like this. Now, of course, all of the dough will have
bevels on as well, so we just have to
bear that in mind. The other thing is I need one on the other
side, of course. So if I shifts like this, right clicks the origin
to three D cursor, add in a modifier, and we'll generate a mirror
on the other side. Now I want to do is I
want to I'm wondering if I should just leave this and
bring in a bevel on its own. So if I come in, I modifier, generate a bevel,
turn the bevel down. To something like, around there, not point naught two. And then I can join
this up with this now. So if I join this to this, contoJ and what I'm worried about is the actual bevel
it's going to put on there. So do I leave the bevel on like this? You know
what I'm gonna do? I'm going to come
in, apply the bevel, like so because we're
having gold on this, and then I'll come in,
apply the actual mirror, and now I can join
it altogether. So Control J, join
it altogether. Now, lastly, I want this
over the other side. So if you come to
my door, shift S, cursor selected, come
to this one, then, right clicks origin
three D cursor, add in a modifier and
generate a mirror, press control A,
and there it is. There is my actual door handles. And yes, they're
a little bit low, but they're more ornamental
I think than actual handles. All right, so what we'll do
now is we'll save our work. And on the next
one we'll do then is we'll get the gold on these. And we'll make sure
they're the right size, and then we'll start
on our next door. Alright, everyone.
So you enjoyed that. I'll see you in the next
one. Thanks a lot. Bye bye.
86. Creating a Unique Door Variation for Scene Diversity: Welcome back if we want to blend the building master class from
Concept two final render, and this is where
we left it off. Alright. So now let's come
in and you know what? I'm just going to make
them a little bit bigger these I'm
gonna press tab, S and Z and s, pull them out just a little bit, just to make them a
little bit chunky looking a little
bit flimsy there. And then what we'll
do is we'll go to shading. And you know what? First of all, though,
I need to bring in the actual correct resource, which is this one here.
There's gold here. So we'll come in, drop
that on them both, double tap the eight, and then you can see just
how nice they look. And then let's go
over to the shading. Let's actually have a
look at this gold, then. So if I click on
this, it should come up as gold, and here you go. One of the more simpler ones. So you can see
here, all this one really adds on has a bevel, so it's actually good this because you can really
break it down from this one. So if you didn't
understand it before, it has a bevel on there,
and what that does is, if I zoom into these, so let's zoom that then puts
some edgeware around here. It also has, as well, a concrete roughness, and basically this is what gives
it that shine on there. As you can see, you can
see the shine on there, and then they're mixed together, and finally, they come down
to where the texture is. This is the actual gold texture. So you can see this goes into this principled,
which as I said before, is the main principled
and everything then slots in together using
a screen. All right. That one is more simple one, so you can play around
with that one and you shouldn't really break anything
playing around with that. Now let's go back to modeling. So we're going to go back
to modeling and what we're going to do then is
join these two together. So we've got we haven't
got a bevel on here, so let's actually add that in. So what I'm going to do is
add, modify, generate a bevel, and then we're going to
set this to note point, note, not three, like so. And then what I'm going to
do is as check what it looks like on our rendered
view, and there we go. If we turn this up, you'll see that it actually starts to bevel them
more, or it should do. Let me just have a look
at the Yeah, again, it's going to be one of those
where we're going to have to probably come in and
turn off our clamp overlap. Then let's put it on note
point, note, note five. And now you can see, we should be able to turn it up like so. And we don't really
want it that high. I'm just showing you if
you have those problems, that is what it's going to be. Now I'm going to turn that off. I'm going to put on note
point nut note three. I think that's easily enough. And then what I want
to do now is join these handles up with this part. I'm going to press Control
J. Join them all together. Right click, Shade To Smooth, Control A or transforms and
set origin to geometry. And this is what it should be
left with, and there we go. Now I think that's
really, really nice. I'm wondering about the gold is, as it smooth them off too much, that's one of the issues
I've actually got. And I'm also looking
at, I think, I'll come in before finishing because we are
going to use these. I'm gonna press Alt Shift
click Alt Shift click. Right click, and we're
just going to mark a shot. And there we go. I
think that looks much, much better
now, as you can see. Now, because they're not
mirred over the other side, we'll have to do it
on the other one as well. So there we go. I've missed one as
well under here, and I've also missed
one under here, right click and Moker Shop. And then what I also want
to do is on here as well. So if I come in, and I'm going to go, Alt Shift, click, all shift, click, and I'll also press
the dot but then, so I can just orientate
myself around that, and I'm going to go down
on the bottom, as well. So, shift, click, right
click and Moker Shop. And there we go, now
you can see just how much nicer that looks in
comparison to this one, and that is the reason why
we put these bevels on. And you can see using
the bevels and using the sharps together
is pretty powerful. In changing how something looks. So rightly, mark a
shop, and there we go. That is the doors then done. Okay, so that's that done. Now what we want to
do is we want to move on to this door. So this is kind of a
simpler version of this. But once we've actually
done this one, this one's pretty
easy to do anyway. So we'll move on to this one. So first of all,
as we normally do, we will get the dimensions. So I'm just going to
move this to the side. I'm going to press
file and save. So I'm going to file and save. Move it a little
bit further over. And then what I'm
going to do is shift this and cursor to world origin. I'm going to put it on
object mode just once more. And then what I'm
going to do is shift a mesh plane or X 90, spin it round, control
A or transforms, set g into geometry, and now let me give
you some dimensions. So if we come over
to the item here, we'll put this X. Let me see which way the X is. So this X is going this way, and it said 2.3 yeah, on the other version, actually. Yeah, that's the
actual orientation, it said note 0.2. And no, it's definitely not not. If I put this on Note 0.2, it was telling me
it's this small. So it's 1.47. And
then we've got the Y, which is bending it that way.
So we don't want that one. So the z is going to be
on 2.76, and there we go. Okay, now, what we've
got to remember about this door is which is here. It's 2.76 meters, but
that is the top of it. So where do we want the actual, you know, this kind
of bevel to come to? That is what we
need to work out. So we've got two panels in here. One of them, as we can see, is much longer than
the other one, and then the handles
come on here. Pretty much, though, this
is actually built out. You know, it's built out
the same way as this one. So let's come in, first of all, and what we'll do is we'll put our guy here. And basically, I do not want
it to be below this guy. So the top of here, you'd
never have it like below. You'd have him still
roundabout here. So this panel here would be whereabouts his
head is just below. So if I come in,
bring my guy forward, and what I'll do is I'll come
back to it and then what I'll do is I'll press
Tab Control off, left click and bring it
up something like this. And we can see now.
That's probably around the kind length of here. Then what we'll do is we'll
come in to vertex Select, grab both of these vertices, Control Shift B,
bevel it in, like so. And there we go.
Now, I know that there's some of these probably
touching around here. So what I'm going to do
is I'm going to press A, mesh, cleanup, merge by
distance, two vertis. So that's the two
vertors done here. And then I'm going
to leave this part. And what I want to do now is, it's probably going to
be easier to actually separate this from
this part here. So I'm just going to grab
this and press the Yb. I'm going to move my
guide to the side then. And then what I'm going to do now is come back to this part. So, this part in
here, it's very, very simple to bring
the first bit in, which is going to be I. So this is going to
be You know what? We need to reset all
the transforms first. So all transomsZgen geometry. Let's press the I button
now and bring it in. And now you can see it's
coming in, nice and neat. Now, the next thing is, it
will have a boolean in here. That's the easiest way to
get that glass in there. But now let's focus on
the bottom of this first. So what I'm going to do
is press Controller. Bring it up to where I want it, so it's going to be
round about here. And then you can
see his head now, if I bring him over,
put him in. Oops. You can see his head,
his jaws below there, like I said, then press Control R. Left
click, right click. Control B, pull this
out to the side. Like so. And then
we want one more, which is more or less down here. Control R, left click, bring it down a little
bit round about here. And then I'm just going
to pull this out as well. Control B, pull it out, like so. And now we need a
middle section. I also think I've made that probably a
little bit too thick. We can also see on this
door as well that these, let's fix these before doing anything because
they're too low. As you can see, they're not
stuck in the correct place. All I'm going to do
is just pull them up and put them in
the middle there. Alright, that's looking
much, much better. Now with this one,
then, let's make sure that they're not
bigger than these. So they look about right
because it is a smaller door, and then Control R,
bring in one more, and then control B, pull it out, move my guy to
the side, and go back to it. And if I need to bring them
in, then just press S and X, and you should be able to
bring them in. Like so. Now we've got the top,
we've got the panels here, we've got these parts that
are going to come out. Now what I'm going to do is I can see the thickness of here. So it's around go to
this one here, tab. Thickness of here is
this, two point 0.246. So we're aiming for that
top part to be 0.246. So what I'm going to do
is I'm going to come in. And I also want to
split these up as well. So this here, this part here, probably better off splitting
it from this because then we can actually do a lot
more with this wood. So I'm just going to press Y. And then what I'll do
is I'll split all of this going up to here. I'll have them. Yeah, I'll go all the way around to
this point in here. Pressing Y button. And then what I'll do
is I'll grab both of these, and I'm going
to pull them out. So I'm gonna pull
them out, like so. And note point, what do we say? Let's reset the
transforms first. And then the Y is
this point in here. Let me see what this
one is again, 0.246. I don't think that's
going to be 0.246. If I go to 0.246, we can see. It's going to be
absolutely massive. I don't know why
it's reading that. But anyway, if I press
three and go in side view, I can really then
see if I press tab. So I've still got
the ones selected. I can really see that I
can then just pull it out. Round about here,
and there we go. So I'm going to be happy
with that, I think. What I'm also going
to do remember, it's going into a wall. These things are always
surrounded by walls. You're just going you should never just stick these on
the front of somewhere. If you do intend to do that, even if you did, you'd still be pushing it
back into the wall. We're making it bigger because of the fact we know
it's going into wall. So just remember that
if you think it looks a little bit crazy and
a little bit too big. Okay, so what I'm
going to do now? Is pull this one forward,
to around about here, and then I'm going to press
E and pull it out to just be in front of this door here. Now,
why have we done that? Because it means now
that on this part, if I press right click, shade Smoove, you're going to end up with those
wooden parts in there. So the wood and groove
is going down there. Let me just check
see cavities on. The wooden parts
going down here, as you can see, it's going
to be split off now. And when I bring in my bevel, so add in a modify generate a
bevel, put it on not point, not point not three
or not point, not three, like so now you can see you've got those
little parts in there. That's exactly what
I'm looking for. Alright, so on the next lesson, then we'll make a start on
the bottom of this door. But you can see,
it's pretty easy now because we've got most
of the things in place. Alright, everyone, so I hope you enjoyed that, and I'll
see you on the next one. Thanks a lot. Bye bye.
87. Adding Glass and Decorative Elements to a Single Door: Welcome back, if you want to blend the Building master class from concept to final render, and this is where we left off. Now, I just want to
look at something within here, you can see, actually, if I just grab this, press the dot but, and I
should be able to doom in. We can see we've actually
got a bomb on here. On this one, we
didn't have that, so we need to make sure that we're taking that into account. Now on the bomb on my own, I've just basically added it on. So I've just added
it onto there, and I don't really want
to do that on this one. So what I'm going to
do is I'm going to come I'm going to press Control, left click and then drop
that down into the like so. And now from here, I can start
actually creating my dog. So first of all, let's grab this. This is
going to be the top. I'm going to press Y,
delete, limited dissolve. Then I'm going to do the sides. So coming down to the sides, like so, grab this one, Control, select that one, Y,
delete, limited dissolve. And basically what
we're doing is just splitting everything off, and then we'll do
the middle section. So the middle section, how
are we going to do that? You can see on here
the middle comes down, then we've got one either side. That is probably the
best way to do it. So we'll grab this one
going all the way down, and then y let, limit to dissolve, and
then grab these two here, and all we're going to
do is just press Y. From here, then we can actually
start working on these. So I'm going to come in, and what I'm going to do
is I'm going to press E to pull this out two,
just under here. So it's j under this part here, let's have a look just under. And then what we'll do
is grab these ones. We're going to press
E and pull these out. So these again, just under, like so, and then we're
going to bring this out. And if we go Control seven, we should then be able to
if we press wireframe on, we should, if we press E, be able to pull that out
just before this here. So if I look at this,
put it on object mode, it should just be a
little bit further back maybe than even
these parts here. Now, let's do these
ones here then. So we're going to
pull all these out. We're going to press
E, pull them out. Like, so, making sure that
they're just below there. And now, finally, we've
got these parts here. Now, these parts here, there's no point pulling them all the way
back from there. We need to basically
pull them forward, and we've split them up, so that makes it pretty easy for us. We want to then
press control layer, transform set
origin to geometry. Now, we're going to do these
pretty much the same as we did with these ones here.
So we've got an inner. Then we've got one
that goes, sorry, an outer, an inner, outer
and then this part on here. And we've actually put this
on here from the original, which I really want to keep. So we'll do that
now. So let's move a little bit further over
just so I can see wondering. And then what we'll
do is grab our dough. And the first thing
we're going to do is press the I button, so bring it in with I, like so. Then we're going to press
the I again, bring it in. You can hold this
shift but remember, as well to bring it in. And then what you're
going to do is you're going to bring
it in for here. So we're going to press I again
and bring it in. Like so. And from there, then we should be able to
create the panels. Now, let's go in then and
pull all of these out. So we'll do these parts first. Like so. And we'll
pull these out. So if I press E, I should be able to pull
them out, like so. Then I'll grab this part
here of the middles, press Control plus, and then
I'm going to pull them out. So I'm going to pull
them out like so. And then we need to now pull this part out and
then bring them in. So we'll do that now. So
we'll grab each of these, press the EB and pull them out. And then what we
want to do now is we could bring the
tops in, you know, like we've done on
these parts here, so you can see on
these parts here, we've brought them
in a little bit and the tops in.
So let's do that. So what we're going
to do is we're going to press S and Z, making sure that you're
on individual origins, and then we're going
to press S and X and bring them in, like so. And finally, then just make
sure you're happy with them. Right, click, shade or smooth. And if they're not
going flat, don't worry because we're going to smooth
those off in a minute. Now we want to do is
make this part here. So it's just an inner part. So what we'll do is we'll
come in, grab these. We'll press the eye button then. So the eye button
to bring them in, and then the eye
button once more, and then we can bring
these parts in. So we've got this outer band. So I bring it in once more, like so, and then Alt Shift
click Alt Shift click. Alt Shift click and
Alt Shift click. And they might be a
little bit too much. If I press E now, let's have a look what they're
going to look like, so if I pull them back, maybe maybe it's a little
bit too thick, so just go back before
pulling those in. So this here I'm going to press I and bring them in and make
them a little bit thinner. They were too thick
before, I think, so now I should be
able to come in. All shift, click,
and now they should be a little bit thinner, and
that's what I'm looking for. Alright, now if I
press the E button, you can pull them back
holding the shift. There we go. I'm much,
much happier with those. They look very nice. Now, let's grab this part here because
I want to use these. So I'm going to press L, L and L. You can see they're going
to be very big on there, I'm going to press
Shift D, bring it over, and then going to
press the P bone. So P selection, tab, C troll, all transforms
right click, set origin to geometry. And then what I'm going to do is just press one and then need to make these a little bit
smaller just to fit into here. Now, it's up to you how
you actually do that. I'm going to pull
them out. I could just press S and X
and bring them in. But I think then they look a little bit too chunky
for this door, I think. So instead of doing that,
I'm just going to press the S button and
bring them down very, very slightly, making
sure that they're fit in place. Like so. Now, I want to put these
on the other side. So I'm going to come on over, add a modifier and
bring in a mirror. I'm going to right click
Set Origins three D cursor, and there it is. Come on down then, and let's
supply that with Control A. And finally, it's on Note
point, not not three. This one's on not
point, not not three, which means then I can grab
this one, grab this one, press Control J, join
everything together, and everything then should be
beveled the way we want it. Now, the last thing then is
this actual window here. So let's just move
it over to In fact, you know what, we'll
leave it there because we still
want to do this. And what I'm going to do is
I'll just bring in a circle. So let's bring in a circle. Let's put it down to we might be able to
get away with 20 on this, bring it down to 20. Let's rotate it. So X 90. Let's bring it up into place, make it much, much smaller,
and then just pull it out. Press one, and now
you should be able to see it, make it smaller again, and then press S and, like so, and then let's fit
it into the plate. So you can see I need to
be a little bit smaller. Like so. And yeah, I think that's going to do it. So now I can just press Tab, make sure we've got
Edge select on, press the F bone, and
then we'll create a face. And then I just want to press E and pull it all the way through. Now, if it's red, just press L, shift N, just to spin it round. And all I'm going to do
then is grab this and this and press Control
minus, like so. And then it's just going
to cut that through there like so when we've
got our actual window. Now, at this point,
you can see that it's probably looking a little
bit big this window. So because of the way we've
done it with the bull cup, we can actually
now bring it down. And make it a
little bit smaller, pull it out if you want to. You can make it much more intricate if you really
want to do that. Once we've done that, then
let's come to this part. Come down to your Boolean
and click Control A, and then this actual boolean, I'm just going to delete because I'm not going to
need that anymore. Now, from here, then we need
to actually fix this part. So what I'm going to do
is I'm going to come in with Edge select. I'm going to press Alt Shift, click Alt Shift click and make sure I've got it
going all the way around. What I'm going to
do is right click, come down and bridge edge loops. Now, edge loops only
works when we've got nothing in between them.
So nothing in between them. We've basically got two lines, you know, next to each other,
but nothing in between. So right click and
bridge edge loops, where's Bridge edge
loops. Here it is. Bridge edge loops like
so, and there you go. Now, what I tend to do
is I'll press Controla. Left click, right click. And then what I'm going to do
is just pull this forward, and I'm going to press the F
but just to bring this in. So F. I don't like to leave this window where
it's just a window based in this part of the wood. I don't like to
leave it like that. So what I'm going to do
is just press the IB and bring it like so, and then I'll come back and Alt Shift click and
then just bring it out. I'm going to press E,
just to pull it out. You can pull it out
further or more in. I think I'll go more in
like so. There you go. Now you can see
that just makes you look a little bit better. All right, so we're pretty
much done with this. Now I want to do is I want to obviously bring in
some materials. We need a glass on
here, but mainly it's the same materials
as what we had on here. We already know these are
pretty much unwrapped, but I'm going to unwrap them
anyway because it's gold. It's very easy if I go to here, let's see if that'll
work first, actually. It's very easy. If I just go to here and see you
can't see anything on there. There's no grime. Well, there is grime on
there, but you can't see it. It's not like the wood is. So basically I'm going
to just press U. Smart UV project,
click Okay on the rap. And then what I can do is
press Tab, grab this one, press Control L L,
and we're just going to link materials like so. And now we can see we
do have some problems. We need to turn it all the
way around, basically. So if I come in, UV editing. Let it load up a
90, Zoom into it. So dot born. And
here we are now. We've spun it all
the way around. You can see that looks
much, much nicer. Now, there is a part on here
that I actually want to fix, so I'm just going to come into this part going all the
way around, like so. And I'm gonna come over
here, then just press T, spin that round,
spin it round again. So 90. And remember how I showed you how to
straighten everything out, and there we go. That's looking
much, much better. Okay, so we've got a dozen. Now we need our glass.
So if I come over and I'm going to pull this
over, go to my material. You can see we've got two
lots of metal gold here. Let's take one of those off because we don't
need them Bf on. And then what we'll
do is we'll press the plus button down arrow, and we should have one
that says glass green. And then all I'm going to do
is come into this part here, just grab it, click my glass, click a sign, and there we go. Now, one of the
things we can see is this is looking
massive on here. Now, if I bring it out, you can see now I can get
it to the way I want. So something like this is
looking much much better. And because it's so small,
you can also see that the dirt around here as
well is much, much smaller. Oh, yeah, that's
looking pretty nice. You could split off, you
know, the glass green. So in other words,
make another one and change this to
a different color. I think I will show
you on the next lesson how to do that because I think
that's actually important. So we've got glass green
here, but we will change it. And then it'll change right
across the board to glass. Blue. Like so. Ops. Let's take caps off. So. There we go. Glass and Blue. Like so. Okay, so on the next lesson, then we'll change that material. And then what we'll do is
we'll work on this fine do, and then we'll get
to work on the gate. The gate is very
interesting to create. You're gonna love
creating the gate. It uses a lot of skills
that we've learned, and when it all comes together, it just looks really nice. Alright, if you want, so
I hope you enjoyed that. I'll see you on the next
one. Thanks a lot. Bye bye.
88. Modeling a Tall Door with a Radial Frame Top: Welcome back everyone to blend the building master class
from concept to final render. And here is our door. Now,
what I want to do is I want to actually add another material using the glass
that I already had. So what I'm going to do is
press I'm gonna pull this. In fact, you know what?
I'll make it easy for us. I'll go to Shady M because
then it's actually, you know, it's much further out here so we can see
what we're doing. Let's press Plus. And what
I'm going to do is call it glass glass green.
Let's call it green. So. And then what I'm going
to do is come to this one. Click the little down
arrow, copy material, come to this one, click
the little down arrow, paste material, and there we go. Now we've got glass
green and glass blue. Now, if I zoom into this, what I'm going to do now is
come into this one, grab it and you can see
it's on Glass blue. Click on Glass
Green, click a sign, and then you'll see
nothing happens. And the reason nothing's
happened is because it's still classing it as the same because we copied it and duplicated it. Now, what I'm going to do
is just minus this one off. So in object mode, minus this first one
off, the blue one. And then what we're going
to do now is come in. We're looking for
the emission color. So the emission color
emission color A and B, this is the one
that we want to do. So if I now come in, and instead of it being on blue, let's change it to a green
like so, and there we go. It's just as simple
as that to change it. And you might also
want to come in and just make it a
little bit darker. It is a door, after all, so it doesn't want to be that dark
cause the light, you know, it would be from the
hallway or something, so it's not going
to be like being, you know, like Yankee Stadium
or something like that. Okay, so let's go
to File and Save. And then what we're
going to do is return back to modeling. So there is our two doors. And they were done pretty
quick, as you can see, I think, two or three
lessons, and that's it. We've got our doors. And now what we want to do
is this door here. So you can see pretty
much the same thing. So I don't really want to
move them right over here. I want to keep them
next to each other, apart from this top, which has got some glass in. So this top looks a
little bit more complex, so let's make a start on that. So again, first of all, we'll press Shift D. And
this is the last door. We've done the windows,
and we've done the doors. And they are kind of, you know, they're pretty intricate things, and, you know, you have to do three of them, and
they're kind of the same. So once you've done those and
got those out of the way, you've got some
archers, but they're a little bit easier to
do, to be honest. So the other stuff
quits more unique, you know, and not
so time consuming. So just take that into account. Okay, so let's come in
then and bring in a plane. And then what we'll do
is rotate it round. So R X and 90. And the other thing
I want to do is just make sure that face
orientations on. So I've got no red depot
from at the back there. So everything's looking
good on there, anyway. And now what I'll do is, I'll just bring in
the dimensions. But first of all,
as we always do, let's reset the transformation. So control A or transom
set origin to geometry. Now, this door is very tall, and the reason it's
very tall is if I come to My. Let me just open it up. Here it is. So if
I come to this, why is this door so tall? You can see this
what we're creating. If we come on over,
this is this door here. So this door is here. Now, we're only going to use
this door and this door. I think we only use them once. I'm not sure if we
make this door a little bit smaller on this one, but I'm fairly sure we only use them once, so at the front. So that's what they use for. So I don't know if we have
a better view here yet. It's this door here, what
we're trying to create, but you can see it really sets the tongue for the front of the building
and then going up. All right, so let's
put that aside. We know exactly what
we're doing now, so that's good, and then
we can start building it. So when you're asking, Well, why am I doing this so
tall, now, you know. So 4.23 meters, it's
going to be the height and the width is going
to be 1.71, like so. All right, so let's press one, let's bring it into place. So huge, huge door,
as you can see, now we want to know where the actual top of this
is going to go. So I would say that
the top of here. So the band that goes over here is going to line up with this. So let's do that part first. So what I'm going to do is
I'm just going to press Control R. I'm going to bring
it up, so halfway between. So it's kind of halfway and
then we're going to press Control B and pull this
out. To make it like so. And then what I
want to do is the dome that goes around this, I only want to really I only want it really to come
from round about here. So I'm going to press Control
R, bring in another part, left click, right click, and then bring it down
a little bit like so. Then come in and
grab your vertices, and then we're going
to press Control Shift and B, bring them out. Like so. Let's make
them a little bit more. And then what I'll
do is I'll come now and change the angle
to how I want it. So I want it a little
bit more dome shaped, so let's pull these out, then, just so they're
not quite touching. Something like this,
I think, looks great. And then we should have maybe I've gone a little bit too far. Let me bring them in. Just
a little bit like so. Okay, so now I can press A,
as you should always do, and then clean up and merge by distance, two
vertices removed. And this is what
we've ended up with. Now I want to do is I
want to bring this in, and I want to make a
middle part on here. So the way that I'm going
to do it, first of all, is I'm going to come in and
I'm going to get rid of this. So I'm going to press delete
and dissolve edges like so. And that's not going to work, so we're not going to do that. What we're going to
do is split this off. So I'm going to press
Y, split it off, tab, control A, or transform
set origin to geometry. And then what I'm going
to do now is bring it in. So I'm going to press the
i button to bring it in, like so to where I actually want it. So something
around there. And now what I want to
do is I want to actually create bands going into here
from this center point. But the way I'm
going to do that is I'm going to come
to Edge Select, grab these two edges. So these two here,
right click, subdivide, nothing will happen, but we
have got vertices there, so this verte is here,
this verte is here, and you can just press the JB
and join them up together. Then what we can do from
there is we can come now to this one
here. To this one. Press the JB, and
then we can come from this one to this
one, press the JB, and then this one to this one, J, and then finally
this one to this one. Press the JB. Now we want
to do is we want to get rid of this part here because it's going to interfere
with our insert, so we go to grab all of these, like so, delete and
dissolve edges. And finally, then you can see now all of these are split,
so they're all on their own. We can come in come to this one, press C, and then you can
just go all the way around. And then you're just going
to press the I button, press the e button again, and then you'll end up
with that insert like so. And there you go. That's
looking pretty nice. Now, the one thing I don't like about this is
these ones on here, they're a little bit
too sharp going in. So I'm actually going to
round those parts off. Once I've round them off, then we've basically near enough
got this pot finished. So what I'm going to do
is I'm going to come in. To each of these points here. So this one, this one, this one, this one, this
one, and this one. And all I'm going to do
is press Control Shift and B and just round
them off a little bit. So I should be able
to round them off. Now, if they're not
rounding off properly, just press Tab Control A, transform set origins, geometry, and then just go
back to it and let's see if I can do it a
little bit better now. Let's round them off
a little bit like. So if I increase it as well, you should be able to
see that it's looking a little bit more rounded
now as you can see, and that to me is looking way, way better than
where it was before. Now, I'm going to
try that again. I'm going to press Control
Shift B. Just drop it down. I'm going to turn
it up one, two, and then just pull them
out, and there we go, I'm happy actually
with how that looks. And now, finally,
we need to split all of this off
because, you know, it's a little bit difficult
to work with it like this, and then we can actually
start pulling it out to the same thickness as
these doors on here. So what I'm going to do is I'm
going to actually come in. I'm going to first of all,
get rid of these parts here. So I'm going to
come in. These are going to be my glass, of course. So what I'm going to
do is just press Y and then hide them out the way. Now, this is going to be
my wood, as you can see. So what I want to do
is I want to actually bring in First of all, I'll bring in a seam, so Alt Shift click,
bring in a seam. That then will make it easier just to split
it off for me, like so, and I'll press
right click, Mark a seam. Then what I can do is now I can split this whole thing off. So if I press L, I can
split it off now. Why? And then it's all split off. Now what I want to do is
I actually want to split, you know, most of this off. So where is the wood going to come from? Where is
it going to go up to? Because we don't want
just wood going, you know, all the way around here. It
wouldn't work like that. It would work where we've got the wood going into
this part here, for instance, and then
coming down to here, and maybe all of
this wood is joined. You would then end up with
this bar going across, and it would probably
come into this part here. So we need to think
about that logically. So I'm going to do, first
of all, the corners, of course, would be where the wood kind of comes together. So I'm going to write
click and Mark asm. Then what I want to
do is come into here, Alt Shift click, and you can see that's not
where I want it. So I want it coming
from here to here, from here to here, and then right click Marcosm. From here, then, I
should be able to come in now and split this off. So this one and this one, Y, hide it out of the way. And this is what we're
left with. Now I want to come to
these parts here. I'm going to press Y, hide them out of the
way. These parts. Now, the thing is,
you won't know, but if you touch like that, they're still going to
be joined together. So you're better off just doing them one panel by one panel. So Y, H, hide them out the way. One panel by one panel. You can see I just want to do this side because
they're touching there. So why, hide them
out of the way. And then finally this one here, why hide them out of the way. Now, I'm okay with
having this wood, you know, all of
this being one part. It's up to you if you want
to split them up further, but I'm okay with
it being like that. The one thing though I do
want to do is put one more in here and here and
right click, Mark asm. And then all I'm going
to do is come to this, press Y, hide it out of the way. And finally, is this
split up from here? Let's just try and
yet can see, it is. So that's all splayed now. Now, let's surpressOtH,
bring back everything. And the only problems
we might have now is with these parts here. So when we come to unwrap it, we might just need to unwrap these and spin
them round separately. But that's for another
time to worry about that. What we want to do on the next
one then is, first of all, get this out to the
size it's going to be, finish this top off, you know, all the
things we need to do, and then we can actually work on the bottom
part of the door, which we know is way
easier than the top part. So we're attacking the
hardest part here first. Let's go to pile then, save, and then I'll see you on
the next one, everyone. Thanks a lot. Bye bye.
89. Finalizing Tall Door with Detail and Material Accents: Welcome back if
you want to blend the building master class
from concept to final render, and this is where we left off. Okay, so what I
want to do is now, I'm just looking at this one. I'm just wondering
if I want this to be put further back instead. I'm just thinking, let me just have a
look at all of this. Yeah, it's actually
all together. Where does it come
from? There we go. I might actually
just pull this back. Yeah, and I think it looks
way, way better like that. Yeah, when I leave
that one like that, now I'll do is I'll grab
this one, grab this one, press Control L, and I'm
going to link materials, Control L and copy modifiers. And then it's come
back to this one. And before pulling
out, I'm going to press Control layer or transform
set origin to geometry. Now, when I come in
and grab all of this, so let's grab all of this
part and pull this out, so I'm going to press
seven to over the top. I'm going to pull it out round
about to this point here. So I'm going to press E, pull
it out to roundabout here, like so you will see now it's already got the splits in
there for the actual wood. Now what I can do is I can
come in to all of these parts. I'm just going to
grab all of this. So if I just grab all
of these, I should. Kind of press Control
plus. No, I can't. So I'm going to press L
on this part in here. Going to grab it all. It's a little bit tedious grabbing it. Oh, but still, this one here. I'm going to pull them
forward. Like so. Now what I want to do is
again, grab the wood. So I'm going to grab all of these wood because
if we look at this, they're all level
with each other. So all of these are
level with each other. It's just that they're
actually split for the bevel, which you'll see
in just 1 second. So instead of going back, I just need to
minus off my glass. So I'll just minus
off the glass, and then I'm just
going to press E pull them out to
where I want them. If I press tab now, you can see this is what
we've actually got, and that is looking
pretty beautiful. Now we can come to
our glass finally. And grab it and just because
we want plain glass, we can just pull it
forward now into place. And there we go. You
can see we've got some beautiful
wooden parts here. You might not like
these parts here, and we can you know, if you don't like that, we
can actually join it up. So this is like one wooden
piece if you want to. I'm just wondering whether
I actually want that. If I come back, so
I will show you how to fix that if
we come back before pulling this out
because these are basically we want to join
basically all of this together. So if I come in, and
grab all of this. So if I come in
grab all of this, grab this one and this one, I should be able to come in
and press mesh, clean up. Let's see if I can
actually do it. Merge by distance,
nine vertices. Now, if I come in
now and try and grab all of this in Edge select, it should should grab the
more coming down here, as you can see, because
they're not split anymore. Then what I'll do
is I'll come in. I will keep still, no, I won't. You know what? I'll do? I'll come in and grab it going all the way from there,
all the way from there, all the way to here,
and then I'm going to right click and I'm
going to clear scene. Now finally, what I'm
going to do is I'm going to come in, grab the
whole thing then. So grabbing each of
these because I think it actually looks better
when this has joined. And then what I'm
going to do is press E and pull it forward into place, press the tab button. So tab. And now we can see
what that looks like. And I think,
Yeah, you know what? That actually looks
a lot lot better. But press tab now. Yeah,
I think that looks way, way better than
where it did now. And now just with the glass. So if I come in, have each
of these glass parts. And then what I'm
going to do is pull it forward into place, like so, and there we go. That is that bit of door right, click, shade Ato smooth. Yeah, it's looking
really, really nice. Alright, so now we've
got just this part here. So we've got two long
ones and one small one. So if I press one, let's first of all, do
what we always do. Now with this one, we do
have a bottom on it again, so we've got a bottom like this. So just take that into account. We do have a bottom, as
you can see on here. So we'll do exactly pretty
much the same thing. So first of all, though, we've
got our main base in here. I can press Control, left
click, right, click, Control B, bring it down with the scroll of the mouse
wheel, do something like you. And then what we'll
do is, you know what we'll make it,
something like that. And then we'll do the
middle part. So control. Left click, right, click
Control B, pull that out then. And then we've got one in here. Now, for such a large door, it only has one, you know, one of them in here, not
three like this one, but I think actually,
it looks good. It looks imposing, but
it's up to you if you want to actually change,
you know, your dough. Now, what I'm going
to do is press Control art, bring it down, and then press Control B
and pull it out, like so. And then we want a
bottom part in here. So control, bring it
all the way down. And there we go.
Alright, so now let's start pulling all of these things out and
splitting them off. So first of all, let's
come to this one, and we're going to press Y,
delete, limited dissolve. Then we're going to come to
this one all the way down, this one all the way
down, Y, delete, limited dissolve, and then we'll come to the middle
one all the way down, and then Y, delete,
limited dissolve. And then finally these two,
and we're just going to press Y on those. So Y on those. Let's start then with the toppot and what we're
going to do is pull it out. So E, pull it out
just under there, so we've got that
little edge there, and then we're going
to come to these parts and then E, pull them out, just under that
little edge there, and then finally these parts,
we're going to pull out. So we're going to pull
them out no quite as far, so a little bit further back, like so, and then these parts, we'll pull out through here. Like so, and there we go. Now we've just got the
center in the center, we're going to do
exactly the same thing as we've done with
these. So we'll come in. You know, at this
point, you could really play around and change, you know, how you want your doors to look
and all of that. You can play around with
these parts, I mean. So what I'm going
to do is I'm just going to pull these
out, first of all, pull them out a
little bit to round about round about here, I think. And then what we'll do is now if we move this door
over a little bit, we can see we've got one there, inner, outer, and then out. So let's actually do that. What I'll do is I'll grab these. I'm going to press the eye
button to bring them in. So, you know, before I do that, let's resettle the transforms
as we normally do. Like so. Then we're
going to press one, and we're going to
press the eye button to bring them in. Like so. Then we're going to press the
eye button again to bring them in, like so. And then we've got
this one here, so we press the eye
button again to bring them in. Like so. Now, let's bring
all of these out. I'm just going to press Control plus to grab all of those. I'm going to press Alt
Shift click then, like so. And then what I'm going
to do is pull these out. So I'm going to
press the E bond to pull them out, like so. And you can see now we've
left this part behind. So this one in here,
we're actually left behind. It's up to you. I want mine a little bit
further forward than that. So I'm just going
to grab both of these now in the center. And I'm just going to
then pull these forward because I think they're a
little bit too far back. So something like this. Now I'm going to do is pull these out. So we're going to
pull these parts out. So these are these
parts on here. So I'm going to press the
E button to pull them out. Like so, and then I'm going
to squish them in on the z. So S and Z, pull them in, and then S and X, pull them in this way, like so. And finally, then let's
put the center parts in. Let's press the I button
then to bring them in, and then the I button once
more to bring them in. And finally, then let's
actually create this part here. Now, again, I might
have gone a little bit too far with this part, so
I'm just going to go back. I'm going to press I,
bring them in with shift. Yeah, and I think
something like this. And then Alt Shift
click Alt Shift click. O shift, click,
Alt Shift, click. And then finally pull them back. So I'm going to press
E. Holding Shift, pull them back into place. Now I'm going to
do is right, click shade at smooth,
and there we go. That is our actual door. Now, the one thing you
can see is on here, these are not so flat. You can actually come
in and bring this down. To flatten them all off so you can bring
it down to there, and then it'll flatten
everything off. I'm not sure if we've
got the same on these, but we can actually come
in and do the same thing. So if you put it on 24, you'll see that it
flattens everything off and come to this one, put it on 24, flatten
all those off as well, and now you can see they probably look a
little bit better. Okay, so we've done all that. We've got our door in. Now,
let's get our handles in. So we'll use I'm looking probably use better
off using these handles. So let's come in and
then we'll press L, L, shift D, bring it over, press P selection,
and then control A or transforms set origin
to geometry, press one. And what we want to
do is we want to put it in the center of here. I'm going to make these
a little bit bigger, so I'm going to press
the S bone because it is quite an imposing door. So let's put them
round about here. Put them into place, then
just make them actually fit the door. Like so. And then what I'll
do is right click Set Origin three D cursor, adding a modifier and
bring in a mirror. So I'm going to bring in the
mirror, and there we go. And finally, let's
join it together. So Control J, join it together. After after we've
added in our mirror. So Control A, shifts leg
control J, join it together, and then Control A, all transforms set
origin to geometry, and there is our dot. Lastly, then we just
want to grab this part. We want to press
Control L and we're going to link materials. And now click this
on and there we go. That's what we've got.
So on the next one, then we need to unwrap
this, of course. All of it. Then we need to
put our glass in, turn the wood around, and
all that other good stuff. And then we have our
final door actually done. Doors out of the way done, guys. Let's go to file and save everything out, and I'll
see you on the next one. Thanks a lot. Bye bye.
90. Creating a Fence Gate with Stylized Geometry: Welcome back, everyone to blend the Building
Master class from concept to final render, and
that's where we left it off. Alright, first of all, then, let's come in and actually
bring in our glass. I'm just going to select each of these coming over
to our material, click on our glass here and
then click Assign, like so. And now we can see if we go to the UV map what we
need to actually do. So first of all, though, it's very easy now to come in and grab everything
and spin it round. So if we go to UV Editing,
now, I would say, let's put it onto rendered that normally if you want to grab
a certain part, obviously, all you can do is just
select all the ones, which have got gold or, you know, if I come
in and select, you'll see it selects all those. If I then deselect everything, deselect the glass, you can
see select them like that. Let's select all the wood, then. Click Select. Not a sign. Don't click assign.
Just click Select. And then A, and you can see
everything here actually, it's not unwrapped properly
so let's actually grab it. Let's see if we can unwrap
it a little bit better. We go. Now it's rap
much much better. Now if I press tab, we can see, yeah, that's looking
way, way better. Let's press tab then again. R 90, spin it all round, and now you can see, all that woods looking
really, really nice. And now let's come to our glass. So I'm going to click
Select on our glass. A, then, and then what I'm
going to do is make them way, way bigger like so.
And there we go. You can see now that
looks beautiful. Okay, so let's go
back to modeling. And what I'm going to
do then is get these because they're nothing to
do with the gate whatsoever, so I might as well just
get all of my doors. Let's put them over here and let's actually come
in and name them. So we'll call it
large square door. So let's first of all, they'll
put them in their own one. So I'm going to press
M, new collection, doors like so, and then I'm going to
come to this one first, and I'll press F two, and we'll call it large. Well, first of all, we'll call it door because then it's easier to find large square. Like so. And then we'll
come to this one. These are way easier
to name, by the way, than all those little parts
that we've done before. So F two, we'll call
later door small, arched. And you've guessed
it. This one here, we'll call door Lodge. Arched. And there
we go. Alright. So now what we want
to do is we're coming over to the right tied, select them all right click, mark as asset, go to
our asset manager, make sure run current file. Come on down then
to where it says, we haven't got one that
says doors actually, so let's make one. So doors. And then bring them
over assigned, grab them, and drop
them in to doors. Make sure we save or work. So file and save. Now, let's go back
over to modeling because we know they'll be in
there, so that's perfectly. They're perfectly done now. And now, we're going to
be working on our gate. So have a click on this, zoom into it, we can see that there. Again, whenever we're looking at this, let's break it down first. You might not know how to do it, but you know that you can break
it down. That's for sure. So with this, we're looking
at this bits quite easy. So we can see that all of
these, they follow this along, so these parts,
they just look like they're square got a tip on
them, easy enough to do. Then we've got the bars going
across. Easy enough to do. They're just a cube, basically. Then we've got this bit.
How would we do this? Easiest way to do that is
probably to use a curve. That then will make it easy. And we could probably
use the curve to do this part and use the same curve to do
these parts as well. So we'll probably
do it that way. And then we're
moving on to here. So this bottom bit, cube
extruded, easy enough. This bit then going up is a cube with an insert and
then extruded inwards. We've got four things on here, really, really easy
to create this stuff. So when you break it down
like that, you can see, is it really that hard to model something like
this? Probably not. Then we've got this bit.
Now, we already did a lot of this work with the
actual pillar. So we know we can already get pretty much all of these
shapes that we need. And finally, we've
got a sphere that looks like a sphere
on top of there. So you can see, when you
break it down like that, it's very, very easy to do. Now, what about scaling? That's the other thing. So we'll actually get a scale to work on, and then what we'll do is, I think I think we'll probably work on the base pillars first, and then we can work on the gate after rather than doing
it the other way round. So we'll do it that
way. So let's come in, and what we'll do is we'll
come with our pillow. So first of all, I'm
going to bring in a cube. Make sure you cut in the
sense of so shift day, bring in a cube. Let's then come on down and make it around
the right side. So what I want to
do is not 0.49. So not 0.49 on the
cube, like so. And then what I'm going
to do is I'm going to bring it down then on the z. So EN Z, bring it down. Now, this is the bottom
then of our actual cube, and the height that we're
actually going for on here is going to be 3.21 meters. So if I press Shift
D and then put this over here on the
z at 3.21 meters, that is the height that
we're actually going for. So I'm actually going
to put this side. You know, let me just check and make sure
I'm happy with that. I'm going to check it against my door as well if I come in. Yeah, you can see it's
quite an imposing gate, so pretty imposing that gate. And it's obviously
a massive building. So, you know, a big gate like this wasn't actually
out of the extraordinary. I was more of the norm. So what we're going to do now we
need to stick to this. So first of all, we'll
make the actual base. So if I press one, just make sure that it's stood
on this part here, and then what we'll
do is we'll just shrink it in a little bit
and then pull it out. So what I'm going to do
is I'm going to come in. Alt Shift, and click. I'm going to press Alternss and just bring it
in a slight bit, and then we're going
to press Control on, bring it down then
to where I want it, and then we're going to
press Alt Shift click, and then E enter. And what I want to do is just
bring it for a base in it. Alness bring it out. Like so. Now, again, if it's
not coming out, you know, how you want it,
let's zero everything out. So if I grab both of
these, sorry, this one, press Control plus,
and then S Z zero, that then is going
to zero it out. If I come to this part as well, Alt Shift click S Z zero, that then is going to
zero that out, as well. And then you should end up with something that
you're looking for. Now, you can see we were
looking for not 0.49, and you can see we're on 0.489. So let's put it on 0.4 Ops. 0.490, and there we go. You can't even see
any difference there. Now, next of all,
let's make this then a little bit taller, so
a little bit taller. And then what we're going
to do is bring it in. So, I, let's bring
it in, like so. And then what we're
going to do is press one, and I want to bring it up. The pole, so the
actual top on here, we need to include that in here is probably going
to be this height. So what I'll do is first
press tab, Shift A. Let's bring in a cylinder. If we bring in a
cylinder, doesn't matter about the
vertices right now, we just bring it in to get an idea of how tall
the top of it is. So if we bring it in
even more, press S ands, I'm going to say that the
top of it is going to be roundabout this sort of size. So something like this.
Now, that means we've got a good idea then of if
we pull it up to here, we've got a top on
here coming from here, and then the gate
going around here. So let's give that a try. So what I'm going to do
is come back now to this, and I'm going to
press one again. And then what I'm going to do
is press E and pull it up. So I'm going to
pull it up to here, and then this other part. So this will be where
this actual top is. And now you can see it looks
a little bit different now. You can see now that the
gate is coming up to here. So you can see this is going to be where the
gate comes up to. So his head could be
where the first bar is. I think I'll pull
it up a little bit more like so, just a little bit. And then what we'll do
now is we'll actually create the first part
of this top bit. So what I'm going to do is I'm
going to come round again. I want it to be round about the same as this bottom
one down here. So I'm going to press E, enter, S, and pull it out, like so. And then what I'm going
to do is pull it up. So I'm going to pull it up
E to pull it up, like so. And then what I want to
do is I want to pull it up a little bit more, but
I want to split there. So if I pull it up to here,
I can get a split there. Like so I'm going to put
split nine in the middle. Control, left click,
right, click. Now I'm going to come in and alt click and press the
Sp and pull it out. So, to give us that
nice actual curve, as you can see on
this part here. And then what we'll do is now
we'll bring this part out. So I'm going to
press E, enter S, pull it out, and then E, pull it up, like so, and then E, pull it up, and then finally S, pull it in. And there you go. You've got
that nice actual part there. Now, it's up to you
whether you want to bring any of these parts in. You might want to come
in, for instance, and press control or left click, right click, press Control B, and bring this bit
in a little bit. So if I press E to alter ness, we can bring it in a
little bit, like so. Let's put it in an object mode and then we can really
see what we're doing. And let's also press
Control layer transform set origin to geometry. Let's make sure we've
got cavity on, as well. Always make sure cavity is on. And finally, then let's give in ad modifier generate a boolean, and let's put it onto
not a boo Not a boolean. A bevel. Let's bring in a bevel, not 0.3, like so. Alright, now we can really see what that's
actually looking like. And actually I actually like this little pot
that I've put in there. Next of all, then, let's think
about these inner parts. So we only want an inner part on the let's have a look on
the front and the back. So if I come in, I
can grab this here, come around the back,
and then I can press the I button and bring
these in like so. And then what I'm
going to do is I'm going to press E, enter, and then S and Y because
we're following that Y axis, and I should be able to
bring them in as long as I've grow on median point. S and Y, bring them in. Like so, and there we go, that's what you
should end up with. And already, you can see
this is looking pretty nice. All right, so on
the next lesson, then, in fact, you know what? Before that, we'll just
come into this part, press the I button,
and then we'll press E and pull
that into place. So ready for that light to
actually go on top of there. All right, everyone, so
I hope you enjoyed that. I'm going to save out more work, and I'll see you
on the next one. Thanks a lot. Bye bye.
91. Modeling Decorative Fence Details with Curve Modifiers: Welcome back everyone to blend the Building master class
from concept to final render. Now we're going to
do is we're going to create this part on top of you. Now I'm going to
show you a couple of ways of doing that
because one of them is a real easy way to actually create
something like that. The issue is the topology. Sometimes it stretches the
topology out a little bit, but I'm going to show
you, in any case, just so you can see what's
actually available. Now, the first thing I
want you to do is go back to where we've
got our extensions, and the one we want to bring in is called extra curve objects. So do a search up here,
extra curve objects, then come down and drag and drop and drop them into blender, exactly the same as we did
with the other add ons. Once you've got that, then if
I move my guy to the side, I'm going to put I'm also going to move these
to the side as well. Like so, scrub all of these,
move them to the side. And now we've got our
cursor right in the center. And now if I press Shift A, come down to where it
says curve going over, and the one we want is under
simple, and we want point. And the moment we put point on, we should then come
over to the left hand side, click on draw. And finally, then what we want to do is come to where
it says surface. And at the moment, you'll
have surface on fifth 70, put this around 15. And now you should be
able to do is you should be able to draw an actual curve. So we've got our reference here. We can see how it's
going to come up. So just kind of draw the
same way I will draw it. So imagine that this
is our line here. So this is the center
of this part here. So what I'm going to do
is I'm going to come. I'm going to draw
it up, going out, coming back, coming in,
coming in like this, coming in again,
going up, coming in, like so, coming out, then, going around, back in. You can make it as
complicated as you want. I'm going to make you round, and then I'm going to
put a top on. Like so. So something like
this, as you can see. Alright, so now we're going to do is we want to press Control A or transforms, right
click, in fact, we can actually do that
because first of all, we want to right click, and what we're going to
do is convert to mesh. So let's convert it to a mesh, and you will see now that this is being converted to a mesh. Now, I would say, at this point, it's a little bit too complex. So let's just go back just for 1 second so I can show
you what I'm going to do. So let's go back for
it to be in a curve. So here's the curve menu. And instead of that, we
can bring this down still. So let's not have
it set so high. Let's put it on something like let's see where
we're going to go up to, so eight or nine. Let's put it on nine for now. And then what I'm going to do is right click and I'm going to convert it to a mesh. Okay, now what do we do? So at the moment, we've
got a curve like this, what we're going to
do now is Control A, all transforms, and then
that's coming over. Add modify and the one
we want is generate, and we're going to
generate a screw. And there we go. We can
see that we've created a top that looks pretty
decent like that one. Now I can do it, I can
simply coming over, press Control A one. And then I've actually
got my top of this song. Now, you can see
the problem we have with doing it this way,
even though it's a really, really easy way to do it, is the fact that our
topology isn't even, and it's actually
screwed on there. Now, to fix this, it actually takes quite a
bit of work to fix this. So instead of doing this, I prefer to do the
old fashioned way. But I'm showing you
this so you can play around with it to your
heart's content because it's really nice
to actually test out different things
that you want to create. So now we've got
that. Let's actually delete that because we're going to do it then
the old fashioned way, and I'm going to show
you how to do that. So this is the
sizing that we want. So what I'm going to do is
I'm going to delete that way. And then I'm going to grab this. I'm going to press shifts, cursor, sorry,
selections cursor. I'm going to press one then, and I'm going to bring it up, and this is the scale
that I actually want. So once I've got it
in the center now, I'm going to actually shift D, move it to the side, like so. Alright, so now with this, we want it to be this kind of height going all the way up. So what I'm going to
do, first of all, is I'll bring out,
you know what? We'll start it from the top. So I'm going to come to this. By select, come on down, and let's start the
first point over here. And then what we're going to do then is we're going
to bring it out, so I'm going to press E
enter S, bring it out. And then what I'm going
to do is press E, and bring it up a little bit, just to add a little bit
of a bevel on there. Then what we're going to do
is press I, bring it in. And it's going to be
coming in to just before. So like a third before that. And then what we'll do
is press E, bring it up. Then we'll press the S button. And then what we're going to
do is press the I button, and then we want to
press E, and then I'm going to press I'm going to press E again. So
let's bring it up. Let's see how close
we are now so you can see this is the height
that we actually want it. And we brought you up here. Let's bring it up
a little bit more. And then what we'll do
is we'll bring it out. First of all, uh
before we do that, let's bring in a few edge loops. So maybe four, left
click, right, click. And I'm gonna come
grab it on the top, then. So grab the top. Put on proportional editing, and we'll bring it
in with the root, maybe. Let's try the root. So we'll press S, bring it in. And that there maybe is
the way they'll want it. Something like this,
so you can see now I've got a nice
curve going up. It's up to you whether you want it to be curving a
little bit more. So if I put it onto
sharp instead, you will see maybe not that way. Let's try it onto. We've
got Rube inverse square. Let's try that. Yeah, maybe
on that one. Like so. I think that looks a
little bit better. I'm going to try 1/1. Gonna try my sphere. Yeah, that's the one
I'm looking for. That is the one that I'm looking
for. That looks perfect. Okay, so now we can see this is the height
that we want it. Let's press E then. And then what I'll
do is bring it out without portion on just
press O, so bring it out. And then we're going
to press E, like so. And then we're going
to press E again, S, bring it out a
little bit more, E to bring it up, and then S, and then E, bring
it up to there. And now we're working
now on the top bit. So first of all, let's
press I to bring it in. And then E to here. And again, I'm looking how
close I'm to the top of there. I can make it
bigger I know that. I can make it smaller
and make it fit. But at the moment,
what I'm trying to do is just bring in the
kind of shape of it. If I press tab
now, right, click, shade Automot autosmooth, you can see the shape
that we've actually got. Now, I want to on this part, I want to bring this part out. So I'm going to press
tab control law, left click, right, click, and
then just press the Span. You know what? I'm
going to I think, instead of doing it that way. I'll come in. Alt Shift, click, E AlterS, bring it
out a little bit. Make sure that we zero it off because you might
have to zero it off, so I'm going to grab the
middle Control plus S, Z zero. Just make sure. I'm sure this bit is zeroed off, so I think we'll
be okay with that. And now all I want to do
is bring out this part. So Alt Shift, click, press the S but, bring this part out. Now we're on to the
kind of mean bit. So what I'm going to do is I'm going to pull it
in a little bit, so I and then E and then E and S. And this is kind of the main bit before we get to the top, so
the top of here. So what I'm going to do is I'm
going to pull this up now, and I want to make this
a little bit rounder, so I'm going to
press E, pull it up, like so, maybe like this here. And then what I'm going
to do is control, making sure I've got
one in the center. So I'm going to bring
in five edge loops, left click, right click,
grab the center edge loop, and then press O to bring
on proportional editing, press the S but,
and there we go, you should be able
to then bring it out just a little bit like so. Now, let's come in and
put a band on this part. So again, we'll turn off
proportional editing. Althip click Alt ship, click, E, enter lns, bring
that out. Like so. I'm also going to press
N's E and pull that in. And now I'm actually
on to the top. So I'm going to press
I, bring it in. E, bring it up, E, enter S, bring it out, like so, and now we're creating
this kind of top on there. So what I'm going to do is, again, I'm looking
at the sizing. I can see it's round about here and it has a top on there. So what we'll do is we'll
bring it up to here, and then I now want
to bring it in. So bring in some edge loops. Left click, right click,
come to the top of it. Okay, press one, press the S button with
proportional editing on. So do we want it like that? I think I want it
bend more like this. So, that's probably
going to be on sharp. Let's try it now. Nope,
that's the wrong way around. So let's go to Sphere. Is that gonna give
me what I want? Maybe it's not quite enough. I actually want it a little
bit more. Let's try root. I want to keep that bit there. Still not right. I'm just going to see if
I can find the right one. Let's try linear. No, they're
bending in the wrong way. So the last one,
let me try smooth. No, there's definitely not the right way. I'm going
to try root again. Root Roots seems to be the closest one to
what I actually want, but it feels like we've not got enough edge loops
down at the bottom, so I'm going to
press Control lot. Drop another edge loop in there, and then I'll come in now again. I'll try it again now. So let's see if bring it in. There we go. It's coming in a little bit
better than where it was. So yeah, something like that. If it doesn't work, you can always come in and just do it yourself. So
we'll have it on here. We'll bring this one in. So
I'll show you how to do it. What I tend to do,
if I'm doing it, I'll come in, first
of all, grab this. So I'm going to come
from here, and I want it going. Like this. So what I'll do then is then
come in, grab my edge loop. So this edge loop here. Oh, ****, click. Without
portion ding on S, bring it in. Oh, shift, click, bring it in. Oh, shift click, S, bring it in. And oh, shift, click, S, bring it in. And you can see just
how easy I made that. So S, bring it in.
And there we go. Now we just want to top on, and then we need our
ball on top of there. Again, we'll come down
and take this off. So note Minus off. We also had a ruler
on there as well. So let's minus off our ruler
data. And there we go. That's what we've
got so far, guys. So you can see that's
looking pretty nice already. Now the next one then,
let's just finish off the top of this,
put on a little bow. But you can see it looks
a little bit like a pawn. There are a few other things
that we want to do on this, but we'll do those
on the next one. So I'll do is I'll go to
File Save on my work, and I'll see you on the
next one, everyone. Thanks a lot. Bye bye.
92. Adding Fence Supports and Gate Pillars: Welcome back everyone to blend the building master class
from concept to final render. Now, let's come in,
and what I want to do is I want to
create a top on here. So what I'm going to
do is just press E, enter S, pull it out, and then we're going to
press E, pull it up. And then on this top,
I just want to pull out the center of
it. So control all. Left click, right, click
Control B, bring in a bevel, and then finally bring
it out with the S. And now we just want
that little ball on top. So I'm going to press Shift A. I'm going to bring
in a UV sphere. And, of course, I
don't want it on 32. So let's go down
to let's try 16, and we'll also try 12. And let's see if we can
actually smooth this off. So right, click
Shade Auto smooth. We've got a little bit
of a band around there, but apart from that,
the rest of it's fine. So let's actually bring it in. Like, so, and the
problem is there, I actually forgot that when you bring in a
sphere like that, it's actually going to bring
it in instead of this. So we're going to
press shift day, bring in mesh UV sphere, and it should come
in with the same. So now we can right
click Shade auto smooth. Uh, sorry, come back to it, S, bring it in, pull it up, and let's get it on top of here. So if I press the S but
on top of you, like so. And there we go. That is
looking. Very, very nice. Now, he's at the right
height. Let's have a look. Nearly nearly the right height. If I bring this over, you can see just about the right
height, a little bit higher, but hey ho, we can put it into the It's not quite
at the bottom, actually. Is this one at the bott?
Let's have a look. You have the ones at the bom, so I can actually pull it down. Pull it down a little bit.
And this then would be, you know, in the fence
or whatever in the top. So yeah, I think we got it
pretty much about right. So lots of practice, guys.
That's what that is. Now, let's join this and
this together, so Control J. We're going to get
that line there then. Because we're going to
join this up with a gate, let's actually fix that
because we don't want it. So what I'm going to do
grab the center of it, Control B, and then it's going to give us
that nice flat area. And then we want to
do is add modify, generate a bevel,
and we want to put the bevel on not point
not not three, like so. Now, from here now, I want to bevel some of these parts off. So I want to make
it a little bit more rounded, especially
on these parts. So I'm going to press Oh,
shift, click, all shift, click Control B, bring it
in a little bit. Like so. Now, remember, I might
want to before doing that, press tab, Control A, reset all the transforms. And yeah, there we go. You can see that the bevel might be
a little bit too much now. So let's put it on
note point, note, no. Five. Let's try. No, no point. No three. Let's keep on what we had it on. I'm just looking now. Okay, this is Bevdof. This is Bevdor. I'm looking for areas where I think it needs
beveling off more. You know what? I don't see any. It looks it looks good enough. You could maybe
put another band, a thin band around
this part of it. Control left click, bring
it down or put it going in. So Alt Shiv click Enter
Altnes. Let's see. Altnes. Let's bring it in. Js are tiny little
bit. And there we go. Yeah, this is looking really, really nice. So I'm
going to leave this one. I'm going to grab this one now, and let's put it on top of here. So we should be able to see how I'm going
to put it on there. Now, it's not gonna fit exactly, and if it doesn't fit exactly,
let's make it bigger. So we're going to make
it bigger, like so. So I want it right in
the center of here, first of all, so shifts, cuss to select to grab this one, shifts and selection cursor. And what I'm going to do is
I'm going to take my ball, so L P selection. And this is in case,
as well like me, if yours is a little
bit too high, which mine is, by the way,
I'm going to shrink it down. So S and Z shrink it down, and you're still not going
to lose that detail, and then you're going
to get it around about the size that
you actually want it. So now I should be
able to come in. Can even put this probably
even a little bit further in, and I can bring my ball down, drop that on top. Let me just make
sure that's right in the center. Which it is. Double tap the A,
and there we go. I think, You know what?
That's looking pretty nice. So if I bring my guy over, we can see now that's
how it's gonna look. Now, let's come in and delete I'm just wondering whether I want to delete this part out. You know why I'm going to keep this part because it's going to give me a measurement
for the top of my gait. I want my top of my gate
somewhere around there. So this part is
pretty much done. Now, if we get the measurements, then we know how big
our gait needs to be. So what I'm going to
do is I'm just going to pull this over here for now. And I want my measurement
to be around 3.6 meters. So if I press shifts, cursor to world Origin, shift. Let's bring in a plane, and we'll put the
plane on the red, which is the X axis on
3.6 meters like so. And then what I can do is
I can grab both of these. So this and this,
I can press one. And I want to pray on
Y frame just for now. So on Y frame, can I actually still
see that? No, I can't. On wireframe, not ghost.
Now I can actually see it. Now, if I move my guy just over here quickly, I should
be able to come in, grab my little point,
grab everything, and pull it to the
side, like so. If I zoom in them, this
is where I want it. I want to ride down
here, next to this. So next to this, like so.
That is how I want it. Now we've got the gate that's
going to come up here. We've got the two hinges that are going to
open and close. And now I want to
do is I want to basically join all
this together. So if I press, let's
have a look first, making sure. Let's
turn off that. Making sure that
we've got a bevel, not point note three,
a bevel on here, not point note three,
and a bevel on here, which means I should be able to join this up. So Control J. Join it together, right, click, shade auto smooth, should get it back then to
where we had it. And then finally, I want to now right click and
set the origin, two, three D cursor, bring in
then another modifier, which will be our mirror,
bring in our mirror, then we'll put it
at the other side. And now we know exactly
where we want to put it. Now what I'm going to do is now, I'm just going to
turn this round, so X and 90, and then going to press
S and X and bring it in. So this will represent
if I press one, it's going to represent the
gap between the two gates. So if I bring it down, I want the gap between
the two gates to be round about here. So if I pull this
so, there we go. Now I want to do
is I want to bring in the easiest way to do this, actually, is to
bring in a curve. So we'll bring in a
curve, first of all. So let's press Shift D. And what I'm going to do is I'm going to bring in a curve, and we'll bring in a path. So let's bring in
a path. Make it smaller, so press the S bone. Let's pull it into place because once we bring in a
curve, it's way, way easier to create the
gate while using curve, makes things so much easier. Now we've got this.
Let's come in, and what we'll do is we'll go instead of using resolution, we will come and extrude it. So if I extrude it, we should end up with
something like this. And then what we can do
is we can come now adding a modifier, generate a solidify. Come round, I'm going
to shade it flat, so shade flat, like so, and
then going to pull it out. And I can also from here, as you can see, it's
not in the center. So from this, we
can actually bring the offset down to zero. Then it's going to put it
right in the center for us, and that's exactly what I want. Now, what I want to do
is I want to pull this out now to get it to
be the right lens. So we already know that
we need one this side. So instead of doing that, what I'll do is I'll press
Shift D to duplicate it, and then what I'll do
is I'll spin it round. So Y 90, and I need this to be slightly
bigger than this one. So what I'm going to
do is I'm going to drop back my thickness. So if I bring back
the thickness, holding a ship but, there we
go. That then is in there. Now I can do is I can bring this to where I
actually want it. So if I press one,
I should be able to bring it just to
the tops of here. Now, there is one thing
I missed on here, which I should put in because that then's going to
give me a better idea. Wants to be lined up
with this part here. And from here, you can see, we've got a great idea now of how thick everything
needs to be, and that is why we're
working it out in that way. Now, what I want to do
is before doing that, I want to come
back to this part. And what I want to do
is I want to grab it going all the way around
there, so lt, shift, and click, shift ands, cursor to selected,
and then tab, shift A. And what we'll do is
we'll bring in a cube. We'll make our cube much, much smaller, so much smaller. And then what I'm
going to do is going to go to the outside, and I'm going to pop it
into the corner of here. So, into the corner Of here, as you can see, let's
bring it back there. It's way a little bit,
and maybe this way, and then maybe this way, just so the line up a
little bit, like so. And this is where I want
it. Not there, actually. What I have line up with that? Sorry about that, everyone.
So let's pull it down. Let's pull it then in place Just so it disappears
past there. And then we'll do it maybe a little bit more,
pass that bevel, and then j so it disappears, pass this bevel here.
That is what I want. Now, the other thing
is, I'm thinking I'll probably need to
bring it this way a little bit because it seems a little bit it needs to cover this. I
mean, that's what I mean. I'll also bring it down, so I'm going to bring it
down a little bit. And then what I'm going to
do is pull it out, like so. Now what I want to do is I
want to move this part in. So what I'm gonna do is I'm
going to bring this part in. Leaving a little bit
of a gap like that, and then I'll do
the same one here, bring this part in, like so,
and that is what I want. Okay, so now I need to just
mirror it over that side. So right click Set origin, two, three Dcursor,
add modifier, generate a mirror, and
also put it on the Y, and then we've got the
four corners on there. Press Control A, and finally, join up to this, Control J. Join everything up.
And there we go. Now we've got what I'm
actually looking for. Okay, so we've got
that so far so good. Now, what we want
to do is make sure that this part here then is roundabout halfway
to this point here. So around about halfway
to this point here. So if I bring it there,
drop it down a little bit, that is round the halfway point. Then what we want to do
then is create the hinges, and we want to create the hinges because then we'll
have an idea of how close it needs to be
to this actual partier. So we'll create the
hinges two hinges, one and two, and then we can
build our gate around those. Alright, let's save our work, and I'll see you
on the next one e on. Thanks a lot. Bye bye.
93. Constructing a Metal Frame for Fence Gate Design: Welcome back, everyone to blend the Building master class
from concept to final render, and this is where we left off. Now, as well, we're
building like this because it's
very nondestructive, and that's exactly what we want. So what I'm also going to do is press Shift ask us to selected. Shift D, let's bring in a cube. Now, unfortunately, making nondestructive hinges
is a little bit harder. So all I'm going
to do, though, is bring the hinges in like so, and we just want one
hinge at the top, like so, and then
another down here. What are we going to
do as well is press S and E and pull them out. And then finally, what we're
going to do is press tab, Control, one, two, and we'll have yeah, I think
we'll have two in there. Left click, right click, Contra B, pull them out. And yeah, I think these will
do for hinges for this. So what I'm going to do is
tab controle all transform, set origin to geometry, and then enter lns, bring them in. So bring them in. Like, so, press tab and pull
it over to the side then, so it should look
something like this. Maybe maybe I've even
gone too far in here. So I'm just going to press Alons or S and pull them out
a little bit more. You can see that I've
got a problem there. So what I'm going to do
is just put it back. Before I've gone in, I'm
going to press Alts and not come in so far and
then move them back. Like so. Now I want to get the grab the top and the bottom. Like so. And I'm going
to press Control B, turn up the bevels a little bit. Like so, and now you can see the stare to look like hinges. Alright, so right, click Shade or Smooth Control
A or transforms. And then what we'll
do is add modifier, generate a bevel, like so, turn it down to not
point not naught three. Like so and I'm probably going to be happy without those look. Yeah, I think I'm going
to be happy without those L. The one
thing I would say, I'm just wondering if the top, so if this top should
be shaded flat. So shade it flat, like so, yes, I think I'm
right about that. So I'm going to right
click and shade flat. And then wondering if I need
an edge going around here. So I know they might
seem small things, but I would sooner fix
them while I'm here. So I'm going for this one here. Right, click, Mark shop. And there we go. I think
that looks way way better. Okay, so that's my first hinge. Now, the first hinge ones to be set probably a little
bit lower than this. So one. So control all transforms right click
origin, two geometry. So probably around here,
shift D. Bring it down to, and then we need this part now. So is this part
going to fit into that hinge or do these hinges
need to be a bit thinner? I think they need to
be a bit thinner, so what I'm going to
do grab them both, S and Y, and pull them
in a little bit like so. And now I'm looking
at this part. Yes, the hinges are in there. And I'm also looking at
this here as a whole. So I think the thickness
is a little bit too much. Not the thickness this way. Thickness this way,
I think is okay. It's the other one. So
it's the extrusion. If I bring this down, see
you can make it thinner, or I can make it thicker. So press let's pull it into place where I
actually want it. So do I want it in
there, like so. And that's staying there. So what I want to do
is I want to pull this down now. So I'm
going to come in. Pull this down to
the bottom here. Now, the thing is, we've got to think he doesn't want to
be in there like that. He wants to be come in probably down to here wants to be a little bit of a
gap underneath, but not too much of a gap. So probably round around here. And let's move it over then. So we move over past that point. So you can see now we've
got a little bit of gap, and then what we can do is
now we can move these over. So move these over,
hold in the shift, double tap the A,
and there we go. We've got hinged in
there. Maybe maybe we want them a little bit wider. So S and X, pull them out, double top
the A, and there we go. I think they're
looking very nice now, and I'm happy with the
actual scale of this. Now I want to do is
I want to create. So if I pull this in there, you can see now it's fitting
in there very nicely. So what I want to do is pull
it up to the top, like so. I want to make this then
a little bit thinner. So if I come in, is it my
extrusion? Yes, it is. Let's make it a
little bit thinner, like so than this one. Let's press one, and this is
where we're coming up to. So we need another
bar come in here, but we don't know where that bars going to be yet because we need to make this part come up. So if I pull this up
now, and pull it out. I want it come in to
something like this. I'm going to bring this part up, bring it up, like so. And how much do you
want it to go and bend? I think this is a very,
very nice flow now, apart from maybe this bit here wants to come down a little bit, like so. All right. That looks pretty nice. Now I'm going to do is I'm
going to grab this part here. Now we want one
here and one here. So I'm going to press
Shift D, bring it down. And then what I'm going
to do is extrude it. So E X, extrude it
out, and there we go. There is next part.
And I told you, working with curves, makes
things really, really easy. Now we're going
to do is press L. I'm going to press Shift D, bring it down to the next
one. And there we go. Now the next thing we want
is we want to kind of thick a bit in this bit for
these to actually go on. So another reason
I'm working with curves is because when we
bring it all together, it makes things much easier, you know, when we're
bringing up these little poles with
the ends on them, much, much easier to do it working in this non
destructive way. So that's why I'm
actually doing it. The other thing is we
need to make sure A, we've got a tiny, tiny bit of a gap there,
as you can see. Now what I'm going to do is
I'm going to grab this part. I'm going to press shifty and I'm going to bring it
over then to this side. So I'm going to
bring it over, and this is where we want
the gap to come. So if I press one, we
can see this is what we decided roughly where
the gap is going to be. Now I'm going to mirror this
all over the other side. But for now, I can actually
delete this out of the way. Then what I'm going to do is
I'm going to pull this up. I want to get rid of these first because I'm not
going to need them, so delete and verses, it's a straight line, so we're really not
going to need them. And all I'm going to
do then is pull it up into place just
over the top of there. We know it's lined up
with this one over here. So we end up with
something like this. So far so good. Now what we need is the bottom part. So
I'm going to grab this part. I'm going to press Shift D. And then what I'm going
to do is move it over, rotate it round, so R Y 90. And then what I'm going
to do is press one, I'm going to move it into place. So I want it just just
at the side of here. I'm going to pull
it down into place, and then I'm going to
pull it over here. So I'm going to
delete those two, delete vertices,
pull it over here. Just a little bit past this
one like this one is here. Now, the next thing I want
to do is make it thicker. So I think that will
be on the extrusion, let's have a look. There we go. Make it slightly slightly
thicker than this one here. And there we go. Everything
should be fining nice, so we should still end up with a little tiny bit of
a gap down there. And that then is
looking pretty nice. Now, the one thing I
would say is maybe, maybe I just want to move
this over just very slightly. So if I grab this and this, maybe I want to move
them over very slightly. So holding shift but very, very slightly, like so, and then move my hinges. Again, press one
over very slightly. So I'm just going to
pull them in the middle. Like so, double tap the
A, and there we go. Now, the other thing
I would say is, as much as I like these hinges, I think they need
something else here. I'm going to press
shifts, Custer selected, Shift A, cube, make it smaller. And then S and Y S&X
Pull it over there, and then it's something that the hinges can actually latch onto Eons head, like so. Yeah, and I think that
adds a lot more to this. And I think also now, I can actually pull this over Jaws very slightly
over to there, double tap the A, and I think that looks
way way better now. And this can also be mel. Now, what I want to do is
shift cursed to selected, grab this, shift D. Shifts
and selections cursor. Press one, and then
let's drop it in the same place as this
one here in there. Double tap the A,
and there we go. Alright, that is looking
very, very nice. Now, what we'll do
on the next lesson is we'll start with
the actual railings. And again, because
we're using curves, it makes things so much
easier when we're doing this. Alright, let's move our guy over here and I'll see her on
the next one, everyone. Thanks a lot. Bye bye.
94. Building Fence Grids and Metal Mesh Panels: Welcome back if we want to blend the building master class from concept to final render, and this is where we left off. Now, I do want to show you
something before we finish. At the moment, if we
click on this one, you will see the
resolution is on 12. If I right click
Convert to mesh, you will see we've got
something like this. You'll also see
that these bands, they get thinner as they go up. Why is that? I'll
show you why that is. If we press Control's
Ed and just before we highlighted
that, if we go in, every point on here, means that it will basically distribute the bands around it. And on this occasion,
it's set to 12. So if I come and I
delete these two bands, press these two verses, and now I press Right
click, convert to mesh. You will see now they're
evenly distributed. But we still have
a problem in that. We don't need all those bands. So when you've got
something like this, turn it down to one. And then right, click
convert to mesh, and now you'll see it's
a straight actual plane. And that's exactly what I want. So now I'm going to do is,
I'm just going to press Controls head because I'm
still going to use it. Make sure this on these
parts is set to one and make sure you've got rid of
all of the parts in between. So if I come to here, now I can see I've got a point here, I've got a point here, and if press delete, I can
delete vertices. Not that one. Let's have a look.
Yes, not that one. This one here, this one here, this one here, and
this one here. Press Nope, that's not. Let me just make sure. Let's
do this one at a time. This one here, this one here. Is that part of that? I'm not actually sure. Delete verts. Yes, it is. So we'll
do this one part time. So I'll press tab.
Nothing in there. Grab this one. Nothing in there. Nothing in this one.
Let's come to bomb one. Nothing. Is there one there? Let's have a look, Delete
verts. Yes, there was in there. So we did find one, I think.
Let's have a look again, last one. This one here. Is there any points in there?
Is that a point there? Not sure if it's a
point, so let's try. Delete vertices.
Yes, it was a point. So we got a point in there. It's weird because
they're hard to see. I should have used, you know, put it on Y frame or something. Can I see it better
than Y frame? Yes, I can, but the
orientation is still there, which makes it a
little bit harder. The other thing you
can see now as well, on Y frame, is we can
see right through here. If I set this then to one, we can see all of
those disappear now. If I put it on object mode, you can see we've not
got anything in there. So let's put this to
two, which tells me, I think there's one
more band in there, delete vertices. Is there
another band in there? Let's actually have
a look. Control and plus, and there we go. There's nothing in there. So
let's set this to two then. Let's just test this
out. Right, click convert to mesh.
Yeah, there we go. So we've set it to two. Let's go back now, and let's set this. So we've put this down to. These three at the
moment are all joined. We don't want that. So what we want to do
is want to go L and L and P selection,
separate them off. Now we've got just
these two here. If I put this down to one,
it's not going to work. Let's put it on two. Let's
do the same thing on here. And this one here, we can
actually bring down maybe, maybe a slight bit, but
we really don't want to lose that smoothness
that we've got on there. So just take that into account.
Now we've done all that. We can do now is we
can take one of these. I'm going to press Shift D, and then what I'm going
to do is rotate them, so R, Y, 90, rotate them round, I'm going
to delete one of them. I'm just going to come in to this one, L, delete vertices. And then with this one, what
I'm going to do is just press one to go into
front view, right, clicks origin, two,
where is it set origin, two geometry, and then I'm
going to move it over now. And what I want to do
is I want it to come from the bottom and go all the way to the top and poke
out of here like so. The other thing
is, I want to make sure it's thin enough that it's actually going to
go out of all of these. In other words, if I come
over and bring this up. I want it to come out all of those like so, and I'm thinking, as well, that I might want to make it a little bit thinner just to differentiate
it between them. So if I come down
here, let's make it a little bit
thinner. Like so. And there we go. That is
what I'm looking for. Now, I know I've got
these all lined up, which means I can now
come in and add in an array because you can add in an array at the same
time. An array. Let's put it though on to the X, which is going across here. So all we need to do is move
around the X, not the X. The Y? Let's try that.
No, not the Y. The z. For some reason it's
the z. Either way, let's put it going over. Like so, and you'll end up
with something like this. And that is exactly
what I'm looking for. So now what I can do is I can apply my array, so control A. Let's I can't apply the array, actually until I bring
that in there, apparently. So it says, cannot apply
constructive modifiers on curve, which means I need to apply all of this onto this before
doing anything else. So we'll do that. No problem. So what I'll do is
I'll come in and go and right click Convert
to mesh, and there we go. Now I want to do
is I want to make sure that this is
following this curve. So you can see
here this needs to be following this
up to this point. And we also want to
put a top on there. So what I'm going to do is
I'm going to press one. I'm going to come grab
my actual tool again. Or we can do it different way. You know what? We'll
do it a different way. What we'll do instead
is, we'll press Shift D. We'll bring it up and we'll
put that just under there, like so, and then we know how far we need
to bring these up. Now, to bring them up
and not keep, you know, moving this way and
moving that way, what I'm going to do is I'm
just going to click on these, go into wireframe, tab, double tap the A, face select, and I should now just be
able to grab that face. And you know what?
That's not working? Let's go into Edge select. There we go. Now I can grab that top face and
bring it into there. Same for this one,
bring it into there, same for this one, bring it
into same for this one, then, bring it into there,
same for this one, bring it into there
and same for this one, and bring it into there. Now you'll notice that
when I was doing that, it was bringing this
side up into it. So this other side is
disappearing into it, but this one is the one that's
catching on each of those. Now, let's see what
we've actually got here. So if I come in, press delete,
so get that rid of that. Now you can see what these are looking like. Now, we
do have one problem. In that, for some reason, I brought them up on
ven though it was in. Was it in wireframe? I'm just gonna go back
down and put them back. Why was the only grabbing that? Maybe I wasn't in Wireframe. Alright, we'll try that again. Okay, so let's put
it onto Wiframe. I was in wireframe. Wonder why it's not actually going
all the way through. I wonder why that is. So it should go all the way
through, as you can see. Why isn't it doing that? I don't know why
it's not doing that. So instead, Yes, if I've got
that on, let's have a look. Can I actually grab it
now, double tap the A? And I think for some reason, A. Now it's going all
the way through. I think for some reason,
I got it turned off. Anyway, let's pull them up now. So again, the back end humps. And I promise you guys, it's definitely quicker
doing it this way. I know it seems slow, but, you know, I am trying to
explain what I'm doing here. Many ways of doing things, but it's definitely quicker
building a gate in this way, rather than I don't actually know which would
be a better way than this. Let's press tab. Let's
get rid of all of these, and then we should
hopefully be left with something like that, which
is what I'm looking for. Alright, so now we
need a tops on these. So let's do them all
at the same time. So if we come in now, grab the tops on each of these, like, so and then what I'm
going to do is press E, enter, make sure that we're
on individual origins, press the S button
to bring them out. And then what I'm going to do is press E to bring them up, and then we're going
to press the I button to bring them in. And then finally,
I'm going to press E to bring them up and then S to put the tops
on those, like so. And if I look at those, I think, I'll pull them up a
little bit higher. And there we go. That's
looking really nice. Now we want these parts here. Or to have bottoms on. So the
way I'm going to do this, I think because we know they're
all at the same length, we can see they're all
at the same length, if I come in and press tab, grab them all, I can
then come in, mesh. And what I'll do is
I'll come to bisect and I'm going to cut them across
going straight over there, so make sure you
set the X to zero. And then if you need to, bring them down using this. Bring them down
using this, like so. All right, so that's
what we want now. And what I'm going to do now is I'll grab them going
all the way around. Now, I'll just add
a seam on these, so we'll right click, right click and mark a seam. And then what I'll do is
now we can come in and just press L on all of these. In fact, you know, well,
that's not going to work because we've
got bombs on these. Yeah, we've definitely
got bombs on these. So that was a waste of time because what I
was trying to do, if I just hide this
out of the way, I was trying to come in and just grab the seams, but you
know what I'm going to do? I'm just going to delete
these out of the way. We don't need these
bombs on anyway. So let's delete and faces. And now I should be
able to just come in, press the bun on each of these, like so, like so, like so. And now I should be able
to press E to Alterns. And pull them out
slightly so they have something to
rest on, like so. Now, if I press, alternate,
bring back everything. That is what you
should end up with. And what we're making sure is that they're not
going over the edges, so you can see the
right of the edge here. Like so. And you
know what, guys? I think I think we're
nearly done with this git. So just make sure you're
happy with yours. You might want another
band in there if you want. But once you're happy with
it, save out your work. And what we're
going to do now on the next lesson is we'll
convert these to mesh. I'm just making sure,
these are all converted. Look, that
everything's in place. We'll convert them to mesh then, and then we'll get it
on the other side, we'll get it beveled off, and
then all of this joined up. And then finally, we've
got our gate done. It seems a long process to get this gate done,
but honestly, it makes such a difference, you know, to the
actual finished piece, now you've got this
gate on there. Really, really bring it to life. All right, everyone.
I'll see you on the next one. Thanks
a lot. Bye bye.
95. Ensuring Symmetry in Dual Fence Gate Panels: Welcome back everyone to blend the building master class
from concept to final render. Now, one thing I want to
do is I just want to, I think, you know
why leave them. I was just wondering
whether to pull these out a little bit more.
You know what? I want to leave them. What
I'm going to do then is just turn everything into mesh. So I'm going to
grab all of these. I know all these are
already turned into mesh, but you can grab them anyway. It will just literally put on
the solidifying everything. So right, click, convert
to mesh, and there we go. And now we can do it,
so we can just press Control J, join everything up. Control A or transforms, right, click Set Origin to set Origin, to you know what we'll
leave the origin there. You know why I'm going to
leave it there because we need to actually
put the other side on. First of all, though, we'll
come in, add a modifier, generate a bevel, and we'll put it on naught point,
not not three. That's the one that
we like putting on. Double tap the A,
and there we go. And now I want to
put a mirror on. So add modifier,
generate a mirror. Let's put it on the other side. There is that gab I
was talking about. You know what, guys? This
looks absolutely perfect. The one thing I would say
is maybe maybe you want to make this part here
a little bit wider, but I'm pretty happy with mine. Now, on this one here, we've
already got bevelon 0.93. We've got our mirror on. So
let's apply the mirror here. Let's apply the mirror here. And let's come to
these parts now, and we'll join both of these together because
they've got the bevon. We'll just press. The one thing, yeah, I've still got
the bevel on there. Okay, let's go back. So grab both of those.
Press Control J. Right, click, shade Auto Smooth. And then what I want to
do, I'm just wondering, did I actually pull bevel
on there? No, I didn't. Okay, so that's
okay. What I want to do now is shift desk, cursor to world origin. Right click Set origin, two, three D cursor, add
in then a mirror. So bring in a mirror, put it on the other side,
apply your mirror. And now we've got
our bevel on here. So we've got a bevel
on here, a bevel on here at no point no three, and then we want
to grab this one, but we want to grab this last, so we end up with our bevel. So Control J, join
everything together, right click and
shade or two smooth. Finally, then, let's press
Control A or transforms, right clicks origin to geometry. And there we go, guys, this now, hopefully, should
be our actual gait. And that is looking very nice, really, really happy with
how that turned out. And our overall dimensions. I'm just checking on my own. So 3.63, we had it, which is where is
it? Is this the X? Yes, it is. So this is the X.
I'm just wondering whether it's a little bit wide at the moment because I
want it around 3.6. So if I bring it down 3.6, you can see it squishing
everything up a little bit too much,
so I'm not sure. If I want to bring, you know, these parts in and you
know what I'm going to do? I'm going to go back
before joining it all up. I'm going to grab this part, and I'm just wondering if I want to bring it in a
little bit more. So I'm just going to press. I need to go back before, probably before the mirror. So let's go back
to this part here. And I'm hoping that
it can come back. Yes, there we go.
This is the bit, then what I want to do. I
want to squish this in. I want to put this git, the whole thing
around 3.6 meters. And you can see, it's
3.6 meters on its own, which means I'm probably
going to have to come in. I've took off the mirror
off there as well. So I'm going to bring
in, first of all, a plane, and I'm going
to pray around 3.7. That'll be okay. So 3.7. Let's bring it in. We'll move
it on the X to 3.7 meters, and that is the kind
of size I want it. So what I'm going to
do is I'm going to grab all of these, first of all. I'm going to not that one. This one. Maybe I'll get it. This one here. Like so. And then what I'm going to
do is join these together. So Control J, join
them together. Right, click, SeraginT. You know what we won't
do the origin yet. What we'll do first is put on the mirror. So I'm going
to put on the mirror. Right click Seragin 23d cursor, add in, then a mirror. So generate a mirror
on the other side. Now what I do is grab
these right click, shade or smooth, grab this then, and I'm going to try
and bring them all in. Now, if I move them like that, you will see it moves
the whole thing along. We don't want to do
that. What we want to do is press tab, A to
grab everything. And then if I move this one, you know why it's not
doing what I want? Because I think the mirror
isn't on this one, either. So you know what
we're going to do. We're going to mess this up. So what we're going to do
is we're going to come in, make sure wireframe is on, B, grab all of this, delete and vertices like so. And then what we're
going to do is we're going to come to these. We're going to take off
this mirror just for now, join both of these together. So press Control J, join
them both together. Come back now, make sure that the beverly is on.
So there you go. You can see the bev
is on everything. This is where the um,
middle part of it is. And now what we're going
to do is adding a mirror. So I'm going to generate a
mirror, come down, mirror. And then I'm going to press
one. And what I'm going to do now is tape to
grab everything, and now I should be
able to move it over. So where do I actually want it? Let's put it on wire
frame so we can see where is this part. So if I move it
over, there it is. So it's going to be around here. Now let's see if I can squish
these down a little bit. So I'm going to
press A, S and X. Let's squish them
down a little bit. As you can see, not everything's
moving at the same. So what I want to do
is make sure that we're on medium point tab, and then S and X, and let's just squish them
down a little bit and move them over
because I've made it, I think, a little bit too thick on there, and
I want to fix that. So I'm going to bring
them out, like so, and then go to
come back to this. I'm going to move them
over just a little bit. And if I look down here, I can see that it's
just not touching now. So now let's have a look
at that. Let's move up. And we can see now we're about right in the realms
of where we wanted it. So my fall and made it
a little bit too thick. But doing it this way
means we're not going to squish these posts.
That's the main thing. We can afford to squish
this fence a little bit, and I actually think it looks a little bit bad the way
that it's done now. So Hopefully, hopefully,
yours will fit in place. You see, it's a
little bit too big, still, but that's okay. I think we can actually
work with this. If I bring my guy over now, you can see this is what it's
like. Now, it's up to you. You might want to come
in. Let's actually see. Can we get away with squishing
it a little bit more? So S&X, can we get
away with that? Move it over to there. Come back to this one, tab, and move it over to place. Like so. You know what? I think we actually
can. I think we can. There's a little bit
of a gap down there. Yes, I think we can actually
get away with that. And I think that looks even
better. So we'll grab this. We'll grab this has got
Bevlon no point not no three. This has got a mirror on, so let's apply the mirror first. This has also got mirron,
so let's apply the mirror. Let's join them both together. Control J, and let's press Control A or transform
set origin to geometry. Right click and
shade Auto Smooth. And there we go.
Alright, finally, the gait is done,
and there we go. We can get rid of this
part out of the way. We can save our work
now, so file save. We can bring it
over now over here. To my doors, like so. And now all we need to do is start getting in the
materials on this thing. So let's actually bring in, first of all, we know we've
got two types of stone. So if I come in, we need two
types of stone and metal. I'm just wondering if this has. Yes, it's got metal building, stone light, wood crack. We've got all of these on which we can remove
some of them. So if I grab this and grab this, I can press Control and I
can actually link materials. Now we'll do is we'll put
this on Rendered View first, and we'll come into
these parts first. So what I'm going to
do is just grab all of this going down, all
of this going down. And, you know, I'm
going to also, I think, grab all of these. So I'll unwrap them
all at the same time. Go around here as well. Around here, press U smart
UV project. Click Okay. Let's have a look at
what that looks like. And they are now around
about the same as that. So that's looking pretty good. Now one thing is,
I do want some of these to be stone lighter. So I do want some dark
and some lighter. So when I bring them into,
you know, the other fowl, I want to make sure that
these, you know what else? I'll do I'm just wondering
whether to make them darker, this stone lined stone
docket, the same on here. I'll come into this part here. Can I just grab all of that? No, because it's
going all the way up, so I'm just wondering
whether I want this part except
this part down here. So yeah, I'll show
you what I mean. So I'm going to come in. I'll shift click. Go all
the way around here. Let's just put it
on object mode. So all the way around here, like so, same on this side. Like so, right click and
what we'll do is Mcasin. And then I'm going to
come in, and we're gonna come to this part
here and this part here, and gonna put on stone lighter. Like so. Let's have a look
at what that looks like. Let it load up. And let's
put it on rendered view. Yeah, something like
that. There's definitely a contrast now between them. You might also want to make sure this top pillow is also
the same color of that. That might be
something worth doing. So if I come in,
and I'll grab this, and I'll put it at Control
plus going all the way down to the bit
underneath here, like so, and then we can
put it on stone light, click a sign, and there we go, I think that actually
looks better. Now we'll come to
these parts here, so I'm going to press L, L. And they're on here. And then I'm going to
press U Smart UV project. Click Okay. And then the metal building,
let's click Assign. And then we go there looking very, very nice, as you can see. Now on the next one then, all we need to do is create
this metal along here, see what that looks like,
and then we finish the gate. Alright, everyone, so let's save our work, and I'll see
you on the next one. Thanks a lot. Bye bye.
96. Enhancing the Back Entrance of the Manor: Welcome back everyone
to blend the Building master plast
from concept two, final render, and this
is where we left it off. Alright, what we want to do then now is put it on Render View. Let's come and
grab all of these. Now, the easiest way to
grab these if I press one, I can then come in
with box select, so B, make sure it's up here. And then what I'm
going to do is just drag all the way down to halfway over here and all the way over
to this one here, and then press Control plus. Enough times to make
sure they've actually selected it all.
Finally, then come in. So L, L, L and L, and then come around
to this side, and L, L and L U, smart UV project, click Okay, metal, click a sign. And there we go.
Double tap the A, and that's where you
should be left with. And look how
beautiful that looks, guys. Really, really nice. We've got a lot of edgeware on here and
everything like that. And yeah, that is
looking really good. Alright, so now let's
get this in place. So first of all, we'll put it under a new collection
called gates. And then we'll
call it main gate. So main gate, like so. And then we'll go over
to the right hand side, and we'll drop it into our asset manager.
So mark as asset. And then what we'll
do is we'll come over now to our asset manager. And here's our main gate. Let's make one for gates then. So gates like so, coming over to there, and then we'll just make sure
the doors are on as well. So everything is
there now, guys. Everything is there. And now
what we can do is we can actually coming over
back to our main build, and then what we can
do is we can check out where we're going
to put these doors. We can bring in the gate, as well and see what that
looks like within the build. And yeah, then we can
start making the steps, wherever this one
of these doors is going to go coming down. And then there will be a
big part once we've got those steps in to the
rest of the build. So the main things
that we've still got left is going to
be, if we bring in, let's just open
up our reference, so we'll bring this
over so we can see the next bi we're going to
work on is this be here. Can see where the door is. We
have got the arches to do. And it might be worth
checking the doors out in our other build and then dropping back into this one and creating these arches there. Because once the arches
are done, you can see, we've got the balconies,
we've got all of these parts already done. We need to do the steps, and we need these parts here. We need the railings
and things like this. But these are relatively easy. Next of all, if we go around, we can see again everything
is done, pretty much. We need a chimney in there. We need this part of the roof. This is a little bit different
this part of the roof. We've done the window over here. This is the gate that we did. We need some steps
coming down here. And if we go around
even further, so we can see even
around this part, everything is pretty much done. You know, we've got the
odd thing like the sign. And the main thing is then
after that is this front bit. So this front bit is probably the hardest
part to actually build, but we've got a lot of
the parts already done. So we've got things
like these pillars. We can steal those from the pillars we've already created. So just a lot of
it's already done, but this part will take probably the
longest amount of time. We've got this part
going up here then, you know, we need to create
an arch and stuff like that. But once we've got these
parts done, you know, we're on the home
straight, basically, as far as modeling lots
of tiny little parts. Of course, we've got benches
and things to do as well. But you can see where we're at. If you've got to this pot,
just keep going, guys. Honestly, keep going
because you're going to see such a vast amount of
improvement in your work, because pretty
much from year on, it's rinse and repeat,
rinse and repeat. It's going to, you know, just get all that muscle
memory in there. You're going to finally figure out how to put
everything together, because, you know,
building this side of the building is
relatively easy. Pulling it all together
is a hard thing. Put it in the hedges,
put it in the trees. That's the thing that really
brings everything to life. And that is the last
part of the model of, you know, setting up
a scene environments or creating buildings. It's the last part where you're
going to learn the most. So stick with it, guys, if
you've got to this part. So now what we'll
do is we'll put that out of the way. So
I'll put it down there. I'm going to then just
open up my other file. So my other file is here. So here we are. I'm going
to then save it out, not save it out, reload this. And we should have
it here at doors. So let's go in first,
put in rendered view, and look where our
door is gonna go. So the door that's
going to go in here, I think is going to
be the smaller door. Let's bring it in. And we'll spin this around, so we've got the
back of it there. Let's have a look.
Let's spin this around. So shad 90. That is going to be
our door. And you can see that's fitting in very, very nicely with what we're
trying to build here. Let's have a look
at our other doors. So this is our other
door. This is this door. Very, very nice. You can see just how nicely
they're fitting in. And again, if we need to change
our glass, for instance, we can easily come in and
change that on the fly. So that makes
things easy for us. You know, if we don't like
the blue or we want to make a bit darker, we can
come and change that. So the other one we want
to look at is the gate. So let's bring in
our actual git Z 90. Let's spin it round, double
tap the A and there it is. And you can see, Wow, just how nice that looks, and you can see how it
goes with everything else. Alright. So now let's think
about this actual door. So what we need to know is
we need to know our steps. Where are our steps going to be, how tall are our steps. And then from there,
how far do they come out and how far does
this actually go back? So this door, how
far does it go back? Because we can kind
of put this door in. Alright, so let's
look at that now. So what we want
to do now is work out the size of our step. So let's actually do that now. So what I'm going to do is
I'm going to grab this. I'm going to press
shifts, cuss to selected, bring in a cube, shift A, bring in a cube like so. Now, the dimensions of this, I'm going to come
over to this side. And what I want to do is I
want to put this on 2.41. Like, so I want to
put the Y on 1.5, and then I want to
put the z on 1.5, as well. Let's have
a look at that. And that is the right dimensions,
I think, for my step. So I'm just going to put it down to the ground plane so
it sticks in there. And then what I'm going to
do is just pull it back. Into place, like so. So I'm going to pull it
back round about there because I want that top
step on there as well. And then what I'm
going to do is lift up this and pull it into place. Like so dropping it
on if I press three. Should be able to drop that on there and put the
door in, like so. Now I've got a good idea
where that doors going to go. Now what we need is the part that's going to go on the side. So what I'm going
to do is again, I'm going to bring in a cube, so shift date, bring in a cube, and I'm going to come over
and over now again to the X and put it on 2.64. And then I'm going to put
the Y on naught 0.486, and then the z on 4.66, like so. Then what I'm going to
do is again, press one, pull it up just below
the ground plane, and then I'm just going to
pull it in to the wall. Now, remember when
it's in the wall, this is going to be set a
little bit further back because we want to make
sure that the steps, so how big the steps are so let's pull it out a little bit. Like so. And you can
see now I've done that. Basically fits new
enough the actual door. It's like magic. Let's
pull it back a little bit. Let's pull this one out a little bit, so
out a little bit. And basically, this
is how we want it. So we want our stairs
coming down to here. And then this kind of
coming down from here, and then out and following
our stairs down. That is what we
want. Now, as well, we can see from here now that we can bring in now we've
got these dimensions, we can actually bring in a
boolean to set back our door. So we'll do that as well now. So what I'm going
to do is I'm just going to come to the front, grab my door, press Shift
desk, cuss to selected. Shift D. Let's bring in a plane. Let's spin the plane round. So RX 90 or Z 90. So sorry. Y 90. Let's pull it out a bit
so we're in front of it. Let's press three again. And then what we're
going to do now, I'm just going to hide
this one out of the way. I'm also going to hide
my steps out of the way. I'm going to pull it
in on the S and Y, so S and Y, pull it
in, pull it down. And then what I'll
do is grab the top, pull it up into place, like so. Then what I'll do is I'll
come to here and here, Control, Shift and B. And then bring it down to
where I actually want it. Now, if it's not coming in properly, resell the transform, so control A transforms, etginGeometry, and
now try that again. So control should
B, increase it, and there you go, it
should work better. From here, then, we're going to press L. And then
what I'm going to do is pull it forward and
then pull it back into place. Now, it should just
drop through that wall. So what I'm gonna
do then is I'll just hide my door out of
the way just for now. And then what I'll
do is grab this, grab my wool, press Control
minus, and there we go now. That is all we need in there, actually, because then
I'll show you what I mean, Controller come to your cutter, and I might actually
save this cutter out. So press op, clear paren. Bring it over here
and let's drop it in. So you can see we've
got the cutters in here, but we want in boolean. So I'm just going to drop
in boolean, like so. And now what I want to
do is I just want to remove come to my
cutter remove cutter. And it disappears
because we've hit them, so I'm just going
to bring it over, and this one is for the door, so I'll actually open
this up. Not that. We'll open up our
booleans, this one here, and we'll call it door just
so we know the difference. And then I can close that up,
hide them out of the way. Save I work by save. And now I can do is press
TH, bring back everything. And now I can actually
pull my door in place. Now, if it's going through, then it's not far enough back, I can actually saw
that because I can just literally come in, grab this face here and
pull it further back, further forward,
wherever I want. It's really, really nice
to work in that way. So I can pull my
door back to here. I'm going to have my
archway on there, going to have a top over it, and you can see it's really,
really easy to work with. Alright, so, lastly, then what we want to do is
we want to take these. We want to press Control C. And then what I'm going to do
is go to my modular pack. So this one, which is,
let's have a look, this one here and not
this one. This one here. And what I'm going
to do is press Control V. Bring them in. And here they are. I'm
going to spin them round, so's head -90. Spin them round. And then these are then
there for the next lesson, and we can create
our first stairs. So we'll create our stairs.
We'll create this part here. So this part on here, going down, and then finally, we'll probably once
we've done that, start on the archways. Now remember, with
these parts as well, we'll probably come in
and create this part as well and then just get
everything fitting in together. Alright, everyone, so let's
save our work, like so. And I hope you're really
enjoying the course so far. Hopefully, at this point, you should be able
to leave a review, so think about that as well, and I'll see you on the
next one, everyone. Thanks a lot. Bye bye.
97. Modeling Backdoor Staircase with Stone Elements: Welcome back if
you want to blend the building master class
from concept to final render. And this is where we left it on. Okay, what do I want to do then, first of all, is obviously
delete that out way. Now, if we come over
to our references, let's just put let's
leave that one there, actually, because we're still
going to be doing that one. And the ones we want are
going to be our stairs. So these ones here, you can see. So we're going to actually
create both of these stairs. With this one, we're going
to create just the stairs, and then we're going to
work on this bottom part. And then with this
one, we're going to create these stairs
and just this part, like, down to here. And then we can put
that part on top. So basically saying it
out so we can bring it in and put the gates and
things like that on top. We'll probably actually end
up creating the whole thing. But to start with, let's create just the stairs on this
one, and then on this one, we'll create this bit
here and, you know, move it along a little bit, and then probably jump
back to this part. Alright, so with that
said, you can see, also, as well, the tops on here
are exactly the same. So we can use the
same ones for this. And I think I think these parts as well are
also exactly the same. So once we've created one of
these, we can bring it in. The only difference
is, as you can see, this one is a little bit taller, and I'll show you why that is because this one's obviously
going up a lot higher. Alright, so let's pull
it over to that side. Now, let's come to
our stairs, then. So, you know, Stairs
is one of those things where you'll always like there's so many ways
of creating stairs. But the easiest way, honestly, I find you can use bevels, you can use curves, you can use so many
different ways. You can use geometry
nodes, even. Let's well put this
out of the way. So if I go to modeling, then
I can see all of my model. Press the little dot button on the number pad to zoom
in, and there we go. Now, we've stairs then,
what we're saying is. So with our stairs,
if I just come over, we will see we've got one. So we're looking
at these going up, so one, two, three,
four and five. So one, two, three, four, going this way. So imagine it going this way. So what we want to
do is create one, two, three, four, five stairs. So let's have a look. So the first stairs
will be down here. So if we come in and
we press control law, we've got basically one
stairs at the moment, two, three, four, five stairs. Left click, right, click. So we've got one, two, three, four, five, and then
this part going up. So again, one, two,
three, four, five. At the moment, we've got
six stairs on there. And we've put in five, so let's put it down to four. Now we've got one, two,
three, four, five stairs. Alright, so now we've done that. Let's bring them
in the other way. So we want to split them evenly, and we know we've got
four going that way. So let's press ContolaO, two, three, four, left click, right click. And
let's drop those in. Now I've got one, two, three, four, five stairs. And that is basically
what we want. Now, there is a reason
why I'm doing it this way as well in that once
I've done this, like the topology is going to be really good if we
do it this way. So what I tend to do
is now I will come and I'll come to these and I'll
press Delete and faces, and then come round to
these and delete and faces. Then I'll come
round to this side, I'm going to come down, so delete and faces, and then we're just
going to come in. And delete all of these
going around to this side. Like so. Like so. So delete and bases. Now, finally, all we want
to do now is join these up. Now, we might be able to get
away if we come to mesh. Let's see if it
can actually work. So if we press A and
we come to mesh, and we go to cleanup and
then we go to fill holes. Let's turn this up and see if we can actually fill
in all these holes. Let's see. And there we
go, let's bring it down. There you go. You can
fill in all your holes. Now, has it filled
them in properly, that is the question. As you can see here, you can see that we have got a lot
of issues with these. In other words, these
aren't joined up. If I press J, yes, then
we can join them up. So is it worth doing that? Because we'd have to actually
come in and do this anyway? So, probably not. And
it's also causing issues. So we're not going
to do it that way. I thought I'd give it a try.
That's not going to work, so let's go back, like so. And then what we'll
do instead is, we'll come down with this one all the way down to this one. It's cut it through,
as you can see. So instead of doing that,
we'll just do it like this. Just grab this side,
grab this side, like so. And then what you're going to do right click and
bridge edge loops, and there you go. There's your stairs.
Now, the next thing is, what I want to do
is I want to make sure I'm keeping the height. But what I also want
to do is I want to put a top on these. So let me
show you how to do that. So if I press Shift D, then what I'm going to do is I'm going
to go to the side view. I'm going to make them a
little bit smaller E and E, pull them down to where
the other one was. And what I'm looking
for is to get these the same thickness. So
I've pulled it down. I need now to bring
them up to run about here to get them to
be the right thickness. So what I'm going
to do is I'm going to now come in, grab this one. So this one here. Like so. I'm going to press Shift D. I'm going to
press P selection, separate those out. And
now we should have two. If I hide these out the way now, you'll see we've got these
press Control A or transforms, right clicks at
origin to geometry, and then press tab
A, three again. And now all I want
to do is press E and get the thickness of my slabs. So something like
this, I think is fine. Next of all, then what
I want to do is I just want to bring
these out, like so. So I can see on this step, if I press three, when
I bring them out, we can see just how far
they actually go over. So something like this.
And the other thing that I did forget to talk about bring my guy over,
he's going to be stud here. Like, let's break over. So let's press three. Make
sure he's on the ground plan. Now, you can see
with these stairs, they are pretty steep, but it's going into
house, so they probably are going to be a little
bit steeper than none. But honestly, guys, if you
check your own stairs out, you will see, like, coming up to this part of your car here
is a little bit steep. Normally, steps are
around this height here. So normally somewhere
around here and a lower step might be
down nearer the ankle. So this is always the
sweet spot to put them in. So, honestly, you
can come in now, grab both of these and
shrink them down even more or grab this one,
bring it down a little bit. So Herson said, Let's
bring it down a tiny bit. Let's pull it into place, and
then let's bring this down. And don't forget, well,
when we bring this in, we can make sure that
it's fitting properly. Okay, so so far so good, we've got the stairs and we've
got these parts on here. Now we need to do you
know, because on this, you will see as well that we
have got some sides in here, so that is going to hide
any of these parts here. That's a good little trick to hide everything
out of the way. But what we want to do now
is we want to actually bring in some slabs. So if I come and a
press Control R. And I'm going to bring two and
pull them over slightly. Control R, two, three. Yeah, maybe three,
something like that. Left click, bring them
over very slightly, and then Control R three, bring them over slightly
and then Control R two, bring them over slightly,
and then Control R. Three bring them over
slightly, like so. And there you go now. Why have I done that Because you can see now that these will
be their own slabs. So Alt Shift click,
just grab all these. Like so, and then
right click Marksin. And then from there, what
you can do is you can come in and press L and then L and L and grab all
of the islands like, so press the Y button,
and then with this, we can press well, first of all, bring in a bevel. So I'll press Contole
all transform, set origin to geometry, bring in a bevel though
generate a bevel, put it on not point, not three, and now
the magic happens. So if we grab we've still
got all of these grabs, we just press Y, and
then we press A, and then we press
mesh, clean up, and we're going to fill holes, and then press tab, and
then the lolly filled. Just make sure you've
got it on at least four. It should be by default on at least four down on
this menu down here. And there you go. It's as simple as that then to
create those stairs. Alright, so the next thing I also like to do
when creating these, I also like to just come
in and grab one of them. So grab this one here, come in, put proportional editing on, and then what you
want to do is you want to come in and
put it on random. It's a really good
way, actually. If I bring this out, you
will see I can bring it out and just bring it up and then come to this
one and bring it down. And it's just going to make them a little bit more uneven. We also can do it here as well. So if I pulled
them out, like so, you can see now that these and I pull this one in like so, now you can see they're uneven and they're looking very nice. So really, really
easy to do that. Alright, so now we're not
gonna need this part anymore. What we are going to need
now is these parts in. So these parts going
up to this part here, and then this is
going to be on top. So let's actually work
on that part next. But of course, what
we're going to do first is say about our work, and I'll see you on the
next one, everyone. Thanks a lot. Bye bye.
98. Adding Stone Side Supports for Stairs: Welcome back, everyone
to blend of building master class from
concept to final render, and we left it at our stairs. So what I'm going to do now is I'm going to bring in a cube. So let's bring in a cube. Let's shrink that
cube down then, and let's pull it over
this side like so. And here you can see, if we come to this, you can
do it by eye if you want to. I mean, you can
see that you know, it's a little bit shrunk in on the what is it on ours on the X. So it's a little
bit in on the X. So if I pull it to, let's say, here, press S&X and just
bring it in a little bit. I still needs to be pretty chunky because it
does need to go, you know, next to the
other things that we're actually going to be creating. And this then we'll
just pop there. Then what we'll do is now we'll put it up to the grand plane. So just make sure that it's up to the ground plane, like so. And what I want to
do now is bring in the front and make sure
I'm happy with the front. So all I want to do is press
a shifty bring in the front. And then what I'm
going to do is I'm going to shrink it
down, first of all, because it looks a
little bit too chunky, and then I'm going
to press S and Y X and bring it
out a little bit. And this will be our front. I'm going to place it
just around there, so it actually is
in the front here, and you can see that it's just in front of it so
you can see just in front and then bring it down perhaps a little bit
lower than my stairs. Then what I'm going
to do is I'm going to now bring my guy over. And what I'm going to
do is bring this up, and then it'll be
able to tell me if I turn this off where
I actually need it. So as you're walking
upstairs, generally, when you come in, you can put your hand on here and
you'll lift it up slightly. You won't put your
hand down here and bend down. It
wouldn't be like that. So that's what we're
trying to keep it. So from here, then what
I can do is press E, enter, S, pull it out. And then what I can
do is I can press E, pull it up, and then
E again, like so, and now I'm going
to do is just press the S button and
bring it in like so, and I'm probably going to make it a little bit more shallow. Now the thing is, I can see here I think this is looking
a little bit too thick. So what I'm going
to do is instead of shrinking it
all the way down, all I want to do is
just grab this one, press con CoClck and then I can actually bring it in like so, and make it the right size. Now, I think, as well, is this a little bit
too big at the moment? I think so. So I'm just going
to bring it down, like so. And then we're going to
pull it back in to place. And we can see if I just move this one out of the way
how far that one is, it might need to come in a
little bit more, we shall see. And then finally, I'll just
bring this part up again. So Control plus once
you grab the top, and then we can actually
bring it up jaws to tad more, like so, and we can also
bring this one down. Again, jaws under there. Okay, so far so good. Now what we need to
do is we need to make this part that's
going to go up here. So we can imagine that
if I put my guy on here, we already know the
height of this. So if I put him
on here, look, we already know the height of this, so the height right to the top. So to the top or let me just show you this
part here without this part on should come to round about
that height there. But what I want to
do, first of all, is create this actual part
that's going to go up. So if I pull this
into place now, it doesn't mask so
much if it's in the center because it's going to be come in just over this. And this is another
reason why if I press SNC and bring it in and pull
it into the center here, you can see now it
needs to kind of go over my steps a little
bit more than that. So it needs to come in probably a little bit more like so. And then from there then, what I can do is I can grab this now. Like so, pull it all
the way to the back. And then what I want
to do is create a arch going up. Now,
where do we start it? I always say that start
it like under here. So just under this part here, and then grab the back of it. And we also want it
to be flat here. So basically, if I
come to this step, I want it to come just
in front of this. So if I press three, I
can press Control off, left click and bring it just
in front of this step here. And then what I can do now
is I can bring this up. So if I come in, I can
bring this up, three. I can bring it up to
something like that, again, where his actual ankle is or his shin bone, should we say. And there now, you just want to make sure that you're
happy with everything. Now, one of the problems
you're going to have is you can see on
here that this, so this from here to here is
a lot lower than this one. So I will come in and just
drop that down a little bit. And again, this is
just if you want to. Like, there is no set
rule on this, guys, so it's just if you
want to do that, then it might look a
little bit better. Alright, so I've
got this main part built out. I've
got it in my wall. You can see here, it's
looking very nice. It's in the wall. And then what I want to
do is put a top on there. So all I'm going to do is I know that the top in
fact, you know what? We won't do it that
way. What we'll do is we'll bring this up first. So if I come into
here, press three, and what I'll do is I'll press E and bring this up into the
place where I want it. So it's going to be right to the top of there,
and there you go. That's going to be the place,
then it's going to have a top on there, so. So let's now come in and
make this part here. So if I press Control lot, bring it down to
where I want it, press Control B to pull it out, and then we're just
going to press E and alternates pull it out. Now, if it's not
coming out, let's just reset the transforms
just once more. Set origin to geometry. And then what I'll do is I'll come in now, press the tab but. Have I That's the other thing. I did extrude, but
did I extrude it? Is there something
done under there? Always check that
if you're not sure. The way you check that is mesh, clean up, merge by distance, zero vert is removed, which means I don't have
a extrusion on there. So Alt Shift click,
E enter Alter pull it out a little bit
like so and there we go. All right, so that's
looking pretty nice. Now what I want to do is
I want to make this kind of arch up at the top of here. Now, just so you guys
can follow along, I think the best thing
is to make the arch from round about near
the top of his head. So if I press one, I
can press Control R, bring in another edge loop, and just make sure it's near
the top of his head like so. And from there,
then I can actually start pulling this out
and bending it in. So what we'll do is we'll
pull it out a little bit, and then we'll use
probably the bevel to bring it in a little bit. Let's give that a try and
see if that actually works. So what we're gonna do is
I'm just going to press E, pull it out slightly, and then I'll come in to this part here. Again, press Control
A or transforms set genes geometry,
press Control B, and then bring it out
like so Left click, and now we can
actually come in and change how we want
it to actually look. Like so you might want it
going is the original. On the original, you can see it goes out and then it goes in. But I'm actually
looking at this, thinking, Yeah, you know what? I think that actually
looks better for right click and
shade Auto smooth. Yeah, for me, that looks
actually a little bit better. I think it'll be a bit
better with a spot. And I know why I
actually bent it off. I bent it so it wasn't
coming out so far, but you know what? I think this actually
looks better. So the one thing is,
though, if I grab this now, I actually want to join these up because we brought
the bevel down. So basically, there's
two edges here. So if I come to mesh, come to clean up and go to
merge by distance, you'll see two verts removed. That was those two there, making this a much,
much cleaner mesh now. Alright, so we've done this bit. Now what we want to think
about is these stair tops. So what we're going to do
is we're going to come in. I'm going to grab
this part here, I'm going to press Shift
D and just bring it up, like so, so bring it up. And then what I'm going
to do is I'm going to press Control left click. And drop some of these in. Now, again, these slabs, do I want them all the same? I don't think so. So you
know I'm going to do, Controlla bring it down to here. Control A, bring this
one down to here, controla bring it down to here, and then control LA and just
bring this one up a little bit and now you
can see they're a little bit different
from each other. And from here, then
what we can do is we can come in, split it off. So LP selection, grab this one, then Control A or transform, set origin to geometry. And then we're just going
to pull it out slightly. So S and X, let's pull it out very slightly where we actually want it to be. And you can see that it slightly overlaps on this top part. That's absolutely fine,
nothing wrong with that. And now I want to do is we basically want
to split them up, so I'm just going to grab
them, pull them into place, and then all I'm going
to do is just come down each one of these, press Y, split them up. And then what I can
do is I can press A and then E and pull them out. Now, I think it's
better if we press Z, so we can press Z, and we pull them up like this. So they're going in line
with this part here. The other thing is
this on the bottom definitely definitely
needs to cover these up. We don't want them
hanging out like that, and we probably even
don't want it coming in. So it's up to you. If you
come to the face here, you can put it on normal, and then all local. Let's try local. None of these are
working. That's a shame. So I think it's
probably because we reset all of the transforms, so we haven't got it anymore. It should go to the normal, but you can see we do
have a problem there. It's not actually doing that. So what I'm going to do
instead is that I will just press one, sorry, three. I will pull it back,
so I'm going to pull it back and then lift it up into place like where
it needs to be, like so. Alright, let's put
it back on Global. And then what I want to
do now is pull this out. So I'm going to
come to this part. We can see we've got a beautiful
edge going down there. We just need to pull
this out a little bit. So I'm just going to press S and X, pull it out a little bit. Like so making sure
it's covering it up. And if I need to, you know, the last thing I want
to do is bring it in if it's not quite fit
in there, as you can see, it's a little bit
out, which means that I'll come to this
and I'll pull it over jaws to slight
bit just making sure that it's in each
side and now it is. Finally, then what I
can do is I've split all these up, so now
I can fill them in. So A, mesh, clean up, build holes, and now they
should be filled in. And now we can join.
We can copy this. So if I press Control L, copy modifiers, grab this one, right, click, Shade Auto smooth. And I'm just wondering, did
we actually split those up? Let's just grab this. We did split them up. Is
the holes in there? Yes, there is. Oh, that's
why for some reason. We just copied the smoothness. Let's copy this one. Concho,
copy modifiers. There we go. Now we've got what
we want. Right click and shade Auto Smooth,
and there we go. Now, before we finish,
let's try one more thing. Can we actually pull
it out on this normal? Yes, we can, so that's great. So let's pull this out.
Let's pull this one back in. Yours very slightly, very,
very slightly, guys. So when you're
pulling it back in, just grab the blue,
and then hold shift, and then you should
be able to pull it back in very slightly, like so. And there we go. We've made them a
little bit uneven. And finally, then, let's
just grab this side, and we'll go to randomize. And then we'll
just pull them in, but bring it a little bit in. Like so, and then bring
this one a little bit in because we just want to
randomize them a little bit, like so, and they're all going to be part of the
same mesh, these. We're not going to have one, one side, and then the other. We should be able to join these up to create the full stairs, which makes it very easy to use. Now you can see they're
randomized like so. Alright, so on the
next lesson, then, what we'll do is we'll get
all these joined together, get them moved over
to the other side. And finally, we'll
turn this around. We'll actually put
a top on, as well. We might do a little
bit more work on here if we need to, like, put it in, you know, on here, an extra thing going
in or something. I'm actually, on this bit,
I think we'll do that. Get them over here, and then
it'll look pretty nice. Alright, everyone, so I
hope you enjoyed that. I'll see you on the next
one. Thanks a lot. Bye bye.
99. Creating a Stone Arch Above the Backdoor: Welcome microphone to blend
the Building Mass plat from concept to final render, and this is where
we left it off. Alright, so what I want to do now is just alter
this a little bit. So what I'm gonna
do, first of all, obvious self press Control A, or transoms not sure if I did that or not, origin geometry. And then all I'm going to do
then is just bring this in. So I'm going to
press the i button. I'm going to bring
it in a little bit and make it a
little bit more than what I did on the older version, something like this. I'm just going to make
sure yeah, cavity's on. I just haven't got
my my bevels on yet. So what are we going
to do grab this, grab this one, corto, and we're gonna copy, whereas it copy modifies, like so, and right click, Shade Auto Smooth.
And there we go. That's what we
should be left with. And then what I'll do is,
I'll put another bar around the top of here
'cause I feel like it's a little bit
boring without it. You could either do
that, or you could grab the whole thing
and bring it in, like so, and then pull it in, so you can pull it in, like
so. Jaws to little tad. That might work better. But I think for me, I'm not
going to do that. I'm going to put a bow.
Around the top up here. Now, to do that, of course,
I can't do that right now because we've got edges
going all the way down here. So, a bit of a
messed up topology. So we want to bring in our Bthectol and
just cut this away. So if I press one, I'm
going to go to mesh, I'm going to go down to bisect. I'm going to put it
round about here. Again, you can move
this up or down. First of all, though,
just make sure you are resetting your X because then will straighten
everything up. And from there, then you
can pull it up or down. Now remember, we're going
to have a bar on here, which means I can pull it up
a little Control B, then, and I should be able to
if I drop these back, pull them out, like so, and you should end up with
something like this. Then what you want to
do is just press E to lns without proportional
editing on, so turn it off, alterns and then just bring it out
a little bit like so. I think that just adds a
little bit more to it. Now we've got that,
then what we want to do is put it over
the other side. I'm going to grab my steps. I'm going to again press
all transform set origin to geometry just to make
sure it's in the middle. And then what I'm
going to do is now I want to keep these separated. So I'm going to grab
this pot first, and then what I'm going to do I just want to keep them
separated for now. By the way, I don't
want to keep them separated, you
know, for all time. And what I want to do is I
want to mirror from here. So again, I'm going to come back to my stairs, shift stairs, cursed selected,
back to this part, right click Set origin, two, three D cursor,
back to this part, right, click, set origins, three Dcursor and finally
back to this part, origin, three D cursor. I want to keep them separated because I might
need to alter them. That's why I'm doing it. So
if I come to this one first, add in a mirror. So let's put it over that
side, and there we go. Then come to this
one, add in a mirror. Put it over the other
side. And finally, this one, add in a mirror. So let's go and add
in a Mirror, like so. Alright, so we've got
these now all in here, and what I want to do
now is just come in and press Contole on each of these because we
mirrored them over. So Control A, mirror them over and then Control A,
and mirror them over. And now I'm going to
do is just change these around a little bit. So all I'm going to do is just grab the whole thing,
grab both of these. I'm going to press
the question mark. Just isolate everything out, and then we've just
got these left. Now, I'm going to
come into this part. I'm going to press L, L, L and L. Make sure
that you're on Global, and then you're just
going to press three. So control three to go into the other side, and you're
going to flip it round. So X, blip it over, like so, making sure that it lines up, and then all you're going to
do is put this on normal, and you should be
able to pull it up. If it's not working on
normal, try the local, and if that isn't working,
just basically pull it up. Pull it into place, like so, just make sure it's stuck in. The wall like so,
and there you go. Now, the reason I've
done that, of course, is to make those a little bit
different from each other. Now I can press the question, Mark, bring everything back. And we're pretty much
done with these steps. The only thing is now we
need that top on there. So let's actually
create the top, and then we can use that
for our other steps. Well, let's get some decent
dimensions for our top. So what I'm going to
do is press Shift, and I'll bring in a cube. And then what I'll do
with this cube is I'll come over to the
right hand side here. I'm going to put it on 2.72. And let's put this on 1.07, and then the z on
0.33 94, like so. And there we go, now let's see if we can actually
put that on top. So again, I'll press one. I'm going to put
it right on top. And because when I
brought this cube in, it came exactly where I'd
positioned my cursor, so you can see it's
coming very nicely. I'm going to pull that
back. Don't forget it's going to be
going into the wall. Now, the one thing
is that you just want to make sure
it is overhanging, so it might need to
come back a little bit, because if you look on here, you can see they're slightly, slightly over like so. First of all, though,
let's actually create what we're
actually doing here. So we need this, and then
we need a top on there. So I'm just going
to, first of all, pull that to the side, so
shift D, pull it to the side. And then what I'm going to
do is come to this one, and we use this as a reference for the height that
I actually want it. So I'm going to pull it
down, like so and then what I'm going to do is press
I think I'll bevel this in, actually, first, so I'll
come to these parts. I'll press Control A or
transform set origins geometry, and then press Control B, and I'm just going to
bring it in like so. Not quite I want it but. I'm going to give it a
few edge loops, like so. I'm going to come
down then to custom, and then it's up to you
how you want to shape it. So I'm going to
pull this part out. I think I'll pull
this part in and just have it going
down and more rounded, so while making sure that I'm not overlapping this part here,
we don't want to do that. Alright, so that's looking good. Now, the one thing is I
think what I'll do is, I'll probably shrink
it on the sides. So I know this is the
dimensions that it should, but what it's not accounting for is just this bar
that's coming round. So I'll shrink it in
the sides a little bit. So I'm going to press S. Well, let's go back to it, S and X. Pull it in very
slightly, like so, and then we'll press Control
R. Left click, right click. Carm troll B, pull this out, drop down the amount of
bevels we've got on there, and then eat, alternS and
pull it out a little bit, hold in the shift
if you need to, and you should end up
with something like this. Right, click, shade smooth. Okay, now let's work
on the top, then. So the top now is pretty easy. We can just
grab this part. We can the one thing
is with the top, we want to bring it in, and
I'll show you how to do that. So first of all,
we'll bring it in. So press I and bring
it in with Insert. Now, we do want to make sure
that it's back to the wall, all the way back to the wall
so that when it sticks in, we've not got a gap down there, we don't
actually want that. So what we're going
to do is press K. Press the Abn just to
make sure it's lined up, press click on the line, press the enterb and then do the same thing
on the other side, so click it and then
A and then Enter. And if it doesn't go, what that means it's trying to
connect to this part here. You see how it's connected here. If it doesn't go, it's just trying to
connect this back part. So just make sure
you do it again, and then you're going to
press A, line it up like so, press the ends bone,
and there we go. Now what I want to do is we want to grab this one as well. So shifts like this, and now
I can actually pull it up. So I'm going to pull it up to the height that
this part is here. So if I press E now, you can see I can pull
it up into that height. Alright, so that is basically what I want now. I just
want to top on here. So all I'm going to do now
is grab both of these. I'm going to press the
insert to bring them in. And you can see now we've got a lot of crossovers
that are happening. Now, I'm just wondering
if it might be easier to create a
boolean in here. Let's first of all, try E. Enter S and bring
it in that way. That might actually be a
better way of doing it, because you can see it doesn't
break the edges as much, and that's always a good thing. And I'm wondering if I should bring it from this part here. So you can see, we've
got edges in here. They're not crossing
over. That's fine. We just though want to
only bring it in mainly, so the top of this, we want to bring this
in a little bit. So you know what? I won't
make this hard for myself. I'll just press S
and Y, pull it in. Like so, and then all I'll do is drop it back a little bit. And then all I'm going to
do is press E and bring it down just to have a
top on there, like so. Now, it's up to you whether
you go inwards or outwards. You know, the problem
with inwards is you're going to get a load of dirt and stuff accumulating in there. So is that the best move? Instead, let's
probably try going the other way and just give
you an edge like that. And I think actually
more realistic. On my original, you can see
I put it on the inwards one. And yeah, if thinking about it, it's probably not that
realistic doing it that way. Alright, so we've got that now. Now what we want to do
is create our next step. So I want to create
our next steps once I've actually
joined this altogether. So let's you know,
join it together. Should we do that first
because we've got a lot of parts that we might
be able to use? I'm just wondering this
part here, for instance, and this top, we're going to be reusing it. So you know what? At the moment, we won't
join it altogether. What we're going to
do now is we'll get the dimensions for other steps. So we'll get those dimensions, and then we can start
creating those. So let's first of
all, bring in a cube. So we'll bring in
a cube, and we'll move it over to
somewhere like here. And now we'll come in and
get the dimensions of these. So on the X, we'll go for 2.07. We'll go for 4.18 on the white, so it's much, much longer, as you can see, and
then on the height, we'll go for 1.72 light. So you can see now if I drop this just above the ground
playing like our other stairs, you can see now it's not only
taller than our original, but it's also much, much longer. I mean, if I go
over the top now, you can see it's
much, much longer. And the reason for this is
because this step is going. On where is it this part here? So you can see it's a long, long walkway to this part here. Now, you can see that these are a little bit
shorter on this one. So I've just got to make
sure that I actually, you know, make these parts. That's why I've kept
them to be probably a little bit shorter
than these ones here. But it doesn't matter because
at the end of the day, we can actually
join them together, maybe even separate this out, you know, for a
ledge or something. And then we'll have actually three different parts out of these two. So
that'll be great. You might also
want to, you know, split it even further
if you want to. So now I'm going to do is
just pull that over there, and I'm going to save
out my work like so, and I'll see her on the
next one, everyone. Thanks a lot. Bye bye.
100. Designing Staircase Variations Using Curves: Welcome back, everyone to blend the building master class
from concept to final render, and this is where
we left it off. Now, if we come over here, we can see if we count the
lines. So not the bottom one. We've got one. So
one line here, two, three, four, five, six, seven. So edge loops, seven edge
loops is what we need. And then you can see if
you count the other lines, so you're going to be
counting in, you'll see they're pretty
much exactly the same. So let's try that one, two, where is it, three, four, five, six, seven, so 71 way,
seven, the other way. So let's put that over there.
And then what we'll do now is come into this and we're
going to press Control R. Left click, right click, and let's put it on
to seven like so. Now, I did forget to
say before doing that, make sure though you have
reset all of your transforms. Now let's go seven
the other way now. So seven, left
click, right, click, put it on seven, like
so, and there we go. Now we want to do is we
want to delete the ones away that we don't want exactly the same
as we did before. So if I come in,
and go up, like so. You should end up with it
nice and evenly spaced, and now you can come round to the other side and
do exactly the same. So we're going to go up, it should end up right
around there. And then we should be
able to press Delete and faces and know exactly what we're going to be pulling away. Now you might be
able to press on this now and actually with Face L be able to delete and faces, delete
those out of the way. And then finally, what we're going to do is
we're just going to press Alt Ship click
If it doesn't work, just Control click and just keep Control
clicking all the way up. Just make sure you hit
in that top part of it, like so and then you're going
to do Shift click and then Control click going up. Like so. Now you're going to
do a right click and we're going to
bridge edge loops. Now, I've missed one
there, so I'm just going to come in and
instead of doing that, I'm just going to press
F just to fill that in. Then Control R O
transforms, right click, set origin, set
origin to geometry. Now I want to do is I
want to pull them out. So I want to pull them
out a little bit to make them a little bit
more random what they are. So I'm going to do
then to do that is I'm going to
press control law, I'm going to bring in, I
always want one in the middle. So just remember that if
you want one in the middle, we just need to make
sure there is one in the middle with three or five. So left click, right click. And finally, I want to pull all of these parts
out a little bit. Now, I'm just thinking that
it's probably going to be better if we
grab all of these, because if we use
proportional editing, it's going to pull
even these backs away, and we don't
particularly want that. So instead of doing that, let me just try Alt Shift click. Is that going to take
us all the way around? Yes, it is. So I don't
really want that. What I want to do then is
I'm going to You know what, we'll grab these sides first. So I can grab all of
these going round. So a little bit tedious to know, but let's just grab all
of these front parts. Like so. And then we'll do
the same thing on this one, and we'll pull these
out very slightly. And it's up to you if you
really want to do this. I think, personally, it
adds a lot to these stairs. It makes them look
a little bit more ornate than what they
originally were. But let's pull
these out like so. Now, I'm just thinking,
Yeah, we'll do it like that. We'll actually pull
it out, like so. And then we want to jaws pull
it out a little bit further than what we intend because we need to pull this
middle bit out as well. So now I'm just going to go in and grab all of
these middle parts. Like so, and even the bottom
one. Don't forget that one. And then we're going to go
seven to go over the top, pull them out to give
us a nice slope. So it's a nice slope
there, as you can see. Right click, Shade Auto smooth. And there we go. We've got
the first part of our steps. Now what I want to
do is I want to make sure that these are
the right height. So again, shifty, bring it over. And then all I'm going to
do is just put it there. I'm going to press I'm going
to isolate them both out, so I'll press a
little question mark. I'll go to the side
and grab this one. So just make sure you've
grabbed this one, so it'll be the other
side, so three. And now I can do
is I can press S and Z. I'm just making
sure, here it is. It's okay. It's just
where the roundo bit is. So S and Z, hold them
down a little bit, and then pull this
down how far you want. So if I pull this
up, you can see, I'm going to pull it
down, pull it down, so it's level now with
that, and I can see the thickness now
of my actual steps. And now I'm going to
do is actually create the steps like we did with
the other steps that we did. So I'm just going to come in, shift select in all of these, like so, like so, like so. And on these, we'll
have them more even because these
are more on it, so the chance of these
being, you know, pretty even even as in
where the slabs are. So, you know, four on
each is probably higher. What I'll do then is
press Shift D, P, selection, split them off, and then I can delete
this out of the way. In fact, you know what? Won't
delete out the way yet. What we'll do, first
of all, is we'll come in and we'll split
these off now. So I'm just going to come
in to each of these, like so, and then I'll
come into each of these. Like so. And then
what I'll do is, I'll press the Y bone just
to split them all off. And then A, three
to go in side view, and I just want to pull them up now to where
they're going to go. So if I press E,
I'm going to pull them up and check how
thick the slabs are. So something like this,
is looking about right. I might need to just raise these up just so
they go under there. They come in and just
pull them up there. And then what I'll
do you know what? I'm not going to pull
them up like that. What I want to do
is I want to press eight and pull them up together, so holding shift bun
down, pull them up. And then Altag bring
back the other part. So tab, Altag, bring
back this part. And then three again.
And I just want to make sure now that they
are underneath here. So they're attached to these. So I'm just going to press
Eons head, bring them up, and don't forget you can bring them up a little bit
more from the bomb, so I'm not quite in.
And there you go. Alright, so now we've
got those on there. Now, the other thing
is, you can see, these all need pulling out, and I actually forgot that. I forgot to pull them out. So what we'll do now is we can come in and pull
all of these out. Now the problem we've
got is we have to go down each one
because I messed up. So sorry about that, guys. I actually messed up
a little bit there. So I want to pull
them out evenly before coming in and
randomizing them all. So yeah, I've made it a
little bit harder for myself. Like, so there is a
quicker way of doing this. We could just go over the
top, put it on I frame. And go in there and
just pull them out. Well, see first,
then pull them out. So if I go over the top now, I'm just going to
see if they all pull out and making sure they're
all right. Yes, they are. So now I can pull them out
where I actually want them. So how far out do I want them? Probably something like
this. You don't really want a bigger lip than that
anyway. And there we go. Now finally, what I
want to do is I want to randomize these
as we've done. So I'm just going to
grab a few of these, and then I'll go to
proportional editing, and then I'm going to
just pull these up now. So if I pull these up,
bring it out a little bit, like so jaws pull them up very, very gradually, like so, and you will get a little
bit of randomness on those. You can see I've
not got any bomb, so I'll do the bomb now. I'll pull it up by
bringing it in. Like so. And then finally now, do I need to pull them
out a little bit? You can see they're
not quite out. So what I'll do is I'll just
come to this one, this one. This one. I'm just
grabbing it at random, as you can see, this one, this one, this one over here, this one over here, and
maybe this one here. And now I should be
able to jaws pull them out, pulling all this out. Holding the shift but and just pull them out very gradually, making a little bit of
difference on the steps like so now you can see
that's looking pretty nice. Now, if you feel like you've gone a bit too far, you know, just go back in, press the z, and then you should
be able to level them up a little bit
more if you want to. But I think with mine,
they're absolutely fine. Now, we've got this part here. We don't need it here anymore. What we need to do is, if I bring it over, you can see everything's
correct on there. I delete that out way. Finally, then, let's
come in to these parts. And then what we'll
do is add in a bevel. So control A transforms
set origin to geometry, add in a modifier,
generate a bevel, and put it on point
not three, like so, and little question mark
to bring back everything, and this is what we
should be left with. Now, we already know
that this part here, so this part here, probably better off not all
joined together. So the moment, you
can see, we've got it all joined
together like that. We just need this part here. So all I'm going to do is I'm just going to
grab this part. I'm going to press Shift
D, and I'm going to bring it over without proportional
editing on, of course. I'm going to bring
it over, and then I'm just going to
press P selection. And before I reset all the transforms, I'm
just going to come in. I'm going to grab this side and the underneath, delete
them out of the way. So delete faces, and now
we'll just fill in that face. Again, you can just
grab it, mesh, come in, clean up,
and fill holes. Then we'll fill
in the hole here. And there we go. This is
what we've got so far. So now what we need to do
is we need to make sure, first of all, all
of this lines up. So control A, I transform, set origin to geometry, and let's pull this into place. So we're going to pull
it into place like so. And then what we need to do
is like we've done here, you can see they're slightly wider than this. That's
absolutely fine. It needs to make sure they're not wider than the
bottom bit on here. So slightly wider
at the top is okay. On the bottom, normally, there would be level
with the wall, so you won't be able
to see them here. That is exactly what we
want to do on these. What we'll do then on this one is we'll create
the bottoms first. So Joe going to move it over. I'm going to press
one, pull him down. And then what I'm
going to do is, I'm just going to steal
one of these as well. So I'm going to press L,
shift D, bring it over. And this is about
the same height as what we want for
these bomb bits, so I'm going to
press P selection, and then Control A or transform
set origin to geometry. And I've done that basically so that I don't need to go in and measure everything up again. There might be a little
tiny bit lower or a little tiny bit higher,
but roughly around there. So shift desk to selected
shift, let's bring in a cube. Let's make the cube
lots lot smaller. And these, I think I want to
be a little bit more square. So I'm going to put them maybe, maybe even a little
bit thicker than this. So maybe going out to
there for the bombs. And then what I can
do is I can bring them, put them in place, so seven to go over the top, bring them right to the
front where I want them. And on these, you can see there's quite a shallow
gap between here and here. But because these are a
little bit more ornate, I think, you know, putting them in like
this where they're at, you know, a little bit more
set back on the stairs, I think it's a better idea. Alright, so we're going
to save that'll work, and I'll see you on the
next one, everyone. Thanks a lot. Bye bye.
101. Finalizing Staircase Details and Side Decor: Welcome back everyone to blend the building
master class from concept to final render, and this is where
we left it off. If I press one now, what
I should be able to do is just bring this
up a little bit. So I'm probably going
to bring it up, so I'm going to grab the
top, press one again. I'm going to bring it up Jaws about halfway past
this one here, like so, because I will
need a top on there. So halfway on the third one
or something like this. And then what I'm
going to do is press the ebonne jaws to bring it in. Like so, and then
what I'm going to do is bring it up
nearly to the top. I want it the same
height as this. So if I press E, I should
be able to then bring it up because I want the
top of this to be much, much thinner because it matches the stone better than this one where it's
got brick on here. So what I'm going to
do then is come out. I'm going to make
this then about, if not a little bit more
than the bottom of here. So if I press E, enter, S, pull it out, like so, and then what we'll do is
we'll press E. Like so, and press in one again, and then I can match
it up with this. So if I then press E, bring it up, and then S, bring it in, like so, and then you can see it's a lot much much, much
thicker stone. I think I need to go a
little bit more in, like so. Now, how far in do I want this? Probably a little bit more.
So something like this. I'll line it up with that,
so don't worry, guys. And now what we're on to do
is I want to put a base. Now, my base on this one is
probably going to go from the bottom of this step and then all the way down
to somewhere like here, needs to make sure that
it's covering up the steps, but don't forget
we're going to have some slabs on there as well. For now, though, I can
actually get rid of this. And then what I can also do
is come to the front of here, grab the front,
press the e bone, and bring it in, and then the E and pull
it back a little bit, so just making it a little
bit ornate than what it was. It's up to you whether you want them in the sides, as well. I think it just looks
better like this, so it's just a personal view. Now I want to do is, I want
to bring in another block. So shift D, let's
bring in a cube. Let's make the cube smaller. So S and X on the X,
and let's pull it in. And then I'm just
going to get to fit into this point here. So I'm going to
come in. I'm going to get it to fit in. Do this. So S and X. There we go,
something like this. And I do want to make this tie up with the bottom of there. Now, what I also want to do with this is making
sure that it's in, but I'm going to make it
a little bit thinner. So S and X, bring it
in a little bit more. And then what I'm
going to do is grab the top. Bring it down. And what I want to do with
this is I actually want to put another part on the top of this and then bring
them all down to here. So first of all, let's just pull them in so I'm making
sure they're putting in. And how I'm going to do that.
If I go over the top now, put it onto wireframe,
so on wireframe. I should be able to see now
how far that is in there. The other thing is, you can
see that when I moved it, I actually didn't
move the whole thing, so I'm going to press L on this, just to make sure
I've grabbed it, and then pull it
over just to make sure that it's in that stone
right down at the bottom. Now it wants to be just in there because we're going
to do a bit on the top. What do I mean by that is we're going to come
off wire frame. We're going to press
the E button. Like so. And then what we're going
to do is bring it up, like so, just to make
another chunky bit. From there, then what
I'm going to do is I want to make sure that I've got, first of all, the
right width on here. So what I'll do is I'll
just lt ship click, bring this down a little bit, like so, and then just
grab each of these. So what I'm going to do
each side of here, E, enter, S and X, pull them out. Like so, and then just make sure that you've got a little
bit of a gap there, maybe even even more so X and X, pull them out a little
bit more like so. Now, let's first of all, get where the top of this. So the top of this is going
to come just just below here. So roundabout here. And the reason is
then because we actually want some slabs on top, we're actually going
to have, you know, a kind of metal gate
going up there. So what I'll do is I'll grab
all of the top on here. So what I want to do is just
wondering the easiest way, I'll grab this one, this one, this one, this one, and
this one, and then the top. And I should then not have
to bother grabbing the back because we should have grabbed enough where it's
actually going to work, and I should then be able
to be able to pull this down to halfway on there. And finally, then what I want to do is I want to grab all of just the front because this
part here I want to pull out. So I want to pull out to here. I I pull it out
to here, like so. And then I want to
drop this part down. So this part here, I
want to drop down, making sure that it's pretty low down,
then so going down, going down all the way
so that it covers Yeah, so you can see now we've got
the same going all here, and then the top of
this, so the top of it here should be
covered up with the slab. So maybe, maybe I
want to lift this up jaws to tad more just
to cover those parts. I have a grab just the top here, should then be able
to jaws pull it up, like so so it's
covering all of those. And now you can see that's pretty even going all
the way up there. Now you can also see that mine
isn't quite in the middle. So I'm just looking now if
I want to pull it this way, jaws a little bit,
holding the shift bun, like so, and I'll line these
up a bit more as I go on. But for now, I'm fairly
happy with how that looks. Now, again, with the slabs, they're going to be pretty even. So they're not going
to be different on each side like these
ones over here. You know, these
ones over here was the side entrance
of the building, you know, not as much work
on the grand entrance where, you know, the officials go in. I'm thinking about that
actually when I'm, you know, modeling these things,
and I think it's really important to think
through those things. You know, grab a
book or some images and look at these buildings
and how they were built. Okay, so now we've done that, we need to create these
slabs going over. So what I'm going to do is I'm just going to grab
all three of these. I'm going to press Shift D, and then I'm going
to press P. So P selection, separate those off. Hide this part of the way, and then I should just
be left with this. Now what I do is I want to bring in some edge loops. So control. Let's bring in some edge loops. So left click, right click. Now, when I'm bringing
the edge loops in here, I'm actually thinking of where the actual gate pots
are going to be. So you can see they're
evenly spaced out. If I put a gate pot in the
middle of each one of these, it's going to look pretty good. So if I've got one
here, you can see it kind of matches up
at the top of here, and that is what I'm going for. Now, at this point, you can
go right click and moccasin. And then what you can also
do is then split them off. So if I come to L, L, L and L, I can press Y,
split those off them. And then finally,
I can press tab, oltch, bring back
the other part. Now, I do want to
grab this part here, so you can see I've
grabbed this part here, and I want to make it, you know, a little bit wider
than this part. And here, of course, so
I'm going to press S and X, pull it out a little bit. Like, so making sure that
it's still in this here. We don't want it
going past there, so just take that into account. We just want it to
have a little bit of a lip on, as you can see. We also want to make sure
it's not going past this one. Finally, I can press tab, I can press E and Z, making sure it's
going up straight, and then pull it up
to how big you want these stone parts to actually
be, something like this. And then I can grab this one, press Control L, and I can
copy modifiers, like so now, I do think, like on this part, probably chance of
them being, you know, a little bit uneven is probably,
you know, a lot lower. So what I'll do is
I'll just bring them randomize them
very, very gradually. Now, there is another way
you can randomize things. You can actually, if I come to just this one and
grab it and press A, I can actually come up to mesh, come down to transform
or come up to transform, come down to them where
it says Randomize. And what I want to do
is turn this down. So turn it all the way down
the note point note one, and even maybe you want
to go further than that. So you can see at the moment,
we've Great like this, and now they're
slightly slightly out, but hardly noticeable,
as you can see. Let's write Click and
shade Auto Smooth. And the other thing
is before doing that, you know, I'll actually go back and I'll show you
something else. So before doing
that, you can see at the moment that
we've got edge loops on here, which we
really don't need. So these ones here are
what we don't need. So what I'll do is
I'll press Delete, and I'm going to delete
limited disolve. Let's go with Limited Dissolve. And now, if we come
to mesh, transform, go down to randomize, turn it down to note point note. One. Now press tab,
and there you go. Now you can see the
slightly uneven. Now, the thing is, why am I bothering doing
all those things, the eye picks up on so much. So even with the edgeware
that we got on here, even with these
steps being a little bit uneven, the
eye picks that up. It makes it less uniform. Cause even though this
building is very uniform, I see a lot of
people's renders where everything is so uniform that, you know, it just looks
generic type thing. And we don't actually want that. So even on a building like this, where everything is built, you know, very, very
well, you know, it's not like some Western
themed saloon or something. It is actually an 18th
century building, and they're normally built
to a very high level. They have stonemasons
working in there, you know, even sacred
geometry in some of them. They have all these
goggles and things. Amazing, amazing level of craftsmanship that went
into these things. So we don't want things to be bent all over the place
or anything like that. We want it just to
be very subtle, but just subtle enough where you can actually
pick up on it with the eye without
actually thinking about it. That's the
key right there. All right, so what we're
going to do now is file, save out our work,
and on the next one, then what we'll do is we'll
actually start creating these railings that are going to go up into
this part here. Alright, everyone, so
hopefully enjoyed that. I'll save out my work
and I'll say it. I'll see you on the next
one. Thanks a lot. Bye bye.
102. Modular Fence Piece Creation in Blender: Welcome back, everyone to blend the building master plat from
concept to final render. Now what we want to
do is we want to actually create the railings. So if we just take a
quick glance at here, we can see that these
railings look like this. So we just need to
create the railings, and then pretty much
with this part, at least, we're actually done. Now the thing is
with these railings, they're also going to be used, as you can see in
this part here. So we may as well create the railings to
actually use on here. And then what we can do
is we create these bars, and then we can use those
railings for the back, which is this part here. So for the bag going
down here as well. So let's actually do that now. So just going to go
back to my stairs, so I've actually got
them out, and then we're going to put them over
the right hand side. So how do we create
these railings? So first of all,
we're going to create them basically for
the actual fence. So the fence that's going around the
outside, not for this. And then for this, we
can just take those and use them and adapt them. That's the
best way to do it. What I'm going to do
is, first of all, I'm going to come into
where my little guy is. I'm going to press one
to go into front view. I'm going to press shifts, cursed or selected,
bring in a cube. So let's bring in a cube. We're going to make this
much, much smaller. I think with these
railings, it's better if we actually keep it square. So I'm going to bring
it down right to there, and then I'm going to
bring it down even more, so a little bit more like so. And I think the top of my railings just wants to
go under is crotch there, which is round about
aligned with with this. And then what I'm
going to do now is come to the bottom side of this. So I want to go to the
bottom, grab it in face leg. So just grab this,
press one again. And then what we can
do is we can bring that down nearly to his feet. Now, this might be got proportional editing
on turn that off. This might be a
little bit too thick. So if it is, I'm
just going to press. Let's just zoom
in so you can see shift click just to make sure I'm grab him
around the outside, and then I'm going
to press alternates, and that's not going to
hold to their height. It's just going to alter
the actual thickness. And there we go,
that might be still a little bit too big. And I think something
like that is about right because remember,
these are made of steel, so they're not going
to be, you know, really, really thick
or anything like that. That wouldn't make any sense. Now they're gonna basically
be sat on top more. They're not guarding anything. They're not keeping people out. They're too low for that anyway. People just climb over them. They clearly for
decorative purposes. Now I'm going to do
is gonna press E, enter, S, pull this out, and I'm gonna press E,
pull this up. Like so. And then from
there, I'm going to press I and bring it in. Slightly more probably
than this part in there. So I'm going to press S if I want to go in a
little bit more. And then what I'm going
to do is bring it up. So E, bring it up, like so, and then
finally bring it in. So S, bring it in. Now, it is up to you if you want to make them a little
bit more decorative. So if you want to make them a
little bit more decorative, rather than bringing it,
you could do it like this. So we could basically
come in now, control or bring in
three edge loops maybe, lt shifting click,
proportional editing on. And what we're going to do is
we'll use the sharp maybe. So let's try the
sharp, bring it in. So bring it in.
Scroll in, scrolling. Yeah, maybe that one's
a little bit too sharp, as you can see, so we'll
try one of the others. Let's try the root that's
normally a little bit less. And you can bring it in like so, and you can see, right
click, shade or too smooth. That is looking a
little bit better. Now, the one thing is
when I brought that in, so before bringing it in, I don't want to alter
this part here, and the easiest way to do that is just to come up and you'll see that if I press Control plus going all the way up here, so Control plus up to here,
hide these out the way. I should then be
able to come in. I'll just show you Alt
ship click, bring it in. So we'll bring it
in even there and then press tab and you'll see now it's not altered
any of this, so hiding it out of
the way is really an easy way to bring it in
without altering anything. What I'm now going to
do is just bring it in. Where I want it, like so, right click, Shade Auto smooth. And there you go. You can see
that's looking pretty nice. Got a nice bend on there. And yeah, okay, it's costing
us a few more polygons, and that's up to you whether
you think, you know, is it worth it those
extra polygons just to create that
nice top on there? The other thing is,
is it high enough, or do you want yours
a little bit higher? Remember, these ants
keep people out. So having a big spike on there is probably
not the way to go. Alright, so now want is we
want the bottom on this. What I'm going to do
is press tab, Alt H, bring it back, and
then I'm going to press E and bring this down. So I need a little kind of part where it's going
to go down like so. So E, bring it down, and then alt, shift, and click, going
this way around Alt, shift, click, grabbing
it going around there. I should be able
to then press E to alter ness without
portional ensing on. Probably not ltess.
Is it going to work? Yes, it is. So
we'll bring it out, so it's got something
then to sit on. Now, just remember that
you want this flat, and I'm fairly sure
that this is flat. Yes, it is. So that's
nice and flat. Now the next thing we
want to do is we want a couple of bars that
we can actually use. So we've got this main part now, but I want a bar that's
going to go underneath. So underneath from here, and I also want a
center bar, as well. So let's bring those in.
So what I'm going to do is shift A, we'll
bring in a cube. I'm going to make my cube much, much smaller, like so I'm
going to pull it out. It's clearly not in place, but we'll throw that
out in just a minute. And what I'll do is I'll
grab the center off here. So Control A, you'll transform
set origin to geometry, and then shifts,
cursor selected, grab this cube, shifts
and selection to cursor. And now we know this is
right in the middle. So what I'm going
to do now is I want it Nice and thin, first of all, and then S and Y,
sorry, S and X, pull it out a
little bit like so, and I'm going to
come in, and it's going to sit on top of that. So now if I come in
and pull this out, and then I'll pull it this way, this is how it's going
to sit on, like so. And then this part here, we're actually going to add on, first of all, a
generate an array. We're going to turn
it off on the X, and I'm going to move
it on the Y, like so. And then when we bring
this in or save it out, we've already got this array on. We can also move these
along if you remember, I did show you if you
come into the face set, you can actually come
on and make sure correct face attributes is on. So once you've actually
brought in your materials, put on the shader and
things like that, you should be able
to just pull this out and it just lines, you know, it just automatically vis it more and more and more as long as that's a
seamless texture. Alright, so next of all,
I want to grab this now, and I want to pull it up to where it's going
to go on here. So I'm going to press Shift
D. I'm going to bring it up, and I want it just to
be where his tie is. So kind of halfway
in where his tie is, maybe maybe a touch higher
like so, and there we go. So now all we need to think
about is the top bit. Do we want it so wide? I don't think so. So what I'm
going to do is press S and X and pull it in just to make it a little bit
thinner like so. And there we go, This is basically what
we're looking for. Now, with these two parts, we can probably get away
we join them together. So Control J. Let's
join them together. And the one problem you're going to have is when
you're arrange something, you can't keep the modifier
on and join it altogether. So that's one problem
you're going to have. So you probably have to
bring these separately in because I have tried pairing
them up and see if they, you know, come
through like that. So what I'm going to do,
though, is I'm going to bring them all out here
together, like so. And then what I'm going
to do is I'm going to see if they work now
with parenting up. So if I go to my asset manager, so open up my asset manager, and I'm just going to grab
this one and this one, press Control P, and we'll
set parent two objects. And now they're parented up.
And now if I right click, I'm looking for, as you can see, I can only mark them
as assets like so. So when I come in now, you'll see that they come in like this, and when I bring them in, now you can see they're not
coming in properly. So you can see they're
not coming in with the bom parts, no
matter what I do. Now, I can do another thing. I can grab both of
these and press M, new collection and put them
in as railings, like so. And there we go, now we've
got one that says railings. We should be able
to go up and clear. So we're going to clear these. So I'll grab both of these, right click and we'll clear
the asset, so clear them. And then I'll go to the
railings right click, Mark as asset, and now
we've got both of them in. So now you can see, I can't bring them in
apart from the here. Did I bring those in? Let's have a look? I actually
did bring them in. Now I have they got Have they got the modifier
on because they've come in very weirdly,
as you can see. So, Pete, clear parent.
Let's press Tab. I can't even do anything
with them, as you can see, they're actually a
railing like this. And when I open this up,
it just comes in as that. And now I can't do
anything with them. So as you can see, I don't
know how to get around that. So I'm going to come
to both of these. I just thought I'd
show you just in case you go down the
same route I did. I'm just going to
clear them out, making sure my arrays on, my
railings are there. And I know it's a bit long
winded to show you that, guys, but I'm just showing
you the limitations of asset manager. So now let's clear the asset. And what we'll do now, we're not going to put anything
in the asset manager. We're just going to
go back to modeling. And what we're going
to first of all, do before finishing is
we'll add in a bevel. We'll add in a bevel,
not point, no, no three, like we always do
not point, not not three. So and then we'll come to
this one, do the same thing, add in a bevel, so
generate a bevel, and again, note point,
not note three. Finally, then what
I'm going to do is I'm going to grab both
of these and just reset. So control a reset
all the transform, set origin, to geometry. Now, I think with these, it's probably a little bit too high on the bevel,
as you can see. So if I put this on note point, note, note one, let's try that. And then we'll put
these on the bevel, note point not note one. And I think now they
look ready to go. Now on the next lesson then, we'll actually put
those into here, get those all fixed in. And first of all, though,
let's say that all work. And I'll see you on the
next and every one. Thanks a lot. Bye bye.
103. Using the Array Modifier for Sloped Fence Placement: Welcome back on to blend
the Building Mass class from concept to final render, and this is where
we left it off. Okay, so what I'm going to do
now is grab both of these. I'm going to press Shift D, and I'm going to
bring them over. And then what I'm going to
do is put these in place. First of all, though, we want to delete the bomb off here.
We don't need that. So, delete and vertices because these are
going to be sat on top of these parts here. Next of all, then, I want to
bring them over and put the first one into place
wherever I want it. So I'm going to
make sure that we said that we're going
to be using these here. So these steps are
nice and even, which means I can put
the first one into here. Now, I don't want it
disappearing in there. I just want to have it nice and laid out into here, like so. Then what I want to do
now is I'm thinking that maybe I want a bottom section on here or do I want to pull
this down? You know what? I think I'll do all that once I've actually got
these in place. Now, because we have
an array on here, what we can actually do then is pull this out, first of all, so if I hold the shift
bone and bring the Y out, and then what I can do is
I can now lift them up. So I can actually offset
it a little bit as well. So if I press the z, you can
see now we can offset it. And then what I can do is I
can bring them up like so. I need to offset a little
bit more, as you can see. And also, I've got one, two, I need to pull them
over a little bit more. Let's see if we can
actually do that. So pull them over, pull
them over very slightly. Like, so into the
center of each. We bring it back one because we've got an
extra one in there, as you can see, so
bring it back one. Now, let's try and offset
a little bit more. Can I get away with
that? Sometimes you can. Sometimes it's a
little bit too much. So you can see here, not 0.1. Let's try not 0.180. So eight to four. So it's not 0.13, not 0.172. Let's try that.
And there you go, now you can see that they're
pretty much all into place. There's a little
bit of difference. So let's try just putting
up three. Let's try that. And there we go, I think, maybe, maybe, maybe two more.
So let's try five. And I reckon that
is about right. And I'm looking now just to
make sure everything's in. And there you go, that is how you're going
to do that, guys. Alright, so now that
we've got it in place. Now, let's bring this part into place. Where is
this going to go? Let's first of all, resell the transforms set
origin to geometry. And then what I'm going
to do is I'm going to put it into roundabout here. Now, the other thing is, as well as I feel like with these, maybe they're a little bit high, so I'll bring them down in time. What I'm first of all
going to do, though, is pull this out to where
I actually want it, so it'll be all the way over to here, and then I'll lift it up. Pull it out, like so. Now, what I want to
make sure with this, I can delete this
out of the way. By the way, we don't need this. What I want to make sure
is if I grab all of this, I'm just going to
select all of it, press the question mark,
just isolate it out. Press three then to
go into side view, Control three to go into
the other side view. And what I want to make sure is this is lined up with these. Now I can bring this down and I can make sure
that it's pretty much lined up near enough
perfectly with this bomb here. You see, it's tiny,
tiny bit out, which means that I can
come to grab this, hold the shift button, and just line it up a little bit more. And from there, then, I can actually pull it up into
wherever I want it. Now, we can see
here that these are probably a little bit too high, and if they are, it's
really easy to come in. Or it should be, grab the top. So let's just grab the top
right on the top there. Press the little question mark once you've grabbed it, like so. And then what you're
going to do is you're going to press Control plus and go all the way around just to
the inside of there. And then what you should be able to do then is just pull them down a little bit and still
keep everything in line. So it's up to you if you
want to pull them down. I think, for me, they're a little bit too high, so I'm just going to
pull them down like so, and I'm looking, have
they alter the bomb. If I pull them up, you can
see it as alter the bomb, and that's something that I
really didn't want to happen. So I could come in,
pull them down. And then remove this z. So if I bring the
z down, sore up, like so slowly bring
it back Is place, like so there, and
then drop it back. So it's 1.85. So let's put it on 0.183. Like so, and I'm looking
if I press Control three, I can see now the
distance between each one looks about perfect. So that's looking good. Now, last of all,
then let's apply this array because I'm not
going to need it anymore, and to be quite
honest, it'll cause me problems later
on down the line. So let's press Control A. Then what I want to do is
just isolate these out, so shifte you can
isolate them out. And then what you can
do is you can come now to the bottom of here. Like, so press control plus, just so you've got both of them. And then what you're going
to do is pull them down, so press the taba Ita, bring back everything, and
then we should make sure that everything is
in place like so. Now finally, what
I can do is and come to these now,
press the tabun, just press delete and
face us because we're not going to need those
bond faces in there anyway. And there we go, guys. We actually might
be done with this. One of the things is, though, they're not actually
in the middle. So let's grab both of these, pull them over more
to the middle, like so, and that's
looking pretty nice. Now, let's have a
look with our guys. So let's unisolate everything. And what we're going to do
is just bring him around and see if it looks
good on the steps, yes, I think that is.
That's about right. Alright. Really cool. Now what we need to do is just delete this out
of the way because, as I said, we're using
this and this together, so that's going to be
looking very nice. So now let's come in, shift desk, curse to selected. And then what we're
going to do is move everything over this side. Now, we can pretty much
join everything up. So we've got not
point note, note one. This is going to be
one of the problems where you're probably
going to have to, um apply this because this will have a different
amount on the bevel, and we've been through
that discussion before. So what I'm going to do
is just grab this one, press Control A, and then we're going to grab this
one, press Control A. And then what I'm going
to do now is grab this one and this one and
join them to this one. So I should be able
to press ControlJ. So grabbing this
one last Control J, right click Shade Auto smooth. And you can see we do have
a bit of an issue there, and I don't really want that. So sometimes, as I said, we'll have to before
joining it altogether, apply the actual bevels, because you can see what it's actually done is it's
beveled it twice. Now one thing we can do is
if I join this with this, so press Control J, you
can see now C right click shade Auto Smooth
and that for some reason. It's not going how I want it, so I'm just going
to bring it back. And you know what? I haven't reset my transformation,
so it might be that. So before I do that,
you know what we'll do? We'll press Control
A transforms, right click, set origins geometry, and now
join them with this. So Control J, right,
click, shade ato, smooth. And the thing is, they're
not actually auto smoothing, probably because
they've got a bevel on. If I turn that off, right, click, shade to smooth. Yeah, it's still not actually smoothing it out the
way that I want it. You know what I'll
do? I'll do it a different way. So we're
just going to go back. We're going to come to this one. So before it had the bevel,
now it's got the bevel on. You can see they're all
smoothed off very, very nicely. And we should be
able to shade them flat with maybe some
sharps on there. That might be something
else that we think about. So let's press tab and let's
right click and shade flat. And then what we'll do is now I think we'll bring
in some sharps. It might have been better
to do that, you know, before using the array on here, but I've already
used the array now, so I don't really want to
mess around with it anymore. So yeah, what we'll do is we'll join them all together,
and then we'll try. And so I'll go to here, press Control J.
And there we go. Because we shaded them smooth, you can see now they've actually
turned out pretty well, and they've still
got that on there. Now what I'm also going to do is I'm just going
to bring them up because I can see now
because how these are, we're not actually getting
the bevel on here. So we need to come
down to geometry, clamp overlap, turn that off, and then we're still going
to get that bevel on there, as you can see. And then I'm going to
resell the transforms, right clicks at
origin to geometry. And now let's have a look
at what these look like. So double tap the A,
and you can see now we do have a little bit of a
problem with the clamp overlap. Let's turn it off
a minute. And now we don't do we need it on? Do we need it on?
Let's have a look. Here I'm getting the bevel
there. I turn it off. I'm getting the bevel there,
but it's a bit too high, so let's put it down to
note point, not one. Let's put it down to
that. I'm just looking. I've got some bevels in
here, as you can see, if I press A, shift N, I
can't turn them round. So this is ended up a
little bit of a mess. So you know what we're gonna do? We're just going
to go back before joining all these up before
doing anything like that. Split them off. So
let's go. There we go. They're all split off. One
more to get back our bevels. And what we'll do is
we'll save our work, and on the next one, we'll join them up in a different way. Alright, everyone, so I hope you enjoyed that, and I'll
see you in the next one. Thanks a lot. Bye bye.
104. Adding Arched Staircase Entrance Decorations: Welcome back, everyone to blend the Building Master class
from concept to final render. And now let's get this finished. So what we're going
to do then instead is we're going to grab this one. We've already applied our bevel, so just press Control
A on your bevel. Let's make sure it's in there so you can
see it's in here. Let's then grab this
one and this one we'll press ControlJ because we can join them both together. We can join this one, then
we can apply the bevel, so Control A, let's apply that. And then we can join
these two together. So ControlJ let's join
them both together. Now, the one thing I would
say is, before we join those, let's actually mirror
them over the other side, and then let's join
things together because I might want to make these a little bit different
at the moment. We can see there is some
randomness on them, but we might not want that translating over
to the other side. So I just want to check how
that's actually going to look because I might want to spin them round like we did before. So let's first of all, go
to our center and make sure that we've
got our cursor in the center and then
come to this one. And what we're going
to do is we're going to go to or modify, a modify generate a mirror. Let's mirror on
the actual cursor set origins, three D cursor. And there we go. Let's do
the same then with this one. So we're going to copy
the mirror from here, so I'm going to grab
this one, grab this one, and press Control L, and we're going to link
or copy modifiers, right, clicks Origins,
three D cursor. And then this one as well,
we're going to copy this, so I'm going to write clicks
Origins, three D cursor. Same for this, right, clicks
origins, three D cursor, grab both of these,
grab this last, control, and we're going
to copy modifiers. And that then is going
to put everything over there. And then
finally this one. So right, clicks
origins, three D cursor, grab this one, control, copy modifiers, and there we go. Now let's have a look
at what we've got here. That is looking very nice. These bits here, are they know, can you really tell that
they're both the same? A little bit, a little bit. So what we can do then is we can apply the mirror,
so Control A. And then what we can do is
we can grab now this one. So all I'm going to
do is just press B. I'm going to grab it going
all the way down to here. I should then be able to press Control plus P selection,
separate it off. Control A all transforms right, clicks origin to geometry. And now I'm going to
do is spin it round. So I want to press R Z 180, spin it round, and then
just balance it back out. So if I come now and hide,
You know what? I'll do? I'll just grab the
whole thing, and I'll press question mark, and
then I'll grab this. Press three to go in side view, and I just want to
level it up now. So if I press R and X, I should be able to just level it up the same as the other one. And there we go,
double tap the A, and now they should
look different. From this. So you can see this one's rising up here.
This one's a bit down. They look a little bit
different from the other ones, and very happy with
how they look. Now, the next thing
we want to do then is we need bevels on these, and we want to apply
the bevels, obviously, because we don't want to join everything up without
the bevels on. If we come to this,
we've got bevels on, Controle. Come to these. We'll do the same thing
Contro adding a bevel. So generate a bevel and we'll
put it on Noto note three. Like so, we'll press controle. I'm just looking to
see if that's right. Not not five. Let's have a look. Maybe a little bit more
of a bevel on these. Control A, apply that,
hide them out of the way. These have got a bevel on, as we can see, hide them
out of the way. These don't need a bevel.
These are done now, so both of these sides
are actually done, so I can hide those out of the way. These are
actually done, as well. They've got a mirror
on, so let's apply that with Control A, hide
them out of the way. These don't need any bevel on or anything, just the mirror. So apply that, hide
them out of the way. And finally, then
this part here, these have a mirror. I can press Control A.
Let's bring in the bevel, so I'd modify a bevel. Let's put it on Not
point not three. Let's press Control A. And let's press Alt H and bring back everything.
Question mark. And now we need
is this one here? Now, does this have
a bevel on it? No, it doesn't yet, so we
need to pour bevel on, so add modify, generate a bevel. Let's we click
shade Auto smooth. Control A, all transforms
set origin to geometry. And what I'm looking for now is to make sure it
has that bevel on. So we want to put it down
to not point not three, like so, and there we go. Now, on this, because I'm
joining everything together, I should apply my
bevel, so control A. And now what I can do is
I've got these two here. Probably, you might
want to split yours up. In other words, you might want to split them
up so you have, you know, this top, which you can use
for other things. So you can put that in there, put that on your own buildings, or you can keep them
the same as me. It's completely up to you. But let's deal with
this one first. So at the moment, I need now
to bring this one over now. You can see they're not
in line with each other. So all I'm going to do
is just press Shift D. And then what I'm going to
do is just plate it there. I'm going to grab
both of these ones, and I'm going to press
Control A, all transformed, set origin to geometry,
grab this one, shifts and selection to cursor. And then what I'm going
to do is bring it up now. I'm going to press
seven to go over the top, and I'm
going to line it up, making sure it lines up so
that this, as you can see, first of all, is pulled up, and second of all, is pulled out. Now I'm just wondering,
this one here now. I'm wondering if I have to. Pull this one out a little bit, because you can see here that these are a little bit wider, and that's why these aren't
leveling up properly. So what I'm going to do
with that is I'm going to, first of all, press Control off, left click, right click. Now, that's not going to
go all the way through, so I need to do this
a different way. So the way that I'm
going to do this is seven to go over the top. A to grab it and I want to
bisect it down the center. So mesh, come down and bisect it straight
down the center, just a little bit to the left. So center, a little
bit to the left, make sure we zero this out, like so, and then all I'm going to do is pull
it over a little bit. Now the reason I can get
away with that is because we've got no bends or anything
like that in this bit. So if a right click, Marc asin. So we're going to
mark a seam if that's not working, press
Controlle, Mcasine. And then what we can
do is we can come now, press L, delete,
and faces, like so. And finally, now I can
actually put a mirror in here. So if I come in, add a modifier, generate a mirror, and now
finally I can come in, press the Abn and move these
over to where I want them. So I want it moved over to here, just in that point there. I'm also looking at this point here so we
can see if we zoom in. Got about the same
distance either side. So, this sticking over a
little bit more is okay. And then what I'm going to
do is come over control. So I need to be object mode, Control A, and now finally, what I can do is
just build these in. So I'm going to come in, Alt, shift click, Alt, shift click. And then what I'm
going to do is right click and bridge edge loop. So bridge edge
loops, there we go. Now, you shouldn't be able
to tell the difference. And finally, then
what you can do is shift, click, shift, click, Dissolve edges, like so, and now you can come in
and shade Auto smooth. Now, if it's not
shade auto smooth, just turn it down a little bit, Just a tiny bit, and you
see that's now perfect. And then finally now,
let's work on these. So, have we got a
bevel on these? Let's have a look. Yes, we have. And I think this now is actually ready to completely join up. But if I move these over here, I should then be able to come
in and join all of this up. I'm just going to have
one more check on it, hiding each part out of the way, just to make sure
I've got no mirrors or bevels on or
anything like that, or the bevels even on
where I need them. So these so let's check
this one as well, and we can hide
that one out, wait. Let's check this.
Hide the other way. And let's check this,
hide it other way. OT H, bring back everything. One I just wanted
to check is there. And now I should be able
to join it altogether. So let's press Control
J, join it altogether. And then what we'll do
is press Control A, all transforms, right, click
Set origin to geometry. And now we're going to
do is come to this one, exactly the same process. With this one, we've also
got bevels on as well. And Not point not no three, as you can see, no bevels on, not point not no three. So if this let's go Control
A, hide it out way. This one, Control A,
hide it other way. These don't need any bevels on, so we can hide that other way. This does. So all we're
gonna do is come in, and it's already got a bevel on, as we can see note
point not three. Control A, hide it
out of the way. And then we're on these two now. So has this one got bevel on? Yes, it does. So we can
hide the other way. And finally, we're
left with these which don't I'm going to
add in a modifier, generate a bevel, note
point not note three. There we go, maybe a little bit higher again
because it is stone, not point non five.
Let's try that. There we go. Let's apply
that, hide it out of the way, Altag, bring back everything, and I'm just checking this. Yes, the bevel has been applied. So now I should be able to with this one, join it altogether. So I'll press Control J. I'm going to right click
and shade Auto smooth. I'm going to turn
this down just very, very slightly like
so, and there we go. That is that part done as well. Okay, so very happy with
how that's turned out. Now we need to do is
we need to obviously bring in some materials. And then we're basically done with this. We've
got our railing. We've got our steps on here. And yeah, this is
looking really good. So I think the next
thing that we'll do is, once we've added in our
shaders and things like this, is we should make a
start on these arches. And the reason I
think we should make a start on these is
because these are going to go like in
between these parts here. So these are going
to go over the side, and then these parts
are going to go in. If I show you the door, you can see in here this
is where the arches. So it's not just a
wall going back. It doesn't look
right if you do it. Even on the one in here, we've got an arch going in there
that you can just see. So that's the reason
why we're doing those. Once we've done those guys, honestly, as you can see, if I put this over here, this is the main parts now
that we've got to create. All of the other
stuff, honestly, we've already created, so we can really start now
building this out. We've obviously got
this part in here and this dome that
I've talked about, which we haven't done yet. So we've got this, this
part and this dome. Now, these are the
most difficult parts, I would say to actually model. But once we've done those, we can start building
all of the stuff out, pretty much putting
everything in, and you should really then
start to see your model actually come together
because I know what it's like when
you're building things, and, you know, it's taking
a long time to actually get to that point
where you can actually see what you're
actually building. But I assure you, once
you've actually you know, built these walls and doors out, then we'll
be able to see. I'm thinking that actually probably the best
thing that we can do is once we've built
those orchards, let's go in, and
what we'll do is we'll start building
all of this pot out. So we'll start building all
of this pot out, I think. Before building out the archers
because then it'll just get rid of that repetition of just modeling,
modeling, modeling. I don't think that's
the best way to work. It gives you a break from
that and actually gives you some motivation to actually see what you're
actually creating. Alright, everyone, so
I think, as I said, once we've actually
done the archers, we'll start on the back
of this building it out. We might even start
building out, you know, these gates
and things like that. I think that's going
to be a lot of fun. Alright, everyone, so I
hope you enjoyed that. I'll see you in the
next one. Thanks a lot. Bye bye.
105. Finalizing Staircase Decor and Integrating into the Manor: Welcome back, everyone to blend
the building master class from concept to final render. Now, let's just take a
look at our stairs first, just to give you an idea of
the materials and shaders, so you can see we've got a slightly different
part on top here, slight bit of difference
around here and here. These are a little bit slightly
different to the stairs, and then you've
got the male parts and these parts being brick. So let's move this over
to the right hand side. What I'll do is,
then I will come in and we'll deal
with this one first. So all we're going
to do, first of all, is grab the whole thing,
press U, smart UV project. Click Okay. And we
want to make sure that we're just getting the stone looking
the same as we know. Let's put it onto either
material view or Shade View. Let's put it on
rendered view for me because I can run it at that. And then what we'll do is we're
coming over and material. Now we want the same material. As let's have a look at this here because this has the metal and it has the stone on there, and that is basically
everything we need. So I'm going to basically
grab this press Control L, and we can link materials, and let's go back to it, and let's actually do this first. So we can see that this is
why I split up my materials. So I've got light on top and dark underneath, and
that's why I did that. We can also see we're
getting a little bit. I'm just looking to see if
we're getting repetition. No, we're not. We're not getting
repetition, so that's okay. So what we'll do
then is we'll come in and we'll grab
these here first. So we're going to press L, L, L, L and L. Same for these. And then what we'll
do is we'll come down stone light, stone lighter, click a sign, and then
we're going to do the same thing on
these parts here. All of these. All of
these. Now, one problem. Yeah, I grabbed it edge. Just make sure you
grabbing oh it's an edge slick because we've
got some seams on there, and stone lighter, we can
click a sign like so. Now, let's come in too. The top parts because
they're going to be stone slabs on top. So Control plus, so going
underneath, press the dot but. You can look underneath
Control plus, and then all we're going to
do is press stone light. So stone lighter, click
Assign. And there we go. And now I want to
do is this light's probably a little bit too
bright for these, actually. What I want to do
though is break it up then with brick under here. So if I press Alt ship click, and what I want to
do is now going up and press the plus p. So plus, if I go to this one you can
see brick normal Ooh one, let's come down then
to these and we'll go for bricks. So
brick, normal o. Press tab, click assign. Now, we want to just make sure that the bricks are the
same size as these, and you can already
see that they look around the same size
of these anyway. They might have been
a tiny bit smaller, but generally, you want to keep them around about the same size. So that looks pretty nice. Now we want these parts. So we're going to go with these two outcroppings and
this outcropping on here, and we're going to
have them stone light. So what I'm going
to do is Althif click going all the way around, like so Alt Shift click. And then Alt Shift click. And finally, Alt Shift click Alt Shift click Control plus, and then stone
Lighter click Assign. And there we go, that is
what you should end up with. And that is looking. Really nice. Okay, I'm really, really happy with
how that looks. Yeah. Okay, so now let's
move on to this one. So if I grab, in fact,
you know what we'll do? We'll take off the glass blue because we're not
going to need that. We'll take off the wood crack because we're not
going to need that. And then we've got
all the materials that we need for both of these. So now if I grab this
one and grab this one, I can press Control L,
and I can link materials. I can grab this one
then, I can press A, U, smart UV project, click
Okay, and there we go. Now, one thing I'm just going to do is I'm going to press
Tab, press Shift D, and I'm just going to
bring this over to this one just to make sure my
stone is looking the same. So I'm just looking
here. And you can see. Yeah, the stone is
looking about the same. So on this one, as well, is the stone looking the same B these will be a
little bit smaller. So I'd say on this
one, as you can see, especially on these,
the stone is looking a bit more a bit higher
resolution as you can see. So what I want to do then
is I want to come in to all of this and
then go to UVEditing, grab one of them, press the
Db one so you can zoom in. And then what you want to
do then is coming over, drag this over and just make sure it's rendered so you can
see what you're doing. And now I want to match
them up with this. So the way they'll do
it is if I press S, I should be able to bring
them out or bring them in, like so, and I think that looks a little bit better than
what it did before. Okay, so now we can
go back to modeling, and now it can work without
being hindered at all. So what I'll do is I'll
come to these first, Alt Shift click, Alt, shift, click, Alt, shift, click. And then I'll come to
these Althif click and Oh Shift click contro plus, Stoneighter, click Assign.
That's those done now. And now I need to come to each
of these panels down here. So L, all of these stop top
steps and all of these ones, not the metal into here. Like so, and then
we'll do this one, and there's one pink. No, it's not. No one in there. Going down to these, like so, and then these steps. Coming down, and then up, and then I'll just
move my camera and see, have I missed any? And there we go, God them all. So then I can come
in, stone lighter, click a sign, and there we go. So he's got a difference
between them. And then finally now,
I need the metal. So if I come in to
these meal parts, I'm going to grab
each one of these. One. And then I'll grab the bar. That goes across as well, because that obviously
is going to be meal. So metal building, click a sign. And then finally, I need these on top of you because these are a different color if
you look at the reference, so we'll go down,
grab all of these. Press Control Plus, keep going cause you've
got bevels on there, so it'll be a little bit
more of a Control plus. There we go all the way
under Stone Lighter, click a sign, and there we go. Alright, so this
I can now delete. And then we've got large
steps and small steps. So we can actually
save those out now. So come in. I'll put them
under their own one. So we've got a new collection,
we'll call it steps. Like so. And then
what I'll do is I'll so I will also put
this in there as well. So come down steps and then I'll call this
one small steps. So F two, small steps, and then large steps. Large steps. And then what I'll do
is save out my work, so file and save. And I'm just going to
grab both of these. They should all be
down here and I can right click
and Mark as asset. I can come over then to my
asset manager. Here they are. I can make one then
plus all its steps. Like so, roll down, and then I can grab
unassigned and bring those over into my
steps, and there we go. Okay, so now with these, I can just bring them
over to the back of here, like so, and then I'll
actually check those out. Then in my main file, I can bring them in and see how they're
actually going to look. Now, if we go back to our
reference just once more, we can see and we've
got steps here. So this is this part here,
so we've got steps here. We haven't gon any
steps around here. We've got this is the front
again, as you can see, so this is the same one as here, and then we've got some
steps to the back. So basically, only two steps. Up to you, if you want
to put more steps in, I tried to balance this out. So generally, you know, you're
going to have an entrance, which is the side entrance,
which is this one, and then you're going
to either Well, we have got some more steps. We've got the main
entrance here, and we've got a back entrance. So I would say on a
building like this, you're probably going to
have three entrances, maybe four, but no more
than that, really. And I always like
to keep one side of the building with no doors
or anything like that. It's like, you know, the
back side of the building. Alright, so now we can actually
put this back over there. I can come now to save,
just save it out. I can open up then my next one, which is the one that
I've got, which is here. So here we are. This
is where we left it. And now what I can do is I can delete those
out of the way. I've already pulled my door
far enough back into place. To be honest, when I
bring in my archway, I'm probably going to have to pull it back a
little bit further. So I'll put it there for now, and what we'll do is we'll
just come down to our steps. So we haven't even
done this bit yet, so that's why I'm saying
we'll build that after, but we're just giving
one of the steps to try and seeing how it
actually looks. Now, I need to reload this. I'm Joe going to reload it. Then going to come to steps, and the one I want is going
to be the small steps. Spin it round. So our Z 90. And then we'll do is we'll
put this into place. So I'm Joe's going
to press three. Jaws to get it where
it needs to line up, so we can see there
it's lining up. It's a little bit big, and
that's okay because we can actually shrink it down a little bit if it's a little bit big. And also, the other
thing is we're going to have this
archway on here, which is going to be hiding
these little gaps here. That's another reason
why I want down there. So, you know what? Even if it's a little
big, a little big, I'm actually going
to leave it because I think it's actually
going to fit perfectly. So Jas going to bring it in. And then what I'm going to do
now is pull it into place. So I'm going to pull it into
place. So, it pops on there. And finally, then we can see that it is a little
bit out this way. In other words, all of this
is a little bit out this way. So where does this need to be? If I move this over a little
bit, in fact, you know what? Is it because let's just have a look on three
before we finish? Is it because these two are a little bit out?
And I don't think so. I think that this, I'm going to pull it
down to the floor, so to the ground plane, like so. And then I'm just
going to pull it over and get it
into place like so, and that is where
it needs to be. So I'm looking up here
now lining up with here. So you can see here this
is lining up with there. My door, when I put it in, I put it a little bit out. So how do we fix that? We're going to fix that just before because it's
so easy to fix, so I'm just going to
press Alt Shift click, move it over, and then I want to hide my
door out of the way. So just hide my door out of the way and just go
back to the wall now, and you should press in three, be able to move this over now. So you should be able to move
it over relatively easy. And then all you want
to do is press ultage, bring back your door. You just want to move
your door back over just so it fits in where
it needs to go. So if I fit it in
somewhere like this, and now you can see
everything is lining up, and that is looking really nice. I'm going to write click
and shade do to move just to get rid of those parts there. You won't be able to
see in there anyway. And now we can see if I double tap the a press three once more, I should be able
to see that this and this line up a
little bit better. I'm going to line them up
just a little bit better. Yeah, I think that's
looking about right. So let's now put on
our rendered view. We'll have a quick look at it. And there we go. We can see on the inside of here that
the bricks aren't there, and that's not something I want, so I'm probably probably
going to on the next lesson, just quickly unwrap this. And then once I've done that, I can actually focus
on the rest of it. Now, the other thing
I would say is that this maybe needs pulling
up a little bit. So you can see here,
this has dropped down, not quite right. So I think I'm going
to actually sort that out on the next
one. All right. I'll see you on the
next one, everyone. It's gone a little bit over, but I'll see you on the next
one. Thanks a lot. Bye bye.
106. Measuring and Planning Door Arch Geometry: My wants to blend the
building masterclass from concept to final render. Now, what I want to
do is I just want to. So I'm going to put this
on material for you. I'm just going to change
this to the right material, and I'm also going to drop this down a little bit because
it's a little bit too high. When this loads up, we actually want this to be below here. So we're going to drop
it down, as well. So the way that we're
going to do that is, first of all, let's go in
and we'll grab all of this. We're going to press.
So let it load up. RV project, click Okay on rap. And then what we're going to
do is come to our materials. And instead of it being that, we're just going
to hit the plus. We're going to hit
the down arrow, and we're going to pick the Don't goofi building like
this one here, that will do. Click a sign, and there we go. Now, I'm hoping that that when
I put it on rendered view, should look a little bit
better than what it did. Okay, so far so good. Now let's think about
bringing this down. So obviously, I want my
daughter to fit in here, but I do want this to be
below the floor here. So I'm going to do is press
three to go into front view, and I should then be
able to pull this down, pull it down, pull it down. And you can see here
now that it's actually changing the way that
all of this looks. That just means I'm going
to actually have to come in and unwrap these parts here. So re unwrap it, basically. So I'm going to do
that. I'm going to run wrap it all together. I'm going to make
sure, though, first, before I do anything,
that this is actually in. So you can see it not quite in. So let's write clicks
origin to geometry, and let's pull it in, but it goes just over there, like so. So we've got a little bit of a lip, as you can see on here. So you walk to the steps,
and then you go over. Okay, so now we should be
able to come to this part, press tab, A, to grab
everything and then U. And let's click
Smart UV project. Click Okay. Like so. And I'm hoping now I
should be able to come in just with the brick only
because I don't really want, you know, what we
can change it all. It's okay. So what we'll
do is come to UV editing. And then what I'll do
is I'll press three. I'll zoom in, grab everything. And then what I want to do is pull these either in or out, let's pull them in, and make them the same size
as the other one, which now you can see they are. So easy to fix it
if it is a problem. You may as well fix it because I think now this is looking much, much better than where
it was, as you can see, and now finally,
I'm just thinking that I just need to make
sure this door is in place. So let's put it
on rendered view. Let's have a good
look at our door. You can see here that it's got a little bit of a gap there. So let's bring it
down, bring it down, bring it down into the floor, making sure it's all still
fitting in, which it is. Basically, what we want to
make sure is if I come to object mode, this bit here, as you can see, it needs
dropping down a little bit, so that ward is in there,
maybe even a little bit more. So something down
to there, like so. And finally, one more
render, just to check. And there we go. I think
that's looking very nice now. And once we've got the arching, we're going to hide
a lot of that way. But now you can see that door
is fitting in very nicely. Alright, so let's
go to object mode. Let's save out our work, so we're just going
to save out our work, and there we go. One thing, um yeah, I was just going to have a
look on a render from here, but I don't think we
actually need to do that. I think it's actually
looking if I press three. It's looking all nice
and level anyway. So, yeah, that's
looking very nice. So now, let's go back
to our modular pack. So we're going to go back to
our modular pack, which is. Let me just find out for
you guys. Here it is. And then what we're
going to do now is, first of all, we're
going to look at our reference as
we always should. And then we're going to look at this one. We're going to
move that over there. That is part of the De list. And now here we are.
This is what we've got. So creating, you
know, these arches, we could do it even with
the stone geometry node, which I actually showed
you how to use that yet? Yes, I have on the column. So you can see here
if I grab this, I can actually press E. In fact, if I do it into front view, I should, if I go back, be able to E, pull it up. Like so. Let me see
if I can resell the transforms if that
actually straightens it out. You know what? It doesn't
actually straighten it out. I think if I dropped a um if I put a curve in and then drop this Jumptre node on there
rather than bending it all, I think it would actually
go in perfectly. So I will show you that as well. So let's go to curve.
We'll bring in a path. We'll bring it over. And
then all I'm going to do is see if I bring this up
a little bit, so move. Let's bring that up a
little bit, like so, and let's then grab
this one and put on the same Jumpture node. So can I press Control L and copy modifiers, and there we go. That is what I'm
talking about. You can see now there is no bending. I can actually
bring in as well if I go to length and bring that. Yeah, I'm on this
one. On this one. If they're coming
to bring length, you can see now I
can bring them down, light so I can come down and
put the randomness to zero, and now all of them are in line. So that might be an easy way for you guys to actually
build out these. So you see these parts here, that's probably going to be
the easiest way to do it. These parts here, as you can
see, they're just stung. So we'll go through them. We'll probably start with this
one here and we'll create this kind of dome
structure on there. We'll get the right sizes
just to make sure you know that we're keeping
with the right scales all three of these, as you can see, they're
quite big, as you can see. Alright. So let's
actually do that now. Let's enough talking here.
Let's get on with this. Alright. Well,
let's first of all, delete this out of the way. And then what we're
gonna do is bring in something to use as
an actual scale. I'm just wondering
about this bit. I haven't put that bit in there. I'm just going to put
it over there just for now just so I
don't forget about it. And then what we'll do
is we'll just press shifts cause to world
origin, and then shift A, and we'll bring in a hube now what we'll do
is we'll come in and we'll get the dimension
of the first one. So the first one will
be the smallest one. So what I'll do is,
I'll come with the X. We'll put it on 1.65. We'll put the Y on not 0.517, and we'll put the
z on 2.88 like so. And we'll just pull it up to
that ground plane, like so. And then what I'll do is
I will move this out. So I'm going to press Shift D, move this over to this side. And then what I'm going to
do is come to the next one. So the next dimensions, guys, if we come in and
we'll put it on 2.99, we'll put this on not 0.26, and we'll put this
on 3.85 like so. Alright, again, we'll put
this up to the ground plane. We'll press Shift D, and
we'll bring it over. So that's our
second one. Now our third one, which is
the tallest one. Again, we'll come to the X, we'll put the by the way, this here, if I just
pull this over quickly, this here is just this arch. This is not including these parts on here or
anything like that. It's literally just the arch because I think if you
got the damage for that, building on top of that is
going to be way, way easier. But let's pull that over again
over the right hand side. And then what we'll do
now is this one here. So we'll put it on 2.43. We'll put the Y on 0.583, and we'll put the Z on 4.51. So pretty tall. Alright, let's move
that over there. Okay, so we've got
our three now. Let's start then we're probably better off
starting with this one. And all I need to do then is create an arch
that's going to come up and go all the way
up to here, like so. We also need our little
guy here because we need to make sure that it can
actually fit through this thing. So if I press one, bring
him down, like so. Like so. Now, what I tend to do when I'm
building arches is you can build it out of
things like a you know, a cylinder and
then pull it down. You can do it that way. Or and then you can bevel
the top of it. That's one way of doing it.
Or you can do it with curves. Now, the beautiful
thing about curves is we can change them
quickly and easily. So that does make it very easy. So let's give it
a try with curve. I'm going to press shift
desk, curve to selected. Shift day. Let's bring
in them a curve. So we'll bring in, where is it? Let's bring in a curve. So curve, and we'll
bring in a path. I like using paths, much more than the Bezier curve. So I'm going to bring it up,
and I want it up to like so. And then what I'm going to
do is bring these two down. Before I do that, though,
let's shrink it in. So S and X, let's bring it in. Let's put it on wireframe so I can actually see
what we'll be doing S and X. Zoom in a
little bit S and X, and there we go,
maybe a little bit out O S and X, like so. Now, that will do for now. And then what I'm going
to do is just bring these two down, like so. And then all we need
to do now is create a few more edge loops in here so you can right
click and subdivide. And then what you can also do is press S and X because they're going to be
round about the same. And then if you're
doing it this way, from here, then you can end
up with a nice nice curve. So I can bring these down now, and we can do it not those,
bring these ones down, like so, and there you go, you can end up like so, getting it exactly
how you want it. Now what I'm going to
do is pick all three of these up like so. Now, the one thing
you're going to have is, when do you want these to bend? So the moment they bending from here to here, we
don't really want that. So there's a couple
of ways. You can grab both of these,
right, click, subdivide. You can see that brings in. Right, click, both of these, subdivide, and then
finally these ones here. So if we grab both of
these, right, click, subdivide, now you can see that we've got a much,
much better curve. So that is one way of
doing your curves. Now, from here, you can come in, add modifier, sorry, you can come in and extrude
like we've done before, so you can extrude
them out, like so, and then you can
use the modifier, which is the generate
and where is it? The solidify. So you can bring
that out. Put it on flat. So right, click. Let's put
sheet flat, and there you go. You've got your curve, press
Control A, right click, set origin to geometry, and then you can work from that. This makes it actually
easy in some ways, because what it means
is that you can, like, bring it to the next one,
the next one, the next one, and actually, you know, create
your arch really easily. I'm not going to use
this because I think sometimes it's easier to
use the Bevel option, but I'm showing you
just so you know that this is available and it might be a good way
to create them. So we've got three ways which
I've showed you really. We've got the junction node way, which I showed you
with these and creating a junction
node because from here, we can actually,
you know, take off. Let's take off the solidify,
so we'll take that off. We'll come back and put the
extrusion down at zero. And then what we'll do is
we'll just grab this now, so our Jumpton node, press Control L. And what we're going to do
is copy modifiers, and there you go. You've
got your curve there. You can do it that way. We do have some problems,
as you can see, probably due to the
fact we've got two of these in here if you bring
them down, and then delete. Let's try and delete inverters. Is that going to work?
Let's bring them up? But, yeah, I don't think adding that in is actually
going to work. So, forget about that, guys. We're not gonna do it that way. Just pretend you
didn't see that. But the other way we
can do it is with using a cylinder and
bringing them down, or the way that
we're gonna do next, which is using a cube and
just simply beveling it off. I like that way because I've already got my dimensions here, which means really I
just need to bevel off each of these into
the shape that I want. Alright, so let's
delete the way. Let's go to file
and save our work, and I'll see you on
the next and everyone. Thanks a lot. Bye bye.
107. Modeling a Stylized Arch Decoration in Blender: Welcome back if we want to blend the building master class
from concept to final render. So what we're going to do,
let's go to modeling because it's going to make
it a little bit easier if we can see everything. Let's put it on object mode. Let's make short cavity is on. And once we've done that,
we can press one and go in. Now, we've got I would recommend here having your
references open. So we're going to do this
one, this one, and this one. You can see that this one
is a little bit higher. This one's a little bit flat. This one's a little
bit more rounded. So they are a little bit
different from each other. So we're going to try
and replicate that. Let's put it back over
there. And then what we'll do is come
to this one first. Now, again, one other thing, these aren't joined on here. It's like I just strap them on after probably not so
much of a good idea, and I'll probably actually
put them all together. Alright, so let's
do this one first, then, so we'll come
in. We'll press tab. We'll go to the sides
of it, like so. And then what we'll do is,
in fact, before we do that, let's just resell
the transforms, make it much easier for us. Let's then come to this one first, and then I'll press one. And what I'm going to
do is press Control B and bevel them out like so. And as I said, with
this one, it's kind of a little bit flat. More like this, I think. And then we'll come
to the second one. This one's a little
bit more rounded, so we'll come to this one
now and grab both of these. Like, so pressing one again. Control B. So we'll bring it
in, same as the other one. But as I said, on this one, it's a little bit
more kind of slanted, more like a little
bit of an arch. So we can come now
and we can bring it in this way or we can
bring it in that way, and that's the way
that we want it. So a little bit more of
an arch, as you can see. And then the final one is a
little bit of both, actually. So what I'm going to
do is, first of all, let me increase the number of subdivisions on
there because it's a little bit bigger, and
then we'll come to this one. And we're going to
press one again, and then we're going
to press Control B and bring it down.
You know what? I think, actually, I don't
actually need to do a lot with this one because I think
that is looking very nice. As is, if I bring this
a little bit more, yeah, I think that's looking about right for what we've got. Go around the side
and just maybe add one more subdivision just to
make sure it's quite tall, this one, and there we go. Alright, so now if a right
click and shade are smooth, we should get each of these now being absolutely really nice and smooth on
the top of them, and that's one of the main things that we're
actually looking for. So now we want to do is we want to bring these in,
keep the bottom part. So there's a few
ways of doing this, and the easiest way is probably just deleting all of
the faces on here. So if I come in and grab
all of the faces on here, front and back, like so, and grab the bombs and then
press delete and faces, and then press tab, Car troll, all transforms right plate,
the origin geometry. Now, let's come to
this one first. We're just going to do
the arch so you can see a a lot more intricate
with these top parts on. But for now, we're just going
to build out this arch. So once we built out, you know, this arch where it's going in, you can see it is coming
in on this part as well. I can't turn it
around or anything, but you can see that it's
kind of all one piece, this, so we have to take
into account that as well. So let's put it
over to this side. This one's probably the
most complicated, actually. And then what we'll
do is we'll come in, add a modifier, and we're
going to add in a solidify. And what I'm going to
do then is bring out my solidify, like so. I'm going to just make sure
reset all my transforms, and I'm going to bring it out to where I think it should be. So I think something like
this is absolutely fine. And then what I'll
do is I'll make a edge loop going across to you. So what I'll do is I'll
come to my solidify, press controla A,
and there we go. We've got our mesh.
One thing I didn't do actually is make sure
even thickness is on. Just make sure that's ticked on. Control A, and now we'll come with this
other part coming out. So I'm going to press
Control left click and just move it forward
like so, and there we go. And then what I want
to do now is bring out this back part
just to make it, you know, that little bit
extra that's gonna come out. So I'm going to go
all the way around. Hits in Control
click, Control click. And then what I'm going
to do is I'm going to press E, Enter, one. And what I want to do is press AlnS and bring it
in the other way. So alternS and we should
keep the actual sizing. Now, this one here is going
to be for our main door. So I think something like
this is looking really nice. And then what I want to do now is I want to press Control R, left click, right click, and then Control, left
click, right click. Old shift click, grab them both, and then I'm going
to bring them down. Now, you can see that
these aren't zeroed out. So because they've
followed the line up here, this edge, they've actually
come in at a bit of an angle. So just press S zero,
level those out. And then what we're going
to do is we're going to pull them probably down
to something like here. And then from there,
what I'm going to do is exactly the same thing. You know what? It's
probably going to bear if I just press Control B. Pull them out a little bit, like so because I think it'll be a bit
easier to do it this way. We don't want them too thick, so something like this, and then just pull them up like so. And then what we're going
to do is, of course, we're going to
press E Alter ands. So let's try that E, Alt S, and pull them out like so, and then press tab,
and there you go. That's the first part done, looking very nice,
as you can see. Okay, so now we need just
the center bit on here. So if I press Shift
desk cuss select is going to put it
right in the center. So let's bring in another part. So we're going to
bring in a cube. So cube, bring it
down a little bit. And then we want to
ride in the center, something like this,
bring it down even more. And the thing is,
this is on the front. So, in other words,
this is coming to the front because it's
hidden in the back. So we want it yours to fit. We don't want it
floating up there. What we want to do is
make sure that it's fitting just under this
part here, like so. Then what we're going
to do with this is obviously put a
middle part in here. And because it's a front bit, it's going to have a
piece of gold on there. Now, I recommend when you do this, that you
just come in now, grab the back of
it and just pull it all the way to the
back because then it's going all the
way through then it looks a bit weird on this part, if it doesn't, even if
the top part is hidden. Now, let's come in and press the I button and bring it in, and then we're going to press
E and bring it in like so. And then what you could do just to highlight it a
little bit more, is press the I
button, bring it in. Just a tiny bit, then press
E, bring it out a little bit. And finally, then we're
just going to press the S but and bring it in. And I think then
this bit of gold on here is just going to look
that little bit better. Okay, from here then, we need a arch that's going
to come up on here. So the arch is going
to go across there. What I'm going to
do is I'm going to come grab this part here. I'm going to press E to S, pull it out, like so, and then E, pull it up, like so, and then I pull it in, and finally, I'm going to pull it in
probably a little bit too far, so I'm
going to go back, and I'm just going to
press the Ibn again, pull it into there, and then press E and pull
it up into place like so. Now, my arch on here can
either fit, you know, going all the way up to here or even further, but
I think you know what? I think what I'm going to
do now is I'm going to put another pawn here. So I'm going to press I,
bring it in, like so, and then I'm just going
to press E and pull it up. To the top. Now we'll put in another part, so control, bring it
up to here, control B, pull it out, and then heat
enter lns and bring it in, like so, and there we go. Okay, so now this part here
we want to top on here. So what we'll do is
we'll grab this. Where do we want our
top to start from? Let's start it from here. So we're going to go all the way over, back over to
the other side, making sure I ever press one, put it on wireframe, making sure they line up with each
other, as you can see. Then what we're going to do is just put it back on object mode. And we're probably going to press Shift D because I
think it will be easier. P selection, separate it off, and then just try and grab
it if you can. There we go. We've grabbed it
there. And then if you can't just go into wireframe, you should be able to grab it. Add modify, generate a solidify. So let's generate a solidify. Let's press Control A, just make sure retell the transforms. And then what we'll
do is we'll increase the thickness the other way because this gives
us more control. Put on even thickness. And what it also does
enable us to keep these parts straight if
you want them straight. If you're not doing it
this way, you know, if you're extruding and the
notes or scaling like that, it doesn't give you as
much control over this. So now I've got control
exactly where I want to put this to
relatively easy. So you can see I can drop
it just under there, like so, and then you can see just how easy
that was to do. Now, from there, then let's
apply that. So control A. And then what we'll
do is we'll make sure we've got all of
our modifiers on. And from here then, I can simply join it together with Control J, Control A or transforms
right click, set origin to geometry, right click, and
shade auto smooth. Finally, then that's
adding a bevel, so generate a bevel. Let's put it on not point
not note three, like so. Let's go in and just make
sure that bevels on there. Maybe note point on five. Let's put it up a slight bit because it is stone after all. And there we go, guys. That
is the first one done. So you can see, really,
really easy to do that. This will be then
for going with this massive not the
window, where is it? The massive door here. So if I now bring this over, you should see that it fits. If I press dot but, it fits
relatively nicely in there. So if I pull it back, let's
pull it back into place. Now, if it doesn't is
no problem with getting your door and just
pressing SN and bringing it down a slight bit.
There's nothing wrong. You won't be able to see no difference apart
from this part here. So let's bring it
up a little bit, a little bit raise
it up. Y a tad. Like, so let's put
it in the middle. And if it's not fair in
the middle properly, and what we'll do
is just press S and X and pull it
out a little bit, and we just testing to make sure the door fits, and there you go. Simple as that. Look at
this, how it looks now. You can see it looks beautiful. Now, the thing is while I've got this, I can
actually grab this. I'm gonna press Shift again because that is now This
has now been changed. So you know what? We don't actually want to do that. We're just going to put it back. So let's put it back because we don't want to
actually change it and scale it and all that
cause it will update from our what's it called? Our asset manager. So we're
going to leave it like that. We'll bring our
door in the other one and then we'll change
the scale and everything. Alright, everyone. So that's looking good. Let's go to file. Let's save it out, and then
we'll work on our next one. And this one, I think is even easier actually
than the last one. So I'll show you how to do
that. Thanks a lot, everyone. See you on next one. Bye bye.
108. Creating Mid Sized Archways and Enhancing Bevel Use: Welcome back every on to blend the building master class from concept to final render, and this is where
we left it off. Now, if I bring over this, this is the one that
we want to create now, now you can see, first of all, we've got a kind of
part added onto it. Also, this part actually
goes in, as you can see. So let's actually create
that in part first, and then this bit
on the outside. So let's move it
over to this side. So what I'm going, first of
all gonna do is, of course, bring in the modifier, so bring in another solidify. Let's put even thickness on, and let's create
the right thickness that we're going
to need for this. I think something like this
will be the right thickness. And then what we'll do now
is we will apply that. So let's come in, press
controle A, apply that. And then what I'm
going to do, you will actually see, by the way, this one looks better
than this one, because it's very
jagged on here. So we've made it much,
much better than the than the original. Now, let's come in
then, and what we want to do now is press tab. I want to bring in one edge loop because I want to bend
it in, as I said. So if I press Control,
left click, right click, it's up to you whether
you want to have it in the center or bring it
a little bit to the side. I think for me, I'm going to be happy with
it being like that. The other thing, you know
what I think actually, I need to bring it
to the side, because if I pull this part out, it's going to be
very, very thin. So what I'm going
to do is come back control of, left click, bring it in, like so, and then ult click. And what I want to do
is bevel this off now. So Control B, let's
bevel it off, and we brought that there
to kind of hold it to here. Now, you can see at the
moment it's actually going through there, and
we don't really want that. But what I'm going to do is I'm just going to put
it through there, so come down to the bong left hand side
where you've got bevel. And instead of doing that,
just go to clamp overlap, turn that on, and there you go. I shouldn't actually
interfere it. What's more now, you
can actually come in with this and try. Let's bevel it a
little bit more. I'm just wondering if I can change it
round the other way. And you can see at
the moment that even if I try and
pull this down, I'm not actually getting anything that's
going down there. So the other way, once
you've got clamp overlap on is to come and put
it onto percentage, and then we can just increase
the percentage of this, and hopefully it will be able to create that inner
bit that we want, so we can see now we
can create it so I'm still unsure whether I'm
actually happy with this. Let's just put
clamp overlap off. I don't think I'm
happy with that. So what I'm going to do
is just press Controls, and I'm just going
to come back and see then if I can pull it
out a little bit more. Like so, and can I actually move this the way that I want. I'm just going to
turn it up again and come down to custom. I'll just move it out and
play around with it a little bit on here and
see if I turn this up, I'm going to get what
I actually want, maybe maybe I am. Maybe something like that
is going to look good. And you can see
how I actually did that with these options
that I've got now. Yeah, I think that looks does
it look like the reference? That's the question or does it look better than
the reference. But the reference is this,
you can see it going in. Here is mine. We can
see it going in. You know what? I'm I'm going to stick to
the reference more. I'm going to go Control B, bring it all the way
back through here. So all the way back to here, I should then have
full control over it. I'm going to put
it on to offset, which is the one we had it on. And then what I'm going
to do is turn this up. Near enough to the edge. So near enough, we've got a
little bit of an edge there. And then instead of
doing that, what I can do then is press Old Ship click and just do it
the old fashioned way where I can actually just
drop it back a little bit. So I can also press probably
their spun and bring it in, or press SX and bring
it in that way. You just wonder if that's okay. Let's right click
Shade Auto smooth and let's actually right click, put in a shop, and there we go. Alright, so that's one way
of getting around that. Now what we need to do is we
need to bring out this part. So I'm going to
press Control off. Left click, bring it up. Around about here, and then I'm going to come to the bomb. Control click going all
the way around, like so. And then what I'm going to do is I'm going to pull them out now. So if I press E, I should be
able to just pull them out. So Joe's going to pull them
out a little bit, like so. And there we go.
We've got actual that little indentation
now, the bending in. And yeah, this
looks pretty nice. Now I want something
on the top part of it. So what I'm going
to do is just press Shift Desk bring in a cube. And it's coming over here.
So let's press Shift S and selection to cursor to selected. There we go. And then shifts and selection to cursor, and
then let's bring it up. Now, we want to create
this kind of shape, which should be
quite easy to do. I'm going to bring it in. So first of all,
we'll press the. Let's bring it into
where we want it. And then what we'll do is we'll pull it back a little bit. So S and Y, making sure. And it's in the correct
place, like so. And then what we'll
do is bring this in. And we're going to bring
it in. So S and X, bring it in like so,
and there we go. Now, on this one,
you can see it's got a bit of a bevel on the top,
so we'll go in and do that. So we're going to
press Control B, burn it up a few, like so. And it's up to you if you
want this or if you just want it on normal
because with normal, we have a lot more
control, as you know. Let's turn up the amount
of subdivisions on there. And let's also play
around with this as well, and just put it
however you want it. And I think something
like that for me. Right click Sheet or smooth is probably going to
be how I like it. I like that actually better
than the original that I did. And then from there,
I'm going to bring it either in or out
completely up to you. Sorry if I press the i bone, should they then be
able to bring this in. Now, you can see here, we have a problem with
these vertices. Can I actually go
to select, sorry, mesh, clean up,
merge by distance. Let's turn this up,
and there we go. The two vertices
have been merged. But they're not merging the way that I
actually want them. So if I go back, I really want to merge this
one to this one. So instead of doing it that way, I'll go here to here, right click and we'll go
merge vertices at last. So let's merge it at the last. That's not what I want, either. It's causing a little
bit of an issue, but you know what?
I can fix that. So I'm going to go here to here, and then or Shift R, even Shift R. And now
let's straighten this up. So all I want to do is grab
all of these S Z zero, straighten it up,
and there we go. Okay, so now I can actually
pull this back in. So or pull it out, whichever one you want to do, you
can pull this out. Like so, and there we go.
That is that part done. Now, what we can do is we can join all of
this up together. So we've got one
part and two part, press Control J, Control
A or transforms, right, click the
origin geometry, adding a modifier and
bring in our bevel, bevel it off to no point not not three or not point non five, whichever one you
think looks best. I think no point, not
not three on this one. This one's set a
little bit higher, but it's a different
kind of arch. But I think now they
look about the same. And yeah, I think
I'm happy with that. So there we go, guys. Now, if
I move that one over there, what we can do now start work
on our last and final arch. So if I bring this over,
you can see I built this in 22 parts, but I don't think it's
really worth doing. But what I do think
it's worth doing is maybe splitting
off these parts here. So splitting off these parts, so they are little kind
of stones in there. That's something that'll
be good to learn. So let's pull this over
the left hand side. And same thing again, we're going to do
exactly the same thing. Control A or transforms
the origin geometry. Adding a modifier,
bring in a solidify, pull mas solidify inwards, make sure even thickness is on, and then take a check and just make sure you're
happy with the size. But the size on this one, we can actually bring
the door over, press the dot bun
and you can see, this is how the doors
going to fit in. If I made this any wider, so if I press S and X, let's pull it out and see if we can actually make it fit
a little bit better, which it does now, like so. And then what we
can do now, we've got the right
thickness, I think. So what I want to do is this
isn't going on the door. It is going in the arch in front of the door, as you know, but what I can do now is
just put my door back, so I can put my door
back over there, and then I can come
back to this arch now and actually
get to work on it. So first of all, let's come in. And apply these, solidify,
and then press tab. And what we want to
do is we want to put in two parts on here. So we still want our
stones coming up, but we want these
parts flattening out. So what I'm going to do is
see if I can flan these out, so, shift, click, shift, click, press one,
and then S and z, and zero and zero those out. And you can see
it hasn't altered the shape of it, which
is great for us. Now we want to do is we want to keep these three parts in here, so l, shift, click,
l shift, click. Then we want to split
these up like so. We're going round,
splitting them up, and this one, right click
and marking a seam. Now, from here, let's
split all of these up. So we're going to split
these up, these up, and these up, and the
same this side as well. We're going to press Y, and
now they're all split up. And from here, then we
can grab the whole thing, mesh, clean up, build holes. And there we go. Now, we
should filled those holes. Now what I'm going to
do in this one is, I'm just going to resell
my transforms now, right click SargensGeometry, adding a modifying
generator bevel. Let's put it on note
point note note three, and we should end up with
something like this, which is exactly what
we're looking for. From here, then we need
two bands on here. So if you look at
the reference again, you'll see there's two bands. So on the next lesson, then
we'll put one band up here, one band here, and then
get this center part in. Once we've done that, then,
those are the archers done. We can get in our
materials and shaders. We can name them, put them
in our asset manager, and then we're on to actually building out a little bit
more of our building. So all to look forward to. Alright, everyone, so I hope you enjoyed that, and I'll
see you on the next one. Thanks a lot. Bye bye.
109. Preparing Archways and Fences for Asset Libraries: Welcome back everyone.
Blend Building master class from concept to final render, and this is where
we left it off. Okay, so let's now, first of all, start with
our points on here. So if I press Control
R, left click, right click, Control R,
left click, right click. What I'm going to
do is Alt shifting, click and drop those up there, and then Control R, left
click, right, click. Control, left click,
right, click. Alright, so now for press one, I should be able to
come in, Alt Shift and click and drag
these wherever I want. So what I'll do is I'll
bring these down first, so I'll bring these
down near the bom. Don't forget, I've
got to bevel it as well. And then I'll
leave these in. I'll bevel them all at the
same time. So Control B. Turn the bevel down
and let's bevel them all at the same time,
holding the ship button, and then eat, enter, and then lt an and
bring them out. So. And there we go. Alright,
so that's that bit done. Now we need just this bit
here. We may as well. Use this to actually
create this top part. So if I come in, control,
left click, right, click, control, left
click, right, click. And then what I'll
do is just mark a quick scene because I'll
make it easier to grab them. But then I can
press L and then E, enter alters, and then I can bring this one
out as well, like so. And then finally, I can press I, bring this in, and then
either bring it in or out. I think actually what I'll
do is instead of doing that, I'll grab all three of these, press the ebon and
bring them in like so, and then I'm going to bring
them in on the original. They are put out, but I think it actually looks better in. Now remember, we've already got a bevel on here, so
that one's that one. We've got a bevel on this one, and finally, we've got
a bevel on this one. Now we need to do
then is name them. We need to put them in our asset manager because these are pretty much done now and finally
get some materials on them. So what I'm going to do
is just grab all three, controle or transform
set origin and geometry. Now, unlike the stairs,
we don't actually have to apply the bevel
because we're not joining loads and loads
of different things together where they need
different bevels on them, for instance, so we're
not going to do that. Now, we're also
going to bring in, I think, so this
part this part here. Let's also bring that
over. Let's spin it round. So if I zoom into it, should be able to press
Rsad -90, spin it round. And then what I'll also do is
just resell the transforms. So I'm just going to
grab one of them last. Just sudden they're
both not orange. Press Control A or transforms and set origin to geometry.
And you know what? I don't know why that happened.
That is on the array. So there's an issue
there with the array. And I will need to
sell the transform. So I'm going to try that again. I'm going to press
Control A You know what? I'll actually look,
first of all, 3.250. Let's see if actually, if I copy this so Control C,
reset my transforms. It's on the Y. So Control A, what I know what's
happening, actually. If I press R z minus
if I press R Z 90, press Control A, all transforms. There you go. That's
what's happening. It's because we have spun them round is why
that's happening. So what I'm going to do
is press Control Z twice. And what I'll do is
I'll come to it. I'll press Control A, I'll transform set
origin to geometry. And instead of it being on
the wire, I'll zero that, and I'll put it on the X, so Control V, enter,
and there we go. Now I'll reset all the
transforms on this one, set origin geometry,
and there we go. Now, unfortunately,
we can't actually, grab these together because we need to pull this part out. That's the reason and
also we're going to be arraying that. So I'm
not going to do that. What I'm going to
do instead, then is just go to my rendered view. And when I come in,
file save out my work. Let's come to these parts first because these
are the easy parts. So what I'll do is
just grab them all, press A U Smart UV
project. Click Okay. And then I'll come
down to material, drop down menu, and
we're looking for metal. So metal building,
this one here. And I'm also then going to
grab this one and this one, press Control L, and I'm
going to link materials. So let's just link
materials, and there we go. Now the reason I did that
again is if I press tab now. Come to each of these ends. I should be able to if my option is on crack
face attributes, just pull these out without stretching
them and there you go. Now you can see what
they look like, and that is exactly
what I'm looking for. Let's put them back.
They're actually done now, and let's actually
come to our stone. I'm going to press the end but just to put that
out of the way. Now, with our stone, well, we need one with gold on. I'm just looking if I
should be able to use this. So what I'm going to do
is just grab this one, this one, this one, and
then grab this one. This only has stone
light on, actually. I'm looking for one
where it might have both on. Let's have a look. Have we got anything
with bofham? Stone lighter, stone
light. There we go. So that one there, we'll
grab all three of these. Grab this last, press Control L, and we'll link materials. Then what we'll do is
we'll come into these. So let's press tab A U, Smart UVPJ click Okay, and let's have a look what
that's going to look like. The stone's looking
very, very nice already. So now all I want to
do is change this one. So L, you can see that
if I zoom into this, it's gone to the actual seams. So what I want to
do is press Control plus just to go
to the next part, and then I'll do
Stone Lighter a sign. Let's hide it out of the way. And all I'm going to
do then is Alt Shift, click, Alt Shift click
around these edges. Like so Control Plus, Stone lighter, click a sign. And then that one's done. Press voltage, bring
everything back. And you can see now just
how quick this actually is. Now, with this one
here, we'll come in, and what we'll do is Alt Shift
click going around there, Control plus, and we'll go
Stone lighter, click a sign. Don't think I really
want to change anything apart from
bringing in some gold. So what I'm going to
do is just click Plus, go to my asset manager, come over to my resources. So resource a pack, go over to materials and
shaders, and here is my gold. So over here on materials, I'm just going to drag and
drop this in right there, and then it's back
over to modeling. So back over to modeling,
and there we go. And now just click on this part, and we're going to
click Jos wondering, let's just have a look. You need to press Control plus L just to go to the next part, click Metal Gold, click assign. And there is the metal gold. You can see that looks
really, really nice gold. And then finally,
we're on to this part. Now, we'll just then
what we're going to do is either do just the front. So if you grab just
the front with Control plus and click a sign or you
can grab the whole thing. I think for me, I'm
going to be happy with just the front. Okay, so small, medium, large arches. That's
what we'll go with. So if you grab this one, this one's going
to be the small, so small. Small. Not snow. Small arch. Like so go with the second
one, large arch, large. Arch. Like, so and medium arch. So up to medium arch. Like so. Alright,
let's grab them all, and then what we can
do is we can press M, and we can put them in
their new collection, so we'll call it Archds L so. Now before we go
into asset manager, let's just do this, as well. We'll call it fence
railing, fence post. So this one here, fence post. It's got a kneeon
there, like so, and then fence railing. So F two, fence
railing, like so. Now, let's also put these in their own as
well, so grab them both, press the button, and we'll
call it fence. Like so. Fence. Fence. And there we go. Now, let's go to
our asset manager. So what we'll do is we'll grab
all three of these first. We'll make sure that this is on our modular pack, like so. And then what I'm going to do is go over the right and side press the dot bom right click
and Mark as asset. Then I'll go to this one, and I'll come down right
click and mark as asset. Now, let's do two. So we'll do Archers first. So Archers and then
we'll do another one, and this one will be
fence, fence, like so. And then what we'll
do is now we'll come down to unassigned, and here is our arches. So let's move up
right at the top. It should be and go
and drop it in there. And then we've got our fences, which are in this
one here, like so. Alright, let's tidy everything up because they're all done now. And then what we'll do is
move them over to here, and I'll move my fence over to something
like here, like so. I'm also going to come to modeling now and just make
sure everything is tidy. So we've got our
boolean cutters, which we're not going to
need, so just delete those. Tidy everything up. We've also got something called
railings with nothing in it. So railings. What is railings, even? I don't even know
what's supposed to be in there, to be honest. So what we'll do is we'll just delete that out of the way. And then we should have
just these things like so. We've also got something
which is a ground plane. Where are my ground planes, which are these here
because they weren't named. So we'll call this F two, and we'll call it fence post. Like so, and there we go. In fact, it's not actually
naming for some reason. So fence post. Why is it not
naming? There we go. So fence post oh 01,
which should be. Let me just have a look
at where it's gone. There's that fence post. I don't know what this is.
Et's have a look what that is. Press a little dot
B. This, okay. So this is actually an empty. So if I press tab, you can see that there's
nothing there. You will end up with
empties in your file, especially when you're
beginning ended up with thousands of them
when I first started out. Don't worry about
them. You can see it's an empty because
even when I press tab, there is no mesh
there, as you can see. Sometimes it happens
when you start something a curve or
something like that. So just delete it
out of the way. We'll come to this
one then. I'll press a little dot bun and
this is my wool. So it says ground playing on here, but it's actually my wool. So what I'll do is I'll
just rename it to wool. Like so, and I will also put it in one that says
New collection and wool to tidy everything
up, like so. You can also drag and drop
these in any way you want to, and then I'll just get rid of my grand plane because I
really don't need that. Okay, so far so good. So let's go out now
and file and save. And then on the next one, we're going to be jumping in to our main build and actually getting to work on
that one again. Alright, everyone, so I hope you enjoyed that, and I'll
see you on the next one. Thanks a lot. Bye bye.
110. Filling Gaps and Enhancing Wall Decorations: Welcome back everyone to blend the building master class
from concept to final render, and this is where
we left the off. Alright, so just make
sure this is saved out. Make sure it's either on
wireframe or object mode, and then what we'll do
is go to our other file, which is this one here. Now, finally, we can actually do a lot of building in here, because this part
here, as I said, is mainly going to be built inside here because there's no point taking
that into the file. Once you've done it, then you can put them
in the other file to be used in other buildings
and things like this. But at the moment, what we're going to do is
build them on here. Now, we're not going
to do that right now. What we're going
to do right now is actually bring in
some of the parts. So I'm going to put
it onto RenderView. I'm going to then just save out my file, making sure it's saved. We're going to go
to asset manager. So let's go to asset manager. I'm going to put this
to the front as well, because reorder the front. There we go, because
my other ones set the front and
this one's not. Now what we want to
do is come to arches. So let's go to arches
and the arch we're going to one is going
to be the small arch. So let's bring this in Arts 90, and then we're just going
to put this into place. So if I press one, sorry three, I should be able to actually
grab my door, shifts, curse its leg to grab my arch, shifts and selections cursor. And there we go. Now
what I want to do is just lift it up into place, wherever it's going
to go and then just pull it out, like so. Now, you can see that this
is looking in a tiny bit. Too small on here. So all we'll do is press S and Y and
then just pull it in, so there's a little
bit of an edge. You don't want much, and
you also just want to make sure that it is pulled down to the actual floor because you can see
at the moment it's not quite in the floor, like so. Now, last of all, we want
to put a front on this. So we just want to take
a piece of mesh and put a front on here because
it wouldn't be like an arch and then
just this part here. So just a small thing. So if you go to mesh,
bring in a plane, spin it around, so Y 90,
and then just pull it out. And all we're going
to do is just put it into place like so, bring it up, and then S and Z. Like so, pull it up into place
wherever it's going to go. So something like
this, just make sure we've not got
any gaps in here. So just press S there if you need to pull it down
a little bit further. And then all you're
going to do is S and X, sorry, Y and just pull it in. And finally, then
if I press three, we can see now it's in place. Now, all I need to
do now is control, bring in a few edge loops. So maybe five,
something like this. And then finally,
what we can do is we can come in now
to each of these. So if I grab each of these, I can pull them up,
pull these ones down. And if you want to
see through there, you can grab both of them. Like sew, and then just
pull them up into place. So like sew, hold them up, and like sew, hold them up. And then all we want to do
is tab, A, grab everything, U, and just unwrap it is just a plain
now. It does say this. So it means I just need
to resell my transform, set origin to geometry, like so now tab, click Unwrap. There we go. And now grab this one, purse, control, L, and we're
going to link materials. And you can see
that the material doesn't quite look right. I'm going to bring
it further forward, first of all, just so
we can see it, like so. And then what I'm going to
do now is come to UVditing. So we'll just go UV Editing. And you can see
here it's massive. That's part of the problem. If I zoom in, press the aboard and I can bring it down then to be something more like this
and back to asset manager. Let's have a look at
what that looks like. Tab double tap the
A, and there we go. That part is done. Now, let's move on them round. To this back section here, and we're going to be using
so these are our columns. Now we know with all of
these, we can simply come in. So all of this
side, all of this, we can come in and press Alt D because we're not actually going to be moving
those in any way. They're just going
to be basically duplicated over this side. So if I press Alt
D, I should then be able to pull them out
into the corner of here. Let's check them against here. Now, again, remember, I'm using, you know, on Render View. I'm going to be
dropping between them. So just remember, though, you might not be
able to get away with having it on Render View, but you'll be able
to certainly see bet what I'm
actually doing here. So I'm going to pull
these in place like so. Now I need the bar. So I've got this bar here. Again, Alt D, I
can bring it out. I can press R Z 90,
spin that round then, press Control one
to go inside view, and I'll just bring
it into place. And you can see it's
nearly finished. Just a little bit of
tiny more, so E and X. Pull it out a little
bit, like so, and then let's drop that back
into place. There we go. Alright, and you can
also see, as well, how quick everything goes.
Now you've got that. Now, the next one I need, I want to possibly the smaller bar. So I've got the thick bar here, and I'm just looking
what other bars I actually have.
Let me just go too. And these parts here so
decorative. It's not under that. It's under support. There we go. Now, these are my supports. So let me look at which
supports I've got. I just want a smaller piece, just go in in this part here. So let me just have a
look which ones I've got. I've got all of these. Think
it's going to be that one, which is, I'm fairly
sure this one down here. I'm just going to bring it in. It doesn't matter if you're in, by the way, I bring it in
for your asset manager. They're basically pretty
much the same thing. So control one.
Let's pull it up. And what I want to know is, yes, if we have an array on there, so I'm just going
to turn that on. Put it up to three, and then
I'll move it into place. And I want to put it just
round about in between here. Now, what I'm going
to do with this one is I'm just going
to press Es and's E and pull it out a little bit to make it
a little bit thicker, and then I can put it
into place, like so. And this part is time consuming, but it's pretty enjoyable. Now you can see what's
happened to this. Yeah, As it 180. There we go. Now, let's press Control and one again. Let's
put it into place. I've got it where I
want it. Let's press S and X now and Js. Bring it back a
little bit, see if I can fit it in. Like so. So how much time you spend on
this is entirely up to you, but I actually find it
pretty fun doing this part. I like all that work has come
together to produce this. Okay, so now I want to do is I want one of the smaller ones, which is this one here. We do have a smaller one. So we have supports we have, where are the columns roof
support bottoms, there we go. So we have, I think, this
one here. Let's have a look. Is that the same size,
or is it a bit smaller? That looks the same size. So that's that one.
Let's try this one. There we go. That's the one. Now, let's put this
right in center of here. Now, get in the center off here. Now, I'm just going to come in, grab this shifts,
cursor selected. Now, once I've done this, I
can actually look on my wall, but let's get
everything in first. So if I bring this
in now and I pass shifts and selection, do cursor. And then what I'll do is now, I'm going to drop this down. Now, this needs to go
just on top of that. I think I should have
used the bigger one, but instead of doing that,
I'll just pull it down. I want it going into the
top of there, like so, and then I'm going to grab
one of these like so, and shift a selections cursor
and let's spin it around. 180, and then I'll also
spin it the other way. Y, 180, and then Control one, and I'm going to pull it
down into place like so, and maybe maybe it's
a little bit thick. A is it in the middle? That's one question I
need to ask myself. Let's have a look.
Pull it out a tad, just making sure
everything goes in. We'll make a tiny, tiny
bit smaller, pull it up, pull it out a tad like so, and then just move it over
a little bit, I think. Alright. That's that bit. Now, let's put in the bottom. So this one here, we know we've pulled it
out a little bit. So all I'm going to do
with this one, O D, bring it out, and
then R Z 90, control. In fact, you know what we'll do. We'll pull it out
into place first. We'll press the dot button. And then we want to, as you
can see, ride on top of that. So if I pull it back into place and then
pull it over here, like so, and then all I'm
going to do is S and X. Pull it out, and there we go. Now, if it is irritating you, you know, where the center is, it's like pulling from here. You can shift right click and then set your origin to
there if you want to, but it doesn't
bother me too much. I'm just telling you if in
case you want to do that. All right, so that's that bit. Now, let's think about
the bottom section. So the bottom section, I'm just going to
carry this along, so I'm going to
press Old D again. I'm going to press Z
90 and bring this out. And then we're going
to jaws drop this into place like so, and I'm going to pull it
back, making sure it fits. Now, let's have a look, making sure that we've got
no flashing in there. I'm going to pull it out, and then we go just making sure it's fitting in there and maybe maybe I want one more.
Let's pull it up. You can see with this one that I might need to shift D this because or I could let's just have a look how far it's
off. It's a long way off. If I go S&X like with this one, you can see it's a long way off. You know what? Let's
have a look. You know what I'm going to
leave it as it is. Now, I can see that
when I come out, you can see the
flashing on there. We don't really want that, which means we need to pull it a little bit, little bit forward. And let's have a
look. Not so bad now. And there we go. Alright,
that's that part. Now, on the next one, then, we're gonna get
this roof part in, and then we can get
one window in here, and then two windows down here. And then we all use our Boolean, and that part is
pretty much done. Alright, if you want so
I hope you enjoyed that. I'll see you in the next
one. Thanks a lot. Bye bye.
111. Enhancing Wall Decor with HDRI Lighting Previews: Welcome back everyone to blend the Building master class
from concept to final render, and this is where
we left it off. Okay, so windows. This is one window
we're going to need, so I'm going to grab this one. No, we can't grab this one. Can't grab this
one. This one here. There we go. Alt D,
let's bring it down. Then we're going to need
some smaller windows, so Alt D, bring them out.
Spin them both round. So R z, 90. And then all we're going
to do is press Control and one and what I want to do then is
fit them into place. So now, roughly, this is
the center, as we can see. Now we want this
bang in the center. So if I pull it up to there, you can see it's bang in the center. And this one, we want each side. Now, we do want it level with
this like the other ones. So if I pull this then
to the side, like so, and I should I'll
just hold D and see if they actually
fit because I can see the gap down here, so hold D. No point creating
more work for myself. And then let's put
them in, like so. And then what we'll
do is pull them all back at the same time. Though we're going to
pull them back to there. These are going to
be these windows. We're going to actually use a boolean, like we've
done with here. You can see in here. Have we used the Boolean
in there? I think we have. Let's have a look. Yes, we have. So we've got our
boolean already set. And then we want. So with this, for instance, you can see, and I'm going to
have to pull them further back so
they're in the wool, so they're just over
the top of there. Like, so we don't want
them coming forward, so that's why we
need the boolean. And then with this one, we can see roughly how
far they go back. So you can see roughly
that gap there. That is what we want
to do with this one. They've come ins. They've
come in and pull them back. Let's say something like that. That looks about perfect. Let's save out our
work. And then what we'll do is we've
got our booleans here. Let's turn them on. So
we've got our square, and we've got our
small window, like so. Now, what we can do is we've got these centered, so
we'll come to this one, this window, shifts,
cursor selected, and then shifts,
selections cursor. If you press now Control one, you will see that
that's fitting in perfectly, really, really easy. And now we'll just
spin this round. So Is 90, we'll grab
this window first. Like so shifts,
goes to selected. Grab this one, shifts, and selection to cursor. And we can see if I
press Control one, that is pretty much perfectly aligned with this one as well. Now what I want to do is I
want to put this over here. So I'm going to press Shift D because I'm going to
delete it anyway. To this one, shifts, selections cursor or
cuss to selected. Sorry, grab this one and shifts and selections
cursor, and there we go. That one's in. Now,
let's pull them back. So we're going to pull them
back into place like so, and then we're going to join No, we're not going to join
them together, actually. We'll pull this one. Whoops. We'll This one's already
back far enough, actually. So now what we should be
able to do is grab this one, grab this one, press
control, and minus. This one, this one, control, and minus not working. Let's have a look.
References. Do we still have a ball tool on? Let's have a look, so ball tools not ticked on for some reason. Let's tick it on.
Blows that off. Control and minus,
and there we go. Let's grab this one and this one and see if I'm
doing both at the same time. So control the minus,
and there we go. Now, let's actually apply these. So I'm going to apply them all together. So one, two, three. I want to make sure
when I'm doing this, I'm not applying anything else, so just click on this one, and then you've
got all of these. Now, you can go down Control A, Control A, Control A. Sometimes, though,
depending on what order they modifies in, that
doesn't always work. So the best way of
doing it is object, convert, convert to
mesh, and there we go. Now what we'll do
is we'll come in. We'll delete one of
these out of the way. We'll grab then this one, and we're going to
remove the cutter, grab this one,
remove the cutter, and then all we're going
to do is pull those out. At P, just to take
off those parents, and then finally hide your
booleans out of the way. And there we go as
simple as that. Now, let's come in
to these parts here. Alt D, let's bring it over. We want this right
up against here, so Z 90, control one, and let's put it into place. It's going to be
roughly around there. Let's bring it in. And then we obviously want to
turn up the array. So let's turn up the
array a couple of times. Let's press S and X because remember that
when we're pulling this in, we haven't got to worry
about other ones going wrong like this one over
here because we're not actually using edit mode, so we're not editing it,
so it's okay to use that. Make sure everything's
in, make sure it's not coming forward over here
and make sure that also, we know it's jaws to right height where the
actual roof is going in. So with this one, we can see that the roof is
not quite there. So we've got a couple
of choices here. We can either move this
back a little bit, but then we've got the problem
with the wall or we can actually pick this up a little bit. It's completely up to you. Jaws to tad, like so, so we've got j a little bit. Or the lip going in down
there. You know what? I'm jaws looking at these 'cause I don't want to
pull it up too high. You can see now it's
gone way too high. You know what I'm gonna do? I'm not going to worry about it. You know, hardly noticeable. Hardly noticeable.
Okay, let's go now to Rendeview this is what
we've got then so far. Now, at this point, as well, I always look and think, do I need to change my sun? Now, before doing this,
just go down, save it out. And what I want you
to do now is come and did we actually apply that? Yes, we did. Come
over to your world and come down to sun settings. I'm just wondering if I can move it around
let's have a look. Can I actually move it around and you're also going to go to my shading and go to World, because sometimes with HDRIs in particular, let's
just move it up. There we go. Yeah, like this
one here at the moment, I can't actually move it around. Now, we have to be very
careful how we do this. So what I'm first
of all going to do is put it on rendered mode. Like so, and I'm going to see if I can just spin
this around now. Now, just remember to do this. Go to edit. You're going
to go to preferences, and you just want
to put in Wrangler. So just make sure that's on. Once that's on, then
come back to it. Control T, and that will
bring in the mapping. Again, make sure it's safe
because generally, you know, if you've not got a lot of VRAM, blending normally
crashes when you rotate in the sun,
so just be careful. Once you load it back up,
it will be absolutely fine. Now I'm going to
do is I'm going to come down to where
it says rotation. I'm going to go to where it says Z and I'm going to
spin this around then, like so, and then we
can turn it around. Onto here, like, we
should then have a nice, nice view of what we're
actually doing in here, which is the most
important thing because we need to
know what we're doing. Okay, so that's that bit. Now, now I'm going to do is I think I'm going to
work my way around, so work my way around here. And, you know, it'll
be interesting once I've got here
actually, you know, built this out, then we can actually start with one
of my favorite parts, which is this part here. So, let's get this
finished first. I know it's a bit
tedious, but you might want to you know, start over here, H here. Look at your reference if you're going to
do it on your own. Now I'm going to do is
I'm going to make sure, first of all, as you can see,
these are not improperly, so I'll press S and Y and
squish them in on the Y. And then what I can do
is I can pull them out slightly so that in
front of that roof. I'm just going to check now they're still
a little bit out. I need to pull them
a little bit more. Check in this. You
can see S and Y. Let's pull them in a little bit more and then pull them out, holding the shift bone, like so. And there we go. You can see now that roof is
actually feeling better. And now what we'll do
is on this one here, so on this back here, we don't
actually have this part. We just have this bar
kind of going across. So what I'm going to do
is I'm going to put in one, two, 2 bars, and then I'm thinking, we'll
put in I won't put a bot. I don't think I'm
going to put a bar. Here I think I'm
going to put because the way it's laid
out, I've got one, two, three, four, and
then five, six windows. So I think I'm going to do this one a little bit different. But first of all, I do need a big a big ball like
this. So you know what? Before we do that, though, let's actually bring this over. So if I come in, I'm going
to grab all of this like, so I'm going to grab
this, this and this. And then what I'm
going to do is put them right in this corner here. So if I press old D, I should then be able
to drag them over. Press the dot bun or zoom in. At least if I press the dot bun, we should be able to
see what we're doing. And then what I'm going to
do is shift and select. I'm going to put my
little sideways V on and go to three D cursor. And now I can actually see how
far I'm pulling these out. So into place into
place into place. Now we've got that
line going down there, and that is what I want, and now they're pretty much into place. And I'll deal with this bit. Um as I worked my way around. We can also see we've got chimneys and we
haven't done those, but we can see exactly
where they're going to be. So I can see that lines up
very nicely now with that. Alright, so now let's grab this part here, and
I can put this over. So I'm going to press O D. I'm going to press RZ, 90. And we can see we're coming. The reason that
happened, by the way, is because we move this
little sideways vehicle, press it and put it back
to individual origins. Now it'll actually
rotate around there. Either way, it doesn't
matter because I've already got it
in place anyway. So in place like so. Now what I am going to do is just make it a
little bit smaller. So S and Y, let's pull it back a little bit, so we're not wasting
all that UV space. And then we want this one here to come around and up here. Now, I think at this point, we'll probably be better off bring in now we've
got this one in. Probably be better off
bringing in our windows. Now, I'm also looking, and I don't know
how I've done it, but even putting the booleans in there because we
unwrapped this part first, it basically just left all
the brick there as well. So that's really nice. You know what we'll do
on the next one then is, we'll bring in I think these windows are a
little bit too far. In. So what I'm going to
do is just grab them all, pull them out a little
bit, double tap the egg. And I think now they look way, way better than what they did. I'm just making sure that
we're not going over there, as you can see on this here, if we're going slightly
over like on these two, just pull it out very slightly. And then we go, you're not going to harm
anything by doing that, make a check on everything
else just to make sure like these here now, you can see they're
a little bit out, which means that we're
going to pull these out, and then I'll pull
these out as well. So I'm just going to pull
them out very, very slightly, making sure we've got a little bit of a
lip there like so, because if you've
not got that, it's going to look a
little bit weird, and you will pick it
up in the render. Now, I can also see as
well that these here, they'll not out far enough. So what I'm going
to do is just pull them out, pull them
out, pull them out. And now I can see
that these have gone a little bit over this, so I'm going to pull them out. And these are the final
fixers, by the way, guys, just make sure
everything's going right. I want to make sure that
I've not got a gap in here. Now you can see I've
got a gap in here. So S and Y, pull them out a
little bit, double tap the A, and there's that fix. And then I'm looking now to make sure I can't see any
bricks in there. No, that looks absolutely fine. Sometimes, if we do this, um I'm going to get
rid of this, as well. You'll be able to see in the render and we
don't want that. So going back, as I said, on the next one, then we'll
grab these windows here. And what we're gonna do is
put one here, one here, and then go to put one
and another one on there. And then finally, up here, we're going to have
some bigger windows, and then we can start
filling them out. Alright, everyone, so I hope you enjoyed that and I'll
see you on the next one. Thanks a lot. Bye bye.
112. Wall Decor Refinement and Window Placement in Blender: Welcome back everyone to blend the building master class
from concept to final render. Now, let's come in, and
what we'll do is well, first of all, before
carrying on with that is we're just going
to grab all of these. We'll grab this one in here, we'll grab this one in here, and we'll grab this one here. And then what I'm going
to do is just press Alt D. Like so, and just pull them
over to this side. Now I want to do
is I just want to mirror them so they're
going the other way because I want them facing this way to go into
this part here. So what I'm going to
do is see if I can come in and go to
object, mirror, and I want to mirror
on the y like so, and I should be able to just turn them all
around like that. Without altering
these ones in here. The most important thing is
we don't want to alter those, so it should be
able to just turn around, and then from there, I should be able to just
come in, go round to here, and pull them over, hopefully, so that they go into this corner along here and let's see if it can actually
do this into this corner. Long here, pull them
out, pull them out. I'll get this part
in first, I think, so pull them over because I can see they're still
going the wrong way. You can see here that you
know what I'm going to do? I'm just going to pull them
out, and then I'm going to put them in separately because I think that's going to work much, much better, pull them
out, pull them out. And I can also see that this
is a little bit higher. And maybe made Maybe I've made a little bit
of a mistake here, but anyway, let's pull
it up into place. I'm going to pull this up. You know what I'll do, actually? I'll take this one
and use that instead. So I'm just going to grab
this old D, drag it over. I'll pull this one into place. Like so. That's
looking pretty nice. Now, this one here, I might be able to just
stretch out a little bit. So if I pull this over, I should be able to just put
it in the corner there, like so, and then
have it coming up. So pull it up into there. And I'm just wondering whether I should put it underneath here. Let's see if it'll
actually go under there. So if I pull it up, pull it up. And I'm just seeing if
I can pull this out a little bit more just over
the front of it. Like so. And there we go that then is going all the way down there. And you know what?
I'm just going to delete that one
out of the way. So I'm not going to
put that in because then we haven't really got enough room in
there down here anyway. And I'm going to think
put this part in. So I'm going to delete this.
I'm going to delete this. And I'm going to
just press Alt D, and just bring that part over, put it right into place with
a little bit of a gap there. There we go. And it's just tying up that little
bit just in case. I mean, we're not going to
take an image like this, but we might take an image, you know, from this angle here, and that's why I'm just making sure that we've got something in there and it's not just an empty gap or anything like that. And once we've got this
part going over here, so if I come in
and, for instance, grab this, press Alt D, bring it over, you
can see that it needs mirroring on the X. So object, mirror,
X, spin it round. And then I should
be able to put this in place right along there. And as you can see now,
that's fitting in very nice. And then you can see that lines
up very nicely with that. Now, the rest of whatever
we do down here, you know, this little gap and that
doesn't really matter. But now, let's move on then. So let's move on then
to this part on here. So what I'm going to
do is, first of all, halfway up, I think
I'll take this, and then what I'll do
is I'll press Alt D, bring it over or Z, 90, spin it round. I'm going to put
this into place. Like so, and where do
I actually want it? I'm going to put it just
for now in roundabout here. So if I pull it back, it should
sit your nicely on there. Now, let's bring
in those windows. So what I'm going to do
is I'm going to grab this window or this
window. Let's see. This window here, Alt D. Bring
it over and spin it round. So 180, spin it round. And now I want to put
two windows in here. Now, I want to just grab
all of these parts here, I think, this part
and this part. And then what I'm going
to do in this window is press ShiftH now I can
actually see what I'm doing. So now for press Control three, I should be able to go
around the back and see where these are
going to line up. Now if I pull this
over here, like so, and if I press Alt D, pull it over here, so we can see that probably
they're a little bit too big. There's not much of
a gap down there. We only want a little tiny
space down here, but still, this is either a little bit too big or if I put them in place because I
can put them in place now, like so, I want
them just just on there so we can see now that's
what they will look like. They look a little
bit too big to me. Even if we pull them down, I think I still think even
if we pull this down, they're still a
little bit too big. So let's grab them both. And then what we'll
do is make sure that we're on individual origins. And then what we'll
do is just make them smaller, like so. And I think now if I pull this up and then just pull them
out a little bit more. Pull them out, it might
have gone a little bit too far down there. I think they're
going to look much, much nicer there, like so. Now, the other thing is, you
know, I put these in place. So what I'll do is,
I'll come round. I'll press Altag now
because I've got those realistically in place. And then what I'm going
to do is I'm going to grab this one here, I'm going to put
it right in there. So if I press Alt D, should
then be able to bring it out. I want to put it
right in the center. So shifts, cursed to selected, grab this one, and
then we'll press shifts and selections cursor. And then what we'll
do is drag this down. And I'm going to sit it
right on top of there, pulling it out a little bit, so pull it out, like so, and I want it going all
the way down to here now. So I'm thinking, what
other one can I use? Let's have a look
at our supports. So we're going to asset manager. Here's all our
supports laid out. Though we could. We've got
this one at the moment. Let's have a look at this one,
so we can bring this one. And I want to basically come
down to this point here. So this point here,
sit in under. So if I press Shift
desk elections cursor, bring it down and sit it
right on there, I can see. Yeah, it needs
probably stretching out a little bit. Can
we actually do that? So, EssensEd, how far can we get away with
stretching it out? And I want it just
there, pull it out. So we shift, and then
I'll grab this one, op D, bring it over. Go. And then R z 90, shifts, so shifts,
selections cursor. And then let's drop
this part down, and then let's bring it out. So bring it out, bring it out. There you go. That
is that part done. Alright, that's looking
pretty cool as well. Now, let's come with
these two parts. I'll grab this one first, and then what I'll do is I'll
press D. And then, Z 90. And then what I'll do is I'll
put it below this one here. So if I just grab this one, I should be able to press
Shifts, Coster selected. Grab this Shifteselection, cursors shifts,
selection cursor. I should now if I go
to Control three, be able to see is that
lined up with that? Why is it not lined
up with that? Shift, first to selected. Hide it other way.
Grab this one. Shift, selection cursor,
oltate, bring it back. And now you can see I should
be able to grab this, and it's in line with these. So now I can go and pull it down where
I actually want it. At this point, I can see whether this is a little bit
high or a little bit low. We go all that into place. Then we'll do the
same on this side. So I'm going to go Shift, Selections curses. Shift, curse selected. Grab this one. Old D, shifts, and selections cursor
and then bring it down in line with this one, making sure that
they're lined up. And then I should be able to
pull this one out, as well. Like this one here.
And there we go. Now finally, we want
the bottom ones. Now before we do that,
actually, let's look. Are we happy with these? I think they need
going up a little bit, so I can just grab
all of these now, and I can grab this as well, and I can just pull
them up very slightly, giving us a little
bit more room. And then with this, I
can just press Edson, bring it down to
the top of there, so double tap the
A, and there we go, that's looking much better. And now what we need to
do is bring this round. So I'm going to press Alt D
or Z 90, bring this one out. Press a little dot born, and I'm going to
pull it into place. Just on the top of
there, like so, and then let's put it into here. Making sure it's not
going past there, so I'll press S and
Y, bring it in. Like so. All right.
That's that part. Now we'll come to this
bon pot of D or Z 90. Then just pull it into place. So. And with this one, let's see if we take down. So if we come to this, if we take down the count, yeah, it's going to be
too far, as you can see. Even if I move it up to you, it's still going to be too far. So what I'll do is just
point in another one, and then what I'll do is S
and Y and bring it down. And see if I can
actually fit it in then, like so, and I think that
is looking pretty nice. Now, if I zoom out, is it
going to be it far enough out? Basically, is what
I'm looking for, making sure it's
not coming past, you know, this part or
this part, which it's not. And finally, then we
can grab both of these, D, bring them down, dig them right on top of the right on top of here,
bring them up, bring them up. And then maybe, maybe
I'll either pull these out or I'll pull these back. So if I pull this out, coming out slowly, it's going in front of there,
so you know what? We'll just grab both of these. And instead of doing
that, we'll pull them back a little bit, like so. Okay. And there we go. That is looking very good. So now we'll do is
on the next lesson is we'll bring in our booleans. So we'll bring in our booleans. We'll get those booleand and then we'll do we'll
start work on here. We'll start work on here. And finally, then we can make
a start on this part here, which is the part I'm
really excited about doing. Alright, everyone, so I
hope you enjoyed that, and I'll see you in the next
one. Thanks a lot. Bye bye.
113. Decorating Upper Walls Above Ground Level Roofing: Welcome microphone to lend the building mass class from
concept to final render. Now, let's actually bring
in the Booleans on here. So we'll go first
of all to modeling. And then what we'll
do is we'll come over to our Booleans, which is this here.
Let's bring them all in. So we need one of
the large ones, which is this one
here and one of the little side ones,
which is this one here. So let's bring them over. Now what I'll do is
I'll spin this round, so I head 90. And then what I'll do
is I will come now, and I think the
easiest way to do this is just to have how
many of these we got four. So four of these
and two of these. So if I press Shift
D, bring it out. In fact, Shift D, enter, shift D, enter, and then on
this one, Shift D, enter. And then what I can do with this one is I'll
come to this first. In fact, I've already
got one there, so I'll come to this one, shifts and selections
cursor, keep offset. Now we can see because
we made those smaller, we are going to need
to make this smaller, which means I'm
going to shift D, this one again,
come to this one, Shift S, and cursor selected. Come to this one, shift
D, selections cursor. Now grab both of these. Now we can see as well,
they're a little bit out. And I'm just
wondering why that is maybe it's because I need
to reset both of these. So I'm just gonna make sure
we're doing this right. So let's have. Yeah, I think the first cursor was a little
bit out with this one. So if I press Control,
drop these back in, and then you'll see if I come to this one now, grab this, shifts, cursed to selected,
grab this one, shifts, selection, curse it. Now they're the same
height as you can see. Grab them both, make sure
under individual origins. Press the S bone then and now we're just going to
have to line them up. So it didn't work out like
I wanted it to. Not really. If I press it down, can actually
get it how I want it to. Let's press the S bone and bring them out a
little bit bigger. Let's pull them up
now, and there we go. Alright, that'll do. I'm just making sure
everything's in. Now, let's come to these ones. So these should be easier because we
aren't alter the size, so shifts, cursed to selected. Grab one of these, shifts
selection to cursor. Grab the next one, shifts, cursor selected, Shift S, selections cursor, Shift S, cs to selected, shifts
and selections cursor. And finally, last one.
Like this. Alright. There we go. Now
I can do is I can grab all of these
at the same time. I just want to make
sure, everything's in, so it should be okay
to rock 'n roll. Let's grab this one last. Let's press Control and
minus, and there we go. Now, we're just going
to grab just this part. We're going to go then to Object and we're going to apply
all of those booleans, so convert to mesh,
apply them all. Then we're going to come in now. We only want one each of
these, so delete this one. This one and this one, just
delete them out of the way, and then this one will
come over to our tool. So press N bunt to open it up, go to Boolean tool
and remove cutter, and same for this one then. So Boolean tool
and remove cutter. Now, this one's the same
as this, so actually, I can get rid of this because I made it smaller as well,
not forgot about that. Now, if I pull this out, I
just need to press ol P, clear the parent off,
and there we go, That is that part done? Let's hide the Booleans
out of the way. And you can see
working in this way is incredibly effective,
incredibly quick, way quicker than, you know, coming in and actually building
out the whole building or something like
this, really easy. The one thing I would say is
when you've built this out, you might want to take a
whole block like this, a whole block like this,
a whole block like this, and then you can
build out things extremely fast, you know,
once you've got this. So, in other words, take
just this block here, even with the stairs,
and you can put it over here, over
here, over here, and you can build out an
entire even city near enough based on this and then create more parts for it, and that is how you would do it. You wouldn't be
building, you know, little pieces in
like we're doing here because we're just
building a building. So let's come on round then. Now what we're
going to do is work our way around to this bit. So first of all, I
want perhaps one, just a line going over there. So all I'm going to do is
just grab this, hold D, and then bring it over, and I'm going to drop it,
obviously, in this part here. So it's going to go right
in this section here. Now the thing is
when you're actually building any buildings,
for that matter, or anything in three
D, it's important to not let have empty walls. You want to be doing
something. You can see here as well. I
need to pull this out. So good job I saw that, so let's pull it out a little bit. You want to be having something always going on with any part. You know, here,
we've got windows. We've got this part on here. Here we've got, you
know, a little bit of a balcony here,
another balcony here. There's always
something going on. It's not just the same
all the way around. That's something that you really want to think about when you're building something.
Alright, we've got this in. Now, let's come in and
grab these are the same. These are the same.
I'm thinking they'll just grab this one here. We've got this one in
here. You know what? We'll grab this one
here, we'll press ld. And what I'll do is
just bring it up just so it's going in
this building here. And then I'll press
Eston'sE and just squish it down just so it's
a little bit different. It's up to you whether
you want another part coming down there or not. I think for me, I'm actually
okay. I don't need that. What I want now is just
to grab this part here, and I want to put
this over here. So if I press Alt D, I should then be
able to bring it down into place right
on top of there, and I want to pull it
out a little bit more. And then finally, what I want to do is grab this part here, and then going to
press Alt D spin it round, so bring it over here. Odds head, 180 spin it round. Seven to go over the top, and then I just want
to line it up to make sure it's going in
to this part here, so you can see into there. Press the little dog bun. And now we can see
where we need to pull it out to pull
out, pull it out, pull it out, and double tap
the eight, and there we go. Alright, that's looking
so far so good. Do we need another part in here? I don't think so. Do we need just, you know, one more chunk or
something in this bit to show where it's
going into or another, you know, part like
we've got here. So we've got this
part right in here. Do we need to put part in there? Maybe. Let's see
what it looks like. So D, being as
we're already here, we might as well
just have a look and see if it's going to
add anything to it. So that's the main thing,
adding something to it. If it's not gonna add anything
to it, don't put it in. It's waste of time. So I'm
going to pull it out to there. And then what I'm going
to do is just grab this bit and pull it out a
little bit further. Like so. Double tap the A. And there we go. You know what? Yeah, I think it actually
looks bed like that. So yeah, I'm going
to leave that. Alright, working our way over, let's grab this part here. Did we squish this? I
think we squish this once, so I'll just grab this lt D. And then what I'm going to
do is I'm going to bring it up to the top of you. So up to the top, I'm going
to pull it out slightly. So just making sure
it's going in front of the wall and then I'm
going to pull it over, like so making sure that it's going to line up
with this part in here, like so, and I want it going
all the way over to there. Now, let me just hide my
chimney out the way at the moment because I want this to go all the
way over to here. I also want another
chunk in here. So I'm going to grab
this one Alt D, bring it over, like so, drop that in there, just with it stuck out
there, as you can see. And then I want to I'm just thinking I've
got a chimney her. I'm going to leave the chimney
off because it's going to make my life a
little bit easier. Now I want to one
of the windows. Now, we haven't used
this window yet, so let's come in
to Asset Manager. Let's bring in our windows. This is the window
we're going to use, so we're going to
drop that on there and then going to pull it up, spin it around making sure it span around this
way, I think it is. So I'll head -90,
and there we go. And then what I'll do is, I'll just come to this part in here. I'm going to press
Shift desk curse to select to come to this pot. Shift desk selection to curse. That then's going to put it
right in the center for me. That's exactly what I
want right in the center. And then what we're going
to do is drop this down. Now, with this, do you actually want it to
be set right back, so to be set right
back in there. So in there,
something like that, or do you want it to just
be on the outside like so. If you want it to be just
on the outside like so, don't bother print a boolean in. It looks good enough without it. Now, let's think about this
part coming down to here. So what I'm going to do is
I'm going to steal, I think. I'm going to move that over a
little bit because it's not quite in the right
place for some reason. Okay, so I'm going to steal, I think, this point here. And I'm going to put
that coming down to this point and then a kind
of column going down here. So let's do that. So I'll grab right, this
one and this one. I'm going to press Alt D, not Shift D, Alt D, and then we're going
to bring this into line a little bit further
maybe something like this, and then bring it up into place. And the top of it,
you go just over there with this part
just in this one. Now remember, we're going to be having a roof going on here,
which we're going to do. So just make sure
that this parts in, and then we'll have a
column in down here, and I think I'll use this one. Alt D, and let's bring it over. Now, if it's lt and D, remember that I don't want
to alter the amount of it. So I'm thinking on this point, we're only going down
to here such a waste. So what I'll do is
instead of that, I'll grab this one and go, This one might be
better, actually, Alt D. Let's see if
this one's better. I think this one's going
to be much, much better. Press the little dab
on just to zoom in. And let's drop it down
into there, like so. And again, you know, you need those parts
in because you can actually see
quite far over here. Now, next of all,
what I'm going to do is I'm going to come
in and I'm going to grab this part and you can see this part is
slightly forward. So I'm going to press the
TD, bring this part over, drop back the amount of eras drop it down by one
and then just pull it out, and it's going to be the same
is it going to be the same? Do we want it? Yeah,
you know what? I'm just wondering if I
need to place it higher, and I don't think I'm
gonna do it because I'm gonna let my roof do a little
bit of the work there. Now, finally, finally, I'm going to put
one more window in. So one of these windows, press salt D, and we're
gonna bring it over. I'm going to stick it right
in the center of there, again, always supporting them. So it'll always be
supported on here. Make sure it's in the center, and then we can pull it back. And on the next one,
then we can get a nice boolean in on that one. And then that is
that point done. And from there then, I think we can actually
make a start. And I think the third
thing we'll do is we'll make a start on
our roofs on this. And the idea is here that
I want to work our way around so that we can
start putting our gating. You know, putting our gating
and putting this part around here that parts really,
really interesting to do. So I'm going to save up my work, and I'll see you on the
next one, everyone. Thanks a lot. Bye bye.
114. Speeding Up Roof Tile Optimization with Feature Selection: Welcome back if we want to blend the building master class
from concept to final render. And this is where we left off. So now let's bring
in our Boolean. Now, the other thing
is, if you're like me, I love jumping around. I don't like just doing
something over and over again. So, you know, I tend to jump
around a hell of a lot. So if I bring this over and
I come to this part here, I'm gonna press Shift Dess, curse to selected,
grab this one, Shiftes and selections cursor. And the reason I'm
saying that is because once I've done this, I'm actually going to start
creating the roofs on I'm not going to create the roofs
for the whole thing because I don't really
want to do that. And then I'll jump around. I'll create the fronts on here, and then I might jump over to creating these side
bits or this top bit. You know, jumping around
makes it interesting. You're just going to
make sure that you don't get absolutely tired
of doing the project. If I press dot, then
I can zoom into here. Let's grab this wall, and I'm gonna press
Control minus. And then what I'm gonna
do is just apply this because I've only got one
boolean on, so apply this. And then I'm going to
grab this part here, remove cutter, oat P, and then clear pin. And then I can move
this over here. Alright, so we're pretty much
done with this part now. So what I want to do
is create the roofs for this part, this
part and this part. So we'll come hide our
booleans out of the way, bring back our roof. We might be able to get away
with one of these roofs, but being as we're
doing a more together, let's just use this one. So I'm going to press Shift D. Because we don't want to press Alt D and then
go to spin it around. So Z 90. And then what I'm going
to do is pull it over. And again, we'll use we'll just grab this
one and this one. I'll press ShiftH just to hide everything
else out of the way. And then I should be
able to jaws put on my magnet again like
before, bring it down. And hopefully, let's
see if it'll work. We should be able to
then pull into place, and you can see it's not
rotating Have we got rotate on. We've got rotate on. I don't
know why it's not rotating, so you know what
we'll turn that off. It's on here, as we said, so
we know it's roughly there. Let's first of all,
though, turn up. Well, let's put it in place. Let's also, as well,
before we do that, let's just press
Altag just a minute, and then you can see that this is it going all
the way down to there? Okay, so that's the reason that's going all the
way down to there, but we don't need this
going quite so far. So first of all, we'll
pull this out into place. So it's going to go
somewhere around there, and then we'll turn down our
vertical not our vertical, sorry our horizontal count. So we're not wasting
all those tiles. So if we put it in here, turn down maybe a couple
more, then it down, and then we can just
drop it in there, like so, and I think
that's going to be right. And now I can grab
this one and this one, press shift age, and
then drop that in place. Okay. Now what I'll do is
make sure snapping is off. I'll turn up then
my vertical count, so let's bring it up. Let's press one or three
to go in side view. And then what we'll
do is we'll press and X and split it round. Now, we can see we still
need a few more to go. Let's pull it into place, though, to make
sure it's in there. So just around here. Then we'll turn up
the vertical count. So maybe even one more and then make it a little bit smaller because we've got
a top on there. We need it to come to this edge. So S, if we make it smaller, though we're going
to have to pull it out on the other one. So if I pull it down to here, you'll see now it's
in line with the top. We can put something on
there. That's all great. I need to bring it down
a little bit more. Something around there. But the problem we're
going to have now is, first of all, it's not
level with it anymore, so I can press R and X. I can sort that out
straightaway, like so. Then I can press ln H,
bring back everything, and we can see now that this
simply not going to go, so I need to put
this into place. Double tap the A, and
what I'm also looking for right now is to make sure
that I've not gone too small. So you can see, have
I gone too small? Do they look the
right size of those? And I think, yes, they do, which is good for me. Okay, so now I want to do
is turn up the horizontal. So let's go one, two, three, four, get those in place. And finally, then
I can come in now, grab all of these just once
more and press Shift H, hide everything out of
the way. And there we go. I think now that is
looking pretty nice. Now, from here, what
I can do is, again, I can press Alt D here because I can just
copy this one over. So Old D, like so, spin it round Z, 180. And hopefully, this
is the same size. Which it is, like so, and we can get that in place. And the other thing is, the one other thing is, how
far is it going that way? Let's check that
before we finish. And yes, we're not going
to get away with that. So instead of doing that,
we need to go shifty, like so, Z 180 spin it round, get it into place, roughly
where it's going to go. So somewhere around here, and we might need
to pull this down, but we'll check
that in a minute. And then what I'm going
to do is pull it into place and then increase
the number of horizontal, so one, two. Let's
have a look at that. And yes, now we can see might even be able to get
away with not going so many, so I might be able to
bring it down one. Yes, and I can, I
think. There we go. Alright. That's fitting
in place beautifully now. On this one here, you can see
it's pretty much the same. So we can probably get
away with Alt on there. So what we'll do is
we'll press Shift D, first of all, and we'll
do the back of this. So if I come down to the back, so we're miles off at
the moment, I think. I don't think it's going
to be anything like. So we'll just grab this, ShiftH and I'll first of
all, line it up. So first of all, let's get it pull to where
it needs to go. So it's going to come
all the way down there, like so, and then you can see, actually, if I press three, I'm going to line
it up then, so O X, like so, I should be able to then just lift it up a little bit and then and X
a little bit more. And there we go. Now, I should be able to do
Alt D on this one. So if I press Alt D Z 180, spin it round, and I should
be able to put that in place, it should should line up. Nearly perfectly. This will
be into the wall anyway, so I'm not really
concerned about that bit. And what I can do
now is press ultage, bring back everything, and then pull these two parts over here. Now, remember with the
roofs, we need to make sure. These are alt deed, remember, so I can pull it over a little
bit. Like, you know what? I'll leave that one there. Then what I'll do
with this one is, I'll pull it over a
little bit, like so. Now, as I turn up this, I think they're both
going to go up, so let's have a
look so horizontal. No, they're not. I'm not
going to go up on that. So I can turn that without
altering the other one. I didn't actually know that. And we're going to go even more. Pull it over, like so,
and I think from here, I could probably go away
with pressing S and X, pulling out very slightly. Like so, S and X, like so, and then with this one,
let's put up the horizontal, not the vertical,
the horizontal. Let's pull it over.
Now to go even more. There we go. Alright,
that's that one in as well. Okay, so that's
looking very nice. And now we need to do is before doing anything else,
let's save work. And then what I'll do
now is we'll do what we've done with all of these,
where I can grab them all. We'll get rid of the backs and we'll get the actual
material on each of these. So if I press Shift H, I should now be able to come
over and grab all of these. Let's see if we can do it all at the same time because that is going to make it our
job much, much easier. So if I press tab, in fact, you know what, we've
got to convert them first. So object, convert to mesh, and now we can press
tab and I'm going to grab BsegGrabbing all of these. And I'm hoping so if I go now to I just wonder if I
go to, you know what? Rather than let's just
have a look at this. So if I go to sideview and
we put it on wireframe, is it going to be easier? If I take this off, now
we're on wire frame. Is it going to be easier if
now I come in and press C? Yeah, it's grabbing
Let's try that again. So C minus it off
with the middle one and just grab
these ones here. Now, it's grabbing
all that face, so we can't get away
with just doing that. So okay, that's
answer my question. What I want to do
then is come in and grab the faces going down and going the
other side because we know these are the ones
where we need to select. And then what we're going to
do is we're going to select similar and on the
normal. And there we go. Now, we've selected all of the
normals or these selected. This one, for instance, for some reason, hasn't
been grabbed. Now, this one hasn't
been grabbed, so I don't know why
it's doing that. Um, I don't know why it's
not showing that one all. Let me just go back. What is going on
here? And I'll select all of them. Yeah, I don't know. If if I bring in a cube, if I bring in a cube, grab
them all, grab this one last. Yeah, it's still Oh, I I don't know why I
can't edit these two at the same time
unless it's because it's old D. It might be because they're
old D on this one, and that's the reason why. Probably the reason why. So instead of doing that,
we'll get rid of the cue. We'll grab all of these.
We'll going in again, so we're just going to
grab this one last. And you can see now we've
grabbed all of these, so all I'm going to do then is press H to hide them
out of the way. And then what I'm going to do
is now I just need to make sure that I've got
no side points. So you can see on here, I've got all of these. I've
got all of these. Let's go to select and
select similar and normal. And then I shall be able to
hide those out of the way. Now, whoever grab them
all, going around here. Grab the more going
down the bottom. Same on this one, look
going all the way around. Same on the note on the
bom, so grab this one. Select similar normal. Hide them out of the
way. There we go. And now let's come to this one
here. We'll grab this one. We'll grab the top, as well. Select similar normal. Hi them out of the way. Now we should have all the
sides gone on there, as well. Like so. Now, if I'd leave
the backs off these, I'm hoping he'll let
the backs on these, but we'll see, of course,
on the next lesson. Let's save our work, and I'll see her on the
next one, everyone. Thanks a lot. Bye bye.
115. Designing Roof Details for the Manor’s Central Section: Welcome back, everyone to blend the Building master class
from concept to final render. This is where we left it off. Now I'm hoping that I can
grab all the bags of these. So all the bags of
these go to normals, and hopefully it will select them all. So
let's give that a try. So I'm going to go to select, mesh, sorry, select
similar normals. And now I can't do that. So what I'm going to
do instead of that is I'm going to press three
to go in sideview. Double tap the A, and now I should be able to do is
bring a line down here. So if I press C now, making sure that
you're on Y frame, by the way, making sure
this is turned off. Now, if I go C, I should, can I select all these? Why is that not working? I also see, I think,
there's these on here. So this is turning
into a bit of a pain. And I'm just wondering if
I come to this one first, where is my face on there? Okay. And the dots on
the faces on appear, and I think that's what's
stopping me selecting them all. So if I click this on,
then they should appear. Now, I might be able
to select them. So if I go see yeah,
I can select them. Okay, so that was the issue. Now, first of all,
before we do that, we can see that we've still
got all of these faces on. So all of these faces on the top are on there for
whatever reason. So let's make sure that
this is done properly, so select similar normal,
hide them out the way. I'm just going to go
down, making sure. And then I'm just
going to come to this one now can see
the same on this one. So let's do the same
thing. There we go. They're not appearing
anymore. Nothing in the side. Okay, so now let's
come to this one here. You can see because
these were the same now, that I haven't got that problem with these, so that's great. If I do one of these, the
other one will get done. Brilliant. So now I can do is I can come to this one,
this one, and this one, press three to go in side view, press the tab,
make sure then I'm in wireframe and make
sure that's ticked on. And finally, then, I should
be able to come now and press C on each of these. Like so. Like so. And trust me, guys, this is the quickest
way. I don't think. Just make sure you've
grabbed them all there. I don't think there
is a quicker way of doing this, actually. To get rid of the backs
of these, but luckily, we haven't got that many
roofs to actually do. I'm going to go to this one,
this one, and this one, like so now, let's come to the other side.
We can see there. Look, there's all
those on the front, but I might be able to get away without actually
interacting with those. It's just that
most of the sides, especially on this way,
need to actually be gone, se we won't be able to do this. So So, let's going. And there we go.
Now on to this one. And which one we on? I think
we're on this one over here. So let's go. And it
will take us What? 5 minutes to do all this. So even though it feels like
it's taking a long time. 5 minutes, not a long time when we've modeled hours
and hours of this. And I think also it's teaching you a lot of skills of how
to fix things as well. So we've done all that
now, delete faces. Now, let's press Old Age, bring back everything, like so. Let's put it on Object mode, and we should end up with all the faces gone
from all of these. Next thing we want to
do then is we want to check our normals and we also want to join
these together. So what I'm going to do is I'm going to grab all of these. Now, we know that this
is a copy of this one, so we just want to make
sure that we keep that. So what I'm going to do
is just grab these three. And we also want
to know now we've got rid of the bottoms,
we need to join them up. So A, if we come to mesh, clean up, and what we want
to do is merge by distance. It's important that
we don't forget that because if we do, right, click Auto smooth, let's right click Auto Smooth. If we do forget that,
it means the normals will a very weedl and
we don't want that. Now, let's come on and
check our normals. So face orientation and pretty much we've got some
like this one. So if I press, A on this one, shift N. We can spin all of those around,
and there we go. There's all those done.
Let's come to this one then. We'll come to this one next, A, shift N, spin them all around. This one, then A, shift down
and spin them all around. Alright, so they're
all done now. And what we want to do
now is just unwrap them. So I think it'll be better if we press
Alt ag first of all, just so we can actually
see what we're doing. And then what I want
to do is I want to unwrap them so they're pretty
much the same as these. What I'm going to do is I'm
just going to put it onto rendered view. Let that load up. And then what I want
to do is I'll come to this one first, and I'll press A, and U and
SmartUVPject. Click Okay. Then what I'll do is,
I'll come to this one. I'll press Control L, and
we're going to link materials, and there we go, and that's
what it's going to look like. So yeah, they're looking good. Let's come to this one. We'll
do the same thing then. So tab A ltates just make
sure everything's there. Smart UV project, click wrap, and then control L
and link materials. Let's do the same
then with these. So tab A, Smart UV
project, click Okay, and then grab this one
and press Control L, and we are going to link materials like so,
and there we go. Now, the thing is, you'll
never be able to see, like, if, you know, this is the same as this because they're going to
look a little bit different, but you can see here that even though they're the same ones, actually a little bit
longer than the other ones, so they're a little
bit different. So yeah, we'll leave
those like that. I think even if I'm
zooming in here, the tiles look exactly
the same as these. And even looking at the size,
I'm just checking that. So what I'm going to do
now is save out my work. Now, what do I want to do next? So we've got these in. So I think what we need
to do, first of all, is just hide this chimney here. And what I'll do is
I'll grab one of these. I'm going to press
Alt D, bring it over, and then we're going to press
Z 97 to go over the top. And then what I'm going to do
while I've grabbed this is, I'm just going to press G because it'll follow that along. I'm going to get it into the
place where it needs to go. And I'm also going
to increase it. So if I come down, we'll
increase the array. So let's increase the array
and then bring it into place and then just get it
to fit down on top of there. I'll fit down on top of here. Let's have a look then. So we've got I'm just wondering if
I want to, you know what? First of all, I'll hide
this out of the way. I'm going to grab this shifts, cursor selected, press tab, TH, hide this out of the way, and then grab this and I'll press Shift selections cursor. And that the n's go to put it perfectly in the sense for me, and all I've got to do
realistically is raise it up, so it's similar to
that one. Like so. Double tap the A,
and there we go, make sure it's in this
part of the roof, as well. And then we can bring
it over to this one. So if I press l D, I can even bring it
down one because we don't need maybe even two. So let's come down, one, two, and let's bring it over. And then what I'll do is
I'll come to this point, grab the top of it, Shift S, c to selector, grab this one. Shift S, and selection to curta, move it over into place, zoom into it so we can
see what we're doing. And finally, just pull it up so that it's got a bit
of thickness on there. Making sure it's in the wall, making sure it's in
the wall this way. Double tap the A,
and there we go. It's really starting to
come together now, guys. Alright, so I'm really, really
happy with how that looks. And I think what we'll do now is we'll still have our asset manager open because we're definitely
going to need that. I think what we need to
do now on the next one is we need to bring
over these parts here, so this and this part here. So with these, I mean, so
we'll bring that over. Round here, there really
is nothing for us to do. You're never going
to see in there, so we don't need to worry
about any of that at all. All we need to worry about we'll actually do this
front and this front, and then we'll put
whatever we're going to put in
there. You know what? Actually, what we'll do on the next one is
we'll grab this and this and we'll make sure
that the topology is good. So if I press shift
H, you can see, we've got a lot of
topology on here. All we need on these, we don't even need
the back of this. We don't need the sides of it. We only need the
front and the roof. We don't even need the bottom. So you know what? Let's actually
come in before we start. And what we'll do is we'll
delete this one, this one. This one, this one,
press Delete and faces. And then we're also going
to delete the back. So if I just put
this on, I should be able to come in then
and grab this one, Delete and faces, and
that is that one then. And now, what I want to
do is just split it off. So I will even delete
this middle section. I'm not even going to need
that. So delete faces, grab this one and this one
and press P selection. And now we come to this one now. Bit harder to tell on this one. So tab, the do we
need the back of it? No, we don't only
need the fronts. We don't even need the sides. So we're just going to
grab this, shift H, and we'll come round
the back of it, which is here, hopefully. We don't need the
sides. We don't need the bomb. We
just need the front. So all the way up to here, delete and faces, like so, and we've also got a part
in there for some reason. So delete faces, delete
faces, and there we go, delete this middle
bit, delete faces, split these two off
with P selection. And hopefully, hopefully, if a result ge, bring
back everything, double tap the A,
we should be left with everything we
need. Should be. We can't see down
there, so that's good. And now what we'll do
is on the next lesson is we'll bring in the wood, like we've done with this one. Then we'll bring in the walls, make sure they tie up, and then we can start
working on this. So file, save everything out, and I'll see you on
the next one everyone. Thanks a lot. Bye bye.
116. Enhancing Exterior Walls with Stylized Decorations: Welcome back if
you want to blend the building master class
from concept to final render. Now, let's come to. So what I'm going to do is just hide each of these
out of the way. I'm going to hide each of these. And then what I'm going to do is come to let's grab these. We're gonna press tab, A, Smart unwrap biangle, I think. If it doesn't work, just
grab both of these. Grab your walls as well,
it's going to help. Control AO transforms
set origin to geometry. Now we'll grab these and we should be able
to unwrap them, and then we'll come to this
one, grab them, A U unwrap. Now, finally, then, let's
just hi this out of the way, want them looking
something like that. So I can just grab this one and this one, press Control L, link materials, grab
this one and this one, Control L, and link materials. And there we go, they look good enough, so that's good enough. Now we're on to these parts, so we can see we've
got this part here and this part here, and all I want to do is make sure that these
are unwrapped as well. So I'm just going
to grab this one A, angle based, and then same
on this one, A, angle based. And then finally, what I'm
going to do is I'm going to grab both of these
breast control L, and again, we're going
to link materials. Now we can see we do have some
problems with these ones. Let's go to UV Editing. Let's put it onto material once we get there,
so let it load up. Let's zoom out a
little bit on this. Let's go round. And here we are. So we've got these two here, and this one here, A are
90, spin them round. Now we can see these
are way, way smaller. Than these ones here. So
we don't really want that. So what we're going to
do is press the board, make them to be
about the same size without anyone noticing. And that looks. Looks. I think these bricks actually
here a little bit small. I don't think they're
the same size as those. So let's
have a look at that. What's going on with
these. Are they all the same size.
It's this one more. That's bothering me,
but with this one, I can bring it in a little bit, like so, and there you go. And then this one,
they look about the right size,
so can I come in. And bring these ones in
a little bit like so. Alright, now they're
all matching up pretty much. Alright,
I'm happy with that. Now, let's go by
COVID to modeling, and let's have a look
where we left this. So if I put it onto
Rendered view, I should then be
able to press Ath, bring back everything,
double tap the A, and let's now start
work on this part here. So what I'm going to do
here I'm just wondering, I think I want a small
one and then a big one, but before we do that, let's
press old D bring this over, and then I'll press Z -90 because it's
going that way round. I should then be able
to press CtlumO. Yes, there would go, bring
this down into place. Let's pull it into place. And then what we'll
do is pull it out. L so into there. And you can see how beautifully
that is fitting now. I'm just wondering how far
I want to pull this out. I think I want to pull it out
a little bit further than what it is. I'm going
to pull it out there. Like, so and then I'm going
to just put it into place, making sure there's no brick shining through there
or anything like that, and then increase the array. And, of course, it would
be going the other way. It would be going the
other way, wouldn't it? Let's put it into there.
Increase the array. We need to increase
it not that many. And now, I'll just press S and X, pull it out a little bit, hold in the shift
but. Here we go. Double tap the A. Now, let's come over and we'll press O D, ring it over, and then I'll
press Control and one. Bring this down into place. So I want it just above there. And let's pull it out.
So let's dot to zoom in. Like so, and then let's pull it over into the place where
it's going to be going, which is into that wall there. And then it's going to be
going into this wall here. And the other thing
is, let's just turn down the count and see if I can pretty much get it going into the
wall, just expand it out. So if I press S&X should be
able to pull it out very slightly and still get it going into that wall, yours there. Is it going in there.
Tiny, tiny bit off so S&X There we go. Double tap the A, and that's
what we should be left with. That is pretty much
perfect because we are going to have a
corner in there as well. Now, let's look at the next bit. So I want a small part. I'm just looking to see
if I've got a small and a big. And yes, I have. So I'm looking at if I can use one of these
parts I've already got. So I'm just going to
go to asset manager. Look at my supports. So
these tops and bombs, and I'm looking at which supports do I
actually want to use. So I want a small one and
then probably a big one underneath to go onto this part here and then
a line going across. So let's first of all,
bring in our line. So I'm going to press Alt D. I'm going to bring this over them. I'm going to press Z -90, and I'm going to
pull that over then into place over here. Now, if I press dot,
I should be able to zoom in there and line this up. With this part here
and then just pull it back a little bit,
just so it fits in. Now, if it doesn't
fit in properly, just press SNY and squish
it down a little bit. There we go. Make sure then it lines up,
let's have a look. Let's increase the array. And there we go. That's
fitting in place now. And then what we want
to do now is put on a couple of things just so
this is not a blank wall. We don't want a
blank wall on there. So I'm probably going to
want this, You know what? These two here. They're perfect. So we'll use those. Opdi.
Let's bring them over. Seven to go over the top, and I just want
them then just to be in front of this here. Like so and I want
them both lined up. So I want to pull
them out enough just to make sure that they're pulled out enough just so I can see what I'm
actually doing. Line this one up
that will come in. And if you're struggling,
just put it on object mode. You'll probably be able
to see a bit more. Now, you can see
that on this now, we are struggling a little bit. I want that to go under there. I also want it
probably to come down, so it's actually
supporting like so. And the other problem I've
got is if I do it like that, yeah, is it going to be? You know what? I'm going
to get rid of this one. I'm going to pull this
one up because I think I can put that under a little
bit better than this one, so I'm just going to press
the S but, bring it down. Put it just under there,
like so, as you can see. And then I'm going
to make sure that the level up like so. And then with this one then
I'm going to press Alt D, bring it down, but make this one a little bit bigger
then. So press the Sb. Make it a little bit bigger, and then drop it just under
like halfway between, like so, and then I'm going
to grab them both and Alt D, and I'm going to
bring them over, and I'll put them here, like so. Double tap the A.
Let's put rend Van. And there we go. That's
looking pretty good. Now, next of all, I'm
going to save out my work. And I think with my HDRI, I'm going to come down and can I actually move it? Yes, I can. So here now, I can
actually move it round. So can I actually get it so it's actually shining on there, a little bit brighter
because at the moment, I'm struggling to see
what I'm actually doing. And yes, I can. And
that's our roof. Let's hide the roof
out of the way. There we go. We
don't want those. Let's bring them back. And what we'll do is these need
going into roofs, so I'm just going to
put these into roofs, so I'll press M and
put them into roofs, like so, and then I should be
able to hide that way now. Double tap there, and we've not got that big shadow there. Alright, so let's now
come round to this part. So we've got this part. We need a cornet
probably in here. And we're probably
going to need a cornet in this part here. So we need a little top on, so we have a little top here, and we have this here. Now the problem is that's probably not going to go all the way down to I'm looking. Have we got any of that
R gonna go all the way down to that? In
fact, you know what? They need to we need
another post on, so you know what? We'll grab. We know that this post is the same as these, so
we'll start on that. Then we can move this
over this should be about the right
height, Savalu. Yeah, that's gonna be
about the right height. So what I can actually do is
I can grab both of these, hold D, and then pull them over. And all I want now is a top. So I want a top on here, and I'm going to steal
my top from Savo. We have got the tops from this. These are the tops. So
I'm going to press old D to duplicate that. I'm
going to pull it over here. Now, what I want to do
is put it obviously in the center of this
I'm already working on. So shifts cursor selected. Grab this one, Shiftsk
selections cursor. Press the dot button, and
then what we'll do is now we'll make it do we need to make it bigger?
Let's have a look. Can I pull it up into place? Into place there? I'm
going to make it tiny. In fact, you know why I don't
want to make any bigger. I'm just going to
put it up just so it's sliding over
the top of there. Then I'm going to
grab all of this, including this. And we're
going to pull them back. Into the corner. Put it
on object mode so you can really see what you're
actually doing. Oh, here, here, you
can see this one here. I'm going to pull
these back into place. They're over there. So now
we've got a gap there. That's exactly what
I want, then into place into this corner, like so. I'm just looking at that now. And that there, I think, I will pull this one because I know when I've got this right, and I need to pull
this out as well, then I can get the other
side right, as well. So if I pull these into place
where I want them to go, so you can see now
they're all lining up. Now at the bottom of here
is this one looking good? I think it needs to go
this way a little bit, and then this way a
little bit, like so. Now what I can do is I can
grab all three of these. No, it's not that
one. This one here. I can press Alt
D, bring it over. And then what I want
to do is mirror them. So I will see if I
can go to objects, mirror, and it's
going to be on the X. Is that mirrored?
I don't think so. Object. Mirror. Let's
try it on the Y. For some reason, they're
not mirroring these. So let's grab this. Yeah, I think it's
'cause they're centered, so they're not really mirroring. So if I come in and grab
this one, Object, mirror. And let's mirror
locally on the X. Why aren't those mirroring? You can see though we have
got one problem here, so fix that walla
me here, actually. So I'm just gonna go old
shift click. Shift down. I it round. Just notice
that, so let's just fix it. Okay, we've got these here. Let's pull them into place. So we've got this
little corner here. Now, of course,
this little corner. I can put it in. So let's
bring in this one then, and that then should fit
under there, like so, and then this one should fit
outside of here, like so. So I'm just going to
put those in there, and I think that's going
to be good enough. I just need then
another piece here, so I might as well grab these
parts and bring them over. So I'm just going
to press Alt D, bring them over to this corner, like zone, make sure they're
in the corner properly. And yeah, that looks good. So let's do it again. Let's press Alt D, bring
them over into this corner. Now, the problem
with this corner is it's coming up against
here and my roof here. I'm just wondering if I need
to make that a bit smaller. It's going to come over to
here. I've got my roof here. This roof, I would say, needs to come up probably a little bit
because we're going to come down to them and
we want this to be over. So I'm thinking that the
roof is a little bit low, it should be around
the same height as there. You know
what I'm going to do? I'm just going to come in
and grab all three of these. And I'm also going
to, first of all, just hide these out of the way so I can actually
see what I'm doing. Come back to this.
Press Control one, and then I've got a
front view of it. And then what I'm going
to do is just lift it up. Like so, lift you up to there. And I think now I can
lift my you know, while I leave my chimney there, it's probably going to be okay. Let's press Altag,
bring back everything. And now you can see that this is coming up to where
my roof is gonna go. Now, perhaps perhaps these want to be lifted
up a little bit. Let's see. Can we lift them
up a little bit? Yes, we can. And they're still
under there, like so. And, yeah, that's
looking pretty good. Okay, let's go to pile. Dave everything out, and I'll see you on the
next one, everyone. Thanks a lot. Bye bye.
117. Staircase Integration into Stylized Structures: Welcome back, everyone to blend the building master class
from concept to final render. I think it's time that we actually put
our stairs in there. So where are our
stairs going to go? So let's first of all,
come in and see how everything's gonna
fit because remember, we're gonna have
our stairs here, we're gonna have a gate
going this way, you know, coming over here, and
then a hedge row, probably going round here and then a hedgerow
going round here. So let's come in and look at
our stairs, first of all. So our stairs, those
steps, here they are. This is the large step
that we want to bring in. Let's spin it round,
then, so ours head 180, and let's put it where we
think is the best place to go. Again, looking, if
we go over here, we're looking at this
edge to this edge, and we want them to be
roughly the right dimension. So all I'm going to
do is press T just to open up this measuring tool, and let's measure from let's say this section to here or
round about here to here. So this is 1.4, and this one is they're
around about the same. I move it a little bit more
this way, but you know what? They're so close that I think I'm going to
actually leave it. Now, the other thing is to
get these off, I think, if I come up to here, I've
got one that says ruler, I can actually minus
it off there, as well. So now I can actually go to my ruler and they disappear.
I didn't actually know that. I just found that out recently. Okay. So now let's
pull this into place. It's going in there, like so. Then let's grab our door. So if I come down
and grab doors, and the door we
want is going to be the large rounded door.
I think this one. And the other thing is
about large rounded door is yeah, it's spun round. So Z 180. Let's spin it round. Let's press Control one. And what I'm going
to do is I want this door to be right in the
center of there roughly. So if I hold shift,
I should be able to move it in the center. You
know what I'm going to do? I'm actually going to
grab the center of it. So curse the select to
grab this part then shifts selections cursor.
Press Control one. What I'm going to do is put
this into place like so. Now, of course, he needs
to go back quite far this, so want to pull it
back into place, so I'm going to pull
it back into here. Like so. So how far back
do I want it to go? I think something like this, and then I can pull it
back to wherever I want it probably going to be the
best way of doing this. Now, I'm not sure
if on my Booleans, if I have one for my dough.
Let me just have a look. I think it might be this one. Let's just press R Z 90, shifts, and selection to cursor. Let's press Control one, and
let's see if it is this one. Or if this one's
a little bit big. I think this one's a
little bit big, actually. I'm not sure if I
kept my door on, so let's actually have
a look at this one. Shifts, and selection
UCursaO S 90. Control one, let's
see if it's this one. No, it's not this one either. Now, can we use this, though? Let's press Tab, A, shift the N, spin it round, and let's just press Control
one once more. And you know what? I
think we actually can. If I press the S bon,
let's actually have a look where this is.
Press the S bone. I'm not actually sure,
so what I'm going to do is I'm going to
grab this and this. Shift H, control one. Now I can see where it is. Alright, so now if
I lift this up, yes, it is. This
is the right one. But I should be able
to lift this up. And then drop it all the way back so I can move my
door all the way back. So something like this, I think, pull it back into place. And then what I'm
going to do is lt age, grab this one and this one, press control and
minus, and there we go. Then what I'm going
to do is come to my wall over to here, and we've got our boolean
on there, Control A, and then I should be able to
come back to this splitter. Remove splitter, P, just to take away that parent that we've done many times before, and then let's just
move out of the way and hide our booleans
out of the way. Now with my door, I should be able to pull this
back into place. Now, something here
that sometimes happens is because
it's just a plane, as I said, sometimes it won't actually work
the way that you want. So it will take it all
the way back like so, which means for this, at least, we need to make a floor and we need to make
an arch around there. So what I'm going to do
is I'm going to come in. Alt Shift and click Alt Shift click going all the
way around, Marcosin. So mark as. And then what you're going to do
is you're going to press E and whichever way it's going back. So
it'll be the Y for me. So I can pull it
back, pull it back, press the F button just
to put a back on there, like so, and there we go. We've got our door in there. Now, the next thing
we need to do, as you can see this floor, knees drop in below
this part here. And the other thing is, if
I start pulling this down, it will start moving
around my bricks. So let's actually have a look at that and I don't really
want to do that. So let it load up
with material view. So if I grab this,
start pulling it down, you can see how it starts
dropping down there. So rather than do
that, what I'll do is I'll press delete bases, and I just want to come in now
to each of these, like so. And instead of doing it that way, let's just have
a look at this. What is this here? What is this floor here?
Is this a floor? O? I'm going to hide my door. Out of the way. So now
I can see under there. So what I want to do is I
want to bring this down. So instead of doing
that, all I'm going to do is grab
each of these, press E Z, bring
it down to there, and then press the F
but, and there we go, that is how I won my floor. Now, while I've
got this on here, I'm just wondering,
I might as well make this stone like we've
done with the other one. So let's come in and we'll grab it going
all the way around. So Alt Shift and click, like so. And then what we'll
do is we'll press U, unwrap, and it won't
wrap properly. So all we'll do is we'll
press Smart UV project. Click Okay. And then what we'll do is we'll put
it onto the stone. So this stone here, if we go
to material, stone lighter. So this one here, and then we'll come plus, and we're looking for stone. Stone light, I think it is. So let's scroll down.
So stone light. There we go. Click sign. And we need to obviously
think as well, go to UV Editing because we might as well fix
this while we've got it. Zoom in. Zoom in over here, press the S bun, bring it down like
so. And there we go. Now, let's also grab this, right, click Shade Smooth. And now let's go back to our modeling. Now
we've done that. Come round here, press
Alt H, bring back our D, double tap the A, and you should end up with it like this. Now what we need to do is you
need to bring in the arch, and it's going to
be the same arch as what we've
brought around here. So this one here,
I'm going to press Al D bring it over then. I'm going to spin
it round, so z 90. I've already got my
cursor in the center, so I can press shifts
and selections cursor. I can then press Control one. And what I can do is put the
arch in where I want it. So the arch is going to
go right about in there. I'm going to pull it back then into place where I want it, which will be the top
of this step, like so. And then if I need to, I can pull my door
even further back. Like, so, double tap the A, and let's actually have a
look at what that looks like. And I'm looking at this
gap under my door, so I want to pull it
down a little bit. And I'm looking at the
lighting on this part here. I'm also looking at
how far this is out. So how far is this one out? Like, so. And you can see the issue is that this needs
to be a little bit smaller. That's why I've got the
lighting issue around there. So this needs to be a
little bit smaller. So if I bring it in,
bring it in, bring it in, and then just pull it down, just so it sits on the floor. And there we go. That is
looking much, much better. I'm just making sure that this is also going
the right way. So I'm just going to check
my normals on there. So face orientation. And yes, it is, that's going the right
way. So that's all good. Double tap the
ears. Have a look. There we go, guys. That is
looking very, very nice. Now, last of all, I think, I'll also squish it up on the Y, so S Y, and then I'll pull it out a little bit more,
double tap the A. Like so. And yeah, I think that looks
actually better. Now, the one thing
I'm wondering is if I need bricks up
there, but you know what? I think I think that
looks good enough. So finally, we've got
our door in there. I'm going to have some lights on there and all
kinds of things. Now, we'll have our railing then going in this
side and this side. You can see how much
room we actually have now to build our
railing going round. Now, on my original, which I'm just going to
put on just to check here, I had hedges, hedges which
were right up against here, which I think I've still got
room for to pull them in. I might bring this
in a little bit. I might bring the whole
thing in just a tad. So if I press SEX
and bring it in. I don't want to squish it
too much as the thing, so I want to bring
it in, but still keep, you know, most of this. So I'm wondering
if I want to come in and just bring in these steps a little bit
and then join together, I think I think it's
a little bit wide, but if I just bring
everything in, it's going to kind
of mess it up. So I want to be careful of that. The other thing is,
I want to be careful because I am messing around now, you know, with with
the actual mesh. So we need to be careful when
we're actually doing that. We can see here now
that this needs probably going back a little bit because we're right
on the edge there, or this here is right on here, as you can see, we
don't really want that. But we also on that
drop down, as well. I think what we'll do is
I think we'll fix that, because I've dropped this down
here, should I pull it up? So let's actually do that first. So if I come to this,
I'll bring it up. So it goes over there, and then I've got a
little bit of a gap, but I do know already that, if I bring up my floor, I can bring it all the way up to there without real linear shoes. You can see where it's
going to bring down to. But I still feel like probably want to stretch
this a little bit. So I'm going to press
Esn'sE and pull it out, and I should then be able to get away with pulling this down, pulling it down, and
then just pulling it over the top, like so. And now it should fit in a
bit better, which it does. So that's that bit sorted. The next bit that I want
to sort out is I want to bring these in a little
bit because this to me, the steps are a little bit wide. So unfortunately, we could go back to our modeling and actually
bring them in a touch. So if I come in, the steps really want to come in
to each one of these. So what we'll do,
we'll do that first. We'll press Shift D.
We'll bring in a cube, and then what we'll do is
we'll bring our steps down. So is this in the center? Let's have a look. Let's press Control and one. Yes, it is. So I want to bring my steps roughly roughly in
to this part of it, because then it's going to
give me a bit more room for my hedge row each side. And then what I'm
going to do is press Control C. I'm going to go then to my parts section,
which is this one here. And then I'm going
to press Control V and bring in that cube. And from there, then I
can take my steps now. So take my steps. Here they are, and
bring them over. And if I zoom in now, we'll see where I need my
steps to come to. So you can see now I need these to come in
all the way to here. Easier to fix inside of here. Trust me, guys. Alright, everyone, so let's
save out this. Let's go back to the other one because don't forget to
save out that one as well. We don't want to lose any of
that. Let's save that out, and I'll see you on the
next one, every one. Thanks a lot. Bye bye.
118. Detailing the Back Entrance Staircase Area: Welcome back. I want to blend
the building master class from concept to final render. And what we're going
to do now is we're going to come in to these steps. Now, I'm going to
go over the top. You know what? I'm just wondering if, actually,
I won't do that. I'll press one to
go into Frontew. I'm going to put
it onto wireframe. And then what I should
be able to do is double tap the eight first
floor so nothing else selected and come
in and just grab them going all the
way to here, like so. Press Control plus, and then you should be able to
grab your steps like so. And then what we're going
to do now is press S and X and bring them in to where
we actually want them. Now, the main thing here is we don't want to
bring them in too far. So if I grab my cube now, we can see roughly it's
about the right size. We don't want to bring
them in too far, where, you know, they kind of look stretched and things like that. So that's the last thing
that we want to avoid. Now what we're going to
do is we're going to grab these this side only and bring it in and mirror
it on the other side. So what I'm going to do is we've done a lot of work on here, so we don't kind of
want to, you know, mirror it because
if we mirror it, we're going to lose all of
that work that we've done. All of these are going to
look exactly the same. That's going to cost
us a lot of work. So instead of doing that, what
we're going to do is we're going to grab both
of these, I think. So I think what we'll do is we'll separate these
off just for now. So P selection,
separate these off. And then what I can do is
I can separate this off, so L, E selection. And then I can hide
this out of the way. So I don't need that, and
then I can come back to this. And now I can grab this
side only, for instance. So if I press seven, I
can put it on wireframe, go over the top then
and grab this one. And then what I'm going
to do is bring this line, so this line up to
my steps and just have a check because then I'll
know about the other side. So if I bring them
to that, press the object mode and then
double tap the A or press tab, double tap the A, and then look at where this
is going to come. And I think that actually
looks probably better. So now I'm going to
go over the top, and we're going to do exactly the same
thing with this one. Then I'm going to go on
wireframe, click on one of them. Press B, grab the whole thing, and now we're going
to bring this side up to there like so. Object mode. Let's come in
then, delete this cube. So delete the cube, press lth
to bring back everything. And now what we
should be able to do is grab the whole thing, grab these last,
press Control J. And hopefully, hopefully, this should look
exactly the same, except now it's a little bit
thinner in between there. So if you ever get
anything like that, we now know how to fix it. Now, if I save a work, hopefully now, that
should update. So if I go to file, save all
my work and there we go. And now if I go back
to the other model, which is over here. And what I want to do now
is bring in the new one. So, let's delete
this out of the way. Let's go to my asset
manager, which is here. Load up. Let's zoom
our little bit and bring in our first
of all, we'll update it. And let's come in and
bring in our stairs, which is and I'm really
hoping it's updated. So let's bring in our
stairs. Let's spin it round. So Rs 180, let's
press Control on one, and it hasn't updated.
Not updated at all. So, you know what? We're
gonna try something else. What we'll do is now,
we'll route click and we refresh library and
see if now it's updated. So let's just have a quick look, and that's gone
wrong. Let's see. Has it updated now? Oh, Z 180. Patrol one, no, it's still updated. So what we're going
to do is we're going to go back to file. Now, remember, we might
have a problem here. So what we'll do is we'll press
Control layer transforms, right click Set
Origin two geometry. We'll go to an asset manager. We'll come down to our steps. We'll click it. And if I bring it in now you'll see it comes in right on here. It's just not on the other file. So all we'll do is we'll go in, right click and clear asset, come back to it over the
right hand side here, and then right click
and mark as asset. Now, sometimes it
doesn't update. I do not know why it's
not updating sometimes, but sometimes it doesn't
now, I brought that in. What I need to do
now is just put it unassigned into our steps. And now let's see if
I save out once more, so file, save, update it. Now let's go to the other
file and see if it's updated. And if not, we've got another
way of doing this anyway. So here is our file.
Let's update this. Z 180. Control one, let's bring it over, and
it's still not updated. So what we'll do is we'll
delete out of the way, go back to our file. And I think this is
a book with blender. And then what we'll
do is grab this one. So Control C. Go 'cause
we only need one stairs, we'll go back to here, and I'm hoping that in the next
one, they will fix this. Control V. Bring it in, and there we go. It's in now. Now I should be able to. Bring
it over, spin it around. So Rs hundred and 80. And you'll see, first of all, that because the
material is different, that it's actually brought in the kind of a different
type of material. You'll see a stone light Ooh one and stone lighter Ooh one. We want to make sure that
we don't have those. First of all, though, let's see if it's the right size now, which it absolutely should be. So if I bring this over to here, you will see that now, if I pull this in, it should
fit in, much, much better. The only thing is, I need
to pull it up into place. So we're going to do
exactly what we did before, pull it up into place. And I'm also going to make
it a little bit bigger. So S and Z make it a
little bit taller, making sure it fits
into the floor. Let's put it on render view just so we can see
what we're doing. There we go. And you'll see now what I mean by the
dark and the light. So that is something
that I want to fix. So now I'm looking at the
edge coming over here. I'm looking how it
all fits into place. You can see it's
filling very nicely. Maybe, maybe this wants
to come out a little bit. So S and X, pull it out a little bit just
so it's in there, like so double tap the A
and just make sure then that we've got no
flashing around here. And the way we'll look at
that is we'll go to here, making sure that that's
stuck all the way through. And then finally, finally, we want to make sure
that this bit here, we put a front on here. We've got our cursor here. So let's bring in another plane. In fact, we'll borrow
this one from here. Then we'll sort
out the material. So if I press Alt D, should be able to
borrow this from here. As head, 90, pull it forward, press Control one, and I should be able to line
this up with this. So if I bring it
up, bring it up, should line in near enough
perfectly with this, so you can see it's
nearly nearly there. So what I'll do is I'll press n's head and then pull it up, pull it over a little bit. Oh, sure, pull it
over, pull it over, and there we go, and it should
then be able to fit in. With I pull it back,
press the little db. We just want it past
there, like so. I really hoping that works. Let's put it on render view. Double tap the A,
and there we go, that is that part in now. Now, as I said,
these parts here, the dark, so the doke, we need to replace with
this one. So stone Light. So what I'm going
to do is replace this one with stone light. If I come down, I can find
one that says Stone light, and there you go.
Now you can see. If I come to this one,
click the down arrow, Stone lighter, and there we go. Now it all fits in place. And that is looking beautiful. Alright, so that was a
lot of messing around. I'm just wondering
if this stairs needs coming down a little bit, maybe it's a little bit too high still if I bring it down,
holding the shift board. In fact, you know what?
Let's have a look at that. I think it's actually and
it's just the shadow. Yeah, it's just a shadow,
I think, have a look. Yeah, it's definitely
just a shadow. So it's just contact
shadows there. I'm just looking
now to make sure. Now, you can see if I
put some railings here, we've got a lot more
room for our hedgerow, and that is basically
why I did that, you know, If I didn't do that, I don't think there'd
be enough room. Now, the other thing
is, before I finish, I just want to measure
if I press control one, I want to measure this
from here to here. So let's come in measuring tool. Let's grab it from here to here. So it's 1.9 and one
point nearly 1.9. So not far off, oddly anything. 20 centimeters or something. So that's okay. Let's
get rid of that. So we'll come. Where is it? That's press tab? Is it on
here? No, that's not working. Where is it? Why is it
not coming up here? I want to actually
delete this off. You know what instead.
Instead of doing that, we'll just come in
and delete them off. There we go. Okay,
so that's done. Now, on the next lesson then, we're gonna either. So
we've got a choice. We need to put these
in here first. That's the first thing we
need to do. That's a given. But then we can actually
start building this part round or we can
come to our dome. And I'm thinking that
probably the best way to do this is maybe make a start on the dome or at least
bring these parts in. I think what we'll do is
we'll bring this part in. So we'll do these
on the next one. I think once we've got this front part in here with
a little window over here, then we'll come to
these side pots. Alright, everyone, so
I want to see if I work, and I'll see
you on the next one. Thanks a lot. Bye bye.
119. Creating a Compact Variant of Stylized Roof Geometry: Welcome back if we want to blend the building master plat from
concept to final render. Alright, so we said we're
going to do this bit first and then we'll move around
and start this bit here. What I'm first of
all going to do is write click shade Auto smooth just to get that night
and smoothed out. And then what I want
to do, I've already got these parts that I
already put in there, but one I want is
these parts here. Now remember, on these parts, if I go down to supports tops and bottoms,
uh, no, not there. Look supports. Here we go. We've also got some
different ones, so just remember
that we could swap between these round
here instead of, you know, these are a
little bit different here. So we could swap them over
and have something like this. Let's have a look if I
bring this in to shed 180. This one might be a bit big, but what I'm saying
is just remember that you actually have them. That's the main
point. So we could put like one here
and then two there. Something like that might
actually look really good. So if I put this in here,
let's just give it a try. Let's see how it's
going to look. And what we'll do is we'll bring the square one in
and then sed 180, and let's have a look
what this one looks like. Like so, and I think that one looks a bit
silly, so let's delete that. Let's have a look at these ones. Are these going to
be the same size or are they going
to be a bit big? Because we basically
want one or the other. Yeah, I think what we'll
do is we'll delete that off with try sad, 180. I do recommend always going in and giving it a test to
see what things look like. Obviously, I've pre built this, but that's a little
bit different. But when you're doing
it on your own, make sure you do that. So Alt D, let's bring it over. And then what we'll do is
put those both in place. I'm going to squish them
up a little bit then. So S and X, squish them up. Make sure we're on
medium point to do that. S and X, let's pull them in, and let's get those into place. Like so. And then
what we'll do is press Alt D and drop them over. We don't want to
join them together. Don't ever join them
together, or you're going to have some big problems
actually doing that. You can see on this side,
we're quite far out, but that's because we're relying on this part here,
as you can see. So this part goes straight down. This part we'll be
going from here, which gives us a bigger
bit of a garden here. What I'm going to do
with this one is, can I get around S and X, squishing it down even further? Can I actually get
away with that? Let's have a look on
the rendered view just to make sure
we're happy with that. Yeah, I think that actually
looks quite nice like that. Really hard to tell anyway, if there's a difference in them. Alright, so now we've done that. Let's come in then, and
what we'll do is we'll bring in our window. So it's another one
of these. Do we have to bring it in?
No, probably not. We can just grab
this one. Or maybe even this one, it's
a little bit closer. So OPD, bring it
out, spin it around. So s -90. Let's press Control one
just to go into this view. We want to keep it
the same level, so we want to keep
it the same level, and just pull it back into the wall and make sure
you're happy with it. So if I pull it back, pull
it back, pull it back, just in front of
the wall like so, and I think something like
that looks pretty good. Now, if we come to Boolean then, what we want is,
which boolean is it? I think it is this boolean, so Rs 90, go back to my window. So this here is shifts,
go to selected, go back to this then, shifts, and selection to curta. Control one, and it should
fit in perfectly like so. Now, grab this one and
this one Control minus, pretty much like we've
done many times before. Go to the cutter, remove it, and oat P. And at this point, honestly, guys, you should be
pretty fast at doing this, understanding exactly
what I'm doing. And then we can speed
up this process. Alright, so last of all, then,
I just want one of these. I'm going to press Alt D. And what I'm going to do
is bring it over. The other thing I forgot
is I could have you know, instead of pressing Ol D, just use the modifier, the array. So I could have
just done that, but I forgot, so my fault. Let's put it into place
anyway, regardless. And then let's press E and X and pull it out a little bit, and then put it into
place, like so, double tap the A, and there
we go, that is that bit done. Okay, so moving round then
onto one of the harder parts. So this part here,
the thing that makes this part
hard is the angles. So the angles are,
if we go on here, we'll see 55 degrees. So just make a note of that. That it is 55 degrees. Alright, so what do we
start with first on this? Probably going to
start with the roof. So let's start with the roof. What I'm going to do is hide
my booleans out of the way. I'm going to bring in my
Jumptno which is this one here. And then what I'm going to do is I'm going to press Alt D, jaws to bring it over, so I'm going to rotate
it round by 55, then. So z, 55 degrees, and it should line up with the
roof, at least, perfectly. Now, we can see it's not
lining up with this part. What I want to do is put it on normal when I
actually twist this. I'm also going to grab this, so shift H. So we've got both of those grabbed
at the same time. And then what I'm going
to do is just rotate it. Now the problem when you're
rotating this, obviously, is that you can't
really see down there because it's at
a 55 degree angle. But what we can do
now is press Atonex and we should be able to rotate it round just enough to actually get a good view of
what it's going to look like. So if I drop this
in here, like so, let's move it over and let's pull it down a
little bit further. And you should be
able to pull it down, as you can see, with the normal. Let's pull it into place, just so it's not
going through there. You can see it's going
through there a little bit. And now I want to do is just bring it down and get it into the right size and then
you'll be able to see exactly how it's going to look. So I'm going to leave this bit here because at
the end of the day, we're going to
have those bits on the roof that are going
to cover all this up. So what I'm going to do
is come over to here. Let's bring down, first
of all, the horizontal. So if I bring this down like so, should be able to bring
down the horizontal. Let's pull it a little
bit more, maybe one more. And let's have a look
what that looks like. Let's have a look.
And there we go, I think maybe we can
bring it in from there, so Eta next, bring
it in a little bit. Now, the vertical, let's
bring that up then. So all the way up to
maybe up to there. And then what I'll do is instead of doing that,
you know what I'll do? I'll press Controls head.
Just go back a minute. I want to go back to hens. Instead of pressing Etanex and bringing it in like we
did, let's first of all, bring up the vertical,
and then from there, I can actually
shrink it all in to get it to be near
enough the right side. Now, when I'm looking
at that, you can see, pretty much it's
lined up perfectly, and that is exactly
what we want. Now, I want to mirror
it over the other side. So what I can do is I've
got it on at the moment, I've got it on normal. So I'm just wondering if I should use a mirror
to go over there, a mirror on here, but
the problem is then I have to convert
them all together. Let me just see if
that actually works. So this will be into no man's
land. So I'll grab this. We'll grab the top of here, shift desk curse to selected. And then what I want
to do is right click. Can I set the origin
to three D cursor? No, I can't, and that's what I was worried about
actually mirroring it. So what I'll do instead
is I'm just thinking I'll come in to put it
on global, sorry. And then what I'll do is
I'll press Alt D rotate it, sad, 180, and then we should be able
to get this in place. Now, if I put this
on normal again, and I actually get
this in place. So if I pull it over here, like so, let's pull it
down then into place. We can see we're quite
far out at the moment, that we'll get it
into place like so, and then hopefully then
should be able to pull it back and pull it up
like the other one. So we've got it
nearly going down to here or something like this. I think think of nearly let's have a look
how close this one is. So it's quite close to there. And I think this one is
also quite close there. So I think from this, yeah, I think that's
going to actually work. Alright. So before
we finish this, let's just move it
over a little bit. Before we finish
this, let's make sure that first of all,
we've got the parts in. So making sure that
all this fits is really important before
doing anything with this. So what I'm going
to do is I will press AltH, just bring
back everything. So we want one of these
parts in, as you can see. So what I'm going to do is
just press Alt D. Let's bring this part in over here, and then Z, 55 degrees or
R Z -55 degrees, like so. And we can see
that is really not fitting in there. I'm
going to go over the top. And I'm looking, Oh, 55. There we go. That's why. There we go. Now it's fitting in place. Now I want to do is level it up, so I want to get bang in
the middle just about. I think I could
probably come in. Let's have a look where
the This is in the middle. So we already know though
there's this part in here. So what I can do is
I can just press shifts and selections cursor. That should. Let's have a look. Has it put it bang in
the middle for us? Yes, it has. Like so. Alright, now what
we want to do is I want to pull this
down into the top, so we can see where these parts are here. Let's bring them over. I'm going to put
this into the top. Now, the other thing
is, we can see on this one how far it's down, so you can see it's near
enough all the way down. So let's actually
replicate that. And maybe maybe I
should have brought in the other parts as well. Now we can see it's not
coming down enough, and that's probably
because we've got a big gap at the top. And this is why I
said it's important to bring these down as well. Now, the other thing is, if I bring down my
vertical count, there's going to be too
much, as you can see. So let's see, first of all, if I bring this down
and rotate this, what I'm going to do is
rotate it on the normal, so that's Rt and X, rotate it a little bit, and I
don't want it in there. I'm going to rotate
it around here, and then I'm going
to pull it out. So now I'm going to pull
it out into place like so, and then we'll have
a piece on here. So now we've got it like this. I'm thinking I've rotated
that a little bit too much, so art and X spin it around
a little bit. Like so. And then the other
thing, of course, is getting the center part in. So I'm going to grab this,
I'm going to press Alt D, and it's a little bit tricky. But the thing is,
once we've done this, we can just mirror it
on the other side. Really, really easy to do, guys. So R z 55, and if not, R Z -55, like so,
is that rotated? Why is it rotating like
that, let's have a look. So Z rotate it this way
and then put it on 55, like so, seven to
go over the top. G to bring it into place. And we can put it right in
actual place. So shifts. Let's do it that way.
Selections cursor, bring it out then into place, maybe even take one off. So take one of the array off. Pull it into there, and then
S and Y and pull it out, like so now. Is that
stuck in the wall? And the other thing is it needs lifting up, of course,
as you can see, and then making sure that my
tiles are in place on there. There are the tiles in place? That's the question.
And it looks as though, they're touching up
to the top of here, and that's what I need. Now on this one, as you can see, they go slightly under. So, should I lift this up a little bit or notes have a lucky if we
got to lift it up. I'll tap the e. There we go. Now that's looking better. Now, what that means is, though, that we need to
lift up this part and pull it back a little bit. So if I pull this part back and then even pull
it up a little bit, like, so now we should be able to get the other
part in and line that up. So let's see on the next
one if we can do that, use it doesn't need
to be perfect. Not in the slightest. I'm also looking at where
this line is coming down. So I think what we'll do is we'll get these parts in here, then we'll get the part in here, and we can build this
out a little bit and see if it all fits together. Hopefully, it will. Alright,
let's see if I work, and I'll see you on the
next and every one. Thanks a lot. Bye bye.
120. Placing Decorative Supports for Short Roof Designs: Welcome back, everyone to blend the building master class
from concept to final render, and this is where
we left it off. Now, let's grab this one,
Op D. Let's bring it over. And then, again, we'll spin
it round on the 55 degrees. If I put this on
55, yes, it does. It works just doing
it like that, which makes it
incredibly easy for me. And then I'll just press Shift
S and selections cursor. And then this makes it
even easier for me. So I'm just going
to bring it out. And then what I'm going to do is just pull it down into place, and hopefully hopefully
this will actually work. Now, we don't need to, you know, bring it all into there. We can bring it up, bring it up. Do something like here,
double tap the A. And we can see we're a
little bit out on here. So what I'm going to
do is bring it up even more, bring
it up even more. Yeah, it's too far out on there. So what I'm going to do
is just bring it in. Double tap the A,
something like there. Maybe drop it down or pull
it back a little bit even. So let's try just Oh, pulling it back into there,
double tap the A. And that looks. Yeah, that looks cool. That is
actually working. Let's have a look at this
side. The only thing is that, of course, it's a
little bit low on this. Let's see if I put this into place. You know what I'll do? I'll actually try and pull it in there SNX, pull it
in a little bit. We're going to have
a point on here, as well to hide this part. But what I need to do
now, as you can see, is probably bring it up
to get it over there. Like so we can see we're still a long way round.
So you know what I'll do? I'll actually just bring
in these points, I think, the bottom parts
because at the moment, we're really
struggling with this, but it could be as
well, as you can see. We've got quite a gap
down here, quite a gap. So what I want to do is
just pull it into place, and then I'll rotate it round and see if that
makes any better. So art &x, it could be
me not getting in place. But the thing is,
as I said, it's very important that we
get these in place first. Now you can see that's
probably looking better. Now, let's pull this down and have a look at
this. There we go. Now it's fitting into place, much, much better
than where it was. Alright. There we go. That's
looking much, much better. Let's have a look
around this side, 'cause remember, we
didn't alter this side. And now I might be
able to get away. I'm gonna put post on here. I'm just gonna move this
post and have a look. How close are we to this one? Yeah, it's fitting perfectly. It's fitting perfectly on this. But the thing oh, yes,
that might be where it is. It's because of the
roof. The roof is a little bit out here. You
know what I'm going to do? I'm actually going
to press S and X and pull this roof out a
little bit to make it fit a little bit
better, like so. Now it should fit in place. And then we can have our bricks on here and then going down. That might actually work
a little bit better. Or we pulled the whole thing in, including these parts as well. Doesn't matter again
because we're doing our, we're gonna
mirror it over there. Let's just press Controls and
let's come to these parts. Now, the thing is if I
edit it in edit mode, that will cause a problem. And that's why I'm actually
trying to avoid it. I can actually bring it
out from here so you can see I can pull it out from
here and bring it in, but I really don't want
to edit it in edit mode. And then, of course,
I've got the problem in. You know what I'm going to do? I'm just going to pull it in. So I'm going to
pull this one in. I'm going to pull
it in all the way to and then I'm going to do the same thing
again to this one. So I'm going to pull
this one in, so it's behind this line. And I know it's a lot
of fiddling around, guys, but it's definitely
going to be worth doing it. So pull it into there
now you can see that tucks in under
there perfectly. And then what I'll
finally do is I'll grab my roof the roof
isn't so important. And then what I'll do is press S and X and bring these in, hide them out of the way,
like so, and there we go. Now we can actually
fit that in place, apart from these bottom pots. Now, let's see if I can
just grab this one. And grab this one through here. So this one here. And let's see now if I
can also pull those out, because if you can pull
those out there without altering the roof,
that would be great. So S and X is it S and X. Let's look, S and Y. And actually, so
let's try this one first. We're on normal. And at the moment, we don't really have one
to pull them out, so let's go to local. Let's see if local works. Note that's not going
to work either, so we'll go back to normal. And then what I'll do is
I'll pull it out and up. And then my roof is
not going to fit. Mm. Okay, wondering about
the best way to do this. You know what I'll do? I'll put my roof back to there. And what I'll do instead is, I'm going to take
this part here. I'm going to press P
selection, separate it off. And then what I'm going to
do is pull this part out. So if I grab now this
part going down here, I should be able to press S and Y and pull just this part out. And then I might be able
to come to the top. So if I hide these out of
the way, come to the top. Where this is, there you go, you can see where this
is and then bring it in. So I should be able to
bring this part in. So if I grab this, and
we'll merge at center. Let's have a look
what that looks like. Voltach, double tap the A. And nearly nearly very close. Let's pull it up. Is it still going to be in there?
That is the question. Let's pull it back a minute. And it's just this bit that's actually not going so right. Joe this bit. Once you know, the rest of it will be easy. We just got to figure out what's going off with this part. We can see as well
that we've got a lot of parts in here, as
well that we don't need. Well you know what? Let's
just go to this part. And what I'm going to do
is I'll just get rid of this because we're definitely
not going to delete faces. We definitely need
the top of it. We're definitely not going
to need anything in here, so we'll just delete them
all, even the bottom, delete faces so. We're going to need this side, this side and this
side, these sides. We're not going to need
the backs of them, so we'll delete those as well. So delete and faces. We're not going to
need the top of this, even though I've joined joined the front of this, so we're not going
to need the top. A we're going to
need this part here. But what I want to
do now is press tab, Alta, bring back everything. And now what I should be
able to do is grab not this, this part in the
center and pull it in, so it's not going to be you know what it's not
actually going through there. It is just literally this part. So this part looks near enough in place,
except this part. So you know what we'll
do? I'll just come in. I think we can just
drop it down if it come to here, this part, take it off, come round, should be able to drop
it down, like so. And then we need to make sure now that this is
underneath the roof. So if I press S, you'll be able to bring
them up to the roof. And this one looks like
it's already under there. So under there, under there,
that looks pretty good. Now, before carrying on, let's think about this part
here because at the moment, we need this to plug this gap. We need this one
to plug this gap. So what I'm going to do is
I'll just bring in this one, old D. And then I'll
press Z 55, like so. And then I'll press
I'll bring it down, first of all, and just
try and get it in place. And I'm also, if going to
pull it back a little bit, pull it into here a
little bit, like so, and then I'll shrink it down because I think it's
a little bit too big, and then and Z, pull it out
and just drop it under there. Like so. That is
looking very nice. And now I just want
one on the other side. Now, can we mirror this? I think we can, yes, we can. So what we'll do is we'll
just if I move the origin, though, I don't really
want to do that. So what I can do is, though, we know that this one
here has the orientation, right in the center of here. So I'm going to mirror,
actually, from here. So if I come in, I should be
able to go add modify it. Come down to where
it says mirror, so come down to mirror. And then go down and we want to mirror it from the object. So the object in this
case, will be this one. And there you go,
now you can see that's mirrored it
on the other side, and then I can just
simply apply my mirror. Come down, apply your mirror, make data use a single apply, modify, remove it from the list. I'm just wondering whether if I remove that from the list, it's going to mess
up everything else. So I don't really
want to do that. I think I'll just delete
the mirror. There we go. So what I'll after do instead is Alt D and bring it over to here, go over to here, and as far
out as what I need them, so it needs to go that far out. And now I want to actually
bring in this part. I want a little one, actually, so I'll just I'll put
in it going over here, and then we'll do
the smaller part. So we'll do Alt
D, bring it over, and then RZ 55, like so, and then RZ 180 to
spin it all the way around. And now I should be able to put this into place wherever
it's going to go. Let's turn down the array. So we'll turn down the array. And now we'll drop it
in place into place. And I think if we turn it down once more, we
lose that have. No, it will fit in,
so that's good. And we can drop
it in all the way there, making sure it's in. Maybe that's going a
little bit too far. Like this, and going
go around this side, and there we go. Yeah, that is looking good. Now we can on the next lesson, grab this and just
put it into here. Or you could put in, like, this bit here if you wanted
to just in these points. I'm wondering which one I want. Maybe, maybe. One of
these bars, I think. I think that will look better. So I'll just get this ready, so I'll press Alt D
and bring it out, and we'll use this
on the next one. And then we'll continue
building this out. Once I've got this bar
in, we'll then go in. We have to check
this, as you can see. So there's this hanging through
here that I need to fix. And I will fix that on
the next one, as well. So we'll get this bar in. We'll fix this part of the roof. I think if I hide this out
of the way and hide this, it literally is
just bringing these in this in a little bit more. So we'll do that first.
Alright, everyone. Alright, so sorry for
all the messing around. Sometimes it takes a little bit of time to get everything in, fitted into place and
all of that stuff. And, of course, you know,
even though I've built this, I'm still trying to
rebuild it again. So sometimes it is a
little bit fiddly. So, you know, you're always gonna get that when you're
putting these things together. So let's say that all work, and I'll see in the
next one, everyone. Thanks a lot. Bye bye.
121. UV Mapping for Compact Roofs and Building Extensions: Welcome back if I want to
Blend Building masterclass. From concept, final render, let's now crack on
with this part here. So if I grab this, should be able to pull this
back just a tiny bit. Now, let's press Tab voltage
and see if we've done that. Yes, we have, so that's
all looking good. And now the final bit,
which we got here, let's bring this out, spin
it round so -55, like so. Let's have a look, 35, 55. There we go. And let's then pull
this back into place. Hopefully, it's going to fit, and we'll pull it up into
there's where we want it. So we're going to bring it out, bring it out, bring it out. And then pull it over because we can hide
it behind there. We can turn down the array. So we can turn down the
array, maybe to three. And then what we compress is S and X and squish that
up a little bit. And I don't think even
though it's the stone, I don't think we'll
have a quick look, so let's have a look and render. Double tap the A, and I don't think we're
going to notice. Now, the other thing is, again, I really want to get the brick in here as well
before doing anything else, because if not, it's going
to make things a little bit hard to see what I'm doing
before we've got the roof in. Now I'm going to
come round here, as you can see, this is how the roofs going
in around this bit. I'm just wondering if
I should bring those up a little bit more because you can
see on this one here, this actually goes
just under there. And even though this
does go under there, it's a little bit out, or this bit here I'm talking about. So I could press EN E and
pull them out that way. Let's just try that E&E, pull them up that way,
pull it into place. Yeah, and I think
that actually might work better as well for us. I'm also going to, I think, pull it out on S and Y just
to get it in front of that. Let's have a look
what that looks like. Double tap the A. Yeah, maybe that doesn't
look right like that. But let's press Control's head, flip back. There we go. You know what? I'm going
to leave it like that. I'm just wondering if I
pulled all of this down look there it's not
gonna look right, so you know what? I'm going
to leave it like this. I think once we've
got our roof in, it's going to look
cool. Right, let's now. Now we've got that roughly in
the place where we want to. We've got all of this built out. We've got this part on
here. Now let's come in. And what we'll do is we'll
get the wall on there. So we'll get all the wall on. Now, we've got rid
of the back here. So even if I press tab now, I should be able to
unwrap it and get it in. Now, before we do that, though, let's bring round the sun. So the I'm going 234. Again, before moving any sun, make sure you rotate your make sure you save
out your foul. So then what we can do is
I can bring this down now, bring it all the
way around and get some nice lighting on here, like, so just so I can see it. Alright, now we can
see everything. What I want to do now is
grab all three of these. So if I grab all
of these, shift H, and now let's come in,
and what we'll do is, first of all, we'll
unwrap everything. Now if I press A, we've not grabbed that from one,
so let's grab that as well. So now if I press A, U, unwrap angle based, and
now what I should be able to do now is come in
and bring in a material. So let's bring in a material. At the moment, we've
got ambient occlusion. Let's minus that off. So we'll minus that off. And we'll put in bricks, bricks, like so we need
to spin that round. Now, on this one, let's come in. I'll grab this one
just on its own. I can't grab it on
its own, as you see, so I'll do is just minus off ambient clusion and
we'll bring in the wood. So roof, not roof. What is it called? Wood cracked. Is that one, or is it wood
stylized? Wood stylized. I think that's it. Yes, it is. You see, as well
this is at an angle. Now, why is it at an angle? If I press shift,
let's try again. Cursor to select. And let's also then press Contro
all transforms. Right click origin to three D cursor just to
keep it in the center. And now let's grab both of these and see if they
unwrap any better. So if I press unwrap
angle base, there we go. If I press I I grab this one, press U unwrap angle based. Is it going to
unwrap any better? No, it's not, but we
can rotate that round. And finally, then
these ones here. So let's come in. We'll
grab each of these. Unwrap. And let's see now, if I click plus down arrow, put it onto bricks
normal, click assign. Yeah, there we go. These
are going to look better. Now, let's press tab, lth, bring back everything first, and then we'll come to
these bricks here. Now, these bricks here, as you can see, look nothing
like these ones here. So let's go to UV
Editing. You've heard it. Let it load up. Not responding. Okay. I also, I also forgot to I thought I'd actually done that.
Why isn't that there? Did I not put my boolean in? Oh, I brought my boolean
out before applying it. Great, great stuff, Neil. Okay, let's come to
this one in hand first. This one here, let's zoom out, press the tab button, A, to grab everything, A over
here, and then rotate it. So R s 90. Let's rotate it round. Is it going to be right? Now,
you can see with this one, we are having a real big
problem unwrapping this one. It's definitely
not the right way. So if I press the S button,
though, first of all, let's get it to be the
right size for those bricks and then R. And because
most of this is hidden, we can probably really get away. We've lining it up like
this, as you can see. Now, one of the
problems I've got is, W is this coming through
here? That is the roof. I'm going to pull my roof, Joe's back a little bit on the red. So let's pull it
back into place. And then what I'm going to
do is press S and X just to get it into that part under here, and
then pull it back. And there you go, Is that
enough? That is the question. I think on this part as well, we can bring in another
part which you'll go down here, which
is this part here. I think that might be worth it. But first of all, let's
just have a look. Have a look at this one.
This one's in there. It's just this part here. So I'll come back to this, press Controls and just
bring it back a little bit, making sure that it's not
sticking through there. So if I come in, do this part. Grab the red, and it should if I grab the red properly.
So grab in the red. Let's turn it around this way. We can see where it
is. This one here. You can see now if I press, double tap the A, now it's
in place. Up to there. And now let's grab
this one here. Let's press salt D. And then what I can do
is I can pull that back into place there,
double tap the A. Like, so and there we go, that is looking much better. And now let's come in. And what I want to do as you can see we've lined these up. We just want to
line these up now. So if I come in with these
and then go L and L A R, 90, spin them round, and
just make sure they're looking around the right
size as these ones here, which they pretty much are. Alright, double tap the A, and that's what we're left with. Now we've got now our wood
in there like before. And now what we want to
do is sort out this roof. Now, we already know
how to do that. But let's go in
and first of all, though, let's put
this on object mode. Let me bring back in by Boolean. Let's go to Mmdling actually. Let's come to Boolean. Bring them back in. That is very, very annoying, actually. Shift Des cursor selected. I think it was this
one, actually. Shift Des and selection.
Let's grab this again. Shift Desk, Cursor selected. Shift Des selection to
cursor. Control one. Just make sure it is
that one. Yes, it is. And now grab the wool, Control minus, and now
we'll press Apply. So apply it on there, and
then we'll come to remove cutter and then we'll come
to Oat P and remove paring. And now finally we
can move it out. And then what we'll
do is just make sure then what I'm making
sure that I've got my booleans in another
way and then put it in rendered view and have
look, making sure that's okay. Alright, that looks
cool. Like so. And then what I'll do
is, I'll just hide the roof geometry
node, and there we go. Now, let's come back round
here and look what we've got. So this is all looking
good now, as you can see. We're going to press lth, bring back the roof on here. No, we're not. We're gonna
put it on object mode. Where is my roof, lth. And I don't know
where my roof is. Did I actually delete
that other way? Or did I have it on? Have I hid my roof? Yep, there we go. It's under the Boolean roof. Alright, so let's put
this in its own part. So we'll grab both of these,
and we'll put them in. We've got Boolean.
So the junction, I want them in roofs, like so. These also should be in roofs. If I press M, is it in roofs? Let's have a look.
Press the little dot B. Yes, it's on the
roof, so that's good. Alright. Now let's come
into these two parts, press Shift H, hide
them out of the way. And now what we'll
do is we'll see, first of all, if they've got
the face orientation on. They're all the wrong
way round, as you can see, and we know why that is. So let's come in,
and it might turn amund when we convert
them both to mesh. I'll grab them
both. Right click. You should be able
to convert to mesh from here as well,
and there we go. And now what we
can do is press A on Let's look on
this one and press Control N or ShiftN and we can see that this is the reason why I joined them all up in the beginning as well. So there is a set procedure to go through when we do this. First of all, we actually
convert them to mesh. Second of all, then
we delete the normal, so the backs of them,
and then third of all, we actually join
them all together. And then fourth of all, we
turn around the normal. So make sure you're
doing it in that row. If you don't, you're going to have a lot of problems as
we've learned in the past. Alright, everyone, so we'll sort that out on the next one. Thanks a lot. Bye bye.
122. Optimizing Roof Tiles and Building Decorative Supports: Welcome back, everyone to blend the building master class
from concept to final render, and this is where
we left it off. Okay, so now we've Can we
join them both together? I wonder if we can
do them both at the same time or should
I do them separately? You know what? It's not going to take
that long to do them. So what I'm going to do
is I'm going to come in. The only problem we're
going to have is grabbing them all at this angle. It's quite hard
to grab them all. You can press, let's say, three. You can press three
and then press six or seven or four, sorry. And what it'll do is
rotate them slightly. You can still see that we will
have a problem with that. So we don't want to do that. I'm going to try and line them up as best I can like
this as you can see. So we'll give it a try. Maybe we can get away with it,
maybe we can't see. It's a little bit hard to do. The other thing,
of course, you can do is if you come to item, you will see that
I can move them around on if I zero
this out, let's see. If I zero that out and
press three, there we go. So I've zeroed that out,
it was 145 degrees. Can I actually get rid of
these and then put it back? So if I come down, get rid of these and put it, let
me just have a look. 170 was it at? Let's have a look.
Let's put it back. It was at 145. So our Z in fact, you know what, Let's
put it at zero, like so, and then put it at 145. We might be able to get away
with doing it like that. So let's give it a try first. Save out your work because then if you need to come
back to it, you can do. So let's go to zero it out, and then let's come in now and do the work that we need to. So we're going to just
grab all of these. We're going to come into
here and grab all of these. We're going to come
round the backside of it and grab this one here. And then what we're
going to do is we're going to go up to select, click similar and
go down to normal. And then finally what
I'm going to do is I'm going to hide
those out of the way. So I should be able to
hide these out of the way. I should then be able to
press three and go into side view and we can see
all of those have gone now. So we're getting way, way
quicker at this anyway. And then what we'll do is
we'll put it on wireframe. And finally, then I should one we forgot these ones
here, as you can see. So again, select Bear normal,
hide them out of the way. Okay, let's make sure then three I'm just looking
at the bombs of here, making sure they're all
there, and yes, they are. And now I should be just
come in pressing C, C and C and just
working your way down, and we should be able
to select them all. And we'll do this first
just to make sure it's working and then we'll
try it on the other one. And then I think
we'll be absolutely fine with this and be able to motor along and get it on the other side once we've
finished building it out. These are the slowest
bits, of course. Like this, like this. And of course, the
other way you can do it is just using a texture. You can see on
this one, as well. We've still got this here,
but I think we'll be okay. So delete and fats, like so, there we are.
You can see it there. And now if I press OtaH,
bring back everything, press A, mesh, clean up. And then merge by
distance, 4,248. And now if I put
it on object mode, I should be able to
spin them round. So shift, spin them round, and then right click
and set Autos move on. And now, finally,
let's go to 145, and there we go, we
put it back in place, and it's all done. Now, we should be able to
do the same with this one. This one is 325. So again, just in case you
can't fix it, put it at zero. And there we go. Let's hide
this one out of the way. And then pretty much
the same thing. Now, if I press three, I
should be able to go into side view and actually
delete all those off. Now, why do I choose
to hide them? Because it does make it a lot easier. I know what
you're thinking. You know, while you're
hiding all these, you can just go down
and select them. For me, it makes it
easier to do it this way. So I'm just going
to do it this way. But then I don't
end up selecting anything else like these sides. You can be very careful
with the C select and just, you know, grab the backs, but
I find this way way easier. I'm going to go to select,
select similar and normal, and then I'm going to hide
those out of the way. Now I'm just going to
come down and have a look so you can see
here, for instance, I'm going to select similar and normal and then hide
those out of the way. Going to the side view then, so it's 325. I'm just
remembering that. I've got one here
as you can see. Now, where are the backs of where are the backs of them? Have we still got
backs on there? No, they're already
deleted out the way. So that's the best
thing ever, 325. Let's put it back. Right, click, shade to smooth, oltage,
bring back everything. And the reason is because these are Alt D from each other. So that's the best thing.
It makes it so easy for us. Now we need to do is
bring in the textures. So grab this one A, U, smart UV project, click
Okay, and there we go. And then what we'll
do is grab this one, press Control L, and we're
going to link materials. Then we'll go back to this
one. And there we go. It's done, guys, and
it looks fantastic. And it took a bit of
work, but we're there. Let's take a face orientation,
get rid of all of those. But, yeah, that's looking
amazing right now. Okay, now, let's look at
this wall, so the walls in. So let's work on this
bottom part here. So I want two kind
of ends on here. Now, this is where I
think I've got one which I haven't built out yet, so I think I haven't
built it out. So what I want to do
is, first of all, I'll put in the main pots. I'll put in a pot going this way and a big bulky pot on here. So we'll go, first of all,
to the asset manager. I'm fairly sure I've not built
out the corners for these, and I'm also fairly sure
that we can change, one of these if we need to. Let's go to supports,
first of all. We've got these big chunky
pots. Which is this one here. Let me look what I've got
for su puts because I definitely want to put
something better in here, and maybe, you know what? We'll just go to these.
But we'll go to these. I'm just looking. I haven't
got anything I can work with. I could probably work
with this one, probably. Let's bring it out. Let's
rotate it round first. So Y -90, like so, Z 55. Let's put it onto Global
and then do Z 55. That's what I mean.
Something like this maybe. And then let's put
it onto normal. And now I should be able
to put this into place. So let's bring it
over and see if it's going to fit into what
I'm trying to do here. But if I put it like that, is that going to look any good? Possibly, possibly. Let's first of all,
bring in the round bit. Have I got one of
those on there. Let's go to the supports. What is this one?
Let's have a look at this one. What does
this one look like? Well that's the big part.
I could probably bring that in or let me look
at the other parts, 'cause we haven't used
many of these yet, I could probably bring this one in putting that in the center. So let's see if we
can build this out. So it's Rs Rs 55. Let's
put it in that way. And then we'll put it
in the center roughly up here, like so. And I'm wondering about the bottom bit is what I'm
wondering about because the bottom bit
needs something in there to kind of hold it up. So that's why I'm
trying to put in something like this and then have something
else underneath it. That's what I'm trying
to do. So if I bring in this one and then
let's have a look. Shall we bring in
how big is this one? We'll bring in both of these,
actually. This one here. Bring it up and
then Z 55 or Z 55, like so. Let's
bring it over then. I mean, into place
Pull it into place, and then I should be able
to put that into there. Like so. And hopefully, hopefully, it should fit in. I I bring this to
let's say to here, just into there, like so, then pull it up a little
bit and put it like this. Pull it out a little
bit, see what it looks like with it and
how it looks better in. And then what we'll
do is we'll put it on the other side as well. So if I bring it over, so I should be able
to press Alt D, bring it over to this side, put it into this side as well. Let's have a look at
how these things line up and then grab all of these and make sure we're
on normal and then S and X and bring
them in, like so. Double tap the A,
so far so good. And now we want to
some lumpy bits here. So we'll use probably
these parts, Alt D, bring it down. It's already at set at
the right angle anyway. Press a little dot one
to zoom in and pull it out like so, and let's pull it up a little
bit so it fits on there. And then finally one
we're going to do is I should be able to S and Y. I should be able to pull
it out and then pull it in, so it's in the wall, like so. And then what I'll
do is, I'll press Alt D and bring it
over the other side. So Alt D, let's bring it
over to the other side, making sure it's roughly
around the same on the edge. And there we go.
That's that part. And now we need a
part underneath. So the big bulky part underneath
will be this part here. I don't see why we
wouldn't use that. Though old D, let's
bring it out, and then R z -55. And we're always going 35, so I don't know why
that is, but we'll put it on 55 regardless. And now we'll pull
this into place. I'm going to pull it
into place over there, and then I'll drop
down the array. So if I turn down the array, maybe to there because we're going to have this
one the other side. And now let's see how
that's going to fit in. So if I pull it back
into place like so, and let's see where I
need to bring it to. So if I bring it
down to just down to there and then press Essen'sEJ squish it
down a little bit more. And I'm just looking, where
is it coming down to? You know what it's coming
down to that part there. So I'm just going to pull it
up just a very small amount. Though this part
here, you can see, I want it just into place there. And now let's grab this one. I'm not sure yet. So O
D, let's grab this one. And let's mirror it on the
so let's go to object, and we're going to
mirror it on the local, and it's going to be
the local Y, I think. So let's miror it on the
local Y. No, that's not it. Let's go to an object mirror
on the local X. Nope. So let's go to Object
Mirror on the Y global. No. It might not, you know. There we go. Z. Who would
have thought Z. Alright, let's pull it out there.
Let's look in this. I'm going to put an
object mode just for now so I can
see what I'm doing. You can see the
gap here and here. Let's pull it out. Got
about the same gap now. And then finally, finally, let's look at where this is. So I'm going to pull this here. I'm going to press S and X, pull it out into place. Like, so double tap the A. And now let's have
a look at that. You know what? I think I'm happy with that. I think
I'm happy with that. The only thing is, I think I may need one more of
these to hold that, and then maybe this one's wrong. I think what we'll do
is on the next one, we'll test out some
things on this one, just to make sure
everything's fitting in properly because
at the moment, I feel like it's
not quite there and I'm not quite not
quite happy with it. I need to move it
a little bit more or change a few more things
with the pots I've got. And then from there, I can get this bottom window in and start working
on the other side, which will be a lot
more interesting. So yeah. Alright, everyone. So I'm going to
say about my work. Thanks a lot, everyone, and I'll see you on the
next one. Bye bye.
123. Adding Decorative Elements to Manor Walls: Welcome back everyone to
blend the building master class Rome concept
to final render. So these parts here, let's first of all, grab
this part, and I'm looking. It's got this point
in. Do I want that point in there or do I want it to come
in straight down? That is something I need to ask. So as well, this one,
we'll use this one. This one seems to
go straight down. So O D, let's bring it over. And then what I'll do is
spin it round by 55 degrees. So art Z, 55, and there we go. And then what we'll do is
we'll put that into place. I'll just drag it over
and then into place. Like so, press the dot
born, let's zoom in, and let's get it set
on there, like sew. This is my worry that it's not going to sit on there properly. You can see it's not out enough, so I'm going
to bring it out. I'm gonna pull it up into place. I'm going to make
sure that there's a little bit of
thickness on there. And then what I'll need to do is I'll need to bring
both of these out. So just make sure
you're on normal. And then let's just pull
them out a little bit, like so, double tap the A. And there we go. Now,
I'm looking at this, and actually, it
looks pretty nice. I actually like it. So
I can do nice press salt D. Bring this one
over to this side. Zoom in, so zoom into it. Like, so, making sure it's around the same as this
one, which I think it is. And then what I can do is bring this out now a
little bit, as well. So bring it out, bring it out.
Bringing out not that way. I think I'm going to
have to have a look. So this one is just
on the edge of there. So if I pull this out, is it just going to be
on the edge of there? Or do I need to pull it
out a little bit this way, as well, like there. And let's have a look
now at this part. Can see it's going all
the way over there. Let's just tweak
this a little bit. So S&X and place. You know what? I
think we've got it. Now, we'll do the
parts going down. So we want I think with this, should we carry on with this one is what I'm
thinking? I think so. So what we'll do is we'll
just grab both of these. We'll press Alt D, and
I'll bring them over here, and then I'll press Z
55, spin them round. I'll put it on object mode so I can actually
see what I'm doing. And then what I'll do is
I'll pull them into place, like so, and I'll pull
them into place, like so. And then now we can see that
we've got this part in here, but I don't think we need that. So hold deep. And then 55. Like so, bring it over. We'll just put this into place. And then we'll bring
this, the other side. Op D, bring it over. Make sure that we've
got a nice bit of a gap there as well, like so. Then now let's have
a look at this. Can we bring this one
over to the other side? If I put it on another
one, yes, we can. That looks perfect. All right, so I am happy with that. Now I also want to
do this one, Op D, bring it over 55, thin it round, bring
down the array. Then from here, I'm going to
press S&X and bring it in. Pull it into place, so it's
going to be Ja sat coming over the edge of here, like so. And in it goes. All right. Now, I want
one more above it, and then I think I'll
put a window on. So if I press Alt D,
I should be able then to bring it up and
put it onto there, and then I'll bring
this window down. So I've grabbed this window. In fact, this is all
part of the same window, so I'm probably going
to have to come over and grab this
one over here, so I'll just press
Alt D. Bring it over. And then I want to
just grab the front of here or at least these two
to put it in the middle. Or, you know what? We'll
just grab this point here. If I grab this point
here, shift S, cursed selected, and
then I'll grab this one, spin it round to 55, like so, and then shift S
and selections curtain. It's going to put it right
in the center for me. And then if I bring it down, we can see it's going
to look like this. These are a little bit smaller, so it's up to you whether you want to make this a
little bit smaller. Let's first of all,
pull it in. Let's pull it down onto the top of here. And let's see where
we need this to come. So you can see it needs
to go back, needs to go back, right around there. Is where it's going
to come now, I would say it's not far enough out. I'm going to pull them
out, pull them out. Yeah, and that looks
way, way better. And there we go. Now we can see that these are bigger on here. And I think that
looks pretty good. Now, one thing I'm going to
test is O D, bring this out, and then I'm going
to press Y 90. In fact, you know what Y -90. And let's bring it out
into where I want it. So ride about into
the wall there. And then pull it down
under here, like so. And I'm just testing this
out to see what it looks like because I feel like it just needs something
else, holding it down there. Now the thing is, I could
use this one here as well, at the corners here instead. But I think, actually, let's have a look with it on rendered view if I actually need it. Let's hide it out of the way. I think it needs something, so let's press D and
bring this one down. Like so. And then
what I'll do is press ALTH. Hide this one. So hide this one out of the way. And then we've got something
that looks like this. You know what? I think that looks better. I really think
that looks better. So I'm going to delete
this out of the way, and then I'll delete
this one out of the way. And then I'm going to press
l D and bring this one down. Down into here. And then what I'm
going to do is just make sure you know what? We won't do it that
way, we'll grab this one because
for some reason, its this looks a little bit low, so old D, let's bring it over. Yeah, and there we go now it's
fitting in place, like so. And then we'll press
Old D on this, bring it over, put
that one in place. We can see this one is a
little bit further out. But this one's a little
bit further out. Let's pull it in. And
double tap the A. And finally, then
this part here, let's press S and X and
pull it out into place. Double tap the A,
and there we go, and I think that looks actually I think that looks
way, way better. Now we can see though that
we've not quite got in, so S and X, let's pull
it out even further. Pull it over, double tap the A. And there we go. And now
let's do this part here. And I think, yeah, we need one little part
on the front, maybe. Let's look what
supports we've got. So we've got supports
top and bottom. So we've got all of these
little tiny supports here. I may put one like this. Yeah, let's use this one. You know what? Let's
bring this one in. And then Z 55. And we should have the
Cursors Sar in the center, so shift desk, selections
cursor bring it down. And I just want that
going under here. Like so. Let's pull it back a little bit
further under there. Double tap the A. Yeah, and that looks fantastic. I'm very, very happy with
how that looks, actually. But now it means I think I need to shrink down
my window a little bit and just drop it in
here. Double tap the A. And, yes, I think
we've got that. Now, it needs to drop
down a little bit, as you can see, so hold in
the shift and drop it down. Now, let's save that'll work first. But we'll
save that'll work. Bring in our booleans. And the boolean we
want it's going to be a little bit smaller for it, so I think
it's this one. I'm going to press Shift D, and then I'm going
to spin it around. So I 90. But, you know what,
we'll put it on 55, like so, and it needs to
be on the other. So -55. Let's try that. So -55. And then what we'll do is let's see if it's actually
going to do. So we'll press Shift S, selection cursor,
drop it into place. And this is
absolutely not right. As we can see, why is it not right, though?
That's the question. If I put it on there,
press Control A, or transom set
origin to geometry. Now, let's try putting on 55. And I don't know why oh, I think it was already rotated, so let's put on zero again. And let's turn it around.
What is it going to be at? Roughly. And it
looks like 35 -35. No idea why it's that. That seems to be what
it's going to be at. Now, I don't want it obviously going all the way into there, so I'm going to make it
a little bit smaller, so S, bring it down. So I think something like that, even though it's
a little bit out, it doesn't really matter
because, you know, you're only trying to
create a boolean from here, as long as the boolean works. So if I press Control and minus, as long as that boolean works like that, you should
be good to go. So now if I press Control A, let's delete this out of the
way because we're not going to need this because
we're going to mirror it over the other side anyway, and that is what we
should be left with. Now, what I want to do is
I want to first of all, on the next one, bring
in a window in here. I want to make
sure that I've got something at least
going over here. I want to bring in the window
on the bottom, as well, because then I want to make sure I've got
this part in here. You can see these pots missing. These little tiny parts in here are pretty
important, actually. I'm thinking I'd probably use this and make it a little
bit bigger for this. I'm wondering whether I need an actual another
column in there, you know, to balance
it out a little bit. You can see I could
put a column, but then it might be too much, but you can see the bricks
don't quite line up properly. So I'm just wondering the
way to get around that, 'cause we have to think
how we're going to fit all of this in together, probably. I'm probably just going to
use these panels on this, use this, turn it
around, this one, turn it around, and the
top ones already done. I'm probably going
to do it like that just to make it easy for myself. Alright, we'll do
that in the next one. Again, we'll save it out, and I'll see you
on the next one, every one. Thanks
a lot. Bye bye.
124. Refining Building Corners for Curved Structural Integration: No. Well, welcome back everyone to blend the
building master class from concept to final render. Now, let's get these parts in. So I'm just going to
put out an object mode. I'm going to grab
this one on here. I'm going to press Shift D. And then what I'll do is
I'll spin it round by. Let's first of all,
spin it round. I think it's going to be
in this direction. So 155. Let's try that. I think that's
going to be about right. And let's pull it into place. So we'll pull it in. I think it's a little bit out, actually. Yeah, it's a little bit out,
as you can see, so R Z. Let's pull it a
little bit more even. Let's pull it out. And we also will need this top on here. So what I'm going to
do is I'm actually going to shrink it
in on this time, and then put it in place and shrink it in even a bit more. Put it in place, like so. And then S and X. And we only need to do this one, so I'm not worried
about, you know, shrinking it too much,
and then S and Z, like so, making sure
it's in the floor. And then we'll grab this one.
So t D and then R, Z 55. Turn down the array
all the way down, do one, and then grab this
and put this in place. Now, again, always remember
to lift it or drop it down, so just so you've not
got that flashing like so, and there we go. And what I'm wondering
with this is if I need to where do I actually want it? So I think something
around there. Looks good. And then we'll do the
same thing with it. So might as well
just grab this one, old D, bring it up, making sure it's fitting in. Making sure it pulls back
a little bit, like so, and then we'll do, these
are the thick ones, so I also want to thick one, and I want a thick one to make
sure I'm hiding this part. So old D Z 55, turn down the array count, like so, and then
drop this into place. Like so and then drop it
down or up up to you really, or you can just go S and Z and just pull
it out a little bit. That might work out
a bit better for us. Double tap the A,
and there we go. All right, so that's
all that bit in. Now, from here, I'm just wondering whether
it's easier just to mirror them over
the other side. Maybe that is the
easiest way to do this. So I'm just thinking, what is the easiest
way to do this? Because it's quite
complicated. It's not so easy. So first of all, what we'll
do though is we'll put our cursor right in the center. So cursor to selected. And then what we can
do is we can always base it on the object. So if I now grab this object
and I press Control A, all transoms right,
clicks Origins geometry. And then what I want to
do is now I want to come in and actually delete this up. So I want to come in
and grab this if I can. So I'm going to
try and grab this. And you can see that this
has got a mirror on there. So this one's okay. This one's probably
done. Let's just have a look and
make sure we've got all of our roofs in and everything. We've
got our booling in. So this one's okay. So what we need to do now is
mirror this over. So if I grab I can't even join them up
because we've used old, and we really don't want
to mess around with that. So we're going to
have to do it a little bit of the hard way, but it is going to change it is going to save us a
lot on optimization. Now, what I want to do with
the mirror is, of course, I want to grab this object and
put it over there like so. So now I want to do is just grab each of these, add in a mirror, so generate a mirror, and then the object is always going to be
this one over here. And then what we can do is
as we're working down these, we can hide them out the way. But we'll come to
this one now, adding a modifier, generate a mirror, and then the mirror object
is going to be on here, like so, hide it out of the
way. Stay with this one. Yes, it's a little bit of work, and yes, it's a bit of a pain, but I don't want to
go in and even apply the modifier because
some of these have rays on, and we
don't want to do that. So we have to be very, very careful when
we're doing this. Though the object is
going to be over here, so, hide it out of the way. And just work your way down. Doing it like this, and I
think at the end of it, we can see that we're probably not going to have any issues. Let's do this one as well. Let's come to this one.
God, generate mirror. And then we'll come down
to where it says mirror, and we're going
to pick this, and then we can hide
it out of the way. And if we work like this,
I think we should be okay. It's just a little
bit of a pain because we can't add just
the mirror to the more at the same time. As far as I'm aware,
we can anyway. So add one if I generate mirror. I'm just wondering, actually, if I can just press Shift R. That might be something
we might be able to do. Let's hide that out way. So if I press Shift,
will that add a mirror? Shift? No, it doesn't because all it does is
basically put it there, so we can't do it that way. What I can do though is
put them up, obviously, generate a mirror,
grab this one, hide it out of the way, and then put these up,
generate a mirror. And Mirror is going to be this object here, hid
it out of the way. Alright, you can see, though,
the way that I'm doing it, it's quite methodical,
which does make it a little bit easier. At least I think it does. And then we've got
this one, and we'll have a once we've
done it to make sure that this is the way to go and make sure
everything is in place. And a lot of the time,
when you're modeling, honestly, there is a
lot of repetition. So just take that into account. I mean, yeah, you're going to be modeling lots and
lots of different things, but within modeling itself, there's so much repetition, and that is the way that you
actually speed up workflow. But I keep repeating things over and over again,
unfortunately. And every model you
come to is in the end, they're all built
from hooligans, which is basically
built from just pulling out edges and vertices. So it's part of the process. You're not going to
come yet and build a model from just
putting in a prompt or using a geometry node to
build everything you want. It's not going to happen yet. So for the time being,
which is a good thing, we will be doing it this way. Alright, that's that
part. Now, let's keep working our way around. And I think we spent the whole lesson just
doing the mirror. But I don't like to leave
you guys in the lurch. I don't like to leave it so
that you just kind of left, and you're just like, Okay,
just get on with that part. I don't want to actually
do that because I remember a long time ago. I did a tutorial from
quite a famous guy, and at the end of
it, it was like, Right, you're going to finish
off the shoelacers now, and you should
know how to do it. And, no, I didn't have any clue how to do
it. It was very new. And it really annoyed me, and I couldn't find out
anything on how to do it because this was probably
ten years ago by now. And so I kind of left it, and I couldn't finish it.
And it really got to me. So now I'm like, Well,
with all our courses, we're going to make
sure that we go through the entire process, no matter, you know, if it's taking up a time
or anything like that, we're just going to make sure
that we go through them, and that's the reason why
we go through everything nowadays because there are a
lot of new people out there, and they'll probably be lost if we don't finish
every part off. And also, it's a little bit more comforting if you've
got someone showing you the whole process through it. So I think that's important. But you can put that
in the reviews if you agree or disagree with me
because at the end of the day, you can always click forward, but you can't make
that content again. So that is what I
think about that. So yeah, if you agree
with that, let me know. Okay. Go. And by the way, guys, we have got
a discord channel. So if you have a
struggling, then make sure join our
discord channel. There's lots and lots of people there who will be
able to help you with all kinds of things from geometry nodes,
shading, modeling. And I think we have nearly
1,000 people at this point. So there's always hundreds
of people online. Alright, so at this point,
we've nearly done now. And I'm hoping that
I'll try and get it in in the next 2 minutes to
finish this, so mirror. So all in all, it took
probably 8 minutes or something to actually
get this done. So not too long.
Not too long, guys. And drop this in plate,
hide it out of the way. And finally, this one here.
And hide it out of the way. Now, let's see the moment of
true voltage, do tap the A. And there we go. Okay. That
is looking really nice. And, yeah. So the reason why I did that is because I actually want to start building
out this part. So this part on the bottom, I'm going to start actually
building that out. So we're going to build
these steps on the next one. And then from there, we can actually start
with this part here. So before we finish, let's just grab our guy. And what I'm going to do
is I'm going to spin him round, so Z -90. No, we're going to
put it on Global. And then Z -90. Spin him round, we
should be able to press one now to go
into front view. And then what we're
going to do is just stand him on the bottom of here. Y. Then what we're going to do now is the most complex part
of this modeling process, at least, because we need
to get some steps in here. We've got a big door in here. We've got so much
work to do on this, but it is actually a lot of
fun creating all these parts. So, lastly, I'm just going
to go into modeling. And then what I'm going to do is I'm going to press
Tab, first of all. I'm going to go
into object mode. I'm going to save I'm going to delete these
parts out of the way. I'm not going to need
them, and then I'm going to save out
more work, so save. And finally, I'm just
going to make sure that all of this
part is in here. And yes, it is. Yeah, it's
all looking good there, so that is awesome. All right, so I'll see you
on the next one, everyone. Thanks a lot. Bye bye.
125. Modeling a Balcony Base in Blender: Welcome back if
you want to blend the building master class
from concept to final render. We finally made it
to the front of the building guide.
So here we go. Alright, so first of all, we can see that this has got
a lot of chunky parts in it. It's the main part
of the building. We don't actually
want that. So let's bring in another cylinder. So we're going to
press Shift day. We'll bring in a mesh.
We'll bring in a cylinder. And because this is pretty big, this part here
it's pretty round. We might actually be
better off for what we're using it for
keeping this on 32. I think we will. What
we'll do is we'll right click and shade Ato smooth. And then what I'm
going to do is come down, bring it into place, bring it all the way out to
where we actually want it, and line it up then with this
one that we've already got. At the moment, it's
not a cylinder. It's kind of a cynder
but not quite a cylder. So what I'll do is
I'll press S and X, making sure I'm on global, and then go to pull it out and making sure it all
lines up from there. Now, we've pretty much got
the shape now of this. So what I'm going to do is
just delete the other one. So delete the other one, so don't worry about deleting it, and then I'm going
to press S and X and pull it out a little bit more because I do want it
right in that part there, right in there, so it
fits perfectly in there. And then what we can
do is we can pull this up. Right to the ground plane. So I want to pull it up right into this ground plane here. Now, I can see the ground
plane is a little bit higher. So what I'm going to
do is pull it up, pull it up just so it
sat on top of there, and then finally, let's
grab the top of it, and we're going to pull it
down into place like so. Now I want to do is I want
to grab this part because I'm going to use this
for this part up here. And I'm going to press tab, I'm going to press Control
A or transforms, where I clicks at
origin to geometry. And then what I'm going
to do is pull it up, so I'm going to press Shift D to duplicate it because we are
going to be altering it, of course, and then I'm going
to put it into the top. And from the top, then, I'm just going to delete
this one out of the way. And now we've got
two rounded pots. So if I press S and bring it in, slightly, like so,
and there we go. Now, how far is this pot
going to be coming out? It's going to be
much, much more in. So it's probably, if
I go over the top, it's perhaps even going
to be this far in. Something like that, and then
I'm going to press S and X and just pull it out slightly just to kind of
level it up like so. And there we go, that is
the start then of this. Now, of course, so much
more work to do on this. So what we're going to do
now is we're going to make this around 1.19 meters. So if I come down to the z, I'll put it on 0.19, and then I'll just
line it back up again. So if I press one, I'm
going to line this back up, then, wave my ground plane. I'm going to come
around this way, making sure that it lines up
just under my ground plane, like so such that
in and there we go. Then what we're
going to do now is we're going to
move our guy over. Now, the thing is
about these stairs is they're going to have
a little bit of a lip. So let's put him on the stairs, first of all, put
him on the stairs, pull him back, and
his feet should just hang over because
this is going to have a little bit of a
lip on going up. Alright, so now what we want to do is we
want to grab this, grab the top of it, and then
what we're going to do is press the eye button
and pull it back. So it's actually looking like a step. So
something like this. Now, we want three steps, and we want them to be not 0.19. What that means is
then I can go E, like so, and put it on not 0.19. So I think on here, not 0.19, I can put it on not
0.19 and then I again, but I want to bring it in as far as I did on the last one. So rather than do it this way,
let's do it the other way. What we're going to do
is we're going to go I, bring it into where we want it. So somewhere around here and we'll have a
little lip on front, copy and paste this,
so control C. And then what we're
going to do is come back. We're going
to press the I. We're going to
come down, Control D. And then we're going to press I and Control V. So. Then what we're going to do
is we're going to press Alt, shift, click Alt Shift
click and pull it up. So pull it up to 0.19 0.19, like so, and then
come to the next one. So grab this one, Control
plus, pull it up, two, you guessed it, not 0.19
0.19, and there we go. Alright, so that's what
we should be left with. Now, at this point,
it's up to you if you want to pull them
back a little bit. But first of all, let's pull out those lips because
I'm looking at this, and I'm wondering if they're
actually wide enough or not. And I think so we've got
one, two, and three. Let's bring in the lips first, and then we can decide if we I'm just wondering if I
want to pull them back. Can I actually pull
them back? Al, shift, click, shift, click, lns? Yes, I can I can pull them back quite easily on their own. So if I pull them back, if I pull this one back, let's see. Al shift, click, lns, pull it back a
little bit. Like so. Control C, and then
we'll do this one. So should click Alters
and then Control V, and then we go, we
can pull them back, so now these should be
at least, have a look. Are they? Are they
the same length. I'm just going to have
a look at that one. Can I pull it back a
little bit further? Yeah, I'm going
to pull it back a little bit further, like so. Alright, so then the third one then has got the pillars on. So I'm going to show you
what that looks like. So shift desk has selected, Shift A, let's bring
in another cylinder. Let's bring our cylinder out. Let's make it kind of like, you know, the size that it's
going to be for the pillars. So maybe the pillar is going
to be kind of this size. And then if I bring this up now, you will see that
it actually goes into this part on here,
which is what we want. So this is roundabout where the actual
base is going to be. Once it's actually
got, you know, a top on here as well, you can see that will
be fitting in there, and that is exactly
what we're looking for. But for now, we know that
it's going to come in. It's a little bit too
close to maybe the edge, but I'm going to
bring those out now. So what I'm going to do
is I'm going to come in. I'm going to press Control R, left click, right, click,
Control R. Left click, right, click, Control
R, left, click, right, click, grab them
all at the same time. Press one, and then we've got a good idea that if
we pull these up, the lips can then be that big. What do I mean by the lips? Well, if I come in, I'll shift, click, Oh, shift,
click, Al shift, click. And then I'm going
to press E, enter Alterns and then pull these out, make that little lip on there, like so, and there you go. You can see that's looking
very, very nice now. Alright, so we've done that bit, and now it is time for
the actual pillars. So we need to bring
in the pillars, and we also need the top of here where it's
actually going to go. Now, it's a little
bit hard to say where that's going to go when we haven't got anything else
in there at the moment. So I'm thinking
that we've already measured this out, so
that's one good thing. So let's start with our pillars. Now, remembering our pillars are not going to
come up to the top. We've got another
space in between where we've got some arches
and things like that. If we come back, two, this, which is our reference. We can put this over
here now, by the way. This is what we're building. So this here is what
we're trying to build, which is some feet,
as you can see. So I'm thinking that if this is where our
balcony is going to come, we can probably start work on our balcony and from there build down and kind of
join them in the middle, that's probably going to
work out better for us. So I think we'll
actually do it that way. Alright, so let's
put this over there. And then what we'll do
is, this is perfectly in the middle to where our
balcony is going to be. So this bit here we can use, and I'm also
thinking that maybe, maybe it wants to
be a bit thicker. But first of all,
if I bring this in, so if I bring this and
drop this over here. So what I'm going to
do is I'm going to click Alt D. And then what I'm going to do is I'm going
to bring it in because what we need to do is make
sure that the balcony, so this part here is
larger than this. That's for sure. So
let's put it on normal. And then what I'll do
is bring this over. And you can see we're mirrored,
which is pretty good. So kind of going 90. Yes, I can. So
that's really handy. So -90, like so, pull them in into place, like so, and then I'll
turn down the array. So turn that down at one count and then
pull them in place, and then maybe maybe even lift them up on this or make them
a little bit bigger. So go and, make it a
little bit bigger. Then put it into place like so. Alright, so you can see now with this, this is still covering it. So let's actually now create the first
part of our balcony. So if we put our guy or
imagine our guy on there, we can see just how much room he's got to come
actually out to this, which I think is actually a pretty decent
amount, actually. So that should be okay.
So what do I mean? This amount from the
door to the balcony. I think that's about
right. Okay, so now let's come in
and create this bit. So what I'm going to
do is I'm going to, first of all, press Control of, left click and I'm going
to bring it down just to, um just to the top of there. And then what I'm going to
do is I'm going to make sure or try and make
sure that this part looks as though it's sat maybe on the top of
here. You know what? I think I've actually gone a little bit too much with that. So what do I mean by that? I think I'm going to line it up just actually under there. I'm going to line
it up with it just under there, like so. And then what I'm going to do
is come to the underneath, so underneath of it
and line this up. Like so, and don't forget, no one's going to see this part at least under here because it's going to
be all covered up. So shift and click then. And then what I'm going to
do is I'm going to press E to Alter S and pull that
out a little bit, like so. And there we go. That lines up perfectly now,
as you can see. So if you look from here, double tap the A. That's
looking very nice. Now we've got the top
part and the top part, I want to be sat on top of here. So what I'm going to do
is just bring this up. You know what? I'll
press Control law, and I'll put it to here,
and then I'll bring it up. So if I press in the
middle Control plus, I should then be able to just
bring it up on top of that. Grab this, Alt Shift
click, E, enter Alterns. And this time, I'm going
to bring it out a little bit further along here. So it looks like it's all kind of fitting
together, and there we go. Alright, that's
looking pretty nice. Now, the next bit then
on the next lesson, we want to get in our
banister going around here. And what I'm going to
do is I'm going to be using a part from here that I can separate off because I don't remember if we actually built the
banisters in here or not, but what I can do is certainly separate it off from these. I can just press
Shift, basically. So I'll press Shift D. I'll
bring this one out before. And then what I'll do is
I'll just grab one of these. So I'm just going to come
in before I finish so I can grab this here, this here, this here, and this here, and then I'll just
press P selection, separate them off,
delete that out of the way, delete this
out of the way. And there we go, now we've
actually got these parts here, which we can use for this because we already
know it's the right height. On the next one,
though, first of all, we'll bring up this part here, and then we'll start
putting these parts in actually before finishing. Bring up my guy, making sure
he stood on the balcony. So making sure if I press dot at his feet or stood on there, like so, and now he wants
to be looking over. Alright, let's say that'll work, and I'll see her on the next and everyone. Thanks a lot. Bye bye.
126. Creating a Curved Railing for the Balcony: Welcome, everyone to blend the Building Mass class from
concept to final render. Now, we'll say on this part, as well, if you don't quite get it, just repeat the class again
because this is quite difficult to do this type of modeling to get
everything fitting in and all of that stuff. So, honestly, guys, it's nothing bad if you
don't get it straight away. So just repeat the class, start again with, you know, that individual class, and you should be fine as long as
you're saving out your work. So, you know, save
out your work now and then come to this part and then
we'll work through it. Alright, so what I'm
going to do is I'm going to now I want to pull
out this a little bit. So I want to make it basically
a little bit bigger. So what I'm going
to do is I'm going to grab the whole thing on here. You can see, let's hide these
parts out of the way first, so we'll hide them
out of the way. Let's grab then the top. No grab the top.
Sorry, let's grab the whole thing,
minus off the top. So just minus off the top, so like this, and then
minus off the top. Like this. And then
what you're going to do is you're just
going to press alters, and hopefully we should be able to pull them
out a little bit. Now you can see everything's being pulled out there, and
that's not where I want. So I'm going to do
is Alt Shift click, going down all the sides, not the top bits,
but just the sides, like so, and then keep working your way down so you can see we've got a little
bit of a lip under there, so Alt Shift, click,
leave that one alone. At shift, click,
Alt Shift, click. Now, we should be
able to press lns and pull them out slightly now to make them a
little bit thicker. Now press Altag, bring
back these pods. And what we need to do now
is the same thing on these. So Alt Shift click,
Alt Shift click. And then what we're
going to do is make sure that this one's thin
a little bit better. So alterna bring them
out a tiny bit like so. Alright, so far so good. Now I want to do is I want
to separate this part off, so L P, selection,
separate it off. And then what I want
to do is, of course, I want to keep this part here. So the easiest way is just
to put in an edge loop. So control left
click, right, click. It will be straight
because we've only put one edge loop in and then Control B and then
just pull this out, like so and then
press P selection, and we can actually get
rid of these things now. So delete those things
out of the way. Finally, then, I'm going to
leave them with no ends on here because they're going to be actually stuck into
the wall on this part. Now what we need to do is we need to bring this
in, first of all, so I'm going to press Control
A, all transforms right, clicks origins geometry, I'm going to bring
it into place. I'm going to bring it
to something like that. And what I'm also going to do is I'm also going to bring
up this little part here. So if I come in, I want a little bit of an edge going up where all of these
are going to be sitting on. But what I want to do
is I want to make it part of these. So I'm
going to come in. And what I'm going to do
is I'm just going to grab this part and this part,
going all the way around. So press control plus,
actually it'll be easier. Shift D, bring it up, so bring it up very slightly. Press P selection
and separate it off. Then we'll come to this
part. And what I'm going to do then is just
delete this edge loop. So delete edge loop, limited dissolve
edges, that one there. Alright, now what we
can do is I can go over the top and I can see
exactly where this is. So you can see at
the moment, this isn't right where I
actually want it, so I'm just going to pull
it a little bit forward. And then what I'm going to do
then is bring in this part. I'm going to press the e
button to bring it in. J slightly, like so. And then what I'm going to do is I'm going to bring in
another edge loop, so I'm going to
press Control of. If that doesn't work
because it's a circle, instead of doing that,
just press the i button. So insert, insert,
insert, like so. And then what we're going to
do is bring up this part. So Alt Shift and click.
Let's just bring it up. So if I press E now, I should be able to bring it up, like so, and there we go. Now, I'm thinking
now we've done that, we might as well add this
in to this part here. So if I come in,
Alt Shift click, grab this byte bit,
delete and faces like so. And then what I
should be able to do now is pull this
down into place. Bring in this just a tiny
bit, and there we go. Now, sometimes it's
going to work really, really nicely like this, so you can see it's
on top of that. It's going to work really nicely and other times not so well. I'm also going to just pick
this up just a tiny bit, I think it's a
little bit too low. Let me give you a little
bit more depth to it, and there we go. All right. So now
let's grab this one. Press Control A, all
transforms, right, clicks at Origins geometry,
and then grab this one. Again, Control A,
all transforms, right, clicks at
Origins geometry. Now on these, we've
already got a bevel on, which is very handy for us. And what I want to do
is put this over here. So I'm going to grab
this one, Shift Desk, because selected, grab this one, shift Desk and selections curta. Spin it round, so hard de 90, Make sure it's span round. And then what I'm going to
do is pull it up and put it. Ride in place on top of that. Now, we can see maybe, maybe on this that we should
pull it out a little bit. So we'll do that, so
I'll press S and Y, pull it out a little
bit, giving me a little bit more
thickness, like so. Alright, I press seven now you can see that's
what we've got. These are the moment,
as you can see, they're not going
around here perfectly, and that's absolutely fine. We'll deal with that
in just a minute. But first of all, let's come in. And what we'll do is we're
going to array it now. So I'm going to
try and get it to go round about here
with an array. So I'm going to pull
this over here. And I'm going to
array, and I know it looks a little bit weird
the way that I'm doing it, but I'm going to
array it, and then we're actually
going to bend this. So basically, it
comes down to this. If we press one,
going to front view, I'm going to pull this out
then to round about here. Now, when I bend
that in, hopefully, it should go nearly round there. What do I mean by that? I'll show you
exactly what I mean. So now, if I come in and I bring in an array,
so we'll grab this. We'll bring in an array, and we'll do this before
doing the other part. So if I come in,
generate an array. And what I want to
do is press one, and I want to get these the right distance
between each one. We don't want anyone falling through the gaps
or anything like that. So let's just bring
them out. Like so. And then what we'll do
is turn up the count. Now, where does the count
need to go? The other side. So round about here.
So let's turn it up, and we're going to bring it. Yeah, maybe that's as you can
see, maybe it's too many. So let's bring it
down a little bit, and then we'll bring this up. So just a tiny bit up, making sure they're kind
even from each side. Now, the thing is we
want to now bend this. The problem is, though,
when we come to bend this, we've not got the center one. In other words, we need to apply this array
and then bend it. So what I tend to do when I'm
doing something like this, I'll press Shift D.
And I'll bring it out, and then I'll come to this one, and I'm going to
apply the array. So I'm going to apply the
array with Control A. And then what I'm going to
do is add modifier, deform, and we're going to
bring in a where is it? A simple deform. We're going to press
Control A, all transforms, and we're going to
right click and set origin to geometry. It's going to put it
right back in the center. Next of all, we don't
want to untwist. At the moment you can
see this is twisting. It's very nice if you want to twist it, but we don't
actually want that. What we want to do is
actually have it unbend. When you first bring it in, you will see that it's
bending in this way. We don't want that
at all. We want it to bend either on the Y, which is wrong or the z. That's the way that
we want to bend. As you can see now, it's
slightly bending on. And if we bring this up, we can now see that actually we're actually
getting the bend that we want. The one problem we can
see is that we're very, very far off where we need this. You can see we need another
actual post on here. So this needs to be more. So we need probably two more, and it probably moving
over as well a little bit. So what I'm going
to do is I'm going to press one and come
back to this one. So I'm going to press one,
come back to this one, and I can see you know,
this is how it is. So let's pull it all the way over right
to this part here. So right to this part here. Then what I'm going
to do is now, I'm going to come in and
turn my array up one. So let's turn it up
one, and then I'll just drop it back just to make sure that it's
going in this corner. So we're just going to
come to the X factor, bring it back down a little bit. Right about there.
And then, again, we're going to press Shift D. So we're going to press
Shift D and bring it out. And what I'm also going
to do is I'm going to come and delete this
one out of the way. So delete it. I'm not
going to need it. I'm going to press
Control A on the array. Control A transforms, right,
clicks origins geometry, adding a modifier deform, and again, it'll
be simple deform. Once we've got this,
by the way, guys, we can pretty much use it on
most of the other things. So let's give it a
try and the bend, Z, and then we'll bring it over. So seven, bring it over. And now let's see if we can get that into place where
we actually want it. So now you can see we're
nearly very nearly there. I would say it needs to
be a tiny, tiny bit more, which means if I take off this, you will see that I press one, these two line up. So it needs to be a
tiny, tiny bit more, which means I can grab this now and I'm going to put
it right around there. And then what I'm
going to do is move this or add in another one. So add in another
one, bring it down, and we want it level
with this one. So you can see just on the inside of this one, I'm
going to bring it down. Not like that. We're
going to bring it down. So I'm holding Shift, by the way, it's on
the inside of there. Alright, I think
we've got this now. So what I'm going to do is I'm going to delete this
one out of the way, and then I'm going to press
Control A on my array, and then I'm going to
add in a modifier, and we're going to go to deform, and the one we want is simple, and we're going to go to bend, Z and let's see. Control A, all transforms
right clicks origin geometry, and let's bring it
into place now, and let's bend it away and see now if we've got that actual
fit that we actually need. All right, so let's have a
look. Can we fit this in? Let's pull it back a little bit. Like so, let's go to seven,
so we go over the top. And we can see now it's
pretty much fitting in place. I'm going to bend it, I think, a little bit less. So
let's bring it out. And you can see
that we might need to move some of
these a little bit, so we can see we've got it a little bit out, as you can see. And I'm just wondering if we can get away with that,
because at the moment, you can see that this part here, it's not rounded enough. And I think what we'll
do to actually combat that is maybe bringing another part that we'll actually put over the top of here, put the same bend on, and I think that'll
actually fix that for us and make it much,
much easier with this. And I think that's
what we're gonna do. Alright, but we'll leave
that till the next lesson, and then we'll do that
exactly on the next lesson. I'll show you a very, very easy way of doing actually that. Okay, so what we're going to
do is on the next lesson, we'll save this out
then because we know it's okay up to
this part, anyway. And then on the
next lesson, we'll work on this little
bit a bit more. Alright, everyone,
hope you enjoyed that. I'll see you on the next
one. Thanks a lot. Bye bye.
127. Bending Railing Sections with Deformers: Welcome back, everyone to blend the building mass plast from
concept to final render. Okay, so what we're going
to do is we're going to, first of all, just
hide or deform. And then what I'm going to do
is I'm going to press one. And what I want to do
is recreate this part. So I'm going to press
Shift A. I'm going to bring in a plane to start with might seem
a little bit weird, but we're going to bring
in a plane. So RX 90. First of all, I want to
get it to be this size. So I'm going to press the
bone just to bring it down to be exactly this size
or near enough, like so, and then maybe pull it down a little bit. Like so. And then what I want to do
is I want to pull it out so it's going to go
past the ends off here. So I'm going to
press S and X and pull it out so it goes
past the ends off here. And you can see
that I don't think that the orientation let me
just have a look at this. Yes, the orientation you here, so I've just missed
the mark a little bit. So I'll do is grab this hit Ds, curs the selector,
grab this one, shift Ds and selections cursor. And now I can actually pull
it down to where I want it, and now it's even,
as you can see, so it should be going
in the wall there. Now we want to actually
copy this part here. So we want this
part and this part, and Shift H, you can hide
everything else out of the way, and we'll use this
as a kind of marker. So what we want to do is
we want one edge loop, so we'll press tab on this, control, bring it up
to the top of here. Like so and then controlar, bring it up to this one. And then what we'll
do is controlar, and we'll bring this one down to round about this
one here, like so. Alright, so we've got
this so far so good. Now I want to do is
I want to pull it back far enough so that
it's actually going to go over my actual part here. So what do I mean by
that? Let's press altage. Let's hide this part
out of the way. And then what I'm going
to do just for now is I'm going to pull
this into the front. So you can see we've
got this part on here. We're going to hide that part
out of the way, as well. And I'm going to pull this
to the front like so. Then what I want to do now
is this will be the top. So this part here, once
I've pulled it out, this will be the little top it. So in other words, if I
grab the whole thing now, seven to go over
the top and pull it just just back, so
it's over there. And now I can do is I can
pull it all the way out. So if I press E, I can
pull it all the way out. So this is now the
top where these are sat on. Now, why
have I done that? Because now I can
actually pull these out. But you'll see, I can bring in an edge loop and pull
them all out in a minute. So if I press tab I'll take H, bring it back, I can pull it out in the
way that it is now. So you can see, at the moment, this part is pulled out
a little bit further, and then you've got
this part pulled out here. So let's do that next. So what I'm going
to do is grab this going all the way down to here, so all the way
down to this bomp, I'm going to pull it out
E to pull it out like so. And then the bomb part I'm
also going to pull out with E. I'm going to
pull it out like so. All right, the moments of truth. Let's first of all,
bring in some edge loop. Control R. We want to bring
in a lot of edge loop. So left click, right, click. So let's then press
Control A, A transforms, and let's right click
and we're going to set the transform to the
same space as this one. So right clicks origin, two, three D cursor. Now, let's come in. We're going to put the let's just make sure they're lined up. So yes, let's hide
this out the way, just so I can see what I'm
doing. And there we go. If we go over seven now we can see they're lined
up on this part. They're lined up on this
part, as we can see. Alright, let's come in now.
And what we're gonna do? Control L, and we should be able to because they should
have a bevel on these. We should be able to grab
this one, grab this one, press Control L, and we should
be able to copy modifiers. Right click Shade Auto
Smooth, and there we go. Now, let's delete, let's not
delete this out of the way. But now what you can see is
that it's completely smooth, and you can see now all of these things are
fitting into place now, so it's really, really
beautifully done. All of this is following exactly as we
actually want to it. We can see, though, maybe maybe we're a little
bit out on this one. Let's coming in. You can see maybe we're a
little bit out. You can see it follows it all going all the
way around there. Let's bring it back. Just a tad holding down
the shift button, just to line those up just that little bit more,
and there we go. Alright, guys, that's
looking pretty good. Now, let's come back,
and what we're going to do is we're just going
to turn this off a minute, and I'm going to turn
this one off a minute, so I'll just turn them off. And then what I'm going to do
now, once we've done this, by the way, we can
join them all together and keep the same actual one. So we can keep the same bend because we know that
we're going to fit in. The five press seven now, I can come in and put this exactly over where
we actually want it. So we've got these here. Let's bring it out,
then into place. And this is, you know, the first major part
of this actually done. So if I press seven
to go over the top, make sure it lines up, like so. And then what I'm going
to do now is I could probably array this and
split these up as well. That might be something
we're thinking about, but we'll do that in a minute. We'll do this part first. So old shift plate.
Bring it over. And I want to bring it over
all the way to this end here. So all the way to here, like so. Now, the thing is if I don't
put any edge loops in there, when I use simple deform, it's simply not
going to bend it. It's going to bend
it very, very weird. So if I press Control
A, transform, set origin to three dcursor, bring in a deform, so simple deform, you'll see we've got
nothing to bend it with. I can't actually bend it
even if we put it under z. But the moment that
you come in and you press Control R, so
in pressing Tab, Control R, bring in
some edge loops, left click, right click, now you've got that deform. That is what the issue is there. Now, the other thing is when
I was trying to bend these, why does it have
a different bend from these ones, for instance? That is because we didn't
set this to the center. We just moved it over. So that's the reason why that's happening. With this one, I'm not sure if we did set it to the center, but what we'll do is we'll
give that a try first. So I'm going to reset
all the transforms, Control A, or transforms, and then I'm going to right
click and set origin, two, three D cursor, like so. And then what I'm going
to do with this one, we've already got
this one, actually. So now let's see if we can copy the bend from here to here. So if I press Control L, link copy modifiers,
and now what I'll do is I'll
turn them all on. So if a right click,
shade or to smooth, let's come and turn this one on. Let's turn this one on. Let's turn this one on. Like so. Now, they're lined up. Let's have a look at
this. So this one needs a little bit
more of an alignment. So if I bring it in, do here, like so, double tap the A,
and there you go. Now it's aligned up
perfectly. All right. So now what we can do is we
can join these together. The problem is though we've
got a bevel on at the moment, which we don't want to
actually put on yet. And the other thing is, yes,
we will do that actually. We'll turn the bevel
off on this one. So turn the bevel
off. Oops. Like so. And by the way, turn it
off means deleting it. So delete it out of
the way. Like so. And then the next
thing we want to do is before using the deform, so we want to close the
deform down 95.9 it was on, but we'll check that in just 1 second making so
the bend is okay. So we're just going
to turn it off on all of these, like so, turn it off on this one as well, and there we go, everything
should line up now. Now we'll join all
of these together. So press Control J, control
then, transforms right, click Set origin to geometry, and now we'll add in,
first of all, a deform. So simple deform. It's
going to be on bend. It's going to be on the Z axis, and it's going to be on
95, something like this. Let's just see now if I
need to pull it back. So let's press all tapes,
bring back the main bit. And I'm just looking if I need to pull it
back a little bit, which I don't think I do what I think I
need to do, though. Is, let's see if we can
increase it's not that one. Let's see if we
can increase this. And I'm thinking
now I'll have to probably pull them
out a little bit. So if we go back, in fact, if we go to this and
we just press S and X, we should be able
to pull them out a tiny bit and then
bend it a little bit. So bend it a little bit
more and get them in place. Now, let's just hide both
of these parts out the way. I think we've got
another part in there. So, look, there we go.
Hide it out the way, and let's make sure everything
then is fitting in. So this is the main thing
that I want to make sure. This part is fitting in plates. Now, there is one. Just looking. Let me just go and
have a look on this. I'm looking why. This part hasn't come out. I don't think I
pulled that part out, so I think I need to
pull that part out. On here a little bit further
than the other part. So I'll just put it on
Object mode. Turn off. Yeah, it's on the object mode because we've got the
simple deform on. So what I'll do is you
can still work with this. By the way, it just makes it a little bit harder if you're going to work with it. You
know what I'm going to do? I'm just going to turn
this off a minute. Turn it off. Yeah,
it's this part here. I'm going to pull
this part out a little bit and have a look
what that looks like. So Control click, press the Ebne and pull it out just slightly
further than the other one, like so and then put back
on that, and there we go. And I'm looking now
where it's going. Above here, if I'm
happy with how that is, or if I want it actually, I double tap the e
or if I want it. Yeah, it's just above
that pot there. That's what I'm looking for.
Now, the other thing is, I have bent this round enough. If I press seven,
go over the top now and grab the pot,
so grab this part. You can see that's
how it's bent. I think I need to bend it
a tiny, tiny bit more, so I'm just going to bend
it a little bit more in like sowing now. It's fitting in
there a little bit bet as you can see, so
it fits down there. It's not crossing
over there. I think now I'm happy with that. Now, let's press altage
before finishing. And of course, we're not going
to need this part in here. So this part in here, we
can let out of the way. This part in here
now, as you can see, it's nice and flat against here. So if I grab this part, you can see, it's nice and
flat in there. We've got a bit of a walk,
a bit of a ledge on there. And on the next one then,
what that means is then, we can actually come
in and just add this gold leaf that's
going to be on here. And then we can
actually start probably working our way down to here because what we're going to do is the main thing
we're going to do. Oh, you can also see
this bit, as well. So this bit in here is
a little bit too big. Though, I think I'll do this
a different way, actually. I think we'll use I'm just
wondering if I should or not, 'cause it's going to alter
the bend going around here. So the bend needs to be exactly the same is what
I'm trying to say. You know what we'll
do on the next one. What we'll do for now is we
can look at this all day. We'll save it out, and I'll see you on the next and
everyone. Thanks a lot. Bye bye.
128. Advancing the Curved Balcony Modeling Workflow: Welcome, Macon to Benda
Building master class from concept to final render, and this is where
we left you off. Now, at the moment, I'm really not happy
with this part here. It means I can mess
around with it, you know, bring it in
and all of that stuff, but we've also got all
of this on the outside, anyway, which is not
exactly very clean. So I'm actually
going to fix that. We will fix that. And yeah, that'll look then much better. So let's delete it
out of the way. Then what we'll do is
we'll come to this part. We're going to go to where
it says tape and we're going to actually
click that off. I'm going to press
Shift H just for now so you can see exactly
what I'm doing. Okay, so let's come
in. Let's press tab, and now we've
turned it off. What we want to do is
grab this part here. So Control select
these parts here, press Shift D, and then
press P selection. And we've just got this band
here, like you can see. Now I want to do is I want
to actually select it. So I'm going to select
it by coming to here, and then I can
select it like so. And then what I'm
going to do is I'm actually going to turn
on the bend on this. So I'm going to turn
the bend on like so. And then what I'm going to
do is I'm going to press A on this part so you
can see it's on here. In fact, you know what?
I'm not going to do that. What I'm going to do
is apply the deform. Apply the deform. Then
I'm going to press A and then E and bring it in. So I'm going to press E, enter lns and bring it in. Like so. Now we can still press Alterns, but I'm going to show you, first of all, what we
actually did there. So tach, bring back
everything, and there we go. You can see now that has
been brought in perfectly. So if we come back to
this now, press tab, Alterns, bring it in a
little bit further, like so. Come back to this part, then, turn on a taper and
simple de thom sorry. And then there you go.
Now that's in perfectly. Now the thing is, why
is that a good thing? Because, first of all,
when I bring this in, so if I press Control off, I can bring it in there
right where I want it. You can see this line
now if I press seven, go over the top, follows
this line here perfectly. It also means underneath. If I want to bring this
down, for instance, it's also going to follow
this line perfectly, which is really great for doing the actual underneath because we're going to be
working on that a little bit in the future. Now, what I want to do then
is I've brought a line here. That's fine. I want a
little bit of a gold trim. So what I'm going to
do is the compress Control B now, pull that out. And the gold trim needs
to be either in or out. I'm going to try going down, so I'm going to go E and then z and then z again to line it up and then just
bring it down very, very gradually like so. And there you go. Now
you can see you've got that gold trimming
there from this point. And it looks very
nice, as you can see. Alright, so that is that bit dk. Now we're on to the
actual pillars. So the pillars are
going to come up. But maybe before
we do the pillars, we should actually
come in and build those archers that are going
to go around because we know if we click on
here, these are just in. We can see just on this
side and just on this side. They're just in, so we
can actually use this to actually create that because we can just turn
this on and off now. It makes it incredibly easy. The other thing is for
something like this now, you can send it through to your resource pack if you want. You can just press
Control C, grab this, send it through to
your resource pack, Control V, and then put it into your asset manager.
You can also do that. I'm not going to do this because obviously this is
part of the course, and I'm just showing
you how to do that, but you might want to do
it so that in the future, you can build this
how this Pn too, or even put this on something
else if you wanted to. Alright, so let's
start then building out these parts
going on here now. First of all, what
we're going to do is we're going to come under here. Now, if you click this on, you should then be able to alter this now with
this clicked on, which means I can
now alter this mesh, bring it down, and it will
keep in line with my curve. If I click this off see, you'll be trying to work
with it like this, which is handy in some ways when you're doing the archers but
not handy in other ways. So that's what we need to do. So if I come in and
just click this on, what I'm going to do now is
I'm going to come under here, and I think I'll start pulling
down because we absolutely need some thickness
on this because we want to pull it
right back into place. So the first thing I'm going to do is I'm going to grab the back of and I'm going to come
right from inside here, right to the inside
of this other bit. Control click in here. Then what I'm going to do
them is I'm going to bring this back and then pull it down because this
again, will be hidden. So if I press E, Enter, alter Ns, and bring
that back like so. That then is going
to enable us to have the thickness to bring in, if I bring on my reference. So if I bring him a reference, bring it over to have the thickness to do
these bits here. So you can see these bits here. This is very
complicated, by the way. So again, if you struggle,
don't worry about it. It's all part of the process. So let's put that
over there, and that's why I'm actually
building it, too. So you can see now that I
need to bring this part down in a slightly behind it. So if I pull all of
these, let's try this. What I'm going to do is
I'm going to press come from here and I'm going
to come from here, and then I'm going to come
from here and come from here. And what I'm going to do is I'm not just going to
extrude it down. I'm actually going to shift D, so duplicate it, and
then bring it down. So I'm going to press E and bring it down into
place where I want it. And then what I'm going
to do is press L, P, selection, and just separate it off because I really don't want those actually joined together. Next of all, then
what I'm going to do, it's going to make it
a little bit easier for me to bring these parts in. So I'm going to press
Control R left click right, click Control B, and
pull that out so. So we've got a little bit of an inner part in this part here. Then I'm going to I don't want to bring
the whole thing in. I just want to bring
these parts in. So I'm going to grab the
front up here with face slept and grab the side up here. So control select, heat ter Alone, and
bring that in then. Be so, and maybe yeah,
that's far enough in. Alright, so far so good. Now we're actually on to another of the difficult
pots, but we can, if we want to turn this off, which is going to make
it way way easier. Trust me, guys, way way easier. Now, what we need
to do now is we need to figure out where these
pillars are going to come. So we need to kind of make these archers in
here going along. And the way that we're going
to do that is, I think, we'll probably put in three
edge loops going around. So if I press tab, you can see we've already got
our edge loops in actually. So maybe that's not the
right way to do this. What I'm going to
do instead is I'll bring in a boolean and we'll boolean them and
then we can work out where everything's going to
fit because at the moment, we've got three arches
one, two, and three, and we've got four pillows to think about putting
those in place. So quite complex stuff. What we want to
make sure is that this azathd is much
thicker on this part. So let's do that next. So what I'm going
to do is I'm going to come to this part. I'm going to grab it, go in all the way around because we want to actually pull it down. So basically, what have we got? We've got up to this
part here so far. Let's just have a
look. Roundabout here. So you can see here
we've got this part, which is the two top parts. Then we've got the
part underneath, which is this part
here, which we've got. So if we pull that
back over there, you can see now we've
got this part here, and now we need to pull
it down from this part. Alright, so let's come over here and ship select
all of these. And because I've
got this pot in, I might as well separate this. So what I might as well do is press Shift D. And
then what I'll do is I'll press E and
Z and pull this down, following the z, like so. And then what I'll do
is I'll split this off. So P, split it off like so. Now we can still obviously
put that back there like so. Now, what we also want to do is then we want to
pull this back. So if I come in, grab
all of this part, going all the way over to there, I should then be able to
pull it back like so. Now the problem is, when I
come in and try and bend this, it's not going to bend
correctly because of the fact that I haven't got enough
edge loops in there, really. So realistically, I want
to put more edge loops in, so I'm going to
press, You know what? I'm actually I'm actually
going to leave it like that because I think we can actually get away with
that without doing that. So what I'm going to
do turn this off. I want to press Alt Shift and click going all
the way around here. So Alt shift, and click
and then dissolve edges. So dissolve edges, and
we should still get, if I click on this one, this
going rounded, like so, and then this one going
rounded, like so, and it should should bit
under there, perfectly. Now you can see, we need to bring it back a bit
because it needs to have that little bit
of a lip going under. So we've got this
bit pulling out, and yeah, it needs to go
back just a tiny bit. Went in, and I'm going to grab it going from
all over there. Do all over here and
I'm going to press lns and just bring it in now, like so, and then we've got that little bit of
a lip on there. Alright, now we need
the actual arches in, which means where are
these gonna come up to? I'm thinking probably this needs to come down a
little bit further. So grab this, grab this one. And then what I'm going
to do is just pull them down a little bit
further, like so. And now we should be able
to get our archers in now because we've actually still got our deform on simple deform, we can actually
come and actually place that around there. Now, the thing is about this, this doesn't have nowhere
near enough subdivisions on. It needs even more than
what we've got here. So what I'm going to
do is just press A, delete, limited dissolve,
and then Control. I'm going to bring
in many, many more. So let's bring in
even this many. So right click, 32. Let's even bring in 40 just to make sure. And
why are we doing that? Because when we come
and bend it and we've got a boolean in
at the same time, it's going to make
incredibly complex topology, and we need to have
enough topology to make sure this can bend. What we're going to do now
is we're going to come. We're going to
save our work, and I'll see you on the
next one, everyone. Thanks a lot. Bye bye.
129. Modeling Arch Supports with Curved Deformers: Welcome back, everyone to
Blender building master class from concept to final render, and this is where we left off. Now what we want to
do is I want to, first of all, bring
in our Boolean. So I'm gonna press shift day. Come down to where it says mesh, I'm going to bring
in a cylinder. The cylinder, I'm going to put on 24, something like this. I'm gonna then rotate
it round on the X. So let's rotate it round. So X 90, and let's bring
it into place like so. And we want it Js
just above here. And then I'm also
going to make it a little bit bigger, pull
it down a little bit. And I'm wondering whether
I want to keep it rounded, because at this point,
you can either keep it rounded or you can
pull it out a little bit. So if I press this the next, I can pull it out a
little bit like so. Alright, this is
looking pretty nice. Now the next thing you need
to do is we need to kind of um get these to be
the same either side. That's harder than it seems, okay, because if you press one, it's going to be if
you put one here, you want one right
in the center, and then one on the other side. So let's see if we
can do that now. So all I'm going to
do is shift D. I'm going to bring it over
to this side, like so. So how far do you
want these points? So you can see this gap here is going to be
around about the same as so I'm probably going
to have it here for now. And when it comes
to this one then shift desk, cursor selected. Come back to this
one, Control A, all transforms right click, set origin, three D cursor, adding a modifier, and we're going to generate then a mirror. So put it on the other side, press Control A because
then we can move them, join them all up together. I'm just wondering if I
need to actually do that. You know what? I'm not going to actually apply my
mirror, but I will. I can't actually
join them all up together, either.
So you know what? We'll give it a
try. We'll give it a try like this and see if we can actually
get it to work. So what I'll do is I'll
grab all three of these, grab this one last, and I'm going to press
Control and minus. And you can see there that
I've not got my boolean in, so let's have a look, see
if my booleans working. You know what, we'll
just grab this one. Grab this one, press
Control minus. Yeah, for some reason,
my booleans not in. I don't know why that is. So let's go to add ons. Let's put doll and see if the ball tool, it's turn itself off. That's handy. Handy guys. Let's turn it back on. Now,
we'll grab all of these. We'll grab this one last,
press Control minus, and there we go. That is
what we're looking for. So you can see
now, first of all, these have gone
way too far back, so it's a good job we did that. So what we can do now
is we can grab all three of these and we can press S and Y and
bring them really, really far forward
because we want to a nice gap at
the back of these. Now we can actually
press Control minus and then boolean those all. We can also write click
and shade Auto Smooth, and that is what we're
going to be left with. Now the moment of truth. Now, before we do
this, we can come to this one and put
on simple deform, but what's going
to happen is it's going to go back
without the boolean, so we don't really
want to do that. So we've got another option. Can we come to these and put on simple deform.
I don't think so. So what I think
we need to do is, I'm sure that we need to
apply the boolean to this. So if I apply to the Boolean, so you can see, Yeah,
I've got two Bollians on. So let's go Control A, Control A, and now turn
it on, and there we go. Now you can see what
you're going to get. And you can also see on this, for instance, you've got them
roughly around the same. Now, we don't really
have that at the moment. You can see that this gap
here is a little bit, um, small in comparison to
this gap over here, which tells me I can
press Controls E now, bring back my booleans. And what I can do is I
can grab these Booleans. So these two here, press tab, and I can move it
slightly over like so. Now I can go back again. I can come back to this.
I can apply these again, and then I can go
to simple deform, pull it back, and now
let's have a look. Now, I would say
that I've probably gone a little bit too
far the other way. So let's go back again. So let's press
Control E. Control E, Control E, come back to this. And let's pull it over just very slightly this way, like so. And again, now
come back to this. Control A, control,
simple deformon, and there we go, now
we're about right. So now we're about right
on each of these parts. So you can see they
are quite thick. Now, how would we widen them up? The thing we can do here
to widen them up is, again, we can press Control Z, come back to the and
instead of doing that, what we can do is come to all
of our booleans, like so. And I can come in and go
to individual origins, press S and X, and just pull them
out a little bit, like so to make them
a little bit thinner. And then finally, again,
we'll do the same thing. So control A, Control A, and
then we can put this on. And there we go, now we've
got a thinner amount. Go in here and I actually think this now is probably
going to work. Now, you will see that we've got some shading issues as
well. Don't worry about it. Let's first of all, though, come to these booleans. So I'm going to delete
them out of the way now. I'm not going to need those, so they're all deleted
out of the way. And now what I'm going to
do is I'm going to show you how to fix those shading issues. So we're going to do that next. So I'm going to do is come
in. I'm going to press A, make sure you're on Face select, and what you want to do is you
want to triangulate faces. Then you want to press right
click and tries to quads, and now all of those shading
issues should be fixed. Alright, so now
they're all fixed. Now we need to look at
our reference again. So we can see we've got
this coming out here. So we definitely don't
want to take away this simple deform because we want to make sure
that we've got, you know, the archers
coming in front. These are the difficult bits. These parts here
are pretty simple, and this part here is also pretty simple. So
let's go with this. Now, the one problem we're gonna have with these parts in here, as you can see, is that we need to actually
take these parts. So let's go to simple deform, turn it off and see if we can actually create
those parts that we want. So if I come in to this, I need to grab all of this here, and I want to actually
keep on these parts. If I press INw,
can I bring it in? You can see we do
have some problems. I'm just testing here, guys,
so I'm just going to go in, test it, put my
simple deform on, like so, and there we go. So we can actually work with
that. We absolutely can. So let's come back
and we'll go back in. And then what I'm going to
do is I'm just going to. The other thing is, if we can't we need something
to bend them with, and having them coming down like this is actually
pretty handy for us. You know, if they came down
perfectly down like so, that would make it
even better for us. So that might be
the way that we go. So how would we
actually do that? So what I'll do is I'll
come in to all of these. You can see I've
grabbed it going all the way through there. I
don't want to do that. So on a shift select this, Corn chow select this, and I'm thinking, you know what? There's actually a better
way of doing this. Let's just try Alt Shift click
or grabbing it from here. Concho clicking, all
the way around here. To here, and then doing
the same on here, here, and going all
the way around here, and then coming round to here
and doing the same thing, grabbing it, grabbing it, all
the way around here, soap. Now, let's at the moment,
just turn off simple deform, and we should end up with
something like this. Now what I can do is I can
press Shift D like so, and I can pull these out. Then what I can do is
I can actually press E and Z and split these off. So E and Z and pull them down. And now you can see we've
got a perfect cut here. Now, let's zero these out. So S, Z, zero, let's
zero those out. Hold them up then into place. So this is roughly where
they're going to be. And then what we'll do is now is we'll press the button
on each of these, press one, and we just
want to make them smaller. Make sure they're
smaller on individuals, and I should then be
able to pull them in, like so, making them a tiny, tiny bit smaller, like so, and I can also probably go
away with just pressing S and E and bring
them down, like so. And finally, then
let's pull them out. So if I pull them out with E and then let's grab each one of
these and put them in place, and I'm hoping I'm
really hoping, guys, that when I put
these in place now, I'm making sure that
they're in place, like so, and I've also got a lot of
control over those now. If I press the tab but,
put it onto simple deform, right, click shade or to smooth. There we go. They
are looking amazing. Now, the one problem,
let's have a look. The one problem I've
got is, of course, that this one isn't
on the other side. So if I just turn
this off a minute, just wondering, why didn't I do that one at the same time? Sure, I brought that one out. Maybe I didn't I don't
actually know what I did then. What did I do then?
Let's have a look. Yeah, for some
reason, there we go. That's the reason why.
Why is that one not there? Why is it not there? Let's press Tage. Why
does it disappear? Have I got something
else set on here? Right, click, shade Auto
smooth. There we go. Why is it disappeared?
I don't know. Anyway, let's turn this
off before finishing. Let's pull them all
back into place. Let's put it back
on. There we go. Alright, that's all fixed now. So really, really nice. Now, what it does give you the ability to do
when we come back, is it gives you the
ability in fact, no when we come back. Let's actually have a look
now, see if we can do it. It gives you the ability
now to bring these in. So I can actually turn this off. If you want to, you can make
it even more elaborate. So what you can do is you
can grab all of this one, for instance, going from
here to here to here. And then what I can
do is press the Ib. No I bring it in. And I need to join these updo if I'm actually
going to do this. Let's just try it with
let's try it with this one. Coming to here. Let's press
the i button. There we go. And from there, then what
we can do is bring it in. So let's actually
have a look what that looks like. And there we go. That looks even nicer, perhaps than what we had. Maybe it would be better if
we brought it out instead, making it even more
elaborate, like so. You know what? I
think that looks even better than the first
one I actually created. But I think, You know what? I'm going to do that
on the next one, so I'm going to press Control Z. And then I'm going
to save out my work. So file, Dave. And then finally ready
for the next one, I'll just turn this off, making sure they're all
there. All right, on. So I hope you enjoyed that
again. You didn't get it. Go back, start again. Not going to take too long
and just get the hang of it. All right, thanks,
Live one. Bye bye.
130. Designing a Brick Pattern for Curved Arch Structures: Welcome back, everyone to blend the building master class from concept to final render and building this really
is a master class. So let's now come
with each of these. So we'll come into this one, making sure we're not
selecting that side one because that side one
will causes a few issues. And then what we're going
to do is we're going to press the IBn to bring it in, and then the EBO to bring it out there is slightly like so. And now, if we use the bend, that is what we're
going to be left with. And again, looking very nice. Now, let's work on
so, we turn this off. Let's work on these parts here. Now, the problem
with these parts is they're kind of really bumpy and we don't
really want that. So what we're gonna do is we're going to actually
bring in another. Let's bring in first of all,
and we'll just line it up. We'll line it up to make it
really easy for ourselves. So if I bring in
another cylinder, I'll do the middle one first, because then I can drop
it into each of these. That should be easy.
So if a first of all, press R and X and
90, spin it round. And then what I'll do
is kind of line it up so that it's lined
up near enough. If I grab this and this,
then put on a wire frame. I should then be able
to come to this. Now you can also see, you know what? Let's
put it on object. Let's grab this and
this. Press Shift H and put it on wireframe. Now I should be able to see
exactly what I'm doing. Okay, so we can see that
this is the outside. So this one here is the outside. So if I grab this,
press the S button, and I want, basically have
it going over the top of it, and then S and X and pull
it out so that it's going evenly all the way round because we don't want these to
actually be touching, but we do want them
to be coming out. So now we're going to do is
make it a little bit bigger. I'm going to pull it
down who ran about here. Maybe maybe drop it back
in a little bit more. So S and X, play around
with it a little bit, and then we're going to
end up with, you know, kind of stones
coming down to here, having a little bit of a gap, and then we can actually create, you know, the stones, sorry, these blocks that
are going to come in here on the other side. Alright, so far so good. Now, what we actually
going to do with this? Well, first of all,
we're going to come and we're going to make
sure it's a lot thinner, so SNY is bringing it down. And then what we're
also going to do is we only want our stones realistically to be dropping through, maybe even into there. So maybe maybe I can press EN'sEd and pull it down a little bit and then
just pull it up. Like so, and then
just let me check now again to make sure
how far are we off. So we're still nearly
the same distance. So let's pull it
up a little bit. So now it's nearly the same distance going
all the way around, so I'm looking from
here, and then I'm looking from here to here,
something like this. Okay, let's put it on. And what we're going
to do now is we can actually get rid of the front, or we can just grab it going
all the way around here, like so, press P selection, separate it off, grab this bit. So just this bit here, press delete, and we should be left with
something like this. And now, finally, what
I want to do is and grab this press Control or
transforms right click, set origin to geometry. Add in a modifier, and we're going to
generate a solidify. And then what I'm
going to do is bring the solidify out this way, so making sure even
thickness is on. And also, I'm just
looking to make sure that I'm actually happy with how far or how thick
this actually is. And I don't think I'm happy. I think I need to bring
it in a little bit. So S and Y, let's bring it in. Let's make it nowhere near
as thick as what we had it. And the other thing is, I want
to zero these out as well. So I'm going to come in.
Zero the bombs of these. So I can probably come in. I'm just thinking I can grab I can't grab both of these
ends, as you can see. I need to really
bring these down, but I can't bring
them down until I brought in my solidified. So let's actually
see if this works. It might not actually work. I might have gone the wrong
way around with this, so let's press Control Aid. And then what I can do is I
can come in to the botms up here and I can press S
z zero, zero those out. And let's just have a look if we're happy with how that is. You know what? I think I am. I think it actually
looks I think it looks good if we bring them
up a little bit. Yeah, something
like that, I think. Now, we need to
split these off now. So all I'm going to do is
I'll grab the bob off here, press delete bass, and
then I'm going to go Alt, ****, click, Alt, ship, click, going around these, like so. And then finally what
I'm going to do is, I'm just wondering whether
actually one, two, one, two. So if I've got, I'll
have one and two, and then one and two,
and then one and two. Yeah, I'm going to split
them off like that. I'm going to press Y. And then what I'm going
to do is I'm going to I'm just wondering whether I need to bevel these out before
or after. You know what? I think I'll split
them off first, and then we'll try the bevel on them after. We'll
do it that way. So I'm just going to press
Y. I'm going to press A, split them off, and then mesh, and I'm going to come down
to clean up and fill holes. I should fill in
each hole on there. So now, I'll just test it. Let's generate a bevel,
and there you go. If I put this down
to note point, not note three, now we've got that we're actually
looking for note point. No, not five. Just try that. That's exactly what
I'm looking for, right, clicking
Shade Auto Smooth. Okay, so I'm looking for that. Now what I need to do is I
need to put them on this side. So I'm going to take
off my bevel for now. I'm then going to
try and grab these. So you can see this
in the center. I want it right bang in the
center of this one, as well. So if I grab this, let's say, I should be able to
press Shift Des curse to selected and then grab this one and press Shift Desk
and selection to cursor. And now I know it's right in Do I know it's right
in the center? Probably not. Probably
not in the center. Maybe I should put it down. On the bottom of here. So
if I come to this one, I'm going to press Shifts, cursor selected, and
then I'll right click and set origin to three
D cursor, like so. And now I want to
put it over here. So can I actually
get it down here? So instead of doing
that, what I'll do is, I'll now come in, grab the bom off here and the bomb off here. Making Shop grab the bott one, Shifts cursor to selected, and now I'll pull
this over here. So if I press Shift D, shifts, and selection cursor,
now it's there, I think. Let's pull it out. Is it there? Press
one? No, it's not. It's a little bit
out. You know what? I'm just going to
pull it down. And I think it's actually in
the center of there. So let's put wire frame. And yeah, I think I'm just looking now if it's
the same each side. And yes, it is the same. I'll put on object mode. And you can see here
the gap, as well. This is the gap
that we've got now. And I'm also going to go
over the top seven and just pull them out. Like so. And then what I want to do now is I want to come
back to this one, shift desk, curse to slip
to come back to this one, right click SurrogenTD
cursor, add in a modifier, generate and add in a
mirror. And there we go. And then what I'll
do is I'll apply the mirror, join these together. So Control and J,
join them together. And then what I want to do
now is join them with this. So I can join them with this, or I copy the bend
whichever's the case, 105. So let's see. Let's
see if we can. So I'm going to grab
these, grab these, press Control L, and I'm
going to copy modifiers. And then I'm going to press Alt age, bring back everything, put my modifier on,
put this modifier on, and you can see it's
a little bit out. So I would say,
probably better off joining these together.
So let's go back. And let's join this with
this press Control J. And now let's see we've
got that bending. There we go. Now we've got
what we actually wanted. And finally, then let's
try adding in a bevel, and that is exactly
what we want. Now, you can see
everything is lining up perfectly as we wanted. We can bring in now our pillars on top of there. So
underneath here. So you can see now if
I bring my guy down, just how high these are, let's actually have
a look at that. So if we're bringing
down to the floor, right on the floor, you can
see now that is our height. So we're going to have
a big block under here, under here, and over here, and then bring in our pillars. So let's actually do that next. So we're nearly
there on this bit. Now, the bottom bit, we're actually going
to put in a really, really nice vaulted ceiling in here just in case you're
taking a shot from here. But of course, we'll
actually get to work on that once
we've built out these pillars these pillars
are going to be the next, you know, hard thing. So here we come in now, for now, just turn this off. We actually have somewhere
now where we can actually put those posts in,
making sure they fit. And once they tht, then we
can put our pillars in. So we'll do that. Yeah,
we'll do that next. Alright, everyone. So I
hope you enjoyed that. Making short, we save all work, and I'll see
you on the next one. Thanks a lot. Bye bye.
131. Modeling a Stylized Pillar for Balcony Support: Welcome back, everyone to blend the building mask flass
from Concept final render, and this is where
we left it off. Now, what I want to do
is I want to bring in these pillars that are going
to be supported on here. So let's do that first. So what I'll do is I'll come
into this part. We can see that these
are not centered, but these ones pretty much are. So I can grab one of these, one of these shifts
cuss or selected, and then tab Shift A
and bring in a cue. So let's start with a
cue. Let's bring it in. We can bring it out, you know, in just 1 second. So and E. Let's pull it down to
where it's going to then what I'll do is now I want
to pull it out on the Y, or is it the X, the X? There we go. S and X, bring it out, like so. Now, the other thing is how
far do I want it coming back. I pretty much want this squared. So I can actually
square it around. You can see here the X, if I pull this out
is not the one. It's which one is it? So the X is that
way. So that's 1.28. So I also want the
Y on 1.28, like so. And if I pull that back then, let's see how that's
going to look. And that's going
to look from here, actually, that's going
to look pretty nice. You can see that
this is probably going back a little bit far. But yeah, I think, like
starting like that with it being 1.28 on each
of these, so 1.287, so control COs. Control Z, Control C, then
come to this one, Control V. Try that again. Control C. Come on. Control C and then Control V, and it's not doing
it for some reason. Why is it not doing that?
That's a bit weird. 1.2 8257, 1.2 8257, and there we go. All right. Now, the other thing is, I
think, while we've got this, we can't actually bring in
an edge loop because I would like I think we'll pull
this back a little bit. You can see at the moment, this is probably a little
bit too far forward. So I think I'll grab it from here and grab it from
all the way back here. So all the way
round to this side. All the way up to here,
so control select. And then all I'm going to do
is just pull it back down here to here just so
this is in front of it. Now just press simple
deform, just make sure. That's actually going
to go in right. The problem is with
this, if I put simple deform onto this part, as you can see, it's not really it's going to actually deform
it or put it in place. So let's have a look at that. Let me show
you what I mean. If I put one here, and then what I'll do is I'll
just quickly show you. So if I put one
over here, like so, and then I'll put one over in the center here,
let's bring it over. And then I'll put one over here. You're sticking through there, so join them all together. And before I do that,
I'll just save out my work so I can actually
load it up pretty fast. Control J. And then
what I'll do is, I'll join it to this. So Control J, join it to this. Simple deform on,
and there we go, that's what we're
going to end up with. Now, you can see because I've
actually done it that way, I'm actually going
to end up with a little bit of
bending on the inside. So if you come under,
you can see it bends slightly on the inside. So we have to be
careful with that. So what I mean is when
we bring in our pillow, we need to take account of that. Now, you can see at the moment, just how nice this looks, it looks really, really nice. Now, can I just turn
this off for a minute? Because I think,
you know, even now, I've not put them in
exactly the right places, so I'm going to do
that in a minute. And I'm just looking
at this part here. So should I bring it down
slightly to just under there, and then let's give it a
try with simple deform on? Yeah, you know what? I think that's actually
going to look there. Okay, so we've got our main
one, which is this one here. Oops that off. We've got our main one,
which is this one here. So what I'm going to do
is just I'm thinking, should I leave them in
or should I actually do this I think I'll
do this properly. So I'll split these off. I'm going to come back I'm
going to press L, L and L, delete versus, and
then L on this one, and then P selection,
split it off. And we're going to also take
off all the on this one. Control and z and going to come to this one
then, press tab. It's not split off, so L, P, split it off, come back to this one
then and just take off the bevel and the simple
deform. Now I'm going to do it. I'm going to come
in. Grab the bomb because I've leveled it up now. I know exactly where
it needs to be, and then I'm going to press
the Ib and bring it in and then press the E button
and bring it out like so. Alright, something like this. And now I want to do
is bring in my pillow. So my pile is going to
be round about here. Now, this should be on enough. So if a Right takes
shape smooth, you can see, it's
already nice and smooth. What I can do now is
I can, first of all, come and just hide this
flow out of the way because it's getting in a
way. It's quite annoying. And what I can do is press
Shift desk, cursor selected, grab this one, shift desk
and selections Cursor. That then should be right in the center of
there, and it is. And then what I'll
do is I'll pull it out a little bit,
so it levels up, press S and z and bring it down, like so, and then maybe maybe pull it
in a little bit more. And pull it down just so it
slots into there nicely. And I also want to round
this up a little bit. Now, I don't think I'll
round the top of it off. I think I'll just
round off this bit, so I'm going to press Control B. And you can see it
pulls out like that. That's just because we
haven't reset the transforms. I'll set origin to geometry, and then I'll press Control B and round it off a
little bit like so. And I'll have one
actual shop on here. So this one going here,
I'll shift and click, right click and marker
shop and there we go, now, that's looking about right. Now I need to bring this down. So what I'm going to do is
I'm going to come into here, and I'll bring you all the way down to
nearly to the bott. So we can see at the moment how far is it going
to come down to. So it's going to come
down to this part here. And remember, This is not
where it's going to go. You will see if I
come back to this. So don't get confused
and put the taper on. You can see now that
it's going to shod, grab both of these,
hold them back. Rotate them, so are the individually. They
are individually. So let's control A
or transforms right, clicks origin geometry, and now it should be
able to rotate them, rotate them round and
just get them in place. And you can see
now where actually they're going to
come on our step. Now, when we're doing
things like this, as well, it's important to think, you know, where are our
steps going to come now? Because at the moment
on the original, I had them on the
platform on here. So I think that having them on here or having them on here
is entirely up to you. So in other words, if I want
to bring these steps out, I can and have them,
you know, like this. I can bring them out
certainly like this. I can bring back my terrain. You can have them like
this and we can cut it away along here
if we wanted to. And we can do it that way, or we can just leave
it as we've got it now and put the stone
slab on top of there, which I think is
also a good idea. So I'm just going
to press Control's before I twisted all that round. I'll bring it out to there.
And then what we'll do now is we'll have a
smaller part on here. I think to do this, we'll come in and we'll
grab this part here. And then what we'll do is press
Shift D. Shift space bar, bring in my move tool, right
clicks Origins geometry, and I'm going to bring
it down to here. Now, of course,
where do want it. I definitely want
it slightly above this step, this one here. And I also want to bring it in. So I want to bring it in.
Like, so round about there. And I'm also thinking,
then, if I spin this round, it might make it a
little bit easier. So y 180. Y, 180, spin it round. Let's make sure it's
on that step. Like so. And I don't want to rotate it
yet because if it rotates, it's going to make everything
much, much harder to do. So we don't want to do that yet. But what we want to
do is first of all, get this into the place
where we want it. So I'll come I think I'll put in Control art, left
click, right click. I'll press Control B. So Control B, pull it out. Bring back your bevels, just so you've got
something like this. Alt. So E, Alt and S, and let's pull it out, like so, making sure offset even is on. And then, you know
what, I've gone a little bit too far
then, so alter this. Pull it out, offset even on. There we go. That looks better. And then finally, let's
think about maybe, maybe we want this to be kind of a little
bit higher, maybe. So control plus, so it's in line near enough
with our top step, like so, and that's
all fit in place. And now we just need to be
careful of this bottom. So do I want it where it's, you know, slightly into
the floor like that? That means it's going to be then in slightly into the floor, slightly into this stone. Do I want it like that?
I don't think so. So let's pull it up, so
it's a little bit higher, and then we'll press
E, pull it up, and then S, bring it in, like so, right click,
shade oro smooth. Let's bring in a sharp. So l shift and
click, right click. And mock shop. Alright, so far so good. Everything about this
is looking good now. Now, at this point, I can
actually rotate it round. I can join it altogether. I
can see here as well that this one maybe maybe we should make this a
little bit smaller. So a little bit smaller, so S, squeeze it in a little bit, like so, making sure
it's still fitting in. I can also see as well that this bomb part probably needs pulling up, so I'm
going to pull it up. To where it's going to go, so
we're not wasting anything. And now let's join
it altogether. So Control J. Join it together. Now, what I want to test
now is if I bring out this. So if I bring out
this, turn it off, and I join this to this,
let's press Control J. Save out your work
before, so file, save. Join this to this, so Control J, and then put under
bend and let's see what that actually looks
like. And there we go. You can see that. Actually, that is
fitting perfectly. And yeah, that is
looking very, very nice. I'm just wondering
about this bit. I think this bit here needs
to come up a little bit. I'm going to grab all
this going around here, a ship clay control
plus and then pull it up just so it's
below that bottom step, and there we go. Perfect. Todd is looking very, very good. Alright, so now we
need to do is I think also I will pull this part
up as well. So Control plus. I don't want to pull all of
that up, as you can see, so all I want to pull up
is really this part here. So if I pull this up
just a little bit, just to make it a
little bit thicker, yeah, and I think that
looks way, way better. Now, the other thing
is, you can see, it's not really bending this. And the reason is because we need to add in some edge
loops, and there you go. Now, you can see you've got
a bit of a bend on there. I think that looks better,
actually, personally. Now, if I turn this off, we can actually carry
on working on this, test it out, and then move it over here once we've
got everything in. So again, let's
save that'll work, and I'll see you on the
next and every one. Thanks a lot. Bye bye.
132. Detailing Pillars and Modeling the Curved Entrance Staircase: Welcome back, everyone
to blend the build in master class from
concept to final render, and this is where
we left it off. Alright, so now we
want to do is we want to bring this part down, bring in another part on
here. So we'll do that now. So all I'm going to do
is press Control R, bring up an edge loop,
press Control B then. And then what I'm going
to do is pull it out. So if I come in, E, enter old and S, so lns, pull it out. Like so we've got
a bevel on there, which is making it a
little bit easier. That looks good so far. Now, we want another bit
that's going to go in here. So what I'm going to
do then is I'm going to want to grab this
going all the way around. So let's come in, first of all, and we'll grab
it going all the way around. Thinking the best way to
do this is probably to grab this part, Alt Shift click. And then Alt Shift click, Alt Shift click, Alt Shift
click, Alt Shift click. I'm just wondering as well about that one
because at the moment, this thing is a
little bit too thick. So if I press Altnes I should then be able
to bring it in. Like so, and then I can put a bottom part on this part here. So that's what I'm going for. So now I can bring
up this part here. So control law, bring it down. And then what I'm going to do is I'll bring it up a
little tiny bit, Control la, bring
another one in. Then bring this
down. Alt Alt Shift and click going all
the way around, Alt Shift, click, going
all the way around, E, enter Alt and S, bring it out now back
to nearly where it was. And then finally
this top bit then, I should be able to press S
on and bring it in like so. There we go. That's
looking nice. And now I'm just wondering about this top. Can
I bring it back? There we go. That's
looking better. And now, finally, we'll
have one more edge going round here, so control R. And then Control and B. Like so, and then E enter lns
and bring it out. Like so. Okay. Now we've got
our columns on. We've got a small one. We've got a big ring.
And now finally we want to point those little
square things on here. So the way that we'll
do that, first of all, we'll just isolate this
off from everything else. And then we'll press Control
R right in the center. Press one, press Control B. Where do we want
to come in up to? Probably somewhere around there. Like so. All right. Then what we want
to do is now if we measure this up, we should
be able to come in. So the center is right
here, as we can see. So if we come into these, one, two, three, four, like so. And then I'm not even
sure what this is. I think it's got four on. So if I press Control
Shift and plus, no pair found, so we
can't do it that way. So four. And let's see
if we can do four. So how many sides is this? One, two, three, four, and then one, two, three, four, and then one, two, three, four,
and then four there. So it's worked out
pretty nice for us. And then what I'll do is I'll press the Ibn to bring them in, like so, and then I'll press E ter alters and bring those in. Like so. Now, let's have a
look what that looks like. Now, we might want more of them. So you might want more cause at the moment, there's
only four on there. And I'm thinking one, they've gone in a little bit too far, and another one, there's
not enough of them. But let me just see how
many vertices are in here. So if I grab this one, two, three, four, five, six, seven, eight, nine, ten, 11, 12, 13, 14, 15, 16. I think it's 32, 17, 18, 19, 20, 21, 22, 23, 24, 25, 26, 27, 28, 29, 30, 32. So there's 32 vertices. So let's try instead
going four and two. So if we go to the center, one, two, three, four, and then miss two, and then one, two, three, four,
and then miss two. I'm opening these line
up. They might not. If they don't might have to go. We're just missing out the same amount, one,
two, three, four. Yeah, there we go. We've
got four in there, so we don't really
want it to do that. So I'm wondering now, you can do it the other way
as well. You can go three. And then four and then miss out, what are we doing missing out three and four
missing out three, and then four missing out three, and then four missing out three, and then four and then
missing out three. And then can we do four? No, we can't we can't do it that way either. So you know
what we're going to do? We're just going to do I think
we could do two, as well. Let's just see how they look
when we've brought two in. But if we bring
them in slightly, and bring them in. What
they're gonna look like. If we bring in two on each, so we've got a miss of two
and then bring them in, that might actually
work, actually. That might work out better. So we can definitely do that.
We know we can do that. So, again, if we come
in and miss two, same on here. Let's go back. And they are two. Like so. And then two. I'm really hoping they'll line
up. Yes, they do. So there we go. Now,
let's bring them in. We could even bring them in
like they are now, even, so we can just press E enter Altere and bring
them in, like so. Yeah, and I think that
looks the best way. That looks way better, actually, way better
than what we had. Alright. I'm actually
happy with how that looks. I'm actually very happy
with how that looks. Okay, we press lth, let's
bring everything back. This is what we've
ended up with. Now, we need to put this
over to each of these sides. So what I'm going to do is
I'm going to select this, select this one,
select all of this. Like so I'm going to press P selection and separate it out. And what I want
to do now is make sure that's the same each
side, which this one is. Now, if I grab the
center of here, this should be the
easy one, actually. I should be able to
grab the center of this or the center of this, whichever is the case, so
shifts cursor selected. Let's come to this one then. Right click origin,
two geometry. No, origin, two, three D cursor. Let's take off the
bend off here. Let's go in now add in a
modifier and bring in a mirror, and there we go,
that's the easy one. Now, can we do it
on the other side? So what I'll do is I'll
come in, grab this, this and this, and then
I'm going to press Shift D. And I'm going
to drag it over like so. And what I want to
do is make sure that this is round
about the same. If I can get away with it,
can I get away with it? So if I put it there, you can see that's round
about the same, that's round about the same. Now, we've got this
has got a mirror on. I can't join it with this, so I'm going to have to apply my mirror and do it that way. So again, I'm always
going to save. I'm going to apply my mirror
and then join it with this. Join it with this,
press Control J, and then let's put our bend on, and there we go, that
is what we should end up with. You
know what, guys? That looks really good, except this part here, which is not to do with this. It's more to do with these steps on here,
which we're going to fix. And we did these steps, but I think actually
we might want to come in and just grab this and bring it down to
where we want it, and then we'll have steps in. So let's come in to this one
and then shift and click. Let's press Shift Deep
and bring it down there. And as I said, you
can see now now this fit in perfectly in there because we've
still got the bend on. So we can actually probably build these steps
with this bend on. And I think, You know what? I think I'm going to
actually do that. So if I take off this
simple deform for now, and I just come in and I just get rid of all of
these going round all the way down to here and
all the way down to here. So delete and bases. And then I can come in
now and bend it like so. Then what I can do is now I can, first of all, start
with this part here. So I'll bring it
out a little bit. Let's see if I can
actually split this up. So L P selection, grab this part, press the S but. Well, actually, control A all transforms right clicks
origin to geometry. And I'm just looking if I need to bend that
a little bit now, which I think I do
because I want it all to be exactly the same, like so. Now you can see why this is
not working with our steps. It's not working because
it's not actually even. And we've also now as well, if you look on here, we've got something now which
looks way better than this, because if you
look on this, look at the gap between them, so where the edge loop is and look at the edge
loop gap between these. They just look way,
way better, guys. So what I think I'm
going to do is I'm going to pull it to here, I'm
going to make sure, though, that it's going to
be in because at the moment, you can see it's not
actually in there, and we really need our
steps to fit inside there. So I'm going to first of all, pull it out a little bit just
to make sure that it's in. And then what I'll do is
increase the bend now, like so, making sure that
it's level with all of them. So you can see now if I bring
that out just to there, it's just level now going
all the way around, as you can see, and
we've got them in place. Okay, let's now then come in. So we're going to come
to this step first. So if I press SN E,
I can bring it down. To this bomb step here, and making sure then I
come to this top step. So if I come in, I can
make sure I put this on that I'm going to come
in and Alt Shift click, turn this off and make sure that I can come
to this top step, so you can see now I can
come to that top step. Now, where is so
I want one, two, three, and, you know, I can bring it out, pull
it down for the next one. But we'll do that on
the next one guts because I definitely need to, you know, give this
some thickness. So the moment I'm just
getting the height, I definitely want to pull
it out and bend it round. So I definitely want
to pull it out to this point here,
but I'm not that. Pull it out to this
point here, like so. But it's just in
front of it, like so. And then what I'm going
to do is, I'm thinking, do any delete this yet,
or should I keep it? You know, I think
for now, we'll just keep it just to
see how this goes. I think it's going
to go perfect, but we will see how this goes. Alright, everyone, so I
hope you enjoyed that. Let's save our work, and I'll
save you on the next one, and we're nearly
actually done with this. There's not a lot
more to do on this. We need the inside of here, but I'm going to show
you how to do that to make it look really nice. But I think as far as
everything else goes, we're pretty much pretty much done with this really,
really difficult part. Alright, everyone,
so I'll speak to you on the next one.
Thanks a lot. Bye bye.
133. Enhancing the Curved Front Entrance with Stylized Details: Welcome back, everyone to blend the Building master class
from concept to final render, and this is where we left off. Okay, so now let's come in, and what we'll do is we'll
press Alt Shift click, and then we're gonna
press Enter Alter NS. And hopefully, nope, we can't
pull it back like that, so let's just press the Sbn and that's not going
to come back either. So I'm just wondering if I just need to
pull it back like so. So if I pull it back like that, will it pull
everything into place? Can I then lift it up and is everything gonna be in line?
That's the main thing. So Es Ed, bring it up. Like so. And then E enter
S, can I bring it back? No, I can't, but can I bring
it in? Let's have a look. So we're just going to hide
these stairs that way, and then we're going
to come back to these. You know what? That is going to work
much, much nicer. It looks way, way better
than what we had before. So lth, let's bring it back. And then what we'll do
is we'll come back to, not this part, this part here. So I can grab this, and then I'm going to grab
this front of it, so I'm going to come
in, put this on. So Alt Shift click. And then what I'm going
to do is E enter S. Nope, it's not going to
let me pull it out, so I'm going to pull
it out like so. And then I just want to
make sure where is it coming out up to, and
it's coming up to there. So maybe now I can pull it down. So E and Z, pull it down into
the ground plate. Now, at this point,
let's get rid of this. We're not gonna need anymore. This is what we're left with. Now, one thing we did
have on the other one, we had a little bit of um of the taper
coming off of there, not taper, a little
bit of a ledge, and that's something that
I actually want to keep. The other thing
is, at this point, you've got a choice how far you want to pull
up each of these. In other words, old shift
click, going across, old shift, click, going across, old shift, click, going across. And from here, then you
can pull them up and make them slightly
higher if you want to. And I think for me, they look actually a
little bit better. The next thing is,
you want to press Control law, left,
click, right, click. Control law. Left
click, right, click. Control, left
click, right click. And now we're going to give them that little bit of a ledge. Now, you can see every
time I've done that, it's dropped down a
little bit further. So all I'm going to do
is manually bring it up and put those into place. Like so. And it's up to you whether you
want to measure them. You know, you can actually
measure them out, as you know, and I'm going to
put that just above there. And then what I'm
going to do is come round and Alt Shift click, O, shift, click, O shift, click, and then going to
press E to lanes, and pull them out where
I actually want them. So is that too far. Let's have a look. Yeah,
that's way too far. So alters, I'm gonna pull it out just before it goes
into that part there. So just before it starts
coming out of there, have a look, and
there you go, there's your actual ledge on there now. Okay, so now let's
carry on on the inside. So we do want another
piece in here. So what I'm going to
do is I'm going to press Control R. Can
I press Control R? Yes, I can, and I
can bring that out right where I want it
just in front of these, and then I can press Control B, or I can press another
Control R. You know what? We'll press Control R again. I'll bring it out then to here. And then what I'm
going to do is I want to isolate this out, so Shift H, isolate it and we can see, actually, it's really great
because it's one flat piece. It's actually perfect.
So, you know what? That's perfect. So what I
can do is I can come in now and not have to worry about
extrusions or anything, 'cause all I can do
is I can just come in and pull it down
slightly, like so. And there you go. It's really, really beautiful how
we've done this now. Okay, so the one thing I'm thinking is now just
on these parts, I should probably just lift them up a little bit just so they're more
in line with her. That's the only
thing I'm thinking. So to do that, I'm going
to grab all of these, so Alt Shift click, and then Alt Shift click, and I should if I bring this up. Yeah, you can see I've got to bring it in on
the edge as well, so Alt Shift click, and I bring it all up now. And there we go. If we
bring up like that, that's going to make
it look even better. So I know the little
funny fiddly things, but I think we might as well do this scene
as we've come this far. So Alt Shift click. Oh, shift, click,
all shift, click. And then on this one, O
shift click and O shift, click, and shift click, like so. Now, let's bring them up, so. They're under there, like
so, double tap the eye. And there we go, perfect. Absolutely, perfect. Up to you, have a look what they look
like if they were actually up above there.
Now, I don't know. Now, I don't know if
they look bad like this. I actually think they'll
look better like that. I'm going to leave
mine like that, guys. They'll look better like that. Alright, so now we need
to do the inside of here. Now, it's actually really, really easy for us
to do that, as well, because all we're
gonna do is bring in bring in, drop it down. One of the things is, though, let's bring in our door first. So, again, we're gonna save out of work and make sure
that our doors gonna fit before doing anything
else cause then we're gonna have a real good idea where we actually
want to put this. But let's first vote. Come in to where I'm a asset manager. Let's come to doors, and the one door we want
is this one here. So let's bring that into place. So Joe's going to
bring it into place. I'm going to grab
this part here, I'm going to press Shift
Desk, cursor selected, grab my door, Shiftsk
and selections cursor, pull my door out
where I want it. And then what I'm going to do is just put it down like so. Now, the other thing
with this door is, I actually don't want it to, you know, just sat on
the front of there. We're not really doing
anything like that. We want to pull it
back into place. We want to make this intracu. So if I now press Shift Desk, cursor selected,
bring in a cube. There we go, bring it in and then bring down the
bob of it, pull it down. Yours too, nearly the
bottom of the door. So just to there and
then what I'll do is I'll grab my cube and
make sure it's in place. Grab this part here, press control and minus, and then just put that in
there and then grab my door. And I should be able now to put my door back into place like so. Let's then grab this part, make sure our booleans attached, and then grab this and just
delete it out of the way. Now, there is the
makings for our door. So now what we want
to do with our doors, we've got pretty much this
part here and some columns. So I know that I can come in now and happily bring
these parts in. So I'm going to press
Control left click like so, and then I'm going to
come in, grab this part, and then press E to Alter Ns. And bring it in. Now, if
all of that is coming in, which we don't want, by the way, let's just before we press S E, press Controls and go back, and then all you're
going to do is press Shift D and
P and selection. Now you've got
this part in here. So we've got this part in here, and you can see why
it starts to come back is because we've
grabbed it all around there. So let's just isolate it
off and see where we're at. So we've got it
coming up to there, which is perfect, and
we need to bring it in. So let's come in, first of all, and delete this coming
all over here just so we don't end up with any manifold edges or
anything like that. So delete and faces Ops. So not coming all the way over there.
Let's take that off. Shift Control. Delete basis. There we go. Now what we can do is we should now be able
to press E. In fact, we'll resell the
transforms, first of all. So l transforms, right
click origin to geometry. And now let's see
if we can press A, E, ter Alternate
and bring it in. Now, let's come back underneath. So lng. We can see as well. Let's put this not
point non three. Let's press Altag
and now let's go under so under
here, there we go. Now we can see Dad is
looking beautiful. So what I'm going to do now
on this part is I'm just going to be focusing on
the actual ceiling now. So I can bring this to here, and what I want to do is
I want to drop it down, drop it down, drop it down. So what do I mean by that? I want to now bring in another
part and bring it down. So I'm going to press E, enter, alters, and just bring
it out slowly like so. Then I'm going to grab
this part of here. It's going to go all
the way around there, unfortunately, and
that's not what we want. We want it to come from
this part of here. So if I press dot, I should
be able to zoom into there. Maybe, though, maybe that's made it a little
bit hard for me. It's a bit tricky
seeing in here. So you know what? We'll just
hide this out of the way. Now we can see what
we're doing with this. So this is this point here. You can see now we've
got all of this point. And then what we can do
is we can drop this down. So drop it down a little bit, like so, or even
not even that far. Then what we can do
is now we can grab this part coming round
to this part in here, and then we can press E enter Alons and bring that
part in like so, and then we can have one more
part maybe on top of you. So we'll bring this down. So I'm going to press E, enter Alons and bring this part in. And then finally, I can
come grab this one, grab this one all the way over
here, press the E button, and bring it down,
and then we can have a beautiful pot on top of here, which I'm going to show
you in just 1 second. But first of all,
let's make sure then that we have one
more ledge on here. So what I'm going
to do is just grab the inside of here,
or just the inside, He enter lnas tiny bit, and then grab this part, and then grab this part, we're going to press E,
just a little edge like so. And then finally, we're
going to go from here, right from here with our edge elect all
the way over to here, with our edge select that's
in control, like so. And then all I'm going
to do is E enter lns and if that's not working,
just press the s button. And if that's not
working, just pull it back into place like so. Then we just going to press A, shift and end, spin
everything round. And there you go, guys.
Alright. That is looking cool. Now, if I press Altag,
bring back everything. Even if you're taking
a shot from over here, it still looks beautiful.
You know what we'll do? We'll do one more part.
I love this part. Press Control B,
and then we'll pull a little bit down just
to show that we can. Okay, grab it on
the inside here, around the inside of here, and then press E, and
just pull it down. Make it even more
intricate. All right. There we go. Now, on
the next one then, I'm going to fix this part. I'm going to bring it in to
make that more intricate. I'm going to bring
some columns in here. And then what I'm going
to do is I'm going to put in a round bit on here to make this as ornate as possible. It's the entrance to
the whole building, so we actually want to make
it as ornate as possible. Alright, so we'll do that
on the next one for now. Let's save our work.
There on the next one, everyone. Thanks a lot. Bye bye.
134. Inserting Doors and Windows in the Entrance and Balcony Area: Welcome back everyone to blend the building mass class from
concept to final render. Now, let's come in to this
part, hide the other way. And what I want to
do is I want to put some columns going up here, but these columns I want to
be a little bit different. What I'm going to
do is I'm going to look to see if I've got columns, which I have, I'm going to
bring in then a large column. So let's drop it not there. I want to drop it on the
ground plane, which is there. And then what I want to do
is I want these columns to be pretty much uniform. That's one thing I do once bound so first of all, I'm
going to bring them down. Like so. I'm going to make
them exactly how I want them. So I'm going to put
them into place, and it's going to be holding
up this part, like so. And also, if you think about it, let's just press Shift H on this and look where
this goes up to. But the moment, you can
see, we're definitely not going to need this
top, this bomb. We're definitely not
going to need this bomb either because that's
going into the ground, and we're definitely not
going to need the bag. So no one's going
to see that either, so we might as well
then delete and pass. So delete all of
those out of the way. And now let's come back,
press SaltaH and I'll just hide this out
of the way just once more, so hide it out way. I want my column to fit
perfectly in there, and I want to have a little
bit of a ledge over here. And I also want to make sure
there's enough room for a lamp or something like
that in that place. Next of all, then I want to come over to the right hand side, and at the moment, we've
got length on random. So let's turn this down to zero. Let's increase the length, so we've got a few
more in there. And let's also turn down the
width down to zero. So zero. Let's also turn the thickness
random down to zero, and we'll end up with some
nice stone blocks there, which look like they're actually going to
be doing something. Right click then set
origin to three D cursor, and let's then add in a mirror. Add in a mirror, like so. And now you can see they're
both kind of uniform. Now, the next thing I'm
going to do as well, is I'm going to put
some parts into here. So if I grab both
of these parts, press the ebon, can
I bring them in? That's the question. You can see and bring them in in this way. Now, is that because I'm
grabbing the whole of the back. So if I press Shift yeah, I shouldn't really be
grabbing all the back. I need probably an edge
loop or something like that there just to make it a little bit smaller. So you
know what I'm going to do? I'm just going to press AaltH. I'm going to hide
this out of the way. And then I'm going
to grab this, this, this and my do Shift and now I can see
exactly what I'm doing. Now, if I grab this now, I should be able to press tab
A to grab all of that and bring a bisect into
here and into here. So let's do that now. So
bisect into this part here. Like, so remember to zero out, always zero it out, and
then I'll do it again. So, a, bisec so mesh bisecTol into just above these parts here because they're on
the ground. I'm hoping. And then we'll go to the Is that I I zeroed
it out already. I think I actually
zeroed it out already. Really? I'm surprised they
actually zeroed that out. Okay, we got
something like that. And now, if we come in, this press controle transform
set Origin, greedy Curtser. And now we should
be able to come in and just bring in these parts. So if I bring in
these parts now, it should work very
nicely for us. Now, if we press voltage now, just bring everything back and then just come back to here, and we should then be able to just bring those out, like so. Now, the one thing we
anchor on here is a bevel, and beveling these is probably
going to be better for us. So if I just come in, add in a modifier generator
and a bevel, so let's put it on Not
point not note three, we might as well do that while we've actually got
everything here. Lastly, then, I want to actually put something on this part here. So what I'm going to do I'm
going to press Shift day. Let's bring in a let's
bring in a plane. I think that's going
to be the easiest way. X 90, spin it around, and I'll just grab this one, this two, this door,
and then I'll press. I'm hoping I've grabbed this as well. So yeah, there we go. Shift H, we should end up
with something like this. That is exactly what I want. Then what I want to
do with my plane now, if I press one, I
should be able to press N's and bring it down. I want my plane,
this part here to be coming out probably just
around the edge of here. So around the edge, maybe even drop it down a little
bit, something like this. Then what we'll do is
we'll also pull it out. So if I press S and X, you'll be able to pull
it out to here like so. Now I want to do is
put in a center, so control, put in the center, so make sure it's
always got a center. I'm going to put left click, right click, nine
edge loops on there. And then all I'm going to do
is grab the center of here, proportional editing on, and let's have it
kind a rounded. Let's see if I can
get it rounded, bring it out, bring it out, bring it out all the
way to the edge, and we can round that
off pretty easily. If we pull it out there, be careful with
it, should be able to round it off pretty easily. Let's turn it off then,
grab the whole thing, and then pull it out
wherever you want it. So I want it probably out
to something like this. And then all I'm going
to do is press E Y, pull it back, like so, and then press S, Y, zero it out, like so. Finally, then, A,
shift and then, spin everything round, and you should be left with
something like this. From there, then, right,
click, shade Auto smooth. And now I want is just to put something on
the front of here. So all I'm going to do is
reset all the transforms. And then we're going to
come to this part here, grab it all the way to here, I'm going to press the Ibar
to bring it in, like so, and then we're
going to press heat to Alteres and bring it in, like so, and there we go. Now, the other thing is, we
need to put a bevel on here. So I modify not juncture
known as bevel, put it onto Noeint
note three, like so, exactly the same as the door, exactly the same
as this part here. And finally, is it the same as
this part here? Yes, we've got a bevel on. Let's press saltaH, double
tap the A, there we go, guys. Let's go to File,
Save everything out. And just looking at that,
that looks amazing. Now, one thing I'm
wondering, you know what? Actually, that little bit of a ledge doesn't look too bad. Now, what else do
we need to do then? So we're going to
have a plant here, a plant over here. We're going to have
a window in here. So we need a window, so we
can bring the windows in. We can get those on here. Now, we've already got I think we've got the
walls on here already. Let's just check that because
once we've got those in, then we're going to have to
start bringing in all of the materials and things like
that. But let's just check. So here we go.
We've got all This is what we've got right
now, so let it load up. He shade load up. So this is what we've got
with this part underneath. So I think we'll actually
start, you know, getting all the materials
and everything in, and then we can really
see what we're doing. And then from there, we can probably take a break and work our way around
here a little bit, I think. That will
be the best thing. And then from there,
we can actually start probably building
up this dome pot. But I think it's important
that we just take a break, maybe build this
part, maybe go in and build our couple of
chimneys, maybe do that. I think that might be worth it. Alright, but for
now, let's actually stop doing this and
put these windows in. So we've got these windows here. We know these are the
windows that we want. So it is one of these windows, and we've also got one so one's the bottom,
one is in the top. Now, in my original, one was
bigger than the other one. Completely up to you if
you want to do that. What I would say, though
is, so as we've got this, let's just press Old D, and let's bring in our
I think it's this one. So I'm going to press
Shift D on this. And then what I'm going
to do is spin it round, so there 90, and
let's line them up. While I'm in there, I might
as well line everything up because if I'm making
them smaller or bigger, it's going to save
me a lot of time. So I'm going to
come to this one, shift desk, Custer selected, come to this one, shift
desk, and selection curta. Now, let's make sure
these line up perfectly. So if I press three to go
inside view, bring it down. There we go, making sure
it's in the wall then, and then I can grab both of these now and I can
bring them over. So if I bring them over, and now I can put them into object mode because it's going to be easier to work
in that anyway. And then what I want to do
is I want to spin it around. So's head spin it
all round, like so, and you can see at
the moment, they're not spinning the right place. Let's put it on medium point. So ars head spin it round. And we want it all -55, like so. And now I'm hoping is it going to go in.
Let's have a look. Put it on normal. Yeah, it's not right. So let's have a look. Where's the angle? Oh, that's why we're turning
just this one round. Let's spin them round, see why. Why that isn't right.
So 51 degrees. I'm just wondering why maybe it's this it's
55 degrees on here, and this isn't for
whatever reason. I'm absolutely certain though we should have been
able to level them up. I'm just wondering why
they can't level them up. But, you know, even
this one look, you can see us out, as well. So let's just go back before
actually twisting those. So we'll go back. And there is where the point where things start to go a little
bit pear shaped. So if I pick this up, and I press seven to
go over the top. We're going to twist
these. I'm going to line them up near
enough perfectly, so. Bin them both at the same
time, and there you go. You can see the
lined up, and it's 192 point something.
Is slightly weird. If we're bringing normal now, I'll be able to bring them in. I'm just going to line them up because as soon as
I've got lined up, I could use snapping course, but there is two of them. I don't think I'm
going to use that. What I'm going to do is I'm just going to line them
up to where I want them and then bring them down. And I'm looking at where
I actually want this. I think I want this
one, probably a little bit over. Like so. And the other thing is these have still
got the mirror on. So whatever I do to
this one is going to happens down, which
is great for us. And then what I can
do with this one is now once I'm actually happy
where that's going to go, maybe a little bit
further this way. And then what I'll
do is I'll press Shifty or should I press
Alt D. Let me think. Probably press Alt
because I'm not going to be changing the
mesh or anything. I'll press Alt,
then what I'll do is bring this down
to the bottom one, which should line
up then with it. So down to here look
as you can see. And you can see now why I
made it a little bit smaller. So I can make it a little
bit smaller, like so, and I think that looks I think it looks a little
bit better like that, and I'm still happy with
this window being on there. The one thing I would
say is, we're just going to pull it
back, Tad, like so. All right. Now
we've got Windows. Let's come then.
We'll grab this. We'll press Control and minus. And then what I'll do
is now I'll apply that. So Control A, and then I'll
delete this out of the way. Also, the window is
the wrong way around. So if I spin the
window around s 180, spin it round and just make sure then
I'm happy where it is. Like so, and now we'll do the
same thing with this one. This one and this one
Control minus, apply, delete your bevel,
grab your window, Z 180, spin it round,
and there we go. Now we want to do is we want to mirror these over the
other side as well. If I grab both of these, hopefully, if I grab this, yeah, we can't join them together because if a
join them together, it's going to change
the windows and stuff. So I need to be
careful about that. So what I'll do
instead is, I'll press Shift desk cursor selected. I'll grab both of
these. Right, clicks Origin three D cursor, and then I'll add in a mirror. So we'll come in, add
modifier, generate a mirror. You can see now it's not
actually going over there, and it's because right clicks
origin to three D cursor. Still not going over
there, so you know what we'll do. Do what
we did last time. There we go. And now I'll come to why is this
one moved out there? Let's actually,
that's the point. You can see what's
happened there. We actually moved this in
because we moved the origin. So SiginTDcursor. You can see we don't want to do that. We really don't
want to do that. So instead of doing
that, we'll come in. We'll add in a mirror,
so bring in a mirror, and we'll put it onto
this point here, and then we're not going to mess around with
any of that stuff. We don't want to do that. So let's do the same thing
here, add in a mirror. And we're going to
put it on here. Double tap the A, and
there we go, guys. Alright, lead that load up. And, yeah, that's
looking very, very nice. At the moment, it's
looking a bit, you know, raw because we haven't
got all of our things in. But I think once we
have this point in, so you can see this here, it's going to line up
on there, hopefully. It's going to look
way, way nicer. Now one thing I'm worried about, yeah, this is just shadow, so that's just shadow
going under there. When I've got
materials in there, we'll be able to see, much better what this is
going to look like. For now, though,
we're going to leave it at that. We're going
to save our work. And then when we come back,
we will definitely be getting all of these materials
in and things like that. All right, everyone, so
I hope you enjoyed that. I'll see you in the next
one. Thanks a lot. Bye bye.
135. UV Unwrapping and Texturing the Front Entrance Area: Welcome back and run to
Blend Building Master Class from concept to Final Render. Now, before we leave the
asset manager just for now, let's bring in a new material. So what I want to do is
I want to unwrap this. So you SmartUVPject, I'm not actually sure
what's under there. And let's come down to
the asset manager and go down to Resource
Pick. Let's press tab. One we're looking
for is going to be materials and shaders and
we're looking for marble. That's the one we're
going to be dropping on, and there we go. And we can see it looks a mess. And the reason it looks a mess is because we need to go to UV Editing and we can see
this is what we've got. Let's zoom into it, then. Let's press A, and
let's come out. Now, sometimes you
will see on here, this isn't looking
like what we want. The reason for that is if
I go over to the shading, probably, if we're
going to object, not got this selected. So if I select this,
maybe then I'll do it, and if not, there we go. That's the reason why it doesn't show up and is
showing up as normal. So now you know
that little trick, and now what we can do is pull
this out and make it way, way bigger without though
looking like it's repeating. So there you go. Something like this is looking very, very nice. Now, from here then, we will do this one here because the steps has also got the moble on. So I'm just going
to grab this one. I'm going to press
Control A O transforms. Set origin to geometry. That's the problem,
though, because I'm going to go back
actually before that, and I'm just looking
this part here. So let's pull this part
out because that's definitely not right. Like so. And I'm just wondering whether I need to pull
it out even further because or I can bend
it in a little bit. So let me just go back. We'll
fix that before doing this. So let's go back to modeling. Let's come to this because
it's actually got the bend on. We need to apply the bend first, so I'm just going to pull
this back tiny, tiny bit. I don't want to go
over this part here, so I need to be very, very careful what I'm
doing here, guys. You know what I'm going
to do? I'm going to pull. You know what? Instead
of doing that, can I actually apply this? Pull this out a little bit. So if I pull this out
a little bit, like so, and maybe I can get away with just deleting this edge,
let's have a look. I could bring in an edge
loop and then delete it. Let's see. Control, left
click, right click. And I think it's
gone through there, so we don't actually want to. Let's have a look. Yeah, that's
that one. You know what? Just going to pull
it to the side. N out of the way. Yeah, I'll just do it like that.
Let's have a look at this. Let's press and X, bring it in. There we go. Yeah, we'll
just hide that there. All right, no one saw
that. That'll be okay. Now, of course, we
still need these parts in but now now we've got that. What we'll do is we'll come
on to this part of it. We'll apply or simple deform. Now, remember, if I
actually take this off, you can see this what it's like. If you're going to save this
out in your resource pick, make sure that you
keep the simple deform on because when you bring it in, then you'll be able to
deform it even further, not this far, of course, even
further if you wanted to. So again, just make
sure you keep this on, Control C, Control V, and
then send it through. Alright, for me, though,
I'm going to press Control A. I'm going
to press tab A, U, smart UV project. Click Okay. Is it going
to unwrap properly. Let's actually have
a look at that. Let's put it onto rendered
view. And there we go. So let's grab this
one and this one. You can see we're
struggling a little bit, probably because I've got a lot of blend files open right now. Control and L. And let's
go to link materials. There we go. Now we'll
come down to this. You know what I'll do is I'll
just come over to Object. I'll save out my work
just so we don't get a crash because sometimes
that will cause a crash. And then what we'll do now
is we'll come to this one. And what I want to do is
put this on material view. There we go. And I want to make sure it's the
same size as this one. So what I'll do is I'll
come over to UVditing and I can see it's nowhere near the same size this one,
so let's bring it up. Let's actually have
a look at this one. So if I grab both of them, you can see if I'm grabbing this one, this is
the size of it. If I'm grabbing
this one, you can see nearly the same size. So let's just grab this
one, make it a tiny, tiny bit bigger, like
so, and there we go. Now, they're the same size, and that now should
look pretty nice. Now, let's go back to modeling. So we need these parts in here. Now, these parts in here is
actually going to be stone. So I should be able
to grab all of this. I've got my bevel on. I should be able to put this on Global, and I should be able to U
Smart UV Pj, click Okay. And then let's
bring in our stone. So I'm going to come down.
It's got ambient occlusion on. Let's go for our stone. Stone, where is it Stone Light This one
here. There we go. Now, is that unwrapped
well enough? I'm not actually sure
'cause I need to check it. Let's have a look
against our other stone. You know what? That'll do. Now, I think one thing we
can do on here, though, is grab both of
these, press Control plus, click the plus button, click the down arrow,
and let's have a look at stone light or lighter, like so, click assign. There we go, Yes, I
think that looks better. Now let's work our way over. So the actual columns are going to be either on stone light or all
the other stones. So let's come in. We'll
minus this one off, and then we've got
them on stone light, or we've got stone lighter. So stone light, stone lighter. We haven't unwrapped them
yet, so don't worry. You could have them in
marble if you want to. I think, actually these
probably going to be better off on you know at the moment, we've got all of these like this because it's
all the same thing. So I think for me, I'm
just going to come in, and what I'll do is I'll
apply my simple deform, like so, and then I'll come
in A U, smart UV project. Click Okay, like so, and there we go, now we've
got something like this. And now we can actually
work out where we actually want our Stone
light or Stone dark. For instance, you know, on these, let's just go back. We've got Stone
light of the moment. So let's change this to
Stone Light. There we go. And then let's click
Plus Down arrow, Stone Lighter like so. And then what I'll
do is I'll just come into these columns, like so, and I'll put
stone lighter on. Yes, and I think
that looks great. And then we'll do
the same on these. So we'll go on all
of these, like so. And we'll put these also on stone lighter and see
what that looks like. So stone lighter, click
Assign. There we go. And then on the inside of here, can we click on the inside? Because we did
separate these out? We should also be able to put those on Stone
Lighter, as well. Like so. There we go. That looks pretty good, guys. Now, let's come on
the inside of here. So let's press A, U, smart UV project. Click Okay. Let's also make sure that
we've not got simple deform. So if you got it on, just
apply it. So come down. Clip controle A, apply that. And then what you
want to do is just make sure then that you put it on stone double up
minus this off. And then we've got
stone lighter. We don't want that
one, so let's put it on stone light. There we go. Now, the other thing is, if you've got all of these
materials at the moment, if you've got loads
of materials in here, sometimes it happens
like brick normal 01. Sometimes these materials
aren't applied to anything. So what you can do
is you can actually come to file, clean up, purge unused data, and it says, 18 meses, which are supposedly
in here not being used. You've got linked data blocks,
and you've got recursive. You just click Delete, and
it actually will get rid of anything that's left behind. No, materials that
are in the list, but not actually on anything. So you just press
delete, and there we are 18 data blocks deleted. So it's a good way,
a really good way, actually, of tidying
up your scene. Okay, so now we've got all of this. We've
got the underneath. We need this part here. So all I'm going to do is
grab this part. A. I'm just going to make
sure got nothing on there. So, Mart U V project, click Okay, and
then grab this one. Sorry, this one,
and then this one, press control L, and we'll
just link materials. And there we go, Stone light. We don't need stone lighter unless unless it's just on here. So we'll just go stone
light to click a sign. There we go. We can
just make out that. That's exactly what
we want. Now, we've got everything on here and very happy with how that looks. We've got a little groove
on there, as you can see. Now on the top, I'm going to put this little groove
that you can see here. So we're going to come into
this little groove like so, and we're going to click I'm just looking at what else
I've actually gone here. Can I take these
off? I think I can. So minus off, minus off, plus down arrow, and the
one we want is gold. Ab. We've grabbed them all, click a sign, and there we go. We've got that little
bit of gold on there. Now, let's come to these parts. So we'll come in, first of all, we'll apply our simple deform. We've got no bevel on
here at the moment, so we'll add in the bevel,
so generate a bevel. We'll just go to object modes to make sure that
bevels on there. So if I come on and put
on geometry, sorry, geometry and turn
off clamp overlap, let's put it on note
point note note three, like so, and we should end up if I increase got that
little bevel on there, and that is looking perfect. And now back to
RenderView. Onto material. And what we'll do is minus
this off, and there we go. We'll grab everything
at the same time. U, smart UV project. Click Okay. So on the wrap, and
there we go, guys. Now we want these to
probably be stone Light, but we run have
time on this one. So what we'll do instead is, we'll get that done on the next lesson.
Alright, everyone. The one thing is, actually, you know, the one
thing on these is, I'm just going to look I'm just wondering whether I
want all of that on stone light or whether I
want this part on dark. So, in other words, if I grab, you know what? I'm
going to do that. Before I actually finish, I'll put this on stone light, a sign, and then all I'm going to do is come to the front of these, so it's easy to grab them. So shift click Control click. It's up to you if you want
to mess around with this. Con throw plus, and then
stone light to click a sign. And it just brings it out a little bit
more, as you can see. So, yeah, that's looking
much, much better. Again, now let's
come in. Say a work. Let's move our guy over
because he's stuck in the in the column there, and save our work finely, and I'll see
you on the next one. Thanks a lot. Bye bye.
136. Adding Supports and Wall Ornaments to the Entry Section: Welcome back everyone to
plan a building master class from concept to final render, and this is where
we left you off. Now, we've unwrapped all these. We've done all of that part. But let's come in and change
at least the pillars. So let's change the pillars
and see what they look like. Now, of course, we
could make them marble or something like that. But I think what we'll do is we've got stone Light
and stone lighter. Let's put them on
Stone lighter and see if we can get a little bit
of distinction between them. So stone lighter, click a sign. Let's
have a look at that. Now I think that looks
a little bit better, and I think we can also
do the same on here. So old shifting click Control plus. That's
not working out. So we'll just go from here
all the way around to here. Control plus. Do Control plus. Like so and then come over Stone lighter,
and there we go. And I'm going to
leave this part here. I think that part looks great. What I'm going to do though,
is grab this one now. I press U Smart UV project, Unwrap coming over,
making sure simple deform is on with Control and A in
object mode, so Control A. Simple deform is on on this one. We haven't got a
bevel on this one, so all we'll do is
we'll copy modifiers, and we'll also control
link materials. And then what we'll
do is unwrap this. So we'll unwrap this part now, and I'm J looking
at the little edge. I think I need to
pull it out tiny, tiny bit more just
to go over there. But for now, let's
do SmartUV unwrap. I'm J looking. You can see it's different,
and I don't want that. So what I'm going to do
is just go to UV Editing. Let this load up.
And there we go. And now let's come in, press the little dot on. And what I want to do is pull
them out or pull them in. Pull them in a
little bit, I think. Let's pull them in, making
sure that they are the same. Let's press Control, actually,
the origins geometry. And then let's try that again. So you MU V project look
okay. Let's bring them in. There we go. Dad's looking
much, much better now. And yeah, now, the
one thing I said I want to do is just bring
this out a little bit. So I'm just going to
grab all of that. I'm gonna press Altern I
should be able to just bring it out just giving this a little bit more of
an edge on there. Now, let's go back to modeling. Let's have a look
we've got. Now you can see that's
looking very nice. Now one thing is, I'll put this also on light, go to materials, er, let's click Assign, and there we go, now that
is looking. Perfect. That's exactly water one. Yeah, I'm very, very happy
with how that looks. Now, I'm just making sure
everything else is done. Now, there's two things
that we need now in here. We need these parts here. So I want to go back
to object mode. I want to press Old D. And then what I want to do is
spin these around. Now, I'm just wondering if it's because they are normal
or something like that, why they're not going
around 50 degrees. At the moment, these
are on 50 degrees. So yeah, that's probably it. What is the if I click on this. I have a reset now. I think I've reset that can't look on there anymore,
it's 55 degrees. What is this one now?
Let's have a look. 325 degrees. If I press Control C, let's see if we can spin those round with Control
V, spin them round. Do the same thing
on here, Control V, spin it round's C. If I
can grab these and drop them into place
under there like so. The other thing is, you need
to come out a little bit. So that the window
is actually on here. Now, that means then I'm going to have to move
this a little bit, or I can pull them back, probably better off
pulling this back a little bit and then
grabbing both of these. I think, though, as well, that these are still not
rotated, correct, so I'm just going to rotate
them to something like that. Looking like there now. I can also rotate this as
well just to make sure. You know why I'm not
going to rotate that because I think if I go in, I think that's about
right, actually. I think it's more to do with just bringing this
forward a little bit, so I'm just looking making sure. The issue we've got now is the bomb of here,
as you can see. This bomb part is
really stuck out here, and I want to make sure
that is not the case. So I'm just going to
hide this out of way. I'm going to come in, and
what I'm going to do is press control law and just
pull it over to there, and then all I'm going
to do is old **** click delete and faces
I'm gonna get rid of it. Who was bugging me delete faces. Let's just hide it out way, see if there's
anything else there. Yeah, there's some
little bits left over, as you can see, we really
don't want those little bits, so I'm actually going to take the time just to delete
those out the way, delete faces, tab old age, bring back everything,
double tap the eight. And now it's looking
much, much better. Now, let's go to this side and just make sure
everything is in there. And that's also
looking much better. The final thing, this part here, I'm going to press S and X and just bring it in a
little bit and then move it over and bring it in a
little bit more and move it over just to make sure that it's fitting
in a little bit better. The other thing is, we could really squish this
up to bring it in. But you know what? I think if I put it on here and
just have another look, I'll let it load up.
Let's get it on here. Yeah, I like so.
You can see now. How they're fitting into
place. And we could. Let's just have a
look. If I press SSNs E and really
squish them up, or they're gonna
look any better like that. You know what? I think they do.
I think they do. So E's, let's squish them
up a little bit more. Like, so bring them up. Into place, double tap the A. I'm also going
to just move them. They're not quite in place. Move them to there, double
tap the A, like so. And now the one issue we've
got is just this part here. You know, sometimes
that's going to happen. But what I'll do is I don't want to alter the
mesh on here, of course, but I do I want to make sure I'm
covering that part. Now, I do have an issue. If I pull this part back or
this part on the other side, it's going to kind of
mess you up for me, and I don't really want that. So I think I'm just
wondering what to do here. I think what I'll do
is I will press Shift D. This is already
facing the correct way. And then what I'll do is I'll
just grab this part here. So Alt Shift and click
Shift and D. Bring it out. Oh it's on normal. Is it going to come on
local? Let's have a look. Yeah, there we go on local. And then I should be
able to bring this part into here, like so. I'm going to pull it back
into place, like so. Then I'm going to press
EnsE and pull it up. And finally, I'm just
going to go to mesh, clean up little holes. Like so let's have
a look at that. Let's delete this
part out of the way. So I'll delete zs. And let's have a look,
see if I've actually done a good job of dodging it. Which is what we've
done. Let's see. We'll put that into place, and we might even pull it
out a little bit more even. So let's pull it out
a little bit more. Let's also unwrap it again. That's one thing that's
actually missing on there. UVditing Hicks this. Let's zoom in.
Let's press the Sb. Like, so double tap the A. Now, that's looking good there. Now I can shod. I can't
actually join up to that, but what I can do is where
is the mirror on here? Of course, it's going
to be set there. So I want to put this
on the other side now. So I can grab this like so, I should be able to
copy the mirror. So I can grab this,
grab this one, press Control L, and we're
going to copy modifiers. Now, let's go back to modeling, and let's have a look to see if if it's copied
that over there, which it has, let's just make sure then that this
part over here, so press tab, I'll apply
my mirror, actually. So press Control A,
apply my mirror. Let's turn off the array because we're
not going to need that. And now I should be
able to press tab, zoom into this one, and there we go, that's
what we've got. I'm just wondering if both of these are unwrapped correctly, because
I don't think so. So let's press Control A or
transforms. There we go. Now they're unwrapped correctly. Are they? Yes, they
are. Double top the e. And there we go. I think that looks
way better now, way better than
what it did before. And yeah, I'm happy
with how that is. Now on the original,
I actually put a little bit of, you know, something there, but I don't
think I think I've done this one so well. I don't
actually need that. So what I'm going to do is
gonna put it on Object mode, and then go to go to file. I'm going to save it out, and I'll see you on the
next one, everyone. On the next one, then I think we're going to move
on to this side. So we're going to move on to
this side and the next one. We'll build this
out a little bit. And yeah, we're really
moching along now. Alright, everyone. I
hope you enjoyed that, and I'll see you next one.
Thanks, lot. Bye bye.
137. Designing Roof Decor and Managing Roof Intersections: Welcome back, everyone to Blend the building master class
from concept to final render, and this is where
we left it off. Alright, so what we want
to do now is basically come in and do
probably these roofs. So I'm thinking, if
we do this roof, we might be able to do this one and this
one and this one, and then it's all the roofs
done and out of the way, and that might be
the best way to go. Once you've done
the roofs, then we can get the tops of these in. So all of these tops here. And then we might work our way down the side or do this top. I know it's a little
bit different, but it's a new day today, and I'm thinking that might
be the best way to go. So what I'm going to do
is just put these up, and we're gonna go to my
Boole them out of the way. And then we're going to
drop into object mode. I'm going to grab this,
I'm going to press Shift D because we don't want to press Alt because we can't
alter it then. And what I'm also going
to do is put this on Global just to make sure we're punting it
in the right way. Alright, so now what
we want to do is we want to grab this and this. And what I'm going to do I'm thinking this one is all the
block. So you know what? We'll sort these out first.
I'm going to grab this one, shift H, and then what I'm
going to do is delete this. Now, you can see here
that this front, we do have a problem.
So you know what? We're just going to
make sure, first of all, that this is correct. So I can see here that this
is a little bit of a mess. If I come in and press tab, you can see it's
a bit of a mess. It's bending over there. So you know what
I'm going to do. I'm going to just
press Alt Shift and click, delete and faces, and then I'm just going to
come in, Alt Shift and click, and I'm just going to pull it so it's in line with that, like so. What I can do is I
can press Shift H and come to this bit. So you can see here this
is where the bit of a mess is actually pulled out.
And you know what? It's actually also
messed around with that. So we'll check that
out in a minute. Let's first of all, though, come in and sort this out. So if I delete this one,
I'll delete the inside one. I'll delete the top of this. So this going all the
way along, like so. So delete and faces. I'll then come in
and delete each of these because we don't
need these parts underneath. And we certainly don't need
this at the back as well, so delete those
and delete these, delete faces, and
we should be left with something like
this to start with. Now what we want
to do is we want to also delete all of these. So all of these going round, like so and delete and faces. And what we're left
with is these two and this one, not that one. Sorry, and delete faces. And now we're left with
something like this. Now, I might as well also come in and just delete
all of these, as well. So all of the bottoms
and the sides because we're definitely not
going to need those press delete and faces. Now, I've got all these
now. I've still got these. I'll delete those as
well, so delete faces. And now what I should do
is just pull these over. So if I grab these, I should
pull them more in line because I know then they
will be in for press three. They will be in
line. With my roof, which means now if I press tab, ltH, I should be left with this, which is exactly what I want. Alright, so that's that
part. Now we've got, I might as well come in
and actually do them all. So I've got a you can see here, I need to keep everything on here except the back
and the bottom. So shift H, so the
back, which is here, so three to go into facele
and the bottom like so, and also this top bit
here, as you can see. So delete bases,
and there we go. Now, let's press Altag,
bring back everything, so we're onto our next one now. Again, with this one, it's
the back and the bottom. So shift H, let's delete
the back and the bottom. So top, back, bottom, delete bases, tab
Altag, and there we go. And now we've got this one here. This one here, if it's
got any going through it, then we need to delete
those and the bottom. So shift H, let's take a look. So if we come in, we
can delete this one, so delete faces and this, which is this one right up here. So delete and faces. Go underneath it,
let's have a look at this one, delete faces. And now we should be all the way up to top, as you can see. Now, the other thing is on here, we might as well,
split this off, so control and plus
because I think, as far as I'm aware, this, if I press G is still
attached to it. So all I'm going to
do is P selection and just split that off, and there we go, now
if I press lth so tab, AlternH, bring back everything. This is what we've got left. And now let's
actually fix these. So we don't need the bottoms on these because we're
going to be hiding them, and we don't need
the insides as well, so we'll press Shift H. Now, the one thing about this is if we delete the backs on these, you know, actually,
before we do that. We delete, let's say, any of these, we'll turn
it into a two D object. Instead, this will be two D because it'll
just be a plane. And when we do that, it might mess around
with our boolean. So we need to be very careful of that, actually.
So, you know what? I'm going to just
leave those. Now we're going to move on to the
last one. So Shift H. Remember, it's the
back on this one. So we're going to go the top, these two, and the bottom. So delete and basis. And let's press Tab ltH and just make sure now
nothing can be seen. So we've got no holes in
there or anything like that. Alright, so let's come
to this one first. So what I'll do is they'll
just press Shift and like so. And I also want, actually, I need to go back a minute. I also want to grab
this roof tile, so I'm just going to
grab this as well, shift and and there we go. Now, let's come in then,
and what we'll do is we'll bring this seven
to go over the top, and I'm just going
to line it up. And again, these, I think they're pulled out a
little bit different. I'm not sure if
they're level or not. So all I'm going to do
though, is just bring it in. So if I press one,
but on the wireframe, I should now be able
to see what I'm doing. So I'm just going to
pull it down to there, so I'm going to bring it
up once I've rotated it, so R Y, rotate it round, so maybe bring it up
a little bit more. Like so and then
coming over and we just going to raise that
vertical count all the way up. Now, I can see if I put
it back on object mode, is that top of there too high? And yes, I think it is. So all I'm going to do
is just shrink it down a little bit like we've done
many, many times before. So just something like this, and now it's going
to fit in perfectly. Now we need to do is just
raise up the horizontal count. I'm just going to raise that up, so I'm going to pull
it into the center, and then I should be able
to just keep raising it, so just so it's in place. Like so. Now, I'm going
to see if I can alter it, so it goes over the
other side and see if it actually fits in
because it's going to make it a ton easier for us. So I there 180, and then let's bring
it into place. And I'll rotate it and just see if it's actually
going to fit. It might not fit, but we can we make it a
little bit smaller? Let's just see if
we can do that. So if I press Control one, put this on wireframe. This is the one, so you can see, look, it's too big. So instead of doing that,
what we need to do is we just need to press Shift
D. And unfortunately, we'll have to do
them both together. So now if I press R s 180, let's get it in the
right place first, so I'll just pull it over here. And then what I'll do is
I'll rotate it round, so Y, rotate it round like so, and then let's put
it into place. So if I grab this, I'm
going to put it into place. Just at the bottom of
there like this one, maybe that's a little
bit too close, and maybe this one needs to
moving a little bit closer. And then what I can
do with this one is take off the vertical count, so take down that by one, and then I should be
able to press R and Y and bend it over like so. Alright, let's have
a look at that then. So that's what we've got so far. Let's move it over a little
bit, just so it's in place. And there we go. Now, if I press Alt H, this is what we should be left with. I'm going
to grab this one. I'm going to press Alt D. I'm
going to press Ads and 90, and then I'm going to go
over the top with seven, press the G button, and
bring it into place. And what I want
to do now is just pull it up to make
sure that it's in line with those and
there it is you can see, it's a little bit out on this. So all I'm going to do is
I'll come into this again, grab the two tops off here. So if I grab this
one and this one, I should then be able to press Shift desk, cussor selected. Pretty much the same things
we've already been doing. So selections cursor, ups,
that's the wrong way around. So you can't actually press Control's head and then
it moves the cursor back. Unfortunately,
that doesn't work. So shift desk, cussor selected, grab this one again,
Shift desk and selections cursor
and there we go. Now, let's pull
it up into place, and let's see if
it's going to line up with everything because
this is pretty long, and this is another reason why we put this in blocks like this. First of all, it
keeps it so that, you know, we've not got
to keep wrapping it. And second of all, you're never
going to have a piece of, you know, a top piece like
this all the way along. It's just not going
to be like that. It's going to have
some breaks in it. So now we can turn up the count. And then we've got this
near enough in place. Now, if it doesn't
fit, of course, just press S&Y and
pull it out like so, and then put it into place, maybe even a little bit more. So S and Y, pull it
out a little bit more. And I think we're
actually in there. Alright, that is looking. That is looking. That
is looking pretty nice. Okay, so now we've got that.
We've got this roof in. We're not gonna actually do
anything with the roof yet. We know it's gonna fit in once I bring these in, hopefully
it will fit in. You know what? We
should probably do that as well while we're
here, because, you know, all of these roofs,
even this bit here, we might as well just
bring in these parts. So what I'm gonna do is
I'll do this part first. So ltd I want to
bring this over, and then I'm going to
select all of these, including this wall here. So then press shift H, like so, and then ds head, 90, spin it round, seven
to go over the top, and that's put in place so G. We're just going
to put it in place. And if we need to alter it, then we can, but at least
it's actually in there. So, you know, we can pull it up into place where
it's going to go, maybe even a little
bit higher, like so. And then we'll just
increase the count. So if I come in and increase
this count all the way up, like so, and then we'll see
if that actually fits in. Now we'll do it on the
other side, so old D, and then we'll check if we've increased it too much.
So spin it around. I'll say 187, go over the top, pull it into place like so, and then just pull it back just to make
sure it's in there, exactly the same as this one, so we can see here and here, and we should end up with
something like this. And maybe on this one, let's have a look, Let's press one. Let's just go in
with the wire frame. And I'm just looking at
this one, as you can see, it's a little bit
closer on this part. I'm just wondering
if I have to pull it out, just a tad like so. And again, I said,
we'll check all those, so don't worry too much
about get them in Playcuts. Lth then bring everything back, and this is what you
should be left with. And, you know what,
both sides of that look look absolutely fine. It's just this bit, as I said, that we might need
to go in and change, which we will do, but the top on there actually looks perfect. Now, we need to think about
our roof on this one. We'll do these first, then we'll come to the more difficult
one, which is this. So I can actually
probably get away with grabbing all of these
pression shifts. Sorry, pressing shift aids. But I'll do, first of
all, is we'll come in. We'll grab this. We'll press I'm just wondering if these are already, like, leveled round. And these are already I'm thinking I'll
probably grab this. So shift and D we
don't want old D. And then I'll just
bring it over like so Z 90, spin it round. Now, from here, I should be
able to grab all of these. I'm fairly sure these
roofs are all even, which means we can use
Old D on these roofs, which is going to make it
way, way easier for us. But we're going to start
that on the next lesson. For now, I'm going
to save this out, and I'll see you on the
next one, everyone. Thanks a lot. Bye bye.
138. Continuing Roof Intersection Modeling and Optimization: Welcome back if you want to lend the building master class from concept to final render, and
this is where we left off. Okay, so what I'm going to
do is I'm just going to press a Shift H once
I've grabbed all those. Let's then bring
this into place. Now I'm going to
bring it into here can see it nearly actually fits. So it might actually
fit on here. If we pull it in, we might just need to make it
a little bit bigger. Let's bring down the
horizontal, then. So jaws going to pull
it down, like so. And of course, we need to make sure that it actually
goes into place. I'm just going to
bring it down once more on the horizontal. And then I need to make it a little bit bigger,
as you can see. So if I press the button, a little bit bigger,
move it over. Like so. And then what I'll do is now, I just want to get in place. So if I press three, I
should be able to twist it. Now you can see that it's not you know, big
enough on here. So R and X, let's just, first of all, spin it round. Let's bring it down into place. So again, we'll bring it down
into the bottom up here. So just into the
bottom of there, and then R and X, X, not Z. Spin it round, hold
in the shift but, and then maybe
maybe bring it up. And now it's in
there. So you can see maybe it's a little
bit more like this. And then what I'll
do is bring it up. So vertical count up, up, up, we go and I'm just wondering if I can get away
with that, I think I can. I think I just need to
make it a little bit bigger, like so. And then what we'll do
is we'll pull it back on the horizontal, like so. And then finally,
I will just move it over a little bit and
pull it out on the X. So and X, pull it
out a little bit. And there we go, I'm
hoping that we can get our parts in there now. And we'll do that actually on the next part before
doing anything else. So now if I press three, I should see that I might be able to just bend it back in a little bit and then
pull it up just a tad, like so, and there we go. Now I'm going to do
is if I zoom out, we can see I don't think we can see through there,
so that's great. And all I can do now is lt D. And then I'm hoping
I can just mirror it. So let's try and mirroring it. It will mirror on here. So object mirror, and it's going to mirror on the Y,
and there we go. Now let's see if I can just
pull that into place without it going through there. Like so. And I'm thinking that's
probably going to be fine. All right. So now
we've got this. We might as well move
on to this part here. So if I press, again, though, the problem is now I'm
going to press shifty, I'm going to make it easy
for myself and then RSE 90, so I don't have to
alter anything. And then what I'll do
is, I'll bring it over, and I can see it's way,
way too small for that. So I'm just going
to bring down the horizontal all the way down, like so and I'm also going to bring down the vertical
all the way down, and then I'll just
get it in place. So if I press Control one now, I should be able to
fit it in place. I can see it's still way too big. Let's sort
out that first. So Y. Let's bend it into place, and let's pull it
over and then up. And then there we go, and then maybe a little
bit out, and there we go. And then let's turn
down the vertical. So the vertical, turn
it down one, two, and then we'll also put it into place and see where we
need to make it smaller. So we can see we can get
away with probably making it a little bit smaller
just so it fits on there, pull it out a little
bit, so it fits on there. We don't need
to worry about that. It's just that last
one that we need to worry about, making
sure that one's in. And then what we'll
do is we'll again, press Alt D because it's
going to be the same size, which makes it very easy. This time though, it's
going along the X. I always know because I'm using this, I can
see the X here. You can click on
the X and see it. So what we'll do now is object, mirror global on the X, and then pull it out
into place. Like so. And now what we can do is
we can come to this one. For this one, I'll grab this because it's a
little bit bigger. I'm going to press Shift D and then I'm
going to spin it round. So -90. I'm going to then press
three to go into side view, I'm going to press G just to put it into place
where I want it. And we can see where
this one, actually, is probably nearly the
right size already. So I'm going to turn up the
vertical count maybe by one and maybe make a
tiny, tiny bit smaller. Let's just see what
we've got there. You know what that
might even fit. So control and one to go into
this view and then and Y, and it round and finally
just pull it up a little bit just to make sure that it's
not actually touching. And I think this part here
is going to be fine there. And then what we want to
do is press Alt and D and bring it over
and then R z 180. In fact, you know what,
we won't do that. All we'll do is object and
mirror on the X again. So X, pull it over, and that then is going
to make it a little bit easier, like so. Alright, so we've done
all of these now. Now I want to put a
top on each of these, and I also want
to make sure that we've got these parts on here. So just these side bits on here. If I check, you know, my
original build, I can see. Let me just check
that just to make sure that we're on
the right track. So yes, it has them
going across here. And yes, it has them going across here as well
and down here. So basically, all of the sides are always covered
with those things. So if I press AltnH, I should be able to come
now and grab this top. Now, this one here
is a little bit different because it does
have one of these in. So it has one of these in there. So I might want to bring that over as well just to make sure
it's all going to fit in. So if I press Alt, I should
be able to bring that over, press Z 90 and just spin it round seven
to go over the top, and then I'm just
going to come and put it into place roughly
where it's going to be. So roughly round about here, I'm going to grab the
middle of it, as well. So I'm going to grab
this part here. So if I can, there we go. And then what I'll do is I'll just grab this side
and this side, shifts cursor selected,
and then I'll grab this one and shifts
and selection to cursor. Now, of course, I know it's
going to pull it up too far. So I know he'll have
to pull it down. At the moment, it's
just in there, just so we can see how we're going to do
this so you can see it's still a little bit too, maybe a little bit too
high. And you know what? I think that's actually going
to fit in there perfectly. I'm just making sure this is in. Maybe pull it out a little bit. Like so. There we go. Now, let's say
that I work again. Let's grab these parts now. So all I'm going to
do is hold D and then Rz 90, bring it over. And again, we want to put
it right in the center, so I'm going to just
grab these two. So shifts, cursed selected, and then come back to this part, and I'm going to go shifts and selection cursor
so, bring it up. I'm just going to put
it in place and then obviously bring down the count. So bring down the count, maybe maybe to here. I've got a choice if I can
even pull it in to place, which I'm probably going to do because it's
not then going to stretch anything out.
Alright, that's that one. Now, let's come to this one here. So
again, we'll come in. We'll grab both of these two. Shift desk cursed or selected. There we go. Then
we'll grab this one. We're going to press
Alt D, and then R 90, and then shift Ds and
selections cursor, then we're going
to pull this into place. Let's turn it down one. Pull it into place, like so. Now, of course, we don't want to come into these parts
here. Now, you know what? This roof, if I just delete that actually and come to this roof and just
turn up the count. It's going to turn
it up that way, but I might actually be able to pull it all the way through. Can I? Let's have a look. No,
that's not going to work. It wasn't even lined up. Okay, let's pull it
down into place. So what I'm going to do
is I've got to now be very careful where I'm
pulling this, as you can see. So S and Y, I'm going to pull it
down and just get it in. So S and Y, pull it out,
pull it into place. Like so, and the one thing is, I'm just a bit concerned
on these fronts, but we'll put the
fronts in in a minute. We're gonna do that
next, actually. And then once we've
done the fronts, we can put these sides in and
then finish the roofs off. So now what we'll do is we'll
do the same thing on here. So if I come in once more
to these parts, on here. So these one's on
the inside, like so. Press the tab on, shifts. He's selected. We've already
stretched this one out, so we can probably
use one of these. So shift O D, shifts, selections curtor,
and there we go, now let's lift it up into
place where it's going to go. So round about
there, you can see that you might be happy
with how that looks, or you might want to just
lift this up a little bit. So let's have a look we lift it up just a little bit, just
so it's going on there. Maybe that then is going to
look a little bit better, and this here can stay
exactly like that. Alright, so that's looking good. Now, let's come to
these parts here. So we know about these parts. Sometimes it's better
if you split them up. So with these parts,
maybe I want to split them up because some of these are a little bit longer, and then you can mirror
over the other side. So I think with this in
particular, I'm going to do that. So I'm going to press Shift
D, just to bring it out, and it's a duplicate,
which means then I can just get rid
of one of the sides. So if I come in and press L, I can go to delete and
vertices or faces. Better with vertices, actually. And the reason is then you
don't end up with any empties, and the empties are
what I showed you those little points that
I showed you before. What I want to do is I want
to get this into place. So first of all, though, I'm
going to press Control A, all transforms, right
click origin to geometry. And now I should be able
to put this into place. Now, what I'll do to
put it into place is I'll grab all of these and this, and I'm going to press Shift H, so hide everything
out of the way. Come back to this then. What I'm going to do is I'm just going to put this right
down at the bottom for now and then
lift up this side. So if I come in, I
should be able to come in and grab this side, making sure that we've got a
correct face attribute on. So now I should press three. And then when I pull this up, it should be fine to
go under to there. So if I pull it up now, I should be able to
put it under there, hiding all of my roofs out the now the best thing about
this is because it's shifty, it means I can come
to this shifts cursor selected,
come back to this, right click Set origin
to three D cursor, and then add in a mirror. Now, this is only like you know, four polygons going
around there, one on each end.
It's six polygons. It's not really going
to matter so much. So now I can just
put it on the Y, turn off the X, and there we go. In other words, it's not
going to matter so much if, you know, we've got a
duplication of this. So control A, and then
right click set origin, two, three D cursor. Sorry, set origin to geometry, and then let's just pull it into place like so. And now
let's have a look. Because we do want this, though this part on here coming
out a little bit more. I'm just going to pull it over just so it's sticking
above there. And now the last thing is, I want to make sure you can see on the tops of here,
it's not quite right. Now, I did put my mirror on, but it's still easy
to actually fix this. So all we'll do is we've still got them fixed, as you can see. Turn this off, and
then all I want to do is just press S and Y and just pull them out a
little bit because no one's going to see that
slight variation in there, and it's just going
to be really easy to fix that, as you can see. Now, if I press tab, TH, bring back everything,
double tap the A. That is what we're
left with on here, and you can see it's pulled
out far enough where we can actually work with this,
and that's perfect. So we've now near enough done this part and this
part of the roof already. And on the next one, we'll
actually finish this part, this part on here,
these under here, the same as these ones,
and then we can move on. I think after that, we'll
actually unwrap these roofs. We'll get them
unwrapped, and then we'll move on to this big roof. But, you know, these parts here, putting the windows
in and all of these little points is way
easier than doing roofs. Roofs is a bit fiddly. Alright, everyone, so let's say about our work, and I'll
see you on the next one. Thanks a lot. Bye bye.
139. Decorating the Upper Levels of the Stylized Manor: We want to blend the
building master class from concept to final render. Now, let's come in, and what we'll do is we'll
grab this one here. So I just need to put one on here and one on this part here, and then pretty much we can
actually put these sides in, and then we can do our
roofs, and then we're done with all of
these flat roofs, at least, except
these, obviously. Now, let's press
Shift and D. Shift D, not D and then R Z 90, pull it round and delete the other side like
I've done before. So it's Always we
delete and vertices. And then what I'm going to do
is just press Control one, and I should be able to just
put this in place for now. So if I press L, I should be able to just bring it
into where I want it, and you can see that
it's miles away. So let's just grab the top. Let's come in and
put it on normal. Let's press Control one again, and then let's pull it
back into place like so. Now, with this one,
it's a little bit easier because we've already
got everything in there. So if I grab this
one, control one, I can pull it all the way back, and I know there's going
to be a stone down there. Now, next of all, then
I want to pull it all the way back
into actual place. So if I press L, you know what? The one thing I'm
looking at. I'm just making sure it hasn't
been pulled out. It looked a little bit thicker
than what I remember it. So seven, let's
pull it into place. And we want it going in, in, like so, and we can see
we're kind of far out here. So let's first of all,
pull this bit up. So we've got that
nice edge there. And then what we want
to do is come into this part and turn this off, and then what I want to do
is pull this up like so. Now, I can see that
it's going over there, so I'm not going to worry
about that at the moment. All I'm going to do
at the moment is I just want to pull
it up to make sure it's going past
those roof tiles, and then I can pull
it back into place. And finally, then I can
actually pull it out. So if I pull it out, so it's
in front of these tiles, and then I can grab this one, pull it out a little bit more, so that one is in
front, and there we go. Simple as that. Now,
we can see on this, we do have some problems in
that this needs lifting up a little bit because of tiles we're actually
poking through. Now, let's see if we
grab this now and press shifts cursor selected,
come back to this one. Control A, all transforms right. Click at Origin to
three D cursor, add in a mirror, so generate a mirror,
and there we go. Now it's press Control A, and put it on that side. And there we go, guys. Alright. So now the last one, which is this one down here. Now, again, I might as well I might as well use this actually
what I've got here. So I'm going to press Shift D, not hold D. So Shift D. Let's
get rid of the other side. So L, delete and vertices. And then we'll grab this one
and L, and then Control one. And all we'll do now is we'll just put it on
Global just for now, pull it down into place
wherever we want it, so it's going to go around here. And obviously, we need to
pull it out a little bit, and we're going to pull
it over to here then, like so, making sure
then we've got a nice, healthy part that's going into. Now, at this point, it's
up to you whether you want to pull it, you
know, round to here. So just in front of this here, so it's just going up, that might be actually the best way. So let's pull it
down into place. And then what I'll do is I'll
come round to this side, and I'll grab this top here. So this top turn it off and then what
I'll do is lift this up. So if I lift this up now, you can see that's fitting
in there beautifully. Then we can put our front there, and then we should
be absolutely fine. Okay, so we've got that one now. Let's come to the
center up here. So shift desk, cursor selected. Back to this one.
Control A or transforms. Set origin, three,
cursor add in a mirror. And then all we need to do
now is apply our mirror, Control A, and double tap
the A, and there we go. Alright, so far so good. Now, we've done that. Let's think about bringing in
our tops to each of these. So these are these points here. If I look on my own reference, every single one of them pretty much has the same top on.
So we need a top here. We need a top here, top here, maybe even a top over here, and then we can
bring the sides in. So we may as well do that. So what I'm going to do is
I'm going to grab this one. I'm going to press O D. Like, so I'm going to bring it over
them. Let's bring it over. I'm going to press seven
to go over the top, and I'm just going to put
them where I want them. So if I put one here, I'm then going to put I'm
not going to mirror it. So what I can do is
I can just press Old D again, put one here, and then I can press Old
D one here, D, one here. So roughly in where they're
going to go, you know what? I'm going to just
make sure that I'm putting them near enough
in the right place. So just so I can save
myself a little bit of work and not have to
keep changing them round. Like so, and then we've
got this one here. I actually looks like
it's a little bit out, like so, and then this one's
definitely a little bit out. Like so. And I'm also
going to move these two forward, like so. And then I'm going
to come with old D, and I've got them here,
so in the side here. Like so, and it's going
to go over to there. So hold D over to
there into place, like so, and there we go. And now what we want to do is
pull them all the way down. I can pull the same ones
down at the same time. It makes it very easy
for me. Like so. Let's pull them a little bit further down just so
everything fits in. And then I can do
the same with these, hold them down, into place, like so, and then those side
bits are going perfectly. And then these two,
hold them down. Like so. Now, you can
see with these two, we've got a bit of a problem. Let me just pull them down to where they
need to go first. So if I pull them down to here, then what I can do is I can
just pull this one out, like so, and I can see that
it's a little bit out. And the reason it's a
little bit out, obviously, is because we're in line
with this part here. So you can see that I really
need to pull it up into that part and then into
here. And you know what? I'm probably going to
have to pull that back a little bit to get this to fit into place properly
because at the moment, it is sticking out a little bit. And you know what
else I'm going to do, actually, I'm going
to grab these. Soon as we used shift, I should be able to get
away with just pressing S and Y and bringing
them in a little bit. Like so and then just
pulling them back. Maybe I can pull them back a little bit, as well, like so, and then I can come
into this one, put it on normal, and I'll do the same on
the other one as well, and then just pull
it into place. And then this one, pull
it into place, like so. All right, so now I'm going
to just grab this one. Det out the way, and
I'm going to use this just pull it back
into where I want it. So just above there, like so, and then I'm going to pull
it back, pull it back, pull it back, making sure
that it's not poking through, even further, pull it back. And then I've got something now more tangible to work with. And from here, I can
press Alt D. Like so, and then pull this one
into place exactly the same as this one on
here, and there we go. Alright, that's looking good. Now, let's come to this part here. So I'm
going to grab this one. I'm going to press old
D. And then what I'm going to do is I need them
up here, as you can see. So if I put this
back onto Global, I'm going to pull them up here. And as you can see, it's very small,
this one up here. So I'm going to pull it over. I'm going to start turning
down then the count. Let's turn it down to one. Let's see if it even one. I might need it on
two. Yeah, I do. I absolutely do need it on two. So let's put it on two, and
let's bring it this way. And let's possibly press S and X and bring
them in just a tad, like so, and then
I can bring them up and make sure that
fits into place. Like so. And I'm just wondering. Yeah, you can see that then I think that's actually
fitting in fine. And then what I can do
is now I'm hoping that I can use this again. So shift desk has to
select to grab this one. In fact, you know what?
I can't mirror it again. I keep forgetting that
unless I'm using shift. I don't really want
to do that on these, so you know what? Just D, bring it over, object, come down to mirror
and we're going to mirror it on the Y. So
mirror it on the Y. And there we go, at least
it's in the right place, so now I should just be
able to put it in, like so. And there we go,
and I think I'll just pull it this
way a little bit. And there we go. And then what we'll do now
is the other part. So I need this part over here. Now, again, I've shrunk
this down a little bit, so it's up to you
whether you want to use that one or use this again. So, Ode let's bring it up. Let's bring it down to two. So let's spin it
round to our z -90, like so, and then let's
put it into place. Out it comes, and
then up it comes, and then just put it
into against this one, making sure then
it's just below, like so and then pulled
back into place. And then we need to turn this
up by one, and there we go. The other thing is, I want
to make sure that it's going back further than
the actual block. And then we go
something like this. And then what we'll do is
put that on the other side. So Old D, bring it over. This time we're going on
the X though mirror X, and put that in place then, making sure it's going
back far enough. You see here the little
lumps they're sticking out. We don't want that. Double
tap the A, and there we go. Now, we've not altered
the size on these, which is good because it
means I can put them in here. So Old D, bring it down. And then pull it out, pull it up into place and maybe maybe
even a little bit more out. And now let's move it
over to this part. Now, you can see
with this part, we need to pull it
out a little bit, or we pull this bit back in. First of all, though, let's
make sure it's looking right. So I've come in, one,
two, three, like so. And then what I'm going to do is press I'm going to pull
it back, actually. See if I can pull it
back a little bit. And you know what? It's going to fit in
there. Night enough. That's going to be
good enough. Now let's bring it on the
other side. So D. And again, look at
your direction. So it's going to be
X D mirror on the X, and then pull it into place. Now, let's see the top of here. So if I go over the
top, I can see that it's just in there and it's a little bit
further in there. So it doesn't stick
out of anything. You can see here it
is sticking out, so it's good that we check that. Now let's come in, sideview, pull it back a little bit, and into place, and there we go. Now, let's go to file
and save it out. And finally, let's just
have a look round. Make sure on our end of view what this is
going to look like. Should be a bit dark,
I think, now this. But yeah, you can see now it's really starting to
come together, guys. Really starting
to come together. Looks amazing already. So on the next one
then, we'll come in. We'll get these roofs done, and then we'll work
on this roof here, and this one's a little
bit more technical. There's a little bit more
stuff to build out here, again, it'll be one of those where we're
building things out. And if you want to,
you can actually send them through to
your resource pack. And then put them into the asset manager exactly the same way. All right, so let's
end it there, and on the next one, we'll
get these roofs done. Alright, everyone.
Thanks a lot. Bye bye.
140. Cleaning Roof Tile Mesh by Removing Unnecessary Geometry: Well, if I want to blend the building master class
from concept to final render, and this is where
we left it off. Alright, so for this, let's
go on to our material view. That will make it
then a little bit easier than doing this
in rendered view. And we might even need
to jump to object to view to see exactly what we're doing because we're not gonna
be doing it straightaway. Let's put it on Object. Well, I've not seen
it do that before. But anyway, let's come in
and we'll grab all of these. So all of the roofs, the
ones that we've just done. So this one and this one, press Shift H, and this is what you should be
left with. Alright. So now what we can do
within working within here, we can actually come in
with press Shift H. We can now isolate them
out and do it that way. Now, these two roofs, I'm
fairly sure are different. So what I need to do is first
of all, come to object, convert, and convert
to mesh, like so. Now, as I said, if I press tab on both
of them, they both, you can see in
there, which means that we have to do
them separately. So all I'm going
to do is I'm just going to grab two of these. Then I'm going to come round
to the top and grab two of these and then come round to this top and
grab two of these. Then come round to the
other side and grab two of these and then
come down to the bottom. And the bottom ones,
we're going to be grabbing one each there, and one each there. And then what I'm
going to do is go to select select similar and, of course, select by normal,
hide them out the way. Now, let's come into side view, which is going to be and what I'm looking for now is the back. So I can also see that these ones under here
haven't been selected. These ones under here
haven't been selected, so select and similar and normal, hid them
out of the way. Again, press three now, sorry, one, and then we can see
now if there's any left. Now, on this bit, you can
see there's none left. On this bit, you can
see there's none left. Okay, so now, let's
go into WiFRing. Let's make sure then we've got selected this one
here because if not, we can't actually select them. And then all we're
going to do is do what we've done
many times before. So I'm just going to
zoom in a little bit, and we're going to make
short work of these. So just click in each one of
these working your way down. Even though the roof is so big, so vast, we're still going
to make short work of these. So there's just a certain
thing we need to go through. To do this, as you know, and it's just following
the same process. You can see here I've
missed those ones on there, but I'm not going
to let that deter me because I don't need to
do anything else with them, and they're probably
going to be missed on the other side,
but we'll check. You can see as long
as I can grab them in the middle and I'm not
grabbing anything else, then we should be
good to go. Like so. I think actually with this node, I will get the team to maybe think about
removing the backs. The reason we kept them on is because we needed to
keep them on right at the bottom on these
ones just for the roof that are hanging over. That's
one of the reasons. So delete and faces. So delete all the faces, old age, bring back everything. Let's put it on Object mode now. And let's grab everything. So A, grab everything,
mesh, clean up, and merge by distance
and then tab, right click, Jade Auto Smooth. Now, at this point,
you will see that these already have 16,000, 33,000 triangles.
They're fairly heavy. So what we're going
to do now, though, is make sure we've got
face orientation on, press A, shift N, spin them all around, and
there we go, they are done. Now, we'll move on
to the next one. So if we press question mark, we can now come to
these ones here. So we'll do both of these. You can see here, if I press tab, we've only got one there. And the reason is, of course, is because they're like
Old D of each other. So I'm hoping
because they're O D, even when I change
them in something, maybe we can work them
at the same time. First of all, though,
let's press question Mark. And then what we'll
go is we'll press right click and where
is it convert to mesh. Alright, now, let's see if I
press tab on both of these. Do I have to do them
both at the same time? No, I don't. I can
do one or the other. Let's see if that
actually works. So if I come in and I delete this back on here, will
it delete the other back? So delete faces. There we go. So we'll need to work on
one, which is going to save us a lot of work,
guys, a lot of work. So five year press let's
come first of all. Let's not get muddled up. Let's come first
of all, and we'll grab these faces, these faces. We'll come to the underneath, and we'll grab the
underneath faces. Then we'll come
round to this side. We'll grab a few of these, and then we'll go to select, select similar, normal,
hide them out of the way. And then we're left with
this, and then a shot be able to come in and press three. And you can see here
we've got one here, but you know what? I'm not going to
let that worry me. What I'm going to
do now is come in, press C and hopefully
miss that part. Like, so like so, and then just work our way down. Making short work of
all these things. Now, when we first did these, yes, it was a long process,
but by this point, a lot of the things we're doing now should be second
nature to you, very easy, and it is
just ruins and repeat. Like, so, Alright,
delete and faces, lth, bring back everything, A, to select everything,
and then mesh, clean up, and we're going to merge
by distance, and tab, right click and
shade oro smooth, and there we go,
that is the next one done. So there we go, guys. One thing we did
forget is shift N, spin them all round,
and then right click on this one,
shade Ato, smooth. And quick little question
mark, bring back everything. All right, two more to go. And we've got halfway
through this lesson, can we actually
grab both of these? Press the question mark. Can we do it before the
end of the lesson? That's the test now. So right click, convert to mesh, and then we'll
grab this one, and I'm hoping that
they're all the same. So I'm just going to
go under this one, and we're going to
go over to this one, select similar normal,
hide them out of the way, press one to go into side view, press the little
wire frame button, press C, select these, like soap, select this one. Like, so, and then
we go and then we're going to press delete and
faces, and then take, bring back everything, A,
to select everything, mesh, and we're going to go to
cleanup and merge by distance. And then all we're
going to do then is check our orientation, which is all the
wrong way round. So control sorry, shift N N, spin it round, grab them both, right, click, shade auto smooth. And finally, did
we join them all together? Yes, we
did. We did that. So, have we done on these ones? Are we done already on
these? I think we have. So they're all done.
All the backs are off. That's looking great. It up question mark, and we're
on to the last one. So we're going to have time
to do the last one, I think. So let's come in,
grab them both, it up question mark
again. Are these joined? I think so. I think these
are joined. Yes, they are. So I'm going to grab
them both, right click, convert to mesh, and then
we'll go pressing one again. And press in tab. Well, we're on this
one, so I'll just grab this one, go underneath, grab this one, go around
here and grab this one, and then I'm going to go to
select and select similar and we're going to go to normals and then we're going to
hide them out the way, press one again, and then I
should be able to now come in wireframe C and
grab in each of these. Like so working my way
down. I'm zooming in. So just making sure I'm
not rubbing that top one. And we are nearly
done with these, and we've just got
the smaller roofs which are going
to be way easier. So I'm going to just this one
now and this one like so. And then all I'm
going to do is delete and bass and then we go, We
should be left with that. Now, let's come back round. Object. Let's come in, press A. We joined both of
these together. Let's press A, TH, A again, to grab them all, mesh, clean up, merge by
distance. No verts remove. That's because. Have we
already joined them? Look, mesh, clean up. Merge by distance. There we go. I don't know what happened.
But anyway, grab them both. Right, click, shade Auto smooth. Press the tab button, shift, spin them round,
and there we go. Little question mark. And
there you roof's done, guys. Now, let's press Altag like so. And on the next lesson then, what we're going to do
is unwrap all of these. So you know what we'll
start with that. So we'll unwrap this one first. So, A, U SmartUVPject. So smart U V project, click Okay, and then
come to this one. It's a big roof, so we
need to check that. Smart U V project, click, wrap. And then what I want to
do is grab both of these, grab this one last,
press Control A, and we're going to
link materials. And then let's put it
onto material view. Sometimes, you can see things better if you've
got it on material view, so I'll just wait
for that to load up. I should have probably
saved out my work first, so double tap the e, and
that's what we're left with. And I'm just looking in them. You really can't
tell the difference. I'm going to put it
on Rendered view now. Just have a look
what they look like. And yeah, you really can't
tell. So they're good to go. Now, we might even have
time if I put it on too if I keep it on render view, actually, so I'm going
to grab both of these, I'm going to press
A, smart UV project, click Okay, and then
I'll come to this one, A, smart UV project, click Okay. And then finally this one AU, smart UV project, click Okay. And finally, just
grab all of these, grab this one last,
press Control L, and we're going to
link materials. There we go. All
of them are done. So on the next one, we'll just hide these out the way
because what we need to do is we need to come in and fix
the inner side of the roof. So the inner side of the roofs, we're going to finish that off, and we might even come
in and actually do the brick walls on these
before starting on this. I think that's probably the
best way to go with this. I'm thinking at this point,
now we've got these in, would it be a better idea
rather than moving on to here, creating, you know, the
sides and things like that? It's probably going to be
better than bouncing around. So, you know, we've
had enough roofs at this point, and that's
what I'm trying to say. Bouncing around a little bit, it does make things much, much easier when
you're doing that. Stops you getting
bored and stuff, which we all do, by the way. Alright, so now I've done that. Let's go to File and Save, and I'll see you on the
next one, everyone. Thanks a lot. Bye bye.
141. UV Unwrapping and Material Linking in Blender: Welcome back, everyone to blend the Building master class
from concept to final render. This is where we
left. Now, let's for now just hide this
roof out of the way. And then what we're
going to do is we're going to grab all of these. And also, yeah, I've got
all the roofs there. I just making sure I
haven't grabbed this one. No, I've not. And
then I'm going to grab this one and this wall, and I'm going to press Shift H and hide everything
else out of the way. Now, from here then,
what I want to do is I want to
unwrap all of this. So L, just click Unwrap, and then we'll do the
same thing on here. So L U ups, click unwrap. And then what we'll do is
we'll grab each of these, and we'll unwrap these together because these aren't as
long as these ones here. And then we'll go
to these three. We'll do these three.
We'll grab both of these, press U and unwrap. And then you can see here
it said we have a problem, so control A or transforms right click the origin to geometry. I'm not actually sure if I actually reset the
transforms on here as well. So you know what? I'm
going to do them now. And then I'm going to
unwrap these again. So unwrap and then we'll
go to this one unwrap. About L first because we don't
just want to unwrap that. So L unwrap. And then
we'll come to these now. So we'll grab all
three of these, and we'll grab both
of these then, and we'll press L, unwrap. And then both of these, unwrap. And then finally both
of these and unwrap. Now, there we go. Alright, so now we've got all
of these unwrap. So let's now grab each of
these and grab this one, and we're just going to
press Control L and link it. I'm wondering actually whether
I want to split these off. I think it's going
to be just easier to work with if we do that. So we're just going
to split them off. You can see all of
these are joined, and that might make it a
little bit harder for me. So all I'm going to do
is grab each of these, so I'm going to press P
selection, split them off. And finally, then I'm
going to grab this one, this one, this roof,
and this roof. And finally, this roof, forest
control L, link materials. And there we go. You know
what? They're close enough. They're only going
to be underneath them. They're absolutely fine. Now we can actually hide all
of those out of the way, and we should be left
with something like this. And now we can actually do
the same thing on here. So if I grab all of these, press unwrap, and we'll
do these one at a time. So if we grab this now
with press Control LL, we should be able
to link materials, and then we can go into this. So the editor we've got
our material on here. So this is probably a little bit easier to see, as
well, which is great. And then we can
press, 90 spin them round and just make sure that they're round
about the same size. Now, these here
you can see are a little bit bigger,
just a tiny bit. So let's make them a little
bit smaller, like so. And then we'll come
to this one now. We're going to press A and U and unwrap. And this
is what we've got. And then we're going
to grab this one, press Control L,
and link materials. And then we'll go back
to this tab A R 90, spin it round, making sure
that it looks the same. Pretty much does. Same
for this one, A, unwrap. And then grab this
one, Control L link materials. Spin it round. So A or 90. Let's make sure these are right. These are a little bit
smaller, as you can see, so we definitely want to make
these a little bit bigger. So I'm going to
pull it in, making it a little bit bigger, like so. And now we're on
to the final one, and we've done those
already, guys. So unwrap, and then
grab this one, press Control L Link materials. And again, let's come in
A or 90, spin it round. And let's look. These are
perhaps a little bit smaller, as well, so let's pull them in, make them a little bit
bigger. There we go. Simple as that. Okay, question
mark. No question mark. Old Age, bring back everything. Let's have a look when they
pop back in. And there we go. Alright, let's go
to modeling then. So what we want to do now is do, I would say, probably the easiest ways to
work on this back. So if we work on the
back with object mode, and we'll start
building that out, and then once we've
got the backing, we can kind of work our way around, you know,
these points here. So I think we'll work
from here and just work our way around and then
back round to here. I think that's going to be the best once we get round here, then we've got this
trunky bit on here. We need to deal with
that, and we've also got then a roof on here. This bit here, as far as I know, if I just put it on material, yeah, we've not got
anything in there. So I think then we'll pop back into once we come to the
chimneys, I mean, in this part, we'll pop back into
our resource pack, and we will build those
out in the resource pack. I think that's going to
be easier. Alright, then. So for this part now, then, what I want to first of all, do is bring in a column. So I'm going to bring
this column in. I'm going to press
Alt D, bring it over without for some reason, I've got snapping and everything on here. I don't
know why that is. Let's go over the top
then and bring this in. So I'm going to press G, just to bring it into
that corner there, and then I'll start pulling it down now. Have
I got anything? No, yeah, I've just got this
that I'm going to hide, and I'm just going to hide
my roof out of the way. And then I can actually
bring this down. So I can bring this down
into place, like so. And I might also let's see if I can actually put it
in these corners as well, because it might
actually, you know, break it up a little
bit because I want to bring this part over to here, and then going over
this part as well. So let's have a look.
So I'm going to press Alt D, yours to bring this over. Like, so you know what? I think I can probably get away with putting that in there. And what I also want to do then is bring this over just
to line up with the top. So I'm going to press Alt D, bring it over, so bring it over. I'm going to make it a little bit smaller because
at the moment, it is a little bit too big, so let's turn down just
so it's more usable. And pull it out, and then
let's spin it round. So was a -90. And then what I
want to do is fit this into place where
it's going to go. So it's going to go
over here and then up into place and probably
just above that top bit there. And then what we can do
is we can sit a window on here so we can put
it up a little bit. Like, so, pull it into
place, making sure it's in. And the other thing is we can
also then drop this down. So Old D, let's bring this
down to this point here, so it fits in very
nicely like that. And then what I'll
do is I'll press Old D. I'm going to bring this over. So R Z -90, pull it over the other way, bring it down to
probably a count of one. And then pull it out and
into place. Like so. And then I'll probably
bring this one over, so old D. And I know it
seems a lot of work, but, you know, the more
we you spend on it, the more detailed
it's going to be. So something like this, and I think I'm going
to end it there, I'm just wondering whether I want a pointing here and
another post going down, and that is then the last
part I think I need. So if I grab this,
I can press Old D. I can bring this one over them and pull this into
place and then pull it down. So just so it pops over there, maybe even bring it
out a little bit more, grab this old D and then
just bring it into place. Like so and then bring
it down a little bit, just so it pops into place. And then pull it out
and up and there we go. Alright, that's that bit done. Now I want to do is I want
to bring these over here. So if I bring this
one and this one, Alt D, making sure that fits. So you can see here that
is fitting into place. It's just this bit here, whether I want to move this out a little bit, which I will. So I'll move that
out, and there we go. That is that. And also, then we want a bit that's
going to go into here. So if I grab this, I'm
going to press Alt D. I'm going to bring it down. Arts -90. Pull it into place. You go in and then in, and then up, and then just
into place a little bit more, maybe a little bit further up, double tap the A like so. And I'm wondering, you know, can I get away with just putting
one in? And maybe I can. So you know what?
I'll bring that down. I just put one in
there, but I'll obviously pull it
out a little bit. So I'm going to press S and Y, pull it out, so it's going in, double tap the A,
and there we go. Alright. So that pot then
is looking really nice. Now, of course, we need
to follow it around. I don't think Yeah, I think I need one pot in here, so we might
as well do this. So D said -90, spin it round, let's put
this in so it's in there. Press the little
dot bon to zoom in. And we'll pull it back,
so don't worry about that into the wool, and then we'll press S and Y, squish it in a little bit, and see if I can get
those both of them in. Like so, and no one's even
going to see that, really. So yeah, I think I think I'm going to be
happy with how that is. Now, working our way up then, we do need one more piece. Now, did I squish
this in? Yes, I did. So what I want to
make sure is that this part here maybe
is not squished in. So I'll D, drop it all the
way down to one just for now, and then I can pull it up and into place and see how that's
going to fit with two. So if I click it again, I'm going to fit two in there, like so, and then bring them
up a little bit. Like so. Double tap the A,
and there we go. Alright, that's that bit. And now let's deal
with our window. So I want one of
the big windows. So one of these windows
sat on top of there. So I'm going to press Alt D. I'm going to bring back my
boolean before I do anything. So you know what? No, we I'll
just come to this one here. So this one, this part, and then I'll just
press Shift and H, hide everything else
out of the way. And then all I'm
going to do is press three to go into front view. And then it looks like I've actually got the
cursor right in the center. So I can press Shifts
selections cursor. Bring it down then
it's going to be right in the center
of there, hopefully. Bring it down to
where I want it. So ride on top of here. Now, of course, it
needs to be much, much smaller than
that because if I bring back everything, you will see and it needs
to go round about to there. And then I'm thinking, I'll bring in the boolean first. So if I br salts, let's look at what that
looks like. Yes. So we'll bring in the Boolean, and the boolean is going to
be, I think it's this one. So s there 90 shift desk. In fact, not shift desk because we want to grab
this window first, so grab your window if you can. I might need to zoom
in a little bit. There we go. Shift desk,
cursed to selected. Grab E Boolean and shift
desk and selections cursor. And now let's line them up, jaws to make sure
that they're level. So if I pull this down, we
can see now it is lined up. And then what I can do is now I can shrink them down together. So if I grab both of them, you can press the S button. So S, shrink them down together, and pull that down the right
on top of there, like so, and I think that I pull
it out a little bit, is going to look much,
much better like this. Now I can grab this.
I can grab this. I can press Control minus. I can press Control A and delete that out of
the way. So delete. In fact, no, no, no, no, not delete. Remove cutter, Ol P, play parent, just in case I still need it for up here,
so I'm going to keep it. Gonna put those there,
and then I'm going to hide my boolean, like so. Alright, let's have a look then, oltH, bring back everything. And I'm just wondering where
all my roofs have gone. So dH, where are my roofs, they're in roofs. That's
what's happened to them. But I need to move them
out before finishing. So let's move all of these out, all of the roofs out, and we're going to put them in the one that we've got,
which is called roofs. And then I should be able
to hide my roof generator. You can see this one's
going out of the way. So roofs, hide my roof
generator. And there we go. And finally, finally,
let's save out a w. Like so, and
let's do a render. And let's also turn off
for now base orientation. There we go, guys.
That looks amazing. Alright. On the next one then, we'll carry on
building this out. We'll build all
of this pot down. We'll build the balcony in here, and we'll work around this side. And then finally, we might
even get around to this side. We'll see. We'll
see how it goes, guys. Alright, everyone. I hope you enjoyed that,
and I'll see you on the next one. Thanks
a lot. Bye bye.
142. Extending Vertical Supports and Alignments: Welcome back. Everyone to blend the building master class
from concept to final render, and this is where we left off. Now, what I'm going to
do is just put this on Object no so I can
see what I'm doing. Make sure, of course,
that cavity is on. Sometimes it does switch itself off, so just
be aware of that. And what I want to do now is
make sure that I've got one, which is going to go
all the way up there. Now, you can see this
is very, very long, and I'm not sure if
I've actually got one that is going to be
that kind of length. So what I'm going to do is I'm going to
press Shift D instead, so shift because I don't
want to pull it out so much. And then what we'll
do is pull this one up into place. So along here. Like so, and you can see now
why I wanted to do that. So just have it
popping out like so, and then what we can do is
just grab the top of it. Shift space by bringing the move tool and just
pull it up under there. Now, just make sure, of course, that it's pulled out
into the right place. So you can see if
I go around here, you can see that there's a tiny, tiny little gap there,
tiny little gap there. This is going into a
nice place on there, and all of this is
working out perfectly. Now, on this one over this side, I can use this, so I can just
press OD, bring it over. And put this one in place
because it's very, very small. So let's bring it over. Like so. Let's put it into
place, like so, and let's just make sure that it is covering this bit here. So I need to pull it
out, pull it out, pull it out, and there we go. And I'm also thinking that
I'll pull it over as well, making sure there's no gap in there and double tapping
the A. And there we go. So let's now finish
this part going down. So if we finish this part here, and then we can actually work
our way around, you know, to the fronts of these, I think that's going to be probably
the best way of doing this. So if I grab this one,
I'm going to press Old D. I'm going
to bring it out. And you know what? I
might as well just I'll delete that out way
instead of doing that. What I'll do is I'll
grab both of these. So I'm going to
grab both of these. I'm going to press Alt
D and then bring them out into place like so. And I'm also thinking that, let's bring these into place. I think it's in there, like
so, and then bring them in. Like so. And let's
have a look at that. And I need to go a little bit more this
way, as you can see, just so this is going
past there. There we go. And I also want to look at this, and I'm just wondering if I need to I could,
let's have a look. There's actually no gap there. You know what?
There's a tiny gap. So what I'll do is I'll
just press EssensE, pull it up very slightly,
and there we go. Now, that's going
into place there. And now, these parts here, I think we should
grab these ones. Let's have a look, see what
they're going to look like. We do have three of these, so we have a little bit more of a square version, which
we already know about. But I think changing
these a little bit round here might be the way to
go. So let's press Alt D. Let's bring it round. And let's
see what these look like. Am I going to be
able to fit them in or should I use a smaller one? Let's have a look
what these look like. I might still keep
them, actually. I'm going to use these
maybe on the front, so I dead 90. Let's see if I can
pull them out, do the front because
I'm going to need some on the
front here, I think. Like, so and let's
put it up one. And then we'll have a look
what it looks like over there. And for now, these ones then, I'll just press old D. I'll bring it out. I'll spin
it round, so's head -90. I'll put it into
place. Right in there. Holding Shift B, like so, and then I'll bring
it into place here, making sure it's thin, press the little dot but,
pull it out a little bit, increase the amount, and
where is the amount? We need to turn it
on. There we go. To let's try four, a little bit too many, as you can see, so
let's pull it back. Into place like so. And then
we need one more window, so I need another window like this one, so
I can press all D. I'm going to keep it around
there because then it's exactly the same height
as this one, press Z -90. And let's just grab this
wall and these two here, and then just press question
mark, just isolate them out. And then I should be able to put this right in the center
or roughly in the center. Don't want to move it
up and down, though. Just remember that, guys. That we're not
moving up and down. All we want to do is grab
it and put it right in the center. Round about there. Question mark again,
bring everything back, and let's put it into place. So it's going to fit
in there like so. You can see the
difference in height between those. They're
absolutely fine. And the other thing is, I
want to come round now, as well before I
actually do the boolean. And what I'm going to
do is I'm going to take this all the way under there. And what I'm going
to do is I think I'll bring it over to this side. Now, I'm going to bring it over. I can see we've got
some parts there. I think we'll just
bring it over. So Alt D and then R Z 90, and then Control and one, and then G, and
where do we want it? We want it roughly around here. Now of course, we need to
pick it up and make sure it's fitting in place, like so. And I want it yeah,
just above these here. It should fit in very
nicely above there. Now let's have a
look, see if it does. I'm just making sure that these parts here,
as you can see, pulled all the way back into
the actual wall. Like so. And yeah, that is fitting in
very nicely on top of there. Now what I'm wondering
is you can see the slightly slightly
through here, so I might press S and Z
and just pull them down, making sure then that they're still on the ground
plane so we can see they need to come down
a lot and then I'll press SNsE and pull them up, making sure that they're
just on top of the like so, and they're fitting
in wonderfully. Alright, so that's that
bit. That looks nice. Now let's deal
with this boolean. So grab your window,
shifts curse to selected, bring in your Booleans. And the one we want is
this one here, Rs 90, shift and S. Shift and S, selections cursor,
press the little dot born, move it down. Let's have a look. I
might need to make it a little bit smaller and then
pull it up into place. You know what? I think that's
actually the wrong one. I think it's the wrong one.
I think it's that one, so I'm just going to press
Control Z, bring it back. This one here, z, 90, shift desk, flections cursor. Press the little dot
bun. There we go. Grab this one, press
Control minus. Grab it again, remove cutter. Hot P, clear pairing, and then let's put
that back over here. Okay, that's that bit. So now we've got
all of this bit. Now we need a window. So we're going to need
another window on here, and I'm also so going
to move this over. So I'm going to put
my window in first. So we're going to grab one
of these square windows. Do we have one of
those anywhere else? Do we have a square
window? Yes, we do. There we go. Alt D. Let's bring it over, all the
way over to here. Pull it up and there we go. And then what I want to
do is grab each of these. I'll press Shift Des, and you know what? We won't do it that
way. We'll grab this. We know that's in the center. Cursor selected, grab my window. Z 90, shift Dess, selections cursor. And
that's the wrong way round. Shifts, cursor
selected. Shift des, selections cursor There we go. Alright, so now let's
pull it into place. And if it's not thin, remember, we can always make it smaller. So we're going to put
it right around there, which means I'm
going to make it a little bit smaller like so, and we're then going
to put it into place. So let's put it into
place into that wall. Like so. There we go. That's looking. Great. So we've got one window there,
one window there. Now I want to do is before
a Boley in this window, I want to bring this across into into this point
here and I'm thinking, do I need another post going
down there? Probably not. Probably not. So let's
press Old D and then Z 90. In fact, you know what I
didn't press OLD then Old D, Z 90, bring it over into there. Let's turn down the count. Can we get away with
one? Maybe we can. Yes, we can, so that's great. We'll put that in
the wall. So, maybe a little bit further
back. There we go. And then now we want it
going under this here. So if I press Old D again, bring it out. Pull
it into the wall. Like so, press a little dot but, and then we're going to pull
this up just under here. Now, because it's a small
window, probably get away, we've not actually
balancing it on there, so it's up to you whether
you want to do that. The other thing is, let's
increase that to two. And then what we'll
do is pull it back. So S and X, pull it
back a little bit. I'm wondering if I should have it all the way
there. No, I shouldn't. I'm going to pull
it back. I'm going to pull it back, S and X. And then I can pull
it out, of course, because we're right on there
now on the cusp there. And we still got this in here, as you can see, so I'll
pull it back a tiny bit. Double tap the A,
and there we go. So now we've got this
and this window. Now, let's come
into this window. Shift desk, cursed, selected. Let's come to this then
Shiftsk and selections cursor. And what we want to do
is press the Db on. We're going to make it a little bit smaller because obviously, it's the wrong size
of the moment. Something like this, maybe even drop down the
bottom a little bit, so we'll bring
bottom down to here. And then what I'll do is
I'll grab this, grab this, press control minus,
and then we'll come in and apply this.
I apply that one? I did. Apply this and then I'll do remove cutter
and then oat pe, clear parent and
put that back over. And then turn off booleans. And there we go, that's what
you should be left with. Alright, so now we've pretty much got all of this
part on the side herein. What we want to do now is
actually start working our way around here
to the other side. So I'm going to bring these
over on the next one, start working on
this other side. We're not going to
build this part up, so all we're going to work
to is just this part here, and then we're going
to come round to here. So pretty good word guys. We've got a lot
done in that one. And you can see now it's really starting
to come together. So file and save, and I'll see you on
the next and everyone. Thanks a lot. Bye bye.
143. Using Mirroring and Fill In Details for Complex Facades: Welcome back, everyone to blend the building master class
from concept to final render. And this is where we left
it off. Now, what I want to do is then bring over this one. I want to press D,
bring them over. And what I'm going to do
is probably just mirror, so object, and we'll
mirror on the X, like so, and there we go. That's fitting in.
Very nicely on there. Maybe maybe I need to
pull it out a little bit, but we'll see about
that in just 1 second. Then I'm going to
grab this old D, bring it over, and I'm going
to again mirror it on the X. So object, mirror on the X, like so, drop it in place. Like so. And then
I'm thinking I'm going to need the other
bit going up here as well. So I'm going to grab
all of this, actually. So I'm going to grab not that. Sorry. We've got that in already, so I'm going
to grab this one. Have I got a little thing
in there? Yes, I have. Grab this one and this
one. There we go. Now, the other thing
is about this. Is this one out enough? I'll bring it over, and
then I'll have a look. So I'll D, bring them over. Did that coming over?
No, there we go. Okay, bring them over.
Let's bring them forward. And then what we'll do is object and mirror again on the X. Let's put those in place. Like so. And now you can see if I drop that.
Oops, not like that. If I drop that just a
little bit further, just in front of there, it actually looks way
better, though, which means that I
should realistically bring this probably
out a little bit, like so, and there we go. Okay, that's that bit.
Now, one more thing. We've got an empty wall here. Now, as I told you, really, you don't really want that, so I'm just going to grab this one. Hold D, bring it
out, spin it round. So I'll z 90, Control three to go
inside view, G then. And what we want
to do is just put it against this wall here. So turn up the counts, double tap the A,
and there we go. We've got no empty wall there. Even though it's
just a bit of stone, it still looks better
than just an empty wall. Now we can actually come round. Now, before we do
that, let's just have a gander at what
we've actually done. So file and save. Let's
put it on rendered view, and we'll turn around our sun and actually have a
look at what we've got. So you can see here this
is looking really nice, really intricate, really,
really interesting. Imagine, once you've got
your hedgerows, your trees, and things like that
in there, really start to see this come to life. Okay, so now let's bring around, though,
because at the moment, we've got the sun right around here and we don't
really want that. So I want is the sun on here. So I'm going to go
around, like so. I'm going to come down
there. Here's my rotation. Let's rotate the sun around so we can get some
light on there. There we go. It's a little
bit bright this sun, but still you get an idea of what we're
actually looking at. I think it's always good yours to take a step back and look at what you've actually done and achieved to actually
keep yourself going, as well, because I remember
when I first started out, you know, keeping myself
going was pretty difficult. Now, one thing I
will say these here, they're not right, so let's
pull them out a little bit. So SNX let's pull them
out and see if we can get them in some sort of place that's going
to look right. So SNX little bit more, bring them over and maybe
even a little bit further. So SNX bring them over
a little bit further. Like, so let's have
a look at those. Maybe, maybe we can go
back. Let's have a look. Let's press dot and see
if we need to go back. You know what? I think
they look absolutely fine. One thing I'm looking
at is to smooth. That's what it is. So these
have been smoothed off. Okay. Alright, let's come
round then to this side. Now we can see we got a lot of building
to go round on here. We have to build
all of this part out and then this part out here. So it looks intimidating. We can get a window in here. We can get a window in here. The one thing I'm looking at
a this as I'm looking at, if I press Control
three, is it centered. That's the point. How far is this distance to this
distance to this distance? Do I need a pillar in
here, for instance, I'm looking at it and
wondering if it is centered or if I need to
center it a little bit more. So I'm going to, first of all, bring in and see how
far the distance is. So we've got 3.98 there. And we've got two here. Look, 3.9 very close,
so good enough. Good enough, as far
as I'm concerned. Now, also, let's come in, and I'm just wondering how to get rid of that. Let me come in. Sometimes it's on there
and sometimes it's not. So let's come back to this. I think it's actually maybe it's an object mode.
Let's have a look. No, for some re you know what? If I draw something on
there, there's the notes, and now you can see, I've
got my ruler on there, so you can see my
lines on my ruler. This is why it doesn't pop up. So now I can actually
come into the ruler, minus it off, and then the
notes and minus it off. Alright, so we learn
something every day. So there we go. That's that bit. Now,
I think the first bit we should start with is going to be the top of here.
So let's start with that. Now, we should, if we
go to asset manager, actually have something or a few things that we can actually put
in the top of there. So if I come round to
this site, there we go. Let's then go down and put this instead of
on resource pipe, put it on our modular pack
let's go to supports, and it's probably going to be the big chunky one
that's under here. This one here, let's
press's head and 90, and then's head
180, spin it round. And what I want to do is just
pull this up into place. So I want to put it
right on top of here, so I'm just going
to grab this part. Now, the other thing
about this part is, you can see that
it's way too big. It's poking through all the way through here. We really
don't want that. So let's put it on object
mode. Let's put this on. We'll come to the
back of it, then. So if I grab this, press tab. I should be able to then grab
the back of it, like so. If I then go over the top, you can see I can pull
it down, pull it down, pull it down all
the way to here, and grab the top then shifts, curs selected,
grab my part then, shifts and selections cursor. And then what I should be
able to do is take this off and pull this
up. So pull this up. Like so. Into place. And the one that's basically to be just above these parts here. So just above them and
obviously, a little bit bigger. So you can see now a
little tiny bit bigger. I'm even going to pull it
this way a little bit. So Etanex will pull it this way, a little bit into
place, like so. Now I want to do is I want
to put two tops on here. Now, let me look to see what actual tops we've
got. These are the ones. So these are the ones that I
want to put on top of here. Now, if it's flat, generally, you can get away with just
dropping them on like so. And I think with these, let's put them into
the corners then. So into the corners like so. And let's have a look.
Are they big enough? Are they big enough? Or should they be a little bit bigger? I think actually they match the right size for
these other things. So yeah, I'm going to
leave those on there. What I'm going to do
then is I'm not going to mirror it because
I can just simply press hold D and then bring it over to the other side
and drop it into place. Like so, and there we go. Now, let's think
about the next point. So we need one of these on here. So I also need some pillars. I need lots and lots of
things actually on this. So I'm just going to go round to the other side and I'm
going to look these here. This is what I'm going to steal. I'm going to steal
this and see if I can actually make this
work. If you know what? I'm going to take the
whole thing. Let's press all D, bring it over them. Let's spin it around. So we're going to spin it
around on the X. So object, the mirror, X, there we go. Now, let's see. What that is going to
look like because I think we need to make
sure it's in rows. We need some windows on
here and the windows, realistically, I'm just wondering
where the first window, second window, and all of
that stuff needs to line up. So I'd say the first window possibly possibly needs to line up with this one down here. So this one down here, I think, should be the first window, and then we'll have
the second window and the third window up there. So let's actually let's just
move this to the side and bring in our windows
first because I think that will make
it much, much easier. Now, to start with, I want
to bring in these not these, this window here because we know this is round about
the right side. So if I press D, bring it over, and then ds Ed, 180, spin it round. And then if I press, let's
press Control three, is it going to be?
Yeah, Control three. And then I should
be able to place this right in the
center of there, and drop it down, and
this is where I'm saying, this is the point where
I want this part. So this beam going under here, which means I can take this
press D and bring this over. And then what I can
do is object mirror on the X, I think this one is. Yes, it is. Let's
pull it into place. Let's press the little
dot one. And it should. There you go, line
up with this one. Now, it's up to you. You can either go
all the way through. I don't think
that's a good idea. It seems a little bit of waste. But what we'll do is we'll
just pull it into place. Like so. You see now it's actually lined up very
nicely with that one. And we're going to
put up some sort of post in here anyway, so don't worry too much
about this part here. But what we want to do now
is we've got our window in, and I want to grab my window
and press Control three, and I want to pull
it up into place. So it's yours sat on there, like so, and then
I want to bring in another window and then
another window near the top. So making sure you're
happy with this one, making sure that
it's pulled back, so it's actually sat
on these like so. Now, the other thing
is, before I continue, I might as well
bring in my Boolean. I'm going to save myself a
lot of work if I do that. So what I'm going to do
is I'm going to comb to Maboleans and which one is it? This one here. I'm
going to grab this, and I'm going to
just bring it over. And then what I'm going
to do is grab this. I'm going to press shifts, curse to selected, and then
I'm going to grab this, and I'm going to
press Shifts and selection to cursor.
There we go. Now what we need
to do is we need to make sure that we can fit all of these in because we might
need to make them smaller. But if I grab all three of these and including the window. And I just press Alt D and
bring them to the top. So Alt D, bring them
to the top, like so. Right up there near
enough, touching that top. Now, can we fit
another window in? So Aldi, bring them down. And the answer is, yes, we can, but it is very close, very close, probably a little
bit too close, actually. Now, the windows are the issue, so we'll make the windows
a little bit different. So what I'm going to do is
I'm going to grab all these, so, I'm going to press the
S bone to shrink them down. Now, we want to do this on individual origins,
so shrink them down. Hold them all down
then into place. I press Control three, I
can pull them all down, then into place, and then I'll make them slightly
slightly wider. So S and Y slightly
wider like so. Now, the next
problem we have with this is you can see
the bricks here. We've already unwrapped
these bricks. So if I go onto here, we're going to have
to re unwrap them because we definitely want
to fill in this part here. At the moment, we
need the breaks in the bricks to be going
along these parts. So we'll fix that on
the next one as well. So let's save that our work, and we'll get straight on
with that in the next one. Alright, everyone, so I
hope you enjoyed that. I'll see you on the next
one. Thanks a lot. Bye bye.
144. Wall Booleans and Middle Facade Design in Blender: Welcome back if
you want to blend the building master class from
concept to fine or render. Now, let's deal with
this wall first, then. So what I want to do is, first of all, where is
the wall coming up to? It's coming up to here, which
is probably fine, you know? And the reason it's
fine, actually, it's going all the
way through there. So, yeah, it's absolutely fine. It's probably a little
bit too far on this way. I'm just looking
around the inside. Probably too far,
and we need to pull it back a little bit. I'm just
looking where it goes in. It's fine where it goes in.
It's just these points here. If I put this on, we
should then be able to see that these points on
this point and this point, we probably get away
with pulling them back all the way up
to perhaps there. Now the problem is, when
I pull them back, yeah, just make sure that you've
got this on, so where is it? Let's go here, crack
face attributes. Now, I'm wondering if
we've got this gap here. If I press Alt Shift click, it should go all
the way over, and I should then be
able to pull it up. Into place without
altering the wall. So alt click, pull
this up into place, and it should just
make more of them, like so, and there we go. That has fixed our wall for us. Now I want to do
is I want to come in and grab all of these again. Now, let's grab all
of these like so, and then all of these. Like so. And then what
I'm going to do is again, hold D over to the other side. So Old D, bring them over,
press Control three, just so we've got them on
back view, pull them over, and then we should be able to
stick them inside, like so. And I'm just wondering the gap between each of these,
probably not right. I probably need to pull
them out a little bit further because I want
them right in the middle. Which means then I
just want to come in. And pull these
over a little bit. So pull them over into the wall. Now, again, we're going
to have some things going down the side there
and things like this. So what I'm going to do
now though is I want to take one of these just
in case I need it again. So I'm going to press
Shift D, bring it over. And then what I'm
going to do now is come in with each of these. And I'm going to press Control
J, join them all together. Control A, all transform, set origin, to geometry. And then what I'm going to
do now is grab my wool, press Control minus and
minus them all off. From there, I can actually
apply my Boolean, Control A. And then what I
want to do is just delete this out of
the way, like so. And now I want to just put this in Mbolean because I
did press Shift D, so let's put it in our Booleans. And for now, let's just
hide those out of the way. Now, let's start
work. We're going to need some parts coming out here. So I want to basically bring
in one of the supports. So these supports and the
one I want to bring in, I want a normal
support down here. So what I'm going to do
is I'm going to press Alt D, bring out this one. And then let's put it
in the center of here. Now you can see it's a little
bit too long at the moment, even if we put some columns in there
and things like this. So let's pray S
and Y and bring it in and just have it round about there, and
then that should fix that. And then on the two others, I want to bring in this here. So I want to bring
in something one of these each side or just
put it over this part here and then have
another part in and then a kind of square
window on top of that. What I'll do is I'll press
Alt D, bring this out. I'll drop it all the way down, so the array all the way down to something that's
easily manageable. Something like this, just to
start with, Control three, and then let's press G and
put it in place like so, and maybe maybe let's try
and turn it up one more. Put it into place. I'm going to shrink
it in a little bit. S and Y, shrink it
in a little bit, move it over. Like so. All right, so I want this
right in the middle of there. So right in the
middle of that one, and then we're going
to press Alt D, and we're going
to bring it down, and we're going to
put this one right in the middle of this
one here as well. And then what I'm
going to do is now pull these back into place. So pull them back.
It plates like so. Now we want this part on. So one of these parts,
probably this one. This one looks the best one, and we're going to put that
right in the center of there. So if I come in and grab this, bring it out, Z -90, did that actually spin around? No, let's have a look Z -90. There we go. And then
press Control three. And then what I want to do
is I want to bring this up. And put it into place. Now, I might need
to make it a tiny, tiny bit bigger
because I want it actually into place on that. And that is how I want it jaws probably lifting
up a little bit. Like so. That is
looking very nice. And now I'll do the
same thing on here, so I'm going to press Alt D. I can see how big a
gap I've got there. So I can now bring that up, put it on the same gap, like so. Double tap the A,
and there we go. Now, on this part here, we might as well
unwrap it before doing all of our booleans
and things like this. I'm not sure if we got rid of the bag, so I'm
going to come round. I definitely don't
need this back on, so I should be able
to grab the bag, press delete and faces, and then I should be
able to press Control A, all transforms, right clicks
a origin to geometry. The other thing is, I don't
need the top and bom, so I'm also going to
delete that like so. Then what I'm going to do
is press A, U, unwrap. I'm also going to make sure I've not got face orientation on. I'm going to then press
oltage, bring back everything. I'm going to grab this and
grab this and press Control L, and we're going to
link materials. And we can see that this you might want it where, you know, the bricks on this part
are actually smaller, but I don't think I do. I think I actually want them to be the same size
the rest of them. So to do that just quickly
hopping over to my UV editor, press the dot Burn,
press Control three. It's going
into front view. And then what we'll do
is we'll bring them out or bring them out
the other way and make sure they're round
about the same size as the other one,
which now they are. Okay, so we've got
that so far so good. Now I want to do
is we're going to put the front sections on. So we're going to 11
more of those up here. Now, this is the point where I'm probably going
to have to pull out this a little bit more because it's
probably not out far enough. So what I'll do is I'll
drag it out to here. And then before bringing
it back into the roof, what I'll do is I'll
grab this part here. I'll press Aldi,
and I'll bring it up and drop it under there. So now it should
fit under there, very, very nicely like so. And now just make sure
that this part is in here. If not, you can pull it back again like
we've already done. Let's save out our work at this point, so
save out our work. And now we want to do
is we want to work on pretty much these posts. Now, we brought out our posts
so you can see them here. These are our posts.
So let's see if we can actually use those in
a way that I want to. Now, the other thing is going in so these ones
here, they're fine. I'm going to
actually bring these in and I'm going to
press the dog on, and I'm going to put
this in so it's actually fitting in the wool
nicely, like so. I'm actually probably going
to bring it up a little bit. And I'm going to do
this side first, and then I can duplicate
it over the other side. So let's now come
to this part here. And when I bring this part in, I have to be careful that I'm
making everything line up. That might be a problem,
which means I'm going to press Shift
D on this one, delete this one out of the way, so this will be
the one I'm using. Control three, and let's just line it up first
where we want it. So it's going to go around here somewhere and then going
to pull it into place. Now, remember, the other
thing is with these columns, don't worry too much about how the brick looks because they're not unwrapped yet or
anything like that. So don't worry about
that. The main thing is just getting them
in the right place. So we want to pull
this back a little bit without this part
coming forward. So that's the bit
that we don't want. So now we can pull this back, pull this back into
place like so. Now with this part, I just
want to bring this down. So I'm in the press
shift space bar, bring in the move tool,
bring it down. To here. And I'm going to bring in
another part, so another one. We might not even
have used that, so I'll go to asset manager. I'll go to support supports
and bombs and tops. And the one we want
is this one here. So I'm just going
to bring this in, like so, Control
three, bring it up. And I want to put this
right on there now. You might need to or want to make this a little bit
bigger, I think I do. I'm going to make it
a tiny bit bigger, and then I'm going to drop
that onto the top of here. And finally, let's put it back into place and
see what that looks like because this is
long, it's quite high. And so it's stuck out, meaning it'll need quite some
serious amount of support, and that's why I'm trying
to bring into this. Okay, so the next one then, I'll also bring it up to here. So I'm going to press Alt
D and bring it up to here. So again, I'll put
it on here, like so. Then we need this column here. So I should be able to press Alt D on this one and
just bring it up, and it should fit in there
very nicely, like so. And then we've got
this top part. Now, on this top part, I'm
going to be using this one, so l D, press Control
three, and bring it over. And then we'll drop
that into there, press the dot but, then
around, and then zoom in. And then where do
we want it? We want this one, not sticking through. Again, we're going to press dot. We're going to pull it out
like so, and there we go. Then what I'm going
to do is I want this sat under right under here so you can see that
I just need to pull it back a little bit of the sway,
have it sat under there. Now, the thing is with
this, as you can see, I probably need to pull this
out a little bit because this needs to come out a
little bit more of the wall. So it needs to come
out round about there, which means then what
I'm going to do is I'm just going to
grab each of these. And I should be able
to pull these out. Now, remember, if I pull these out like
this or like this, it's going to alter any other
ones that have gone here, but it's not going over
these in the scene. What I'm going to do is
I'm just going to press S and Y and pull them
out a little bit. Now, make sure you're on
medium point and then S and Y, and you should be able
to pull them out over there without altering
anything like that. Finally, then, let's just
bring up this one again. So hold D. Let's bring
it up into place. And we can see now why I wanted to pull that bit
out because you can see, I still need to pull
out a little bit more. So let's pull it out
a little bit more. And then finally, we'll
come to this again, and then S and Y and pull this out just so now that's
fitting under there. So everything now in this bit, is fitting in very nicely. I'm really happy
with how that looks. The one thing we
might want to do is just pull this out a little
bit more just wondering, can I pull it out or in? Probably in a little bit. Let's try S and Y
and pull it in. Let's press Control three, and let's see now if
it's going to fit in. So we want it fitting in
like that realistically. Now going down, I do want more, one more part, which will
be. Let's have a look. So I do want I'm just looking at what parts I've
got. Let's have a look. I want one with it in
a bit. Here we are. This is the one I want Rs 180. Let's spin it round, Ctrol three. And where do
I want this one? I want it right in
the center of here, and the reason I want it
there is just to break up the monotony of this
a little bit more. So I'm going to pull
this into place, pressing the dot bon,
so let's pull it into place. Like so. Let's put it halfway maybe. Let's make it a little
bit smaller and then pull it out and
making sure it's in. And there we go, Let's have
a look what that looks like. So if we put this now, take now work Oops. Dave. There we go. And then put it
on rendered view. Let's just have a quick look
at what we've got there. And there we go. You can see
why I want to put that in. It's pretty much the same
going all the way up. Just to break it up, just to
add a little bit to the top, that is what we're
trying to achieve. So on the next one, then
what we'll do is we'll get in our bottom sections
at the moment, we've got this
going across here, and we do definitely definitely
need in a bottom section. I'm also wondering
whether you know what? I think Yeah, I think
that looks good. I think I need another bar going across here and then
this part on here, and then I'll put my windows
in going up like so. But, yeah, I think this
is looking very nice. I think it's I think I've
got in the right place, even though they're
a little bit higher up than these ones, which
I think is a good thing. So yeah, we'll get our
center windows in. We'll get this over
the other side. We'll get this part built out, and then pretty much guys. We just need to
fill in those tiny, tiny other bits. But,
yeah, we're nearly there. We're nearly there on this one. Alright, everyone, so
see you on the next one. Thanks a lot. Bye bye. But
145. Adding Horizontal Trim Details Around the Structure: Welcome back, everyone to blend the building master class
from concept to final render. Alright, let's put
it on Object mode. Let's turn this off. And what I'm going to do is, I feel like I should add these on before going any
further because I think it's going to just add
a little bit more, especially around the
whole building and especially n as, you
know, I'm already here. So if I press dot, I'm going to quickly make short work
of this, hopefully. So if I pull this up,
put it into place. And then what I'm
going to do is pull it back slightly, just
so it's in there, and then I'll grab both of these and pull them back
very slightly, just so they're under
there, like so. And then what we should do now is use this going
all the way through, as long as it's not
poking through, which you can see
here it is, actually. So what we'll do is we'll
just turn it down one. We'll press S and Y and
bring it down a little bit, and then Alton D and bring
it over the other side, like so making sure
it's not poking it. Okay, that's that one. Now
what we'll do is we've got one already on here, so
we'll work our way over. So old D, let's bring
it over, again, putting it on, bringing
it out slightly, making sure that it's
just in front of these. Like, so, is it in front? You can see with these,
they're a little bit taller, I think.
Let's have a look. So no, they're not.
Let's have a look, see if these are on the
right one. So three. Yeah, they're not, so I
just need to pull it out further or pull the
other ones back. You can see already
here, we're very, very close for it to stick out. So if I bring this over,
you can see very close. So what I want to do
is pull this back now. It's just out a
little bit too far. Keep pulling it back just
till it's in front of there. And then what I'm going to
do is put it in another one. So three. Why is that? Yeah, it's the other
way. Let's pull it down. So S and Y. There we go, and you
can see your needs pulling back, a tiny, tiny little bit because
it's still in the weight, so holding shift, and then pull these back a tiny,
tiny little bit. So pull it back. Like, so just
so nothing's sticking out. Now, let's move on round. So I've got this D, A, 90, bring it round to here. Like so. Pull it into place. And this one I'll
have to pull it out. So and X, pull it
out a little bit, pull in shift bone,
do those points, pull it back a little
bit just to make sure that it's in
this part here, which it is now, and then
pull this part back. Without losing it, we
don't want to lose it. So if we go back so far, you can see it's popping out a little bit there, so I
need to grab them both. Pull them out a little bit,
there we go. Now, it's not. And then we're just going to check to make sure
it's in there, and it's in that part,
as well, which it is. So great stuff. Now we can
work our way round again. So Alt D Z 90. And again, if you don't want
to do this, don't bother. But I think, you know, I do think it's worth doing, personally, because
I think it just adds a little bit
more to the build. So on this part, I'm not going to go into
the corner here. I am going to put it on here because it's relatively
easy to do that. So Alt D, z -90 and then
pull it in to here. Like so. Now, you can see on this one, it's actually a
little bit higher. So I'm not afraid to
pull it up a little bit. I think it adds to this, so I'm not afraid to do that. Just make sure that
it's in the wool, like so, and then what
we'll do is bring it over. We can go under the stairs here because that makes
sense to me as well. And then I'm just going to
plug it right into there. Now I'm just making sure, as
you can see, on this part. So this part here, maybe I'm just looking where it's
going to come down to, and this is coming
all the way down to the so should I drop
it down a tiny, tiny fraction just to make
sure that fits in there. If I do that, though, Yeah,
I will, you know what? These two aren't lined up
anyway. So I'm gonna do that. And then I'm just gonna
come in add in another one, making sure then that's
going into the wall like. So, right. That's that one now. Let's press Alt D, bring it out. Let's turn it down
all the way to four. Let's spin it round.
You know what? I'll put one here.
To make it easy. I'll press Alt D and then R
Z -90, spin this one round. And then I've got these
two to actually use. So that'll make it
quite easy for me. Plug this in, pull it
back a little bit, making sure it's in, making sure there's a
little ridge there. That's good. Do
the same for this. Pull it out a little bit. Making sure that
this one this time, as you can see, it's a mile out. So let's pull it back. And
how far can we get it back? So that's in the wall. Now let's pull this back a little bit, see if it's going to
go through the wall. You can see that it is, and that's a little
bit of a problem. So instead, what I'll do is, I will pull this out
where it's going to go, something like there, and then
I'll probably have to pull this out a layer bit, like so. And there we go, now
that's feeling better. And now we can use
this one, so old D. Bring it round, put it in place, just over the top of there, like so. And then
let's increase it. I think it'll increase
the other way, actually. Yes, it does. So we'll increase it
to two, bring it out. And again, we've got the
problem of this one here. So let's pull it
back a little bit. We might be able to get
away with this one. Yes, we can. Perfect. Now, this one on here, I think we should
also put it on here because I think it's looking
a little bit bet down there. So old D. I it round. So Rs 90, press Control
one to put it in there. And, of course,
this one, we need to pull it down a little bit. Now, the other thing is,
let's bring in the third one. Here we go. Let's
pull it into place, like so, and then
let's pull it back, see where we can get this too. So if we bring it to here and see there's it
going over the top. No, nowhere near. Let's pull it back,
pull it back. Where's the wall.
There's the wall. So we can pull it back so it's
going under. There we go. Now, we're working
our way around. So this is the one that
we want to use on here. So D, bring it over. Like, so spin it round. So art Z, 180. Nope, art Z 180, spin it round. And then pull it into
the top of here, making sure it's not going through there at the
moment, it just is, as you can see, so I'm
going to pull it back tiny, tiny bit tiny bit
holding the shift, like so, and there we go. And then what I'm going to
do is just grab this one, and I want it go in to
the bottom of here. So you can see if I press Alt D, I should be able to bring
it over, and there you go. There you can see where
it's going to go. Now, this is where we need to check these parts
going over here. So I think on this one, at least, you can either have the big ones
or the small ones. I think for this one, I'm just going to look which
ones I've already got. Maybe these, maybe these ones. I'll bring this over and have a look what
these look like. So I'm going to press D, bring these over, spin them round. So RZ -90. No, RZ 90, spin them round. Control three. Let's have a look where
they're going to come up to. And I think if I turn
the countdown on here, I should be able to
get those in place. I'm just going to delete
that one out of the way. Come in and bring them in
place where I want them, pray the little dot one. And this is these ones here. And I think what
I'll do is I'll turn the count up and
then squish them in. So S and Y, let's squish them in and see where we
can get them to. And you can see
that if I do that, these should fit in relatively nicely and they've
got this on top. Now, this one on top, I
can also bring this one down and then pull them
out a little bit, I think. S and Y, pull them
out, and there we go. And from here then, I think
I just need to bring these a little bit more in because they are going to have
a post each side. So if I press S and Y, bring them and I'll put
them there for now, and then I'll bring them out and put them
on the other side. So we'll do the other side
first. So D. Hold them over. Should be near enough the same. So near enough, the same height
and everything like that. We're going to have
a post in here, so don't worry about
this part here. And then finally, I would say that probably they're
going to have to go a little bit further
into the wall. So before they start going into the wall, it's roundabout there. The round about there. And now, finally, let's do this last one. So lt deep, bring out this. And it didn't take us too long to do that, as you can see. Now, this one here needs to
be a little bit different. So we'll bring this
one down first, and then we'll bring
it into place. We'll put it into
place, coming out, coming out, coming
out. Maybe to there. You can see this now needs
pulling back tiny bit, just so it goes into there. I I we go. And then we'll make this one, probably one and then bring
it over and then pull it out. Let's see if we can
actually pull it out. So S and Y. I think we might be
able to get away with that, double tap the A. There we go. Now, that's
looking to me a lot better. I'm going to save out more
work, have a quick look round. I know it was a hard lesson, you know, just putting
those parts in. But as you can see
now, it just added all of that to the
tops of these, and I think it does make it
look much, much better now. It all kind of fits together. And has that real feel of it? Yeah, so I'm happy
with how that looks. Now on the next one then, what we'll do is we'll get
this over the other side. We'll get our rear windows in. We'll get the post up here. Now, you can see, as well, before I move on that this here, as you can see, is not it's
mirrored from the other side. So let's just have a quick
look while we're here, on the other side, and we can see that this definitely
wants to be pulled out a bit. So if I go to my normal, I'm going to pull it
out a little bit. Double tap the A. You
can see if I pull it out that for, here
if I zoom into it. The problem is, if
you've got mirror, you're better off pressing tab, grabbing one, and
then zooming in. Now, if I pull this in, you can see that it's
just poking out there. If I pull it back, pull
it back, there you go. Now you can see it's
not poking out. And now if I go around here, this one should be fine.
Let's have a look. Alright, just wants
to post up there now. So once that posting, you
won't be able to see anything. Alright, very happy
with that, guys. Okay, everyone, so I hope you enjoyed that, and I'll
see you on the next one. Let's say that a
work and I'll see you on the next one.
Thanks, Lot. Bye bye.
146. Reinforcing Corners with Structural Geometry: Welcome back if
you want to blend the building master class
from concept to final render. Now, I think there's one
other thing I want to do. These look a little
bit dinky here, so I've just been looking at. And what I want to do
is just bring these in. So Alt D, let's bring this
round the other side. So we're going to bring
this round the other side. I'm going to press art Z, 180 spin it round. I'm going to press
Control three. And what I want to
do then is just put it into the place
where these are. So I'm going to go that high up, I'm going to then come on
over and give it a few more. So maybe four, maybe five, and then press S and
X and pull it down. Just so it's going to fit
into that corner there. And then finally, I
can pull this over. And I think if I
put this in here, so what I'll do is
I'll just delete these two out of the way,
just so I can show you. So delete these
two, pull it over, and then we're going
to pull it into place just under those like so. And you can see now that I think that looks
way way better. And the reason it
looks better, I think, is because it just
looks a lot stronger. It's a bit dinky over here
and a bit strong over here, again, supporting all of this. So I think it just looks just
better than what it did. So what I'm going to do is I'm going to delete these
out of the way. I'm going to bring this.
The other thing is, of course, it's different
from the bottom one. That also makes a
huge difference. So let's bring them down, but it just under here, like so. Alright, so now we've got um we need to put some
supports into here. So the first support I'll grab before doing anything
else, you can see, as well that this one here
is stuck out a little bit, so I'm just going to
pull that back in. Then what I'm going to do is I'm going to grab this support, and we'll do this corner first. So this corner, and then
we'll just copy it over, I think, to this
corner over here. So we'll bring this in.
Do this corner here. Like so. So it goes in, where, how far is it going in? Probably something like that, and probably
something like that. And then what I'll
do is I'll grab this part and this part,
and I'm just looking. I'm not going to actually I'm going to grab
this part, I think, and I'm just wondering
if I want to make it all the same or if I want to
use these. You know what? I think I'm going to make it a little bit different from this. I've still got
this one, as well. But what I'm going
to do is just press Alt D and bring that over there, and then I'm going
to press Alt D on this and bring it over. I'm going to line you
up, first of all, so I'm going to press
Control three and zoom in. So I'm just lining it up. Where is this part of
that put? There it is. And I'm going to bring that down then to round about there. And then I'm going
to bring it back just to the top so
it fits on there. And then I'm going to
bring the whole thing back into place along there. I'm going to press the dot just to see where I'm at with this, and then I need to pull
it back, pull it back. And I also need to probably
pull it up a little bit, pull this one up a
little bit, maybe. And then this one, let's see
where that's going to fit. That one's fitting in
very nicely on there. And I think this here now,
can I get away with it? So Alt D. Let's pull it up. Nearly nearly, you can
see it's a little bit. Can I pull these to the side? I might be something
else we can do. But let's pull
these to the side. Let's grab this then,
Alt D, bring it up, and put it in place like so, and then now I want this top
part where these line up. Now, you can see on this top. They're definitely
not lining up. Let's come in, and let's press
Alt D and bring them up. And we can also see that
I can put that in there, but then we've got a
problem with this. So let's just bring it
down, making so it's in. Like so. And the other
thing is, as well, is we may as well, can
I bring this down? I've got it going all the way
over here, as you can see. So I might be able to get away with just bringing it down one. Let's have a look. Bring it down one. Oh, we can get away. Is it going all the way
through there? No, it's not. So we can bring it
down quite a few. I think I just let this
on here for some reason. Alright, let's pull it over. I think I can get
away with that, how that looks. There we go. Now, the one thing is we need to pull this down a
little bit more. And what I'm gonna do
actually with this one, because it looks a
little bit weird. I'm gonna stretch it,
so Hess and's head. Stretch it. Let's pull it up, making sure that it's in the
top top of there, like so. And you might want to
put another one of these on there. I
think I'll leave mine. You might want to do that. Now, the one part you've
got is this part. I think I'm not going to
put another one in there. I reckon it'll be too much. And now what I want to do is put this over to this side.
So in this corner. So, you know, cheating
a little bit. So let's come in,
grab all of these. And what we'll do is now we'll bring this one, this
one, and this one. I'm going to press Alt D then, bring them over,
rotate them round, so it's going to be on the
Y, as you can see here. So object, mirror on the Y, and then let's pull these
into place round about here. And there we go, that's looking. Very nice. Double tap
the A, and there we go. Now, let's come with
this part then. So the same process, grab all of these, all of this. I want to press all D. And then what I want to do is
just slightly bring it over, object on the Y again. So object mirror on
the Y. I want to press Control three to
go into the front view. And what I want to do
now is line them up. Now, you can see on this one, what I'm looking for, you can see how close
this is to here. So how close is this to there
is how close this one is. And if if we do
everything properly, we should end up with
something like this, which is nearly finished. Now we want is those
square windows. So these square windows,
we want to bring those in. So I'm going to press
Alt D. I'm going to bring it over. I'm
going to spin it round. So, Z, 180, spin it round, Control three, and we'll want to line it up now right
in the center of here. So they want to go right
in the center of here. The way I'm going to
do that is to center this is I can just grab
this grab this part, shift desk, curse to selected,
and just center this out. So shift desk,
selection to cursor. And now we know if we pull it up properly, that it's
actually centered. Now, the other thing is, I don't quite want them that big, so I'm going to press the S born and bring them
down a little bit. Now I'm going to do
is, I'm just going to make sure it's in the right
place where I want it. So I'm going to pull it back
to something like that. Finally, then shift desk
cursor to selected, and then shift bring
in another cube. So bring in a cube, press
the S born, bring it in, like so, press Ns, bring it up. And nearly. So now we just want to
bring it down a little bit, so grab the bomb one,
bring it down to there. Okay, so like that. Now what I want to do is just
replicate the same thing. So if I press Control three, I should then be able
to just press Alt D. Enter bring them
down where I want them, round about there and then D and bring them down,
round about there. And then what I'll do is
they'll join all of these up. So join all of these
because these, obviously, I'm I
pressed all D on these. I think I did, but
it doesn't matter. I can join them all up
like so, and finally, then grab this Ctrol minus,
and let's bring them in. Now, we've got a problem
with these for some reason, let's press curve control A. Let's look what our problem is. Can we delete these? Can we
come in and delete these? Now, you will see sometimes
this happens actually. So let's go back go back to these before we did the
Boolean. So here we are. And we've got a difference and
we don't really want that. And we don't really
want to There we go. Union. Let's have a look. Let's press control. Come into these, delete them
out of the way. Let's come down and
look at our wall and see if everything's gone
in the way that we need it. And there we go,
guys. There we go. Now, that is looking amazing. Okay. So now you can see why
I want to get all that in. Now the next thing is, what we'll do is we will
bring in these chimneys because we've already got them the right size. We just
need to make them. You know, we've got di two
different chimneys here. That's all. So what we'll
do is we'll grab these two. And it's up to you again if
you want to make them in here and then send them
through to your resource pipe. So I'm going to actually
create them in here. But if you want to send them through to your resource pipe, you know exactly
how to do that now. So that's what we'll do next. So I'm going to
grab both of these. And what I'm going to do is I think I will just
isolate them out. So Shiftg I'll use Shift he
actually, I'll make it easy. Let's go into object mode. And then what we'll do is
now we'll save out our work. And on the next one,
then we'll look. In fact, you know what? Before we do that, we'll
actually come to our references. So you can see now this
is our references. We've pretty much done near
enough everything on here. So we've still got this to
do. We've done most of these. We've got this bit here
to do in this dome, of course, but you
can see, pretty much. So it's all of this we've got to do, the dome we need to do. And then looking
around, we've got, you know, the
pathways and hedges. These are really fun
things, by the way, so you're going to really
enjoy doing those things. We've got benches,
we've got lights, all the little dinky things
that bring it to life. We've also got on this side, as well, we've got a
couple of windows. So this main bulk, we've got to do, this part here, and the rest of it is about bringing it to
life with lights and, you know, bushes and trees
and things like that. So once we grow that in
then, this bot here, I mean, chimneys, I mean, once
we've done the chimneys, then we can really
start thinking, right, what are we
going to create next? But you can see from
what we've done, most of it is now done. The hardest parts are
basically out of the way. Alright, everyone. So I
hope you enjoyed that. I'll see you in the next
one. Thanks a lot. Bye bye.
147. Modeling a Detailed Stylized Chimney in Blender: Welcome back if
you want to blend the building master class
from concept to final render, and this is where we left off. Okay, so let's come
to this one first. And what we'll do
is we'll actually create these parts here. So these parts here
are pretty much the same on both of these
types of chimneys. So what I'm going to do is, I think I will start over here. So if I press shifts, Curtis selected, and then what I can do
is I can press Shift A. You know what? We'll go
into modeling as well. Make it easier for ourselves. And then I can press Tab dot. Let's zoom in and then Shift A, and we'll create a cylinder. Now, we've got it on 24. Don't have it on 32. 24 is
quite adequate for this. And all we're going to do
then is S, bring it down. Bring it down a little bit more, and then Ess and's head, bring it up. Something
like this, I think. Now we just need to make
that shape of the chimney. Generally, I feel
like it goes up. I'll actually show
you what I think. I think generally, he
goes up like this, and then it goes in like this, and then up, goes straight up, and then it comes out, and
then up again, like so. That's roughly how
I imagine it going. What I'm going to do is
I'm going to press tab. No, I'm not. I'm
going to click on the Move tool and I'm
going to press Tab. Then I'm going to
press Control LA and bring in my first edge loop. Then what I'm going to
do is press Control art. I'm going to bring
my second edge loop, which will be
somewhere around here. And I want it going
all the way up then. So yeah, I'll bring it to you and then what
I'll do is Control L, bring in five edge loops,
left click, right, click. Grab the center one. Come
to proportional editing, and I'm going to bring it in. Like so, something like this. And then what I'm going
to do is go to the top. I'm going to press three
again, bring it down. And let's have a
look at the height without portion editing on, so let's bring it down like so and then what we'll do is
we'll press E and bring it up. Round about. Here. And
then I think with the top, what we'll do is
we'll shift, click, E Altern and bring
that out a little bit, and then I will
round off the top. So I'll grab this
edge here, Al shift, click Control B, turn
it up a little bit, like so, and there we go. We've got that bit. Now I
want a little part in here. So all I'm going to do is I'm going to come in,
grab this part. I'm going to put this on global. Control B. Ove it out a
little bit, turn it down. Like so, and then E enter
lns and pull this out. Now, you can see it's
pulling out in a weird way. I don't really want that,
so I'm just going to press S and pull it out like so, making sure that it's probably
not the same as there. So maybe a little bit in
pressing the S button, like so. And then all I want
is this bottom because I want it to stand on something not straight into
the brick, so control. And then Alt Shift click and
then E enter an S or LTS, whichever one's
going to do the job. If it E S and it's
still bending up, as you can see, just come in, as we've done many times before, Alt Shift, click, like so, and then Alt Shift,
click on this inside, and then Z and zero it out, like so, and then do
the same thing on here. So Alt Shift click,
Alt Shift click. The reason we're
grabbing both of them is because generally, it'll zero out to the
last one you select. So if I select this
one, select this one, Z and zero, you can see, then that's how it zeros it out. So something like
this is what we want. Now let me just take that off a minute because we're
not going to need that. And then all I'm going
to do is press tab and come back to movement, right click and shade Auto smooth just to see what
that actually looks like. Now, of course, we're going to need an inside on here as well. So all I'm going to do
is grab the inside, press the ebonne, and then I'm going to press E and
drop it in like so. Now, just make sure that it's
not sticking out like this, so just press S and bring it in a little bit. And there you go. Now, all we want
to do is round off this part here before
any bevels, actually. So control B, round it off
and maybe turn it up one, like so, and there we go. That is that first part
then of the chimney. Now what I need to
do is I need to probably come in and get
rid of both of these. So L and L, delete and vertices. And then what I'll do is
I'll bring in this part. So when I bring in this
part, perhaps down to here so we can
just did those part. And then with this,
then I can actually create the rest of the chimney. Now, for this, what
I'm going to do is I'm going to come to this part, and I'm going to bring
the first bit in. So I know this is, you know, kind of the right
shape for my chimney. So what I'm going to do then
is press B and pull it down just so we can
actually see those parts on there, like so. And then what we're going to do is bring this bottom part down. So Alt **** click,
press in three, and then we'll bring it
down something like here, and then I'll press
Control left click, bring it up slightly,
control B, bring it back. Like so. And then
what I'll do is Alt Shift click E and lns, bring it out very slowly, like so, and then we'll
do the bottom section. So just this here,
control law, bring it up, Control B, and then E and
alterns and bring it out. And this is the
very simple chimney that we're doing here, and we should look
something like this. This will be stone,
this will be stone, and the rest of
it will be brick. And now let's bring this over. So if I pull this over to here, want it in the center up here or I want to make it
a little bit bigger. If I want to make it bigger, it means I need to
pull this down. We don't need any, you know, massive chimneys,
things like this. It just looks silly.
So don't do that. But what we'll do then
is we'll come in, we'll grab the center. So this center here, shifts, curse the selected,
grab this part, Shiftess and selection
to curse her. And then now we can
put this in place. So if I'm going to
pull it up here, I should be able to then
pull it up into place. And then I have a look
at what that looks like. And I'm looking to see
if it's too high or not. I think it's a
little bit too high, so I'm just going
to pull it down a little bit, and
then I'll come in, grab this pot again and pull it down just so
it's sat on there, like so seven to
go over the top. Now what I can do is I can set my orientation to the middle up here and then mirror it over. So I'll grab this one,
right click Set Origins, three D cursor,
adding a modifier, and we're going to
bring in a mirror. So let's bring in a mirror, and we'll put it on
the Y, turn off the X. Press control A on
the mirror, then, and there we go, There's
our chimney actually done. Now the thing is I want
to take one of these, so I want to grab one of these. So L, shift D, bring it over, and then press P. Selection separates it. Control A or transform
set origin geometry. Now I should be able
to grab all of this. It shouldn't have anything
on. I'll press Control J. Again, right click
shade Auto Smooth. And also, then we just want to come in now add in a bevel. So add in a bevel, we'll turn it down to note
point note three, like so, and just
make sure that it's actually beveling on there,
as you can see, it is. Do we have the
bevel properly on? Let's just sir Control I'm not sure if I did that or
not, let's turn it up. And you can see, it's
not beveling quite, and the reason is because
if we go to geometry, turn clamp overlap off, and now we should
be able to bevel it a bit more if we want to. Now, I'm still
going to keep mine, I think, on note point. Note note five. Let's
have a look at that. Note point, note, note three. I'm going to put on a
point not five, I think. Something like
this. Yeah, that's looking that's
looking about right. Okay, so now we're on to
this chimney over here. Now, being as this chimneys
already over here, let's actually use it
to create these parts. So this is a square chimney, as you can see, and it's very similar to the
other chimney apart from. It's got some, you know, little points on the side like so. So let's come in, first of all, and what we'll do is we'll pull this out a
little bit further. So grab this, press alterns, pull it out a
little bit further. And I'm just making sure it's all coming
out the same way. And then Alt Shift click, we're just going to pull it
down a little bit, like so. I'm also going to make sure
that it is zeroed out. I'm going to pull it down
a little bit further. S said, zero, making sure. And then I'll also SS zero
making sure that's zeroed out. And then Walter is,
I'll pull this in now. So I'm going to pull
this in and then I'll put this in because we know this is already
the right height, which means then we can come, get rid of these and delete and vertices and now
grab your chimney. So seven, go over the top, put it roughly where
it's going to be. Let's put on wire
frame and then we can see exactly where
it's going to go. So somewhere around here, let's now grab the center of here. Shift S, cursor selected, grab this one,
right click, Sagen, two, three D cursor, add in a mirror, put
it on the Y as well. And now we can see that sure
I'd be feeling perfectly. If we go back to object mode. There we go. Now we can also see that I need
to pull this down, so I'm going to pull it down into place
where I'll want it. So maybe something around there, and then I'll just
come in and make sure this is pulled up high enough
to where it needs to go, which'll be round about there. Alright, so far so good. Now, let's come in. And
we'll put in 2 bars then. I still think I need to come
down a little bit further with this one or bring it down
just a little bit further. Then I'll press Control and left click and
bring it up and then Control R. Left click and bring it down a
little bit, grab them both. You know what? I'm
just wondering if I make one taller. Yes, I will. So I'll go, Control B, make
this one a little bit bigger, and then or I'll do it the
other way round, sorry. So I'll press
Controls, Control B, make this one a little bit smaller, and then this one here. Entre B and make it a little bit bigger
than the other one, like so, because I'm going
to use something under here. I'm just going to pull it up just slightly, as well, then. Then what I'm going
to do is Alt ship click on the face
going around here. So this face here, and then E enter Alterns and pull it out
a little bit like so. And then finally, this one, E enter Alternes and we're going to pull
this one out a little bit further
than the top one, like so, and this is what
you should be left with. Alright, so let's go
to File and Save, and I'll see you on the
next one, everyone. Thanks a lot. Bye bye. Oh
148. Creating Symmetrical Ornament Elements with Modifiers: Welcome back if you want to blend the building master class from concept to final render, and this is where
we left it off. Now what I'm going to
do is press Shift A. We're going to bring in a cube. I'm going to make my
cube much much smaller, and I'm going to pull
it out into the side, press in SNX and
just squish it in. I want this just to be
on the front of here. So if I come in
and pull this up, I want it to come out
just in front of this. So SNH, pull it out, pull
it out, pull it out. So move it over a
little bit. Like so. And then what I'll do is I'll
pull this up to the front, so grab the bottom of
it, pull it up to here. And now I want to
actually pull this out. So I'm just going to press E, enter, S, pull it out. Now you can see it's
not pulling out, right, so what I'll do is I'll just go back controla and then tab, he enter S, and
now it should be, pulling out the correct way. I think I'll have to
pull this bit out a little bit once I've
brought it down. So I'll just bring it down
from here, so bring it down. And now we can actually
pull this bit out. I think because
it's a weird shape, that's what's actually
happened to it. So I'll just pull it out loud. And then S and Y, pull it in. Like so. And also, let's just
also pull it back. Now, that doesn't
look right to me, so I'll press
control law bring up one edge loop, and then
I'll pull it back. So now if I pull it
back, you can see it's looking much much better
than where it was. Albeit, I think it needs
to be a little bit longer. So let's see if I
can make it longer. Like so. And the other thing is, I'm going to squish it in
a little bit, as well. So free to mess around with
this as much as you want. And then finally, what I'll
do is I'll grab the top, press the bone to bring it in. Like so, and then I'll
bring it, and there we go. Alright, looking good. Now, let's come back to this, and then we've got a cursor right in the center,
so we'll use that. So controle transforms
right, click.TiginT cursor. Add a bondifre and we're
going to bring in a mirror, and we're going to
put it on both sides. Now, generally, you'll never be able to get it on
both sides like that. It just doesn't work that way. So what we'll do is we'll
just put on the Y, the Y. No, not the Y, the X, like so. And then what I'd tend to do is just press Shift D
and rotate it round. Let's see if that
actually works. So Shift D, Rs 90, let's rotate it round,
and there we go. There is it in place now. Okay, so let's come in, and what we'll do is we'll
press Control A on this one, and then Control A on this one. And then what we'll
do is join it all together now. So
join it together. Control A on this mirror, just make sure that's on
OntolJ and there we go. Now I can press Control A or transform set origins geometry, grab this one, press Control L, and we're going to
copy modifiers. Double tap the A. And there
is this actually done now. So there are the two chimneys. Now, of course, we need
some materials on them. So let's go back to
our asset manager because there is a material
that we've not got on here. Also, we do need the
brick on here as well. So we'll come First of all, I think we'll unwrap it also. A, smart UV project. Lo. Then what we'll do now is we'll come in
to our materials. We've got ambient
occlusion on there. Let's put rendered
view on so we can actually see what we're
doing. And there we go. And let's actually come in
and minus off both of these. And then we'll come
on the down one, and we'll put in, first
of all, our brick normal. Obviously, we're going to
need to turn it around, and obviously we're
going to need to get the right sizing for
this because we want them to be roughly the same as others, you know,
or other brick. But before we do that,
let's just press plus and then we'll click the down and we're going
to put in stone. So I'm thinking, we'll have
stone the normal stone. So stone light, this one here. And what I'll do is I'm just
wondering whether yeah, so we, I'll put it in here. So we'll go into
these Control plus. Don't light, click a
sign. There we go. And now we need this new one, so I'm going to
click Plus button. Come over then to resource pack. So my resource pack, and then we want
materials and shaders, and we want this
one, which is clay. I'm going to drop that in there. And then what I'm
going to do is grab both of these and come down to clay and click a sign
like so, and there we go. Now, the next thing I want
to do is unwrap all of these properly
because you can see that they're not
unwrapped properly. So what I'm first
of all, going to do is I'm going to
save out my work, file and then what I'm going to do is press TH
to bring back everything. Now I can see how that's going to, you know,
stick in there. If it's stuck in there
properly like this bit here, just touching here, probably
doesn't look so good, so I'll have to pull
it back a little bit. So I'll just pull it back
a little bit, like so. And then we go, it
looks a little bit better and I might also make this one just a tad smaller because I think
it's a little bit big, so I'm just going to press the button and bring
it out a little bit, like so, and I'll also bring it up and see what that looks like. So it could be. Yeah,
it's still in there look. It's still in. Alright,
let's fix now the bricks. So what I'm going to do is
come to I'll double tap the A. Come to my bricks, click Select because then
it'll select them all. And I'm just wondering
the top bit here, do I really want this
made out of brick? I don't actually think so.
So what I'm going to do is just Control plus
going all the way around, stone like, click a sign. And something like this, I
think, looks much better. Now let's turn these bricks
around because at the moment, we're not going to be able to see what we're actually doing. So if I come in, the
other thing is, as well, that when we unwrap this brick, we should have put in a seam. It would have been probably
better to do that. I'm going to press
Alt Shift click. I'll go all the way
down then right click and mark a
seam. You know what? We'll actually mark the seams in this because it's just going
to make it so much easier. Like the underneath
of the brick, um, yeah, I think we will. So if I press shift age, just come on down
then and we want to mark a seam in the
bottom or in fact, delete the bottom, we
don't actually need that, so delete and faces. And then what we'll do is
mark a seam under here because it's only the brick
that we need to worry about. So Alt Shift click going
all the way around, right click, Mark a seam. And now we should be able to go in and just grab our brick. So, U, unwrap. We should be able to
unwrap on angle base now, and that is not what I wanted. So that means that
somewhere along this line, it's not unwrapped correctly. I'm going to reset
the transform first. So all transforms set
origin to geometry. And now let's try that again. I'll grab this with
L and then And yeah, that's not wrapping
wanted it to. So U I want conformal. Let's try conformal. And that still looks like it's
boeing up there. So let's press shift edge and let's have a look
what's going on here. Let's put in object
mode. And let's see. So we've got a seam going all the way down here,
all the way through, which means if I go to UV map, it should open really flat, but you can see we've got
some bending in there. We don't actually
want that. So what I'm going to do is just
grab the whole thing, and I'm going to see if I
can actually straighten out. We Alter knee I'm going to come, first of all, edit preferences, and we're looking
for our unwrapped, which is going to be UV
squares, UV squares. Here it is. Let's turn it off, and then I'll just
press Alter knee. Now remember, I
showed you earlier how to straighten everything
out if you need to do. So R 90, spin it round. Let's zoom back to it, then. And there we go. Now
it's looking perfect. We can see why I
did that, as well. You can see even when it comes
around to this part here. So if I come around here,
everything lines up. That is why I wanted to
put the seam in there. So even though the bricks
aren't quite lined up, they all line up as they're
going around. Very important. Now, if I come back now and just press Old Age, bring
back everything. What I want to do
when all this loads up is I want to be able to see the thigh of my bricks
because I want them to be the same size as the
other things in here. So you can see here this
is the size of them. But if I now come back to
this, press the tab on, I should then be able
to press S and bring them roughly into place on the size that
they're going to be. So you can see here,
something like this. Now, what I also tend to do, if it's like this
where you can see the bricks is just
in the top of there. Press altage and let's have
a look what that looks like. I tend to, if I see that
come in and just press Eons head and pull it back just so they line up a little
bit better, like so. So we've got that little bit of, you know, grouting
underneath there. Alright, that's looking
pretty good now. Now what we want to do is
come to the rest of it because we want
to make sure that this and this are all the same. So if I come to this,
pull it out a little bit, go to material, and
now I'll press Tab. I'll double tap the
A, and I'll come to my clay first, click Select. And then what I'll do is A, and then I'll unwrap these again. So if I press U, I should be able to unwrap
them again, like so. And let's look at what
they look like now. Let's put it on rendered view. And because it's clay, you
can get away with a lot more. Now, I'm going to just come
in and bring it bigger. So I'm going to make it bigger. And you can see there
now it's looking better because we're not
losing any of the, you know, it looks more realistic because before
it was just too chunky, but now this is looking
way, way better. Like so. The one thing I would say is it's looking a
little bit too smooth. Let me just bring
it in the other way and have a look on that. Yeah, that might
be the way to go. I think this will be
the way to go with it. But what I'll do is I'll press S and bring it out
a little bit more. Yeah, something like this
looks way way better now. Now, the one other thing is, I think these maybe
double tap the A, maybe a little bit
too dark, maybe. So I'm just wondering if I can change the color
before continuing. Let's go to shade and have a
look at the setup on here. So if I come in, you can
see here is the orange. I come into here. Let's press
the dot button to zoom in. Now, if I come into this, I should be able to
if I bring this up. Yes, change it a little bit, bring this back a little
bit. And there we go. Now we can change that
and we can also bring this down a little bit, maybe, bring it up. Definitely too dark
there, too light. But maybe something
like this up. Something like that, I
think, looks better. Double tap the A. And I'm
just wondering if this. So this one here
is the main color. This is the lighter
color around here. And this one, if I come to
it and just put it onto black I'm just wondering how
much effect it has on it. Well, let's come into this one. Now, there we go. Let's
bring that in a little bit. There we go to make a little
bit of roughness on there. Alright, everyone, so let's save a w and I'll see
you on the next one. Thanks a lot. Bye bye.
149. Fixing UV Mapping and Seam Issues for Accurate Texturing: Well, welcome back
everyone to blend the building master class
from concept to final, render, and this is
where we left it off. Now, you can see
that the moment we messed around with these,
so this part in here. Now we can also mess
around with this as well. So what you can also do is
bring this back a little bit, and then you get a little bit more edgewre as you can see. And then what you can
also do is come to this one and just drop down the drop this down a little bit J so they're not
quite so warm warm, not warm, and there we go. Alright, so far so good. Now, let's come to these parts. So what we're looking
at in this part is just making sure that the stone is looking nice
and, you know, tidy. The bricks are looking
nice and tidy. And from there, then,
what we need to do now is we can come and
grab this one. So grab this one here. Making sure it's all
joined together. Is it all joined that's pressed, G just to make
sure? No, it's not. So it's a good job
to check that. Let's just make sure we've got no mirror on or
anything like that. The other thing is,
we've got the bevelon, so we'll join this last. So this one Best Control J, join it together, and now
we can come to this part. Now, we'll go to materials,
minus these off. And then what we'll do is we'll grab this one, grab this one, Beast Control L, and we're going to link materials like so. And there we go. What a mess. Alright, let's first of
all, come to these parts. So L, L, L and L, and then U smart UV project. Click Okay. And I'm
doing that on these, by the way, because you can see. If I was doing it on bricks, you can see just what a mess
that would actually be. But because this is clay, it's actually fine to do that on because it's a little
bit like metal. So, you know, we have got some issues here,
though, as you can see. We don't tend to have those. Let me just have a look. Have we got some
issues with this. Though this might
be because the way that we've unwrapped them
in they're too small, too big, all of
that sort of stuff. So if we end up with
things like that, we can absolutely fix that. But we don't want all of these
bands on here is my point. If I put it into material
view, you will see. So let me just drop it
into material view, and we might need to spend a
little bit longer on these. So now you can see exactly
what I'm talking about. So let's come on
in, first of all, to UV Editing, and let's have a look what's
going on here. So I'm going to press
A, and then going to come back over to
these parts here. Like so. I'm just going to move this over then
so I can see what I'm doing. So it's on here, turn off face a minute, and now I can see a little
bit more of what I'm doing. And then what I'm going to
do is make these smaller. So if I press the S but,
let's make them smaller. Let's try making them
bigger then as well. So we'll try it the other
way to make them bigger. And I think that's going to
make it even more of ***. So I'm going to bring
them in, like so. Yeah, and I'm not
happy with these, which means that I
need to basically unwrap them properly. So what I'm going to
do is I'm going to just grab all of these, press Shift H or
what we'll do is, first of all, I
think we'll press Control E. We'll press tab, question mark just to
isolate all of these out. Then we'll come to
these ones here, press shift and then we'll
be able to work on these. Now, the thing is, we want
to add in some seams. So what I'm going to
do is Alt Shift click. I'm going to do them all
at the same time, like so. Now, I'm wondering
whether I should grab them going all
the way up there. Probably. Probably
so. So, you know, what we'll do is we'll come in to the bottom
with face select, and I'm going to grab all
of these faces, like so. And I'm also going to
put this back on now because I want to see which ones I'm grabbing,
so you can see like that. Controlled then, and we're going to mark a scene.
So mark a scene. And then what we're going to
do is we're going to add in a seam going all the way
up the inside of them. So all the way at the inside, if I press Alt, shift, click, Alt Shift click, come around to this side
then and then ot shift, click, O shift click. We have to put our
seam somewhere. That's the thing.
So Mxm like so. And then what we'll do now
is we've got a seam in there and we want it to come all
the way to this part here. So you can see this part here. Oh shift click, o shift, click, O shift, click, and
Alt Shift click. Like so. Now, we're
going to test to see how these
look, first of all. So what I'll do is
right, click and Mark a scene, and then I can come in, L, L, L and L. And what I'm going to do
is press U and unwrap. So I should be able to
unwrap them like so. Now let's go in and
actually put this on material view so we
can see what we're doing. And now you can see already
they are looking 100% there. Don't really need to
do anything with them. Now, the one thing
I'm wondering is, should I have a shop on the
inside of there as well? Because as I'm here, let's
actually have a look. If we put a shop on here, the right click, Marker Shop,
how is that going to look? I hasn't really done
a lot, to be honest. Now, we do, as you can see, we have still a seam on this bit here on this bit and on this bit. So you
know what we'll do? We'll now try and
straighten these up. So what I'm going to do
is we're just going to come back going all
the way down, like so. And first of all, I'm
going to spin them round. So I'm going to spin
these three rounds. So let's have a look. If I spin them round, I'll
a 90, spin them round. Now let's see. Still
got a seam on there. Let's see if we grab them all and make them a
little bit smaller. And there we go.
Now we've got very, very little seam
on there that you can see. That's what
we're looking for. If we come to this one now,
we'll do the same thing. We'll just move it over.
Tiny, tiny bit there, as you can see, move it
over a little bit more. And all we're trying to do
is just get them lined up somewhere where we're
not going to see so much of that seam. So it's still in here, just a little tight,
as you can see. So let's try moving
it over here. And there we go, now it's hardly visible. That is
what we're looking for. Now what we're going to
do is work our way down. So we've got a scene going
all the way down here. We've got bombs on here, which we simply
aren't going to need, so I'll just grab all of these, press Control plus,
delete, and faces. And then what I can do is I
can come in now, press L, L, L and L, and let's see now
if I can unwrap these. So we might have a
problem just with this part wrapping
it, so we'll see. So let's unwrap like so,
press the tab button. And now let's see
what we've got. So we've got a little
bit of seaming there, a little bit of seaming
there, as you can see. Now, let's come in
then and make these a little bit smaller like we've done with the others, like so. And now what I'll do is
we'll grab this one. So we'll grab this one,
press G. Let's move it over, see if we've still got
that seam in there. Like, so I'm going
to spin it round. Let's see if that gets rid
of it. It's even worse now. Let's see over here. There we go. That's
looking much better. You can see now we've hardly got it there, and same
thing on this. So, 90, spin it round.
Let's pull it over here. Yeah, that's not too good, so we'll pull it over
here, there we go. And now we'll come
round to this one. So we'll grab this, R 90, and I'll put it round
about here. Nope. Now, let's put it round
about here. Get in there. And just there we go. That's not too bad at all. And then this one in here, not too bad at all again. So now you can see that's
how we've actually stopped those seams actually
showing through so much. If I put it on Render View now, let it load up, and
now you can see, actually, they're
looking pretty nice. Okay, so let's move on then. So now what we want to
do is we want to move on to these parts here. Now, again, I'm
going to put it on Object mode just so I can
really see what I'm doing. I'm going to press lth then
bring back everything. And now I want to do
is come to this part. So we already know what
we did with the last one. What I'm going to do then
is come to this part here, Alt Shift and click, right
click and mark a scene. Now, on these, so this was
pretty much a stone on here. If I just put it on material. Let's see. So the top of here
was stone, the very top. I'm thinking that probably
this part here will be stone. This part here will be stone. So let's actually
fix that first. So if I come in, grab this part, control plus, and then I'll
go all the way down to there. And I'm going to press U wrap, and we'll do Smart UV project. Click Okay. And there we go. And then I'll just pull
this out a minute, and we're going to put it onto
Stone Light. Click a sign. And there we go. And then we'll come to this
part here now. So Alt Shift click Control plus. And then there is U,
smart UV PjetClicko. And then we'll put
it on Stone Light. And then what I'm
also going to do with this one is I'll just press S and bring it down just
so it's not so thick. And now we'll do these parts. So L, L, L Ops, not that one, L and L. And then we'll
click Plus down arrow, and we'll put it
on stone lighter. So stone lighter and then I'll
press U Smart UV project, click Okay, and click assign. And there we are. There's
the stone lighter. Now finally, we've
just got bricks. So if I double tap the A, come to our bricks,
click Select, should select all of these. I don't want this bon part done, so I'll delete faces on now the seams should go
all the way over there. So if I select these
now, I should should. You can see I'm
selecting those as well. I don't really want to
do that, so I want to make sure just got it on here, and then I should be able
to press U Unwrap Cfm. And then L, and I'll just
straighten it all up. So if I grab all of
this, press Alt, straighten it all up and
then A or 90, spin it round. Now, what I want to do is I want to get to be
the same as this one. So if I go to seven, go to the top shift and D,
and just bring it down. Don't worry because I'm
going to delete this anyway. Come back to this then and
then press the button. And what we want to do is
just make them the same size as these bricks
that we've got here. Now, what I'm going
to do is hold shift because I want to get these bricks as you can see
in there nicely like so. And there we go, now you can see that's looking
very, very nice. Am I happy with these bricks? I'm just wondering
with the size of them. These are a little bit
smaller, as you can see, so I'm going to have to make
them a little bit smaller. Let's see if I can get them,
keep going, keep going. Then I'll just spread S and
Z and just pull them in. S and Z, pull them in. Yeah, that's not working. So
S. Why is that not working? S Y. There we go. Let's press some Y and pull
them in just a little bit. Big so. Alright. There we
go. That's looking better. Okay, so now I can
get rid of this one. I can go back to modeling now, and I should be able to put the rendered view and have a good look what
they actually look like. So there's that stone chimney. Here is this one.
And look at that, guys. It looks perfect. Alright. Really, really nice. Now, what we'll do
on the next one is, we'll get this over here. So this stone going over here, and then we'll get it
over here as well. And then, I think,
I think we can actually start work
on this actual dome. So lots to look forward to. Alright, everyone,
so let's go to File, Save that work, and I'll see you on the next one.
Thanks a lot. Bye bye.
150. Organizing Materials and Resource Packs in Blender: Welcome back, everyone to blend the mass class from
concept to final render. Now the thing is, at the moment, we can see that
we've got this Dmie, but I don't think
it's flying off. So what I'm first of
all going to do is just press S and just flatten it out a little bit and then pull it back into place. Now, I also want to make sure that it's right on top
of there, like so. And then we want to
make sure, as well, that we're splitting
this off from this part here because we're going to have to use this part. So this part here is entirely
separate to this part here. And as I said, just
make sure that you're happy with your dome. Now, what you might
want to do is, I might want to
keep that height. Let's just have a look
if I bring it down a little bit, pull it into place. And I'm just looking
from here now. Yeah, and we can
see that probably that's going to be a
little bit better. Yeah, and I'm happy with that. Now let's go to object mode. And what I'm going to
do then is press tab. And I want to come in and grab
all of this going around. So Alt Shift and click
Control plus Control plus, and let's grab
this part on here. And then what I'm going
to do is I'm going to I'm just wondering if
I can keep that shape, but make it a little
bit more rounded. And, you know, I probably
can. Probably can. The re you know, I could probably bring in
a cylinder and do this. I think it's a hexagon,
so it's eight sided. So what I'll do is
press P selection and just take that away. Now, I'm just going
to quickly try Contole all transforms
right click. It's the origin geometry. And what I'm going to
do is I'm just going to bring in a cylinder. I'll bring it down
to eight sided. You know what,
before we do that. We'll delete it out the way.
Grab this one. So shifts. Cursor selected like so
shift and this is the thing. You should always
be playing around and seeing where
you can get it to. They'll put it to eight,
and then I'll pull it out. So pull it out now. We know it's already going
to be in the center. So we know we need
to turn it round by 22.5, I think it is. So Rs 22.5, and there we go. And then what I'm
going to do is I'm going to bring it up
to where I want it, and then I'm going to bring
the top to where I want it, so bring the top down. The roughly around about there. And now I should be
able to bevel this off. So let's see. Control
B, bevel it off. And can I get it more rounded to where I actually want it? So the thing is, let's just hide this one
out the way for now. And also, let's reset
all the transforms. And now let's try
as beveling it off. So I'm going to bevel it. It wants to come in all the way. You can see it needs to be a bit more rounded,
as you can see. Let's bring in some more
and left click, like so. And there you go.
Now you can see, it's a lot more rounded than
what the other one was, and more can control
this, as well. So I can bring it out,
bring it out, bring it out, like so, making sure I've
not got those top pits on. And I think that actually
looks way way better. So now for a shade or so smooth, there we go. I think
that's looking better. Now, the other thing is we're going to use these
parts on the outside, I'm going to come and
bring back the other one. But let's have a look at the
difference between them. So now you should be able
to see if I press one, look at how much more
rounded this one is. So the shape just looks
better than this one. And that's why we actually
went in and did that. Now, if I come in as well
and grab all of this, I should be able to press
P selection, split it off, and then control A or trans onset origin
through geometry, and then just pull it down into the place where
it's going to go. Now, it's not going to be exactly in that
place, of course. Now what I want to do
because I've got this, I want to actually
create two of them just in case I mess up
because if I mess up, then I've got to restart it all again, and I don't
really want that. And then what I want to do
is take this line and use it too if we go back to
our reference point. So if we go to our reference, you'll see here, you
want to take this line, and it's going to go out as it actually comes down here.
You can see it's going out. We want to actually create
something like that. So I'll actually do that next. So what I'm going
to do is just put this to the side,
so put that down. But first of all,
then what we'll do is we've got our other party thing. So have we made a duplicate
of this yet? No, we have not. So let's just press Shift D, hide one of them out of the way, and then come back to this one. Then what I'm going
to do is, I'm just going to isolate this out. So I'm going to press
Shift H, isolate this out, and then what I'll do is I'll
come in and first of all, delete this because
we don't need that. So delete faces, delete
that interface then. And then what we'll
do is we'll come to this side, l shift and click. And then what I'm going
to do is press Control B and pull it out like so. But we want the first bit to be relatively thin in
there, as you can see. And then what I'm going
to do is press Shift D, like so P selection
and separate it off. Now, I should be able to, if I'm careful, be able to
click this one in here. You know what I'll
do is I'll just put this on, and there we go. Now I've got it
selected, turn that off. And now we're going to do
is we're going to come in, and I should be able to
just grab this bottom here. I'm going to come in then
put this on to normal. Then now you can see
if I go over the top, it's facing or should be
facing exactly the right way. And then we're going to put,
um, proportional editing on. Come down to where it so sharp, and now I'm going
to do is press S and Y and bring this out. So I'm going to press S
and Y and bring it out, and then you're going to
get something like this. Now, we just have to
be careful how far we bring in this out, like so. What I'm next going to
do is before I do that, I'm just going to
press Control's E, and then what I'm going to do because I've got
it all sealed now. If I come back to
proportion editing, you can see it's the right
size now is what we do. What I'm also going to
do then is add modify, generate a solidify, and then I'm going to
pull my solidify out. So hopefully, we should be
able to pull it out now, like so, as you can
see, let's pull it in. Just a little bit, pull it
in, pull it in, pull it in. Like, so now we should be able to come
back to this part and press S and Y and pull it out and get it
exactly where you want it. So you can see now I can mess around with it and bring
it out to where I want it. And that is how we create that. Now, some of you will be asking, well, how do we create
the center bit? We're going to do that bit next. So first of all, though,
we need to press old age, and we need to bring
back everything. Now, I want the bit that
I've actually created this. So if I press, you
know, on here, press G, you can see,
this is the original, and click on if I hide that out the way
and bring this one, you can see that this is the same, but it's got that top on. So you can see it's got
the top but go G again. You can see this top here. So let's delete that
out of the way. Press Saltag and bring
back the other one. Now you can see if I press G
that this one has no top on. This is the one that
we actually want. Now we want to do is we want to actually bring this all the
way around to each of these. So I think it will
be 45 degrees. You can also see just how nicely that is
fitting in this part, but it's going to be rounded
off this part anyway. So we're going to
do a little bit of work on that in just a second. But, first of all,
we want to make sure that we've got this the
way that we want it. Now, it's up to you from here. Do you want it to have a
little bit more thickness? Do you want it to get
thinner as it comes in? Because if you do, you
can also do that as well, because we can also once
we've applied our solidify, shrink it in from the top, thinking, can we shrink
in from the top? And we can actually
do that after. So we'll do that after.
For now, though, we need to make this thicker
than what we actually think. So I'm just going to bring
out the thickness, like so, so I've actually got
something to play around with because you can see that
this at the moment, isn't very flat against her. We need to take
that into account. Now, what we'll do
is we'll actually save out our work
before doing that, because then if we
make a mess of it, we can come straight
back to here. We can then press Control A
and bring back that part. And then what I can do is
I can come to this part. So to this face on here, I can make sure
proportional editing is on. And now if I come
and press S and Z, I should be able to
shrink that back. Now, you can see S and Z, so S and Z shrink
it down even more. And now we can actually
put that into place. And now we can actually bring this over, so I
can bring it over, stretch it out where I want it, bring it up a little bit, and now I'll grab this part as well. So jaws going to grab
this part as well, pull it back into
place where I want it, and now you can see it's
touching much, much more. Now, if you're very
gentle with that, you should be able
to get a shape like this like I've got. Yeah, and I think that's
looking pretty good, guys. Pretty good how that's working. And now you can see
it just follows the shape just
much, much better. It looks as though it's
actually a touch there. And the final thing is,
I'll actually come in. And what I'll also do
is grab this part here. Still with proportional
editing on, we should have
brought all that out, and then if I press S, I should be able to
bring this out very, very slightly, like so. And there we go, while
still keeping that shape. Now, the moments of truth then, we can see that
we've got thickness. It gets thicker as it
goes down. Very nice. The moment of truth, though, is if we can actually replicate this going
round. So let's come in. And what we'll do is
we'll grab the top up here, so grab in the top. I'm going to hide
this out of the way. I'm going to grab
this part here. This is the top that
I want to grab. Alt Shift and click, turn off perfect
portion editing. And then what we'll do
is we'll press shifts, cursor selected,
grab this part then, and then what I'm going
to do now is grab this and right click and set
Origin three D cursor. And now I should be able
to shift D and then, pull it round to
where I want it. Now, you can see if we
go to item, it's 45.215. Let's put it on 45. And now we know that's the
size it's going to be. So shift D, Z 45, shift, or Z, 40, 45, and then shift D, Z, 45, 50, Z 45, and then two more like so, and then shift D Z, 45, and there we go. Now you should end up
with something like this, and you can see that is looking pretty nice.
Very nice, in fact. Okay, so let's press SaltH,
bring back this part, double tap the A, and this is what you
should be left with. And that, guys, is how you
create a dome like this. Alright, so really happy
with how that looks. Now, we can see we do have I think we have
some shading issues, so let me shade it smooth. We do have some shading issues. Let's see if I can
actually bring in an edge loop going
round here. Yes, I can. Let's see, then if I can
also bevel this off. What I don't want to
do is ruin the shape. So you can see here, I really don't want
to ruin the shape. So what I'm going to do
instead of doing that is, first of all, I'm going to save out my work. Now I've got that. So I'm going to save out my
work, and on the next one, I'm going to show
you how you can actually smooth this
off a little bit. All right, everyone,
so I hope you enjoyed that, and I'll
see you on the next one. Thanks a lot. Bye bye.
151. Final UV Cleanup and Seam Refinement Before Export: Welcome back, everyone to blend the Building master class
from concept to final render, and this is where
we left you off. Now, you might be joining
all of this together. But what you want to do is
you want to bring this down. So bring it down, bring it down, bring it down, bring
it down, keep going, keep going, keep going until we've got rid of
all of those parts. Now we can see that that
is shaded off very, very nicely, and that's
exactly what we want. Alright, so I think now
what we'll do is we'll actually start with
this part here. So I'm going to
start with this one. And what I'm going to do is
I want it extremely round. I don't want it like
this. It's very, very, it's not right. We don't want to
hexagon on top of it. We want it actually
to be rounded. That then fits the scene
much, much better. So what I'm going to do is
just hide that out of the way. Then what I'm going to do now is come in and I'm just wondering. I'm going to bring in
my cylinder first. So we know that this is
already in the center. So shift day, mesh,
bring in a cylinder. Let's leave it on 32 for this because we want it very nice and rounded
like this part here. So I'm going to leave it
on 32 just for this bit. And then what I'm going
to do is I'm going to press EsnsEd and bring it down. Now, I want to bring it down. And we're actually
doing want it. Let's just press Alt H 1 second, and we can see this is
how far this one is out. So I'm going to bring it
out a little bit more and then press EssensE and
bring it down a little bit, and then just hide this
one out of the way again. I'm also going to come in and
right click and I'm going to let's shade move
Shade Atos move. Sorry, like so.
Let's bring it down. Drop it into place where it's going to go. So
somewhere around there. And then what I'm going
to do is I'm going to bring it up just a tiny bit, so I'm going to come
to face select. Grab the side of it and
bring it up just a tiny bit. Probably from halfway.
So halfway to there. And then I'll press the eye
button and bring it in, like so, and then I'll bring it up once more to
the top of there. So these bits now should be
hidden within these parts. So I don't want these
parts showing through. Now, what that means
is I can come to each of these, join
them all together. So press Control B Control J, sorry, join them all together. Go over the top, and then seven. And what I want to do is I
want to delete all of these. Now, you can see, if I grab this face here, this is
where it comes up to. So I want to delete all
of these parts here. So the easiest way to do that is probably to
come into Y frame, press C, bring it out, and just select them
all there like so. Then press delete and faces. Delete faces, bring them back, and there we go, That is
what we should be left with, and now I've got rid
of a lot of those. And now let's bring
up this part here. So if I come back to this part, then I'm going to press the
I button and bring it in, press the E button,
like so, bring it up, and then the eye button, sorry, not the eye button
and bring it in. Like so. And there we go. That is looking pretty nice. Now I want to bring this
up because I want to see how tall this part
here is going to be. So with the spire going in here. So something like this, then
let's bring it in again. So I and bring it up and
E and then bring it in. So S, bring it in, like so. And from here, we can
actually work on this more. So just focus at the
moment on bringing this into that
spire that we want. So E like so, and there we go. All right. Now we've got something
that resembles like this. Now, I don't want to
just leave it like that. I do want to add in a little bit a bit of extra stuff in here. So what I'm first
of all going to do is bring in an edge loop. Control our left click and
let's bring it up to here. And then what I want to do is I want to bring this point in. So number of ways of doing
this. Alt Shift click. If we bring it in then press E, you are going to
get some overlap, so just be aware of that. I'm just going to press
lns and bring it in. Like so. And you can see on
the left hand side here, I press Space Bar by mistake. If you ever see
that, it just means that your animation is running. Okay, so we brought that in. Now I want to do is just
get rid of this top. So I want to grab all of
this going around here, Alt Shift click Delete faces. You're still going to be
left with another bit, which is this part here. So Alt Shift click,
and delete faces, like so, and now join them up. So if I come in, Shift click, Alt Shift click, right, click Bridge edge loops. Then you should be left
with something like this. Alright, so far so good. Now we want some something
on here, I think. So at the moment, we've got them pretty much always going out. So this one here, you know what? I'll put an edge
on here as well. So Control R, left
click, right, click. Control B, pull that
out, and then E, enter lt and S, and pull that out a little
bit holding the shift. Like so. There we go. And now on this bit, I'll do kind of a similar thing. So I'm going to press
Control R. Left click, bring it up a little
bit. Control B. And then eat to lns, pull it out a little bit,
like so, and there we go. I'm just making sure that it's fitting into everything
else that I'm doing. And now on this part here, I want to have some parts that are
going to be coming out. Now, being as this is, as you can see, 45
degrees going over there. So 22.5, I'm actually, first of all, going
to bring in a part. So I'm going to press
Shift A, bring in a cube. I think I can work with a cube, and I'm probably going to split this off
because it'll give me a little bit more variation into what I actually
want to do with this. So if I put this here, like so. And then I can maybe round this little bit off and
then pull it into the top. So I think, first of all, we'll press Control, we'll bring in five eedge
loops, maybe. And then what we'll
do is we'll grab the center one. So
just this one here. I'm going to go over the
top. And what I want to do is round this off round
about the same as that. So I'm just going to come
in and if I pull this out, then, you can see that I need to pull it
out and bring it in. So if I bring in
this through here, now you can see
something like this. Now, have a look
and see what you think and I don't think
I actually like that, so I'm going to try
a different one, so we'll go with a round sphere. And again, we'll
go over the top, round it off, like so, and I think I'm probably going to like that much, much more. Now we need to do is
bring all of this back. So turn off proportionality. We'll grab this like so, and we'll bring it back
to this point here, and now I want to bring it in. So I'm going to press chip
select, control select, make sure it's on global, then bring it back. Like so. And I'm also probably going to bring it in as well.
So let's come in. Grab these ones, and X
and bring it in. Like so. I might even just put
on one more edge. So if I grab all of
these, press tab, Control A or transforms right click set origins, geometry, right click, shade, auto smooth, and then let's put
it one more in here. So all I'm going to do is press the eye button to bring it in. So you can see it's not
coming in where I want it. So what I'm going to do is I'm going to go on
the press Control, bring it back to this point, press control law, bring
it down to this point, and then I'll come in again
and grab these, like, so enter lns, let's bring
it out in that way instead. And I might even then just
get rid of the backup here. So let's have a look
what that looks like. And it looks like now it's actually holding all
of this together, and that's exactly
what we wanted. So I wanted to hold, you know, this big
spire on there, something, at least, holding
it on. You know what? I think I've actually
done a good job on here. So what I'm going to do
is just come in now. I'll come to the back of here. So Control click, Shift
click on these points. Delete faces, and then
come in and just shift, click, going along this way, like so, then this off. And then I should be
able to pull it back, pull it back, pull it back into the place
where I want it. And, yeah, that's
looking good now. And I think I'm happy. Now what I need to do is I
need to rotate it. So we want it in
line with these. So we need to rotate
it from here. So set origin, three D cursor, and then R Z 22.5, like so. And then we can do Shift D, or Z 45, Shift D, or Z 45. And there are other
ways of doing this. But honestly, guys,
the amount of time it will take you to
set up, it's not worth it. You can use an array on a
circle and all kinds of stuff, but honestly, this is the easiest way that
you're going to find. Alright, so far so good, let's have a look then
at what this looks like. We might want one more
bar going over there. I'm looking around here. I'm going to actually put
it onto Rendered view, and I'm going to
save out my work. And that's what
we've got so far. So let's go to file,
save out a work. And I think actually that's
looking pretty good. I might want one more
bit coming out there. So if I do that, though, it means I'll
have to bring up. So what do I mean by
what I'm talking about? If I come in, press Control R, and bring it up into here. Let's just give her a try and
then bring it up into here. So control like so. Let's go. Click Eto Alter Ness, bring it out just to this point here,
where it goes around. Like so. And now let's
work on this part. So on this part,
I'm gonna bring in. So I bring it in. E, like so, and then I
bring it in once more. Now, this part here
I'm going to use to create my spire Spire. Spire. Spire. This part on here. So you can see it goes in, and then it comes out like so. I'm going to create or recreate
that on the next lesson. I'm going to put that
over the right hand side, and I'll recreate
on the next one. Alright, everyone. I hope you enjoyed that, and I'll
see you on the next one. Thanks a lot. Bye bye. Oh
152. Modeling a Stylized Tower Cap and Spire in Blender: Welcome back if you want to blend the building master class from concept to final render. This is where we left
it off. Okay, so now let's just press Shift D because we don't want
that to be part of it. I'm going to pull it
up very slightly. Press the P but
selection like so. Now I'm going to
come back to it. And then what I'm
going to do is reset the transform first of all, set origin geometry, and now
I want to bring this up. So I'm going to come
to Phase select, and I'm going to bring
it up if I press one, I'm going to bring it
up to roundabout here, and then we'll have
this going in. So if I press Control, bring in a few edge loops, always one in the middle,
left click, right click. And then all you're
going to do is grab the one in the center, put on proportional editing, and then press the s button to where you actually want it. So you can see maybe, maybe something like this. And now we'll go to
the second part. What I'll do is I'll
go to Edit mode, take portional editing off, and then we're going to
press E and pull this up. So E, not, E, pull it up, and then Alt Shift and click, E, enter S to pull it out, like so. Now, of course, we want
to zero those off. They're slightly bent, I think, so we'll do what we did before. So grab this one, grab this one last, and then S, Z and zero, like so, to zero them out. And then the same for the salt Shift click Alt Shift click, S z zero to zero
them out, like so. And there you go. You should end up with
something like this. Now, let's bevel these off, so control a Control
Shift and click, sorry, and then Control B, level them off a little bit, so just to make them a little
bit more rounded, like so. And now run to the final bit, which is this spire going up. So I'm just taking a step back, looking at how that
actually looks, and now I'll put on this spire. Okay, so what I'm going to do is I'll press
E to bring it up. I'm going to press I actually. I think I'll bring it in
just a tad more like so, and then I'm going
to press E and bring it up to how
high I want it. Now, first of all, let's look
at how high you want it. Definitely wants to
be higher than there, though I think that sort of
height will be about right. And what I want to do is
bring in some edge loops. So control R, bring
in some edge loops, like so, left
click, right click. And on this one, what I'll do is I'll bring it in from the top. But if I put portion editing, I should be able to
then pull this out and bring it in from
the top like so. Now, it's up to you
whether you want to go straight,
completely up to you, or you can come in
and use the shop, for instance, and you'll end up with something
more like this. Or let's have a
look at the root. Like so. I think you know what, maybe the roots
going to be better. So right click Jade Auto Smooth. Double tap the A,
and there we go. We've got a spire on there. Now, the one thing, I
think is at the moment, this looks around the
same size of these. I think I want to make
it a little bit bigger, so control a I'll
transform set origin, who geometry. Now,
we've got a choice. We can either press S and z
and pull it up like this, pull it up like this, and
make it bigger in that way. So it's J slightly
bigger than these, or we can just press S and make it slightly
bigger the other way. So if I go back before, and I just press
S and pull it up like this, and I
think, You know what? I think that looks
better. If I pull this up now, into place. So I'm going to pull it
up up up into place. So double tap the
e, and there we go, I think that looks bad because it's a little bit
bigger than these, and it looked a little
bit too dinky before. So, yes, I'm very
happy with that. Now, on this one, we're probably going to be better off
joining everything together. So joining all of these parts
together, let's come in. Like so, like so, like so, and then control and
J, join them all up, Control A, or transform
set origin to geometry. Okay, guys, so we've
got one more piece now, one more piece that's going to come around this part here. So we can see here this
is what it looks like. We might want to think
about getting rid of the front off here
after we've actually built this out. So
let's do that first. So first of all, then,
if we come down to here, we definitely definitely I want to bring this back
so that it's level with. I'm just wondering if I
want to bring it back. You know what? I think what I'm going to
do, first of all, is, I am. I'm going to bring this
back before I do anything. So Alt Shift and click Altnss drop it back
without the portion in on. So lns, drop it back. And what we want to do is
just be in front of those. Then what I'm going
to do is that set this outside for me. You can see it's still quite
far away on this outside. Still, it might be it might need bringing back even
further than that, you know. So what I'm going to do is test, bring it back even
further, look underneath. Now, I can imagine my columns coming up here, so
they're not quite. Let's go back around there. Okay, now let's come and what we'll do is we'll
bring this part out. So Control R, bring
it down, like so, and then I'll bring this part, Alt Shift click, E enter alters. I'll bring this part
out slightly so we can see now this is what we've
got a little ledge, like so. Then I'm going to
press Control R, bring it down to here, and then I'm going to
bring all of this out. So Alt Shift, and click, E, enter lns, and bring
this part out. Do here. And then finally, I'm going
to bring the top bit out. So if I actually come under, so shift in H, hide
everything else. Control seven to go under. I want that bit that
I've just done, like, out a little bit further. So I'm going to
go Control seven. You can see it's out
a tiny, tiny bit. Let's make it a little bit more. So ln, a bit more out, like so. Alright, that's looking better. Now, tab, lth again,
come back to it. Save out work, so file and save. And now we'll come to
the big chunky bit, so control, left click and we'll bring it
out from here then. Then we'll go in,
Alt Shift and click, at enter Alter ness, and bring it out, like so. And there you go,
now you can see that's looking very, very nice. Now, you might want
to put some things in here, like, I don't know, a couple of balls or something completely up to you what
you want to do with that. Now, the next thing
is, we don't want this part on here because we're
building up through this. But if you want to
save all of this now and then go in and change, you know, bring it in before doing any of that you can do. But I always think that
if I keep this in here, it's going to interfere with this front part
I'm doing on it. So, in other words, what
I'm trying to say is when we come to join this all together, just
have two of these. So, in other words,
just select it all put it over here somewhere, you know, shift, put it
over here somewhere, and then you'll be able to use it in your own resource pack. For me, though, what I'm going to do is I'm
going to press Control R. Left
click, right, click. I'm not going to
press, if you notice, Control R two,
left click, right, click, and then pull them
out because I could do it that way as well to pull
them out and then delete it. Why? Because they're
not straight. And we can obviously
straighten them up. So if you're doing it that way, you can straighten
each of these up, but I'd sooner do quicker
workflow, which is Control. Left click, right
click, Control B, bring it back, and
then that's going to be able to place it
wherever you want it. And I just find it much, much easier to do it this way. So I'm going to leave
mine like that. I'm going to press
Delete and faces, and then we've got all
of these faces in here, which I'm going to fill in. So old shift and click, you can see, A were going to be able to fill those in?
Let's have a look. Shift H. Yeah, this is
what we're left with. So we do need this bomb on here. So you know what? I'm not
gonna fill those faces in. And the reason I'm not
gonna fill them in is because it's going to
be quite hard work. And do I need to fill them in? I'm not gonna fill them in. I'm gonna leave them like that. Alright, so now we've
got all of this. Now, when we come to
join this together, we're gonna have a
problem with this pot, so let's even get
around that first. So we're gonna join
all of these up. You can see here. We've
got our old one in here. Not that one. This one here. We don't want that, so
delete it out of the way. Now, let's join all
of these parts up. So if I grab this with G, you can see I can grab
this then, grab this then, and grab the bottom, a knife press G. I should
have the whole thing, and I should be able
to join them up. But what's gonna happen
is, as soon as I join them up, this
is going to mess up. So Control J, and there you go. You've got some shading
issues on there. Now, what I want to
do is, can I come in, grab all of this and right
click on Face select? Right click, and we're
going to shade smooth. Now, has that fix the
issues? No, it's not. So can I come in and
put this on ten? Yes, I can. Now, we've got some issues on
here, as you can see. Let's have a look
if I bring this up. So where can I get it up to? So 13 looks about right. I've got no shading
issues on there, and they've got no shading
issues around here. Good. That's great to know. Now, let's come in, add
in a generator of bevel. And what we're going to do
is now just check our bevel. You can see that our profile, note point, not not three, and then geometry, turn
off clamp overlap, and now I should be
able to bring this up like so. So where
do I want it at? Note point, not not
five. Let's try that. And we've got some
issues on here, as you can see. This one here. I'm wondering, it's the
only issue we've got, as you can see, and
sometimes this happens. If I turn clamp overlap
on, you can see, as soon as I brought
in the bevel, it brought in that issue. So I'm wondering if I just want it on if this is
too sharp an edge, and it's probably just
too sharp an edge. So I'll turn clamp our lap off. I'll put it on 0.95. Now
I'm looking at this part. What I want to do is
I want to turn up the angle, turn down the angle. Sorry, keep going. Keep going
one more, and there we go. Now we've got that
smoothness back on there. Everything is looking cool. And we've got more importantly, we've actually got bevel
on there, as well. And yeah, really, really
happy with how that is. Alright, so let's now, save our work. It'll save. And on the next one,
then what we'll do is we'll actually get all
the materials on here, and then finally,
we can actually start working on
this part down here. So the main front
of the building we can start working on
when we've done that, then, guys, we've
only got this one left before we can actually start building the
other stuff out. So we're really moting
along here now. You can see if I do this. So if I come on, double tap the e. How is
that coming together? Alright, it looks
beautiful, guys. You can't see I forgot
to change my chimneys. I'll do that first
when I come back. Alright, everyone. See
you on the next one. Thanks a lot. Bye bye.
153. Placing Chimney Assets and Adjusting Building Depth: Well, we come back
if we want to blend the building master class
from concept to final render. And now let's come in then
and we'll put this over here. So I'm going to press seven. And I'm going to press
Alt D. Now remember, with your chimneys, put them in your resource pack if
you want them in there. For us now, though,
we're just going to press Alt D. We're not going to bring them over
there because that then we'll just
extend the course. I'll be way way longer
than it needs to be. Now you guys know that.
There's no point keep going over the same ground
over and over again. The main point is now to actually get
everything built in. So I don't think I'm leaving
you in the lurch you know, to go and put them
in because we've done it so many times now, you should actually
know how to do that. So now I'm going to delete this one out of the way, like so, and we should be
left with something like this, looking very nice. And now we've got
one more to do. So I'm going to grab it again, Alt D. I'm going
to bring it out. Z, 97 to go over the top. And then let's put
it into place. So G, it it right into the place where I want it somewhere around there. Then I'm going to drop
it down into place. Around here and then
delete out the way. And there we go, now with this one, let's
just zoom into it. Just want to make sure that
this is above that part. So it's fitting in like that. And then it's up to you if you
want to change the height. So you can see here this one
we could bring it up even somewhere like that to
be more in line with this or somewhere in between. I think I'll bring it up a
little bit of difference. And the reason I
do that is because then we've got, again, depth. We've got depth throughout
all this building, and that is the main
thing that you try and do when you're
creating something. Not every side is the same. Everything looks
different. As you can see, going all the way around here, we've got different
points in here, different things going off, and it really looks
like a proper building, and that's what
you're searching for. Okay, so now what
we're going to do is bringing the materials
for this part here. So I'm just going to come
in to Asset Manager. Because we need a main material. And what I'm going
to do is, I think, so it's pretty much if
we go to the reference, so we'll open up the
reference for now. You can see if I
bring this over, it's pretty much the dark stone. I would say the
lighter stone on here. This is the metal, and then
we've got some gold on there. So it can play around with
the dark and light stone. We've got this
green bit in here. So let's try and stick relatively close
to what we've got. So we're going to unwrap
this as well separate. So let's come in we've got
ambient occlusion on, which, on this occasion
is actually good because I can just
minus this one off, and it's going to just keep
in that ambient occlusion, which means that I can add them on a little
bit by little bit. So let this load. And then I'll press Plus and bring
in my new material. So first of all,
let's though come in, press L smart UV Pj. Click Okay. And then
what we'll do is we'll come now plus down arrow. We were looking for stone light. So stone light, this one here. Click a sign, and there we go. That's that part.
And don't worry. We'll have a check on this
once we've actually done it to make sure that the stone is lining up with the stone
we've already done. You can see probably
isn't probably too I probably needs to be made a little bit
smaller. You know what? I think I'll do that now, so I'll go over to U Vediting. Tab, let's go into
it. So where is it? Let's press Alt H.
Bring everything back. If not, we'll just press
the question mark, so come around to it, press tab. And here we go, now we
can see what we're doing. And if I come in and make
these slightly bigger, now it's probably
lining up more. Maybe it is, make them
smaller or bigger still. There we go. Now it's
lining up with that. You know what I'm
going to do? I'm just going to put rendered mode. Again, I'll save all my
work before doing that. Put on my rendered mode just so I can see
what this looks like. I can't really see the
stone at the moment. I can see we've got a little
bit of an issue with these. But what I'm going
to do though is, first of all, let's just
turn around our sky. I'm just going to
turn it around, turn it around. It's
shining on there. So I have a good
view of what I'm looking at here, and
let's have a look now. So we can see. We've got a
block here for some reason. Don't know what that is. I'm
going to just move it over. See if it's that. Yes, it is. There we go. Now that's
looking very, very nice. Okay, I'm happy with
that. Now, let's go back. In fact, before that,
we'll grab this pot. I'm going to press and on Rap. I know that's not going to work. So probably on this bit, I'll press U, smart UV project and see how
that actually works. Sometimes when we're
dealing with these parts, we can get away depending
on the material. So let's look for
our material now. Here is the material
that I want to use on this so you can
see metal green. So let's just press Plus. Metal green. Drop that in place. And then what we'll do is tab, click a sign, and
there we go, now, let's go back to our UV diting, look back to UV editing. Let's have a look what
that's going to look like. So I'm going to press
the tab but. And again, if it's like this, go
over to your shading. Come out and just make sure that you've got
it on base color. So click on Base Color, back to the editing,
then it should be fine. Uh, light base color. I think it's been added
a lot of green in here. But let's have a look what
it looks like regardless. Okay, so now I'm going to do is, I'm just going to grab them all, press S, and bring them in. No, not that way.
Bring them out. Let's have a look on
that. And there we go. I think that's looking
how I actually want it. Something like this. Okay, now
let's come to these parts. So I'm going to come
in and grab each of these parts going round and I'm going to unwrap
these separately. And let's see if we have
any issues with these. So, MU V project, click Okay. And then what we'll do is
click a sign on the material. So it's stone, click a sign. And let's look at what they
look like. You know what? They're looking great as is. Now, at this point, you have
another option as well. You can grab the
center of this and probably get away
with bringing it out a little bit if you want to. So you can probably go
away with bringing it out. Make it a little bit
bigger if you want to. So let's see if I can bring
it out just slightly. And if you bring it out
like here, let's say, for instance, you can then come in and just bevel
off these edges. So you see these edges
here that are kind of poking out, we could
probably come in. Let's just try it on this one and see if I can
actually get away with it. So Control Shift and
click Control B, bevel it off to go in. And
that's what I'm worried about. Am I going to be able to get
away with it? Probably not. I'm going to bring it out to I'm just wondering
if I bring in, so if I press Control, I can bring that round
to here, let's say, just before there, and then I could get rid of that
if I'm bringing it out, just looking at how I
actually want this. I'm going to put it back a
minute and just have a look. So before I brought
that out there, am I happy with how thick these are is my point on my own? Or do I actually want
to bring it out? Let's have a look with
it brought out again. So I'm just gonna press this and I'm gonna bring
it out and not really worry about that. I'm just wondering if I want it, you know, coming out to
something like that. Is that gonna make
it look better? It might actually do. It might do. Just wondering if it's worth the
trouble to do it. Just gonna go back.
Let's have a look. You know what? I think
it is worth doing that. So I'm going to come in. I'm going to go to modeling. And I know it seems a
bit of faffing around, but honestly, I think for this, it's probably going
to be worth it. So we can see this is kind of the scale
that we're going for. Now, it'd be handier
if I could actually, you know, bring it out and
then use my bevel on here. Let's just press Searchig to hide everything
else out of the way. Now, I've already put
a bevel on this bit, as you can see, and I'm probably going
to have to go back before bringing it all out. So let's go back. And let's see before actually,
you know, there we go. Now, let's see if I grab this, have I got my bevel on there. Yeah, I've still got
my bevel on there. I'm going to see how far I can bring it out, bring
it out, bring it out. I can bring it out
all the way to there. And you know what?
It might just be worth just adding a
bevel on these parts. I'm going to come
in Control Shift click and just grab each of these parts that
are sticking out, like so, like so, and like so. Now I've grabbed them all.
What I'm going to do is then I'm wondering if I can
just isolate these off. Now, I'm not going to
do that, actually. I'll just press Control B
and just pull them down, pull them down, pull them down just before they
get into that part. Like so. Now, let's
have a look at that. There we go. We've
still got one here, so I'm going to have to
come back even further. So I'm going to come
back Control B, pull out, pull out,
pull out, pull out. Let's have a look now. Now, none of them
are stuck out there. I'm looking at the
shading on there, guys. You know what? I think
we've got away with that. And I'm also looking at how far This is out
compared to the others. And you know what? Yeah, I think that looks better like so. So I'm going to leave
mine like that. Now, let's carry on working. I think actually what we'll
do is we'll save it out, and then we'll
carry on working on the next lesson because I think we've done enough
on this lesson, and we should then be
able to get it finished off and looking
really, really nice. Alright, everyone, so I'll
see you on the next one. Thanks a lot. Bye bye.
154. Assigning and Balancing Materials for Realistic Surfaces: Welcome back everyone to blend the building master class
from concept to final render. And now let's come.
Let's do this bit first. This bit seems an
interesting bit. So what I'll do is
I'll grab all of this, come over to this, click the downer, and
we're looking for metal. So metal building. Let's click a sign
then. Let's wrap it. So smart UV project,
and there we go. Now, what I want to do
is I want to come in and make sure that this bit
going round is actually gold. So Alt Shift click Control plus, Control plus, Control plus.
Go all the way in there. Press dot just so you can
see what you're doing. Control plus once more. Alt Shift click just
to minus that off. Bring in then your gold. It's all been unwrapped anyway. So we should be able to
bring in our metal gold, click a sign, and there we go. That's the gold on
there. Now, let's come to this part here. So this part here, let's go. I'm going to select all of that. U, Smart UV project, click Unwrap, and let's
go to Stone Light. Click a sign. Let's
have a look at that. That's actually looking
very nice already. Now, let's come to
these outer bits. So we're wondering whether we need to make anything
lighter on here. Yes, we've put in
some parts here, which will make it
so we can do that. So this one here, this one here, conto plus plus arrow
down and Stone lighter. Click a sign, and there we go. And then we can
do the same thing on this part here as well. So if I come into each of
these now, going round, clicking them all, like so
and like so and like so, and smart UV
project, click Okay. Don't to click a sign,
and there we go. Let's have a look at
what we've done there, and it might be the case
that the stone light on these might not
actually work. So let's put it on the
stone light. Click a sign. Double tap the A. You know what? I think it looks better
the way like this. Now, the other thing
is, if we look on here, we can see that these instead of being stone light of gold, so we might want yours to
gold trim, maybe on this one. So let's have a look. So
old shift clay Control plus. Test this out. Double tap the A. Yeah, I think that might be that
might be a little bit better. Do it like that. Alright, I
think that's looking good. Okay, so now let's go to Object. Let's put it on Object mode. Once again, save work. Now, let's get a
front view of this. So we can see that this
is quite intricate. And when we're
building this out, it's probably going
to be better off that we start with the door because then we're
going to have somewhere where we understand where
we can build this off. So I would say it's
probably better off starting there. We can see. I've got a better view of this. So we can see we've
got a side view here. This is my door.
I've got my columns. I've got this big
coming in here. I'm not sure if I've
got these bits on. I think I have. So let's
start with the door. Then build out these sides, then build up the columns, and then finally build this bit. So let's put that over there, and you can see here
I've got these bits on. Let's come in then and
grab the front top here. So just the front shift desk, cursor selected, like so. Now let's go to
our asset manager. We've got two things we
need to bring out here. One of them if I put
it in object mode. If we go to the modular pack,
one of them is the doors. So if I come to my doors, it's this very tall door here, so I can just bring that in, drop that in place, and
the other one then is the arches which is this
one here as we can see. Alright, both of those
now I can put into there. So back to modeling.
Let's come in then. And first of all, I'll
bring this one in. So shifts and
selection to cursor, and then I'll bring
my door, shifts, and selection to cursor. Now, of course, they're
not going to line up, so I need to line them
up, first of all. So let's first of all, bring up this pot to make sure that it's
actually in place. Now we can see that it's nearly touching
the floor. Not quite. So what I'm going to do is
I'm going to bring it down, bring it down just so it's
in that floor, like so. Then I'm going to bring down
my door. So my doors here. Like so just so. It's fitting in there beautifully, like so. Now, the other thing
is with the door, how far back do you want it? You'll see on here it goes all the way back
past this part here. So let's actually
have a look at that, so you can see it's
going all the way past. Do we want it to go any further? So if I pull it back
a little bit further, I can see where maybe
where I want it to. Now, what I'm going to do
with my door now is press Shift H. I'm going to
bring in then a cube. So if I press one, shift A, let's bring in then a cube. We'll bring it down to here, and what I want to do is
make sure that it's just in just past my door. So if I press S, should be
able to bring it down to here, bring it all the way near
enough down to the floor, just above it, like so. And I'm just wondering
if I bring that back, I'm going to have a
little bit of a ledge, so I'm going to bring
it down even more, just level with. Oops. Like so. Let's bring it up a little
bit down then to there. Alright, now, let's
bring this up. We're going to bring it
all the way up to the top. It's going to make it
way easier for us, all the way to the top
where the door is. And then we're
going to press tab, Control A or transforms
to Origins geometry, and now I want to
bevel off these sides. So if we come to
this one, this one, press in one again. Control B. Let's bevel them off, turn
it up, bring it down. Where we're going to be
able to get away with it. Like, so let's turn it up then. And then what we'll do is bring them down a little bit more. Like so. There we go. Now I can press Altag,
bring back the other part, and then I can grab
this one and this one, press Control minus, and then
we go, There is my door. Now, from here, I can see how far back I want my door to go. You can see if I bring
it back any further, this will then need
to come back further. Now, if we look on this, on this, it's only
really the top. So you can see this is coming out this far, this is this far. We need some other
things to fit in here, but we can definitely
probably pull it back a little bit. Sorry,
this bit here. We can probably get away with pulling this back
just a tad mow, like so, and then bringing
our door forward. Just to here, double
tap the A like so. And now, it's actually looks as though it's
going into the wool, and that is way better
than in not doing that. So if I come now to this part, before we actually apply that, the one other thing
that we need to do is we need to unwrap this. But if I press shift H, let's get rid of the top
and the bottom, like so. So let's delete it off. Basis. And now what we'll do
is we'll come back to here, come over and just hide
this part out of the way. And then I should be able
to press A. You know what? I'll think I'll
marcasm I'll mark asm on the part where
we're never going to see. And I think that's in here. So tab Altag, bring it back. Yeah, we're never going
to see that part there. So I'm going to
come back to this, press ShiftH, hide everything
else out of the way. Mark myseme here.
So mark as like so, and then it should go
all the way around. Now, if I press L,
U, unwrap like so. I should be able to then
come to adding the material, and the one we want to do is going to change this
to the brick normal, and then I'll go to UV
Editing. Let that load up. Of course, we need
to spin it round. So, 90, like so. And finally, then
we need to make sure that this brick is
the same as the others. So TH, let's bring
back everything. And let's have a look at
the size of the bricks. And these are massive. We
definitely don't want that. So what we're gonna do is
bring it out, bring it out, bring it out to the
size of these bricks. We can even press G
and Y and move them up into place and making sure
that they kind of line up. Now, you can see these are
still a little bit too big. So let's bring it
in, bring it in. G and Y. Line them up
a little bit better, like so, and there we go. Now you can see, they're
looking perfect. You can see now if I come
in and put that back on, you can also see now
if I apply that, get rid of this, delete,
and there you go. That's what you're left
with. Fantastic. Now we need to bring in our columns. So let's bring in our columns. So I'm going to go back to modeling because we already know the columns are
already laid out for us, and I'm looking now we could
use these huge columns here. You can see that
these are separated, so I can shift D
and bring those up. Let's see if I can
actually do that. So shift D. Let's bring them up and let's pull them into place where
they're going to go. Now, they might be a
little bit too thick. Now remember, one thing is, once I bring them up, so I'm going to bring them
up into place. And I think with these, at least these columns, I'll have a bottom on them as well. So I'm going to
just pull this up. You can see they're a
little bit too big, but we can actually bring down the width. I
think it's the width. Yes, we can. So we can bring
down the width to not 0.370. We can bring down the
thickness to not 0.370. Now, I'm just wondering I'll
put them slightly more. I'll put them on no 0.4, and I'll put the thickness on
note 0.4, and there we go, now they're going to fit
into place very nicely. It's a little bit
close to there, so I'm going to pull
it back to here, and now I want to make sure that I've got a bottom in this part. So I'm going to come
over this one here. This is what I want. This
one is obviously mirrored, so I'm going to pick this
one. I'm going to press l D. And then what I'm going to do is bring it over, hopefully. No, I'm going to
pull it over with the green and then
put it into place. So shift that selections cursor. And now let's drop
that and hopefully, it's going to come into place. So I can see here
drop into place, pull it down into place like so, and then bring both
of these down. So I should be able to
bring this down now. Just drop into the top of here, grab this one, all D, bring it over to the other side, put it into place like so. Double tap the A, and let's have a quick look once we've saved
out what that looks like. And then finally we just need I think just one
more piece in here, and then we can
start on this bit. So let's have a look
on the rendered view. Yeah. Perfect. Perfect. Now, I'm very happy with how that looks, and I'm going to just
look over my reference. Yeah, you can see this be here. So this be here, do I need it? Probably. Probably.
So bring that in, and then we can start
building this part out. But yeah, that's
looking really nice. Alright, everyone. So I'll
see you on the next one. Thanks a lot. Bye bye.
155. Aligning Center Geometry with Modular Elements: Welcome back, everyone to blend the building master class
from concept to final render. And this is where
we left you off. Alright, so now let's start
on building this part out. So if I go to object mode, what I want to do then, again, make sure that you've got your reference handy so that you know what I'm actually doing and you can
see what I'm doing. First of all, then, let's
build out this center point. Now I'm going to
need some parts. And it's probably
worth stealing some of the parts which
have already built like this part
here, for instance. I can bring this part in. I can probably then put that over the top
just to sit on there. So let's actually grab
this bit, so hold deep. We don't want anything too
different. That's the thing. Or Z 90, and then shiftiness selection to cursor and then
let's pull it up. And pull it out into place, going to the top of here. Now, what I'm also going
to do is I'm going to get the three of the side points, so I'm going to grab three
of these parts here. I'm going to press all D. I'm going to bring
that over as well. Z -90. And then what I'm going to do is press
one to go into front view, shift desk and
selections cursor. Now, let's bring out
this point here, so I'm going to bring
this out over the top, so I'm just going to
press dot, bring it out. Just going over
the top of there, and then work out. You can see as well my door really isn't in the It's even not in the center.
I'm just looking. Let's just press
one. It definitely is in the center of here. I'm just wondering if it's
this point. Let's have a look. If I grab this, should be able to press Shifes cursor selected. And then let's grab this one, Shiftes and selections
cursor. Bring it down. And let's pull it out now. And it's still not in
the center of here. So that might be let's have a look. That's
in the center of there. I don't want it too lobsided. So if I pull it over here, that seems to be
more in the center. I'm just looking at my door,
looking at everything. And I'm just wondering, because
I know I centered it up, I'm just wondering why
it's a little bit out. And instead of doing
that, what I'm going to do is just grab this shifts, curs selected, like so, and then shift Des and
selections cursor. Now let's bring it up. And I'm wondering, this
bit isn't in the center. Let's have a look
at this. This is perfectly in the
center, as you can see. Why isn't this in the center? Is it let's s. There we go. That is the reason because I'm going to press Shift
D, and then I'll show you. Let's just delete this
one. Grab this one, and let's press Control
A or transforms set origin to geometry.
Now it's in the center. Now we should be
able to come in. Shift desk, selections
cursor or cuss to selected, and then shift desk, selections cursor. Now
let's bring it in. Yeah, and now it's
actually working. Okay, so that was
a bit worrying. I thought, Oh, we've
really messed up here. Now, one thing I want to do with this one because I want to
make it a little bit smaller, like so, and I want
it come in just out, like so. So something like this. And then I'll press Old D, bring it out to the other side so that it's
actually going to be supported then by these parts
that are going to come up. So if I pull this
up, I need to then make it a little bit
bigger, like so. And then pull it
into place like so. Now I want to do is I want
to put it on the other side. Now, if I press one, I can see I've got this much
of a gap there. I could mirror it
over the other side. Or I think if I mirror it, and then I press Control A, that means then that it
will not work properly. So let's do old D instead, and we'll bring it over
here over to here. But it's just in the
same position. Like so. And then we'll just
pull them both back into place, like so. And it's really
worth on this point, taking your time with these, just to build this out properly. Now, where is the
top going to be? So where is this top going
to come and how far are these parts then going to come up? So we'll
put that in now. So what I'll do is
I'll press shift day, bring in a cube, and this
is just a placement. So I'm just going to press S said and then put it into where actually it's going to come
somewhere around there, and then S and Y or S and X. Let's pull it out into place. Something like this, maybe
a little bit further in, so S and X, something like that. And then let's see
now if I bring in a cube, where is
that going to land? Where is it going
to land on here? Maybe these are a little
bit far out, let's see. So what I'll do is I'll press Shift A, bring in another cube, press S and X, bring it in to get
the right thickness that I'll want, bring it over. And you can see now if
I pull this onto here, it needs to be
thinner than this. So S and X, bring it in, press one, line it up. Like so. And now
let's pull it back. So and Y, pull it back a little bit, and then
we'll bring it up. So if I bring it
up now into place, let's look where
that's going to come. So if I put this here, you can see it slightly slightly out, which means that we should
bring these in a little bit. So what I'm going to do is
I'm just going to bring this and this over because I don't really want to
crossing it over to this, so I'm going to bring it
over slightly, like so. And now you can see that's
how far brought it now I'm going to do the same
on this one, as well. So instead of doing that,
I will mirror these over. I'll use Shift D instead. So what I'll do is I'll delete
this one out of the way. I'll press Shift D on this one, hide it out of the way, delete this one, old age,
bring it back. And then now right click
Set Origin, three D cursor. And because we shifted it, we should be able to
get away with it. So we've got an array on here. Let's take it off. We're
not going to need that. Let's add on then a mirror and put it over the
other side like so. And then we'll do we won't
do it. Yeah, we will. We'll do it just a C where
everything's going to line up. So if I do the same
thing now rightly, set origin to three D cursor and then just
Control L on these, and we'll copy modifiers
and there we go. Now we can see how far
now we need to come out. So these here need to come
out round about here. So we'll actually
work on that now. So let's first of all, though, bring it out to
where we want it. So I'll come round
about this point here. So if I come now, it's
got a mirror on there. C trolar, bring it down to here, like so, and now let's
bring these out. So I'm going to bring
it out then over here. So bring it out over to here, like so, and then we'll
have the front bit. So this part here,
so come from here, controlar, bring it down, and then we'll have
this part out to here all the way out. Like so. So it's like a three
stepped approach. And then what we're
going to do is now I will reset the
transformations, put it back to the sense of
subset origins three dcursor. And then what I will do now
is bevel this part off. So let's see if we
can bevel this part. So this part on here off and more press
Control B, bevel it off. And I think on this part, at least, it should probably be a little
bit rounded, like so. Let's turn up this so
you can see now how we can have it can have
it very rounded or not. And we need to look like it's
actually going to hold it. But if we put it in there,
let's turn up then the amount, and let's also, pull it in or pull it out
wherever we want it. But maybe something like this. Maybe we can get away as
well with turning that down. Let's press tab and
shade at smooth. Yeah, I think that
bet looks good. Now let's work on this bit. So this bit here, let's come in. Car troll B. We'll
bring it up to that. But what we're gonna do on
this one is we'll bring it in. Like so, and I'm
just wondering now. I think actually that's
going to look very good. The one thing I would say is, let's delete this
going around here. So this edge here, I could probably delete and
dissolve edges, so have a look and do it again, dissolve edges,
and now Alt Shift click and dissolve the
edges going around here. So delete and dissolve edges. And we should be left
with that now and it's pretty smooth,
as you can see. Now, knowing the original, it did look a little bit
different from this. But I'm always playing
around with these things, so shade or smooth. Always playing around just to see how I'm actually
going to do this. Because I wanted it looking. You know, that bit
there. I always felt like it was a
tiny bit rushed, and I could have
done a better job if I had a little bit more time. Now, the other thing is, I think I want to bring
this in a little bit, so I'm going to press tab A one, bring it in a tiny bit because I want to add in one
more part on here, one more part going in here. Let's see that we'll come in control click, Control click, and then I'm going
to press the I but, bring this in, and
then I'm going to press E and pull it out. Like so. And there we
go, that is what I want. And now we can see we've had a little bit of
intricacy to there. Now the next thing I want to
do is down here. So control. Left click right,
click Control B, bring it all the
way back. Like so. And then we'll bring it down. D here, and then E enter lns
and bring it out, like so. All right, that's
looking so far so good. Now, this part on here, I definitely want to make sure that these parts are in place. So you can see here that
if I move these in, so if I press tab,
move these in, I can move them into place. Like so, would you see,
is it better to do that, or should I press S and X and
pull them out a little bit, make them a little bit bigger, and then pull them
this way a little bit. Like so, too, offset. Do they look better
offset? I think they do. And then what I'll also
do is press S and X and bring this part in just so we've got that little bit
more roundness there. Maybe I've gone let's have
a look a little bit too far on that one. You know what? I think this looks good.
I think it looks good. The only thing is the flatness. Let me just turn those
down just a little bit. So now that's relatively flat. Okay. So now what we'll
do then on the next one, we'll build this part out, and then we'll build this
part out and then this part. And, you know, it shouldn't actually take
that long to do that. The one thing I
want to make sure, though, is I've got no brick. I don't want my brick really
coming through this bit, so I'm probably going
to hide the other way, but let's see how
we go with this. Either way, though, you can see, it's already looking nice. And the other thing is,
I want to make sure that the top is looking different. So yeah, I'll pull this bit out and maybe bevel
these off a little bit. We'll do the top I think
when we come back. So I'm gonna save on my
work now and I'll see you on the next and everyone.
Thanks a lot. Bye bye.
156. Beveling and Rounding Front Details for Stylized Aesthetics: Welcome back if we want to blend the building Mass class
From concept final render. Okay, so let's pull this out, first of all, a
little bit, because I need something to work with. And then what we'll do is
just go round to the bike, press tab, come in and just grab that bag because we don't
want to waste all of that. So we're just going
to pull this out into place. Now we've got it. We can actually pull it
out to where we need it. So if we pull it out, pull it out, we know
it's just there. And then what we can also do then is come now to the front. So let's press Control R.
Left click right click. Press one to go into front view, and then we're going
to press Control B, and we're going to bring this
then just to around there, which means now
when I bevel this, I should have more control over how I'm going
to get this bevel. I'm going to press
Tab Control A, all transform set
origin, two geometry. Come to these side bits then, and then we'll just
press Control B, increase the amount of bevel, and we'll bring it
to there first. And then what I'm going
to do is come down custom and I should be
able to now pull it out, not this one, sorry,
this one. There we go. Pull it out or pull it in to
where I want it, like so. And now we should be able
to mess around with these, bring it up if we want to, and basically put it
wherever we want. We can also increase those. Like so now you can see, it's looking very nice. And I also want a front in it. So I think I'm happy with
that. Shade or to smooth. Let's actually have
a look at that. I think it needs a bit
more roundness on it. On these parts here, especially, and we can actually just come in then and bevel them off
just normally, though. So if I press Control B,
you can bring them out, turn turn this to normal
and then turn this down. Like so maybe two. Let's have a look,
and there we go. Round it off. And then
what we'll do is we'll just pull it back a little
bit now into place. So it's just under there. And now we'll do is
we'll do the front. So we'll give it
a front on here. So if I grab this
contose like this, press the ibn, and then press E and just pull
it out a little bit, like so. There we go. And then the top.
So I'll come in, grab all of these,
press the barn, bring it in, and
then press E and pull it up like so, and
there's a top on there. And I'm just making sure
I'm happy with that. And yes, I am. Yeah,
that's looking good. I'm just thinking, You know
what? Yeah, that looks good. Alright, so now let's grab our reference once
more, pull it over, so we can see we've got
this rounded bit on here with a circular
dome inside. So let's do that part now, and I have no idea how I'm going to do this,
but I'm going to try. Okay, so let's press Shi Da, and what we'll do is we'll
bring in a cylinder. We'll put it onto 24 because we're going to
make it relatively small. Right, click Shade
Auto smooth X 90. Let's spin it round
and first of all, get the size that
we actually wanted. So we want to round about here because we're going to have another
part coming up. So if I put this on
here, from there, then I can actually
slope it round and maybe then come
down to here like so. That is what I'm
going for, at least. So how am I going to do that? So I want to slope it down
and bring it down to here. So what I'll do is, I
think the easiest way to do this is if I come in,
delete the front of it, so delete faces, I could
then so delete faces, delete the back of
it, delete faces. And then what I can do is I can grab this and grab the bomb, delete faces, grab this part, L, delete faces, and
then bring in a mirror. So I can bring in a mirror now, I add in a modifier, generate a mirror
on the other side. And now if I come
in and let's say, grab this part, going from here, let me see if I can
actually do that. So if I press E and pull it
out and then E, pull it out, and then E, pull it
out, and then E, pull it out, and then E going into there,
something like that. Maybe that then will work because then I can have
the front on here. The one thing I can
see, of course, is I can see that
these lines here, they need to be a little
bit more straight. So if I bring it in, I can
straighten those off like so, and I can also press Control B and just bevel them off
and make them straighter, like so, and I can come
in then press one, arm, troll B, bevel the soft, make it nice and smooth like so. And that is the kind of shape that I'm
actually going for. Now, of course, this
part in the center, so all of this going round, I need to now split off. So I'm going to come to this part coming all
the way around here. And what I'm going to
do is press Shift D on this part and then
hide it out of the way. Now in the next part, then I'm going to come to this part, going all the way around
here, press delete, and faces like so. Now we've got two parts. Now, this part here then, I
should be able to come in, press and then press S and Y and pull it into the size
that I actually wanted, so I can pull it out, pull
it out into there, like so. And then I've got
the other part here that I should the press voltage, be able to then bring into maybe even into the inside of it. So you know
what I'm gonna do. And first of all, I'm
going to separate this off. So P selection. Hi it out of the way.
Hide this out of the way. This is the part that I've got. And I think we want
just making sure before finishing that it's
nice and slope like soap. And then what I'll
do is, I'll press E, I'll press E Z. So Z going down, you might have to press it
a couple of times and then S Z zero to zero it out, and then let's pull it up into place to make sure
it fits there. Now we can see that it's going a little
bit too far forward, so we need either something in the edge here or to pull it back, whichever
one's the case. So let's try just
pulling it back first. If we pull it back to there,
is that going to look good? Double tap the I think it does. And then what I
want to do is now, I think I want to insert. So I'm going to first
of all, though, apply my mirror, so Control
A, apply my mirror. And the thing is about mirrors, sometimes you need to check
when you've applied it, you press H, and just make
sure there isn't this here. Then if you have this
in the center of here, does it a lot with the mirrors, you will actually end up with issues with shading
like on top of here. So you can see at this point, if you delete it out of the way, delete faces, now it's gone away. So good
thing to know that. Now let's press Old Age,
bring back everything. And what I'm going to do now is I should be able to press A, delete and limit to dissolve, and then I'll bring
in this part here. So I should be able to bring
it in very nicely now, as you can see, it
should stick with them. And then what I can
do is pull this out slightly like so,
and there we go. Now, how am I happy with
that? Yes, I think I am. I think that it just probably when we've got the
other pots in, it's going to look even nicer. And I'm just thinking that this bit here maybe wants
to come out a little bit. So the way that I'm going to do that is I'll grab this bit, grab this bit going from here
all the way around to here, chifD, and then I'll try S
and Y, pulling this bit out. P selection, give me
something to actually work with Control A or transforms
set origin to geometry. Adding a modify and we'll
generate a solidify. And then what I'll do is
pull up the solidify to give us something like this. And yeah, that's looking great. Now, if I press Altag, I should be able to
bring not Altag. Sorry, Old he, like so. I should be able
to bring in this part that I actually
started with. So it's all based on here now, and now I should be able
to fill in these faces. So first of all, though, let's bring in a little bit
smaller and then let's come round and just
filling this face. So let's actually apply the mirror because we've
got a mirror on now. I'm just wondering
if I want to create something else on here, maybe. But first of all, let's
apply our mirror. And then let's fill
in this face with F, like so, and now we can actually see what we're actually doing. Let's make sure cavity
is on, which it is. And it's a little bit
harder to see on here. Now, the thing is, if
I go back to here, I can actually probably come in and make this a
little bit bigger. Let's make it a
little bit bigger. So S, let's pull it down, and it should just flow over
the top of that, like so. Now with this one, I'm going
to actually probably come in and make a boolean
in the center of here. So let's give that choice. I'm going to grab this
one, press Control minus, and then we go,
There is the boolean in, and I can pull it. Not that I can pull my
boolean out. Like so. And you can see that we're
getting in the way of this. So obviously, it needs to come out a little bit further a little bit further,
a little bit further. Let's see where we need it to. And we are getting
in way of this bit, and the reason is because not face on it. So I'm
going to put it there. Like so, and I'll
actually create a face on this part and then work on these parts on
here. All right. Let's now come in and
come to this part. We'll apply our Boolean. So this part here, Car
troll, by our Boolean. Let's then come to this part and delete this out of the way, and this is what we
should be left with. Now, we do have some
issues in here. So what I'm going
to do is grab this. Alt Shift click, press the
Fb, and close that up. And now from here
then, I can come in, press the Ibn, press
the ebon again, and then Alt Shift and
click, pull this out. And there we go.
Alright, now you can see that it's really actually
fitting the scene, and now I need a top on here. So when I bring in a top, I'm
going to measure that out, and we should be
able to hopefully plug it all into this and
plug up all these holes. So far so good, though, let's now see if we can
bring these parts in. So if I press the
Ibn, bring it in, like so, and then press the
E button and bring it out. Now, the one thing
I might not be happy with here is
just these parts here. We might want to plan those off. So if we want to plan those off, before we do that, let's
actually have a look. Here, we can actually come in and bring these down
before doing anything. So as you can see, we can bring these down and get them into the place that we
wanted just to make it a little bit more
smooth like this. Then what we can
do is grab them, and then we can press E
and pull them out like so. And there we go, that is
looking very, very nice. Now, what about the center part? Do we need anything
else in there? Or are you happy with this? Is this part this
solidify enough, or do we want to
solidify it a bit more? So we can do that. We
can do even thickness, and then it goes
to this part here. And I think, you know
what? I think that looks way way better
than what it did before. And yeah, this is
looking pretty nice. Now, if I go in,
I'm just wondering if I want to bring out
one more part on here, just to kind of go over there. Let me just have a look what
it's going to look like. If I bring it over here, does that sit better?
Let's have a look. Have a look, press
Control E, put it back. Probably not. Probably not. Probably looks bad
just like this. Yeah, I think so. All
right, let's go to file. Let's save out our work. And then what we'll do then
on the next one is we'll get this type of cynical part. So it's this part here. We'll get that in there,
and we'll see what it looks like once we've got down there and work off of that, because we wanted to all kind of come together
and plug into, you know, this part on here. And we do want a bit
of depth, as well. So I'm just wondering
if we want to, you know, bring it
out a little bit. But we'll see. We'll see. We'll see how complex
we want to make it. Alright, everyone, so I
hope you enjoyed that, and I'll see you
on the next one. Thanks a lot. Bye bye.
157. Constructing a Decorative Stone Inlay with Custom Geometry: Welcome back, everyone to Blend the Building master class
from concept to final render. Okay, what I'm going to do then now is bring in another cube. So shift a, bring in a cube. I'm going to make it
then much, much thinner. So S and Y. I'm just going to pull it
out, delete the back off. I'm not going to need
that delete and faces, and then I'm going to
pull it into place. Now, where do I want this? I want this right
in front of here. I want it in front of this. Going over this just
to hide it other way. So if I pull this up, I should
be able to put it there. And then what I'll
do is just grab the top of it and pull it up, making sure it's all in there. And then when the unwrap this, this will be over everything. So it'll still have that stone, and that's where I want
going all the way down here. Alright, now I want to do
is bring in I'm thinking probably the easiest way on
here is to bring in a circle. And what I'll do is
I will put this on to I'll probably
leave this on 32, actually, and then
I'll rotate it round. So X 90, rotate it round, bring it out where
I actually want it. But we want to go in
over here, like so, but S and Z pulling out, like so, and then S, making it a little
bit smaller. Like so. Now, if I press tab,
I should be able to press F and fill that in. And what I want to
do now is I want to press E and pull this out. Now what I'm trying to do is I want to bevel this off now. So I'm going to press Control A, I'll transform set
origin to geometry, tab again, press Control
B, and bevel it off. In a nice way, right click, shade or too smooth.
Maybe like this. Maybe this is sticking
out a little bit too far, maybe it's not quite
beveled off enough. And also, maybe it's
a little bit too big, if I put it round here, and again, I'm just
playing with shapes here. Like, so I'm just going to
have a look you can see there. It's like some
memorial or something. So S and Y pull it back. And there we go,
and let's pull it in where it needs to go. So I'm thinking if it sticks
out a little bit over this, that will be the
best thing for us. But now we need to obviously
make it actually all fit in. So that's another part
that's going to be, you know, relatively difficult. So what we'll do is
we'll come to this part. And I'll press Control Control of left click, right click. And then we'll go
from this part, all the way around to this part. So I have a Control click, it's going all the way through
there. Don't really want that. So I'm going to Control click. And then I'm going
to go from this part to this part here. And then let's press E, enter lns and bring this part out, like so into the and we're
just wondering whether that's going to look good
like that or if I have to pull it back further so that
it sticks in like this, double tap the A. Yeah, and I don't actually like that. So I'm going to find
a different way, I think, to do this. I probably want, you know, a piece coming down
and around, like so. And if I want
something, you know, a little bit more complex, I'm always always better off
using a curve to do that. So always bringing a path. I find it makes things
way way easier. So Ss, grab my curve,
S, bring it in. And let's see. So now I'll do is I'll increase the extrusion, like so, and then
I'll come in and I'll also add in a solidify. So solidify meet up. Not subdivision. A,
solidify, add this in. Let's right click,
put it on shade flat, and then let's pull
this out a little bit, like so, and let's pull it into place where
it's going to go. So into here, up. And let's pull it
out, just under here. Let's put it into place there. You know why it might
be actually better off. You see why I do this
now because it might be better off where we've
just got it on there. And also, if I mirror
this on the other side, so I'll right clicks
origin three D cursor, adding a mirror, I should then be able to see
what it's going to look like. We can see there.
If I then come in, pull it up, but it's
actually in there. Now, we can also
see that this here, this part here,
doesn't go back way, way far enough at the moment. And also, it probably needs another bit just coming
out on the back of it. So I'm going to grab the
whole back with face leg. And the thing, you know,
it might be like that, or it might be better
off with a square block. That might also work better.
And then this in front. You know what? We'll
do that. Shift A. Let's bring in them.
We'll bring in a plane to start with Emma
can just pull it back. So X 90, spin it round, press the button, so we're
going to bring it down to there, bring it up to here. Then we'll have this part
then just coming down. So up to, if we look, maybe even up to there, and then grab the edge on
this and pull it down. I know you can't see it, but you can if you put wire frame on, you will be able to see it down to maybe even even
further. Let's see. We'll put it on here. And then what we'll do is
we'll press tab. I'm going to pull
it forward then, all the way in front, all the way in front, keep
going into the front. And I'm just looking
then if that's going to look right.
So I don't think so. I think it needs to
be just pass here, though maybe even
a little bit less. So holding the shift
but to there, A, and then E, and pull it
back into place like so. Now, from here, I can
probably get away with now. Pulling these parts
down a little bit, you know, into this place
here. So let's have a look. Control. Left
click, right click. Control B then and
pull them out. We're going to go
from this point here so you can see the marking
that point up there, and then I'm going to try
now pulling these two down. So I have a grab
this one, this one. This one and this one. And before I do that, you
know I'm going to do. I'm also going to
bring in control, just one more edge loop
before doing that. So just around there, and
then I'll grab this one. I'll do them
separately, actually, and I'll pull it down all
the way going down in here, and then I'll pull this one down all the way going
down to in here. And what that enables
me to do now as well, is I should be able to now grab this going all the
way over here, pressing the eye button. And if I bring that
in very slowly, you can see that
I might actually be able to get a nice
bit going under there, which will be very nice. Now, the one thing
I've got with this is so if I bring this out now, I can pull it out
slightly or pull it in, or whatever I want
to do with it. I'm probably going to
pull it in, I think. The thing is though, I've not got enough
edge loops on here, so I'm going and
need a few more. So Control, left click, right, click, Control, left
click, right, click. And now I can actually probably smooth that off a
little bit more. Control, left click, right, click, Control, left
click, right, click. And then what I'll do
is I'll come in now. And I'll smooth these off. So if I come into
this, press one, should then be able to just smooth those off a little bit, following the contour
of this part. So we can see here,
following the contour, following the
contour, let's grab this one, follow in the contour. And then this one,
I might need to bring in one more edge
loop. And yes, I do. I'm going to follow
the contour there. Control all left, click, right, click, control,
left click, right, click, grabbing this
one and this one, then, following the contour. There we go. Now, I'm just looking to make sure
I'm happy with this. I'm going to grab both of
these. I want to bring them in. So S and X, bring them in, and then probably pull
them up a little bit. Now there is something
else you can do, as well. You can actually
straighten these lines. But if you come to,
let's say, this one, go all the way over
there to this one here, and you want to straighten them, for instance, you can
come up to vertex, and you will see that
you've got smooth vertices, and then we smooth them
out, as you can see. So now it's nice and smooth. That might be something that
you actually want to do. Now, why did I do all of that
in the first place anyway? The other thing is, by the way, you want to make sure that
you're not smoothing it on which one, the Yaxs. So just turn the Yaxs off. And just make sure then
that it's nice and smooth. So if I turn the X
off, you can see. So you can see how
it's smoothed off. If it turn the z off,
you'll see nothing happens. Turn the Y off, like so. Alright, smoothed
out. Okay. Now, let's come in and I'll show you
why I've done all that. So I need to grab, first of all, I need to grab this
bit behind here, so I'm just going
to grab this now. This line here is what I want. So what I'm going
to do is I'm just going to grab it
from here to here, pull it down into place. And what I'm looking at now is, hopefully, if I press Shift H, I want to make sure that it's not bent in anywhere
or anything like that. If it is, grab the
whole of this face, press S Y on my occasion,
and zero it out. And if not, just go
back to where it was, grab it again, press
the tab button. And now what we should be
able to do is pull this out. So I'm just testing this
out if I pull this out now, you can see not to
this part here. Press the E borne and pull it out like soap,
and there we go. Now, the one thing I'm
thinking is these bits here, they're a little bit too much. They're not beveled off
enough before we go. So what I'm going to do is I'm going to just press Control Z, come to these parts here
of just these parts, arm trolls shift and B, and just round them
off a little bit, so bring it down just
a little bit, like so. And while we've got
them here as well, we can increase
this if we want to. So we can increase it like so. And then what we can do is
come on and do the same thing as what we've just
done all the way over and then bring them out, like so to where you want them. Then let's bring it all
the way out maybe here even just in front of that,
let's have a look at that. And then right click,
Shade At Smooth and that's what we
should be left with. And then we've got
this bit here. Now, how much gap have
we got, as you can see? This bit here is coming if
we put on the rendered view. Let's see if we can
actually see that. There we go. So this bit
here is coming to this part. Right two, if I press one, you can see it's actually a
little bit over this part, which means I'm probably going to be better off
making it a tiny, tiny bit smaller, like so, or bringing it up. Like this. There we go. Now it's fitting in,
much, much better. Now, you can see that
little black bit on there. That is from our mirror. So don't worry about that yet. We don't need to
do anything like, you know, with that or anything. Now, we've got this bit in here. This bit in here now
is looking nice. Now, the one thing
is that I said, I want to actually bring
it in a little bit more. And then what I'm going to
do is come to this part. This is why I put this line. I'm going to come
to this bit here, press the ebon and bring it in. Then I'm going to press the
ebon and bring it in again. Now you can see I'm completely destroying that because I need
to grab this bit this bit. So press the eyebon,
bring it in. Press the ebone and
bring it in again, like so just before we
get that crossover, as you can see, we do not want this crossing
over, so just before. Now the thing at this point is we might as well
join these points. And I know it seems a
lot of messing around, but what I'm going
to do is right click and merge vertices at the last. So at the last, merge them, and then we'll come up to
this point and this point. Make sure you grab the
inner one last, shift O, and then this point
and this point just to clean
everything up, shift O, and then finally this one
and this one here, shift O. Now why did I do all that? Because I want to pull this out. So if I come in
should be able to come all the way around to
here, all the way up to here, background to here,
and then press the E button and pull them out, making that nice square
that's going to be on there. Double tap the A, and that
is exactly what I want. Finally, then you might want to come in and on this part only. I'll show you that actually
when we come back. But on this part only, you might want to
then come in and actually do something
with these parts. In other words, make some
corners in these parts. We can absolutely do that. We can just, we can use
this and create that. So I'll show you how to
do that on the next one. What we'll do, first of
all, when we come back, though, is we'll just
get this bit cleaned up. So we'll clean this bit up. Then we'll work on
this part here. So we might even bring
this out as well, and then these
corners, and then we pretty much pretty much. Pretty much done on this. Alright. Alright,
everyone, so let's save our work, and I'll
see you on the next one. Thanks a lot. Bye bye.
158. Intricate Boolean Cuts and Geometry Cleanup in Blender: Welcome back if we want to blend the building master class
from concept to final render. Alright, let's then
do what we said. So we're going to deal
with this bit first. We can see it's
actually a curve, and it's actually a mirror
over there, as well. But rather than doing that, why don't we just get
rid of the mirror? Come in, delete these
out of the way. So delete vertices and then just pull it over to this side, and that will then save us a lot of work on anything
else that we can do in. And then bat so we can
come in, right click. And what we can do then
is convert to mesh. And finally, let's get
rid of all of these. So delete, limit to dissolve, and we should end up with
something like this. Now, let's move on.
To the next bit. We might want a front in this. So I'm going to press Control. Left click right,
click Control B, pull it out, drop it back one. And then all I'm going
to do is just grab the front then and
just pull it out. So E, pull it out, making it more intricate. And this whole part is
basically showing you how intricate you can
actually make things if you really set
your mind to it. Okay, now let's deal with this. So what I'm going to do is
press I to bring it in. I'm then going to press
Control B and bring it out. And then what I'm
going to do is press E and pull it out like so. And there we go,
that's that bit on. And I'm also thinking
that maybe maybe I want a bit on the inside as
well. So I'll just grab this. I'll just press E, pull it out, like so, and there we
go, that is that bit on. Okay. That's looking
very, very nice. And now I'm just wondering
whether I want to set it back or in front
of this bit here. So I'm going to play around
with it a little bit more. I'm going to set it a little bit tighter to there just so it's
not sticking out as much. And then I'm going
to take a step back and have a look what
I'm looking at. And yeah, I think
that looks good. Now, the final bit then. So we want to basically
bring this out. So shift D. Let's
pull it out like so, and all I want is the back
of this for this next bit. So I'm just going to
grab the back of it. I'm going to press
Shift D, duplicate it. L, delete this bit
out of the way. So delete and vertices,
grab this part now. Now they're not joined
with each other, so I can press Control A, or transform set origin through set origin,
through geometry. And then what I'm going
to do is press tab, A, E, pull it out, like so. Finally, then, add this bit out the way, bring this bit in. So this is where
it's going to come. And the only piece that
we want to cut out is just on this inside here. So I'm just going to come
in, grab this inner part, I'm going to press P selection, separate it out of the way, and then I'm going
to grab I'm going to press Control A
transform Seroteometry, grab this part, I'm going to save on my
work before doing that. Grab this part,
and then what I'm going to do is press Control and minus and just get that in there like so, and there we go. And then I'm going to come
in and before doing that, I'm just wondering
maybe if you want to split them off
before doing that, so just hide this
out of the way. Come back to just
this part here. Press Control R. Left click
right click Control B, and just pull it
out a little bit. And the reason I'm
doing that, if I press Tab now, click it on, you will see now I will have a gap in between here when
I want to boolean it in. In other words, Control E, A, sorry, to apply that. Come in now to your Boolean and just delete
it out of the way. And then what you can do is now you can come in as you can see, and you can grab these
faces on here like so. So you can grab all of these, and both of these, like so. And then what you can
do is you can press the eye button and bring
them in, as you can see. You can see we've got some
problems with these parts. You're always going to
get problems like that. When you're using Booleans, guys, it's just
part of the course. So if you've got that, let's
grab this one and this one, press right click
and we're going to merge vertices at the last. So at the last, and there
we go, that's fix that one, and then this one
and this one shift, and there we go,
that's fix that. And from here then, we might be able to
now pull them out. So first of all,
thought's press Altag, bring back this part,
come back to this then. And then all we're going to
do is come into this with Face select and this one. And this one, and
then round to here, these two, like so, and these two, like so, and then I'm just going to press E and pull them
out a little bit, like so, and there we go. Look how nice that looks, guys. Alright, really,
really cool stuff. Now, just make sure they're
happy with any of this. So, for instance, on these, you want another part in here. In other words,
you'll want to press Control R and bring in
just a little bit on here. So, in other words, I will
come in, grab it again. I'll press Control
B, pull it out. And then what I'll do is
I'll bring this part out. So just this here
going down to here, do I want to press E and
bring this out a little bit? Like so. Double tap the A, and I think that adds a
little bit more onto this, so it's a little
bit more intricate. Okay, so everything now is nice. I'm happy with
everything. I don't think I need anything
else in there. Now, we've got bevels
on some of this, as you can see, and we've got mirrors on
and things like that. So I always tend now to come in. I'll press Control A, and what I'll do is just delete
the bevel out of the way and hide these out of the way. Then I'll come to this one. Making sure nothing's on it. I will come to this then, I
will come to this bon part, come to this part, and just go round just making
sure nothing is on. You can see you've got
a solidify on here. I don't even think, it is. So let's come in, PS Control
A, hide it out of the way. Let's come into this
one. Hi it out the way. And finally, this block here, hide it out way, or
bring back your stuff. So all bring everything back. And now finally, we've
got one where we actually put some
smoothneess on it. So where did we put
that smoothneess on? It was this one here. So let's join everything
up to that part there. So if I come in grabbing
all of these parts, grabbing all of this and this, pressing G, you can see if I've missed a part
there, pressing G again. You can see I've
missed this part, G, and now we should
be able to join the t here with this angle. Control J. Join
everything together, and you should end up
with something like this. And now press G and everything should move around together. So far so good. Now let's
press Control A, A transforms. And there we go, right
clicks origin geometry, and now let's bring
in our bevel. So bring in our bevel. Now, the bevel isn't
going to work correctly, and it's because we've got so many twists and
turns and all of this. There's no wonder it's not
going to work correctly. So what you want to do is
put this on note point note, note three, and then you want to turn off
your clamp overlap. So turn off clamp overlap,
and there you go, now you've got your bevel in there and just make
sure nothing is broken. You will end up with some of the very small parts where
you've got, you know, a little bit of an issue like this. You will get
those on there. Unfortunately, we can't do a lot about those
little tiny parts, you know, where they're
coming out like that. And actually, I don't think they're really going
to show up anyway. Okay. So now what
do we want to do? We want to actually bring
in now our material. Now, our material is
basically the same as this. We can have some gold, you know, on here and things like that. So let's just grab
this part here, press Control L, and what we want to do
is link materials. Now I'm going to do is
grab the whole thing, so grab the whole thing on here. A, U, smart UV project, click Okay, and there we go. Now, let's come in and actually come have a look what it looks
like on our rendered view. And first of all, let's go over. We definitely won't
want this once. I grab the whole thing, dowel, click a sign, and there we go, that's what it's going to look
like straight off the bat. Now, of course, we don't want
it straight off the bat. What we want to do now is add in some difference in
actual materials. So I'm going to come
down. I'm going to go to Metal lighter, click a sign. And I'm going to play
around with this now and see how nice and get it. Now, these parts here, for instance, I'm going to
add in some gold, I think. So Alt hip click Alt
Shift click Control plus. Let's add in then
some metal gold. Click a sign, like so. Let's also come up and take
off our ambient occlusion. We're not going to
need that. Let's add in some gold on here as well. So Alt, shift click going
all the way around here. And if not, I'll just press Control Click going all
the way around here. So all the way up to
here, press Control plus, and let's see what the
gold looks like on there as well. And there we go. And then on these parts here, let's make sure that we
bring in control plus. Some of them stone lighter. Click a sign, and there we go, That is looking beauty
for guys, as you can see. And now finally this bit. Now, on this bit, I'm probably
going to have let's see if it looks like stone
lighter have a look. Okay. That looks good. And then
we'll have this bit here. Oh, this bit here, Control
plus, Stone lighter, like a sign, and maybe
even this bit on here. So all should click
Control plus, Stoneighter, lick a sign, and then maybe on this
one here as well. So Control plus going all
the way over Control plus. Done lighter, click a sign. Double tap the A,
and there we go. Now, let's make sure
this be here maybe. So we'll go, Oh, shift click, control plus. Don't light. We've got no stone
lighter in there now. I got to think
about this because do I want to change
that? Probably not. So Oh ****, click. Oh Shiv click Control plus. We'll definitely put this
on stone lighter. Like so. And then we've got
just this center part. And I'm just wondering if we want that a different material. We could have this on
metal, for instance. Let's try what that looks like. Like this. And it might be
just too crazy to do that. This also going around the outside might
be too much gold. So what I'll do is
I'll just change this back to Stone lighter. And then what I'll
do with this is I'll also come in and just try and see what it looks like on
light instead of the gold. So Control Plus, Stone
Lighter lick a sign. And I can press Controls E. And I can press Control Shift E. I
press Control Shift head? No, probably not. Let's
click Stone Lighter then. There we go. I think,
You know what? I think that looks
very nice as it is. Just wondering about
this gold here. That's the only thing
I'm worried about. This here should be maybe light. So should click Control plus. Don't light or click a sign. Yeah, I think it
looks better like that without the actual gold. And the one thing we can
try is just these bits. So I'm just going
to come in, and I'll just try these with gold and see what that looks like. So Control plus metal gold leaf, click a sign, double tap
the A. Yeah, there we go. That's looking much, much Okay, let me just move my
cursor out of the way. Final check for finishing. And yeah, I think
I'll looking awesome. Okay. On the next one, then. We only have this
building to do. Only this building for the
main part of the building. From there, we'll be building out the fences that's
going to go around here. We've got some lights to
build, some benches to build. But I think what
we'll do is we'll build this part out a
little bit different, some roofs and things like that. We've done all that before. And then from there,
what we'll do is we can actually start building out these and then we can start putting in some hedges
and stuff like that, something very, very different
to what we've been doing. But we're nearly
there guys, honestly, you should know pretty much most of the stuff now
that we're going to do, at least when it comes to
building, if not all of it. So when we've done
that, as I said, we'll start on these
parts. Alright, everyone. So thanks a lot, and I
hope you're enjoying it. I'll see you on the
next one. Bye bye.
159. Final Roof Assembly and Custom Fit Adjustments: Welcome back everyone to blend the building Mass class from
concept to final render. Now, what we're going to do
is make a start on this part, but before doing that, I just
want to do one more thing, which is just grab one of these, up D, bring it out, and then we're going to
spin it round so head -90. Press one to go into side view, and all I want to do is
just bring this up to here and then maybe squish it in enough,
so it goes in there. If not, what I'm
also going to do is just press Shifty, bring it up. Get rid of this one, and then I can come now and actually alter this
at my leisure. So if I put it in
to, let's say, here, press the little dot
born to pull it back, let's put it into place in place in place, dot born
to bring it back. And now what I can do is
just pull this side over, so I can grab this side, pull it over without
affecting the stone. So you'll see put it
onto material mode. As long as I've
got this on this, paste button on, as we know, which we've talked about
quite a few times by now, then we should be
able to just pull it over, as you can see. So we're pulling it over and it's not actually
squishing it up, and then we'll do the same
thing on this side as well, like so, pull it in. And then what we'll do
is now grab this part, press L, shift D, and then just pull it
over to this part. Now, you can see as well
with my door that I do have some bricks coming over each side. I don't
really want that. I'm just wondering if it's the door that's actually
not pulled out enough, we'll have to check
in that in a minute. But for now, if you look at
that, that looks pretty nice. Now, let's grab a
door then and press S&X and just pull it
out a little bit more. And there we go. Now
that's looking fine. Alright, so that's that
bit out of the way. Let's save out our work then. And now let's make a
start on this roof. And this is going to be the
last roof that we've got. And you can see we've left
the hottest till the last. So what we're going to do
then is bring back our roof. So bring back our roof. I'm going to press
Shift D on my roof, and then I'll press Old D to go around all of these parts. One I'm going to do then
is press dead and 90. Let's then press Control one so we can bring it up into the
place where we want it. Like so, something like here. And then what we're going
to do is just pull it back. And, of course, we
need to rotate it, so I'm going to pull
it back to there. I'm going to rotate it then, so R and X, rotate it. And yes, we could use the snapping tool,
but you know what? It's so easy just to
get this into place. So I'm just going to hold the
shift but to bring it in. Now, let's mess around then with the
vertical count first. We know it's probably
going to go in. Let's see how that's
going to look. And I can see that it's lining up a little bit too high there, so I'm just going to press the E but just to bring it down. Now the things
about this roof is, in particular is
you're going to have to cut this away because you're gonna have a lot
of problems with, you know, overlapping there. We have got some parts that
we need to put in here, but those parts there are
going to actually overlap. So we'll sort those
pots out first. First of all, though, we
need to make sure that it's actually bent in
the correct place. At the moment, if I
go into side view, we can see we end up with
something like this. Let's just pull it
out a little bit, and then what we'll do is rotate it round a little bit more. So x, Jaws rotate it, holding the shift
button just to get in a little bit easier, like so. And then what we'll do with
this bit as you can see, it should go wonder still think if I press through
again, it's a little bit out. We need to be very,
very tight on this one. We can pull it out the
bomb a little bit more. And we're gonna have a look
on the other view, as well. I'll hide these out of the way. I'll hide my chimney
out of the way, and now I can really, really
see what I'm actually doing. You can see here, this part
stuck all the way out here. That's quite far out, so we have to take
that into account, and then this parts
stuck in here. Now, the other thing is you
can bend this roof as well, which I'm going to
show you momentarily, but at the moment, we
don't really want to do that. Now, we've got this in. So what we'll do is we've
got some sides on here, so we might as well,
I'm just thinking, should we bring
those parts in yet? 'Cause this one's a little bit different from the other
parts we've been doing. So what I'm going to
do is I'm just going to grab this. I'm
going to press Alt D. And I'm going to move it over. So I'm going to move
it over into place. And then I'm going to grab
the let's have a look. Where's the top
parts that we need? These are, this one here, we'll press D, and we'll
bring that over as well. And then what I'll do
is rotate this round. So I'm going to Z 90, rotate it round just so we've got that little
square piece there, and then control one, and then I should be
able to bring this up into place, round about here. So it's going to be going
round about here into place. Maybe maybe, maybe it needs to go a little
bit further this way, maybe we need to fit it in. Or it's actually in and not
actually stuck out there. So something like this. And remember, we'll be getting rid of this part anyway,
so don't worry about that. You can see it's stuck
through slightly. We don't want that,
so let's pull it over and then this part here. Again, control one, bring this up into place.
Let's drop it in. You can see it's a little bit different from our other parts. I'm also wondering
about this bottom part. Because we have one, which
has got a little bit of stone in or we put
the stone underneath. So at the moment, though, I'm just going to
put this in place, and this is the thing
that I'm worried about. So you can see here
that on this roof, it's kind of stuck
right in through these, and we don't want
to cut it away. So what I'm going to do is
just press Control one again. And what I want to do
is just drag my roof, my roof up a little bit. Like so, and then I'll press
dot just to zoom to it, and then pull it
back a little bit. Now, when I pull it
back, obviously, we can see it has to
go a long way back. Now, if we pull it all
the way back to here, are we then going to be able
to fit it in this part? So you can see in
this part here, it needs to be
bent a little bit. If I press Control three
to go into the other view, you can see now I can
bend it a little bit. So if I press R and X, just bend it a
little bit. Like so. And what I'll do is now, you can see, that's
fitting in very nicely. That is exactly
what we want now. Even these pots
poking out there, these parts coming down to
here is exactly what we want. Now what I want to do is
we've got this edging. Let's bring down
this edge, then, so we'll drop down the horizontal,
keep dropping it down. And what we want to do
now is just lining up. We're going to hide
these out of the way. So H, hide them out the
way, bring this over, and I want this then to fit into here without dropping down the size or anything
like that because I'm going to actually
cut it away. So maybe one or two more. So more two more maybe two more is going to
give me exactly what I want. Something like this, OTH, bring back these
parts, double tap the A. Yeah, and there we go. That is looking perfect now. Okay, so these parts here, they're going to go into here.
It's going to come round. It's gonna have
another block in here, another block in here. So we've got these parts now.
And that's looking good. Now what we need to do is
let's mess with this roof, and then we can
put it on each of the sides because you
won't be able to see that, you know, this part is
looking the same as this because of the
angle that we're facing. So you can see it from here, but you'll never be able to recognize they're
exactly the same. So with that said, let's come in and do what
we normally do. So what I'm gonna do, first
of all, is go to object. I'm going to come
down to convert, and then I'm going
to go over to mesh. So we've converted that Shift H, hide everything else
out of the way. And now let's delete the bags
before doing anything else, because once we come in with
our um, what's it called? Or bisectll. We're
going to cut these. It's going to make
it a little bit messy, and we don't
really want that. So what we're going
to do, first of all, is then we'll come in and we'll delete those
backs out of the way. So I'm again going to come
in, like I've done many, many times before,
grabbing a few of these, especially the
underneath on top ones. Not that one. This one here and especially
these here, like so. Then we're going to
do is go to select, select similar and go to normal, and there we go hide
them out the way, press three to go in side view, and you should be left
with something like this, which should be what
we can work with. Let's now go to wireframe. And then see and just grab
each of these going down, so and luckily for us on
this particular roof, we don't actually need
to do this four times. We can get away. Now, there's maybe, I'm just slow cown that. We only need to do this
once because then we can actually rotate it round and maybe even mirror
it if we want to. So let's just work our way down. And from this one, then we
have got the bendy roof to do, and you'll see how we can
actually bend this roof. If we're subtle about it, so see, let's keep going. Like so. Like so. We've got the backs there, but it doesn't map because
I haven't touched them. And then, like so we've got
the fronts here as well. Now, let's delete and faces. Let's press SoltaH then,
bring back everything. Let's go back to object mode, and this is what we
should be left with. Double tap the A, and
then just make sure that you're happy with it and nothing's disappeared
that you don't want. And then, A, finally
mesh, clean up. And what we're going to
do is merge by distance, tab, right, click Auto smooth. And then we need to
spin these rounds. Let's first of all,
see. Yes, they're all the wrong way round. A, shift down, spin
everything round. There we go. All that
is done for you. Now let's finally just
take off base orientation. Let's press Alt and H and
have a look what we've got. Now what I want to do is
I want to grab the roof. I want to grab this part then. I want to press seven
to go over the top. And what I want to do now is just press Shift and hide
everything else out of the way. And that then, if I
put it on wireframe, should give me the line where I need to cut down
to, as you can see. So this is the line, and
this is the line over here. And you can see it's a
little tiny bit out, but I think we can actually
work with this as it is. So we'll do that on the next
one. What we'll do now is then say if'll work and I'll
see you on the next one, everyone. Thanks a lot. Bye bye.
160. Refining Upper Trim Geometry for Structural Integration: Welcome back if we want to blend the building master class
from concept to final render. Now, let's just open up
our reference guide, so we can see here if we come
round to this part here. Again, when you're
looking at something, just have a little
bit of pre planning. For instance, you
can see here because this was the rough draft
that I actually created, these parts here, they're pretty chunky. We don't
actually want that. We also need to forward plan
these parts because they're going to be incredibly hard to get the same angle that we need. So we're just going
to pre plan both of these parts when
we've done this roof. So let's pull it over now. And then what we'll do is
we'll come back to our roof. We'll press tab A, just to select everything. And now I want to bisect. So I want to bisect down here and bisect down
the other side, so I'm going to go to
mesh because we've got all of this wastage
and not only that, we don't want it
leaning over there. So I'm going to come in
and bisect from here. Like so and can
hold the space bar and move it into
where I want it. So round about here, all the
way going to there then. And the good thing is about
the bisect best thing about the bisect is we can clear
the inner or clear the outer. So for me, it's going
to be the inner, and you can also
use the fill tool. Though the fill
tool will actually fill in these sides
if you want it to. This occasion, we don't
need to use that. And the reason is because
these are going to be hid by a bar that's
going to go over there. So all we want to do is
just cut it away like so. Now if we go to
this one and we're going to use the
bisect tool again. So what we're going to do
is bring it down like this. And you can see now I've
got that option on. I can actually probably see a little bit better,
and there you go. You can see we're cutting
right along there. All we then need to do
is click this one off, click this one on,
and there we go. Now, let's press tab. Let's press Object Mode, and this is what you
should be left with guys. And you can see why
I was saying to, you know, take the
backs off first, because you can
see that we've got little tiny pieces, little tiny, tiny pieces on some of
them like these ones here, which we're simply
really not gonna need. So any of these, first of all, just go in and clean them up. So let's go in and make
sure run edge select. And all we're going to do
then is just clean these up because that bar is
actually going to hide it. You can see here, even
this tiny piece here, we really don't want
those pieces in. Even this bit here is going
to be hid by that boss or something even this big we'll be hidden by that
bar coming across. This one may be a bit too big, but you can see ours have
worked my way down here. I'm just going to go in
and see this bit here. And then what I'm going
to do is go around the other side and see
where the issues are. So I'm going up, going up. You can see this one, actually. Pretty much got a way. Got away without any of them. Alright. Now I'm going to do
is just delete and vertices. And now, finally, we're
on to these bars here before moving it around because I want to
do this bar first. So what I'm going to do is I'll just hide the roof
out of the way, come into this part,
and first of all, I'll come in, and I want these separated off, but I don't
want to do that yet. So what I'm going to do is
just press L on this part. I'm going to press Shift D. And then what I'm going to
do is press Shift and H, hide everything else
out of the way. And finally, I can do this
all at the same time. So if I come in,
grab this like so, press Control B, like so,
and then pull it out. And then what we can do from
there is we can now come in and adding a solidify. Now, the thing is
before doing that, Bress Altage and
just make sure or shift H or question mark or what it is, you want
to bring everything in. So I'm going to come
back to it, Altage, bring back everything, and
just make sure that this boss. I'm going to hide this
one out of the way because that's not this one. I think they're both
joined together, actually. So let's go back
in and make sure. If I press tab, yes, they are. I think they're all
joined together. So what I'll do is I'll just
press L on this E selection, and there we go,
now, I've got this. Now, if I want to Altage hide this one out the way I can
do, and there we go. That is what you
should be left with. And what we're checking here
is the thickness of these, you know, how far we
need to pull them out. So if I come into
this, for instance, now, you will see that I'm going to have to
pull it out quite far. So if I go to generate a solidify and then start
pulling it out like so, you can see we need to well, first of all, let's put
even the thickness. There we go. You can
see first of all, we need to delete
these front parts because they're
not helping much. So let's just turn
that off a minute. Press tab, and then what
we'll do is now come into these parts here, WY frame, grab this one, this one, and go round and grab this
one, delete and faces. Now press Control A all transforms set
origin to geometry. And now what we want
to do is let's see now if I can put an object mode, what are they going
to look like? You can see now I'm
going to turn on my solidify again,
way way too far out, as you can see, you
can also see that they probably get further out as they go up. So
let's turn this down. Then down, then down. And now we can see where else
we need to cut away. So these bricks, as you can see, are really in the way. And, you know,
sometimes that happens, and sometimes I have to
actually come in and, you know, fix the tiles. So if I come in now, you'll
see if I press L on this one, I can get rid of pretty much all of
these that are in here, and this is why we're doing
it one part at a time. And the ones that I can't, I'm just going to come
in because I know I need to get rid of pretty much all of these because
we're not going to be going out further than
that, unfortunately. So let's just come in and I'm going to put
it on wire frame, actually, and then press
L, work my way down. Hopefully, hopefully,
at least this side. You can see that
I've got one there, so I need to fix that. Hopefully, this side
shouldn't take too much work. So let's press L, L and L, and then delete and Vertzs. Now, we can see the ones
that are stuck out. We can see like this
one here as well. So L, delete, Vertzs. Now what we need to do is
we need to actually find a way to cut these away. So we know that if
I come to this one, so it's this one, it's this one, work my way down then,
and it's these two here. And we'll do this side first. So what I can do now
is I can press tab, isolate it out of the way with
question mark, tab again. And now we know these are four. So I can press ShiftH, hide everything else
out of the way. And now I want to do is I
want to cut these away. Um, so if we cut the
tops away like so, we should be fine with this because we
know that it's just literally the little bits of
the tops that are going in. So if I press Control one, I should be able to
come in and just cut these tops away like so. Now, the other thing I want
to do is I really need, if I press ultage again, I really need and question Mark, to bring this part
with me as well, because it's going to
make it a damn site easier if we can see what
we're actually doing. We also, if we want to turn down the thickness, can
we actually do that? You can see we can turn
down the thickness here, so it looks better
like this, I think. I'm just checking this
middle bit out as well, and bear it in mind,
once we've done this, we can just rotate it
round to the other side. So don't worry, guys, if you're thinking this is a lot of work. We only need to do one of
them, and then from there, we can rotate it
round the other side, and then it will be done. So all of this work I'm
doing I'm showing you, you know, the easiest
way to do it. Now, let's grab our roof. We've got this part
on this spot now. Shift H, and then we
can grab our roof. Now I've got nothing
else in there, and I can press Control one. I can just look now,
double tap the A, and this is where these
are all coming out. Now, can I again come in and cut that down
there? Maybe I can. So what I'll do is
I'll press lth, and I'll go about
it that way first. If I then bring in my bisect
tool again, so let's see, mesh, bisect, and I
need to zoom out first. So a mesh. And where is it bisect. And then from here, I'm
going to cut it away. So I'm going to cut right
down on this edge here. But we're following
this edge up like so. Now, let's see. It's
cut them all the way. I can't see anything
through there. Let's see if we can do it
on the other side as well. So A, and then we'll
press Control one, zoom in a little bit, so we've got it
right in the center, mesh, and then we'll
come to bisect. And I think we have to
go this way down this time just so we can
actually cut it that way. There you go. That's what I'm talking about.
And I'll line it up. I'll press the space
bar to line up. So I'm going to line it up right in the center there, like so. And then I'm cutting all the
way down this side, like so. And I'm making sure that I can still see have I still
got anything in there? It doesn't look
like any roof tiles are poking out, and
that looks fine to me. Now, if I press tab, that is
what we should be left with. Alright, so far so good. Now what we'll do is we'll press low question mark or lth, whichever one it is, we'll hide just these out of the way, and there we go,
guys. There we go. That is looking pretty good. Now, if I come into this bit, I should be able to now grab this bit and hide it
or delete this one. You can see this one here. This is the one that
we're not going to need. So this one in here. So let's see. If I'd hide these, first of all, this is the
one where I don't need. So I need to get
rid of this now. So, let's press Delete. And this is then press Tab, Alt Age, bring back
the other part. And I'm just wondering
where is the other part? Let's press question Mok see
if we can bring it back. Where is that other one gone? I think we did it as two,
so I'm just going to go back before deleting it. Now let's press Altag. Let's press Q Mark. Where is it gone? Where
is that other one gone? Did I delete out of the way? If I did, it's not such
a big deal because I can actually bring
in the other one, but it would have been nice. If I could have it, let's just hide this and then
we'll be able to see. And then we'll hide
these. It looks like I deleted that
one out of the way. So that's a shame. So what we'll do is we'll
just work with this one. And then what I'll
do is just press Control B, bring that out. And what I want to do now is
delete and faces like so. And then if I press Tab lth, I should be able to
bring back that part. And now you can see I
should be able to have my wooden parts in, and
that's exactly what I want. So I'm going to go in and
just grab each of these, like so, each of these, and then press P selection
and just separate those. And these are basically
here for my wood now. That is why I did that. Okay,
so on the next one then, we'll get this roof tile
going round to here. We'll press Alt D thing, and then we can do it
all at the same time. And then we'll get it
going all the way around. And then I think we'll actually start work on this part here, seeing what parts we
have to put in there, we'll get our roof on here. I think that's the
best way to do it. We can see as well with this. Let's see if I pull this out. So let's press Contro
the origin geometry. Just pull it out
a little bit and see how that's actually
going to fit in there. So if it's going to be
that kind of width, you can actually get
that in there, and I think that's going to be fine. Like so. You might not get
this the first time, guys. It takes a little bit of
practice, to be honest. So if you don't about it. None of us, you know,
get it the first time. Alright, so that's
what we've got so far. I'm gonna save at my work, and I'll see you on the
next one, everyone. Thanks a lot. Bye bye.
161. Finalizing Overhangs and Fitting Corner Roof Details: Welcome, everyone to
Blender Building Mass class from concept to final render, and this is where
we left it off. Okay, then, so before, yeah, we can actually do that, we can do it the same
because it will put it onto the if we put
the textual material, then it will just put
it on the rest of it. So that's fine. We can do that. So what I'm going to do
then is I'll grab this. I'll come to this point. I'm thinking to just
hide this point out of the way because I
know this is centered. So these parts are
centered here. So if I grab a press
right, in fact, shifts, cursed or selected, like so if I press seven,
then go over the top, it should be right
in the middle, then I can press set
origin to three D cursor. From there, then what I can
do is I can add in a mirror. So let's add in a
mirror, put it on the Y, and we can see that it's definitely not going
the right way. Even the z is not
going the right way. So sometimes what I
tend to do is I'll just take these off, and instead of that,
I'll just grab this. And then, hopefully, there we go. Now it's going on board. Alright, so then what we can
do is we've got this one. And again, we want to press
l D and spin it round. So Alt and D, and then R Z 90, spin it round, and there we go, that's what we
should be left with. And now everything hopefully hopefully is fitting in
exactly to the right place, which these look like
they actually are. Okay, so now we've
got the mirror. We need to go on the XO, of course, not the
Y, and there we go. Now we've got them all in place. From here, then, we can join all these
together. So grab them all. Let's go to, in fact, you
know what? We won't do that. Before doing that,
we'll actually come in and bring
in the materials. So I'm going to press smart
U V project, click Unwrap, like so, and then we're
going to grab this one, press Control L, and we're
going to link materials. Now, let's have a look what they looked like before carrying on. Double tap the A,
and there you go. As I said, you would never be able to see that
these roofs are, you know, got the same materials on
or anything like this. And you can also see that these now are looking very, very nice. Now, we can see with this one, for instance, that we
haven't got a bevel on here. Let's save that
or work, like so. And then what I'll do is,
I've got a solidify on. So let's apply that
with Control A. And then what we'll do is
we'll add in a modifier, bring in a bevel, put it on press Control A or transform set
origin to geometry. And then what we'll
do is put this on not point and not three, just to make them less
sharp, as you can see, so they don't look as sharp now, and that's exactly what we want. Then from there, then
what we want to do is we want to press Tab, U, smart UV project, click Okay, and then finally
grab this material. So this one on here, Control A, and we're going to
link materials, and there we go, that is
what we should be left with. And now you see that is
looking very, very nice. Now, from here, then
what we're going to do is we're going to
build out this part. So this part here
pretty much the same because we've got one
on here and one over there. Now somewhere around here, I do know we have got a
front on one of these, so we've actually put
a front on something. I'm just wondering where we've
actually got a front on. What I mean is that we need a front for just
this bit on here. I thought we built
one of those out somewhere. I'm just
looking for it. You know what? I'll just go to art asset manager and see
if it's actually in there. So I'm going to go
to Roof supports, and none of these
look like it, really. Let's have a look at this,
this. And you know what? I don't think I actually built
out that decorative parts. No, I don't think
I built that out. Let's look at archers
maybe one of the archers, let's have a look, got
this arching here. We've got this arch in here, as you can see, maybe that
might fit it, this one here. And let's look at this one. Maybe. Let's have a
look at this arch. If I bring up this one, that is not the arch I'm looking for, but there it is. That's the one. So SE 180, this is the one
that I'm actually looking for. So what I'm going to do is
delete this out of the way. I'm going to then come
to this one and press L, and then I'm going to press
Shift D, bring it over. Shift D, not hold D,
press P selection. And we're going to
delete this one out of the way, so delete, and then I'm going to come
back to this control or transform set
origin to geometry. And there we go. Now
let's bring into place. So Control one, G,
bring it up into place. And it's going to go
right in the center. So I'm just going to
come in, grab this part. Shifts, make sure we press, first of all, Control
A, all transforms. I'm just wondering, is there a mirror on there?
Yes, there is. Let's right click Set Origin 23d curt just to put
it back in place. And now we should be
able to grab this. Press Shift DS and
selections cursor, bring it out, and it should
be centered perfectly. That is what we want.
We're just going to bring that up
then into place, like so I'm going to pull
it back a little bit. And then what I'm
going to do, as well, is I'm going to
bring the rooftop, so you can see these
rooftops here. Go to grab this, press
salt D, bring it over. Press shifts,
selection to cursor. And now I'm going to
do is pull it up into place like so. And bring it in. And then from here, I'm going
to actually place my roof, so it's actually along here. So I've got something to
work with, in other words. So if I pull it here,
you can see, like so. Now, let's come in and just
turn down the fixed count of the array down and
then pull it into place. And there we go, you can
see it's fitting perfectly. Now, we want to mirror
this on the other side. And sometimes it's better using shift D rather than, you know, Alt D. That might be actually something we
need to think about going forward because we don't
want to alter any of these. So what I'm going to do is
I'm just going to press Shift and D. Hide
it out of the way, and then grab this
one, press delete, and this one's already been done, so we're okay with that. So bring everything
back, and there we go. Alright, so now
we've got this on. Now we need our roof. But before bringing our roof in, we need to make sure
that this here is, you know, not so chunky. We can see here that if
I go in, you can see, it's not got a lot of verts
edges going along there. So what I'm going to do is
I'm going to press Shift A, and I'm going to bring
in then a cylinder. Let's put it on 32. So 32 on this occasion. Rotate it round. So RX 90
and let's bring it forward. Where this one is, and then going to press
Control and one. And what I'm going to do then
is make it slightly bigger, pull it down just to make
sure we've got that size, and then S and X and just pull it out and get it right
into where it needs to be, which will be somewhere
around there. And we also want to make
sure that it's going down from this point here, like we did with these, it needs to be going
down from there. So what I'm going to do then
is I'll grab it from here, going all the way
around to here, not through I want
to go round the top, all the way around to here, and then P selection like
so and delete this one, the rest of it out the way. And then we should be left
with something like this. Now let's press S and
Y and squish it in just making sure it's still
in the roof, like so. And finally, then let's
come to the sides. These sides here, grab
this side and this side, and then all you're
going to do is press E Z and pull them down just so they go Jas to
the bottom of here. So J there, and then
press F, like so. Now you should be able
to do, you should be able to come to this
part of the front, press delete, like so, and then fill in this face. So if I come in,
shift click, press F, fill in that face, like so, right click, shade Ato
smooth and there you go. You can see it's wayway Smoove. From here, then let's
right, click Set origin, three D cursor,
adding a modifier, and we're going to
bring in a mirror just to put it over
the other side, put it on any of these. No, none of those
are going to work. So again, I'll come in, grab this point,
and there we go. Now it should be
over the other side. This point should be
right in the middle. As you can see,
they look perfect. Alright, so now I've got that. I won't join all this up, so I won't join this part up
to it or any of this yet. What I'm going to do first
is I'll build this out because then I can mirror
the whole thing over. The one reason I'm
doing this is just so I have a good visual
of what I'm doing. Like for this, for instance, this is stuck right in here. Let's turn that down
one count. There we go. And we're going to put
something in there, anyway. Alright, so far so good. We've got everything
prepared now. Now, let's come in, bring
in our roof, so shifty. Like so, and I prefer
working right hand side. I don't know why it is,
but my brain struggles to, you know, fit it on
the left hand side. So all I'm going to do
is a 180 spin it round, control one, and then, G, let's pull it into place. And we already
know that we don't want to go a lot
smaller with this. So what I want to do is bend it and then bring it
kind of into place. Now, the best thing
about this roof is you can actually
come in and bend it. You can see here
you've got roof angle where you can bend
roof angle again, and you've got bend
and you've got compress and bend and compress. So what I'm going to do
with this is, first of all, I'm going to get it
to be the right size, you can see at the
moment, it's fairly big. Now, the other thing I could
do is bring out the front, see how far it's going
to, you know, line over. But I think, first of all, let's actually just get into a place
where I actually want it. So we know these
roof tiles should reasonably fit with these ones. What I want to do then
is it's up to you. It's probably easier,
working with this in a smaller part rather
than a bigger part. So it's going to be
easier in the beginning, harder in the end because
you've got to mirror it over. So I think though realistically, it's easier just to bring
down this horizontal. So bring it all the way down. And then what we'll do is
we'll drag it out and see how far we've got left.
So keep coming down. And we want it to make
sure that we're in, you know, just hanging
over the hedge, maybe. So something like this, you
can see now it's going in. Now, at the moment, I'm
not really concerned. You know, about, you know, this bend or anything like that. I'm not concerned about
that. At the moment, all I'm trying to do is just get it in so it's
fitting into place, and of course, it's
going to bend on there. We can make it very, very
slight adjustments, anyway. So on the next one, then, what we'll do is
we'll get this fixed. Well, maybe, maybe
even if I come in, I can also turn
the subdivisions. So we can turn the
subdivisions up. Now, before I go though, the reason why you can turn
the subdivisions up is if you come down to where
is it bottom bending, you can actually bend
these as well, guys. I don't know if I showed
you that, but really, really handy if you want to change the way
that they look. So you can bend them as well. And if you go into
the geometry note, if we come over to tal shape, you will see if I press a little dot button and come
round to here. And I just set this bottom
bending down to one, set it back or zero
even. There we go. Zero and then come in, and I can actually bend
them this way, as well, turn up the subdivisions.
And there you go. You can also come in, press
a little control button, and you can actually bend
them that way if you want. So you can see these are very, very handy to create amazing
roof tiles with these. Now, the other thing
is you can come in here, reset the curve. Let's pull this back down
then to zero, like so. And the other way of doing
that, if I bring this down Siri you should end up with something
again like that. Now, the other way you can
do this is just come in, grab one of these and just
sorry, grab one of these. Right click. I'm just
looking for the lead. I think it's a minus button.
Let me just have a look. Let me have a look
if I can actually just delete that delete. Is that gonna do it? No,
that's not deleting that. Remove. I'm just
wondering how I actually got rid of this. I'm sure. But I thought I could just
press delete on here. So maybe it is just reset curve or just press Controls
head and go back. And fairly short, this might be it. Let's
see if this is it. Yeah, there we go.
Now it's there. Alright. That's how you do it. There we go. So all we'll
do then on the next one is, guys, we'll actually
convert this to mesh. Now we've got it in
the right shape, and then we'll get this
bend onto our roof, get on the materials, all
of that other good stuff, and I'll see you
on the next one. First of all, we're
going to go to modeling just so I can
see what I'm doing. And I'm going to zoom
up to it and get prepared for the next lesson.
Let's save out everything. Alright, every one,
I'll see you on the next one. Thanks a lot. Bye bye.
162. Cleaning Mesh Backs and Preparing for Bending Modifiers: Welcome back, everyone to lend
the building master class from concept to final render, and this is where
we left it off. Alright, what I want
to do then is just, first of all, turn
this into mesh. So what I'm going to do is
just control A and apply that, and then we're going to end
up with something like this. The next thing we
want to do then is delete the bags as we always do. So shift H. Let's come
in and delete the bags. So I'm just going to come in
and grab all of these round. Here and the bottom of these
two maybe and then select. And we're going to let's
have a look select, whereas it select
similar by normals, and then hide them out away. Let's press one,
go into side view, and then we'll delete
the backs off as normal. So I'm just going
to press wireframe, C, and then just
grab these backs. And they're tiny these things. So these things don't take a
lot of work, as you can see. And then what we'll do is
join them all together. Like so, let's make sure
we've got them all, and then delete and faces, and then alternate,
bring back everything. Let's put it on object mode,
go to the back of them. Let's then come up and join them all together
for the next bit. So if I press tab, A
to grab everything, mesh, clean up, merge by
distance, tab, right, click the origin to geometry, and then right click
shade auto smooth. Now, let's just turn around the normals before we
begin the next process. So A, shift N, spin them round,
and there we go. Now the thing that I
need to do now is I basically need to put in a subdivision into
each of these. So right click, subdivide, like so, and maybe
even subdivide again. Now, the problem is,
I don't really want I only really want to
subdivide this top. I don't really and
I only want to subdivide it going across, you know, along this part here. So I'm just wondering
whether it'll be easier for me just
to select these. Can I actually do that?
I'm just going to select a couple of
them and then go to select select similar
and select by normal. And then I should be
able to press ShiftH, hide the rest of
them out of the way, and then right click, subdivide, right click, subdivide
Altag, bring them back. And you'll see now not gross subdivision down
and all of those. Now, I want to do that
because the other thing is, I want to do the sides as well. I just don't want
them going down here. These are the bits
that I don't want going down. So you know
what I'm going to do? Instead of doing that?
I'll press ALTH and I'll bring in the sides
and not these parts. And the reason is, I'll
show you the reason. If I press Control
A or transforms, right click a origins, geometry, adding a modifier and the modifier I want to bring in is going to be under deform, and it's going to be the simple deform like
we've already used. Let's put it on bend then, and let's put it on the Y, and there we go, that is
what we actually want to do. You know what? We
might be able to get away without actually
bending these. We might be able to
do it. So let's press altage without bringing
in a subdivision. What do I want to do is I want
to bend them a little bit more, bend them a
little bit more, a little bit more, and
then or and exit it. Now R and Y, rotate it round. Let's make sure they're
in place, first of all. And now we can see where are
they going to come up to? So what I'm going
to do, I'll bring them I can see I probably
need to bend these, so these are going straight
down because we realistically want them coming down probably
this one here coming down. So if I come in and really
rotate that round like so, and there you go, that might
be a little bit too much. So now let's pull it
back just a little bit. Like so, and then R and Y, and just take your time with these because it's important
that we get them right. And then what we'll do is just bring them
down a little bit. I'm going to bring
them in a little bit, and then I'm going to
rotate that out again. So, you know, it's a
lot of fiddling round, but I'd sooner it be right. I'm pull it out. An RN Y, holding the shift
button, bring it out. I'm just wondering
if this parts here. Now, you'll see if I come in and I take this off a minute. So if we take this off, not
this one, this one here, and then come in to so if
you see if I just put it on, sorry, this one here. So you can see if I
press this one here, and I come in and I bring in edge loops, three,
left, click, right. You can see how it bends
a little bit more. We don't actually
need to do that, and that's why I was
wondering about in the beginning whether I
should be doing that. I'm going to try and
bend it just a tad more. So I'm just going to try and bend it just a little bit more. So R and Y, holding the
shift but, and there we go. That is I think the best
we're going to get it. Now what I want to
do is before doing anything else, obviously,
I want to pull it in. I want to pull it
up a little bit, just get it in right
into that crease there. And again, we can get rid of this roof or even bring
this roof in if needed. So I'm going to
mess around with it a little bit more R and Y. And again, it might seem like this is a lot
of work for nothing. But honestly, guys, it's really worth if you can
get this you know, to be exactly as you want it, so bring it in a
little bit more. And the n Y. The other thing is,
depend on where this is. So depending on, you know, this part here, you could also bring it from this part
or from this part. So in other words, if I come, let's say to the top here, so just grab one of these faces Shift desk
cursor selected tab. Now, right click and set
Origins three D cursor, you will see now that it's
bending from that top, and that might be a
better way to do it. So if I bring it down, you'll see now what sort
of bend we get, completely different
bend what we had before. And as you can see, maybe that's not going to work
for us on this occasion. Alright, lastly, then, let's go back and put it
back to our a it. Something like this, I
think, looks pretty good. And from this, I think
I can work with it. Okay, so what are we
going to do next? First of all, we'll come in
and bring out this part. So we'll bring this part out. So if I come in and I want it going all
the way down to there, and I've already
got my reference. So make sure you've
got your reference so you know what we're actually
dealing with on this. So this will be if I can
pull my reference over, let's have a look, this will be this part
going around here. So this part going around here is what we're
dealing with now, and we want to create
it like this kind of gothic type look to it. So let's pull that over. And what we'll do
is, first of all, I'll just press Shift
D and bring that out and then press P selection
and separate it off. And you'll notice I'm doing this before doing anything else. I'm not doing anything
else right now. And then what I want to do
is now I'll bring this back. So I just want it
to come from here, going all the way
around just to here, down to here, and then
shift D, bring it out, and then I'm going to press E Y, and pull it out like so. Then I'm going to grab
this, press, shift and N, spin it round, and then I should be able to delete
this part of the way. So delete and faces sorry. Delete. Versus. Where
is it? Delete Versus. There we go. Alright,
we got this. Now let's press Control A. And you know what,
as well with this, we'll take off the
mirror because it'll just make
it harder for us, control A or transforms, right clicks origins geometry. And then what we'll
do is we'll come in this time with solidify. We'll solidify it
out, so out, like so. And then what I tend
to do with this is, if I breast Control one, I should be able to bring it in. So you'll notice you've
got one that says offset. If you bring that
in to naught 0.5, it'll kind of put
it in the center. So it'll put it in the
center of this line. So you can see now if I drag
that in, let's say here. Now you can see exactly
what I'm talking about. The other thing from here
is you can see that we've got or roof tiles. And we can now get a better idea of how far they actually
want to bring in. And finally, the other thing is, if I just hide the
roof tiles out the way and come
back into this part, I should be able to
split this out the way, so split it going
all the way up here, for instance, because we're really not going to need this. We're going to have some
bricks coming down here. But this part here, so
this part going from here, going all the way
round through here, we're really not going
to need at the moment. We might bring it in in a bit, but what we should
do is press Y. And then what I'll
do is I'll press the S bone and bring it in and then just make sure
that'll pull it down. Es and Ed, pull it down and
then drop it down there, and then we should still be
able to have some wooding. Now, if I press tab tag, you will see round this side
now, we cannot see that. That is exactly what
we're looking for. Again, where is
this coming up to? So if I hide this out the way you can see
this is the line, and this is this line
where we're coming up to. So let's have
another look. Do we want it then coming
down to here? In other words, do we want this part here bent
in a little bit more? So if I bring it
up, for instance, and then bring this up, I
think there that there. Let's pull it in a little bit. You can see here that I do need to pull this
out a little bit. So I'm going to change
the offset. There we go. Now you can see
that is fitting in. Absolutely perfect. And once you've got it, you've got it. You don't need to worry
about the other bit. The other thing is, we don't
need these parts on here. It's good going down to here, which means then I can come in. And I think I'm going
to be happy with this simple form because I'm
going to press Control L, and now I should be
able to come in, put it on wire frame, and I should be able to
get rid of these. So L, L, L, L, L, L, delete and VertsG rid of them, Alta, bring back everything, put it on object mode,
and there we go. Now, why did we do
that? That means now that we can probably get away with pulling this
out a little bit, have a look how far
can we pull this out? Maybe to something like that, giving us a lot more room here, pull this out a little bit, and again, don't worry because
we're actually going to be mirroring it over
the other side, anyway. And finally, then we
can actually come in right click shade or smooth
just to smooth that off. And I think at this
point, actually, we could probably
apply this solidified. Now, before I do that,
actually, so before I finish, let me just have a look
at what pots we've got, because I think I'm going
to bring one more pot in, which will be let's have a look. Oh, we can see on here as well. Let me fix that as
well while I'm here. So shift N, and if this one
fix, let's come back to it. L, shift N, spin it
round to the inside, and we'll do the
same thing on here. If you notice any of those, just make sure you fix
them on the way. It's going to make life
much, much easier. Now, this is the
one that I want. So I'm going to press O D.
I'm going to bring it up. And then when we do it Os, 90, and then pull it over into
place, press Control one. And then all we're going to
do then is fit it into place. So if I press G, I
should be able to bring it roughly into
place where it is. And this will give me an idea of the thickness of this part here. So we can see now I want to
fit it right in the center, so I'm just going to come in for finishing and grab
just this edge here, shift desk to selected, and then come back to my part
and shift and selections, cursor that then he's going to put it right in the center. Is it going to put it around
the center? No, it's not. No, it's not because it's
just took that part. It's not right in the center
of there. You know what? I'll just put that
in. Pull it over. S and X, pull it in, like so. And there we go. Alright,
that's looking good enough. Do I want to pull it over.
Control wants, have a look. Do I want to pull it over
a little tiny bit more. I think we're near enough
there. Something like that. Let's have a look. Yeah, and that is looking how I want it. So on the next one
then, we'll get in this chunky bit,
which is from these. We'll get that in
there, on this side. Then we'll get this laid
out the way we want to. We'll put the bar on, we'll
get a window in there. And basically, once
we've done this, we can mirror it
over the other side. Alright, I once, I'm
going to save my work. I'll see you on the next
one. Thanks a lot. Bye bye.
163. Shaping Curved Roof Elements with Custom Modifiers: Welcome back, everyone to blend the building
master class from concept to final render.
This where we left it off. And now what we're
going to do is we'll come in and first of all, we'll just make sure that this is high enough up,
which I think it is. I think it's a very nice sort of size for the things
we're going to do. So I'll just press Control
A and put those in. Next of all, then,
what I'm going to do is lt shift and click. And by the way, we're
dealing with many, many things at the
same time on this. So just don't get overwhelmed. Just try and break it
down and understand, like, I have not
done my roof yet. We all have those
kind of things, but you will come back to it. Don't worry. We'll just keep building and then come
back and fix things. Alright, for this then,
what I want to do is I want to press Control B
and bring it in. Now, before I do
that, I want to press Control A or transform
set origins geometry, and now press Control B. And then what I want
to do now is come in and put it onto custom, and I want to set
this onto steps. So set it on steps,
turn it up one, and then we should
get a step in there. Now, you can see that I probably can still
pull this back, let's have a look, so
pull it back very slowly. It's way too big, actually, and I want to pull this
down, and I can't. I'm going to see if
I can pull this out. And if not, we'll just do it the old fashioned
way of doing it. And if it's not going to
work, instead of that, let's actually come
in and just put it onto sup clips. Let's
put it onto there. And then what I'll
do is I'll just try and bend it the other way. So I'm going to bend
it in, like so, and we can do it
that way as well. We can actually pull it out
then, hold in the ship bone. Like so, and I just wondered if the step would actually work, but it doesn't seem
to have done that. Now, one thing I
want to make sure before finishing, you know, just this little bit in is, if I go into wireframe, you will see that
I can see through. So if I bring this overs, you can see, can I
actually bring it? You can see it's nice
and straight there. So the only thing we're dealing with here,
everything's straight. So in other words, all
you're dealing with there is how wide do
you actually want it. But you can see here how
wide do I actually want it, how big do I actually want it. So I think I'm
going to drop mine down maybe something like here. Then I'm going to come now to the inside. Shift and click. Let's come to the inside, press Control B, and let's
bring this one in, like so. Now with this one, I probably want it to
be on the custom. So let's go to the custom. Let's actually reset
this so we can reset the curve.
So let's reset it. Then what I can do
is now I should be able to bring that out like so. I'll increase it as well. So if I increase it, I
can then bring that out. Make any kind of curve
that I actually want. So something like this, and you can see that looking
pretty nice. All right, so far so good. Now, let's bring in
the little side bit. So if I come to this, I
should be able to press up D, and then we're going to
bring it up into the side. Now, the thing is, because, you know, I'm going to be mirroring it over
the other side, same as this, what I should do is shift D. Hide
it out of the way, delete the other one because
we are using a mirror. Oh tag, bring it back.
Same for this one. Then once I've
brought it in place, I'll bring it into the place
where I actually want it. So maybe something like this, turn down the actual
count all the way down, drop it into place
where I actually want it without it
poking through. We don't want it poking
through, something like this. Is way way better. Now shift H, hide out the way, delete this one, and there
we go. Now, let's press TH. And what I'm going to do now
is use this because in fact, this one should be
right in the center, shift desk is selected.
Adding a modifier then. The one thing I'm
looking at here, actually, is before
mirroring it over, I'll just pull it out
very, very slightly, all the way to the edge
just so we've got a bit more of an edge along there. Like so. Then what I'll do is
this will be my brick here. Then what I'll do
is I'll grab it again right clicks origin 23 dcursor then I'm going to we've got an array
on here which we don't need. We've got a bevel on
here which we can keep, generate a mirror, and let's put it over the other side like so. All. Again, so far so good. Now let's come to our roof. Let's copy the modifier. Control L, we will
copy modifiers. Again, this is going to be because right clicks
Origin three D cursor. Going to go over there? That's the question
that's put on next. The, No, it's not. So
we'll press Control A. We'll grab this one, actually. This is the one Control
A, A transforms, right clicks at
Origins three D curter and is it going to mirror
over the other side? Yes, it is. And there
we go. Alright. Very nice. Now, the
one thing I would say is that these parts on here, as you can see, they're bending down a little bit,
and we don't want that. So I'm going to go over
the top and I'm going to fix these before
doing anything else. I'll put it onto wireframe and then all I'm going
to do is just press B, making sure I'm on Facet. So faceleg D and you'll just
grab all of those edges. And then come in, and now I
should be able to just lift those ones up a little
bit. So, and there we go. It's going to lift them
up on the mirror as well. And then you go, that's
that final part there. Now, let's come to this and control A or
transform set origin. Three D cutter. We'll do the
same thing on this as well. Shift D, hide it out of the way. You know what? We grab both of those there. Let's do it slowly. So Shift D, hide it out of
the way, delete this one. And then we'll press TH and join these both
together because I think they both have a bevel on let's a bevel and an array,
let's take that off. So let's take the array off.
Let's come to this one. This one has an
array on as well, and they both got bevels on.
Let's join them together. Control J, and then clicks
Origins three D cursor, add in a mirror. So let's bring in a
mirror, and there we go. Now, can we add this
to it, as well? So again, remove the array, press Shift D, hide
out of the way. Delete this one, old age, join it with this one, press
Control J, and there we go. Alright, we're
motoring along now. So we've got all of this so far. Now, the thing is, how is
this going to come in? You know, what parts are
we going to use on this? I would say probably
on this one. Got a top on there. I would say probably
we're going to have another part underneath here
and then a post coming down. So I think before even starting this, let's
actually do that. With this, again,
I'm just wondering, I think under here, we should have maybe a version of this and maybe
some post going down. The thing is round here, we've also got, you
know, windows in here. So I'm just wondering the easiest way to
actually do this. We've got a lot of
windows in here, so we can either start just with the top and not work on
these parts going down, or we can start with the top, but just put in the first part. I think on this one, we'll just go to sket manager, and I'll just look at what the support and
bombs and tops are. I think it's going to be
this one that I want to use. Either this one or even this
one here, You know what? Let's just have a look at
what this one looks like. So let's bring it in. Let's
pull it up into place. Let's go back. No, we won't. We'll actually
press Control one. We'll go to this way
first. Let's get into place to see where
that's going to go. Going to put it in
place, like so, and then I'm just going
to bring it out, like so. I'm just looking underneath how far that's going
to come across. So if I put it in something like this, pull it
back a little bit. Maybe even a little
bit more. Like so. Yeah, and I think something like this will
give us room then, kind of build down from here. So yeah, I'll grab
this, shift D, and then hide this
one out of the way, grab the old one, press like
so old age, and there we go. Now, this one here then
is a duplicate again, so we don't need to worry
about mirroring it, and that's basically
everything that I want to do. Alright. Now what I'll do is
Control A, all transforms. Take off the array,
right clicks at origin. You know what?
Rather than do that? We've took off the array.
Let's just join it with these. So Control J, join it
together. There we go. Okay, this is looking good. Now what we want to do
is want to bring in our one of let's have a look, one of these. So our window. So Old D, we'll bring in
one of these windows. Let's press RSE and 90, Control one, shift in
S, selection cursor. Drop that in place,
bring it down. And then obviously
we're going to have to make this a little bit smaller. So S, make it a
little bit smaller, bring it down to here. That's right in the center now. So now I can bring it forward to where I
actually want it, which will be
roundabout in there. I'm also, as well going to
put on our bottom band, which will be here. So this here you can see
Old D, bring it over. Again, I should
press Shifty really. Get used to pressing Shift on these shifty because we are going to be mirroring
it over the other side. You can't mirror, of course. If you're not or if you're Alden you don't really want to mirror because it'll
mess everything up, so control one and
bring it over, making sure it fits in
S and X, pull it in. Like so, there we go. And for this, I'm going to
put it round about here, and then gonna pull it back into the place where I want it. Roundabout there, making
sure it's still in the wall. And then this part here, I can actually bring down to be sat on top of that bit, like so. Now I would say that this
is it the right size? It looks a reasonable size. It's fitting in with everything,
so that's looking good. And then under here, I'm just wondering wondering
if I want this bit, stuck out a little bit more
before going any further, which means let's have
a look in my roof. I've got plenty of room in my roof to stick this
out. So you know what? I think at the moment, I will grab Let's have a look. Can I actually grab those? You
know what I'm going to do? I'm going to at the
moment, bring this out. So I'm going to bring
it out over there, and then go to bring
the back wall. So this one out over here
where it needs to go. So it'll be something
like there. I'll bring this part out, so I'm going to pull it out S and Y. E's pull it
out into place. Then I'll bring the roof
out a little bit more, so the roof fits into
place very, very easily. I'm going to hide
the roof out of the way and come
to this part now. And what I'm also going to do is just make sure old
shift and click, I pull this part out into place. Then I'm going to
grab this part, and I'm going to pull it out. So I'm going to pull it
out, press in S and Y, pull it out a little bit
more, put it into place. Even further, S
and Y pull it out. And if it's not going
to pull out so much, we can still
remember array this. So you can see I've
pulled it out that much. Now, does that look good, or does it look better if I come in and array that instead? So let's come in,
bring on the array. So add, modify,
generate an array, and let's pull it forward now and see what
that looks like. Does it look bet like that? You know what I
would say it does? I'd say it's too
stretched out before. So I'm going to pull it
back just very slightly. So pull it back just
very slightly, like so. And I think that looks better. Ol tag then bring back the roof. And now we just
need to make sure that all of this is
fitting into place. So this is okay. Let's come
in the grab this part. And what we'll do
is we'll pull it out, fitting into place. So let's pull it over here. And what I'll do
is they'll press EnsEad and pull it down to here. Probably a little bit higher and then put something
underneath here. So put something underneath. Now, what I would say
is on the back of here, rather than stretching this out any more than
what we need to, I would say probably come
in and just grab the back, so grab the back
faces, go from here, into here, and then
turn this off, and then pull it back
into place like so. Double tap the eight
and there we go. Alright. Again, seems
like a lot of work, but I think just
pulling it out that slight bit honestly makes such a huge difference
in how this looks, and I think it looks way, way better just, you know, sticking out that little bit. And then what we're going
to do now is we're going to us grab all of these. Again, I'm going to press
Shift D so I can mirror them. So shift D, bring them over. So the 90, press Control one, and I'm just going to get them ready then for the next lesson. So I'm just going to put
these round about here, and then on the next lesson, we can get these into place. Alright, everyone, so I
hope you enjoyed that. Let's save our work, and I'll see you on the next
one. Thanks a lot. Bye bye.
164. Mirroring and Positioning Trim Components Around Structural Roofs: Welcome back everyone to
Blend Building master class from Concept final render. Now, let's come
round to the front. Let's grab this part. I'm
gonna steal this part. So shift D, bring it over and
then RZ 180, spin it round. You notice I press Shift there, guys. Just remember to do that. I think pretty much I've
got everything I need here. Alright, so let's then start with this part here and this part here. They
can go on to these. So if I grab all of these, I should be able to make sure first of all,
you know what? I'll remove the array. So I'm going to
take off the array, I'm gonna see if this
has an array on. And then I should be able
to come to this one. No array on. This
one's got an array on. Join them all together,
so control J. Join them all together,
Control A, all transform, set origin, two geometry, shifts, and selections cursor. Grab this one then. And again,
this one has an array on. Let's take that off, and then shifts and
selections cursor. Now then I've got all
of these in the middle. I can start bringing them out. We'll bring this large one down first and
just put it there, and then I'll bring
this one down and put it there just for now. Now, I want to make sure that these are
fitting into place. So I'm going to
bring them under. Hold them down just so
they're fitting in. And you can see here that
these two on each side, I need to bring up and
pull out a little bit. So I'll make them a little
bit bigger, first of all, press the S pan, bring them out, bring them out, and
then grab these. So tab, L, L and L, and then bring these up like so maybe squish
each of these in. So let's put it on to
individual origins, pred S and X, bring
them in a little bit. And then what I'll do is, I need to bring them
in. You know what? I'll get rid. I'll
take this off. So I'll come in. I need
to mirror them, really. They're not going to
look good like this. So I'm going to do
is P selection, and then just remove this one. So L and L delete hurts us. Now, let's just come to
this one on its own. Control A, all transform
set origin to geometry, press Control one, and
I just want to line it up now with this
here, as you can see. And I also want to pull it out a little bit just to make
sure that everything fits in. Now, we can see we've got a little bit of an
issue with this top. We can see this top is
actually going through there. That's not something
we want. Now, this top isn't attached to anything. If I just grab this
part press shift each, I should be able
to come down and just pull it up. On both sides. So if I grab both of those, tab again, tach,
come back to it, tab again, and then I should
be able to pull those up into place without
damaging anything. Now you can see that we're
starting to get there. Now, the next thing is
that I want to make sure that I press S and Y, pull it out, that
little bit more, make sure everything's
going into. Make sure it's got
a little bit of a roundedness on here.
That's looking great. The next thing I
want to do then is S and X and pull this out a bit, just so that part's
going into place, so grab this one, then right click the
origin three D cursor, add in a mirror. So let's mirror it
over the other side. And there we go. We actually
getting somewhere now guys. Now, let's think about
bringing this up a little bit. So I'm thinking if I put this underneath
and press S and X, let's pull it out a little bit to where
we actually want it. And let's press I'm wondering if I need to
pull it back a little bit. Can I get away with pulling
it back under there? And how far can I pull this out? Again, we've done Shift on this, so can I pull it out to there?
And does that look good? I'm thinking that this part here probably needs to
come down a little bit. And I'm just looking
at whether I want this to be a bit bigger
seen as it's mirrored. Let's grab it again.
And let's press the S button just to
make it a little bit bigger altogether.
So medium point. Then let's pull it down there, and then S and Z, pull it up, then put it into
place. Yours done to here. And let's have a look
what that looks like. So tab, double tap the A. You know what? That actually
might look better like that. And seeing no it's coming out. Now, this part here, should I pull it
out a little bit? Let's have a look
what that looks like, pull it out a little bit. Then we've got that
one back there. And yeah, I actually think that's probably
going to look better. Than what it did before. Now, let's work
on this fit then. So I'm going to grab
this part here. It's mirrored over
the other side, press Shift D, and
just bring it down. Like so, and this is
where we really want it. We also want to make sure that we're pulling this
out into place on this face here just
to make sure that those bass line up. And then finally, I'm
going to come back to it, press L, L, and pull it
back into place, like so. There we go. Double tap the
A, and that's that side. Alright. Now we
need one more bit, which is going to be
this part in here. So I'll just grab these because I know
they're mirrored on. I'll press Shift D, and
I'll bring them down. And then what I'll do is I'll
press A and then, Z, 90. Spin them round.Hpefully I should be able to
then pull them out. Yep. Oh, Z 180. There we go. Now, these have got looks
like two mirrors on here. Yes, because it needs
to be on the Z. No, we need to reset
all the transforms. So let's just turn them off. Press Control A all transforms. Right, clicks the origin to
three D cursor. There it is. Then let's put it on too. Oh, it's got an
array on as well. That's the reason
why. So let's put it on the X, turn off the Y. And the array is the
thing causing the issue. So we're just going to turn
the array off just for now. And then what we'll do
is put these in place. So under there, ring
them out, like so. Now, with these, can we get away with having
another array on? So what we'll do is add
modify generate an array. And let's press Tab. Why is it only generating? Maybe it's because I need to
pull that up. There we go. Alright. Finally got
there. That's why. Let's put it into place here. Let's move this back
then into place like so. Double tap the A, and
even though that's going in there, that's
looking pretty nice. Now, if we grab all of this, press S and X, we should then be
able to pull it in, and then probably get away with pulling it out into
place like so. I think, actually. Yeah, that looks that looks
very nice like that. And again, a lot of work
has gone into this. Now, let's come to
this, and what I'm going to do is shift
desk cuts to selected. Now, I know we made it smaller. Let's hide our roof out the way. We can pretty much delete
our roof from this point. You're not going to need
it for anything else. I'm just going to leave it
in there just to make sure I really don't mess up or
something like that, but I'm fairly, fairly sure we don't need it
for anything else. Now let's go to Boolean,
and the boolean we want is going to be I
think this one here. I'm going to press
Add 90, Shift S, selections cursor,
and then zoom in, and I want to make this smaller. So I'm just going to make
it a little bit small. I'm not going to worry too much. I know I'm going to need
it for something else, but I'm going to make
it you know what? I'm just going to put
it back, pull it down. And then I'm going to press
the S button and bring it up. I'm going to press
Control one and just make sure I can bring it
up a little bit more. Like so. Then I'm going to
grab this, grab this part. I'm going to press
Control and minus, bring in my boolean, apply it, grab my boolean once more, and turn off the remove
that at p, as always, clear pain, and then let's just put it back to
where it's going to go, hide the booleans
out of the way. And there we go, that is what we should
be left with guys. Now, let's press AltH.
Where is my roof? Did it actually cut that way? Let's just have a look because I might have really
messed up there. Where is my roof gone? I'm not actually sure
where my roofs go. Let's do that again. So we'll
go all the way through. I'm hoping I didn't
lead the way. Maybe I had all my
roof tiles selected. That's something else
I might have done. So I'm going to press Control A. You know what I'm going to
press Control Shift head. Just go all the way through.
Put that back over there. And if I have deleed my roof, I will make sure, guys, that it is in the next
one, because what I can do is I can bring
back my old version. Now, if you ever get
a problem like this, save it out as
something else just for now or open up your other one. I would say, probably save as you can see a 19th century
course. Let's come in. And what I'll do
is, I'll save it as 19th century course, build. In fact, we'll just
go build, build, and then one, like
so. Save how's that? Then what you're
going to do is you're going to open up the one. So open recent, 19th
century course. Like so. Let's hopefully, there's my roof.
There is my roof. Okay, so let's press Control C. And then what we'll
do is file open recent, 19th century build, one. Don't Save. Now, let's press oltge C and bring
it back. Is it there? Q mark? No, it's not. It doesn't seem to be there.
I have a hid it in the roof. That's the other
thing. I better have. There we go. There's my
roof, so it's still there. But either way, if you did that, then, if I hide
this out the way, for instance, and
bring Control V, that's how you
would bring it in. So you can see there just save down another one, brought it in. Now we're going to do instead of messing
around with that, is we're going to come in
and grab all of these, and I'm going to drop
them into my roofs. So if I come down, we've
got roofs in there. We've got roofs here, so
I'm going to press M. No. Sorry. Let's have a look. Let's press M. There we go. Put it into roofs, and then turn our roofs off,
and there we go. And we've still got this
one, as you can see. So let's come with
this one then, M, put it into roofs,
turn off our roofs. And finally, there we go. Now, that is looking really
nice, as you can see. Now, what we need
to do now is on the next lesson is we need to get everything over
the other side. So all of this over the
other side with a mirror. And then we can start actually
bringing in, you know, things like the
bricks, for instance, the bricks, the wood,
the roof tiles, all of that stuff
we can do on here. I think the rest of
it can stay as is. And yeah, the rest of
it's looking pretty nice, and then we can get this top on. So once you've done this bit, though, the rest of
it is very easy. I'm also going to turn
off my face orientation. The rest of it is
really, really easy, guys, since we've done all that. It's just basically placing
some more windows down here. And then finally finally, guys, we've actually
finished the main building. So if you've got
these four guys, you've done very, very well, 'cause this is sun built. Alright, everyone, so I
hope you enjoyed that. I'll see you in the next
one. Thanks a lot. Bye bye.
165. Adjusting Roof Layers and Curve Alignment in Blender: Welcome back if we want to plan the building master class Brom. Concept final render. This where we left off. Alright, so now we need to
actually build this part. Well, we need to get the
textures and things like that. We've pretty much got
everything in here. So let's actually do that now. So what I want to do
is I'm thinking that probably on the sides, for sure, we're going to
have bricks on the sides. And the front of this is
up to you whether you have bricks or whether
you have stone. So that's one of the things
that I'm actually thinking about when I'm
actually doing this. So with mine, I think I'll come and what I'll do is
I'll grab all of these, smart UV project. Click Okay. And then what I'll do is
grab this press Control and L. And what we're going
to do is link materials. So link materials like so. All right, with this, then
we're going to press A, U, Smart UV project. Click Okay. Unwrap basically, grab this and we're going to
press Control L, and we're going to link materials
again, and there we go. Now, the bricks down here, so let's actually do these next. So we're going to grab
both of these sites. And I think everything on here. I think they're all
joined together here. I'm going to just
hype this out way just so I can see
what we're doing. Yes, everything's
joined as you can see. So the entire thing is
actually joined up, which means let's split it off. So we'll grab this part here, and what we'll press is, you know what? No, we won't. We'll grab both of these
here and we'll press Y, and then we'll come up and
we'll grab this going all the way around here and press
Y, and there we go. Now, everything's
split up. A, U, smart UV project, click
Okay, and there we go. Now, from here, then, let's first of all, bring
in the material. So we'll bring in
the stone light. Let's bring in the stone light. Now, obviously, we
don't need everything, you know, on stone light. Also, do we want it on
stone lighter on this bit, or do we want it all this, you know, kind of stone color? I think that let's
try instead go in with plus down
arrow, stone Lighter. Let's do Stone
lighter and see if that's any better.
So stone lighter. And then we'll
grab all of these, and we'll click Stone lighter, click a sign, and
let's have a look at what that looks like. Not sure. Let's go in with plus.
Let's click the down arrow, and let's come into
bricks like so. And then what we'll
do is we'll click a sign, and let's
have a look at that. Now, I think, because I'm just wondering if I press
lth, bring back everything. This bit here in particular, I think has the block missing, which is going to go
over the top of there, which I've not actually
sorted out yet. So what I'm going to do is
I'm just going to press L, shift and D. Bring this out because I don't know why I didn't
put that over there. I'm sure I had one in there. I'm just going to look to see if it's actually under roof or something or Booleans or something like that. I
don't actually think it is. So you know what? I'll press
question Mark, as well. No, it doesn't seem to be there. So what I'll do is I'll press
P on this one selection. I'll come over then to here
and take off the mirror, and then all I'll do
is press Control one. I'll press Control
A or transforms, right click at
origin to geometry, and then I'll just
put it into place like so wherever
it's going to go, which looks to me like it's
going to go down here. Now, the thing is, I
did actually set it up, so there was under
the under here, but then I've got to come in and perhaps perhaps
let's have a look. So we'll get it in
place, first of all, before we're doing anything a I don't know where
it's actually gone. I'll pull it up a tiny, tiny bit so that window
is resting on it, and then I'll grab
this going all the way around here and pull that
out. So that's no problem. That's the easy bit.
I'm going to have to pull it back a little bit
because it's too far forward, but pull it back
into place like so. Now let's look at this part now. If I hide just this
part of the way, let's put it onto Object mode. Have a look. You can see now we've got a bit
of a gap in there. And I think that realistically, to keep this looking like
it's actually stuck out, maybe it's worth coming
back to my brick, maybe it's worth
getting rid of that. So if I press voltage,
bring this back. I I delete this
one and this one, so delete and faces, and then come into this part and grab the front and
the back of it, I might be able to just lift
that up into place like sub. So pull it all the
way up into place. Now, you can see we've got
quite a big gap there. But I know because
these are all shifted, I should be able to
get away with it. I'm just going to make
sure that I did hit shift. And then I'm not pulling
these up out of place. So you can see here
this is the one I think. Or is it this one yet? It's this one here. I'm just wondering now, if
I pull this back? So if I pull this one back
or because it's got a shift, should I, you know, just pull another part out? Or should I put
another part in there? You know what I'll
do? I'll just come back before doing that,
I'll bring that down. And what I'll do is I'll
come to my smaller part, this one here, I'm going to pressure D, and I'm
going to bring this out. I'm going to see if
this fits on there. So I'll bring back the array, so bring the count down,
press Control one. Like so, and I'll also
bring it down once more, and I'll put it into
place along here. Bring it back, and now it's a smaller version of that
top one, as you can see. Let's see if this fits into place in a better way.
You can see already. If I bring it down
there, actually, that might fit in perfectly
and look very nice. Okay, so let's come into this
and then just pull it out. Like so. And yeah, You know what? That
looks pretty good. I'm happy with that. So
yeah, we wing that one. Alright, so let's come in,
put it onto our rendezvous. Then we've got bricks in there
and everything is looking. Very nice, actually. Very nice. Okay, so now we've
got these bits here. Let's come in, and what
we'll do is we'll just change these to lighter
stone, I think. So we'll go do material, stone lighter, click
a sign. Like so. Okay. And then we've got
the bricks going down here. Now, let's sort our
bricks out for this part. So all I'll do is I'll press
Shift H. I'll come in, make sure the bombs deleted. I'll also come in and make sure we've got an
edge going down there, and then we'll have
something to work with. So if I write, click now, Mark acne A, smart UV project. Okay. Now, one
thing I didn't do, did I resell the transforms? No, I didn't let's
do that first. And then, smart UV
project, click Okay. Or we could just press U and Unwrap scene as we've
put our seam on there. And then what we'll
do is just change that to brick normal. Of course, it'll be going
the wrong way round, so then we can come to this A, 90, spin it round, and then we can go and press
tag, bring back everything, come back around to this, and then get it to be
the same brick size as let's say this one here. Let's put it on render view. Let's then grab that
part, and there we go. Let's now have a look. So let's press tab and we can see they're
nearly the right size. I just need to bring them
out a little bit smaller, like so, and then we
go to the right size. Now we can work our way and, yeah, that is
exactly what I want. I'm just wondering
about this being brick. You know what? I think it
actually looks better. Let's try it. Let's just
try this bit on the inside. I we'll go to the inside, and all I want to do
then is just change the material for let's say
stone lighter, press the tab. You know what? I'm gonna
have the stone lighter. It looks better with the stone than the brick, the
brick underneath. And yeah, that's
looking pretty good. Okay. Now, let's come in. We basically want this
to be on this side. Now, again, because I've
come in, where's modeling, because I've done this in
a certain way, we need to, first of all, come and check it before doing anything else. Now, one thing I did forget is, if I come into here, I've
still got these parts. So if I come in, grab all
of these, press, unwrap. And then down arrow and
we're looking for the wood. So let's look for wood. Cracked. I think it's
that one. Click a sign, and there we go, Wood
cracks on there. And now lth, bring
back everything, double tap the A, but
I'll save it out. Now, so what I want to do is grab all of this block, really. I want to grab all of this, and you can see here we do
have one problem in these. So let's grab all of these
and make sure that these are out much much further than
the back of the wool. And then what we can do now is press tab and we can
bring these parts. So, this part here and bring
this part out a little bit, pressing dot just to make sure that it's
in front of those, like so, double tap the
A, and there we go. All right. Just looking how far I can get away
with coming out on that, maybe a little bit
less. Let's go back. Maybe something like
that. There we go. Okay, now what we can
do is before finishing, we can make sure you can see here this
has a mirror on it. This one here, I mean. What
we can do is we can come in, object, clear off the
mirror, and there we go. That's disappeared all that way. Now, what I'm going
to do now is I want to basically mirror them
onto the other side, separately, probably,
and one at a time, and then I can actually have, which ones want my bevel on? Are there any arrays that are on there, which
shouldn't be. All of those things is why I'm going to do
this separately now. So I've just took my
mirror off there. As you can see, over this side, there is nothing on there at
the moment, which is great. So on the next
lesson, then we'll start going through
each of these, join them up where we can, but most of the time just mirroring them over
to the other side. Alright, let's go to file. Let's save it out, and I'll
also put it on object mode. So when we come back, we can make a start on that.
All right, thanks, live one. See you on the
next one. Bye bye.
166. Completing Structural Wraparound and Corner Cap Fitting: Welcome back. Everyone to blend the building master class
from concept to final render. This is where we left the off. Alright, so now let's come to each of these. We've
got an array on here. Do we really need that rayon? No, we don't. We've
got a bevel on here. For now, I want
to actually leave the bevel on cause we've
go to mirror it over. Now, the other thing is, we need to make sure that we've got a cursor right in the center of somewhere where we're
going to mirror it over. If we go over the top then, we can see shifts cursor select is gonna put
it right in the middle. From here, then we
can right click Set Origin three D cursor,
adding a modifier, generate, and we can generate a mirror
over the other side, which will be on the Y, like so. Hide it out of the way. Now, I'm not actually going to
hide that on the way. I'm going to hide the
rest of them out of the way once I've
actually done them. So if I come to this one now, we want our mirror on, so
let's press Control A. We now need another mirror
on, which will be over here. So if I grab this
one, grab this one, press Control L. We're
going to copy modifiers. And then what we're also
going to do on this one is right clicks Origin
three D cursor, right click, shade auto smooth, then hide this one
out of the way. Now we'll come to the next one. So we'll do exactly
the same thing here. Got it going all
the way down there. We've got just the smooth on, so add modifier,
generate a mirror. And what we're going
to do then is put it on the You know what? We're
not going to do that. What we're going to
do is Control A, all transforms, right
click Set Origin, three D cursor, and then
we're going to grab this one, grab this one, Control L, and we're going to
copy modifiers. Now, first of all, we can see, we're going to copy
modifiers off here. So control L, copy modifiers, and then we go, now, let's
hide that one out of the way. Working our way down then. We have on here an array. Let's control A. We have on here a
mirror. Let's control A. We haven't here a
bevel that we can keep because we've got the same
one on here as you can see, which means then control A all transformed set
origin to geometry. No, set origin, three D cursor, grab this one last,
Control L, copy modifiers. There we go. Let's hide
it out of the way. Hopefully, this is all
going to go right, guys. So let's come to this part now. We've got this and
we've got this. We have no bevel on
this, for instance, so if I grab this one,
and then grab this one. We should be able
to press Control J, and it should add our
devil onto there as well. Now for press Control A, all transforms, the origin, two, three decursor, grab
this one, press Control LL. What we're going to
do is copy modifiers. Right, click, shade Ato smooth, and then we're going to hide this out of the way.
So far so good. Now, this should
just be easy because we've got the same
bevel, which is 0.5. So if we've got something like that, let's not do it that way. Let's just right
click Set origin, three Dcursor, add
in a modifier. Let's generate a mirror. Let's put it over the Y, like so turn off the eggs and then hide it out of the way. We're going to see if
everything lines up, guys, so don't worry
too much about it. Now, we've got all
of these parts here, and all of these parts can pretty much should be able
to be joined together. So let's press Control
A on this one first. Note point note, note three, we've got these parts
on here with the Rym, let's press Control A. Let's apply the mirror, and then let's join
them to this bit. So we've got mirrors all done. We've got arrays all done, and now we've just got a bevel. So Control J, join them all
together, and there we go. Let's right, click Shade Smooth. If I move these now, you can see exactly
what I've got left. This with a mirror on Control A. These haven't got anything on them or shouldn't have
anything on them, so I should now be able
to theoretically press G and make sure that I'm
joining everything up. So you can see there's a few things behind this part here, where I've pulled them
out a little bit. And we can see we do have
a problem with this. First of all,
though, let's press Control J, join all
these together. And then I've got
this one on here. Now, this one is stuck
out of this part here, and we obviously need
this part going in here, and then maybe maybe a
top because you can see, we do have a problem with
this part. So you know what? I'm going to just
get rid of that. And what I'm going
to do is work my way around to this part here. I'm going to press Shift D.
I'm going to pull it out. I'm going to press Z 90, so spin it round, and then I'm going to press
shifts and selections cursor and then I'm going to pull that into this part here. Drop it down into there, like so, and you can see
pretty much filing perfectly. I press SNx should then
be able to pull it in. Now, the one thing
is, as you can see, it does need pulling up
a little bit higher and going over just so we've got a little
bit of lip in there. You can also see there the moment this has not
grown back on it. So's head, 180 spin it round. Then let's wondering if that actually looks
better like that. I'm going to press Altage. Let's have a look. Does
it look better like that? I'm gonna press Control's. I'm just going to bring it down. Just below there, lt age. And I think actually, it looks bad like that. So I'm
going to go with that. Now, I've got the
same bevel on here, which means I can join it
with these, so Control J. And now if I press G, everything comes away, apart from this bit. Again, array. Let's apply that. Let's join it up
to the other bit, so Control J. G now, everything should come together, which means now press
Control A O transforms. Set origin, two, three D cursor. Select this one last Control L, copy modifiers and oltge bring everything back,
double tap the A. Save that all work. Come over to RenderView. And
let's have a look. Now, one thing I did
notice is the shading, but we can fix that, no problem. I'm just making sure that these are looking exactly
the same going round. And I'm also wondering whether this part here should be brick. And I think that this
part here probably. So just these parts here,
and this part here, if I go over to material, should be brick.
Let's click a sign. Let's spin those round, so we'll go to UV Editing. Then what we'll do
is we'll press eight or 90, spin them round, press the Span to bring them in, get them to be round
about the right size of the other ones, even smaller. There we go. Now I think
they look perfect. That's looking much
better like that. Now, let's come to this
because we do have a problem with the smoothing. If putting on object mode, you will see we have
a problem there, right click, they'd also smooth. I'll tap the eight. Now last let's have one
last look at that. There we go, finally. Finally, we've got
that bit done. Alright. So now let's think about creating the top on here. So this top, it has
got this part on here, but I'm still not happy with it. I'm actually going
to use this part, actually, I'll make it
a little bit bigger. And then what I'll do
is I'll bring it in. So I'm going to press the
Sbrne just to bring it in. I'm then going to come
into the center of here so you can see
this part here. Oh shift and click,
press the E borne, press Z just to make sure
it's following that. Press the F bone
just to fill it in. And I'm thinking
something like that. Looks way better. Now,
if I go to side view, we want to make sure
that this is definitely not taller than this.
Definitely not. We want this to be kind of,
you know, the highest point. Oh, yeah, something like this, even though it's
high, it's still not quite as high as that. Now, next of all, then
we need to come to it, press Control A or transforms
the origin to geometry, add in then a bevel,
so add in a bevel, put it on tonto,
not five, maybe. Noun five, like so. Just looking if I'm
happy with that, that is done. I don't think so. I'm just gonna go to object
mode. You know what? I think I'm going to
bevel this up a little bit more on my own,
so hold shift, click, l shift, click.Hl shift click, because I feel like
it's too sharp. One of the reasons why it
might look too sharp is because this bottom
part is too sharp. So you know what? Let's
before doing that, come in. Control plus, delete this
off, so delete faces. And then what we'll do is
we'll also delete this. So shift clay delete and faces. And then what we'll
do is we'll come in, grab this part, E,
pull it down on the Z, so down on the z and then F, and then I pull it in, so I pull it in, and then E, pull
it down in place. And now you can see it's just
got rid of that sharpness. It was just a little
bit too short. Now, the other thing
now we can work on is the insides on here. So if I come to these parts, I can reset the transformations I would set origin
through geometry, and then I can come in
and press Control B and just bevel these
parts off so you can see already now what
that's doing we ain't got to go in and we probably ain't even got to
go in and bevel it. We might want to, let's just
have a look O shift click, Oh shift click, oh shift click, oh shift click, Control B. Bring in very slightly, like so, and let's
have a look at that. And you know what? That's probably going
to look there like so. Now, let's press A
smart U V project. Lo, and then we'll grab let's say these that we've
got stone light on there, so Control L link materials. Let's have a look
what that looks like. Double tap the A
when it loads up. And there we go. And I think. I think that's looking.
That's looking pretty nice. I like how that is. You know, it's smooth, a little bit
smoother than what we had it. And yeah, from there,
it looks very nice. Now, on the next lesson, what we need to do is all we need to do is bring in this
part going over here, so we're going to have
this part on here, just going along here. Maybe we'll have a
break in the middle. I'm not sure yet, because
this is quite a long wool. So we'll see if we need that. Then from there, we can mirror
it over the other side. Then we can start
building these parts out and lining up our windows
where we actually want them. Pretty much then we're done
with this bit on the bottom, and we can probably start work, I would say from there
on the actual fence, which is quite a fun
bit to actually do. So probably start work on there. Now we can also see
that for some reason, this one here got pulled out, and you can see all of
them got pulled out. So all I'm going to do is right click Set
origin two geometry. And we can see now that's pulled that one in some reason, though. You can see now
these are not right. And I'm just wondering where the actual geometry lies because it hasn't
been pulled in, and that's the problem that we need to fix before moving on. So let's fix that problem. So where are these windows? So the easiest way to do this. I'm just thinking
the easiest way Have we got a window
which we've used, or is it on all of them? All of them are lifted
up, as you can see, because we pressed old D. So if we come across
problems like that, rather than panicking, we'll
just come in to our windows. We'll bring in this window then. So this window here, and it's good this actually happened because I can actually show you's 90, how to fix this. I I press three then, and brewing this up into
place, like so. And what I'm going to
do is pull it back. Like, so shift desk
cursor selected and hide this one out the way
and then come to this one. And what I'm going
to do is I'm going to now right click and set origin to three D cursor. Now, let's see if that's
pulled them down. No, it's not. Why are they all up there like that?
That is the question. If I click on this, so if I click with Shift Click on here. And then right click
Sigin to TD cursor. Yeah, you can see Log. It's actually moved
them like crazily. I don't really want that. I've
got a choice here as well. I can always pull them all back down, okay? I can do that. But the issue is that it's either one of them or the other, has been affected by where
the actual orientation is. And that's something
I want to fix. So what I'm going to do is I'm going to press Shifts, again, cursed to selected, and then just hide this
one out of the way. And we can see that both the cursed in the bomb.
So, you know what? I'm just going to pull
this one into place. I'm going to press surge.
See where this is. And I don't know what
I've done there, but it's simple fix anyway. So I'm going to pull it
back just to make sure it's in. Double tap the eye. Then I'm just going to go
round before finishing, making sure that these windows
on here should be right. This window on here it's got
a mirror over there anyway. I'm gonna zoom into it. And then just pull it
back down to the ground. So on top of there, like so. There we go. And then we'll
do the same on this one. This one's also a mirror, so I can pull this
one down into place. And then this one
up here, which is also a mirror.'s pull
it down into place, double tap the A. I'm just
going to work my way around and see if there's any other
issues with any windows. Maybe this one has an issue. No, it doesn't. And I think
I've fixed them all anyway. These two. Alright, we can pull these down
at the same time. Double tap the A. Let's
pull them back into place. Double tap the A. There we go. And now I'm looking at this one. So now you can see
my windows here because we reset it, have moved. And where have they moved to? Let's hide this out and
see if they're in there. There they go. Probably
because I used a mirror. Yeah, there it is.
That's the reason why. Because I used a mirror. It put a mirror on
all of these as well, I think, because it
didn't do it correctly. And there we go.
That was the issue. Now, I just need to
come round and make sure all my windows
are the same again. Not sticking out too much
or anything like that. They're all in a nice place. Let's also make sure that none of them
have been spun round. By that. So you can see
here this is the only part. And then what I'm
going to do is I'm just going to pull
out this window. I'm going to press TH to
bring back everything. And then what I'm going to do is just get this window into place. I'm going to press Control one, put it into place where
I actually want it. So it'll be somewhere
around here, right on top of this
kind of line here. And then what I'm going to do is just make sure that it's been pulled back far enough to
where I actually want it. So maybe like there, and I'm actually going
to pull it down then onto top of there, like so. Then I'm going to press Shift
D. Hide it out of the way. Come back to this one,
delete it out of the way, press Altage like so. Then finally, I'm going to come to this point here, shifts, cursor selected,
back to my window, right, clicks origin,
two, three D cursor. Adding a modify and
bring in a mirror, and then we're going
to put it onto the Y, turn off the X, and then press Control A,
and there we go. Now we should be good to go. Now, the one thing I didn't bank on was that sticking out there. So all I'm going to
do is just come in. I'm going to press
A on this one. It's gonna grab them both,
so you know what we'll do? It's running over this one, so what we'll do is we'll
actually save it out. When we come back,
you know what? We'll just fix it quickly. Let's come on to Wireframe. Double tap the A, B, just to grab everything like so. Come back then. And then
all we're going to do is just pull it out very
gently, car in front. Come round to this one,
wireframe, double tap the A, B, and then we'll go to this one and pull this out
very slightly as well. I felt like it was
speed running then. Okay, let's say that I work, and I'll see her on
the next and everyone. Thanks a lot. Bye bye.
167. Window Layout Planning in Blender for Stylized Architecture: Welcome back, everyone to lend the Building Master class
from concept to final render. And this is where we left off. Now, I'm just going to drag
these in a little bit. Now, I'm grabbing this one. Remember, if I move this one in, the other one should come
in and also remember that it should be on local
just so you can move in. It's just stuck out way
too far on that wall, like so. And there we go. Now, we should, at this point, now, be back to normal
from where we was. And it's a good lesson to learn that when you're using an old D, it does cause some issues. Now, what I'm going
to do is just grab this and delete it. I'm going to have one
more look round now, make sure everything's
still okay. I'm just looking at these.
These have not been moved. This should be okay. Everything
is looking nice now. Now, let's figure
out then where we're going to put everything
because where we're going to put
everything is going to dictate where the kind
of lines go across. First of all, let's
grab this window here, and we're going to press Old D, and I'm going to bring it out. We're going to also
put an object mode. It just makes everything easier. Press Control three,
and then what I'm going to do is place
this first of all, right in the center. So shift desk selection curve to place it right in
the center. Like so. Now remember, we're
going to have the roof going over
the top there, so we want to make
sure that this comes somewhere in the
center roughly like so. I wouldn't build my
windows out yet. In other words, I
wouldn't put in Boolean until I've kind
of got everything in. So we're going to have one here. We're going to have
one down further down, then one down near the bottom, and we want to spread them out, you know, pretty cleanly. So I'm just going to place them roughly where
they're going to go. So one Oops. I'm going to press Old D. There we go. Now I
can pull that down. I'm going to put one
here, so Control three. Let's put one around this point, maybe up a little bit close
to this one and then old D, and maybe this one can go
a little bit further down. So round here type thing.
Something like that. We'll have a sign on here, and this part going
across maybe. Something like this, I
think, looks pretty nice. Now, let's rope around
to the other side. And what we'll do is we
need this window here. These are mirrored.
Can bring them in, so they're in kind
of the same place. So all I'll do is old D,
and I'll bring them down. And I just need to pull them
back, obviously into Wormle. So what I'll do is I'll
just put him on A, if I grab this one, it should, pull this one back,
which it's not. And it's also
messing around with that one there. So you
know what I'm going to do? I'm just going to delete
those out of the way. And I'm going to grab
myself another window. I'm going to press Old D, bring this one over rather than
cause myself problems, A z -90, and then going to press shifts
and selection to cursor. And then finally, I'm
going to pull this out and pull it up to
where I actually want it. So I'm going to pull
it somewhere into the round bound here. I do need something
that's going to, you know, it's going to
be hold on something. So something like this,
right in the center, it's up to you if you
want to put it, you know, a little bit towards
the other side or something like this,
completely up to you. Now, for this one, I'm going to press Alt D. They'll bring it
out to here. Spin it round. So s 180 spin it round. Now, let's put this one a little bit closer into the wall. Let's put this one a little
bit closer into the wall. This is the one that's
gonna have the balcony on. So as you can see, just
laying everything out. Gonna grab my balcony over here. Gonna press Old D. And then z, 180 shifts and selection cursor. And now let's pull this out
to where it's going to go, so it's going to go
underneath this window here. So we're going to go under here, pull it out to where
it's going to go. Go into the wall,
something like that, in. And how far is it going to be
going down past my window? Maybe even maybe
just at the level. So maybe even there. Like,
so, something like that. That looks good.
And then finally, we need two smaller
windows. So two of these. And on these, I'll press all
D. And then I'll press Z 90, and then shifts
selection to cursor, and then I'm going
to pull this out into place, pull it down. And roughly with this, I'm going to want it to
be halfway between. So this one and this
one, so you can see, it's much higher than this
one here. Pull it into place. So it's about the
same as this one. It's just a little bit below, a little bit higher,
something like that. As you can see, that's what
it's going to look like. Then we'll press D, bring it over the other
side, O Z, 180. And with this one, if
press control one, it really needs moving
into the side, like so, and then we'll pull
it into the wall, there we go, we've laid out pretty much all of our windows. Now we can actually start
building around those. We've got all the
foundation laid out. So first of all, let's
think about this bit. This is the bit
that's irritating me. I really want this
actually done and dusted. So all I'm going to do is
just press Alt D on this one, bring it over into my
wall, bring it up. And let's get this tight in
place up to those tiles. Now, how far down can I go? So with this, you can see, it's going into there, slightly below and
slightly below there. So with this one,
let's have a look. I think with this, because
we've got, you know, we've got a different
structure on these, we can keep it realistically
just probably below this. So if I bring it over,
so it's just below this, as you can see, bring it in. And I think that's actually if I bring it up a little bit, fitting in beautifully there. Now let's have a
look over the top. And yes, I think
that's going to work. The one thing I would say with
this at least this bottom, you know why I'm going
to leave those tiles in. I can see them sticking out,
though. That's the issue. I'm wondering if how far
is that go to go down? You know what I'm going to
do? I'm just going to grab. Let's have a look. Both of these because we can grab
them both because it's still mirrored
over the other side. And then what I'm going
to do is I'm just going to press Control three. And basically, I want
to cut those away because then it'll still
keep them as the same tel, so I'll just come to mesh. I said, You know what? I'll
just cut these over here. Like, so zero them out so
make sure they're zeroed out. Clear the inner or the outer
so they go clear the inner, and then let's have a look
around the other side. Nothing's sticking out now. They're looking
much, much better, and now I can just
increase the array. So increase the array, like so, and pull them into place, pull
them out a little bit. So S and X. Holding Shift, double tap the A, there we go. That is looking very nice. Now I can grab this. So shift D, bring it round to
the other side. R z, 187 to go over the top. And then what I want to
do is put these into place so they're gonna
fit pretty snug in there. Like, so looking for the gap, this side and this
side, you know what? I think they've gone
in really easily. Now, the next thing
is, I want to just make sure that they
pulled out about the same. And the other thing is, I
want to make sure we're not seeing our wall in there, so
let's have a look at that. Let it load up on the
material preview. Let's even see our
wall in there. When it's loaded up, let's save out our work so we
don't lose anything. So yeah, we're not seeing
any wall in there. That's great. Let's save out
our work before we lose it. So I was worried
about file and save. There we go. Let's have a
look around the other side. See no wall in there. Perfect. I'm looking
at both sides now, making sure maybe on this one, it's not quite
pulled out as far. You can see on here, how
close is it up to this. So it's up to there
and maybe on this one. Maybe a little bit less, maybe. Hold shift, pull it
out a little bit. Alright. Good enough. Now, one thing is, let's make sure what is
going on with that. Double tap the A. I'm just
pulling that out a little bit just to check
if that's what it is. Yeah, and I think it is. I think it's just
a gap in there. So, let's come in. Put object mode and see. Yes, it actually cut
away that part as well. So we actually cut
that part away, just wondering, because this
is obviously a copy of this. And again, sometimes
these things are going to happen where we do things and we make a mistake with the other
things that we're doing. And I'm just wondering the best way of course of
action to fitch this is shifty, and then what we'll do is
hide it out of the way. Come to this one, press delete, and then press TH, bring
back the other one. Now, let me see if I can just stretch those out a little bit. So if I press S and Z, kind of pull them out
a little bit, like so, and get them into place, or should I do it
a different way, which would be let's
pull them back. Let's come back to it on here. So now before
they're pulled out, you know what I could
probably just come in and pull all
these down I I press shift H. I've got we haven't
got any bombs there, but what we can do is put it on material mode and
then just come in, press the tab, edge select,
we grab the edge there. So in ending mode. Which one is it going to be?
This one here. There we go. So if I put it into like this, they should all be pointing
the same way anyway. So I'll just come in along
them and just grab them all, and I'll quickly get these
fixed anyway because it will come out along here. Like so. Now you can see,
look, they're all pointing the same way anyway. Now, if I press tab, lt age, bring back everything,
put it on object mode. Now you can see that
if I come back to it, press the tab button,
now pull them out. I'll be able to pull
them back into place. Now, the one thing I want to
make sure is if I'm in tab, just make sure Crick
face attributes is on. Finally come to
Render view again, double tap the A, and now you should be
able to fix though. So you can see we've fixed
them fairly easy anyway. There's no problem
there. Yeah, and they're looking pretty nice. Alright, so far, so good. Now, on the next one, then, a lot of
missing around there. On the next one, we should then be able to start
working our way around. So I think we'll start working
our way around this part. We'll get in the stuff
that we're going to need, like all of these parts,
things like that. These, you know, these other, where are these little
blocks and things. We'll get those in
there, and then finally we can start working around this side,
around the other side. And then once this is all done, again, as I said, we can
start work on something else. So we're nearly there,
guys, nearly there. One lesson, maybe two
lessons at the most, and we should have this
all done. I hope I hope. Alright, everyone.
See you on the next one. Thanks, lot. Bye bye.
168. Assembling Building Facades with Blender Modular Assets: Welcome back if you want to blend the building master plats. Brought concept to final render, and this is where
we left it off. Alright, so let's get some parts
that we're going to need. So first of all, let's
bring in this part. So I'm going to put
this onto Global, and I'm gonna press
Alt D, bring it over. Then I'm going to
bring in this part. I'm gonna need some of these,
so Al D and bring it over. Now the thing is, I'm
pressing Alt D on here. Maybe on this one, I should
just press Shift D just so I can actually influence it a little bit, so I
need to be careful. I can make these bigger, but
I don't want to edit them, of course, as we spoke
about many times. Now, we've got these
parts in so far. So let's bring in
these two parts, and then we can
bring in this wall. You know what? In fact, we'll
bring in this part as well. So we're going to
bring in this. So OD, I can then stretch it out, like so I'm just wondering if
I want to stretch it out. I've still got the
array on here, so I can actually make
it more if I need to. So you know what
we'll go with that. What I'm going to do
is, first of all, I'll put these into place
where they're going to go. So I'm going to bring
it back, bring it back, holding the shift bone,
bring it out, into place. And then what I'll
do is I'll pull this one into place, as well. So we'll pull that
one into place, and finally, this one here, and we'll also pull that, bring it up a little bit, and just make sure
it's pointing out. Alright, let's
press Control one, and what we're
going to do is just hide our chimney out of the way. So we'll hide it out of the way, and then we'll bring this over. So if I bring this
over and put it in place roughly where it's going to go, so
somewhere around there. And then what we're going
to do is we're going to have another piece. So I forgot about that one. Let's just bring
in one of these. So again, I'll press old D.
I'll bring it over then, and where I want to put
this is halfway down. So I'm going to put it not halfway, a little
bit further down. I'm going to put it
round about here, and this is where I'm
looking now at my window. I'm wondering if it's, you know, a little bit too low, and this is why I want
to do this first. So what I want to do is I
want to pull this into here. Going into this bit
here as you can see, so maybe something like that, and then another bit going into the bottom with
this coming up. So if I put this, let's say, in the bottom part
of this window, and then I'll go Old D, bring this down a
little bit more, and I want it sat then
on top of this like so. So something like this, I think I'll have to pull
this out a little bit more, pull it out there, put my window back a
little bit into the wall, like so, and then
have this one here. Let's put this into
place as well. So we'll pull this
into place make sure. This is maybe a little bit
higher just covering that. Like so and also make sure that it is in place so you can see, I just want it back
there because then I'm going to bring it over,
of course, to the other side. Let's then bring down the array. So if I bring this down
somewhere around here, and then what I'll
do is pull it out. So and X, pull it out and make sure that's in place like sew. I'm just wondering now, if this is going to
look good first vault, I'll press all D, bring
it over then. Like so. And now what I'll do is I've
got all of these in place. I think I've pretty much
done with this part. I'm just looking now. So what
I'll do is I'll grab this. I can bring it
over. I'll press D, bring it over into
place on this one, and this one, I'll press O D. And then all
I'll do is mirror. So if I go to Objects, I'm hoping I can mirror
on the X, Y, like so. Let's pull that into place. Like so we can see, it's
not quite fitting in there. This one, I mean,
so we can pull it a little bit further
over. Like so. And then we've got
this point here, which I'll grab another
one of these D, bring that down then into place. Now we can see this
is using shifty. So if I bring this up, we should see that
only the other one that comes up is this one here. Just make sure that
before you do anything because what I want to do then is bring this all the way down. Now, the thing is, if I
bring this all the way down, this other one's going to
come all the way down. You know what I'm
going to do Shift D, hide it out of the way, delete this one, and then
press TH, bring it back. Hide my chimney out way just
so I can see what I'm doing. And then what I'll
do is I'll bring this now down all the way, perhaps to top of here, something like that because
I'm going to then come in, grab this one with D
and bring it in tops, bring it in to that
corner like so. And you can see it's
a long way out, so let's pull it back, pull
it back. And there we go. So something like
this, we can see this one is stuck out lots. Well, now let's come in, and what we'll do is we'll
pull this over there. All the way over,
pressing S and X, let out into place, pull it back a
little bit, like so. So this is the
front of this one. Now I'm going to have
another part then that's gonna I'm thinking
where to put this. So just under here, there should be
another one of these. So if I press Old, should be able to bring this
down then to this one here, under so it's resting on
there, as you can see. And I just make sure it
is resting on there. But if I pull it up to there, that then is resting on there. And now I've got this one
here that I can bring around. So this one and then this one we should be able to bring around and put in here. So then we need one more, which I will put going
along this part here. So if I press D, bring it up and we'll put that one into
place round about there. And what I'll also do is press
Alt D and bring this one down to this part here like so. Alright, so far so good, that is looking pretty nice. I'm just wondering if this is a little bit
too far forward, so I'm just going to pull it back so it's actually on there. And now I can grab all of this, press Op deep, and then
Z -90, spin it round. And hopefully I should
be able to put this somewhere into
place around here. But if I bring, first of all, this one over, put
it into place, then I'll bring the count on
the array down on this one, and then I can stretch
it out just a tiny bit, like so, put it into
place, maybe too much. So holding the shift board, like so, double tap the A, and yeah, I think
that looks good. Now, at this point,
it's up to you whether you want to lift
that up a little bit. So have a look at all of this. We're going to
grab all of these, like so, grabbing both
of these and this one. Just press the G bun just to make sure
you've got everything. And then what I
want to do now is just play around a
little bit with it. So if I lift you up like that, is gonna look a little
bit better like that? You know what? I think it is. Which means that we need to just pull this out
a little bit more. So S and X, pull it out,
bring it into place. Like so. Double tap the A. Let's pull this
out a little bit, maybe a little bit
too far in there now. So if I pull this
out, pull it out. To there. And there we go. I think that now fits in a little bit better
than the other one. Now, from here, what
I want to do is I want to take these and pull
them across this side. So what I'm going to do is
I'm going to grab this one, old D. I'm going
to spin it round, so Z 90, pull it out a
little bit into place. So where do I actually want it? If I zoom into here, I should be able to put
it into place, like so. Maybe maybe I want to pull these other ones out a
little bit, as well. Let's have a look how much
room up we've got there. Not a lot of room
there, so maybe we can fit in like
that. We'll try. We'll put it there. And we've
also got these parts here, but I think at this stage, I can actually get rid of these. I can just delete
those out the way, and I can just work
my way around now. So you can see
I've got this one. Let's pull it over then
to the other side. So if we start pulling all of this over to the other side, then we can actually work out where we actually
need everything. So I've got this,
this, this, this, and this down at the bottom, I can press Alt D, bring it over, and I'll
just put it on the Y. So object mirror on the Y, like so, just spin it round and then put
them into that corner. Press the little dot bun
and then come round this side and just make sure
they're stuck out enough. Like so. Okay, so we've
got this part now. We can see how far they're out. I can see that probably
most of these. So going from here, need
pulling out a little bit more and have a look at the
bot even down to the bottom. So if I press G, I should
have grabbed all those, and then what I'll do is
pull them out like so. I should have perhaps done that before finishing
the rest of them. But before finishing the rest, as in you can see that it's probably a
little bit too far over. So if I bring it just
a little bit less, there was something like this, let's have a look
around this side. And yeah, that's
going to look better. And what I'm saying is, then, you can see also on here. Maybe maybe they need
pulling back a little bit, so I'll just go back and
pull them back just a tad, like so, and now they seem
to be fitting in bed, making sure all of
those are fitting in. You can see here this one's
sticking out a little bit. And basically, this
is just going around, refining everything, and
bringing everything into place. Now finally, I will
just come down now and just delete
these once more, and I'll do this again
just so they in bed because these aren't as pulled
out of these to delete, and then I'll come
into these now. Grabbing each of these.
So from here, here, here, here and here, press in D, then what I'll do is
just bring them over object on the Y,
mirror on the Y, and then I'll just
pull them into place, and I'll go to the back of them, pull them out a little bit. Because we need them over
here as well to make sure that we actually got something where we can
use this side as well. All right, so on the
next lesson then, what we'll do is we'll get the supports in
for each of these. And then what will happen
is it'll probably be able to put these more
in their correct place. So, you know, at the moment, they're probably a little bit out because I want this one, this part here to go under here, which means that this window here is probably a
little bit too low. But we'll do that on
the next one. For now, we'll just say that'll
work. You know what? I'll also go to
muddling just to make sure that I can see
everything that I'm doing. It's a much bigger
place to work on this, of course, and I'm
also before I finish. Just looking at this, how
far can I pull it out? I think pulling out that far
is going to work better. And again, I'll just
save that my work. Alright, everyone, so
I'll see you in the next one. Thanks a lot. Bye bye.
169. Precision Asset Placement for Complex Wall Designs in Blender: Mike want to blend the
building master class from concept to final render, and this is where
we left it off. Now, what I want to
quickly do is press Alt D. I want to bring
this round then. I want to press R s
-90, spin it round. Now, I just want to make
sure that I did do it 90. Or is it yeah, it's
180, that's okay. And then what I want to
do is press Control one, and I want to pick
this up and put this a little bit of a
thinner one in here. I think this one's looking
a little bit too thick. Then what I'm going
to do is just delete both of these
out of the way. So delete and delete,
delete them out of the way. Bring this in then into place where it's going to go roughly. So I'm going to pull it
it into place into there. And then what I'm going
to do is just bring back on here the arrays. So let's bring it down to one, and then I can press Alt
D and bring this one over using the X, pull it into place, like so. We can see this is a little
bit out this, I think. But I'm not going
to worry about that because I'm not going to mess
around with that right now. Impossible to see it being
that little bit out, or it could be this one's
far enough, far across. I'm not actually
sure. Either way, let's come into
the next bit now. So I'm going to
grab this part, I'm going to press Alt D again. I'm going to bring it out
and put it into place. Like so, let's bring it out where we actually
want it into place, and then move it
over to the side, like so into there, and
then we'll grab this, and I'm just going
to increase one. And if it's not quite there, you can see we've got a
choice either increase it and shrink it or don't increase
it and make it larger. So I think I'm going
to make it larger, pull it into there,
then pull it over. And then with this,
I'll increase the array and then pull
this over into place. And finally, I'll
just bring that in with S and Y,
and there we go. Alright, that's that bit done. Now, want my window. I want another part
coming round here, so I'm going to grab this one. I've actually got this one in
so I might as well use it. I'll pull it first of
all, all the way over. So I'll do is I'll
increase the count, and then I'll press S and Y
and bring it down, like so. Then I'll press and D.
And we want to bring this one down to
wherever this one is. So where is this one?
Bring it down to here. Maybe line them up, making
sure that they're in, place, not sticking out, so double tap the eight. Have a look. Yep, they're just in there. That's
going under here. And now we've got
this part, this part. Now on these two parts, I'm going to steal one of these, so we'll D. Bring it
over and then R z -90. No, R Z 90. Control three. There we go. Let's pull this into place. We want it right at
the center of this, like so, and then pull it back. Into place where we want it. Now, with these windows, they're a little bit stuck out. So what I'm going
to do is just make sure they're a little
bit further back, so a little bit further
back into place, like so. And we don't want these windows. They're quite small, so
we just don't want them, you know, hanging
on these parts. Now, finally, what
I want to do is then I want to grab this, press O D, and bring it
up into this part here. So this then should
line up with this one. And then we've got a window in the middle of each of these. Now, we can see if we
press Control three again. This window, it's a
little bit too low, so we're just going
to center our windows out now, so center them out. And then this one
should be okay. Let's have another
look around there. Dad is looking very nice. Now, we're on to the final part before bringing in
all these windows. I'm fairly sure we haven't
brought in this as well, so I don't think we've
got a hole there. You can see no hole there, so we'll do that very shortly. What we'll do now then is
bring in these last pots. And this is another
reason I've left this the way it is because I wanted to bring this one over. So let's bring this one
over and plug it into here. So if we go hold D, let's press Z -90. No, Z 90, bring it over. And then put it into place
like so, and plug it in. And then what we'll
do is grab this, bolt D, and bring this over. And again, remember that when you're creating
now large buildings, you've got this large building. So what you want to
do is you want to take now lots of pots. You want to join lots of pots. Remember, let's say
this part of it. I can grab all of this part. I can then shift
D, duplicate it, drag it over, and then press Control J, and
join it altogether. And from there, then you should have this actual large part. And then you can take lots
of these different parts. And rather than keep, you know, going in and putting
different parts in like little parts, you can then build cities
through larger parts like this. So not only have you
got the small parts, you've got the large parts, you put those into
your asset manager, and from there, it's very, very easy to create things. You can also as well use things like ometre nodes then and, you know, kind of put things together with them if you're
good with geometry nodes. And this is how you
can build cities, actual cityscapes in
this sort of style. And the more parts you have,
the better it's going to be. Now let's look at this
because the thing is, do we want this to be
supported down here? In other words, do
I want this to come down and be supported
on this part? If I pull this part out, you can see this is
where it should come to, and then it would be
supported under here. So can I get away with
bringing it up a little bit? And if so, where can I bring it up to? So I can
bring it up to there. That then we'll sit on
there. And then what we'll do is we'll bring this
down to this part here. Like so and maybe even
drop it back a little bit. So let's drop it in, drop it in, like soap, and there we go. Now, this part here, then I'm going to have
the smaller ones, so I'm going to
grab both of these. I'm going to press O and D, bring them over Z, 180, spin them round, and
then I'm going to drop these into place
within this part here, and bring them out,
bring them out. Like so. And now what I'm going to do is just stretch
them out a little bit. So S and X. You know what? Maybe we can do
them both together. So S and X, pull them
out both together. Bring this one over. Let it into place, bring this one over. Set it into place like
so, and there we go. And yet, I'm thinking
that's looking pretty good. And then now we've got the bottom bit and the bottom bit is going to be relatively
easy because I'm just going to
grab all of these, I'm going to press O and D, bring them out, and
then rotate them. So I'll add 90, rotate them round and put
them into place along here, making sure that they're
sticking through the wall. Into place. Like so. Now, we can see let's pull
them back all the way in, and then let's grab this one. And I'm thinking, I don't want to stretch
them out anymore. So what I'm going
to do instead is, I'll just press S and X
and see if I can shrink this one in just where
I want it to go, like so, double tap the A. And there is that. Alright, so with this last window then, I might not need to have it
supported like this one. It's up to you if
you want to support it or if you want it
more in line with this. It might look better if
it's just put there. Let's have a look. It might look a little bit bare if
it's put there, I think. Yeah, I think it does
look bare like that. So you know what? You can carry on
this all day long. And the last thing then is
just to grab this one l D, bring it over, put it into place here just so this looks
like it's been supported. You know what, guys? I think
we're nearly done with this. I think we're nearly done. I'm just wondering, did I actually put holes in
there? Yes, I did. Alright, let's save that work. Let's make sure we've got
all of our bricks in. So we just make sure now
everything's in there. And yeah, there we go. That looks fantastic. Okay, I hope you've got
something like this. And again, if you've got
something like this, should be very proud
of what you've done here because this
was a lot of work. And now, finally, we're
onto Boolean Pot. So we're on to the Boolean pot, which we'll do actually
on the next lesson. So again, save out your work. We'll do that on
the next lesson. And finally, after
the Boolean pot, then we can actually start creating these we can
actually get in from there, our gate because we
already created our gate, so we can actually
get our gate in. We can get, you know, this fence going round. Then we can get
our hedge rows in, and that's going to be some
really, really cool stuff. Alright, really happy
with how that looks. Okay, everyone, so
I'll see you on the next one. Thanks a lot. Bye bye.
170. Finalizing Window Groups and Alignment Across Structure: Welcome back if
you want to blend the building master class
from concept to final render. And we're actually nearly there. Not to render, but we're actually nearly here
to the concept. So let's first of all, think
where this is going to go. So if I press Control and one, let's bring this one, then, first of all, into place. So you can see here we don't need to do a lot with this one. So I'm going to bring
it back. Into place. I'm going to zoom in, as well, just to make sure that
it's in the right place. You can see here if I
press Control one again, it's definitely
not at the moment. So let's bring it into there. Let's press S and make
it a little bit bigger. Then what we'll do now is we definitely need one this side. So if I press Shift D, let's press Shift because we're not going to need
these booleans. Now, if I was you, honestly, I would still save
out these booleans, save them out just in case
you're ever going to need them again, and then we can use them. With this, I'll press one,
just go in side view. I'm just going to hide
this part of the way, making sure that's in
there, as you can see. I want to press E and Z, make them a little bit bigger. Like so. Alright,
so far so good. Now I'm going to we've
got both of these in. Let's bring in this one then. So down here, first of all, so R z 90, control one, G, let's
put it into place. Let's zoom to it. Then just
make sure it's in place. Let's bring it down, like so. And then what we're
going to do is obviously pull it all the way back dot to zoom in again. And there we go.
That's that one. Now let's do this one
on the other side. So Shift D. Like so control one then or one
to go into front view. G, let's put it into place where this one's going to
go, round about there. And then what we're
going to do is now we need our square one. So we'll just grab this cube. But this one, this one,
we just need these three now. Let's pull this one out. Let's put it in
some sort of place. Let's press Control three. Let's first of all, get this into place,
somewhere around there. So let's press the S
but, bring it out. And then what we'll
do is press Shift D, bring it down into place, and then shift D, bring it down. And there we go. Okay, now let's join
all of these up, so we're not going
to join them up yet What we first
of all going to do is put them into place. Now we can join them all up. So just making sure
they're all in the walls, press control J, and then just make sure that this part
here is on its own, looks like it is, so
grab this and this, press control and minus, and there we go, Let's
apply our booleans, and let's just delete
this out of the way. Delete it out of the
way. Let's delete this other boolean out the way. And we should end
up with nothing in there now, so
we can delete it. The roof, then that's
just open it up, and we should end up
if I turn this on, with just this roof here. All the other roofs
should be in their own, you know, in roofs on here. So now I'm going to do is
delete that out of the way. Next of all, then I can actually delete this out of
the way, as well. And now we should be left
with something like this. Now, at the moment,
this isn't very tidy. And we can also
delete the Boolean, what's it cutters. Let's
delete the cutters. Alright, so the moment,
it's not very tidy. We need to really tidy it up. First of all, we want to do,
though, is just save it. And we want to make sure
we're not missing anything. So just make sure we're not
missing anything at all. Has everything been
taken care of. So we can see on here, all of this is looking nice. The windows are looking
nice. They're all in. We've not missed
anything there. All of the bottoms are done. This is why I checked because
you can see here that these are stuck out way,
way too thin in there, so we brought those
out a little bit, looking around
every little bit of your building just to make sure that you're
happy with everything. Let's now make our way round to the front and the one
thing we're missing, if I press ol tag
is the balcony. So it's a good job I
check that as well. Making our way around
then to the front. All of this is
looking really nice. Now, at this point, we don't
want to get rid of our man. You still want your
man in there, and the reason is because
we're going to be creating the walkways
and things like that. Now we can see here
that we've got these parts that really need
pulling out a little bit, so I'm just going to
grab all three of these and pull them out very
slightly, pop them out, and then we can see that
when we pop these out, that these on here,
in particular, are they popping past
there or are they okay? You know what? Have a
look. They're okay. Going up then, looking
at my buildings, making sure the
wood is not coming through on the roofs
or anything like that, going all the way around
here, there we go. Yes, that's looking very good. Now, the last thing I want to talk about
then as you can see, this building looks fantastic. It really does look nice. But you can see, even when you've built a
building like this, it's not actually live here. It's not alive because it
hasn't got the chairs. It hasn't got the
scenery in there. It doesn't have the
bushes in there. It doesn't have the
floor in there. So you can see, even from here, this would fit in
beautifully in, you know, an unreal game world that's already been built out
and things like that, but it doesn't really shine
in blender. Not quite yet. It's looking great in that, but it needs more to it. Now, the other thing is,
how far are these up? Because you can see if
I bring up my flow, is it just let's have a look. Is it just if I come under here? I forgot, they're
all down to flow. That's the next thing I'm
checking whether it's just contact shadows or whether these things aren't
low enough down. And I think they're just contact
shadows, so that's okay. All right. Okay, so moving on to the next stage.
Let's now go in. And what I would suggest you
do is tidy all these up. Now, I'm not going to
do this on this course. Honestly, it's going to take at least probably two
lessons to tidy this up. But what I would do
is so all the roofs, as we've been putting
them in, are in roofs. So the moment, you can see, all of our roofs are in there. Now, let me just show
you what I would do. So I can come in now and hide
all of my roofs, like so. I can also come in
when I see this now and actually press A, U, unwrap on angle based. And then what I'll
do is grab this, press control L, and we're going to link materials like so. So now you can see they're done. Now, the tops of
these roofs, then, so let's come in, and I'll
just show you what I would do. So I'll grab all of these, all of these, even
those around there. And what I'm going to do is
put them in their own one. So if I press M, I can come in and put them under
Roof wood, let's say. So roof wood, like so. And then what I'll do
is I'll come down. Put them all up, hide
them out of the way. And from there now I can see exactly what I've got
to actually put in. So next one I'll
do is the walls, so I can hide all my
walls out of the way. Now, you can see
when I hit my walls. All of these never
went into my walls. These ones here as well. So I would just grab these, press M, put them in your walls. So walls, and now
you'll notice they get hit out of the way.
Same for the windows. Then what I would do is I would work with these structures here. So the support, for instance, the bottom supports, the steps. Make sure everything is nicely organized because
you'll find once you've nicely
organized everything, it's very easy then
to work especially when we come in and uh you know, we're working with
renders and things. Sometimes it's easier if
you can hide things out of the way while you're
building something. So what I'm going to do now
is I'm just going to put these into, like, roof wood. Well, you can see these
are already joined. So I'll probably join them
up with something like this. Let's have a look, I I
press dot, wall outcrops. You can see they're
in wall outcrops. Let's hide those out of the way. So these wall outcrops, let's hide them all
out of the way. Let's then drop these parts
here into wall outcrops. So wall outcrops, hide
them out of the way. And there you go. You can see. Alright, so now, what I'm going to do is
I'm going to save out my work and when I come
back off the next lesson, I will make sure that all of
mine are in the collections, their own collections,
and I want you to go away and put yours in
your own collections. And when we come back then, we can actually make a start on building out all
of these fences. We can make a start
on this gateway. And from there, once
we've built those out, we can actually start with
probably with the terrain, and then after that,
we can start bringing in things like the foliage
and things like that. And finally, near the end, we can actually start creating, you know, benches, lights, all of the stuff that really
bring everything together. Alright, everyone, so I
hope you enjoyed that. I'll see you on the next
one. Thanks a lot. Bye bye.
171. Preparing Structural Elements for Scene Integration in Blender: I'll come back
every one to blend the building master class
from concept to final render. And yes, you won't
have left yours here. This is not where we left it. But as I'm going through,
sorting these out but there's something that's quite useful
that I do want to tell you. So, for instance, if
I grab one of these, which is the top structures of these and go to object sorry, select, and we're going to
select Link and Object data. You can see I can actually
select all of these pots. Now, it's important that
we're actually selecting all these actual pots because you can see it
just makes things much, much easier, as you can see. What I'm then going
to do is I'll put in the roof support, but we'll put in rooftop
support, something like that. So if I go into New collection, rooftop supports, and we're going to go
through these now. Because I think it's
important that I show you what I've been doing. So if I come down now,
hide those out of the way. Now, if I bring this
down a little bit, you'll see this is how
I've split my pots into. And I wouldn't suggest, like, splitting every single
pot into something. So I would say that
if I come in now, I'll put my guy into
human reference. For instance, I'll hide
him out of the way then. My gray box still has
things in, as you can see. The rest of these things, I can just put into now support. So if I press, put
it under support, for instance, and then
hide that out way. And then we've got
the roof in it, and you can see there's
no little arrow there, means there's nothing
in there, so I can actually delete that out
way, holding it over here. My gray box now there's
nothing in there, means I can delete
the other way. Now, let's actually
go through these. So we've got a human reference which has all of these parts in, for some reason, didn't
want it like that. So I'm going to do
is hide him out of the way, grab all of these. And what I'm going
to do is put them into supports, like so. Alright, the next
thing I'm going to do then is come down and
I've got my ground. So I've got my ground plane. I've got my walls, so you
can see all of these. Let's put it onto Rendeve so we can actually
see what we're doing. All my walls are here.
Then I've got my roofs, which should be
all of the roofs. I've then got roof supports, which is all these parts that
are supporting the roof. I've then got all
of the supports. So you can see here all of my
supports are in somewhere. Now, the other thing I want to tell you about is if you come down to your rendered
panel, film, come down and put
on transparent, then you should be
able to see much, much better on the rendered
view of what you do. So these are fine
in all supports. Then next of all,
we've got windows, as you can see, wall outcrops, which include these
ones on the top. Then we've got roof wood,
which is all of these. Now, you can see here that these ones are actually part of that. Don't really want that.
So what I'm going to do is P selection, split those off. And then what I'm going to
do is I'm going to press M, and I'll put those under walls. So I'll put those under walls, and then I should just
have roof wood there. Next of all, then
we've got our doors. Then we've got our chimneys. Then we've got our stairs. Then we've got our balconies. Then we've got our dome, and
then we've got our veranda, which is all of this
front bit on here, as you can see, then
we've got our arches. Then we've got our columns. And finally, then we've
got our rooftop supports, which are those that I've
just showed you how to do. Now, the main one we want to
work on then is our columns, because at the moment, this is something that's leading the
whole build down in a way. And the way it's laying it down is the fact that you can see here these are not
unwrapped correctly. They need to unwrapping much, much better than what they are. Now the problem we've
got is now that we need to separate
these out to actually unwrap them because if I come to let's say these
and I just apply. So if I go to object and
convert and to mesh, you will see that things end up disappearing because these are
all connected in some way. So we need to sort
that out first. Well, the problem is if I come to these two
here, for instance, and go to Object and
convert to mesh, you will see that those
end up disappearing. And that's because in some way, all of these are connected. So even if I come to,
let's say, this side, and I go to Object and
I convert them to mesh, you will see all of
these get deleted. So what I'm going to do
is I'm going to grab the whole thing, like so. And then what I'm
going to do now is I'm going to
instead of doing that, I'm going to go to Object. I'm going to go down to I just need to think
where this one is now. So add modifiers constraint, let's have a look library
override relations. Make single user. There we go. So relations, make single user, and let's do with the
object data and material. So let's make that single user. Now you'll see now
I've done that. If I press Control
E, nothing happens. Control Shift Z,
let's put it back. And now what we'll do
is we'll go to Object and convert to mesh, and now you'll see everything
has been converted to mesh. Now, of course, we do
have another problem. In that, you can see
these have got many, many blocks in here, many, many blocks in here. Now, what they're doing is
they're pulling them out slightly on some of these and making them a little
bit more wobbly, but I don't really want that. What I want to do instead now is actually join
all of the Well, you don't even have to
join them together. What you can do is you
can just press Tab, making sure they're
all there, so press Altag, making sure
everything's there. A, and then what you can do is delete and limited dissolve. And then it'll just
do all that for you. And now you can see
this is what we've got. Now what I want to
do is I just want to come in and unwrap them. So if I press A, smart U
V project, click Okay, unwrap them, and
now you can see, all of that stone now is looking
exactly as we wanted it. So now if we come
in and we bring in, so if I hold the left click, drag it all the way down, all
the way down to the bottom, double tap the A,
now you'll see that that stone is
looking as intended. Now, on some of
these, you can see, for instance, like these, the stone is looking
very blurred. So what we're going to do is
we're going to go back in, and I'm going to come back
in, grab all of these pots. We all the way down like so we should be able
to grab them all, go over to UV Editing. Hopefully, I'll have them still all selected,
which I have. Let's come round to this one, so we've got a reference point. So we've got a
reference point here. Let's put it on RenderView. Let it load up, press tab, and then we should have all of these in here,
as you can see. And now I want to
do is just zoom in a minute and then pull them out. So pull them out until until they're looking
like these ones here. So now you can see that these stone columns are all looking the same
as these ones here, and now you can see they're
looking pretty nice. Now, last of all,
before finishing, what I want you to do
is just go to modeling. Go back to modeling. And
what I want you to do is zoom out and make sure that
you've got no columns. So make sure you did it
properly where you've got no columns missing
or anything like that. So I'm just going to go
round and have a look. Have a missed any columns. You know, these columns in the middle are pretty important. Have I missed a column
going up there. I don't even think I
had one going up there. But what we're looking
for is the actual corners to make sure all
these columns are in. And then from there, you
should be good to go. So I'm looking around
here, everything seems as it should be. Alright, finally, so that's the one way that you
can fix all those. So just to reiterate
then, we've gone over. We've put them all
in groups now. Everything is in its own group, which means that we can hide things out of the
way quite easily, especially when we start
bringing Jumptonodes in. For instance, when we start
bringing Jumptonodes in, it's going to be a little bit
heavy on the blender scene. So what we'll do is then
on the next lesson, we'll make a start with
our actual fences. So we'll bring the fences round, get this gate in there
and things like that. And from there, then we can actually start probably bringing into the B, Bb, the terrain. Okay, on. I'll see
you in the next one. Let's save our work.
Now all that's done. Thanks a lot. Bye bye.
172. Creating a Custom Gate Opening in a Stylized Wall: Welcome back, everyone to
Blender Building master class from concept to final render, and this is where
we left it off. Okay, we're here, guys.
We're at the actual part, where are we going to
create the actual fences. Now, when we're doing fences,
then what we want to do is, first of all, we want a gate, so where is our gate going to come? Let's first of all,
go to Asset Menager. I will go over the
top again like so. And what I'm going
to do is I'm going to bring in my gate. So let's look gates are here. Let's drag this in and drop it. Just around there for now. Then what I'm gonna do
is come to this part, press shifts and
cursor selected, and then grab my gait shifts and selections cursor.
Let's drop that in there. Now I want my gait to be around 3.8 meters or somewhere
around about there away. So if I grab this and
put on a measurement, so 3.8, it doesn't
have to be exact, just, you know, something
like that is absolutely fine. Now, to keep that there and
move this at the same time, I'm just going to
press G and Y and just move it into place,
something like this. Now, just make sure
that you are happy with the distance of um of this
gate from your actual steps. Because what we're
going to do now is if I come in, I can draw. So this is where I
want my fence to come. So my fence is going
to come to there. Then it's going to go round to here maybe, and
then round to here, and then round to here,
and then down to here, and then down to
something like there. So I'm looking here. This is about where I want my fence to come out
just in front of this. So maybe this line has
gone a little bit skewed. So something like this, I think. And I also want to make sure that this and this
kind of line up. I want them to actually line up. So we can do all that, and I'm going to show you
exactly how to do it. So making a fence,
it's not that easy. You could do it with curves. You can do it with, you
know, just blocking it out. There's many, many
ways of doing it. But I think the easiest
way to do it is just come in press shift day, and what we'll do is
we'll bring in a plane. We'll then make the
plane a bit bigger, so we'll bring it over here. We'll press the S button, like so. Bring it out. And you can see, as I bring
this out, this plane, I can still actually
work over the top of it, working on all these parts. That's important
because it enables me then to actually create
what I want to create. Now, first of all,
let's put the point. So the point where our
this part is here, so our actual what's it
called? Our actual gait. And then what we'll
do now is we'll press K to bring
in the knife tool. I'm going to bring it from
the center of my gait. And what I'm going to do is
just drag it down to here. If I press A, I can actually
make sure that it's held down in a straight
line to their t so. Now I want to do is I
want to press K again. Ok with a knife tool
back to the point here, and I'm going to
drag it over here. I'm going to press the A button, and you can see I've
got an angle on here, but it's not quite the
angle that I want. So the best way to do this is just actually bringing
both in together. So if I press K, come to this point here that
I've already made, and let's actually pull it out. So if I press A again, you can see I can pull that now to angle wherever
I wanted to go. So let's bring it
to this angle here. And the reason I
want to do that is I'll show you momentarily. Now I'm going to do
is I'm going to bring in another actual knife. So I forgot to press end there, so I'll do it
again, so I'll come in here, press the A button. That then we'll lock
it to this angle, press the enter button. Now I want to do is, I want
to in fact, you know what? We will make this
easier. I'll press K, and what I'll do instead is, I'll bring it straight
up, so press in the A, and I'll lock the angle there. Then what I'll do is now
I'll come to this side, press Control, and where do I actually want this
to come back to? Let me just turn off that. I was playing around
with that earlier, so face angle,
let's turn it off. Now, let's pull this out to
where I actually want to. So I'm looking over here
where this part is, and I want it to come roughly the roundabout there
in front of this part. The next thing I
want to do then is actually bring this part back. So I want to press Control
lot going this way this time, and where do I want
this to come back to? I think I want it to come into the wall roundabout
at the side of here. So at the side of here is
where I want it to come. So something around
there like so. And we can move these out,
so don't worry about it. You know, you'll be able to move them out a little bit, anyway. Next of all, then I want
to bring in this angle and bring it down to
this point here. What I'm going to
do is I'm going to come to the side here, grab this one, grab this
one, and bring it down. So it's nice and flat
into place like so, and then what I want
to do now is I can grab both of these
points like so, and I should be able to bring
them in at the same time. So if I press S and X, I should be able to bring them in creating the same angle. Now you can see we've
got this coming to here, all the way over here,
all the way over here, all the way over here, like so. Now, you will see that
on our actual reference. So if I come quickly
to my reference, you will see that we've got
one going out here and round, one coming out here and
round into this part here, and then one around
the back there. That is exactly what we're
going to be creating here. So next of all, then, what
we'll do is we'll create the other side
because we can use this angle that we've already
got on the other side, as well as putting it
exactly where we want it. So you can see here this
is right at the side. So basically, if I
come in and grab this, so if I grab this
part here, so L, shift and D because I want
to stick it all together, and then I can bring this out
into this side, mirror it. So mirror on the X, mirror on the X, like so. And now let me put
this part here, so you can see this part here, right in the center
like this one. So if I pull it out, I can put it in the center like this. Now, again, now you've
got this line going out, going all the way
around to there. But the thing is on this one, we actually want it to come
right into the wall here. So right into the wall just
before this part here. So what I'm going to do
is I'm going to come in, grab this part, this part, this part, and now I can pull it actually across and keep that same angle. So it's where this part is here, where I want
it to come in. So I think something not
like that, actually. To this part. This part here. Alright, something like that. Now, even though we've
done that at this point, we can still change the angle, so we can still pull
them out if they're a little bit, you
know, far along. So if I come in now and
come now to this one, and I'm thinking they're stuck out probably a
little bit too long, so I'm going to pull them
back in a little bit, and I'm also going to
come to both of these, press S&X and pull
them out individually. So if I come in and go to individual S&X and pull them out then to where
I actually want them, and I think that actually
looks much, much better. Alright, so working
our way around. Now we want the same angle then. So this angle come in
round on this part here. So again, I'm going to come in. I'm going to press
L, shift and D, or Z 90, spin it round. And I'm hoping I've got,
I grabbed that as well. So let's just come in
and do that again. So Shift D, Z 90, spin it round. And then what I'm going
to do is I want these two perhaps line up with here so we can see this line
here, I want to line up. I'm just wondering,
yes, round about there. If I line that up, let
me just have a look. It might be this
one. Yes, this one here is where I
want it to line up. Let's bring it into there,
and that is perfect. That is exactly where I want.
Now if I pull this down, we can see about this. So this part here, this
line here is going to line up in the corner of here,
something like this. Okay, so what have we got here? We've got our garden. We're looking at this line here, not the outer line,
the inner line, so it's going to
come all the way around here all the way around, back in and then into our
fence and then come down here. And then the same
is true for this. Now, let me just come in and just delete these
notes out the way, so I'm just going to minus
off the notes on the ruler. And now you can see
a little bit better. Now the next thing
I want to do is, I'm just going to delete
this part out of the way. I'm just going to
delete these parts. You can actually see exactly where this thing is going to go. You can see it's coming in here, coming in here, we can see
it's going to be here, here, and then on this
part, it's going to be this one coming
around here and here, let me just make sure of that. Just wondering about
this line coming down here, maybe this line. So this one here. I'm going to press
delete and faces. So now I can see it's going out. That looks very nice all the way to there, apart
from this one. Now, this one, I want to
keep this angle here, but I think I want
to pull it back a little bit. So I'm
just going to press L. And what I want to do is
line it up with this one. Now, I could come in
and use the bist, but we don't need to be
that obvious with it. I think I'm just
going to bring it in there just so they line up nice. Now, why have we done all that? What was the point
in all that work? Well, you're gonna find out on the next lesson why
we did all that. It's gonna make it way, way easier than, you know, going in and trying to
build the wall yourself. Alright, everyone, so I
hope you enjoyed that. I'm gonna save out my work, and I'll see you on the
next one. Thanks a lot. Bye bye.
173. Building a Brick Fence Base with Modular Precision: Welcome back on to blend the Building master class
from concept to final render, and this is where
we left the up. Now I want to do is I
want to come in and grab all of these. So
all of these edges. This is where my
actual not a fence. It's like a brick
wall with a fence on it. Is going to be. So going all the
way around there, it's going to come all
the way around here then. So you'll notice it's
just the outside of my actual fence. Then what I'm going to do is
I'm going to press Shift D, and I'm going to just
drag it up a minute. Then I'm going to
delete the underside. So L, L and L, delete the underside,
so delete versus. Finally, then I'm going
to grab everything. So tab, we're going to
pull it down into place. Now, we're going to see here how easy this makes
everything to put it exactly where you want it without actually you know, actually making it
stick, basically, so it's keeping it so that
it's non destructive. Now I want to do then
is I want to press Control A or transform
set origin to geometry. Next, then what
I'm going to do is I'm going to bring this up. Now, I want to bring
it up from the floor, so we actually have a good
view of what we're doing. So first of all, let's actually
put it into the floor. You can see as well that
my gate needs bringing up. So I'm going to
bring my gait up. I'm going to make sure that
it is in the ground plane. So put it in the
ground plane because that's pretty important to how your brick wall is going to come because your brick wall should
be probably below this. And the next thing you
want to do then as well, is double tap the eight and
let's bring back our guy. So here's our guy. Make sure again he is stood on
the ground plane. Just make sure he is stood
on the ground plane like so. And the place that
you wanted this to be is you want it to be above. So round about here. So this is round about is c
here's where his cough is. So run about there is where
we want it to come up to. So it'll be if I press
three and going side view, I can see that this wall
is round about here. Now, I have to remember that I have a top on here as well, so I might want to just
drop it down just slightly. So just slightly, like so, and then we'll add in a top. Now, we'll do the
top in a minute. First of all, though
let's press Control A, I'll transform set
origin geometry. Let's press A then, and then
what we're going to do is press E and Z and pull
it down into place. So this will be the
bottom part of our wall, make sure it's going
through the floor like so. Now we've got this bit
in. We can see that, of course, we do
have some problems that these aren't centered. So this is centered over here, but this part is definitely
definitely not centered, which means I actually
need to move that. Now, the problem is that moving this part
means that I've got to actually pull it out to actually move it across
because I'm moving this part. You can see here it's
not in the center. So what I'm going to do
is, I'm just going to put on my see through, and then I'll turn it off,
and then I'll move these out. So now you can see, as
I've pulled these out, you can see now they're
fitting a little bit better. Still not perfect, but they're fit in a little bit better
than what they wear. They're not going to
fit absolutely perfect unless we bring them
to something like so. Now, just make sure that you've got yours
as you want them. Now, the next thing
is we're going to do. Don't worry too much because
as we've brought them out, I'm going to also
bring these out, as well, just so they
all look the same. And I think I could probably,
I'll leave that one there. I'm not going to worry
too much about those. I'm going to do that again then. So I'm going to bring
them out so that they fit better. I think so. Alright, and we'll have to
move those a little bit more. But first of all,
let's first of all, bring in our solidify. So control A or transform, set origins geometry, add in a modify and we're going
to generate a solidify. And then what we're going
to do is pull this out. And you can see
there now they're starting to line up pretty nice. Now, not perfectly
yet, as you can see, and that's because we need
to put the offset on zero. So we're going to put
the offset on zero, and now you can see how they're actually
going to line up. So the brick comes
out just to there. It's up to you if you want it, you know, into
the wall or not. We'll discuss that in a minute. But first of all, let's
get them the right size. At the moment, they're probably
a little bit thin these. So let's make them a
tiny, tiny bit thicker. So we'll bring them out, so making sure they're
fitting into place. And I'm just going around
this way now making sure I'm happy with
the measurements. Now the problem you've
got on the corners is this part's going into
the corner, as you can see. I think I'll also move
this a little bit more. This part's going
into the corner, and then you've
got this part that sticks out slightly
on the corner. That's absolutely normal. That's what you're
actually going to get. The main thing about
this is, though, working out, like, where do you want the fence
to come up to? I think on this side, for
instance, I want my fence. So if I grab this one
going over here to come, or if I grab both of these, so I want to be on face leg. So this one here. And I don't think I can grab a face, actually,
so you know what I'll do? I'll just grab both of these. There we go. And then what I
can do is I can come back. I just looking where
that goes in as well, it goes all the
way to there, but we can fix that in
a minute, as well. But first of all, let's
actually bring it in, do here. And I'm just making sure,
as you can see now, because I've done that this part here is not working
out correctly. So I need to fix
that first of all. So the easiest way to fix that, as you can see, this
is going over there. I think what I'll do is I'll just grab this and then
join them back together. So let me just hide out my
solidify at the moment. And then what I'll
do is grab this one. I'll press Y. In fact, yeah, I'll press Y and then I'll join it back together here. If I come in now, I can
grab both of these. So if I grab one and
two in Wireframe, so I like this and then
right click Merge Vertus at center and then right click
Merge verts at center, and there we go,
now we should have just these ones over here. What I'll do is
I'll press Control R. I'll bring in an
edge loop over here. I'll go over the
top, then and look where this edge
loop needs to be. So first of all, we'll bring it over to here just so
it's in the wall. And then what I can do is now
I can delete both of these. So if I come in, Yeah, facet grab this face, so you can see here delete and faces, and that
then has fixed that. Now, with this,
there is going to be a lot of, trying to fix things. Now, next of all,
then let's come in and just put
our solidify back. And what that means
is now I can grab this face and I can pull it in then to where
I actually want it. Remembering there's going
to be a top on here. Now, the other thing is
about my solidifiers, you can see it's kind
of not level there. So what I want to do is
just put even thickness on and then it's going to make sure everything is leveled up. So now you can see
that's looking really nice coming all the
way around to here, coming into here, all
the way out here. And what I'm also looking
at is this part in here. I don't want it stuck through that wall or anything like that. This one, we can see
is a little bit out. So this is stuck in the
wall kind of nicely. It's going to have
a top on there, but this one is stuck probably
a little bit too far in. So what that means is now. I'm going to also
do the same thing, this one's basically the same.
It's got a join on there. So what we'll do is
just press shift age. And there we go. Actually, it's not
the same. Yeah, that makes things easier for us. So what that means is old age. Bring everything
back. And now what I'll do is I'll just
come in, do this one, and I'll grab it from
there and there, and then I'll just pull it slightly this way a little bit. Like the other one. There we go. Okay. So far, so good. Now, we'll just make sure
that we're happy with this. So where is this one going
in Round about there. And then this part
is coming out. Probably want to bring
that out to there. So I'm going to grab
this one and this one. Just pull them out. Maybe to
there, something like that. Alright, so far so good. Now what we want to do is then
we want to create the top. So what I'm going to do is press Shift D. I'm going
to bring it up. I'm going to actually save out
my work, so file and save. And then what I'm going
to do is press S and Z and bring it down. Like so. Now, what should happen
if I put this on the top now and get
my top pots on there, I should then be
able to increase the thickness and bring it
out level all the way around. If I press dot and
then zoom around, I should be able to if I hide my floor out the
way, get a good idea. Of where the edge
is going to be. If I press Control seven, that might make things easier. Now you can see it's
an even edge going all the way around here
on all of the pots, and that's done very, very fast. Can you imagine
trying to do this by hand, just going
all the way over? Probably going to be
really, really hard work. Now, the next thing I want
to do then is just make sure I'm happy with the
thickness of these blocks. I think they're a little bit
too thick at the moment. But all I'm going to
do is just come in. And drop the thickness down
just very not the thickness, sorry, the thickness
of the whole thing. So it's E and Z, bring it
down very, very slightly, lights out and making
sure that they're on the wool and also making sure they where
they're coming up to. Now, I did say the whole
thing should be coming up to jaws the top of his cough there, which it
looks like they are. And also, at this point, you can bring these
things out if you want to bring them a
little bit further out, but I think for me, I'm
pretty happy with those. Now, why have we gone to the
trouble of doing all that? Because we need to
make the fence, and we need to now put in these posts, as
you can see here. So you can see all of
these posts in here. This is what we need to put in. You can also see if
I just hide this out the way now what this
is going to look like. So this part here,
as you can see, this one here is
going too far out. This one's to come
right up to here. So maybe even this one's
a little bit further out. So let's fix that before we actually do anything else. So I'm going to grab them both. I'm going to put on
my transparency. And then what I'm going
to do then is just grab this one and this one and
then this one and this one, take off my transparency
and just move them very slightly out like so. And there we go. That's
how we want them. And now the same
for these as well. So transparency on,
double tap the A. Come in and grab this
one and this one, and then this one and
this one, then it off. And then what we
want to do is make sure that this part is the same. So if I pull this out, I should be able to pull this up and just have a look and pulling it all out together, pull it over, hold in
the chef but then, and bring it right up
to round about there. Double tap the e. And if
I go over the top now, you can see, these are perfectly straight.
Everything's in line. And everything is looking very
nice even this part here. So really, really good. Now, the next thing, then
what we're going to do is, first of all, save out our work. And what we're going to
do on the next lesson is then is we're actually going to start bringing
in these pokes. We're going to create these pokes wherever
they're going to go, and then we'll start
bringing in the metalwork. That will be in our
resource pack, of course, because that's where
we created it, and we just need to bring
that over to this side. Alright, everyone, so hope you enjoyed that, and I'll
see you on the next one. Thanks a lot. Bye bye.
174. Modeling and Texturing a Stylized Pillar for Fence Integration: Welcome back. Everyone to blend the building Mass class from
concept to final render. This is where we left it off. Now, these are the parts
that I mean that we need, so I'm just going
to grab those press Control C. I can then, in fact, just select one of them just to make
sure they're yellow. Press Control C, and then you can shut that down. No problem. Then what you're
going to do is press Control V. So Control V, they're going to come over
here, as you can see. And then all I'm going
to do is just drag them just in front of my gate, just so I know
where they are and just so I can actually use them. Alright, so the next thing
that I want to do is I want to create a pillar on top of you. So the way I'm going to do
that is, you know what? I'll come to my guy,
press shift desk, Custer selected, press Shift A, and I'll bring in a cube. I'll make my cube
smaller, like so. And I should realistically put this in the center of this. But for now all I'm going to
do is just place it like so. So I'm going to place it like so to get it the right size. So something like this will be looking like the
right thickness. Then if I put this in the wall, and then what I want to do
is I want to bring it down. So I'm going to
bring it down top, like so let's press dots so we can zoom into
it, bring it down. Something like
this. And then what we'll do is we'll
press the I bone to bring it in and
then E to bring it up, and then E enter S
to bring it out, and then E to bring it up, and then finally one more E to bring it up and
S to bring it in. Now, from here, you can play around with this
as much as you like. You've got to remember that
when we're doing this, where do we actually
want to come up to? So if you press
Tab, press three, I would say that it wants to come up to
roundabout his neck. So I've got mine in
the right place. Yours also wants to
come up to Roundabout there because then it's like the railings are
going to be on there. The one thing I would say is maybe just maybe this
is a little bit thick. If it is, Alt Shift click, lns, and then you can
actually bring it in a little bit like I'm thinking, now, that looks pretty nice. The one thing I would
say is this again. So old Shift click, Al bring it in is a
little bit too thick. So bring it in like so. And I think, yeah, that
looks very, very nice. Now, let's come in then and figure out where we
actually want these to be. So if I come over here, would like one ride in the wall over here because
I don't want you know, the metal bars going into there, so I want it right up at the
edge of the wall like so. Then what I'm going
to do then is use I could use an array. I think that would
probably be better. So Control A transforms
set origin geometry. Now, before I use the array
or anything like that, it's probably a good idea at this point that I actually get some materials on here just so I haven't got to go
and do all that again. So what I'm going to
do is I'm going to put on my rendered view. I'm going to look for a wall. So when this loads up,
I'm going to save it out, look for a wall and stone, and then use that all this.
So let's do that first. Alright, so here we are. Now, let's come in then and
we'll save our work, Save, and then I'll press tab, A, smart U V project,
and click Okay. Now, the one thing is because I've actually got brick on here, probably better off coming in, Al shift and click, Oh shift, click, right click, Markasm. And then same on this one. So right click and Markasm. Now, you can see on these that they've got a little bit
of concrete on here, brick, and then concrete again. That is what we want
to actually replicate. So let's see if we can do that. That is why I've poured seamen. So on this part here,
I want to press L, Unwrap, and there we go. Now, let's see what it looks
like then with our stone on. So first of all, let's
come in, add in stone. So if I come down,
we're looking for. Stone light. And there we go. It's definitely not looking
like the other bit, but we're not going to
worry about that right now. And then on the top, Control plus Control plus Control plus going
all the way around, plus bu, down arrow, and then we're going
to go to Stone lighter, click a sign. And then we're going to
come to this bit then. So just this bit here
plus down arrow, brick normal, click a sign. And now let's figure out
to get everything right. So we're going to
go to UV Editing. We're going to zoom
in. We're going to put this on material view,
so pull this over. Do material view. Not that one, Let's
pull that over. Let's press N just to close that. And let's do
our bricks first. So first of all, spin it round. So 90. Let's press the Span
to bring it in. Oops, not that far. Like so. And there we go, the bricks are
looking kind of the same as here. That looks good. Up to you if you want to make your bricks smaller on these, by the way, you're
welcome to do that. Now, on this part, then, let's
come to these two parts, so L and L. And let's press
A and make them smaller. Like so. And now everything's
looking great on there. Now, let's go back to modeling. And we'll zoom into this. And the one thing we want to do now is make sure that
we've got our bevel on, so add generate bevel. Let's put it on
Noeint not not three, like so, and there we go. Now we can bring in our ray, because now if we
bring this in and let's have a look at
it, double tap the A. Let's save it out and bring round our
sunshine a little bit. So bring it round with
this button here, so move it around.
And there we go. There is our brick, and
now just have a look at it and make sure that
you're actually happy with it, that it's happy that
you're coming out north. And I think with
mine, one thing I want to do is just bring
it out a little bit more. Not poking out just enough. And there we go. I think
that looks way, way better. And now I can actually
bring it to here. So what I'm going to do
is come to this one, come down to array, put it
on to zero and move the X. Is it the X? That's
the z. The Y, sorry. Moving the Y where I want it. And I want it to come. So we've got an even distribution
of my fence. If I press seven and
go over the top, we can see it starts here
and we need it to come here. So if I bring in four, so we can see now the
distribution between them. So it's a lot bigger
gap here and here, don't worry because we're
going to test this out anyway. So if I bring it to here, something like
that, there you go. Now you can see it's really
starting to come together. Now what we need to do
is bring in our railing. So we put our railing here. So these are these two parts. And what I'm going to
do is I'm going to press Z 90 to spin it round. Now they're going all in
different directions. So make sure you're on
medium point and then, Z 90, and there we go. Now, I want to put these
right in the center as well. I'm not sure if I put this one in the center.
I don't think so. So what I'm going to do
is just grab this edge. So this is right in the center. This edge is, or it should
be shifts, cursed, selected. Now grab these shift desk
and selection to cursor. Now, of course, we have
to move them back up, but we now know that
they're in the center. So if I put these
right on there, and then I'll bring
this back into place. Like, so against there. So we can see now this one is
perhaps too much in there, so I'm going to
pull it out there. And then what I want to do
now is bring in my railings. So I'm going to bring my
railings in pull them over. Press the little
dot bon to zoom in. And again, I want to put
these actually in the center. I don't want to join
them up, though. That's the main thing. We
don't want to join them up. What we want to do is we can see that we
can click on one. So click on this one, ShiftS
and selections Cursor. Now, I'm hoping as it moved
them around, yes, it has. So instead of that, shifts and selections curse keep
offset, and there we go. Now, let's pull them into
place to where we want them. Ing them out, and we'll just do this one for now because we
know they will be the same. And can we join them up
and do them all together? It will make it harder. And the reason I'll make
it harder is because we'll have to pull these out
and put them into place. That's why, 'cause it won't be exactly the same
all the way around. You can get it close, but it's not going to be
exactly the same, and that's why I don't
want to do that. So what I'm going to do,
though is once I've got them into kind of the
right place like this, making sure that this bar, of this here is above, so it should be
above, like this. There you go. That's
how it should be. And now I should be
able to come to this, and it should have an array on, which it has, like so. And now what we want to do
is either spread them out. So these are probably
going to need to be spread out a little bit,
just so they're even. You can see the
distance between here. If I go over the top
again, the distance between here and here
should be the same. The other thing is, as
well, if I grab these now, put on my see
through them in it, and then I should be
able to grab all of the faces going down.
Double tap the A, B. Let's see if I can
grab them all. And if I come round now, you should see I've
grabbed all those, making sure then that this
correct face attributes is on, and then I should be
able to pull them out into this place here. And that is what you
should end up with. Now, of course, all
these you know, Oh, these are next
to this walling up. So what I'm going to do is
grab all of this, grab this. Breast shift H. And
now if I press three, I can see how close
these are to each one. So you can see now these are
pretty nice to spread apart. They're just a
little bit too close with each other,
and there we go. Now, the other thing is, are these stuck
out a little bit? You know, is that the
way that I want it? I think I do. And these
are looking really, really nice, as you can see now. Now what we need to
do is we need to duplicate these onto
the other ones. So I want to keep the
array on one of them. So you know what
I'm going to do? I'm just going to grab this. I'll press Shift D, and
I'll drag this out. And I'll also grab one of these. I'll press Shift D, and
I'll drag them out. So now we've got the arrays
basically set on there. Now, what that
means is now I can come in and join all
of these together. So if I press Control
A on my array, I come down and join all these together with Control
J, and there we go. Now, let's press
Control A or transform set origin to geometry. And then what should be
able to do is press Old D. So press hold
D, bring it over. These should fit in perfectly, and the reason
they should fit in perfectly is because we know
we had the array on them, so they should fit
in very nicely. So hold D, bring them out. Like, so, making sure that everything is
fitting in very nicely, and now we can bring the
rest of the things back. So if I press Alt, not Alt D, let's
just delete them. Let's press Altag,
bring everything back, and there we go,
That is what you should be left with for now. Now, don't worry. This bit is
not going to be left white. We're going to actually
saw that, as well. But for now, let's just get this fencing going
all the way around. So you can see it's quite hard putting this fencing,
but trust me, guys, when you've
actually done it, you will see that
it looks amazing. It looks so nice once
you've actually done it. One of the other
things I would say is if I come to this
before going anywhere, let's put it on note
point not note one. I'm just looking if that looks
any better. You know what? I think it does look better
like that, so you know what? I'm going to leave it
on notepointnn one. It needs to be a
little bit sharp. It looks a little
bit too round there. And yeah, it looks really nice. So let's save our work,
and on the next one then, we'll get the fencing here. Then we'll get it going
all the way around here. We've got our ray on already. So, yeah, I'm wondering
before finishing, we've got our array on here. Can I actually put
it over onto this? So, can I put this
basically on there? Is it going to work,
like that? Is it gonna make life hard for me? It might make life a little bit hard for me,
so you know what? I don't think I'm gonna do that. I think I'm just gonna
try and do it like this. Alright, anyway, let's actually
go on to the next one. Alright, everyone.
Thanks a lot. Bye bye.
175. Duplicating and Aligning Modular Railing Segments: Welcome back if
you want to blend the building master class
from concept to final render. Now, of course, the other
thing we can do once we've actually done these is bring
them over the other side. It's going to make it easier. So all is not lost. Let's now come to this one. We've got on this one. I think we have on these, at least, an array. So we
have an array on these. I think what I'll
do with this one is I just want to
put one in there. So what I'll do is
I'll press Alt and D and then I'll
bring these down. And we know the lineup
and you can see here that's why I didn't
want to actually do that. So what I want to do is
come to these parts, turn the array down one count. And then hopefully we should be able to log
those into there. So double tap the A minute. Let me just have a
look round here. And yeah, they look
fine going into there. And now I want another stone on here before doing anything. I'll actually come in and just make sure they're
not poking out there, as you can see. Now, as long as you're not
poking out there, it's fine. We're using a seamless
texture anyway. So all I want to do then is
just apply this so Control A. It says it's a single user. And the reason that is because we need to come to object and we need to go to link transfer.
I think it's this one. One where we
transfer the data or we remove the data
from the other ones. So that's what I want
to actually bring on. So the one I want here
is this one here, relations makes single
object and data. There we go. Now
I should be able to press I don't
want to do that. Actually I want to
press Control A. There we go. And now I can
join both of these together. So Control J without
changing anything. Okay, so now we're
on to these parts. So this part here,
let's use this. So if I come in
and I press Z -90, so Z -90, let's just press D so I'm not
actually going to you know, so I've still got
something to actually use. Let's then bring these into place where I
want them to be, so they want to be, you know,
fitting in there somewhere. And then what I want
to do is make sure I can actually bring
in these railings. So again, I'm going to
come to my railings. You can see I've joined
these as a single user. I didn't really want to do that, and that's Oh, no,
I haven't you. Thought I'd done that. Okay, die, let's
bring them over. And then what I want to do now
is rotate them into place. So can I actually we click
and set origin to geometry? Is that going to mess around
with them? Yes, it is. So we don't want to do that. So we want to do is press R and Z rotate them round and get them into the place
where we're going to go. So R z, bring them in. But this is really where I want them to go
so that they're actually lining up with
the center of here. So you can see this
center here is lining up. Can I line them up a bit better? And then move this
one. Just wondering if I can move it
back a little bit. Without we still line them up. Probably, that's going to be
the best I can line them up. We can see we're quite a long way out at the
moment, as well. If I put this on Local, can I move them from
there? Yes, I can. So that's all good. And now I'm looking where I want these
to actually line up. I don't think I want them
quite so much like that. But what I'm going to do is I'll just come to my railing part, and I've got no, this one here as the There we go.
What is this part? Why is that part joined up? I don't actually want
that, so I'm going to come in just delete
these out of the way, so delete verts,
and there we go. That's what one. I don't
know why they've doubled up. Let me Yeah, this one's also
not in the right place now. Maybe. What did I do there? Let's have a look
what I've done. There we go, because
I deleted them. So let me just have
a look at this one. If I come in, hide
this out of the way. Yeah, this is all one mesh. This one isn't one
mesh for some reason, and as well, you know
what I'm going to do? I'm going to come.
I'm just wondering if the object data is
on all of these. Let me just go back, actually. I'm going to come to
this one and see. This one here where it is. So this one here, and this here. If I press G. Yeah, it's this. That's
what I don't want. But if I come and delete this, I think I'll have an issue. So we might have made
a bit of a mistake there with making
it a single user. So if I delete
these, it's going to probably delete them on
there, which it did. And if I come in and go to
object and go to relations, make single user
object and data, is that then going to mess
around with this one? So now if I delete those,
delete vertices, there we go. Now it's actually working. I don't know why that happened. So now I want to do is I want to just delete this
one out of the way. Like so. And then what I'll do with the
corners is instead, I'll just press Shift D just so he's not messing around
with any of the others. I'm just looking to make
sure that that's still okay. Yes, it is. And now let's
actually get this in place. Don't wipe in there, guys. So anyway, R's dead. Let's pull it into
place. Let's press G, get it into the place
where we want it. So something like this, I think, right in
the center of there. Maybe, maybe that needs to
come out a little bit more. So you can see here, this maybe wants to come out
yours to Tad moor. And now we can see
that's nowhere near in the place that I want, which means I'm
probably going to have to rotate it a little bit. So Z, let's rotate it. Let's pull it back into
place to where we want it. We'll be somewhere like there.
That's looking better now. And of course, we can see, as well that we've
got a con up to here, so let's remove that,
and let's also then pull this over, and there we go. Now that's looking
exactly as I wanted it. You can go in, of course,
and put some, you know, stone parts on here, you know, on these parts here. That might make it look
a little bit better. You're making sure that
everything's in here. And my gait, let me
just have a look. I might want to just pull it
down just slightly there. And then I think
it's going to fit in a little bit better
on these bottom bits. Yeah, that looks
better. Okay, now, we've got these bits in now, let's bring this one again. So is this one a single user? I'm not actually
sure, but what I want to do is put it
into each of these, as well as bringing this
up to this corner here. So let's bring this
up one more, five. We can see that's what
I'm talking about, where it's a little
bit further apart, and this is why you
don't one, two, quite come in and apply your rays or
anything like that yet. We know we've got this side
to this side. That's fine. It's just trying to
get these all in now. So let's come back to this. And what I want to
do is I want to pull it out a
little bit further, perhaps round to here, and then see if I
can grab this one and put it over in
here, see if they fit. They should fit
perfectly, but we'll see. So what I'm going to
do is I'm going to turn up this here. So the wire let's pull it up, and it should then
start to go into place. Now, I tend to when
I'm doing this, put it on object mode,
turn off transfer. And then I should be able to see where this is going up to. So I'll think
something like this. And then what I'm going to do
is I'll press I think I'll press Alt D because I
can turn that up then, and then what I'll do is Rs 90, and I'll go the other
way, actually, so Rz 180. So the arrays going
that way around. And then what I'll do
is I'll pull this over. So I'll pull this over
into place first, like so. And then I can see now that
these need bringing in. So I can bring this one in now where I actually
want it, like so. And here we are. We're
starting to get somewhere now. Now, let's come with this part. Grabbing all of these, and then I'm going to press seven
to go over the top. Now, I want to be able
to move this round. So hopefully, when
I bring this over, it should line up
with this one here. So if I press Alt D, let's bring it over
then with Global. And then let's mirror it round. So let's see if I can go
to Object mirror on the X. Yes, there we go. And now
let's even put that in there. Let's see what
that's going to look like. And there you go. Now you can see that actually
made short work of that. Okay, so far so good. Now, the one thing I'm
bothered about is that this is kind of the wrong
angle as we can see. It needs to come further over, so I'm just going to see what it's going to look like if
I bring it over further. We can see that my
angle here is wrong. So if I press Arnshad, now it's more lined up. That is what I want
it, but I need to make sure that it's
all going to go in place. So I need to pull it
out slightly slightly. And then what I'll
do is I'll go to local and then pull
it back slightly. And I'm just wondering then if I can actually get that into place where I actually wanted
to go, so double tap the A. Let's have a look. Is it
sat too far back now? That is the question.
Are these going to be able to line up, you
know, as I want them? If I pulled this out
any other angle, would it line up properly? You know, should I
pull this to the side more and get it to line
up more like this? You know, is that going to
be a better way of doing it? Just looking, 'cause you can
see that, you know what? It might be actually better. Doing it like I've
just suggested, suggested, let's have a look,
see if that's in the wall. You know what? I'll
pull these out, I think, a little bit more. So I'll come in and grab
this one and this one, and then just pull them
out more into the wall. And take that off,
double tap the A. And I think it looks better now because
it's just a little bit more angled
than what it was. And then I can
carry on over here. I can also then come, get rid of this one, so delete. And now we've got
the right angle. I should be able to
come in with this one, press all D, bring it
over on the global. So seven, bring it over, and then rotate it on
the mirror on the X. And now let's see if that
goes in place nicely or not. Nope, let's rotate it. So z let's also make sure, first of all, as we've
got it on local, if we go to seven, look how far the distance is
between here and here. Put it on local, we'll just
move it over very slightly. And then what we can do now is we can just bring
in these parts. So if I press Tab, I'll come
to this this, pull it back, like so, and then
we'll come to this and this and pull it back
pull it back, like so. And there we go. Alright.
That is looking pretty nice. Alright, so we'll
save out our work. And then on the
next one, we should hopefully be able to get this
side at least completed, and then we can work
on the other side, it should be relatively easy. From there, then we
can actually bring in we'll probably work
actually after that once we've got
that in on our terrain. I think that'll give us a nice break from
everything else, as well, and I'll see you on the next one,
everyone. Thanks a lot. Bye bye.
176. Finalizing Fence Top Geometry with Cap Detailing: Welcome back if
you want to blend the master class from
concept to final render, and this is where we left off. Okay, so now let's
come in wave this. And we know we've stretched
out a little bit more. I think it was this one, we stretched out
a little bit more just to make it fit.
We've also changed this. So all we need to really
do is get these parts in, and then I think we should
be able to work with them, but we'll see cause this
might be a bit longer. Either way, it's going to take a little bit longer
than I thought. So Alt what did press
Alt D. All said, 97 to go over the top, then, and let's see how
this is going to fit in. So we want it in center there. Now, do we want to put in an extra one there or do we
just want to pull those out? I think we should
just pull those out. So if I just put it around here, so it's pretty much in
the center of there. And then what I
can do then is put this on, double tap the A, and then press B,
grab this side, press B, grab this
side. Like so. And then I can come in
and press medium point. And then S and X is going to be? Yes, it is, and pull those
out into the wall like so. Alright, let's go round then.
Background to this side. Turn up this, and there we go. Now
they're in place there. And now I should be able to make single user on these and then just
duplicate them over. I'm thinking with these, yeah, probably going to be the best way if we
join all these up. It's only a small piece
of mesh, same as these. So it's probably going to
be better if we do that. So what I'm going to
do is, first of all, because I know we pressed
Aldi I'm going to go to Relations Make single
user and Object and data. And then what I'll do is I've got a bevel on here and
I've got a array on here. So I want to come
apply my array first, and then I want to join these
two together, conch or J, and hopefully nothing
actually ends up happening to these like so. Okay, so then what
I want to do is now I can either press
Alt D or Shifty. It might be worth
on these parts. We might join them together. That's the problem. So I need to make them all single user ones
who have done them anyway. So instead of doing that,
I'm just going to press Shift and go over the top and
let's put them into place. Now, of course, we
could we could come in and put them in
place, using the array. But honestly, by the time
you finish using the array, I probably would
have finished these. So shift D, bring
them down into place, like so, and there we go. Now we've got this side to do. Now, this side, are these going to fit,
or is it going to be? Let's see if these fit in first. So shift D, s, 90, seven to over the top, G, let's see if they actually
fit in. And you know what? They're probably going to
fit in perfectly these. So I think I'll have
to move them tiny, tiny bit over, so bring
them into the center then. Like so, and there we go. And then from there, I can
do the same thing again. So Shift D, bring them over into the center just making sure that
they're exactly the same. Like, so holding the
shift and then Shift D, bring them over. Like so. And then Shift D,
bring them over. Like so. Now we'll
grab this one, and we've got our
array on there again. So what I'm going to do
is I'll press Shift and D. And then what I want to
do now is spin this round. So if I pull this out now you can see this is how
it's going to be. I want it basically come
in, you know, from here, see what the array is, and then I can delete
this out of the way. So if I press rds head -90, I should then be
able to line this up perfectly with this and see where we are or
roughly where we are. So if I bring this into here, line it up very nicely, like so, and I can see that that pretty much goes in the
place where I want it, which means then I
can drop back this, one, two, drop them back. I can then come in,
apply the array, Control A, finally, then come to this one,
press the button. With edge select on and then delete that
one out of the way. So delete verts, and then
we're left with this. And then we can grab
this one, Shift D, Z 90, spin it round seven, and then G, bring
it into the place, and we should be
able to get this one nicely into where
it needs to go. They'll just pull
it over slightly, like so, and then shift
D and bring it over. And, of course, it should fit
here absolutely perfectly. Double tap the A,
and there we go. Now, let's save our work. And before going any further, let's have a look at
what we've achieved. So we've basically
done all of this one, so let's put it on render
view. There we go, goes. How nice does that look? Yes, we've still got
this part to do, but it's looking good, right? It's looking very
nice when we've got some trees in there
and things like that. It's looking really,
really cool. Alright, so now we need
to move on to this part. Or, we start on there. I think we'll move
on to this part. I think we're on a roll here. Let's carry on this
part over here. So we'll go over the top, and what we'll do
then is we want to grab all of these pots. So we're gonna grab
let's have a look. Can I grab these? Are
they in two pots? Let's have a look.
Grab this one. Let's grab this one. Let's
grab this one and this one, let's press G, and there we go. All of it is in two parts. Let's press Shift
D. Drag it over. And you can see now the problem is when I'm trying
to drag it over, I can't what I'm going to do
is I'm just going to press Controls Head just to go back
before grabbing that one. And then I'm going to
come in Object and now we can go to relations, single user object
and object data. Now, if I press Shift D
now, can I bring them over? No, still can't bring them over. Can I join them altogether,
even? Control J. Let's join them all together, and let's see what
happens there. All of these then because
the array is not on there. So what I'm going to do
is just press Control E, go back to my wall. I'll come down press Control
A, join those altogether. And now come to my fence,
which is this one here. So I need a fence
on each of these. So what I'm going to do is
I'm going to grab these, grab a fence on each one, and now see if I can shift
D and bring them over. No, still can't bring them over. So let's go back. And we should have now without
me doing anything. I should have just one wall, so one wall that we can
definitely bring over. We know we can move this,
no problem, as you can see. So we've already
got a duplication of this, so you know what? We'll put those
in place for now. So we're going to put
those right in the middle. Now, I can see, as well, that
these are a little bit out, so I'm going to
fix those as well. Some jaws going to put these
into the center, like so, and then going to move
these over into the center, a little bit more like so. And now we're on to
these parts here. Now, what I want to do then if I come in and just grab these, if I press G, there we go. Now they're moving over the side and I move them like that? No, because they're
all going to do that. So let's come in and
press Control J. Can we do that? Then
we can move them over. And there we go, Let's
put them in the center. So a little bit of
messing around there. Now, what do I want
to do now with these? I've still got these over
here that I can use. So that's no problem.
What do I want to do now? If I move these, you can see we've just got
these now and go to Object Pvert to No, I don't
want to convert them. Let's go to first of all to Relations Making or
Use Object data. Let's come down. Then we've
got nothing else on here. Press Control J, and
join those together. And now she'll be able
to pull them out and in. There we go. Perfect. All right, so
we've got that side on. That side didn't take long. Now we want to do is we should
have all of these joins. So I want to keep this joint because it's
going to go over that side. So I'm going to grab this one. I'm going to join it together, so Control J, can't do that. So again, we'll come to these. We'll actually apply our array. So Control A and you can
see single user problem. So object relations, make
single user object and data, press Control A,
and there we go. Join these together with
Control J, and there we go. Now we've got these over here, which is the array on here, and I want to put
that over here. So basically, I want
to grab all of these. I want to grab all
of these then. And then what I want to
do is press Shift and D, shift and D, drag those over. And again, we can't
do that either. So I'm wondering if it's 'cause of growing
local, let's try now. Yes, it is. It would be. Now, let's come in an
object mirror on the X, and there we go seven
to go over the top. And I'm really hoping that
these fit in place for me, at least, let's have a look. No, they don't
quite fit in place, but never mind, never mind. How many more do I
need to bring out? You can see I've got
an array on here. I might need to bring that back. I don't really want
to stretch it out, so this is a little bit longer. Then I imagine this one stuck
out a little bit, as well. So I think, first of all, let's bring it back a little bit into place where
it's going to go. And then we'll come
to these two here. And what I'm going
to do is I'm just thinking now probably better
off bringing these all in. So I'm going to grab this, making sure I'm on
Face Lick this one, this one, this one, and this one, just to
keep that same angle. I don't really
want to lose that. Stevin to go over the top, and where do I want
to pull it into. I want to pull it in, past this. Pass this. There, so I don't want it stuck
in the wall like that. Now from here, I can
come back to these, bring the array down
now a little bit more. Like so. And now I can
come to this part here. We've still got
the array on here, press Shift D, bring this over because we know
these line up perfectly. So as long as I get
these lined up, I know where it'll
have to be, so we'll put those in there. Now I can see with this, we've got one that's a
little bit too far. So what I'm going to do is just turn down the array to four. And I also know that I need to bring that up
to the wall there, so I'm going to increase the Y. So increase the Y up to
there. And there we go. Now, finally, I want to
make sure that this is not sticking over the side of
the wall because you can see here that they are. So let's grab these, as well. And then we'll move
them so that they're in place in the center, like so. And now we should end up
with something like this. And there we go,
now, the next thing is, of course, that these, if I come to these parts, can I put them in place
where they're going to fit? Yes, I can. Can I do
the same with these? Press in Control one? Let's look at the distance
between those. Yes, I can. And actually, you know what?
This is going to work. But we'll pull these
over into place. Like so we'll pull these
over into place like so. And then we want one over here. So I'm gonna press
shift D, bring it over. Control one, put it
into place. Like so. Okay. Now, the thing
is with this one, we already know that these are a little bit further apart
than most of these, so they're not
really going to fit. The other thing is, though,
let's first of all, see if we can make this fit. So all I'm going to do with this one is I'm going to press shift in D. I'm going
to bring it over. I'm going to, of
course, use the mirror. So we're going to use the
object mirror on the X. Let's get this first of all into place where
it's going to go. So if I pull this in,
pull it in, pull it in, pull it into here, so it's in the center and maybe, maybe go to local again and
just pull it over slightly. But it's not sticking
out that wool and then go to local and
put it back on Global, double tap the A, and there we go, that is
what I'm left with. And you know what? That's
looking pretty good. So on the next lesson, guys, we should be able to get
all of the rest of this done because I think this
one's going to be pretty easy. And from there, then
we can start working on this stone and this brick. I'll show you how to
do that. And yeah, it's really, really starting
to come together now. Yes, it took a few lessons
to do this, but I think, actually, at the end
of the day, these are looking really, really nice. Alright, everyone, so
save out your work, and I'll see you on the next
one. Thanks a lot. Bye bye.
177. Aligning Decorative Assets and Adjusting Arrays in Blender: Welcome back everyone to blend the building master class
from concept to final render, and this is where
we left you off. Okay, so let's actually see if I can I'm just
looking for one. Have we got an array on
these? Yes, we have. We still got but we've
not got an array on them, but we've got joined
together, not like these. So these are joined together,
just not with these. And I'm just looking at
something like that. So let's go shifty and drag it out because I can probably use this over the other
side as well. So let's put them
in the middle and see if they're actually
going to fit in. I'm going to put
it in the middle. I'm going to make sure then
that these fit in nicely. And then what I'm going to do is that's not in the middle, is it? Let's move it out a
little bit. There we go. And let's make sure they fit. So double top the A. Yeah, they're fitting in pretty nice. Now I've got that. What I can do is and just
do the same thing. Shift D, bring it over, making sure they're
exactly the same in there, and then shift D, bring it over, put them into place, like so, and then we can go
to the next one. We've got an array on here. Let's press Shift D, what we'll do then is bring this over to where
I want it to go. Let's come round to this side. And the thing is, I want to make sure that it's definitely
definitely not in the wall. We don't want it in the wall. We want it just away from it. We don't want it sticking into any of the stone or
anything like that. Basically, these ones
are, so that's okay. And then what we
can do is just add in another one, like so. And I think for this one,
we're actually going to need to spread it out a little
bit or pull them in. So if we add in six, you can see it's going
to be over there. We can then bring it back and make them a little bit smaller, if you wanted to, like so. Maybe maybe that's going to work better rather than stretching
them out even further. So I think, yeah,
something like this. Let's then make sure
that these are in line. With the other side.
So we'll go shift D, and we'll bring them over them. And then we're going
to press Z -90. Seven to go over the top. Let's just press the G bone, make sure they're in the center. They'll zoom in a little bit. Making sure they're in the
center, pull them back. Into the wall, making
sure that we're not double tap the eight,
stuck in the wall like that. We don't want that, so pull them out a little bit,
and there we go. And then finally on this one, we need to obviously
turn them down. You there, and then
drop them back. Tiny, tiny bit more, like so. Now, let's see if we can
fit in our railings. So will these railings fit? Probably not, because we've
shrunk them down so much, so we're probably going
to have to do those, but we will give
her a try anyway. So shift D, bring them over, press the little dot born. And, it's close. It's close, guys, but
I think I think we just need to come in
and grab this one. And then what we'll do is we'll press Shift D and bring it over. And then seven, to
go over the top. G, and we'll line it up
with these ones here. Like, so let's get them
lined up enough perfectly, and there we go, and then let's bring them over. So
we'll bring them over. We'll line them
up, first of all, and I think what
we'll do is we'll go over the top now and I'm
looking where these are. And what I'm going to do
is I think I'll turn down. So if I grab these, I should
then be able to turn down the array and then move these out so they're
more in the center, like so, and even pull them
out a little bit more, making sure they're in
the center, like so, and I think that
looks way way better. Alright, so with these then? What I'll do is
I'll go to Object. I'll come to where
is it relations, Object and data, join them
together with Control J. That's not working because we've still got that array
on, so Control A, then join them together
with Control J, and there we go right
click shade up to smooth. Seven then go over the top, and then all I want to do
now is put them into place. So making sure they're in round about the same
place as the others, and then Shift D. And one thing I want to
make sure as well is The more in line,
are they in the center. I think they're a
little tiny bit out, so I'm just going
to move them over. And then we've got this one. So shift D, bring it over. And then finally, this one, shift D, bring it over. And then the last
thing I want to do is I want to see if
they actually fit in here. So shift D, z 90. G, let's put them in place,
and you can see here. No way Jose are they going
to fit, I don't think. Are they going to fit?
Let's have a look. Maybe the will. Maybe the will. It's just these are a
little bit out, that's all. But if I press Control one,
can't see through there. Let's press one. Can I
see through them there? No, I can't get rid of this.
A few of these things. Can I see then? Yes, I can. And now I can see look
how they line up. So now I can line them
up a little bit better, and then I can press Shift D, move them over to this one, line them up, double tap the A. And there we go. Okay,
so they're looking good. Now the last one, which
is this one over here, let's press Shift D, and
let's bring it round. So this time, we'll mirror
on the Y, I think it is. So object mirror on the Y, seven to go over the top, and it should be the same angle. So hopefully they will go in, except the fact that they might be a little
bit too close together, and that's what I was
a bit concerned about. So, can I move it over on local without doing
too much work? So can I bring it
over? Like, so, double tap the A.
And you know what? I think we'll get away
with that. I'm not gonna worry too much about that. Okay, that is them all done. So now, let's split these off or delete them,
should I say? I'm looking to see if anything else gets deleted
while I've done that. And then go to come to these and delete these out of the way. And then next of
all, then I want to join all of
these together and put them in my fence before
actually doing anything else. What I'm going to do is just
hide this out of the way, hide my gait out of the way. I'm not going to need that, hide my stairs out of the way. So
hide that out of the way. Seven totel the top, and then hopefully I
should now be able to come in and grab all of these. Now, I'm not my guy. I
don't want to grab my guy. Just grab all of
these coming round. We can see that we need to
grab all of these, as well, and all of these, and then
all of these, as well. Without grabbing my building, I don't want to
grab my building. Press the G button and see what we're
actually moving here, so everything's moving with it. And then we've got some of
these on here so we can see. So we'll grab all
of those G again. Pretty much, we're
nearly done now. We'll grab this one,
this one, this one. Then I'm going to
press B, grabbing all of those grabbing this one. Now, if I move these over here, not like that with global now we can see I've
grabbed them all, control Z, and now finally what I'm going to do is I can't
join them all together. But what I can do is I can, first of all, just put
them in a new collection. So we'll pum in a new collection
called fence, like so. Click create and there we go. Now we've got all
of these parts in. And now what we can do is we
can come to the bomb parts, hide those out of
the way, come to these parts, hide
these out of the way. And then what I can do is I can just literally come in now. Left click, hold it
down, and there we go. Now we've got everything.
I can just press A. And then what I can do, finally, I can come to Object and
come down to relations, make single user object
and data, and there we go. And then what I want to
do is I want to come to I just got to be careful that I've still
got arrays on these, I think, and that's going to be a problem. So you know what? We're going to have to Because
we've got bevels on these, we really want to remove
all of the um modifiers. But the problem then we've got is once we've done
that, as you can see, we've got the bevels on, and we just need to be very careful
about what we're doing. So mainly it's with these. So if I press Control A, I can hide those out the way
then and come then to these. Again, I've got an array
on, as you can see, we don't you know, that's going to be an issue that we need to make sure
that we're not doing. So Control A, hide
it out of the way. Just work your way down them. Let's also, and
you can see here, as well, that on
this one, actually. I'm going to delete that
one because I feel like, yeah, it was an extra. So this is another reason
why I want to check them. So Control A, hide
them out of the way, and then we'll come
to these, making sure we've got no
arrays on there. I'm going to pull
this up actually, so it'll just show it straight
away if it has got one. Okay, now let's work
our way around here. So this is just got Bvlon. This has an array, so control
A, hide them on the way. No array on this one.
Nothing on this one. This has an array. Hide
it out of the way. I'm working on each of these. I don't think they have
anything on these. Come to this one.
Nothing on that. An array. Okay, hide
them out of the way. And then finally
onto this one array, hide out of the way. And then these shouldn't have anything on them, all of them. So hide them out of the way. And finally, this
I'll have an array, hide it out of the way. And there you go. Now, you can see that it was
pretty methodical. And now I can do is just
hide these over again. So all takes, bring
everything back. Hide your gait out of the way because we
also put that in. And now let's join all
of these together. And hopefully hopefully we
shouldn't have any issues. So if I grab all of these, grab let's say this one last, or let's have a
look at this one. No, point, no, no, one on the bevel slats the
one I'm going to join. Press Control J, join
them all together. Press Control A, all
transforms, right click. It's the origin, two geometry, right click, and we're
going to shade Auto smooth. Then what we're going to do
now is double tap the A. We're going to bring
back everything and make sure
everything is working. We're first of all
going to press Alt H, bring back these parts. Then we're going to
turn all of these on. And on the next lesson, what we're going to do I'm going to pull this down
now because I don't need it up so high is
work on these parts here. So we're going to work
on these parts here. But first of all, let's actually have a look at what
we've achieved here. And yeah, that is
looking pretty nice. Now, one of the things that we could have done is basically randomized
all of the bricks. You know, at the moment,
they're looking pretty similar. And we can do that as
well on the next lesson. We can grab all these now,
grab them by the bricks, and then we can
actually see where they are on the UV map, and then we can randomize
and pack them up. I'll show you how to do that. That'll be the first
thing that we do. And then from there,
then we can come to this bit to this
stone bit on here, break that into parts on here. And then, yeah, we should
be done with these. Perhaps on the next lesson, we'll be done with this fence. And then from there, we can
actually start with um, with our blocks going round
and then our terrain, I think we'll start
on that next. Alright, everyone, so I
hope you enjoyed that. I'll see you on the next
one. Thanks a lot. Bye bye.
178. Efficient UV Mapping and Material Application in Blender: Welcome back if we want to blend the building master class
from concept to final render, and this is where we left off. Now, let's come and do what
I actually spoke about. So if we go to UV Editing, let that load up, and then what we'll do is we'll actually come in and find the
ones with the bricks on because they've
already got them on. Okay, so here we go. And it's because it's in shade, and by the way, why
it took so long. But anyway, either way,
let's come in then, press the tab bom, double
tap the A, Stone brick, click Select, not assign, click Select, and there we go all over the same
one, as you can see. If we come up to UV then
and we go to Pack Islands, so we're going to
go to Pack Islands, we want to keep the same scale, and we want to keep
the same rotation, and then we can just hit Pack. Let it think about that it's
gonna pack them all for us, and it didn't keep that. So what I'm going to do is, I'm just going to do it again. So I'm going to go
to UV Pack islands, and I want to keep the
scale and the rotation. Shut keep those.
Okay, let's pack. Let's see what
happens this time. There we go. Now it's
packed them all. And now we can see
they're all different. We can see they're all different.
They all fit in nicely. That's exactly what
one. Exactly what one. Okay, so that was easy. Let's then go back to modeling. Let's have a look at them now, so double tap the
A, and there we go. All the bricks look different. Okay, so now we're
on to this part. So we're on to both
of these parts. Now, what I want to do now is, first of all, we'll
deal with this part. So this part here is what
I want to deal with first. Now, we don't need a lot
of this what's in here. So I'm just going to
press Control A on here, and this is the mesh that
we're going to be left with. Now, the only parts of the
mesh that we're going to need is the sides. We're
not going to need the bomb. So if I press one,
I should be able to come in, turn this off. Let's put it on wire frame, and let's just try
double tap the A, press B, and I should be able to just grab all of
the bombs like so. So it's just grab all the
bombs. Not going to need those. They'll delete faces.
Then what I'm going to do is I'm going to come
into all of these. These as well we're
not going to need. And that then straightaway
is going to make things way, way easier for me, especially
when I come to unwrap them. So delete and faces. And there we go,
now we should be able to unwrap these
pretty easily. So if I press A, U, smart UV project, click Okay. And then what I'll
do is I'll just put this back onto material mode. I'll come to M material. Click the down arrow,
and the one we want is going to be
probably the dark. Or do we want it as brick?
That's the question. Let's have a look on our reference and see
what we actually had. Yeah, on here L you can
see it's actually stone. Though stone, dark
stone, and light stone. So let's actually try that
and see what happens. So we're going to come down.
Stone light. Click Okay. Double tap the A, and this
is what we end up with. And we do seem to have a
lot of stretching on here. So let's have a look
what's causing that. So let's unwrap it in
this way. There we go. And it's probably caused. If we're going to RenderVew I don't think that's actually
going to be on there. Hm. I'm just wondering why that's actually
stretched out like so. Maybe it's it's tried to fit
it all in the same UV map. So let's just try that. So if I grab one, press you. Unwrap. Yeah, we still got some stretching on there.
You know what, though. I think it's going to be okay. I think that's actually
going to be okay. I'm not going to worry about too much because that is
underneath there. Now, if I press SaltH and
bring everything back, I want to come to this one then. And what I want to
do is I want to isolate this and this out. So isolate them out,
and there we go. Now, let's grab this one, press the question mark to
isolate it out even more. Now, let's think what
we need on this one. The thing is we do
need the underneath. We also want to make sure that we have a solidify on here, so we might as well
apply that so control A. We also want to make sure
then that we've got a bevel on here and that
these are split up. These are split
up in a nice way. Now, honestly, the
easiest way to do is if I press question mark. I'm going to come
in then and put in some blocks going long here. In other words, control O, and you can see here that
it's not going straight. So you can see here
this is definitely not straight in
comparison to this one. So whenever I try and move this, you can see it's
moving at an angle based on this one over here. But if you have to press E, you can see it can
straighten up. So there we go. Control R. Let's do it again. E. But
let's put it over here, so it's going to make it a
little bit easier for us, and then let's press Control
R. Move it over here, and then Control R,
move it over here. And the reason I'm
doing it this way is because I want
these placed on, you know, actual proper stone. And I also want
to make sure that they're a little bit randomized. So, yes, it's going to
take a little bit longer. But in the end of the
day, it's going to make it easier long term. So if I bring this over here, press the E borne,
you can see here. Sometimes this happens
where it's not quite going to, you know,
go where you want it. Sometimes. So if I
press Control, oh, look, bring it over
this way, press the EB. It's not actually going
to where I want it. So what do we do about that?
Well, let's come over. Let's press the AB, and all I'm going to
do to fix that is, I'm gonna bring in a bicyc. So I'm gonna bring in my
bicyc roundabout here. Make sure we've got this
zeroed out on here. Make sure no inner
or the other ones, you know, done or anything like that. We don't want
to clear anything. Then we're going to do it
again. So we're going to come mesh and bisect,
and then grab it. That was the wrong one,
I think it was coming. Bisect. Where is
it? There we are. And put that on here, make sure this is zeroed out. And now when you come in,
you can press Control Law. And yeah, I've got one in here
as well, for some reason. I don't know if I
left that one in. Hops click, delete and
dissolve edges. There we go. Now when you come in, you should be able to
come in and press Control A and bring in just a straight one like
soap. So there you go. Now I can press Control R. I can bring in another
one, and Control R, bring in one over
here, Control R, bring in one here, and finally Control R,
bring one over there. And there you go. You can
see how easy that is now. Same for this side as well.
So control, Control R. Like so, and then one in the center or maybe move to a little
bit to the side. Now you can see,
they're all randomized. That is exactly what we
want. Now, let's come. We didn't have one over here, but we have got one
here, so we'll just press Control law,
bring it over. Because these blocks are going
to be an angle, of course. We don't want these
blocks straight. So control law, bring it
over, something like that. And now we're on to
these. So control law, you'll see, is it
going to be an angle? Can I press E to straighten out? No, I can't you know what? I'm going to do exactly
the same thing as War just did. I'm
going to press A. Mesh, bisect, and let's
straighten it out. I'm going to put that onto zero. So this one this time, and
then I'm going to press A, mesh, bisect, straighten it out. And again, I'm going
to set that to zero. Now, the other thing is
over the other side, you will see that we've
probably bisected these. Can you see these
bisects on here? We also did those
at the same time. So that's because we grabbed the whole thing, and
when we went to do it, we actually went
through everything, you know, not these, but because they're in line with the bisc. The thing is about the bisec whatever you've got selected, we actually get bisect. If you don't want to bisect like let's say this
one over here, just deselect it and then bisect this one here,
and you should be fine. Now we've got these. Let's do these ones at the
same time, then. Now, with these, as I said, we don't want to go all
the way through there, so I'm just selecting this one. So I'll go to mesh, bisect, bisect it down, like so, put it on to zero. Let's do the other side
then. So this side here. So I'm going to go with L. And then I'm going
to bisect this down, so mesh, bisect,
bisect this through, put it onto zero. It's already zeroed
out, so that's okay. Then finally one
we're going to do. So now I'm going to
work with these. So we've worked all
the way up to here. So control Let's put one
here, control, one here. And yes, it might seem slow. But honestly, guys, it's
definitely worth doing, you're going to get a
lot more randomness. Gonna look a lot more
alive if we do this, and this is why we
bother even doing this. You know, we're not just doing
things for the sake of it. We're actually doing it
for a very good reason. And now let's come into these. So I'll bisect it around here. I'll bisect it here. And then I'm going to work my
way around now up to here. I'll put that one there. So you could just go in
and press Control and get these all in
place relatively easy. But I don't want to
actually do that. And I'm going to show
you after this, as well. You can see here
that this one's not quite right. You can
see this one here. But what I'll do is hold
shift and click and just move it over, like so. Alright, now we've
got all those. Now, let's just work our way around here
again with this one. Let's grab it. Move it over. So I'm going to move it over a little bit different
to that one. Then I'm going to
come up to here and look where my posts are. That's not what I
want, so control. There we go. Put it here, control, here, work
my way around. Okay. Like so. And then, let's put a middle one in here. Move it to the side, offset it jaws slightly,
like we always do. Now on the next one,
then, what we'll do is, in fact, you know what? We'll do this one
first, before we leave. And we'll put in two. Like so. On the next one, then we'll
just finish these off, and then we should be able
to turn these into blocks. And then once we've
done that, pretty much the fences are done, and then we can move
on to the terrain. Alright, I'm going
to save on my work, and I'll see you on the
next one, everyone. Thanks a lot. Bye bye.
179. Refining Mesh Geometry for Better UV and Material Mapping: Well, I come back on to blend the building master class
from concept to final render, and this is where
we left you off. Okay, so let's now come in
and just finish this process. So I'm just gonna come
in and not do that. I want to move it
over here, like so. Then, like, so then like so, and let's put one over here
because this is kind of a So the reason as well, we're going to do
this is because it's going to make it way, way easier to actually make
these look like stone. At the moment, they
don't really look like stone because it's
just 1 bar, of course. So that's why I'm
actually doing this. I'm going to put one
there this time. Now, let's work
down here. This one should be a lot easier. So let's come in.
Put one down here, one here, one here. Okay, we go and then warm here, and find the two maybe
in here. Like so. Alright, now, the last
bit, let's first of all, make sure that we've got a
straight line because we didn't actually do
Did we do this one? Let's have a look, see
if. Did I do the bisect? Can I press E. No, I can't do that.
So, you know what? I'll just grab this and mesh. Bisec we'll cut
it straight down. Here, we'll put zero
out on this one, like so, and then we'll just
do it this side as well. Again, I'm not pressing A. I'm just actually coming
in and pressing L on it. There it is. Let's zero out. I don't even know
which ones that zero, so let's do
that one again. I just, uh pressed it by
mistake. So there we go. Now we can zero this one out. And now let's come
to this part here. We can see as well.
This is all wasted, so let's bring that in as well. We definitely don't want
it all the way out there. So I'll shift and click. Is it actually a
face? Yes, it is. We'll keep the face
on there. We'll just pull it in where it needs to go. So somewhere like
that, and then we'll come in and just
go over the top. Like, so like so, and we'll
leave that one there. And then we'll go in
just with one in this, then we'll come to this center one and the final straight. Now, the other thing is,
where is this going to? You can see that
this is probably a little bit further out, as
well than what we need. Also with this is also a bit further out
than what we need. So with this one,
I'll just come in, grab it and pull
it back in place. And with these two, I'm going
to press Delete and faces, and then I'll delete this
face out of the way. So delete faces. And now
we can come in control R, and we'll put one
in here, Control R. We'll put one here,
control R. Here. And then we'll do Control
R, bring it over here. And you notice that
I don't want these placed on lines that
are going through. I don't want them
placed on the cracks. That's another reason
why I'm doing this, spending all this work doing that because I don't want that because it's
not going to look right. So I'm going to bring
this over like so. Alright. So now let's put it on Object mode because it is going to make it a little bit easier. Now, what I want
to do is I want to basically split these off now. So I want to split them
off from each other. So ls click, playing them off. Doesn't take long, going
up every single one, and all you want to do
is just every other one. Don't miss any because then
you'll see it will go wrong. So just make sure that
it is every single one. Like, so and this tiny one here. This tiny one here, as you can see, I don't really want that. So I don't want this as a block. I want this one as a block. So I'm just going to ignore
that one for now, like so. Once I've actually got
these, then I can press Y, and then they're all split
off, as you can see. Now what I can do is I can
just come into this one. I don't want that there, so I'm just going to dissolve in edges. Now, we've done this one,
so let's do the next one. So we're going to
go, Oh, ****, click. Just making sure if
you've got an end one, you select the end face. Always makes things
easier if you do that. You don't want to
leave those behind. And then we'll do this going up. You can see I've got an
edge on this one, as well. Probably come from the bisect. So again, I'm just going
to leave that there, making a mental note. This one has got an edge here, but we have to have that edge on there because that's how
it's actually going to bend. The same for this one,
also got an edge on there. So we just need to take
that into account when they're on there and then
work our way around. Like, so this one here, again, it's got an edge on there
coming all the way to here. This one is too
small, I would say. So what I'm going to do
is just grab them both. And then we've got
this one, this one. Making sure if we've got an end, you click the end. Now press Y, press G. Like so. Now, you don't have to go
in and delete those edges. So remember this
one where it's got an edge here. You don't have to. It's just to bring down the
polygon count if you want to. Now finally, then, let's
come round to this one. So again, I've got an end. So select the end. Like so. And then this one is
going to be here. This one is going to be here. Then we've got these two, like
so, why, and there we go. Alright, so why did I
bother doing all that? Well, first of all, then
we can come in now. And what we can do is we
can now join up the faces. So if I come in now
and grab them all, I can come to mesh, clean up. Bill holes. You'll notice fill holes. You
can turn this up. It will fill all
the holes for you. The next thing you
want to do is come in. You can see already that they've got some little split in there. A, modify, generate a
bevel, and there you go. Control A or transform,
set origins, geometry. Note point, note, note
three, and there you go. There is all those metal slabs. From here, then what you
can do is press Tab, A, U. Smart UV project, click Okay, bring in a material,
and the one we want is going to be stone lighter. So stone lighter, L a sign. Let's have a look. Let's press oltage bring everything back, render it out, double tap the A, and there you go, guys.
That's why we did that. So now we've got
stone lighter on top, the stone underneath really, really easy to do
that, as you can see. And now you've got
all of those splits off on your actual stone. Now, the thing is, as well, you could come in and turn up the, you know, turn this up to be
a bit more if you wanted to. But for me, I think I'm
happy with how that looks. I'm also wondering, as well, because the other thing
you can do is just change this to the
stone light instead. Let's have a look at
that. You know what? I think that actually
looks better. So I'm going to go with that. I've got lighter
stone underneath. You might want bricks
underneath or something, but I think for me, that's
looking pretty nice. Alright, so the next thing
then we want to do is we want to plan out how far
we're going to come with, you know, our stones that's
going to come round here. So for that, I would
say that you can pretty much put this
how you're going to have it because it's going to be a little bit rounded
on the edges here. But let's do the side,
the back part first. So with the back, I'm going to leave a
little bit more room. So I'm going to grab my guy, and I'm going to put him round here and I'm going
to spin him round. So's head 90. So I imagine my guy
walking down the road, like so and the path. So this bit here.
So if I grab it, grab this edge, pull
it over to him. It's going to be
round about here. So you can imagine if he's
walking down the road, we've got our
little cobblestones here that are going to be here, and we can even put in
a lamp or something, you know, along here,
street lamp, basically. Let's also do the
next side, as well. So if I bring this over here, and I'm going to
bring it in not quite as far as this one, so
a little bit shorter. He's going to walk
down that part there. And then we'll bring him round. So we'll bring him round over
to let's say over to here. And then what I want
to do with this base, first of all, work out for
this is going to come. So I would say
something like that. And then, again, with this one, I would say try and have it
the same distance as here. So try and have it around about the same
distance as there. Now what we want to do is
want to bevel off these. So we're going to come in. We're going to grab
this one and this one, and we're going to press
Control B and bevel them off. Simply something like this. Okay. And now we
can see that we've got plenty of room for
him to walk around. There's going to
be a walkway here, and we've got all
of this space here. He can still walk up
there, as you can see. And from this, then
what we can do now is we can actually
put our stone. So those stone blocks
that you've seen on the reference
going around here. And once we've got those in, then we can actually start, um texturing this terrain because before we
bring any trees, plants, things like benches, we really want to make sure that we've got our soil in here, for instance, because
the shader that we're going to use is like
an environment shader. It has three different
shaders within it, and we're going to use that
to actually texture this. So making it look
very, very nice. But now, though, I'm just
going to put an object mode, and then I'm going to
go to File and Save and we'll work on
that on the next one. Thanks, Life, W. Bye bye.
180. Enhancing Details and Finalizing Wall Structures: Welcome back everyone to the
Lender Building Master Class from concept to final render. And now what I think
we should do is we should work on this
bit around here. So we should build our pathway going around here onto
some kind of road. And I also think that
once we've done that, then we'll get the materials
in for this part here. So for this, you know, on this plane here, we'll get the materials in there, and
then once we've done that, we can probably come and make
the benches and lights and then finally get the grass in
something around like that. Alright, so let's come in. Let's go task it manager. At the moment, we've
got it on modular pack. Let's put it onto resource pack. And the one we want, we don't
want geometry nodes raw. We actually want joton nodes. And the one we're looking
for is this one here, which is the column. So if I go over the top, I should be able to
bring my column in. So let's just bring
it in like that. Spin it round, so R Y 90 and just line it up
to wherever we want it. Now, of course, you can't
join it up this column. And what I recommend
you do is just get it in place halfway down, so halfway in there, like so. So maybe even a bit further. So where people aren't basically going to trip over it, you know, it's some kind of curb, but not where people are
going to trip over. So something like this maybe, we can come back as well and, you know, change the blocks and things like that once we've
actually got it in place. So then it's up to you to say, Yeah, this is how I want it. Okay, so what I'm
going to do then is, I'll come over now and
I can pull it over. Now I recommend rather
than coming to the corner, and then press in E
because what you'll find is if I press E now and Y, as I get to that corner, you can see it gets kind
of small and dinky, and all of these end up
kind of curved in a way, we don't actually
want that, so I'm just going to press
Control's head. And rather than do that, I'm just going to
come to this curve, press E and X, pull it out, and now you'll
see that it's actually fine. And now let's pull it E
and Y and pull it down. And you'll see if I pull it to here and then press E and
Y and pull it to here, press tab, Control A, or transforms, we can see that we've got a little
bit of a problem in there, but it's nowhere
near as severe as what it was because of
the fact we did that. So now you can see all of
these are pretty straight. And it's this corner
it's a little bit bent, but, you know, it's a corner, so it has to bend in some way. We can also as well pull
this out a little bit, like so, and we can change
how that actually looks. And we can also as
well bring this out. So bring this one out, like so, or bring it in and put
it into place like so. And now you can see it
looks a little bit better. I do recommend this is the
easiest way to actually do, you know, this cobblestone. If I press seven then to go over the
top and press E and Y. And bring it all the
way down to here. The other way, of course, is you can actually split it
so I can split it from here. So instead of joining it
all together like that, I can press Shift and D
and then just bring it over and then press E and Y and I can fit
it in like this. So now I can bring
this one up to this, like so, and you wouldn't
notice any difference. And from there, then
you can bring it down. And then we need
to go down here. So if I press E and just pull it down rather
than on their axis, so like this, and
then press E again. But this time, we're
going to go on the X, so E and X and pull
it down to this one. And let's have a look at
what we're looking at here. You can see a little bit
starting to bend a little bit. And again, that's because
I need to bring in a note. So first of all, what I'm
going to do is instead of doing that, I'm
going to grab this, just make sure you can see
here I've not grabbed it, so I'm going to press
E, in other words. So if I press E, I'll bring it down to I'll pull it to here, I think, something like this. Then I'm going to press E again
and pull it down to here. Maybe to here, and
then E, like so, and then E and X, pull it to here, and
then E X, pull it round. And again, now we
can see if I press tab that we've not got all that bending that we had before, so this is the best
way of doing it. And now we'll go back
in. We'll press E and X, pull it to here, like so, and then E, pull it
round to here maybe, and then E, pull it all
the way up to here. And then. So basically, we've just broke it down into little sections,
and then E and Y, pull it to here, like so, and then E Y and keep
following it up. Then I can just pull
it up till I get near the top and then pull it into
place to where I want it. And then all I want to do now is just pull this one across just making sure that they
meet up, like so. Alright, so you can see now
this is what we've got. We can also see if we
put this on object mode. We can see we've got some
slight slight bending here. Most of the time
though, you can see, if I go over the top with seven, that it's actually
pretty straight. So as we start to come down and bend down here,
you can see this. If I just grab these two and press right
click and subdivide, now you can see I'm
starting to straighten up. I can grab these two, as well, press subdivide and start
to straighten that up. I can also move
this over, like so, and as I move it
over, as you can see, everything starts to
get straightened up. So anywhere where you've
got, kind of, you know, moving away from how you want it, so it's starting to bend. I'm just going to go
around and have a look. Then just bring in
a few more vertices and you should be
absolutely fine. Alright, so the best
thing about this, let's save out our work, and
then just come round to you. And the best thing about this,
I can grab it and actually still come in and
use my subdivisions. I can turn up the
subdivisions, for instance, and you'll see now
if I turn these up what actually happens to it. We start to actually
round the parts off. We can also come in as well
and bevel it a bit more, so we can come in,
bevel it down. Like so to make them
much more rounded, like so, which I think
look probably better. I'm going to see if I can actually turn down
the subdivisions. You can see what happens
if I turn them down. So everything can be done from, you know, this type over here. The other thing is,
as well, we've got noise and we've got
power on these. We can actually turn this
up and make them a lot more lumpy, like so. Right click Shades move. Maybe Shadesmv is on here,
Autosmooth There we go. A lot more lumpy, like
this, as you can see now. Double tap the A let's have a look at
what we've got here. You know what? I think
they're looking quite nice. Now. Maybe we've gone
a little bit too far. So we have got the noise scale and we've got the noise power. If I turn this down
up to, you know, really low, you'll see now
that they become less lumpy. If I turn it up a little bit, you can see we end up
with something like this. Let's turn the power down
to not point note three. A little bit. So now
they're a little bit lumpy. Let's turn up the noise a little bit more, and there you go. And I think they
look pretty nice. And we've also got now
the rotation, of course. So we've got rotation where we can actually rotate them round. I'm going to reset that zero. And then, of course,
we've got, you know, the randomization
and the length. So we can turn the
length up still so we can have more like
this, you can see. Well, rather than
being tiny and small, I think they're better
if they're like that. They look very different
from these ones over here. And then, of course, we've got the random width and length, so we can change
the width on these. So this is this way, I think. Let's have a look. Yes, it is. We can make them a
little bit wider. Now, at the moment,
as you can see, if I just go back, these now are looking a little bit
too big, I would say. The other thing to
check as well when you're doing this
is just press Z. Spinning around
because it definitely wouldn't probably be like this. You know, let's have a
look if we bring these in. So if I just grab all of these, going from here to here, I can still bring them in. So if I come in, press the
B button and grab them all, going from there, I
can still bring them in where I want them
if you can see that. And then if I want to, you know, bring all of these in as well. So even these two on here, I can still come in then press B and bring these in, like so. And there you go. And then I can also bring
these in if I want. So if I want to, you
know, have them come in. So my guys over there, as you can see,
he's walking past. The curb would be here
wouldn't be so far away. And on the back end, it's
probably going to be. Let's bring him in
a little bit again. And then 90 and put him
on the walkway like so. You can see he's got a
massive amount of room there, probably more than he needs. So let's come in,
double tap the A. Box select, and then
just bring them down a little bit, like so. And then let's do the
same thing on here. So if I double tap the
A, press the B born, box select, and let's just bring these in as well
to something like this. And I think this is much,
much more reasonable. Now, finally, of course, we've got all that in, but we need to alter
this, as well. Well, let's come in
and do that now. So I'm just going to do
it one step at a time. I'm going to put it halfway in, so always halfway in there. I'm going to come to this then and put this one halfway in. Now, if this is not
fitting in, of course, what we need to do is we need to move just these parts here. So again, halfway in. If you can't see in there,
you can see in there. Now, look, I can pull this
one out a little bit. Just to make it fit. And it's important those actually do fit. And the reason is because
we're going to put grass up at the sides
of here as well, let's pull it halfway in, like so, and then
let's make sure this final part is also
halfway in, like so. Let's also turn this off now. Let's come round, have
double tap the A. And there we go. Now, I'm
just looking at the height, looking at the height, see
if it's the right height. And you know what? I think
that is perfect now. This has done
perfectly, I think. And from here then,
we'll save out our work. And on the next lesson,
then what we'll do is we'll get started on the
actual material. And we're going to modeling as well just to make it
a little bit easier. You know what? Actually,
there is You know what? We're going to
leave you modeling. We'll save our work,
and on the next one, we'll come back to and
ashore exactly what I mean. Alright, everyone, so I hope you enjoyed that, and I'll
see you in the next one. Thanks a lot. Bye bye.
181. Creating a Realistic Cobblestone Floor with Subdivision and Remesh: We'll come back if
we want to blend the building master class
from concept to final render. And we need to really do
this flow then in two parts. So first of all, though, we
can see that it's very flat. We don't really want
something so flat. So let's press
Shiftg and in fact, you know what? We'll
just press Altag. And what we'll do is we'll
just put this in its own we'll call it pathway. So press M. I'll
call it pathway, drop it in there just so I can hide it out of
the way if needed. So path way like so,
and there we go. Now, let's grab the floor, shift H, hide everything
else out of the way. And at the moment, you will
see that if I come in, I press A, right plate,
subdivide, nothing happens. I don't really want that because I need to
subdivide this. And the reason I
need to subdivide it is because I'm trying
to put lumps in it. Now, if you've got
a plane like this, it has nothing no lumps to
actually do anything with. So I'll kind of show
you what I mean. The way to get around
that is you could come in and grab this one
and this one, press J, then press A because now
you've got actual quads, so you can see one, two, three, four, one, two, three, four. So you've got quads. If you're trying to subdivide something, it doesn't like end guns,
it will never work on them. If now though I go to subdivide, you'll see it
subdivides, but it ends up with a little bit of a mess. Now, rather than do that,
let's not even do this part. Let's just press Control A, reset all the transforms. Then what we'll do is
we'll come over to our modifier tab and go
down to where it says, generate and come
down to where is it, sorry, subdivision
surface. There we go. Now at the moment,
you can see, Oh, it's bent all out of fashion. We don't really
want that either, so let's set it on simple. Now, if I go into, let's see film wireframe,
if it'll show me. Yeah, I can't actually
see wireframe. Let's turn it up one. Yeah,
I can't see, unfortunately. Sometimes in wireframe, you are able to see the
actual subdivision, but Ah, never mind. Let's just turn these up to six, and then you'll get
the point anyway. So control A, turn them
up, and there we go. Now, you can see if
I press double tap the A that this is the
mesh that we've got. Now, it's actually
subdivided it, but it's subdivided in a way that when I come to do
anything with this, it's not going to
look right because these are very, very uneven. If I come to paint on this, you're going to end up with
very, very skewed paint. And the reason for
that is because all of these little
polygons, as you see, they're not uniform, some
of them are stretched out, some of them are way way
smaller than the others. So there is a great technique
actually to get over this. And what I'm going to
do is I'm gonna press E pull it down to
something like here. And then what I'm
going to do is give it a few more edge
loops in the side. So three in the side like so. And you should end up
with something like this. Let's press Control A now
and set all the origins. And what I want to do now is I want to come to add modifier, and I'm going to
generate a remesh. So generate a remesh,
and there you go. Nothing's happened. Now, can we see on here what's
actually happened? There's what's happened.
If I double tap the A, you can see that it's
all been generated in a way that has created
these even blocks for us. Now, if I turn this down or up, you will see that we can
create more of these or less of these if you
wanted to, like so. So now you can see it's not
quite as thick that mesh. Let's turn it up a
little bit more, something like that because
we don't want it too high, where we can't
actually work with it. So what do I mean
by that? I mean, too high is in there are not enough points on here to
actually do anything with. So we need to turn
it up slightly. Now, as you can see, now
we've turned that up. This has gone bent at this side. Now, I think that you can turn this down and actually
bring that a little bit, but not enough to do
anything with it. So what I'm going to do is just turn this
down a little bit, just so I've got those
sides back on, like so. And then what I'm
going to do is press controle A and apply that, and this is what you
should be left with. Now, why did we go to the
trouble of doing all that? That's shade Auto
smooth, as well. In fact, you know what? Shade auto smooth. There we do. Why did we go to the
trouble of doing all that? Because we want to
actually make this lumpy. So set origin to geometry. Let's come in now, and
what we'll do is we'll add in another modifier. This time, though,
we'll generate A, so on the form displace. We'll put in the display and you notice right away.
Nothing happens. That's because there's two
parts to the displays. One of them is how much
displace do you want on it? And the second
part is, what sort of displace do you want on it? So now with the displaced, let's come in, and
you know what? Before doing that,
I'll just come back a minute because I want to just
change something before. I want to actually before adding in my remesh, I'm
going to take it off. And then what I'm going
to do is come in deform, sorry, generate and
add in a remesh again. And we should end up with
something like this. I'm going to leave
it on that for now. Adding a modifier,
and we're going to generate a decimate. Now, at the moment, you will
see nothing really happens. So let's come in, though and
not a decimate displace. Definitely not a decimate. So deform, displace,
and there we go. So we can add both of these
on now at the same time, which is gonna make
life much, much easier. Let's put this on not 0.2, and let's put this on not 0.6. Now, these basically control how much displacement you have, the strength of displacement. And now we need to do
is we need to come in to this little button
here, which is the texture. In this case, it's going to be the texture that's going to control how our kind
of plane is displaced. It's not a plane anymore.
I'm calling it a plane because it's basically
our environment flawed. So let's come in and click New, and the one we want is
going to be clouds. And you can see already
now this is how it works. It's displaced it in this way. It's really, really
good trick rather than sculpting all of this
or something like that. Now I want to do then
it's a ones come down. And I want to change a
few of these just to make sure that we've got it
the way that I want. So if I first of all,
bring this down, you can see now it's much, much less or more
or bring them up, like so, and then we can
bring this one down. That doesn't really
do anything actually to what I'm going to
do is I'm going to bring this up,
something like here. And then I'm going to go
now back to my modifier, and I'm going to bring
the strength down. So you'll see if I put this
on zero, Ah, nothing happens. Let's put it up one, not 0.1. Let's surpress ultage and
bring back everything. And now you can see if
I go in a shade or too smooth, that is what
we're looking at. So you can see now that
we've got a load of lumpiness on here, that's
exactly what we want, because when we
come to paint this, it's going to
actually look much, much better than what
we've got at the moment. Now, don't worry
about these kind of bits hanging over or
anything like that. The main focus of this
lesson is just to make sure that you understand
how the displacement works. Vibra pata thee now
going to rendered view, should be able to
see quite a bit when it loads up quite a bit of displacement now,
as you can see. If you look over
these parts here, you'll also be able
to see, as well, that it's quite heavy on the um what's it called
on the render view. It's very heavy now. What I'm going to do is save out my work, and then on the next
one, we'll come back and we'll actually
get this painted. Now, of course, we don't
want to be painting it, you know, with all of this
on there, for instance. We want to actually get
rid of some of that, so I'm going to show
you how to do that, because at the moment,
we've got two. We've got the bottom under
here, and we've got the top, and that is causing us a
lot of work in the render, because obviously it's got
a lot of topology on here. We can see we're
over 1 million if I hide this out of the
way. Let's just hide that. It's like 500,000 polys. So now you can see it's a
bit easier to move around. It's still a lot
of stuff in here, but you can see it is
a little bit easier. Alright, everyone. I'll
see her on the next one. This one's a little bit
short, but on the next one, what we'll do is then we'll actually get all of
this cleaned up, and then we'll start getting our environment
texture on there. Thanks everyone. Bye bye.
182. Painting Soil Vertex Colors for Stylized Ground Effects: Welcome back everyone to
Lender Building Master class from concept to final render. This is where we left
the. Alright, so the main thing now
is press Shift H. Let's have a look at what
we've actually got here. Now, we want to come
over then to Y frame. So just make sure that your blocks are the right
size that you want them. If not, you can turn them up and make them a little bit bigger. Maybe that's going to
be a little bit easier, you know, on the
triangle polygon count. You can see if I come into it. This is what it is, but this is not a true version of this, of course, because we've
not applied these. So if a right click set, where is it convert to mesh. Convert all of those, and you will be left with
something like this. And now you can see
it's 200 polygons. So I think, you know what?
I'm going to go back. And instead of doing that, I'm going to bring this
down a little bit, like so, and then I'm going to go right click and
convert to mesh. And now you can see
it's 381,000 polygons. Still too much. So
I'm going to go the other way a little
bit more. Like this. I think I can get away
with something like this, and then going to right
click convert to mesh, and now we're on 181,000. Now, when I'm pressing
Tab on there, you will see that it's all blue. If I press Controlle, I can come down though and clear these shops
because basically, for some reason, it's
put shops on there. Now, let's come over
to object mode. And what I want to do now is I want to basically
get rid of the bottom. It's causing, you know, a lot of polygons on there, and
I don't need them. No way do I need
these on the bottom. So double tap the A, go into wireframe mode,
press the B button. And what we're going
to do is drag across, so press Control plus, and now we can see this is
what we've got all the way up to here, delete and faces. So delete all the
faces out of the way, put it on top jet mode, and this is what you're
going to be left with. Now, if I press tab now, we're at 86,000 polygons, which is reasonable, you know, for a plane with a
lot of displacement. Can bring this down, as well, but I'm not going to
do that quite yet. I'm going to do that a bit later on once I've actually done
the work that I need to. It's important that you do that first because then
you can get all of the textures in and things like this rather than decimate
it straightaway. But what we're going to
do now is bring in well, first of all, we're resetting
out all the transforms. Set origin to geometry. Not like that. Set
origin to geometry. And then what we're going
to do is press tab, A, and it might take a bit of time, but you're going to unwrap it. So click on Unwrap. I'll take you know, depend on what machine
you've got a minute, a few seconds, depends. Now we've done that,
everything is unwrapped. So now if I come over, I
can see at the moment. I'm going to save out
more work, as well, just in case it crashes because we really don't
want to have that. We can see at the moment
it's got ambient clusion on. Let's come over, first of
all, then to Asset Manager. Let's put it on rendered view just so we can see
what we're doing. You can put yours on
material view if you want. And then what I'm going to do is come over to the material, and we're going to
change that for this one here, which is floor. So this one here, I'm going
to change it to floor. Drop that on there,
and there we go. That is what you're going to end up with something like this. Now what we want
to do is you can see it doesn't look too
good at the moment, and the reason is because it's very kind of tiled
and things like this. What we want to do,
though, is we want to actually put it
onto vertex paint. So if I come in, just click down onto vertex paint,
and there you go. Now it will change over. Now, the best thing
about here is I can actually left click and draw
on this, as you can see. Drawing on it, you can
also bring it quite small. And draw on it, as you can see. Now, the thing is, if you've
got less polygons on here, if you've got less of these, you can see it keeps to this line. I will not be able
to draw like that. So it'll only be able to
draw big chunky pots. So that's why we brought
it down to here. But the good thing is
that now we've got this, we can come in, add in I'm going to save it
again so I don't lose it. We can come in, fit save. We can add in a decimate. So if I come in
generate a decimate, I can actually bring
this down now. You can see we've
got where is it? Whatever put a decimate on
here. Yeah, let's have a look. I need to come out of Vertex
mode. Let's just press Tab. Come to object
mode. There we go. Now we've got a decimate
on here, 43,000. Let's put this down to note 0.3. And you can see now we get a little tiny bit of difference even when
we bring this down. So if I put this back to 100, you can see as I bring this
down, they'll bring it down. Look. You see it slightly,
slightly change. And the further we go,
the worse it becomes, as you can see,
you can see there. So we can get it
down quite a bit lower without breaking
the mesh too much. Now I'm going to take that off because I'm not
going to be using that away so you know how
you can bring yours down. Now, at the moment, we've got this on here, like I've said. Now, I'll show you now
how this actual shader works because I
think that's very important. Now we've
got the shader on. We can actually go to modeling, not modeling, sorry, shading. Let that load up, and then
when that's loaded up, I can show you what this does. So we can see here this is the shade. It says, floor here. We've got one, two, three different shaders
all plugging in. And basically,
what this does is, if we zoom in here, we can see we've got one which are bricks. We've got one which
are let's have a look. Tiles, and then we've got one, which is this one
here, which is dirt. So we've got three
different textures all plugged into
one using the RGB, red, green, and blue. So that means if I come in, I should be able to go to vertex paint and
change the color. So at the moment, I'm on white. So if I change this to White,
you'll see we've got this. If we change this then to red. And when you're doing
red, by the way, it's always a good
idea to come to GB and then go on to it
and just turn the red up, turn the green down, turn the blue down,
then you get pure. But that's the red one.
Let's try the blue one. So we're going to go to blue. And again, we've got this
up, then all of these down. This is the blue one.
In fact, you know what? I think I'm on the wrong
one. Let's try that. Yeah, there we go. Alright,
it's that one on the left. So there we go. White
takes all of these off. And then we've got red. So let's put it on red.
So turn these down. Okay, that's that one.
Let's try blue then. Let's go with blue. Yeah, there we go. So
if I put blue on here, turn these down,
turn these down. Got blue, like so, which
is different again. And then finally, I
think we've got a green. Put it on green. Turn these
down. That's that one. So which other one
have we got we've got white, which is back to there. So we've got the three materials on there anyway, as you can see. So I thought I was wondering
if there was another one. So let's just try black. I know there isn't, one
of the others we have, it has a transparency in there, but for us, we haven't
actually got that. So if I put it on white now, I should be able to come in and actually just paint these over. Now, the next thing we want to do is bring back
our house on here. So we're going to bring back our house and what we're
going to do then. Again, don't worry because
these are the moment, you can see how they're, you know, seamless textures, so they end up
repeating like that. Don't worry about it because
if I now press oltge well, let's go into object mode first. Let's press Altage, bring back our houses and
everything like that. So everything's going
to load back up. Just give it a little bit of time because there's
a lot going on now. And there we go. And remember, I'm also in material mode. You can see now this is
the size of these tiles. Now, our little
guy is over here, so you have a good
reference point for the size of these tiles. Now, what I want to do
is I want my tiles, and I think my tiles are
either this or the other one. So what I'm going to do
is before finishing, I'm going to come
back to vertex mode, so vertex mode, and this
is what I always do. I'm going to come in
then and paint these, so I'm going to come let's put this on black and
paint in the soil. So this will be the
soil, as you can see. And then what I'm going to do is look at the size of that, and I'm also going to come in, and I'm going to put
it on was it red? I think it was red. Let's just
try red. No, it's not red. Let's try blue. Oh, blue, all these back. There we go. And what I'm
going to do is I'm going to bring this up now
and paint on here. Like so. Now, we can
see the size of these. So these are really chunky. The tiles are really chunky. You know, they're
pretty big, these tiles that would have been
much smaller back in the day and also this sauce
probably chunky, as well. So what I'm going
to do is I'm going to come in first of
all, to this one. We can see we've
got a scale here. If I put this on one, you will see that these
become even larger. Let's put this on 12. Like so, and now we're
getting somewhere. These look about the right size. Now to grab all three, you
just left click and drag down, and then you can do them
all at the same time. Now, let's come to
these tiles here then, which I think are
these ones here. So we'll go over to our
transform where it says mapping. At the moment we've got on ten, let's put them on
12, and there we go. Now, they've become much, much smaller, like so. And now let's come
over to our soil. So our soil one is over here, and we'll also put this
on something like ten. Like so, and did I do that. So have a look. And yes, they're all on ten now, and now they're looking
much, much better. Now on the next lesson,
then what we're going to do is we're going to get our
soil in these parts here. I'm going to show you actually
how to actually make this. You know, even though
it looks so uniform, I'm going to show you exactly how to make it look
all different. Now, for now, though, we've
got everything we need, so we can actually come on
over now to Object mode. So I'm coming over
to object mode. And then what I can do is
then come over to modeling. And from here then
I can put it onto material, and here is our view. And when we come back, we'll actually start
working on this part. Now, before we do
that, one other thing I want to do is at the moment, as you can see, we've
got no material on this. Now, am I happy with these look? I think I'm happy
with these look. It's up to you whether
you want to convert these now and make it easier to view what
you're actually doing, convert it, put on the material. We're gonna do that once we
finish this part, anyway. I'm just telling you it might be something that
you want to do now. Alright, everyone, so I
hope you enjoyed that, on the next one when
we come back then, we'll start getting
this all painted up. Thanks, Live, everyone. Bye bye.
183. Enhancing Ground Detail with Blended Vertex Painting: Welcome phone sled the
building master class from concept to final render. Now, let's come in,
and first of all, what I want to do
is get rid of this because it looks a
little bit of a mess. So I'm going to go
to Vertex mode so let me just click on here
and then go to Vertex paint. And then what I'm going
to do is come in. I think it's the white. Let's
just see. Is it the white? Let's turn the
strength upon this? Yes, it's the white. So all I'm going to do is just get
rid of all of this. And then what I'm going
to do is now come to, I think it's the blue. Let's try. Make sure
your strengths on 100. It's not that one, so
let's try the red. So we'll go all the
way down to the red, and then we go, that's the soil. Now, what I want to do then is I want soil going all
the way in here. So all the way in
here, as you can see, because this is where all
the plants, of course, is going to go, so I want soil all the
way in these parts. Yours going round. And
don't worry if it comes a little bit out on the side. Don't worry about that at all. That's absolutely fine. And then what we'll do is we'll
go to the other bit. So seven again, we're
going to paint in. And I know it looks really
rough at the moment, but don't worry, guys.
It's gonna look good. They all under here.
Like so. Then in here. And then what we'll do
is come to this part. We'll bring it out, like so, like so, like so. And now I'm going
to do is just make sure I've got all
the soil in there. I've got all the soil
in here, all in here, just making sure I've
got all the corners and things like this. Okay,
so now we've got that. Let's actually put it on too. I think it's blue
again. So we'll just go on blue.
Yes, that's the one. Now what I'm going to
do is I'm just going to turn down the
strength quite low, and then just come
in and add in. Now, don't worry
if it's you know, a little bit too much
or anything like that, because what you're going to do is you're going to come to blur, and then we're going
to just blur this out, giving it a little bit of
variation, as you can see. Now, a lot of this
is going to be covered with plants
and things like this, but you can see now
I've got a little bit of variation where the soil is. And again, if I
jaws drag it over, you'll see now breaks it up that little bit as I'm dragging it. I'm dragging it from the soil, by the way, as you can see, or dragging it from the
soil and just breaking it up a little bit like
so. And there we go. So now we've got this
side and this side. Now it's barely notable, but you can see a little
bit of difference in there. Now, this is what we want
to do on this actual pot. So on this actual pot on here. So what I tend to do now is I'll come in and not with that. I'll come in with paint and
just paint in some of these. Now, that might be a
little bit too high. I'll come in, first
of all, with my soil, and you can see my soil strength is turned all the way down. But what I'm going to do
is just turn down this, and then I'm going to turn
it up a little bit, like so, and then I should be
able to now come in and draw in just a few
lines following, like, the crevices of here
like this, like this. You don't have to go, you
know, over everything. It's not about going
over everything, so don't worry, you're
not going to be, you know, doing
anything like that. But what I want to do is
definitely on the corners here, where the dust and
everything gets up, we definitely want more of it. So on all these corners
coming out, as you can see, the other thing is when
we're doing this, you know, we're thinking ahead,
and we do have some plants that we're actually going to
put in here as well. So if I bring this down,
going all the way around. And the idea of this is
just to break it up. So we want to break up this surface so it's
not as uniform, and that's what we're
trying to do without, you know, destroying
the surface. I'm not even going to Don't
worry if you go over, you know, this
part a little bit. So we'll try and do
this part first, so I'm just going to come in and bring in this like
so, and there we go. And then we'll come onto
this going down these lines. Yours to here, and I'll do
all of this part first, and I'll come around
then especially around the steps
look around there. Then I'll come in and
do this part on here. And also, next of all. So we'll do all this
coming down to this part, so I'm going to go up here. Like so, and like
so and like so. Now, the next part
is, obviously, we need a lot of dirt
around these parts as well, because this, again, is the curb, we're
going to need a fair amount of dirt coming towards the curb
more than in the middle. Like so, like, so just keep
working your way around. And up to here, and we should by the time
we get around here, nearly be not halfway, but, you know, it doesn't take too long if you quick with it. Okay, so the next part then, let's come in and add in. I think it's a blue.
Let's put it on 100 just to make sure. Yes,
that's the one I want. So I'm going to
turn this down now, and I'm going to just bring
in a few bits of this. And this is just mainly
to break up that surface. Like so. I mean, Jaws pressing the
mouse clicking away. Okay? Let's come into
this part as well. Break up that surface a
little bit. All right. And once we get back round here, we should then be able to use our blur
tool or the other tools. So let's talk about these tools. So we've got the blur here,
which is, if I zoom out, we've got a strength
on this, which is going to blur it
all out, like so. Which I like actually using. We've also, though,
got this one here, which is our smear tool, so we can smear
this out instead. But I think that takes
a little bit too long, so I actually like using the
blur tool a little bit more. And we've also got the average. So this one here if you ever over it, it's
called the average. I haven't used this one really, but the average tool basically just averages everything out. And that's the one that
I don't like to use. I like to use the
blur tool, actually, so I'll come in and
blur it out. Not that. That's the strin tool. We
definitely don't want that. So we want the blur
tool, this one here. So let's just blur these out. You'll see, even though
we're bwing it out, we've actually kept some of the parts that
we actually want, so we're going to blow this
part out here like this. And once I've done
this, you will see compared to the other
one, the difference in them. So we're just bluring
it out, like so. And if there's a
lot of, you know, like dirt like this, just
clean it up a little bit more. We do want dirt patches, but maybe not so dark. This is a lot of
walkway, so around here. I don't mind a fair
amount of this, let's just come in, blur
it out a little bit more. Like so, like so, like so, and like so. So now you can see this is
the top, this is the bottom. You can see what a difference
that actually makes. Now, if we go onto
Rendered View, so again, say that work, go on to Rendered View,
and this is what you'll be left with something like
this now as you can see. Now on RenderView, you can
see a little bit more. So sometimes then I'll
put it on Render View and just come in and blur that out a little bit more, like so. And then we go there we go. I think that's
looking pretty good. So far, let's blur out these a little bit.
Will it load up. Anything that's a
little bit too high, I'm just blurring
it out a little bit because I don't
want it in there. And there you go, now you
can see just how uniform that is compared to
how uniform this is, and this one, of course, is looking really nice
coming down here. Now what we need to do
then? Because we need to do that on the rest of
the rest of this. So again, I'll come in, and I'll first of
all, grab my soil. I'm just going to put it
on material mode because it's going to make it
much much easier to see. And what I'll do is then
come back to vertex paint, put it onto the brush, put it up to 100 just so I can see which one this is.
This is the wrong one. So I'm going to leave
that on there, and then going to come to the white. Is this the soil? No, it's not. So let's come to the
red, and there we go. Now's the soil, and now we can actually turn
that down to, like, 0.150 and then
bring in the soil, especially on these parts here, this is definitely where
we're going to need. I want to turn it
up a little bit. I definitely coming down and
doing this part down here. In those little grooves there, then I'll turn it around, and
I'll come into these parts, definitely under
here, going around here this is where the dirt
would accumulate more. They will have had,
you know, sweepers, obviously, but they
won't have been like the road sweepers of today. So that's what I'm
banking on at least. I'm just going to
do a bit of a time. So I'll come round to this
bit. I'll get up to this part. And I find if I do that, it enables me then to just, you know, not get
so bored with it. So something like this. And then we'll go back to the blue, which I think is let's have a
look. Yeah, that's the one. And then what I'll do
is just a tiny bit. I'll turn it down even more
this one. So one I wait. Just to break it up,
that a little bit. Like so. And then
finally the blur. Let's pull it out a little bit. Let's just blur it all off. Like so. And there we go. Now we can see definite
difference between here and here. All right, so on
the next one then, I'm just going to blur off
this a little bit more. Just get it a little bit
more shiny in those parts, so on the next one then
and on here as well. And what we'll do is
then this final bit. So this final bit is going
round to here as you can see, so you can see coming all the way around to here from here. And then once we've
done that, we've basically pretty
much done our floor. And you can also see, as well
that if I come up to it, you can see it's
also lumpy as well. And the reason is, of
course, that we've actually got lumpiness on here. You can see this. It's very
uneven, which also helps. So, there we go. That
is how we do our floor. Once you've done the floor, then I think we'll convert this. Then we'll bring in the
grass geometry node, and we'll put some
grass in there. I'll show you how to do that. And then once we've done that, run to benches and
lights. You know what? I think what we'll do after
we've done this is we'll convert this and then do
the benches and lights. And from there, then
we can actually do the little grass pot and
the actually I'm wrong. Once we've done this, we will actually bring
in the hedge. We'll actually do these parts. I think they'll be very, very interesting to
show you that part. So I'll bring in the hedge
on this part because then you'll really start
seeing it come to life, and then we might
even do the trees, and then we'll do the
benches and lines. So plenty to go yet, but
we are getting there. Alright, everyone.
Sophie enjoyed that, and I'll see you on the next
one. Thanks a lot. Bye bye.
184. Refining Soil Textures and Preparing for Rendering in Blender: Welcome back if we
want to lend the building master
class form concept, final render, and this
is where we left off. Okay, so we've got
this part to do now. So what I'm going to do
is I'm going to come, first of all, put
this on to strength. Let's see what this one is.
Yeah, it's this one here. So let's turn that
all the way down. Something like 0.150. Let's just put a few of these. Maybe that's even too high
and a little bit more. Let's make our circle
a little bit smaller. Like so. Let's just come in and we'll put this on a little bit first just to break
up these parts. Then we'll bring the soil
in once we've done that. So just breaking up these, as you can see, all
the way up to here. Now with our soil,
let's bring it in, and the soil will be
on the red, I think. Let's turn that up and see. Yes, that's our soil, so
then we can put it down to perhaps 0.7 or something. Bring it into there. And
we'll do the edges first, so I'm just going to come
down and do the edges. There's in this part here, as you can see, should have
quite a lot of dirt in there. This bit is going to be
cleaned quite regularly. The front of the house is
definitely going to be cleaned. These bite bits not
probably so much, so I'm still thinking of
that when I'm doing this. Like, so like so, and then going up
into these bits. Like so. And there we go. Now, let's bring
in the other one. So it was on the blue, was it? Burn it up. We'll see. Yeah, that's that one.
So I think pretty much we need probably a little bit more soil
actually over here, so let's put it
onto the red again. Just see if that's
the soil. Yes, it is. Bring it down a little bit
of soil on these bits here. And then we'll
blur all this off. So coming down here, like so, and then we'll blow it off,
so we'll come to this. We'll make our marker
a little bit bigger, then just start blurring
this out a little bit. Like so, and like so. All right. Now, let's come
in then. And then what we'll do is we'll
come out of vertex mode. I go to object mode, and this is now what
we've actually got. This should be in the floor, so we should have
one that says flow. So if I press, I should be able to
see this is in floor, so let me just have a look
at where this is on here. So if I press dot over here, we can see ground, so not floor but ground.
We've got a main gate. I'm not sure why
that's not in one. I'll put that in the fence. So if I come in now
and hide my fence, yes, all of that gets hidden, so that makes it very easy. Now the next thing I
want to do then is, I want to actually play
you a short video about rendering EV and cycles because we are going to be moving
on to that fairly soon. And from there then, you should be able to get a nice
render of you scene. I'll show you how to
set everything up. I'll show you how to render it, and then from there, then you'll be able to
actually come back. And when we come to render it, you should already know
all of that stuff. Alright, everyone, so I hope you enjoyed that and I'll
see you on the next one. Thanks a lot. Bye bye. Welcome everyone to the IV and
cycles part of the course, and this is a full guide on both the EV and the
cycles renderer. So the first one we're going to approach is the actual EV, and you can see the moment I have a scene setup like this, and I'll be using this to go
through the various options, and after which you can
give it a try yourself. So the first thing at
the moment is we're on actual shading object mode, and we want to be
on the EV renderer, so I'm going to click that on. Now, you will notice
at the moment I have a sun and I have a heri over here as well for
the other demonstration. So first of all, let's come
to this actual object here. And what I want to do is
I want to, first of all, go over to the right hand side where the render options are, and you'll see this
is actually on EV. Now, the first thing I want to discuss is not the sampling. We'll come back to
that in a minute. It's actually the
ambient occlusion. If we turn our
ambient occlusion on, you will see that able then
to actually make much, much better shadows
within our actual scene. So, for instance,
this actual cube here, if I turn it off, you'll see that all of
those shadows disappear, and if I turn it on,
enhances the shadows. We're also able to
go in, as well, and we're able to
come over to where the distance is and
turn that down to zero, and you'll see that makes
them all disappear. And as we turn it
up, we end up with more and more actual shadows on there up to a certain
point, as you can see. But you can see now turn
it off and on makes a real difference to how your scene's actually
going to look. Basically what I'm discussing
here is the setup of EV, and then we're
actually going to go over and actually
render that out. Now, let's move on to the next part of
this demonstration. And what we're going
to talk about now is the actual samples. So if I come up and
open this menu up, you can see at the
moment that we have render on 64 samples
and the viewport on 16. Now, not only does this give you a better
quality of image, but also the main reason is
that we can actually get a lot more definition on
these actual shadows. You can see if I zoom in here, these shadows are
kind of pixelated but if I come in and let's say, put this to 300, you will see now it makes a real difference in
how the shadows look. It makes them much more
realistic and much better when you actually
come to render this. Now we're actually
going to discuss the other powerful
thing with EV, which is screen
space reflections. So at the moment, if I turn that on and I come to my
ground plane here, let's actually mess around
with the actual roughness. If I turn this down, you can see we end up with
loads of reflection on here. If I come then over and turn off screen
space reflections, you can see that all
of those reflections don't actually reflect on
this ground plane anymore. So this is why this
is so powerful, especially if you're
doing things like really, really shiny objects or metal, you really want on screen
space reflections. Let's just go back to my
ground plane now and just turn it back down on the
actual roughness. So let's turn it up a
little bit, like so, and then we've got
some reflections, and let's move over
to the next part. So we can see at the
moment we have this light, but it doesn't look very
good at the moment. We can see it has got a bluish
tinge reflection to it. But if we come back
over to Eve now, and what we can do is we
can actually turn on bloom, and now you can see that
we've got some really, really nice light and also
reflections enhanced, as well. We can also open up the bloom, and the best thing about the
bloom is we can actually control how much this is
going to actually bloom, how much fogginess it's
going to have to it. You can see the range that we
can put on there, as well, and you can also see
that we can turn up this intensity all from
within the actual EV option. Now there are a load
of options within EV, and to go through all of them honestly would be
doing another course. But what I want to show you is just one more thing within EV, which is where we have shadows. If we open this up,
we will see that these shadows actually come with their own resolution map. And at the moment,
they're on 512. The higher I turn this the better the actual
shadows are going to be. So if I put both
of these on 4,096, you will see now that when I actually come to
render this out, these shadows are going
to look even better. They even look better
in the actual view pot. So now all I've done, I've brought an actual
camera in place, and I just want to show
you one more thing before we hit that render but. If we come back to our monkey
and we click on our light. So let's click on
our light here. You can also come over
to the right hand side, and you'll have something
that says shadows. Just open that up and
click on Contact Shadows. And you will see now
just how much nicer, especially around these eyelids, how that looks, so you can see the difference and
how that looks. So all these things together, including the ambient
occlusion, the bloom, and the screen
space reflections, can make for a really,
really nice render. Now, it's important
to remember that EV is designed as a
real time renderer. So something like in a game
like real engine or unity, that is where a real time
renderer will be used. Whereas cycle, on
the other hand, is not actually meant for that. It's meant for getting really, really high quality
images or animations. It's not meant for
actual real time. So now what we can do
is we can actually go over and hit
that render button. So it's just render image with EV it's not like cycles where
it builds up and up and up, and then actually actually
get your final render. It actually is just there. So 1 minute, it's not.
The next minute it is. Now, depending on how many
samples you actually ask EV to actually render out is how long it's actually
going to take. So you can see at
the moment, this has took around 3 seconds, and this is another
reason why you might want to use EV
because it's very, very fast at
rendering things out. So let's close this down now, and let's move on over to
our cycles render engine. The first thing to note, when I actually turn this
over to cycles, it's going to be
much higher demand on your actual system, especially when we're
in the viewport view. You'll also notice, as well, that it's pretty
grainy at the moment, and this is because
we just need to turn on the viewport denoising, although this requires a lot of performance
from your machine. But you can see
straight off the bat that this is looking really,
really nice already. The only thing is,
whenever we turn around, because it's not a
real time renderer, it's going to take a little
bit of work to get to a certain level of samples
that you might be happy with. Now, the other thing
is at the moment, you can see the cycles, we also have a
device, and this is basically telling Blender
what device to use. So it can be your
CPU or your GPU. I do recommend that you use
your GPU rather than CPU if available because your GPU is much better at
handling rendering. So now, before we go into any of the options in the
cycles render engine, what we first need to do
is come over to edit, go down to preferences, and what we first need to do is go up to where
it says system, and from there, we can actually change the options for cycles. So what I'm going to do
is I'm going to come over to where it says Optics x, might not be able to
actually click this on. It might be down to QDa. This Optics X is the
CyclesXRnder engine, so we do have a new version of cycles in Blender
four onwards, and it's called CyclesX as well as come in with a host
of different features, which will increase the
quality of your renders. It's also much, much faster
than the old cycles. Now if these options are
actually great out for you, that means that you
just haven't got a graphics card that
actually supports it. I do know that QDa, I think, is anything from Nvidia's
second series and the Optic sex is anything from the high end of
the second series, and certainly on the
third series of Nvidia. I'm not sure about the
other graphics cards. So you just have to pick whichever one you can,
the highest one you can. And unfortunately, if
you can't pick any, then you'll just have to
have the basic cycle. All you need to do to
enable that is, again, just put it on Optics sex
and take both of these on. I like to take both
of these on just in case blender can use both of them together to
speed up performance. So once you've got
those ticked on, or you've got your
cubia ticked on, then what you can do
is close that down, and then you can come over
to say CPU and put it onto GPU compute and you'll see just how much faster
that actually is. If I now move around, you can see how fast this
actually speeds up, and that is because
we're now using our GPU. Alright, so now, let's go
through a few of the options. So you will see
under light paths. We've got a lot of options here. Now, all of these options will change the way that you're
seen actually looks like. We won't go through these, but these are where all of the light options will actually be from the transparency to the glossiness of
the actual scene. So you're free to mess
around with these. Just be aware. The
higher you put these, the more performance is
actually going to take. The other thing you
need to know is that sometimes when we're dealing with certain
shaders within blender, they won't be able to
be rendered out in EV, and it's normally down
to the ray tracing power of cycles that will actually be able
to render them out. A lot of the times
when we're dealing with something that has
a transparency in it, for instance, or something
that has displacement, and it's built through
the actual shader. So it's a material built
through the shader, you will have to actually
use blender cycle. What we're going to do
is I'm going to come down and just go through the performance options because performance on actual
cycles is very important. Now, depending on if
you're using your CPU or your GPU is how important it is to get
the right tile size. The higher the tile size, it is, the better it is
for your graphics card. The lower the tile size, the better it is for your CPU
or your computer processor. So, whichever one you're
using to render out, whether it be your CPU or GPU, just take these into account. So again, CPU, lower tile size, so something like 64. And GPU, higher tile size,
something like 2048. The next thing we
want to look at is this use spatial splits, and you can see what it says, longer build times
faster render. So just make sure that you
tick this on because what we're also going to tick
on is persistent data. Once we've ticked these two on, what it basically means is, it's going to take longer
to actually build out the scene than it
is to render it. If you don't tick this
on, it's going to take a certain
length for each one. Finally, the next thing
we want to discuss now, we've gone through that is
the actual color management, and you will have this
within EV as well. I've just saved two cycles. Now, if you're
using Blender four, you will have a view
transform that says AGx and this is the new
actual view transform. This one is supposed to
be the most realistic. If you're using older
versions of Blender, we'll have something
called filmic, but I recommend with
a new one using AGX. Now, you've also got a look which you can actually change, which is really
handy, especially if you're doing stylized scenes. And you can change this look to something like very
high contrast, or you can change it
anything in between. So you can have base contrast or let's actually let's
put it back on AGX. Let's put it on something
like a medium W's medium. So medium high contrast. And you can see now this scene is looking really, really nice. Now, you can also see
a few other problems with blender cycles. One of them being, we don't actually have any
ambient occlusion. We don't actually
have any bloom. So though everything looks
better in blender cycles, not only are you going to lose all that
straight off the bat, but also, you have to then come in and set it up
in the compositor. So this is why you really need to think when you're
rendering out a scene, whether you want to render
it out in EV or cycles, EV is much, much faster and everything is there
straight off the get go. Cycles is much, much slower, needs a lot more performance
from your machine. And on the back end, we
also have to go into the compositor to get a
really, really nice image. Before we finish and
actually render this out, it's also very important with blender cycles how many samples you're actually
going to work with. So you can see here
where it says render, not the viewpoint on
where the render one is. You want to set this
pretty low to start with. It is set as default of 4,096. I recommend setting this at 200. Lapping is then, it's got a
noise threshold on there. I'll hit near that 200, and then the noise
threshold will kick in and basically denoise
your actual image. In other words, get rid of all those fireflies
and things like that. Now, if we come up and
what we're going to do before hitting the render bun, I also recommend if you're
working in cycles that you put this onto wireframe because then it's going to
save on performance, and it's not going to be rendering it out
in the viewport, as well as trying to render
it in the actual render. So let's put this on wireframe. What we're going to
do then is come over to render, Render image. And here we go. Now,
you can see it's very, very different from
how actual IV works. You can see it builds up,
builds up, builds up. You can see on here
the samples going up, and then you'll see
it actually finishes, and we can see it
took 12 seconds, which is around six times
longer than what IV took, but you can see it's a really,
really beautiful image. There's just no
ambient occlusion or contact shadows and
things like that on here. So that's the
difference, everyone. Now, the final thing
before I finish is, I want to show you just one
more thing that's important that you can do with both
EV or blender cycles. And if I come to my camera, and all I want to do is
just hit camera to view, and I just want to put my actual camera in this position just so I can
see the background here. And then all I'm going
to do is I'm just going to come down
to where it says, film, open that up, and you will see one that you've got here that says transparent this is how you create an image with a
transparent background. If I know go to
render out my image, you can see now it comes with
a transparent background. You can also see because we've got that persistent data on now, it's a little bit faster
than what it was before, and it's just under 8 seconds
instead of 12.5 seconds. Alright, everyone, so I
hope you enjoyed that. I hope you learned
a lot from it. We will go into a
lot more detail about this as we're working
through the course, whether we're working in
EV or Blender cycles, and we will be discussing, as well, of course, the
compositor in Blender cycles. Thanks everyone. Cheers.
185. Introduction to Eevee Rendering and Ambient Occlusion Settings: Welcome, everyone to blend the Building Mass class from
concept to final render. And I hope you enjoyed that
introduction to rendering cycles and EV and just how
powerful this is going to be. Now, if you want to go
away and have a play around and render your
things out, that's fine. But when we come
to render as well, I'm actually going to show
you one of the best things, and that is compositing,
which will really, really bring out, you know, what you've actually
created here. So, if you think
it looks good now, and you're actually
trying to render it, wait until we actually come in and start using
the compositor. Now what we want
to do is then we want to bring in
some grass on here. So what we want to
do, I'm just going to put an object
mode just for now. I'm going to go
to Asset Manager, just make sure that's
also an object mode. And what we're going to do
is come to our jug notes. And this is the one
that we actually want. So if I go over the top, I'm just going to drag this one in. So this is our grass. And you'll notice when
I bring all of this in all of these
come in like soap. Now I'm going to leave
those there just for now. And what I'm going to do is then I want this grass
to be, you know, over here on this actual
this material here. So at the moment, you can't
see any grass on here. But if I come on over and turn this box on, here is my grass. Now, let's actually just press dot so we can zoom to that. Let's put on our render view, and you're going to see exactly what this
grass looks like. So if I double tap the now
you can see this is what? It's full of ferns,
little piece of grass, and all the stuff that's
going to fill out this part for us before
putting on our hedge. So what I'm now going to do is I basically want to copy this modifier onto this
because at the moment, this hasn't got
any modifiers on. So if I grab this one,
grab this one and press this button here, so
make sure it's turned off, first of all, so I'm going to
grab this one and this one, I'm going to press Control L, and we're going to
copy modifiers. So copy modifiers, and you'll
see that we've got this on, and the reason is because it
has got a displacement on. So you know what? Before
doing going to come to this. I'm going to get rid
of my displacement. I don't need that on. Get rid of smooth, and now
I'm going to copy this. So copy this, copy this, Control L, and copy modifiers. Now what I can do is I can actually delete this
out of the way. It won't delete these
out of the way. If I press delete, look,
everything's still there. If I come back to
this, you can see we've got our grass
modifier on there. Now, the thing is
the grass modifier works on this part here. So let me just come down and
show you what part this is. So you can see here
where it says, weight paint. This
is how it works. So you can see weight
paint on all of these, making sure that, you know, the weight is painted
wherever we want these parts. So it's really, really
handy to have this part. Now what I can do is now, I can actually come
to this part here, so I'll come over and
put it on weight paint. I'm going to put it on
Object mode just for now. Press seven to go over the top, and going to go then
to weight paint. What I want to do now is coming over to this right hand side, select a new one,
and we'll call this we'll call it just grass
for now, grass wheat. Like so. Oops. Let's call
it wheat. There we go. Now, when I come in
now and draw on it, you will see now we've got
actual weight paint on here. So you can see we've got
weight paint on here. If I click the plus button, you can see weight
paint disappears. If you click on this one, though, the weight
paint is there. Now, what does that
enable us to do? So grass weight,
we've got this on. You can see wherever it's red, that is the most dense
part of the grass. And as it gets further
out to the light blue, that is the least dense part of the actual grass of our grass. So the weight is red,
you know, bright red. Is lots and lots
of weight there, and going towards really, really cold blue is less
and less weight there. Really important when
we're using this, because on our modifier, what we want to do now
is put the weight paint. You can see here we've
got a little bon here. Let's put this on too. Click on it. Let's hide that
out of the way. 1 second. Grasslands, it
shouldn't be that. It should be grass. Let me see how I
actually turn this over. Yeah, so it's my fault.
If I come over to the modifier and what I'm going to do is
actually turn it on, and then I can come over to
where it says grassland. Once I click this off, you will see grass
appears everywhere. But if I then come to this
where it says wait painter, click this arrow or down here and you can see grass
weight, and there we go now. It's actually
putting it on there. Now I want to do is want to do the same with all of these. Click the down arrow, grass
wait, click the down arrow, grass wait like so, click the down arrow
and grass wet like so. And that then you can
see fills out perfectly. Because what it does
is it enables all of these little side parts to
come to the edge of here. If I then turn off my weight painting and
go to object mode, you will see we end up
with something like this. If I go then to rendered view and load that up, there you go. There is your actual grass. You've got a few rocks in there. I want to save out my
work at this point. So basically, if
you turn this off, so if I come up and just turn this off
with this bone here, you will see you just
get grass everywhere. If you turn it on, then it
goes back to the grass weight. This is the one then
that you've put inside. So this is grass weight. Now, with this, you can actually create as many
weights as you want, and you can add in different grasses wherever you want to. Now, the best thing
about this is, if I'm going to try this like this. I
wouldn't recommend this. I would say do it in object mode rather than in rendered mode, but I'm going to give her a try. So if I come to my floor
and I come to wet paint. So come over to wet paint now.
You will see we have this. Now, there is a way of turning that off, which
is this button here, while still being able to actually paint on
your actual scene. And again, I don't
recommend doing this in rendered view
because it's quite heavy. I'm going to press N
to get rid of this. So N just to move
out of the way. But I'm going to then come in and I can paint
on this really, really nicely, as you can see. And you'll see it's
very randomized, and it's really, really a joy to actually paint on like that. Now, you can also put it
on material mode as well. And you will see now it's a little bit easier
to paint on this. What I'm going to do is I'm
going to come in and paint all the way around here
down to these parts here. And once I've done that then
we'll have a look at it, and then we can actually get in our hedges down
this bit, as well. You don't want to
paint on every bit. You do want some patches where there's not
a lot on there, of course, because
that's being realistic. You know, in the
corners and things, I'd probably say put more
in, but something like this, like in the corners here, going round down here, you know, where they don't
get to, basically, where they're not actually cutting it or
anything like that. But you can see, at the
moment, just down nice, this is actually looking
and how easy it is to do and why why it's worth using this geometry node because it just makes life
so much easier with things like this
and wait till I show you the hedges and the actual trees. So we're going to
get this in here, in here, in here, like so. All right. Let's go
off of weight pain, put it on object
mode. There we go. And the good thing
is, as well as we can actually turn it
off or turn it on, which makes it even easier. Now, again, when you're
finished, save out your work. Let's put in our rendered view. And there you go. That
is all that grass there. And the good thing is, as
well, and I recommend this. I'm not going to be
doing much of this, but I do recommend coming in and playing around with this. For instance, we've
set this up now, so this is pretty
much perfect for you. You can also come in, I
think you can come in, at least. Let's have a look. If I can grab all of this,
let me just make sure. Let's press Shift
H. Yes, we can. Oh, it's because I've
turned this off. Let's press Control A, all transforms that
origins geometry. Okay, so if you want
to then come in, double tap the A and
play around with these so you can change
the scale on these plants, for instance, you can change
the scale randomness. You can definitely
change the density. Now, this is the main thing that I actually
want to talk about. This density, you've got
a view port density, which you can turn
to let's say one, and you've also got
a render density. This is really
great if you've got a computer that is not going to, you know, um, be able to
render things out too easily. So if it's, you know,
really struggling, then you can actually turn
all of these densities down. So density, density, turn them all down to
one or something, then stop from there and
see how it performs. Because at the
moment, if I press ATs, bring back everything. You can see on my computer,
it's not that bad. When I go to render mode, you can see it
takes a little bit of time, but it ain't that bad. But the thing is, once
we start to really ramp up the amount of stuff we've
gone here with the trees, with the hedges,
things like this, it is going to, you know, take a lot more power
to power all of that. Now, okay, we've done that bit. That is looking really, really
nice. I'm happy with that. And again, if you want
to come in, as well, the main thing is if I
actually want to come in, go back to weight paint, so go to wet paint. I can also come in and hold control and actually
take away what I want. So I can hold control or click Control and
click to take it away. Click is just to put it on, so you can see I've got
a few little gaps here, so you can see if I want to
the gap here, for instance, when I bring my tree
in, very easy to actually bring that
away. Alright, everyone. So that's really good. Now
let's go to Object mode. Again, let's double tap the A. Let's save out our work.
And on the next one then, we're actually going to be
bringing in our hedges. Okay, everyone, thanks a lot. Bye bye.
186. Fine Tuning Eevee Settings for Realistic Stylized Shadows: Whoa, come back if we
blend the building, master class from
concept to final render. Alright, we've brought this in. Now let's go to object mode. Let's make sure your
works saved out. Don't do anything without
saving out your work. And next one we're
bringing in is hedges. Alright, so let's drop
our hedge right in there. Now you can see it's not really gone in as we wanted it to. I'm going to drop it
in right around here. Now, the next thing I
want to do, as well, before going any further
is all of these, I don't want in my viewport. So what I need to
do is, I need to put them in their own category. But the problem is, when you're putting them
in their own category, you can see it says
Midshrubs here. We have to be very
careful that all of these go into their own. So in other words, what
I'm saying is we can't just grab them and press, you know, H or to put them
in their own category. What I want to do
is I'm going to put it in some one
that's called leaves. So you can see I've got pathway. What is this pathway?
Let's have a look. Let me just have a
look what the pathway is. Yeah, it's that one there. So that's okay. We've got our fence, which we
know that one is. So let's just put
all of these up. And what I'm going
to do instead, is I'll create a new one. So new collection, and we'll
call it. I think it's gone. Where is this new
collection. There it is. It's gone in there
for some reason. Let's drag and drop it up there. And what we'll call it
is leaves, like so. And it says leaves are one because of the fact one of
these is actually name leaves. So let's name it something else. So we'll call it leaves
and foliage. Like so. And then what I can do is
I can now bring all of these without affecting
my grass into this. So if I grab all of these, I should be able to
drop them in there, like so, and hide
them out of the way. Now, what I'm looking for
is if I can hide these, which I can without
hiding this part. So you can see this part is
still part of the terrain, and then I can turn
off the render. What that means is then
when I'm rendering it, I'm not going to be rendering
all these leaves out. And that's the reason
why I want to do that. Okay, so moving on
then to the hedge. So here we can see
we've got our hedge. And again, this was all
set for you this hedge, but you will be able to see
if I want to bring this on. So first of all,
we'll turn it on. So you can see
this is the hedge. Like, so let's show
your unrendered view just so you have
an understanding of how powerful this is. So there we go. There
is your hedgerows. Again, all of these
do something. Now, we've not got
any, what's it called? We haven't got any weight
paint on this one, but we have got a lot of options here to change
the resolution, the noise scale, and all of that stuff to bend our
hedges the way we want. For instance, if I want to come down and
turn up this noise, wait a minute, let me
just go back to my hedge. So here's my hedge.
You can see here. Let's put it on
object mode again. Like so, and let's just come up and change the noise scale. I think what I have
to do, first of all, before changing that, let me just come and
hide this out of the way is bring in
some more edge loop. So if I bring in, let's
say this many edge loops, I should then be
able to come in and change the noise
so let's come in, where's the noise
gone. Down here. I think it's this bone
to change the noise. Let me see if that actually
changes it. There we go. Now you can see, 'cause I
brought those edge loops in, we can actually
change the noise. So if you want to mess
around with some of these, just make sure you've got enough edges in to actually do that. Now what you can also do as
well as if I press Shift A, in fact, shift right click
first to bring in my cursor, Shift A then, and
we'll bring in a cube. And then what I'll do
is I'll grab this cube, press Control A or transforms. It's origin geometry,
grab my hedge, grab my cube, press
Control L, copy modifiers. Run way round. This one first, then this one, press Control L, copy modifiers, and there we go. Now we have a cube shaped hedge. So really, really easy, as
you can see to do that. Now, what I'm going
to do is then I'm going to grab my cube, put it on object
mode, and I want to brasly bring in this edge
to the height I want. So where would this hedge
realistically be coming up to? Let's first of all, bring
it in place, like so. And it's really so easy
this hedge to use. You can actually use
it just on the fly. You can pull it
wherever you want, bring it up to
wherever you want, and all of that
great, great stuff. What I'm going to do is
I'm going to actually come in turn it off a minute,
so turn this off. And I definitely want
to, first of all, figure out what height
actually wants it. So first of all, I'm going
to pull it over to here. I really don't want it, you
know, in the wall like this, so I'm just going to
press to grab it, and I'm going to start my
hedge from round about here. I'm going to make
sure then it's up to ride up to these stones here. And then what I'm
going to do is pull it over here, like so. From there, I'll press
control layer transom, set origins, geometry, bring in my hedge then,
double tap the A, and now I can see exactly where it's
going to come over to. Now, if I bring my
little guy over here, can see now this is really
starting to come to life this scene because we're starting to really do all of this stuff. Just make sure he's
on the ground plane and then make sure that
you're happy with the hedge. Now, let's come in render view, and let's have a look
what that looks like. And there you go,
guys. There you go. You can see exactly what
that's going to look like. Now, is the hedge
too close up to, you know, these railings,
or is that about right? You know what? I think
that's actually about right. The one thing I would say is how high do you want it to go? So if I come in again, can grab the top of it and I can
pull it down in real time. Like, so and there we go. Don't worry, by the way,
because the thing is, you can actually come back
and alter anytime you want. So in other words,
you can alter all of these once you've got
your entire hedge in. So what I'm going to do now is I'm just going to come over, and I'm going to
look at my hedgerow. So here is my hedge row. It's about level, wave the tops off here, and
that is where I want it. Now, the other thing
is, my hedgerow, it looks probably a
little bit too thick. And the other thing is, is
it about level with those? Level look. It is about
level with those. So, you know, what we'll do now is we'll come in, put
it on object mode. And then we'll pull
it out through here so you can see here. I'm also going to put the
noise down a little bit. I think the noise displacement
is a little bit too high. So I'm going to put that on
there. Let's put it on one. I don't want it too much. And then what I'll do is, I'm just going to turn this off. Now I'm in it. So I'm
going to turn this off. I'm going to pull it all
the way up then to here, and I'm going to make
it perhaps a little bit thinner, and then
I'll turn it back on. Let's have a look at
what this looks like. Now, before I do the rest of it, I just want to make sure that
I'm actually happy with it. I think it needs coming up a
little bit taller, like so. And let's have a look at
what that looks like. Let's bring our sun
round, as well. Again, before you do that, just make sure you're
saving out your work. We don't want to turn the sun round and
everything crash in, but let's turn this
sun round this way, just to bring a little
bit of light on there, let's have a look at
what that looks like. And yeah, it's probably
got a little bit too much displacement
on, I think. But yeah, I'm thinking
this is looking nice. It looks very realistic. You could make it
leaves a little bit smaller if you wanted to. That's also in the options. But what I'm going to do now, I think I'm going to
come to object mode. And I'm first of
all, going to come to the modifier, turn
this off a minute. Then what I'm going to
do is press Tab Control and bring in another edge loop. Now, what I want
to do is make sure that it's the same
thickness as this one, which is not that easy to do. But what you can
actually do, instead of doing it this way, you could, instead
of doing that, just use a solidify
on this instead, so you can solidify
this going all the way around there, but I don't think we're
going to do that. What I'm going to do is
just pull it out like so. I'll pull it maybe
to here like so. And then what I'll do is now I want to do is I want to
actually bring it over here. So all I'm going to do
is I'm going to press Shift D and then R Z 90, spin this round seven
to 12 over the top, and I want to then put it around about here, somewhere like that. And now let's see if I can
actually join these together. So first of all, though, I'll pull it out along here. So E and X, pull it out along here,
like so towards this one. And then from this
one and this one, I can select both the
faces right click, and we should be able to bridge faces like so, and there we go. That is what we end up with.
Now, let's have a look. If I press Control A or
transform set origin geometry, let's have a look then
when I bring on my hedge, what it's actually
going to look like. If I then come in, laid it
render up. And there we go. We've got a little bit
of grass through here, as you can see, which we
can sort out on the fly. If I come into wet paint, I can then come
in. Now, is that? There we go. It is from there. Alright, we've got rid of that. Let's go back to object mode, double tap the A, and let's
have a look at this hedgerow. So if I come round to here, you can see it's looking. Perfect, gos.
Perfect. Now, let's get our hedge in then
on the next one. And once we've got our hedging, then we can mess
around with, you know, making it a little
bit distorted if we want or anything else
that we want to do. But first of all, I just
want to get my hedge going around all of these parts on here because you can
see if I go back to my this one here, for instance, you
can see that we've got some of these bushes in
here, these beautiful bushes. You can see if I go
up to the other side. So the backside here, you can see we've got hedges going
all the way around here. We've got a few trees in here, so we've got a tree
just stood here. We've got some hedges,
as I said, in here. We've got a tree
in this part here. So lots to do, and I think we should actually get
this part finished. Then move on to our
lights and benches. But we can really start
bringing this to life. You know what? In fact, we've basically gone
the other way around. We've done all of, you know, this kind of scenery stuff before doing the
benches and lighting. I didn't really want to do that because I was hoping that you'd actually finish this off and actually create these
lights and things. But anyway, please,
please, guys, finish it off because it
really will add something, you know, when we finish this to create these lamps and
benches and stuff. And I know they might
seem like small things, but let's get those finished. I'm going to put
that over here then, and then what I'm going to
do is I'm going to come. They've had my work,
and I'll see her on the next one everyone.
Thanks a lot. Bye bye.
187. Designing a Modular Stone Bench with Stylized Geometry: Welcome back everyone. Blend
the building master class from concept to final render. So we're over at the
hedge over here now. So let's come in,
and what I'll do is I think to make this maybe
a little bit easier, can I grab all of these,
all of this bottom part, and grab the floor,
and press Shift aches, just hide everything
else out of the way? Is that going to make it a
little bit easier for me? Probably. So what
I'll do is I'll also come and just turn
this off as well. And now I should have a good idea of what I'm actually doing. So if I come in
and grab this end, and then what I'll
do is I'll press Shift D. I'll rotate it round. So z 90, seven, to
go over the top, and then I'll just bring it in to where I actually want it, which might be
something around here. So let's then pull it out. So I'll pull it out
all the way down here, so E and which ones are going to be on It's
going to be on the Y. So let's pull it out
down to here. Like so. And then we're probably going to have to pull
this back a little bit. You can see it's probably
just a little bit too far forward, so
I'll pull it back. Well, then grab this
one and this one, right click and we will
bridge faces like so. And you can see it with
this one, especially. We might want to pull
this up a little bit, so I'll come in and
I'll grab this edge. Seven go over the top, let's pull it up into place. Now what we'll do is we'll also press Alt Shift and click and pull that down and get it
nice and level over there. You can see now that's
looking pretty nice. And then let's look
at this one as well. So on this one, I'm
looking kind of pull it over a little
bit, pull this over. Just up a little bit,
and then this one. So. Now, before I carry on, let's press Control A, all transform set
origin and geometry. Let's put them on then and have a look what
they look like. You can see we've
completely covered this, and I really don't
want to do that. So I want to make sure that
I pull it back a little bit. So while I've got this, yeah, we definitely don't want that. That's a little bit too much. I'm going to grab this face. I'm going to put it onto
either normal or local, and then I'm going to
pull it back, like, so into place. There we go. Okay, so far so good. Now, again, let's hide
this out of the way. And then what I'll
do is I'll bring this I'll try and bring
this over, actually. If I press Shift D, should be able to
bring this over. Not like that, bring it over like this and put
it near enough. Into place. So if
I go over the top, I can see how close
each of these are. I can see this one's
relatively close up to you. Maybe we can move this away. Just to tiny bit. So we'll
check out how that looks. What I'm going to
do is I'll come in Control plus Control plus
seven to go over the top, and then I'll pull
this out J into place. Now we can see it's
pulling at an angle. That's because I'm on normal, so let's put it back on Global, and then we should be
able to pull it out. I can also see that this probably needs moving
a little bit down. So Alts shifting, click, move it a little bit down, and then let's pull the
whole thing out. So Alts shift, and click. Let's pull it out. We want it, so a little bit close to there. Just refining. That's
basically what you're doing. So Alt Shift and click,
bring it over to here, like so, and then you can also just grab this one,
not this one, actually. I don't want to do
that. You know what? I don't want to do that. I don't want to
pull all this out. I would soon have it smaller
and thinner over this part. I could put another edge loop in here and then pull it out, something like
that, but you know what I don't think
I want to bother. What I will do, though, is I'll pull this back through here, and I'll check out where
that's going to come to. I'll also, as well, come in Control plus and delete
this out of the way. I delete faces, and then
I'll fill up this face. So l shift click, press the F button,
and there we go. Now, again, let's
press Control A. I'll transform Sauro geometry. Let's bring on our hedge
row now, and again, just check to make sure
that first of all, it's in place. Like so. So it's going probably as well, a little bit too high up here. We definitely want
to bring it up, so I'll sort that
out in a minute. But the main thing
that I want to do is check to make
sure that it's not, you know, going over
these edges here. So I can see where the
hedgerows coming up to. I can see here it's
a bit thinner, and here in be going a
little bit too much. Let's put it on rendered view. I don't mind if it's going over slightly on some of it,
you know, like this. But I think in all in all, this is probably a
little bit too close. So I'm just going to press
old Shift click, like so. And I want to move this out. So again, I'll just
turn this off. So I'm going to come to
this hedgerow once more, let it load up,
press the tab but, grab this one, turn
it off a minute, and then all I'm going to do is select alt shift and click, like so, and then just pull it forward and then just
turn it back on, let's have a look what
that looks like now. And now I think that
looks way way better. I'm looking at this, it is looking a little
bit thin on this. But what I'll do is I'll just lt shift and click, pull
it out a little bit. Then we'll make it a little
bit thicker, as you can see. And there we go. That's looking nice, going all the
way around there. That looks beautiful. Let's turn this one
on then as well. Double tap the A, and let's have a look at what this one
looks like, and there we go. Now the next thing
is, as I said, we need to come to
both of these perhaps, so I'm going to grab
this one, turn it off. Grab this one, turn it off. And then what we'll do now
is we'll grab the underside. So we're going to
grab the underside. Now, I'm just wondering if I can delete that out of the way. I'm not actually sure if I can. So what I'm going
to do is just come round and delete faces, and let's see now what
actually happens. Yeah, and they come
down to there. So it might be worth doing that. Now, before doing that, though, let's just go back for 1 second and actually bring that back on. So we're going to
fill this in so you can see now it's filled in. And then what we're
going to do is we're just going to
come round to this. We're also going to press tab and we're going
to grab this one. So shift select this
one at the same time. And then I'm just
going to take that one off and grab it going
all the way around here. Like so. And then what I'm
going to do is lift it up. So we're going to lift it
up, lift it up, lift it up, just to the bottom up there, and then I'm going to press tab and just have a look
what that looks like. Double tap the A. So from this side, then we can see it
looks as though that's going in pretty nicely. So yeah, I think I'm
happy with that. Now let's do this one then. But we'll turn this
one on as well, double tap the A, and there
we go. That's that one. Now we've got this
final one down here. So what I'm going to do is
I'll come to this part. I'm going to grab
them just this front. So this here, press Shift D, and then what I'll
do is bring it over. I'll bring it over in
place where I want it. And then what I'll do is
bring it over to here. So I'm going to press
E, pull it over. Where do I want it?
Round about there. And then what I'm
going to do is, I'm just going to put
it on Object mode. It's gonna make it
way easier for me. Shift D and then Rz 90. Let's pull it into place then, so if we pull it
over here, like so. And then we should be able
to pull it over here, so E, pull it over here. Like so. And you can see
that it's a little bit out. And the reason is, I need
to reset all my transforms, set origin to geometry,
and there we go. And it's still probably. Is it a little bit out
there? I think it is. I think it's a little bit out, so I'm just going to grab it. Maybe I went too far. And it's not quite on
there where I want it. It is enough. I'm just
wondering why that is, actually. Why is it so far out? I'm just going to make sure that I'm going to reset
all the transforms, so I'm just going
to go back before resetting all my transforms. That's perfectly working there. It's just this part here that I don't want all
the way out of there. And I'm just wondering if
I want to split this off. So if I split this
off, P selection. And then I can come
in, grab my head, press Control A, all transforms, set origin, do geometry, and now I'm just looking if it's in line. Now it's in line. That's exactly what I want to. Now what I can do is I can
just hide my hedgerow again. I should be able
to join these two. So if I grab this
face and this face, right click, bridge
faces, and there we go. Let's turn it on again,
double tap the A. Now finally, let's
come in with rendered. Again, I'll save at my work, save my work, and then I'm just going
to have a good look. What this looks like.
So let's bring that in. And there's this hedgerow here. Go over to here. This is looking very nice,
guys, very nice. The thing is about
this, these hedges would be cut pretty straight. So we could come in and mess around with the displacement. You know, we could come
in and displace it. But you know what? I think
I'm not going to do that. I'm going to leave
them like this because I think they
look very nice now. I'm just going to have one
more quick check around, make sure everything's okay. And then finally, I'm
going to press LTH, bring back everything, double
tap the A, and there we go. That's what you should
have now. And there we go. Now, the thing is, have I gone a little bit
too far with this, are they coming through
here a little bit? Too much. I would say so. So again, we'll come up, then this off, and then
we'll come to this one. So we'll go to the front. So from here to here, and then just the back here. And I think from that,
I can pull them back. I'm going to pull
them back just a bit, put it back on because I don't
want them poking through. I still want to see
the actual grate here. You can see here. Probably need to pull
them back a little bit more. They're like that. There we go. Have a look. This side, they're okay. This side now looks
way, way bet. This looks nice. These look
nice on here, as I can see. All of this now is
easily readable, going all the way around here. All of this is easily readable. So very, very easily
readable now. And yeah, that looks nice. This one is probably the
most overgrown part. Let's double tap the
A, and there we go. Now, this part here then, I think I can get rid
of the Fi press delete. Yes, we can. We can
get rid of that. We're not going to
need it no more. And there we go, guys. Now, I'm just wondering if
before I finish, can I join all of these up? So can I join all of these up or will it move
them out of the way? So I'm just going
to press Control J. Yes, it did. I moved
them out of the way. So, unfortunately, if I
actually do that, actually, so I press Control A
all transforms, right, clicks origins geometry, is it going to put them
all back in place? That is the question,
and I don't think so, but we'll have a look, and
then I might have to go back. I think these have all gone
now and moved, have a look. Yeah, they've all moved, so
I don't really want that. So you know what I'm going to
do? I'm just going to press Control E and go back before
joining them all together, and there we go. I'm going
to leave them like that. Now, what I can do, though, is I can put them
in their own one. So if I come in
now, go to these, I should be able to, not this, my hedges, at least. Press M and put them under a new collection
called hedges, like so, and click
Create, and there we go. Now, we've got hedges, so we can hide those
out of the way. We've got leaves and foliage, which we've already
hidden out of the way, and more importantly,
we've turned it off on our rendered view. Alright, so let's have a look, then what we're going
to do on the next one. So we have got some trees here. We've got some soil here. We've got some bushes here
and things like that. And we can see basically
all we've got to do then is we've got our benches and our lights and
our small lights, but our small lights
are pretty much these. So I think what we're going to do before bringing in our trees, we will definitely be
creating the benches. And I think from there, then
we will create these lights. And then finally,
once we've done that, then we will be bringing in our trees and bushes
and things like this. I think that'll probably be the best way to go
about this just so you're not tempted
to not put these in. Alright, everyone.
The other thing is we've got this grass
as well to do. So yeah, right, everyone. So I hope you enjoyed that, and I'll see you
on the next one. Thanks a lot. Bye bye.
188. Building Bench Supports and Adjusting for Character Proportions: Welcome back, everyone to Blend the Building Mass class from
concept to final render. This is where we left it off. And now I want to
do is actually want to create our actual benches. So first of all, let's
just hide most of this. So we'll hide all of
this out the way, like so, including our hedges and where is our
walls, there we go. And then let's put the
cursor in the center. So shift center, cursor
to world origin. Let's grab our guy then
shifts and selections cursor. Now, let's press Dot
just to zoom in round. Let's press RSED. In fact, we'll see
where forward is. So forwards here, so
RSE, 90 spinning round. Let's pull him up into place. Now, let's bring in a plane. So Shifte we'll
bring in a plane. Let's spin it round. So R Y? No, no, X, 90. And then what we'll do is
we'll just bring it up. Now, where am I going
to bring it up to. So typically, if you think about where you're going
to sit on a bench, typically your legs
will come to the back. So, in other words, you
will sit on the bench. The top of the seat will be where your
legs bend generally. Because no one wants to sit on the bench, that's higher up. If you think about if you sit on the bench, that's higher up, you've got to kind of squish onto the bench, and we
don't really want that. Next of all, then, where
is it going to come up to? Probably around this part here. So if you think about
siting on the bench, it's never going to
come up to here. That would just be silly. So probably up to
the chest height. So once we've got
these dimensions, then we can actually bring
this down into place and get our dimensions of our
actual, um bench. So something like this, I
think, would look good. And then what I'm going to
do is pull this out now. So if I press E and Y, I can pull this out then. And what I'm measuring
now is looking, if he sits down on this, is he going to sit
down comfortably? Is the back going
to come to here? And I think so. I
think that looks good. So then what I'm going
to do is just pull this back a little
bit, all benches, as you know, they've got a slanted back and the reason so people can be
relatively comfy. Now, I would say that at the
moment, if this sits down, maybe that's a little
bit too short, so we'll pull it out
just a tad like soap. Now, it's up to you how big you want your bench to actually be. But I think something like
this is pretty good for me. Now, what I'm going
to do now is start actually building out
these parts here, so these chunkier parts here, and I'm going to do that
probably by doing it this way. So if I grab this
one and this one, I'll press E and X and pull
them out a little bit, like, so to get the
size that I want them. So something like this
may and then what I'll do is I'll grab both of these
then and split them off. So I'm going to press Y, split them off from
this other one. I'll actually press P selection, split them off in this way. Then what I'll do is I'll split
them off from each other. So Y? And now I'll press controle or transomsR
click, Surrogens jump tree. Now I want to do is I want
to make this obviously a little bit taller
on this part here, and I also want to probably bring it into place on this one. So let's actually work on that. First of all, then,
let's bring this out. So we'll bring it out to there, and we'll also bring this up. So make sure we've got
it on local or normal. Have a look normal, and
then we'll bring it up to something like
here. And there we go. Looking so far so good. Now what we'll do is then
we'll bring in a solidify. So let's bring in a solidify. Let's pull it out a little bit, so we're going to
pull it out this way. I think this way is the best
way to do it. Like that. And then what I'll do is I
need it more in the center as well because we're going
to solidify this bit, but I'm not going to
do that quite yet. What I'll first of all do
is I'll come to the back of here and I'm going to press S and X and pull it in, like so. So it looks as though
it's going to fit in. Next of all, then what I'll
do is I'll pull it out. So I'm going to pull it out
up into place, like so. So I want to go into
this part here, like so, probably
around here. Like this. And then what I can do is
before doing anything else, now I can come back to this part and I can pull
both of these out. I can put it onto Global, press control, and three. So Control three, go
around to this side, and then pull it out, making
sure that it's lining up. Now, you can see here I'm going to have to
pull these all out, so I'm going to pull
this up a little bit, get it right into the middle. I'm going to do the same
thing with the top. So control three,
pull into the top. Like this. Alright,
so far so good. Now the next thing is then we obviously want this now to
be a little bit further out, so a little bit
further out than that, and then I'll pull
it into the center. Alright, so that's that bit. Now I want to do is we're not going to put
the legs on yet. We'll first, all create
these two parts here. So what I'm going to do is
I'll bring in an edge loop, so control R one,
two, and maybe three. So one, two, three, left click, right click Control B, and just bevel them out to the gap that you actually
want these to be. So something like this,
delete and faces. This one here as well, control R. Let's bring in
maybe five edge loops. And then what we can do then is we can come to this part here. We can put it on to normal. And then what I can
do is I can pick this up with proportional editing on. So if I pick this up, I can bring it in and
pick it up like so. Now the thing is here, I really just want to
pick up these parts. So what I'm going to
do is I'm going to hide these faces
probably on here. So hide in all of this. Let's see if we can get this to work. So hide in all of this. And then what happens is, if I pull up the center, press tag, the other bit, I was hoping it would
be getting safe. So what I'm going to do is,
I'm just going to come in, hide these parts as well. So I've just got
this flat line on here and this one in here.
Hide them out the way. Now let's see if I
pull up this center, press Altag, there we go.
That's what I'm looking for. So now we can pull the
whole thing up without worrying about altering this
part, which is really handy. So if I now come in, put it on smooth.
I can grab this. I can then pull it
out a little bit, like so, and have
it nice and smooth. And then if I press AlternH, I can bring about that part, and there we go as easy as that. Okay, so I'm happy
with how this part is. Now let's come to the bomb part. I'll bring in two edge
loops, so Control R, two left click, right click, and I'll go Control B, pull those out a little bit. Grab his face, so
just his face here, and this one, and then
delete and faces like so. Alright. Now what we want
to do is we want to make sure that these parts
here is going under this. So this here, as you can see, probably wants moving
up a little bit. You can also see
these are joined. So let's come to each of
these, press P selection. And now what I can
do is I can come to each of these,
press in the born, and I should be able to
just slide them up without proportional editing on
just a little bit, like so. That then gives me enough room now to create these
wooden planks. So what I'm going to do now
is I'll come to both of these controle clicks
at Origins geometry, and let's come to this one
first, adding a solidify. Let's solidify it out this way. I'll bring it out to the
thickness that you want it. And of course, you can
see, is it in the center? Yes, it is because we already sorted that out, so
that's that one. And then I can simply grab
this one, grab this one, press control, and copy
modifiers, and there we go. Now, you can see the reason
I did what I did now, I need to bring this
down into place like so, and you can see now it's
actually fitting under there. I want to do is
we want to mirror this over to the other side. So if I grab this,
I should be able to then right clicks
Origins three cursor. Adding the modifier, I'm
going to generate a mirror, so it goes on the other side. Okay, so we have two
parts to do now. We have the arms of
the actual bench, and we also have the
bottom part of the bench. So let's put the bottom part on first and see how it's going to look these might not
be quite chunky enough. In other words, I
might need to make these a little bit more chunky. Let's set press shift day, and what we'll do is just
bring in a simple cube. Let's press S, press one just to level it
up to where I want it. And then what I'll
do is bring it over. And I think with these,
we'll have a bit of wood, and then we'll have
probably a little bit of metal that's going to be
going down the bottom. But first of all, though,
let's make it a little bit smaller and let's pull it into place wherever
it's going to go, so you can see in
here, under here, like so, and then pull
it to the back, like so. And then what we're going
to do is bring it down, first of all, so one, bring
it down to the bottom. Roundabout here, and then
we'll pull it out, like so. Then what we'll do is
we'll just press L, shift D, bring it over, or Z, 180, spin it round and
then put it onto Global, making sure that it's
rotated correctly. Yes, it does. Then we can
pull it out to here, like so. And finally, now, let's
make a bottom bit on here. So let's see what
that would look like. So grab both of these
control or transforms, set origin then to geometry. You know, we we'll leave
that in the center. We'll bring then
in another cube. So we'll bring in a
cube Pull it over. And this then can
be the metal part, so we'll press son's
head and then S and Y, pull it out, like so so
let us something sit on S and Y. There we go. Let's put it more
into the center. Let's press EsnsEd and make it a little bit
thinner because it's a little bit too thick, like so. And then we'll just
bevel off these edges. So again, control A, you transform set origin
to three D cursor, let's come in and
bevel these off. To B. Put up a few. And if you're going over
each other, by the way, you can press the C button, and that will stop them
going over each other. So you can also do that as well, I learned that the other day. That's why I didn't tell you about it because I didn't know. Let's turn these up then. And then what we'll do now
is bring them to here, and then bring them in,
and then bring them out. Like so. And then we go, Let's right click
shade or two Smooth. And that is our bench. Okay, so now we've got the handles to do. We've got these to put
over the other side, and then this bench should
be finished everyone. So let's go to file and save. And remember, if you want to take this
through and use it many, many other times, just
take it through to your resource pag and then
drop it in there as well. Once you've actually done
this, just press Control C, Control V, take it in there, and then save it on
your asset manager. Alright, everyone, so I'll
see you on the next one. Thanks a lot. Bye bye.
189. Creating and Refining Metal Armrests with Geometry Modifiers: Welcome back, everyone
to plan to Building master class from
concept to final render. This is where we left it off. Now I want to do is I
can join pretty much. Yeah, these bits
here. These bits here need the solidify
actually appliance, so I'm going to
press Control A on the solidify Control
lay on. No, I'm not. I'm not going to press
Control A in the mirror, because I'm going to grab
both of these and then grab this one last
and press Control J, that then should put it
over the other side. Let's the auto smooth. That then is looking
pretty nice. And now what we need is the
actual armrest in here. So to do an arm
rest pretty simply, all I'll do is press shift date. I'm going to bring
in then a curve. I'm going to bring
in a path because I always like working with pass
when I'm doing something. I'll press S Z 90, and let's just put
that into place. And the first thing
we're going to do is just extrude it out. So a bit like what we've
done many times before. Under geometry, extrude it out to get the thickness
that you actually want it, and then you're going
to go add modify it, bring in a solidifying. Let's then pull it out. Like, so let's pull it more into the
center, so put it on zero. Let's then bring back this
is a little bit too thick. Put it into place
wherever we want it. So jaws, so it fits in there. Remember, this part
is going to be metal. From this, you can make it
as neat as you want to. That's the great thing about it. Let's also shade it
on flat for now. Let's press S and Y and bring
it in to where we want it. So if he's san here, you can see it's probably going to be around here where he's got his actual
arm rest on there. Now, what I want to do is I want to bend it coming to the front, so I can simply now just
bend it going to the front. I can also, as well, bend
it in the center like sew. And you can see just how easy it was to actually create that, bring it up a little
bit, and there we go. Now, it's up to you if you
want it a little bit thick or if you want to bring
in this front as well, because you can press ol test on the front and you can
bring it in like so. You can't press S and X, for instance, and
bring it in that way. We can do that though when we've actually Well, why
would we do that? Altest we can bring it
out like that look, and then it makes it
look as though it's supported a lot more
on this back port. So that's why I've done that. The other thing is, let's
bring it in just a tiny bit, like so. And there we go. It looks like sport a lot more. And finally, then let's come
down and just bring down these a little bit because it's a little bit too dense at the
moment, something like six. Now, let's bring in these
side bits before we finish, and we could probably
get away with just bringing in an
edge loop on here, Control R. And then all we'll do is we'll come
into these parts, press the I button, like so, and then just press E and
bring it up into place, and then we'll also just
bring up this back. Let's see if we can
bring up the back. Double tap the A. There we go. That's looking very nice.
Now, let's apply that. So convert to mesh,
right, click, shade Auto smooth,
join to this then, so Control and J, and then we go, we've got
the other side on there. Really, really simple stuff,
as you can see, to do that. The one thing I would say
is with this part here, I think it's not out far enough, so I'm just going
to grab it with L, S and Y and just pull it out a little bit and then pull
this more to the front. So yeah, I think that
looks way better. And the next thing I want to do is just move my
guy out of the way. Coming to my bench now and Joe making sure I'm happy
with that. Yes, I am. And what I'll do is
I'll press Control law, bring in a few edge loops. Now, you can see here can't
bring in edge loops because we haven't yet come in and
applied our solidified. So we'll press Control
A on this one, Control A on this one. And then what we'll
do is we'll come now and apply our edge loop, so control law left click, right, click Control law. Up to you if you want
to do this, by the way, I recommend doing this, control, like so. Why am I doing that? Because then I can
actually come in, mesh, transform, randomize. So randomize this one here, turn it all the way down to note 0.1, even less than that. Nopoint not point, note note five. Let's
turn it down to that. Press the tab board, and
then you're going to get that little bit of unevenness that you
want on your bench. We're also going to
do it on this one, as well. So we'll do this. We'll go with this, and
we'll go with this. If we're going to do a bench, we might as well do it right. But let's go to mesh,
transform or randomize. Note point note, note five. Let's put it on there, and let's have a look
what we've got. And there we go a little
bit uneven, as you can see. Jaws to the eye. Okay. So now
let's grab the whole thing. Like so, and what
we'll do is right click and convert to mesh, and then we'll press Control J, and then we'll right
click Shade Auto Smooth. Finally, then, let's
bring in a bevel. So we'll bring in a bevel. We'll put that on Naught point, not not three, like so,
and there we go, guys. That is your bench near enough. Done. Let's just resettle the transforms or if I did that. And now let's go over
to our materials. So material wise, we've got
our materials here actually, so we can see which
materials going to use. I want to save a work
just so I don't lose it. And I'm looking
for this one here, which is the not
the metal green. The wood painted green. There we go. Let's
put it on RendeVew. And let's bring in the
wood, first of all, so we'll just drop that
on there. There we go. We didn't unwrap it yet,
so let's unwrap it. So, U V project. Click Okay. Is it going the right
way? Pretty much looks it apart from
these parts here, might not be going
the right way, but these are going
to be metal anyway. So all I'm going to do
now is come in L, L, L and L. I'm going
to click Plus, and then I'm going
to go to which Mel metal building?
Let's put that in there. Let's click a sign,
and let's press tab. And there we go, There is
your bench. Easy as that. Now, it's up to you whether you want this part to
be metal, as well. Maybe we do. Let's have a look. So we'll have a look on
just this part here, not this sole part. So shift and click. Li a sign. Let's see if
that actually looks right. Maybe it doesn't. Maybe it
looks bad with the wood. I think it looks bad
with the wood, actually. The one thing I would say,
it's a little bit thick. That's the one
thing I would say, so lones Bring it in. Now maybe it could be better with metal. Let's have a look. Anything that looks
bad like that. Alright, that is our bench
done. Simple as that, guys. It took what? One off
lesson, something like that. Now, we've done the bench. Let's move that over to
the right hand side. Now what we're going
to do is we're going to go back to modeling, and we're going to
create a plant pot. So we're going to
create a plant pot for our plants, eventually. So let's move them
over to the side. And then what we'll
do is we'll just move this bench over as well, and then we'll press Shift
day and bring in a cylinder. Cylinder can be on something like 24, something like this. And then what we'll
do is we'll make it a little bit smaller and
get it to the right size. Now remember, this is
a fairly big bush, so just take that into account. What we'll do, first of all,
is press one, bring this up. Now, the bush maybe this is a little bit ridiculous
the size of it. So I'll bring it down
something like that. And then what we'll do is
we'll bring this top down. So this top down, so we'll press Control,
bring in a few edge loops, left click, right, click, and then we'll grab the top of this. Or the middle of it, we
might bend it in the middle. Now, you can see that
I brought in four. I always try and as I've
said many times before, bring in odd number. So five, left click right click. It does make things
easier I find. So now I should be able to bring this in a little
bit or bring it in, like so, and then I can
make the E top of this. So if I come down, bring this down a
little bit, like so, still with proportional
editing on, and then I'll come in
and press E, like so. And then what I'm going to
do is press the I button. Like so and press E and
bring it in just to there. Now, for the top, let's come
in then and bring in a bar. So a band. Left
click, right click. Let's press Control B, bring it all the way back,
holding the shift but. Let's press E to lns,
bring it out a little bit. Let's then round off this bomb because it's never going to look right with botm like this. Control B, bring them
out a little bit. You can see now we could
round it off like that, but I don't really
want to do that. So what I want to do is bring it to that and then round it off, and then bring it back where
I want to round it off from? Something like this,
let's press tab right, click Shade Auto smooth and have a look what
we've got so far. Alright. Everything
on there looks nice. The one thing I
would say, though is maybe maybe we can bring
this in a little bit. So S, bring it in a little
bit. And there we go. Thing that looks better like so. Alright, now let's round
off these lips on here. So Alt Shift and click
Alt Shift, click, Peres Control B, round those
off. And we're nearly done. Now, let's come to the soil because we will need
some soil in here. So what I'm going to do is
just I'll separate this off, so peace selection, like so. And then what we want to do is, if you want to just create some really, really simple soil, all you can do is just
grab the top of here, press the Ibn to bring
it all the way in, press Control R to bring in a few edge loops, left
click, right, click. And then what you're
going to do is you're just going to control A or transform set
origin to geometry. Bring in then a
modifier, add modifier, generate a deform and
you want displace. And then you just want
to put this to Not 0.1, like so and bring in
the displacement. So new. Let's bring
in something. You could have
distorted noise or magic or something like
this. You can see the magic. You can change the
turbulence up, like so and then
bring down that. Now I'm going to see
what clouds looks like. Generally, I tend to
stick with clouds. I do like clouds. Like, so let's turn it up a little
bit to this. Like so. Let's write click and
shade or to smooth. Now, let's go back
then to the modifiers. We've also got another modifier that we can bring in
that's called smooth, and then we'll smooth
everything out for you. We can also as well turn down
our strength to note point, naught five or something, or even higher or
something like that. Let's put it on note point
naught eight, like there. Alright. Now, if you
drop that in place, like, you know what?
Yeah, we've deleted that. We drop that in place now, and as you can see, it
looks kind of good. Not perfect, but kind of good. Now, of course, there is another way you can actually do this. Instead of using this, what we can do is we
can actually come in and where is it? Remesh. So again,
before doing that, though, let's go to save. Add modifier, remesh so we want to generate
remesh. And there we go. And what we want to do is
put this up near the top. So I want to bring this
all the way up to the top. Drop it in place all the
way up above displace, like so, and then what I'm
going to do is just now, you can see that
it's not working. And the reason that's
not working, by the way, is if I press A and
E and pull it down, then press tab, now you can
see it's actually working. Now just drop it down
to where you want it. When you've done this, you will see now that's looking
much, much better. If we turn smooth off, let's have a look
what that looks like. Let's turn the turbulence off,
and that's what we've got. And then what we can do is right click and shade auto smooth. That's not working. So what we'll do is
we'll just right click and convert to mesh, and then we'll right click
and shade auto smooth. Is it going to work
let's have a look. Or have gone a little
bit too far with it. Oh, it's got the shops on. Controlle there we go. Clear shops. And there we go, right click, shade or to smooth. Now, what I'm wondering
with this is, is it sticking
through the bottom of here? I think it actually is. So what I'm going to do is just come in, l shifting, click, grab it going all the way
around, right, click, mark a seam, and then come
in and grab the bomp. So L, grab the bomp,
delete and faces. And now you can see that's
looking pretty nice. Now, let's put that into
there. Pull it out. And why did I spend all
of this time doing that? Well, on the next lesson,
I'm going to show you, as well, that we're going to use it for our tree, as well. So we're not just using
it for our plant pot. So I'm going to work on this
actually a little bit more, and then we've got it ready for our actual tree where
we can plant our tree. We're going to do that on
the next one, as well. So again, file, save. Here on the next one, everyone.
Thanks a lot. Bye bye.
190. Building a Procedural Tree Planter Using Geometry Nodes: Welcome, Macon to blend the building master class
from concept to final render. This is where we left it off.
Now, let's add in a smooth. So we're going to go generate. No, we're not going to
go to deform, smooth. And then what we
can do is we can turn that down a little bit, and there you go, you've got
your actual soil in there. Let's then I'll
leave that on there, actually. Now, let's start. Before we join all
this together, let's just move this
over this side. And then what I'm going to
do is I'm going to bring in a curve and a circle. So we're going to
bring curve, circle, add in a modifier, and we'll
bring in a geometry node. I'm just checking to see if we've got our columns on here. Stone path. There we go.
That's the one we want. There you go. We bring that in. It's looking nice already. Albeit, it's a little bit thick. I brought this in
then to show you basically how you can actually, you know, create things
straight off the bat. So I brought the
geometry node in. I can also smoove
it, as you can see. I can also then come down and turn up the length or down
the length or randomize. So I can randomize this
length, as you can see. I can then turn down the width to get it the way
that I want it. And this is going
to be for a tree. So maybe maybe it's a
little bit too big. So a tree is going to be
in the center of here. This is why I've
actually kept this now, so I can actually bring this
and put this in the center. Now, the thickness
of these probably needs to be a little bit more, so we're going to
increase the thickness. So then what we're gonna do is increase the
thickness randomness. So I'm going to turn that
up, turn that up. Like so. Then what I'm going to do
is increase the bevel. So I want to bevel
these off more. Before doing that,
though, I need to turn up the subdivisions,
and there we go. That is exactly what we want. Now the gaps, we've
got it on naught 0.1. If we turn this
down then to zero, you will see we end up
with something like that. The further we turn this down, the closer these things
actually get together. And as simple as that, now, if I bring in my soil, shift D, put it over here, Shift S, selection cursor, press
the S born, bring it out. There you go. You've got your soul
for your tree, as well. So all that now is done. What I can now do is I can
come grab all of these, right click, and I should
be able to convert to mesh. Control J, join
them all together. Control A all
transform, set origin, set origin, two geometry, right click, and
shade Auto smooth. And there you go. Now,
let's do this one, then same thing on
here. Grab them all. So grab all this. Right,
click and convert to mesh. Join together. Control J. Well, let's join them both
to give her Control J, right click and shade or smooth. And last of all, Control
A set origin geometry. Now, with these,
I don't actually need the bevel because
they're already bevelled off. There's no point bringing
in another bevel on here. They look good enough anyway. Now, let's bring
in then our soil. So we'll go over to
our asset manager. Let me see if I've
actually got so I don't even know I haven't
even checked that yet. So we do have stone, though. So we know with this, we
need to unwrap it first. So A, smart UV,
project. Click Okay. And then all I'm
going to do is just grab this part and press U and unwrap it with angle base 'cause you
know, it's straight up. Now, we've got floor on here. Ha we got any of that
same mud. There we go. Mud is the one that I won, but first of all, let's
bring in stone light. So stone light this one
here, and there we go. And then all I'm going
to do is grab this, press Plus, bring in my
mud, drop that on there, like so, click a sign, and there is my mud on top
of there all done for you. So that's easy enough to do. And now we'll do this one here. So we'll come to our plant pot. Now, what have I got
for my plum pot? I don't even know what
color it's supposed to be. I think it's going to
be a metal on this. First of all, though, let's
come in and I'll press A smart UV project. Click wrap, and then
I'll come to this one, which is the soil, L,
and unwrap, like so. Let's first of all, then bring in I think I'll bring in metal, gold, and soil. So we'll
come with this first. I'll bring in my metal because
we already have a metal, so let's look down here. So metal building.
Let's bring that in, double tap the A, press the tab. Then I'll bring in my gold. So Alt Shift and click Control
plus plus bu, down narrow. We can do a search
as well for gold. So metal gold, click a
sign, and then on mud. So if I grab this here, plus bu down narrow, type in mud, and you should
be able to find it like so, click a sign, and there we go. So we've got now plant pot a
tree pot, and there we go. All three of those done. Now, let's pull these over here. We're not done yet, though, because now we want
to move on something, which is a little bit harder. I'm going to put
it on object mode. I'm going to save out my work, so save out my work, and we're going to go back
to modeling then. Now, the next one we want to do is going to be a lamppost. And these lampposts
are a little bit more complex than what
we've done with, you know, previously
what we've done. So what we want to do
then is we'll start with probably the main pole. I'm thinking to start with
the bottom or the top. I think we'll start
with the bottom. I think that's going to
be easier to start with. So what we'll do
is, first of all, we'll bring in, so
we'll press tab, we'll press Shift Day, and we'll go to mesh, bring in a cylinder. 24 is okay on this
because then we can split it up into the
splits that we want. And what we're going
to do, first of all, is create the size that
we actually wanted. So if you think
about a lamppost, if we go to a reference,
actually, that will be easier. So if I come to my
reference and I go, I have one that's lamppost. I'm just moving it over
here. There we are. So if you think about it,
really, it's in three parts. We've got this part of the bomb. We've then got this part, and then we've got the
lights on there. Now, on this one, of course,
we've got more on there. We've got these parts,
which, you know, tell you Piccadilly or a train station or
whatever, things like that. These are basically
things we did on on the Victorian course, as well, we created
them a lot like this. So you can see we've got all of this intricate work
and things like that. But first of all, I think we
should start with this bit. So just this bit. So
have this bit open, and then you definitely know where you're
going to start from. Then what I'm going to
do is, I'm just going to put that over to the
right hand side. And I'm going to use
that as my reference. So first of all, when
we look at our guy, how far should this
be coming over? So how far should the main bulk of the
lamppost be coming? So this bottom section
should be coming up to round about this part
here. So let's do that first. So I'm going to bring mine up without proportional
to on turn that off. To, five press one
and bring it up. Oh, let's bring it
up. That's too high. A little bit, and let's
bring it down to here. So something around
there, which is in line with kind of his
crotch area there. And then what we'll
do now is we'll shape this first before
doing anything else, and then from there, we
can actually work with it. Now, before we do that, though, we need a
bottom on here. So we're going to
pull it up like so. And then what we're
going to do is press E and pull
it down like so. So that'll be our
bottom section of this, and then we can start with this part here now. So
let's shape this part. Control, bring in
a few edge loops and make sure one's
in the middle. So you can see if I left
click right, click, I've got nine, which means now I want to shape this from here. So shift and click,
proportional editing on. Let's go with sharp and see what that
actually looks like. Sharp is definitely
not going to be it, so let's go with sphere.
Yeah, there we go. That might work
much, much better. Or rs. So something like this, I think is
going to work there. Now, from here then, let's just create the top, first of all, and then we can actually create this bit separately
from everything else. Okay, so the top let's come in, and what we'll do
is we'll press E to S with that portion
editing on again, S, pull it out, and then what
we're going to do is press E, pull it up, and then I, and then E, pull it up like so. Then we've got a
central bit here, which we're going to
create separately. But let's work on this part
going down here first. So as well as doing that as
well, I would say on this, at least, probably better off
adding your own bevels in. So if you bevel it, turn
them down a little bit. So left click, and there we go. That's that bevel.
Let's shade it smooth as well so we can actually
see what we're working with. And I would also say that probably on this top,
let's also do that. Control B, bevel that
off a little bit. Okay, now let's work on
the bomb section now. So the bomb section is
going to have a huge part. It should be flat this.
And at the moment, you can see that this
definitely is not flat. So what I'm going to
do is I'm actually going to flatten this part out. So Alt shifting click. I'm going to press E enter lns. I'm going to bring that out
where I actually want it. So maybe something like this. You know why? I
actually like your bear rounded in there. Yes, I do. I like that bear. But what I'm gonna do is
I'm going to bring in another one, controla. And then I'm going
to bring this out. So old Shift click,
heat enter Altns, bring that out, like so. And then all I'm going
to do then is just grab the top of you, seven, to go over the top, and I'm just going to press
S and bring it out, just so it lines up a little bit better. But now
that's straight. So we've got
something like this. And now I want to actually
bring out this part here. So I'm going to press
Control R. Left click, right click and then create
a band coming out here. So first of all, let's
press Shift and click E, enter lns, bring that out, and then Control R.
So let's go back. Control Z. Why that's
gone on there, but controls,
control, left click, right, click Control
B, bring it in, and then E, enter
Alons, pull it out. There we go. Alright, that's time to look very nice.
That's exactly what I want. And now on the next lesson, then we'll actually start
with this part in here. So we'll start pulling
these parts out, hopefully level to
something around here. And then we should get, that
look that we're looking for, which is this here,
and we should be able to carry that on
all the way through then. That's what I'm hoping to do. So now I'm going
to pull that over. I'm going to come and
save out my work. And I'll see you on the
next one, everyone. Thanks a lot. Bye bye.
191. UV Unwrapping and Texturing for Outdoor Assets in Blender: Welcome back everyone to blend the Building mass class from
concept to final render. Alright, so now we've got that. Let's actually come in and
create these parts then. Now, what I suggest you do for this part is actually probably
come in and split it off. So shift, click. All Shift click, right
click and Marcosm. Then what we'll do is we'll
just come in, grab the face, so L and Y to grab that face. Now we want to do is we want
to bring each of these in. So where are we
going to bring them in probably every two. But if I go Alt Shift click, Alt Shift, click,
ok shift, click. And then what I can do
is I can go, O whoops. Alt Shift click. There we go. We can just work our way around. Now, we'll show you
something else, which I was trying to do there, but unfortunately
it doesn't work. If you click one and then
click the third one, you can actually press
Control Shift and plus, and it will just keep selecting
the third one every time. Unfortunately, it doesn't work when we're doing
Alt Shift click. So it doesn't work like that. That is unfortunate, but
we can make it work just by going around quickly and
clicking these like so. And then all I'm going to
do is mark a seam on these because it is going to make
it much, much easier for me. So right click and Mark asm. Now, let's bring out, then all of these parts. So what we're going
to do is just grab all of these parts like so, going around, like so, like so, and like so. And then what we're going to
do is we're going to press E alternates and bring
them out like so. There we go, we
want to bring them out slightly. Not too much. If I press tab now, you can
see that's looking very nice except these parts
aren't quite over. So I'm going to come
in, Alt Shift click. I think as well, I'll do
Alt Shift, click on this, and then I'll do lns and just pull those out just
so it's going over there, like so, and then have a look what that looks
like. And you know what? That still looks pretty nice, except maybe this bit needs
coming out a little bit. So Alt Shift click, Alterns, bring it out a little
bit, so there's not that massive gap there.
And there you go. Now you can see they are
looking very, very nice. Now, it's up to you
whether you want to bring your top parts in. You
can absolutely do that. We could do it by, you know, coming in and grabbing each of these and then
pulling them in. If I come here and
grab each of these, like so like so and like so. And then what we'll
do is I'll show you a little trick to
actually do those. So first of all, we'll put
on proportional editing. In fact, you know
what? First of all, yeah, we'll try
doing it like this. It might actually not work because you might try
and bring these in. I'll do proportional editing. I'll put it onto connected only, and then we're not
going to be messing around with these because we're only messing
around with this. I'll put this onto normal, and then finally, I'll put
this on to individual origins. And then what I can do is if
I press S and X, let's say. So S and X, it
should pull them in, like, so individually,
as you can see. So as I bring this in, you can see now we
got a nice slant on. I press tab now, you can see the thicker the bomb and the
thinner as they go up. Now, I might have made that
a little bit too much. So what I'm going to do is
I'm going to try and root. Let's try and root, so S&C. I don't want to bring
them in slightly so much. Let's have a look at
what that looks like. What did I do there?
Probably brought those in a little bit too much. Let's try this one. So S&X. And you can see here
that this one for some reason, it's non normal. That's why. Let's
try that again. So root, S&X and there we go. Let's bring them
in very slightly. Yeah, and I think that
looks better like that. Alright, that's the bottom sort. That's why I took a little
bit more time on the bottom. Now, let's work our way up then. So now we need to come
to this bit here, and I think what I'll
do, first of all, is I will make a little
bit of a lip on here. So I'm going to
press the I bone, bring in very slightly. Then I'm going to press E.
Then I'm going to press I, and then I'm going
to bring it up. So I'm going to bring it
up then, press in the S born without proportional
editing on, turn that off. Turn it back to global and let's also put this on
individual origins, like so. Then what we'll do is
we'll bring it up now, so bring it up, like so. We want this to be quite
thick this part here. At the moment, this is
relatively thick, actually. It's a bit thicker
than I would like. I'm just going to make
it a little bit smaller. Like so, pressing one,
and just pulling it down. D here. Now, remember what
I said with this bit. This bit wants to be
come to his crutch, so I'm just going to pull it
out a little bit like so. And now I want this bit here
to be a little bit wider. So E enter, S, pull it out, and then E, pull it up, and then yeah, let's pull it up again.
Something like here. So it should come to maybe where his solar plexus
or something like that. And then what I want to do
is pull this little bit out. So if I come in, I should then be able
to shift and click S, pull it out a
little bit like so. And then what we'll do
is we'll come up again. And I think I'll press Control B and bevel that off a
little bit like so. There we go. And then I'll come in and also bevel off
the bottom of it. So shifting, click
going around this edge. Control B, and bevel this off a little bit like
so, and there we go. Now, let's bring
in this top part. So this top part, if I come in, I can pull it up and then
press the S bone to bring it in and then bring
it out, like so. Now, on this bit,
I'm going to press Control R. Left click,
bring this down, and then Control R, left click and bring it
up a little bit, just so they're a little bit
thinner than to each other, and then l shift and click. Around here, E, enter lns, bring this out, and then
this one not quite as far. So Alt Shift, and click, E, enter lns, bring it
out, not quite as far. Maybe this one a
little bit further. So lns, bring it out a
bit further if you want. And we've got
something like this now. Alright, very nice. The only thing I would say
is this bit here, though, this bit on here needs probably coming out
a little bit more. Like so. Here we go. Okay, so we've got this bit so far so good now from
the chest area. So if we look here, we're
now nearly at his chest. So from here, then we can go up. Now, I'm just going
to measure mine out to get you a good height. So I'm just going to actually
on the other screen, measure him out, and it's roughly two guys height to get that up to
the top of there. So what I'm going to do is
I'm just gonna press shift, bring him up, like
so and there we go. Now, the other thing
I'm going to do is this is where I want
the top of it to come to. The other thing I'm
going to do is if I grab a center point on here, that's going to make it
much, much easier for me. So if I grab this, for instance, press Shift and D and
then bring it up. And then what I can do is
I can press they button. Bring it into place like so, and then press E and Z and bring it up to where
I actually want it. So E Z, bring it up, like so, and you can
see how easy that was. Now I would say, this is
probably a little bit too thick, which you can see
why I did that. Makes it very, very easy. So if it's too thick, let's just put it in place. Let's make it a
little bit thinner. Like so, and then let's press E and Z and pull
it up into place. Now, that looks about
the right thickness, what we want it. And what we're going to do
is we're going to pull it up to the top of his head, which is round about there. Okay, so let's get
rid of our guy. Let's press file and
save out our work. And this is what we
should be left with. Now, of course, we don't just
want it stuck in like that. What we want to do is
we want to bring this in and make it look a little
bit neater than that. So we're going to press E,
pull it back in, like so, and then just make sure if
we grab the whole thing, so L so let's zoom in, and let's pull it down on the z. So G and Z, s to pull it in place in there, like so, and there we go. Alright. Now, let's
grab this right, click Shade Auto Smooth, and this is what we
should be left with guys. Already, it's looking
very, very nice. Now, let's work on
the actual top first. So if we comb to this top, we definitely don't want, you know, this kind
of thing on there. What we want to do now is
grab probably one of these. So if I come in and grab just this loop
going around there, I can press Shift D. And then what I can do is I can
bring it up to the top. So if I bring this
up to the top, and then zoom in
with the dot bon, press the F but, fill
it in, and there we go. We can make a slight
top on there. And from there, then what
I can do is I can press E and pull it up like so, and then I can press
E and pull it in. Now on this part,
I'm going to press Control B and just
bevel that off like so, and then now can go
to the center of it, and then I can
press on Face leg, and then I can press E, pull it up like so I want
to round this top off. So I've got it like this. And I want to round
it up a little bit, so I'm going to press E
and bring it in, like so. And then I want a nice
decorative top on it. So I'm going to press I to bring it in, E to bring it out. Yours on the top, like so. Now let's create kind
of a poll on there. So if I press I should
be able to bring it in, we'll press E then
to bring it up. And again, we'll probably
separate this out. It's probably going
to make it easier. Let's have a look. So let's
bring one in first of all. Again, it's on six.
Let's put it on seven, so we have got something to
actually work with here. So old shift click,
proportional editing. Let's bring it out, bring it in. Lo, bring it in. Maybe something like that. Maybe that's not on enough. Let's try Sharp. Let's try that. And I think that's going
to wear much better. So if you bring
it out like this, then what we can do is we
can bevel this off now. So if I turn this off, press
Control B and bevel it off, like so, and then we've
got a nice top right, click sheet or smooth, and
this is what we've got. Now, let's put a
little bit more of a top on because it is
a lamppost after all. So we'll go back to the top, I to insert, and
then E, bring it up. Let's have a look
how big that is. Yes, that is what
we're looking for. And now let's just
finish that top off. So we'll press tab, E, enter S, bring it out, and then E, and then E again, and then S, bring it in. And then finally the
very, very tippy top, so I and then E,
and there we go. All right, that is
the top of there. Now, let's go out
and file and save. Save out of work. And
the other thing is, I noticed before finishing, I should have probably. Probably a sharp on these. Here. Let's try putting
a sharp on there. And then we go, Yes, that
looks better like that. Now on the next one, then
we pretty much we've done the hard part for
this lamp post now. Now, what we need to do is
the side of the lamp post. So we need to come in now and create the flowing bits and the lamps and
things like that. So from here, I'm probably
going to create the lamps. I think that's going to make
it a little bit easier. And then once we've
created the lamp, then we can put on these kind of swirls and things like that and make it look
really, really nice. But you can see here from now, double tap the egg just how
nice that actually looks. And yeah, it's
looking really cool. It fits in with everything. It's looking round
about the right size. So, as I said, on the next one, let's actually
create our lights. Alright, everyone, so I
hope you enjoyed that, and I'll see you in the next
one. Thanks a lot. Bye bye.
192. Final Touches and Mesh Cleanup for Outdoor Assets: Welcome back. Everyone to blend the Building Mass class from
concept to final render. Alright, I have created a
lot of lights in my life, and they're quite
tricky in some ways. So let's try and make it as simple as possible.
I'm thinking. So first of all, it's all
down to how many actual, like, divisions your
your what's it called? Your sphere, actually have. So I think for us we
will go with eight. Let's try bringing in
a sphere with eight. First of all, though, let's
move this to the side. And then what we'll
do is we'll bring in a sphere, so mesh, cylinder, and let's put it on eight, like so, and then we should
be able to work with this. I'm also going to change
it because I like working not with the points here, so I'm going
to change it round. So R Z 22.5, and then flattens out all those. And then what I'm
going to do is create the midsection of
my light first. I always feel like it's easier to do that and
then build off of. I'm not even going
to worry about the sizing at the moment. So don't worry too
much about the sides. Let's press S and Z, but we definitely
want something, you know, like this length
is what we're looking at. Then what I'm going to
do is I'm going to come in and bring in the bomb. Now, it's made of steel. Now, when they're dealing
with something like a light, would they really have
gone in and, you know, made it, you know, kind of like this?
I don't think so. So what I think we would do
is just bring in the bomb. So if I bring in
the bomb, like so. And then let's have
a look at the top, and I think I can make the
top a little bit wider. So something like this, I think. Then let's bring in
three edge loops, so control all one,
two, and three. Left click, right click. And I'm also going to get rid
of the top and the bottom. I think that's going to
make it easier for me, so delete and faces. Alright, so we've got
something like this. Now what we need
to do is we need to bring these parts in. So these parts here, we
need to bring them all in. So if I press A, I should
be able to then press the I button and press I again and bring
these in like so. But that will lead me one
little problem in the fact that I don't have a top and I don't have a bottom on
here, as you can see. So I'm definitely going to need something to
help me do that. And the way that I, Typically, typically approach this is I'll probably build
it in two parts. And instead of doing
this, actually, what I think we'll do is we'll just get rid of these again. So I'm just going to
come in and I'm going to dissolve edges like so. And then we're going to do
is Control R, left click, right click and then
Control B and pull that out just so it gives us
actually a top and bottom. I think that's actually going to make it a little bit easier. And then from there, control R bring in three, left
click, right click. Now, from here, what I tend
to do is I tend to split this in two to make it
easier for myself. Now let me just see if
I grab both of these, if I press I and then I
again, can I bring those in? So you can see when I'm
bringing these in now, I can actually get a line
that's going to go from here, round here and
create these parts. So, yes, I think I can
actually do it from this. So we'll give that try.
So what I'm going to do is I'm just going
to Oh shift click, old shift, click, old shift,
click, Oh shift, click. Press the I button, press it twice just to make sure
you've got it like so. Then I'm going to press E and Alter S and bring them in
to create those lights. And there you go.
You can see really, really easy to create that. Now, because we did it that way, what it means is
now we can actually probably bring out these a little bit further than the
other ones if we wanted to. By coming in and actually
grabbing these here, for instance, we can go in,
press J and join them up. So you can join them up,
pull the way around, and then pull these out very, very slightly in
comparison to the others. I'm not going to do that on
this one, I don't think. I'm just looking at wondering
whether I should do that. There is another way
of doing it, as well. So what we can also
do is we can come in, grab the top off here and
I'm going to pull this out, so at enter alters, like so. And if it's not
coming out properly, just press the S bone, like
so, something like this. And I'm wondering if, yeah, I think I can create it create these a
little bit further out from these parts here. So I'm going to come in and I'm going to press
Alt Shift and click, E and S and pull
those out like so. So we've got two like this.
I think I'll pull these out. Yeah, I'll leave them
like that just for now. Then what I'll do is
I can come in now, and I can join these together. So if I come in, grab
this one and this one, press Shift and D,
and then shift H, hide the other part
out of the way, and then I can come in Alt Shift and click and Alt
Shift and click, right click, and we
can bridge edge loops. And then what we can
do is now we can come in grabbing each
of these like so, and we can bevel these off. Like so, so bevel them off, Control B, like so. Now,
what are we left with? If I come in now and grab
just these parts here, so first of all,
let's just grab. Let's actually have a look.
Before we bevel them off, let's make sure we've
not gone too far. Let's press Alt and H. And
then if I go in and press one, let me just make
sure, first of all, that I'm just grabbing
these parts going round. And then what we'll do
is we'll bevel them off, but making sure that they fit within the realms of
where we want them. So something like this, and then what we'll do
is if I press one, I should be able to come
in and just see in there. So now you can see
how big these are. We can now press
Control B and bevel those off to the size that
we need them, like so. And then what we can do is
now if I take this off, and then just grab
these parts once more, like so, like so, and I'll split them off and then delete the other part, like so. And it's just something
I'm trying here just to see what it
looks like. So why? And then grab this
part and L and delete and bass or vertices. Let's try deleting vertices. And now we're left with these
parts here, as you can see. Now I want to do is I can grab all of these parts
just once more and I can actually use the
E and bring them in, or I can actually
use the solidify. So if I press P selection, grab these and then it gives me perfect opportunity
to give them a test. So add modifier,
generate a solidify. Let's bring them in
then so I can bring in the thickness, like so, or bring them out, whichever
one it is and bring them in like so like that. Double tap the A,
and there we go. So now we've got
some on the outside. Now, what I would
wonder is you know, when you bring them
in, you can see that they're slightly
past these sides. But luckily for us, we do know how we can
actually bring them in. So if I come in and just brings all of these
in a little bit, as in in the sides. So what I can do is I
can come to normal, individual origins,
put it on normal, then press S and X, and then you can bring
them in like so. And there you go,
double tap the A, and now you can see
what you've got there, where they're slightly
out, and it looks actually a little bit nicer.
Now I can come in now. So lt shift click, press the s, but, pull it out, past there. Check the bombs to make sure they're not poking over
the bombs as well, so I'll shift and
click S, slightly out. And I'm also going to bring
this down a little bit. So old shifting plate, bring it down a little bit,
like so, and there we go. That is the light actually done. Well, the first part of
the light actually done. Let's say I work now, like so. And what I'll do is I'll come
in and apply my solidify, so press Control A, and then I'll press Shift
H. And what I want to do is just delete the
inside of these. So the inside, and I'm
wondering about the top, you know, I'll just delete
the inside of those. We're not going to need those. I'll leave the top on for now. So I'll leak bass, like so. Alright, lth, bring back everything, and that is
what we're left with. Yeah, and I'm really happy
with how that looks. Okay, so now let's come down. What we want to do now
is create this bombit. So what I'm going to
do is I'll come to this bombit and I'll grab this part here, so
just this part here. I'll press Shift and B. And then what I'll do is I'll
put this back onto Global. I'll put this back
onto medium point. Then what I'll do
is I'll press E, enter S and bring
it out, like so, and I'm going to drop
this down just a tad, like so, then I'm going to press E and Z and bring it down. Do here, press the S
but to bring it in. And now I want to work my
way down this part here to make that if I bring
over the reference, so bring over the
reference, which is here. But if we zoom in here, we can see it comes down here, slightly rounded, then another chunk and then
down to this part. And this all hangs on here. So that's why we're
actually creating that. So what we'll do
is we'll come in, and what I'll do is I'll
press the I button, first of all, and then I'm
going to press E, like so. And then what I
want to do now is just press Control plus, and I'm going to press
Y and then Control R, bring in five edge loops,
grab the center one, make sure proportional editing
is on and connected only, and then I should
be able to bring this out and bring
it in our one. Not like that, of course. It
needs to be maybe on smooth. Let's bring it in. Like
this, and there we go. Just make sure that
this has not moved. It looks actually fine to me, shade or to smooth. And we should end up with
something like this. Now, I would say, this at the moment, it's
a little bit big, so I'm going to press this in z and squish it down a little bit, and then pull it up
into place, like so. And now we're on
to the final bit. So the final bit, if I come in, then off proportional editing, press E to bring
it down, like so. And then shift, and click
E to alter Ness or yeah, alter ness is going to work. And then I can grab the sent
a bit and then press E, bring it down, and finally
then just bring it all in, like so, and there we go. There's the bottom part of that. Now, of course, we can see
at the moment, this is huge. We really don't
want it that big. And the other thing is
we've not got these joints. So let's join it all together. So we'll press Control
J, join it altogether. And now we can make
it a little bit smaller to the size that
we actually want it. You can see it's kind of fin. The one thing I
would say is this is a little bit too chunky. But remember, that
we've got the wire, you know, this kind
of thing that's gonna come on here, to hold
it all together. So, you know what? I'm not going to
change that right now. What I'm going to work
on then the next lesson is I'm going to work on the top, and then I'm going to try
and get it into my lamppost. I might have made it a
little bit too small here. But hey ho we'll see
how small we need it. Alright, everyone, so
hope you enjoyed that. I'll see you in the next
one. Thanks a lot. Bye bye.
193. Modeling the Top Section of a Stylized Street Lamp: Welcome back, everyone to blend the building mask class from
concept to final render. And here we are on the top then. So what we're gonna do is now let's make an actual top for it. So first of all, let's come and grab this going all the way around the outside. Then we're going
to press E, enter, S, and let's bring it out. Let's press E then and
pull it up on the Z axis, make sure we're following
against the Z axis. Like, so let's make it relatively thick,
something like this. And let's also, as well, perhaps bring it in a
little bit like so. Now, let's bring it
in a little bit more. E enter S, bring it in, like so, and then E, bring it up again, following the Z axis. Now I'm going to pull it
up something like that, and then what I'm going to
do is just put a top on it. Then I'm going to
press tab control A. Not that. Control A. No controls, all transforms
set origin to geometry. And now let's go back
in and bevel this off. So I'm going to press
Control B on my face. So Control B, bevel it off and why are we
beveling it off over there. Let's have a look why
that's not beveling off. So again, why is it
not beveling off? Control and B. It's trying
to bevel off this part here, and I'm not actually sure. Let me just delete faces. And let me come in. Oh, yeah, maybe we can actually
do it the other way. So if I put it on
there, control B. It looks to me like there's
an issue with this. So what I'm going
to do is just I think what I'll do
is actually coming. I'll grab this, and
I'm just going to, for now, probably
separate it off. So P selection, separate it off. Let's actually
have a look what's going on here. So Control B. It looks like these
extra edges in there, so I'm going to press A, mesh. Might be an extrusion
which I've messed up. We'll go to merge by distance
zero vert is removed. This is strange why
this is doing this. I'm just going to I'm not sure why it's
actually doing that. So what I'm going to do is
I'm going to I'm going to try and just bevel off
this or bevel off this. There we go. It's this one
here, for some reason. It has a non manifold edge or something on there,
so mesh, clean up. And let's delete loose. Let's again go in
and mesh, clean up. And if so, I can
just rebuild it. L concave edges,
nothing like that. So you know what I'm going
to do, delete and faces. And then what I'm going
to do is press tab, I'm going to press Shift, and we're going to come
in with a new cylinder, and I'm going to
put it on eight. I'm going to rotate it,
so ours there 22.5. And then I'm just
going to see if I bring this in to
where I want it. So if I bring it up and bring
it in, something like here. Let's pull it out a little bit, just so it's over the top. Like so. There we go. Then what I'll do
is see if I can actually come into
the top of here, press Control B,
and there we go. We haven't got a
problem on that one. So I don't know actually what actually
happened with this. But anyway, let's press Control B, turn it
up a little bit, make it a little
bit more rounded, and there we go. Now, the one thing
is, I would say, it needs to be pulled out a little bit. So
let's pull it out. Js to tad, like so, right click, shade or
smooth, and there we go. That is what I'm looking for. Now, let's put the top on them. So we've got our top
on this bit here. I also think, let's come in
and put a sharp on here. So mark a sharp, like so, and let's also come in and maybe flatten
off this part here. So if I grab the middle, press Control plus S said zero, we should then be able
to flatten that off. And then from there,
then we should be able to pull it out, not this bit. Sorry. Let's come in again, tab, grab just the center,
E, pull it out, like so, and then E enter S, pull it out, and
then E, pull it up. And then I, pull it in, and then E, pull it up, and then S, bull it in. And we should end up with
something like this. Now I want to do is I just
want to bevel off these edges. Don't want to press Alt, shift, click, l shift, click. Control B, bevel them
off a little bit, just to make it a little bit
more round or bring it out, like so, and then right click Shade Ato smooth and then
see what we've actually got. So double tap the A. And
that is what we've got. Now, maybe I've gone a little
bit too much on this bit. Maybe it needs squishing
down a little bit, so I'll just squish it down a little bit, put it into place. And yeah, that looks to me
like a very, very nice lamp. Now, on mine, it was
a little bit fatter. You know, on the top, I can
join this together now. So let's join it together. So Control and J,
join it all together. And what I can do finally is
then I could probably come in and just grab all
of this going out, portion edit in, take off
connection only pressing one, and I could probably
get away with pulling it all out
in a certain way. So if I bring it down, I could probably
get away with just bending these out a little bit. Now the problem
with bending them is you can see that we end up sometimes
where the breaking is, so it's not so smooth. That's the only problem
you might have. So let's just put it on to root. Let's try that. Like so. When I'm looking,
if there's any kind of breaking in there
or anything like that, and you know what I
don't think there is. But now I might come in, grab this going all
the way around here. It's all shift and click. Just going to go round and
see if I can just bend this in a little bit more
cause when you finish, it doesn't mean you can't
alter the shape or anything. So if I come down, press one, I can press the S bone. And as you can see, then
I can actually bring it in and bend it
a little bit more. Now, the reason why it's not quite bending
in the way that I want it is just because these here need to have some
edge loops on them. If I bring it in, you will see now if I press left
click, right click, and now I start bending them in, you will see that I can
actually start bending all of this in the
bend quite nicely. I think, for me,
I'm going to leave the ***. I think
I'm happy with it. But just in case
you want to change something, then
you're free to do so. Alright, so let's press
Control A, A transform, set origin to geometry, and then let's bring in a bevel. So we're going to
bring in a bevel. And we can see here, this is what happened with that bevel. I know now what happened. The reason why it
wasn't working is because the normals were
all facing the wrong way. If I come to here, put
it on face orientation, the normals, we're
facing the wrong way. Shift down, spin everything
round, and there you go. You can see that was the issue. Now, the other thing
is the top up here, as you can see, it
isn't in place. So let's come in
and just bring it down into place without
proportional editing on. So bring it down, make
it a tard, tard bigger, just so it fits in there, like so, and there we go. Now that's looking
really, really nice. Now, the other thing
is, if I press ShiftH, I can come underneath and I
can get rid of this bottom, so delete and faces, and then press ltH once more, bring it back, tab, double tap the A,
and there we go. That is this done,
except, of course, let's put this on
note point note note three. There we go. And let's have a look
at what we've done. And yeah, that's looking
really, really nice. And I actually think
with this one, we could probably put it
on note point not no one. Yeah, I think it looks a
little bit better like so. Now, I'm looking in here. I can see a little bit
of red down there. That is because I think this
part is split from this. So I just want to make sure
that this bits in here. So it's got a little
bit of a gap in there, as you can see, we can press
the S born and bring it in. So we can also do it
with this one, as well. So shift and click, press the S boorn and
bring it in past there, making sure everything's
nice and tidy, which it is. Alright, Control A, I transform
set origin to geometry. We want to do is we want
to bring in our sign. So we're going to have I'm just thinking
the best way to do this, actually, is we want one
lamppost, which is a double. So a double one of the lights, and then one lamppost
which is so this one here, you can also see that
we've got normals on here. So I'm looking tab A, shift and N, spin those round. It's a good job I
check that, actually, and then we'll turn
face orientation off. Okay, so what I'm
going to do is I'm going to take now
this part here, and what we'll do
is we'll create the kind of signs that are
going to come out of it. So let's just move
this over here. Let's move this one over here. Like so, and we'll create these signs that are
going to go each side. So if I come in, should then be able to should be in
the center, actually. So shifts c is selected. Let's pull it up to
where it's going to go. Something like
here. And then what we'll do is we'll put
a sign each side. So if I press Shift
A, bring in a plane. Let's spin the plane round. So RX 90. Let's then bring it into the size that I
want these signs. So S and Z, bring them down. And you can see the way way
too long at the moment, that's way, way too big. So if I put it around here, so is that going
to be about right? They're going to be
probably round about here. So something like this, I
think is about the right size, and then we can have
one on the other side. Now what we can do now is
we can come in and just create the sign outline first.
We grab all four of those. Press control AO transforms just to make sure we
get the corcck bevel. Press I think what we'll do is we'll leave
these ones actually, and we'll just do the
outside, so Control B. And it's not Control B.
It's Control Shift B. So make sure you press
Control Shift B. Press the CB just so it
doesn't go past their look. And then what we'll do
is we'll turn them up, make them nice and rounded and a little bit
square at that end. So you can pretty much see now this is going to be pretty nice. Now, the other thing
is on this side, actually, yeah, do I want it
all rounded on the inside. So, you know what I'm gonna do? I'm just going to go back. I am going to grab it all.
I'm going to press Control, Shift and B, and then
bevel these off. Like so. And then I'll
come to the inside. So first of all,
I'll pull it out. As you can see, at the moment, it's basically in the center. So rather than pulling
it out like that, what I'll do is I'll
press Tab Control A, I'll transform set
origins geometry, add in a modifier,
bring in a solidify. We'll put the solidify on zero, and then it should zero it out. So you can see now no
matter how far I pull this, it's zeroed out to the center, which is exactly what it wants. And I'm going to
hold shift down, bring it to the thickness
that I'll want it. And that will be
something like this. And then finally, I
can apply that now. Come in, grab the center part of it, press the eye button. Bring it down, and then
press the E button, bring it back, and
then we can have now our sign or whatever else we're
going to put on there. Now, the inside of here, do we want the inside of
here to be like this? Because we have a choice that
we can actually change it. We can make it a little bit more flamboyant if we want. So
just change that if you want. I think for me,
I'm going to shade auto smooth and I'm going
to go with how this is, I think it's looking
pretty nice. And I'm also just going to
put it over here because the next part I'm
going to bring in is just going to
be a metal part, just to kind of hold
it all together. So we'll have some rings
going round like on this one you can see we've got the three
rings going round. We've got a metal pot that's going to hold
it all together. Now, on here, you can also see that metal part is
holding these in as well. So once we've got
those metal parts in, then we can actually create
the other parts that we want. Alright, everyone, so I
hope you enjoyed that one, and I'll see you on the
next one. Thanks a lot. Bye bye.
194. Drawing and Extruding a Custom Lamp Arm with Curve Tools: Welcome back on to blend the building master class
from concept to final render, and this is where
we left it off. Alright, so what we want
to do is design now a part that's going to actually
hold everything together. Before I do that, I think it's probably better off if
we bring our lamp over, press R z and 90. Let's just spin it around,
actually. You know what? We can't spin it round yet, because we need to
put it in place. So let's put it in place. So
it's going to be just below. Let's grab our lamp. Just below a roundabout here maybe
even a little bit closer. So the sign sticks
out slightly further. Now, it's being
held by one part. So let's have a look at
this. Let's actually move this over to the site because we can bring that part back in. That's no problem. So let's have a look how we're
going to do this. So what I'm going to do
is I'm going to draw online, and then from that line, I can actually stick to what I'm actually
going to create here. So on my other screen,
I'm actually just hiding the parts out so I can actually see what
I'm going to be doing. And then what we're going to
do is come with the draw, and I'm going to show you that I want to draw it like this. So before you do anything, I recommend that you actually test this out to see what
it's going to look like. So something like this. And then we're going to go from here. So we'll go from here like this. And then this part will come round and then round
here and hang on there. And then we'll have another part which will come around here and hang up here,
maybe a little bit in. So if I come in, Oops. Like so. I think that's gonna look
pretty nice like so. I think with this bit, though, it will come in maybe
a little bit more like this and this bit
may be in line with that. Something like this, I
think we'll be sticking to. Let's now make a start on this. So what I'm going to
do is I'm going to first of all, I'll
leave this on. I'll come back to
this, and then what I'll do is I'll come to my post shifts and cust
to selected Shift A, and we'll bring in a curve. And the one we'll bring
in is going to be a path. Now, we can actually
draw this on as well. So you can either create it like this using this to actually
pull those points round, or you can actually draw it on. I'm going to show you
how to actually do that. So if we pull this
over to this side, like so, press the tab button, press delete and vertices, you will now notice
that we actually have over the left hand side because we're still basically
in edit mode. We just haven't got any points. So what I can do now is if I come over to the draw button, I should be able to
then come in and draw on my curve like so,
and there's our curve. Now, the next thing
we want to do before doing anything
else because we're in this view is what we want to do is we want to come over
to where the curve is, and we want to bring out
the extrusion first. So bring out the extrusion
very slowly, like so, and then we're going
to add in a solidify, and we're going to set
the offset to zero. And then what I'm going to do
is bring out the thickness, and then we're going to
right click and shades move. So I'm going to go
back I'm going to press tab right click Jade flat. There we go. And there we go. That's what you've got. Now, you can see that this
isn't quite right. So if I press one, I need to
go into the move tool again, and I need to move a
few of these round. So you can see here
that, you know, this is also a little bit thick. So I can bring down
the extrusion. So let's do that first.
So we'll come down, bring down the extrusion,
just a tad like. That's a little bit
a little bit more. Something like this will look like it's
actually holding up. Then what we can
do is we can start messing around now
with these points. Now, be very careful when
messing with these points, you can see that we can
drag them out like so. We can then drag
them out into place. We can delete one
out of the way, so I can delete this
vertice out of the way. We can also add in vertices, so right click subdivide, we can add one in, like so, and then bend it to how
we actually want it. So if you look here, we can bend it and get this part
to how we want it. So maybe something like this. And then I'm going to
straighten this down maybe and then bring
it over a little bit, pull this one out just
to get more rounded and working with these bars
rather than against them. We'll like this. And then
let's look at this side. This sides pretty good except the fact maybe that it's
not actually in place, so it needs to be against there because we're going to have
a metal part against there. This part, though, here
is looking very nice. Now, the other
thing I do is Alts. I can actually bring these in. You can see here
I can press Alts and bring these in like so. And there we go. That
is looking really nice. Now, what I can also do is grab these two, right
click subdivide, come into this middle
one, delete and vertes and what it generally
does is straighten it out. So now you can see, I've
got a nice straight part. Now, if I press tab,
sorry, not tab. If I come back over to my draw, I should then be able to
draw this one in as well. So let's start. It's
going to come from here, so I'm going to come round from here and then go down and
level it up with this. And then what I'm going to
do is come down to this, and then round and like
so. And there you go. It's the same as this. Now,
the other thing I want to do is right click
and shade flat, and there we go, we've got
exactly what we want here. Now, let's just make sure
that this part here, of course, is how we want it. So I'm going to move this over and then going to come
to this one, press in G, and move it around, like so, and then just lining it up, like so, and then I'm going to bring this one up a little bit. Bring this one up. I think there's one here.
Let's have a look. It might just be here actually. Let's see where this one is. Is there another one in there? I think it actually
comes down to this. So what I'll do is I'll grab
both of these right click subdivide and now I've got
one I can actually lift up. Like so, so lift it up onto this one. And you
know what else I'll do? I'll actually, I won't
actually do that yet. I was going to get rid
of the grease pencil, but I'm not going to do that. I'm just wondering whether
this is thick enough. Maybe if I zoom out of here, press the tab button, maybe they need to be a
little bit thicker. Maybe they're a
little bit too thin. So what I'll do is, I'll come. Is it the extrusion? Yes, it is. So I'll come and thick them
up just very slightly, and now they look
much, much better. But what that means
is now probably have to bring these
up a little bit. So if I bring all of this up, just raise you up, a tiny
bit, just so it's on there. Alright, so now we need to
just move out this one. So I'm going to move
these over into place. And then with this, I could come in and make it a little
bit more rounded. So if I pull it out,
I can pull it around, like so making it a
little bit more rounded. This one here has been a
little bit of a pain for me, so I'm just going to
look to deleting that. And now, now it should make it more rounded
like so, and then with this, I can come in again
and bring this out, and it's all just about
playing with what we have. Now, I want to actually bring
this down a little bit, so I'm going to press G, bring it down to something like this. Then I'll grab both of these, right click subdivide
and then I can press G and get exactly the
shape that I want. Now, it has to come up here and it has to come
up here and then these parts come up here and then with this,
we can round it off. Like so. Like so. Like so. And again, it just takes a little bit playing around to get the
shape that you want. Okay, so that's
looking pretty good. Now let's come into
the last part. So I'll come in with
my drawer again, and I think I will
draw from here. So it'll come from here
and then come out to that. So I'll draw from
here, bring it round. Draw it out, bring
it down to here, and then bring it
out here, like so. Then what I'll do is
I'll press the tab on. I'll right click and
I'll shave flat like so, and now you can see
they're all fitting in. Now, let's press one again. And let's bring this up to where we want it and this down
to where we want it. So we'll come into
this part first. We'll bring in our move
tool, and then I'll look. But which ones I
want to bring out. So if I press G, I want to
bring those slightly up. Now, I've not got one in
the center, as you can see, but I can bring this
back to make sure it's fitting in, you know,
where we want it. I can bring all of these down. I think they're a little
bit too high now. And then with this one, I
can definitely delete this. So delete versus just for now and then just
bring it back in. So if I press G,
I should be able to bring it back in like so. And now let's make
it more rounded. I'm going to round it
off, bring it down. And then let's come to
this one. D, round it off, pull this one out a little
bit because they're a little bit non rounded. And it does take a little bit of time just to get
used to how these, you know, these
bars actually work. They're called handles. It does take a
little bit of time. Now, I've done that. We
need to bring this one in. So Alt and S bring
it in, like so, and then Alness
bring this one in, like so, and then lns
bring that one in like so. Okay, hold on. Now, if I go to
my grease pencil, I should be able
to come in now and minus this off, and there we go. That is what we're
left with guys. So you can see just how easy that is to create
something like that. You can see now it's
looking pretty nice. And what I'm going
to do for, you know, for the main part
for the lamps on the walls and things is I
will be using just this part. I'll leave this part just for
the post, so the lamppost. Now, what we'll do
on the next one is, then we'll get our part in, making sure everything fits
before doing anything else. And then once we've
done that, we can actually come in and see. Let's just double tap the A. I still think they're
a little bit too thin. You know, if you
look out from here, maybe they are too thin. So you know what?
We'll come into them because they're
all joined together. And then what I'll
do is I'll just First of all, I'll
turn down this. If you turn this down to zero, you will see they
become like that. We don't need it up on 12, but we definitely want it up on, you know, nine or
something like this. And we'll come down to
then the extrusion, so the extrusion is here. So that makes them thicker.
That's the one that we want. But if I come in
and turn this up to nought point nuh
nine, let's try that. Naught point naught,
naught nine. Have a look. I think that's
actually going to fit better. It does look a
little bit better. Even though it's a
tiny difference, it does look better from
over here. Do you know what? I'm going to leave that
on the next one then. I'm just going to make
sure everything's smoothed off, as you can see. And I'll see on the
next one. Let's save that'll work.
Thanks a lot, guys. Bye bye.
195. Constructing the Lamp's Light Cage Using Precision Modeling: Welcome back, everyone to Blend the building master class
from concept to final render, and this is where
we left it off. Now what we're going to do is now we need to
bring in this part, which is going to
hold it all together. So let's do that
now. At the moment, we need to grab our post. We've got our cursor
in there, so shifts. And what we'll bring in
is we'll bring in a cube. So let's bring in a cube. Let's make it way, way smaller. We know it's in the center now. And then what we can do
is we can bring it up. Press ser three, and
we can go side view. Let's just hide this
out of the way. So just my lamp just for now. This is the side view then,
and we want it to be, if I press the S button, ride in the center just in
the center there, like so. So now if I bring
it out, I can press S and X first, squish it in. Like, so bring it out, and it should sit on here a
little bit better than this. Actually, it should be
in a little bit more. So S and Y, bring it in. Like, so this is how
I want it set in. And then if I bring it up
through the top off here, I should be able to
then grab the bottom. Like so, and then pull it
down into place like so. All right, so what I want
to do now with the bottom, I want to round the bottom off. So I'll press tab, Control A or transforms right clicks at
origin to geometry, like so. And I'm just wondering
if it's stick enough. I think it actually is. It looks stick enough to me. So then what I'll do is
I'll come into the bottom. Grabbing these bottom parts, pressing Control B then, and just rounding
it off, like so, and then I'll come
to the top parts, and we'll make them a
little bit different. So we'll grab the
top in this corner, pressing dot just to zoom around that, and then
grabbing this one. And then what we'll do
is press Control B. But this time we'll
do it the other way. So we'll bring it in instead. So if we bring it in this way, like so, and there we go. Now, right, click,
shade or smooth. And we're nearly
done. Now, let's come to these parts, then. So all I'm going to do then
I'm going to grab this. I'm going to go to I'm
going to make sure, first of all, bring in my lamp. I knew there was one on here, which is a little
bit too far in. So what I'm going
to do is just grab both of these and just pull them out slightly just so it's actually on
there, as you can see. You can mess around with them again just to make sure it's following that, as you can see, and then what we'll do
is come to this one, and we'll make it so that it actually follows this as well. So let's have a look how we can follow this a
little bit better. Maybe coming down to here, maybe following this round. If we pull this
out, bring it in. Again, it's going to take a
little bit of playing around. So we're going to get
this part in first. Like so, and then let's bring
this part back. Like so. And I'm happier with that? I think I need to make
it a little bit smaller. Press in the S
borne, and then G, and then bring in this
one in a little bit, and then this one round. Yeah, something like that, I think looks better
than what we had. Okay, so now we can just right click to convert to
mesh, and there we go. We can right, click
then shade Ato Smooth. And there that bit
on there, guys. Okay, very happy with that. Now, the other thing you can do, of course, is you can
come in to these parts. So all of these, they
don't look quite right, where they're all the same size. So what I tend to do now is
come to the end of them. Click on them all, and then what I'll do is put
proportional editing on, and then we can press S and
X or Y and bring them in, bring them in very,
very slowly, like so. Maybe even that's a
little bit too much, and maybe it's too
much on the shop. So let's try this. S and Y, bring them in. Like so. Now just check to see
if they've not come in enough and make sure
they're not breaking. I'm just looking at these,
making sure they're okay. And yeah, the other thing is, I don't want to I don't want to shade them smooth anymore than
what they are. So what I'm going
to do is I'll just come in with these two here, as you can see, Control Alt
and click press Control B. And you can see they've been
brought out in a weird way. We don't actually want
that, so what we'll do is set this to 0.5. And there we go, now
they're smoothed off. Now they're a bit
too smoothed off. So what I'll do is just
press Control's head. Control B, bring it
back a little bit, like so, and there we go. Alright, let's look for any other parts that we
don't want like that. And the rest of it
looks absolutely fine. So now we've got this part.
We've got this part in. So now we're able to
put in two lamps. So what I typically do now is I'll join these
two parts together. Now, you can see that we've
already got a bevlon here. So let's join this with this press and Control
J, and there we go. Control A, or transform
set origin to geometry. Now, that's our first light then that's going
to go on this part. Now, let's look
at the next part. So if I pull this over, I'll be able to put
that back on there. And you know what
I'll do, actually, is I will put it
against my lamp here. So I'll go right click
Set Origin 23 cursor. And now, if I move
this actually, I should, if I want
to put it back, press shifts and
selections cursor, and there we go,
we're putting it back into place. Now
let's look at this. So one of the lamps needs
two sign posts on it, and then a lamp going the
other way. So we need that on. And then this also
needs to have. So if I come in and
I press Shift D, like so, and I press
Shift space bar. Move. In fact, you know what? I'll go right, click SeragensGeometry with
this second one. And then what I'll
do is I'll come in and I'll delete this off. So, delete vertices, like so. Now with this one, what we're
going to do is we're going to bring our little guy
over, bring him up. Just make these a
little bit smaller. So I'm going to make
it a little bit smaller just so they're
more like lights. And then what I'm going
to do is press Shift A, and we'll bring in a cube. We'll bring our cube to this. So I'm going to press Shift
desk, cusor selected, grab this one, shifts selections cursor, press the S form. Press S and Y or X, bring it in. And then we've got
it in the center, and I'm going to bring
it down and into place. And basically what
I want this for is this to sit on the wall. So this is about
the right length. If I press one or three, you can see now I
can bring it in. So and Y, bring it in. Bring it in, bring
it in, like so. And then what we'll do
is we'll put the back, so we'll grab the back of
this a little bit further in without portional
editing on, there we go. And then what I'm going
to do now is do the tops. So these tops will bend in a
little bit wave Control B. So you can see
they're not coming in properly, resell the transom, set origins, geometry,
press Control B, bring them in, turn them up. Left click, and then what we're going to do is bend them in, like so, right click
and shade Auto smooth. Finally, then I want
to bring this part in. So what I'm going to do
is I'm going to come again to the face,
press the i button. Making sure they're
not crossing over. Now again, pressing I, can I press C and stop
them crossing over? Let's have a look. No,
they're doll crossover. So we don't want
them crossing over. So just before they
crossover, as you can see, and then we're going to
press the E just to pull it back like so, and that's
what we're left with. And now let's pull this forward. So if I pull this forward into place so they
actually sat in there, maybe that's a little
bit too far, like so. And then we also want to make sure that this one is
also setting there. So all I'm going to
do is I'm going to grab the front of
here Control Plus, and I just want to bring it up to there where that
straight part starts, and then I should be
able to bring this in just a little bit
more if you need to. Alright, so that one's
in, that one's in. That's looking good.
Now let's grab this, join it with this Control J, press Control A or
transforms right, click. The origins of geometry. Right, click, Shade Auto smooth. Now, let's spin this round,
so Asha -90, like so. So that's that one
done. We've got these now to do, so
just the lamppost. So there's going to
be one lamppost with um two parts and maybe one with so one lamppost is going to
have two of these on it. So these parts here. The other thing about
the lamp post right now is we'll have one
where it comes out. So I'm going to put this
on three of the sides. So what I'm going
to do is I've got the center here and I've
got this part in here. So what I'm going to do is
shift Ds cuss or selected, grab this part, and then what I'm going to do
is rotate around. So if I press Shift D, we've got a duplicate there, little sideways V then, individual origins
or three D cursor. Let's put it to three D cursor, and now I can press R z 90, and then it'll spin around
exactly where I want it. Then all I can do
is shift D again, and then R Z 90
and spin it round. And there we go, now we've
got the three pots on there. And now all I want to do
is bring in some bars. So I'm going to press a
little sideways V again, go to individual
origins, press Shift A. And what I'm going to do
is bring in a cylinder. And because I
restart my blender, I need to put it on
something like 24, and now I can actually
bring this in. So I'm going to bring
it in. I'm going to bring it up then and
I want three of these. Bring them in, bring
them in, bring them in. Zoom into it and they want them. Yours, the edge up here. So you can see here
they don't want to be. They want to just be here, as you can see, and they
want to be pretty thin. So E and Ed bring them in. Like so, and then bring them up and they
will be holding those on. Now, of course, we can see
that they're not quite right. They're coming through here.
We don't really want that. So I need to kind cut
them on each of these, and I'm also wondering, yeah, that one's okay
going around there. It's just these
ones where they're actually coming
out a little bit. I don't particularly want that. So what I'm going
to do is I'm just going to see, can
I pull them in? We'll try it with this
one. Can I pull them in? So I'm going to pull
them in flat and just see if I can do it the easy way before doing anything else. Like so. And I'm just
wondering if that's the way to go or should I actually
cut it going down here? You can see I can
actually come in and cut this round
about here instead. So let's just have a
look. Let's just go back. And then what I'll
do is control. Left click, right, click,
control, left click, right, click, and just do
these ones that are out here. So control left click, right, click, going around here, Control, left click, right click and Control A, left
click, right, click. And now it'll do is
just delete the top. And the bottom, delete
those out the way. Delete and faces. Now I can come in and
just delete these. So these ones here, going
round, these ones here. So and then this one
here, going round. And then we'll leave that
a Zs, delete and faces. And finally, then control A
or transform, set origin, do geometry, adding a modifier, generate and a solidify. Okay, so now I can actually got control of how far I
want them brought in, and I think something
like this still leaving a gap down there
looks about right. So let's just double
tap the A, right, click, you know, right, click. Shade or move, double tap the A, and there we go. That's
exactly what we want. I can come in now
with my solidify and apply that and
then we'll do one, and I'll press Shift
and D, drop this down. Into the place and then shift in D and bring it up
into the place. And maybe this one will
make a little bit bigger. So Es ands Ed, pull it out a little bit. Double tap the A. And there you go. There is
your lamppost nearly done. Okay, so on the next
one, then we'll get two of these and one
of the lampposts. And on the next lamppost, we'll get one of these
on and two signposts. So then the lamposts are done. The flower pot is done, the tree thing is done. I think I think we're nearly there with all of
the modling after that. Basically, we're done.
Alright, everyone, so let's save out our work and I'll see
you on the next one. Thanks a lot. Bye bye.
196. Assembling and Positioning the Final Lamp Prop in Scene: Welcome back everyone to blend the Building Mass class from
concept to final render. Okay, so we've got
this one. Now, let's do the first lamppost then. So what I'll do is I'll
just grab this lamppost, press Shift D, and just drag it over to this side for
the next lampost. Now, I messed up there because
I want to press Control, actually, so I want
to come back to it. And what I want to
do is I just want to make sure that these now have the solidify on them. And then what I can do
is I can grab this, grab this last, press Control J, join everything together. Control A or transform
set origin to geometry. And the last of all, I
didn't put as far as I know, a bevel on here yet. So I'm going to add in a
modifier, generate a bevel. Let's put that on there. Not
not point, not not three. Let's try that. And let's just make sure that
bevels on there. And there we go. That's
looking pretty nice now. Okay, bevels on there. Now, let's grab this then one we're going to do is Shift
D. I can drag that over. Now, let's make sure we have
no bevel on here as well, but the bevel on here is not point not note
one, as you can see. Now, let's just go into this. Control A. You know what? We've got it already
there. So shifts, selections cursor, and there we go. Then that's actually in. Now, one thing I want to make
sure is it's in properly, which it looks to me like it is. So now I can do is
I can come to this. I can press Shift D, Z, 180, spin it around the
other way, and there we go. That
is that one done. Now, the next one, then, that we're going to need is going to be one light and two kind
of stone pots on here, not stone pots,
signs on stone pots. Where is that coming from?
Shift D. Let's pull it over. Let's join all of
this together now. So what I'm going to
do is I'll join these two with this last
press Control J. Join everything up,
and there we go. And now what I can do is just make sure
everything's looking good. And then what I can do
is pull this over now. And then pull this one back. I'm going to pull this one shift desk selection to cursor, press one and then
just pick it up, so it's put into place, like so, and now I'm going
to do is grab this, and I want to put it
in the center here. Shift desk and selections
cursor bring it up, like so and I think
I want it halfway. So halfway around there, around this point here, like so, maybe a
little bit higher, like so, and then
pull it into place. Like there. And there we go. Alright, that's in the center. Now we've got a
back and a front. So the front of Witty should
be where the light is. So what I'm going to do is
now I'm going to press Shift D. And then I want to
move it from here. So little question, sorry,
the little sideways V, three D, curta and then R Z 180, spin it around to that side. And now I want to mirror
it on perhaps the Y. So object mirror on the Y.
Jul turn it round like so. Alright, so the last part
then is I want to grab this R Z and you can see
here again, it's over here. So I'll just press shift
desk and selections cursor. And then what I'll
do is now the little sideways V that I've
already got on there, I can press OSE and 90 or Rs Ed -90 on this
occasion, Odds Ed -90. And why is it -90? Because we've got this
little band in there, so we need to make
sure the signs fitting in there perfectly. Now I'm looking at is this side. I've only got three of
these, so I've actually put this in the wrong way
on this lamp post, so I can press RSE, 180, spin it round, and there we go. Now, I'm just going to check
that on the other ones. Yeah, this one's facing
the wrong way, as well, so I'm just going
to press Rs Ed, 180. Not from there. From this little sideways V, individual origins, and then zed 180 spin it round.
And there we go. Alright, so far so good. Now, let's finally join
all of these together. So we'll join all
of these together. Before we do that, though,
let's just take this out, and we'll have that as
another pot, like so. And then what we'll do is
grab all of these now, grab the lamppost last, press Control J, join it all
together, and there we go. Now, then we've got our
lights. We've got our benches. We've got everything
pretty much done now. Our lamps, I think we're pretty much done with
all of this stuff. So with these, again, you can take them into
your asset manager. I'm also going to just pull these over and pull
them over there. And when they're over there, I'm going to pull them in my leaves. So I'm going to put
everything in the same place. I'm just going to scroll
down all of these things, so including my hedges, and then we go,
you'll notice that the viewport is a
little bit sluggish. That's because we've got
a lot of stuff on here, a lot of jammage notes,
things like this. What I'm going to do
now is pull these over. Now, for sluggish
viewports, again, if you want to come in, you
want to see your building, it's easier just
to turn this off. You'll notice as soon as I
start turning these off, that the sluggishness
actually starts to go away. Already, I can feel that
sluggishness drop down, and there we go, now
it's absolutely fine, even with the grass on there. When we come to
render it, though, it will still render it out. It's just not showing
it in the viewport. So you can see display
modifying viewport, display, modify,
draw and render. Also, don't forget if you've
got it very sluggish, you can also turn
down this part here. So we can still have them on. But if I come to my hedge, so if I come to my hedge, you will see if I go to
the modifier, where is it? I've got the leaves on here, you can see density. This density in let me
just find it on the hedge. I don't actually
think we have one on the hedge of the density
in the viewport. I don't think we
have that, actually. That's one thing that
we should actually get. So we don't have any density within this. Okay, never mind. We haven't got that, but we'll actually change
that in the future. Alright, so we've
got this so far. Now let's put the lamps in, so we'll call it small props. So what I'm going to do
is grab all of these, and I'm going to put
them under small props. So M, make a new
collection small props. Like so. And for now, because I'm going
to be using them, I'm going to shut the hedge up. And then what I'm going to do is just turn off the render. So these won't be rendered
under small props. Now, there's one thing
that you need to remember that when
you turn this off, whatever you bring in now, you need to make sure that it's put under a different one. So we've got small props. I will call it assets, actually, because then I can have
another one, assets, like so. Then I can have another
one where I put it in small props and, you know, under just small
props because then we can hide these out of the way that are over
there that we're using, and the ones in the scene we're actually going to
be able to see. Okay, so we've got that so far. Now I've got a cylinder here. What is this cylinder? Let's have a look.
We'll pull that out. This is an empty,
as you can see. Probably to do with the curve
or something that I made. Let's just delete
that out of the way. So this is what we've
got so far, guys. So now what I want to
do is I want to start bringing in these lampposts. So I'm going to bring in
one of these lampposts. So what I'm going to do is press Alt D. I want to bring it over. And my first lampost
I'll put over here. So if I press seven,
go over the top, Z and 90, and I
should be able to put my first lamppost
round about here. Like so, and then just make sure that it's not
too far on the floor. You can see it's a little bit
far in the floor, like so. Alright, working our
way around then, I'm going to grab another
couple of lamp posts, so I'm going to grab this one.
I'm going to press Alt D. I'm going to bring it
over to this point here, seven to go over the
top, and then I'm going to press Z 90. And I'm going to pull this then over into the center of here. So round about the
center of here, pull it back a little bit, and then Alt D and ing it over. Do this side like so. And now we're going to work
our way around and we need I think maybe one
or two more yeah, maybe just one more
lamppost, I think. So the other lamppost, I'm going to put around
here and then put a bench over here or
a couple of benches. But what I'll do is now I'll
grab my other lamppost, which is this one
here and I'm going to press OTD, bring it forward. And I'm just making sure
everything's there, as you can see, and then
I'll bring it over. And the angle of this, I think was 52. Was it 52? Let's have a look? Let's
see if we can open up that end panel? Yeah, 55. So let's see if we
can spin this round. So Rz -55, and there we go. It's going to line up
absolutely perfectly. So now I should be
able to line it up down here somewhere. And then make sure that
it's out of the ground. Now, the one thing I forgot
to do before finishing all of these is I forgot to bring in all of the textures
and things like this. Now, I'm hoping as
they update these, all of the others get updated, so let's hope so because I completely forgot
about that part. But let's come in now and
look at the material, and then what we'll do is we'll also save out all of our work. So let it to load up.
Let's see what material. I think I've done
the benches and the plant pots and
things like that. I think it's just these
that I need to do. Alright, they're all done, as I said, so it is just these. So I'll do is I'll come
in, I'll press file. I'll save out my work,
and on the next one then, I'll get all of
these materials in. Alright, everyone, so I
hope you enjoyed that, and I'll see you in the
next one. Thanks a lot. Bye bye.
197. Preparing Stylized Props for Final Scene Placement: Welcome back if
you want to blend the building mass class from
concept to final render. This is where we left you off. Now, what I'm going to do
is I'm going to isolate these out because it's a
lot of stuff over there. So if I grab all of these, I should then be able to press Shift H, isolate everything out. Now, of course, because the
way I've done it means, I'm going to have to
unwrap a lot more stuff, or I just duplicate it over
and reput them back in. Completely up to you which
way you want to do this. It's my fault in Tyler
that I did that. I should have realized
that, you know, I should have, you
know, unwrapped the put on the materials
and all that stuff before. So, let's put that behind us, though. For now, let's come in. Smart UV project. Click Okay. Now, let's go over
to our asset manager because it will make
it way way easier. Let's put it on material mode. Let that load up, and then
we'll zoom in to or sign. Now, you can see here
while that loads up, if I press Dot bun, that we do have one,
which is like this. This is a very, very nice
sign that we've created here. Let's first of all though,
bring in the metal. So we're going to
bring in metal. So let's do a search,
and the one we want is metal building, like so. And then what we
want to do is grab just this part,
press and unwrap. Now I'm going to do is I'm
going to on this part, press the plus button,
drag this over, drop it in there, like so. So sign streets and then
click a sign on this. Now, let's come over to our
UV Editing. Here it is. So if I can press eight or 90, completely up to you. I
would leave the green one. I'm going to show you why I
would leave the green one. I want to put that
on something else. Now, for me, I'm going
to go with Park Avenue. I'll put it on there.
So I'm going to grab this, press the G button. And drop this into place. I'm going to press S
and X and bring it in. So let's have a look at
that. Then press the dot bo, come round, and there we go. Now, I don't think
that looks right. I think it's been
squished in a little bit too much or too less. So S and X, let's bring it in. I want it just where
these little points or these parts here
are like this. And that to me looks very nice. I think, though, this side, as you can see, I've got
a little bit of gray. So all I'll do is
I'll bring it in. I'm going to fine tune
this a little bit, guys. So S, bring it in. And then G and Y, hold in the shift but, bring it down so it's fitting
in perfectly. Now we've got gray
there, as you can see, and maybe maybe it's looking
a little bit better. So now I press S and X, pull it out with the shift, and then G and X. And just get this lined up
really nicely. Like so. Alright, now, this sign, as you can see now, I've
got the mall in place. Now, this sign is the one that I need the Piccadilion
because it is its own sign. So if I press G and Y, I can then just bring it
up into place like so. The one thing is, I do
need to pull it over. So G and X, let's
just pull it over, getting those two little
these parts in there. And so maybe I'm just wondering if I pull it out a
little bit. You know what? I'm going to be happy
with that. Now, let's come to the other part, then. So we've got all of this here, but I'm going to work on
it one step at a time, because I think I'm going to actually put those
over to there. So I'm going to come
in, and then what I'm going to do is I'll
come to this part, and I'm actually going
to split this up again. Like so. So let's come in,
split all of this part. Coming round there,
grabbing each of these. And always check, guys. Always check if you've
actually grabbed everything. So if I come in now,
press the G button. You can always see then if
there's anything left behind, which there isn't
on this occasion, press P selection, hid
it out of the way. Now, let's come to
this part, then. I'm going to grab
everything, U smart UV project because
this is mostly steel, well, it all is steel, I think, which is going to
make it very, very easy for us to
actually work with. Now what we'll do is
we'll bring in the green. So now I've unwrapped it,
I need the green metal. Now, I'm not sure if I've actually got my
green metal here, so let's have a look green
metal green, there we go. Okay, so that's the metal green. Now, at the moment,
doesn't look too hot. Let's have a look on
the rendered view just to make sure
it's looking good. And there we go. Now it's
looking pretty good. Now, let's put it back
on material view. Now we know it's okay. And then what we'll do
is with the top of here, let's come in and add
this for the black metal. Control plus going all
the way down to here, like so, and then let's put
click Plus, down arrow metal. Non one is metal build in, click Assign, and there we go. Now, let's work
our way down then. So we've got this
going down to here. This might need to be
a little bit shiner. We'll have a look at
that as we work along. But all I'm going to do now
is grab three of these. So these three going down then, I want to grab these parts here. Like so work my way around. Grabbing this part, this
part and this part. And then what I'm
going to do is metal building, click a sign. Now I'm going to
come to these parts. Same thing. Metal
Building, click a sign. And then let's work
our way way down now. So on the way down,
let's have a look, I'm just looking at what
I've got on my own. But if I come to here,
do this part here. I'm going to grab
this Control plus, Control plus, Control minus because
they only want the top. So press the dot but,
Alt shifting, click. Metal building, click a sign. And then now we're going
to come to this one here. So with this one here,
all shift, click, Alshift click Control
plus just keep going up, it grabs them all the way round. Like so metal building,
click a sign. And there we go, Let's have
a look what we've got. Yep, that's looking pretty
good and now just the bottom. With the bottom, Control
plus going all the way up. To maybe just in there. So maybe go so I look one more, like, so metal
Building, click assign. Alright, that is what
I think looks good, and now we just
need these parts. So again, we'll come
into these parts. Now, can I actually copy this? So I'm looking if I
can come in and copy. So if I press you,
can I actually copy? No, I can't. So what I want to do is make these
the same size as this. So what I'm going to do is I'm going to grab all
of these together, so I'm going to grab
this one and this one, press tab, and then
I'm going to grab these two and press and unwrap. And then A, 90, spin them round, and then
we're going to grab this one. Now what I should
be able to do is grab both of these
at the same time, press the S bone
and bring them in. So I want them pretty
much exactly the same. So I'm going to bring them
to here right in the middle. I'm going to press G and
X and pull them over. But they're nearly
the right size on the X. I'll do that first. So S and X, bring them in. Like so, and then S
and Y and pull them out and G and Y and just get
them roundabout into place. Okay, something like this. Now what we'll do is
we'll grab one of them. We'll bring it down to
the Park Avenue, like so. And we want to make sure
we've got no gray around there and want to make sure
it's fitting in nicely. So I'm now looking
at street sign. I want to bring in the
street sign first. So if I come to this, I
should be able to press Plus down arrow, street sign. And then I can come
into both of these, click a sign, and there we go. Now we can see this one's
the wrong way round, so we'll come to
this one or 180, spin it round, press the tab
button, and there we go, now you can see it's a
little tiny bit out, so I'll just move it over
with GNX making sure it's fitting in nicely like
so, and there we go. And then we'll do
the next one, why should we put this
on Train Station? Yes, we'll put it
on train station. We'll go down G and
fit it in nicely, and then G and Y, pull it down a little bit, like so, and then of
course, spin it round. So, 180 spin it round. And we also need to mirror
this because for some reason, it has actually not mirrored. So we'll just go right click mirror on the X,
and there we go. Double tap the A, and now
we've got all of that in. Okay, so this is pretty
much the sign post done. I'm wondering, let's
have a look on Render view and have a quick
look at what it looks like. I was just wondering
whether I want this part here to
be black, as well. But you know what? I think
I'm happy with how that is. I think I do, actually.
You know what? I think I'll just come in and press Alt Shift
click Concho plus, Concho plus Concho plus,
and then I'll go to metal. It's noting. And there we go. Yeah, I think that
looks better like that. Okay. So the signpost now
is done, as we can see. Now we've got the
actual main part, which is, if I bring it
back, this part here. So our light is one of
the main parts and also probably one of the
hardest parts to texture because we've got all of
these lights in as well. Now, let's press
A, first of all, and we should be able to
press U and smart UV project. Click Okay. Now, on the light, we want some of it to
be the metal green, some of it to be the metal. And I think what we'll do from here is I'll just
let this load up. I'm hoping it doesn't
crash because I've got my other one, of course, over on the other
side, my other blender pal. What I'm going to do
is I'm just going to put this onto when it loads up onto material view
instead in the beginning, just to make it a little
bit easier for me. And then what I'm
going to do then is save out my work, so
I'll let it load up. Say that my work, and then we'll finish this
on the next lesson. I'll let it come
down. And after that, guys, we've got our plans to do. With the plant pots, we've
got our benches to put in. And then finally, you can see, as well, I might as well check and see if these
actually go updated. No, they didn't
though they're all D, they actually
didn't get updated, so I'll go in and update them. I'm not sure why they
didn't get updated. I'm just gonna have a look, actually, I'm gonna press tab. And maybe it's because
it's this one. I think, this one
got updated, look. You can see. Okay, this one got updated. That
one looks perfect. It's just these
two I haven't been updated 'cause I haven't
actually finished them. You know what? By the
time I've done these, it shouldn't take too long. I might just paint them
all, you know, instead. It won't take that
long, guys, honestly. For now, though,
let's save our work, and then we'll do
that on the next one. Thanks a lot, everyone. Bye bye.
198. Adjusting Modular Lamp Meshes for Correct Scene Integration: Welcome back to blend the Building master class
from concept to final render, and this is where we left off. Now, the first thing I
want to do is make sure that we can actually use
this lamppost on here. So what I'm going to do is I'm going to come to this part. First of all, I'm going
to press shift D just so I'm not messing around
with the original one. I'm going to bring
this over here. And what I'm going
to do is I'm going to get rid of this part here, so get rid of it, so
delete and verts. And now we're left with
exactly what we have on here. Now what I'm going to
do is I'm going to come to this one, and I'll grab this
part round here. So Alt Shift and click, shifting S, and then
cuss to selected. And then what I'm going
to do is right click and set origin to geometry. No geometry, right click
Set origin, CD cursor. Alright, there we go. Now
we'll come to this one. This is exactly the
same as that one. So I'm hoping that
if I come Alt shift, and click, shift,
curse to selected. And then what I'll do is right click and set origin 23d cursor. Now, I'm hoping that if I
move this one over here now, so if I press shifts
and selections cursor, it's going to line up
perfectly with it. Now, if I join these
two together and then delete this one with
the materials out the way, that is really
what I want to do, and that then should replace
these ones over here. So let's give that a try. So what I'll do is I'll press dot Zoom in I'll hide
this out of the way then, and I will in fact,
you know what I'll do. I'll first of all, yeah, I will. I'll hide this out of the
way. Come to this one. Press tab, double tap the A to make sure
everything's not selected, and then press L. And what I want to do is select
the whole thing. So I want to select
the whole thing. Of these parts here going
round, all of this down here, make sure we're on edge
select just because we've got some seams
in there and things. Go around to the outside, and what I want to do is
make sure that all of this, including these parts
here, is selected. So all of this going round, like so, is selected. And now I'm going to do is
press P selection like so. Now, if I come over here now, we should see that
these lampposts, you can see they've gone
the wrong way round. They've gone the
wrong way round. So what I'm going to do, I'm going to do
it the other way. So if I come in and join
this back together, so Control J, so, I will separate these
parts round first. So now if I go
back, you will see, and I know this is a
lot of messing around. We've still got those selected, and I want it to actually
update on this. You know what? This is going to
cost me probably more too much work
to do it like this. I'm going to just press Alt H, and I'm going to move
this one over here. We've got now this and this. So if I grab this one, which is the one which
is painted, two these, press Control J,
press Control A, all transforms, right
clicks at origin geometry. Have they updated now? No, they've not updated. So if I bring this out now you can see no updating on there. So you know what? We're
going to actually come in. And I'm going to
select these now and delete probably the other one because we've got
everything set out. But what I'll do is I'll come in and I'll grab all of this. So if I minus this
off, for instance, so I tab, minus this
off, come back in then, and what I'll do is I'll select the trouble is now that this is doubled up. So
this is all double. So what I'm going to
do is just go to mesh, cleanup and merge by distance, and 2,800, um verte is removed. If I press G now, you can
see all that is in place. Now if I come back to
those, you can see still none of these are done
correctly, as you can see. You know what I'm
going to do I'm going to delete them
out of the way. I'm going to leave
them out of the way. I know that this
one, for instance, isn't done properly
either because it will need a light on
the front of there, so I'm going to leave
that one out of the way. I'm just going to come round and delete these out of the way. And I made a mistake there, so I'm now going
to be fixing that. So what I'm going
to do now is grab this. I'm going to grab this. I'm going to press Control
J, join it together. I've got my other light here, which is on its
own, which is fine. So now all I want to do
is come in and basically, yeah, what we'll do
is we'll come in first of all, minus this off. And then what we'll do is we'll
come just to this p here. So all of this part
let's come to it, and we'll just put it
for metal for now, and we'll also
unwrap it, as well. So I'm going to unwrap
it, I'm going to press the dot bone
just to zoom into it. And yes, it was a lot of
faffing around, I know, but it's good that
you're actually seeing these issues and possibly how to fix
them or what I'm trying to do to
actually fix them. I think that's important.
But let's press U, smart UV project. Click Okay. Then what I'll do
is we'll come in. Metal building, click assign. We'll minus noon
won't minus that. What we'll do is we'll
bring in a plus, and the one we want is
going to be if we come to our asset manager,
we want this one. This is the one that we want,
so I'm going to drop that on and I'm going to
press dt and zoom to it. Now, let's actually have a
look at what we've got so far. So this metal on top of
here, I want to be green. So now it should be simply
ultra click Control plus, and then what we'll do is the
metal green, click assign. Now, the metal going all the way down here is
going to be black, same as this metal
going down here. This one here, should I have
a different meal for this? Let's actually have
a look what it looks like on Render view now. I think we have another metal. I think let's just have
a look metal shiny. We do have a metal shiny, but I don't think I need
to actually use that one. I'll actually come in. We have a metal brass
look. You can see it. You could make this brass or
you could make this brass. You know what? I think,
actually, this looks quite nice. What I'm going to do then
is select all of these, so select all of these faces
going around here. Like so. And we might be
able to come in and select similar buy area. Let's see. Nope, that's not going to work. Let's
try another one. Select similar perimeter. No, that's also
not going to work. You know what? I'm just going to go down and select the more because it's
going to be easier. Like so, like so, and then select these ones, like so, come around
and the last four. And then all we need
to do is click Glass, click assign, and there we go. Alright, now you can see
that's looking pretty nice. I think I'm just looking if I want anything else green on here because I on
we've got this green. Maybe this part here,
just to finalize it. All shifting, click
Control plus, Mel green, click Sign. Like so. Alright. Does that look right? Oh, you know what? I think so. I think
it looks pretty good. Alright, so now let's come
over and bring this one over. And what we'll do is
we'll work on this one, and we'll also bring
this over because they're relatively short
to get these things done. What I'm going to do then is I'll come in and first of all, I'll come in and I want it to look basically
like this one. So basically like this one, but with these in here. So what I'm going to
do is, first of all, I'm going to come
in again and I'll grab this going around here. So Alt Shift, click, shiftiness, cursor selected,
and then tab right click Set Origin 23d cursor. This is going to
save me doing all of that work on this part again, and then I'll just
have these parts. So what I'll do then
is come to this one. I'll come to this part here, and I'll go Alt shifting click
Shifts, cuss to selected. Then what I'm going to
do is I'm going to come now and delete all of
these out of the way. So I'm going to come in and delete all of these
parts out of the way. I've got three on
there, which is what I need. So I'm going to come in. Like, so making sure that I've selected
all of these pots. Now, I'm just wondering
with these parts here, yeah, I think I'll also select
these as well. Like so. I'm going to go around
the other side now, making sure that I've
deleted everything. So L, but around the other side, and then L, L and L, and then delete and vertices. And we should be left with this. And now I should be
able to come in, press Shift and D, and then press Shift and S and selection to keep cursor
offset. And there we go. Alright, that is what we want. Now, we also luckily for us, no, we don't don't need
a light on there, so what I'll do now is I'll come I'll delete
the light on this. So let's delete the light. We'll also delete all of these fixtures,
things like this, and then I'll press
Delete and verts, and now I'm left with this, so I can press B, grab them all, press Control plus just
to make sure delete and vertices and now
come around to this one, and we're going to
come in and delete these and delete
vertices like so. All right, so now we've
got both of these. So let's join them together. So we'll join this
one with this one. We'll press Control J. And there's one thing
that I want to check. You can see here this
is not unwrapped. Is it unwrapped properly?
Just making sure. You know, with that on
there, I will come in. And just unwrap
all of this again. So U, smart UV Pj, click Okay. Let's unwrap it again.
And there we go. That's probably looking
a little bit better. Now, do I need this one
on the front anyway? I don't think so, actually,
but the problem is, if I get rid of it, then I'm
going to have the rings. Going down here as you can see. So you know what I'm
going to do, actually, I'm going to press
Delete and vertices. And then instead of
these being here, I'll actually grab the
rings round the back. So I'm going to grab the
rings around the back, and I'm hoping that
it should go around. So if I press delete vertices, then what they'll do is I've got my cursor right in the center. So now if I press L on
each of these, like so, and then shift D,
little sideways V, put it onto three D cursor, or Z 180, spin them round. So did they actually go
around to where I want them? Double tap the A,
and yes, they did. And there you go. Alright,
we've got those on now. They're all part
of the same thing. Now, let's come in, what we'll do is we'll do
these parts first. So we'll grab all of
these parts like so. We'll also come in and grab
all of these parts like so. And for now, we'll just
give them the same color, which will be our
metal building. So click a sign, hide
them out of the way. Now, they're not
hidden out of the way, as you can see, because I
need to come in like this. I'm going to press B and control plus until
we've got them all. Assign metal
building. Now press, Othe, bring back everything. Let's put it on
material mode now. And then what we're going to do is these at the same time. So now it's on material
mode. I can come in. Oh, shift, click, Oh shift, click Control plus going
all the way up like so. And then what we're
going to do is assign the metal green. Then finally, we're
going to come down here. Olshif click. Same on this one. Al Shift click Control plus
going all the way to there, and click Assign metal green. And now, finally, all we want to do is just come
to each of these. So we're going to
come to each of these, going round like so. And yes, it's a few
squares, but honestly, takes a few seconds to
grab them all. Like so. And we'll also do that on
the other side as well. So on this one, this
one, and this one, and then just on this one, we'll do exactly the same thing. And then we're just going
to assign the glass. I'll click on all of these, like so like so, and finally, this one here. Like so and click on
glass, click a sign. Double tap the A,
and there we go. So we have two signs now. We have this one, and
we have this one, and now on the next one, what we'll do is our smaller signs. I think after that, what we'll do is we'll get our butchers in just to these plant pots that
we're going to have them, and I'll show you how
to use our butchers, and then we have our trees. Finally, then we have a bit of grass that we need
to put in, as well. And then we're pretty
much on to camera setup, rendering and all
that good stuff. The things that you're
already, looked at. You've already seen how
to render in cycles NV. So I'll be going
quickly through those. And from there, then we should
be able to get a really, really nice Render guys. Alright, everyone, so I hope you enjoyed that, and I'll
see you in the next one. Thanks a lot. Bye bye.
199. UV Mapping and Material Assignments for Prop Variants: Welcome everyone to blend
the Building Mass class from concept to final render. And hopefully now we
are nearly there. So we're going to grab both
of these, first of all, press Control A or transform
set origin to geometry. Then what I'm going
to do is I'm going to grab this one first, then this one, press Control L, and I'm going to link materials. I'm going to come back
to this one, then tab A U Smart UV project. Lick okay, and then
let's zoom to it. Now, we can see
that the main bulk is going to be the metal
building. Click a sign. We can also see that we don't need the street
signs on this, so I'm just going to
go down minus it off. Then what I'm going to
do then is I'm going to keep everything
pretty much the same on here except this green exactly as
we've got on this one. So Al ship, click Control plus, Control plus, and Metal
green, click a sign. And then, of course,
underneath it, Al ship click Control plus, and Metal green, click a sign. Finally, then, let's
come in and just change these then to the glass like
we did with the other one. We'll change these over
quick in a way round. Like so and then what
we'll do is glass glow, click a sign, and there we
go. Double tap the eight. Okay, so before we finish in, let's actually name this then. So we've got in here now. We've got small props,
as you can see. You know, do we
need to name them? I don't think I named
anything so far. I recommend it's probably a good idea to name these props, take them through
to your resources, put them into the
asset manager there, and keep them there
because they're just so handy these things to have. I will leave mine,
though, as there is. And what I've got in
now as you can see, I've got all of these
in my small props. Now, from here, then, I'm
going to close that up. You can see again,
I'm going to turn off the render button on these because I don't want
them rendered out. Now, let's once more, put them in the place where we want them to go and see
how well they look. So first of all, I'm going
to grab both of these. I'm going to press Alt D
and bring them over to. Let's first of all, check
press in little sideways, put it on individual oigins, bring them over to here. Now, I'll do with my sign first. So ds -90, I think it is. And then Control three, and I want my sign to go yours to bob probably around here
somewhere around here. So it's quite high up.
And then what I'll do is I'll bring it in to my wall. So press the dot on,
bring it into the wall. Like so, let's have
a look at that. Double tap the eight,
and there we go. Now let's come to this one, and I'm going to spin it round. So Z -50 57 to go over the top, and I'm going to put it down
here somewhere, like so. Now, for now, these
are just placements. I can move this out, but I'm
going to put it down here, lifting it up, making
sure that it's in my floor. So
let's have a look. Is it in the floor
there? Yes, it is. Okay? And I'm also looking. If I look at the top here, it does look a little bit out. Is it out? That's what
I'm checking now. You know, why,
it's looking good. Okay, so we've got those two in. Now, let's bring in, I think, we'll bring in our bench now, so I'm going to press old D. And then what I'll do is
bring this round. I'll spin this round by 55. So Rs 55. Nope, R -55. There we go. And then I'm going to
11 and two benches in. So if I put this here, press a little dot
bone, like so. I'll also do I want one
more over the other side. So I'm going to come in,
grabbing my plant pot. And then what I'll do
is I'll press Alt D, move it out a little bit, and then I'll put my cursor here. So shifts pista selected, and then shifts and
selections cursor. And then what we can do
is move that out now. Now, I should be able to move it along this way, so
let's see if I can. So normal, can I move it along? You know what I'll
do instead of doing that to make it a
little bit easier, I'll just press Rs 55, and now if I put it
onto local, or normal. No, I can't do it
like that, either. So I'll leave it
like this for now, and what I'm going
to do is I'll just press G and just
put it into place. Now for this one, can I move
this one out on the local? Yes, I can, so I
can press Alt D, bring it out, put it into place. Now we can see, are
these going to fit in or do I need to move this
a little bit further over? That's looking nice like that. Now the next thing is,
I can see that these need pulling up a little bit,
the same as the plant pot, so let's pull everything up just so it's just going
into the ground like so, and then the plant pot, where is that going to fall in, too? Round about there. Let's see if we need to lift this
up a little bit more. Just so we've got
that black bitter at the bottom done,
and there we go. So we've got our
two benches in now. Now, let's move around. So I'm looking as well
when I'm doing this. To make sure that I've got all of my other
parts in as well. So I've got my bush here now. I think I'll put my bushes in after because I think
it'll make it easier. So what I'm going to do then is I'm going to take
this plant pot. I'm going to press and D and just bring it over to this side. So I'll just put it
on Global again. And what I'm going to
do is I'm going to place it in here, so I'm
going to lift it up, press the little dot
bun and I want it right next to these. So one in here. Against
the wall there, and then one in the other side. So Alt D, pull it over
the other side, like so. Now we need our two
lights in here. So we've got a few
light fixt fixtures. So what I'll do is
I'll grab my light, which is where is my
light. There it is. I'll press Alt D, Shift S, selections cursor and bring
it round, press the dot born. Now, let's bring
this into place. So we're going to
bring it in to here, bring it over, bring it out. And if I press one now, I should be able to put this
in where it's going to go. So if I'm Alright, and now let's bring in these into place where we want them. So I'm saying on the inside of this wall, let's
pull them out. And, of course, the
lights there are being good because they
will brighten this up. Let's say if you've got a night scene or
something like that. Let's also make sure
they're in the center so. So something like this,
if I press one now, I should be able to
press Alt D and just bring it over to the other side, like so, 'cause the fittings would be pretty much the same. Alright, so now we've got those. Let's bring a fitting up,
though, to the top of here. So I'm going to press Alt
D. I'm going to bring one up to the top of here, and
I'm going to press one. And I think we'll put this
one in something like here. Push it back a little
bit into the wall. Just around there. I think
that looks pretty good. So now what we want
to do is we want to move around the other side. I'm not going to put in two, so one this side, one this side. I'm not going to do that. I'm going to move around the
other side now and let's get the things in that
we're going to put there. So around the other side,
I'm going to, I think, grab this bench, press
salt D. Bring it over, press Alt Z, just to alt sorry, to change the rotation. And then what I'm
going to do is I'll also grab one plant pot, so I'll grab this
plant pot here. I'll press Alt D.
I'll bring it over. And I'll also grab
at the moment, I've not got the right light. So what I'll do is I'll
bring a light over. The light that we want for this is going to be this one here. So D, bring it over. And then finally, not like that. Let's bring it over
here properly. And then finally we need
one of these fixtures here. So D, bring it over. Alright. Now, let's
do a bench first. So's head 90, seven
to go over the top. It's pretty much
straight with this one. We're going to put
it around here somewhere, somewhere
around there. Like, so, making sure again that it's out of
the floor, it should be. Then we'll put the plant
pot around this part here. A nice plant pot in
there with a hedge. Then we'll grab this
and we'll put it right on the corner here
like we had before. So Rs head 90, seven to go over the top, G, and we'll have to pick
this one up a little bit. So just make sure you do that. So put it right around there. Make sure then it's pulled out of the ground,
as you can see, make sure it's just t
on the ground. Like so. Okay, so working our way over, let's have one more bench then. We'll put this bench
here because I'm going to put a tree
round here as well. So we've got this in
here now, this in here. And finally, then, where did
I put my lamp? There it is. RZR 90, spin it round, press three to go in side view. And the lamp then is going
to go somewhere around here, right in the center of here. Probably on this
part, and then let's pull it back into place and
see what that looks like, and that then will brighten
the way for people who are coming into their
house around here. Now we might need to pull
it down a little bit, because we've got a little
bit of bend on there. So right in, actually, right in there looks pretty
nice right in there, like so you can see it's
bending through the wall here. We don't want that, so let's
pull it over to the center. There we go. Alright, so
now let's move around. Oh, there's one other thing. We are going to put
a tree in here, so we will do that
part, as well. I'm going to grab this
one, old D, bring it over, and then my tree can go
somewhere around here. So it's going to
come out, and as you can see, we've
got a bench in there. Maybe maybe this is a
little bit too big. So I'm just going
to pull it over, press the spa just make
it a little bit smaller, making sure it's
in the ground, so. Okay, so now we've
got we need a light. We need perhaps we don't need
another bench over there. So we just need a
light over here, and we'll also need this light, as well. So what
am I going to do? I'll do this one first, so D, bring it over. Turn it round. So's 90, bring this one over, Old D, and then we'll
spin this round. So let's pull these
over, first of all. Let's do our lamp first. We know it's right in the
right place at the moment, so let's press G. We'll put
it right in the center. Around here, and then
we're going to press D, bring it over right in
the center over here, and then now with our light. So where did I put my light? Let's have a look. Here it is. Let's first of all, press Dot, spin it around. So's the 90. Then let's press Control one, and let's put it where
it's going to go. So I imagine it's going to go
similar to the other light. Let's press Dot to
zoom in and let's put it into place where
it's going to go. So somewhere around here, let's pull it into the center, and let's pull it
into the center, and let's pick it up a little
bit, right up to there. Double tap the A,
and there we go. Now, I'm just looking
round my main scene, just making sure that I've
got everything in there, if there's any other
plant pots or anything. And when we come back now, what we'll do is we'll first of all, deal with the buhs. We'll first of all,
deal with those. And you know what? I think
before doing anything else, we'll deal with
these things first. So we'll deal with this. Then
we'll bring in our buhers. Alright, everyone,
so let's save out our work, and I'll see
you on the next one. Thanks a lot. Bye bye.
200. Duplicating and Placing Props to Populate the Stylized Scene: Welcome back, everyone to blend the Building Mass class from
concept to final render, and we nearly are at
the final render. So let's now, first of
all, tidy these up. So we know that all of these props are going
to be hidden away. Same as our guy, as well.
Let's find our little guy, make sure he's not in
the render, either. And then what we need to
do is we need to make sure that all of
these parts are in, you can see a small prop
assets, small props. So we need to make
sure that all of these props now go
into another one. Same as the lamppost, just
go work your way around. Like so all the ones that you
actually created. Like so. And this little sign here,
not forgetting that. Not that one. Let's
see if and grab it. No, I can't. Just go
zoom in a little bit. Here we go. This one, this one. And this one here. And then all I'm going
to do is put them in another one called small props. Like so, and then create
and they're all in there. Now, this obviously is
going to be rendered out. So all of these are not
going to be rendered. These are going to be rendered out. That is exactly
what I want. Alright, let's deal with
this now. So where is this? What is this the pathway? So let's come in, right
click, convert to mesh. And then what we're
going to do is press tab and just look at how
dense those are. These are probably a
little bit too dense. Now, if it is
something like this, I'm just going to take
this off a minute, you can see how dense those are. Are they too dense?
That's the question. So what I'm going to
do is just before doing that, I'm
going to go back. Making sure my jut
nodes on here. Subdivisions at the
moment are three. Let's have a look if
we turn those down one and have a look at
what those look like. So we can see we've got
a big difference 3-2. So you know what I'll do is, I'll right click Convert to mesh, and then I'll press Tab, and I'll just see if
I can press Delete and Limited Dissolve. Can
I actually dissolve those? You can see now we've
got these like this. You can see all of these
actual parts look like this. Now the thing is, if you're
keeping it in blender, you will more than likely be
able to get away with that. The only problems you've got is, as you can see, we have got
some shade in the shoulds. So let's go back before
doing that, let's see. You can see the shading
issues are not there now. So for me, I'm going
to keep it like this with this amount
of polygons in there. But for you, you might want
to drop it down a little bit, either by deleting. So deleting, limited dissolve, or you might even want to
come in and actually grab some of these edges on these
and delete them that way. I'm not sure which way
you want to do it. But, you know,
either way is fine. As long as you're
keeping in blending, you're really not
going to notice that slight shading issue. What I'm going to do now is U, smart UV project, click on wrap. And then what I'm
going to do now put it onto rendered mode. Go to my material
when it loads up. And then what I'm going
to do now is click on the little down arrow, and the one we want
is going to be stone, and it's going to
be stone light. Bring that in, and there you go. Now you can see it's really
starting to come together. Now what we need to do is
then the actual buhers. So we need to bring
in our bushes. Then we need to
bring in our trees. And then finally, we need to
bring in the grass on here, and then we're ready
to rock and roll. So now let's come in and just
hide these out of the way. I don't want these
there at the moment. Now let's bring in our bushes. So what I'm going to
do is I'm going to go over to geometry nodes. We can see we've
got our meadows. We've got our grass, our
hedge. Here's our bush. This is the geometry
node, you know, to actually bring something in, and I think this is the raw one, so let's see if I can
actually bring this in. Let it pop out. And I'm just
seeing turn this on then. There we go. So let's
press the little dot bone. Let me open up my other
blend file so I have something to actually view where I'm actually going
to be putting these. And let's come round then. So let's first of all, come to this geometry node. Let's make it a
little bit smaller because at the moment,
it's pretty big. We don't want it that big.
This is what we've got then. Now you can see at the
moment, we've got three. Repeat count, we can bring that down to one or we can
turn it up to three. The start scale is
obviously how big this is. We can make it much, much bigger, and we can make
it much smaller at the top. If we bring this down, then we can see that it starts
getting smaller, smaller, smaller, like so. So you've got that
as well to do. Now, what you can also
do is the spacing. So the spacing in
between them is how much distances
between each of these. And then you've got
the E z offset, which is from this floor here, so you can see we can also bring them up or drop them down. Next of all, then we have
all the displacements, how you round this is. We've already talked about
the noise on the hedges. This is exactly the same thing. And finally, then we've got
the things like resolution, and we've also got the
materials and the leaves, so the leaves are under here, how dense you want the
actual leaves to be, the scale of your
leaves, for instance, you can turn them down, all
of that sort of good stuff. Now, what I'm going to
do is, first of all, is I'm going to grab this bush. I'm going to press Shift D just to bring it over because I don't want to do it
with old D because then I might end up
messing something up. I'm also then going to turn
this down a little bit, and then we've got
the start scale and the end stat scale,
as you can see. And the other thing we can do is if I come in,
press the tab button, I can also press S&D and just pull that up a
little bit, as you can see. So now if I double tap the A, you can see
we've got a much, much longer bush, and I think something that looks a
little bit more reasonable. I can also then bring
down the scale. So the start scale,
let's bring it down, bring it down,
bring it down, and make it a little bit smaller. Now, the other thing is, I
can also turn up the seed, so I can change how the bushes. And for this one, I think
I'll bring it round to the other side and see if it fits into
this one over here. So if I come round, I'll grab this here,
press Shift Desk, cursed to selected,
grab this one, shift Ds and selections cursor
and drop that in there. So if I press dot now, we can see if I
double tap the A, that then is setting
there very, very nicely. So that's our first bush. Now, let's come in to
these bushes here. Side press Shift
D, bring it over. And what I want to do is I want to change
this a little bit, so I don't quite want them. I want them in, obviously here, but what I want to do, I'll
grab this one first, Shiftes, cursor selected, grab my bush, Shiftes and selections
Cura. And there we go. It's in there. Now, what I
want to do with this one, though, is I want to bring
down the density, perhaps. So if I come down to my leaves, let's put it on two, and you'll see now hardly
anything there. So let's actually turn it up a little bit. Let's put it on. It was on 75 or thereabouts. Let's put it on 50. Let's even turn it down to 25,
and there we go. We've not got quite so many, um sticks in there now, and that's probably what
I'm going to want to do because I don't want
it quite as thick. I also want to maybe let's have a little wels
we can change on here. We can change the
end scale on here. Can we change the end scale? I think when you grit it like
that, it's just this one. Bring it in a little bit
like so, and there we go. Now they're a little bit smaller in comparison
to that one, and I think that
looks pretty nice. Now I'll do is I'll press
Shift D. I'll bring it over. And then what I'll do
is I'll grab this. Shift desk, cursed to selected. Woops wrong way round, shifts, cursor selected, grab this one, shifts and selections cursor. Drop that in place like so. Now let's work our way around. So the other side,
I will com two. I'll come to this one, actually. Shifty. Let's bring it over. And what I'm going
to do is if I press Control A or transforms, right clicks at
origin to geometry, for instance, now I can actually get a different
looking bosch. Now, am I actually
happy with that bosch? No. No, I'm not. I'm not happy with
that, so you know what? I'm not going to do that. I'm going to leave it like
this. But what I'm going to do is I'll probably stretch
it up a little bit. Now, the other
thing is, if I come in and let's say
stretch this bit in. So if I come in just
with this middle, I can actually stretch
it in like so. So you can see
we've got a lot of actual control of how this
bush is going to look. So what I'm going to do
is I'm going to grab it. I'm gonna press EnsEad and
just pull it out even further. And I think what I'm also going to do is just turn this off. So I've just got this
part, and I'm going to, I think, flatten the
top out a little bit. So I'm going to come in and then Alt Shift and click or
seven to go over the top. And what we'll do
instead is, we'll press the C for circle select. So C, circle select, like so Control plus. And then all I'll do is they'll just squish this
in a little bit. So if I come in, Eons head, let's have a look
what that looks like now, turn it back on. And there we go. It's a
little bit more flat. Double tap the A or tab, double tap the A, a little
bit more flat at the top. Now, the other thing I see is the bottom now is
not coming out. So can I go the Z offset? And there we go to
bring out that bob? And I think now this is going to look better in
this part over here. So if I press seven, I'm
going to first of all, where's my plant
pot. There it is. Let's grab my plant pot, shifts, cursed to selected, and then shifts and
selections cursor. Let's press the little Db bon. There we go. That is
looking very nice. I like how it's
hanging over there. Now, rather than come
in and do my tree, first of all, we'll come
in and bring this over. So we'll bring
this over to here. So let's pull it over to here. In fact, you know
what? We'll pull it over to here, like so. And we're going to
drop this right in the center of here,
something like this, and then I'll go
Shift D. I'll bring it over to roundabout here, and then I'll drop
this one down too. So we've got a little round one, but I don't really want that. What I want to do is press tab. And I'll hide this
out of the way. A, then S and head. Let's really stretch this up and then press tab
and put it back on. There we go. Double tap
the A. Let's bring it up. Because I need to see if
there's a bomb under this now. You can see if I put
this on object mode. The bottom hasn't
come up, so I'm going to move the offset. Whereas the bottom,
there's the bottom now. So you can see all
the way down there. Now let's see how tall this thing actually is, so
it's in the ground there. Double tap the A, and let's see if actually
that looks nice, or if it doesn't look. Let this load up.
And you know what? If I turn this on,
double tap the A. There you go. That's what
you've got. You know what? I think that actually
looks pretty nice. I think I'm missing
one over here. So what I'll do is
I'll grab this one, press shift D, bring it over. And then what I'll do is I'll squish this one
down a little bit. So tab, E and Z. Wish it down a
little bit, like so. If I press tab now, we can see probably going to have to change
the offset a little bit. So Z, offset, bring it down, bring it down into the floor, like so, double tap the A. Let's have a look what it
looks like with the hedge on. Before I put that, I'll
know I'll save out my work. I'll save it out because
it's getting a bit heavy on the viewport. Let's
turn this on. Double tap the A.
And there we go. That is what we've got so far. That is looking really,
really nice, as you can see. And now what we
want to do is we've got nothing else round here. This all looks great on that. What we need now is
a couple of trees. So I've got two
trees in the scene. One tree is going
to be around here, and the other tree is
going to be in here, but we're going to do
that on the next lesson. Alright, everyone, so I
hope you enjoyed that. I'm gonna save on my work, and I'll see you
on the next one. Thanks a lot. Bye bye.
201. Elevating Final Presentation with Bench and Plant Prop Polishing: Welcome back everyone to blend the building Mass class from
concept to final render. And again, we're nearly there. Okay, so let's
bring our tree out. Let's have a look
at what our tree looks like. Let it come out. And then what we'll do is just put it on so we can see what we're actually looking
at, and here is our tree. Now, of course, the first
thing you can see is the size of the tree is huge, and
we don't really want that. So what I'm going
to do is bring it down to something
more realistic. And then you can see, also, why is that over there? Let's put set
origin to geometry. And I'm not sure why
that is over there. Why is that all the way over there? I don't
actually know. This should be over here. Oh, it's because I've
got all those grabbed. Okay. Because I've brought all my trees and I've
got those grabbed. That's the reason why.
So simple. Simple. Alright, so let's
pull all these out. And again, when we're
grabbing all of these, they'll be all at the bottom. You can see here leaves
one, leaves two, leaves three, leaves four. All of these need to be put
into leaves and foliage. So all of these from here, need to be put in
leaves and foliage, like so, and hide
those out of the way. What that means is
now I've got my tree, and we'll sort these
out in groups, as well, guys, so don't
worry about that. Now, first of all,
though, let's put our tree where it's
supposedly going to go. So it's going to go into
here roughly around there, and let's put it
in, and then we'll discuss what we're actually
doing with the tree. You can see here
we've got a lot of roots. Let's pull them down. Let's pull it in
where we want it. Now we've got roots
under the ground. Now, do we want those roots
all the way under the ground? Like, so or do we want
them sticking out? Now, the first thing
about the tree is, you will see we've got seeds. Makes it really easy just to bring in the tree to where
you actually want it. We've also got then I'm going to isolate
this out, actually, I'm going to press the
question mark just so it can deal with
just this tree. I'm also going to
go to modeling just for now so you can actually
see what I'm doing. And then I'm going to
save out the work, and then I'll show you
exactly what we're doing. So let the modeling load up. Okay, here we go. Now, where's my tree gone?
Somewhere around here? They've at my work. There we go, and you can see everything's
getting very heavy now. And the main reason
is because we've got a lot of bushes in
here, first of all. So before dealing with my tree, I'll just hide my
tree out the way. I will come to my hedges then. So we've got one that
says hedges on here, or we should have hedges here, hide them all
out of the way. Then we've got these ones
which are the butchers. I'm also going to come in and
grab all of these bushes. So including the
ones under here, and we're going
to put those into their own collection as well. So collection, buhers. Let's put them into there.
Great. And there we go. And now I can scroll down. I've got small props. I've got buhs here,
and there we go. I should be able to hide
those out of the way. Okay, now we can
bring back our tree. So let's bring back our tree. Let's then isolate it out,
so press the question mark. Now we can actually
see what it is. You can see as well that
it looks beautiful, all of that bark on there. You can see as well we can
change the seeds then. You can see also we can change the viewport resolution of this. So viewport, let's
put it on one. We can change it down to that. Oh, we can change it to two, but we can also render it
out at eight, as well. So if I put it on eight,
you'll see the difference. It actually looks
like a real life tree looks like a minecraft tree on two or something like this. The other thing we can do is
change the actual leaves. So we've got spring, we've
got summer, which is green. We've got autumn, and I think we've even
got a winter one. Let me just have a look. There's the winter one, we
have nothing on it, of course. Let's put it on autumn because the thing is
the bushes generally don't change a leaf
color on a lot of them. Generally, they're evergreen, whereas the trees
obviously are deciduous, which means that, you know, the leaves change color and
they fall off eventually. Now, we've got our tree with, so we can change the actual
tree width, as you can see. We can also change the bend on here so we can bend
it over more or less. We can actually change
the bend offset. We can change the tree length
so we can bring it up. So lots of things you can do and especially changing the branch length and stuff like this. We can also change the levels
of these actual leaves. So you can see here, we
can actually increase it more and more and more
wherever you want it. I'm going to keep
it at five for now. We've also got down here,
if you keep going down, you can play around
with these guys, and I do say just play
around with these, put them in a different
file, so nothing crashes. But you can also see down here, we've got bar holes as well. So we can enable
bar holes on here, and it just adds some
little bar holes in here. So let's put the radius up, and you will see that IF
I bring them up or down. There's a little bar
holes that are on here. You can change the
rotation of these, so you can have the 90
degrees, for instance. You can move them up
and down the tree and things like this. So
you can also do that. Maybe maybe you build sin bit Bar put that
on. There you go. There's your bar
holes. And as I said, you can bring them up, as well. Now, what we're going to
do is just turn those off. I don't need any
ball calls on this. And what I'm going to do is
then put it on Render view, and now I'm going to show
you the root system because we've also got a root
system in here, guys. So you can see the roots here. First of all, I can
change the count. How many roots do
I actually want? And then I can change
the amount of level. So you can see I can have
more roots on here or less. I can change the
angle of the roots, and I can change the
angle randomness. I can change where
they start with the end and all of
that good stuff. I can also change where
they actually fall off, so the actual thickness
of the roots. So on this one, for instance,
I can change the count. I can have it like this. I can then bring back all
the other stuff. So if I press TH,
bring back everything, let it load up or question mark to bring back everything.
And here we are. So here is our tree now, and you can see it's
looking very, very nice. Now the thing is, is that root, if I press the little
dot but and zoom in, is that root sticking
out the floor? Let's have a look. Is this in? You can see it slightly
stuck out the floor there. Do you want that? You might want that or you
might not want that. Is the tree looking
nice enough for you? Do you want to
change the seed on there to try and get
a nice looking tree? Let's have a look.
Let's keep going. And maybe that tree looks
better than the other one. You know what? I think it does. The only thing I
would say is this is probably a little bit too
small for this tree now, so you know what
I'm going to do is I'm going to pull it
out a little bit. And there we go. Alright, so now we want another tree
over the other side. And again, it's up
to you whether you want to change the
leaves on here, whether you want
everything green or brown or whatever you want. Let's press Shift D. And
then what we'll do is we'll bring it over the other side now seven to go over the top. G, let's pull it out, and we'll put it in
place around here. Press the little dot born, Zoom round, making sure it's in. Now, of course, I want to change the seed for sure on this one. Have a look what
we're going to get here. Double tap the A. Let's have a look
at that. And yeah, that looks pretty nice, like so. I think that looks really,
really cool how that is. And I think I'm going
to go with that. So now we've got two trees. So let's grab both the trees. And then what we can do is press M. New collection, trees. And there we go. So two trees now, one this side, one this side. Everything is looking beautiful, except A few he's of grass. So to bring it
even more to life, we just want to now finish everything with bringing in
a couple of pieces of grass. Well, I say a couple, a bit of grass around all
of these edges around here around some parts of the
pavement, things like this. So I'm going to show you how to do that on the next lesson. And from there then,
we've actually finished, and we can actually
start rendering this out. Alright, everyone. So it's been some journey, but we're very nearly there. We're right there actually
rendering it out. So we'll leave that
until the next lesson. I'm just making sure
everything is tidy on here. Yes, it is. I'm also
making sure that the hedges have the render on. The small props, everything is rendered
out there I want to. You can see my bushes, as well. If I bring those back now, you can see they pop
in, but they won't be. They'll also be
rendered out as well. So just make sure
turn anything off. Along here, but
make sure you keep the render on whatever
you want rendered. Alright, so look at that, guys. It looks amazing. Now, let's bring in the
grass on the next lesson. So let's go to
File, Save it out, and I'll see you on the next
one. Thanks a lot. Bye bye.
202. Setting Up the Blender Scene for Final Rendering: Welcome back, everyone to blend the Building mass class from
concept to final render. And we're on the final pot
now, just the grass to do. What I'm going to
do, first of all, is I'm going to
bring in a curve. So what I'm going to do is
I'm going to come to this. I'm going to bring in a curve. So my curve will come over here. So let's press Shift A, and we'll bring in just
a bezier curve for now. We can see here it is.
And then what I want to do now is bring in
the geometry note. So I'm going to go
over to Asset Manager. This time, I'm going
to go down to Raw. I'm also going to press question mark, bring
back everything. And the one we want is
called curve meadow. So what I'm going to
do is bring that and drop that on my actual curve. Now, the object where
this is going to be targeted to is going to be
my actual ground plane here. So if I come in and
grab the ground plane, we should see now that we actually have
sgrass being built. Now, let's pull this down into the floor
a little bit more, so I'm going to bring it down, bring it down, and there we go. Now we can see that
if I put this on rendered view, let it load up. You will see it actually has
grass forming around there. Now, the main thing
is we don't want flowers and things like
that coming round here. We might want some
leaves, but honestly, I would probably keep
it at just grass. So let's see, first of all, we want to bring in a
little bit further. The spread of this is
going all over the place, and I will come in, first
of all, before doing that, I will grab my actual
curve, press the tab on, press A to grab
both of these pots, press delete, and
then click Vertices. Now I'm going to do
is, I'm just going to come over to the
left hand side with my little penciler where I can
draw it in, go to surface. And what I'm going to do is just draw it down there
and there you go, you can see just how easy it is. Now, the other
thing is, we've got all these things sticking out the steps and
things like that. So what I want to do is bring down the actual spread of it. And now you can see wherever we draw this out, that is
where it's going to be. If we draw it around
here, for instance, you can see it's going
to come around here. Still, the spread might
be a little bit high. But what we want
to do first is we want to come down
and keep our grass. So the one that we
do want is grass. We don't want our stems. So what we can do there is come down and set this
to zero, like so. And now we should be
able to keep our grass. Now if I bring this up a
little bit, let me just see. You can see these are
the actual stems. So do we want the
stems, not the flowers? So I think what we'll
do is we'll come in and turn our flower
collection off. So we'll turn those
then what we'll do is we'll come in and
do we want these leaves? Probably we do want the leaves. I'm just thinking
with the stems, let's just bring them
down, bring them down, bring them down to a
more realistic level, which will be
something like this. And also, what we can do we can bring down the
density of the stems. So at the moment, viewport
density is on 50. Let's put it on ten,
and there we go. We haven't got that
many stems anymore. Let's also put the
render density on ten, so they're exactly the same. And then let's come
back to our grass. Now, with the grass, we can see that they're not that long, so let's bring them up
a little bit, like so. And then what we'll do is bring the density down
to let's say 25. Maybe that's a little
bit low, let's try 100. And maybe that's about right. So now you can see this is what we're
going to end up with. And we can also see, let's do it on 100 on the render as well. And now let's come in and
think about the spread. Do we need to turn that
down a little bit? Because you can turn it
down so much that it's near enough on top of
wherever you're drawing it? This is probably how we're going to want it. Now I can do it. I can simply press Delete and vertices and come in again
and just draw some in. Draw them in slowly, and you'll see that you can actually
have some grass, not like that because it
drew on the surface there, but draw them in slowly, and
you can actually come in. And actually draw the grass then where you actually want it. Around here, we'll have some
grass on the inside of here, for instance, maybe
some round here, some round here,
some around here. Let's also put some in
the edges here, like so. We don't want to draw
over there, maybe some over here in
the corners there, as you can see, and we're
just going to work our way around just drawing a
few pieces of grass. And you can see just how easy it is to actually do
that. And there we go. Let's come into this. Let's come into this and this, like so. And we're going to draw around the sides of the building first. The wall down here,
for instance, like so. Let's draw some round here. Some down here maybe. And then you can also draw
them obviously in the middle of the actual floor. I don't recommend drawing
too many in there. There might be some around here, for instance, just the odd one, but they're definitely
going to be more creeping down the edge of the
building, like so. So I'm going to work my
way around this part. I definitely going to
put some down there. I definitely going to
put some down here. So there will be just a few, and we'll definitely
want some maybe around here and
around here, like so. Working my way around. And then once we've done these ones, you can see we've got some grass here
poking out, as well. I'll put some bit of
leaves on there, like so, definitely round
here, around here, maybe under here, definitely
in the corner here. And I'll just keep
drawing round. Just wear one, some extra leaves poking out, maybe there, maybe. The front of here
is probably more likely to be weed free. So just remember that
because they're going to actually cut
this around here. Now, the other places
where there's going to be quite a few weeds is going to be in these places along here. All along here, you're going
to have a lot of weeds, at the sidewalk,
things like this. So put a few weeds around
there if you want, and then let's put some in here, down here, in the
corner here maybe. Let's work our way around
wherever we've missed some. So some may be around here, maybe even some going on here, so you can see here, put
some on there as well, maybe some in here, maybe
some in this corner. So it's just adding that little
bit extra who you actual seen just to make it stand
out a little bit more, bring a little bit
more life to it, and it's something that's
really, really easy to do. Like so. Now, if I press tab, double tap the A now, now you can see we've
got a little bit of weeds and things like
this hanging around. It just brings it out
a little bit more, and I think it looks
very, very nice. Now, for these, then,
let's put them in their own little collection, and we'll call it weeds like so. And then what I can do is
now I can put this up. Now I've got trees
here as you can see, so this hopefully should be these trees. So
they're in the right one. Then I've got my grass. Now my grass is all
the way over here. You can see, these are the
grass or these parts here, which are all of these. So if I come in all
the way down to here, these are the grass that
came in with these parts. Now, this part here
then wants to go in. So this grass and flowers, grass, flowers and leaves, this one here flowers and leaves want to go into
my leaves and foliage. So if I drop those in there, we should be able to put them in there and hide them
out of the way. They won't be rendered
or in my scene at all. Now we've got our weeds,
which I can come in and just hide that the way on the
fly, and there we go, guys. That is actually
near enough done. So let's now file,
save our work. Let's go to modeling. And we're going to take one final look. First of all, we're going
to have a look round on our object mode just to make
sure everything is nice. We're also going to make sure face orientation is
facing the right way. Now the thing is with leaves, things like this, grass, you're not going to be able to get in the right way because leaves face one way and the other way, you
can't change that. One thing we can change, though, is this one here, and this
is because we mirrored this. So I'm just going to press
shift n just to spin it round. And there we go.
Everything is set now. And now, finally, I'm
going to turn that off. Not that one, face orientation. I'm also going to bring back my bushes because I don't
have those in there, so small rock packs, don't need those edges on. I'm going to put
leaves and foliage, I think, right down to the bob. So right down here, I'm going to drop them
in there, like so. And then I'm looking at
my bushes. Here we go. Let's turn these on,
and there we go. Now I'm looking at
everything else, just making sure
everything's in here. The final check, basically. My human, he can also be
hit out of the way now, so I can actually
hide him out of the way. And there we go. Now what we want to do
is the final look of what this is going to look
like in our rendered view. So if we come over here, But in our rendered view, that is exactly what
it's going to look like. So you can see now that
it is looking beautiful. Let's also just for now, come into our hedges, so our hedges, let's
open these up. And all I'm going to do, you can see my hedge
around there is on. My hedge here is on. It's
just this hedge here. So reason not clicked on. Put that up, double tap the A. There we go. Now we can see exactly what it's
going to look like. And it's looking
beautiful, guys. Absolutely fantastic. Now, again, if you
want to come in and change the leaves on your tree, let's come in and change the
leaves, where's the leaves. Autumn leaves enabled. There's a little drop down menu, which here we are. So let's put them on
summer. Double tap the A. And now, if you want
yours, you know, to be green and not brown, that's completely up to you. But I think for me, I'm just
gonna have a look on spring. For me, I think autumn is
probably going to be the best to set the scene apart a little bit with
the trees and things. So, yeah, that is
looking amazing. Now on the next lesson,
what I'm going to do is, I'm going to talk you through our compositor and
how that works. And then from there, we
can actually come in and start setting up the
camera and rendering it out. Alright, everyone, so I hope you enjoyed that, and I'll
see you on the next one. Thanks a lot. Bye bye.
203. Configuring the Blendcraft Compositor Add on for Advanced Renders: Welcome back, if
you want to blend the Building Master Class
from concept to final render. And now I'm going to do
is I'm going to play you our video on the three
D Tudor compositor. And this is an amazing add on, guys that comes with
this actual course, one of the best things about actually
getting this course, and I'm going to show
you exactly what you can do with it and
just how amazing it is. Alright, everyone, so see
you on the next lesson. Thanks a lot. Bye bye. First of all, to
actually install this RN blender, 4.2 0.1, as you can see, and all
you need to do is go up to preferences and go to
where it says add ons. And then all you're going
to do is click this little down arrow and
install Brum disk. Then you're just going to
find the actual add on. Here is where I've
put my add on here. You need to make sure
that it's zipped, so don't unzip it once
you've downloaded it, and then just double click it, and there you go, three
D Tudor, composite. We need to do is just
close this down. And if you come over
to your compositor, you will see now
it's here setup. Now what I'm first of all going to do is just show you how to set up your actual
compositor so you can use it. So first of all, click US Nodes. You will see when you first open blender, this is what you get. You'll also see over
the right hand side, all of these passes, so that's things like the
color pass, the volume pass. All of the passes are
unticked at the moment. Now, rather than
you having to go in there and do all
this work yourself, just one click, lets
you do it all for you. So first of all, let
me put this down. So I'm just going
to drop this down to give us a little
bit more room. And then what I would recommend
you do is just pull this over and then just change
this one to Image Editor, click the down arrow, and
click Render results. Now, once you've rendered it
out, everything is set then. So this will app here, so you actual render
will appear here. And now let's come back
to the actual add on. So what I'm going to do is
just click three D Tudor here. And you can see you've
got a little button here that says setup compositor. At the moment, none of
these are ticked on, as I said, we just
click this button, and there we go,
everything now is set up, and you are ready to render. Even if you come over here, you will see as well
that even on the film, for instance, the transparency
has also been set. So if you want to turn that off, then just come down
here and turn that off. You can see all the passes or
sap is well ready for you. So what we're first
of all going to do is then just go
back to modeling, I'm going to show
you that if you want your actual
miss pass to be on. So let's come to our camera. Over to the right hand
side, and you will see that one that
says here, miss. Just make sure that is
actually ticked on. Once you've actually
ticked that on, then you can come over
to your world settings, and then all you need
to do, you can see here you've got one
that says miss pass. Now, I recommend that you
put your miss pass from nearly the start of
the camera, so here. So this is the start, and this is the actual
end over here. You can see moving
these around actually changes the length of
the actual miss pass, and I recommend you do it like that because you can
have miss then right up to the camera
and you can just keep putting it back
as you go along. Now with the volume,
as you can see, I've just created a
small volume box, and this is then to put some actual volume over these leaves and
things like that. And I'm sure you
might want to do that in your own scenes. Alright, so the last thing then to do is actually
render this out. So if you're coming over
to the right hand side, it's just the same setup
as what you guys have got. All you need to do is just
change the maximum samples. Now, for this, I'm going
to put it on 1024. And what I'm also
going to do is, I'm just going to
speed it up just to cut all of that bit out, and then you'll see
how it actually works. But, first of all, let's
come over to the compositor. I'm going to pull this over, so pull it over because you really don't even
need to work in here. This is just to show
you how it's sped. So if I pull this over all the way over to the
right hand side, and then what I'm going to do
now is hit the render but, and I'm going to speed
this up so you guys haven't got to watch
through another render. Alright, everyone.
So the renders done, and you will see
now that we've also got a transparent
background on there, because that is what it actually sets it up with
in the beginning. I'm going to show you
how to change that, so don't worry too
much about that. So what we're going to do
now is close this down, and then you'll be
greeted by this screen, which is that compositor
that we actually set up. So first of all, let's go
through a few of these options. So what we can do is
we can actually put the alpha on or turn it off, which then we'll put that sky that we had in before on there. The other thing you
can do is you can actually add in an
image if you want to. So you can see here, I've got
an image that I can add in, and it's very easy
to just change the image with this button
here so you can click off and then bring in s. So all I would do is click off
and then click Open. And here you can see I've got various backgrounds that
I've used in other projects. So let's click this one on and you'll see then it
just pops that in. And that's actually
looking pretty nice, but we're not actually
going to use that. The other thing you can do with your own images that you bring
in for the background is, you can change the brightness. You can change them to dark. You can change the
scale, the angle, and you can transform them
in all those various ways, which makes it
incredibly easy to use. Now, what I'm going
to do in study, I'm going to turn Alpha back on, which is the sky that I actually all right,
so moving on down. Then we've got this mist, so
I'm going to click this on. What I'm going to do is
open that up to show you all the perimeters
that we've actually got. Now, the first thing
with the mist is, it is based on the
camera, as we said, so that camera actually
where we put that miss from the beginning of the camera to the end allows us then
to move this back. So if I start moving this back, you can see I can start dropping this miss all the way back like so and only have a bit of mis in the actual background and
a little bit round here. What I'm going to do is I'm
going to drop this round about just before this RGB and then I'm going
to come to this one, what I'm going to do as well, is I'm going to change the
color to something darker. If I drop this down,
you will see that now we start to bring
back that actual sky, so I'm going to bring
it down a little bit darker to
something like this, and now you can see that's
looking pretty nice. The other thing I'm
going to do as well is I'm going to change
the mix from white. I'm going to set it
to a nice blue color, and you'll see how we can change the background of the sky. That's really handy as well. Now the next thing
we're going to move on then is to our color. If I move to color, you will see that we
have full control over all of this color
in the actual scene. So not only I'm able to
make the colors brighter, as you can see, or darker, whichever way I want to do it. But also, if I turn
this up a little bit, able then to control the
saturation, for instance. I can bring that saturation up. I can drop it all the way back whatever I
want to do with it. Now, what I can also do
as well is I can change this value as well to brighten it all up or make it all darker. So lots and lots of things you can use here to actually
play around with that. Going to close that up now
and open up the gloss. Now, the gloss, of course,
on this scene in particular, is normally to do with
things like metal, but it can also be to do with
things like your leaves. So for instance, if I come to my gloss here and turn
this all the way up, you'll see now that
all that glossiness on those leaves starts to
really pop out like so. So we're also able to set the gloss levels
whatever we want, and then we're able
to play around with them along here like so. You can see now
we've got a lot more richness in those leaves. We're able to bring this
one over as well, like so. And what I'm also
able to do with this shine as well
is put a slight blue on you can see now we can put some blue on there
from the actual moon. So what I'm going
to do is I'm just going to put it down just a tab, like so, and there you go. Now you can see what
difference that makes. It looks nice and luscious
and things like this. Now, it's not going
to work too well, but generally metal glm, and what it does is
it actually gives a little bit of a
glint to the metal. So I think you saw in
the introduction on the metal on our dungeon scene. Once you click this on, it
actually takes that sun that shine on it and just adds that little bit of a glint. So that's also really,
really handy to us. The next one is transmission. Now, in the introduction, you saw the transmission, which was the water.
We had a water there. You can do a lot with this. In this scene, we haven't really got a lot
of transmission, but we do have some over
here as you can see here. There is a swimming
pool around here, but I did like
this angle better. What you're able to
do, as you can see, this actually turns this up, so you can see it for zooming, you can see that messing
around with here, I'm able to turn this
to red, for instance. It's just loading up and I've
got a red edge around it. I'm able to really, really mess around with this and change
it to my heart's design. And what I'm going to do
is I'm going to put it on a tinge of blue there,
so let it load up, and then I'm going to change this one I'm going to put this on a little bit of a sky blue, something like that,
and there we go, and that's looking pretty nice. The other thing we're
able to do as well is with the actual
transmission pass, you're able to actually
bring in some light. You can see here we've
now lit it and we're able to turn that up a
few levels if we want it. So now you can see
it's nice and lit up. I think that's really something that we
want to add in there. Once you've got
transmission in there, adding a bit of glow for those magical scenes
and waterfalls, especially if you doing a
stylized render, really helps. I think I've turned mine
up a little bit too much, so I'm just going
to rein it back in just a little bit like so. Moving along then, we've
next got the volume. Now, the volume is the one with the fog that I
actually sell here. So those of you using volume, turn this on and
you'll see Walla. There we go. Now, let's come
into the volume control. Everything in here,
you can control it all from here so
I can turn it up. And what I'll do is drop that back down a little bit, like so, what I'm going to do
with this actually is I'm just going to turn
it up a little bit, like so, and then I'm going to bring it
up using this one. Let it load up and there we go. We can change the density. We can change the thickness, and what we can also do is
we'll put this all the way up. Let's make it a lot more dense, so I'm also able
as well to change the color of march or fox now you can see it's
beautiful and green. Maybe you've gone a little
bit too far with that. Let's pull it up a little bit, Let's pull this back
a little bit more, bring in a little
bit more, and let's then bring this back just a tad. So it's just that little bit
green, and there you go. You can see exactly
how nice that is. Now, the other thing is I
haven't talked about yet, but we have got a denoise on. So we'll just put that on just
quickly just to show you. So this is the
bottom. I recommend you put this on right
at the end once you've finished everything
because it does take a long time to actually work everything out and
denoise everything. But you can see now that fogs looking absolutely beautiful. Alright, so let's turn
this off while we actually work on the rest of the notes. So what I'm going to do is I'm
going to put up my volume, and then we're going to come
down to the next one, very, very important one, which
is light or emission. Now, we've got a few things
that we can use here. So first of all,
we've got this bloom. If I turn the bloom on, you will see we end up with
something like this. We can also turn that off and put the glare up instead.
So let's put the glare up. And you'll see now we've
got control over there. We've also got control over
how bright things are, so you can see now
we can really, really get that to
where light up, and we can bring it
down if we want to. And we can also, as well,
increase the range. So increase the range of
this light, as you can see. So we're also able to do that. And what's more when you're
bringing in your own light, it's always handy if they can
give off a certain color. So if I come in and I want
to give off, let's say, a nice blue color, for instance, for
the moon over there. So let's put this up.
And there you go, now, we've got a
nice blue tinge. We can even go more than
that if you want to, so I can go all the way up here. And now you can see you've got a nice, nice tinge to that. Alright I'm going to turn this down a little bit
just so it looks good. I'm going to leave it like that. I think I'm happy with how
the light looks there. I'm happy with mys.
I'm happy with my fog. And now let's move on
then to the environment. So the environment is
this part on here. You're also able
to control that. So if I come in turn this up. So if I turn this up, you will see that this environment
on the background, so let's turn it up even more. There you go. You
can see those stars now really starting to shine. The other thing we're able
to do with the background is I'm able to actually
change the color as well. So if I come to the game here, I'm also able to, let's
say we want a bluish sky. Let's turn that on,
and then we go, we've got a bluish sky so. Now, at the moment, this is not being as
effective as it can be, and the reason for that is we just need to
make sure when we render this out that we've
got transparency turned off. So in other words, if you
are not going to using a if you're going to be using the one that you've put
on there within blender, just make sure this is
turned off and I'll show you after this what we
can actually do with it. I'm just going to
leave everything on like that at the moment. And what I'm going to do
is just close this up. Now I'm going to click
on my ambient occlusion. Now, one of the best
things that you can have is of course
ambient occlusion because what it
does is allow you to control all of this shadow. All of this shadow that
you see in there now, I have full control of that. I'm able to bring
this one down then. And bring all of those shadows
exactly where I want them. I can do it like that. I can also come in and
add in another one, so I'm just going to
click Control and click. And you'll see now
once that loads up, I'm able then to bring
in some more shadow. So this is midtone
shadows, if you like. There you go, now you can
see just around there, everything is coming into play. And what we're also
able to do as well is we're able to turn
them up or down. So you're able to get rid
of the shadows slightly. You've got complete control
over pretty much everything. So those shadows
are looking nice. And the other thing
we're able to do is we're able to change
the color of the shadow. So if I come in and let's
say I want them red, you will see now
once this loads up, let's just put those
down a little bit. Now you'll see they
have a red tinge to them once I turn this on, and there you go, now let's
turn this up a little bit. Like so. Now you can see, look, all of these shadows
now have a red tinge. Now, what I'm going
to do is just turn it off just to show
you the difference. And there you go. Now,
why is this useful? Well, for instance, when you're dealing with something
with moonlight, you might want a little bit of a blue tinge. It's
a blue tinge now. Let's come in and just turn
that down in a little bit, like so, and there you go. Now the shadows have a
slight blue tinge on there, adding to that realism. You can really, really get
in with the details on this, really, really fine tune
everything as much as possible, which means that
pretty much any of your own projects can look
to a professional level, really pop out when
you're blowing them to our station and things like this or from this simple add on. Now what I'm going to do
is I'm going to close up now ambient occlusion, and now I'm going to
move on then to the rest of the things which are effects. So what do the effects do? So we've also included
all of these in here. So if I click on
Diamond Sharpen, what it's going to
do is just going to sharpen everything up. Now, I recommend that
you put these on. And what you want
to do is you want to put them on very gradually. So let's put it in Noe 0.1, for instance, just to bring
out some of that stonework. Now, the other
thing is, as well, don't forget we have got
denoise on top of this, so you want to be clicking on that So you might be asking, basically, what is
the difference then between diamond shopping
and box shopping? Well, box shopping is
used when you want to get an overall
sharpness to an image, and diamond shopping
is used when you want to actually pinpoint
certain areas with sharpness. So if I turn this off now, click on box shopping instead, and you'll see there's a little bit more of a softness there. We've also added in one
that's softened as well, so it can soften all scene up. If we put this on note
0.6 or something, you will see that
this goes much, much softer as you can see now. And sometimes actually
looks a lot nicer. So five foot on not
0.3, for instance. Then you'll see that we've still got that sharpness there, but we've got that
slight softness to the image that makes it look a little bit more
professional, in my opinion. We've also got
antialsm which will get rid of all this
jaggedness on here. That's really if
you want to go into the weeds and we've also
added in color balance. This is really
important, actually. Turn on your color
balance, open that up, and this is how you
define basically what the overall feel
of your image is. You'll notice on something like World War Craft Leitch king, it's all very blue. If you notice something like
matrix, it's all very green. All of this is done
with color balancing. If I come in, for instance, and I put this on green, you'll see that the whole
thing will turn green. Now, obviously, it's not
done to that degree. It's done, very slightly, so you can see here we'll add a little bit
of green on there. Can you see how that works? Now, this one is the
wrong one for the green. What we're going to do
instead is just add a tiny, tiny bit of blue, and then we've got a bit more
moonlight on there. Now, you can see that that's probably a little bit too much, so I'm just going to put
it down a little bit, and there we go. Now we've got a bit of
blue going in there. Now, let's add a little
bit of green as well. So if I come in,
what I tend to do, by the way, is if I'm
using colour balance, I'll put it right to this end just to see which
parts are affected, so you can see most of these parts are mainly
affected, especially the sky. So if I come in now and I put it right bound there just on
a little bit of green, and there's a little
bit of green, but it's not too
obvious, as you can see. The other thing is,
if I go back as well to my ambient occlusion, still drop that up
a little bit more. I needed, just making it a
little bit brighter like so. All right, so far so
good. So let's carry on. So we've also put in
here an RGB curves. So if I bring in the
RGB curves, turn it on, and then what I'm going
to do is just put it up, and that's then going to
brighten the whole image. So you can brighten the whole
image right at the end and get just that amount of light
that you want in there. Next of all, then we're moving
on down to Hue correct. And basically, with this, we can actually saturate
only certain colors. So if I want to, for
instance, saturate the red, I can just turn this down
and you'll see what happens. It starts to go, as you can
see that kind of gray color. So we've also got control over how much saturation
based on the actual hue. So we can change all of these, bring in more green, or we can, for instance, drop
the green down. Drop that back, as you can see. So it's a very,
very powerful tool. Not many people use
this, but it's really, really handy for getting that
perfect look that you want. Next of all, then
we've got brightness and contrast, and of course, this will turn up the
brightness of the actual scene, and you've got a lot
of contrast there. So if I put this on 0.8, for instance, we've got that misty type of look now to it. And finally, the last one, the hue and saturation, this is the overall
saturation of the scene. So, for instance, if
I put this on 1.2, it will bring out all
of the colors now. As you can see. So I tend to come on there and put
it on just a little bit. So 1.05, something like this. We're also able to change, as well, the overall
of the scene. Not that I recommend, you know,
messing around with this, but in case you want
an alien scene or something or you want
a certain to it, then go ahead and mess
around with this. And again, we're also able to change up the values
and things like that. Alright, so this is
looking pretty good. Now, what I want to do
now is come to denis. So this is the last
one that we click. You can see at the
moment, we've still got a lot of haziness
around here. This means that then
you can use a much, much lower sample level once
you click this denoise on, it's going to clean
everything up for you, hopefully get rid of all those fireflies and things like that. You can see now the difference will be down here
and now you can see this is all smoothed out,
looking really nice. From here, what you can do
is you can go back then. Your box shopping,
turn that on and sharpen the image up just
that faction like so, and now you can see it's
looking an amazing image. Now, what I'm going to do
now is before I finish, I'm just going to show you
what it's like if we actually render this out transparent. I'm also going to show you
at a lower sample level what this powerful add on
stroke plugin can actually do. A I'm going to do is
I'm just going to turn off my transparency. I'm going to come up there
and put the maximum samples on something like 20
then what I'm going to do is I'm just
going to come over to the world Ss and I'm going to change this to them on the sun elevation
is on minus six. I'm going to give you a
little bit more brightness. So I'm going to put it on
30, something like that. Then you'll see if
I come over now to render and render image, this then should
take no time at all. So you'll see it's
only on 20 samples, so it should be very, very fast. The longest part of this is, of course, when the actual
compositor pot starts, but even then with such
a powerful compositor, it doesn't actually take that actual lung to do
that part of it. So you can see now
we're halfway through. You'll see once it
gets up to nearly 20, you'll see then the
compositor will take over. That is normal. I'll take a little
bit of time extra then and then you'll be able
to play around with it. Now you can also see
on this now that the sky is already quite blue. And the reason for
that is, of course, is we actually change
the lighting now, we've changed it so that sun is a little bit higher in
the sky. There we go. Now I'm going to do is I'm
going to close this down. I'm going to come back
then to my compositor. What I'm going to
do is just turn off my mist just so we've got
this view on the sky. I'm also going to turn
off the denoise as well, just turn that off,
let it load up, and then we're going to come
back to this environment. What I'm going to do is
change this sky a little bit. If I come in now, I
should be able to come let that load up and change the background
of the sky once it actually finishes
loading, and there we go. Now we can change the
background to whatever we want. We can also change the color of the sky
as well when we want, not just those stars, so
let it load up again. It's going to take a
little bit of time to put everything through
here and there we go. We can change it to
whatever we want.
204. Mastering Camera Setup and Turntable Animation in Blender: Welcome back, everyone to
Blender Building Master Class from concept to final render. And I really hope you enjoyed
that blender compositor. Add on, and now you can see exactly what three D
Tudor has created there. And we're going to actually
use that and you're going to see how amazing it is. But for now, let's move on
to camera and turn table. So I'm going to play
you a short video. This one is short, guys, of how to set your camera, how to do a turn table. And then when we come back,
we're actually going to start rendering out our 18th
century building. Alright, everyone, so see on
the next one. Thanks a lot. Bye bye. Welcome everyone to our camera setup,
Complete guide. And as you can see here,
we've got a fairly, fairly large scene, and
we actually need to bring a camera in to
actually render it. So what I'm first of all, going to do to
bring a camera in, I'm going to press Shift A, and within our primitives menu, you will see one
that says camera. Now, normally, the camera
will always come in. Whereabouts you've
actually got your cursor. So if I delete that
camera out the way now, shift right click and
put my cursor over here, press Shift A,
bring in my camera, and you'll see there it is. Now, rather than
go into my camera, so to go to our camera, we're going to press
zero on the number pad. That then is going to
zoom into our camera, and from there, then
we're able to actually come over and open this
little panel here. To do that, we just press
the end button to open it. And then what we
can do is we can click this camera to view, and you'll notice
that it goes fairly red around the outside
of the camera. And from there, then we're
able to scroll our mouse wheel out and put our camera
where we actually want it. We can also hold Control
shift middle mouse, and what you can actually
do then is really, really get a nice, smooth zoom in and zoom out of our actual
camera, as well. So all of the basic functions of moving around the
actual viewport work exactly the same way
with the camera as long as we've got camera
to view turned on. Now, what if I told you, though, there's an easier way of
actually doing this, as well. So all I'm going
to do is I'm just going to delete my
camera out the way. And then what I'm
going to do is I'm going to press Shift A, and I'm going to bring
in another camera. I'm going to position myself in the viewport of where I want
my camera roughly to be. And instead of zoom in
to the camera with zero, what I'm going to do
is I'm going to press Control Alt and zero. And then what it's going
to do is it's going to put the camera in the middle
of the viewport for me. And from there, I normally
zoom in two, three times. And then why there is I
click camera to view on. And now I'm able to position my camera where I
actually want it, which is a little bit
easier than actually going to the camera and
moving it into place. From here, I want
to discuss a few of the camera options that you can actually do with the
camera, as well. So what we need to do
with the camera selected, so just make sure that your
actual camera is selected, so you can see mine
is selected there. Pre there on the number
pad to zoom back into your camera and get the view that
you're looking for. Let's press camera to view, although you don't
need to take this on to do these options. And if we come down to
the right hand side now, we have one that is
the actual camera. Now if you're going over to
the right hand side here, we'll see we have a type
called perspective. And if I click this little
downo you'll see that I also have orthographic on here
as well and panoramic. Now, we're not really
going to discuss panoramic because that is really taking it up a notch when it
comes to actually rendering. So we're going to keep this
pretty simple for now. So we do have perspective
and orthographic. And perspective is basically as though you're
viewing this yourself. Orthographic to keep it simple, basically means it
has no depth to the actual scene that you're
actually trying to render. Now, as well as that, we
can actually at the moment, zoom in and zoom out
with our actual mouse. But I recommend
instead of doing that, just change the
focal lens slightly, and then that will
be able to zoom you in and zoom you out and get probably a
better perspective on what you're
actually rendering. Also want to talk about
the shift X and Y. If you want to move your
camera left and right, what you can do is you
can come up to item. And instead of moving this around left and right
with your actual mouse, what we can actually
do now is move the location of our
camera like so. And I find this sometimes a
little bit easier to use, especially when we're
going on the Z axis rather than moving my mouse
with shift and middle mouse. I find it a little bit easier because it will be more exact. In other words, if I actually
take off camera to view, you will see if I
come to my camera now and I go to the item
and I'm moving this up, you'll see it moves
out perfectly. Alright, so going back now, let's go back to the camera, and let's now discuss our
clip Store and the clip end. Basically, if you
have a lot of things outside of the scene and you don't want to actually
have those rendered, what you can do is you can
actually change the clip end. This is the most important one, and let's put it to
something like 20. And what you'll see is
everything disappears. Now if I start turning that up, you will see that the camera clipping actually
starts to increase, which then shows you the
actual buildings of our scene. And if I turn it up, so far, what I can do is I can actually start rendering
the entire scene. But anything in the background here won't be actually rendered. So it's extremely handy when you've got a load of
assets over here, you've got a scene,
and you don't actually want to
render those parts. Okay, so the next
thing we want to discuss is actually
coming in and naming our cameras because if we have multiple
cameras in the scene, and we want to take
different renders of them. Let's say we're doing
shots and we want one shot to be coming out
of this corridor somewhere, want another shot going around the roof or something like that. It's important to know
how to actually change the view to render these pots. So what I'm first of all,
going to do is I'm going to come to my camera,
make sure it's selected, go over to the right hand side to where all my collections are, press the little dot button, which is on your number pad, and that then will
take me to my camera. Now, let's add in another
camera after this. But the first thing I
want to do is just rename this camera to camera long shot. And then what we're
going to do now is bring in another camera. So I'm going to press Shift A, bring in a camera. It's
gonna come over there. And let's say I want the
shot to be down here, so going down through
this alleyway like so. I want to press Control Alt and zero to bring
my camera there. And then going to Ja
Zoom in a little bit, go to view and win
a camera to view. And then what I'm going
to do is just set my camera up where
I actually want it. Next of all, I'm going
to put it close up, so camera close up shots. Like so. And now I'm
going to turn this off. So now we have two
cameras in the scene, one short range and
one long range. And at the moment, you can see the local camera over here, is set, if I click on
this, too long range. The moment I click on
this and press zero, you will see it takes me
to my long range camera. Now, if I click on it again
and click to short range, it will take me to my short range camera or
any other cameras, you can have as many cameras
as you want in the scene. Now, what about
rendering if I set this to camera short range, and I've got my camera here, the moment I go to
Render Out image, you will see that it won't be rendering out the camera
short range image. What it will be doing
is rendering out the camera long range image. Why is that? That's
because we also need to change the camera
in the actual scene. So you can see here we
have camera at long range. And if we click this, we also
have camera short range. And now, basically,
I can render out this actual short range like so so come to render render image. Let it start up,
and there we go. Now it starts rendering out this actual
part of the scene. Now, the thing is, you've got to remember that when you've got loads of cameras
in your scene, this part here
controls the viewport. So where you're looking
in the viewport, which camera you're
actually looking through, and this part here controls
the actual render. So just be sure to switch
them over and just be sure also to rename your cameras when you've got lots of
cameras in your scene. Now, finally, the next
thing we want to discuss is how to actually make
a quick turntable. And the reason we're doing
that is because many, many times people want a
turn table of where they're actually going to
be going around their scene or their
actual assets. So the way we're going to
do that is, first of all, make sure your asset or your scene is in the
center of the viewport, so you can see where
these crossing lines are. And then all you want to
do is press Shift desk and you want to put
cursor to world origin. That then we'll say your
cursor to the center. And what I'm going to do from
there is I'm going to press Shift D and I'm going to
bring in an actual curve, and the one I'm going to
bring in is a circle. From there, then I'm going
to press the S button and just pull the circle out
where I actually want it. And now what I want to do is
I want to tie my camera to my actual circle because
I'm going to use my circle to actually
animate the camera. So the way I'm
going to do that is I'm going to grab my camera, grab my circle, cross Control P, and then I'm going
to go down to where it says, follow path. And you will notice
now you've got a little bit of a line where the actual camera is
to the actual circle. Now, it's important wherever you want your camera to start, so you can see at the moment
this is on actual zero. So we want our camera probably to start
somewhere around here. So the first thing
I'm going to is grab my circle and
rotate it round, so Rs rotate it round, and then my camera is going
to start roughly over here. But what I need to
do, first of all, is move the camera
to this point here rather than it rotating away
from the actual circle. So the way I'm going to
do that is just press tab on my circle to go
into Edit Mode. And then I'm going to
grab this little point here because this is where
the camera is attached to. It will always be attached
to a point on here, and then I'm going
to press shifts, and then cursor to selected. Next one I'm going
to do is press tab, and then we're going
to go to my camera. And what I'm going to
do is press shifts and selection to
cursor keep offset. That then is going to
put my camera there. Now, you will see if I press the spaceboard now because
it is following this path, my camera actually
shoots around there, like so before it
begins again at frame 200 or 800 or
whatever you set it to. Let's now set this back at zero, and the camera should be
exactly where they'll put it. And now what we need to do is we need to if we press zero, you can see, it's not actually looking at the building
or anything like that. So the next thing we
need to do is make sure this camera is looking
at our actual scene. So the way we're going to
do that is press shift day, and you're going to bring
in an empty and plain axis. And at the moment, you can see, I've put this in the wrong place because it came
where my cursor was. So what I want to
do is delete that. And then what I want
to do is press shifts and cursor to world origin. Shift A, bring in an empty
plain axis, like so. And the reason we're using a plain axis is because it won't be rendered out at all
within the render, but it is something which our
camera can actually follow. So now I've got my
plain axis in there. I recommend that
you pull it out, so keep pulling out till
it's pretty big, like so. And then what we're
going to do is we're going to come to our camera come down to where it says constraints just above
the camera image. Add constraint, and the
one you want is Track two. And then all you want to do is click this little pipette here, click on your actual empty, and now you'll see
that your camera is pointing at the actual empty. Still, this isn't very
good because we have a problem in the cameras looking completely in
the wrong direction. But if you zoom out enough, what you can actually
do is you can select your empty and you can
pull it up like so. You can select your circle then, and you can also
lift it up like so. So you can actually really
start to mess around with this and get that perfect viewpoint what
you're looking for. So something like this. Then all I'm going
to do is I'm just going to press the S but
to expand the circle, pull it out, and now you'll see we've got the perfect
place where we need it, need to pull it up a
little bit more maybe. Let's pull up the empty a
little bit. And there we go. And now if we press space bar, you can see that we've
got a term table. So one more thing before
we actually finish this, we obviously need to
control how fast the actual how fast
the actual camera is going around the circle. So all we need to do to do that is we will select our circle. So if I come out and
select my circle, over then to the right hand side where you've got
your circle options. And then what you want
to do is come down to where it says path animation, and then you can turn this down or up to whatever you like. So let's put this on 800. Let's put the
evaluation time on 800. And then if I go
to my camera now, press the zero button,
press Spacebar. You can see now that
we have a render, which is going to
last 0-800 frames. Or we can change this to 600, so let's say 600, 600, like so. And there we go. Now
it's gone to 600 frames. Then when it gets to 600 here, it'll just carry on over the 800 because we obviously
have 800 frames here. So last of all, just
change the amount of frames to match the amount of frames in your
path animation. And what will happen
is it will get to 600, and that then should
restart the camera. So you can see there's
no break in it. It just actually
carries on in a circle or a turntable around
your scene or asset. Alright, everyone, so I hope that's a lot of
information for you. I hope it made sense, and I hope it gave
you a good rundown of how cameras actually work. Thanks a lot. See you on
the next one. Cheers.
205. Enhancing Final Renders with Mist Pass and Color Correction: Welcome back if we want to blend the Building master class for Om concept to final render
and we're nearly there, guys. So now let's come
in, first of all, and make this
viewport a little bit more lighter because the
moment it's very heavy. So what I'm gonna
do, first of all, is comb two, my hedgerows. I'm going to turn that
off on the viewport, I'm gonna come round
this side, as well. I want to turn off
this on the viewport. And also this hedge as
well, turn that off. And I should be able
to also come in and turn my foliage off on
the viewport, as well. You'll also find that you
should be able to come in and turn down your
grass on the viewport, as well, so we can
turn that off. As long as you're
not turning off, you render it, you're
absolutely fine. I would also, if you're
even struggling even more, also come in and turn the
hedges off on the viewport, because we can't actually
turn those down. So we can't turn them
down on the viewport. So what do they look like
in the viewport versus what do they look
like in the render? So let's just go in,
turn all of these down. Or off on the actual viewport. And you will find
once I've done this, it's going to be much, much better on the frame
rate. Alright, much easier. Now, what you can do
with your trees is, you can also come in, and I'm just looking to see
if I've got an option here of I can turn them
off or density is 25. I can't actually turn those
down either on the viewport. I can only do that
with certain things like the grass.
So, you know what? I'll just I'm just wondering whether I
want to turn those off. For me, it gives me a good view how everything's going
to look, actually. Now, the last thing is, I did forget to bring these
down to this part here. So what I'm going to
do is, first of all, I'm going to save out my work, so file and save before
doing anything else. And then what I'm going
to do is just press one. I'm going to come to my
light, I'm going to press Alt D, I'm going
to bring it down. I don't know why I
forgot that, but I did. So let's pull that into place. Then we'll press Alt D, bring it across to the other
side, like so, and then all I'm going
to do is grab them, press the little dot
but and pull them out. So Alright, so we are going
to be rendering or building out in with transparency on, so we'll do that, but I will show you
some other tricks and tips you can use to get a
really, really nice render. I always recommend when
you've done this to take it through something like Photoshop to give it a really, really nice background
or something, and that is what we
actually intend to do here. You could, like one
of the other courses, build out an entire environment, but being as this course is
approaching 40 hours long, I think that would just
add a lot of stuff that you're probably not
going to need because you can take all of these parts, build out some more stuff,
and then take a render. Okay, so going from here, let's now, first of all,
take a look at our lighting. So if we come in, I will show you let's go to our
world settings. Let's also then
we've got HDRI on, so you know what we'll
do, first of all, we'll come down and
just turn off our film. So on our film, we've
got Transparent. Let's actually turn
that down off, sorry. And there we go. Now we can actually see through and see what we've actually got. So if we were
rendering this now, we would have all of these
trees and things like that. So I don't recommend
rendering with your HDRI unless you're going to completely hide it and
unless it's just the sky. So you can see
around here, we have got some parts which
are just a sky, but to get that image, we'd have to come
all the way up here. So that's not a good idea. We've also got on here as well. If I come to my HDRI, I can also put it
on my sky texture, which is this one here. So I'm going to
render with this. Now before we go on, though, we have got a lot of
things that we can actually do with our sky, for instance, so we
can come in and set the sun intensity up
to something like note point note five oh,
something like this. And you can see now it's
much, much brighter, near enough matching
what the HDRI did. Next of all, then,
let's come in, and we can also change the air, so we can change the air to, you know, make it very, very
different how it looks. Now, you can actually
create a real nice Pixar look with messing around with these ozones and
things like that. For me, though, I've got
them on about right, what I want them. And what I want to do is
I want to leave this at the moment on the
sun rotation at 283. Of course, as well,
the sun elevation is also very important. So the higher we go up, so let's say if we
start turning it up, you will see that
you've got really, really long shadows here. If we start bringing it down, you can see the shadows
start coming down, start coming down,
start coming down. And there you go, now you might
have some better shadows. I think they always look
better when it's like that. And yeah, let's think
about our sun rotation. So what I'm going to
do, first of all, then, is bring in now a camera. So I'm going to press Shift A. I'm going to get myself
position of where I actually want my
first image to be. So let's say
something like this. And then what I'll do is
I'll just come round. The thing is, I don't really want just this part
poking out there. I don't really want that. I
want to avoid that, actually. So even this with
this little bit there is a better view
than it round here. So just make sure
to take that into account when you're
taking images. You could have it where it's
not actually there at all. That also would be
quite a nice image. So something like
this, for instance. And then what I'm going
to do is press Shift Day, bring in my camera. So bring in my camera,
which is this one here. And then rather than
move my camera around, I'm just going to
press Control Alt and zero. And there is my camera. Now, before I do anything, I
always zoom into my camera, so I get it right
up to round here, and then I'm going to
press the end button and I'm going to come
down to where it says, view, and then I
want camera to view. From there, then, you
can actually zoom in and zoom out while
holding the camera. Now, what I tend to do
here is control and shift, and then middle mouse
and pull out very slowly and then get it into
the place where I want it. So now we can see this is
the angle that we've got. Let's actually move it around a little bit to
something like this. Okay, so when I'm
looking at this, I'll just press N I get
everything in frame. So I can move it a little bit further over to get
it all in the middle, like, so I can even move it probably a little
bit further around. I just don't want this bit just, you know, poking
out in a weird way, so I'm just going
to put my image round about here, like so. Now, we are going
to take a very, very basic image just so I
can show you the difference. So what I'm going to do is
I'm going to come down, I'm going to first of
all, come to my render. The render here, this button
here is what determines how many samples we are
taking of the actual scene. So how many little
squares are we taking? How long is it taking, which determines how
clear this will be? So for now, let's put this
on something like 50. That should give you
quite a small wait time, depending on what
machine you're running. But also, this is how we start. So we go from 50, let's say, to 200 to 500 to 4,000
where it can take, you know, hours sometimes depending on the
machine you're running. We do this then because we
don't want to spend, you know, hours getting the render, and then we realize like
something's wrong with it. So that's why we
actually do it this way. Now what we're going to do
is we're going to put this onto Object mode
before rendering. So it's either on wireframe
or on object mode, completely up to you
which one you want to do. And then what we're going to do is go over to the
left hand side, hit our render button,
and here we are. Now, let's see, in the beginning the first render you do is going to
be pretty slow, and the reason for that is
because blender actually saves the data out for when you actually
come to re render it. So I'll show you where
that is a minute. I'salledPersistent data. So you can see already we've got a beautiful, beautiful image, but you can see that probably the background would
need to be changed, and that's where you can
take it in, you know, to Photoshop or
another software, add in that background and make it look tons, tons better. Now I want to do then is I
want to come in and just close that and if you
come down over here, it will say performance, and you will see on there there's one that says
persistent baking. It's persistent data, sorry. Now, the other thing is on here, we've already gone through
how to set all of these up, so we should be pretty
much ready to go. The one thing we haven't done is brought in our
actual composite it. So let's go over then to
Edit and preferences. And what you want to do is you want to come on to add ons, and you want to go down
to install from disc. So this one here, you're
going to install it from disc and then you're going to
go to where the add on is. So online, I think it's under Blender Course Resources.
Resource Pike. Let's have a look
if I've got it on here. Need to find where it is. Pure rev compositor,
here we are. This is the one that you
want to install then. Now, for me, I've
already installed that, but just double click it, and then what will happen when
you've done that is you'll have it on here and just
make sure it's ticked on. From there, then when you
come over now to compositing, you will see that you have a
button, which is compositor. And from there,
then all you need to do is setup compositor. You don't need to
do anything else, guys, like a shod in your video. You just click Setup compositor, and there we go,
it's actually done. Now, before we finish on this, what I want to do is set this
up properly because I don't like having all
of this out here. I like to really see what
I'm doing in the compositor. I don't even need any of
these parts over here. So I just spend a little bit of time moving everything over, like so, and you'll end up
with something like this. So at the moment, we've got
the three D Tudor compositor, and over this side then, I'm going to have
the image editor. So image editor open this up. And what we're looking
for is render. So render result,
and there we go. Now we've got
everything in here, and on the right hand
side, we've got all of the options we can
mess around with. So I'm going to go through all of those options
on the next one. I'm also going to turn off this to show you how you
can have transparency. We're also going
to go through how to put in a shadow
catcher on here. And I think I think that is pretty much everything that we're
going to go through, but it's still quite a
bit of, you know, depth. Oh, yes, we're also going
to be adding in a mist. I'll also show you how
to do that, as well. Alright, everyone, so I
hope you enjoyed that, and I'll see you on the next
one. Thanks a lot. Bye bye.
206. Exporting Stylized Renders with Custom Backgrounds and Effects: Welcome back everyone to blend the Building master class
from concept to final render, and this is where
we left it off. Now I want to do then, I've rendered my C now. I've
got everything in it. It's all looking great
and everything else. And what I want to do now is
come into these ones here. So, as I showed
you on the video, I think we have presets. So once you've
actually set this up, you can save it out as a preset. So you can save this outlook, save or export or even
import any of your presets. We're not going to
use that today, but it's there if you
actually need it. So if you get a great image
and everything's set up amazingly well and
you really want to save out that composition, how it's set up, then you
can actually do that. Next of all, we've got
the background then. On the background, we can change what is actually
on the background. You can actually bring in an image and put that in the background
straight off the back. You can also put the Alpha on if you've got the Alpha set. We have not got the Alpha set, so we just need to
load it back up. Unfortunately, though,
it's not loading backup, so you know what we're
going to do and I'm going to hit that render button. Let it load up and you
will see that this time, it's actually going
to be quicker than the last time.
Let's load that back up. Let it do its thing,
and when it's finished, we should be able
to then go back to compositor. And there we go. Okay, so now we can
close that down. Here is the compositor again. And the mist is something I'm going to be talking
about in a few minutes. But for now, let's actually
come to our color. So the color, you can see we can bring the
colors out like so, not like that, and
grabbed it wrong. We can bring the colors out
like so, or down like so. So we have a lot of control here over how our
colors actually work, and we're also able
to bring up things like the saturation
and the value. So if I bring all this up, you can see everything
gets completely saturated. Like to come in and
just mess around with it and find a happy medium. You can see 1.050. It looks pretty nice
on our building, and I'll also mess around with the value and put it on 1.330, something like this, and now you can see it
just brightens it up. We've saturated
it. We've brought the color down a little bit
just to make it a little bit darker and then we've
brought the value up just to increase the light
from there. All right. The next one then is the gloss. So if we turn this up, you can see we've got a lot more gloss on things like here. If we turn it even higher, you can see just how much
gloss we're able to get there, and we obviously
don't want that much. So let's just turn it
down a little bit, so we'll turn it down nearly
to the halfway point. And the other thing is, we
have got metal glint on here. So if you're, you know, looking at something close
up and it's a barrel with, you know, that metal casing
that goes around it, you can actually turn this up, and you will see
a big difference. At the moment, because
we haven't got anything really
glinting with metal, we've not really got that on. Now we've also got
the brightness that we can turn up, of course, to turn up that gloss, but we don't need to mess
around with that, either. So on this particular scene, because there isn't
much metal in, there's a little bit
of marble and things, but they haven't got the
same shine as actual metal. We don't really need to
mess around with that, but in other scenes, you're absolutely going
to find this useful. Alright, next of all, then
we've got the transmission, and this is something that
I've actually forgot about, so I will go in and
actually show you. Basically, transmission is
how see through something is. So if I turn, there's something let's try and turn
it up or down. It should be on the glass
or even through you might notice a slight
slight difference on it. So before we carry on, I'm just going to go straight
away over back to modeling. And what I'm going
to do is I'm going to come down and go to where it says light
paths, and here it is. So under light paths, you have got one that
says transparency. And if I put this
on rendered view, you should be able to
see with this tree what actually happens. So
let's just put this on. Let it load up. And basically, this controls how see
through the leaves are. If you don't have that,
you're going to get a lot of darkness within the
actual tree itself, which I'll show you
in just 1 second when this actually loads up. So, the higher you turn it up, the lower the actual
darkness within the actual tree or
transparency is going to be. And I'm going to make sure
actually, when this loads up, I'm actually going
to be saving it out because this is taken
quite a long time. And there we go. Alright, so let's save it out first
before doing anything else, so I don't lose
anything of my work. And then what I'm
going to do is put this on something like 40. And at the moment, yes, we're in with the camera, so I'm just going to press N
camera to view off N again, and now I should be
able to move around. Now, let's see if it's more obvious on our hedge
row, for instance. So if I come into my hedge, go over, turn back on
my hedge, like so, double tap the, and then I'm just going to see if
we can actually notice it, because I assure you guys,
it should be notable. It should be notable, really. Let's just press dot and zoom into it. Double tap the eight. I'm really hoping that you can see this because I know it is. Alright, let's zoom
down. Let's put this on something like
one, and there you go. You can actually
see the difference. So you can see on one and you can see on 40
if you're looking here, just the difference on how each of these, especially
in the tree. So I tend to put this around
40, and I get a really, really good zone between seeing through and a little
bit of darkness in there. Again, I'll put it on
one just to show you. You can see now in
there, it's much, much darker than before. So let's put it on 40, and again, you will see
the difference now. Alright. Not only that, though, the transmission also controls like how see through
your windows are. Now, at the moment, our windows, you can't really
see through them because we've got the
transparency turned, quite the way up, so they're
not very transparent. We didn't want to see through the windows on this occasion, not like some other
courses we've done. And so now you can see
that's what they look like. Now, heading back then,
if I press zero again, let's actually go and put this on Object
mode just once more. Let's go back then to render. So what we do is render image. We'll render it out once more. Every time we do it, it
should be, you know, a little bit quicker, and you must make sure before as well, going to that
massive final render that you've already rendered
it out at least once, or it's going to be
incordibly slow. Alright, so let's
have an hour check on our model here so you can see everything's
looking very nice. Let's come to then compositing. Now we've rendered that out, and here we are back at this stage. Now, if this bit's bugging you and you
don't want to see that, just press Middle
mouse and just move it out of the way because
sometimes that bugs me. Now, with the transparency now, you can see, can I
actually turn it up now? I still don't think we
get any difference from the maybe a little tiny bit of difference from the window. So we're going to leave
transparency alone. Transparency is mainly used. You know, if you've got
skyscrapers and you want to see through the glass or you've
got a pool of water, things like this is much
better with transparency, as I showed you in
the compositor video. Now let's close that
up, and what we're going to come to now is volume. Now, again, we've got no
volume in this scene. What we're going to
do instead is use mist because you
can get a really, really nice volumetric effect for a lot less on performance
with actual mist. So we're not going
to be using volume. Now, we are going to be
using the lights, of course. So we've got a lot
of lights in here. Not to mention
that these windows also have emission on them. So if I come in to my lights, what I want to do then
is turn this up to one, and you will see straightaway
that these start blowing, I'll turn it up to two, two. Look. Two, there we go. Even three. And we can also
increase the light as well. You will notice my
windows also changing. And so you can see just
how easy it is to really get those brighten
now in an evening. Now, at the moment, of course, this is not an evening scene. This is a day scene. So
these lights will look, you know, kind of
out, as you can see. We don't really want
them like that. So first of all,
let's drop that back. Let's put this then on
something like one, so one, and we'll leave
the increased light on and maybe maybe turn it
up a little bit, like so. Something like this,
I think, maybe that's a little bit too high. All right, something like
that is looking pretty good. Now, what we can also
do with the lights, of course, is we can
also change the color, so I can actually put them
on something like this. Change color to white, and now you can see it
drops those back. We can come in then and put them on a little bit of an orange, I think, you know what
that's looking pretty nice. Now, next of all,
then, let's come down. Let's just have a
increased light. I don't actually think I
need the increased light on, so I'm going to turn
that off as well. Now, the environment, we haven't really got
an environment except the skybox because
it's transparent, but you will notice that if you look up here
on these spikes, when you actually
don't touch this, you're getting a lot
of white around there. So this is really great if
you want to turn that off. So you've now got, perfect
spikes with no light to, you know, background on there. So again, if I turn this up, just to accentuate that, you
can see exactly what I mean. Let's just press Control's
head, put that back to there. So that is how you can get
rid of also have it where, let's say you turn it
up and then you want to change it to a red
color or something, you can also do that as well. So I'm just going to reset. Now to reset these, you
can either press Controls, right click and we're
going to reset to default. So where reset to default value, and then we'll
reset that for you. And then all I'm going to
do is pull it down like so. Alright, so far so good. Now we're moving on
to ambient occlusion. This is one of the main effects
within this compositor, my favorite because it just
brings everything to life. So what I'm going to do
with the ambient occlusion is I'm going to come,
first of all, take it on. And, wow, what a
difference it makes. It's instantaneous.
It's straight there. That is why I love
ambient occlusion because it just makes
everything pop, everything looks so real. And the reason, of course,
it does that is because it's adding ambient occlusion
to all these corners, crevices, and things like that. Without it, you will
see it looks very flat. W it on, you can see now. Oh, boy, how nice
does that look. Now when I come back then,
we're gonna actually mess around a little bit
with Amit inclusion. I want to show you what
it does. And from there, then we're going to
move on to effet. After that, then I'm going
to show you the mist. I'm going to show you
the shadow catcher. And yeah, after that, you should get an
amazing randy guie. Alright, everyone, so I
hope you enjoyed that, and I'll see you on the next
one. Thanks a lot. Bye bye.
207. Ambient Occlusion, Mist Effects, and Shadow Catchers in Blender: Welcome back if you
want to Blender Blender Mildingblender
building master class form, concept to final render. Alright, everyone. So we had
our ambient occlusion on. Now, what I tend to do, I never, ever leave it just like this. I'll come in and mess
around with the color. So, for instance,
now I've brought in the color, which is this white. Now I can see I've got
a lot more of this. So if you look, if I turn this you will see that
we can see in here. If I turn the color off, though, everything is really dark
and unreadable, really. So I intend to turn this on and make it a little bit darker
than what it is now. I'm also able then, as well, to come in and
actually turn this up or turn it down and actually
have a lot more control. But what I'm going to do, first of all, is come into this, and let's put it on to, you
know, a yellowish color. So a yellowish color, like so, bringing out
all of that kind of sun. And then what I'll
do now is I'll come down and start
bringing this down, and now you'll see not quite
they're a little bit up, I think, something like this. And now we can still see in here we've got all
of these shadows on. Now if I turn this
off, you'll see flat. If I turn it on now, you can
see now it's looking really, really nice and
pretty realistic. And we've also got
control over this to make it as light or dark
as we actually want. So first of all,
create the color, then create the actual darkness, and then you can mess
around with this. And you've also got
the ability, as well, then, to increase now
the actual inclusion. So if I come in and turn
this all the way up, you will see now that it creates a lot more darker shadows
around these points. So let's actually bring
it down a little bit. And I think something like this actually looks pretty nice. It's making it a little
bit more grungy. We can still see in
here a little bit, maybe, maybe a little bit more. Let's just play around
with it a little bit more. Let's bring it up a little bit. Like so. And I think
that then looks perfect. Very, very happy
with how that looks. Alright, now, before
we go to the effects, we've got a lot of effects here, the first thing we're going
to do is bring in the mist. So what I'm going to do now
just go back to modeling, and the mist is
going to be found, so I want to press tab, the mist is going to be found
on the actual camera. So if you come to your camera, you will see that you've got one that says, let
me just have a look. Where is the mist viewport
display. Here it is. Though this one
here is the mist, and now we've got
the mist on what we want to do is at the moment, the mist is ending here
and starting here. So if I mess around
with the mist, I've only got this
much to play with. I want the mist to end
right at the back of the building so that I've got a lot more to
actually play with. So what I'm going to do now he's come over to here,
I think it is. Let me just have a
look and make sure. Let me just go down. And
I'm looking for the mist, how we can actually
pull that out. And the miss passed, it's going to be found on
the world because I just looked up on the
other one off screen. Now you can see
miss passed here. Now, the depth, which is
this one here and the start. So let's put the
depth all the way back to the back of
the building like so. And now, what exactly
does this do? So again, let's come up
and render out our scene, and then it will all become clear what this actually does. So what I'm going to
do is just let this render and then I'm going
to come over to my missed, it should be exactly
the same a one because I've not
turned my missed on. So exactly the same render
as what we created before. So this is the original render, and then you see it pop
into what we've done. You can see there's
a huge difference. And now if we're coming
over two, compositing, we will see that over here
we have one that says mist, turn it on, and there we
go. Nothing really happens. Now, the reason nothing happens
is because at the moment, we've only got our mist
set all the way through. So if I bring this though up, you will see now if I bring
it back, bring it back, we've actually started
now to get mist based on how far back we
actually pulled that. So I like to add
in a little bit of mist I think it really, really adds to the scene. And what I'm also
going to do then, I'm going to come now and
put this on a yellow. Instead of it being white, let's put it on a little tinge. In fact, we'll go
all the way, full red and then put it on
a little bit of yellow. Like so. Then I just
want to show you if I come in now and turn
this down a little bit, I'll turn this color
down to black. And then what I'm
going to do now is hopefully show you
exactly how it works. If I pull this back,
pull this back, now you can see we're getting a little bit of mist on there, and that is exactly
what I'm looking for. Now, on this color now, I want to actually set not this color. This
color is black. Now in this color, let me see
if I can actually make it a little bit whiter
or yellowish. Like so, maybe even
a little bit more. Like so. And I can also come in and turn this down a little
bit to drop the mist down. So you can see now as
I turn it up and down, we get a little bit
slight bit of mist. You can also then bring it up or bring it down,
and there we go. So what I'm going for here is just a little bit of extra
kind of misty effect on there, you know, a little
bit of dust in the air because it
wouldn't be perfect. You know, you wouldn't
be able to see it all perfect and look great
and all that stuff. It would have a little
bit of something. I mean, we're dealing in
the 18th century here. There was a lot of smog in the air from the Industrial Age, all of that sort of thing. So I'm thinking about that
when I'm actually doing it. So now you know how you
can actually do that. Now, let's go back
then and just show you how we can actually mess around with
our shadow catcher. So this is for if you're rendering out,
let's say, a chair, and you just want it
balancing in the air, but you then want to take
it through to Photoshop, put it onto a scene, and actually have
the shadows there. That is when you would use this. So what I'm going to
do, first of all, I'm going to go
back to modeling, and then going to
press Shift and I'm going to come down
to mesh and plane, and I'm going to
bring this plane out. I'm going to pull it into place, and then all I'm going
to do is press one, I'm going to drop it
through the floor. So I'm going to drop it
through the floor, like so. Alright, so now what we want on is we actually want
a shadow catcher on. I think it's under shading. Shadow. Let me just look
for shadow catcher. And it's under visibility, and there is our shadow catcher. So what does it do exactly? Now I've clicked our
shadow catch on. Let me just put it
on Random mode. Let this load up, then I'll
actually save out the work, and from there,
then I'll be able to show you exactly
what this does. This will be invisible
on your renders. The only thing it's designed to catch is what it says, shadows. So once you've got this in
place, and this loads up, then you'll see that
when I actually move the light source around, it can also catch actually
things like emission as well. You can use this when
you're doing CGI. So if you have, let's
say, a video and you want to bring some extra light
source in or some shadows, you can actually do
that. So here we are. Again, you can see
it's invisible. Now let me show you
what we can do. So first of all, let's
save out our work. And what I'm going to do
is move this sun round. So if I pull the
sun elevation up. So if I come around here, you can see at the
moment, here it is. You can already see Lo on our shadow catcher
is shadow there. So you can see the shadow there even though there's
nothing else there. Now, the thing is, I don't
actually want that on. I'm just showing you that so you know what's actually available. Now, the next thing is,
then let's close that down. So we're going to delete
the shadow catcher, now you know about it. And what we're going
to do then is come over to our
compositing once more. So first of all, let's
put this on object mode. Come over to our compositor. This is what we're left with. And now we're going
to do is we're going to come down
to the effects. So we've gone through all of
the different composites, the different layers
and things like this. And now we're on to effects. So we have one, which is diamond shopping
and box shopping. And these shop and your
image in different ways. So if I put on diamond shopping, you can see this is the
way it sharpens it, and if I put on the box
shopping, when it loads up, you can see, if I turn this up, so let's just turn
this up a little bit. This is the way that
box shopping works. I prefer, honestly, to
be used to box shop, and I don't know why, but
I just like box shopping. I think it gives a nicer image. So I'm going to put this on note 0.1 just to start and see where we now what I also tend to do is when I'm
dealing with this, I will also soften it. So I soften it,
and then I soften it because I think it gives you a really,
really nice effect. So if I put this on one for one, you can see that's
how blurry it gets. Now obviously, we
don't want it there, but let's try dropping
it back to Not 0.3. Then 0.3, let's turn our sharpen off, and
there you go now. You can see it's probably a little bit too but you
can see it's a much, much softer image now and it's sharpened
at the same time. So let's put this on Not 0.2. And there we go. I
think that's just soft enough with
the sharpness on. Now, the thing is, when you're
dealing with compositing, it's the little tiny things that make the most
difference, really. Slight differences, but when
you've built them all up, you'll come to a point
where it just looks so much better than what it did before because you've spent
all of that time. I also think, as well, that this might need
dropping down a bit. So before I finish, I'm actually going to come
down to ambient occlusion. I'm going to just drop it up
a little bit just to make it a little bit lighter in those parts there,
and there we go. You could also, as well bring in a separate light source and drop that in there just to
brighten that part up. But I think actually,
it's looking pretty nice. You know, I could come in and actually put some
light sources on here, so some point lights
just on these parts, and that then would
light all of this up a little bit more than what
it is, because at the moment, this is relying on
a mission you know, just the emission
from the material, and that is not always the
best thing to be doing. It should be lit up a
tiny, tiny little bit. So on the next lesson,
I'm going to show you how to line
it up a tiny bit. And then what we can
do is we can come in and fix these parts here. So all of these effects
and things like that. And then we should end up with an amazing vinyl render guides. All right, if it on
I'll see you on the next one. Thanks a lot. Bye bye.
208. Fine Tuning Lighting and Color in Blender for Stylized Scenes: Welcome back everyone to blend the Building master class
from concept to final render. This is where we left
you off. Now, let's come in with that light
then that we said. So at the moment, this hedge, let's just hide that
other way because I will want to be using the
viewport, so we'll hide that. We'll also come in with
our trees as well. We've got a good idea now
what they're gonna look like, so we can hide those
out of the way, which means now the viewport is very, very smooth,
as you can see. Whenever I move that, there's
no loading or anything. Okay, so let's
come to our light. So we'll come to this one. We'll press shifts
Custer selected. We'll press then Shift A, and what we're going to
bring in is a light. We're going to bring
in a point light. And what I'm going
to do is put this on rendered mode just so you can see what this
gonna look like. Again, we're gonna
have to wait a little bit of time for this to load up. And then once we've got that, we're going to head on
over to our light source and just light up this
bottom pot us at the moment, this is a little bit too dark and we don't
really want that. When it loads up,
guys. There we go. Alright, let it
load up everything. And here is our light source. Now we can do is we come
to our point light. Let's first of all,
increase the radius. You can see it's small
and dinky at the moment. Let's bring it out. So we're gonna bring it out, bring
it out, bring it out. Like so, and then we can
see as well where this is. And I'm also going to change
the color to a yellowish, so a yellowish color. We can also see that I've
turned up the power. I need to now turn
up the radius. So let's turn up the radius. And as you turn up the radius, you will notice that it gets a lot softer and that is exactly
what we're looking for. So at the moment, you can see if I press zero on this one. And let's just zoom in a little bit where
it's going to be. Now it's actually
lit up those pots. Now the thing is, let's bring
it forward a little bit, maybe, and pull it actually into place because then I can just move it over to the other one. Let's press one and
see where we're at. So something like this. And then what I want to do now is make sure that I'm
happy with it. Is that lit up enough? Is it looking realistic? I think that is
looking realistic. I don't think it
should be, let's say on 500 or something. If we put it on 500, you can see it lights it up like Yankee
Stadium. We don't want that. We want to be very subtle, actually, very su guys. So let's now press Alt D, and then I should
be able to bring this one over to this one here. I'm not actually sure if I turn this one down
because it has OD. I've not tried this before, but let's put this to zero. And yes, it does. It actually turns them both down
at the same time. So first time
knowing that, guys. So, um, that you can
actually do that with them. And I know on many courses, we've actually gone through
and actually just shifted, and then we come to change them, and it hasn't
changed everything. We have to go in and
edit them a little bit. So that's really nice to know. Alright, so we've got our
light sources in now. What we're going to do is again, always put it on object mode, and then we're going
to go to render, render image, and let that render out, and let's
have a look at that. Showed light up a
little bit down there, which means we can make
it a little bit darker. Because the reason
is, we're actually making this a little bit dark
with the ambient occlusion. And with the dark and
lightness channels to actually compensate for this pot in here because
it's just too dark. So that's why I brought
those light sources in, and it would be light
bouncing off of here anyway. So it would definitely
be the soap. There we go. That is
what we've got now. So now you can see
it's lit that up very, very nicely for us,
really happy with that. And what that means is
now I can come over to my compositor and
maybe come in to where my ambient occlusion is and maybe come in and make
it a little bit of look. Is that actually going
to work? I don't think this is the right one, so
let me just have look. Okay, so I just had a problem
there where it wasn't actually changing anything when I went to my ambit occlusion. And generally that is
because for some reason, it's got the old render, so
you know I actually alter it. So I did was, I staved it out, I closed it down, I
loaded it back up. I rerendered it, and here we are. Now it's actually working. So now you can see that
I can bring this down, make it a little bit lighter, and still see
everything in there. So that might be
something that you want. And from there, then
let's also come up to where, you know what? No, we're not going to
do that. We're going to come down now to
more of our effect. So antialsin what
that means is that you've got little kind
of bits like this, as you can see on here, and sometimes they get too much. That is what that's there for, so you can turn it on
or turn it off like so. Alright, the next one is
then color balancing. I use this a lot in
my actual scenes, and the reason I use it a lot
is because it's a really, really great way of, let's say, bringing in a cooler scene. So if I bring this
down, you can see really easy then to bring
it into a cooler scene. Now, I would say when
you're using this, don't mess around with the
darkness and lightness. Let me just reset this to
default, and there we go. Always just tiny amounts. If you pull it all
the way over here, you can see it just looks crazy, but we can pull it in and
make it a little bit, this scene a little
bit more yellow. So you can see now it's a little bit more sunshine on there, and you might want to have that. Now, we've got lift,
gamut, and gain here. So the lift is shadows, and it affects the darkies
parts of your image, and it brightens the dark and shadows without changing
highlights too much. Then you've got the mid
tones, which is the gamma, and this changes the middle
of the brightness range. So the middle, not these
bright, really contrasty parts. It's just the
middle range of it, and it adjusts the overall tone and contrast of those mid parts. And then finally, finally, you've also got the highlights, and that is the gain. So
that will change those. So if I come over now and
go to my mid and gamma, so again, dark, mid high. That's how you need to think of it when you're
dealing with this. So let's come in and change
this and put it, you know, I don't really want to
change my shadows too much, so I'm just going
to reset actually, reset default values. Now, the mid, let's come in then put those a little
bit on the yellow. So a little bit on
the yellow light. So now you can see that's the overall effect
that we're looking for. Just that little click made
such a huge difference. So if I press Controls head and then press
Control shifts head, you should see how much
warmth is actually in there. And finally, then we've
got the highlights, and I don't want to mess
around with those either. Next of all, we've
got the RGB curves. This is a really
important one because this is what brightens
up the whole scene. So if I bring this up,
you can see I've really, really got some contrast now. So from really, really dark, you can actually have
it really light, and it just makes a
little bit of difference. Now, with anything
on here, again, you can come in and just
reset the and what I tend to do is I tend to just alter things very,
very slightly. So very, very subtly, guys, if you're messing
around with this. Now, I still think that's
a little bit too much, so I'm going to bring it down a little bit and
leave that alone. It's up to you, though,
if you want to make it darker or lighter, especially this is helpful
when you're dealing with a night scene
because in a night scene, obviously, you've got to mess around with these a lot more. We're not doing that
in this course. We're only messing around
with the day scene. So next of all, you've
got you correct. If I turn this on, you'll see this looks pretty
crazy, but it's not. Basically, you can
bring up the color. So let's say you want to bring
this red up, for instance, while the red is the
red and orange bands, so I can just come
in and pull this up, and you can see now I
can mess around them. Again, with something like this, it's worth know that you
just want to bring it up slight bit just to give it a little bit more warmth
or something like that. Again, you'd be surprised
what colors are actually affected when you
start messing with them, how these are sometimes
affected you would think there would be some blue in there
and things like that. We can definitely turn up the
green and make these much, much greener, as
you can see, so you can see difference
in green there. Let's turn it up
here. And again, a difference in green
map and want to make those pop out
a little bit more. For me, I'm happy with it,
so I'm not on this occasion, going to be using you correct. And then we've got brightness
and contrast, which, of course, is the overall brightness or the
overall contrast. We've set it not 0.1, but you can keep turning it
up and then turn this one. There you go, you get
some slight difference, as you can see if i bring
this all the way up. Can see. Not like that. Just a slight bit. Let's
put it down to 0.6. Brings it up very slightly. And you can bring
this one up to, let's say one, there we go. You can see we can
mess around with those and get it that perfect perfect. This is why these are at
the bottom, by the way, because these are there just
to have that, you know, perfect ending to your render. Now, next of all, we've
got hue and saturation, and this, of course,
is going to, like before, bring
up the saturation. So if I bring this
up, you can see, we've got a lot more
saturation within the scene. Now, being as I used the hue and saturation all the way up
here, I'm not going to, I think, at this point, I
could turn up the value a little bit and get it to be a little bit brighter
than what it was. And maybe that is
adding something to it. So controls Control Shift E, is it looking a
little bit better. I think it makes it
look a little bit more sunny if I'm honest. Also, the gain, let's just mess around and put this on
yellow or something. It's a little bit too much. That's the problem
with it, so I'm just going to turn it
down a slight bit. Now, what we're
going to do is press Control Z and Control Shift Z, and you can see a tiny, tiny bit more warmth in there. Alright, I'm happy
with how that looks. So on the next lesson,
then that is going to be the final lesson, next one. We're going to talk about the denise and what
it actually does. And then finally,
we're going to make our final render, and I'll
show you how to do that. Alright, everyone, so I
hope you enjoyed that, and I'll see you on the
next one. Thanks a lot. Bye bye.
209. Final Render Optimization and Export Settings in Blender: Welcome back ever on to blend the Building Mass class from
concept to the final render. And here we are, on
the final render, guys, and what a journey
it's actually been. Alright, before I go
into all that spiel, let's actually come
over to the denois. So, the moment I click this on, you will see it takes quite
a long time to composite. But, oh, boy, what does that actually do to you
if I turn this off? You can see how greeny
everything looks. The moment I turn it on, everything comes to life and
looks absolutely beautiful. Now, the main thing here is
that we've got a few options. So using HDR, what does that
mean? It's basically there. So when using HDR, which is a high dynamic range. So that's, for instance,
like the HDRI that we used, you can use it without this on. If I actually turn
this off look, you will see when it loads up. It makes a tiny, tiny
bit of difference. I actually think it's
better leaving that on. But it's best to use
when you're using HGRI or when your render
contains things like fire, bloom, sunlight, et
cetera, things like this. And our scene does have a
fair amount of sunlight, so I want to actually
keep that on. Next of all, then, we've
got this pre filter, which accurate, fast and non. Now, we do want this
on. The accurate one, though, does take
way, way longer. So if I put this on
non, for instance, let it load up,
turn it off and on. So turn off the denoise,
turn on the denoise. You'll see now how
quick that actually is. I'm going to put mine on accurate because I
always like that. But really, if you've
got a large scene, you want to actually
put this on non, and only at the final part, do you want to turn
this on too accurate. Now, we've got our
final scene here. Can we make it look even better? Yes, we can, but in smaller and smaller and
smaller increments. And that's the idea of this. I'm happy now with
how this scene looks, so what I'm going to do is now, I'm going to go
back to modeling, and then what I'm going to do is I'm going to help this speed up. So at the moment, we've
got everything in the image. We don't
actually need it all. What we can do now
is just turn off everything to help
speed up the process. So I'm just going to turn
them all off, like so, turn off the I'm going
to leave the camera and, you know, the point lights,
I'll turn off, like so. So, it should be left
with something like this. I've got my weeds that I'm
also going to turn off camera. And a mist, and that's it. And then what we want to do
now is go to the render. So if I come down to
the render button, we can see the moment we
render them out on 50, let's put this on 200. And then what I'm going to do
is I'm going to go over to render and render image. Let it load up, initialize, and I think I loaded mine
up and had to re render it, so it will take a little bit
longer than it did before. But you will notice everything
pops in same as normal. Now you'll see that
it does take a little bit longer
to actually render. And this means it's actually going to give you
a better quality image. It means every sample
that it's going to go through is going
to be higher quality. It also means when
you've rendered it now, then you will come to
compositing and there you go, There's your final image, but you can see now
it's actually rendered out at a much higher level. So you can see we've got a lot more clarity within our scene. Now, we can go even further than that and render
this out at a much, much higher level, which
is what I'm going to do. The best thing is,
though, if you come now, your compositor is not affected by how many
samples you've done. Once you've actually
rendered it, all of the rest of it is
not affected by that. So that's the beauty
of having this. Now I'm also going to go in. I'm just going to look now
to make sure I'm finished, so I'm going to
turn off the mist, and you can see there what
a difference that makes. And I might have gone a
little bit too much with my. Let's have a look,
so we've got color. Let me turn up the
color a little bit. It's going to take a little
bit of time to cut load up. And the reason, of course, that is because we've actually got in now our denoiser that
always takes a long time. And I think just turning
that up a slight bit just brings in a
little bit more sunlight, and that now is perfect. So again, now I've got that. I've looked at it. I've messed around with those final parts, and now what I would do is now would go for
my final render. So I'm going to turn
this up to 4,000 and I'm going to save you
the journey of my 4,000, but I will let you know how long it took, because
at the end of the day, you can see how
long the last one took and how long this one took, and I'll show you that
in just 1 minute. So first of all, though, I'm going to go to render this out, and I'll see you when it's done. So, just to give
you an idea, guys, this on my machine took 1
minute to actually render out because we messed
around with all of the rendering options
on the right hand side. That brought it down a lot. And, as well, the
first image I took, which was 200 samples before
that one took 25 seconds, so not long at all. The problem comes
when you're using the um doing turn tables
and things like this, then, you know, you need to lower it down because it's
going to take forever. Even though it's
taking a minute, that minute will start to build up because the hotter
your machine gets, the more render it's doing it will take longer to
actually do that. So just bear that in mind. You don't want to
be rendering out turntables unless you're
working for Pixar, you know, at 4,000 samples or
something. So here we are. Here is our final render, and you can see what a beautiful actual image we've
actually got there. Now, from here, I
wouldn't just leave it at this front image like this. I would actually move
my camera around. So first of all, though,
let's go to image, and what we're going to do
is save us and we always, when we save it, let's put
the color depth on 16. And then this will help
something like Photoshop. When you export it out, you're going to get a
much better color range if you actually turn this to 16. The other thing is
the compression. We want this at 100, and I know it seems
like 100 should be Maximum lossless
compression, you can see there. So I might have time to
turn best compression, zero, no compression
with fast file output. 100 equals maximum
losless compression with slow file output. I know should seem the other way around, but
they're actually not. So what I'm going to
do now is just come in and I will call it. Let me go up so I can find
my files. And here we go. We'll make a new one that's
going to be new folder, and we'll call it image
or main images. Like so. And then what I'm going
to do now is come in double tap this,
first of all, and I'll call it
front building image. Like, so, click the Enter
bone again, and again, it's going to take a
little bit of time, as you can see, to
actually save that out. So, guys, thank you so much
for taking the course. And if you've made it
all the way to the end, seriously, hats off to you, what an incredible
journey you've been on from the first concept, gray box or even the
references that we got to the final polish render
and everything in between. Now it's your turn to show
off what you've created. I'd love you to share your final results
either right here on this platform or over on the three D Tu
Discord channel, and that's a great place to get constructive feedback
from fellow artists. Some of them are beginners, some of them are real pros guys, and it's not the kind of feedback that's going
to tear you down, but the kind that highlights
areas for improvement. It's a really nice space to actually share
work over there, because that's where the
real learning happens. It's not from
chasing perfection, but from spotting and embracing
the flaws in your own. You've done something
awesome here guys, be proud of it, share it, and keep pushing forward. I can't wait to see
what you build next. Happy modeling, everyone. Thanks a lot. Bye bye.
 3D Tudor, Bestselling Blender Author & 3D Educator