Transcripts
1. Introduction to Blender 4: The Modular and Kitbash Environment Guide: Welcome, everyone,
to Blender pool, the modular and Kit
Mash environment guide. Well, you'll learn
everything from the basics of three D modeling to the creation of a sprawling,
detailed environment. Whether you're new to blender or looking to
enhance your skills, this course is
designed to guide you through every step
of that journey. Let begin with the essentials, understanding, the importance
of gray box modeling. This foundational
technique widely used in the gaming industry at a
professional level allows you to block out your scenes and
ensure that your designs are functional before diving
into the small details. As part of this process, we'll also introduce
lighting early to test out the scene
looks and feels, making necessary adjustments
before moving forward. Alongside this, we cover the basics of navigation
and modeling, making easy for beginners to get started with blender
and three D modeling. Next, we dive into
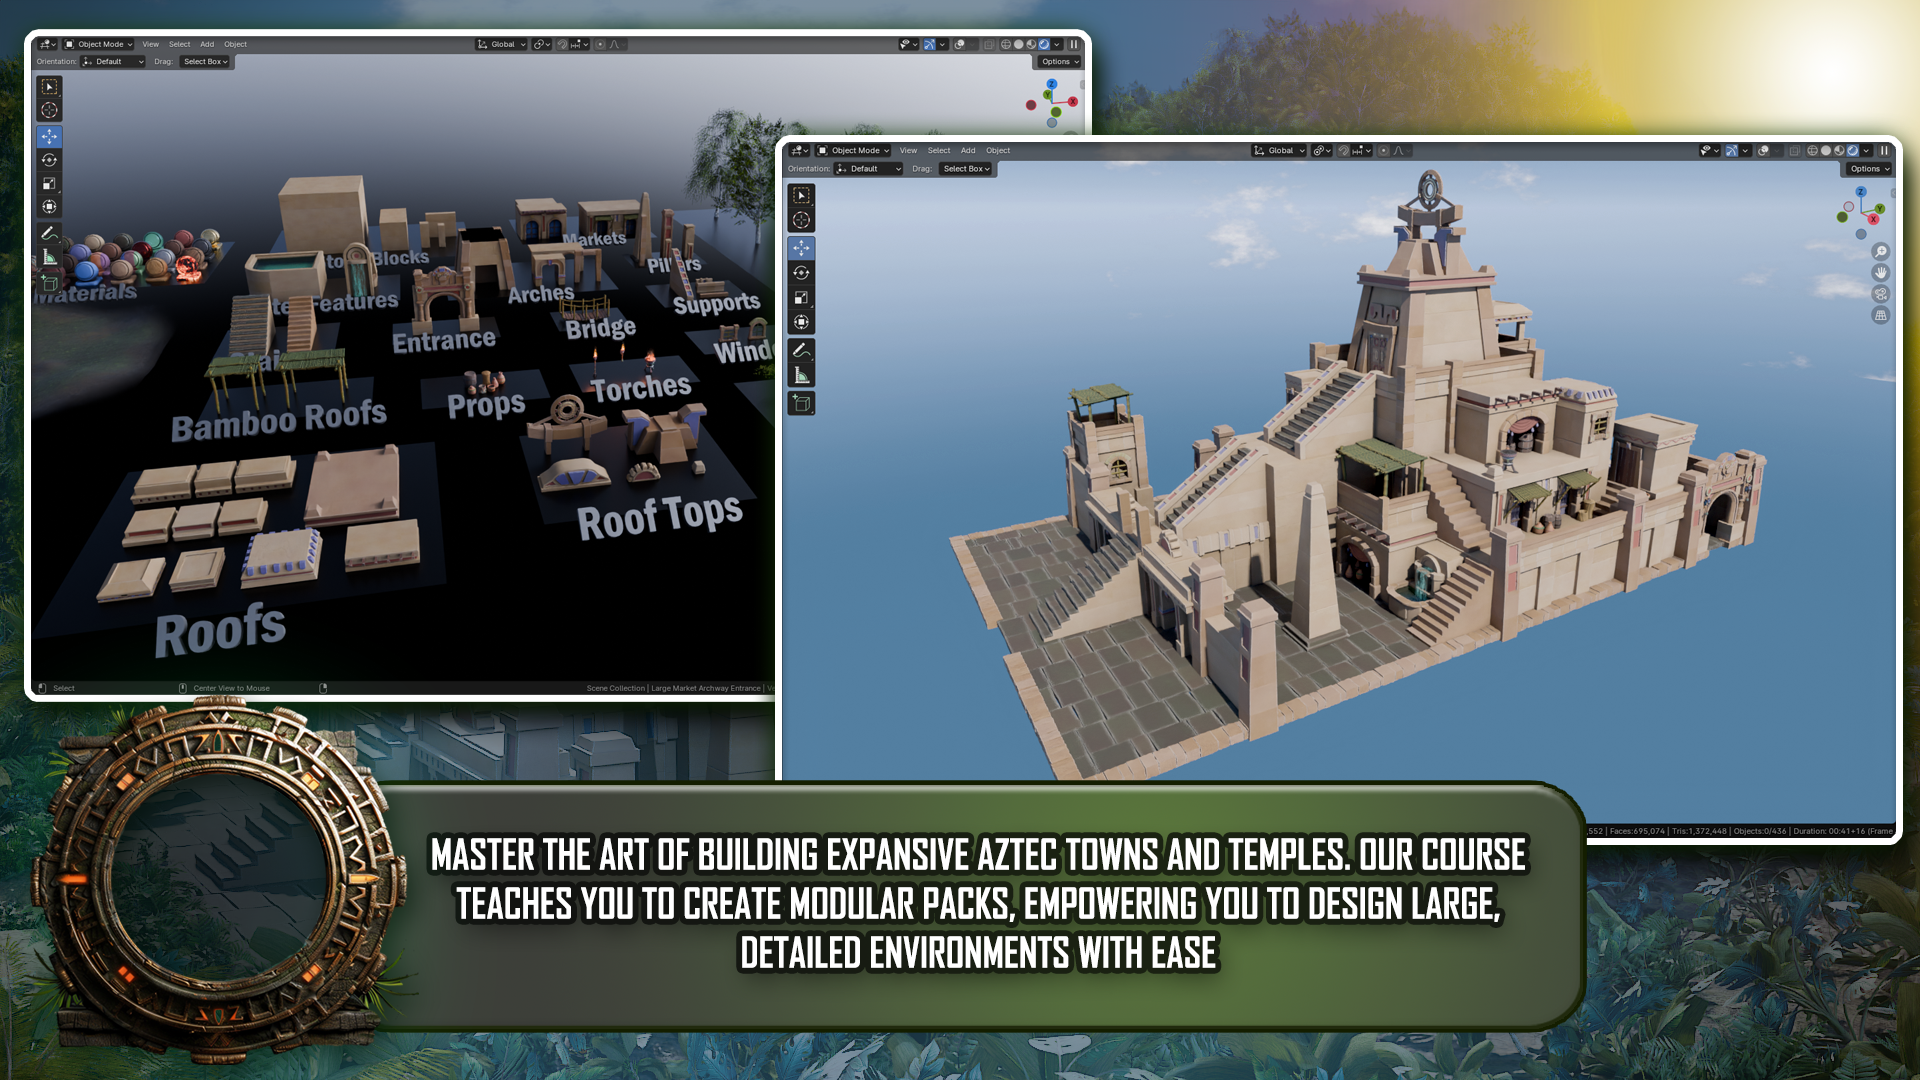
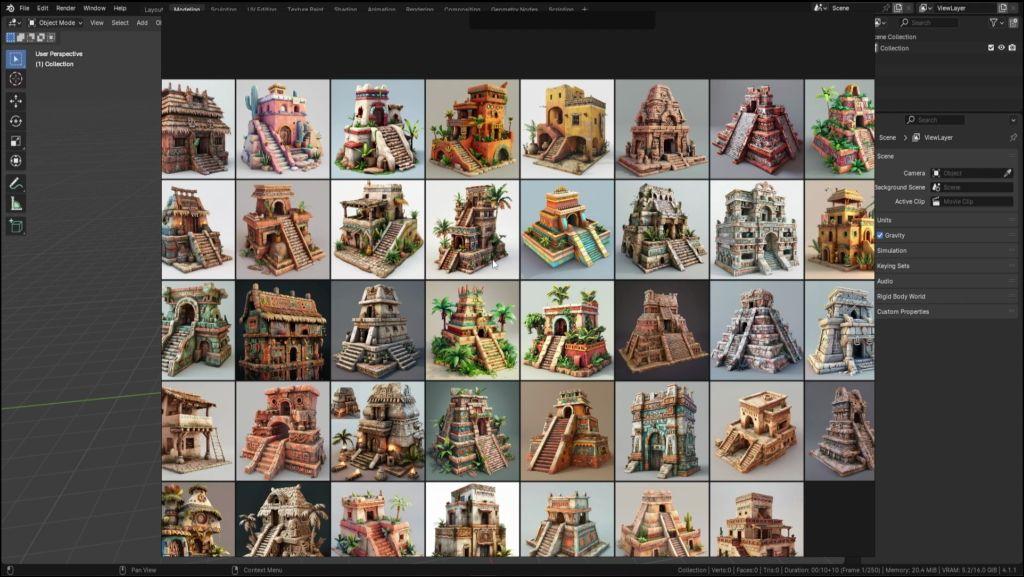
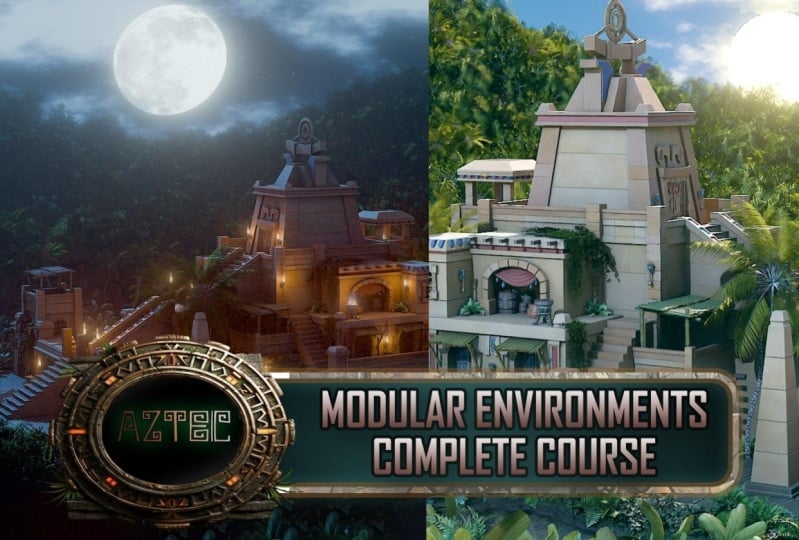
creating a modular pack, specifically designed for
constructing an Aztec temple. This pack also includes
the necessary parts, allowing you to easily
assemble not just a temple, but entire towns if you wish. We'll guide you
through the process of building each component and how to efficiently use these
parts in your projects. As we progress
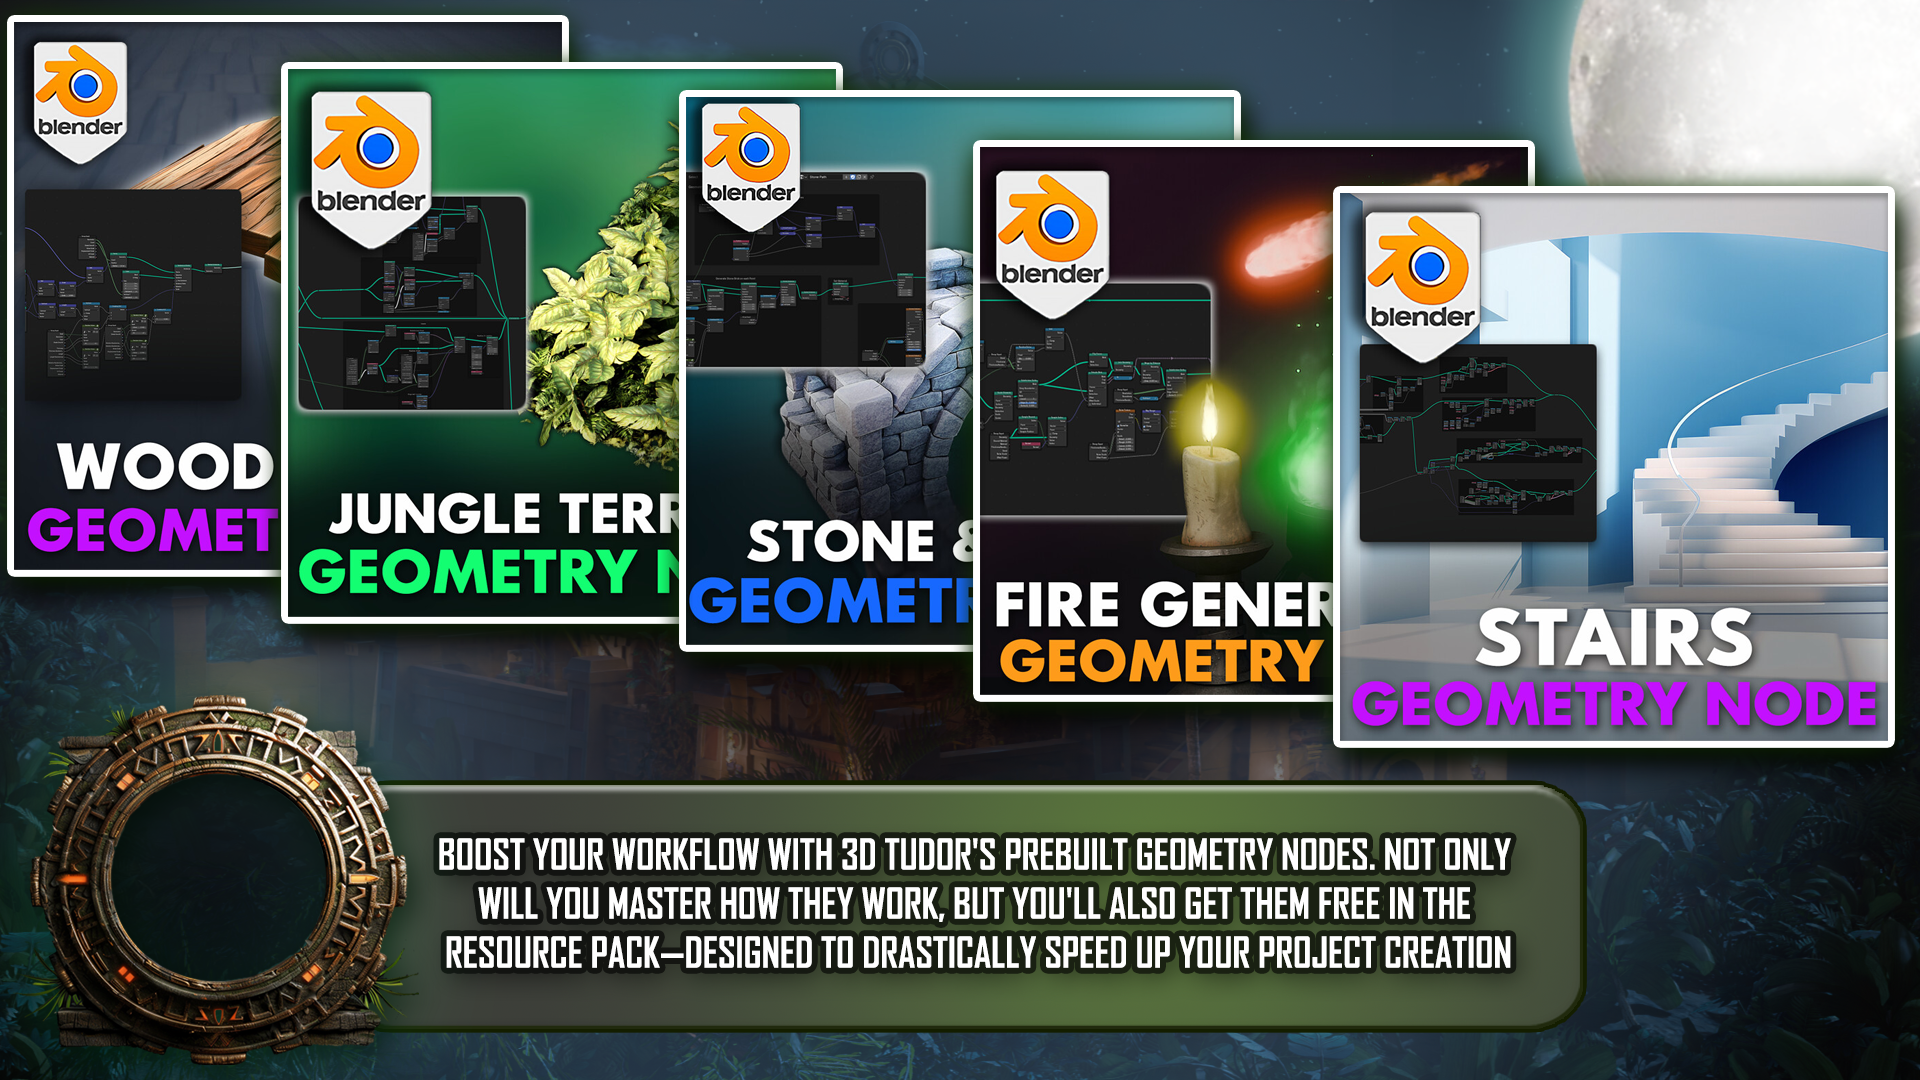
through the course, you'll not only receive
a massive resource pack filled with various
geometry nodes and shaders, but you'll also learn
how they work in detail. These nodes and shaders are
based on references that we've carefully selected and built into the resource pack. Troughout the course, we'll
guide you through each one, showing you how to customize and apply them in your own projects. By integrating
this understanding into the modeling process, you'll gain hands on experience that enhances your ability to create dynamic professional quality environments
with confidence. To ensure your models are as accurate and realistic
as possible, we'll teach you how to
effectively use references. You'll learn what software
to use and how to import and organize reference
images directly in blender, guiding you in
modeling everything from buildings to small details. This method not only improves
the realism of your models, but also streamlines
the modeling process by providing a
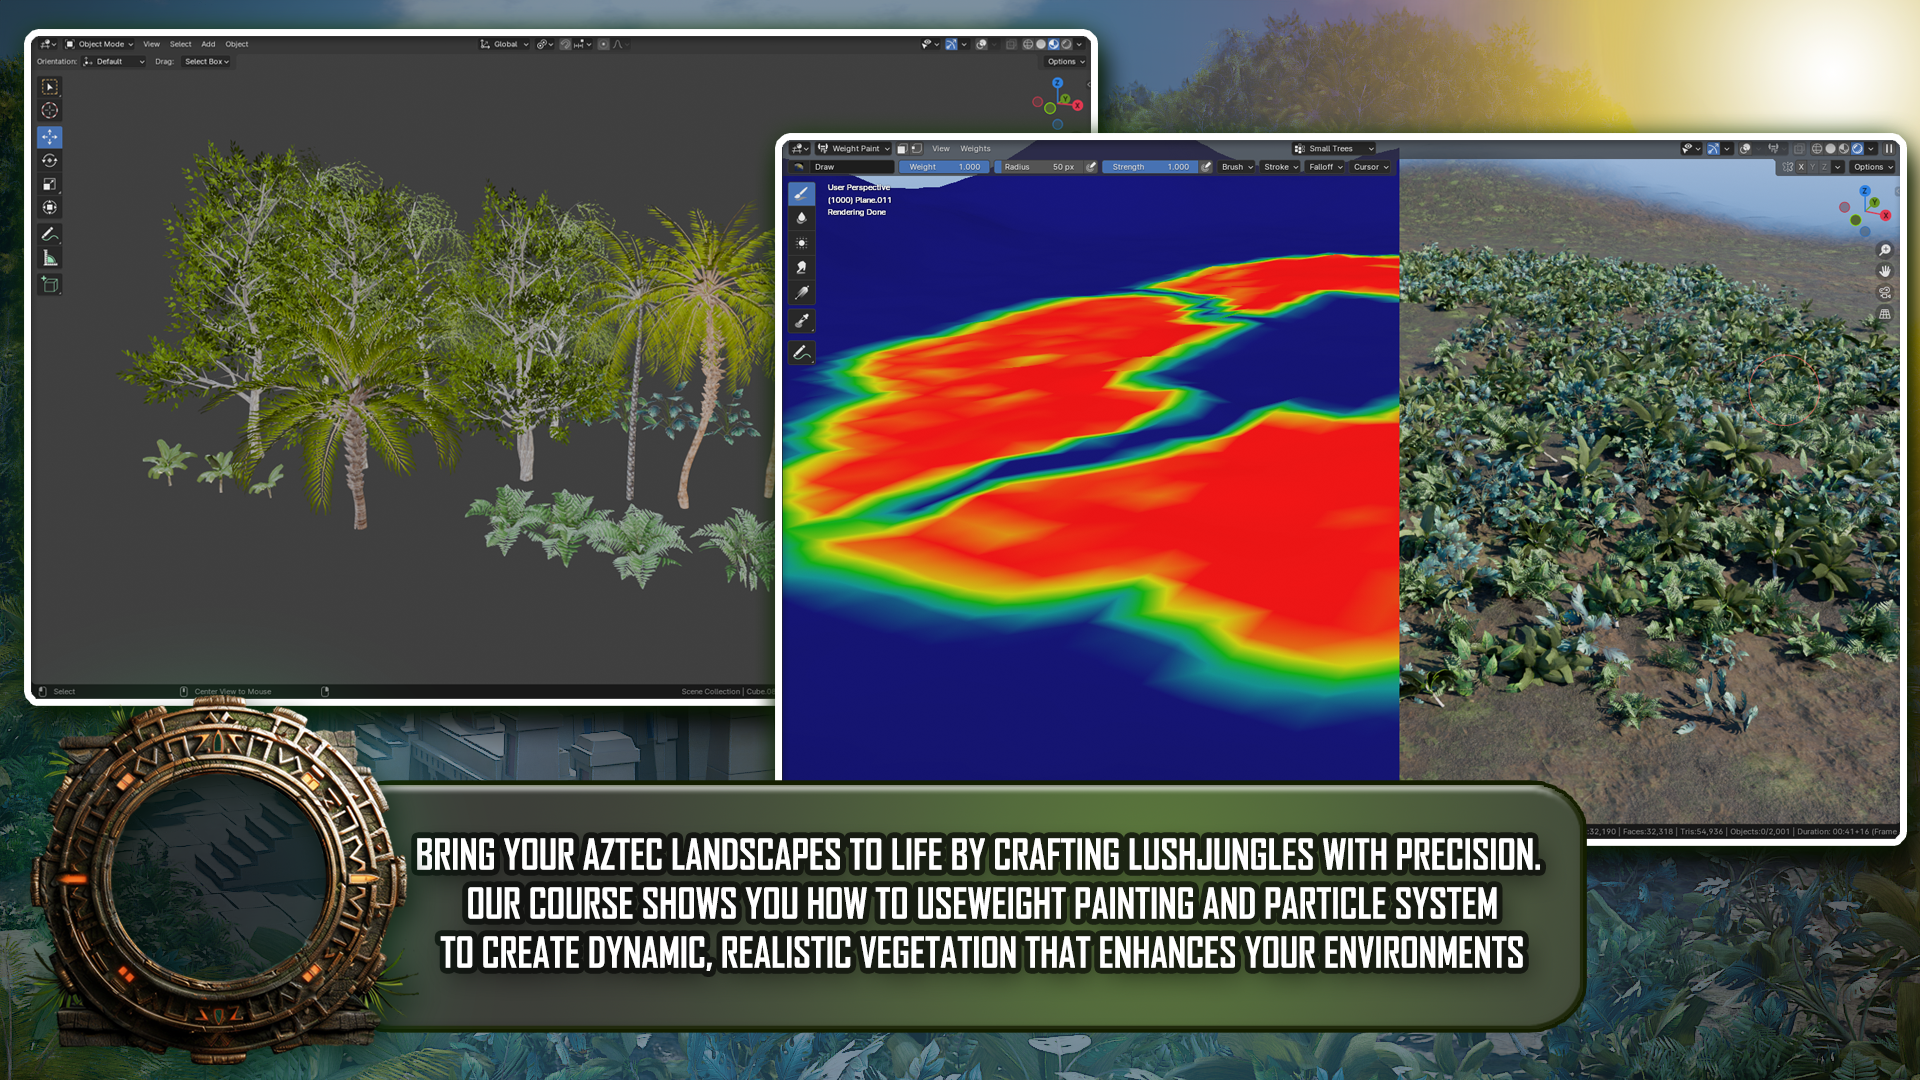
clear visual guide. The course also covers creating expansive terrains
and environments, using damage nodes
and particle systems. We'll discuss the art
of will building, how to tell a story
through your environments, by using different
heights and ensuring every part of your scene
is visually engaging. Rendering all this out is a
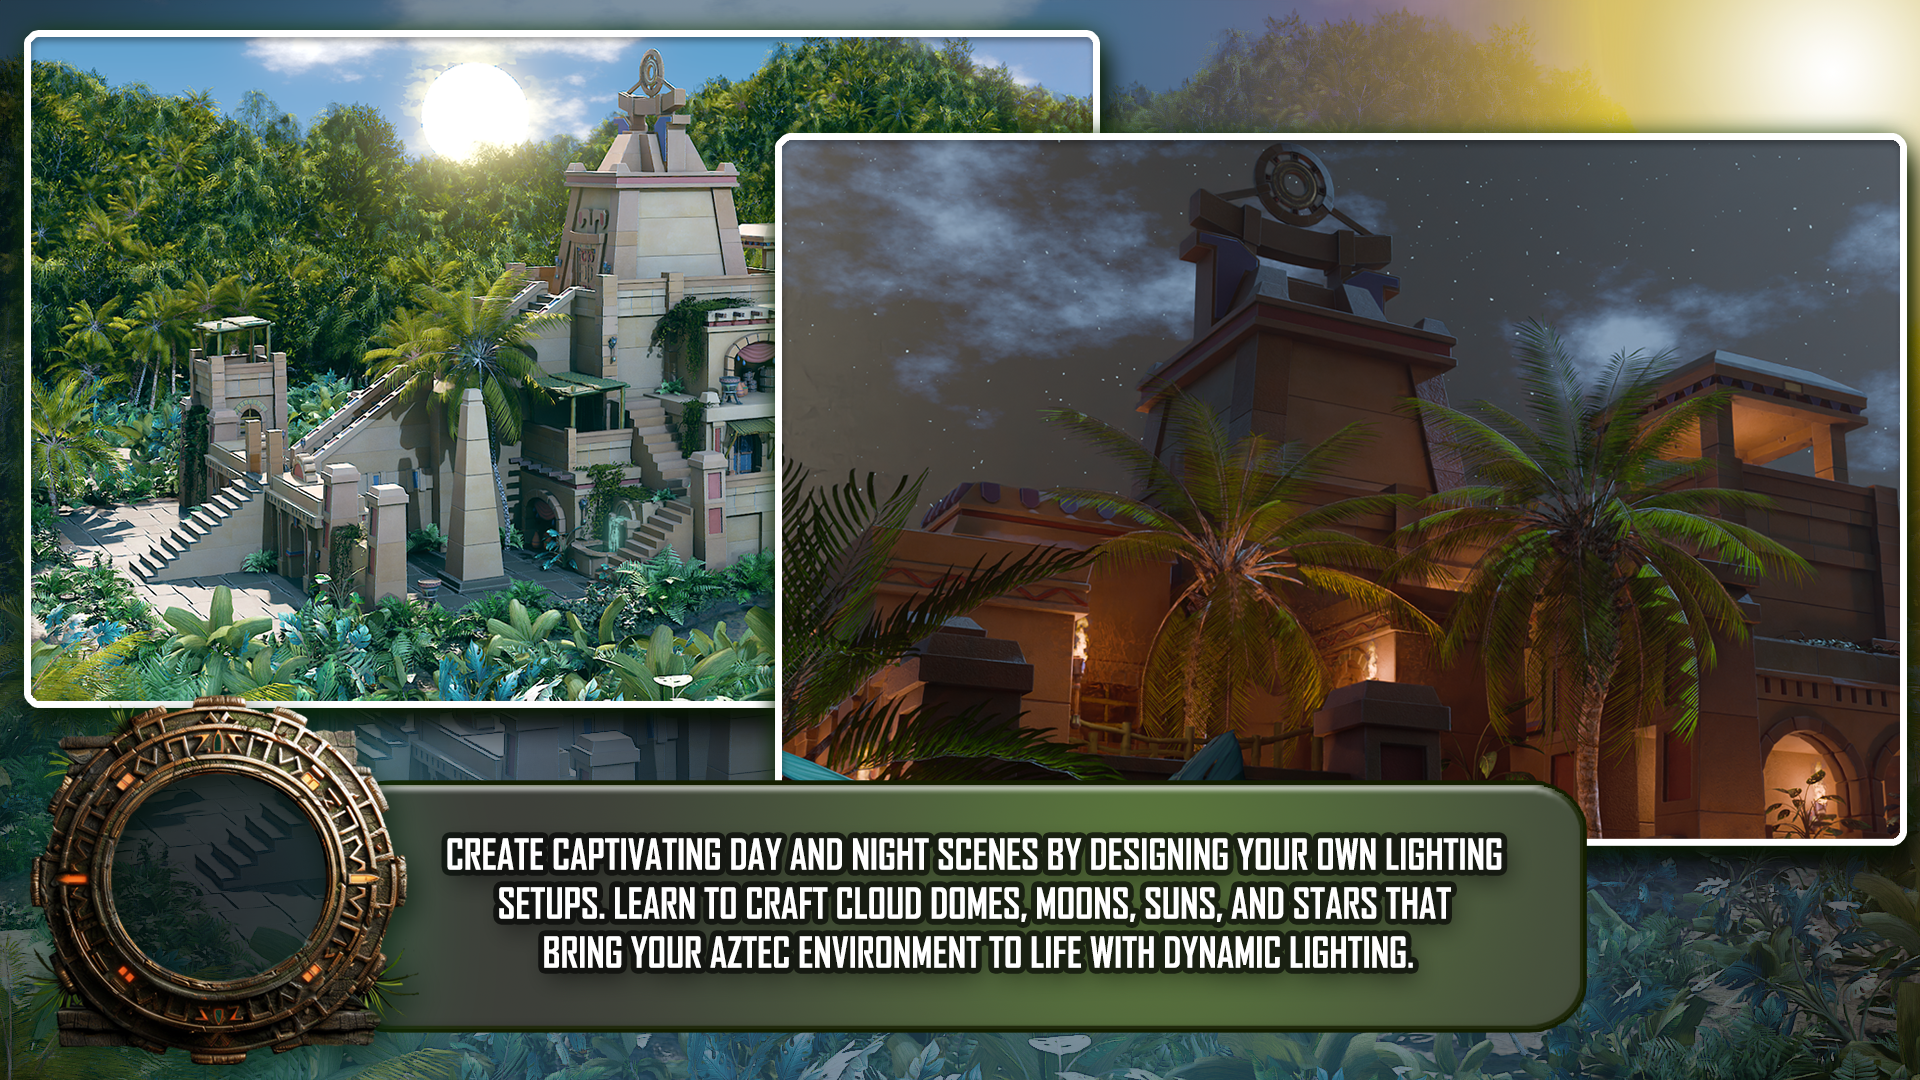
critical part of the process, and we'll be showing
you how to create stunning day and night scenes. Learn to set up
jungle lighting with a sun and sky doe
for daytime scenes, and how to achieve the
perfect lighting balance for moonlit night scenes. We'll also be teaching you how to use the blender
camera effectively, including how to
create turntables, to showcase your work. Additionally, you'll
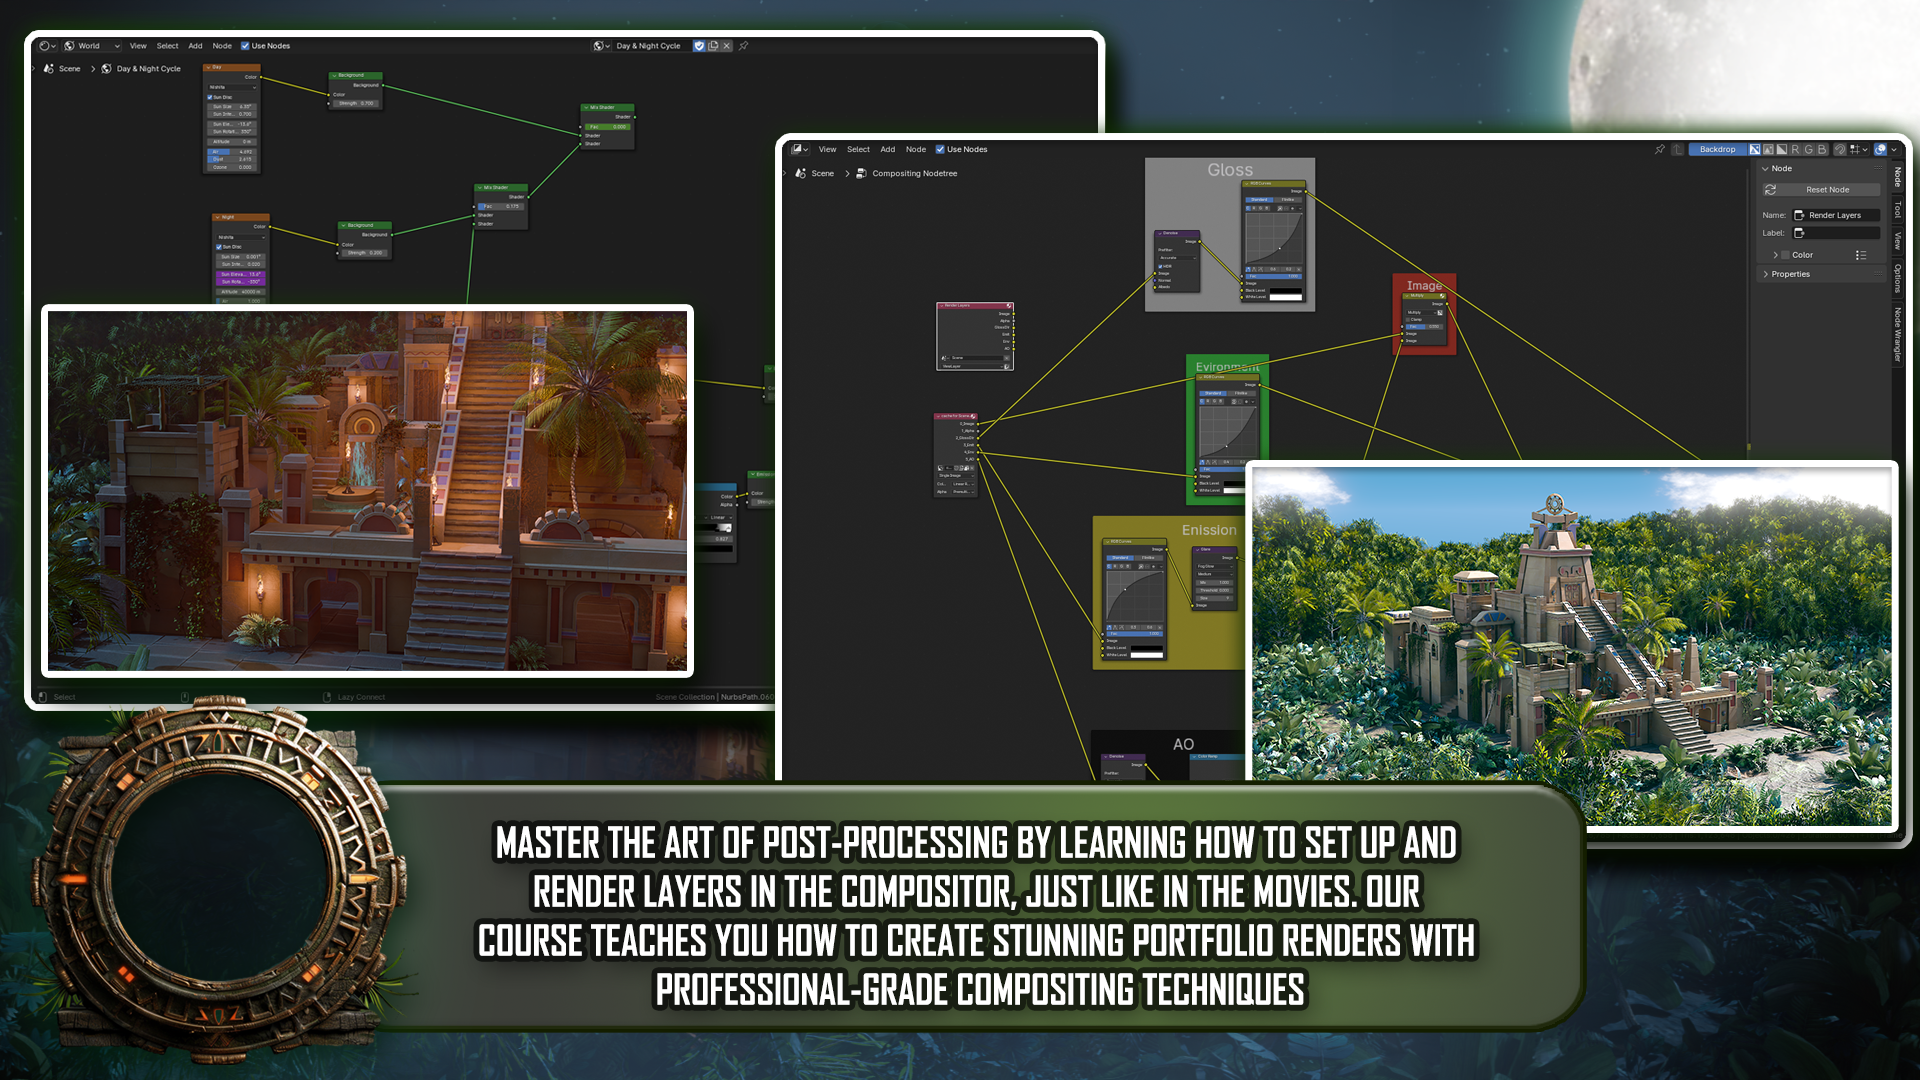
learn the ins and outs of blender composite, how to set up nodes to enhance your images with
effects like emission, and ambient occlusion,
bringing your scenes to life. As we reach the
end of the course, we'll be exploring advanced
modeling techniques, including the use of booleans, loop tools, and even a bit of sculpting for terrain creation. We'll also delve into the intricacies of
Shader animation, giving you the skills to
bring your models to life. With this course, you'll
gain the knowledge and tools needed to create
not just a modular pack, but also a sprawling dynamic
scene from start to finish. Join us on this creative
journey and take your blending skills
to that next level. Whether you're looking to build detailed environments or enhance your
modeling techniques, this course offers everything
you need to succeed. Start today and bring
your visions to live. Happy modeling, everyone.
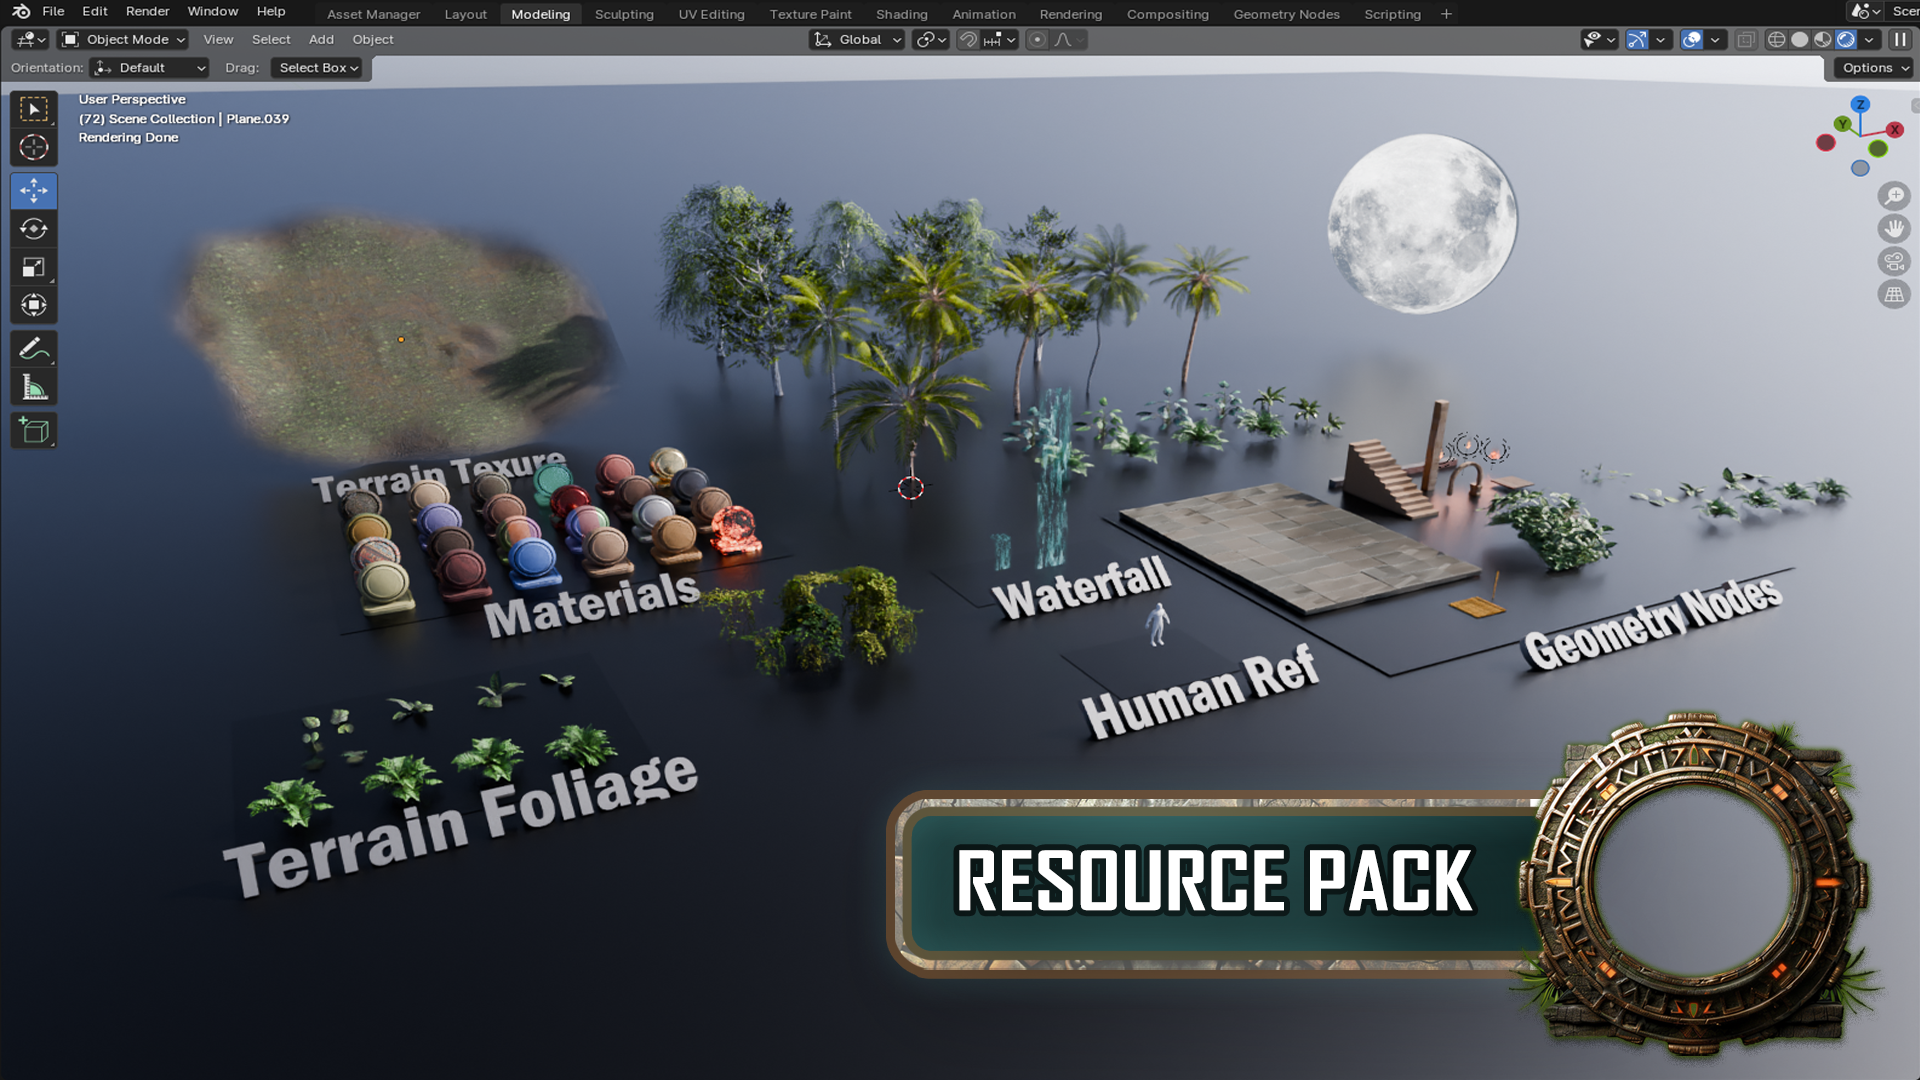
2. Going Through the Resource Pack: Welcome everyone to
our brand new course, Blender for the Modular and
Kibash environment Guide. I'm Neil, and I'm the guy behind the usually popular
three D tutor. And today, I'll be
taking you through the entire process of creating a large environment
right here in Blender. We'll be going through the whole process from start to finish. So first up, let me give you a condensed timeline
of how you'll get to an environment exactly as you see here, completed by you. Who is watching right now? First of all, we'll
be going through the massive download pack
that comes with the course. Next, we'll go and gather
all of our references, and then we'll be moving
on to our gray box. We'll then be adding
in some basic lighting before finally modeling
our modular parts. And we're not done there
because after all of this, you will learn how to create
terrain and foliage in a large environment
right here in Blender. Next, we're onto the professional lighting
and compositing before finally camera work and rendering. Is
a complete guide. So I'll be honest, it's going to be quite long and
tough in places. But stick with it
and you'll walk away understanding
the entire pipeline. So now, after that condensed lowdown of what we'll be doing, let's move on with the course. First up, I'm using
Blender 4.1 0.1. Now, you don't need the
latest version of blender. As long as it is 3.0
onwards, you should be fine. As this as most of the key features we'll be
using to create our scene, things like the asset manager. Things like some
certain node options or lighting options may not be in a blender version
less than 3.0. Just make sure if you
are using Blender 2.7 or 2.8 that you
are aware of this, and you may want to actually
upgrade your blender. Now, let's begin by going through the course download pad, which will be available
with this course. So if you open up that first,
we'll go through there, just discuss a few
of the things and how to use it before moving on. And here we are. Here is the
course download pack then. So you can see, first of all, if I move over here, we
have some terrain here. So this terrain is actually a material that you
will have access to when we come to actually painting our
environment terrain. Now, the thing is, once we
actually bring this in, and we'll go through how this is actually set up, so
don't worry about that. Next of all, then
we've got all of the materials we're
going to use. It's much easier if you gather your materials in
the first place, and I'll show you how
to put them together. And then once you've got
that, you can create other modular packs
with this in mind. So we're going to
teach you everything about basically getting
everything together, getting all your references, getting all of
your materials and everything like that
before you start. When it comes to things
actually like foliage and, waterfalls and plants. It's actually better to
leave that until you've actually finished
the environment and then go off and
gather all of those. This is because
you might actually change the way the
environment looks. Certain plants might fit better. So I recommend that you
wait until you finish. With the materials, you're
going to need those in the first place because
you have to have an idea of what actually
you're going to create. It's best off to get
a bulk of materials. And then as you're actually going along and creating
different things, you might think, need one of those and then actually go
out and get the material. But it's best off to lay them out like this so everything's
nice and neatly laid out. All right, next of
all, then we have, as you can see, all
of our foliage, all of our vines and things
like this that we're going to add to the scene once we've actually put all that
modular pack together. So it's designed the
modular pad to put it together to make
large massive cities. And then once we've done that, then we add in this foliage. So this is a small
foliage that'll be going around
the main building. And then we've got the
vines that will be going on top of the pillars
and things like this. And then also with then we've
got the large foliage that will be encompassing
the main jungle around the entire environment. So that's why they're
actually split over. Next of all, then,
we've got one of the actual main shaders, which is the waterfall shader. We will be going through how
this works if I press play. You can see that actually
this is animated. I'm going to show you
how to animate that. It's way easier than
what you think. Next of all, then, we've
got a human reference. Really important that you
have a human reference. You want everything to be as good scale as you
can possibly get. Making sure that
things fit together, making sure barrels aren't ten feet big and
things like this. Also, it's good to have a scale. So if you're working in
a team, for instance, you're going to be sending
it through to someone else, and then it's going to pop up, and it's going to be really big. That's then going to affect
the UV and the lighting. And also, if they take it into something like real engine, it's also going to
cause problems there. So it's always best off to
work to an actual scale. Hence why we've got
this human reference. So we'll talk about that
as well as we move on. And then finally,
we've got all of our actual geometry nodes. So we've got our
simple geometry nodes here like the geometry stacker. All of these geometry nodes are actually created
by three D tudor. We have a whole bunch of them. So if you want to go and visit
three D tudor on Google, you'll see all of the omet
nodes we actually create. Then finally, you
can see that we've got things like this one, which is another stacker
to create our bamboo huts. We've got one that
scatters foliage around, different foliage
and things like this and creates terrain really, really fast and easily, and you're going to love that
one when you try that out. We have our stone
surfaces like this one, and you can see all of this is done with an actual
geometry node. We've also got them
things like stairs. Again, done with
the geometry node. This makes it much,
much easier to actually create things
really fast and easily. And there's nothing
wrong with using geometry nodes if you have them. It's going to speed
up the process. If you can create something without the use of
geometry nodes, then I would say just
get a geometry node, to create it, does
make things easier. Then next, we've got things like archers. So
things like this. We can create also
with a Jot node. We've got some pillars. And finally, we've got our fire, which fire is notoriously
hard, create and blender. So if you can get
either some fire that someone else has created, or you can get a Joe node that's actually going to do most
of the work for you, that will be great because
at the end of the day, we're always going to need
extra tools and add ons and things like this to get
to where we want to be, or it's going to take hundreds of hours to
create something. And this is why you do
want things like this, just to short cut certain
aspects when you're building. All right, so that is the
complete download pack. So just make sure that you've downloaded this. You
want to have it open. And if you do have it open, just make sure that
it's on object mode, so it's not going to take up so much of your
computer space. So, now, before finishing, this first lesson stroke
introduction stroke, showing you what comes with the course and
all that good stuff. L et's actually put this down, and what we'll do is go
back to our main blender. Now as you can see, when
you open up blender, it will tell you the
version that you're using, so mine here is 4.1 0.1. It also tells you down on the bottom right hand
side what version you'll have if you've
set that option on. So let's go through
saving out and setting on these options down
here before we start. The one I'm going to do is click somewhere on the viewport, and you will notice
when I click that on, we also have key
commands on here. So, for instance, if I press t, you'll see that this
actually pops up here. So you'll never really
be lost because the key strokes will be
available on the screen. So, first of all, before I begin, I'm going to go to file. I'm going to go to default, and what I want to do is
load factory settings. And this makes sure
everything within my blender will be
the same as yours. This is a completely Vanilla
blender then from there. So it means anything
I need to do, you will also need to do,
which makes it very easy. So let's load those settings
now. And here we are. This is what you
should have then when you open up your blender. You can see at the
moment, we've got nothing down at the
bottom right hand side, and that's something we're
going to fix right now. First of all, though,
let's go into modeling. At the moment we're in layout, and we have this timeline down here that we
really don't want. So let's go over to
modeling. Click that on. And then what we
want to do now is you can see down the
bomb right hand side. It says, Blender 4.1 0.1, but none of that other
information there. So let's sort that out first. So first of all,
let's come to edit preferences on the
interface then, if you come down to where
it says status bar, let's open that up,
and what I want to do is tick each of these on. And then I'm going
to close it down. And now you'll see that it tells us what the object is in here, the object we've got selected. It tells us how many edges and faces and things like that, that encompasses
this actual cue. And finally, then, the
other important things is it's tell us how much
memory our blender is using, how much V RAM it's using, and the version of
course of blender. So this V RM, and this memory is actually
quite important, especially when we're
facing bottlenecks, and that's why we've
put it on there. We'll talk about that later on the course so don't
worry about that. Next of all, then
what I want to do is I just want to come to file, and I'm going to save it out. So it's important that after every single lesson, you're
saving out your work. So first of all,
let's go to Save As. And the one I'm going to
save mine as is going to be this one which says
course Astex scene. If you don't have
one, just call it a name and then click
the Save as button, and then you'll able
to save it out. And finally, when
you come to save it then after every single lesson, all you need to do is
come to the Save Option. Before we finish, all I'm
going to do then is you can see at the moment my cube
is actually in edit mode, so you can see over here
on the left hand side, it's in edit mode. I'm just going to press tab just to get it out of edit mode, and then you'll see now
it's in object mode. And finally, what
I'm going to do is I'm going to delete the cube. I'm going to then
come to the camera. I'm going to delete the camera, and then I'm going to
come to the light, and I'm going to
press the delete one to delete the light. And now I should end up with a viewport with nothing in it. This is actually
called the viewport. You should just have a
little circle here called the cursor Ride in the
center. Alright, everyone. So what I'm gonna do once more, then is go to file Save, Save out my work, and I'll see here on the
next one, everyone. And I hope you're
looking forward to really getting stuck
into this course. Thanks, everyone. Bye bye.
3. Mastering Basic Blender Navigation Techniques: Welcome back everyone
to Blender for the Modula and Kitash
Environment Guide, and this is where
we left it off. Absolutely nowhere
because all we did was go through the resource pack. And now I'm going to do is, I'm going to play
you a short tutorial all to do with the blender
basics of navigation. So in other words, how to get around the actual
viewport of Blender. This is one of the most
important things you can actually learn because if you
can't move around Blender, then you can't really do a lot. So let's actually play
that for you now, and I'll see her on the
next lesson, everyone. Of course, if you know
already how to do all that, then just skip along
to the next lesson, and I'll see you over
there. Thanks, everyone. Bye bye. Welcome everyone to the basics of
blender navigation. Now, before we begin, it's
important to understand how the axises work
within blender. So we can see at the moment, we've got a green
line going this way and a red line
going this way. This is called the y axis, and this one is
called the x axis. We also have one
that is the Z axis, which we can't see right now. It doesn't actually come in with Blender viewport as deft. But if you want to
actually set it on, you just come up to the
top right hand side, where these two
interlocking balls are, and just click the Z axis, and now we can
actually see that. So how do we actually move
around the blended viewport? There's a number of
ways of doing this. One of them is over on
the right hand side here. You can see if hover over here, it's the zoom in and zoom out. I can actually left
click and move these up and down then to
zoom in and zoom out, or I can use the actual
mouse to actually zoom in and Zoom use in
the actual scroll wheel. There's also another thing
you can do with Zoom, which is holding control shift and pressing the middle mouse, and you'll see you have
a lot more control over zooming in and zooming out. Now the next thing we want
to discuss is actually rotating around an object.
So how to do that. First of all, we'll bring
in a cube with shift A, bring in a cube. Now if I press the
middle mouse button and move my mouse left to right, you can see we can
actually rotate around. Unfortunately though
we're not actually rotating around this cube. So to actually fix that, we need to center our view
onto the actual cube. We basically want to focus our view onto this actual cube. To do that, we're
just going to press the little dot button on
the actual number pad, and then you'll see that we
actually zoom in to the cube. Now if I scroll my mouse wheel, you will see now if I hold the middle mouse boron
and turn left and right, we're actually rotating
then around the cube. This is important because if you actually bring in another cube, so I duplicate this
cube with shift D, move it over, so bring
in my move gizmo. And now you'll see if I
rotate around this cube, I'm not rotating
around this one. So that's fixed side, just
press the double button. Again, zoom out, and now I can actually rotate around
this cube as well. Now let's look at
something called panning, which means that we're actually going to move left and right, and we do this by holding the shift baron, holding
the middle mouse, and then we can actually
scroll left and right around our
actual viewport. So now we've actually
discovered how to zoom in and the different
ways we can actually do that. How to rotate around an object
and how to actually pan. We can also come up to
the top right hand side here and use these buttons here. Again, remember, we're
looking at the y axis, the x axis, and the Z axis. If we come to our y
axis and click that on, you will see now that you've got a front view of the y axis. If you click the x axis, then we can change it
to that red x axis, and finally, the Z axis as well. Now, there are other
ways as well that we can actually look
around the viewport, and these involve using
the actual number p. If I press one
on the number pad, it's going to tap me into
that y axis or front view. If I press two, it's going to actually rotate
that slightly, and if I press two again, it's going to rotate
it slightly more. Now, if I press the eight, it will rotate it the
other way as well. Now, to go into the side
view or the x axis, we can also press three
on the number pad, and that will give
us that effect. We can also press seven to
go over the top as well. Now, what about if we actually want to go to the opposite? So instead of going from
the bird side view, we want to come to the
underside of our model. Well, that's actually
quite easy as well. All you need to do is
press Control seven, and that then will take you to the bottom view of
our actual model. We can also do the
same inside view and on the x axis and y axis. So, for instance,
if I press one, I'm going to be
going into y axis, if I press Control one, I'm going to be going into the opposite side on
the actual y axis. Can also find these
options just in case you forget at the top left
hand side here under view. So if I go down to view
and go across to viewport, you can see here that this actually tells me exactly what I need to press to
get the viewpoint that I've just
actually explained. Now, we also have the button on the number pad, which
is number five. And number five button
in blender toggles between perspective and
orthographic views. Perspective view offers a more natural realistic
viewpoint with objects appearing smaller
as they get further away, mimicking human vision. Orthographic view removes
perspective distortion, making all objects appear
at their true size, regardless of distance, useful for precision
modeling and technical work. The other thing that number
five does, for instance, if I come to my cube, at the moment, I am able to
actually zoom into the cube. Hwever, if I press number five, I will not be able to
actually zoom into this cube no matter
how far I zoom in. I'll still be able
to move around it by pressing the little
dot button, like so. But if I actually
want to actually work on the inside of an object, I can quickly press number five, and then I can
actually go in and work around the inside as well. If you're working on a laptop or something like
that or a tablet, and it doesn't actually
have a number pad, you can also use
if I press five, the actual squiggle key, which is under the escape board on the left hand side
of your keyboard, and that then will
give you pretty much the same options
as we had before, so we can click the right view. We can actually
click the back view. And we can click the left view, for instance, the opposite
to what we had before. So instead of pressing
one and three, we just press the
little squiggle line, and then we can actually view
whichever side we need to. Now, we're nearly at the end
of this short introduction. There are a couple more things
that you can actually do. If you come over to
the right hand side, and you see here where
we've actually got the name of the actual
parts within our scene, we can also grab them from here and then press the little
dot on to zoom in. So I can grab this one,
press the little dot dot b, and that then will Zoom as in. The other great
thing about this is, we can also come in.
Shift select them both. Pressed the little dot boron, and then we're able to actually rotate around both
of these cubes. Alright, everyone, so
I hope you enjoyed the short introduction to the
navigation within Blender, and I hope from now on, it won't be a struggle
navigating around the viewport. Thanks a lot, everyone. Cheers.
4. Complete Guide to Referencing in Blender: Welcome back, everyone
to Blender for the modular and Kit
Bash Environment guide. And I hope you
really enjoyed then, actually learning how
to move around Blender, how to get around the viewport
and all that good stuff. Next of all, then,
what we need to do now is play your
another short video, and this one is about
the referencing and how to get
started with that, how to build up references, what software to use and
all that good stuff. And then after that,
when we come back, I will be going through
my own actual reference, which you can also find
within the download pack. So I'm going to play that for you now and I'll see
you on the next one, everyone. Thanks a lot. Bye bye. Welcome, everyone to our in
depth referencing guide, and it's very important that we actually
use references in pretty much any kind of modeling or environments that we're
actually going to be work on. So before we actually
do anything, before we put any cubes
down or anything like that, it's really important
that we have some really, really decent references
to actually work with. So, the first thing I want to recommend is that you can use something to actually
put all your references on like photoshop or even Word. But what I'm going
to recommend is that you use something
called Pure Rf. If you go to the site
that's called pure.com, you will actually open
this and from there, you can actually
click Get PureRef, and that then will take you
to this download screen. You will see at the moment, you've got 157 or custom amount, you can actually put this on zero and actually
get this for free. It's completely free, and you can come back and
make a donation if you like Then all you need
to do is click download. So the only things
we're going to talk about pretty much
for referencing here are going to be free
except our mid journey part, but there are other
alternatives like Dari and a load of others
out there that you can use instead of mid journey. Once you open up Puro then, this is what you will be
greeted by this screen. And if you want to right click, you can actually drag
this around to any of your other screens or you can actually make it
smaller like so. And it's a really, really
good program, this, really, really handy, highly
recommend getting this. So now, let's actually think about getting our references, and there are a few
sources that we use to actually grab
references from. But generally, what
you want to do is, you want to build up a kind of reference pack if
you're going to be a hobbyist or a professional in three D
modeling or environments, where you're going to see things perhaps on Pinterest
or sketch up, and actually you want
to save them in a file. So I know people with
thousands and thousands of images that they've
saved over the years. And whenever they're
coming two a project, they'll then dive in
and actually find all of the images that they've got on that particular thing. This could be a Samurai
warrior or a Chinese bell. Also, a lot of people I know as well who are working
professionally at this, will go around museums. They will take their
own actual images, and then they'll also upload
those to the file as well. First point of
call, if you've not actually got your own database yet is probably going
to be actually Google. Let's open up Google, and you can see here that at
the moment I'm looking for, a Victorian delivery truck. Now I'm going to do is, I'm
just going to go through these and get some nice
references like this one, for instance, and then
I'm simply going to right click and I'm
going to copy image. Then what I'm going to do is
I'm going to go over to PRF, so I'm just going to open it
back up. Press Control V. You'll see now that I've
got my nice image in here. We're also able to
do with pure vis. We're able to also pull it out and make it bigger if needed, which is really, really
handy when we're putting in lots and
lots of actual images. Now, the next thing
I recommend you do once you've actually
got an image in there, here is what you can
do is you can left click and drag it
over somewhere. And then what you can do is
you can press Control N, and you can actually
make a note. Let's call this Victorian, Trucks. Let's put it trucks. Now, within my scene,
I might actually want a Victorian lamppost as well as part of the scene
or something like that. So let's actually
look at the next one. So the next point of call is actually going
to be pinterest, and let's actually put
in Victorian lampost. So let's try that. Like so. Let's see what we get
and we can see we've got many many styles,
especially this one. This one's actually really nice. This one's also really nice. So what I'm going to do is I'm going to actually take this one. I'm going to right
click Copy image. Go back to my Purv and then
drop the images in there. So maybe make this one
a little bit bigger. What I tend to do is gather a load of images for
each of these things. When we're actually building a scene or even just the model, you want to grab as many
images as possible. I'm talking hundreds
of images here. And especially if
you're doing the scene, you want all of
the little parts. You want everything
down to the lighting, the environment, the trees. You want to grab references for absolutely everything because it will make your
scenes just really, really look so much better if you've got some
really good references. So now, let me show
you this is one that I'm actually working
on at the moment, so if I come over
and load resent, and I'm just going to
load this one here. And you'll see at the moment, I have all of my props. I have all of my main
buildings that I'm going to be looking at
to users references. I have a ton of doors. I even have a load of foliage, I have all my windows, I have my lights over here, and I also have more importantly,
all of the lighting. In other words, it's a scene, what time of day
is it going to be? Is it going to be
early in the morning? Or is it going to be a dusk? Is it going to be a night scene? Or is it going to be midday with that some beating
down on my scene. Just make sure. That it
actually matches the scene. There's no point having
a scene like this, for instance, this one here, if you've got a log
cabin out in the snow, you really want it to
match your actual scene. Now, before moving on,
there are a couple of other places that we do go
to use for referencing, especially something like
sketch up, which is really, really great because you can actually come into
an actual scene. And then what you
can do is you can actually rotate
around it and really really check out how model is put together
like something like this, which is one of our actual own. But you can see here, how
easy it is then to get a good idea of what actually
incorporated in this scene. And what you can
actually do from there then is we can
actually come down, and we can actually get
some screenshots of this or even Rilick
and copy image. Also, let's say if
we wanted to do a Victorian truck, for instance, to keep it the same theme
as what we've been doing, you can see that
there's no end of actual Victorian or vintage
type vehicles on here. Not as many as what
there is on art station, but still a very, very good place to start
looking for reference in. That leads me on to my next one, which, of course,
is art station. This simply is one of the biggest resources
for referencing, or for looking up
artists in the world. Let's put in a
reference of Victorian, for instance, and let's
see what we actually get. Let's search artwork, so we're
going to search artwork, and let's see what it
actually comes up with. Should be lots and lots of
things to work with here, especially good if you're
looking for actual lighting, so you're looking for line
effects like this one here. Again, we can take these and actual use them for references. And the best thing is
about art station is, we can also come down
and look at things that may be our concept o2d
or Actual three D, and we can also
come down as well and look at what
subject matter it is. So it could be automotives, so Victorian Automotives, or it could be architecture
or something like that. So the possibilities with art station are
pretty much endless, and you're able to grab
tons and tons of really, really high quality references. There are, of course
hundreds and hundreds of other places you could probably
go to grab references, but I'm showing
you these because as far as references go, these are some of the
best places to go. Let's move on then to one of the things that we
really use a lot of now, which you want to thought
actually would come into it as far as
referencing goes, but it actually is
really, really handy. So let me introduce
to you now, Chat GPT. Here is Chat GPT. You can see that we
have chat GPT four, but we also have 3.5. 3.5 is actually free, and it is actually good enough
to do whatever you want. You really don't need
to pay for this. It's also free. So what I'm going to do is I'm
going to go to message. And I'm going to
type in. Give me ten different buildings for
a Victorian town scene. Something like that. Let's click enter and let's see
what it gives me. You can see now it's given me a lot of things to
actually work with here. And the best thing about
this is you can also say, give me ten more. And you will just then go
ahead and give you ten more. Now, these things
are really handy to e because then I can simply take these ideas and it'll
also bounce other ideas to me, and I can then go
into Pinterest. Or Google search and actually look there or try
and find something like this. I can get ideas and design
my scene around there, using all of those things, and especially pure RP. We can also take them in
to our actual mid journey. Now, again, our mid
journey is paid for, I think the lowest amount is
$20 or something like that, but there are many
free things out there. But I will still show you
what we actually do with our AI based image generator. So you can see at
the moment, this is the image that we've
actually generated. I know we've called it is
Victorian Ea delivery van, and this is what
we actually get. If we go to my images, you will see that
we've generated a ton of images about
all of the things, especially we use this as
well to generate textures. It's not just there to actually generate images and ideas
and things like that. You can actually use it to
generate transfers that are going to go on windows or
adverts or actual textures, and we do use this, especially for things like curtains
because it's really, really easy to get that look that you're actually
looking for. You can see it,
we've got a lot of ideas for living rooms, we've got a lot of ideas for bedrooms and
things like that. What we can also do
in mid journeys, we can also go and explore, and what you could do
is you could look up with a search prompt Victorian. Let's put in Carage. And then we can also
get ideas from this. So if I put in
Victorian carriage, you can see this
as what comes up. Now, if we come over to
here, we can also say, if we click on here, this is the actual prompt
that somebody put in, so you can actually
take that prompt, maybe change it around
a bit and then get your own images rather than just simply copying
other people's images. It's a great place to start to actually gather
your own images. The other thing is about mid
journeys, I can come in. For instance, let's
just go back. Then what I can do is I can
hold the shift bond down. I can grab all of
these, for instance, and then what I can do is click the download bond and
download all of those images. And the best thing
is about pure is, you can bring in multiple
images at the same time. So you can just drag, drop them, and then they'll all appear
actually next to each other. So really, really
handy things to have. So, lastly, then to somewhat. Don't do what I did a
few years ago where I just dive straight
into blender and not even think about
references and just find references if I had to while I'm actually
building something. Don't do it that way. It leads directly into building the
beautiful gray box as well, all this, because first of all, you grab all of your references. You make sure
everything set out. You can go and find some more
references if you need to, if you suddenly have a
spark of inspiration, you want to make
something on the fly, then grab some more
references for to start with, grab all of your references, have them really, really nicely laid out, and spend, you know, even half a day to a day
grabbing all those references. You can then save
the pure val as well into individual files, and then you'll have
all other references around that particular
build in there, ready to use, maybe on another
project in the future. Alright, everyone, so I
hope you found this useful, and I'll hope you'll take
my advice going forward. Thanks everyone. See you
on the next one. Cheers.
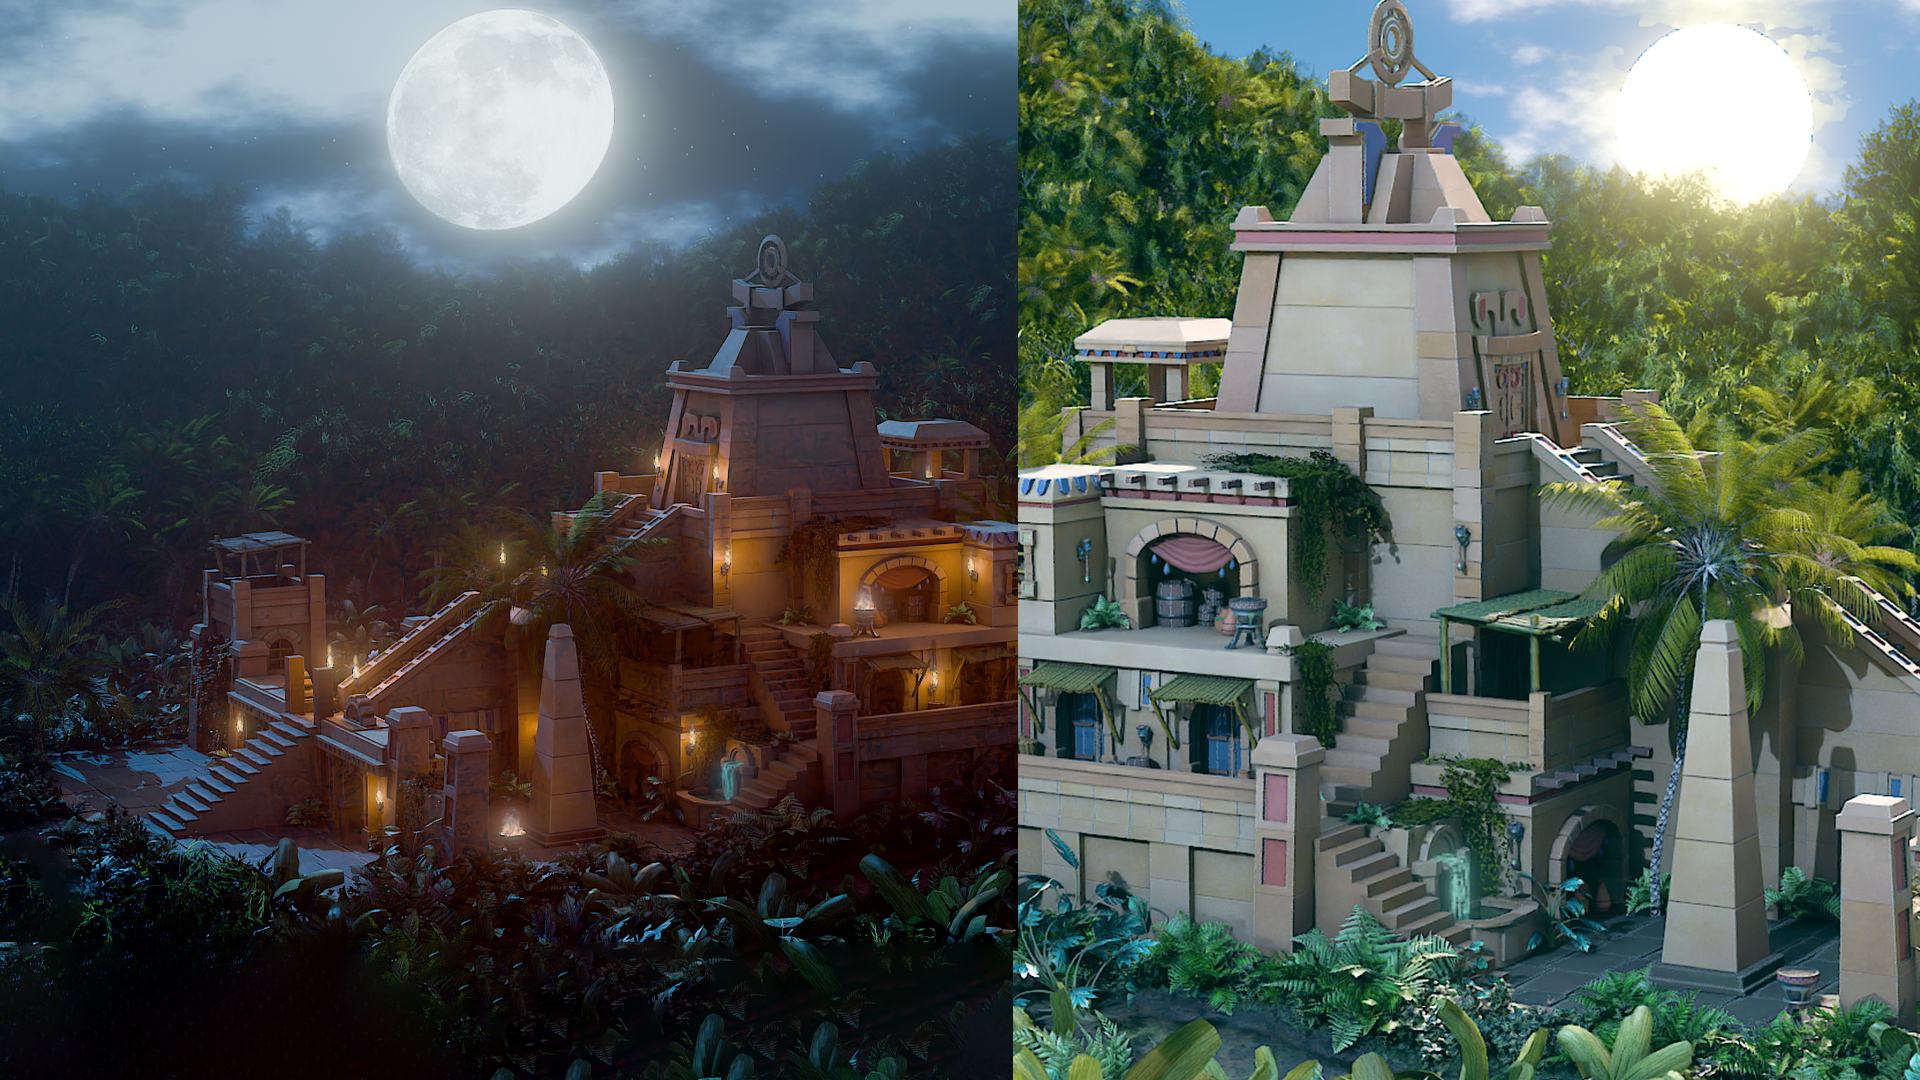
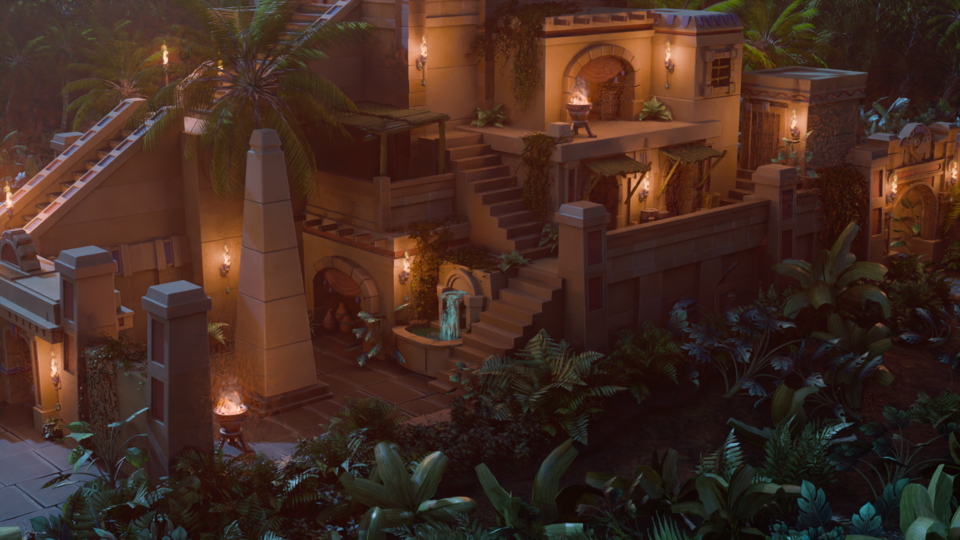
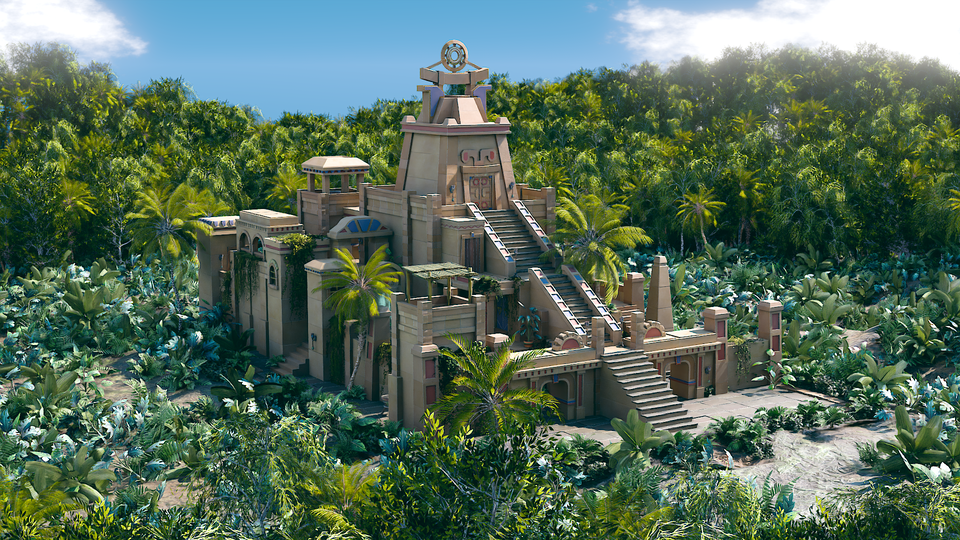
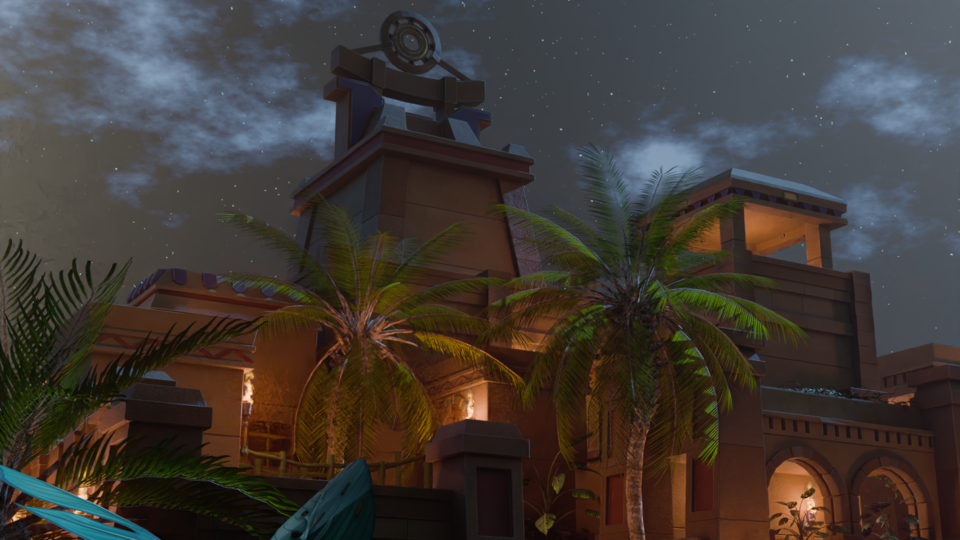
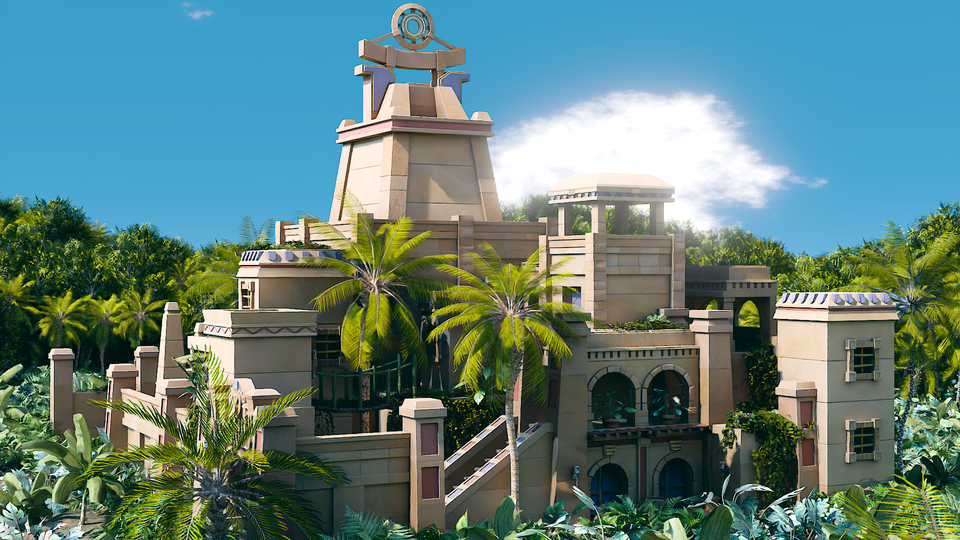
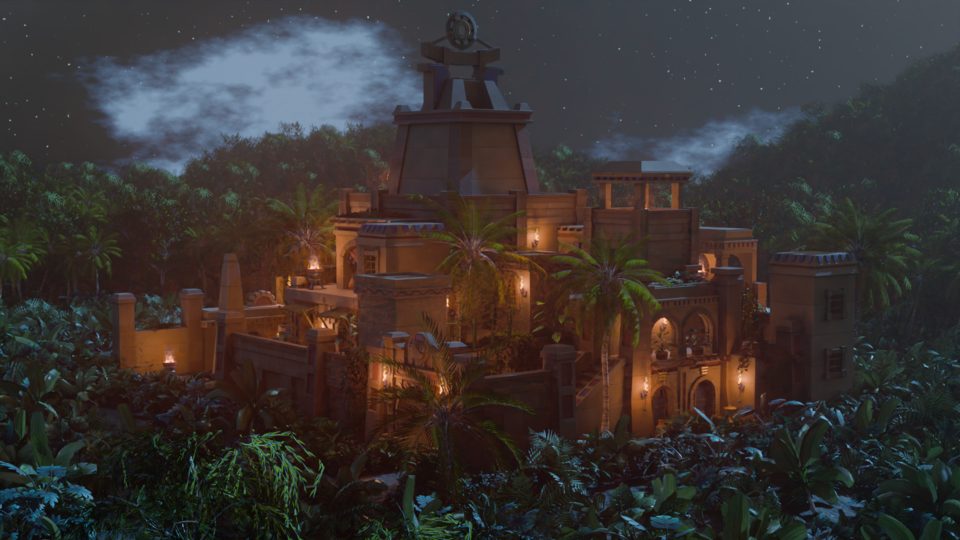
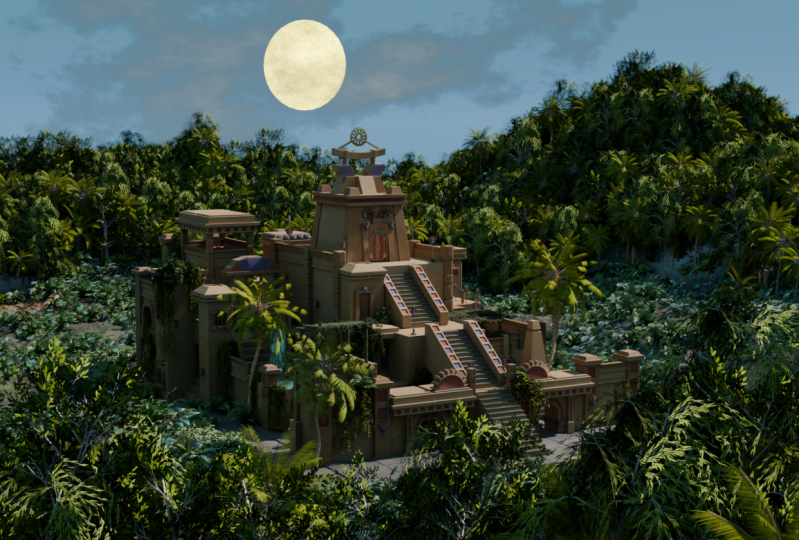
5. Setting Up References for the Aztec Scene in Blender: O. Welcome back, everyone
to Blender four, the modular and Kit
Bash environment guide, and this is where
we left it off, and I hope you really enjoyed
the referencing guide. And now what you should
have is something within the resource pack called
Aztech Jungle template. And within here, you're going to find all of my own references. Before I create any scene, and that means any scene, any prop, anything at
all, I get references. Now, when I first started out, I didn't bother with references. I just jumped straight into Blender and started
modeling everything. And this actually is a really, really bad way of having
a pipeline or workflow. You really want to start before you jump into blender,
gathering references. It's the same if you're
doing concept art. It's the same if
you're making a film, you really want to be
gathering references before starting anything. Even writing a book, you want
references before starting. So as you can see here, I got a real feel for actually
what we're creating here, which was an Aztec theme temple. So I decided to go and get a lot of symbols to
do with the Aztec a. And as you can
see, I've put them all in this kind of place here. Now, I've showed you already
how to use the Pure Rf. You can use Photoshop. I'm sure there's
some other softwares out there that you can use. So I'm not going to go in
to show you how to do this. Setting them out,
things like that because it's pretty
much straightforward. So the next thing I did is
went and got a load of doors, even though I might only create two or three doors within
a whole modular pack. It's important
that we still have a lot of references
to work with. And when we're actually
building, what I tend to do is, I will take little parts from somewhere and little parts
from somewhere else, and then I'll create my door. I'm never ever just going
in and copying a reference. I don't think
that's a good idea. I think you should learn to take bits and bobs from
everywhere else. If you look at something like overwatch and you look at
a character like Roadhk, you can see all of the ideas
that have been brought from all these other places
that have been put together. To make this amazing character. And whether you're
playing World of Warcraft or league of legends, it
doesn't really matter. It's the same kind of process. They take references from all over different things and
bring them all together. You can also see that
they're not just jumping in and creating characters or creating landscapes
just on a whim, they're actually
going in and getting all the references before
they actually start. So that's why it's
really important. Next of all, then, I've got entrances, so as well of doors, I really knew that if I'm
creating an Aztec theme, I'm going to need
some entrances. So I already had an idea in my head of what sort
of things I needed. I made a list of them, and then from there went and
grabbed all my references. Next of all, then I knew
there would be some kind of markets in the actual
scene to bring it to life. Now, of course, when you're
create modular packs, You can create
huge modular packs with entire markets in there, or you can add on to the magic modular pack you've already got, and you can do it that way. But I knew I wanted some
basic markets in there, which meant that I
needed some references, so I got those there. And next of all, obviously, as it being an Aztec temple, I had in my mind,
that I really wanted a pinnacle point for the actual scene or
for the modular pack. And that's why I went and got these temple actual references. And from here then,
I can actually build it up to where
I actually want to. You'll see a lot of the
style in here is taken from these references and put in to our own scene when
we've actually created it. Certain things like
these steps going up. And again, none of these look like the scene
we're going to create. It's all little parts of it taken from there and then
built into the scene. All right, next of
all, then we're looking at terrain
so you can see, I really want to an idea of what terrain I'm going to go with which way
I'm going to go. The thing is when you're
building a modular pack, you need to keep
to the same style. For instance, if
you are creating something that's quite stylized, you need to make sure you keep
that all the way through. And that includes the
foliage, the grass, the terrain, the actual
materials, on your models. You need to make sure
the size of the models actually is in the scale
of the rest of the scene. You think of something
like World of Warcraft, it isn't just the textures that are actually making that style. It's also the size of things. If you look at a
dwarf, for instance, in World of Warcraft, and look at their feet,
they are huge. They're like size 24 or
something. They're massive. And this is and the
hands are also massive. So it's kind of really, large characters with
a lot of emphasis on on parts of the character that
really bring it to life. And they carry that on
all the way through, if you look at a barrel in
World of Warcraft and a dwarf, you will see that
it's accentuated. All the parts are
actually accentuated, and they carry that on
all the way through. And this is why it has
that cartoony look. Because together
with that, they also have this hand painted style that's simply beautiful done by professional artists
over there at Blizzard, and you can really see
it carries on all the way through the actual game. So when you're actually
creating something, you want to make sure
that you go with realism, or you go with stylized, or you go with something, a
little bit darker like ESO, And you want to
carry on that style all the way through
the building. You want to make sure that every modular piece then is built in that particular style
and that particular size. Obviously, when we're
dealing with things like just walls and things, it's very hard to do that. But when we're dealing
with things like props, or we're dealing with archways, we can really accentuate
the parts within them. We'll go through that a little bit more as we're moving on. That's the terrain. Next
of all, we've got houses. This then gives me an idea
of building, and depth. I always recommend you get something that gives you an
idea of depth when you're actually creating
modular packs and scenes because what you
don't want is just blocks. You don't want just blocks of houses and then roofs on top. You really want to focus on creating as much
depth as possible. So what do I mean by that
where you can see here? Even though this is a relatively simple building has
a lot of depth. It has a cellar down the bottom, has some steps that lead up, has one floor, and
this floor has a door here and a door here, and then you've
got the next one. It's laid back a
little bit further. You've got a window over here. You've got some pillars here, all built on top, and finally, then, you've got a
top part on here, which again has some
windows and doors on there, set back again in
the main structure. You can see the depth here,
this part sticking out, this part, sticking
out all the way here, this part rounded off. And this is what actually
makes it look so interesting. Same on this one, even though it looks a little bit
more realistic. It has a lot of depth
to the actual building. I see a lot of people building
buildings more like this. This has not got so much depth. I mean, it's still got
a little bit of depth, but nowhere near
these other things that we've actually
been looking at. So we really want to focus on creating something that
has a lot of depth. I'm just looking
for something now which has a little
bit less depth, but I haven't really got one
because I focused on depth. So this has a little
bit less depth. There's only two floors to it, and one of them sticks
out a little bit. We've got a little bit
of sticking out here with the actual stairs. So this is quite
simplistic in depth, but you can see some of the others are
very, very complex. So generally, the more
complex you make the depth, the better, more interest in the
building is going to look. So that's something
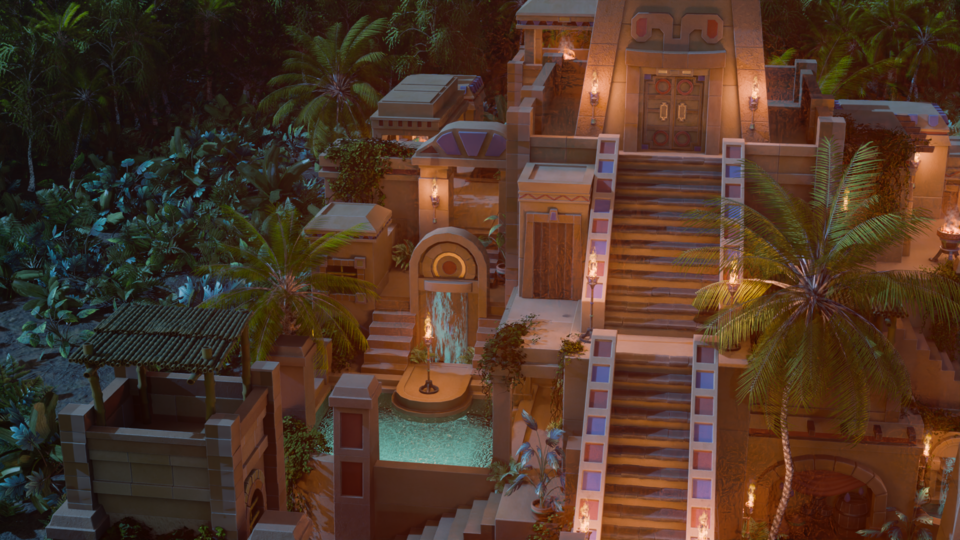
you want to focus on. Next of all, water features, it's always going to
be something that you're going to have
in most scenes, especially when
you're dealing with, medieval, stroke, fantasy,
stroke, Aztec themes. You're going to have
some water in there. And it's important to get
a real grasp not only of how the water is going to look, how it's going to flow, where it's going to flow,
how long it's going to be, the colors of the water
and all that stuff, but also what actual water features you're going
to have in there. If you're not that
good at modeling, you might want to keep
it very simple with just a simple flow like
something like this. And that's actually
what we've done in this scene because people
have to actually model this. They have to actually
create the material. So we've kept it relatively
simple, but you can see, you can really go to
town with something like this waterfall
here or this one here and really actually
accentuate waterfalls. Right. So moving on then, we've
got our environments. Let me just have
a look see you've missed anything? Yes, I have. So we've got our flows, I wanted an idea of how I might
want to do flows. Even though I didn't go, that
complex within the floor, I still wanted to have an
idea of how I could go. It's important because
you might want to change mid flow when
you're actually building. You might want to create
something like this. When we're creating
modular packs, so it's better to
go with something a little bit more simplistic. And the reason is
because trying to put this next to another one
next to another one, if someone needs more
flows is quite difficult. And if you're going
to cut this out, where exactly do you cut it? So you've got to think
of all that stuff when you're creating
these modular packs. Hence why we went
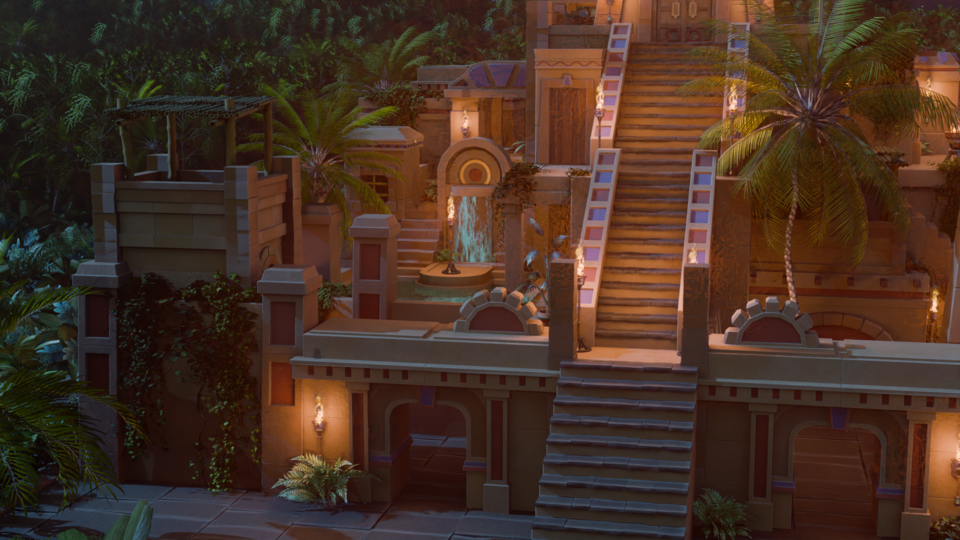
with a simple flow. Next of all, then we've got
a lot of fire and tortures. And, you know, because I knew we were going to be
doing a night scene, we're going to be
needing some fire. Even in a day scene, they're going to have
tortures on the wall. It's not like they're
not going to be there. They don't take them off
the wall and put them away, you know, in the
daytime, then bring them out at night. They're
going to be on the wall. They're just not going to
have fire lit on them. So it's best off if you
get the lighting there, even though it might not be lit, whether it's a day
scene or night scene. So this is why I've got these. You'll also see
some other courses, you know, whether it's a
medieval fantasy type thing. We always go down
the same thing, so it'll be doors,
windows, tortures. And these are the
main bulk of things that we need to actually
create the scene. Finally, then, the two that
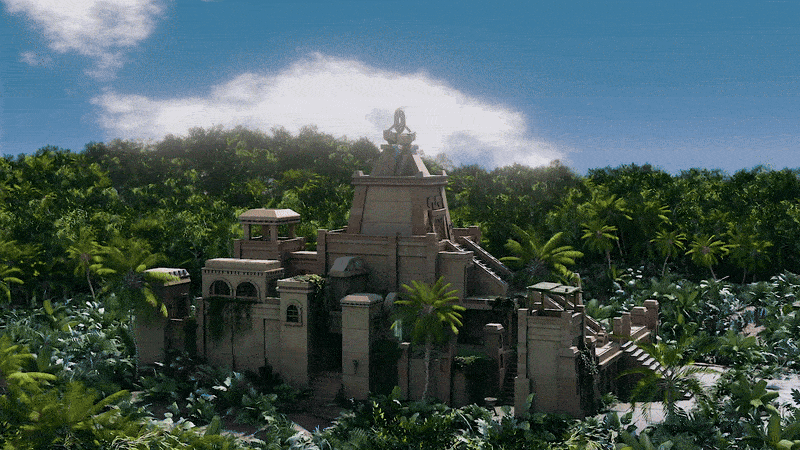
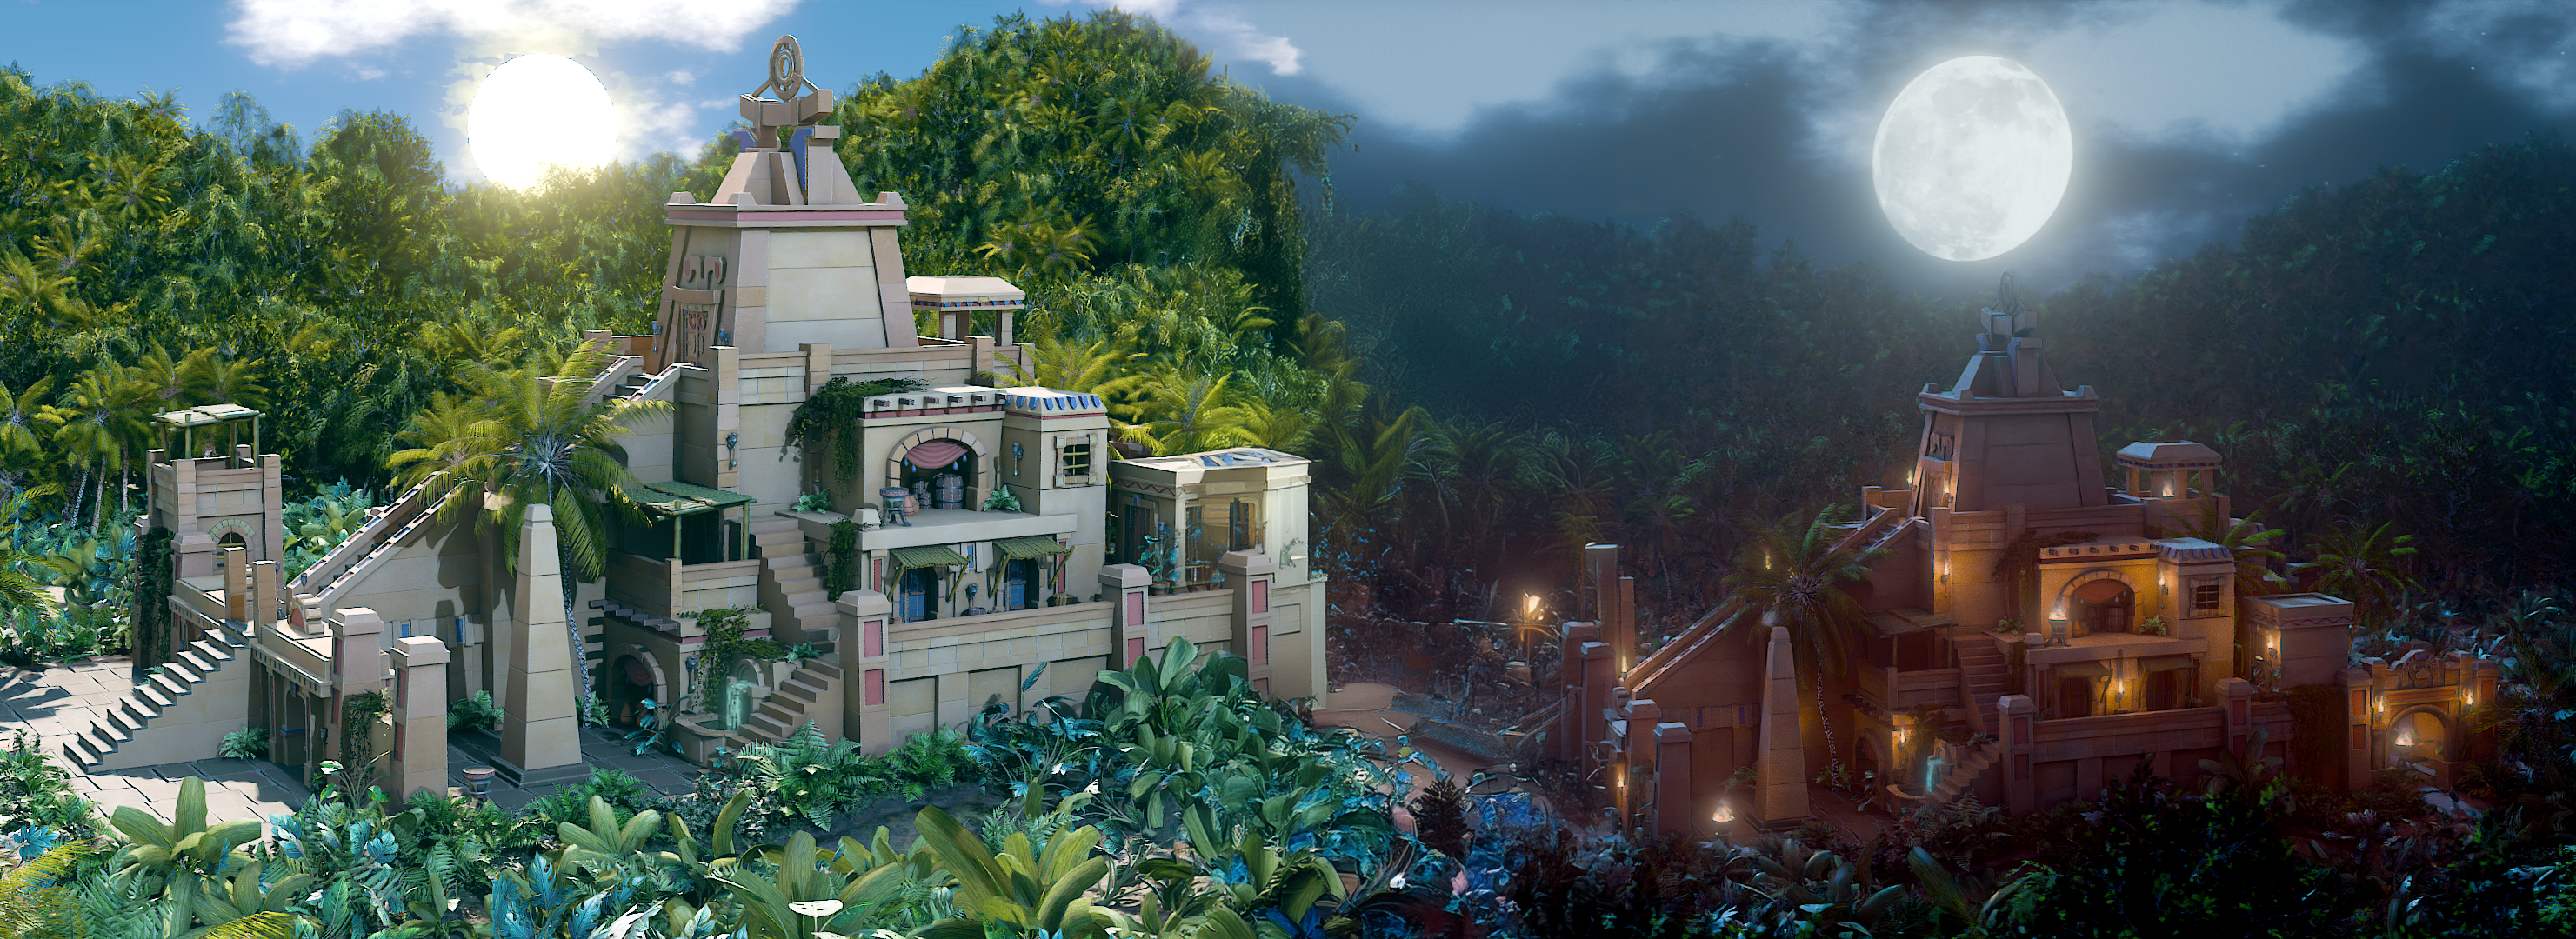
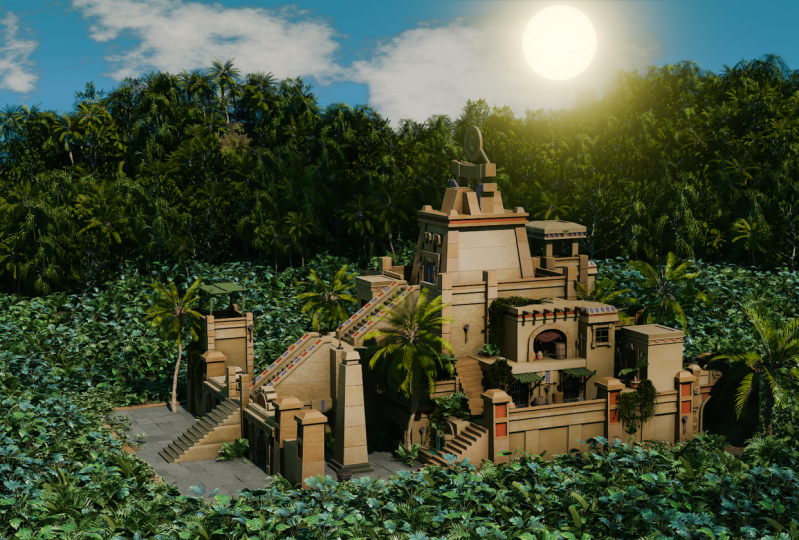
I've got here is day scenes. So I've got an environment
day scene here. And as you can see,
this then, actually, within the thumbnail,
you will see that we do have a day scene
which looks very much like these because
this is what I based it on. It's really bright.
It's really sunny. It has that real kind of
feel of being in a jungle, you know, very hot,
very humid type thing, and that's what
we're looking for. For instance, in a jungle, you're not going to really have perfectly
clear clouds like, you know, skies like
this with no clouds. And the reason is because
jungles are very humid. They have a lot of rain in
jungles and a lot of sun. So you're going to
have a lot of clouds. So that's why we put
in clouds in ours. And you can see here
sometimes it's so cloudy that you can't
actually see the sky. You know, there's so
much water vapor in the air because this
is a jungle theme. It's not a desert theme, so
you really need to think about that when you're
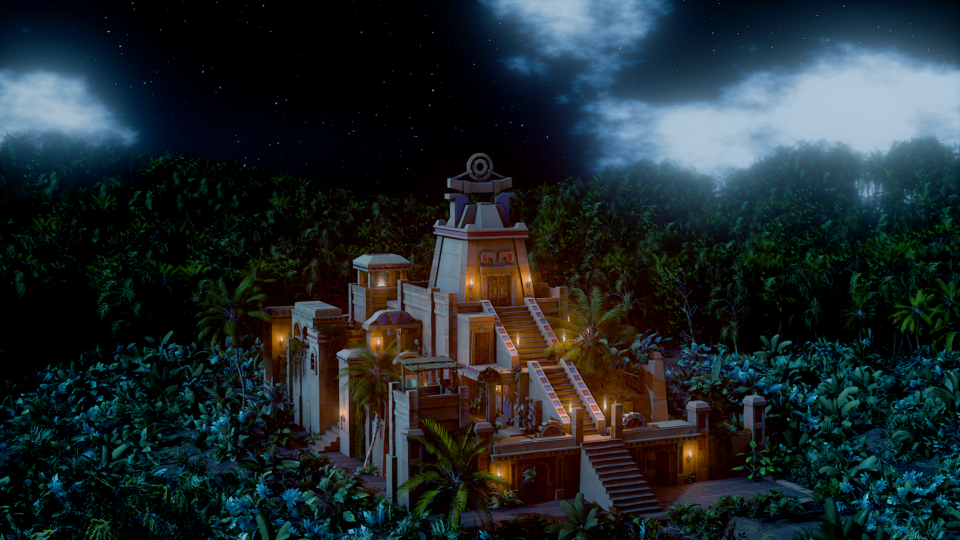
actually creating something. And then we're going over
to the night scene Again, you can see there's
a lot of rainier. There's a lot of
cloud cover here. The looks very wet because this is how the
jungle scenes are. And this is what we're mainly
going to be focused on with an cene because creating
night scenes is actually, I think, much harder than
creating day scenes. With day scenes, you can
stick a sun in there, put some clouds in there,
and it's pretty easy. In a night scene, you have to think about how
dark you're going to go. You have to think about shadows, you have to think about where the moon lights coming from. It's not so obvious. It's actually much harder to
create a n scene with all of the tortures and all of the
different light sources than it is to
create a day scene. So that is why we've got
all of those in there. That's an explanation of them. So I hope you followed
along with all that, and I hope you add it in to your own pipeline when
you're, you know, going to create
your own models or modular packs and really
take this on board. Alright, everyone, so I hope you enjoyed that lowdown
of referencing, and I'll see you
on the next one. Thanks a lot. Bye bye.
6. Blender Basics Introduction to 3D Modeling: Welcome back everyone
to Blender for the modular and Kish
environment guide, and this is where
we left it off. And now, what we're going
to do is I'm going to play a short video on the basics
of modeling within Blender. This then stops me going through everything
over and over again, and might miss something now. I've actually put
together a really, really great tutorial
just on the basics. If you already know
the very basics, so this is things like extrude. This is things like
bringing in an object. If you already know
all that stuff, then move on to the
next actual lesson. Alright, everyone, so
I'll see you after that. And after that, we'll
actually move on to beginning our actual gray
box. Alright, everyone. Thanks, lot. Bye bye. Welcome everyone to the basics
of modeling in Blender. And this is a short
introduction just to get you started on a few of the
basics in modeling. So the first thing I want to
do is bring in a primitive. So the way that we're
going to bring into primitive is press shift in A, and then what we're going
to do is open up a menu. And you can see that
we've got all of these things along this
actual primitive menu. But the one we want to focus
on is the actual mesh. And from here you can
see we can bring in many things like
cylinders, cubes, planes, and the one we
want to bring in just now is going to be our cube.
That we brought our cube. The next thing I want to discuss
is object and edit mode. And you can see at the moment, over the the left hand side, we're actually in something
called object mode, and this means basically we can manipulate this whole object. So if I press G, I can actually move it around
my viewport light, so I I press S to scale, I can actually scale the
whole of the object in. But the thing is, we
don't really want to work in object mode necessarily. And a lot of the time, we're actually going to be
working in edit mode. So we can come up to
the top left hand side and put this in edit mode, or we can actually press the tab button and jump
into edit mode that way. You will notice once we've
actually gone into Edit mode, we have a lot more
options to use, and more importantly,
we have a lot of the topology now to
play around with. So the first thing you'll notice the difference being is that we have now these three options up to the top left hand side. And if you have over them, it will say vertex,
edges, and faces. Now, vertex is going to be
these little points here. The edges is going to be these edges of my cubes
or any of the edges. And finally, we've
got the faces, which is actually the
whole polygon face. Now you can also instead
of clicking on these, press one on the keyboard, and that then will jump
you into vertex select. If you press two, you
can go into edges, and three is going to
take you into faces. From here, we can actually
manipulate any of these parts. So you will notice at the
moment I've grab gizmo here. Now, if you don't have
the Gizmo available, coming over to the
left hand side, and you'll have this little
barn here that says move, or you can press shift bas bar and bring in your
move tool like so. Now because I'm on faces, I can actually pull
out this face like so. If I go to edges, I
can actually grab one of the edges and pull
this out like so. If we're on vertexes, I can grab this vertex or grab the second vertex
with shift select, and then pull this out like so. Really really easy to actually
manipulate things once you know how to select
each of these parts. Now, before we go too
much in the weeds with actually modeling in
this actual edit mode, let's just jump back into
object mode for now. What I want to show
you is how we can actually move this
actual co around. So as well as moving it
with the actual gizmo here, we can also press G and actually free move
this object around, or we can press G and y two. Let's put it along the y axis, move it around, or the x axis, for instance, and
move it this way, or even the dead axis
and move it up and down. To drop it back
where we started, let's just right click like so. So that's actually move in the location of it's
not a cube anymore, but let's just say it's a cube. We can also scale this in
as well with the S one, so we can scale it in or
scale it out like so. Now we can also
press the S button, hold the shift button, and then we have a lot more
finess on actual scale. We can also scale this up by
let's say a factor of two, so S, two, enter,
and there we go. And of course, we can scale
it down pretty small as well. Now the next thing I want
to discuss is rotating, because if we rotate it with
R and just rotate it around, we haven't got a lot of
control over how this rotates. So what I want to do instead is, I always want to press R, then attach it to an axis,
which might be the y, so the green one, and then
rotate it either by free hand, or by actually inputting the
value on our number pad. So if I want to rotate it, let's say by nine, zero degrees, press the ends born,
and I've rotated this round by 90 degrees. Now if I want to rotate
it back, I can press Y, the little minus born
on the number pad, 90, and then we can
rotate it back. Now there is something else
that you need to know. We also want to reset
our transformations, and this is one of the most important things within Blender. Because if you don't reset
your transformations, Blender still
considers this a cube, even though it's not
really a cube anymore. So what we want to do to reset the transformations
is press control. A, all transforms Then you'll notice that
the orientation has moved over here because it will always move to the
center of the world. From there, then we
want to actually reset orientation as well. So we want to right click, set origin to geometry, and then it's going to
put the origin right back in the center
of this object. Now, it's also
important to know, resetting the
transformations will also impact things like UV mapping,
things like modifiers. Basically, if you ever
have a problem in blender, always make sure that you
reset the transformations, and then most of those problems
will definitely go away. All right. The next thing about resetting
our transformations, it makes it really
easy then to get something back to how
we add it before. In other words, if I press
S and scale this down, and then let's press R and Z and rotate it round this way. Because before this, I
actually reset my rotations. What I can now do is
press Altern S and put it back to the scale that it was before I did anything, and then alterar and actually reset that rotation as well. So really, really handy, once you've actually reset your transformations in
what you can actually do. Moving on, we're
actually going to be looking now at duplication. So if I come round here, I'm able to actually
duplicate this. If I press shift D and
then press the Enter born, it's now a duplication, and I can move this over
to the right hand side. So now we have
actually two objects. Now, what if you want these two objects actually combined, and you didn't mean to actually duplicate it in object mode, for instance. Well, that's easy. We can just shift
select the other one and press Control J, and now they're both actually joined together
as you can see. So if I press tab now, we're able to come
in and actually work on them both
at the same time. What happens if we want to
actually split them off? We don't want the
objects to actually be together. That's also easy. Just make sure that you
select one of them first, and then all you're
going to do is press L, just to select everything. So all of these faces, then you're going
to press P. Come down to where it says selection, and now if I press tab, they're both actually split off. Now, of course, using
the same command, if I press tab, I can
actually come in, grab a face, for instance, press Shift D. I
can actually also duplicate things with
inside edit mode as well. We might want to duplicate
all three of these? Shift D, I can actually come in then and actually
duplicate them like so. What it also means though, is that these when you
duplicate them in edit mode, will be part of the
same object, of course, because in edit mode, they're not actually
clauster as an object, they clauster as the
same actual part. Now, for the next
part, I'm going to bring in a brand new cube, and I'm just going
to show you some of the basic modeling
techniques within blender and go through
a few of the options. So here we have a
brand new cube, and the first one I'm
going to show you is, if we come into Edit mode, we'll always be working in edit mode to show you these things, just make sure
you're in edit mode. I'm going to grab the top face, and what I'm going
to do is press E, and that then is going
to extrude this out. Now, sometimes you will need
to extrude something out, and it will need to be
along a axis, for instance. So what I'm going to do is
go to Eglit, grab this edge, and then what I'm going
to do is press E, and you can see because
it's not tied to an axis, it's floating around everywhere. However, if I press the x b, you can see now it extrudes out following along
that actual axis, which then makes it really, really easy to manipulate it where I actually
need it to go. Next one we're going to look at is something called beveling. And then all I need
to do is come in, and I'm going to grab my edge. So I'm going to press
two on the keyboard, grab an edge like
so, and then I'm just going to press
control B like so. And you'll notice now it's actually beveled off that side. You'll also notice down on
the left hand side here. We have something called
an operator panel. It will be closed, open it up, and from here then
with the actual bevel. We're able then to
turn the bevels down, for instance,
turn them up, move how the shape of the
actual bevel is going to be, and all that other good stuff. Pretty much anything you do in blender is going to give you
an operator panel like this. We're not going to go
too much into this, but basically the
moment that you press tab button to
come out of edit mode, this is going to disappear, and then you're locked in
with the actual shape that you've chose or the
insert or the extrusion, so just bear that in mind. So the moment I press tab
that actually disappears. What about if we want to bevel off vertices and not edges? So, for instance, if I come to a vertice like this
and vertice like this, press Control B, you'll see
that it bevels off like this. But if I come to one that are the
opposites of each other, press Control B, you'll see
nothing actually happens. However, if a press
Control shift the B, then we're actually
able to bevel off the actual vertices like so. So that's another handy
tip for actually beveling. Now the next modeling
technique we want to discuss is
actually edge loops. So how do we get more
geometry onto this? So, for instance, I want to
bring some edges on here, I can press control, and that then will bring me
one edge in here. If I left click then, you can see that I can put this either this side or this side. But let's say I want it
right in the center. I'm just going to right
click on the mouse and that then is going to
put it right in the center. Now, the other
thing I can do with the operator panel
again is then come in and turn all of these up to give me more
actual edge loops, and I can even move
them to the left and the right. Now, I can also, if I press Control, ed, come in, press Control, I can
actually scroll up on the mouse wheel to give me as many edge loops
as I actually want. Or if I want a little
bit more finess, I can actually type it out
on the actual number part, so I can type out
120, for instance, and have 120 edge loops. To cancel it at any time,
just press the escape board, and then that will
cancel it out. Now, the next modeling
technique I wants to show you requires two actual blocks
or two cubes like this. And all I'm going to do
is, I'm going to come in, and I'm going to select
opposing faces like so. And then I want to actually join these together,
for instance. So all I'm going to do,
I've selected them both. I'm going to right
click and come down to what it
says bridge faces. And now you can see I can
actually join those together. Now, if I press controls that
and just go back a minute, you can also do this by coming in and let's say
grabbing this edge. And this edge, and what I'm
going to do instead is, I'm going to press the F born like so and come
down to the bottom as well and then
grab both of these and press the F born like so. Sometimes bridge will
not work because bridge has to work with two edges
and nothing in between. In other words, nothing
selected there. If I come into this one
now and try right click and come down to what it
says Bridge edge loops, you will see select at
least two edge loops. We can't actually
join out from there, and that is when
it's a good idea to use the F borne instead. Now, the final modeling
technique that I actually want to show you is
something called insert. What I'm going to do is I'm
going to grab this face here. I'm going to press the ibonn, and then you can see you can actually insert this face in. And from there, you can actually extrude it out if you want to. You can also then
press Control B and bevel it off if you want to. And you can see now,
it's really easy to use all of those techniques that have actually showed you. Now, lastly, the
last thing I want to show you is the insert again. But this time we're
going to grab this base and this base, and if I press I,
it's true you can actually insert them
both at the same time. Now, the best thing
though about insert is if I press the i and
then press I again, we can actually insert them separately from
each other like so. Now, I see a lot of
renders on Facebook and other social media that kind of look really,
really block. For instance, if I press tab now and going
into object mode, you will see this actually
looks pretty blocky. But there's a really
easy fix for this, so it doesn't actually
have to look like that. All you need to do is once you've actually
finished, right click, come up and where it
says shade auto smooth, and that then will shade it off based on the actual angle. So really, really easy
to either shade flat, shade completely smooth like so, or shade auto smooth like so. If you actually are struggling
and you actually want it to shade a little bit
smoother than what it is, you can come over
to the right and side where this
little triangle is. Go down and open up the
normal, and from there, you can actually increase
this and shade it even more smooth based
on a higher angle. The default is always set to 30. Just make sure you st it to 30 in case you
actually overdo it. Now the last thing I
want to show you in this introduction is the actual cursor because
I think it's very, very important to
actually modeling. So what I'm going to
do with the mores, I'm going to make another
cube with Shift D. And then I want this cube on top of
this cue, for instance. Now, if I move my
cursor over here, so shift right click, then what I can do is I can
press shift desk and I'm going to go selection
to cursor, keep offset. And that then is going to move the exact center of this cube, or the orientation
to my actual cursor. Now, how would it get this
then on top of this cube? I would literally
grab this cube. I would first of all right
click and set the origin to geometry just to make sure that origin is right
in the center light. So I would then press Shift
DS cursor to selected, and that then is going to put my cursor right in the center. And then I would grab this cube, and from there, I'm
able to go Shift D, selections cursor, keep upset, and now that cube is right
next to this actual cube here. From here then, I can
actually bring this up, and let's actually just have a quick play around of
everything that we've learned. So you can see now
if I pulled this, going to join them both
together then with Control J. And then the first thing
I'm going to do is come in, grab this face and this face. I'm going to right click then, and I'm going to come
down to bridge faces. And then we're going to
bring in some edge loops, so let's bring in two
or three edge loops. Left click, right click. And then what I'm going
to do is I'm going to press old shift and
click just to select all of this edge
going around here and press the S one and
pull it out like. So From there, then, what
I'm going to do is I'm going to level off
both of these tops. I'm going to grab this
top, shifts like this top. I'm going to press control B and actually level them off like so. From there then, I'm going
to bring in an insert. So I'm going to grab
the front of here. I'm going to insert this with
the eye button, like so. And then from there, I'm
actually going to extrude out. So I'm going to extrude
this out like so. Now, let's say I
want a bigger piece on the next bit. I'm
going to press shift D. Pull it out, so this is a
duplicate of this face. I want to press the S b to
make it a little bit bigger. And then I'm going
to press E and pull that out along that axis. Finally, then what
I'm going to do is grab this one and this one. I'm going to right click then
and bridge faces like so. And you can see just
how easy this really is now to actually start
building out some really, really complex models with everything that
you've just learned. Alright, everyone, so I
hope you enjoyed that, and I'll see on the
next one cheers.
7. Starting the Aztec Temple Greyboxing the Stairs: Welcome back everyone
to Blender Ford, the modular and Kash
Environment guide, and this is where
we left it off. Alright, so what I'm going
to do now, it's quickly, just go to drag over my
actual resource pack. And then what I'm going to
do is I'm going to come. First of all, and the only thing I'm
going to need out here for right now is going to be
the human reference because, of course, I want to make
sure that things are to a certain scale
within my gray box. So what I'm going to do is I'm just gonna click on my human. I'm going to press Control C. And then what
I'm gonna do is, I'm just going to put
this down a minute. I should come then to my actual blender that I'm
actually working on. Press Control V and assured,
be able to bring him in. And here he is he's
brought in here. So just make sure you zoom out a little bit, just
make sure you see. Now the moment I would shut down this actual resource pack, you're not going to
need it anymore for the foreseeable at
least hour or 2 hours or something like that while
we build out this gray box. Once we've done that,
then we'll actually start creating all of
the modular parts, and from there we
will be needing this. But for now, just shut it down, just so you're saving on your processing power,
on your computer. And the next one
I'm going to do is, I'm just going to show you how you would actually
bring this in. So, in other words,
if you can't have two blenders open at the moment, then let's just
sort that out now. The other thing is, I
want my guy right in the center at the moment,
turn in the right way. And I always make sure
before I do anything, I press one on my number pd pad, and then that gives
me the front view. So one on the number pad
gives you the front view. I can see my guy is
facing the right way. So let's press Shift S. And
then what we'll do is we'll put selection two
cursor keep offset. And then finally, I
just want to move him up so he's level
with this line here, which is called
the ground plane. So I'm just going to
press Shift bas bar, come down to where
it says, move, and then I'll get my
Gizmo and move to, which is this button over here and actually buil
to pull him up. You don't have this
open over here, just press the T button, that will close it and open it, and then you can also
click it over here. So now I can Zoom out and I know that he's facing
the right way, and from there can
actually begin. Now, how would we bring him in? If we couldn't have two screens or we don't have two blender
files open at the same time, we can simply come over to file. We can go down to
where it says a pen, and then what we
can do is we can come two our course
pack, you can see here. We can go to our
course resource pack, double click the actual
blender file, and there we go. And then what we do
is go to collections. And then what I'm looking
for is the human, human reference, you can see
m here, and there you go. Now I can bring them in. It
brings everything in for you. Now, of course, I'm not going to need all of this in like that. I don't need to do that
because I can press Control C, Control V, and I
find that easier. Unless we want to
bring in all of the materials at the same time
or all of the jump notes. But for me, I think I
working a little bit slower, bringing things in is actually
much more beneficial. So let's actually grab all
of those press delete. So I've just dragged
across all of those Pressed burn and
get those out of the way. And you'll notice over in the collections as well that
you have collections here, but you also have
the human reference. And this is because when we
brought that in appendd it, it will also bring in this
little box called collections. We're going to discuss collections
a little bit later on. In the course, you'll
learn all about those. But now though, let's just come over and make sure
this is deleted. So just going to hover over it, make sure it's
selected, press delete, and then delete
that out the way. And now that all you
should have in here is your collection and your human
three D tutor reference. All right, so now we're
actually ready to begin. So what are we going to do? The first thing
we're going to do is actually create a gray box. It's very important that
you create a gray box rather than just jumping in
and creating all the parts. And this is because even if you're creating a modular pack, it gives you an idea of all the parts that you're
actually going to need. And that's really important. When we're doing this, we don't want to focus too
much on getting, you know, all of the pots, exactly the right size
and things like that. What we're trying to do here is get out of gray
box actually done, laying out all of the structure
of how it's going to go, looking at all of the pots
that we're going to need. And then finally,
once we've done that, we're going to bring
in some basic lighting just to make sure
everything is working okay. Alright, so let's first of all, move our guy just
over to this side. Alright, so let's first of all begin with our actual stairs. Now, when we're
building this, it's important to know that we're not going to have
anything exact. Your sizing and my sizing
are not going to be exact. It's up to you to try and
fit things in together or decide the size of things that
you actually want things. There's no exact sizing in this. We're dealing with art here. We're making you know, a modular pack, we're
making environments. So, my size won't fit
your size, for instance. We just want to make sure
they're roughly the right size. That everything is going
together very well, and we can change the sizes as we actually work through
the actual protest. So, a lot of people
are saying, Well, you need to make the size, five by seven or something, just to make sure we've
all got the same but. You'll see as we move on,
there's so many parts that it's impossible to create everything
exactly the right size. So it's better off deciding
yourself and seeing yourself, what actually looks right
for your particular scene. What I'm going to do is, I'm
just going to move my guy a little bit closer to
my actual cursor. And let's discuss the cursor before carrying
on at the moment, wherever I put my cursor, when I press Shift A
and bring in a cube, it will come wherever
the cursor is. This is the same
if you're bringing in a tree or if you're bringing in a cylinder, it
doesn't really matter. It will always come
where the cursor is. If I leave the way for now. And then what I'm going to do
is just press Shift S. I'm going to put the cursor
back to the world origin, and now I can bring in a cube. So Shift A, let's
bring in a cube. Let's actually
bring our cube up. So if I press three now,
I can bring my cube. To the ground plane again. And then what I'm going
to do now is work out the scale of these
actual stairs. Now, when I'm thinking
of doing stairs, I'm thinking of this will
be round about two floors. Now, it's not exactly
right. We two floors. If I press three
on the number pad, press shift D, duplicate my guy, so shift to duplicate him, pull him up, and
then what I'm going to do is just stick
him on top of there. This is roughly where
his neck is now where I want the top of
my flight of stairs. So what I'm going
to do now is just come round to my cube, press the tab button
to go into edit mode, and then come over
to the Face elect. You can either press three
or you can click it. Grab the top of it,
press three again, and now you can see inside view. So this is three on the
number pad, shift space bar. Come down to where
the move tool is. And then what I can do
is now drag that up, where his neck line is,
something like this. Now what I want to do is I want to pull it
out the other way, so I'm just going to
come around slowly. Grab this face this time, press three on the number pad, and then what I want to
do is I want to drag it out to how far I want
the actual steps. Something like this
at the moment, you can see this is roughly
how long I want my steps. Now you want Ms a little bit
longer or a bit shorter. Let's just check then to
see how I've got my step. So if I grab this guy here, spin him round so I can
press R and x and 90. Doesn't matter which
way he's facing, and let's put him down and we can see if we'd put him here, press shift D, drag him over. Shift D, drag him over, and you can see roughly my guy comes up to where his
chest starts on there. So that's the actual
length of my stair. Now I'm going to do is just
delete these out the way. So I'm going to select this one. Shifts like this one,
shifts like this one. Press delete, delete
them out of the way. And now we've got our stairs roughly to where
they actually want to be. The next thing, of
course, is we want our stairs to be a
little bit wider. So what I'm going to
do is I'm going to drag my guy over here, put him in the front like so. I'm going to grab these stairs, and then we're going
to press S and X, and I'm going to pull it out
for the size that I want it. So we want quite a lot of room there to go up
these front stairs. And from there, then we
can actually bring them in as we go further up
the top of the temple. Alright, so this is looking
good to start with. Now, we actually want
to create our stairs just so we have an idea of
what it's going to look like. Now we're going to do
before doing anything, we're going to actually
reset all the transforms. At the moment, if
I bring in a cube, so if I press shift A, bring in a cube. Don't do this. Just watch what I'm
actually doing. I bring in a cube, Blender
knows this is a cube. It knows it's even
on all of the sides. And once I actually
start bringing this out, so let's say I bring
out this face, Blender no longer knows
that this is Well, it still thinks it's a cube. So until I actually press control A and reset
all of the transforms, Blender still thinks
that this as a cube, but now he knows it's
an actual rectangle. The thing is once you've reset
the transforms generally, your orientation will always go to the center of the world. You just need to
click, right click and set origin to geometry. All right, so now
what we want to do, first of all, then is reset
all the transformations. So control A, all
transformations, right click, set
origin, geometry. And now let's actually
create some steps. So the easiest, the easiest
way to create steps, is to come in, grab the edge, so grab the edge up here. Brest Control B, and then just pull it out
where you want it. So I'm not going to pull
it out so far that it actually gets rid of this bottom step, so
goes all the way down. I'm going to pull
it out to there. Now, the problem here is, if I bring in steps, they're only going
to come up to here. So if I come in and show you, if I come to custom, you can see if we pick the
one that says steps, so on the presets,
we pick steps, start to turn up these segments, and you will see that
they don't fit right. So you'll see now,
they don't fit right because we want them coming
all the way back to there. How do we fix that? What we need to do now is come
to where it says, offset, come down 2%. And then as we turn up
this percentage now, they'll actually start to fit a lot better for us,
as you can see. And that is exactly
what we want. Now, don't worry in the
actual modular pack. We do have a junctional
that's going to do this, but you want to
know really how to create steps simply and easily. And this is the easiest way
that you can actually do it. Alright, so once we've got that, then we can press
tab, and there we go. Our first actual gray
box, which is our steps. Now, from here, We can pull these steps
out if we want to. So, in other words,
I can press S and y, and I can pull them
out to make them a little bit longer
if I so want to, making the bottom of the
actual Aztec temple, leading up to it
much much longer. So you can see now
we've got our height. We've got our width,
we've got our steps in. So net's now on the next lesson. Start building this
out a little bit. Alright, everyone, so I hope you enjoyed that, and I'll
see you on the next one. Thanks a lot. Bye bye.
8. Modeling Simple Arches in Greybox: Welcome back, everyone
to Blender for the modular and Kippah
environment garden. This is where we left
it off. Alright, so let's put now
another block here. And then what we'll do is
we'll put the stairs up again, and that then will
be our second tier. So once we've got that started, we can actually move on to the process of creating
the front of here. So what I'm gonna do,
first of all, is, I'm gonna press shift
A. I'm gonna bring in a e. Then what I'm going to do is put my cube
into the right place. I'm going to pull it up onto
the ground plane again. So if I press three, I got
a good view of the side, I'm going to pull
it over, like so then what I'm going
to do is I'm going to press seven, to go over the top. I'm going to press S and x. And I know it's S and x because
I can see the red line. So this red line here, I can see it on here, so S and x, so Sx, pull it out. Like so. And then what
I'm going to do is, I'm going to going to edit mode. Grab the face select and
pull up the face like so. Now, the top of here wants to be basically somewhere where a
guy can actually stand on. So if I pull him up,
put him onto place. You can see he gets to
the top of the steps. There's plenty of
room for him to stand on or a few people
to stand on there, and that looks about right. Next of all, then we'll
grab the stairs and all I'm going to do is press
shifty, to duplicate it. I'm going to pull it
over then to here, and then I'm going to pull
it up into place like so. So the top of the
steps starts here, so he's going to walk up there. Stop on here and then
carry on walking up there. Now what we need is we
need another block. That's going to
basically come this way. So what I'm going
to do, I'm going to grab this actual
cube press shifty, drag it out into place, like so. And then what I'm going
to do is come now, grab this face in edit mode, and then just pull
it over like so. And you can see now
we've got basically our second tier ready
to go. Alright. So now let's focus on the actual first archway
that we've got here. So what I'm gonna do? I'm gonna drop my guy back down
on the ground plane, so I'm gonna press
one. Bring him down. And now let's create
our first arch. So what I'm going to
do to do that is, I'll bring in an actual cube. So I'm going to press Shift
S. Cursor selected that, then he's gonna put my
cursor right with my guy is. And then I'm going
to press Shift A. Bring in a cube. Like, so I'm just going to
move it to the side slightly. Like so. And then
what I'm looking for here is I'm looking
to see, you know, what? Instead of moving
it to the side, I'm going to move
it back like so. Now, what I want to do
with this archway is, I want to make
sure because it's, you know, kind of
aztec themed archway. He wants to be quite
wide, the archer is where they're going
to walk through. So he don't want
to be, you know, kind of really thin or
anything like that. But we also want to make sure
is that it's quite high. So what I'm going to
do is grab the top. I'm going to pull it
up into place like so. Now, what I want to do
is I want to actually bend these parts inwards. So the way I'm going to
do that is I'm going to press Control A, all transforms, reset the origin to geometry, so that's reset this scaling
of this actual cube. And then what I'm going
to do is I'm going to come over to my edges, and I'm going to
press Control B. Now, I already know
that when I press Control B, this is
going to happen. We're going to bring
in stairs again, and we really, really
don't want that. So the best way to deal
with that is come to file. Save out your work. And
then reload it again. So open reason, open the one you've got
open, and there you go. Now when I come in
and press Control B, you'll see it all
goes back to normal, which is exactly what we want. What I'm going to do is
I'm going to pull it out to roughly
something like that. You don't have to get
it exactly right. Then what I'm going to do is I'm going to turn this up, like, so maybe to four, and now you can see we've
actually got an arch. Now, if we want to
bring these back, we can actually
bring them back or bring them up to get the
right sizing that we want, and we can also drop
this back as well, and that then makes it really, really easy to create what
we're actually looking for. Right, then, so we've
got our actual kind of archway in there. We're not going to
worry about, you know, whether it's ideal, whether it's exactly what
we want right now. A we want to do right
now is just create something an archway that
can actually be used. So now I'm going to do it,
and we actually come in, and we're going to
grab the front, grab the back, grab the
underneath with shift select. So shift select and all these, press delete and bases and
delete those out the way. And again, now, because You know, we've got rid of all that. It's always best off
press in control A, resetting all the transforms and just getting used to
doing that all the time. Then what we're going to do
is add in our first modifier, and this is going
to be a solidify. And what that's going
to do is going to turn this two D object into
a three D object. So let's come in, add modifier, generate, and bring
in a solidify. And then what I'm going to do
is pull out the thickness. So if I pull the
thickness out now, you can see that we
can bring it out and create that kind of archway
that we actually want. Alright, so so far so good. Now, the one thing we want
to do is we want to make sure that the archway is around the thickness
that we want it. I think at the moment, it's
a little bit too thick. So let's bring it in a
little bit, because yes, we can do this, even though
we've got muddy fire on. So if I press S and y, I can actually bring it
in a little bit like so, and there we go,
there is the archway. The other thing is,
I want to line it up realistically with this over here, so something like this. And I'm thinking that's
looking pretty good. Alright, so the
other thing I always do when I'm actually
using solidify. I always make sure
even thickness is on. It just evens everything out going all the
way around here. Just get used to doing that. Now, the thing is from here, you can either apply
a modifier or you can actually leave it on there.
It doesn't really matter. The one thing is, when you've
got a modifier, you know, on the actual object, where you can turn it off
on and off like this, it's not actually applied it. So blender doesn't actually
take it as complete mesh, which means sometimes
it's easier to work in large environments
with the modifiers on there and not
actually applied. It just helps blender deal
with large complex measures. But in something like this, it's so simple this mesh,
it doesn't really matter. So what we're going to do is we're going to
actually apply that. Now, there's a few ways of
actually applying modifiers. The first is you can come
here and click apply. The second is you can
come over here and press Control A over
the actual modifiers. So Control A, and that
then will apply it. There are other
ways, and we will discuss those a little
bit later on the course. But for now, these
are the easiest ways. All right, so what I
want to do now is, I want to bring this up and
make this a complete archway. So what I'm going to do is
I'm going to press Control. Left click, right click, and what that's
going to do is it's going to bring in an edge loop going all
the way over there. Now, the reason I
press Control law, and then left click
is because if I press left click I can then move it along to
wherever I want, and then I can press left click
and drop it where I want. But if I press Control, left click and then just
press right click, it'll just drop it
right in the center, and that's what I want for now. Now, what I want to do is
I want to bring a walllo. From kind of here,
and then going up. So the way I'm going
to do that is, I want to press Control B, which is the bevel, and then I'm going to
bring the bevel out. Now, the other thing is
about a bevel at the moment, you can see that we've
got all of these cuts. If I scroll the mouse wheel back or forwards, I can
make more cuts. So what I want to
do is scroll it all the way back to
something like this, press the left click, and then that will drop it in place. And the reason I'm doing that is because I want the wall set back a little bit from
the main actual building. Now, I know this is
only a gray box, but still when we've
got that lightening, it will still give us an idea of how everything's
going to look. So what I want to do now is
I want to grab this edge, I don't want to grab this edge, and I want to pull them up now. So E to extrude, and you'll see that
they start coming out. So we're extruding
from these points, and then if we press d, we can bring it up to just
the top of this arch like so, and then we can press
the F one like so, and what that's going to
do is fill in that phase. So it's important when
we're dealing with extrude that we're
grabbing a side like this and pressing E and extruding it out because
you can keep extruding it. The problem you might have is if you press E without knowing it, and then enter and then E again, you've actually got two
actual loops in there, which you can't actually see. So it's important when you press E that you make sure
you're not doing that. All right. We can also,
the thing about extrudes, you can extrude
pretty much anything. You can extrude these points, you can extrude the edges, so the vertices, the edges, or even the face, you
can extrude all of that. Next of all, then, now
we've put a face on there. We just want to put a face on this bit here and a
face on the back. And luckily for, there's a very, very easy way of doing it. If we press ult shift and
click, what they'll do is, it'll select all the edge loops going all the way down
to each of these, and then simply we can
come to this part, ult shift and click, and then that will select all of these. Now, people will say, that if I press the F b here, it's going to give us
engons, which it is. So what is an engon? Well, you can see here if I
come to these parts here. So don't do this, but I'm just going to
show you what it is. So if I grab this
one and this one, press the J bn, I will then give myself a line
growing across here. Now, you can see that
this is a triangle. You can see that this is a quad, so a triangle three sides, a quad is four sides, and an engon is something
more than four sides. So if I go by, Before
I put that on. You can see that this engon, I grab it has many, many sides. Now, when you're dealing
with something that's flat. You don't need to worry
about en guns, really. Even when you send it through to something like real engine, it's going to be
triangulated anyway. The only problem you're going
to have if something is rounded and it has
an engon, you know, let's say, for instance, you've pulled this out and
you've rounded it off, and it's got engons in there. If it's a character
and it's got engons, there's going to be a problem. And the reason is the
lighting is not going to bounce off it
correctly with engons. You can't smooth things
off properly with engons. Can't do animation
properly with engons. So these are the times when
you wouldn't be using engons. But in certain things like this, so a flat wall, for instance, not
going to be a problem. I see a lot of people out there
saying, Never use engons. You shouldn't be using engons. Engons are fine as long as
you stick in to those rules. In fact, sometimes engons make building
something much much easier than trying to triangulate or put
quads in everything, especially when
you don't need to. So let's come in now
and come to this one, so we're gonna press
Alt Shift and click. Alt Shift click,
we're gonna press the F button to
bring in an engon. Now, the other way you do
that is you can press Alt F, and what they'll do is it'll actually triangulate
everything for you. But on this occasion, we really don't need
all these triangles, so we might as
well just press F, and that then will
just bring us a face. So let's go back, press the
F board, and there we go. Alright, so we've got pretty much this arch now,
this arch is done. And from this arch now, we can actually start building
up these parts over here, so building kind
of a part on here. Going over to this wall, and then we can start
building around this. And from that, as well, it
will also give us some of the parts we're
going to need for the rest of the actual build. All right, everyone.
So, first of all, let's save out our
work, and I'll see here on the next one.
Thanks a lot. Bye bye.
9. Using Circles in Greyboxing for Aztec Architecture: Welcome back everyone
to Blender for the modular and Kish
environment guide. And now what we want
to do is we want to just put this into place. So somewhere around here. And what I'm going
to do, first of all, before carrying on
with this part is, I'm just going to bring up a large column that's going to come from the ground
up past here. So let's do that first. All I'm going to do is press Shift da. And again, because we're
dealing with the gray box, we don't need to
worry about any type of real details or
anything like that. All I'm going to do then
is put this into place. So in where this is, I'm going to make it
round about this big. I'm going to put it on
my ground plane then, and then I'm going to grab
the top of it in face select, so grab the top face, and
then pull it up into place. Now the thing is
if you see it's a little bit too thick,
don't worry about that. All you can do is shift click, so you're going all the
way around the outside. It means you haven't grabbed
the top all the bottom, and then all you're going to
do instead of pressing S, which will shrink the
whole thing down. What you want to
do is press old S, and then that will just bring it in to the size that you want. And that's easier. Now, the thing is
about this columnis. I want to make it tall
enough So that if I decide to put a torch on
here or something like that, I definitely want it to be
round about that height. So something like this
looks about right. Now, of course, we're going to put this on the
other side as well. But we might as well mirror everything over the other side because that then
is going to make it much much easier
to work with. Alright, so what I'm
going to do now? Again, when you're
using the great box, try and speed up the process, make this as quickly
and easily as you can, use the blocks that
you've already got and just repurpose them
for what you need. So what I'm going to do is I'm going to grab
this block here. I'm gonna fresh shift. I'm going to drag it over then
to where I want it. So something like that. And then what I'm
gonna do now is, I'm going to pull
that into place. So I'm gonna grab this
face and edit mode. I'm going to pull it
over into place like so, so somewhere around here. And then what I'm
gonna do is I'm also gonna grab the back of it. And pull it into place
behind this part here. So you can see at the moment,
this is the height of it. This is where it's going to go, and you can see that's
looking pretty nice. Let's also as well,
pull it down, so that it's the
same height as this. So we're going to pull
it down to there. So now you can see
that it's back, so let's pull it back
a little bit as well, just in front of here. And you can see that I might need to move this a little bit, so I'm going to move this
a little bit into place. And what I'm trying to do,
once I've put this into place. So ran about here is
I'm trying to make sure that this part is
slightly back here, and this part, especially is a lot further back
than the other part. So something like that creates that little alcove that's
looking pretty nice. Alright, so I've got
that part there. Now what I need to do is I
need to think about my roof. And I also need to think about a large kind of part
that's gonna go over here. So what I'm going
to do is first, I'm going to grab this part.
I'm gonna press shifty. I'm going to grab drag it over like so and put
that into place. Next of all, then
I want a huge kind of pillar along here, probably around the
same height as this, but much much bigger. So what I'm going to do is
I'm going to grab this one. I'm going to repurpose it. I'm going to pull it over them. And then what I'm going to
do is the I'm going to put this into the front of here. Maybe maybe it should
be a little bit lower, and maybe it's going to
be much much thicker. So let's first of all,
deal with the thickness. What I'm going to do is
I'm going to come in. A shift click lns. Let's pull it out, like, so to give it a nice thickness. And the other thing is, I'm also going to pull it
back a little bit. Tough basically I'm
going to come in. Grab the top of here, and then just pull it
back slightly like so just so it looks like
it's leaning a little bit. And then what I'm
going to do is I'm also going to pull it back
a little bit further. So if I go over the top now, press the tab board
and I'm going to pull it back into place like so. And now because
I've got that in, I can actually see how much
gap is between here and here, and that the makes this wall much easier to work
with because this wall needs to be coming behind
this actual pillar. So what I'm going
to do, I'm going to come to the back
of the pillar. Pull it out just a
little bit like so, and then we're going to
come to these two walls, and I'm going to
press the tabon, and I'm going to pull these
back into place, like so, and now everything's kind of fitting into the place
that I actually want it. Alright, so we've got that
part. That is looking good. And now we should do is
we should think about the top of our actual building. Here, the little pillars that are going to come up
here will do, as well. So let's first of all
give this and top. Now, when we come
and give this a top, we will be splitting
the tops up, and the reason for that is that when you're making
a modular pack, you have to think about how things are all going
to be split up. And that actually makes
it easier because then you can create many
things from actual block. So let's actually think
about that first. So the first thing I want to do I want to put a top on here
that's going to go, you know, kind of the halfway point here, and then a top on top of there. So let's do that next. So what I'm going to do
is I'm going to come to this archway here. Shift S, urs to selected, and then shift A, I can
bring in then a cube. Let's bring my cube up
then to the top of here. Let's press S and this time
to squish it in that way. And then all I'm
going to do is sit the cube on top
of there like so. And you can see it sticks out from the front and the back, but a little bit too much. So let's press S and y
and bring it in. Like so. And there we go. A thing
that's looking about right. Now, the next thing I want to do is I want to pull it out, so I'm going to press S and X, and let's pull it
out into the place. Now, you can see that
when I pull it out, it's going to be
in front of this, and that's absolutely
fine, actually. I don't mind it
being slightly in front of there. That's fine. I just want to make
sure that it's going to touch the wall like so. So let's press S and X, pull it out just so it goes into that wall, and there we go. Alright, so this is
our first block. Now, the thing is,
when we come to create the modular
pack, as I said, we're going to be splitting
this in half in some way. But for now, we don't
really want to do that. All we want to do is get the gray box laid out and
save ourselves some time. So what I'm going to do now is, I'm basically going to press
Control A, all transforms, set origins geometry,
Shift D. Shift D. Like so. And then what I'm going
to do is pull it up. And now I'm going
to do is make this a little bit smaller. Like so. I still want it, just
nearly touching the side. So you can see here, it needs
moving over a little bit, so I'm going to pull it
over a little bit, like so. And then what I want
to make sure is that it's on the front and the back. We've got this little
type of gap down here. Then, then let's make it
a little bit thicker, so I'm going to
grab the top of it, make it a little bit
thicker like so. All right, so we can
see now if we zoom out, that is looking pretty nice. Now, let's deal with
the next part then. Once we've got this top on. There's two things
that we want to do. We want to make it easier to visualize what it's
going to look like, and I'm going to
show you how to do that on the next lesson. And the other thing
is we want to bring in a little
bit of lighting, and we also want to
make sure that we can see the definition
of these lines here, and we're going to do that
on the next lesson as well. But before we do that, let's
just put a top on here. So what I'm going to
do is, I'm going to bring in a circle. So that will be the
easiest thing to bring in. So bring in a circle.
It's going to come. Where your actual cursor is. Now, before you do anything, make sure that when you bring it in this little
menu that's there, open it up and make sure that this has set something like 20, that then is going to
cut down the amount of polygons in the actual scene. So once you brought this down to 20, we can actually bring it up. And then what we're
going to do is we're going to join this one and this edge and make
it into a semicircle. So all I'm going to do,
I'm going to press tab. I'm going to come over
to my vertice select. And what I'm going to
do is grab the sides. So you can see here
we've got a side here, and we've got a side here. So let's grab both of those. Press the J button, and if that doesn't work, press
the F button. Sometimes the J born, well, it always works when you've
actually joined in Virts, and there's already
a face there. If there's not a face there, you won't actually be
able to do that. Now, let's come in
and delete all these. So instead of
grabbing each one of these or pressing
old shift click, you can see it grabs the
whole lot, grab one of them. Come round, press Control click. Control click, and
then you can actually work your way all the
way around like that. And then what you're going
to do is press delete, and you're going
to dissolve edges or come up to where it says, delete edges like
so. It all depends. Sometimes it will
be dissolve edges, and sometimes it will
be just delete edges. Depends. Let's now come
in. O Shift click. I'm going to press the
Fb to fill in that face. And then what I'm gonna do is
I'm going to press the tab. Reset all my transform. So and control A, rest, transforms, right
clicks origin into geometry. And then what I'm going
to do is spin it round. So R X 90, let's spin it round like so, and then we can actually
put this into place. So where I'm going
to put it is, I'm going to put it on this half. And I'm going to put
it round about here, and then I'm going to press tab, and I'm going to extrude it out. So I'm going to make sure
I've got this face selected, so this face selected, and then just press the e bond, extrude it out, like so, and then let's put
it into the ground well into the top of the roof. Alright, so there we go. That's looking pretty nice. So on the next lesson, then what we'll do is we'll
carry on going down here. We'll finish off this side, and then we can actually get those onto the
other side as well. And then from there, In the
beginning of that liston, I'll also show you how
to bring in some very, very basic lighting and also how to actually make this stand out
a little bit more, just so we have a better visual on what it's going to look like. Alright, everyone, so I
hope you enjoyed that. I'll see you on the next
one. Thanks a lot. Bye bye.
10. Ambient Occlusion Shaders Setup in Blender: Welcome back, everyone
to Blender four, the modular and Kit
Mash environment guide, and this is where
we left it off. Now, at the moment,
we haven't going any lighting in here and we really want to bring
some lighting in. So to bring lighting in, I'll go up to these four options actually and go through them. So the first option up
here is going to be a wire frame where
you get to see all the wire frame
within your scene. You can see how dense wire frame is and all that sort of stuff. The next one then is going to be the object mode that
we're dealing with. The next one then is
going to be materials. And at the moment, we can't see any materials because we
haven't got any on there. And then the final one is
going to be our rendered view. Now, the moment we don't
have any sun in there, and so everything is dark. The other thing is, if we come over to the right hand side, you will see that
this is set on EV. Now, you can work on EV or
you can work on cycles. I prefer to work in cycles. I feel it gives me
a lot better view. But if your computer isn't high spec or
anything like that, you might be better
off working in EV just to visualize
your gray box. Now, what I'm going
to do also is, I'm going to be bringing in a material that
pretty much relies on cycles to give us
the actual depth. But I'm going to show you
both ways of how to do it so that you can pick and choose
whichever one suits you. So first of all,
before we do anything, we need to bring
in some lighting. Now, what people
generally tend to do here is just bring in a sun, and it's really not
the best way to work. The actual best way to
work is to bring in a sky. So what I'm going to
do is, I'm going to come over to where
it says world here. This is where the background is. You can see if I start
turning that up, it really starts pumping up the strength of the
lighting that's in there, but it's very, very
false lighting, you don't want to
work like this. You want to actually
do is you want to come to this born here, click it on, and what they're going to do is, it's actually going to bring
in a new world for you. F here, we'll call it day scene, like so, and then what
we're going to do now is we're going to actually bring in our own day scene. So I'm going to come over
to my shading panel. And generally in
the shading panel, this is where you
deal with all your materials and things like that, but you can actually also
deal with your actual world. If I come into world, you'll see now this is a replica of what's over
here on the right hand side. Now, if I put this
onto environment, You will see this
is what we've got. Now, if I come in
and turn this down, you can see it actually
alters it in the viewport. What I'm going to do is
I'm going to come to my background and delete
it out of the way. And then we're going
to press shift A, and I'm going to do a search. And the one I'm
looking for is put something called sky texture. Let's bring in our
sky texture then. And then what I'm
going to do now is, I'm going to plug that
in to the surface, and immediately, you'll
get a vast, vast change. Now, the sky texture
when it comes in is pretty good anyway, even in EV. But what I want to do is, I want to change
this a little bit. So what I'm going to do
is I'm going to come. At the moment, let me see
if I can see the sun, I think the sun is
way way too big. Let's pull the sun down
to something like two, and we might be able to
draw see it in the sky, actually, where is it? I can't actually
see it in the sky. Maybe I'll be able to
see it in a minute, but sometimes it's
really high up and we changing the size of it. I think it's this
here, but I think the sun intensity is making
it a little bit too much. So let's put it on
something like nought 0.1. Let's bring that down. I
just seeing I can see it. I'll find it eventually. I assure you Okay, so let's come in and
alter a few of these. So at the moment,
the sun elevation, let's set that down
something like zero, and you'll see now what
that actually does. Let's set the sun rotation up. So you can see at the moment
if I come round here. It's like a morning
sky right now, and the sun is coming this way. The moment I start messing around with this,
let's put it on 90. You'll see now it
turns it round, so it's coming from
this way here. So you've got all of these
things you can actually do with the sky texture.
Now, let's come down. And what I'm going to do
now is I'm going to put the the air on not 0.5, like so, and now we get
that real blue feeling. And we're just going to set
these up just as you know, to give us an idea
of what they do. Let's set this then to 1.1 0.75, like so, and let's set the ozone to 6.9,
something like this. And now you can see all
of what these things do. So one of them brings a
lot of dust in the air. One of them changes the ozone, so it's really, really blue. And one of them changes
the sun intensity. So I recommend actually
playing around with these. Let's bring up that sun now, so let's bring it
up a little bit. And now you can see, actually, that's looking pretty nice. Now, the next thing
we want to do is we want to come back
to our object mode. So back to object mode
just for a second. And when we're working
in object mode, we really want to see we'll get a better visual of what
things are looking like. What you want to
do is you want to come over to the
right hand side, click this little down arrow, come down to this
cavity and turn it on, and you can see straight away
now you have a lot better visual or what everything's
going to look like. Next of all, then we really
want to come in and see what this looks like on cycles
because the thing is on here, If I come over to this E, you'll see this is EV and
click this onto cycles, and this is cycles, and you can see it just looks a lot there. Now, before we do that, though, let's go back to EV and
let's set it up a bit. So when you're dealing with EV, you can come in and you can turn the ambient occlusion on. And this is really, really
important actually, because you can see now if
I turn this distance down, I can actually already
get shadows in there. Let's turn this
down a little bit, and I can turn them up like so. So I can really
bring that distance all the way down and really get some nice shadows
in there and I have a really good visual of
what I'm actually doing. The other thing is with EV,
if you're going to use it, make sure screen
space reflection is set on and make sure
refraction is turned on, and the half rest trace
trace is turned off. And the reason for
that is that then will make any metallic
that you're bringing in. We will go through
all of these options, so don't worry later
on the course. But just make sure
if you're bring in any water, anything metallic, it's going to make sure that you'll be able to
see it properly. And the half rest trace is just something that you need when we're dealing
with, you know, a full environment, all
the materials are in, and half rest trace is something
we'll go through then. But for now, just put on screen space
reflections. All right. So let's discuss the next thing
I said I was going to do, which will be bring in
a certain material. And once we've
brought that in then, we'll put it on cycles, and we'll have a
good look at that. So what I'm going
to do is instead, I'm going to come over
and turn this from world to object mode. And going to zoom out, and you can see there's nothing there. What I'm going to do
then is click new. And I'm going to call
this ambient occlusion. So ambient occlusion, like so. Now I'm going to do is
before I do anything, I'm going to save out my work, so let's save it out, like so. Now I'm going to do is
I'm going to create a material for all
of this gray box. So what I'm going to do is
I'm going to press Shift A, I'm going to do a
search, and what I'm going to do is look
for ambient occlusion. So type in A and B, and it's this one here, the ambient occlusion node
that you want to bring in. We want to do is we want to have some way to control
this ambient occlusion. So the ambient occlusion
is basically how much darkness is in between
each of these parts here. So you'll see what
I mean as soon as I bring in a color
ramp so shift aa, search, bring in a color ramp, like so, and drop that in. Next of all, then I'm going
to drop my color in my fat, and then we're going to drop
the color into the base, and you'll see straightaway, something's actually happening. The moment I turn this
up, now you can see, we've got some real
real shadows in there. This works better in cycles. So if I come over to
the right hand side, go down to where it says EV and put this onto
Blender cycles. Now you'll see we have a much, much better view of what
that's actually looking like. Now, as I say, you
can use this in EV, but I'm going to working
in cycles from this point. Now the thing is, when
using blender cycles, First of all, you
want to make sure you go over to edit preferences, and what you want to make sure
is that you go to system, and you want to make sure that this races cycle render devices. You can see here I
want to put this on Optics X or QDa,
whichever one it is. And you can see the moment you put it on each
of other of these, it will come up with what
graphics card you using, what your processor
is that you using. Now, generally, people
take both of these on, but I actually think it's slower if you take both of these on, so I recommend that we just use our graphics card for now. So let's click our
graphics card on here, either utter or
Optics x. I'm sure Optics X is the new cycles X. So if you can use that one, g. And if you can't
use any of these, I would stick with EV rather than trying to use
your graphics card. Once you've done that,
then close it down. Come over to the right hand side on what you want to do now. You can see here the moment
the samples going up, and you can see the
moment I move that round, you can see them going
up very, very slowly. Now, you can see how long it
takes to get till finished. So it's rendering dumb. If I put this sth on
my graphics card, Now you can see how
much quicker that is. So it's like near
enough instant, moving it around within
the Blender viewport, and you've got a really, really good idea what things look like. Alright, so the next thing
then that we want to do, is we want to make
sure that underway sas viewport de noising is on because at the moment we've
got loads of grain on here, and it doesn't look too good. Now, this is quite high on performance when
you tick this on. So if you are struggling
or if blender is crashing, this is the first
thing I would look at turning the D noise off, and if it's still crashing, going back to EV, just to look at the
viewport that is. So let's tick that on, and now you'll see everything
is really smooth. You can see it takes
slightly longer to get there because it's also
doing the de noising. Now at this point,
we can come in. And what we can do is now, we can add another one in, so
let's bring in another one. And now we can do is we can make this one a
little bit darker. So it's like kind of not
quite the full shadow. So you can see we've
still got a really, really dark shadow there
right in those centers. But now we've got
a little bit of shadow on the steps where it's
facing away from the sun. And this is why I
like using this. We've also got control here, which can control how much
we have in between them. So if I set this to zero, for instance, or minus even, you can see we have
a slight bit of control over bringing
this up like so. I just depends what
you actually want. So I'm going to put this back on one. I'm happy with that. And from there, then
on the next lesson, what we're going to do
is We're going to put this on all of these
actual parts we've built. And then from there, then
we can carry on building because now we've got some
basic lighting in there. Let's make sure though before we finish that our world
lighting is how we want it. So at the moment, you
can see we've got sun intensity on not 0.1. Are you happy with that, or does it look a little
bit too bright? You can turn this down to zero, or you can put it on not 0.5 or something, not quite as high. I think that looks bare. Then the other thing
is you can also mess around with these
parts and bring it to the color that
you actually want it. So let's bring it a little
bit of red in there. Let's bring back the sky or bring it up a
little bit, like so. And then let's also
look at the ozone. Bring it a little bit darker. So. Yeah, and I
think that's much much easier for me
to visualize what this is going to look like.
Yeah, I'm happy with that. Up to you, how you
put yours on there. I do you want to see if
I can see, there we go. Now, I'll tell you, I'd
find it. There's the sun. So if I bring this down to 50, you can see now
we've got that sun. And you can see I
can turn that down now and get it into the
sky where I want it. And you can see why we
couldn't see the sun. So something like that
now, we can see our sun. Great stuff. Alright, let's
come in and save our work. And I'll see on the
next one everyone. Thanks a lot. Bye bye.
11. Creating Pillars in the Aztec Greybox: Welcome back everyone to
Blend for the Modular and Kit Mash environment guide,
and that's where we left off. So now I'm going to do is, I'm going to go back to modeling. What I'm going to do is,
I'm going to put this onto my render view. And
now I'm going to do this. I'm going to grab
all of these parts, so you can see all of these
parts I actually created, including this one, this one, all of these, the archway, and these big parts here. And finally, I'm going to
shift select these stairs. So, if I shift select
the stairs now, and what I'm going to
do is press Control L come down to Link materials. Like, so double tap the A. And there you go. You've got
all of your materials on. This one hasn't got material on. So I'm going
to grab this one. Control linked materials. Does this have material on it? I look. Right on the side. Oh, it has got material on it. It's just a bit weak over there because it's just the
some going there. All right, lastly, then, At the moment we can't see the ground plane or
anything like that. This is the time when I tend to bring in my
main ground plane. So what I'm going to do is
I'm going to press Shift Day. I'm going to bring in a plane. And before I do
that, you know what? We'll just set the
cursor to world origin. So it's down in the
world origin there. Shift Day, let's
bring in a plane, and let's make this plane
a little bit bigger. And let's also give
this the same material. So I'm going to grab
this, grab this one, control link materials. And there we go. Now we can
actually see something. And from here as
well, the thing is, you've already got
your ambient occlusion over on the right
hand side here. So you can see if we
open up this base color, it does say color
ramp, and we can actually control
this now from here. So if I turn this down, you can see can control
all of these parts and get it exactly the way that I
want it. So you know what? I think, actually, that's
looking pretty nice like that. It's just those really dark spots that I don't
want on there. Let's bring them up
a tiny, tiny bit. And what we can also do is we could also bring
this all the way up, so but then drop that back
the color a little bit. And now you can see that's
looking pretty nice, giving us a good visual or what everything's
going to look like. The other thing is when
you're working like this, sometimes when I'm building, I tend to turn off
this wire on here, does make it easier sometimes
to visualize things, so you can turn that off
just quickly like this, and then you've got a beard view of what everything's
going to look like. The other thing is, as well, that you
might want to come in, grab you guy, let's make
sure these are back on. Click new and give him,
let's call him human. Like so, and just give
him a red color like so. Double tap the A to deselect
everything, and there we go. Now you can see he
really stands out. Now, you can really see where he is because most of the time, you actually end up losing your reference in the
grand scheme of things. All right, so let's now move on. So what I want to
do now is want to create a wall that's
going to go down here, and I want this other
post going over here. Now, when we're
working, of course, we don't need to be in cycles. We don't need
to be doing that. So let's put it back
into object mode, and now we should be
able to see what we do. Just make sure our cavity is on. I don't think it's
on for some reason, so make sure that's ti Ton. Let's save our our work, and
now when we load it back up, cavity should be on there. Now, let's bring in this post. All I'm going to do is I'm
going to grab this post, and I'm going to pair shift
D. I'm going to drag it out. To somewhere like here, and then create a
little bit of a wall, so I'm going to grab
this wall, shifty. Let's bring it
over then to here. And then all I'm
going to do then is press tab to go into edit mode, grab this face and pull it out. Alright, so we're moving on now. That's pretty much
that part done. Now, what I want to do
is, I want to bring so these parts over
to the other side. So what I'm going to do is, I'm going to mirror all of these. So the easiest way to do that, we know that the center of the steps is where
this cursory is. So all I'm going to do is I'm going to grab each of these. Like, so, including this one. And if I press G now, so just press G, you will see that everything
comes with it. If I didn't have a mall, selectors, let's
deselect that one. Press the G, you would end up with seeing that still there. So now, select it, press the G, right click. Drop in place. You know,
you've got the all. And then what you want
to do is one tonight. We don't want to join
them all together, but we do want to mir
them over the other side. So all I'm going to do is
I'm going to right click. Origin to three D cursor. That then is going to move
the origin to all of these. Now I'm going to do is
add another modifier, so add modifier,
and we're going to bring in a mirror. So
we've got a mirror here. And all it's going to
do is mirror this one. And the reason
it's going to only mirror this one is because all of these others have
not got a mirror on them. So the reason I've
done it this way is that I can mirror them
all at the same time. All I need to do now
is press Control L, and I'm going to link modifiers. So copy modifiers, and then it will actually put them
all over the other side. Now, any one of these
I click on now. You can see it's got a
mirror on each of those. Now, I also said that I
was going to tell you how you can apply
modifiers a different way, and this is the point where
we're going to do that then. What I want to do
is I want to come, grab all of these because
all of these have been mirrored over the
other side now, like so. Press G, and you'll see
that everything moves. And what you want to do now is you want to come over to object, and you want to come down to convert and just
convert them to mesh. What that means is
that you won't have to go through each
one of these pressing Control A or
clicking the down on click and apply on
every one of these. So let's go to object. Let's go to convert, convert
to mesh. There we go. When I click on each of these, you can see now the mirrored
over all on the other side. Now, the one problem we've
got is that at the moment, we can see that all of these are part of these. We don't
really want that. So what I'm going to
do is I'm going to grab them all once more, like so, press the G b, like so. And then what I'm going
to do is I'm going to press one on the number pad, and I'm going to press Z, and I'm going to go
into wire frame. Then I'm going to do
is I'm going to press tab, And at the moment, you can see that some
of them selected, some of them aren't, double tap the A in quick succession. And what I'll do is I'll make sure that everything's
de selected. And now you can do it,
you can box select them. So if I come in,
grab all of these, so it'll only select this side, and from there then, I can
press P and selection. And now what I've just done, I've split them all off. So now I press Z,
go back into solid. You will see now that
all of these are split off from each
other all independently. Now, the last thing
I want to do is, I actually want to
select them all again, because what
I want to do is, I want to grab all of these, like so, all of these. Like, so. And of course, guys,
as we move on, this is going to be
sped up a little bit, because at the moment, I'm just showing you
how to do everything. So you can see now
they're all grabbed, the press G, right click, drop them in place,
and I want to set the transforms to all
of these points now. So when I grab
them for this one, for instance, I'm
grabbing it down here. If I try and move it, it's all moving from here, and I
don't really want that. So all I'm going to
do is grab them all. When it right clicks
origin to geometry, and then it's just going to
make sure that they're all selected from the geometry
of each of these, and that's exactly what I want. Alright, so now let's
move on a little bit. So what I want to do
now is, I want to come. And pull this out a little bit. So I'm going to press S and X. Let's pull it out a little bit. Let's move it a little bit over, like so, and there we go. And then what I'm going to do now is I'm going
to grab this one. I'm going to press shift D, and I'm going to move
it over to here, round round about, the
same distance as this one. It doesn't have to be exact
or anything like that. Just make sure that it's round
about that sort of size. Then what I'm going to do is I'm going to put another
wall in here, so I'm going to grab my wall. I'm going to press shift D,
drag it over into place, press the ta, grab the front
of the side of this wall. And then what I'm going to do
is I'm going to lift it up. Nearly to the point
of these posts here, so we've got a bit of variation between this side and this
side, as you can see. All right, so next of all, then. Want to really think about designing the top of this part. So there's going to be kind of a watch tower in this part. So I want to make sure that everything is fitting in place. What I'm going to
do is I'm going to, first of all, grab these. We'll grab this one.
We'll do this one first. We're going to press
shifty. We're just going to drag it out
to here for now. And then what I'm
going to do is, I'm just going to grab the top of it and pull it down
into place like so. Not going to worry the
fact that, you know, it's slightly bent there
or something like that. The one thing I do want
to make sure, though, is whatever I bring in
here is an actual cube. I'm thinking it will be
better if it's a cube. You'll make sure the top of it and things like
that fit together. Alright, so let's
actually press tab. Let's press Shift S and
cursor to select it, so that then's going
to put it there. Let's press shift A, and what we're going to
bring in is a cube. Let's then put it right
in the middle of here, so we're going to put it
right in the middle of here. And then we're gonna
press the S bond, see if we can actually
bring in a cube. You know what? I was laying. It can't be a cube because
the way that s is gonna fit, I don't think it is actually
going to fit there. So we're going to actually
instead of making a cube, Yeah, we won't make it cube. We'll make it a rectangle. I think is going to
fit there anyway. So what I'm going to
do is go over the top. I'm going to pull it
into place like so. I'm going to press S
and y, pull it in. And then we're going
to press S and x and pull it out into place in the center
realistically of each of these going
up against this wall. Then what I want
to do is pull it into the place or right
down to the bottom, and then I'm going to lift it up above this part here.
So I'm going to press tab. Grab this part, and this then will be our stone
actual block tower. So let's bring you up
to something like here. And then what we'll
do now is we need to put some actual pots
going around it. So what I'm going to do is, I'm going to grab
this part here. I'm going to press Shift D.
Drag it over to this side. So it's kind of in
the center of there. Again, it's a gray box. Don't need to worry
too much about it. And then what we're going
to do now is we're going to bring this part over here. So shift D, bring it
over here into place, so drop it into place, like so. Now, let's grab
these pillars here. I'm going to press
Shift D. Bring it over. And I'm going to drop this
into the center of there, and then going all the way up
all the way up to the top. And I'm thinking probably a
little bit higher than that. So probably up to
roundabout there, maybe. And I'm just looking if that
is a little bit too high. I think that's a little bit
too high at the moment, so I'm just going
to bring this down because the thing is we want
it to be a certain height, and then the rest of it is going to be, kind of the platform. So I think of something
like this height. I'm going to bring my guy
up on the next lesson, making sure everything's
a right height, because they have a certain role won't actually do
things like this. But first of all, let's make sure everything fits in place. So you can see here this pillar probably needs pulling
this way a little bit. So let's bring it this
way just to there. It's just at the side of there. And then what I'm going to do is I'm going to grab this again. I'm going to press shift D,
bring it to the other side, and then put it
into place like so. And what I want to make
sure is that these pillars. So, in other words, this pillar and this pillar are coming
out a little bit more, so I'm going to pull
them out like so, and then I'm going
to pull this block. And these two of all of
this back a little bit. So we've got a little
bit of an edge on there, and everything now
is fitting in place. And finally, finally,
we'll grab all of these, we'll press shift to
duplicate them both, we'll bring them over
into enter of here. All right, so that's looking
pretty good like that. That is what you
should be looking at, so you've got two smaller
posts at the back. You've got these pillars
that go up to each of them. You've got one of the pillars
that comes out one of these pillars and one
of them that kind of comes out the wall like so. And then finally,
on the next lesson, as I said, we will
create the top of here. And then that's another
part actually done. Alright, everyone, so I
hope you enjoyed that. I'll see on the next one.
Thanks a lot. Bye bye.
12. Finishing the Greybox Temple Front: Welcome back, everyone.
Blender fall, the modular and Kash
environment guide, and this is where
we left it off. Alright, so let's
do what we said. We're gonna do. We're going
to bring our guy over. We're going to pull him
up onto this part here. Like so, and from there, I'm going to make
sure that his feet, first of all, are
touching the floor. And then what I want to
do is, I want to bring him a little bit closer
because the thing is, I want to make sure
that these parts here where is actual just here where he can put
his hands on there. So what do I mean by
that? So, shifts, urs to selected, Shift A, let's bring in a cube, make the cube smaller, and then we're going to put
kind of a railing into here. So if I bring this here, make it a little bit smaller, like so, but jaws fits in there. And then what I'm going to do
is drop it down a tiny bit, like so, and I'm going
to bring it out. So if I bring it out over to
this one, And there you go. You can see now that's
looking really nice. And then what we want to do is we want to have another part that's going to kind of come
under here and kind of, you know, hide away
this kind of view here. So what I'm going
to do is I'm going to grab this part here. So I'm going to actually
be an object mode, control A or transform, set origin to geometry. Shift D, Let's drop it
down here, like so. Let's make it a
little bit thinner. So let's go S and Y, bring it in a
little bit like so. And then what we're going to do make it a little bit higher. So S and's, pull it up
to where we want it, so we'll be something like this. And now you can see everything
will be hidden away there. And let's also give
it a little bit of detail so we can
actually visualize it. So what I'm going to
do is I'm going to press tab. I'm going
to press Control. Left click, right click. Control B then to
bevel it, like so. And then what I'm
going to do now is pull out these two parts. Now, it's important to know
if I isolate this out. So if I press shift and H, that then we'll isolate
everything out. Now, if I bring
just this part in, so if I come in and
press the e born, I can extrude that in, but
you're going to end up with a bit of a mess on
the sides like this. It just makes it a
little bit messy. So rather than doing that, I'm going to grab both
of the top parts, so I'm just going
to press Control Z, grab both of these top parts. And instead of doing
that, I'm going to bring these parts out and that then won't make a
mess of my mesh. From there, then we're
going to press voltage, bring back everything, and we should end up with
something like this. Now I want to do is I want to bring this
to the other side. So shift D. Let's bring it over. So now if I go over the top, press seven, go over the top, making sure
it's still there. And then what I want to
do is rotate it round. So ours 180, rotate it round. Go to the top part,
put it in place, like so, and you
can see now it's fitting in place beautifully. And then what I
want to do now is I want these side pieces. I also want to make sure that this bar is also on top of here, so I'm going to go
over the top again. Shift D, bring it over, do the top, like so,
and there we go. And then what we
want to do is now grab one of these, shift D, and then R Z 90, spin it around over
the top again, and I want to put it into
place in this one this time. So bring it into place, so it's just touching in there. And then what we're going
to do is we're going to go to the side points
of each of these, so if we press tab,
grab this part, this part, this part,
this part and this part. And then all we can do is just push them into place,
and there we go. And again, it's a great box, so we don't need
to worry too much about everything kind of fit into place and looking really nice. It's
not about that. And then shift D,
The duplicate z, hundred 80, spin it around.
Let's go over the top. And when we're over
the top as well, we don't have to use these arrows to bring
things into place, because what we can actually
do is press the G button. And because we're over the top, we'll keep it level
with where we had it. So you can see here if a press g can move it up
down anywhere I want, but if I go over the
top and I press G, you will see it keeps exactly the same level,
and that's what we want. So if we go over the top,
let's press the G bon, let's drop this into place
where the other one is, so quite close to there, as you can see here and
here, and there we go. We've pretty much
finished that part. Now we want to do
is we want to make sure that if our guys
stood on this part here, want to make sure that we've got some bamboo that's going
to come out of here. And the other thing
is, I'm I happy with how wide this is?
Probably, probably. We'll see once we actually
carry on building this out, we might pull this
in a little bit, because at the
moment, as I said, it's a gray box, so it
doesn't really matter. Alright, but let's put
the top of this on. So what I want to
do is I want to put some bamboo, a bamboo, coming up, this one, this one, and this one, and then
put it on a actual roof. So just really, really rough. What I'm going to do is press
Shift S, coaster selected. Shift A, let's bring in them. We'll bring in this
time a cylinder. We'll drop this cylinder
right down because the moment it's got 32
edges going around there. Very high on the polygon count. It's a gray box.
Let's put it on 16, and let's bring that down. Just a something we can see
and something we can use. So what I'm going to do is
just put it into the corner. So seven to go over the top. G, let's put it in
the corner here, so put it into the floor. Doesn't matter if
it goes through the floor, doesn't really mat. Grab the top of it, and then all I'm going to do is
pull it up into place, like so something like this. And I can see here
that this probably is a little bit too
wide at the moment. What I'm going to do then
is just press shift. Drag this over to here. So I've got one piece
of bamboo in here. I'm going to put
my guy over here, so he's going to be
going round about here. And then what I'm
going to do is move this other piece of
bamboo up to here. Like so, and I think
that looks much, much better like
that sort of size. So what do I mean by that? I'm going to grab all
of these parts now. All of these L, so all of these parts. So both of these parts here. And then what I'm going to do is then we're just going to move them over into place, like so. And finally, then I'm just
going to come bring this back then into the place
it was, so like so. And then what I'm going to do just under there
as you can see, so maybe a little bit more. And then I'm going to come
and grab all of these, both of these parts,
grabbing this side, this side, and then going wick my way down and
grabbing all of these. Control click, shift click. And then shift
click, Shift click, Control click, and shift
click. Get used to using that. It's going to save you a lot of time, and then bring them in, like so, and this now is looking much much better
than where it was. And this wall obviously needs going back in place as well. Alright, so that's looking good. I'm very happy with that now. And now I'm going to do is
grab both of these pieces of They're not really bamboo, but they will be bamboo. Shift D, drag them
back into place. So. Now, of course, with these, we want to make sure that one
is higher than the other. So we're going to bring
up these two, like so. And then what I'm
going to do is I'm going to grab all four of these. I'm going to press Shift
S. Cursor selected. And then is just going to put my cursor in the middle
of all four of these. Shift A, then, bring in a plane, and then we can
bring our plane up. We can make it a
little bit bigger, like so, and you can see now. It's actually starts into place. S and y to pull it
back a little bit. And then finally,
all I'm going to do is I'm going to drop it down. I'm going to grab the front
of it with edge select, in edit mode, pull that down
into place, and there we go. Now, it's up to you
whether you want to give it some thickness. I don't really want to do
that. I don't need to do that. I'm just looking at the moment, the actual height on here. And I think actually the
height is looking pretty good. Now, to get rid of all of these little edges on
here that you see, so you can see if you
can still see all that. All you need to do is select it, right click and
Shades move by angle. That then I'll
smooth them all out. You can do them all
together as well, so you can right click,
Shades move by angle. You can do the same
on these as well, right click, Shades
smooth by angle. And now you can see everything
is looking really nice. Now, we already know If I
come up to my rendered view, I've got a good
view of it, but I already know that
most of this is not going to have this kind of ambient occlusion on there. So all I'm going to do
is just grab a guy, hide him out of the
way, and then I'm going to press A to
select everything, select my steps last, and then press control L, and I'm going to link materials, and now everything has got
that ambient clusion on. And now we can really, really see if we shift right, click to me with that
cursor right the way, what it's actually starting to look like, really, really nice. So on the next lesson then, we will start to build
probably around this bit. We might even get the pull in, because we're just dealing with the second floor of the moment. But before we do
that, let's actually bring in some of these. So what I'm going to do
is, I'm going to grab. I think I'll just
grab this one here. And what I'm going to do
is, I'm just going to press shift. I'm going to drag it out. And what I want to do
is I want to bring this then into the bom of here, just to hide a little bit
of this wall actually away. So something like this
just below there. Making sure it's tucked
into this part here. And then all I'm going to do is come out to the back of it. And I'm going to select
each of these like so. And then all I'm going to
do is just pull them out just to hide that
kind of ledge there, and then going to pull
it into place like so. And I know I'm going to
have those on there. And also, I know how far
it's going to go over here. And you can see now it's really starting
to come together. So let's now do the same thing. So I I press shift D. I'm going to bring it
out to this side. Now, rather than
rotate it round, I might as well just
mirror on the x. So all I can do
is come to object and go to transform,
not transform, mirror on the x, and then it'll just
turn it around for me, and then I can just
put it into place. So lots and lots of
things that you can do to make things
easier for yourself. Now, we need another
block in this part here, so there's going to be another block that
comes in this part here going up to kind
of the second floor. So let's actually put that
in place before we finish. So what I'm going to do is I'm going to grab this part here, press Shift S,
'cause the selected. Shift eight, let's
bring in a large cube. Let's pull it back.
Let's press the SP, first of all, and
bring it into place. I'm not quite sure. You know, how far back it's going
to be at the moment. But what I do know is I do want it wider than
the original steps. So I'm going to press S and X, pull it out a little
bit, like so. And then what I'm going to
do is pull it all the way back into place to where
I actually want it. So maybe maybe something, let's pull it back into
place where I want it. So maybe something just there. And then what I'm going
to do is make sure that the steps right up to it, so right up to there, like so. And then finally, let's
drop that back into place. So pull it all the way
down into place. Like so. And then finally, what we'll
do is we'll grab this, shifts like this,
press control out, link materials, and there we go. Let's also come in
before we finish. Grab the back of here,
pull it all the way out. Then we go, now we're starting
to actually get somewhere. Now, one last thing then, before we finish, if I
come around to this side, it will be a good idea if
I put some posts in here, of course, to hide
some of this as well, just so we have a visual
on those as well. So what I'll do is I'll just
grab one of these posts, shift D, and I'll drag it over. And then what I'll do
is, I'll press Sen's d, make it a little bit smaller, and we'll put it into place. So it has some actual
support in there, like so. Let's also make these a
little bit wider, so S and y. And then what we'll do is we'll press Shift D, bring it over, and then shift D, bring
it over, like so. On the other side, I know I'm going to put point
some steps there, so I'm not going to put
three of them in there. What I'm going to do is just
grab two of them for now. I'm going to press shifty
and then just drag them over and put them
into place in there. Like, so double tap the eight. And there we go, now,
we've got a really, really good visual of how
everything's going to look. Alright, so that's that bit. Let's save out our work. And as I said, on
the next one then, I think we're going
to start working round on this point round here. It's incredibly hard, actually pulling everything together.
That's the hardest part. And this is why we're
building our grade box, because you can imagine
We would you start? We would you start if you want
to create a modular pike? You'd have no idea of where to start or how to build it
or anything like that. You'd actually need to
create a gray box first. So that's why we're
doing it in this way. I know it seems a lot of extra work actually
doing it this way, but trust me, it's
much much easier. And once you've got
the gray box down, and you're creating
all the parts 'cause you know what
parts you need, it really really starts
to come together and really looks like a
professional piece of work. Alright, everyone, so I hope you enjoyed that, and I'll
see on the next one. Thanks a lot. Bye bye.
13. Greyboxing the East Wing of the Aztec City: Welcome back, everyone
to Blende four, the modular and Kit
Bash Environment guy, and this is where
we left it off. Alright, let's bring
back our guy now. And what we're going to do
is we're going to bring our guy down and over to here. So basically what
we want to do is we want some steps that are going to start round about
this point here. And the guy, if I
press Control three, to go to the opposite side, so the guy needs to come
round and about here, so the steps are going to come to probably this point
here, so a little bit over. And then our guy wants to have enough room to be able
to stand on a part. In other words, there's going to be a couple of doors here. He needs to stand
on this ledge here. So let's put some
temporary legend first. So you can see on this, I don't actually
think, yes, we are. We've got ambient
inclusion on there, which means that we
can actually use it. So let's press shift D. And then what we'll do is
we'll bring this out, and then we'll squish it
in on the S and X axis. So let's bring it in, like so. And then all I'm going to do is I'm jaws going to
pull it across, I'm going to grab the
top of it, like so. And then I'm jaws
going to pull it down. So my guys actually
stood on it. Like, so. So, something like
this, I think, maybe maybe a little bit higher. Maybe just halfway on there. Let's pull it up a
little bit. Like so. Now, let's pull our guy up, and then what we'll do is we'll get some actual steps in here, pretty much the same technique
as what we did before. At this point, what
I'm going to do is I'm going to go
into object mode. And then what I'm going to
do is bring in a new piece. So I'll just press Shift S, first to select it just
to get my curs to M guy, Shift A, and then
let's bring in a cube. And then what I'm going
to do is I'm going to put these steps
around about here. Now, of course, we
need the steps to go all the way up
into this part here. So I'm just going to
move it across like so, so I'll want it going in
just a little bit in there. Then what I'm going to do
is I'm just going to pull them down onto the
ground, like so. And then finally grab the
top of it, pull it up. Into place. I want to maybe
maybe slightly higher. We'll decide that when we
actually make the steps, and then what I'm going to
do is pull it out like so. We don't quite want them
as big as these steps. It wants to be a small steps
going up to where we've got the actual the swim pool. Alright, so let's
press Control A, all transforms, set
origin to geometry. And then all we're
going to do is we're going to come in, grab this, and I'm going to press Control B and bring it across like so. I'm only going to bring it so
far down like I did before. And then what I'm
going to do is, I think from here, you
can see near enough, I can do my steps
from this part, and then we've
still got a ledge, which is really,
really handy for us. But let's come in,
and what we'll do is we'll put this on percentage. And then we'll turn this
up slightly, like so. And then what we'll do
is put it on custom. And then we'll set this up now to actually make our steps. And from there, once
we've got these steps in, We can actually change
the percentage. So now if I change
the percentage, I can have them
exactly where I want. You can see, we do have an
issue though with the steps. They're a little bit, you know, this step here is going to
be a bit hard to go on. So let's pull them back
a little bit. Like, so. And then what I'm
going to do instead is, I'm going to press tab, I'm going to press S
and X and bring it in, and then just pull it
out where I want it, which will be round about here. And then finally, I can grab the back of it with face sect, and then let's just pull
that out into place. Alright, let's pull it all the way into place. There we go. Okay, something like
that looks great. Now, let's just grab this one, and then we can see how far
we're going to go back, so we're going to
grab these stairs. As I said, these dimensions, they're probably
going to be a little bit out. Don't worry about it. Once we start getting
the main stuff in, then we can see how it's
all going to come together. I think these steps
actually are a little bit too wide, actually. I think I might pull
them in a little bit. So what I'm going to do is
just grab both of these steps. I'm going to press S and y. Now, before you do that, just make sure that instead
of it being on medium point, it is going to be on
individual origins. What that's going to do is
it's going to make sure that we're not bringing them
in from this origin here, for instance, once we grab them both. Add it on medium point. It's gonna bring
them both into here, and it makes it kind of
weird, how they come in. But if you put it onto
individual origins, it means it's going to base
it on each individual origin. So let's press S and y, and now you can see that's
what I'm talking about. And now let's pull this in. So pull this into
where we want it, and then pull this
part where we want it, and this is looking
much, much better. So now I'm going to
do is grab all of these and just pull
them into place. And this is what the
gray box is about, just looking around
and seeing, you know, what we need to
change, what looks good, and all that
sort of stuff. Alright, so now, let's come
in and bring these steps up. So all I'm going to
do is press shift. I'm going to bring
it over there. And then what I'm going to do
is pull this up into place. Like, so, and I want my steps to realistically start
roundabout here. So he walks off of
here, and then there's, you know, a bit of
a stand in place, and then some steps. The other thing is
that I want to have a kind of roof going
over this part here. And that's why I
need this part here. So I'm going to create that now, but first of all, let's
actually pull this back. So I'm going to grab
this one. You know what? We'll grab them both
at the same time. So this one and this
one, and let's pull them back into place, like so. Alright, so that's
looking pretty good. Now we just need, as I said, this part over here, this little bit of a roof. So to do that. A I'll do is, I'll
grab this part here. I'm going to press shift D
and pull it up into place. So I'll pull this end
back a little bit, so I'm going to grab this end, pull it back a
little bit like so. And then what I'm
going to do is, I'm going to grab
the whole thing. So to grab the whole thing, all I want to do is just hover over any of the edges and
just press the button. And what I'll do is that, then we'll grab the actual island. From then then I'm just
going to pull it down, like, so, just to create
a temporary roof. There we go. That's the roof. Now, the one thing is, I don't want to join to this
because I want to, you know, kind of
take these parts out. So what I'm going
to do is I'm just going to press the
bon, press P then. And what that's going
to do is enable me to separate this out from
the rest of this one. So P's election,
and there we go. Now they're separated.
Lastly, then, I just want to reset the transformations
of both of these. Let's grab both of them, control A all transoms, set origin to geometry. And now I want to do
is I basically want to bring in a couple of posts. So let's press Shift A, and we'll bring in
Let's press shift d, and we'll bring in a cube. And then all I'm
going to do is make my cube. A little bit smaller. I'm going to pull
this into place now, because it's a pillar, it
needs to be relatively small. Also, when we're
doing great boxing, we need to think like
how much detail to add. Like, do we add pillars
and things like that? I think it's a good
idea to add pillars, but I think that's
where you should stop. I don't think you
should do, you know, little steps and doors and
all that sort of stuff. It's up to you if you
want to add doors, but don't bother
doing booleans to add the doors and little
steps after them. I think doors actually
is a good idea, but that's where
we kind of end it. We don't bother adding
in, you know, torches. We don't bother adding all the little bit of detail of the mesh and
things like that. Alright, so let's grab this top. L et's pull it up
into place like so. Let's move it to the
side a little bit. And the reason I wanted
to do that is just to make sure that it can
actually walk down here, which you can see cod. Now, what I'm talking about
here is I could obviously come in and add in something
like this for my pillar. So let's just add this in, but don't do it because
I'm just showing you. I could add in
something like this, just a little bit of
detail for my pillar. But I don't want to
take it that far. There's just
absolutely no point. So I'm just going to control said that and take that back. All right, so now let's come in. What we'll do is we'll
add in our other pillar, so I'm going to put another
pillar round about here, and then I'm looking just
how far the distance is. Now at this point,
let's actually bring in those doors that we
actually talked about. So what I'm going to do is I'm going to grab both of these. Shift S, Kura selected, that's then going to put it
right in the center there. And also, I'm going
to press control A, all transforms and then right
clicks origin to geometry. That then is going to reset
both of those geometries. Next, let's bring
in a door then, so Shift A, let's
bring in a cube. Let's press the S
b. And with a door, all I want to make sure is
if I bring my guy over here, spin him round, so D -90, just so he's facing
the correct way. Make sure he's on the floor, so make sure he's on the floor. Now, with these
particular doors, there's going to be some
steps going up but. Mainly, I want this in there just to
measure the door width. So if I press S and y, I can pull it out a little bit, and I can see that that's about the right size for a door, because if
you think about it, this guy's walking
around with his arms out like some kind
of body builder, and, you know, that's
not realistic. You want a door that's
like this sort of size. This is actually
quite a big door. If you just step out
or look at your room, you can see how much
distance you've got, and if you put your arms out, you're going to actually
touch the door edges. So we can see
that's about right. Let's keep it this size because what we're going to do is
just grab the top then, and we're going to pull it up to the height of a normal door, which will be round about there. Then what we're
going to do is again reset all the transforms, set origin to geometry, and then what I'm
going to do is I'm going to pull it into place. This will be one
door, as you can see, so let's put it over this side, and then let's press shift to duplicate and put another
door maybe over this side. So if I press control, three, I can see exactly
where my doors are now and actually line them up
to where we want them. Of course, we might change
this in the future. Now, it does tell
me something that this part here is a little bit
too far this way, I think, but as I said, as we're building and
carry on building, we realize like, Oh, this is probably a little bit too big, but I
can already see that. So what I'm going to
do is just bring this back a little bit. So I'm
going to pull this back. I'm going to pull this
back because I think it's just too much space there. And then what I'm going to do is I'm going to move this door in. So control three again, making sure that the gap
here is about the same, and now these doors
look about right. Now, from here, I can
actually pull this bit back, so I'm going to pull this
a little bit further back, like so, and then I'm going to pull this
one back as well. And now this is looking
a little bit better. I looked like there's too much gangway on there, to be honest. Now let's pull the steps
back a little bit. And the steps on here. Might have enough
room on this part, but I'll actually have a look at that as I work through the rest. Alright, so last of
all, then, last of all, all we want to do
is just put it onto our redeve and then what
we want to do is grab all of these parts that
we don't think have got on the actual material, so control ing material, and there we go. All right, so that's
looking pretty nice. We can see this is looking
a really nice view, Randy, and when we're making
gray boxes, like I said, the shadows, they're a
little bit accentuated, but that's good because
that for me gives me a better visual of how this
thing's going to look. So so far so good, I'm happy with how that looks. Alright, so now we've done that. On the next one, I think
we'll either start the pool. I'm just looking at my own
gray box I actually created, or we'll actually start the main The main
part going up here. I think once we've got that on, and things are going to start
really coming together, and we'll actually
have a better idea of how big or small
to build this thing. Alright, everyone,
so I'm going to save it out, and I'll
see on the next one. Thanks a lot. Bye bye.
14. Incorporating Realism into Greyboxing: Welcome back everyone
to Blend the four, the modulate and Kit
Bash environment guide, and this is where we left off. Now, some of you might ask if
I'm building a modular set, why am I bothering
building a gray box. And the reason is, because when you start building a gray box, you start to see all
the little things that you're actually
going to need. You start to see, for instance, that even with the
part we've just built, all of these little
parts that we've built, bearing in mind that
we could actually have two different
versions of this. So this top, we could have a different version to this one to this
one to this pillar. You start seeing just how
many pillars you need. You start seeing
what type of steps, how many steps you need,
same with the doors. I mean, you don't want the
same door and everything. So you're building this out. And what you're also doing when you build this out
is trying to add depth. You know that thing
that we spoke about before with the referencing, you're really really
trying to add some depth to your
actual builds, and that's why we're
actually doing this. All right, so with that said, let's actually come in
and bring in this top. So this top's going
to be pretty big. Now, to do that, let's just, first of all, bring in a cube. I'm going to bring in a cube, and I'm going to pull it up
to where it's going to go, so it's going to go
on the front of here. Now, the thing is, this is
not going to be level at the moment because
I didn't actually bring it in based
on these steps. But first of all, let's
get the right dimensions. Now, there is a good
technique for bringing in and creating things to
the right dimensions. And what you can
do is you can come over to the right hand side, and you can click this little
arrow button you see here. Or you can actually press the end button, that
then we'll open it up. And what you've got
down here is you can see you've got dimensions, you've got locations,
you've got rotations. And this scale here, don't
worry about that one. That is a scale that is
based on transformation. So it shows how far the transformation
is going to be out. Now, let's come into this
part here, first of all. And what we're going to do
is going to put this on 5.5. And then what I'm going to do is I'm going to come
to the next one. I'm going to put this on 6.9. And finally, then, this one, I'm going to put on 4.7 like so. And I know that these are the dimensions that I
created my first one on. But of course, I'm just
showing you how this actually works and how you can get the right
dimensions for this. The other thing is,
of course, when we're actually creating this
part up at the top, we need to bring in
the top slightly. So if I come in
now, grab the top, all I'm going to do
is press S and x, I'm going to bring it
in slightly like so, and then I'm going to bring
it in from this side as well. So S and y bring it in like so. And now you can see that this
dimensions haven't changed. And the reason for that is
because this is just the top, and the dimensions are
based on the longest part. So this is what this
is telling you here. All right, so now
we've got that. We can put that into place, but we need to actually
level it up with these. So the way we're going
to do that is we'll grab our steps,
we'll press Shift S, cursor selected,
grab our top, then, shift S, and what
we're going to do is selection two cursor. And what that's going
to do is going to place it right in the
middle of those steps. And that then is good enough for us to, if you can see here, we can actually then
move it back into place, and it's perfectly level with everything that
we actually need. So from here then, we can
actually create our top. So, first of all, what
I'll do is I'll pull this up into place just so
it's in the right place. And then, of course, they're
going to need a little bit of room when they get
to the top of here, so you can see the top of here to actually move around in. You know, they need to walk
around the sides and things, so I'm going to pull
it back a little bit. And then from there one we dose, I'm going to press Shift S, and then cursor to selected, so that's going to
put my cursor there. Shift A, and what we're going
to bring in is a plane. So let's bring a plane in. And then what I
want to do is scale this plane up, so
I've got enough room. So if I go over
the top again with seven to actually walk
around this thing. So you can see here that if this is in the middle like this, and I need enough room
to walk to each side. So I want it to kind of come
a little bit out from here. So up to maybe just in
front of this here. So if I've now pressed S and X, bring it in a tiny bit, like so, and then what I'm going
to do is now want the same evenness from the front to the actual back, so I'm
just going to come in. Grab the back of this
with edge s elect, and then just pull
it back into place, so it's about the
same each side. Now, the thing is, don't forget that if I now pull this down, it might be a little
bit too small, so let's pull it into
place round about there. And can my guy walk around
there? That's the question. So can he actually walk around the sides if he comes
out the back of it? There shouldn't be a
lot of room there, but there should still
be a little bit of room. So if I pull him up onto the
top of the actual temple, let's pull him into place. Let's go seven over the top, put him into place like so. And if he puts his arms down, I think he should be able to
walk around there like so. And I think that's
actually enough room, especially on the sides. It might actually be a little bit too much, but we'll see. Alright, so let's pull
this down, like so. And then what I'm going to
do now is grab my plane, press the ta bon,
going into edit mode, grab the bottom of my plane. And all I'm going
to do is grab it. I'm gonna press E to extrude
and pull it all the way down into place right down
to the bottom like so. Okay, so that's
looking pretty good. I'm not going to do a lot else with this actual tower part. All I want to do then is just
get these parts in here. So these parts going
around the side. And to do that, all I'm going to do is grab these parts here. I'm going to use these
because they're pretty much the size that I want. They might need making
a little bit bigger. So all I'm going to
do is press shifty. I'm going to bring
those out then. Like stow. What
we're looking for here is what's actually
going to look good as well. So I'm going to bring it
out around about here. I think it needs to be a
little bit wider this. So all I'm going to do
is t shift and click. Al tes, pull it out, something like this, and I think that's about the right width. And then from there, what
I can do is I can come in, put this into place like so. Get it right in the
corner of this part here. There, something like this. And then what we'll do is
we'll grab the top of it, and I'm going to pull
it all the way up. Around back here. And that's looking pretty nice like that. Now, while we've got these
two parts, let's grab them. Let's grab this step control el, and what we'll do
is link materials. Just make sure we've
got those on there. And then from here, what
I can do is now I can come and look around and make sure I've got
it at the right scale. So I'm going to grab this post. I'm going to press Shift D.
I'm going to grab it back. Put it somewhere around here, and I'm gonna grab it again, Shift D. Pull it
around here, like so. Alright, so this is looking
pretty good so far. Now all I need to do is just replicate that on
the other side, and that then should give
me a really nice scale. I'm just wondering, You know, with this actually
being out a little bit, do I need to pull
this back a tiny bit? I think I do, so all I'm going
to do is pull this back, and then I'll pull my post
back while I've got them. And then what I'll also do
is pull this plane back. So I'm going to pull this
plane back a little bit. All the way over there,
'cause we're going to build a lot more over that part. Alright, so this looks good. Now what we want to do is think about putting these
over the other side. So I'm going to
grab all of these. I'm going to go over the top. I'm going to press
shift, like so, right click to drop
them into place, and then just pull them
over the other side, like so, and there we go. Now, let's think about
the top of here. So I'm just going to, I think, do this part going down here, and maybe the back. I
don't think on the back. Yeah, I've actually got
one post on the back. So what I'm gonna do? I'm
going to grab one of these? I'm going to press shift
D, and I'm going to drop it right in
the back, like so. And then what I'm going to do is now come to these parts here. So you can see we've
got these parts here that we used before. Press shift. Let's drag them over and put
those into place. Just so, they're going
to drop side of this. Finishing it off neatly. So what I'm going to do is just pull them into place like so, and then I'm going to press S and y and just pull those out. Just making sure
they're wide ing off. And then we got a thing that's finishing that off pretty nice. And now I'll do is I'll press shift d and bring
them the other side. So R Z, 180 spin them around, seven to go over the top. G then jaws to put
them into place. Just make sure they're in front of the wall,
which these are. And then finally this
one here, so shift D, and then Z 90, seven to go over the top, G again to put them into place. And now we can see this one's probably probably
a little bit out. Let's pull them this
way. And there we go. Actually, that that looks
pretty fine like that. Alright, so that's
our temple top do. And then what we'll do
now on the next one is, I think we can finally
start with our poll. So we'll start with our
pull down this part. And you can see from this view, even if we go from here, that is looking pretty nice. Bearing in mind as
well that we can also change the actual sun. So I'll just quickly
show you that. If we come over to our sky, we can actually go
and change the sun. And you'll see now it's actually starting to change the sun. And also, we can change the
sun size as we already know. Let's make it a
little bit smaller. And let's also drop the
sun elevation down. And now you can see that's
the kind of view that we're going for right on
top of our temple, and that's looking pretty good. Alright, so now, Let's just
put in one block here. This will be a little kind
of door here in things. So all I'm going to do is
steal one of these doors. Shift D, bring it up because I know this is
already the right side. So Is 90, spin it around. Shift S, Koster selected. Shift A, bring in a cube. Let's drop the cube
then right in here. I'm going to have
the top. Go in. Jot in this point here. Like so. Just make sure it's in place. And I think what
I'll do with this is I'll make it a
little bit bigger. They're a little bit
bigger, like so. Let's pull it in to place.
T on the top of that. And then what I'm going
to do is I'm just going to lift it up just so it's nearly level with this
point here, L so. And of course, we're going
to have a roof on there, so let's put it
just around there. Let's put the door here. And finally, finally,
let's just grab this, grab the stairs, poncho el, and we'll just link
materials again. Double tap the A,
and there we go. So now we can see what
we're actually doing here. You can see that we're building basically places
where people can walk, and we're giving it depth
like we've talked about. So, this part, there's a
little bit of depth on here. Now, back then, they wouldn't have had, like,
barriers and things. They wouldn't have bothered
with stuff like that really. So I think I'll
just pull this out just to make sure that they
can actually walk across it, and then I'll just pull
this across a little bit. So now you can see it's
fitting in place a little bit. So they would have just walked
around near to this door, whatever this door was, treasury room or
something like this. Okay. All right, everyone, let's save out our work, and I'll see you
on the next one. Thanks a lot, everyone. I
hope you're enjoying it, and I hope you're seeing
the benefit of actually building this gray
box out first. And I'll see you on the next
one. Thanks a lot. Bye bye.
15. Designing the Temple Pool in Greybox: Welcome back, everyone
to Blender for the modular and Kash
environment guide, and this is where
we left it off. Alright, so what I
want to do now is, I want to bring in
my swimming pool. So let's bring that in now. So what I want to
do is I want it to basically come around here. So if I go over the top, you can when you're actually
doing things like this. If you put it actually
on object mol, it will make it a
little bit easier. You can kind of come in
and draw with this pen. And this is basically
what we're going for. So we want it to come to there. And then over here, there's going to be a little bit that comes out around there. And then finally,
we're going to have a little bit of a
waterfall here, and then two steps that
come up each side of here, and I think that's going
to look pretty nice. So that's the way that
we're going to do it. Now, when you draw notes, you cannot come up and actually draw it just
with the left click. You can also hold control, and what that'll do
is wipe it away, so you can draw
it and wipe away. And what you can
also do is delete the whole thing by coming
up to where it says notes and clicking this minus off and that then
we'll delete them. Then you can go back and
put it back on like so. Alright, so we know
what we're doing. Let's first of all,
then bring in a cube. So we'll bring in a cube. We'll pull this cube
down into place. And we need obviously
the top of the pole coming roughly roughly that
is to the top of here, so let's do that first. So we've got our cube in place, we'll grab the top of it, we'll pull it up into place like so. Now we want it going
far enough back, so around this level back. And then, of course, all the
way up to the step because the pole is not going to be
this is not the entire pool. Obviously, there's
a little bit of wall around then we have
to think about that. Now what I'm going to
do is I'm going to pull this out, so I'm
going to pull it out. Keep going all the
way past the steps, so something like here, and then this bit, I'm
going to round off. Once I've actually got that in then I can actually measure up my poll a little bit better
than what we've got it. But this at the moment
looks pretty nice, and you can see if they're
walking around here Again, it's adding a little
bit of depth. They've got to walk
past here down here, and you might want to put some
things over here as well. Again, adding more
to that depth. When we're thinking
about depth, by the way, we're not just thinking
about height in depth. We're also thinking about in the little intricacies
of depth, as well. You don't want this
to just be, you know, kind of just empty and flat.
We don't really want that. We're trying to
avoid those things. Alright, so now I
want to do is I want to bring in my pole. So all I'm going to do,
first of all, is come in. I'm going to grab
the side of here. And then what I'm
going to do is I'm going to press control B, and I want to actually
bevel it off. Now, you can see straight away, we have a problem
with the bevel. I did show you that
you can actually stop that by saving it out,
reopening it again. What you can also do if you don't want to do
that, is just come, put it back on super lips, and then you will actually have control over that once more. The thing is, let's turn
this to offset instead. So the offset, let's put this
on one for now, just one. And then what we can do is we
can turn up this width now, and we'll get the
same actual results. So we want it start
to bend rounda here. And then I'm going to
turn these up now. And you'll see now
we get a nice, beautiful bend, which is
what we're looking for. Alright, as far as this poll
goes, that's looking good. So what I want to do now is
come in. Grab the top of it. What I'm going to do is
press the eye button. And what that's going to
enable me to do is insert it. So if I press eye, it's
a little bit like tree, but it's made for
actually insert. Now when you press the
eye button, generally, before doing that,
you should always always reset all the transforms. So all transforms, set origin to geometry over the top again, press the eye button, and now you can see
it's coming in, much neater than it was before. Alright, let's bring
it in that far, make it nice and thick. Then what we'll do
is we'll pull it in, and there we go, that
is our actual pole. I'm not going to spend too much time in the pole because it is, after all, just
getting it in there, so we have a good idea of how
things are going to work. Next of all, then, I want to
bring in these posts here, so I'm going to bring
in a couple of posts. So shift. Let's
bring in this one. What I'm going to do is
I'm going to put it right, right around this part here. So. It seems like
something is being held. You know, the polls being held together with something,
and not only that, when I'm actually
building this, I'm also visualizing like, where are the vines gonna go. And the thing is, as you
build more of these, you will start to
do that as well. You'll start to see, Oh, I can put a vine here or a tree here, and it's really, really handy once you have something
to visualize. Okay, so let's pull
that into place, and you can see now If I
pull it roundabout there, that's going to fit
in really nice. And then what we'll
do is we'll put one more part along here.
So one more pillow. I think we'll grab one
of these pillows here, so shifty and we'll
put that into here, just a smaller pillow, like so. And with this one, it
doesn't actually have to, you know, go all
the way through. We're not looking for that. And then all I'm going to do,
finally is just pull it a little bit over roundabout. Let's pull it over
to here, actually. Something like this
because I need to put my steps in here as well. So let's pull it down,
so we're going to grab the top of it,
pull it down slightly. Yeah, and that's looking
absolutely fine. So from this part, what I want to do is I want to put a block, so I want to block around here. So if I grab this block
over here, press shift, I'm going to bring it
over then like so, and I want it to go a
little bit back here. So basically, I want it to be small enough where
two steps come down, so you can see this is way
way too big at the moment, so let's make it smaller, and we'll put this into the ground. Round about it here for now. And then what we'll
do is we'll bring in a couple of steps and make sure that they can go up the side of
each one of these. That's important that we want to do again, to give it some depth. And once we've got that in,
then we can pull this up. But let's come in.
And what we'll do is we'll grab
this part of here. And then what I'm going to do is I'm going to pull it back. I would say round about
to this post here. So I'm going to press shift
D before doing anything. And then what I'm
going to do is, so there's another duplication
of that pace there, and then I'm going to
press E, and I'm going to pull it back to
round about here. L. So, then again,
I'm going to come in, press the button,
press P, selection, and then it's going
to separate it off, and always always control lay or transforms and set the
origin to geometry. And there we go, that's
that part there. Now, from here, we
need a little part that's going to come out here. So again, I'm going to
grab this part, shifty, bring it up, make it much, much smaller, press S
and's, and pull it down. And what I want to
do is I want to pull this just in front
of this part here. So you can see if I put this
down something like that. And then I'm going to press
S and y, sorry, SN X. There we go, S and
X, pull it in. Now, before I level this off, I want to make sure
that my steps are actually going to fit here
before doing anything. Now we could come in and use the steps here. That might work. Sometimes it doesn't,
sometimes it doesn't. But I think actually we'll
just bring in our own steps. Now, it's important if we
put this on to render view, and we grab our guy,
and we bring him down. We put them into place here, and we make sure
that these steps are going to be wide enough, once we've got them in place. So I'm going to press
Shift S, as to selected. And then what I'm going to do is I'm going to press Shift A, bring in a cube. And I'm thinking that that's
probably a good e. So it's basically one story going
up to round about here. And the steps want to be starting round about
this point here. So I've got my steps in. I've got the right
width, I think, so I can pull them a little
bit this way, like so. And then what I'm going
to do is grab this face, pull it over to where I want it, which will be round about here. And then from there,
resell the transforms, like so, press the table, and then we're going
to grab this part. So control B, bring
it all the way down. We round about here just before it actually
reaches that pot. And then what we're going to do is we're going to come in, put it on custom again,
and we want our steps in. So let's put our steps in, like so, and then we'll just fold them back a
little bit, like so. So let's bring them
back now on the width. We want it on
percentage actually. There we go. That's better.
Then let's pull it up. There we go. That's
exactly what we want. And we'll bring it to I've
forgot to step in there. Let's just put it on
object mode. And y. Something like this. That's
looking pretty nice. Maybe a few too many steps. But again, we have a geometry node that's going
to sort that out. But we're not gonna
worry too much about it, but I think this is
looking pretty good. I always look to make
sure everything's looking good before I
actually accept it. And the reason, of course, is is that once
I've accepted it, I can't go back
and change any of these points on
the actual bevel. So what I'm going to do then? I'm gonna pull it in place. Like so. Alright, so
that's the first step in. Let's put the
second one in then. So shift, let's bring it over and put it into
place. Like so. And the one thing I think
actually is about these steps is I'm not going to have
enough room between here. I'm not going to have enough
room for this block here, so I'm going to grab them both. I'm going to press, make sure
I'm on individual origins, press S and X and just make them a little bit
thinner, like so. And I think now if
I bring these in. So if I bring this into here, let's make this a
little bit wider. So SN x, let's pull
it out a little bit. I've still got that in the
middle, as you can see, so I can see my steps are
this side and this side, I'm just thinking that I'll
move this over to there, and I'll move this
over to there. And I think that then is
going to be about right. Maybe maybe this is a
little bit too short. But anyway, let's
bring this over. So what I'm going to do
is I'm going to pull this back to round about here. Then what I'm going to do
is pull it out a little bit and see if that's
the right size. And I think this is still
a little bit too big, I'm just going to press S, pull it over, and there we go, that's how far I want it
stuck out realistically. So now you'll be able
to pull this up. Like so, and then I can pull it up to
something like that, and then look at the size. I think, actually, this
is still a little bit too small now because I definitely definitely wanted
a window on here. And if I turned him around, Soz 90, you can see that. Well, maybe maybe you could
just fear a window on there, but I think he needs to
be a little bit bigger. So all I'll do is shift
and click alternates. Let's pull it out just
a little bit like so. Let's pull it back a
little bit, like so. And now I've got a better idea where my stairs need to be. So I can come in now and
the top of my stairs. Is going to I think also, as well, one of the
issues I've got is. These stairs are a little
bit too far back as well. So what I'll do is I'll
grab them both. S and le. Let's pull them back, make
them a little bit steeper. And let's pull them
this way into place. And now I can pull this
into place like so. And then finally, I want to
move these over a little bit, or make them a
little bit thinner. So still a little bit
thinner, so let's press. Find a bit thinner. Let's move
them over then into place. And yes, this is what I want. This is looking better.
Something like this. All right. Now we've got that in there, and now it's all starting
to come together. So you can see, we've got a lot of depth in there
now going up here. We can have a nice
archway on top of here. We can to have a beautiful
waterfall coming down here, and this bit then
can be rounded off. If we go on finally
to the render view, I'm just going to grab all of these parts that
I actually made, making sure that we've
applied the materials like, so double tap the A. These have got them on, I think. Yes, they have, and this
one's also got them on. So now you can see if I come
back, double tap the A. That's exactly what
we've got the moment. Now that is looking very nice. You can also see because we've got that ambient inclusion on there that we don't need to
add in loads of materials. It just gives us that perfect
view that we're actually looking for with that
basic lighting in place. Alright, everyone, so make
sure you save out your work, and I will see you
on the next one. Thanks, everyone. Bye bye.
16. Understanding Levels in 3D Modeling: Welcome back everyone
to Blender four, the Modulate and Kit
Mash Environment Guide, and this is where we left off. Now, please remember, guys. If you are struggling with
the cycles at this point, just remember to put it
on EV, you can use EV. It's not going to be that
much different to the cycles. I just prefer working in cycles because it gives
me a better visual. But, of course, if
you're struggling with the machine, make
sure to use EV. So let's put it back on cycles. And what I'm gonna do now is, I'm just going to
put this actual door in before I forget. So I'm going to Put this door
in. I'll go over the top. Right next to our actual temple, so let's drop it down. I'm going to make this door
just a little bit wider on the X O S and X because it
is a temple door after all. And then what I'll do is
I'll just put it into place like so, pull
it all the way back. And there's my temple
door on there. Alright, from here as well. I think that we should
actually maybe just put something on top
of that and bend it in a little bit just so
we have a good visual on it. So I think we'll do that first before doing anything else. So I'm going to grab
the top of my temple. Shift S, cuts to selected, and then all I'll
do is press tab, go back into object mode, shift A, and we'll
bring in another cube. And then all I'm going to do is make this a little bit smaller, so S and y. I just want something very,
very basic in here just to give me an idea of what it's
actually going to look like. So even if I bring
something like this in, press S and Y, again, I'm going to pull
it out a little bit further actually, like so. And then instead of doing it
S and y, what I'll do is, I'll grab the top
of it in edit mode, S and y and pull it in, and then S and X and
pull it in this way. Something just very
basic like this. Now, from here, let's
actually put a top on here. So shift S because to
selected tab shift A, bring in one more cube. And then what we'll do is
we'll make it smaller. We'll pull it up into place. And then what we're
going to do is just pull it out now, so S, and Y, X, sorry, pull it out into place, like so. And then finally,
all I want to do is, I'm thinking, maybe just
bend in this top of it. Yeah, we'll actually do that. So what we'll do
is we'll come in. We'll press control. Then
we'll bring in an edge loop. We'll bring it up maybe
five, six, seven times. The reason I want to
give it an odd number is because then I can actually
grab the center of it, left click, right click, and then we can actually
grab this center. And from there, what we can
do, why I want to do that is? Because I want to
pull this down. Now, if I come in and
click on this bon here, this is proportional editing. And if I open this up, you
can see that we've got all of these options down here
doing various things. Have a play around with these, but the one that we're going to go for is probably sphere. And now you'll see that
when I pull this down, I actually end up
with a little circle. Now the thing is, if I
just go back a minute, we can actually
increase the size of the circle or
decrease it like so. The problem you're going to have is though that you can see, the further I
increase that circle, the more actual influence
it has on the old mesh. Now the problem there
is, I don't want to actually mess around
with this bottom mesh. What I tend to do instead is I'll grab one of these sides, control select the
next side, shift H, to isolate it out, and then now come to the center of it,
and now bend this in. So you'll see now once I bend
that in for bring this in that everything bends except all of that
that I've hidden, which is a real great way of actually doing
something like this. The moment then I press
tag and bring it back, you'll see now we end up
with something like that, and that is looking pretty nice. Now, let's grab both of these. And then what we'll do is press Control L and link materials, double tap the A,
and there you go, no, can see we've got
a top on our temple. Albeit, it's a very, very rough idea of what we're
actually doing there. Okay, so back then
to Our actual pull. So what I'm gonna
do is, I'm going to come to this part now. I'm going to pull it
out a little bit, so let's pull it
out in Edit Mode. Without proportionality,
don't forget to turn that off,
guys, pull it out. And then all I'm going to do now is come to each of these. Like so. I'm going
to press Control B, and I'm going to pavel them off. Now instead of doing that,
all I'm going to do is, I'm just going to
save out my work, so save, and then open recent
like, so, open it again. Put it back on to rendered view. Come out, press Control B. And there we go, just to make it a little
bit easier for me. Like so. Alright, so that's
that bit coming out. Now, let's think about this bit, so we've got this is where
our waterfall is going to be. So I'm going to press
Shift S, sa selected. And also, I've got my material on there. Yes,
I have, so that's fine. So let's press Shift
A, bring in a cube. And then all we're going to
do is bring this into place. Let's pull it up, first of all. Let's make sure it's going
into the sides of this. So I'm going to press S and X, pull it out, just
into those steps. Let's bring it back then, so I'm going to bring it back. Probably to this
second step. Like so. And then what I'll
do is I'll bring the other part back a
little bit, as well. So if I come round to this side, press tab button, grab the
back face, pull it back. Like so. And then finally, what we're going to do is I'm
going to pull this up now. Pretty high because we
want our water fall there, and we want people to
walk in the side of here. So we need our little guy again. And as I said, you will lose your little guy.
I can't see him here. For press altate. He's actually
hidden behind something. Probably this step
here, I'm guessing. Nope, he's not hidden there. So the easiest way
to find out if he is hidden is go over to
here and type in human. And there he is.
There's our little guy. Now, where is he? Here he is. He's hidden behind here. So
let's actually pull him out. And then what I can do is I can click that off and get
back to what I had. And all I want to
do is just pull him over to the
top of the steps. Like, so if I press
a little dot on, let's put him on top
of the steps like so. And then what I'm going
to do is grab this part. I'm going to grab this part,
I'm going to pull it up then just to make it a little
bit higher like so. And then what I'm going to do is grab each of these sides, press control B and
just bevel them off, make them nice and round. Now, the other thing
is with the bevels, Well, you've also got the shape. So with the shape, you
can actually bring it in, or you can pull it out, and it's completely up to you what
kind of shape you want. Now here is going to be a
waterfall that's going to drop into a part here. So in here is actually
going to be more water. So you can see if I go into, look, this part
here, not this part. This one here, you
can see this is where we actually want some water that's actually going
to go in there. It's up to you whether you
want to put that in there. It will require a Boolean to
actually put that in there. I think for us, just because we're building
out this gray box, I don't think we should build
that out at the moment. But now then, let's
actually come in and make another
row of stairs. So all I'm going to do
is I'm gonna press shift D. Bring up my stairs,
to the top of here. I'm going to pull
it into place then. And what I want it is in the
center of this part here. So I'm going to grab this part, Shift S, Cura selected. And then what I'm going to do
is grab this one, shift S, and selection to cursor, and then let's pull it
back into the place. So we want a little
bit of a walkway, where our guys gonna
be able to walk over. Here and then up
another flight of stairs onto the actual next bit. The other thing is, we
need to make sure that this is wide enough. And the other thing
is, I want to make sure there's a hole
in this part here. So what I'm going to do is I'm going to grab this part here. I'm going to pair shifty. I'm going to bring it over
then to this part here to make sure that it touches the top here, as you can see. And then what I'm going
to do is I'm going to come underneath to
the bottom of it. I'm going to grab
the face of it. So let's grab this face. And then what I'm going
to do is pull it up. Into place like so. And the reason I'm
doing that is because I want to be able to
go under this part. Now, one of the things is if
I'm going under that part, this is how I'm going to make sure everything's
actually put together. First of all, we can see that this needs coming
up a lot higher. So let's bring it up
to the top of here. Making sure everything
it's inter place like so. And this is another
reason, as you can see, why we put things on here like this is because we can
hide a lot of stuff. So that's another
reason we do that. So you can see now, pretty much everything is hidden
away, stairs look good. And yeah, it's really
starting to come together. So how much walkway do
they need around this bit? I would say, Probably around
what we've actually got now. I think we should shrink
these down a tiny bit. Also the height. So let's make sure it's the right height
because I think these are a little bit
high at the moment. So let's shrink them
down a little bit. So all I'm going to
do is press S and Y, and then S and Z
and shrink it down. Just a little bit. Like so, and we'll put it round
round about here. Alright, that's looking good. Now we want is another flight of stairs down this part here. So at the side of here, going into an archway on here. So what I'll do is I'll
grab these stairs, shift. Let's bring them over. Let's spin them round,
so z -90, like so. Let's bring them down
then. To the floor. So they're touching the
floor a about there. Let's put them into place then. And the thing we'll do is I'll make them a little
bit wider on here. So S and Y. I think that actually looks a little
bit bare, like so. And then what I'm
going to do is I think they come out a tad too much. So S X, and then S, Z, like so, and there's
the flight of stairs. And then what we'll do is
we'll come with our guy. And we'll check how much
room he's actually going to have if he comes to
the top of here. And what we want to do to hide this part here is put
in a small archway. So what we're going
to do is press Shift A. We'll bring in a cube. Cubes going to come
round about here. And let's just make a small
archway with the cube, so I'm going to press S to bring it in. It's still a block. So just remember, it is a
block of stone, like so. And then what I want to
do is just pull it up, so make it a little bit thinner. And then what I want to do is bring out these two sides of it. So in other words, have a
side here and a side here. So what I'm going to
do is press Control. Left click, right click,
just one edge loop. Control B, bring it back down just so you've got a couple
of edge loops there. And then from there, what
you're going to do is, you're just going to
come underneath now, grab this one in this
space, we shift select. Shift D, just to
separate those off. So we've duplicated
them to separate them, and then E and pull them down. And then we go, we've
got a nice archway there and they're
actually separated off. Now, if I press Control
A, all transms, right clicks the
origins geometry, and finally, well
I want to do is, I want to grab this one,
and in fact, you know what? We'll grab them going
all the way around. So old Shift click, going
all the way around, lt Shift click,
and then AlternS, and let's just make them a
little bit a little bit, not quite that small,
a little bit smaller. So we've got an
actual edge there. And finally, let's
grab all of the ones, which we don't think have got a material on control and
link materials. All right. Now then, that should have
the material on which it has, and now let's put it into place. So how far is this
going to go up? So we want it, really to
cover the top of here, which tells us how far the
steps need to come up. So you can see these
steps are a long way out, or these are going up too high. I think the fact is that these probably a
little bit too high. So all of this, I
think is a little bit too high because I want this realistically to
be round about here. Now let's check our guy to make sure that he's going
to walk through there. So I think this is round
about the right size. I think it needs to be
a little bit thinner. So S and Y, let's make
it a little bit thinner. Let's pull it against here. And what we'll do then is pull
the steps up a little bit. So I'm going to press S and Z. Pull these steps up.
Put them into place. Pull them up a little
bit more I think. So S and Z, F a little
around with it. So and then S and Y, pll them out a little bit. Like, so into there. I think that looks pretty good, how we've got that now, so
it's walking into there. The one thing is with the
steps, of course, is, have made, you know, there's too many steps on here. Again, I'm not going
to worry about that. So jaws going to pull it
out a little bit. Like so. Now I can see once
I've got these on, that this and these steps are probably going to have to
come down a little bit. So maybe maybe
something around here. And then from there,
I can see how far now these need to
come down. So S said. And again, it's a lot
of fiddling around. And then I can
finally bring this down now because this
is way too high. And the way to
bring this down is just make sure when
you're grabbing it, you grab it going all
the way around to here. So control select, and then
we can pull it down, like so. And then finally,
this part here wants to be and of the
same height as this, a little bit more maybe. And also it wants
a nice top on it. So I actually, I'm just wondering whether
I should put my top on it. You know, well, I'm not
going to bother that. Finally, then, what we'll do
is we'll save out our work. And I'll see her on
the next on everyone. Thanks a lot. Bye bye. O no.
17. Completing the East Wing Greybox: Welcome M everyone
to Blender for the modulate and Kiash
environment guide. And this is where we left off. Now, it's a lot of
fiddling around, I know, but getting everything to fit nicely is the most
important thing. I'm gonna show you the
reason why in a minute. So first of all, then let's
pull our guy up a little bit. Is there enough
room under there? Or should we make these
steps a little bit smaller? I think we'll make the
steps a little bit smaller, so we'll bring them down
just very slightly like so. And then what we'll do is
we'll pull them out to there. And now our guy looks
as though he's actually got a little bit of an arch going into
there, and that looks. Now what we'll do is we'll also. Come in and put a
window on here. So what I'm going to
do is I'll grab one of my doors, press shift. I'm going to pull this
out then, spin it round, so I'll say 90, Let's spin it around into place, and let's put it
up for a window. Now, if you need your
guy over here to make sure the windows the
right size, then do that. What I'm going to do though
is just press S and Y, Sen's d. And I want
my windows to just be a little bit differentiated
from my actual doors. So what I'm going to do is just pull this into
place roughly like, so I'm going to grab
then the top of these. So this one and this one, so shifts elect in the edges, press Control B, and then all I'm going to do is
increase the amount. Scroll in the mouse
we look like so. So there's my first window. I'm also going to
put a top on this. Because that then will
give you a better idea of, like, we need a roof on this. We need a roof on this, and
I think that helps a lot. So what I'm going to
do is I'm going to grab the top of here, like so. So just make sure I face,
let you grab the top. Again, what you're going
to do is press shift D, to duplicate it, press the S p, like so, just to scale it out,
press the E button, and then press E again. And then what you're going to
do is scale it in like so. So you should end up with
something like this. And from there, then
what you want to do is press L P selection, separate it off, and then
control A all transforms. Set origin to geometry. Now, these roofs at the moment, some of them are going
to be different roofs. But what I want to do mainly, is come over to this roof. Grab the center of it,
Shift S. Kursa selected, grab this roof then
and then shift D, and just drop it anywhere so
it can come here and then finally shift S
selection to Kursa, Keep offset, and there we go,
there's our next roof on. Now, what I'm going to do
with this other roof is, first of all, I'm going
to go over the top. Going to make it a little
bit bigger than what it is just so it fits
a little bit bet. And what I'm going
to do with this roof is, I'm going to squish it down. So Sen's, squish it down, and then I'm going to use
that roof on top of that, just making sure that it
goes in place like so. Now, it's not to say the style of roof I'm going to have
or anything like that. It's not there for that reason. It's just there to tell me that, hey, I need a roof or this one. So I can see when I visualize this that at the
moment, I need one. Maybe possibly two
different actual roofs. I can also see, where
I need the pillows, how many different
pillows I need. Now, the best thing is at
this point, you should, once I just checked
the materials or on, have a great visualization
of how it's going to look. So you can see, if we
look from this angle, we can see going up
all the way up to the top of the temple. We can see slightly
the swimming pool, we can see these steps leading up here, steps leading up here, and you can see
that you're already getting a lot of depth in there, no matter which angle you
look at is interesting, and that's exactly what
you're looking for. So if I'm looking
from this angle, you can see it's
all going up here, it's flowing up here and
we're going to flow this up even further. It's
all interesting. And when you're
building something, you really looking
like, if I look from this angle,
is it interesting? That's why I always
do no Whenever I'm building something and
I've finished building it, I'll go to each angle, so I'm
going to go to this angle, let's say, and I'm looking
for the interesting parts. I'm looking if I can
put some plants there vines or if it actually needs
some geometry in there. And this then will really bring your actual low models to life
when you're building them. Because this course isn't just
about building a gray box, creating modular packs and kitbashing, and
things like that. It's also about building
environments and making sure your environments look good and the ways that
you can actually do that. Alright, so now,
We've got all this. I think before we hop on
over to the other side, what we'll do is we'll
finish this last part of. We'll bring in, I think
one more level on here, so another level on here. So the way I'm
going to do that is I'll grab this part here. I'm going to put a shifty, and I'm going to bring
it over into place. And I want this one but
much, much further out. So I'm going to pull
this one all the way out even to here,
so it's coming out. Again, making this part
interesting further out, and also, I'm going to
give this some height. So first of all,
I'm going to give it a little bit more height. Now we can see it's going
a little bit higher. And what I'm also going
to do is pull it out, so pull it out into here. And then what I'm going
to do is pull it back. So let's pull it
back, making it a little bit more square, like so. Now, this part here should, realistically, just come
before the end of here, so you can see here and he's pulling out a little bit more, just before the end
of this post here is where we're looking,
and the height of it It's probably going to
be a roundabout this. Now on this one, a
roundabout where it is now. Now on this one, I'm
going to pull it down a slight bit. Look at that. Joes, looking at the height now. I think it's a little bit too
high, so let's put it down. Yeah, something like
this, because I'm going to put it down a
little tiny bit more, because what I'm going to do now is put a roof on this as well. So again, what I'm going
to do with this one is, I'm going to first of all
resell the transforms, so all transforms,
the origin geometry, grab the top of here,
shift D, the S button. And the other thing is when you're working with gray boxes, you're going to
learn a completely different way of modeling compared to when you're working and actually creating models. This is rough and
ready modeling. So we don't really
care about topology. We don't really care how things are going to be pulled
out or any of that stuff, we're just trying to get
in the actual gray box. Alright, so now we've got
this. Let's then come in. Press the e button, like so. And then to differentiate this from the rest of
the actual roof. I'm just going to press the
eye button to bring it in, press the e bon, and then
just bring it down like so. And there we go, we've got
a different roof on there. Finally, finally, then, let's actually bring in our other, you know, kind of temple
going across here. So I'm going to steal this part. I'm going to press shift.
I'm going to bring it up. And what I want to do is I want to create this at
the side of here. So if I bring this over,
I'm going to press R, Z 90, I'm going to press the
S b then to make it much, much bigger, and then I'm
going to put it into place. Maybe that's a
little bit too big. So put it into place like. So, now this bit here, it wants to be a lot
taller because obviously, it's going to be over
the top of here. Now, if I bring my guy over, so if I bring my guy
quickly over here, you will see if he gets
to the top of the steps, let's put him on the
top of the steps. It's clearly going to bang his head on the top of the,
and that's not what we want, which means that we need to hold this st be roundabout here
and then put a top on it. It also means that
we need to come in and grab the bombs
of each of these, hold them down, into place. Like so. And then we go, that's looking a bit
better than what it was. And now let's think
about the actual top. So what I'm going to
do with the top is? I'm going to grab all of these. I'm going to press shift D. And we're then going to
extrude it up, like so. And then what I'm going
to do is grab it again. So L, and I should just grab all that because we
actually duplicated it. And then what we're
going to do is press delete and
limited dissolve, just get rid of all
of those edge loops. And finally, let's come in, grab each of these edges. Control B, bevel
them off like so. And from here now,
We should have a good visualization of how tall everything's
going to be. Now, I think this is
the right height. The one thing is, I
think this is a little bit just a little bit too high. So what I'm going to do
is I'm going to come in. Well, bring my roof
down, first of all, so I'm going to bring
my roof the roundabout there so we can actually
go a good visual, if we're looking
from this angle, we can still see the top of this, and that's
what I'm going for. And now you can
see double tap the eight that is
looking pretty good. Just make sure again that
audio ambient inclusion is on everything,
and there we go. Now you can see The one problem we're gonna have is inside here. We need to actually make
the inside of here. So let's actually do that now. And the way we'll do
that, I think, let's see, we've got a part here,
chunky part here, which we can use. So shift. Let's bring it over to
where we actually want it. So you can see now we've got
an inside door in there. That's exactly what we want, so we're going to walk inside. We need a platform
for them to stand on, and we need it to
come up to here. So let's first of all, make
sure this is into the floor, so you can see have
no, I actually put this into the floor,
so let's come in. Grab the bottom of
here with face elect, pull it down, like so. All the way in. And
then what I'm going to do now is pull
this into place. So let's pull this into place. I don't want it going past here. I want it just just back there. And then what I'm
going to do is just grab the top of it
and pull it up, cover that part up there. And then finally,
what I can do is, you know what? I can
pull it all the way up. And I'm going to leave this part just just like past there, like so, because I'm going
to build around here, but I want to go over
the other side and build a little bit
more around there. Now, the one thing is you can see is we need a floor on here, so let's finish that, so
shift, we'll bring this over. And you can see that as well, cause we've built this,
we can get some really, really nice lighting in there, some torches in there, you know, to really
light up this part. What I want to do,
though, is just make sure that my floor is in
the right place, like this, making sure it's
covering all of those edges. You can see here we've got
a problem with this part. And it's not actually, you
know, covering all up there. Not going to worry
about that bit yet. We don't need to
worry about that. We've covered it up pretty much. We just got a visual on
this, so that's all we want. And then what we're going to do is we're going to press 50, bring in another door, press R, D, 90, bring it over. And then let's put
it into place. Like so. Like so. And also, when we come in
to replace all these pots, we will be able to see exactly
where these parts are. But we can see now we're
going to walk up there. We've got some really,
really nice lighting, that's going to, you
know, light up all this. We're going to have maybe
a barrel over here. You know, It's
basically a storeroom underneath the actual temple. And finally, then let's
bring in another window. So shifty, bring in a window, R 90, and let's put this window. If I press Control three, I'm going to put this
window roundabout here, so a little bit higher. Maybe even a little bit bigger. And then what we'll do is pull
that into place, like so. And again, now you can see
why we've actually done that. Because we've got a really, really nice look going over here going all
the way around. Now, I would say that this probably needs coming a
little bit further forward. That's one thing I would say. So let's bring this a little bit forward with actually
pulling it out. So S and y, let's bring it a
little bit forward, like so. And now you can see, 'cause
I've brought that forward, it just looks that
little bit better. All right, finally, then, so
he's going to walk up there. We'll need a platform
going up here, so you can see this part here. Let's lift this up then. So we're going to lift
it up. Into place. And then what I'm going to
do is now pull it back. So I'm going to
pull it back into the top of the steps or the top of this here.
And there you go. You can see we've
got another alcove. And finally, finally, let's grab this part this part here. So I'm wondering if I need both of them or
just one of them. You know what? I think
we'll grab both of these. Chit D, drag them over, control three, and then G, and I'm just going to put
this into the top of here, just to finish this bit off. I press the little dot
bard I can zoom to it. That's on the number pad. That makes it very easy
to zoom two things. Like so. Double tap the A. And there we go. Now we
can see that's really, really starting
to come together. Don't forget as well, we've
got our water falling here. We've got our poll still here, so you can see now. That's
what we're looking for. Alright, so on the
next lesson, then, we're gonna move
around to this side, and hopefully we can start figuring everything
in this side. And then finally, once we've
built this out a little bit, we should be able to move
around to the back of it. Alright, everyone, so I
hope you enjoyed that. I'll see on the next one.
Thanks a lot. Bye bye.
18. Starting the Aztec Market Area Greybox Techniques: Welcome back everyone
to Blend the Ford the modular and Kish
environment guide, and this is where we left off. Alright, so let's bring
our guy round two here. So all I'm going to do is just drop him down
somewhere around here, so he's on the other side. And then what I'm going to
do now is bring in a cube. So shift S, sa selected. Shift A, let's bring in a cube. And then what I'm going to
do is, I'm actually going to set the dimensions of this cube, just setting us up to
make sure that we've got the right dimensions
for our market area. Cause this place is all
going to be the market area. This place is kind of
this is the temple. This is where they do of the all of this
sort of relaxation. And the back, I kind of
put it as, you know, quarters where people walk around, where they
would meet up, where the servants
maybe would go, and that's the way
that I had it. And out here, of course, would be where they, you know, do some farming or go and get all of their meat
and things like this. That's the way that I
actually envisioned it. Because it has to be when you're thinking about doing
something like this, it needs to be
something that has an idea of how it's working. And that's the one reason why I had this
here, you can see. We've got an outlook post here, and over on the back as well. I think I've put another
outlook post, you know, where people can see, you know, in case there's any danger or in case they're
hunting something. And so all of those things, what I'm trying to say
is all of those things need to also be
taken into account, as well as depth color models. All of it needs to be
taken into account. Alright, so let's come
in then with this cue, and let's give it
some dimension. So what we'll do is we'll
put this to 4.8 on the x. And then the y will be 3.35. And then on the Z, we'll
put this to 2.83 so. And then what I'm going
to do is, as well, I'm going to actually come
in now. And make an archway. But before I make an archway, let's actually learn
about the Boolean, so let's bole in this part of. So again, let's press shift S, as the selected shift A, and what we're going to
bring in is a cylinder. So I'm going to bring
in the cylinder. I'm going to put the
cylinder on something like 20 because
this is a gray box, of course, so we don't
want it too high. And then what I'm
going to do is I'm going to pull this cylinder out, so I'm going to pull it out
like so and rotate it round. So R y, or Rx 90. I'm also going to
put in object mode so I can see what
I'm actually doing. And then what I'm
going to do is, let's pull this
out a little bit. So S and X, let's pull it out, like so. And now I want to do is want to create a Boolean into here, but first of all, I don't want
just a cylinder like this. What I want to do is I want to actually create an
actual archway. So all I want to do is grab
the front and the back, delete them out of the
way, or delete faces, and then I'm going
to grab the side. So it's the very side before
it starts sloping inwards, going all the way around
to here, so just control, click it like so,
delete and faces. Now what we want to
do is bring it down. I'm going to grab this
edge and this edge. E Z, pull it down
into place like so. When you're doing a
Boolean, just make sure it always goes further than
where you actually want it, that way it will cut
away all this part. Then let's press the F
b just to fill that in. The other thing about Booleans. Unlike the N project, you need to make sure it's
an actual three D object. So what I'm going to do
is ult shift and click. F. Again, don't worry about gon, ult shift and click F, like so. And finally, now, let's
reset all the transforms, so set origin to geometry, do the same thing
on here as well, because we are using
a modifier on here. And finally, then, let's
bring this into place. So I'm going to
bring my guy over, just making sure that
it's the right height. So if I pull him over here, just make sure his feet is in the ground properly, like so, and now you can see
that looks round about the right kind of scale
for our actual market. Let's make sure then we
can see through there. Another thing you can
do is you can also turn this board on here,
the ghosting button, and that enables you
to visualize how far back this is going
to go into here. So I would say, let's pull it back a little bit
further, so S Y, something like this, I
think looks pretty good, making sure that it's all
the way through the bottom. Turn that off. And then let's
come back to this part. What we're going
to do then is come over to our modifiers. Add in a modifier,
and this time, we're going to
generate a Boolean. So Boolean is here. And then what we're going
to do is with the Lil pipe, come down and click on
your actual arch like so. And you can see it's already like looking as though
it's going through there. As we move further on to course, we'll show you some other
techniques how to do this. There are other ways
to do it where you can get a better visual on it. But for now, we're just
going to do it this way. You can also click fast. I find that sometimes a
little bit better than exact. Sometimes when using an exact, it doesn't seem to cut
all the way through it. So then I will use
the fast one instead. Now, again, let's press Control eight and
actually apply that, and then we can
come to our arch, delete it out of the way, and this is what you
should end up with. Alright, so that's
looking pretty good. Now, what I want to
do is I also want to put on the top for this. So what I'm going
to do is, I'm gonna grab this part here. And then we're going
to press I think what we'll do is we'll press
Shift S. Cursor In fact, you know what? We'll
just take the top of it. So I'm going to
take the top of it. I'm going to press shift D. I'm going to pull it up slightly. I'm going to press E
to extrude it like so. And then what I'm going to
do is press LP selection. Tub, grab it again, and we can see here that these
are the dimensions for it. I don't want those, so control
A st origin, two geometry. And now it's reset everything, and we've kept the dimensions
of what this actually is. So for this, what I'm
going to do then, is I'm going to set my
dimensions to 3.42. I'm going to set my Yeah, I'm thinking it needs
to be a little bit wide than that because I've
got two on there. I'm going to set let's
set this to three. And let's set this to naught
0.7 something like this. And now I'm going to do is just make it a little bit wider, so a little bit wider, and then a little bit on the x. And the reason I've set those in that scale is just
to make sure that we're following some
kind of scaling to making sure we don't get way off track of what we're
actually creating. Be bearing in mind, we're
creating a gray box here, but imagining that I never went ahead and already
created the gray box, I never went ahead and already created all the parts
and things like that. So we're kind of
cheating a little bit. What I first did was, I created this whole thing with no parts, no modular parts, or
anything like that. But because I've actually
completed the course once, it means that I'm going in now and just going over
the steps again, which means I need to keep
to some sort of scale. In mind when you
do this, you will have all of your scale on here and you will create
your modular parts to the actual scale, and this will be slightly out from obviously the original. Now we've got this.
Let's bring into place. So what I'm going
to do is I'm going to pull it over to the side, making sure it's in the wall, and then we're going to pull
it back into place, like so, making sure again,
it's all fitting in the wall nice and neatly. Next of all, then, we've got our little market stool so
we can walk around here. And then what I'm going to
do is I'm going to come grab all of these because this
is our bamboo kind of roof. And then what I'm going
to do is press shift, and I'm going to drag
it over to this side, and I'm going to drop it on
top of this actual roof. So it, hopefully, go
on top of this roof. Maybe maybe with this, I might hire it up a
little bit or you know, make these a little bit longer because I
think actually it should start
realistically from there. So let's put it back a
little bit, like so. Yeah, and I'm thinking
that looks pretty good. I can see that this
is maybe all of this temple is maybe a little bit higher
than the original, not by much, but a little
bit higher nonetheless. So what I'll do is I'll
just put it there. And then I think,
actually, you know what? I'll bring it down
into the floor. And then what I'll do
is I'll get a much, much better idea of the height. I'm just wondering whether
to lower everything down or whether just
to leave it like this. You know what? I think I'm
going to leave it like this, and we'll work from this. And as we build on, we can
actually create those things. So I'm going to grab
both of these now. I'm going to pull them out
a little bit over here. I'm going to grab the
side up here now, so just press two
on the keyboard and pull these out. Like so. Okay, so now what we want is a little bit of a ledge
going around here. So all I'll do is I'll
grab one of these, and we'll put that in
the corner just here. So I'm going to press
shift D, ring it over. Put it in the corner.
Just along here. Just in front of that bamboo, and then I'm going
to press essens ad, and then just pull it
up to where I want it. Now, bearing in mind,
as we always said, if you've got your guy here,
it always wants to be. And also, this looks a
little bit high as well. But it always wants to be.
If you put him on there, And I now come in and grab
these, these parts here. 50, bring them over. Or Z. So R and Z -90. Let's press one, go into front
of view, press the G bone. Let's pull them back into place and he always wants
to be able to put his hands onto here, so you can see I need to
move it down, like so. And you can see now that
is the perfect height. And then what I'm going
to do just pull it out a little bit and then come, and now I want to fit them into this sow place so it means I need to pull them
back a little bit. Let's pull them out. So I'm
going to pull them out. They select, you have
in each of these faces. Like so, and then let's just
pull them out into place. And we can see they're
probably going to have to go back a
little bit further, like so, and then everything is fitting in place rather nicely. Now, let's grab these and shift the Fin them around once more. So, 90, pll them out into place. And then all I'm going to do is press S and y, pull them out, pull them right or S
and Y again into place, like so, and here, of course,
there's going to be a wall. Now, let's pull the
into place then just to make sure
everything's fitting nicely. And let's pull this
back s to Tad. Like so. And then we go, that
is that bit on there? Looking pretty nice. Now what we wants is
we want another step. So I'm going to grab
this step here. Shift D. Bring it over. R, Z 90. And what we're gonna
do, we want to line this step up a little bit, but if I come here to
the side of this one. So something around there
looks absolutely fine. I want my steps to be level with the back
of here, like so. I also want my steps to come, so to come to the top
of this part here. So just before this
roof is on here. So I'm going to
press Essens head, bring it down a little
bit, put it into place. Like, so now you can see, it's just before
that roof starts. This is where my steps are. Let's pull that back
in a little bit. Looks a bit. Wacky there. Alright, so that's good. Now what we need to do And
the next lesson is we'll put in another little water feature cause the thing is
they're in the jungle. And that's the other
thing to think about. They're going to need some
water sources from somewhere. So in medieval times, they will have add a
well, and in here, they will have add, like
a kind of water feature, where the water would
have come you know, from plants, dripping
down, you know, from somewhere where they
would then irrigate it, come into somewhere where everyone can go and
actually get the water. And what better place
to have that than in the kind of center of
the actual marketplace? And that's why I've done that. Alright, everyone, so
let's save that out. Like so, and I'll see you the next one. Thanks
a lot. Bye bye.
19. Building Complexity in the Greybox Model: Welcome back everyone
to Blend Ford, the modular and Kash
environment guide, and this is where
we left it off. Okay, so let's now
grab our steps. So we've got our steps here. Obviously, they're going
to go way too far back. So the moment we've got all of this part in here that we
really really don't need. So all I'm going
to do this point, I'm just going to
pull this back. And then what I'm going
to do then is go over the top again and pull
this back to here, and now you can see that's
feeling much better. It comes out just after
the edge of here. What I'm looking to
do is I don't ever want anything lining
up perfectly. That's why I've got all of
these kind of bits poking out. The steps of poking out a little bit further in
this part back here. And you really really want to make sure that you
actually do that. Because then it'll
make sure that everything looks,
you know, uneven. It looks like it would be
naturally built by people, not built by machines. Alright, so let's press shifty, and then what we'll do
is we'll grab this. We'll spin it
around, so ours 90. And then what we want to
do is we want this to realistically start at the
beginning of these steps. So if I pull it back to here, I'm going to pull it
round about back to here and then pull it back
just to tad, like so. And then what I'm
going to do is lift it up. It's at the top of there. So if I press three now, you can see if I lift it
up just a little bit more. There we go. And then what
I'm going to do finally. Let's pull this back into place. So I've already got
the back selected, I'm going to pull
it back into place, and then they can walk
up there and actually turn to go to the main
actual market area. Okay, so finally,
then I'll bring in some cube to go under here. So I'm going to press Shift S, cursor selected, shift A. And then what I'm going to
do is bring in a queue. And basically, I'm going to drop my Que down to this point here. Like, so, so ran about here. I'm going to pull it all the
way back then into the wall. So just make sure
it's into the wall. And then what I'm going to do
before doing anything else, I'm going to duplicate the cube. So shifty, duplicate the cube. And then what I'm going
to do with this one is just pull it out
into there that. Then, it's just going to
save me a little bit of work because I know I need some
kind of water feature there. What I'm going to do
with this then is, I'm going to pull this out. So I'm going to pull it out
all the way to the steps. I'm going to pull it down then. So all the way to
the floor, like so. And then I'm just going to
pull it back a little bit. I don't know how far
that bit's gonna go yet. I'm going to work on
that as a work through. Alright, so this will be
the actual water feature. So the water feature over here. What I'm going to do is I'm
just going to pull it back. And then what I'm
going to do is I'm going to pull it
back to this far. I don't know how big
it's going to be yet. So let's say the
second or third step, and then we'll go and
pull it all the way over here all the way over
to the actual wall. Like so, and all the way
to the steps, like so. And then what we'll
do is we'll come and zoom in and come down
to the bottom of it, pull it down there, like so. Alright, so let's now make the part that's
going to come out, so we can see we've
got this kind of. We need to bring it out
realistically to round here. So round this part, or you can leave it in there
completely up to you. But the way I'm gonna
do it is press Control. Left click, right click, just to drop in the center. And then what I'm gonna do
is I'm going to drop it down just a little
bit down to there. And then I'm going to come.
Grab the bottom of here, press the E bone, and then it enables me to pull
it out like so. And then from there,
I can come in. Grab each of these edges, control B to bevel it, and then just bevel
it off, like so. And finally, I'll look at just
creating an in part in it. So I'll just grab the top of it, press the eye bone, and then
e to extrude back down. And there you go, there
is the water feature in. Nice and easily. Okay, so next of all, then we want to think
about the next kind of market place on top of here. And once we've got that in, we'll be able to make
sure that everything's in line because I think
it's going to be, a little bit too small
this area, but we'll see. We'll see how it all
fits in. Alright, so let's bring in another part. What we'll do is we'll
press shift eight. We'll bring in another cube, and this time we'll have actual su dimensions
for this cube as well. So the x is going to be 7.1. The The Y. Is this the Y? Yep, 4.6, and finally, the Z is going to
be 2.7 like so. So something around this scale. Now, we do need an
actual roof on here. So what I'm going to
do is, I'm going to actually create another cube. So I'm going to press
shift S goes to selected, Shift A, bring in another cube. Not going to worry where
it is at the moment. All I want to do then
is get the dimension. So the X is going to be 7.4. The y is going to be 4.95, and finally, the Z is going
to be nut 0.5 like so. Now, we should be
able to bring that up now and put that right
on top of there, and that should fit very nicely. Alright, so finally,
then this part, if I pull this into play, so if I press R Z 90, I should, if I press three, going in side view,
and I should then have an idea of where this is
actually going to come to. And this actually isn't looking too far off
or where I need it, so let's pull it back
into place like so. And finally, because this is, let's pull it down as well. Because this is an
actual marketplace. It needs some actual
marketplaces in there. Now, one thing I
could have done is save out that boolean,
but I didn't do. So what I'll do is, I'll
have to create one more, and then we'll just save
that out in case we need it because I think we need
it once more as well. So again, we'll go
in mesh cylinder. It's already on 20.
It's already over here. So what we'll do is we'll
just spin it round, so Y, 90, let's spin it around, and let's quickly just make that
boolean that we did before. So, we'll grab the front,
we'll grab the back. We'll press delete,
and we'll click faces. And then we'll grab the edges just before they start
turning in like last time, control select it,
delete and faces, and then come in,
grab the edges. So this edge, this edge, press E, Z, and pull it down. Now, what I'm going to
do is I'm going to draw, drag this over to here. And this one would
have a door on it, so it doesn't need
to go as far back. What we just want to
make sure is that it's, you know, high
enough for the guy to come in and stand next to it, so let's bring him
over, and let's pull him down into place, like so, and you can
see that's quite tall. So let's make it maybe a
little bit smaller, like so. And let's press Sen's, pull it out a little bit, just to make sure
everything's in place. And then what I want to
do is I just want to make sure that I've got another
one the other side. So basically, what I want
to do is I'll come in. I'll press Control. And what I'll do is I'll base
it on this part. So if I press left
click, right click, I know that's right
in the center, and then I can come to this one. I can press Shift S to selected, and then finally I can
come to this part. And what I can do is I
can then put it into place over here
right in the center. So what I'll do, first of all though I'll actually
finish this off. So I'm just going
to isolate it out. You can also press the little question mark to
isolate everything out. So a little question mark
isolates everything out. And then what I'll do is I'll
fill in this face first, with F. Shift click, with Edge slick.
Press the F board. Come around the other
side, shift click, press the F board,
and there we go. Now we want to do is want
to put it in the center, so control A or transform
set origin to geometry. And now what I'll do is press the little question mark
again. Bring back everything. Now I'm going to grab this. Press Shift S, curser
selections, cursor. And there we go. I just need to pull them out.
Now I'm going to do this. I'm just going to press
sift d. Drop it there. Come to this one. Grab
this face instead. So this face here,
shift, curs to selected. Grab this part, shift S
and selection to cursor. And now you can see we've got them both in the perfect place. So let's pull them up,
making sure that they're below that line to make sure that they're
Boolean into here. And finally, then let let's
not join them together. In fact, you know what, we will. We'll join them together. So Control J Control
J. Join them together. And then what we can
do is now we can press Control A all transforms, set origin to geometry, just to make sure they're reset. Same thing for this then,
reset all transforms, set origin to geometry. And finally, finally
coming over, and again, Boolean, click these. And there we go. Make
sure it's on exact. It doesn't make it easier. Press Control A, and the
moment I take these out now, you should see we've got
our markets dull in there. That's looking pretty good. Now, I'm going to
leave these together. And all I'm going to do is
just put them over here. And I'm going to
actually put them in their own collection just
so I can easily find them. So all I'm going to do is
just press the button. New collection, and we'll
just call it Boolean. Now, at the moment,
we're not going to go through, not like that. At the moment, we're
not going to go through collections
and how they work. You will find out
how that works. For now, though, move it into
a collection by pressing M, type in Boolean,
and there we go. Now you can say we've actually
got a new collection, which means that it's going to be really easy to find them. Now, if your collections
gone all the way down here, just
go and grab it, and what you can
actually do is instead, you can grab the
actual collection, and you can put it up
where you want it, so I can put this right
at the top if I want to. We can also close these
and open them like so. All right, so that's
looking pretty good. Finally, then, let's go back
onto our rendered view. Let's save it out
before we do anything. And then all I want
to do now is just make sure that all
of these parts, so all of these parts
that I've just created have in the same material. So control L, link material, double tap the A,
and there we go. Now you can see again, we've
got a lot of depth here. We're going to have
a main feature here, which will be, a large obelisk, which will be the
central feature of this kind of courtyard. And you can see also how the steps now are
leading up to here. T one market stool down here
is another market stool. And what we'll do on
the front of here is, of course, we'll put, you know, some nice pillows and
things like that, just to fit pillows Pilars
just to finish this up. Alright, so what we'll do
then on the next one is, I'm just going to
make sure that, this has not got the
right material on. So control link materials,
and there we go. We'll start building this up now with the things
that we've got. We'll put some steps
over here and just start building this part out
leading up to here. Alright, everyone, so
hope enjoyed that. I'll see you in the next
one. Thanks a lot. Bye bye.
20. Creating Realistic Working Environments in Blender: Welcome Move to Blender for the modular and Kits
environment guide, and this is where we left off. All right, before
I forget, then, let me put a door in here. So we want a door right
in the side of here. So let's just grab
one of our doors. Let's press shift, and
then we know it's there. So let's bring it
down. Let's press one. And what I'm going
to do is just drop this door into place, like so, drop it down, and then put it into where
I'm going to have it. So in there looks about right. I need these moving
over a little bit, I think, but I'm not going
to really bother with those. As long as I've got door in
there and I know it's there. Perfect. Double tap the A. Let's just pull it
back a little bit. There we go. All right. We can see there's a door there. And now what we want to
do is work on the oblisk. So what I'm going to do I
want to press shift day, bring the cube, make it
a little bit smaller. And then what I'm going
to do is bring it over to the central part of
here, if I go over the top. I can see this is round
about the central part. And then what I'm
going to do is put it into the floor like so. And then what I'm
going to do is grab the top of it, just the top. And I want it
realistically to be about the same height
as this roof here. So something around there. And then all I'm going to do is press the S born
and bring it in. And finally, I want to put a little bit of a
base on it as well. So control, bring it down all the way down to
around about here. Come in with face elect, old shift and click, making sure it's going around this way. So lt shift and click, like so. And then E. Don't we extrude it straight away,
press the n to button. And then all you're going to
do instead of pressing S, just press old S, and we'll bring it out that way, and then we get a much
smoother transition. Again, now, let's
just grab this one, control, and what we'll
do is link materials. And there we go. There
is our blisk in place. And now you can see it's
filled out that bit. And once we've got a few barrels and things like
this all over here, a bit of grass and vines, it's really gonna look nice. Okay, so now we want to
do is we want to put the top part of the
market store on there. So what I'm going to do
is I'm going to come. I'm going to grab this, grab the roof. I want to press shift. I want to drag them
over. Spin them round, so R, Z 90. And then what I'm
going to do is just pull them up so
they're into place. I'm going to pull them this
way because I basically want it to start halfway
on this post here. Then I'm going to pull
them out. Like, so making sure that people can
still walk around here, which they obviously can. Now, finally, we want to
put in another part here, so another kind of bit
with a window and, you know, some kind of stone. And also, I want to pull
this out a little bit just so I've got a little bit
more to actually work with. Alright, so if I come
round this side, what I can do is I can
pick one of these. So let's pick this one. I'm
going to press shift D, and what I'll do then
is bring it out. Like, so I'm going
to bring it round. And basically, I
want this to come. From nearly the front of here. So nearly the front
of here like so. I also want to make
sure that it's going to be in the actual wall. So I'm going to need
to make it bigger, so I'm going to
press the S born, create it bigger and
you can see what's happening is. It's
going all weird. And the reason
that's happening is, I need to actually turn
this on to medium point, not individual
origins, and now I'll bring it all for me, like so. What I'm going to do then is,
I'm going to make sure that this is round about the same
height as this one here. And I basically
want to also just pull it back into here
a little bit less. So we've got a nice edge there. And then finally,
I'm going to pull this back then to
the actual wall. So if I come, grab this part. And just looking out
part that's coming out. Actually, that
looks pretty good. So now what I want to do is, I want to grab this part and this part and pull them
all back into the wall. Now, obviously, the roof on here probably isn't
going to be a roof like. This, it's probably going
to be more of a flat roof. But for now, this is
looking pretty good. What I want to do now though is give it a little
bit of a height. Though, basically,
I want it some steps coming roundab up to here, and I want the steps to start from round about
this point here. So if I bring these steps here, the press shift dy,
drag them over. You can see that these steps they're going to be
way way too big. I basically want
them starting from, let's say, round about
this point here. And what I want to
do is I want them leading up just past this point. So round about this point here. So what that means I'm
going to do is instead, is I need to cut away these
kind of steps going here. Now, there is a really
easy way of doing this. First of all, let's
first of all, mark our steps, where
we want them cut two. So we want them two
here, basically. Is a really easy way
of marking something. So what we want to
do is right click, and what we're going
to do is mark a scene. Now I can see exactly where
I want to get rid of. Now I'm going to do is, I'm going to isolate
this out again, so I'm going to press the
little question mark. I'm going to isolate it out. And then what I'm
going to do, now I can see perfectly where that is. If I go now into three, so if I press three, I
can go into side view, and what I can do
is I can press K. And what K is going to do is it's going to bring
in a ni tool. From there, you can see I can
click on this point here. And then I can
click on the bottom of here. Now, I
need to line it up. Now, rather than, you know,
trying to line it up, just press the A button, and that will line it up going
straight down. Left click. Press the enter b,
and there you go, you've got a beautiful
cut going over there. Now, if you press Control three, we can go
to the other side. And again, we can see
where this line is, so you can see where my actual
seams have been marked. Barn, click it A down. Drop it down there
and there we go. Ove a play around with the
knife tool is very, very nice. You can actually cut
parts out like this. You can also instead of
magnetizing onto those parts, what you can do is you can
hold the control button down, and what that'll mean is
you can actually get very, very close to the sides like so. If I'm going around here like
so and come to this part, press the b, and there you
go, you've cut that bit out. From there, as well, what you can do is you
can actually come in now and actually cut this
part out of the mesh. Now, I'm not going to
do that, of course, but I have a play
around with it, see what you think of it. I find it very handy. What I'm going to do though
is I'm going to come in now and delete all of these
parts going around here. All of these parts going
around here, round here, around here, around
here, around here, press delete and bases. And now we've got
just this part here. Now, with this part here, we don't really need
to use the n tool because We've got two
points there already. So I'm come in, grab this
point and this point, press the J born, and then I'll actually create an edge
going along there. Now I can come in and actually lete that out of
the way, like so. In the I'm just gonna
fill in this face, so you don't need to grab older faces when you
fill in them in. As long as it's two of them, then you can press the F button
and fill them in like so. Now we can press
the question mark. Bring everything back, and we should be left with
something like this. So now I can just bring
that up a little bit. And now I can actually carry on working with this
top part along here. Now, the thing is,
I do want to put some posts and things
like that down here. So before, I actually think about where I'm
going to put my steps. I'm going to grab my post. I'm going to keep it the same as what I've got
for the front ones. And then what I'm going to do
is I'm going to press shift D. I'm going to bring
it down over here. In the first place, I'm going to put it is round about here. And then what I'm
going to do is I'm going to bring it
to the next one. So I'll bring it round
about this one over here. So just at the bottom of those steps to
kind of hide them. And then finally
I want one more, which I'm going to
bring we're going to have a kind of
building on here. So what I want to do is just bring it to
the end of there. So I'm going to
press shift D, bring it to the end of here. So somewhere around
here, I think. And then on here, what
we're going to have is, we're going to have a building. And it's going to come
up from the floor. So I'm going to pull this
bit back in a minute, and it's going to come
up from the floor and go up to round about
this point here. So, let's bring in
that building first. So we'll use this building here. I think this building
is altogether. Yes, it is. I'm going
to put a shift D. I'm going to bring
it over into place. And it's going to
be a little bit too tall for what I need it. So I'm going to bring it down. I'm also going to put
a window on here. So first of all, let's let's
put it into place first, so we're going to
put it into place. Round about here. Go in. So we've got a
little bit of a gap, as you can see there, and I want to put it
into place like so. And then what I want
to do is I want to drop down this roof. So
I'm going to come in. I'm going to grab my roof. I
think this is all connected. No, it's not, so
that's okay, actually. We'll drop down our roof round about the window
height of here, so something like that, we'll
grab then the top of it, and then we'll pull
that down as well. And that looks
about right for me. What I'm gonna do
then is just pull my steps this way a little bit. And finally, I want my
steps a little bit wider. So I'm going to press S and X, let's pull them out, and let's put them
against that wall. That's what I want
against that wall against here and
everything lining up. Now, last of all, before
we do anything else, let's just grab one of
these doors because I do want to make sure that
whatever is walking up here, of course, and walk
into an actual door, and that tell me if
my height's right. So let's bring it over. Let's put the door into place. Let's put it into place this
way. Let's pick it up then. And there we go. That is
looking pretty much perfect. That's exactly how I actually envisioned
it, how I wanted it, and all I want to
do now is just pull this back a little bit like so. Now, the thing is
that this part here, I'm going to have some other,
you know, kind of parts. You can see this part
sticking out here. I really don't need this
part in here anymore. The thing is though I
can pull it away so far, but it's not going
to look right. So what I'm going
to do instead is, I'm going to grab it
and go over the top, and this is where we'll
actually cut this away. So what I want to do is I
want to cut it this way. And then I want to
cut it that way, and I'll show you a great
tool for actually doing that. So what we'll do is
we'll come over to Mesh. We'll actually put it on Ghost in first, so we
can actually see. So I'm going to be
an object mode. Now we can see exactly
where we're cutting it. We're going to go
to Mesh, bisect, and I'm going to
cut it this way. I, so, come down once
you've used your bicc tool, and the one that you see
where it's like No point North six or whatever means
that this is out of line. Set this to zero, and then you'll see
it's nice and lined up. The other thing about
the bicect tool is, you can also clear the
inner or clear the outer, not that we want to
do those right now, but we can clear
either of those. And what we can also do once we've cleared them
is fill them in. We can also move it as well to where we
want when we've got it. Now, once you click
off for this, it will disappear, and then what we'll do is
we'll come to mesh, go to Bicect, and
then I'm going to cut this one down here like so. Again, this one's a
little bit higher, as you can see, set
that to zero. Like so. And then what I'm going
to do is I'm just going to come in
and actually get rid of all of these parts
here, Crest delete, bases. There we go, double tap the A. Let's turn ghosting off. Let's put it onto
our rendered view, and this is what you
should end up with. Now, you can see
that we're a little bit slightly out,
but it's really, really easy to fix
that now because of the fact we've got
both of these. So you can see, I've
selected both of these. And what that means is
then I can pull these back into place like so, and this one here, pull
it back into place, like so, and then
let's fill them in. So F to fill those in, and then this one and
this one underneath, F, pull it in. And there we go. Double tap
the eight. And there we go. That's that bit there.
Now, before I finish, let me just grab a quick window. So let's grab this one. Shift D. Let's bring it over. Let's spin it around.
So I was at 90. Let's press three
on the number pad. And all I'm going to do
then is just drop that interplay roundabout
here. Let's pull it in. And then we go, we've
got a window overlooking there and some steps. And you can see now just
how intricate this actually looks now on this back part
in a short space of time, and that is looking pretty nice. Alright, let's
save out our work, and I'll see he on the
next one, everyone. Thanks a lot. Bye bye. Oh.
21. Finishing the West Wing of the Temple Greybox: Welcome back everyone
to Blender for, the modular and Kits
environment guide, and this is where we left off. Now, we do need an
actual rope bridge or a bamboo bridge
going down here. So what we're going
to do, first of all, we'll bring that in and then decide if we need to pull
this out a little bit, because I think actually
we probably will. So what I'm going to do is, I'm just going to
come to this side. I'll grab both of these, being as I've got edge select on. I'll press shift S,
cursor selected. And then what I'm going
to do is press Shift A, and I'm simply going to bring
in just a plane like so. I'm going to pull it up
a little bit I think. And what I want to do is
I want to first of all, bring in, you know,
some kind of doorway, just so I've got a kind of view of how up, I
actually need this, because the road bridge might need to be the same
height as these, cause I mean, the door
is. You know what? I'll actually just
bring up to here, that makes more sense because they're not exactly going to be, you know, coming in
here, this small area, going down some steps and
then into a rope bridge, it just wouldn't work like that. And that's the other thing when you're designing
things like this, even though we're not designing
the inside of things, we actually have to think how things are actually go together. So let's put the door on here, like so. Let's put
it in the middle. And now if I bring
this rope bridge out, and if I bring it out roughly to just past this point here. So roundab this point. So if I come in,
grab the edge of it. Let's pull it out the
roundabout there. Let's also come in and
give it some edge loops, so we'll give it
some edge loops. Always an uneven amount
because that then makes it easier with
proportional editing. Let's put it on then, and then we'll grab this middle one. And what we'll do is we'll
just pull it out like so, and that then gives us an
idea of what we're doing. And then I can see that there is a little bit
of a gap down here, but maybe maybe it needs
a little bit more. So what I'm going
to do is, I'm just going to grab all of these. I'm going to move it
across slightly, like so. I'm going to move my door
over slightly, as well. And then I'm going to
pull my stairs out, and I think this
is going to look much much better
than it did before. But let's pull the stairs out, trying to keep it just
on that edge there. So S and Y, let's pull it out,
bring it over, like so. And I think that then is
going to look pretty nice. Now, the other thing
is about the steps. You can see the steps
are pretty wide here. And thinking that I don't actually want
my steps that wide. What I want to do is offset
my door a little bit, so move it to the
side, and then I'm going to bring my steps
a little bit further in. So S and X, let's bring them in a
little bit, like so. Let's pull them over then.
As to the edge here. Maybe even a little bit more, so S and X, pull them
over a little bit. And then what I'm going
to do is I'm going to put in a piece here where we can have a plant pot
and things like that. So let's put that
piece in first. So shift, st to
selected, Shift A. Let's bring in a cube. And then what I'll do is
I'll just bring it down to Maybe as below
this step here. So something like this. And then what I'll do is
I'll pull it out. So grab this face in edit mode. Without portional editing on, let's pull it out, like so. And then what we'll do is
just drop it down into place. Like that. And I'm thinking I'll bring it to
the bottom of my steps. I've just past this
point. Like then. I think that looks
really, really nice. Let's move the post. Maybe
a little tad that way. So now let's think about
we've moved all of that. The one thing we haven't
done is just move this post. I'm just going to
move this post here. And that then is
going to give me a bit more room to
build around this area. Now, the thing is we also I
think what we'll do now is, we'll have another post on here. And then what we'll do is
we'll put an archway in here. So in other words,
if I grab this, so Shift D, let's grab this. Let's put it here,
and this is going to be where the
other archway is. Now, for the archway, let's just make
something pretty simple, I guess, for this archway. I can use actually
part of this as well. So what I'll do is, I'll
come in. I'll grab this. I'll press shift D. So just
duplicate it P selection. Let's reset the transforms then. So control A, all transforms rightly so origin to geometry. I'll bring it round
to round about here. Now, because this is an archway, we're like a main kind of archway where people are
going to walk through, we do want it a bit more
foreboding. Let's call it that. But if I press three, we can see if I bring
this down the moment, it's quite dinky, this size. We're going to want to much,
much bigger than that, so let's pull it out like so. And again, if we put
this on object mode and we put the
ghosting on our x ray, now I can see how big that is. I think that then is going to be roundabout the right size. Now, rather than building the whole thing out, I'm
not going to do that. I'm happy with the size of it. I just need to pull
it in a little bit. So if we press S and x, let's bring it in, like, so let's put it into place then. And then what I'll do
now is, I'll come in. Grab this part and this part, and I'm going to
separate it off. Now, you can see,
I press control, it actually cuts it across. If that happens, just control
control select like this, and then all you're
going to do then is press P selection. Separate that out,
delete the other bit. Now, let's come in, press
control ate, all transforms. Origin geometry,
and we'll add in a new modifier and this time
we'll go with a solidify. Let's pull it out a little bit, and let's put on even
thickness, like so. So it's going to be this sort. It might be a little bit smaller or a little bit bigger this. I'm going to pull it
out a little bit. And then what I'm going to
do is shrink it down just to tad pressing three like so, because it was a
little bit too big. So something like
that then gives me a good baseline to
actually work with. And from here then, we're also going to have
a top on there, and we're going to
have some side points in there. So let's put those in. So first of all, shift S, Kirst to selected, Shift
A, let's bring in a cube. Let's make the cube a
little bit smaller. What we're going to
do is bring it up to this top part here, like so, S and X, and then S and y
and bring it in. Like so. And of course, we don't
want it going over these. So what that means
is, I can pull the whole thing back
then into place like so. And then finally, we just want these parts down here.
In fact, you know what? We won't actually bother putting those parts in there.
Parts in there. All we'll do is we'll bring it down and put one side this side. Let's have a look to see
what we can do with this. So shift. Let's bring it down. Let's press S and Y. And what I'll do is I'll put
that into place like so, and then do it the
other side, Shift D, put it into place,
just so we have a good visual on where
we're working too. Now, let's pull this
out now, do that. And there we go,
now you can see, really started to come together. And now I want to
do is I basically want to pull this down. So can I actually do that? So if I press Control, left click, right
click, Control B, and what I'll do is I'll pull that down, so
I'll bring it to, let's say this point here, and then control. You know what? It's not worth doing
control like that. Instead of what I'll do is,
I'll press Control on here. And then we're going
to press Control B again, going to bring it out. I don't actually think this is going to work the
way I want it to. You know, what I'm going to
do instead of doing that? We'll just press Control R in the center. Left
click, right click. Control R in the center. Left click, right click,
and we'll work from this. So how I'm going to do this
is I'll press Control R, going this way, so
going around the side. So I've got a nice,
even distribution here. And then what I'm going to do is I'm just going to come in, grab this one, this one,
this one, and this one. I'll press E and Z,
and pull those down. And then what I'll do is
grab this one and this one, E and Z and pull
it down. Like so. And then finally, just
to finish this off, I'll bring these two
points up like so. And there we go. Simple as
that, really, really easily. Alright, so we've
got these points in. Let's just move these
out of the side. We've got in now our actual ramp or bamboo bridge that
we're going to cross. Let's right click and
just shade that smooth. And finally, let's put
it on to rendered view. And what I'm going to do now is just move my guy out the way. Grab all of these
new parts that I've actually got, grab this one, grab this one last,
press Control ell, and we're just going
to link the materials, double tap the A,
and there we go. This is what we
should be left with. Now, the next one, then, what
we'll do is we'll actually start I'm putting in some more You know,
what, we'll do that now. We'll just put in
another window. So shift D. Let's
bring it round. Let's spin this round. So ZD 90. Let's press Control
one, to go to the back, and the window, one is going
to be round of about here. I'll make this one a
little bit bigger. And then what I'll
do is I'll pull it back into place like so. And then I'll have a window
on this point down here. So what I'll do is, I'll press Shift D. I'll press
Control one first. Shift, and we'll put
it round about here. Make it a little bit smaller. And then what I'll do
is I'll pull it out. And there's a window
on that side, like so. And I'm going to put it yeah, just below the bridge here, and I think that looks great. And then what we'll do
on the next one is, we'll start building
this part out, you know, kind of get it so they can walk around here, up some steps. There'll be some
more steps here, for instance, and all
that sort of good stuff. The other thing is,
we'll actually put in these parts going along here. So we can grab this part or, we can grab this
one and this one. Let's grab both of these. What we'll do is
we'll press shift D. We'll bring that
round to here then, and we'll put it
behind this post here. And then what I want to do
is I want to drop it down. Where my guys going
to be coming out, so let's pull it
back a little bit. Like so, so it's in that wall. And then I'm just going
to pull it all the way across now to this
one you can see, I've already got the selected. If not, just going
in and select yours, pull it all the way
out through there. And then all I want
to do lastly before finishing is I just want to make sure that this
is the right height. I don't want to
pull it up, so I'm going to pull him up to here. Spin round, so I add 90, pull him over to here. And there you go. It's
the perfect height. And it's the perfect
finish to it. Now, Ron, the rear part
of our Aztec temple. And you can see now, that is really starting
to come together. I'm wondering if I didn't do this on the last
one, but I think we should. These are two the same height. I think I should just put
that up a little bit. I think it's going to make
it look a little bit better. Like, so, give us a bit
more variation on there. Again, the roof won't be like this, and we'll be
a different roof. And I think now we've got a lot of different
heights on there, and that really makes
things interesting. Alright, everyone.
So on the next one, then, we'll start on the
rear of this building. Let's save our work, and we're nearly actually done with a gray box,
believe it or not. And from there, then
we can actually start creating all of
these modular parts. Alright, everyone, so, I
hope you enjoyed that. I'll see on the next one.
Thanks a lot. Bye bye.
22. Enhancing the Interest in Your Scene: Welcome back, everyone
to blend the for the modular and Kit
bash environment guide, and this is where
we left it off. Now, what I want to
do, first of all, is, I want to put that postba 'cause I actually took that
post and didn't put it back. So let's put that
post back there. There we go, like, so. And then what I'm going to
do is grab both of these. I'm going to press shift. I'm going to move them then over to this side and
spin them round. So Z 180, spin them round, and let's put them in
place along here, like so. Like so. And then what
I'm going to do is, I think, we'll also take
these pillars here. So I'm going to press shift. And I'm going to drag those over here and put maybe two
in place along here. Let's pull them up,
just a slight bit, like so, and then shift,
bring this one up. And then what I'm also
going to do is I'm going to make this a little bit wider to come to this part, even though this is the plants. So let's press S and Y. Let's pull it out all the
way over to this part here. And then we'll grab one
of these post shift and then drop that in there. So and you can see now
all that comes together. And finally, finally, let's grab this one shifty.
Let's pull it out. Let's press S and Y, make it much, much thinner. Let's spin it around, so Oz 90. Let's press control one, and what we'll do
then is we'll drop that into this part over here. Let's pull it in
two place like so. And I'm not sure whether it's gonna stay like
that at the moment. The thing is though, I think
we'll do is, as well as, I'll make this a
little bit longer. So if I bring this
to just there. And then what I'll do is
I'll grab all of these, pull them into place there, press S and X, and just pull them out
and drop them in place. Double tap the A.
And there we go. Now we've got a nice entrance
way going through there. Alright, so now we
want to do is we want another stairs
going up to here, but first of all, let's
put a block in here. So the block that's
going to go in here, wants to probably come up to
be ran about this height, of course, so that they can
actually walk along there. So what we'll do is we'll
bring in the block. So I'm thinking, what can I
steal to actually make this? Probably this one.
I don't actually need it to be square
or anything like that. Doesn't matter about
the size of it. All I need it to be
come over to here. Go into that and leave
a little bit of a gap, not that much,
just a little bit. So let's pull it over. Like so. And then what I'll do is
I'll grab the top of it, I'll pull it down
into place like so. And then I'm going to
pull that part over. So come in around here,
pull that part over. And into place like so. Alright, so on top of here then. The thing we'll do is we'll
put in a top on here, and then some stairs
going over there. So let's see if we can actually do that. So I'll grab this one. I'll press shift. And
then what I'll do is, I'll bring it round about here. I'm going to pull it up there. And the height I'll want it. Yeah, this is going to be about the right
high I'll want it, because I'll have a
window on there as well. So I'm gonna push that
over to there. Like so. Let's grab this window here. So shift. Let's spin it around. So I'll d -90. And let's put that into place. Yours in here. Like so. And then what we'll do is we'll have a stairs leading up there. Now, I do need my guy
over here just to make sure that those stairs are
not going to be too thin. So let's pull him
over here. Like so. Let's put him on the floor. Like, so, and that actually
looks pretty perfect, actually, if we put
some stairs in there. That will lead us up then
to the next kind of branch. And then what I want
to do is really, I want to see how far I
want to go up with this. So what I'm gonna do is I'm
just going to pull this back. To rad about the end of here. And then what I'll
do is I'll pull this back with E, like so, and then what I'll
do is I'll look to get this to go up to kind of the bottom
of the stairs here. So what I'm going to do
is just grab this one, and I'll press e again and pull it up to the
bottom of the stairs. And that then will give
me enough depth to go up that first kind of
ramp like that. Alright, so let's grab these
stairs and we'll use those, so I'm going to press 50. I'm going to bring
them over, spin them round soles they're 90. And then what we'll
do is we'll put these into place against here. And I'm going to make sure that first of all they
fit in place there. Second of all the to the bottom. Third of all they pulled
back a little bit, so we've just got a little
bit of an edge on there, and then next of all that
they're not too high. You can see at the moment,
these are a little bit too high, So Essens head, let's pull them down
just a little bit just so they go to
the top of that, double tap the A, and
there we go there fitting in pretty
nicely around there. Alright, so the next bit, the next bit is this
bit coming out here. So what I want at
the front of here, Is not only do I need a place where some huge pillars
are going to come up here, but I need a place where
we're going to have a little bit of it's a
bit like this market. So these market stalls here, except they're a
little bit bigger. The dolls are a little bit
bigger because basically, this is the warehouse
on the back. So this is where
they're going to take. They're not going to
go through the front entrance with all of the food and the deers they've caught and
all of that stuff. They're going to take it into the back entrance,
and from there, it's going to be distributed all across the rest of
the city or temple. And that's the way
it's going to work. So what we'll do, first
of all, is we'll create this bit here with the archways. And then what we'll
do is we'll create the huge columns coming up
here. So let's do that now. Let's first of all,
bring in another cube. So I'm just going
to shift right, click to bring my cursor that. Shift A. Let's bring in a cube. And then we'll
bring this cube up, and we're going to change
the dimensions on here. So we'll have it 5.5. We'll have it to 4.2. And then the Z axis
will be 3.4 like so. And that then should give us the right dimensions or this
part on the actual back. And we should be able to just put that in roundabout here. Let's put it on the floor. Like so. So something
on the floor like so. And then what I'm
going to quickly do is grab some stairs. So
I'm going to grab. I'm just wondering if I
should grab those stairs. Yeah, I think these ones
are going to be okay. So what I'll do is, I'll
grab these, so shifty. Let's bring them over. And what we'll do is we'll
spin them round. So 90 90. Let's
spin them around. Now, we do want them
coming to the top of here. So you can see here if I
put them into the top, but I want them in the middle. So in the middle like so. I'm thinking I need to pull
this back just a little bit. We're in the middle leg. So and each side of these
is going to be kind of like a little
archway, not an archway. It's going to be like a
barrier kind of thing. Let's actually create
that because we can use that as well
on these parts here, so we'll actually create that. So the way we're going to
do that is, I will take. I'm just thinking the
easiest way to do it. Yeah, I'll just bring in
a cube to start with, so I'm going to bring in a cube. And what I'll do is I'll put this where I want it roughly. So I'm going to press S and
y and just squish it in, so it's relatively thick. And then I'm just going to
place it at the bottom. So I'm going to place the
bomb up here, as you can see. And also, I think my stairs needs to come out a
little bit as well. So I think I'll make it a little bit longer than what
it is right now. So let's press S and X, just pull it out a little
bit, and there we go. So that bomb stairs is going to come draws to the top
of their like so. And now let's come
back to this part. What I'll do, first of
all, just make sure that you press the dot b and
that it's into the floor. And then all you're
going to do, I'm going to save out
my work actually, just in case anything crashes, which sometimes it does. What I'm going to
do is I'm going to bring it out to here, and then what I'm going to do is bring it up all the way up, so, it's just above there. From there, then what
I want to do now is, I want to reset the transform, so Control A, reset
the transforms, and then I'm going to come
to the front of this, grab the front of
this, press control B, and I'm going to pull
it back like so. Now, if it's not pulling back enough, again, use percentage, it does make it a
little bit easier to actually making sure that it comes from
there to there. All I'm going to do is
put this on percentage. Then we're going to
pull it back, like so and you can see it now gets an even distribution
between there and there. All right, so that's
looking good. Let's have a look then,
how thick this is. A little bit too
thick at the moment. Let's press S and Y and
bring it in a little bit. Like so shift then, let's put one on the other side. Like so, and there we go. We've got a nice steps,
and we're up here. Okay, so the next
thing then is we want a top on this bit. We also want a kind of
some distribution in here. Now, I'm going to put
the Booleans into these things once I've actually
created the other parts. So let's do that now. So what I'm going to do
to do this final bit. First of all, I'm
just going to push this down just so it's
in there, like so. And then when I come
to the top of it, I'm going to grab this top, so control, bring it
this way a little bit, just so it's got some
thickness to it. And then what I'm going to
do is come to just this bit. I'm going to press
shift. And then what I'm going to do
is press Control one. And what I want to do is
I want it coming round about to the halfway up the
window, somewhere like that. So if I press E now, I should be able to
bring this up to round about this part here. And then what I'll do is
I'll put a top on that. So what I'm going
to do is press E again, put a top on there. Like so. And I'm going to come round to this side
now, grab this face, I'm going to press
E again and pull it out into place like so. And there we go, now you
can see that we've actually got a beautiful walkway
going down here. I'm going to put
some post down here. I'm going to fill
it up a little bit. And on the next lesson, we'll basically
bring the posts in, and then we'll able to see
how we actually line this up, put in our booleans, and then that should be
that part done as well. Quite a sophisticated
part of this, to be honest, because, you know, the guys going to
walk up the steps. He's going to walk
through this part here, so let me just put
him on the floor, just to show you go
to walk through here. And again, it's a in
depth through our scene. So let's make sure he's
actually in the ground, like so he's going to
walk through here. There's going to be an archways here where you can
actually look out of, and then there's going
to be the warehouse part underneath this part here. So this might be a little bit high at the
moment, but we'll see, as we carry on working, how this is all go
to fit together. Alright, so let's
say about our work, and I'll see you on the next and everyone. Thanks a lot. Bye bye.
23. Finalizing the Greybox Model: Welcome back, everyone
to Blender fall, the modulate and Kash
environment guide, and this is where we left off. Okay, so, before we
carry on with this, let's get this part. So this part that's gonna
be in here in first. So what I'm going
to do is I'm going to I'm just first
of all going to look how far this
parts coming back, cause I think actually shouldn't
be coming back to there. I think actually this is coming back a little bit too far. So this part on here, I think
is a little bit too far. So let's just pull it back
round about this part here. And what I'm going to do now is I'm going to
grab all of this, so all of this here, and I want to pull it back
a little bit further. I think I'm a little bit out of line with what
I've built before. So what I'm going to do is
I'm just going to pull all of this back over to here. And what that means
is I'll also need to pull this part out a little
bit and this part here. So I'll just pull them
out. Just a little bit. So if I pull them out,
something like that, I think then we
have enough room, you can see this is
not come with there. So let's pull it out, like so, and we will get all
this into place. Don't worry. Trying to get everything into the right scale. And if we expand this
out a little bit, let's pull it out just
a little bit like so. And now let's pull
these back into place. And this is the trickiest
part because basically, you're coming around
and you're trying to join everything up and
making everything fit in. That's why it's so difficult. What we're going to
do now is we need to pull, in fact, you
know what we'll do. We'll first of all
get these big kind of pillars in there. So what I'll do is
I'll take this pillar. I'll bring it over
to this side first, and I'll put it roundabout
in the center of this one. Now, what I want this
pillar to do is I want it to come to
the edges of here. So if I expand this with
the S one, pull it out. You can see now, it's got an edge on here,
which is what we want. We can pull this bit then back because the
pillars are going to be right down against here. I'm also going to pull
all of this back as well, so I'm going to grab all of this and pulling it all
back into place. Down to roundabout here. And then what I'm also going to do is I'm going
to stretch this out. So I'm going to stretch these steps out a bit a little bit. So S and X, stretch them out, pull them back into
place, like so. So we've still got
that, and now it's just going all the
way back to there. From there then now,
it means that this now is going to fit along here, much better than
where it did before. And what it also means is now
I can come into this bit, and I can pull this part out, so I'm going to
pull this part out. So E let's pull this part out, maybe to even this far there. So into that part there, and now we can see the walkway is looking a little bit bare. Albeit now, it just needs to
come this way a little bit. Now, when we come to put the parts in and
things like this, we will not we'll be
putting blocks in there. So at the moment, it doesn't matter kind of how
messy this is. In other words, if
I pull this out, so if I press and pull
this up to there. You can see it's a little
bit messy down this side. What we are doing though,
is we're going to grab this side, so
the side of here. If we can't see, put x ray on, and then you'll be
able to see inside this part here, like so. And then what we can
do is we can press E and pull that into place. And now you can see it's
looking a little bit bare. I'm also wondering,
Now, you know what? I think that's going
to be absolutely fine. Now, let's bring this
pillar up a little bit. So what I'm going to do
with this pillar is, I'm going to bring it up,
just a little bit more. And then on the top of it,
I'm just going to press E to S. Well it out a
little bit like so, and then press E just so we can see it's a kind
of pillar like so. Let's turn our x ray off
now, so we'll turn that off. And then what we'll do is we'll poll pillar on the other side. So let's make sure
we're happy with this. I'm thinking whether this needs
to be a little bit wider, but we'll find out in a minute. So let's press shift D,
and what we'll do is put this on the other
side now, like so. Now we know, now
we've got that in there that this one
wants to be halfway. This one wants to be halfway, and now the stairs,
as you can see, need making a little bit wider. So S and y, pull them out. Double tab the eight, and you should end up with
something like this. Alright, so that's
looking pretty good. Now what we want to
do is we want to place another part in here first before doing anything
else to try and pull all of that
together to make sure. That what they're walking
along is actually going to, you know, lead somewhere
around the back of here. So, the first thing I'm
going to do is come round and grab this here. So this pillar here. Yes, we can use
that one. And what I'll do is I'll press shift. I'm going to rotate
it round then. So Z 90, let's rotate it round. Again, when we're doing
this, we're always looking at how everything's going
to be fitting into place. And what I'm going to do
then is I'm going to put this right against this pi. So I'm going to drop
it on the floor. And then I'm going to put
it over here, like so, and then I'm going to pull
it back a little bit like so and just making sure that
it fits in place like so. Then what I'm going
to do is, I'm just going to pull this out
a little bit more, so I'm going to
grab all of this. We might have to pull these
back in a little bit, but we're just going to
pull it back just there, and then I'm going to drop
it down a little bit just so it's in the floor like so. Alright, so we've nearly
got this part sort. Now, what we need now,
is a tall structure, which is going to
come up to here. So it's going to
basically come up here and then be nearly, so about halfway up to where
this point is along here. But let's bring in another cube. So all I'm going to do is
press Shift S, Kursa selected, shift A, and it's going to be kind of another lookout tower. So shift A, bring in a cube. Let's make this
smaller then, like so. And what I want to do
with this is I want to have still have
a walkway going in, you know, kind of
down this part here. So I'm going to pull
it by a little bit, like so, so we've still
got that walkway. And then what I want to
do is I want to make sure that this part here then is
coming to the edge of here. Now, I'm going to have some
posts on there as well. So I can put those on there. So I'm going to grab both of these. I'm going to pair shift. I'm going to bring
them over then. I'm going to put them
into place like so. And you can see that this one here is not fitting in place just simply
down to the fact of, you know, the actual length
of this part next to here. So I'm looking First of all, to drop this down, and this
is the trickiest part. So don't worry if you find it
quite hard to follow along. And then what I'll do is I'll make it a little bit smaller, pull it back into
place, like, so, because what I want to do is
make sure that this post. So this one here is
in like slightly in. So if I bring it in,
bring it in, bring it in, now we can see that's the size that I'm
actually looking for. I'll pull it over and then
pull it I'll pull it out. And pull it out a little bit
more, and then pull it over. And there we go. That is
what I'm looking for. So we've still got a bit of that kind of huge column
sticking out there. Make sure this is in the floor. And then what we're
going to do is we're just going to
pull this up now. So we want to pull this up to basically the
beginning height of here. So s two, the beginning
height of here. And then what we're going
to do with this part is, we're going to put a big
kind of top on this part. So Before we do that, though, let's make sure
all of this is done first. So first of all, let's come
in and pull all of this down. So all of this down into place. And now what we can do is we
can see if all of this fits. So we can see it fit
in all across there. This bit fits down nicely there. We can see we've
got a little bit of a walkway leading around here, and on here, let's put a door. So if I grab a door,
I can press shift, I can bring my door over, I can press Z and 90. Then let's pull that
into place along here. Bearing in mind, once we've got this bit done, it's
the hardest bit, and it does mean then
that pretty much, you've got the hardest
part of the gray box done. And you can see why we're
doing all that work, because you can see now all
of the different levels. And we've not even
finished this bit yet, but you can already see all
of those different levels. Lo really, really cool. Now, let's think about
this top bit here. So what I'll do is, I will come and steal kind
of all of these. So what I'm going to do
is, I'm going to come. I'm going to grab all of these. I'll grab actually all
of these parts here. So we'll grab all of these, and then we'll press shift, and we'll come round
this part here. And what we'll do is, we'll
drag all of those in. So what I want is these
posts, first of all, or these big posts here, going all the way up
around about here. I'm going to stick my
man on top of there, so my guy is jaws here. Let's press G and
drop him over here. Press the dot b and zoom in. And then what we'll do is we'll
pull him up here like so. And then we've got
this part in here. Now I'm thinking that this part, so this part here is
going to be going in. To this here. Like, so, I'm going to drop this part down to where his
waist height is, again, like we
always do. Like so. And let's put him over there. Spin him round. So I's
880, let's spin him round. And pull them up to, so he's actually looking out, making sure it's the right
height, and that it's perfect. And then what I want to do is I just want to see if I
need to make the small, so I'm just going
to press shift D, bring it over, put
it into place. Making sure that actually fits, and you can see
that this one does. And then what I'm going
to do is grab the top of it or the bottom, sorry,
and pull that up. And then we're going
to come to this one. And I'm going to pll that
one all the way down. Like so, There we go. And now I'm going to bring those to the other side as well. So I'm going to grab
this one and this one, press Shift D. Bring them
over to the corners of here. Get them back a
little bit. Like so. Now we need to think
about on the next lesson. We're going to save
it out, so file save. I'm going to grab all of
these parts just making sure that all of this has on
it the ambient clusion. Let's grab this one last, contro L and linked
materials, and there we go. As this one going on Ys. Let's also come
under here and pull this one down a little bit
as well. Jot into place. Like, so, A right, now we're actually
really going somewhere. This will have a roof on
it, and on the next lesson, then we'll start
with this part here, and we'll put a
beautiful top on there. And then we'll have
a real good visual of how we're going to actually
finish this part off. We'll bring in the
Booleans at that point. We'll make the archways in here. We'll see if this is a little bit tooth, it might be too thin. We'll get our guide down
here and have a look. But even the view from here
as you can see looks really, really nice,
everything lines up. The view from here
as you can see. Everything is really intricate
and looking like it. Right, everyone, so I hope
you enjoyed that one. I hope you didn't find
that one too messy, or sometimes it's very hard, but just keep looking around
what I've actually created here and really try and get it as close to it as possible. Don't worry if it's perfect. We don't want environments
that look exactly the same. We want to have a little
bit of variation there, and I hope you're
enjoying it so far. Thanks a lot. Bye bye.
24. Exploring Different Perspectives and Angles in Blender: Welcome back, everyone
to Blender Ford the Modulate and Kash
Environment guide, and this is where we left off. Alright, so before
we go any further, let's just pull this part out. So all I'm going to do is
just grab both of these. I'm going to actually
pull them out a little bit, like so. Just to make it a
little bit more flat along there just so
everything fits into place. Alright, that bit's
looking good. Now what we'll do is
we'll come to this part. Now, first of all, what we'll do is we'll measure this out. But if I come round to here, I can see these are a
little bit too tall. So all I'm going to do is just pull them
down a little bit. The thing I'll do is also, I will steal like this one here. So this roof off here, we'll press shift D. And the other thing is when
you're doing a great box, it gets easier as you
actually go along, as well as harder
because it means you've got more parts
to actually work with. What we're going to do is just
put that on top of there. I'm going to go
over the top then, and all I'm going to do is press S and y and pull
that out a little bit. Jaws to make it a
little bit more square. I doesn't have to be perfectly square or anything like that. As you can see, all we're trying to do is just put it on there, so let's make it now
a little bit smaller. Like so. And then what
we'll do is now and jaws, looking from this angle, and making sure if
I double tap the A, that yes, I'm happy with that. Okay, that's looking good. Now what we'll do is we'll
put the rest of these in. Now we've got that. So
I'm going to press 50. I want to press our z
-90, spin them around. Let's get them into
place along here. Let's push them back a
little bit into place. Like so, and then let's do
the same in the other ones. So shift, and then Z -90. Once we've done this as well, we're going to see all of the parts that
we're going to need. And if you're building
your own gray box, one you've done, then you can just go around and see which parts
you'd like to have, how many kind of
posts you'd like, how many pillows or
pillars you'd like, how many roof different
types you're going to like, and this is why it's
important to build these gray boxes
out first, like so. And then finally, now, I'll just hide this
out the wait a minute. I'll come to this part here. And what I'm going
to do is, I think, I'll just put it
into here like so, and then shift,
put it into here. They don't have to
be exact, as I said. Once we come to build
out the main build, and these will be
a lot more level, of course, t, bring
back the roof. But t the A, and there we go. That is looking pretty nice. So even from this angle, we've not got this bit yet, where you can see coming
from this angle now, just down nice that looks. Okay, so let's now come
to this part here. Now, what I'm first
of all going to do, I'm going to isolate
this part out. I'm going to press Let's just press question mark,
just to isolate it out. And then what I'm going to
do now is split this off. So I'm going to come to the top. And instead of just
trying to grab it all, I'm going to press control
and plus on the number pad, and that then will take me
all the way down to here, and you can see it all selected. Then we're going
to do is press P selection, separate that off. And now, finally, let's come in, press a little
question mark again, and I'm gonna grab these, and I'm going to grab these. I'm going to press the
question mark again and isolate everything
out in that way. I'm going to spin these round, so our 90, let's
spin them round. And then what I'm gonna
do is, I'm going to line those up over here, like, so Let's go the other
way down though, so control one, and
let's line these up. So first of all, we
need our bottom one. So we're going to put
these into here, like so. And then what I'm
going to do is, I'm just going to
move these over. So if I pull this one
over, pull this one over, like so, make sure then that they're in,
where I want them. So these are going to be the
doors down at the bottom. And then, of course, we want to the top arches along here. So these are this is why
this is actually split off. So now if I grab these, I'm going to press
shifty, like so. I'm going to bring
them up. To here so that they're actually
cutting into there. And then what I'm going
to do with these ones is I'm going to make them
a little bit higher. So I want them coming
nearly up to there. So S, let's pull them out a little bit.
Let's lift them up. And what I'm also going to do, I think with these is make
them a little bit wider. So let's make sure,
first of all, were on individual origins. Press the tap button, press A. And then all you're gonna
do is press S and X, and then you should be able to pull them out individually, like so and then finally, what
I'll do is, You know what? I think I'm actually happy
with those how they are. I'm just making sure they're a little bit lower than
this, which they are. Okay, so everything
is split off now. So what we'll do is
we'll save out our work. We'll come to this
one here first. We'll go to In fact,
you know what? We'll reset all of the transforms of all of
this first, so control A. All transforms set
origins geometry. Let's come to this one first. Adding a modifier, and the one we want is going
to be the Boolean. The Boolean we want to use
is going to be this here. Make sure it's on fast. Press control A, and then we'll come to this one now, and
we'll do the same thing. So add in a boolean,
grab these here. Put it on fast, and you
see there the difference. You can see it's not
actually working, and that's why we
generally put it on fast. Let's then hover over
it, press Control A, and let's move these
out of the way. And there we go. That is
what you should have. So now you can see they're
going through there. You can see we
have a few issues, we need to fill in this mesh, but apart from that, we've
got our doors now on there, and we've got our main
archway on there. So let's just pull
these out to the side. And then what I'll do is
I'll come now to this part. I'm going to press
the little question mark to bring back everything, and then I'm just going
to fill these parts in. Now, the way I'm going
to fill these parts in, I'm just going to grab this
part here. You know what? I'll make this easy for myself. I'll press shift H, hide
everything else out of the way, and then let's fill
these parts in. So let's go to object mode so you can really
see what I'm doing. I'm going to grab this
one and this one. Press the F b, grab this one
and this one, press the F b. And I'm just going to
come round this side, this one and this one,
press the F born. And then all I'm going to do is come to the back part first. L shift and click
O lt Shift click. Now instead of pressing
the F b on here, I'm going to right
click, and you've got one that says
Bridge edge loops. As long as you've got gap
missing on each side, bridge edge loops
will work fine. So I'll just show you if I grab both for these, right click, Bridge edge loops, select
at least two edge opposite. So deselect them, right click. Bridge edge loops, and now you
can see it actually works. Same on this one,
then, Alt Shift click, Bridge edge loops.
And there we go. Now, if we press lth to
bring back everything, double tap the A, and let's put it onto render view again. And there we go. That is
what we're left with. Now you can see, it's a beautiful walkway
walking down here. You can see that the
storage is below it. And now you can see that
they're making the way over to this edge over here. So now I'm going to do
is I'm going to I think, think about this
part round here. So this part around here. First of all, they needed
to be the right height, so it needs to be
up to this height, and they also need to put some steps leading
down into here. So let's probably
do the steps first. So what I'm going to do is I'm
going to grab these steps. I'm going to crash shifty, go to bring them over. I'm
going to spin them around. So z 90. And what I want from here is the steps to come
from the top of here, so you can see from the top of here, but they need to come. Down to the bott. They
relatively steep steps, you can see from top of
here down to the bottom. Now the thing is, You can
also do this a different way. If you come into your steps, select the top step, I shift, cursor selected, right click, set
origin three D cursor. Now if I press Control three, you can see that I need to get them down to this point here. So this point on here. So if I press
Control three again, this is where they
need to come down to. It's quite a steep step. They need to go this far back. In fact, let me just yeah, they need to come to
round about here. So if I pull them
round about here, if I scale them now, you can see that I'm
scaling from that point, which means I can pull them from here and scale them up like so. So what I'm going to do is, I'm just going to pull
them back to there. I can see now my
steps are still here, but I want to pull them
now down to there. So what I can do is
I can press S and, and you can see they don't
move because it's right on the top of here where the
actual orientation is, which means I can pull it from
there and make it really, really easy then to create
these steps for myself. Now, the next thing I
want to do is I want to actually pull this
out a little bit, so we can see if I grab this, I can pull it out
to steps like so. You can also see this needs coming up a little bit, so
I'm going to pull it up. Just a little bit, like, so it doesn't matter if there's little edges on there.
They look fine. They look absolutely normal when they're actually like that, so we're not going to
worry about those. Now, the next thing I
want to do then is, I want to grab this part here. And what I want to
do is I want to put a little bit of a gap
here and then have this. So this one here, like, kind of round this side as well. So what I'm going to
do is I'm going to, first of all, pull
my steps back in, first of all, so S and X, let's pull them back in, make
them a little bit thinner. And then what I
want to do is put another block come in
to the edge of here. So from here all the way
over to this part here. Let's first of all, press Shift S. Ster selected. Let's press. You know what? Let's not I'm thinking Ive got a block
that I can actually use. You know what?
We'll use this one. So shift D cause
it's already got the material on. But
bring it to here. And what I'm also going to do. I want it come in
rounda this part here. And then I'm going
to pull it over, and I want it going to
round about this part here, like so, so you can see
the bottom of the steps. And then what I'm
going to do is, I'm just going to bring my guy down. So I'm going to press
Shift S elections cursor. And I'm looking how big these actual steps
are. So you can see here. This is how big the steps are, and I think it's absolutely fine walking down those albeit, these steps, the
very, very, very big. But we're not going to
worry about step size or anything like that right now. So we want it coming
up here and then we want another part
coming over here. So what I'm gonna do is,
I'm going to first of all, pull this back now.
So I'm gonna come in. I'm going to grab
the front of here. I'm going to go over the top, and you can see that I want
to pull it back basically. So it's a little bit back
from this point here. So something like that, again, making sure that
the edge, you know, you've got these huge variations in the edge and
things like this. Now what I want to
do is I want to pull this part out a little bit. So I need to see how
far it's going over. So it's going over
to this part here. And what I want to do is
I want to pull it back to something like here. It's got a little bit
of an alcove there. Then what I want to do
now is grab this part, a shifty, bring it
round, so I 90. And I'm going to see if I
can fit this part onto here. And will it fit well? How close to the front do I
actually need it? Do I need to pull this
out a little bit more? And let's see how
this is going to fit? So if I put this on here, you can see that
it's fitting okay, but it needs kind
of another part in here cause I think I'll
leave this part in here, so we're just going to need
a little bit of a pillow. So a pillow, which will be save a look. I don't
want to use this one. I would soon use one of these, or do I use something like
that? Let's actually try it. So we'll bring this
over. And we'll see if that's going to fit. You can see it's a little bit probably a little bit too thin. So maybe that's not
going to do it. I'm thinking, let's have
a look at the other one. So I is, I'll grab one of these. I'm going to press shift
D and drag it over. I'm going to zoom to it
with the little dot b, and I'm going to see if
this one it's into place. So let's pull it up, and
you can see that that one actually nearly fitting into place like so. And
you know what? That's probably
going to look okay. So we'll use this one. We'll come under. We'll
just grab the face and bring it into
the floor, like so. And you know what, that's
looking really nice. Now, with this bit
here, I'm just going to Drag it up just so
we've not got that there. Then all I want to do now
is bring this one across, so shift D. Let's
bring this across. Like so, and there we go, that is looking pretty
good, as you can see. All right, so on the
next lesson then, we'll put a roof on here. We'll do the back of this,
but you can really see now we've got one more
small piece to do, and then we've actually
finished our gray box. Now, let's have a
look round now. You can see from
double tap the A, all the way around. You can see this looks
very interesting. Lots of stairs, lots of
high points, low points, and even when we come
around this part, all of it is really intricate,
really interesting. It all kind of fits and blends
together, as you can see. So, if you've got
this far, Well done. There's a lot more
of the course to go. We should be really
proud if you've got anything like this because it's your step into actually creating professional looking
scenes and environments, and in the end, professional modular and kit bash
packs, as well. Alright, everyone, so I
hope you enjoyed that. I'll see you on the next
one. Thanks a lot. Bye bye.
25. Completing the Greybox for the Aztec Scene: Welcome back, everyone
to Blender fall the modular and Kit
bash environment guide, and this is where
we left it off. Now, I think the first
thing I'm going to do is grab this door. I'm going to bring it
round then to this side. And then what I'm going to
do is I'm going to have a door down against here. So I'm Js going to put
this door to the floor. Like so. Then I'm
Jos going to pull it back against there. Like so. And I think I'm so going to have a little door
around this part here. So I'm going to press
50, bring it out, and then A Z 90
and bring it over. Now, I have checked,
and the amount of time. It's took to make the gray box
is roughly around 3 hours, which, to be honest, I have been showing
you what to do, but I expect a gray box
to take around 2 hours, depending on the
complexity of something, but yes, it is a long process. You know what? I'm not
gonna have a door there. I'm actually going
to get rid of that. I'm going to have
a window there. I think it's going
to look bare. But it is a long process or
relatively long process. But if you're
create in something like a modular pack or
something like this, then absolutely I
recommend you do this. Now, the next thing
I want to do is just quickly show you
that at the moment, you can see this
is looking very, very nice, but have we missed any of these parts where they don't have
ambient occlusion on? So what I'm going to do
is, I'm going to grab the whole thing.
So click and dry. And then what I'm going to do is I'm going to go up to select. I'm going to go down to what
it says select by link. And the one I want is material. So select material. And you can see here it takes away two of these
that aren't links. Now, you don't have to actually
select the whole thing. All you need to do is select one that says like
ambient occlusion on. Let's go to selection,
Link and material. And then all we
can do is press H to hide everything out the way, and these are the
ones that's left. So now can go to these, click the down narrow
ambient occlusion. I Control L, and we're going
to link materials like so. And now you'll see
everything has that on. And the moment we bring
them back, now you can see, look, this has got ambient
occlusion on there. Alright, so now what
we're going to do is, we, first of all, need some
pillars under here. So have we got any pillars to put onto there,
I don't think so. So let's make Let's make like three pillars just to put under there to
finish this off. So all I'm going to do is
come to this part. Shift S. Is selected. Shift A, bring in a cube. And I'm going to make it a little bit smaller
with the S bond. And what I'm going
to do is bring it over the top. Let's
see where it is. So here it is, and let's put it round about here. Like so. And then I'm just going
to put it into the floor. So I'm going to press the little dot bond
on the number pad. Let's put it into the floor. Like, so let's
press S and Z then. And then all I'm going
to do is turn this then into A actual pillar, so I, to insert, and then let's press
E and finally pull it up all the way under
that roof, like so. Finally, then let's
grab this one, grab this one, control L, and we'll just link
materials, like so. Then all I'm going to
do is go over the top. And I want to press
shift D to duplicate it, bring it over to
this side, then, just making sure it doesn't go. Maybe, so there's a little
bit there as you can see. I'm just going to put
it there for now. And then I'm going to put
one right in the middle. So shift D, one right
in the middle, like so, and you should end up
with something like that, which finishes it
off pretty nicely. Alright, so next
thing we want to do, is we want another part that's
going to come down here. So I'll just actually
steal this part. So I'll press shift, and I'll bring it over
to the end of here. And then what I'm going to
do is, I'm just going to leave it there the moment. I'm just going to bring it down. So if I grab the top of it, I'm going to pull it down to
the bottom of these steps, and then finally, I'm
going to pull it this way, so it's covering
all of those steps. You can see with this, it's got a little bit of a step up. Well, a big step up, should I say on this bit, so let's pull it
down even further. And there we go, and
then let's pull it this way. Interplace, like. And then finally, what I'm
going to do is I'm going to have I'm going to pull
it back a little bit, so I'll pull it back a
little bit, like so. And you can see now
that is giving us another kind of little alcove in there, which is what we want. Okay, so now I want to
do is I want a cube that's going to come here
and basically come to, you know, set this part out with a roof on top or
something like this. And I think what I'll do
is I'll use this one here. So I'm just going
to press shift. I'm going to bring it over. And I'll stick it out a little bit, so I'm
going to stick it out. A tad. So, I don't
want it roughly, roughly, actually, you know, yeah, roughly around this height because then we can
still see everything. It's a little bit higher
than this part here, and I think that's going
to look pretty good. So all I'll do now is just pull the bottom of it
down into the floor. Like, so. And then I do want it. Jaws stuck out, maybe
not quite that far, maybe a little bit in like this. Alright, so that's
looking pretty good. Now, I'll just grab
one of these posts, shift. Let's bring it over. And what we'll do is
we'll just put that into place. Just against here. So I'm going to slot
it t against here. L so, and then pull
it back into place. Right, so. And that when we'll finish this
place part off, near enough, we'll just
put a little post on here. So shift A ub. And I find these things that would be like
telling people, just be careful, there's
a bit of an edge there. That would be about
the most health and safety you're
gonna get I think. So let's pull them down
and get it into place. Like so, and we'll put
the post around there. And I'm going to have, I think, we'll come round this side then. And I'm just looking at
this part here because it's definitely going to need
something going across here. So what I think I'll do is
again, I'll steal this part. I'm going to press shift D. And the first bit I'll
do is over here, so I'll bring it over to here. Let's drop it down. Because we know this is the right height
for people looking over. So all I'm going to do is
just drop it down here. And this is like the
finishing touches like so. And then what we'll do is
we'll put a door in here. So let's grab one of our doors. Then we'll go shift
deep, grab or door. Let's pull it over
here into place. And this part,
let's pull it back. And then we'll go
there's a door. Just make sure it's not
too close to this edge, if it is, just move these
two parts back a little bit. Like so. Alright, so
that's looking good. Now let's pull these up here. So Shift D, let's bring them up, and we're going to pum in
place along this part here. Now, with this part,
I definitely want them inside there,
I think, like so. Let's squish them
down. So S and y, let's pull them
down a little bit. Let's make sure they're
on the floor as well. Like so, and I think
that's going to finish that off pretty nicely. And then what I'll do
is I'll press shift, bring one over to this side. And then finally, Shift D, let's bring one over to
this side as well. Like so. And then let's put in
a couple of windows. So I'm going to
grab this window, Shift D. And then
we'll bring it over. Rotate it round, so Oz
-90. And let's put it. If I press control one, I
can go to the back of it. I'm going to put
one window here, and then I'm going
to duplicate it, so Shift D, duplicate it down. And let's put one
window there. Like so. And then what we'll do is we'll get this one little post here, and we'll put it one
over here as well. So, if D, let's just drag it all the way over and then
just pick it up. Seven, to over the
top. Find where it is. And then all I'm
going to do is G, put it over here, and then just drop it
down into that corner so. And I think at this point, guys, we've near enough finished. With our actual gray box. I'm just looking around my own gray box because obviously, I've been working
from my own gray box. I'm going to hide hide
my guy out of the way. And then what I'm
going to do is, I'm just going to
grab everything now. Click on one where I know it's got the ambient
occlusion on. Object, and then
sorry, not object. Select Linked and material. Hide them out of the way, and this is what
we're left with. So both of these, let's put
them on ambient occlusion, and let's press Control
and link materials. Lt bring back everything. And this is what you
should be left with. I'm just looking. Make sure
everything's on there. And now what I'm going
to do is just have a quick check round, and I'm just looking to
see anything I've missed. Now I think I have missed
one part over here, so I'm going to
grab this, shift. Let's bring this
down into place. Now, you can see already
even the gray box, if you were to render this out. Even this would
look pretty good. Lo like a professional piece of work because of the fact that we've stuck to all of those points that
was laying out for you. Which would be the depth, which would be the height,
which would be the intricacy. And now what I want you to do is if you look round any of this, you can see that this here
would be a nice shot. Let's just press end to close
this panel out of the way. You can see here that this
would look a very nice shot. You can see if I come
round to this part. This would be a nice shot.
There's lots of intricacy. You can see if I come
round to this part. They've got the whole
market then out. And even if we come round to
something like this shot, you can see everything
is really interesting. And that is exactly what
you're looking for, even a little step
leading up here. If I come around
to here, This is perhaps even the most boring
shot out of the whole lot. But even here you
can see we've got this bamboo bridge going over. We've got these two
archras, warehouses. Eventhough we've got height
to it, we've got depth to it. And you can see that's
what we're actually looking for when we
build a gray box. So just think of it
as you know, flaws, like how many flaws
are you going to have and then try and
base everything on there. So, you know, maybe start with the height that you want to go to and build from there if you struggle
to do it this way. The way I do it is, I start
out with a central piece. So I start out with an of
this being my central piece, and from there, I get ideas from the references
that we went and got, and I build around those. And then I take all those
ideas from the references. And rather than just creating
something from a reference, we definitely don't
want to be doing What we want to be doing is t checking this idea and
this idea and this idea, combining them and then
building around it. Now, when you're
building the gray box, you get chance then
to make mistakes, you get chance to see
what things look like. You get chance to, check out
how good this part looks. You know, you get
chance to think about what can go in here. You don't really get that
if you jump straight in and just start modeling.
Alright, everyone. So what we're going to do
then on the next one is, we're going to now take a
look our resource pack, cause one thing I didn't show you that's also in
the resource pack. I'm not sure if I
did or not, but we've basically got
a load of renders, which are going to
really help you recreate all of
those little pots. And this is where it gets really exciting because we start
now to create the models. We start to get the textures on, the shaders on and
all that good stuff. Alright, everyone, so I
hope you enjoyed that. I'll see on the next one.
Thanks a lot. Bye bye.
26. Setting Up and Using References in Blender: Welcome microphone to lena for the modular and Kit
bash environment guide, and this is where
we left it off. Now, what I'm going to do
now is just clean this up. So first of all, I'm going to
get rid of these booleans. I'm not going to
need those anymore. And this is what we
should be left with then. Now, from here, what
you should be doing is, you should be looking
around and looking at all the parts that
you're going to need. If this was you creating your own modular pack or
your own environment. What you're going
to do is you would take these pillars here. You can see we've got
these pillars here, which are the same
as these pillars here and these pillars here, and basically we would
take those parts and we would take them into
another blend of file. The reason we're
going to do that is we're going to be jump
in between those. We're not going to
do it that way. What we're going to
do is, we're going to open up a new blend file. And open up our reference guide that we actually have
and do it that way, but when you're actually
doing this on your own, what you need to
do is you need to take certain parts of these and take them into
another blend file and then build them from there. And the reason we're going
to do that is because then we can make use of
the asset manager, which is really going to
help us build this out. I'm going to do now
is you can either shut this blend file down
or you can leave it open. Depend on how powerful
your actual computer is. It doesn't really
matter because we're going to be jumping
back to this. It just saves me opening it up. Now, if you are going
to have it open, just make sure that you
put it on wire frame because then that's going to
make sure that it's very, very low on the performance it's going to take from
your computer. What I'm going to
do then is put this down and open up
another blend file. So here we are in
our new blend file. And what I'm going
to do is, I'm going to once again go up to file. I'm going to go to default
and load factory settings, like so, and we end up
with something like this. I'm going to then click
and drag everything, press delete, and I'm just going to delete them all out the way. Now, we do have a
load of resources, so let me just show you those resources that
we actually have for bring these over This is what
comes with the actual pack. You will receive these in there. And if you press control
and mouse scroll upwards, you will be able to
see these much larger. And you can see we've
got things like arches, the bamboo roofs, the bridge. Everything basically is in here. And this then is
it's not something that you're going
to be able to use to actually directly create, create your pillars
from, like this. You won't be able to you plane up against it
and see how big it is. But I've done it this way
because it actually is a great way to actually grab references and create
things from references. And that's why we're
going to do it. Now, with the scaling, I am going to be
helping you out there. I am going to be giving you
certain scales to things, which is going to
help out a lot. And the other thing
is that what we're going to do then is
create these parts, so we'll start with
something like the pillars because
they're very easy and slowly introduce you to
modeling these actual parts. Once we've done that then, we're going to put them
in collections, put them in the asset manager, and then we should be
able to periodically bring them in to that
scene that we had set up. Now, it's up to you
whether you want to go ahead and create
all of these parts. For me, I like to create things, bring them in and
put them in slowly as I'm actually working.
Alright, everyone. So we're going to
put that down, like, so So now what I want to do is, I want to bring in
some of my resources. Now, if I press Shift A, you will see that
if you come down, you've got one that says image, and you've got one that says reference and one
that says background. The one we want is reference. The background is
basically used for if you're putting up something
against the schematic. So let's say you're
building a boat, you have a schematic
of the whole, you basic would use
the background. For us, we want to use references
because the background will disappear if you're
moving around your viewport. You can only see the
actual background if you press one on
the number path. So just remember that. As though, we're going
to use the reference, so if I click the reference, and then what I'm
going to do is head on over to where I
actually need to. Now the easiest way to do that is if you open
up your blend file, you can see this along here. All I need to do is click that. Press Control C, and then
I can drop that down. Come back to this
part, press Control V, press the enter board, and then it will take me right to there. Now at the moment, you
can see that all we can see is just kind of
these names of things. And sometimes that's
not very handy. So what I'm going to do is
click on this button here. And then you can see that we've got all of these parts now. Now, albeit, we can't
really see them so well. So let's actually click
this size button here. Let's pull it up and
make them a little bit bigger just so we
have a better visual. Let's open it up, and now we can really see what
we're looking at. And as I said, we're going to start with the stone blocks. But there is one other
thing I want to show you. So we'll bring in
our stone blocks, and you can see a
brighter reference, but it's rotated funny, and
we don't really want that. And the reason is because
wherever you're viewing, when you're bring
in a reference, it will come in in that angle. We don't want that. So
let's delete the other way. Let's press one on
the number pad. Let's press Shift Day, bring in our reference again, and we're going to bring
in that stone blocks. And now you can see
it's in really nicely. You can also see that if
I put this on wireframe, we can still see our
reference even then. Some people prefer to put
in their reference over on the left or right hand side. I don't actually prefer that. I prefer working
with it actually in, it gives me a much better view of it a thing, but
it's up to you. If you want to put it over
on the right hand side, then all you need to do is, I'll show you actually
how to do it. So if you press one
on your number pad, you're going to zoom in. And then what you're going
to do is you're going to pull this over, like so. You're going to
make another screen for yourself. So like so. Just put it down, so
I'm going to press one. I'm going to move over like so, and then you can actually create this part and drop it into here. So, in other words,
you can see now, I've got a place I can work, my references on the
right hand side, and I've still got my collections
and things like that. Now, if you don't
want to do that, you want to get rid of it, all you need to do is drag and pull it over to the
left hand side, and then you'll have
that same part b. Let's come over to
modeling because we don't actually want to
work with the layout, so we don't want this timeline
or anything like that. What we want to do
is working here. Now, let's also save our works. I'm going to go to file.
I'm going to go to save AS. I'm going to save it where
I save my other file. And the other thing is at
the moment, this is very, very hard to read because I did, put on the actual images. And you can see my course
Aztec scene is here. So let's call this
course Aztec Ps, like so and save that out. And now from here then,
we're actually ready to actually start creating
these pillars. Now, if you want this to be a little bit bigger, then do that. The last thing though, the
last thing that we need to do, is we need to bring in
our human reference. So we've already got our human reference on
the other file. So what I'm going to do is, I'm just going to open up my file. And it's up to you how you
want to bring this in so you can see Human reference,
here he is over there. Let's put this on. And
just going to grab him. I'm going to press Control C. And if you haven't
got him in here, if you deleted him or
something like that, you don't want to
open up this, then just bring him in from
the resource pack. Completely up to you. So I've
copied him. Pt that down. Press Control V, and here he is. Now, let's pull this up so we can actually sit it
on the ground plane. So I'm just going to pull it up, sit it on there, pull it back. And then finally the
human reference, let's bring him in control less, and what we'll do is
selection to cursor, which should be
right in the middle. I'm going to press one
on the number pad, and then what I'm
going to do is press Rs head and 90 to
spin him around, so it's face in the route way. And finally, finally, let's
put him on the ground plane. And we are ready to begin. So on the next lesson, then
what we'll do is we'll start creating these
kind of blocks. And then from there, we'll create the pillars
and then the stairs. And then we can actually
start getting some of this stuff in to our own scene. Alright, everyone, so I hope you're really
enjoying it so far. I hope you're excited
to get this bit done. Let's save out our work now, so just go to save, and
I'll see on the next one. Thanks a lot. Bye bye.
27. Creating Your First Modular Pieces in Blender: Welcome back, everyone,
the Blender four, the modeling the modulate
and KBsh environment guide. You think when I've
said that 70 times, I wouldn't mess it up,
but I do sometimes. All right, so let's
bring in A cube. So first of all, let's make sure our curses to world origin, but make sure that's
in the world origin. And then all you're going
to do is press shift A, then you're going
to bring in a mesh, and we're going to
bring in A cube. Let's press n then to open up this panel over on
the right hand side. And these dimensions is
what we want to stick to. So 8.269 0.26 0.74. Like so. And this is going
to be our first block. Now, it looks huge, but when
it's actually In the scene, it's not going to
be that big at all, it just looks big in this part. So what I'm going to do is just move it to the left hand side, and then going to level
up with the ground plane like so you can see pretty
much leveled it up there, and then we're
looking good to go. Now, one of the things
that you should know. First of all, we're
going to talk about snapping a
little bit later on. So how do we snap
things to each other? The first thing we're going
to talk about is scaling. Now, when you're scaling things, everyone thinks that when
you build in modular packs, they have to be 1 meter
two meter three meter. But this doesn't
always work because trying to get everything
to be that scale, isn't always going to work. Now it does help with snapping. But honestly, it's better off if you're not sticking
something like that. It's going to make it much much harder for you to do that. And basically, when
you've got the snapping, it will snap on top of buildings or at the side
of buildings anyway. So try not to worry too
much about that part of it, getting everything
to a certain scale because it simply
isn't going to work. It's going to make
your life harder. And at the end of the day
when people build things, they're generally
going to be scaling things up to what they
need it to look like. So you'll notice
professionals when they come in and the
building environments. There's lots of them
out there You know, building environments
from these packs. You'll see that they're scaling things, they're snapping things. They're twisting things
all of the time. They're even using
things in ways that you wouldn't even think were possible or even
ways that you didn't actually envisage when
you set out to do this. Alright, so what we're going
to do now is, first of all, let's come up to the
top right hand side, and what we're going to
do is put cavity on. And then all I'm going
to do is just save out this just to make sure
everything is saved out. Now, let's make our
first actual block. So what I'm gonna do is
I'm going to press tab. I want to press controller And I'm going to bring
in three edge loops. So scroll the mouse we look. Left click, right click then. And then we want to do
is split all of these up because these want to
look like actual blocks. So what we're going to do is
Shift click, l Shift click, l Shift click, right click, and we come down
and mark a seam. Now, marking seams helps
with unwrapping things. And I'm not going to
go into yet why we, you know, mark things to unwrap things to
put materials on. The reason why we're
actually marking seams right now is so
that we can grab islands. So you'll notice now because
I've marked these seams, if I come in with Bas
elect, not Edge slect. So I'll show you, if I
come in with Edge elect, press on here, it will
select the whole thing. We don't actually want
that. What we want to do. It's come in with
Face let, press L, and it will only go up to the actual scene that
we've actually created, which is really handy
to split things up. Let's then come down and
press L on this one, as well. And then what I want to do
now is press the y button. And what the Y
button is going to do is it's going
to separate these off without actually separating
them into two objects. So if I press P, you can see I can separate
them by selection. I'll just quickly show you,
but don't actually do it. So separate by selection, and you can see now we've got actual loads of blocks here. So two blocks basically. I go back though, instead
of doing it that way, what I'm going to do is I'm
going to press the y button. You can see now that
they're still part of the same object
they're just selected, and that's why we press
the y button sometimes. Now, the next thing is,
if I just grab this one, press shift space bar to
bring in my move tool, you will see when I bring
this up that they've got holes in them, and we
don't really want that. We want to fill those holes in. We could go in and
go on each one and press the F button and
fill them in that way, or we can do it in easier way. So what I'm going to do
is I'm going to press A. I'm going to come up to mesh, and what I'm going
to do is clean up, and we're going to
go to fill holes. The moment I fill
holes, you can see now, if I bring this one up, let's see if it's
actually worked, and there you go.
It's filled in. All of those holes
going down there, while still having
a mole split apart. So now if I come
in, grab the top one or grab this one
or grab this one, you can see they're
role separated and all of the holes
are filled in. So it's as quickly
and easily easy as that to actually create
this block part. So now we're going to do
is to finish this off, we never want really, really sharp edges like this. When we're dealing with
anything, you know, even the Egyptians had kind of a little bevel on
the edges of their stone. Nothing would ever
be razor sharp. So to combat that, what we're going to do is we're
going to, first of all, reset all of our hansorms, set the origin to geometry. Add in a modifier, and we're going to
add in a generate, and it's going to be a bevel. And the moment we
bring the bevel in, you can see this is
what it looks like. Obviously, this is way
way to over the top. So what we want to do
is turn this down. Now I normally turn it down to naught point
not note three, and then that gives
me enough of an edge. Now, I would say on this one, maybe it needs to go
a little bit higher. So let's try Naught
point naught one. Let's try that. And then we go, I think that's about
right for this stone. You will find when
you're working with metal, or you're
working with wood, or you're working with stone, that you're probably going
to have to change this a little bit on the actual bevel. And pretty much, as far as modeling goes, that's
it for that one. So really, really
easy as you can see. Now, let's now create
the other block. So we might as well do those
other blocks all in one go. So what I'm going to do is,
I'm going to first of all, we've got four other
blocks to create. So you can see here we've
got one, two, three, four. We're actually going
to look at this, so you can see now we've created this one with the
four blocks like so. Let's make this a little bit bigger so we can just see it, so we can just
press the Spot now. I'm going to pull it
back a little bit, and now we can see it
a little bit easier. And as I said, for those of
you who have it over here, sometimes that's a little
bit easier working that way. And now you can
see that we've got these four blocks. So
let's go in with those. So all I'm going to do
is we're going to press Shift D bring in the
cube, move that over. And then all I'm going to
do duplicate the cube. So shift D, duplicate it, and then grab them
both, shift D, and duplicate them both. And now we've actually
got four cubes. Now, let's come to
the first cube, and all I'm going to do
is give you the scaling. So we're going to come
to this first one. We're going to put this on 2.93. We're going to put
the next one on 6.59, and we're going to put the
Z factor on 3.21 like so. Then we're going to
come to the next cube, which will be this
one over here. So we're going to put this
on 3.5 0.752, 2.8. Like so. And then these two small ones, so we'll grab this one first, and we're going to put this
on at 0.974 0.972, 2.8, L so. And then finally, this tiny one over here, so I'm
going to grab this one. What we're going to do
is let's put it on two, sorry, 0.716 0.972. 2.57. And there we go. Alright, so these are these pretty much all set out
now with the scaling. Now, when we come to build
more complex things, we will grab a cube. We'll get the right
dimensions of it, and then we'll build
something else at the side of it from that scaling and make sure everything
scales up to that. So we're not gonna
be that accurate with the other parts
as we are these parts. And this is because these are pretty easy to actually create. Alright, so let's come in then. And the first thing we'll
do is we'll press one. We'll bring them up on top of
the ground plane, like so. So let's make sure these are up on top of
the ground plane. Make sure this one is as well. Like so. Now, let's
come to the first one. We can see we've got one
band kind of in there. So we'll come to
this one Control. Left click, right click. And while we're here, we're
just going to right click, and we're gonna mark a scene. Then what we're gonna do is come to the next one,
and this has three. So same thing
again, control law, scroll the mouse
where L. Left click, right click, right
click, mark a seam. And then we're going
to come to these two, and I think they've
both got the same, which is two in each of them. So control law, two, left click, right click, right click, mark a seam, and then the
same again on this one. Left click, right, right
click, mark scene. Alright, now we've got those. Let's actually split them off. So I'm gonna come to this
one first with Faceck. I'm going to press. In fact, you know what we can do
them all at the same time. So what we're gonna do is we're going to come to this one. We'll press L. We'll
come to this center one, this center one,
this center one, and then we're just
going to press the y born that then is going to separate them all
off individually within the own objects. Alright, so now we've done that. What we want to do is now, go back in, press the A
born to select them all. You're going to come to mesh, go down to cleanup, and the one you want
to do is fill holes. And now all of these should
have their holes filled. And this is really, really fast modeling straight
off the get go, just showing you
some really, really professional techniques. Now, the next thing we want
to do is grab this one. So we're going to
grab this one last. Can see it's actually
got a bevel on there. And what I want to do now is reset all of the
transforms first, so Control A, all transforms, right clicks the
origin to geometry. That then is going to set
the origin to all of these. And finally, finally, what we're going to do is control L, and we're going to come
down, and we're going to link not link
materials. Control L. We're going to copy modifiers. Copy modifiers, and there we go. We've got exactly now the same modifier on
here, which is the bevel. We've filled all those holes in, and now you can see just how quickly and easily we
actually created those. Now from here, what we're
going to do on the next lesson is we're going to put these
into their own collection. We're going to put them
into the asset manager. We're going to
then get materials on these and things like that. So there's lots and lots to do before we finish these ones, but that then will
set you up for the rest of the
actual buildings. All right, everyone, so
I hope you enjoyed that, and I'll see on the
next one. Thanks a lot. Bye bye.
28. Working with Seams and Sharps in Blender: Welcome back, everyone
to Blender for, the modular and Kit Mash
environment guide and. This is where we left it off. Now I'm going to play
you a short tutorial about seams and sharps and why they're important
now on things like this because they've got
some very hard edges anyway. The actual sharps aren't as important as some of the other things we
will be building, but nonetheless, you'll still
need to know about them. You'll definitely need
to know about seams. On these, again, they're pretty easy to unwrap because
they are stone. Things like stone and metal, very, very easy to unwrap. You can just basically
unwrap them. So if I grab one,
you can press U, you'll find all this
out in the tutorial, but you can just
smart UV unwrap it. With more complex things, we have to unwrap them properly. The other thing is as
well that something slightly changed where it's
now shade smooth by angle, so you shades things
smooth by angle. You can grab all of them, right click, shade
smooth by angle. Now in the Tutorial, I
think we show on this part, there is one that
shows you how to shade things smooth
and change the angle. But you will notice because I
shade them smooth by angle, if I click on this, I
can actually change it down here on the
left hand side now. All right, so I'll
play that now, and I'll see on the
next one, everyone. Thanks a lot. Bye bye. Welcome everyone to the
shop introduction to marking seams and Sharps
part of the course. Before I give you examples of what I'm actually
talking about, let me just briefly
explain what they are. Seams you can think of like
seams on a piece of clothing, like a shirt or a
pair of trousers. The main job of seams
is to make sure the texture that
you're trying to place on your mesh
goes on correctly, but more importantly, gives you control of how that
texture will look. Sharps are marked like seams, but serve an entirely
different purpose. We use sharps to
give us control of how sharp and soft angles
are on our meshes. This makes them look realistic. It is also important we do this, not only for
rendering in blender, but also sharps carry on through to other software
or games engines, earning one to use, like substance painter or unreal
engine as an example. With all that said,
let's get started. So here we are in blend it
with our starting cube. Now, if I click on my cube
and go to my UV editing, you'll see that the cube is basically unwrapped
in this actual way. So basically, it
unwrapped like a present. Now, if I come across
and I grab this cube, and I press shift D, and then we press shift spacebar
to bring in our gizmo, and we move it across. And now let's say I want to
alter this cube a little bit. So what I'm going to do is
I'm going to press the tab. I'm going to go into face let, click the top face shift spacebar to bring
in the move tool. Bring it up so. Now, let's say I
want to unwrap this. Now, if I grab this with L
just to grab everything, and I press the U
button for unwrap, you'll see that it unwraps
exactly the same way. Even if I reset the
transformations of this, it will still unwrap
exactly the same way. Now, let's mark some
seams and see how that has an actual effect
on our actual unwrap. So let's grab the top and
we'll come down to the bottom. And what we're going to do is we're going to press control. Then come down to what
it says Mark seams. Now, it's important
to remember that it's control leak to mark
seams in Face select. But if for instance, we're in Edge slick, so
if we come to this edge, if we press control leap, you will get this option
up as well, Mark Seams. But you can also right
click in Edge slick, and you can also see we can
mark seam this way as well. So for now though I'm not going to actually
mark this scene. What I'm going to do
is I'm going to grab the whole thing with L, like so, and now I'm going
to press Unwrap, and you can see it unwraps
completely different. Now, let's bring
in some textures so you can see what
exactly I'm talking about. So if I press tab, I'll come up to my
materials panel up here and I'm going
to give this material. So I'm going to come across
to the right hand side, click on my material button. So let's now bring the material
I've already prepared. So if I come across
this little down arrow, come on down, you
can see I've got one here called wood, and
let's click that on. Now, you can see
what's happened. We've actually applied our
material to this object, but you can see, it's
pretty much a mess. The top of it looks fine, but the bit going around the
side is all bent and skewed. So if I zoom out and
I press tab now, you can see that the
reason is that it's not actually UV unwrapped correctly.
So how do we fix that? If we come up to Edge slick, and we grab this edge, and now I'm going to do is I'm
going to right click. Come down to mark Seams, and now grab the
whole thing again. I'm going to press U, unwrap, and now you'll see it
unwraps absolutely fine. You can see that
woods looking really, really nice actually
on this mesh now. So what this does, the Seams do is actually gives you control of how this actual texture
is placed on this mesh. You also need to
take into account that this is basically
an infinite loop. So if I come round and I look
at this face and this face, you can see that
they're going round. If we have no seam, when I
talk about infinite loops, it's basically going
around and around, and Blender doesn't actually
understand how to unwrap it. So you'll end up with
that mess we had before. Now, the other thing to
take into account is, if I turn this wood around, for instance, what
I'm going to do, I'm going to come over
to the left hand side, the viewport of my UV editing, press A to grab everything, 90, spin it round. Now, the other thing
I want to show you is that where we join
these actual seams up is also really
important because you'll never ever get
it perfect on here, where there's an actual seam. So let me exaggerate
this a little bit. So I'm going to do is
I'm going to press tab. I'm going to make
this a lot smaller, and I'm going to move it into
the center of my UV map, and then I'm going to press tab. Now you can see that
these edges don't line up whatsoever against
this other side. So this texture here doesn't
line up with this texture. And the reason is because
we've got a scene down there, and that is the actual
break in the texture. Yet if we come
round to this side, and I spin this round. So if I grab it Z 90, and now go to this
one where we can see, you can see that these
line up perfectly. And the reason is
because obviously, there's no seam there.
The seam is here. So you need to take that into account on your own measures and objects that when you're
applying textures and materials, that try and put seams where you're not
going to see them. So if it's on a door
handle, for instance, try and put them on the inside where no one's actually
going to see them. So always bear that in mind when you're actually
marking your seams. So now let's discuss sharps. So if I bring in
a new primitive, so if I press shift A, I'm going to go across the mesh, I'm going to bring
in a cylinder. Now, you'll notice
that this cylinder has all these little
edges around there, and let's say you want to
make a cup or something. The last thing that you want is all these hard edge
faces in there. Now there are things we
can do to sort this out. The first one we can do is we'll bring in
another cylinders. I'm just going to move
this one out of the way. Shift base bar, bring in
Magismo, move it out of the way. Shift A, bring in
aother cylinder. And this time, I'm going to
come down to where it says, add cylinder and turn
up the vertices to 100. And now you'll notice that
we do have a round edge. But the problem is
that we've brought in 100 vertices to
actually achieve that, and that's not
something we want. We want to use as
few polygons as possible while still getting
a really good looking mesh. So how do we achieve that? Well, there are a number
of things we can do. First of all, we can come
across to this right hand side, what we can do now
is come to where it says normals and
click on Auto Smooth. Then we can right click on the viewport and
click Shades Move. Now you'll notice it's
actually been smoothed off. But the problem with this is, if I turn up my auto Smoove, you can see if I turn
it up all the way, it goes really, really funky. That is because at 170 degrees, Blender decides that these edges along here needs moving off. So it doesn't give
us a lot of control. If we do this on the other
one, se grab this one, right click, Shades
move, Autos move on. You can see again, even with
lower amounts of polygons, we're still able
to smooth it off. But if we turn this up, we're still going to end up with the same problem as
what we had before. How do we solve that
Well, if we come in now, press the tab button,
come to the top, grab the top, shifts
like the bottom, press Control e because
we are in face select, and we'll come in
and mark a shot. And now you'll notice
if I press tab that now has got
hard edges on there. This gives us control. So this is why we
actually use shops. No matter what I turn
this up to, 180 degrees, which is the highest it goes, I will not get rid of
those shops that we mark. We can also mark shops
around the edges as well, sever grab this
one and this one, and now because we're
in edge select, we can right click,
Ce down, mark a shop. Press the tab, and now you'll see you've got hard
edges on there. It's very important
that you mark shops, where you're going to
actually want hard edges. It's also important
they get into the habit of marking shops, when you're actually
marking seams. And then what happens
is when you join two objects together and you
turn up the auto smooth, if needed, you're
not going to end up with some measures like this. Okay, for one, so
I hope you enjoyed that introduction to
marking seas and shops, and as they say,
on with the show.
29. Introduction to Blender Shaders: Welcome back, everyone
to Blend the Ford, the Modula and Kash
Environment guide, and this is where
we left it off. Now, before I continue, I'm just going to save out my work, just making sure
I've got everything. And now what I'm going to do is, I know we've actually
just done one tutorial, but I think it's a good idea to actually move into
the next section, which will be
textures and shaders, because after this lesson, that is what we'll
be doing next. We'll be bringing in
our actual shaders. So what I'm going to do then
is play that for you now. I hope you enjoy it,
and I'll see you on the next and everyone.
Thanks a lot, bye bye. Welcome everyone to
the blender shading and texturing introduction. And you can see here
within my scene, I've actually brought
in a few shaders just to kind of explain
how they actually work. So first of all, what
is an actual shader? A blender shader is a
type of material that can be applied to three D
models within Blender. Shaders define the
way surface of objects appear under various
lighting conditions, simulating a wide range of materials and effects
such as metals, glass, plastics, wood, and more. Essentially shaders tell
blender how to render the surface of an object based on its
properties like color, transparency, shyness,
texture, and reflection. So within blender,
we use actually a no based system for creating
and customizing shaders, particularly within its
powerful rendering engines like cycles and the newer
EV render engine. Now, it's important to note
that the actual shaders within Blender react differently to each of those shaders. So at the moment,
you can see that I've actually got this on EV, but the moment I
put this to cycles, these actual shaders,
some of them, at least, will
react differently. So now you can see
that our emission here that we had
that was glowing, doesn't glow anymore,
and that's what happens in typically
in blender cycles. Also, the glass now, we can actually see
through the glass and see this is actually
a glass shader. So it's important
to know straight off the get go that some shades will work in EV and
some in cycles. Now, next of all,
we need to look at the different types of
shades within blender. So some are created entirely in blender
through node systems, which we're going to look
at in just 1 minute, and the others are
created through textures. Generally, these will
be PBR textures. Now, a PBR texture is a physically based
rendered texture. And it's a texture map
designed to mimic the way light interacts with
surfaces in the real world, based on physically
accurate models. These textures ensure
that materials reect to lighting conditions in
a realistic manner, making them essential
for creating life like three D models and
environments within blender. So now, enough of all the
back story on textures, let's actually go up then, and first of all, we want
to bring in an add on. Now, this add on is in
bill within blender, in other words, it
comes with blender. I wish they would
actually turn this on a standard, but So far, you have to actually enable it, but trust me want
to say it's one of the best add ons that
blender ever produced. Let's go up to edit. What we're going to do
is come to preferences. We're going to go
over to add ons, and the add on we want is
called the node wrangler. Type in node, make sure the
node wrangler is turned on, and then all you need to do
is just close this down. Next of all, we're going to
go over to our shading panel, which is this one over here. And then what we're
going to do, we're going to click on this cube, which at the moment,
doesn't actually have a shader on it
or any material. We know that because if we come over to the right
end of the side, where our material
panel is here, you can see this is
completely empty. Also in the shader panel, you can also see if I zoom out, this is also completely empty. If you do happen to
have a shader in here, and then there's
nothing in here, just zoom out as far as you can, and then you'll find
all of the notes. Now, what I'm going
to do, first of all, is adding a new shader, and what we'll do is we'll double click it and
we'll call it wood. Like so. And now
you can see he is actually set something
up within Blender, just a basic principle BSDF. Now, this basically
is the super node. It's where all of the
texture maps will plug into. This is the main node that
you will be using. All right. So now what I want
to do is, I just want to click on this node. And what I'm going
to do is I'm going to press control, shift, and T. And what then that
will enable me to do is open up my actual
computer file, and from there, I just
want to find my textures. So here are my textures
that I'm going to use as an example You can see
here we've got wood grain, and you can also check out
what these actually look like by coming over to
the right hand side here and clicking this on, and now you have a good idea of what these are actually
going to look like. We can also make them larger
as well if we need to. So you can see here
at the moment, the size is 128, and we can just bring that
up to actually make them bigger and see exactly
what textures they are. Now, to bring them in, all I need to do is select
the first one. Shift select the last
one, so we've got all selected and click
principal texture. And what Blender is
going to do from there is is actually going to bring them all in and set
them up for us like so. You can see now because
of the node wrangler, everything is set up for us. Now, within our
actual shading panel, you will see over
the left hand side, we actually have a UV map here, and it's not actually showing
anything at the moment. If we come on over and we select one of these actual
textures like so, you will see if I
Zoom we've actually selected this actual
metallic shader. I can also come down and select the roughness, for instance, I can select normal, or I can select the actual
image texture like so. Just remember, if it's
on the wrong one, it's probably because
you've got one of the textures or the wrong
texture actually selected, and I generally want to
have it on the base color. Now with blender four, comes
a new principled BSDF, and now a lot of the options are actually hidden behind
these little tabs here. Emission, for instance, is now hidden behind here, so
I can turn this up, as you can see, bring it down and change the color
of it if I sell one. So remember that some of them
might actually be hidden. Because this is
the basics video, we're just going to
go through a few of the actual options
that we normally get within our actual textures. So PBR setup normally
consists of a base color, known as the Albedo, or cut just a color map, a metallic map, a roughness
map, and the normal map. There are more maps, but they take a
little bit of work to actually set them
up within blender, and this is the basics video, so we won't be going into those, but we will be going into
those later on in the course. The first one, which
is the albedo map, it just defines
the basic color of the material without any
lighting or shading effects. It represents how the material looks under natural lighting. If we go to the next
one, we've got metallic, and this map defines which parts of the texture
are metallic and which are not influencing how the material reflects light. Metals have a high reflectivity and distinct coloration
in their reflections. Now, you will notice if
I click on this one, it's completely black because this wood has
absolutely no metallic. If this was completely white, all of this wood would
be completely metallic. If it has kind of
graze in there, that then is defined the roughness of the
actual metallic. In other words, those
little spots that you see when you shine
light on something. The next one is roughness, and this isn't to
be confused with metallic because roughness
is how shiny something is, and metallic is obviously
how metallic something is. Generally, as well
with metallic, either something's
metallic or it isn't. You don't really get in the
real world half and half. The roughness map
controls how rough or smooth the surface of
the material appears, affecting how sharp or
blurred the reflections are. A lower value results in a smoother surface with
sharp reflections. Why a higher value leads to rough surface with
diffused reflections. Now, when I'm talking
about values, I'm talking about
these values here. So the more sharp this is, or the more blurred this is, or the more darker
these little spots are, that will give you the result that you
actually looking for. And finally, we're going to
go now to the normal map, perhaps, one of the
most important maps, and the normal map simulate
small surface details and textures without
actually changing the geometry of
the three D model. It affects the way light
pounds off the surface, creating the illusion
of depth and detail. And this is used
a lot in games to actually look as though there's more geometry than
what there is. Now, let me show you
how that works then. So if I come down to this
strength at the moment, you can see that we've
got our wood here, and it's kind of defined. So if we look from here,
it kind of looks like it's three D and these
little grooves are going in. But if we turn this
all the way up now, you can see that's the
effect we actually get. You can see now it
looks as though it's much more ipy
along the edges. We can see big grooves
going down there, and this is what the
normal map actually does. Now at the moment,
with our actual cup, you can see we've only got
one actual material on there. And what about if
you want to put multiple materials
onto an actual object? I'm going to do is, I'm just going to
click the plus button. I'm going to click
the down arrow. And I'm going to
choose one like glass. I want to click the
plus button again. Click the down arrow,
and this time, I'll choose one that says stone. Now, if I go into my cube and press the tab button
in actual edit mode, come over, select
one of these faces. It only works on faces. By the way, you can't select an edge and apply a
material on there. You have to select a
face or multiple faces. So what I'm going to do
then is come down to glass. And finally, then I'll
click a sign L soap. Then I'll come round
to the other side. I'll click this
face and this face. And what I'll do
is, I'll come down, click the Stone
and click a sign. And there we go. Now
we've actually got stone, we've got wood, and
we've got glass. And if we put this on
our render view now, you can see exactly how
that's going to look, and you can see how the lie is interacting with all
of these surfaces. I come over just to
the right and side quickly and turn around
my sun rotation, we can get a clearer view of
what we're talking about. If I come even further aun and bring it to the front line, so you can actually
see that glass then is actually starting
to be seed through, and you can also see that actual normal map working on the
inside of this cube. Now, let's quickly
go back to our wood, so to do that, what I'm
going to do at the moment, you can see that
we're probably on the stone in this
shade of view here. It says actually stone here. Actually come down
and click on my wood, for instance, and
then it will take me and put the wood
on there as well. So that's another way
to actually apply them. Instead of the stone,
it's actually just put on wood instead,
as you can see. Now, what I do want
to do is I want to come in to my actual wood. That's the one that
we actually brought in this one here
and just show you, for instance, we can actually interact with all of
these texture maps. Now, there's thousands of
nodes available in blender, and the way that you
put them all together, it can become extremely
complex with huge, 100 node maps and shaders. So I'm just going to
show you something of the basics just
to get you started, and that will be an RGB curve. So an RGB curve, as those of you may
know who use photoshop, changes basically how the
actual image is actually lit, darker spots, lighter
spots, things like this. So if I come in and
press Shift Day, search RGB, and you can see, I've got an RGB curve here. Now, just before we do that, if you do press shift
day, you can come down, you can just see get a flavor of how many nodes there are
actually within Blender, and you can see also how many shades there
are within blender. Let's discuss that after, but first of all, we're
going to go with RGB curves. Bring that in and drop
that down like so. And from here now, you can see
that I can actually affect the color of this actual wood on the fly in real
time, like so. We can also put this onto the metallic onto the roughness, and even onto the normal
to get different effects and different ways
that the metallic or roughness actually work. Now, the next thing is we want to discuss is just shaders. So as I said, this is the
main shader within blender. This is like the one
ring of shaders, and basically, this will be the main one that
you actually use. But of course, there's
plenty of shades. So depending on what you want
to do, if you come down, you can see we've got diffuse, we've got emission shaders, we've got glass glossy, and a whole range
of other shaders that you can actually
try out and use. Now that we've discussed that, let's actually come over
two our actual shaders that have got to set up here. Now you can see with
this glass one, it's just a very
simple shader of glass and got some roughness on, and of course, an IOR value. Next of all, then, we've
got an emission shader, and you can see now this
is using texture maps, and it's slightly more complex, and you can see how all
of these things plug in. In other words, what
I'm showing you is that Shaders can be very, very simple or get
to be very complex. So the next one is the metal, and you can see this
gets even more complex. The next 1 stone, and
you can see again, this is slightly more complex, and the final one is wood, and you can see
things like this. So we can see that
we've actually got some edgeware on this wood, and all of this is actually
done within blender. Again, with quite a big
setup for the nodes. But it's unbelievable
really what you can actually do
with these shaders. Once you've actually
got your head around how to set up
the node systems. Really are just
scratching the surface in this blender shaders and
texturing introduction. And even on the right
hand side here, you can see you've got
all of these options as well to play around with, as well as the fact
that you can actually put these into your
asset manager as well. But this is just a
basic introduction just to get you started. All right, everyone, so I hope you learned a lot from that, and I'll see you
on the next one. Thanks a lot. Cheers.
30. How to Create a Sky Texture in Blender: Welcome back, everyone
to Blender for, the modular and Kash
environment guide, and this is where we left off. So I hope you've
learned a lot from both the seams and shops and the textures and
shaders tutorials. And now we should be able to carry on now you've
got that information. So first of all, I
want you to open up your resource pack that came
with the actual course, and you should have
something like this. And the first thing we're
going to focus on is going to be these actual materials here. Now, the thing is, if you
bring in all the materials, they shod stay normally
within your blend file. But sometimes when you
save it out and reload it, you might actually
have to bring these if they're not actually
on a object. So in other words, let's put this two shaded mode so you can see what
I'm talking about. It's going to take a little
bit of time to load up. But basically, each
of these shaders, as you can see here, they
are different shaders. And when we bring them all into this blend file
that we're working on now with the
actual stone blocks, you will find that You
can put these stone. So this one here,
I think is stone. So midtone, we've got another stone over
here, L lights stone. We've got weave over here
and things like that. When we bring all of these in, we'll be able to put
them onto our object. So let me actually
show you rather than trying to explain. Is a
little bit hot to explain. So what I'm going to do is, I'm just going to go over the top. I'm going to grab all of these. I'm going to press Control C. And then what I'm going
to do is put this down and come back
to this one here. And then what I'm
going to do is, I'm just going to press
Control V. And what I should do is should
put all of these in here. Now, rather than trying to click on each one and
move them, don't do that. Press shift Spacebar again.
Click the Move Tool. What it'll do is, it'll just put the move tool over
to these parts. So now you can see I can drag them over the
left hand side. Now, what you could
do with these is, you could basically
delete them all, and you would still find
that they're in here. So for instance, if
I come to this one, come to my materials, which is this b here,
click a little down now. You can see now, I've got
all of these files in here, all of these actual
shaders in here. Now, if I put stone on here, so stone on this one, and then close my
blend file down, it may get rid of all
of these materials. It might not load up with all the materials and
is what I'm saying, for some people,
that does happen. You might have to
re bring them in. What I'm trying to say as
well is Sometimes it's easier if you've got a slow performing machine to actually delete
all these out. So if I come in and delete
all these out like so, then come back to M Stone. You will still see that I've got all of these materials here. Now, for me, if I
save out my work now, so save it out, and then
load load up this again. So of course, Aztec,
which one is it? This one is Aztec parts. So let's load that one to
open recent Aztec parts. And here we go, come
to my materials, and you'll see all of
minus still in there. Yours might not be, so
you might just need to dry bring that in
again, the materials. So with that said,
let's move on. So you can see now that I've
got a clean scene again. Got all of my materials in. And I recommend now that close the actual
resource pack down, and we should have enough to work with this
from this point. The other thing is because we're working in a new
blend file here, it's always a good idea
to come up to file, sorry, edit, and then
let's go to preferences. Let's go to system, and let's also make sure we're on Optics X just so we
can see what we're doing. We also want to
make sure these are set up in the way that
we had them set before. And the other thing is, we also want to have a good
view of what these are. So again, we're going to bring in that actual sky texture. First of all, though,
let's go to interface, and what we want to do
is come to status bar, and just make sure all of these parts are on here,
so you can see now. I've got all of these details on here that I actually need. Right. So now what we'll do is we'll actually bring in
our sky texture again. So what I'm going
to do is, I'm just going to head on
over to Shading. I'm going to put this onto wild. And then what I'm going to
do is same as we did before, delete the background
out the way. Bring in your sky texture, so let's search for a
sky texture, like so. Let's plug that in
then to the surface. And then what I'm
going to do now is coming over to
the right hand side. Put this onto cycles. Again, if you can only use EV, put it on EV. No problem. You will see as well that some
disc not available in EV. It isn't the same
the sky texture in EV as I've explained, but if you can only use EV, then Hayhle, that's
what you need to use. Make sure ambient occlusion is on and make sure subsurface, whereas it screen space,
reflection is on. Refraction is on, half
res trace turned off. Let's now put it on cycles, so we'll set up the cycles. Make sure this is on GPU, and also make sure that we've got de noising on
on the viewport. Let's come in and just change
a few of these. So 1.5. Let's change the sun
intensity down to No 0.1. The elevation will keep at 15. Sun rotation will keep the same. Altitude will keep the same, and now we'll just
move on to the air. So No point not five. Let's put the dust on 1.769, and let's put the
ozone on 6.923 so. Now, let's put this before
we do that, actually, let's click on our render view, have a look at what
they look like. Something like this. I'm
just going to see if I bring that down a
little bit because it is going to be a
little bit warmer. I'm also going to see if I bring my dust down a
little bit as well. I don't want them too blue. The other thing is
I want my rotation, so it's coming around here. I'm going to turn this
to, let's say 180, let's spin it all
the way around, and there we go, that's
looking about right. Then all I'll do
is I'll turn down my sun to 0.5,
something like that. So a bit of brightness
with the sum. Finally, then, I'm
just going to set this to object mode, like so. And what that's
going to mean is, if I need to mess around with materials, I can
actually do that. Now, the other thing for me is, I don't need this on here, so I don't need these
files. I never use them. Sometimes end up using
the UV map, but for me, I always pull this across
over to left hand side. It just gives me a bit
of a better view in my viewport to see what I'm actually doing
with my materials. This setup is fine for doing this, what
we're doing right now. And just depending on
what you're doing, you might need another set up. Now, if you do want to create
your own setup for this, you can come up to the
top right hand side and click on and
pick one of these. So let's say we pick
animation, for instance. So we'll click on the
animation and we'll see we get this
new actual setup. Now, what we can
do from there is set this up perfectly
to what we need. So let's say we want
this just as UV, No UV. Let's say we want this just
as modeling, for instance. So what we can do is we
can pull this across. We can pull it across again. We can pull this
then down, like so, and we can also pull this down, like so, and finally we can
pull this across. Like so. Now you can say, all I've got in here is just my modeling scene. You can also change it up here and put it on
different things then, so you can have it on the
dope sheet, for instance. You can have it on
three D viewport. And we can also
come in and change the name of this to
whatever we want, as well. And finally, we can right click and move this to the front. What I'm going to do
is I'm just going to actually delete this because
I don't want that on. And then I'm going to go
back over to Shading, which is the one
we have it on just so there isn't any confusion. And this is what we have. So now you know how to set up your own. How to change them,
how to delete them, how to bring them out, and just basically how to set
up the viewport. Now we've done all of that. Let's go back to modeling, and this is what we're
actually left with. And now if I put this
on rendered view, you'll see that we've
got a beautiful scene ready to add in our materials. So if I then come
to this one first, I'm going to press tab
to go into edit mode. A to grab everything. U, and what I'm going to do
is smart U V project, because it being stone. I don't really need to
do anything with it. So once I press that, I'm going to get all of these options up. I don't need to worry
about any of those. I'm just going to click. I'm
going to come over there. Click the little down narrow. And the one we actually
want to look for if I check on my other screen is the
lights stone material. So I'm going to come down, I've got a little
search board here. I can point in light.
Let's point in light here. L so. So lights stone.
And there we go. And that's what it's
going to look like, and you see straight away now, hey, that's looking pretty nice. Albeit, this stone is looking a little bit big on
here, as you can see, and that is the problem, because what that means is
that I'm going to have to go in every single time and
change the UVs on there. So we really don't want this
stone to look that big. So rather than going
over to the UV, so you can see here if
I go over to the UV, press the tab, this is
the size of the UV map. What it tries to do always is put it within that UV space. We can even do it two ways. So if I just open
this up a little bit, Put this on material. Let it load up, and now you can see this
as what we've got. If I press tab, grab all of these and press the S
bond to make them larger, you will see now that that stone is looking much much nicer. Now, I don't want
to do it that way, and the reason I
don't want to do it that way is because I don't want to have
to come into the UV map every single time. What I'm going to do instead is, I'm going to go over
to the shading panel. I'm going to come into
my actual material, and this might look complex, and it is complex, some
of these materials. So this material is a setup, and we're going to go through this now on the next lesson. I'm going to tell you what
all of these things do. And if you're setting
up new materials, how you can actually
get this effect, and, of course, how we
can set this up so we don't have to keep
going into the UV map. L et's come on with a
file and save that out. And of course, once we've
gone through all of this, it's going to be much easier. You know, we're front
ending everything. We're teaching you
everything on the front end, just so you'll know it
later on in the future. Or let's say you want
to put this course down and go and create your own, you know, your own brick
wall or something. Then you'll have all of this
information already there. Rather than, you know,
putting it right to the end, Oh, by the way, you could
have done it this way. We don't want to do
that. Alright, everyone, so I hope you enjoyed it, and I'll see you on the
next one. Thanks a lot. Bye bye.
31. Blender UV Mapping Techniques: Welcome back everyone
to Blender Ford, the Modular and Kit
bash Environment guide, and this is where we left off. Alright, let's just pull
this up a little bit, just so we can zoom into here. So you will see on this block. That it has different colors. And the way we do that is by
setting it out like this. So you can see at the moment that this has different colors, and it also has a little bit of edging on these edges here. This is done by this
bevel effect here. So, for instance, if not the grabbing that
one, let's just go back. Let's just pull this down
here so you can actually see. So basically, if you
want to do this set up, what you need to do
is copy this and then plug it in to your actual
materials down here. This one here then is set
to random per island. And what that is doing is
putting a little bit of different colors onto
these actual blocks. You can see really,
really, finally here. I wouldn't go too
crazy with this, but this is the actual setup. And from here, you can control
how that actually works. So you can see now
if I turn that up, you can see a bigger
variation in that. This finally then is the color, so the color of the ambient
occlusion on there. We've dealt with ambient
occlusion already, and you can see
just how easily it is to plug all of
these things in, generally using a mixed color. Now, over here is the
main actual texture. So these parts, when you first bring in your own
textures in blender, you're going to do
it very simply by bringing in a principled BSDF, and then you're going to
press control shift t as long as you've got the
node wrangler enabled. That is one thing,
actually, if we come up to here, go to preferences, and the add on, it's an
inbuilt add on within blender, and it's called node wrangler. So this one here that
says node wrangler. Make sure that is tied on. And then if you want to actually
do the things I'm doing, you'll be able to do it
because this then gives you a lot of shortcut
keys to bring things in or cut things
like you can cut things going across them like this you can take
this off of here, you know, pretty easily
with the old button. You can do all kinds
of things with the nod wrangler can cut this like so or join little parts on. We're not going to worry
about that right now. As we move further
into the course, we will be discussing a
little bit more on that. Now, though, what
we need to worry about is this actual text size. You can see that
we've got a mapping, and this mapping is
based on the UV. So it's not based on generated or normals, it's
based on the UV, which is the map that
I showed you, which, if I press tab, you will be
able to see it over here, as long as I changed
this to UV editor, so you can see this
is our UV map here, and you can see
that this is what it's based on this UV map. Now, the other thing is it's
plugged into a mapping. And this mapping basically changes how this is
mapped onto this UV. In other words, if I
come in, for instance, and change the
scale of this way, you will see that
it gets stretched out along the actual x axis. Now, we don't actually
want to do that. What we want to do is
we want to come in, left click and drag
them going all the way around and put them on three
or something like that. You'll see now that we end
up with a much finer stone, and rather than keep going and changing this UV every time. Now what we've done is
we've made it so that this basically is
three times bigger. So that makes it much
much easier to actually change the scale within
the actual shader itself. And what that means
is when I come now to put this shader
on all of these, I don't have to keep
going in and making the actual UV larger. All right, so that's the
explanation for these. And finally, everything
always plugs in through an actual
material output, as you can see a
surface on here. Now, this one is it's
complex, it set up, but it's simpler than some of the other shaders
that we actually have. You can also see that if you want to change,
for instance, the darkness of
the actual shader, we also plug this in
after the base color, and what that enables you to
do is change how dark it is. Now obviously, it needs a lot of finess but you can get the kind of darkness
that you actually want. I recommend for now, Stick in with the shades
that we actually gave you, go in and save your blend file out, so go
ahead and save it out. And play around with
some of these things, so you learn actually what all of these
parts actually do, and how you can plug
other things in there. As I say, a little bit later on, we'll be showing you a little
bit more about the shaders. Alright, so let's
go to modeling now, and what we're going
to do is we're going to grab all three of these, so four of them, sorry,
one, two, three, four. I'm going to press the
tab on, grab them all. And then what I want to
do is UV unwrap them. So I'm going to smart
UV project. Click Okay. Now the thing is when you're unwrapping all of them together, what will actually happen on the UV map is it will
unwrap them all together. It won't unwrap them separately. So sometimes, you'll end up in a case where this UV space
that we actually created, so we made it larger won't
be big enough because we've got four objects in there
on the same UV map. For instance, this one
is all on one UV map. And then these four, if
I click on this one, for instance, you can
see, this is this one. This is this one, so you can
see it's a shared UV map, and sometimes that
actually causes problems. So just bear that in mind. In other words, sometimes
you might want to come in and unwrap this
one, so press U, smart UV, pj, click Okay, Unwrap it separately
from the other four. Now, in this case, it's okay because this one is
such a big block. That unwrapping
these all together. So grabbing all these, A, U, Smart UV project, click, Okay, Unwrapping them all together is absolutely fine. Now, the other thing is about the way we're UV mapping
these and the way we're putting shaders on is
the fact that it doesn't matter if these
share A UV space. In other words, you
can see at the moment, all of these are on
the same UV space. But if I grab just this one, for instance, press the A borne, press the S born
and bring it out to something like this,
it doesn't matter, first of all that it's going
over the edges of the UV, and that is because we are using seamless textures within
this within this shader. Now, it's important that
you learn the difference between seamless textures
and normal textures. Normal textures, you
can't pull it out past this UV map
because you'll end up with lines kind of going down it where the actual
textures starting again. Seamless textures, of
course, it doesn't matter. The other thing
that's important is if you're sending this
through to something like substance painter to
paint up your textures, you'll need to make
sure that these are mapped on one UV map. In other words, there
is no crossover. If I grab all of these
again, Press the tab button. Make sure they're all grabbed, you can see that this one here is overlapping all of these, it's outside the UV map. We can't do this if we send it through the
substance painter, because what'll
happen is it'll end up painting over these parts. So this will end up with
little parts from this one, and you just won't
get that same sell. So it's important to if you
send it through to you, smart UV unwrap, click Okay, unwrap them all together. Alright, I hope
that makes sense. And if you want to do a
little bit more research about seamless textures
and about UV mapping, I suggest that you actually
go away and do that. Okay, let's come into modeling. And then what we'll do is now, we'll just come in and
drop the same material on. So all I'm going to do
is grab all these four. Grab this one last,
press Control, and I'm going to actually link materials like so,
and there we go. That is our actual
blocks all done. Now, the next thing I want to do is on the next lesson is, I want to actually show you
how to use collections. But at the moment, let's
just rename these, so we can have block one, block two, block three,
block four, block five. You can call them large block
or something like that. Now, the easiest way to do that is also if we come in here, you can see this is a block, which is nine by six or
nine by seven roughly. We can see that this
block is three by six, roughly, something around there. You could name them based
on the dimensions as well. Completely up to you. For me,
I'm going to call this one. Large block. So
if I press F two, you can see that I can come in and actually name it there. A. You can go over to the right hand side
and name it here. But what I'm going to
do is press F two. I'm going to call this
large block, like so. Then I'm going to
come to the next one. I'm going to call
this mid block, mid block, like so. Then this one, I'll
call it small block, so F two, small block. So then we'll call this what
should we call this one? These are more
like square block. Square block, large
square block. Let's call it that,
so we'll call it F two large square block. And then what we'll
do is go to this one, and we'll call this one
small square block. So small square block, like so. And now you'll see
that all of these now on the right hand side
have all been renamed. And that means then you
should be able to find them because you can do a
search and call it block. And then everything with block in the tile will
actually come up, including the actual MT, which is also called block. Alright, that's it for this one, everyone. I hope
you enjoyed that. I hope you learned a lot, and I'll see you
on the next one. Thanks a lot. Bye bye. Oh.
32. Organizing with Blender Collections: Welcome back, everyone
to Blender for, the Modular and Kit
Bash Environment guide, and this is where we left off. Now, what I'm going
to do is I'm going to play you a short
tutorial all about collections because
you will need to learn how to put these things
in your own collections. And then when we
come back, we'll actually put them in
our own collections. And then we'll go
on to talk about the asset manager to get them into the asset manager ready for actually bringing them in to our own actual built that we're actual building,
which will be the gray box. And I hope you enjoy this, and I'll see you on the next
one. Thanks a lot. Bye bye. Welcome everyone to
our collections guide. And you'll notice over the
right hand side in Blender, you will have something that's called theme
collections over here. And this is basically how the old blender used to
actually handle laying. So with different layers, you would have different scenes or different objects in place. It's changed a little
bit now and in the new blender 2.8 onwards, we're now dealing with
scenes and collections. The first thing
you'll notice is over here that we've got one
that says collection. Let's call this
collection plane. And then what we'll
do is we'll actually put our plane into
that collection. Now, the moment you can see
within this collection, our plane is actually here, and we don't actually
want the other three. We want them basically into
a different collection. So all I'm going to do is
I'm going to right click. I'm going to go and
click new collection. And then what I can do is, I can call this Q. Like so. And then what I can do is I can left click and drag and drop my cube into
the new collection. And then what you can actually
do is you can actually close these up and you
can see how neat that is. Now, what we're going
to do is I'm going to show you the other way
of doing this now. So if we come to
our actual sphere, what I'm going to do is I'm
going to press the button. I'm going to then
click new collection, and I'm going to click Sphere. L so press enter or hit
the k b, and there we go. Now we've actually
got a new collection with our sphere in there. The other thing is
you can also come, you can press the n button, and then what you can
do from there is, you can actually click
on one of these, so let's say we wanted
this cylinder in the cube, and it will automatically put
the cylinder in the cube. Now, if you don't want that, you can press the n button again, new collection, and
let's put cylinder. Like so, and then click, Okay. There we go. Now we've actually got a
really nice collection sorted out really fast. Now, what about the
objects in there then? Well, what you can
do as well is, let's say we want to change
the name of this cube. We come on over to it. Instead of actually going
in here and renaming it, what we can actually do then is press F two, and there you go. The object name comes up. If we change this to
cube three, press, You will see now if we go
to the right hand side, this cube is called 33. Now, it's important
in large scenes to actually put things into collections because
that way you can actually increase the
performance of blender, or you can hide certain
things out of the way. Because what you
can also do is you can grab multiple objects, press the Mn button again, drop them in a new scene, so press M, new collection, and let's call this one objects. Like so, and there we go, we have our new one with all of the objects
actually in there. Now, you can see as well that because nothing
is left in there, we've not got this
little arrow there, so all of these are now empty, but it's quickly and
easily able to just press M and put them in their
own collections once more. The other reason why
this is actually important is because many of the displacements
or particle systems and lots of other
things within Blender, or even Joigen nodes, you can actually use
collections to do certain things to a certain
bunch of collections. Okay, so the next thing
we're going to look at is over on the
right hand side, we're also able then to
hide any of the collection. If we click the little ion here, that will mean that this
collection has been hidden away from
the viewport view. Now, it's important
to distinguish between viewport and Cm review. The cam review basically means
that if I click this off, when I actually come
to render this scene, everything within
this collection will be hidden out of the way. It won't cast any shadows
or anything like that. It will all be hidden
out of the way. Now, the other one we've got
is this little tick born. If I select this, you will see that it just
turns both of them off, so it won't be visible in the
viewport nor in the render. Now, the other thing to look at is if we click this
little down arrow, we also have a few
interesting ones here. So we have one that
says indirect only. We have one that says hold out. But the ones we're most interested in is
actually this one here. So if I click this
little arrow here, You can see now we
get a new option, and if I come and
click it on here, you will see now that
if I come across, these will still be
rendered in the viewpop, still rendered in the render, but I'm not able to
actually click on them, which makes this really
handy if you're trying to grab a load of actual assets or objects that you
won't actually be actually selecting this
collection on top of that. The other thing is
if I turn this on, I can also do a search
here for let's say cube, so if I typing cube. So I'm able now to
quickly and easily find it within my actual scene. The other thing is over on
the right hand side, as well, the double tap the able and to deselect everything
also actually works. So let's turn this off now. So now, let's have a
quick look at this in actual action in a real scene. So you can see here, we have
a scene here with many, many parts which aren't named, and we need to basically put these into their own collection. Because you can
imagine a scene like this with thousands of parts, all in the same
collection is obviously having an impact on the
blender performance. So what I'm going to do is I'm just going to hide the floor, hide this part of the
floor, hide maybe this car. And then what I'm going to do is I'm going to go over the top. And all I want to do now is just make sure that I'm
not going to select anything else apart from
this actual building here. And then all I'm going
to do is I'm just going to press B and just try and select everything on that
actual building like so. Just make sure I've not got my camera selected or
anything like that. And then what I'm going to
do is I'm going to press the morn new collection. And let's call it butchers. Shop, and then press
enter and click. Okay. And now what
I'm able to do is I'm able to now come all the
way to the top of here, so I've I go all the way
to the top and then let's start closing up these
collections like so. So we've got square
building there. We've got bookshop and butchers, and now we've got
the butcher shop, which is the one that
we've just made. And now you can see,
just how quickly, I can actually clean all that. I've come along and I double tap the A. I've not got
anything selected. I bring back my floor like so, I double tap the A again. And then what I'm
going to do is just close hide the butcher
shop out of the way. And you can see this is the parts that I've
actually missed. Then all I can do
is I can select these three parts or four
parts like so, press M, and let's drop them into
our butcher's shop, and then they'll be
hidden out the way, leaving the other
parts that are left, which I actually missed, so butcher shop again. And there we go.
Now we're able to hide the butcher's shop. All we're able to bring
it back into the scene. So from there, going a little
bit more advanced now, what we're also able to do is hide all of our
collections in one go. We just need our mouse
in the viewport, and then all you need
to press is number one, and what that'll do is hide
all of these collections. From there, what
you can actually do is you can press number two, and what that'll do
is actually bring in the gray box or the second
collection on there. Number three then brings in
the third actual collection, and so on and so on and so on. As you can see, turn maximum, I think of even nine or zero. So you can see very, very
easy once you've put them in collection,
to rename them, to actually increase the
performance within Blender, to hide them in the actual viewport or
hide them in the render. And then also, once you've
done that, to select them. You'd have to be a
very, very big scene to have more than ten collections. Within the collections as well, you can also add
inner collection, so I port new new here. And you'll see if
I open that now, we've actually got a
new butcher shop one. So within the collections, you can also have collections
within themselves, and you can build a really, really large
hierarchy from there. Alright, everyone, so I
hope you enjoyed that. I hope you found it useful. Thanks, everyone, cheers.
33. Tutorial on Blender's Asset Manager: Welcome back everyone
to Blender Ford, the modular and Kish
Environment guide, and this is where
we left it off. Now, what I'm going to do, first of all, is I'm going
to come in then. I'm going to grab all of these. And including this part, I'm going to press M. I'm
going to put a new collection. And what we'll call
this is stone blocks. I think they're called
stone blocks on the actual on the image as well, so we'll keep it to that. So stone blocks. Like, so not blocks.
Let's get the C in. There we go. Like so. Click Enter again,
and there we go now. Now they're all
in the actual its own collection over here. Now, what we want to do is, you always want
to make sure that when you finish that you're grabbing each of these You
reset all the transforms, so you can see all the transforms
or reset in each other. And the thing is when we come to discuss the asset manager, which I'm going to show you now, then you'll find out
that you can bring these in based on where
the orientation is. So I'll show you what I mean by that as well, a
little bit later on. But for now, we're going to
talk about the asset manager, why it's so important,
how to set it up. And then when we come
back on the next one, we're actually going to set
up our own asset manager. Alright, everyone,
so Obi enjoyed that, and I'll see you
on the next one. Thanks a lot. Bye bye. Welcome everyone to the
Blender Asset Manager Guide. And Bates of what we're
going to do in this one is just go through the asset
manager, show you how it works. It does seem fairly complex
when you first start this, but actually it's quite simple once you get
your head around it. So here you can see, I've
got a standard scene here, and I've actually brought in some actual assets,
and they're named. This is important actually that just make sure you
name the assets before you actually put them
into the asset manager. Now you will notice when you
first come into Blender, whether that be Blender
three or Blender four. At the top here, it doesn't
actually say asset manager, so that's the first
thing we want to do. That, all we need to do is
come to the little plus born. We're going to come across
to where it says general, and then we're
going to go down to where it says asset manager. Once you click that
on, you'll actually be taken into the asset manager, and this is the easiest way
to actually work with this. The thing is now you'll
see at the moment we have our asset manager down here with all of the files
on the left hand side, and in this, this is we'll be populating all of our assets. Let's actually just pick
this up a little bit then. And then what we're
going to do is, you can see at the moment
we have current file, and we have essentials, and under essentials is
basically all of the assets that Blender has decided to put into the asset
manager as default. What we want to do is we want
it to be on current file. So now I'm going to
do is, I'm going to come to my first asset, which is going to be my tree. And now what we're going to
do is we're going to add this into our current
file asset manager. With this selected, come
over to the right hand side, you can see here it says three. If a right click,
you'll see here, it says one that
says marks asset. The moment we actually
mark is asset, you will see now that actually appears in this space down here. You will also see that if we
put this onto material mode, and now if I come in and
actually drag this out, you will see that it
actually comes out with materials
actually attached, which is really, really handy. Now, let's delete
this out of the way. And what I'm going
to show you is now, if we focus on our actual car, let's press shift in space bar
just to move it over here. And then what I'm going to do
is I'm going to come over, right click and going
to markets asset, and you'll see now our
car appears there. Now, if I come up and right
click and put clear asset, And then spin this round, z -90, like so, right click, markers asset, you'll see it appears
exactly the same way. So to actually change the rotation in the
asset manager itself. What you need to
do is you need to now reset all of the transforms. So what I'm going to do is, I'm just going to
clear the asset, and then we're going to put
control all transforms, right click, set
origin to geometry, and then right
click, and I'm going to come down, markers asset. And now you'll see it's actually rotated
that round for you. You'll also see as well, now if I pull this out, it comes in with all the materials. Can actually do some
other things as well. We can actually also
save out materials. What I'm going to
do first of all, though is I'm going to come down and click the
Little plus button, and what I'm going to do is I'm going to call this assets, like so I'm going to call
the next one materials. Like so. Now I'm going to do is, I'm just going to
save out my work, and then I'm going
to go to unassigned, and you'll see at
the moment we have these two assets that
we put in there. We can simply shift select them both or shift select
them all if you've got a lot and drop them
then into our actual asset, and now they're going to
appear in our assets. Now, let's move on, and if
we click on this bench, what we'll do is we'll
come over to our material. And we can see we've got
two materials in here. So let's right click this one, mark as asset, the same thing. And then what we'll
also do is come to this one and we'll right
click and mark as asset. Now you will see when you've
marked them as asset, that we've got this
little book here, the same as we've got up here. And now you'll see we haven't got any assets in
there at the moment, so these two materials
didn't go in there. And that is because they
will be in unassigned. Now, let's grab both
of these materials. Now, drop them into our
materials, and there we go. We've got materials,
and we've got assets. Now, the best thing
about asset manager, what you can also do is, you can also use this for
things like geometry nodes. The only thing that
you can't use it for at the moment is animations. But pretty much everything else, you can use it with
the asset manager. Now, the next thing
we want to look at is actually doing that then with
an actual geometry node. So I'm going to do
is press Control V, and here is a geometry node
that I've actually created. You can see here that if I pull this up over on the
right hand side, you can see it's actually
a geometry node. And at the moment,
if I press tab, you'll see it has
actually no mesh or any kind of topology because it's
obviously a geometry node. Now, what I want to do
is I want to come up, right click Markers asset, and now you'll see that I've got something that
says unassigned. So let's make one more
now and what we'll call this is geometry
or geo node. Like so, and then I'm going
to come to it on a sign and put it into my
geometry node there. You will see now if
I bring this in, it actually comes in
as a geometry node, which is really, really handy. If you've got loads of
geometry nodes and you want to bring them and
drop them in your scene. Now, let's first of all, come up to file and say, because this is
all great in that, but actually, how do we
use this in other files. The way that we can do that is, we can come up to
a new blend file. Let's open up a new blend file. So here is our new Blend file. And what I want to
do, first of all, I want to come up and add in my asset manager,
plus asset manager. And at the moment, you'll see
there's nothing in there. And what I want to do now is, I want to go up to edit, I want to come to preferences. And within preferences, you will have one that
says file path, and this is basically going to tell Blender where it needs to go to look for asset manager. So let's actually come in, and what we'll do is
we'll click the plus. And then all I'm
going to do now is find where I've
actually saved out that previous file
and I saved it in something called Blender
Asset Manager, which is here. This is the one that
I'm going to add it to. You'll see here that
it doesn't show any blend files or
anything like that, and then all you need to do
is add asset library like so, and then we can actually
close that down. Now what I can do is I
can come down and you'll see that I've got one that
says Blender asset manager, and here are all of those actual files that
I actually put in there, as well as where it says assets, GO nodes, and materials. Now I can simply come in, drag and drop my
actual truck in there. I can actually turn
on the materials. Now you can see once again, it actually comes in
with all the material. Now, the best thing is
if I actually bring in a cube now and
just drop that there, shift space bar just to move it. And then what I can also do is I can come to where my materials are drag and drop straight
on to my actual cube. Let the actual shader compile and load up, and there we go. Now we can actually drag
and drop materials as well. Let's come to our
geometry node then, and I'll show you
that that also works. So now we can see we've got a geometry node that
we can actually use, which is really, really handy. Now you can say just how useful the actual asset
manager really is. Now, the other
thing, if we go up to edit and go to preferences, you will see that we
are able as well to add many, many asset libraries. Just make sure that you
save your blend file. So if I bring this over
here just to show you, just make sure you make a file, and then within there, you're going to actually save
your asset manager. Be the most important thing actually is when you're
actually saving it in here, you will see that what else comes in is an actual text file. This text file gives
Blender all of the data that it needs to
actually set up these groups. So important If you're moving your asset manager
to a different file. Make sure you move this
text file as well. Alright, everyone. So
let's close that down. And lastly, before I finish,
what I will show you is, if you come to current file
where we don't have anything, you can also select all of
the things in your scene. Right click, go down
and mark as asset. And then you'll see
that they all get pour into the asset manager. Alright, everyone. So I
hope you enjoyed that, and I'll see you
in the next one. Thanks a lot, cheers.
34. Creating Initial Asset Manager Parts: Welcome microphone to Bendaf, the modular and environment modular and Kash
Environment guide, and this is where we left off. So I hope you learned a lot
from the asset manager guide. It is a bit complex
on first viewing, but once you get used to it, it's really, really
simple to use. Alright, so let's
jump in and do that. Now, the first thing I want
to do is open up my file. D s going to open
up my file now. Now, as we can see here, up at the top right hand
side, you can see here. This is called Aztec Jungle
Temple, course Aztec Pots. This is where I save mine out. Now, I recommend when
you're dealing with the asset manager that we go in, and what we're going to do is, I'm going to call it a new file, and I will call
it asset manager. So let's click a new
one, Asset Manager. Like, so I recommend now
you've got a file called asset manager that you put all of the blend files
with all of the parts, so it might be other parts. It could be, you know, balloons in one of your blender files. It could be trains in
another blender file. Make sure that they're all
put in the asset manager. From there, then, what
I'm going to do is I'm going to double click this. I'm going to right click
and create a new one. And what I'll call
this is Aztec Ps. Just so. We know that this is a different
one, so Astec parts. So then what I mean is that one Blend fallo
being this one, another Blend fallow
being another file, and then they really,
really well organized. Now, what I'm going to do, first of all, is, I'm going to come. You can see this is
the one that I've got. Blender automatically does
a second save of that. So when you come to find
work that's been lost, Blender will have already
saved it in a second save. Now, what I'm going
to do is just delete that one. I
don't need that. And what I'm also going to do
is the one that says parts, I'm going to drop it
in my asset manager. And from there, then
what I'm going to do is go to my asset manager now, and I'm going to
drop that then in the Aztec parts, like so. And now within there, we've
got our course aztec parts. Now, of course,
putting that down, when I come down
to save this out, I won't be able to save it because it doesn't
exist anymore. So what I want to
do is go to file. Save has asset
manager Aztec parts, and double click
that one like so, and then it's saved in there. And the reason I've done
that is because when we actually start putting
these in our asset manager, it will create a new file, which I'll show you as
soon as we do that. But let's first of all,
come to this one here. And what I want to do is you can see I've got large block here. If I right click this, you can see I can mark this as asset. But before doing that,
what we want to do is, we need to have our asset
manager actually in place. What I'm going to
do is go to Plus, and we're going to go to General and you'll see one that
says asset manager. Now, if you don't have one
that says asset manager, either because you're using a very old version of Blender, and it just simply
isn't available, then you'll have to
skip this bit out. If you don't have one
that says asset manager, because you're using Blender three or
something like that, I will show you how to do that. So what I do is I tend to come to layout. I'll click that on. This is for people
who don't have the asset manager, by the way. And then all I'll do
is I'll pull this up. And I'll click this
little b here. Go across, and you will have
one that says asset browser. That is the first way then that you can
actually set you up. So now every time you come
to this one, this layout, we can actually go to
our asset manager. Now, if I double click this, I can also rename it
asset manager, like so. I know it's not spell right, but don't worry about that.
It's just to show you. And then now every
time you click from modeling to
the asset manager, you'll be able to
actually go in there. Now, I'm going to
actually delete that. And what I'm going
to do in studies, I'm going to put it
back on modeling, click the Plus button,
go over to General, and going to just click
on asset manager, because it's available
in Blender for onwards, I think it is, click it on, and there we go, everything
is set up for you. Now, what we want to
do is you can see a local direct that contain blend files with assets inside. Managed assets from
file paths actions, and we don't want to open
preferences at the moment. What we want to do is click
on current file, like so, and you can see at the moment, nothing is actually in here. Now, what we want to do now is we want to put these
in our asset manager. What I'm going to do
is, first of all, you can see here
where it says all. I can click this
little plus one, and then I can call
it whatever I like. So let's call this stone blocks. L keep spelling that
wrong. I don't know why. But anyway, let's
purl it stone blocks. Let's also click, where is it? So this is called
Stone blocks now. Now what I can do is
I can come on over. I can right click this and
come down and mark as asset. Now, nothing appears in
here, or so it seems, but on the signed, we actually have a
large block in here. Now what I can do is I can drag this and drop it into
my stone blocks. And there we go. When we
click on stone blocks now, we'll have all of our
stone blocks in safe. It saved in there. Now, the thing is you can
see a little star here, that simply means that we need to come up and
save out our work. And now you'll see
after a bit of time that star disappears. You can also see over here on the right hand side that
we've got large blocks, and it's got this
little book icon there. That just means
that it is part of the asset manager.
Now, let's come in. And what we're going
to do now is grab all four of these because we can do them all
at the same time, right click and mark as assets. And now you'll see all of these are marked as assets like so. And now what we can do is
we can go to unassigned. Click all four of these, drag across, drop
them in stone blocks, and now they're all in there. Now let's go to file and
save, and there we go. Everything is saved out. Now what we can do is when
we come to our other scene, and we use the asset manager, we can actually
drag and drop them. Bring them out
wherever we want them, and you will see the come
in with the materials on. Now, before we carry
on doing that, let's now discuss
the actual file, so we're going to save
it out once more. And then what we'll do is
open up that file again. So here we are with
that file opened up, and you can see that we also have now a
text file in there. Very important, and this is why we actually set
out the way we did. That text file is basically
all of all of this setup. So if you're writing
in stone blocks, it will keep all of
that in this text file and use it to generate what we've actually called
each of these things. If you delete this, you will still have this
asset manager there. So all of these will
still be in there, but they won't be assigned to any kind of collection
or anything like that. So it's very important
that we don't delete this Don't
delete anything in here except maybe the other
blend file. That's okay. But any of this text stuff, do not delete it,
leave it there. That means everything
will be set up nice and neatly for you. Alright, so now we've
discussed that. We're going to put this down. And then what I'm also
going to show you is, if you come to your stone block, come over to your material, you can also save
out your material. So, for instance, all I
need to do is right click, and I can mark it as asset. So Light Stone is
marked as asset. It's in unassigned. So let's create a new art, and what we'll call
this is materials. And then what this will
enable you to do is anytime you want to use these materials in any of your other projects, these will be available straight from this
actual project here. So what I'm going to do is I'm going to grab my lightestone, drop it in my materials like so, and then go to file
and save it out. And the best thing is
we don't need to create spheres with materials on
or anything like that. We can do it all from this side. The other thing we can do
is if we're coming over, let this Yeah, there
we go saved out. We coming over to
the right hand side, where we've actually
got our sky, and what I can also do
then is put in sky set up. Like so, and I can also believe it or not come in and
mark this as an asset. So I can mark that as an asset, and there you go, the
sky setup is there. So let's actually
call that sky setup. So Sky setup. And what this is going
to enable you to do is not have to keep actually going in and setting
up that sky. It's already done
for you. I just needs a little bit of tweaking. We can basically put anything
in the asset manager, including the
compositor, including, I think you can even
put renders in there. You can put HDRIs in there, all of your materials
and shaders, and all of your models, and
everything can go in there. The next thing we're going to do then is the human reference. So we can see here we've
got a human reference, let's right click,
Markers asset. And what I'm going
to do is again, I'm going to put
human reference here, so do click it, um reference like so. And then we're going
to grab it and drop in in there, like so. Let's save it out. And then
that should disappear, like it has. And there we go. We've got our human
reference in, who can bring in to any
of our projects any time, which makes it much
easier as well. Now what we can do is we
can actually, I think, we can move this up into
one of these top ones. Let's see if I can do that. I don't actually know
if we can do that. Let's see if we can
move it back down. No, it just drops it in
there. The unassigned. I don't actually want
to hide that in there. So let's see if I can
actually take that out there. I don't want to clear
the asset either. Let's see if press controls ed. Okay, luckily I can
press controls ed. I was just looking to
see if I could actually, you know, move these up
or put them in order. Maybe we can. Maybe
we can asset details. Yeah, I don't know
if we can put those in any sort of order
at the moment. Either way, though, we know
where all of these parts are. Alright, so what we'll do
then on the next lesson is, we'll put these over
here somewhere, and then we'll start
on the actual pillars. Alright, everyone. I
hope you enjoyed that, and I'll see here on the next
one. Thanks a lot. Bye bye.
35. Crafting the Pillars for the Aztec City: Welcome back one to Blender for the modular and Kash
environment guide, and this is where
we left it off. What I'm going to
do then now is, we'll go back to modeling first. It's going to make it easy
to see what I'm doing. I'm also going to move
my little guy over here. And then what I'm going
to do is just move all of these blocks. So
let's press the tab. Let's move all of these blocks. And what I'm going
to do is just put him over the left hand side. I've moved my little guy
there. I didn't mean to. Let's put him back, so
Shift S, selections cursor. And he's got his orientation
in the wrong place. So let's set origin to geometry, Shift S, slections
cursor, and there we go. Just make sure he's on the
ground plane then. Like so. Now, what I tend to do is,
when I'm working like this, so I can see everything, I tend to have it on rendered view, and when I'm actually going
to create a new parts, I tend to put it on object view, and then I can actually
see what I'm doing. Okay, so, what we're going to do now is we're going
to do pillow pillars, and we need six
different pillars. And the first thing
we're going to do is get in our reference. So we can see we've got
a reference like this. Now, rather than,
you know, bring in, we can actually just shifty,
bring this over there. Just so you can see what
I'm actually doing. So let's put it around a here. And then over on the
right hand side, we've got a data here, and all I can do is I can
actually close that off, and it doesn't
close that one off, as you can see, open it up, and now I'm going to find where these where this
actual images are. So course pack, and it's going to be on course references, references, and the one we want then is going
to be the pillars. So if I come down here, we can see this is the one that we're actually going
to be dealing with. All right. And now we've
also got it the same size. This one because
actually duplicated it. So what I'm going to do now is this one here is built
with a jute node, and the other one,
two, three, four, five pillars are built with just meshes, actually
modeling something. So we want a basic size
to actually work from. And from there, then
we can actually build these out because
we've got the sizing. So let's actually get the sizing of everything
before we actually begin. So we've got a big bolus, we've got a big
pillar, a mid pillar, a Small and a tiny pillar. Let's call them that because
that makes more sense. What we'll do is, first of all, I'll press shift A,
bring in a cube. And then what I'm going
to do is set this. In fact, one, two,
three, four, five, six. We'll actually bring in
six different cubes. So shift. 50. And then grab all three of
these, and then just shifty. And there are our six cubes. Like so. Now, the first one, let's actually put
the scale on this. So we're going to put 2.262
0.26 because it is a square, and then 7.24. Like so. And this then is going to be the size of our
actual oblisk here. Then we'll go to our next
pillow and we'll put the sizes in as
ops, not like that. 1.09, 1.275 0.28, L so, and that is our mid pillo,
which is this one here. Then we come to the next one. So this one will be 0.974
0.974 again in square and 3.6. There we go. Let's move that
over to the left hand side. Okay, so now we're on
we've done the bliss, we've done these two, so now
we're on to the smaller one. So let's look at
the smaller one. So 0.53 fiven 0.535,
and finally 2.78. And there we go. And now
we're onto this tiny one. So let's do the tiny one next. So 0.535. And finally, the
2.2 on the small. There we go. That's that one. Okay. And then finally this one. And I'm going to get
the scale to it anyway, even though it is a ometo just so we have
something to work with. What I'm going to do
is I'll grab this one, and I'll put it at 5.38 0.523. And then, 0.564 0.564 like so, and it's obviously
the wrong way round, so I'm going to spin it round, so I'll y 90 controle
all transforms, set origin, two geometry. And all that's done then is
spun all of those round, and it's now the
right size and scale. Now, let's press one, and what we're going to
do is just bring these up so they're on to
the right place. And with some of these,
you can actually use the parts that we
actually created. You just have to be careful. You're not going to
change the scale of them or anything like that. And let's put this one over
here. But let's start. I think with one of
the easier ones, which, in fact, you know, what, we'll start with the bliss. Let's go for the Big
Boy first, okay? So let's bring this over. What I'm going to do is, I'm
going to duplicate this. So shifty, let's duplicate it. And then what I'm
going to do is now I'm going to bring in this end. So let's bring in this end first, so I'm going to come in. I'm going to grab
the top of here. Again, nothing of
two perfect scale. It's all depends on
what you want to do. So if I bring this in, like, so we can see already that's looking a
little bit like an blisk. And then what I'm
going to do is, I'm going to And I think bring this top part in and then
make cuts along here. So I'm going to first of all,
make the bomb cut first. So if I press control law, left click, bring it
down to the bottom. Make sure it's quite thick that it's
actually standing on. We don't want
anything too dinky. Al shift and click then
going all the way around. I'm going to press E to lns, not S to bring it out, and sometimes you will end up with this actually happening. Let's see if we've got it
on individual origins, so Altern S still going
to do the same thing. If that happens, just
press the S bottom, and we'll bring it
out that way instead. And then all we want to do is just make sure that
it's not bending in. So you can see here,
you can see we've got a slight bend on this part here. So if I press one,
let's see now if I pressed S and Z
and bring it down. And now you can see that we've
got a slide bend that way. Let's bring it so it's
nice and flat like so. Now, to flatten things up. If you really want
to flat things up, so you can see maybe maybe it's bending in slightly this way. If we do want to
flatten things up, all we need to do is shift and click going
all the way around. And then press Sen's Ed. And what that's going to do
is if I bring it in slowly, you can see then that it's
going to flatten all that up. We can do the same thing
on the bomb as well. If we grab the bomb piece
here, press Control plus, just to grab them all,
press the Sen's Ed bone, and then it's going to
flatten that all up like so. All right. Perfect so far. Now, on my own, I've got four. So if we look here, one, two, three, four cuts, and we've also got a top one on, which will make it
five cuts on the top. We actually want to
bring this down, and then put a top part
on here as you can see. So let's actually do that now. So what I'm going to
do is I'm going to bring this down, like so. And then what I'm going
to do is I'm going to press the ie button
to bring it in. Like so, and then we're going
to press E and bring it up. And then finally, I want to make sure it's on the same size. So what I'm going to do is, first of all, I'm
going to pull it out. So E, pull it out, S. Like so. I'm going to press one them. And what I want to do
is, I just want to pick it up then so it's level
with here roughly. It doesn't need
to be exact guys. Don't worry about it.
It's a little bit out. What I'm going to do is,
I'm going to press E, pull it up, like so, roughly to that
size, press the S p, and bring it in, and
there is a decent oblisk. Now, let's bring in these cuts. So, one, two, three,
four cuts, Control. Our cuts. Left click, right click. Like so. Now, let's deal with this
bomb bit because we can see here it's gone
nother bit under here. So what I'm going to do
is, I'm going to make a I'm going to just bring
this up a little bit. So if I press ult
shifting click, let's bring it up a little bit. Let's press Control off. Left click, right click. And now all do is we'll
bring this bomb part out. So ult shifting click. E enter to extrude it, and then alternS, and
let's bring it out. And again, we can see it's not coming from the right place. So instead of pressing all test, let's press the S board again and pull that out into place. So, now what we can do is to flan this bow rather than
grabbing the top of the bomb. All we can do is
just press Sen's. And fly it out a little bit. Like, so, let's
move it down there. And then finally, all I'll do is I'll press a little dp on, just to zoom in Old shift and click going all
the way around there. Essens d, and I'm just going to flan that out a couple of times. And there we go. Alright. So now let's make these cuts that
are going to go down there. So the same as what we did with this first block
all the way over there is old shift click. Right click, and we're
going to mark a scene. Now, the other thing is, do we want this part here sat
on top of here as well? So should we make these like actual split from the rest
of it? I think we should. I think they'll be better. So
I'll do lt shift and click, lt shift click going all
the way around these. Right click and mark a scame. Here, then what I'm
going to do is and now, I'm going to
split these up. So I'm going to grab this one, this one, this
one, and this one. And I'm going to
press the y board. You notice I've picked
every other one, and then make sure
that everything will be split. So I'm
going to press y. Then we're going to press A. I'm going to come over to mesh, come down to cleanup, and I'm going to
fill holes like so. All right. So now everything should be filled in
there, hopefully. So now if I come in,
press the table, press Control A, all transforms, set origin to geometry. And what I'm going to
do now is I'm going to grab this large block next. So I've still got
this one selected. Shift select this one, Control, and I'm going to
actually copy modifiers. So copy modifiers. Now you'll see that that has come exactly as we wanted it. The other thing is as well, that the material here. We've got two materials on here, we've got dark stone
on the bottom of here, and on the top part of here,
we've got lights stone. So what I'm also going to do then is I'm going to come in, and I'll grab this part here and I'm going to
come over to material, and we've got lighttone. So you can see now what
I was talking about. Everything has disappeared. All those materials
have disappeared, and that's why I was saying, sometimes that actually happens. What I'll do is I'll just
click on Light stone for now, put it on to render view. And then the next one, what we'll do then is we'll actually bring in the actual docs, no. Before we do that, though,
I'm going to press A. Grab everything. U.
Smart U V project. Click Okay. And now you can
see we've got a beautiful, beautiful obelisk that's
looking pretty nice. Now, the one thing I would
say is I'm just wondering if it needs making a little
bit inner at the bottom. You know what though?
I think I'm going to be happy with how that looks. Yeah, I think it's looking good. I'm just wondering if I should make it a
little bit thinner, down on this bit here. But no one going to
leave here as it is. Alright. It's looking a
bit chunky as one, saying, you might want to make
yours a little bit thinner, but I think I'm happy with this. All right, everyone, so I hope you enjoyed that, and I'll
see you on the next one. Thanks a lot. Bye bye.
36. How to Create Stone Slabs in Blender: Welcome microbe to Blende Ford, the modulate and Kash
environment guide, and this is where we left there. So we have a problem with
our actual materials. So what we're going to
do is we're going to sort that out
properly right now. So what I'll do
is, I'll come in. I'll grab this actual pot first. So I said it was a
little bit chunky. I do want it a little bit inner. So what I'm gonna do is
I'm going to set these. So just these 22.3. Let's send them to that,
and now you can see that's looking better than what it was really easily and
quickly to do that. Okay, so now I've done that, I'm going to delete this
block out the way. And then what I'm going to
do is, I'm going to pull over my actual resource pack. So the resource pack we have. We're going to now
show you because we've been through the asset manager. You know how to do that now, so now I can actually show
you how we do this. So what I'm going to
do is I'm going to grab all of these materials. Press Control C, and then
I'm going to put those down. Come to my actual file here. Press Control V. Let them
load up, so there they are. And then shift space bar again, and we're just going to
move them to the side without let's turn off
proportional editing. I might make it a
little bit harder. Move them to the
side. You can see my proportional editing is
on, but it's not on on here. Though and the reason is is because I've got proportional editing
on in the edit mode, so I'm just going
to turn that off. Like, so, press the table, and now we should be able
to drag them all over. Drag this one back.
Drag this one back. And there we go. Alright. That was a bit of
faffing around, but we got there in the end. Okay, so all of
these materials now, you can see, They are
not named in here, but they are named down here. So what we want to do is
come to each of these, right click marker's asset. Come to the next one, right
click marker's asset. Now, the thing is with these,
you can't actually come in, grab them all, and, you know, mark them all at the same time as
assets. You can't do that. What you could do is, you
could grab all of the, you know, these little spears, and you can mark all
those as assets, but it won't be the same as
marking all of the materials. So I'm going to mark
all the materials as assets, like so. And then what that'll mean
is, as we're going on, working through the course
and creating all these parts, everything now will
be in here for us. The same we'll do when we come through the
actual geometry nodes. Now, you can see with this
one, we've got three, so we're going to go one,
two, three, like so. Same for this one, we've
got a few metals here, but it is going to make it easy, even though this is
a little bit of work for now. Like so. And this one maybe. This one is already
marked as asset, I think, so we'll
come to the next one. This one looks like it's
marked as asset as well. So light wood, and we
also got light wood. I wonder. This one's
already marked as asset, as you can see, so we've
got a little tick there. We've got a little
tick on this one. And we haven't got
one on this one, so we'll mark that as asset. And I did have a crash
there in Blender. So what I'm going to do is
just move these parts over. And I think the crash
was caused basically, I'm just going to
go to asset manager and see if I've got
any on on the sin. You can see there not in there. So what I'm going to do
is go back to modeling. And I think it was
caused because I had in rendered
view and was doing a lot with the asset manager.
So let's try that again. So what I'm going to do
is mark as asset manager, and then keep going down them. Like, so And it's a shame that we can't
do these all in one go, but as of yet, I don't think so. So let me just see if there's
a button what we can press. Let me just keep
marking these assets. And hopefully, now I've
got it on object mode. I won't have another
crash like that, but it just goes to show that even with the
best equipment, because we are running
here a 40 70 TI. And even with a The
most experience, we still have
crashes in Blender. So but I will say
this that Blender has nowhere near as many crashes as most of the other
software I work with, whether that be substance
painter, on real engine. The only one I would
say that is stable as blender is probably Z brush, and the only time
that ever crashes is if you've got a lot
of things in the scene. Okay, so all these marked. Let's right click Mark asset. And now we get into the one
where it crashed before. So hopefully, it won't And
as soon as I've done this, I'm going to save out my work. So I don't lose anything.
And there we go. Alright, let's save out
our work, so save it out. Let's then come to
the asset manager, and here are all
of our materials. Now, these, I think will
load up eventually. I think these are
the heavy duty ones, but they should load up. There you go. One of
them's loaded up now. And then all I'm
going to do now, I'm just looking
to make sure there was one in here that
didn't seem to, let's come over to material. Lightwood, and we've got
lightwood here, so that's good. And now I'm going to do
is drag all of these over and drop them in
my materials, like so. Now, let's come in and
actually save this out. So I'm going to go to
file, save it out. And then what I'm going to
do is delete all of these. And I'm going to delete
all of these like so. And again, once we've actually
brought in Goog nodes, we'll also put those in a
set up on here as well. And so everything will be
nice and neatly set out. Now, let's come over
to the modeling. Let's put it back on
rendered view now. So we're gonna put it
back on rendered view. I want to do? Now, I want the bottom of this to
be the dark stone. So what I'm going to do is, I'm going to grab all of these. Let's just make sure I'm
happy with all of these. I think with the
blisk, actually, what I'll do is I'll just turn
up the bevel a little bit. So if I turn this up,
just a tiny bit like, so I think that actually looks a little bit better than
what we had it before. And then what I'll do is now
I'll come into this one. So lt shift and click Control plus Control
plus Control plus. Come over to my materials, click the plus button, click
the little down arrow. And what we're looking
for is dark stone. So we want dark stone. You can see there's
one that says dark stone here. Click that on. And finally, because we've
got all of these selected, we can click a sign now, and that is what
we'll end up with. Now, you can see
with the dark stone. We've got the same problem as what we had with
the lightstone. In that, these are too big. A I'm going to do
is I'm going to go over to my shading panel again. I'm going to come over
then to where it says, just make sure that
you're on dark stone. And then what you're going
to do is you're going to change these to three because that's what
we changed it before. So change them to
three. We don't need to actually see if it works.
We know it's going to work. So what we're going
to do now is go back to modeling Persa tab, and then we, you can see
that looks pretty nice now. Alright, that's
what really cool. Let's press file and save. And now what we're
going to do is we're going to work
on the next one, which will be this
pillar over here. So you can see there's
a big contrast between this pillar
and this pillar. And yeah, let's start
working on this. So first of all,
what I'm going to do is I want to top
on this pilar bar, I want to keep the same scale. So what I'm going to
do is just press shift D. I'm going to drag it over. And then what I'm going
to do is I'm going to pull this down a little bit. So I'm going to pull
this down just a little bit to make that
top what we actually want. And also going to object mode, because it's going to be
a little easier to work than working in render
view all of the time. And then what I'm going to do is I'm going to pull this out. So E, enter S.
Let's pull it out. Let's pull it up then, so E, so, and then let's
put a top on this. So I bring it in. And then let's press E. And
then S bring it in like so. And then all we need to
do is just make sure that it's roughly the right
height, which it is. If you're not happy
with how far, these are going out,
in other words, if you want to pull
them out a bit further, then just go in shift and click
going all the way around, press the S board,
and then we can actually still pull
them out like so. And then just make sure
you're happy with how far. This part is out, so you can see here this part. Is
it out too far? I think so. So lt
shift and click lns, and you can bring it in
like so. There we go. That's looking pretty nice. And then finally, what I
want to do is With these, I want to bring the
front of this out a little bit. I'm
going to come in. We have the front of here, and just bring it
out just to give us a little bit of
a slope on there. Now, the thing is
on this, we need to have three different
cuts in here. So control, one, two, and three. Left click, right
click. Like so. Alright, right, click, Mark Sm. And then what we'll
do is, we'll come in now to these two faces. And what I'm going to do
is press the eye bone. And you'll notice when
I press the ie bon, they both come in
at the same time. We really don't
want that, so what we want to do is
press the eye again. Now, you'll notice now that when I bring them in,
they are split up. But the one problem we have is They're coming in a
really, really weird angle. So I need to reset
all the transform. So all transforms, right click, set origin to geometry, and now I'm going to
press the yebont, and now you'll see press
the ybonton again. They come in pretty
much perfectly. Alright, so that's looking good. Now what I want to do is
I want to pull them back, so I'm just going to press E and just pull them back like so. And there we go.
That is pretty much the second pillar done
for the modeling part. I just need to
split them up now. So what I'm going to do
to split them up is, I'm going to come in. Old shift. You can see I've got old Shift click done already
with the seams here, so I'll just do it underneath here as well. So
Old Shift click. And sometimes it doesn't
work and you just have to go round and just make sure that
all of them are selected. Right click, and you're
going to mark a seam. Finally, then, let's
split them off. So L, L and L, Y, to split them off, A, to grab the mole, and then mesh, clean up, and we're going
to fill holes like so. All right, let's see if
this actually works now. So what I'm going
to do is Again, I'm going to press
control all transforms, the origin geometry. Grab this one over here and
I'm going to press Control L, and we're going to actually link we'll link materials and
we'll press Control L, and we'll also copy
modifiers, and there we go. Now, with this one here, we might want to
come to our modifier and turn it down perhaps
one, not that one. This one here, turn it down one. Does it look good like that? That's the question.
You know what? I think that's actually
perfect like that. And now let's go over
into our material view. So not into render view,
into maateial view. It will actually make it
easier to view things. The other thing you can do
as well, I Material view, you can also see
that you can turn on your scene lights
and things like that. And sometimes, if you've
got these tik toon, it will make it much
heavier on your machine. All right, so on
the next lesson, then what we'll do is we'll
get the materials on here. And you can see
now because we're actually starting
to learn things, we're starting to pick up
the pace a little bit, which will make it much much quicker as we keep
going down the road. Alright, everyone, so
hope you enjoyed that. I'll see on the next
one. Thanks a lot. Bye bye.
37. Cleaning Up Your Asset Pack in Blender: Welcome back
everyone to Lena for the modular and Kish
environment guide, and this is where we left off. Alright. So on this one, we're going to have midtone. So it's going to be a
mid stone material, and in here is going to be red stone. So let's do that now. First of all, though,
let's actually unwrap it, so smart UV project,
Okay, unwrap. See it's already looking, be. Make sure that you've
got your bevon, which we have, and
then make sure that we changed this to mid. So if I put in mid stone, like so, you'll see it
comes a little bit darker. And then finally we need
these parts in here. So what I'm going to do is I'm going to come in with face leg, slick both of these parts. Come down to where it says dark stone, click
the down arrow, and we want to put in red, and the one we want
is the red stone, and then finally click a sign. Now the next thing I
want to do, of course, is change this stone, so it's
looking more like this one. So all I'm going to do is go
over to the shading panel. I'll do the redstone first, so all we'll do is come to this. Put it on three. Like, so, come to the midtone then. And again, the same
thing on three. Like, so, go back to
modeling, and there we go. That is that one done. Now, let's go up
to file and save, and now let's delete
this out of the way. And finally, now we're on to this one here. L
et's come in then. And with this one, you can
see that it's this one here. It's just got a bit
of a basic top on it. All I'm going to do
is I'll come in. I'll press control,
bring in an edge loop. And what I'll do is I'll
bring it to the top here. So this is how thick I
actually want the top. Then I'll bring another
one in, so Control L. And this is how thick
I want this part here. And then all I'm going to
do is come in with Face lt, shift and click, E, Enter AlternS, and we're just going to bring that
in very slightly, like so, and there we go. And then what we're
going to do is bring in, you can see here
one, two edge loops. So control. Two, Left click, right, click. L so. Now, let's mark in our seams
like we did every time. So what I'm going to do
is mark the seams here. Al Shift click to
mark the seams here. And then old Shift click underneath to mark
the seams there. Right click Mark a sea. Whoops. Right click. Mark Seam. And there we go. Now, the next thing I'm going to do then is split these off, so I'm going to
come in with Face select to make sure
I grab my islands. So L. L and L, and then y, split them off. A, and pretty much, it will be the same as what we've done
all the times before. Now I'm going to do is I'm
going to press Control A, or transform, set origin
through geometry. Grab this one here. I'm
going to press Control L, and we're going to
copy modifiers. And then I'm going to
grab this one over here. I'm going to press Control L, and I'm going to copy or
link materials like so. Let's grab this one then and just minus this material off. We don't need the dark material on there. And there we go. That's our second stone
actually done except. I think we just need to smart
UV, project. Click Okay. There we go. Looking good. Okay, so now let's move on. To the ones that are a
little bit more difficult, not by much, but a little
bit more difficult. What I'm going to do,
I'll come to this one. I'll first of all reset
all my transforms, set origin to geometry. And then what I'll do is I
want to make this pillar here. So you can see this
pillar here like this. This is what we
actually want to make. This one here is just, if you look, it's
just slightly taller. That's all there is.
That's the difference. So all we can do when we've done that is just make this
one slightly taller, no, this one, sorry,
slightly smaller. So let's actually
have a got that. What I'll do, first
of all, I want to create this part here
and this part here. So I'm going to come
to the top of here, control, bring it up. Like so. And then I'll
come to the bottom, control, bring it down. Wants to be obviously
bigger than the top part of here, like so. And then all I'm going to do
then is t shift and click, and I want to bring
this in then. So I'm going to press
E, enter AlternS, and bring it in very
slightly like so. Now what I want to
do is I want to make sure that I actually create this one as
well at the same time. So what I'm going to do
is I'm just going to press sift, bring it over. For this one, and I want to make this now the same height. Now, the thing is
we need to bring this down and this
top part down. So the way I'm going to
do that is, I'll come in. I'll grab the top of here, control plus, control plus. That then will take me
all the way under here. And finally, then I'm just going to grab the bomb up here, so ult shift and click like so. And if I press one again now, I should be able to bring
this down to where I want it. So it's going to be
this sort of size. Now, you can see that it's
not gone down ideally. So what I'm going
to do instead is, I'm going to grab the
top control plus, control plus, press
one on the number pad, and bring it down to there. And then what I'll do is now. I will drop this part
down a little bit. So shift and click, press one, drop it down just a little bit, like so, and there is
our second pillar. Now, for this, then, I can
just get rid of this one. Grab both of these.
Press Control A, all transforms, clicks
the origin two geometry. And then what I
want to do now is, bring both of these
in at the same time. So I might as well grab
them both at the same time. Grab these parts in
the center, like so, and then we're going
to press the eye button, bring them in. Like so, and then
I'm going to pull them back again, both together. So E pull them back. And there we go. That is
those two parts done. Now I want to do is again, set resell, the transforms, because we've made
a change on them. And what I'm going to do now is, I think these actually, they're going to be light stone. So they're going to
be the same material, except the same as this,
except the ighttone. So what I'm going
to do is grab this. I'm going to press Control
L, link materials. I'm going to press
Control L. And what I'm going to do is copy
modifiers as well. Now, with these, we don't
need actual any cuts in them, so we don't need any
of these cuts in them, so we just want them like this. What we do want to do though
is grab both of them, press A U smart U V,
project, click Okay. And then what we
want to do is change this midtone for this one here, which is, this is lighttone. So let's grab both for these. We'll have to do them
actually separately. So we'll do this one first, and we'll put it on light. So light, done, and then
we'll come to this one. Same thing again,
light. Done, like so. And then just the center point. So this center and Yeah,
we'll do this one first. L a sign. Come to this one, center, L a sign,
and there we go. Alright, they are
looking Friday night. Now, the last one, let's save that our work because this one is going to be a
little bit more intricate. We are going to need to bring in here now our geometry notes, so let's head on over once
again to the resource pack. So here we are in
the resource pack, and what I want to do is, I want to have all of these. So you can see here, we've got the steps, sorry, the floor. We've got the bamboo, we've got the stacker, we've got this geometry
node for these. We've got all kinds of
geometry nodes in here, and it's just going
to make it much, much easier if I come in now, and you can see here,
we've got a stone path. We've got a stone path here, but it's slightly bent. So what we'll do is we'll
bring all of these in. So what I'm gonna do is
just go over the top. I'm going to grab
the mole, like so. I'm gonna press Control C, and then what I'm
gonna do is come back now to the original file. So here is the original file. I'm going to press control the. And hopefully, they should
all pop in. There we go. Now, the thing is with these, it will pop them in because
they're geometry nodes. It will pop them in
with this folage. And the reason is because
it's using the foliage, so it's using these assets
within this foliage itself. Now, don't worry about
that at the moment because we are going to hide
them out the way. I can make these as assets, put them in the asset manager, but I do want to keep them within the actual file as well, just in case I need them again. So what I'm going to
do is, first of all, I'm going to pull
these over to here. I'm not going to change
the collection on these. You can see we've got all of these exotic leaves
and all these things, apples and all of this stuff, and then finally, we've
got all of our cubes. Now, the way to do this,
what you want to do is, you want to put these into
their own actual collections. And then what I'm going
to do is, I'm going to right click on
a new collection, so right click new. And you'll see that new
collection will be all the way. Let's have a look this
new collections gone. There we are. Collection six. And then what we'll
do is we'll put this geo node assets like, so now I shall be able
to grab all of these, so the fern, the
moss, exotic leaves, and everything like
that and drop them into this one here without
actually messing them up. Now, if I went in these, so this exotic leaves
and things like that and put them in a
different collection, it would mess all of these up. Just make sure that you actually do it the way
that I've done it, so you can see, now
they're all in here. And then what we can do is now, we can put all of
these parts to all of this into geometry notes. So what I'm going to do now, I can grab one of them
like this, press M, new collection, and
call it geometry nodes, like so, click Okay. And the reason I've
done all that, took the time to actually
do all that is now I can actually come in and hide all of those assets
out of the way. I can also come into
my geometry nodes, close that up a in it, and I can hide all of
those out of the way. So I haven't got them on
the screen all the time. The next thing I want
to do now is put them in their own
actual geometry nodes. The other thing is, yeah, let's do it that way. So what we'll do is we'll come over to our little spanner. And what I'm going to
do is I'm going to right click where
it says stone path. I'm going to come down and I
can put it as mark as asset, and then hide it out the way. Then what I can do is
I can hide these out the way because I know I'm
not going to need these, so I can hide all of these
because none of those are geomet nodes and then come
to, let's say, this one here. This one is the create stacker. I can right click, mark as
asset, hide it out the way. This is just a
basket you can see. These are just apples, so we don't need to worry
about those either. And then we've got
the Geo stacker, but this is the basic stacker. So I can right click,
markers asset, and then hide it out of the way. This one is just a bamboo stick. And finally, then we've
got this one here, which is a huge, huge
jungle terrain node. I can right click, markers
asset, hide it out of the way. Come to my stairs, right click, markers asset, hide
it out of the way. And then I think these
are mostly the same. So we've got stone
path, stone path. Don't path. This is
just showing you basically how we
actually built this. So all we'll do is grab this
stone path, right click. And you can see it's already been marked as asset, I think. Yeah, it's been marked as asset. So we've got that
already in there. So let's hide these out the way. And finally, let's
come to our tortures. So if I come to my
torches now, fire 01. These are fire, and this
is fire as you can see. So let's come to one
of them. Right, click. Mark, as I said, hide
them out the way. Alright, so let's press all
tags, bring back everything. And then what I'm gonna
do with these is, I'm going to put them
right over here. Now, if it's crashing
your blender or whatever, just make sure you
put it on wire frame. It's gonna be much easier
then to move them all. As you can see, we can
move them all now. And also, before I move them, I forgot to grab all my torches. So I'm going to grab
all my torches, and I'm going to move them
all the way over here, just so they're not
in the way of me building anything around here. Then finally what
I'm going to do is. I'm going to come
to where it says Joe nodes, hide them
out of the way. Hide them out the way of render as well. Then I can
bring them back. I'm also going to go up to where I put my jot node assets, hide those out the way, and
hide them out the render, just in case I want to
render something out. Now, on the next lesson,
what we're gonna do then is we're going to hop on over
to the asset manager. Look at where the
unassigned things are, so you can see here,
there is a basket. I don't know why that's in
there should be in there. But you can see now
we've got the fires, the jungle base, the stairs, and the stone path, and
both of the stackers. And I think that's all we're
going to need, if not, we'll sort it out as
we carry on down. But basically, what
we want to do now is create something like this with the actual stone
path. The stone path one. Alright, everyone, so I
hope you enjoyed that, and I'll see you
on the next one. Thanks a lot. Bye bye.
38. Exploring Geometry Nodes in Blender: Welcome back everyone
to Blender for the Modular and Kish
Environment guide, and this is where we left off. So first of all, this doesn't look to me like an
actual geometry note, so I'm going to delete
it out of the way, or we can right click
and clear asset instead. And then what I'm going
to do is make a new one, and we'll call it
geometry nodes. Like so, and then I'm going
to go back to me on a sign, grab all of these,
and I'm going to drop them then into the
geometry nodes. Now when I open up this, you'll see that they're all in there. Let's go to file and
go to save, like so. Okay, so what we want, first
of all, is, let's go back. Yes, actually, we'll do it this way because we've
got them in here. So what I'll do is, I
want to create this, and I want to create it
with kind of stone blocks. So what I'm going to do is
I'm going to press Shift A. I'm going to bring in a curve. And the one I want to
bring in is a path. Let's press Shift space
bar and move it over here. And what I want to do now is
drop a grommet node on here. And the one I want to drop on is going to be my stone path. So let's drop that
right on there, like so, and you can
see straight away. Now, we're actually
going somewhere. Now, let's press r y 90, and let's put it to
the right place. So what I want to do is,
I want to make sure, first of all, that it's
going to be this size. So you can see here, this is
what it should look like. I'm going to press
the tab button. And what I'm going to do then is just grab the top of here, press shift space bar, move, and I'm just
going to pull that up then into place the same
height as the other one. Now, the thing is, with
this geometry node, we want to keep it realistically
as a geometry node. We don't want to, you know, turn it from a curve into a
mesh or anything like that. And the reason is
because when we bring it in to the scene, we'll probably be moving it and changing it
and things like that. So we don't want to
change it right now. Which means it's
probably going to end up with not the
right materials on. So just say you aware of that. So what I'm going
to do now is go to modeling. I'm going to come in. Onto object mode, and then I'm going to go over now
to the right hand side, and we will explain a little bit now what actual
geometry nodes are. So what are these things that we keep talking about
geometry nodes? They're basically a way
to create mesh in a very, very easy way where the
actual node system, so geometry nodes
have all been set up. So you can see here what we do in house at three D tutors, we create things
called geometry nodes, the very, very complex, and basically it's a way to
create geometry using nodes. It allows you to do really, really crazy things procedurally
just with a few levers, which is really,
really handy to know. But what I'm going to do now, I've showed you the layout. If you want to go in and look up omet nodes. I'm
going to do that. We do have courses on omet nodes, so just
check those out. And basically, this is the level that you can get to and even higher
than this actually, once you've actually
been practicing a bit. Now, I would say that jump
nodes are more akin to actual coding rather than being, you know, artistic. So
that's what it says. So if you have a code in mind, you're probably going to
be very good at this. Now, let's go back
over to modeling, and you'll see that over
on the right hand side, these are called perimeters, and this allows us
then to actually create things with
the geometry nodes. Now, of course, all geometry nodes have different perimeters. They're all there for
different reasons. So what we'll do now is I'll
just go through this one. This one is the stone
half geometry node. So first of all, let's get
it to be the right side. So you can see this is
the size that we want it. So you can see here
at the moment, we've got we've got the width, so you can see if
I pulled that out, we have a different width. You can also see
that on this one, Control Z doesn't work. So just go right click, and what you want
to do is you want to reset the default value. And instead of the width, then, let's do the length. So let's see what the length is. So the length is changing, the ones going up and down. So we do want actually that going down a little
bit, so we've changed that. And then we've got
finally the thickness. So let's bring the
thickness out, like so. Now, you can see
the width is 0.5, the thickness is 0.46. So let's put that on
0.5 to be the same. And there we go, now we actually got something we can
actually work with. Now, the thing is
these are the moment. They all look the same size. We don't really want that.
So what we've also got here is a length random. So if we start to click this up, so let's put a no
0.1, for instance, and you'll see now that
actually starts to randomize these a little bit, which is what
we actually want. So you can see there. I
can randomize them a bit. We can also change
the seed as well. And we can also bring
out the width random. So you can see, I can bring this out a little bit.
So now I can see. Maybe that's too much, so I
wouldn't say go that much. Let's put it on no
point Not five. Let's try that. Maybe
No point Not three, let's try that. No
point not three. Yeah, and I think something
like that is good. And then we'll also do
the thick randomness, again, not point
not three, like so. And then we go, now we've got some nice randomness in there. And I think that's actually
looking pretty good. Now, the next thing we want to do is we want the
material on here. So if I go to render view, at the moment, you can see
this is what the material is. Now, of course, on this one, we want the material
to be the midtone. In other words, we want it to be the same material
as this one. So if we come to
this one, we can see we've got midstone on
there. So let's go in. Go back to the geometry node. The clear this off, and we want to put mid. So mid. This one here, which is mid Stone.
Let's put that on. And there we go, now we can see we've got the
right material in. So when we come into blender, and we're happy with these. We can just actually turn
them then into mesh. We can also got auto smooth on here, if you
want to use that, which is really
handy if you've got, some stone that's a little
bit bent in some way. And now what we'll look at
is the live view and wrap. If I click this on, Basically, it's unwrapping it all the time, so you'll see that we've got, kind of a stone
texture in there now. I want to turn that
off because it's a bit heavy on the system,
to be honest with you. And finally, finally, now, we've got the gap. So we've got the gaps down here. This is how much gap is
between each of these. And the other thing is, as
you can see on this here, it's a little bit wobbly. And the reason it's a
little bit wobbly is because we've got a noise
scale here and a noise power. So let's put the
noise power to 0.1. Let's also come up and just save out my work for now,
so save it out. And now let's put
the noise scale up to something like ten. And let's put the noise
power down to point not two. And then we go now we can see the rocks are
looking a lot better. Now, I think still the noise, it's a little bit too low,
so let's put it on 25. And then we go now,
I think that's looking much much better. And finally, let's put
the subdivisions on two, three. There we go. Maybe maybe this
now is too much. So let's try putting
it on ten again. Let's try putting it on three. Now, I think that's
looking much, much better, more
like stone blocks. Yeah, and I think that's looking near enough perfect
for what we want. Let's try turning this
down to Not point Not one. Yeah, and there we
go. They are perfect. That is what I'm looking
for. You can see now, that is looking
really, really nice. That is exactly what we want. All right, from here then, let's delete that
one out the way. And then what I can do now is same as I did
with the other ones. First of all, we need to
put them in a collection. This collection, of course, is going to be called pillars. So let's pull them all this way. Like, so let's grab
all of these now. What I'm going to do is I'm going to call it a
collection first, so we'll call it a pillars. So, click, okay. And now finally,
all we want to do is we want to come
to each of these, right click them, and we want
to mark them as an asset. And right click doesn't work. I'm sure there was
a board here to mark them as an
asset, but if not, we're going to go over to the right hand side, where
our collections are. Let's pull this down. Let's
close these up a minute. Here's all our pillars, so we can see as well,
they're not actually named. So I think it would be a
good idea to name them. So first of all, let's
call this obelisk. Don't know if I spelled
that correctly. Let's call this large
pillow or pillar. Large pillar. Like Let's call this mid pillar, we'll
call it mid pillar. So F two pillar. So. And this is
just naming them, so we've got a naming convention within the actual asset manager. And then we'll call this
large ornate pillar. So let's call it that large. One pillar. And then what I'm going
to do is press control A, control C, and then
I'll come to this one. I'm going to press
F two, Control V. And then all I'm going
to do is change that large, four, small like so. And then I'll call this
one small stone pillar. Okay, so. There we go. All right, so now they're
all in their own group. They're all here ready to be pointing to my asset manager. So let's now come
to all of these, so grab all of
these, right click, Markers asset, and there we go. Let's save our work before
heading over there. Let's then go over to
our asset manager, and let's go to the unassigned. And what we need
now is we do need one that says pillars.
So let's click plus. Let's call it pillars, like so, and then let's
coming over to where all of these are,
including this one, which, by the way, when
I bring this one out, you will see it will
come out like this. This is simply because of the way it's still
got the Jumptde on. Also, I not reset
the transformation. So let me just see if I
reset my transformation so control A or transforms
the origin, geometry. We've still kept the
same detail on there. Let's now clear this asset, and let's now come to this one. So over here, I'm just
going to press the dot one, that then will take
me straight to it. Right click, and we're
going to mark as an asset. So I'll mark as asset, and there you go, now it's
in there nice and straight. So if any event or
anything like that is generally down to not
resting the transformations. Also, things like the obelisk, you can see the missing
the textures of them. Sometimes this
happens. Done away. I always happens in,
in the asset manager, but sometimes they don't always appear perfectly
how you want them. Don't worry about it, as
long as you've named them, and you can see what they are. You can also make
them bigger as well. You change the size
of these things, so you can really get an idea of what these things look like. Okay, so what we're
going to do now? These are still assigned. So let's put them into pillars, like so, let's save
out our work. Like so. And then what we'll do now
is on the next lesson, we're going to make a start
on our next bunch of assets. So let's pull these over here. And I think what
we're going to start on next is going
to be the stairs. And actually, after
that, we can actually start probably bringing in some of these assets into
our actual grate box, just to mix it up a little bit. Alright, everyone, so I
hope you enjoyed that. I'll see on the next one.
Thanks a lot. Bye bye.
39. Easy Techniques for Creating Stairs in Blender: O. We Macon, blend four, the modular and i ash
environment guide, and this is where we left off. Alright, so we've got
our little guy here. Let's make our stairs now. So first of all, what I'm
going to do is, again, I'll bring in a block,
so I'll shift A. Let's bring in one cube. Let's duplicate the cube, so shift D, and let's
bring that over. And then what I want to
do with this block is, I'm gonna come in over
and put in the sides in. Let's actually go to
modeling so I can actually really see what I'm
doing. A there we go. Let's come to the size in then, and we're gonna have it on 2.74. 5.02, and then we're going
to have it on 3.4 like so. Then we're going to come
to the second steps. And what we're gonna
do is go to this one, and we're going to go 1.77, 4.92 and 3 meters. And there we go. Alright, so they're roughly the same height, so we can see here
3.4 and three. The ones a little bit smaller. We're going to pull this
up to the ground plane, pull this one up to the
ground plane, like so. Now, the thing is
with the stairs. These ones here,
These will be set. In other words, we'll actually
apply the ometry node. This one here won't be, because the thing is,
we've got a lot of stairs. We need to make them different sizes for whatever
we're dealing with, so we want to keep this
realistically as a geometry node. Now let's put it on object mode. Let's press file and save. And then what we're going
to do is bring in a curve, first of all, so we'll
bring in a curve. And again, we'll bring in a path because they always find paths a little easier to work with. Let's pull it out.
Let's spin it around, so I'll say 90. Let's reset all the transforms. The origin to geometry. And finally, now, let's
go to the asset manager. I want to the under
geometry nodes, and the ones I one is going to be stairs, which
is this one here. Drag and drop it on there. Now, you will see
that this looks nothing like the stairs
that we actually want. So let's come on over
to our modeling again. And then what we'll do is I'll show you how this
actually works. So first of all, if
we pull up this, so fire press shift space
bar, click the move. Pull it up, you'll see now we've actually
got some stairs. Now the problem is,
you can see when I pulled that up, it
comes like this. It kind of doesn't go even. And the reason is because of the fact that we've got all
of these points in here. What we can do is we
can actually come in and delete those
e of the way. So delete Vertices and now you can see that
is what we want. Now, the next thing is, we
want to make sure that these are for this one here,
the right height. What I'm going to do
is I'm going to pull it over to this side. If I press the n three
or control three, I can now see where
I need to start it, which is over here, and I can also see where I need to
end it, which is over here. So I can press now cause
I'm in the side view, just press G, pull it up
to where you want it, which will be
something like this. Now, the other thing is, we've
also got a width on here, so we can see that we've
got no banisters on here. We've got none of these poles, but you will see with this
stairs geometry node, it's incredibly,
incredibly useful. I'll show you why. So if I press shift D, I'll bring it over. And then what I'll
do is instead, I'll add in a few more segments, so right click, subdivide,
right click, subdivide. Now, what I can do
with this stairs, if I put proportional editing
on, you don't need it on, but it's easier to
work with and turn it, I can actually turn
it and the stairs will keep actually growing. I can also come
in, press the eb, and just extrude it out, and you'll see that we've
already got a stairs. We've got many, many
options down here as well. That I suggest you
play around with. So I'll play around with
all of these options. And you'll see exactly how
powerful the stairs is. For instance, we can even come out and change the
height of the stairs, as you can see, we can also come in and change the
depth of the stairs. Like so we can also come in and change the width
of the whole stairs, or the width of the
whole of these parts, and we can even come in and
change the hand rails here. We can change the size of these. We can change the
size of the poles. And we can even come in and grab one of the
points like here, press alterns, and you can actually pull out the bottom
of the stairs as well. So it's incredibly
incredibly useful. Just make sure when you're
messing around with these, that you're not
having too much of a curve on them because
it will upset the stairs, but you can see a pot from that. They actually work
really nicely. And, of course, you've
also got a shade smooth on there to shade that smooth
or have it hard edged. Alright, so that's enough of
talking about the stairs. Go and play around with it,
see what you think of it. Let's delete that out the way. And what we're gonna
do now is try and set these stairs up
to look like this. So what I'm gonna do is
I'm going to come in. And the first thing
I'm going to do is remove the actual hand rail. I'm also going to
remove these poles. We don't need those on. And then what I'm going to do is
I'm going to come up. Save our work before dealing with anything
with geometry notes, 'cause if blend is
going to crash, it will be down to
the geometry notes. Now, what I want to make
sure, first of all, is that the stairs, as you
can see, are high enough. So generally, when you
think about stairs, you can see that this is coming up to the
back of his care, and that is quite a high
stairs if you think about it. So you have to decide like, how many stairs do you
actually want in there. The way you do that
is you can change the length to change how many stairs are in
there as you can see. So let's bring it out a little bit down to this point here. Now you can see it's just just like halfway between
his ankle and the calf. And that then is a much better
height I think for this. Now, the next thing
we want to do, you can see I can
hide this as well. I'm just going to
hide these out the way for now, so the stairs. And what I'm going to focus on is just getting
this part right, so getting the
width of it right. So if I come in, I can actually change the
width of my stairs. I can bring it over here, and I can change the width. To be round about
what I want it, which is going to be
something like this. Now you can see already got a really, really
nice stairway, and it's done much easier
because it enables us to change it on the
fly to whatever we want. Alright, let's just
shade it smooth for now. And then what we'll
do is we'll come down now to the actual stairs. So we'll bring in the stairs. You can see now they don't fit at all, but luckily for us, we can actually change
the depth of these so we can bring them back, like so, and what we can also do
is change the width, so let's bring them
up right to the edge. Like so, and there we go, we've got some nice stairs. And now we're going to do
before doing anything, is we're going to bring it over to this basic stairs here. So we're just going
to bring it over, put it into place there. And then from there,
we'll actually work on these actual stairs. We also want to change the
material and things like that. But let's do that after. But let's first of
all press shifty, drag it over to my
stairs over here. And then the first
thing we're going to change is the actual width. So let's bring the width
down, where I want it. Let's bring the width
of these down to where I want it. You know what? For this, I'm not actually
going to use those. I'm not going to have
the stairs on top. What I'm going to do
then is come in and drop this down without
proportion editing on. Drop it down to
the top of there. And then let's make sure
the width is right. Again, we can change the width. Once we're actually
in our scene. And then all I'm
going to do is grab this one and delete
it out of the way. Now, next of all, I can actually put on a material on here, so we'll have it on the midtone. So if I come to this one, I'll come to where it
says material on here. Li it off, put it on mid. Stone, this one here,
and there we go. And then what I'll do now
is delete this out the way. Not going to need that anymore. And then, first of all,
I'll come and put this on. So on the other one, this
is going to be light stone. So this one here is light stone, so let's click this down. Light. Stone, like, so. And then this one
here is going to be. Now, we're actually going to
actually make this stairs. We're going to actually do that. So what we want to do is
we're just putting these on temporarily because the stairs, so this part here is going
to be a darker stone. So just so we have a visual on it is why we're doing this. So if I put in dark, stone, this one here. Now we have a great visual on what we're
actually looking at. Now, the next thing is, this one is going to stay as a geometry node, as you can see. And this one, we're
actually going to be changing into actual mesh. So once you're happy with it, just make sure you're happy with it before you do anything. Then all you're going
to do, you can't generally come over and
press control doesn't work. You can't come over and
generally apply Doesn't work. What you have to do is
come over to object, come down to where it says
convert and convert to mesh, and then you're going to
have something like this. Now, the first thing you
want to do is come in and press L and shift
and hide that part, the way, because what I
want to do is get rid of this one going down
here, this mid section. This is there to make sure that if we want to
bend the stairs, we're able to do
that, we're able to turn the subdivisions
up going along here, and that's why that's there. So what I'm going
to do is come in. I'm going to shift
click and then delete, and I'm going to dissolve edges, and that will get
rid of that for me. Next of all, what I
want to do is want to basically give these
stairs, some actual edging. You can see here, we need to
put some edging across here. So the way I'm going
to do that is, I'm going to press
three to go to side view or control three,
to go to the other side. And then what I want to do
is decide where I want them. So I can see probably
going to want it one here, l shift and click. And then I'm probably
going to want one down here, l shift and click. And I think that then will
be perfect for what I need. It's going all the
way around there. Let's right click
and mark a scam. And then let's come in and mark mark a same on each of these, and mark a same like so. And now you'll see
that basically, I would be able to
split this off, fill in this hole. Like so. And then I can actually have that split on there when
I bring my bevel in. But we will discuss that on the next lesson because that is quite a lot of
work doing that part. Alright, so let's
save that our work, and I'll see on the
next one, everyone. Thanks a lot. Bye bye.
40. Bringing Models to Life with Details: Welcome back, everyone
to Blend the four, the modular and Kish environment guide and this
is where we left it off. Alright. So what
we're going to do now is we're going to split
this off, first of all. So let's come in to face select, or grab this face. What we're going
to do is press Y, and then we split all that up. And now what we
want to do is want to fill all of these in. Now, there will be a
problem in filling these in because of the fact
if I press tag, bring back all the parts, and what I want to do is, I
just want to split these off. So I'm going to grab the. I'm going to press P selection, split them off now until
there are two objects. Then what we're
going to do is hide out the stairs just for now. And the thing is when I come now to split these
off, if I press L, you will see that to fill all these holes in is a
little bit harder this time. So I'm going to show
you a different way, well, the same way, but
how to actually do that. So if I press L, what
I can actually do is, I can come to mesh
and go to cleanup, and it can go to fill holes, but it won't fill anything in. But if I put this on
something like 20, it will actually
fill it in, albeit, it will fill it in
with an actual engon. Now, that's probably not the
best way to fill this in, so I will show you a better
way to fill this in. If I press Control's head,
just to go back a minute, and then I go up to face
so make sure I'm on face. We do have one that
says grid fill in here. Now the problem is,
I need to come up, first of all, shift click, face, and then we're going
to go to Grid fill, and then that will fill it in better than we did
with the other one. So, sometimes we
have to go in and do a little bit of
work, as you can see. Now, the other thing
is, for some reason, it filled it in, look, with this one here and we
don't really want that. So let's click this off. In object mode, so
let's click it off, like so, and now what it's going to do is going
to put in that. We'll fix that in 1 minute. So let's first of all, what
we'll do is we'll come in. Grab all of this, all of
this going down to here. Shift H, hide the rest of it out of the way, and then
all I'm going to do, come on the underneath,
and then we're going to go to face grid fill, like so. And then I'm going to come
to this top part now. So ltH, come to this top part, L and L with the bottom one. Shift H, hide everything
else out of the way. And then we'll come to
the underneath of here. Alt Shift click, face grid fill. And then what I'm going
to do is l shift click, and then face and grid
pill. And there we go. Now, let's bring everything
back, right click, shade, auto smooth, and there we go. All of
that is filled in. Now, the one problem
we've got, as we know, is if I come in to
this underneath, You can see, it's probably
a different material. So let's grab all of these. Let's put it on light
stone, plick a sign. Let's press old HH, bring everything back.
Now all I want to do. He's check middle one,
or the bottom one. So let's press L and L.
Hide them out the way. Let's come to this one then. Let's go on Light
stone, click a sign. Let's come onto this
one. All the way across, click a sign, and there we go. Alright, so we took a little bit of away to get those steps done, but now they're actually done. And the last thing we want to
do now is bring in a bevel. So control A, all transform, so origin two geometry. Let's go to Add modifier, bring in a generate and a bevel. And that's what we end up with. Not very good, right,
but let's turn it down to naught point
Naught naught three. Maybe not point not four, like so, and that is
looking pretty nice now. So we can see that these stones, steps were built out of blocks, and that is looking
much much nicer. Now, finally, the
last thing you can do with these is if
you press all Tage, and then what you want to do
is you want to grab all of these stairs going all
the way down here. What you want to do
is you just want to randomize them a little bit. So if I click Control plus, you'll see that's
not what I want. So I want to click Control plus, Control plus, Control plus. What we're going to
do is go up to mesh, transform, and we're going to come to what it says, randomize. If I turn this down slightly, You'll see now to not 0.1 or something that they do get
slightly randomized slightly, slightly uneven, and that
is what we're looking for. So now we're going to
do the rest of them, so come down to here to here, shift select, and then to here, and finally to here, like so, and then
mesh, transform, and then randomize, set this
to not point naught one, like so, and there we go. The stairs are a
little bit uneven. Now, let's bring back
those steps then. So these steps, what are we actually going to do with these? First of all, we want to make
these a little bit thicker. We've left them thin on purpose. The other thing is we want to randomize the edge
loops along there. So let's do that first. So what I'm going to do is I'm going to press Control L law. Bring in, I don't know, four edge loops, left
click, right click. Control L law, let's bring in five edge loops, left
click, right click. Control L law, let's bring in another four, but this time, left click and just
move them to the side, and then control law, sticks, and then control law. Them to the side, and
then control law. And all you're doing is just
randomizing all of these. Now, the thing is, once
you've actually got this far, just go back, put in another edge loop
plonk here, like so. And now you can
see all of that is actually randomized,
looking really nice. Okay, so control law, let's bring them over, and we'll go back and do
those bits in a minute. So down. So it's worth doing this for
the amount of time it takes. It's not a long time,
so it's actually worth definitely doing this for sure. We're trying to make them
as uneven as possible. Now, we'll bring in
the edge loops now. Like so. So just
anything that's really, really big, like this one here, especially. And there we go. Alright, that's how long it
took didn't take long at all. Now, the next thing we want to do is split all of these off. So all I want to do is I want to come in to each of these. Now, we could go in and grab sharp edges, but
that's not going to work. There is some ways of
grabbing all of these. I wonder if we can
actually do that. So let's see if we can
come in and go to select. See if I can select them.
Sometimes there is. Sometimes you can select all of the edge loops.
Sometimes it'll work. Let's see if we can
actually grab them all, go to select and
select edge rings. No. Let's try a different way. Let's see. I'll show
you what I mean. So we can select
like sharp edges. You'll select all those, but we don't actually want
that on this occasion. What we want to do
is select all of the ones going around this way. So we can go to
select, select loops. This doesn't seem to do it. Select edge loops. It selects
all the edge loops on here. We don't actually want
that because then we'll end up doing
splitting this off. What we'll do instead is,
we'll select similar. Let's see if we do that, select similar i direction,
and there we go. Now, that actually
is actually handier. So what I can do now is
I can go in, wire frame. And then what I'm going
to do, I'm going to press B and bring it over, hold in the shift born, and then that will de select them. So B, hold in the shift born, all the way over these edges, and that then we'll
deselect them. And there we go back
into object mode, you'll see that we've got
all of these selected, which means that I can right
click now and mark a scene. Now, the next thing I can
do is split these off. So what I can do is
I can come to mesh, select, and what we
can do is split. So mesh, split or separate
by loose parts, like so. Sorry, not that. We can go to mesh and split bases
by urges. There we go. That's the one and
one. Now we can give this a test and see
if that actually works. First of all, though
what we want to do is, let's bring in a modifier because that'll show me
if it's actually worked. So I'm just going
to press Control A, all transforms,
origins geometry. And then what I'm going to
do is now add in a modifier, generate a bevel and is it
actually work in. Not yet. I think we have to come
in and go to mesh, clean up, merge by distance. And let's see if that's
actually worked, have we filled in these edges. So let's see if these
edges are filled in. Yes, it looks like we
haven't filled those in. What I'm going to do is, I'm
going to try that again. So mesh, where is it separate or split by faces by edges.
Does that split them off? Let's have a look.
I'm going to go in, try and grab one with L, and you can see what it's done, is it split them up
by face by edges. So we don't want that. We
definitely don't want that. So let's see now, if I'm going and do this
a different way. So if I press. Yeah, you can see they've been separated
off in a really weird way. So let's forget that.
We'll keep it as this. We'll turn off this pvel. And what I should
be able to do now, if I come to faces, you can see I can select
every other one. Let's just do it that way
rather than messing around because it's going to make
it much much harder for us. What I'm trying to do
is find a quick way. Of selecting all these just to save us a
little bit of work. But I can't find a way of
selecting them all like this. So I'll just have to come
in and grab them all, every other one, like, so. It's not going to
take that long. But it is a little bit of pain if there's a better
way of doing it. So we're just gonna
select every other one. Like I said. Like so. Then all I'm gonna do is why. Grab every one of them now, and now I shut be
hell to come in, mesh, clean up, fill holes. And let's see now
if that's works. So add modifier
generate and a bevel. And A, it's actually worked. Okay, Control A, resell the transform, the
origins geometry. Let's turn this down to
No Point Notate three, like so, and there we go. Now, we're still not done
yet because we want to randomize these a little bit
more first before we finish. So what we're gonna do is
we're gonna grab them all. We're gonna go to
mesh, transform, and we're going to go
down to randomize. And then I'm going to
turn this all the way down to Not Point Notate one. And finally, then what
we're going to do now is we want to
bring these up, so we want to make them
a little bit thicker. Now, the way I do this is I'll come in and I'll
grab a few of them, like so, going all the way down. L so, just grab a few of them. Like, so, grab one
from here as well. And then what I'm going to
do is put this proportion, let it in, put it onto random. And then all I'm going to do is lift them up while
pulling this out. So you can see now we can actually randomize
these a little bit. Just don't lift
them up too much. It wants to be
very, very slight. And there you go, you can see, you've got a randomized
steps on there, and all of it was
done very easily, and you can see we've not lifted them up too far off of there. Now, the one thing
I would say is that maybe we want to make
these a little bit thicker. So, of course, we
can do that as well. All I'm going to do
is just press tab A. I'm going to turn off this
proportional editing. I'm going to press S and Z, and I'm just going to pull
them out a little bit, like. So just to make
them a little bit thicker than what they
were, and there we go. A thing that's looking
pretty much perfect. Now, we've got a bevel on here. We've got a bevel
on these ones here, and they both different. So we need to decide what we're actually
going to do with that. So the first thing is, I
think with this part here, let's come in and actually
apply the bevel, so control A. Let's join them then up to here. So join them up to
the stone steps. Control J, and there we go. We've not affected
that bevel too much, and that's what I'm
actually looking for. And then finally, let me have a look at the difference
actually. Let's go back. We're actually doing that.
Actually, let's go forward. Let's join them up again. So control J. Yeah, I think
that's actually okay. I think we can get
away with that. I'm just wondering if my steps need pulling out a little
bit. I think they do. So what I'll do is just
grab all my steps. And I'll press S and X, and as pull them
out very slightly. And there we go. I think
that looks Tungstens bare. And finally, finally,
then before finishing, let's come in now, put
it onto material view. Let's come into all of my steps, being a, Yeah, I haven't
gone more grabbed. Let's come in and
grab this one here. So L L L, let's press U. Smart U V Pj, click. There we go. That's those. They're looking very nice.
Hide them out the way. With H, H, grab all of these. U, smart U V project, click ok. And there we go. There's the actual
stone steps as well. And they look also very nice. Finally, then, let's
save our work. Let's have a quick look
on our rendered view. Let this load up. And there we go. There
is your stone steps. Now, the one thing is,
I'm not sure about these. And the reason this might
have happened is is because these are really,
really big pieces. But we might just have
to go in and make the UVs on these a little bit
smaller, and that's fine. And we also need to come in and actually fix a
few things on here. You can see the moment
the shades move is on, and it's making it very, very smooth, so we don't
really want that on, but we'll do that
on the next lesson. All right, everyone. So
I hope you enjoyed that. I'll see on the next one.
Thanks a lot. Bye bye.
41. Key Modular Pieces and Supports in Blender: I'm gonna back everyone
to blend the Ford the modular and Kish
environment guide, and this is where
we left it off. So what I'm gonna
do, first of all, just see if I fix
this shade issue. I'm just going to
press Control A, all transforms
origin to geometry, and let's put shades move on. And still got a little
bit of creasing on there. That's fine because when
we bring these steps in and we turn them from
geometes into mesh, we're not going to
have those problems. The main thing is just to
make sure they are looking, you know, right to actually use. Now, with these parts, though, we actually have to come
in and change these parts. So if I come in,
and press ol tag. Let's put it onto yeah,
let's grab these first. So L L and L. Let's go over then
to our UV editing. So UV editing over here, and we can see this
is the issue here. Now, let's just zoom in. Wo it. And the first thing I
want to show you is, Blender now has a new feature where it packs all
these islands up, and if you're
dealing with Blender four and above, you
can actually use that. If you go to UV and you go to
average island scale first, it will make sure that
all the islands are the same based on the actual
overall structure. So, in other words, if
this bit is a tiny bit, it will actually
make it that size compared to this huge
bit in the UV map. Now, if we go also and
go to Pack islands, you will see if we
can also change whether we allow it when it's
packing scale or rotate. Now, if we just click on scale, so we allow blenders
to scale it, you'll see what
it actually does. So once we bring this
in, you'll see now it packs those islands beautifully. And it makes the actual mesh, as you can see, much smaller because it's packed in
so much more dense. Now, I think if we turn
on our render view, now, it's nearly okay, nearly. So let's come in again. What I'm going to do
is grab all these and I'm going to pull
them out a little bit. There we go, I think that's actually looking
much much better. You can see now the stone
isn't looking so big on there. We can even go even
further on this. We can press tab again, we can press S and bring it
out even further. Now you can see it's
looking even better still. Not sure how far
should go with that. The reason why I don't
want to go in and change the shader on this is because
if I change the shader, it means I'll end up
changing the shader for the other objects
within the scene as well. So all of those
pillars we built, and all of those
blocks we built, that will also change unless you give it a separate shader. So sometimes like this, it's easier just to go
in and make these stone blocks just a little
bit bigger in the UV map. Alright,
so that's that. Let's come to the modeling now. And what we're gonna
do is we're going to actually save out all of this. I'm going to put it
onto object mode. And now I need one
that says stairs. Now, I didn't actually
bring in my stairs. So I'm going to
bring in one anyway. I'm going to press shift.
Tell I forgot about that. And what I'll do is now,
I'll bring in my stairs, so let's bring it
in. Open it up. Let's come over and
look for our stairs. So course pack and
course references, references, and we're
looking for stairs. There we go. Just pretend
I brought it in guys. Just pretend that. Okay,
let's bring it over. Let's put it into
place. Like so. And then the same thing
as we do every time is, first of all, we'll name them. So large stairs, small stairs. So let's come to
this one, F two, large stairs, like so. This one, that's going
to be small stairs. Like so, and then we're going to put them
in a collection, so new collection, stairs. So finally, then, we're going to go to our collection,
which is this one here. You can see here only this
one has been put in there, so let's press M.
And when we press M, we'll already have
stairs already there. Put that in, and there you
go, now they're both there. Click them both, right
click, mark as asset. Let's go over to Asset Manager. Let's come to this plus here, and let's click a new one, which we'll call stairs. Like so, and let's
go to a unassigned. Grab both of them and
put them into stairs. Make sure they're in there, and finally, save out your work. And that is another one. Done. Now, let's go
over to modeling. Now, we've got the stairs. We've got the pillars, we've
got the blocks in place. The last one we
want to do before actually start bringing this in then is going to be Support. So let's come on over, and rather than forget it this time, let's press Shift D.
Bring this over. Like so. Put it just in the
middle like so. Then I'm going to change
out this, open it up. And the one or one
now is going to be cos reference references, and it's going to be support. So this one, we have
one that says supports. Let me just look to
see if I have that. Hopefully, I've
not missed it off. Though it's going to be, let's make this a little bit bigger, so I can actually
see what I'm doing. Let's see if I've called
it something else. Then we've got the
stairs. Here they are. Wall supports. That's
the one that we want. So this one here, when
we bring it in now, we can see that we've got these that are going on
the side of the stairs. We've got this little railing
that we created as we saw, and we've got these larger
supports on here like so, and then this kind
of mid support. Now, you can see the
difficulty with these. These ones are really
easy to create. We'll have no problem creating those. It's just this one here. You can see as a little bit
of a lip going on here, all of these little
points in here, and also, it's actually
broken down here. Whenever you're thinking
how to create something, it's always best off having
a real good look at it, and thinking like, how you're
going to approach this. That makes things, much easier. Okay, so now we
need the scaling. So first of all, what
we'll do is we'll bring in four cubes again. So mesh cube. Let's bring in a cube.
Put it over here. Let's press shift D,
bring in another cube. Let's grab both of these. Shift D, bring in
cubes, like so. Alright, so now let's deal
with the big one first, so I'm going to
do this one here. And then what I'm going
to do is not 0.575. 5.033 0.95. And there we go. That is the scaling for
this big support here. Now let's deal with
the other ones, so we'll have the little
tiny support here, so let's come in. And then what we'll do is
we'll put this on 1.64 0.388 and not 0.897. There we go. That's
that one there. Okay, now this support here. So we'll put that on
0.272, 2.67 and 1.04. And there we go.
That's that one. And finally, then
this long support. So let's put it in as 0.293, 2.74, and not 0.423. There we go. All right, so that's the four supports now. And I think the first
one is this one here. This one looks relatively easy. So I think probably bear off first time with this one
soon as it's so easy. So what I'm going to
do, first of all, is I'll spin these two rounds. So 90. Let's move this one over,
do something like that. And then all I'm going
to do is if I press dot, just to zoom in so I
can move around there. I'm just going to pull
this section back. So, it's hard to
do with blender. So to extrude it back amine. It's much easier actually to extrude it out than it
is to extrude it in. So just press shifty. Create another one.
Grab this face just to make this
easy for ourselves. Pull it back. Press control. Left click, pull it
up a little bit. Then all you're going to do is pull this one out with extrude. So E, pull it out. Go over the top, just making sure you can see
the bomber there, and now you can see
that lines up with it. So there you go.
That's how we do that. Now we can actually delete this out the way. And there we go. That is this part here. Now, let's move to the next
part, which is this one here. Again, we blend it. We'll do this one a
different way though, because we already know In fact, you know, what we'll
do it the same way? We'll do it exactly
the same way. So what we're going to do is
press shift D, bring it up. So let's pull it up straight. So let's pull it back
a little bit then, so I'm just going
to grab this face, pull it back a little bit. And then what I'm
going to do now, I need two kind of edge loops, one in there, and one in there. Now, to make sure
that they're central, I'm just going to press Control.
Left click, right click. And they're no longer
going to do then is press Control B
and bevel it out, and now I can make sure that
these are pretty straight. Like so And there we go. And then what I'm going to do is grab both of these faces. So this face, and this
face, over the top. Then all I want to do is
extrude them out down to here. So E, pull them out down
to there. There we go. That is that piece done. So both of these
pieces. No, it's not. No, it's not, 'cause we
need some edges in here. So let's do that first,
getting ahead of myself. So control our two, left click, right click, right click, Marcin, and
then come in, face slick, grab the center one,
so L, and then P, P. Y, separate them off, and then A, and we want to
fill in these holes now. So mesh clean up. Bill Holes. The moment it's on
20, which means it will have filled them in,
so that's great for us. Alright, so that's that.
Now, let's you know what? We'll just see if this
is actually separated. So all I'm going to
do is just press L. I'm going to
go back after it. I just want to make sure it's filled in those faces like so, and that is perfectly
what we want. Alright, so let's pull
this one over here. And now let's deal
with a little bit of a more difficult one
on the next lesson, which is this one here. So you can see it's got a
kind of a band in there. It's got some parts that
go around it as well. It's a little bit more
intricate than the other parts. Let's save out our work, and I'll see here on
the next one, everyone. Thanks a lot, bye bye.
42. Modeling Angles for Aztec Architecture: Welcome everyone to Benda Ford, the modular and Kith
Environment guide, and this is where we left off. Alright, so now, let's
think about this part here. So this is a little
bit harder than these, but it's nowhere near
as hard as this one. So let's come in and do that. So what we'll do is
war press Control o2o, two, where is that gonna put them Left click, right click. We'll do it that way rather
than the bevel this time. And what we'll do is
we'll press Control B and pull those out. Like so. And then what I'm
going to do is I think I think we'll
pull those this way. So if I press S and X,
I should be able to, if I put it onto medium point, pull them this way, a little bit, like so. And then finally what
I'm going to do is I'm going to come
to the underneath. I'm going to press
three, just to go into face select, grab both of these. Put it this time on
individual origins, press S and X, and then I should be able
to pull them out like so. Alright, now, with these
then, let's come in. Shift click, Shift click. I'm going to press E, er, tern S, and then just
pull them out. Like, so. And then we've got a bit
of an edge on there. I'm just wondering, I think that's actually
going to be okay. I didn't reset the
transformations, which means that these are a little bit thinner in
comparison to these. So let's actually go back.
And before doing that, let's press tab, control A, reset all the
transforms, like so. And then what we'll do
is we'll press alterns, and now we'll pull them out. And then you can
see that they come out much much more even. Now, let's do this center
bit, so I'll grab the center. I'm going to press the iborn, and bring it in, like so. And then all I'm going to do
is press E and pull it back. Like so. All right, that's looking pretty good. I think I've gone a little bit too far back maybe with this. I'm going to pull it
back a little bit. And there we go. Now
what I'm going to do is, I'm going to my obelisk. I'm going to grab all of
these because I know, pretty much, except this one. They're all going to
be the same colors. Let me just put it
onto the Shader mode. And then what I'm
going to do is I'll grab All of these and I'm
going to grab this obelisk. And what I'm going
to do is press Control L. I'm going to
have copy modifiers. I'm going to press Control L, and I'm going to have
link materials as well. Now, let's have a look
see if the modifiers of work first of all,
so we can see on here. It does look a bit weird as though it's not actually
worked properly. So let's actually go in and
see what's going on there. Let's press L, move it to the
side. It's actually worked. It's just for some
reason, the bevels not actually going on properly.
So let's pull it back. Let's come in, press
control all transforms. There we go. That's
what the issue was. Let's do the same
thing on either. Control A all transforms, the origins geometry, and
let's do the same thing. We already reset on there, so that's absolutely fine. And what I'm going to do
on this one, I think, is I'll turn down the amount
to Not point No Not one. I'm going to do
the same on this. And then what I'm
going to do is the same probably on this one, as well. Let's turn it down one. Now, let's come to
this one first. So this one here has got one
of the right materials on. It just needs
another color on it. So if I come to this dark stone, let's change it then to blue. So if I put blue, you will see that we've got
one that says Blue Stone. Now, if we come in,
now we can grab this, we can press a sign, and there we go,
there's our Blue Stone. Now we can do is we can grab
the whole thing, press U. Smart U V, project, click Okay, and there you go, Dad is
looking. Pretty nice now. Let's come over to
this part here. This part is fine.
Everything's fine. We just don't want
the dark stone on there, so minus it off. Rest of the ta born, A
U, Smart U V, project. Click Okay. And there you go. Dad is looking
pretty nice as well. And finally, then this one
minus off the Doc stone. This one, instead, it wants
to be Dark stone or midstone. It wants to be the same
color as this one, and this one is midtone. So let's just change that. To. Mid stone. And the reason it's
like that is just to differentiate between this one and this one when
we've got them out. So this is kind of the
balcony type support, and this is underneath it. So let's come in now
and just press tab. A to grab it all U. Smart U V project, click
Okay, and there we go. There's that stone on there. Alright, so all of these now
are looking really nice, and now it's time
for the harder one. So I'm just going to
pull these over here. All these down a little bit. And just move them into a
little bit better placement before beginning
on this other one. Like so. All right, so we can see on here that
we need a top on here, and we need to bevel
it off as well. So I think the first
thing we should do is actually bevel it off because this is
supposed to line up with these stairs actually. So if I bring these stairs over, I'm just going to
duplicate it with shifty. I'm going to drag it over
them, and we can see That if I pull my stairs down, this here of this part here, if I pull it down,
the right height is supposed to be
coming to my stairs. Now, the thing is, obviously, we can change the height and
things like that of this. Let's pull it back into place, but you can see now that it
fits near enough perfectly. What we want to do is
we want to bend this, and so it's evenly coming
down and making a kind of, you know, a part where you wouldn't step off of the stairs. That's basically
what it's there for. What I'm going to do, first
of all, press Control A, resettle the transforms,
origins geometry. And then I'll come to the top
of here, so to this edge. I'll save out my work
while I'm there. Just get used to
doing that all the time. Press Control B. And then what we want
to do is bring it down. Now, you can see, again, we always have a
problem with it. And the reason is just because we need to put it on percentage. So let's put it on percentage. Let's bring it out then
where we actually want it. So something like this is
looking roundabout perfect. And I'm just wondering, Yeah, I think I want actually a
bigger part on the top of it. You can see here. It's quite
smaller than the top part. But I actually think,
you know, what? I'll bring it out a little
bit more. Like, so. And I'm looking at the flow, and it's flowing quite nice with the stairs apart
from this bombit. So what I'm going to do is, I'm just going to grab the bombit, and I'll pull it
up a little bit. Like so. And now I think
that's flowing pretty nice. Now what we need to do is
we need to create the top bit away from the actual bombit. So in other words,
this bit needs coming away realistically from this cause you
can see here it's got the slip on here going
all the way here. So what we're gonna do to
actually achieve that is we'll grab this part going all
the way down. This part. Then all I'm going to do
is separate them off. So I'm just going to
press Shift D this time because I do want the bottom part
underneath as well. So Shift D, let's
separate them off, then press P,
selection, like so. Now we've got two parts. We've got this part
and this part. Now with this part,
let's press Control A, first of all, right clicks
at Origins geometry. Lets go in then, and what we'll do is
add in a modifier, and the modifier we want is
going to be under generate, and it's going to be a solidify. From here, then let's put
even thickness on first. Let's bring it out. Like so. And now we can see
that we're actually getting somewhere to
what we actually want. Let's press S and
Y, sorry, S and X, and bring it out a little bit, just so we have that
little lip over there now. So now, can see you've got that beautiful lip going over there. And now you just need
to decide if you want this to come right
to the bottom of the stairs or not. I think I do. So what I'm gonna do is I'm going to grab
the whole thing, press S and y and just
bring it in a little bit. Go over the top
then, and then I'm just going to pull
it back into place. And now you can see that actual lip is still in
front of the stairs, and it just drops down there, and I think that finishes
it off quite nicely for us. Now, the next thing you can
see on here is we have one, two, three cuts
going down there. So let's deal with those now. So at the moment, I don't really need
these stairs anymore, I've got the right
size and everything. And because I duplicated it, I can actually delete
this out the way. If you just moved it, just
make sure you put it back, don't delete anything, so
delete it out of the way. And now what we'll do is
we'll come to this part. So if I press Control three, I can then go into
the side of it. And what I realistically
want to do is, I want to hide this
part of the way first. And then what I want to do is, I want to point going down evenly on here and across here. So what I'm going to
do to do that is, I will come to this
side first of all, I'll right click, and
I will subdivide. And what that's going
to do is it's going to put one point in here, as you can see, but I actually need another subdivision,
so I'll click it again. And now what I've got
is if I come over here, you can see I've got one
and two points on there. So now I can use that to kind of cut across where I
actually want it to be. So control three again. And what I'm going
to do is press A just to grab everything, and then I'm going
to come to Mesh. I'm going to go to
where it says bisect. And then what I'm going
to do is I'm going to cut straight across
there, like so. And then all I'm
going to do is I'm going to come with
the one slightly up, as we spoke about before. Just set this to zero. And then we're going to
do the same thing again. So A mesh, bisect, and I'm going to
cut this a little bit lower than
what it should be, because I'm going to
show you that you can press zero on this, zero it out, and then pull it up, and
you can really put it into place wherever you want
it. Now I want to do. We've got that. We've got these two little
pointers that we really, really don't need, so I'm just going to come
in do each of these, so we've got one in the
bomb, one in the top. And let's press delete, and we're going to
dissolve vertices. And now it's going
to strain those up, and it's like they never
existed. Now we can come in. Shift click, shift click, right click, Marko sin. And then from there
now, we can come in, grab this center one, L, and then Y, split it up. A to grab everything, mesh, come down, clean up, fill holes, and there we go. That is that part done. Now, If I press
tab press ol tag. You can see it's still not
together with the other parts, so if I press ol tag,
can bring it back. What that means is though
now I can press Control A, all transforms, the
origin to geometry. Grab this one and this one, press Control L. Not only
can I link materials, but I can also link Poppy
modifiers, and there we go. Now we've got those
lines on there. That's exactly what
I was looking for. So now all we need
to focus on on the next lesson is this
part going down here, which is actually pretty easy. All right, everyone. I
hope you enjoyed that. I hope you learned a lot. Always always save
about your work, and I'll see you on the next
one. Thanks a lot, bye bye.
43. Integrating Modular Pieces into the Scene: Welcome M everyone to Blend Ford the modular and Kit
bash environment guide, and this is where we left off. Alright, so let's
now do this one. So what we're gonna do is
we're going to come in. And first of all, we want
to make sure we're happy with the thickness of
this, which I think I am. And then what we'll do
is we'll just hop and over press Control A and
actually apply that. And finally, then let's
bring in some edge loop. So, let's think
how many kind of, you know, little blocks
we want down here. So let's press Control, bring
in a few Maybe like this, left click, right click, which will be eight for me. And then all I'm going to do then is resettle the transform. So all transforms
that origins ometry. And then what I'm
going to do is come in all the way down to here. I'm going to press
the eye button. I'm going to press
the eye button again and just drop them in like so. Next of all, then what I want
to do is extrude them back. So if I press E, you will see, as long as you don't
touch anything else, that it will extrude back along
the angle of the normals, which is great for us,
and that's what I want. All right, so now, finally, again, let's press control
lay all transforms. And then what we'll do is we'll actually grab this one here. Press Control y,
and we're going to copy modifiers, first of all. And then what we'll also do. Which will also copy of the materials to
add the materials. And then what I'm going to do is go just come over to materials, and we've got a the
moment, Blue Stone. So what I'm going
to do is, I'm going to first of all,
come into this one. Unwrap it all, so U,
Smart U V project, click ok. And then
what I'm going to do now is come to
every other one. So every other one, going down here like so, click
on Bluestone, click a sign, and then
come to the next one, so like this, all of these. Plus down arrow, and we're
looking for red this time. So Rd Stone, which
is this one here, click a sign, and there we go. Alright, so that's
looking pretty nice. Now, find that we can
join this together cause they have got the
same bevels on there. So Control J, join
it all together. Control all transforms,
set origin to geometry. Okay, so now we've got
these as supports. So first of all, let's come in. What we'll do is
we'll name these. So F two Sir supports. And then what we'll call is
balcony top. Let's call it. We'll always call it
supports List of all, so support balcony top like so. Then we'll call this
one support balcony Min like so. And then we'll call
this small support. So support, what do I just do? Let's bring that back. H
t. Where is it all gone? Here it is. I don't even know
how managed to hide that. I press two on the thing, but let's press controls
ad and bring it back. Alright, I didn't even
know to hit everything, and I don't know how it
does that but anyway. Alright, let's press F two, and then we'll just
call this support small like so.
Alright, there we go. Now, let's put all of these
then in a collection. So new collection,
we'll call it supports. And then finally, finally,
let's put all of these. So these four here, right
click and mark as assets. Let's then head over
to the asset manager. Unassigned. So we need a
new one called Supports. Let's double click it. L so, and then unassigned,
let's grab all four of these and drop them in. Sports like so. All right, so they're in there.
Let's save out the work. So file, save. Then what I'm going
to do is move them all back now in
some sort of place. So let's just tide
them up a little bit. So we'll just put
this one over here. We'll grab all four of them. Let's drop them over here. And these are those done now. Okay, so now what I
want to show you is, how do we get these
into our main file? So what I'm going
to do is, first of all, I'll save it all out again. I'll move over to
modeling because that's what we're
going to be next time we actually work on this. I'll press tab, and I'll
save it out once more, just to make sure that when I
come back into this file or if it crashes or anything like that, these are still here. Then what I'm going to do
is open up my gray box now. So here is the gray box,
which we first start with, so you can see if I put it on redevie, here is the gray box. Now, what we want to do now is slowly replace each
of these parts. We're not going to have
nowhere near enough parts yet to replace the
vast majority of it, but I am showing
you if you want to break from actually creating all of these parts
because it does take a long time that you can come in here and
start replacing them. It gives a bit of respite from just creating things. So
what I'm going to do then, On here, as you can see, I've actually got no asset manager. So the first thing I want to do is bring in an asset manager. I don't actually want to create a new asset manager or anything. All I'm going to do because I'm going to be
using it mainly in the modeling is I'm going
to come down to this. I'm actually going
to come up to this. So on the left hand side, I'm going to pull that down. And what I'm going to do then instead is I'm
going to drop this onto my asset browser, like so. And then what I'm going
to do is pull this Now, you will see at the moment,
if I click on here, we've got current file. We've got these in here
that are already in my own asset manager. So these are things
where all my materials are stored and things like that. I'm going to show you though now how you can actually
set this up. So we're going to put just on
current file at the moment. I'm going to go up to
edit, go to preferences, and what I'm going to do is
I'm going to open file paths. On here is where all of
my asset libraries are. Now, we made a new asset
library for all of these parts. What I'm doing is,
I'm just going to minus these off, like so. And then I'm going to click
the plus born What I want to do now is go and find
where I actually put those, and you can see here it's
on the asset manager. This is the one I
used, Astec parts. And then all I want to do is
add asset library like so. And you'll see now that
we've got this in here, and if I close this down, I can come now to where
it says current file, and I can go down to where
it says Aztec parts, and you'll see here now that all of these parts are
actually in here. Because of go on all, you'll
see the pop up like so, but the one we want is
all of these parts. We see we've got pillars. We've got the stairs in here, we've got the stone
blocks in here, we've got the supports in here. What we want to
do, first of all, is come to our stairs. All I'm going to do now is just drag and drop my stairs in, and now I can start replacing all of these stairs that
I've actually created. If I bring this here, you can
see it's a little bit off. From what I actually created, but that's no problem because we'll start moving
everything in. So what I'm going to do
is I'm going to place this right in the
center of here, and then we're going to come
in and delete these stairs. Now, you'll also see that because we built everything
from the ground plane, that's how it actually does it. I'll actually start everything
from this ground plane. Now, what I'm also going to
do as well is, I'll come in. And where these big blocks are, you can see we've got
these big blocks in there. We're going to come in and
replace those as well. So rather than do it like this, let's put it onto
this view here, and now you can see, already, that's looking pretty nice. So what I'm going to do now
is I'm going to come in. I'll delete this
part of the way, and I'll also delete this
part of the way like so. What I'm going to do
now is stone blocks. I'm going to come in
and bring in my huge, huge stone block, like so. And maybe this one's a bit big. Let's bring in one of the
mid stone blocks like so. And that one's going to
be much, much bigger. What I need, and I'm going
to pull it over into place like so and just drop
it into place like that. And you can see with
this stone block, it's not going nowhere
near it long enough. So I can see here, I'm
going to need another one. That's what I'm going to do is I'm going to press shift deep. I'm going to
duplicate it over and just put it a little bit over. So we've got a little
bit of a gap there, so a little bit
holding the shift bon. Oh, yeah, that's one
other thing you can do. When you move in something,
if you start to moving, then you hold the shift
on, you can really slow it down and get it
right in place like so. If you press the shift
before doing that, you'll just mess around with it, so you don't want
to do it that way. You want to move it first,
then hold the shift b, and then it'll slow
it down like so. So you can see now already, This is looking pretty nice. You can see a lot of this now, is nowhere near high enough. You can see my stairs. Need dropping down a
bit, for instance, if we put our stairs down a little bit into
the floor like so. We can see we've
got a bit more of a lip than we want to on here. So what I'm going to do is
grab both of these, like so. If I lift them up,
it's going to be a bit too high up off the floor. So what I'm going to do
is press Sen's d and just pull them out a
little bit. Bring them up. So now the lip of that stairs
is just right around there. And you can see
now we can really start building this out, flushing it out base is
what we're trying to do. Now, let's come in then and
build the next point up, so I'll come to my stairs. I'm going to delete
this one out the way. Then what I'm going to do
is put another stairs on, so let's come to our stairs. This is the one that
we actually want. We're going to drop
it on there, like so. Now we need to decide how far
this is going to come over. To me, this looks too far now. Thing I'm going to pull it up to here, something like this. And we can see that
we need to really start moving a lot of this
forward and things like that, just simply for the fact of
how big I actually built it. But don't worry
about that because you're really just
replacing things, moving them forwards, and
all that sort of stuff. So let's put these here. Let's come then to
our stone blocks, not stone blocks, and
let's have a look. We've got pillars. There we go. That's
what we want. And what I want to do is
bring in this pillar, and I'm going to
replace these two here. So what I'm going to do
is I'm just going to put these in. Like so. I'm going to put it
down to the floor then. So I'm going to press
one. I'm going to press G, put it
down to the floor. And the reason why this one
didn't come down to the floor is because it's actually
a geometry note. So I'm going to
pull it into there, I'm going to pull it
back then into place. Delete this pillar
out of the way, so I delete it out of the way, and then just make sure
they're happy with this one. So I'm going to pull it
out into place like so. And then all I'm going to do now is put it on the
other side as well. So shift, let's bring
it to the other side. Put it into here like so. The thing is you can
see at the moment, this is the same as this one. We don't really want
that, so what we can do is come in over and
just change the seed. So change the seed, like so, and you'll see now, it makes
it completely different. The other thing you
can do is as well, is you can press ry, 180, spin it around, press one, and then just pull it up
to the other one, like so, and also think now that's
changed the colors of them, so they're looking a little bit different
from each other. Next of all, then let's
bring in these kind of tops. Let's make sure as well
that this is kind of even. You can see it's a little bit
off center at the moment, so let's pull it over, so it's a little bit
more even like so. And then what I'm going to
do is come to the supports, and these are the supports
that I want to bring in. So first of all, I'm going
to bring in support here. I'm going to pull it into
place to where I want it. Then what I'm going to
do is slide it back. Like so, pull it up to
the top of those stairs. Like so. And it's a bit like
lego now doing all this, so I'm going to pull it just so. There's a little bit
of a lip over there. So you can see a
little bit of a lip hanging over it
because we're going to hide it with our other supports. Now what I can do is
I can press shift D. Pull it over to this side. Same again on this side, it's going a little
bit too far there, just hanging over,
and there we go, now, I can see already this is
starting to come together. Now the next thing we want to do then is bring in
these other supports. We're not going to actually
carry on with that. What we're going to do
now is when we come back, is we're going to actually save this out, so we're
going to save this out. This will update, by the way, when you reload this up, and
what we're going to do is, we're going to carry
on building out all of the parts first because there's a lot of things to move on here, as you can see, a lot of these blocks are not
quite the right size, and it's a lot of wed. But once you've
got all the parts, it's much much easier to move everything
kind of into place. I need to kind of move
all of these things down. I think actually
before finishing, what we'll actually do is we'll hide our floor out the way. We'll press seven
to go over the top. Now I'm going to hide
this out the way. So just this block,
and then what I'm going to do is I'm going
to grab the whole thing. So I'm going to drag everything, all these things, and I'm going to pull them all this way. Now, I'm going to have
to pull them up again. I know that. I'm going to also have
to sort out this, making sure they
can walk past here, and everything fits perfectly. But I think moving everything
like this is going to make it a little bit easier for us when we actually come
to build this out. Now, the next thing is,
if I press saltge now, I've got a block in there. So if I hide this block, I've got a block
in here, which I really don't need right there. So all I'm going to do
is just, you know, what, I'll just delete
out away because I think we can use a
bigger block in there. Alright, but you can see already now how nice that's
actually looking, how easy it is to bring
those pots in once you've done them and all
that sort of good stuff. So finally, let's save it out, and let's close that down, and on the next lesson, we'll
be back into creating pots. Alright, everyone, so I
hope you enjoyed that. I'll see on the next one.
Thanks a lot. Bye bye.
44. Planning and Creating Arches in Blender: Welcome back, everyone.
To end the fall the modular and Kit
Bash Environment guide, and this is where
we left it off. Alright, what I want to do
now then is copy this one. So I'm going to press
shift. Let's bring it over. And let's do something
a little bit harder. So we'll move it over to here. And from now on, as
we go through these, the be getting more technical and more difficult
to actually create. And that's exactly what we want. So what I'm going to do is
I'm going to come over here, delete this out, open it up. And the one we're looking
for is called Archers. So let's find that one.
Let me just find this one. Here we are. Let me
just have a look. This one here is the arches
that we want. So there we go. And let's have a look
at this one first. So we can see that we've got a few technical things in here. First of all, this
one is quite simple. You can see it comes
in at the sides. And again, we're looking
at something and checking how we would
actually build this. Next of all, then
we've got these here, and you can see the randomized on these parts here going in. There's also this archway that's going into
the actual stone, and as well as that,
as you can see, that this line here is also going all the
way through there, and I think that's important. That's probably the most
technical part of this part. Now on this one,
we've got an archway, we've got another kind of
arch coming around here, which is above that, which
is a boolean in there. We've got a couple of
parts that are coming out, and then finally, we've
got this bit on here. This one, I think is
relatively simple in comparison to something,
let's say like this one. This one's a little
bit more complex. This one's actually
using a Geo node. You can see it comes
up, goes round. So if I was looking at
this one, for instance, I would build this part
first going round, and then what I would do is
I would bole in it round, bole in these parts in, so both of these parts in, grab my geometry node
and create this part, and then create these
bottom structures on here. Alright, so I think
that we should start with probably this one,
and then move to this. In fact, you know
what? We'll start with this one? It's
the easiest one. And then what we'll do
is move to this one. Alright, so let's get some
scaling in like we always do. And I hope you guys don't
mind again, the scaling in. I think it's way easier,
then let's build it just to round about here
and round about here. I think it's much much better. Alright, the guys still going to stay in there because I'm
not going to give you scaling on things like barrels and market props and
things like that. I want you to decide what
kind of scale you want those. So what we'll do
now is bring in, I think we'll bring
in three cubes again. I think it's always the
easiest way to do that. So one, two, and then grab
them both. 34 like so. And now let's come to this one, and this will be this one here. And the scale of this
one is going to be 5.496 0.93, and 4.72. And there we go, you can
see that one's quite big. And this one is the top
of the actual temple. Now, let's come
to this one here, and this size in is
going to be 3.021 0.772 0.81, like so. Let's move that one over there. And then we'll come to
this smaller one here. So let's grab the
smaller one here, and over here, we'll
put it down at 0.545. 2.64 and 3.26 like so. Alright, so we'll spin
this one the round first. So z 90, let's get it
spun round, like so. And then finally, which
one's left? This one here. So this one here's left. And over here, we'll
put this at 5.36, 2.73 and 2.43 like so. Alright, so there we go. We've
got all of our scaling in. Now, let's come to this
one here then first. So, what I'm going to do is, I might as well start with
a block going up like this. So you can see it's
got a block going up like this, and
then one on top. I think it's gonna be easy
if we kind of create it. These straight, for instance. So you can see these ones here. They're very, very straight.
Unlike these ones, they're pretty randomized. Alright, so what we'll do then? Is we'll bring in a cube, so I'm going to press Shift
S, Kirst to selected. And what I'm also
going to do is, I'll bring in my cube first. So Shift D, let's
bring in a cube. Let's bring them all up then. So all of these up onto the ground plane,
let's set them up. So if I press one, I can see my ground plane is
going to be here. I can see that the other ones at input on the ground
plane very well. But oh, well, we'll get there. Let's put this one on the
ground plane like so. And finally, this
one. And there we go. All right. The
other thing is just so these don't get in the way. You can see that all of these are in their supports
and things like that. And what I'm going to
do is I'm just going to hide these ones out the way. So if I come in, hide
my pillows, my pillows. You can see here that actually, this one is part of my stairs. So I'm going to fix that first. So what I'm going to do
is just grab all these, press the n but, and I
want them in stairs. I'm going to grab
all of these then, press the n button, and I
want these in supports. I'm going to grab
all of these then, and these are going
to be under pillars. And then finally, all of these, and these are going to
be under stone blocks. And there we go now, we should be able to hide
everything out the way. So let's see if we
can hide the pillars, we can hide our stairs, and we can hide our supports. Now, you can see that this one here has actually
been hit as well. So what we'll do
is we'll just make a new one called arches,
so new collection, arches, Like, so, and now, I should be able to close
that up and hide my support. Alright, so now, finally,
we're ready to start. Now, with this one here, it's important that we
bring him over. And the first thing we do. Why is that support still hidden side that other
way? There we go. It's important that our guy can actually walk through here. So what I'm going to do
with this part here is, I'll make it a
little bit longer, first of all, so S and next, let's pull it out
to the right side. S and Z, let's
pull it down then. L so, making sure that
it's pretty chunky, and let's put it on the side. Like so, make it a
little bit chunkier. And then there's enough room for him to go underneath that. And then let's press tab. Control to bring
in an edge loop. Left click, right
click to drop it right in the center,
and then Control B, and all I'm going to
do is pull it out to where I want the
actual parts to start. So I'm going to say I want
them to start around here. All right, from there
then, let's actually come in now and split these off. So what I'm going to
do is I'm going to lt shift click Alt Shift
click, and then right click. I'm going to mark a scene. Next of all, then,
what I'm going to do is I'm going to come
underneath this. So, the other thing is, I want to make sure actually, before I do that, that it's the right actual
width because at the moment, it's way too wide. So I'm just going to press tab, I'm going to press S and y,
and we're gonna pull it in. To get it to the right scale. So you can see if I
go over the top now. It's a little bit, is it a
little bit out? I think so. So S, Y, let's pull it in a little bit more,
and that's more like it. And then finally
out, let's come in, and we can hide
this out the way. We don't need this part anymore, so I can delete it out
of the way like so. And then I can come to
these bottom parts. All I'm going to do is
grab the bottom of them. I'm going to press one on
the number pad, press E, and just pull them down
into place like so. Then what I'm going
to do is now, I'm going to come
to each of these. So each of these
little sides here, gonna press S and X, and
I'm gonna pull them out. Now at the moment
they're not pulling out, and the reason is because this
is on individual origins. Let's set this to
median point then, so S and X, and let's
pull them out like so. Alright, I want two then
blocks in here, so Control. Two, left click, right click. Control, two. Left click, right click. And there we go. And now finally, let's
add in some seams, so Alt Shift click,
add in our seams. Let's add in a seam along here. Now you can see it's
already marked along there, so we don't need to
worry about that as long as it's going
all the way over, and then right click
and mark a seam. Now what we want to do is
want to split these off. What I'm going to do is
I'm going to call L. And the thing is, you should know that when you
split off, like, if I split these off here, they will still be joined in this little corner here, and
we don't really want that. What I'm going to do is I'm
going to grab this one. I'm going to press y. And what I tend to do when it's
something more complex, I'll hide it out the way. And then I'll come to the
next one, I'll press L, L and L, and then Y, and then hide them out the way. And basically, then I can see
if everything is split off. From there, there is
another way as well. You can actually grab
everything with A. Make sure that you're
on individual origins, press the S but, and then you can see
that it's all actually, split apart, and from there, I can just press right click
and drop them back in place. Now what we're going to
do is go up to mesh. We're going to come down
to where it says cleanup, and we're just going to
fill in those holes. Now, let's do that
again, so if I press S, you can see now that all of the holes all of these holes have
actually been filled in, and that's great for
us, and then I can press controls head and
bring them all back. Alright, so the last
bit that I want to do is just this
center part here. I also want to make sure that
these blocks on top of here just come out a little bit
just so it doesn't look like, you know, in fact,
you know what, I'll bring in these
parts a little bit, so I'll bring these parts in. And then what it'll do is
just make sure it doesn't all look to flush with each other. So let's come in and
bring this part out, like, so just very slightly. And then what we'll
do is we'll press the eye button and bring it in. Now, you can see that
it's not coming in right, and we know why that is. It's because we need to
see reset the transform, so set origin to geometry. And now let's bring it in. So bring it in with
the eye button. Like, so, let's pull it
out then, so pull it out. Like, so. And then finally, now, let's bring these parts in. So all I'm going to do is
I'm going to grab each of these like so. And I'm hoping I can press S and bring them in just
a tiny bit like so. So les to bring them
in, and there we go. That's exactly what
we're looking for. And now, finally, now we've
split everything off. Let's reset the
transformations again, right, clicks the
origin to geometry. And then what we're
going to do then is coming over, adding a bevel. So we're going to
add in the Bevel, and we're going to put
this on Not point. No No three. Let's try that. And maybe a little bit higher. Let's go one higher, like so. Now, you can see that we've
got some problems in here. Then let's have a look what
is actually causing that. So let's hide this out the way, and let's see what's
going on with this. You can see for some
reason that this or this face on each of these is not actually
working properly. So what I'm going to do is,
I'm just going to come in, and I'm going to come
in with my edge select. So let's press saltge,
bring it back. Let's come in then with edge set and hide that out the
way, and there we go. There we can see
what the issue is. For some reason, the faces, when they got drawn on this
part, didn't go on properly. So all I'm going to
do is you can see, I'm going to grab each of
these press delete and faces. Sometimes, sometimes that
will happen when we're using, you know, like fill faces
and things like that. Let's come to this one,
id it out of the way, and then all I'm going to do
now is fill this in with F. Fill this one in
with F. Underneath. Fill this one in with F, not G. F and F on
this bottom one. And then lth, bring back
everything and then tab. And now you can see that's
looking to tons Bre. Alright, the last thing,
then, before finishing, I think I'll just pull this
part up just a slight bit, like, so, and I think that looks a little bit
bare, like that. And yeah, that's
looking pretty nice. Alright, so on the next lesson, then what we'll do
is we'll actually get the material
in for this one. It's just basically
one material, and then we'll be moving on. I think we'll move on
next to this one here, a little bit more complex. So this one is this one here. So we'll move on
to this one next. Alright, everyone. I
hope you enjoyed that. I hope you're enjoying
the full process, and I'll see on the next
one. Thanks a lot. Bye bye.
45. Managing Polygon Count in 3D Models: Welcome to end the Ford the modulate and Kit Bash
environment guiding. This is where we left it
off. Alright, so what I want to do now is this one
here, I'm going to come down. Put it on mid, mid Stone. Which one is it? I
think it's this one. So I'll put it on midtone. And then all I'm going
to do is come in A to unwrap everything, so smart U V wrap. Okay. Now, the reason
why I haven't gone into any other shaders
at the moment is because of the fact that we've already discussed these kind of stone shaders and
basically all we've been making through all of this
is pretty much stone, and they're all
basically the same. So once we move
on something like cloth or we move on to the wood, then we will go through those
and never look at those. Alright, then, for
now, let's just check this because I just want to
make sure this stone is. So we've got two midstone. We've got this midstone, this midstone, and you can see what a difference
that makes. So I think that for some reason, the other midtone
isn't the same one. I'm not sure what I've
put that on, but anyway, we'll check that out as we
go through the process. Alright, so we've done that.
Let's save out our work. And then what we'll do is we'll move on to the next one now. Let's put this on object
mole because it might make it a little bit
easier to work with. First thing I want
to do then is, I want to create this kind
of size that this is. So I'm going to actually
bring this in, I think. So the way that I'll do that is, I'll just come into it. I'll press control. Left click. Let's bring it up to get
the right thickness. So I want some
thickness on here. We don't want it, you know, just a slab and no
thickness on there, because it needs to look big
enough this slab that some, posts are going to be
holding it underneath here. And then we want to
come to the front now, control and bring it
to the front light. So now, a lot of this front
is going to be hidden. The other thing that
we have to take into consideration is that we're going to have an
arch on the front. So let's pull it out
just a little bit. So I'm thinking something
like this looks about right. Now, let's come in. And
what we'll do is we'll just come round and delete
all of these faces. So if I come to here,
press delete and faces, and we should be left
for something like this. And then all I want to do is just grab this edge, this edge, press the F button,
grab this edge, and this edge,
press the F button. And there we go. All right. So now on this,
we're going to have a couple of booleans that
are going to go in there. So we've already actually
had a go a booleans. Let's just see what height
these are so if I come in. Now, the reason why this one
is so low is because this is the archway that
is going at the back. If you remember there's
an archway where the guys going to walk through, and then there's a couple of, you know, kind of arches there. This is why this is like this. So they don't have to be so high to support doors
and things like that. They're just
basically open holes. Alright, so what we're gonna do? I'm going to come to
the center of here, I'm going to reset
all the transforms, first of all, I'll set
origin to geometry. I'm going to press
Shift S, to selected, I'm going to press Shift A, and now we have to be careful
what we're doing here. And the reason is because we're going to be bringing
in a cylinder. The cylinder is going to be
coming in at 32 vertices, and we want to make sure
that that is not too high. So we definitely
don't want it at 32. We do, however, want it at something where we can
still round it off. So I'm going to show you
what I mean by that. So if I get one
cylinder like so, if I press Shift A and
bring in another cylinder, so let's bring in
another cylinder. Let's put this cylinder
on 24, like so. Pull this one over
here. Let's bring in another cylinder,
so mesh, cylinder. Let's put this one at
something like 16. Like so, and then
finally we'll bring in one more cylinder. So shift Day. Don't actually do
this, watch y do, and let's put this
on eight, like so. All right, so we've got
four cylinders here, and all of them, this is 32, 24, 16, and eight. If we come to each of these and right click now
and Shade Smooth, you can see pretty much
what is happening here. So something like this, if we're building an
archway on here, you can see it's
relatively smooth. Okay, there's a little bit
of blockines on there. The roundness of
it is very smooth, but there's a little bit
of blocking tiny bit. Now, on this part,
Compared to this part. This is 24, this is 32. You can see there's
a little tiny bit of a fraction more
blockings on this one. The moment that we
drop down to 16, you can see now it's
getting really apparent. And the moment we
drop down to eight, you can see we can't even
smooth off the edge anymore. That is what we don't want. And this is the
reason why we need a happy medium to
use for boolean. Now, I always recommend the
happy medium is going to be around 24 or 16 at the least. So somewhere between those, and you always try and keep them normally at an even number. So I'm going to say, let's do 24 because we're not so much
worried about polygon count. On this build. We
need to keep it relatively low to
get everything in, but we don't need it super low. I mean, it's not a mobile
game or something like this. Okay, so let's delete
both of these. And then what we can
do is we can use this one now to create
these parts here. So the first thing I'm going to do is I'm going to grab this. And again, what we need to do is we need to spin this round. So let's press r and x, and 90. Let's spin it round. Then what we're going to
do is get rid of the front and back, so delete bases. And then what I'm
going to do is now, I'm going to come in and
do what we did before, where whereever it
starts turning in, so you can see it's
turning in here, they're the parts that
we're going to get rid of. So what I tend to
do is I'll grab one side, grab the other side, and then control
click the other side, and then from there can
press delete and faces. Now, let's put this into
some sort of place and then I can see how far this is
going to be dropping down. What I'm going to do is, I'm going to bring it into place. You can see it's way
too big at the moment. I think, let's bring it down. To something like here, Let's also then make it a
little bit smaller. So S, make it a
little bit smaller, I'm going to pull
it over this side. Now, what I'm going
to do is now, I'm going to set
the orientation to the center of here because
I want to mirror it over. So I want to mirror it over from the center of this
actual object. So what I'm going
to do is control A, all transoms, set origin, two, three D cursor because
we know that's in the center, and then add modifier. And then all we're going to
do is generate a mirror. Like so. Alright, so that's
looking pretty good. They're looking a little bit, tiny, tiny bit too
low at the moment, but we have got to take
into account that we are going to have kind of
blocks going over here, so I'm just going to pull
them up a tad like so. Now what I'm going
to do is just make sure that my guy is on
the floor, actually. H is a little bit off the
floor as you can see, so he's gonna be
around about here. Alright, so now
what I want to do is I've got those
going through there, and now I want to come in. And basically bring
both of these down. So if I come down, I
can press E and Z, and you'll see that
the mirror one does exactly the same thing. From there, can press
F, fill them in. Come round to the
back, Alt Shift and click, F, fill them in, and then come round
to this side, Alt Shift click and
F and fill them in. And there we go. All right. So now I actually can figure out where we
actually want these. So in the middle of here, there is going to be, so
let me just pull them back. There is going to be a block that goes around the and
meets kind of in the middle. So let's bring in
our block first. So what I'm going to
do is press shift A. I'm going to bring in a curve. So the curve of one is
going to be a path. Let's pull the path out. What I'm going to do
here then is make this actually into a
stone block first, and then into a curve. So let me show you how
I'm going to do that. First of all, I
need a goat node. I'm going to come on
over, add modify it, bring in a omg note. And let's just see if
I've got that on here. I've got all of these gooten
nodes as you see here, and one of them is
called stone path. I'm not sure, yes, that's
the one that I want. So this one here, I can then bring it into place, like so. Now what I also want
to do on here is, I want to curve
this round as well. Now, the good thing about the
jump nodes we create here, most of them can
have a something called modifier stacking
applied to them, which means that you can apply more than one actual jump node. Now, let's safar our work before going any further. And then
what we're going to do. Before doing anything on this, we're just going to
push this up a minute, adding another modifier,
and the one we want to generate is
going to be a deform. And it's going to be a simple, where is it's simple deform. This one here. Alright, so simple deform. Let's
put it on bend. Let's put it then
on the y or the Z. So, the Z, you can see here now. Now, let's pull this
round a little bit, and now you can see this is actually starting
to take place. Now, if I spin this round, so R X 90 or R X 180, just to bring it round
to I want it, press one. Now you can see
that is what I one, albeit, it's a
little bit too bent. And the reason is we need
to set this to 180 like so, and now we can make it smaller. So let's make it
smaller like so. And now you can see, yes, this
is what we actually want. Now, the next thing
we want to do is we want to pull these parts
down first of all. So we've got this
right in the center. Not in the center of
here. So let's get it in the center of there first
before doing anything else. So what I'm going to do
is, I'm going to come in, grab my Bleu, press Shift S, cursed to selected, and
then I'm going to grab this part with the actual
orientation in the middle. And then what I'm going
to do is press Shift S, selection to cursor. That then is going
to put it right in the center I want it, and from there, I can
actually drag it up like so. Next of all, then,
I'm just going to move my guy to the side. I'm going to pull
these down because these want to come
down roughly to around here before they end up with some blocks that are
going to appear around here. So what I'm going to do is I'm going to come
into this part. And you can see at the moment that because I've
got that bend on, it means that I'm going
to actually have to pull this out on its own basically. So if I press S and X, I can pull it out, and you'll see that nothing
really happens. Let's see if I can pull it
out with each of these then. So I'm going to press E, enter S and x, let's pull them out. And what's happening in there? I, look, let's just see if I can pull that
out. There we go. I'm not sure why
that's not puting out. I think it's because I've got
it on individual origins. So let's put it on the S
and X, let's pull them out. And there you go, and now you can see
we're going to have to increase that bend or we
reset the transformations. Let's now reset the
transformations, control A, all transforms, clicks
the origin to geometry. Let's spin it round, so r x -90, and there we go, Let's make it a little bit smaller.
You know what? I'm wondering if I need to pull these out before
because at the moment, these are not
actually coming down, so I'm just wondering, Yeah, if I need to pull
these down before. So what I'm going
to do is, you know, I'm going to take off the
simple defe first, like so. And then what I'm
going to do now is I'm going to come in and mess around with my geometen node on the next lesson before
doing anything else. So basically, I'm going
to see if I can make these the right size,
bend them round. And then if not, what
I'll do is I'll actually create some parts
going down here, but I think I can actually
get it to go around there. Alright, everyone, so I
hope you enjoyed that. Better fiddling around
as they're always we being something a little
bit more technical, and I'll see on the next
one. Thanks a lot, bye bye.
46. Creating Arches with Geometry Nodes: A Welcome back to blend the par the
modulate and Kash environment guide and this
where we left it out. Alright. So instead
of doing it the way we were trying to do it
with the actual curve, what I'm going to do is,
I'm going to come in and actually bend them
down like this. I'm going to press S and
X and bring them in. And then we're going
to grab these ones, S and X and pull them out. And now you can
see we're actually getting somewhere
with this curve. Let's pull this part up.
So let's put our x ray on, and then we be able
to see through there. Can I see through there?
Let's hide this part the way, so let's hide it al the way. And can I actually
see through there? I can just see through there. So from there, I'm
just wondering, yes, I can just see through
there as you can see. Let's put wide frame on. There we go. That's going
to work out better for us. But let's come in
then and actually try now and bring these
out a little bit. So, in other words, I'm a
little bit more like so, and if a press heat ands head, now I should be able to straighten those
up as you can see. Alright, so now let's come in and bring this down ale bit. Like so, and now you
can see that all of this pretty is
following that curve, except maybe this bit, so let's bring it
in a little bit. To there, and then let's bring these in a little
bit. So S and x. Let's see if we can bring
them in. There we go. And then let's finally
bring these in. L so. Now, let's come in. And let's actually make
these then the right side. So first of all, we can see that we've got a
subdivision of one. We want this probably
on a round about three. So just to make them a
little bit more blocky. We're going to put it
on object mode now, turn off our x ray, and now we can see
exactly what we're doing. We also have these where
they're way way too big. So let's first of all come in, and I think it
will be the width. Let's turn that the
width. There we go. Now we're starting
to get somewhere. They're looking much,
much better, except, of course, they've got a funny bend around here.
I don't really want that. So what I'm going to
do is I'm going to see if I delete these, so delete vertices, Then
what I'm going to do is, I'm going to pull
these parts up, so let's pull these parts up, and hopefully, then that
will give me more of the bend than I'm
actually looking for. And then what I'm going
to do as well is, I'm going to pull these
up because these are going to go into a
block down here. Now, finally, now you can see that's looking much much better. You can see that it's a little
bit out on this part here. So what I'm going to do
to fix that is I'll just press S and x and pull
them out slightly, and that is much more what
I'm actually looking for. Alright, so now we've got
that bit let's come in. And what we want
is you can see at the moment the width
is all the same. So let's come in and change
the width randomness, so we can change the width just slightly random on
each one, like so. And then what we'll do is we'll come in with
the thickness, and we'll change the
thickness slightly. So if we come in, bring
the thickness out, making them look more
like stone blocks. Let's change the
thickness randomness. So if we do this, like so, and now we'll come to the length the length I'm
actually happy with. The only thing is we want
a random length on here. I'm going to grab this, and you can see as I
move this round, all of those lengths
get randomized. And I'm just
wondering if this is, I think actually we'll make it a little bit larger
on the width. There we go, like so. And you can just see just how handy it is to have
something like this. Now, the next thing I
want to do is this noise. If I start turning this up now, you can see now we've got a
little bit of noise in there. Let's put auto
smooth on as well, just so we have a good view of what this is
going to look like, and I think that's looking
much, much better now. And finally, you've got all of these other options that you can mess around with as well, including the gaps and
the gaps randomness. Now I want mine, pretty much, you know, kind of put together. You can see we've already
got some randomness in here. And the other thing
you can do as well is you can see you've
got a bevel on here. You can mess around
with that. You can have it really beveled
off if you want. So I'm going to bevel
it off just a slight more like so, and there we go. I'm thinking that's
looking pretty good. And then finally, we've
got this live UV wrap. Now, what that does is, if I come in, you can see at the moment we've
got it on this stone. If I come in and just
put that on the mid. So let's put it on the mid. Stone, this one here. You can see that when I've got Live V V unwrapped on, actually, if we go to render view, you can see now it's
actually unwrapped, and we've got some edge
wn, things like that. So if I turn this off. So now I can also come in and
change the seed, like so. Right, very easy. Now, what we want to do now is we want to put it on
this side as well. So you can see we've
got the top of it here. What we want to do
is we want to set the orientation to
round about here, because then that is the
center of this one here. So if I come in, right click the origin to three D
cursor, there you go. And then what I'll do
is, I'll press shift. Bring in another one, put it around here around
the same place. Now, we don't want
these to look the same, so I'm just going to
turn the set up like so, so it looks
completely different. And then what I'll do is, I'll come to this one here.
So you can see here. I've got this point here,
so come to this point. So this one here. Let's
put it on object, and see what I'm
doing. By select Oh, yeah, this is a mirror. That's why. Alright,
we'll do that bit after. Okay, let's do this bit first. So what we want to do
then is we want to boolean this into
this part here. So first of all, let's
come over to this. Let's go to generate, and we're going to
generate a Boolean. And then all I'm
going to do is click on this part here
for my Boolean. Make sure fast is on, and then controla
and apply that. Now if I hide this out the way, you'll see that we've got
a beautiful boolean here. All right. So let's now
grab both of these, and what we're going to do is just pull them back into place, and you can see these are
exactly what they're going to look like now before
doing anything else. They're looking pretty nice. Now, this one here is
obviously not level. So how do we get this level? If I press tag and
bring back these, what I can do then is
just apply the mirror, so control, apply that, and now I can come in
and actually grab this. What I'm going to do is press
Shift S, cursor selected. Come back then to this one, and I want this
right in the center. So I'm going to press Shift
S and selection to Cursor, and that then is going to put
that right in the center. So you can see now it's right
in the center of there. And then I can just pull it back into place
along with this one. From there, then I can actually just make sure that you're
actually happy with these. So hide these out the way. This is what it's
going to look like. And you can see, once you've got some stone blocks in here,
are these thick enough? That's the question you
need to ask yourself. Is this thick enough along here? So let's actually make
these stone blocks now. So what I'm going to
do is I'll come in. I'll grab the bottom
off here, like so, I'm going to press
shift D, and then I'm going to press the S
button and pull it out. Now, before I do that, let's
actually separate it off. So P, selection,
separate it off. Let's come in then to these
contro la all transforms, right click, set
origin to geometry. And now if I come in, I can actually pull it out. So S, let's pull it out. I'm going to put
it to the bottom. Like, so, I'm going to
press the tab button, press A to grab it, and then what I'm going to
do is pull it up into place. Now, you can see, it's a long, long way out at the moment, so we really need to make
sure this comes out much, much further than what it is, which means that I'm
probably going to have to pull both of these
back a little bit, so let's pull them back
round about there. Grab this again. At shifting click going around the outside, Alter S, and let's pull them
out then into place like so. Now you can see this is
looking much, much bare. Now, from here,
let's press control, two, left click, right click. And the other thing is now, you just want to decide,
is this thick enough? In other words, if your
guy walks over here, do you want this
thicker, for instance? Because you can actually
pull these archers up still? You've got the
ability to do that. And I think it's thick
enough, I think. I think the one
thing I did wrong here is I put three in here. Yeah, actually, you know
what? It's going to be good. So let's right click, and what
we'll do is mark a scene. And then what I'm going
to do is I'm going to bring this over then
to the other side. So if I grab all of this, I can press Shift D, I can bring it over then
to the other side. And then what I can
do is I can press S and X and just pull
it in, like so. And then I'm just
going to pull it over to there because I know
it's actually going to fit. Finally, then, finally, I want to make sure that
this is in the center. So you can see at the
moment the origin is here. So if I just split it all off, if I press P selection, my origin will still
be in the center, which means I might be
able to get away with using a mirror over
there, and there you go. There's the mirror in. Now,
let's come in to this one. And what we're going to
do is split it off now. So if I come in, L and L, let's press P, split them off. And then what we'll
do is we'll come in. And I should have not P. H. What I should have done is press
Y and split them off, not P. Let's grab them all then, and then all we're gonna
do is we're going to go to mesh clean up Bill holes. Then what I'm going
to do is grab this bott one, t shift and click, and then I'm going
to press lt and S and pull this one in
a little bit like so, and it should match
this other side. So that's perfect. Now
let's come into these ones. We're gonna do pretty
much the same thing, lt shift and click,
Y to split it off. A, and then mesh clean up holes. And there we go.
Now, let's come in finally and add some
levels on these parts. So if I come in, Add
modifier generate a bevel. Control eight, all transforms, right clicks the
origin to geometry. And let's put the
bevel on Nought 0.3, like so, that's still too high. Let's bring it
down a little bit. Nought point Nought one. I'm thinking, Maybe
that's looking. Maybe that's looking okay. I'm just wondering whether to bring the center one in as well. Let's bring it down to
Not point not note three. Like so No point not
five. Let's try that. Yeah. I think that's
looking much much better. All right, from
there then, let's come in then and
do these as well, so we can see if go mirror on. Let's apply the mirror, so control Let's add
in a bevel then. Let's reset all the transforms
that origin geometry. Not Point No note five. And there we go. And
now finally, these, we can actually apply the Joe. I'm going to grab both of these. Just make sure you're happy
with them before you finish. I'm just going to see if I turn this down just very slightly, and turn this one down
just very slightly. And I think that looks a
little bit better actually. They looked a little bit too much like they're
not actually stone, they're a little bit rubbery. Let's turn this down.
Just a bit to 0.5. Let's try that. Yeah, the
thing that actually looks bad, and then all I'll do
is I'll put the gaps up a little bit, like so. So not 0.5 gaps on not 0.3. So let's do the same one here. No 0.5. No 0.3 on the gaps. And there we go, Gap randomness,
we'll leave as it is. All right, I think
I'm happy with that. That's looking pretty good. And then what I'll do is
grab them both, object, come down, and what we'll
do is convert to mesh. And then we go double tap
the A and all of this. Now is converted to mesh. And you can see it took
a little bit of time, but in the end, I think it
looks really, really cool. Now what we need to do then on the next one is we'll bring in all the materials for this because you can
see at the moment, they've got no materials
on apart from these. And what we'll also do then is get them all unwrapped
and things like that. And then move on
to the next one. Alright, everyone, so I hope you enjoyed that one, and
I'll see the next one. Thanks a lot. Bye bye. O
47. Working with Booleans in Blender: Welcome back everyone
to Blend the for the modulate and Kit
bash environment guide, and this is where
we left it off. Alright, so let's come
into these parts first. So I'm going to
grab both of these. Now, the thing is when we
join this all together, we need to make sure before
we join it together that we've actually got this actual
with the bevel on there. So I'm gonna do is grab
this one, grab this one, press Control L, and we're
gonna copy modifiers like so. And we can see we've got
a huge split down there. Not sure why that actually is. Did we actually
split it off or not? Let's press shift and find
out what's going on there. Oh, it's to do with the actual
Boolean that we put in. So first of all, if you end
up with something like this, press Control A, all transforms, see if that fixes
the problem first. And second of all, you can see that it's not fix the problem, and it's probably due to how close this part is
to the top of here. So the best thing we can
do with this is come in. A shift and click,
grab the top of it, grab the bottom of here. And what I'm going to do is
split this away from here. So I'm going to
press a p selection. Let's split it away from there, and now you can
see that's working absolutely fine now,
apart from this bit. So now we're going to
fix this next bit. So what I'm going to
do with this part is now, I'm going
to grab this part. Shift H, hide everything
else out the way. Let's fill this part in first. So lt shift and click
going all the way around. F put on, fill it in. Alt H bring back everything. And now we can see we've got a nice bevel actually on there, and you can see it's
going through there, which, for our case
is absolutely fine. Now let's come to this part, Shift H, hide
everything out the way. And what we want to do
now is put a top on here. So I'm going to come in. Grab this top, shift and click, press the F button,
fill that in, and you can see I've still
got a problem there. Even if I lift it up, you can see that now it gets rid of it, and what happened is there is that it's too close
to this part here, and blender can't
join it together. So lifting it up a little
bit is making that go away. So that is the easiest
way of fixing this. Now you can see we've got a
bevel coming down here for right click and whereas
it shades move by angle. Now you can see that's looking very nice and a nice
bevel on there. If we press l tates, let's
bring back everything. You can see that slightly
slightly along here, It's actually coming
through here a little bit. Let's put it on object motor. You can see what I'm talking
about. And we don't actually really want that because it's actually flashing a little bit. So what I'm going to do
is just grab the top, and I'm going to pull it
out very, very slightly, so I'm pressing SP to
pull it out just so we've got a little bit of a
ridge going along there. Now, from here,
what I'm going to do is I'm actually going to save these out because
these are going to be handy these Booleans. And what I'm going to do
is I'm going to press the n button, new collection. Let's call it Boolean. So we don't have to keep making them click okay,
and there we go. Now we've got our
Booleans there. Now, from here then,
let's come in. Now we've sorted all
of those problems out. Let's put it onto
our shading mode. And what we want to do now is we want it on the
light colored one. So if I bring back
my stone blocks, what I can do is, you can
see they're over here, I can grab this
then, grab this one, control, and I can copy or
link materials, like so. Now I've got that
there, I can come in, hide my stone
blocks out the way. And then what I can do is I can grab all of these parts here, grab this one, press Control
ell and link materials. Grab all of these then, grab this one, control
ell, link materials. And let's have a look at what
the materials are on this. And we've got a wrong
material on here. So let's come into. It's got
a false material on there. So what we'll do is
just minus these off. There we go Alright, so let's grab all of these then. So all of these
archers, press tab, A, U, Smart UV project, click. And there we go. Finally,
we've got that part. Now, let's do the
same with these. So both of these, A, U, Smart UV project,
click, and there we go. Alright, so that's the stone
that's this stone dumb. And I think I'm really
happy with these. Finally, then, finally, we want to join all
of this together. So what I'm going to do is, first of all, pull my guy over. Whenever I'm joining
things together, some of these have, if we go over, bevels on them, and some of them we don't want to apply
the bevel to these. So what I want to do
is, I want to actually, first of all, Grab the whole
thing, go up to object. And what we want to do
is convert to mesh. What that's going to do
is it's going to apply that modifier on each of the parts that
we've got them on, and then make sure that
we can join them all together without applying
modifiers on them. So if I click
convert to mesh now, and then press shift
select on this one, Control J, I can join
them all together, and you see nothing
gets affected. We've still managed to
keep the bevels on there. Not the bevels on here. The bevels are still on
here, as you can see. Now, finally, control
A or transform, set origin to geometry, and there we go, that
is that part finished. So it does seem a little bit long winded when we're
doing it like this. But it's actually pretty simple once you get
the hang of it. Alright, so, finally, then let's test our guy out,
let's press one, and you can imagine him now
walking across there in here, and you can see now
that is pretty nice. Okay, so let's pull this
one out of the way. And what we'll do now is we'll deal with something a
little bit different, so let's bring this
one into place. And what I want to do is, first of all, bring
in the top of this. So at the moment,
This is supposed to be like the top of the temple,
so it needs to come in. So let's come in, and I'm just wondering whether to
bring everything in first or create
these parts first cause sometimes it can cause
a little bit of a problem. I think what we'll
do on this one is we'll create these parts first. So what I'm going to do
is, I'm going to come in. I'm just wondering the best
way to actually create the. I think we'll just focus on creating one of them and
then bring them all in. I'm just thinking through my head how to actually do this. When you're looking at
something like this, it's important that you figure, Okay, how am I actually
going to do this? Let's first of all,
press controller. Left click, and what
I'm going to do is, I'm just going to bring it over the roundabout here to measure out the thickness
of this stone block. So, something like that
thickness is going to be fine. And then what I'm going to
do is I'm going to come in. I'm going to grab just this
part and press shifty, like so, and pull it
out a little bit. And then what I'm
going to do is I'm going to grab the side of it and pull it out a
little bit, like so. And finally, then what I'm
going to do is separate it, so P, separate it off,
selection, like so. Now, the next thing I want to do then is want to come to it, press control A or transform
set origin to geometry. And then what I'm going to
do is add in a modifier, and we're going to
generate a solidify. And then we're going
to pull that out into place like so,
and make it a block. If I put that on one, I
think that then that going to make it a block or a cube. I think it's I think
that looks cube enough. And what I could do is press
Shift S. Cursor selected. Bring in a cube now, so shift A, bring in a cube. Let's try that. Press the S bar. And I can see now roughly
If this is a cube or not, you can see it's a little bit out. So let's
just pull it back. So we're going to pull it
back a little bit like so, and now it's more of a cube. All right, so that's
looking good. Now the thing is, now I can actually make it smaller
I want or make it bigger. It's really up to me. I'm going to put it
on object motor, I can really see what I'm doing. I'm going to press Sen's ad and pull it out a
little bit like so. Now I think that this is
a little tad too big. So what I'll do is I'll
apply my solidify now. And then what I'm going to do is come around
the side of it. So lt shift and click, and then Altern S, and I can bring it in a little
bit, like so. And then finally,
what I can do is I can pull it out
wherever I want it. So if I go over the top now, I can see it's this far out here and not so far out here, so
I'm going to pull it out. Just a little bit like so. And yeah, I think
I'm happy with that, and it's a little bit higher
than the whole thing. Now, the next thing I
want to do is then, I want to bring all of this in. But before I do that,
what I want to do is, I want to make sure that this
is on all of these corners. So the way I'm going to do that is come to this part here. Grab, make sure that
this is not in there. Don't need that there, so
I'm going to press delete. Limited dissolve just
to get rid of that. Limited dissolve just basically gets rid of all the edges
mat have put in there. And then what I'm going
to do is grab the top. Shift S, cursor selected. Grab this one then, right click and set origin
to three D cursor. And finally, let's come
in and generate a mirror. It's going to put the
mirror on that side. But I also want it
over the other side, so I'm going to click on the y. And then we go, we've
got the actual mirror. All right, so now I'm going
to apply that with Control A. And finally, finally,
let's come in and grab both for these,
and then press tab. Grab this one here, this one, this one, and
this one, and this one. Let's make sure they we're on medium point, so medium point. And what we're going to do
now is go over the top, and now I should
be able to press the S button and bring them in. How I actually want
them. So you can see now it's bring
in everything in. We're going to bring
them in that far. Let's bring them
in on the x axis, let's bring them
in on the x axis. Like, so, and let's bring them
in slightly on the y axis. Like so. Now, the trick here is we don't want
to bring them in too far because it will mess
around with our actual door. So we're looking
to bring them in. Also remember that
this is a rectangle. It's not a cube. So
bringing them all in perfectly level, probably
ain't going to work. So I'm just making sure
I go over the top. All of these, as you can see, these are not quite in
as much as these sides. Just make sure though that you're happy with
how that looks. And I think you know what? I think that's looking
really nice. All right. So now what we'll do
is we'll come in. And we'll give this
some edge loops. So control law. Let's bring in three
edge loops, left click, and just pull them up like so, and then control
four edge loops. Left click, bring them down a little bit like so,
and then control. Let's bring in three, and
we'll bring these ones down. And then finally, control four or yeah, four,
bring them up. And now they're a little bit
different from each other. That's looking pretty nice. Now, the one thing I could have done when I'm
actually bringing in those edge loops is actually right click and
marco seem as I'm doing it. But being as I didn't do that, I'm just going to right
click Marcose Okay, so on the next lesson, then, what we'll do is
we'll split these up, so we'll split all these up, and then we'll start work on
our actual doorway because we need to think that we need to split everything up
before we actually do that. Fairly complex. Fairly complex. Let's save out our work, and I'll see on the
next one everyone. Thanks a lot. Bye bye.
48. Creating More Complex Meshes in Blender: Come back everyone
to lend the for the modulate and kits
environment guide, and this way we left it off. Alright. So we've
grabbed all of these, we've marked the seams on these. Now, let's come and think
about this part in here. In fact, you know, what,
before we do that. Let's finish these parts off. So at the moment, we can see
that these are split off. So if I come in and just grab
every other one of these. Like, so let's fix these first, and then they're
done out of the way. Press the y button, press
A to grab everything, mesh, clean up, pill
holes, and there we go. And now let's reset
all the transforms. Like, so, add in the modifier, bring in a bevel, and we'll put this on Nt point,
not Not three. Like, so maybe a
little bit higher, point not five, let's try that. And is that go to
look good enough? Let's put it up one. Yeah, and I think that's actually
going to look bare. So 0.15, I think it's bare. Now, let's hide
these out the way. And what we'll do now is come to this, and what we want is, three different,
so one, two, Yeah, two, that'll make one, two, and three. Let's try that. So control our Yeah,
one, two, three, left click, right plate,
because we want these to be big, solid blocks. And the reason is, of course, is because this is
the temple top. So let's right click
and we'll mark a sm. And then what we'll do is we'll come around to the
bottom of here, so L and separate it, Y, a gythin mesh. And then what we'll do is
clean up and fill holes. Now, what I want to do is, I want to bring in a block now. To make the actual
door. So what I'm going to do is I'm going to
just press shift date. We'll bring in a cube. Now, it's important that we get
the right scale on this. What I'm going to do is, I'm going to come
out over to here. And I'm going to
leave this on two. I'm going to put this on 2.43. And I'm going to put this one
on 2.43 as well, like so. So that is roughly the right
size that I want my door. If I bring this down
now and press one, I want to put it right
on the bottom of there, so it's right in the center just through the bottom
of here and if I bring over my guy now, you can see it's a fairly, fairly chunky door, and
that's exactly what I want. Now, let's pull this into place, so we want it going
quite far back. And the reason is because you want to see this
back bit anyway, because we're just going
to put a door in there, and then we can
push the door back. That's why we're putting
it back a slight bit. Just make sure then that this
is through this part here. And then what we
want to do now is, we want to bole in this off. Now, the thing is, you can already see that we've
got some edging on here. So let's just make sure
before we do anything, that we've got it on
to individual origins, press the S board, and just make sure that you've actually got faces on there, which it looks like we have. And then finally,
what we can do with this one is reset
all the transforms, so set origins geometry. Add in a boolean, so a Boolean and click
on this one here. And there we go.
Let's put it on fast. Let's press control A, and then all I'm going to do is, I'll delete this one out way
because it's just a cube. It's not hard to
actually create that. Now, what you'll find is now, when I come back to this,
press control A or transform, set origin to geometry, you will find that when you
try and bring in a bevel, h, it might not work properly. Let's see if it has,
so we'll put this on naught point Nought
three. You know what? We might have got away with it. So let's put it a
little bit higher. Yeah, and actually, it's worked. I didn't think you
would actually be vel these through and fix
all of these problems. So let's just have a look
though before we finish, so, let's press shift eight,
hide the rest of it. And you can see, it's actually filled in those
holes really nicely. Sometimes the Boolean
doesn't work so well, and we have to go in and
fix those, but on mine, it's actually gone in and
fixed it really nicely. Now, of course, if you do
have problems with yours, hide each part out
of the way and go in and fill the
particular part. So it'll be these two
bottom parts, for instance. So if I hide this
one out of the way. So, hide this part. You can see here that
we've got this part, just fill this pace in, and then it should
look like mine. Hopefully, hopefully,
yours will be the same. I'll take bring back everything, double tap the A,
and there we go. That's looking pretty nice. Now what we need to do is let's
join these both together. So we'll join these
all together. Again, we'll go to object. We'll always convert to mesh
to get rid of those bevels. We'll press control J, control A will transform, set origin to geometry. And then what I'm
going to do now is I'll come into
this part first. So L, L and L, U, Smart UV, project, click
K, hide it out the way. A to grab everything. U,
Smart UV, project, click. Now, let's bring it back, so lg, and now we'll do is we'll come
in and add in A material. So let's put it on
material first. And basically, we want this
material for these parts, and then this lighter material
for these parts here. So all I'm going to
do is I'll come in, grab this because that's
got them both on. Control L, and then
link materials like so. And then what I'll do now is, come in, hide this out the way. Like so, hide. And then
coming over to my materials. Let's minus that one off.
We don't want that one. So you have to be an object
mode to minus it off. And let's the mid
one is what we want. Grab everything, and
then you're just going to click a sign like so. I'll teach then in here. So I'll teach in edit mode, bring everything back,
and there we go. Now, let's right click, set origin to geometry. And I'm just wondering why my actual cursor is there
shouldn't be there. Oh it's 'cause I've
gotten both grabbed. So let's grab this one. And then I can move this one to the side. Alright, so we've nearly
finished with our archers. So we've just got
our final arch left. We've already got the
scaling on there. And all we need to do is make an archway in this part here. So you can see this
is the one here. So what I'm going to
do is, first of all, I'll bring in a cube, so you can see if
I've got my guy over here set there like so. And what I'm going to do is, I'm going to grab the
center of here, press Shift desk us
to selected Shift D, and what we're going to
do is bring in a cube. And then all I'm going to do is just drop my cube
down a little bit. I'm going to make sure that
it's poking out both sides, so I'm going to press S and y, pull it out both sides, like, so what I'm going to
do with this one is, I'm going to be vel
off the tops of it. But first of all,
before doing that, I actually want to see in here so I can see my little guy. So you can see now
if I press one on there, ide this out the way. There you go, there's my guy. So what I want to do is make
this a little bit bigger, so Sen's d, pull it
up a little bit. Just to make this
archway. Like so. And then what I'm going
to do is I'm thinking, I'll just vel off
this part here. So let's level off this part. So all I'm going
to do is come in. Grab this part and this part, press Control B,
and bevel it off. And then what I want to do
is, I want to come down to these perimeters or this menu down here and make sure that
actually is beveled off. So first of all, I'll
turn this up, like so. And then what I'll do is I'll increase this slightly and
then increase the size, like so, and now you can see that's looking like an archway. Albeit it's a little bit square than the other
archways that we've had. Now, the next thing is, just
wondering if it's actually, I think this is about the
right right width because we are going to put
another part on here. So there's going
to be another part on here that's going to come out around here and
going up like so. I'm not actually sure
how I'm going to do that part of the moon because
I forgot how I did it, but we'll have a
go, nonetheless. So first of all,
then, let's come in. And what we'll do is
we'll turn this off, and we'll come to
this part, we'll press control lay
all transforms. Just make sure the
transforms are set, and then I'm going to
come to my Modifier tab, add modifier, and the one
we want on is Boolean, and the Boolean we're going
to pick, is this one. Make sure it's on fast. Press Control A, and there
we go for hide the way now. We can see this is
what we're left with. Now, if we come to this part, we right, click and we shade, Auto smooth, you can see that it has managed
to smooth it off. We have got some a little
bit of blocking us here. And that's the problem
that was talking about before with
the actual bevel. The thing is, I'm okay with a little bit of
blocking us on them. We can come in though
and actually fix those a little bit by
grabbing each of these, so each of these ones, like so, and then
pressing control B. Then you can bring them
out and make it a little bit more rounded if you want to, so something like this, and then a thing that looks
a little bit better. All right, so now we've
got this part here. So the way I'm going to do this part is I'm going
to bring it all in. So there is nothing on the back. So it is literally
just the front of it. So what I'm going to
do, I could bring this across and kind of
cut it and then have it, so it just comes up from here. And I think that's
probably going to be the best way of
actually doing this. So what I'm gonna do is, I'm
gonna grab the whole thing. I'm going to press one
on the number pad. And then what I'm going
to do is come to mesh, bisect, and I'm going to bisect it, I think
from this part. So round about where his hip
is somewhere around here, I'll bisect it
through like that. So let's set this dens 20, and then let's make
sure that we've got this high enough
where we want it. So I think I'm going to
cm roundabout to here. So then we've got
a nice free flow in part that comes around here. And then what I'm going to do is I'm going to come to this from. I'm going to press
the eye button, and I should be able to
bring it in like so. So I'm going to bring
it in like that, making sure it's
even on both sides. And now I need to just
create this bit here. So what I'm going to do
is, I'm going to come in. Grab this part, control shift
and B, and there we go. That's how we're
going to bring it in. So I'm going to bring
it in that far, scroll my mouse wheel
up a few times. And then where do I
want to bring it in. So do I want it extremely
rounded like so. And I think, you
know what? I think that's probably going to
be a little bit better. I going to increase it, increase it till it's nice and rounded. I'm just looking where
I want to get it to, so you can see if
I go it that far, it's going to start
crossing over. Do I want it that far? I'm just wondering
if I right click, if this is the
best way to do it, I'm just wondering if I could actually cut
it this way instead. I might have done
that on my other one? Let's have another go. So Control Shift B,
let's bring it in. Like so. And I think what it is, what I'm looking at anyway, is that this part on these parts here just is a little
bit not too far out. So let's have a look
if we grab this one. You know, I think I'm going
to be happy with that. I'm going to leave it
like that, actually. I'm going to leave it like that. I think it just needs a
little bit more of a bevel. So let's go back once more. Control Z, Control shift
and B. Let's bring it in. Let's increase it, like so. All right, I think
that's going to be fine, and then I can put a
bit on the top of here. Now, let's come in then see what that
actually looks like. I could also, also, as well. Yeah, I could also do this
a different way to actually make it follow this perfectly.
So let's try another way. Let's try another way. Many,
many ways of doing this. So let's just get
rid of the part that we've actually done. So
we'll get rid of that. And then what we'll do
is we'll come to this p, grab it going all the way
around here, like so. And then all we're gonna do is press shift and D
and bring this out. So we're going to bring it
out just to here for now. And then what I'm going to
do is separate off with P, selection, separate it off. And now we've got this part,
control, all transforms, set origin to geometry, add in a modifier, and this the, we're going to add
in a solidify. Let's increase then the solidify and now you can see if we
put even thickness on. That is pretty even. And finally, then,
if we increase this or decrease this, we
should get what we want. Now, we can see
that it's not going kind of the right
way with the offset. So what I'm going to do is I'm going to make it a
little bit bigger, so pull it out a
little bit like so. But now you can see
if I pull this up. That that now is an even band
going all the way around. And that is pretty much what
I was actually looking for. Now, finally, the one thing is I might delete these
two parts off here. So I might come in and just
delete these two parts, so delete and faces, delete these two parts off. And there we go. Now you can see that it's not quite level, and that means that I just
need to bring these parts in. So, in other words,
I can come in, delete these two parts off, so delete faces, come
to this part now, so this edge, and this edge, and then extrude them down. So e And now you can see
they're actually very straight. And now, if I press sad, you can see they're coming
down pretty straight. So I'm going to bring
them down to here. And finally, then, all I want to do is pull these
out a little bit. So now if I grab
each one of these, I can press S and X. Put them on medium
points, so S and X. And there we go,
we can pull those out a little bit to
how we want them. Now we can see that
we're probably gonna have to bevel in
this one and this one, and we're going to do
that on the next lesson. Alright, everyone, so I hope you enjoyed that, and I'll
see on the next one. Thanks a lot. Bye bye.
49. Finalizing the Arches Pack for the Aztec City: Welcome back everyone
to Blandford, the modular and Kit Bash environment guard and this
is where we left it off. Alright, if I press
one, you can see at the moment that these are a
little bit thin over here, so you can see it's a
little bit thin over this part and on
this part as well, to be honest, and we need
to probably bevel off this. So first of all, though let's
pull it out a little bit. So if I press the S button, I'm going to pull
it out ale bit. And now you can see if I
hold the shift button. Now it's nice and even
going around there, nice and even going
around there, and there's enough to make it look like it's actually stone. If it was too thin, it
wouldn't look like stone. Finally, then let's come
in to these parts here, so I'm going to come to
this part and this part. I'm going to press one again. And what I'm going to
do is press Control B and bevel those off. Bring your bevel
down a little bit, so it's just like
that, and very, very slowly, bevel it off, like so, just so it's a
little bit more even. And there we go, that's
looking much much better. Let's right click
and Shade Smooth by angle or control
A all transforms, right clicks the
origin to geometry. Right click, Shade
smooth by angle. It's not going to
go. Let's shade flat instead. That'll
make it easier. There we go. Now we can see what were
actually looking at. Alright, so that's
looking much much better, as you can see. I'm happy with that
going up to here. I'm just wondering
whether I want to pull it up or make it a
little bit bigger. You know what? I think I messed around
with this too much. I'm just going to offer over press Control A,
and there we go. Now, let's bring this
in out a little bit, so we're going to bring it
out a little bit, like, so, and then what you can do is
you can actually go up two, where it says edit preferences, and we're going
to go to add ons. And the one we're going
to look for is Boolean, and this will be
called ball Tool. Just make sure this is
ticked on. Close that down. And then what you're going
to do is you're going to select this one,
select this one, press Control and plus, and there you go, you can see you brought
your Boolean in. Now, you can also do it where
your press controls ad, press Control minus,
and that then we put in your ball
tool that way as well. And sometimes it's easier to work this way because
what it means is you'll be able to get
a better visualization of how far you're
pulling this thing out. So you can see now
if I grab this, I can actually pull this out, and see exactly how far
I want to pull this in. What's more, I can
actually lift it up, lift it down, and put it
exactly where I want it. So sometimes working with the ball tool makes
things much much easier. So I think at the moment,
that's looking pretty nice. I think I'm happy with the
amount of width along here. So what I'm going to do
then is come to this part, press Control A, and
actually apply that. Now, the ball tool in here then, I'm just going to
delete it out the way, like so, and there we go,
that is that part done. All we need is these
edges coming around here, so I'm going to make these
edges coming around here. We can also pull this
up if we need to. Just this part here,
because you will see that if I come
into this now, we can actually pull it up
to rounda this part here. Let's grab just
this. So this one. Just this one. Pull it up. You can see we can pull them
up a little bit like so. Now, the thing is if I trample an edge loop round here, you'll
see that it doesn't work. So the best thing
to do before you do that is grab the
whole thing again, come to mesh, and let's
go to bisect and we'll drop an edge loop just
under these here. So we're going to
set this to zero. Go to pull this up a little bit, like, so just so it's
sat under there. And then now we can
make these other parts that are going to
actually come out. All right, so let's
make those parts. So first of all, I'm thinking
we'll bring in control law. So let's actually fix that. There we go. Then control law. Left click, right
click, Control law. Left click, right click. And I'm just going to grab both of them. So Alt Shift click. And what I'm going to do then is
pull them up to there. And then control law. Left click, right click. Control L law, left
click, right click, and then lt shift and click, and then drop them up
to something like here. Maybe a little bit bigger
than that top one. Okay, so now let's
grab them both. But we're going to press Shift
and click lt shift click. And the same on this side. So we've grabbed them
all going around there. E, enter, and then AlternS. And then let's just pull them
out a little bit like so. So you can see these now
have been pulled out. Then what we're going to do
is grab jaws to bottom ones, and we're going to
do the same thing, but pull them out a
little bit further. So E, AlternS. Let's pull them out a little
bit further on the bottom. Like so. And there we go. Finally, let's press Control A, all transforms, right click, set origin to geometry, right click and Shade smooth
by angle. And there you go. That is how you do that.
All right, on mine, I think I pulled the bot pots of these out a little
bit, so we can go in. Lt shift click lt shift click, and then just pull
them out a little bit, like, so, I think
I did down mine. But I think on this, actually, I'm just going to
leave it as is. Alright, so this is
pretty much done now. Now the one thing
we're going to have problems with is probably
going to be the beveling. So we'll see if we actually
have problems with that. Sometimes on something
like this, you will. Let's press Control A again, set origin to geometry, add in a bevel, like so. And actually, my
bevels worked out. Okay. Now, if you do have problems with
your bevel, generally, set it down low, so not point, not not three, like so,
make sure it's pretty low. Come over to geometry, and what you want to do is just turn off the clamp overlap off. Just turn that off,
and then it should bevel any parts where
it's struggling to bevel. The reason is, then what it's trying to do when you
turn this off is, it's making sure
that any overlapped. We're don't bothered
about them, basically. But if you've got
this set low enough, it shouldn't make
any difference. If you have this turn up
high and you turn this off, you'll see that I'll
break the mesh. I'll actually put the vertices over the top of each
other and break the mesh. So that's maybe something
that you don't want. Now, finally, the
final part on this is obviously this part in
here, so let's do that now. So shift S, Kursta selected, shift A, and then what we're going to bring
in is just a cube. Going to make this cube smaller. We're gonna pull it up
to this front of here, so let's pull it up
to the front of here. Let's press S and
y and bring it in. So we want a nice chunky
stone just on the top. Going up to the top
of here, like so. And then what I'm going to
do is pull in this front. So I'm going to grab
the front like so, make sure I'm on medium point, and then S and X, pull it in. And now let's bring in this so if I press the i
born, bring it in. Hold in the shift one
down, if you need to. And all I'm going
to do is press E and pull it back like so. Alright, that is what I want. That is exactly what we want. Now, finally, I'll
just grab this one. I'll press control J. And then what it
should do is inherit the actual boolean from here. Finally, then let's
grab the whole thing. A, to grab everything, U, smart U V Pj, click okay. And then we've
unwrapped everything. Now, again, don't worry
about the engons. We've got a lot of
engons in here. But again, it's pretty flat. You can see the shading looks
absolutely fine on here. If we have problems
with the shading, including underneath
here, fair ing off, let's fix the engons. But at the moment this is
looking absolutely fine. So we're okay, and
we're not going to animate it or
anything like that. Okay, so now what I want to
do is bring in some colors. So first of all, I'll
come over to this one. So I'll grab this one last. Control, and what I'm going
to do is link materials. Come back to this one then. Let's go to my materials. Minus this one off, so
minus just this one off. Let's put it onto shading mode. Let's save our work, so save. And then what I'm going to
do the inside of here first. So let's come to the inside. So I'm going to grab this face going all the way
around to here. And then what I'm going to
do is put this on mid stone, so a sign, like so. And now I want a couple more, so I'm going to click the plus. I'm gonna go for Rd Rd stone. I'm gonna click the plus again. I'm going to click
the Down arrow. I'm gonna go for Blue Stone. So Blue Stone, this one here. And then what I'm gonna do now is come to the center of here. In fact, you know what?
I'll grab the whole thing. I'll put it to Red
first, so a sign. Put this one then to blue, click a sign, and then come to this one here.
So I'm gonna press. Yeah, all that's
joined together, so we don't really want that, so you know what
we're going to do. We're going to click Alt Shift click around the top actually. We'll do the top Alt Shift click Alt Shift click Control plus. And then what we'll
do is we'll add in our blue stone, so click a sign. And then Alt Shift
click Alt Shift click, and then come underneath
an old shift click. Just make sure you're going
at the point in this way, like, so can see I've
got another one there, so I'm just going
to go like that. Then the same on this
one Old Shift click. Old Shift click. And then finally, let's put in the red Stone, click a sign. And there we go, that's what
you should be left with. You know what? I don't like
this top bit like that. So all I'm going to do is I'm going to click Control
plus. No, I'm not. I'm going to press old
Shift click on each of these Control plus, and then click a sign, just to get rid of that
there, which was there. And now I'm happy with those. Now, the thing is we can
see on here these stones. You can see how it's
quite the bubbly. We don't want that. And the reason is the Blue
Stone hasn't been set yet. So click on the Blue Stone. Let's go over to
the Shading panel. Let's zoom into it. Let's
put it onto material. And let's fix that
while we're here. So you can see here, these
need point to three. And there you go now, you
can see it's fixed it. If we go to Redstone, you can see these are
already on three. That's why they
looked like that. Back to modeling then,
press the tab button, press file, and save. And there we go.
Alright, I take. Let's bring back these parts. Now, what I'm going
to do is I'm going to I think I'll keep that
part over there as well. So I'm going to put that
in with my Boolean. So, put it in with your Boolean. So now, this one is archers, so let's put these all together. So seven to go over the top, G, let's put them all together. Like so, and now
let's name them. So I'll call this one
temple top temple top. I'll call this one
small square arch, F two, small square arch. L so, I'll call this
one double arch. F two double arch. Like, so, And then I'll call this one large arch.
Large round arch. Let's call it that
large round arch. Like so. Alright,
so we've done that. Now let's put all of
these in arches. So M. Let's put him in
arches. Like so. And then finally, now
we're just going to come over. You can see. I've put my little guy in there. I don't want to
put him in there. I'm just gonna move him out. I'm gonna press the button. And I want to put him in.
Does he have his own? Doesn't look like
it. So I'll put him in a new one called
human Reference. Like, so when there
you go, he's in his own little one down here. Now, let's grab all of these. So you can see all of these, grab four of them, right click, and we're going
to mark as asset. We're going to then go
over to asset manager. We can see they're in here. So we want a new
one called archers. Let's double tap that. Archers. Like so, and let's come to unassigned and drop
these four into there. Like so. Finally, let's go to Archers, make
sure they're in there. Save out our work,
so save it out. And then you can see
that little star disappears back to modeling. And the final thing is, let's put everything
together now. So if we turn these
on, we can put it just in the front of them. So let's turn them
all on stone blocks. Whyt you turn it
on? There we go. Let's grab not
those. All of these. Let's press seven, and then G, and we'll just put them
over here, like so. Alright. So, now
we've done all that. Let's actually finish
here, and on the next one, I'm sure there's
something that we'll need to create because we need to
create a lot of parts yet. So Alright, one, so I
hope you're really, really enjoying the process, and I'll see you on the next
one. Thanks a lot. Bye bye.
50. Working with GeoStacker in Blender: Welcome back, everyone
to Blender for, the Modular and Kibash
Environment guide. Now, let's create something
a little bit different. So what I'm going to
do is I'm going to grab this press shifty, and then let's drag
this out, like, so. And then I'm just going to
replace this with our bamboo. So let's move our guy,
first of all over here. Let's bring him over. L, so let's come in and zoom in then. And what we'll do is
we'll come to this. Come to this point, click the X. Open, and now let's
find the pack. So if I open this up, we can see course pack
bs reference references. And the one we want
is bamboo roofs. So something a little
bit different. All right. So first of all, let's get the scaling in, so we understand what sort
of scale we're working at. So I'll grab my
first bamboo roof, and I'm going to
bring in a cube. So Shift A cube. Let's do the same thing we've
done with every other one. Let's press Shift D. Then
the other bamboo roof. So we've got two
bamboo roofs here. Now, we do actually have
another bamboo roof, as well, which is on
the market stool. So we're better off
keeping the bamboo, like we've kept with the
Boolean as a reference, and then we can use
it again and again. So we'll do that first. So what I'm going to
do is, I'm going to come to this part here. And then what I'll do
is I'll get the sizing. So we'll come over
to the dimensions. So over here, 3.87, 3.1. 3.23. And there we go. That's the first scale then. So you can see if
I put my guy here, you can see he's got a lot of room to actually
move around there. So this is going to be
like the lookout tower. And then this one is going to
be a bigger version of it. Now, of course,
when we bring these in to the actual built, we can make them smaller,
bigger, and make them fit. But for now, let's just
keep to this scale. So now we'll come
to the next one. This one will be 4.37. Like so. 3.1 and 3.32. Like so. All right. So now you can see the the same ye
and everything like that. Now, let's create
our actual bamboo. So the first thing
I'm going to do is I'm going to bring in a mesh. I'm going to bring
in a cylinder. And then what I'm going
to do is set this to something like let's try 16. We should be able to get
away with that. So 16. Let's right click
then and Shades move, and you can see, it's a little
bit blocky on the ends, but there's a lot
of bamboo in here, and they're kind
of tiny as well, so we don't need to worry
about them so much. So what we're going
to do then is make this a little bit smaller. Like so. So what we want to do is we want
to make two of these. So you can see we've
got this one here. What we want to
do, first of all, is we want to make a chunky
part for each of these. So what I'm going to do
is I'm going to come in. Bring this to the front of here. And you can see now if I, in fact, you know what,
we'll bring it over here. We'll put this one
out of the way for now. They're the same anyway. So what we'll do is
we'll come to this one. We'll press the tab, just to check our vertice
press the dog board, and I want this to be a
little bit thinner than this. So what I'm going to
do is then essence d, I'm going to pull it up to
get the right thickness. So you can imagine that's
stuck in the ground. This wants to be stuck
out a little bit further, and these are these parts
going up here like so. Now, of course, at the
moment this is quite chunky, let's make it a
little bit thinner. And then ENS, pull
it out a little bit. And then we go, that's the
right thickness, I'll want it. Now, what I want is now, some others that are going
to go on top of you. So what I'm going to do is
I'm going to grab this one. And I'm going to try
and get the right size before doing anything. So what I'm going
to do is I'm going to make it a little bit thinner. So Ess, like so. I'm going to spin it
round so ry or Rx 90. And basically put
this into place. Now, the thing is on this one. I want one come in here and
these ones being under here. Though, they're going to
go to the front here, as you can see. Now you can see that the the
same thickness as these. We do want them a
little bit thinner. So what I'm going
to do is come in, make sure on face,
let shift and click, and then alterns, and
I'm going to make them a little bit
thinner, like so. And they look about right to me. Alright, so now let's actually
turn these into bamboo. So let's grab both of
these control A or transforms, set
origins geometry. Let's save our workout so
we don't lose anything. And now what I'm going
to do is I'm going to actually put my bamboo
going along here. Now, bamboo, when
you look at them, they are pretty straight. In other words, they're
pretty even going up. You know, they'll grow
so far before having a little kind of outcropping on here. So let's
actually do that. So control. Let's bring in, let's say, this many, which is if a right click seven. So let's bring in seven. And then what we'll do is
we'll press Control B, and we'll bring them up like so. And then what I'll do is
I'll press E, enter Alterns, and pull them out a little bit, just a little tiny *****, the very tiniest
of bits like so. And then finally,
what I'm going to do now is I want to bring
each of these out. So if I press Control, I want to really go down,
you know, on each of these. So Control. I'm just wondering
the best way to do that. Let me just check to see if I actually, before
I bring them out, Yeah, I think I'm just wondering if it's better to
put four edges in instead. So if I press Control
Z, for instance, if I press Control B now and
bring them out and put one, two, three, four, like this. I think that then is going to be a little bit easier for us. So left click, right click. Make sure they're
dropped in place. Well, left click because
we bevel in them, sorry, and then enter AltneS, and pull them out jaws to very, very slight bit, like so. And now we can do is we can come into the center
of each of these, so lt shift and click, like so. Like, so, like so. And like so, and
I'm going to press the S board just pull them out. And you can see that they're
coming in the wrong way now, so let's try all test first. Yeah, there we go. So all test. You can either bring them
in or pull them out. I think, actually,
they go out like so. There we go. Alright,
they're looking about right. Now, if I write, click and
Shade Smooth by angle, now you can see they're
looking pretty nice. Okay, so now we just
need to do the top, so we're gonna grab the
top And the bottom. We're going to press
the for insert, and then just make sure
it's on medium point, and you're going to
press E, enter S and Z, and you're just going to
pull them in a little bit, finish in the top
some mouth like so. All right, that's
looking pretty good. Now, let's do the same
thing for this one. So I'll do is I'll come in. Control. Let's bring in five. Left click, right click. Control B. Let's pull them out. We've already got that
four on there anyway, so that's pretty nice. Let's pull them in a
little bit like so. And then all we'll do is we'll
come into each of these, with facelt, In
fact, you know what? We need to bring more t first, so we'll keep it like that. We'll press E Altern
let's pull them out, a little bit like so, and then let's come to the middle parts with Face select
and pull those out. So l Shift click, Shift click, l shift click. And then let's press ls not extrude or
anything like that. Let's just pull them
out a bit like so. Alright, so they're
looking. Pretty good. Let's right click.
Shades smooth by angle. Let's now bring in our
bamboo, I'll grab this one, go to material, and come
in and click on bamboo. So it's this one here. And let's also grab this one and
then grab this one. And what we'll do is we'll press Control L and link materials. Finally, then with this one,
just so I don't forget. I will come in, grab these, press the ye button
to bring them in. And then e enter S and Y. And then let's just pull them in like so. And there we go. We've got both of our
bamboos into place. All right, so now
the most tricky bit. So what I'm going to
do now, As I said, I wanted one going here, one going there, and then these kind of posts
going in there. So this is the most tricky bit. What we're going to
do then is we're going to come to
this block here. We're going to press Control A, all transforms, set
origin to geometry. And then what I'm
going to do now is coming over and
adding a modifier. So adding a modifier
geometry node. And the one we want
is going to be called something
like basic stacker. So click on basic stacker. Nothing will happen
in the beginning. What we want to do now
is click on our bamboo. So click on your bamboo. Click the x on or the y,
whichever one is going to be. Hizontal flip, and
let's just see if I can find where these are going
to go, and there they are. All right. So it is that one, let's click these
off. Let's try the x. So it is going to be the y. And from here, then I
want to actually rotate these round now
because obviously they're going in the
wrong direction. Now, the moment you
can see that these are going in the
wrong direction. So what I'm going to do
is, I'm going to come in. I'm going to press shifty. I'm going to grab this, and then all I'm going to do is
just turn off this, and it should give
me my cute back. And then these ones, I'm actually going to
rotate them around. So As 90, let's
rotate them around. And then what I'm
going to do is, I'm going to press the tab button. And what I should
be able to do now, they're in the right direction. They're still looking
a little bit big, but we can fix that. But all I'm going to do
is just pull them like, so it actually
creates one on one, so one kind of level. And then finally
what I'm going to do is just pull them into place. So I'm going to pull
them into place. And what I've got now is I've actually got the right length to what I actually
want them to be. If I press tab now,
you can see that I can pull this out to
where I want them to go. So roughly around there, pull this one out,
roughly around there. Now we can see we've got
a problem with the scale. So all we can do is we can turn this scale down,
as you can see. Then what we can do is
we can actually turn up the scale randomness so make
them a little bit random. And finally, then just turn
down the gap probability, and then we can actually stack them next to each other like so, and you can see pretty
easy to do that, right? Now, the other thing is, and looking at the length of these, I might need to pull
this back a little bit, so it can get them into place,
so something like that, and I'm also going to turn down the scale a little bit more because what I
want them to be is actually the same
scale as these. So if I go over the top now, you can see they're
a little bit thin. I'm just wondering if I press
Control A, let's have a go. Right clicks origin geometry. They're a little bit too thin. You know what I'm going to do? I'm going to actually pull
down the scale a little bit, so I'm going to pull
this back a little bit, pull this one back a little bit. And as I said, it's a little bit tricky messing around
with these things, and then let's turn
them up like so, and we really don't want
them to come out too far. But I'm just wondering, can I actually scale these?
Can I actually come to this? Press control A the
origin geometry? Is that scale them up
a little bit better? You know, well, let's
just press controls d and just go back and
put them where they were. And what we'll do
is on the next one, we will figure out how to scale these to
be the right size. Don't worry, though, we can do that for sure. No problem there. I know we'll get
these sorted out. Alright, everyone,
so sorry about that. A little bit tricky
getting these into place. But on the next lesson, we will get this
sorted, no problem. And once we've got these
bamboos in, by the way, it's easy because you
can just put them on the next one over here so you can stick them on this
one, and they're all done. Alright, everyone, so
hope you enjoyed that. I'll see on the next one. Thanks a lot. Bye bye. Oh.
51. Finishing the Bamboo Roofs in the Aztec Scene: Welcome back everyone
to Blend the four, the modular and Kit
Bash environment guide, and this is where we left off. Sometimes, guys, the most
simple things are the easiest. So what I'm going to do is I'm just going to come to these. I'm going to set this to one. I'm going to make
sure that this is set up a little bit
higher, so maybe not 0.7. And then all I'm gonna do is I'm just going to come in and press S and y and squish
them down. There we go. Alright, so this is the
one that we're looking at, so you can see this is around the size that
we're looking at. So let's press S and y, squish
them in a little bit more. Then all I'm going
to do is just pull them to the back
now you can see, that I need to fill
these up a little bit. So let's do that. So all I'm going to do to
fill them up is turn down or up this
gap probability, like so. And then
I'm going to go in. And what I'm going to do is just pull this out a little bit more. So the just going
in to the sides, and then I'm going to come round and do the same thing on here. Like so, and there we go. Now we can see that's
looking pretty good. I can also move this to the side without actually
interfering with them. And I'm just wondering
now if I want the gap probability to
be a little bit less, so you can see I can also change the flip probability as well, which gives vary the colors. And now let's change
that down a little bit. And what I'm also going
to do now is come in, and I'll just pull this down creating them so they're
just kind of more even. And now if I pull them up, you can see that's what
it's going to look like. Let's pull it down
a little bit more. Like, so, and let's increase
this down a little bit. Like, so just till we get them, exactly what we're looking for. Maybe a little bit too
much crossover on there, so let's turn it
down a little bit. Like so. And then we go a
thing that's looking good now. Now we've got the
right sizing for this. Now let's bring in another one. So what we'll do is
we'll press shift, so we'll bring in another one. And then all I'm
going to do now is I want these to be
underneath these ones. So I'm going to pull these down a little bit, so
they're underneath. Like so, double tap
the a that's a look at that. Yeah,
something like this. And then all I'm
going to do now is rotate them down a little bit. So if I come in and just
rotate it on the x, so I've grabbed both of them, rotate them down just a tad. And now we know that
these are the right side. So if I grab all of this now, so grab this, this, this, pull it back, I can actually get
in this one here. So if I come to this, I can see that it needs to
be a little bit bigger. So Sen's, pull it out, like so, and then shift D, drag it over to the other side. Like so and put
that one in there. And then finally, let's
bring both of them shifty. And then what we're going
to do is just bring them to the front and make
them a little bit smaller. So Essence, Ed, pull
them down a little bit. Like so. Now, let's
get rid of this box. I I don't think we'll
need this box actually, because if we get rid of it, we should end up with
something like this. Let's pull this one
back a little bit, then just to randomize
it a little bit. Let's move it over to this side. Let's pull this one back,
maybe move it over. You know what? I think
that's looking pretty good so far. I think I'm
happy with that. The one thing I'm not happy
with is that they all look the same, so
to combat that. I'll just turn this
one up a little bit. So. And then what I'll do is I'll do
the same on this one. Then it up. And now this should look a little bit
different, and also on this one. I can flip around the colors. Double tap the A.
And there we go. All right, that's
looking pretty good. I'm just wondering
on the front whether I've got too many
interconnecting here. Let's bring it up a little bit. We're not having too many. Let's change the, the
scale randomness, bring it down a
little bit on these, just flip, playing around with it till I've got it
how I actually want it. You are going to get some
obviously crossovers on here. I just don't want a big gap like that, but the
end of the day, you can actually change this intermesh and
then move these over. I'm still going to
mess around with it, though, just to get
that gap filled up. And the other thing
is to fill a gap. You can also pull this
back up a little bit, grab this end and pull it, and it'll start to fill
up the gaps hopefully. Like. So, I'm going to
leave it like that. I think that looks good as is. Okay, so lastly, then, what I'm going to do is I'm going to grab all of these now. And I'm going to pull them
over to this one over here. So this is my next block. Making sure I grab
all of these as well. Shift D. Let's bring them over. And now we just need
to make sure that they're going to fit
onto this one as well. So you can see it's kind
of the same length. It's just these n parts on here. So what I need to do
is I need to bring both of these over, like so. And then what I'm
going to do is grab both of these, press the tab, grab both of these parts, and then we're just going to
pull them over into plate. Now, I should be able to
delete this one as well. There we go. We've
got that one done. And now I just
don't want to make sure that they're
the same colors. So what I'm going to do turn
down the flip probability. Turn up the flip probability. And now you can see they're looking different
from each other. And finally, finally,
then, let's come in. And what we're going
to do is we're just going to put on
proportional editing. I'm not going to randomize. What I'm going to do
is, I'm just going to put onto smooth. And then what I'm
going to do is, I'm just going to grab a part of it, press the G bond, and I should
be able to just bend them. Like, so if I grab another
part like this one, let's make it smaller. I should just be able
then to bend this one. Let's do the same on this
one, so you can see, I can bend it in a
little bit and just make them a little bit more uneven, like so. And there we go. That's looking pretty nice. Now let's come to this
one. Same thing again. So G Move it over and then
the same on this one. Let's come from this
bond part this time. Move it over. And then this one, let's pull it out a
little bit, so G, let's pull it out a
little bit like so, and then this one
will bring it in. Not too much. It's all about just the thinness of touches. Okay, so let's now move
our guy over here. I think I'm happy with these. I think I can actually
keep those as is. So what I'm going to do now is come over grab the whole thing. I'm going to also shift
and grab all of this one. And then what I'm going to do is object and convert to mesh. Now, you can see we haven't got to convert to mesh on here, and the reason is ca
they're both orange, which means that you
just need to select one, and then you can come to convert and convert to mesh,
and there we go. And let me just show
you why that happens. So if we go to object, convert
to Mesh, they disappear. The reason it disappeared if we're coming over
to our Jamat node. So if this ever happens
on your own Jomage node, either you can't
convert it to Mesh, or you convert it to Mesh, and it disappears like that. Just coming over to
your Jomage node. There's a real simple fix. Come to the end of
your Jomage node, where the actual
group output is. So the very end doesn't matter what it is in
here, just the very end, and what you want to do
is press shift A and do a search for realized
instances. This one here. Drop that in there, and you'll see nothing
really changes on it. And then what you can do
is go back to modeling. And now, what that
actually enables it to do is change that geometry
node into actual mesh. So if it doesn't work or it's doing something like
that, then just do that, and then all you'll do, object, convert to mesh,
and there you go. Now, everything will be converted
to mesh as you can see. Alright, so this is
looking pretty good. Let's have a look in
our rendered view now, what this looks like,
and there we go. And then what we'll do now? I'm just wondering, that if I should show you how these actually
work. You know what? I think I will. So what
we'll do is we'll go to shading. We'll let that load up. We'll let zoom out a little bit. So let's zoom out a
little bit on here, and here is the bamboo. Let's zoom into it then. And we'll zoom into this now. And what we'll do
is we'll put this onto we'll put it
onto rendered view. And I'll just show you the setup on here. So let it load up. And there we go. Now, you can see at the moment that
these parts here, they're a little bit
green, as you can see. Now, you can also see
that with this one, it's entirely
created in blender. We don't actually
have any mapping. Well, we do have a
mapping, but we don't have any texture maps
or anything like that. All of the coloring
and everything is set up completely in blender. So I'll show you actually how
you can change something. It's a good idea to
do it on this one. So what we're going to do, first of all, is we'll come in. At the moment, this
is set to diagonal. So let's set this to
something like spherical. L et's set the
linear to B spline. So rather than it
being like a hard cut, we're going to set
it to B spline, which is more of a smooth cut. So now you can see we're
getting a little bit more of a yellow feeling there. If we then turn this down, you can see now it's actually starting to look
much, much better. Let's turn this
yellow down then to make a little bit
smoother transition. Like so. So something
maybe around here. And that then, you
can see now we've got little edges going along there. And we can also mess around with the actual ambient
occlusion as well, so you can turn
this up or turn it down to make it much brighter
or darker on those parts. I think darker is
actually better. And we can also turn
up the actual overlay. So how does this work? This
overlays one over the top? So this one here
overlays this one here. And if we put this overlay
to something like not 0.94, not 0.94, like so. Let's have a go with that again. 0.94. Like, so now you can see that's looking
a little bit better. Let's turn it down
though a little bit. I think we've gone a
little bit too much, make it a little bit brighter, just so we don't lose that
intensity on these parts here. And now let's zoom out, and I think that is looking
much, much better. We've also, as well, this
affects this side here, so you can see how you've
got little stripes on here. This is what affects them here. And we've also got a U, and we've got a saturation that you can also
mess around with. So let's now go back to
modeling. And here we are. This is what we
actually end up with. So they're looking pretty nice. Let's put it back
onto our material. Let that load up. And
the other thing is about the Jumpt nodes is
you could actually not turn these into Jome node and just keep them like this. Now, what I'm going to do now is just join all of these together, so Control J. I'm going to
join all that one together. Join all this one together. Grab one just to make sure
you've got yellow one. Control J, join
them all together. And I don't think I'm going
to need this bamboo anymore. So all I'm going to do is
delete it out the way. And then what I'm going to do
is pull this one over here, pull this one over here, and there we go, we've got
our bamboo roofs in there. Now, think on the next lesson, what we'll do is we'll
name both of these. We'll get them into
our asset manager. And then what I think we'll do is we'll start on our roofs. Because once we've actually
got our roofs in place, we can actually then start building out a lot
of our gray box. So we might actually head on over to our gray box and start building a lot of
that out because we've actually got a
lot of the parts in. Just to break it
up a little bit. Alright, everyone. So I
hope you enjoyed that. I'll see on the next
one. Thanks a lot. Bye bye.
52. Starting the Roof Pack in Blender: Welcome back everyone
to Blender fold the modulate and Kita
environment guide. And this is where we left off. So now let's come and move
our guy over to this side. Let's come to this one first. And what we'll do is
just press F two, and we'll call it
small bamboo roof. And then we're going
to control A, control, see that, press the ter born, come to this one, F two, and then we'll just go
in and control V and large Bamboo roof, like so. Now, let's put these
all four of them into new collection bamboo
roofs, like so. And then what we'll
do is we'll just pull them over here,
not with my guy. I'll leave my guy there.
And then we'll just pull them over to this part here. And then finally,
what we're going to do is just going
to come over now, grab both of these right. As we've done many times before, Mark as asset asset manager, and we'll just click new bamboo. Grooves, like so, and then
they'll go to unassigned, drag both of them and drop
them into place, like so. And you can see the
colors aren't on there. And as I said,
sometimes that happens. And then all we're going
to do is go to file, save it out, and then come
back over to modeling. All right, let's press tab
on those, and there we go. And now what we'll do is
we'll grab this one here. We'll press shift D. And what we're going to do now is
work on the actual roofs. But once we've done these roofs, we can actually start getting
a lot of things into place. Now, the roofs are
actually quite technical. Some of the roofs are
actually just single roofs, and they just stick on
the top of structures, and other ones can actually
be joined together. So we've got two
types of roofs here. We'll do the simpler ones first. And then we'll move on to the actual modular parts that
actually stick together. So what I'm going to
do, first of all, is bring in my reference.
So I've got this here. I'll come on over open it up, and the 11 to here. So course pack
references reference, and we want roofs. So rooftop, this one here. Not that one. So let's
open that up again. Not roof tops. Let's go back. Let's If you come
down here, actually, you will see on recent, there's always one that says references. So we've got rooftops
and then we've got roofs. These are
the ones that we want. So we can see here, if we come in, we've got these three roofs
that go together. These three roofs
that go together, so we've got a central one, and then two of
these that have been basically mirrored on
the opposite side. And then basically
what we've got is this roof and this roof
and this one's a large. I think this is the temple
roof or something like that. And then smaller roofs
for the market store. So we've got plenty of
roofs to build the. It's going to take
a few lessons. But as I said, once
you've got our roofs in, it's a big chunk then
of the difficult parts. And from there, it's a
lot more technical parts, and not so many parts,
just more technical. All right, so with that said, let's bring in our parts. So what I'm going to do
is, I'm going to bring in two parts for these two here. So two parts, I'll get
the size and on there, and then one, two, three, 45. So we've got nine in total. So nine cubes to work on. So what we'll do
is first of all, we'll press Shift A. We'll bring in a cube. So we'll put this cube here. We'll press shift D, then
drop the cube there. So these are these two here. And then what we'll do
is I'll grab both of these shift D, bring them over. So these are these
next two here. And then finally, we've
got one, two, three, 45. So shift, bring these over. And then what I'll do is
shift D. Bring them over. And then one more, which
will be this one here. L Alright, so now
let's get the scaling. So we'll do this
middle one here, which is this one over here. What I'm going to do
is come to this one. And the scaling will be 1.81, 2.23 0.974. Like so. And then we'll come
to this one here, which is going to be this
larger one over here, and the scaling is going to
be 2.922 0.22, and 0.974. Like so. And you can see
that they're kind of go to already fit in
together like so. Now, we'll come to the next one, and this middle one is going
to be 1.872 0.32 0.702. Like so. And then this one here, which is this one over the side. I think they're near
enough the same size a little bit different on them. So let's come to this one,
and what we'll do is 2.022 0.32 and 0.702. Like so. Now, the bigger roofs now, so we'll come to this one here, which is one of
the smaller ones, and we'll put 2.24, 2.24, and 0.678 like so.
And now to this one. So, I know it's a bit tedious, but as long as we've
got some dimensions to work with, 1.91. Now, of course, 2.17,
let me just finish this. So we 0.542. When you actually when you would be
creating your own gray box, what you would be
doing is rather than putting these sizes in, you would be taking the roofs from the actual gray
box we bought or taking the size of something
and bringing that into this blend file and using that as a size to
actually go against. Now what we're going to
do is this roof here, so it's a bit bigger
than the others. And this one's going to
be 3.332 0.9 and 0.952. Like so. Let's move all three
of these over, like so. And then we've got the biggest
one and this one here. So let's do the
market one first. So the market one is
going to be 3.42, 2.91 0.727, like so, and then finally the big
one, which is this one here. And the sizing on that
is going to be 4.686 0.03 and 1.02 like so. All right, so that's that one. Now, with this
one, the thing is, it's taken into account like
the top parts on there, so we need to take
that into account. So there's no way that
it's probably going to be this thick it may be a little bit
thinner than this, and then we just
put some points on. So I think we'll work
on this one first, and we will use this
as a kind of guide. So what I'm going to do first,
Voice press Sens d. I'm going to go into object mode as well just so we can
see what we're doing. And then what I'm
going to do because this one's a relatively
simple roof. That's why we're
doing this one first. So what I'm going to do
then is press Control. Left click, right click, and then control B, pull it out. Like so, and then we're
going to press e to alters without proportion
iting on alternS, and bring it in to
where I want it. So something like this, making sure that these, they're not going
to be chipped off too easily. They're
quite chunky. We don't want it way way back, down here where it's going to be really able to smash them
off and things like that. Okay, so now I'm going to do it. I'm just going to press tab. I'm going to press Shift S
and Shift S. There we go. Selection, cursor to selector. So put my cursor right in there. Shift A then. Let's
bring in a cube. Make the cube a
little bit smaller. Let's bring it up, and let's put it into
this corner here. So all I'm going to do is
just press G over the top. I'm going to put it
into this corner here. Like so. And then what
I'm going to do is, I'm just going to press Sen's E, pull it down a little bit. And finally, grab the top of it, and I'm just going to
shrink that in, like so. So very, very simple this roof. All right, now what I'm going
to do is I'm going to right click origin three D cursor. Add in a modifier
and, of course, we're going to
bring in a mirror. Let's put it over that side, over that side, Control
A, and there we go. That is that roof
actually finished. Now, let's join it all
together with Control J. And then all we're going to
do reset all the transform. So reset all transforms, right, click the
origin to geometry. Bring in our bevel. So bring in your bevel.
Not point None three, or a little bit higher
if you want to. So Nott. Let's try Noh
Point No Not five. Yeah, and the thing
that's about right. For these, I'm not
going to go in and come to object
and convert to mesh. I can leave my bevels on there. It's no problem when you put
it into the asset manager. They will come in with
the bevel stole on there. The only time I'll ever, apply the bevels is when I have to join a lot of objects together, and they've all got different
bevel amounts on there. Sometimes then I'll
do it that way. The important thing
is that we do join most of the objects up. It does make it easier, but there are times
when we won't be able to do that, of course. So that's the role that I have. So what we'll do
is with this one. We'll put all the materials
and everything on once we've actually
finished building them. What we're going to do
then is come to this one and this one then is going
to be the market sur. It's going to be It's going to be kind of
the height that it is. So what we'll do is it's quite
easy, actually. This one. We'll come in. We'll
press control. And then what I'm
going to do is just drop it down a little
bit because I want it a little bit lower than
this right in the middle. I'm going to press
control B then just to level it out, like so. And then we're going to press E enter Alton S and bring it in. Holding the shift bond that'll make it a little bit easier. And if it hasn't come
in enough, by the way, you can actually come down here and you can pull it
in from here as well, which makes it a
little bit easier. What I'm looking
for is just making sure that it's even going
all the way around, which it looks like
it is on here. I'm also looking out
far it's going in, and I think that is
absolutely fine. Now what I'm going
to do is just create the little kind of wood parts
that are coming out here. So again, I'm going to press
Shift S, cysta selected, shift A, bring in a queue, make it a little bit
smaller, like so. Let's pull it up. A little bit smaller, these
pieces of wood. Let's pull them into place. Let's pull it over here. And then this then will
be ready to pull it out. Or the actual piece of
wood that we're going to put on there on
the next lesson. So let's now save this out, and I'll see you on the
next one, everyone. Thanks a lot. Bye bye.
53. Crafting More Complex Roof Structures: Welcome back everyone
to Blend Ford the modular and Kit
bash environment guide and this is where we
left it off. All right. Now I want to do
is, first of all, let's array this
going over here, so I'm going to come
in, generate an array, and you'll see at the moment
that it's on the x factor. And this basically array, this first of all, is the count. So how many do you
want? Basically is how much gap you have or
where it's placed along here. So if I move this x out, you can see now that we can move them out to
round about there. If I press one, then I can see there's a little
bit of a gap here. You can see it's much
bigger on this side. So let's turn that
down a little bit. Get it's around about 3.9 I think that looks
about right for me. And also, When you've
got an array on, you can actually
come in and actually mess around with the mesti
so I can press all test. So the thing is,
though, of course, it will bring them
close together, so I'll just increase and
put another one on there. Press one, and let's
have a look if I'm bringing it
back a bit, so 3.8. Maybe 3.7 maybe 3.75. Yeah, that looks about right
to me, and there we go. And then finally,
what I want to do is, I want to apply this. So if I press Control
A I can apply that. And now I'm going to
do this. I'm just going to grab these,
grab one of them. Put it on proportional editing. Let's put it on random. And then all I'm going to do is just pull them back like so. So I'm going to pull
them back. All of them together, grab this one. I'm going to drop this in. Pull them back a
little bit further, and now you can see they're
a little bit uneven. Now, the other thing
you can do as well is, you could also use the
randomize on here. I don't think so I'll think I want them relatively straight. Let me just show
you just in case. So if I put in
three, left click, right click, let's put
in three on this one. Move them back a little bit. Like so. Let's put
in two on this one. And let's put in
three on this one. And then two on
this one. Like so. And then let's grab them all. In fact, I don't want to
grab these faces, though. That's one thing I
don't want to grab, so I'm not going to mess
around with those faces, so I'm just going
to deselect them. So, and then we're
going to go to mesh, and we're going to
go to transform, randomize, and you can see straight away
what that's done. Now let's turn that
down a little bit. So not quite so much.
Maybe something like that. And you can see now
they're a lot more uneven. Now, again, let's come in. Join all of these up together. In fact, before we join
them all up together, let's see what the
actual bevels look like. So first of all, grab them
Control A, to origin geometry. Grab this one last, control, and we're going to copy
modifiers, and there we go. That's actually
looking pretty good. I don't think there's
anything wrong with those. So let's join them
all together now. Control J. There we go. That's the next part done. Okay, so we're on
to the next roof. So this one here, a little
bit more teical this roof, so let's give it a try. You can see that
this, if you want to reference is going to be
press dot and Zooming. This is this roof here, so
you can see it comes out, it goes up a little bit. It's got a little bit that
comes in, goes up again, comes in again, and
then we've got all of these little pointers
going around here. So let's see if we can
actually create that. So what I'm going to do is I'm going to come
into this part here. I'm going to first of all bring in an edge
loop, so control law. Let's drop it down a little
bit. So something like that. And then what I'm going to do is another edge loop,
so control law. Let's bring this down
to something like that. And then what I'm going to
do is t shift and click, so with great going
all the way around. If that doesn't work,
just come in with face elect, grab the bomb face, and then let's pull
it out a little bit without proportional
editing on, especially not the randomize. Let's pull it out.
Light bit like so. And then what I'm
going to do now is, I need to bring this part in. So I'm going to
press control law. Left click and right
click, and then control B. Like so, maybe a
little bit higher. Like so. And you know what? I've actually messed up here. I'm going to leave
this edge loop here. I'm going to bring
it in from here. And what I'm going
to do with this top now is I want to bring it in. But the thing is, I think I need to drop this edge
loop down first of all. So let's drop it down
to round about here, and I think this is where
we'll bring it in from, and then one more edge loop, bring it down to
rounda there, like so. This is what we want. Now if I come to the top of it, a short, if I go over the top, be able now to bring
this in a slight bit. So if I bring it in, like so, now you can see we've got
a nice bend on there. And now what we can do is
we can bring this part in. So if I press enter
AlternlternS, should be able to hold in
the shift born, bring it in. Let's see if it's
coming in even. And Joe's going to come
round just making sure that it's coming in all even and
looking the way that want it. Yeah, that's looking
pretty nice. Now, the one thing
is, I think that this top part of it needs to
come in a little bit more. I'm going to grab it,
press the S born, bring it in a little bit more. So now we can say, I've got
that beautiful flow there. And that's what I'm looking for. So now let's think about these little parts that are
going to come over here. So first of all
I'm going to press shift S, s to selected, shift A, bring in a
cube, press the S born. And I'm going to show you
a real nice technique to actually achieve this. I'm going to press the S bn, make it a little bit smaller. And then what I'm
going to do is just bring it to this
side, first of all. Like so, and then I'm
going to press S and y. I'm going to bring it in. Just so it's starting
along there. And then what I'm
going to do is I'm going to press controller. Bring in one edge
loop, drop it down, and then I'm going to pull
in this bottom part here, so I'm going to come
to this bottom part, S and X and bring it in. Now we can see that the back of this needs probably
pulling out a little bit. So what I'm going to do
is I'm going to pull this part out a little bit, so into the back like so. Then I'm going to
grab this part, and I'm going to pull it back. Like, so, and now you
can see that's a very, very nice flow going down there. And then I'm thinking, maybe, maybe I'll just I'm thinking, Is that all I need, really? You know what? I think
that's all I need. Just something very
simple like this. I think that'll be
fine. Now, you can see it's not exactly
the same as this one. It's up to you how close you
want to get to that one, but I think I'm happy with this. Now what I'm going
to do is I want to actually bring in an array. So first of all, control
A all transforms. I'm also going to
right click and set my origin to my three
D cursor this time. That's right in the
center of there. And then what I'm going to
do is add generate an array. Let's put in at the moment, this thing as five, so
one, two, three, 45. Let's split them up
then. We want them. So let's have a look
operate on 12.3. You can see you've got rounda the right gap there that
looks round about right. Now, the thing is at the moment, These aren't exactly
in the middle. I want these exactly in the middle before I put
them around the outside. What I'm going to do is,
I'm just going to press control A to apply
that actual array. And then what I'm going to do is now I'm going to press control. I'm going to come to the center one actually
will be easier. So grab the center one,
Shift S, cursed to selected, tab control A, all transforms, set origin then to
the three D cursor. So we know that's
right in the center. Now if we come back to this one, we can press Shift S,
cursor to selected. Now grab this one finally and shift S selection to cursor. What that's going to
do is it's going to put it right in
the center for us. So now we need to do is
just bring it to this side. Bring it up to where we want it. And then if I drop
these into place now, you can see that they are right in the center where I want them, and that's exactly what I want. The next of all, what
I want to do now is, I want to put the origin
right in the center of here. But if I click, right click, set origin three D cursor, and you might think, well,
why am I doing that? Because now if I press 50,
press the enter button, and then press R Z 90, I can actually put
it on that side. You can see that's not
exactly working out for me. So let's have a look why
that isn't working out. And I think it's actually
because this is not a square. So let's scrap that. And what we'll do instead is, we'll just go back before
we actually apply that. So we're just going to go
back a little bit before we apply this array.
So let's go back. I don't know how far back. Hopefully. Hopefully, we'll
be able to get there. There we go. There's the array. And what I'm going to
do instead now is, I'm going to actually
press shifty R Z 90, put it over to this side, like so, and we'll do
this a different way. So we still want five on there, but we just don't
want the gap as much. So all I'll do is, I'll start
pulling this down, like so. I'll move these across then
to I actually want them. So something like this
looks about right. I'll make sure as well that they're as far in as these ones, these, so you can see the jaws poking out, so let's
pull them back. Holding the shift
born again, like, so we can also see that this is a little bit
further back on these ones. So what I'm going to do
cause I've got me array. It means I can actually come in and grab the back of these, and it'll just pull them
all that out as well. And there we go. Alright, so we had to change
tactics on these. That's no problem, though, because now we just want to put them in the correct place. So let's now come
to both of these, go to object, convert to mesh. That means then we've
converted those arrays. And now let's do the same
thing as what we did. We want these right in the center. At the
moment they're not. So what we're going
to do is we're going to grab one of these. Shift S, cursor selected right click set origin
to three D cursor. Now we'll come to this
one. We'll grab this one. Shift S, urster, selected, tab right click, set
origin to three D cursor. Now we know that the origin of each of these is
right in the center. And from there,
what we can do is we can come now
back to this one. So Shift S, cursor selected. And then what we
want to do now is we want to put these
right in the center. So I can grab this
now and I compress Shift S and selection
to cursor like so. And now I want to do
is pull these out. Pull them down to
where I want them. Now, first of all, before
pulling them down, I'm not going to
pull them down yet. What I'm going to do is
come to these first, Shift S selections cursor, and now we can see
that the right height. So what it means is I can now pull all of these down
at the same time. So if I pull them down now, you will see that they all get into the same level as
where we wanted them. So let's pull them
up a little bit. And now it's the question
of doing is making sure that they're out far
enough where we want them. You can see they're
roughly about the same. That's looking good. From here, then what we want to do is now, We want to bring in a mirror. First of all, let's right click
S Origins three D cursor. Same on this one, then.
Origins three D cursor. Add a modifier, and we're
gonna bring in a mirror, and we're going to put it
on the y, turn off the X. And then we're going to do
the same thing on this. So I'm going to add
modifier, bring in a mirror. Put it on the y, turn off
the X, and there we go. Easy as that, guys. Alright.
So on the next one then, we're gonna save our work. And on the next one then, we'll just get this quickly
finished off, and then we'll start
on our next roof. All right, everyone. So be enjoyed that. I'll
see on the next one. Thanks a lot. Bye bye. O.
54. Using the Knife Tool for Precision Modeling: Welcome back everyone
to Blender for, the Modular and Kibash
Environment Guide, and this is where we left off. Okay, so what I'm
going to do now is, I'm going to join all of this together once I've
got my be levels on. So first of all, let's come in and make sure
everything is on there because I don't think we've beveled any of this off
yet, which we've not. So what we can do is
we can grab it all, and we can apply all of those
mirrors in one fell sweep. We've convert and mesh. And then what we can
do is now we can join all of this
together with control J, and then we can press Control A, all transforms,
origin to geometry. And finally, now grab
this one control l, and we're going to copy
modifiers like so. And there we go, that
is what we've got. Now, it's looking
very, very nice. Everything is done
beautifully for us. Now, let's move on
then to the next one. Now, as we can see here, the dimensions,
they're slightly out. So just remember that
when you actually, you know, when you're creating this because I messed
up on this one. So let's pull it over. What I'm going to do
is, I'm going to now create so we'll
create the top first. So first of all,
what I'll do is, I know the top wants to
come out a little bit. I'm just wondering
whether what kind of angler wanton here you can
see, this one, this one here. A little bit hard
to see over here, but it will talk you
through the process. So what I'm going to
do, first of all, is I'm going to press Control. And I think what I'll do
is I'll bring one down to to round about here. The thing is I want them to be the same size.
So you know what? I'm going to bring
it down to the top, which you'll be
round about here. Then what I'm going to do is
I'm going to press Control. Left click, right click.
Drop in the center. Control B, and then
I've got control over, bringing that out
exactly where I want it. And then what I'm
finally going to do is I'm going to go Shift
click, O Shift click, E, er Altern S, and then bring it out using
the Shift born, like so. So bring it out
something like that. Then what I want to do
now is this top part, I want to pull this
out a little bit, so if I press S, I
can pull it out. Like so, and I think that's
looking pretty nice. And then finally, then let's
bring the top part in. So if I press the iborn, I can bring it in like so, and then finally press E
and put a little bit of a top on there like
so. And there we go. And now all we need
is this kind of intricate bit that
goes around this side. Now, it's much easier to do
this than what you'd think. So all I'm going to do
is I'm going to come in. I'm going to grab
this part first. And I think the easiest
way to do this is just to press Shift D, like so. And then what I'll do is, I will split it off. So let's press P,
selection, split it off. Let's hide this bit
out of the way, and we should just be
left with this part now. Now, what I want to do is, I want to create bands that
are going across each way. So I want them going
like this, basically. So what I'm going to do
is, I'm going to come in. Control. Let's put in, so we've got one, two, three, four, five, six, seven points, so one, two, three, or five, six. So let's put it like that. Left click, right click.
So we've got one, two, three, four,
five, six, seven. Now, the thing is, if
I do it like that, it means that they're
not going to be even. So you can see it's
going to go up here down here, or here, down here. Then it's going to end up here. We don't really want that. In other words, we've
got one, two, three. Let's turn it up one more, and now that should be fine. Now, before we do the next one, we know we've got this on seven. So what I want to do now
is come in with my knife. So all I'm going to do is press the K button. I'm
going to come in. Grab this one,
this one, like so, and this is going to be the easiest way to
actually do this like so. All right, so now we want
to do the other side. So we said it was on seven,
so let's give that try, so I'm just going to left click, right click and turn
it up to seven. And then I'm going to try and
see if it comes from here. All the way to there,
Let's see if that actually works. And yes, it does. And that is perfect. Now, I don't
actually want to do. This part, I might as well
mirror it over the other side. Unless I actually want
to join them together. And I need to decide, do I want to join them
together or not? If I do, I'm just wondering, do I want to keep these
all joined together? You know what? I think I do. So what I'll do is I'll
just press Control, put this on left click
right click onto seven. Do the same thing on here. Left click, right
click, put it on seven, and then just come
around and quickly do it because I think it's going to be a little bit quicker than what I was planning. Let's grab all of these
going all the way around. Do here, like so, and then let's come around
to here. Same thing again. You can see now the
way that we've built this course is working so that we make it more
and more complex, bringing more and more things into play as we build it out. The first part was all about
referencing gray boxing, then building out all
of the little parts, putting some of them
into our gray box, and you can see now even the
things that we build in, the courses laid
out in such a way that you're gaining
more and more skills, and we're teaching you
more and more things, and we're actually upping the professionalism actually
of creating something. So it's getting more
and more technical. All right, so we're
going to do is I'm going to come in shift click or I'm just going to come down and grab all of these
going round like so, and I'm hoping that I should
be able to bevel these out. I'm hoping. So let's just see
if we can actually do that. I think it'll work. I think that's how I
did it the first time. I'm just going to grab
all of these like so, and then I'm going
to press control B, and you can see that I
can be vel them out. Albeit, you can see that we're actually getting it where
it's not kind of straight, but we're going to
straighten up then a minute. So let's just bevel
them out first. So we've got them all
nice and even like that. Now if I press Sens d, you can see that I can actually straighten
them out again, like so and get them
relatively straight. They don't need to be
perfect because they are going to be in
the stone structure. And then finally, what we
can do is we can now press the y button to separate those of In fact, on
this one, I think, we'll press P selection, and then I can just come
into the back of it, press delete, delete
the other way, and I'm left with just this. Now, let's press control A, all transforms, set
origin to geometry. Add in a modifier,
and we're going to generate a solidify. Let's pull it out the other way. Let's pull it out this way. Let's put even thickness on. We're definitely going
to need that on on here, and now I'm just going
to have a look and make sure I'm happy with
how these are working. But go over the top. We
can see now the very, very straight going along there. That's exactly what we want. Now, if I press ol tage, to bring back the
other part now, you can see this
is what we've got. You can see they're a
little bit stuck out. We don't want some
too stuck out, so let's bring them
back a little bit. So let's make sure that
they're all in place. You can see the touching
here, touching here, and actually, that's done
a really, really good job. I'm actually very happy
with how that looks. Double tap the A.
And there we go, even the corners
directly in line. Yeah, and that's looking good. So what I'll do now is,
I'll go over the top again, grab all of them, over the top, object, convert to mesh. And then finally, I'll grab this one here, press Control J. And then all I'm
going to do now is press Control A, all transforms. Set the origin to geometry. Grab this one here,
press Control L, and we're going to
copy modifiers. And there we go. We've
got our bevels on. Everything is working
out very, very nice. Okay, so that's that one there. The one thing I'm not sure
about is the bevel on here. If I turn it down to naught point naught naught
three, let's have a look. I'm going to turn it down
even further. That's not. That's because I've not got it on here, so
let's do it on here. Let's bring in a bevel.
Generate a bevel. Let's put it on naught
point, not naught three. And there we go, the bevels
looking better on these now. So you can see the bevel on this is a little bit different
to the bevel on there. And sometimes that's all I was saying, sometimes
this happens. So what I'm going to
do is, I'm going to come I'm going to
grab all of this, P selection, grab this. And what I'm going to
do with this one is, I'm going to leave that
naught point not three. I'm going to grab this
one then, grab this one. And you can see that the bevel on here is not
Point not not five. Let's press Control L, copy
modifiers, and there we go. So now you can see No point
not five, No point not three. Let's join these now together. So what we'll do is object, convert to mesh, press Control
J, join them together. Right click, and shades
smooth by angle. And there we go. Alright. You can see
now that they look much much per than
how they did before. Okay. Okay. Now, let's move
on then to the next one. So the next one,
have a look at what we've got to actually
create here. I'm not actually too happy
if I zoom in to this one. So if I zoom in. This one here is a little bit
too sharp on the edges, I think, so I think on this one, we'll make a little bit of
a flat section on there. Because sometimes
when you're building, you always get everything,
now you want it. You know, sometimes
you'll think, ah, should have made that
a little bit different. I would have been better
if it looked in this way. So what we'll do now is
zoom out a little bit. We're going to
save out our work. So let's go to file
and save out our work. And then on the next lesson, what we'll do is then we'll
create this actual roof here. Sticking to obviously the size that we've got.
Alright, everyone. I hope you enjoy that, and
I hope you're learning tons and tons of stuff that
you didn't know before, and I'll see you on the
next one. Thanks a lot. Bye bye.
55. Creating Roof Parts that Fit Together Seamlessly: Welcome back everyone
to Blenda for the Modulate and Kit
Bash Environment Guide, and this is where
we left it off. Okay, so, this one, in
comparison to the others, should be relatively easy. So let's see if it actually is. So what I'm gonna do is, first of all, I'll make
a cup, so control lot. Let's bring it down to In fact, you know what with
this cut, we'll put it round about here. And then what we'll do is
we'll make another cut, and we'll drop this one
down to roundabout here. And then what we want to
do is make another cut, which is going to
be roundabout there to create that top
bit of our roof. So something like
this. I know it's not. You know, I know
it's a bit pie in the sky and we put it
here here and here, but just try and get it roughly
around what I've got it. And then from there, What
I want to do now is, I'm thinking that I'll create another cut along
here, so control. I'll put it halfway in, actually, so left
click, right click. And then from there, I
want one more cut now, which I'm going to
put around here. So a little bit further
down than way it's said. And then from there, what I'm going to do
is I'm going to press the SP and just pull that
one out a little bit. Then what I'm going to do
is I'm going to come to the top of this, and I'm
going to bring it in. Like so. Now, I can
see that on this one, first of all, probably
want to go in a little bit more to make them a little bit more bent,
as you can see. And second of all,
I'm thinking I'll probably pull this
down a little bit. So what I'm going to
do is I'm going to grab all of these,
so Alt Shift click. All of these off shift
click, and pull it down, just to make them
a little bit more slanted than what
they actually were. And I think now
that's looking fine. I think all I'll do
now is just pull this one down a little
bit, so Alt Shift click. Pull it down a little
bit, like, so. And then finally, with
this part, Al shift click, e enter Altnes, and bring it
in, hold in the shift born. Like, so I'm going to bring in a little bit more on this one, so hot S again. Like, so, and again, we can control it down here, and we can also make sure that the offset is even on there, and that then we'll bring it in a little bit further
than what it was. Alright, so I think
that's looking okay. And then what I want to do
now is put a top on the here. So rather than On the
actual reference, you can see, if I press it just comes straight
in like that. I don't really want that.
So what I'm going to do is, I'm going to press
the e born again. Sorry, the i button,
so I'm going to press, bring it in first,
and then bring it in. And I think actually, that's looking much better
than where it was. So something like this, I
think looks pretty nice. And now what we want to
do is we need to think about bringing in these little side points
that we have in there. I'm just looking,
just making sure I'm happy with what I've got
there, and I think I am. So I'm going to press Shift S, urs the selected, Shift A. Let's bring in a cube. Let's make the cube
more much much smaller. And then what we're going
to do is just pull it out into place along here. I'm going to press the S board. And I'm going to put this cube, so it actually comes just
under there, like so. And I'm going to have
it sticking out. I think sticking out rather
it's a little bit far out, I think, so I'll bring
it in a little bit. So S and y. Let's bring
it in a little bit. Let's pull it out. And then what I'm going to do
is just pull it up. And I just want it placed
under this part here, I think. So something like this.
Then what I'm going to do is press SN x and pull
it out a little bit. And finally, then I want it, so it's just just coming
at the bott of here, so I'm just going
to grab the bottom of it, pull it up a little bit. Like, so, and I think now
that's looking pretty good. And now finally, I
want to bring this in with the ibonns,
so let's bring it in. Like so. And then what I want
to do is E and pull it out. And you can see now
it's actually fitting into place rather
nicely on there. And then finally, I want
to resell to transform. So control A, all
transform, set origin, two geometry, and then come in, press the ibond,
bring that in then. And then all I'm going
to do is pull it back. So E, pull it back. Not too far, just so we can still see
whatever's in there. So it's just in front of that
actual plane behind there. And there we go. Alright,
so that's that there. Now what we want is these little Vs that are going
to go down there. We're going to want
three roughly each side. So I'm just thinking the
easiest way to do this, probably going to be with
a mirror coming from here, so three of them this
side, the mirror over the other side,
will give that a try. So what I'm going
to do first voice Shift S, cursor selected, Shift A, bring in the cube, make the cube much smaller. There is another trick as well. When you bring in a
cube, you can actually bring down the size
to let's say 0.5. And then every time now, until I reload up blender, I can delete the cube, bring in another cube, shift A, bring in the cube,
and you'll notice now it comes to round
about this size. I might make it a bit easier
for you to work with. Whatever you put along here, Basically, that's how the
cube will come in next time. So, let's come in then
and pull this over. Let's make it a
little bit smaller. And what we want to do is we
want to fit this right in. So if I press S, and y, we want to fit it
right in around about there. So what I want to do is
I want to pull it over, pull it down, like so, and then pull it down
to this part here, so pull it all the way
down to this part, S and X, like so. So just something
very simple just to, kind of finish this off. And then what I'm going to
do is I'm going to add in a modifier, generate an array. I'm going to pull that out a little bit. To where I want it. Hold in the shift born again, you can also hold
shift born on here. Bring in three, just bring them to wherever you want them. A thing that looks
pretty nice along there. So then all I'm going to
do now is press control g, and now I'm going to mirror
it over the other side. So I want my
orientation right here, so set origin to three Dcursor. Adding a modifier. I'm
going to add in a mirror. And there we go, that's
looking pretty nice, now it's mirrored
over the other side. Now, the thing is, if I want to sent to this and
put it around there, it's going to be a little
bit difficult because probably this is not square, I'm guessing, let's have a
look, so it's two point. Actually, it is square. That's going to make
it easy for us. So what it means is we
can actually come in, join all of this together. So apply a mirror, control A, Control J then to
join it all together. Control A all transforms. And now we just want
to come to this part. Shift S, cursor selected, back to this part, right clicks the origin
three D cursor. And now all we can do
is press Shift D. And then zed 90, spin it around, and it should all fit in beautifully into that part
there, as you can see. Rather than miring it, we
can just press shift again, Z 90 because it's orientating
around the square, and then shift d z, 90, and there we go. As simple as that guys. Okay, so now I want to do
is, I want to grab it all. I want to first of
all, always get into the habit first of
coming up to object, go down to convert a mesh
just in case you've got any residual modifiers left
on or anything like that. Press Control J, join
it all together, and then finally
resettle the transform. So you can see we're
doing the same thing pretty much over and over again. And now I'm going to
do is, you can see this one here hasn't
got a bevel on. This one has, so I'm going to steal that bevel, so I'm
going to grab this one. Grab this one, control l, copy modifiers, double tap
the A, and there we go. That is looking pretty nice, so that's the next one done. All right, so now we're on to the slightly harder the ones. So what I want to do now is, we can see here that these, they're going to look
pretty much the same. So we want to make
sure that we're doing them all well not doing
them all together, but making sure that we can create what we basically
do is we create one, and from that one, then we
can create the middle one. And then we can make sure that we mirror it on the other side, and they all join in together. So, I know we've
put two out here, but it's probably easier
that we just create one. And then from that one, as I said, we create the other one. So let's do that first. So from here, What I'm going
to do is, I'll grab this, and I'm basically going
to create a full one, and then I'll basically
cut it in half. So that's the way I do it,
or I'll actually mirror it, whichever is the
easiest way to do this. So what I'm going to
do is, first of all, this top is way too big. So this top here. So what I
want to do is bring that in, but I only want to bring
it in on this direction. So how do I actually do that? I think the easiest thing to do, I'm just wondering
how to actually approach this because I
actually have to bring it in. And I know that I'm going to be bringing it in along here. So let's give it a try. So what I'm going to do is
I'm going to press Control, Let click and right click, Let's put it right
in the center. And then what we'll try and do is I'll try and
extrude it in. So if I grab these
three, press the E bon, and then press AlternS, I should be able to then
bring it in, like so. Now, the point I'm
trying to say is here, it's kept towards this
actual side here. That's why I've
done it that way. But what it does mean is
that I've got to come in and actually fix
these parts here. So you can see these parts here and delete them off,
so delete faces. And then we're going
to end up with this. And you see how it causes a mess when you
extrude the other way. So let's come in,
delete faces, like so, and then we'll end up finally with what we actually wanted, which is something like this. But then what I can do
is I can come in now. Pull the faces in with F, because it's just easy to just press the F but rather
than coming up here. And there we go. We've got the first part of
this actually done. Now, let's come in and
do this next part. Now, the thing is
with the next part, we want it again to be a little bit out
on this part here, so Let's bring this part in first. So we'll do this part first. So I'm going to bring
this in with I. And I'm just
wondering, actually, let me just look
around the other side. Yeah, the other side as
well is also the same. So we'll do them both
at the same time. So we'll grab this one,
we'll grab this one. We'll press the eyeball,
bring it in now. You can see they're
not coming in even. And that's because I just need to reset all my transforms, I'll set origin geometry. And now let's try that again. And now they're coming
in, so much more even. I'm going to pull
them out. Very, very close to this edge here.
You can see this edge here. And then what I'm
going to do is just make sure I'm on medium point. I'm going to press E,
enter, and then S, and y, and then just
pull those out, like so. All right, so far so good. Now we can do the
next part, so we're going to grab this
side and this side. I'm going to press the i born, and I'm going to bring them in. And on this one, this time, I'm going to pull them
back the other way. So I'm going to press
E, enter, S and y, but pull them inwards this time, like so. And there we go. That is the first part done. Now what we need to make sure is that we've got a center part. So you can see with
the center part, this part doesn't exist. So this part doesn't exist. Everything else is the same, except this part in the middle just comes
in a little bit. So the way we're
going to do that is, we're going to press shift. We're going to go over
and pull it over to here. And then what I'm
going to do is now You can see if I try
pulling this over, you can see how it lines up, but without these
edges on there, that's what we want to avoid. What I'm going to
do is I'm going to come to the center of here, press Shift S, Kursta selected, and then I'm going
to go over the top. Over the top and
you can see here this is where I want to cut it, right where this cursor is. What I'm going to
do now is press A. I'm going to come
in then with mesh, bisect, and I'm going to
cut it straight down here. So straight down here. Doesn't matter if it's
a little bit out. Set this to zero again. And then all we're going
to do now is just move in and pull this over just
so with the shipboard. You can also use that
right to the center there. Now what we want to do is
you can see that these are level this
side, pretty much. What I want to do now is, I want to cut this
away from this side. So if I come in, I can go
to clear the inner like so. I don't want to fill this gap in. I don't want
to fill it in all. What I want to do
though instead is shift S and cursor
selected like so. Now I want to do is right click, set origin, three D
cursor, and finally, we're going to
bring in a mirror, so let's mirror over the
other side, and there we go. You can see though we've
got to cut down here. We're going to fix that,
so don't worry about that. All we're going to do though is press Control A and
actually apply that. Control A, apply my mirror, and now let's
delete, so dissolve. Edges out of here, if
that doesn't work, come up to delete edges. If that doesn't work, let's
see what else we can do. So dissolve vertices. No, Dissolve. Let's have a look. I should be able to get
rid of the edges on here. I'm just wondering why I
actually can't delete that. Let me have a look if there's
something on the inside. Or it could be that they're
not actually joined together. You can see here, they're not actually quite
joined together. So the reason for that is if I go back before I actually
added in that mirror, And I come to this, you can
see that at the moment. If I pull this this way, the reason why that's happening
is we didn't clip them. So what I'm going to do is I'm going to click clipping on. Well, actually, I'll click
it off, and you'll see that. If I bring this over, they just go over the
top of each other. Nothing actually clips. But if I come in and
I put clipping on, drag them to each other, and then release,
you'll see now, I can't pull them apart. And when I actually come in now, press Control A, and apply
that. So let's press tab. Control A, you'll see now. We've still got a
line down there. You can't see it through
here because there's no gap, but we can actually come in now and dissolve edges,
and there we go. There it works. And the other great
thing about this is now, if we pull these over here, we can actually put one in
the center here, like so, and we can grab
this one, shift D, bring it over this side, and then just mirror over. So object transform,
and we're going to not object transform or is
it mirror. There we go. We want to mirror on the x
axis, where this red line is. So let's go to object, mirror, x. And there we go. Now we can put
them all together, and that's what we
end up with really, really nice, as you can
see, really simple. Now, the one problem
you're going to have here, which we haven't spoke about
is going to be normals, and that problem
we'll talk about on the next lesson.
All right, everyone. Let's save our work, and I'll see on the next
one. Thanks a lot. Bye bye. I know.
56. Understanding Normals and Their Usage in Blender: Welcome back everyone
to Blender Ford the modular and Kish
environment guide, and this is where we left off. So we're talking about normals. Now, what normals are is
which way the mesh is facing. Now, it's a really good
easy way to see this. All we done to do is come up
to the top right hand side, come down to what it
says face orientation. And you will see that all
of these at the moment, are blue, and that means good. That's what that means exactly. Now, when you come
to some like this, you will see these are
the wrong way round. That is bad. So we don't
actually want that. We can also see that
if we go over here, we've got anymore that are red, Look, no, I think it's
just those ones over here. So what that means is
basically that the mesh on these is facing
the wrong way round. So if we took this into a games engine like on
real engine or Unity, it means that these would be see through because in
those games engines, it only actually renders
one side of the pace. It doesn't render the backside unless it's a leaf or
something like that, which is just a plane
a two D object. In other words,
because of the fact it saves on computer power. So that's why it
does it in that way. So we need to make sure that
when we're creating things, everything is created with the face being the
right way round because we don't want to
add double sided materials because they are very costly. Now, normally, when
we do extrusions, or when we do mirroring, it can have the
effect of actually flipping those normals
and facing the wrong way. So like something like here, you can see that these
are the wrong way round. Now, I will show you
something else as well because we need to put
these the right way round. So come to your archways. I'm fairly sure that yours might be either the right way round or
the wrong way round, but I am going to show
you something else. So if you come in, grab this, press A to make sure everything
selected, press shift. What'll happen is it'll
flip those around then. So now they're the right
way, but We have a problem, and we have a problem in that it flips all of these round, the other or wrong way round. And the reason it's done that is because the way that this
Jot node is created, means that if I come
in and select these, you'll see only
selects up to here, which means that these parts are actually not
joined together. So I forgot to actually tell
you to join these together. So what you want to do is, it's no problem. It's easy to fix. All you need to do is press A, come over to what it says mesh, pleno, and what you want to
do is merge by distance. So what this is going to do is is going to join
all of those up. You can see here, 2,913
vertices joined up. And that is basically, if I come in now and try and select this, you'll see it selects
the whole thing, and now they're all
joined together. Now I'm going to do is I'm
going to press A, shift N, and actually turn
those normals around, and now you can see these are
all the right way around. The other good thing
is the asset manager. So if I go back and
press Controls, so before I actually flip them around, you
can see like this. If I go to my asset manager, come down to where archers are. Let's put this onto
face orientation, and you will see
that if I come in, drag this in, the actual normals
are the wrong way round. But if I come in and
actually reset them, so grab them all again, shift, reset them, so they're all
the way out around now. Bring this in, it actually
updates in real time. That is really cool. I actually
didn't know it updated, but I found that out just
through seeing that And yeah, that makes things really handy. So let's now go
back to modeling. Let's take phase orientation off and now you know what it is, and now we can
carry on building. So we have these three
now, these are done, and now we're moving on
to the final final roof. So let's put these in
place. Let's save our work. Now we've updated that, and then what we'll do is move
on to the final one. Now, I've left the
most tricky one. The last because it is
the hardest one to do. So all we're going to do is
we'll make this part first. So I'm going to
bring it in first. So the thing is, though, again, I don't want
to bring it in. I want to bring it
in like this one. I don't want to bring
it in, you know, kind of all of it. I just want to bring
in these sides. So I'm going to do that.
And I want to do it. I want the top to come in. So I'll show you
what I mean by that. So, first of all,
let's press the tab. Let's press Control, and let's
drop it round about there, so left click, right click, drop it right in the center. And then all I'm going to do is press Control B, pull it out. Like so. And again, with this, I don't want
to pull out this side. So what I'm going to do is
I'm going to come around. Grab all of these.
I want to press e enter AlternS,
and pull those out. So pull them out
in the ship born. Like so, and you'll
see now that they pull out nice and even
going across there. That's exactly what
I want like so. So we've got a little bit
of a lip on there like so. Now what I want to
do is I want to actually pull this bit back in. So I want this bit to come back in further
than this part. So I'm going to come. And you
know what I'll do. I think The easiest way to
do this is just delete this top,
so delete faces. And then what I'm going
to do is grab each of these. Like so. And if I press alternS, I can bring them
in then, like so. Now, you will see that it's
kept this bit nice and flat, and it's brought them
in nice and even. No, it doesn't. Let's put
offset even on. There we go. Now it's nice and even for
me going across there, and that's exactly what I want. So that is the other way
of actually doing this, which makes it a
little bit easier. From there, then what I can
do is just fill in this face now with F. And then finally, what I'm going to do I'm just
going to put a top on this. So I'm going to pull it
down a little bit first. And then all I'm going to
do is press the ibonn, and bring it in, like so, and then press a
key and pull it up, like so, and there we go. All right. So that's that bit. Now you can see, we're going to have a
really, really nice, smooth bit on this
center bit here. Okay, so now let's
come in and think about these actual
holes in here. We want some holes in here. So I'm thinking the
best way to do this is probably to separate
this part off. So let's do that.
So what I'll do is, I'll grab All of these
going all the way around, so old shifting click, and we're going to press P and selection separate them off. And then we're going to
come back to this one. And what I'm going to
do is press control. Let's bring in some edge loops, so we're going to have one, two, three, four,
five, six, so one, six, one, two, three,
four, five, six, seven. Let's have a look left
click, right click. One, two, three,
four, five, six. All right, we've
got six that side, and I think we'll also have
either five or six this side. So this is going to be one,
two, three, four, five, six, and bring another one
in. Left click, right click. And I'm just looking at
the difference there. You can see there's a much
bigger difference there. So, you know what? We'll
turn this down one, like so. Alright,
now we've got that. I'm going to come, select
this one, control, select this one, Control
select, Otrol select. And then what I'm going to
do is press the button. Bring them in, press I again, to make sure we
bring them in even. And you can see now,
they're not coming in even, and I don't really want that. Do I want them to be
square or more oblong? I can actually fix that because
all I need to do express control A or transforms,
that origin geometry. Go back into it, press I, press I again, and now
you can see the M square. So if you want them square,
if you want them oblong, you can actually fix those. Alright, so I want
them like that. I want them a little bit longer. So Sen's Ed pulled
them out, like so. And then all I'm going to do
is press E, enter Altern S, and then I should be
able to pull them back in where I want them to
be something like this. And I'm thinking, I'm
I happy with those? And I'm going to show you
another trick now what you can use. You know
not happy with them. So let's press Control plus. Now, I want them to be
all a little bit thinner. So how am I going to do that? What I'm going to
do is, I'm going to put this instead of on global, I'm going to put it on normal. And then what I'm
going to do is make sure this is on
individual origins. And from there, what
I'm going to do is I'm going to press S and y. And what you'll see
that does is it changes them depending
on where they're going. Now. I'm going to reset my
transforms before doing that. All transforms, right,
click the origin. To geometry. Let's go back, and now let's press S and y. Still having the same problem. So instead of normal, let's
put it on local, S and Y. And that's not working.
So let's put it back on to normal. And
then let's try. I've got a little
bit of a problem here in the fact that it's not bring them all
down exactly the same. So you can see going
along this normal here, the le should be going
on the x or the y. You can see though
it's not quite working the way it wanted to. So failing that, fail in that. We can also do a different way. So what we're going to do
is put this back on global. I'm going to still make sure
this on individual origins, and I will show you
another way of doing this. What we're going to
do is, we're going to select each one of
these just on the side. We're going to come around
then and select each one of these on the side. Like so. And instead of doing that,
what I'm going to do now, is S and X. I'm
going to pull, well, first of all, control plus, then I'm going to press S and x and pull those in to
where I want them. So a little bit thinner
as you can see. I'm going to come
over now to this x. I'm going to click on it. Control C. And then what I'm going to do now is
come around to these ones. And then what I'm
going to do is S and y, bring them in slightly. In fact, control plus again, and then S and y, bring
them in slightly. Then all I'm going
to do is go over to the y, press Control V, enter, and there you
go, now you've got them exactly the same
size as each other. So that's how you
can bring them in. If you're not happy
with them or if you're not happy with what
you've actually created. Now, the next thing
I want to do, I've got my bevels on there. Yes, I have. Did I put my
bevels on this? No, I didn't. Next thing I'm
going to do is add my bevels onto this
because I didn't do it. So I'm just going
to grab this one. Control L, and we're
going to copy modifiers, and there we are, my
bevels are on there. Now, let's think about finishing this one on the next lesson. So what we'll do on
the next lesson is we'll create this
smaller part here. And I think all
I'm going to do is I'm just going to cut
it down this center. So down here, making sure that it's the same
length as this one here, and then just bring this part. So this part here
in a little bit, and I think that will
be absolutely fine. Let's see how it works. Uh Let's see if we
can actually do it. All right, everyone, so
I hope you enjoyed that, and I'll see you on the next
one. Thanks a lot. Bye bye.
57. Adding Materials to the Roof Structures: Welcome back everyone
to Blanda Ford, the Modula and Kit bash
Environment Guide, and this is where we left off. Alright, so we want
to bring first, we want to cut it around here, so we can see you want
to cut it around here. Now, before I do that, let's make this easy for ourselves. So what I'm gonna do is,
I'm just going to pull this over past this point here. So if I press one, let's see. Can I actually see
anything from there? No, I can't. L et's hide these
out the way, first of all. So we're just going
to hide these out. Now, if you want to hide
them out permanently, so you can't press lth
and bring them back. There is a way of doing
that. You're just go to click it off on here, so you can just come
down, click these off. Like, so, click these off, and this one off, not
that one, the bamboo. Click these off, Bos that up. And then they're all
hidden. If I press alta, you'll see, 'cause
they're hidden over here. I can't actually bring
them back, which means now I can pull this
out a little bit. I fact, let's pull
it out altogether. Or pull it out
altogether like so. The other thing
we've got is that we didn't think about is I want to really join this up
with these under here. Do I actually want to do that? Well, I've look at
that in a minute. What we'll do first,
though, is press one, and now I should be able to see if I'm going to wireframe, I should be able to see how far then I want to
bring this back. You can see at the
moment that this one is slightly slightly past there. So that's what I
actually want to do. So if I'm going to be cutting, let's say down here. So I'm going to be cutting
round about here, I think, on this part, up to here, this point here, so you can see now it will line up
with this one here. So up to this point, so
I realistically want to bring this in just
past this point. So just past this point
here. So let's come in. And what we're going to
do is grab this top. I'm going to press one again. And then what I want
to do is, again, we're just going to measure
it up so from here to here, or we could just cut
it straight down the center here and then just mirror it
over the other side. And I think that
might be actually, I'm wondering if we cut it
straight down this part here. So this center part here. Let's press control
going along here. You see, I can't cut
it down there either. So I'm thinking the easiest way, so the easiest way
to do this sevel up. We'll come to this
one, actually, and I'll see if I'm going
to make a cut. Yeah. There we go. So I can
make a cut down there, which is great news because
that means I can cut this, both sides, mirror over the other side,
join them together. So what I'll do now is, I'll bring in my bicect tool. So what I'm going to do is, I'm going to join both
of these together. Control J, join
them both together. Press A, bring in my mesh, and bring in my bicect tool. And then what I'm going to do is I'm going to bring
it down to here. And then what I'm
going to do is I'm going to put it onto zero, so zero out, and then finally I'm going
to move it over now. So if I move this over, I should be able
to get it just to the other side of that
one, which is what I want. So just to the other side. Now, you can see that we
need to move it along the x, but we can actually move this along the x,
as you can see. What I can do is
I can really zoom in, hold in the shift board, and then I can move this
over to where I want it, which is really
right around there. So let's actually
now cut this way, so I'm going to clear the
inner, and there we go. Now I want to do
well, I've got this. I'm going to press Shift S, ps to selected, like so. And finally, finally, There is a line or there should be a line in there going down here. So I just want to make
sure if I press G, you'll see that there's
two lines behind there, and there doubles bass. So let's see if we can actually delete those doubles
out the way. So mesh, clean up, merge by distance, and there
we go 20 vertices merged. Now let's see if we've
actually messed that up. And it doesn't look
like here it looks like we've just merged all of
these vertices on here. Just going to press tab and have a look at what I've done. And finally, then, We've got our cursor right
in the center here. What I can do is I
can add modifier, generate a mirror, put
it over the other side. And the reason it's gone all the way over there is
because I need to right clicks origin 23d
cursor, and there we go. Now, that should be joined up. Now, let's see if I
apply this mirror, Control A, and there we go. Now, the one thing we
actually forgot to do. Before doing that, is I forgot that this
is like one part. I need to actually
keep this part. I don't want to delete
this part. So let's come in. We know what
we're doing now. So let's actually press
shift before destroying it. L et's come in now and
cut that down again. So if I press one, I'm
going to come in mesh, go to bisect, and then
let's cut it down. So let's put it onto
zero. Let's zero it out. What I'm going to do now
is I'm just going to. So if I pull it this way, you can see on here
again, I zoom in. I come in and I'll
pull it this way. You can see it's just past that, I want that just
before that court. So very, very slowly, as before that court,
and there we go. Alright, that's going
to be so small, no one will ever notice it. Now I'm going to
do this, I'm going to right click and sorry, Shift S. Cursor selected, and then right click, Oigin, three D cursor, and
that in the mirror now. So generate A, where
is it I mirror? There we go. And there
is the middle piece now. So that's looking pretty nice. Now one thing you might want to do with this middle part is, you might want to cut it
a little bit smaller. So that's the way
to do it like that. Now let's come in and actually
cut it the other way now. So I'm going to do
is, I'm going to cut it just past here, so it's four, and
then join it up. So I'm going to press A.
I'm going to press one. And what I'm going to do now
is bisect it again, so mesh, come down to bisect it, B and as we've got it here, and then I'm going
to drop it down. Like, so. And then
we're going to zero this out, so zero it out. And then what I'm going to
do is, I'm going to zoom in. I'm going to move it this way because then we can
see where the cut is, so you can see that little
cut there, jaws past it. Like so. And then finally, what I'm going to do is,
I'm going to right click. And in fact, I'm gonna
press shift des, Cursor selected tab right clicks Oigin to three D
cursor. And there we go. Now we've got what
we actually want, so now we can just
pull it over here. And now you can see
that's gonna fit in beautifully with each other. Alright, V, very
happy with that. Let's press control A then. Let's come in then and just
delete this edge out the way. So dissolve edges. There we go. No problem at all. And then what we're going to
do is grab this one, shifty, bring it over. And all I'm going to do is object mirror and
mirror on the x. Again, whenever you using
the mirror, always check, always check to make sure that the orientation is still
going the right way, which it is, so that's fine. Delete this one out the way. And finally, what I can do then is grab each of these now. Control A, or transform
set origin to geometry. Grab this one, control, and all we're going to do
then is copy modifiers. And there we go. There
is our second roofs. Second roof done and dusted. Okay. So now, Finally, we can come in and actually
give these some materials. So what I'm going to
do is, first of all, I'll come to this one. And what I'll do is I'll
put it onto material mode, and I'll unwrap this
one, first of all. So, let's wait for
everything to load up. Let the shaders load
up. And there we go. These have got no
materials on them. And the other thing
is with hiding all of those parts out of the way, it does make it easier
because there's not so much in the viewport, which will cut down the
actual performance. So what I'm gonna do then
is come to this one, A U, Smart U V project, click k. Let's come in then. Bring in our mid our midtone. There we go. Add
that on. That's what that one looks
like, pretty nice. And then what we'll do is
bring in our red stone. So let's put it on facelt, and then plus down arrow red. And then we're going
to look for red stone. Spine. And there we go. Alright, just make sure
you've got your bevel on, and then all that is done. Then we'll come to the next one. Now, this one's going
to be the lights stone. Now, I'm just going to
bring my stone blocks. Because what I want to do is, I want to select this
one, select this one, control el link materials, and then I can hide
my stone blocks out of the way again, and
then come to this one. Now, this one has
some wood on it as well as some red
going around there. So what I'm going to
do is click on it. I'm going to press tab. And
then what I'm going to do is, I'm just going to select each
one of these separately. I'm going to press.
Smart U V project. And again, because this
is wood, normally, it's very, very easy to
actually put the material on. So what I'm going to do
is now, I'm gonna come. Add in another material. And the one we want is wood. So let's have a look. We've got dark wood, prop wood, lightwood. So I think with this one,
we'll go with dot wood. Let's have a what
that looks like, so let's click a sign. And there we go,
there is the dogwood. I think that's the one
that I'm looking for. And all I want to
do now is you can see these are going
the wrong way round. So I just want to
come over to shading. And I should, if
I press dot bon, I should be able to
press the tap on, A R 90, spin them round. And you can see the thing
is with this wood is, if I put this on render view. You can see that it's got
some dark and light spots, and it just makes the wood
look a little bit different. It's also got some
edgewaar on there as well. And you can see it really actually makes the
wood look really nice because they all look
like different parts of wood. Alright, let's go
back to modeling now. And then what we'll do is
hide those out the way. We'll grab the
rest of this then. A U, smart U V project. Click Okay. And then all I'm going to do now
is come to this bit. And what I want to do
is plus, down arrow, red, And then Redstone,
click a sign. And there you go. Press O T, bring back everything,
double tap the A. And that's another part done. So they're looking
really, really nice now. On the next lesson then, we'll
get all of these roofs in. We'll get them into
our asset manager, all of them named up. And then from there then, we can actually bring some
stuff into our gray box. Alright, everyone, so I
hope you enjoyed that. I'll see you in the next
one. Thanks a lot. Bye bye.
58. Completing the Roof Pack for the Aztec City: Welcome back everyone. Benford the modular and
Kash environment guy. And this where we left off. Now, one thing I've noticed is, if I bring back my bamboo, you can see that these
are in the wrong one. So what I'm going to do
is I'm just going to grab all of these, not my guy. So I don't want my guy in there, so let's actually pull
him out of the way. Let's grab all of these then. And all I'm going to
do is make a new one, and we'll call it roofs, like so, and there we go. And from there, then,
what I can do is I can actually hide my bamboo
roofs out of the way, and there we go.
That's that done. Alright, now you can
see the reference, so you might be able to see
what I'm actually doing here. So what I'll do is I'll come
to this one. I'll press. In fact, you know, I'll do
them all at the same time, so I'll just grab all of these, grab this one, control, all transforms, set
origin, to geometry, so I'll set the origin to
all of the geometries, and then we'll come to this one. And what I'm going to do is
grab this one, grab this one, control l, and we're going
to link materials like so. What we're gonna do is
now come into this one, press A, U, Smart U V project. Click K, wrap it all. And then finally what
we're going to do is now bring in our red stone, so red Stone, click a sign. And then what I'm
going to do is I'm going to grab the whole of it. Hide it out of the way,
press A, and then plus. And this time, we're
looking for blue stone. So I'm going to
click down arrow. Blue. Stone. Click a
sign. And there we go. Old tag, bring back everything. Tab, double tap the A. There we go. As simple as that
to bring in the materials. Now, let's come to this one.
Pretty much the same thing. So I'm going to grab it A U, smart U V project, click Okay. Grab this one, control
L link materials. And then all I'm
going to do then, is come in to this one. Hide all of this out of the way. So if I press L on it,
s'll be able to hide it. A, grab all of these, and this down, we're
gonna put these on red. So sign. And then press l tag. Bring back everything.
Tab, double tap the A. And there we go, it's as
simple as that to do that one. Now, with the next
one, we've got actually a new material in, which is going to be gold. Well, first of all,
let's grab it. A U, smart U V
project click okay. And then all I'm going to
do now is grab this one. Control L, and we're going
to link materials once more. So we've already got a stone on. And then what I want to do
now is with these ones, I want it to be the dark stone. So the midstone, basically. So I'll do I'll do
these parts first. So L, L and L, and then L. And what
I'm going to do is put these on the
midtone on here, so I'll just click the
plus down arrow mid Stone. This one here, click a sign. There we go. And then the center of these are
actually going to be gold. So I'm just going to come round, grab these like so. And then I'm going
to come to this plus down arrow,
gold. Scratch gold. Let's click a sign. Let's have
a look, and there you go. You can see the look
very beautiful. And then what I'm
going to do is now, I want to grab this one going
all the way around here. So I'm going to press
lt shift and click, and I'm going to
put this on red. So red stone. There we go. And now, finally, we want
to grab the whole thing. So grab the whole thing,
grab all of these, and we're just going to hide
these out the way with H, so hide them out the way. And then A, and the ones we want on these are going
to be the blue stone. So click a sign. And finally, I've got actually
this one selected. So let's not mess
around with that because I've still got this
one selected. There we go. Now click A sign, and then press old
H. Double tap the A, and there is that
one done as well. Now we're moving on
to the easier ones, because I think those
were a little bit harder. If you can say the hard, nothing's really
hard on this part. And what we're going to do, we're going to go
into each of them. So A, U, Smart UV project. Okay. And then we're
going to do them all separately because
they are quite big parts, and we don't want
to mess around. You know, changing
our UV or our Shader. So Smart UV project click
k. Smart UV project click. And then this final one, A, U, Smart U V project click.
Now we'll grab them all. Like, so, grab this one, this one last because we're only going to need
the red on these. So I'm just going to press
Control L link materials. And now finally, we'll
just finish them off. So I'm going to come to I don't think you can do them all together
because they're not joined. In other words, if I come in, and even if I grab
each of these, let's see if I can, Redstone let's click a sign, Oh, we can. Actually, I didn't
know we could do that. So now we'll come to these and we'll click a sign
on the red stone. And then finally, I
actually assign them. Yes, I did. And then finally, we'll come to these parts here. So we'll just click
on all of these. We can see here. These two. So I'm just going to isolate
these out, actually. So I'm going to press shift. Hide everything else
out of the way. I really don't want to have. I've got a bevel on here, the bevels working nice, but I really don't want
this edge on here. You can see where is it gone? There's a bit of an edge.
I think it's on this one. Not on there. Sever a look on this one. Yes, this edge here. I don't want that on
there, so I'm just going to come in and
then ult shift and click and then dissolve
edges. Don't need it there. See if there's one
on here, actually. Did I leave one on here? They're fine. E a look on
this one? Yes, there it is. So t shift and click,
Dissolve edges. There we go. Alright, so now
let's grab all of these. We'll pull them out actually, just to make it a little bit
easier to go around them. So and then we'll
grab all of them, and we'll do them all
at the same time. Now, there is
sometimes a way where you can grab one of them or
two of them or three of them, and then go to select, and you can select
similar by area. And you'll see
there. Sometimes it works, sometimes it doesn't. You can see it's
grabbed a lot of them, and they're all
similar, the same, but it's grabbed a lot of
them on the back as well. So let's actually go with that. And what we'll do is
we'll assign them stone. And then what I'm going to do
is just hide those out the way just so we don't end
up selecting those again. And now I'll do the sides. So let's see if it does
all the sides for us. So select similar by area, and it's grabbed this one here. And it should have grabbed
all those those there. The casing. And there we go. Now, I'm gonna press all tag, and I'm gonna press tab, and I'm just going to
have a look around just these ones
just to make sure I've not made
anything read that I shouldn't have done.
Like this one here. So there we go. Let's make sure then that we
put this on stone. There we go. Alright,
looking good. Let's press al tag,
bring back everything. And now let's put
these into place next to each other. Like so. Alright. So now what
we want to do is we want to name these. So all I'm going to do is I'm going to call
this large roof, so I'll press F two. Large roof. And then I'll put this one, we'll call it roof, stone, and wood,
something like that. Something that's
memorable for you. We'll just make sure
you call it roof, stone and wood. Like so. And then this one we'll call medium roof F two
mid roof. Like so. And then this one we'll
call tiny roof, tiny roof. And then this one
we'll call small roof. So F two, small roof. And then these three now. So these are part of a pack, so we'll call it roof Pack left. So we'll call it Roof Pack single We'll call
it roof Pack bar. So let me just figure out we're going to call
this. So roof. We'll call it modulars
in modular pack, and then we'll call it bar
and then left, like so. And then what I'll do
is I'll copy that. And then I'll come to this
one, I'll press F two, and I'll press control V, and I'll call this mid like so. And then this one,
I'll call it the same but right. Like so. I think that makes sense to me, at least it does, and then
we'll come to this one. So F two, control V. So this one will be roof that
the bar we'll call it square. And that's on the left.
I'll copy that again. So Control C, and then we'll
come to this one, F two, control V, mid, like so. And then finally this one, and
we'll do F two, control V, and we'll call this
right. Like so. All right, so that
makes sense now. Now what we can do is now let's
make sure that we go over the top and we
just put them into some kind of nice order, so
they're not too spread out. And then finally,
what we'll do now, they're all in our roof. So they should all
be under here. So what I can do is
I can grab them all, and you'll see them all
grabbed and then right click, and I can mark them as asset. And there we go. Let's save out or work them before
doing anything else. And finally, finally, let's come over to our asset manager. And what we'll do is
we'll call them roofs. So let's name another
one roofs, like so. And then what I'll do
is come to unassigned, grab all of my roofs, and
I'm going to drop them in. Tua roofs there and then
file and save them out. Now you can see when
I've actually done that. What has happened is,
they've turned around. So good job I've actually
had this on to check that and I said that if
you mirror them round, then you might end
up with them being flipped over, which is
what's happened here. So let's grab both of these at the same time, A, shifting then. Spin them around,
and there we go. Now, this one here,
as you can see, if I press the little dot board, and they'll take me there
it's called Mod square right. So we're looking for
mod square right. So this one here, if
I bring this out now, you can see it's
actually fixed that. So you can see everything's
fixed on there. All right, so I'm actually going to leave that
on because it's a good thing to actually see whether things are
going right or wrong. Now, let's come
back to modeling. And then what I'm
going to do is, I'm just going to press seven, G, put this a little
bit closer to them. And then what I'm going to
do is just close these up. I'm going to just turn
these on a minute so I can see where I'm
actually going to put this. So I'm going to
see bamboo roofs. So I'm going to put all
of these just over there, like so, and there we go. And on the next lesson then, I'm going to load up in fact, I'm gonna save this out first. And then we're gonna
load up our gray box, and then we'll start bringing
in some of these parts, and you'll really see it
now start to come together. Alright, everyone, so
hope you enjoyed that. I'll see you on the next one. Thanks a lot. Bye bye.
59. Integrating Supports into the Greybox Model: Welcome back, everyone
to Blender for the modular and Kit
Bash Environment guide. So here we are. I've open up now the gray box that we had with
all of the assets in there. Now, let's just open up this at the moment you can see,
it's on materials. So let's go down,
as you can see, I've reopened this, and
sometimes this happens. Where you'll reopen it, and it won't have any other
things that you opened. So all you need to do is
just go to preferences, and we're just going to
go down to where it says, not system file paths.
And I want to add in. So I'm going to take
off these again, like so, click the plus b, and now all I want to do
is go to my asset manager, where we add all
those Aztec parts and click Add Asset Manager. Close that down then, and then
I want to go to this one. Aztec parts, and they should, all be in here now. All right, so Now what we've got is we've got some of these parts already
in, as you can see. So what I want to do now, I just want to save this
before I start. Now, let's go to
our arches first, so if I bring out my
arch, you can see now, I can simply start
putting these into place, so I can start coming in, bringing this into
place like so. And then what I can do is
I need a wall on here. I'm going to actually delete both of these walls
out of the way. I'm also going to delete
this out the way. So this part behind here, so I can put it there,
delete out the way. Now, let's come in and
look for our blocks, so stone blocks. Let's
look at this one. Is this the stone
block that we need? Can we use that one in there? Or should we use
this mid size block, have a look at that one. That one looks a
little bit too big. Let's have a look at
the smaller ones. So let's bring this
one in. And this one. It's either going
to be this one or this one that'll do
the trick for us. So I think we'll use this one. So what we'll do is we'll
use this one this side. We'll bring it over to this, so make sure it's
plugged in a little bit. And then what I'm going to do is just pull it over to this side. I'm going to have a pillar
here, as you can see. So what I'm going to do is
just press S and y or S and x, and just pull it over to
that side a little bit. I'm then going to
bring this one in. And I'll put this one
in this side over here. So just make sure though I don't drop it down,
like I just did there, I want to pull it back
into place, like so. And then what I'm going
to do is put bring in a couple of pillars. So pillars, we need
these ones here. So this one in here. I'm going to put
this then each side, so I'm going to pull
it over to here and plug it in just
round about there. And then I'm going to press
shift D. Ring it over. I'm going to put it into
this side along here, making sure I press one. That they're going to
be how I want them. So let's pull it there. Pull this one out a
little bit, so to there. And then just pull them
forward just so we've not got these parts in
the front of there. So just pull them
forward a little bit. Just hide those parts,
and there we go. And now we need the top part on here and also the actual pillar. So let's bring in not that one. The huge pilar. Let's
bring those in. Let's put it into place. Let's delete that
one out the way. Let's have a look at
the back of here. I want to make sure
that this pilar is covering this part on here, because around the back of here, I don't really want to
put another one of these. So what I'm going to do
is just pull it back. So it's covering up that. Like, so maybe even a
little bit further. Let's try that. And there we go. And then what I want
to do is I can have another pillar on there
and then bring in my wall, so this wall over here. So let's do that f. So
shift D. Bring in our wall. Pull that over there,
so it fits into place. Delete this wall out of the way. Bring in this
pillar, so shift D. Pull that into
place along there, delete this one out the way. There we go. And now let's
think about our actual roof. So we've got a lot
of roofs to use. What ones I think we'll use. So let's go to
roofs. There we are. The ones I think we'll
use is these square ones. So these three square ones here, and I think what we'll do is, we'll bring this one in, and we'll bring this one in, like so, and we'll
put those on top. So we'll just join
those together, so you can see here, they
don't need a middle bit. We have a middle bit. We need to use it. Gonna go over the top. I'm going to pull this
into there, like so, and then you can see they're
pretty much joined together, and then I'm going
to bring them up, like so, and pull
them into place. Now, the thing is, you will see that you can
join them together, and you can still bring them, you know, different ones
in because they're not affected in here by
this asset manager. In other words, I can come in and make this one
bigger if I want to. The moment I bring this one in, as you can see, nothing's
actually affected. Because the things
that you do in here, As I say, and not being
affected by the asset managers. So you can see here, I've
joined these two together, which is going to
make it easier to put them on the
other side like so. But let's now bring these in. And what we'll do is we'll
put them into place. Jaws going along here. So, I'm thinking
that I'll have it. Just above this part. So if I drop this down, just above this part like so, so it's jaws just on there. And then we'll get rid of
we'll get rid of this edging, and we'll get rid
of this main part, and we'll also get
rid of that part there just to make sure now that it's all
going to fin place. You can see now, just needs tightening up a little tiny bit. You can see this
bit here is a bit stuck out. We don't
really want that. We want to to the edge
of each of these. So to the edge of the wall
to the edge of the pillar. That means I'm going
to move the pilar slightly over. Like so. So it's all fitting
into place very nicely and neatly.
And there we go. That is looking very, very nice. Now what I need to
do is I'm going to save out my work again,
so if pile save. Let's bring this blisk in then. We'll get the blisk in there. So blisk is going to be again under my pillars and the blisk. Let's have a look at here it is. Let's bring that in.
Seven to go over the top, and let's replace this one
that was already there. Let's hide it out the way. Delete this one,
lt, bring it back. And there we go.
That's looking cool. Now, let's come
to the next part. So The next part is going
to be the supports. So let's get rid of these, going to press delete,
and the pillars. So I'm thinking, it's going
to be the support first. Let's bring in the support, and we're going to have
These supports here. So I'm going to bring this
one in Z 90, spin it around. What I'm going to do is,
I'm going to put it, so it's going just
on the edge of here, and what that's going to do
is if I press the dot one. You can see if I just
pull it up above there, it means I can slot it
in under here, like so. So I can slot it
all the way under. So it's going into this wall, so pull it out just so
it's going into that wall. And then what I can do
is I can press shift. Bring it over then and put
it to this side, like so. And I'm not sure yet how
far down it's going to go, but one thing I do know is it's going to need
another part in there, so shift D, let's pull it over. Slot it in and place
double tap the A, maybe a little bit
closer so you can hold the shift born
again, like so. Alright, so that's that part. Now, let's come in and bring in these pillars that are
going to be under here. So pillars, and I think
we'll use these ones here. Let's have a look
at how these go in. I think we're going
to use these ones. I'm just looking to see if I've actually got anything else that I want to use on
their stone blocks. I think, you know
what? Instead of using this big pillar like this, I use the stone blocks. I'm going to come
under stone blocks. Large stone block. There
we go. We'll put that in. I think that's going to
work a little bit better. You can see I might need to
pull these out a little bit. So we'll just pull
them out into place. I think that looks better, so, or we can pull them down, but let's have a look first, so we'll grab or three of these, and we're
going to pull them out. See how far we can
pull them out, and there we go,
that is looking. That is what I want, actually. Let's hide the obelisk
out the wait a minute. And there we go, so we
want one, two, and three. Now, where are we
going to place these? I'll pull it over
this side first. And what I'm going to do now
is go to the supports again. So supports. I want this one. I'm going to spin it round
so it's the right way. So I s 90, I'm going to press three,
so I'm in side view. And then what I'm going to
do is I'm going to press G, and I'm going to put that
into place along there. Now, I can see that these
supports going across here. They're a little bit
big at the moment, so I'm just going to
pull it into place. And again, Don't
ever worry about, you know, rescaling these
or anything like that. When I first started this,
I always used to worry about scaling them.
Don't ever do that. What I want to do
is press Sen's ad and make them a
little bit smaller, and then grab the whole
thing and pull it up a little bit like so
and into place. Now I want to do is I
want another support, so I'm going to grab both of these press shift
to duplicate them. The thing is, I don't actually
want to press Shift D. I once again the
habit of pressing old D. And the reason is, Shift D is basically
a direct duplication. If you're pressing old D, what that means is
it's an instance of something which will save a
hell of lot on performance. So just make sure if
you're doing this, use old D. So old D, like so, and it feels the same,
but it's actually not, and then we can bring
those into there, like, so maybe over to here. So we've got a little
bit of a split there. Double tap the A,
and there we go, that's looking pretty nice. Now, let's bring in
our main part here, so this will be the part
that's going to replace this. We're looking for that
huge huge stone block, which is going to be this one
here. Let's bring that in. And we'll put it in here. Obviously, let's have
a look at the mid one. Yeah. That one's way too small,
let's bring this one in. You can see it's
the right height. I just needs bring in,
much thinner into place. Where it's going to go. What I'm going to do is I'm going
to make this smaller, so S and X, bring it in. I'm going to pull it
all the way back. To here. And then what I'm going to do is just pull
it out just a tiny, tiny bit, so S and X, like so. And then I can actually get
rid of this stone block. And now everything's
fitted into place. We can see we've got some
beautiful stone work on there. That's exactly what
we're looking for. Alright, so moving around then. What we can do now is
we can actually get this top top stairs on there. And again, we're gonna
use these parts. So I'm going to
grab all of these. I'm going to press old D again. And then what I'm going
to do is lift them up. And then pull them
back into place. So just make sure that
they're on the top of here, so just on the top of there, like so pd them them back into place
wherever you want them. There was something like
this. You can see I'm going to have to move
things forward again. That's going to be what happens. And what I'm also going to
do if we go over the top. I'm also going to pull
these out a little bit. So I'm going to pull this
one out to rounda here. So it's just at the
side of this wall, and then I'm going
to pull this one. And I can get a good
idea of where this is, as you can see, from
these two lining up, these two here, so
something like this. And then what I'm going to do is delete this out of the way. And that's what you
should be left with. Now, I just want to make sure that all of these
are look in about right, so we can see here,
if I'm struggling, what I'll do is, I'll press
Shift S, urs selected. Bring in a cube, so
bring in a cube. And then I'll just
pull it to this. And now you can see that this
is directly in the center. So this one is a little
bit further this way. So now what I can
do is I can pull it in and see exactly
where I need it to be. So delete this out of the
way, and there you go. That is looking pretty good. Now we can decide how far we want this back? Do
we want them right there? Or can we get away with moving these back a
little bit like so? Is that going to look
actually better? The other thing
is you can see my stairs are a little bit high, but I'm going to
pull the whole thing down just to get those stairs
onto the top of there. And you know what? I think that looks a little bit
better like so. Might have to pull this
forward a little bit, but I think at the end of day, that's looking pretty
nice. All right. So now I'm going to do
is just press tape, bring back my obisk.
Double tap the A. You can see now how easy it is to start bringing
things into play. And also just how beautiful this is
actually going to look. Alright, so what I'm going
to do now is go to file. I'm going to save out my work. And on the next one then, we'll actually finish creating this part over the
left hand side. And then from there,
we're going to go back into actually
creating things. Alright, everyone. So I
hope you enjoyed that, and I'll see on the next
one. Thanks a lot. Bye bye.
60. Working with Stone Blocks for Aztec Architecture: Welcome back everyone
to Blend for the Modula and Kibash
Environment Guide, and this is where we left off. Now what I want to do is I
want to grab all of these, so I'm going to grab
all of this so. And this and this
one and this one. And if I press G now, you can see that
gray all like that. Then all I need to do is
press D, duplicate it all. I can then bring it over. Now, the problem is that we're
going to mirror this over. I'm not sure if it will
mirror the whole thing. So let's try mirroring
it on the x. Now, is it going to
mirror all of them? Let's try that again. Then
I'm going to go to object, mirror, and let's say local. Yeah, it's just going
to mirror this one. That's going to be
a little bit of a problem for us
because we don't want to We want to basically
mirror all of this. Now the thing is I can join all of this together,
so control J. But the problem is,
then you can see that I've messed around with
this now over here. So I don't really
want to do that because this is basically
old D. It's not shift D, it's old D. So we need to decide if we want
to do it this way, or if we just want to we've got all these
parts basically here, which means that we can
just put them into place. It's probably going to be better than having a whole new shift D, basically, a duplicate of it. It's going to save
on a bit of power. So what I'm going to do is now. I'm going to start putting
these into place again. So I'll start putting one here. I've got these exactly
the right layout, so I can put these at the side. I can come in then and
put my walls in as well. So I'm going to put
this wall, this post, and this post into the right place,
somewhere around there. I might actually make
those a little bit wider. I'm going to then get rid
of all of these parts. You're like, so, I'm going
to get rid of this, this. I'm going to leave this part, here I'm going to
get rid of this, this, this, and this. And then what I'm going to
do is bring this part over, put that into place,
this part over. Put that one into place, just making sure it's in
that wall there. And then finally, these parts
he put these into place. And I think, actually,
that's probably going to be better than
what I was trying to do. Put those into place. So and
let's now get rid of that. We're not going to
need that part either. And let's just have look
what we've got there. Yeah, and I think that's
looking pretty good. And then what I'll do is now, I need this wall to be
a little bit higher. So I need this wall
to be, you know, another two steps higher
maybe something like that. I also want to pull
this out a little bit. So I'm going to
basically drop this up. So shift D. Let's bring it up because I am going
to be altering it. That's why I didn't use t
D. And then from there, what I'm going to do is
just grab the top of it. Make sure I'm in edge select
and delete vertices like so. Double tap the A,
and there we go, we've got another wall up there that's fitting really
nicely on there. Now I want to do is
bring over these, so you can see these parts here. I want to grab each of these, like so, and then I want
to bring them over. And you can see that I've
got another part in there. Just make sure, grab that one. I'm going to bring them over. I'm gonna press shift
D. Ring them over. No shift. Let's go back. I keep telling you not to do
that, and then I'm doing it. Let's make sure I've
grabbed them all. If I press G, I've grabbed everything.
No, I need this one. I'm going to press at D. Like, so, and then bring them around. Like, so now basically, I want to spin the
whole thing round, so A Z 180. You can see, I want to spin
it around on medium points. So A Z, 180, and there we go, now we can put those into place
where we want them. Now the thing is I can see
how far they're in here. So this is poking out this far. This is poking out round
about the same distance. And the other thing is, when
I'm dealing with these ones, I might move these
around a little bit, so I'm just going to pull them over this way a little bit. And then I'm going to
delete these out the way. I'll delete them out of the way. I think I've actually
got a post missing here. So let's just hide
that. No, I've not. Let's pull these over.
I'm going to pull these this way over to here. And then I'm going to pull
these this way over to here. I'm going to press al
tage. And there we go. And I think that looks
a bit bad, like so, Mind even we need to pull them
out a little bit further. You looking how that's
all fitting together. Jos looking at my
gaps here as well. Maybe maybe, I can grab this part and pull
it out a little bit, so S and X, Jos trying to
get it all to fit together, double tap the A. There we go. Yeah, and I think that's
looking better now. I'm just looking how
everything's still fitting in, making sure everything's
fitting in. And see here that these
the main problem I've got is if I press g, you can see this is coming
out the top of here. We don't really
want that. I'm just looking at this side as well. And see it's coming out a little bit over
the top of there. So what I'm going
to do is, I'm going to come in and
grab all of these, and I think I'm going to
lift them up a little bit. I'm going to grab all of these. All of them on
this side as well. These ones, these
ones, these ones. And I think I've got one in
there as well. Yes, I have. Let's pick them all up just
to hide that other way. And that's looking then much
better, double tap the A. And just making sure
that this one here, as you can see, it's
sticking out through there. I don't really want it
sticking out past there. I'm thinking with this one that I'll actually squish it in, so S and Y let's pull it in, and let's just line it up then, making sure that
it's under there. In case you've got a under
here, why I'm doing this. And the other thing is
I'm going to pull these out a little bit. I think so. And the thing is when you're
building these, again, don't worry about like if
everything is neat and tidy. That's the last thing
that we actually want. We want it to be a little bit varied because
it's going to give you a lot more character and
a lot more realism because it would never build things
where it's exactly the same. This is why we've got this side is different from
this side as well. That's the reason
why. So like I said, I used to worry about that too much, don't worry about it. Now, let's come
to this one here, and what we've got is we've got four of these basically
coming up over here. So we'll use this one. We'll bring it over,
we'll press shift D. And then I'm going to bring
these up and into place. So we've got one here that can fit right in this part here, as you can see, ran there. I can delete that
out the way then. Then I can see what
that's going to look like. That's looking good. Now what I can do
with this one is, I can press all D. I
can bring it over. In fact, with this, I
don't want to press old D, I want to press shift
D. And the reason is because I might actually change. So if I grab this
one, delete it, I will change come over here. Because this is still
a g omegen node, I can change the seed and make it look a little
bit different from this one. And that's why I don't
want to do that. The same with these going
around the back as well. So if I grab both of these, I'm going to press
shift D, but we only use old D when you can. I'm going to put that one there, and then we're going to lift
this one up a little bit, just so it's a little
bit different. And what I'm also going
to do with this one is, I'm going to pull it
down a little bit. So I just want to
shift baseball, pull it down into place like so. And then what I'm
going to do with the seed is put it on five. I'm going to come to this seed, and I'll put it
on, I don't know, nine, something like that, just making them a little bit
different from each other. All right, so now what
we want to do is we want to delete this one
out of the way, delete this one out
of the way, like so, and you can see now,
we're nearly onto the stage where we can
actually bring in our bamboo. Now, let's bring
in another block. So another stone
block. Let's have look at this mid block.
How big is this one? It's probably going to be a bit better than the other
blocks that we've got. So let's look at
the square block. That one's going
to be a bit small. This one's a bit small. So let's not use any of those. So I actually think what
we'll do with this one is, we'll delete that
one out of the way. We'll bring in a large block, but we'll make it smaller, so much, much smaller. Let's have a look what
that's going to look like. So if I put this in place, we can see it's got
what I'm looking for basically is to make
sure that the stone blocks, because it's quite a high tower, don't look too small. So if I bring in this
one, make this one, you can see it's already
round about the same, but it's only made
up of two blocks, so it's maybe better
to use this one. So what I can do
with this one is, I can squish it in
on the S and y. I can even come over and
make it square on here. So these two here can put it. Let's get the right
dimension in first, so what we'll do
is we'll pull it over, put it into place. And we can see that if I just put it here
and then pull it up, now we can get our
right dimensions in, so I can see probably going to want to come out
this way a little bit, so let's pull it this way. Holding the shift bon. All the way out to there, have
a look at this side. Is it poking through that side? Go to have a long way to go yet, so let's come out a little
bit more holding the shift, like so, and like so. And that looks about right. Now let's look at this side because you can see this
side is way way out. We want to pull it all the
way to in front of those, which means that we need
to bring down this side. So I'm going to bring
it down, bring it down, and then I'm going to
pull it back. Into place. And then what I'm
going to do is now. I'm just going to pull
it down to the floor. So I'm going to pull
this all the way down to the floor, like so. And then what I can do is I can actually delete
this out the way. I can pull this up, so shift. Let's pull it up, put
it on top of this one. And now I'm thinking
I'll probably need to expand these two. So if I press Sen's
d, let's expand them, pull them up, and
what I'm looking for now is where these people are
going to be stood on here. So what I need is, I need
my human reference in here. I think I have him
here, there he is. I'll bring him in once more. I'll pull him over, and I'll stick him at
the top of here. I'll zoom into him with
a little dot born. I'll put him on here,
and then what I want to look is how he's looking out. That's what I'm talking
about. You can see now that he's too high up, so I need to pull him down. And now I can see how far, so maybe up a little bit. So his hands just
gone there like so, and that looks
about right to me. Now what I'll do is, I'll bring both of these
down a little bit. So you can see here this
one's in the floor. Let's bring them
down a little bit. So I said, like so, and now we can see if i. There's his feet on there. Keep pulling, keep
pulling, and there we go. Now that's looking about right. Ule tap the A. And there we go. That's looking
really, really nice. So what we can do now on the next lesson is we can
bring in this stairs, we can bring in this stairs, and we can put that together on that part, as you can see. We can start filling
out this part. And then we can start probably
putting in this on here. We've already got our
pillars on there, so we could actually
fill that out as well. So we can do a fair bit on this. But I do think after we've
done a little bit more, we should go back to actually building out
a little bit more. It's just to whet your appetite for what we're actually going to achieve here. And I think we're
doing that right now. Alright, everyone, so I
hope you enjoyed that, and I'll see on the next one. Hopefully your own actual
model is coming to life now. I really hope you're enjoying the course, and I'll
see on the next one. Thanks, lot. Bye bye. O
61. Utilizing Modular Pieces Effectively in Blender: Welcome back, everyone
to Blend Ford, the modular and Kit
bash Environment guide, and this is where we left off. Okay, so what I
want to do now is, first of all, we need these
bottom pillars in place. Do we have anything that's actually going
to support those? I think we will
use stone blocks, have a look at
what stone blocks. So I've got a small
square stone block. I've got this
square stone block. I think we'll use
this one. All right. Let's get these into place. So I'm just going to
replace those like so. And then what I'm going
to do is hide it. De lete, lth, bring this one in. And all I'm going to
do then is press t d, bring it over, and then
just rotate it round. So RY hundred 80, just so it looks a little
bit different from that one. Put it into place. So
hide out of the way, elite this one out of the way, lt, bring it back,
and there we go. Now do we need
another one in there? I don't think so, actually, I think that looks
pretty nice like that. All right, now we've got
these parts on here. So what I'm going
to do is I'm going to these are the supports, so we'll come back to the
supports, and here we are. So we've got this bar on here. So if I spin this
the right way round, so z -90, and let's
bring that up, and we'll put that
into place on the top. Of here, and then the
other parts underneath, so this part underneath there. So if I pull this into place, should fit into there. Like so. Let's delete this
part of the way. Let's delete that
part of the way, and that's what we
should end up with. And then we can see now
that we need to pull this a little bit more
into place like so. Let's actually delete all of
this out of the way as well. I'm not going to need these. And then we can really
really see what we're doing and how high
this needs to come up. So we need to come up to
round about this height. And then what we'll do is
we'll bring this part in. We'll bring it up, Z -90. We'll press three or one, which way is it Control three. There we go. G, let's
put it into place. And now we just need
to pull this out into place against our wall. Now, have a check to see
how far out you want it. I think that looks nice, which means though
we're going to have to pull this one out
a little bit more. And then we're going to
have to drop this up a bit. And I think we're going
to have to pull it back a little bit like so, so it all fits into
place really nicely. And then you can see that is looking pretty nice like that. Okay, so now we want to do is we want to put it
around these other sides. I'm just going to
delete these sides, delete these, delete
these, delete these. And then what I'm going
to do is grab this one. I'm going to press
old D again, seven, go over the top, and then I'm going to spin
them both round. So s 90. Now, you will see
that these need to be longer going this way.
That's no problem. The only problem is
if we press S and x, it might make the
other ones longer, but it hasn't, so that's okay. Because we did old
D. So like this. And now we can actually use
these on all of the side, so I can grab this
one and this one. I can press old D, like so, and then rotate it z 180,
seven to go over the top. And then what I want
to do is just put it pretty much in the same
place as this one. It's a little bit over. And then this one
now I can do an old D. Pin it
round, so Ads, 180. Let's pull this then into
place here, like so. There we go. That's all
looking really nice. Now, finally, we should be
able to now get our bamboo on. So let's come to bamboo roofs, and let's look at the big one. So this is the smaller one. I think, no, this one
is the smaller one. Which one is the smallest one? Uh this one is slightly bigger, so we're not going
to use that one. I think it's going to
be this one. Let's spin it around, so Is 90. Let's put it into place with G, and it should fit in, pretty nicely along there. So let's put it in. Might have to make it a little bit
smaller as you can see. Let's press the S one,
bring it into place. Let's make sure it's in
the floor, which it is, double tap the A,
and there we go. Had is looking really nice. Now, it's up to you how
high up you have that. Of course, but I think mine's looking pretty
nice like that. All right. Let's go to let's
save our work actually. And then what I'll do is, we'll bring in our stairs. These are the stairs
I'm talking about. This has still got
the geometry node on, which means that we
can press our d -90, we can really start putting
these stairs into place. If I bring this down
into the floor, we can see it's going to
come round about there. I can then pull it into the
floor all the way over. I want to make the stairs
wider than what it is, and that's why we left
it on the geometry node, so I can bring the
width out like so. Making sure then
it's into that wall, following that
around. I can then Delete this out the way. And what I can do then is, I can pull this back a
little bit and pull it up. So if I come to this now, I can pull it back, and
I can also pull it up. I can pull it up into place. No like that, and pull
it up into place, just below there,
and then now I can put a stone block
in this part here. You also make sure people can walk past there, just
make sure of that. And the way you're
going to do that, by the way, is just
change the width again. So bring the width
down a little bit, and then pull it into place, and now you're going to
make sure that they've got a little bit more room
to walk around here. You grab your guy. I already know he's gonna
fit around there, but if you want
to grab your guy, make sure he can
fit around there. Now we want the
stone blocks again. So I'm going to come
to my stone blocks. Let's see if this stone block is going to be I
think that one's going to be a little bit small, so we'll we'll use the
stone block this one. And then what we'll do is
we'll pull this over this way. And I want it basically going
to the top of my stairs. So you can see now really
starting to fit in. I'm going to pull it making
sure it's down to the floor, like so, I'm going to
pull it out a little bit. And there we go. And
then all I'm going to do is I'll pull it this way. Lining up nearly with that. I'm going to delete this
part of the way then. And you can see that definitely definitely I'm probably going to need another stone
block above this one, like a little ledge there. So what I'll do is
I'll just use this, so shift D. I'll bring it over. No shift D, sorry, old D. I'll
bring it over into place, like so, I'll bring it
out then into place. And then finally,
what I'll do is. I'll press a little do born, and then I'll just lift it up. Like, so just above
the other one. Now, bearing in mind
my swimming pool can be just above there, so I'm just going to
lift you up to there, and I think that's going to
look pretty nice like that. All right. So with this
as well, we've got doors. Now, when we come
to do the doors, I always recommend using
a blem with the door. I always think it makes
things look better. And but let's not worry
about that right now. What we want to do
now is our roofs. So I'm going to
come to my roofs. Now, the roof I want to use
is going to be the bar roof, so I want to bring all
three of these in first. So we'll bring this one in. We'll bring this one, this one's the center
one, or is it the left? Yes, this is the left. Then we'll bring this one in. That's the center. And then
we'll bring this one in. Now, let's first of all, press G and get them into
line with each other. Let's press G on this one, bring them into line with
each other. There we go. They're all in line now. And now finally, we can
join these all together. So control J, let's
join them all together. Make sure, you see, that's what I'm
talking about when you actually join them together. It sometimes messes up our blend file like this one here as well,
we've joined it together. Really, really don't
want to do that. So I've got to be careful that I don't
join them together. I'm going to end up joining
roofs and things like that. If I bring in this one now, let's see which one it is. Is it going to be one there it is? There's the
one that we do. Well, that means is
then you have to reload the file lob and we don't
actually want to do that. We're going to
leave that for now. But what we are going to
make sure we don't do. If I press Controls and go back is I'm not going
to join these together, and make that mistake. I'm going to do is to press
s -90, spin it around. And then what I'm
going to do is seven, go over the top, and I want to place this a round about here. So let's bring it in to
place round about there. And let's pull it
down into place. And then let's delete
this out the way. So delete it out of the way. And let's pull these
all the way over here. You can see I'm going
to have to make them probably a little bit wider, and I'm also going to have to
pull them out a little bit, so I'm going to pull
them out a little bit, and I'm also probably
going to pull them down. Into place. So there's
just a little bit of a ledge on there. And then finally, S and y. Pull them out, double tap
the A. And there we go. That is looking very nice. Now, the final thing
for this lesson, let's put in these pillars here. And the pillars we're
going to put in here are going to be like the ones that we've
got on the front here. So we'll just grab
one of these D, bring it over. Put
it into place. L et's spin it round, so z -90, and let's press control three, so I'm going into front view. Let's put it into place
round about here. Let's delete this
one out the way. There we go, Is
that supporting it? Is it high enough? Not quite. So let's put it in the middle. Then S and, like so. And then I'm going to
press D, duplicate it, pull it over, and
pull it into place, delete this one out
the way. There we go. That is that part.
And you can see now. Wow, really starting
to come together. Alright, so what we're going to do is, we're going
to save this out. And on the next lesson,
when we come back, we're actually going to
continue building things out. We might start building. I think I'm just looking
at the parts that we need. We've got a lot of
steps in there. I'm just looking,
let me just have a look at the parts that we're
going to start building. So these are those parts. I think we'll start
just so you're aware. We've done our roofs now, so we're on to actually
the smaller parts. I think we'll do
something different, and I think we we'll
start building out some of the simpler things. Like, I think we'll
start with our windows. We'll make our windows next, make it a little
bit interesting, something we've not touched really rather than just
blocks all the time. So we'll do that.
Alright, everyone. So hope you enjoyed that, and
I'll see on the next one. Thanks a lot. Bye bye.
62. Modeling Windows for the Aztec Scene: No. Welcome back everyone to Blandford the Modular and
Kitbash Environment Guide, and this is where
we left it off. Okay, so let's now
come into this one. Let's press shift, and
let's bring it out. And today, for me,
is a fresh day, so I'm full of energy today. Hopefully, you guys,
you have a break, and then you start again, and you keep on
doing it like that, maybe working it four or 5
hours a day or something. That's what I tend
to do at least. Alright, so let's
change this over. We'll come over to the image, and we're going to close
this down and reopen it. And the one we're looking for
is going to be course pack. Course references, and again, we can come down
here if we need to. Now we can also open up this so we can see
what we're doing. And the one we're going to
want is going to be windows, which is this one down here. Double click it,
and there we go. Now, the first
thing I'm going to do then is get the scales out, so let's bring our
cursor over to here. So let's just put it
over here a minute. Let's press Shift A, then
we'll bring in a cube. And then what we'll do is
shift and duplicate the cube. And there we go. Okay, so
let's come to the first one. So the scaling on this
is going to be 0.294. 1.54, and 1.81. Like so, and then we'll
come to this one, and this one is going to
be 1.52 0.329, and 1.46. There we go. Alright,
so two windows. Let's rotate this
one around then. So Ole's d 90, let's rotate it around like. So and then what we'll do with this one? We have to
remember with this one. If I zoom into the
little dub one, is that, as you can see on here, this one goes around like this. It's got a couple of things in, and then it's got
a top pot on it, and then this one's a
kind of a square block. So I think we'll
do this one first. Now, this one is way easier than what it
looks because we're going to be using our
actual jump node. So shift a, let's bring
in a curve, first of all. So we're going to
bring in a path. I always like to
bring a path in. Let's move it just over to here and pull it
into the front then. And then what I'm
going to do next is I'll bring in
my geometry node, so add modifier omit
node, little down arrow. And the one we want is stone
path. And there we go. Alright, so now we need to do is we need to bring this in, so I'm going to press the Sb.
I'm going to bring it down. And then what I'm going to
do is I'm going to bring it nearly to the top of there, and then I want to bring
it down to these sides. So I'm going to press
the tab button, and I'm going to
come to these sides. I'm going to press one
on the number pad. And then all I'm going to do is just bring it down like so. And I want to make
sure that it's nice and rounded going round here at the moment you can
see, it's not very rounded. Don't worry at all. At the scale right now, we're not
worried about that. All we want to do is get
that roundness first. So let's grab this one. So this point and this
point and this point. So four points, right
click and subdivide, and that then is
going to give us a little bit more
roundness on there. Now I'm going to do is I'm
going to actually press tab, I'm going to pull it
more into the middle. So we don't need to be
exact because we know that these are going to be the
same each side anyway. And then finally, all the want to do now is bring these in. So I'm just going to grab them both S and X and bring them in. And if they don't come in, just make sure we're
on medium points, so S and x, let's bring them in. Like so, and finally, then let's drop these. In fact, you know, what
we'll have them there. We'll just grab these three,
and we'll drop them down. Now, from here, then,
let's start work on the actual stone blocks because these are way
way way too small. They look so dinky, so
let's bring them down. So what I'm going to
do, first of all, is I want to change the length. So if I bring the length up, So, something like this, you can see now we've got
nice stone blocks in there. And then what I'm
going to do is, I'm just going to come around, and I'm happy with the
actual width, actually. I don't think they
need to change that. Now, one thing
you'll learn about windows quickly and doors for that matter is the fact that you want them
to go into the wall. So always try and make them. So I think the thickness,
let's increase that. Yeah, that's the wrong one.
Let's increase the width. So always try and make them a little bit wider than what you
think they're going to be. All right, so something like
this is looking pretty good. Let's change the thickness
a little bit more. And what I tend to do is, I tend to get the scaling
right first before sorry, get the bricks, the
right size first, before actually going into the randomness and
things like that. So let's have this like
this at the moment. And then what we'll do is we'll actually now work
on the randomness. So at the moment you
can see, they're all pretty much straight.
Also work on the Bevel. If I bring the bevel
up a little bit, you'll see nothing happens, just because I need to
put on my bevel on here, and now you can see, already, they're looking pretty nice. Let's also put on Auto smooth, just to smooth off
all those edges. And finally, then
what we'll do is, we won't bother with
the live V UV unwrap. And that's because we're
actually going to unwrap them anyway as we've done
with all of our other parts. Now, the next thing
I want to do then, let's think about
our randomness. So we don't really want
random length on the window. They would build
them pretty even. I don't think they'd be
uneven. You might want to just increase just a slight bit, something like
this, to offset it. Let's go a little bit more. Offset a little bit more,
but as you can see, I don't like how what
it does to the window. So I'm going to
leave mine on zero. What I'm going to do though
is change the width. So I'm going to come down
to width randomness and bring that width a little
bit in and ale bit out. I'm also going to come in and change the thickness random. So let's increase or decrease that like so.
And now it just adds Little touches, by the way, you will be able to notice them. You won't be able to pick
them up straightaway, but you'll be able to
see that it's uneven. That's for sure. Okay, so now we've got
our main starting point. What we can do now is we
can bring in another curve. So let's press Shift
A bring in a path. And then what I'm
going to do now is, I'll grab this curve, grab this curve,
press Control L, and I'm going to copy
modifiers, like so. You can see now
that it's not even, and that's because I
need to grab this one, and all I'm going to do then
is pull it out into place. Like so. What we're
gonna do is drop this down at the
bottom of my window. You can see at the moment it's
not really in the middle, so let's right click and
set origin to geometry. You will notice that I'm not going to reset my transforms, and the reason is
because if I do do that, if a press control
Ale transforms, you'll see that happen.
I don't want to do that. All I want to do is set
origin to geometry, and there we go,
that's in the center. Grab this one, and then
what we'll do is in fact, you know, what we'll
grab this one first, Shift S, cursor to selected, grab this one and then shift S and selection to cursor,
and there we go. I want to do is I just
want to bring this in, so I'm going to press
the tab button, and I'm going to
bring it further in, so S and X, let's bring it in to
the sides like so. And there we go that is
our window nearly done. Now what we want to
do is we want to pull these out a little bit. So this will be on the width, so let's pull the width
out a little bit like so. And now all we need
is just this top bit. I can use this one as well.
So I'm going to press tab. I'm going to press shift D,
and I'm going to bring it up, first of all, like so. Now, with the top part,
I can drop it back, so I'm going to come down and bring my width back like so, because this is just
the top part of here. Then what I'm going to do, finally is bring these down now. So if I bring these down, I just want them to kind of
follow going around here. So I'm just going to
bring them down slightly. So, I'm going to bring
these up slightly, and just get it to where
I actually want it. So where do I actually
want to sit it. Once I've got
something close to it, I'll finish that in a minute. And then what I'll do is
I'll increase the length, Well decrease the length, bring it down to make these blocks a little
bit smaller, L so. And now I can come in and
actually finish this off. So all I'm going to do is
I'll bring these two up, so bring them up, then
bring them in with S and X. So fit in them on top
of here, like, so. And then what I'm going to do now is bring these two down. Like so, and then maybe
maybe pull these out. So because they're
different random lengths, we just have to be
careful that we fit it right on top of there, just making sure
that it's in there. And then on one of the side, I think, not that one. This one here, and we'll
have to bring it out, kind of drop it down a
little bit, like so. Alright, that's
looking pretty nice. Now, for the bamboo, then, all we're going to
do is we'll come over to this part here. We'll come in, and
we'll just grab this. So if I press dot on this, you can see we'll grab this
little piece of bamboo. So, grab it. And then all I'm going to do is press shift. Ring it over. I'm going to press Shift S and selections cursor.
Dot one to zoom in. And finally, all I'm
going to do now, split this off because
these are still actually joined together.
So I'll press P. Selection split it off. C again, control eight, all transforms, set
origin, two geometry. And finally, then
all we'll do is we'll put this right
in the center, so I'm going to bring it down. Put it in there like so. And then what I'll do is,
I'll drop this back a tiny bit. Create another one. So Shift D. O Y 90. S and X. And then what I'll do
is I'll pull this up. So pulling it up. Into here. So why am I put it in
here because I don't really want it in these parts where there's an actual gap. So you can see here it's going through the
gap a little bit. So all I'm going to
do is press SN X, bring it in a little bit more. And then I'll grab
this part here, put on proportional editing, but put it on smooth. And then what I'll do is
I'll just pick it up, so it's not actually
going through there. And it's gonna give us
that natural bend anyway. We'll pick this part up a
little tiny bit like so. And finally, then we'll just
bring it in front like this. We'll bring it in front of
this one. And there we go. Right. Now what we can do
is we can grab this one, bring it down, and
then we'll put it in place here, so
something like that. And if you want to,
you can make it a tiny b on even by
just pulling this up. Like so, and there we go. Alright, so that's pretty
much the first window done. We're not going to put on any materials or
anything like that yet. What we want to do first is
get the next window done. So let's save out our work, and then we'll actually create
this on the next lesson. This one, I think is probably
a little bit easier. We could also, as well,
actually use these, but I think I'm just wondering whether it's
worth using them. Maybe it is, maybe it is. We might use this
actual technique here. Alright, everyone, so I
hope you enjoyed that, and I'll see on the next
one. Thanks a lot. Bye bye.
64. Creating Bridges in Blender for the Aztec City: Welcome microphone to
blend for the modulate and Kit bash environment guide, and this is where we left off. So let's come to this one now. We're going to
press shift D, like we've done many,
many times before. We're going to bring it
out. And then what I want to do now is
bring in my bridge. So I'm just going
to pop on over. Turn this one off open straight down to where
it says references, and the one we want is
going to be bridge. So where is our bridge? Here it is. Let's
double tap the A. And there we go. That is
what we're creating next. Now, we can see that a
lot of this bridge can be created from these parts
over here, so that's fine. Again, we're looking at actually how this is created
before creating it. So what I'm going to
do, first of all, is I will bring in a cube. And then what I'll do
is I'll press Shift A, bring in a cube, like so, and I'm going
to get the dimensions. So the dimensions are
going to be 4.21, 1.621 0.98, and there we go. There is our actual
bridge dimensions, relatively small bridge. Now, I'm just going to
bring it down to here. And what I'm also going to do is press Shift S, Cursor selected. Grab M guy, Shift S, and selection to Cursor.
And there we go. That is the scale of the bridge to small bridge as I said. Okay, so first of all,
Now we've got this. What we want to
do. The main thing that we want to do
is first of all, bring in these planks of wood. So what I'm going to do is
I'm going to press Shift A. Bring in it doesn't even
matter what you bring in. So just bring in a cube because the actual planks of
wood is a really, really nice geometne,
really, really easy to use. And you'll see once you've
actually got it in there, you won't want to do
without it, really. So let's come in,
control A or transform, set origin to geometry. And then what we'll do
is adding a modifier, and we'll go to geometrde, and the one we're looking
for is going to be called what is it called? Planks? Maybe planks. Let's have a look. Curve ellips stone path.
No, it's none of those. So, you know what?
Rather than do that. What I'll do is
I'll come over to my asset manager you ever
got John C nodes in here? Yes, I have. And the one we
want is Jungle based stairs, stone path, and this
create stacker. And I don't think I don't think we've
brought that one in. So let me just have a look to see if I've brought that one in. And actually, that's
a good check, because what it means is now, I have to do a little bit
of magic and bring it in from our resource pipe. So here we go. Now you can see that I've
actually added this in. You can see it's got
the jump node on it, and you can see
it's called plank. So what I'm going to
do when you actually open up your resource pack, of course, this
will be in there, so you'll have no
problem with that. So what I'm going
to do now is, I'm going to press Control C, and then I'm going
to come over back over to the place I'm working, and we're going to put that
then into our asset manager. The way we are back
in our modeling. And what I'm going to
do then is come back over to modeling and press tab. Control V, bring that in. And let's see if it actually
comes in, and there we go. And then what I'm
going to do now is I'm going to go over to
the right hand side. I want to right click,
and we're going to market as an asset like so. From there then,
what I'm going to do is I'm going to come over to my asset manager. I'm going to go down
then to where it says on a sign, and
here is my planks. I'm going to put it then
into my Jot node here, so into Jot nodes. And then we go,
there's our planks. Now from here, I can actually delete this out the way.
So let's delete it. And then what we'll do is
we'll go back to modeling. And finally, now, finally, we should be able to put
on our actual woods. So let's come over,
click the down now. We should be able to find
planks now. And there they are. There's our planks, and press a little dot born
and here you go. There is our planks of
wood just behind magic. Okay, so finally, let's
bring this over then. So what I'm going to do
is I'm going to make sure first of all, it's
actually the right width. So if I press seven
to over the top, you can see it's roughly
roughly around the right width. And the thing is with
this, we're going to have bamboo on the side of it, so we can leave it
exactly like this. All I want to do is
just pull it out into place and make sure the moment that it's
actually long enough. So the way I do that is, I
just increase this count, and you can see that is putting the count roughly to where we want it.
Let's put it on 16. We might have to
change that depending on how we actually have this. Now, the thing is with this, You can see that it's
slightly bent on here. So let's actually
fix that first. So the way we're
going to do that, you can see that we've actually
got a curvature on here, and we can actually bend it up. And I told you that this
actual node is amazing. So you can see exactly, it's really, really easy to use. Now, the next thing
we want to do is, I'm happy with my
actual thickness. So if you can see
with my guy here, you can see that the
thickness of the planks of wood are going to be absolutely fine if
they're that thick, you can see you can
walk across there. Don't want it too thick at all. It wants to be something
that's quite robust while at the same time being able to be bended and swayed
and things like this, it doesn't want to be too solid. So let's now come
back over to this. And what we're going to
do is we're going to go to thickness randomness, and we're just going to turn
that up slightly, like so. And then what I'm going to do is I'm going to come round to the actual width
and turn the width randomness up, like so. And then you can see now
these are all random. And then finally the length. So let's turn
length up tiny bit, holding the shift bum. Like so. And you can see, as well, with this actual live UV unwrap. You can see live UV
Uwraping the is on on here, and you can see it's
unwrapping them in real time as we actually
work through this. Now, there's many, many
more options on this, as you can see,
including displacement. We can actually displace
them if we want to. If you're going to use,
that's just displace it very, very slightly, as you can see. Very slightly does the job. Don't turn it up much at all. Okay, so now we've got this pot. Now what we want to do is
bring in our bamboo them. So what I'm gonna do
is, I'm going to come. So we'll pick this one here. So let's grab this one. And what I'm going to do is I'm going
to grab this one with L. So just grub it with L on
that and then grab this one. And then I'm going to make
sure proportionality is off. Press shifty, bring it over. All the way over to here, and then what I'm going to do is just press P selection,
separate those off. Now I'm going to do this, and
I'm just going to come in, and I'll separate
these off as well. So L P selection. Grab them both
then, so just make sure the both grab control late or transforms right set
origin to geometry. Now, let's bring them
over into place. So if I press one, we can see this is roughly where
they're going to come. So they need to go up, so it's along kind of like
where his body is. So let's bring them
up, make them smaller. And if I put them around
there, you can see then, if I bring them
up to this place, that actually looks about right. It just means that
I need to make sure that the actual bar that's
going to go across here is, you know, a little bit lower down so he can actually put his hand on there
as a hand railing. So what I'm going to
do, first of all, I'll pull it over to this side. I'm going to pull
this one up like so. And you can see at the moment
that these are way way out. I also need five of the months. So what I'm going to do is I'm
going to come to this one, and I'm going to pull it
over a little bit like so. And then what I'm going
to do is press shift D. I'm going to bring
it over to this end. Like so. And then I'm going
to press Shift D. I'm going to bring it over
to here, like so. And then finally
one in the middle, so shift D in the
middle, like so. Now, I'm going to do is,
I'm just going to pull them down so they're
actually into the wood. So if I pull it down, it's going to be
in the wood, pull this one to the
side a little bit, it's going to be in
the wood, and then pull this one to the
side a little bit, pull it up a little bit,
so it's in that wood. This one's in the
wood. And finally, this one to the
side a little bit up and in the wood like so. Now I want to do is I
want to drop them back. So I'm going to
come, grab them all, drop them back into place
into my wood, like so. Alright, so they're
looking pretty good. Now, with the randomness, we won't do the In fact, you know what, we
will because I'm just wondering if we
can spin them around. Should we do the randomness now? I think we'll do that
after, actually. So what we'll do is, we'll
just grab these now. We'll make sure that they're
not right on the edge. You can see they're
right on the edge, some of them, just
pull them back in. And then what I'll do is I can now delete this out the way. I'm not going to need
that. And then I can grab each one of these now
and bring them over. So shifty. We'll
bring them over, and we'll put them in place
on the actual lo side. And this then is
looking pretty nice. I'm wondering whether they are a little bit too
high at the moment. I think they are. We
all I'm going to do. Essens, just pull them
down just a slight bit, and then put them
back into place. Like so. All right. So now what we need to do is we need to think about
this hand railing. So what I'm going
to do is, I'm going to grab this one here. And I'm wondering, Yeah, I think I'll bring in a
few of them, make it easy. So all I'll do is I'll press 50. Like, so I want to make them
a little tiny bit smaller. Like so I'm going to rotate
it around then, so y -90. Let's rotate them that way. And then I'm going
to press one again. And then what I want to do now is put this as a hand railing. So I'll put it in
this one first. You can see it's still a little bit too small
here, as you can see. So S and X a little
bit too big I mean. Let's put it into place. Let's go over the top, making
sure they're in there, so you can see
that's in there now. And then you can
see that it needs a slight rotation on it just to follow kind
of this curve. I'm going to press one again. I'm gonna press r and y, and just rotate it up.
And where don't want it? I want it to go
between these two. So these two here,
so r and Y. Like so. And then what I'll
do is I'll press Shift D, bring it to here. And then the same thing again, so r and Y, press the S one, just make it a
little bit bigger, and then let's put
it into place, and make it a little
bit uneven, actually. So a little bit uneven, like so. Then we'll grab this one,
shift D, bring it over. And then S to make it
a little bit bigger. And then R and y. Like so. Bring it up, like so, and then over to there. So Shift D, bring it over, make it a little bit smaller, and then r and y, bring it into place. Like so. And there we go. Alright. That's looking
pretty good so far. Now I want to do
is I want to grab all of these, f of these. Shift D, and just bring them over and put them
into the same place. So you can see these are
right in the middle. Let's bring these
into the middle then. Like so. Double tap the
A. And there we go. We nearly got our actual
bamboo bridge done. We just need now to
come underneath, and we need to secure it to. So we need to basically put some ones that are
going to go across, and then some in between. And for that, we'll probably
actually break one of these, put it in a half or
something like that, to make it a little bit easier. Once we've done that, then,
we'll actually come in, randomize these a little bit. And then we've got
another part finished. Let's go to file then
and save that our work, and I'll see you on the
next one, everyone. Thanks a lot. Bye bye.
65. Completing the Bamboo Bridge Model: Welcome back one to the end p, the modulate and Kits
environment guide, and this is where we left off. Okay, so what we're going to do now is we're going to
grab one of these. So I'm going to press shifty. And then what I'm going to do is I'm going to spin it round. So I want this right
really in the center. So can I put it in the center? So grab the actual plants. Shift S, urs to selected, grab the one that
we've just created, Shift S and selection
two urs Keep offset, and then rotate it round. So X 90, rotate
it round like so. And then what we'll want to
do is we actually want to put this right along here. Now the thing is it wants to be a little bit thicker this, I'm going to make it a
little bit thicker like so. And we have a choice now, we could get rid of these two points. I
think we'll do that. What I'm going to do is, we'll
come to this point here. In Face late, grab this one. Come to the back
here, grab this one. And because they're all even, if I press control plus
now and just keep going, you will see that I will be able to bring them all back
exactly the same. And we want to up
to this point here. We're going to press
delete and faces. Then what I'm going to do is I'm going to come to this side now. So to this side. And
then lt shift and click, press F, and we're
gonna fill that in. And then this one
exactly the same. Al shift click, F, like so. To face select then, select this face, come
around to this one. Then all I'm going
to do is press the eye button, bring it in, and then E enter S and Y and bring them in like that to create that bamboo
that we had before. Bambo then let's press S and y and pull it
out a little bit. If I press three now, I can actually see roughly if I press Control three, where
this is going to go. So I want it just
just over the side. So S and Y, pull it
out, pull it out. Like so, so it's stuck
on the side like so. Now what I'm going
to do is. I'm going to press one to going
into front view. And what I want to do is I
want to put this in the front. So if I bring this over now, I'm going to put
it just on there, just so it's holding
that underneath there. And then what I'm going to
do is I'm going to press shift D and bring it
to the next side. So it's up to you
whether you want to go this side of it or this side. On the next one then,
I'm going to press Shift D. And I'm going
to put it around here. And then we're going to
come to the next one, Shift D, and I'm going to
put this one around here. And then shift D, let's put this one around here
somewhere like so. Alright. That's
looking pretty cool. Now, let's come in
and randomize these. So S and Y, just pull
them out a little bit. And then S and Y, pull
them out a little bit. And then S, Y, pull it out, and then
maybe rotate it, so I Z like so, and then there we go, they're a little bit randomized as well. Now, finally, let's come to these parts that are going
to come over here then. So shift D. L et's press one. Let's rotate it around first. So Rs 90. Let's make it march,
much smaller, and then let's try and
put this into place. So if I press R and y, should be able to bring it down then and stick that into
where it wants to go, so R and Y, like so, and it wants to be
holding it underneath. And then what you're
going to do is you're going to pull it
out to the edges. Like so. All right,
so that's that one. Now what we can do is we can just simply do the same thing. So shift D. Now, you can see here that
if I press R and Y, maybe this needs a
little bit of a bend. So what I'm going to do is
I'm going to press S and X. And you can see here
it's not really being pulled along this axis. I do need it longer. So
what I'm going to do? I'm going to put this on normal. And then if I press
S and Y or Z, in this case, you
can see it's Z. So S's, let's pull it out, making sure it's in place, like so, pulling it into
place, and then S's. Pull it out, and there we go. Now with this one, let's come
in, just grab one of these, make sure portion,
let it tines on, and then all I'm going
to do is lift it up. Like so and just bend
it a little bit. Now, let's bring it over
to the next one then. So I'm going to press shift in D. I'm going to bring it over. And then what I'm
going to do is press r and maybe X, so it's r x. And the reason is it's a
little bit different is a we've got that normal on,
so let's bring it up. And then again, we
need to press S and Z, pull it out, making
sure it's in place, and then I'll bend this
one up a little bit more. Bring it out, out,
and there we go. Okay, that's looking
pretty nice. Now, one more left. So
let's press one again. Let's grab one of them
that we already have. So this one here,
let's grab this one. Shifting D. Let's bring it
out and up and into place, like so, and then all I'm
going to do is rotate it, so R and x, rotate it. Press the G b then just
to put it into place, and then R X. Like so. And then I'm going
to press is S and Z, and then pull it out
into place like so. And let's now make
sure that they're all being held properly on here. You know what? That
looks pretty good. Okay, so finally, then,
let's bring these over. So all I'm going to do is I'm
going to grab all of them. I'm going to press Control
seven to go over the top, shift and D and drag them
over into place like so. Now, we're not really gonna
see the back of this one. But you've got to
remember that what we are going to be able to do is
put this as a modular pack, so we might want
to reuse it again. So it's important that we make sure not all these
look the same. So what I'm going to do is I'm going to come in. You know what? I'll just grab them all, so I'm just going to
grab all of these. Man, so we'll do these ones
first. I'll grab them all. Control J, join
them all together. And then what we'll
do is we'll just come into each of these, making sure
proportional it is on. Now, let's do these ones first. No even going to go straight
on or anything like that. I'm just going to come in
and grab certain parts of them and just move them
one way or the other way. Now, I do know because I've already done
these ones over here. And that these are I think
the bent different ways. You know what?
We'll just do them mo. We won't be lazy with it. We'll just pull
them all one way. Straighten some of them or.
Bring this one down here. Let's come round the other
side then, bring it this way. Like so. Let's pull this
one back in as well, 'cause it stuck out a
little bit. Like so. Let's move this one. Let's move it on here
as well. There we go. L et's also bring this maybe
a little bit touch that way. Like, so, let's bring
this one out like so. And there you go,
now, you can see they're looking pretty
different from each other. The tops of them, I'm
thinking I'll bring this one. So let's come in and
grab all of these. We've got them in place, not the picture. Grab all of these. Control J, join
them all together. And then finally, all
I'll do is I'll come in. And I'll just drop these a little bit
different into place, like so just making them
a little bit different. Like So. Let's drop
this one down. Let's just come in and drop
this one either up or down. Like so. Now, let's make sure we've gone not too
crazy with it, because you can see
this one is a little bit a little bit out now. Like so. Alright, we've made them look a little bit
different from each other. And if you really want
to go to town on this, you could come in and add
in some rope on that. Now, for me, I think I'm
pretty much done with this. So what I'm going to do
is bring my guy over. I'm happy with how that looks. I'm going to come in
then, go over the top. I'm going to grab
the whole thing. And then what I'm
going to do is now I'm going to go to
object, so object, convert, making sure
we grab one last, so object, convert, and mesh. And the one thing I'm
looking at actually before we do that is
the plant resolution. You can see, I've
grabbed my plank last. Let's turn this down
to something like ten. Now, it will affect, obviously the where is it? The noise. It will affect that. That's why you can
turn this up so high. But because they're just
simple planks of wood, we don't really want a
lot of noise on these, I'm going to leave
them like this. And now, finally, can come to
object, convert, and mesh. And now if I press tab, you will see this is how
many subdivisions he's got, so you can see we've got a
slight bit of noise on these. Now I'm going to come
to my planks of wood. I'm going to press control Al transforms set origins geometry. And then what I'm
going to do now is make sure that I've got
the right material on. So dark wood material
should be the material. So we can see you've got wood. Let's come in, minus this
one, minus this one off. Press the tab button, U, Smart U V, project, click OK, and then we're going
to go down and look for Doc wood material, so Doc. Wood. Here we go. This one here. You can see that these are
going the wrong way. We will be using this
wood in other things, so I want to make sure
it's going the right way. First of all, I'm going
to go over to Shading, what I'm going to do is
I'm going to rotate it round again within the
actual shading panel. I'm going to pres the
dot b. I'm going to zoom out on here now
and then you can see, it's a simple setup, same as our stone actually except it's got in
these textures, which are obviously
wood textures. Now to rotate it round,
we can see here. These are going the wrong
way round, so let's rotate. You can see on the Z.
It's already set to 90. So let's have a look if
we set that to zero. And there we go, there is the
wood actually turn around. That's looking pretty nice. Let's also turn these
up while we're here, so let's put it on
something like three. Maybe that's a little bit
too high, so let's try two. And then we go a thing that's
that's looking about right, I think, so that's
looking pretty nice. Maybe maybe a touch less, 1.5. Try that. Yeah, there we
go. I'm happy with that. The other thing you
can do as well is, if you really want
to ramp up like how bumpy it looks
and things like that, you have got a normal map here. If you set this up to
something like three, you'll see now it adds
a lot more of that. Unfortunately if
I bring that up, then it probably
means that I need to drop this back
down a little bit, so 1.2, let's try that. And let's put this down
to maybe two, try that. And there we go. I think I'm happy with how that looks now. Yeah, that's looking
about right now. Alright, so, there we go. That's that part done with
the actual shading now. And now we just have to come
in and join it together. So we'll do that actually on the next lesson cause we have
to join it all together. We've got to put it
into our asset manager. And I think then we
can actually make a start on our stone slabs
that are going to be under the entire build
that we've actually got, which will start actually really bouncing that light off and
bringing it to life as well. So we'll do that next.
Alright, everyone, so, we're gonna
save out our work. And I'll see you on the
next one. Thanks a lot. Bye bye. I know.
66. Creating Stone Floors with Geometry Nodes: Welcome back everyone to Blend F the modulate and Kit
Bash environment guide, and this is where
we left it off. Okay, so what I'm
going to do now. Everything now is
pretty much done. The only thing that
I didn't do that I actually forgot about
is bring in a bevel. So I'm going to just bevel
these off. So add modifier. Let's generate a bevel then. And then all I'm going to
do is put this on 0.3. Let's put it on there. Bring it in a little bit of
a bevel on there. Let's just make sure we've
got that on, and there we go. We can see it on now, and now we can press control
lay on there. And finally, finally, let's
join it all together. And the reason I press
control lay on this because I don't want to bevel
off all of these bamboos, and I don't want to
lose that bevel ever. So now I'm going to do this. I'm just going to grab it all, like so go up to object. Always get used to doing
this, convert to mesh, press Control J, join
it all together, Control lay all transforms. Set origin to geometry. And finally, if you right click and shade or to smooth,
just make sure that's on. And then let's have
a look at that. So that now should be done. Let's have a look in
our rendered view. And there we go. You can see
that's looking pretty nice. All right, so that's
done now Let's put it back onto
material shade of view. Let's then press M, and what we'll do
is we'll call it bridge bridge. L so, click Okay. Let's press F two, and we'll
call it bamboo bridge. L so. And then finally, let's close this up, and we should have one that
says bridge here. I can right click, come
down and mark as asset. Let's go over to
our asset manager, and then we'll go down
and make a new one. So we'll make a new
one called Bridge. Like, so, and what
we're going to do is, did I actually do that? Roofs? No, I think I
dropped it in there. So for some reason, I'm going to actually delete that catalog. Come down, there we are bridge. I don't know why that
one end up in there, but anyway, let's
go to one assigned. Let's drag and drop
our bridge into there, like so, and there we go. Let's go to file, save. Let's press the dot on, just to zoom in to
make sure we've got no red on there,
which we haven't. And finally, then we
can go to modeling. That is done now, so let's
put it with our other part. So I'm just going
to go over the top. I'm going to press G, to put it with this part.
Grab the whole thing. Press seven to go over the
top again, and then G, and we'll put it just
here because that seems to fit really,
really nice there. Struggling to see what we can see, there's
another part there. We can see it's windows. Plus in this, we don't
actually need this too much because they're
in the asset manager. If we delete these,
it means it will delete the objects in
the asset manager, so we don't want to delete them, but it doesn't
really matter where we actually put
them in this scene. Now, let's go to file, go
to save, and there we go. Now, finally, let's come in. We're going to
bring our guy over. And for this, we don't actually have a image or
anything like that. What we're going to
do then is we're going to come in,
and first of all, we'll bring in a
what's it called? A curve? So let's let's actually put it
right in the middle. So shift cursor to world origin. Let's put our guy in
the middle as well. So Shift D, selections, cursor. Let's press one, and what we'll do is we'll just bring him up and put him into
place like so. The other thing is, I'm
going to close up this. I'm hoping I'm in there. Yes, human references there. What I'm going to do is
what's on the collections that's log GO node, assist? What is this? Ag,
let's turn that on. I'm not actually sure. What that is. Let's open it up. Oh, yes, that's all the
therms and everything. We do need that in. Let's not
mess around with that then. So we're coming in
to that's basically all of all of this over here. So we can actually hide it
either way, as you can see, and we can hide
our stone blocks, and we can hide everything
else like our geometry nodes. I'm going to actually use my geometry nodes because
you can see on here. All of this is actually
set up for us. So this came from our actual the pack that
we actually add. And what I'm going to do
is I'm actually going to show you how this
actually works. So you can see this one here. We're actually just going
to recreate that as well. So I'll show you how that works. But first of all, let's just
close up the rest of it. So we'll actually
close that up as well. We don't need that in there. We're just going to
close up everything. The only one we
don't want to close up is going to be
our human reference. And we've also, yeah, we need to bring
in something else, as well, which
will be our curve. Let's close the bridge. And then what I'll
do now is I'll bring in a curve, so mesh curve. Path again, I love using paths, 90, bring it into place. Now, what I want to
do with this is, I want to actually delete
all three of these off. Delete vertices like so. And the reason
we're doing that is because then I can
just pull this back. And been as, this actually is
going to be a umeten node. We then will have control over the length of this actual part. Now, what I want to do now is Want to come in and bring
in my geometry node. Let's add in a geometry node and it's going to be stone path. So generate ometer node,
click the down arrow, Stone, the stone path, this one here, and this is
what we'll end up with. Now, of course, we want it, much larger, these parts, so control A or transforms
the origin to geometry. So what I'm going to do now
is I'll come over to here. We're going to
bring first of all, this noise up a little bit, so not point note four, like so, and then we're going to go down a little bit further. And what I'm going to
do is I'm going to put the length on 1.13. So 1.0 0.13. C. Like so. Alright. So now we're
starting to get somewhere. We can see though the gaps
are a little bit too similar, so let's bring it up. Like so. And now we have a few gaps in there, and we can
see what we're doing. Let's then come down to
the length randomness, and we'll put that on not 0.15. Then we'll come to
the actual width, and we'll put that
on 1.63, like so, and now we can see
we've actually starting to get some
actual stone blocks, albeit, probably a
little bit thick. So let's bring the thickness, you know, up a
little bit, so 0.26. And then what we'll do is we'll bring in this
thickness randness, which will, you know,
naturally bring them down. So not point nut four. And then you can see
it brought them down. And now sum are raised
up and sum are put down. Okay, so now We've got this, now you can see that
we've got stone blocks. Now, just make sure that
you're actually happy with your stone blocks before doing anything. Don't worry. If we put it onto
this button here, you can see if we
put it rendered, you can see we've got these kind of lines in there at the moment. This is due just to the fact that It's not actually
turned into mesh yet, so don't worry too
much about that. The main thing is they are happy with the size
of these blocks, because we want to pull
them all out together. Now you can see we can also
change the seed on these, like so, so that's handy. We can put live UV map on, which then will bring in
this type of material. Now, the thing is when you bring on we'll put an auto
smooth as well. When you bring on live
UV mapping into this, it will mean that it will
take a little bit longer. So I recommend for now, just bring that
off at the moment. So live V V, bring that off. Now, the other thing
I recommend is that it depends on how
powerful your machine is, but if you've got a
pretty powerful machine, you can turn the subdivisions
up a little bit, and then you can have a
slight slight bevel on there. Or you can do it another way. If I turn this
down, you can see, we've got a slight
bevel on there. I just just a very, very slight bevel on there. Or you can actually wait
until we bring it in. And then what we'll do is we'll actually turn it into mesh, and then we'll be
level it off after. So I'm going to do
that because I think the vast majority of
people will be doing that. Now what I want to do is, I
want to press tab and go in. I want to grab my actual curve, press seven to go over the top. And then what I'm
going to do now is press shift D and
drag it out like so. So now you can see it comes out as a completely
different mesh, so it's got a
different sd on there. And then I'm just going
to do this again. I'm going to do this six times. So now I'm going
to do is press A, Shift D, bring them out. And you'll see once again
that the different again. Put them next to
each other holding the shift board and leave a little bit of a
gap down there. And now we just want two more. So shifty, bring them out into place. So. And there we go. Once we press tab now, you can see that's
what we've got. That is looking pretty cool, really, really easy to me. So this is going to
be my stone step. Now, I recommend saving
this out as what it is. Basically these stone steps. Let's put it into
our asset manager, and we'll do it that way. So what I'm first of
all going to do is, I won't call them stone steps. I'll just call the
ground slabs. L so. And then what I'll
do is I'll press M, and we'll put it in
a new collection, and we'll call it ground.
Like so, click Okay. And then I'm just
going to go down now, right click, and we're
going to mark it as asset. Once we modize asset, we're going to keep
those curves in there. We're going to keep the geometry
node actually on there, so everything's going
to be in there, which will make it easy. Now if I press tate, you'll
see nothing comes back. So let's just bring
these in just once more. So what I'm going to
do is stone blocks. Let's just bring these in just again so I can see where I'm
actually going to put this. Ridge. There we go. So
let's put this over here. Let's put it over here. And let's press seven to
go over the top just so I'm keeping it level
with what I did. And then we'll just
drop it over here. Now what we're going to
do is on the next lesson, we'll head on over back
then to our setup, so our gray box, and I'm going to actually bring
in these steps. So we're going to
bring in those steps. We're not going to build
anything else out of the moment. We're going to bring
in those steps. And then on the next lesson, what I think we'll do is We'll
actually look at possibly creating I think we'll
look at creating our I'm just thinking which is one that's going
to be easier for us to do. And I'm thinking probably
or even nicer for us to do. I think what we'll do
is on the next lesson, we'll create the actual props. I think that'll be nice
to actually have a break from creating all of this
stone and these bridges. Let's create some
props on the next one, and that should be
pretty enjoyable. Alright, everyone, so I
hope you enjoyed that. Let's save that
our work, and I'll see you on the next one
everyone. Thanks a lot. Bye bye. He.
67. Starting the Prop Pack for the Aztec Scene: Welcome back everyone
to Blenda F, the modular and Kitbas
Environment guide and this is where
we left it off. Alright, so one thing I did forget to do is my ground slabs. I did forget to put
them in master manager. So I'm just going to press
dot just to Zoom to them. And then you can see,
it's called ground slab. So we'll just call it, I think, we'll call it just ground stone. So ground stones, like so, and then all I'm going to
do is go to unassigned, drag and drop it in there. All right, so that's
in there now. And there we go.
That's looking good. So then what I'll do is
go back to modeling. I'm going to save
out this work now, I'm going to press
tab, save it out. I'm going to also put
it onto shade of mode. And now I'm going to do
is, I'm going to open up again my actual gray box. And here we are in
my actual gray box. Now, this at the
moment, if you've had your gray box
actually left open, just make sure you
right click and you want to refresh
the asset library, and what they'll
do is they'll just refresh that actual file. And then from there, what
we want to do now is bring in our actual ground done. So if I come in, drag
and drop this in, you will see now that once
to get this in place. So I don't want it nowhere
near, this kind of far out. What I want to do
is, I want to pull it back and I want it to be just in front of
those stairs there. Now, you can see this
needs a lot more. It needs to be much bigger than this, but
don't worry about that. First of all, what
we're going to do is just delete
this out the way, so delete it out the way. And then what you're going
to do is pull it down then. So, everything kind of
slots on top of it like so. Now, the thing is we do know that if we pull it out this far, it needs to be at least
to where this step is, and being as we don't know
how far that's going to be, we don't need to
worry about that yet. Next of all, then what
we're gonna do is we're just gonna grab
each one of these. Like so, and then
I'm just going to pull them out all the
way over to here. And then what I'm
going to do is now, I need to put this all the
way over to this side. So what I'm going to do
is I'm going to press A, grab everything seven
to go over the top. And then what I'm
going to do is, I'm going to press shift and
D, and then drag them over. And just make sure that
the slotting in really, really closely to
this line down here. And then again,
I'm going to press shift and D. I'm going to pull them out all the way
over and then drag them in, and then hold in shift, just slot them in
nicely like so. Now, I'm probably probably not going to need this one here, so I'll just delete
it off out the way, so delete and ss. And there we go. That's what
you should be left with. Now, you can see that all
of them looking different, and it's really, really easy to actually get in a
floor like this. We have many ways
of doing you know, flaws and things like
this here at three D two, we have a lot of jump nodes to actually help you out
doing that, but this, I think is one that really makes this really,
really simple. Now, you can see
that I've probably gone a little bit
too far that way. The point is though I don't know how far I need
to go that way. Now, let's go back to modeling, just for now, in fact, we've got our asset manager on there. So you know what, we'll
leave it like this? I'm not going to put this
down or anything like that. What I'm going to
do though, just to show you is just put
it on rendered view. And there you go, you can see just what a
difference that makes. Now, remember,
this is not view V wrapped yet. Let's
save that our work. And if we double tap the A, what we can do now is
just come over here, put on Live V V map, and then it's going
to give you a much, much better idea what
that's going to look like. So you can see now it's really bringing
everything together. Don't forget as well. We've
got no lighting in here. You know, we've got no bounce, no nothing with the composites done yet or anything like that, and you can see already it's
looking pretty fantastic. Alright, so finally, then, let's just put this back
on object mode. I'm going to save that
out, and then I'm going to drop back in to my next file. Where we'll start actually
creating the prop. So I'll start with barrels and, you know, vases and
stuff like this. And that actually, you can
actually add to that as well. Alright, everyone, so let's
hop on over there now. And here we are back
in our main file, and what I'm going
to do is, I'm going to grab my bridge, first of all, I'm going to press
shifty, bring it over, and I'm just going
to set it over here just so I can see
what I'm actually doing. So Make a little bit easier rather than
closing all that down. We could put these
in a group and then hide them and
close them all the way. You know what, actually,
I will show you that. So what I'm going to do
is I'll just make sure but this one first,
let's bring it in first. We'll make it easy for ourselves.
Let's close that down. Open it up, come down to
where it says reference. And the one we want is the props, which is
this button here. So let's bring that
in, and we can see we've got many,
many different props. Now, the two barrels
are both the same. Let me just show you. We've got a plant pot here,
got a few vases, and we've got kind
of this basket made from some type of cloth. Of course, you can
create a lot more vases and all that good stuff. You know, huge plant pots,
different size barrels. You can have crates in there, all kinds of things,
whatever you want to do. But for me, I'm
gonna stick to this just to keep the course. You know, as sure as possible. We don't want a 50
long course because we've created 100 props. Alright, so now we've
brought that in. Let's put this then
in one call Pp, so I'm just going to press M. New collection.
We'll call it props. Like, so, click. And then we'll
have one here call Props. Now, what we can do now is
bring in a new collection. So all I'm going
to do is I'm going to right click on collection,
click new collection. It's gonna drop it all
the way down the bottom, like so, and we'll just
call this finished. Like so, and then I'm just
going to drag and drop this, and I'm going to put it
right at the top there. Now, the thing is what
I don't want to do is, I don't want to
destroy all of this, so you can see all of these
kind of ferns and grass. We don't want to destroy
them, and it's important that we keep them in
the right collection. Because if I drag these out, so if I drag these out into
a different collection, then it will destroy the geometry node
that's actually on. I'll destroy this because it is based on collections,
as you can see. We really don't want to do that. So what we want
to do instead is, we want to Grab all of these. So we're going to grab all
of these, except the props, and what you're
going to do is drag and drop them into finished. And then what you can do is you can actually close that up. And now at the
click of a bottom, we can hide everything
out the way, which is going to make it much easier for us to work with. So let's now drag
this over here. Like, so press the little dot b. And the one thing we've not done, we need to
keep our guy out. So I'm just gonna come down. I'm going to look for
my human reference, so here he is, and I'm just going to drag him out of there. So let's drag him all the way down to the bottom, like so. And then you can
see now he's here. And what I also want to do is just drag him above there now. So you can see now
he's still there. He's out of all of this
finished work like so. All right, so let's actually over look what
we want to create here. So let's start with
something easy. Let's start with this plant pot. That looks relatively easy. And then we can move
on to something a little bit harder
like our trusty barrel. I'm sure by now all of you watching this have actually
created your own barrel. It's one of the
first things that everyone tries to create. Let's move our guy over, and then what we'll do is
we'll press Shift A, mesh, and we'll
bring in a cylinder. Let's drop the cylinder
down to something like 20. And then what we'll do is we'll press one and just
to go inside view. Now, we want to make
sure that this is not going to be
absolutely massive. So first of all,
I'm going to press the SP just to bring it down. And what else I'm going to
do is because I'm going to be creating a lot of
different things here. You can see these barrels. You can see all of these vases. I'm going to have one, two, three, four, five,
and six of them. So what I'm going to do is
I'm actually going to put these over here because I've
already brought them in. It's going to save me
a little bit of time. So shift de, drag it
over, grab them both, shift, drag them over, and then shift and drag
them over, like so. Let's now grab each of these, and what we'll do is we'll
just pull them out of the way, and we'll work on this one here. So this one, first of
all, is a plant pot, so let's make it look like that. First of all, then we'll reset all of our transforms.
You know what? We'll do that on all of
them, save us some work, control A, all transforms
the origin, ugiometry. And now we can come
back to this one, let's press the little dubbin again. All right, finally, then. Let's go on with our plant pot. Simple plant pot. Let's
come underneath then. And all I'm going to do
is grab the bottom of it. I'm going to put this back on global because
it is a normal. I'm going to press Control B, and I'm going to
level it off like so. So let's bring in maybe four. Let's bring in four, and just make sure you're
happy with the boto of it. Again, you can mess with
these if you want to. And then it is a plant pot, so let's bring it
down a little bit, make it a little bit smaller. And then what we'll
do is we'll put on this band going around
here. So control. Let's click, bring
it up a little bit. Like, so control
B, drag it back, so we've just got one
band in there, like so, and then E enter alterns, and bring them out like so. And then finally, we'll
actually bring this in. So I'm going to come base
leg, grab the center of it, press the eye button, like so, and then press E and
drop it back in like so. Finally, then what you're
going to do is you're going to press Well, actually, because
it's a plant pot, you can see, it's
got some soil on it. It doesn't really matter
then about this part here. We just want it to kind
of look, you know, like some soil basically.
So let's bring it up. We'll put that up to there because we don't need actually, you know, to have a
hole in it or anything. And then what we'll
do is we'll separate that off with P selection. So now we've got
two parts like so. Now, let's make this a
little bit more rounded. So what I'm going
to do is, I'm going to come to the top of it first. Alt Shift and click Alt
Shift click, Control B. Turn up the bevel of
a few times like so. And then we go, that's
slightly rounded. Now let's come to
this one, lt Shift click Alt Shift click, Control B, and we're gonna
be vel off that as well. Maybe not so much, so,
something like this, left click, right click. Right click and
Shade Auto smooth. And there you go. There is your actual plant part.
Near enough, done. Let's then come to the soil. So the soil we're going to do is we're going to bring
in a quick modifier. Now, the thing is when you're dealing with things like this, I'm going to show you a little
technique to make soil. It seems complex on the outside, but there's a reason why we do it the way that I'm
going to show you, and I'm going to show you
that on the next lesson because it takes a little
bit of time to do. But whatever you want to
create something like soil, it's important that you give it a little bit of variation
within the soil. I've done this on many
of my other courses, but I'm going to
show you probably a better way of
actually doing that. Alright, everyone, so I'm
going to save out my work, and I'll see her
on the next one, everyone. Thanks a lot. Bye bye.
68. Easy Techniques for Creating Vases in Blender: Microphone, n fold the modulate and Kish
environment guide. Now what I'm going to show
you is actually very simple. It just looks a little bit complex as I'm going through it, but you'll see it's an easy
way to actually do soil, giving you those a little
bit of variations. So what I'm going
to do is just first of all, come in Facelt. I'm going to pull
this up just to show you actually
what I'm doing. I want to press delete, come
down and delete only faces, and that'll leave that
ring going around. And I'm going to press A to grab everything and then
come up to face. And what you want
to do is go down to what it says grid fill. This thing gives you
more even distribution of actual polygons,
as you can see. Here, then what I'm going
to do is going to come in. We'll go to generate, and we'll bring in a subdivision surface. We'll turn it up to two, and then we'll actually
apply that on there. Control A, apply that
into object mode, so Control A, and
now you'll see we've actually got a pretty
nice distribution now. They're not actually
perfect, but on a circle, getting an even distribution
of polygons isn't easy, and this is the quickest easiest
way to actually do that. First of all, then,
we're going to come in add in a generate sorry deform, and we're going to
bring in displace. And then what we're going
to do now is coming over and bring in a
texture two displaces. I press tab, it's going to pop it back down there like so. Now, the moment in the display, the strength is one and
the mid level is five. So let's set the mid
level down to zero. It's going to put it
all the way down there, and that is because we haven't brought in a actual texture yet. So let's bring in a texture, so we'll come to this one here. Click new. And then what we
want to call this is soil. So we'll just call
this soil, like so. And then what I'm
going to do is instead of it being image or movie, I'm going to
actually put this on something like
Clouds or Musgrave. It all depends what you
really want to put it on. So now you can see that we've actually got
something like this, which is looking a bit funky. Let's turn up or down the size, so I'm going to turn
this down a little bit. And then what I'm
going to do now is go back to my modifier, and I'm going to
drop this down to, let's say a 0.5. So pretty low. And now you can see
we've got our soil base. Now, if I write, click,
Shades move by angle, you can see that's actually
looking pretty good. Albeit, if we put
it on object mode. Probably a little bit lumpy. Now, one other thing
that you should do realistically is come
to add modifier, and you're going
to go to deform, and you're going to come
to where it say smooth, and you're actually
going to turn this moving up a little bit, and now you'll see that you've actually got much
much nicer salt. Now you can just fiddle
around with the strength, so we can put this on
naught point naught three, for instance, and now
you can see there we go, as simple as that to
actually make soil. Also, you can come
back to your texture. You can turn the
size down a little bit more if you want
to or up a little bit, completely up to you
to what soil you have, but you can see it's pretty
easy to actually do this. You can also bring
this up as well or mess around with
these parts on here. They will actually,
as you can see, bring them out or
bring them down. So just have a play
around with it. It's important that
you play around yourself with all of
these things as well. Now what I'm going
to do is I'm going to actually apply that, and you will see if it come
to object, convert, to mesh, press and now press tab, you will see that
we've not actually added in any other polygons, but we have actually got a nice uneven surface that
we actually wanted. So control A all transforms, set origin, to geometry. And now what I'm going
to do is just put that in place in a plant pot, making it a slight bigger
to go to the side. Double tap the A. There we go. As easy as that to
make a plant pot. Now, let's join
everything together. So control, join
it all together. And there we go. And then
all we'll do is now, we'll actually move
on to the next one, which I think we'll
just create this. This one's pretty
easy, actually. So we'll actually make this a little bit smaller
because it is a plant pot. So let's just move
it over there, and let's come to our next one. So this one is some kind
of basket, I imagine. So pretty much similar to
what we did to this one. So what I'm going to do is
just cm to the bottom of it. I'm going to, first
of all, bring it in, so control B, like, so I'm not going to bring it in as much as that plant pot, so just a little
edging on there. Like so, and that's
looking pretty nice. And then what I'll
do is, I'll bring in some edge loops now. So I'll bring in control. Let's bring in three edge
loos, left click, right click. Grab the center one, make sure that proportional editing
is on, and we want it. Again, it's all about
playing around with it, but I'm going to try my root first, so let's try the root. And if I press one now,
and I bring it in. So if I press S, you can see it's kind of coming in the
way that I actually want it. But again, play around them because you can see
the more you bring it in, the actual worse that gets, so coming up, Pick one
that's not quite a shop, which will be the sphere, and then bring it in, and now you can see it's
bringing in much, much smoother, like so, and that's looking a lot
more like an actual basket. Now what I'll do is we'll go to the top, grab the top face, turn off proportional editing, and then I'm just going
to press and bring it in. Like so, and then E, drop it
down all the way down there, so it actually looks
like something is in there or
could be in there, or you might want to
even put something in there like some
apples or something. And then what we'll do is
we'll grab now the edges. The lt shift click
Alt Shift click. Control B, and then
just bevel off this. Don't bevery off too much. You really doesn't need
it, and then right click and shade smooth by angle. And there you go.
There is your basket, so you can see this
is the basket here. Alright, so now we'll move
that over to the side. We'll definitely
definitely actually make sure that this is
much, much smaller. It needs to be roughly so we
can actually pick you up, so you can see now that's
roughly the right size. And then what I'll do is just
put it on the ground plane. Same as my plant part, it
does make it easier, like so. Okay, so let's come
to the first vase. So pick anyone you want, but I'm going to start
with this one here. So this one on here.
Let's bring it over. Again, we'll bevel it off, it looks a little bit more rounded than perhaps these two, you can see these two
come in a little bit. So it's pretty straight up, so I don't really need
to worry about too much except maybe this top part. So let's do the bottom first. So what I'm going to do again, is I'll come in, Control B. We've already resell
the transforms. We're going to bevel
it off just to make it a little
bit more rounded. And then what I'm
going to do now is I need the top of this on. Now I recommend when
you're doing this top, probably better off
take Studio out. So let's first of all, pull
this down a little bit. And then what we'll do
is we'll bring this out. So and then what I'm going to do is bring in some edge loop. So Control, one, two, three, left click, right click. And then what I want to do is I want to bring
in this top part. Now I want to bring in the
top part with proportion len, you will see it's trying to
bring in all of these parts. Now, sometimes that can
get a bit messy because I want to bring them in but not mess around with
these bod parts. So I want to do what
I did last time, Control plus and just hide
them all the way up to here. So hide them out
the way. And now finally we can bring this in. So I'm going to
bring it in then. Bring it in, bring
it in, bring it in. And then we've got
that nice smoothness, I going along there. And then what I'll do
is a press control, bring in another edge loop
just at the top of it, like so, and yeah, that's looking pretty nice. Let's press all tag
and bring it back. And then you can see
that's what we've got. I'm just wondering as it actually pulled
that in a little bit. You know what I think it has. So what I'm going
to do is, I'll come in, and I'll grab this. And I think it's 'cause I
left the top edging on here. So I'm just going to then come in and just pull them
out, straight them up. A little bit like so.
All right, no problem. Now, let's right click
Shade Smooth by angle. And this is what
we're left with. And finally, finally, let's
bring in the center of it. So this, I imagine
would be for carrying, I don't know, some kind of
milk maybe, some fluid anyway. And let's bring in the top bit. So what I'm going to
do is I'm going to come, grab the top of it, press the eye
button, bring it in, and then E, bring it down. And from here, what
I tend to do is because you might just
be able to see in there. I'll bring it down again, so I'll press E. And
then what I'll do is I'll press S and bring
it all the way out. Coming near enough to the side. So you can see before
getting to that side, I'm just going to pull
it back a little bit. And then finally what
I'm going to do is press e and bring it down. Now, I can't see
where it is in there, but I can if I put this on, because you can see now we
can bring it down into place. And now you can
see turn this off. When you're looking in there, it actually looks like there's
something in there. So that's why I always do that. Now, finally, let's
actually finish this off. So we want this
kind of band going on there pretty easy
for us by this point. So I'll just come
in, shift click, E, enter AlternS, pull
it out. Like so. And then you can see, do
I want this straighter? I can have this straighter
if I really want to. Let's have a look
first on right click, Shades smooth by angle. And definitely definitely I want to pull these
down a little bit. So all I'm going to do to
do that is shift click, shift click on the front
and back and then let's just pull them down a
little bit like so. And it is this. You know,
too sharp an angle. I think it is. And also, I feel like this part here. Yeah, it just doesn't
look right for me. So all I'm going to do
is just press Control, Ed. I'm just going to come out. And what I'm going to do instead is instead of bringing that out, I'm going to actually bring
in another edge loop. I'm going to come to here. Control L. Bring in
another edge loop, and I think I'll bring
it out from here. So all I'll do is, I'll grab
this with Old Shift click, this one with Old Shift click. And then I'll press E to
Alton S and bring it out now. Something like that. I'll
make sure offset even is on. And there we go right
click, Shats move by angle. Yeah, and that's looking
much much better for me. And from here as
well, what it means is I can actually
bevel this off now. So if I come to
this, shift click, Control B, we'll be level
it off very slightly. And then we'll come
to this top bit. Control B and beverly
this one of as well. And there we go. That's
looking much nicer. And now find the lip, so we'll come to this
lip here. Control B. Make it more rounded.
Same for this one, control, B, tiny
bit on that one. Right click shades move by
angle, and there we go. That's looking much
much nicer now. Now let's make it a little
bit smaller. Like so. Yeah, there we go. I'm
actually happy with that. The only thing is, I
think I need to make it maybe a little bit smaller on
here. So I'll just come in. You can also see that
Blender is added in a sharp. We don't really want
that, so I'm just going to shift and click that, right click and clear sharp, and then you'll see that
looks a little bit smoother. Now, let's come down to the bomb and just pull
it up a little bit, so I'll grab the bomb,
Control plus Control plus, and just pull it
up a little bit. Grab this one, pull
it up a little bit. And there we go, now it's looking more like my
actual reference. All right. Let's pull it
over then, let's press one. Make sure it's on the
actual ground plane, and that's another
one out the way. Okay, so on the next one, then, I think we'll
actually make this, so this first, a little
bit more interesting. Then we'll move on to these two, and finally, then
onto the barrels. Let's save our work,
and I'll see you. On the next one, everyone.
Thanks a lot. Bye bye.
69. Modeling Unique Props for the Aztec City: Welcome back everyone to map, the modular and Kish
environment guide, and this is where
we left it off. All right. So now, let's come in and create our basket
that we have here. So the first thing we want
to do with the basket is, I want to make it a little bit smaller, so it's the right size. I want to press SSD
then and bring it up. So the basket wants
to be a fair size. They can't carry it, but
obviously it's got closing, but they'll take
down to the river. Looks like that sort
of basket anyway, so that's why I'm
going to leave it at. All right. So let's first of
all make it into a basket. So all I'm going to do is
bring in some edge loops. Control. I'll bring in five edge loops for this.
Left click, right click. I'm going to grab this
bom edge loop then, put my proportional editing on, and all I'm going to do is press the S bon just to
bring it in like so. And I'm just wondering how
far I want to bring it in. Maybe something like this.
And then I'm thinking, should I bring the
top part out as well, so lt shifting click
let's have a try bringing that top part
out, just a little bit. Maybe like this, to round it
off a little bit like so. All right, so now I'm going to do is I'm going to
come to the top. Take proportional editing
off, grab the top a bit, and then just pull it
down, and there we go, that's looking to me, at least
pretty much like a basket. Now, let's come to the bomp, Control B then, and
just bevel it off, like so, and there we go. Right click shade auto smooth. And there we go. I thing that's actually looking pretty nice. Now, it's up to you
whether you want to put a top in there. So
I'm going to press. Let's bring it in,
and let's press E, drop it down all the
way down to here, and then press the
S bond just to kind of slot it in a
little bit like so. Now, let's think about
these bevels on here. So what I'm going
to do, I'll come into this one and this
one with old shift click. So let's grab this one. Control B and just
bevel it off very, very slightly, like so. And now we just
need a top on here. So what I'm going to do
is I'm going to come in, I'll grab the top
of this like so. I'm going to press shift D,
then, just to duplicate it, bring it up, and then I'm
going to press the F bond, flit in, like so. And we want it to
look like this. You can see here it's
slightly rounded on the top. So what I'm going to
do to do that is, I'm going to press the i bon, bring it all the
way in, like so, press control, and then
bring in a few edge loops. Left click, right click, grab the top of it then. And then I'm just
going to make sure that proportional editing is on. Make sure connected
only is on as well. And then from there, you should be able to just bring it up. And create that
kind of nice top. Right click, Shade auto
smooth, and there we go. Okay, so now let's come in
and let's extrude it out, so let's press E, extrude
it down. Like so. And then we go that looks like
the top, and then finally, we can grab it all turn
proportionality off, press the S born, pull it out, pull it into place, and then it should fit just on top like so. Alright, now we just
need a handle on top. So easiest way really to make a handle is probably
well, there's two ways. You can e use pipes or we
can actually use a curve. And I think on this actual part, we'll actually use a curve. So Shift S, urs to selected. Shift A, let's bring in a curve. And we'll bring in a path again. It is easier. Let's bring it up. Let's press S, make it much, much smaller, and
then press control A, reset the transforms,
right click the origin to geometry,
pull it down. And then all I want
to do now is come over to my actual curve options. And the first thing I want to do is come to where
it says geometry, and we want to turn
up the extrusion. So turn up the extrusion. Sorry. No that one. Let's come down to depth. Let's
turn up the depth. So we'll turn up the depth. And then we'll actually create a nice handle through this. Now what I'm going
to do is, I'm just going to grab both
of these sides. I want to pull them
down then into place. I'm going to press S
and x and pull them in. And then finally, I'll just
drop this down a little bit, and you can see now, already, we've got a pretty nice
handle for that top. Finally, then I'll just
grab both of these sides. I'll press altern and just
pull them out a little bit, like so, and then I'll grab
the center, lns again. And there we go. That's
a beautiful handle. And now what we want to do
is we just want to turn down these resolutions because we really don't want it so high. If we go in, we can
see we've got all of these little bands
going around there. Just going to y rem
you be to see that. And if we turn it down,
let's say the two, you will see now it's
got rid of those. Now, it's important before
actually doing that. There's two things
that you understand. First of all, there's
the bevel this way, and then there's
a bevel this way. So the bevel on this one is kind of the edge
loops going around here. If you put this on object mode, you will see now it's looking kind of a
little bit chunky. We don't really want that,
so let's put it up to three, and then we can
pretty much get rid of most of that while keeping the actual the amount
of polygons pretty low. And then we've also got on
here, this one down here. So if I come in again,
we've also got this, if I turn this down, you will see that it turns it
around the other way. So now you can see it's
looking much more flat, for instance, I'm going to
turn that maybe to two. And then we should still be
able to keep that form while making it a little bit
lower on the polygons. Now, that's looking good to me. I think I'm
going to leave that. And then what I'm going to
do is just come to object, convert, to mesh,
and there we go. All right. So now for press tab, you can see it's quite low poly, and it's a pretty nice top. Okay, so let's grab
this and this, press Control J, join it all
together, and there we go. That is the basket done. Okay, so now let's think
about these two here, so we've got two vases here. Let's work on this first one. So this first one looks
kind of like this. It's kind of more cylindrical. So let's bring this in. All I'm going to do I'll come
first of all to the bottom, as always, grab the bond, press Control L,
and level this off. Like so, and I might just make this a little bit
different on the bomb. So I'm just going to
bring it in like that. I'm going to turn up
the amount of segments. And then what I'm going to
do is change the shape, and I might bring it
in like this instead. And I think that's
actually going to look a little bit nicer on this one. Now I'll do is I'll come
to the actual face. I'm going to bring the
face down like so, and then we're going to
press E and bring it up. And then from there we're
going to press E again. And bring it up to
this top like so. From there, then I want
to bring these in, so I'm going to press Control. Left click, right click.
Bring in four of them. And then what we'll do is
press three on the keyboard, grab the top of it, and
then I just want to bring these in in a
kind of rounded way. So if I come over to my
proportional editing, you can see that
this might do it or this inverse square mine,
do it or even the shop. So let's try inverse
square first, we'll press the S board, and then we'll try and bring
it in. And you know what? I think that's going to be
the way they'll want it. So I'm going to bring it in from roundabout here. Like so. And yeah, I think that's the way that I'm going
to go with this one. That's looking pretty nice. And then I want to
extrude this up. So if I press E, I should be to be able to just
pull it up like so. Right from here then. We want to make sure that we've
got this one on here, and these kind of
two going in here. So let's do these two first. So I think we'll bring mine
in on this one and this one. So we'll come in. Grab
this, Shift click. Turn off proportion let
its in, press Control B, and we're going to bevel it
just with one band this time, like so, E enter Altern. Bring them in slightly, like so. Right click. Shade autos
move. And there we go. And now let's think
about this top, so I'm going to grab this
top bases going across here. So Shift click, E enter AltnS. Bring it out. Very slightly, and you can see it's not
coming out very well. So all I'm going to do
is just zoom to it, press the S board instead, like so, and then I'll press S and's and just squeeze those in. Right click, Shade Auto
smooth, and there we go. And then what I'll do is now bring in this top. In
fact, you know what? I'll bring out this
top a little bit. So all I'm going to do
is press E. And then S, bring it out a little
bit, and then I. Then finally, E drop it in. Now, no one's going
to see in there. You'd have to be right
over the top see in there, so we don't need to pull
that out or anything. We're just going to
drop it back like so, and this is what you should
end up with with this one. And then we can actually
make this one a little bit smaller because it's biggerthan our human over here. So let's make it a
little bit smaller, and let's bring it
over, press one. And all we're going to do is
drop it to the ground plane. And then we can put it over here with the rest of our part. You can see now, we've got a fair amount of stuff
going along here. And to be honest, the more
the better. All right. So now let's finish with this last one before
moving on to the barrel. So I'm going to bring this over. And then what I'm
going to do is, it's kind of a little bit like this, a little bit different. So what I'll do is
I'll press Sen's d, make it a little
bit more elongated. And then all I'm
going to do now is, I think the easiest way to do this is bevel
the bottom first, but we'll bevel the
bottom first, like so. I don't want it like
that, of course, so I'm going to pull it
out, make it rounded. I think what I'll
do with this one actually is make it a
little bit flatter. So let's bring it
down a little bit. Yeah, a little bit flat like so. And then we'll want it coming
out and round to here. So let's bring in
some edge loops. I want to center one, so
I'm going to give it five. So you can see here five. Then I'll grab this one,
and let's pull it out. So let's try different
ones of these. This one going to be the
right one. You know what? I actually like this better
than what I did before. It looks a lot more like a s. I'm going to keep
mine like that. It's up to you what
you do with yours, but I think this
one's pretty nice. All right, so now I'll do is
I'll bring in the top of it, so I'm going to grab the top of it, turn this off a minute. And then we'll
bring in this top, so I will bring it in. Then I want to press E. Like so. Now with this, I want to
actually bring it in. I want to make it a
little bit more slanted, and then we're going to round
off this bit. So Control. Bring in three edge loops,
left click, right click. Grab this one, portal
editing on, rest the S bon. Then I can actually
bring that in. You can see now this is really
starting to lock the part. So let's come in now,
grab this, Control B. And we'll round that bar off. And then finally,
the top of this now. So I want to bring it in. So I, let's bring it in, and then E and bring it down. You can see you
can have a lot of fun with these vases as well. All right. So now we
want bands going around. So I'm going to grab this
one. I'll shift click. This one, I'll shift
click. Control B. Drop it all the way down, like so, and then E, enter, and then just make sure
it's on individual origins, AlternS without proportion
editing on, so AlternS. That's not what I want.
So I want to press S instead, pull it out. And then the support, I'm not
going to do that actually. I'll just pull it
out to their thing. And then we go let's look at that right click
shade or to a smooth. Yeah and that's looking
pretty nice already. Now, there's too many
like hard edges. These are definitely too hard. These are definitely too hard. So let's actually
sort those out now. So A shift click Control B, bring down my bevel a
little bit like so, and now you can see
that's smooth that off. And then we'll do the
outside and inside of here. So control B, like
so, and there we go. Now, let's make it a
little bit smaller. Wants to be fairly chunky, one. Let's move it over to this side. And there you go,
you can see now. We've got a lot of
different vases, a lot of different parts, and every one of
them looks very, very different from each other. And yeah, I think they
look pretty cool. Now, up to you, you can keep creating
vases and more props. You can have like 20 of these. As I said, we're not
going to be doing that. What we're going to do
then on the next lesson is move on to our actual barrel. We're just going to
create one barrel. Again, you can create barrels or many
variations of barrels, but we're just going
to create one, and we're going to
save out our work, and I'll see on the
next and everyone. Thanks a lot. Bye bye. O.
70. The Best Way to Create Barrels in Blender: Welcome everyone to blend for the modulate and Kash
environment guide, and this is where
we left it off. Now, the barrel,
the trusty barrel. Now, if you've done
some of my courses, I'm sure you've seen
how I create barrels. But for those of
you that haven't, I'm going to show you
pretty much my way the easiest way I think
of creating a barrel, I've created hundreds and
hundreds of barrels in my time. So let's see how we're
going to do this. So first of all, what
I'm going to do is, I'm just going to press
Shift A. I'm going to bring in them another cylinder. And what I tend to do is with the cylinder when I bring
it in is put it on 24. I always find 24 is
an easier number to work with because then we get an even number going around. L et's as well make
it the right size, first of all, I always tend to just make it what
size at you want it. In other words, how
long do I want it? So S's, let's pull
it out like so. Next of all, then
I'm going to bring in some edge loops, so control. Let's bring in five edge loops like so, left
click, right click, and from there, you
grab the center and where you want to just
put proportional editing on. And generally, let's see which
one's going to look right. So if I press S here, you can see that pretty much that is giving me
this sort of barrel. If I come down and
put the sharp on, you'll see that I'm getting
this kind of barrel, so really really up to you
what sort of barrel you want. I think for me, let's
try the sphere. Bring that down. You know what? I like the other one better, so which one was it in the
square, I think it was? There we go. So I'm
going to create something like this
barrel, like so. Next what I want to do then is, I want to actually
take off the bottom. So this one here and the top
or the top and the bottom. Press let's press P, separate them off, like so. And let's for now, just
hide these out the way. Also, what I want
to do is I want to make sure these bars
are actually done. What I'm going to do is,
I'm going to come back into it. I'm going
to grab this one. So O Shift click, I want
2 bars going along here. These are these points here. I'm going to press Control B, bring them out to the
thickness that I want them, drop them back, left click, and there we go there, my bars. And from there, what
I want to do is, I want to now separate these off away from
these pieces of wood. Now the way that I do it
is, I'm just going to press sift D. Separate them off. M them a little bit bigger. So without portion it on, just make them a
tiny bit bigger, press P selection,
and there we go, we can hide those out the way. Now I want to do is
come back to my barrel, and what I want to do now is
bring in some actual seams. So all I'm going to do is
I'm going to come in and then shift click on
every other one. So like this, you can also come with three as well. You
can actually do that. Sometimes it makes them a
little bit more interesting, so you can see here,
someone picking with three, someone
picking with two. Just make sure that when
you come to this end, that they actually line up. Like this, you can see
now three and two. All right, so they're
then a little bit uneven. Now we can do is
right click and we can mark a scam, like so. And then what I can do now is come in and split these off. Now, the easiest
way to split them off is to come up to mesh, and we're going
to go to where is it we split or separate. Let's split faces by edges. Let's see if that actually
splits all of them off, or is it going to
split these off? Sometimes that actually
happens. You know what? I'll just show you. We'll just grab them every
other one, like so. Instead of doing that, all I'm going to do then
is just press Y, separate them off like so, A, and then S. You can see now
that they're all separated. All right, so finally, then, what I want to do now is,
I want to bring them in. Now, before I do this, actually, what I'm going to do is
before separating them. So before separate them
off, what I want to do, first of all, is
bring in a solidify. So we're not going to
separate them first, we're going to bring
in the solidify. So let's come in over. Let's bring in our solidify, so generate an a solidify. And I'm going to tell you why I brought that in first as well. First of all, though, I'm
going to bring you out. Like so. And the
reason I brought this, and we're going to put
even thickness on. And the reason I brought this
in first is because if not, you're going to have a
problem where you're going to end up with crossing over. You're going to end
up with them crossing over if you separate
them off first. So I've brought that in. Now what I'm going to do
is I'm actually going to actually apply the Slidify. So I'm going to press tab,
Control A, apply the solidify. And then what I'm
going to do now is just remark these seams, cause I know where they're
all going to go now, so Alt Shift click,
Alt Shift click. We're going to remark
all of these seams. Like so, and then we're
going to split them off. And that then is going
to make it much, much easier for us. So right click, mark a scene, and then we're going
to come in and grab every other one of these. Like so, like so, and then y, and now all those
are separated off. Alright, so next of all, then what we want
to do now is we actually want to fix
all the holes in here, because if I come in
and hide this one, you can see now we've got
gaps going down there. So I'm just going to press
ol tag, bring them back, grab everything, mesh, and
then we're going to clean up, and we're going to fill holes. Make sure that this is set to 20 or something just to
fill all those holes in. And now if you come
in and press L, hide this out the way, you'll see that all of
these are filled in. Now we've done that.
We do have a problem in that. These are all gns. These might cause some
problems in the future, so we need to fix those. So l tate, bring back everything,
A to grab everything. And then what we're
going to do, we're going to make sure
run face select, right click, and you're going to come down to where it says, triangulate faces like so, and then right click come down and tries to quads like so. Now, if I come in now to
this, hide out of the way. All of that now has
been set to quads, which is making it much, much better for us
when we come to actually put textures
on and bring these in. We're going to
bring them in now. But before we bring them in, let's now come to
the top on bomb. So all I'm going
to do is press A, and then going to come in. Ma show on i frame, and then I can see
exactly where I need to cut this down
to as you can see. Now, we do have
two options here. We could have grabbed
all of this line going down here
and pulling it up, or we can just cut
it with the bicep. So I will show you two parts. If I come in and grab this
one on the inside of here, press B for box select, and we're just going to grab it going all the way over there. And then what we'll
do is just grab the going all the way
on the inner side. And from there, what you
can do is you can actually then pull them up and make
it a little bit more level. Now, the bottom one, I'll show you the other
way of doing it. So all we're going
to do is press A. We're going to go to wire frame. And then what I'm going
to do now is cut it away. So mesh, come down to
where it says bicect. And then we're just going
to come down to where that line is and cut
it away like so. So we can just clear the inner so make sure
it's all filled in, and it's going to fill
everything in for us. So if I put this on object mode, you can see it's gonna
fill everything in. Up to you, which way
you want to do that. Now the problem is we're
doing it that way, of course, with the bsect. You're going to actually
lose some of the length. So maybe maybe you want
to do it the other way. So double tap the
A, wire frame, one. And then we're
going to box select and select just this box here, like so, and then
pull it down so that they're all nice
and level, like so. All right, so it seems a lot of work to
actually make a barrel, but if you do it this
way, you're going to find it's much much easier
to actually work with. Now what we want to do
is we want to come in, and we want to actually make these parts a
little bit smaller. So what I'm going to do
is I'm going to come in. I'm going to make sure that
we're on individual origins. And now if I press the Spin, you can see that I can make them slightly slightly smaller. So we have a nice gap
going down there. Right click Shade auto smooth, and there we go,
we can see we've already got a
pretty nice barrel. Now we want to do is we want to random randomize
them a little bit, so let's come to mesh. We'll come down to transform. We'll come down to randomize, and we'll turn this all the
way down maybe to Not 0.1, like so, press the
tab, and there we go. And finally, then what we
want to do is you want to come to these edges here. And all you want to do is you want to just pull
some of them up, pull some of them down, like so, just randomize them a
little bit, like so. Now, you don't
want to do this on the actual bottom ones because they would be grinding
against the floor anyway. Which means that they
wouldn't be so flat. So there we go.
There's that part. And we're pretty much done
with the outer part of it now. And now, if you remember, we actually hid some parts
of it out of the way. So let's press alt and
bring back these parts. First of all, let's
deal with these ones. So what I'm going to do
contro A or transforms, set origin then to geometry. And then what I'm
going to do is I'm just going to pull
them in a little bit, so I'm going to press
A to grow everything, and then S, pull them
in a little bit. So doesn't matter if they're
poking through there or not. And then what we're going
to do now is going to press control A or transform, set origin geometry, add in then where is it
generate a solidify. Let's bring it out
the other way. So if we bring it out this way, then you can get the right
size that you actually want. And then finally,
what we're going to do is we'll put on
even thickness. We'll apply this with control A, and now we want to
level off these parts. So if I come in, shift click, Shift click, Shift
click, Shift click. Now, the first thing is before we actually
level them off, we actually want to randomize the whole thing a little
bit before doing that. So first of all, we'll just press a to grab them all, mesh, transform, randomize
naught point naught one. There we go a little
bit randomized. Now. I'm I happy with that. I think it's still a little bit too much so I'm going to put on naught point naught naught five. There we go. Now it's
slightly randomized, as you can see. That's looking pretty nice. Right click, Shades smooth. There you go, you can see exactly what it's
going to look like. And now we can come
in shift click and just bevel off
these edges. Like so. So we're going to
press control B, Bevel them off a little bit. Like, so I'm beveling them off now because it gives
me more control. So now, if I bevel those off, you can see now I've actually got control of how
that's going to look. Alright, you can see now we've also got these top pots in here, so the top and the bottom pt, and we'll do those actually
on the next lesson. I'll show you how to
do those. Again, it looks like it's a lot of
work for just a barrel, but this is the
easiest technique to get these barrels looking
really, really nice. Alright, everyone, so
hope you enjoyed that. Let's save out our work. And I'll see you
on the next one. Thanks a lot. Bye bye.
71. Applying Materials to the Prop Models: Welcome back everyone. Lend Ford the modular and Kits
environment guide, and this is where we left off. Alright, so we've got
these two tops now. Now what I tend to do is
I'll come to the bottom one, and I'll delete out the way. So delete vertices, come
to the top one then. And then what I'll do is
make this a little bit smaller and put
it into the place where I actually want it first. So if I pull it down
into place like this, you can see now, that's fitting
really nicely in there. Let's go over the top now. And what we want to
do is we want to join some of these
parts together. So I'm going to put it
onto my vertice selection. I'm going to grab this one, and let's say, let's
put it on wireframe, actually so we can
see what we're doing. So this one and this
one press the J button, and then we can actually
make one of the edge loops, and then J, make
another edge loop, and then this one and this one. And then press J, make another edge loop. And then I think, do you want a small one down here or
do you want to leave that? I think for me, I'll just grab this one and this one, press J. And there we not like that. Sorry. This one. Not
this one. There we go. J Ls. Alright, that's
looking good enough for me. I think that'll work out fine. And then what I'll do is
put it back on object mode. And now what I want to do is, I want to again split these off. So I'm going to come. I'm going to grab this one, this
one, and this one. I don't need any
seams this time. And the reason is because of the fact that it's just a few. It's not like the barrel
with loads of them. So all I'm going
to do is press Y. And then what I'm
going to do is press A and then E and split them off, like All right, so we've
got pretty much this. Now the problem we've got is
that these at the moment, they're not really in against each other, anything like that. So you can see that they're all kind of touching. We
don't really want that. So what I'm going to do is, I'm going to make them a
little bit smaller. So I'm just going to grab
the tops of them like so. And then we're going
to press the S but and bring them in slightly. Like so. I'm going to press
A then to grab everything, pull it out again slightly. L look at this.
And then finally, what I'm going to do
now is I'm going to randomize them and
then level them off. I also need to level
this off as well, and we'll do that as well. So I'm going to press
control A or transforms the origin to geometry,
and now we'll come in. And you can see here, I think I made them
the wrong way. You can see that these
are overlapping. So I think I made them too big, so what I'm going to do is I'm going to make them
a little bit smaller. Like, so just to make
that cracks there. There we go. That's
what I'm looking for. Alright, that's
looking much better. From here, then, let's grab
them all, A, mesh, transform. We're going to randomize
them a little bit. We're going to put this
on not point naught one. So, that's maybe two highs
and not point Nought five. And there we go, I think
that's looking pretty good. And now, finally, we
can come in and we can bevel them and drop them
on the bottom as well. So let's first of all grab them. I'm going to press shift D. I'm going to bring it
down to the bottom. And then what I'm
going to do is spin it around, so RY, 180, spin it around, and
let's just put them up, so they're in place,
not like that. Let's put them up into place, like so, and always just
rotate them around then. So ZD rotate them around just so it doesn't
look like the top, in case you've rolled your
barrel over and it's on its side or something. All
right, now we've got that. What we can do is we
can grab all of these. So I can grab this
one, this one, and this one, join them
together with Control J. Control A, resell, you
transform origin to geometry, add in a modifier, and we're
going to generate a bevel, and of course, let's turn it down not point nut note three. So, and there we go, that is how I do a barrel. All right, so simple
way to do a bowel, you can see that
looks pretty nice. And now we've got our bevel
on, we can actually come in, and I think what I'll do is, I'll actually grab
these sides, grab this. Press control J. Join them all together because
the bevel won't actually interact with this much because we've already
put a bevel on there, which means that we can keep our bevel on the actual barrel. And I want to do
that just to make sure the wood looks
good on there. Okay, so now I'm
going to do this, I'm going to grab this barrel.
I'm going to press shift. And what I'm going to
do is I'm going to actually squish it
down, so Essens, squish it down a little bit, and then press the S bone, and then this will be a
actual smaller barrel. A smaller barrel and
you can see now, it looks a little bit
different from that one because it's squished
in a little bit. So we've got two
barrels out of one, then rotate it round like so, and then finally
press control A or transforms origin, to geometry. Alright, so we've pretty much
got all of our props done. Let's move our guy over there. Let's put it onto not
render view material view. And then what we'll do is we'll
start with these barrels. So our barrels are going to be prop wood material and
iron dark materials. So let's come to our barrel. I'm going to come
to my material. I'm going to grab
this one first, A, U, Smart UV project, click. And then we'll go to
prop wood, so Prop. Wood, this one here. Let's drop that on there. There we go, and you can see that's already going
the right way. Now, we do have one problem in that you can see
that all of this wood, some of it is not
actually bending. And if we go over to UV editing, we will see if we zoom to it, press the tabon, we can see
that we've got a lot of bending in these parts here. And it's up to you if
you want to go in and straighten all them up or
leave the way they are. Now, there is a great add
on called UV squares, and that then will actually straighten these up
for you automatically. But I need to show you how
to do it properly as well. So what we'll do is we'll
just grab this one, and I'm going to come all the
way down to here two here, two here, here, two here. So we've grabbed
all of this side. You can see this,
what it looks like, and let's click
on this one last. So I've got this
one selected last. Then what I'm going
to do is, I'm going to go into Light Map. Pack, click Okay, like so. And then finally
want to go to U. All active quads, click. And now you'll see that
it's gone like that. Now, if I press A, shrink
it down a little bit, you will see now, if I put
this on material view, that that now is
nice and straight. A B it's a little bit
too big on the wood. I understand that,
but you can see now it's looking pretty nice
and pretty straight. Now, the add on that, you'll have to go
in and actually straighten them up, using that. Now, the add on I'm
talking about is free. You can get it off
of free of Git Hub, I believe, and what you can do, if I press controls Ed and
just bring that back a minute. So let's bring it back
before we did that. And what you can do is you can
go up to edit preferences. So once you've got this add on, go to add ons, and we're
going to call it UV squares. So UV squares this one
here. Close that down. And then what you can do is you can simply come to this part, so you can press L and
then press t and E, and then we'll straighten
it all up for you, and you can see just
how easy that is. The great thing about it is that once you've
straightened one up, you can just press,
hide it out the way. And then what we can do now is we can do a few
at the same time. So if I grab all these t, hide them out the way,
and then just keep working your way round like so. Sometimes it does bug
out a little bit, so you'll see we can straighten all those up on some of them. Now, the ones we want
just of these big ones. We don't want the
little small ones because they are
obviously the sides, and we don't want
straighten those up, so all t, straighten
them all out. And pretty much that is it, I think. There you can go. You can see they're
all straight and out. That is looking pretty nice. They're already all
straight anyway. And yeah, I'm happy with
how that actually looks. Let's look where it looks
like on rendered view. And there you go. One
barrel actually done. Now, I'm thinking that the normal on here might
be a little bit high. You can see it's a bit
gritty around these pots. So let's go over to
our shading panel. And then what I'll do is,
I'll just check my normal. You can see it's
on three. So let's press the dot born to zoom in. Let's put it onto rendered view. L et's turn this down
to one first, like so, and I'm thinking,
it's looking nice, but it maybe needs making
a little bit smaller. So let's put this on uh 0.5. Yeah, that's too small,
so let's put it on 1.2. And then we go,
that's looking much much better now. All right. Now we want these
parts here doing. So for these parts,
we want iron dock, so plus button, down
arrow, iron Doc. Let's bring that
in. And then all I'll do is I'll just grab these going around here and
click a sign on My Doc. And there we go, now you can see that's the
barrel finished off. Now, we want pretty much
the same as on here. So what we can do is we can
grab this one, grab this one, Control L, and we're
going to copy modifiers. And we're also going
to press Control L, and we're going to
link materials, like so You can see already this one's
looking pretty nice. I don't think I really need
to do a lot with this. Yes, I do. I'll
have to unwrap it. So I could get away with
it, but I can't say. I'm going to grab this
one. A Smart UV project. Click Okay. And I'm just wondering if I can get away
with leaving the wood as is. Or if I'll have to go in,
I'll try it on this one, L's 'cause it's a bit
smaller this one, so we might get away
with not going in there. And then in the
wood. You know what? I think we've got away
with it. It will do. That'll look good.
Alright, let's go back then to modeling. And there we go, that's to done. And then we just
need to bring on on the next lesson the materials
and all of our vases. And then we can actually get
them in our asset manager, and they are done. Alright, everyone, so I hope you enjoyed that. I'll
see on the next one. Thanks a lot. Bye bye. No.
72. Dealing with Seams in Blender: Welcome back everyone to Bleep, the modular and Kash
Environment guide. This where we left off. Now,
let's come to this one. This one, and these two here. And what we're gonna
do is press A. Grab the M U, Smart UV
project. Click Okay. Let's even do all
of these together. So the first material
I'm going to bring in. So I'm going to click
new down arrow. And the one we want
is going to be clay. So let's bring in clay. So we're going to bring
in Clay this one here. Then what we're gonna do
is click the plus one. We're gonna click
the Down arrow, and I'm going to bring in clay. So we have clay
green and clay blue. So clay a green. We have a clay purple as
well that we can bring in another one plus
down narrow clay. We've got clay
green, clay purple. And let's bring that
one in as well. I thought it was
blue, but apparently, it's actually purple. Now, you can see Here
we have some seams. You're always going to get
seams on things like this. You can also see that I
didn't get away with it. You can see it's looking fairly big on here. What I'm
going to do in studies. I'll come in. Grab
just this one. So I've just grabbed
this one, press U, Smart U V project. Click Okay. And you can see now
this is a mess. And this is why you need to learn how to actually
mark seams as well. On these things, we're
going to have to go in and actually mark some seams. What I'm going to do is I'm
going to come to the top. I want to press Alt
Shift and click. And then what I'm
going to do is I'm going to go around
the back of it, and I'm going to press old shift click going all
the way around to. Let's put this on object mode, you can see what I'm doing. Now you can see we've got a seam going all the way around there. Going to right click
then and mark a scene. Now to open this thing up, he's going to be pretty difficult when we've
got this band on here because it's an
infinite loop on here, and that's why we've put
this going down here. But to open this up at the same time is going
to be a bit hard. So all I'm going to do is
press Old Shift click, an old shift click, Old Shift
click, and shift click. And then finally on the
bottom, Shift click, when no one's going to see that right click and mark a scene. What we can do again is, we can put this on material view. We can grab it again, press you. And this time, we
can press on Rap. And now you'll see already it's looking much much better
than it was before. You can still see we've got a
big seam on the back of it, and they're very hard to
hide some of these seams. Now, the reason is
why this looks like this is because this probably
needs moving a little bit, and then we should be
able to blend it in. So what I tend to do is, first of all, I'll come in. You can see on the
inside of here, going all the way
down, it's fine, but we've still got
that seam there. So now what I tend to do is, I'll come in and
work it in block. So I'll go over to you
the editing first. I'll make sure that I'm on material mode, so I can
see what I'm doing. I'll press dot b to zoom in. I'll come round to
this seam then. And what I'm going to do, first of all, is grab this part. And you can see it's a huge, huge part, and it's
bending around. Now, again, we can do
the same technique. So if I come in, press L, I can press OT and
straighten that up, and you'll see how
it looks bare. Albeit, we've still
got a seam in there. But we can actually
move this round to actually blend it in a
little bit better like so. We can also as well press the
S button and bring it out, and then try and blend
it in a little bit. So we can see now we'll
blend it in a little bit. Now, if that doesn't
work, press S and x and squish it in just so we can get it where
we actually want it. So let's try blending it in. A little bit better
than that, have a look. Let's make it a
little bit smaller. Let's move it a little bit. See if I can actually blend
this in a little bit better than what I had it a
little bit better. And if it won't blend in at all, what we can also do is mark
a seam along here as well, if we need to do that, but I think I'm not going to get
it a lot better than this, even if I actually did that. It in, like, so I think that's
about if we're from here, look, you really can't see there's actually
a seam in there. Now, the rest of it, as you can see, is looking pretty nice. So I think I'm happy with that. Now, again with this bit, if you don't have the UV squares, just come to one of the faces. So generally I would
pick like this one here. So I'd pick this one here. And then what I would do
is I would press the L, and then this one is selected, and then you can go to
follow LightMP Pack first, then follow active quads, and then you'll actually get the same result as what I've got. So I'm pretty happy with this. The one thing I'm not happy with is this one here, so
I'm going to press L. And what I'm going to
do is, I'm not going to straighten this up. I don't
really need to do that. What I'm going to
do is just move it over and see if I can get
that a little bit better, which now you can see, you
can't see the seam on. So really, really difficult to see the seam from back here, and we're not going
to be right up close, so we don't have to
worry about it too much. Next of all, then, what we
want to do is we want to do the rest of these before
adding in any of our colors. So let's come now to this one. So we're going to do pretty much the same thing as
what we've been doing. I'm going to actually
press the question mark just to isolate everything
out of the way. And then what I'm going
to do is now bring in Old Shift click. Let's
come around the back. Old Shift click, and then Old Shift click,
Old Shift click. And then on the inside of here. So we'll go Old Shift
click, Old Shift click. In fact, you know, what we won't do on the outside because it's only the inside that are going to have the
different color. So we're just going
to go on the inside inside and inside. And then what I'm
going to do is I'm going to mark a scene On here, and I'll mark
same right on the bottom, like, so, right
click Mark scene. Now what I'm going to do is I'm going to grab
the whole thing. So L U unwrap this time. We don't need to use Smart UV. And straightaway, can see we've got a problem
in this part here. If I come in and grab this part, not really going to
show me anything. However, I can actually
see what part this is. So instead of having this clicked on here,
just click this one on. Come in and grab just this part. So just this part
here, press the elbow. And then what I's going to do is going to show you
what the issue is. I can see straight away
the issue is because I've not marked seam on
the inside of here now. So what I'm going to do is,
I'm just gonna come in. Grab this bombit, press Control, and we're going to
mark a seam again. I'm going to then turn this off. I'm going to grab
the whole thing. I'm going to press you and
unwrap and there you go, can see it's unwrap,
u, much nicer. Now we need to actually bring everything back with
a little question mark. And what I'm going
to do is I'm going to grab each of these. So all three of these,
grab this one last, press Control L, and we're
going to link materials, and then we know what
materials are gone. And now I can see
where that seam is. So you can see if I zoom out, it's a little bit there on on all three of these
parts, actually. So let's come in and
actually fix those though. So if I come into this part, this part and this
part, L et's zoom out. And what I'm going
to do, first of all, is L O T, and then L OT. And let's put these into place now and see if it looks any better
than where it did. So there we go. Now you can see, we can barely see that seam. Let's come to this part then, so L A, G, make it a little bit smaller. And there we go, we can
still see that seam, let's move it over a little bit. Move it over. L et's
turn it around. 090. Doesn't really matter
because it's actually clay. And then we go, that's
looking pretty nice, like so. Yeah, I'm happy with that.
All right, moving on then. So this is our plant pot. First of all, this
pot's got soil, so we'll need to bring
that in as well. We don't need to
worry about that bit. What I'm going to do is
just hide that out the way, so hide it out of the way. I'll also isolate this. So question, isolate
everything out of the way. And then what I'll do is
I'll mark a seam here. So, Shift click
going on to here. Old Shift click, going
all the way down here. Old Shift click, and right
click and mark a seam. Going to come round
the back now. And then Old Shift click
going all the way around. It should go all the
way down to there and all the way down to here. Right click, mark a seam. And finally, then let's press A U Unwrap, and there we go. Now, let's see what this looks like before doing anything else, so we can see we've got
a big seam along here. This far here is
absolutely fine. So let's come to
these two here first. So L and L O to N. Can see that he did
mess it up a little bit, so I'm going to come
to this part first, T, and then come to this part, L O T. Spin it round, so R 90. You know what? Actually,
let's leave it that way. Let's see what we've got.
Barely see the seam now. Barely see it. Let's sort this top bit out. So we'll come. By just grab this top bit, L, and I'm going to press
A, R 90, spin it round. Okay, now, it's
much more visible. And there we go, now, we
can hardly see that seam. That's pretty good.
Question Mark, bring everything back
and run the final one. So let's come in. Pretty much the same
thing as what we did. We're gonna mark seam
right at the bottom there. First of all, Control
mark Sam. There we go. And then what we're gonna
do is we're gonna come up to this part here. So right click and mark a seam. And then I want it
to flow all the way probably up to here. So right click, mark a seam. And then it's gonna
flow all the way round, all the way down to here. So Alt Shift click
Al Shift click, right click, Mark a seam. And then all the way
down to the bottom. So Al Shift click, right click, Mark scam. Now, let's go around
the back of it. And then Al Shift click, mark this down here, Mark Seme. Okay, so the moments
of the, A, on rap. Let's not turn out too bad, but we need to fix some things. So, let's first of all, come to these parts here. So I'm going to grab
this one Alt E, grab this one, L lt E, grab this one L olt E, and grab this one L A
to E. And then finally, what I'm going to do is
just grab all of these. Spin them around. So R 90, let's just spin them
around the right way. And already we zoom out. We can see that's looking much, much better than where it was. And what I'm going to do
now is come to face leg, grab this one first, so L, and then make it a little bit smaller and maybe
move it around here. And then we go,
that's about perfect. And then finally this
one, let's press L, and G, Let's try
that a bit more. There we go. Dad is
looking perfect. Alright. So finally, those vases
took a long time to do. But it was definitely worth
it because now, you know, we've hidden most of the
seams, except, you know what? We'll fix this one as well. Let's fix this one. This
one's a bit of a mess. So what we'll do is we'll
press S, bring it out, and then G, try and
make it a little bit. There like so. Still a bit of a mess. There we go. That's better. Now we can hardly see the
scene. Alright, fantastic. Now, I'm gonna save out my work. I'm gonna go back into modeling. And then on the next, one,
all we need to do now is just add in our colors
on these parts. And then we can finally start actually getting our materials
on these parts here. Alright, everyone, so I hope you're really, really
enjoying the course. So we're enjoying the process. I hope you can't wait
to get these all of these props into the actual
scene. Alright, everyone. Thanks a lot. Bye bye. Oh.
73. Finalizing the Prop Pack for the Aztec City: I'll go back everyone
to Blend four, the modular and Kash
Environment guide, and this where we left it off. All right. So let's
come to this one now. And what I'm going to
do is, first of all, let's mark some seams in there, so we'll come to Edglick grab. I think this edge here. And then what we'll do is
we'll bring it all the way over all the
way down to here, right click and mark seam. Then let's come to the
back. I shift click. And on the inside, shift click, right click, Mark a seam. All right, let's give
this a try then. So you unwrap. And let's bring our carpet in. So let's just put in carpet, and here it is.
Let that load up. And let's double tap
the A, and there we go. Now, with these, if you
were making our fabric, you're going to
have a seam anyway. That's how seams work. That's where they
comes from that name. It comes from actually
sewing things together. So with this one, we don't
even need to worry about it. So I think that one
is absolutely fine. Now, let's come to
this part here. And what we'll do, first of all, is we'll bring in our weave. So let's put in weave, and there we go.
Let's bring that in. Let it load up. And
you can see already, we've got some issues in there. But I was thinking, Yeah, this is looking
pretty good already, but, you know, we might
need to change some of it. So let's first of all come in. We'll grab all of these,
we'll hide them out the way. We'll then come in. We'll mark a seam in here. We'll
come into the back. We'll mark a seam there. And then what we'll do is we'll mark a seam going down there. I'm just going to take that off. So right click, mark a scene. And I also want to take, let's have a look on here. So we've got a seam going all the way around
there. That's fine. Sam going down here. We want
to see them in the middle. So right click Mark scam. Now, let's try this, so
we'll grab it all on wrap. And there we go. That
looks pretty nice. We have got a seam at the back. Now, let's unrote the
rest of it first. Then I'll make it easier for us. I'm going to do is press tage. And then I'll press L. I'll
hide this one out the way. And then I'll just
bring in a seam here so that then
should open up the top. I think, actually,
one seam on this, will be okay, so right
click mark seam, because then this
can just open flat, and this can also open flat, so they're perfectly fine. So, hide them out the way. And then one seam just going up here on the inside
of this handle, so no one can see it, right
click and mark a scene. Alt, bring back everything then. Then all I'm going to do is
grab both of these parts, I'm going to press you
unwrap, and there we go. And this is kind of the
size that I want this. I think actually this
handle is done perfectly. This needs to be Maybe maybe that is maybe about
seg a Zoom out a little bit. Maybe a little bit bigger. So we'll sort that out now. I'm just looking
at the rest of it. I'm thinking that this here, this edge, I'm just
going to come in, press Control B, and I'm just going to
bevel it a little bit, make it a little bit smoother. And then what I'll also do is, I'll remove this seam. So right click clear seam. And then I'll grab it again, I'll press and I'll wrap. And then we go now, I think, Yeah, that's looking nicer now. And just zooming
out and thinking, maybe I want to make these
a little bit bigger. Alright, so let's send it
over to our UV editor. What we'll do is we'll
press dot to zoom in, and we'll grab this one first, and what we'll do is I'll press A and make them a
little bit smaller, like so, and I think that is about the size that
I actually want it. The other thing is, do
I want them rotated? So we can, if we press R, we can actually rotate them, and I think that looks better. And then finally, now
we've got this bit. So let's come in first of all. What we'll do is
we'll grab this, so we can see this one here. Let's grab it to me. Let's grab this one then, L, l for the inside. And now if I come
around to the back, you can see, it's a little
bit different now the seam. I think I might be able to get away with lining those
up a little bit. So what I'm going to do is,
I'll just come into this one, and I'll select it on here, like so let's just
select this one. L. And then what I'll do
is I'll just zoom in, and what I'm going to
do is now just try. First of all, we'll make
it actually you can see I've grabbed all of this. I don't actually
want to do that. So let's come in. Let's
just grab it like this. The easy way. And then we'll do is just make
sure I've grab this one. We'll make it a little
bit smaller then. And as I'm using the shift, I'll hold the shift board now. Drag it in, and there you go. Now you can see mine, be able to get away with bringing these to
be the same size. Let's try that
again. We'll bring it this one here.
Express the S board. Let's bring it out a
little bit. There we go. Now, all I need to work out is if I'm happy with the size, or if I want to make everything on here a
little bit smaller. Let's make them a little
bit smaller, or this way. Let's go this way. Tie them up to everything,
holding the shift born. And now I know that works and
bring them s to each other. Like, so there you go, you can barely see a seam on
there, and that is perfect. The sizing is fine, everything is good now. Alright, so let's go
back to modeling. And let's re name all of these. So we'll come to this
one. We'll press F two. Large barrel. And then this one F
two and small viral. Now, these vases, I forgot
to add the colors in, so let's come to this one first. So can I grab this one
going all the way? I'm going to press Control plus. There we go, you can see, it's going all the
way up to there, so let's just minus
this one off, and then we'll put it as
green a sin, there we go. Then what we'll do is
we'll come to this one. And then shift click, control plus up to there, and then we'll add
green into this one. And then these two, we'll
add this one first. So Shift click. We'll
add in a purple. And then this one, we'll add
in a purple and the green. So shift click Control plus. Let's add in the purple.
Let's come to this one. O Shift click, Control plus, let's add in the green.
And there we go. Alr. They're looking call
now we've finished those. Now we can actually name them. So we've got three vasas here. L et's call this the plant pot. So we'll call it plant pot. So. We'll call
this cloth basket. So F two cloth basket. We'll call this weave basket. And then we're on our vases. So then we'll call this one. I'm thinking, medium, probably
easiest way to go with it. We'll make it a
little bit smaller so we can see that's what it is. We'll line them up. And then
we'll come to this one, so we'll call it se
mid and then this one, these and then finally this one, and then se small. Like so. Alright, let's put these now all into place.
So we'll move our guy over. We'll grab both of
these. Pull them over. Move them over here. Like so. Okay, so now we've
grabbed all of these. Let's put them in.
I think we have one that says props.
So this one here. Let's put them in props. This should also be
in props. Like so. And then finally, what we'll do now is we'll grab all of these, and we'll come over right
click and mark his assets. Now, let's go to
our asset manager. Let's make a new one. So we're
gonna click Plus on here. No, not. That's what
I did last time. We're gonna click Plus on here, and then we'll call
it props. So props. Like so, and then we'll
come down to on assigned, grab all of these. And then what we'll
do is we'll drop them into where it says props. Now, actually, on here, I think what I'll do first is, I'm just going to take all
of these off, actually. I'm going to right
click Clear assets. And then we're going
to go back to them. And what I'm going to do is I'm going to reset
all of the transform. So I'm going to come to all
of these, press Control A. All transforms, right click, set origin to geometry. And then what I'm
going to do is I'm going to come to this one here. So I'm going to press tag. And I'm going to press
Shift n, spin that round. Now, you can see it
didn't spin it rounds. What I'm going to do is, I'm
just going to come to this. Shift n again. And then
what I'm going to do is, I'm just going to
open up where it says recalculate normals, click it on the inside, and there we go. Now
I'm going to do is. I'm gonna press one. I'm
going to grab them all again, so let's grab them
all. Like, so. I'm going to come now, and
I'm going to right click, and I'm going to mark as assets. And I was hoping that they
come through and look a little bit better than
what they did from resting all the transforms. But hey, ho, never mind. So let's put them into
the props. Like so. And then what we'll do
is why have they not all go in there look into props. Let's try mole now into props. There we go. Alright, no. Let's save it out. And then
let's go back to modeling. And then let's again put them
where I want them to go. So I'm going to open
up the finished ones. Let that load up. Let
them all load up. Let's put it on object mode. We'll make it a
little bit quicker. And then I'll grab all of these. I'm going to press seven
to go over the top. And then all I'm going to do, put it over here. Like so. Alright, now, I
just want to make sure they're on the ground
plane, which they are. So everything is done there. And I'm thinking that
for the next one, let's do something a
little bit harder. So let's ramp up that difficulty a little
bit with the next one. So what I'm going to do is, I'm going to come to this part. I'm going to put my props
as well into finished. Like, so, I'm going to
grab this one then. I'm going to pull it over here. Like so, and the one we're
going to do. Come down here. We're going to close this off. Open it up, go to references, and the one we're going
to do is going to be this one here.
Water features. Let's have a go at
this. So this is a bit of a step up in terms of
what we've been creating. We've got some really,
really nice shaders on here, as well as you can see, And I'll show you how those shaders work. And we've also got a fair amount of modeling to do on these as well
to get this kind of shape that we actually want. So we'll do what we did
every time before though. We'll bring in a cue, we'll
get it to the right size. And then what we'll do is we'll create our water
fall around that. Alright, everyone, so I
hope you enjoyed that, and I'll see you
in the next one. Thanks a lot. Bye bye.
74. Creating the Swimming Pool for the Aztec Temple: Welcome Move to Ben pool the modular and Kish
environment guide, and this is where we left off. Now, let's move our
Booleans over here. Not even sure if we
need those anymore, but I'm just going to
move them over there. Let's also bring in a cube, and what we'll do
is we'll put them in to our water features first, and then we can hide
everything else out the way. So let's press Shift A, and we need three cubes. So Shift D, second cube, Shift D, and the third cube. And then what we'll do is
we'll grab all of these. M, and we'll make
a new collection. We'll call it water features. L so, press the Enterborn,
terburn, and there we go. Now we can actually hide
all of this out of the way. Still got our human reference. Let's bring him over here. So let's make the first one. Which will be this huge one
here. So we'll click on here. And the scaling that
we want is 5.965 0.46 and 0.4 74l so. And that doesn't look
anything like what we want, but that is because I forgot
This is only the water. So that's how big the
water wants to be. Now, what I'm gonna do is
I'm going to press Shift S. Cursors selected. Shift A, let's bring in another cube, and now this will be
for this outside part. So this part here
is just this water. Then we'll create
the outside part. So if I come back to this now, and it's going to be 6.625 0.79, and 3.05, and there we go. Now inside there, we'll see
that we've got some water. Once we actually start
creating the sand. We're gonna just pull it down a little bit, so I
can see more water. And there it is. Alright, so now you can see that's
how that's going to fit. Okay, so now we'll
look at this one here, so that's this one
that we'll make here. And the scaling on this
is going to be 2.65, 1.35 and 2.73. L, so. Alright, now, the one thing is, is this yeah, it's
not far enough out, so we need another bit on here as well because
we are doing this in kind of we're not actually
building them together, so What I mean is, I'm creating a bit that comes out here to make it
a little bit easier. So now I'll actually
create that bit on there. So I'm going to come in again, Shift S, the selected. Shift A. Let's bring in a Q. And then with this one now, we'll put this to 2.652 0.03 and no 0.919,
and there we go. So this is going to
be this bott p here. And again, we can change
them slightly anyway, the scale as we see fit. All right, so the next one then. What I'm going to do
with the next one is, I will just get the scaling
for this part over here. So what I'm going to do is I'm
going to click on my cube, and then we'll set it to 2.35 0.618 and 5.19 because
it's very high. Okay, so now we've got
all three of these, we can actually
start work on them. Before we do that, though,
let's just grab them all, control A or transforms, so origin, two
geometry for each. Let's come up and save
that our work as well. And now let's come first of
all, to our swimming pole. So what I'm going to do is I'm
going to isolate this off, so I'm going to press
the little question, Mark, just to isolate it off. If you need to look
at the reference, so you've actually got something
to war with polyd over. And then what you can
do is you can grab your reference, grab this part, press a little question mark and I'll isolate them
both are for you, so you still have
something to actually see. All right, so what I'm
going to do is I'm also You know what
I want to do that. What I'll do is I'll first
of all, level this off. So I'll come in, and
I'll level this off. So I'm going to come in and
I'll press Control Beat. And what we want to do is get a nice round circle on there. So if I bring in left click eight little edge loops going around there
to level that off, I think something like that is going to
look about, right? Giving that a bit of roundness. And what we're gonna do
is we're going to put a couple of pillars
in each of these. Alright, so the next
thing then we want to do is we want to
bring this in now. So we want to bring it in. And then what we
want to do is also. I'm thinking the best thing
that we can do is also, we're going to make
this out one slab, but it's going to be three
on top of each other. So they're going to be big slabs that are going to be carved out, and we're thinking of that as we're actually
building this out. But I'm also thinking that this round bit would have
to be its own slab as well. So to make this a
little bit easier, what I'm going to
do is I'm going to grab the bottom of it as well. And then we're going
to bring it in, it's going to bring
everything in. So you can see now I'm
bringing it in like so. Then what I'm going to do now is I'm going to
bring it in again. So I'm going to press I
to bring it in again, like so, something like this. Now I want to do is
I want to actually bring this part down. So I want to come in. I want to press old shift and click
to grab all of those. Grab those. I've not
grabbed the bond bit, but I've got this, the same
length and things like that. And now I want to do is press E and bring it down like so. Finally then I want to have this bottom part now of this pulse. I want to bring this
all the way down, near enough touching this bott. So if I want to do that,
I can see through it now. And then what I can do is
I can just press E and pull it down near enough
to the bottom of there, like so, and what you
should be left with if I turn this off is
something like this. But what it's going
to mean is that these parts here and these parts here can
actually be split, and that's exactly
what it wanted. We also want to
split the outside. And the inside as well, which is going to be a bit harder because we've
done all this work. But I will show you, if
I bring in an edge loop, you'll see if I bring in two, so I want two edge loops, but you can see the
not on the inside. We need them on the inside. So what we're going
to do instead is, we'll grab the
whole thing with A. And then what I'm going
to do now, You know what? I'll make this easy for myself. I'll press Control, bring in two edge loops, left
click, right click. Grab the whole thing again. And then what I'm
going to do now is, I'll in fact, you know what? We'll mark a scene on these. So Shift click Shift
click, right click. Mark a scene. There we go.
Now I'll grab everything. Mesh, come on in, and we'll bring in our bicect, and I'm going to
bsect it on the top, and then bsect it on this one
as well. So I'll come in. Bring in my bicect, toll Light. Set this to zero.
Clear the inner. We don't want to clear it.
What we want to do, though. Is bring it down close very
close to this edge here. Maybe even closer if
you can get it closer, so bring it down, bring it down right to there. All right. So now what we're
going to do is, I'm going to get
rid of this edge. So shift click. And then what I'm
going to do is, I'm going to press delete, and I'm going to dissolve edges, and then we're left
with just this one. Alright, same thing again then. So we're going to press
A to grove everything. Then we're going to go to mesh. And we're going to
come down to bisect. Then what we're going
to do is cut this across here, set this to zero. It looks like I've
got it exactly right. So let's bring it down then. So we're going to zoom in
bring it down nearly to there, and then l Shift click, and we're going to
right click, and we're going to no, we're not. We're going to press the lead, and we're going to
dissolve edges. And there we go. Now we've got it going all the
way through there, and that's exactly
where we want. From now then, we can
go l Shift click. Old Shift click Ol Shift click. Olshift click on the middle one, right click Marco scene.
That is exactly where one. Now, finally, we want to,
also, have our stone. We want it going all
the way around here. So what I mean is, we don't want any joins
in this part of here. Generally, when you're
dealing with stone, you're not going to
have joins like this. So they're not going to kind of slot together in this way. Very unusual for you
to be like that. They're going to slot
together sideways. But we don't actually
want to create that. So we're not actually
going to put another cut going down
here, is what I'm saying. Alright, but we do want
to cut going down here. So, l Shift click
Old Shift click, Old Shift click Ol Shift click. And then l Shift click. Down here, and then down here, like so, and that then should take us all the
way round to this. Now, finally, the next
part is this part, so O ship click, and
the inside part, right click and mark a scene. Now, basically what
we've done there is, we've laid everything out. These parts here are going
to be one solid piece. This part here is going
to be split from here, and then each one
of these bands is also going to be split
between each other. So what I can do now
is, I can come in. I can grab, let's
say this one here, I can press Y, hide
them out the way. I can come to this one, I
can press L. You can see here that I need to remove that scam because
I do want it going all the way from here. So I shift click, O Shift click. O shift click? Not that
one. Ol Shift click. This one here. Right click, and we're going to clear scam. And then what I'm going
to do is hopefully. Yeah, it's not gone
through there. This has not worked out
how I wanted it, too. So let me go back and see what we've actually
done wrong here. So I'm thinking that
before I put these in, did I actually split these off? That's the question.
Let's come in. Should grab it going
all the way through? Okay, that's perfect.
Let's go again. So you can see, though
it's not grabbing all of the C. I think it's because the bicc
that's caused that. So instead, what I'm going to do is, I'm just
going to come in. Mark my seams again. And I know it's a little
bit of fiddling around, so right click Mark seam. And then what I'm going to do now is I'm going to
come in and grab these, press y, hide them out the way. And then you can see that
this is the issue here. So that one top fine. It's
just these ones here. So what I'm going to do is
grab this one and this one, press J, and grab this one
and this one, press J. And now I want to see
if I can actually split so this chunky part
off here. Let's see. So if I come in, press L, L, you can see it's still
going through there. And that's a bit of an issue.
I don't actually want that. And we can see instead
of doing that, I'm just going to
grab all of these. And I'm going to
grab all of these. Then we press y, them away. Now we're going to
come to this part. And again, I know it's
a little bit fiddly, but we need to make
sure that we've got these split into nice chunks. So this one here, J, and then just make sure
that it's done underneath. And again, now we'll
see if we can grab it. I don't think we'll
be able to. So, you can see it grabs it all.
It's all we're going to do. Grab all of this. We're going to grab all of this
with control click. And then what I'm going to
do is grab all of the bot, all of the bott here,
and then I'm going to press y and hide it out the way. All right, so now we split
off All of this part here. So now we've got
this part on here, and then these three
parts on here. So let's see now I press
L. I can split this off, so that's good, so y,
hide out of the way. Then I'll come to this
pit, L. You can see here, I need to grab all of this,
going all the way around. Y, hide out of the way. And then finally,
this last part, which is this part here, y, hide out the way. And then we're left
with just this. Alright, so that was
a fair bit of work. Hopefully you followed along. Okay. Hopefully you kind of clued up into what
I'm actually doing. And on the next lesson, then, we'll start bringing all that together and
creating that stone. Alright, everyone. So, we enjoyed that. I'll see
you on the next one. Thanks a lot. Bye bye.
75. Utilizing Volume Shaders for Water Effects: Welcome back everyone
to Blender four, the modular and Kish
environment guide, and this is where
we left it off. Now, the first thing
I want to do is, I want to grab all of
this and all of this. And what I want to do is I
want to bridge these two. So I'm going to
just going to go in right click Bridge edge loops, and that then is
going to give me that nice flat bit under there. Now, I do want all
this splitting off, so I'm definitely going
to split this off now. So what I'm going to do
now finish this one is press P selection
and split it off, and there we go.
There's our first part. Let's hide it out the way, and then we can see exactly
what we're working with. Now, let's come to
this part here. So if I press all tage, bring back everything, and what I want to do is
just grab this part. And then I'm going
to press shift He to hide everything
else out of the way. And I want to join
all of this in. Now, I'm not going to use
the fill on this one. I'm going to do it the
old fashioned way. So I'm going to press old
Shift click Old Shift click. And the reason is
then I can cut out any mistakes that I'll be
happening. So, right click. What we're going to do is
bridge edge loops, like so. And then we're going
to come to this one, and I'm going to press
F to fill that in. And then the same for this one. So F fill it in. And then we're going to
grab the whole thing, P selection, split it off. Lth, bring back everything, and now we've got this one here, go to hide it out of the way. Now we're on to the next part. So this one here, I'm
going to come in L, and then I might as well, instead of just hiding
everything out the way. You know what? We will do that. So Shift H will do
exactly the same. So l shift click, Shift click, right click, ridge ge loops, F. And then F, like so, and then LP selection. And then tab, hide it
out of the way. Like so. Now let's come to
this last one. Al TH. Sorry, tab Olah, bring
back everything. Grab this one, L, shift H, and now we'll
just bridge these first. So shift and click, Shift click, right click and
bridge edge loops. And then this one here,
F. And then finally, this one here, F to fill it in. And then TH, and let's
just split this part off. So L E selection, split it off. We go. All right. So now,
believe it or not, we've actually not
got a lot more left. So we'll come to this part now. So grab all of this
part, shift H, and we want to come
in first of all, A Shift click O Shift click, right click and
ridge Edge loops. And then these two parts here. So we can probably do
them at the same time, so press F. Then what we can
do is grab the whole thing, P selection, and then tab. And now let's come
to this one here. Let's hide this out the way. Let's come to this one, lth. Then this one here, so L Shift H. And then l Shift
click Ol Shift click. Right click, Bridge edge
loops. And then this one here. Al Shift click, Shift click F, build them in, and then grab the whole
thing, P, selection. And there we go, hide
them out of the way. And the final one. So
we'll come in, Ol TH. Old Shift click, l Shift click, right click, and we're
going to bridge edge loops. Then we're going to come
in, Old Shift click, and then F. And there we go. Now, let's press tat, let's press old He and
bring back everything. And now the moments of truth. So first of all, what we
want to do is want to join all these up together now and
see if they actually bevel. So let's go in and do that. So I'm going to
grab all of this. First, Control J,
join it all together. Control A then transforms right clicks the
origin to geometry. Right click, Shade auto smooth. And you can see now it's
shaded pretty smooth. Now, the moment of
truth, let's see. So add in a modifier, and we're going to
generate a bevel. And then what we're going to
do is turn this bevel down to not point not three, like so. And what I'm looking for now is any problems where you
saw with this over here. Now, if I turn this up, you can see that we actually
get a lot of breaking. And the reason is because
some of these parts then are not actually got
the right topology on. So let's see if we can
fix that first of all. So you can see as well that some of them are
bending the wrong way. Generally, that is
down to normal. So that's the first
thing we'll check, then we'll check the topology. But let's come in,
grab them all, put it on face orientation. Here you go. What a surprise. That's what the problem is. So let's press tab, press A, shift ten, hide
them out of the way. There we go. Typology is fixed. We don't even need
to do anything else. Let's come down then, face
orientation, turn it off. Let's put this then on
naught point n naught five. There we go. That's looking.
Pretty nice like that. We can see we've got
nice blocks in here. And I'm just
wondering whether to turn it up a little bit more. I think I'm going to have
it a halfway between it. So not point, naught
one. There we go. I think that looks
pretty nice like so. Right. So now then
just the actual water. So if I press all tach, I want to bring back everything. If Al Tach doesn't work, it just means you've used
the question mark. I just press the
question mark again. And then what I'll do
now is, I'll come in, and I'll level this off to be a roundabout the same as what
I did with the other part. And finally, finally, then, I'm going to bring this down
as below this part here, so that's where the swimming
pool is going to start. And then what I can
do is press Control A transforms the
origin to geometry. Alright, so that
is that part now. Let's actually have
a look at our water. So what I'm going to
do is first of all, this is going to be a
light stone material. So if I come to this part, we'll unwrap it first. I'm going to grab everything, U, Smart U V project. We don't need to mark any seams. I mean, we've got seams on here. Really doesn't mount when
it's stone, as we know. And let's come in and
bring in our light. So, light stone, this one
here. Let's get that on. Let's put it on so
we can actually see what we're doing.
And there we go. That is looking fantastic. And now let's come in
and bring in our water. So our water is just going
to be under water material. So down arrow, water, and where is it? Water, this one here. Alright, et that load up. There we go. Now, what is
this bog that's on there? It's just the way
the materials so as let's save it out first, as soon as you put it
onto your rendered view, you will see we'll come to
life and look pretty nice. So let this load up
once I've saved it out, and there you go,
you can see now what the actual
water looks like. And we can have a play around
with this a little bit, and they can show
they're happy with it. But I really like this water can feel like you can
just see through it. Got just enough ripples on there to kind of
bring it to life. And yeah, I think I think
this looks pretty nice. There are some other things that you might want to do with this like creating little
ripples going around here, for instance, you could
actually do that. But being as I wasn't going
to animate this course. I mean, I know the waterfall is animated if you
want it to be. But basically, this
is supposed to be a static scene unless you
actually want to animate it. And yeah, if you
want to bring in your own water though,
you're free to do that. For this, though, as
happen with this. We can see you know
enough in there and things like that.
Right, everyone. So what we'll do now on
the next lesson is then, we'll start with our
smaller water feature. And once we build that out, then we can actually
go through and look at how the actual
waterfall works, and I can show you
the setup for that. We're not actually
going to set that up. We've actually got a material
that's going to come in, but I will talk you
through the process of especially the masking on
there that's quite important. And let's save about our work, and I'll see her on the
next one, everyone. So I hope you're
really enjoying it. See you on the next one.
Thanks a lot. Bye bye.
76. Designing an Aztec Fountain in Blender: Welcome back, everyone
to blend the for the Modular and Kish
environment guide, and this is where we left are. Okay, so first of all, then, let's create this back bit
since it is the easiest part. So what I'm gonna do is,
I'm just gonna drag my guy over just so I can see
the actual scale of this. So you can see when
we've got our guy here, actually, it's quite big.
So let's pull it up. Let's grab both of them. Box let. Like so. And there we go. Alright. So first of all, then,
what I want to do is, I want to bring in
this part here. So this part on top, but I only want to bring it
in from roundab here. So what I'm going to do is, and first of all, gonna come in. Add in an edge loop.
Control click. Left click right click. Alright. Sorry, Control. Left click, right click. Then what we're going
to do is we're going to now grab the top of this, so let's grab the top, and we're just going to
bring it in with S and X, let's bring it in a little
bit, something like this. Maybe maybe that's a
little bit too much, so S and X split it out just so we've got a slight
slope on there. Then what we're going
to do now is we're going to bend the
bottom part of this, so it's supposed to be a
world where people go, you know, with their
buckets and things like that to actually get
water out of here. So what I'm going to
do is, first of all, I can see it's probably
on this part, at least. So if we grab this part, it's probably a little bit high. What I'm going to do
is I'm just going to pull it down a
slight bit, like so, and then I'm going to
come round the back, and I'm going to
pull this in line then with the back
of here like so. Alright. Then what
I'm going to do is I'm going to grab
each of these edges. I'm going to press control
B and pull them in like so, and I'm probably going to bend them just a little
bit like this. All right. So what we'll do now is we'll grab
the front of it. So Face select, grab the
front, press the eye button. And then what we're
going to do is just pull this out with E, like so. And finally, then we can
actually bring this in now. Before we do that, we want to bring an edge loop along here. Now, we can't bring an
edge loop along here because you'll see
that we've got actually an eng on here. So if we press Control, you'll only get
something like this, so left click, right click, and you'll see it only comes
up to this point here. But let's do that
anyway. So Control. Left click, right
click. And then what we'll do is
we'll grab them both. So I've got this one
selected and this one. And then I'm just going to pull them back like so, and finally, then we can just join
them up in the other way, which is just pressing J once we've got those two
vertices like so. So let's just press J
on this one. All right. So finally, let's
bring this part in, so I'm going to press
I, bring it in, and then we're gonna press E, and then pull that
down just to create that actual water that's
going to go in there. Now we want some
slabs on top of here, and then the waterfall is
going to come over this and into this part here to
create our water feature. So what I'm going to do then
H will do this part first. So we have an idea of
how that's going to sit. And first of all, we can see
that if you look on here, it's got an outer stone
and an inner stone. So let's actually
fix that first. So I'm going to first
of all come in, grab this one again, grab this face Shift S s to selected. And then what I'm going to do is I'm going to fresh shift A, and we're going to
bring in a cylinder. Now, the cylinder
will come in at 32, I want it on something like 24. And then what I'm going
to do is spin it round. So R X 90, let's spin it round like so, and then let's bring it down to make it a little bit smaller. And then let's pull it
back as well because this is going to be our
actual stone blocks. Now I'm thinking, is that a
little bit too big or small? I'm not actually sure yet.
So what I'm going to do is bring in these two stone blocks
first. So let's do that. Let's press Shift A.
We'll bring in a cube. Let's press the
Sp. You know what? We'll put this actually
on object motor. We can really actually
see what we're doing now, and we'll bring this down
to here, press the Spoon. Bring it down a
little bit further. And then what we'll
do is we'll bring it up round about to
the halfway point. So if I pull it
out a little bit, actually, I'll pull it
out round about here, and then I'll pull it up
to the halfway point, just round about there, like so. And then I'll just
grab this edge. Control B. And all I want to do is just
bevel it off once, so one bevel, like
so. And there we go. I think actually on
our actual reference, we have got a top on this,
so let's put that on, so I'll have to come in, pull it down to there and then press E
and S, pull it out. And then finally, E to
pull it up into place. And just making sure that I'm actually happy
with it at the moment, I think it's a
little bit too high, so I'm just going to
press Control plus. A couple of times, and then I can bring it down
to where I want it, which will be just above
the halfway point. So and now we've got this on. Now, what we can
do is we can put this onto the other side. So all I'm going to do is press Control late or
transform Dr clicks origin, two, three D cursor, add in a modifier, and we're
going to bring in a mirror. So let's bring in a mirror,
put it over the other side. And now we can really really see how this is going to look.
Is it going to be too big? Is it going to be too small? And to be quite honest, I
think these are a little bit to too big at the moment, because if I bring in
another, stone slab, Let's actually bring
them over a little bit. So what I'm going to do is
just grab this one, this one, and this one, and I can actually freely pull them over, like so. And I think actually
that's looking better. Also, we've got our stone
slabs to pot in there, but we'll do those in a minute. Now, let's come in and think
about our actual water. Then, where is it actually
going to come out of? And I think it's
going to come out of a platform that's gonna
sit just on here. So what I'm gonna do is
I'm gonna press tab. Shift A, let's bring
in another cube. Let's bring this cube down
to something like not 0.5. And then whenever I bring it in, it's gonna be a little
bit more manageable. I'm going to press S D then. And what I'm going to do is
I'm going to pull this down to this point here, pull it out. And then I'm going
to press S and X, and then I'm just
going to pull it out. Like, so just to here for
now, I'm going to pull it in. I'm just checking how far
it needs to come over. Because if I go over the
top, you can see here, if I put it on wireframe,
This is where the line is, so the water would
come this way out, so I can see that I need to pull this over to round about here, and then that's going to
fit much much better. Now, because I've brought
that out there, obviously, you can see that these actually
need pulling out as well. So we'll come in. We'll
grab one of these. We'll control, select this one, and then we'll free jaws to
pull them out a little bit. And there we go. Now it's starting to really
come to shape. Now, the next thing
I want to do is just bevel off this part here, so I'm just going to come back. I'm going to put the on x ray, grab this one and this one. Now, if it doesn't
vel in properly, I'll just reset the transform, so we'll just re, do we need to no actually? I think
we'll get away with it. It's turn that Yeah, actually, I think that's going to be
okay. We'll leave it at that. And then finally, we
want now the bottom bit that's going to be held
up with all these parts. But let's actually
do that as well. It's all press shift date. We'll bring in A cube. We're going to pull
my cube over here, and going to press SNS, make it much, much
thinner. Like so. Let's pull it over.
And let's just get it, so it sat on top of here, so it actually looks as though it's actually
holding these, so I'm going to pull
it out, pull it up like so, into place. And then what I'm
going to do is I'm going to press S and X. Let's pull it out. And now
we want one more piece, and then a block going down. So I'm going to make sure, first of all, that
the back of it, as you can see, it needs to
come through a little bit. You can see here. It's
kind of in the wall. And I'm just wondering, if I can come in,
grab the back of it, so I'll grab the back,
turn this off then, and then we should be able to pull this out
to where want it. So if I come in, I can now see that I'm going to pull
this out just to there. All right, then
finally, we want to now put on a block
on the bottom. So what I'm going to do,
I'll bring in another cube, so shift A, bring in a cube, and I'm just going
to put this as a placement just for
now because I'm not sure how big or small how
far back pat you want this. So I'm just going to put
it as a placement as a solid placement holding
all of this thing together. So then I'll grab the
bottom of it and pull it down. Into place like so. Alright, so we've got
most of this now done. We can see that we just need
to fix these blocks here. We need obviously these
stones going around here. So let's come in first of
all and grab this one. And then what I'm
going to do is, I'm going to press I probably just select the front
of it and work with that. I think it's going to be much
easier to do it that way. So what I'll do is I'll just
press sift, pull it out, and I'll just grab the back
of it with L and lite and ts. Now I can pull it back again. And then what I'm
going to do now is I need another one as well, so I'm just going
to press shifty. I'm going to bring
in another one. I'm going to press
the Sport, like so. And then what I'm
going to is, I'm just going to pull this
out a little bit. So my stone blocks on the outside are going
to be that size, and the stone blocks
on the inside are want roughly the same size. So how I'm going to do this?
I'm going to grab this one. Grab this one. I'm gonna
press I at the same time. You can see when I do that now. I can bring them in to the kind of scale
that I want them. Make sure it goes
past this line. And then all you're
going to do is press the lite and bases. And there we go. Alright, so
this is looking very nice. On the next one, then, what
we'll do is we'll bring in our waterfall once we've
created these stone slabs. We'll create the stone
slabs going around here, and then we should be able
to get this finished off. Alright, everyone, so I
hope you enjoyed that, and I'll see on the next
one. Thanks a lot. Bye bye.
77. Fixing Geometry Nodes Issues in Blender: Welcome M everyone's spend for the modular and Kash
environment guy and this is where
he left it off. Now, let's come in and
grab both of these. Let's press the little question, Mark, Isolate everything
else out the way. And then what I'm
going to do now is, I want to come in
with my edge select, and we want to select
a few of these. So if I come in and
select this one, and then every kind of two or three it's
up to you really, we want it to be a little
bit random, as you can see. Just make sure as always,
we line these up. So if I grab this one
and grab this one, now you can see
everything lines up, and then we can go right
click and mark a scene. From the next one,
all we want to do then is select
everyone in between. So we want to make sure that we're selecting all of them in between them because
I think you'll look a little bit better than
what we have there. So right click and mark a scene. Now, the reason
I've done that is because now I can
actually split these off and pull these back and
turn them into actual rock. So what I'm going to
do now is come in and select not that one,
every other one. So if I'm selecting
every other one, like so, I'm going to press Y, and then I'm going to come
to this one L L L and Y. And finally, now, I can actually split this one off because I think it'll be a little bit easier
if we do that, so I'm just going to split
it off. P. Selection. Okay, so now, let's come in, and what we'll do is
we'll solidify these and then level them so we can do
them both at the same time, and we can do them
with a modifier, which means then if we need
to change it, we can do. Well, before we do that,
let's resell the transform, so right click, so
Oigin to geometry. And then what we'll do now
is come to this one first, adding the modifier, and
we'll bring in a solidify. Let's pull this back then a little bit, so
let's pull it back. Like, so at this point, as well, we can also press a
little question mark, bring back everything,
and now we can see how far this
has been pulled back. So let's pull it back, making
sure it's into that wall. And then what we'll
do is add a modifier, generate and a bevel. And now you can see
with the modifier stacking very, very easy to do. So not point, not not
five, and there we go. Okay, then with this
one, then all we need to do now is grab this one, grab this one, press Control L, and we're going to
copy modifiers. And there we go. Now,
let's pull this one. So just this one
back into place. We're going to pull it back a little bit further
than this one. And there you go,
now you can see that's really started
coming together. Now, our water is going
to be coming out of here. And it wants to be kind of
near the edges of here. So this stone is a
little bit too close. Not only that, this is not
pulled back far enough. So let's come in, and what we'll do is, we'll grab both of these. We'll press the S but,
and just pull them out. Like, so just so the go past this point here while
leaving this bottom. The other thing is then,
let's pull back this part. Now, I'm happy with
how far out this is. I just want to pull
it back though to make sure everything's
fitting in place. What I'm going to do is I'm
going to put it onto x ray, and then it should enable
me to grab each of these. Now, I'm going to pull
these way way out. So I'm just going to grab this
one, pull it way way out. Come to these two then,
so this one and this one, like so, press the tab one. I see I've grabbed the
wrong thing there. So all I want to do now is
grab this one and this one, and I'm just going to
pull them way out again. L et's turn off our x ray, and now we can put
these more into place. I'm going to grab this one
first. Let's pull it back. Let's grab this one
then, pull it back, and finally this one,
and let's pull it back. And now if I come into here, so you can see at the moment,
I'm actually in the cube. Now, if you can't
get in the cube, just press five on
your number pad, and that then we will enable
you to actually go inside. So one of them is a view
where it changes the view. And if you want to
work inside something, you just press five,
and then you can go inside to it, like so. Alright, so we've got
this now like this. Now we want a Boolean that's gonna come
on this part here. So let's actually make that now. So I'm just going to press tab, press Shift A, bring in a cube. And then what I'm
going to do is press SNS, bring this down, and then S and y or
SN x, pull it out. Like, so. Then what I want to do is I just want
to level this now, so bevel these two edges. So I'm just going to press
control A or transforms, its origin to geometry. And now, finally, let's come
in, grab this one, this one. This one in here, and
this one in here, we can just seed
just this edge here. And then I can press Control
B devel it off, like so. And that, I think will
be absolutely fine now. Now I want to put
this into here. So I want to make this
whole into this one here, which means I need
to use my Bleion. So grab this press
Control A all transforms, set origin, two geometry, adding a modifier,
and we'll use. In fact, we'll just
grab this part here, so we'll grab this
one and this one and press control minus because we do have that bleion
on into effect. And there you go. Then you can see exactly what this
is going to look like. Now, the last thing to do is
to put this part onto here. And I'm thinking with
this. We wanted to look a little bit
different from this stone. He wants to like, you know, kind of stone blocks have
been placed on here. So what I'm going to
do, I'll come in. I'll grab all of this and control click going all
the way around here, like so, all the
way around to here, and then I'm going
to press shift D, just to duplicate it, pull it up a little
bit, press P, selection, and separate it off. Here then, I'm just going to
press control or transforms, reset the transforms and
the origin to geometry, and then come up to object, and we're going to
convert to curve. And the reason we want
to convert it to curve is then we can use
our geometry node. So add modifier geometry node, L the little down arrow, and we're going to go
down to stone path. This is the one that we
want to use because we're going to get a lot of choices. We're going to be able
to move it easily. Now you can see
because I brought in that curve just how easily
it is then to bring this in. We can also see if we bring
up these subdivisions, it's going to make it
a little bit better. Let's turn down the
bevel a little bit, make it a little
bit more squared. And then what we'll
do is we'll bring down the actual width,
I think it's the width. Let's bring the
width down, like so. And then we'll put
this into place. We'll also bring
down the thickness, so the thickness is a bit too big, let's put it into place. So they're a little
bit more like tails. And finally, finally, let's
bring down the length. So you can see the length. Bring that and I
still think I need to bring this width
down a little bit, or I need to bring it in. So if I press S, I should
be able to then bring it in and put it into place
just so it's over here. I'm also thinking that I'll pull these out a
little bit the moment, this is quite far out
and these ones aren't. So let's come in.
And all we want to do is just grab each of these. Like so, all four of these. And then I should be able
to press S and X and just pull them out
based on medium point. So S and X, hold
them out, like so, and then you can
see now it lines up much much nicer than
what it did before. Now, let's bring
some randomness in. So at the moment, we've
got no kind of randomness. So if I bring this down, I can randomize them a little bit. I can also wear randomize the width for a little
bit, so not that one. Let's randomize this width. Just a tiny bit,
holding the shift. And let's also randomize the thickness,
holding the shift b. And then we go there
looking pretty nice. Alright, so this is
pretty much done. I'm just looking on
my own reference. I think it's just the waterfall now to actually get into place, and I don't think we
need anything else. So, I think what we'll do before bringing the waterfall in is we'll actually put on all of the textures
and things like that. We'll also put the water here. We've got actually the water
here, so let's come in. And what I'll do is
I'll press Control. Left click, right click, and I'll just bring in an edge loop right
to the top of there. And then all I'm going
to do is press F and then P selection and separate
it off, and there we go. There is our little piece of water now that we can
move up and down. Okay, so this is
looking pretty good. Now we'll do is we'll grab we need to be vel
these off as well. You can see that these
have got a bevel on them. I'm happy with the
size of everything, so I don't need to worry
about that anymore, which means now I need
to be vel off the rest of the stuff and then
join it all together. So what I'll do
is, I'll come in. I'll go to object.
I'll go to In fact, you know what? We'll
grab both of them. Object, convert to mesh. So this one here, hide
them out of the way. And then what we'll
do is we'll actually, I think we'll convert
this as well, so I can er over re Control A, apply that and then just
delete this out the way. Grab it again, Control
A all transforms, Oigin to geometry, right
click, Shade Smooth. And then finally, let's
bring in a bevel. So generate a bevel. And then it's to put it on
naught point naught three. L, so just a tiny, tiny bevel on there,
and that's fine. Let's press Control A,
hide it out the way. And then let's come to this one. Object, convert to mesh. And then we'll put our
own bevel on here. So Control A, right click, so origin to geometry. Let's select everything,
and then what we're gonna do is we're
going to go to mesh. We're gonna go to cleanup, and we're gonna
merge by a distance. One than 743 vertices
joined together, so that's probably
something to do with it. Reset the transform
just once more, and then add modifier,
generate a bevel. And there we go.
There's our bevelin. So let's put it on Nought 0.5. Let's turn it down
to there. And now you can see that's
looking pretty nice. Let's press control, A,
hide it out of the way, save our work, and
then I'll see here on the next one everyone.
Thanks a lot. Bye bye.
78. In depth Discussion on Waterfall Shaders: Welcome microphone to Blendp, the modular and Kash
environment guide, and this is where we
left the f. Alright, so we might as well do
all of these together. So if I grab this one,
this one, this one, and let's try and grab them
all this one and this one. And then what we'll
do is object, always convert to mesh first. Control J then join
them all together. Control A, all transforms, right click, set origin, to geometry, adding a modifier
and generate a bevel. Naught point naught naught
Five. Let's try that. And I think that
looks pretty good. Let's then press tag. And what we'll do now is
just apply this bevel, so I'm just going
to press Control A. And finally, finally, I can
join all of this together, including the water as well, because we don't
need to bevel that. So what I'm going
to do is just click and drag press Control J, join it all together, press G, just to make sure it's all
grabbed. And there we go. There is our actual Well, this Aztec type well. Okay, so now before we bring in our waterfall let's actually bring in all of the materials. So what I'm gonna do is
I'm going to come in. I can probably get away
with grabbing everything. Press U, Smart UV
project. You know what? We'll just minus off this. We'll minus off this part. This is the water. I'm
not going to use that. I'll put down a different
one. Let's see if we can. So, Smart UV
project. Click Okay. And then what I'm gonna do now
is put this onto material. And the materials I
want are going to be. Let's come over to materials. Let's take both of
these off. Like so. Let's come down, and
we want the light, so the light stone. So this one here.
And there we go. You can see that's looking
pretty good already. Now, let's come in
with the midtone. So all I'm going to do
is grab each of these, like so, press in L, to grab all of those islands, and then I'll come
in plus down arrow, and we're going to go the mid. So midtone, this one here. Let's click a sign, and there we go. And
then, you know what? I'm thinking, With
the front of it, you wouldn't really have a
different stone on there. So you can see the
stone here to here. This would even be gold, so there might be a gold
plate put on there, but I don't think we
need anything like that. So it's just like a piece
of stone maybe carved down. Maybe it's got some numerals
in there or something, not numerals, but
something as tape. All right, so now
we've got that. Let's bring in our water. So I'll come in, and
I've got my water here. So it's called water. So that's handy. So
plus down arrow water. Let's bring that in, and then
all I'll do is grab this, and I'm going to click a sign
to water. So. All right. Now, let's have one
final look then before we actually
bring in our waterfall. So we can see here. That is looking pretty nice.
I'm happy with that. I'm just making one final
check before going on. And yeah, the sun's a
bit bright on there, but we can actually see that
it's actually 1 stone block. Now, the one thing I'm thinking
is that these two here. You might want to actually split this off from the top of here, so like 1 stone block,
second stone block. Let's actually do that
before finishing. So Alt Shift and click on here. So Alt Shift click.
Grab the bomb of it. Let's put it back
on object mode, and then all I'm
going to do then is press Y and split that off. Now, I'm going to do
this a bit different. I'm going to grab
the whole thing, hide it out of the way. And then all I'm going
to do now is grab here. Old Shift click, press
F. And then lth, come back, grab the
bomb of it with L, and then to hide. And finally, you want to
join all this together. So F, join it all together. Now, we are going to have
one problem in that, we need to level this off. So basically, I'm
showing you this just in case you make a mistake. So all I'm going to do then
is grab the bomb off here. And I'm going to be very
careful when I press Control B, and I want to be level it off just with one actual segment, and we're very careful pulling this down just to
something like that. And now you can see we've
got that top up there. Now we just need to
do the other one now. So if I press lth, bring back everything, grab this part, hide it
out of the way. And then finally, I'll just
come Grab the hole up here, I'm going to press
Control B again, holding the shift
but and being very careful because I don't
want that split to come. You could see then there
was a split in the center. And this is because it's
already been leveled off. Now press Hol tage, bring back everything,
and there we go. Fine, let's right click
Shades move by angle. And let's have a look at
what that looks like now. I think now it's looking a
little bit better than it was. We can just see the
line going down there, and I think that looks
a little bit nice. Now, if you want the line
to be a little bit bigger, don't bevel it off, more.
That's not going to help. Come in and actually
grab the bottom of it. So L L, let's hide
that out the way. And then all you're going to
do, let's put it on object. Just so we can see is you
want to come to the bottom. Grab the bott, press control, plus, so we've got that bevel, and then just pull it up very, very slightly like so. And then press oltge,
bring back everything. And I'm just making sure
now I have brought it up, and I've put it
and rendered view. You will see, now we've got a bit more of a break in there, which looks a little bit better. Alright, so that's
how to fix that. Now, let's come to
our actual waterfall. So, I've just hopped over back to the actual
resource pack, and we can see here for put this onto shading mode. Let
everything load up. You'll see that we've got
actually two waterfalls here. Now, this is a fairly
complex shader. I'm going to go through that. But the first thing
is, let it load up, and then you'll actually
see it actually working. I might be better actually just putting it on object
mode actually. Bringing it throug.
Oh, there we go. Okay. So we've got this
waterfall, which is the long one, which is for the swimming pool, and then we've got
this one for the well. So what I'm going to do
is grab both of these, press Control C, and
then I'm just going to pop that down and then
come back to Macine. I'm going to hide
these out the way. I'm going to come back
and grab the cube here, press Control V, and hopefully, they should both come
into play like so. All right, so you can see
When I press space bar, these two waterfalls
actually move. You can see that this one's flying much much
faster than this one, and the reason is
because of the fact that this is a much much
higher length. You can also see if I
put this on the redevew, which it is double tap the A, we can actually see
through the waterfall. But the main thing
is, you really struggle to see the
edges of the waterfall. And that's the main point about how I've set
up this waterfall. So with that said now,
let's actually go in. So what we're going to
do is press space bar. I'm going to come over to this one first. In fact,
you know what we'll do. We'll press shift a, and
we'll just bring in a plane. So we'll bring in
a plane. I think that's going to be much
easier to show this. And then what we're
going to do is going to rotate
the plane around, so our x -90 or R X 180, just to get it facing
the right way. And then what I'm going to do is I'm going to grab the top of it, like, so I'm going
to then pull it up. Like so, and we'll
use this an example. So let's press tab
control A or transforms, right clicks at
origin to geometry. And then all I'm
going to do now is copy this material onto here. So grab this one,
press Control L, and you can come down
to link materials. And there we go. Now, if I
press space bar on this, let's see how fast
this one's flowing. Well you can see, first of all, it's
flowing the wrong way. So that's good,
because that means I can show you it
flowing the other way. You can also see that, for instance, it's
flying very, very slow. And you can also see
that at the moment, this is called Water
001 and water 003. And the reason why there are
actually different materials or different name materials is because I've had to
play around with them. And if you play around with one, you of course going
to change the other unless you make
a duplicate of it. So that's the first
thing we want to do. So what I'm going to do is, I'm going to grab
this one again, and we'll call it water 04, so plus new waterfall. Let's just call it
waterfall test. That makes more sense. Then
you'll know Waterfall test. Like so, and then all I'm
going to do is come down to copy material and paste
material onto this. And then finally, I
can minus this off, and you will see
when I minus it off, it will keep exactly the same, even though this is a
different material now. Okay, so now we've done that. We can see if I still
press space bar, nothing's actually
happening in now. And the reason is
because it's got rid of all of those drivers
that are in there, and we need to actually
go in and fix those. So let's go in and
fix those now, so I'm going to come over to
shade in. Let it load up. I'm going to, first of
all, place myself so I can actually see my
waterfall, like so, I'm also go to come
in and put this onto Shader mode and
let everything load up. And finally, then I
should be able to zoom out now and actually
check out this waterfall. So it does look complicated, but it's not as complicated
as what it looks. But I think what we'll
do with this now. Now we've got it all open is we'll actually go
to the next lesson, and I'll go through all of this. Everyone, so I hope
you enjoyed that. I'll see on the next one. Let's save that
our work, and I'll see on the next one.
Thanks a lot. Bye bye.
79. Animating Shaders for Dynamic Effects: Welcome back everyone to end for the modular and kits
environment guide, and this is where we left off. Okay, so our waterfall. If I press space bar,
the moment you can see, we've got a beautiful
flowing waterfall. One of them's flowing slower, one of them's flowing faster. Now, let's first
of all, make sure, because we can see that
this is generated on a UV. Just go in, grab
the whole thing, press U, and wrap.
Let's unwrap it. Now what you'll notice
if I press tab is, it changed everything,
how it looks. But it's still not flowing the right way. Let's
bring it over. You can see now if
I pull this left and right because it's
the flow of the water. It's flowing actually
the wrong way. Let's first of all,
though make sure it actually flows. So
how do we do that? We come into this
value over here, and what we're going to do is
if we go to this one first, actually, click on this value, you will see, it says Frame 100. Let's actually copy
that with Control C, and then we'll go
over to this one. Now, if we press Control
V and press enter, you will see that
we actually get a warning on here. It's
not actually worked. If a press spacebar,
nothing's happening. However, if I come back
to it, press Control V, go to the front of
it, and this time, all we're going to do is
put in hashtag Frame 100. So now you can see,
if I come in here, you can see there's
no hashtag on there. We just have to make
sure there is a hashtag. Now, I can come in
and change this now without putting
a hashtag in, but when you're saying
this up to yourself, to make it move,
like, so you want to put in hashtag frame 100. Now at the moment we don't
know how fast this is moving because it's obviously moving in the wrong direction. I need to first of all come in and put this in the y value. So instead of it being the x, let's try the y, so
I'll drop it in there. Let's press the space
bar, and there we go. We've actually got movement. Now, the next
problem we've got is the fact that This is flowing the wrong way.
We don't really want that. Now, the reason it's
flowing the wrong way is because of this value here. So if I bring this down to one, then you'll see that it's
actually flowing the right way. Now if I come in and turn this up the other way,
let's go to 3.5. Now you'll see we've actually controlled the pace of this. So we're controlling
the pace of this, and now you can see it's
flowing in the right direction. All right, so let's
put this on one. Let's keep it
something like that. That seems to be
quite a nice flow. Now, the next thing
we want to look at is how to control
the color ramp. So in other words, the darkness and things like that in here. And this is basically over here, if I come in and drag this, let's have a look,
this one down or up. You can see whatever
is in the black, that is going to be transparent. So if I just put this
onto rendered view, you will see now if
I bring this over, it brings a lot more
blue into there, and now you can see we've
got this kind of effect. Now, also, remember,
it's flicking And the reason it's flicking because if you go over to
layout quickly, you will see that
scene ends on 250. Now, turning this up doesn't
really affect performance, so you can turn this up
to 10,000 if you want to. I'm going to put on 2000
just so I have a much, much longer timeline, and I'm able to see it for a
longer amount of time. Now, let's go back
over to Shading. And then what I want to do now is I want to
actually create this so it looks more like this rather than kind of a splatter, like what this looks. Like what this looks like. So to do that, all
I'm going to do is, I'm just going to
press the tabon, and then I'm going to
come over to my UV map, grab the whole thing with A, and then S and X, let's just
pull it out a little bit. And now we can see the
further we pull it out the more of that kind of
look we've actually got. So now that's
looking pretty nice. Now let's just press tab and now we can actually
play around with this, bringing less in or bringing more in completely up to you. Now, the final
thing on this setup then is going to be
the actual masking. In other words, if
I double tap the A, getting rid of these hard
edges that we see in there. So, how do we do
that? Let's just stop our actual len.
What's following it. So this is all going to be controlled by this
mask over here. Now, if I come to this
mask at the moment, you will see the jaws place
this in here, come down. Bring this down.
You will see that we at the moment
control going up here. But bring this one
down, you can see I can bring it a
little bit darker. Now, what I want to do is
turn this over to the x. So if I put this on the x, now you'll see we actually get some control over the
side of this one. Now all I want to do is put
this one on the x over here. So, and now we can see
that we've actually got more control over
one of the sides. So if I pulled this down
this way, for instance, now you can see that we've actually smoothed off
all of those sides. We actually have more
control over it as well. So think of this as
controlling the actual mask, whether it be the
top or the sides. And then this one over
here controls how actual Bright the
mask actually is. So in other words,
how sharp it is. So if I bring this down, you can see I can
control it this way. I can then control it this way. If I put it all the
way over to here, bring this one, not
all over to there. Let's bring it over to here. So you can see now that mask
actually ends up really, really sharp, if
I want it to be. Now, of course, I don't
want it like that. I want it something. You know, let's bring this up. Not like that. Bring
it down a little bit. I want it probably
something more like this. And you can see now you can really struggle to see
the edges of this. And again, we can still come over and mess around
with this part, so we can bring it down, or we can bring this one up to make it brighter or darker. And you can see now it's very, very easy to actually
set up this waterfall. All right, so now you
know how it's set up. Now the next thing is we've got these noise values down here. And what these will
do is, of course, these will change the way
our actual waterfall looks, as you can see, we can mess around with these
as much as you want. Finally, everything
then plugs in, you can even change the color. So if you c to the color here, let's come down and give it a red tint or
something like that, and you can change
the roughness value, so you can make it
more shiny if you want to through the actual
principle down here, and then everything
is going to be going in to a material output. Now you know how to actually
set up this waterfall. You can use it in any
of the other projects. And what we're going
to do though is, we're going to actually use these that we've
already created. So what I'm going to do is, I'm going to delete this out the way because if I need to go in and create another waterfall, I can do that now pretty easily. Now, if we go over to modeling, What we're going to do then is we're going to grab this one, and we're going
to bring it over, and then we're going
to put it in place. I'm just going to press shift
S and selection to cursor. That then he's going
to put it in there. And all I want my
Waterfall to do then is basically come
out of this area here. So you can see we made where
is it this hole in here? I want to pull it down
into my hole in there. And then what I want to do is, I want to pull it
slightly this way. Now, you can see I
want it actually coming into this part here. What I'm going to do then
is just bring it out. I'm going to pull this
out like so into place. Now, you'll also see that
I've actually brought it in on a curve because you can actually
do that as well. So you can see that were bought in a plane and
actually used it on. You can also bring
it in on the curve. And the way you would
bring in a curve, so let me just show you
that as well is shift A. Let's bring in a curve, so we're going to come to path. We're going to pull
it out. I'm going to spin this curve around then. So Y 90, let's spin it around. And then all I'm going to do is extrude this curve like so. And now let's put
it onto our shader. And then all I'm going
to do is grab this one. So grab this one, control, and we're going to copy or
link materials like so. And there you go, you can see now we've got it on the curve. So both ways of doing
it, both ways work well. The good thing about
using a curve, of course, is that we can
actually pull it back, and you end up getting
a flow like this, which is really, really nice. Okay, so let's delete
that out the way. And then what we'll
do is we'll come back to our actual curve now,
and let's have a look. So at the moment, you can
see now it's in the wall. I'm going to come
in and just turn down the extrude
jaws to tiny bit. Like so. And then I'm just
going to press the space bar, and there we go, that is
what I'm looking for. Alright, so you can
actually convert that then. And if you convert it,
we're going up to object, coming down to convert
and converting to mesh, you will end up with
the same process. Now what I can do
is I can actually join all of this together. So press Control J, join it all together,
and there you go, you can see it still working. And finally, finally,
let's come in, put it on render view,
double tap the A, and now you'll see
everything working, looking really,
really beautiful. Alright, so that is the actual
waterfall on this part. Now, of course, we need to
make the bigger waterfall that's going to go in
the swimming pool. Now, once we've done that,
I recommend that we make there's a little part that comes out on the swimming pool. I think we'll make that after this actual large waterfall. And then from there, then we
can actually start bringing that pool into place because I think that'll be important. Give us a little bit of respite from building all
of these parts and actually start to build our gray box up a little bit more. Alright, everyone,
so you enjoyed that. I'll see you on the
next one. Thanks a lot. Bye bye.
80. Creating a Waterfall Feature in Blender: Welcome back everyone
to Blender for the Modulate and Kash
Environment guide, and this is where
we left it off. All right. So now
let's put it onto object mode so I can
actually see what I'm doing. This is the part then that
we're going to be working on. So let's press a
little question mark, just to isolate everything
else out of the way. And then what I'm gonna
do is, I'm gonna come. First of all, let's
resell the transform. I don't remember if
I actually did that. So right clicks the
origin, two geometry. Let's then grab both
of these edges. I want to round this off. So I'm gonna press Control B. Going to turn up the amount of bevels have gone there or
the amount of segments. Something like this, left
click, and there we go. I think that looks
absolutely fine. And then finally, what I want
to do is I want to bring the front and back
in because I don't want it just a plain
slab on the back. So what I'm going to do is
I'm going to bring it in. And then I want to bring
these feet back down. So to do that, what I'm
going to do is I'm going to press and bring it in like so, so to the size that I actually want it. So
something like this. But what I don't want
is these parts on here. I want them going straight down. Now there's a number of ways
of actually fixing this, so they actually
come straight down. But I think the easiest way to do this is just
going to come in. Press one on the number pad, press K, grab this point here, and then just point it
down and press the A bone, and that, then we'll point
it straight down, like so. And then we'll do the same
on this one, so down, A, point it straight down, like so, and then all we're going
to do is the back, so control one, K, and then A, point
it straight down, and then enter, and then K, A, point it straight
down, and finally enter. And then what we're
going to do is now just join these
two points up. So if I grab this
point and this point, press the J, and
then this verts, and this verts press
J, and there we go. O, so now what we can do is we can actually
bring this in now. So if I come in to
this one and this one, then this one and this one. And then what I can do
is I can press E, ter, and then S and y, and I can pull those
back in to place. Now, as I said, always, always, when you
bring things back in, you can see that we do end
up with a little bit of a problem always on
the bottoms of these. It's always the way of that. So let's bring this one in now, so I've brought this
one in far enough. I'm just going to bring this
one back now a little bit. So a little bit further. Like so, and there we go. And then what I'm going
to do is now come in and I'll delete
the bottoms of here. So press delete faces. You might have to
delete a few fases, so there'll be another one here, for instance, delete faces. And there we go. Now we
just want to make sure. Always when we're doing
working with extrude, it's best if you just grab
the whole thing, mesh, and what you're going to do
is you're going to clean up, and you're going to
emerge by a distance, and you'll see zero
vertices removed, and that means that we've got
no vertices under here now. It means that this is
pretty much watertight. Finally, because I'll be
putting a bevel on this, I do want to put a face
on the bottom of this. I'm just going to grab both of these and press the F button. Okay, so now what we need. We need to fill out
this section here, and we need to fill
out this section here. So what I'm going to do
is, I'm first of all, going to grab the
center of this. So I'm going to grab the center press Shift S s to selected. And then what I'm going to
do is now press Shift A. I'm going to bring
in a cylinder. Again, I'm going to
put my cylinder on 24. So 24, like, so spin
it around, so RX 90. Let's spin it around. Let's
press one on the number pad, and let's bring this into place. So I can't really see how
far I'm bringing it in. So I'm going to
put on wireframe, and then I'll have a good idea of where
I'm bringing it in. I think this is round about in the right place. So
now I'm going to do this. I'm going to come in.
I'm going to press tab. I'm going to grab my face. I'm going to press the
eye button and bring it in to get the size
of my actual stones. And then what I'm
going to do is, I'm going to press
the eye button again. So something like this. Press the eye button again, and what you're going
to do is work on the actual kind of bull's
eye that we've going in. It's not really a bull's eye, but, you know, you
get the point. So let's now press control, bring in another edge loop, and this is going to be the
kind of outside of there. And then one more control, and then left click and
bring it in like so. So now we've got basically
a bull's eye in the center. We've got this band camera
going around the outside. And then, of course, we've
got our actual bricks. Now, let's come
in, first of all, you can see at the
moment that this is a solid object. We
don't really want that. So all I'm going to do is
just come to the back of it, press Control plus and
then delete and faces. And then we should end up
with something like this. Now, I'm going to
separate this off first, so let's grab this point here. I'm going to press y because this is going to be my bricks. Next of all, then, I want
to band in this part here, so I'm going to press
ult shift and click. And I'm going to pull this out. So E, extrude it out, and there we go, that will be the gold that we
actually want to create. And finally, then this
little bull's eye, which is going to be kind
of an insert in the stone, I'm just going to
press E and pull it back into place like so. Will have a little
bit of a problem in that I need to pull
the whole thing back, so you will see that this, for instance, here,
has to come back. So this point around here. So let's come first of all to our bricks, hide
them out the way. And then what we'll do is
we'll press shift and click, and I want to pull this back, pass this ball's eye. Or that will disappear
into the wall. Let's press E and Y and pull them back like so, and then
it's further than that. Let's press l tag, bring
back our bricks then. And then what I want to do
now is pull my bricks out. I'm going to come to my bricks. I'm going to press
L, pull them out. And then what I'm going to
do is extrude them back. So extrude them back like so, and I can split them up now once I've got
everything in place. So now we can go
back to object mode, and we should be left
with something like this. And then what I can do is
press control all transforms, set origin to geometry, and now let's pull it back into place where we
actually want it. So it's just going to
be slotted into there. Like so. All right. So now, let's split
up these bricks. So this part here is
already split up. Let's have them nice
and even on this one. So if I press one,
I can come in. I will have two at the top. So ld Shift and click
Old Shift click, three on each side,
Old Shift click O Shift click,
three on each side, O Shift click O Shift
click, three on each side, Old shift click O Shift click, and one large one in the middle. Let's right click
and mark a scene. Let's come in and
split all of these up. So, L, L, L and
L. Let's press Y, and now they're all split up. And finally, then,
let's just come in now, and what we'll do is we'll come in and actually fix all the holes that we've
grown in here now. So we're just going to
press A on everything. Mesh, and I'm just going to go to clean up and fill holes. So let's fill our holes. Let's put this on 20. Let's put it on ten. This time, make sure everything's filled.
Now, I should be to do. I should be to press
L. Grab this part, and you'll see now
everything is filled in, which is exactly what we want. Finally, then, we
don't want these bricks to all look the same. So what we're going to do is, we're just going to pull some of them out, like so, we do, however want them to be We don't want them to be randomized or
anything like that. We just want them slightly
coming out on some of them. So just a little bit of
unevenness, like so. And then what we want
to do is right click, Shade smooth by angle, control or transform,
set origin to geometry, and then just add in a bevel. So add in a bevel. And let's set the bevel
down to Not point, No five. L so, and there we go.
There is our stone. Now, finally, we want to have a block that's going
to come across here. A round apiece on here, that's going to be
the actual waterfall, and then just some structure
which is going to kind of hold all this together
for us on top of that. So what I'm going to do is
I'm going to press Shift A. The other thing is, now, you know why I'm going
to leave it as is. Bear in mind. Just press
the question mark if you want to get this back to what we're actually
building here. So you can see mine is a
little tiny bit different. It's a bit more square on top. But as long as it's similar to the reference, that's
what we're looking for. I'm just going to press I'm going to press the
question mark again. And then what I'm
going to do now is work with all of
this stuff here. Alright, so let's
bring in another cube. So bring in another cube. Let's press the S bot. Let's bring it down, and
we'll press SNs head. And I'm just looking now
where I actually want this. So first of all, way too thick, actually sticking through there. We don't want that, so S
and Y, let's bring it down. And what I'm going to do first of all is get it in
the right place. So I definitely definitely don't want it touching
my bull's eye. However, I do want it over
that bit of gold there. Now I want to do is pull it out, so S and X, let's pull it out. And the next thing I want
to do is make sure that it is actually behind my
actual stone here. So it's not poking
through there. All I want to do
then is come in, grab this face, and then just pull it back behind
there, like so. Alright, so now let's think
of this bottom section. So the bottom
section is going to be what is kind of holding
all this together. So what I'm going to
do is I'm going to grab all of this shifty, and then I'm going to pull
it down to the top of here, like, so and then
going to pull it back. And I want it going back
past my actual stone. So you can see past
this stone here. And then S and X,
pull it into place. And you can see, I've
only got the front of it. Don't really want that. I
want to grab the whole thing. So let's press L. And then let's press S and X and pull
it into place, like so. And finally, then let's grab the top of here or
the bottom of he and pull it down into place so
it can fit in very nicely. Now, all we need to do to finish this off before
bringing the wall fall in is have a nice
round a bit on here. So I'll make use of
this I've already got. I'm going to press shift D, and then I'm going
to press the S p. I'm going to pull it
out then into place, like so, I'm probably
going to have it just so it's coming to
where the edge of here is. So let's press S and
x, pull it back. And we need a waterfall
coming out here, so it needs to be pulled out probably a little bit further. And finally, then let's
be level these edges off. So grab this edge and
this edge Control B. Now, you can see
it's not be leveling off very well for me on there. And the reason is because I
need to reset the transforms, the resettle transforms,
and then come in, try that again, and now you'll see it'll bevel off
much much better. Alright, I'm not gonna put a
hole in there or anything. On the next lesson, then, I'm going to bring
in the waterfall. I'm going to make sure that
this is out far enough. It might need coming
out just a little bit further to make room
for that waterfall. And then what we're gonna do
is, we're gonna grab this. We're gonna put this into place, and it's going
to be dropping, you know, from here all the
way down. Alright, everyone. So Lastly, before we
actually bring that in, and before we add in the lesson, what I'm going to do now
is grab all of this. I'm going to come up then to
object and convert to mesh. And then we're going to
press Control J. I'm going to press Control
A all transforms. Right clicks origins geometry, right click Shades
move by angle. And finally, then, let's add in a modifier generate and a Bevel, and we're going to put this
on Not point or not five. Now, you can see on some of it, If I turn this up, not
a lot's gonna happen. Let's put it on point
n n five thirst. Let's come down to
its profile profile, so geometry, and let's
turn clamp overlap off. And now you'll see
we've actually got that leveled off the way that
we actually want it. And again, this clamp
overlap use it sparingly. You don't want to use
it all the time because it can mess around
with the mesh. Alright, now that's done. We'll save out our
work, and I'll see on the next one everyone.
Thanks a lot. Bye bye.
81. Finalizing the Water Feature Pack: Welcome everyone to end the for the Modula and Kish
environment guide, and this is where we left off. Okay, so what I want to do is now I want to
bring in the waterfall, but before I do that, let's just discuss the omet
nodes in this pack. So the omegdes that come
with this course are free to use in your own projects and
environments and stuff like that. If you're using it commercially, so if you're using it and
selling it, you know, these products to
hundreds of people, then you need to check
out and actually look at our commercial options that are available to actually give
you the license for that. These are fine.
These jupure nodes are fine to using
your own projects. If anything bigger, then check out our
commercial licenses. All right, so now
I'm going to do. I've got all this
done. All I want to do now is bring
in my water fold. Now, the moment, We can see that this waterfall
is a little bit big. What I'm going to do, but it is going to
drop down further, so we have to take
that into account. But you can see it's a little
bit big on this X axis. So what I'm going to do is
shift S selections cursor. Put it into place, and then
I'll see just how big it is. And I can see if I
pull this down now, here, I need to bring it in. So S and X let's pop it in, make it a little bit smaller, so Or we can make this
a little bit bigger, it's up to you however big you want your
actual waterfall. So now I can actually come in. I can put this on
to rendered view. Let it load up,
double tap the A. Then there we go. We can see it actually flowing
out of there now. Next of all, then, I want to come in, put it
on shade of view. And then what I want to do is I want to come to this part. And I want to give these
materials, of course. So I'm gonna press tab A U
Smart U V project. Click Okay. And then what I'm gonna
do now is come in and I'll grab all of the In
fact, you know, what? We won't grab all
of that material. What we'll do is, we'll come in, add in light stone first, so light stone, this one here. And then what we'll do
is now work on these. So we're gonna have
this as a gold. So I'm gonna press
lt Shift click. Let's come to this
one. Old Shift click. Control plus going round. Just make sure that you go
all the way up to the edge. So Control plus, Control
plus plus button. Let's click the down arrow, and we're gonna look for gold. So down arrow, gold. And scratch gold, and
then click a sign. And then finally, red stone. So plus down arrow, red stone, this one
here, click a sign. And there we go. That is actually this one
finishing you to see. It looks very, very beautiful, exactly what we wanted.
And there we go. That's that part done. Now we've got all three of these done. We need to obviously,
join them all together. So first of all, on this one, we can see that we've
got a bevel on it. Let's just press Control A because we know it's
already joined together. So grab your waterfall. Grab this part here, press Control J, and
let's join it together. No mesh to join. The reason is, obviously this is a curve. So let's change it from a
curve to a actual mesh. I'm just wondering, actually. Yeah, you know what? We
will change it to a mesh. So we'll go to object,
convert to mesh. And then all I'll
do is join this and this together
with Control J, so press the space
bar, and there we go. Now we can still alter this obviously when we've
brought it in. Now, let's call
these some names. So let's come to this one first. And what we'll do is
we'll call it pool. So f2p like so, and then we'll come to
this one, we'll call it fountain, so fountain. And then we'll come to this one, and we'll call it waterfall. So F two water fall, like so. And then what I'm going to do is I'm going to put these in their own in their own group. So I'm going to call it water. In fact, we've got it here.
It says water features here. So let's just drop that in. We've also got a cube in there. Let's have a look w that cubes. Oh, the cubes,
this actual water. So that means then I need
to join this to this block. So this block is
actually named Paul, so I need to make sure I grab the water first, grab the block. And you can see we've
got a bevel on here. So all I'm going to do is
apply a bevel with control A. Join it together with Control
J then, and there we go. Now, one thing I do
want to make sure is that this actual water
is still working, so I want to look on my rendezv and just make sure that that's
looking still nice, and that's looking
like it was before, so that's absolutely fine. So now we've got all
of these got Pool, fountain, we've got our
empty. That's fine. All I want to do now is
grab all three of them, right click, and what we're
going to do is mark as asset. Finally, then let's go
over to the asset manager, and we can see we
have some problems. So that's why we always
leave it on like this. So first of all,
let's come to this. So this one here, let's press L shift and N to spin it around. Let's come to this one then, and we'll go to
what's for first. Shifting n, spin it round,
and then these bricks. So if I press A to
grab everything, we might together with
just pressing shifting n, and then it'll spin
them all round for us. And there we go.
Now, let's come in and we'll make a new one
called water features, so click Little plus
here. Water features. Like so. And then what we'll do is we'll
go to unassigned, grab all three of these. And what we're going
to do is drop them in. Now, the thing is we can see that one of them is upside down. Let's see if I can
actually fix that. So I'm just going
to right click, clear assets, and then going
to grab all three of these. I'm going to press Control A, all transforms, right clicks
a origin to geometry. And then what I'm
going to do is just come over now and look
for our what's feature. So these three here, right click and we'll mark as asset.
And then we go now. They're all the right
way up. So that looks much better than
where it did before, so I'm happy with that. So what I'm going to do now is, I'll first of all,
just pull them up so they're on the
actual ground plane. This then will make it a little bit easier for us, like so. Now, then let's grab
all three of them, and we'll put them in
our water features. And finally, we'll go to
save and save out our work, making sure that that
disappears, and there we go. Another asset done and dusted. Now, let's bring in all
of our finished items. So let's bring them all in. I'm going to do
then is just pull all of these together, so
I'm going to pull them over. I know my guys there. I'm just going to move
them out the way now. So I pull them over,
so and then I'm going to grab them all press
seven to go over the top, and I'm just going to
put them over here. So let's see if they all go
in there. And there we go. That's those done. And
now we want to copy this. So I'm going to grab
this one, shift, bring it over, put it
into some sort of place, and I want to change this over. So let's go over to here. Change it over, so let's
minus this off, open it up. Go to references, and the one we want is a little tiny
water reference, which is this one here.
We've called it flaws. This basically is going to be kind of the part that
comes out near the pool, so I'll show you what that is. But basically we want to
make something like this, which is a pretty easy structure compared to what we've
already been creating. So what I'm going to do then is, I'm going to give you
the dimensions now. So first of all, I'll
grab my little guy. I'll press shift S, Custer
selected, and then shift A. Let's bring in a cube. So we'll bring in a
cube. Move it over here. And then the dimensions that you want are going to be 2.29. 3 meters and 0.582. So these are this is the structure that
we're going to have. Now, you can see here, it's much much thicker
on certain parts. We do want to make sure that
he's able to stand on this. You know, this looks
actually really thick, but it's not actually as thick as what it actually looks like. Okay, so the first
thing that I want to do with this is,
I want to come in. Let's put it on object mode so we can actually
see what we're doing. Come into edges, we'll
grab both of these edges, and I'm hoping there
I level them off. Yeah, they're gonna
bevel off prey nicely. So let's have a
look over the top now and have a look what
they're beveling off like. I think that
actually looks good. We could turn it up one more, make it a little
bit more rounded. And then what I'm going to
do is I'm going to come now. And again, I don't want
to have like a gap here. So what I want to do
is I want to come in. I want to press the eye button, bring it in, like so. And what I want to do now is, I want this to be back to here, like we had it with
the other part before bringing this part in. So I'm just making sure
that it's coming to the right kind of scale that I actually want it,
which I'm happy with. And then what I want to do now, is bring it all the
way back to here. Now, what I'm going to
do instead of, you know, taking pulling this back and doing it all
the way through, what I'm going to do is I'm actually going to
grab all of this. So I'm going to
grab all of this, going all the way around here. And then what I'm going to do
is, I'm just going to press P selection and just
take that top off. Press the tab then, and then
we can go back into it. And then finally, I'm going
to do is go over the top. And then going to press
K, bring it to here with holding press in A to make
sure it's a straight line, and then K. And then A, making sure it's a
straight line, like so. From here, then, what
I'm going to do is, I'm going to now bring all of this down and
then extrude it up. So if I come in and grab
the whole thing, so A, let's pull it down
then into place so we can see now it's right
at the bottom of there, and then we'll press E
and bring it up like so. Then what we'll do is we'll
bring this part up now. So if I come in and
grab s, this part here, like so, I can actually bring that up then
into where I want it. For press three to
go into side view. Put on our x ray, and I can see where I
need to bring it up to, so it is something like this. Finally, then, before I finish this, I want
to turn this off. I want to delete this out
the way, so delete it. And before I actually
finish this, I want to make sure my guy
can actually step up on these steps and
actually walk on there. So let's see if he can. So
what I'm going to do is W, first of all, make sure this is on the ground plane,
which he pretty much is. If I pull this over here, I can pull it down then
onto the ground plane. Like, so, and now I can see how big these
actual steps are. And you know what?
These actually look pretty good for me. As he always said, the steps, the highest you
should have it is really around the
shin bone here. That's a pretty steep step. You don't want to up to his
knes or anything like that. And this is looking
pretty good now. So let's come in then, and what we'll do is we'll
grab the top of it. And then what I'm
gonna do is press the eye button and bring
that in, like, so. And then finally, I'm
gonna press E and pull it in two place,
just a slight bit. But we've got a little bit
of an indentation there. And again, control
A or transoms, set origin, two geometry, right click,
Shademooth bi angle. Now, what we'll do then
on the next lesson is, we'll just get a
bevel in on this. We'll then bring
the material in, put it into our asset manager. And then we'll head on over to our gray box and start getting some of these
things in place. Alright, everyone. So I
hope you enjoyed that, and I'll see on the next
one. Thanks a lot. Bye bye.
82. Integrating Water Features into the Aztec Environment: Welcome everyone
to Blender Ford, the modular and Kit
Bash environment guide, and this is where
we left it off. Now what I'm going to
do is come over to my modifier tab, add
modifier generate, and the one we want
to do is the Bevel, and let's put it onto Not
point Not five, like so. And that then looks pretty fine. Now on this one, 'cause we're not joining it together
with anything, we can actually leave
just the bevel on. And all I want to
do now is just put it onto our shade of view, coming over to our materials. And we're gonna have
light done on here. Let's make sure that
when it loads up that we're going to
actually wrap everything. Now I made this a little
bit harder for myself. Because I've got all of these
on, so let's turn them off. Let's make sure also
that this one is all in, so the water features
is in finished as well, and you can see now we
do have that problem. So let's actually
fix that first. So we're going to just
pull out both of these. I'm just going to
drop them down there, pull them out, same as
the human reference. Let's put the human reference
back in back in there. And then I should be able
to now put these in, so drag this one here, put it into finished,
and there we go. Alright, let's clean up that. Now, let's come in.
Click the down arrow, and we're looking for
light Light Stone. And then we're going to
press A U Smart U V project. Click. Okay. And then we go. There
is our light stone all done. Now finally, what
we can do is we can actually call it floor. So swimming. So Paul
floor, let's call it that. So pull floor like so. And then what I'm going
to do is right click, and I'm going to
mark it as an asset. Come over to my asset manager. And I'm gonna drop this
into my water features. Let's put it in
there. Let's not make a new one, and there we go. Alright, let's zoom in then, just make sure that
the normals are the right way round, which
they look like they are. And finally, then we can
press tab and there we go. Now, let's put this in
its own category as well. So I'm going to You know what? We'll put it into flows. We'll actually put
it into flows. I'm going to grab the
whole thing, flows, new collection flows. So just in case you want to meet your own flows, look, okay, and then all we'll
do is drop that into finished, and there we go. Save that our work. And
now what I'll do is we'll head on over back
to our gray box. So here we are in
our actual gray box, and what I want to
do is, I want to actually start now building
this out a little bit. So what I'm going to do
then is I want to make sure a right click and
refresh asset library. And come down, we
should have one now that says water features. And the first one I
want to bring in then, is this actual waterfall here. So let's bring in this. Let's drop it on there. And we can see it goes all the way up there
and that's because pretty much this waterfall
only comes up to there. So what I'm going to
do is bring it down then and I want to
put this into place. So let's bring it over
and drop it into place. Now, Let's put it
into the floor. Now, remember, This actually looks pretty high at the moment. And the reason it
looks pretty high is because we need to
actually delete this off. We need to delete
this floor off, and we need to then
bring this one, we'll delete this off as well. So we're going to start
building this out now. So what we're going to do, we're going to put our floor on. And then what we're
going to do is bring a pool over here. So this chunk here where this
is all dropping down to. We're going to bring
two walls into here, have our steps going up, and then kind of bring
it all into place. So you'll see what I'm
doing as I build along, but first of all, let's
bring our pole in. So what I'm gonna do
is I'm gonna come. I'm going to grandma pull
drop it into place there. I'm going to go
over the top then, press G, and I'm going to drop
it where it's going to go. So roughly somewhere
around here. And now this is the
stage where it gets a little bit fiddly because we have to make everything
kind of fit in. So what I'm going to
do is some draws, go to drop that in there, and we're going to
then pull it out to my actual post where
these posts are. And I think I will drop it
back a little bit there, and then I'll delete
this one out the way. So just this one that
we had as a placement. And now I can do is I can pull this all into place, so
I can bring it down. A little tiny bit, just so. It's over there, so we've got
that little bit of a lip. And then what we're going
to do is bring it this way. So if I bring it this way, I'm going to pull it just in
the side of there, like so. And the next thing is you can see that it's not
quite high enough. So let's bring it down a little bit more and let's
have a look at that, and that's looking pretty good. And now we can see that it doesn't come all
the way up to here. And this is one of the
things I was worried about when I actually
brought these bits in. So now we have a choice. We can either pull
this part over, so you can see here this part
needs pulling over and get it right up to this wall here. Or we can pull our swimming poll this part here back a
little bit as well. So let's first of all, Maybe I'm thinking bring Yeah, we'll bring in the stone slabs first and this center part. And then we can decide where we want to bring this all up to. But I think all of
this, all of this part. So all of this, except this
bond bit, we bring forward. So if I hide all of this, go over the top, and what I want to do is just
grab all of this, so all of this part, like so, including this part, and let's
bring it up a little bit. So I'm also going to
bring this part here, this part here, and
this part here. And what I'm going to do
then is just move them up atle bit like so. So a little bit closer. I
still want This part here, bringing up to roundabout here. So this post slightly
goes in there. Then what I can do
now, you can see my post is fitting
in very nicely. I can pull this one over then, more into the center of here, so more into the center of here, so I can actually walk past su to where you want to put it. Then I'll put mine
round about there. And now you can see everything's
fitting in just nicer. Albeit, you know, it's
still a little bit out. You can see this part
it's a little bit out. So let's come to this part. And we'll pull it
back a little bit. There you go. Now it's starting to fit in, much, much nicer. Now, let's get this
center part in, and then we can actually decide how high we actually
want this part, because I still
feel that this bit is maybe a little bit
too high, but we'll see. We've still got a
nice view from here. We need to pull this
post a little bit, which we're going
to replace anyway. Let's get this sense part in. So what I'm gonna do is I'm going to bring
it in, first of all. And then I'm going
to go over the top. I want to press G, and I'm going to put it right in
the center there. And then what I want to do is I want to make sure
that it's, you know, back a little bit, and then
through this part here. So if I bring it down here,
I'm going to pull it in, and you can see now
it's going to fit in, pretty nicely around there. We don't want it
too high of a step, so let's pull it
down a little bit. Like so. Then we'll want this two blocks now to come each side of
here with the steps, kind of leading up
on top of the stone. So let's come in and
we'll look at our stone. So if we're coming over, let's find where are the stone blocks. Here we are. Let's bring in. Let's try this one first. This one might actually do it. Let's make it a lot smaller. Let's press three
going side views or control threes going
to the other side view, and let's bring it down into place where we actually want it, and we want it just
below these steps here. Now, we're going to
hide it, of course, with another stone block, which is going to
come into here. But for now, let's see. If we can get this in
place underneath our step. So what I'm going to
do, first of all, I'm going to bring
it up, and I'm going to put it in
place, like so. So I want a little bit
of an edging on there. Now, I can see that this is going to have
to come down now, because in here, we're actually
going to have some water. So what I'm going to do
is I'm going to pull this down now very slightly, like so, and then my water
should actually cover that. Now I'm going to do
is, I'm going to grab this stone block, and I'm going to put
it the other side. So I'm going to press shift.
Put it the other side. So again, it's going to be a little bit of a lip
there, as you can see. And then what I'm
going to do now is, I want to bring two
more stone steps. So two more stone slabs. So I want to press shift, bring them down
into place like so. And then finally, I
want one in the center. So if I grab one of these,
I want to press shift D, bring it over, and then I'm
going to bring it out now. So if I press S and X, bring it out and drop
into place like so, and there we go, now
we can actually see. We've got our pool that will go all the way down
to there as well. That looks pretty nice. And now all we need
to think about, you can see this is, you know, it's coming right
up to the back up here. We need another stone block
that's going to come up to the back and kind of hide
this part at the back here. So what I'm going to
do is I'm just going to hide this part
here, so hide it. And this is where I want to drop my stone block down
between all of these. Probably coming near enough
to the top of the steps. And then we'll have
a stone, you know, kind of top on here as well to hide this
little room in there. Alright, so let's come in and
the stone block I can use. I think I can get away
with using this one. So let's have a look. We'll bring that into place. We'll press seven
to 12 over the top. I'm going to then put it into roughly the place
where I want it, so which is going to
be round about there. And then what I'm going
to do is I'm going to drop it down now into here. Like so, and that then is hopefully hopefully
going to hide this part. So I can drop it down further because I know I've
got a roof upon there, I'm going to drop
it down into place. Let's have a look where
that's dropping down to. Let's hide this part out of the way as well, so we can see. And now you can see it needs
coming down a little bit, so I'm going to move it over,
drop it down just to here. That is where I want
it actually to. Now, the other thing
is, I also want it maybe maybe a little bit higher
than that. Let's have a. If we have a roof on here, actually, that should be fine. So what I'm going to do
now is just press S and x and pull it out into place. And then S and X. So double
tap the A, and there we go. Now, let's save out our work on this one before we
do anything else. Now, finally, the last
thing is I want to put some water out in this
bit before carrying on. So what I'm going
to do is I'm just going to grab my pole. Let's have a look at the
pole, see if it's actually a cube or a plane,
or is it bevelled? Let's have a look.
So five press G. Yeah, it is actually beveled, so we don't really
want to do that. What we want to do then is
just bringing a plane to here. So I'm just going to grab this
Shift S because selected. Shift A then, bring in a
mesh, bringing a plane. Pull it to where I
actually want it, so I want it round about here, but I want it lower, so
it goes past those parts. Basically, I want it the
same height as the poor because it wouldn't make
much sense if it wasn't. If I bring it up, bring it up, us there, and then drop it back, and you'll see now it fits
in place very nicely. And from there, then, what I can do is
just press S and in, just pull it out a little bit, just making sure it fits in. And then control A,
all transforms right, clicks a origin to geometry. And then finally, I'm
just going to press A U on rap because it's
just a simple plane, and then I'll bring
in the water, so I'm just going
to grab this part. You know, we'll come to this, and it's cut underwater, so then we can pull it water, like so, and then
double tap the A. Now, let's have a look
what that looks like before finishing then.
So rendered view. There you go. Now you
can see it looks a bit. It's still got the
volume on here. And I think now
if I come in now, I've got this in place and grab just this part,
press P selection. Now you can see
that one. He's also got that lightness
back on it as well. So that's always
worth actually doing. Alright, so we've got
this, and we've got this, and now we can press space part, and we've got our flowing
river into this point. So what we'll do then
on the next lesson is, we'll save it out again. We'll actually start bringing
in these posts here. We'll build up this part
around the outside. We'll get these steps in, and we might even have time
then to get the actual roof in that's going to
come onto this O h, we'll create a roof that's
gonna come onto there. Because sometimes you need to create parts as well that
aren't actually there. You know, if they're
just blocks and things, you might as well just create. They're not hard to create
once you're in here. And people aren't really
going to need those as part of the modular pack
because they're just floors. So you could go in and guess
and create just a floor. That might make it easy. But for me, I'll just come
in and add that in there. Alright, everyone, so I
hope you enjoyed that. I'll see you on the next
one. Thanks a lot. Bye bye.
83. Designing Internal Spaces for the Aztec Temple: Welcome back everyone
to Blend for the modular and Kit
Bash environment guide, and this is where
we left it off. And what I'm going to
do first of all, is, I'm going to actually
bring in this part first, because we're going to need
a floor going along here, and we're going to
need a floor above it. So let's bring in
this part first. So if I drag and drop this,
let's spin it around then. So O zed 90. Now, this is spun
around the wrong way because we can see we actually
have a front on there. So let's press zed 180 s so. Now, let's bring it over. What I'll press
is control three. I'm going to put
this into place. I know it's going to be
in these parts here. I can move these a little bit
to the side if I need to. But the main thing is
that I get it into place. Now, you can see, it's a
little bit too big for this. So what I'm going
to do is make it tiny, tiny bit smaller, and then bring it into place, like so, and then all I'm
going to do is pull it back. Like I'm going to have, look what that
actually looks like. I'm going to get rid
of this old archway. And there we go. Now,
that's looking pretty nice. Now the one thing is, I've got this big chunky bit in here. Let's have a look what this is. Oh, that's my actual
door. So that's okay. All I need then is a floor in here and a floor in the top. So let's actually create
that while in here. We're just going to
go to object mode. And it's up to you
whether you want to save this out as an asset manager. If you do, you know, let's have a look, see if
we've got floors first. We don't have one that says flows on here. But
we don't have that. So basically, let's just yeah,
we'll create it in here. We'll create it in
here. Just be easy. Okay, let's make a cube. Let's bring it out
then into place. So if I go over the top, I want it come in
basically from here. So the top of my stairs. Let's hide these out the way, just to make it a little
bit easier to see. So you can see now this cube, it wants to come to the
top of these stairs here. So the top of these stairs, just under this stair here, and it also doesn't want
to be too high where it's, you know, kind of, no one
can walk through here. So what I'm gonna do
is I'm gonna grab the bottom of it and
pull it up like so. From there, then I'm going to actually push it
all the way over. I'm going to press L, push it all the way over
into this part here. And then what I'm
going to do then is pull it back into my stairs. And I want it then just just
below my actual stairs. So just below my stairs, making a little lip on there. The other thing
is, I really want to hide this part as well. So I'm going to have
to pull it up a little bit into my wall there. And then what I'm going to do
is pull it all the way out now all the way out
to this stairs here. And then finally, let's
pull it all the way across right above that
actual door there. And then you'll see
everything fits into place very nicely. Now, the next thing I want
to do then is I want to, of course, level this off. It's up to you whether
you want to have some, you know, kind of slits
going down here on this. I'm just going to
leave it as a plane. So what I'm going to do is
control A all transforms, set origin, two geometry. Let's put it on material view. Press the tab, A U Smart
U V, project. Click Okay. Now, let's bring in
our light stone, so light stone, like, so. And then I'm just wondering, if I want to actually
beverly off? Do I need to beverly
off because it's right in these corners
here. You know what? I don't actually
think so. So all I'm going to do is press shift. And then bring it down. And again, I want it right
just below this lipre. Now, you can see, this
one is not big enough, so I'm going to have
to pull this one out. So what I'm going
to do is grab this, and then going to pull
it out into my steps. And you can see now if
I pull it out further, you can see exactly
where it's going to go. So these steps definitely
not in the right place. The one bringing
down a little bit. You can also see that this definitely not in
the right place. So which way we're going to go? I think we'll go the other way. So I'm going to grab
them all I'm going to pull them up into place like so, and then my door should fit
on top of there nicely. So if I bring that
back, you can see the door fits on there
nicely inside there, and this will be a really,
really nice, cozy room. Now what I need to do
is bring this one back. So if I bring this back, back, back back into my steps, like so, and there we go. Double tap the eight. And we should end up with
something like this. Now if I press ol tag and
bring back everything. Now you can see this is how everything's going
to fit together, and it's fitting together
really beautifully. I need to delete this
one out the way. So if I press G, you can
see now I've grabbed this. I've going to drop
it there, press delete, and delete
it out the way. Finally, then you can see I
need to bring this part over. So this part over
into the top of here. So what I'm going to do,
I'm going to come down. Grab this part, pull
it into place on here. Now, you can see
that it's a little bit out this actual pillar here. This door here, it's actually sticking through a little
bit too much for me. So what I'm going to do
is just grab this part, pull it down a little
bit just so it's not sticking through there,
and there we go. Like I said, the hardest part on this build is bringing everything together. It's
very, very difficult. Now, what I'm going to do
just put it on render view, and you will see in there now, it's got a large darkness,
looks very, very nice. Got some light
shining through here, but the rest of it
is in darkness. Now, you can see as well that this is kind of
poking through here. So before we do anything,
let's move this a little bit over just to hide
those parts out of the way. And there we go, and let's
pull it all together. Now, the last bit is
then is this part here. So we can see we've got
two of these in here, and we can see that they're
underneath the steps. Now, it's up to you how
you want to do this. You can either grab
both of these, so you can grab them
both. Press shift. And what you want to
do then is bring them over to the side of here. Like so. So I'm going to put a post in there. So
don't worry about that. I just want to make
sure that the kind of level the level like so, and I also want
to make sure that they're probably round
about the same map. We might be able
to get away with it because we have these parts, and these are going to hide it a little bit out of the way. This post is going to be a little bit further out like so, and it's also going to
be over here like so. Now, you can see that
if I bring these up, it's going to make this
part a little bit higher, and that might work to our
actual benefit as well. So we might actually
do it that way. So let's actually try
that. So we'll come in. And what we'll do
is grab them both. We'll pull them up because we've got a lot of
room to work with. And there you go. You can see this parts
a little bit higher. And actually thing that
looks a little bit better than what it did before. Okay, so we're really
now moving along. This part, then we have actually got all of the parts
to create this part. We've got the parts
to create the steps. Let's do the steps first. So what I'm going to do is, I'm going to grab my old steps. I'm going to put it
onto object mode. And then what I'm going
to do is press 50. Going to bring it over z
90, just spin it around. And then what I'm going to do is put these steps into place. So first of all, I want to make sure that a merging them out so that a bomb step is
coming to rounda there. And then what I'm going to do is pull them up a little bit. So my bomb step is all
the way over here. I'm just going to
pull them into place. My bomb step is going
to be down there. So let's actually have a look at how these are going to fit. Now, I want my bomb step realistically to be
at the edge here. So if I pull this out, you can see now that if
my bomb step is there, that's going to look
much much nicer, then you know, if it's
down here somewhere, I think that's going
to look better. And I'm also going
to pull it just this way a little bit,
and I want it like that. Now, the last thing
is you can see that it needs pulling this way. So what I'm going to
do because we've got the jumps nod on, I
can pull it this way. And then what I can also do is I can pull it down now
into where my steps are. So if I pull this down, I can pull it right into
the top of there like so, and that then is
looking about right. You can see they're not
very steep these steps. Finally, then let's
come into my old steps. I want to grab my old steps,
which are going to be. If I hide out the
way, I can actually grab the old steps,
press delete. Finally, let's press
ulta, bring them back. Let's put it onto shaded
molder so I can see. I'm going to hide this
piece of water out the way just to make sure that everything
is looking good. You can see now that
this step needs probably pulling down
a good little bit. So I'm just wondering whether I want to pull these
two parts up a little bit. So this one and this one. Do I want to pull
them up a little bit. Let's pull them up a tiny bit. So let's see if we can get away with that, so pull them up. Like, so, I don't
want a gap down here. So I don't want this,
as you can see, there's a little bit of
a gap, let's come round. So let's grab our main block, which is these two here. And you can see they're the
ones leading under there. And then what I want to do is
just move them to the side, and let's pick
them up as to Tad. Like so. There we go. And finally, then, let's make sure now we're happy
with these steps. So these steps got
a little bit of an edge on there. They're
going up to here. And this lip on here, we also need to make sure
that we bring it down, so bring it down, bring it down, like so, and there
we go. All right. Next of all, then, we've got
the actual width problem. So you can see way way too wide. When I bring this over
here, they're going to be all the way over here.
We don't want that. So what I'm going to do
is come to the modifier. I'm going to go to the width, and I'm going to
actually turn it down. And then I'm going
to pull them across. And I want them just in there, like so with this
little bit of lip. There maybe a little bit more, making sure there in the wall. And then what I'm going
to do is, I'm just going to delete this
one out the way. Going to grab this one, shifty, what I'm going to
do is bring it over roundabout to the same like so. And then we go, I think those
steps looking very nice. Let's press soltge,
bring back that water. Let's have a look on the
rendered view once more. And then we go, that's
looking pretty good now. Now if I look from back here, you can see, Walking
through there, you can see it all makes sense. If you're walking down here, walk through here.
I kind of compact. Well, that's exactly
what we're looking for. This bit now coming around
here looks very nice. And we can see now let's
replace this block first. So we'll do that actually
on the next lesson. We'll put it onto shade of view. We'll save that our work, and then we'll get this block in, and we'll work on this bit going around here on the next lesson. Alright, everyone. So I
hope you enjoyed that, and I'll see on the next
one. Thanks a lot. Bye bye.
84. Finishing the Pool Area in the Aztec Scene: Welcome M everyone
to Blender Ford, the modular and Kish
environment guide and this where we left off. So let's come first of
all to our stone blocks. We want a square stone block. So let me see if it's this one. That one's way too small. Let's try this one. We might
be able to use that one. Let's try this. That
one's. You know, what? This one might be
the one that we use. I think we'll use this one. So what I'll do is I'll just
delete this one out the way. And then all I'm going
to do is a press S, and I can scale that up. Press seven. And I want it to be able to house
someone in there. So, you can see at the moment, if I put this in, S the S pin, I can bring it out then to
round about that scale. And what I can also do is press S and x and
pull it out this way, and then let's drop it
into place like so. You can see it's still
not poking out this side, so let's bring it
over a little bit. And then we go that roughly looks or transitions
to the right size. And if I pull this down now, I can pull it into the floor. Like, so. And then
what I can do is I can grab one of these
and put another top on. Now, before I do that, you can see there's a window in there. How would they get in here? It's probably going to
be from underneath. So underneath here, they're
going to climb up there. You know, maybe it's a
lookout tower or something. Again, we have to think, how are they going to get in there. We might want to put a
door on the back of here, you know, so they can
actually come in here. I'm just wondering whether I want to pull it out a little
bit more than what it is. It is set back a little bit, but I'm just wondering whether
I want to set this back. This part back a
little bit more. I think I will,
you know, I think I'm just going to
pull this part back. You know, what I'll pull this part and this part all back. So I'm just going to pull
it back a little bit. And then what I'm going
to do is, I'm just going to set this
pit back as well. So I'm going to set
this back into there. Making sure everything's
fitting still. Yeah, and I think that's
looking a little bit better because it's given me a
little bit more of a shape. Now, then let's
come into this one. And then what we'll do is
we'll grab all of this, so come in, grab the top part, and you're just going
to press shift deep, bring it up and put it
into place, like so. Now you can see that my
windows go to go there. I don't really want it
to be where the edge is. So what I'm gonna do now is
I'm just going to grab this, press Ssans head, pull
it up and into place. And then my window now, we'll go around there. Now, we do have windows so
we can put the window in. We also have the top of the
roof, so we can do that. So let's come to our roofs. This will be the first roof, I think we're going to bring in. And the one we want is going to be this one here. I think
we'll use this one. So let's first of
all, bring it in. There we go. Let's then
put it on top of here. So what I'm going to do is
delete this one out the way. I'm going to come
then to the center of here, grab the center. So, Shift S, urster
selected, grab this part, Shift S, and selection
two n way around. Let's do it again. So
Shift S, urs selected, grab this one, Shift S, and selections
cursor dot zoom in. Then all I want to do pull
this up into top of there, like so, and just make sure
that it's even going around. It should be pretty even. You can, if you want to,
you can squish this in. So you can press S and y and
bring it in a little bit. I think that looks a little bit better. Okay, so
that's that part. The main thing is that we have it higher than
this part here. So you can see it's
still a little bit out. If I really want
to make this nice, I want to actually bring
it up to roundabout. I think that gives it just makes it look better
looking from this angle. You can see it's a bit
more hight variations, and that's what we're
actually looking for. Some of this is
hidden out the way. So I'm going to do that.
What I'm going to do then is I'm going
to grab this block. I'm going to press Sen's and just pull it out a
little bit more, then I'll drop it
down into the floor. L so make sure that
it's in the floor, and there we go, and then let's put this window up a little bit. Like so. And then what
we're going to do then, is just hide this out the way and delete this part
out of the way. So delete it. Let's also
delete this window. We know we're going to
put a window in there. Let's hide this out the way, just make sure we've
gotten a roof on there, and then let's press soltag,
bring back everything. Now let's come to windows, and the window we want is going to be the
square block one. Or the round one,
it's up to you. Let's see what the square
block one looks like. What I'll do is we'll press Shift S and selections cursor. And then I'm going
to pull it out and drop it into place. Like so. Like so. Now, the
other thing is, what I haven't spoke about yet, we definitely definitely
going to need to put a Boolean
into these parts, and we're going to do that
on all the windows and pretty much all the doors
once we've got them in place. I won't do that yet because
it's time consuming. You might as well do them
all at the same time. It does make it easier,
and also we can make the scale of things
all the same as well. So what I'm going
to do for now is I'll just leave this as
kind of a placement. I'm thinking I'll pull
it down to there. I'm going to take a look
now, what that looks like. And I think as well. We'll actually pull this back, so we'll pull it back
more into place. And you can see
another reason why we need to need to
bevel is because we actually want the
window to look like it's not just stuck on the side.
So that's another reason. Alright, so now let's deal
with these parts here. Now, we've got these
big pillars here. We're going to press
old D to bring it out. And I want to stick this
into this part here, so I'm going to
put it over here. And I'm thinking that with this, I might as well have
it coming through here because it breaks
it up a little bit. And then what I can do is I can delete this out of the way, and there we go, that's
looking pretty nice. And then what I can do is
I can press old D again. Bring it round this way, R -90, seven to go over the
top, and let's put this one then into
where the corner is. So if I bring it over, let's
delete this out the way. Bring it over. I want it
right where this corner is. So right around here
just so we're not losing too much of
this kind of corner. Also make sure that
you can see it. This one's pulled out quite far. Let's pull it out
the same. So I want to make sure that
I've got round. But look here, you can see round about this distance,
so you can see, we have to pull it out a
little bit more like so, and now you can see if I
have double tap the A. Yeah, that's look in, realty nice. Now, let's think about
this block here. So first of all, this still has the
geometry nod on, so we'll use that over
on this part here, and then we'll put
this support in. So I'm going to press shift D, bring it over into place. Drop it in then to
where I need it, so seven to go over the
top, press the G b. And we're going to
put it right in the corner there. Just so. It's popping through
a little bit on this corner here
as you can see. And then what I'm going
to do is I'm going to pull it down into the floor. And I want it lower than this. I'm going to delete
this one out the way. I'm gonna come to
this one. I'm going to grab. In fact, you know what? We'll grab all three of these, press delete and vertices, grab the top one them. Me it easier for ourselves, and then we can pull
them down while keeping these stones
exactly the same. And I'm as looking. If I want to make these
stones a little bit wider. We've not got a big
gap on this part here. So you know what?
I think it will. So we can come onto this part. We can go to the width, and we can make them
just a little bit wider, like so, and I think that
now looks a little bit bare. Now let's bring in our supports. Now our supports are here, so we've got this one and this one. Let's press shift D. Let's
delete these out the way. So delete out the
way. Grab these. Press control three,
then you're just going to drag and drop
these into place. Like so, and I'm not
sure if I pressed shifty or D on these
ones, but either way, let's get them into place first, so I can see they need to come out a little bit
on the y, so S Y. So let's come to the bottom. We can pull these
back a little bit, so let's put them
back into place. And then what I can do
is I can drop this down. And into place like so. And it's the back. We want
this edging on here anyway. That's exactly as we want it. But, yeah, that's
looking pretty good. Now, let's bring our guy over
because one thing I want to measure is to make
sure how high this is. I'm just going to put him into place with his feet
on top of here, like so, and if I put him there, you can see now
that's quite high, but it looks still reasonable. The one problem we've
got is now that this is definitely not
going to go through there, so I'm going to pull it
out. And you know what? I think think, if I
pull that out anymore, I'll probably have to pull
this back a little bit. So let's have a look. Let's pull it out
a little bit more. Let's pull this edging out. How far do we have to go? Going
to be a roundabout there. And I'm just looking now, that's still in there,
so that looks good. Double tap the A. And yeah, I think actually looks good. So now what I can do is I
can grab both of these, and I can put them over on this part here,
so the top of here. So what I can do is I
can press t D. Actually, I'm not going to press all D.
I'm going to press shift D, and the reason is I might need to break this one
down a little bit. So I'm going to press shift D. I'm going to drag it up and
then put it into place. Now, you can see why I
might want to break this down is because we've not got
a lot of room on this one. So what I'm going to do is
I'm going to go into it. I'm going to grab this one
here with L L delete vertices. And then what I'm
going to do now is, I'm going to grab this top part, S and Y, bring that
in, I fits in nicely, and then grab this bomb part, and then press S
and y and pull it out to make sure this bit
fits in nicely like so. Finally, then, I
can actually grip rid of this part and this part. And then I can actually
bring these back now into the place where
I actually want them, making sure they're just
above this stone here. And then what I'm
going to do is pull them back into place, tap the A. And there we go. Alright, Dad is
looking pretty nice. Now, then, let's think then
about on the next lesson, actually, we'll think about this part that's
going to go up here. I don't think I'm gonna build. I could build this part, just this part in here. And I can make it
from these parts because it's slightly
bigger than these. Let's look how big these are. So if I press old D, let's press D. I can
bring that over there. I can check out
the scale of this. Yeah, it's not going to be too
far off the scale of this, so I can use this block. I can create a few of
them to create this part. Yeah. I think that's going to be I think that's going to
be easier to do it that way. Let me see what other
archers I've got. I've got these double archers, which are these parts here. So what that means is
actually I can probably carry on building around here. I can put the steps in for sure. I can put this in, so
this wall along here. You can see at the moment
we grow a wall on here. We need to build this wall
this huge block in here. We can get that in as well. We can build all of this up. We can build this up, so we can build a fair amount
still, actually. And I think actually,
you know what, we'll carry on building
this out a little bit more because I think it's really starting to come together now, and I'll give you an
appetite to actually go in and finish the rest of it. Alright, everyone, so hope you enjoyed that, and I'll
see on the next one. I'm gonna save out
my work. And I'll see on the next one.
Thanks a lot. Bye bye.
85. Adding the Temple Base to the Scene: Welcome back
everyone. Blender for the modular and Kash
Environment guide. And we can see at the moment
that this water here, for whatever reason, has the volume on there.
This one doesn't. So what I'm going to do
is, I'm just going to grab my water, grab this one, press Control L, link materials, and there we go.
As simple as that. Now when I put it actually on to render view, double tap the A. You can see now these are
looking exactly the same. Alright, so where
do we go from here? Let's put it back on
the shade of view. What I'm going to do then is
create this part here first. So I'm going to get it into right sort of size
where I want it. I'm going to press the S one, bring it down, bring it over. And then I think
something like this, going to look very nice. And then what I'm looking
for is just to make sure don't cut off this
actual part here. So, in other words, I need to
pull it back a little bit. Like so, and that's I think
going to fit very nicely. Now, what I do is, I'll
pull that up to there. I'm going to press Shift D then. Shift D, not all
D because I want the actual blocks to change to be a little bit of
a different color. So let's actually
have a look at that, make sure they are. And then we go, we
can see they're a little bit of a
different color. And now I'm going to
do is press Shift D. And when I join them all
together now on this, it end up with these blocks
completely different color. So you can see at the
moment that like this, let's see, if I join
them all together, control J, and there we go, now it's actually changed
the color of them. And that's why I did
it that actual way. All right, so on here,
we've got an actual roof, and the roof that's
going to go on here is going to be
our wooden roof, which is this one
here that we created. So what I'll do is I'll
zoom out a little bit. Put it back on shader. I'll bring this one in then. I'm going to spin it
round. So was ad, 180. Let's spin it around. Let's press seven. And what
I want to do is I want to bring it round about
on top of here. Nearly fits perfectly.
As you can see. Let's delete this
one out of the way. So delete it out of the way. Grab my roof then,
and then just pull it up and put it on top of there. Like, so, and there
we go. All right. Now, I'm just wondering whether I want to pull it out a little bit because the edge on on
here is a little bit out, so let's pull it out a
little bit, like so. And then I'll also
pull it this way, a little bit,
making sure it's on top of the biting ninetly. Now, let's bring in our window, so we'll have a window on here. So all I'm going to do is leave that window
out of the way. Come down to where
my windows are. We'll have a round
window on here. Z -90, just so it's
going the right way. Control three them, and
I'll put my window on here. Like so. And then let's
pull it back into place. Into there, so those bars are
poking through, and again, we're going to be bleing these,
so don't worry too much. I just want to make
sure that it's out far enough, like so. Okay, that's looking good. Now let's think
about these steps. I'm going to steal this step. I'm going to press shift D. I'm going to pull it
in to place them, and I'm going to bring
it up to the bottom of this step on here. So up to here, let's delete this
one out the waist so we can actually
see what we're doing. Let's pull this over. We don't want to gap each side of that. That's for sure, and
we probably want it to be a little bit
higher from this bomb. So if I pull this up, there you go, and
I sit on there. And then if I pull this down, low there, like so. And finally, if I
pull this this way, I think that looks pretty nice. And then what I can do
is just change the width of my stairs just
to fit into there, Dub tap the A, and there we go. That's that part. Let's think about this part here.
We'll do this part here. It's a big, big block this, and we need to get this in going all the way all the
way around here, which is no easy task. So let's come in,
and we'll go to our stone blocks,
large stone block. So let's bring that in. I'm going to press seven
to go over the top. And we actually made this
block pretty much for this case because this is
the biggest block in there, and you can see pretty much, now I brought that in, near
enough bits perfectly. So let's make it a
little bit bigger. Bring it out, bring it out. That's it, and let's
put it this way, just so it's fitting into place. And we'll also pull
it this way as well, and then we'll get it
fitting into all of these. So all I'm going to do just
put it round about here, press S and X, and just pull it
out a little bit. L so I don't want it too far, so you can see it's going
a little bit too far over. Let's first of all though
pull it into place, so if I pull it into
place, like so, you will be able
to see though it's not quite come down far enough, so it's dropped below there,
so we need to sort that out. But everything else
in the other side of it looks absolutely fine. So I'm thinking
that the rest of it Is pretty much perfect. It's just this point here, this bomb part here. Now, it's up to
you if you want to create another block from this. And I think it's probably
better off doing that. So what I'm going to do
is, I'm going to come in. I'll grab this part here, so I'll press L shift, and then all I'm going to do
is just bring this block. Down. Because it's only
in the inside of there, so you can't really
see in there. You'll see if I put it onto render view and look in there. We're going to have
a torch in there, but you're not
really going to be able to tell that's just
a block on its own. So that's absolutely fine. Now, the next thing
I want to do is just put it back on material. And what I'm going to do
now is bring in this part because I think we've actually created this part.
Let me have a look. I think it's under roofs. Let's see what this
is actually called. This part here. So,
is it this part? I'm sure I've created it. And I'm just wondering
why it's on the. Let's have a on the
roofs. No, stairs, stone block, supports
windows, arches. Yes, there it is.
So, there it is. It's on the arches. And now
I can bring that part in. Seven, put it over the top. And then G, let's
put it right in the center roughly around here. And then what I'm going to
do is pull it up into place. And then I'm going to
delete this out of the way. I'm going to delete
this out of the way. And there we go. That is
that part. On top of there. And then what I want to
make sure is that I've got enough room for my guy
to walk around here. So if I grab all of these, I'm going to pull them
back a little bit, and now we should
have enough room to walk past and walk around. All right, so now
we've got that in. We need to just make sure that I've pulled
it up high enough. So let's pull it up
a little bit further just so it's in the
floor. Double tap the A. Just make sure we've got no gap. We've got a tiny bit of
gap there. That's fine. That looks as though the
stones put on there. So that's okay. And now what we need to do is
just bring our guy in. And I'm just going
to check that door just to make sure how big it is. It should be a fairly,
fairly chunky door. And if I zoom into
him, put him in place, you can see i bring
him up into place. You can see now that
that is one big door. So that's a huge door, quite a lot of height on it. We that's absolutely fine. Now we need to think about
is these parts here. So all of these are going
to be done with this. So if I come in, I
can bring these up, make them a little bit bigger. So I don't really need to
mess around with the large just need to make sure that
they're the right scales. So these want to be a little bit chunkier. So if
I bring them up. You can see there they are. If I put it into place,
then in the center. What I can do now is, I've got the width and I've
got the thickness, the thickness of, look, yes, that's going that way. So if I put this on
0.65, let's try that. Then what we'll do is we'll
put the width on not 0.65. So N can see the
pretty much square. So let's go to the next
one. Let's put it on 0.75. There we go and put the
width on the width, sorry, the thickness, not 0.75. And there we go. Now,
the only thing is, I'm thinking, Yeah, actually, the randomize
should have worked. Let's delete this one out
the way, and then we'll see. So we can see they're
still random. The only thing I'm not sure about is if they should
be so small now. So first of all, though, let's come in and just drag them down into place, like so. And then what I'll do is I'll
change the actual length. So if I bring this length up, you'll see now that we
can make them bigger. And now you can see they look much much better
than what they did. I can bring this across now. And there we go. That
is looking pretty nice. Now we can do is we can
put it on each of these, so I can bring it to the
next one, so Shift D. Bring it over. And
then what I can actually do is delete
that one out the way. Come back to this
one, change the seed. And there we go. It's
completely different. And then we can do
the same thing again, so Shift D. Bring it over. Drop it into place,
making sure that it's poking through this part here. Let's delete that one out
the way. And there we go. That's looking
pretty nice as well. And I'm wondering, as well. I can also, as well, bring in bring in another one of these or another archway. Yeah, it's a different archway. I think it's a Yeah, it is. It's the same archway, actually. So it's the same archway
on this part here. So, you know what I'll do? I'll actually bring that one in. So I'm going to I'll grab
it over here, actually. I'll grab one of
these. I'll press D. I'll spin it around, so Is ad 90. I'll go over the top. And this
is where I want this one. So this one I want in here. And you can see that
I'm probably going to have to move a lot of this. But let's see when we bring it down, how it's going to fit in. So we're going to
bring it down to here. I'm going to pull it out. I want a roof on there as well. So you can see, actually, this is fitting in quite nicely. It's just this chunky bit here. It's probably sticking
out way way too much. So I'm going to
grab all of these. Just going to pull
them back to see where I want them, so
something like that. And then finally one we're
going to do with this is press S and Y. And just bring it in just so we can actually
see that arch. And I'm also going to pull
it down into the floor. Like, so, and also
with this, as well, I'm going to put a smaller roof on so a smaller roof
on top of here. So let's just grub this,
let it out the way. We've got this over
here. You can see. That's why I want to do it because I want to pull this one up a little bit more,
so let's pull it over. Into there, Let's
pull this back a little bit, see where
we need to go to. And then what we'll do
is just grab this again. S and Y, pull it out
into place, like so. And then once we've got our roof on there, that should look fine. I'll be to move it a
little bit more that way. Alright, let's bring
our roof on there. So if I go to my roofs, I've got It's going to be the
same roof as this one here. So what I'll do is I'll grab
this roof D, spin it round, so is 90, and I think I'll spin it round
again, so I'll love this. Bin as the the arch. So this main arch is this way. I think what I'll do
is turn this round, Ole's 180 to be the right way. Then what I can do is just
simply make it smaller. Seven to go over the top. Let's put it into
place, like so. And I'm going to have to
make this a lot bigger, so let's pull it up, S to
make it a little bit bigger. Pull it into place,
and then S and y, pull it out a little
bit, put it into place. Let's look at this side. So this side, I'm happy with that. Let's
look at the back. Happy with that. There we go. All right. So that is
looking pretty good as well. Now, we're thinking
about this part here. This part here, we can
actually take this part, so shift, bring it over. Because we're going to mess
around with a scale on here. And then what we
want to do is pull this back into against there. So it has to be against there. Now, you can see,
we're going to need a block underneath here, but this is an actual floor. So I'm going to put
my floor in first, all the way up to here and all the way up
to this point here, and then I'll put
another block in here. So we'll do it that way. So what I'm going to do is, I'm
just going to come. I'm going to grab this edge. I'm going to pull it all
the way over into place. Like so. And then what I'm going to do now is I'm
going to pull this one. Yeah, this one's into place
already. I'm happy with that. I'm just wondering about whether I've gone a little bit too far. Let's go back just a little bit, like so, like so. And I definitely
want to pull this over to this part here. So let's pull it over to there. And now we have a good idea of how that is all
going to come together. And I've already
got these parts in so we can actually carry
on building round. It's just the main
side on this and some other parts that
we haven't got yet. Now, let's say about our work. And then what we'll
do on the next one is we'll start getting
more of these posts in. I'll need to change over
the seed on this one, and get them in the other side, change the seeds over again, and then we've pretty
much done with that. And we're going to be able
to look at this soon. I think when we go
back, we'll build, and still need my steps in. I'm just looking
at all the little parts that I'm going to need. You can see I need a block here, which is going to be this block here that
we're talking about. Anyway, we'll get
all of that in. You can see it's still
quite a lot of work to go, but you can see we've got a lot of the parts already in here. And I think After
the next lesson, we'll go back then to build
in some of the parts. Alright, everyone. So I
hope you enjoyed that, and I'll see you in the next
one. Thanks a lot. Bye bye.
86. Integrating Roof Structures into the Scene: Welcome back everyone
to blend for the modular and Kit
bash environment guide, and this is where we left off. All right, so let's, first of all, if we come to this one, we can see this as Sd six, Sd five and Sd six. So let's put this one on
nine, something like that. Then what we'll do is we'll
grab all three of these. And we're going to
press Shift D. And what we're going to do is drag them over then into place
over the other side. And then what I'll do is I'll
grab all of these parts, and I'm going to actually
delete them off. So delete delete this part here, delete all of these, just keep deleting them
out of the way. We can see that we did
have one that was in here. So all I'm going to
do is press shift d. Bring it over and put this one into place
round about the center. So you can see here the center
will be round about here, pull it out a little
bit, like so. And I'm also thinking
that I will pull these out a little bit more like so. And then I'll delete
all of these. I delete seventh go
over the top again. I'm just looking how far these are out now. You know what? I think they look
pretty good. All right. So what I'll do now is, I'll bring in the supports. So we'll bring in these
supports along here. So first of all, let's go. If we come over here,
we can see we've got supports in here already. So I might as well
use these because I'm not going to be cutting. I might actually be, you know. So what I'll do is, I'll press. I'll bring them over, and I'll press seven to
go over the top. And this one here
is the one where I think I will be making
it a little bit bigger. So what I'll do is, I'll
pull it up into place. I'm going to grab my
little guy just to make sure he's on there looking over. So then we can see how high these are going
to have to go up. We can see they're a little
bit too high like that. I'm going to drop them down. You imagine a king or something looking over his
empire over here, like so. So something like that. And then what I want to do is, I can probably get away with shift D and then
joining these together. Probably get away with
that. So let's try shift D. Bring them over.
Join them together. So this one here, I'll delete. And then this one
here, I'll bring over, press S and Y and bring it
over like so, and there we go. And then what I'll
do with this one? Do I need to re unwrap it? That's the question. I
don't actually think so. I think I can get away
with that. Like so. So I think we can
do it this way. And then from there we can
use that on these parts here. So we'll see how
that's going to work. So Shift D, spin it around. You can see if only
grabbed one of them. So let's delete
those out the way. And then I'll come back
to it, grab these, like so Shift D, and then z -90, spin it around. We've got the right
height already. We just need to then
put it into place. So something like that. And maybe maybe if I
pull this over this way, you can see that I
can probably get away with having
the stone there, but not this stone in here. So what I'll do is I'll come in, and I'll come to this part. So L, and I'm going to delete it out the way.
So delete vertices. And what I'll do is
I'll come to this part, and then press S
and x this time. Bring it into place,
lot it in there. Like, so, and finally, then we just want to
bring this part out. So we're going to
bring them out. Over the edge of there, which
means then we can see now. We've got an edge here.
We've got an edge here. Just means that we need to bring these parts
out a little bit. So bring them out. They're
actually out there. I'm just wondering whether this one's a little
bit. You know what? Just wondering whether that's
a little bit too far out, but I don't think so actually,
I think that's fine. And then what I'll do is
I'll bring this one over. This one over here. So I need to press
shift. Bring it over. We can see that this one's
a little bit out now, so I'm just going to put
it round about there, and then I'll grab
this and just pull it more into this position here. That's looking nice.
And then what I'll do is I'll bring I
should have this one, and this one, I should be
able to bring these over. So shift, bring them over. Plot that one into
place like so. Grab this one, and then S and Y bring it down
into place, like. So now what I want to do
is just grab one of them. So shift again, z
90, spin it round. And this time,
we're going to put this into the top of there. So I'm going to bring
it over. Bring it over. Go to make it a
little bit bigger, so S and X, P it out lit a tiny bit. And now it's up to you where you actually want
this to come to. You might want it just
just on top of there, like so. You know what? I think that looks
really cool like that, so I'm going to keep
that like this. Now, I could, I guess, mirror these over
to the other side, or I could just
drag them all over. I think, first of all,
we'll bring this one over, so I'm going to press 50, go to bring it over, making sure it's in the top of there. And I'm just wondering
whether to bring them up. Like, so, just Tad. And I'm also wondering whether I need to pull them
out a little bit. You know, what I think actually, they look pretty good like that. I'm just wondering
whether I need to bring these out just a
little bit more. Let's have a look where
it comes to on here. And maybe. Maybe bring them
out just a little bit more. Just creating a
little bit more of a lip on this part here, so they're not too
close together. Yeah, something like this. And then what I'll do is
I'll grab all of these. All of these, and then shifty. Drag them over to this
side and then rotate them. So I'll dead 180
spin them round, seven to go over the top. G. In fact, let's not use G because they've
been spun around. And you can see that they are in the wrong
section now as well. So maybe, maybe that wasn't the best plan to actually
spin them around. So I'm just going to spin
them around this way, and then I should be able to
mirror them the other way. So let's see if that
actually works. So if we go to mirror, and we'll mirror on
the y, not the y. Let's mirror on
the x, The mirror on the x, and there we go. Alright, that might
actually work now. So let's put them into place, and let's have them coming back. Do here into place, and I can see that these now probably a little
bit too far out. Let's have a look at
the gap under here. Actually, they're about
right. They're about right. That looks pretty much perfect. Just go to pull them into place. Double tap the A.
And there we go. That is looking really cool. Okay, so now let's just
put in this block here. And I'm just wondering, We've got we need a
block in here as well. I'm just wondering what block I think we'll put in
this block first. So this block is this huge, huge block over here. Let's actually have a
look at what that is. Yeah, it's just a white block, like, so I ever get rid of that, then what I can do is
I can hide this wall, so it can hide the top of here. And then what I can do is
I can put a block in here. So if I go to my stone blocks, I should be able to
grab this one here. Make it a little bit
bigger, so let's press S, and then let's pull it up into
place into place like so. Go around to this side, and now you'll see that that
stone block is in. Now, the one thing is,
if I come into here, so go into there, you can see it needs pulling
forward a long way. Let's go in a little bit more. Let's pull it out a
little bit more like so. And I think now
that's going to fit into place, much, much nicer. Now, if I press old tape, you can see, we still
need to bring it up. So in other words, if I
just grab this one in here, and I pull it up, so pull it
up, pull it up, pull it up. You see now it's
coming out to this, so let's keep pulling it up. Pull it down a
little bit. Like so. There we go. Now let's pull
it this way into place. So when you can see
now that's fitting in. Pretty nice, just want to make sure the bottom of it
is not coming through. So sen's ad, let's pull it out. Let's pull it into the
floor a little bit. Let's come round this
top, now and you can see it stuck through
that floor a little bit. We don't really want that,
so let's pull it down. And then let's
come to this part, and what we'll do is we'll pull this down a slight bit as well. L so double tap the A. And there we go, we've got a little bit
of an alcove on there. That all suits that very well. The door is in there now,
everything's in there. And yeah, this is really
starting to come together. Now, before we finish,
let's come in, and what we'll do is
we'll save our work, first of all, and
we'll just quickly bring in this part here. So it's another stone
block, so we'll come. Let's have a look
if it's this one. That one looks a
little bit too big. So let's try this one. No, let's try this one. You know what? Let's
just grab this one. And what we'll do is we'll
create it from this. In fact, We won't use that
one. We'll use this one. This will make it easier. So shift D. Let's
bring it over then. Let's put it into place, and you can see, Asa
bring this one over. I actually nearly
fits perfectly. So let's first of all, bring you up into place. So you can see here, it
should be two stone blocks. We can get rid of all of
these, so if we come in, and grab this one, this
one, and this one, press delete, and vertices.
Come back to it now. And then while I should
be able to do is Essens d. Let's press Control A, first of all, all transforms,
the origin geometry. Essens d. Let's pull it up. That's why I wasn't
working. Let's pull it up. Let's get rid of
this one as well. So delete vertices. Control A trans right
clicks the origin geometry. And now we should be able
to drop that into place, so drop it into place, like so, and then we'll press essens
d. Pull it into place. Pull it out. And then all I want to do now is pull it that way a
little bit as well. So I'm just going to
come in, grab this one, and this face on the inside, you should be able to see
now this face and this face. There we go, then that off, and then we should be able
to pull them into place. Like so just to
the side of there. Making sure it's in.
And then finally, what I want to do now is
just put a top on this. And the top I'm going to use. So if I delete this
out of the way, let's go to our roofs. And the top I want to use
will be this one here. So we'll use this one.
I'll drop that on there. I'll pull it into place. I'll delete this out the way. So this white one here
out the way, press the S, and then I'll put
this into place now, so you can see need
to come in this way. So S and y, and then S and X. And then I'll pull it
up onto the top of a, into here, so S and x. There we go, and then maybe
out a little bit as well. D top the A, and there we go. Now, the one thing is, I want to decide to make
it a little bit lower, so just a little bit
lower than this lip here, and then we got a thing that
looks perfect like that. All right, so let's
save our work. And as I said, on the
next lesson, then, we'll head on over back to our part section
and we'll start creating some more parts like the doors and like the
other parts of the roof. So like these parts of the roof, we haven't actually got
that much left to create. The thing is the things we
have got left to create are a lot more complex than the things we've
created already. So things like the markets, the archers over here, they're pretty complex parts, but we've done enough now to actually Get to that stage and have no problems really
getting through that. Alright, everyone. I
hope you enjoyed that, and I'll see you in the next
one. Thanks a lot. Bye bye.
87. Modeling Doors for the Aztec Architecture: Welcome back everyone
to plan for the modulate and kit ash
environment guide, and this is where
we left it off. Well, it's not actually
where we left it off, but I hopped and
over into the parts. And what I'm going to
do is, first of all, move my flows over to
this section here. And then what I'm going to do is grab this part here for shifty, drag it out, and I'm going
to change this over. Now, I think the first thing we'll start with is the dolls. So leads coming over.
Minus this off. Open it up, and the one
we want references, and we're going to pick our
doors which are of a look. Windows, doors. Here they are. All right. So you
can see here we've got three or types of doors, really, because
these two actually have just some stone
steps coming off them. So we'll create
those. We'll create probably this door here first, and you'll notice with this
door It's actually made for, you know, the parts that
actually are square. We want it to come out
a little bit on those. And these doors can actually go back in as well with a
Boolean if we want to. And then we've got this
huge, huge temple door. So let's first of all get the scaling as we do every time. So all I'm going to
do is press Shift A, I'm going to bring in a cube, and then we're going
to press shift D. And then shift D once more. And then I'll get the
scaling for this door first. So this door scaling, so this one here is
going to be 1.63. 0.346 and 2.46 like so, and then we'll come to this one. And this one's going to be this small door here
because the steps we'll put those on after. So with that one, we'll do 1.37 0.328 and 2.22, like so. And then finally, we've
got this huge door here. So the scale on that
is going to be 2.71. 0.82, and then 3.85. Now, remember that
most of the scale on that is this part
on top of here, so the door actually
isn't this part here, so don't worry about that one. So let's start then with
this simple door here, which is this first one here. So let's do this one first. And first of all,
what I'll do is, I've just this is just
to give you a scale. So it is easier if you bring your guy over, put
him in front of it, so if I press one, make sure that these then are
on the ground plane, so I'm going to pull them
mo onto the ground plane. I can see this one's
a little bit short. I can see that this
one needs coming up a fair amount, so
something like this. All right, from
there, then we can actually create the door, and then create probably the structure that
goes around them. I think that'll be
the easiest way. So let's first of
all create the door, and we'll create it from here, but then we'll split it off. So all I'm going to
do is I will come. I'll bring in one
actual edge loop, so I'm going to press control, bring in an edge loop, and
I'll put it just above there, so the door you can see
still quite high for a door. And then what I'll do is, I'll
press Control left click, right click, and then Control B. Bring them all the way down. And then what I'll do is
I'll put them roundab here, and we can see if
we do that, and we put our guy in the middle. We can see if I grab
the door on him. We can see now it's pretty much about the right
sort of scale. Next of all, then,
what I want to do is I want to pull these out because you can see they're pulled out slightly along here. So let's do that next,
so I want to come in. Grab this one and this one. I'll press S and X and pull
them out very slightly, like, so then what I'll do is I'll split this off now because we don't need this center part. So I can split this off
all the way around here. So I can do is press
y, split it off. And what that enables me to
do now is pull these out. So these front pieces, we're going to pull
out very slightly, like, so putting them
in front of the door. Alright, so this is
looking quite nice. Now, the only thing
is, I think that this is a little bit
too chunky on the top. So I'm just going
to come in now. Grab the top, grab the top and pull that down,
because bearing in mind, when I give you the
scale, it's not included like this
part on top of here, so we need to put that in. So the whole height will
be included in that. So we need to just take
that into account. Let's put that
center part in then. So I'll just press
shift S. Us selected, Shift A, let's bring in a cube. Let's make it a
little bit smaller. And then what I'll do is I'll
bring it in so you can see, now I can bring it in, so S and X, et's bring it in. Like so. And then what we'll
do is we'll make this little outcropping on here. First of all, though, is this does show we pull it out a little bit
more? I think we will. All right, so. And then
I'll press to insert, and then finally E,
and we'll pull it out. And then we go, there is
the first part of our door. Now, of course, we do have
a few problems here in that I've grabbed my guy and this. So, let's grab this part here. Let's press P,
selection, like so. And then what I can do
is I can pull this back, pull this back to where
I actually want my door. So somewhere around there. Alright, let's hide
this out the way. And then what I want to do
now is split these parts off so I can actually
work with them. So what I'm going to do is
I'll come to this part first. And I'll come to
what I want to do is I want to grab the bomb of this one and the
bomb of this one. Control plus, and then I can
press y and split them off. And then finally what
I can do is I can press A and come on in mesh. And what we're going
to do is clean up and fill holes. And there we go. Now, we should have now
that these are split off, which they are, so that's great. Now all I'm going to do is just split this
part off as well. So shift and click, Y, split it off, A, mesh, clean up, fill holes. And now finally I can
grab both of these. Pull them out very, very
slightly, like, so, grab the top of these, and then pull them out very, very slightly, like so, and we should end up with a little bit of a lip on there and a little bit of a lip on this part here,
which is what we want. So there's this
part here, like so. Okay, so all looking good. Now, the last of all, do
we want blocks in here? I think it would be
better if we did. So Control R. Two, left
click, right click. And you can see it goes all the way
around. So that's fine. Control R, two, left click, right click, L so. Alright, so that's looking
good we've got our blocks in. Now what we want to do is
split each of these off. So if I come old
shift and click, we know that this is
split off from here. So all I can do is old shift and click going all
the way around here. Same around here, Y, A again, mesh, and cleanup and B
Halls. And there we go. Now, let's check that out. So Control A all transforms,
set origins geometry. Let's come in and just look in, it's mid stone material. So we'll come to our material. Press tab A U, Smart UV project. Click Okay, down arrow mid mid Stone. Let's
bring that in. And there we go.
And then finally, what we want to do
is bring in a Bevel. So generate Bevel and
Nought Point Naught five. O point not five. Non point, not not five. There we go. And now you
can see that's looking. It's actually looking
big than my old door. Now, we can see, we do have
a problem in that this, for some reason, has
got a double on there. So what I'm going to do
is grab the whole thing. So A, and then mesh, clean up, merged by
distance. And there we go. That's merged the mo,
but you can see we do have a little bit of a
problem here in that. Messing around with these, and I don't actually know why that
happened, but we'll see. Let's first of all come
in and delete faces. Let's come in and delete
this face as well, just in case there's
an issue with this because it
looks like there is. Then finally, we'll do is,
I'll come in to this one. Is there an issue with
this face as well? It looks kind of like there
is? What are we going to do? I'll come to this
one? Here we go. This one here, delete faces. Come to this one, delete
faces, and there we go. And I think what's
happened is there. Is that for some reason, it's joined all of these parts up, and we need to now fix it. So how are we going to fix it? First of all, let's come in, and what we'll do is we can
see that this is one of the main problems in
that for some reason, split, put this together with the rest of it, and
we don't really want that. So let's delete faces. Let's fix these parts then. So what I'm going to do is
come in F and fix these parts. So F fix these parts. And then what we'll do
is we'll hide these two. You can see as well that
these are all joined as well. They shouldn't be. Let's
go back. You know what? Let's go back and
see what's going on here because this is
a little bit of a mess. And I don't really want that. So we've got our Bvalon. Let's come in then,
first of all, and see if we can
grab all of these. So yes, we can. Let's press P, selection, split them
off. And there we go. Let's press Control A.
Well, let's go into it. And first of all, there's
always control A, all transforms the
origin geometry. And then A to grow
everything in edit mode, shift, b lit them up, and you can see stigar problem. So we can see here that these are still joined for
whatever reason. I really don't understand why
this is connected to there. But anyway, let's come in, and what we'll do is
we'll delete these faces, first of all, like so. And then what we'll do
is fill these faces in. So F, fill that face in, fill this face in with F.
And then what we'll do is we'll come down and put
this to not point n not five. And there we go. That's
the first part done. Don't know why that happened. Sometimes it does.
Now, this next part. So I think we'll do that
on the next lesson. This part looks a
little bit more tricky. I don't know what's
happened to it, but we'll able to fix it,
so don't worry about that. Alright, everyone, so
let's save out our work. And it's funny
that we're dealing with something that
seems to be so simple, and yet we have a lot
of problems with it. Maybe maybe it's the
way that I actually did it with filling
holes and things. Normally, as you can see,
it works out perfectly. On this occasion, it looks
like we've got some errors. But actually, that's a
good thing because it also teaches you how to fix the errors that
you create as well. Alright, everyone. Hope you enjoyed that or
didn't enjoy that, and I'll see you
on the next one. Thanks a lot. Bye bye.
88. Maintaining the Aztec Aesthetic in Modeling: Welcome back everyone
to Blender for the modular and Kit
ash Environment guide. And this is the mess
that we left it with. So let's come in first of all. Let's grab all of these, so you can see this is a mess, and let's press P selection
and split it all off. And then what I'm
going to do now is, I'm gonna come to this shift H to hide everything
else out of the way. And let's see what's
going on with this mess. So first of all, I want
to split this one off. If I split this off, so shift and click going
all the way around. And let's press y, split it off or P. Let's press
P even selection, like so. Hide this one. So just
this part out of the way, and now we've got this mess and we can see what's going on. If I come in then,
press delete and faces and delete and faces, and now I can do is and come in join both of these with F, both of these with
F, Both of these with F and both of these
with F. There we go. Put this on naught point
Nought five, like so. And finally, let's press t
and bring back these parts. And hopefully,
hopefully we should now be able to fix
this part here. So grab this part, shift H. Let's see what's
going on with it. Let's join these two first. So, F, let's join these two. F. Let's join these two
with F. And finally, then, let's put it on Not Point not Not five. And there we go. Let's fix that bit. Now,
let's press all tag. And what we need to do now is we need to grab each of these, and we need to re unwrap them. So tab A U, Smart U V, project, click Okay. And there we go. It's fixed. Finally. Now,
let's come into this part. I'm going to grab
the front of here. I'm going to press Control plus. I'm also going to put this
on Not point not Not five. And then what I'm going to
do is go into material. I'm going to click the plus, plus, down arrow,
and we want blue. And we want the blue stone, and let's click a
sign, and there we go. So that is our blue
stone on there. Now what we need is
our actual door. So I don't know if we
built a few doors yet. I don't think so, so
we'll bring in our door. You know what? I'm going
to just leave that there. And what I'm going to do is, I'm just going to come
to the backup here. Delete these, so delete face, and you should end up
with just this part here. Now, before we do anything, We know the door's going to be a right size, so I
can move my guy over. I can reset them on
my transformations, like so, so set origins
geometry. I can press tab then. And what I'm going
to do then is bring in some edge loops.
So Control law. Let's bring in five,
left click, right click. We're going to right
click and mark a scam. We actually made some barrels. It's very, very similar
to making barrels. So once you mark seams, what you want to do
then is control law, bring in some more edge loops, left click, right click, and now you can come in and
split these off in a minute. Not quite yet. I'm
just thinking, do we want to split
these off yet? I think we should yes, we will split them off now. So we'll come in, and
we'll grab each of these. We'll press y, split them off. And then what I want
to do is press A, and then E and pull those out. Now I'm going to grab
the whole thing with A, so make sure it's all grabbed, and then I'm going to turn
off proportional editing, bring them back into
place where I want them. So Something like this, I think. Like that. And the reason why we put all of
these edge loops down here is because now I can come to the front of
here. So come to these. So shift selecting,
control selecting, shift, selecting,
control selecting, and just keep going on. And then what you're going to do is you're going to go to mesh, and we're going to
go to transform, and we're going to
go to randomize. It should just randomize the front ones and
leave the back ones. That is exactly what we want. And what we want to do now
is put this on Not point, not not one, Like, so if you want to turn
it up a tiny bit, not that way, it's turn
it up the other way. Like, so you can do. So you can see now this is
what it's going to look like, and you can see what work
that's actually done. It's randomized
the bottom of it. It's randomized the top of it. If you come to the side, you can see it looks very, very nice. Now, the wood on here is going
to be dark wood material. So let's actually bring
that in, so A, U, Smart U V project, click K, and then down arrow, wood. Like so, and the one we
want on is the dark wood, and we don't need to sign
it, and there it is. Now, let's put it on
rendered view and have a quick look at what this
actually looks like then. So rendered view, the
same as our barrel. And there you go, you can see
exactly what that's done. Round the back
though, you can see that they're all still
perfectly together. That is why we did it that way. You can see now that
because they're together, when you look through here, you're not seeing any gaps in the water or
anything like that. That is why we did it this way. So it's a really, really easy, nice trick to do, and you get a really, really
fantastic result. Okay, so that's the
first one done. You'll notice on here that this has been brought in a
little bit on the top. Up to you, whether
you want to do that. I actually think it looks
pretty nice the way it is. If you do want to do that, where you can do is you can just grab all of this and then just squeeze it all in with
proportional editing on. Now, before we do that, we don't actually have
a bevel on here. So what I'm going to
do is I'm going to join all of this up together. So all of these, I'm going to press control J, join it all. And then we'll have a
bevel on there as well, which will make it look
even nicer like so. And from here,
then, like I said, you can grab both of these like so, with
proportionality on. Let's put it on smooth, and then all I want to do is press S and X and
bring these in. Now at the moment, it needs
to have connected only off. Press one to going
into front view, S and X, and then
we can bring it in. So if I bring all this out, I should be able to
bring it in slightly, like so, and there we go, we've got that nice
form that we wanted. Maybe this one was
a bit thin anyway. Okay, so now we're
on to the next door. Now, this door here
has a top on here. So first of all, we
need to make sure. We grab our guy. Let's pull
him over. Let's make sure. It's going to be
the right height. So something like that
looks about right. Now you can see it's quite
a chunky door, this one. It's got a top on it, so
let's put that top on first because the top
is pretty easy to do. A I'm going to do
is, I'll grab this, I'll press Shift
S, s to selected. I'll press shift A.
I'll bring in a cube. So let's bring in a cube.
Let's make it smaller. Let's also put it onto
material view or shade view. Let's press the S
p, bring it up. And I'm going to put
that on top of there. I'm obviously going to
pull it out a little bit more as well. So S and y. And then S and X pull it out
just to the edge of here. My maybe a little bit further, so S and X. There we go. Alright, so now let's
create these parts on top. We'll make it a little
bit thinner as well. So SN, Let's make it
a little bit thinner. Like so, and I'm thinking, I'll pull this down to here. I'll press one, and
maybe pull it up, and there we go,
something like this. Now, lastly, before
doing it with this, what I want to do is select this one and bring the
top of this down. So I'm just going to
select through here, so you can see I can
grab my top here, bring it down then into place
without portion to know. We don't want that on, bring it down just to the top of it, like so, and then we
can turn that off. And now we're ready to rock
and roll with this part here. So all I'm going to
do is first of all, We need a number of
edge loops in there. So I'm going to
press Control law. Left click, right click. Control B, and I'll
bring them all the way then up to the edges
where I don't want it, so I'll want these
centered. L so. Then what I'm going to
do is press Control Law. Left click, right click, Control B, Beverly how again, so how big I want them, L so, and final n Control law. Bring in a few edge loops then. Left click, right click. And now we can come in and grab each of these going
all the way over here. I can press the
eyeban, bring them in, press the eyeball again, bring them Now, you will see that they're not
coming in properly. So as before, we reset
all the transforms, set origin through geometry. And now let's try that
again, so I and I, and there we go,
and then finally E to pull them out, and that's it. It's as simple as that
to create that part. Now, something a little bit more complex is this part here. First of all, what we'll do
is we'll grab this plane, shift D. So pull it
out very slightly, just to front of there. We'll delete this
one out of the way, so L, delete Ts. And then what we're going
to do is press Control, left click, right click. And what I'm trying to do here
actually is break it off. So before I do that, Since I've got that right
in the center there, Ag press Shift S,
cursor selected, and come to face select. Delete this one out of the way, so delete faces back
to this one then, and what I want to do is
reset the transformation. So reset all transforms
origins geometry, and then come over
and add in a mirror. Now, when you bring the mirror, it's not going to work properly because we didn't put the
origin at the cursor, or right clicks the origin
through the cursor, and there we go,
now we've actually got a mirror, and
we've got our door. Now, I want to bring
this one slightly back, so I want to pull this
slightly slightly back. Like, so just making a tiny, tiny gap down there just so
I have a good visual on it. And from here now, I can
actually pull my guy over, and I can actually start
creating this door on here. So what I'm going to do is
I'm going to press tab. I'm going to go in. I'm
going to press one. And what I want to do is
I want to put a kind of V going this way and
a V going that way. So all I'm going to
do is press Control. Left click, right click. Control heavily out to
where I actually want them. Or maybe something like that. K then to bring a knife tool, and all you're going to
do is click on this point and this point, it's
the Enter bonne. And then again, on this point on this point,
press the ter bone. And then finally, you're
just going to come in and grab this
one and this one. Now, the thing is,
before we do that, we might want to
extrude this out, all of this out because we actually want this door to
have some thickness on it. So all I'm going
to do is press L, and we're going to extrude
it then all back, like so, making it relatively
thick because it is going to stick
into the wall, so even further than
what you think, and now we can come
to these two parts. And all I'm going to do is
press to bring them in. Like so, and then we
want to press E and pull them out like
so, and there you go. That's that part
of the door done. Now, let's think about this
gold section on this door. So while I'm here, I
might as well, come here, press Shift S, sa selected, press Shift A, bring in a cube. And as I make this cube smaller, you will see then that it goes
to the other side as well. Now, the thing is, it's kind
of a push for the door. So we need to make sure that our guy is going to
be the right hi. So if I press one, you can
see that this on here, so this cube is going to need to come up to run about here. And there we go
something like that. Alright, so what
I'm gonna do then is I'm just gonna press the tab. I'm going to save out my
work and on the next lesson, we should easily easily be
able to get this door done. And then we'll be onto
the final temple door. Alright, everyone.
Hope you enjoyed that. I'll see on the next one.
Thanks a lot. Bye bye.
89. Troubleshooting Door Shader Issues: Go, M, everyone
to lend the four, the modulate and Kish
environment guide, and this is where
we left it off. Alright, now we've got our
actual height for these. Let's move our
guide to the side. And what I'm going to do is
come in, and I'll press one. And what I want to do is
create, first of all, the top of these, so
SNS, pull them down. Let's bring them in then, so S and y, we don't
want to stuck out. And then what I want to do
now is create this V shape. So the way I'll do it
is just press shift. Bring this down
underneath it slightly. S and X pull it out. Like, so, and then what I want
to do is bring this down. So I'm going to
bring this bomb of it down to where I
actually want it. And finally, I want to merge
these two into each other. So I'm just going to grab
this one and this one. I'm going to right
click, and we have one that says merge, hopefully. If we haven't,
let's see if we've got one that says
merge on the M. So I'm going to
merge at at center. And there you go. It doesn't
actually merge properly, and the reason is we can't merge edges. So
what I'm gonna do? Kind of merge edges.
Let's have a look. I don't actually think
there's a merge on edges. So what I'll do is,
I'll just. I'll grab the back of each of these. So I'm just going to
show through there. So I'm grabbing this
one and this one. I'm going to press M. And I'm going to merge at
the center, this one, and this one, M merge at the center like
so. And there you go. The last thing I'm
going to do then is I need to bring
both of these in, or I can just grab
the front of it. So I think for us, it'll be easier if we just
grab the front of it. So shifty, just bring
it out slightly. Grab this part L and
delete and rtses. Then what we're going to
do is just grab this part, press the iborn, to bring it in. And then all we'll do is press delete and delete
bases this time. Then we'll grab it with L. I'm going to pull
it back into place. And then I'm going to press
E and just extrude it back into that part
there. Then there you go. Symbol as that to
make the actual door. And now you've got
the skill to do that. You can actually create something probably a little
bit more complex than that. Okay, so this is the first door. Now we want one with
the actual steps. So what I'm going to do is
just shift, grab them both. Pull them over to
left hand side. And what I'll do is I'll
paint these up and I'll get the bevels in and
all that sort of good stuff before
doing anything else. So I'm going to go to object, convert to mesh because
we've got a mir on here. And then what I'm going to do is press Control and J,
join them together. Control A, reset
all the transforms. And then we'll bring in
the actual No, we won't. We'll bring in a bevel first. Let's bring in a bevel.
So generate a bevel. Let's put it on naught
point naught five, like so. And then we'll bring
in the materials now. So the materials for this
are going to be midtone, red, stone, blue stone, and some scratch gold. So these are actually
stone these doors. Maybe maybe let's just see
if we've got some wood, first of all, so wood. I'm just looking blue wood. We've actually got
some blue wood. I don't know why
I didn't use it. So let's first of all, come in. And what we'll do is we'll
grab we'll grab all of it, and I'll just pour in wood
and we'll bring in blue wood, and let's have a look where
that actually looks like. Let's wrap it as well. So I'm going to
grab it all with A, U, smart U V, project. Click. Yeah, you know what? The blue wood looks much
better than the stone. I am wondering if I want to make this a
little bit smaller, I think it's a
little bit too big. So if I come over to shading, let's go in then to the wood. Let's press dot so
we can zoom in. Let's put it onto material. And in fat, let's put
it on rendered view, and then we're going to
have a brilliant view of what that's
going to look like. And the sun is very, very
bright over this area. So let's come in and turn down our sun
intensity a little bit. In fact, you know what? We won't turn the sun intensity down. What we'll do is
rotate it round. Now, if you were ever dealing
with the sun in blender, this sky, actual in blender, make sure you save
how you work first, especially if you rotate in
this round and render view, just make sure you save it out just in case you get a crash. Now, let's rotate that round, and that then is going to give us the perfect view
of what we want. You see, the gradient is really, really harsh on here, and I don't really like that. So what I'm going to do is, I'm just going to set
this to one for now. Let's have a what
that looks like. And I can see it's really, really large on here. So I'm going to come over here. I'm going to set this to three. Let's have a look
what that looks like. And then what I'll do is
I'll turn up now this. So let's put it on
two. Let's turn it up. And I can see now that's
looking a little bit bare. Albeit. We can see in here. It doesn't actually
look like it's been unwrapped properly.
That's the problem. So what I'm going to do instead is I'm going to
grab all of these, and I'm going to press U, Smart U V P j. Click
Okay. Let's unwrap them. And it's these parts here
that are causing the problem. So these parts in here that
are causing the problem, and I'm just wondering why they're not looking
like this here. So you can see this here. Why aren't they
looking like that? So let's grab just these just to give you a test,
and let's pull them up. And let's go the other way now. So we'll press tab, we'll
go the other way to test it out. Let's press tab. And they're looking a little
bit better than what it was. Still nothing like
this part here. So let's let's grab this one. That's how small that one
is. Let's grab this one. Press the S one, make
it even smaller. I'm just wondering. Why we've
got so much green on there. Let's press one. Let's see what we've actually
got going on here. So let's bring this up.
This is the There we go. That's what the issue was. Let's bring it up
a little bit more. Too much green on there. So I'm just going
to bring that up. Now you can see
they're looking be. Now, let's try that once more. So what I'm gonna do is
grab both of these again. U, Smart U V PJ. Click Okay. There we go. Look, Tonstons bet. And from here, then we
might be able to come in. And turn up the strength to two. Let's try that. Yes, and then they're looking
much, much better. That's more what I'm
actually looking for. The only thing is, I would
say is that these parts here, they need to be much,
much smaller, maybe. So let's just grab these and
let's press A and then S, bring them down a little
bit, press the tab. Yes, and that's what
I'm looking for. They're looking much better now. All right, so we've
got through that part. I'm just going to
set this down a little bit lower, so 1.5. There we go. And I'm still still not happy
with this green. This green on here, is, doesn't actually look that
good, Let's turn this up. Let's turn this one
up. I'm just going to keep fiddling around with it until I get it to where I'm actually happy
with it. There we go. That's that wood
grain coming through. Bring this one down. Like so. And the wood going all
the way across there. I'm happy with it
just this wood here, for some reason.
I don't know why. But it's not unwrapping
the way that I want to. I'm just
going to unwrap it. Yeah, now it's rapping It's
unwrapping properly now. I think let's just
try that again. So control A or transform,
origin to geometry. Now, let's give
this another try. So we can see now the difference between
them is night and day. So when I'm going
to do this again, I'll come in and
grab all of this, and I'll try it on more. So Smart UV project, click Okay. And yeah, now they've
wrapped absolutely fine. So now we can actually
mess around with this. Bring this up a little bit, like so, bring this
back a little bit. You know what? That's probably going
to want to go up there. There we go. And then what
I'll do is I'll now come in. Grab all of this, press the S bone to bring
it back a little bit. And now we should have exactly
what we're looking for. No, gone too far, so
let's put it back. You know what? I'm going
to leave it like that. I'm not going to mess
around with these anymore. I think they look good enough. So yeah, maybe we should have
got a better wood on these. Maybe something like
this, put in blue. Let me just fiddle around
with it a little more. I don't want to
take too much time messing around with
this, if I can help it. There we go. There we go. Now, that is looking better. That is looking
much, much better. Okay. All right, I'm
happy with those. Finally, I'm happy with those. Now, let's come in and
bring in the stone then. So what I'm gonna do?
I'm gonna go over here. I'm gonna click the plus. And on this one, it's going
to be mid midtone. Mid Stone. I'm going to click plus. I'm going to click
the Down arrow. And this time we're going
for blue stone. Blue Stone. Is it blue Stone? No?
It's not it's Redstone? Let's go Red and red Stone. And then we want the gold. So bring in the gold. Scratch gold. There we go. Alright, so now let's come in. And what we'll do is
we'll grab all of the top and we'll put
it on midtone, like so. And then we'll grab
each one of these. Press Control plus, and
what we're going to do is put those on Redstone. We'll click a sign, Red Stone. Just make sure that
you're happy with how far back they're
going, which I am. And then finally, the gold, so I'm going to come into
this one, this one, this one, and this one, gold, scratch gold, click a sign.
Yes, and there we go. Now I'm happy with
how that looks. Alright, so that took
longer than we thought. And sometimes that happens
like things go wrong, and we just have to fix them, make sure things look right. From now from over here, they look really, really nice. And what we'll do in the
next lesson is then, we'll bring in these steps, and then we'll make a start
on this massive temple door. Alright, everyone. I
hope you enjoyed that. I'm gonna save on my work, and I'll see you on the next
one. Thanks a lot. Bye bye.
90. Crafting the Temple Door for the Aztec City: Welcome back everyone
to Blender for the modular and Kish
environment guide, and this is where we left off. Alright, so what I'm going to
do is I'm going to shift D, just to duplicate this door. And then what I'm going to do is just lift it up a little bit. Now, we're just going to
make some steps under here, so I'm going to press Shift
S. Goos to selected. Shift A. Let's bring in a cube. Let's bring it down then. Let's make it a
little bit smaller, and we'll make it y once
we've got it into place. So just a simple step on these, so if press one we can see now, maybe maybe a little bit
bigger, so something like this. And then S and Y or S
and x to pull it out. Round about here. And then
what we'll do is we'll make this this first step. So we'll pull it out to
the edge of the door. And then what I'll do is I'll pull it out a
little bit further, and then press controller
left click, right click. And finally, let's
pull it out here. So ear with E, extrude. And then what we'll do is we'll
grab each of these sides. And you know what, in fact,
we'll just grab this one. And we'll just pull this part out to make it look
a little bit nicer. So E enter S and X. Like that. And there we go. All right, so let's
press Control A, or transforms, right click
set origin two geometry. And I'm just looking now if
this does a modifier on, which it does, so it means I can join this and this straight up. Control J, join it up, and then we'll get not only
the materials on there, but also the actual modifier. So let's come back now
and what I'm going to do. I'll just grab all of these. I'm going to press. Smart
UV project, click Okay. And then let's go over
and we'll put it onto I'm just wondering if
we'll put it onto Light stone on
this, not midstone. I think we will, so I'll
just click plus down arrow Light and light stone, and then click a sign. And there we go. There
is the bottom steps. Alright, so that one's
looking pretty good. Now what we want to do
is work on this one. And we can see that this is going to be so what
I want to do on this one, actually, I'm going
to take this through just to make sure that
the scaling is okay. Or, in fact, I won't take it
through, what I'll do is, I'll grab this part
here because this is where the actual door
is going to go into. And all I'm going to do is just press shifty
and bring it over. So we've got a duplicate
of it just so we don't use it or a mess up
part asset manager. So let's bring it
over. Now, when I bring it over, you will see, put it in place,
that this door here, so you can see that this
is hugely, hugely higher. Than where our actual door is. So in other words, it
goes way way above it. And this is because
we've created a part that's going
to go around here. So what I want to do is I want to put this
in with my door. So at the moment you can
see have not got doors. So what I'm going to
do is I'm just going to grab all of
these, not my human. Just grab both of these, M, and let's make a new collection
called doors. Like so. And then all I'll do
is I'll grab this one, I'll put that one in
the doors as well. So indoors. And then I'm just going to hide these out the way. And then if I press
one now, assured, if I put this onto object
mode and go through it, you can see now just how much
bigger that actual door is. So from here, then I can actually build kind
of build this out. So if I come in and I press
we want this basically to be. You can see the sides will
be along here. Like so. And then the top will
be along here like so. So let's bring in the top first. So all I'm going to
do is press Control. And I'm going to pull it
up to roundabout here. I'm also going to
bring my guy over. So let's bring the guy over. And we can see that that's how
much room we've based got, because we don't want to banging his head or anything
like arn it. Then we'll go back to this bit. And what I'll do now
is press Control, and I'll bring in
another edge loop. So this will be my
stone slabs on the top. Like, so, and all we're doing here is just basically
planning it all out. It wants to be
kind of, you know, kind of big on this part. Now what I'll do
is press Control. Left click, right
click, Control B, and then we're just
going to pull it out get as the right size. Now, you can see, we're a
little bit out with this. So what I'm going to do as
well is I'm going to come in. I'm going to come to my actual this part
here. Grab this face. Let's come in, grab
just this face here. Shift S, Cursor selected. And then I'll come
back to this part, Shift S and selection. Cursor. And now I'm just going to lift it up to make sure
that it's in place, so we can see here should
be round about here. Now I've got this in place. Now I can see how much width I've actually
got to play around with. So you can see that this
stone is going to be all the way into it here, and then it's going
to be into it here, so it's just going to be
into it on these side. So let's come in and make
these a little bit more so. Alt Shift click, l Shift click, S and X and just
bring them in very slightly just so we can
fit it in place nicely. Then we'll go l Shift
click, l Shift click, and we're going to
lift it up to make that door a little
bit bigger like so. Alright, so now we've got
these bits. Let's come in. And what we'll do is we'll
take these parts out, so I'm going to press shift. I'm going to bring them out. And then what I'm going to do
now is bring this part out, so the front of these, like, so, I'm going to press
shift and bring those out. And then we know how big
our door wants to be. So this is the actual
door now, this part here, so shift D. And now, finally, we also
want to top on here. So Once I've done these parts, then I'll create my top and
make sure it actually fits. So what I'm going to do now
is just I'll keep this here. I won't actually get rid of it, but what I will do is,
I'll split these off. So if I go to each of these, and I press P selection, split them off, let's
take off this now, and let's come
back to this part. And then what we
can do is we can start building out these parts. Now, first of all, on
this part, let's press L. Let's press delete, and we'll
go to limited dissolve. And then what we'll
do is we'll press controller and bring
in a few bricks. So I'm thinking, Something
like four bricks, Left click, right click, and then we'll now
go down the side. They want to look chunky.
That's the point. So, control law,
come to this side, and we'll have three bricks, and then control,
come to this side, three bricks, like so. Okay, so now, if I come in and
I bring this back to here, I'm going to bring
it back to here. And then what I'm going to do is I'm going to pull
it forward then. So E, let's pull it
forward, like so. And then what I'll do is I'll come to the side bricks now. So L and L. And then I'll
bring those back into place, like so, so they want to
be back there, like so. And then E pull
them out. Like so. Now we can see that this is still not chunky
enough at the moment, so I'm going to grab L, and then S and Y. Pull it out a little bit. Let's make it a
little bit chunkier. Let's put it back
into place like so. And now we're actually
starting to get somewhere. And now what we'll do is
we'll make these again a little bit chunky because we have got something
to work with. So I'm going to pull them back,
then we're going to press S and Y and pull
them out. Like, so. Finally, then you can see
that we've got a huge, huge gap between here and here. So all I'm going to do is I'm
going to grab the bottom. So joust the bottom
basing this way. I'm going to put
proportional editing on. And then what I'm going to
do is pull them out, like, so nice and gently, like, so just to bend
them a little bit. Now, you can see
that they're not bending really the
way that I want them. So what I'm going to do
is, I'm going to come in, and let's try Root first. We'll bring it onto Rot. We'll bring them in and
see what that does. So you can see here, this is
how it's pulling them out. That's not really we want to, it's the wrong type of bend. So we'll come. Let's
try the shot then. If that's going to
be any better now, you can see that's actually
working a little bit better. Now we've got that nice,
beautiful slope. All right. So that's looking pretty good
how we've pulled those out. And I'm just thinking
I might want to pull them out a
little bit further. Let's bring it up. Like so. And I'm just looking now if
that's what I actually want. And yes, I think it is, but the back of them once
the acts to be straight. So I'll turn off this
proportional editing. And what I'm going to
do then is come round the back and grab. I can see it. Let's
see if I can. I'll grab the top one. You know, why, I'll
make this easy. I'll put it onto this one here, the x ray and then come down, and then I'll do the same on
the back. This one like so. Then what I can do is
I can press S and y, and I can straighten
those up like so, and then S and straighten
them up even further and S and y till it stops
moving, like so. Now, fine, let's turn this off. Let's pull these back. And now you can see that is
what it looks like, and that is looking pretty nice. It's up to you, whether you want to bend
them this way as well, but I'm going to keep
mine straight, I think. And now we've got
our actual door. So let's come to our door. Make sure this is split
off from these two. O there we go. Control
ate all transforms. Set origin to geometry. Now, with the door, of course, I want to I want to have
an inside of this door, and then I want the
door to come down here. So we've got basically
two parts of this door. What I'm going to
do is I'm going to come in. I'm going
to press Control. Left click, I'm going
to bring it up. I'm also going to pull this
door into place as well. So I'm just going to put
it into place like so. And as I said, this is a much more complex door than the other ones
we've done before. And the other thing is
with these stone blocks, we need to split
them up as well, so we'll come back and do
that in just 1 second. With the door now, we've
got this bit here. This will be the kind of stone that's going to
go above the tops, that's going to hold the door. And then we'll have another
stone going down here. So control left click, right click, control B, and let's pull it out like, so some little
stones, basically. Alright, so with this, then, we can actually split
this off again. So I'm going to
come to this, come to this, come to
this, come to this. And then we're going
to press P selection, like, so we should end up
with something like that. And then what we'll
do is we'll save out our work and finish
on the next one. Alright, everyone,
hope you enjoyed that, and I'll see on the next
one. Thanks a lot. Bye bye.
91. Breaking Models into Parts for Optimization: Welcome back,
everyone to Len Ford, the module and Kith
Environment guide, and this is where
we left it off. Now, let's come first
of all to this one. And what I'm going to do
is I'm going to control, bring in a few edge loops. So three, left
click, right click. Control, bring in three,
left click, right click. Now I want to do is I want to
think about this part here. So first of all, we'll
we'll get rid of these. So if you grab all of this, you can see it still together. So I'll just select this
edge and this edge. Press the Y button,
split it off, and then press delete and
limited dissolve light, so. And what I'm going to do
is press Control R again. Left click, right click, Control B and just
pull that out. And then what I'm going to do is make this a little bit bigger. Now, of course, the
problem with God, the moment is that none of
this is actually extrude out. So what I'm going
to do then, I'll grab all of these again. And I'm going to
pull them forward, like so, and then I'm going to pull them
back with extrude. So E, pull them back like so, and now we have three D
objects to actually work with. Now, let's pull
this out. So what I'm going to do is
I'm going to come in. L shifting click, so it grabs it going all the
way around there. H enter lns and pull
it out very slightly, just so it gives a little bit of a lip along there.
And there we go. Now, just make
sure that the guys not going to bang his
head or anything, you know, if the door's on the floor or anything like that. And this is coming
together now really. Well. So now I want to do is
I want to press Controller. To left click, right click. And then what I'll do is
I'll bring each of these in. So I'll come into
the front of it. I want to press the eye
button, bring them in. Like, so making sure
they're split like this. And then S's ad,
pull them together. And then finally grab
this center one, Essens d, and just
pull it out, like so. Alright, that's
looking pretty nice. Now, lastly, then, I want
to pull this one out. I'm going to press the
e bon, to pull it out. And then these two here. I'm going to press the
e bon to pull them in. L so. There we go. Now, let's think about. There's
a lot of work to do here. I'm thinking, let's
fix this wall first. So what I'm going to do, it's the three D objects
as you can see. So what we're gonna
do is shift click, going all the way
down these blocks. L so, right click, and we're going to mark a scene. And then what we're going to do is we're going
to come back in with L just to grab
each of the islands. But like so, and then
press y, then press A. And hopefully, this time, when we actually
come to clean up, it should clean them up, so fill holes. And
then let's come in. Ponto A or transforms,
right click, set origin, two
geometry, right click. Let's shade at to smooth. And finally, let's
bring in a bevel. So generate a bevel. And this looks like
it's work this time, not point, not five. Let's try a little bit higher. So let's go one higher. No downwards, upwards. And let's put it on
this. No point, not one. That looks much, much better. Now, let's come to
this part here. And what we're gonna do
is split these off now, so we can see that this is
already split off from there. Just needs each of
these split off. What I'll do is I'll just come round Old Shift
click Olshift click. Aim on these, and
then press y and then press I'm just wondering whether to split
these off as well. These little parts
here. You know what? I think, I'll
actually leave them. So what I'll do is press A, mesh, clean up, fill holes. And then finally
control a transform, set origin to geometry, add in A, Fevel. Then set it to It's already set to n 0.1, the
same as the others. I might set a little
bit lower these. So not point Not
one. Let's try that. That was the same, so
not point, not at eight. Not point, not not five. There we go. Alright. That's
looking a little bit better. So we've got the stonewall now. This is pretty much
done on my original. I actually had it,
as you can see, bending in a little bit, but actually, I think it
looks better like this, so I think I'm gonna leave it. And now let's finish
on this door. So, you can see,
if I come in now, Let me move my
guide to the side. And what we'll do now is come
in. So come into my door. I'm gonna press Control. Left click, right click
Control S. Kirst to selected. Delete the other
side of the door, so delete and faces. Now I'm going to do is just grab this edge and pull it over. And finally, then, I'm going
to press Add modifier, and we're going to
generate a mirror on the other side, like so. I've just left
that bit of gap in there just so then I can come in now and just bring it together
a little bit like so. Now, remember, this is
not three D objects yet, so we will make sure that we
can't see through that door. Then what I'm going
to do now, I've got to look at my reference, and you can see all of
these little details. Now I'm going to
be using something on the other monitor
on my other screen, which makes it much easier for me. You know, the reference. So if you have the
reference here, if you can put it in your other screen that will also help, I think, and what
I'm going to do, first of all, I'll come
in. I'll press Control L. Left click, bring it
over to this point here. And then I'll press Control. Left click, and then right click and then control
B, just to bevel it out. And I'm just setting
something out. Like this. So we've
got this here. Let me just show you, we've got this chunk here and
these chunks here. Now what I want to do
is grab both of these, and I want to press the ib
just to bring them in very, very slowly and just a little
bit of a touch like so. And from there,
then I can actually I'm not going to
extrude them out yet. I'm just going to get all of
these parts in that I want, so then I'm going to
come to this one. I'm going to press the eye
button to bring it in. I'm going to press eye
again to bring it in because I want them coming
in all at the same. So you can see now they're
coming in like this, leaving in this bar
kind of going round. And then what I'm going to do is I'm going to press
the eye button again and bring them
in again, like so. Now, one thing is that I think that I want this bar
to be a little bit lower. So this bar on here. So what I might do is just
press controls that again. Press the eye button
and bring them in just so it comes past this part here, and then press the eye button again and bring
them in once more. I think that's going
to make them a little bit thinner than
what I had before, but, you know, for
me, I think that's actually better in this case. Now, let's pull
them out a little bit just so we can
see what we're doing. And then what we're gonna do is we're going to
grab the whole thing, press E to extrude them back. That then is going to
give me some thickness. And now we can start
bringing these out. So I'll bring this
one out first. This will come out to here. So E, you know what we're
doing both at the same time, so let's just grab
this one and this one, and then E pull them out. And then we'll come
in shifting click, grabbing it all the
way around there, pressing the e bond and
bringing it out like so. Okay. Now, we've
got these parts on. Now, we just want some little circles in
the top and bottom. So what I'll do is while
I've got this here, shift A, and we'll bring in. I think actually we'll
bring in a circle. We'll make it easier, so you can see my circles come in here. Now, if I make this
circle smaller, you should C for pull it over the side that we have two
because it's mirrored. Now the problem is now because I did that, though,
just to show you. It means after bringing
another circle, of course, because I want
to bring the vertices down. Let's put the vertices
on something like 20. And then what I'll do is
I'll press the S one, bring it down, bring it over, and then I'm just going
to spin it round. So our X 90, spin it round. Press one on your number pad, and then I want to do is just
bring it into place now. So I'm going to put it
into place down here. I'm going to make
it a little bit bigger just so it's
fitting in there. Like so. And then we go, it's nearly fitting
in now a bit more. And then we go. That
looks roundabout right. So if I bring it in
a little bit less. Okay, so now I'm going to do is press the F button
just to fill it in. And then I'll press
the i button, and I just want the
same same chunkiness as what I've got on these. And then I'll press
delete and faces. And finally, I'll
grab the whole thing, and then I'll press E, and
extrude it back like so. Then I'll press L to grab the whole thing and then
let's pull it into place. And then we go, let's pull it past these parts here, like so. Okay, just make sure
that it fits into place. And then what we'll
do is we'll just press shift d, duplicate it, and we'll pull it
up, and then we can drop it into
the top of there. Now we need 2 bars going
down each of these. So let's press shift A and
we'll bring in a cube. Let's bring in a cube, make the cube a little bit smaller. Let's pull it out, so
this is the easy part. We'll use the cube
again, as well. So what we'll do is
we'll bring this in, and we're going to place
it just under here. So if I now press S, and y, let's pull it back. And then let's make it a
little bit thinner, so S and, and then S and X, and we want it now to
go into this part. So let's press S and y again,
pull it back, pull it back, and then put it into place like so just
so it sits on there. And there we go. Now,
let's press shift D, and we'll bring it down then, and we'll put it on
top of this one. And then finally, we want it
now going into the middle, so if I press shift D. Bring it into the middle
and then S and X. Let's just pull it
this way, like so. Now we can see with
our guy if I bring him over now, Dios once more. If I bring him over, press
one on the number pad. You can see where
this is going to be. If I put it onto x ray, so I can see, and if I can't put an x ray, let's
put it on y frame. You can see this is where
the handles going to be. Now, don't forget our guy
is going to be down here. So you can see that's
right about in the center, which is fine. I think it's slightly above because you can see
the centers here. So I think actually
that's going to be fine. So let's just turn that
off, put it on object mode. And now we have that. All I want to do is just
create another one. So I'm going to come into this. I'm going to grab
this whole thing. I'm going to pay shift, and then I'm going to
spin it around. So R, y, 90, let's
spin it around, and we'll use this for our
actual door handle on here. So S and x pull it out. Like so, and then all I'm
going to do now express S and Y and just pull
it forward like so. Now, the next one,
what we'll do, then is we'll get
this beveled off. We'll create this
insert on here. And then finally, we'll
create the top of this. Also, we've got
these parts as well, remember to bevel off and
all that other stuff. And we've got to also bring
in all of our materials. So a lot to do on this one yet, but you can see now it's really starting
to come together. Alright, everyone, so
hope you enjoyed that. I'll see on the next one.
Thanks a lot. Bye bye.
92. Finalizing the Temple Door Model: Welcome back in Blender for the modular and Kit
Bash environment guide, and this is where we left off. Now, what I want to do now is come in and bevel these off. Now, I might be thinking, why bevel these off if we
need it to look you know, something like these doors here. So if I zoom into there, you can see like this because
it's the easiest way, actually, very, very
easy to do that. What I'll do is I'll come in, grab each of these, so each of the sides. So on edge slick, each of these edges, like so. And the other thing
is before doing this, better off to reset
the transformation. So control A all transforms, and then just right
click, set origins, three D cursing and
then it'll be back. Now what we can do is
we can level these off. So if I press control B, I can start to level
them off like so. And then what I can do is I can turn the segments up to one, and then I can drop
this back into place. Now, if I drop
that down to zero, you will end up with that
sort of shape that we wanted. But also, we can
also play around with this and bring
it further in or out, I think, like this is
a little bit better. We don't want it like
a crucifixion or anything like that because
it has text, obviously. Alright. So now we've
done this. Let's bring it in, so we'll come. We'll press the ye
button and bring it in. And then what we'll do now, we've got all of this
actually grabbed, so I can press control
B and level this off. I'm going to turn
it down one more, and then we'll end up with this, and I think actually
this looks very nice. What I'm going to
do now is then, I'm going to pull it
back with extrude, so pull it back, grab
the front of it then. And all I'm going to do then is pull this out a
little bit, like, so we should end up with
something like this, and that is exactly what we're looking for. So now
that's the door. What I can do now
is, I can apply this actual mirror modifier because I'm not going to do
anything else on the door. So control A, let's apply that. And then what I can do is I can come round now to the back. And I don't want to
see through the back. So all I can do for that
is ult shift and click, ult shift and click,
and then just minus off each of these. So each of these ones, oops, right down the bott, the top, like, so, and then S and X and just pull
those together. And now we can see that
there's basically very, very little gap there
to see through. Also, this will be hidden
on the inside as well. So it'll be very dark in there, so we won't
be able to see it. Now, let's right click
and shade smooth. And then what we'll do is
we'll press controle A, now all transforms that
origin to geometry, and now find that
we can pull this back into place
where we want it. And there we go, there is the first part of
the Aztec door. Now, let's think about
the top bit. Now on here. I think on my original one, I made this part probably
a little bit too chunky, so I might make it a little
bit more rounded on this one. What I'm going to do
then is I'll press shift A. I'll bring in a cube, and I'll bring the cube down
to where I actually want it. So S and Y. Let's put it into place. We're going to fit it
down into this place. I'll actually pull it out a
little bit more, so S and Y, let's make it a little
bit chunkier. Like so. And what I'll also do is just make sure
that it's actually sat on top of that
rock, like so. Okay, so now I've done that what we need
to do is we need to pull this up a little bit to the height that we're
actually going to want it. So I'm going to grab the top of it with Face elect,
so I'll grab the top. Then what we'll do
is we'll pull it up, and we want it probably around
this sort of height here. And then we want a center
point in here as well. So I'm going to press control.
Left click, right click. Now the thing is when we're dealing with
something like this, it may be much, much easier to deal with
it as a two D object. So I'll just grab this part. I'm going to press P selection, and then I'll just
grab this part and just delete it out the way, leaving myself this plane. I think the planes just much much easier for me to work with. We can extrude things out. We can pull things
out much easier. Alright, so now we've
got this center part. What I want to do
is then, I want to come in and press Control B, just to give me that shape
then off the bottom. We can see now that this shape
is probably a little bit. It's not wide enough,
so let's come in. Grab each of these, with face select. There we go. And then we'll press S and X and just pull them
out a little bit, like so, and that I
think looks much much b. And now the thing is we
need to pull this down. So all I'm going to
do is press Control. I'll bring it up to here, and the gap I want The first gap one is going to be around there. And then the second
gap of one is going to be perhaps a little bit down, perhaps just above these. Then what we'll do is
now we can come in, and we can delete
these out the way, so delete faces, and now
we've got these parts here. Now, if we come in verte select and select
these two vertices, I can't press control B, but what I can do is, I can press control shift and B, and then I can level
those off like so. Now, it's up to you
whether you want to bring them all the way down. Just be very careful that
you don't bring them down to these points or you will
need to actually merge them. Okay, so we've got
this first shape. Now what I want to do is I want to come to these edges. So these edges here, and I want to bring
them out a little bit. What I'm going to do
is press E, enter, S, and x, and then just pull them out, where
we actually want them. So they're going to
be round about here. And from there, then
I can actually create this other shape that I've got because you can see
here at the moment, this is not kind of
the shape that I want. I want them leveled
off a little bit. So what I'm going
to do is I'm going to come to these parts again. Control Shift B, and then
let's level those off. Now, you can see
that we've probably gone a little bit too far. On this edge on this part. So what we'll do
is we'll come in, grab them again,
and then S and X, and we should be able
to pull them in. Like, so, then we'll press E, enter, S and x,
and pull them out. And there's that actual shape
that we actually want to. Now we want to actually create these kind of round
bits in here. So what I'm going to do is
we're going to press E again, S and x. Let's pull them out. But this is how far I want them, and then we'll grab
the bottom parts, and then E and enter, and then let's just
pull them down. So pull them down. Like,
so just below here. Now, I can see that I want to pull these out
a little bit more, make them a little
bit more chunky. So I'm going to grab all of
the edges on both sides, S and x and pull them out. And there we go. And now we want to be level
some of these off. So what I'm going to do is
I'm going to grab this edge, this edge, and this edge, same on this side then, and then control shift
and B to bevel them off. So, and there we go, we've got the actual shape
that we actually wanted. And finally, finally, then, I want to bring in
this part here. So all I'm going to do then
is grab all of, all of these. Press the eye button,
bring them in, making sure that
you don't go too far where these end
up crossing over. Don't cross them over, and we'll end up with
something like this. Now, if you do cross them over, it is fine to cross them over, but you just need to make
sure that you fix it. So if I press, you can see that it ends up
slightly broken. Now, all you want
to do if you do cross them over is
join these two up. So if I come in, I should be
able to get grab this one, grab this one, press
M, and it should be. You should grab
the top one last. If I press n then,
and I'll not a curse. At the last, you'll
see now it joins them up to there and
creates this for us, and then we can do it on
the other side as well. So I will go that far
in just to show you. So again, I grab this one last. At last, and there we go. Now we can make this an
actual three D object. So what I'm going to
do, first of all, is, I'll press A. And I'll press E. Just
t extrude it out. Now, we're gonna have
to go back a long way, as you can see, so it's
gonna be fairly chunky. Now, let's pull the whole thing back a little bit, like so. And then what I'm gonna
do now is I need to pull these parts in or pull the whole thing out.
It's really up to you. First of all, though
what I'll do is, I'm going to pull
these parts out. So if I grab all of this, going here here, and then
going all the way around here. So Alt Shift click, grab
this one, l shift click, grab this one, and then grab
the whole thing, like so. And what I'm going
to do is, I'm just going to extrude this
out a little bit. So E, extrude it out, like so, and now we'll grab these parts
here and these parts here, and we're going to
extrude them back then. So E, extrude them back. And there we go, I think that
looks pretty pretty cool. And that's nearly the door done. So again, let's
press Control eight, I'll transform T clicks
the origin to geometry. And now we've got this set
on naught point naught one. Now, let's see if we
can get away with that. So what I'll do is,
I'll grab my door. Grab Well, the stones
have already been set. So actually, we need
to probably better off add in bevels on and
then join it all together once we've actually
got the materials on. So we'll do it that
way. So, first of all, we'll come to our door. It's got no bevel
on at the moment. So let's add in a
bevel. So bevel. Let's set this Not
point not note five or n point No
note three, like so. And yeah, I think it
just wants a tiny, tiny bit of bevel on there. Okay? Let's come up
to our next point. And what we'll do
is add in a bevel. And I'm just wondering
whether I want to bevel off these a little bit more before going any further. It's up to you
whether you want to. I'm just wondering
if I can come in. I could be vel these off quite
easily going around here. So I'll show you what I mean. So lt shift click, going through there, and then lt Shift click
lt Shift click. Old Shift click l Shift click. And then what we can
do is we can press Control B and bevel them
off a little bit more. And let's just have a what
that actually looks like. We've got some
broken mesion there. I'm not concerned about that. I'm just wondering
if they look better. I press one, a little bit more round. You know what?
I don't think they do. I think I'm going to
leave them alone. And then what I'll
do is control A, right clicks, a origin geometry. If you do want to round
yours off a little bit, just make sure you go in and you actually merge those vertices. Don't leave them overlapping. Okay, so let's add in a
modifier, so generate a Bevel. Let's set this to
nought point not five. Like so. And I think that
then is looking pretty nice. Now what we can do is we can join the whole
thing together. So first of all, we'll just
grab everything. Like so. We'll go to object, we'll
go to convert and mesh, and then we'll press Control
J, join it all together, and then press Control A, or transforms, set
origin to geometry. And now, finally, let's come in. And what we'll do
is, first of all, I'll make sure this stone. So this top stone is
unwrapped on its own. So U, Smart UV project, click okay, hide it out the way. Then we'll make sure that all of these stones or also unwrapped
on their own UV map. So, Smart UV project. Lick K, hide them out the way. And finally, all of this
part, we can unwrap together. So A, Smart UV project, click OK. Tag, bring
back everything. And then what we'll do now
on the next lesson is, we'll bring all of
the materials in. Now, let's save out our work. And I think it's a good place
to end it on this part. Let's bring it out
again then so now we can see exactly what
it's going to look like. And yeah, that's looking pretty
nice. Alright, everyone. So I hope you enjoyed that.
I'll see on the next one. Thanks a lot. Bye bye.
93. Starting the Market Pack for the Aztec City: Welcome back if we
want to blend for the modular and it ash
environment guide, and this is where
we left it off. Now, what I want to do then is bring in my materials, so
I'm going to come on over. And I'm going to bring
in the dark stone first. So let's first of all, put this on material view, so shade of view,
and let's come in, and then what we'll do
is I'm looking now to see what we've actually got to pick from. I think
we'll pick this door. This door has most
of materials on. What I'm going to do
is just shift click this door, control
link materials. And then we go, we've
got the wood on. Now, you can see the
wood is looking very nice along here, so
that looks good. I think we'll have some
other wood on here, and then we'll have
some gold trim. And I'm I'm not sure actually what wood
we've actually got. So what I'll do is I'll
click the plus button. Let's see five point in wood. Let's see how many
different types of wood. Dark wood, Prop, light wood. Let's come in, and what we'll do is we'll
come to Prop wood. Let's see what it looks
like with prop wood on. So I'll grab this door. Now, on mine, I actually made
it stone. These parts here. I'm not sure whether wood and Stone's going to mix,
so it was all stone. But I think for me, I'm not
actually going to do that. What I'll do is then, I'll
come to this part here. And I'm going to press Alt Shift and click, and same on this. O t shift click, and then
Control plus Control plus, and then I'll come
to the Prop wood. So I'll click plus,
down arrow, wood. And then we'll point prop wood, and we'll see what that
actually looks like. So let's bring that in. And then we go let's put it
onto rendered view, and we'll just give it a test and see what
that looks like. Alright, actually, I think
this is going to look okay. So what I'll do then
is, I'll leave no one. I'll come in. I'll grab
all of these. Same thing. So Control plus, control plus, Control plus, going all the
way back down to there. Coming down then to the
prop wood, clicking a sign. We're not going to
worry yet about whether they're
going the right way or anything like that. I'm going to leave it now for now. And that's looking good. And I think what
we'll do then is, we'll do these three parts
will be wood as well. So let's come in.
So Old Shift click. Old Shift click, l shift click, and then just shift
click on each of these. Then we're going to press
Control plus, Control plus, going all the way back,
sign, and there we go. And yeah, I think this
looks pretty good. Now, what I'll do
is while I'm doing this is I'll come up
to these parts here. So on each of these, and we're going to put these
on the on the dark stone, I think, and then we'll put
the others on the lighttone. I'm just looking at
the outside of here. You can see this is dark stone, and this is the lighttone. So let's put it on
lightestone, actually. So light stone, click a sign. And now it's short actually have a difference now in them, which it does, which
looks much nicer. Now what we'll do
is we'll come in, and we'll do these parts. We'll also put these to stone. So all I'll do is I'll come in, grab the whole of these, and I'm going to come in
light Stone, click a sign. And there we go. And then
on the inside of these now. I'm going to come in and grab just the inside
so if I press dot. You can see them grabbing
Alt Shift click. And then on this
one, I come out. You can see Alt Shift click, and then we'll put this on goal. So scratch goal, click
a sign, like so. Now, one thing is, I want to unwrap these separate because
you can see at the moment, very, very big on this stone. We don't really want that, so
we'll press L L. And then, Smart UV project, click Okay. Now you can see,
smoother, and they look. And then what we'll do
is apart from the gold, I think the gold, Yeah, actually, we'll
leave that like that. I think it looks
absolutely fine. And now let's do
these parts here, so grab just this part here
and click scratch gold, pick a sign. And there we go. Alright, that's
looking pretty cool. Now we'll come to
this part here, and we want the
dark stone on here. So what I'm going
to do is go into each of these with Edge slate, because we have actually
got some seams on there. I'll just go in with edge
slack select and all these. And we'll do this top part next, and we'll come in and
put it on midtone, click a sign, and there we go. And now just the top bit left. So what I'll do is we'll come to the top bit. We'll
grab the whole thing. We'll press U, Smart U
V project, click Okay, and then I'll come to midstone, and click a sign like
so. Now, I can see. I've got some issues in here. Let's right click and
Shade Smooth by angle. There's all my issues fixed now. And finally, now what
I want to do is I want to fill these parts
in with the Redstone. I'll come in and grab
all three of these. And I'll go to
Redstone, click a sign. Doublet at the A,
and there we go. That is that piece finished. And that looks pretty
nice, guys. Pretty nice. Okay, so now I can I can
just move this over. I can make sure that it's
indoors, which it is. I can delete this
one out the way. So let's delete this
out of the way. This is my door scale, so I can delete that out
the way as well. And then I can pull this
back into place like so. Now, let's call these. We'll call these. I'm thinking. We can call it p poor or rich. Doors. We can call it
intricate or simple. Let's do that. So what
I'll do is I'll grab this one F two simple door. Then we'll come to this one.
We'll call it Onate door. So Onate door. And then we'll come
to this one and we'll call it Onate door with steps. With steps. And then we'll come to this door and we'll just call
it temple door. Temple do so. Right. So, we know already
all of these are in here. All we need to do now is
just grab four of our doors, right click and mark as assets. Let's then save
our work. So save. Let's then go to asset manager. And as we load that up,
let's then drop these in. So I need one called doors. We can see we've got a lot of problems there, so that's good. So let's come in. Double
click this, doors, like so. And then what we'll do is
we'll come to this one first, A, and then shift N,
spin everything around. Same for this one, A, Shift N, spin everything around, and then the same for
this one with A, shift N and spin
everything around. And there cause, by the way, by the extrude, as I've said. So let's now come
into the unsigned. And then we'll grab all
four of these doors, and we'll drop them in
to our doors, like so. Okay, so we've got all those. Now what we can do is we can
put these out of the way. So I'm just going to go
back to modeling tab. I'm going to bring back
everything then like so. Let everything load up, and you can see now just
how far we've got. So let's put it on materials. Let it load up, and there we go. And then let's
grab all of these. So this is our doors, and we'll pull it
over to this side. And you can see, Wow, we've already created
all of this stuff. Let's move these back
a little bit. Like so. Okay, so the next one that we're going to do is
we're going to I think we'll do the I'm
thinking we'll do. Let's do the entrance.
Let's do the entrance next. And then we might do the
markets. You know what? I think we'll do the markets. We'll get those out of the way. It is the hardest one to do that we'll start
with the markets. I will show you how
intricate these are. So if I just grab this
one, for instance, I'll put my doors into
finished, like so. And then what I'll do
is I'll grab this one, press shift D. And
then all I'll do is press M. And we're going
to put in a new collection, and this one will call markets. Like so, and then you
can see it's here now, and then what we'll do is
we'll change this over. So let's press dot and
just zoom into it. In fact, you know what?
Let's pull it out into here first before
we do anything. And let's press dot and zoom in. And then what we'll do
is, we'll come down, and we'll take this
off, open it up, and the one we want
is going to be references and markets,
and it's this one here. So this one here, let's
have a look at that. Now, it's a little bit hard
to see on the reference. I am going to talk
you through this, but you can see that
we've got a lot of different intricate
parts in here. A lot of parts have been stolen
from other parts as well. You can see just how
nice all of this looks. We've got a little bit of
cloth on this part going over, and of course, some
cloth on this part. So we'll actually
get on with that, then I The easiest one to do, believe it or not, is probably
going to be this one here, even though it
looks pretty hard. Yeah, it will be this one here, but we'll make short work
of it, so don't worry. All right, everyone,
so let's actually, first of all, then
bring in our scaling. And then from there we can actually start
building these out. But we'll bring in the scale for this one here,
the small one. Let's bring in three
cubes, first of all. So shift D, let's
bring in a cube. Let's pull it over.
Let's press Shift D. Duplicate it shift D, duplicate it, and I'm pulling
them a little bit further apart because I know these
parts are much, much bigger. Let's come then
to the first one. And what we'll do is we'll
put it down at 4.83. And then 3.35, and
then 2.83 like so. And then we'll come
to the second one, which will be this one here. So we'll put that
onto 5.484 0.18, and then 3.41 like so. And then finally
this beast here. So let's put it
onto 7.38, so 7.38. And then 4.94 94, like so. And then finally
0.524. Like, so. And that is just the top of it. So we'll just put the
top there, actually. We'll bring another
one in, so shifty. Just drop it down.
And there we go. Now, this should be
the whole thing. Let me see if the
whole thing, if I grab it to get the
dimensions for you. Alright, I've got
the whole thing now. So, this one here,
let's come in, 6.98. 4.392 0.74. And there we go. Alright,
let's press one, and let's drop this down and making sure it all
fits together. So we're short, if we bring all of these up to the
ground plane now, be roughly around the same
height, which they are now. Alright, that's
looking pretty nice. So what we'll do is
we'll drag our guy over. And then on the next lesson, then we'll start
on the simple one, which I said, will be this one. Alright, everyone, so I
hope you enjoyed that. Let's save out our work, and I hope you're looking
forward to starting this. Thanks, Live. Bye bye.
94. Modeling the Small Market Building: Welcome back everyone
to Blend four, the Modular and Kitbah
environment guide. And this is where we left it off on a very very difficult part. Let's press shift, and what
we'll do is bring it over. And I'm going to make
this a bit smaller. And I want to make
this, first of all, a market store where
you can actually walk in and you can look around. It's going to be
a very small with some guy study and all the stock will be kind
of in the bag. What I'll do is I'll press
Shift S, sta selected. I'm going to hide
the rest of these out the wage so I've got this. You can see everything disappear.
Let's bring them back. And what we'll do is
we'll just first of all, drop these, so just these
three into markets. Let's drop them into market, and then we can hide
the rest of them. You will see M
Booleans disappear. So let's see where
the Booleans are. Do I have 14 Bleions? You know what? I'll
bring them all back? I'll grab each of these then, so grab all of these M, and let's put them
into a new one, and we'll call it Bleions. Like so. And there we go, now, we should be able to close that up and hide these out the way. Let's just close these up
as well. And there we go. Alright, so we're ready
to rock and roll. Let's grab this one. Let's press Shift S, and selections cursor.
Let's press one. And then what I
want to do now is get the right sort
of scale for this. Now, you can see on this one,
this is what it looks like. You can see R is a little
bit too thin on here. So first of all, let's
pull it out on the X. So S and X, let's pull it out. Let's press S and Z and
pull it down a little bit, like so, and let's get it into the place
where we actually want it. So something like this
looks quite nice. I want a little bit
more of a wave on here, and that's to show off this curtain that
we've gone there. So not too much
just a little bit. So all I'll do is I'll come in. I'll grab this center one, and I should be able to
pull it up a little bit. And then from there, we'll just have a little bit of fines. Pressing one, and we should
then be able to just pull these up and get that roundness that we
actually want to. Now, we don't want to go too far up so that we've got, you know, all of this hidden, once
we've brought the stones in, it's too close to this top,
so we want to avoid that. So what I'm going
to do, I think, I'll just pull it down
a little bit like so. Alright, that's looking good. Now, the other difficult thing
about this is, of course, that we need to actually
make it so that we've got something
on the sides. So inside here, we've also got
things that go in as well. They're not just In fact, you know, what?
We won't do that. That'll make it too complex.
Forget what I just said. All we're going to do
then is press Control A, A transforms right click, set origin to geometry. And then going to pull
this all the way out. Then what I'm going to do
is grab this one last, press control and
minus, and there we go. Now we've got how far back that's going to go in.
And you know what? I think that's actually going
to be about perfect for us. One thing I do need to
check, if I press one, if I bring my guy over and put him on kind of the
ground plane then, how is he going to look once
he's actually in there? We can see that's
what he looks like, and that, I think
is about right. Okay, so now we've got that. Let's apply that, so we'll
come to this market. We'll press control
and apply that, and then no longer
going to do is just delete that out the way. Now, unfortunately,
unfortunately, if I press control
plus or control minus, you will see I can't
get rid of that. And that's not
really useful to us. So we do actually want to keep this as a boot and we might
need it on the other, what you want to do is you
just want to come to edit, and you'll see one that says properties, and it's the one. You can see here, it says batal. Just come down and
remove the brush, and then you'll be able to get that back and actually
use it again. So let's pull it over this side. Okay, so now let's
put this on on jet moot so we can really
actually see what we're doing. Let's first of all, build
these parts out first. And then what we'll
do is we'll get the little shelves And finally, then we'll get in
the actual cloth that's going to come down here. So the first thing I want
to do is I want to create this stonework that's
going to go into the center of here,
we'll do that first. So all I'm going to do is I'm going to press ult
shift and click. I don't want it
going all the way around there, so I'm
just going to come in. And instead of doing
that, I'll just grab it going down here like so. Then what I'm going to do
is, I'm just going to press shift, and I'm going
to pull it out. Now, there's a number number of ways of actually doing this. At the moment, you can see that this if I bring
in a solidify. So probably going to be better off bringing in a solidify, so extruding it out and
then solidifying it because that means
then I can move this kind of forward.
Let's try that. So what I'm going to do
is, I'm going to press E and y and just pull
it back like so. And then what I can do
is now I can press L, first, P selection,
separate it off. Control A or transform dry
clicks to origins geometry, adding a modifier,
and the one we want is going to
be the solidify. Let's actually pull
that out then. You can see we've got all
kind of problems on there, all caused by the actual normal. So if I press a tab, eight to grab it
all, shift an end, spin it all around,
and there we go. That's all fine now. And now I can actually put
this into place. Now, you will see
that we've not got a real gap between the
top and the actual bomb. It's really, really, you know, it comes in there, but it doesn't actually
go out to the top. So what I'll do is just pull the offset this
way a little bit, like so, and then I can
bring in the thickness. So now you can see it's
actually going over the top. Let's bring this thickness
then up a little bit. Like so. And now you can
see we've got a really, really nice form in this part. And if I put it on wire frame, you should be able to see also it's actually going
in there as well. So you can see this is
where the center is. It's going either side of it, so you can see that's
looking really nice, and then we can actually put
a shelf in there as well, once we've done
this bottom part. So let's now come in, and what we'll do is we'll put
it back on object mode. I think at this
point, I can actually apply this actual solidify. So I'm going to press
tab. Control A, and apply that, and this
is what we're left with. And then what we'll do is
now we'll press Control. Left click, right click. Control. Left
click, right click. Alt Shift click, I'm just
going to pull them up, so. Now, why I've got them these here I might as well
split everything off. So old shift and click, just going on all
of these edges. L so, right click
and mark a scene. Now what we want to do is we
want to split them all off, so we're going to
come in with L on each of these ones going
all the way down to here. So Y, and then A,
split them all off, and then we're going
to go to mesh, and we're going
to go to cleanup, and we're going to go
to fill holes like so. Finally, then we should be
able to now pull this out. So if I come in, Shift click, l Shift click, and then AlternS, should be able to pull these
blocks out a little bit, making them a little
bit bigger than the other ones around
it. And there we go. That's what we're left
with. Now let's come in. Control ale transform,
set origin to Jome try, add in modify it, and
we'll bring in a bevel. And let's set this bevel
down to not point, not not five, like so. Okay, so that's looking
really, really nice. Now I want to do is, I think we will right click
and shade auto smooth. Same on this then, Shademth, just to get rid of all that
lumpiness that was in there. And pretty much this part
is near enough done. We need some shelves in here, definitely some
shelves, and we need a cloth part that's going to come around here
from the inside. And once we've got that in
then, we're near enough done. So we've made this
pretty simple. It's just a cloth part that is a little bit harder
than the rest of it. So what I'm going to do is I'm
going to bring in a plane. So shift A, let's
bring in a plane. Or come where my cursor is, of course, I'm going
to spin it round, so R X and 90. Let's
spin it around. And then what I'm going to do is I'm going to press Sen's ad and pull it up into place where
I actually want my cloth. So let's pull it
back into place. And then what we'll
do is we'll press S and X and pull it out. So it's just over there, and then pull it
up a little bit. Now, we will want a little
bit extra cloth for the top. I'm sure of that. So we'll
press EN's ad and pull it out further than
what you think and then pull it up. Into place. Now, we want the cloth to
obviously come down here, dropping down, and we want
it to look kind of natural. So that's another
thing that we need to think about when we're
actually doing this. Now, what I'm going to do is, I'm going to be
bringing in a modifier. So what we'll do is again, now we've got the
size of our plane, we're going to press control all transforms right click set
origin through geometry. Now let's add in a modifier. And this time, we're
going to go with a multi multi tier solution or multi mul tier
solution. This one here. This is the one that we want.
So let's go on that one. And then what we'll do is now, we'll start subdividing it. So the moment I subdivide it, you'll see that it
starts to bend, like so. And the thing is though
we want this simple. I'm going to do is I'm
just going to go back. And instead of
doing it like that, I'm going to go back to zero. I'm going to click Simple. And what that's going to enable
me to do is subdivide it, so if a press tab, you
won't see anything. We are dividing
this at the moment. We just can't actually
see it being subdivided. The moment you can see it being subdivided the moment
actually a press Control A, and apply that, you'll see now that we've got
subdivisions in there. Now, let's just go back
and before we do that, let's subdivide
it one more time. So we're going to subdivide
on the simple Making sure we pound simple and not on linear so we don't bend
all this thing in, press Control A,
and there we go. Now we can see this is how many subdivisions we've
actually got in there. So if I go back now
with Control Z, you'll see you've got
subdivisions in there to six. So maybe six or seven up to you, how far you want
to go with this, depending on what
your machine is. Now, the next thing
we want to do then is we want to go
over now to Scud mole. We've got all of this
setup ready to go. And the reason we didn't
use subdivision is because I can actually come
in now and turn this down. So you look, if I turn this
down all the way down to one, press Control A, Then you'll see it's just got
one subdivision in there. We've still got
control over this, and that's why I like to use it. And most people who are working with anything to
do with sculpting. We'll use this multi resolution instead of just subdivision
for that reason. You've got a lot more
control over it, basically, because
you can change it, you can move it up
in render view, in sculpt view, or
in the viewport. Okay, so with all that said, we'll actually end it here
and on the next list, and then we'll go
into our sculpt mode. Now, don't be afraid
of sculpting. We're only doing a
little bit of sculpting. I'm going to make this
accessible for everyone. You won't need a table
or anything like that. You can use your mouse, and I'll see you on the
next and everyone. Thanks a lot. Bye bye.
95. Basic Guide to Sculpting Cloth in Blender: Welcome back, everyone
to Blender Ford, the modulate and Kit
bash Environment guide, and this is where
we left it off. So now what I want to do is I want to head over to
my sculpting tool. So let's head on over there, go to sculpt mode. And at the moment, as
soon as I bring this in, it comes in with a huge brush, first of all, you can see that. What I want to do is I want
to make my brush smaller. Now, it's the same keys as what you would
use with photoshop. So let's click the
little sideways bar on next to the enter button, like so, and just bring it
in a little bit smaller. Around 23 or 24 or 25, you can see up here
something around that side. Next of all, I've got my
grab tool at the moment. The one I want to work with right now is going
to be the draw tool. So this draw tool is what
I want to work with. And when I come on
now, you can actually see that I can actually
draw on my mesh. Now, if you're come over to
where it says render view, turn this up one. So let's go to where is it? Let's go to Simple again
and divide it up one. You'll see now that if
I come in and draw, it's actually much,
much smoother. If I come in and turn
this down, let's say, on the sculpt tool down to four, you'll see now it's
much more blocky, and this is the reason why we'll want to
actually use this, so very, very smooth
to actually use. Okay, so the next thing
I want to do then is I want to bring in these cloth
kind of bars going across. And what I'm going to do to
do that is, first of all, I'm going to make my brush
a little bit smaller. And then what I'm going
to do is just draw a line on going across, like so. Then what I'm going to do is I'm going to turn my brush up. So turn it up one or two
and draw another line. And then I'm going to
turn it up another two or three and then
draw another line. And then finally one
more at the top, where I can actually see it,
so let's draw another line. And now I'm going to do
is, I'm just going to head on and over
back to object mode. And then I'm going to hide everything else
out of the way. I'm going to press shift H just to hide everything
else out of the way, and now I'm going
to come back into it and fix these parts. So back into here, scalp mode. And then what I'm going to do is draw another line
on top of that, and maybe another
line on top of here. Don't worry if the
straight or not. Me my brush a
little bit smaller. We just want a little bit
of randomness in here. Like, so now what I want to do is I want to
deal with the other way. So the moment we've drawn on the mesh to actually
pull it out, as you can see, so
it's been pulled out. And now what we want to do is
we want to draw it inwards, so we want to draw it
inwards with control. So if whole control, you can see that I can actually
draw lines inwards. And this then is giving
our cloth a little bit. Of depth. And that's
what we're looking for. So a little bit of depth, let's draw this one in, like so. Let's draw over the top of
these like so. All right. Now what we want to do is we
want to bring this down and actually turn it into that
kind of market stall, you know, dropping
cloth actual look. And the way we're
going to do this is we're going to come
to our grab tool. So grab your grab tool, make your brush, bigger, and then what you want to do
is start pulling this down. So pull it down from
the center first, and you will see as
I bring these down, I can actually start getting the look that I'm
actually looking for. So if I pull these down and
then pull these down after, And then what I'm going to
do is pull these parts up, so pull them up and then pull these parts
up, and I told you, it's pretty simple
to actually do this and then start
rounding this bit off. Like so, like so, and then also pull
them out a little bit, because we can get rid
of some of that anyway. And now what you want to
do is you want to come in, and you want to bring back
then your market store. So we're going to
go to object mode, Alter, bring back everything and come back then
to this part here. Now you can actually
go back in and now let's shape it while
we've got this part here. So now I can pull this down and shape it into how I
actually want it. So I'm just going to
pull left and right, so I'm going to have one
a little bit further out. And I think this is already
looking pretty nice. Now, from here, what
you want to do is you want to make your brush
a little bit smaller. You're going to harver over
any part of your cloth, and you're just going to tap it, hold in the shift key. So just tap it or
drag it as well, hold in the shift
key very gently. You can also come in, and
where the smooth button is, you can also turn this strength down if you don't want
to do it that way. So you can do it that way
or the way that I've said. Now, come in and just smooth
these off a little bit. Then you'll see you actually start getting the
look that you're looking for. You can see here it's
not quite right, it needs kind of bending
down on these parts here. So back to my grab tool, and let's bring them down
just a little bit, like so. Make it a little bit bigger. You can't really make
mistakes? Don't worry about? You just want to get it in line with how you
actually want it. Like so. And then
again, I'll come in smooth tool and
just smove it off. Just make sure you don't smooth
it off too much. Like so. And so. There we go. Now you can see, as
I turn this round. It goes back to the
lowest render point on here, and that's fine. But now you can see that's looking pretty nice.
That's what I want. Now, do I want to pull this
bit down a little bit more? Yes, I do, to get it in line. Then I want to pull this
out maybe a little bit. Like, so. Alright, that's looking pretty good.
I'm happy with that. I'm just wondering
whether I want to pull this bit down as well. Make it follow that kind
of line going over there. Maybe the little bit
down on the top of it. L, so, yes, and I think that
is perfectly how I want it. Okay, so now we've got all that. We can also use all
of these tools. I recommend you play around
with all of these tools, have a go, see what
they actually do. They're not going to
help much in this cloth. You might find a really, really nice way of
doing the cloth. That's the best way I found
of doing this sort of cloth. So now what we can
finally do is we can actually come back
up to object mode. Now we've got this here,
go to object mode. And what we can do is we can
come over and apply this. Now you've got a choice here. You can actually turn this down, so you can see, now
in render view. In the viewport, we can
actually turn this down. Or we can turn it up
to whatever you want. So I'm going to turn my
first of all two, seven. And what I'm going to do is I'm going to apply that
with Control A. And now you'll see
that we've got a lot of you know,
polygons in here. We don't really want
so much. So what I'm first of all going to do is though right click and I'm going to shade to
smooth by angle. And then what I'm
going to do is I need to get rid of a lot
of these polygons. We don't want all this in here. So what I'm going to do is
I'm going to press one. I'm going to make sure
that I'm in x ray, so I can see exactly what I'm doing. I'm going to press tab. And what I'm going to do
now is I really want to get rid of a lot of these
polygons that are here. So I'm going to do
is double tap the A. And then we're going
to come in with Face select pressing C
to add my circle select, and then I can use the scroll mouse wheel to bring
it in and out. Now the thing is once
you click and drag, you'll see that you
can actually click on them, so you
can click on them. To minus it off, use the
middle mouse button. And then also to get this off, just right click, and
that'll take it off. All right, so let's press C, and then what we're going to
do is we're just going to go round all of the
outside of here, and then I'm going to fill
all of these in, like so, and I'm actually going
to get rid of these because we really don't
want these parts here. Then we're going to do is
right click elite and faces. And then we go, now we've
got something where we still can't see inside here, I might even go and just get
rid of these bits as well, because that'll be on
the inside of that mesh. So round these parts here, for instance, clean it
up a little bit more. So see again, clean it up a little bit more
on these parts, and on these parts, right click, Galt, and faces, like so. Okay, so now we've
got that part. Now we can actually put
it back onto object mode, so let's go back or
turn off the x ray, and this is what we
should be left with. Finally, then we just need
to bring in our cloth. So if I come in and put
this on rendered view, And what I'm also going to do, you can see at the moment
the sunshine in this way. So let's see if that's okay. Let's come in then, click the Down arrow. We're
going to click red. And the one we want is going
to be fabric red like so. And there you go, you can see that is how that's
going to look. And it looks very,
very nice, of course. Okay, so at the moment, as well, let's just see how it's
actually unwrapped, so we'll go to edit, and
it's unwrapped like this. So that's my unwrap. You might want to go
in and unwrap yours. It was the plane, so it
did unwrap it anyway. And unwrap yours, just make sure it's going the right way, so you get all of these
beautiful details into your cloth like so. Okay, so that's that part done. Now, the next part, what we'll do is we'll put in our shelves. We'll bring in all of
the other parts on here. I don't think at the moment, yes, we have got
a bevel on there. We've also not got
a bevel on there, so we might be vel
that off as well. And yeah, guys, I hope
you enjoyed that. I hope you find that useful. It's pretty hard to explain
just the sculpting in like, one lesson because there is
a lot more to sculpting. But for what we need it for, we might as well not go full
depth into sculpting because we're not going to be using
in this course that much. And we will talk a little bit more about
sculpting, actually. Also, as we develop our
terrain and things like that, we'll be using the sculpting
tools a little bit more, but actually going over
everything in sculpting, it's not really a
sculpting course as such. We're just going to use it to
get what we need out of it. All right, everyone, so
I hope you enjoyed that. I'll see you on the next one. Thanks a lot. Bye bye.
96. Finishing the Small Market Building: Welcome microphone, Blender for, the modular and Kash
environment guide, and this is where we left off. Okay, so now we
need some shelves. We need a little baubles that are going to
come down here. And then we can finally start putting in all of our props. So what I'm going to do is
I'm going to press Shift A. I'll think I'll do
the bauble first. So yeah, we'll do those first. So what I'm gonna do is going
to bring in a UV sphere. Then rather than moving
my U V Sre at the moment, I'm just going to turn
these down to 16. And I think that should be
enough to actually wear with. I think I'll leave the
rings on 16 as well. Alright, let's
bring it out, then. We'll just press the
S bond, bring it in. Like, so, then what
I want to do is press Sen's d and pull
those out a little bit. And finally, I want
to make the bottoms of them a little bit
larger than the top. So what I'll do is I'll come in. Grab the top of this
lt shift and click. Let's put this on
something like sharp. Press the S bond,
bring in the mouse, like so, bring it
out a little bit. And there we go, now you can see that's looking kind of nice, let's pull it up a little bit, making it a little
bit of a tear drop. And then finally, let's press the dot bond so I can
actually move around here. And then what I'm going to
do is t shift and click. And grab all of these. So Old shift and click. If Old Shift click won't work, by the way, just press C, select with left click, right click, and then you
can delete and faces. And then finally, we
just want to make these bubles go into
these curtains. So I'm Joe going to come and grab the inside of here
now with Alt Shift click. And then all I'm going
to do is press E and Z and just pull it up like so. Now, let's put these into place, so right click.
Let's Shadesmooth. So Shade Smooth by angle. And you know what, we'll just
have a little another pom. I'm just wondering whether
to make these out of cloth. I think on the original, I made them out of some
metal or something, but I think on this one,
I'll make them out of cloth, which means I'll just
put them into place. I'll put one here, shift D, I'll put one here, and then shift D, I'll
put one this side, and then shift D, I'll
put one this side. And then all I want to do is
just hide them behind there. So I'm going to
pull them back into place and just hide them. Behind there. So just make
sure the relatively close. So you can see the
pretty close there. Double tap the A.
And there you go, we should have
something like this. Now we'll put in our shelves. So let's press shift A, and we'll bring in a cube. We'll make the
cube much smaller. Let's put the shelf in first, and then we can actually pull you know what things are
going to be on there with. So in other words, the supports. Let's put the supports
in out there. Press the dot, let's
zoom in and out just to make sure we've
got the right orientation. Ens head, and all I'm going to do is pull
this into place. Pull it out a little bit. Essen d, make it a
little bit thinner tab. Let's come to the face. So face select, grab this face, and then we'll pull
it out without portional editing on
into place like so. Now obviously, this one's needs dropping back a fair amount, so let's pull it back,
like so. There we go. And then we'll just
make a small support. I think because of the
size of this shelf, we'll actually grab it
and we'll press ens d, make it a little bit thinner. I'm also going to drop it down
a little bit because then I can get ale bit more
of the shelf in there. So if I pull it out
now against here, So, and there we go. All right, so let's make
the actual supports. So I'll grab my shelf. I'll press shift
urster selected. And it's gone over here
and the reason is, because obviously, I need to
reset the transforms first. So right clicks the
origin, do geometry, then shift and S,
urster selected, and now let's bring
in a support. So all I'm going to do is
I'll just bring in a cube. I'll make my cube smaller to get it to be round
about the right side. And I'm probably going
to be beveling this off. I'll show you a really easy way of doing this, by the way. So S and Y, let's bring it in. Get it to the place
where you want it. So S and X pull it out, and then SN x again, like so, and then just drop it into
place like so, bring it down. And then what I want to do
is I want to press Control. Once I'm in Eddie Moto, Control, left click over to here, and then control, left click. Over to here. Now, basically,
wy I've done that is, I want to actually
level this inner part off just to give it a
roundness going around. But I put these
actual edge loops in to make sure that it
doesn't go past there. Now if I come to this
and press Control B, you'll see it can't go
past those edge loops, and that's exactly what I want. Now I want to do is I want
to bring it in a little bit, so I've got a little bit
of space to work with. I can then turn up the
amount of segments like so. Then what I can do is
I can drop them back the other way and create
that shelf factual look, increase the segments
just so I can actually now right click and
shades move by angle, and it's as simple as
that to create a support. Okay, so what I'll do
is, I'll put one support here and one support over here, like so, and then you can still see these actual
supports in there. Finally, join it
all together then. So Control J, control
A or transforms, the origin to geometry. And now I'm going to do is,
I'm just going to grab these. I'm going to press
shift D, bring it over to the other side, rotate it around, so Is at 180, and then let's drop
it in to this side. Now, it's up to you whether
you want it to be the same out on each side.
I think I do with mine. And this now is
pretty much done. Now the thing is we want
to join it together. We've already got
bevel on these parts, so let's scrub both for these, first of all, press Control J. And then what we'll do is
we'll add in a modifier, generate and a bevel, and
we'll put it on naught point, not Not five. And then we go. And then what we'll do is
we'll grab the outside, add in a bevel again. So Bevel Naught
point Not five, so. And then I'm just going
to press Control A, all transforms, right,
clicks the origins, geometry, just to make
sure that's fine. Finally, finally we can
join all of this together. So when I grab my
guy put him over there, Grab it all together. I'm going to go azo weights. Make sure ones selected,
and then object, come down to where it says
convert and go to mesh, and then finally control J
and join it all together. Now, all of this will
come in as cloth. I'm sure. Yeah, there we go. So let's actually bring
in some materials first. So what I'm going to do,
we've got our cloth on there, so we don't need to
worry about that. These little bubles, we
can also have as cloth, but we do need to unwrap them. So let's come in first of all, and grab all of our bubles, and we're just going to
press and Smart UV project. Click Okay. And let's see what they look like.
You know what? I think I'm not sure whether I'm happy
with how they look. So instead what I'll do is, I'll just press one to
go into front view. And instead of unwrapping
them like that. I'm just going to unwrap
them with project from view. Sometimes this works out
a little bit better, especially if you're
looking straight on. Es basically projecting it from this view or where you are. So if you're from here and
you use project from view, it's going to project the UV map onto where you're looking from. If I press one and I'm
looking straight on, I click, project from view, and now you'll see now that's what
they actually look like. So you can see they look
much more like bubles, Much better than what
they look before. Now, let's come into
this part here. So this huge part here, and then what we're
going to do is add in our light stone, so light. Stone like so. Add that in. There we go, and we
change the whole thing. So let's go back. Let's go back. Actually, we'll have to
do it the other way. Let's go in and
put in red fabric, so red fabric, this one here. Alright, we've got
it back. Now let's click plus down arrow, Light stone. Light stone. Let's click a sign.
And there we go. There's our light stone. I don't remember
if we unwrap this, so let's unwrap it as well, so Smart UV project. Okay. Yeah, we didn't unwrap it. And now we can come to
each of these in Edgeck. So Edge lech grab each of these. Like, so, U and Smart
UV project click. Plus board, click the
little Down arrow. And this time, we want
to bring in the mid, so the midtone, this one here, click a sign. And there we go. And they're looking pretty nice. And then finally, the wood. So the wood over here, we'll grab all of these
Smart UV project, click. And then we'll click
plus down arrow, and it will be the Prop. So the prop wood. And then let's click a sign,
and there we go. That is a wood on.
That's looking pretty nice, both sides. Okay, so that's
looking pretty good. Now we want to do
is we want to just fill this up with
some of our props, so they're already in there when we actually bring them in. What I'm going to
do is, I'm just going to put my finished on. Turn that on. Wait for
everything to load up, and then we'll
bring in our props. So let's wait for everything
to load up, and there it is. And then we're looking
for now all of our props. So where of all our
props. Here they are. So I'm just going to
grab all of these props. And then we're going to press
shift and bring them over. And what I'm going to
do is I'm going to also put these because we're going
to use them a few times. Over here. So what
I'll do is I'll press M, and I'll put these. I'm going to just select one
of them, so one selected. Still grab them all, and we'll put them into markets like so. Now, when I've opened
up my markets, you can see, because
we duplicated them, they haven't gone in as asset manager or
anything like that, but they are all name fors
and things like that. Now what I'm going to do is, I'm going to bring
them over here. I'm going to keep these
here just in case I need to use them for,
in fact, you know what? We don't need to use them
for any of all other props. We will put some in once they're actually in the actual scene. But actually making them
as part of the props, probably not the best
idea with these ones, because we want to move
them around a little bit. So what we'll do then on
the next lesson is we'll actually populate this
with a few props, and then we can join
it all together. All right, everyone, so
I hope you enjoyed that. I'm going to save out my work, and I'll see you
on the next one. Thanks a lot. Bye bye.
97. Starting the Large Market Building: Welcome microphone
to Blender porn, the modulate and Kit
ash environment guide, and this is where we left off. Okay, so let's come in and
bring in these two barrels. So what I'll do is
I'll bring one of them just so it's
on the outside, and I think this barrel
is a little bit too big or This is not on the right
place, which it's not. So what I'll do now is, I can hide all of
these finished. And then what I can
do is, I can bring these up for the right space. So you can see all
of these on here, definitely definitely
in the wrong place. So let's bring that up. Let's bring this
barrel down then. Let's make it a little
bit smaller, this barrel. Let's also find our little guy. I think he's actually
under or in there. There he is. Let's bring
him over. Press one. And then we go, let's pull
him up into place, like so. So that barrel then is
still the right height. Let's pull it over into there. And then what I'll do is, I'm going to pull my guy
out a little bit, pull this one in a
little bit, like so, and then get these
smaller barrels, make them a little bit smaller. I'm going to pull
them into place. And again, you
could have loads of glasses or potions that can
also go on these shelves. Though you can see what you
can do with all these props. Let's pull this into here. And what I'll do is I'll
put this back in there. Shift, bring in another one, rotate it round, so I'll there, rotate it round, shift. And then what we'll do
is we'll put this on top of this one here
and a mint even. I'm just wondering
whether, you know what? We'll bring it over a little bit more just so it's on there. Then I'll move this one forward and rotate this around
a little bit more. Like so. Okay, now let's
bring in then these vases. So we'll bring in a large vase. We'll bring in all the vases, actually, all three of
these ones at least. So let's go over the top. Let's bring them over,
put them into place. And again, we'll make this
one pretty big this vase, and we'll put it in the
back over here. Like so. Then we'll bring in a
couple of the small ones, make them a little bit smaller. Like so, and let's put them back into our market
store like so. And then all I'm doing
is, I'm just making sure now everything is
on the ground plane, as you can see these
are a little bit out, just to make sure
everything fits on there. Like, so a little tiny
bit higher if you can, because we just want to
make sure this drops in. And then what I'll do with ease. Pull these down as well,
a little bit above it. Like so double tap the
A, and there we go. All right, so that is our
first market store finish. So now let's join
everything together now, I'm just wondering, If I have, yeah, I have levels
and things like that. So what I'll do is I'll
just come over the top. I'll grab everything, making
sure I select one of them. And then what I'm going to do is object and convert to mesh. And then I'll press Control J
and join them all together. And there we go, this now is our actual markets stall all done and that's
looking pretty nice. Okay, so I think then we should
move on to the next one. I'm going to put this over here. And this is the one that
we'll be doing next. And what I'm also
going to do is, I'm doing this one next just so we don't have to do more cloth. We'll do that in the next one, but this is the one we'll
be actually covering next. So what we're going to do is, I think we can use some of
the parts we've already got. So with the top of here, this just wants
to make sure this is actually on the top of here. We're going to bring
our guy over then, so we have some idea of the
kind of height that is, and I think that if I press one, let's bring it up as well. So let's bring it up.
Into the right place, so like that, you can
see it's pretty high. But that is because we've
also got underneath here, we've got some kind of bamboo that are going to go
on there as well. So what we'll start
with first is here, we'll bring in the pillars. Now, the pillars, we can use the pillars
that we had before. So if we come over to
this section here, we can see we've
got a pillar here. Let's press shift, drag it over. And then what we
can do with that is we can actually use that. Py press dot now. We can use that and
bring it up and put it into place on one
of these sides here. Now, what I'm going to
do is press M and put it into my markets. And then
we're going to press one. I'm going to put
this on object mode. And then what I'll do
is I'll put it over. I think we'll put it just not actually I'm just wondering whether we're
to put it in the corner. You know what? I think we will. I think we'll put it
right in the corner here. And then, of course, we
need to stretch it out. So S and's. Now, it's up to you how much you
want to stretch it out. I might just instead, just drop it down there. I'm happy with this here. So what I'll do is I'll
just pull the top up. But if I come in and
just pull the top up. So if I grab the top with L, and you can see it's
all joined together, so that makes it a
little bit harder. So all I'm going
to do is just grab the top control
plus control plus, press one again, and now I should be able to
drag all this up. Now, rather than dragging it up in stages, there's
no point to that, so what I'll do is, I'll
also grab this part here. And what that'll mean is
now when I press one, it should all drag up
at the same time and keep this actually in place. So yes, I think that
looks much better. The only problem you're
going to have is probably I'm just having a look to see if this
got stretched too much. You can see here the stone. It's got stretched a little bit, but don't enough to see, so we're not going
to worry about it. So let's put that back in place. And then we can decide how
far we want it out, like so. Alright, so let's get a
center point on this then. So what we'll do is shift
S curs to selected. Let's then grab this part. What I'm going to do is, I'm just going to put
it over the other side. So I'm going to
bring in a modifier. We'll bring in a mirror, and
we'll put it over the y, turn off the X right clicks
the origin to three D cursor, and you can see if
great on the wrong one. So let's just swap them
over, and there we go. That's the first start
then of this part. Now I want to do is I want
to create my Boolean, and from there, I
can create a door. But I think it would be easier if we just give this a color. So let's grab this. Let's press A, U, smart UV Pj, click Okay. And then what we'll do
is we'll come in and add in our light
stone, so light. Stone, this one here, like so. And now we can really,
really see what we're doing. And the other thing
is we want to have this, though, this part in, we want to have this also broken down the center of
it. So we'll do that next. So we'll press
Control. Left click, right click, and we'll have two stone slabs on
top of each other. So let's right click
and mark a scene. Let's then come in
and split this off. So if I press L, Y, and then A to grab
everything, mesh, and we'll just
fill in that hole, so fill in the hole,
and then finally I can press control
A all transforms. It's that origin, two geometry,
and then I can come in. Add in a color just for now. So what we'll do is we'll bring
in our light stone again. So light stone. Not sure
if we'll unwrapped it. Did I unwrap it? Let's
try it again, U. Smart U V project. Click okay. There we
go. Now it's unwrapped. And then we'll also add
in a Bevel two here, so Id generate Bevel, and let's set this down
to point n not five. And there we go now we can see we've got a little bit
of a gap in there. Let's set it a little
bit higher point ne not eight. There we go. And now we can see we've
definitely got a gap in there. Now what we'll do
is for the bamboo. So we'll come over, and
we'll grab our bamboo. So this one here, we'll press
shift. We'll bring it over. No point in creating
something again, I don't think when we
can actually use this. So we'll see if we can
actually use this, and I think we'll be able to. So what I'll do here
is first vote press M, put it into my markets. And then what I'm going
to do is I'm going to grab the top of these,
so I'm going to come in. I'll grab these ones here. So I want to grab a fair few. And instead of just going in and randomly grabbing L
et's just come in, and what we'll do is
we'll just press B. So B, and I'll grab them over to there and
then press control plots, and just keep pressing control plots until
you've actually grabbed them until that
thing stops moving, as you can see. And then what you
should be able to do is you'll be able to
move these out then, so you can move them
out and get them to be the right scale that
you actually want them. Something like this looks okay. So what I'll also do while, I've grabbed them is I'll press P selection and split them off. Now I'll do is I'll move
these over to the side. Now, this was a test just to see if I could
actually use those. I think I've got way
too many in actually. So I think I'll just
bring them down because it's okay if
it's a lookout post. But do I really want
that many in there, like, so? Probably not. So let's come in, and let's
just grab a few of these, so I'm just going to grab
a few of these, like, so ones that are
basically crossing over, and I'm going to delete
those out the way, so I'm going to delete that one, this one, this one, this one. Delete vertss or faces. It doesn't really matter
which. And there we go. As there's still too
many close together. We might have to I think
on this, create a new one. I'm just going to come in
and I'll grab this first. So I'm going to grab all
of this one press sift. And bring it into place, and
then what I'm going to do is press the S b, like so. And then what I'm going to
do is I'm going to rotate it just to see what
sort of scale I've got. Cause I haven't even got
my archways in there yet. I'm just putting
these on. I need a centerpiece in here as well, so I'm just going to put
it over to this side. And then what I'm going
to do is rotate it round, so R x, rotate it round, and then pull it up to where
I actually want this to go. So, something like this.
Let's move it over. Let's put the orientation
in the middle. So origins jump tree. Let's bring it
down a little bit. And now let's pull it into place and see how
that's gonna look. First of all, I want it
below this part here, so I want it below, so
it's being held like so. And then I also want it to the side so that this is
actually holding it there, and I need this to be
closer to the edge. So I need to see how far this
is over the top of my guy. Let's pull it back a little bit. There we go. Let's pull this
down then a little bit. We'll also split this off, so P selection control
Ale transforms, srogen to geometry. Let's pull it down into place
and pull it out if needed. Yeah, I think if we
bring it to there, and then what we
can do is we can put one underneath here. And I think actually that's
not going to look too bad. Now, one thing is, I'm going to first of all,
before finishing, I'm going to grab a few
more of these because I feel like they're just
too close together. So a few of these and
press delete and vertices. We're going to end
up with a few gaps and then I'm also going
to do the same with this, so L delete vertices. And then what I'm going to
do now is move them over. So if I grab this one. I can move it over,
for instance, and grab this one, move it over. I can also grab. I'm just wondering if I can get away
with deleting another. So delete vertices,
grab this one. Move it over. Then grab this one and move it back
over that way a little bit. Like, so just straight
from the mot. Then atrain the
monk, just fill in those gaps, wherever
you've got them. If it's too far out, just
move it up into place. And there you go. Alright,
that's looking good. And then what we'll do then
on the next lesson is, I can put this bamboo
going the other side. I can start making
the arch as well. I'm also thinking I want to rotate this a
little bit more. The moment's a little bit too flat, so let's finish with that. So RNx. Let's rotate
it a little bit more. And there we go. Alright, that's looking about right for me. Okay, so I've got that in. I'll finish this off,
and then I'll duplicate it over the other
side with a mirror. I think I'll also, you know, what, we'll
leave it like that. We can mess around
with this all day. We'll leave it like
that. What we'll do is we'll save out our work, and I'll see he on the
next and everyone. Thanks a lot. Bye bye.
98. Creating Doorways for the Market Building: I'll come back
everyone to Blend for the modular and Kith
Environment guide, and this is where we left off. Now, what I want to do is I
want to go to my support. So my supports, where
are the supports. Let's find them. Here they
are. There's the supports. And what I want to do
is grab this support, so I'm just going to
press Shift D. I'm going to bring that
one over to there. And then I also want this
here. So this pillar. I'm going to press
Shift D and bring that over then
rough here as well. So I've got one support
and one pillar. I'm going to grab them both, press M, put them into markets. Now, let's put this right in the center as
well as this one. So Shift S and
selection's cursor. You can see they
didn't go in there, so I'm going to press Shift
S. Selections cursor, like so, instead of keep offset. And there we go. Then I'm
just going to press one. And I'm going to pull
these into place now. So the first one I'm going
to press is this one here, so let's pull this one
in place like there, and then we'll bring this
part in in front of it. Like so, and we should
still have enough room. Just wondering whether to pull
it back a little bit, yes, we will to now
bring in this side. So if I come in, press shift, should be able to bring in this side and put it
at the side of here, like so, and now you can see that's really starting
to come together. Now we can also
see how much room have we actually
got because we can see we can move all of these
over a little bit, like so. We can also see that this
is right down against here. So what I'm going
to do is actually I'm going to rotate
them both round, so R and X, rotate them both round
just a little bit, just so they're in there
a little bit there. Now I'll do is I'll
grab one of these. I'll press shift D.
Now at the moment, this one is rotated round. If I want to set it back, so if I want to set back, in fact, we'll show you that
actually. We'll press shift. Ks selected Shift S, Ks selected. There we go. Shift A. Bring in AQ. Once we reset the transform. So if I reset the
transforms like now, if I press all transforms
and set origin to geometry. If I rotate it round, so if I rotate it on the y, press the S one, like so. And now what I can do is I can actually get it back
to what it was before. If I press lt and r, it will actually reset back
to where I transformed it to. If I press all test, it will do exactly
the same thing. Now, the other thing
is, just remember, if you press S and then control A and all transforms
the origin geometry, now if you press all test, it's going to reset
to that transform that you already selected. As long as you're not reset your transforms,
like with this one, we should be able
to press Alton R and actually rotate it
back to what it was. Now, you will see that
Altar doesn't work. It means that we didn't reset. It means we reset the transforms
once it was like this. But I have to come back to this one. I'll show you on here. It won't reset it as well, because of the
fact, if I come in, it's part of all of this, which means the The origin and the transformation
is set to this point. So you can't reset
it if it's part of another object,
but you can reset, if I come back to this
now and split it off, so P selection, split it off, controla or transforms,
it's our origin geometry. So let's make it smaller. Let's rotate it round, and now let's press
Altar or Alt S, then we can actually reset it. So just a handy
tip there to know. Let's press R and X rY and 90. And then what we'll do
is make it smaller. And what we're going to do now is just fit this into place. So it wants to come at
the bottom of here, and it wants to be wide
enough to come out of each of the sides or near enough
up to the sides on here. So we're going to use it as a support underneath
these two, like, so you can see it
stuck out there, and now it looks like it's
actually being supported. Okay, so once we've done that, what we want to do now, is
join all of this together. But before we do
that, we obviously want to put it on the
other side as well. Now, we do want this
to be fairly even, which means that it's better to actually
join it all together. So if I press Control J,
come back to this one. And then what I'm going to
do is I'm going to press Shift and S. So Shift
S, cursor selected. Grab this one, right click
set Origin three D cursor. Adding a modifier and
bring in a mirror. You should put it exactly
where we want it. So you should put it
right over to that side, and that's exactly where
we actually need it. So I'm just making sure if a breast control all
transforms rightly, Sargen three D cursor, and there we go seven
see if it is level. So I'm looking now to
see if it is level, and that's looking around
about level to me. What I'm going to
do is I'm going to actually apply the mirror, and then I'm going to come
in, grab one of these parts, put proportional editing on, make sure it's on smooth, and then I'm also going
to move this over, so I'm going to bring it all out and just move it
over a little bit, just so it looks a little
bit different from this one. You can see at the moment
they look a bit similar. I can also grab this and pull all of this
up a little bit, like so and then we go, it's a little tiny
bit different. And that's exactly what we want. Now, let's think
about our arches, because we just need
our arches in now. Now, we do have a boolean, which is this one here,
or I think this one. I think this will be the
one that we should use. But let's press shifty rather than then we can just delete out the way once
we've finished it. And then what we'll do is
we'll just pull it into place, go into place here, but it's not going too far
back into there. And then what I'm going to do is just put it into place here. Now, remember, this is for the stone that's going
to go around there, so I'm going to make
it, much smaller. Like so, I'm going to
pull it down, like so. And then I can think now, Okay, this is the
height of these. Now, let's check first of all our guy on here because
you can see at the moment, this needs bringing
a lot higher up. So if I press esens d, let's pull it up a little bit. Let's put it into place,
so it's in that stone. Let's see our guy, so I'm just going to put y frame on then I'll be s.
And now if I press one, I can see it's going
to come up to here. M guy's got plenty of
room to walk in there, plenty of room each side. But just remember that this is going to be stone each side, so we'll bring in
a little tiny bit. So now I've got a
little bit of room. For the stone to go in there. And I think at this stage
that will be pretty good, so let's put on object mode. And there we go, and
let's pull it back into our wall, a
little bit like so. Now, the next thing
we want to do is we need to mirror this
over to this side. The one I'm going to
do is I'm going to press control all transforms. St origin, three D cursor. Add modifier, and we're
going to bring in a mirror. Let's mirror over that side. And then from there
now, let's come in. Grab this part, not this one. This one, press
control and minus. And there we go, there we've
got our actual bevel in. And I'm actually looking
to make sure you can see here that it's not actually going
to cut this away. So we'll have to go
in and fix that. Sometimes that
happens, especially when we're beveling archers, you have to actually
go in and do a fair amount of fixing.
But we'll fix all that. The other thing is, let's
put it on fast as well, and you'll see fast on this doesn't work, so we'll
leave it on that. What we'll do is press
control leg, apply that, and then come in and
press delete on here. Now you can see that that actual bevel isn't
working no more. And the reason is we
need to fix all of this. I recommend that we fix
this first before we even think about bringing on
our stone around here. So what we'll do is
we'll press shift HH, hide everything else
out of the way, and let's come in and
see where this line. So this line needs to come
all the way over there. So what I'll do is I'll
press Shift click, going all the way around, right click. Marco scene. Then what I'll do
is I'll come in, grab the whole of the bomb, press L. And then all
I'm going to do is press Y and split everything
off from each other. And now you'll see,
still not go anything, and the reason is
because we need to grab everything, go to mesh. Sometimes this will work,
sometimes it won't. So we'll come down to clean up, fill holes, and now you'll
see nothing's happened. So let's check why
it's not filled holes. So we're just going to go
in, we'll hide the top bit, and you can see
this is the reason why it's not filled the holes, because it's not filled it in. So we'll just go
in, press the F b, and there we go, now
we've got one bevel. Let's come to the next one then. So I'll tach, grab the top. Press L. Shift H, hide the other part, and
then we'll fill this one in. L shift and click F, and now I press lt.
Bring back everything. Now you can see it's filled in. Now, we have got some points
in here like this one and this one and this one and this one that we
simply don't need. So let's press delete. And all we'll do
is disolve edges. And then we go, now we've
got a much smoother surface. Now we can write click
and Shade Smooth by angle, and there we go. Now, don't worry about
actually this bit in here. It's a bit edgy, I know, but you won't be able
to see it anyway. Now, the next point
we want to do, if we press tags, then we can bring
back everything, and there is that part. Now, what we want to do
is think about our stone, and we want to think about
our walls, our doors, sorry. So let's actually do that first. So I think we'll do
our doors first, then we'll bring our
actual stone in. What I'm going to do is, I'm
going to come to this part. I'm going to grab this
part, grab this part, go all the way around
to this park again, press shift D, and then
I'm going to duplicate it. So shift D, duplicate it without
proportional editing on. Let's bring it out. And
there it is, that is our. This is going to be
our door basically. But once I've got that,
what I want to do is now, I want to get rid of the some here that are
not joined together. These are not joined
together, of course. Also, we've got a
bevel on there. So what we're going to
do is press P selection. Split it off. Minus the Bvlock,
Control A or transforms, right click the
origin Tro geometry. Tab A to grab everything, mesh. And all we're going to
do then is clean up, and we want to merge
by a distance. And those two vertices
then are merge. From there, then,
what I can do is Grab these two
vertices of the bomb, press the F born to actually
make a face or an edge, and then t shift
and click F again. And then we go, we've
got the making or the first part of the
making of our actual door. And I think actually, that's
going to look pretty nice. But what I'll do then
on the next lesson is, we'll cut this in half because I think it makes things easier. Create our door, and
we'll actually create an outline for our door
as well. So lots to do. I'm going to show you a
way where we can make this look even better than what
I did on the original. So yeah, let's do that
on the next lesson. Let's save that our work, and I'll see you
on the next one, everyone. Thanks a lot. Bye bye.
99. Texturing the Large Market Building: Welcome back, everyone
to blend the poor. The modular and Kit Ashenan guy. I couldn't say it for a
minute. But there we go. Okay, so let's bring this in. So all I'm gonna
do is grab this. I'm going to press I to actually bring it in with
insert. Like so. And then what I'm
gonna do is press K, and then A to drop it down. Like, so, and then K
and A to drop it down. Went along this part. Like so. Right, so this is the wooden slant going all the way around. We need one in here now. Now if I press Control, you will see that I can't really put it going all
the way through, but it does help me in a
way where I can actually measure it out then going
down here type thing. So if I press right click, then what I can do is
I can come in now, grab this vertice here. Now, what I can do instead of that actually,
we'll just come in, grab both of these, right click, and we will subdivide. So subdivide, now
we've got a point in the mid and a point down
the bottom in the mid, which means that what I can do now is grab this and grab this, I can press J, and then I can make that line
going up there. What we want to
do now is we want to create a middle part in here. I'm just going to
grab both of these. I'm going to press Control B, and the problem
is when you press Control B and need
to bring it down, you'll see that we can
only go out so far, but that's all
right in this case. It just means that we'll need to create another middle
part in there. We'll create it like
this, first of all, and then I'll show
you what I mean. So we need another halfway point because these two doors are
actually going to be split. A we'll do that is we'll come
in, we'll grab this one, this one, and this one, we'll
right click and subdivide. There we go, we've dropped
that in place now. I can actually split these off. So if I come to these two, so these are going
to be separated from this all the way
down to the bottom, like so, so I'm going to
press the P selection. And then I'm going
to come now to the outside of this. So L. You can see grabs the.
We don't want that, so I'm just going
to control click, going all the way around,
selecting this one. And this will be the outer
wood part of the door. So I can just press P, selection, split those off. Now we've got the main door, so I want to join all of
this together basically. I'm going to do is delete
and limited dissolve. That then we'll get
rid of those from me. The only problem now
is that I've got is though that I want
to bring these down. So I want to bring these down to create this part
going down here. So what I'm going to
do is, I'm going to come with vertix select. I'm going to press K A
and bring it down there. And then I'm going
to do the same thing on this part here, so K, A and bring
it down, like so. And then we're going to do the
same part on here as well. So K. And then A and bring
it down into place like so, and finally K's not there. A and A, bring it
down into there. Now, I'm just
wondering if I want another piece of wood
or if I want them, you know, quite big these pieces of wood, these
parts here, I mean. You know what? I might
actually come in as A. And drop it down to there. And then finally,
the last piece, which will be this one, A, and drop it down to there. Now I want to do is I want to bring in probably
some edge loops, so control, let's bring
in some edge loops. Now you can see the reason
why we've not got edge loops going over here is because
this is an actual triangle, and these are actual polygons. And that does make it
a little bit harder. So what we'll do instead is, we will add in one cut. So if I come in here
and just bring this in, you'll see though,
what happens is, if I'm just going to
actually bring it in. We'll bring it in all
the way over there. Now, if fire press control law, you'll see still
can't bring that in. That's because it's
got an edge on here as well. So, you know what? We'll do this way. I'm just
going to bring it over. Not like that. I don't want to do it like that.
That's going to make a mess. I'm going to bring
it to the points. Like so. Now, now I
should be able to. There we go. Let's bring
in three or four of those. Okay, now, let's do the same
thing on the other side. So we'll do not like that again. We want the same thing
on the other side. All I want to do's
come to this point, this point this point. Then I'm going to press K again. I'm gonna come to this point, this point, this
point, at this point. And then I'm gonna
press Control, bring in three or four of them. Left click, right
click, and there we go. Now, why did I do that?
I did that again, to give us some actual
difference in our wood. So select all these, right click, mark scene. And now I'll do is, we'll
come in and split these off. So L L, L and L. So
every other one, as you can see, y,
and there we go. Now we can actually create
these wooden actual parts. So what I'm going
to do is, I'm going to I'm thinking, yes,
what I'll do is, I'll first of all grab them all, and then going to pull them out, like so, so I'm going
to pull them back. And there we go.
And then I'll just need to come in and grab
the front of them now. So I'll have to come in,
grab the front of them. Now, of course, there
is a quicker way. You could go over the top and put it into wire frame
and grab them that way. But honestly, this
is taking seconds, so it doesn't really matter. So we're going to go to mesh, we'll go to transform, and we're going to
go to randomize. And then we're going
to turn this all the way down to not
point naught one. Like, so maybe even lower
not point naught five. No, not point, not not five, No point, not not five. Like, so, press the tab on, right click, Shade auto smooth. And there we go. Now you can
see they look pretty nice. And then what I'm going to do
now is bring out this part. So, L E, pull it out. And then what we'll do
is we'll pull this back. So A, A L on this part. We can pull that back now. So. And finally,
the center part, so we'll grab all of these
centers, so L and L. And then I'm just going to press E and pull them out into place. Now, we should end up
with something like this. And now what we should
be able to do is grab everything
and shade smooth. And there we go, there's
the first part of the door. And now we want to do
is we want to have some wooden slats holding
all this together. So what I'm going to
do is press Shift S. Custer selected Shift A, and then we'll bring in a cube. Let's press the S button. Now, just in case you
want to animate these. Always get used to the fact that we need to split
down the middle. So you can see here
this needs to split. You can see it with great
like this at the moment. We also need to make
sure that this bar, rather than putting
it all the way over, rather than just putting it
all the way over like this, just get used to adding
it in onto one side, just in case you ever
want to animate it. So we'll put it down to here, and then I'll press S and y and pull it into
place like so, and then all I do is press sift. Doesn't take really no more time when you're actually doing it, but when you're going back into doing something,
it's a real pain. Let's grab both of
these then. Control J. Control A, or
transform, set origin, two, three D cursor,
add in a modifier. We will bring in a mirror. All that on the other
side, and there we go. And then what I like to do
sometimes is I'll come in, apply my mirror, so control A, and then just move these up. So if I press R and y, I can just rotate them slightly, and then L and just move this up a little bit just so they
look a little bit uneven. Let's split this up then. So all I'm going to
do is I'll press t, shift and click, so let's
go all the way around. Shift click this side,
Shift click this side. Press y, and then A
to grab the mole, mesh, clean up. Bill holes. Let's set this to something
like six, like so. And then let's press
tab, right click, Shades move by angle,
and there we go. Now, finally, what we want to
do is pvel all of this off. So I'm going to grab the
whole thing like so. And we're going to press Control
J, join it all together, and then control A or transform, set origin to geometry. Finally, then that's
bringing a bevel. And if the bevel isn't working, we already know the reason why, so we'll go to geometry, amp over a Po and then
put this on Not point, not Not three, and just
turn it down a little bit. Now you can see we actually
have some breaking here. So this is what's
causing the issue. So if we go in, we can see that we've got some breaking
on our mesh here. So what we'll do is
we'll split this off, so LP selection. We'll then actually take
the bevel off a minute, we'll come in and we'll actually overlook what the issues are. So you can see we've kind of got a part that was really
not needed on here. You can see this part here. If I come in and press L
and then limited dissolve, that will get rid of
it, but it will also get rid of all of these
other edges on there. But that's not actually a problem because
then what I can do is we can come in and
triangulate faces, and finally then tries to quads. And then we've actually
fixed all that issue. Now, if I join this back up, so if a press control A,
that origins geometry. Join it back up to here
now, press Control J. Now you're going to
get that bevel in, that beautiful
bevel, and now you can see that door
looks fantastic. Now what we're going to
do is we'll just just actually bring in
some materials. So what we'll do is
we'll grab all of these. We'll press A U,
Smart U V project, click Okay, and then we'll
put it onto render view. What we'll first of all
do is bring in our wood. So we're going to bring in wood. So the moment it's lighttone. Let's minus that off. Let's bring in our blue wood. So this one here. There we go. And now what we'll
do is we'll actually fix this with drop wood. So down arrow, drop. Wood, like so, and
then no longer going to do now is come in
through each of these parts. Like so, and I'm going to
assign it to the prop wood. L so, and double tap the eight, and there we go, There
is our actual door. Now I want to do is I want to
pull this door into place. I'm going to pull it
into place like so. Now on the next
lesson, we'll actually create the stone that's
going to go around there, because we still
need that on there. And then what we'll do is bring them over to the other side. And finally, then that is this market store actually done, and we're actually on
the last market store, which you're gonna find
easier because most of the stuff we've already
built on it actually, so it's gonna be much
easier than this one. Alright, everyone, so I
hope you enjoyed that. I'll see on the next
one. Thanks a lot. Bye bye. A O
100. Modeling the Warehouse for the Aztec City: Welcome back everyone
to Blend the poll the modular Kiah
environment guide, and that's where we left it off. Now, let's come in.
And what we'll do now is create this arch
here. So I did. Did I bring yeah, that
was for the door. So I need to go in and
create another one. So all I'm going to do
is grab this one here. Control click.
That doesn't work. So shift click, Control click and control click down to here, and then shift
click down to here. Shift D, bring it out. There we go. And then I'll press Pete selection exactly
the same as I did before. Control Ale transforms to origin through geometry,
minus off bevel, and then tab make
sure we're in there, and then mesh clean up, and we're going to merge by
distance, and there we go. Okay, so now we've done that. Let's actually start
creating this. So all I'm going to
do, first of all, is I'm going to press E and
y and pull it out like so. And then what I want to
do is I want to create another block down here. So control two. Left click, right click, and then
control our two, left click, right click. And then what I'm going
to do is pull these up. So I'm going to pull
them up and get them roughly the right scale as
this one, as you can see. And then the big blocks will be down at the actual bottom. Now I'm going to do is
put these into place, so I'm going to bring it
into place where I want it. So round about here. And then what I'm
going to do is, again, I'll press Control
A or transforms, and then I'll bring
in my modifier, which will be, of
course, my solidify. I want to generate a solidify.
I want to pull it out. You can see it's all
over the place again. So A, shift N, spin it around. And now I can see it's coming on the inside but
not the outside. Even thickness on, bring
down then the offset, like so, and then find we
can bring this out now, and make them a little bit chunkier what we
actually want them. And I think something like this chunkiness if I press one, you can see that looks
about right to me, and I think I'm happy with that. All right, so that's
looking good. Now what we want to do is, I'm thinking we're going
to need another one of these on our
on our other one. And I'm just wondering
whether you know what? They're so quick to
actually create, then we're not going to do that. So what we'll do is we'll
just apply this solidify. And then what we'll
do is we'll press S and y and just bring it
back in just a tablt. So and then what
we'll do is now, we'll split these up and make these ones a little bit bigger. I think with the
center one, actually, we can do a little
bit more with that. So all I'll do is I'll come
in with lt shift and click, and we'll just split them off. Now, there's two
ways of doing this. We can actually go in and
mock Sam on everyone. Or we can just go
old Shift click, lt shift click going
all the way down. And that's probably going
to be the fastest way. Ares y and then A, and then we can come in mesh
and clean up and bellhles. And then all we
can do is come in, add modifier and
generate a bevel, put it on not point n not five. So look at that.
And there we go. Now, from here, we
can still come in. Alt Shift click,
Altern and we can pull that one out a
little bit, like so. And now we'll come
to these ones. Old Shift click,
Alt Shift click, Altern let's pull these
ones out a little bit, like so. And there we go. Alright, all of that is
looking really neat now. The door's looking really neat. Everything's looking good. And finally, now, this
is on point No No three. This is on 0.5, but we're gonna join it
all together anyway. So we might as well just apply both of these. So
we'll go to object. We'll go down to
convert and mesh. We'll press Control
J, join it together. The only thing is we forgot actually just to unwrap these. So we'll just quickly go in. And what we'll do
is it's already should have the right material. So it's got light
stone on actually, so we need dark stone, so we're just going
to put all mid stone, so let's c it on mid stone. L, so. And then what
we'll do is we'll come in now L L and just keep
working our way down. So, And then what I'll
do is I'll assign. Then we go and I'll press U. Smart UV project, click. And there we go, that's
midtone on there. Okay, so this is done now, F press G. We can see
we've grabbed it all. Now all I want to do is I want to come to the center again. Shift S, Kussa selected. And then what I'm going
to do. This here, by the way, doesn't look like it's unwrapped properly to me. I'm just going to see
if it actually is, so, Smart UV project, click. And it is. It's just that it's so big on the actual the UV map that it's not
unwrapping it properly. So let's fix that first. All I'm going to do then is
right click and mark seams. It's going to mark seams
all the way around it. They're going to
press U and Unwrap, and you'll see it
wraps like this. And you can also see it says
object non uniform scale. Let's see, then if we reset
all of our transforms, if that will fix the issue. So A, U, wrap, and there we go, now it's unwrapped
and no I can see, that is looking much much better than where it was before. Okay, so now let's come
in. Grab this one. And what we're going
to do is right click, set origin to three D cursor, and then come in
over, and, of course, we're going to
bring in a mirror. And there we go. That
is on the other side. Let's press control A on there. And there we go, we're
finished with this part. So we can just see
how nice that is. We can see how we
use the other assets that we have to speed
up the process. Now what I'll do is
I'll pull my guy out. I'm going to go to seven, to go over the top,
grab all of this then. Grab this one last, object, convert to mesh. Control J. Control A, A transoms, right click to
origin to geometry. Finally, finally, then, we have our second actual market stool. Now, once we've done
this last market sol, then we can actually
head on over to our gray box again and
start getting more of the parts in
because we've only got a few more parts
to actually bring in. One of them is going to be the
huge entrance on the back. The other ones are going
to be the rooftops, and then we've got the torches, and that is about it. So we might as well do that. Now, this one here, we're not actually going
to need this anymore, so we might as well delete
that other the way. And now we're on
to the main one, which is this one here,
which unfortunately, involves a little bit more clot. But Ah, so what
we're gonna do now, is we have a top on this. Now, the top is pretty much where is it?
It's one of these. Let me just find the top.
It's like this one here. So this is going to be the top, except it's a long top. So we're going to use
this. So I'll do, I'll grab this shift. I'm
going to bring it over. And then what I'll do is,
I'll bring this over to here. I'll press seven to
go over the top. And what I want to do is I want to create this a
little bit longer, but I still want to keep
these sticks I think. So if I zoom into it
with the dot one, I can bring that up
then into place. I'm just looking
if I can actually utilize this then
to bring it over. Now, the problem we've got
when we do utilize it is, we need to bring
it out into place. So let's bring it over
into place like so. Like, so, let's bring it. I'm thinking a
little bit more out, so a little bit more
out express Controls and a little bit
more out. Like so. And you can see now it's not halfway between,
but that's fine. And then what I
want to do now is, I want to go over the top. And I want to actually
split these up. So if I come in, I
can split these up with L. Split them all up. P. Selection, split those up. Now that's all split up.
And then what I can do is now I can come in with facelect. Grab it going all
the way down here, and then I can
pull it and put it over to this side like so. Then I can come to
the back of it, and I can drag it, put it
over the back, like so. Now finally, I can
grab both of those, and I can pull them down
to where I want them. Now, I'm just going to see
if that makes it too small, so you can see it's lower
down than this one. So I don't think we
need to go that low. Press one. You can see now.
In fact, you know what? It's right down here. So it's not even on
the ground plane. Let's hide the rest
of these first. In fact, before we
do that, let's just press and we'll put
these in our market. And then I should
be able to hide everything else out
of the way like. So press one now, and now I can see exactly
where that ground plane is. So if I bring it all
the way up here, you can see now it's really
tall, perhaps too tall. What I'm going to
do is grab all of those, this one and this one, not the bond one, and then just pull them down into place, and I think the height
should be round about here. Now, I've got the top of this,
obviously, poking through, so I want to pull that back in, so I'm just going
to pull it down back into place like so. Okay, so we've got the
main set out for this. Now I want to do is I want
to steal one of these, so I'm just going to come over. I'm going to grab this shift D, bring it over, like so. And then what I'm going to
do is press P selection, and that then we'll just
go in the center of here. Now I want to do
is come on over. And grab the center
of this part here. So Shift S, cursor selected,
and then I'll grab this one, and I'll go control
eight all transforms, right clips origins geometry, Shift S and selections cursor. Then what I can do is
I can drag it up now, and I know that's
roundabout in the center. Roundabout in the
center. I press one now. And bring it up a little bit higher than this
one that we had. Now that pillar will
actually fit into place, and now I can actually
bring it back a little bit. Now, I'm just wondering if I clicks the
origin's geometry, how far back should
I go with it? So if I put it on here, is that actually
going to look right or is it too far back? I think it's probably
too far back. So I'm going to pull it forward. And then what I'm going to do instead is grab the top of here, press S and y and pull
it out a little bit. And there we go, now I think
that's looking better. Yes, that's looking
much much better. Now, from here, what
I can do is I can create something that's going
to come underneath here. I can create my archways and all that sort of good
stuff. Now, let's come in. We've got a bevel or a Boolean, should I say on each of these. So which one do I want to use? Perhaps You'll want
it more rounded. That is the question. Yeah,
let's use one of these. So what I'll do is I'll
press L P selection, control lay or transforms
right px surgen jomtry. I'm only going to grab one of them because I can mirror
it on the other side. So I'm just going to
put it into place where I want it roughly,
so if I press one, I need to take into
account that I will need some stone
each side of here. So we want to make sure that our guy fits in
there first of all, so I can pull it up to here. Like so. That's quite a
big storage room then. Then I can bring it down
into place, like so. Now, I'm also gonna be using these doors as
well on that side, which means I might need to just alter them a little
bit to make sure they fit, and we'll do that
on the next lesson. Alright, everyone, so I hope you enjoyed that, and I'll
see you in the next one. Thanks a lot. Bye bye.
101. Creating Door Arches in Blender: Welcome back, everyone. Fold the modular and
Kish environment guide, and this is where
we left it off. Okay, so let's grab this one, and then what we'll do is we'll come to the center of this one. So I'm going to press Control
A or transforms right, clack origin to geometry. Shift S, and then cursor to
selected. And you know what? This actual post then looks
to be a little bit out. So what I'm going to do is I'm going to put this
post in place first, so shift S selections cursor. Let's move it out
then into place, making sure it's in the center, so we can get everything
kind of right with this. So put it up to here, bring it back a little bit. Like so, and now it's
pretty much in the center. And I'll also, I think, bring this up a little bit. So what I'm going to do
is, I'm just going to come to the bottom of this post. I'm just looking actually, this post is it's beveled off. Can I actually bring it
up? That's the question. So I'll grab it in
the center here, and then I'll come to this point here, press Control plus. And I'm just wondering
if I can do that. It might be The problem I've got here is that
if I grab it here, so shifting clicking, see, I can grab it around there.
I've grabbed it now. There you go. That's exactly
what I'm looking for, but what I'm looking to do
is actually extend the bomb. So I'm going to do is
just you can see here, that's what I'm
talking about there. Right? Let's press shift take and
we'll do this a different way. I'll show you an
easy way to do this. I'm just going to
put it back first. Let's put that back. There
we go. Let's press shift H. Let's press one. And
then what we'll do is pre double tap the A,
go into wire frame. And if you want to move
something like this, the easiest way to
do that then is just to grab all of this like so. And then what you can
do is you can move this up and down as you can see. Now, what I'm going to
do is I'm just going to pull it above the
ground plane like that, and then I'm going to
double tap the A. I'm going to press B and
grab all of the bottom. And now I can actually
pull it down into place, making that post a
little bit bigger. Let's put it back
on object mode now. And then we go, that's what
we should be left with. I'll take And there you go. All right, that's
looking a bit bad. The other thing is, as
well, before we actually use this here is, I want to get rid
of one of these. You can see, I want to
kind of have two of them. So let's come in and
just grab this one, L, the lite, and vertices. And now finally, we're able to put this over the other side. What I'm going to do is I'm
going to press Control A, I'll transform Dr clicks at
Origin two, three D cursor. Add in a modifier then, and we'll bring in a mirror,
put it over the other side. So and then finally, we'll come to this part now. Press Control and minus. And there we go, we should
be able to get those in, and they're not going in
because I grab this part. We don't want it on there. We'll leave the bevel on there. We'll come to this
part. And then we'll come to this part in
this part. There we go. Control minus. Now it should
work. Okay, there we go. It's working. Okay, so
now, I'm happy with these. I think what I'll do is I will pull this
back a little bit, so let's pull them back
jaws to Tad Lite, so. And then what I'll
do is, I'll come in, and I'll come to this part here, Pres Control A, and
then this part here. Now, The thing is, I don't think I'm going to
need any of these anymore, so any of the booleans anymore, so I think I'm going to
actually delete this now, because I'm looking at
the parts I've got left. Let me just have
a look. We've got one entrance left,
and that's about it. So, yeah, we can
actually delete this off now unless you
actually want to keep it. Then what I'll do
is I'll right click and Shade Smooth by angle. And finally, then, let's
come in now and bring in, I'm just wondering, to make
this a little bit easier. I could bring in this, or
I could make a new one. I think we'll bring
in our door first. Let's come in and
bring in our door. Now, the door we'll have
to come in with dgelit. And grab all of these parts like so because it is joined
to the rest of it. So we'll have to come in,
make sure you grab in all of these parts. Like so. And then what we can do
is we can press shift D and then pull that door
out and finally press P, selection, separate it off, come back to your door, then, control A or transoms, set origin to geometry. And now I want to do is I
want to put this into place. So what I'm going to do is
fit it perfectly in places. I'll grab the center of here. So let's come to Face select. Grab the center, Shift
S, cursor selected. Tab, right click, set origin. No, we're not going to do that. We'll actually come to this
one now and we'll press Shift S and selection to Cursor. And there we go. All right, so it should be a
little bit bigger. I'm actually expecting that
because I knew I would actually have to make this
door a little bit wider. First of all, then, let's make
sure the door is in place. So we'll move our
guy out. Like so. We'll put this on
wire frame so we can see this line that
we need to go to. And then what we'll do is
we'll grab our door again. And first of all, I'll press S and x and pull it out that way. So I want to pull it out
to get to the right width. And you can see the
moment I do that, I'm actually halfway there. So all we need to do then
is pull up this bit. So what I'm going to
do is press to t. I'll grab this point here, and then I'll come in with
proportional editing on. We'll leave it on smooth, and what I should be
able to do now is just drag the whole
thing up like so. So I'm going to drag
that up to there. And then what I
want to do is drag these parts down, so
I'm going to come in. Shift click, shift click, ring it down, ring it in. And there we go. And now
you can see that's fit in, pretty much in place. Now the thing is, do I want
another edge loop in here? Control, if you do? So let's see if we
can actually put one in. Left click, right click. And then what we'll
do is drag that up a little bit, like so. And now let's pull
it out into place. So we'll pull it out into
somewhere like there. Let's have a look where that
looks like double tap the A. And then there you
go. It's pretty nice. Looks bigger and
rounder than this door. So yeah, we'll actually now make the actual stone work.
So let's come in. I'll do is do exactly what we did before, so grab this end. Control click. Control click
going all the way around. So shift D, bring it out with
that portion of editing on, of course, and then E
and y, pull it out. And then finally,
let's split it off, so L, P, selection,
grab it again. Control, all transforms,
right click, origin geometry. Now what we want
to do is we want to actually separate these out. So I'm going to press
Control L two or three. Let's think about this.
Yeah, we'll go with. We'll just make it the
same all the way down. We want B print any bigger
versions on the bomb. So left click, right
click and then Control L. So three left
click, right click, like so. Okay, so now we want to
actually bring in a seam. So we'll actually
mark the seams after. So first of all, what
we'll do is we'll add in our solidify. We'll bring in a solidify, press A, shift n, just to make sure they're
going the right way, and then bring them out or in a little bit,
bring them back. And let's put this into place, wherever we're going to put it. Like, so, making sure there's a relatively big gap because it is like this part here because it is a
warehouse door, this one. And I'm looking at the center. I think we'll make the center. No, we won't because
we're going to have a bar up here as well. So we'll put that in directly.
Alright, let's carry on. Let's carry on. So what we'll do is we'll actually apply this, so control A. I'm just looking never got
the right thickness. Maybe maybe a touch thi
touch more thick, like so. I can also see if I press one, and it's kind of hiding this
top, so you can see here, I would really like it to
be up up a little bit more, which means I just need to drag this bottom down,
so I'll come in. And I'll drag this bomb
down just to the floor, so press one, bring it down
just to the floor like so. And then what I'll do is
I'll apply my solidify. And finally, then I'll come
in now and split them mo lot. So I'm just going to come in. Now the thing is,
if you're splitting the map with this way, so rather than marking a seam. So if you're going in t shitly, make sure to grab the bomb
one or you'll end up with it like overlapping
the other measures on there, and you
might not want that. The other thing is to remember that we're also
keeping the bottoms on here, and the reason we're
doing that is because you never know where we're
going to put the parts. So for instance, it could be a part just hanging
over a ledge or something. We never know because it's actually part of a modular kit. So I recommend if you're
doing modular parts and kits, keeping the bottoms, also
keeping the faces on the back. The thing is with this
one, it's actually easy for us because we're
using seamless textures. We're not using textures which have been taken
in substance paint. You are doing
something where you're taking something in
substance painter, then it is absolutely
worth, you know, getting rid of the
backs of doors, getting rid of the
backs of buildings, where people aren't going
to see them because then it reduces the amount of space you're going to
have on that UV map. So just bear that in mind. All right, so let's
go old Shift click, and then just work our
way up to all these. Like so. And then
all the way down. Now you can see because I've not an to grab that one.
This one is fine. So in other words,
I press A now, you will see if I press the
S p that they all come in, and you can see that this one on the bottom comes in with
the bottom on there. Okay, so let's press A, mesh. Clean up, fill holes. And then what we'll do
finally is bevel this off. So control A all transforms, set origin to geometry. We're going to move the geometry to the center, so don't
worry about that. And then what we're going
to do is we're going to right click shade auto smooth. Add in the modifier,
bring in a bevel. No point, No No five.
Let's try that. And that's look in. That's
looking pretty nice. Yeah, I think that looks good. I think it looks much
smaller than this one. So yeah, it's a
little bit different from this big blocking
one over there. So yeah, I think I'm
happy with that. Now, let's put this
in the center. So what I'm going to do is I
know this is in the center, so Shift S, Cursor selected. Grab this one. Let's
grab this one then. And then what we'll
do is right click and set origin 23d cursor. And then finally, we're just going to mirror over
the other side. So if I grab this one first,
I can add in a mirror, so let's add in a mirror, like so, and then grab this
one and add in a mirror. L, so, and there we go. Alright, so far so good. Let's just take a quick look at what we've actually got here. And there we go. And they're
looking pretty nice. We'll bring in some stone
materials and things like that. And what I want to do now is, I want to create on the next lesson the cloth that is going to go
over these parts. So we're just going to
drape some cloth over here, and I'll show you how to do that with the cloth simulator. So just using no using the sculpting mode or anything like that,
so don't worry, guys. Alright, finally, let's save out our work, and I'll see
you on the next one. Thanks, Live. Bye bye. H
102. Simulating Cloth as Door Overhang: Welcome back, everyone
to Blender for the modulate and Kash
environment guide, and this is where
we left it off. Alright, so just
hop on back into object mode if you've
not already done that. And then what I
want to do now is, I want these in the right
in these same place, but I want them a little
bit more rounded. I feel like it'll just break up a little bit from that roof
that we've actually got. So what I'm gonna do is
I'm just going to come in. I'll press Control
A, A transforms, right, clicks the
origins geometry. And then what we'll do is
we'll bring in now a mesh, and we'll bring in a cylinder. Let's turn the cylinder
to something like 16. So I think we can
get away with that, right click, Shade
Smooth by angle. And you can see now it's still gonna look a little bit blocky. And I want it to look
like that actually in this occasion because it is
actually a piece of wood. So it's a piece of wood that
they've just rounded off. So what I'm going to
do is I'm going to right click, sorry, right click. I'm going to press rx and then rotate it by 90
to get it into place, like so, and then just drop them into round about the same
place as the other one. Bring them out a
little bit, make them round about the same size. So if you bring it
down, you can see, we're going to make it
round about the same size. And then from there I'm going
to do is grab the top of this and just pull it
out to where I want it. It's going to be slightly
longer than these as well. All right, so here
we can see that this maybe is a
little bit too big. So all I'm going to do is
just press the S button. In fact, you know what?
We won't do it that way. We'll come on the inside. So l shift and click Altern S. Let's make it a
little bit thinner. And there we go, that's
looking much much b. And then what I'm
going to do is now, I'll just place it in the same
place as these ones here, so I'll go shift D.
Bring it over roughly. It doesn't need to
be perfect. Like so. We want it a little bit
different to be honest. And that's why I'm
not using the array. We don't want them,
you know, perfectly straight or anything like that. So shifty. And there we go. Now, finally we can get
rid of these parts, so delete them out the way. And now what we're
going to do is, we just want to make these a
little bit more more random. So what I'm going to
do, first of all, is, I'll come into them,
join them all together, that'll make it
easy for me then. So control J, join
them all together. And then I'll grab the
front of this one, pull it back a little bit, grab the front of this
one, pull it back, like so, and maybe
even rotate it. So and Z, rotate it a
little bit, like so. Okay, so they're looking a little bit different
from each other. Now what I want to do is I
want to bring in my cloth. So again, I'll press control A, I'll transforms the
origin to geometry, and then shift A, and
we'll bring in a plane. Now, my plane has
come over here, and the reason is because I
didn't put my cursor there, so shift S cursor to selected, bring in your plane, so shift A, bring in a plane. Now, first of all, let's
make this plane so it's actually going to
fit on these parts here, so S and Y, let's bring it in. And we want it not to
come right to the edges. So we want it to come, you know, a little bit close to here, but a little bit closer
to here as well. So let's bring it
out. Not over it. Don't go over it
because this is going to be our cloth. So
let's pull it up. And then what we're going
to do is we're going to pull it out now further
than these parts, because what we want it to do is we want it to kind of drop over. If you look at this
here, you can see here, this one, how it's looping over and then kind of going
on the little bands on there. So that's what we
want to achieve. All right, so to do that,
I'm going to grab this one. And this one, I'm going to press S and X and pull them out. T so they're going
to hang over there. Like so, maybe even
a little bit more, so pull them out, like so. Now what we want to do is we
actually want to bend them. So we want to bend these
slightly because then it'll give the cloth
a help in hand. So if I come in, control, bring one up to here,
and then control. This then we'll
randomize them a little bit because they're not going
to be exactly the same. And then from there, what
I want to do is now, I want to bring in
some edge loops. So control, let's bring in
some edge loops, like so. Left click, right click,
and then let's bring in some edge loops
this side. Like so. So for that side or that side, and then bring in some ed
loops going the other way. So control, bring
in some edge loops. Left click, right
click, and there we go. Okay, so we're going to
use the cloth simulator. So first of all, we need to
reset all the transforms. We need to also do that
on here if we haven't, so reset all your transforms. Then what you're going to do is you're going to
come to this part. This will be the cloth, then,
this will be dropping down. Let's go over to layout
because then we've got a actual timeline that
we can actually use. So the way that the
cloth simulator works is that it works
on basically a timeline, and it works mainly on gravity. So when you actually press play, it will actually use gravity
to push the cloth down. What we're going to
do is we're going to come over to our cloth. So we'll come on
over to our cloth. Here it is, and we'll click on. So this space is called
the Physics tab. We'll click on the
cloth, like so. And now if I press
the space bar, this will fall
through the floor. And the reason it's falling
through the floor is because it has nothing to
interact with right now. Zero. It has none of these
things to interact with. So what you need to do
is you need to collide. You need something
that the cloth will actually collide with. The reason we've gave it so
many subdivisions as well is, if we don't put those in, it's just going to be
like a piece of wood. It won't bend in any
way or even a piece of metal because it hasn't
actually got any subdivisions. So subdivisions give your cloth more actual bend within it. So if you want
something like silk, you need to add a
lot of subdivisions. And if you want something
more akin to rubber, let's say, then you need to
add in less subdivisions. We can also control
that as well down here, which I'll show you in a minute. So now I've got my collider on, I'll put my collider on, so collision, it's called. Let's click on these,
put collision on. Back to your cloth now, and
once I press space bar, you will see that it goes
perfectly into shape like so. And you will see that
if I leave it going, it starts to pull it all
down, as you can see. So the further you
leave this going, the worse it's going
to be, as you can see, but you can get some really,
really cool effects with it. Now, what I'll do is I'll
set this back to zero. What I can do is I can
just come to here, and you can see this is pretty much what I'm
actually going for. So right click,
Shademth by angle, and there is your
cloth on there. The thing is that
we can actually do a lot more than that
if we wanted to. So I will show you,
if first of all, I come to the vertex mass
and I put this on five, you will see that
it's heavier now, as you can see, bending
more than what it did. Now, if we also come down, and turn this tension
down to let's say five. Now you'll see that we've got less tension in there as
well in these little parts. Now, we can also come in and
turn the stretching down. So where's this stretching, let me just find the stretching. I think it's down here.
Collisions. Okay, so we'll now talk about
collisions as well, and then we'll go back
to the stretching. So here you can see
the collisions. These are the quality. So this means how accurate
the collisions are. And then a little bit further down, we've got the distance. This is basically the
distance of the cloth. So you can see here
at the moment, this cloth is hung
way way above there. You can see this on all of them. It's hung too high up.
So all you want to do is put this Not Point, No No point, Not five,
something like that. Set this back then to zero. And then what you'll do is
you'll press space bar again. And now you can see
that it's actually closer because we've
turned down this distance. If I put this on zero, like so, all the way
down. There you go. Now you can see
it's a little bit closer to our actual mesh. And what we need to do as well, is now we've turned
this down zero. Let's come to our collider. And what we want
to do is also turn down this damping effect. So if I come in and I turn this all the way down,
let's restart it. Let's press space bar. And then we go it's a little bit closer, let's turn this down zero, this, zero, this down zero. So now you can see, if I
do that, there you go. Now you've got the cloth
actually hanging on there. So there's a number
of ways of doing it. You can see now that cloth is acting a lot more realistic. We can pull it two here, a lot more realistic
than what it was, and let's pull it
back a little bit. There we go, we don't
want it to swing so far. The reason why it's
swinging so far now is because if we
go back to our cloth, we've got a weight mass of five. Let's put it on two. Let's
press the space bar. And there you go, now
you can see we've got the perfect
angle that we want, there on top of there, even
to the point where they're actually going through
there because we've turned that dampening
down so much. These are the things that
you can play around with. You can also play around
with the compression. You can also play
around with the mass. Now, if I put the
mask, let's say on 25, you will see that
if I come in again, press the space bar, look how far they drop down on
that initial thing now. We've even got some
bending on here, and you can see that's probably looking even better
than what we had. Let's just wait for
a part where they stop swinging, and there you go. Now you can see a little
bit of bending in here, cloth is actually
bending on here. This is actually
bending within here. And it's all about how far you actually
want to push this. In other words, if I
come in and put this on, let's say 40, and let's
bring it down again. And let's press the space
bar. And there you go. You can see now there's
more and more on here. Like, so, and let's come in now and put it where I want it. So something like this, I think, is perfect. There you go. Let's actually press space bar, a little bit more, so
you can get better. Let's come in and
bring it through here. Still swinging a
little bit more wild than I actually want.
Let's bring them in. You see, I've got one side going on the other side, and I
don't really want that. And the other thing is,
so we've got that so far. The other thing is the timeline. If you want the
timeline to be higher. So at the moment it's
stopping on 250, come down to where it says cash. And what you're going to do
is turn up the timeline, let's say to 500. Now, if I come in now
and I'll let that go, you will see that it will keep
swinging much much longer. So you can see if I
zoom out of here, it should not stop swinging at 2:50 like it was doing
before. So here's the 250. We'll get to 250, and there you go it just carries
on, which makes it easier. You actually just let it finish, and then you're able to pick the cloth that
you actually want. So if I press space button now, you can see now that's
looking pretty nice. They're pretty
full down on here, and that is exactly
what I'm looking for. Alright, so on the next
lesson then, well, before that, actually,
what I want you to do is, I want you just to
play around with this. Have a good play around with it. The one thing we haven't talked about is
the field weight. So if I come in here, you will see that we've
got all of these. Now, the one I want you to focus on is one called gravity. We can increase gravity, and what they'll do is it'll
really push them down. So, let's say we
put this on ten. Gravity is on ten. Let's
start this on zero, Press the space bar,
and there you go. It's so strong that
gravity actually pushes it through the mesh here. So let's set it a little
bit lower than that. Let's put it on
something like two. Stephen G away with that, press the space bar, and there you go, you can see now just
how much influence that has on that actual mesh. You can see it's pushing
these all the way down. Okay, so let's put it on one. Finally, let's go to the simulation again.
Press the space bar. Let's have it a normal, and what we'll do
is I think we'll stop around 350 marks,
somewhere like that. As soon as these start coming
in together, you can see, as soon as they start hanging down like this, near enough, I'll press space bar
again, let them go a little bit longer.
And there we are. Something like this,
I think is great. So what we'll do now
on the next lesson is, once you've had a play
around with that is, we'll apply this cloth
over the other side. So we'll drag these
over the other side, we'll put them in
place, and then we'll make both the cloths look a little bit different
from each other. Alright, everyone. I hope you enjoyed that, and I'll
see you on the next one. Thanks a lot. Bye bye.
103. Adding Texture Detail to Door Overhang: Welcome Maroone to Bendpo, the modular and Kit
ash environment guide, and this is where we left off. What I'm going to do now is I'm going to drag these
over to this side. So I'm going to press 50. I'm going to drag them
over to this side. And then what I'm going to
do is, I'm just going to put this timeline back like so. And we've got this one
here as you can see. Now if I press space bar, you will see affects them
both, as you can see. We are getting a different
role in each of these. You can see this is rolling
a little bit different. And if I leave them now
to go to around 300 dish, you'll see if I stop it
there that now we've got actually something
that looks a little bit more realistic
than what we had. Let's stop them
rolling a little bit. Let's find the perfect place
where we can stop them. And I think O, look. There. There is
the perfect place. You can see this one's
a bit lower down. This one's a bit
higher up. You can see this one's lower down. They look a little bit
different from each other. So now what I want to do is
I want to grab them all. We grab them all, to object, and then what you're going
to do is go down to convert, mesh, and then we go everything.
Now is applied on them. If I press space pale,
nothing's going to happen. Now we can dousing head
on over back to modeling. Press the tab. And
then what we'll do is we'll come in to each
of these, right click. Shades move by angle. You can see now we've got a little bit of
breaking on there. Now, before we fix that, let's bring in a modifier because we want them to
have some thickness. Now, sometimes
thickness with these is a little bit of a pain because
what tends to happen is, it'll solidify them out and then you'll get
some crossovers. Let's see if we actually
get that today. So if we're going to add
in a modifier, generate, solidify, and then what
I'm going to do is I'm going to even thickness
all the way around. And I'm just looking
if I can bring up the thickness this way, just a little bit like so. And then I'll right
click Shades Move by angle, and let's have a look. I might need to come in and add in a sharp on each
of these edges. So I'll just hide this
out the way for now. I'm going to hide this
with the little TV. I'm going to press
the tab button. And then what I'm going to
do now is go in and I'll mark sharp. So you can
see at the moment. All of these sharps
are marked here. This is what's causing
these issues here. The moment I come in, press A, control, and I'll
clear my sharps. Now in a press tab,
you can see it looks way way better
than what it did before. What we want to do then
is we want to add a sharp going all the
way around the edges. So shift and click,
Alt Shift click. Come to this bottom,
then, Al shift click, right click, and mark A sharp. Now when I bring this back in, you will see that
that's looking much, much nicer than it was before. So double tap the
A, and there we go. We've got some
thickness to our cloth. It's all nice and smooth, and that is exactly
what we want. Okay, so what we'll do now is, I'll come to this one.
I'll do the same thing. So A, Control L, and what I'll do is
I'll clear the sharps. And then what I'll do is I'll shift click and go to
each of the edges. So Alt Shift click, Alt Shift
click onto this package. Al Shift click here,
right click, Mark Sharp. And then what I'll do is I'll grab this one, grab this one, control L, and we're going to copy modifiers, and there we go. Double tap the A, and that is exactly what we're
looking for. All right. So finally, you
might want to come in and just randomize
these a little bit. Let's see if we can actually do that. So I'm
going to come in. I'll press the tab button, to going to edit, press
A to grab everything. Mesh, transform, and we're going to randomize
these a little bit. We'll put them on naught
point naught one, like so, and there we go. Let's see what they
look like, and I think that's just going to make
them look a bit better. Then we'll come to these ones. Exactly the same thing. So mesh, transform, randomize
Not point naught one. And there we go. All right. So the moment of truth now, let's put it onto material
view or shade of view. L et's come in then, and
what we'll do is now, we'll add in some materials. And then we'll get
finished finally with just a bit on here.
But let's do that first. Let's bring in the
materials because we can see behind this door. That means that these doors need coming forward
a little bit, so a little bit from there. And now we can see
a little bit less. But let's bring in our material. So first of all, we'll
come into this one, we'll press tab a U M
U V project click k, and then add in a material, and it's going to be the
light, so the light stone. Like, so, and there we go. And then we'll come
to this one, and this one will be the dark stone. So tab. We can see as well that these two
at the moment are mirrored. So let's come in,
object, convert to mesh. So now the mirrored and also, these are mirrored, I
think, as well as overlook. Yeah, these are so let's
just press Control A. Then we'll come to
these then, press tab. A to grab them both, U, Smart U V, project click Ck. And then we'll bring
in that material, which will be the
mid O the midtone. And there we go, that
is looking pretty nice. And now finally, let's
come to these parts. So these parts are going to
be prop wood and the cloth. So what I'm going to do is
I'll come in first of all, and I've still got
the solidify on. Now, maybe, maybe it's a good
idea that I have got that on because what that means is then I can unwrap
this bomb part, and then it'll actually
place it on the top. So let's give that a try first. So if I come in A to go
everything, U unwrap. And then what I'll
do is I'll come now, bring in my red cloth, so red, Cloth, so where is it red
metal red cloth, here it is. And there you go and
you can see though it's facing like completely
the wrong way round. So let's go over now
to our UV editing. Let's press the tab button. And then what I'm going
to do is Zoom to this. And as I move the bottom, you will see that the top
actually moves as well. So what I'm going to
do now is rotate it, so I'll add nine,
rotate it round, and just get it into the place where I actually
think it looks best, which you'll be round
about there, like so. Now you can see that
we've got the sides, which you can't
really see anyway. It's not going to
make any difference, but we can see now we've
got the cloth on there. Let's come then to these parts and then what I'll
do is I'll press A, U, Smart U V project. I'm hoping that works on a
round object. It might not. What I'll do then
is drag this out, so I can drag this out, go to my material, and the
material we want is called Pp. So Pp wood, this one
here, double tap the A. And there we go. That's
what you've ended up with. And actually, that is
looking pretty good. Now what we need
to do is we need to do the same thing
on the other one. So I'll grab this first,
press A on rap, like so. And then A R 90. Let's spin it around. Let's
put it in some sort of place. And then what I'll
do is I'll come to these tab A to grab them all U. Smart U V project. Click Okay. Finally, then let's
grab this one and this one, press Control L, and we're going to
link materials, and then this one and this one, Control L, and we're going
to link materials like so. Now, what I'm looking for is just to make sure that this top of here is different
to this one on here. So you can see it
looking different. And then what I'm also going to do now is before I finish, before I apply all my modifiers
and things like that, I actually want to make sure it looks good on my rendered view. So there's the rendered view. This is what they
actually look like. You can see they're
looking pretty nice underneath,
pretty nice on top. And yet, I'm very happy
with how they look. And so, finally, what
I'm going to do is, I'm just going to grab
the whole thing now. We've not finished
with it quite here. We've got one more part to do. Let's shift select
this one, like so. And then what I can do is
go to object and convert, grab the last one, object, convert, mesh, control
J, join it all together. There we go. All right, so we've got one more tiny
piece to add on here, which will be like a stone
block on these parts, signifying that this is a
warehouse kind of thing. That's what I add
in my head anyway. So let's come in
then to object mode. We've already got
this in the center, but I want it really, really in the center,
which means that I'm going to put it round
about these two here. So shift and click, or we can just
grab both of them. Both the top ones, shift
desks to selected tab, and then what I'm going
to do is bring in a cube, so bring in a cube, make
it a little bit smaller. Like so, and then decide
just where you want it. So I imagined it
coming out of here, so coming either
out or underneath. But I think with this, I'm going to have it coming
out a little bit. So popping through
there like so. And then what I'm going
to do is pull it up, so I'm going to grab this face. Ups. What that one. This face, pull it up, like so, and then I'll press S and X and pull that
out a little bit. And that is what
I actually want. And then what I want to do is bring in some edge loops now. So Control, bring in
three edge loops. Left click, right click. You know why I've
brought in too many. Let's bring in two edge
loops, so control. One, two, Left
click, right click. There we go. Keep
that chunkiness. Let's grab all four
of these then. Press the eye button. Press the eye button
again to bring them in. And finally, press E
to bring them out. And there we go. That is why I'm actually
wanting on there. Okay, so now let's just press
control Ale transforms, right click set
origin to geometry. And basically, do I want to say it Oigin, geometry
or the center? Probably the center. So
Shift S, cursor selected. Grab this one, then, right click st origin to three D cursor. Adding a modifier, and
the one we're going to bring in is going
to be a mirror, just to put it over that side. I'm looking now to see this one's a little bit out from
where I actually put it, for whatever reason.
So let's come in. L, and we'll put it right above the center of
the door like so, I'm looking at the center,
Is that about right? This looks about
right. There we go. Okay, so finally, let's
apply the mirror. L, so, press tab on here. Let's put it in shade of mode. Let's unwrap it, so U, Smart U V, project, click okay. And then what we'll do is
we'll bring in a material, and the material is going to be dark or mid midtone,
this one here. And then we want
the other material, which is going to be
these parts here, and I'm going to make
them gold because, obviously, there's a lot
of value in these places. So let's press plus, down arrow, gold. Scratch gold. L a sign. And there we go. Now, it's up to you whether
you want to, you know, bring these out a
little bit, whether you think these are a
little bit too small. If you do, V map, A, and then we'll press S
S to bring them out. Let's have a look now
what that looks like. We'll have a look on our
rendered view as well. And there we go. They
look fine like that. Finally, finally, to
finish these off. What we want to do
then is grab them. Grab this last. We'll go
to object. You know what? I know one thing that
we actually forgot. One thing we actually
forgot is our bevels. We forgot our bevels. We did our bevels on here. We don't have any
bevels on there. So yeah, let's do that first. So we'll come in. We'll
grab all of this. Make sure you're
on H when you grab all of this, press P selection. And now we've got this and this and these two need a bevel on. So we'll go to control
eight all transforms, clicks origin two geometry. And add in a bevel, so generate a bevel. We'll set it to naught point
n naught five, like so. There we go. And then
we'll come to this one, add in a bevel. And we'll set that one to
Naught point Nought three, so have a look at that, just a slight bevel
on these like so. And the reason why we
always had a bevel in again is so nothing is razor sharp. We want it to look
a little bit soft. We're going through for
a stylized look here, so everything's kind of
a little bit softer than what it would be in real life. Now what I want to do is just finish this off by
grabbing the whole thing, going up to object,
inverting to mesh, and then pressing Control J, like so, and there we go. All right. So now let's have one final look at it
on rendered view. And there we go. That is our actual warehouse. So we've got a warehouse. We've got a market, and then
we've got an open market, and we can actually delete
these out of the way. And then on the next lesson, then we'll get these in place. So we'll get them named, we'll get them into
our asset manager. And then what we
can do is we can actually head on over back to our gray box and
start getting some of these things in now
because we've near enough, got everything done built out. The only thing we're
missing is the entrance, the torches, and the rooftop. So very, very little to go
now in actual building wise. Some of them are a
little bit tricky. The rooftops are a
little bit easier. The torches are a
little bit tricky, but we've done enough now to
get our head around those, and I'll see you on
the next one everyone. Thanks a lot. Bye bye.
104. Placing Door Assets in the Scene: Bogo microphone, blender for the modular and Kit
bash environment guide, and this is where
we left it off. Now, what we want to do
then is name all these. I'll just put it
on shade of view just so we can see
what Rec are doing. And then what I'll do is
I'll come to this one, and I'll call it to
F two small market. Let's call it that. Like so. And then what we'll
do is come to this one. We'll call this
one large market. Like, so. And then finally, we'll come to this
one, and we'll call it warehouse, warehouse. Like, so. And there we go. Now, all of these are already
in the actual market. So all I can do is grab all
three of these right click, and we can mark as a asset. Then we can come over
to the asset manager, and we can see the
issues with them. So this one looks absolutely fine. This one with the door. So what we'll do
is just press A, shift an n, spin
everything round. Come to this one, A, shift an n and spin
everything round. And there we go, they're fixed. Now what we want
to do is we want another one that's
gonna call markets. So markets. L, so. And then what we'll do is
we'll come on down to the unassigned and drop
these into our markets, just make sure they're in there. And finally, save them out. Now, let's go back
over to modeling, and we'll just quickly tidy
this up before finishing. So what I'm going to do is just come in and put in my finished. We'll let my finish load up. And then once they've
loaded up, we go, let's put this somewhere that's going to make a
little bit of sense, so let's put it
over, not the guy, just the markets, like so. And what we'll do is
we'll put them over here. Pull it out a little bit. Right, so, and there we go. Alright, so now what
we can do is we can drag all of these markets
and put them into finished. And then when I close
up that, everything should close up
exactly as we want. Let's then save that out, and now what we'll
do is we'll head on over to our actual gray box. So here we are in our grate box. Now, what I want to do,
first of all, then, is I want to come right click, and I'm going to
refresh asset library. And then what I'm going to do
now is come down two doors, and these are all
the doors I've got. Now with these doors on here, we can see we've got
some doors in here. I do want some steps near. Now, similar to the windows. We're going to be bole in them, but I'm going to bole in
them all at the same time. It will be a fairly big job, but we'll be able to bring
the all in at the same time. The other option we've
got is, of course, is that we can bring a cube in with each of these stairs
and blem as we work. But honestly, I found it much
easier to do that after. A I'll do is I'll
bring in my do. I'm going to rotate my
door around, so D -90. And then what I'm
going to do is just make sure that it's
actually in place. I'm going to press the
dot bond to zoom in, and we're then going
to put it into place where I want
my actual door, so somewhere around here, and then I'll move it
over to this side. I'm going to delete
this out the way, so I don't need
that at the moment. I'm going to also delete
this out the way, and then I can put my door
in where I actually want it. Now, again, remember,
it's going to be a little bit more
set back than this. So we'll have a door there. We'll press ol D because we're not going to
be changing this, and we'll put in a door here. So if I now press control three, I can go to this side,
and what I want to do is just line these up a little bit better
than what they are. So you can see here,
I'm going to line them a little bit
better like so, and that's looking really cool. Now, let's bring
in on next door. The next door then is
going to be on here. So what I'll do is
I'll bring this in. I'll press z -90 or
z 90 in this case, and then I'll drop my door into place wherever
I'm going to put it. So in here, like, so I'm not sure with this door whether I'm
going to booling it in, but you can see it
fits very well. The only thing is on this,
you can see that the wood, for whatever reason, has
actually gone the wrong way. So we're going to
fix that right now. We're going to head on back
over because if we fix this, we won't be able to fix
this in here because it's coming from the
other blend file. So we won't be able to
actually do that in here. You can give it a try, but we won't be able to
fix that in here. So let's head on over back
and just quickly fix this. And here we are back
in our gray box. Let's come to our doors. I don't I can't believe I
missed that, but I did. So what I'll do is I'll
right click, first of all, Shade Smooth to
get that smoothed off because that's not
smoothed off either. So maybe maybe I
didn't finish it. And we can see here
that for some reason, this wood is actually
going the right way.'ve got a bevel on. So what I'm going to do is I'm
going to apply that Bevel. And what I'm also going
to do is press Control A, all transforms, right click, set origin to geometry. And then what I'm
going to do is now, this should have
all changed now and now I've reset the
transformation. So what I'm going to
do is head and over back and see if it's
actually changed it. If not, I'm going
to actually have to rotate the wood round, and we'll come to that
one if it doesn't work. So what we'll do is we'll go over now back to our gray box. And here we are back
in our gray box. What I'm going to do is I'm just doing to delete out of the way. And then going to right
click, refresh the library. Bring this back in,
and let's see if now, if I press s 90, if it actually spins around. Let's press's 180. Yeah, it's actually still
doing the same thing. So what we need to
do on this one, apparently is we need to
change this wood ran. You can also see this has got a bevel on it. You know what? I'm actually going
to delete this back, go back to my Grey box. Again, where we're
building not my gray box, M part section, W we're
building all this out. And what we're going
to do is we're going to bring this back in
to our asset managers. So I'm going to
delete this on here, and then going to head
on over because you can see it's got the
bevel on it still. It wasn't updated
for whatever reason. Sometimes these things happen, maybe because I didn't
save it out as well. So we'll save that
out first of all. So here we are back
in our Parks library. We've got our door here now. We're having some
problems with it. So let's first of
all, come on over, and I'll find it in here. And the way I'm going
to find it in here, first of all, I'll go
to my asset manager. Then I'll go to my doors. And what I'm going to do is just right click and clear the asset. So clear the asset like so. Then what I'm going to do is
I'm going to find that door, so you can see my
door over here, I've actually go
selected Press the little dot born on
your number pad, and that then we'll take
you to your simple door. Right click, and
then what you're going to do is markers asset. So marker's asset, and
then it'll be on the sign. And all you want
to do then is put it back into your actual door. So I'm going to come, drop
it back into my doors, press the little dot born, and it could be something to
do with the shader as well. So we'll see if this
works first of all. So all I'm going to do now is go to file. I'm going
to save it out. And I'm going to stay in
asset manager just for now, and then we're gonna add on over to our gray box just once more. So here we are in
our actual gray box, and what I'm going to do
now is dragon drop this in, and you can see we've still
got the actual same problem. So it must be something to
do with our actual shader. So what I'm going to do is
then finally to fix this. I'm going to head on
over back to our parts. I'm going to check
the shader to make sure everything's
going the right way. It will actually affect the
barrel and things like that. I already know less I bring
it in as a new material, so that's the other
thing we can do. Hopefully, you're
following along with this, but if I change
this shade around, so if I rotate it around, it's going to affect the barrel. What I want to do actually
is see if the barrel is also going the right way
while I'm actually here. If I come down to props, we do have a large barrel here. If we bring this in, We can see that the barrel is going
the right way around. If I bring the other barrel in, you can see they're going
the right way around. So it basically is,
for whatever reason, this door doesn't
actually like that. So what I'll do then is go in, I'll rotate the shade around and see if
that actually works. So I know there's a
lot of playing around, but I'm actually glad something like this
came up because it means that you will understand how you can actually
fix this issue, what might be
causing this issue, and some of it to
be quite honest, a little bit of a
bug in blender, where it's not actually rotating around or it's causing issues, even though in the other
file, everything is fine. So let's head on over now
back to our gray box. Keep saying gray box,
I mean, actual part. So here we are back in here. So first of all, what
we're going to do is we're going to
go to our modeling. In fact, you know
what, first of all, we'll clear this off
again, so clear asset. And then what we'll do
is we'll go to modeling. And then what I'm going to do
is I'm just going to click on this part, go to my Shading, and let's see if this has
actually been rotated around, and we can see here on here. Actually, no, it's not. It's not been rotated around. So let's press dot. This is dark wood. This is
the reason why. Okay, so now we understand
it's the dark wood that's causing the issue and not the prop wood that's
causing the issue. So we've got an issue with the dark wood for whatever reason. I'm just looking
why that might be. And I'm wondering if this has not been rotated
round. This is on the UV. Everything is going
right on there. So what I'm going
to do is, I'm just going to come into my dogwood. I'm going to select all
of them that are dogwood. So if I come up to select, and we want to select similar. So select let's have
a look where is it select similar by
material. There we go. Now, if I spin all these round, so A R 90, it's going to spin them all around that way, and basically, that will mean then it will
be correct from there, but it's kind of like a
messed up way of doing it, but I reckon that
will fix the issue. So let's now come in. We can
also see if I come on here. That we have got an
issue with our Wood. You know what I'm going to do.
Instead of ing on dogwood, let's just put it on Prop wood. Prop wood. Let's
put it on there. Let's come in then and spin
these around, so R 90. Let's spin all these around. And let's see if this fixes it. Rather than using
something that's going to require probably recreating
the shader or something. Let's just go in and
see if this works now. So I'm going to come
back to modeling. And then what I'm going to
do is I'm going to press Control I transforms
right click Set Oigin, two geometry, and
let's come in now and find it in the
Asset Manager. So let's come to Asset Manager. Here's my simple door. Right, cl. Let's mark his asset. Let's come in then on assigned. And what we'll do is we'll
drop that then into doors. And finally, then,
I'll go to doors, make sure it's in there,
file and save it out. Now, last time,
let's head an over back to our gray box and
actually see if it works. So here we are once more, and I'm going to delete that. I'm going to bring it in then. And in fact, before
I bring it in, I'll right click
Refresh Asset library, bring it in, and we can
see it's not worked. So what I'm going to do instead is, I'm going to go up to file. I'm going to go up to save, and I'm going to
reopen this now. So if I go to file, I'm going to go to Open. In fact, I'll just put it
on Arches before I do that. So File, Open reason, and we've got it on
the Aztec scene. Let's click that and open it up. L et it load up, and now let's see if the does go
in the right way. And Hal Lua, it is. So it was a small bug with the actual safe
for whatever reason. It wasn't refreshing
this library, and that probably then, if I bring in that wood now, it might actually work, but
I'm not going to risk it. So all I'm going to
do is press sad 90, and I'm gonna drop this
into place like so. Finally, then before we finish. I'm just going to have one look, one sneak peek at
what it's going to look like on our rendered
view with the doors in. Well, there we go,
we can see now. Even from any angle
like I've spoke about, it looks pretty amazing. And there we go, we can see. I've actually missed
a pillar in here, so I better replace that.
Just ends in nothing. Let's press saltag. Yeah, I
deleted it for some reason. I don't know why, but
we'll bring that in first here so we don't forget. Alright, everyone, so I
hope you enjoyed that. I'll save out this work now. So now you can see at least, like if you come
across problems, what might be causing it? All of those different issues. The last thing you might want
to do is go to preferences, and you might want
to come in and just minus this off and then reload it on the asset library that also might work
in fixing something. Okay, everyone, so
I'll close that down, and I'll see on the
next one. Thanks a lot. Bye bye.
105. Replacing Greybox Blocks with Final Assets: Welcome back everyone
to Blend the for the modular and Kash
environment guide, and this is where we left off. Okay, so let's saw that out
first before doing anything. Let's put it onto Shade view. Let's bring this part over. So shift D, not old D because we want to actually
be able to change this. We're going to put
this then into place, where we want it. So let's come around and drop it back in place
or something like that. And then just decide how
far you want it over. So we can see here, if I
just hide this out the way I've got a bed view then of
where I actually want that. I think actually that
looks quite nice. It's just way way too high. What I'll do is I'll
pull it into the floor. Get the right height
that I actually want. So maybe something like that. I'm just making sure
that all of this is in. So we've got it in there. We've got it not in
there, so let's bring it out a little bit.
And there we go. And then finally,
let's just bring it up so it's not stuck through
that floor so much, so I'm just going to pull it up into place where
the stone starts. And there we go, maybe a
little bit further down. And there we go. That
is that part in. Now, next of all, let's come
in with our actual steps. So I'll come to these steps. I'm going to again press shift because I might be editing it. And then what I'll do is
I'll pull my steps over. An interplay. So I'm
going to pull them over. This is how far I
want my steps out. I obviously going to need my
steps a little bit wider, but let's deal with
one problem at a time. So I'm going to press tab
going into the edit mode. I'm going to pull them then
down to where I want them. So right at the top of
here, let's pull them over. So let's get rid then of
the original steps, Oglete. We've got these steps here, and then let's come
and bring drag them over N. Can also
see with my steps. I'm going to need when I finish these steps to actually
unwrap them all. And you can also see the
line going up there. We don't actually want that. And we will finish with that. We'll tidy everything up at the end because it will
need some actual tidy. And so let's come in over there, and what we'll do is we'll bring our width out a little bit, so bring our width
out, and then put these steps into place
right at the side of there. So there's a little
edge going over there and they're into
the wall like so, double tap the A,
and there we go. Now, do we want Let's
come around this side? So let's come in just here. So we've got a little
bit of a lip on there. Just make sure it's not too big. You don't want people
tripping up and falling down the stairs.
And there we go. So now I can press old H and
bring back this part here. Now, I did see For some reason, the bottom of here,
the bottom of this part has another
piece of water in there. I'm just wondering why
that would be in there. I don't actually
want that in there. So let's delete and faces. Let's see. Yeah,
and there we go. I don't know why that
part's in there, but I'm going to
delete it out the way. Press salt, bring
back this part. Double tap the A. Let's put
it on render view again. Yeah, and there
we go. Now we can actually see further
into that water. That's looking much much better
than what it did before. No idea why that
got in there, but, hey ho, we've fixed that now. Now, let's come over
to this part here. So buy onto shading mode. And in this part here
we need our pillars. So let's come to our pillars, and the ones we want are
going to be these ones here, so I'm going to drag this in, and then we're going
to pull it over, and I want to put
this into place. Now, The pillars, how i up, do they need to be?
Let's put it into place. They should be coming
at the bottom of here. So I'm going to put
these to the side here and then pull
them into place, like so, drop them down
to the bottom of here. And then what I'm
going to do is, I'm going to delete
this part of the way. So I'm going to delete
this part of the way. In fact, you know what, we'll
keep just this top part, so we'll come in and we'll
delete these out the way. So I'll delete vertices. And now I can see how up, I want that, and from here then, I can see that I want my pillars to be a little bit higher. Now, I have a number of
options here at the moment, My pillar is if I bring it
up to here, and in place, you can see that there's a lot of variation here between
the bottom and the top. Now, I've got a choice where I can actually just extend it. So if I press Sen's head, can I extend it enough where it's going to then
pop into the floor. So a little bit more, Ens head. Let's see what that
actually looks like. We don't want to go too far, so if I come back here,
double tap the. You know what? It doesn't look like it's
stretched or anything. So I think I can
get away with that. And all I'm going
to do is express shifty and bring it over. And then what I'm going
to do is just rotate it. So our ZD 180, just
spin it around, so that the stone looks a
little bit different, like so. And once I've got this top p in, then I'll be able to see
exactly how this looks. But the moment, we can see
one more problem we've got is that these come
right to this edge here. We don't want that. We want to pull them
back a little bit, just so we've got a little
bit of a lip there like so. Alright, that's
looking pretty good. Like so. Now, let's work
our way around then. So we've pretty much got
all of these parts already, so I want to build
these steps first. So what I'll do is I'll
grab my steps over here. In fact, you know, what? We'll
grab the steps for here. It'll be a bit
closer, so shifty, bring it over, and then
R Z 180, spin it around. Make sure that it's
put into place first, so you can see it needs
to come all the way down to here, all
the way into place. Run about here. Delete these steps out the way, so delete. And then what we can do
is we can press tab, and then we can pull these over, like so pull them up and then we can see exactly where
they're going to come up, and finally bring
them over into place. Pull them over a little bit more there, and then
drop them down. Obviously, we don't want
that huge huge step. So drop them down
into place like so. And then finally, we need to
pull them out a little bit, so you can see the width
on here, not quite right. So let's come in, bring the
width out a little bit, and then let's move
them over into place. L so Maybe maybe it's
pointing in the wall there. We'll tap the A,
and there we go. That is that part. Now, let's
think about this part here. So we need a huge,
huge piece on here, which will be one, something probably
like this one. Let's have a look at
our stone blocks. And let's see if we
bring in this one here, how big it's going to be. And yes, that should
actually do it. So if I bring this in, I
can then drop it down. And what I can do is I can
get it to the right size, and then put one on
top of the other. So you can see here, we already have the stone
floor. Going up to here. So this needs to go all the
way over to this point here, and then all the
way over to there. But if I press S and y, let's pull it out a
little bit. There we go. And then if I come to
the front of this, if I bring it all the
way back to here, you can see we've
got some flashing. Let's delete this
one out the way. And then what we'll do is
we'll come now into our stone. I'll grab the front
of my stone here. Can see we've got that bevelon, which really really helps us. Then what I'll do is I'll
bring it all out into place just under where these parts are going
to go, like so. Now what I want to do
is I want to make sure it all fits in place
because at the moment, you can see that this is near enough the
same height as this part, and we don't really want that,
so we need to pull it down a little bit just to make a little bit of a drop off there. And then finally, we want to
pull this down to the floor, or we want to double this up. So all I'm want to
do is press shifty, and I'll bring this
second one down. Put it into place like so. And then you can see it's only
just really in the floor, so I'll grab both of them, press Sen's ad, and just
squish them up a little bit, and then bring it up and put it back where I
actually wanted it. Double tap the A,
and there we go. And making sure that
that lip is still there, so we've got a tiny lip there. And yeah, that's looking pretty nice. Now,
what we want to do. Is we've got one pillar in here. So what we want to
do now is we need to bring this part in first. So let's bring that
part in first. What I'm going to do is just
delete that out the way. And I'll bring in I think
it's under archers. Let's have a look. Yes, it
is. It's this one here. We want to bring in our arches. Let's put it on there.
Let's spin it around then. So Z -90. And we do have a
problem actually with our arches in that. The material is not the right
way, so we can see here, if I come to my material, it's on midstone, and we
want it on light stone. So let's even come into this. We'll grab all of this part, so L in edge st, grab
all of this part, L, and let's put
it on lightestone, instead, click a sign, and there we go,
that is what I want. I want it like that.
And then what I want to do is I want to put this now into place of where
it's going to go. So it's going to go
in here, but I'm going to set it
back a little bit. So I'm going to set it back,
pap something around there. And we delete these parts then. I'm going to create
new ones for them. I'm going to set it back
just in here, like so, and we can see our
pillars are a little bit high because this
has sat right on here, so we can get rid of
these pillars as well. Of delete. And then last of all, I want to make sure that
my guy can come in here, so I'm going to
press Control three. G, let's put him up there. So you can see, yeah, he can actually walk through
there if he wanted. Now, not that we want him
to walk through there because we actually
want him to, you know, be able to maybe sit down here, maybe he'll have some chairs
or something like that. Now, let's come
into our supports. We'll put those in first. And then once we've
got our supports, and we'll be able to
have a clearer idea of where we want them up to. So if I come in, and
what I'll do is, I will put in these parts first. So if I bring these in, I'm going to rotate
it round then, so y 90, like, so,
conchal three. And what I want to
do is I want to put this just before we get
to this corner here. So round about here, and
then round about here. L so. And then what I can
do is I can pull this back into place like so, and maybe maybe even
I'm just wondering, maybe even go further
than that, actually. So pull it up to here. Like, so, and the
thing that's gonna look about right actually. Alright, let's save
that our work. And then what I'll do is
I'll see on the next one, everyone, and we'll just
keep building this out. As you can see now, it's really starting
to come together. It's looking pretty amazing. And yeah, we'll just
keep building this out, getting this bit right, and then we can move on
to the next part. Alright, everyone. I
hope you enjoyed that, and I'll see you
on the next one. Thanks a lot. Bye bye.
106. Adding Pillar Supports to the Aztec Scene: Okay, everyone to
lend the for the modulate and Kit bash
environment guide, and this is where we
left it off. All right. So let's see now, if we bring in I think what we'll do is
we'll bring in our pillar, first of all, so I'm thinking we'll probably
bring in one of these. These are actually quite big. We'll bring in one of these, and we'll put it
over in this corner. So I'm going to do
is press shift D because I want to actually create it to be the right size, and you'll see that
it'll be too big. So control three to go
into the side view. G, let's pull it
down into place, so we want it
roughly around here. And then what we'll
do is will grab this. We'll bring it into
the floor there. Like so. And finally, then, we should be able to pull
that back into place like so, delete this one out the way and delete this one out of
the way. And there we go. Now, we want to
make sure that it's also in place at
the back of here, like so, because at the moment, we've got it going up
against this wall. So I'm just wondering how
far can get to go back, maybe a little tad bit more. We've also got a door to
think about here as well. But at the moment, let's
look at the lip on here. So this lip here, like I said, we never want anything that's right up close to it, like so. We want it to always
be a bit out, makes it a little bit more
realistic, and there we go. Now, let's come in and
think about our level. So we're going to put basically
another part on here. So we're going to
put this on here. This support balcony. Let's see then how we can
actually put that in. So if I put it in there, D
-90, let's spin it around. And then what I'll do
is, I'll drag it over, and I'm going to see where
I can actually put it. So if I put it into here, I'm going to bring
it out a little bit, like so, and I'm wondering if this should be
the other way round. So if I put it into here, I think I should spin it the other way around
actually on this one. So z hundred 80,
let's spin it around, and let's put it into
place in here like so. Drop it down, just on top
of those blocks there. And I'm just wondering if that's going to
actually look bare. If I need to pull this up
all, good stuff like that. So let's put it into
place. Let's move it over. And what we'll do then is we can see that this
needs pulling up, and we can see that it
needs pulling back as well. So can we make it fit
just under there? What I'm worried about
is this, as you can see. You can see that it needs
pulling out a little bit, so S and X, let's pull it out. So and then we've actually got another problem in that
this part on here, as you can see, it's actually coming through the wall here. So maybe maybe let's pull it up a little bit, up to there. And then we've got this bit into there. And you know what? That actually might work out
for us a little bit there. Let's pull it up a
little bit more. And it's just fitting
all this into place now and looking
what actually looks best. Let's pull it out a little bit. Double tap the A. Yeah, I think actually that might actually work out a
lot better for us. Finally, let's bring this up, so we'll bring this
up over the top. Making sure it's over the
top of this part as well. Like, so. Yeah, and
if we come to here, I think this is going to
be much, much better now. Now what I want to
do is I want to grab this one because I want it
on the other side as well. Let's press S and y, then squish it
down a little bit. Let's put it into place. And then what we'll do is
we'll just press shift D and bring it over and drop that one
into place right there. It's coming all the way
over to there then. And then I'm thinking
that I'll also bring it over to the wall
here, so shift D again. Let's bring it over and
plug that in the wall. Now, the thing is,
as you can see, if I put this here, it's not really supported
by anything. So what I want to
do is I want to press S and y and bring this in. Pull it over. To this wall here. Then it's being
supported here and here, and then I can bring
this one over, and now this is being
supported here, like so, I'll bring
it a little bit out. So then, let's see if now we can get this over the other
side as well. So Shift D. Let's
bring this over. Double tap the A, just
have a quick look. And then shift D Did I actually grab anyth
in? No, I didn't. So shift D, bring it over
into the wall here, like so. Now, the thing is this is
then going to interact with me putting a
boolean in here. So definitely definitely want to bring all of these back a
little bit. So it's up to you. You could actually come
in and grab them all and then press S and y
and pull them all in, making them all a
little bit smaller, and then pull it into
the wall like so. And then S and y again. And let's do it
that way, I think. I think that way is
just going to look. Double tap the a little bit
better. And there you go. Now you can see what
we've got there. And you know what? It looks
quite natural like that. The one thing we do want to do, though is put some
supports along here, some big actual
supports along there, because if not, it doesn't really look like it's
supported by anything. And then we're just going to go round the back now
and have a look. Yeah, and I think that's
looking pretty good. The one thing I do want to do is maybe pull these
out a little bit more, so I'm just going
to grab them all. I know it's a bit fiddly, but we want it to look right, so I'm going to pull
them out a little bit more and then press S and X. So the reason I'm doing that is because I want
to put some support underneath here to make sure that this is held up properly
because at the moment, we haven't got any
supports on here and we haven't got
any supports on here. They're very big blocks. So I think we'll need a support. So what I'll do then
is come to pillars. And the pillar we'll
use is this one here. We'll use these big
pillars, like so. And what I'll do is, I think, actually,
you know what? We won't do that.
What we'll do is we'll come back to our support. So stone blocks,
we'll use those. I'll bring in a stone block, and I'll bring that up
to roundabout here. So let's put it in place. So
G, let's put it in place. Long here. And what we're going to do, we'll
have two of them in. I'll make it a
little bit smaller. So S, just to make it
a little bit smaller. And then what we'll
do is we'll pull it back and just fit
it under there, we'll fit it under
there into place, making sure that it
is behind there, like so so one here. And then what we'll
do is we'll make it a little bit bigger and
pull it down to the bott. So if I now press shift, bring it over and
we'll put it into this part here, like so. And then I'll press shift,
and I'll bring it down. And then what I want to do now is make it a little bit bigger. So S, make it bigger, and then S and D, squish it. Not that far. So
son's d. Push it now, pull it into place, like so, and double tap the
A, and there we go. That is what I want, I think. I'm just wondering
whether I need to make this a little
bit bigger even more. So what I'll do is, I
will do that, actually. I'll come in, I'll grab
it. I'll press the S b. And actually, can
I spin this round? If I spin this round,
so let's spin it round. Shile it's 90. Yeah,
there we go. There we go. That's what we're
looking for. Pull it out a little bit,
and that's perfect. Shift. Bring it over to this side then,
drop it into place. So double tap the
A. And there we go, that is that bit
actually done now. I think I'm actually happy
with how that looks. And yeah. Okay, so now let's not focus
on this one too much. Let's actually now
bring in these pillars. And these pillars are just going to be the other pillars
that we're using. So if I come over to
small or large on it. Let's have a look at large,
let's have a look at small. Yeah, and the small
look as though they're going to fit it much
better. Let's have a look. I should have a red bit on this section here. There we go. So all I can do now
is grab this one, Odds d 90 spin it round. And then what we'll
do is we'll aim for a three pillars on here, Let's come on over, making
sure it fits into place. So I can see if I grab
this underneath there. That's looking pretty nice, making sure it's in the floor.
It's in the floor there. And then what I can do is
I can just come in and old D this time because we're not going to do
anything with this, and then old D and bring
it over to this side. Now what I want to
do is I want to grab all three of these. I want to press shift H to hide everything else out of the
way, go over the top, seven. Now I can see if I go into wireframe, exactly
where these are. You can see here this one
here is definitely not in. I want this right about
in the right place, so same as this one over here, and then this I
want in the center. So at the moment I can see That's roughly
going to be the center. Now, let's put it on
object mode this time. Let's press Alta. In fact, you know what?
We'll press three, and now I can see where
actually want this. So I can see these
are roughly the same. I can see if I pull this over. There we go. That's
going to make it easier. Alright. This one needs going over a little
bit over here. And there we go. Now let's press Alta, bring
back everything. Double tap the A, and let's put it onto shade
of view. And there we go. All right, so we've
got our steps in there now, and now finally, we can start pulling
these parts over here. So these parts over here, we can start blocking that out. I can probably get away
with using this block here. So shifty, let's bring it over. Let's rotate it round, so Z 90. And you can see
here that it wants to go up to this floor here. So if I press S and Z, I should then be
able to bring it up just into place and lift it up. Just in place there, like so. All right, so you can see
that we're a mile out on this end and not enough
out on this end. So let's pull it over
first, where we want it. So roughly around here, so let's press S and y, and then we can
pull it out exactly to where we want it,
which is around there. And then we want to press S
and x and pull it back in. So S and X, pull it back in, and then pull it back
to where we want it. And we need to keep
going with this. So S and X. To there. Perfect. Okay, so now, I can
hide this out the way. I can delete this part, so
delete this part of the way. Press ol tag, bring it back, double tap the A, and this is what we
should be left with. Now, I'm not happy
about this part. I know I need to pull
that part back in. It's way too far out. It needs going back behind
this pillar here. So I'll delete these
parts here first, so I'll delete them
out of the way. And then what I'll do is
I'll grab each of these now. And I'm just going to pull
them back behind that pillar. The the back. Like,
so, and there we go. And then what I can do is I can make all this work
because at the moment, yeah, that needed to be
in there realistically. The other thing is,
I can also as well grab this part, so shifty. Let's grab this part
and pull it over. And I think on this one, I'll pull a different roof on anyway. And also, I'll make it a little bit let's have a look to see if it actually
fits in place. So, it's gonna fit in
perfectly like that, I think. Might need to make it
a little bit wider. What we'll do then
is we'll come to the top of it, delete
that out of the way. We'll delete the
door out the way. We know we're gonna
need that in there, and we'll leave this
post here just for now. And now let's bring
in a support, so we'll go back
to our supports. And then what we'll
do is we'll bring in this support and we'll
bring in this support. And it might be
easier, actually, if we just grab them off
here, let's do it like that. It's going to be
easier to do that. So I'll grab this
one and this one, and I'll press O D, and I'll bring them over and we'll drop this in place,
and then we'll finish there. So control three, let's
bring them down into place. Like so, let's press S and Y. And then what we'll do is we'll just make sure that
they're hanging over a little bit
that actual lip. So you can see here, they're
not hanging over yet. I've got to be careful
of this part on here. We'll bring them over and there we go, they're
hanging over. Just a tad on there. Might need to pull this out
a little bit. On this part. So I'll just pull
them out a little bit more just so they're hanging
over, and there we go. And then what I'll do is I'll pull this part out a little bit more looking to where
this part is here. So I can pull pull p. Still got that
little bit of a lip on. Is that going to be
enough? No, it's not, which means that I'll actually increase the thickness
then on here. So I'll come to this over to My not length,
it's going to be. I think it'll be thickness. Let's increase the thickness. Nope, it's not thickness,
so we'll put that one back and we'll increase
the width instead, so let's increase the
width. There we go. There we go. And there we go, it's all in place now. Finally, then, let's bring
our guy down because we will need to look how this door is and how far we
need to pull it out, so let's pull him down to the
floor, press the dot born. Make sure he's on that floor, so he's really
really on the floor. And there you go, you can see if he walks up to there now, that's how high it's going to
be. That looks about right. This one's a little bit higher because it's high
and a door there. And yeah, I think
everything on there now. Is really starting
to come together. And I think I'm
happy with how I've actually created this
part with the archways. And I'll save that out, and I'll see you on the
next one, everyone. Thanks a lot. Bye bye.
107. Working on Balcony Placement in the Aztec City: Welcome Mon to plan
pull the modulate and kit Bash environment gay.
Miss where we've left it off. So while I've been off air, I've actually been
playing around with it. And I think what
I'm going to do is, I'm going to actually
pull this back. I'm going to pull it
back into place like so, and I think it actually
looks a little bit better. And I'm going to pull
it back even further, but actually comes just
into there, like so. Making sure that this
gap, there's no gap here, so just far enough where
there's no gap here. You know what? Have
a look at that. I can actually probably
pull this all the way back. Let's have a look if I can
pull this all the way back. Let's keep going,
keep going, keep going, and pull
it back to there. Let's have a look
where we've got left. Yeah. I think that
looks better except maybe this part here needs to be a little bit bigger
because I don't want that actual
gap through there. So what I'll do is, first
of all, go round here. We can see we've got a little
bit of a lip on there, which means I need to increase the width, a little bit more. Let's increase that
width of look, and there we go,
now it's in place, got a little bit
of a lip on there, double tap the A. Yeah, I think that just looks
a little bit big. Looks a little bit messy
how I had it before. And now I'm actually happy
with how that looks. Just looks a better place. Okay, so now, let's think
about our actual door. So what I'm going to do is, I'm going to grab my door over here. I'm going to press old
D, and I'm going to bring this door over
to this part here. I'm going to press the little
dot born, drop it down. Let's put it into place
wherever we want it. And again, with this door, I don't actually want
it to be Boolean back. I don't want to be booling
back or anything like that. What I want to make sure though is it's actually in the floor, so I'm going to bring
it up just to there. Now's the point where
we need to decide how far this is going to come out because you can see
here at the moment, maybe, maybe this is not
going to come out far enough. You can't have a door really
ending on a corner like that just doesn't look realistic.
So we've got a choice. We either pull this back
a little bit further in, which might work out,
but it might be, in other words, a
little bit too far out. I do like the fact that
it's a little bit further out than this, but
it's way further out. So let's pull it back
a little bit like so. And now let's look at our door. And I think now that door is actually fitting into
place much much better. Now what I can do is I can think about the top I'm
going to put on here. So let's come to our tops, which will be, let's
have a look roofs. So where's our roofs? Maybe CDF G should be on
here. Where's our roofs gone? Bridges, stones, markets,
pillars, props, roofs. There we go. All right. Let's bring in, I think
we'll look at this one here. This is the one that
I want to bring in. So I'm going to
drop that on there. Put it into place, and
then just pull it. Making sure it actually
fits on there nicely, and see that it's a
little bit out that way. And it's up to you
whether you want to make it a tiny, tiny bit smaller, just to make it fit
on there a little bit bare. I think I do. And then what I'm
going to do is just drop it down a little bit more. So, double tap the A. Yes,
there we go. That looks good. Okay, so now we can actually
just put in a windows here. So we'll put in but
two windows here. So we'll come to our
windows of windows. Here we go. We'll have both the round of
ones in here then, so let's bring one in. You can see that's
not what I want. So let's drop it on onto here. There we go. And now let's just pull them into place. So seven. Let's press G to pull it
into place where I want it, so roughly around there. Obviously, that's not
the center of it, and I do want them in the
center, not like this. So I'm just going
to pull it more into the center
and pull it down. I will have one
there, and then I'll press D. Bring it down, and we'll have one
in there as well. Now, let's get rid of these, so delete some out the way, and let's grab both
of these windows and pull them back into place
where they're gonna go. And again, we'll be using
the Boolean on there. So double tap the
A, and there we go. And now we want a
actual pillar in here. So we'll have one
of the big pillars. So like these ones
we've got round here, what I'll do is
I'll grab this one, press lt D, and then
I'll bring it over. And then what I'll do is
I'll put this into place. So our Z 180 spin it around. Let's grab it and put it
into place roundabout here. And I think with this, it will need to be a little bit smaller because I don't
want it that big, so what I'll do is I'll
press the S button. And then what I'll do is
I'll press Sen's head and pull it out a little bit and then make sure
it's in the floor. So delete this one out the way. There we go and I
think that looks absolutely perfect there. And then we haven't
got this part yet, so we haven't got
this part like that. Also, this will be drop
back a little bit as well. We'll drop this flow back. Once we've actually got a
few more parts in here, we've now got the market. But what I think we'll
do is we'll start from this end with
the actual market. All right, so what we'll do is, we'll hide this out
the way, first of all. So let's just hide
this out the way. And then what we'll
do is we'll start, I think, we'll come
with our water feature. So water features, let's bring in this part here, like, so. And then what we'll do is we'll drop that back into place, and hopefully, it's going
to fit in some way. So let's leave this out the
way. Let's pull it over then. So we'll pull it
over into place, and it just wants to be in
the side of the wall like so. Next of all, then we'll
bring in our market stool, so and then we'll bring in
our steps. Build this up. So let's go to markets now because that's the first
one we haven't brought in. So let's bring this
in, drop it on here. Make sure everything
loads up, which it does, and then it should slot into place roughly around
where we had our other one. Let's delete the old
one out of the way. And then what we need
is a top on here. So I'm just going to delete this part out of the
way just for now. I'm also going to come in,
delete this one out the way. And then we'll go to our roofs. So let's go to our roofs,
which is this here. And the roof we want is
going to be this one here. So I'm going to grab this
and drop my roof on like so, and then bring it
over and I want it to fit right on top of here. Like so, and then let's
pull it back into place. And obviously, we're going to need this marge, much wider, as you can see, because this roof is a little
bit smaller moment. So let's first of all, press the S one to make it
a little bit bigger, going underneath just to making sure how far this is across. And then finally what we
should be able to do. Hopefully, is press S
and x and pull it out, stretch it out and get it going into place
right over here, so S and X, let's pull it
out a little bit more. And then let's slot it
a bit further back, so we can see and we
have to press S and y, pull it a little
bit further back. Not that one, pull
it into place. So making sure it's
going into that wall. Now, you can see
that this wall is a little bit too far back
anyway, so we can fix that. But just make sure that it's
in place all the way over. So you can see here still needs S to make it a
little bit bigger. And there we go now,
f double tap the As actually in the
wall, and there we go. Okay, so now, let's think
about this top part. Now, this top part is the
wider version of this, and that will be under. What did we put that under now? I'm not actually sure.
What did I put that under? Let's have a look. So
we've got bamboo roofs. There we go. Alright, so
we've got large bamboo roof, and I think that will be
the one that we need. So let's turn them
around the right way, so we can see the angle
is going down this way. So ours head 90. Now that's the right way. And then what we can do
is we can bring it over, put that into place along here. So this will be the
height into place, and let's make sure that this is going all the way over, like so. And then we can come in now, delete these parts out the way. Like so, and there we go. And then we're going
to need a block. We'll also delete
this out the way. So we need a door,
and we're going to need another block that's just, I think going to come out
where these actual stairs are. Now, this door, let's actually pull these out
a little bit further, so let's pull them into
the wall, like so. Making sure this bamboo is
ride up against that wall. There we go. And now we
can build around these, so I can basically
get rid of these now. Get rid of them out of the way. Bring in my door now, so I
can delete this out the way. The door we'll use
will be the one that we've used over this part here, so I'll press ol D. I'll bring this and drop it into
place against the floor. And then you can see I
might need to lift these up these bamboo
roofs a little bit. I'll drop it into place into
here and then drop it back. Around here, and then move it to the side.
And you know what? I think that actually
might fit perfectly. So yeah, we've got
that underneath there. And now we just want to
bring in our support. So we want some
supports on here, so I'm going to steal
these again once more. I'm going to press all D,
and then bring them over. And then R z -90, spin them around, and I
will need a little post, which I'll take
from here as well. So I'm going to
bring these over. Zoom into them with
a little dot button. Then let's place them on here. Now, once again, we're going
to bring our guy in just to make sure these are the
right height, first of all, let's get them into place, and making sure that our bamboo is going to also fit into place. So we can see here, let's
put them into place like so. We might want to use
two pillars on these. So one pillar here. Yeah, let's
see what that looks like. At the moment you can see that it's fitting quite
nicely in there, can even pull it
back a little bit. Given it is a little
bit of a lip. Let's then press D and
bring them into place. And then I can pull
possibly another pillar on here or not. We can either pull them out
or leave them like that. You know what, we'll make
them a little bit smaller. So S and X, pull
them into place. So and then we'll bring in this pillar,
and then from there, we can decide how we
actually want these because we might just leave
this here without no pillow. So let's come in, grab
this pillar here, and then we'll press
shift. And bring it over. And then let's put it
into place on here. Bring into the place along
here and bring it out. And you can see here now
that it is sticking through. I don't really want to
bring it up too high this. So what I'm going to
do is just come in, I'll delete all of
these out the way. So I'll delete vertices, come to the bottom
of it, pull it up just so it's sat
on top of there. And then I can actually
bring this down, maybe a little bit. And finally, then I want
to bring this part back. So you can see these
parts that are a little bit too far forward.
Let's bring them back. There we go. You can see now
my bamboos a little bit. Sticking out of there.
We don't want that, so let's just press S and
y very, very gradually. And then we can pull them back a little bit more and making sure they're not stuck in the wall like so. Okay, I'm
happy with that. I don't think, but let's
have a look, so shifty. Let's bring it
over. Yeah, I mind, I'm going to leave
that post there. I think it actually
looks quite nice. And now I want to
bring these around. So if I grab this one shifty 90, you can press old D or shift on these. Don't
worry about it. They're not actually a lot of high polygon or
anything like that. So S and Y is just one part. So don't worry if you
accidentally do that. There we go. And
we might have to pull those back a little bit once we've got
these stairs in. And once we've got this big
chunky part on here as well, we will be able
to see like a lot more what we're actually
doing. All right. So we've got that in. Now,
what I want to do is, I'm going to need a big
chunky part like this. I'm going to grab this part. I'm going to press old D. I'm going to
bring it over then. And what I want to do is I
want to put this on here. Now at the moment,
you can see we've got a couple of pillars on here. We've got a bit that's
going to go back on there as well with
the top of the steps. We might actually just create that top of the
steps on our own. I think it will be easier. So Oz 90. Let's pull this into place. So we can see here. We
need to pull it all the way up to here and
then drop it down. Interplace along
here, and then pull it all the way over into here. Now, where do we
actually want to? Do you want it above there? I think it's going to be better if it is above there, like so. And then how far
out do we want it? So we need to make sure it well, actually, do we need
to make sure that? I don't think so. So
what we'll do is. We'll just pull it
further forward. And now we have a good gauge
on where we can actually, if we want to put our pillars. Now, it's up to you
if you want to make this like a full block
going all the way up there, or if you want to do it in two
parts or even three parts? I might do it in three parts because then I think it
will be hidden here. So if I press in y, I can bring this in then and
hide it behind this pillar. So S and Y, bring it in, hide it behind that
pillar like so. And then what I can do is I
can bring another one in. Now, the thing is, I've messed up a little bit
here because I need to pull it all the way
over to this step. So I'm going to
pull it over there. I can see it's still in there, but I need them to line up a little bit better than that.
So what I'm going to do? And when they're
coming in, making sure I can see through there, and then I'm going to grab
this face and this face, and then I'm going to pull
it out to the halfway point, or roughly for press three, roughly the halfway point. Now what I should
be able to do is press shift, drag it over, put it into here, and then pull it out again and making sure it all lines up. So if I press S and y, I can make sure then but double tap the A that
it lines up like so. And then I can grab
this one again, and I can do the same thing. So shifty, pull it out, making sure it all lines up. To the bottom of
these stairs here. So S and Y. Pull it out, double tap
the A, and there we go. Now we can see that's lining up, and that's really starting
to come together. And now we can think
about these steps. So, as I said, with these
steps here, You know what? Before we do that, I've got one thing that I
actually forgot to do. I really forgot to put a
top on this on this here, which means it doesn't
actually look right. So we'll actually do that first. We'll save out our
work, actually. And what we'll do is because I'm running out of
time on this one. Rod a 15 minutes on this one. We'll do that on the next
one. Alright, everyone. So I hope you enjoyed that,
and I'll see on the next one. Thanks a lot. Bye bye. A
108. Readjusting kitbash blocks to fit them better: Welcome back everyone
to blend the for the modulate and Kits
environment guide, and this is where we left off. So I quickly jump
back to this part because I wanted to put
on my roofs on here. So the roofs are on here, and the ones I want on are
going to be these ones here. So what I'm going
to do is just zoom back a little bit,
grab one of them. You can see here because
this didn't update, it means that I need to now
bring in this roof again, so you can see here this
is the roof that I've got. This is the one I've got. This is the two I've got. And you can see that
won't update unless I actually bring it
back in because I saved it out within
the other file. Now, what I'm going
to try and do first to see if this actually can update is I'm just going
to go in and save my work. And then what I'm going
to go in, I'm going to go to edit preferences. Open that up, minus this off. That then we'll take all of these out the
way, as you can see. I'll close that down, and
then I'll go to file, and I'll open it back up again. So open, you know, what, we'll save it out first, and then file open recent course at sen. Let's open
that back up again. Let it load up, and now you'll see that we've not
got these on here. Now, what I'm going to
do is, I'm just going to delete all of
these out of the way. And I'm going to try that again. So I'm going to go to file. Sorry, edit preferences, and
then let's add it back in. So plus, and we want the course. So we've got a course file. So course which will
be on the references, because if I go up
then and backwards, we've got one that says here. Now, here we are. Man
was in my asset manager. So Aztec Pots, add
asset library, and then let's close that down. Then we'll go back over
then to Aztec Pots. And now let's see if we
actually bring that in. So no, it's still
coming in as that. So what I need to do now is, I need to go in and
actually fix that. So what I'm gonna do
is I'm going to go in. Back to my roofs. I really thought like this
would, you know, fix that pt, join them both together wouldn't actually cause this issue, but it seems as though it has. The other thing is
if I split them up, so I could split
them up instead, that might actually
be a better idea rather than actually going
all the way through there. So what I'll do is
they'll come in. And I'll grab all of this
one. So all of this. So L, L L. And then what I'll do is I'll press delete
and delete vertices. And then I end up
with a single part. So I've got this
single part here. I'm just wondering,
actually, I've deleted the wrong
part. Yes, I have. So let's come into this part, L L delete vertices, like so. Control A, all transforms. There you go, Control
A, A transforms, and it says, create new object data use and apply
transformations. Okay. And now I want
to bring this in. There we go, it's fixed. Now, the last thing
I want to do then is right click the origin geometry. And now I can bring each
of these in like so. So that's going to make
it a little bit easier. Wait 1 second. We put
it the wrong way round. So is this one here. This is this one
here. Let's see. We're going to spin this round. So I'll say 180. Yes, I can. There we go. We've got the parts
and eventually. Like, so now, what we want to do is we want to put
these all together then. First, before we do anything, so I'm just going
to go over the top. And I'm just going to press G, drop them all in together. And the last thing I
want to do then is join everything up because then it'll create a new part for me. I don't want to
do that. I've got to mess around with
this one already. So zoom in. And let's just grab
them all then. And then let's
press our dead 90. And then what we'll do
is we'll put them now, we'll want them, which will
be right on top of here. So G, bring them all to here. Press the Sp. You can see that we can get
them small enough. They're just going to
need to be a lot wider. So we'll bring them up to there. Then what we'll do is we'll
pull them up onto place. And then I'm going to
pull them out now, so S and X, let's pull them out and seeing how much we can actually get away with, stretching them over. Now, I'm just wondering. Yeah, actually, I think they're actually going to be
all right like that. So I'm always looking when I'm actually
stretching something, how far I'm stretching it,
it can get away with it. Then I'm going to
pull it back, and then look around the back of it. And then press S and X and just bring them in
slightly again, I around the front of it, and make sure then that
they're lining up. Double tap the A. I'm looking at this edge
here and this edge here. And I'm looking how
close this is to this. So I think I can
pull it this way. Holding the shift bond
just a little bit, double tap the A. Maybe that's a
little bit too far. Pull it out, holding the shift bond out to
there, double tap the A. And there we go, now
they're fitting in. And now you can see that's
really finished off that part. It really looks the part now, so that's great to know. And you can see
around the sides. I'm actually going
to put this on render view, have a quick look. Yeah, and you can see
now that looks perfect. I'm just going to
also come around here and have a
quick look on here. And the other thing, of course, is we didn't actually
press plate. So if we press plate, we can
actually see now we've got those two water features
actually working in place. So they look really,
really cool now. I'm just looking now
at the rest of it, because what I'm also
looking at is if this, where is it dropping down to? So we'll have a
quick look at that. Just make sure
everything's okay. We'll turn this off. What I want to do is just
hide this out the way. I'm just looking how far is
this going down into there. I'm going to come
in. To just this pt. So what I'll do is
I'll grab all of these parts, and I
want to just see. So if I press shift H, how far is that going
down? So you can see here. It's coming down to
this point here, and then how far is
the thing behind it? This block here. Block there. And then I we've got a block
behind here, this one here. That's what I'm looking for. So if I grab this
one and this one, that's press shift
H. Yeah, I mean, it's hidden behind it.
That's what I'm looking at. So when I come to this part, you might want to Pull this
part down a little bit, so you can see this part
here if I bring this down. Yeah, it's not that. So
it's definitely giving us some shadow bouncing
off of this part. So if I pull this part
forward, for instance, and then pull this part down, let's pull this part down. Will it get rid of that
shadow? I know it won't. So we're going to
leave it as it is. Not going to touch it anymore. It's just a little bit
of a shadow there. I might come back to it a
little bit later on and see. The shadows coming from here, basically, this part here. This is causing the shadow. What we could do
is we can actually take this and actually
give it no shadows. And the reason why
it's doing that is, of course, this is the plane. So actually, what we'll
do is we'll come in, press P selection,
separate that off. And then what we'll do is we're coming over to the
right hand side, and we'll go to the object data, and I think it's on the shade. And if I scroll
down, no, it's not. It's on the visibility,
and you can see we've got one
that says shadows. And if we turn that off, then, that is looking a
little bit better than where it was before
now for press plate, you can see what
that looks like. So that's looking much better. Now, let's just have a
look at this one as well. You can see we've got
a big shadow on here. Let's see if we do
the same thing. So I'm going to
press LP selection, grab this part, and then we'll
turn off shadows on there. And again, if I
press space but now, that looks much much better than what it did before.
So there you go. Alright, we've sorted that out. Now, let's think about where
was we were on our steps. So what we're gonna do is just put this back on shading mode. And then what we'll do is
we'll save out our work, so file and save. And then we'll grab one of
these steps around here. Let's grab this one here. Now, the other thing is, let's have a look at this
step, for some reason. For some reason, this has
got a big big piece here. And I don't know why it's
come out that far apart from I'm just wondering if I
need to pull this back much, much further where it is.
Let me just pull that back. Yeah. It's been pulled
out for some reason. I don't know why, so I'm just going to
put it back into place. I'm just making sure I've
not done it for any reason. I don't know why
that's like that. Let's pull it out a little bit
further this way, as well. There we go, and now we've
got a nice edge on here, and I'm also looking
at this part here. Did I take something up here and just Or did I move
this part here? That's what I'm
looking for. I think I move this part over here without thinking
about this part here. So what I'm going to do
is, I'm going to come in, grab both of these faces. And you will find as
you're going around it. You're going to end up
with stuff like this. Ah, we can see here,
that's what's happening. We're changing the size of this, which is changing the size of this because it's
got old D on it. So instead of doing that then, what I'll do is, I
will unlink these. So I'm actually going to
press the let on this one. And then what I'll
do is now I should be able to pull this back. And you can see it's
pulling all of those back. And this is the problem that
I was talking about when you're using old D and shift D. You actually can mess around
with the whole thing. And I don't really want
to actually do that. So what I'm going to do
is I'm going to pull this one back into place. That then we'll mess around with all of these parts as well. So you can see here if
I pull this in and out, starting to pull that
back, so instead, what we'll do is we'll come in. And I think, You know what? I'm going to actually
fix the whole thing, so I'm just going to delete. I'm going to leave those as is. And then what I'm
going to do is I'm going to bring in
another block here. So stone blocks,
and I'll bring in, let's see, this mid block, I think, I'm just
looking under here. So we'll bring in
this mid block, and I dropped it on the wrong
place, so I'll bring it in. And then we'll have to shift and bring in another
block on here. So I'm just going to
bring it in to my steps. And then what I'll do
is I'll drop it down, and making sure that
fits into place. Because what you can
do is you can edit it in object mode, but you can't edit
it in edit mode, or then you'll end up with the problems that I've got here. We don't want those problems. So I'm going to bring it up. I'm going to make sure
it's in the floor, so I'm going to
press the dot born. I sure it's in the floor, which it absolutely
is not, so S's, pull it down, and then
pull it down into place, and once it's in
the floor, now I can check to see where
it's going to be. So you can see here,
is it down too far? I want it rounda there. And I also want to make sure now all of these are
fitting in place. You can see I need to
bring it this way. And I also I want to bring
it back that way as well. So I'm going to grab
each one of these. We're going to bring it
back that way as well. There we go, how far do I
need to go actually on these? I s, look. There we
go just past there. And then what I'll do is
I'll grab it once more. And we can see that also the block here has actually
disappeared as well, and that is because we
changed it on this part here. So we're going to I think we'll grab a new block
and bring that out. So let's come to our
supports and our supports, our roofs, and we'll
bring this one. So it's this one here, should be this one, at least. Bring this one out,
and you can see now. And we have to spin this round to get this into
the right place. So, yeah, I've
messed up a little bit here with doing
all of those, you know, joining all of these parts together
and things like that. So you can see here, I
really need to come in now and actually
fix these problems that I've actually caused
myself from using old D and Shift D. So I've caused myself a lot of
problems here, guys. And I'm just now going to
go in and go around and fix those issues with using old D and then going
in and editing them out. So you can see, I've
caused another issue on this one with using the old
D. So what we'll do is, we'll just delete
those out the way, and we'll repair these parts. I'm going to go around then and check everything out while I'm actually I fair. So I'll do that, make
sure everything's right. And then from then on,
I'll just be bringing them out and shifting everything
rather than Ding, cause I think on a
scene like this, Old D is probably not going to work when we need
to edit so much of it. Alright, everyone, so, I
hope you enjoyed that one. Sorry about my mistake, but I'll go in now
and fix those things. I will do it live, so
you'll be able to see what I've actually fixed
and what I've not fixed. But go around your own
and just make sure that everything's good for you
as well. Alright, everyone. I hope you enjoyed that, and
I'll see on the next one. Thanks a lot. Bye bye.
109. Continuing Work on Large Structure Pieces: Welcome microphone
to Blend four, the modular and Kit
ash Environment guide, and we're in our parts again, because we want to
come in to our roofs. So our roofs are going to
be where do we part roofs. Here's our roofs.
And what we want to do is these are the ones that
we actually want to fix. So what I'm going to do is
I'm going to go to my roofs. I'm gonna come in to
these three here. And what I'm gonna do is right click and clear the assets. And then we're going to
come to these three here. A little dot bond to
go and find them all. Right click, and
what you're going to do is mark as asset. Now I'm going to do is save
work once I've put these in. So one assigned. Grab
you three roofs, and we're gonna drop
them into roofs. And then what we're going
to do is save our work. And now let's head on over
back to our gray box. So here we are in our gray box. The first thing
we're going to do then is delete this roof. And then what I'm
going to do is right click and refresh
my asset library. And now, hopefully, this one is still
the wrong way round. And this one is still
the wrong way round. Let's see if this one. This one is still that way round as well. So for some reason,
they're not dated. So what I'm going to do is now, I'm going to delete
these once more. I'm going to come to edit
preferences, minus these off. Close that down,
file, save it out, and then what I'm
going to do is file open reason course Aztec
scene, which is this one here. You will just reopen, and hopefully we shouldn't
have anything in there. Edit preferences,
plus refine this one, which will be this one here, and then click Add
Asset library. Close that down, and let's see if this actually
works. So Aztec parts. Let's see now if
this one goes in. Still the wrong way
round, and I don't know actually how to fix that. So what I'm going
to do instead of that is I'm just going
to bring all three in. And then going to
rotate this one round. So I add 180. Let's spin it around. And
then what I'll do is I'll press Control A, O transforms. Yes, we'll create a new user, right click and set
origin to geometry, and this then should put
it the right way round. Let's see if it does,
or is it going to put it the right way round? No, we've still gone like that. So we'll have to
live with this at the moment until I can
figure out how to fix that. So what I'm going to do now is, I want these two
blocks in place. So these two here, let's bring
them close to each other. Press seven, go over the top. And then what I'll
do is I'll put them both relatively together.
Press a little dot born. But we can see that
there's still a bit a few errors in
the asset manager. Some problems you'll
have with it, but you can also see the ways that you can do to
actually get around it. So what I'm going to do is I'm going to bring this down now, and I'm going to put these
into place so we can see these need to be
a little bit bigger. And it probably is
Something to do with me using the old D to try and save on a bit of the
processing power. That's caused some of these issues. So
let's bring it over. I want this right
into this pillar. So I'm going to press S
and X, pull these out. Then I can put it right
into that pillar like so, and now we're actually
going somewhere. Okay, so now I'm just looking
what is underneath here, so I've got a little
part underneath there, so I've got a few options here. I can drop these down. So I can drop these, these two, I can drop them
down a little bit, like so. And then the problem we've got then is if I drop them down, you can see it's in this part here. Let's actually
have a look. I don't actually think that's
going to matter too much. I'm going to leave
them like that. I'm going to leave
this part in here. And then what I want to
do is grab this part, shift D, bring it over, and then S and X, bring it in, so
squish it in then, and then drop it into place. And I'm hoping once I've got this part in, I'm near enough. Background. To
where I was before, so I'm just going to
drop that part in there. And then what I'm going to do is delete this one out the way. I'm going to come and
grab all of these. So I'll want this
one and this one. So shift. Let's bring them
over and drop them into place. And then we'll grab
this one and shift D, and we'll bring this one over
and drop this into place. Like, so now finally we need to think about this part here, because we've got this
nice wall in there now. That all seems done. I'm just looking at this part
here, this pillar. Yeah, this pillars.
You know, you can see, they're a little
bit too big now, which means I need to bring
in some new pillars as well. So we'll bring in these
four pillars on here. So we'll come down,
bring in our pillars. There we go. And the ones
we want, not pillars. There'll be stone
blocks, I think. Yeah, there we go. So
I'll look at this one. We'll look at the size
difference in them, so we've got that one. And we've got that
one, and I think we'll use this one here. So
we'll bring this one in. And what we'll do is we'll
grab this, this, this, and this, and this one, and then we'll come
around to this side and grab them all like so, and then I'll press shift H,
hide everything out the way. And that then will enable me to see exactly what I'm doing. So then I can put it right in the center of here
down to the floor. Like so, and I'm
just looking now. I want that level,
and then shift, bring it to the next one, and then just make sure that
they're out enough. So you can see now
they're out enough. And then what I can do is
I can just press shifty, bring them around
to the other side, put them into
place, under there, and then just shift them
into the right place. So one like that, grab this
one and one like that. Now let's press, bring back
everything, double tap the A. And now we just want to
make sure that this part then has got another blocking,
so I can use this one. I can press sift. And then
what I can do is now, I want to make this a
little bit smaller, so it comes to the
end of my steps. So it comes just to the
end of my steps there. So what I'm going to do is
press S and y and bring it in. Like so, and I want it to
come probably to around here. Like so. And what I'm
also going to do is I'm going to either pick
it up or drop it down. Now you can see that
both of these now. They also want to come
out a little bit, so I'm going to bring them
out a little bit like so, and then with this one, I'm going to drop it
down a little bit, and then bring it back
a little bit like so. And then we go now from here, then I'll drop my stairs
down, jaws to Tad. Like, so just making sure everything fits in place,
double tap the eight. And lastly, I think I'll also move them
back a little bit, double tap the eight,
and there we go. Now, I'm hoping I'm
hoping that everything now has been put back to the way that
I actually wanted it. I'm just looking around. And I think I want one more pillow pilar in this part here. So what I'm going to do is
grab this one, shift again. I'll put that into
this point here. Like so. And then
what I'll do is I'll also. Now it's in there. If we bring it out
a little bit more. Drop it down a little bit,
so I'll grab the top of it. I'll grab this one,
this one, this one, delete vertices,
grab the top of it, and then just pull it down. Like so. Tab, double tap
the A, and there we go. Now, let's have a look
at the rest of it then, making sure that we've not
messed up any other parts, because I do think that let me just check these pillars
as well while we're here. So we're going to go
with the large pillar and just making sure that
they're the right size. And yes, they look
the right size. I don't want to
talter those. So we can get away with
scaling things. It's just that you
can't get away with messing things up on in edit mode. So that's
the problem we had. So like this one here, you can see It's messed up a little bit because I actually pulled it out in the edit mode, and I don't want
to do that again. So what I want to do is I
want to pull this out now, press S and x and pull it out, and we'll see that as long as I don't reset the transforms
or anything like that, we'll be absolutely
fine with this. Now, what I want to
do with this one is, I want to pull it
far enough out. It comes out to ride
the top of that wall. And then far enough out where it's gone enough over this part. Now, rather than, you know, pulling this this way, I
don't really want to do that. What I'll do is I'll just pull my stairs a little bit this
way, double tap the eight. And there we go, now you can see that's fitting
all in together. So, one last look around, then just making sure that I've not messed
anything else up. So I'm looking at these. These are fitting
on really nice now. I'm going around
here and making sure these pillars will make sure
they fit on really nice. We never did anything
with those anyway. I'm looking now I'm going to
hide the water out the way? Hide the water out the way here? Just to make sure all of this
is actually in together? Making sure this these
large pillars are in there? Making sure that
all of these now is actually coming together. Like so. And the warm thing, I'm just looking now
at this one here. I've got this pillar
stuck in there. I'm just wondering if I can
move this over a little bit. So over or this
way a little bit, at least, like so. Yeah, and that's fitting a little bit better
on there now. And do I want to move it over just so it's
touching there? So, look, Yeah, I think
that'll be okay like that. And then I need to now
come to the front. And what I'm looking at now is bringing these
up a little bit. Or bringing these roofs down, so I'll bring these
roofs down a little bit, making sure this
stuff stuck on there. And the other thing is you
can see where this roofs, these pillars, they're not
actually in place very well, so I'll press S and y and pull
them out just to make sure those pillars are
holding something in place now, and there we go. And now, finally, I think. We've got back to where we were. So a lot of messing
around to fix that. Hopefully, you will also be
able to fix yours as well. I'm sorry that
actually happened. But I didn't see that we was messing up the rest of my scene. And so I guess we all
learned a lesson from that. So now I'm going to do is
delete this one out the way. Bring in my final one. I can also delete this
floor out the way. You can see it'll go
all the way over there. Let's just have a look
before I delete that. Yet it's going all
the way over there, as you can see. So
let's delete that out. And then what I'll do
is I'll grab this one, and I'll bring it into place
where we actually want it. Now, I definitely definitely don't want it going over this. So I'll press S and y, bring it down, put it
into place, making sure. So S and Y, bring it out, like so, and we definitely definitely want it touching around here. So that means I'll bring
it out a little bit more, and then S and y, holding the Shift bon,
double tap the A, and there we go, now we've got
that there and that there. Now, finally, that
looks to me like we've actually fixed all
of the problems that I made for myself. Yeah, now we can come in. We can grab this final
piece, so shifty, and then we can bring that
into play around there, making sure it's going
under the steps. So you can see here
that it was going under the steps anyway,
but that's fine. And the one problem
we've got with this is that I really
need to bring it back to this part here
without kind of moving this. So what I'm going to do instead
is, we'll come to this. In fact, you know,
what we won't do that. What we'll do is we'll press
S and X and just pull it in. Just pull it in, with
press shift on it. Let's pull it in, and let's put it into place where we want it. So I'm thinking on this. We've got our stairs there.
We wanted a little bit out. We wanted a little bit out
here as well, so SN X. Like so, and let's pull it
back into place like so, and then just make sure
we're happy with this part. Now, we're going to need this
part here as you can see, and we can pull that
part out a little bit. But for now, I'm just looking at this little
square piece in here. I'm just going to pull
it out a little bit just so I know that
there's something there. And then what we'll do on
the next lesson is then, we'll finally get on,
we've put in our steps in. Then we'll put in our
other markets in these, and then it'll start
coming together and you'll put all that behind you that
that actually messed up. Alright, everyone,
so I'll see you on the next one. Thanks
a lot. Bye bye.
110. Detailing the Market Section of the Aztec City: Welcome back everyone
to Blend for the modular and Kash
environment guide, and this is where
we left it off. All right. So let's come
in now and what we'll do is we'll grab
one of these steps. So we'll grab this shift D, and I'll use this one, and I'll bring it over and
put this into place. So what I'm going
to do is I'm going to put it into place, so it's round about coming
off the top of this one, off the top of this
one, as you can see. And then what I'll do is, I'll pull it
straight down, then. So we're going to
pull it down and pull it out to this part here,
so I can press three. I can then press G, and
I can actually pull it down into place just
in front of there, making sure it's in the floor. And then what I can
do is I can come in and change the width
on here. Like so. And then finally, I can put it into place where
I actually want it. Delete these steps out the way, and there we go, There
is our steps in place. Now, let's come in, bring
one of these pillars in, so I'm going to press shift D, not old D. Then rotate it round, so I'll say 90, and let's put this one
into place around there. Let's delete this out the way. And we'll look to put this
right in top of the step. So right on top of
this last step there. And then I'll bring
another pillar over. So basically, I want a
few pillars in here, one, one here, one here, and one
here, and finally one here. So let's put them all
in place, with shift D. So I'm just going to
drag it into place. Shift D, drag it into place, and then shift D.
Drag it into place. And then finally we can
get rid of all of these. So get rid of all of
these pillars, delete. And then we'll do is
grab this last pillar. Shift D R, sd nine, and then let's bring this
one into place around here. Right. So, now we'll have a good idea of the room that we've got between
here and here. So that looks enough room out we can actually
walk through there. Might need to play a
little bit closer. We have our little guy, our little human over here. So what we'll do
is we'll grab him. And we'll bring him
down to the floor. So three, let's bring him
down to this ground plane, and then let's bring him over. Let's put him in here,
and you can see plenty of room to actually walk
through there. No problem. We mid move it back. Ad like so, and I
think that's actually probably a little bit better.
All right, so that's that. Now, let's think about
this step along here. So this one, I grab
the step shifty Z 90, let's bring it over
and into place. So where do we want it? We want it a little bit
higher than that, so we want it coming all the
way up to the top of here. Now, at the moment, I'm just going to use
this as a placement, but I'm just going
to place that there. And first of all, going to
bring in the top of here. So this will need a top on here. And it's just a standard top. It's It might even
be with our roof. So let's see where
our markets are. So markets, and the one we want is going to be this
one, this bamboo one. So I'll just pull
back a little bit, bring in my bamboo.
And there we go. It's got a roof in it anyway. So ours 90, spin it around, seven to go over the top. And then what I'm
going to do is put this into place along here. So if I drop this down, Now, just into place along here. And then what I'll do is
I'll pull it out like so, and then I'll pull it this
way a little bit like so. Now, let's get rid of the
rest of this. So delete. I'm going to leave this
little chunky part here, delete this out the way. And there we go. That's what
we've got at the moment. Now we can see that
this needs setting back a little bit furtherth what
it is because of these roofs. So what I'm going to do
is, I'm going to set it back a little bit further. L, so just so it goes maybe with this edge,
not poking out there. So maybe back a
little bit like so, and I think actually
there looks perfect. Now we can have a
good idea of stairs. So what I'll do is, I
can pull my stairs. Now, what I want with
these stairs is, I want them to come out and
touch this wall, of course. But I also want to make sure that they're not into that post, so they're just right at the side of it, like
you can see there. So they're still into
that post there. Let's pull it out a little bit, like so, double tap the A. And what I'm looking
for now is if yeah, I'll have to pull this post
a little bit this way, but then that will
change all of that. So I'm wondering I'm wondering if I'm happy with the stairs going in
there a little bit. So if I put this in here, I'm going to put it
like that instead in the post properly because that post is causing me a
little bit of an issue. The other thing is, I
need to bring these down, so let's bring them
down into place. And the other thing
is, can I have them start in instead there. And yes, we can, and
that looks better. Now, the thing is
with these stairs, I need a bit of a top on here, so if someone's going
to walk up to there, and then it's going to
have a top on there. I also need them coming
out a little bit, so they're actually touching
these parts as well, so I'm going to fix that first. So if I grab my stairs, You can see that they're
quite in the wall there, but then it can bring them out, so let's bring them out a little bit, and let's pull them over. Double tap the H just
so they're in here. And now you can see we
have another problem in that this step
here isn't right, so I can just pull it a bit
slight and then pull it up. Like so. And now you can see that's fitting in
there very nicely. And finally, with
these stairs, then, we need to convert
them because we need to pull this
back a little bit. Now, stairs are going
to be the mid stone. So all I'm going to do is
I'm going to come up to object and convert to mesh. Convert to mesh, and there
we go this or stairs. First of all, then, let's come in and delete this
out of the way. So lt shift and click, delete and dissolve edges. Then what we'll do is we'll
come round the back now. So we'll press shift H.
We'll come around the back, and we'll select all of
these, so select this one. Going all the way
down to this one. Press tab, lt Hh,
bring back everything. Click on your stairs and now
when you actually select it, you'll see that you've still
got those all selected. And from there where you can do is you can actually press E and pull those all the way
back then into place like so. And now you can see
this is looking much much nicer. Albeit. Let's just see if
this is on the floor. So how far is that in the floor? You can see it needs
pulling up a lot more like so. And there we go. We can also see then
that this needs put in around here because this
is going to be a little post. But now we can see
that our stairs is actually nearly about right. If I press S in Z now,
let's pull it up. Put it into place. Double
tap the A, and there we go. Now we can see that
looks about right. Back to our stairs,
then let's press A, U, Smart U V project, click Okay, and let's bring in a material. So the material wants
to minus this one off, and then it should put that
stone material in place. Double tap the eight,
and there we go. We've got that all in place now. And we can actually start
building this one up. Now, this one is going
to be this part here, so you can see this part here. So what I'm going
to do is, I'm just going to grab the
whole thing on here. I'm going to press shift D. Drop that then up there,
rotate it round, so I sad 90, and then let's just
put it into place, making sure that it is
definitely on the ground plane. So if I bring it up, making sure it's definitely
on top of there, making sure nothing's
disappearing into this top here, like so. And then what we can do is
delete that part behind it. Let's just hide
this part, making sure we delete
this part as well, so, Altng, bring it back, double tap the eight,
and there we go. Now we can see With
this one as well, it needs to go
across a little bit, so it needs to actually be
fitting into place along here. I'm just going to put it there
for now. And there we go. That is looking pretty nice. It's still fitting
underneath here, and that is exactly
what I wanted. And now let's think about
bringing in this part here. Let's work on this part here. So we've got some stone walls. We've got so we've got
basically these parts, and then we've got
these support. So I'm going to press
shift. I'm going to bring this over, like so. So I'm going to put it
into some sort of place. Then I'm going to
grab both of these, and I'm going to
press shift again. So shift, bring these over. And then what I'm
going to do is press three. And I'm going to come in. And what I want to do is I
want to make these together. So I'm just going to press G, put them into place
where I want them. So something like this. And I also want to make
sure that my guy. So if I delete this
out the way now, so delete and delete, I want to make sure that my
guy is looking over again. So he can go to the market and have a good look over
there if he wants to. So let's pull him over here. I'm going to put him
G. Pull him over. Let's press dot
and then pick him up on top of this ground plane, Rz hundred and 80. So he stood on top of there, and if he puts his hands on, you can see that's how
he'd be looking over. And finally, then what I
want to do is as well, is I want to make sure that
this is level with this one. So I'm just going to press S and y and pull it together like so. Then what I want to do now
is join these together. So this one here can
probably stretch out. These ones here,
probably going to have to join together, so
we'll do it that way. So what we'll do is
we'll press shift D. Shift D, not all D, put it into place,
and then this one, shift D, and then put
this one into place. Finally, then we can grab all of these once we've
gone into place, and then shrink them together. So grab all of these, and then S and y, bring them in, and then just put
them in the middle, and then S and y and pull
them out, and there we go. Now with this, then
we can come to the sides of here. I
can grab these three. And what I'm going
to do then is pull them out because it
was shifty. It's not. I should mean that I
should be able to do that. But all we want
to do as well is, we want to actually
unwrap this again. So un rap, click Okay, and now your stonework or
looks absolutely fine. Now what we can do
is we can come into each of these and delete
them out the way. Bring in my stone
block then and put it underneath and then decide where we actually want
it. So you can see. Stone block needs to be a
little bit higher like so, and we can see we've got a
little bit of a lip there, not a lot, which means
that we can afford To pull these out a
little bit further. So if we pull these out
a little bit further, like, so now we've got an idea of where
everything can go. So everything's finning
beautifully on there. And now I just want to
press shift D and bring in this pillar to here as
well. They can be uneven. You don't need to make them
even or anything like this. And now what we want is we
want the This going in here. So we've got a little
bit of an edge on here, and we've got our stone
support going over here. So let's think, first of all, let's bring these two over, so ship deep because we know we've got them roughly
in the right place. And then I'm thinking they can come over all the way
to our stone block. It just means I'll have
to move these out a bit. So I'm going to
place this one here. And then with this one, I'm
going to shrink it down. So S and Y, shrink
it down a bit, and let's put it into place. So S and Y. Put it in S and Y. Into place. Like, so double
tap the A, and there we go. Alright, that's in place. Now we can see that we do have a problem with this part here. Now, rather than move in, I would sooner
bring this part in, so I'd sooner bring
these two parts in, I'll grab the inside of here, just so I've got a reference of where
I'm going to put that. I'd sooner bring these
two parts in up to there. Like so. And then I would soon
bring this over, so shift. Let's bring this over
into place, like so. And then what I want
is another pillar. So shifty, bring it over. Put that one into place, like so, delete that
one out the way. And now we can see
that this part here needs going
back a little bit. So what I'm going to
do is this is shifty, which means I can alter it now, so I'll grab both of these and
drop them back into place. Like so. And then what I'll
do is I'll press I think, I'll press shift
and bring it up. Want a little post going
over here. You know what? We'll actually delete
this out the way. And then we'll bring another
little post in there. We'll use our
pillars, and I think not pillars, sorry,
Stone blocks. And I think I've got a tiny one, which can actually go in there. If I bring this in then, if I drop it in to here, Then what I can do is I can
pull it against my steps, pull it to the sides I want it, so N's, like so, and
then bring it down. And I'm going to want
to go in on there, just so I can pull a little
bit of a plant pot for 12. So I'll put it into here, and then S and X, pull it out, and
then let's pull it over to here over
to this point here. And then finally
what I'll do is, I'm thinking I want it
a little bit higher. So Sen's, a little bit higher. I also want it into my
steps a little bit more. Pull it back to here, and
then grab these three now, and I should be able to
pull them out into place. And finally, finally,
this part here. Do I want this little
ledge bit in here? Have a look. Let's double
tap the A. You know what? That's looking okay. I'm just
making sure it's in there. And now we want another flight
of steps going up here. So what I'll do is I'll
grab this one with shifty, bring it over, and
I'll put it in place. And then what we'll do is
on the next lesson is, we'll get these steps into place because it's
basically just, you know, building
lego at this stage. We just want to make sure
everything kind of fits, so you can see that
door's never go to fit. We also want to put in
this main part here, so I'll steal one from
over the other side. But we'll do that
on the next lesson. Alright, everyone, so I hope you enjoyed that, and I'll
see on the next one. We're really rocking and
rolling now, as you can see. There's not a lot
left to do at all. We still need to do a
little bit of building, but the rest of it then
is just this kind of lego block thing that
we're doing right now. Alright, everyone. I
hope you enjoyed that. I'll see on the next one. I'm gonna save out my work.
Thanks a lot, bye bye.
111. Adding smaller detail and props to market section: Well microphone,
the blender part, the modulate, and Kash
environment guide. And what we're
going to do now is, we're going to
bring in this part. So what I'm going to do is, I'm going to steal all of this part. I'm going to press shift,
I'm going to bring it over and create this part over here. So I'm going
to bring it over. W it a lot thinner than
what it is in the moment, so I can press S and
y and bring it in. And we want it to be ran about
the thickness of this one, and then S and X, pull it out. Like so. Let's bring that in. And then what I want to
do is I want to make sure that it's a little bit lower
than this roof, which it is. And then I can come in, I
can delete this out the way, delete this out the way,
hide this out the way, and finally delete
this out the way. Ultate, and bring it
back, and there we go. There is that part in.
Now, the main things too, look for on here, is just
make sure that you know, it's going to be the steps are going to come
down, of course. Just make sure that it's
like round the back of it, we have a little bit
of a gap on here. In other words, I'm going a
little bit too far this way. I want a gap going down
here to make a ledge. So what I'm going to do is
press S and X, pull it back. Like so. And then what I'm
going to do is pull this up to the stairs, go
up to the stairs. And then what I want to do is, I want to pull it out,
perhaps a little bit like so. And then I'm looking
at this gap down here. This is the gap that I
actually won down this part. So I'm going to leave that
like that because from there, we can actually use that
and put some You know, we certain things on there, we can put some vines
on there hanging down. And it's just making it a
little bit more intricate. The next thing I want
to do as well is, I want to probably grab
this block here and put a block coming up from here. So what I'm going to do
is, I'm just going to hide my bridge out of the way. So let's just press
H to hide it. And then I'll come in with
this block, press shift, and I'm going to
put it over here, like so, and you can see
this is what it looks like. Essens d, let's pull
it down a little bit, and let's put it into place. Now, when we put in blocks
like this in place, we can actually shove
them right over, like so. And then let's put
it in the side of here and see how
much gap we've got. So if I pull this out, you can see now we've got a little bit more
intricacy on there. Now, let's pull it
down a little bit, so we do want it
higher than our door. We definitely want it a
little bit wider, so S and X, pull it out, and we
definitely want it going up into this wall that
we've already got. So things like this,
as you can see, You can really get away with
a lot and other things, you can't get away with much. So I'm happy with
how that looks. I can even see there's
a little bit of a lip on there, which
I'm happy with. All of that now
looks really nice. And now I just make sure that everything on this side
is going to be okay. So what I want to
do, first of all, is, of course, drop this down. We actually want it,
which will be round here. Then what I'm going to do
is I'm going to drop this back because it's way
way to close to there, so I'm going to drop
it back to there, and then I'm going to delete
those steps out the way. Now, the next thing of course, is I want to make sure all
of this fits together. So first of all, I'll
bring in this block. So I'm going to come over here. And we'll steal
another one of these. Let's steal this one. So
we'll use this one. Shift. Let's bring it over. And we want to keep the height of this. You can see here that it's pretty a lot shorter
than what we had it. So let's press
Sen's ed, like so. And then what we'll do is we'll put a roof on here in a minute. So S E, let's put a roof on, and the roof we'll have, because we also want a door
in there as well. I just want to make sure it's all fitting in place,
as you can see here. It's a little bit
out, so let's put it out a little bit like so, and then that should make sure. That this is also coming
down to the bottom of H M, so going to come in and
delete that out of the way. So delete that white
part out of the way. And then let's make sure
that we can press S and's and pull it down a
little bit into place. Making sure then it's on the
ground plane, which it is. I'm also looking at that
one, making sure that is. Double tap the A. A little
bit too high still, bring it down a
little bit, double tap the A, and there we go. Now, let's think about
the top of this one. The top of this one, I
will bring in a roof. So let's come to our roofs,
which are these ones here. And the roof I want on this one is going to
be this one here. So it's going to be the one with a little cross
sections on there. So if I bring this in, you will see if I press
G. Pull that into place. Making sure first of all,
it's the right side. So I'll put it into
kind of the center, S. S, let's make
it bigger first. So S, like so, and then S and X.
Let's pull it out. And then let's make sure
it's fitting all sides. Now let's put this
on and we should. If I put it on this, be
able to see through there. No, I can't. So what I'll
do is, I'll turn that off. I'll bring it up then,
put it into place. And then I'll go
around this way. And then I'll press S and X, pull it out, and then S and y, pull it out a little
bit this way. And then I'll finally
just make sure it's sat on top of
there, which it is. And then double tap the
A, and there we go. Okay, so only problem we've got here then
is this part here. I can see that I might want to either lift it up
or drop it down a bit because this step doesn't quite look
right, so we'll come in. We'll just grab it and we'll
lift it up a little bit, and now it looks much better. Go in that way.
Double tap the A. Let's put it back
on material view. And then what we'll do now is we need the actual door on here. So I'll delete this
door out the way. I'll steal this door, where is the door over here. So this one in here.
I'm going to press a shifty. And then
I'll press one. And then what I'll
do is I'll just fit it roughly where
it's going to go, so it's going to go roughly around here, and then
we'll pull it back. Press a little dob on zoom in, and then let's sit it onto place like so and pull
it back a little bit. Double tap the A. And yeah, that's looking pretty good. Like so. Now, let's
bring in a window. For dudes will have a
square window on here. Square window, pull it in. So Z 90, and then three. And then what we'll
do is we'll place the window roundabout there, and then just pull it back. Press the little dot. Then
just make sure it's in place. Now again, we'll be
using our Boolean, so don't worry too much
if it's, you know, poking through
with the bamboo or anything like that.
Double tap the A. And I think at this point, we've near enough, got
all of this laid out. Now there are a few
things to put out here, which we I'm just thinking we might as
well actually do that. We might as well put in, Some of the parts that
are going to be out here. In other words,
some of the props. So, yeah, let's do
that. Let's bring in some props for that, as well. So I'm going to go to my props. And what I'll do is I'll
bring in this one here. So I'm going to drop
that in there. Like so. And then I'll drop in
a couple of these. So let's drop in this one here. Like so. Let's make sure
it's actually in there. And let's make sure this
one's back a little bit. So people can actually
walk past it still, like so, double tap the A. Making sure it's
not in the wall. Still sat in the
wall. There we go. And then what we'll
do is, we'll bring in a couple of barrels. So I'll bring in a small barrel, put that one there, bring in a larger barrel, put
that one on there. Like so, I'm going to make this barrel a
little bit smaller. Drop it onto the
floor, not like that. Make sure it's on
the floor, double tap the A. There we go. And then what we'll
do is we'll come in and bring in a few vases. So I'll bring in one over here. Like so. And then
what I'll do is I'll put in a couple
of small ones. So the good thing about these
is we can always come in, bring them in, and then just
make them, smaller, like so. And they'll look really nice. And we'll put those
into the ground plane, and then drag them over here. Like, so, Maybe grab it
out, rag this one over. Like so. And pull it back, what's the A? And there we go. That's looking pretty nice. And yeah, I'm already
happy about this one here. So this one's already looking
nice, this whole thing. This is looking
nice now down here. And now let's put
down and render view, just have a quick look
at what that looks like. And there you go,
you can see now it's starting to
populate that area. You can see now all of this looks really nice as
they walk up here. They've got a door on here. Yeah, we can see that we're
missing still the entrance, the huge entrance
that goes in here. I think I'm going to leave
that a little bit longer. I think what we'll
do first of all, then is we'll bring
in our door on here. We'll pop in these windows. We'll have a door down here. And then we'll put
in our bridge, and we'll see how that's
going to all go in. So what I'm going to do is I'm
going to save out my work. I'm going to put it
back onto Shade view. And then I'll see he on
the next one, everyone. Thanks a lot. Bye bye.
112. Integrating Suspension Bridge Attachments: Welcome microphone.
Blend for the modulate and Kash
environment guide, and this is where we left off. Now, before we bring
in these windows, let's just first of all,
grab each of these, and what we'll do is we'll
move them round to this side. So I'm just going
to press shift, and I'll drag these over here. And then what I'll do is
I'll also grab this part, shift, and I'll drag
this over here like so. Now what I want to
do is I want to put this one in place in between
these two pillars here. So, whoops, I'm just
going to grab it, drag it, and then delete
this one, delete this one, and delete this one,
and then bring in this one and this 10 Z 90, just to kind of
finish this one off. And we'll put it like so, so we've got that lip,
that all important lip, just making sure though that
it's not too far that it's coming into our right
short pillar there, which it is at the moment. So we might have to
pull this back a little bit further or pull
this one forward a little bit, so I'm just going
to pull it back, pull it back and see
where I can get it. And that looks about right now. I'm just going to pull this
back then just to give us a little bit more of a
lip on there like so. And then what I'm going to do now is pull these
all into place. So let's pull this
one into place, and then S and X
into place like so, and then finally
bring this one in. And then S and X, like so, pull it all into place. So S and X, just so
it's not popping through there, and
double tap the A. And then what I want to do
is just move this forward, like so, and there we go. All right, so that's
that bit finished. Now what we can do is we
can bring in our windows. So a round window down here. So let's delete this
one out the way. Let's delete this
one out the way, and we'll focus on
our windows first. So windows, a round
window down here. So I'm going to put
this window here, and then I'm going to put
the square window over here. We'll do the square one first. So if I press control one, what I want is this window to be probably around this part here. So overlooking this
part here and then this round window to be
over round about here. So we can just see
it above, you know, if we're looking from here, let's pull them both back now. So we'll pull this one
back into place first, then we'll pull this
one back into place. Press the little dot
one. One too far. Let's pull it out. There. So
we've got a window there, and then we've got
a window here. So now if we look from here, we've got a nice window there, just wondering whether that's a little bit too high or not. Let's move it down a little bit there because we're going to
have a door here as well. It's up to you. You might think
it might be bear on here, make it a little bit smaller. And then I think actually that might be a better idea,
so let's pull it back. Because then we've got
a door and they would be able to see through
there from this door. Now, let's bring
in the door then. So this door just wants to be a standard door,
so we'll go up. We'll find our doors.
So one of these, but we'll just bring in one of these, so I'm going
to bring it in. Like so, I'm going
to spin it around. So z 90, z, 180. And then what I'll do
is I'll put that into place in the center of here. L et's bring it in. I can grab both for these
press and this one. Press shift H. And there we go, now I can press three
or control three. Grab this one, press G, and then I can put it
right into the place where I want it round about there. I can delete this out the way, and then I can
just pull it back. And there is my door
into place like so, press voltage, bring back
everything, and there we go. And now let's come in
and bring in our bridge. So I'm going to delete
this bridge out the way. We're going to go to bridge, which is this one here.
I'm going to bring it in. And I'm going to pop this into
place or actually want it, so it's going to be
around about there. And again, we can see we've got an issue with these parts. What I'm going to
do is I'm going to unwrap these within
this part itself. I'm going to pull it out and get it into place first of all. And it's because we're
using the dark wood again. So then what I'm going
to do is press S and X, pull it out, just making sure. That this door then can
actually go into place. Now you can see that
this door needs to be made a little bit thinner. All my bridge needs to be
made a little bit wider. I think I'll lo for my bridge
being a little bit wider. I think that's much easier. Like so and now you can see
all of that is fit in place. Let's bring it up a little bit, just so our door is
right on top of there. And then finally, let's
come into these parts now. So what I want to
do with these is I want to swap this over for
this dark wood to prop wood. So let's go to prop
wood, and there we go. Now that's looking good. Now, let's have a look
at the rendered view once more on this,
so this bridge. And yeah, that that
looks really nice. Let's pull out this window a little bit just so we've
got a better view on it. P at the A, and then we go this window then
overlooking this bridge. I'm just wondering
whether to pull this up a little bit to
have it from there. I think that looks
actually better like, so. And then what we'll do is
now we'll grab another door. So let's come to our doors. Let's put it back on shade demo, it is easier to wait with, and then we'll have a
door with steps on. So we'll bring in this door. I don't want to
bring it like that. The reason I keep bringing it in here is because then
it won't bend over. If I put it on
there, it might like lean one way because
this is not uneven. So z 180. I mean, this is uneven. So let's then press control one. And then what I'll
do is, I'll put it right on top of the
ground plane first, so just on top of that, and
then I'll pull it back. And then what we'll
do is we'll get that into place. So press dot. And again, probably going
to bole in this one off, but we'll get it in place first, go into place where we
want it. Into there. Then what we'll do is
just make sure it's on that ground plane like
so. And there we go. Now, then, now we
need to think about this block here because we're
kind of working around, joining it back up now. So let's think about
this block here first. I've got a lot of blocks
here I could use. So let's I'm thinking let's
probably use this one. Maybe I can get
away with this one. I really, ideally, I
want a block with three. So more like this one, for instance, but smaller, as you can see, a Cord, use this one and just turn
it into three instead. So three of these stone blocks. So I'll press shift D. And what I'll do is,
I'll bring it over, and I've got one, two, three, and I'll get rid
of these other parts. So what I'm going to do is just get rid of these parts here. So, one, two, three, so L, L and L, delete, rss, and then let's bring it in. Now, can I press
control A on this and set origin to geometry without messing
anything up? I hope so. I'm so worried about
messing that up now, because this is
shift and not all D, so I'm really
worried about that. So what I'm going to do now
is just bring it into place, press the SP, make it
much, much bigger. Just making sure it
all lines up first, and as you can see now, it does, which means I can
pull it back this way. I can delete this
block out of the way, so I delete this
block out of the way. And now I need to fix all
of those blocks in there. So Let's actually
get on with that. So, first of all,
Let's bring this part. If I grab these faces, just in front, of
this face here. Just in front of
that face there, it will leave us a
little ledge in there, and then I'm thinking
that I could probably move these over. So I'm thinking that this
is maybe not enough room, but what we'll do is
we'll pull them out a little bit more like so. And then what I'm going
to do is pull these back. So I'm going to go in, grabbing these faces right down here, and then pull them back into
place along here, like so. Now, you can see my
steps going up here, which means I'll
need another block in here level with this door, but we'll focus on
that in a minute. What we want to
do, first of all, is perhaps pull all of
these over a little bit. To give us a little bit
more of an edge down there. So what I'm going to do
is grab all of these. I'll leave that one in there. And if I press G now, you can see all of
this comes away. And what that means is now I can pull this over, and there we go, now we've got a
little bit more of a ledge in that part there. And I'm also thinking at the moment that I need to
bring in this block now. So I'll bring this block,
I'll put that in there. So we'll use this one here. What I'm going to do
is I'm going to press shift and D. So. And then I'll bring
it up and I'll see if I spin this round now, so I add 90. Let's spin it around, and let's see if we get it in place. So I'm going to put this
into place roundab here, can see now it's at
the top of the steps. And then what I'm going
to do is bring it over. And put that into place
roundabout there. Now you can see that's
fitting in rather nicely. The one thing is, I'm just wondering if I should pull
it this way a little bit. And the reason again,
I'm doing this is, I'm always thinking about
making things intricate and thinking about making things where I can put vines on and
put interesting things on. I'm going to pull it back just
so it goes past that step. And yet, I think this is
going to be fine now. We've got another block here, so you can see this whole
block here, which is this. We'll bring that in in a minute. What I'm going to
do, first of all, though, is I'll come
back to these steps. I'll grab my bottom one.
D press L on this part, shift D. And then what we'll do is bring it down into place. Like, so, drop that there, double tap the A, and there we go, that's that
part in there. So what we'll do then on
the next one, I think, I think we'll bring
in this warehouse down here because then it'll kind of bring
everything together and see if everything fits. You can see here the roof on this part is
hanging over here. So I need to make sure that's
dropped down low enough. But yeah, this is
really coming on nice. You can also see I've not
got a window in here. I will put that window in
here before we leave then. So I'll go to windows. I'll bring in a square
window, drop it in there. And then what I'll do
is I'll press A 90, and I'll put that
into place down here, so this is like kind of a
little bit of a courtyard. I'll bring it into place. Like so I'll delete this
one out of the way, delete out of the way. So double tap the
A. And there we go. Now, do I want it right
directly under that bridge? Or do I want it a little
bit closer over here? Probably a little
bit over there. Thing that's more
interesting like that. And we could have another
window on here as well, but we have got one
window on here. So, so yeah, I'm gonna
leave it like that. I'm going to save out my work, and I'll see you on
the next and everyone. Thanks a lot. Bye bye.
113. Placing supports and arches: Welcome back everyone to for the Modular and KitBash
Environment Guide, and this is where we left off. Now what we're gonna do is we're going to come to our markets. So and the one we want this time is going to be our warehouse. So let's just drop our
warehouse over here. What we'll do then
is spin it around. So I s 180. I'm gonna press Control one
to go into the rear view, and then I'm just going
to place it down. Where I actually
want it, which will be somewhere around here, and let's pull it
back into place, just making sure it's on
the actual ground plane. Now, before I do that, I might as well delete this out the way. I might as well also delete
my stairs out the way. I know where everything's
going to go. And then what I can do
is now I can pull that back into place like so. Now, we do have a big
large pillar there. So we just have to make sure
that when we pull this over, that we've also got this
large pillar in place. Now, what we're going to do
for these large pillars, you can see that they are
different to the other ones. What we're going to
do is we're going to bring in this pillow first, so you can see we've got
not this pillow, sorry, this large pillow here, and then all I'm going to do is I'm going to
spin them around. So I add 90 spin it
around the right way, and then I'm going to create it, so it's a little bit
bigger than our old one. I think that's a little
bit big actually like so, and let's put it into place. Like so, and just make sure that is fitting in there nicely, I'm going to bring it back
a little bit like so. Now we can see we
have a problem in that it needs to come
down here as well. So I'm going to make it a
little bit smaller, actually. I still feel like it's a
little bit too big like so. What I'm going to do is delete
this one then out the way. And we can see as well, if I press three or control one, sorry, that this is
bent over as well. It's a little bit bent on there. So I'm just going to actually
grab this one, shift. I'm going to spin
it around then. So was -90, and there we go, now it's nice and straight. So now I can actually pull it into the place
where I want it, so it'll be somewhere
around here. And then what I'll
do is, I'll pull it out and in to place like so. So I'm just going to put
this there at the moment. I can see that I need
to pull it out a little bit further
this way, like so. And I can also see this
I'll need a bottom on it. Going all the way
down to the floor. But let's first of all,
bring in our stairs. So on the back of here, we're going to steal
this one over here. So this one here, let's
grab all of those. I can also see on
this one that I might as well fix
this while I'm here, in that this step here
isn't going up high enough. Now, if I press tab, we can see that's already
been converted. So what I want to
do is I just want to all this out into
the right place. So I can see now, and this one here is also
a bit messed up, so let's pull these
out. To pull these out. And I mine, make these
a little bit bigger or pull them out into
place like so. So now it's going down to there, looking at the top
where the top one goes. And then what I'll do is
I'll also fix these as well. So I'll bring these out into
place, double tap the A. Now, I'm looking
at this one here. I'm thinking I'll need to stretch these probably
a little bit, so I'll grab both of these. I'll press S and y, and just pull them
out just so they're going past these
two blocks here, like so, and I think that
looks better like that. And then I'm just looking
at this part and this part. And yeah, I'm happy
with that now. So what I'm going to do is I'm going to grab both of these. I'm going to press
shift D. Going to bring them around,
and hopefully, press Z 90, short, if we go over the top, fit in the place here. So
let's see if they do. So let's press G,
bring them into place. Press the little dot on. Come around then, and let's drop them down to
this ground plane. Like, so, let's delete
both of these out the way. So delete these out of the way. Like so. And then
I'm looking now how far I actually want to
bring these out and if they're going to go
into the place like so. So I'm going to grab both of these and pull them into place, and I think what
I want to do is, I want to pull them closer, so I'm going to press S and X. Let's pull them closer by stretching them
out a little bit, and then let's pull
them into place. Now, we can see. This is much
higher than these, as well. So I also need to pick it up, put it on the ground plane, and then I'll have another
look, and there we go. That's looking about right. Albeit. It's not quite
into place or jaws, pull them back, pull them
back, pull them back. And there we go. And
then I'll pull them up. And there we go. I think I pull them off a
little bit more. That's looking
about right for me, so they have to step
down onto there, and I think that's going
to be a little bit better. Now we can see that this pillow pilar is a little bit maybe, maybe it's too big. Let's make it a
little bit smaller, we'll make it a
little bit smaller. We'll pull it into place there. And I'm thinking as well that maybe I want it coming
where do I want it. So first of all, I want it coming in a little bit this way. So let's even bring it to here. Then let's see if
then bring it out. So like round about there and then we've got
this little ledge there. And I'm just wondering
if I want to pull this back a little
bit further as well. Let's first of all though, deal with this pillar,
because what I want to do is I want to kind
of bring it down. Or put another pillar
underneath it. So I could use one of my supports underneath this
to actually support it. So let's have a
look at that first. So sup not support stone blocks. And let's look at this one. This is a sideways one, this one is a chunky one. So this one here is 11 we want. Let's bring it into place and
see what it actually looks like if we make this one
a little bit bigger. So what I'm going to do is
I'm going to pull it out. Making sure it's on
the ground plane. I can see that that actually
is looking quite nice. The one thing is, I want to decide how I'm going to
actually support this. In other words, you
can see that this is probably coming out that
way a little bit too much. So S and X, let's put it into place. So straight on top of
that pillar then there. And then with this pillar, I can actually put that
in there and that actually really now looks nice. So I can actually pull it
out a little bit more. And then we've got a
little bit of a lip there. It's in the floor, the
port in this pillar. And yeah, that actually
looks pretty good like that. So now what I want
to do is I want to duplicate that over
the other side. So I'm going to
grab both of these. I'm going to press shift D. I'm going to
bring them to them. Then what I want
to do is I want to grab each one and mirror them. So this is the last one,
so let's go to object, mirror, and it's
going to be on the y. You can see this wine
line going down there. So object mirror on the
y, and there we go. Now I should be able to
bring this one into place. Delete this one out the way. So delete and bring
this one into place. Like so, and there we go. Now we can see that we do have a little bit of a problem
with this back part. This part here needs to come
out and cover all those. So let's do that now. So we'll come with base let
grab each of these faces. And then what we'll do is we'll
pull them out, pass that. And there we go. Now, that's
all fitting in very nicely. The one problem we have is that these pillars need to come
up a little bit higher. Than this part here. Even though there's also going to be
a roof on here as well. But for now, that's
looking pretty nice. Now, what I'm going
to do now is, I'll bring in my arch, so you can see this
is our arch here. We'll bring that in,
so we'll press shift, and we'll bring it
over, and then rs -90, and then control
one, so control one, and then I'll press G, and I'll just drop that where it's
going to go at the moment, so it's going to go
on top of there. Like so, making sure that
it's in in the right place, so we can see we've gone
even side each side. And then what I can do is
now I can delete this one, this huge one out of the way. I can pop it into the ground. And now I can see how high
I need these pillars, because they might
be too high now. I can also see if my
guy comes over here, so where's the guy there is. Let's bring him over here, and is he in the ground plane, so he's in the ground plane, and then let's stick him out. And you can see
this is quite low. This is quite low down. Let's see if I can pull
it out a little bit. So S and D, pull it out a little bit, and put it on there. And there you go,
I think that looks a little bit better
than where it did. And now what we want is just a top on here.
I'm also looking. I I need to pull this back a little bit further
because you can see, we've got a big, big
gap down on the bottom. So how far do we need
to pull this back? So if I pull this
back into there, you can see now we've got a
lot more of a ledge on there. We probably don't want that. So instead of that,
let's pull it out into place where
we actually want it. And then what we'll
do instead is, we'll just come to
the back of it. Grab the back. We'll see, first of all, we've
got no modifier on, so that tells us that we need
to be careful of the level. So I'm going to grab the back
of it, press Control plus, and then we should have
grabbed all that beveled part, and then I should be able
to pull it back into place, like so double tap the
A, and there we go. Now, the other thing
is, I'm wondering, I'm wondering if I'm happy
with the arch on here. So how far these are arch. So if I grab this, I can press S and x and pull it
out a little bit, and then put it more
into the center, and maybe pull it out
a little bit more, so S and x and pull those
parts then into each of these, which will make that
not look so accentuated that part and a
thing that actually looks bare, so double tap the A. And now let's get the roof on, and then we're going
to have a very, very clear idea of how
this is going to look. Now, the roof is going
to be these parts here. So I'm going to
come to my roofs, and I know already. I'll have a problem
with these because we already know what
problem we had with these. So let's bring in this
part and this part. And then all I'll do is I'll
just grab this one, shift D. And what I'll do is I'll
spin it around now. So I want to spin
it along the x, so object, go to mirror, X, and there we go. Now, let's bring
each of these in. So control A or transforms. You see, cannot apply multiple users
because it's in here. So what I'll do is
I'll just press right clicks a origins geometry. R clicks the origins geometry. So. And then we
go, not that one, right clicks origin two
geometry. There we go. Alright, so let's bring all
three of these in together. So let's go over here. What I'm going to do is press G. Drop that into this one here. Grab this one, G. Drop
that into this one here. And now what I should be able
to do is pull them back. Now, let's see if we
need all three of these, or if we can get away with two, because three, might be
a little bit too much. But if I press G
now you can see, probably going to be a
little bit too much. So I'll probably get
rid of this middle one. And then I'll join
these two up, like so. And from there, then
I should be able to put these into place where
I actually want them. So you can see, first of all, if I drop these in, they're
going to look like this. Now I do want them a little
bit bigger than that. I can have them. You know, you can have them
back if you want to. But I think for me, I'm
just going to bring them out just so they're
over this lip here, and I'm just looking
at this lip here. You can see it's
miles over that one. Let's bring them back. And then let's bring them up, so let's pull them
up onto place, and then we'll press S
and y and pull them out, they're actually going
into the wall over there. I don't really want
any gaps with these, so you can see here, I've got a little bit of a gap there, so S and Y, pull it out, double tap the A, make
sure that gap's not there. And then we can see where
we need to pull them up to. So you can see that these parts near f pull this up a
little bit further, though it's actually
going to take that away, which means that we can probably get away with
dropping this down. For this part down here, can we get away with dropping this down a little bit?
Let's have a look. Where can we drop it down
to round about there. And then we can just
see the tops of this. That's what I want. And now I'm just going to
go to the front. I can see that's
bent over there. I'm going to go to
these pillars now. And I'm just measuring because I think that we just want to
put them on top of here. So if I bring them
up, bring them up, I can put them just so they're going over the top
of there while still keeping them
into this pillar here. Alright, so a lot
of fiddling around, I know, but you can see that
we've finally got there. So we've finally got
this pot on there, the way that we
actually want it, and you can see if we put
this on render view now, That is what it
looks like, and it looks really, really
nice, as you can see. Everything is coming together. Everything is really intricate, especially around
this part as well. The steps look really nice. And yeah, that's really good. Once we've got then these
pillars on this side, it'll really really
start you know, kind of coming together,
but you can see just how much we've
actually achieved here. And you'll look even better once we've actually got the
proper lightening, proper rendering in, all of the foliage and all
that good stuff. But let's actually get
this finished first. All right, everyone, so
I hope you enjoyed that. I'll see on the next one.
Thanks a lot. Bye bye.
114. Modeling Tower Details for the Aztec Temple: Welcome back I want to blend for the modular and Kit
Ash environment guide, and this is where we left
off. So now let's come in. And what we want to do
is we want to bring these parts, both
of these parts. Let's bring them over
to the other side. So I'm just going to press 50. I'm going to then
drag them over. And what I want to do is
I want to rotate them round individually,
not on their own. So I'm just going
to go up to object. No, I'm not gonna
go up to objects. I'm gonna go to
individual origins. Press Z 180 and spin
them round like so. Then what I'm going to do is get rid of these two blocks here, so delete them out of the way. And now what I want
to think about is where I'm actually going
to put them at the moment, you can see if this one, for instance, is
a little bit out. I'm going to move that
one over a little bit, so move it over, and I want them right at
the edge of here. So if I grab this one, I want it right at
the edge of there, I also then can get away with probably a little
bit more less on this one. So what I'm going to do
is pull this one out. So we can also see
that the step on here, this has a little
bit of a step on. Up to you, whether you
want to keep that, you could raise this up a
little bit if you want to. I think for me, I'm going
to leave that step there. I think it looks quite nice. And what I want to do now is think about
this part on here. So let's think about this part here before moving
on to this part. So I think the best
thing to do with this part is to use these parts that we've
already created. So shifty, let's
bring them over. And then what we'll do is
we'll put this into place now. So we're going to put this into the place where I want it. And this is what I
need to decide to do, whether you want it so thick, how far you want it
going down to there, how far the side of this actual, you
know, this part here. Let's delete this
one out the way, and then we'll have a clear
idea of where we want this. But if I put this into here,
coming out a little bit. So let's see if I'm
bring it out just ale bit like so there. And then maybe going the
other bit because I want to show a little bit more
of this stonework here. So something like
there, like so. And that then will give me the scaling or the rest of this once I bring
these parts over. So what I'll do now is, I'll, first of all, actually,
I'll bring this down, I'll bring it down into place of jaws at the top
of there, like so. And then what I'll do is I'll delete this one out the way. So I'll delete this one
out the way, like so. Now, I do want this
bringing in this part, but I want to bring it in once
I've brought in this part. So if I press shift,
I can bring them this over to this part here and
see where I actually want it. So you can see it's poking
out slightly past here. So if I bring it out
a little bit more, poking out slightly
past my steps, and I think that
that is about right. So from here, then I want to bring it all the way over here. Now, let's get a block. So we're going to get this block here. We're going
to press shift. We're going to bring it over And then what
we're going to do is, we're going to make it
a little bit bigger. So S, make it a
little bit bigger, and then pull it into place. So pull it into place. Like, so let's delete this one
then out the way, so delete this out of the way. In fact, you know what?
Before we do that, let's just press
Control Z and go back. And what I want to
do is lift it up, so it's actually
the right height. So I've already measured
out that height, so you can see now I actually brought you up to
the right height. And then what I can also do
now is because I can see it, I can actually bring you
out into these parts here. Now I'm going to do is then I'm going to delete all of these. So let's just delete all
of all of this part, all of this part, just
delete them out of the way. We've got our blocks on there, and we can put them in a lot more even once we've got
these other parts in. So this is where we want them. So I can see now straightaway, that this here is about
right on this side. It's too far on this side. What I'm going to do is, I'm going to come
into this part. I'm going to grab each
of the faces now. The thing is the faces on here. If a breast shift H,
I can just go into it and grab each
of the faces so. And then I can press tab
old, bring back everything. Grab this once more,
press the tab, and now I shall be
able to bring them in. And what I want to
bring them into is the same as this here. So I want to bring it in. To be round about the same as
this one here like so. Now, that does leave
a little bit of a gap down here, as you can see. And I think actually
a little bit of a gap down there
is no bad thing. We can actually put some vines in there and stuff like that. And they would have
some gaps down there, but maybe maybe not
quite accentraated. Now we can fix that as well. We'll fix it in a different
way as well, if we want to. And I think what we'll
do first of all, is put these pillars into place. So we'll put these
pillars into place first. And what I'm going
to do first, though, is also, I want to pull
this this way a little bit. So just this way, a little bit, making sure I'm not going
past the steps down there. So I don't want a big large gap. I want my steps in there. You can see now. It's
got a nice gap on here. It's got a nice gap this side. And what we need to do now is replicate that over
the other side. So I'm going to grab
both of these pillars. I want to put a shift,
bring them over. Like so. So we've got
that nice gap there, and now we want the nice gap on the front as well, like so. And now that is
looking about right. So I'm happy with that.
Now, what I want to do now is just come in
and change these over. So just change the
seed over like so. And then change this
seed over just so. They're a little bit
different from each other. So now you can see they're
a little bit different. And now let's look
at this gap again. So I'm looking at this
gap and wondering, should I bring in
another stone block just on this bit here? And I think the answer is yes. So what I'll do is, I'll grab just this stone block
here, press shift. I'll bring it out, I'll press P selection, separate it off. And then what I'll do is I'll make it a little bit smaller. First of all, set the
origin to geometry. I'll make it a
little bit smaller, and then I'll pull it into place where I actually want it, which is going to be down here, like so, and then to
the top of my roof. And then I'll pull it back this way and see what that
actually looks like. Making sure nothing's sticking
through, which it's not. And then finally, what I can do is I can grab the front of here and pull it all the
way out to where I want it. So I'll want it probably
around there like so. And then what I'll do is
I'll go underneath it. Or try and get underneath it and if I can't get
underneath it, all I'll do is look through it, so I can grab the
bottom part on here. And there it is. Is that it? Nope, it's not there, so
let's put an object mode. Now, she'll be able to see has it actually got a
bottom part on here? I don't think it has. I don't think it's got a
bomb part on here. So what we'll do is
we'll just add one. So F. There we go. Now we've got a
bottom part on there. And let's turn this off now. And then what we'll do is, we'll bring this down to the floor, like so. And there we go. Let's put it back
from rendered view. Or shade of view,
double tap the A. And then lastly, I want to
grab it all U, smart U V, project click okay, just to re unwrap it. And there we go. Now you can see, that's all fitted together
really nicely. Okay, so now we're on
to this part here. So let's come to let's come first of all
to our stone blocks. We're going to need the
small stone blocks, so these ones here. I can drag and drop it then on there, but that's not
the one that I want. I want the smaller ones.
Let's put that one on. And what we'll do is we'll
make it a little bit smaller. And then S and d will make
it a little bit bigger. And I want to keep
these because they're relatively solid, whereas these ones are a
little bit more broken. But I want the stone
blocks to look like this. For
sure on this part. Then I'll press
S, bring them in, get them to be the round
about the right size, round about this size,
pull them all Like, so, put it in place. Like, so, and there we go. All right. So that is
going to be about right. And then what I'll do is now I can delete this out the way. So delete this out the way, delete this out the
way, delete this out, the way, delete
this out the way. And what I can do now
is just hide this. L so, delete this one. Alright, so there's
my stone blocks. And what I want to
do now is make sure that the supports are going
to look right as well. So we'll grab our
supports from here. And then what I'll do is press
shift D. And then z -90, go over the top with G seven, and then G, let's pull
it into place like so. And again, we'll pull it
into place like this. Now I want my little
guy up there once more. So I'm going to
grab my little guy, put him up here, bring
him up to the top floor. And we go, and then he's
going to be looking out. So Ads at hundred
80, spinning round. And then we go
looking out there. And now what I want to do
is just make sure that this pillar is not
in the way there. So if I pull that forward, you can see now that's
not in the way, and then press S and
X and pull these out, put them in place, S and X, like so, and then grab this
top one, put it in place. Double tab the
eight, and finally, just make sure that that's nice underneath there,
and there we go. This is round about right. I
just want to pull this out. Tad more just so it's
not into that stone, and we can see now
It's not in there, double tap the A,
and there we go. This is our supports in there. Now, what we need to do
is, we need to put this, mirror onto each of these. Or we can actually just I guess. We'll go over the
top. Yeah, we've got enough view to
actually see that. So if I bring it here, I can see now that it's got
about the same that side. And then what I want to do is I can mirror this over
the other side, and then I'll get a good
idea of it, so I'll do that. So what I'll do is I'll come
into the center of here. Grab the center, shift
S, cursor selected. And then what I'll do is I'll grab both I'll grab
this one first. Add right clicks the
origin 23d cursor. Grab this one, right clicks
the origin, three D cursor, add in modifier, and
we'll generate a mirror. I'll mirror over the
y, turn off the x. And then what we'll do is we'll do the same
thing on this one. So add the modifier mirror, and then y and x like so. Now what I want to make sure is just I've not mirrored
anything over there because I've used all D or something. I
don't think I have. So what I'll do now is I'll
just apply the mirror, so control A, apply the mirror, control A like so. And now we've got both of these. Now, can we duplicate these and then put on this
sign. So let's have a go. But we've got both of
these, and then shifty, and then R, Z, 90, and let's spin them around. Nearly the nearly in the
right place, not quite. So what I'll do now
is, I'll just get them into being in
the right place. So we can see if I go over the top, This one and this one. So this is needs coming out all the way to
here, so let's do that. It was work for Try. I
didn't actually work out. You can see as well, I've got
to split them off as well, so maybe I cause myself more work there doing it that way, so I'm just going
to split these off. So P, selection,
split these off. Then I'm going to
save out my work, and we'll carry on with
this on the next one, but not much more to go. I think this is
the last building Except these and the stairs, so we should get them actually
done in the next lesson. All right, everyone,
hope you enjoyed that. I'll see you on the next
one. Thanks a lot. Bye bye.
115. Refining Indoor Parts and Door Placement: Welcome back everyone to pull the modular and Kash
environment guide, and this is where
we left it off. So let's see now these
are split out the way. So what I want to do now
is move these into place. I'm going to right click
the origin to geometry. And then we're going to
pull them out into place. We've got about the same lip as what we've got on this one. And then what we
also want to do is press S and y and
bring them into place. Now, I did try and just rotate them around.
That didn't work. So what I'm going
to do is get rid of these ones, grab these, shifty, duplicate them, and then said 180 and pull
them out into place. Now, where do I want them?
I want them ride over. Roundabout here. So we've got a nice lip underneath
there. Let's have a look. A nice, big lip
underneath there. But the thing is, I've
gone a bit too far. I think so. Let's put those in. And then finally,
what we'll do now is we'll grab both of these, and I'm just going to
go over the top again, shift de, bring them out, and then we're just
going to put them in the same place as these
ones over here, like so. Alright, so that's
looking pretty nice. Now we want to put
a roof on here. So we'll go to our roofs, and the roof we want
is this one here. So it's a bit of a
more ornate roof, and that's why we're using
it because it is the top, like, the kind of armory. I would say this
probably would be. So let's press seven, and then G, bring it into place, and then let's press the S one. So. And then what
we'll do is put that into place like so, making sure it's nice and even. Now, what I'm going
to do on this one is, I'll grab this part,
so just this top. I'm going to press Shift
S, cursor selected. And then what I'm
going to do now is, I'm going to grab
this part, shift S, and selection to cursor. And then I know it's
right in the center. Then I can pull that up
and see where it's going to fit on top of there. So it's going to fit on
top of here like so. And then what I'm
going to check now is just to make sure I'm
happy with the size of that. Now, if we come in and
we make it bigger, you can see, we could
make it a lot bigger. But the problem is then
it doesn't look right, it doesn't look as though
it supported correctly. So let's just press
Control's head and bring it back to
the sides it was. And the other thing is,
I'm just looking now, I think it needs to go
this way a little bit. So, and I'm looking
around this way. And I think that's about right now because the center of here, it's actually a rectangle, so it doesn't actually
fit perfectly. What we're going to
do then is turn on our render view and have a look round and making sure that
we're happy with it. And you know what?
It looks perfect. It's right about the
right height as well. We can still see that
top of that temple. Yeah, and that looks really,
really cool like that. Alright, let's
save out our work. And then what we'll do now
is the final building. And the final steps. Well, it's not the
final building, but it's pretty much built out. Now we need a door
in here as well. So let's bring in
our door first. So what I want is
this door here. So I'm going to press
shift, bring it up, rotate it around, so s
-90, put this in place. Like so, and then just make
sure it's in the center. We're not in the center
because we've got that stone block there,
put it into place. Like so. Double tap the
A, and there we go. That's looking really cool. And then we need this one here. So this block here, I'm just going to press shift
D, going to bring it over. And I want it to be round
about here, like so, and I probably don't
want it to go that far, so I'm just going to press the S born and bring it out to here. Maybe maybe bring it
this way a little bit. Pull it up. And then what I'm looking for
is the height now. So I do want it
higher than there, but I also want the same
top on here as well. So I'm going to delete
this out of the way. I'm going to delete my window. And then what I'll
do is grab this top, shift D, and I want to
put it over the top now. So over the top
of this one here. So G. And then what I'm going to do is put
it on top of there. And put it on top. So. And then let's just make
it a little bit smaller. Bring it this way a bit,
just so it sits on top. And then finally this way
a little bit as well. Double tap the eight,
and there we go. Okay, that one's on top. Now, let's put that window back. So we're going to have a
round window one here, which we could use
this one, actually. So this window, bring it over, and then z -90. Let's put it into place
where we want it. Out a little bit. And
let's pull it up. Just under there. Like so. Now we need the final
steps then on here. So we just need to make sure that if our guy
walks over here, is he going to be able to
walk down these steps? So we'll bring in our archway. We'll come to this
part. And again, having thin steps, thick steps, it's all, you know, part of Making the building intricate. So z -90, let's point him that way and see
if he's going to struggle, walking down those steps, and he absolutely is not, so they're absolutely fine. So what we want to do then is delete these steps out the way, and bring in our
steps over here, which still have the
jumps node on. So shift. Let's press Z 90, and let's bring in
our steps into play. Let's pull them up. Like so, and let's decide where
we actually want them. Now, with these
steps, I think it's better because they're quite small to perhaps be hidden a little bit behind
here like they are here. And then all we'll
do then is pull this forward and then decide where
we want to drop this down. So the moment you can see,
if I come round here, they're a lot lot
higher than these. So what I'm going to do is
just pull them down there. And I'm also going to pull them out a little bit because I
don't like it like that, so I can either pull
them out a little bit, just bring that in front, like, so, and then we've still got
them hit them out the way. And there we go. All right. So I think That is near enough the main
part of the build done. What we'll do then on this part then is we'll pull these
back a little bit. So we can see that these
definitely want to come back. So you can see here
that this here, this one here is probably not needed because
we have this here, and we're going to put some
stone blocks going down here. So what I'll do is
I'll come in and delete these ones out of the
way, so delete Vertices. And so I want it basically, we've got some stone blocks, and they're going to go
along here underneath this. And on the other side,
so on this side here, I want these coming down to roughly level with
this part here. So what I'm going to
do is, I'm going to go over the top.
I'm going to press. Rub them all. And then what I'm going to do
is pull them all back. So just pull them
all back into place. Round a there, because then we can put some stone
steps going over there. And then what we want to do
then is with these ones. So just these ones here, so one, two, and three. We're going to pull these
out a little bit, like so. And then these will be leading
into the actual jungle. And then on the other side, because we want to leave
it a little bit different, we're going to actually
leave these like this. So we're going to
leave these like this. Yeah, we'll leave
them like this, and then we'll go round
to the front now. And what we want is, we
definitely want them, so a little bit of a
stone step along here. We've got a big kind
of part on here. And then this part will be
leading into the jungle. So this now is looking about right the
way that I want them. So they're okay.
That's all done. And then we're just
going to look round now at anything that
we've actually missed. So anything that's looking a little bit out,
have a good look. You might, for instance, want another one of
these pillars in here, we've actually
finished that off, and you might want
one in here as well. Let's just see what they look
like while we've got time. So let's pull that into
there double tap the A. Let's have a look
what that looks like. And that actually might
look better like so, and then I can
actually grab it here. So shift. Let's
put it over here. Mine get stuck in the bamboo, but move it there, have a look. But I think think it actually
looks bad like that. So what I'll do is, I'll
just move this bamboo away. So I'll grab it, move it, just back a little
bit, double tap the A, and there we go. Yeah, I think that
looks bad like so. The water feature it's
all fitting in place, looking around then
the front of it. Making sure all of this
is fitting in place. I'm also looking to make sure that these are kind
of in place properly. Looking around this part. I'm going like, kind of bit
by bit now going through it. This will be the first
time we do this, but we will do it one more
time when we actually finish. We're just making sure everything
is fitting into place. Now, I'm wondering about this. Should I pull this out,
just a tiny bit. Like so. And yet, that looks
a little bit bare. Water under and round, going down to my steps now, looking at these parts, going over to my pool, making sure we've
missed a door here, and this is why we do this. So this door will be
just a standard door. So what we'll do is, we'll
just get rid of that. We'll bring in this door, we'll press shift, and we'll drop it down into place there. We'll press the little dot born, and then what we'll do is
we'll pull it up into place. Now, you can see that it's
stuck in the ceiling slightly. But what I want to
do is, I want to put it interplay first. And you can see my ceiling is not actually on there really, but my ceiling is here. And I'm not sure whether to pull that up a
little bit I can do. I can come in here and I can pull it up a
little bit like so. And then we go we've got
our door in place there. I don't think that's
actually going to affect anything else, so
I'll leave that as is. And then we're going
to look in the inside. So we've got this big pillar
here, as you can see. Now I'm going to pull
that pillar down then, so I'm just going
to grab this one and pull it down into the floor. We've also can see that we've got a bit of a problem here, so I'm going to pick this
up, put it back into place. Now let's look
around and make sure we've not destroyed
anything on the other side. Alright, so that looks good. Now that room's actually
sorted, moving around them. Have we got all the pillars in place here? I think we have. I'm also looking at
the windows as well, making sure all the
windows are in. We got the windows in here. Got this part in here and
this leads to a door. Got the steps leading down here. And yeah, I think I think this is looking
round about right. So we've got the
rooftops left to do, which are this big one. This is the main thing on here. We've got a couple
of these to do. Got the main entrance
that we need to do, and finally, then we've got our tortures that we need to do. And then we're pretty
much done with the build. Now, because we've already
built most of this out, we only have in this section to put on those parts that,
of course, we create, but then put in the Booleans, and then we're pretty much
done with this build, and then we can start
moving on to things like vines and things
like the terrain. So it's been a
long long process. But, to put something
like this together, You've got It's generally going
to take you, I would say, at least I don't know, something like 60 70 hours to put all this
together for yourself, you know, without having something there
to actually copy. That's the time scale
that you should look at 60 70 hours plus. I know if we were, you know, doing these to a
much higher level, it would take hundreds of hours actually to pull this together, so Alright, everyone, so
I hope you enjoyed that. I'll see on the next one.
Thanks a lot. Bye bye.
116. 3D Modeling the Entrance for the Aztec Temple: Welcome back everyone
to Blender for the Modula and Kith
Environment guide. And this is not where
we're left off, but we did say we're going
to go back into our parts. So what we're going to
do is go to modeling. What I'm going to do is zoom out once the actual shader loads up. I'll put it on
actually object mode for now so I can
see what I'm doing. And then all I'm going
to do is grab this one, and I'll press shifty and
move it across like so. And then what I'll do is
I'll come down to my images. Turn this off and open it up, and the one we're looking for is going to be under references, and we want this one here. So this entrance here, this huge entrance, this is the one that we're going
to be working on now. Now, we left this one to near the last because
it's quite a complex one, as you can see, there's a lot
of things going on there. There's a lot of different
things you can do with this. In other words, there's a lot of different modeling techniques
and things like that. So that's why we
left it to last. So what we'll do
is first of all, we'll bring our little guy over. So let's bring him over just so we have an
understanding of scale, as well as our reference. And then what we'll do is
we'll bring in a cube. So I'm going to shift right
click, set my cursor there. Shift A, then, I'll
bring in a cube. And then what I'll do is
I'll get you dimensions now. Which will be over
here on the item, and we'll put this on not
0.95 65.45 and 5.61 like so. And then I'll spin it around. So I head 90 spin it around. And finally, let's put it up on the actual ground plane,
which is under here. So let's put it right up
where the guy's feet are, like so, and move it across. And you can see just how
big that actually is. Let's put it out as well so we can actually see
what we're doing. I think the best
thing with this is to split it into parts. So the bottom part, if I come here and press
Control, left click, bring you down
somewhere like here, will be then as
you can see here, these two actual stones. And then we have the
next part, which will be the top of here. So basically, you can see if
our guy walks under here, you can see that
you're going to want the archway coming up
to roundabout here. So this is the top of here, not the actual top of the arch, so the top of the archway. So let's come in, press
tab, press Control. And then this gives
us a rough idea of where we actually want it. So now, if I bring this back
a minute, come back into it. You can see now this is then
the top of that archway. Now, if that said, then we do have something
now to wit with. So what we'll do then
is, we'll make a stop. We'll pull this
over to this side. And I think it's easier if you actually start
on your archway, and you can see
this what it looks like. So we'll do that now. So what I'm going to
do is I'll just press Shift S, Kuster selected. And then what I'll do is,
I'll bring in probably better off with this bringing
in a actual cylinder. So we'll press shift A.
We'll bring in a cylinder. We'll turn the
cylinder down to 24. We'll rotate it around then, so Ry or R X 90, like so. And then what we'll do
is we'll pull it out. So if I press S, I can pull it out into kind of the
sides where I want it. Now, if I bring my little guy here once more, we can see then, if I press one, this is
how high it's going to be, and I think that's
a little bit high. So what I'm going to
do is pull it down. Something more like this. So
it's still a huge archway. Then what we're going
to do is pull it out, so S and X, pull it
out a little bit. And now what we can
do is we can actually pull this down into this part here and
then build around this with our stone.
So let's do that now. So what I'm going to do
is I'll grab the front. Well, we can actually come in, and now we know how to do this, rather than actually, you know, going in there and showing
you perfectly how to do it. You might as well come
in and just grab them going all the way around
to each down section, and then just
pressing P selection, and then you can actually get
rid of this bomb part here, so delete, like so, and that's just a quicker
way of doing that. What we're going to
do is press S and y and pull this in
and then pull it out. And we want it probably
around the thickness of here. So if I pull this in,
if I press three, we can actually see
how thick this is, which means that now
I can press S and y and pull that out near enough into the size
where it's going to be. Alright, so once I've got
that, then let's bring it out. And then what we'll
do is we now pull it down into place and make sure we're actually
happy with it. At the moment, I think it's a little bit too flat on the top, so let's press S and X, a little bit less like so. And then what we'll do now is
we'll bring these two down. So E, Z, pull them down
to the ground plane. They will be hidden by the post. So they will be hidden
by these things here. But for now, what we'll
do is we'll just keep them like that all the way down. And then what we're going
to do now is we need to bring in a solidify. And then what we need to do is, we need to actually change it into mesh and make
this kind of archway. It's more like a church archway
or Gothic style archway. First of all, though,
let's bring in some edge loops, so Control. Let's bring in four edge loops, so left click, right click. Control, one, two, three, four. Left click, right click. And then what we'll do
is we'll press tab, contro lay all transforms. So all transforms,
right click to origin to geometry, like so. All right, so what I'm
going to do now is then, I'll come in with
my ad modifier, bring in a solidify, like so. Let's turn it the other way. So we're going to go this way, let's have a look if we
do want it that way, maybe, maybe we'll
come the other way. Yeah, I think that will
actually be better. That will come that way, and we can still change
this at this point. So what I tend to do now, I've got the size of
everything in there. Now what I should be
able to do is I should be able to come in
with my stone block. So then I can actually make this archway a little bit thinner once I've
brought those in. So let's bring those in next. So what I'm going to do is
just press shift A. Cube. Let's bring it down.
Let's press one, so we know how big
it needs to be. And then what I'm going
to do is press S and Z. And then S and X. And this is roughly
where I want them. Now, we can see that it's a little bit further
out than this, which means that we can bring this in or out if we want to, but I think for me,
think bringing it up to roundabout here is going
to be absolutely fine. I'm also, I think happy with the size of
these blocks as well. So what I'm going to do now is, I'm just going to
bring them forward. I'm going to press S and y
then and pull them down, pull them into place, so
we want them jaws just at the front of each of
these. And there we go. Now, let's actually
bring another one in near so Control. Left
click, right click. Rab the top of it, Control
plus, press the Y button, then that separates it off from the other one, and then A, and then mesh, clean up, and then fill holes. And there we go. Control
A, for transforms. Let's set the orientation
to the center, clicks the origin
through the cursor, Add modifier,
generate, and we'll bring in a Bevel
first. So a bevel. Let's put this on naught
point naught five, like so. And then what we'll do finally is add in another modifier, and we'll bring in a mirror
and put it on the other side. And it's as quick
and easy as that once you actually know
what you're doing. Okay, so now I'm looking at my actual reference
and just trying to work out the best way
to actually do this. So a thing What we'll do, first of all, is
bring in the pillar. So we'll bring in this
pillar over this side. So we can see here
this is the pillar. You can zoom into it
and see how it looks. So we want something, you know, similar to actually that. So I'm going to do is shift A. I'll bring in another cylinder. I'll I'll keep my
cylinder on 24 vertices, I'll press the S p, and then I'll bring it over to this side. I want it fit in near enough right in the
center of there, so I'm going to press
S, bring it down, and this will be the largest
point of my actual pillar. We also want to make
sure that we've got that we've got blocks
going up here as well. So just make sure we're
going to think about that. The other thing is I
can see at the moment, that this is probably
a little bit too wide. So I'm going to pull my pilar
just a little bit over. And I can see it's a
little bit too big. So what I'm going to do is bring it down because I can see with my own eyes that this is
all a little bit too wide. And then what I'm
going to do now is, I'm going to bring
this and this in and then press S and y and just
bring it in a little bit. Now, you can see that this shouldn't be joined as part of it because it's squishing
it in too much, so S and ys bring
it in, like so, and now this pilar is fitting
in a little bit bare. Okay, so that's looking better. Now what I want to do
is I want to start shaping this pillar into
what I actually want. So what I'm going to
do is, first of all, I'll come to the
top of it, and I'm going to bring it down like so. And then what I'm going
to do, I'll bring it down a little bit
further actually, and then I'll press E, and then S and bring it
in ale bit, like so. Then I'll press the eye button
to bring it in like so. And then what I'm going to
do is press E. And then E, and then press S. And we just want sl, slight
bend on there, and then E. And then S, like so. And there we go. We've got the start of our actual pillar. It's up to you,
entirely up to you, how you want to
build your pillar. The main thing is with
these pillars is, you want to make it
look as though they've actually been stones
that have been, you know, carved out and then stacked on top of each other. And that's the kind of
look we're gonna go for. Now, Bevern will help with that, splitting the mesh up
will help with that, but a lot of this
you'll actually have to do pretty much with
the actual mesh. Alright, everyone. So I'm
going to save out my work, and I'll see on the next
one. Thanks a lot. Bye bye.
117. Adding Detail to the Entrance Area: Well, microphone to blender for the modulate and kit
environment guide, and this is where
we left it off. Okay, so what we'll do now is, we'll carry on with
this actual pillar, and I'll pull it up then
into place like so. And what I'm going to do
is I want a little bit of a bend on this one before
we go to the main pillar. So I'm going to press
the S S button. Now, you can see that this
is a little bit bent now. So what I'm going
to do is just come in shift click and
then control B, and I'll just bevel that off, maybe with two, just to round
it off a little bit like. So now what I'll do is I'll
come into the next pillar. Now, the next pillar, I want to be pretty much on
top of this one. So what I'm going to
do is grab this one. I'm going to press E and
pull it up into place. Now we're working round to this top bit,
so we're thinking, how we can do the
next bit and then the next bit, and then
the next bit on top. So what I'm going to do
with this next bit is, I'm going to press the
ibonn to bring it in. And then what I'm going to
do is press E, like so, and then we're going to
bring in some edge loops, so control, let's bring in
some edge loops like so. Left click, right click. And then what we'll do is
we'll bring in this part. Let's even bring
this in a little bit using our proportional editing. So I'll put it onto let's try root first and see
what that looks like, and you can see that's quite
a nice form that we've got there because we picked it
above the actual center. So you can see, because of the amount of edge
loops we brought in, we can bring it
above the center, and that's what we end up with, and that is pretty nice. Okay. So with this, you can see, it's all about just
creating form. We don't need to worry too much about exactly how
it's going to look. So E enter S, let's pull it out without
function editing on, and let's put a top bit on here. So then I'm going to
press E. Pull it up. Control, left click,
right click, Control B. Le scroll the mouse wheel
down, just have one in, and then e enter tons, and
then just bring it in. So. Alright, so this is
pretty much the pillars. Now what I'm going to do is, I'm going to split all of these off. So I'm going to split them off, exactly where I want them. And the way I'm
going to do that is, I'm going to come
in and Shift click. I'm going to split it off
here, O l Shift click. I'm going to split it off in
this part Ol Shift click. And I'm certainly going
to split it off here, Ol Shift click, right click, and we're going to mark a scene. Now from here, let's
split these off then. So if I come into bottom one
with L to grab the island, L and L with the top
one and press Y, and then G, and you'll see all
of these now are split up. And finally, now let's
fill in these faces. Now, Let's try first of all, if we come in and actually and fill them in, Yeah,
let's just do it. Let's try cleaning
up fill holes, and we'll put this on 20. We need to run 25,
something like that, because the thing is
we already know that the number of vertices
going around near is 24. So now if I come in, hopefully, if I hide this out of the way, it should have filled all of
those in, as you can see. Now, what we want
to do is want to press tage, bring
back everything. Let's reset all the
transformations, so reset all transformations, set origin, two, three D
cursors, so it's in the center. Right click and shade
smooth by angle. And then what we'll
finally do then is we'll bring now in a bevel. So I'd modifier generate a
bevel. And there you go. You can see now these look as though they're
actually split, and that is what we wanted. Let's put it on naught
point naught five, like so, and that's
looking very, very nice. Okay, so now, want to put this, of course,
on the other side. So what I'm going to do is, I'm just going to bring in a mirror, so bring in a mirror, put
plunk it on the other side. And now we can think about
bringing up this top part. So what I want to do for this is I want some more stone blocks coming in and being kind
of in the center of these. So going in the center
of these like so. So I'll grab my stone blocks. I'm going to press shift D.
And then what I'll do is, I'll press the tabon,
bring them up. And then what I'll
do is I'll press S and Y and bring
them in, like so, making sure that they're actually in my pillow,
so you can see here. They're actually in there.
So I'm going to press S and y a little
bit more like so. And then what I'm going
to do is I want to take them up all the way up. So basic I can just keep copying these and
bringing them up. You can also see that they've
come in a little bit here. I don't want that,
so I'm going to grab each of these faces
and bring them back. So they're in there like so. Then what I'll do is
I'll grab both of these. I'll press shift D, and I'll bring them up
to the next one. Like so. And then I'll bring them up to the
next one as well. So shift D, bring them up. Do the next one.
Like, so. All right. So we'll go that high for now, and I think that's
going to be round about the height that I want it, because I can see maybe maybe one more. Let's
just go one more. So we'll go one more shifty. Let's bring it up and put
it into place. Like so. Let's press tab, and then we go, that's what we
should be left with. Okay, so now let's focus back
on these actual pillars. Now I can see that my pillars They need be made a
little bit bigger. So what I'm going to do is
I'm going to grab this one. I can see this part here is not far enough
out, as you can see. So let's press the S
p and bring them out. Now, the problem
we've got here is, I can't really bring
them out like that. So what I'm going to do
is press tab instead, A, and then what I
want to make sure that they're on medium point. And from there, then I
can actually bring it up. So, and then we go, let's
pull it into place and make sure that this one here and this one here are all the
way through, as you can see. Now what I'm going
to do is, I think with that a little bit
too high, I think it is. So I'm going to press S and Zed, pull them down a little bit, and then put them into place. And we can play around
with this a little bit more as we carry on
through the process. Okay, so let's come
now to the top. And what I want to do is I
want to put a cube on here, going all the way up to the top of here before I
put this top on. So what I'm going to do is
I'm going to press shift A, bring in a cube. Let's bring the cube over. And of course, I want to
put it on top of here. So what I'm going to
do instead of doing that because I'm not actually
centered at the moment. First of all, I'm going
to pull this back a little bit so I can actually
see what I'm doing. Then what I'm going to do
is I'm going to come to the center of this part because that's where we're
basing everything off. If I go over the top, you can see this is where
we're centering it. So Shift S s to selected, and now we'll bring in a cube. Make sure you press tab first, Shift D, bring in a cube. And then what I can
do now is bring that over and I
know it's centered. Now, it doesn't mean that
these are centered, though, because I don't
think we actually centered them, or did we? I'm not actually
sure, but either way, we'll bring it just
to the top of there. And you know what? As well, I think I'm going to
have to center these. So this part in here
to actually put this Cubon to make a good starting going
up, so we'll do that. So we'll just do it that way instead. So what
I'm going to do? Grab this one, shift
S, urster selected, grab this one, Shift S, selection to cursor,
and there we go. Then I can come back
to this one now. Grab this, Shift S, urster selected, and
that's in the middle. Okay, so now, it didn't work. Shift S, urster selected. And why is my cursor not
moving? Let's try that again. So we'll grab it again. So shift S and
cursor to selected. There we go. No idea
why it wasn't working. But anyway, let's come back. So let's pull this
up into place. It's gonna be along there. Then what we can
do is we can press S and Z and pull this in. Like so. Like, so
right on top of there. And then what I want to
do is bring this in and then put a cube on
top of this as well. So I'm going to press
tab. I'm going to come to the top of
it with Face lect. I'm going to press
then I, bring it in, to where I want it, so
something like this, and then I'll press
E and pull it up to roughly to
the top of this. So if I press one, you can see, it's roughly to the top of here. And then what we're
going to do is maybe a little bit higher. And then what I'll do is I'll
put a cube on top of here. So E enter S, pull it out. Like so maybe not as
wide as this part here, and then E pull
it up into place. Like, so just over
the top of it. Alright, so that's looking good. Now, let's once again,
split all these off. Now, to split these two off. All I've got to do is
come to the center one, shift and click, and then Y, and that then splits them off. And then A to grab everything. And again, mesh, clean
up, fill the holes. And then finally, what
we'll do is we'll press Control A, all transforms, right click, set Origen, two, three D cursor. And then shift select this one. And all we're going to do is
control L. And what we'll do is copy modifiers,
and there we go. We've got a bevel on there. And we've now got a mirror on there as
well, and there we go. We're making a real,
real good start on this. Now, what I want to do is
I want to actually think about this part in here, as well as my actual arch. I think what I'll
do, first of all, is I'll bring this
top part into here. So what I'm going to do is, I'm going to first
of all come in. I'll grab this edge of this one and just pull it back
a little bit, like so. And then this is where I
want my top part to go. So I'm going to pull
it all the way back into my stone like so. And then I'll bring
in another cube now. So mesh, bring in a cube. S to make it smaller. And then one, just to
go into front view. And then what I'm going
to do is pull it out. So S and X, let's pull
it out into place. So what I want to do is,
I want to make sure that this is kind of in the
middle of this one here, so we can see we've
got the same Run about gap as this one here, and we've got the
width now like so. So that's looking pretty nice. And what I want to do now is I want to bring in
the center piece. So we already know that once we bring in centers
with extrude, it will cause us problems. So let's not actually have that. What we'll do ins steadies,
we'll press S and Y and bring it back to
where we want it first. Run about there is where
I want the back section. You can see here,
it's gone too far, so let's press S and Y, bring it out past
there, and there we go. Then what we'll do is
we'll press Control. Bring in an edge loop, left click, right click. And now what I want
to do is create a bar in the actual
center. So control B. Let's bevel it, going all
the way up to here, like so. And then what we can do is
now we can grab this one, this one, and the back because we need the
back do, as well. Press E and S and Y. And then we can pull those out to where we actually
want them like so. And there you go. That's
the first part of the bar. Now, the thing is, we also want a Boolean or something like
that going through here, but we might get away
without using Boolean. We can see one thing
though in that. These are way way too far
this way and this way. So let's just press
son next because it will be a little bit
easier to work with. Alright, so what we'll do
then on the next lesson is we'll create this little
bar that's gonna go in there. I think we can
actually get away with doing that with bevels,
so we'll do it that way. But apart from that, you
can see now it's coming along really really
nicely, actually. Alright, everyone, so I hope you enjoyed that, and I'll
see on the next one. Thanks a lot. Bye bye.
118. Focusing on the Entrance Archway Design: Welcome back if want
to blend the four, the modular and Kit
bash environment guide, and this is where
we left it off. So let's think about
this little kind of round piece that's
going to go in there. So what I'm going to do is, I'm going to isolate
this out first, so shift H. Isolate it out. And I'm thinking the
easiest way to do this would be to bring in
a couple of edge loops. So Control, left click, right click, Control B. And then if I pull
that out, like so. So if I pull it out to here, let's just press tab, th
and bring this back in. So now if for a
press tab, we can see where it's going
to come out to. I can see that these aren't
far enough this way. So shift and click
on both of these, S and X, and then I
can pull them out. And then what I want to do
is put a center one in. So control left click, right click, and then
control B and pull that out. Now, what that's
going to do is then going to enable me to
have four points here, which can make that kind of bar on this rounded bar on here. So let's give that try. So we'll come to these four points here. Now, remember, the other thing, we've got one around
the back as well, so we might as well do
that at the same time. Like so. And then what we'll
do is control shift and B. So Control Shift B,
pull it out, like so. Now you can see they're not pulling out the way
that I want them. And the reason is, of course, because we want to set
all of our transforms. And now let's try that again. It's call control shift and B, and now you'll see they're
pulling out how we want them. Now we can do is round these
off a little bit, like so. And there we go, we've got
exactly what we wanted there. So now what we can do is we can grab this one and this one, E enter S and y and just pull
them back now into place. And there we go.
Now we can right click and shade or to smooth. And there is that
bit actually done. Okay, so now we've
got this part here. So this part here, we've got a couple of triangles that
are going to go in there. So the easiest way
to do this is, first of all, grab, I would say, we want it all
doing kind of in one go. So what I'm going to say is,
first of all, let's come in, and what we'll do is
we'll grab this archway, going all the way over
to this part here. And then what I'll do is
I'll press shifty selection. So I've separated
it off of there. So we should end up with
just a part like this. Now, obviously, this
has got to solidify on. We don't want to solidify,
we don't want this on there. What we want to
do, not that one. Let's go back. This one here, let's take this liti five off. There we go. What we want to
do is pull this back then. So let's first of all, reset the transformations,
all transform, set origin, to geometry. And then S and y, we can pull that in then to
our actual stone. From there, then,
what we can do is we can actually
pull this up now. So I'm just going to press A, E Z, and pull it up
onto the Z axis. Press the Z again,
if it's wobbling, just so you can get it going up into the place that you want it. Now, clearly, this is not flat, so let's put it on wireframe. Press one. And then
what you want to do is press S and and
flatten that out. Now, just be careful that you want to flatten
it out properly. I think on this
one, in particular, we can't fly it out
the way we want it. So what we're going to do is
we're going to press one, and I'm going to come
in and go to mesh, and we're going to
come to bisect, and then we're going to cut
across it like so instead. So cut across it, and
then just zero this out. So zero it out, and then just make sure that
you're happy where it is. And finally, you're going
to clear the either the inner or the outer. And also, we're going
to fill it in as well, which means that it will fill in all of those parts for us. And finally, then let's
put it on object mode, and then we should be left
with something like this. Now, why did I do that?
I want to do that so that if I bring my arch
back now, so All take, bring back my arch,
you can see now that I can actually create these types of things that are going
to go in there. So this kind of triangle. Now, what I want to do now is
I want to bring this down. So at the moment I
grew all selected, if not, going into wireframe, select it all, and
then I should be able to drop this
down below there. So I'm going to
bring it just so. It's just actually
in there like so. Then what I'm going
to do is, I'm going to come now
to these parts. I'm going to come
all the way up, grab this part, go
all the way around. Grab this part and this part, so shift select, control
select, like so. Now, I want to do this separate because it's the
easiest way to do it. Because if I come in and
try and grab it all, I'll do it all at the same time. So the way I'm going to
do it, first of all, we'll reset all
of our transform. So grab this one. Control A
or transforms right click, origin geometry,
and then press tab, and now I'm going
to go back into it. Then I'm going to
press the ye button, and I'm going to
bring it in like so. And you can see now we have real control over bringing it in. Once the press left click, you'll see that this
insert menu opens up. And what we want to do
now is come down to this, press Control C, and then we're going to go
over to the other side. So let's grab all of this, going all the way over, the same for this, going
all the way over. And then what we're going to
do is we're just going to press and then enter. And then what you're going
to do is come down to what it says thickness,
press Control V, enter, and then
you'll end up with exactly the same thickness
on each of these. Now we've got each of these. What we want to do
is pull them out. So I'm going to grab this one,
coming all the way round. I'm gonna go round to
here, shift select. Control select. And
then what we're going to do is pull
them out with E, enter S and Y, and let's pull
them out, like so, and there you go, you can see. It's as easy as that to make
that little part there. Okay, so now it's finally on
to this actual archway here. So the way I'm going
to do this archway is, I think I'm going
to bevel it out. And the other thing is, it's
way too low down as well. I'm wasting a lot of mesh if
I bring it down to there. So what I'm going to do is,
I'm just going to come Look, let's have a look in
wire frame, first, let's go to wire frame,
and let's have a look. That's not actually handy.
Let's go on object mode, and then let's see in there. We can see here that if I
got rid of this one and this one and got rid of this one and this one and press
delete and faces, like so, then it should, near enough, sit
on top of there. So if I turn this off, you
can see it sits on there now, and if I hide this out the way you can see it just
comes down to there, that's going to make
it much easier for me. Now what I'll do is I'll
come into this pot. Want to do is I want to bevel
off a certain parts of it. So all I'm going to do
is I'm going to apply, modifier because I'm happy
with the actual width of it. I am happy, actually.
Let's think about this. Yeah, I'm actually. I'm
going to leave it like that. What I'm going to do then
Control A and apply that. I'm going to bring in
one edge loop then. So tab Control O, left
click, right click. And what this edge loop
is going to be there for is just to stop these
bevels overlapping. So in other words, if I come in, Shift click, Shift click. Press Control B, you'll see now that they'll only go up to, or they should only go
up to that point there. Now, this is not how I'm
going to do this, obviously, and I do need to
Yeah, the issue is, let's just press shift H. Making sure I'm going to leave it like this
actually and do it like this. I think it's going
to be much easier. Let's reset the transformers. And then what we'll
do now is we'll come in and we'll
press Control B, and we'll bring it in
like this at the moment. So we'll bring it in
like that two there. Now I want to do is
I want to come in. I want to put this on custom. And we can see now that
because it's on custom, we've actually got the
ability to change this. It all depends though on how many segments you
want to bring in. So let's say I bring
this many segments in. Then what I can do is
I can bring this out, and you will see
that it actually starts to change how these look. Now, at first, when
you first do this, you can see as I move this down. You can see now it kind of evens them all up because
I've got four of them. This then center one either
pulls them to the left. Or pulls them to the
right, as you can see. Also, if you pull
it out, you can see it starts to pull
it out like that. Now, let's add in
another one with control and click,
add in another one, and now we can pull
this one back, and we can actually get some control over how we're doing it. Now if we bring it up, you'll see that it pulls it
more to this side. So you've got a pretty
good idea now of how this is actually
working or a rough idea. And what we can also do now
is we can actually increase, where is it increase
the width? There we go. So we can also increase
the width if we want. Now, the one thing
I've seen is that I've actually managed to grab it going all the way around here, and that is not why wanted. I don't know why
it's doing that. So what I'm going to
do, first of all, I'm going to grab
the whole thing. I'm going to come to mesh. I'm going to clean up, and we're going to merge by distance. Naught vertices removed,
so I'm not quite sure. Why it's grabbing it going
all the way around there. But what I'm going
to do actually, I'll hide the bottoms of these. So let's just hide
those out the way, and then let's see if we
have the same problems. So we're going to go
lt shift and click, lt shift click, and then
we're going to go control B, and I'm going to bevel it off. And let's see. There you go. Now those problems are
not there anymore, and that's what
we wanted to fix. So now I can actually
come in and I can bring this back or bring
it forward like so. Now, what I want to make sure here that I actually have is, I make sure that I actually
have a top because I want to put a little
bit of a lip on there. What I also want to do is
make sure that I'm happy with this part because I want it
still flat on the inside. All I want to do is actually create some kind of
stonework like this. Now, if I bring in another one, you will see now, not there. Let's A, let's go
back. So Control B. Let's pull it out
again. And then what we can do is we
can grab this one here. And I'm wondering how we can
minus that off actually. I'm not sure. If I
can minus that off, so let's get reset curve.
We don't want that. Reset path. We don't want that. I'm not actually
sure how we con. Let's see if I shift click
it or control right click. I can actually move it,
but that's not what want. I don't know how to
actually reset this. So what I'm going
to do instead is, I'm just going to bring in a few more and then place them
wherever I want them. Now, I do know that if
you're not happy with this, you can actually come in and
actually reset the curve. That will reset
everything for you. I don't actually
want to do that. And what you can also
do is turn these up, of course, to the amount that you've got or
turn them down. You happy, and we can also
increase the size of this. Like soap. So I'm
going to bring it out. I'm going to hold
the shift born. I'm going to bring
mine out to there. Okay, so I think I'm happy with the front and back of this. And I think, yeah,
that'll do for me. Okay, so what we'll do now is right click
Shade auto smooth, and that is basically
what we've actually got. Now what I'm going to do
on the next lesson is, I'm just going to bring this out a little bit and this
stone out a little bit because I think I'm not sure actually if Yeah, I think
I'll bring them out. I'll just have a look
at how much room I've actually got
on the other side. So let's press tab tag,
bring back everything. What I'll do is
I'll squish it in, and then I'll bring these out. So we'll do that on the
next lesson, anyway. We'll just get it
selected like so, and we'll also reset
all the transforms, like so, and we'll
also save it out. Okay, everyone, so, I
hope you enjoy that. As you can see on this one. There's many, many
different types of model we use in here as in many,
many different techniques. And you can see when we start
bringing them all together, just how powerful
that actually is. I'm just looking around and just making sure I'm happy
with everything. I'm not sure whether
I'm happy with this. I think I still need to bring
these out a little bit, so we'll also do that on
the next lesson as well. Alright, everyone. I
hope you enjoyed that, and I'll see on the next
one. Thanks a lot. Bye bye. O.
119. Creating Stone Face Decorations for the Door: Welcome everyone to Blender fold the Modulate and Kash
Environment Guide, and this is where
we left it off. Now, let's deal with
these things first. So what I'm going to do is
I'm going to come into them, press A. I want to press the S button and
bring them out then. And then I'm just going to
press essens Ed and just squish them back into place
to where I want them, which will be
somewhere like that. Just making sure that Essens Ed that you
are pulling them. Where you actually want them. So underneath there, making sure there's not really
a gap under there, double tap the A,
and there we go. I think that looks much
much bar against that wall. Okay, so now let's come
back to this part. So all I'm going to do is I'm
going to come back to this. I'm going to press the S and y, and I'm going to pull it
in a little bit like so. And then what I'm going
to do is I'm going to mark a sharp on
the inside as well. So if I come in,
old Shift click, O Shift click, right
click, mark a sharp. Then you can see now we've got that beautiful archway there. We also want a sharp
marking in here. So on somewhere along here, so probably around here, so Alt Shift click, coming around to this side,
l Shift click. And let's right click and
mark a shop, and there we go. And then finally, we want to
bring this out a little bit. So what I'm going to do
is I'm going to come in and then Shift click. Come to this one,
Alt Shift click. And then what I'm going to
do is just press E, enter, S and y, and pull this
out a little bit like so. And finally, then right
click and shade auto smooth. And there we go, that is
what I'm looking for, something like this,
and I think that's quite a nice piece of stone. Now, next, what we want to do is split all
of these up then. So what I'm going to do
is I'm going to come in. And I'll do it the
easy way actually, rather than marking
a seam on each one, so it's shift click
just going all the way across on
individual ones. Now, it's up to
you if you want to have 2 stones like in the top, so 2 stones here, and then 1 stone
either side, like so. I think that's probably
the best way because it, you know, distributes here
a little bit more un even. I think that looks a little
bit more interesting. So what I'll do then
is, I'll press y. And then they're split
up. So if I press G, now, we can see all of these
are split up, like so. And then what I'll do, I'm just looking to make sure
that's okay. Yes, it is. And then what I'll do is
I'll press Control A, I'll transforms, right,
clicks, origin to geometry. And finally, let's
add in a Bevel. Let's turn Let's join
these faces up as well. So at the moment, we've
got no face on the inside, so mesh, clean up, fill holes. There we go. Right click, Shade
smooth by angle. Now you can see
that's looking much, much nicer than what it is. Now, also, let's reset
all of our transforms, right click the
origin to geometry, and let's set this down then
to not point None three, like so, or maybe even a little bit higher No
point not note five. Yeah, and I think that's perfectly what
we're looking for. Double tap the A. And there we go there is our
beautiful arch. Now we can actually think about creating our top pit of here. So first of all, then, I'll create the little circles that are
going to go in here. So I'll come to this one.
I'll grab this face, Shift S, sa selected. And then what I'll do
is I'll press Shift A, and we'll bring in a cylinder. Make sure it's on 24.
That's absolutely fine. Press the Spot and then
to shrink it down, and then R X, 90, and then we'll bring
it out into there. Now, rather than
creating two of them, let's just pull it, what we
will create two of them. I think it's going to make
it a little bit easier, actually. Yeah, we'll
create two of them. So I'll do is I'll
press S and Y, bring it into place like so, making sure it's
flat against there. And then what I'll do is
I'll pull this face back. So I'll pull this
face back like so. And then what I'm going
to do is I'm going to press to bring that in. Like so, and then control
B. Turn them down. There we go, and then I'll
press E, pull it back. And then finally, I'll grab the front of it and pull
it out a little bit, like so, and there we go. All right, right click
Shade auto smooth. And then what we'll
do is we'll press control A, all transoms. And what we want to do is right click and put it into
the center of here. So let's grab this center, Shift S, cursor selected. Grab this one
again, right click, set origin, three D
cursor, add in a modifier, and we'll first of
all bring in a bevel, and we'll set this down
to not point No note five or No Point Not note
three, whichever one you want. So that looks about right to me. And then add in another
modifier, generate a mirror. So let's put that
on the other side, and then it's also generate
a mirror on the y, and it should put it on
the back of here as well. I'm just making sure that
it's come out far enough. So you can see it's a little bit out uh I'm just going to press three
and going to side view. And I'm just going
to pull them out a little bit just so they
sit on there properly, like so, and there we go. Alright, so now let's
think about the top part. So top part, just as complex as the rest of
it, to be honest with you. So let's come into the top part. And what we'll do, we'll
start with this part here. We can see how high
we need to go up. So what I'm going to do is
I'll press, bring it in. And then what I'll do
is I'll press one. So I can see where I
need to bring it up to. So I'm going to press E, bring
it up to this part here, and then E again, to bring
it up to the next part. And then E. And then
what I'm going to do is press the S
b to bring it out. And then E to bring it up. Then finally, E
and bring it up to the top and then press the
S born again, like so. Now, I need a few parts on here. So Alt Shift click, Shift click, and then we're going
to press E enter Altern and bring it out, like so, and there we go,
that's the top part done. Now, just make sure that
this is actually split. So we want to split this up. So in other words, let's
split it going down, so Control plus, going all
the way down to there. Let's press Y then. And then let's
split it from here, so Alt Shift click Control
plus Control plus. And if a press
control plus again, you see actually does
go to that part. So just press control minus, and we want to
split it on there. And then what I'm going to do finally is come in, press A, mesh, clean up, fill
holes, like so. And there you go,
now they're all filled in, and that
is what we want. Okay, so now we want
the actual center part. So all of this now is
looking really, really nice. We just need this
center part on here, which will be kind of a motive
going over here like so. So we'll create that now. So let's first of all, let's first of all, bring in a cube. So shift A, bring in a cube. Let's make this
cube a lot smaller. Let's pull it into place. So S and Y, let's pull it into
something like here. And then what I'll do
is I'll pull it up. So this is just going
to be my actual face. So the first thing
I want to do is pull it out a little
bit, like so. And then I actually want
to shape this face. So the moment we can see there's going to be like a head
dress going over the top, so he needs a rounded head. But we also need to bear
in mind that we want to keep this looking in
the way of the aspect. So what I want to do then is
come and bring this down. So even the aspect, it was a little bit
stylized, if you like. But let's first of all make
the roundness of the head. So all I'm going to do then
reset all my transforms, Control A, right clicks
the origin geometry. And then what I'm
going to do now is come bring in an edge loop, so control, let's
bring it up a bit. And then what we can do
is we can come now to these sides and press
Control B, like so, turn it up like so, and you will see
what's happened there is that it's brought
it in based on this. So based on this. So let's
put it on super lips for now, and then we can actually bend
it the way that we want it. So something rounded like this, we're going to have a
nose in there, two eyes. And then what we need to do is the bottom bit now.
So let's come in. And grab the bott bit,
and we're going to go control B and bring it up. Now, the bottom bit
is actually perfect, putting it onto custom. And once we put it on custom, you'll see that it already
bends it in in the right way. Now, if we want to bring
this point a little bit, you can see if I bring it down, we can actually get a
better shape for that. And if I want to
bring this one out, as you can see, we can actually
change the shape of that. So all I want you to
do is basically get the shape of how you
want this rounded off. So something like this, if I
mess around with this one, I don't think these
are actually going to do anything because of the fact that these
are over three, so it's one, two, three, four,
five, six, or something. If I turn that up, then you
will see that we can actually bring that in place and bring
this one more into play. Let's bring it more into play. Let's put it around
there, like so. And I think that's looking
quite nice as an actual face. So play around with
this a little bit. It does give you an actual
reason to play around with it. Alright, so that's looking good. Now we want to do is we want some ys in there, and
we also want to know. So let's bring in our ice first. So what I'm going to
do is we're going to press shift, duplicate this, and then we're going
to lift it up, and what I'm going
to do is I'm just going to turn off the Y. So I'm going to turn off the y, and then I'm going
to press tab A, and I'm going to bring them in, make them smaller with S, and let's pull the
yes into place, so we'll put the yes
roundabout here. If you press one
now you can say, are they two close together? Probably so. So let's
put those in there. Let's make sure then they're
pulled back into place. Like so and on this, this actual particular part, I'm only going to
dress the front of it. In other words, I'm only going to put the face on
the front of it, I'm not going to be putting you know this on
the back as well, because I think that's
actually important. Now what we'll do is then we'll actually figure out our nose. So what I'm going to do
is I'm going to come in. I'm going to press Shift
S because to selected. Shift A then, and then I'll
bring in a Let's bring in. Let's bring in a cube, and we can shape it
then as we want it. So S, let's bring it in. Let's pull it out.
Into place like so. And then we'll bring it
we'll leave it there, and what we'll do is
we'll press S and X. X. Let's pull it out a
little bit, like so. So we want it coming round
about halfway on the ice. And finally, then
what I want to do is, I want to press S and y and just make it a
little bit thinner. Pull it out a little
bit, like so. And then all I'm going to do is, I'm going to come in now
and grab each of these. Now, before obviously,
I level these off. I want to reset
all my transforms. Like so, and then tab,
and then control B. I'm going to bring
them in like so. And you will notice that it's
probably better off using the same one as what you did for this with this one as well. Alright, so that's looking good. And now I'm going to do is I'm going to grab both of these. Rest Control B, like so. And what I'm going
to do instead is, I'll just put it on superips, and then bend it in and
then turn this down a few, make it a little bit as
though it's actual rock. Okay, so that's looking good. Now on the next one, then, what we want to do is we want to bring in our
head dress that's gonna go around the top and kind of tie all
this in together. I can delete this now out of
the way. I don't need that. And then what I can do is I
can come in file and save, and there we go, that's
looking pretty nice. Okay, so I'll see on
the next one, everyone. I hope you're
enjoying this so far, and I hope your actual entrance
has also turned out very, very nice. Thanks
a lot. Bye bye.
120. Adding Decorative Details to the Archway Top: Welcome, everyone to blend for the modular and Kash
environment guide, and this is where
we left it off. Okay, so let's think about our
head dress on top of here, so you can see it comes
kind of out of here. And then we have these
two parts that go down as though he's got
something on top of his head, which is very obviously Aztecan or Astech, whatever
you want to call it. Okay, so let's do that one now. So what I'm gonna do
is I will come in. I will grab this part here, going all the way around. So control, selecting it,
going all the way around. And then what I'm going to do is I'm going to press Shift D, and then P selection like so. Then I'm going to do is
just hide this out the way. So hide these eyes out the way, hide this part of the way. And here we go, we've
got this part here. And then we'll resettle
the transforms, set origin to geometry. And then what I'm going to
do is just going to press A, and then E to and AlternS. Let's see if I bring
it out with Alton S, which I can I think
that this then will give us the ability to have a little bit more control over it. For instance, then,
I'm able to come, grab the top of it and
lift it up like so, and that then gives me a few points to
actually work with, which is what I actually need. Now, if I press tab,
I can press ol tage, bring back my guy. And then what I can do
is I can come in now, grab the bottoms up here. And what I'm going to do is I'm going to press the eye button, like so, and bring
these in then, like so. So then I can press
E and pull them down into the top of the actual
stone. And that's what I want. I am going to leave this little bird a gap because I'm going to put this piece of stone
work actually behind it, so this piece of
stone work here. And what I'm going
to do as well as, I'll bring down the
center of this. So I'll come to my guy again. I'm going to grab
all three of these. I'm going to press the eye
bond to insert them in. And then what I'm going
to do is press E, and I'm going to pull
them into place. Not worrying about
it flat because they're obviously into
that stone there. Now, what I want to do is start
what I'm doing with this. So let's come to this part.
This first part, then, what I'm going to do
is, I'm going to press the i born and bring it in. And then I'm going to press
E and bring it out like so. And then I'm going to
grab each of these now. So each of these, so shift
select, control select. And then what I'll
do is, I'll press I. We'll press I again to
bring them in. Like so. Now, we don't want
them too small, so don't make them too small, and don't make them too big, like so. This will do. Then when you want to do is,
you just want to press E, and you just should be able to pull those back and make it look as though it's actually
some stone work on there like this. Okay, so now what we want
to do is we just want this part of the stone
going behind all of this. So I'm going to press shift A, bring in a cube. And then what I'm going to
do is make my cube smaller. I'm going to press S and y
to pull it back into place. I want it going
all the way back, like so, and then I want it
sit in just on top of here. And we can see that
if we bring it back now to the sides of here, so if I press S and x, I'm going to bring it back
to the sides of here, like so, I'm just going to pull it into
the ground, like so. And then finally, I
want to make this look. I didn't do this on here, but I'll make it look as
though it is an actual stone. So what I'm going
to do is I'm just going to press control. Left click, drag it down
a little bit to there. And then what I'm
going to do is, I'm going to separate these out now. So I'm going to grab
this one. Press Control plus and press the y
button to separate them. So if we press G, you
can see it's separated. A then, mesh. And then what we do is
clean up, fill holes. And then finally,
control A or transforms right clicks origin to
geometry, adding a fevel. And then we'll set this to
Not point Not five. Like so. And there we go got a piece
of stonework in there. Then from there, then I just
want to level these out. So these top pieces. You can also see the top of this actually comes out as well.
So we'll do that next. All I'm going to do is come in, grab each of these each
of these press Control B, and just level them
over, increase the number of bevels like so. Left click. And there we go. Now, I'm just wondering if I actually won this piece on here. I think I do, so I'll
actually create that as well. So I'm just going to come in. I'll grab each of these then. I'm just wondering, is this a flat piece going all the
way over? I think it is. So what we'll do is
we'll just grab it going all the way over
all the way down. Here like so, and
then press E to lns and bring it out a little bit
like so. And there we go. And then what we'll do is
we'll press, no, we won't, we'll come to this side, and all the way over
to this side here. And then all I'm going
to do is press e, and I'll just pull it out
like so, and there we go. We've got that part on there. Now we want just this part,
we've got a flat piece, and then a kind of
triangular piece going in through here. So that should be pretty easy compared to what we've
actually just been doing. So what we'll do is we'll press shift date, bring in a cube. Me my cube a little bit smaller, bring it down into place, make it even smaller.
Let's pull it over. And what we want to
do is, as well as we want to, bring
it in a little bit, so S and y, bring it in, just so it's sitting
behind these parts here. Then what I'm going to do is I'm just going to bring it down, and making sure that it's
actually sat on there. S and y, bring it in
a little bit more. And then what I'm going to
do is bring it into place. So I'm going to
bring it into place. Along here, like so. I'm going to bring
it up a little bit, so it sat above this one here. And then finally what
I'm going to do is now, I'm going to make a kind
of a triangle part to it. So I will first of all, press E, I'll bring it
up to where I want it. So ride at the top of there is where I want it
just under here. And then what I'll do is I'll come in, grab the top of this, and I'll bring it down, just so it's level
with that now. And finally, then, let's
bring this out a little bit, so I'll come to this
side and this side, E enter S and Y and pull it out. Like so, and there we go. That's that part done as well. Now, let's split this
part off as well. So what we'll do is we'll press I'm just wondering the
easiest way to do this, actually, probably
to go around here. So shift and click going
all the way around, putting on our X ray, selecting this one,
pressing y, then, turning it off, and then
we've got those now split, so A, mesh, clean
up, and fill holes. And finally, then we
can press Control A, all transforms, right clicks
the origin to geometry. Now on this one,
we've got a bevel, and we've got a mirrun, so
let's join that to this one. So control J, let's join
it over, and there we go. And that is looking pretty nice. Now on this, we actually have a bevel on here.
This one is done. This one has no bevelon,
so let's sort that out. So Control A or
transforms right, clicks the origins geometry. Grab this one last,
we'll press Control L, and we'll copy modifiers, and there is our bevel on here. And now we've got
these two parts. So both of these parts, Control J, join
them both together. And then we can also join them probably with
this one here. So let's join them all
together, Control J. And then we go, we've got
a bevel on there as well. We've got a bevel
now on all of this. So if I hide this, you can see that's what it is, so tage. These have already
got a bevel on. This now has got a
bevel and a mirror on. Everything now, I think, let's
have a look at this one. This one has no bevel on, so let's just grab
the bevel from here. This has a myron, so we don't want to join it
from here. You know what? Instead, we'll just
make this easy, generate a bevel and
control or transforms, right clicks origin to geometry. And we can see that this bevel
is not working very well, and the reason is because we
need to clamp overlap on, and then turn this down
to Noah Point not five. And then we go
we've got a bevel, but we have got some
breaking parts in here. So what I'm going
to do is put it on naught point Not three. That's what happens
with the clamp overlap sometimes. And you know what? It's still breaking the mesh without giving us that be vel. And the reason is because
we've got these two close together and
it's trying to actually bevel them off. So what we'll do is
we'll actually fix that. So shift H. Get rid
of everything else. And then what we're going
to do is now we'll actually get rid of these and join
them all back together, and then we'll end up with
no issues with the bevel. So what I'm going to
do is, I'm just going to grab these two sides. Control plus, hide
them out the way. And what we want to be left with is just this part in here. So what I'm going to
do is, I'm going to now I think I'll press
Alt Shift click, and then l Shift click Old
Shift click Ol Shift click. H for hide them out the way. And then we go, and then l Shift click,
hide this out the way. And then finally L L L and L, and then hide these out the way. And finally, we should
be left with this. Now, let's come in, press
the L on both of these. And what we're going to
do is dissolve edges. Let's see if that works first. Nope, so let's try
something else. So let's dissolve faces. That's not going to work either. Let's try deleting
dissolve Virts. Nope, that's not
going to work, so I'm just wondering if I
can actually come in and just delete I just want
to delete this part on here, so I'm just wondering the easiest way to actually do this. Can I come in? And just delete. It might be because
we've got this bevel on. It might be because we've
already got this on. So let's actually
get rid of that. And I'll just try it
on this one first. All I want to do is delete
bases. And there we go. Now we can see that's
actually working. So let's come in
and do this one. So delete bases. There we go. Let's do the same on this one. Let's even do it all
together with C, I'm going to use C. We're
going to select all of these and then delete bases. And there we go. All right,
that is what I want. Let's even do all
this one together. I'm going to select it
all. Like so, D faces, and let's come to
the other side, and then see and delete bases. Now what we want to do is
join all this back together. So what I'm going
to do is come in, Alt Shift and click
Alt Shift click. And then what I'm going to
do is press the F born. You can see that doesn't
work on this occasion. So instead of that,
let's press TF, and that will actually fix that. Then Alt Shift click
Alt Shift click. And then all I'm going
to do is press OF. Now what I want
to do is just see if that bevel
actually works now. So let's add in a
modifier generator bevel and see if we end up
with the same problems. Let's put this on
aught point n five. And then we go, now we can
see we've got the bevel on, and we haven't got
any issues on there, so any breaking of the
mesh is all gone away. Let's press tates then, bring back everything, and there we go. There we go, guys. That is what we've
actually created there. That is looking pretty nice. Now, I'm just looking on
the back before I finish. And you can see there's
nothing really on here. So what we'll do on the
back is we'll just come in, press the eye button, press I again to make sure we bring
them in at the same time, and just make it a little
bit more interesting. So let's just pull it out, like, so and then what we'll do
is we'll come to this part. And I'm going to
press the eye button, just to bring it in and
then E and pull it out, like so, and then we go. It's made it a little bit more interesting on the back
was a little bit boring. Okay, so on the next lesson, then, what we'll do is, we'll join this all together, and then we'll get all of
these materials on there. And yeah, then
it'll look really, really nice, and that's
another part done. And then finally we'll
be onto the roofs. I know we did say we would start on the roofs
when we got back, but this was a fresh day for me, so I actually forgot about that. But now I remember. But we started on the entrance. So we've just got
the rooftops to do. There will be easy
compared to this. And then finally,
we've got the torches, and then we can actually start on getting the last
few things into the scene and then creating the terrain and all
that interesting stuff. Alright, everyone.
Hope you enjoyed that. I'll see in the next one.
Thanks a lot. Bye bye.
121. Texturing the Entrance Area in Blender: No. Welcome back to pleno for the Modulate and
Kit bash environment guide, and this is where we left off. So what I'm going to
do to make this easy for myself is I'm going
to grab the whole thing. And then what I'm going
to do is go to object. I'm going to go to
convert and mesh. And we can see I need to grab one last object,
convert, and mesh. Then what I want to
do is press Control J and join it together. Now, this is all
made out of stone, so it's okay to actually
unwrap it all together. We shouldn't have any problems. So what I'm going
to do then is press U and Smart UV, project. Click Okay. Now, the
only place that we might have some
problems Presal tag. Let's try that again.
U, Smart UV project. Okay. There we go,
now. It's all wrapped. It is just these
stone blocks because they're a little bit bigger
than the rest of it. But saying that,
let's give it a try. First of all, that
I want to bring in the main actual stone I'm actually going to be
using or the one that's going to be easiest to apply. Now, we can see
in mine that I've got some dark stone,
I've got some red stone. I've got some light
stone going down here. So what I'm going to do is
I'm going to, first of all, bring in perhaps the dark stone. I think that's going
to be the easiest one to actually apply on here. So that's the midtone. So what we'll do is we'll
put it first on to Shader. Then we'll go over
to our materials when this actually loads up. So you can see, there
we go, let it load up. Then what we'll do is
we'll come to mid. So mid, stone like
so, and there we go. We can see that's what
we've actually got. I'm looking at this
stone block under there. That looks absolutely fine. All of these look fine as well. And now what we'll do is
we'll add in another one, so plus down arrow, light, and we'll check out what these light stones down here are
going to look like. So what I'm going to do then is, I'm going to come
in with L and just work my way down all the way
down to these ones here, and then the same on this side. L so all the way up, and then click a sign, and there we go. Now, let's put it
on render view, so we actually get a good view of what this is
going to look like. And now I can see
where I actually might want my light
stone and my dark stone. So I'm thinking
pretty much that it might be better for us at the moment to put
these on light stone, so L L and L. Let's also, you can see that we've got a lot
of shading issues. You can see all these
shading issues. Let's right click and shades move by angle, and there we go. That's looking
Tunstons better now. And then what I'll do
is now I'm thinking that we'll put these
two on light stone. So a sign. Let's put
them on light stone. Let's also then I'm
thinking this back part might be might accentrate these parts a little bit
more if I'll put that on. I'm also thinking this part might be better on
lights stone as well. So, yeah, we'll come in. We'll put these parts
here on lights stone. One of them do it is
right is grab all these, pick a sign on light stone. There we go, that's
looking better. And then I'm thinking now, I'm just wondering, If I want anything else
on the light stone. So I'm just having a
quick look around it. You know what? I think I don't. I think that will be okay. So now let's come into
these parts here. So we can see this circle here, if I grab both of these,
grab both of these, grab all of these, and let's go to the
plus down arrow, and we're going to
look for greenstone. So green, we've got
clay green on here. I might be yellow stone. So let's see if
we've got a yellow. I know we've got a yellow.
There we go. Yellow Stone. Let's click plus, as well, and we'll bring in a red. So red stone, this one here. Alright, so with the
yellow, let's click a sign. And then what we'll do
now is we'll come in, and we can see these. They've unwrapped a bit rubbish. So let's first of
all, unwrap them. So U, Smart UV project, click. And there we go,
much, much nicer now. And now finally, let's
come in to the points. So these points here. We
know these are all the same. And then what we can do is we can just zoom in a little bit, press Control plus,
Control plus, and Control plus, and attach
our redstone onto there, like so, and there we go. And now finally this bit in here. And these parts on here. So what I'm going to
do is grab this front. You know, what we'll
do this part first. So attach Red Stone. And that's not. Sign
Redstone. There we go. And then let's do
these parts on here. So Control plus's Control
plus Shift and control, and then control plus and then click Redstone and click a sign. And let's have a look what
that actually looks like now. Alright, that's
looking pretty nice. Now, we didn't do the backs
of them because I forgot. I'm just looking
around the back. I think the one we want
to do is this part here. So we'll put redstone on here. And then what we'll also
do is we'll come in, grab both of these with L and L. And then we'll click
Yellow Stone, click a sign. And then finally,
the center of these. We'll also unwrap these again, U, Smart UV project, click K. And then we'll
grab the center of these, and then Control plus Control
plus and Control plus. Red Stone, click a sign. And there we go. Alright,
that is the back of it then. And that's looking
very, very nice. I'm happy with how that looks. Now we'll do is
we'll jaws coming over and put this back
on our shading mode. Let that load up. And then what we'll do is now,
we'll name this. So we'll call it large entrance. Just in case you want to
make any of your own. The large entrance, and what we'll do is
press controls there, bring that back.
So large entrance. Then what we'll do is
press M, new collection, and we'll put it
on the entrance. L so, click. And then what we'll
do is right click and we'll mark it as asset. And then we'll
grab our entrance, and we'll put that
into finished as well. Let's move it over, just so we've got it in
front of there. Let's pull it back,
and there we go. And then what we'll do is
we'll actually come over to our asset manager and add in
another one called entrance. So double click it.
So entrance, like so, and then we'll come
to unassigned, and we'll drop this
into our entrance, so let's just drop
it in to there. Then we'll do is
we'll save that out. Now, we're just going to head on over quickly to our gray box. We'll just check, first
of all, making sure all the normals are okay,
and we can see they are. We'll head on over
to our gray box. Then we'll bring this in. And the reason I
want to do that is just to show you something else. So let's head on over there now. Though here we are back
in our actual gray box. And if we right click and
refresh our asset library, we've got the entrance here. So let's just bring
that in first, then I can show you what
I want to show you. So bring it in. Let's
spin it around. So As 19, making sure
the guy is at the front, and you can see here, let's
have a look. You know what? We didn't actually
update these parts here. So we haven't
updated these parts, and I think I actually
want to do that first. So we'll just hop back in. To our gray box,
and here we are. This is a gray
box. So let's come in and go back to modeling. And then what I'll do
is I'll just press tab. And all I want to do is just update these because they look a little bit
flat like that. So I need blue in here as well, so click the down
now, click Blue. So, and it's Blue Stone. So all I'm going to do
is press Control plus, Control plus, and Control plus, and click a sign. So look at that. And there we
go. That's looking perfect. And then we need
red and blue now. So all I'm going to
do is grab this one, this one, this
one, and this one. So every opposite one, press
Control plus just once. Click, red, click a
sign, and there we go. And now we'll do exactly the
same thing with these here. L so, Let so, click
Control plus, and finally click a
sign on the blue. So let's click a sign on there. All right, that's looking
much much better now. I'm happy with that.
Just wondering whether I want to actually put
this part in here. So red and blue, for instance,
let's actually do that, so we'll grab it going all
the way around to here. Like, so click in
these two then, and then click in Control plus, Control plus, let's actually
put this one on red. So let's click a sign. And then this one will
do actually separate. We'll put it on blue and click a sign. So
have a look at that. And there we go. All right.
A thing that looks bad. Now we'll do is we'll press
Control All transform, right click so
origin to geometry. Now, I'm hoping now, if I go
back to my asset manager, and I go to my entrance, I'm hoping if I bring this out that this now will have updated. So let's just have a look. Let's turn off our
face orientation. And yes, it's updated,
so that's perfect. Let's pale face
orientation back on, like so, and there we go. Now, let's save out our work, and I'm hoping that when
I bring this entrance back into our gray box,
it will ev updated. So let's try that now. So, here we are back in our gray box. Here is our entrance.
Let's right click Refresh the asset library. Let's bring it in.
And it's not updated. So what we need to do then
is drop up on back over. I don't know why it's updated. I don't know why
it doesn't update. It should update as
easy as anything. But refreshing, let's
even just refresh this. Refresh asset library. It doesn't update,
and it's kind of annoying because everything
should be updated, but it doesn't seem to do
a call or something to it. So what we'll do is then
we'll head on back to our actual part scene. And here we are back in here. So what I'm going to do is, I'm just going to clear the asset, and then what I'm going to do
is, I'm going to grab this, and we'll see if I press
dot. Here it is again. Let's right click and
we'll mark it as an asset. And what we'll do then
is come to unassigned, and we'll drop that
into our asset. So I'm just going
to drop it into my entrance, so
let's drop it in. And then finally,
what I'm going to do is file and save it out. Now, that should be
definitely in there. We already know if
we bring it in here, it's going to work. So now on the next lesson, what we'll do is we'll start
straight in our grade box, see if that comes in,
and then I will show you what I wanted to show
you in the beginning. Apart from this taking too long. Alright, everyone. I
hope you enjoyed that. Even if it's a bit like, Oh, this doesn't work properly, sometimes it doesn't, but hopefully you'll
enjoy the process. Alright, thanks a lot. Bye bye.
122. Creating Stone Borders for the Aztec City: No. Well, come back everyone to Blend for the modular and Kit ash
Environment guide. Now, I did give this
a tri wiles off air. And when I first brought
this in, it didn't work. When I right click and Refresh asset library, that didn't work. So what you want
to do is you just want to go and save it out, so save it out, and
then reopen it again. So Open Recent course
Astex, reopen it again. And now now, when
this is loaded up, when you bring this in,
it should actually work, as you can see now
that's in place. So OZ 90, let's spin
it round. Let's press. Let's have a look.
Let's press three. I think it'll be. Yes, it is. Let's press G, and then I can bring into the place where I want it or roughly
into the place and delete these
then out of the way. So let's delete all of
these out of the way. Bring back then this part here, and let's make sure
it fits into place. Let's press the little dot b, and we can see re a
little bit out there, so let's pull it to the side. Like so, and making
sure it fits in place, making sure none of those
parts are actually touching, which they are a
little bit, so let's see them bring it out
a little bit more. So let's see how far
we've gotten here. So round about there.
That looks about right. Let's have a look
and have a look. Yes, we can see we've
got a little gap there, which means I can need to
move these a little bit more. So all of these, let's move
them a little bit more. So let's pull them
out into kind of the same place where this
one is, double tap the A. And is that right? Yes, that looks about right. I'm at now making sure it
sat on the floor here. So I'm going to bring it down. Little bit, double tap the A. And finally, then I
want to make sure that these come out a little
bit, so we can see. With these parts, I want to make sure they're
actually in there. I'm going to put some stone
slabs up to there actually. I'm just wondering if I want to pull these
out. You know what? I'm going to leave
those on there because we're going to
do the floor after. So what is it that I
actually wanted to show you? So what I wanted to show you is, let's first of all,
save out our work. And the thing is,
if you take this through into another
blend file right now, you're going to lose
all of these materials. You're going to lose the
geometry nodes and things like this that are actually
in here and working. Because what you need to do
is you need to come to file, and you need to go down to
where it says external data. And what we need to click on is this automatically
pack resources. Now, you won't lose anything at all when you've actually gotten the same system
and you're saving it out. So you don't need to do
this right till the end. And the reason is is because it makes the file much much
bulkier because obviously, then it's going to pack all of the materials into that file, and it might cause problems down the road with you actually
opening up that file, depending on what
system you have. So use this right at the
end once you've finished, and then we can pack
everything in together, and then you can send it
through to other people or put it on the hard drive or whatever you want
to do with that. The other thing I
want to show you is, we've also got an option
a core cleaner Now, a lot of the time, when
we're working with blender, we'll have a lot of materials in here that are simply
not being used, which we might have added
a material by mistake, and then just added another one in and that material is still sat in there eating up
data on your machine. So you don't want that as well. The other thing is, if you've
got gomen nodes in here, they will also be sat here, even if they're not
being what you want to do is you want to clean
up your actual scene. So what this does is you
can see unused data blocks. Let's on there, purging, 12 unused data blocks, eight images, four measures. So all of those measures
that have been deleted, they're still stored in blender. We don't want them. So let's now come in and do
the same thing. So file, clean up, recursive unused data blocks. And what I tend to do
when I clean this up is I will come down this first
four Clean them all. So these first four, and then I'll go to file and save out. Then finally, when I've finished everything, I'll
go and click on, pack, automatically pack
resources, and then click Save. And you will see
everything then will be packed inside inside blender. Now, the next thing we want
to do while near then. So we've got our
entrance in here. Before we go back then
and start on our roofs. So we've got roofs
and torches left. Let's actually bring
in this stone path on here because this
is kind of bugging me. So I want to bring
this stone path in, just have a break from
actually modeling. What I'm going to
do, first of all, is I'll bring in a curve. So let's press shift date. We'll bring in a curve, which will be a path, and the path is going to
come all the way over there. It doesn't really mount
where it comes, so ours 90. Then what I want to do is just
go over the top and put it right into this
corner over here, so ride in this corner
somewhere like, so right up to here. And don't worry if
you can't see it. We're just going to
get kind of where it needs to be. Let's
pull it down then. And then what I'm
going to do next is, I'm going to come
in and just delete these vertices out the way, so delete the vertices. Next of all, then I want to give this actually a geomet node. So first of all,
control A transforms, right click the
origin to geometry. Adding a modifier, and the modifier is going
to be a geometry node, and the one we want is
going to be stone path. If you look on here now, all of those g jumper nodes that
I had have disappeared. That's simply because we're
not using them anymore. So if you do need
to use them again, you need to bring them back in. And then once you've actually
turned them into mesh, you can clean up the system, and then gumpt nodes
won't be in here. That's why there's
only these here. Stone path is the
one that I want. What I want to do now is, I want to create a
stone path that's going to be above
and just below here, and this is going to sit
running down this part here. So let's actually do that now. So first of all I want
the right material in. At the moment I've
got this stone live, I don't want that. What I want to bring
in is going to be mid, so it's going to be
the mid stone like so. Then what I'm going to do now is I'm going to increase
the thickness. So let's increase the thickness. Just so they're actually
sticking out there, going to bring it up like so. Then what I'm going to do is, I'm going to pull it all
the way over to this part, so I'm going to pull
it all the way over all the way over
to this part here. Like so. And you can
also also put on L VV. And you will see now
once that loads up, so if I press tab
that we should have, if I put this on rendered view, some different variations in the stone If I turn this off. Does that? Yeah, it's
not an alternating, so we'll just work like this. Now, what you can see is these don't They look all the
same at the moment, and we don't really want that, so we want to make
sure that these are all going to look a
little bit different. So what I'm going to
do is, I'm just going to put it back onto
material mode, or even object mode, so you can really, really
see what you're doing. Press the dot one
and then zoom in. And then what we want to do now is we want
to first of all, mess around with the thickness
again, just to get them. They're a little bit too
blocky at the moment, so we want them a
little bit thinner, so let's press bring
them down a little bit, bring these down a
little bit, like so. So now we've got a
little bit of a step up. Now I want to do is we want to increase the length randomness. So the moment we've
got this length, is that the kind of
length that you want? I think it is, but so let's just increase the
randomness, like so. And let's also increase
the actual length. And there we go. That's
looking much bigger. Let's then come in
with the width. So the width for the moment,
we're happy with the width, the only thing we're not happy with is the width randomness. So let's increase the
width randomness. L so. And if they go too thin, just increase the width again. And there you go. Now you've
got width randomness. Now we need thickness randomness,
so let's bring this up. And let's increase
the thickness. Like, so, let's decrease the randomness
just a little bit. Like so. And there we
go. Now we can see. We've got a load of
random tiles in here. I can see that the thickness now they're a little bit too thick, but that's because we're only looking from kind
of the bottom area. These look to me round a right. The one thing I'm thinking is, maybe maybe I want
to pull them out just a little bit just so they
go in the edge along here, and I think that looks very, very nice like so. Now the next thing is, I need to decide about bringing
them round to this side. So let's do the front first. What I'm gonna do is
I'm going to press shift. Going to bring it over. I'm going to press R, Z, 90, just to spin it around, seven to go over the top then, and then I'm just
going to press G, and I'm going to drop it
into place where I want it. Now, I recommend that
you put it halfway in, grab this one, and
pull it over like so. And then what you do is
you come to this one, and you just pull it out a
little bit more like so, just to get it into place. And there you go, that's
what I recommend, you do it like this. Now, the other thing is, you can see At this part in the middle. We need to leave a gap in there, so I'm going to come
back to this one, and I'm going to pull
it over to here, like so, and I want the gap
to start round about there. And then all I'm going
to do is press shift D, duplicate it and bring it
over to this side here, and then bring it up
to the side, like so. Then what I'm going to
do is, I'm going to bring this one in now
and level this one up. So I'm going to grab
this part, shift, bring it all the way over
into place, halfway between. And then what I'm
going to do now is just drop this
back a little bit. So drop this one back.
Inter place. Like so. Alright, that's
looking pretty nice. Now, the other thing is,
let's come to this part, pull it back a little bit. Like so. Now, let's come
over to this part here. And what I want to do is I want to make a little bit of a
gap where the steps are. So what I'm going to do
is I'm going to come to this part, bring it
all the way back. Round about there,
and then shift, bring it all the way
over round back here. Like so. And then bring
it back into place now. So bring it back into place. And now we're going
to start seeing how far we need to pull these up
because you can see here, these really need to come
over to the edge of here. Not underneath there. I
don't really want them underneath. It's up to you. You might want to put them
underneath here and just have this on the
actual You know, what? We'll try that. So what
we'll do is we'll pass shift. We'll bring this one out. We'll press Z and 90, and we'll put it sideways. And then what we'll do is
we'll move it into place here. And then what I'll do is
I'll pull it now into place. Let's have a look along
this part here of there, and then I'll pull
this one back. So let's pull this
part back like so. And then you can see
this is a little bit out because I really want this
into the side of here. So we'll bring it out a
little bit more like so, and then we'll bring this a
little bit more. Like so. And then what we'll do
is with this one is, we'll bring it back, so we'll bring it back
all the way to here, like so or even to there. Alright, that's looking nice. Now, we'll do is
we'll press shifty, and we'll bring it
over to this one here. So we'll start with it
right in this corner here. L et's make sure it's in place. And then finally, what we'll do is once we've got this,
if I can grab it. We'll pull it over all
the way over to here. So let's grab this,
pull it all the way over to there, like so. Alright, so that's
looking pretty nice. Just have a look round, making
sure you're happy with it. Got a gap here where
these steps are, gap here where these steps are. And I think we'll need
a gap in this back pot. But we'll do that
on the next lesson. All right, everyone, so
let's save out our work, and I'll see you
on the next one, everyone. Thanks a lot. Bye bye.
123. 3D Modeling the Rooftops in Blender: Welcome back if
everyone to Blender for the modular and Kit
bash environment guide, and this is where
we left it off. So what I'm going to do now is I'm going to
come to this one. I'm going to pull it into place just so it's in
front of their look. And then what we'll do is
we'll bring in another part. So I'm going to press Shift D, and I'll bring it over. And then what I'll do is, I'll
pull it all the way back. So let's grab this
part, pull it all the way back to here, and then tab. And then set origin to geometry, and then just pull it into place where we actually want it, so round about here, and then grab this
part and pull it back, so it's just in front of there, like, so and there we go. Now, let's put our guy over here and see what it's like to
walk out of that part. Let's put him down
to the ground plane. So three. Put him down on
the ground plane like so. And then you go if he's walking through that, you
can see it's huge. You can see now we've got
some stone slabs here. So when we come to put our
kind of terrain down here, we can actually put some,
you know, some foliage, some ferns around here
around here around here. And you can see now it just
breaks it up that little bit. It sets the scene because it actually sets the boundaries
of where the scene is. And from there, then
is the vast jungle. And that is why we've
actually done this. Now, let's go back to, we've got it on
modeling at the moment. We've got in our thing.
Let's actually put it on rendered view and actually
have a look at that. Let's double tap the
A. And there we go. They're looking pretty nice. So we've still got a
fair amount of work then to actually bring in the roofs. We've got to do the Booleans. So yeah, there's still a
fair out of work to go, but we really are
getting down this now, and I'm really, really
happy with how this looks. So what I'm going to do now is, I'm just going to bring in. I'm going to delete this first because I've
got this on here, so let's delete that
out of the way. I'm going to come
in to my parts, and what I'm going
to make a start on now is the actual roofs. Alright, everyone, so we'll
head on over there now. So here we are
backing our parts. Let's head over to modeling. Let's press tab on this one. And what I'm going to do is
put this into place first. I'm going to press seven, B to grab it both, and then let's drop it into
some place around here. And then we'll grab
just this part, shift D to duplicate it, and we've got two
more of these to do. So what I'll do is,
I'll actually come in, and I'll duplicate
this one twice, so shift D, duplicate it twice. And then I'll make this
one will be our roofs. So M. Let's put it on the new
collection roofs, like so. And then I'll put
a new one on here, and I'll call this one torches, a new collection tortures. Like so, and there we go. Now what I want to do is I can hide the rest of
them out of the way. Come to this one first, and we're going to go now. And open up under our
references, our roofs. So our roofs are going
to be this rooftops. There we go, and
then we'll come to this one and open
up our torches. So reference, and the one we want is torches, this one here. So we can see here,
this is what we've got. The torches are a
little bit hard to see, just because of our renderers, but you can see we've got
some pretty nice kind of Aztec theme on there
and same for this as well. I'll show you how to do that. And that's why we've left those two last because they are
some of the hardest ones. The other one then is this one here, which
is the rooftop. So we're going to
do the rooftops, and then we'll actually
put the rooftops in place. That then will finish our actual gray box because the torches they will
go in last anyway. The tortures are
well, I'll show you how to actually turn
them on and off. I think that's important because in a night scene you
want them all on. In a day scene, you don't want
the torches on, of course, no one's going to have
burning torches in the day really because
it's a waste of resources. So let's come in then. Make
a start on these parts here. So first of all, we can see one, two, three, four, and five. Now, the thing is, this
one here, you can see, I'm not really going to
create a cube for this one, so I'm just going to
create four cubes, and then this one
we'll do probably first get that one out the way. So all I'm going to do is, I'm just going to shift right click. Shift A, bring in a cube. So let's bring in a cube. Press one on the number pad, and all I'm going to do is just bring it up to
some ground plane. I know I'll have to
move it up and down, but for now, I'll
just do it that way. So shift D, bring in another
one, grab them both, shift D, and then bring
them both over like so. Okay, so let's now
come to this one here, and this one is going to
be this one over here. So the dimensions will be
4.76 0.745 and 3.83, like so. So you can see
it's kind of thin, but this gives a rough idea of how big we actually
need to make it. And of course, this sits
on top of this part here. So maybe in some,
you know, scenes, you might want to just
have this on top of it, and maybe you want to
put them both together. All right, so let's discuss this next big part,
which is this part here. So let's give you
the size on those, so it's 5.02, 3.9 2.4 Light, so. Alright, so let's
move that over there. And then what I'll do is I'll pull these two parts over here, and then we'll do
these two small ones. So we'll do this one first. This one we'll
just create on our own. So we'll do this one first. So the scaling on this one
will be 3.931 0.331 0.22. And then now we'll come to
this little thing here. So I'll give you
the size on those. So this is a cube apart
from the heights. So not 0.617 0.617, and not 0.568, and
there we go. All right. So that is roughly the size of this be we can see
it's a fair size. Let's actually start
them with this part here because it's a
very simple part. So all this is going to do is basically go at the corners of roofs where people walk on to just tell them
there's an edge there. It It adds a little
bit more to it, as well as all we can put foliage and vines around
it and things like this. So what I'm going to do?
I I'll just come in. Bring in an edge loop, left click. Bring it up a little bit. And then all I'm going
to do with this is bring out the bring in
the bottom of it. So shift and click, e enter Altern S. Bring it
in a little bit. Like so. Now, you can see
that the bottom, we'll just have to
replace the bottom. So all I'll do is des grab
the bot, delete faces, and then ult shift and
click, delete faces. And there we go. And then what we'll do is we'll just
bring in the top. So I'll bring this part
down a little bit. So Al shift click, bring
it down a little bit. Grab the top then L so, and just press the S
button and bring it in. And there we go.
Something like that. Simple as that. Alright, so,
I'm happy with that one. Let's press Control
A all transforms. And what we'll also do,
I might as well fill in the bottom because
I'll be giving this a bevel, so a shift click, press the F. And then
right click a Oigin, two geometry, add in
a modifier Bevel, and then we'll put
it on Not 0.5. Like, so Alright,
that's that part done. Now, let's do this part. So what I'll do
is I'll just move these over to this side. I'll bring in then shift date, I'll bring in a UV,
sorry, a cylinder. So let's bring in a cylinder. Let's keep it on 24. I think that will help us create this sort of effect here. And the other thing is this is actually going to
be going on top. Let me just load those up. So I'll just show you
of these roofs here. So you can see on
this roof here, this is where this is going
to be going on top of. So what we need to
make sure is that it's actually going to sit
on there in the right way. So you can see here this
is about how big it is. So you know what
I'm going to do. I'm actually going to
take this from here, so Control C. Let's take it from there and take it
into our other file, so Control V. Bring it
in, let it load up. Hopefully, it's coming in there. So control V. There it is. Then I'm going to bring this
in because then that gives me a rough scale of how big it's going to
be. So let's press one. Let's bring it down
to the ground plane. Let's grab our cylinder,
spin it around, so Ry R X, sorry, 90, let's spin it around and get it
to be the right side. So we're going to have it
round about this size. I've actually got it perfectly sized. I don't know
how I did that. But anyway, let's come in then,
and what we'll do is now, we'll set it to the right whip, so S and y, let's bring it to the right
width, something like this. And then what we'll do now
is get rid of the bottom. Or we'll do what we did before. We'll get it to where
it starts bending in, so you can see down to here,
going all the way over. To here, like so, and then all I'm going to do
is press Y, split it off, grab the rest of it with
L delete and verts, and we're left with
just this part now. Okay, so now I want to do, first of all, is
fill in this part. So let's do that first. So I'll grab this
part, grab this part, and then press F, and then
let's fill in these parts. So lt shift click, press F, and then lt shift and
click, press the F born. And then we'll just
fill in this part here. So all I'm going to do,
grab the face on here, press the i born,
and bring it in. And then what I'll do is
I'll bring it in like so. And there we go,
that's that part done. And now we just need these
top parts coming out. So I'm going to grab, I think every other one. So I'll have to
do this actually. Probably. I'm just thinking, Yeah, I'll bring them in
first. It will make it easier. So what I'm going to do is,
I'm just counting now one, two, so we've got one, two, and then one, two, one top. But if I do one, two, one, two, one, two, Yeah, it's going to work like that, where we've not got a top one, and that's probably
going to be okay. So what I'll do is, I'll
come to each of these, and I'll do them separate. Now you can see I've got 12. Tabor control or transformer
clicks origins geometry. And now what we're
going to do is press the ibonn and bring them
to where we want them, which will be
somewhere around here. Again, come down and
copy this, so Control C, and then come back
to these parts then, and we're going to do
exactly the same thing. Then we're going
to press I, enter, coming over to thickness, control V, and there we go. Now what I can do
is I can come in, select all of these parts. And then what I can
do is I can press E, enter alterns, and I can bring them out in the way that
I actually want them. And as far as the one. I can see that's what
we're looking like. Now, if it's up to you,
if you want to pull them down and make them a little
bit more Wow, like that. It's completely up to
you. I think for me, though, I'm happy
with how these looks. The one thing is, I
want to actually bring them out once more, and
then bring them in. So I'm just going
to press E again, Enter, alters, bring them out. And then what I'm
going to do is put this onto this one here. Individual origins,
press the S one, and then I can bring them back
like so, and there we go. That then is nearly done. So control A or transforms, is the origin to geometry. Grab this one over here
and then control L, and we're just going to
copy modifiers like so. Now, let's see if
that's actually work. We can see now we've got
that bevel on there. That's absolutely fine.
Let's right click, Shade auto smooth, and then it's going to smooth
all of that offers. And that is basically
this one done. So I can put this one over here and delete this one
out of the way. Alright, so now we're going to do is just on the next one then. We're going to save
this out, first of all. On the next one,
then, we're going to create this one here. And this is basically
going to go on top of where the swimming
pool is. We go. There's some pillars there. This is where we're going
to put this one on top of, and then we've got
these two that are going to go on top
of the temple. All right, everyone, so
I hope you enjoyed that. I'll see you on the next
one. Thanks a lot. Bye bye.
124. Creating Variations of Rooftops for the Aztec Scene: Welcome microphone to afford the modular and Kish
environment guide, and this is where
we left it off. Okay, so what I'm going
to do, first of all, with this one is, I
need a little bit that's going to
come out of here. So control, bring it down. I know it's going to make
it a little bit bigger, but I do think it's
going to make it easier to actually achieve this
look that we're going for. So e enter AlternS, and
let's bring it out. And we can see straight away that's not how we
want it to come out. So instead of that,
just press Controls twice to make sure that it's
not extruded out already. Then you're going to press
tab control or transforms, right clip, set
origin to geometry. What you're going to do is
point your edge loop again. If you need to, press
E, enter alters, and then you can bring it
out nice and straight like, so and just make sure
offset even is on. Now, if you want to
bring it back in, you can press alter nes again. I don't actually
need to do that. The one thing I want to do then is a one to flat top on here. So I'm going to press Control. Left click, right click,
and then control B. Pull it out, bring back the
amount of levels I've got. So this is where I want
the flat top to be. And then I'm going to go
into each of these sides, press Control B and bring them in to where
I actually want them. Okay, so what I
also want to do is, it's up to you whether
you want to base this on a percentage. It
might make it easier. So if I come to whip type, base it on percentage,
turn up my percentage, you can see now they're even. You might want to
do it like that. And what I want to do
is I want to slope it down this way and
then out this way. So I don't want it to be too rounded or anything like
that, because I can do that. I I increase this segment, you can see I can go like this, and then I can go like this. But I don't really want
it to be like that, I want it to be a
little bit different. So what I'm going to
do is put on custom. And from there, then you can see that we've got kind
of it like this. And let's have a play
around with this a little bit. Let's
bring it out. Like so, and let's bring it in. And I'm thinking let's
pull it out ale bit. Let's go this way. Like so. And maybe something
like that, I think. I'm just trying to work out
how it's going to look once it's got like these kind of
triangle parts in there. So yeah, I think
that actually looks. I think that will
actually look good. I think it looks very at. It looks a little bit
different from this one. It's up to you
whether you want to, you know, bring it out
a little bit more. Like so. Let's bring
it out. Bring it down. Find it out a little bit. L so. Alright. That I'll do. Okay, so now what
we need to think about is these parts that
are going to come in here. So first of all, let's press Control, left
click, right click. What that'll do is
then it'll give us a center point to work with. And from there, what I can
do is I can press Control B, bring back my bevels and
bring it out like so. Now what I can do is I can bring it in from this point here. So I can bring it in to
here. So let's do that. So what I'll do
is I'll come grab a vertis and bring
it in, press J. And then we've got one part here and one part here. Press J. And now we want to do is we want to bring
in the next part. So if I bring them in, we could mirror this and then
go to the other side, or I can just bring it in. I'm just wondering
whether I want to Okay, so the easiest way
to probably do this I want to bring this in
then slightly to this side. So if I first of all, press one, to go
into front of you, press K, and then what I want to do is press A and
bring that down to flat. So now you can see, the
problem I've got is, this is getting in the
way when I do this. So I'm going to shift click
going it all the way around, control plus, ide
it out of the way. And then what I'll nail
to do then is press one. I'll be able to then
come to my verte. This verte here, and
I'll be able to press K, and then A and put
it all the way down, and it will actually work now, press the nb, and then we now let's do the
same with this one, K, and then A and bring it down to
this one, press the nb. And then what I can do is
I can bring these in now. So let's grab this
one and this one. I can press S and X. Let's bring them in. If
they're not coming in, make sure run medium point, so S and X, and there you go now you can see,
you can bring them in. So now where do I want
this to I want it? I want it actually. Yeah,
I'm going to put it round round about here, and then I've got
this piece here, and then I've got
this whole piece here that I can actually
bring in as well. It's a little bit different
from what I had before. But you can see it wouldn't be that hard to create
what we had before, so I'm going to do it this way. I think it's going to
look bad. So I'll do, first of all, is,
I'll grab this one. I'll press the ibonn, and
I'll bring it in, like so. And then what I'll do is,
I'll pull this out now. So if I press E, I
can pull this out. We actually want it. Like so. And if you notice, I'm not worrying about
the back right now, and there's a reason
for that, and you'll find out pretty
soon what that is. Now, let's come in
with these two. So these two here will
do the same thing again. So I bring them in. Then what I'm going to
do is pull them out, so E, let's pull
them out, like so. And then finally, we'll
come to these parts here. I'm going to press the
ion, bring them in. And then I'm going to press
E and pull them out like so, and that's what
we've ended up with. And yeah, a thing that
looks pretty good. Now, let's press tab OT,
bring back everything. Control, left
click, right click. Right click, then, mark a scam. And then all
we're going to do Is before we actually
do anything else, we're just going to press shift
S and cursor to selected. Then what we're going
to do now is we're going to come to the back of it, press L to grab that island, delete, and faces, and now
we'll add in a mirror. So control A, all transforms, right clicks the origin
to three D cursor. Add in a modifier and
bring in a mirror. Let's put it in on the
y, turn off the X. And the last thing I want
to do is if I press tab, I just want to come in and put in clipping. So I'm
going to bring them out. Put in clipping on,
and then let's bring them in and make them
touch each other like so. And then what I should be
able to do is come in, press Control A and apply that. And now if I get
rid of this line, it should be a solid piece, so t shift and click, delete and dissolve edges. And there we go. Alright, so
that's looking pretty nice. It's the same as the
back on the front. And yeah, that's that one done. So let's move it over
to the side a little. And now let's come to something a little
bit more complex. So let's come to this one here. And what we want to do
first of all, is, Yeah, this one is a little bit more complex than what we've
actually created before. So I think I'll use this
to create the part. So I'll use this
to create the pt. And then from there, I'll
actually build off that. So what I'm going
to do, first of all is, I'll bring in a cube. So Shift S, s to selected, and then we'll press shift A. We'll bring in a cube. And what I'm gonna do
is I'm going to put my cube through
the front of here. So just to the
front Pull it down. And then S and Z, pull it down, like so. And that is where I'm
going to have this part. Maybe maybe up a
little bit higher, but I can actually
work on that now, so I'll just grab this face underneath, pull it
up a little bit. And then what I'm going to
do now is pull that back. So I'm going to pull that back a little bit and set that there. Now I want just the sides in, so I want the sides to be
roughly around this size. So what I'm going to do is I'm going to press shift A again. I'm going to bring in a cue. I'm gonna pull it over. And
then I want these sides. I'm going to press S and X. Like so to be here. And then obviously, I want
them going up to there. So S and Ed, going up to there. And all I'm going to do is
just put a placement in here. So I'm just going to
press controller. Put a placement in there. Grab this face, and then just press E and
pull it out like so. So that's roughly
this side here. Now, this is nowhere
near finished yet. We are going to create
all of this part on here. But let's first of all,
get rid of this cube now because this cube is showing us where we
need to come up to. Now the one problem I've got is, I need to know how far
back that's going to go. And it's going to go all
the way back to here. So what I'm going to
do is, I'm going to grab the front
press control plus, elite, and Faces,
and there we go. Now we have some defined parts where we need to bring this to. So what I'm going to do is
I've got my first cube in. Now, let's bring
in the next cube, which is going to be
the side cubes here. And basically, we're
going to have one, one side, and one,
the other side. So let's see if we
can bring those in. So, I'm not going to use this. I'm going to bring
in another cube, so shift da let's
bring in another cube. Like so. And then what we'll
do is we'll pull that out into this side and make it
slope down and go to the back. So if I pull this to the back, to the back if we
go over the top, we can see now can't see
the back or Pn wire frame, now you can see
the back like so, and let's turn it back
onto object mode. And then what we'll do is we'll pull these out now to the front. So we'll drop them down, pull them out to the front, and I think that will
look pretty nice. So S. In fact, we won't, Yeah, we will, we'll pull
it down, first of all. Let's side all of these
finished ones out the way. Let's pull this
back a little bit, so I can get a good
view of the side. So now you can see if
I press Control three, I can actually see
this side now, which means I can pull
this down into place. And then what I'm
going to do now is, I'm going to pull
it to the side. So to the side here, like so. And then I'm going
to drop it down. So I'm going to grab
the top of the face, drop it down a
little bit like so. And then I'm going to
pull this out into place. I'm going to pull
it out into here. Like so. And then what I'm going to do is pull
it to the side. So if I come in now
and grab the side, I can pull it to the side, grab the top of it and pull
this back, here, like so. Alright, that's looking good. And now we just want
to top on here. So what I'm going to do is, I'm going to come to this top. Press Control. Left
click, right click. Control B, and bring it out to make sure
that it's into here. And then what I'm going
to do with this is, I'm actually going to pull
this back a little bit. So I'm going to press
Control, bring it up. So it's over the top of there. Grab then the center. I'm going to press E,
and I'm going to pull it back to this part here, like so, making it look a little bit like there's a lot of stonework actually
going on here. And what I'm also
going to do now is press control er and left click, bring it up slightly, and
then just drop that in there, and that means I can separate.
All of this part off. So you can see all of this
part can be separated off. Not going to worry
about that at all yet. Gonna press control on this one. Left click, right, click. That
then can be separated off. And now, finally,
what I want to do is I want to on the next lesson, that is, we'll put one more
stone slab on this part here. And then we'll put this part. So these side bits
over this side, and then we should be able
to get this nearly finished. Alright, everyone, so I
hope you enjoyed that, and I'll see on the
next one. Thanks a lot. Bye bye.
125. Designing Decorative Rooftops for the Aztec Temple: Welcome back, everyone
to blend the for the modulating kit bash
environment guide, and this is where we left off. So first of all, this is how
far this one's going out, so I need to move this
one over to this side. So all I'm going to do is, I think I'll just use
mirror, so object, and let's go to mirror, and we'll mirror on the like so, and then I can pull this out into the place where
I actually want it. Pull it out as far. I press one or as this one. So this here up
to there like so. All right. That's
where I want it. And then what I want to do is I want to put this part into place so you can see this is where it's
roughly going to go, but let's make it a lot smaller, so S and y on the
y axis, like so. Okay, so that's
looking good so far. That's sticking into
the ground there. Let's pull it out a little
bit further. Like, so. And I think I'm going to go a little bit
further than this. Let's have a look
what this looks like. Let's pull it up
into place. Like so. And let's actually drop
it back a little bit. Like so. And then finally, let's pull it this way. So we'll have to grab this
one on the inside as well. So this one here, and let's
pull it into place, L so. Then this off. Alright,
that's looking pretty good. And now I want to do is bevel
this off down to there. And I also think. I'm just wondering where I
actually want this up to. I think it's going a
little bit too far. If I pull it back, a thing that actually might look
a little bit b, like so. The other thing is, as well, I feel like this needs
pulling up a little bit. Yeah, and that looks a little bit better
than what we had it. Now, let's level this off, and then we'll have a
real good view. By press Control B. Of how this is going to look. So something like this. And
what I want to do now is, I want to kind of bring this, so these parts in, but I want them coming in and actually following
this part here. So what I want to do is,
I want to grab this, press Control A or transforms
right click Sgens geometry. And then what I want
to do is come in to add modify and generate boolean. And this time. I'm not
going to press like Control minus or Control plus. I'm just going to click this as my Boolean, and there you go. Now, you can see it's
cut away like so. Now what I want to do
is I want to come in and apply that boolean
with Control A, and I should now be able
to come in and press the eye button and bring this
in as I actually wanted it. So like this, I can bring it in. Now, one thing is that we can see I've not done
that on the other side, and I think I should do it on the other side. That's
the first thing. And the second thing
is that I don't want these kind of
hard edges here, so we can see we've
got some hard edges, so I'm going to pull those over, and I'm going to level
this off, I think. So we'll do that next.
So what I'm going to do, first of all, is
grab the back of it, like so, and then
we're going to press the eye bon to bring
them in. Like so. And then what I'll do is now, I'll come to this one here
and come round this one here, and I'm going to
press control shift and B and level that off. Now, you can see
it's not leveling off in the way that I want it. So I'm going to try that again. I'm going to first of all press transforms right
srogen geometry, and let's try that
again. So Control B. Let's see if I can actually flatten this out a little bit. So I'll put it onto custom. We'll change the
percentage to offset, and then what we'll do is
we increase this one here. And there you go,
now, you can see, it's flatting that
off because we don't want no hard
edges like so. All right, so that looks good. Now what we'll do is then
we'll start pulling this out. So now let's just grab in face, this face, this face, this face, and go around the back, and
we'll do the same thing here. E enter S and Y, and let's pull
them out, like so, and we should end up with
something like this. Finally, then, let's
bring in this part here. So we'll press I I again. And you can see. Yeah, there
are two separate parts. That's why that wasn't working. So let's instead of doing that. What I'll do is I'll just
press on just this one here. So I like so, And then what I'll do is I'll separate this off, so shift. And then what I'll
do is I'll grab the back of this.
I'll grab the back. Do here. Got the whole thing, L, pull it up, and then pull it down
slightly into place, like so, and there we go. Alright, so now we want
to do is we just want to make these into stone blocks. I think I'm happy
with how that looks. It doesn't look exactly the
same as this one over here, but it looks close enough, and I think actually I'm
pretty happy with it. Lastly, I think,
I'll just come in. And what I'll do with the top of this is I'll just press S and x and just have a look
actually what that looks like if it's
gonna look there. And actually, I think it looks
better with that set as, you know, a bit of a bit
different than the rest of it. Okay, so what we'll do
now is, we'll come in. We'll mark a scene
going across here. So old shift and click, right click, mark a scene. And then we'll do is we'll
split this bomb part up. So L, Y split it up, and then we'll do the
same thing on here. So, right click, mark a scene. Where's the right click.
Control Marker sm. There we go. And then what we'll do is we'll
come into the bomb, L, and then y. And then finally, what
we'll do is we'll grab Svend M both
at the same time. So we'll grab all of these A, mesh, clean up, and fill holes. We'll make sure then let's
see if it's actually works. So we'll add modifier,
generate a bevel. We'll press Control A on
all of these, actually. Control A, all transforms, right click, it's
origins geometry. Grab this one then,
and we'll put it on No point No No five. Sever that looks like. Maybe that's a little
bit too low for here. Let's try No point Not A. And then we go this
a little bit higher because they are really,
really big blocks. We'll grab this one and this one then, grab this one last. Press Control L, and we will copy modifiers.
And there we go. Alright, that is
looking pretty cool. Let's get rid of this
part, and let's have a good look around there making sure we're happy
with everything. And then finally,
what I'll do is now is I'll put this
over the other side. So I've got this in the center. I'll grab both of
these, right clicks a origin to three D cursor. Grab this one, add a mirror, and we're going to generate a mirror over to the other side. So and then grab this one, grab this one last,
press Control L, and were to copy modifiers, then I'll copy the devil
and the actual mirror. There we go, then,
is that part done, and that should go on
top of our temple, and it should look really nice, especially when we've
brought this part in. So this part here is going
to be going up here, so we might as well build
it at the same time. So what I'm going to do is, I'm going to pull this across now. And now what I'll
do is I'll press Shift S and selection
to Cursor, like so. Let's put it in the center. Let's move it back now. And we can see this is
where it's going to be in. So if I pull this up, I'm going to pull it
up, so I want it. You cannot really see how
high it's going to be. So we're going to have to
actually guess really how high. So Essen, let's pull it round
to something like this. And then what we'll do
is we'll build from this part now because we know it's actually in the center. So first of all, what I want to do is
I want to bend this. So I'm gonna come in control. Bring in a few edge loops, one in the center, like so. And then old shifting click, and what I'm going to
do is I'm going to try, pressing one, putting this on, and then bringing this out and seeing what that
actually gets me. You can see it's been like this, and it's got kind of, you know, a sharp edge in
there. You might want that. That does look kind of as tech, but let's make it with more of a round shape.
Let's try that. And that's definitely
not going to do it. I don't think, so let's
try the next one. Let's try the inverse square. Bring this out, and there we go. That one's going to be the
one that I go for like so. And I think that
looks pretty cool. Okay, so now I'll do is I'll
bring in the bottom parts. So the bott parts, so
should come along here. You can see that this
might not be big enough. But let's press the SP. Like, so let's bring
it up a little bit, and let's now bring
in these parts here. So what I'm going to do
is I'm going to come. At the moment on this, we've got a big slab of stone kind
of going around there. Would do I want down
this one? I think I do? I think I do. So what
I'll do is, I'll come in. Old Shift click,
Old Shift click. And then let's press
E enter Alterns. And let's turn that off Alter S. And you can see they're
not coming out properly. So let's press the SP. They're
not coming out properly, so let's put it on
individual origins. And then let's press
the SP, bring them out, like so, and I'm still kind of happy with
how those are coming out. So what I'll do is, I think let's see if we can
squish them down first, so S and X. Let's see if we
can bring them in. And let's have a lot that
looks like. There we go. Now I'm happy with
that. They're looking pretty flat against here. And now I want to do
is bring them down. So what I'm going to do
is I'm going to come into each of the senses of them, press the iborn,
and bring them in. Again, we need to resee
of our transforms. And then press the i
born and bring them in. And then what I'm going
to do from there is, I'm going to bring them
straight down, so E. And you can see the one to come at an angle at the moment. Now it's up to you if you
bring them at an angle, or, you press and pull them straight
down into place like so. Now, if you pull them
straight down into place, you can see they're going to
come either side of there. And I don't think that
looks particularly good. So what I'm going to do is
then I'm going to press the S born and pull them out like so, and then I
can bring them out. Like so, and then
I'm going to press S and X and pull
them out this way. Just so they're sitting
there a little bit nice. And I think that looks
pretty nice, like so. Alright, so what we're
gonna do then is we're going to on the next lesson. We're going to create
this centerpiece. And then once we've done that, we've pretty much got everything we need,
except our tortures. We can go into our gray box, and we can finish
building eth now. We can do the Bleions. And then finally, we can come
back and do the tortures. So we'll have our full gray
box there ready to go. Alright, let's save our work, and I'll see on the next and everyone. Thanks a lot. Bye bye.
126. Creating Radial Symmetrical Rooftop Decorations: Welcome M everyone to Bland for the modular and Kit
ash Environment guide, and this is where
we left it off. All right. So with
this, first of all, let's Shade Smooth, so we've got a nice
smooth edge to wait with. And then what we'll do is
we've got the center of here. Let's press Shift
S. Sta selected. Shift A, and what we're
going to bring in is a think we'll start
with a circle. Let's start with a
circle r and X and 90, and let's pull that
up into place. So it's going to be
round about that. I think I'll make it a
little bit bigger like so, and then we'll use this then to create this
actual part in here. So the first thing we want to do is press tab to
go into Edit Mo. Just make sure you Edits hard to see when
you've got a circle, press the F button,
and there we go. Now I'm going to do
is I'm going to press and bring this in like so. And then I'm going to press and bring it in again. Like so. Now, from here then, I'll
get rid of this part, so old shifting click
delete and faces. And then the inner side of here, so we've got all of these
little bands going around. The inner side of here
then has first of all, a large hole in the center, so we'll put that in there. So I put that in there,
delete and faces. And then it has a
couple of bands. So it has one band coming here, so Control law, bring
the first band in. So that's going to come
round about there. And then it'll have
another band in. So Control Law, put it
right in the center, left click, right click. And then what you can
do is you can now press the S button and
bring it in if you want to. So we can put one
band around there, and then the final band, I think it's the final band. I hope I've got this
right around there. Now, we're going to
find out if we need another banding and we can mess around with the model
at the same time. But first of all,
let's press Control A, right click and set
origin to geometry. Now, this has a fair
amount of polygons on it, but I think for
something like this, that's going to be
absolutely fine. So what I'm going to
do now is going in to add and generate a solidify. And what I'll do is
I'll pull the solidify out and I want to center it
off because at the moment, You can see now
it's not centered. So let's put this on naught, and then that's going
to center that out. And then as I pull this out, you'll see now it's
still centered out to where we
actually want it. Alright, so that's looking good. I feel like this part here is a little bit too thick now,
so let's pull it back. And then what I want to do is
I want to bring this part, so just this inner part. So let's press L. Let's press P selection,
separate it off. And what I want to do is bring
this back in a little bit, so not quite as thick, like so. Okay, so now, let's think
about these stone parts first. So let's apply our solidify. And then what we want
to do is we want to now separate these off and bring in kind of those stone bits that are going to come
into each of these parts. So what I need to do now is think how big I want each
of these parts to be. What I'm going to do is I'm
going to go into Macron view, so one, and I'm going to have, let's see if I can have two at the top and then
three, and then two. Let's see if we can
do it like that. So three and two,
and we'll see if we can actually
make it round self. So three and two, three, and I think it's going
to be out, as you can see. So if I go three here, you can see now it's
a little bit out, and that's simply down
to the fact that we've got probably too many
polygons in here. So, let's instead go this way. And then we've got two, and
then we'll go with three, and then we'll go with two. And then what we'll do is we've got all of these around here. So if I put this at three, you can see this is what we end up with, two on the bottom. And I think actually, that's
going to look better. Or we have four on the bottom, and that probably will
even everything out. Now if I write, click now and mark a scene,
now you can see. So I went one side and I
did one after the other, and then I could work
out whereabouts, I'm going to have that
and even it all out. Now we want to do is we want to split all of these
of, of course. So L just in each one of these, Like, so, press the y born. A, join everything. And then you're
going to press y, then we're going
to press cleanup and fill holes. Like so. And now we can press control A, transforms right, clicks
origin's geometry. Add in a modifier,
and the one we want is going to be a bevel. So bring in a bevel. And let's set this to Noah
Point Not five. Like so. And there is our stone there. Now, let's set it to Not
Point. No not eight. Like, so, and I think
that looks a bit bare. Right. Click and
Shade auto smooth. Now the thing is we
need some jaws in here, and we've got to think how
we're gonna put these in. So I'm just wondering, the easiest way to do
this is probably to grab these two every two, and then a big one in
the middle, maybe. We could do it like that.
Or we could just bring in, if I press shift des, urs to selected Shift A. Let's just try instead,
bring in in a cube. And put in that in place. So if I press S and y,
I'm going to bring it in. I'm going to first of all, bring it to the top of there, like so. And then what I can
actually do is now come in. Turn this on, grab the
top of here, turn it off, and then pull it into place
and finally press S and X, pull it in, like so, and then pull it in
slightly like so. Now, the joules, we're going
to want on both sides. So we're going to
want on both sides. So I'll do is I'll
grab both sides. I'll press the ye button
and bring them in. And then what we'll
do is we'll press, enter S and y. And we're going
to bring them out slightly with medium points. So S and y, bring them
out very slightly. And then what you're going to do is you're going to press, enter S and y, and
bring them out again. And then what you're
going to do is you're going to put this onto individual origins and
then press the S born. And you'll see now that you'll start to develop those joules. Now I want to come out again. Make sure it's on
medium point again. So medium point, E, enter S and y. And then we'll bend these in on individual origins,
so press the S bn. And then we go, now you
can see it's actually started to actually
look like a joe. Last of all, then, You can see at the moment that
once I brought my jaws in, I need to put these around here. So I want to actually set the
orientation down to here, so right click, set origin, two, three D cursor. And now if I press shift D, and then right click
drop that into place, and then R and y, I should be able to rotate this round to where
we actually want it, which will be
somewhere around here. So you can see if
I put this now on 58 degrees, that should set it. Let's have a look if it is in the center. Not
quite in the center. So let's come back
by one degree, two degrees, let's see, let's keep going.
Maybe the other way. Like so. So 57.4, but don't worry
because we're going to mirror it over the
other side, anyway. Now I want to set it over here. So again, shift D, and then r and y, I set it into place, and we can see
here that this one is going to be a little
bit out from there. And I'm wondering, do I make this smaller or do I
pull this out a little bit? And the reason is of cose
of the angle of this. So I'm thinking I'm
thinking what to do here. So if we pull it out into place, We are going to mirror it over. So I'm thinking I can just simply pull it into
place like so, and then mirror it
over the other side. And then the bottom joule now. So I will grab I'll
grab this one. I'll press shift D. And then
what I'll do is R y 180, and that should then
put it into the bottom, and then I should be able
to slot that into place. Now, these two are fine.
It's just these two now, so let's join them
up. Control J. R clicks origin, three D cursor. Add in a modifier and
we'll bring in a mirror. Put them over the other side with let's have a look. Z, Z. They won't go over
the other side. Let's see why that is I
want these over that side, and I'm just wondering Control
A, all transforms, right, Clicks origin to three D cursor, should mirror them
over the other side. Let's see why that's not. Generate a mirror. There we go. Done
what happened there. But anyway, let's apply that straightaway, so
we've got that part. And now what we can do is
we can come into this part. So we've solidified it. Let's apply our solidify, first of all, so control
A, and there we go. All right, so that's all
looking very, very nice. Now what I want to do is I want to bring in
this inner part, so this part here, let's
bring that back in. So E, drop it back in. Now the thing is, though, I actually want to bring
it in on both sides. So I've already pressed E. So what I would
normally do here is, I'm not sure if there's actually some crossover on
these vertices. There probably is, if
you come to this one, you'll see if I pull it
back, you can see now. We've got broken mesh here. So always, if you're
sore, just go to mesh, clean up, and merge by
distance, 64 vertices removed. So you can see I did
have an issue there. So shift and click, shift click, E enter S and y, and let's pull it
in on medium point. So S and y, let's pull it in. So. And then it looks like
we've got a bar there, and we need one in
the center here, which is what we're
talking about. So if I come in then
to this point here, grab both of these, and
what I'm going to do is just press the S
but, and pull them out. And you can see here, if I press all tes,
it doesn't work. If I press the S one, it's actually pulling the
whole thing out. And actually, I think that
is going to benefit us. So I think what I'll do
is I'll press Control. Left click, right click,
and then control. Left click, right
click, grab them both, press the S born and bring
them in. And there we go. That's going to lead to
a nice flat area there. And then what I'll do
is t shift and click, and then on the same on
the other side, L so. And then E enter S and Y, and bring that one in
L so. And there we go. Now, let's right click
and shades move by angle. And there we go. That is that main part
actually done now. And now what we
should be able to do is we should be able to bring dorm actual supports that are going to go here and
going to go over here. And then once we've
brought that in, this part is actually finished. And I think looking
from over here, yeah, that looks really nice. Okay. Happy with that. Now, let's save that our work, and I'll see. On the
next one, everyone. Thanks a lot. Bye bye.
127. Texturing the Rooftops in Blender: Welcome back everyone
to blend for the modular and Kit
bash environment guide, and this where we left off. So what I'm going to do now is, I'm going to press Shift A.
I'm going to bring in a cube, and I want this to kind of be some support that's actually
going to hold this up. So what I want to
do is, I want to, first of all, bring this
into place where I want it. So something around
here. Like so. And then what I want to do is, I want to grab the
top, just the top and see where I'm actually
going to put this thing. So if I put it over here, you can see that's what
it's going to look like, press L, and then S and
Y, bring it into place. You can see here it's stuck through here, and we
don't really want that. But what that does enable us to do is as we're pulling this back and straightening
this up, you will see. So if I straighten
this up with R and Y, you will see that
it enables it to become much thicker along here. And that might benefit us, so let's pull it
into place like so. And, yeah, I think that's
looking pretty good. What I'm looking at now
is just bringing out a slab onto this part to make
it look a little bit bre. This part here, I mean,
and this part along here. So let's do that first. So what I'll do is I'll
come back to this. I'll grab all these
and this one here. I'm going to press the eye butt on them and bring them in. And then what I'm
going to do then is press E and pull them up. Like so. And now I can
get a better idea for right click shade auto
smooth of where this can go. So if I press tab, let's go and grab the bottom of it, and
then turn that off. And then what I can do
is I can pull that out. I can also as well press S
and x and pull it out this way and make it look a bit
more chunkier on that part. And I think, yeah, that's
looking pretty good now. Now all I'll do is
I'll press Control A, all transforms right click, origin, two, three D cursor. Add in a modifier and we'll
generate a mirror first. Control A, let's apply that. And then finally, let's
bring in a bevel. So we'll put this on Not point, No Not five, like so. And then we'll move our way
down then to this point, add in a bevel, because
it hasn't got one. And put this on nought
point note five, like, so as well,
and there we go. All right, so this now
is pretty much done. I'm happy with how that looks. So this part and this
part and this part and this part are all separate
parts, basically, Los. Let's not forget those parts. We'll join them
together as well. What I'm going to
do is just move them over there, object, convert to mesh,
and then control J, and join them all together. And then control
A all transforms, set origin to geometry, and that's looking pretty nice. Now let's press one and put it down on the ground
plane, so into here, like so, and now let's grab this one and exactly same thing with this one. So we're
going to grab it all. We're going to go up to
object, convert to mesh, and then control J,
join it together, press one, and then pull it
up onto the ground plane. So this is pretty much all
of these parts done now. So what I'm going to
do is, I'm just going to hide these two
out of the way. In fact, you know what?
We won't do that. We'll hide just this one
out of the way for now, and we'll use this as a
reference for the colors. So I'm just making sure all
of these parts are together. These are the one we've got
bevels on but it doesn't man those parts because these
needed to be joined anyway. So these ones, they
don't need to be joined anything, so
they should be okay. Now, let's come to
this one first, and we can see that it's
the mid stone on there. So let's put it
onto object mode. And then what we'll do is we'll grab little parts of this. So if I grab this one here, and what I'm going to do is
I'll do this part first. So if I come in and
press L on all of those, I can press, Smart UV project. Okay, hide it out the way. A, U, Smart UV project. Okay, hide it out of the way. And what that means
is now I'll split it into two actual UV maps. Now what I can do is I
can come to my material. Add in my mid. So midtone, bring that in. Like so. And I want everything
to really be midtone except the center parts
here and these jaws. So all I'm going to
do with the jaws is, I'm going to come in, grab
each of these, like so. And we can see with these jows. I don't think I
leveled these off. So I don't think add
bevels on these, so I'll level those
off in a minute, first of all, though, I'm
going to press Control plus. And then I'm gonna press
the plus b, the down arrow. And we're gonna put in GM. Let's see I've going on the
gem Rd Gemstone. There we go. Lick a sign. And there we go. There's our red Gemstones. And the one thing is I
miss these at the back, so I need to do the
same thing on here. Like so. Control plus once
I've got them all. Like so. And then all I'll do is Rd
Gemstones, click a sign. Now, I'll do is
I'll grab them all, so L and L H selection. And then what I want to do is
reset the transformations. Like so, and then
add in the bevel, cause we forgot to
add a bevel on these, and let's put it on 0.5. Like so. Make sure
the bevels on. It's made them stand
out a little bit more. Apply that to the gemstones, and then join the rest, so control J, like so. Now finally, let's come
in and add in our gold. So we want gold leaf on this one and this one here
and same on the back. So O shift click l shift click material plus
down arrow, gold. There we go and click a sign. And there we go. That is looking pretty good. And I'm just wondering
let's put it onto our rendered view and see what
that actually looks like. And maybe maybe we should come in and smart
U V project click, okay, Unwrap them a little bit better than
that. There we go. We've got our gold and gemstones fit in for
the top of our temple. Okay, so now let's
move to this temple. So what I'm going to
do is, first of all, I'm going to grab these
two parts, press. Smart UV, project, click K,
hide them out of the way. And then what I'm going
to do is I'm going to come in and grab these parts. So L, L, L and L, U, Smart U V project, click OK, hide them
out of the way. And then A to grab everything. And what I'm going to
do is Smart UV project, click okay, and then ult,
bring back everything. Now, let's see what that
actually turns out like. So I'm going to come in, and we want the mid again. So mid stone. So let's look mid
stone, and there we go. And then what we want now
is to bring this part in. So these parts in here, grab all three of these. And then all we're
going to do is press Control plus
and control plus, and maybe one more control
plus plus and then blue. And blue, stone, ick a sign. And there we go. Now, it's
up to you whether you want it a red on here
or something like that, but I think for me, this
is absolutely fine. I think I just forgot these
ones on the back as well. So let's click Control plus
Control plus Control plus, and then click a sign. There we go. Alright, so
that's looking pretty nice. I'm just wondering now if if I want to do anything
else with that, I don't think so. I think that looks
pretty nice as is. So now we'll come
to this one here. So this one's going
to be light Stone, the main body mean of this one, so U, Smart U V, project, click
Okay, down narrow, and we want light
stone, this one here. And then what we're
going to do is we'll click on these parts first. And these will also be
blue, these parts here. I should be able to do
and I click Control plus. And then give them the blue. Now, I can see that these
aren't leveled off, so I need to level this off. But first of all, click plus, down arrow, blue, **** a sign, and then we'll come to this one. We've got to do
the back as well. I should have done that at the
same time, but never mind. Lick the plus, down arrow, red, red Stone, click a
sign. And there we go. Okay, so let's now
come around the back, so we'll grab both of these. And both of these,
like, so, click plus. And then Bluestone,
click a sign. And then this one and
this one, Control plus. And Redstone, click a sign. Like, so, and there we go.
Now, let's bevel these off. So Control A, all transforms, right click, origin geometry. And let's add in a
modifier and a bevel, and let's put it
on Nought point, Not five. Like so. And then let's press do we need control A on there?
I don't think so. I think that looks pretty good. And now we're onto this one here again, light stone and red. So what I'm gonna
do, first of all, we can see I've got
a bevel on there. We'll grab this one. We'll press Control L, and then we'll copy modifiers, and then we'll press
Control L. And we'll also copy or link
materials like so. Then what we'll do
is this one we'll right click and
Shade auto smooth. And then this one finally
can press tab A U, Smart U V, project. Click. Now, with this one, all we want to do then is
just the inside of here. So just this inside
of this part, and then coming up and just
click a sign on the red. And there we go. Now, this one here is just going to
be some light stone. We already have a bevel on,
so we can just press tab A U, smart U V project, click Okay, and then come down to materials, and we want it on light. Stone, like so. And there we go. It's as simple as
that to do that one. Now, what we'll do then
on the next lesson, because it's a good place to end this is we'll get
these named up. We'll put them in our rooftops, and then we'll head on
over back to our gray box. We'll get it all
finished. And then we're coming over here, get
the torches done. Bring those then
into the gray box, and then we can finally start on things like the vines and
all good stuff like that. Something completely different. Alright, everyone, so I
hope you enjoyed that. I'll save out my
work, and I'll see you on the next one.
Thanks a lot. Bye bye.
128. Placing Rooftops in the Aztec City Scene: Welcome back everyone
to Blend fall, the modular and Kitbah
environment guide. This is where we left it off. Let's just put it on Shade mode, make it a little bit
easier to work with. All of these then
should be in rooftops. So let's make a new one. We've got roofs, and
we've got roof tops. So let's press M,
and we'll call one. You can see here, we've
got one that says roofs. We don't really
want that. We want a new collection of tops. Like, so and there we go. And now, this one
that says roofs, I can just delete it out
the way I don't need that. Okay, so now we've got all
of those in the right one. What we can do then is
come to this one first, and we'll press F two, and we'll call this temple top, like so, and then we'll come to this one and
we'll press F two, and we'll call it temple roof. And then we'll call this. I'm just wondering
what we'll call this. Let's have a look
on my other screen to see what I
actually called it. So I called this decorative
Roof small post. So let's call it that. Roof small post like so, and then we'll come
to the next one, which we'll call Roof Cog. I think actually
that's a good name. Like so, and then we'll come to this one and we'll
call this half dome. I think that's also a good name. So Ruf dome. And I'm just making
sure that this one, did I call it yes, I called it Ruf Cox,
so that's okay. All right. So we've
got all these now. Now, let's grab
each one of these. And then all we're gonna do is going over to right hand side, and we can see roof hop. Let's change the
name of that first. So Harp Dm Done. Dome. Okay, dome. There we go. Alright, so we've
got temple top. We've got two of
those apparently somewhere. So we'll call it. We can't call item This
is called Temple roof. I wonder what else is
called temple top. Maybe it is just that block
that we've actually made. So we'll call it
Onate temple top. Let's call it that instead. So temple top Onate. Like so, and then
we've got nothing that says.o1 or anything like that. Finally, then we can grab
all of these right click, and we can mark them as asset. And then we can come over
to our asset manager, and we can see that we've
got a problem with this one. So what we're going to
do A to go everything, shift then, spin
everything round. And then finally we can come in. And we would have
one that says here, where is it roofs ofs. We want one that says roof top. So plus Roof top. Like so. And then all I'm going to do is drag all of these into there and put them under roof top and then go to file and save it out. Alright, so they're
all saved out. Now we can head on over
back to our gray box. And before we do that though, let's go back to modeling. Let's clean these up. So
all I'm going to do is drop these in to my finished. And there we go.
I'm going to press lth and bring back my
tortures hopefully. Let's turn this one
back on. And I'm not going to need these anymore. So these booleans might
as well be deleted. Let's clean up this
before we finish. Let's delete our booleans. And then all we should be
left with is tortures, human reference, and all
of our finished parts. Let's also, as well, bring back those parts that have just hidden
out of the way. Let this load up a minute. And then once it loads up, I'll just put those
into place just because I like to
keep things tidy. So I'm just going to
move my guy over here, and I'm going to move all
these back into place. So I'm going to put
these two here. And then grab these three, move them over into
place. Like so. Grab all of these, and then
let's move them into place. Like so. And there we go. Now I can finally save this out and move them over to
my actual gray box. So here we are one,
back in our gray box, and what I want to
do is, first of all, right click and refresh
my asset library. And then what I want to do is I want to find first of all, my rooftop. So these ones here. Then what I'm going
to do is I'm going to bring in this Cog first. We can see let's put
it onto Shade moot so I can actually see what I'm
doing a little bit easier. Let it load up,
and then what I'm going to do is, I'm going
to go over the top. I'm going to press G and put
it into place over there. It might be a little bit big. If it is, just press dot. Let's pull it down first. We'll delete this
one out of the way. We'll pull it down.
And put it into place. And we can see actually
mine just press one. I Mine actually just fit. So if I move it this
way, a little bit, like so, and then move
it more into the center. L so, actually, that
looks pretty good. And then all I'll do is I'll come and delete this
one out the way. I will grab, I'll grab
this one and this one. I'll press shift S,
cursor selected. And then I'm hoping I can actually mirror this
over this side. So I'm just going to write click the origin,
three D cursor. Add in a modifier and
we'll bring in a mirror. So let's bring in a mirror, and there we go, Let's
just apply that mirror. And then all I'll do is I'll split these off from each other, so I'm just going to
come into the first one, press P, just a box select it, and then press Control plus, and then P selection,
split it off. And then finally grab them both, control A or
transforms the origin, two geometry on both of them. And there we go there,
actually in place, looking much, much better now. Now we've got those
in. Now, finally, let's not finally, but Let's actually
carry on moving around. So the thing is we've got
all of these parts in here. We need to replace
this part here, so let's actually do that now. So all I'm going to do is
delete that other way. I'll come then with
my little **** part in here. I'll drop that in. And then all I'm going
to do is just drop that into place and just pull
it more into the corner. Like, so, double tap
the A, and there we go. Now let's work our
way up to our temple. So we'll go up to our temple. First of all, then, we'll
put on this top here. So I'll get rid
of both of these. And then I'll bring my
temple top on here. Now, this is the point
where you need to decide how big or small, you
actually want this. I also want a temple
top roof on here. So let's put our roof on first. So what I'm going to do
is come down to roofs, and we should have one
that is this one here. This is the huge,
huge temple top, and I'm going to drag
and drop it over there. And then we're going
to come to this part. Grab the sensor of here, press
Shift S, cursor selected. And then what I'm going to
do is grab my temple top, shift S and selection
to cursor like so. What I'm going to
do is bring this up into place.
Making sure it fits. If it doesn't, I'm going to make it a little tiny bit bigger, making sure that it fits
perfectly in there. That looks very, very nice. And then finally I can
come with this top. I'm going to make it
a little bit smaller, and then drop it into
place on top of my roof, like so, double tap the
eight, and there we go. Then what I'm going
to do is I'm going to come to each of these parts now. So this one and
this one, Shift S, cursed selected, like so. And then now we're
going to go back to our roof tops, Gab, this one, L et's bring it
into that place there, and then shift this
selections cursor. Press the dot born, and then all we're going to
do is drag it up, and we know already that we
might need to make this a little bit smaller because we needed to make the other
part a little bit smaller, so I'm going to make it
a little bit smaller. And then what I'm going to
do is drag it down into place wherever I want it,
double tap the eight. And there we go. Now, it's up to you how far you
drag this down. I think I need to
drag it down a little bit more. Double tap the A. And there we go,
let's put on our rendered view.'s have a quick look at what
that looks like. Shift right, click just to move that cursor out the way.
And there we go that. It's looking very, very nice. Okay, so we've got that bit. Now we want to move on down
then to our actual door. So, again, let's put
it on material view, makes it a little bit easier. We'll also save it out. And then what we'll do is
we'll come to our doors. So our doors are here, and the one we want is this
one here, of course. This huge huge temple door. Now, what I'm going to do
is, again, I'll come in. I'll grab this part,
shift S, cursor selected, then I'll bring in my door, like so, Shift S and
selection to cursor. And then what I'm going to
do is pull out my door, and then lift it up to
where I actually need it. So if I lift, lift lift, want it just on by zoom in
with a little dot born, I want it onto the floor. So I'm going to pull
it onto the floor. L so. And then what
I'm going to do is, I'm going to make sure that
all of this is in place. So you can see it slightly slightly out let's pull
it back a little bit. So we've made a gap there
as well in that door, so it should actually fit. I just wondering where
that gap actually starts. You can see starts
right around there, so actually, okay, to pull
this back as far as we want. And there we go, the actual
door is set back as well. Just wondering that might
be a little bit too far. That looks much b. And there we go. Alright,
so that's that part in. Now, I'm wondering,
let me just have a look around and see if we've got everything
on the front. Yes, we have. And then we're going to come round
to this side. And I'm just making
sure that I've got everything in this part here. Now, we did make a plant pot, and we might as well
put the plant pot in place as well
while we're here. I'm just looking where
my plant pot's gonna go. So let's put this vase. So they're gonna under props, and we've got this one
here. It's a plant pot. Let's put it on top of there, like so, and I'm wondering
where the actual soil's gone. So you can see here
stil is not in here. I didn't put the soil on for some reason. What I'm gonna do? Make it a little bit bigger. So I'm going to
put that on there. And then what I'm going to
do is bring in the soil. So what I want to do is grab. You can see this
is already grab, which is great and
plus down arrow, and the one we want is soil. And do we have our soil?
So let's have a look. No results found, so we
don't have our soil. So what that means is, We need to either bring
in the material, or I'll change it
on, You know what? We'll do that while
we're doing the torture, so remember to bring our
I'm just thinking it might be easier to do that now because then it's
done and out the way. So yeah, let's do
that. Let's head on them back over to
our actual gray box. And I'm in our part section. So let's find our props, whereas all our props of a look. All of our props
are There they are. Okay, let's had on
over to our soil. I don't know how I forgot that. But either way, let's come in. Bus, down arrow soil, and nothing in here. So what did I use for soil? Let me just check
that. And of course, it would be under dirt. Not soil. So there
we go. So dirt. Let's bring that
in, pick a sign. And there we go. Now we've
got our dirt in there. And now we should actually have updated our asset manager. So again, I'll double
tap the eight. I'll press file and save. L, so. And let's see if that's
actually been updated now. So let's head on over
back to our gray box. If not, we'll just bring
in some date over there, because I don't want
to go back into you. Let's pop this down. And here's our gray box. And what I'll do then
is all right click, Refresh Asset library,
bring this in, and dirt's still not there. So let's see if I can bring
in the dirt. So dirt. DIR and there is my date. And then what I'll
do is just press tab and click a sign. There we go. All right, the dirt's in. It was always in there.
Always in there. Let's pull it over. L so. Let's make it a
little bit bigger. Let's grab this, make
it a little bit bigger. All it making sure
it's on there. And in there we'll be obviously a flower or something like that. Alright, let's save it out then. And then what we're going to
do now is on the next one. We're going to carry on
working our way around till we've got all of the
pots that we want in there, all of the tops of the roofs
in then, things like that. You can see here lots
of things that are white still left that
we can bring in. And then once we've done that, once we've done that, guys, we can actually start getting our booleans in for
these actual windows. Alright, everyone, so I
hope you enjoyed that. I'll see on the next
one. Thanks a lot. Bye bye.
129. Plant Pot Placement in the Aztec Environment: Welcome Mcaone to Blender four, the modular and it bash
environment guide, and this is where
we left it off. Now, let's just steal not this. Let's steal this part,
shift D. And all I'm going to do is I want to put
this over this part here. So just in this corner here. I'm also going to
steal this plant part. So I'm going to press shift D. And then I'm
going to put this over in this part over here, and then I'm going to
place those in there. Let's fix this one
first, though. I'm going to press seven
to go over the top. I'm going to press
G, and I'm going to drop it right around there, and then put it into place. Like so, and then I'm going
to come to my plant pot. And I'm going to put that. I
can press control and one. I can then come back
to the back of this. I can press S, make
it a little bit smaller and put that
into place like so, and I want to just right
on the edge here, like so, shift D. Bring in another one, and then put that
in place like so. Okay, so let's bring
in this part first. So all I'm going to do
over the top again, I'm going to press shift D
and put it where I want it, which will be round about there. Delete this one out the way. Bring this one down. Like, so, and then just pull it
out into place. Like so. And now I want to do
is I want to bring in a few more props along here. So first of all, I'll
bring in the basket. Then I'll bring in the
other little basket. So where is it this one here? Let's bring in this little
basket, drop it there. And then we'll bring
in a couple of vases, so I'll bring in a vase.
Put that one there. I'll make it a little
bit smaller. Like so. And then I'll just press
dot and zoom down to that, put it onto the floor. Like, so. And then we'll
bring in a barrel, so I'll bring in a large barrel, put that there, make it
a little bit smaller, drop it down to the
floor. Like, so. And then on this
side, we'll bring in another vase,
bit different one. We'll bring in a bigger
vase that there, making sure it's not
sticking the wall. Like so. And then we'll bring in maybe just a small barrel. So I'll bring in a small barrel, put that on there, double tap
the A, and that's enough. But there. Yeah, I
think that looks good. You can add some more, of
course, if you want to. And then what we're
going to do is now just work our way around. And what I'm looking at is
my own reference guide. And when I did this
myself, obviously, I was looking around thinking where I can actually
add more things. So where I can add more
things into there. Have I missed out any windows, would a window, you know, look better, you know, like one here or something or have a missed a
window over here? You know, W a window
look good here? That's what you should
be asking yourself as you're working
around this now. And that's what I'm doing
as I'm working around. For instance, you might want
another, plant part on here. I think that would
actually look good. I didn't put that
one in the original, but I think on here
would look good. So I'm just going to
press control one. And then all I'm going to do is, I'm just going to sit
it on there in place. And if you make some
ventures as well, you might want to
put those in there. So there's plenty of stuff you
can actually do with this. And then what I'm going to do now is working my way
around to this part. And on this part, I know I
need to change that over. And I'm looking
also to make sure all of this is okay,
which it does look. And I also need this plant pot, and I'm going to put another
plant pot down here. So shift. Let's bring it over. Seven to go over the top, and we want this one just in here. Maybe against the wall
a little bit closer. Let's bring it down. Maybe you want one on the
other side as well. Let's pull it down into place, all the way down, not
stuck in the floor. We want it a little
bit out like there. Okay, maybe a little
bit higher there. Alright. Let's now
get rid of this part. We'll go to our roofs then. So roof tops, these ones here. And the 11 in is this one here. So what I'm going
to do is zoom out. I'm going to put it there.
And then what I want to do is I want to put it kind
of in between both of these. So grab both of these. Shift S, cursor selected, and then grab this shift
S and selections cursor. And then what you want to do is bring it up and
put it into place, and then make it the right side. So at the moment,
it's way way too big, I'm gonna make it a
little bit smaller, so it fits beautifully on
there, as you can see now. And that's looking
very nice like that. Very happy with that. Okay, so now Just carry on
working your way around. And I think we need
another plant pot on here. So another plant pt on here, so let's just grab this one. Let's press shift, and
we'll bring this one over. And I'll put another
plant p on here, like so. Let's drop this down. I place. Pull it over there. Like so. And then I'm thinking, maybe maybe one more
plant pot and we'll put it in this here because this looks a little bit boring at the moment. So shifty, let's put one
more plant pot in here. Like so, press the dot
born and then just make sure it's on in the ground. Like so, double tap the A. And we finished. A we finished on
it. First of all, we can get rid of all
of these booleans. We're not going to
need those anymore. Then will clear the
scene up for us. And I'm thinking, yes, we
are just about done on this. Now, what I'm going
to do is I'm going to press file, save it out. And for now, I recommend that
you have a good look round. So what I would do is, we've got the moment
that is modeling. This should really be called. If we double click it, this should really be
called asset manager. Like so. And then what we'll do is we'll put another
one in here, general, and we'll
put it as modeling. So this one will be modeling. And then what I'll
do is you can't drag them. It doesn't work. So what you want to
do is right click, reorder to the front or next workspace. That
doesn't work either. So let's reorder to the front. There we go. There's
our modeling. So now we can actually
have a really good view of our entire viewport of what
we've actually created. So let's click on our render
button. And there we go. This is what it looks like. Now, what we're trying to do, you can even come up and turn off these interlocking
links here. Now, what we're trying
to do, as you can see, is every part of this makes something
interesting happening. So you can see, no matter
where you look on these parts, not only have we got
interesting things happening, but we've also got lots and
lots of height variations, lots of intricacy, and it's all in quite
a confined space. And that's what you're
looking for whenever you're creating something like a level design or whether you're creating
something like this, where you're putting a load
of modular parts together. That's exactly what
you're looking for. Not only that, what
we've also done is we've taken something
from a gray box, and we've took all of those
little parts and we've made an actual pack from
them that we can use to create an entire
city just about. You might want to
come in then and create a few more parts on here, but from this, you can
create out a massive city. You can take this into a real
engine or unity or got it, and you can put it in there and actually build out
an entire city. And then all we need to focus on now is getting the
vines in place, the lighting in place,
the trees and bushes, and things like
this, the terrain, of course, and once
we've done that, then, you should have the keys actually to creating
your very own worlds. That is the whole idea
of this actual course, creating modular packs, which
then can create worlds. So I'm just going to
have a quick look round. And make sure that I'm happy with all of the angles.
That's what I do next. I'm happy with all
of the angles. But if you can see here, it
all makes sense as well. Whatever they're doing,
so you can see at the backup here is
where all of the, you know, the rich
people or the king or the Sultan or whatever
he is called live. And down here, you can see this is where all
the protection is. This is where they go
to worship something. This is where the
market is around here. This is where all the
storage is round here. And this, of course, is the kind of cheaper places where the
other people live round here. I imagine and on here is where the Sultan lives or
something like this. That's what I think anyway. So that's what happened in my head when I was
designing this. Now, what we'll do then
on the next lesson is, we will actually start
creating then all of the booleans for these
actual windows and doors. That's the next problem we're going to have because
at the moment, all of these look as though
they're stuck on something. So what we'll do is we'll
create a boolean for the doors, a boolean for the windows, and then we can start
bringing them in. The only problem you have when you're doing
things like that is You're going to actually
destroy some of these walls. So some of these walls, this
part here in particular, they're going to end
up probably destroyed, and we have to go
in and fix those. That's why it's not
such a simple job as bringing booleans in. Now, you could
actually create parts, so you could create a block where it already
has a window in. That is something
else that you could do as the actual pack. But for me, I went in and I just created the windows that
you can put on the side, because I think then you can put your windows
wherever you want. But you could absolutely
go and do that. And I think even
a unreal engine, you can do that as well. Alright, so as far as that goes, what I'm going to do now is, I'm going to save out my work. I'm gonna save this out, and I'll see here on the
next one, everyone. Nearly finish the actual build
now. Se on the next one. Thanks a lot. Bye bye.
130. Using Boolean for Door Section Cutouts: Welcome back, everyone
to Blend the fall the modular and Kiah
Environment guide, and this is where
we left there off. So what we're going to
do now is, I think, first of all, we'll focus
on our actual doors. So just come in, and
what we'll do is, we'll just hide these out
the way just for now, just so I can actually
see what I'm doing. So I'm just gonna
hide all of those. And then what I'm gonna
do is grab this door, press Shift S, sa selected. Shift A, and let's
bring in a cube. Let's make the cube a
little bit smaller. And then what we
really want to do is we want to make sure
that there's a tiny, tiny bit of a gap on
each side of these. You can see at the moment, it's kind of a little
bit too big there. If I press this, I'm just going to bring
it out a little bit, just so that door
just fits in place. Then what I'm going
to do is I'm going to press shift space bar, bring in my move tool. I'm going to bring it down
just to the top of that. Again, leaving a tiny,
tiny little gap. And then finally
what I'm going to do now is bring it
down to the bottom. So if I press tab and come
to the bottom of here, press Shift space bar,
bring in the move tool, and just bring it
down then into place. Now, We're going to be
hiding a lot with this step, as you can see, so
we don't have to go all the way down
to the bottom. The important thing is though once I've
actually done this, you will see that it does affect this actual mesh and
this actual bevel. So we'll have to go in there
and fix that on all of them. So what I'm going to do
now is just press shift, and then I'm going to pull
it across to the other side, making sure there's
a tiny tiny gap. It doesn't need to be perfect. Just make sure there's a tiny, tiny gap in each side like. So you can see here, it's a litle bit maybe a little
bit too much that way. So hold the shift born and bring it back, and there we go. Alright, so we'll do
this for the first one. And what we also want to
do is we just want to keep these actual
Booleans as well, because then we can use
them on our other doors. So we'll do all the doors first, as I think that makes
it a little bit easier, seen as they near enough
round about the right size. So what I'll do is I'll join these both together
with Control J, press Control A, or transforms, set origin to geometry. Then I'll come to
this big piece here. And what I'm going to do is I'll grab this one and this one. So both of these press shift H, that then will hide everything
else out of the way, and then I can actually
come to this one. Now, before we do
anything, we want to reset all of our transforms. So you can see here,
reset Control A, reset all transforms, create a new object using
and applying data. In other words,
because we've actually made a new mesh out of this. Cause we squished it in or
made it a little bit smaller, it will actually
affect this mesh. Now, I'm hoping
that doesn't affect the mesh. My asset manager. But what I'm going
to do instead is, I'm just going to try
it without actually using the research
transformation. So let's give it a try. So we'll come on
over add modifier. We'll bring in a boolean, and the Boolean will be
these two guys here. We'll put it on fast, and let's actually see if
that's actually works. So I'm going to do is
just press Control A. In fact, if you want to, save out your work before doing that, and then you can actually
press Control A and apply. You can see and make object
usan and apply modifier. So let's actually do that. I think we're going
to have to do that. Then we can hide these out
of the way, and there we go. Now, you can see
what I'm talking about with the actual
bevels on here. They're not actually
working properly anymore, as you can see. So what we need to
do now is we need to come in and fix all of these. Now, the best way to do
it is first of all to come in to, let's say this one. So we'll grab all of
this with Edge select, and then shift H, hide
everything else out the way. And from there, then I
can actually come in, press the F button,
and actually F, and actually join
it all together. So F like so, and then F L so. And then finally, F and then
F on this one. There we go. Now we've joined
all that together, and you can see that's all done, except the fact that we
need to unwrap this one. So what we'll do is we'll
grab it all or press U, Smart U V, project, click
Okay, and there we go. That's that one
done. Now we have to do the same for
the rest of them. So what I'm going
to do is press L on this one, and L on this one. Shift H, hide everything
else out the way. And let's check this one first. This one is looking
absolutely fine, so it will only
affect some of them. You can see that we do probably need to unwrap it on
these parts here. The top one is
definitely not fixed, so let's do that one next. So all I'll do is grab this one. And the top. We can see here. Sometimes this happens as well. We'll actually make
a mess of the top, and that's because it never
actually had a top in there. So we actually have to come
in and actually fix that. Now, the easiest way to fix that is probably to
grab both of these. Press three on the number pad or control three to go
into the front view. Press E and Z and
just bring them up near enough into place.
They don't need to be perfect. And then all we can do is we can grab this one and
this one, press F, and then this one and this one F. And then just the same thing, just so we still get that bevel. That's what we're looking
for to get that bevel. Onto this actual stone block. So this one and this
one, press the F, and then press A to
grab everything. You know what? We won't bother unwrapping this one. I
think it'll just be this. So we'll just grab all of this, Smart U V project. Click Okay. And there we go. And
now you can see, that's actually
working much better. Can I still turn this
up? That's the question. Yes, I can. So that's
all looking good. So let's put it on nut point, not not eight. Let's try that. Too much. So let's think about bringing
it up. A one more. And there we go. I think
that looks much much better. Now, it actually looks
like some stone. Maybe maybe a little
bit had too much. Let's turn down
one. There we go. Alright, let's press tag. Bring back everything,
let that load up. And now you'll see once
I bring these out, so I can pull these out now. I've got my doors there, and I can actually come in
to each of these doors now, and we can actually pull them back a little bit into place. And you can see what that does. It actually makes it look
a lot more realistic, and it makes it fit a lot
better within the scene. It's up to you how far you
want to pull yours back, make sure that you know, these blocks are pulled
back far enough. Now, we could do
the same thing on this one as well. We
could pull that back in. And I think we'll
do that. So what we'll do first of all now is split these off
because I don't think there's any door
actually together. So all I'll do is press
delete and vertices. And you can see that they've got the top of it
for some reason. So L delete vertices, and then come back to this one
control late or transform, right click so
origin to geometry. Now, what I'm going
to do for this one, I'm going to keep this here, so I'm basically going to
put this one in place. So if I press one, I should be able to
go into front view, press G, and let's get
it into place like so. Now, I do want to keep this, and the reason I want to
keep this is the fact that this is already
created for this size door, and we have a lot of those
doors over the other side. What I'm going to do
is just press shifty and I'll move it
over to this side. Now I want to do
is I want to make this one a little bit wider. So, S and X. Let's pull it out a
little bit, like so, and then let's make sure now
if I hide this out the way, and hide this out the
way and hide this, how far is it into there? I don't really want it coming
through this part of you. So what I'm going to do is I'm going to grab the bomb of it, and I'm going to lift
it up above that part. We should be able
to just lift it up. Just above there. Like, so where are the doors
actually going in? I'm just wondering whether
actually, you know what? Let's put it down a little bit there. Something like that. And then what we can do
is we can press again, control lay all transform, set origin to geometry, grab this then, the
door, and let's grab. You know what? Let's
just grab this and this, and then shift H. Hide
everything else out the way. Now, let's see if
this one bloons off. So all I'm going to do is
adding a modifier generate, and we're going to come down,
and we're going to go to where is it, look, Boolean. There we go, and the Boolean
is going to be this. And we can see, again,
we're going to have the same problem in
fire press control. Let's see if we've
hide that away. Oh, we haven't. We've actually
made it easy for ourself. One thing about this, though is, I can see that before
adding my Boolean, I need to pull it
back a little bit, so the other thing is, just be aware you might
probably want to come through. Here it will make life
easy for yourself. In other words, if I bring
this down below there, it is going to make it
a little bit easier. So now let's come
back to this one. I'd modifier generate a Boolean. Let's bring in boolean, and let's put it on fast. And we can see now that
because we've done that, it's kind of messed
that up, and I'm just wondering why
it's messed it up. And I'm just wondering whether
to actually lift that up. Let's see if I come in now and
lift this up a little bit, and there we go, You know what? I'm going to leave
it like that because rebuilding this is going
to be more costly in time. So I'm not actually
going to do that. Alright, let's
come back to here, apply our Boolean, and there we go, you can
see it got rid of it. And the reason is, I think
it is because I need to reset all the
transforms on here. Now let's try and apply
that, so control A, and it's still
getting rid of it, and that's not what I
want was not first. Okay, so now we know
what the issue is. So let's pull it up. So what I'm going
to do is grab this over here, pull
it up to the top. And now let's see if
I put it on exact, can we actually get
away with that? Yes, we can, but there
will be a problem. Now, if I come in, let's see if I grab the
bomb of this now, pull it down, and there we go. So now you can see
what's happened is. If I come back to this,
this is at the top now. It's took off the
bevel to start with. But the thing is, it's
going to still be there. Sometimes this happens
with the Boolean. I don't know why, but
sometimes it does. Let's just come in and
reset this as well, so we'll transform origin to geometry, just to make
sure it's not that. And in the end, we're probably
just going to have to breath control A and apply it. Now what I want to do
is I want to come in. Now, you will see this
is all joined together. Sometimes, as I
said that happens. So what you've got
to do is shift click and just go around, grabbing it, like so. And then you're going to
press delete and faces, and then you're just
going to go around. And you can see now this is the Boolean pressed lite
and delete out of the way. And then you should end up
with something like this. Now, you can see some of this is filled in, some of it isn't, so you can see here this is
filled in. This part isn't. So what I'm going to do now
just fill all of these in. So I'm going to press F
and fill them in, like so. And there we go. Now
we can see we've got issues with doubles
and things like this. So what we're gonna do
is turn off our bevel, first of all, like so. And then what I'm going
to do now is press A, Now, the thing is at the moment, I'm not sure whether
this is joined now. It is joined now, so that's also going to cause a problem. So you can see here a lot
of issues on this one, a lot of issues, and I didn't really want all these issues. So what I'm going to
do is I'm just going to delete these.
So delete faces. I'm going to come
in then, delete. Do I need to delete that face? Now I'm going to leave that face, and then
I'm going to come in. Let's have a look at
this bottom as well, so delete bases, and we're just going to go in and
tidy all of this up. So delete and bases, like so. And then what I'm going
to do is I'm going to come in and delete
these edges as well. So delete and edges,
and there we go. Okay, so on the
next lesson, then, hopefully, I'm going to
delete this edge as well, and this one down
here, so delete and edges and delete edges. And hopefully, then I'm also going to come in and
delete this one as well, so delete and basis. So hopefully, on the
next lesson, then, we should be able to come
in then, and now we've got this pretty much, you
know, straightened out. We should be able to join
these pots together and then split this off
from this bottom pt. So I will show you
actually how to do that once we've
actually fixed this part. Alright, everyone, so
I hope you enjoyed that bit of a long one going
through the same things, but we really need
to make sure that we get this right when
we're actually doing it. It is a bit time consuming, but it's well worth
it, as you'll see once you get more into it. Alright, everyone.
Thanks a lot. Bye bye.
131. Fixing Boolean Mesh Issues in Blender: Welcome back, everyone
to Blender for, the modular and Kiash
environment guide, and this is where we left
it off. Now, let's come in. And what I want to do is,
I want to first of all, split all of this
off because you can see that it's at the moment, it's got well, pretty much a join mesh, and
we don't want that. So what I'll do is, I'm
thinking I need this part here. So what I'm going to do is I'm I'm just wondering the easiest
way to actually do this. I think the easiest
way to do this is, first of all, join
this with this. So let's press F. Let's
join this with this, and let's press F. And let's join this with this,
and let's press. And you can see here,
this is not a full one. So let's go and delete
this one first. So delete edges, and then I should be able to
join this one with this one and F. And that's not
joining either because this one is two of them. So let's press delete. And what we're going to
do is limited dissolve, and now I shall be able to
join this one and this one, press F. And there we go. You can see we've
still got some issues. So I'm going to do
is, I'm going to press A. I'm going
to go to mesh. I'm going to go to
cleanup, and we going to merge by a
distance first of t. So that's five vertices removed. Now, finally, we should
be able to come in. Grab it all again, and let's press limit to dissolve on
there, and there we go. And now let's try to even join
that up. And there we go. It's finally finally working. So just try and
follow what I did, but it's a lot of cleaning
up, unfortunately. So that's what the case is. Now we want to do
is we want to come in and join these up. So if I press F on this one, F on this one, and then F
to take a face on this one. And now we can actually come in and hopefully
split everything off. So I'm going to grab the top
of here, press control plus, and then what I want
to do is want to come in, do these ones here. So, making sure
I've got the back, and then all I'm
going to do is press Y. H, hide out of the way. And then this what we
should be left with. Now, we'll just press
t, press A again. And then what we want
to do is let's see if that bevel actually works
before doing anything else. So I'll press control
All transforms, set origin to geometry. Add modify it, bring in a bevel, and it looks like it's worked apart from this bottom bit that doesn't seem
to be filled in. So I'll come to this bob bit. I'll hide this bob
bit out of the way. And then what I'll do is
I'll come to this one. Alt Shift click,
press the F but, and there we go, now,
it's actually working. Now, let's press tab, A, OH. And then, Smart U V, project, click Okay.
And there we go. And t's finally turn this
down to Not Point No No five. And finally, then, there we go. That is our stone
block. Let's turn it up to Not Point Note eight. There we go. Let's press Alta
to bring back everything. We'll take a little
bit time to load up. And then hopefully, this door now should be able
to go further back. So you should be
able to now pull this door back to
wherever you want it, and you can see, again, it looks much, much better. Now, I know, that this bit
is stuck out a little bit. And what I would do on this one personally is just come in, press L and just press delete
and vertices delete it. Now, the first thing is we need to make sure that
before doing that, we've got a few of
these over here. If I delete that, is that
going to change all those? Let's press delete and vertices? Because if it does,
yes, there we go. Well, that means is
then I'm going to, instead of doing that, I'm going to press shift on this one. And then what I'm
going to do is delete this one and then pull
this back in place. And then what I should
be able to do now. Instead, I should be
able to now come in and press delete and
vertices, and hopefully. It's left that
still there because it wasn't old D. It was shifty. So instead of old D, we just
shift it, and there we go. Now you can see that
looks to tons bare. Okay, so this one, I'm
definitely going to leave there. I'm not going to do
anything with that one. We've got another door in there that we're going
to leave in there, and I'm not going to do
anything with that one. I'm going to come
round then over here. And I'm looking at
this door down here. I think I'm definitely going to do something
with this one. And I'm thinking
that this one here, I should do something
with that one. So we've got two doors there. And then this one here. I think I'll leave
this one the same, but what I'm going
to do is just pull it back a little bit like so. So I'll leave that one there, and we've got two
more doors to do. This is not the windows.
It's just the doors. This one here, I will
do something with. So pretty much
three doors to do. So what I'll do
is, I'll come in. I'll grab these three
that I want to do. So I'm grabbing all
of these like so. And then what I'm going
to do is press Shift H, hide everything else
out of the way. Except, except my Boolean. So shift H, hide everything else out of the way,
and there we go. Alright, so let's start
with this one first, so I'm going to bring it in and sell all of my booleans
in one go this time, so I'm going to press
G go over the top. Seven, sorry to go over the top, and then G to put
this into place, pull it back, and then let's look where
this first one is. So you can see, it's a little
bit out a little bit out. If I press control three, I've got this one in the way. So what I'll do is
I'll do another trick. I'll grab this one,
this one, and this one, press the question
mark, and then I'll further isolate
everything out the way. And from there I can
press control three. Now let's bring this one down. And then when I first press tag, it should or the question mark, sorry, it should just bring back All of the things that
have been hidden. So let's point it down
to there, like so. Yours down to there and
then what we'll do is, I'll grab the top. I'll pull this down. And I don't want it to
go back that far, so you can see it's
really far into there. We don't want it to
go back that far. All right. Something like this. Press question mark, and then
we go on to the next one. Let's press shift D then. And then we're going
to bring this over. And then we're going to bring
it down and into place. So let's press control one just so we get
that right view. Then I'm going to put
it into place like so. And then what I'm going
to do is I'm going to grab the bottom
of it and pull it down into place like so. And then finally look
how far this is back. Make sure you're happy with it, maybe a little bit
further, like so. And now I can press shift dee. And bring it over and I
want it over in this one. I want to press seven to
go over the top again. G, let's put it in the right place or roughly
the right place first. And then let's isolate
all of these out again, so grab my door, this and this, press the little question mark. We'll press three
to go in side view. And then what I'll do
is I'll put this or pop this into place where
I actually want it, which will be
somewhere around here. Just make sure it's going
back far enough. Like so. Little question mark
again, and here we are. We're ready to actually
work on these. So let's hopefully, these ones are going to
work out a lot better. Let's actually hide our doors, not this, our doors
out of the way. Now we know we've got these
in the right place. Like so. L so, L so. And then what we'll do now is
come to this one, and we'll use our bevel. So let hopefully this g
to work. So let's try. Let's generate a not
a bevel, a Boolean. I mean, so let's
click on this one. Let's click on fast, and I think that's actually
one that's worked. Control, delete this
out of the way. And there we go that one's
work. So that's great. Let's come to this one and a
Boolean. Llick on this one. Let's click on fast, to make sure it works. Let's
press Control. Now, this one here,
you will see. If I delete this
one other the way, no, it's actually worked. So that's great. And
now finally this one. Let's hope we get
this one as well. All I'm going to do add a
boolean L one, Ma Boolean. Lick come fast, and let's press control A and
delete it out the way. And that one's worked as well. So that's made things really, really easy for us, guys. Alright, so let's
come in to this one. And what I'm going
to do first is grab the center with Edge select. So with Edge select and press L, and you can see it's
all joined together, and that's causing us a problem. We don't actually want
that. So what we're gonna do is we're gonna
come to this center one. O shift and click,
then that's gonna grab them going all
the way around here. You can see we've
got a bevel on, and that bevel is actually making things a
little bit harder, so I'm just going to take
it off just for now. You can see then we've
got a top and a bott. So it looks like I've
grabbed all the top, I be hide this out the way. You can see, there's a
stellar bevel on there. There's a stellar face on there. It looks like there actually is. So what I'm going
to do in studies. I'm going to just
press control plus a minute and see where
that comes down to. And then what I'm going to
do is hide that out the way, and this is what I
should be left with. So you can see here
that we've got a problem with this part
now, and we don't want that. So what I'm thinking to do is, I will delete both of these. I'll delete both of
these, so delete bases, and then I'm going to press
A, and then I'll just press limited dissolve, like so. And I'm hoping now
I can actually fill this face in properly. So if I grab this edge and
this edge and press the F one. You can see I've still got a bit of a gap there, and I
don't really want that. It's because of this. So
let's ser delete edges. And now you can see
we've got this. So if I press A and
limited dissolve, like so, and now I
can still see that. So I'm just wondering
why that's the problem. And sometimes just not
worth messing around with. Like here, you can see. Sometimes it's just worth of getting rid of the
faces instead. So if I delete this
fa delete faces, like so, and there we
go, now it's gone. Now we shall be able to
fill this part, this part. F b. And not that part. This part and this
part, F. There we go. And this part and this part, F. And then this part and this
part with F. And there we go, now, can we grab all of this? Does it grab all the thing?
Nope, just grab that part. That's perfect. So U, smart UV project okay,
and that one's done. Now, let's move up
then to the next one. I'm just making sure
that it's okay. Let's move up then
to the next one, which is this top one here. And I'm just making sure this
one actually looks okay. So all I'm going to
do is press tag, and I should then, just
fil to grab this one. Nope, because it means
that all of this, for some reason is
already joined. So what I'm gonna do now is I'm going to come in
to this one here. The ult shifting click just
going all the way around. Now, the thing is
here, you can see that I am going to have to use
this to come down to here. And the reason is just
because this part here is overlapping
slightly as you can see. So what I want to do is I want
to basically bring it up. So let's bring it
up a little bit, and then it should
just sit on there, and now you can see it's
looking Ts tons bare. Now what I want to do really is, I want to f fill these in. So what I'm going
to do is just grab this one and this edge
here, press the F b. And I'm using that then to
create this kind of opening. So if I grab this one and
this one, for instance, I can now press F and then grab this one and this
one, press the F b. Then finally grab this one and
this one, press the F bod, and then I should be able to
come in and grab this bomb, press delete and faces, and there we go, we should end up with
something like that. Now I'm just going
to have a quick look at how we're
looking now and you can see that I
can probably come down and bring this
down a little bit. So now if I grab it
all, I can come down, now fix that and just drop
it onto the top there, but it's nice and
fitting on there. And then we just need to come to the top
because obviously the top is again,
I'm looking now. I think it's all
joined to this one. Let's come to deselect. Yeah, it's all joined
together on this one. So I've just got
to split this off, and then finally
I can get all of this placed nice and neatly. Make sure the mesh
is looking good, and then we can go on
and fix the others. Alright, let's save out
our work, so save it out, and then I'll see on the next to everyone. Thanks a lot. Bye bye.
132. Connecting Blocks After Boolean Operations: Welcome back to Blender fold the modulate and Kit ash
environment guide, and this is where
we left it off. Now, what I want to do
is I want to come in and basically split this off
now. So let's come in. And what we'll do is we'll grab this one, this one, this one, and then just grab it
going all the way around, so all the top one, basically. And then all you want
to do is press Y and split that
off. Shift H then. And then what you
should be able to do now is see that
it's all split off. Just press delete and make
sure it's not delete. So. Let's come to mesh, clean and merge by distance, just to make sure there's
no vertices in there. Alright. Lastly, then with this, we need to fill in
this bomb part, so l shift and click,
press the F button. And there we go,
that's that part done. LtH, bring back everything, and now we move on to this one. So grab this one, shift H, hide everything
else out the way, and just make sure it's
got a top and a bomb. So Alt Shift click, press
the F bond, and there we go. Let's press AltH once more. Move down to the next one. So L, shift H, make sure it has a top and bottom.
And there we go. Now what we should be
able to do is come into each of these. So
come into this one. U, Smart UV project click. Okay, come into the next one, L. Smart UV Object, click. And finally, this one, then L U Smart UV Object and
click. And there we go. Now, finally, what
we want to do is you can see this is
a little bit high, this one here. Looking
through there. And I think I just
need to pull this down just very, very slightly, so let's just pull it down, holding the shift bar, and
bringing it down to there. Now, you can see, do have
a little bit of a problem. And that is that I've got one here that
shouldn't be there. So let's come in and
actually delete that way, so delete and Vtss. Finally no, I should
be able to come in and pop this right on
top of there, like so. Now, let's just come in, press Control A or transforms, set origin to geometry. Let's write crick and
shade smooth by angle. And then let's come in
and generate a bevel. And let's put the
bevel on No Point Not five or No Point
Not note three. And let's see how that
looks. You know what? That's looking pretty good. So there is that one done. Now, let's come to the next one. Let's come to this one, then,
and what we'll do is we'll isolate everything out with
a little question, Mark. And then what I'll do is I also going to put this on
object mode just for now, so I've got a good idea. Now, this top part, we
can see this is fine, so we can come in and
press L on this one and on this one and
hide them out the way. Now, if I press L on this, it's gonna join
them all together again. Don't really want that. So what I want to do
is I want to actually, you can see here as well that we do have a problem in
the back of this. It doesn't really have anything that's
joined up on there. So what I'm going to
do is I'll actually fix this bottom part first. So Alt Shift and click. Just make sure you go
all the way around. Grab this one and hide
it out of the way. Then what I'm going to do is I'm going to grab
the top of hear, press delete and faces, and then grab it again,
delete and faces. And there we go. Now I'm
going to actually fix this. So Alt Shift and click. Going all the way around here, and we should be able to press the F be and fix it in place. I know that's not working, and it's probably not working because we have a
bevel on there, that's also going
to affect things, and there's probably some
mesh in there as well. So let's come up to mesh. Clean up, merge by a distance,
12 vertices removed. Now we should be able to
come in. Alt Shift click. Let's see if we can do it now. F, and there we go. Now let's press lth. Bring back the next section
then, so it's this one here. And what I want to
do with this one is, I want to press L, and you can see, still
all joined together. And that's really Yeah, what I'll do is I'll press
Controls Ed and just go back. I'll grab all this
one, I'll press Y. Then it should be separated. Atg and now if I come in, press L. Now you can see
that it's actually working. Alright. So now we
want to join these up. So what I'm going to do is
I'm going to grab all of this with L. You can see
it's got no floor in it, so shift, hide everything
else out the way, and this is what we're
actually left with. Now, the problem with this is we need to pull this part back. So we need to pull all of
this back to the same level. So what I'm going to do is, I'm just going to press F on this. And then I'm just
going to press E, and I should be able
to then pull it back. Delete the floor out the way. So delete and faces. And then finally, lth,
bring back everything, and now I should be
able to grab this bit and pull it back
to where I want it. So it should be level
with this one down here. And finally, then, finally, we should be able
to grab a shift H and then fill in
this bottom section. So lt shift and
click, F, fill it in. Now, you will see that we do still seem to have
some problems. And the main problem is, shading smooth by angle,
and there we go. And then we want to press
control A or transforms, right clicks origin to geometry. Adding then A Bevel. Let's see if this
bevel actually works. We can see we still
have some problems. Let's put it on not
point not eight. L, so, and I'm just wondering if there's any issues
with these parts now. When I go in there, I think those issues are probably
caused by normal. So let's have a look
at face orientation. Let's press ol tag. You know, what doesn't look like
it's caused by that? Let's turn this up. There we go where there is some face
orientation problems. Let's press tab A, shift
and n, spin that one round. It's not really
spinning that round, so I'm wondering if mesh, clean up, merged by
distance, ten vertices. That's not working very well to our liking, so let's
turn this off. And let's turn it down to
not point not not eight. Let's turn it down to
there. You know what? I don't even think want to worry. What is the
issue in there. Th there's a mesh that's
join in there wrong. You know what, I'll try one
more thing. So right click. And what we'll do
is we'll come to Face elect, right click. And what we'll do is tries to quads and then
triangulate faces, and then tries to quads. And let's have look if I turn
this up now, there we go. That has fixed the problem. So now you can see that
it's actually fixed. So we got there in the end. Let's shades move by angle. And let's put this on
not point not not eight. Like so. So you can see many, many ways to
actually fix things. Let's press a little question, Mark, and I messed up there,
so let's just go back. So controls. And
instead of doing that, we just press a
little question mark. S bring back everything. And now we're on
to this one here. Let's press question
mark on this one. Now, let's hopefully make
this a little bit easier. So what I'm going to do is,
first of all, I'll come in, and I'll press L. And
then what I'll do is I'll press y. And then
I'll come to this one. And I think this
will all be joined. Yes, it is. So we don't
really want that. What we want to do then
is split it all off. So what I'm gonna do
is, I'll come in, and I'll press t shift and click going all the way around. I'll grab these ones, like so. And I'll come in and grab
these ones, like so. I'll press Y. And there we go. Now I can hide that
one out the way. Then what I'll do is
I'll come in now. With this one pretty much the same thing as what I did before. Now, you can see here that
this floor doesn't look like it's joined correctly. It needs pulling
back down to there. So what I'll do instead
with this one is, I think, I think I'll grab all of this
going all the way around, like so, and even to there. And then what I'll do
is I'll pull this back. So I'm just going to press Y, and I'll separate
that out of the way, as well, H, hide it out the way. Now I can delete this one,
so I can delete this floor. I can delete this
little barrier. This is not very useful, so delete fases on that one. And now I'm on to
this part here. Now, I'm hoping that this floor is joined to there,
but it might not be. So let's press A, first of all. Yeah, let's take these out
of the equation as well. So we'll come in L L. Yeah, you can see
there. If you look what happened there if I press
L, hide this out the way. You can see that
floor there also needs delete in,
so delete faces. Then we'll come into
this part. So L, and this should be perfect now. L, hide it out the way. Now, let's come to this
part, L. And then what we'll do is we'll come to mesh. Clean up, merge by distance. Zero motor is removed. So that one then should be fine. So what we'll do
now is press tag. We should now be able
to come to this one. And we should easily be able
to hide it out of the way, but we don't quite in fact, you know, what,
we will do that. We'll hide that one out the way. And now we should have this one, which is also separated. Now, we can see on this one,
we actually have a floor. So we actually have
a floor on here. So what I'll do
is, first of all, I'll delete this
floor out the way, so delete and faces. And then I'll come
back to this one, and I'll grab both of these. And then what I'm going to do
now is pull them that way. So if I press E and x, I should be able to pull
them into place like so, press the F board,
and there we go, now, I should be able to press L. And the shift H, hide
everything else. Alt shifting click. We'll
do it on the top one first, l shift click F, and then
lt shift click and the F b. And then we go we
filled all those in. And then finally
let's press the ltH, and it shot just now. I'm just looking now
if it's this one. Have we done this one? I'm not sure if we've done
that one, so shift H. Yet we need a floor on here. So lt shift click F, and then l Shift click. And we need to fill
this in, as well. So F fill all that in. And then right click
shade auto smooth. And there we go. Not Point
Not Not one, that looks fine. And yeah, they look
pretty good now. Now if I press ol tag, or the question mark and
bring everything back. Now what we should be able to do is we should now be able
to pull these back. So I should be able
to grab these and pull them back to where
we actually want them. And you can see that's
looking now if we put this on material
view much much better. And I need to prove to you why
we're actually doing this. So why are we pulling
these things back? Why are we taking so much
trouble to actually, create these parts like
this with the Booleans. And you can see that I think these look
tons stuns better. Now, I'm also going to do
the same thing with here. I'm going to pull this back a little bit, double tap the A. And I just think it looks
so much better like this. I'm also going to
pull this one back then into place,
double tap the A. And it just looks
more realistic. It just adds a lot more. If we put it on rendered view, You'll see now that I think, as I said, that these look
a lot bet lot better, especially when you've
got your torches in because it's really go to
bounce more light around. So I think it just adds
some realism to it, especially under here
where the actual, you know, where they
put back near the pool. And yeah, that's
looking pretty nice. Press space bar now. You can see that looks
really, really cool. Alright, so what I'm going to do is I'm going
to save that out. And now we're going
to start working on the next one is the windows. And there are no windows where we can't
actually use it on. We have to use it on pretty
much all of the windows. So we just need to take
that into account. I'm looking where actually the
windows are at the moment, and we can see we'll
work through them. We'll actually create
a couple of booleans just to make sure you
know, we've got them all. Alright, everyone, so I
hope you enjoyed that. I know it's a
little bit tedious. I know it's a little bit fiddly. But hopefully, it's
showing you as well how to actually
fix your measures. So if you didn't go through it, make sure you go through it. Make sure you're
following what I'm doing. And then you'll
see like, there's so many ways of, you know, removing doubles, using if
I press delete on here, you'll not delete on this one. Let's go in and grab one of them and press delete
and limited dissolve. There's so many
different ways we can actually use to
actually fix things. So I think it's really important that you
actually learn those. Alright, everyone, so I
hope you enjoyed that, and I'll see you on the next
one. Thanks a lot. Bye bye.
133. Fixing Additional Boolean Holes: Welcome back
everyone to lend for the modular and Kash
Environment Guide, and that's where we left off. Now, we're looking at window. So let's come in and
make a new boolean, so we'll make a square one. So shift A. Let's
bring in a queue. And then what we'll do
is put it roughly if I press one to how
big this window is. I'm just going to hide
a few things out of the way here just so I can
actually get out this window. So roughly there. You can see
there, if I press G then, press the S one,
I'm going to bring it roughly into the right space. Now, we don't want it going
over the edges of here. We want it right in the center because these stones are actually supposed
to go around there. And then what I'm
going to do is just pull this back into place. Now we are going to
need another one. So I'm going to pull this
into place around here. And then what I'm going
to do is press shift. Now, most of the time, most
of the time, on the windows, at least, it's much much easier because they're not actually
crossing through something. There are a few occasions like this one where it's
crossing through two, but it's not like
the doors where it's crossing through
three or something, and every single
one is like that. So let's now bring this one up. And what we'll do is we'll
bring it into place. So I'm going to bring just down, halfway on this one, and
then I'll bring it to here. And then what I'm
going to do now is bring it up, so I'll come in. I'll press the tabon,
grab the top of it, pull it up into where
we actually want it, and then we're going
to devel it off, so Control B, on
each of these sides. You might have to actually
reset the actual orientation. So let's reset. Let's actually, first of all, try and see them bring it in. You know what? That's looking actually good. I'm just wondering about this
part here as you can see, it probably needs coming
out a little bit. So what I'm going to
do is grab this one. And this one, S and y, pull it out with
medium point on. So S and y, pull it out. Into place like so. And then maybe I've gone a little
bit too far there. So as and why I bring
it back a little bit, and I'm going to have
to pull it all of it. So all of it this
way a little bit. Like, so if I press
Control three, then I've got a good view
of how that action looks. And I'm wondering whether to put another edge loop
going across here. So that's what I'm going
to do. So I'll come in. I'll press Control, left click,
right click, Control la. Left click, right click.
And then what I'm going to do is I'm going
to grab both of these, pull them up into place like so, and then press S and Y and
pull them out, like so. Alright, that's
looking pretty good. Let's now press control
A or transforms, set origin into geometry. And finally, with this,
I'm thinking I'll probably have to go in
because you can see here, this is not joined up properly. It's actually a
curve. We'll try it. We'll see if it actually works. So we've got two here. Then what we'll
do is we'll grab, let's look where
we've got the other. So we've got our other
two around here. So I want to do is press
50, bring it over. And then R z -90, pressing control and one, and then I shall be able to
go in reverse, pressing G, putting this one into place, and then shift D. I'm going to bring this
one down into place. And if you look in,
I'm not actually worried about actually
fixing the Booleans. I'm not trying to actually fix them. I'm
going to pull them back. So I'm going to make sure
that first and foremost, I actually get my windows in. This one here needs going
back a lot further, as you can see,
rather than worrying about fixing things because I want them to look right
at the end of the day. Alright, so now
we've got another window here, another
window here. So let's do those two first.
So I'll grab this one. I'll press Shift D, and then
I'll press control the one, and I'll pull it
over and into place. So you can see this one
is a little bit smaller, so I'm just going to
press the S button, bring it down into
place like so. And then what I'll do
is I'll pull it back. So, and then I'll move to the next one, which
will be this one here. So shift D, and then r z -90. I'll hide this out the way a minute just so I can
see what I'm doing. I'll press three then
to go into side view, and then I'll be able to press G and put this one in place, and it's around about
the same as the other one. And I'll
pull that back. Like so, and there we go. And again, it doesn't
have to be perfect. And then what we'll do now is we'll come to the square block, which is this one here. So we used very few
square windows, actually, and then shift D control one, go to the rear view, and let's put that
one into place. Here, like so, and then
let's pull it back. But we'll pull it back
into place, like so, and then I'll press shift D, and I'll come to this
one, press in three. And then G, drop
this one into place, and then finally, pull
this one back as well. Alright, so they're
looking pretty good now. I'm just having look if
we've got any more windows. I don't think I do I
think that's them all. You're just having to look
around. And no, we haven't. So let's press Alt,
bring back everything, and now let's start
creating our window. So let's come to this one first. And what we'll do is
we'll grab this one, add modify it,
bring in a Boolean, and the Boolean will
be this part here. Let's put it on fast,
press Control A, and then I should be able to make data a single
user and modify. So the problem is with
this is the fact that this is lt D. So it's
not a single user. When it comes up
with that, instead of using the Boolean on there, all you want to do is press
Shift and D. So Shift D. Enter H for hide and then
delete this one out the way. So delete that out
the way, press old He, and bring it back. Now we should be able
to add modifier, generate a Boolean, and then
click on this one here, click on fast and then click press Control A and a player, and we shouldn't
affect anything else, 'cause we got that
warning up that told us, Now I should be able to come in, this press delete, delete
this one out the way. And then we go, there is
our Boolean in place, which means I can actually drop this back a
little bit further. And then we go I press
on rendered view. Now you can see that
looks Tons toons Bre. We can see slightly in there. Given is the illusion that there's actually
something in there. Okay, so now let's come
back to the others. So we'll work our way around. Now, this one obviously
is going to be a bit harder. So we'll
come to this one. We'll add in a boolean. We'll see if we've
actually duplicated this. I'm not actually sure. If we use D or shift D. We'll click on this.
We'll click on fast. We'll press cir control A, and that then should
be able to apply it. Now, you can see with this one, unfortunately, I I delete this, we've still got one there. And as we know, this
sometimes happens. So let's press shift. You can also see the Booleans actually gone away. It's
not working properly. And then what we'll
do is we'll come in control plus elite bases. And this is what we
should be left with now. And then what we want to do we want to join all
this together now. You can see at the
moment, this is a mess, like what we're used to. So what we'll do
is we'll come in, and first of all, we'll
grab all of this one. So let's just grab it
going all the way around, like so, like so, and
then grab the inside. And you can see this
one's all the same, so I won't bother grabbing that one. I'll just
grab this one. And then what I'll do
is, I'll just press y, like so, hide it out of the way. And then I'll fix this one now. So I'm just going to
come in delete bases, and I'm going to fix
all of this one here. Well, the first thing
I'm going to do is grab these two,
press the F button, grab these two,
press the F button, and then come in, and
then shift click. And see, maybe maybe this
is still not working out. Okay, I'm going to come in and delete the bomb
now, so delete ases. And there we go, now we
can see this is the issue. So now we can see this is the
issue with this face here. So now I should be
able to come in and click Alt Shift and click
going all the way around here. You can see if I've still got a problem with it
going around there. So what I'm going
to do in studies, I'll grab this one and go
all the way around two here, press the F b and fill
that in, like so. Now, let's see if I right
click and Shade Auto smooth, and then we go, that then
should be that part fixed. And now let's come
to this bottom part. So we can see if I press saltHe, and grab all of this one now, so L. And then Shift H,
hide everything else. Now, I should be able to
grab all three of these, press the F p, and then
t shift and click, press the F pon, and
fill all those in. L, let's put it onto shaded mode just so I
can see what I'm doing. I'm going to unwrap it,
then, Smart UV project. Alt H, bring back
the other part. So where is the other part? L U, Smart UV
project, click Okay. Now let's see if that actual
bevel is going to work. So, what I'm going to do is
just turn it up a little bit, and we can see Ponto A
or transform still not working on actually Near
enough any of this. And the reason is just going to check here
with this top one, so L and shift date. Hide everything else
out that way. I'm just making sure I've got
a bottom on there. Then what I'm going
to do is tate, so we'll go through
the process of making sure that everything
is fixed on these, because we're not only having
problems in the bottom, we're also having problems
down here, as you can see. So let's first of all come in. A, grab everything.
We'll go to Facelt. We'll go to right
click, and we will come to triangulate faces, and then tries to quads. And now let's see if
that's fixed anything, right click, shade auto smooth. And we've still got a
lot of problems on here. So on this part,
we're having a lot of problems, which we
don't really want. So what I'm going to do is, I'm going to try the next part. So let's go in and
fix it the next way. What we'll do is we'll
come to this one first. We'll press shift H h. And then what I'm going
to do is now I'm going to delete all of these
going around here. So these are the
first ones I'm going to delete, going all
the way down here. Press delete and Faces. And now you can see that we've got all of that left in there. Now what I'm going to do is,
I'm going to redo these. So lt Shift click,
Old Shift click. We don't want the bond
part. We're going to fix that one in a minute. So we can see It has
grabbed the bomb part. I don't want that yet
because I want to pull these back
actually separate. I'm just wanting
to do this all at the same time. You know
what? We won't do that. So we'll do it from here,
so I'll grab these. I'll shift click going
all the way around. Grab this one, and then
just grab it going here, with Control click, going
all the way around. T here, and then right click. And what we're going to
do is bridge edge loops. So this one, bridge edge
loops, and there we go. And now we'll fix
the inside of here. So I'm just going to grab it
going all the way through. Control click, delete and faces. And there we go. Now finally what we want to do is
remove any double. So A, delete, not
delete, sorry, mesh. Clean up, merge by distance,
eight vertices removed. Finally, then I can come in. A shift click, and I
should be able to press F on this part and then right
click and shade auto smooth. And there we go. Okay, so
that's that part done. Now let's come in press salt H, and now we'll come to this
part and see what's going on. So Shift H. First of all, we'll come in mesh clean up, merge by distance, making
sure one vertice is removed, as you can see, and
I I press salt. Now we can see
everything is working, except this is all poking
out the wrong way, which is generally
down to a normal. So Shift N should
fix And there we go. We've got one slight
problem here. Let's put it on point n n eight, and that then will disappear just because we went too far. And there we go,
finally, finally, we got this one actually fixed. Alright, so you can see that
was a little bit harder. And what we'll do now is press ol tag and bring
back everything, where you can see why again, why we're doing
this just really, really makes it so much better. So what we'll do then
on the next lesson is, we'll work our way round. We've got you know, one, two, three, four, five,
six, more to go. Some of them are a
little bit easier, like the squares,
not round ones. Most of them, though, I think, have cut through the mesh.
You can see on here. This mesh might
need fixing anyway, but we'll look, maybe it's 'cause there's two
going in there. Or maybe maybe It doesn't
actually have a split on there. Yes, there's a tiny split there. But anyway, we'll move
around some individually, and we'll get them sorted out. So let's come up to file now, save, and I'll see you on
the next and everyone. Thanks a lot. Bye bye.
134. 3D Modeling a Torch and Brazier for the Aztec Scene: Welcome Mahon Blend p the modular Kit Bash
Environment guide, and this is where we left off. So first of all, then
let's do this one here. So I'm going to grab this, and I'm going to grab both of these, and I'm going to press shift H, hide everything else
out of the way. Then what I'm going
to do instead of doing it the way
I've been doing it. I'm just wondering
whether it's easier. Split these off before doing it. I think that might make it a little bit easier.
So let's grab this. And all we're going to
do then is I'm going to press L L L, so I'll then press P selection
and split those off, and then I'll go to this one,
L I have split these off. Yes, I should have
split those off. That's good. So then what we'll
do is grab both of these, we'll press control
A or transforms, set origin then to geometry. And now, finally, let's
join these both together. So Control J, join
them both together. Now, you will see that these
now are all split off, which means I need to
do them individually, but I do think in the long run, it's going to make it
much easier for me. So let's come to this one first, and what we'll do is Adding a modifier generate a Boolean. And the Boolean, of course,
is going to be this. And then I'm going
to put on fast. And then what I'm going to do
is press Control A like so. Then what I'll do is
come to this one. I'm going to do exactly
the same thing. Add modifier generate A Boolean. The Boolean then is
going to be this, and let's put it on fast, and let's press Control A, like so. And now let's come in and delete both of
these out the way. And there you go, that's what
you should be left with. Now, you can see, because
I did it that way, what's happened is now I've
still got my bevels on, and I don't actually have
to do any work for them. What I should go to do
now is press Control J, join them together old age. There you go. That is actually a much easier
way of doing it. And I personally didn't
realize that before. So let's try it on the next one and see if
that actually works. So what we'll do then is
we'll come to this one. We'll grab our Boolean. So this Boolean, press shift H. And then what
we'll do is we'll come in and split
lth, these two off. So I'm going to press this
one on here, L, P selection. And then what I'll do is
now. These are two split up. I'll grab them both, control A, reset all my transforms,
origins geometry. And now what I'll do is
we'll come to this one, add in, generate Boolean. And then grab this one, like so. Put it on fast. Now instead of doing that, what I'll do is
grab this one then, grab this one, control, and I'll copy modifiers. Then what I'll do
is I'll just apply them both, so control A, come to this one, or this one, control A. Delete
this out of the way. And then we go. All done. Alright, so much, much easier doing it that
way. I didn't know that. So let's let's join
them both together, first of all, Control J. And then we go, I'll take, bring back everything.
And there is that. Even when I was
doing my gray box, I wasn't actually
doing it like that, so we learned something
every single day. Let's come to this one,
Shift H. Same thing then. So I'll grab this
one and P selection. And then what we'll
do is grab them both. Just the same process, res rinse and repeat origin geometry. Grab this one at modifier,
generate a Boolean. Grab this boolean fast, and then grab this
one and this one, control, copy modifiers. Apply this boolean.
Fly this Boolean, delete this out of the way. And there we go, th,
bring back everything. And now we're onto the last one. So what is, we'll grab this one and this one,
and then grab this, shift H. And then what
I'm going to do is join both of these together,
first, so control J. And then what I'm going to
do now is split the top off, so I'll press L on the top. You can see that
these are already joined together for some reason. I don't know why
that is, but that's gonna make things a
little bit easier for us, actually, because it means that now I understand why
there's no bevel there. I don't have to mess
around with it. So what I'm going to do
is I'm going to come in. T shift and click, press
Y, hide it out the way. And then now I can come in and
see what's joined on here. So if I press L, we can see that this bott part is not joined, so I can press Y,
hide it out the way. Then what I can do is I
can come in, delete faces. Then the press lt H. And now let's come
to this one first. So L. And then question mark
to hide No question mark. So Shift H, hide everything
else out of the way. And let's give this a bottom. So lt shift and
click, press F. Lth. Bring it back everything.
Now let's grab this one. So L, shift H h, give it a top and the
bomb. So Alt Shift click. Shift click, F, Ol tag,
bring back everything. And now you can see that we've got what we actually needed. The last thing, of course, I want to do on this is press A, U, Smart U V PJ, click. And then we go, now it's looking much much better
than it did before. And it's another reason
that we're doing this because going
through these things, we will pick up all of the
flaws as we move along. And the more we interact
with these things, the more flaws we're gonna find. Now, let's press a
little question, Mark, to bring back
these two points. These then are now joined, so I can just come
straight to here control A or transforms
origin to geometry. And finally, what I want to do is I want to split these up. So L P selection. And there we go. Now,
let's come to this one. Add in a boolean. The Boolean, of
course, is going to be this. Put it on fast. And then what I'll do is I'll grab this one, grab this one, control, and I'm going to copy modifiers, and there we go. Now I can do is press
control lay on this one, Control layer on this one, delete these out the way. And hopefully, there we go. All done. All take, bring back everything,
double tap the A, like so. And there we go,
everything's done. Now, that was so much easier. Than than the doors. But let's have a look
what that looks like now, and it should start really bringing it together
now, as you can see. Alright, so that's
all the windows. Now, I'm sure you know that, you might want to put
some more windows in. But I think I'm happy with
how many windows I've got. So what I'm going
to do finally is, I'm just going to click file
and save it out the way. Now what we need to do is
we need to finally head on over back to our parts
to create the last parts, and then we can
actually shut that down because we won't
need it anymore. And what we're
going to do now is create the actual tortures. So let's head back
over to our parts. So here we are in our parts. And let's just hide our finished parts out of
the way for just 1 second. And then what we're going to do is we're going to
create these tortures. Now, the first thing is that tortures around about
a similar size. So it's up to you how big or
small you do your tortures. Just bear in mind the need
basing on our little guy here. He needs to be able to actually
pig it up and hold it. So we don't want anything
bigger than him, for instance. The Brazies, on the other hand, you know, they're quite big, and you can imagine him
putting his hands over them to warm them up or how much light they will
actually give off. So that's how I think
of them in those terms. Let's take a quick
look at our tortures. So if we come into
our tortures here, so let me just grab this,
press the dot button, and I should be able
to zoom into it. So we can see that we have
got a reference here. It's a little bit
hard to see, I guess. You can zoom in really well. You can see we've got
a couple of eyes here, and we've got some
side parts on here. And I guess this is a
little bit harder to work with as a reference
as some references are. So just bear that in mind. Going to do is we're going
to create this torch, and we're going to guide you
through the whole process. And then pretty much we'll actually put a
flame on top of it, and then we'll
create the brazier. Alright, so let's do that first. So first of all, I'm
going to press shift A, and I'm going to come
in and bring in a mesh, and I'll bring in a cylinder. Let's keep it on 24. Let's press the S bond,
and what we'll do is we'll start with the main part
of the actual torch here. So what I'm going to do is,
I'm just going to press one. I'm going to press G
then just to move it over and then get the
right size from my torch. So you can see
something like this is fairly, fairly chunky. It would be fairly heavy, but I think this is a
good place to start. So then I'm going to press Sen's d. And pull it out a little bit. Next of all, then
I'm going to go in. I'm going to press Control and
bring in a few edge loops. So left click, right click, and then grab this
center edge loop. So grab this center edge loop. Make sure we've got
proportional editing on. I'm using mine on sharp.
Let's see how that looks. I'm going to bring
it in. And yeah, that's a little bit too sharp, so let's try a different one. We'll try it inverse
square. And there we go. That one looks just
about perfect for me. All right. So now
what I want to do is want to fix these actual yes. And the reason we
want to do that first is because once we've
actually got those in, then we can actually
create the rest of this. Now, the thing is when
you're doing this, it's actually easier
probably to use a boolean or to cut them
out and then solidify it. So I think for us,
what we'll do is we'll come in and we'll grab
the top and bottom of it. Like so, so we'll grab
the top and bottom, and we'll press
delete and faces. Then what we'll do is, I
think we'll split it in half. I'm going to grab
press dot to zoom in, and I'm going to go
straight down the middle. So if I go Alt Shift click, Shift click down the middle, right click and mark a seam, and then I should be able
to come in and actually press L for that island
and delete and faces. And then we should be left
with just half of it now. Now what I want to do is
want to create those yes. So I'm going to use my knife tool to
actually create them. And I want them to come
kind of up here and then going around here and then back around here.
So let's try that. So let's press K.
I'm in front view, so I'm going to come up to here, and I'm sticking to these
lines if you notice because I feel like it's
going to make it much, much easier for me. And only when I
come around here, I'm actually going to
then bring it around, like so, and like so. But you can see if
pretty much still predominantly kept to my line. Now, the other thing
is we're going to need anther part in here, so there needs to
be a middle part in here while still keeping this actual this cylinder shape. In other words, we
need to bring in a mirror. So let's do that now. What I'm going to do is
grab the center of it. Shift S, curs selected, right click, set origin
to three D cursor. Add in then a mirror, let's bring in a mirror,
put that on the other side. Now we can see if I come in and click on this b,
press the tab button. Now you can see what we're
actually looking at. So you can see this, and this is going from there to there, and they're both
joined together, and we don't actually want that. What I'm going to do is,
I'm just going to come in. I'm going to grab the center
or round back the center, press the a button
and then go all the way down to here and
press the end to button. And these then should be RIs. Now, if you're not
happy with them, now is the time where you
can actually come in, and round them off a
little bit if you want to. So, for instance, if I take
off proportion editing, I'm now able to round these off just a little bit like so, and like so, and just make sure that the right shape
that I actually want them. Like so. And I think now they are looking
round about right. From here, then what
I'm going to do is, I'm just going to come
in, grab all of these, all of these parts like so, and then press delete and
faces. And there we go. That is how our eyes are
going to look to start with. Now, I've done that for a
number of reasons as well. I've done it as well to make sure that I can
actually solidify this, and then I can actually bevel this off and make
sure the bevel works. Doing it other way sometimes mess around with
the actual bevel. What I'm also going to
do is I should come in, and I should do limited
dissolve on all of these parts. So delete. Limited
dissolve like so. And then I'll right click. Come down to triangulate faces, and then right click and tries
to quads. And there we go. That should be now
looking pretty good. Once we've actually
got this mirror actually on there.
Alright, everyone. So what we'll do now is on the next one, we'll
actually save it out. And on the next one, then,
what we'll do is we'll actually start
creating the mouth. We'll get these
eyes in properly. And from there we should
be able to build off that. Alright, everyone, so I
hope you enjoyed that, and I'll see you on the next
one. Thanks a lot. Bye bye.
135. Designing the Face of a Tiki Torch: Welcome back everyone to Blandf the modulate and Kit
bah Environment guide, and this is where we left off. Okay, so let's see now how this mirror is actually
going to work. So what I'm going to do is I'm first of all going to
pull it out a little bit. I'm going to press A, making sure I'm
grabbing everything, and then I should be
able to pull it out. So and then all I'm going
to do is put clipping on and make sure that these are actually clipped together. So if I hold the shift board, I should be able to bring
them in closer and closer together and lock them
into place like so. Once I've done that,
then if I come in and try and pull them out,
you'll see this happen. So let's just press Control Z. Then what I'm going
to do is I'm going to apply that with Control A. Control A or
transform, try, click, set origin two geometry, right click and shades move. And we can see we do
have a little bit of a problem here in
that this part here. As you can see,
isn't very smooth, and we kind of need to fix that. So what I'm going to
do to fix that is, I'm just going to
come up to vertices, and we can see that this is
probably what's causing it. So these two here
are causing it. So what I'm going to do is, I'm just going to grab this one, grab this one, M, and we're going to
at the last one. So we're going to merge
at the last one like so. Let's do the same one here now, and then we'll press M again. Or you can press shift off. That will do exactly
the same thing. And now you can see that
problem is actually gone. Now what I want to
do is then I want to solidify this before
doing anything else. So get you know, the right
actual thickness for it. So what I'm going to do
is, I'm going to come in, add modify it,
generate, solidify. And then I'm just going to if
I come in and right click, I can shade it flat, and then I can get an idea
of the thickness. We don't want this too thick. It's just steel at
the end of the day, and we wouldn't want
it way way too thick. So I'm looking to have something like this, what it came in as. Let's put it on even thickness, and then that should be fine. And from there, can just press
Control A and apply that. And then control Ale transforms, set origin to geometry, right click and shade
smooth by angle. And there you go. That
is the first part then of the actual torch. Now what I want to
do is I want to duplicate this because I want to duplication to work on because it's going to be much easier than working
on this part. In other words, these parts
that you can see here. So if you zoom into here, you
will see there's a mouth, you will see that there's some kind of parts going
over the top of it. That then will be done with with creating parts on the side rather than actually
making this mesh do that. The only other thing
we want to put on here really is the actual mouth. We need to Yeah, let's
put the mouth on first. I think that's going to
make it easier for Hs. Now, I'm thinking
with the mouth. I'm going to come way. How big do I want
my mouth to come. So if I bring it to here, I think that will be
about right because then I can actually
I'm just wondering, actually, if I still
want to mirror it again. And sometimes, when you're
building something, you'll be like, Okay, I
need to mirror this again. I think it will. So Alt
Shift click Alt Shift click. Let's just come
round the bottom. Al Shift click on here, right click and
we'll mark a seam. And let me just see if I
can grab all this side. Now, so if I come
in and press L, yes, I can grab all that side. What I'll do is I'll
delete bases once more. And then what I'll
do is I'll come in. Control A again, right click, set origin to geometry, and we'll add in
another where is it generate another
mirror because I forgot, and we'll right
click and set origin to three D cursor,
and there we go. Alright, so let's now see if if we can bring this
mouth in a little bit. So what I'm going to do
is, I'm going to again put this on so I can
actually see what I'm doing. I'm going to bring
it then if I if we come out here like this and
then round here like this, I think it should
start from here. So if I come in, K, And then what I'm going
to do is move it round, and I'll move it to here. So I'll move it round to here, and then I'll bring those
up and round those off. L. So I'm just wondering that
might not be big enough, so let's bring it to let's
try to half of here. And then what we'll
do is we'll press A and make sure that
line is straight. Is it straight, though?
That's the question. No, it's not. So let's
do it from here again. So what we'll do is we'll
press escape. We'll press one. We'll come from this part then. So, come all the way
down to this part, and then halfway through.
In fact, you know what? We'll have to turn
it around, so again, we'll press the skate
just to get this right. We could, of course,
use a boolean, but I think this actual
way will be there. So I'll bring it down to there. And then what we'll do is
we'll press the enter button, like so, and then
I'll press one. And what I want to do
now is I want to grab it from there and make
it relatively straight. So I'm just going to press K, and then A because I'm
in front view now. Then enter and there we go. Now, we do have some vertices that aren't attached
to these parts, so we just have to be
careful of those parts. So if I come out, bring this up, I'm going to round it
off now. Bring it up. Bring it up. And as you can see, I'm going to bring
both of these up, just to round it off, like so. And I'm just wondering if I want to even
more round it off. So what I'm going to do is bring this down, and there we go. Now we can see we're
actually starting to round this off a little bit. Like so. Like so. Like so. Alright. That is looking a bit like
what I wanted. So now, let me see if I can
actually bring this in. So what I'm going to do
is, I'm going to come, grab all of these, going all the way around here and making sure you've
not missed any. And then what I want
to do is just press E and pull them back like so. And then what I'm finally gonna do is just delete
these out the way. So delete faces. Like so. And finally, then, I'm just looking if there's anything else I need
to eat. You know what? I'll apply this
mirror, so control A, and then I'll come in and have a look at which
parts are left over. So we can see that it's these
parts which are left over. And this is basically from where we actually
join this together. So the easiest way to fix
this is just to come in, grab both of these S and X, bring them together
with medium point on. So medium point S and
X, bring them together. Really bring them
close together, so there near enough touching. And then what you can
do then from there is, we can come up a mesh
cleanup, merge by distance. Nothing removed at the moment. That's because these are a
little bit closer than that, so I can just turn this up
one, and that's not worked. So you know what? We're not
going to do that either. What we're going to do then
is instead of doing that, We'll come back to these parts. We'll press S and X, and
we'll pull them out. And then what I'm going
to do instead is, I will join these and these up. So I'm going to come
in for instance, and I'll grab this
one and this one. And then I'll right click because you can
do it that way as well. Merge vertices and at center. And then we'll do
the same on here. We'll just press Shift R, and then we'll come up to
these ones underneath here. Like, so, and if
we can't see them, you'll go on so we
can see them like so, and then shift, and there we go. Alright, so let's see
how this has turned out, so shades move by
angle, and there we go. That is looking pretty nice. Alright, I'm
happy with that. At this point as
well you can still come in and do any
work that you need to. And you can also see
that I've not gone back far enough where it's actually
affected the mesh behind. Very important that
you actually do that. Okay, so from here then, We can now test out the Bevel
and see if the bevel work. So Control A, right clicks
the origin of geometry, add in a modifier
generate a bevel. And there you go, you
can see the Bevels wick and absolutely perfect. Not Point Not Nat three, like so or Not Point Not
Not one. There we go. Now we've got that
slight bevel on there, as you can see, and
it really really makes them look much much nicer. Okay, so I'm happy with that. I'm just wondering whether
I want it, you know, so much going to the side or whether I want it
opening a little bit. At this stage, we can still
alter that because you could still grab these in
here, for instance, this one in here
in here, like so, and then you could press
S and X and still end up pulling them out
and then pulling them back a little bit
if you so want to. I think, actually with mine, I'm going to leave
it because it'll cost me a little bit in time, so I don't really
want to do that, so I'm just going to put them
back where they actually were and leave mine
as it is. Alright. So now I want to do is I
want to make a duplicate of this just to create these bands that are
going to go across there. So what I'm going to do is I'm just going to press shifty, and then I'll hide
one out of the way, like so, and then come to
the one that I want to edit. And then I'll start with
my bands here going up round to the side
because that is where these little wings
are going to come off. So if we come on
and we just grab, let's say this one here. So I want them slightly in, which will mean this one here, and then follow
them going round. Up to let's say here, like so. And then what we'll do
is we'll follow them down and go back
round, so from here. And then what I'll do is
I'll come up and round, like so, and then
back up to there, press the erb, and there we go. Now, we just want to
make sure that all of these are nice and smooth. You can see they're
not too smooth here, so now I can mess
around with them. So if I come in with vertice select, and
what I can do now is, I can first of all slide
these down a little bit, slide this one down, and just make them how I
actually want them, so you can see they're
coming from here now. Like, so nice and smooth
going round to there. Now, let's do the
same thing on here. So what I'll do is I'll pull
this down a little bit. Like so. And you know what? The rest of it is near enough perfect. I'm
happy with that. Now, just to outline so you can actually
see what I'm doing. So I'm going to come all
the way down to here, go all the way down to
here as you can see. And I'm just wondering, I'm just going to turn off this
bevel a minute and just see. I'm not sure actually if
there's a problem with the mesh there.
Not actually sure. What I'll do though
is instead of that, I'll actually come and
grab them the other way, so you can actually
see what I'm doing. And when I come in, and
grab them all up to here. So making sure that I grab the smaller parts here. Like so. And that is the part
that he actually wants. So now you can see
it's going really, really nice and round. And from here, then what you can do is you can just press shift. And then what we're
going to do is we're just going to hide
that one out the way. Grab the rest of it and
just delete vertices. Press lth, and you should
be able to bring it back. And then all you're
going to do is press Control A, transform, click the Origins
three D cursor, adding and modifier, and the
one we want is a solidify. And then what we're
going to do is press lth and bring
back the other part. You can see that I have got some problems with my solidifie, Let's just pull it out a minute. Let's pull it out going in this way, hold in
the shift button. And there we go. And let's
also put even thickness on. Let's right click
and shade flat. And there we go. That is
what we should be left with. So now we can actually
put this into place, and I'm going to grab this part. I'm going to turn it down. Yours a little bit like so. And there we go I'm
pretty happy with that. Now at this point, you can
still actually come in. And if you put this
wire frame on, you can still come in and
actually lift this up. So, for instance, if I want to lift this point up
here, I can come in, grab this edge here, and
you can still lift it up, like you see, so you can
actually get it to be really, really the right shape
that you want it. And yeah, that's that's
looking pretty nice. I'm just looking
around and making sure I'm happy with this eye. It's coming right to the sides where those wings
are going to go on. So yeah, let's come in then, and what we'll do is
we'll apply our solidify. We'll save that our work, and I'll see her on the
next one, everyone. Thanks a lot, bye bye.
136. Adding Side Decorative Details to the Torch: Welcome M to Blender for the modular and Kish
environment guide, and this is where we left off. Alright, let's mirror this
then over to the other side, and we'll also see if we
can actually bevel this because the moment this one
is separated from this. So what we'll do is
add in a mirror. Let's bring in a mirror
over the other side. Let's supply that mirror. And then what we'll
do is we'll right click and shades
smooth by angle. Same on this one
then, right click, Shades smooth by angle. And then what I want
to do is I want to grab this one, grab this one, press Control L, and we're gonna copy modifiers,
and there we go. We've got that beautiful
bevel on there. So that now is
looking really nice. I'm really happy with
that. Now, let's think before we go on
about our top on here. So basically, at the moment, you can see that our
cursor is right here, let's press shift as
and cursor to selected. And we can see we aren't
going to fin selector. Let's try that again,
Cursor selected, like so. Now, I'm hoping we to bring my cylinder in that it's going to come in the
right place. Let's try that. Shift D, and what we'll do is
we'll bring in a cylinder. We'll we'll keep it
on 24, first of all. We'll make it a
little bit smaller, and we want it to go right
on top of this part here. So I'm just looking
around. You can see that is what I was afraid of, that
it was a little bit out. So all I'm going to do to fix
that is, I'll just come in. A shifting click, grabbing
this going all the way around. Shift S, cursor selected, right click and set
origin 23d cursor. Yeah, we'll actually do that.
Set origin, three D cursor. And now we'll do is
we'll grab this, and we'll press Shift S
and selection to cursor. And what happened there
is because of the yes, they've been cut away, and it's been brought in a little
bit in certain places. It's just put it in
the wrong place. That's why. So let's
bring it in then. What we want is a
little bit of a lipo, let's make it a
little bit smaller, so let's press esens Ed and bring it down
to how we want it. So let's bring it down to here, I'll put that on top then. And then what I'll
do is I'll show you another technique
that you can use. If you come up to edit then
and you go to preferences, so Edit preferences, add ons, and the one we want
is called Loop. So we've got this one
called Loop tools. Make sure this one is ticked on. Close that down. It's an
inbuilt add on with in Blender, so everyone should have
it free of charge. And then what you
want to do now, is you want to grab the center. But if I grab this center, and this center, and what I'm
going to do is bring it in. So I bring it in. And then what I can do is
I can click right click, and you'll see a new one
here that says loopholes, and the one you want is bridge. So you just want to bridge them, and now you can see it's
done all that work for you. Alright, so that's looking nice. Now what I want to do
is, I want to press A and bring it into place like so. Soever I want it,
something like this. And what I'm also
going to do is, I'm going to bring this part in. So if I grab this part,
going all the way around, I'm going to press the S b and just bring it in
slightly like so. Now I want to do is I
want to bring this up, and then I want to I kind of want to bring
it in a bit more, I think, so shift and click, and then the S b, bring it in. And then what I want to do is bring this part up from here. So let's press Control R, bring in an edge loop, like so. And then what we'll do is
we'll come round to here. So ult shift click, press the e bond and bring
that up, like so. And then you can see this
is the top that we've got. We're gonna put little
like pans in here. And then we want to top on this. So all I'm gonna do then is I'll press E again and bring it up. And then I just
want to bring out the inside and the outside
just a little bit. So if I grab this one here, I can press Shift click,
e, enter AlternS. Bring it out very, very
slightly, as you can see. And then we'll do the
same thing on the inside. So Shift click, l Shift click on both of
these, bottom and top, like so, E enter AlternS, because you will be
able to see to here. So we want to make
sure that it's also looking nice on the inside, right click and shade smooth
by angle, and there we go. That is the top of it,
minus these little bands. So let's now make
those little bands. So I'm going to press
one, to go to front view. It's up to you
whether you offset them or put the center on. I think it's actually
bet you put a center on. So what you should do
is you select two, miss two, select two, and then just carry
on round, like so, and they should,
because we've got it on 24, come together perfectly. So you can see it goes like so. And then you should
be able to press the i bond and bring them in. Now, you can see we need to
reset all the transforms, that origin geometry,
press the i bon, and then it should
come in perfectly. And then all we're
going to do is press E to AlternS,
and bring them back. Like so. All right, so just make sure they're
not poking through there. Press the tabon, right,
click Shapes move by angle. And then, again, what
you can do is you can now grab this press Control L, and we're going to copy
modifiers and then you'll get that beautiful bevel
on. So there we go. That's that part.
Now, the reason we've done all of this work is
because we want to be able to see a little
bit on the inside of our actual torch mask. So what I'm going to
do now is I'm going to actually come in and
put in a top in here. So I'll press shift date, and I'll bring in let's
bring in a UV sphere. We'll make sure
this is set to 16. We don't want it so high. But that'll take all
of these bands down. So we've got rings here,
which are these rings, and then we've got the segments, which are these
segments going down, and then finally,
we've got the radius. So let's keep it like that, and then all we'll do is we'll
make it smaller ourselves. So we'll get it into
some sort of shape. And then what I'll do is
I'll delete the bottom part. So if I come in, I'll
delete this part here. So like we do with the cylinder
from the halfway point. We can see this is roughly
the halfway point, so I shift click, delete and faces, and then
grab the bottom part, L, delete vertices, and this is what we
should be left with. Now I'm going to do is, I'm just going to
grab the top of it. I'm going to come on, put
my proportion editing on. Let's put it on random, and then all I'm going to
do is just bring it up like so a little bit, and then grab this
one and bring it up and then grab this
one and bring it up. And all we're doing here is just trying to make it uneven
because at the top of here is obviously going
to be like hot coals. So that's what we want
to do. So right click, now shades smooth by angle. Now, fine, let's press SNs
ad and squish it down, and I'm just going to put it into the place
where I want it, which will be just
above these ides. So we can see here I need
to fit it into here, making sure it's
going in the side, so S, bring it out. Like so. And then there you go, now
you can see you've got those hot coals in there when we've actually
brought them in. So double tap the
A, it looks like, then the flame will
actually come out of here. So that's looking
perfect like that. Alright So let's now think about our actual wings that are
going to go on the side. I'm thinking that it'll
probably be easier to bring in a plane and then move the edge loops to where
we actually want them. I think that'll be
the easiest way. A I'll do is I'll press shift
A. I'll bring in a plane. I'll make it smaller, of course, and then I'll press
Y R X, sorry, 90. I'll press one then just
to put it in place. And then where do I actually
want it coming from? I want it coming from roughly, from the top up here
down to this part here. So what I'm going to do is, first of all, I'll pull it
out to where I want it. So right around here because we don't want it
sticking through there. And then what I'm going
to do is prepress tab. I'll pull this down
to where I want it. So without portion on, of course, down to here. That's where rougher want it, and then I'll pull this
out to the longest point. And then finally what I'm going to do is bring in
some edge loop. So Control, let's bring
in some edge loops, so left click, right click. Now I want to do is I want
to start bending this in. So if I come into here, we will see that if I
bend all of these in, I can actually start getting
the shape that I'll want it. So if I bring all of
these in, like, so, so I'll want it come into there, and then I'll minus
this one off, and then bring them to there, and then minus this one off
and bring them to there. And then finally, this
one will come flat, and then we'll just have a
little bit of an edge on here. So if I bring this
in, there you go. That's the shape that we're
actually looking for. This part here wants to be a
little bit more rounded off, so don't worry about
bringing these a little bit more just to create
that nice shape there, and there we go. Okay, so now from here, you can see we've got the
perfect shape that we want. We just need to
now solidify this. So control eight or transforms right click, set origin, two, three D cursor, because
we will be mirroring it, adding a modifier,
generate, and a solidify. We want to put it
on even thickness. We want to set this
offset down to zero. And then what we
want to do now is bring it out to
the halfway point. So we need it fairly chunky. We don't want anything
less than fairly chunky, and we just want
to make sure that it's not actually
sticking in there. And this looks about reasonable for what we're
trying to do here. Maybe maybe even a little bit thinner. So
let's bring it back. Yours to t little bit like so. Alright, that's looking
really, really nice. And now what we'll do is we'll
apply that, so control A. And finally, finally, let's come in and grab each of these faces, then going all the way down. We don't want to grab the
last one, just down to here. Press the eye button, press
the eye button again. And there we go. And
then what we'll do is, I'm just wondering if
we should do the back. Yes, I think we should do the back as well on these. You know,
what we'll do that? So we'll grab all of
these going down to here. Press the eye button.
And there we go. And then what we'll do. Just make sure you're
happy with those. Maybe maybe they're a little bit need to be a
little bit chunky. So let's try that again. So
I bring them in, like so. And then what we'll do
is we'll press to AlterS and see if we can bring them
all in together like so. Alright. That is
looking very nice. And then what we'll do is
we'll add in a modifier, and we'll bring in a mirror, put that over the other side, press Control A, and
then grab this one here, press Control L, copy modifiers. And there we go. All right. So now we've just got
this bomb bit to do. And then what we should
be able to do is bring it all down to the floor. So we'll do the one that's actually attached
to the floor first. Yeah, we'll create
this bomb bit first. We'll make that look nice, all fit into place. And it's probably
going to need to be a little bit t a
little bit smaller. It's a little bit
big at the moment. But now though,
before we finish, I think what we'll do is
we'll join it together, so we'll join it together. We'll pick one of these
last press Control J, and there we go. Now, I'm hoping that
with the Bevel, it won't actually affect
on here too much, so Okay. All right, let's save our work, and I'll see you on
the next and everyone. Thanks a lot. Bye bye.
137. Crafting a Decorative Base for the Torch: Welcome back everyone,
to Blender for the modulate and Kit bash
Environment guide. And I'm thinking here that my torch is a little bit too big, so I'm going to first of all, make it a little bit smaller. Like, so, and I'm
also going to press Essens head and just
squish it a little bit, and I think that looks
much better now. Okay, so now let's think
about this bottom section. So we could use this part that
we've go here and create, first of all, a face in
here, so let's press F, create a face, and
then we'll press Control plus and Control plus. I'm hoping that works, but
no, it doesn't seem to work. So let me just go back
before doing that. And what we'll do is instead is, I think we'll use, you
know what we'll do. We won't be laze. We'll just
add in a part onto here. So Shift S, s to selected, and then shift let's
bring in a new cylinder. Let's press the S board and get that to be the right size, so S, bring it down. And then let's make sure
it's gonna fit. So SNS. Pull it down into place, and we want to a little
bit of a lip on there, can see it's coming out a
little bit on the front there, and on the back, so that's okay. So let's just press S, bring
it out a little tiny bit. And then S and Z, bring it down, and then
let's pull it up into place. So jaws just under these
parts here as you can see. All right. So now
all do is we'll now grab the center of this. We'll pull it up to see
where the center is, so it's just about
there, which is fine. And then what we'll
do is we'll press I and bring it in a little bit, press E, bring it down. And then what I want to do then from there is press E again, and then press the S
b and bring it in, like, so L et's right click
shades move by angle. And yeah, that's kind of
what I'm looking for. Now what I need to do
is I need to think about how high up. So it's on a stand this.
How high would this be? I think it would be a little
bit higher than this, so I'm just going to pull
it up to round about here. Round about here can still
reach in and it can still, you know, set the torch light. I think this is round about
the right actual height. Okay, so from here, then we
need it on an actual stand. So what I'm going to
do is I'm going to press the eye button
to bring it in. And then I'm going to press
E to bring it out here. And then what I'm going
to do is press E again, and then bring it out and
now want it on you know, some kind of stand going down. So, something like this, I
think looks about right. Let's put a band though on
this part. But let's come in. Oshift click, and let's
press Control B to bevel it. Let's bring it out to there. And then we'll press e to
Alton S and bring that out. Like so. And then we go there,
we've got our band now. And now we'll want the
inner side coming in. Then another band on here, I think, just under here. So what I'll do
is, I'll come in. I'll press the ye butotm because this will be where
the actual wood is. And then what I'll do is,
we'll bring this down now. So if I bring it down,
so if I press E, I'm going to bring it down to something around about here. Then that is going
to be stuck into, you know, the kind of bit
that's going to hold this. And then going to think about where the
bands are on here. So I think I want
three. So control our one, two, and three. Left click, right click. Control B hod them out like so, and then e er AlternS, and then pull those out like so. And then we go,
there is our bands. And then we can right
click, Shade Smooth by angle. And then we go. Alright, I don't think I'd want to do a
lot more with that. I think that's looking
fairly robust. What I want to think about
now is this bottom section. So I'm going to come
to the bottom part. I'm going to grab this face. I'm going to press
shift S, sta selected. And then going to
press the tab button, press shift A, and
bring in a cylinder. So let's bring in a cylinder. Let's press one, to
go in to side view, and then I'm going
to press S S and E and just get the scale,
which I actually need. So I think this is still
a little bit too big. I imagine the scale
it's needed is going to be similar
to the width of here. So that's what I imagine. Now you can see though that this is fairly thick this part here. So let's make it a little bit bigger to
accommodate for that. So something like this, L et's
put it down to the floor. So make sure it's on the
ground plane like so. And then what we can do is
we can bring this in now. So if I grab this
one and this one, I can press the
ion, bring it in, hold in the shift
but, left click, and then right click
and loop tools, bridge, and there we go. Alright, so now what we need is we need a part going
in the center. I think for that, I should be able to
just grab this part, so shift, bring it
up, make it smaller. Like so, and then to
make it more robust now, we can just press SNS and
pull it out a little bit. And now we can do
is we can actually create a part that's
going to go under here. Now, the thing is it
needs to be, I would say, a little bit higher,
so it needs to come up to here, as you can see. And what I'm going
to do to actually create this part then
is press Control, get a center point
and then bring it up. So press the F button, and then I'll press
the button to bring it in and then
E to bring it up, and then I to bring it in, and finally E to bring it up. And then that actually looks as though it's actually
stuck in place. Now if I right click,
shapes move by angle, There you go. That's
what we've actually got. All right, so that's
looking pretty good. Now, let's bevel
off this part here. So I've just got
this bottom part. Control B, it's not
going to be vel. So I'm going to reset
all my transforms, that origin to geometry. Now try that again, Control B, and you can see that
we can level that off, and now it's rounded
off that end. And now this part here. So what I'm going to
do with this part, First of all, I'm going
to go over the top. We can see that this
is where the line is. So if I come into here, if I grab these two here, so Alt Shift click
Ol Shift click, I can then see it's this
one that I need in here. So Alt Shift click Shift
S curse to selected. That is where then I'm
going to bring in a plane. So if I press Shift
A, bring in a plane, and then I'm going
to press P selection because it's joined to this, and I don't really want that. And then I'm going to press
the Spot and bring it in. And then we're going to
move it over like so, and then press S and Y and
just bring it into place. And finally, then I'm just
going to pull it up into here. So I'm going to grab
this point here. Pull it up, put it into the place where
I actually want it, so it's going to go
into there like so. Alright, now, I can obviously see that's joined.
It's pretty straight. We don't really want that.
So we do it press control. Bring in a few edge loops. Let's try seven, I
think it will be seven. Y. Grab the middle one. And then you want to
bend this now with proportional editing on.
Let's try the sphere. So let's see if we can bend it this way. Let's
bring this in. Is that going to be how we
want it? I'm not so sure. Let's try a different one,
so we'll try in the square. Bring it out. And there we
go, that is what I want. That is exactly what I want. And we're going to bend that in and then straighten it all out. And I think if I come
to the top of this. So if I come to this top here, s under here, I should then be able to bend it this
way, bring it in. You can see that it's
not quite straight. So what I'll do is I'll
straighten it up in just 1 second. Let's
turn that off then. And now I can come
into each of these individually and just make
sure how I want them. So something like this,
I think is very nice. And finally, then
what I can do is now, I can press control A or
transforms, right clicks origin. Two. I don't really want
it set to three D cursor, actually, I want it under here. So what I'm going to do
is I'm just going to press shift desk,
cursor selected. And now I can actually
come back right clip Sargen three D cursor. And now we can actually
bring in a solidify. So let's bring in a solidify, and let's decide where
we actually want it coming from so
fi, bring it here. I can see then that
if I press tab, I can press A and bring
it further this way. You can see then that's still
a little bit out on here. So what I'm going
to do is I'll come. Do these parts here. I'll put proportional ity no
but only as far as smooth, so we'll just put smooth on, and then we should
be able to drag it all down at the same time, like, so we'll keep
in that actual bend. And there we go. Now, the
last thing I'll do is, I think we'll have
this quite chunky. So if I press S and y, I should be able to
bring that out, like so. Now if I put a different
one on, like Sharp, for instance, S and Y, you'll see now that we can
bring it out in the right way. We can also then come in
and grab the top of here, and we can press the other way, so S Y and bring it in
this way if we want to, like so, and now you can see, that's kind of the shape that
I'm actually looking for. So that's looking pretty nice. I don't think I really need
to do a lot else with this. So all I'm going to do is
just apply my solidify, and then I'll press Shift
D. Then R Z and 90. And the reason is because the orientation is right
in the center. So shift D, Z, 90, Shift D, Z, and 90,
and there we go. Now, finally, on this bit, let's we don't need to
fill in this part here. I'll just put a band
though going across here, so I'll just press Control.
Let's click right. Click. Control B, wind
it down to just one then and then E and just pull it up and just make a
small band on there. From there, then I can join
all of this together now. Let's join it all together. We've got no Slidify on there. So I can just press Control
J, press Control A, all transforms, right clicks
the origins geometry, right click shades
move by angle. And there we go.
Looks beautiful. Now, let's grab all of these. Grab this last then, press Control L, and let's see what the modifiers
come out like. So there we can see
we've got our bevel on. We can see we've got
our bevel on there, and this is what we should end up with then
something like this. And I think this is
roundabout finished. And what we can do now is we can actually create on the next
lesson our actual torch. Before we do that, though,
let's join it all together. So I'm just going to grab it all grab this one, this part last. Press Control J, join it
all together. There we go. It's important actually
re join it together. It's gonna make it
easier once we've got the flames in place. Alright, so that's
that part there. Let's move it over
then to the side. And then what I'll do
is now, I'll come in. And I want to grab just this top here going down probably
to somewhere around here. So I'll show you
how I'll do that. So first of all, I'll just
grab all of this top. So let's press P. Grab it all, press Control plus, and we
should be able to get it, or go all the way down. That's not what I want.
So, you know what? Instead of doing that,
we'll double tap the eight, we'll press the Z button, going to wire frame.
So wire frame. And then what I'm going
to do is press B, and grab all of this up to here, press Control plus, and then
go down to where I want it, which will be just
before this one. So there is where I want it. Then what I'll do is
I'll press sift B. I'll bring it over without
porch lights, and I'll make sure
that's not on. I'll bring it over,
press P selection, like so, and let's go back to object mode, and there we go. So now we've got all of
this on the inside of Pre. All of this exactly
as we had it. And now all we need to do is we need to make a n four here. Maybe maybe make this
a little bit smaller. And then what we'll
do is we'll make a back part as well for this to actually
sit in this torch. Alright, everyone, so I
hope you enjoyed that, and I'll see on the next
one. Thanks a lot. Bye bye.
138. Creating Wall Attachments for the Torch: Welcome back to Blendef, the modulate and Kit
Bath Environment guide, and this is where
we left it off. Okay, so what we're going
to do now is we're just going to then create
this second torch. So first of all, I'm
going to grab it. I'm going to make sure
it's a little bit smaller. I want to press control
A all transform, set origin to geometry, make it a little
bit smaller because it is a little bit
big to handle that. And then what we'll do
now is create this torch. So it's about the
right height on here, maybe a little bit
higher, like so, and then we'll come in and
create this wooden part. Now, on this one, we
have to figure out, is this too thick for
him to actually hold? I think it's round about
right to be honest. So what I'll do then
is, I'll come down. And create the
bottom part of it. So if I grab shift click, grab and all that going down. Then what I can do is
I can bring it down. And now I want to
actual handle on this. So what I'm going to do
is I'm going to press e and to S, bring it out. Like, so it's kind of
like a pommel on a sword, but obviously it's a
little bit more chunky, and he needs to be
able to hold it. So if I press E and Z and
pull it down to there. And then what I'm going
to do is I'm gonna press, or actually, we can't use on here. You
know what? We will? We'll press F, and then
we'll press the i button. And bring it in like so. Now what we'll do is, we'll bring it into roundabout there. I'll press E and drop it down. Now, what I'm looking
for is to make sure that he can hold
this with his hand. So you can see here, this is the size of it at the moment. So it might need to be
a little bit thinner, first of all, before
we do anything. So let's actually just wondering
the best way to do this, I think we'll come in and
make it a little bit thinner. So shift and click, altern make it a
little bit thinner, like so, and then I'm
looking at the height now. I think it's still not
quite long enough, so I'll grab the bott, pull
it down a little bit further. All right. So now I want to do is I want to bend this round. So control, let's bring
in some edge loops. Left click, right
click. Now, let me see if I can grab
the bottom of it. Put on proportional editing, and let's try pulling that out. So if I come in, be able to pull that out
a little bit like so. Now I'm just wondering if
that's the angle that I want. You know what? I think
that angle's pretty nice. So now what we'll
do is we'll create the next part, which
will be the bottom. I'll de press E, er S.
I'll turn this off. So S, pull it out, and then E, pull it down. So. And now let's create
that real button part, so I, pull it in, and then E, and then
what I'll do is control B and then turn up
those a little bit, like so. And there we go.
Now it looks like around the right
side for his hand. Now in this part, I'm also going to pull out
some parts on here. So what I'm going to do is, I'm just going to
come in Old Shift click and Old shift click, right click, and
we'll mark a scene. And then what I'll
do is now I want to actually pick the ones I want. So if I come in, l
Shift click like so, and then just go
round every two. Now, what you can do is, again, control and plus and then all mark them
out if you need to. I'm not going to do that. I'm just going to
measure out every two. So like, so, like, so, going all the way around. And because we're
on 24 all the time, it does make things easy when you're doing
things like this. And then what you're
going to do is right, click and mark a scene. And now what you should
be able to do is, you should be able
to grab the front, and then every other one. So L L L L L, like so. Okay, so with these, then, I'm going to pull these out now, so give them something to grip. So if I press E enter alternates, I'm going
to bring them out. Very slightly, like so. And then I'll right click,
Shades move by angle. And there we go. That
is that part done. That looks very nice. The last thing I think I want to do, I'm going to bring in
some edge loops so Control L. Make sure
there's a center one, so we can see here left click, right click. It's on seven. Grab the center one, and
all I'm going to do then. Is bring them in now with
for portal editing on again. So if I press S, I should
be able to bring those in, not like that because it's
a little bit too much. So what I'm going
to do is sometimes, by the way, with all
of these seams now, you can see, it's
better to either take them off or actually
turn them off, and there is a way to
actually turn them off. Let me just find where the seams are so let's
turn our seams off. I think it's here we are. Seams let's turn
them off like so. And then you have a much better view of what you're doing. Let's try it en route. And there we go, the root might do it. Maybe. It's a little bit too
sharp. Let's try the sphere. Yeah, the sphere, I think you can see as I bring
that in it pulled it all up. We don't
really do that. I'm just going to bring
it in a slight bit, like, so so make
it slightly bent. And there we go. Alright,
so that's that part. Now what we need to do is we need to do the back part of it. So we need a back, and we need, you know, something
holding this in place. So what I'll do is I'll press
shift S, ster selected. Let's bring in then, I think it'll be easier. I'm just wondering
if it's easier to start with a cube or toal plane. I think it'll probably easier
to start with a plane. So, let's bring in a plane. Let's rotate it round, so R X 90. Let's make it smaller and get in the right
size we'll want it. So we want it round about here. If I pull it back then,
you can see that I need something to hold
it coming from here, so he wants to be gripping
it on this point here. Now, the thing is at the moment, I've not actually got
anything around this pot, so I need to actually
put that in, so control, bring it down. I need it to basically look as though it's being
held by something. So shift and click e
Altern then this off, Altern bring this out. So, right click. Shades smooth by angle.
And there we go. And now, What I want to do is I want to think how something's
going to come out. So in other words, if I press, I could probably use this
part here to actually do it. So what I'll do is, I
will actually use it. I'll I'll just bring in one mod edge loop, left
click, right click. And then what I'm going
to do is I'm going to press shift and click like so. And then I'll minus
off this one. So if I go to the
front of it now, you can see this is the center. So if I minus off, these five, that then should be enough
to actually hold that. What I'll do is
I'll press shift D, like so, and then P selection. So I've separated that off. And now I should be
able to grab this part. Press control A all transforms, right clicks the origin
to three D cursor, and then add in a modifier and
we'll bring in a solidify. And then I'll bring
the solidify out. Even thickness on. So let's
put even thickness on. And what I want to doing is I want it not quite that thick. If I right click and shade flat, you can see it's a
little bit too chunky. So what I want to do
is bring it down. Ale bit like so. So it just fits
under there very, very nicely like soap. Let's apply that, solidify
then, so control A. Let's press Essens d and
In fact, you know what? Let's right click and
set origin to Jump tree. And then Essens Ed
I should be able to pull it down then because it
was a little bit too thick. Put it under. Now, let's
bring the back bit out. So what I want to do is, I want to grab this back section. So these four, and
then I want to press and bring it in.
And not like that. Press, press again,
and bring it in. And then what I'm going to do is press E and pull
that out into place. And this is then you can see it needs to go
back further than this because then
this will be stuck against the wall so a
little bit further back. So, the other thing is, you can see if I press three, Pull my guy forward. You will also see that it's at an angle. We don't
really want that. So what I'm going
to do is, I'm just going to have to go back in, pull it back a minute there. And then instead of doing that, I'll press E, and
not on this angle. I want to put it
on the y. Like so. There we go. Now it's pulling back straight, so
it's not an angle. And now we have
control over that. Alright, so now we've
got this face here. Now we can see if we have
this face like this big, it's gonna be way too
big, so let's make it a little bit
smaller, like so. Now, the mouth of this is where this is going
to be coming out, and then we've got
a nose on here, and we've got a rounded head. So let's actually do that first. So I'll actually hide my torch
out the way just for now. I've still got this bit in here so I can actually
work with it. And the first thing I'm
going to do is reset all the transformations
of my actual plane, so origin geometry,
and then come up, grab this one and this one, and press control, shift
and B, bevel it off. Like so. And then we go, we've got that nice
round a bit now. Now what we want to do is we
want to bring this part in. So all I'm going to
do to do that is, I'll grab this one and this one. I'll press the J button just
to join those together. Press Control er, to bring in another one and bring
it up, like so. And I'm going to bring
them in on the original. I think I brought them out, but on this, I think
I'll bring them in. I'll just grab all
of these SN X, and then we can pull
them in like so. Now, of course, we
can see that these are a bit. They're
not rounded enough. We need to round them
off a little bit. So I'll also pull this one down. So let's pull this one down. Give us a little bit more room to round those off a little bit. This here. And then
we'll go to this, and then control shift and B. And then we If we turn
this down a little bit, we should be able to round
it off just a little bit. You know what? That's a
little bit too much I think. Let's try it again. Yeah, that's looking bear.
Something like this. And finally, then
we can bring in another edge loop or
another three edge loops, left click, right
click, and let's now bring in this part with
proportional editing no. So let's bring it in
on the X O S and X. Bring it in. And then we go,
I think that looks good. And I'm going to leave this part quite sharp on the
bottom of here. Okay, so that's that part. Now, let's come in now
and bring this out. So if I come in, grab this, I should be able to
press E and pull it out and make actually
some chunkiness. Now the thing is,
when you're dealing with things that go
in against walls, always, always make it
thicker than what you think. Always make it go to here, and then pull it out thicker. And the reason is because once
you put that in the wall, you might have some
tiles on the wall. You might have some
stones on the wall, and it is a real pain
to actually get them to fit once you've
actually created them, so always make them a lot thicker than what
you actually think. Okay, so now I'm gonna do is and I'm just gonna
grab this part, and then going to
press the eye button and bring it in, like so. And then finally,
I'll bring this out, so E, bring it out, and on here, then we
can put his eyes. And on this part, we can
actually put a mouth in here, and then finally A no. Something very simple
on this one, actually. Alright, everyone, so
let's save out our work, and I'll see you on the next
one. Thanks a lot. Bye bye.
139. Texturing Torches in Blender: Welcome microphone to Blend for the modular and Kit
bash environment guide, and this is where we left off. Now, let's bring in a
couple of i. I'm going to press Shift S. Urs
to selected Shift A. Let's bring in a cylinder. Let's spin it around, so R X 90. Let's make it smaller.
So, not that small. Let's make it like
this small for now. Let's bring it up,
put it into place. Make it smaller
now. There we go. And then we'll all do
is, we'll press S and Y. And then finally, all
I'll do is I'll come in, grab this face, and this face, press the i bonds, bring it in. And then right click
loophols, and bridge. And there we go.
There's the is then. Let's drop those in place. So. And then what we'll do is
we want on the other side. So rather than put
on the other side, let's just I'm just wondering if they're a little bit
too small, actually. Let's come in and press alterns, and bring it in,
like so. Here we go. And then let's press Add
modifier generate and a mirror, right clicks a origin
three D cursor. And there's that. Now, let's
think about the actual nose. Just wondering. I I add
cavity on, yes, I have. So let's think about the nose
now, so bring in a cube. And we'll bring it
to the front then, press the S one,
and then S and y. And then what we want
to do is put it here, set it back into place, and then press S and said, bring it down to rounda There we want it
to quite small this. And then all I'm going to do
is grab the bottom of it, S and X, pull it out. And then what we'll do is
we'll also pull out this end. So I'll press control two, left click, right click. And then I'll grab this end, and then pull it
out, and then pull this one out. Like,
so. All right. So that's probably
going to be okay. And now, finally, do
we want to mouth in there or just something
to hold this together? On my original, I didn't
actually put a mouth in there. I don't think I'll do
on this one either. So all I'm going
to do instead is, I'll just press shift day again, bring in a cube, pres
the S p. S again. And then all I'm going
to do is put it to the side. Pull it out. Like so S and Z, and then S and X. Like so, and then
grab the top of this and then pull
it out into place. Not like that. Let's pull
it along here into place, like so just so
something's holding it. And finally, find let's
put it on normal. And then just pull
it out this way just to make it a
little bit thicker. And then we go,
that's looking fine. And then what I'll do is, I'll
join it to this part here. So just grab these control J, and then it'll put one on
the other side for you. And then we go, that's exactly
what we're looking for. Alright, so I'm thinking, Is there anything else I've missed? I think actually,
I'll invert this, so I'll invert just
this bit here. What I'll do is I'll press
the eye button, bring it in. And then I'm going to press
E and just invert it in, so the thing that looks bare. The one thing is, of
course, is I need to come to this part here. Now, I've still
got mine grabbed, so I can just pull
mine out, if not, just go in and actually
pull them out a little bit. And there we go. So now
we've actually ended up with the mouth
just by inverting it. Now, lastly, I'm
wondering whether I should actually
level this part off. So just this part on here. So let's come in, and we'll
grab this one and this one, I'll press control B, and
level that off like so. And there we go. Alright, let's press tag, bring back this part. And then what I'm going
to do now is grab all of these parts like so. And we've got no bevels
on these at all. I'll make sure I've got
my nose grabbed object, convert to mesh,
Now if I press G, you can see I've grabbed it all. Let's press Control J
then to join it together. Control A all transforms, right, clicks a origin two
geometry, right, click shade auto smooth, and then let's bring in a bevel, so generate a bevel. And I think we'll leave that on n 0.1 because
you can see here, the only way I'm going
to go more is basically by taking off the
clamp overlap off, and I don't really
want to do that. And that's because
there are some triangles in there, of course. So I'm going to leave
mine like this. Now, this is looking
pretty nice. And what I can also do
now is join this up with this because basically
this has got this bevel on. I'm just wondering,
actually, You know what? I'm not gonna join them yet. First of all, we're gonna
put some materials on these. We're gonna take a
break from actually creating something,
put some materials on, and then we'll actually
bring in that fire geometry, no, to break it up a little bit. Alright, so let's come first of all, and
save out our work. So let's save it out. And now let's see if we've got all
of these materials in. So I'm going to put it
onto Shade mode first, and then what I'm going
to do is grab this one. I'm going to come
over to materials. And the first material one
is going to be on Doc. So let's see on
Doc. There we go. We've got that one in. Yes,
this is the one that I won. I'm going to grab
the whole thing. I'm going to press you. Smart U V project click. Okay. We might need to
redo a few parts of this. You know, re unwrap them. As you can see, we've got a
big, massive seam down here. Partly, that's because of
the fact that if I come, where is it over to here,
let's pass seams on, you can see that I've
got a big seam going down the center there,
that's not something I want. So what I'm going to do is
I'm going to press Control E, and I'm going to
clear the seams, and I'm going to press
U and Smart UV project, click Okay, and there we go. Alright, so that's that one. Now what I want to do is I
want to create the next part. So the next one is
going to be red Metal. So let's click plus down arrow, red metal or this one here. And let's then come in, and what we'll do is we'll
apply it on the. So if I press, Alt Shift
click going around here, and then l Shift click
on the top part. I'll press Control
plus, Control plus. We don't want it
too far over there, so I'm just going
to assign this. And then what I'm going to
do now is come to the top. Now, you can see already,
I made a mess there. I don't want to sign it
on that. Control minus. There we go. Now let's assign
that on there. There we go. And then what I'll
do is I'll come now to the inside, just
to the top of here. So l Shift click Control
plus Control plus, and then assign it again. And then we go, that's
more how I want it. And then I want the
inside of these parts. So you can see the inside
of these is like here. If I press the dot b,
then I can zoom in, and then l shift click. And then what I can do is I can click on this and click a sign. Now, the next thing I want
to do is show you this. So if I grab this one,
I can go to select and select all by similar material.
It will select the mole. From there, then I
can actually U V, smart UV project, and we can make that metal look much nicer. Same for this once we've
actually finished. But let's finish it first. Now, let's come in and
bring in the green metal. So I'm going to click
plus down arrow green. And the green metal. And then what I want to
do is each of these now. So just select each of
these only on the inside, like so, like so, and like so. And then let's assign.
And then we go. Now, let's come to these parts. So we're going to select all
of these going down to here, and these are going
to be red metal. L so and so. And so, and let's assign
the red metal. There we go. And now let's work our way down. So this one on the
inside up here. We've got also blue metal. Let's bring that one in, so
we'll bring down arrow blue. Metal, this one here. And then a sure, be able
to come into here and just select this like so
and select this one. Blue metal, click a sign. There we go it's Stine to
really come together now. And then we've got
our white metal, so I'll click down arrow, white metal, and we want
to do our mouth with that. So let's click all of these. And you can see now
they're looking a bit low on the resolution. That's
what I'm talking about. While we need to re wrap them, so let's click white
metal, click a sign. Okay, so now we can
work our way down. Now, I do think that
the bottom of here. Definitely, this band, at least here will
want a red on it, so lt shift click Control plus, and then red metal,
click a sign. And then this one we'll point a blue one Alt Shift
click Control plus, and we'll give it a blue
metal, click a sign. And then we go, that's
looking pretty nice. And now let's bring
in the next material, which is going to be light
wood for this part here. So plus, down
narrow, light wood. This one here, and we'll
also add in our last one, which will be coal, I think it's called.
Charcoal. There we go. This one here. Let's do the charcoal first then.
So we'll come to this. We'll press L. And
then what we'll do is come down to
charcoal, click a sign. And there you go, you
can see exactly what you get with your
charcoal already. Again, we'll come in and unwrap these parts, so don't
worry about that. We just want to get
them on for now, but you can see already
that's looking pretty nice. And also, as we come
to the charcoal, we'll also turn that
up a little bit. I'll show you how to do
the lighting on there. Now we want is we want a
red, blue, and a green. So red, blue, and green.
Let's do that now. So all I'm going to do
is old Shift click, old Shift click,
Old Shift click. Let me just bring
them all red first. I'll press Control plus first
of all, and then all red. 'Cause I'm just wondering if I want them so colorful or not. You know what? I think
they're gonna look better. Just like this, Red, I think, red being
the predominant. And then if I come in to here, Old Shift click Old Shift
click Old Shift click, and finally Old Shift click, and Lightwood, click a sign. And there we go,
we can see they're going to look very nice. It just needs to be
made, much, much bigger. And then finally on the bottom, Do I want any color variations on here or just
black? You know what? I think it looks good enough. It would be stuck in
something like this, so I think I'll
keep it like that. Okay, so on the next lesson, then what we'll
do is then, we'll get these unwrapped properly. I'll show you how
to do this light, and then we'll check it out in our rendered view before
moving on to the next one. Alright, everyone. So I
hope you enjoyed that. I'm going to save out my
work, and I'll see you on the next one.
Thanks a lot. Bye bye.
140. Placing Fire Geometry Nodes for Realism: Welcome microphone
to Blender for the Modular and Kash
Environment Guide, and this is where we left off. Okay, so now we've got all
of these materials in. Let's come in then and
actually unwrap them all. So I'll come to this one first. So let's just grab one face. Go to select, and
we're going to select similar by material. And
then we're going to U. Smart UV project. Click,
hide them out the way. That then makes it easy for us. Let's come to this one next. Select similar materials. U, Smart UV project. Click Okay. Hide
them out the way. Let's come to this one then. And same thing, just
rinse and repeat Like, so, Smart UV project, click, hide them out the way. Then we'll come to
this part here. This part is all just one part, so we might as well just press you and Smart UV. You know what? With this one. Instead
of doing that, we'll just press you and
unwrap. And there we go. You can see that looks
actually quite nice. Let's hide those out of the way. Then we'll come to this one. Same thing again,
similar material, U, Smart U V project, to click,
hide them out the way. And I think we've
only got two left, so we'll just grab
all of this one. It's the same island. U rap. And there's that one,
hide it out of the way. And then finally,
these wooden parts. So A, on this one, you might want to come round and just mark a seam down
the back of them, because I think that will
actually make it easier. So just mark a seam going all the way
down the back, right, click, mark same, A, then, and then U and unwrap. And that then should
unwrap them pretty nicely. I think let's have a look on our rendered view just to
see what they look like, but I think they're
going to look pretty nice. And there we go, yeah. Up to you whether you
want to make these a little bit smaller.
I think we might do. So I think I'll go to the
UV editing, UV editing, and we've got them here look, and we can see that we can
expand them out like so. Zoom into it. Let's
just pull this over. Let's put it on rendered view. And let's see what
they're like now, press tab. Yeah,
and there you go. You can say, maybe maybe I've gone to touch too big,
so let's bring them in. Like that, I think
looks pretty nice. Alright, so that's
looking pretty nice. All of it now is
looking very much like metal W. I'm just looking at this blue
metal, the red metal. Yeah, all of it is
looking pretty nice. And I think I'm happy with that. So now it's time then just
to move on to the other one. Now, what we can do with these
is we can grab this one. And we want to join it
together, of course, but we want to join them
together when which are all done because then
it'll affect our bevels. So all I'm going to do
is grab both of these, grab this one last,
press control level, and I'm going to link materials like so.
Same thing again then. I know it's a bit tedious. We could probably grab this, and I'm just wondering if it's a little bit different on
here is the problem, so we might just go in and
actually apply those on there. I just wondering if it's worth doing that
or if it's worth bringing it over and
putting them on there. You know what? I
don't think it is. So what I'm going to
do is, I'm just going to move these over a little bit. Not this one. Just these two. Move them over a
little bit just so I can really see what
we're actually doing. I'm going to go back then and on modeling. Let's
put it on shading. And then what we'll do is we'll come to these points then. So we'll go with face, and then shift
click Control plus, Control plus all the
way down to there. Making sure then we
grab the inside, and then all I'll
do is red metal and click a sign, hide
that other the way. Shift click Control plus, and then red metal, a
sign, hide it out the way. And then we'll do
these parts now. So you can see, because we're doing it
the way we're doing it, we should be able to get
down those pretty quick. So we're just going to
go all the way around here and then click a
sign on the green ML, a sign, hide it out the way. And then we'll come
to these parts now, and we'll just add
them onto the blue, a sign, hide them out the
way. And then onto this one. So I'll just come all
the way up here with control clicking, all
the way down here. All the way over here,
all the way over here. And these are going to
be on the white metal, so click a sign, hide
them out the way. And then what have we got now? We've got all of these? We've
got this one on the inside. This is the coals,
so I can come down, charcoal, a sign,
hide it out the way. And finally, then
we've got not finally, but got these ones on here, front them back.
We'll add the red on. L so. And like so, and then come to red
and then click a sign. And then we go, let's
hide those out the way. So then we've got all of this. We've got the green ones that
I've done on the inside. Moving my way down, then
I've got these black, and I've I've got a red here. So Ol shift click control plus, red, a sign, hide
them out the way. And then I've got this one here, which I have as both of
these I'll as blue, I think, so a sign control plus, and let's put them on blue, and then sign, hide
them out the way. And then we've got
the rest of this. So we've got all of these
now which should be black. But the main one we've got
here is this one here. So what I'm going to do with
this is old shift click Control plus going all
the way up to there, and then I want to press
Control and clear seams. And then what I'm going to
do is come round the back. I'm going to get
this one prepared. Anyway, I shift click, right click, Mark a seam. And then I'll grab it.
I'll press, Unwrap. And then what I want
to do is come down to where my light wood
is, click a sign. And there we go. You can see though I
grab the whole thing, but not to worry about that
one. Let's come in again. So we'll just grab it again. O shift click. Control
plus, going all the way up. Hide that one out of the
way. Now, let's come down to this part here,
so the pummel. I will have this will be red, I think, so Control plus.
Let's have it on red. Hide it out of the
way. Once assigned it. Like, so this part here
is going to be the metal. This one here, I'll just
put it on red as well. So I'll click red, the sign,
hide it out of the way. That means then I can now come in and grab all of this one. So all of this,
we'll press control, and we'll clear the seams. We don't want those.
And then what we'll do is we'll just come
down to our iron dark, click a sign, hide
it out of the way. And then we've got
these two parts left. So this pummel, then we'll
also put as red a thing. So what I'll do is
I'll grab this. I'll press control, I'll
clear the seams, red metal, click a sign, and then oltg, and let's have a look at what
that looks like, so tab. And there we go. The only thing I'm not happy with
is this bomb bit. So what I'll do is I'll
come to this bott. Shift click. And what I'll do is instead
is operate an iron dark, and I think that I'll
look a little bit bare, which it does and the only
thing that I'm looking, do I actually want those
to stand out a bit more? You know what? I think actually it'll be absolutely
fine like that. Okay, so now we've
got this part. The rest of this metal
looks looks good. I'm just going to then, I'll come into the ice. And what I'll do is I'll put these on red, so click a sign. The mouth, I'll
also put as white, so we'll white
metal, click a sign. And then the rest of it, I don't think I really
need to do anything else. I think the rest of it
actually looks fine. So now we need to
do is we need to do what we did before,
which is unwrapping it. So first of all, we'll
just grab one of them. Select similar material. U, Smart U V project. Click ok. And there we go now, they're looking pretty good. Except this line down here, and that's because, again,
we've got the seam on there. So let's press Control E, first of all, clear seams. U, Smart U V project, click ok. And now you can see that's looking
much much better. Now, you can also see we unwrap this one as well
because we grab them both, but you can see that this one, I'm just looking as, you know, why, it's unwraps fine. I'll just hide
those out the way. And then what I'll do is
I'll select this one. Select similar material Unwrap. So Smart UV. Okay. And let's have a look at
what that looks like. Now, you can see, again, I
need to delete all of those, so I need to clear seams, and then I can press
Smart UV project, click. And then we go they
look fantastic. Hide them out of the
way. Again, with this one, we'll do
the same thing. So what I'll do is,
I'll first of all, select similar
material clear seams. And then Smart UV
project, click. Hide them out the
way. Now I'll come to this one. Material. Control, clear seams, U, Smart U V project, click Okay,
hide them out of the way. This one we've
already unwrapped, as you can see, and this one, we've already unwrapped as well. So the last one we've got
is just the green one, so select sim material. Wrap. Smart U V project. Okay, I take, bring
back everything. Double tap the A,
and there we go. We made very, very
short work of that. Okay, so the next thing
then, what we want to do is, we want to bring in some
sort of light source, what's going to be What's basically going to
extend out our lighting. And we also want to bring in, as well, our actual
fire geometry node. So I think I'm not sure if we've got our fire
geometry node in here, we might have to actually
go back to our pack. So what we'll do
is, first of all, we'll just bring in a plane. I'm just going to bring
in a plane there. I'll go in over and see
if it's in the yet. I'm fairly sure it's not. I'll click the down arrow, and we're looking for fire.
It is actually there. So fire is actually in here. And when you bring
that in, you can see already what we've actually
got, you're wondering. Oh, that's because
it's the reference. So m. Okay, so if I then
put this over here, let's press the S but, make it a little bit
smaller. Press one. And what I'm going to do is just move this to the side just so I can actually see what
I'm actually doing with this. So let's put it into place. Seven to go over the top. Let's move it into the
place where we want it. And, of course, we want
the fire to be in there, coming from our hot
holes in there as well. So you can see now,
I'm just going to put it round
about the center. Maybe lift it up a little bit. And now what we'll do then, on the next lesson is, I'll go through all of these. If you didn't have
your fire, you know, by the way, just bring it
in from the resource pack. But on the next lesson, I'll go through all of these
options on here. Tell you what to do, and tell you how we're gonna set them up. Alright, everyone, so I
hope you enjoyed that. Let's save out our
work, and I'll see you on the next one.
Thanks a lot. Bye bye.
141. Tweaking Fire Geometry Node Parameters: Welcome back,
everyone to Blend for the modular and Kit
bash environment guide, and this is where we left off. So what I'm going to
do now is you can see, I've pressed play on mine, so just press space
bar to press plate. And this is what you're
going to be greeted with as soon as you bring in
this fire geometry note. Now, pretty much everything on here I've already
actually set up on here, but now I'll just go through
a few of the options. So if we put this
on rendered view, First of all, you
will see it's black, and that doesn't look good. And this is actually
on blender cycles. Now, if you're using
this on blender cycles, what you want to do is,
you want to go down, and you want to go to where
it says, Let's, look, I think it's not that
one, light paths. This one here. So light paths, and you'll see where
it says transparent, put down 30, and then
you'll see now that it actually makes it
transparent, much nicer. Now, the higher
you pick this up, the more you're going to
get rid of those parts, so if I put this,
let's say on 50, we're even going to get rid
of that part in the middle, and now you can
see you're getting a lot better view of this. Now, the other thing is, I'm I'm also going to
put behind this. I'll put behind a plane, so I'm just going
to spin this round, so Y, Rx 90. Let's spin it around. Let's
pull it out a little bit. Let's press the S board. And what I'm going to do is, I'm just going to pull
on a material. So I'll put on the
metal, I think. So the dark metal, and let's have a look
dark stone, dirt. It is iron dark. Let's
just put that on, and now we can actually
see what we're doing. So you can see that we've actually got some smoke
on there as well. Now, you can also see that
the lighting on here, as I said, is not really
casting a lot of light. Let's move it forward
a little bit. You will see now
there's a little bit of light being cast on there, which is really nice on that
because then we get a lot of flickering from that lighting when we're actually
animating this. But as and when you're
rendering this, you'll have a little bit
of lighting on there. But as far as everything goes, it's not going to be that much. Now, as I said, let's come
back then to the geometry no. Let's put it on shade of view
so we can actually see what we're doing and actually work it with it a little bit bet. So at the moment, we've
got a resolution. This is basically the
overall resolution. I wouldn't put this up too high because
remember we're going to have a lot of fire
in the actual scene, so we don't really want
this setting too high. The next one then is
we've got our layers. Now, the layers basically control how many
layers are on top. So if I put this on object
mode and turn this up, let's say to 50, You will see if I hide my smoke, let me hide my smoke, and I'll also hide my spock. And I'll also,
yeah, there we go. Now you'll see just
how many layers are going over the
top of each other. If you put this to one, you'll see the drop right down,
and it's just one. But what we want
to do is set have a happy medium on this
because you'll see also, if I put this on one, it
looks kind of rubbish. Now if I put this
on, let's say 50, you'll see now it looks amazing. And what that's doing is it's basically building
up the layers over the top of each other to create that fire look that were
actually looking for. So on this, in particular, I wouldn't go that high. So you might be able to get
away with something like six because it's quite
a stylized scene. You might be able to
drop this down to four. Just remember, the
higher you go, the the more it's going
to take on performance. So just take that into mine. Okay, the next one we've
got then is radius. So if I pick this
up, you can see, I can change my radius. Go Let me just take that off. I'm just going to
press Control's head, and hopefully, I should
be able to put that back. Next one we've got
is the height, so this is the height of
the fire, as you can see. Put that back. Next of all, then we've got the
hue, how bright, do you want your how bright, sorry, what color, do
you want your fire? So you can actually set this
to something fancy base, blues, greens, things like this. Then we've got the core u. So this is the
inside of this fire. We can really ramp we can
really ramp that one up high, so this is a core hue. So we've got the hue, and
then we've got the core u. Now we're on to these are why I keep getting confused
with the emissions. So these us basically change
the color of the core, and we can change the
color of the outside. The emission, on the other hand, changes how bright this fire is. So if I put this back on
rendered view, let it load up. Now, if I turn this up, let's say to 100, now you'll see just
how bright that is. Now, I've put it
on a happy medium. So if I put this on
something like 50, let's put this on 50, like so. And then we've got
the core emission, and that is the
core on the inside. At the moment we've
got this on 20, I put this on zero, you'll see it takes
the core down. If I put it on 200, let's say, you'll see now that core really
intensifies on the heat. Now, what I did, actually, I put this onto these here. And what I've done is I've
brought in a light to add a little bit more
because the thing is when you bring
this into a scene, you will see that it
doesn't really go far. You can see it's like, if
I bring this in actually, shifty, and then X 90. Let's spin it around. Let's
put this on global instead, let's put this out where
the flow is going to be. So roughly you can see and
even though this is metallic, you can see we've not got a
lot of bouncing on there. And the only way really to do that is really turn this
or ramp this right up, and even then you're not
going to get a lot on there. So that is why I brought
in an extra light. So let's put this back to 50. Okay, so the next thing
we've got is smoke. So you can see as soon
as the being smoking, you can actually
see smoke there. And again, this works on the same principles
as everything else. We've got all of the
same things here, except we've got a grayness and how dark you
actually want to smoke. But you can see here the
layers, the emission. Now, this smoke, as you can see, can turn it much darker
or much actual lighter. I can also control the
grayness of the outside of it. So again, you can see much
darker, much lighter. And this is really
seen actually, when you've rented it out, you'll really see
the difference. Finally, then we've
got the sparks, so we all like sparks
coming off of our fire. And the thing is the Sparks, they're going to start
at a certain point. So in other words, if I come in and put this on to layout, get my timeline, you can see
at the moment my end is 200. Let's set this on 250, and then it should
restart again. Now if I put this
on rendered view, you will see now that
after a bit of time, we should end up
with some sparks, which now we've got,
as you can see. So we've got sparks
coming off there like so. So Sparks, I think, just
add a little bit to this. Now, again, if I come
back to modeling, we will have and go
back to my fire. These sparks, you
can see that we do have speed randomness. We have got things like density. We've got lifetime,
so how long do you want your
sparks to live for? So basically, if I
put this up to ten, press the spacebar, you will see now because
I've increased that. Once they start again,
so once they start, you can see now they're
going all the way up there, so you can increase how high, how far, how many there is. So if I put this on ten, you will always have
to press the spacebar, though, and let it
actually work out. But now you can see There is a lot of dense
sparks off of there, and you can see it
restarted again. So what we're going
to do, we're going to set the density. To one. So I'm going to set the density to one
and the lifetime 22. And then, of course, you've
got the emission strength. You've got the U,
and you can see what an amazing omet
node this actually is. Alright, but what
I want to do is, first of all, now I've got this set up in the
way I want it. I'm just looking at my layers, making sure they're okay. I think I think my layers for my smoke should be on let's have a look.
Layers for smoke. Let's put those on 12. And then we'll put the
resolution on the smoke on something like let's go 64. And then we'll go to
the layers of the fire, and I think I'm going
to keep that the same. I'm hoping when this restarts, these sparks have set reset, just go back to normal, which they have,
and there we go. I I double tap the eight, I think that's looking pretty
nice for a stylized scene. And then you go from
this angle look, you can see that
actual smoke coming off. Okay, so that's that. Now what I want to do then is, I want to bring in a light. So I'm going to bring in
another light source. And what I'll do is, I'll press I'll get
this center first, I'll press Shift
S s to selected. And then what I'll do
is I'll press shift A, and we'll bring in a light. Now, the one we want is
going to be a point light. So let's bring in
our point light. Let's bring it up,
and here it is. Now all I want to
do is I want to go down and alter a
few of these points. So if I'll head on over
to the right hand side, you will see now that we've
got our point light on. First of all, what
I want to do is I want to set this to 200. So 200 like so. And then what I want to do
is I want to set this up, so not 0.56, let's
pull that up a lot. And then finally,
let's put the color. In fact, we'll put
it on render view, and then we'll actually be
able to see it. There we go. Then what we'll do is we'll
set the color and we want it obviously something
orangy like so. And now you can see
exactly what that does. That is why we've
actually brought this in. So now we've got
the fire going up, and you can see because the
fires over the top of it, you've got the shadows
falling on it, and you've got some slight
flickering in there as well, and that is what we're
actually looking for. So now you can see
that's really, really nice, how that looks. Now, it's up to you how
strong you have yours. I mean, if you say it on
ten when it first came in, you can see it's
not much at all. Set it on 100, and you can
see now you've got that much, but I feel like 200, for me, at least within the scene was about the right sort of size, and might turn it down just
to be a little bit yellow. But when I actually
went on the scene, what I want there we go, what I wanted to do is create
a little bit more warmth, and that's why I went with a bit of a warmer orange.
Well, there we go. That is how we do that.
So what we're going to do then is now we can
put this onto, shader mode, I can
go over the top. And what I want to do is
I want to grab my fire, grab my light, and I'm going to press shift D and just
move them over into place. Then we're going to
do is press one. And what I want to do now
is make sure that this is in the right place so I can drop this one down, drop it down, and looking as though it's
coming off of that part, and then I'll do the
same on this one, so I'll grab this one,
drop it down into there. Now, on the next lesson,
what we're going to find. So if I grab all of these, going to pull them over is
that when I actually come in, I need to join
these all together in a certain way because I need to actually put them
into the asset manager. So on the next lesson, we're actually going to find
out how to do that. In the meantime, they'll
let's save out our file. They'll save it out,
and I'll see it on the next and everyone.
Thanks a lot. Bye bye.
142. Positioning Fire Torches in the Scene: Welcome M everyone. Blender for the Modular and Kiah
environment guide. Now, there are some restrictions
on the asset manager. For instance, if you try and
put three objects together, they don't really go together. We can't actually
join these together. If we try and come and join, let's say, the light,
this, and this, press Control J, you're not
going to be able to join it together because
it will disappear, so we don't really want that. So what we need to
do instead is we need to save them
out individually. So that means we
need to rename them. So if we come to this
one and we call it standing torch, like so. And if I go then, and control, see that, press the
ener button, like so. Then I'll come to this
one, and I'll press F two, and I'll press control V, and we'll call it
standing torch flame. Like so, and then we'll
come to the light, and I'll press F two, and I'll press standing
torch light, like so. Now, if these are the moment they're in
torches, which is fine. What I want to do now is
grab all of these three, so grab all three of them. And what I want to do then is right click and
mark them as asset. Now, I'm hoping that if I
come to my asset manager now, you will see that we've got all of these three objects in. So we've got this one here, which is the actual torch. Let's zoom into it. We've
got the flame then. And finally, then
we've got the light. If I put the light there,
there is the light. And if you go over
to your light, you'll see it's got exactly the same sentence
as what it have. Now, let's see how we use that then in our
actual scene quickly. So if I go down and
I make a new one, and I call it torches, so plus and double
tap, this one torches. Like so, and then a column two, these on a sign, and I'm going
to drop these into here. So I'm going to drop those
into torches like so. And there we go, now
we've got standing touch. And we could also make
another one in here, saying torches, standing
torch and drop them in there. I think I'll do that actually. I'll make it a little bit
easier for us to use. So standing torch. Like so, and then
I'll go to this one. And what I'll do
is, I'll drag and drop these into standing torch. And there we go.
They're in there now. You can see all our tortures, but then it'll break them down into what we actually need. Now, if we go to file
and save that out, just make sure that's saved out, and then we'll go
back now over to our gray box and I'll show you
actually how to use these. And then once we've
finished our tortures, you already know how
to bring them all in. We we are in our
amazing gray box, and what I want to do now
is go to my asset manager. I want to go down
to my tortures, and you'll see our tortures
are already in there. I can open this up now
standing tortures. Let's just always refresh the asset library I
always like to do that. And then what I'll
do is, I'll come in. I'll grab one of these, so I'll grab this one
and I'll bring it in. So this is our standing torch. Let it load up,
press the dot one, zoom in, and then we're going to have to
bring in our flame. So let's bring in our flame, and let's also
bring in our light. Now I'll do is I'll
grab my flame. I want to get the center
of here, so shift S, cursor selected, grab
my flame, shift S, and selection to cursor, and then grab my light, shift S, and
selection to cursor. Now, let's sort out where
we're going to put these. So first of all, the flame obviously wants
to be just above, this actual coal here, and then the light wants
to be in the flame. So in the flame round
about here, like so. Now we want to do as well is if we put this on render view, we'll see that
this is all black. So again, what we want to do is want to come over to cycles, and we want to put this where is light perhaps, I think it is. Yes, it was. We want to put this on Light 50 or something. So, and now we can actually see that flame actually working. The next thing then that
we want to do is we want to grab our flame. So we want to grab our flame. We want to grab our light. And finally, we want
to grab this here, which is our stand. So when I grab this, and I
want to press control P. And what I want to do is
set parents to object. So I want to set all the
parents to the object like so. What that means is now that this is really easy for
me to move around, because when I grab
the bottom part of it, I can really really move that around. I can put
it wherever I want. So let's just put this one
in the scene somewhere. Let's drop it down, and let's put it into
place on the floor. And there you go, you can
see now it's lighting up the whole scene like so. And that is why we've actually
put that light in there. But if I double tap the A now, here it is, if I turn
off this light now, you can see if a
press space bar, this is how it's going to look, and you can see it looks
really, really nice. Okay, so How then, though, do we duplicate this? Well, unfortunately,
what we've got to do is we've got to
actually put these in the own separate collections. So in other words, we need
to put this into torches. So you can see at the moment, got all of these parts
of collections here. We need to put
these into the own. So what I want to do is, I want to grab all of these. I want to turn this on, and
I want to grab my light. And then what I want to do
is make a new collection, and we'll call it torches. Like so. And this is
going to be important later because we
need to have a way. You can see now this
is how it all works. So if I open up this.
We need to grab. So now if I grab this, you'll see it still only
grabs the bottom part. If I grab though all of these, now you can see I've
grabbed the whole part, which makes it much easier to
actually move them around. Now, later on, what
we want to do, we want to also have control
over these actual tortures. So once we've got them in place, we then need to go in and actually put the light
and the actual flame into their own collection so that
we can turn those on and off because that's actually
very important for when we actually
come to render it out. If we're rendering
out a day scene, we don't want all of
our flames on there. So now I've got
this in place and showed you actually
how to use that. What I'm going to do is I'm
going to save this out. And what you can
also do as well, for those of you
using EV out there, you will see that you can
actually use it on EV. Albeit, it will be a little
lower resolution on there, as you can see. Now, the other thing is about EV that we didn't
discuss is the water will need changing slightly
if you're actually using EV, so you will need to change the
shade of the water because the water is actually
set up for cycles. Now, if we're coming over then
to our material over here. And then what we'll do is
we'll go over to the shading. It is on EV now, as you can
see, let's put it on EV. Let's put this on object mode. And basically, what we
can do is with the EV, we can actually unplug
this actual mask, so you can actually come in, and you can actually unplug it. Now, I don't think like this material is really
gonna look great for EV. What's happened here
is it not unplugged? So's turn that down. Et it load up. Let's turn
it up the other way. I thought it was
just that, but maybe I have to turn something
else over as well. And yes, I think it is actually, I'll just drop that down
sy, and what I'll do is I'll come up to, let's
look at this one. That's just going to
swap over the mask. And then I've got one over here. Let's have a look at this one. Bring this up. Seeing if
this is going to be the one. You need to turn
up, not that one. Let's have a then which
one it's going to be. So we unplug this. Let's see what happens
when you unplug this one. So I'm just giving
you a test just to see how to get it
right for the EV. And there we go. That is probably the best
we're going to get. Now, let me just plug
in the fat here. Not that one. There it is. Alright, so this is what
I was saying to you. This is, I think, probably the best you're going
to get with EV, looking something like this. I think it needs a better
shader on this, to be honest. We can also see
that the water on here still looks okay on here, but you'll probably just
need to bring it in, and it will look a
little bit worse with the EV render engine. What I'm going to do because
I don't actually want to change this is I'm
going to go down to file, and I'm going to open
up my scene again, so the course asti scene. And then hopefully, it
should be back to normal. So that's what you
can do if using EV. But of course,
we're not using EV. We're actually going
to be using cycles. So let's just set this now
back to blend the cycles. Let it load up. And then we go, we've got our
wonderful material in there that will tap the
A, and there we go. So enough of the torches. Now, what we'll do is now we'll head on over back to our parts. We'll get the torch set
up for the next torch. And then what we'll do is we'll do the brazier after that. Alright, everyone, so I hope you enjoyed that. I'll
see on the next one. Thanks a lot. Bye bye.
143. Using Array Modifiers for Fire Brazier Patterns: Welcome back everyone to
Blend for the Modulate and Kit bash environment guide, and this is where we left off. So let's zoom out in a minute. Let's go back to modeling
then, and here we are. So we've got both
of these torches. Let's set this torch in before
we do anything else then. So all I'm going to
do is I'm going to grab this one, this
one, and this one. And actually, we
need to rename them. So this is standing torch, so this will be
wall torch instead. So we'll come to this one first, and we'll do wall
torch plane, like so. And then what I'll do is
I'll just copy that part. And then I'll just press Enter. And then I'll come to this
one F two and wall torch. Light. Like so, and
then I'll come to this, and all I'll do is Wall touch. Like so. And then what I'll do is I'll grab each one of these. And we're then coming
over to right hand side, and going to right
click, Markers asset. Go back then to
the asset manager, and we'll have them
down here on the sign, of course, Wall Touches. And then all I want
to do is click the Li plus b here and call them Wall torches or wall torch, like, so, finally, then I can
come up, go to Unassigned, and I'm going to drop
these three in then to my wall torch. So
drop those in there. And now you can see,
if I click on this, it's going to show all six, but now I've got them
actually split off. Let's save that out then, so they're all saved out the way. Let's go back to modeling. Let's press the tab
button, and there we go. That's pretty much
those ones done. So now, let's start with
our actual Brazier. So what we're going to do is, we're going to start with. Let's think how we're
going to do this. It's quite a complex one. So what I'm going to
do is I'm going to first of all press Shift A. I'm going to bring in then I think we'll bring
in a cylinder, and I think we'll
use the cylinder to create that actual relief
that goes around them. So you can see over here
before we start this, we've got a relief that
goes around there, so they're going in and
out in and out like. And I think with that, actually, what I'll do is I'll use a circular array to
actually achieve that. And the rest of it
is fairly easy, fairly stuff that
we've done before. So let's do the
circular ray first. So first of all though we need to actually
create the right size. So let's bring it down. Let's
bring it out into place. Let's press N's d, and where is it going to go and how big is it going to be. So if we put it
something like this, this is probably going to
be a little bit too big, so let's make it a
little bit smaller, and I think that is
about the right size. Also how high up
it's going to be. I think something like this
will be the right height. And then what I'll
do is I'll just grab the top of this, and
I'll bring it up. To create that relief that
we actually need in there. And then when I'm going to do is I'm going to press Control R, left click, right click, and then Control B, and
I'm going to pull it out so I can make the top
and bottom of this part. I'm going to crab this
part and this part, and then I'm going to press E to Altern S. Bring those out, and now I can create this part
going actually into here. Alright, so finally,
let's press Control. All transforms right click
and set origin to geometry, right click and Shades move. And the other thing is, I'm just going to
put this on object. M gonna make it a lot easier for me to
see what I'm doing. What we want to do first is, what we want to do
first is we want to actually create that part
that's going to go in there. So what I'm going to do is
I'm going to create a cube. I'm going to in
fact, you know what? I need to start it really
over here, so curs selected, grab my cube, shift S
and selections cursor. And then what I'm going to
do is press the space bar. Sorry, not the
space bar, the S b to bring it down into scale. I'm going to then pull it out
into place, press the S b. So when I press one now, I should have a good idea of what it's going to look like. Now, we need to bring
one down and two out, and we need to do a lot
of things with this. So I think it's probably
going to be better off if I'm actually using
a plane instead. So I shift and click. Use a plane, so
delete and faces. Now, what we're going to do is we're going to press Control. Bring in a few edge loops, so I'll bring in two
edge loops for now. So left click, right click, and then S and X and just
pull those out a little bit. And then what we'll
do now we need a top, so we need a top, and
we need a bottom. So control. Two left
click, right click. So from here pretty much, I can actually make that part. So if I grab this one, this
one, this one, and this one. You can see already now. I've actually got
the part of one. I can also lower those
down if I want to, so I can lower these sides
down if I really want to. But what I'm going
to do first voice? Just press y. And then I'll just delete
these out the way. So I delete and faces. And now, as I said, you can come in and pull
these down if you wanted to, so you can have it
something like this. Also, we want these. I'm guessing we would like
these pulled out as well. I think they'll look
actually better. So I'll do is, I'll grab
these two e enter S and X. And just pull those
out a bit like so. And what I'll also do
then is shrinks in. So if I come to this one, I'll press S and X, and I'll bring these in like so, and then S and X on here. You can see it's a little bit different from the
one I had before, but actually, I think
it's looking better. So control A right clicks
the origins geometry, and now let's put it into place. And then what I'll
do is I'll make it a little bit bigger
because I want it to fit perfectly in place there, so I'm
going to pull it in. And then I'm going to press A E, and just pull them out
into place like so. And that is basically
what I want. I'm going to press SNS a little bit more,
just to fit them in Double tap the A. And
there we go, I think, I would be happy with
that going around there. Alright, so how then do we
put this to go around there? So the first thing we
want to do is, of course, reset or transform, set origin, geometry, add in A. So let's add in generate NRA. And what we'll do is we'll move it out a little
bit, actually. So we'll move it
out a little bit. We'll bring in a few of them, so we'll bring in
a few like that. Then what we want to
do now is we want to bring in a circle. So what I'm going to
do, first of all, just make sure this
is in the center. Also, what you want to
do is you want to make sure that the origin of
these is in the center. So if I write clicks
origin 23d cursor. And then what I'm going to do is we're going to press shift A, and I'm going to
bring in a curve, and we're going to
bring in a circle. Now, the circle, of course, wants to be roughly the
same size as this C, but we can actually alter it as we actually work through it. What I'm going to do now is
I'm going to bring in them. So when I come to my curve, make sure relative offset is on. You don't need to touch
any of the others. Then what you want
to do is you want to add in another modifier. And this time, I think
it's under deform, and it's going to be under
curve, and the curve, of course, wants to be this little circle that
we've put here. Now you can see what's happened. Now you can see that I
need to pull these out, and then I can get them into the place where
I actually want it. So now you can see if I pull
these back a little bit, like, so Then I can get
them where I want them. I can also right click and
Shades move, and there we go. And then what I can also do
now is I can bring back this, so I can bring them
back, so they're actually touching each
other if I want to. And then what I can do is
I can put the count up, and they will follow that
going all the way around. Now, you can see here
that what's happened is they're to close
together on this last part. Now, there's two ways
of dealing with that. So what you can do
is you can increase this and then
decrease the count, and you can see that you can start to line them up that way. Or there is another
way of doing it, and I'll show you
the other way now. So let's put this back down. And what I'm going to do
is increase the count. Two here. And then all I'm going to do is, I'm
just going to come in. I think, actually, can I
actually do this like this? Overlook. We go. Express A. Where is
the one that I need? Where is he go? Let's see if
can actually increase it. So we're in Edit Mode. Let's see if can press S and
X, and there we go. We can press SN X
and pull that down then into the space where
I need it just like that. So basically, I click this on, and what that does is it makes it not jump away over there. So let's click that on. And then what it did is, I
ma su I'm in Edit. So you've got edit mode,
and you've got object mode. And then what I did is I
pressed A to grab everything, and then S and X, and what I did is I pulled
that out then into place, and you can see just
what that did there. So you can see now it's
brought them all into place, and that there is
looking pretty nice. Now what we need to do is
we need to apply this, so we might as well
apply it all with object and convert and
mesh, apply them all. And then we can get
rid of this circle. So I can get rid of that circle, and that is it as
simple as that. Okay, so now next
what I want to do is, I want to make this part at
least a little bit smaller. So I'm going to grab
this press Control plus, and then I'm just going to pull it down a little bit like so. And then what I'm also going to do now is I'm going
to bring this in because we want this to look
like an actual brazier. So what I'm going to do
is I want to bring it in. So bring it all
the way into here. And then what I want
to do is I want to press Control, bring this out. I'll give it a few edge loops on there. Left
click, right click. Grab the center part there. And what I want to
do is bend this in. Now, if you're bending this in, I recommend that the
best way to do it is just to grab it all
to this point here, press shift age, hide
everything else out the way. And then you can grab
this center part, click on proportional editing, and then you can
actually pull it down to how you
actually want it, because it is a brazier, so it does want to be
coming down like this. Now, if I press lt age,
bring back everything, you'll see now we've got that actual curve that
we actually wanted. Now, one thing I do also recommend is you press shift
and click, right click, and you're going to
mark sharp on there, just to give it a better
side view on that. Now, the next thing we want to do then is we want to bring in a curve or making
it, you know, round. But the best way to do that. So to make those calls, the best way to
do it is actually probably to bring in a plane, make your plane smaller. And then what I'm going
to do is, I'm just going to sit my plane
there just for now, and then going to
come over add modify, and we're going to bring
in a subdivision surface. So subdivision surface,
turn it up a few like so. You're not going to be
perfect, but it's going to make it easier for us
to actually work with. So once I've actually
got that in place, you can see, like so. Once I actually apply that. I'm going to give it one more. Control. And if I press tab now, you can see that mesh is a lot nicer to actually work with, and that then is going to
make it easier for us. Rather than if we
brought in a cylinder, or we brought in a circle. And then you know, within the face, then
we use it insert. We're going to get a much
better mesh doing it this way. Alright, so on the next one, then what we'll do is we'll
pull this out and we'll get it looking like holes
before we put the fire on. And then we'll carry
on building out. Well, this is basically
the hardest part now is done. It's
out of the way. And now we can actually
freely move on. So what I'm gonna do
is save out my work, and I'll see you
all on the next one every on. Thanks a lot. Bye bye.
144. Crafting Additional Decorative Supports: Welcome back to blend the pa, the modular and Kitash
environment guide, and this we left off. Now, let's deal with this
part. So what I want to do is I want to grab it
somewhere in the center, and I want to start
pulling this up. So I want to pull this up. Like so. Let's bring it
in a little bit. Like so. And you can see, as I said, it won't fit in perfectly, and maybe that's because
I'm pulling it at the side. So what I'm gonna do is
I'm going to press C, and I'm gonna grab a few of these right in the middle
hopefully, like so. And then I'll try pulling it up. Like, so, and yes,
I think that's come up much nicer now than
what I did before. And then the next thing
we're going to do is right click and
shades, move by angle. Now, obviously, I want this
to be a little bit lumpy. Now we could go in
and displace this, or we could just
come in, and again, press tab use
proportional editing and put it on randomize. And then what we
can do is we can pull it up a little bit more. And pull this one up
a little bit more. Very gradually, pull
it up a little bit, pull this one up a little bit. And that then will probably get you the look that you're
actually looking for. And now I want to do is just
make sure it's all in here. So I can also come in and just stretch these out a
little bit if I want to. And then what they'll do is
I'll stretch these edges out and more importantly
break them up a little bit, because they're never
going to be straight like what we've got
them at the moment. So there you go now
we can pull them out. Now, you can see that
this one, for instance, here, is way way out. So let's just pop back
on to our smooth. So we'll just bring
it down with smooth. And just make it all fit in
to where we actually want it. Sometimes, I prefer
just to press G, just to pull them into place. And I'm just going to go
round and have a look, make sure that they're all
in place where I want them. And there we go. That is our brasier top
looking very nice. Okay, so now, let's come down
to the bottom of this then. So what I'll do is, I'll
pull this down first of all. So I'm going to pull this down. And then what I'll
do is, I will press the S bond just to bring it in a little bit without
portion editing on. Of course, so I'll
press S, bring it in. And then what I'll do is
I'll pull it down again. I'll put a rim on here. So if click e enter Alton S.
Let's put a rim on like so. Just make sure it
doesn't go out too far. And then from here now
is the bottom section, so I'm just going to press E
to bring it down, like so. And now I've got something for the other parts to grip onto. And I just need the
actual bowl now, which is going to go form
underneath this place. Now, think for the bowl. What I'll do is
I'll bring it in, first of all, so I'm
going to bring it in. And then what I'll do
is I'll bring it down to near here because I still want it to be
standing on something. And what I'm going to
do then is transform, so resell the transform, set origin geometry, right
click, Shades move by angle. Come back to bomb then
then press Control B. And what we're gonna do
is we're just going to increase the amount of
bevels on there. So like so. There we go, All right,
that's looking nice. Now we need the bottom section. So for the bottom section, I'm going to come. I'm
going to grab this part. I'm going to press shift
D, just to adupicate it. Then I'm going to
press S to pull this out because this is what I
want to actually sat on. And then I'm going to press E, like so, and then I want
to pull it out again. So e to S, pull it out again. And then what I want to
do is press E. Like, so this is the part then
where I want the actual legs, you know, the legs
to actually go into. So underneath here, basically. What I'm going to do now
is press the i born. And then e and drop it down, and then my legs can actually
go under there like so. And I think I'll
also tilt them in. Okay, so far so good. Now, let's deal with
this part now first. So what I'm going to do is I've got my curse already
in the center. I'm going to pair shift
a. I'm going to bring in a queue. I'm going to press S. And I'm hoping I can do
this without a curve, because I might need a curve to actually do this, but we'll see. So what we want to do is we
want to drop it under here, so we want it to go
in here, like so. And then what we want
to do is want to, yeah, let's make it a little
bit thinner first, so S and Y, and let's
then put it in. It wants to be jazed
in there, like so. And then S and X. And then what we want to do is want
to make this bit come in. So control, in dimo. So control pull it
down a little bit, grab the bottom of it,
and then pull it in. And then what I want to do
is bring this part in now. So if I come in, grab this part, I can press S and x and
pull it in, like so. I'm just looking kind of pull
it back a little bit more. And then what I want
to do now is want to press the I and bring this in. So insert with, and then I'll press E. And
pull this down. No, I, of course, want this
now to bend around here. So I want it to bend and
go into this part here. Now, if I come in and
just bend it like so, you'll see that happens, and we need some
edge loops in there, and we need to be
able to also see what we're doing in there,
so I'll just turn this on. And then when I can
press this controller, Center one, left click, right click, grab my center one, and hopefully, hopefully,
I should be able to then come down
with sphere maybe. And let's see if I can
actually pull that out. So what I'm going to do is
just turn this off again, and then I should turn this down and be very
careful with it, be able to pull this out
the way that I want it. Like, so any of that are a little bit too far out
like this one here, just turn it off again,
and then shift and click, and then just bring it in to
smooth it out a little bit. Now, you can see that
the problem I've got is that this bottom and this
side aren't going in eno, so I'm going to grab this
bot and this one in here. But this one under here. And pull them back into place. And now I can actually work on rounding this out because I can see that both of
these not round enough, so we to round
that out, like so, and I think right click
Shade smooth by angle, that that is what
I actually want. So that is looking
quite nice now. Yeah. Now what I want to
do. If we do 360/6, of course, is 60 degrees. And so we could have
six going around here. So basically, if I go
shifty and then R Z 60. No right click,
Oigin 23d cursor, and then R Z 60. It's going to take it
around 60 degrees. And if I do another
one, then it'll take it around
another 60 degrees. So shifty, R Z 60 like so. And you can see then
it's creating them all. Now, what you can do on this actually Instead of doing that, what you can do is
you can grab it, and then you can press Alt D, and then RZ 60. L et's write. In fact, you know what? Let's
believe the other way. Let's go to this one, right, click the origin, three D
cursor. And now let's try that. So lt D, enter R Z
60, and there we go. Now, what that means is now, I can come in. Let's
say to this one. And what I can do is I can
come to this face here. I can press the ye button,
and I can press E, I can pull it out, and
what's happening is, it's actually influencing
that one as well. So I tend when I tend to when I'm doing
this to actually do it that way because
it does make it a bit easier to bring
things and change things. So Alt Shift click Shift click. Control B. Turn it down. And then what we'll
do is we'll press E, enter Al TNS, bring
those out a little bit, like so, and they're
not coming out, right. So what I'll do is I'll press the Sport and to bring them out. And I'm just wondering, I'll
bring them out individually. So on medium point, to
put it on individual. Then let's press
the Sport and now they should come out
much, much beer. Right click J to move. And now you can see that
they've inherited this. So now what I can do is I can actually press Alt D, enter R Z. 90, not 90, sorry, let's put this on 60. So if you do make a mistake, just put it on 60 here. Like, so, come to this one then. And again, D, R Z
60, and then D, RZ 60, and then O D, R Z 60. And then, I think, s, look, Yeah, there we go. And they're all in place
now looking really nice. And now finally we can, join all these together.
So now they're done. I'm happy with what
they look like. I can come in now and
join them all together. So grab this last
one around here. Press Control J, join them all
together and there you go. Now we've got no problems
with the actual mesh. Now what we want
to do is we want to bevel this a little bit. So this bond bit, we want to
bevel it out a little bit. So what I'm going to
do is, first of all, Control A or transform, set Oigin two, three D cursor. And then let's come in, grab this one, shift click, this one, and then control B and bevel
it off a little bit like, so just rounding those
off a little bit. Now, finally, we've
just got the legs now, and I think I'm going to
sit it on three legs. So again, if you're doing
anything like this, you want to divide
your 360 by three, which is 120, so that's the
way that you want to do it. What I'm going to do
with the legs is, first of I'm going to press
Shift A, bring in a cube. Now, we've done a few
things like this already, so we should know
exactly how to do this. What we'll do is we'll
just pull it down, put it into place,
press the S button. And I want it coming
from underneath here, as you can see, and then going
all the way back to here. Now, I'll do it the same way as what I've been doing
with all that. Again, you could use a plane and you could increase
the thickness. That's also where you can do it. So we will actually do it that way because it's a
little bit different. But what we'll do is
we'll just grab the back, press control plus,
delete and faces. Grab this face then, and
all I'm going to do then, I'll pull it right into here. And then what I'll do is
I'll pull it out now. So I'm going to grab the
bomb of it, pull it out. But if I press three,
I can go inside view, pull it all the way down to
the ground plane, like so, and then pull it all the way out where I actually want it, which will be
something like this. And then what I'll
do is, I'll press control center one, left click, right click, grab my center one, proportional editing on, and
then just bring it back. How I want them.
Oh, not like that. I want it rounded.
Like so. Alright. Now, on the next lesson, then what we'll do is we'll actually get this into looking like
a leg rather than this. I think this needs
pulling up a little bit. I think it's a little bit
too low on the ground. I think this needs to be a
bit more of a leg on there. But we'll do that
all on the next one. Let's save our work, and I'll see her on the
next one every one. Thanks a lot. Bye bye.
145. Texturing the Fire Brazier: Welcome back
everyone. Blend pull the modular in kit bash
environment guide, and this is where we left off. So first of all, let's come in and grab all of these parts. I press G, I can drop it back and see the ones that
I've not actually got. So G, again, there we go. And then what I can do is I can pull this up a little bit, and then find I can grab this.
And all I'm going to do. Still with proportional
editing on, I'm just going to
drag it all out and pull it up into place like. So I've lost a little bit of the curve on
them, fortunately. So I'm going to try and curve
it again, bringing it in. So just to curve it. And you can see, I've grabbed that side. I don't mean to do
that. Let's bring it in, curve it a little bit. Like, so Yeah, and I don't know if I'm
happy with this at the moment, so
let's turn that off. Let's press three and
going into side view. And what I'll do is I'll
put this onto wire frame. I'll put this onto then so I can see these verors
going in there. I'll grab both of these vertes, and now I can actually curve it in the way that
I actually want it. And that's another way of doing
this, as well, of course. Let's curve it and finally
curve this one into place. And now we've got that kind of curve that I'm
actually looking for. And now, finally, what we
can do is we can come in. And put the modifier on. So generate a solidify. Let's put it on even thickness. Let's bring it out this way. We can see we're going
to have to go much, much higher up on
this one. Like so. And we're also going to
have to pull it back into the floor as well because at the moment it's not
actually in the floor, but we'll sort both of
those things out in time. So let's first of all,
grab the top of here. I'm going to press E and Z and just pull
it up into place. And then with this one, I'm just going to grab the
bottom up here and I'm going to press E and pull it back into the floor where
I actually want it. So you can see they've pulled
it back into the floor. Albeit, it wasn't done
in a very good way. So what I'm going to
do is I'm going to press three, and then
I'm going to press E, and I'm going to pull
it now like so and put it into the floor,
following this curve. Now I'm going to do
this, and I'm going to actually Apply this. So I'll apply my solidify. So let's apply that.
I'll press tab. Ponto A apply it. Then what I'll do is now want to make sure that this is flat. So the first thing
we're going to do is three again, press the t one, press A to grab it all, and then mesh, bsect, and we're going to cut
it round about here. Make sure this is zeroed out, clear the inner,
and there we go, and let's also fill it in. So let's put a face in there, and that now is on the floor. And now, finally, let's make this a little bit
thinner as well. So I'm going to press
lt, shift and click, proportional editing
on, and then I'll press S and X and bring this in. Like, so, and there we go. There, that is looking good. Right click Shades move. Now, what we're going
to do is want to put a few bands going in here, just to make sure that
it looks as though it's actually holding
it so something solid. So I'll do is I'll
start with this one. And then we'll just work
our way down to this one, press the eye button, and
bring those in. L so. And then finally
press E and pull them back into the place
where we want them, right click shades
move by angle. That is looking pretty nice. Now, I do feel like on this one, at least, probably gonna
want the bomb on this. To make it look a
little bit better. Let's see what that
action looks like then. If I grab this, press
Shift S coaster selected. Press shift A, I'll
bring in a plane, I'll press S without
portion of editing on. Press the S button, and I'll see what this
action looks like. So I'm going to
pull it into place. Make it a little bit smaller. And then all I'm going to do
is press E and pull it down. Yeah. I think that just sets
it off a little bit bare. I think it gives a reference to where to put it
into the floor. So I'm going to actually
keep that on there. Now, I've still got my cursor. Where is my cursor?
Cursors over here. So what I'll do is I'll
grab this ring going round, shift S, cursor selected, and then what we'll do
is we'll grab this one. And I'm just wondering if this
looks a little bit flimsy. I might need to expand
it a little bit, so I'll just press S and X and pull it out and make
it a little bit thicker, and I'm also, as well. Going to drop this down
a little bit more. So what I'm going to do is
I'm going to pull this out, I'm going to pull
it up a little bit, just to make it a
little bit thicker. And then what I'm going
to do is the bottom, I'm going to put that into
below there, like so. And then we go. Alright, that's looking much much
better than it did. And now what I can
do is I can press Control A transforms,
right click. Set origin, two, three D cursor. And now, as I said,
it needs to be 120. So we're going to go
shifty this time, Z 120, and then shifty
and then Z, 120. And then we go, we've got
our three legs into place. Now we want to do is we want
to join all of this up. And then finally, we
want to bevel it off. And this then is
pretty much done. I think it looks really cool. And then we can bring
in our next fire. So what we're going
to do is join all of this together, like so. Again, press G, I'll be at
this part and this part, G, and always always
object, convert to mesh, and then press Control J and join it all together.
And there we go. Let's press control
A or transform, set origins geometry,
right click, Shades move by angle. Then what we'll do is
we'll generate a bevel. The bevels come in, as you see, that looks pretty nice. Then what we need to
do is now we need to actually get some
materials on here, so that's what we'll do next. Now, what I'm going
to do for this, I'll copy the
materials of this one. What I'll do is I'll grab. This one is still not joint. I need to remember that
when I actually come. Yeah, I actually created this without joining
it together. So I'm going to actually
fix that first. What I'm going to do is I'm
going to join this with this, press Control J, like so. And I'm just going to check my asset manager because I want to make sure that
that is updated. That we've got Watrch. I'm hoping this,
if I bring it out. Yes, it has. So it's updated. Now we can see that's
on the back of it. So, I was lucky. Okay. Let's go to modeling. I've been looking. I
saved me a lot of work. Now, let's come in then and grab this, and then
we'll grab this. We'll press Control L, and we'll link
materials. There we go. Now let's put it onto Shade of U, so I can see
what I'm doing. Now as you can see most of
this looking good already, let's press A U, Smart U V, project, click Okay. And now let's come in and
start adding these materials. So, this one, first
of all, you can see, it's got some sharp
edges on there that have been put in for
us. We don't want those. So all I'm going to
press this controle and we'll clear the shops, and that then will make
it much, much smoother. And now I can do is I can
come to my materials. I'm going to scroll
down charcoal, and then unwrap that. Now, you can see this is
not unwrap that well, so I'm going to
press and unwrap. And now you can
see that's looking much much nicer
than what it was. And now I can hide
that out the way. Now, let's come to each of
these parts last, I think. Let's unwrap all this first. So we'll unwrap this part, U, Smart U V project, click. Let's have
a look at that. That's looking pretty
nice. Now, what I want to do is these bands. So, one band here, Control plus, let's put it on red
metal. Or blue. Let's put it on
blue, blue metal. And then we'll
have these as red. And then what we'll do
is we'll have these. I'm going to try and
keep it a little bit more consistent with
the colors, actually. I'm also looking at, if I grab all of this.
So all of this part. Yeah, I think that
actually looks good. What I need to do now is, I'm going to hide
the out of the way. And then I'll come
to each of these. And I'm wondering if
the front of these, I'll just do the front of these. So what I'll do is
I'll grab each of these. In fact, you know what? We'll grab all of these.
We'll unwrap them again. So U, Smart U V
project, click okay. Then I'll grab the
front of these. And then I'll come round and
grab front of each of these. I'll zoom in front
of each of these. Press Control plus, and then
red Mail, click a sign. And there we go. That is
what we've got so far. I think actually that
looks pretty nice. And then what I'll do is I'll
I'll grab all these again, and I'll hide them out the way. I'll hide out the way, and then we'll look
at this part now. Now, you can see on
this part that some of it has got shops on,
and some of it hasn't. What I'm going to do is, I
will grab it all first of all, and Smart U V project click. And then what I'm
going to do is I'm going to actually
add in my own shop. So Old Shift click, O Shift click Ol Shift
click, right click, Mark Sharp, and that now looks much better than
what it did before. And now the last part is, so if I grab all of this,
hide it out the way. These are the last parts. So let's come in, grab
the le, grab the feet. S U, Smart UV project, click Okay, and then
we can come in now. And what we'll do is we'll
click each of these, and we'll put these
on red as well. So all of these fronts
and all of this front. And then we'll just
add in red metal, click a sign, and there we go. All right, all of
that looks good. Except this part.
So if I come in now and grab each of these, including the fet, hide
them out of the way. That would mean then,
I can just press A, U, smart U V, project, click K, and then click a
sign on red Metal. O tag, bring back everything, tab, double tap the A. And there we go, that it
Brazier actually done, and that's looking pretty nice. So what we'll do now is make sure that everything's
joined together, which it should be. And what we'll do
on the next lesson is then we'll get our fire. We'll get our light in,
like we did on the torches, and then we'll get those set in our asset manager as well. Alright, everyone, so I hope you enjoyed that. I'll
see on the next one. Thanks a lot. Bye bye.
146. Adding Fire Geometry Nodes to the Brazier: Welcome back everyone
to Blend to Ford the modular and Kit
bash Environment guide. And the first thing
we're going to do is press Shift S, Cursor selected. Then we're gonna
grab both of these, so I'm going to grab
this one and the light. I'm going to press Shift D. And you will notice
when a press Shift D, they're not actually put
into our asset manager which is really great for us. They just name the wrong thing. So just remember that
we need to rename them. Then we're going to
do is press Shift S and selections Cursor. And finally, then what I'm
going to do is lift them up. So I'm going to lift the
fire up to here for now. Lift up this light then to be round about the
center of the fire. And then what we're
going to do now is come to our actual fire. Now, with a brazier, so the smaller flame, generally, especially when it's a torch, depending on what they're
using to combust, de is how fast the flames go. If you notice on a bonfire, for instance, you know, they're quite slow
sometimes the flames. Also, the sizing has a lot
to do with this as well. So we need to take those things into account when we're
actually doing this. So we're going to come
over to our jumture node. Now, the first thing is we
want these a different speed. At the moment this is on two,
the same as the other one. I'm going to put this on 1.5. And then what I'm
going to do is I'm going to work my way down. So I'm going to
come to my radius, and I actually want this
to be much, much bigger, as you can see, and then
put it down into place, like so, and now you can
see that's what we've got. Now you can see
because I've done that and put it onto 1.5. If I put this on three, you can see now that actually
probably looks better. So you can see now messing
with the scale of things, how much difference it
actually makes them. Now what we want to
do is come down to the U. I'm going to put
this on point not two. Just try that. Make it a little bit redder
than the other one. And then what I'm
going to do with the core U is keep
that the same. I'm going to keep I'm going to bring up the emission
because at the moment, we haven't got much
emission on the core. So I'm going to put that on 50. Bring that up a little bit, and now that's
looking pretty nice. And then the next thing
I'm going to do I'm going to come down to my smoke. Let's put this
resolution on too. I don't want too much
smoke coming off. That needs to be very, very
high resolution or anything. And the layers though
will turn up to 25. So I'll turn the layers up,
and now you can see we're getting a lot more smoke
actually coming off there. Okay, so with the
U on the smoke, I'm going to leave
everything the same apart from this u here. So we've got the
u, the overall u, and then we've got the
core U. I'm going to turn this to nut point n two. So I'm going to turn
my smoke a little bit more of a u that's
matching the actual flame. And then finally, I'm
going to turn down. I'm going to keep actually
all of those the same. Now, I'm going to
come down, and I'm just looking what
I've actually got on On my spots.
And you know what? I think I'm going to leave all
of those the same as well. And finally, then I just
want to check this light. So I'm going to come to my light now on this, let's
grab this light. Can I grab this light? There
we go. No, I can't grab it. There we go. And I'm
just going to check my light if I want it to be
the same as my other one. So it's 200, look, 200, 0.56, and yeah, everything is the same except because this
is a little brighter, a little bit bigger,
the brazier. You can see that that hue
doesn't really match this. But what I'm going to
do is I'm going to come in and see the black
smoke on there as well, is I'm going to
turn this more to a little bit of a
redder scale like so. Maybe that's a little
bit too much like so, and there we go, that's looking. That's looking about right now. I'm just wondering if this
is a little bit too high. It's a big flame, and
I'm going to come back to this then. What I'm going to do
is come into my flame. I'm going to turn
down the height. Let's try five. Maybe
even more than that. Let's try not seven. Let's try 3.5. L et's try to see
what that looks like. Yeah, and actually
think that looks a lot more realistic like that. Alright. We've got a
lot of smoke off there. Our light. Now,
where is our light? Let's hide the fire out the
way. Here is our light. And I'm just seeing if afresh. Yeah, fire light looks a about, as you can see here,
about in the right place. Alright, so we've got that. Now, let's come in and
rename these then. So this will be Brazier flame. So Brazier And let's
just control A, control, C that, so we've
got it for the next one. Space bar plain. L so, Fide that the way. Then we'll come to our light, and then I'll call it
Control V and light. And then we'll come
to our bottom, and we'll just
call that Brazier. Control V and Now what
we should be able to do, so we've got Brazier light. We've got where
is the other one? Let's press te hidden
away. There we are. Brazier frame Brazier light, and we've got more there. Then what I want to do
is just right click, and we're going to mark them as assets over to the
asset manager. They're under a sign. So let's come to our tortures
first, click the plus. Control V on this one, brazier, and then a sign and drop them into our
Brazier, of course. So drop them into brazier, like so, and there they all are. And let's go out
and save that out. And now what we're
going to do is we're going to basically
finish with this. Now, before we
finish, you can see got a little bit of problem
with these parts here. So I'm going to fix those.
I'm going to press A, shift n, spin all los around. Just make sure that once
you've updated them, so file, save it out, that it actually updated them. So if I bring this here, you can see now that's updated. Now, the next thing
I'm going to do is, I'm just going to delete
these all out the way. I think it's always worth tidying everything
up before finishing, so you can see here
I'm tidying these up. And moreso these are in torches already, so
everything's in there. I'm going to go back to
modeling then. Let it load up. And what I'm going to do
is I'm going to go to finish. Load them all up. And then what I'm going to do
is just put my torches up, so you can see in my torches, there's nothing in here anymore, which means I need
to grab all of these and drop them
into my torches, and then I can close that up. Then what I can do is I can
bring these all over now, so I'm just going to
put onto object mode. I'm going to grab them
all. And then what I'm going to do is just put them
nice and neatly into place. I always feel like I need to, you know, just make sure
everything's nice and neat, move my guy out of
here and finally put my finished into my
finished, and there we go. That is the asset pick done. Now, the other thing
is, of course, that now you know how
to create the kit bash, a modular pack, how to
put them into blender, how to create them, how to scale them all of
that sort of stuff. The one thing that we
haven't spoke about, and it's because we're only
using blender is point. So, in other words, where are you saying your orientation? Normally, when you're actually
dealing with, you know, a pack like this, it's not a good idea to have
the orientation sat right in the center. If you want to kind of snap things together
in on real engine, it's always better off
having it on the floor. So on the floor where
you want it to go and right at one of these sides. So pick a side. Probably the left hand side
is always the best one. You're going to press shift
desk, cursor selected, and then right click and
set origin 23d cursor. And then that's going to
set that orientation there. That means then when you
bring it into on real engine, It's going to bring it in with this origin straight
on the floor. If you brought this into
something like real engine now, it's going to bring it above the floor and set it to here. Another words, it's
going to come in, and it's going to come in with this orientation on the floor. And that's not what you
want. So just remember, if you are going to
take this through or if you are going to
sell assets like this, always take into account
the orientation. Because we're only
using blender, we're not really having
to worry about that, but definitely definitely for
snapping purposes as well. If let's say you brought
another one of these in, I'll just move it over here. So let's say I've brought
another one of these in. I want to then snap it to this. Now, how it works generally
in unreal engineers, it will be snapping
it to vertices. So what this wants to do is snap to this vertice
on this side, and then it will bring them together perfectly in
line with each other. And again, that's why it's
so important to actually have the origin set
in the right place. So that's that we're not
going to cover or do that with our own asset pack
in this in this one. But when you know, you come to do your own and you're working
outside of Blender, then just take
that into account. What I'm going to do now
is file and save that out. I don't have anything
else to create in here. I don't think so anyway.
I'm just looking now in my pack to make sure
I've created everything. I'm fairly sure we've
created everything in here. So what I'm going to do now is save that out and close it down. What that lead me to then is now is to our actual gray box. And on the next lesson,
then we'll start getting all of these
tortures into place. We'll start print
them on the walls, getting the braziers
in, things like that. And then finally, then, finally, we can actually
start on our terrain. So we've basically done with the gray box once we've
got our torches in. I'll show you how to
hide the torches, but when it's the daytime
scene and all nighttime scene, and we'll go on from there. Alright, everyone, so I'll
see you on the next one. Thanks a lot. Bye bye.
147. Torch Placement in the Aztec City Scene: Welcome back to everyone
to blender for the modulate and Kit bash
environment guide, and this is where
we left it off. So what we're going to
do now is actually bring in all of the torches, and we're going to set those out where we actually need them. So, as I said, you will
notice that when you actually grab like
one like this, when you move it, that's fine, but when you duplicate it, then you're going to have a
problem with the rest of it. So what you can actually do
is you can see over here, you can actually grab
it like this as well, and then you can
actually duplicate it. So the first one
I'm going to put up is I'm going to put
one around here. I'm going to put
it, not like that. I'm going to put it on
top of the actual stairs. So I'm going to move it over here and let's not
pull it like this. Let's grab this blue and put
it on top of the stairs. Like so I'm going
to press one and see where it's
actually positioned. And then I'm going to
move it just around here, like so, and maybe a
little bit back, like so. And then what I can
do is I can press 50 and duplicate that one
out over this side. Like so. Alright, so that's
looking pretty good. Let's have a check then and see what that
actually looks like. And let's turn off
these so we can actually see double tap
the A. And there we go. You can see that's
looking amazing. All right, that's
looking pretty good. Now what we need
to do is we need to figure out where else we're going to put
these large torches. So what I'm going to do is I'm going to actually
come back now, and I'm going to grab it again, so I'm going to grab
this one, this one. I'm going to turn
this back on as well, so I can actually see what
I'm doing. And this one. And then what I'm going
to do is press shift. I'm going to bring
this then up like so. And then I'm going
to move it over. Press the dot on
just to zoom in, and then just put it
into place along here, just making sure that it's
actually in the floor. So this one can
go. Probably, I'm just looking to make sure they
can actually walk around. So they need to be able to walk around to this
door, for instance. Thou I'm just wondering
whether I put it here or whether actually
I put it in front, I might actually be
better on this one, putting it to the side. So look around there, like so, and let's do the
same on the other side now, so shift deep, put it over
the other side. Like so. Yeah, and I think they'll still be able to
walk around there. Or I pull it forward
and put it here, and then they can definitely
walk around there. I think actually, it's
probably better there, so I'm just going
to grab this one and move it over, put
it there like so. Alright, that's
looking pretty nice. Now what I'm doing is
I'm just looking on my own my own example,
my own gray box, to make sure where I'm
actually putting all of these, so I'm just checking to see if there's any larger
ones that are on the floor. And I think with these ones, that'll be it for
these ones here. Then what we'll do is we'll
come now to our Brazes. So, let's come to our brazes. What I'm going to do
again is what I did before is I'll bring
one of them out. And before I do that, actually, you know
what I'm going to do. I'm just wondering
whether I want to put these into a
different In fact, we'll actually do that after,
because at the moment, we haven't actually
got them in anything. Let me just I've got
them all in tortures. Let me just grab one of these, and just make sure that all
of these are in tortures. So we can see, is
this in tortures? Let's grab all of this and grab all of this
one and this one. And what I just want
to do is make sure that they're all in the
right collection because that then will make it
much easier for us. So if I press, I can see I've got one that says tortures,
let's put them in there, and then I should be able
to turn all of these off, which can including the brazier which are brought
out, which is good. And let's have a look actually, did I turn out? No, I didn't. There it is. Let's put
that one then inside. Once we've actually
got the rest of it in. So what I'm going to do now
is I'll bring the flame out and put the flame
on top of the brazier. So seven to go over the top. And then G, let's
put it in place. Let's press dot to zoom in, and all I'm going to do then
is bring it up. Like so. And then what I want
is the actual light. So I'm going to bring
the light source in. Drop that in side there. So let's have a
quick look at that. What that looks like.
And there we go. Let's bring it
down a little bit. Let's put it over. O G, let's put it right
in the center. And then let's make sure
that it's low enough down. So I'm going to bring
it down, like so. And then what I'm
going to do is, I'm going to grab all of this now. I'll grab all of it. And
what I want to do is just put it over to let's say
the floor over here. So I'm going to put
it there back here. I'll run about on here. And then what I'll do
is I'll drop it down. I'll be able to see
that light then. Press dot and just make sure
there's not in the floor, make sure it is in the floor. And there we go
that's on the floor, and now I can see
that light source bouncing off there. That's
exactly what I want. The other thing is at
this point, as well, it might be worth
actually turning down the light being as we're
dealing with these tortures. So we'll actually do
that now as well. And the way we do that is, what we'll do is we'll first
of all, save out our work. Then we're coming over to
our sky textures, over here. And then what I'm
going to do is just click this little b here, and then it'll give me
access to a new sky one. Now, let's rename it, first of all, and then
I'll show you what I mean. So night theme, we want this
to be called. So night. Scene like so. Now,
the moment you can see we've got a day scene
and we've got a nice scene. On this one, what I want you
to do is click this button. And what that means
is it will save it out even when it's
not being used. In other words, if I
actually don't click this, I save out blender, then when
I come back into Blender, it's more than likely
going to get rid of it. The other thing is,
if I come up to here and I go to external data, sorry, clean, clean up these, it will actually delete it because there's an
option on here, as you can see, I think it says delete fake
users or something. There's not actually that there. But anyway, it shouldn't
delete the actual fake users. So what I'm going to do now is I'll come up and click that on. I'll go back to my night
scene now and click this on. And then former night scene, which I'm actually
on now, I'll just set the sun intensity
down to zero. And then what I'll
do is I'll set the sun elevation,
because bear in mind. The sun once it drops
below the horizon. That's when darkness
is going to come. So the sun and elevation set at zero means that it
will be in darkness. And now you can actually see what that
actually looks like. All right, so there you go. You can see how it's lit
up now, and from there, you can actually decide, well, give you a better idea of where you're actually
going to put them. So I would keep
swapping between them, or you can just simply put this on and then let the
shaders load up, or you can even put
it on object mode, and that's probably going to
be even easier for you then. So let's let it load up. And then what I'll
do is I'll come in, I'll grab my where's
my light source. Let's see if I can grab that. I don't see my light
sort. It's have a look, there it
is. It's in there. So what I'm going to do is, I'm going to just put on y for a minute. Can
I see in there? No. So let's side
that out the way. Let's grab this one,
grab my brazier, press salt, and then
we can grab them both. And then what I'm
going to do is, I need where's the
other brazier. Let me just have a look where
I've put the other one. I think there's another
one around the other side, and one then in the top of here. And I'm just looking
to make sure. I've got them all. Alright.
So one in top of there, so let's do that one first. So shifty. We'll bring it over. And this one then is
going to go around here. Around here. And
it's a good idea to put them on the
outside like this because what it's going
to do is it's also going to light up
the actual leaves. Or the foliage, that's
going to be around edge. Make sure it's not poking
in the floor like so. There we go. And I'm also looking at making sure that I've got that one in the
floor properly. So if I come down,
you can see that this one isn't in the
floor, grab this one, ide it out of the way, grab
this one, grab this one, I'll tape, bring it back, and then let's put it
into the floor. Like so. Now, I'll do is we'll grab this one
again, so shift, and I'll bring it over,
and the place I want it then is going to be over
here, right in here. So let's put it right
in the center here. And what I'm going
to do is lift it up. A little dot born. And what I want to
see is it going into right on the floor. So yours before it gets
in the floor, like so. And then we'll have
one that's going to go right on top. So let
me just have a look. Right on top of this part here. So inside this part here, so press shift, and
I'll drag it over. Seven to go over the top, just to put it in
the right place. I want to ride in the
middle of these two. And then what I'm going
to do is drop it down. Press a little dot
born and zoom in, and then I can pull it down
onto the floor, like so. Remember the height
of this, by the way, is the actual smoke. So
don't worry about that. All right, so
that's that one in. And then I think as far as braziers go, that
is all of them. And now what we need to think
about are our tortures. So I'm hoping that our torch. So I'm just going
to come in now and see if this actually
gets hidden away. So if I come to my tortures, ah, it's not actually
hidden because it's brought them into
a different place. So what I'm going to do is
I'm going to grab this one. I'm going to come in then
and grab all of these. I'm going to hide this.
Shifts like this, I tach. And then what I'm going to do
is come round to this one. Grab this one, this one, H. Shifts like this one. And I'm just wondering I've
actually hid them all. Yes, I have. So I'll take. Then finally, the braziers, let's come in, grab
this one and this one. Hide them out the way,
shifts like this one, tag, and then what we're
going to do is just put them into torches, like so, and now
when I hide these, it should hide everything. So it should hide all of these, all of these braziers, and
that's what I'm looking for. It's very important
that we actually get these into a good position. Also looking at this mesh here. I'm going to right
click and Shade Smooth by angle, while I can see that. So anything I'm seeing at the moment like
this one as well, Shade Smooth by angle. I'm
going to actually fix. I can see this needs
a bit more fixing, and I would actually go
around and fix those. So I need to find out actually what's
wrong with this one, but there's definitely
something wrong with it. So what we'll do
on the next lesson is we'll actually fix
any problems we see, and then we'll start
bringing in those tortures. So I just see that
one having a problem. And of course, if
it looks like this, it might mess around
with my light, and that's why I want
to actually fix it. All right, everyone, so we'll
do that on the next lesson. Thanks a lot, and I'll see
on the next one. Bye bye.
148. Continuing Light Placement for the Aztec Environment: Welcome back everyone
to blend for the modular and Kit
bash environment guy. This is where we left off. So what I'm going to do
is just grab this one, shift H, to grab everything. And then what I'm going to do is I'm going to come
in and I'm going to press delete and limited
dissolve and fix that. Alright, let's press whole the, and there we go. Let's
bring everything back. And this is what
we're left with. Now, one last thing I want to also do is I want to make sure. I'm just wondering if let's
put it onto rendered view. I'm just wondering if I
actually need to fix these. Now, of course, now we've
got our dark lighting, we can't actually see
anything unless we turn all of our torches
on and let them load up, and now you can see it's
actually brought to life. The other thing is we want an easy way to switch these over. So now I can just switch
them over like so, and it should load
up and here we go. Now we can see everything
as we did before. Now what I'm wondering
is if I need to convert these because all of these
at the moment are geogendes. I think if you're taking it through to re
engine or something, obviously you're going to
have to convert these, but for now, I'm not actually
going to convert them. Now, one thing I
am looking at is these little black
marks on here, and this might be just caused. Wondering, by by
this flame here. So what I'm going
to do is, I'm just going to come in and check that. And you can see if I
hide this out the way, there you go, it's
actually disappeared. So it's actually caused by
the flame or the smoke. So what I'm going to
do, first of all, is I'm going to
come over to here. I'm going to come
down to my smoke, and we should have
a height here. Let's set the height
to zero and see if that actually fixes
it. And there you go. So it is that. So what
I'm going to do is, I'm going to put the height
of this down to three. Let's try that. Nope, it's
still there, let's try two. And then you go,
that's that one fixed, and let's just fix
this one as well. So we'll come to our
smoke, put it onto two. And there you go,
that's fix that one. Alright, it shouldn't
have a lot of impact actually on the rendered. So now, if we go back to 19, so we're going to
go back to the 19, and it shouldn't have really any impact on how they
look, as you can see. So they're still
looking wonderful. Okay, so now let's come in. And we're going to
bring our last torch. And these are
definitely the ones where we have the
most torches in. So these are the ones that
go up against the wall. But last thing before we do that is we just want to
grab one more of these, so I'm just going to
grab this one here. And then what I'm
going to do is shift D. So I'm going to
go over the top, shift D, and I'm going to
drop that then over here. So I just want it on
my swimming pool. Like, so. Let's pull it down. And let's pull it out
a little bit. Like so. And then that light then should really
bounce off of here. So if I put it on
to rendered view, put this onto, sorry
on night scene, and let's also turn this off. And there you go, now you can see it lights up
that whole place, really, really
brings it to life. Okay, so now let's
turn this back on, and then what we'll do is
put this on object mode, and now run to our
final touches, which are going to be
the wall mounted ones. So what I'll do is I'll
come over to my torches. Let's go down. And we can
see the wall torches here, so it's all really easy for us because we
brought more low. I'm just wondering
if I bring all three of those out. No, I can't. So what I'll have to
do is just press dot, zoom in, and then I'll
bring my flame out. And I'll put my flame
there actually, and then I'll bring
my light out. Now, with this one, let's pull it into place then, so I'm
going to go over the top. I'm going to press G, put
it into place, like so, and then I'm going to
lift it up into place, making sure that it
drops down into there. So again, I'm going to
put it onto render view, not render view
so shade of view, and then I'll be able
to have a good look and see where that actually is. And I can see my flame
starting kind of from here. But press space bar now. Yeah. That's looking
pretty good. And now all I need is my light. So I'm going to press one,
first of all, press G, put it into roughly
where I want it, so it's going to be right
in the middle there. Seven to go over the
top, and then I'm just going to move it into
the middle again, like, so I'm just going to
place this one into place. I should still be able
to press G. No I can't. So what I'm going to do
or grab all of these, put it on here, and then
I'll press Control P, and I'm going to set
parent two object. And then I should be able to now grab this and move it all. Like that. Alright, so
now I'm going to do this. I'll move this one over first. I'll check it out, see
where it looks like. Now, the first place I
want this one is going to be around the wall here at
the side of this centrn. So I'm just going
to press G. Then what I'm going to
do is press dot, then I'm going to come down
now and drop it into place. I want it right around here. There's a nice piece of wall
there where I can put it on, and let's see what it looks like there. I'm going
to pull it back. Into place, and then
let's pull it out, and then we can
have a look at it. Make sure everything's
right before continuing. And again, I told you in the beginning when we was
making these tortures, that the problem you're going to have is putting it in the wall, so just make sure that it
sticks in the wall properly. Now I'm going to pull
it down to just here, so it looks like it's stuck
in the wall, and there we go. Now, let's have one
final look at that then. So we'll turn this one off. Like so, double tap the A. And there we go,
you can see that's looking very, very nice now. You can also see that now
when I'm pressing render, it's very, very slow, and this is because we've got
a few of those flames in. Now, when I'm going to show you how you can turn
these off on and off. Well, first of all,
let's get them all in. Now, the thing is with
this one, first of all, need to put it in
with our tortures, that then will make
it easier for us. So let's go back then to object mode. Now we
know that's okay. We'll turn this
back on. And then what we'll do is we'll
grab all of these, and we'll make sure that
they're in actual tortures. So just make sure
they're in tortures, and now we should be able
to turn those on and off. Now that's going to make it easier to do the rest of them. So what I'm going to do
now is just press shift. Bring it over to this side, so I'll want it into this wall. It's up to you whether
you put it in that one or this one. It's
completely up to you. But you see, 'cause
I brought it over, I'm going to put it
right there now, which makes it
pretty easy for me. And then what I'll
do is we'll bring in Another one of these. So all I'm going to
do is press shifty, and then going to bring
it over to this side 090. And again, it's up to you
way to stick your torches. I'm just putting mine where
I think places need lit. And when I've actually done
this, what I'll do is, I will be checking it with
the lighting as well, just to make sure
everything's lit. Now I can see if we don't
really want it in half, we want to pull it
up a bit, like so, and just make sure
it's in the wall, and there we go. Let's
do the next one then. So I'll have another one
over here, so shift. Let's put one right
near this water well. Like so. There we go. And then we'll have
one up the stairs. So I'm just going
to press shift, and I'll drag this
one up the stairs. Now, all of these as well now, because I've put them
into torches already, should be able to be turned
on and off, like so. Alright, let's put this one. Now I'm thinking
with this one. I did have it on my gray box here, but I think I'll stick
it in the wall here. I think that's better idea. So put it in there, make sure then it's
stuck in the wall, like so, holding the
shift b. And there we go. Okay, so working
our way round now. So we'll grab this one. We'll set it then in the middle. In the middle of not that.
I need to press Shift D. Shift D. And then we'll set
it in the middle of here. So if I press three,
press the G but one, should then be able to bring it roughly into place
where I want it, and then just pull it into place and see if I can actually
get that one in there. There we go, actually. It's fitting in
there very nicely. Okay, so that's that one there. And then what I'll
do is I'll press shift D again, and
we'll move our way up. And then R z -90. And I can see there's
a broken part here, so I'll come in and fix that
once I've done this one. So I'm just going to go
over the top a minute. I want to press G and
put this one into place. So what I'm wondering is, I need to put this
one low enough down so it's not going to
burn the top of there. We don't want it burning
anything like so, so let's drop it down,
and let's pull it out. Go and let's just check where
the flames on that one. I don't think they're going
to be anywhere near that. You can see the down there,
so that's absolutely fine. And let's come to
this part then. So I'm going to do is just
right click Shademooth. And then I'll come
to this one, right click shade smooth by angle. And then we go, that's
that one fixed. And then what we'll
do is we'll put one at the side up here. So I'm going to
come in. I'm going to grab all of this again. I'm going to press
shift, pull it out, press one on the number pad. And then G, let's put it, maybe this slow down,
and let's drop it back. Now there is a plant pot there, so I have to be mindful of that because I
don't want it burning, so I'm going to pull
it up a little bit, making sure that
it's in the wall. Like, so. Alright, so
that's that one now. The only place where I was
worried that there wouldn't be enough of flames is
round the back here. So I think what I'll
actually do is, I'll grab my brazier again. So if I've grab this, I'm going to hide it, grab my light, grab my brazier, press salt, then I should be able to
grab it like, so shifty. What I'm going to
do is I'm going to bring a brazier around. And just put it into the
place where I think. So if I put it around here, I think that's going
to be just going to light up that back a little bit at the moment this is
not very lit up. The so. We might need, I think we're going to have a
couple of torches in here, one down here, so that should then light it up
enough. But let's see. Let's just grab this one again, and then I'll put them into place here. So we'll
do that one first. So I'm going to do is
shift the bring it out, and then R Z 180, like so, seven to
go over the top, and then I'm just going to
put it round about in place, so it's going to be round
about here, like so. And then what I'm going
to do is press the little dot one and then
just doom it down. Now, we know already that
when we put this in here, we're going to have to
bring that shadow down because it's probably
going to be two high. So let's put it into place. And then we'll just come on and see if that shadow is actually
coming through there. So if I put it and
rendered view, overlook. Double tap the A. Let's put it onto Daisen
just to make sure. And yeah, you can see
a little bit there. So I'm going to
come round to it. I'm going to grab my plane, and then what I'm going to do
is come where my shadow is, this one here, and
let's put it on three. And that, I think
will get rid of it. So, L. No, still, so let's put it on two like
we did with the others. So two double tab A. And there we go, that's
disappeared now. All right. So we know we'll do
it with that one. Let's then make sure
this is in place. So if I press control three or control one to
go around the bike, I'm going to grab
then all of this, and I'm going to move it over right into the center of these. I'm also going to
put it on object mot so I don't crash the system. I'm also going to
save out my work, and then all I'm going
to do is just press sift and bring it over
to the other side. And you can see
already, it's much easier to work with like so. Alright, they're looking good. Now, what we'll do then is just carry on with this
on the next one. We've not actually got
a lot more left to do. And then once we've
got those, we'll get those sorted out into place, and then we can actually
start on our vines. I think we'll start
on our vines next. And then finally,
we're on to T terrain. Alright, everyone. So I
hope you enjoyed that. I'll see on the next one.
Thanks a lot. Bye bye.
149. Blender Optimization Tutorial for Large Scenes: Welcome back everyone
to blend for the modulate and Kit bash
environment guide, and this is where we left off. So we should have
this one selected, if not, just select yours. And then what I'm
going to do is press shift D. Drag it up. And I'll put this one
over the back over here. Press the little dot
born, turn it around. Let's see where this
is going to go. I think up a little bit like
this and then pull it out, making sure that's in place. And pull it out a little
bit further. There we go. Is that high enough? I
think it is actually. I'll put it a little bit
higher, maybe. All right. That's that one. And then what we'll do is we'll press shift d, and we'll bring them
now down to the front. I'm going to press
control one, I'm going to press g. And then
what I want to do is I want to put it
around this part here, maybe a little bit higher, like so and we'll give them some difference in height
as you'll see in a minute, so we'll p that one into here. Pull out a bit like so, and then I'm going
to grab it. Shift D. I'm going to bring
it over. And then I'm going to press Z -90, spin it around, and I want
this one then around here. So on this wall over here. Again, just making
sure I'm not going to it burn in the
curtains or anything, so which means, I'm
going to lower it down. And then I'm going
to also pull it out into place like
so, and there we go. Now, there's no way that's
going to burn anything, and we've got a difference in height, and that's
what we actually want. So now let's press 50, and we'll carry on around here. And then when we turn,
our Render on again, you will be able to see exactly what this is
going to look like. So I'm wiping away
around now and see where I've actually
put the rest of the hm. So let's bring this around
here, so, first of all. Let's pull it over and zd -90. So. And then I'm hoping
I'll put this in. And then R z -90, and then seven just
go over the top, and then G, let's
pull it into place. Like so, and let's see
if that's actually in the sell express dot. Zoom in. You see, we might be able
to get that in there, actually, put it in
place, pull it over. And yeah, that's fitting in
there, actually quite nice. And then what I'll do
is I'll just pull it up a little bit. There we go. That's that one in. Now, let's
think about where is it? This one? This one around here. So we need some light source
to come in under here. I'm just wondering about
down here as well, we don't actually
have a light source, you know, kind of
walking around here. Again, when I'm doing this, I'm actually thinking we will
to be light sources. We don't want every
part of it to be lit up like Yankee Stadium. So we want to kind
of tell a story. And so, you know, places down here might be a little bit
darker is my point. So let's press z -90. And then what we'll
do is we'll pull this over. Let's pull it over. Rest the dot bon again, and let's put it into this wall over here.
Let's put it on there. And in place we go.
And there we go. So maybe maybe a little bit higher than this one over
here, think that looks good. And then now let's have one. We're definitely go to want
one in the inside of here. So we're definitely
gonna want one in the inside of there
to lie that up. And the other thing is, well, I think on the inside of there, we'll also put some
barrels and things. So all I'm going to do
is just press shift. I'm going to bring
this over then. And I think I'll
put one on here. The one here just
lighting the way up. I'll press control T, press G, and then I'll put it I'll put it in the center, I
think that looks good. Pull it back into place, press the little dub
on, and there we go. That's that one. And now let's put one on the
inside, so shift D. So, let's pull it
out a little bit. And then what I'll
do with this one is, I'll actually hide this
floor out the way. So I'm just going
to grab my floor, hide it out of the way. Grab these stairs,
hide it out the way, and now I can actually
see what I'm doing. So now grab this one. Shift, click, shift, click, and let's bring it into place. Over here. Let's press
the little dot born. And I'm just wondering,
should it be back I think actually putting it back here
was actually quite nice, so we'll put it around here. I'll make sure that it's
stuck in the wall properly. And what I'll also do
while I've got this is, I'll just come over and grab a couple of these barrels,
and I'll press shift. And I'll drag those
into place then. So all I'm going to do is press
seven to go over the top. I'm going to press G then and bring them over, and
then lift them up. Let's lift them up, make
sure they're in place. Like so. And then what I'll
do is I'll also press sift. Duplicate those again. And now I've got them
level with this. I can just place them
wherever I want. So for instance,
if I just press G, I should be able to just move
this around a little bit. And then this one, what I'll
do is I'll spin it round. So r Y 90 R z spin
it round like so, and then I'll just pull it
down back to the floor now, so let's stick it into
the floor like so. And there we go. Now if I press tape should be able
to bring that back. And we'll just have a quick look at if we can see in there. So again, before you click that render Briton, just
save out your work. Make sure that you're
on night scene instead, so night scene, and
then click that Render born and
let's have a look what we can actually
see in there. And there we go
everything's loading up. Now, also at this point, there is a point now where you will need to know about
performance and optimization. What I'm going to
do before carrying on any further with
these torches is I'm going to play a quick video on performance and optimization, and I'll see you on the next
one everyone. Thanks a lot. Bye bye. Welcome everyone to our performance and
optimization guide. And a lot of times when
you're dealing with really, really complex scenes
or even simple scenes, if you've got a low end machine. You will come across
things like cuda out of memory or Blender
actually crashing. And there are lots and lots of ways we can actually
deal with that. And I think it's important for all of you guys to actually know what things we can actually do to stop
this happening. We probably won't to get
rid of it altogether. There'll still be times
when Blender crashes, but we can do a lot to actually increase that
performance to get our scenes where we want
them to be and more importantly render
out beautiful images. So the first thing we're
going to discuss is RAM. And now if you look down
at the Baratn side here, you will see one
that says memory, and you will see one
that says V RAM. Now, the most important
thing is that first of all, you understand now
to bring these on. A we're going to do is we're going to go up to preferences. We're going to go down
then to interface, and under interface,
you'll have a status bar, and you can actually
click all of these on. So we've got system
memory and video memory. And these are some of the
most important things. So let's just close
that down a minute, and let's actually
go through these. So basically, you can see
here that down the We've got how many triangles we've got in the scene and how many objects. These directly correlate
most of the time to how much performance
your computer will need to actually
run this blender scene. So the more faces,
which are polygons, you have in your scene, the more performance
you're going to need. Same thing goes for
the amount of objects. If you've got a ton of
objects in your scene, then it's going to
come at the cost of actual performance. Now, let's move on
to the actual RAM, which is how much RAM your
actual computer actually has, and I recommend a minimum. A bare minimum, you need 8 gigabytes of RAM
to run blender, and it comes down
to the more the better the performance
from your machine. So I would say aim
for 16 gigabytes. Now, also, we have something
that's also very important, which is called V RAM, and this is normally
the RAM that comes with your
actual graphics card. And basically, the higher
this is on the graphics card, the much smoother time
you're going to have. So I tendency problems myself is with the actual
memory on your computer. If it's too low, you have
problems in the viewport, and where I see the problems
arise with the V RAM is normally when you actually come to render out complex scenes. The next thing we
can do to actually limit the amount of
performance needed is actually put everything
in a I neat order in collections and make sure everything's
just named correctly. What we can do from
there, then we can close certain parts
of our scene down. Which means that we can
either render them out a little bit at a time and then lay them on
top of each other, or especially in the viewport, what we can actually
do is close parts that we're not working
on at the time, especially in large scenes, and then this then, again, will limit the
actual performance. Also, it comes down to your
CPU as well, your CPU, the better it is, you know, the better time you're going
to have with all of this. Let's now say we've got
all of that sorted, and we're still
having some problems. Let's now go into a few of the options that we can
actually mess around with. So what we're going to do is
we're going to go to edit, go down to preferences. And the first thing I want
you to look at is system, and on the system,
just make sure that you've got this set
to whichever you can. So it can be cute Optics
x or one of these, just make sure it's not a non. And then once you've got the one selected which you want to use, just make sure both of
these are ticked on, and blend of them will
take advantage of those. Also make sure that
you haven't got undo steps set at
250 or something. This has a huge actual
impact on performance. So if you're really,
really struggling, I recommend turning these undo
steps down to five or ten. But the problem obviously is that you're not going
to be able to press controls head and go back
far if it's set too low. So I recommend all
of these things. I'm actually showing you try and play a memorandum with
it till you've got, that kind of perfect setup, and then you shouldn't
have or you should have less problems
in the future. All of these other things we can mess around with as well. I don't recommend these unless you're absolutely
really struggling. I think you should keep
these what they're set to. This is the only one,
and this tikton is the only one as far as I would go on here messing
around with those. Alright, so let's
close that down, and let's now come over
to the right hand side. And you can see
here at the moment, if a scroll up a mon blender
render engine cycles. And it's important to know
that to have an easier time, it's much much easier
to put this onto EV, which is basically a
real time render engine like unreal or unity or
something like that. That then makes it
much easier if I come to render this or
click on my RenderVw, to actually move
around the scene while it's actually
being rendered. The thing is if
you're on EV as well, there also are some
things that you can actually turn off to
increase performance again. But normally with EV, unless you've got a
very low end machine, you shouldn't have any problems. If you have ing
problems, however, just make sure that viewport de noising is
actually turned off. This is one of the
heaviest things actually, denoising both on Blender and cycles that actually really increase that
performance needed. You can turn the
viewport de noising off. You can also turn the
ambient occlusion And you can also
turn the bloom off, and especially screen
space reflections, make sure that is
also turned off. Now, pretty much, everything in EV You shouldn't need to mess
around with anything else. Once you've turned these off, you should have a
much easier time. Now, let's move on
over then to cycles, which is a little bit different. So if we come over to cycles, you will see even my machine, it's quite a high end machine, or it was maybe two years ago or something,
sometimes struggle, especially with large
scenes like this, with a lot of textures and a lot of sand and
things like that. So if you look over
here at the moment, I actually have in my
viewport de noids on, the first thing I recommend
doing is turning this off. This then will increase
performance no end. Once you've turned that off, it's going to take
a little bit of time to actually apply
that as you can see here. And then you can also turn the
D noise off in the redeve. But I don't recommend that because then you're going to end up with a very grainy render and that's maybe something
that you don't want. Now, you can see already that I'm really, really
struggling here, even with the D noise turned off because this
is quite a large scene. It's got a lot of
displacement on there, so I'm just showing
you just how pixelated that is and just how
long we need to wait. I'm going to do now while I
actually fix a few things, I'm just going to put
this onto material mode, and that leads me on
to my next point. So when you're working in
blender, it's important, even though it looks really, really nice to be working
in blender cycles, it actually comes
at a huge cost. You can see already working in material mode over here
is actually really, really helping me
navigate round my scene. Now, if you're
struggling even more, what you can do is
you can come and put this just on object mode, and then you shouldn't actually have any problems whatsoever. It's also important to know Before you click
this render bond, so the render image bond, make sure that you're
on wire frame. And the reason is
because you don't want to be rendering
out the scene, you know, in cycles, on viewport shaded, and
then render it out again, that is more than likely
going to lead to a crash. So what I always do before I actually hit that render bond, is put it on wire frame. This is the lowest
amount that blender needs to use in the
actual viewport. It's also important
to remember that everything comes at a cost
that you put into blender, this could be things
like geometry nodes, particle systems, simulations. Some of them have larger
costs than others, but everything down to the smallest object
has some kind of cost. So when you've got a scene that's just crashing
all the time, it's generally down to something that's quite a large
cost on performance. Now, the other thing to know is, when you're actually
bringing in textures to your scene, It's
important to know. So if we go to this
one, for instance, and we go to our shading panel, this is quite a complex shader. The more complex
the shaders are, the much higher performance
it's going to need. The other thing is, when you're actually bringing in textures, be very careful that
you're not bringing in really, really
large textures. So I recommend four
k be the maximum. But honestly, if
you can stick to two k textures or one k
textures or much better, it's going to be a
much easier time for you making large scenes. This is why a lot
of game companies, especially mobile, use only
like 512 or one K textures. So they can handle the
performance and keep that optimization pretty high. The other thing is
about textures, if you're using
seamless textures, that is better than
using something that you've gone out and you've painted in substance painter, so it's just much easier to use seamless textures
because they can be used over and over again and limit
that performance. Also make sure on
the right hand side if you come up to
this lay arrow, you can see that light
in our scene lights and sen will make sure they
are turned off as well, because they will also
cost you performance. And last of all, before we move on to the
cycles part of it, if you come over to
your actual world, If you're using a HDRI within,
we're not on this one. We're using a sky texture. If you're using a HDRI, that's also going to
come at a cost of performance and it's quite
a large cost in comparison, something like the sky texture. So if you can make sure that you're using something
like the sky texture, as you can see, it's
just one node here, and I know it's very
nice to use HDRI. But if you need
control optimization, try and learn how to use
the sky texture instead. Alright, so finally, then
moving over then to our cycles. We can see, first of all, that the device I'm
using is my GPU. It's always beat to use
your GPU over your CPU. It will make it much
much faster because it's relying on a lot of V RM from
your actual graphics card. And as we discussed moving down, we can also turn
off the D noise. This is one of the
best things you can do to actually
increase performance. Next thing you can do is you can come down to where
it says light paths, and all of these come
at a cost as well. The lower you set these, the better it's going to be. I recommend messing
around with these last. So last of all, after you've done
everything else, this is why I would be clicking off or turning down,
especially caustics. They're also quite high
on the performance. Last of all, let me show you one of the best things
you can also do, which is, if we've got
it on rendered mode, we're on actually cycles. We turned on D noise again. You can see how nice
this actual sand looks, but it comes at a huge cost. So just remember, this
comes at a huge cost. Now, if I come over and down
and just scroll down here, we have one that says
simplify click that on, and then what you'll have access to is all of these options here. Now, one of the main
things we can do here is the texture limit and the
maximum subdivisions. The maximum
subdivisions, if you go over that subdivisions
in your modifiers, you can actually reduce
that or override that over here and simplify and turn them down
to one or something. That then will reduce the polygon count right
across your scene, wherever it's over
six or five or whatever you set this to
increase in performance. One of the last things we can do is we can turn down
this text limit. If I turn down the text
limit, something like 256, you'll see after a
while what it'll do is, it'll turn down all of
those textures right across your scene down to 256. Even if they're four k or
eight k, if you turn this on, you can turn them all down
the And then you'll see, look how grainy now
this actual sand looks, look how bleary these looks. And the reason is because
we've turned down our texture limits all
the way down to 256. The other thing
is, if you having problems rending
out, you'll see, you can also come
in and turn them down in the actual
render as well, which really significantly
helps with crashes, cutter out of memory and
things like that. Right. The last thing
then we can do is, especially when we
come to actually rendering now is you can see here that if
you hover over here, it says, use compact
deviate structures. It uses less RAM,
but renders slower. So if you are having
problems with crashing, I recommend turning this one on. And if you go to the next one, you'll see it for
hover over this. It says, Ue special type
BV H optimize for curves. It uses more RAM, but renders
faster. Turn that one off. Also, turn persistent data off, if you need to, as well, because what it means is that
blender is caching all of that data of the scene to save on basically
having to redo it all. So if you turn this
off, what it's going to do is a fresh
start every time, and it's not saving so
much in the memory. I don't actually know whether this one is bad to
turn on and off. Again, I would ever
play around with it. Something that is a little
bit more sophisticated, so we're not going
to go into it here, but you do have the option
that you might want to look into of baking
out your scene. So in other words,
you can actually bake all of your scene out onto a UV map for all the lighting and all the textures
and things like that. But mainly for lighting, to make sure when you
come to render it, everything is already
rendered out, and then all it's going to do
is render out the objects, or the textures and
without the lighting. So that then makes it much
much easier on your machine to have a fast render
without crashes. Last of all, what
I want to say is, if you're building large
scenes within Blender, try and use the Shader
panel more than actually bringing
in actual textures. That also is going
to save you a lot of performance and optimize
things really nicely. The only problem
you're going to have obviously is if
you're sending things out into real or Unity
or another games engine, you obviously won't be able
to use those materials, so you will need
textures for those. This primarily is based on rendering and building large
scenes within blender. Everyone, so I'll help
you found that handy. I know if I was
just starting out, I'd really want to know
this stuff because it would have made my life so
much easier in the beginning. All right, everyone,
thanks a lot, cheers.
150. Organizing Assets into Collections in Blender: Welcome Mace phone to Blendf, the Modula and Kit bash
Environment guide, and this is where
we left it off. So what I'm going to do now is, I hope you found
that video useful, by the way, with the
performance and optimization. Sometimes when you have a quite a powerful
computer like myself, you forget how slow something can be or how something
can crash the system. So that's why we actually put
that in there just to make sure you know how to actually
reduce the performance. Okay, so what I'm
gonna do now is, I'm going to come
back to object mode. I'm gonna grab this
one with shift. I'm going to duplicate it then, and then what I'm going to
do is pick this one up. I'm going to first of
all, spin it around here, like so, and then R Z 90, G seven to go over
the top, and then G, let's move it over here
into place, like so. We can see we've got this
sticking through here, so I need to think about that as well. I'm going to reduce that. Well, first of all, let's
deal with this one. Well, let's pull this
into place, like so. Now, for this one,
I'm going to come in. I'll come to my object, and it's already on two. So what I need to
do is, I need to check if that is coming through. So again, we'll go to Day scene. Let's put this on Day scene. Again, save out your work always before
clicking that bone, and then you're just going
to click the render. And let's see if it's actually
coming through there. L, double tap the A. And we can't see
anything on there. Just never going to see it,
so that's absolutely fine. So then back to object mod, and then I'll grab this one,
this one, and this one. And I want one more I think. I think this is the last one. And it's going to be in here. So let's press shift D. Like, so I'm wondering,
I I need any more, so I'm just looking round. Do I need one in
there? For instance, I think actually I might need
one somewhere around here. We've got a brazier there. We might need one over here where they can reach
over maybe and do that. But for now, let's put
this one in place, and then we can have
a good look round. What I'm going to do is
just press G. I'm going to press r z -90 just
to spin that round, and then G again, let's put
it right in the center there. And then what I'm
going to do is pull this back and into place. Let's press the little
dot b to zoom in. And then let's get
this into place. So I'm going to put
it round about here. And you can see there's a lot of thickness going
through there, so you're never gonna show
anything going through there, can even probably pick
it up a little bit. Like, so Alright, there we go. Now, when we've
done all this then? Now what we want to do is
just go round and make sure everything is looking
nice, everything is lit up. So again, we'll
put this onto 19. But 19, we'll also as well go into modeling rather than
being in our rendered view. We'll fix any issues like this, so right click shades
smooth by angle. So just have a good look round, making sure everything's
fixed like this one, right click shade
smooth by angle. And I'm just looking at all
of those parts now so they're not distorted in any way because the mesh
isn't smoothed off. I'm also looking up the top. And yeah, everything looks
looks good with mine. So now, again, save it out, and then we'll put it on render
view now. Let it load up. Double tap the A,
and now we should, if we turn this off as well, be able to see pretty much
where we've put everything. Now I can see that I have missed some, which are
going to be up here. We definitely want
to light that up. We definitely definitely want to light this up a little bit. You can see it's a little
bit too dark around there. So we've got this part here. We've got all of this down here. That's pretty nicely lit up. We've got this part around here. Again, I said we want
some places in darkness, and I think this is about the
right mix as you can see. And I think we're definitely
going to want this lit up. So we want our temple, and we want this lit up. And then I'm just
looking around. You can see it's a little
bit dark ground there. It's lit round here. So I think this part here, our temple, and this here. All right. Let's do that now. So what we'll do is we'll do, but we'll grab this one.
We'll turn this back on. We'll grab our light,
we'll grab this, and then all I'm
going to do is shift D. I'm going to bring this over. I'm going to press Z 90. I'm going to press three. And then all I'm going to do is a press G and drop this
into place in my wall. Pull it out a little bit, and then pull it up, and
then in Tad light so. Alright, that's
looking good there. Now what we'll do is we'll
light up the other part. So, again, we're
going to press shift. And I'm thinking now where I want to put
one on this side. So probably around
this part here, I'm thinking or maybe
even the outside, so we've got a brazier actually. So maybe maybe better
off over here somewhere. So let's see where we
can actually put this. Now, I don't want to put
it on here, of course, so it wants to be somewhere
where they can actually, you know, come in
and light the thing. But let's put it
round about here, and let's put it down,
and then they should be able to reach over
and actually like that. And it might look
nice like that. And as well, what we'll
do is, we'll put one either side of here now
just to like this part, so I'm going to press D. I'm
going to spin it round then, so r z -90. Press in one. And then what
we're going to do is put G, and we're going to
try and fit that into place. Roundabout here. We'll pull it up a
little bit and then put it into place like so. And then when we do it, we're going to bring one the
other side, so shift D, bring it the other side, making sure it's fitting in
there. And there we go. Okay, so now I'll have
another check round. So again, we say about our work. We put this on to rendered
view. L et it load up. Turn this off once it's loaded up, and now
let's have a look. So now we can see we've got our light there lighting
this up a little bit more, as you can see, that's
looking a little bit better. Got this lit up. I'm
thinking about my day scene, how it's going to be lit. This is not lit up
so much, Obviously, it's nighttime, so it
wouldn't be lit up so much. This now is looking be. You've got a little
bit of a view onto this as you can see. And then I'm moving around. The bridges lit up, a
bit dark around there. All of the warehousing
is lit up. And basically,
wherever you look now, it looks kind of interesting. And it looks realistic
and it looks alive, and it doesn't look
like it's, you know, just lit up, as I said,
like Yankee Stadium. So I'm very, very happy with how that looks. Now I'm
going to do is. I'm just going to put this on top jet mode,
turn this back on. And again, now I will
save out my work. Now we need to
actually split all of these up so we can have
it on day scene or not. And that's very, very important. Now, what we should be able
to do now is if I come down, let's let's just put
this up a minute. And we're going to sort
all that out as well. But at the moment,
let's actually think how we're going
to do these parts, so we can see If I
grab all of these. So if I turn this on and off, as you can see, it should
just be now all my torches. Band, turn off my collection, turn off my Booleans, and you can see all of those
parts now are in Booleans. So let's actually put
this in there as well. Let's press M, put it
into Boolean, like so. Now we should have
now is tortures. And what we want to do is now, we want to come in, and we want within our tortures
to put in flame. So we want to come
in, and we want to grab all of these parts here, all of these umage nodes. Now, I think, let's
see if we can actually slick them by group, and let's see if we've got
one, we've got children. Let's slick by link,
and I'm looking. I I can select them. Let's see if I can
select them by material. No I can't, so they must
be different material. I'm just wondering if
there's any way to select these by instance. No, Let's see by
library. There we go. But the thing is it
selected all of them. And I don't really want that.
It should just select one. So they're all in the
library, of course, but I don't want to
select Let's see by Okay, so we'll go to select
and select all by type. Light. There we go. We
select all the lights. I'm just looking
at this part here. I'm not actually sure
what that part is there. I think it's a bamboo
piece or something. I've look at that in a minute. So we've select all of
the light sources now. And what we should be able to do is press M. And then what we'll do is we'll go we'll actually make a new collection, and we'll call it torch
lights, torch lights. And flame. So 'cause we might as well turn them
all off at the same time. So torch lights and
flame, click okay. Now I'm going to do this. I'm just going to
pull this down. And then I should
have one that says, torch lights and flame,
which is this one here. Now, I should be able to
drag this into my torture. So if I drop that
up, I should just be able to drop that in
there, and there we go. Now, this cylinder here,
what is this cylinder? Let's actually bring
back everything, so collection, and boolean. Let's have what that is. I don't even know what that is. So we'll just delete all
the way. Let's delete it. I'm hoping it's
nothing important. So let's hide the Booleans
out the way once more. Now we should be able to
open up our tortures, and we've got tortures. And then we've got all of these, so we've got torture
lights and tortures. We should be able to
hide all of the lights. Now, the next thing
we want to do is, of course, is we want
to hide all of these. So all of these fire gotos, we want to be able to hide them, to be able to turn
them off and on. And all we're gonna
do is drop those inside the same point as
what we had on these. So I'm going to
turn all of these, and I will be able to
see if they've missed any anyway, like so. And then what I'm going
to do is press M, and I want them to
go in tortures as you can see now and
tortures lights and flame, and there we go, they're
all hidden out the way. Now you can see that basically, we've got all of
the lights hidden. So if I turn this on now, you can see the come on
off and they come on. Now, that's exactly
what we want, because what that means is now, I can hide this up like so, and I can turn everything
off and on if I wanted to. And I can open this up and turn on only the tortures
and lights and flames, and we'll show you
what that does. So file save. Let's put it onto. Let's put our Booleans
on back first. And then what we'll
do is we'll make sure all of these
are on. There we go. Let's put it on rendered view. And then we can see
it's actually dark now. Now we can see that
we've still got some braziers that aren't
in the right place. So I'm going to
grab all of these. Like, so this one here. And then what I'm
going to do is press the button, torches. Actually, I know that. I know what's happening here. So basically, what's
happening here is these have still got
like these have, the actual members in there. So that's the next thing.
So everything's done now, except our members, and
I did forget about that. So we'll have to fix
our members next. Now, we'll show you actually
as well how to fix those. I'm just wondering if
we swap over materials. But anyway, let's
turn them all on now. Let's turn all of our flames on, and there we go, it's lit up. Now we need to fix on the next lesson then
is our members, and once we've done
that, then we can have our day scene without embers in there and just our
torches in there. All right, everyone,
so once more, let's put it on object mode, actually. Let's
save out our work. And on the next one, then
we'll sort the embers out, and then finally
we can move on to the vines and all that
sort of good stuff. All right, everyone. I'll speak to you on
next one. Thanks a lot. Bye bye.
151. Continuing Asset Cleanup in Blender: Welcome, M everyone. Lender for the modular and Kit
Ash environment guide, and this is where we left off. Now, let's look first of all
at putting all of these. So these are all
of our tortures. So we'll just put them
into one that says torch. What I'm going to
do is just press M, and I'll make a new
collection within here. So we've got one that says torches and tortures
light and flame. I'm just wondering, yes, I think what I'll do is
I'll make a new one. I'm just looking to
make sure that there isn't a new one in
there, first of all. So M, and we'll call a new
collection torches or torch. Like so, center again,
and there we go. Now, I should be able
to then drop all of these into there. Like so. And now I can close that up and hide everything
out of the way, or I should be able to just hide the flames out of the
way, and that's perfect. Now, let's look at the members. So the members, there
isn't really a button that you can click unless you duplicated all of your members. I'm not sure whether you
actually want to do that. You could come in and duplicate
all of these members, or you can just come in and grab one of
them, for instance, coming over to your material, and then all you have to do is come to where it says charcoal. Scroll down, and you'll
see at the moment, under emission, you've
got one that says 20. If I put this on redevu, so let's put this on rendezvou. Let's remove our tortures. So let this load up, remove our tortures and flames like so. Let's press dot then zoom in, and this is what we're
actually left with. So you can see this
torch in here. Now, the higher I put this, you can see the
brighter it gets, and if I set it to zero, you will see that it sets
it to zero right across the board obviously because they're using the same material. So that is how we can
actually turn that off using just one
of the materials. I think for now, what we'll
do is, we'll come back. We'll put it onto our day scene, so let's put it onto Day scene, and there's what
you'll end up with if you're using a
day scene then. Okay, so now what I
recommend we do is, we've got a all in
Booleans at the moment. We've got something in
collections, that's that one. So let's actually
rename these as well. Make it all nice and tidy before we move on
to the next part. So what we'll do is we'll
call this human reference. Like so. And then what
we'll do with this one, it should be all of the pots. You can see all of the pots. Now, the thing is,
I don't really want this floor being
in there as well. So what I'm going to do is I'm actually going to put
this in a different one. So I'll select all of these then going all the
way around here, like so, like so, selecting this one and
this one and this one. And then what I'll
do is I'll press M, and I'll put it in
a new collection, and we'll call it Temple floor. Like so. And there we go. Now what we can do is we should be able to hide
that out the way, and that's what
we're left with, so we can see we've
missed one here. Let's drop that in there, so
temple floor. There we go. And then what we should be
left with is all of this. Now, let's hide then our
tortures out the way. Hide our human
reference out the way. And now all you should
be left with is just the main build
of all these parts. Now, what I tend to do now
is I'll change this to temple temple temple parts. Let's just call it like
so. And there we go. Now, if I had this, there
shouldn't be anything else in the scene. Now,
why do we do that? That then 'cause we've
broke it down into parts, it means that You know, it's actually a little bit
easier on our machine? It's a bit better optimize
once it's in collections, and so it should
be easier to run. Now, the other thing
is, you can actually you've seen the video already
on how to optimize things, how to turn down the textures
and all that sort of stuff. But what you can
also do is you can put these into different parts. So, for instance, you
could separate the top out and put that as
temple top parts. You can separate the
markets and put those as temple market parts and break it down into even smaller
parts like so. And then this actually
makes it easier to render. Why does it make it
easier to render? Because you can
actually turn off these points when it
comes to rendering? In other words, I
can actually turn off this and turn off this, turn on the temple floor, and all that's going
to be rendered is the temple floor because this is the actual
render button. So this actually
disables the renders. So when you come to actually
bring in the scene, for instance, so I've
brought in my scene. If it's split up,
what it means is I can turn all of these
little lines off. Turn them all off but,
leave the render button on, so I'll just leave
the rendering on. So when it comes to render, it's not actually having to show it in the viewport as
well as render it. And that actually dramatically speeds up the rending process, and if you gain crashes, it's going to really
really help with that. All right. So what
we're going to do now is we're just going to
put an object mode. I'm going to come on over
there and save up my file. And what I want to do
now is head on over back to our resource pack, and we want to grab
all of our vines, because that's where we're
going to go with this. Next, we're going to actually
start putting in our vines. So let's head on over there now. So here we are in
our resource pack. Here is all our vines. So we've got all of these, as you can see, these
trees and foliage. We're going to bring
those in soon, but the main thing
we want to bring in, first of all is the vines. Then what we're going to
do is going to bring in the small shrubs and
things like that. And finally, we're
going to bring in some trees to we seen, and we're going to split
them all up so everything's nicely named and making sure that everything
runs correctly. So first of all, let's
come in and just hide this out the way,
hide this out of the way. I'm going to press seven
to go over the top. And then what I'm going to do is press B. Now, I'm wondering, If on this, if it's easier to put it in our asset manager. Let's just have a look
at our asset manager, and everything is laid out for me in here. Let's column two. Let's have a look,
see if we've got it in then. We should have in here. Let's just click on
this. Let it load up because it's obviously
the shade is loading up, and the one we want is vines. I'm just making sure all
the vines are in there, and then I should
be able to pull everything in from
my resource pack. Hopefully, hopefully
it's all there, look. We've got pillars,
materials, props, rooftops, stairs, windows, and I'm just looking at
where these vines are. So let's click on one of them, press the little
dot one, go down, and we can see that our vines, for whatever reason,
aren't actually in there. So they're not
actually in there. It doesn't really matter
because what I can actually do is
instead of, you know, using all these, I
can either right click and drop them
into one of their own, so I can put them into
one of their own. I'm just looking at which
one this is actually. I think this is Aztec
parts, isn't it? Yeah, I don't think any
of this actually is in its own its own one. So what we'll do is
actually, I'm thinking, we'll copy these into, we'll
do it that way, actually. We'll grab these, so we'll press control seat, and
we'll grab these. And then what we're going
to do is we're going to go and over now to our parts. So we'll reopen up our parts, we'll drop the vines in there, or you can put them
in another blend file if you want to,
completely up to you. And then from there
what we'll have, we will have access to
all of these vines, and that then, I think will
make it a little bit easier. So let's open up the
parts section now. So here we are back
in our part section, and what I'm going to do
now is press Control V, and we should then
be able to drop all of these vines in,
as you can see here. Now, what I'm going
to do then is just put them into a place
where I want them, so I'm going to put
them over here. And then what I'll do is I'll
come on over now and drop them in their own
actual collection, because that'll make it
easier to work with them. So A I'm going to do is
press new collection, and we'll call it vines. Like so click. Now I'm going to do is I'm
going to come in. It's up to you whether you
want to rename them all, you can rename them
all like this. So if I grab them going
all the way down, double tap this one, I'm hoping If I can actually
rename them all. I'm just wondering if I
can. So let's just grab this one and then
rename. Can I rename it? I'm just wondering copy paste, select link new
collection markers asset. I don't think I can
actually rename it. I think I have to rename one. So Vine one, for
instance, like so. Yeah, I can rename them Vine. So what I'm going to
do then is come in, and I'll just type Vine like so. And then what I'll
do is control A, Control C, and then
just click Enter. And then just go down,
Control V, enter. And what I'll do is it'll
just rename them for you. I was hoping I could rename
them all at the same time. I wonder if I can actually grab them all and rename
them the other way. But let's point vine.
See if I rename them. No, it's just going
to rename that one. So never mind, let's
rename them all like this. And this will make
it easy when we're bringing in the vines
for us. All right. So there we go. Now, let's come down and grab them
all. So grab them. Right click, and
all we're going to do is mark as an asset. And then I'm going to go
over to my asset manager. I'm going to come up to the one that says
parts basically. So let's click this little
Down arrow when it loads up, so let's load it
up. There we go. And then little down arrow, I make sure that
we're on Aztec Parts. And then all I
want to do now is, I want to put that
up, first of all, so I want to unassigned. And this is all the
vines, as you can see. So let's now click a new one, and we'll call it vines. Like so, and then we're
going to go to unassigned, scroll up or down wherever the vines
are, here's the vines. So this is where we
want to put them in. So I'm going to
grab all of these and drop them in to my vines. A few things to not on
our vines is you'll see well we can see the
red underneath them. Things like vines and trees. They are going to be
double sided material. If you take them
into real engine, Unity, got it, things like that. You have to have
them double sided because you're actually going
to waste mesh, actually, making them they want to be, simple things like this, so you can see if a press tab, they're just planes, all
of them just planes. Alright, so now
we've got those in. What we're going
to do now is we're going to bring in the trees. So we might as well
on the next lesson, we'll head on over to
our resource pack. We'll bring things like
the foliage, the ferns, and we'll also bring in all of the trees into this
resource pack. And from there, then we can
start building that out. And then after that,
we'll actually start with the terrain. But it's a fair few
lessons yet until we get there because obviously,
we've got to put in, you know, all of the
foliage into the scene, all of the vines into the scene, which is kind of time intensive. It's not difficult to do.
It's just time intensive. So just just remember that. Alright, everyone, so I
hope you enjoyed that, and I'll see you on the next
one. Thanks a lot. Bye bye.
152. Foliage Placement in the Aztec Environment: Welcome back,
everyone to blend for the modular Kitbash environment guide and this is
where we left off. So you'll notice in
the resource pat, we have one called
terrain foliage. Now, this is the one that works with the actual
geometry node. So we don't actually
want to use that. What we want to use
is this one here. Now, those of you
who have a keen eye will see that some of these are actually used within
the geometry node as well. So we've actually used
them many many times. And what we're going to do is we're actually going
to split these up. So first of all, I'm just going to hide all these
out of the way. I'm going to go over
the top with seven. And then what I'm going
to do is I'm going to come down. And
split these off. So I'm going to press Control C, and then I'm going to head
on over back to my part, and I'm going to bring
them into there. I'm just looking at anything
else that I need on here. There's not be anything else
needed in the near future. They will, of course, be
needed our geometry node and our terrain textures a little bit later on, but for
now they should do. So let's head on over
now back to our parts. So here we are in our parts, and what I'm first
of all going to do is just press control and V and bring those
in, and there we are. Now, rather than trying to
move them straight away, if you just press shift
spacebar, go to move. What that I'll do is it'll
put your actual cursor there, and now you should be able
to move them like so. So don't touch anything,
just press shift spacebar, and then you'll be
able to move them. Now, what I want to do
is I want to go back to modeling because I
actually want to see what I'm actually
doing with these. I'm going to press the
tab, and then what I'm going to do is
just put on my shader. So now I can see, I've got
a few variations of trees. So you can see, I've
got these trees here, I've got these
small foliage here. So what I'm going to do is I'm thinking These are actual small trees,
as you can see here. These are ferns. So
these parts are then. So what I'm going to do is I'm actually going to
split them off. I'm going to split them
off between trees. So let's grab all of these. And then what I'll
do is I'll put them in their own kind of collection. I'll call them trees. Like so. And then what I'll do
is with these ones, I'll call them palms. So let's press M, and
we'll call it palms. Like so. And then these ones we can see are small foliage. I'm just looking.
These are ferns, and these are small shrubs. Let's call them that. That
makes most sense to me. These are large shrubs, small shrubs, and ferns. Let's do it like
that. I think that's going to make it
much much easier. So what I'll do is
new collection, and we'll call
these large shrubs. Like so, and then we'll call
these one small shrubs, so M, new collection
small shrubs. L so. And then finally, these ones will be called ferns, so, new collection ferns. L so, and there we go. Now what we want to do
is rename all of these, so I'm going to just
grab these ones here. I'm going to press the
little dot on to go to them. So these are gonna
be large shrubs. All I'm going to do
is large of that. Shrubs. Control A, and then control C. And then all I'm going to
do is the next one, Control V, and I can press can
I press tab or down arrow, Control V. No down arrow doesn't work
and tab doesn't work. So let's press Control
V, and there we go. So there are the large shrubs. Now we need the small shrubs, so you can see
here, small shrubs. Let's call them small shrubs. So, and then control A, control C, and then
onto the next one. So Control V, and then
onto the final one, Control V. And then finally,
we have these ferns. So I'm just going
to grab my fern. These are already name
ferns, but fern something. So what I'll do is I'll
just come to this one, and I'll just put fern in, Control A, control C, and then go to the next one, Control V. Next one, Control V, and the final one, Control V. And there we go. All right, so that is all those. Now, we just have
our large trees. So we'll call these trees. So I'm going to
go over to these, press the little dot b over
here. Let's select one. L, so little dot bon.
And there we go. Where's all our
trees. So let's just call them trees. So trees. Like so Control A, control C, and then
on to the next one, control V, control
V just like this. And it's actually a very quick process to rename all these. Like so. Now, before
we do anything, let's save out all our work. And then what we'll
do now is we'll put these into their own place. So what I'll do is I'll
grab all of these, and I'll right click and
I'll put Markers asset. And then I'll do these
a bit of a time. I'll first of all, save
out my work, though. So let's save it out. Let's
go to our asset manager, and then here's
all of our trees. So let's make a new one, and we'll call it
plants and foliage. And then within there
we'll put these. So I'm just looking
to make sure we've got no plants and
foliage at the minute. And then what I'll do is
I'll click a new one. So new, and we'll
double click it plants. And bolage. Like so. And then what we'll do
within here is we'll click the Plus button
and we'll go trees. Like so. And then we'll
click the Plus again, and we'll go large shrubs. Let's put that one in. Rubs. Like so, and
then the plus again. And then we'll go small shrubs. And then we'll click
the Plus again, and we will go Ferns.
Let's click Ferns. L plus, so. Let's
click file and save. Now what we can do is
we can come over to the unassigned ones.
These are our trees. So let's drop all of
these into trees, and we forgot one
that says palms. So we'll make that one now. So let's click the plus, and then we'll call one
that says palms. L so. Okay, so all
of them now are in. So let's now come to the next one, which will be our palm. So all of these then, if I press let's come over
to the right hand side. Let's find them. And we can
see we didn't name these, so let's name them
first. So palms. And then control A, control C. And we'll just
keep going down now. So Control V. Okay. The other thing is
I've not got on. There we go now it's on. So on screen commands. Control the control
B, and there we go. Sometimes it makes it easier actually as I'm working
over this side, and you can actually
see what I'm doing. So. But anyway, let's
come over to this, and then what we'll do
is grab all of these. And then I'm just
going to right click, and I'm going to
mark them as asset. So mark as asset. Come down, then, these are the
palms. So assigned. Let's go to my palms now, so grab all of these and
drop them into my palms. Then we'll come down now
to the large shrubs. So over here, I've
grabbed them all, right click, mark as asset. So large shrubs are going
to go into here, like so. And then I've got my small
shrubs, I think these are. Yeah, small shrubs, right
click, mark as asset. My small shrubs in there, like so, and then finally,
I've got all my ferns. So my ferns are
here, right click Marker's asset, here's my ferns, and this then is going
to make it very, very easy to bring them
in to our actual scene. So save that out. Make sure all of these little stars have
gone, and there we go. Now, let's go back to modeling. So we'll go back to
modeling section. And all I want to do now is just place them in
the right places. And then I'm finally
done with this part. So what I'm going to do is
I've got my trees here. So let's just separate
them out a little bit. I don't want to change
the scale or anything. Let's grab these and this one, and we'll separate them out, like so, let's grab
these ones then, separate them out over here. Let's grab the small ones, and we'll separate those
over here, like so. And finally, these
ones that will separate over here, like so. Alright, everything's
separated then. We can see how everything
is it is there. File, Save out your work, and then we can close
that down because we're not going to need
this for a while now, so let's just close that down. And here we are
back in our scene. Now, what we should be
able to do now is come to our asset manager and
going to right click, refresh library Then I should
be able to go down now, and I should have
one that says vines. So here are all our vines. We should also have one that
says plants and foliage, here are all our
plants and foliage, and they're all nicely
split up for us, which means it's very, very easy now to actually start
bringing them in. So let's go to our vines, and you'll find that
as you bring them in. So let's say we want one on
here, so let's bring it in. And drop it on there, and
you'll see straightaway that it's actually quite
easy to bring these in now. Now, sometimes they end up
looking the wrong way round. So what I tend to do if
that actually happens is, I'll bring them in over here, and then I'll pull
them into place. So seven, let's press G, bring it into place, and we'll start putting
our nes around. Now, what we're
looking for here, it's up to you, whether
you do in sections, but what I look for
here is anything where there's empty
spaces or empty walls. So if I put this on my
shader, You'll see here, if I double tap the A, that this was looking a
little bit empty, and that's why I actually
brought this in. Now, also, play around, get to know what your
vines look like. So you can see here that that
one is very, very small, for instance, and probably not great to put in this
big wall over here. So what I'm going to do is,
I'm just going to press Gee, bring it into place,
and then drop it down. So right against that post. As I said, this is going to
take a little bit of time, so don't worry about
it. Just make sure. And also, don't be
afraid to press S and y, for instance, and just squish those in and drop
those into place. Also, don't be afraid
to play around. And so for instance, with this
one, I can press shift D, and I can bring it to
the other side and it looks exactly the same, and
I don't really want that. What you can also do is object, mirror, and then mirror
on the x or the y. And then you'll find that
you can drop it into place, and it looks a little bit
different from the other one. If you also press S and's, then what you can do
is you can bring it up into place, and there you go. So now, they're the same bush, but they look slightly
different from each other. And that's the kind of
thing that we want. Then to fill it out, you could put one in the
middle, for instance, so we could grab this one, and then just bring it up. Press seven go of the
top, press the G b, and then just finally put it
in the top here like this because we really
don't have to be so concerned about where
we're putting these, but we could put it in
there, for instance, and now that's looking
pretty nice, as you can see. Now, I think it's coming
a little bit over there, so SN X, let's bring
it in a little bit. Let's put it over there, double tap the A, and there we go. Now you can see that looks
actually really, really nice. What we're going to do is
we're going to work our way around the scene now,
bringing these in. We'll show you what I'm doing. But honestly, probably better off actually working
through this on your own. But definitely work
your way around it. In other words, work
your way around a certain place
and work your way up and all that
sort of good stuff. Probably avoid places like
the top of the temple. Maybe don't put so much in the top of the temple
if you're going to, because the thing is they would probably clear all that away. It'll probably be nice
and clean up there. And it's just these
parts down here, which are, you know,
overgrown a little bit. Alright, everyone, so
on the next one, then, we'll carry on with this.
We'll save that our work. And by a couple of lessons, I think, we'll have
this actual vine in. Hopefully. Alright, everyone.
Speak to a mi. Bye bye.
153. Positioning Vine Foliage on Overhangs: Welcome back everyone. Spend for the modular in kit bash
environment guide, and this is where we left off. So now what I want to do is I'm going to work in
this corner here. So let's bring some
into this corner. Let's see if I can actually
put that in there. So if I drop this in
here, for instance, let's see if I can just spin
it around a little bit. So Z is that one going
to fit in there nice? I'm just looking at
the bom. It looks like it'll go into the floor. So let's press S and Z,
squish it up a little bit, so, double tap the
eight and there we go, and then I might want
one on top of that. Also, I'm making a mental note of how these are fitting in. You can see here if I
drop that one in there, and then going to drop it back. So I'm making a mental note or which ones are
fitting in where. So as you can see now that
fits in beautifully there, and I know now that which
one of these does that, what I actually want it to do. Now I'm going to test
this one, so I'm going to drop this
one into here. Let's have this one
give it a test. Let's just hide this out the way just so I can see
what I'm doing. And then what we'll do is
we'll drop this one in here. Like so, and it's actually
creeping over there, which is exactly what I wanted. So now I'm going to
do is press Shift D. I'm going to press art and Z and have it going this
way a little bit. And I'm also going to
mirror this one, I think, so object and mirror on
the x. Let's try that. And then what we'll also do is I'll actually mirror
it on the y as well. So mir it on the y. And there we go,
that's going that way. So now we're just going
to spin it around. Like so. Pull it out a little bit and then
I'm going to squish it in, so S and X, like so, and then
pull it back because I wanted to look a little bit different from this one here. I'm also going to pull it down a little bit, we'll tap the A. There we go. You can't really go wrong with these, by the way. It's not something you
can really do wrong. Let's bring this one in then. Let's put this one on top of here, and then spin it around, so I'll ZD let's just
put it on to here, Z, spin it around
a little bit more. We'll tap the A.
And there we go. And now we need something
just to fill out this part. So we have a couple of ones that can fill out parts
like this one, for instance, Z, make it
a little bit smaller. Make sure it's on
the ground there. There we go. We'll tap
the A. And there you go. Now you can see that's
looking pretty nice. And now what I'll do is we'll work round to this part here. So we'll put someone here. Well maybe bring this one in, let's see what that one's
going to look like. Let's bring it
down against this. I'm thinking, put
it this side first. So what I'll do is I'll press
S and x, so it's on there. If I bring it down a little bit, pull it out a little bit, and then pull it to the
side a little bit. So now, it's hiding
a little bit, you know, these doors on that. And then what we'll do
is we'll try this one. Let's see what this
one looks like. R Z 90. Let's spin that one round. And what we'll do is
we'll get this into place coming out of
there, double tap the A. And we do have one, which
is actually a corner one, which I will show
you in a minute. And I think it's this
one and this one here. These are actual corner ones. So if I put this in here, you can see that this one should work on the
corners, like so. So five press G,
I should be able to get that one in
where I want it. Let's pull it up a little
bit, double tap the A. There you go, you
can just see how nice that actually looks. Now we've got these two, now, let's walk over to
this part here, so we'll have one kind
of hanging down here. What I'm going to do,
I'll grab this one, and I'll see's not gone
on top of there properly. That one's a little
bit thin, actually, let's try that one, have
a look at that one. That one might do one side. So zed 90, z hundred and 80, and then I want one
that comes down here. So let's have a
look at this one. This one is a massive one. I'll spin this around z -90, and then SNS squish it up. And then I'll drop
this one in first, so I'm just going to press G. I'll drop it where I want it. I think it's around here, and then G can drop
this one down here. Dot to zoom in, and then I just want to pull this one down now. Into place. Let's just drop
it on top of that wall. And then with this one, we'll drop this one on top
of this wall here. Like so, I'm going to pull
this out a little bit. And then what I'm going
to do is press S and y, I'm going to pull
it out a little bit more, double tap the A. And then we go, that's looking quite nice. Okay,
happy with that. Now, let's work our way
around a little bit. So now I'm going to have some coming creeping down
from the top of here. And these need to be
fair fairly chunky. So let's see what
we've actually got. So I'm going to
bring out this one. That one's looking
nice, bring out this one. That
one's the same one. Let's bring out this
one. So I think these two will be going
over the top of here. And then I want one
in the top as well. So one either like this. Or like this one. Both of those will actually do.
So I'll just delete. In fact, you know what,
we'll keep this one as well. So all I'm going to do is I'm just going to back
grab both of those. I'll press seven to
go over the top, and then G, just place them, first of all, where I want them. So let's come to this one, and we'll place it on top
of there against there, like so, and then I'll
come to this one. I'll press G. Like so, and I'm going to place
this one then on top of here. Like so. You can see that this one needs something definitely
going on top, so it's going to
hang down to that. That's looking perfect. And then we've got this one
in the middle. If I go over the
top again, press G, I'll drop this one in there, and then just pull
it up a little bit and pull it into place. Like so double tap the
A, and there we go. And now let's put
these top parts on. So we'll grab both
of these seven, G. Let's put them
over here somewhere. Pull them both up
at the same time. I'll press S to make them a little bit bigger, and
we might get away. We just having one in there. Yeah, and I think one
might just do it. So what they'll do is
though. You know what? Yeah, I'll just leave
them with one in there, I think. I'll press
the leave then. Don't forget there's going to be also ferns in here as well. So it's not just
going to be vines, it's also going to be ferns. Now what I want is some
hanging down here. So again, let's come out and
think which ones we need. So that one Z -90. That one looks good.
Let's bring this one out as well, R Z -90. And what I also tend
to do is if I'm doing ones like this is I'm
bringing three of them in, as you can see. R z -90. So then they can go across here, and I want them at
different heights just to kind of set the scene, and then maybe a
longer one at the end. So I'll bring in this
one, for instance. Now I'll do is I'll
put these into place. I'm going to put this over here, this one over here, and
this one over here. And then this one is going
to go right at the end here. So r z -90, like so, and then they'll just put this one over here roughly. Now, I'll do is I'll
go over the top, and then I'm just going to press G put them in a rough place
for now, same as this one. So G, and then this one here, and G. And now what
I'll do is I can see from the front now how they're actually
going to look. So let's bring this one in. Put it along there.
Let's bring this one in. And put it, so it's hanging. So double tap the
eight. So look at that. Maybe maybe lift this
one up a little bit, and then we'll drop this one down and into place, like so. And then finally, this
one will drop down here and pull it out a
little bit into place. Now we obviously we need some
tops on this one, for sure. Well this one's going to hang down all the way down to there. And we also need to
pull these out ale bit. So I'll just press S and X, pull them out a little bit. Double tap the eight.
And there we go. There's those. And now
I need some in the top. So something going
along the top here. So what I'll do is
I'll just bring this one in, drop it on there, and put it into place
on the top of here. Double tap the A, look at that and there we
go, that's perfect. And then I think I'll
leave these as they are. They look nice. It's just
this one here that I need. I might be able to actually get away with a corner
one let's see. I don't like that one it's a completely different color,
so let's try this one. This one looks about right.
Let's drop this into place. The tap the A. And there we go, you can see, now that's
looking pretty nice. Okay, so now the final one before the end of
this lesson is, we'll just put one
in this part here. So I'll let's try this one, see how that's
going to hang down. I'm not sure whether I
like that one or not. I don't think I do. Let's have a look at this one.
We'll bring that one down. I just don't want it looking
the same as this one. That's all I want,
double tap the A. And yeah, it looks very
different from this one. So I just need to get this
into place. Tap the A. And there we go, now what I'm going to do is press S and X, and I can bring it out
a little bit more. And just make sure that
it's actually on that wall. And then we go, that's
looking pretty nice. Now, before we end them, let's save that our work,
so file and save, and you can see just in
that short amount of time, how much we've actually
transformed this. And what we'll do now is
we'll put it on render view, and you'll actually see that
that is starting to really, really now come to life. So it's really starting
now to come to life just with a few different
vines, as you can see, and wait until we've
got actually, you know, the trees in there and
the ferns in there, you'll really see that it
starts to come to life. Alright, so on the
next lesson, then, what we'll do is
we'll start working around the other side. So I'll start
working around here, pretty much the same process. And I'm hoping by the
end of that lesson, I'll least have this part
here done with the vines, and then I can move around
to the final section. Alright, everyone, so I
hope you enjoyed that, and I'll see on the next
one. Thanks a lot. Bye bye.
154. Continuing Vine Placement in the Aztec City: Welcome back
everyone, spleen the modular Kash environment guide, and this is where we left off. Now, let's put it back
onto material view. It does make it easier. And then what I'll do is I'll
bring this one in. I'm going to make
this a little bit bigger just so it's
covering there. And then what I want to do is I want it hanging over here. So I want something
coming over here. So let's see what we've got. That one might be okay
hanging over this bit, but then I want
it dropping down. So let's see, first of
all, double tap the A. Let's have a look. That
might be okay there. So I'm just wondering which way round this actually
is because I'm not actually short
at the moment. Let's put it in seven go
over the top, and then G, let's drop it in where
it's going to go, which will be somewhere around here. And then
I'll drop it down. I can see now which way it's supposed to
be turned around. So I's at 180, spin it
around. Dull tap the A. And there we go. We definitely
don't want it though, you know, just kind of hanging
through the actual stone. You can see it's still
hanging through the stone, let's pull it out a little bit. And there we go, now
that's looking much bare. Is it looking bear? Let's
pull it up a little bit. There we go. Now
it's looking bare. Yeah, that's looking perfect. Now we want another bit
maybe on the corner here. So let's grab one
of our corner ones, so we've got plenty of corner
ones. Let's try this one. Bring it down. And have this hanging just
on this post here, double tap the a again,
and there we go. And then we'll have one
now hanging down here, and I think that will
finish it off for us. So I think we can get away
if we use a large one. So a look at this
one, too small, too small, too small, and let's try this one. That one might do it.
Actually, you know what? Maybe it's better with
one of these small ones. Let's try one of these
small ones actually, r -90, and then seven and G put in
place where it's going to go. And then got to zoom in, and then all I'm going to do
is drop it down into place. And there we go. It's
hanging slightly over. That's what I want. And then I'm just thinking I'll
put it this side. Like, so, so now people can actually walk past that.
It's just hanging down. So yeah, I think
that's looking good. And now I've got
all of these out. Can I use any of these? First
of all, spin this around. So I said 90. And I'll drop
this in the corner over here. So if I press seven, I should be able to
then bring it over here or said Now normally, I don't like putting
an angle like that because you'll see it
interferes with things. Sometimes you can see from
here, it looks straight. Just be careful if
you are going to do that with how you pull it out. So double tap the eight
and just make sure that these vines aren't going into anything like this,
for instance, if they are, either
just squish this in, so S and X to bring it in, like so and then put this back. Make sure it's not. The vines
aren't going through it. So there we go. Alright,
no vines going through it. Now I might need to bring it out a little bit more.
Double tap the A. And now that looks absolutely fine. Going all
the way up there. Now I want to do is I want to drop another one down on here. So let's try this
one, for instance. Let's press Z 90, and let's bring it
down into place. Like soap. Let's pull it over, double tap the A.
And there we go. That's looking pretty nice, maybe even a little bit further. Double tap the A.
Yeah, and there we go. Alright, that's that
bit. Now, we've got this bit done up here. I'm thinking, would it actually come round to these parts here? Or would we actually have
some foliage in here? I think what we'll do is we'll bring in another flat piece. Put that in there,
make it a little bit bigger. Tap the A. And there we go. I think that's
finished that off nicely. And now let's work our
way around a bit further. So we're definitely
going to want something around this part here heading over the bridge
then because you're definitely going to have some
vines crawling around type, you know, hanging off
this bridge for sure. Now we can have
small vines on this. So if I put this here, we can actually have
some small vines going off of the bridge here, so I'm just going to bring
in a few ones again. And we're going to also just delete these out the way.
Not going to need them. And I can pick this
one up, like so. And then I'll have
some flatter ones also going over the bridge. So flat ones and some
flat ones like so. And then I'll have a little one. How big is this one that's
over look hanging down. Yeah, I think that one will
be perfect for this corner. So let's bring it up. Let's
spin it round so's at 180. Let's press seven
to go over the top. Let's press G, and what
we'll do is put it in place like so, and
then bring it down. And then out Lex so,
double tap the A. And there we go, and I think
that's going to look good. This one here then. Let's
spin both of these round. So ours ad 180, spin the round. Let's put this one into place
where it's going to go, which will be, I think,
a little bit over here. Double tap the A.
Yes, and there we go, and then this one can go
on the bridge part here. Into place double tap the A. And there we go. Now what we want is these
two flat pieces. So if I bring these up, first of all to the right level, and then go over the top and then what I can
do is I can place them into place along my bridge, making sure that
they're flat then. I think I'll rotate it, so
I'll y rotate it round, double tap the A, and there we go and let's just also
pull it out a little bit. And then with this one,
let's pull it to this side, so because I've
got to walk across this bridge, so
just remember that, so maybe over this side, like so, and there we go. And that's looking pretty nice. And I want one piece,
which will go on here. So this one on here will be a longer piece. I'm
thinking, a long one. Is this a long one? Look. That
one can go on here anyway. So it's at 180, Let's pull this over here. So seven, to go
over the top again, and G. Let's pull it there, and then we'll drop
it into place. Double tap the A, and then let's just pull
it out a little bit. And, and there we
go, that's that one. And then I still want one here. Now, I want a long one here, so I'm thinking I'll use this. ZD 90, and let's
put it into place. And I'm just
wondering my tortures didn't check those actually.
Let's just turn those on. Tortures are on. And I'm just wondering if if I put
this up, there we go. I've got my actual torches on. Do I have my torches?
There's my breezes. Alright, I can see where
my tortures are now. I'm just making sure that
I'm not like this one here. I don't want to cover this up, so you can see this one here. We have to be very careful that we're not saying
light to anything. So that's the reason why
I'm looking at this. So this one for sure here, this torch might not be in
the perfect place there. And I'm just wondering if
I can get away with that. I'm not sure. I think
what I'll do is, I'll bring in my
flames, so let's turn the flames on. And
I think, you know what? I'm going to have to put
this somewhere else. So round here maybe because
I think it looks good there, but it wouldn't be
practical there. So I'll just bring it out, and then I'll add 90, and let's just put
it on the side of here. To light up this part. So I'll just make sure
it's in the wall, and I'll just make sure that it's a little bit higher
like so. There we go. That's probably going to look a bit better
than how it was. Now I've got a brazier down
here, but they're fine. I haven't got anything
over this side. So that again, should be fine. Let's just pull this
in all the way over just so it's kind of
eaten away that part. Let's also bring it
down a little bit. Or maybe up a little bit, double tap the A. And
I think that's fine. I'll just have one then,
that's the corner one. This one here, so ad.
Let's spin it around. Let's make it a
little bit smaller. Let's then put it into place on this corner
here and drop it down. Double tap the A. And what I want to do is just hide this. So this part of the way
that I've created here. Like so, and there we go. Now, it's pretty
well hidden that. And then let's move
on to this part. So definitely going to
need a longer one in here. So let's bring this one in. Let's spin it around, so R Z, 180, spin it round, and then let's drop
it into place. Like so. Double tap the A. And then we go and then
one more piece, I think. So I'm just wondering if I can go away with
putting this in again. So shift. Let's bring it over. And then let's object and mirror on the
think it's the Yes, it is the X. Let's
mirror on the x. And then let's also bring
it in and press S and X and really pull it out a
little bit. Double tap the A. And then we go let's
also make it longer. So let's grab this bit S and Z. Let's make it longer,
and pull it down into the floor,
double tap the A. And there we go now,
that's looking nicer. Okay, so one final piece
then before ending here. And we'll put some pieces
on this part here. So just this edge here. So what I'll do is I'll grab, let's say, let's try this one. Here, we'll grab this one.
So Z 90. Put that in. We'll have a top part on here. So Z 90, and then I'll also
bring in this one and R Z 90. Now, let's grab all
of these two first. So seven go over the top. We'll bring them into place,
so bring that one there. Bring that one in here and bring this one into
the top somewhere. And now what we'll do
is drop them down. So let's drop them down.'s making sure that one's
in the corner like so, and then we'll drop this
one down over here, I'm going to press S and y
and pull it out a little bit. Then be to drop that back
into there, tap the A. And there we go, now let's
drop the next part down. So we're going to drop
this going along here. Double tap the A. There we go, and now we need one big one and maybe one corner
one to finish. So t's have a look what we've got, have a
look at this one. If that one can
go in the middle. S, make it a little
bit bigger, 90, g27, and then g to go
over the top, like so. And then what we'll
do is pull it down. We'll tap the eight,
and then we go, and now we just want a corner
one, which is going to go. So we've got this corner
one, we'll put it there. And then r y -90, r y -90. Then let's put it into
against this flower pot here. And double tap the
A. And there we go, that's looking pretty nice. Okay, so on the next one, then we've only got just to get around here for the vines, and then the vines are
done out of the way. And then we can finally
bring in our ferns. They're a little bit
easier, actually you can place them
on the ground. And then after that, we'll
bring in a few trees. And then after that,
we'll actually start work on our terrain. All right, everyone,
hope you enjoyed that, and I'll see you in the next
one. Thanks a lot. Bye bye.
155. Plant Placement in Pots for the Aztec Scene: Welcome back to blend
fold the modulate and Kish Kash Kiah
environment guide, and this is where we left off. Okay, so let's actually
put one in here, so let's try and
get one in there. Let's drop this down then. All the way to the floor, and let's bring it out a little bit, and what we'll do is, as well. Once we've brought that out,
you can see it's a little bit thin on there.
Let's actually press. Let's zoom into it. What I want to do is bring
that down to there. And I'm just wondering if
this needs spinning round, while it's a at 180.
Let's have a look. Yeah, and I think I had it
just the wrong way round. So now I can pull
it out this way. And there we go that
looks, lots, lots bare. Let's move it into this
corner. The we'll tap the A. And we now we just
want a piece on here. I'm thinking probably
a corner piece. Let's try this one here.
Let's drop this down. And let's pull it back a little
bit and double tap the A. And there we go, that's
looking perfect there. Okay. Now, let's
move around then, and what we'll do is we'll put some parts on the
top of here first. So I'm going to grab this one. I'm going to drag it in there, and make it a little bit bigger. Make sure it's on the ground, and then we'll bring in
this one. Same thing again. So I'm going to press I'm
grab this, press the Sn. Then just pull it
into place on here, like so, and then I want some
now hanging over this side. So what we'll do is we'll use. Let's see what this one
looks like actually. Yeah, we'll put that one
in the corner there. So make sure it's on
there, double tap the A. And then one more
that's going to hang over. Let's
see if this one. We'll hang over so s
-90. Let's drop this. We'll press S and y,
squish it down a bit, bring it out, and
then just put it into the floor into the
floor into the roof. I'll tap the A and
just make sure that's hanging over
properly, and there we go. Now I want to have
another bit on here. So corner part. So we've
got plenty of corners. Let's use this one.
Let's bring it out. And into place, and then maybe
bring it up a little bit. And a little bit further out. But the A's a little what
that actually looks like. I'm thinking that
looks pretty nice. I just want to piece then
just hanging down here. Smaller piece, I think, so
let's bring in this one. Let's spin it round.
So's 90, and then's 180. Let's press G and 77, and then G, and let's drop
it down into place here. So, double tap the eight, and let's move it
over a little bit. And there we go, and I'm just wondering
about this part here. I'm going to press S and X. I'm just going to
bring it in a little bit. And there we go. That
looks a little bit bare. I think as well I need another
piece on there, actually. So I'm just going to
put this bit here. That one's maybe too big, so I'm not going
to use that one. I've got another corner
one, which is this one. And that one's probably
going to do the job, b and bring this out. And then double tap the
A, and there we go. That's looking much
much better like that. Okay, so now I can move
round to this part here. And then what I'm going to do is I'll drape one over this part, so I'll want it dropping
down here so I'm just going to bring this one round, so Is 90, and then bring it out. And we just have to be careful. We don't want it obviously
where the torch is, so we want it kind of at
the side of the torch. But still, it would be
dropping down into the water. And I think, yeah, that looks. I actually looks
perfect like that. And then what I'll do is
I'll bring in a corner one. And we can put that
if I press seven, I can go over the top, put
that right in the corner. Like so, double tap the A, and then maybe one
over the top of here. So if I put this in here, like so, and I can have it then going back against the steps. And there we go. All right, that one looks perfect. That one's the best
one yet, I think. Now I'm looking at
the rest of it, and I think the one
part we're going to need is maybe one here,
and then one on here. So let's put the first one in, so we'll use, let's see
if we can use this one. So look what this
one looks like. And we'll bring that
over into the corner, double tap the A, bring
it up a little bit. There we go. And I'm thinking that I'll also bring
it this side as well. I'll bring it over here, and then I'll press Sen's ad, stretch it out a little bit, and then drop it
in there like so. There we go. And then
finally, this part here. So I'll put a piece
on the wall first. Well, let's put
this on the wall. Let's make this a
little bit smaller. Then we can drop it right
in the wall along there. And then we'll have one
that comes over here, so let's have a
look at this one. L et's press lessons d, and let's see now if
I can actually pull this one into place
against this wall, double tap the A,
and there we go. I think that one's
looking pretty good. And then I'm just
thinking maybe one more one more over here. S to finish this off. I'm just making sure it's
not poking up too high. And there we go and also, I'm making sure that I'm pull it out enough as well.
And there we go. That's looking
pretty nice as well. Okay, so all of that
then is looking nice. I'm just wondering if I need
any other parts on here. I think I'll need
one part on here, as you can see, so
I think I'll need a flat piece on there. Let's put this on here, z, and then zed 118. Let's have it on the flat piece on here.
Double tap the A. And I don't think it's
poking through enough yet. So I'll double tap
the A, like so. And for me, this part
here is actually poking out a little bit too much here, and I don't
really want that. So what I'm going to do
is I'll just come in. So I've gone into edit mode, I'll press B, box selected,
press Control plus. And then all I'm going to
do is delete it from there, so delete and vertices. And then I've got one more
piece I need to get rid of. And I'll grab all of this
like so and delete vertices. And then we go, now
that that is looking, and I'll also make sure
that this is pulled out a little bit more.
And there we go. Alright, so that is all
of our vines in place. Let's then save our our work, put them anywhere else that
you feel like they might go. And now what we'll do is, we'll head on over two. I think let's have a look a head and over
to our plants, I think. So first of all, we've
got two in this lot. So if I go to my plants and
foliage, I can open this up. We've got ferns, and we've got small shrubs.
So these ones here. What I'm going to do
is, first of all, I'm going to look where
my plant pots are. So first of all, you can see
that in the plant pot here. This is where I'm going to put these small kind of shrubs. So you can see, if
I drop this here, press seven to go over the top. G. Let's put it right in
place in my actual plant pot. And then we go. You can see exactly how that's
going to look. And from there, I can actually
pull this out a little bit and even pull it back
into the wall like so. And then what I'm going
to do is I'm just going to look for the rest
of my plant pots now. So I think I've got a
plant pot around here. So I've got one here. Let's choose a
different one for this. So let's put it in place. Can I actually go away?
We're just putting that into place like
that? Maybe. Maybe. Let's press seven
and go over the top. Where's it gone? There it is. And I can see there's
another plant pot here. So all I'll do now is press G, and I'll put that into
place by pressing dot, spinning around,
and there we go. I'll tap the A, and
that's that one. Then we'll come to
this plant pot here. So this one here, press
seven to go over the top. And maybe I can just grab,
let's have a look at this one. Can I grab it and
actually just drop it in. I can see how it's lining up. You can see that there,
lining up perfectly. And then what I can
do is I can make sure that's in place. Like so. Double tap the A. And
then we've got one here. So let's use a
different one again. So again, I'll go over the top. I'll press G, and I'll try and put that
one in place there. Put it back a little bit. Double tap the A.
And there we go. And now, we'll come over and
look from my next plant pot. I think there's a
couple of plant pots here. There's none in there. Didn't point in the, can put
some in there if you like. But what I'll do now is, I'll bring two of them, so I'll bring this one.
I'll bring this one. I'm just looking at
the size of them, so you can see quite a
big difference in size, and then one is going to press control one to go
to the back of it, and I'm just going to line
them up to where I want them. Put in the small one here because of the fact we've
got some bushes here, so the bigger one
can go that side, and I think that's
going to set it off a little bit like so. And then all I'll do
is I'll pull this back into place and then pull
this one back into place. So, double tap the A. And there we go, we've got
the two bushels in there. That one's looking very nice. And now we can
actually come around, and I think there's
one plant pot left. I think this is the
only plant pot left. So what I'll do is now, I'll use the one that I
didn't use before, which I think was this one here. And then I can press
three, going side view. Grab this plant, as you can see, press G. Let's make it a
little bit bigger this time. So S, bring it out a little
bit, seven go over the top. And then we're just going to line it up and put it in place. Now, we just have to be careful.
We've got a torch there. But actually, I think
that's looking very nice. Now finally, what we'll do
is we'll save out our work, we'll save it out, and then we'll have a quick look
on our rendered view. If you notice, I'm actually
keeping it on the day view. To look around it.
You can see now. Wow, that's a big difference. That is a big difference
of how that looks. Now this scene looks
really, really cool. And the last of all, I'm also going to put this
on tonight scene. Check out how that looks, seen all that foliage. And remember, we've
got no actual lighting in here at the moment. So there's no actual
lighting apart from the actual lighting from the sky box,
which is set to zero. So it's all lit really by our torches and
things like this. And we can certainly
see what kind of silhouettes we're
getting over here. It's little very nicely. Okay, so let's put
that on Day scene. And now what we'll do is
we'll bring in our ferns. So we'll do that on
the next lesson, we'll start again round here. So we'll start around here.
I'm going to press save. And then what I'm also going to do is put it on Shader mode. And I'm also just going to
turn off these torch and flames because it will make it a little bit easier to
move around there. And then the next
lesson, as I said, we'll start putting
in those ferns. So let's actually go to. First of all, we've got small
shrubs. Here's the ferns. So these ones here, these are the ones that
we want to put in. So we've got a choice of four. But when you actually
mix the mop as you know, it actually seems
like a lot more. Alright, everyone,
hope you enjoyed that. I'll see in the next one.
Thanks a lot. Bye bye.
156. Working with Fern Placement in Blender: Welcome back everyone
to Blend the Ford the modulate and Kit
bash environment guide, and this is where
we left it off. So we've got four
different types of ferns. So if I bring the first one in, you can see here,
this is what they actually look like once
they've been brought in. Obviously, this one
is a little bit big. Now, there would be growing out through the cracks
in the concrete, but I'm also going to make
this one a little bit smaller. So I'm going to put this one
right in the corner here. Now, generally ferns,
if you look at anything real life,
they generally angle. So they generally grow
out of things like this, for instance, and then
if a double tap there, you can see, I need to put
this down into the ground. There we go. That's
the first fern in. Let's grab the next fern then, and we'll drop this in here. And again, I'm going to
spin this round so Z. Let's spin it around a little
bit and put it in like so. And the other thing
is with the ferns, you can always come in and delete any that you don't want. So for instance, if I want to come in and delete all of these, so delete vertices, just make
sure that you press altate, make sure that it's
all there, but you shouldn't have any problems
with them, really. I think this one is a
little bit in place. So delete vertices like so. And then we go, let's look
in much, much beer now. And let's work our way round. So I'm going I'm looking basically for corners
which are empty, or which will flow really well with anything else
I'm putting in here. So this corner
here, for instance, is a little bit, not
a lot going on there. So I tend to then just bring
one in here and put it in, make it a little bit smaller, like so, and then just make sure that
it's into the floor. Like so, and then just pull
it back, and there we go. That's that ferning, and then let's put another
one around here, I think, so I'll just grab a different one.
Drop it down there. Into the floor. Spin
it round, so Is. And I've got to be careful on this one because
as you can see, I don't really want it going
too far over our steps. So I want it maybe out here, maybe a little bit smaller. Pick it up a little bit, make sure it's in the ground, and then put it back into place so that when
they walk down there, you can see there's a
few ferns at the bottom. That looks very nice. Now, let's come to this corner here. So we'll drop one in here. Like, so and on the outside, I would think that maybe
the ferns would be growing a little
bit bigger because maybe they're not
cut back so often, but certainly around
near the steps, they're going to be cut back so people don't trip over them. So that's going on in my head
when I'm thinking about it. I'm also thinking about the rotation of how
they're going to look. I'm also thinking then
about this part here. Well, this one here
as you can see, delete vertices, and just make sure it's not
too much in the wall. Same for this one
here as you can see, so L delete vertices. So something's not stuck
in the wall too much. Now, let's work our
way around then. So we're going to have Some
small fern maybe here. At this point, then I can start
really making them small, so you can see here and
then dropping them in, like so right in the corners, and you can see the
difference in size, really doesn't
really affect them. So that's one really
great thing about ferns. Let's drop this one in then, so press the S button, and then bring it down
into place along here, like so, make sure
it's in the ground. And there we go. All right.
That one's looking good. And then we'll bring in another
one, we'll drop it here. Make it a little bit smaller, and this one will go in
the corner wall there. Then let's push it right
into the wall up to there. Double tap the A,
and there we go. And then we'll work
our way around. So we've done all
those. We'll have a. We'll definitely have some
ferns creeping out of here. So I'm going to hide
this out the way. So hide this on here
because there's a lot of water around
this part here. Probably a lot more ferns,
is what I'm saying? So let's bring this one
in, press the S button. And let's put that right in
the corner around there. Like so. And then we'll
have a couple on here, so I'll bring in a couple,
so I'll bring in one. I'll make it smaller,
and I'll move it over, and then I'll bring in another, I'll make it a
little bit smaller, and then I'll move
that one over as well. Like so. And then I'll
bring in these two. I'll make this one
smaller and bring it over into that
corner. Like so. And then let's bring
them all down, making sure they're in
the floor, of course. Like so, and then let's
do the same for these. So we'll bring this one down. And then we'll bring
this one down. Like so. All right, double tap the
eight, and there we go. That's what that looks like. Okay, so now I'm thinking we'll grow a plant
pot here. That's fine. Let's put. We've got one here. Let's put one at
the stairs here. I think that'll look nice. So we'll drop this one in here. Like so. I'll make sure
it's in the ground. We'll tap the A.
And there we go. Yeah, I'm actually going
to leave that one there. I'll just make sure this
has cut back a little bit. So L L and L delete vertices. And there we go. That's
looking much much better now, and then work our way around basically. So what
we're doing now. The moment is just
dropping ferns in. I'll drop another
one in there, look, so we'll drop one in here, like so, and we'll leave that one actually
to be quite big. Just make sure it's in the
ground. We'll tap the A. And there we go. And then we'll work our way
around the top now. So on this one, we
did on my other one. I did have a plant pot in here. On this part here and I might actually steal this plant pot. So I'm going to
steal this and this. So this one and
the tree. Shift D. And then what I'll
do is, I'll bring it over seven to go over the top, press G, and we're going
to drop it right in there. And then of course, we need
to lift it all the way up. So all the way up into place, and then come
round the back, just make sure that this plant pot is set
in place on there. And then all I'll do is
pull it out a little bit. And then I'm going
to grab my tree, press S and D, pull it up, and then R and Z and just rotate it round just so it fits in there a little bit bare. And now we've got a nice view. That from there, and that's
looking pretty cool. And then what we'll do is we'll put in another few shrubs, so we'll put one definitely
in the corner here. Well, let's grab this one,
put it in the corner. And I'll spin this one round, so I'll s like so, and
then bring it out. There we go. And then I'll have one just in here, a smaller one. So we'll bring this one in, make it a little bit smaller. And then we'll put it
just in this corner here. On the actual steps themselves. So maybe here. There we go. And then we will
pull one out here. So I'm thinking in
this corner here. And I want to get away
from using the same one. So I definitely don't
want to make sure they look a little
bit different. Like so. And then what I'll
do is I'll get rid of these. L L, L, L and L,
delete vertices. And then we go, and let's
get rid of this as well. So L delete vertices. There we go and let's
pull it out a little bit. Let's also pull
it up into place. There we go. And I'm thinking maybe another one
in there as well. Let's bring this one in. Let's make it a
little bit smaller. Put this one into the
floor and double tap the A. I'm just wondering
if I should put it in along here
instead like soap. Double tap the A. Yeah, and
I think that looks bad. Okay, and now we'll have
one another third on here. So against here, we'll have one. Let's grab a
different one. Oops. And sometimes,
actually this happens, and all I tend to do is
just go in another one, or I go to modeling,
and hopefully. You can see how it's got this little band here.
Sometimes it happens. I'm not actually
sure why it happens. But if I press tab, you can see now I can actually
go out of it. And then what I'm going
to do, I'm hoping if I press tab, I
should be able to now. No, it's not going
to work. So what I'm gonna do is I'm
going to file, save. And then what I'm
going to do is now, I can actually work
with it. All right. There we go. Now, let's
bring this one into here. And then what we'll do is, we'll drop this into place. I'll make it a
little bit smaller, like so, and we'll
leave that one there. Like so. Okay, so now
we can work around. I'm just wondering now
where we can put some. So I'm just wondering, do I want one right in here? I think I do, and I'll
have one down there. So what I'll do is now, I'll bring in this one
and drop it in here. Just on the top
of here in there. Maybe we've gone a
little bit too far. There we go. Double tap the A. And then what we'll
do is we'll drop one around this point here. So around here.
Let's bring in one. Let's press control on one, and let's bring it down, so G, and this is where we want it. Right around here. Now, it's hiding a little bit of those, so I might just make
it a little bit smaller, and then bring it over. And so it looks like the jungle is actually overtaking
a bit of this. And then what I'll
do is I'll press L L and L delete
vertices. There we go. That's looking cool. And then
we'll work our way round. And I think on the next lesson or by the end of
the next lesson, we should pretty much, I'll put in one here as well. Pretty much have the ferns done. And then what we can start to do is we can start to
bring the palms in. Now, the one thing that we
haven't done right now, we've not actually
put these into, you know, we've
not put the vines, I don't think into one. So we haven't got it listed
on the vines and stuff. But we'll do that. Once we've
actually done the vines, the therns and the small shrubs, we'll put them into collections before bringing in
the actual palm. So let's just get these finished first, and then we
can actually do that. All right, everyone.
So I hope you enjoyed that, and I'll
see on the next one. Thanks a lot. Bye bye.
157. Final Foliage Placements in the Aztec City: No. Welcome everyone to lend the for the modulate
and Kish environment guide, and this is where
we left it off. So now let's come in and
finish off what we started, so we'll bring in
this fern here, and we'll definitely press Control one and pull that down. So G, let's pull it into place. So I'm going to want it around
here somewhere like so. And then what we'll do is
we'll bring in another one, I think for this
corner over here. So I'll just drop
it onto the floor. I'll pull it right
into the corner there. L so and I'll make
sure. But press dot. Zoom round a little bit, and I'll just pull it
into the floor. Like so. And then what we'll do is we'll
need another one, and I'll put it in
this corner here. Doesn't math, it's the
same one, so shift D, we can bring it over, put it into the corner cause
we know it's level. That's the point. So Z bring
it into the corner like so. We've got a few sticking out, so let's just delete that one. So L delete vertices. And then what we'll
do is we'll put a smaller one around here. So I'll bring this one in, rest the S but and then just make it a little bit smaller,
and pull it into place. Then r and ZD Where
do I want it? Maybe around here, seventh, go over the top, and then G, just put it right into place. Double tap the eight,
and there's that one. But then I'm thinking, do I
need any more round here? I think I'll put one on here. I'm just going to grab
one, put it along here. Make it a little bit smaller, so S, like so, and then put that one in place. D t the A, and yet, there we go. Then I think I'll have one
round here, so one round here. Like so and put it into place. And then Z of spin that
one round a minute. I'm happy with it there.
It's just this pit here. So I'll just come
in, press L and delete vertices,
and there we go. And then finally, I think, I'll also delete this one here. So L and L delete vertices.
Yeah, and that's looking. Okay, and then I've got
one in this part here. So I'll try and
get one in there. We go, press the Sn,
make it smaller. Make sure it's stuck into place. Over there. There we go. I'm just wondering whether I'll bring that out and see
if it's still stood on there. Yes, it is. Let's make it a
little bit smaller, even. Let's pull it up.
And there we go, that's looking
much better there. Okay, so we've got
that one there. And then I've got one in
here, one down there. We could have one
around here as well. Yeah, I think we'll
have one around here. Like so, and let's pull it out. And then Z's spin
this one round. And then let's just delete
this one here, for instance. Let's certainly delete
that. So delete vertices. Let's delete this
one, delete vertices. And there we go. And I'm thinking I'll just pull
it more into the wall. And now we'll work round
to the other side. So I'm thinking We'll have one. We could put one down here, a small one, and then one
over here. We'll do that. So we'll bring in this one, we'll make it small, and then we'll just
put it in the corner. Here, and then rotate it round. So I'll just so it's at
the side of that bin, and then put it down into
the floor, like that. To the eight, and then we'll actually put one around here. And then and head, make it a little bit smaller, pull it up into place,
and then pull it out. Like so, double tap the A. Like so. Then we will
come into this one. So we'll have one on here, we'll put one, not like that. We'll put one in here. L et's see if that's fitting in. It's going down a little bit. There we go. Let's Yeah,
actually, you know what? That one will be okay. I'm thinking I'll make it
a little bit bigger with Es and's Ed and then
pull it up a little bit. There we go. And then we'll have I definitely want
some round here, for sure. We've got one in there.
We've got one there. I'll definitely want one in there as well. So one in here. Let's drop that one
in. I get it in there. Yes, I can. Yes, there we go. And then Art and Zed, let's spin this around. But we definitely want it
there in there, like so. And then actually,
we could get away. If we put another one in here. So if we put this
one on top of here, we could get away, with
actually leaving that there. So. And there we go. All right. Yeah, that's looking
pretty cool. And then a small one
around here and here. So let's bring in a couple, so we'll bring
this one in first, S. And then we'll drop that one in there and
then bring this one in S, and then G, and
we'll drop that one on top of there.'s
making sure it's in. So dot pull it to the
side. Okay, like this. And then this one will go into, I think this corner here, so G into that corner
and then drop down, and then we go like so. Okay, that's all looking good. Now we just need a few
more around this part. A this around here. Let's bring one in here. Bring it down into the floor. Let's cut away this one though. Let's definitely not have that. So delete inverts, and let's
also cut this one away. So L delete vertices, like so. Let's make it a
little bit smaller, and let's pull it a little
bit more out into place. To the A, and there we go. We don't want to
cover it completely, so we'll have another one
over here. One over here. Like so, and we will said. I'm just wondering to get
that into place around here. Let's press the S born, make it a little bit smaller, and then we'll just pull it
up into where we want it, which will be around there. And then I'll just
delete this one. So delete vertices. The
other thing of course, you can do is grab
it and you can press G with proportional editing on, so you can put it on smooth, and then you can
just grab it and pull it into place
wherever you want it. So I don't forget to
use that if needed. I don't think I'll
need to use that. What I'll do now is I'll grab this one and drop that
into place around there, so press the S
born, bring it out. Let's put it into there, and let's also pull
it into the ground. And then our ZD, making sure that there's
not so much in there. And then with this
one, for instance, I can, it's the perfect
time to use this, actually. You can just press G. Now, when you're doing
this as well, just make sure connected only is on. Then all you're going to
do is just move that one. And see very, very easy to do. And then we just want one around here and a couple on
the front, I think. And then we're pretty
much done with this part, so let's drop this part in. L et's spin it round, so A Z. There we go, and let's press
g and put them in place. Let's just make sure
that's in the ground. And then I think a couple
more then on the outside. So one in the corner
here, one around here. And then we'll have a look
at what we've actually got. So let's put this one in. A Zed it round, it into place, right
around here. Like so. Like so, and then last one, we'll put into place here. Into the ground, and then
R and Z, and it round, and then G, let's
put it into place, making sure it's in the ground
then, and we'll tap the A. Okay, so that's pretty
much all of those done. Now, let's actually come
over to our modeling then. And then what we'll do is we'll just put this on a minute. Now, we can see already
that all our temp so the easiest way to do
this is very, very simple. All we can do is hide
our temple parts. We can then come in
and hide our torches. We can then hide
our temple floor, and then that will
leave us basically with everything that
we've got left. So now what I can do
is I can just go in, grab all these, for instance, grab a few of them,
press the n button, and then all you're going
to do is new collection, and you'll just call
it vines, like so. And then what we'll
do is we'll just close that up and hide
this out the way, and then we can just come in. And grab all of our
vines now, like so. Then press M and put
them into vines, and then we'll hide them, and then we can just
work our way around and make everything
nice and neat for us, so M, vines, and then
we'll work on these ones. And also, this will
then make it really nice and tidy as we move along, saving us a lot of
work in the future. So, because in the end, we tidy everything up and make sure everything's
nice and neat. So vines, W M
Vines. There we go. We'll grab this one,
this one, this one. Like, so, vines. M and vines, and there we go, and now
we've just got a few left. This one, I think we've
got one under here. So I'm just going
to grab that one. There we go. Then these two. Let's see if we're going
to your left, and yes, I've got one left there, and I think that is it. So M and vines. And now with these ones, you can see that we've
got some plants. So what we'll do is
we'll actually grab one, two, there's not many of these. So we can see basically
the ones where they are. So you can see all of these, all of these, and I don't
think we've go any others. And then we can press M. And what we can do is
new collection, and we'll call these plants. So. And then what we can do is close that up,
hide that other way. And now, Bates, we should
just have ferns in here. Now, all of the
ferns, of course, I just look in there, you've got one plant there, so plants. And I'm thinking that
is the whole thing. So now I can do is
just grab them mole, press the born and do new collection and call
them ferns like so. All right, so there
is all our ferns. Now we can actually
open these back up. And finally, then,
before finishing, what we can also do now is just have a quick
look round at our work. So let's file and save, and let's put it
on rendered view. Let that load up. And then once it's loaded up,
let's have a look now. So now we can see with
all these ferns in, it's really starts to
bring everything to life. And the final thing
jaws to add to these. Then on the next lesson to this part at least is
going to be our trees. And then once our trees are in, then we can actually
start work now on this first part of
the actual terrain. So we can start on the terrain. That will be very
interesting and a bit of a change for sure. And then after that,
we'll be working on the scene as a whole. And then finally,
we're on to lighting and a I'm thinking of
bringing a cloud dome in. I think that will really
really set the scene, and then finally compositing. So we can we can see the light
at the end of the tunnel, and we can see we've really created something amazing here. So let's bring those
trees in next. Alright, everyone, so I
hope you enjoyed that. I'll see you in the next
one. Thanks a lot. Bye bye.
158. Adding Trees Within the Aztec City: Welcome back everyone
to Blender Ford the Modular and Kiash
Environment Guide, and this is where we left off. Now, let's go back to
our asset manager. And the ones we want
is going to be palm. So these ones here, we've got all of these
palms to pick from. So what I'm gonna
do, first of all, I'm gonna put my first
palm roundabout in here. So if I put a palm
in here, like, so now the palms won't look as good until you actually
put it on rendered view, so don't worry too much about how they're looking
at the moment. Just make sure that
when you put them in, that they actually
go at a nice angle. So when you're looking at them, it helps tell the stories
basically what you're doing. Now, if I double tap the A,
put it on rendered view, you will see now that palm
really starts to come to life, as you can see. So
now let's come in. And we'll get some
more palms in. So I'm going to put one
palm tree over here. So if I press seven
to go over the top, then I'll bring them
a next palm tree, which I want kind
of at an angle. This one's kind of
a bit of an angle. And then what I'm going
to do is just pull it down into place like so, and just make sure,
first of all, with this palm, it's not
in the way of the flames. So we don't want it in
the way of the flames, so make sure it's
higher than the flames. And normally palms, they
might actually grow, as you can see,
outside of the ferns. So outside of the fen.
So it's up to you. You can either put it right next to here or
put it over here. This might be a better place. We're hiding this a little bit. As we move around, we can see, we can really start
telling that story, as I said, and let's see if we can put it a little bit
further in. You know what? I think that's going
to look better around there, like so. Then what we'll do is we'll
bring in another palm. And this time, we'll
come round this side, and I'm wanting this palm probably to come around
here somewhere to hide that little bit of If I press tag actually, you
should be able to see now. I didn't actually bring
swimming pool in round here. So if I put this palm on here, now you can see that we
can actually have that one leaning over a little bit. Again, right up to here, leaning over, double tap the A. And there we go, you can see now it's telling a little
bit of a story. It's shading a little bit
of the swimming pool, and as we move around,
now you can see we've got some really
nice visuals on there. And the only thing I'm
wondering with this is, maybe, maybe I want to move
it up a little bit over here. And the reason is because I
want it a different angle. So now they're at
different angles. Definitely different.
You can see this palm is a little bit
different to this one. And now let's come around. Then what I want to do now is, I want to let's see
how big this one is, how big is this palm tree. This one's actually is
quite a small palm tree. So what I'm going to do is,
I'm going to make sure, first of all, that
it's in the ground, so on the ground plane, like so, and then pull it over and I want it a little bit
to the side of there. So it's slightly in the forest. But it's going to again hang
over here a little bit. So you can see it's
hanging over here, and people are
walking past there. We've got the vines
in there as well, and it looks intricate. It looks very very intricate, and that's another thing that
we're actually looking for. Now, the one thing about
this one is you can see that this palm is
all the way over there, it's up to you where the
delete it out the way, or whether you come in and
you just move it out the way. Completely up to
you, I think for me. It's probably easier
if I delete that one. I'm looking at this one now. And because they're palms, we have to take a
little bit more care on where we're actually
moving them now. You can see with this palm tree, for some reason, these
are actually doubled up. So what I'm going to
do is just go to mesh, clean up, and then
we're going to merge by distance,
and there we go. Let's see if that's actually fix the issue. And it
looks like it has. So what I'm going to
do now, I'm going to actually look at this
on my rendered view. So first of all, file,
save rendered view. Let's have a look because it
might have messed them up, as you can see, I think there's an issue with the normals. Yes, there is. You
can see they've got some bands
going across them. So what I'm going
to do is I'm going to come to this, press tab, A, shift and N, and see if
I can spin them all around. Double tap the A, and there we go, that's
fixed all those. Now, what I'm looking
for now is again, that storytelling, so I've
got it on rendered view. I can see now this is
all looking very nice. We can see that this one
needs bending the other way. So really, I want to press Art and then just move it so it's
bending this way instead. And now you can see
from this view now, we've got one going
that way and one going this way and one
in the background there. All right, so we've
got those two in. Now let's come around the back. And what I want to
do is I want to put a couple of palm trees
in this part because this part to me would have a lot of going
on there really. So what I'm going to do is let's have a look at this
palm tree here. So if I bring this one out, Let's put this one in. If I press control one. And what I want to do is I
want to bring it all the way down into the floor
and around here, like so, and then what
I'm going to do is I'm going to pull it
back into place. Double tap the A. And then we go now it's covering up
that entrance slightly. And there's a bit of a leaf. As you can see, going
down into here. And I don't really
want that. What I'm going to do is, I'm just
going to grab this. I'm going to come to that leaf, press L, delete vertices, and then delete vertices and just delete that out
the way. And there we go. Now, I think with these
palm trees actually, they're all pretty much
doubled up for some reason. So I'll actually fix
that in a minute. Though, it's no
problem to fix that. And what we'll do is now
we'll bring in another one. I think the other one should
hang a little bit over here. So let's see if we
can actually do that, so I've got this palm. Let's have a look at
this one. And that's stuck in the ground there. And if I bring it over here, can I actually fit it in there? That's what I'm looking
for. If I rotate it around, can I fit it going
over there and there? Double tap the eight,
have a look at that. And you can see now that looks really amazing how
it's sticking out of there hanging over these
walls and this bridge. And yeah, that's looking pretty nice. It's
just this part here. Let's see if this one's
doubled up as well. So I'll go to mesh, clean
up, merge by a distance, 1608 vertices removed, and then just press shift N and then spin them all around. And there we go, now, I
should be able to come in and delete these
with no problem, so delete vertices,
and there you go. So, for some reason,
they're all doubled up, and we'll go in and fix, like I said, every single
one of those in a minute. And now I've got those two in. I think I just need one more. So if I look over here, I'm just looking at this
one here, this part here. I think I'll come in and
delete that as well. So delete versus. There we go. And these are looking
around about the same size. So I'm wondering if I can make this one a little bit
taller or smaller. Let's press Sen's. Let's
make it a little bit taller. Double tap the A.
And there we go. Now you can see that
they're difference in size. And now I'm coming around to this side, and I've
got one in here, but I think I need
one more around here, covering this part here. So let's come in and
think, let's try this one. That one's kind
of a massive one. I don't think I want that one. I think I want a
kind of smaller one. Let's try this one.
Let's bring this one in, and let's also
bring this one in. And I think, yeah, we'll
we'll use this one here. What I'll do is I'll
go over the top. I'm going to press G,
and what I want to doing is just covering that
entrance a little bit. Then what I'm going
to do is press three, and I'm going to drop this
down into the ground. So right into my ground plane, as you can see, be
round about there. And then I just
want to make sure now that it's covering
this entrance, just a little bit, again, all about the storytelling. So if we put it around here, it's covering this entrance, let's press S and Z and make
it a little bit taller, just so it's going over
those parts, like so. Now you can see it's covering
that entrance slightly, maybe a little bit too
much so I'll just pull it this way a little
bit, and there we go. Now, I just want to make
sure that this part here is not going into there. So I'm going to press
A. I'll come to mesh, I'll clean up,
merge by distance. No vertices removed.
So that one's okay. And then what I'll do is I'll come and just make
sure this one, first of all, we
don't want there. So L delete vertices, get rid of that one
out of the way. And then this part here, just make sure that they're not actually, fully over this. So what I'm going to do is
have proportional it on. I'm going to press G then, and just pull it back a little bit. Same for this, I'm going to
press G and pull that up. So just pull it up and
over a little bit. And then now we can still
see this part here, and that's basically
what we want to do, and you can see that is looking very, very
nice as you can see. Okay, so now I want to
do is I want to go in, grab all my palms. I want to put it
onto object motor, so I can actually
see what I'm doing. So grab all of these
palms like so. Is that the molt? No,
there's one left there. And then what I want
to do is press tab. Who actually into
these? Go press tab. For some reason, I
can't grab them all. So I'll just grab these first. I'll go to mesh, and I'll go to clean up,
merge by distance, 4,507 vertices removed, shift N, and then spin them around. And I'm just making sure now that these are
going to look right. So if I put it onto this one, to make sure that these all look right now,
and I think they do. And yeah, that's
looking pretty good. Except we missed this
one here, I think, so A, mesh, clean up,
merge by distance. Yeah, there's no vertices
removed on that one anyway. And finally, finally, let's
go back to modeling now. And we've ended on a good
point. So here we are. This is what we've got, really, really coming to life
now, as you can see. And every single
part, as you can see, has got, you know, kind of
some palm trees in there. All of them telling a
little bit of a story. So I'm just wondering
whether I want to grab this one and pull
it back a little bit. So like here, and I think that just looks
much better there. And I'm just looking
around looking around, and yeah, I think
this is really, really nice now, really, really come together to you if you want to put a
few more trees in, but I think for me, this is about right with the
amount of trees. Okay, so let's put
it on object mode. Let's press sur file and save, and then we'll just
put these into palms because then it will
make it easier for us. So I'm just going to grab all of my trees. These two here. I'm going to press M, and then put it in a new collection, and we'll call them palms, like so, and then click. And then right click
Shade Smooth by angle. I'm just wondering
whether I need that on or right click and Shade
Smooth instead. I think actually look good. I don't think we
can really tell, so we can close that up
now. Double tap the eight. Save it out once more,
and there we go. And on the next lesson, then what we're gonna do is, we're going to start
on our terrain going around the building. So we'll start on
the smaller terrain, which is this one here
going around the building. And then from there,
what we'll do is, we'll actually
bring in a load of foliage going around
here and really, really start making this
into an actual jungle scene. All right, everyone,
so I hope you enjoyed that, and I'll
see on the next one. Thanks a lot. Bye bye. O
159. Sculpting the Terrain Platform in Blender: Welcome Moon Benf the Modular
and Kash environment guide, and this is where
we left it off. So first of all, then, let's grab all of our scene, so I'm going to box select with just on the
left mouse bond. Go over the top
then. And then what I want you to do now
is move it over. Now, first of all though
before we do that, I just need to make sure I
grab my bottom ere press tab. I just want to make
sure proportional editing is off, like so. And then what I can
do is now I can grab everything like so, and I want to put it
more into the center. So a little bit more
into the center. Now, the way I'm going to see if this is exactly centered, I'm going to bring
in now a plane. So if I press shift S, cursor to world origin, shift A, I can bring in a plane. I can make my plane then
a little bit bigger, and we're going to use this
plane anyway, so don't worry. And then what I can do
is I can press S and y now and bring it out into place. Now I can see how much distance
between here and here. So if I press S and x, I can bring that And now you can see I've
got to move that over. I can also see from the top and the bottom now which
distancer is there. Now I want to do is I want to come on over to the
right hand side, click this little down arrow and click on this little arrow. That means then that
I can turn this off, and it means that I cannot select this plane
no matter what do. Can select everything
else, just not the plane. And what now I can do is
press B, and grab everything. And now I can do is
I can move it over. So I can move it over, so it's
a lot more into position. You can see here and here, it needs moving a
little tiny bit over this way, holding
the shift born. And now you can see that's
about in the right place. From here, then what I can do is now I can turn this back on, come back to my plane. And now I want to
do is I want to actually create
the terrain that's going to be going around
my actual jungle scene. Now, first of all,
let's make it a little bit bigger because
if we make it bigger, then we've actually got
something to work with. We also, I think, round
about this kind of length, because what we're going
to do is when we come in, we'll actually be
using our terrain, so our terrain material, and a lot of this will actually
be hidden out of the way. Next of all, then
what we want to do is we want to press tab, and we want to press
D and pull it down. Now, the reason we're
making this terrain, even though it only
needs to be two D, in 23d is the fact that when you come and
use the sculpt tool, when you come to sorry, re apologize it, you won't be able to do that
if it's on a two D plane. So I'm going to I will show you that actually
in two places. So first of all, I'll
just press Controls just so you can see what I'm
actually talking about here. And what I'm going to do
is, I'm just going to press shift. Bring this over. And then I'm going to press P
selection, separate it off. Then I'll come back to this.
I'll grab the whole thing. I'm going to press E and
pull it down like so. And now you can
see one is two D, and one is three D.
So grab both of them. Press control A, all transforms right, clicks origin geometry. Now, let's come to
this one first. And all we're going
to do is we're going to go over to school mode. So come over to school mode. And what I want to do
is re apologize this. So at the moment, we've
got no apology on here. It's just a simple
plane with one polygon. However, if I press, You will see now that as I bring
this this way or this way, you can see that it's a really, really easy way to re
apologize something. So I I press left click now, you can see that
actually went off. I I press Control now
and press the tabbot, you can see now it actually
reapologized it for us. Again, we can do that
where we press R, and then we bring a little
bit smaller, let's say, left click, Control, and
then it re apologized it. However, the problem comes once we actually sculpt
something on it. So something sculpt here, let's press Control R, and there you go, you end up
with loads of broken mesh. We don't actually want this. So it's way way easier
to get rid of this, so we'll go to object mode, delete this out the way,
and then come to this one. We're just going to
do the same thing. Now, because it's three D, generally, the re apologize
option will come here. So if I press R, s go
back to scored mode. And then press r, and then you'll see it comes
actually here. So let's bring it down a little
bit, something like this. We don't actually
need it that high. Left click and then control r, and then we go, now you'll
see if I press tab. We've got all of this,
double tap the A, and then we go, This is now what we've got
to actually work on. This is what we actually want.
Now we're going to do is we're going to come on
over to our clay strips. Turn this down a little bit, and now we should be
able to sculpt on here, so you can see we can actually
sculpt on this landscape. Now, one problem you're
going to have is always with the when you come to sculpt things is that
you're going to end up. If you make it really
big, your brush, you will see that if
I sculpt on here now, it starts messing around underneath it, and
we don't want that. So what we want to
do is we want to come to where it says,
let's have a look. I think it's under brush. Here it is brush sings
and make sure face Front face only is on. Now when I come and
I draw over that, you'll see it doesn't
affect that bottom face, and that is exactly one. Just going to press controls are just to get
rid of that part. I'm going to also make sure that my brush front faces is on. And then what we're
going to do now is, we're just going to sculpt
a little bit on here. Now at the moment,
this is a little bit high on the strength. I'm just going to turn it
down to maybe n 0.2 is, something like that, and then
just sculpt around here. Now what we're looking for
here is around the corners. We want the jungle
and the terrain to come up a little
bit around there. So what I'm going to do
basically is come around. Like this. Now, a lot of this on the edges is going to be gotten rid of, so
don't worry about it. But you can see all I'm doing is basically sculpting on here. And on the stairs, I'm
going to hold control. And what that's doing is, it's
actually putting it under. So you can see here
it's putting it under. Like so. Now I'm just going to do is just sculpt on this bit. And all we're trying to
get here is a little bit of depth for our bushes
that are going to go here. So you can see a little bit of depth being added onto here, especially around
here, and you can see just a little bit
of depth like so. So we just want it even really going all the
way across here. Now, on this jungle
one, honestly, you don't even need to come in and smooth
it off or anything. You really don't
need to do that, but you will be able
to see that once a press Control are again
to re apologize it, it's actually fixed, and now
it's re aapolgize, again. If you press the tabon, now you can see all those
parts that I've got. Okay, so I'm going
to come around here. And on this bit here,
I'm just just coming in control click in to
develop this part here. And then on this part, I'm just working my way around
and making it on uneven. Now, there will be a
point when we come, and we actually add in a
little bit more on this. But for now, all I want you to do is come in and on these bits, just press control click, just to give them an entrance
or something like that. Because on these parts here, we're actually going to make it a little bit more muddy
worthy actually walk over. So I'm s bringing it around now. Shouldn't take you too long and just bring this
part up like so. Make sure you save often on this part because you don't
want any crashes happening, especially before
Ret apologizing. If you've got a a
low end machine, it's definitely going
to be affecting that. L so wherever the steps are coming out into
the jungle, like so. And then let's come
back round now, all the way back round to here, like so, and like so. All right, so far so good. Now what we want to do is I
want to actually come in, and we can try using
the clay instead. I'm going to make the
strength on here, you'll see when I bring this
clay in that I can actually bring this up a
little bit, like so. And then come over and just
planting a few parts in here. Just making it a little
bit more uneven. And then the same on this
part, you can see on here. I'll make this a little
bit uneven as well. So now we've got two lots
of roughness really. Same on here, I'll actually
bring this down a little bit, and especially on the trees. What I like to do
on the trees is, I always bring up the
terrain a little bit around wherever trees are because I think that would
be more natural. On this, I kind of
make a little bit of a bank, wherever
this is coming, and sometimes on the walls
as well, I'll lift it up, especially where the walls
directly into the jungle. It's definitely
going to be lifted up, not so much on these. Again, we've got a tree here, so I'll bring this up
a little bit, like so. And then on here,
we've got a walkway, so I'll actually develop that
out a little bit as well. And then I'm just working
my way over like so, making it uneven, like so. Okay, so that bit is near enough done now.
We can press control. And what they'll do is
they'll re apologize it because when you're
actually using brushes, you're actually
pulling out the mesh. So, for instance, if I just
show you the mesh now, if I press tab, you can
see this is the mesh. You can see it's still
got a little bit. The topology is not perfect. But now, if I come in and
I make my brush bigger, I just come in and just
really pull this out. You will see now if I press tab, you've got a load of
stretching on there. And that's why it's important. In fact, I'll show you an
easier way to show this. If I come in and grab this, you can see now all
of that stretching, how this topology
is not the same. If however, if I
press tab control, red apologize that,
now you can see it's actually reset that
all nice and need for us. Now, let's just
press Controls head and go back because I actually don't want this huge
part out there. I don't want anything like that. And then what we'll do then
is we'll save our our work, and on the next lesson is,
we're going to go over it. We're going to flatten
this part out, and then we're
going to cut it out because basically, if
you think about it, we've got all of
this all of this in here that will never be seen or used because we've
got our tiles in there, so we need to make sure that
we're getting rid of that. The other thing is as well, we've got the bottom of
here and the sides of here. Again, the sides, they're never
going to be seen or used. It's a complete
waste of topology, so we really don't want that. So I want to show you how we're going to cut
all of this out. And then we should be
able to texture that out, get all the rocks, mud
and terrain in there. And then from there, then we
can start building it out. I'll show you how we
do all that anyway, and I'll see on the next one, everyone. Thanks a lot. Bye bye.
160. Optimizing Terrain for Large Environments: Welcome back on to Blendf, the Modular Kitbah
Environment guide, and this is where we left off. Now, the one I want is, I want you to get out of the
habit of using the smooth. Now, it's very easy
to come in and press the shift board and
smooth it all off like this, but you lose a lot of
the detail on there. So first of all,
before doing anything, control, just read apologize it. And then what I want you
to use instead of smooth, especially on terrains, is I want you to start using
the flatting tool. So now if I come
in, I can come in. You'll see when I
flatting it off. It does have the
appearance of smoothing, but we still keep a lot of
those bumps and scrapes, and that is what we're
actually looking for. So what we want to use is
this instead because it gives a much more natural
appearance if we're just going over it with
a flatten tool, like so. So you can see now, even when
we come to the sides there, it's a lot more
neater than actually just smoothing everything
off and losing any kind of detail
that we actually had. So you can see here, these are the main lumps that
I've gone here now. What I like to do once I've done this is roughen it
up a little bit, and I'll show you how to
do that in just 1 second, but first of all, we'll go over and just flatten
these parts off. Like soap, and then on this bit. Make your brush a little
bit bigger if you want. Let's get rid of those. We
don't actually want those in. We can see now that it's
looking more like hills and troughs rather than just
lumpy bits on here. Also, the terrain,
the actual material is going to do a lot
of this work for us, as you'll see, but first of
all, let's just go on over. Like so, like so and so. And the reason I
made it uneven first is because when I
use the clay brush, you can see how it lifted some parts up and
kept some parts down. And now you can see
already this is really starting to look
nice, as you can see. And then what we want
to do now is finally, just come on with
our clay strips, and then make sure the
strength is pretty low, and all you want to do now
is just go over them again, very gently, like so. To uneven them a
little bit, like so. And again, our terrain materials is going to
do a lot of this work. I just tend to go
over them like so. Okay, nearly done. And if you've got done too much, just come in with the flat
tool again and go over those. So we don't end
up with too many, kind of lines down here. So now let's come
with our flan tool. Like so turn down the
strength a little bit, and now just one time
going over and just flan them down any that you
want a little bit more. Like so, especially
on these bits, flat them down. Like so. And now I'm just going to
break up that little bit. Wherever I've got,
these kind of edges in. I'm going to just break
them up a little bit. I going back to my clay strips, making my brush smaller, and then just going
over them like so, and just breaking them up, J on these bits. And again, then,
once I've done that, I'll be using my flantll, just on the bits, we've got,
you know, a few like this. Let me go. Okay. And
over these bits as well. Like so. And then press control, just to read apologize. And then we'll come to
our flantll once more. Make my brush a
little bit bigger. And now I should be able to
come over, Platt those out. And it should be a lot
better than where it was, as you can see now, just
don't flan them out too much. We can see we can
have some flat areas, but not out too
much. There we go. And there we go, and you will see as well that with the material
we're going to use, a lot of this will
be hidden away, especially when you've got
material over the top. All right, so that's
looking pretty nice. Now what we need to do is
finally just re apologize it, control because it will
make it easier for us. And now if we come to object
mode, press the tabon. This is what we
should be left with. Now at the moment, this
is way way too high to work with this topology, and we want to bring
it down a little bit. So what we want to do is
we want to, first of all, before doing that, though, we want to actually
bring in our terrain. Now, that means, in fact, you know what, we'll
actually come on over. We'll press control
A, or transform, set origin to geometry. And what I'm going
to do, first of all, is just bring down the topology. I think the we've got
two ways of doing it, basically, we can
generate a decimate. The problem is u with
the decimate it tends to Triangulate things. So if I
bring in the generate Decame, you will see them around
278,000 polygons. If I put this down to
let's say not 0.1, so if I put it down to not 0.1, you will see, takes a
little bit of time to work. You'll see now we've
still got all of this. It's brought it down to 45,000, but the moment I press
Control A and apply that, so Control A, you'll just have to wait a
minute for its ply, and then you press tab, you'll see now that's what it's done. And you can see it's made a
little bit of a mess of it. And what that means is when we come to actually texture this, it's going to make it much,
much harder to texture. So what I tend to do instead
of doing it that way. What I'll do is, I'll
just bring it back. So I'll bring back my decimate. I'll make sure now that the topology is
fine, which it is. So there we go. And
then what I'll do is I'll go back
over to scorp mode. I'll press Control R
to read apologize it, and then we go to re apologize. And then what I'll do is instead is I'll press the r button, and I'll bring this up. Like so. So I'll bring it up. So
now it's less topology. So if I put it on
there, press Control I've gone a little bit too
far, and there you go. You can see though
we've still kept most of those bumps
and things like this, and it's up to you,
depending on your machine, how far you want to
bring this back. I feel like I've gone a
little bit too far back, so I'm just going
to press Control Z. Bring it back to
where it was. I don't want to lose this detail. So what I want to
do is now press R, and we will go up to
maybe let's try this, Control R. And then we go we've kept a lot
of those bumps now, and that is what
I'm trying to do. And I think that actually
is about right for me. If I press the tab now, you can see that that's
what I've actually got. Okay, so the next thing
then we want to do is we want to come out of scorp mode and going into object mode. And then what I
want to do now is I want to cut away
all of these parts. So I'm going to cut away
the top and bottom first. A I'm going to do is I'm just going to press tab,
I'm going to press A, and I'm going to come to mesh, and we're going to
use the bicect tool, and we're going to bisect
down each of these sides. So if I bisect down here now, we should then able
to open up this. We should be able
to zero out the y, like so, and we should be
able to clear the outer. So if I clear the outer,
do not fill it in. And what you should end up
with is a big hole in there. That is what we're looking
for, something like this. Then what I want to do now is I want to go over the top again. I'm going to press A, and we're
going to bisect it again. So mesh, and we're
going to go to bisect, and we're going to bisect
it this way this time, like so, zero it out, and then change
over the clear in it and clear out,
and there we go. And then once more, we're going to bisect it now this way. So mesh bisect, let's
bisect this top part out. Again, we're going
to zero this out, so it looks like it's zeroed, clear this one, clear this one. And then A again, and
finally just one side left, so mesh bisect, and then
clear this part out. So make sure this is zeroed out, and then just swap these over. And then we go, what you should be left with is
something like this. Now we can come in
just to the boto, press L, elite, and vertices. And then we go, but
we're not done yet. We've got our terrain
all done now, but what about the
inside of here? You can see it's going
slightly over these parts. That's fine, but we want to
get rid of most of this. So what we're going to do is we're just going to
go over the top. We've got our cursor
right in the center, and we're going to
bring in a cube, so Shift A, bring in a cube, and I'm going to then press S, and I'm going to
bring it right out to nearly to the sides
of here as you can see, and then S and y and bring
it out to rounda here. And then what I'm going to do is just make sure it's
stuck in there. And you've guessed what
we're actually going to do. We're actually going
to boolean this. So control, all transform, set origin to geometry,
come back to this part, add modifier,
generate a Boolean, and the Boolean, of course,
is going to be my cube. And let's put it on fast. Let's press Control A, delete my cube out the way. And this now is what we
should be left with. If I go to this and
I press the tabon, we can see down here now, this is 70,000 polygons. Now we can still
do work on this, so we can still drop
this down a little bit, but I recommend
before doing that, what you want to do is
actually texture it. Now, lastly, what I'm going to do is, I'm going
to grab mine. I'm going to press
the ta button, A, and then I'm going to
press U and unwrap. Because it's flat, it should
unwrap absolutely fine. Now you'll see in my UV editing, this is how it's unwrapped. Now, with your system, it
might take a little bit longer to unwrap because
it's pretty dense this mesh. If that happens, just drop
down, so just come back. Come back to add modifier, generate, decimate, and bring
that down a little bit. So bring this down
to something like 15,000 and try it that way.
I don't need to do that. And what I'm gonna do now is I'm going to
save out my work. And on the next lesson now, we're actually going
to come in and actually start texturing this. Alright, everyone, so I hope you enjoyed that, and I'll
see you on the next one. Thanks a lot. Bye bye.
161. Vertex Painting the Terrain in Blender: Welcome back, everyone
to Blender for the modulate and Kash
environment guide, and this is where
we left it off. So we've got our
terrain here all done, and now what we need
to do is paint it up. Now, the first thing
I recommend you do is turning off these temple pots. So hide in the temple parts, hide in the torches,
hiding the temple floor, not the temple floor, sorry, the vines, the
plants, the ferns, and the palms, and we should just be left with
something like this. Now, what we want to do is
we want to paint this out. So what I'm first of all gonna do is go over to Masse Manager. And in your asset manager, under materials, so you've got one here that says materials. What I want you to do then is drag and drop this
terrain material. Now, if you don't have
the terrain material, what I want you to do is, I want you to go and
let me just have a look if this is
on all Astec parts. There we go, Astec
parts, under Materials. This one here. So what do we need to do is drag
and drop this material. I should go in there because we actually
did that earlier on. If not, though, go back
to your resource pack, grab the terrain
material and bring that then into
your actual scene. So bring it into the scene. And once there,
you should be able to either drag and
drop it onto there, let it load up, and there we go, or you should be
able to come over to the right hand side and then add it through this way instead. Now, you'll see that the
terrain has come in, already looking very nice. But what I want to do is I
want to do more with it. What I'm going to do
is go to modeling. I'm going to put this
onto shade of view. Now, for those of you with
power falls machines, you can actually do
this on rendered view as well if you want to. You can see that's where
we've got at the moment. And then what we're going
to do is we're going to put this onto vertex paint. Now, when you put
it on vertex paint, it will actually
disappear, as you can see. And the reason why this
has disappeared is because this paint
actually has a Alpha. So you can see if I come to this way and look up
rather than the floor, this as an actual Alpha, which is going to be
going around here. Now, I've done this, and created the lighting in here
at the moment like this, so we can actually see
where the Alpha is. So you can see this is
where the Alpha is. You can also see
that as a C ram, it drops off a little bit there. Now, what I'm going to do
is if I left click now, you'll see that nothing happens, but if I come up and I
press x and then go in, you'll see now I
can actually draw on my mesh up to
a certain point. So here is the Alpha. I
press X though again. You'll see if I draw on it, I can actually minus it away. Whatever I draw with the black, will turn to mud, and the other
part of it will be Alpha. Now, how does this magic work? Let's go over to our
shading panel first, and let me just show you
what we've actually got. If I coming over
here, go to object, zoom out a little bit.
Here is the magic. So what you've got here is
you've basically got moss, you've got light soil, and you've got dark
soil over here, and all of these are
basically plugged into each other and using the RGB colors, so red, blue, and green, we can actually then decide where on the mesh the actual
texture is going to go. So it's extremely simple
but extremely effective. Now, we have tried to add
in more vertex colors, so more than you know, three, and it's pretty hard to
get more than three out of it and actually
doesn't work out so well. So I'm just showing you here how you can
do it with three. If you want to have a go at
doing it more with that, and you actually come up with
a decent system to do that, let me know because I
would really like to know. So you can see here we've got these three, so one,
two, and three, and we've also managed
then to put in our Alpha, which is this one here. So we've got an Alpha
in there as well. So I have a look around this.
You can see how it works. You can also change how the mass or how the soil actually looks. What we're going to do now
is go back to modeling now, and then we're going to
actually paint this up. So I'm going to press tab,
and what I'm going to do now is come in
and paint this up. So I'll go back to
vertex painting. And then what I'll
do is I'll come around and I tend to
just change these over, so x, change them over. I tend to first of all, just put it all all of this. Onto mud, because
then it gives me a good idea of where
everything is, so onto mud like so. And then what I'll do
is I'll keep the mud. So this mud, as you can see, around where these are.
Where my steps are. Then what I'll do
is I'll make my brush a little bit smaller, and then I'll come
into my first color, which should be if I put
this all the way up then, so put it all the way up, like so, and then let's
put it on the red. You'll see that you
can actually draw in now some of the moss like so. I've got some moss here. So what I tend to do now, We've got the moss in.
Let's try the green. So if you come to the green, you'll see now we've
got some darken mud. So what I tend to
do is I'm mixing moss in then with
the actual mud. So the mud is going to be in
little spots around here. So what I'm going
to do now is I'm going to bring the
moss in, first of all, I'm going to leave
these parts here, actually this part here, so you can see here, this
part I've drawn out. These parts here should be the actual soil,
this light soil. So for zooming, you
can see we've got this light soil here, like so. Now, this should also be set up. So the Unwrap should be set
up to be the right scale. These should be the right scale. Because on the UV map, you're not going to
be able to come out. So if I grab all of
this, so if a press tab, you know mail to make
this bigger than the UV map because then
you'll have overlapping. So we can't do it. We've done with the wood and other things. But what we can do is we can
go to the shading panel. Let's just put this on renoviw. And we can come to
let's say the moss. So we've got some moss
here, as you can see, and what we can do with the moss is we can come down
and change the scale. So you can see here,
this is a scale. So if you change these two, just grab both of those, put them on eight, and you'll see now that
they get much smaller. So it's up to you the
scale that you want it. I think how we have it, is pretty much perfect
for what we need. Now, what I'm going to do
now is go back to modeling. And I know that's been a
bit of a long explanation, but I think it's important that we understand how
everything works. And then what I'm going to do is come back to vertex paint, and then I'm going
to put this onto the black and then just come in, and this is going to be
where my entrance is. So I do want to make sure that that is done properly, like so. Then what I'm going to do now is I'm going to put it onto, I think it was on green, so let's put it onto
green. Like so. The best way to do
this, by the way, if you put it onto
RGB, you can see here, you've got it one on
green, set this to zero, and then you've
got it pure green and it should go
over really nicely. Now I'm going to do is I'm
just going to draw on here. You can see I've got
mud coming from here. The entrance is going to be coming down here
somewhere like so. You can see now. I
draw those on there, this will be where the
actual entrance comes from. Now, I don't want it
actually on that, so I'm just going to try red. I'm going to minus both
of these off to zero. And then what I'm
going to do is see if that's the moss, and yes, it is. All I'm going to do
now is draw the moss in coming in from here. And just to test it, just
click on your temple parts, and then you'll be able to see exactly where
that's coming from. So now I can see that can add a little bit of moss
on here, like so. And now I'm going
to do this space. I'm going to make my brush
a little bit bigger, and then I'm just going to
draw in some moss like so. And again, round here, we definitely want
to have some moss. And then over here, we definitely don't want
to go over this bit, so you can see them
leaving a gap over there, going to draw it
round. T here, here. And if you make a mistake, of course, You can go back
and fix that quite easily. So then we've got this. And now we'll bring in our dark mud, which may be on the
green, I think, let's just see if that's on
the green. So zero this out. Go over there and there we
go, that's the dark mud. Now I'm going to do
is I'm just going to go in between these now, like so. In between these. There we go. There
we go up to here. You can see these little rocks. This is the easiest way
to actually do this. So little rocks, especially maybe up here where we've got those little bumps
and things like this. Let's bring it here so and
then just work our way around. And there we go. All right. Now what I
want to show you is, you can actually come in and
mix these together as well. So what we can do is you can
see we can average it out. Now, if we go over there, you can see everything
can get averaged out. Now what you want to do is
you don't want to actually do it like that because you don't want to smooth
them out too much. So there's also the other
one which is Smear. And SMR basically is just going to smear them over each other, and I feel that this one
works a little bit better. It kind of averages
everything out, but while keeping the detail that you want in there, like so. So you can see now, can
average some of these out, like so, we can average
these out a little bit. So if we pull it from
where this part is, so you can see where the
actual sandy bit is, we can actually
bring it down there. Okay, let's bring this out. Let's bring this
into place there, and then work our way around. And remember, a lot of this is going to be
covered up anyway. So just remember
that. I'm going to bring this out now,
bring it over. So M that path
there. There we go. And the other one we've
got is, of course, blur, which is this one here. And if you blur it, you'll see that it just drops
it back in a bit. So up to you if you
want to blur it a bit, I don't really use
that one that much. I'm quite happy with it
looking like this, actually. Now, finally, on the
next lesson then, what we're gonna do
is, we're just going to get rid of this hard edge. We definitely don't
want that on there. And then after that, we should be ready then to bring in our terrain
just on this part. Alright, so let's
save out our work. We'll save it out, and I'll see you on the
next one, everyone. I hope you're really
enjoying the course so far. And I hope you can really see your own project now really
starting to come together. Thanks a lot. Bye bye.
162. Weight Painting Plants onto the Platform: Welcome back everyone. Plan for the modular and Kit
bash environment guide, and this is where we left off. Now I want to do is I
want to press the x one. I think is the x actually. Nope, not the x's press X again. So x, see if it's the black. Nope not that one, so which one. Let's find which one it is. What I basically want is probably gonna be
the blue actually. So let's minus this 20. Let's try the blue. And
we've got it on blur. That might explain something. So let's try that again. So we'll put this onto black.
No, it's not that one. Let's press the x one, put
it on white. There we go. That's the one that
I want. Now I want to do is I want to
go round the sides. So I want to come to the sides and just break off
these little parts. Now, you can see, my brush
is way way too big here. So first of all all I tend to do is make my brush really small. And then what I'll do
is I'll come round the sides. Like so. Remember that to this part here. So it probably wants
coming out a little bit, as you can see, but you can see what I'm
actually doing here is. I'm actually minusing
off some of that and making it very
uneven because then it's going to blend in much bear to my terrain that I'm going to put round
the outside of here. I'm going to round this off. I'm going to bring
this into here. So make this ale bit
smaller on this part. So. So Like so, and that's that bit done, and then let's just
round off this bit. Like so, and then
we'll come into this corner and just
make it a little bit by that might have gone a little bit too far, so what I'll do is I'll
just go back a little bit. There we go. We can also press the control key
and bring it back as well. So if you make a mistake, just press control,
bring it back. Should be to near enough
where you had it before. And then we go, All right,
something like this. And now if I go underneath, you can see that we
can see through there. And that is looking,
very, very nice. If I now broader plane in, and in fact, we will do that. We'll go to object mode now. And then we go. That's
what we're left with. If I put it on Shader mode, maybe we can see this
a little bit easier, actually, so let's put
it on Shader mode. And then you go, now,
you can see that we've got all of
that Alpha in there, and that is looking very, very nice, as you can see. Okay, so now I want to do
this. I want to come to this. I want to press Control
A, all transforms, right click set
origin to geometry. And now it's actually
time to bring in our jungle geometry node. But before doing that,
what I want to do is I want to actually clean
up the actual space, so I'm just going to come in, and I'm going to rename this
to let's call it terrain, and we'll call it in like so. And then what I'll also do is
I'll also call it terrain. And inner like so.
And there we go. Now, I've done that
to make sure then I know which is the inner
rain and the outer rain. Now, from here, I'm going to
actually save out my work. I'm going to then come up and down to where it says, cleanup. And what I want to do is now
I want to clean up my scene. So I've got all of these
things in my scene. I want to clean them up.
So what I'm want to do is click on Unused data blocks. Clean that up. And going to come down then recursive saved. And you can see all of
these things that we've actually got in here that
are not actually cleaned up. I'm just going to head on
down all the next four, clean them all up and
then click File, Save. And also, I'm going
to automatically pack my resources now because I've got to
a certain stage, where I really want to
make sure that I'm saving out my resources in my
actual blend of file. In other words, if I send
this through to someone else, then they will open it, and everything will be
packed in there. Now, again, bearing in mind, once you do that, it really is going to increase
the actual memory, up to you if you do this
at this stage or not, But for me, I think
this would be around the sort of stage
that would do that. I'm just going to click this on. And then it says, no new
files have been packed. Now let's click pack and saved. And now just make
sure that that is on, so it's automatically packed. So we've cleaned up everything, we've cleaned up all this side
because we're moving on to the next stage now where we're
bringing in that foliage. So to bring that foliage in, what I want to do now is head on over to my resource pack. I'm going head over to my
resource pack and bring that straight in then into this scene. So
let's do that now. Here we are in our
resource pack, and you might notice
that my resource pack now looks a little bit different
from what he did before. And that is because I've just replaced this actual
jungle geometry node, because it actually wasn't
working in the original one. It wasn't working properly, so I just made sure it's
working properly for you now. So what we want to do
is we want to control, see this, so we just
want to copy it, and then moving over back to our geometry node or
back to our core scene. So here we are back
in our cocine, and what I want to do
then is just press Control V and bring this in. And there we go. There
is our geometry now. Now, this now should
be working correctly. So all I want to do
is just move this over here a little bit like so. Now, the thing is I don't
actually need this part here. I don't need it. What I do need, however, are all of
these little parts here. So you can see it's
broken down into ferns, into plants, and into moss. So let's actually see
how we actually do this. So what I'm going to do is
I'm going to come over here, first of all, So now what we're going to do is
we're actually going to put this onto here. So first of all, I'm just going
to put it on shader mode, just so I can actually load everything a little bit faster once all the shaders
have loaded up. And then what I'm going
to do is I'm going to grab this one and
grab this one here. I'm going to press control, and I'm going to copy
modifiers onto here. Now, nothing will happen
on this one at the moment. And the reason is because
we've not set any of this up. So any of this weight painting
up or anything like that. This stage, because
we've done all that, we can actually delete
this out of the way. And then what we've got is, if you can see over here, we've got all of these
new collections on here. All I need to do is
just close these up, like so. We are
going to need them. And the thing is, I
want to put these in a different collection once I've actually done
what I'm going to do. So first of all, bring in your guy And what we'll
do with this guy is, we'll put him around here so
we can see what we're doing. The next thing we want to do is click on your actual
terrain again, coming over to the
right hand side, and just make sure this
will be blank for you. Just make sure this is
blank like mine is now. And what we're
going to do then is we're going to tell
Blender where to put all of these plants or where to put this
guogen exactly. And the way we're
going to do that is through using weight pain. So what we to do is
click the plus born. I'm going to make a new group, and I'll call it Jungle. Terrain. Like so.
And then from there, what I'm going to do now is
I'm going to come on over to object modes and put
it onto weight paint. And then what I'm going
to do is I'm just going to come in left click and just hold it down where you actually want to weight
paint this terrain. Now, don't worry. This
is just so we get a good idea of how
it's going to look. You can even wait
paint over there, but we don't want to
weight paint over there. That's for sure. So
just put it around your guy up to the
edges of here, something like this,
just fairly roughly. Alright, now what
we've done that, we can tell Blender that this red part is where the
plants are going to go. And anything in the blue part, there's going to be
no plants there. Because wait painting
works basically whatever's red is where
something's going to go, or how an armature
is going to move, for instance, or where some trees are going to go
with a particle system. You can use it in many,
many different ways. But for this occasion, we're actually telling
Blender that in the red, we want plants, and in the blue, we want no plants, and in the other parts, we
want a few plants. That's basically what
we do. Let's come over now and put it
back on object mode. And now if I come back over to my actual Jungle geometry node, I should be able to click on this and then click in it again. And then what I'm going to do instead is that I'm going to come down to where it
says Jungle terrain. Now, the moment I bring
in Jungle terrain, you'll see now that
we've actually got some of these jungle
terrains actually in. Now at this stage, we really
want to come on down. Actually turn the
scales down of things. So what I tend to do on this
is I'll come first of all. So we can see that
we've got these ferns, we've got our moss, we've
got our stems in there. We've got our leaves in there, and we've got our
exotic leaves in there. You can see as well that
the moss is this on here, the leaves these on here, the stems are these here,
and this is the fern. Now, we want to work
on this a little bit over a time to make
sure that we get it right. So what I'm going to
do, first of all, is I'm going to come
down where it says fern, and what I'm going to do is, I'm going to turn the scale to zero. So turn the scales of
the ferns down zero, turn the scale of the moss
down to zero, like so. Turn the scale of the
stems down to zero, and then turns where is it the scale of these
exostic leaves down zero? And finally, these ones
here down to zero. And we should end up with
something like this, which is basically nothing. And the only reason why we can still see
something, by the way, because we've
actually got this set on scale randness zero. So all I'm Also going to
do is set these to zero. Set these to zero. Set scale randness
on these to zero. And then what I'm
going to do is set the scale randness
to zero, like so. Alright, so we've still
got a few leaves in there. Don't actually know where
they're coming from. There we go. That.
There we go. All gone. Okay, so now we're going to do is let's work on this
one part at a time. And I think on the next lesson, we'll actually start doing that. All right, everyone. So
hope you enjoyed that, and I'll see on the
next one. Thanks a lot. Bye bye. No.
163. Continuing Plant Placement in the Aztec Scene: No. Welcome back, everyone to Blend
for the modular and Kash environment guide, and this is where
we left it off. So now what I want to do is we actually want to come in and actually fix up this terrain and make it look
very, very nice. So what I'm going to do is I put on my weight paint,
as you can see. What I want to do
before actually weight paint and anything else, I want to make sure that
this is looking pretty good. Now if I come in and
put my moss to one, so let's do that first. You will see that
that is our moss. It's looking way way
to over the top. So what I want to do is I
want to drop that right down. So first of all, let's put
this on something like 200. Let's bring that right down, and now you can see that's
looking much, much better. Let's even bring it
down even further. I think actually, as
well with this moss, it's maybe maybe a little
bit too high as well. So what I'm going to
do is put this on not 0.6 and drop it down even more, and then at least we can see some of our terrain in there, which we couldn't
actually see before. Then what I want to do then
is, I'm happy with that. Let's come and
randomize the size. So at the moment, we've got
scale randomness on our moss. Let's put it at 0.3, like so, and let's drop
this down to No 0.4. And there we go, now, that's
looking much, much better. And I think the amount of
viewport should be 100. Let's try that. Maybe that's
a little bit too less. So let's try 150.
Let's try that. And there we go. All right. That's looking
pretty nice for now. Again, we can come
in and change these, but let's also put the render
density on 150 as well. Because the thing
is the viewport for me and the render density, I don't really want that change actually, I think
I' happy with that. I might turn it up
as I move along. Next of all, then let's
come to our fern. So we'll set the firm to one, and there we go,
that's our fern. We obviously don't
want them that much, so let's put it on
something like three. Then drop them back. Let's
put this on three as well. Let's set them back even
smaller so the moment. They're about the right height, they're just way way too
thick, as you can see on here. Let's set them back. In fact, what we'll
do, first of all, we'll set up the randomness
to not 0.5. Let's try that. Then we'll set the
scale down to 0.6. There we go that looks a lot more and even now
as you can see, that's pretty nice, and
let's set this down to one. There we go now that's starting to come to
where I want it. Let's set it down even less. What I'm going to do is
I'm going to drop it down, drop it down, drop it down. To maybe not 0.7 like so. Maybe that's a
little bit too less. We'll see once we get
the other things in. Let's put it on rendered view so we have a good view of this now. And there we go. I'm thinking that's looking
pretty nice at the moment, let's put it on 0.7
on the actual view. And then what we'll do now is, we've got a moss in,
we've got these parts in. Let's come then to
the actual stems. And what we're going to do is
just put the stems on one. And you'll see now all of
your stems are up to here. Now, the problem is with
the stems, of course, is that they need
something on them so we can see actually
what's in them. So what I'm going to do is
I'm just gonna scroll down. And I'm going to
put my leaf on one. Let's bring in some leaves, and then let's scale
these down to, let's say not 0.2. Let's scale those down, and now you can see that's how
they're going to work. And now you're going to have a good idea of how these
are going to work. Let's turn the scale
up of the leaves, let's put that on one, and let's put it on not 0.1
again, let's try that. So as I bring these up, it's scaling up
these bottom parts of these leaves as you can see. So we want those to be a bit
smaller than the top leaves, and we also want to
drop these stems down now into place and give
us that jungle feel. And now you can see that
is looking quite good. The only thing I
would say is that these leaves maybe want to
be a little bit bigger. So these top leaves that is. And now you can
see why we didn't want all of that
foliage in there, and now now we can see
through certain parts of it. Now the thing is
about these leaves, I think they're still
a little bit too much or the fact I've gone a little bit
too far over here. But I think generally this is actually looking quite nice now. With that then, we can
actually now see if I can put these in a different collection. What I'm going to
do is I'm going to grab all these. I'm
going to right click. I'm going to make
a new collection. New collection. Let's calm down. Where's that actual
collection gone? I actually make a new one? No even sure if I've
made a new one. Let's write click
new collection. Let's see. There
we are collection. And we'll call this. What
should we call this? We'll call this in
Jungle terrain in. So Jungle terrain leaves. We'll call it that. And then
we know exactly what it is. And then what I can do is
and grab all of these, and I can drop them into there. And I've done it that
way just to make sure that now everything's
nice and neat, but also we don't lose, you know, this collection
or anything like that. Now, finally, what
we didn't do is We need to scale these up a little bit to
make them random. So what I'm going to do is
I'm going to put this on not 0.1, and there we go. And then I'm going to
put scale randomness on here on not 0.1 as well. And I'm also so the stems, we're also going to put on 0.2. And there we go now
that everything is pretty much randomized. I'm also going to drop back the scale of the stems down to, let's say, not 0.5, just drop them back
in a little bit. And there we go, now that's looking the way that
I actually wanted it. Okay, so now what
I want to do is, I want to come in and I want to actually make sure that I've got enough jungle around here. So all I'm going to do now is, I'm going to put this
on onto weight paint. So let's create on weight pain. Before we do that, let's
save out our file, so file and save. And then we'll go to now
object and weight paint. And you should now be able
to actually draw this on. In real time, as you can see. Now the thing is, I can't really see what I'm
actually drawing on, so I'm just going to turn off these two interlocking links. Make my brush a
little bit smaller, and then I should be able to now paint on where we
actually want them. So we'll have some
gaps in there. You can control, click as well, and minus them off
if you wanted to. And then all we want
to do is just paint around these parts that
we've actually created, like so, especially around
these. Now, don't paint them. Too thick. Leave above gap. You only want certain places where they're going
to be thicker because jungle is not completely
covered with just jungle. That's why we've got our
terrain in there as well. So you can see Mjs
painting on some of them, and that's another reason why I like to see what I'm doing
as I'm actually doing it. And then just take your
time and paint around it. Now, on these parts
here as you can see, we want actual walkway on there. So I want to paint it
going around here, want to take off this one. There we go. And I want to
paint it going round here. So. And you can see all of
that work is now done for you, and it looks very nice, very, very professionally done, and that is what
we're looking for. But we want to leave
a few gaps on here. Again, don't paint everything. You don't just want to load
of paint over everything. You want to actually take
your time a little bit. And if you do that, you'll see that you'll get some really, really amazing results that's
bring it to here like so. Once you get a bit
more familiar with it, you can actually come in and paint a little bit
on these parts here. Bring it in a little bit like this wherever the soil is over, like this part here and
like this part on here. Just remember that
you will have some of the building in here. You can always test that
by bringing it back. So if you bring it back in, you can see now look where
the grass has grown over. That's why I've put that there. If your computer enables it, then you can actually
draw on with the extra building in place. I'm going to turn my
building off though because even thug I've
got a higher end machine. Still, it's a little bit harder to paint with the
building there, so I'm just going to
drop these in here. So, and then I've
got a walkway here. So I definitely don't want to paint on there, go to
drop one in there. One in here because
they're going to be walking into
the jungle there. All right, let's
bring it in on here. Bring it in on
there and on there. And we want it to look as though the jungles trying to
take it over again, whatever they've
developed around here. That's basically what
we're looking for. So. And then on this bit We'll do it like this where
it's coming out here, and then on this, like so. And I think I'll get
rid of that one. There we go, and you
can see, as well. Doesn't actually take that lot. What I tend to do is well Ms keep clicking it rather
than clicking and dragging because then you're going to get these
kind of empty spaces, which, you know, it looks
a lot more realistic. Then if it's not, you can draw
on some of it, of course, just leave empty spaces, though we don't want
lines in there. And you can obviously go back
over as well in the end, and just press Control click. Now, let's do this
per year, like so. You can see, as well as
you get further on in, because there's
more actual plants being there, the
heavier it will be. And you can actually
feel that as you're actually
drawing these on. There we go, that's
looking good now. Got a tree in there and things. Let's put these in. A these bts here, wherever the soil is. And then I'm just going to go
now down here and then fill this rest in as it
getting a little bit heavier on my machine. The good thing is about this geometry nodes
as well is that you can actually hide them out the way when you're
not using them, so they do end up rendered. They're just not
going to be there. Now, we've got stems. I'm just looking now if I'm
happy with all of these. You see the moss on there, got thing coming through there. Trying to draw on
there, actually, S. There we are. All right. That might be
a little bit too much. Okay, so I think this is looking about right,
about we wanted. We can see our guy in there
walking through there. That is looking very, very nice. Now, what I'm going
to do is I'm going to actually go to
object mode now. I'm going to save my file out, first of all for
do anything else. I'm going to then go to
object mode, like I said. And then what I'm going
to do with these is, I'm actually going
to turn this on, so I can see I've grabbed them. I'm going to drop
them underneath now. So I'm going to put them
underneath the actual scene. And then what I can do
is I should be able to come down now and hide
these out the way, and especially hide them when
we actually render them, because then what that
means is when I come, to just looking to make
sure everything's right. When I come to actually
render this out, I don't want to be rendering
those things out down there. So I've hidden them out the way. Now I want to do is, I'm going
to bring back everything, so I'm going to
save it out again. And then we're going
to have a quick look on what everything's
looking like. So let's bring back the torches. Let's bring back the vines, the plants, the
trees, the palms. And the one thing
we don't want to bring back is our little guy. In fact, we'll leave
our little guy in. Let's have a look, then what everything's
going to look like. So what I'm going to do
is then set it on render. And let's see what it looks
like when it all loads up. And then we go, now you
can see water scene. Water seen that looks like. That looks very, very
nice, as you can see. So yeah, I'm really happy
with how that looks. The one thing is, I would
say that these plants here, that might need desaturating, they might be a little
bit too bright, in contrast to here
in other words, they might need to
be made a little bit greener because all
the vines and things, the kind of this rich
type of green and these kits seem to be
more of a stylized green. But we can look at
that another time, but as you can see for now, this is looking very, very
nice, as you can see. Now, one thing before we
finish that I'm going to do, is I'm just going
to come up and show you that you can hide these out the way with
this little bun, so I can hide those out the way. And then what I want to do is now I want to come to these, and I'm just going
to set this on. So I'm going to come
to my charcoal. And what I'm going to
do is put this back on 20. And light those up. And then what I'm
also going to do, you can see on the tortures, I'm actually going to
bring those tortures back, and there we go. And finally, then
I'm going to come on and change this
to the night scene. So put it on night
scene because I want to have a quick look at what
this is going to look like. Let's bring in these parts now because basically
when I design this, I actually designed it for
an actual night scene. Let's bring those back, double tap the A, and there we go. That's exactly what
I'm looking for. So once we've got our moon
and things like that, you can really see
but turn this off, how it's all going to be lit up. So you can see already, it's looking very nice. Alright, everyone. So on
the next lesson, then, what we can start doing then is bringing in the
other terrain. So the jungle terrain that's going to be around this terrain. And from there, then we
can get our sky dome in, and then we can get our
lighting in. Okay, everyone. I hope you enjoyed that, and I'll see on the next
one, and for me, I'm actually just going to set this back to my object mode, so I can actually work
with it properly. Turn on these two lock in links. Save, save everything out of
the way, and there we go. Alright, everyone. So I
hope you enjoyed that. I'll see on the next one.
Thanks a lot. Bye bye.
164. Camera Setup and Large Scale Landscape Design: Welcome back everyone
to blend for the module and Kitah
environment guide, and this where we left off. Now, I have noticed that these have kind of gone out of the place where I
actually need them. No idea how that actually happened, I wouldn't
be able to tell you. But, first of all,
what I'm going to do is, I'm just
going to come in, come over to my modifier, and I'm just going to
turn these off then. So I have a better view, and it makes it a
little bit easier, you know, on my system. I'm also as well
going to come in, and what I'll do is
I'll come to the trees, so we can see where
we've got palms. Let's also turn
those off as well, and we'll turn the vines off, which will really
reduce everything. And finally, then
we've got the ferns. And the plants, Let's
turn all of those off, make it really easy
for ourselves. Then what we've got now is
the jungle terrain leaves, which ones are these, se
a look what they are. Oh, yes, they are all
the things that we need for the gomagenode,
so we can leave those off. Now, let's have a look at these. Why are they going over there? I think it's because
for whatever reason, we've actually got attached
here, as you can see. I think that is the light. Let's have a look. Yes,
there is the light. Let's see if I grab
this and press lt P, what I want to do is clear, let's just try clear parent. And now let's see if
I move those back, Oh, that's what happened. Okay. So, these were hidden when we actually moved
all of this over here. So that's exactly what happened. When I moved this all over
here, everything got moved. So what I'm going to do instead, is all I'm going to do is drag these over and let
me see where this one is. So if I press dot,
zoom into this one, and there we go, I can put this one. Whoops, not like that. Let's go back. So
Control shift said, Let's put this one into place like so, and
let's make this. So this here a little
bit smaller. Like so. Let's see. If I can make
this a little bit smaller. We can also come on over and reduce the radius in this way as well. We
can do it that way. So what I want to do
is just grab both of these and just make
sure they're in place. Then what I'll do is I'll
come to the next one, which is going to
be the top of here. So if I move this now, I should be able to put
this in the top of here. It will have moved a
little bit that way, of course. Like the other one. So let's grab that, put that
one in the top of there, and finally, then
we've got this one. And I'm just wondering about this one. This
one's over here. I've also got
another one missing, which is probably going to be stuck in the wall
here round here. So I'll actually try
and find that as well. So what I'm going to do
is just move this over, not into here, sorry,
into this point here. So if I press dot, should then be able
to bring this down. Put this one in place. And I do need to find the
one because the thing is, if I don't find it, it
means that I might light up somewhere where I actually
don't want to be lit up. So I'm just going to put
this in place like so. And then I will be going round them and see if if
I can fix them. Here it is. So this is the
one that I actually wanted. So I'm going to do is just
hide this out the way, hide this, hide this, hide this, and then I should
be able to grab this and the actual top of it, and let's put this in place. And then, of course, we'll
bring everything back. So I'm just going
to press three, just going to side view. Then I'm going to
press G. Sorry, q3g, going to put it over there, and then finally where
is the part here it is, let's finally put this
over there and into place. Now, I just want to
test it and see what it looks like, double tap the A. What I'm looking
for when this loads up is just making sure that the light source looks actually good. It
looks good there. It looks good around this
one here, as you can see. It's enough light
source going around there because this
radius actually, so this radius, as you can see, if I increase this,
let's say to two, that then we hopefully increase
the radius of the light. The thing is as the radius increases because
it gets bigger, the power of the light
actually gets less, so then you might
have to come in and turn up this light as well. But I'm happy with
that one there. I'm happy with this one there, and finally, I've got one more. We're to put that
one around here. There we are. I've got one more round here that I'm also
pretty happy with, as well. We can see we've got one here as well. So it's a good job. I to check that. Don't know
what that one is there. I don't know if I
put one in there. Is there another one
where I should have one? Let's have a look,
first of all, and see. So if we click on
and off torches, what we should be
able to do is we should be able to
click on parts, so let's click off our parts. And here we are.
It's this one here. So now I can see where
this one's going to go. What I'm going to do
is I'm going to grab my light, I'm going
to grab this. I'm going to press seven
to go over the top, and I can see that it
needs to be in here. Now, once I've
brought this up then, I should be able to see that
it's only this one missing. And I know this
lesson was a bit of a firefighting lesson where
we're just fixing things, but I think it's important if
we do come across mistakes, we should actually fix them. So now, let's have a
look. There we go. It's that one in
there. Let's make sure that one looks
good as well. Put it on our render. Double
tap the A. I'm just making sure that this black line in here isn't
visible, which it is. So obviously, I need
to bring this down, so I'm going to
come to this one. I'm going to come
over to my modifier. And then what I'm
going to do is drop down the height,
let's say to two. Make sure that disappears, and there we go. All right. So that's looking good now. Okay, so everything's
looking good on there. Now what I want to
do is I want to put this back on object mode. I want to also turn
off my tortures. Now I know they're fixed. I
want to save everything out. And what I want to do now is
bring in the other terrain. Now, the other terrain then
is basically the jungle. So we need to
decide how far it's going to come over
to this point, how far out, what sort?
Shape it's going to be. So let's first of
all press shift d, and we'll bring in a plane. And then with this
plane, what I'm going to do is pull
it out of the Sp, just pull it out a
few times like so. What I'm looking
for when I look at this is I'm looking
from this angle here. So if I've got an angle here, I want this tree line to be kind of up in the
air and trees on there, and then a moon shot through
there, things like this. So when I'm looking for
something like this, I'm looking for, what is
the shot that I want? And the shot here would be, Okay, it's going to be here, so the mountain ranges, if I'm looking from, let's
say here, will be up to here, and then the moon will be shining around here, and
that is what I want. So now I've got that.
What I'm going to do is I'm going to set up a camera
and put that right here, and then I can keep coming
back to that and giving it a test when I've got
the treason as well. So what I'm going to do is
I'm going to press Shift A, and we're going to
bring in a camera. So where is it Shift A,
let's bring in a camera. And that's what we
need to do now. We can either press zero and go to the camera shot,
but I don't want to do that. So what I want to do instead is press control lt and zero. And what that will do is
it will set my camera in the position that I'm in right now, and
that's what we want. From there, what I
recommend you do is you zoom in just with
the scroll wheel, just zoom in till we've got this around this point on the
outside, as you can see. And then what I want you
to do is just press n and open up this n panel over here. And on there, you've
got one that says view, and on there, you've
got camera two view. What that means is
once I tick this on. Wherever I move now, it's locked the
actual camera, too. Let's say if I'm putting
my camera view to here, and I've got a moon that's
going to be over here. Now I can actually see, if
let's have some mountain, some hills over here, is this going far out far enough
and things like that? Now, if I turn this
off and move around, you can see my
camera set up there. Whenever I want to go
back then to my camera, I can just press
the zero button, and that then will take me
straight back to there. Now, a few more lessons in. I will actually go through a complete tutorial on camera and turntables because I
think that's important. But for now, let's just
leave it like this. Okay, so what I'm going to do now is I want to
come to this part, and the first thing I want to do is reset all the
transformations. So let's reset all
the transformations. And then what I want to do is, I want to now subdivide this. Now, there's a couple
of ways to subdivide. We can actually go in
and subdivide like, so we can actually see that then on the
wireframe subdivided. Now, if I come in and go to generate and bring
in a subdivision, you will see that we
can actually see those. I can't actually see that. Instead of look
if I can actually put on something that's
going to show me. I I come up and
subdivide it again, you can see I can't actually see that wire frame in there, and that's something that
I actually want to see. I'm just wondering if
I can see it on here. No, I can't I can't
see on there. So what I'm going
to do instead is, I'm just going to turn this
off and we'll redo that again just so you can
see what I'm actually. So what I'm going to do is
I'm going to add modifier. Generate, and let's bring
in a subdivision surface. Now at the moment, this
will all be rounded off. And the reason is because
we've got it on this one here, let's put it on simple, and then what we'll do is we'll turn this up to
something like eight. So let's turn that up to
something like eight. Let's press tab, make
sure in object mode, press Control A, and apply that, and there we go, now you can
see what we've actually got. Now, I think actually I've gone a little bit
overboard on this, so let's just go back a minute, and let's put it instead
on let's try six. So I'll try six and
then control A, and there we go,
that's probably more like what I'm actually
looking for at this point. If you want to divide your
own a little bit more, then you're free to do that. So what we'll do then
on the next lesson is, we'll actually create
the mountainous area that's going to be
coming out of here. We'll also decide if this is big enough to actually do that. But we need lots and lots of trees going out to these sides. So maybe maybe before we finish, I'm going to make it
a little bit bigger. And then what I'll do is
I'll come up to my item. And you can see here, it's
255 meters by 255 meters. So if you want to get round about the same size
what I've got, then that is kind of the
scale that you actually want. Alright, so that's looking good. Again, once you've done that,
control Ale transforms, set origins geometry, and
I'll see you on the next one, everyone. Thanks a lot. Bye bye.
165. Modeling and Texturing Large Scale Terrain: Welcome back to lend for the modulate and Kit bash
environment guide, and this is where
we left it off. Now, what we're going to do is, we're going to first of all, make sure you work saved out, so file, save it out. Then what we're going to do
is we're now we're going to come over to where it
saves object mode, and we're going to again
go into our sculpting. Now, what we're going to
do with the sculpting is, we're just going to come
down to one that says grab. And then what I'm
going to do now is make my brush much much bigger, and we should be able
to grab the ends of these and start
pulling them out like so. Now, again, if you press zero, you should be able to then
come into your camera view. And what we're
trying to do here is bring up these so we've
got an actual line, so a tree line that's
going to come up. All the way up and all
the way out like that. So what I'm first of
all trying to do is base how far I want my
tree lines come up. So that's the first
thing I'm doing. That's the only thing I'm
really doing right now is bringing these up to bring in that moon that's going to
come in there and make these slope away like so. So we've got a tree line in the back of here, and
then right in the top. The trees will come
up, they'll drop down, and then they'll come up again, and here I can put my moon. This then gives me the height that I want to make
the rest of the scene. So now what I can do is I can
come in, bring all this up, as you can see,
bring it up like so. Just bring it all up. And we don't really need to spend
a lot of time on this. Honestly. It's actually very, very easy to do this. Now, the one thing you're
going to end up is with some trees
probably clip in there. But we want to make it fairly, fairly consistent
as you can see. So let's bring these
up a little bit more. And then this will be a nice, beautiful tree line going over. So now if I come around, you
can see this will be how my trees just go up
and slope up like so. All right, so now I want to do is make this a
little bit uneven, because you can
see at the moment, it's a little bit too even going around. Same for this one. Let's make it a little
bit uneven. Like so. So then we've got some
variations in here like so. Alright, so far so good. Now, the inner part,
we do want to make a little bit lumpy, but
we have to be careful, as you can see, if I
bring it up too much, it's going to affect
the inner part of here, and we don't really
want to do that. So what I'm going to do is,
I'm going to bring it up, make my brush a bit smaller, and then I'm just
going to go in. And what I'm going to
do then is just start pulling it down a
little bit, like so. Now, bearing in mind,
we do want this. So where these brushes are, go to make it a little
bit bigger. Come in. Actually, we've still
got them in there. You can see this
is still in there. It's going up to where
our actual brush is going through or our jungle. You can see they've gone
a little bit too far. So we want it just going up, creeping up to those sides
and the same on here. Let's bring this down, same on here without having
those hard edges. We don't really want
those hard edges. So you can see this
one's perfect. This one here, we've
got a little bit of a hard edge over here. So what I'm going to do is, I'm going to make my
brush a little bit smaller and then bring
it up slightly, like, so breaking up this ground, like so, I'll do
the same over here, and I'll definitely be doing
the same around this bit. Like so, and there we go, and this bit may be here. Alright, that is looking
really, really nice. Now, the thing is, if I
put this back on now, so if I put this on
to my shade of view. And then what I'll do is,
I'll turn on these here. So if I come in, And what I want to do is I'm going
to go back to object mode. And then I'm going to
come in and turn this, so I'm going to
turn this back on. You'll see five double tap
the A, let those load up. This is what we end up with. So now you can see we've
got something like this. Now, what we want
to do is we want to copy the material onto this. So I'm going to grab this one. I'm going to press
the tab button. I'm going to press A
U and wrap like so. Now, there is sometimes
we might need to change the text on here,
so I'll show you what I mean. But first of all, let's
actually grab this one now. And then all I'm going to
do is press Control L, and I'm going to link
materials like so. And there we go. That's
what we ended up with. Now you can see,
What I'm talking about with the actual materials is that this at the
moment is huge. You can see all this
is really, really big. We might want to
make them smaller, so I'm going to show you
how to do that as well. Now, the moment, though,
let's actually go into it, and what I want to
do is I want to put this onto vertex paint. The moment I put it
on vertex paint, everything is going
to disappear. Now I can do is I can actually
come and draw on there. Let's just press
the x one and we should then be able to draw
on something like this. Again, as you can see, this
is not really what I one. We also want to be able to see the whole thing
all the way out. What I'm going to do
instead of that is, I'm going to actually bring
in a different color. Let's try on the green. Let's try on green first of all. If you remember you can
zero all these out, let's try the green.
That's the ud. Let's also bring in the green. What I'm going to
do is set these to zero, and then going to draw. Now, this is the green
that I'm talking about. Here now you can see,
we've got Mud, we've got This kind of lighter soil, and then we've got
this kind of green. We can see though this
is way way too big. So what I'm going to do now is, I'm going to come now off
of here go to object mode, and I'm going to go
over to my material. And what I'm going to do
is I'm going to copy this. I'm going to put plus new, and then we'll put
terrain material. So terrain material. And then we'll put
it onto environment. So environment like
so, and there we go. Now I'm going to do is, I'm
going to click on this. I'm going to press
copy material. I'm going to go to this one
and click Paste material. And then what I'm going to
do is minus this one off. So this should be copy
now minus this one off. It shouldn't minus anything off because this is
basically a copy, and now it should be free
to go back to my shading. So go into my shading
and change this now. So if I come to these parts,
so we can see at the moment, we've got our moss, let's
come in and put this on something like
on the X and Y. Let's put it on 12. And there we go now you can see
that's looking much better. Let's even try 14. Let's try 14. Yes, there we go, that's
looking so much better. Now what we'll do is
we'll come to this mud, and we're pretty much going
to do the same thing. So over here is our
mud or the soil, and we'll put this
as well on 14, and there we go. That's
looking much bear. And then finally, we'll come
to the top one over here. And we'll also put this onto 14, like so, and there we
go looking much be. Now I'm going to do is if
I come back to modeling, and if I press the tab, we can see, this is what
we've got at the moment. We want to be painting
all this over. So what I'm going to do is
go back to vertex paint, and then I'm just going
to draw all this on. So I'm just going to really,
really paste this on. So not worrying about how
it looks at the moment. We're going to do that
in just a second. So first of all, we're going
to paste all of this on. Like, so And then what we'll do now is come in and give it like pockets
of different color. So I'm just going
to come in now, and I'm going to press the x b. Let's see if we've
got any on there. That is the Alpha. We
don't really want that. So what we'll do is we'll
put it on the green first. We'll set this to zero. And then if I come in and draw in, you can see that's the mud. Now, rather than drawing
the mud everywhere, all I'm going to do is
turn the strength down. And then what I'm going
to do is just slightly draw over this, like so, as you can see, and just get some variation in
this because we don't want it all to
be green, like so. We're going to make
some variations in here to break up
all of this green. And then we'll come
in with our soil, and we'll do pretty
much the same thing. But don't forget most of this is going to be
covered with trees. So let's now put it onto red, and then we'll set both
of these down to zero. And then I'm hoping. Oh, yeah, that's the green again.
We don't want that. What the colors we've got, we've got black. Let's try that. Let's set the strength up. And then we go, that's
the one we want, so now I'll set the
strength back down. Now we'll draw on some of this and just really really
break the whole thing up. Now, at the moment,
you can see, well, it doesn't look very good, but once you've got trees on here, you're really going to
struggle seeing most of this, and it's going to
be broken up even further with averaging it out. So if we come in and just
average most of this out, like so, Then it will
be broken up even more. Same for this, a age. And if we've got
too much in there, by the way, just use
the blur as well. Ie as I said, it doesn't matter
too much on here. All you want is just
something that's a little bit more consistent
than what we had. Alright, so this is
looking pretty good. Now what I'm going to do is,
I'm just going to come in, and I'll put it
onto paint again. I'll turn up my strength, and then all I'll do, you can see there this
is what this is, so I'm just going
to come in now and just add in a few pockets, and I'm going to do
the same pretty much. We most of this now, so just a few pockets like so. And then we'll come
in and we'll go to which one we got white? I think that we don't want
that, definitely not. We'll put the green on then, and we'll put it on zero. And then we'll come
in and just add in a few more pockets like so. And then we'll come
in with the other one and which one is that? So that'll be red. Let's try the red, zero. There we go in a
few more pockets. And just break it
up a little bit. So. All right. Let's try that. Now what we need to do is
you need to think about. Okay, so we've got
the inner part. So if I come on now just put it on object mode,
double tap the eight. And then what I want
to do is I want to now look on my rendered view. Before I do that, I'm just
going to save it out. And then we'll put
it on render view, and we might have to
put it on the Day view, because I'm not sure
if it's actually on that or not. Let's
let it load up. Okay, so let's now
come in onto our sky, and what we're going
to do is change this over to our day scene. Let that load up, and there we go. That is
what we should have. Now, you can see that's really
starting to come to life. You can see we've got a lot of plants and things
like that here, and we really need to bulk
this out a little bit. So on the next lesson,
what we're going to do is we're going to learn
how to bulk this out, how to bring in foliage
on the inner part, and then how to bring in the massive trees
on the outer part. All right, everyone, so
hope you enjoyed that, and I'll see you on the next
one. Thanks a lot. Bye bye.
166. Weight painting in trees: Welcome back everyone.
Plan to pull the modular and Kash
environment guy and that's where we left it off. So first of all,
let's press saltge, and bring back our actual world. And then what we'll do now is we'll come in and
just turn these off. So I'm just going
to turn these off just to make it a little
bit more lightweight. Next of all, then what I'm going to do is I
want to give this a b is in the way
of displacement. So we'll do that
actual first of all. What we'll do to
do that is, we'll come over then to
the right hand side. Add in a modifier,
will go to deform, and we'll add in a displacement. And then what I'm
going to do is I'm just going to click new. I'm going to put the strength of this just on one point on, so slightly over what we had. And then what we're going to
do is we're going to go down now to our displacement texture. Now, before we do
that, let's just call it Jungle displacement
or Jungle terrain. Let's call it that
actually, Jungle terrain. Like so, and then we'll come
over to our displacement. Now, what we want to do is
we want to change this from image or movie to Clouds. Let's put it on Clouds, and now we can see
if we right click, Shade Smooth by
angle, there we go. Now we can see we've got a lot more displacement on there, making the terrain
much much rougher. Now, of course, you can
come down from here. And change the size of this. Let's put it on one, and change how big or
smaller as you see. If I'm bringing this up, you
can see I'm making it much, much bigger or
much, much smaller. I think somewhere around here
would be absolutely fine. Now, we don't need
to mess around with any of these things on here. All we want is
that little bit of displacement just to kind
of break it up even more. All right, so once
we've got that in, what we can now do
is, we can come down and bring in
a particle system. But before we do that, we actually want to
bring in our trees. So what I want you to
do is head on over back to your resource pack. Let's head on on
back over to there. So here we are in
our resource pack, and what I want to do is, I
want to grab all of these. So I want to grab
all of these parts, all of the trees, all
of the little bushes. And you'll notice
that these foliage over here pretty much
the same as over here. I want to grab all these,
and what I want to do is I want to press
Control C. I then want to put my
actual resource pack down and come back over here. And then what I'm going
to do is just hide this train out the way
just for a second, so H to hide control then, bring in your trees
and arr our trees. Now, instead of moving
them all independently, just press shift space bar, bring in your move tool, and
then we'll be able to move. And what we want to do is
we want to actually put these in their own place. So first of all though, I'm going to pull
them over here. And then what I'm going
to do is make sure that they're dropping
below this line, so they're really far down, so no one will be
able to see them. And now what I want to do is put them in their own kind of place. So what I'm going to do is
I'm going to grab them all. No, not, actually, I'm going
to grab these ones here. So I'm going to grab
the smaller ones. So just these ones, I'm
going to press shift D, and I'm going to bring
those out over to here. Now I'm going to do
is with all these, I'm going to grab all of these. And I'm going to
press the button, and then let's make
a new collection. So what I'll do is I'll
put new collection, and I'll put terrain, large trees, like so. And then what I'll do
is click Enter again. And now I'm going to
do is grab these. I'm going to press the button, new collection,
terrain, small trees. Like so, press the ends born
again, and there we go. Now if I come in, I should
have two of these now, so we've got terrain,
large trees, and terrain, small trees,
as you can see here. All right, so now what
do we do with these? So now we're going
to do is, we're actually going to
bring our train back, so old tag, bring
back our train, and as I said, you can't
see these anymore. So you can't see either
of these anymore, which is absolutely fantastic.
That's what we want. I'm just going to
put that up and what I'm going to
do now is then, I want to put these large trees on the outside of here and the smaller type bushes and foliage on the
inner part of here. So the way that we're going
to do that is, first of all, will come to our actual
this object here. What I'm going to do is
I'm going to come over to the right hand side where
these three triangles are, and we're going to be using
a couple of vertex groups. So one will be large trees. So let's call it large trees, like so, and the other
will be small trees. So we'll call the small trees. So, and there we go. Now, what I'm also going to do
is at the moment, there's probably
the whole weight. So all of the weight is probably
set at one, which it is. I want to turn this down
to zero and click a sign. Then I want to come
to my small trees. Make sure this on
zero, click a sign. And finally, let's just
put it up now to one. Just make sure it's
on one on each one. Now, basically, we've
got no weight on here now because I've
turned that down to zero. When I actually went in
and pressed the tab, you can see it says the weight, how much weight do you
want to put on here. We set them both
down to zero so that we can control the
actual weight. Now what we're going
to do is we're actually going to save it out. Then I'm going to bring in now our actual particle system. So if we come over to the
right hand side here, we've got one that says
particles, let's click on that, and what we'll do is click plus, and we're going to
go large trees. Now, on the particle system, they're really weird in
the way that they work in the fact that we also
need to name this one here, so large trees, like so, and then we can
actually click on this little shield here, and then they will be named. So large trees and small trees. Now, if we come down
to our down arrow, now you'll see that we've got
one that says large trees. Now, if I click plus and
put it on small trees, let's say, so small trees. Like, so click the
down now and you'll see that it's just
says particle system, and this is why for me, I name it on both of these, so I actually know
which they are. And of course, I'm it
in this shield icon to make sure that even if
I've got no trees on here, I can still come into
this blender file and actually copy these results that I'm actually
going to create here. So let's first of all,
go to our large trees. Now you will see that we've got two particle
systems on here. You will see that something is happening in here,
not what we want. Let's first of all
put this on hare. Now we've got something that's actually sticking out here. Let's put it then on advanced. Then what we're
going to do, we're going to come down and we'll put this on something
like let's try 6,000. 6,000 of them make
them a lot on there. What we're going to do
then is we'll come down and we're not going to set
anything at the moment. What we want to do is we want
to bring in now our trees, and I'm going to
show you as well, you will have some problems with your trees and how
to actually fix it. The first thing I want to do is come down. Let me overlook. I want to come down
to my render button. Instead of it being on path, what I wanted to be
on is collection. The collection I want to
pick, which is down here, as you can see, is my
terrain, large trees. So I've got terrain, large
trees, let's put that on. Now, as soon as I put that
on, as you can see now, we do have some trees
popping into place. Now the problem
is at the moment, they're laying on their side, and the other problem is the actual scale of them is
not what I actually want. So what I'm first of
all going to do is change the scale to
something like not 0.164, and I'll also change
the scale randomness to not 0.327, like so. Next of all, what I'm going to do is I'm going
to make sure that it's on Picks random, like so. And then finally,
what I want to do is, I want to change them now
so the right way round, which will be on the rotation. So click on rotation, and the one we want
orientation axis is going to be on object and on x. And there we go. Now we can actually see those
actually working. Albeit, we can see. That some of them like these are actually
stuck in the ground. Now the reason they're stuck
in the ground is because of the fact if I come
to one of these trees. Let's come. We know
it's a palm tree, we can see it's a palm. If I come to this one, can see my orientation is down
at the floor here. We can see on this one, however, that the orientation is up here. This one is down the floor, this one down the floor, and
this one down the floor. Basically, every one of these
is right down the floor, except this one here. All we're going to do is
we're going to come in, and we're going to
actually fix that. We put that in
basically so we could show you how we actually
going to fix that. Or why you might
have that problem. We're going to do is shift click Shift desk because
the selected tab, right click and set origin, two, three D cursor. Now you'll notice
all of those trees now are above the actual ground. We can see already now. We've got trees
literally everywhere. If we press zero to go
to our camera view, this is what the actual trees are looking like at the moment. And of course, we don't want
them looking like that. We want to be able to place our trees where we
actually want them. So we're going to be fixing
that on the next lesson. So what we're gonna do is
we're going to save our work. We're going to fix that
on the next lesson, and then we'll also get
this smaller foliage in around here as well. All right, everyone, so
I hope you enjoyed that. I'll see you on the next
one. Thanks a lot. Bye bye.
167. Placing Small Terrain Platforms with Large Landscapes: Welcome back everyone
to Blend four, the modular and Kash
Environment guide, and this is where
we left it off. Now, what I want to do is now. I want to once again come
over to my particle system. So let's come over to
this particle system. We're on the large. And what we want to
do now is we want to come down to what it
says a vertex group. So click this on and density wants to be
basically at this. So you can see these
actual vertex groups we actually created This ones
to control the density. So what I'm going to do is
back to my particle system, scroll down, vertex groups, and this one we
want large trees. And once we hear that on, everything's going to disappear. And the reason it's going
to disappear is because we don't actually have any
density set on here. So what I'm going to
do is I'm going to come over to my weight paint. And now the moment I
start painting in, here we go, we've actually got trees in here,
as you can see. Now, what I would suggest is that you paint your
trees going all the way around and leaving a
little bit of a gap in the center for those kind
of smaller butchers. In other words, the place
where the people are going to cut away all of the
main majority of trees. So let's just paint them
all these in, like so. So you can leave
some gaps on there. Just make sure the outside of it is painted quite thoroughly. Just leave some gaps
wherever you want them, so you can have a few
gaps in the terrain, and that would be realistic
and then round here, round here, like so, like so, and like
so. And there we go. Now, let's turn off then our weight paint and put
it back on object mode. And this is what we
should end up with. Now, if we press
zero on our camera, You can see that sometimes
this will happen where you won't be able to see through the actual foliage. What I'm going to do is, I'm
just going to come to view on the camera and press control, shift, middle mouse,
and then I should be able to just zoom it
forward in a little bit. You can see now this is
looking pretty nice. Now, the other thing about
this, technique using it. Means that I can
now come into my actual what is it
called the edit mode. I can then go over to sculpting, and I can still come in, grab all of this, all of this in the background, and still lift it up and all
the trees will follow it, as you can see,
making it really, really ideal for actually
sculping the terring, because it's pretty lightweight on the actual particle system. Now, I'm not going to
do that. What I'm going to do is come back
to object mode. I'm going to double
tap the eight. And at the moment,
I can see that it's a bit sparse,
as you can see, it's not You know, all the trees aren't there
we actually wanted them. So you've got another
couple of options here. What you can also do is you've also got one
that says children. Now, children basically is
a lightweight way of adding in trees or foliage on
your particle system. So if I put this on
interloped, for instance, you can see now we've got
a lot more actual trees, as you can see, and they're
all kind of randomized. Now, I don't like
using that way. You can also use
the simple as well. That's another way
you can do it because I feel like the
crossover too much. So what I'm going
to do instead is, I'm just going to come
and turn this up. So I'm going to turn this
up to, let's say 10,000. Like so, and there we go. Now, I feel if I press zero, that that is looking a lot more realistic than what
it was before. Now, what I'm also
going to do now, I'm also going to save
out my work first, I'm going to save
it out, put it onto render view. Let it load up. And let's see what
we've got here. So let it load up, and there
we go, now you can see, that is what we've got, nice, lush, green, actual jungle. Now, the other thing
you can do is as well is we can check
the actual scale of these trees to make sure that the right height
compared to our guy. So that's why I
recommend we do now. So if we come in,
where's our little guy. Let's find him. So
we're looking for. Here we are, human reference. Let's grab hold of
him. Here he is. And then what we'll do
is we'll press seven and we'll put him
into our jungle. So I'm going to put
him over there. Want to press a little
dot b to zoom into him, and then what I'm
going to do now is pick him up and
put him in place. So we can see here that these are kind of the
height of the trees, which, to be honest,
they need to be, I would say, a
little bit bigger. So let's come back to
our particle system. Let's come down to
where the scale is, and let's turn that scale up a little bit,
and there we go. Because this is the deep jungle, so let's turn it
up to Nought 0.2, and then we go now
thing that's looking a little bit better than
what it was before. And if we say him there, put on our rendered view. Then we should be able
to see now what it actually looks like with
the terrain in there, with our guy in there
and you can see this is quite thick
actual jungle. Now the other thing
is the scale randess, let's put this up to 0.4. Let's put that up. Then all
it's going to do is just change the randomness
between all of these trees and
things like this. Let's have a look now round
ours, our actual zone, and I think that this
is looking quite nice, pretty much like a jungle, many variations of trees. Now, the next thing
we want to do then, of course, is bring
in this inner part. So let's actually do that now. So pretty much the same thing. All I'm going to do, though, instead is, I'm going
to come to this part. I'm going to come over
to my particle system, and you can see I've
got a particle system here and a particle system here. I can actually turn
this off if I wanted to just to actually make it a little bit
more lightweight, or I can come in and turn
the number down pretty low. Now, what I'm going to do now is I'm going to come
over to my vertex. I'm going to come over
to my small trees. And then what I'm going to do is paint in these parts here. So what I'm going to do is
I'm going to Go over the top. Let's put it on object mode, so we can actually
see what we're doing. Let's put it onto weight paint, and here is our weight paint. Now, you will see on this one, in particular, if I come
and turn these off. Let me just turn these off for 1 second that there is
no weight paint on here, and this is because
we're actually not weight painting
on those trees. The large trees, we
weight painting out on the smaller trees, and
that's the reason why. Let's turn that back on so we can actually
see what we do. Come over then to our vertex. Come over to our small trees. And now if I press
seven, I should now, if I've made my brush
a little bit smaller, start being able to paint on
round this actual jungle. I'm also going to come in, and I'll show you
what I'm going to do. I'm going to paint
round, all of here. Now, what I need to be careful
of is this part in here because we don't actually
want paint all on there. We want to just paint
around the outside because we want that geometry node to do actually some of the work that
it's intended to do. So you can see here like so, and we can come in and paint a little bit more as
well if we needed. You can see I'm
pretty much painting the whole of this
the way that I want. Like so. I'm also then going to go in and these parts here. I'm just going to
fill these in with some smaller type of brushes, like so, like so. This also allows you. If you want to have a
walkway going through, going through from out of
here into the actual jungle, you will be able to
do that, and I'll show you that bit in a minute. All right, so we've
got all of these in. We don't know if we're
happy with them yet, what we're going to
do, first of all, is put it on object mode, and then we're going
to come in and add in a new particle system,
which is this one here. Now, the first thing I want
to do is put this on hair. And you can see now it's gone
all over the actual thing, but what I want to do is
come down, first of all, go to my vertex groups and
put it on small trees, and now it's just going to
be on these parts here. If I come in and
turn off this now, so the large trees turn it off, you can see now that the
small trees are all on here. Now, what I'm going
to do now is, I'm going to come
down. Change the path. So the path, I want on
collection and the collection. I want pick on random. And I want it if I scroll down to be where I've
put terrain small trees, this one here, and there we go. Now, let's put the size of this. So the size of my small trees. Let me just check
on my other one to see what size
I've got this on. Well, let's put it
on to the size. Let's first of all,
change the scale. So the scale of
here. There we go. No 0.25. And let's also change the randomness
on that scale to not 0.5. And there we go. And now let's
also ramp up the amount. Once we've actually got
this the right way around. So first of all, let's put
it the right way around, which will be under where is it? We've got it advanced
on. You need to turn advanced on. Rotation then. Let's put it on the x, and there we go
the right way now, making sure that there's non sticking underneath,
as you can see. Now, you can see with
some of them like this. It is a little bit lower. It's actually going
into the floor. That's absolutely fine. You can also see that
some of these have actually gone over to
where we don't want them. That's also fine.
We can fix those. The main thing that we
want to do is making sure that we've got the right
scale and the right amount. So what I'm going to do is
turn up this number two. Let's say let's say 4,000. Let's try that.
4,000. There we go. Let's also now bring
back our large trees, and then we can have a good look at what this
is going to look like, because I think at the moment, these are going over here a little bit too
much onto this part. Let's first of all,
come up, turn on our large trees,
and there we go. Then we've got many
many parts where we've got just
simply not enough. Let's You can also control it, by the way, turning
the hair length up. That will also give you a little bit more control over these. Then what I'm going
to do is, I think, I'll come down, and I'll see if I can actually use my
children on this one. Interloper. I definitely
don't want that, you can see. That looks a little
bit ridiculous. Let's put this on one. That may not be enough, so let's put this on ten
and let's try this on ten. Let's try that. That's too much. Let's try it on five.
Let's try it on two. Maybe maybe that's going to work out much better for so two, and we'll put this
on two as well. And then what I'll do is now, I'll just make sure that's
okay because as I said, I prefer normally not
to use this interloper. I prefer normally to
use the actual amount. Now, that using the
amount though is a bit more heavy duty than
using the interlopers. What I'm going to do is just put it on render view for now. And we have a quick look
around what I think to that. And there we go. That's
It's looking pretty nice. I think there needs
to be a little bit more randomness on here, as you can see. So what I'm going to do is I'm going to come down,
put this on none, and then going to
turn this up to, let's say, 6,000 like so. There we go, that might be
looking a little bit bare. I think also we've got
randomize the orientation, let's turn that up a little bit. Randomly bending them over, especially on these,
that should be fine. We'll also turn up the scale
a little bit, I think, and then we'll also turn up the scale randomness
a little bit as well. So now we're starting
to get somewhere. And then what we'll also do
is we'll put it on simple. I'm just wondering if I turn
this up now. Turn that up. So. You can see that
when I actually turn that up, it generates this. We don't really want that. I'm going to put
this on non again. And what I want to do
instead of that is, I think I think I
want more of them. So what I'm going to do,
I'm going to put this on 10,000. Let's try that. Yeah, I think that looks
just much much better like, so this is looking
much, much better. Now, of course, what you could do is you could have
another band in here and make these
a little bit bigger, for instance, as they
move over there. I think that would be good. Now, the last thing I want
to do, on the next lesson, with this is I basically want to come in and I want
to make bring in my geometry node and then
cut away some of these because they're
actually going over the places where I don't
actually want. You can also see as
well with my terrain, so you can see if I
click on my terrain, which is there,
press the tap on, you can see this is going
over there as well. We don't really want
that. So what I really want to do is cut
away this as well. So I'll do that actually
before finishing. So if I double tap the A, I can see here if I put this
onto x ray or wire frame. And what I can do is I can press the V button and come in. And grab all of these. So all of these going down here. I definitely definitely
also want all of these. So I'm Jaws going to see if and grab all of these as well, like so, and then I'm
going to press delete, and Versus, let's try that. Now, you can see that I've
managed to delete those, so I don't actually
want to delete those. So I'm going to press V. I'm going to hold
the shift born. Then deselect them like so, and I'm still
selecting all these. I don't really want
all of these selected. So I'm going to try again, just going on with this one. I'm going to press B
and then hold shift. I'm going to deselect
all those like so, and then we're going to
press delete and vertices, and let's see if that's
actually fixed that. So let's press tab, and I think that's actually fixed
most of those issues. All right, let's put it
back on object mode. I see I've got a gap here. I'm not too worried
about the gaps because it means I can
actually fill those in, bringing this over, but I am I think it looks bad now that we've gotten
none of those points. So before we finish,
let's press seven. Let's come in. And
what we'll do is we'll hide the small
trees out the way. And then I'm going to
press tab and I'm going to come 21 of these parts like, so I'm going to make sure that proportional editing is on. I'm going to press the G
born then, bring it out. And all I want to do is
just move these over, making sure they're in place. Now, you can see, they're a
bit too high at the moment, so I'm also going
to bring them down. Like so, and just
making sure that everything is fixing
in together like so. And there we go, that is
looking much much better. We've got a slight
problem over here, so I'm going to do
the same thing with G, bring it into place. Like so. Alright,
that's looking good. Let's save that
our work, and I'll see you on the next and
everyone. Thanks a lot. Bye bye.
168. Working on the Skydome for the Aztec Scene: Welcome back everyone
to Blend for the modular and Kit
ash environment guide, and this is where
we left it off. So what I'm going to do now is, I'm going to come to this part. So just this part here, and I'm going to
turn on these here. And what I want to do is actually get rid
of some of these. So if I go round here, I want to actually
make parts where they can actually
walk into the jungle. So what I'm going to do I'm going to make sure first of all, I'm on my small trees, and then I'm going
to come over and go to my weight paint. And then what I'm going to do is make it a little bit
smaller first of all, hold control and
just minus this off, going into the jungle. So it's a little bit
of a path on this one. Now on this front
one, I'm going to make a much deeper cut in there, so going all the way
through like so and then putting one at the
side. Like so. So they're walking through
into the jungle like so, and we'll also do it on here. So on this one here, like so. And then on this one here, we'll just have a little bit of a kind of place like this. Now what I'm going
to do now I've done that is I'm going to
turn off weight paint, go back to object mode, and now the moment of truth. So let's actually see what
this actually looks like. Let's put it on rendered
view, let it load up. And there we go. That is what
it's going to look like. Now, we can see, we do
have a few problems here. In that, these parts here need to be all filled
out, and you know, you'll only kind of see these once you've actually
brought it all in, but we definitely
definitely need to sort these parts
here out here. Now, it's probably
my fault because I, you know, kind of
cut these away. Also, these parts here, what I didn't actually take into account is that these are, you know, they've got what is it called some
Alpha on these? And so I didn't take
that into account. So what I'm going to do now
is, I'm going to fix that. I'm going to put
it on Shader mode. I'm going to come to this then. What I'm going to do then is turn off the particle systems, fix these problems with this, so we'll come to the
particle system, turn both of these off, and we should now
we're left with this, and now you can see where
the actual problems lie. Now, from this point,
it might be easier to come in to this part here, so the large part,
press the tab and then I just want to pull
these all this way. So I'm just going to come in, press lt shift and
click like so, and then press S
and y or S and X. Let's try S and X first. Let's bring these in, and
then we'll press S and Y. Then what I'm going to do now is put this back onto render view, making sure that I've
actually covered those up, double tap the A, and we can
see where the problems lie, so I'm still going to
have to fix a few issues. I just need to really blend
this in is what I need to do. So what I'm going to do then
is I'm just going to come to each part of these
and just blend them in. A little bit better
than what they are. Trust me when I say this.
It's not a big deal. You won't be able to see
those because of the fact that we got a lot
of foliage in here. So for instance, if
I bring this in, I can pull this down
now into place, but I am going to make sure that it's right before finishing. You also want to make sure that everything is
looking pretty good. All right, that's that one. Let's bring these
up a little bit. And all this is doing
is just blending it in a little bit there and that's why I prefer to do it this way. I know it's a little
bit more fiddly, but I actually prefer that. Okay, so I'm just going
to look around here, press tab, and I think
we'll fix this one as well. So and then what we'll do now is see if this
is blended in, and if not, we'll fix any parts that we've
got like this one here. Let's blend that in
a little bit there. And then we go and let's
come with this one. Take the time just to blend
them in a little bit bare. If it's one like
this, just press the G b and move it into place, and then move it down. T for this. Okay. Now, let's see what that looks like when
I turn both of these on. So, in fact, we'll only
turn this small one on, and we can see now
where the problems are. Now what I'm also going to do is I'm going to
come to this part here and go over and
turn on my geometry no, double tap the A,
and there you go, you can see, it's
all blended in now. You can't see a thing.
Now what we can see is a little walkways I
said going through here. We've got a little
kind of pit here, we've got a walkway going
through it and through here, and you can actually
really see that. Now if we also come in and make sure if we go to our
particle system, turn on our big trees, and this finally is what
you should end up with, and now you can see that's
looking pretty nice. Now if I press zero though, you will see that we
do have some problems where the actual
these bushes are. So sometimes I'll actually reduce this down
to get that very, very nice shot because if I come in and just move
my camera forward, you can see that we
can get rid of one, but there's still
this one in the way. So let's actually
have a look at that. So if I come to my camera, so I've got my camera
selected, no of not. You know what?
There's my camera. So what I'm gonna do
is, I'm going to press M. And we're gonna put it
in a new collection camera. Like so, click Okay. Press the little dot born,
and here's my camera. So here is what's basically
covering it, or you can see, it's quite far into
the jungle here. So we can come away and, you know, remove
some of these trees. And the way that we can
do that is, first of all, make sure you're on your
right vertex group. And then all you want
to do is just come up and put it onto not the camera. This. Put it onto weight paint. And then all you're going to do is reduce down
this weight paint. So just make sure
it's on large trees, and then we'll make it
a little bit bigger, and then just reduce down some of this
withholding control. Like so, and just see
if then press zero. There you go. There's the
actual view of the camera. Now, we've got no trees
in the actual way. Let's put it on object
mode. Double tap the A. And now you can see once I've actually brought
in that moon there, everything is going to
look really, really nice. Now, remember, this is supposed to be a dark scene as well. So, you know, we can we can bring in our torches
and all that stuff. So in other words,
we're nearly there. Now, the next thing
then I want to do is bring in our sky dome. And then from there,
we can actually set up our lighting. So let's
now bring that in. What I'm going to do
is I'm going to come over to object mode, that will make it easier. Then I'm going to
leave this here. Now, it's up to you if you
want to turn this off, so you can actually see
where you're going to prey. I think we're going
to leave mine on. I want to press shift A then, and what I'm going to
bring in is a mesh, I'm going to bring
in a UV sphere. Now, of course, this UV sphere, first of all, it's not
come in the center. I'm just going to
pop it over there. I'm going to increase
the scale of this. I'm going to increase the
scale by let's try 100. S 100. That's got it
somewhere near a, and then we can put
it into the middle. Pre S the S born, and then
we can bring you all the way out pretty much going
over most of it, just leaving out
the actual corners. So if I press seven, I
should be able to just leave out just some of these
corners as you can see. Now I'm going to do is I need
to delete the half of it. So halfway down here. So all I'm going to do is t shifting click,
delete and faces. Grab the rest of it, L,
delete and Vertices. And here we are.
Here is the star of our sky dome. Right click. And all we're gonna do
is Shades Move by angle. Now I want to do is I want to actually bring a
shader in for this. So all I'm going to do, I'm going to go over
to my shading panel. So let's just head on over to our shading panel,
which is this one here. And obviously, we want
to give this a material. So let's wait for
this to load up. Here we are. So what I'll
do is, I'll click new. I'll zoom out a little bit. Here is our sky dome. And what I'll do is,
I'll put on sky Dome. So sky dome. Like so. And then the first
thing we'll bring in then is a noise texture. So let's press shift a. Let's bring in a noise. So search noise texture. Let's bring that in.
Drop that in there. Now, I am having some issues with all of these
trees, of course. So all I'm going to do is just for now, hide this the way, and then I'll press oltge,
and then I'll grab it, hide it the way, so
still keep my sky dome. All right, so in the
actual sky dome. Let's first of all come in, press control and t. And what I'll bring me in is a generated and a mapping through. Now I want to do is I want to come in and mess
around with the noise. So the noise, if I plug this in, so we should have, where is my material output? I
don't think I've got one. So what I'll do is shift a
material output this here. So if I drop this in here, now we can see we've
got something, and I plug in the
color to my surface, you will see that's the kind of thing that we've
got right now. And of course, this isn't
anything like what we want. So let's actually come in then. What we'll first of all do is mess around with
the noise texture. So I just want you to
copy what I'm doing for now and we'll start this
on the next lesson, we'll just copy what I'm doing. And then after that, then go
in and mess around with it. It's always best
to leave messing around with things
right till the end. And I'll show you actually
how to, you know, set it all up, what
each of them do. And then from there you can
mess around with it yourself. Alright, everyone, so I'm
going to save out my work, and I'll see you
on the next one. Thanks a lot. Bye bye.
169. Basics of Blender Eevee and Cycles Render: Welcome Mac on to
Blend the four, the modular and Kith
Environment guide, and this is where
we left it off. So what I'm going to do now
is we're going to put this on four D. We're going to come down then and
put this on 7.9. We're then going to
put this on four. We're going to put this on 12. So the details on 12, the roughness on
0.617, the lacuna. We're going to leave
that on two, and then we're going to leave the
rest of it like this. Now, all this is controlling, as you can see, is
the actual noise. Now, what we want
to do is we want to bring in a color ramp now. So color ramp, let's
bring one of those in. Drop that in there.
And then what we'll do is we'll
turn up the black, so we're going to turn
up the black all the way just past this G here. And then we're going
to turn down the Y. All the way down just to bring those clouds actually
out a little bit. So now you can see
we've actually got something that resembles clouds. And again, all of that
is controlled from here. Now, what you can
also do is you can turn the rotation round. So if I turn this round, you can see that we can
actually move those round. So you can probably
animate this as well. I'm going to put
this on 225 for now. Like so. Alright. So now
what we need to do is we need to control
the alpha in here. In other words, we can't see
through this at the moment. So what I'm going to do is
I'm going to bring in a mix. So I'm just going
to move this over. I'm going to press shift day, and we'll bring in a mix. So search Mix color. So this one here, mix
color. Drop that in there. And we want to keep it on mix, and we want to put this
down to No 0.225, like so. Now, again, at the moment, you can't really see
anything happening. So what we're going
to do now is, we're going to zoom
out a little bit, and we're going to bring
in two more notes. So the first one will
be a principled, so principle PSDF, and we're going to drop
that into here, like so, and we're also going
to put the color into the actual color
of my emission, because these are clouds, which means that we want to have them
glowing a little bit. So you can see here, the color
is going to go in there, and then we're going
to set the strength of this to one like so. Alright, so far so good. Now, what about
that actual Alpha? So let's first of all, bring in an RGB curve. So shift a search RGB curves. Drop that into there like so. We're going to then bring
the color into there. And then this color then
is going to be going into my Alpha, which
is this one here. So let's drop this
into my Alpha like so. And hopefully, when I put this rendered view,
we should now. Well, let's put it
on render view, be able to play around with the actual alpha,
and there we go. There is our actual sky dome. And from here, what
you can do is you can actually play around with this with the actual masking
around the actual clouds. Okay, so that's looking pretty
goodi fi press zero now. That is what we end up with. We can come in and
as I said, then, and move these clouds over to
where we actually want to, so we can put them
wherever we want, which means that we can
now bring in our moon, for instance, so we can
move them over here, bring in our moon, put it here, and then you'll see that
it's going to look really, really nice with this
actual dome here. So now I want to do before going in and discussing the sky, which we're going to do
on the next lesson is. I want to play a short video of rendering with both
EV and cycles. So I want to play
you both of those. And then after that,
I want to play you another short video about
cameras and turntables. Just so you've got all
of the information, and you're ready to set up your actual own
renders of this scene. All right, then,
so I'll play you the rendering in
cycles and EV now, and I'll see you on the next
one, everyone. Thanks a lot. Bye bye. Welcome everyone to the EVEN cycles
part of the course. And this is a full guide on both the EV and the
cycles renderer. So the first one we're going to approach is the actual EV. And you can see the moment I have a scene set up like this, and I'll be using this to go
through the various options, and after which you can
give it a try yourself. So the first thing at the moment is we're on actual shading, object mode, and we want
to be on the EV renderer, so I'm going to click that on. Now, you will notice
at the moment I have a song And I have a aerial over here as well
for the other demonstration. So first of all, let's come
to this actual object here. And what I want to do is
I want to first of all, go over to the right hand side, where the render options are, and you'll see this
is actually on EV. Now, the first thing I want to discuss is not the sampling. We'll come back to
that in a minute. It's actually the
ambient occlusion. If we turn our
ambient occlusion on, you will see that able then
to actually make much, much bear shadows within
our actual scene. So, for instance, this actual
e here, if I turn it off, you'll see that all of
those shadows disappear, and if I turn it on,
enhances the shadows. We're also able
to go in as well, and we're able to
come over to where the distances and
turn that down zero, and you'll see that makes
them all disappear. And as we turn it
up, we end up with more and more actual shadows on there up to a certain
point, as you can see. But you can see now
turn it off and on, makes a real difference to how your scenes
actually going to look. Based on what I'm discussing
here is the setup of EV, and then we're
actually going to go over and actually
render that out. Now, let's move on to the next part of
this demonstration. And what we're
going to talk about now is the actual samples. So if I come up and
open this menu up, you can see at the moment
that we have render on 64 samples and
the viewport on 16. Now, not only does this give you a better
quality of image, but also the main reason is
that we can actually get a lot more definition on
these actual shadows. You can see if I zoom in here, these shadows are
kind of pixelated. But if I come in and let's say, put this to 300, you will see now it makes a real difference in
how the shadows look. It makes a much more
realistic and much better when you actually
come to render this. Now we're actually
going to discuss the other powerful
thing with EV, which is screen
space reflections. At the moment, if I turn that on and I come to my
ground plane here, let's actually mess around
with the actual roughness. If I turn this down, you can see we end up with
loads of reflection on here. If I come then over and turn off screen
space reflections, you can see that all
of those reflections don't actually reflect on
this ground plane anymore. This is why this is so powerful, especially if you're
doing things like really, really shiny objects or metal, you really want on screen
space reflections. Let's just go back to my
ground plane now and just turn it back down on the
actual roughness, so let's turn it up a
little bit like so, and then we've got
some reflections, and let's move over
to the next part. We can see at the moment,
we have this light, but it doesn't look very
good at the moment. We can see it has got a bluish
tinge reflection to it. But if we come back
over to EV now, and what we can do is we
can actually turn on bloom. And now you can see that
we've got some really, really nice light and also the reflections
enhanced as well. We can also open up the bloom, and the best thing
about the bloom is, we can actually control how much this is going
to actually bloom, how much fogginess is
going to have to it. You can see the range that
we can put on there as well, and you can also see
that we can turn up this intensity all from
within the actual EV options. There are a load of options within EV and to go
through all of them, honestly, would be like
doing another course. But what I want to show you is just one more thing within EV, which is where we have shadows. If we open this up,
we will see that these shadows actually come with their own resolution map. At the moment they're on 512. The higher turn this the better the actual
shadows are going to be. So if I put both
of these on 4,096, you will see now that when I actually come to
render this out, these shadows are going
to look even better. They even look better
in the actual viewport. So now all I've done is I've brought an actual
camera in place, and I just want to show
you one more thing before we hit that render B. If we come back to our monkey
and we click on our light, so let's click on
our light here. You can also come over
to the right hand side, and you'll have something
that says shadows. Just open that up and
click on contact shadows, and you will see now
just how much nicer, especially around these
eyelids, how that looks. You can see the difference
and how that looks. All these things together, including the ambient occlusion, the bloom and the screen
space reflections can make for a really,
really nice render. Now, it's important
to remember though, EV is designed as a
real time renderer. So something like in a game, like on real engine or Unity. That is where a real time
renderer will be used. Whereas cycle, on
the other hand, is not actually meant for that. It's meant for getting really, really high quality
images or animations. It's not meant for
actual real time. So now what we can do is we can actually go over and
hit that render b. So it's just render image. With EV, it's not like cycles where it builds
up and up and up, and then it actually actually
get your final render. It actually is just there. So 1 minute, it's not.
The next minute is. Now, depending on how many
samples you actually ask EV to actually render out is how long it's actually
going to take. So you can see at
the moment, this has took around 3 seconds, and this is another
reason why you might want to use EV
because it's very, very fast rendering things out. So let's close this down now, and let's move on over to
our cycles render engine. The first thing
to know is when I actually turn this
over to cycles, it's going to be
much higher demand on your actual system, especially when we're
in the viewport view. You'll also notice as well that it's pretty
grainy at the moment, and this is because
we just need to turn on the viewport de noising. Although this requires a lot of performance
from your machine. But you can see straight
off the bat that this is looking really,
really nice already. The only thing is
whenever we turn around, because it's not a
real time, render it, it's going to take a little
bit of work to get to a certain level of samples
that you might be happy with. Now, the other thing
is at the moment, you can see on the cycles, we also have a
device, and this is basically telling Blender
what device to use. So it can be your
CPU or your GPU. I do recommend that you use
your GPU rather than CPU, if available because your GPU is much better at
handling rendering. So now, before we go into any of the options in the
cycles render engine, what we first need to do
is come over to edit, go down to preferences, and what we first need to do is go up to where
it's say system, and from there, we can actually change the options for cycles. So what I'm going to
do is I'm going to come over to where
it says Optics. You might not be able to
actually click this on. It might be down to QD. This Optics x is the
cycles x render engine, so we do have a new version of cycles in Blender
four onwards, and it's called cycles x. As well as coming in with a
host of different features, which will increase the
quality of your renders. It's also much faster
than the old cycles. Now if these options are
actually grade out for you, that means that you
just haven't got a graphics card that
actually supports it. I do know that QDa, I think is anything from
Nvidia second series and the Optic X is anything from the high end of
the second series, and certainly on the
third series of NVDA. I'm not sure about the
other graphics cards. So you just have to pick whichever one you can,
the highest one you can, and unfortunately, if
you can't pick any then you'll just have to
have the basic cycles. All you need to do to
enable that is again, just put it on optics x and
take both for these on. I like to take both of
these on just in case Blender can use both of them together to
speed up performance. Once you've got those tion, all you've got your cuba tikton, then what you can do
is close that down, and then you can come
over to where it says CPU and put it onto GPU compute and you'll see just how much faster
that actually is. If I now move around, you can see this how fast
this actually speeds up, and that is because
we're now using our GPU. All right. So now, let's go
through a few of the options. So you will see
under light paths. We've got a lot of options here. Now, all of these options will change the way that you
seen actually looks like. We won't go through these, but these are where all of the light options will actually be from the transparency to the glossiness of
the actual scene. So you're free to mess
around with these. Just be aware, the
higher you put these, the more performance is
actually going to take. The other thing you
need to know is that sometimes when we're dealing with certain
shaders within blender, they won't be able to
be rendered out in EV, and it's normally down to the retracing power of cycles that will actually
be able to render them out. A lot of the times when
we're dealing with something that has a transparency
in it, for instance, or something that
has displacement, and it's built through
the actual shader, so it's a material built
through the shader, you will have to actually
use blender cycles. Now what we're going to do
is I'm going to come down and just go through the
performance options, because performance on actual
cycles is very important. Now, depending on if
you're using your CPU or your GPU is how important it is to get
the right tile size. The higher the tile size, it is, the better it is
for your graphics code. The lower the tile size, the better it is for your CPU
or your computer processor. Whichever one you're
using to render out, whether it be your CPU or GPU, just take these into account. Again, CPU, lower tile size, so something like 64, and GPU, higher tile size,
something like 2048. The next thing we
want to look at is this use spatial splits, and you can see what it says, longer build times
faster render. Just make sure that you
tick this on because what we're also going to tick
on is persistent data. Once we've ticked these two on, what it basically means is, it's going to take longer to actually build out the scene, and than it is to render. If you don't tick this
on, it's going to take a certain length
for each one to. Finally, the next thing
we want to discuss. Now, we've gone through that is the actual color management, and you will have this
within EV as well. I've just saved it two cycles. Now, if you use in Blender f, you will have a view
transform that says AGx, and this is the new
actual view transform. This one is supposed to
be the most realistic. If you're using older
versions of blender, we'll have something
called filmic, but I recommend with
the new one using AGX. Now you've also got a look which you can actually change,
which is really handy, especially if you're
doing stylized scenes, and you can change this look to something like very
high contrast, or you can change it
anything in between. So you can have base contrast, or let's actually let's
put it back on AGX. Let's put it on something
like a medium, W's medium? So medium high contrast, and you can see now this scene is looking really, really nice. Now, you can also see
a few other problems with blender cycles. One of them being we don't actually have any
ambient occlusion. We don't actually
have any bloom. So although everything looks
better in blender cycles, not only are you going to lose all that
straight off the bat. But also, you have to then come in and set it up
in the compositor. This is why you really need to think when you're
rendering out of scene, whether you want to render
it out in EV or cycles, EV is much, much faster, and everything is there
straight off the get go. Cycles is much, much slower, needs a lot more performance
from your machine, and on the back end, we
also have to go into the compositor to get a
really, really nice image. Before we finish and
actually render this out, it's also very important
with blender cycles, how many samples you're
actually going to work with. You can see here
where it says render, not the viewport on,
where the render one is. You want to set this
pretty low to start with. It is set as default of 40096. I recommend saying this at 200. Lapping is then, it's got a
noise threshold on there, it'll hit near that 200, and then the noise
threshold will kick in and basically denise
your actual image. In other words, get rid of all those fireflies
and things like that. Now if we come up and
what we're going to do before hitting the renderorn, I also recommend if you're
working in cycles that you put this onto wire frame because then it's going
to save on performance, and it's not going
to be rendering it out in the viewport, as well as trying to
rendering it out. In the actual render. So
let's put this on wireframe. What we're going to do then
is come over to render, render image, and here we go. Now you can see it's
very, very different from our actual EV works. You can see it builds
up, builds up, builds up, you can see on
here the samples going up, and then you'll see
it actually finishes, and we can see it
took 12 seconds, which is around six times
longer than what EV took. But you can see it's a really,
really beautiful image. There's just no
ambient occlusion or contact shadows and
things like that on here. That's the difference, everyone. Now, the final thing
before I finish is, I want to show you just one
more thing that's important that you can do with both
EV or blender cycles. And if I come to my camera, and all I want to do is
just hit camera to view, and I just want to put my actual camera in this position just so I can
see the background here. And then all I'm going to
do is I'm just going to come down to where it says film, open that up, and you will see one that you've got here
that says transparent. This is how you create an image with a
transparent background. If I go to render out my image, you can see now it comes with
a transparent background. You can also see because we've got that persistent data on now, it's a little bit faster
than what it was before, and it's just under 8 seconds
instead of 12.5 seconds. All right, everyone, so
I hope you enjoyed that. I hope you learned
a lot from it. We will go into a
lot more detail about this as we're working
through the course, whether we're working in
EV or Blender cycles, and we will be discussing,
as well, of course, the composite in Blender cycles. Thanks, everyone. Cheers.
170. Blender Camera Setup and Turntables Tutorial: Welcome back,
everyone. Blend Ford the Modular and Kit
bash Environment guide. And now I'm going to do
is I'm going to play you another short video on
cameras and turntables. And then this will get you
ready to actually create your own turntable of
this actual scene. Once we've got in both
of the sky lighting, so that's the night sky
and the actual day sky. Alright, everyone, so I'll see on the next one. Thanks a lot. Bye bye. Welcome everyone to our camera setup,
Complete guide. And as you can see here,
we've got a fairly, fairly large scene,
and we actually need to bring a camera in
to actually render it. So what I'm first of all going to do to bring a camera in, I'm going to press Shift A, and within our Primitives menu, you will see one
that says camera. Now, normally, the camera
will always come in. Whereabouts you've
actually got your cursor. So if I delete that
camera out the way now, shift right click and
put my cursor over here, press Shift A,
bring in my camera, and you'll see, there it is. Rather than go into my camera, so to go to our camera, we're going to press
zero on the number pad. That then is going to
zoom into our camera. And from there, then
we're able to actually come over and open this
little panel here. To do that, we just press
the end button to open it. And then what we
can do is we can click this camera to view. And you'll notice
that it goes fairly red around the outside
of the camera. And from there, then we're
able to scroll our mouse we allow and put our camera
where we actually want it. We can also hold control
shift middle mouse, and what you can actually
do then is really, really get a nice, smooth zoom in and zoom out
of our actual camera as well. So all of the basic functions
of moving round the actual viewport work exactly the same way with the camera, as long as we've got
camera to view turned on. Now, what if I told you though, there's an easier way of
actually doing this as well. So what I'm going
to do is, I'm just going to delete my
camera out the way. And then what I'm going to do is I'm going to press Shift A, and I'm going to bring
in another camera. I'm going to position myself in the viewport of where I want
my camera roughly to be. And instead of zooming
to the camera with zero, what I'm going to do
is I'm going to press control lt and zero. And then what it's going
to do is it's going to put the camera in the middle
of the viewport for me. And from there, I normally
zoom in two, three times. And then what I do is, I
click camera to view on. And now I'm able to position my camera where I
actually want it, which is a little bit
easier than actually going to the camera and
moving it into place. Now, from here, I want
to discuss a few of the camera options that you can actually do with the
camera, as well. So what we need to do
with the camera selected, so just make sure that the
actual camera is selected, so you can see mine
is selected there. Press zero on the
number pad to zoom back into your camera and get the view that
you're looking for. Let's press camera to view, although you don't
need to tick this on to do these options. And if we come down to
the right hand side now, we have one that is
the actual camera. Now, if for going over
to the right hand side, we'll see we have a type
called perspective. And if I click this
little down now, you'll see that I also have orthographic on here
as well and panoramic. Now, we're not really
going to discuss panoramic because that is really taking it up a notch when it comes to
actually rendering. So we're going to keep this
pretty simple for now. So we do have perspective
and orthographic. And basically, perspective, it's basically as though you're
viewing this yourself. A orthographic, to
keep it simple, basically means it
has no depth to the actual scene that you're
actually trying to render. Now, as well as that, we can actually at
the moment zoom in and zoom out with
our actual mouse. But I recommend
instead of doing that, just change the focal
length slightly, and then that we'll
be able to zoom you in and zoom you out and get probably a
better perspective on what you're
actually rendering. Also want to talk about
the shift x and y. If you want to move your
camera left and right, that what you can do is
you can come up to item. Instead of moving this around left and right
with your actual mouse. What we can actually
do now is move the location of our
camera like so. I find this sometimes a
little bit easier to use, especially when we're going on the Z axis rather
than moving my mouse, we've shifted a middle mouse. I find it a little bit easier because it will be more exact. In other words, if I actually take off
the camera to view, you will see if I
come to my camera now and I go to the item
and I'm moving this up, you'll see it moves
out perfectly. All right. So going back now, let's go back to the camera, and let's now discuss our
clip start and the clip end. Basically, if you want to have a lot of things
outside of the scene, and you don't want to
actually have those rendered, what you can do is you can
actually change the clip end. This is the most important one. And let's put it to
something like 20, and what you'll see is
everything disappears. Now, if I start turning that up, you will see that the camera clipping actually
starts to increase, which then shows you the
actual buildings of our scene. And if I turn it up so
far, what I can do is, I can actually start
rendering the entire scene. But anything in the background here won't be actually rendered. So it's extremely handy. When you've got a load
of assets over here, you've got a scene,
and you don't actually want to
render those parts. Okay, so the next
thing we want to discuss is actually
coming in and naming our cameras because if we have multiple
cameras in the scene, And we want to take
different renders of them. Let's say we're doing shots, and we want one shot to be coming out of this
corridor somewhere, when another shot going around the roof or something like that. It's important to know
how to actually change the view to render these pots. So what I'm first of
all going to do is, I'm going to come to my camera,
make sure it's selected. Go over to the right hand side, where all my collections are. Press the little dot button, which is on your number pad, and that then will
take me to my camera. Now, let's add in another
camera after this. But the first thing I
want to do is just rename this camera to camera long shot. And then what we're
going to do now is bring in another camera. So I'm going to press Shift
A, bring in a camera. It's going to come over there. And let's say I want the
shot to be down here, so going down through
this alleyway like so. I'm going to press control ts and zero to bring
my camera there. And then going to draw
zoom in a little bit, go to view, I'm going
to camera to view. And then what I'm going
to do is just set my camera up where
I actually want it. Next of all, I'm going
to put it close up, so camera close O shots, like so, and now I'm
going to turn this off. So now we have two
cameras in the scene, one short range,
and one long range. And at the moment you can see
the local camera over here, is set, if I click on
this, to long range. The moment I click on
this and press zero, you will see, it takes me
to my long range camera. Now if I click on it again
and click to short range, it will take me to my short range camera or
any other cameras. You can have as many cameras
you want in the scene. Now, what about rendering? If I set this to
camera short range, and I've got my camera here, the moment I go to
render out image, you will see that it won't be rendering out the camera
short range image. What it will be doing
is rendering out the camera long range image. Why is that? That's
because we also need to change the camera
in the actual scene. You can see here we
have camera long range, and if we click this, we also
have camera short range. Now basically I can render out this actual
short range like so, I've come to re render image. Let it start up,
and there we go. Now it starts rendering out this actual part of the scene. Now, the thing is, you've got to remember that when you've got loads of cameras
in your scene, this part here
controls the viewport. So where you're looking
in the viewport, which camera actually
looking through, and this part here controls
the actual render. So just be sure to switch
them over and just be sure also to rename your cameras when you've got lots of
cameras in your scene. Now, finally, the next
thing we want to discuss is how to actually make
a quick turntable. And the reason we're doing
that is because many, many times people want a
turntable of where they're actually going to
be going around the scene or their
actual assets. The way we're going to do
that is, first of all, make sure your asset or your scene is in the
center of the viewport, so you can see where
these crossing lines are. And then all you want
to do is press Shift S and you want to put
cursor to world origin. That then we'll set your
cursor to the center. What I'm going to
do from there is, I'm going to press Shift A, and I'm going to bring
in an actual curve, and the one I'm going to
bring in is a circle. From there then, I'm
going to press the Sp and just pull the circle out
to where I actually want it. And now what I want to do is
I want to tie my camera to my actual circle because
I'm going to use my circle to actually
animate the camera. The way I'm going to do
that is I'm going to grab my camera, grab my circle, press Control P, and
then I'm going to go down to where it
says, follow path. And you will notice now you've got a little bit of a line where the actual camera is
to the actual circle. Now, it's important wherever you want your camera to start, so you can see at the moment
this is on actual zero. So we want our camera probably to start
somewhere around here. So the first thing
I'm going to is grab adjust my circle and
rotate it round, so I'll rotate it round, and then my camera is going
to start roughly over here. But what I need to
do, first of all, is move the camera to
this point here rather than it rotating away
from the actual circle. So the way I'm
going to do that is just press tab on my circle,
to going into edit mode. And then I'm going to
grab this little point here because this is where
the camera is attached to. It will always be attached
to a point on here, and then I'm going
to press Shift S, and then cursors are selected. Next one I'm going
to do is press tab, and then we're going
to go to my camera. And what I'm going to
do is press Shift S and selections
cursor keep offset. That then is going to
put my camera there. Now, you will see if I press the space bar now because
it is following this path, my camera actually shoots around there like so before it begins again at frame 200 or 800
or whatever you set it to. Let's now set this back at zero, and the camera should be
exactly where to put it. And now what we need to do is we need to if we press zero, can see, it's not actually looking at the building
or anything like that. So the next thing we
need to do is make sure this camera is looking
at our actual scene. The way we're going to do
that is pressure shift day, and you're going to bring
in an empty and plain axis. And at the moment, you can see, I've put this in the wrong place because it came
where my cursor was. So what I want to
do is delete that. And then what I want to do is press Shift S and
cursor to world origin. Shift A, bring in an empty
plane axis, like so. And the reason we're using a plane axis is because it won't be rendered out at all
within the render, but it is something which our
camera can actually follow. So now I've got my
plane axis in there. I recommend that
you pull it out, so keep pulling out so
it's pretty big, like so. And then what we're
going to do is we're going to
come to our camera Come down to where it says constraints just above
the camera image. Add constraint, and the
one you want is Track two. And then all you want to do is click this little pipette here. Click on your actual empty, and now you'll see
that your camera is pointing at the actual empty. Now, still, this isn't
very good because We have a problem in the cameras looking completely in
the wrong direction. But if you zoom out enough,
what you can actually do is, you can select your empty, and you can pull it up like so. You can select your circle then, and you can also
lift it up like so. So you can actually really start to mess around
with this and get that perfect
viewpoint what you're looking for. So
something like this. And then all I'm going to do
is, I'm just going to press the S board to expand
the circle, pull it out, and now you'll see we've got the perfect place
where we need it, just need to pull it up
a little bit more maybe. Let's pull up the empty a
little bit. And there we go. And now if we press space bar, you can see that we've
got a turn table. So one more thing before
we actually finish this, we obviously need
to control how fast the how fast the actual camera is going around the circle. All we need to do to do that is, we will select our circle, so if I come out and
select my circle, go over then to the
right hand side where you've got
your circle options. And then what you want
to do is come down to where it says path animation, and then you can turn this down or up to whatever you like. So let's put this on 800. Let's put the
evaluation time on 800. And then if I go
to my camera now, press the zero b,
press space bar, you can see now that
we have a render, which is going to
last 0-800 frames. Or we can change this to 600, let's say 600, 600, like so. There we go. Now it's gone to 600 frames. Then when it gets to 600 here, it'll just carry
on over the 800, because we obviously
have 800 frames here. So last of all, just
change the amount of frames to match the amount of frames in your
path animation. And what will happen
is it will get to 600, and that then should
restart the camera. So you can see there's
no break in it. It just actually
carries on in a circle or a turntable around
your scene or asset. Alright, everyone, so I hope that's a lot of
information for you. I hope it made sense, and I hope it gave
you a good rundown of how cameras actually work. Thanks a lot. See you on
the next one. Cheers.
171. Creating a Day Scene Lighting in Blender: Welcome back to Blend the four, the modular and Kit
bash environment guide, and this is where
we left it off. Now, what I want
to do is I want to come over now to our day scene, I want to make some
changes to that. Now, for me, I can actually
bring in everything. In other words, I
can press altage, bring back all of my
scene like this for you, you might actually
be able to do that. But at the moment,
we're just focusing on this actual blue sky. Let's come on over to the
object and put it onto wild. And you will see
that if I Zoom out, so if I scroll out
with my mouse, here is my actual sky that
I've got at the moment. If you remember, this was some just basic sky that
we actually put in there. Now I want to do is now
I've got everything ready. I'm going to save out my work. Then what I'm going to do is I'm going to bring in now a mix. Let's do a search for mix, and we're going to
bring in a mix color. What we're going to do
is drop that in place. Now, you will see that this
is looking a little bit dark, doesn't really look
like a jungle scene, but let's first of all, put
this on no 0.825, like so. What we want to do
now is bring in instead of this white sky, we want to bring in a
beautiful blue sky like so. Let's make it even more blue
or even more blue like so. Now we can see, ha ha, we're starting to get somewhere. It's looking a little
bit like dusk, and we've got some
blue sky in there, which looks very, very nice. But now set up our
lighting properly. So we're going to do is
put the sun size to 1.5, because we're going to
be using our own sun. We're then going to put the
sun intensity to not 0.4, like so, and ha ha. Now that's looking
very, very nice. Then what we're
going to do is set the sun elevation to 44.7. We're going to set the
sun rotation to 90. Of course, we can change
this as we're moving around. We're going to set the
altitude to 5,000. Like so, we're going to set
the air to point not five. We're going to set the
dust then to 1.769. And finally, we're going to
set that ozone to 6.923. And bearing in mind,
I've played around with this a lot way way
too much actually. But now you can see exactly what that's going to look like, and that is looking very, very nice as you can see. So now it's really
brought it to life. We've got all of that
jungle feeling there. Now, what else we can do
is we can put this down. We can actually put
these parts up then, so I'm just going to move
all of these parts up. Like, so, just to
give you a good idea of what it should look like when you've actually got it rendered. So everything is in place now. Now, what I'm going to do is I'm going to put my torches on. So I'm going to
bring in my torches, like so, and we can have them on if you want to.
You know what? I'm going to actually
turn the torches off. I'm just wondering, I'm
going to turn them on. But what I'm going
to do instead is, I'm going to put this
up, put my torches up. And what I want to do is just turn out the torch
light and flame. So I just don't
want them in there. You can see we've
still got this, you know, what's
called the charcoal in there that we can turn off
as well, if we want to. Let's turn in our vines. Let's put in our plants, and let's put in our ferns, and let's put in,
finally our palms. Let them load up,
and now you can see just how beautiful that looks. Now, before finishing
with the date texture, we, of course, need in a sum. So I'm going to show you
how to create a pretty rudimentary basic s. So
what I'm going to do, first of all though, I want
to put this on object mode. I want to also
make sure that I'm hiding all of these
trees out of the way. I'm just looking there
the large trees, small trees, I can hide
those out the way. Now, these are basically the ones underneath,
so underneath here, those are all those
trees, which you can see, even when I can actually hide them out the way so they're actually going to be
rendered as well. And then we want to do is we
want to wide out our dome. So this here, we've
got it on the sphere. Let's press M and
tight it that up, so we'll call it
sky dome like so. And this sky dome actually
should work for both of the night scenes and the day scenes as well. So
that's in there. Now we've got a plane. This
is our actual main terrain, so let's call it main terrain. And then we'll also put
this in its own group, so press M, new
collection, Main terrain. Like so, and there we go. Now we can put that up. And what we can now do is
hide out our sky dome, hide out our main terrain. Now, what I want to do is,
I want to bring in the sun, and the sun wants to be just in where the
actual sky dome is. So first of all, though, let's actually have a look,
that's our little guy. Let's hide him out the way. We don't need him
in there anymore. We'll also turn him off
on rendered view as well because we don't want
to rend him out by mistake. Then I'm just going to
prob the torches and now find I'm just going to
bring back my sky dome. And that will tell me then where I need to
put my actual son. So what I'm going
to do is I'm going to press Shift A. I'm going to press bring in where
is it a circle. So let's bring in a circle.
Let's see where that is. So shifts based bar,
bring in the move tool. Here is my circle. Let's bring it out a little bit, so
we're going to bring it out. And then what I'm also going to do is I'm going to zoom to it. I'm going to press
the tab button, press the F bonds for lit in, and finally, then I
can rotate it round. So R Y 90. I want to then bring it
in. Pass my sky dome. I want to press seven
to go over the top. I want it more in the center.
I'm going to press G. And I'm just going to bring it in past my sky dome
so it's in place. Now if I press zero and
go to my camera view, you can see if Zoom out it's all the way over
here, and it's tiny. It's a tiny thing.
We don't want that. We want it to be pretty big. So what I'm going
to do is grab it. I'm going to press the S b, I'm going to increase
the size of it. And now you can see it's
looking a bit misshapen, and the reason is because
we have to rotate that round to get the sun
to be the right size. So there we go. There
is our sun actually in, but if I press render view, of course, we're not
really going to see a sun, we're just going to
see a little bit of a blob in the air. We don't want that,
maybe for our moon, but certainly not for our sun. So let's now come
in. Object mode. Let's come over to material new. And then we'll just
call this Sun. Like, so, and now, let's actually bring in some noise to help
create this sun. So first of all, this
principled, let's get rid of it. Like, so, and there we go. It's gone black, so Black sun. We don't really
want that either. So shift, bring in
a noise texture. And again, same thing as normal. Copy what I print on there, then change it once
you're happy with it. Now, first of all, let's
bring in a map in, so control T, bring
in a mapping. And this time we
want it onto object. And we also want to make sure that all of these are set to
one, which they should be. Now, let's come in, and
what we're going to do is 10.6 16. 0.62 and zero on those. Now, let's bring in
a multiply because we want a very high
emission on this. So what I'm going to
do is press Shift D. I'm going to bring
in a math node. So math node, like so. We're going to set
this then to multiply. And then all I'm going
to do is I'm going to plug in the fat from the noise. And then I'm going to turn
this up to 27.4 L so. Now, finally, we
need an emission then to actually deal
with this value. And so I'm just going to pull
this over very slightly, press Shift D, and we're
going to look for emission. Like so. And we're going
to We don't need to actually turn up the
strength because this is going to do that for us,
so I can plug that in. And finally, then, let's
plug this into the surface, and we should end up
with a glowing sun. But we want to actually
make it obviously a yellow sun or an orange
sun, whichever you want. Let's make it a little
bit more yellow. And there we go, there is our actual sun.
Double tap the A. And now you'll see that A, let's make it a little
bit more on the red, or a little bit more on
the yellow, like so. And what I'm going
to do? Let's put this on 100 or something. And you can see now we can
really start to ramp up that I don't want to actually
ramp it up that much, and the reason I put it on round about 28 is because then
I still get that color. Now, if I grab my sum, so let's just grab this s, you can see it needs maybe pulling in to my
actual sky dome. So what I'm going to do
is just press seven, press G and just pull
it past those clouds, like so if I press zero now, you can see it's front
of those clouds. It's really really
up to you if you want it in front of the clouds, or if you want the clouds actually in front of
it, it's up to you. Now, if you zoom into
this pressing Db, you will see now
that that actually looks pretty much like a sun, and we've got a lot of control over how we want this to look. Lastly, as well, you can
see if you're putting this in front of your sky dome, obviously, you don't
want shadows on there. So what I'm going to do is
I'm going to come over and turn of my shadows, which I'm just trying to
remember where they are. I think It is under
this one here. So this little
square, come down, and you should have one
that says visibility. So this one, open it up
and just click off shadow, and then it will
make that disappear. Double tap the A, press
the 01, and there we go. Now, let's just quickly bring back our large and small trees. Not those ones, are terrain. So main terrain. There we go. And that is what you're
going to end up with. And you can see that
if I double tap the A, that is looking pretty nice, and we can definitely
set that sun, in front of this and take
a very, very nice render. So all of that is
looking really nice now. Now on the next lesson then, we want to actually set
up actually night scene, so we can get that in, and
then we've got both of those day scenes and night
scenes already set up. And then what we'll do is we'll put the things
that we need, so like, for instance, our son, we need to be able
to turn that off and on, so I'm actually going
to come to my son. And then what I'm
going to do is I'll rename this sun. Thank so. And then I'll also
press the button, and I'm going to go to where
it says new collection, and we'll call that Sun. Like so. Click Okay. And there we go, that's
in there as well. Alright, so, finally,
let's save out our work, and I'll see on the
next one, everyone. Thanks a lot. Bye bye.
172. Designing Night Scene Lighting for the Aztec City: Welcome back everyone
to blend a for the modular and Kit
bash environment guide. And now what we want to do
is set up our night scene. So we have a day, and
we have a night scene. Also, they are completely
different setups. Not only that, though, we also have a completely different
set up for the compositor, because on the day
and night scene, they will need different things. For instance, in
the night scene, bloom or the fire, how it resonates is a lot more important than in the Daisen
because in the Daisen, obviously, we don't
actually have that. That's very
important. We need to change the composite
over as well. I'll show you how to do
all of these things, so you'll be able to swap
between them quite easily. At the moment, If we're
heading over to our day scene, this is what we've
got to set up. Now, let's change this over, so we'll change it over
on the world as well. This is our actual day
scene that we've got now. Now what we want to do is
go to our night scene, and you will see that this is a completely different
set up, as you can see. Now, let's actually
put this over here, and there we go, there is
our actual night scene that we've got at the moment. What I want to do, first of all, I want to save out my work. And I'm going to use
this in my render view. Now, I know a lobby out there might not
be able to do that. So just watch what I'm
actually doing follow along, but you might want to
put it in object mode, or you might want to
hide these trees out of the way and do that if
you actually need to. So what I'm going to
do, first of all, is set up this for an
actual night scene. So I'm going to first of all set the sun size to be at zero. And you know what, as well, we don't actually need this sun on, so we're going to hide
this sun out the way. We're going to keep
our clouds on for now. We even might even be hiding the sky dome
out the way as well. I'm just going to show
you how it works. The first of all, we'll come to the sun size, set that to zero. Sun intensity, we'll put
to not point not two, like so, bringing in a
little bit of light, we'll set then the sun
elevation down to -6.24, so -6.24, like so. Then what we'll do is we'll
set the sun rotation. I want to put minus -59 because that's what I've got
to set up on my own thing. I want to set the altitude
up to 40,000 meters, so 40,000 like so. And there you go,
you've got a little bit of blue there hanging in there. And then what I'm going to
do now is set the dust. So all of these dust
air and ozone to one. Like so, and you lend up with
something a bit like this. Now what we're going to do
is we're going to come in. And first of all, I'll
bring in a background. So shift A, do a search, put in background, like so, and you should be
able to bring that in, drop it in there, and we'll set the strength
of our background up down to no 0.2 like so. So now you can see it's
dark in the wild up. It's, you know looking a
little bit more a night scene, if I can use that word. And then what I want
to do is now though, I want to actually
bring in some stars. So what I'm going to do is I'm going to bring in some stars. So what I'm going to do is I'll bring in a noise
texture first of. So let's bring in
a noise texture. So I'm going to press
Shift D. Search noise texture like so.
Drop that in there. Then I'll press Control T.
I'll bring in a mapping, and I'll bring in a
texture coordinates. And we can leave those exactly as is. Now I'm going to do this. I'm going to plug in
my fa to a color ramp. So let's put it
into a color ramp. So shift date, search color
ramp. Drop that in there. And then, of course,
we're going to need an emission for all
of those stars. So I'm going to press
shift a search, emission and bring
that in. Like so. Now what I need to do is I
need to mix both of these up. So I'm going to move
my world output just a little bit over here. I'm going to bring in then
a mixed shader because at the moment we've got a background
shader and an emission, which means we can't
use a mixed color. We need to use is
actually a mix shader. So if you come down to Shader, you will see you've got
one that says mix shader, and let's just drop
that one in there. And then finally,
what we'll do is we'll also turn this down to not 0.173, like so. And then I'm going to drop
my emission in there, like so, and it's going to
brighten everything up. And I'm going to put
my emission on five, like, so it should bryn everything up really,
really brightly. That's not what we
want, of course, and we're going to sort
that in just 1 second. Now, what we'll do is we'll
come to our noise texture. I'm going to plug then the
fat into my color ramp, and then we're going
to plug the color into the actual color
of my emission. And of course, then this
color ramp is going to control again the masking. So how much noise is actually in there compared to how much it and how much s
through is in there. So let's first of
all, bring up this. I'm going to put
it all the way up. To where the just before
where the E starts. So you can see just right at the side of the E. And then
I'm just going to come down and bring this
y just a little bit back in front of
that arrow like so, and you can see now
that is what we've got. Now, let's actually move away from our camera so we
can actually put in, position ourselves very
nicely around here. And then what we need to do
now is bring in these stars. So the way we're going
to bring in stars is, we're going to put this
noise texture on 500. So 500. And there we go. And then let's set the
detail down to zero. The roughness down to zero, like so, and there we go. We've actually got stars now. So you can see now we've got some beautiful stars in there. Let me just try and get
a good view of it for you. There we go. Now, you can see on this that this sky dome is a
little bit bright, so these are a
little bit bright. But what we first of all need to do is brighten up
the whole scene. And then we'll have a
good idea of how much we need to turn
down this skydome. For instance, we can come in and just get rid of the skydome, and you'll see that you've
got something like this. But you can also see that we haven't got any lighting
in here whatsoever, so we really need to
light it in some way. And the way that we're
going to light this will be through actual
proper lighting. And one of them will
be the actual sun. But this time,
obviously, the sun won't be used as sunlight, will be used as moonlight. Now what we're going to
do is we're going to head on over back to
our resource pack, grab our moon, and then
we're going to bring that in and drop it in place.
Let's do that now. Now, those of you
with a keen eye will see that I've
added this in, and the reason is because we
weren't going to actually do the day and night scene.
But we ought, You know what? Being as the course is so vast, we might as well add
that in there as well. Give us a little extra
bonus so that you know I set up a day and the night scene as well as
render them out. So we've put this moon in
here to actually use that. And what I'm going to do is,
I'm just going to select it. Press Control C, and then drop
back into my other scene. So come back to my
other scene here. Let's put it on object mode, so we can actually
see what we're doing. And then what I'm
going to do is, I'm also going to
press Control V, bring in my Moon,
shift space bar, bring in the move tool, and then just pull it
up and into place. Now, we can see that
what I want to do is, I want to, first of all, go to modeling because I actually want to
see what I'm doing. And I also want to come
and press the tan. Grab it now, press the n born, new collection, and
let's call it noon. Like, so, click Okay. Then what I want to do now
is position this in place. So basically want it pointing
pretty much at my scene. So what I'm going to do is
I'm going to spin it around. So R X 90. Like so, and then R X
and a little bit more, so it's pointing down like so. Now, I also want it kind of coming in from around near because I want
it in between there. So what I'm going to do is z -90 or z 90 to make sure
that it's at an angle, and it's at the right way. So now I can actually
pull this out into place. And if I press zero, then to get my camera, I want to put my moon
round about here. So I want to put my
moon roundabout here, and I also want to
spin it around. So not quite. You can see there. It's probably a little bit in the jungle. We
don't want that. I want to put it this
way a little bit, and then art and Z and just spin it around the right
way and I press zero. That is roundabout how I
want my actual moon like so. I might need to spin
it around even more. Okay, so the moon is
basically all set up. You'll see that if you press
the render bone you'll see this moon is set
up with an emission. And you can also see you know, it's got some lighting in there, and it's actually got
a texture in there. So so far so good. Now, my camera, I
think, at this point, I'm going to have to move
it out a little bit, so I'm just going to press control shift middle mouse bon, and just bring it
back a little bit, bring it up a little bit, like so, and just get
my moon into place. Now, I can't really see what
else is going on down there. I will be able to
see that though very shortly on the next lesson
because on the next lesson, I'm actually going to bring in some sun just to light
this up a little bit. Alright, everyone, so
we'll save the way, and I'll see you
on the next one. Thanks a lot. Bye bye.
173. Refining Night Scene Lighting and World Shader: Welcome back everyone
to Blend for the modular and Kash
environment guide, and this is where we left off. Now, first of all,
let's press shift S, and what I want to do, so
Shift S is cursed to selected. So cursor to Mamoon. Shift A then, and then
what I'm going to bring in is a light source, and the one we want
is going to be a sun. And as soon as we bring that in, we see that this happens. Now what I want to do is, I just want to turn off
camera to view off. Now I've got a good view
of what I'm looking at. And then what I want to do is, I want to spin my son, so it's pointing the
right way at the moment it's pointing this way, and
we don't really want that. What I'm going to
do is press R and y and just bring it up
into place, like so. Next of all, then, what
I want to do is turn up the strength of my
son, put it to full. And then we go it's going to
brighten up the whole scene. And then finally, what I want to do is make it a
little bit blue. So if I press zero now, you can see that it's
aiming this way. I want to spin it
around a little bit. So A Z, let's move it
round just a little bit, and you can see the
shadows moving like so. And then what I want to do is
put it onto a bluish tinge. So a bluish tinge, may maybe that's a
little bit too much. Maybe like so. So something like this
looks, much, much better. Now, the thing is that You will also see that
in the scene itself, we haven't got our torches on, so let's go and put those on, so then we can actually
have a good view of what they're going to look
like when they're in place, so let those all load up, and you will see that this here is a little bit
too much in shadow. We can't really make a lot
of the actual building, and that's something
that we need to fix because it's okay
in a moon like this, but we really need to fix that. The other thing
is, let's see what happens when we bring
back our sky dome. Let's bring in our sky dome. That will give a little
bit more light to it. Now, of course, with the moon, you might want to put the moon behind the actual sky dome. So you might want to
put it behind there, so the clouds are coming
in front of there. So what I want to do though,
first, before doing that, as you can see, when I
bought back my sky dome, that has actually
lit up everything because this cloud is actually
giving it some emission. Now, I think that this is
a little bit too much. So if I click on my
sky dome sphere, to my material panel. You will see then down here, I can turn the emission
strength down to zero, and you'll see, hopefully, those clouds actually disappear. Now again, now we
can see we've not got much light around here and the clouds
look a little bit dark. Now this is way way to, much, of course, let's
put it on not 0.2. You'll see once I bring
them in a little bit, now we get a little bit
more lighting down here, and now it's looking
a bit more realistic. Now, it's up to you
whether you want to create a second sky dome and
have a default on here. I still feel though
that this needs a little bit more lighting just to actually really
make it look nice. So we're going to do is
we're going to bring in one more light and the light we're going
to bring in then will just be a area light. So all I'm going to do is I'm
going to come around here. I'm going to hide this sky
dome out the way again. Let that hide
itself out the way. And I'm going to also for now, hide this out of the
way, so the environment, just so I can actually
see what I'm doing. Hide I'll of that other the way. And then what I'm going to do is I'm going to put it on object mowing it just so I can
actually see what I'm doing. And then what we'll do is
we'll bring in another light. So all I'm going to do shift S and cursor to world origin, shift A, and then we'll
bring in a light, and this time, we'll
be an area light. And then all I'm
going to do is pull this out. I'm going
to pull it up. And with area lights, I'm going to rotate it, you can see that I can actually
scale this up as well, so I can press S, and I can really start
to scale this up. So I recommend scaling
this up relatively big Then playing around
with these parts over here. I'm going to also rotate it because I hate things
being straight on, so I'm going to rotate
it a little bit like so. Now the thing is
you don't want to fight against the shadows
coming from that moon, you don't want to
fight against them. In other words, you
don't want to create separate shadows in
your actual scene. What you want to
do is you wanted this to work in harmony, just to light up this
back side of it. So if I now put it
on rendered view, you will see that this
will basically do nothing. When it loads up, you can see
it's really doing nothing. However, if I turn this up to, let's say 10,000 let it load up. Now, you can see, it's actually lighting up that back part. But what you can see
is that it's too much. You can see it's
lighting up too much. Now there are a few other things that we can actually
do with this. For instance, at the moment, this is a square. We can change this from
a square to a disc, and I think personally
that is nicer lighting. The next thing we want
to do is we want to put this on a blue
kind of shine. So let's set this to blue. So you can see, it's looking a little
bit more realistic. Now, the only thing is now, let's change the size
to something like five. Let's change it to be's have
change that all the way up. Think we've run a little
bit too big with that. Let's come down a
little bit, so 1.5. There we go. Let's change
this down to 1,000. Instead, and there we go, now you can see, we can
see parts of the wall. It's not fighting against
the shadow from the moon. The one problem we
have is, however, is that on our sky, you can see that this
shadow is going this way. This is where our
sun's coming from, and this is where our kind of moonlit shadows coming from. And they're all fighting
against each other, and that is not
something we want. So what we want to
do now is go over to our sky textures to
our night sky texture, and we sho from here, be able to let me just
see if we can actually change the I'm just
seeing if on here, I can actually change
the su position. This might be the su position, let's have a look, not that. That's definitely not
what I'm looking for. Now, it's in the
sky texture one. I'm just looking.
I I can change. It doesn't look like I can
change it from within here. There's some positions
there, as you can see. So what I'm going to do
is I'm going to head on over back to my shading. I'm going to put it on weld. I'm going to press
the little db. I'm going to go do this. So let's zoom in. Let's
come down where this is. I'm going to view with the
moon there, double tap the A. And then what I'm
going to do now, I'm going to come to my world, which it's on, so you
can see my worlds here. And this is the one that I
want to actually rotate. So if I put this on rendered
view, let it load up, I want to rotate it so
that these shadows, when it loads up, these shadows
are following the moon, so you can see that they
should be going this way. So if I come in, I'll always save I'm work
before altering this, by the way, because it's quite intensive
when your machine. And then what I want
to do is put this on, let's say -30, and see where those shadows actually get
moved to, and there they go. Now, let's put it onto 180. So all I'm doing is, I'm testing
it out. And there we go. And I'm just
wondering if I've got enough to actually change that round with the
angle of the sun. So the sun also might
be causing this. So if I come into my son, as you can see, here is my son. And now if I press Z. Let's move that round a bit. And you can see now look at what's happening
with the shadows, and you can see all of this now is happening
with the shadows. So this is what I actually
want to turn around. I'm just moving it
around slowly like so. And now you can see that is looking much more
realistic, much better. I'll put it there for
now and then I'll ad, move it around
again, again, again. And there we go. That is looking much much
better as you can see. Now you can see that because
the moon's shining up here, it actually looks a lot more realistic of how that's shining. Nothing is fine
against any shadows. You can see now the direction
of this is going here. You can also bend this
down as well with the sun. And then obviously,
you lend up with these shadows not crossing
quite over there. Okay, so that's
pretty much done. Now, you can see that we have, if I double tap the A, we have and turn
this off. Turn off. We have basically
a night scene now, which is looking beautiful, and we also have a day scene. And what we need to do now is be able to turn the
moon and sun off. So we can turn
those off at will, so I'll turn the moon off. I can turn then the sun
on. So there's the sun. Now, the one problem
we've got is that we've got area lights
that should be in the moons and not
in the actual sun. So what I want to do
is I want to come in, put my moon back on and drop both of these into
my actual moon. So let's drop those
in there, like so. Then what I'll be able to do is I can turn off now my sun. And I can quickly
then go back and put this on a day
scene, like so. And let's turn off the
moon, put the sun on. That's hopefully, and there
we go. That's our day scene. And then I shall be able to go and turn on my night scene. Turn off the sun,
click on the moon. And there we go, there's
our night scene, and it's really really easy
then to swap between them. Now what we want to be
able to do, finally, is we want to come in and
actually take a render. So we're going to actually
take a render of this. Now, when we take a render, I recommend turning
most of the things off, that then will make it very,
very easy on your system. And from there then
we're going to be doing some compositing. And I think we'll start with
the actual the night scene. I think we'll start
with the night scene. That is the hardest to set up. And from there then,
we'll actually create a very, very nice render. All right, everyone,
so be enjoying that. I'll see on the next one.
Thanks a lot. Bye bye.
174. Rendering Out the Day Scene in Blender: Welcome back everyone
to Blend pool the Modular and Kita
Environment guide, and this is where we left off. So what we want to
do first of all now, let's go to our Day scene. So we'll do our Day scene first. And what I want to
do is, as well, I want to go to I want to
go to actually my tortures. So I want to just
turn the torches off, not turn the torches off. I want to turn the
torch and flames off. And then what I want to do is come down to this part here. We want to make sure then
that we're on material. And what I want to do
is set the emission. So the emission, let me just make sure I'm
on the right material. So the material is
going to be charcoal, so charcoal, this one here. And then what we want
to do is just set that down to zero. And now, if I put this
on rendered view, We should see that
these are dull, and that's exact one. So we've got double tap the A, and there we go, that is
exactly who want in, like so. Now the next thing we
want to do is, of course, we want to hide our moon, and we want to bring
in our sun. Like so. And I think this kind of view here is going to be pretty
nice, as you can see. If I put the s, can see it glowing through there,
that looks pretty good. I think that'll make a good
actual render for this one. And then what we'll do on the
next one is we'll probably move it to the side a little
bit for the night scene. But for this scene, we'll
set it up like this. So what I'm going to do
now is go over to model. And the first thing I'm
going to do is press zero to bring in
my camera review, and I just want
to make sure that my camera review is set okay. So all I'm going
to do is I'm going to zoom in to my camera review. So shift middle
mouse, move it over. And then what I'm going to do
is click on the cam review, click it on the render board, and then get the view
that I actually want. Now, I've got to
be careful because I already know that if I press control and shift
and pan out a little bit, you will see now we've
got some actual, you know, bits of
jungle in the way. We don't particularly
want those. I'm just going to set
it up where I want it. So maybe something like this, we've got most of the ceiling. And maybe maybe just a little
bit of foliage in there, not quite that much, but
I just want to rotate it. Now, sometimes when
I'm going with, if I put this on
the shader mode, you can see now we've got
all of these things in here, and sometimes it's easier if you actually come down and
click on your camera. So everything load up,
click on your camera. It's also sometimes
easier as well if you actually turn everything
off before doing this. So you can see now,
I've got my camera. Where is my camera gone? I think it's
actually zoomed out. So let's zoom it back in. Let's get the part that we want. So it'll be something like here. We can see we've got a
lot of foliage in there. Let's zoom it out and down. Like so. Like so and there. We can see now we've got
a bit of foliage in here. Which is very nice.
So these bits here, they look really nice. Now from here, obviously, we've got the sum needs to be a little bit more in so I'm just going to pan out a
little bit more, pull it up a little bit more, and just get that sum
just in there like so. Now I've got some folage side, some foliage this side.
Put it on our render view. Let's have look what
that's going to look like. There we go, that's
looking pretty nice. I'm really happy with
that that looks, got my son in there. Now finally, what I want to
do is, I want to come up. I want to close all of these up like so. Close
all of these up. Like so. Now the thing is we don't want
our moon in there, so we don't want our
moon in there at all, so we're going to
click this board on. We also we want our sun in
there and we want it rendered, but we don't need to see it within the scene as we are now, so we don't need to see that
because what that'll do is, it will improve the performance if we close a lot of these down. Now, the main terrain,
we want them rendered, but we don't need to see them
right now, so that's fine. Same with the sky dome, we're going to have our
sky dome there. And the other thing about
the sky dome is that we can also come in and turn up the clouds
if you want to. I think I'm happy
with my clouds. I'm going to turn that off. I'm thinking now the large
trees in the terrain. We don't need to be
seeing those at all. We don't need to see
our jungle terrain, so let's turn that off. We don't need to see
our terrain in here. We don't need to see any of these other things
now, temple parts. I'm just making sure
that everything in here now I'm going to turn
those off like so. I'm also going to
turn off the part. So we should just end up
with a screen like this. Now, from here, let's put
it on to object mode. And what I also do is I'm going to turn off
the camera to view. I want to press the end bon. Finally, then, what
I'm going to do then is also turn this off. I also turn that off.
And the reason is. The reason is, if you're taking a render and you've got a
lot of things in the scene, it's having to render
those out as well as render a render at the same time, and
that's not what we want. So that's why I'm
trying to reduce everything as much as possible. Now, I don't think there's a real big difference between having an object mode
and having a wire frame. Some people say there is,
but I don't think so. Lastly, then, we've got these
two interlocking links, and I actually think these
make a big difference. If I click that off
and there we go. Now, finally, let's
go over then to the right side to
our render button. I'm not going to mess around
with any of these right now. I'm going to do that in
the actual composite. The only one that
you might need to want to change is going to
be the color management. I'm going to show you
in a minute an add on that I use as
called turbo tools. Is a paid add on. I'm
not sponsored by them. I don't make any
money out of them, but I recommend if you can, getting that add on
as it really will speed up the process
of your render time. So it's one of the only add ons I recommend
getting, but for me, it's helped increase
render times dramatically, especially when it
comes to turntables. But for now, what we're going to do is going to make sure this is the same setup as what we
had right in the beginning. We're not going to
change anything else. And as I said, the
only thing you might want to change is down here
under color management, you can see them on we've
got a look of none. Now, we might want
to change that look to be if I click on here, medium low contrast or
something like that, but we'll go into
that in a minute. At the moment, what
we're going to do now, we got everything set up, we're going to
save out our work, and then we're actually going
to hit that render bar, so render image, and then
it's going to load up. So it's going to think about it. And then we're going to
see how this loads up. And you'll see straightaway
that for some reason, the flames are not hidden, and all of these
things aren't hidden. You can also see that because
it's quite a big scene, it is going to take
quite a long time because we've got quite
a lot of samples here. So what I'm going to do
is close that down now. And now you've
tested that out, you should be able to close it down. And let's put the
maximum samples to let's try for
now, putting on 25. So 25 samples. Let's also come down. Where it says performance. At the moment, you can see that we've got persistent data. So we want to click that
on because what that's going to do is make sure that once it's actually rendered out, it's going to render
out faster the next time because it's going
to cash that data. So that's really important. The next thing we've got
then is the tile size. Now, if you're using a
GPU, generally, I think, personally, it's better having a lower sample or
a lower tile size. So you can put this
on, let's say 128, I think that actually
works out faster for me. So let's try it lower.
And if we want, we can actually put this on
higher in just one moment, but we'll give that test. Now, the next thing is, we also saw that the temple parts weren't on. So I'm going
to click those on. We also saw that the torches, if I open this, the torch light and flames are on, like so. So I'm just turning those off, and now when we come to render, it should be much faster, so render image much faster, and we should have everything
in the scene, hopefully. So let's just see if we got everything in the
scene. And here you go. Now you can see, because
I did it the other way where it's a smaller file size. You can see now
how fast that is. I think personally that
this is actually faster. But we'll do it both ways. We'll turn all that on, and then we'll get this
beautiful render out, and then it will
denise everything, which is what it's doing now. And there we go, there
is our actual render. Now, you might think that, hey, this is a beautiful render, but we can do so
much more with this, guys, so much more with this, because on the next lesson, what we're going to do is
we're going to take this, and we're going to actually use our actual compositor to really, really bring this to life. Alright everyone, so I'm
going to close that down. I'm going to save out my work,
and then on the next one, we'll jump into the compositor, and we'll see what we can
actually do with that. Alright, everyone,
so speak to you on the next one. Thanks
a lot, bye bye.
175. Compositing the Day Scene in Blender: Well, come back to blend
for the modulate and Ki ash environment guide and this is where
we left it off. So what I want to do now is, I want to introduce
you to that add on, so preferences add ons, is called turbo
tools, this one here, and the moment I click it on, close that down, and we'll end up with something like this. Now, the moment
you can see that I need to enable it, so
I'm going to enable it. And as I said, I will be
using this from now on. It's up to you what you want
to set your samples to. I want to put mine
back at 4,096. That is what the standard
is, so it's up to you. Just make sure it's in two. So for instance, 2048 1024, just make sure they're
doubled up or doubled down before actually
going ahead with that. So the next thing is, then I
just want to at the moment, if you have this, as I said, we will be using it on draft
rapid and crap the moment. So just make sure
you're set to that. If you don't have
that, all you're going to be doing is
clicking the Render bond. So now I'm going to do
is and I'm just going to render this out once more. I'm also going to come down
and put this back to 2048, so this will be on 2048, so then what I'm going to
do is hit the Render bond. So let's render. We
need to sell the cache, so I need to just make sure it's going to
the right cache. So I'm going to do SN
folder, click on this. I'll make a new folder, so we'll have our course. Here is our folder, and all I'm going to do is right click and we'll
make a new folder, and we'll call it course a
cache cache bolder like so, enter, double click it, and then click Accept, and that is all then set up. And now you should be able
to go over and render. So let this work itself out. There will be persistent
data on. And here we go. So here you can
see, much quicker, and it's already
actually rendered out. And that is why I
actually use this. Okay, so you can see everything on here is looking
very, very nice. Now the next thing we need to
do then is close this down. And now we need to head on
over to our compositor. Now, the moment you
click on compositor, make sure use nodes
is actually tick to. Click on this one and
then click on this and you'll have a rendered layer
and a cache foreseen layer. Now I want to do is
salve this properly. At the moment, we've got
all of these in here, and we really really don't
need most of these things. What I'm going to do is I'm
going to pull this down. I'm going to come over to the right hand side and drop
this down and there we go. Then what I'm going
to do is come to the left hand side and pull this over and there we go. Now, on this side, I don't need two of the same things,
what I want to do is, I want to put this
on image editor, And from here then, I want to
put this on rendered view. So if I type in render, should see render result, and this is the image that
we actually just created. So you can see this
is that image, and from here then, this is
where the magic happens. This is where we
can really, really do some nice things with this. So what I'm going to do
first is open this up, so you can see at the
moment we have image, Alpha, and noisy image. Now, at the moment, we
need a lot more than that. What we need is we
need an emission. We need a gloss. We need an environment, and
we need an ambient occlusion. So what we're going
to do now is coming over to the right hand side, we're going to go to
this view layer here. And inside here is going to be all the different layers that we might want to do a pass on. And a pass basically is a layer. So let me actually
show you rather than trying to explain it,
will be much easier. So what I want you
to do on here is, I want you to turn
on the emission. I want you to turn on the
environment ambient occlusion. And I also want to turn
on the glossy direct. So glossy direct, and There's many of these that we can really
mess around with, but these are the main
ones that I would say Elkon You can even go as far as chasing changing
things like the mist, if you've got volume in
there or the normal. Basically it's just a pass
that's going to be put over the top of It's a bit
like when you look at a movie, and you see then all these
passes going over to show you what the end view
is of the actual movie. That's basically what
we're doing here. Now you can see that we've
got all of these on here. Now, before we use those, all I'm going to do
now, first of all, is go up and save my workout, and we to then
going on to render, and we're going to
render it out once more. And as I'm rendering
it over here, you can see if I click on here, I can actually
come down then and click on these different
ones, for instance. So I can also, if I come to this, let
me just open it up. As it finished. Yes, it has. Let's have a look at
view layer. Here we go. What I want to do is come to AO. You can see here now we've got our ambient cclusion on there. You can also see if I put in my gloss direct.
This is my gloss. You can also see that I've got on I think I didn't think
I ticked normals on, so we can't look at that one, but we can certainly
look at the emission. You can see the emissions
just coming from the sun. We can also look at where is the other one
we've got environment, so you can see this
is our environment. These are the ones
that we can change. Now, let's actually
close that down. I'll close this down. And
now you'll see when I open up my rendered layer,
this is what I've got. All of these different
parts on here. And the same is on
the cache as well. Now, let's first start with
our ambient occlusion. That's the one that I always
start first on because I think it's the easiest to understand and
actually deal with. So what I'm going to
do is, I first of all, come in and I'll do a search, and I'll look for a color ramp. So color Ramp. So color ramp, here we go. And then what I'll
do is I'll plug in my ambient occlusion
to my color ramp, and then I'll plug my
color ram into my image. And this is what
you'll get. Now you'll see that I can actually
come in and ramp this up, and I can actually alter now
how this actually looks. So how much shadow is in there. Now I recommend when you're
doing the ambient oc, you always bring in a third one. So one, two, press
control and click, and then bring in a third one. And what that'll
do is it'll enable you to have a lot
more control over dark and light patches because you haven't just
got from black to white, you've got actually
something in between. Now, the other
thing you'll notice with the ambient occlusion
is that at the moment, this is really, really grainy. And the reason for this is
because when you're using any of these overlays, you will need to
bring in a D noise with most of them,
except the original. So D noise, bring that
in, drop that in there. And you'll notice after
a little bit of time, there we go, it
cleans everything up. Now, we've got this pass here, but we need to actually
join it to our original. So that's what I'm
going to do now. So what I'm going to do is
I'm going to press Shift A. I'm going to bring
in a mixed color, so a mixed color, like so. I'm going to drop that in here. And then what I want to do
is I want to take my image, so my original image, and I want to take my
ambient occlusion. Drop them in like so. And then what I want to
do is multiply this. So come in and drop this on, multiply, and then
plug these in. So I'm going to plug
this in like so. Let it think about it, let
it load up, and there we go. That is what we've now got. Now, you can see, obviously, gone way over the top on that, but you won't see that until you've
plugged everything in. So now let's bring
this back a little bit and let it think about it. Now, I recommend
when you're doing this to bypass the D
noise just for now, and it will definitely
speed up the process. Let's drop this back a little
bit, and there you go, now, you can see it's speeding up the process. Let's
drop this back. Now, you can see, got a
bit more shadow in there, a bit more depth to this, and it's looking pretty nice. Now you can see
that for instance, we've lost the environment,
we've lost the lighting. Now I'm going to bring that
all back a little bit. So what I'm going to do
is, I'm going to mix them. In other words, multiplying
them, mixing them. Putting this on not 0.5, and now you can see that is looking much
much better five. Bring this up now.
You can see I can really mess around
with that lighting, getting exactly the light right look that I actually want. Let's bring it up a little bit. And there we go, now
you can see that shadows looking pretty nice. Okay, so the next one
then that we want to look at is going
to be the emission, so I'm going to plug
these over here, and I'm going to look
at this emission here. So with the mission,
it's basically going to be controlled by a
different setup. It's going to be basically
Clare and things like that. Now, before moving on, we do
want to save out our work, and we also want to
plug all these back in just to make sure
that noise is in there, and now I can see
that's cleaned up. Now, the next thing I want
to do before finishing this lesson is I want
to grab both of these. And because we're using
the node wrangler, it does mean that we can come
down to the bottom here, node wrangler and
frame selected. I can frame selected and then
come back up to the node. And what I can do is, I can change this to
a different color. Like red, for instance, and more importantly,
I can rename it. So ambient occlusion, like so. And I can also change
the scale of this, so I can bring it up like so. Now, believe it or not,
this makes it really, really easy once we've
actually got a load of nodes in here because I can see exactly where the
ambient occlusion is. I can also move this
around if we want to. So I highly recommend
you name everything. Alright, so let's
save that our work. And then what we'll
move on to next will be our emission.
Alright, everyone. I hope you enjoyed that.
I'll see on the next one. Thanks a lot. Bye bye. O
176. Enhancing Gloss and Glare in the Compositor: Welcome back of
one to Blender for the Modular and KBsh
environment guide, and this is where
we left it off. So, let's come now
to our emission. Now, again, what I
tend to do is I'll press shift A. I'll do a search, and I'll bring in a RGB. I'll be the first
one, RGB curves. And what I also tend to do is
now I'll grab my emission, plug it into the image on here. And then I'll bypass
all of these. So I want to bypass all of
these, he what I've got. And there we go. There is
the emission on there. Now we want to do is we
want to bring in a glare. So you can see, we've got a little bit of emission
on our waterfall, a little bit on our cloud, and a lot on our actual sun. So let's bring in the glare, and then we'll see what
that action looks like. So all I'm going to do is
press shift Day, search glare. This is the one that
we want. Plug that in. Now, you can see
straightaway that this glare is
definitely set wrong. We definitely don't want
it looking like that. So what I'm going to
do is, first of all, is instead of having
this on streaks, I'm actually going to
have it on Fog globe. And there you go,
now you can see, that's looking much much
nicer than what it was. Now what I'm going to
do is I'm going to set the mix to one. I'm going to set the threshold
then to zero, like so. And now we can just isolate
that actual sun out, and I think that's
looking a bit bare. Let's also set the
size up to nine, F now, and let's also bring
in a U and saturation. I always like working
with U and saturation, especially when I'm
using emission. Now, what do I mean? What
do I need this info? Well, first of all, we can
saturate this down at will. So 0.8, and you'll see now
brings that down slightly, and now we have control over how this is going
to look as you can see, so I can bring that
down or bring it up and have complete
control how that looks. And now, finally,
what I want to do is, I want to actually mix
these two together. So what I want to do
is, I want to get my ambient occlusion and my actual image and
mix them together, and then I have another
play around with this. So the way I'm going to do that is, I'm going to drag this out. To put my multiply here. And what I'm going to do
is bring in another node, which will be let's have a look. So we want a ad. I think we need an ad for
this. Let's have a look. So mix color. Let's put it onto no 0.5, and then let's
bring in this one. And we'll drop this on the top, and then I'll drop this
one on the bottom. And then what I'll do
is I'll drop these in place, and
hopefully, hopefully, we should now end up
with a mixed up like so, and now we can see that
beautiful ambient occlusion. Now, what I want to make sure is that if I bypass this
and just plug this in, all that should happen is that that ambient occlusion
should disappear like so. And that's what I'm looking for. If I press controls
E, put it back, you'll see now, it goes a little bit darker
as you can see. Now, let's brighten
this up a little bit. Et it load up, and there we go, let's brand it
down a little bit, like so, and there we go. That's looking much higher. Albeit, though, we've
lost a bit of this. But if I set this,
let's say down to zero. Let it load up, set
this threshold to one. And, let's actually come
in and also turn up this. We go. Now we're
getting somewhere. 0.775. Let's set this
back to one again, set this back to zero. Then what I can do is
now I can make this. This way and make it bright
like the sun. There we go. Now it's looking very
hot, as you can see. Now this remember
is the day scene. So with the day
scene, as I said, we want to have a
different control over it. Again, we can see
that our clouds aren't really in front of this, so we can put the sun behind
the clouds if you want to. That's completely up to you. But what you can
see now is we've got a blazing hot sun here, and that is what we
wanted from our emission. Now, emission is even more important when we're
actually using the flames, which we're going
to be coming to. But for now, we're
going to move on, and now we want a
little bit more control over our environment. So you can see now
we've got these plugged in to our ambient occlusion. So let's come in, grab
all these, node wrangler, frame selected, node, and then
we'll call this emission. So emission or lightings completely up to you what
you want to call it, like so, we'll change the color and we'll
have it on a green. And then we'll also bring up the scale of the
emission like so. So now we've got emission, and we've got ambient occlusion. Now I want is environment, which will be this
background here. So if I come in with
a simple RGB curve, RGB curve, like so and I come to my environment,
which is here. So this one here, plug
this into my image, and then I should be able
to plug now this into My output, and now I've got
control of that background, so you can see I can
lighten it or darken it up. The other thing
is, if I bring in a u and saturation
or u and saturation. I now have control if I bring up this saturation of how blue
my actual sky is as well, which is really,
really handy to have. Now, the other thing
is, we need to now plug all of these together. So what I'm going to do
is I'll use another ad. So basically, I'll
grab, where is it. So this is a mix. You know what? I want to plug
those in first and see if this should
be on ad instead. So let's put it on ad. There we go. There we go. That's what I wanted.
That ad now is really, really brightening that up. Let's set this to 0.5. And then we're going dropping the whole thing back
as you can see. Now I think I've
gone a little bit overboard on it's a
little bit too bright. And I also think I need to
bring this up a little bit, so I'll put this on 0.7. And this honesty guises
it is trial and error. You want to really,
really be testing this out to get exactly the right look that
you're looking for. There we go, a thing that's
looking really nice. And now we'll come
with another ad. So I'm going to press shift A. S mix color. I'm going to bring
in another ad. So I'm going to set this to add. And then what I'm
going to do is I'm going to drop this one in here. And then I'm going to drop my environment into
this bottom one, and then finally
plug all these in. And hopefully, hopefully, we should have this
change. There we go. That is what we're looking for. Now we want to do is
we want to come in and set this sky
to how we want it. So if I bring this all
the way back to here, let it think about
it, let it load up, and there is my actual sky. And now we have
control over there. I can change the
saturation of this, make it much bluer,
as you can see. Alright, so that is
looking really nice. We've also got all these values we can play around with as well. Have a real good play around
with those, and there we go. Let's bring this up,
bring this one up a little bit. Let's
see what we get. There we go. Let's also
drop back this saturation. I think that'll be too much. Oh, maybe, maybe 0.9. L et's try bringing
it all the way up and see what that
actually looks like. It's probably going to
be way way to blue. You know what I mi,
I think around 100. Yeah, I think that's
going to look pretty much what we want to at. All right, so we've
got all of those in. Again, what I'll do is,
I'll come to these. I'll box select
them, node wrangler, frame selected, node, and we'll call this
one environment. Like so, and then
we'll add a color, we'll make it blue, and then we'll also change the size of this
and there we go. There's three of them
actually done now. Let's move this one
a little bit over. Now on the gloss, sometimes it's a little bit hard to see, and we have to be
careful of using gloss. But what we'll do is now we'll leave that to the next lesson, and then we'll bring
in this direct gloss, and then we'll see
what that looks like. And then hopefully
hopefully we should have this scene set up because we have a few
more things to add in. Once we've got the
main components, so the main actual
layer is done, then we can actually carry on adding more and more things. All right, everyone, so we're
going to save our work, and I'll see you on the
next one. Thanks a lot. Bye bye.
177. Color Correcting the Day Scene in Blender: I'll go to back
everyone to blend for the modular and Kish
environment guide. So let's now come to R gloss. So with gloss, it's a
fairly straightforward one. We just need an RGB. So search RGB and RGB curves. You can also use a
color ramp as well. But what I'm going to do
is just plug in my gloss. So I'm going to plug
it into the image. And again, what I'm
going to do is, I'm then going to plug this
directly into my compositor. So then we've got a good idea what this gloss is
going to look like, and then I can bring
it up or bring it down to make it
more shiny or not. Now, as well, we can use, like I said, the color ramp. So let's go with a color
ram, bring that in, and then we can
actually have control over all of those
parts, like so. Now, let's plug all of this in. Now, you will notice with the
gloss, I needs de noising. There's a lot of noise on there. Don't worry about that yet. A lot of them need de noising, but we're not going to
worry about that right yet. What we're first of all going
to do now is try and plug this in with another ad. So let's press Shift A. In fact, what we'll do is
we'll just grab this one. I'm actually going
to first of all, I'm going to plug this
one in anther moment. And then what I'm going to do is I'm just going
to look at this, and I'm going to turn this down. Let's try turning
that down to not 0.5. There we go. That is making the sky look a little bit bare. Okay, I'm happier with that now. Now what we'll do
is we'll grab this, we'll press shift, and
we'll drop that in there. And then what I'll do is,
I'll come to my gloss, and I'm going to drop
that into there. And let's see what the gloss
is done, and there we go. Now we can see it's
way way too much. Now sometimes
moving these round. Makes actually a bit bare,
but not in this case. Now I'm going to do
is I'm going to drop my gloss all the way back. There we go, and it might
be still way way too much because of this.
Let's bring this down. Like so, and let's
bring this all the way down and see if I've gone the
wrong way or the right way. Nope, I've gone the wrong way. Let's bring it all
the way back up and then bring this back up. And there we go. It's still
a little bit too much. So what I'm going to do, bring
it up a little bit more. Generally, gloss is meant, I'm going to multiply this. I'm going to see what
that looks like. Gloss is generally meant for things like which are
metallic, for instance, so I just want to make sure that this gloss is
going to go underneath. So I'm going to plug this one down and then plug
this one over the top. And then what I'm going to
do is set this pretty low. There we go. That's
what I'm looking for. And now I'm going
to set this low, t's set it down to there. Yes. And that's exactly
what I'm looking for. So a little bit of gloss. Let's bring it up
a little tiny bit. There we go. Now that's
looking much much better. And now I can come. We've got a little bit of shine on all of these leaves
as you can see, and that is basically
what we're looking for. It's looking a little bit
wetter than what it was, and I think that's
looking much nicer. Now, at this point, you
can bring in your D noise, but we're not finished yet. We still want to do ale
bit more with this. But what we can now do is think
about our box sharpening, or sharpening up the image basically. So what
I'm going to do? That's the first point
of call that I come to After working
out all of these. Now, before we finish that, let's actually just rename
this so node wrangler. Let's go to frame selected. Let's come up to node. Let's pick a color
and we'll have it on what color have
we got purple, and then we'll put
it in as gloss. Like so. And then
what we'll also do is turn up the scale
of gloss, like so. All right, so far so good,
everything's looking good. We've just got a little
bit of noise on there, where you can see now it's
looking nice and were for us, looking a very, very nice scene. Now what we want to do is come in and sharpen
everything up. So shift a search. Let's go to. Now, there
isn't any under sharpen. It's under actual filter. So if you press filter, Like, so you should be able
to bring in a filter, and then what you
should be able to do, you can see at the
moment it's on soften. We don't want to soften it up. What we want to do is
put it on box sharpen, and we also want to
turn this down because it's going to go a bit
crazy. There we go. Let's turn this down to
naught point naught seven. And what that's
going to do is just sharpen up that very little bit now and really bring
out all of those details. Okay, so next of all, then, let's bring down or let's
bring in a RGB curve. So we want to basically change the overall brightness of the scene using RGB
curves because RGB curve, it doesn't just
bright it or dull it. You can actually have a lot
of variation in between. So let's come in now
and look for RGB curve. And bring that in, like so, let it load up because
there's more things you've go here the more it's
going to take to load up. Let's come up and just show you what that
looks like then. So pay attention to
here, and there you go, you can brighten up
the whole scene, and now you can see
it's looking much, much more like a
jungle environment. Now, remember, these
shadows down here are controlled or can be controlled with the
ambient occlusion. If I bring this
all the way down, et it load up, and there you go, now you can see we've got
control over the shadows. Now, for anything that's
way way too dark, you might want to think about bringing more lighting
into the scene. In other words, it
might be a little bit too dark at the moment. However, let's go over, and let's look at maybe brightening our scene
up a little bit more. Let's brighten it up
a little bit more. Maybe that's a
little bit too much. Let's bring it
back a little bit. Yeah, maybe that's about right. And then we can bring in. So what we'll do now is
we'll move these over. We'll bring in a
hu in saturation. Sometimes the thing that's important that we
actually bring that in, so we'll bring that in now. So what we'll do is
we'll press shift A, and we'll bring in
a u and saturation. Huine saturation. There we go. And again, with this,
we can really bring out the green or, you know, the foliage now, if we want to, by simply putting this
on, let's say 1.2. Let it think about let it
load up, and there you go. Now, you can see it's
looking much more saturate. Although I think that's
a bit high, so 1.07. Let's try that. There we go. Is that? Looking
bar, I think it is. It looks much brighter,
much greener. And yep, I'm happy with that. Again, mess around with
these if you want to. Next of all, then,
I tend to bring in a brightness and contrast. And with these, by
the way, really, really fine the way you do them. So, in other words,
don't go over the top. So let's put
brightness on No 0.1. Let you think about it.
It's very, very subtle. You want to be very
subtle with it. Let's put the contrast
down to minus not 0.1. And there we go and that's
looking a little bit better. Now, if I put this up to, let's say 0.5, you'll see
why it needs to be sort. So there you go, you can
see just how sort that is. Okay, that's looking nice. And now, finally, the
last one I tend to bring in is going to be
a color balance. And I always bring this in
because then you have control of the feeling of
the environment. So color balance, where
is it color balance, this one here, drop that
in, and there we go. Now, what this is going to
do is it is going to enable you to actually color any
part of the environment. So, for instance, if I
put this onto green, let it think about
it, and then you'll get the whole thing
looking a bit green. Now, again, with
the color bands, it's really, really subtle. Now, believe it or not, you might not want the
whole thing green. What you might want it is a
little bit of yellow or red. And there you go. Now,
if I come over here, might put this one on green, and there we go now, it's
making, very, very lush. And then this one, what
I tend to do is as well, I'll come to the red, so
I'll make it bright red, and that then will show me like which parts
are going to be, and I can see then
that these might be want to be on a little
bit of yellow, like so. And there we go, let's
put this part all on red. And that's kind of
the whole thing, so we don't really want to mess around with that too much. So maybe a little bit of yellow. And then we go or maybe
a tiny bit of green. And then maybe this one, let's put that one back in
the center, and there we go. Now, I think that is
looking very, very nice. Okay, so these are basically
all of the settle. Now the thing we need to bring
in now is we need to bring in some de noising
on each of these. But you can see that once you've got these major components done, so the gloss, the emission, and the inclusion environment, you've plugged them all in, then you can actually work on the overall feel of
the actual scene. So what we'll do now is
we'll save our our scene, And then what I'm going to do
then on the next lesson is, I'm going to bring
in some D noise in. We'll have a final
render of this, and then we'll actually
see what that looks like, and then we'll move on to
our actual night scene. Alright, everyone. So
hope you enjoyed that. I'll see you on the next
one. Thanks a lot. Bye bye.
178. Compositing Night Scene Lighting Effects: Welcome back andon to blend for the modular Kish
environment guide, and this is where
we left it off. So what I want to do now is, I want to, first of all, bring in a D noise in. So shift A, and we're
looking for D noise. So D noise, this one here. And then what I'm going to
do is drop this one in here. I'm going to press Shift D, and I'm going to drop it into
where is it my environment? And I'm also going
to press Shift D, and I'm going to drop it
into my ambient occlusion. Now, this, once it's loaded up, should clean
everything up, should make everything look
much, much better. Now you can see it's very, very clean looking in the image if you look
in there. All right. So do I want one
in the emission? I'm looking at the emission. Sometimes this happens. We're using a D noise. Let's bring it in
and see if using a D noise with our emission cleans that
up a little bit bare. Now, this is caused generally, once it's loaded up,
by the sharpening. So let me go to the sharpening. And what I want to do is
just set this on zero, and let's see if we can
actually get rid of that. No, it's not being
caused by that. So what is causing this issue here because it
wasn't there before? So maybe maybe it's
the environment. So this one here, Let's
delete it out of the way. No, it's not that, so
let's press Control D, and then what we'll do is
the ambient occlusion, I'm going to plug that
in and see if that fixes it and will work out. It might just be
the actual emission instead, so that's fine. It's not that one, so we
can plug that back in. We're going to zoom out and see what is it
that's caused this? Let's try our gloss. There we go. It's the actual
gloss that's causing this. So the de noise on the
gloss is causing the issue. Everything else seems nice, but we've still got
this grittiness caused by the actual gloss. So what I'm going to do to
try and get rid of that? First of all, turn off the HDR. Let's drop that in place. Let it load up. And there we go. Now let's clean that up.
So that's looking much, much better now, and all
of this is de noise. You can see. All of it
is looking very nice. Still got that gloss on there. And what I want to
do actually is just test out this gloss just to make sure it's
working properly, so let's pull it all
the way up there. Yes, and it's still
working. It's got that beautiful
shine on there now. So now I'm going to just
pull it back a little bit. And then we go that to me is
looking much much better. We've got a little bit
of shadow on here, and now I'm happy
with how that looks, and I'm happy with
the overall scene. All right, so you can see then what we went from and
what we've got now. So the way to actually
test that is, you just can basically grab
L first of all, save it out. And then where you can
do grab your image, so we can we can make
another copy of this, so shift, bring it down. And then I'm going to bring
it all the way around here, all the way around. To here. And then what I'm going
to do is just plug in my image, and there we go. That is what we started with.
And when I plug this in, this is what we
actually finish with. Let it all load up, let
all those things in, and what a difference that
makes, as you can see. All right, so that is
looking really nice. Now, what we want to do on
the next one is then, I no, the next one on this one, sorry, is we want to now
create a night scene. So what I'm going to do, I'm just going to leave
that out the way, and then I'm going
to render it out now with our actual
night scene in mind. So what I'm first of all
going to do, though, I'm just going to move
this out the way, like so. I'm going to grab
all of these now, and I'm actually
going to frame them. So if I come over, node
wrangler, frame selected, and we're going to
call this node, and let's pick a color, and we'll put it on
a lighter color and we'll then call it day scene. So, and then what we'll do is
we'll bring up that label. And I'm hoping that label y, can go big enough, so
I can actually see it. So 64, I think is the
maximum we can do. Let's have it on there.
We can still see that. So that is our day scene, and also now we can actually
move all of these other way. Which is pretty
handy. All right. So now, let's focus
on our night scene. So again, save out your work. Let's go back to our scene, so we're going to go
back to modeling. And then what we want to do
now is set up our day scene. So I'm going to let
this all load up. I'm going to click this on them. And now I'm going to be
bringing in my part so Day. We don't need our human.
We need our torches on. We need to make sure that these
are going to be rendered. So the torch flame,
as you can see, it's going to be rendered,
let them load up, like so. Then we want our temple
floor, we want our vines, ferns, plants, palms, drain
inner, all loaded up. And then we also want
let's have a look. We don't need
terrain, large trees. Let's turn that on.
Let's turn our terrain small trees on.
Let that load up. Let's put our sky dome on. Let's put our main terrain on. Then what we also want to do
now is come over to our sky, and we want to change this from the day scene to
the night scene, a load up, and there we go. Then we want to
bring in our moon, and we want to make
sure that's rendered, and we also want
to make sure that the sun is actually
not rendered. So this is the scene
that we're looking for. Let's see then, first of all, we can see our moon is not
really in the right place. So what I'm going to
do is come to my moon. Now, at the moment, we need
to turn on this as well. I want my moon and the moonlight
to come down together, so I'm going to try
and grab my moon. At the moment you can see
I'm grabbing my dome. So let's just hide the
sky dome out the way. Like so, and now I shall
be able to grab my moon, grab my light source, and then pull them down, hopefully into place
behind the tree, move it over there,
bring it down, there so. All right. I think
I like my moon like that. Double tap V eight. And now I'm going
to do it again. Now I've got
everything to sp and know what's going
to be in the scene. Hopefully, I've not
missed anything. So what I'm going to do now is just make sure that all of
these things are turned off. I'm just looking down there, making sure The things that are don't rendered
are turned off, so let's go with main terrain. Let's turn off our moon. Let's turn off our small
trees, a train in there. Let's turn all of
these off, like so, temple floor, torches,
and finally parts. Let's turn that off.
Let's also click this on. Let's put it onto object mode. This one here, let's
save our work now, and let's give that render. Now, remember when
I render this, it's already going to be set up with the actual
day seen in mind. Let's go to render, render
turbo tools. Let this load up. If you don't have turbo tools, just render out in normal
render settings on the cycles. Let it load up, and there we go. You know what? I think it's actually going to
be pretty nice. Maybe these clouds,
and as you can see, that's already
looking pretty nice. Now, the thing is once we've actually rendered this out now, we can now close that down. We can then go over
to our composite in. And what you can actually do is now you can actually
make a copy of this. So what I can do is I can
come, grab all of this, press controls Well, let's
press shift, bring it down. And then plug in this last one. So I'm going to put this
in the middle like so. And then what I'm going to
do is plug this one in. Instead, shouldn't make any difference
whatsoever on here. And then what I want to do
now is I want to come in. And change this. I'm
going to come to this. So the node, we can
see here is the node. Let's first of all, so we'll
grab this one hopefully. There we go. I'm going to change the color to a yellow color, and then I'll change
the day to nine. So night Scene,
rest the ends born. Now from here, I can definitely come in and
change some things around. So for instance, if I come and just move
the glare over there, but I've got this
emission, you can see, I didn't really want to do that because it's
moved the whole thing. Don't know why it's done that shouldn't actually
really do that. Yeah, it shouldn't really do
that, but, anyway, it does. Let's grab this and press
shift and drop that in there. And then let's look
at how much glare now we get off of these. There we go, we've got a lot
more glare on those now. And now you can come
and actually work with this and turn this
down if you want to, for instance, or you
can turn your gloss up, let's turn this up
to let's say 0.5, bring that back a little
bit. There we go. Now you can see that's
looking really, really nice. Now you can see that with this setup that I've
showed you now, you can come in and pretty
much change the whole scene. You can make it
brighter, darker. You can change the light and you can see the stars
in the background. We can move the sky around. I've showed you how to
move the sky around. You can move the lighting with the different sky
textures that we've used. Pretty you've got
the whole setup now to do with it
whatever you want to do. So on the next lesson, then we'll just finalize
everything that we're So you can pretty much see how this course has been developed to teach you not only how to start
with making a gray box, getting the references, making
the actual modular pack, but all the way through, we've been add adding on little things to end up with
a final scene like this, which looks pretty
amazing to say, we did this in 30 hours worth of work and all of the things that you've actually learned. So now you've learned how
to actually create a day, a night scene on top of that. You've also learned
how to actually use the composite to bring
that all together. I really, really hope you
learned a lot from this course. If you did, please
leave us a review, it really does help our courses get into
more people's hands, and I really hope that
you enjoyed the course. And until next time, everyone, happy modeling, see on
the next one, cheers.
 3D Tudor, The 3D Tutor